Installer/User Guide Cyclades ® TS100 Terminal Server

Welcome message from author
This document is posted to help you gain knowledge. Please leave a comment to let me know what you think about it! Share it to your friends and learn new things together.
Transcript
Installer/User GuideFor Technical Support:
590-695-501A
www.avocent.com/support
Cyclades® TS100Terminal Server

USA Notification
Warning: Changes or modifications to this unit not expressly approved by the party responsible for compliance could void the user’s authority to operate the equipment.
Note: This equipment has been tested and found to comply with the limits for a Class A digital device, pursu-ant to Part 15 of the FCC Rules. These limits are designed to provide reasonable protection against harmful interference when the equipment is operated in a commercial environment. This equipment generates, uses and can radiate radio frequency energy and, if not installed and used in accordance with the instruction manual, may cause harmful interference to radio communications. Operation of this equipment in a residential area is likely to cause harmful interference in which case the user will be required to correct the interference at his own expense.
Canadian Notification
This digital apparatus does not exceed the Class A limits for radio noise emissions from digital apparatus set out in the Radio Interference Regulations of the Canadian Department of Communications.
Le présent appareil numérique n’émet pas de bruits radioélectriques dépassant les limites applicables aux appareils numériques de la classe A prescrites dans le Règlement sur le brouillage radioélectrique édicté par le Ministère des Communications du Canada.
Japanese Approvals
EMC Approvals and Markings
FCC Part 15 Class A, ETSI EN 300 386, EN55022 Class A, EN61000-4-2, EN61000-4-3, EN61000-4-4, EN61000-4-6
Cyclades® TS100 Terminal ServerInstaller/User Guide
Avocent, the Avocent logo, DSView and The Power of Being There are registered trademarks of Avocent Corporation. All other marks are the property of their respective owners.
© 2007 Avocent Corporation. All rights reserved. 590-695-501A
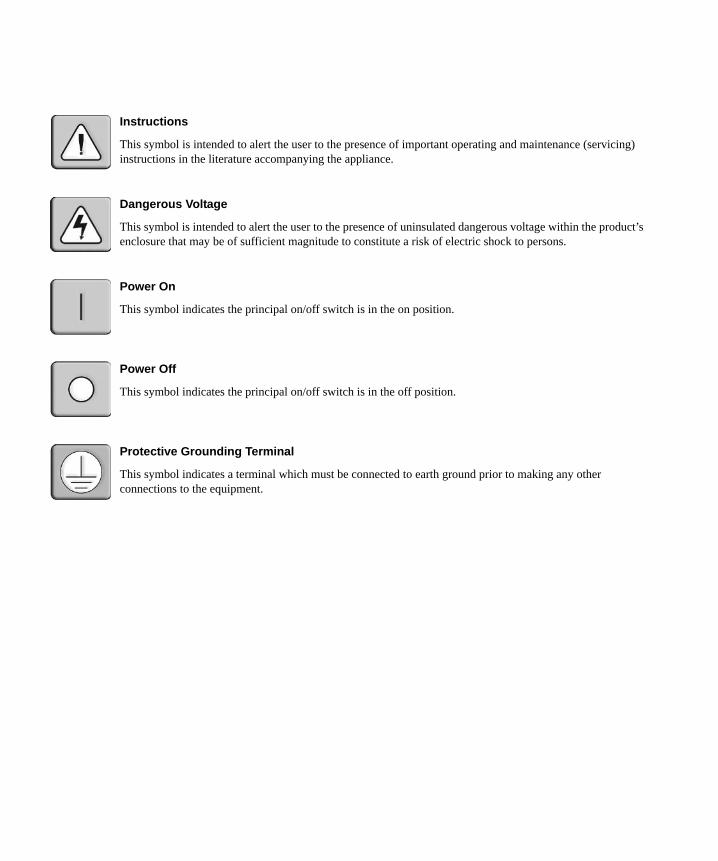
Instructions
This symbol is intended to alert the user to the presence of important operating and maintenance (servicing) instructions in the literature accompanying the appliance.
Dangerous Voltage
This symbol is intended to alert the user to the presence of uninsulated dangerous voltage within the product’s enclosure that may be of sufficient magnitude to constitute a risk of electric shock to persons.
Power On
This symbol indicates the principal on/off switch is in the on position.
Power Off
This symbol indicates the principal on/off switch is in the off position.
Protective Grounding Terminal
This symbol indicates a terminal which must be connected to earth ground prior to making any other connections to the equipment.
iii
TABLE OF CONTENTS
Table of ContentsList of Figures .................................................................................................................. v
List of Tables.................................................................................................................. vii
Chapter 1: Introduction ................................................................................................... 1
Cyclades TS100 Terminal Server Features ....................................................................................... 1Security ....................................................................................................................................... 1Console management.................................................................................................................. 1Port access.................................................................................................................................. 2System management.................................................................................................................... 2Upgrades..................................................................................................................................... 2Additional protocols supported .................................................................................................. 2Benefits ....................................................................................................................................... 2
Chapter 2: Installation ..................................................................................................... 3
Physical Features .............................................................................................................................. 3Before You Begin ............................................................................................................................... 4
Preparing for the setup procedures............................................................................................ 5Initial stage setup configuration (TS mode) ............................................................................... 5Final stage setup configuration (CAS mode).............................................................................. 8
Chapter 3: Configuration............................................................................................... 11
General Navigation.......................................................................................................................... 11Tasks You Should Perform First ...................................................................................................... 13
Understanding the web user access levels................................................................................ 13Changing the root WMI login password .................................................................................. 13Changing the default password for admin ............................................................................... 14Adding an admin login for the WMI......................................................................................... 15Adding regular users ................................................................................................................ 15Adding a system user ................................................................................................................ 16
Console Port Configuration............................................................................................................. 17Configuring the serial port ....................................................................................................... 17Serial port configuration parameters form .............................................................................. 18
Firmware Upgrades......................................................................................................................... 21

iv Cyclades TS100 Terminal Server Installer/User Guide
Getting the latest firmware ....................................................................................................... 21DSView 3 Management Software Configuration............................................................................. 22Power Management ......................................................................................................................... 23
Configuring the PM IPDU web interface................................................................................. 23Managing the PM IPDU using the console viewer .................................................................. 24
Editing Text Files............................................................................................................................. 25Billing............................................................................................................................................... 26
General feature description...................................................................................................... 26Configuration............................................................................................................................ 26How billing works..................................................................................................................... 26Disk space issue........................................................................................................................ 29
SNMP ............................................................................................................................................... 29Configuring SNMP ................................................................................................................... 29
Syslog ............................................................................................................................................... 30Editing syslog-ng.conf .............................................................................................................. 31
TFTP Boot........................................................................................................................................ 31
Chapter 4: Additional Features..................................................................................... 33
RS-485.............................................................................................................................................. 33MODBUS ......................................................................................................................................... 34TS100 (48 VDC) Terminal Server ................................................................................................... 36
Chapter 5: Linux Command Line.................................................................................. 39
Introduction to the Linux Command Line........................................................................................ 39Getting help with Linux commands .......................................................................................... 39Setting the date ......................................................................................................................... 40Saving and restoring configurations ........................................................................................ 41Making FTP file transfers......................................................................................................... 41Setting the TS100 terminal server to factory defaults .............................................................. 41
Appendices..................................................................................................................... 43
Appendix A: Troubleshooting .......................................................................................................... 43Appendix B: Technical Specifications ............................................................................................. 45Appendix C: Technical Support ....................................................................................................... 46
Index................................................................................................................................ 47

v
List of FiguresFigure 2.1: TS100 Terminal Server Top View................................................................................... 3Figure 2.2: TS100 Terminal Server Serial Port End......................................................................... 4Figure 2.3: TS100 Terminal Server Ethernet Port/AC Adaptor Connector View............................. 4Figure 2.4: Terminal Accessing a Terminal Server for Initial Stage Setup (TS Mode) .................... 6Figure 2.5: Terminal Server Accessing a Remote Server for Final Stage Setup (CAS Mode).......... 8Figure 3.1: TS Terminal Server WMI Page Main Menu ................................................................. 12Figure 3.2: PM IPDU Web Interface .............................................................................................. 24Figure 4.1: TS100 Terminal Server RS-485 Serial Port Connector Pin Numbers.......................... 34Figure 4.2: MODBUS Application .................................................................................................. 35Figure 4.3: DC Power Connection on TS100 (48 VDC) Terminal Server...................................... 37
LIST OF FIGURES

vi Cyclades TS100 Terminal Server Installer/User Guide
vii
List of TablesTable 2.1: TS100 Terminal Server Top View Description................................................................. 3
Table 2.2: TS100 Terminal Server Serial Port End Descriptions ..................................................... 4
Table 2.3: TS100 Terminal Server Ethernet Port/AC Adaptor Connector View Descriptions ......... 4
Table 2.4: Terminal Accessing a Terminal Server for Initial Stage Setup Descriptions................... 6
Table 2.5: Terminal Server Accessing a Remote Server for Final Stage Setup Descriptions ........... 8
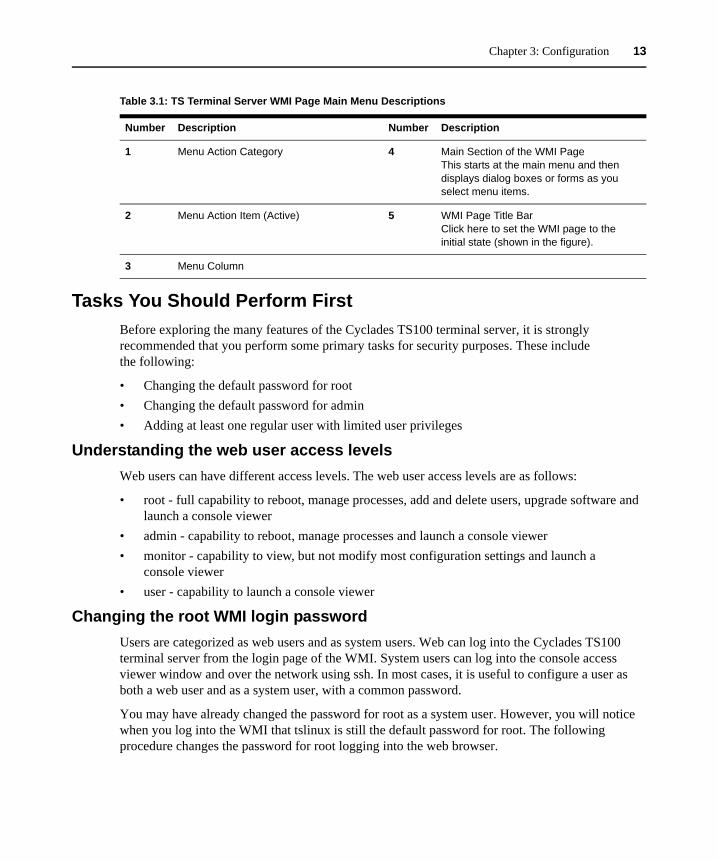
Table 3.1: TS Terminal Server WMI Page Main Menu Descriptions ............................................. 13
Table 3.2: Serial Port Configuration Parameters and Settings ...................................................... 18
Table 3.3: Billing Configuration Parameters to Set in Serial Terminal Configuration.................. 26
Table 4.1: TS100 Terminal Server RS-485 Serial Port Connector Pin Assignments...................... 34
Table 4.2: MODBUS Application Descriptions .............................................................................. 35
Table 4.3: MODBUS Port-Specific Parameters.............................................................................. 36
Table 4.4: DC Power Connection on TS100 (48 VDC) Terminal Server Descriptions .................. 37
Table B.1: TS100 Terminal Server .................................................................................................. 45
LIST OF TABLES

viii Cyclades TS100 Terminal Server Installer/User Guide
1
CHAPTER
1 Introduction
The Cyclades® TS100 terminal server provides remote access to a serial port of a server or a console port of an Avocent appliance. Remote access can be over a LAN or internet connection. The TS100 terminal server can be managed using DSView® 3 management software for added flexibility.
Cyclades TS100 Terminal Server FeaturesCyclades® TS100 terminal servers use their PowerPC dual CPUs to transfer data from their 10/100BaseT Ethernet interface to their RS-232/RS-485 (software selectable) serial interface and vice versa, enabling communication between the serial device and the network. SSHv2 (Secure Shell) is supported for a high degree of security in data connections.
The TS100 terminal server features an embedded Linux operating system, in-band and out-of-band support and a CAT 5 compatible serial interface.
Security• SSHv1 and SSHv2• Local, RADIUS, TACACS+ and LDAP authentication• Token-based strong authentication (RSA SecurID®)• Local backup user authentication support• PAP/CHAP authentication• IP packet and security filtering• User access lists per port• System event syslog
Console management• Sun break-safe (Solaris Ready™ Certified)• Break-over SSH support• Data buffering - local or remote (NFS/Syslog)• Timestamp for data buffering
2 Cyclades TS100 Terminal Server Installer/User Guide
• Unlimited number of simultaneous sessions• Simultaneous access on the same port• Secure clustering (central access to multiple console servers)• Event notification (email, pager, SNMP trap)
Port access• TCP port, IP address or server name• Telnet/SSH with menu• HTTP/HTTPS
System management• Command line interface• Web Management Interface (HTTP/HTTPS)• SNMP support
Upgrades• Flash upgradable• No cost upgrades from FTP site• TFTP support for network boot
Additional protocols supported• MODBUS/RTU support for industrial automation applications• DHCP support• PPP/SLIP for dial-up• NTP for time server synchronization• RFC2217 support for remote serial port access
Benefits• Secure network management• Easy integration with the network and serial devices• Easy customization• Rock-solid stability (Linux Inside)
3
CHAPTER
2 Installation
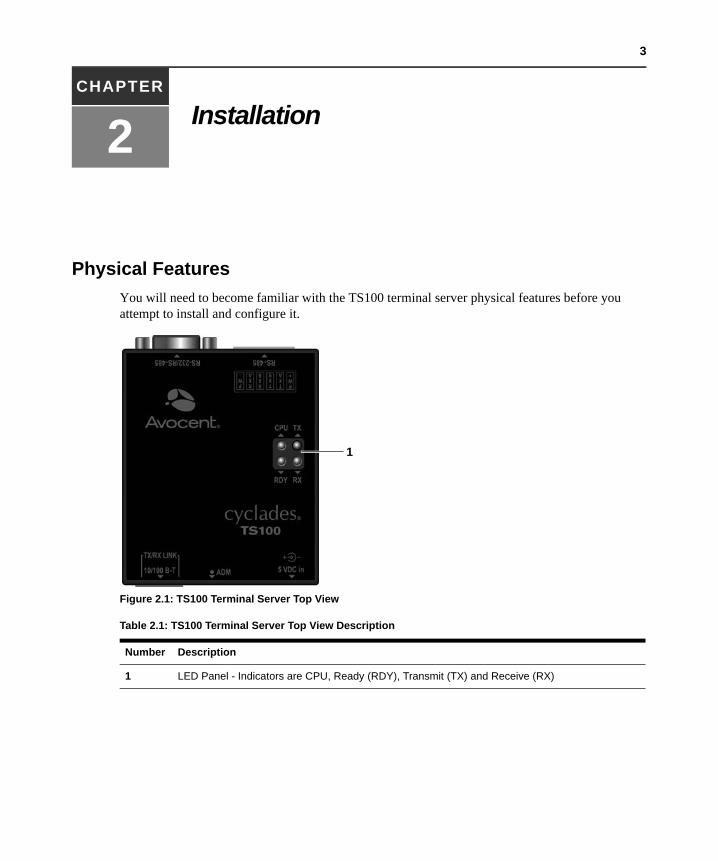
Physical FeaturesYou will need to become familiar with the TS100 terminal server physical features before you attempt to install and configure it.
Figure 2.1: TS100 Terminal Server Top View
Table 2.1: TS100 Terminal Server Top View Description
Number Description
1 LED Panel - Indicators are CPU, Ready (RDY), Transmit (TX) and Receive (RX)
1
4 Cyclades TS100 Terminal Server Installer/User Guide
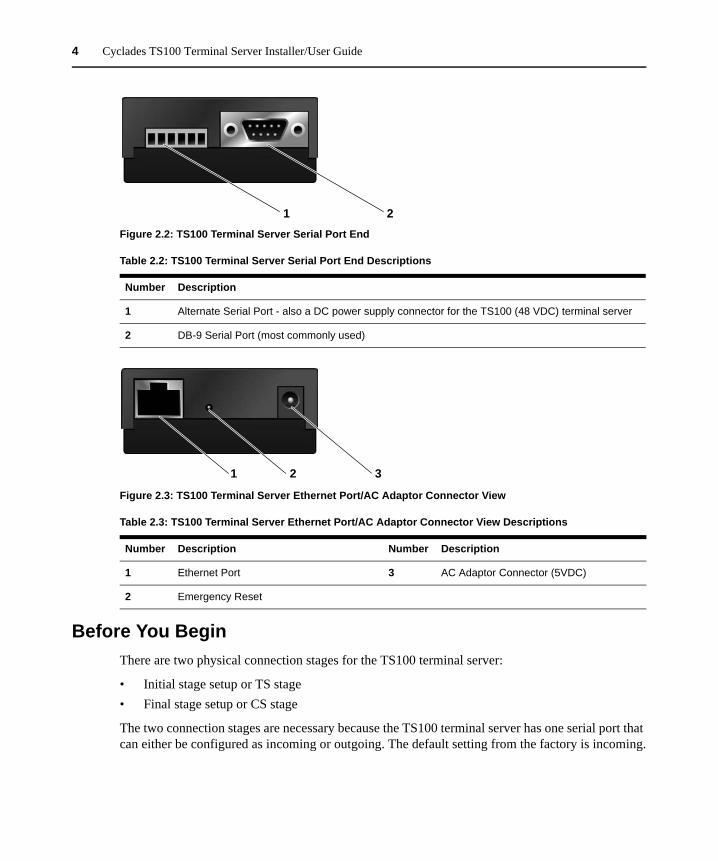
Figure 2.2: TS100 Terminal Server Serial Port End
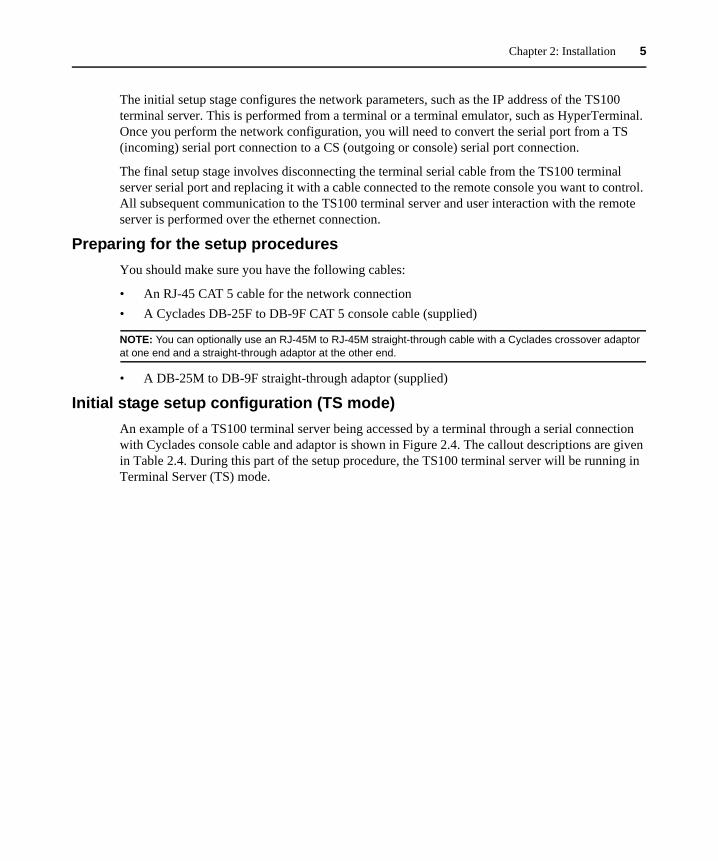
Figure 2.3: TS100 Terminal Server Ethernet Port/AC Adaptor Connector View
Before You BeginThere are two physical connection stages for the TS100 terminal server:
• Initial stage setup or TS stage• Final stage setup or CS stage
The two connection stages are necessary because the TS100 terminal server has one serial port that can either be configured as incoming or outgoing. The default setting from the factory is incoming.
Table 2.2: TS100 Terminal Server Serial Port End Descriptions
Number Description
1 Alternate Serial Port - also a DC power supply connector for the TS100 (48 VDC) terminal server
2 DB-9 Serial Port (most commonly used)
Table 2.3: TS100 Terminal Server Ethernet Port/AC Adaptor Connector View Descriptions
Number Description Number Description
1 Ethernet Port 3 AC Adaptor Connector (5VDC)
2 Emergency Reset
1 2
1 2 3
Chapter 2: Installation 5
The initial setup stage configures the network parameters, such as the IP address of the TS100 terminal server. This is performed from a terminal or a terminal emulator, such as HyperTerminal. Once you perform the network configuration, you will need to convert the serial port from a TS (incoming) serial port connection to a CS (outgoing or console) serial port connection.
The final setup stage involves disconnecting the terminal serial cable from the TS100 terminal server serial port and replacing it with a cable connected to the remote console you want to control. All subsequent communication to the TS100 terminal server and user interaction with the remote server is performed over the ethernet connection.
Preparing for the setup proceduresYou should make sure you have the following cables:
• An RJ-45 CAT 5 cable for the network connection• A Cyclades DB-25F to DB-9F CAT 5 console cable (supplied)
NOTE: You can optionally use an RJ-45M to RJ-45M straight-through cable with a Cyclades crossover adaptor at one end and a straight-through adaptor at the other end.
• A DB-25M to DB-9F straight-through adaptor (supplied)
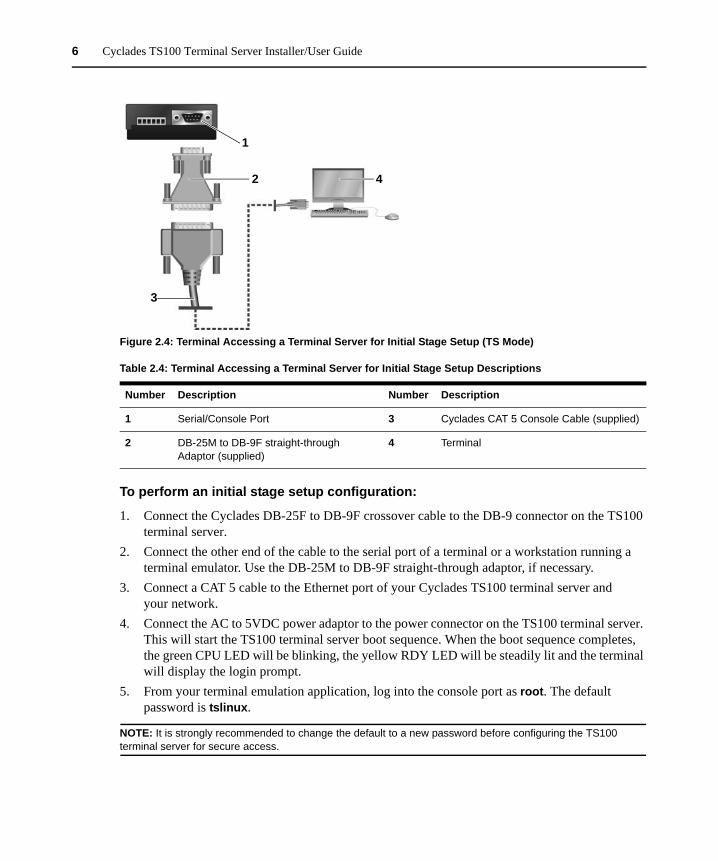
Initial stage setup configuration (TS mode)An example of a TS100 terminal server being accessed by a terminal through a serial connection with Cyclades console cable and adaptor is shown in Figure 2.4. The callout descriptions are given in Table 2.4. During this part of the setup procedure, the TS100 terminal server will be running in Terminal Server (TS) mode.
6 Cyclades TS100 Terminal Server Installer/User Guide
Figure 2.4: Terminal Accessing a Terminal Server for Initial Stage Setup (TS Mode)
To perform an initial stage setup configuration:
1. Connect the Cyclades DB-25F to DB-9F crossover cable to the DB-9 connector on the TS100 terminal server.
2. Connect the other end of the cable to the serial port of a terminal or a workstation running a terminal emulator. Use the DB-25M to DB-9F straight-through adaptor, if necessary.
3. Connect a CAT 5 cable to the Ethernet port of your Cyclades TS100 terminal server and your network.
4. Connect the AC to 5VDC power adaptor to the power connector on the TS100 terminal server. This will start the TS100 terminal server boot sequence. When the boot sequence completes, the green CPU LED will be blinking, the yellow RDY LED will be steadily lit and the terminal will display the login prompt.
5. From your terminal emulation application, log into the console port as root. The default password is tslinux.
NOTE: It is strongly recommended to change the default to a new password before configuring the TS100 terminal server for secure access.
Table 2.4: Terminal Accessing a Terminal Server for Initial Stage Setup Descriptions
Number Description Number Description
1 Serial/Console Port 3 Cyclades CAT 5 Console Cable (supplied)
2 DB-25M to DB-9F straight-through Adaptor (supplied)
4 Terminal
1
2
3
4
Chapter 2: Installation 7
6. To change the password, run the command:[root@TS /root]# passwd
New password: <new_password>
NOTE: The new password will not work when you log into the web management interface (WMI). You will still need to log in to the WMI with the default password “tslinux.” However, the new password will be necessary for authentication when you launch a console viewer from the WMI.
7. To view the IP address assigned by DHCP by default, enter the ifconfig command. Several lines of text will appear. Make note of the IP address (inet addr: in the eth0 section), and then skip to step 12.
-or-
Launch the configuration wizard by entering the wiz command.
The system displays a configuration wizard banner, instructions for using the utility and (after you press Enter) the current configuration.
8. At the prompt Set to defaults?, enter n to change the defaults. 9. Step through the prompts and enter the parameters for each as necessary. When asked if you
want to enable DHCP, enter n.10. Activate and save your configuration.11. To confirm the configuration, enter the ifconfig command.12. Enter the following command:
[root@TS /root]# vi /etc/getty.conf
The following line will appear on the screen:
GETTY=yes
13. Use the arrow keys to move the cursor over the y in yes.14. Type R (upper case), type no and type a space to remove the final s in yes.
The line will now appear as follows:
GETTY=no
15. Press Esc.16. Type :wq
You should be back at the command prompt.
17. Enter saveconf to save the configuration to Flash.18. Enter exit to log out. The terminal will no longer respond to your input. 19. Disconnect the Cyclades DB-9F to DB-25F CAT 5 console cable from the terminal.
8 Cyclades TS100 Terminal Server Installer/User Guide
20. Connect the console cable to the serial port of the system or device you want to access using your TS100 terminal server console viewer. You will now be ready to perform the final stage setup configuration.
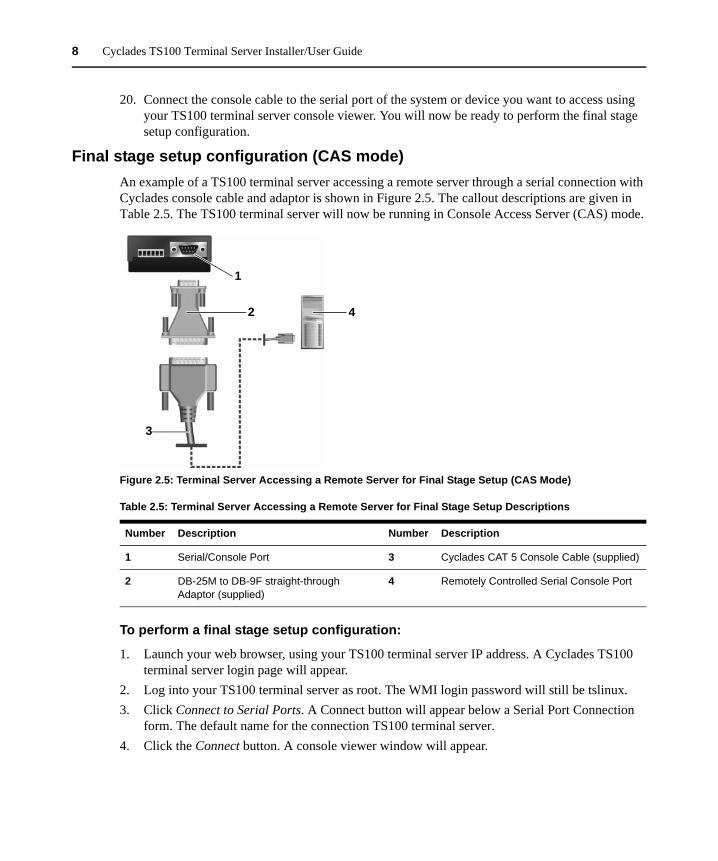
Final stage setup configuration (CAS mode)An example of a TS100 terminal server accessing a remote server through a serial connection with Cyclades console cable and adaptor is shown in Figure 2.5. The callout descriptions are given in Table 2.5. The TS100 terminal server will now be running in Console Access Server (CAS) mode.
Figure 2.5: Terminal Server Accessing a Remote Server for Final Stage Setup (CAS Mode)
To perform a final stage setup configuration:
1. Launch your web browser, using your TS100 terminal server IP address. A Cyclades TS100 terminal server login page will appear.
2. Log into your TS100 terminal server as root. The WMI login password will still be tslinux.3. Click Connect to Serial Ports. A Connect button will appear below a Serial Port Connection
form. The default name for the connection TS100 terminal server.4. Click the Connect button. A console viewer window will appear.
Table 2.5: Terminal Server Accessing a Remote Server for Final Stage Setup Descriptions
Number Description Number Description
1 Serial/Console Port 3 Cyclades CAT 5 Console Cable (supplied)
2 DB-25M to DB-9F straight-through Adaptor (supplied)
4 Remotely Controlled Serial Console Port
1
2
3
4
Chapter 2: Installation 9
5. Click twice on the console viewer window. The console port to which you are connected will respond.
NOTE: Sometimes clicking on the console viewer window will generate a character that the console port interprets as a login attempt. If so, a message indicating an incorrect login will appear. This will be followed by another login prompt that allows you to log in normally.
Basic configuration necessary to use your Cyclades TS100 terminal server to connect to a serial port is complete.

10 Cyclades TS100 Terminal Server Installer/User Guide
11
CHAPTER
3 Configuration
General NavigationThe remaining Cyclades TS100 terminal server configuration will be done from the Web Management Interface (WMI). To perform configuration and routine maintenance tasks, you will need to log into the TS100 terminal server WMI as root. Only the root user has all configuration and maintenance privileges.
When you first log into the WMI, the main menu is displayed. Then, as you select menu items, dialog boxes and forms are displayed that correspond to your menu selections.
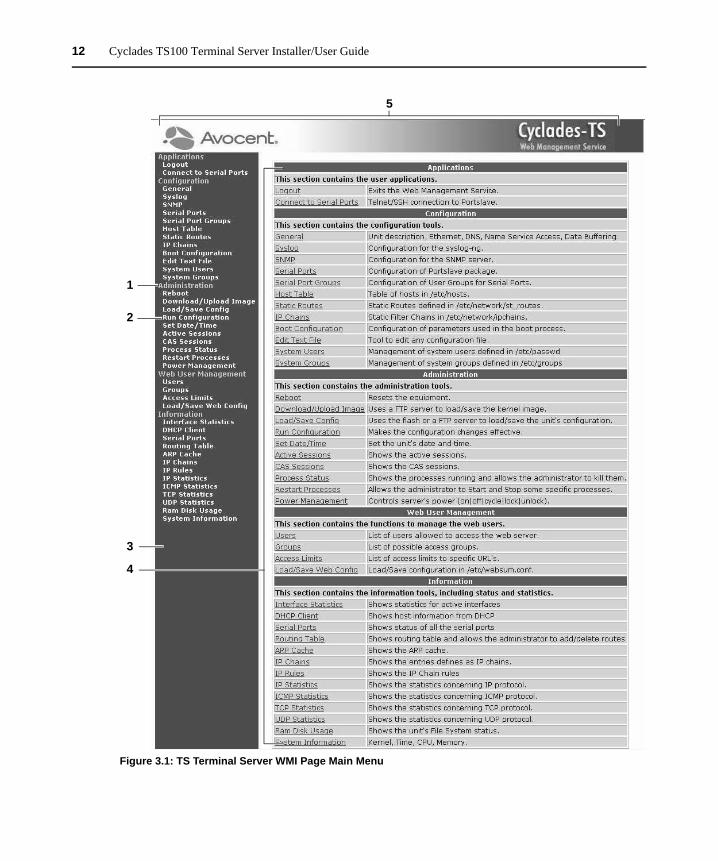
To start a menu action, left-click on the desired menu action item. The main section of the menu page will display the available options. See Figure 3.1 and Table 3.1.
12 Cyclades TS100 Terminal Server Installer/User Guide
Figure 3.1: TS Terminal Server WMI Page Main Menu
1
2
3
4
5
Chapter 3: Configuration 13
Tasks You Should Perform FirstBefore exploring the many features of the Cyclades TS100 terminal server, it is strongly recommended that you perform some primary tasks for security purposes. These include the following:
• Changing the default password for root• Changing the default password for admin• Adding at least one regular user with limited user privileges
Understanding the web user access levelsWeb users can have different access levels. The web user access levels are as follows:
• root - full capability to reboot, manage processes, add and delete users, upgrade software and launch a console viewer
• admin - capability to reboot, manage processes and launch a console viewer• monitor - capability to view, but not modify most configuration settings and launch a
console viewer• user - capability to launch a console viewer
Changing the root WMI login passwordUsers are categorized as web users and as system users. Web can log into the Cyclades TS100 terminal server from the login page of the WMI. System users can log into the console access viewer window and over the network using ssh. In most cases, it is useful to configure a user as both a web user and as a system user, with a common password.
You may have already changed the password for root as a system user. However, you will notice when you log into the WMI that tslinux is still the default password for root. The following procedure changes the password for root logging into the web browser.
Table 3.1: TS Terminal Server WMI Page Main Menu Descriptions
Number Description Number Description
1 Menu Action Category 4 Main Section of the WMI PageThis starts at the main menu and then displays dialog boxes or forms as you select menu items.
2 Menu Action Item (Active) 5 WMI Page Title BarClick here to set the WMI page to the initial state (shown in the figure).
3 Menu Column

14 Cyclades TS100 Terminal Server Installer/User Guide
To change the root WMI login password:
1. Log into the WMI as root.2. Enter tslinux in the password field. The main menu will appear.3. Click Users under the Web User Management menu category. A User List form will appear.4. Click the Entry radio button next to root.5. Click the Change Password button. A Web User Management - Change Password for root
form will appear.6. Enter the new password for root in the Password field.
NOTE: You may make this password match the system password you already assigned to root, if desired.
7. Re-enter the new password for root in the Confirm field.8. Click Load/Save Web Config under the Web User Management menu category. A Login form
will appear.9. Enter root in the Login field.10. Enter the new password in the Password field.11. Click the Submit button. A Load/Save Configuration form will appear.12. Click the Save Configuration button.13. Click Load/Save Config under the Administration menu category. A Flash Memory form
will appear.14. Click the Save to Flash button.
Changing the default password for adminAn admin system user is already configured on the TS100 terminal server by default. The password for this user is cyclades. It is recommended that you change the admin password.
To change the default password for admin:
1. Log into the WMI as root.2. Click System Users under the Configuration menu category. A System Users form will appear.3. Click the Entry radio button next to admin.4. Click the Change Password button. A Change Password for admin form will appear.5. Enter the new password in the Password and Confirm fields.6. Click the Submit button. A message will appear confirming that the admin password
was changed.7. Click Run Configuration under the Administration menu category. A Run Configuration form
will appear.8. Click the Serial Ports Ethernet Static Routes checkbox.

Chapter 3: Configuration 15
9. Click the Activate Configuration button. A message will appear confirming that the Serial Ports/Ethernet/Routing table was reloaded.
10. Click Load/Save Config under the Administration menu category. A Flash Memory form will appear.
11. Click the Save to Flash button.
Adding an admin login for the WMITo add an admin login for the WMI:
1. Log into the WMI as root.2. Click Users under the Web User Management menu category. A User List form will appear.3. Click the Add a User button. The Add User form will appear.4. Enter admin in the Username field.
NOTE: You can give an admin user any name you want, and you can have more than one user with admin privileges.
5. Select admin from the Group selection box.6. Enter the admin‘s password in the Password and Confirm fields.7. Click the Submit button. A message will confirm that admin was successfully added.8. Click Load/Save Web Config under the Web User Management menu category. A Load/Save
Configuration form will appear.9. Click the Save configuration button.10. Click Load/Save Config under the Administration menu category. A Flash Memory form
will appear.11. Click the Save to Flash button.
Adding regular usersRegular users can log into the WMI and launch a console viewer. They have no configuration privileges.
To add a regular user:
1. Log into the WMI as root.2. Click Users under the Web User Management menu category. A User List form will appear.3. Click the Add a User button. The Add User form will appear.4. Enter the name of the new user in the Username field.5. Select user from the Group selection box to enable the user to only launch the console viewer.
-or-
Select monitor from the Group selection box to also enable the user to view (but not modify) the configuration settings.
16 Cyclades TS100 Terminal Server Installer/User Guide
6. Enter the user’s password in the Password and Confirm fields.7. Click the Submit button. A message will confirm that the user was successfully added.8. Click Load/Save Web Config under the Web User Management menu category. A Load/Save
Configuration form will appear.9. Click the Save configuration button.10. Click Load/Save Config under the Administration menu category. A Flash Memory form
will appear.11. Click the Save to Flash button.
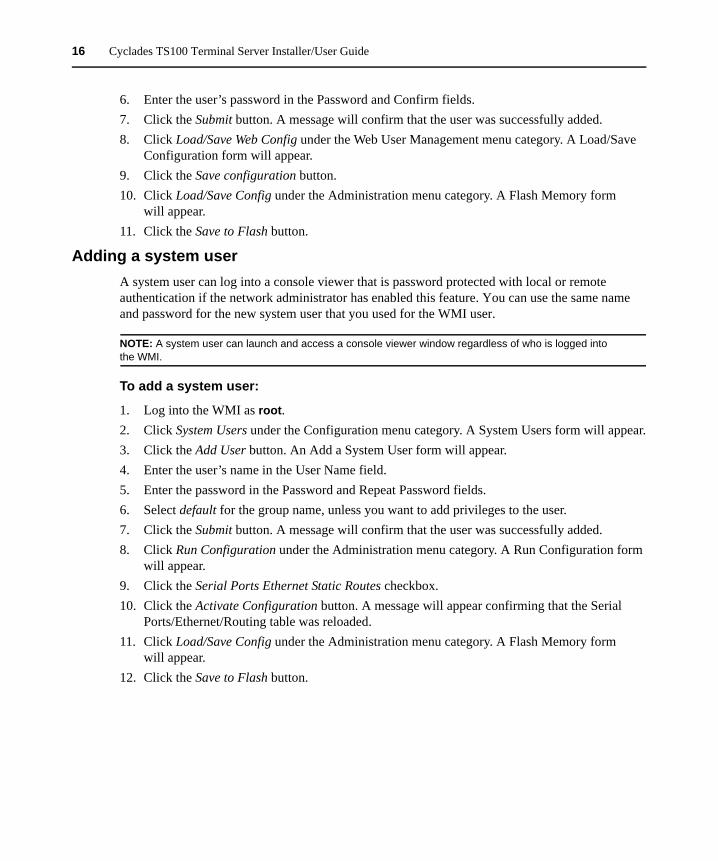
Adding a system userA system user can log into a console viewer that is password protected with local or remote authentication if the network administrator has enabled this feature. You can use the same name and password for the new system user that you used for the WMI user.
NOTE: A system user can launch and access a console viewer window regardless of who is logged into the WMI.
To add a system user:
1. Log into the WMI as root.2. Click System Users under the Configuration menu category. A System Users form will appear.3. Click the Add User button. An Add a System User form will appear.4. Enter the user’s name in the User Name field.5. Enter the password in the Password and Repeat Password fields.6. Select default for the group name, unless you want to add privileges to the user.7. Click the Submit button. A message will confirm that the user was successfully added.8. Click Run Configuration under the Administration menu category. A Run Configuration form
will appear.9. Click the Serial Ports Ethernet Static Routes checkbox.10. Click the Activate Configuration button. A message will appear confirming that the Serial
Ports/Ethernet/Routing table was reloaded.11. Click Load/Save Config under the Administration menu category. A Flash Memory form
will appear.12. Click the Save to Flash button.
Chapter 3: Configuration 17
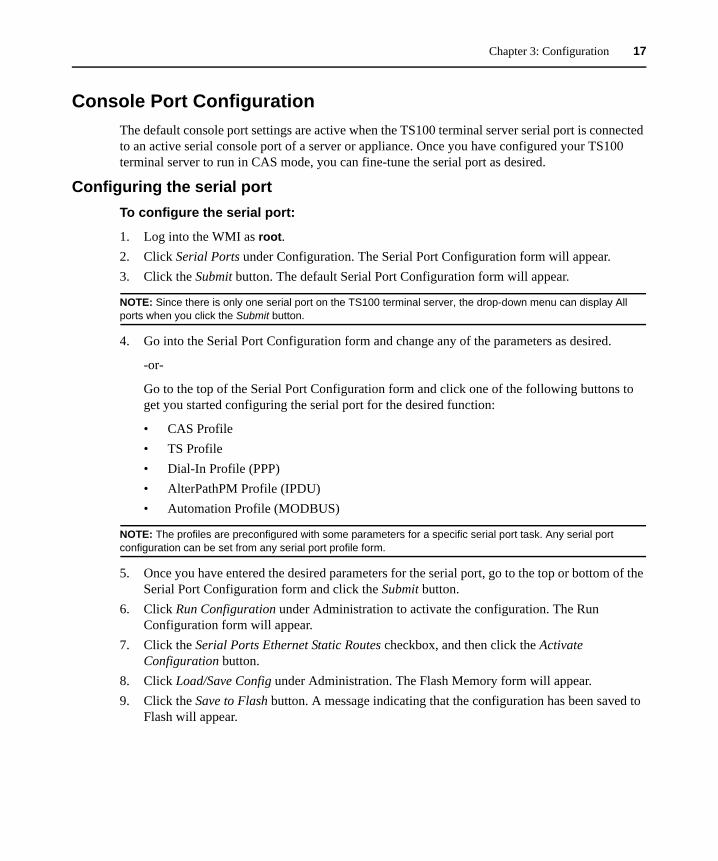
Console Port ConfigurationThe default console port settings are active when the TS100 terminal server serial port is connected to an active serial console port of a server or appliance. Once you have configured your TS100 terminal server to run in CAS mode, you can fine-tune the serial port as desired.
Configuring the serial portTo configure the serial port:
1. Log into the WMI as root.2. Click Serial Ports under Configuration. The Serial Port Configuration form will appear.3. Click the Submit button. The default Serial Port Configuration form will appear.
NOTE: Since there is only one serial port on the TS100 terminal server, the drop-down menu can display All ports when you click the Submit button.
4. Go into the Serial Port Configuration form and change any of the parameters as desired.
-or-
Go to the top of the Serial Port Configuration form and click one of the following buttons to get you started configuring the serial port for the desired function:
• CAS Profile• TS Profile• Dial-In Profile (PPP)• AlterPathPM Profile (IPDU)• Automation Profile (MODBUS)
NOTE: The profiles are preconfigured with some parameters for a specific serial port task. Any serial port configuration can be set from any serial port profile form.
5. Once you have entered the desired parameters for the serial port, go to the top or bottom of the Serial Port Configuration form and click the Submit button.
6. Click Run Configuration under Administration to activate the configuration. The Run Configuration form will appear.
7. Click the Serial Ports Ethernet Static Routes checkbox, and then click the Activate Configuration button.
8. Click Load/Save Config under Administration. The Flash Memory form will appear.9. Click the Save to Flash button. A message indicating that the configuration has been saved to
Flash will appear.
18 Cyclades TS100 Terminal Server Installer/User Guide
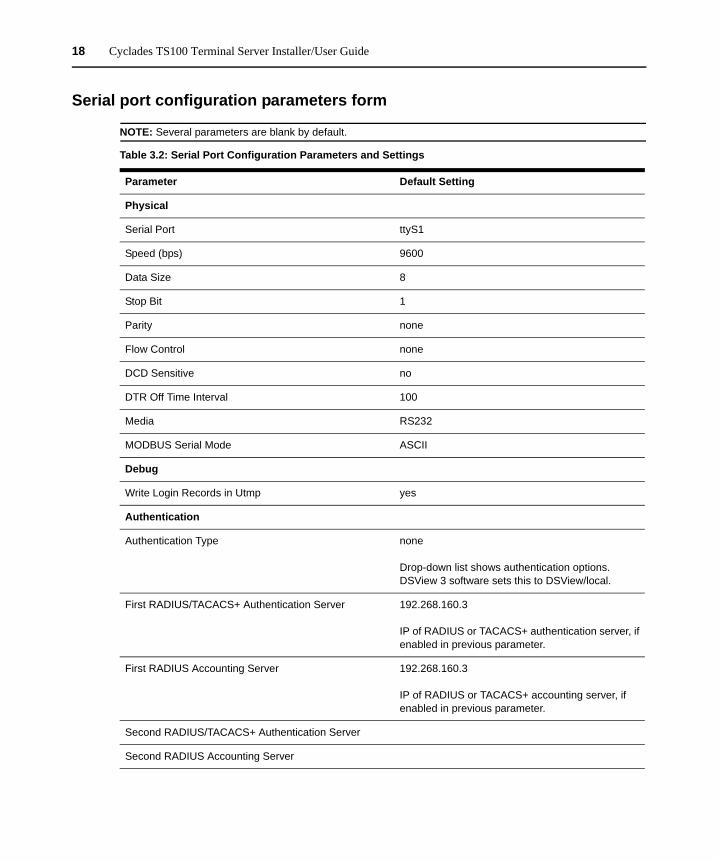
Serial port configuration parameters form
NOTE: Several parameters are blank by default.
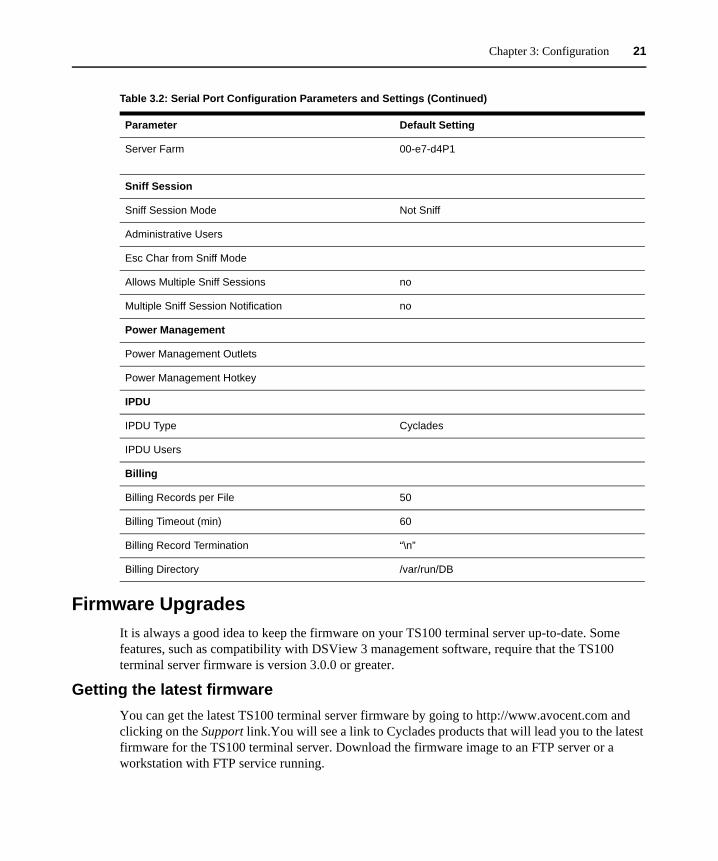
Table 3.2: Serial Port Configuration Parameters and Settings
Parameter Default Setting
Physical
Serial Port ttyS1
Speed (bps) 9600
Data Size 8
Stop Bit 1
Parity none
Flow Control none
DCD Sensitive no
DTR Off Time Interval 100
Media RS232
MODBUS Serial Mode ASCII
Debug
Write Login Records in Utmp yes
Authentication
Authentication Type none
Drop-down list shows authentication options.DSView 3 software sets this to DSView/local.
First RADIUS/TACACS+ Authentication Server 192.268.160.3
IP of RADIUS or TACACS+ authentication server, if enabled in previous parameter.
First RADIUS Accounting Server 192.268.160.3
IP of RADIUS or TACACS+ accounting server, if enabled in previous parameter.
Second RADIUS/TACACS+ Authentication Server
Second RADIUS Accounting Server

Chapter 3: Configuration 19
RADIUS/TACACS+ Timeout 3
RADIUS/TACACS+ Secret secret
RADIUS/TACACS+ Retries 5
RADIUS/TACACS+ Password Required yes
Access Restriction on Users
Profile
Protocol Socket Server
Socket Server and Socket SSH are most commonly used for CAS settings.If set to IPDU, see the Configuring the PM IPDU web interface section on page 23.If set to MODBUS, see the MODBUS section on page 34.
Remote/Local IP Address
Socket Port 7001 (incremented)
Serial Port Pool
Pool Local IP Address
Pool Socket Port
Pool Server Farm
Terminal Server
Host 192.168.160.8
Banner \r\n Welcome to terminal server %h port S%p \n\r\n
Login Prompt %h login:
Terminal Type vt100
Automatic User
Telnet Client Mode text
PPP
Network Mask 255.255.255.255
Table 3.2: Serial Port Configuration Parameters and Settings (Continued)
Parameter Default Setting
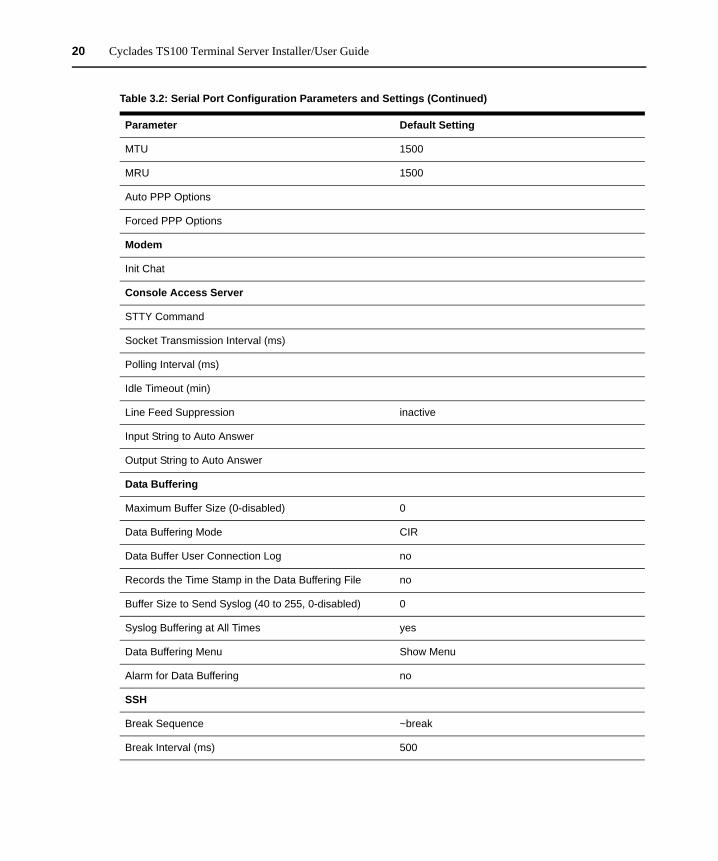
20 Cyclades TS100 Terminal Server Installer/User Guide
MTU 1500
MRU 1500
Auto PPP Options
Forced PPP Options
Modem
Init Chat
Console Access Server
STTY Command
Socket Transmission Interval (ms)
Polling Interval (ms)
Idle Timeout (min)
Line Feed Suppression inactive
Input String to Auto Answer
Output String to Auto Answer
Data Buffering
Maximum Buffer Size (0-disabled) 0
Data Buffering Mode CIR
Data Buffer User Connection Log no
Records the Time Stamp in the Data Buffering File no
Buffer Size to Send Syslog (40 to 255, 0-disabled) 0
Syslog Buffering at All Times yes
Data Buffering Menu Show Menu
Alarm for Data Buffering no
SSH
Break Sequence ~break
Break Interval (ms) 500
Table 3.2: Serial Port Configuration Parameters and Settings (Continued)
Parameter Default Setting
Chapter 3: Configuration 21
Firmware UpgradesIt is always a good idea to keep the firmware on your TS100 terminal server up-to-date. Some features, such as compatibility with DSView 3 management software, require that the TS100 terminal server firmware is version 3.0.0 or greater.
Getting the latest firmwareYou can get the latest TS100 terminal server firmware by going to http://www.avocent.com and clicking on the Support link.You will see a link to Cyclades products that will lead you to the latest firmware for the TS100 terminal server. Download the firmware image to an FTP server or a workstation with FTP service running.
Server Farm 00-e7-d4P1
Sniff Session
Sniff Session Mode Not Sniff
Administrative Users
Esc Char from Sniff Mode
Allows Multiple Sniff Sessions no
Multiple Sniff Session Notification no
Power Management
Power Management Outlets
Power Management Hotkey
IPDU
IPDU Type Cyclades
IPDU Users
Billing
Billing Records per File 50
Billing Timeout (min) 60
Billing Record Termination “\n”
Billing Directory /var/run/DB
Table 3.2: Serial Port Configuration Parameters and Settings (Continued)
Parameter Default Setting

22 Cyclades TS100 Terminal Server Installer/User Guide
If your TS100 terminal server has access to the internet, you can use the WMI to download the image directly from the Avocent web site, but you will need to save the exact path to the image.
NOTE: Before upgrading your TS100 terminal server firmware, back up your configuration to an FTP server (see the Saving and restoring configurations section on page 41).
To upgrade TS100 terminal server firmware:
1. Log onto the WMI as root. The main menu will appear.2. Click Download/Upload Image under Administration. A Download/Upload Image form
will appear. The fields in the form refer to the FTP server that has the firmware image you wish to install.
3. Enter the name or the IP address of the FTP server in the FTP Server field.4. Enter the username and password in the labeled fields.5. Enter the full path to the firmware image file in the Directory field, in the following format:
/home/gregg/ts
6. Enter the name of the firmware image file in the File Name field.7. Click the Download button. When the download is completed, an FTP results message
will appear.
A successful download will display a message similar to the following:
ftpget -u gregg -p <password> 172.26.31.164 /proc/flash/zImage
/home/gregg/ts/FL0558004.bin >/tmp/webte
NOTE: The actual password will be displayed in this message and will not be encrypted.
8. Click Load/Save Config under Administration. A Flash Memory form will appear.9. Click the Save to Flash button.10. Reboot the TS100 terminal server to activate the new firmware.
NOTE: You may need to set your TS100 terminal server to factory defaults after you perform the firmware upgrade (see the Setting the TS100 terminal server to factory defaults section on page 41).
DSView 3 Management Software ConfigurationDSView 3 management software can be configured to manage the TS100 terminal server and launch a console viewer to manage a target device.
NOTE: Cyclades TS100 terminal server firmware version 3.0.0 or later is required.
Chapter 3: Configuration 23
To configure DSView 3 software to manage a TS100 terminal server:
1. Log into the DSView 3 server as an administrator.2. Click the Units tab and then the Add button. The Add Appliance wizard will appear.3. Click the Next button.4. Click the Add a single appliance radio button.5. Click the Next button. An appliance selection box will appear.6. Scroll the selection box until you can highlight TS100.7. Click the Next button.8. Click the Yes, the TS100 does have an address button.9. Enter the IP address of your TS100 terminal server.10. Click the Next button. A Request in Progress message will display. Next, you will see a
message indicating that your TS100 terminal server has been successfully installed.
For details on launching a TS100 terminal server console viewer with DSView 3 software, see the DSView 3 Management Software Installer/User Guide and the DSView 3 Software Plug-In for the TS Terminal Server technical bulletin.
Power ManagementThe Cyclades TS100 terminal server can control the outlets of a Cyclades PM Intelligent Power Distribution Unit (IPDU) or a cascaded chain of PM IPDUs. You can either configure the serial port specifically as a PM IPDU web interface, or you can configure the port as an ordinary serial port and access the PM IPDU Linux command line, using the TS100 terminal server console viewer.
Configuring the PM IPDU web interfaceTo configure the PM IPDU web interface:
1. Connect a straight-through RJ-45M to RJ-45M cable to the IN port on the PM IPDU.2. Connect the other end of the RJ-45M cable to the DB-9 connector on the TS100 terminal
server, using a straight-through RJ-45F to DB-9F adaptor.3. Log onto the TS100 terminal server WMI as root.4. Under Configuration, click Serial Ports. The Serial Port Configuration form will appear.5. Click the Submit button. The Serial Port Configuration menu will appear.6. Click the AlterPath PM Profile button.7. Scroll down to the Profile heading and be sure that IPDU is selected for Protocol.8. Scroll to either the top or bottom of the Serial Port Configuration menu and click the
Submit button.9. Click Run Configuration under Administration. The Run Configuration form will appear.

24 Cyclades TS100 Terminal Server Installer/User Guide
10. Select the Serial Ports Ethernet Static Routes checkbox, and then click the Activate Configuration button.
After a few seconds, the Serial Ports/Ethernet/Routing Table configuration reloaded message will appear.
11. Click Power Management under Administration. The PM IPDU web interface will appear.
Figure 3.2: PM IPDU Web Interface
12. Click Load/Save Configuration under Administration, and then click the Save to Flash button.
Managing the PM IPDU using the console viewerThe console viewer gives you more control over the PM IPDU than the PM IPDU web interface. In addition to the functions available with the PM IPDU web interface, you can assign users and passwords and change voltage and current thresholds with the console viewer. See the Cyclades PM IPDU Installer/Administrator/User Guide for detailed information on using the PM IPDU console.
To manage the PM IPDU using the console viewer:
1. Connect a straight-through RJ-45M to RJ-45M cable to the IN port on the PM IPDU.2. Connect the other end of the RJ-45M cable to the DB-9 connector on the TS100 terminal
server, using a straight-through RJ-45F to DB-9F adaptor.3. Log onto the TS100 terminal server WMI as root.4. Assuming the serial port is configured with the default profile or a suitable CAS profile, click
Connect to Serial Ports under Applications. The console viewer will launch and you will be at the PM IPDU command prompt.
NOTE: If authentication is enabled, you will be prompted to log in as a TS100 terminal server user before gaining access to the PM IPDU.
Chapter 3: Configuration 25
Editing Text FilesText files can be edited from the TS100 terminal server WMI in addition to the Linux shell. Editing a text file from the WMI is relatively simple and is recommended for people who are not familiar with Linux or UNIX.
Log into the TS100 terminal server WMI as root to perform the following editing procedures.
To edit a text file from the WMI:
1. Click Edit Text File under Configuration. An Edit Text File form will appear with a blank File Name field.
2. Enter the path and the name of the file you want to edit in the File Name field. For example:/etc/getty.conf
3. Click the Submit button. An Edit File page will appear with a text editing box displaying the contents of the text file you specified.
NOTE: If you mistype the filename or type the name of a file that does not exist, you will see the following message: Warning! This File does not exist. You can still enter text into the text editing box and create a new file this way.
4. Edit the file as needed.5. When you have finished editing the file, enter the username in the User Name field below the
text editing box.6. Enter the password for the user in the Password and Repeat Password fields.7. Click the Submit button.8. Click Load/Save Config under Administration. A Flash Memory form will appear.9. Click the Save to Flash button to make your changes permanent.
To edit the SNMP or the Syslog configuration file from the WMI:
1. Click SNMP under Configuration. An Edit File page will appear with a text editing box displaying the contents of the /etc/snmp/snmpd.conf text file.
-or-
Click Syslog under Configuration. An Edit File page will appear with a text editing box displaying the contents of the /etc/syslog-ng/syslog-ng.conf text file.
2. Edit the file as needed.
NOTE: More specific information about the snmpd.conf file is given in the Configuring SNMP section on page 29. More specific information about the syslog-ng.conf file is given in the Editing syslog-ng.conf section on page 31.
3. When you have finished editing the file, enter the username (usually root) in the User Name field below the text editing box.
4. Enter the password for the user in the Password and Repeat Password fields.
26 Cyclades TS100 Terminal Server Installer/User Guide
5. Click the Submit button.
NOTE: You can quit editing at any time without saving changes by clicking the WMI page title bar.
6. Click Load/Save Config under Administration. A Flash Memory form will appear.7. Click the Save to Flash button to make your changes permanent.
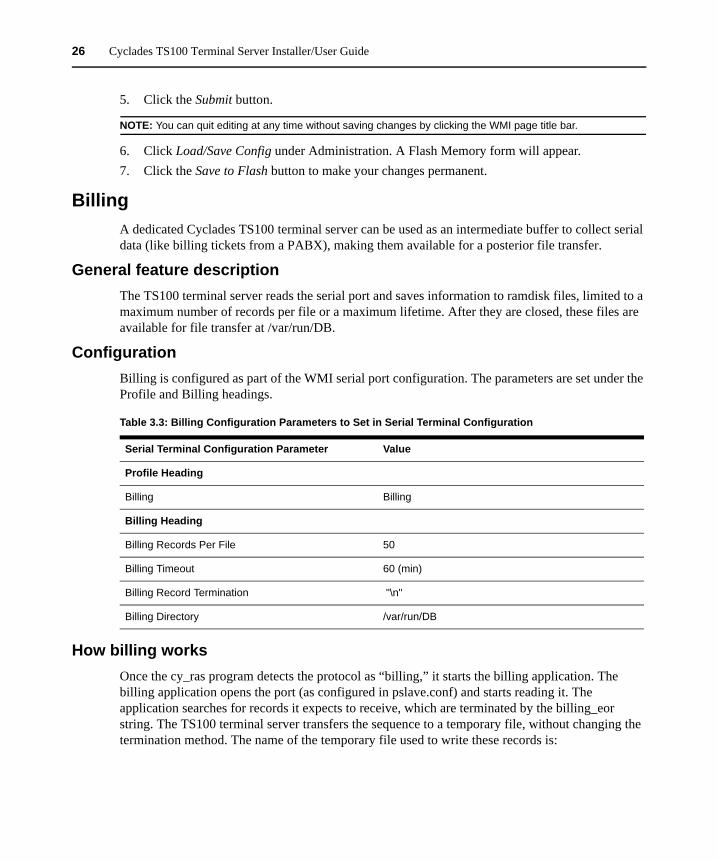
BillingA dedicated Cyclades TS100 terminal server can be used as an intermediate buffer to collect serial data (like billing tickets from a PABX), making them available for a posterior file transfer.
General feature descriptionThe TS100 terminal server reads the serial port and saves information to ramdisk files, limited to a maximum number of records per file or a maximum lifetime. After they are closed, these files are available for file transfer at /var/run/DB.
ConfigurationBilling is configured as part of the WMI serial port configuration. The parameters are set under the Profile and Billing headings.
How billing worksOnce the cy_ras program detects the protocol as “billing,” it starts the billing application. The billing application opens the port (as configured in pslave.conf) and starts reading it. The application searches for records it expects to receive, which are terminated by the billing_eor string. The TS100 terminal server transfers the sequence to a temporary file, without changing the termination method. The name of the temporary file used to write these records is:
Table 3.3: Billing Configuration Parameters to Set in Serial Terminal Configuration
Serial Terminal Configuration Parameter Value
Profile Heading
Billing Billing
Billing Heading
Billing Records Per File 50
Billing Timeout 60 (min)
Billing Record Termination "\n"
Billing Directory /var/run/DB
Chapter 3: Configuration 27
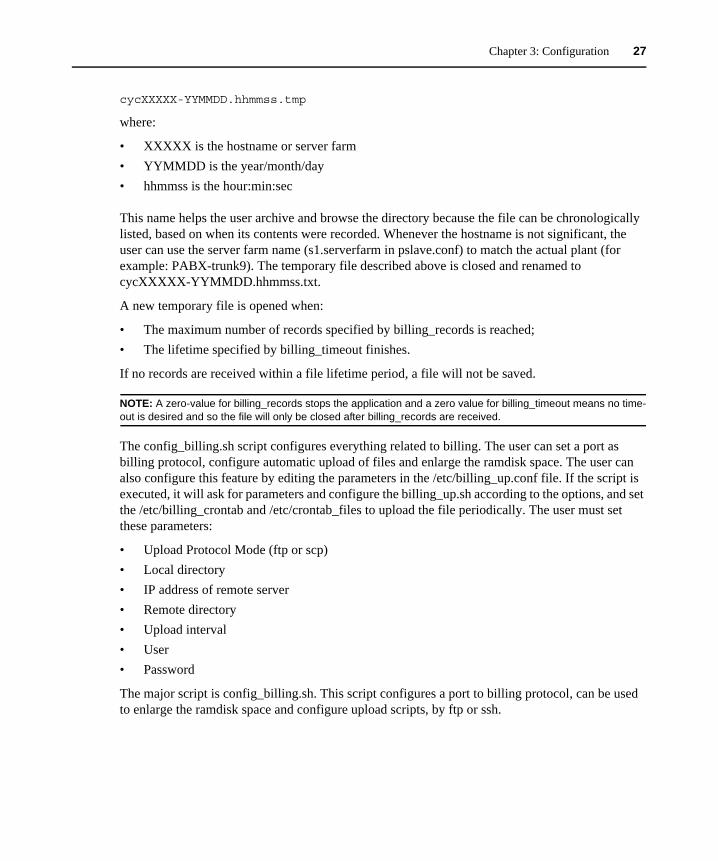
cycXXXXX-YYMMDD.hhmmss.tmp
where:
• XXXXX is the hostname or server farm• YYMMDD is the year/month/day• hhmmss is the hour:min:sec
This name helps the user archive and browse the directory because the file can be chronologically listed, based on when its contents were recorded. Whenever the hostname is not significant, the user can use the server farm name (s1.serverfarm in pslave.conf) to match the actual plant (for example: PABX-trunk9). The temporary file described above is closed and renamed to cycXXXXX-YYMMDD.hhmmss.txt.
A new temporary file is opened when:
• The maximum number of records specified by billing_records is reached;• The lifetime specified by billing_timeout finishes.
If no records are received within a file lifetime period, a file will not be saved.
NOTE: A zero-value for billing_records stops the application and a zero value for billing_timeout means no time-out is desired and so the file will only be closed after billing_records are received.
The config_billing.sh script configures everything related to billing. The user can set a port as billing protocol, configure automatic upload of files and enlarge the ramdisk space. The user can also configure this feature by editing the parameters in the /etc/billing_up.conf file. If the script is executed, it will ask for parameters and configure the billing_up.sh according to the options, and set the /etc/billing_crontab and /etc/crontab_files to upload the file periodically. The user must set these parameters:
• Upload Protocol Mode (ftp or scp)• Local directory• IP address of remote server• Remote directory• Upload interval• User• Password
The major script is config_billing.sh. This script configures a port to billing protocol, can be used to enlarge the ramdisk space and configure upload scripts, by ftp or ssh.
28 Cyclades TS100 Terminal Server Installer/User Guide
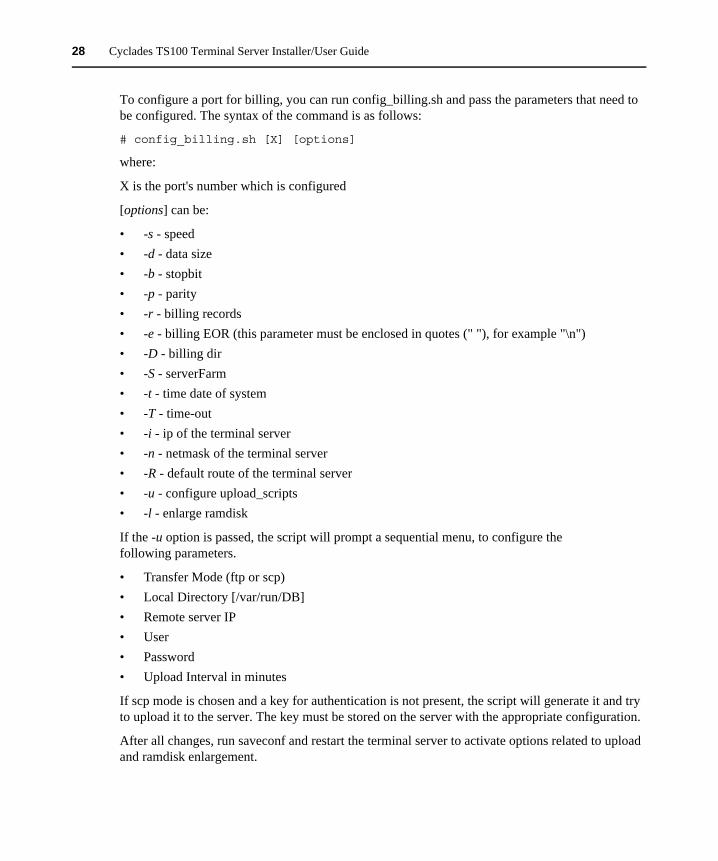
To configure a port for billing, you can run config_billing.sh and pass the parameters that need to be configured. The syntax of the command is as follows:
# config_billing.sh [X] [options]
where:
X is the port's number which is configured
[options] can be:
• -s - speed• -d - data size• -b - stopbit• -p - parity• -r - billing records• -e - billing EOR (this parameter must be enclosed in quotes (" "), for example "\n")• -D - billing dir• -S - serverFarm• -t - time date of system• -T - time-out• -i - ip of the terminal server• -n - netmask of the terminal server• -R - default route of the terminal server• -u - configure upload_scripts• -l - enlarge ramdisk
If the -u option is passed, the script will prompt a sequential menu, to configure the following parameters.
• Transfer Mode (ftp or scp)• Local Directory [/var/run/DB]• Remote server IP• User• Password• Upload Interval in minutes
If scp mode is chosen and a key for authentication is not present, the script will generate it and try to upload it to the server. The key must be stored on the server with the appropriate configuration.
After all changes, run saveconf and restart the terminal server to activate options related to upload and ramdisk enlargement.

Chapter 3: Configuration 29
Disk space issueFinally, it is important to note that there is a protection against disk space problems. If you configure flow control to hardware for the serial port (all.flow = hard in the pslave.conf file), the application monitors the available disk space and if it is less than 100 Kbytes, the serial interface deactivates the RTS signal on the RS-232. RTS is reactivated once the disk free space is greater than 120 Kbytes.
SNMPSimple Network Management Protocol (SNMP) is a set of protocols for managing complex networks. SNMP works by sending messages, called protocol data units (PDUs), to different parts of a network. SNMP-compliant devices, called agents, store data about themselves in Management Information Bases (MIBs) and return this data to the SNMP requesters. The TS100 terminal server uses the net-snmp package. Net-snmp supports snmp version 1, 2 and 3.
NOTE: Check the SNMP configuration before gathering information about the TS100 terminal server by SNMP. There are different types of attacks an unauthorized user can implement to retrieve sensitive information contained in the MIB. By default, the SNMP configuration in the TS100 terminal server cannot permit the public community to read SNMP information.
Configuring SNMPTo use SNMP version 1 or 2 (community):
After opening the /etc/snmp/snmpd.conf file, edit the following lines as described below:
1. Scroll down and remove the pound sign (#) from the beginning of the following line:com2sec notConfigUser default public
2. Scroll down and remove the pound sign from the beginning of the following line:group notConfigGroup v1 notConfigUser
3. Scroll down and remove the pound sign from the beginning of the following line:view all included .1
4. Scroll down and remove the pound sign from the beginning of the following line:access notConfigGroup ““ any noauth exact all none none
5. If you are editing from the WMI, enter your username and password in the required fields and then click the Submit button.
-or-
If you are editing using the vi command, press Esc then type :wq and then press Enter.
6. Save the configuration to Flash.

30 Cyclades TS100 Terminal Server Installer/User Guide
To use SNMP version 3 (username/password):
1. Create a file /etc/snmp/snmpd.local.conf with the following line: createUser <username> MD5 <password> DES
For example:
createUser usersnmp MD5 user_snmp_passwd DES
NOTE: The SNMP v3 password MUST have at least eight characters. If a password with fewer than eight characters is inserted, there will be no error messages, but the SNMP user will not be created.
2. Edit the /etc/snmp/snmpd.conf file.
If you are giving the user permission to read only, add the following line:
rouser <username> (ex.: rouser usersnmp).
If you are giving the user permission to read and write, add the following line:
rwuser <username> (ex.: rwuser usersnmp).
3. Include the following line in /etc/config_files: /etc/snmp/snmpd.local.conf
SyslogThe syslog-ng daemon provides a modern treatment to system messages. Its basic function is to read and log messages to the system console, log files, other machines (remote syslog servers) and/or users as specified by its configuration file. In addition, syslog-ng is able to filter messages based on their content and to perform an action (such as sending an email or pager message). In order to access these functions, the /etc/syslog-ng/syslog-ng.conf file needs some specific configuration.
NOTE: The default configuration of the syslog-ng.conf file passes critical messages to the TS100 terminal server console or SSH screen. For example, if someone logs onto the WMI while an SSH session is open, a message will appear on the SSH session screen indicating that a login took place.
The configuration file (/etc/syslog-ng/syslog-ng.conf) is read at startup and is re-read after reception of a hang-up (HUP) signal. When reloading the configuration file, all destination files are closed and reopened as appropriate. The syslog-ng reads from source (files, TCP/UDP connections, syslogd clients), filters the messages and takes an action (writes in files, sends snmptrap, pager, email or syslogs to remote servers).
Most of the /etc/syslog-ng/syslog-ng.conf file is instructional material explaining how to configure the syslog-ng.conf file itself. The very end of the file has the default configuration.
Chapter 3: Configuration 31
Editing syslog-ng.confBy default, the syslog feature logs event information to an open console or ssh window with root as the active user. The following events are generated from the WMI or from another console or ssh window and are logged by default:
• Log user on or off• Add or delete a system user• Change passwords• Save to Flash
If you need to change the behavior of the system logging facility, you can edit the syslog-ng.conf file to customize it.
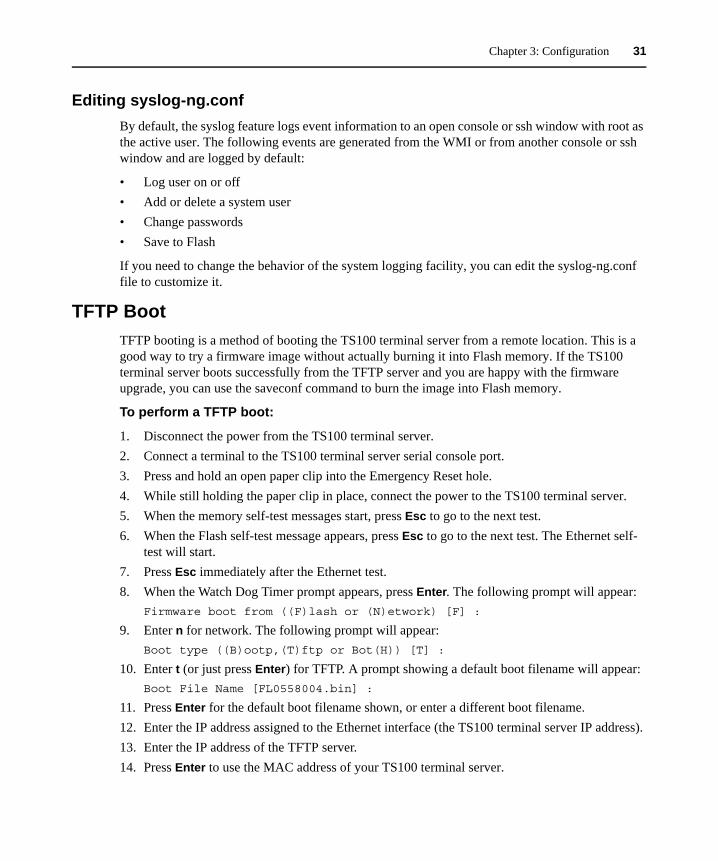
TFTP BootTFTP booting is a method of booting the TS100 terminal server from a remote location. This is a good way to try a firmware image without actually burning it into Flash memory. If the TS100 terminal server boots successfully from the TFTP server and you are happy with the firmware upgrade, you can use the saveconf command to burn the image into Flash memory.
To perform a TFTP boot:
1. Disconnect the power from the TS100 terminal server.2. Connect a terminal to the TS100 terminal server serial console port.3. Press and hold an open paper clip into the Emergency Reset hole.4. While still holding the paper clip in place, connect the power to the TS100 terminal server.5. When the memory self-test messages start, press Esc to go to the next test.6. When the Flash self-test message appears, press Esc to go to the next test. The Ethernet self-
test will start.7. Press Esc immediately after the Ethernet test.8. When the Watch Dog Timer prompt appears, press Enter. The following prompt will appear:
Firmware boot from ((F)lash or (N)etwork) [F] :
9. Enter n for network. The following prompt will appear:Boot type ((B)ootp,(T)ftp or Bot(H)) [T] :
10. Enter t (or just press Enter) for TFTP. A prompt showing a default boot filename will appear:Boot File Name [FL0558004.bin] :
11. Press Enter for the default boot filename shown, or enter a different boot filename.12. Enter the IP address assigned to the Ethernet interface (the TS100 terminal server IP address).13. Enter the IP address of the TFTP server.14. Press Enter to use the MAC address of your TS100 terminal server.

32 Cyclades TS100 Terminal Server Installer/User Guide
15. Press Enter to select Auto. The TS100 terminal server will boot from the remote firmware image.

33
CHAPTER
4 Additional Features
RS-485 The RS-485 is another standard for serial communication and is available on the Cyclades TS100 terminal server. RS-485 uses termination and has fewer wires than RS-232 - either two wires (one twisted pair) for half duplex communication or four wires (two twisted pairs) for full duplex communication. In a serial network that uses the RS-485 standard, the equipment is connected one to the other in a cascade arrangement. A terminator is required on the last device on the serial network.
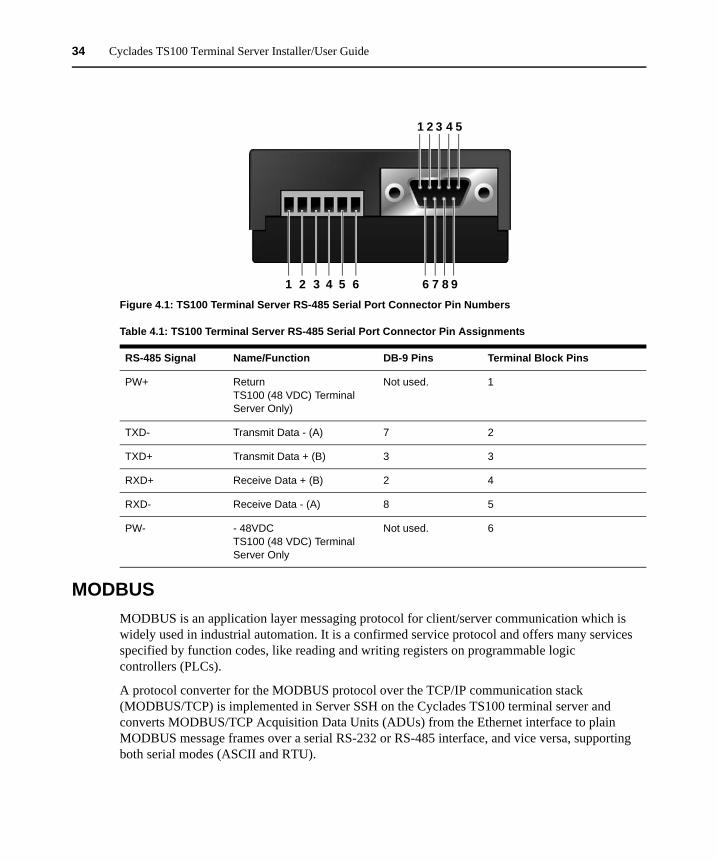
The TS100 terminal server uses a 9-pin D-shaped connector (DB-9) and a Terminal Block with the pin assignments described in Figure 4.1 and Table 4.1.
NOTE: DC power can only be applied through the six-pin Terminal Block on the TS100 (48 VDC) terminal server. If power is applied through the Terminal Block on the TS100 terminal server, it will have no effect and cause no damage.
34 Cyclades TS100 Terminal Server Installer/User Guide
Figure 4.1: TS100 Terminal Server RS-485 Serial Port Connector Pin Numbers
MODBUSMODBUS is an application layer messaging protocol for client/server communication which is widely used in industrial automation. It is a confirmed service protocol and offers many services specified by function codes, like reading and writing registers on programmable logic controllers (PLCs).
A protocol converter for the MODBUS protocol over the TCP/IP communication stack (MODBUS/TCP) is implemented in Server SSH on the Cyclades TS100 terminal server and converts MODBUS/TCP Acquisition Data Units (ADUs) from the Ethernet interface to plain MODBUS message frames over a serial RS-232 or RS-485 interface, and vice versa, supporting both serial modes (ASCII and RTU).
Table 4.1: TS100 Terminal Server RS-485 Serial Port Connector Pin Assignments
RS-485 Signal Name/Function DB-9 Pins Terminal Block Pins
PW+ ReturnTS100 (48 VDC) Terminal Server Only)
Not used. 1
TXD- Transmit Data - (A) 7 2
TXD+ Transmit Data + (B) 3 3
RXD+ Receive Data + (B) 2 4
RXD- Receive Data - (A) 8 5
PW- - 48VDC TS100 (48 VDC) Terminal Server Only
Not used. 6
54321
98761 2 3 4 5 6
Chapter 4: Additional Features 35
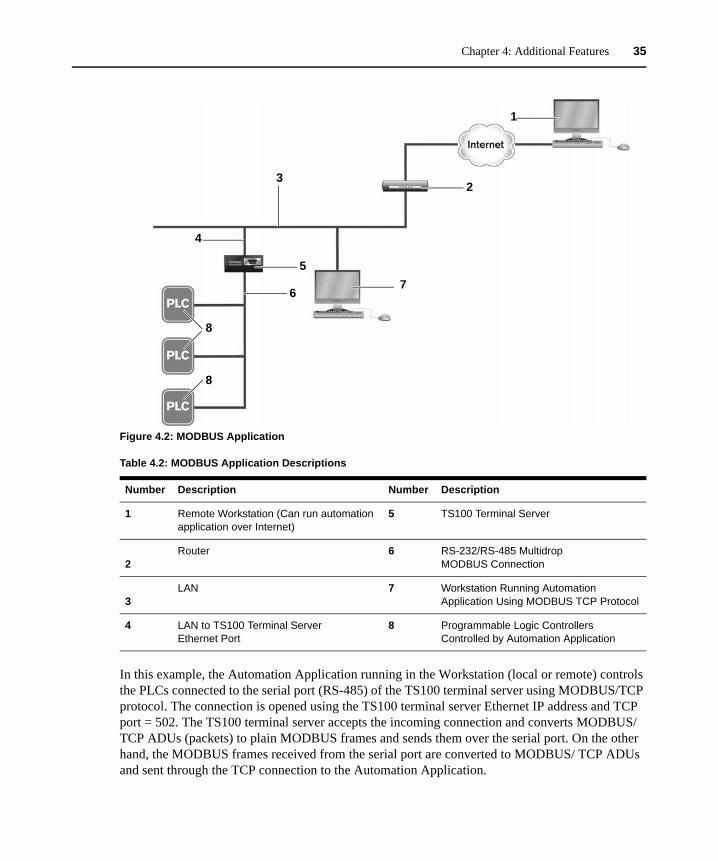
Figure 4.2: MODBUS Application
In this example, the Automation Application running in the Workstation (local or remote) controls the PLCs connected to the serial port (RS-485) of the TS100 terminal server using MODBUS/TCP protocol. The connection is opened using the TS100 terminal server Ethernet IP address and TCP port = 502. The TS100 terminal server accepts the incoming connection and converts MODBUS/ TCP ADUs (packets) to plain MODBUS frames and sends them over the serial port. On the other hand, the MODBUS frames received from the serial port are converted to MODBUS/ TCP ADUs and sent through the TCP connection to the Automation Application.
Table 4.2: MODBUS Application Descriptions
Number Description Number Description
1 Remote Workstation (Can run automation application over Internet)
5 TS100 Terminal Server
2Router 6 RS-232/RS-485 Multidrop
MODBUS Connection
3LAN 7 Workstation Running Automation
Application Using MODBUS TCP Protocol
4 LAN to TS100 Terminal Server Ethernet Port
8 Programmable Logic Controllers Controlled by Automation Application
1
23
4
5
67
8
8
36 Cyclades TS100 Terminal Server Installer/User Guide
The configuration described earlier for Console Access Servers should be followed with the following exceptions for this example.
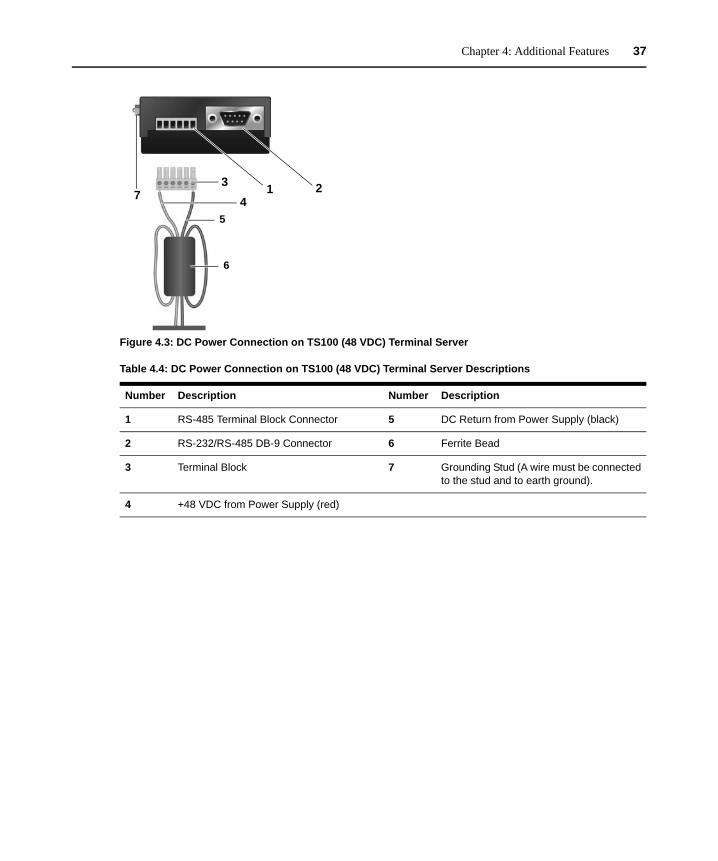
TS100 (48 VDC) Terminal ServerA 48VDC model of the TS100 terminal server is available. This is useful in situations where the standard AC to 5VDC adaptor cannot be used. The terminal block is supplied with the TS100 (48 VDC) terminal server. You must provide the 48VDC source, the cabling and the ferrite bead.
Table 4.3: MODBUS Port-Specific Parameters
Parameter DescriptionValue for this Example
Protocol For the console server profile, the possible protocols are socket_server (when telnet is used), socket_ssh (when ssh version one or two is used), raw_data (to exchange data in transparent mode – similar to socket_server mode, but without telnet negotiation, breaks to serial ports, etc.), orMODBUS (an application layer messaging protocol for client/server communication widely used for industrial automation).
MODBUS
MODBUS Serial Mode Communication mode through the serial ports. Thisparameter is meaningful only when MODBUS protocol isconfigured. The valid options are ascii (normal TX/RXmode) and rtu (some time constraints are observedbetween characters while transmitting a frame). If not configured, ASCII mode will be assumed.
ASCII
Chapter 4: Additional Features 37
Figure 4.3: DC Power Connection on TS100 (48 VDC) Terminal Server
Table 4.4: DC Power Connection on TS100 (48 VDC) Terminal Server Descriptions
Number Description Number Description
1 RS-485 Terminal Block Connector 5 DC Return from Power Supply (black)
2 RS-232/RS-485 DB-9 Connector 6 Ferrite Bead
3 Terminal Block 7 Grounding Stud (A wire must be connected to the stud and to earth ground).
4 +48 VDC from Power Supply (red)
1 234
5
6
7

38 Cyclades TS100 Terminal Server Installer/User Guide
39
CHAPTER
5 Linux Command Line
Introduction to the Linux Command LineUsing the WMI for terminal server configurations will prevent you from accidentally writing something to a configuration file that could cause the TS100 terminal server to malfunction. However, there are some useful commands that can be run from the Linux command line that pose little risk to the function or configuration of the TS100 terminal server.
Getting help with Linux commandsTo list all the possible Linux commands:
1. Start an ssh session on the TS100 terminal server and log on as root.
-or-
Log into the TS100 terminal server console as root (if the serial port is in TS mode).
2. Press Tab Tab. The Linux command set will be displayed on the screen.
To get help with a specific Linux command:
Enter the name of the command followed by --help. The basic syntax is:
[root@TSx000 /root] # <command> --help
The syntax for most of the commands (but not all of them) can be displayed by this method.
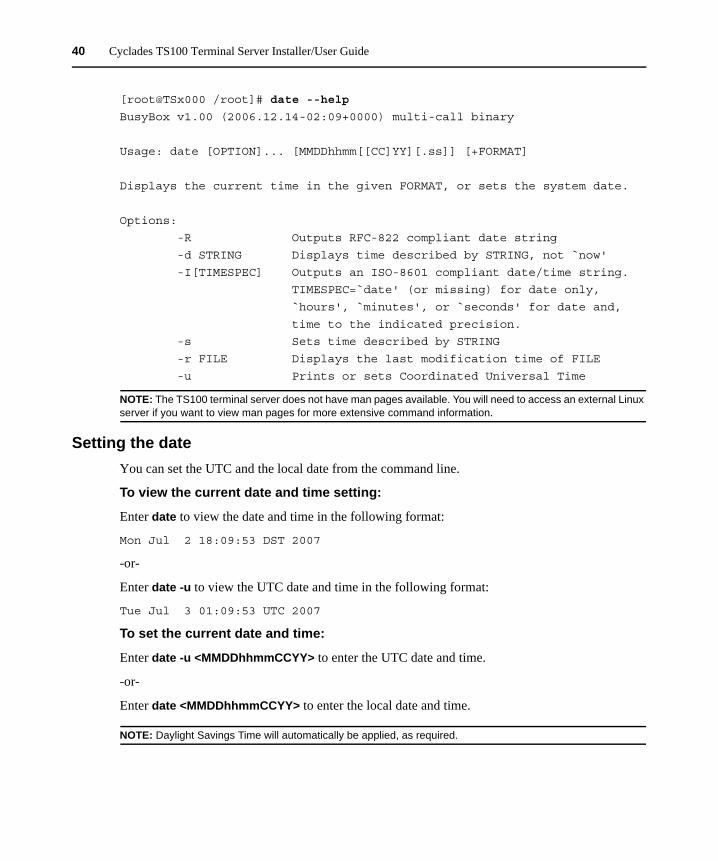
For example, if you enter date help the console will display the following:
40 Cyclades TS100 Terminal Server Installer/User Guide
[root@TSx000 /root]# date --help
BusyBox v1.00 (2006.12.14-02:09+0000) multi-call binary
Usage: date [OPTION]... [MMDDhhmm[[CC]YY][.ss]] [+FORMAT]
Displays the current time in the given FORMAT, or sets the system date.
Options:
-R Outputs RFC-822 compliant date string
-d STRING Displays time described by STRING, not `now'
-I[TIMESPEC] Outputs an ISO-8601 compliant date/time string.
TIMESPEC=`date' (or missing) for date only,
`hours', `minutes', or `seconds' for date and,
time to the indicated precision.
-s Sets time described by STRING
-r FILE Displays the last modification time of FILE
-u Prints or sets Coordinated Universal Time
NOTE: The TS100 terminal server does not have man pages available. You will need to access an external Linux server if you want to view man pages for more extensive command information.
Setting the dateYou can set the UTC and the local date from the command line.
To view the current date and time setting:
Enter date to view the date and time in the following format:
Mon Jul 2 18:09:53 DST 2007
-or-
Enter date -u to view the UTC date and time in the following format:
Tue Jul 3 01:09:53 UTC 2007
To set the current date and time:
Enter date -u <MMDDhhmmCCYY> to enter the UTC date and time.
-or-
Enter date <MMDDhhmmCCYY> to enter the local date and time.
NOTE: Daylight Savings Time will automatically be applied, as required.
Chapter 5: Linux Command Line 41
Saving and restoring configurationsEnter saveconf to save the current configuration to Flash, or enter saveconf ftp bin <remote-file> <ftp_server> <user> <password> to save the current configuration to an FTP server.
To restore a previously saved configuration from an FTP server:
1. Enter restoreconf ftp bin <remote-file> <ftp_server> <user> <password> to restore a configuration from a remote server to Flash.
2. Enter saveconfig to save your configuration to Flash.
NOTE: Enter saveconf --help and restoreconf --help to see the tftp and ssh protocol options for saving and restoring configurations. These options are not available from the WMI.
Making FTP file transfersThe TS100 terminal server does not support the full FTP command set. You must use ftpget or ftpput to transfer files between the TS100 terminal server and another server.
To make an FTP file transfer:
Enter ftpput <remote-host> <remote-file> <local-file> to send a file to another server.
-or-
Enter ftpget remote-host local-file remote-file to transfer a file from another server.
Setting the TS100 terminal server to factory defaultsAfter you have upgraded the TS100 terminal server, it is a good idea to reset the configuration to the factory defaults. This also enables you to examine basic configurations that are known to work.
To set the TS100 terminal server to factory defaults:
1. Start an ssh session on the TS100 terminal server and log on as root.
-or-
Log into the TS100 terminal server console as root (if the serial port is in TS mode).
2. Enter echo 0 > /proc/flash/script at the command prompt. This is the command that sets the TS100 terminal server to factory defaults.
3. After the command prompt reappears, disconnect the power from the TS100 terminal server and reconnect the power after a few seconds. The TS100 terminal server will reboot with the factory default settings.
4. Follow the procedures starting with the To perform an initial stage setup configuration: section on page 6, to set up your TS100 terminal server.
-or-

42 Cyclades TS100 Terminal Server Installer/User Guide
If you have saved a configuration to an FTP server, follow the procedure, To restore a previously saved configuration from an FTP server: on page 41.
43
APPENDICES
AppendicesAppendix A: TroubleshootingConnecting to the remote console locks up the TS100
Disable getty input from the serial port. Refer to To perform an initial stage setup configuration: on page 6 and go to step 12.
Console viewer does not respond; no login promptAuthentication with socket_ssh launches a login dialog box and then the console viewer. The login dialog box is usually hidden behind the console viewer window. Bring the login dialog box to the top by clicking the Internet Explorer icon on the Windows task bar and then the Java icon in the expanded list that appears.
New user cannot log in to the console viewerYou should create and enable a new WMI user and create and enable a new console viewer user.
To create and enable a new WMI user:
Refer to the Adding regular users section on page 15 for detailed instructions on how to add a new WMI user.
To create and enable a new console viewer user:
NOTE: In most cases, the new web user and the new console viewer user will have the same name and password.
Refer to the Adding a system user section on page 16 for detailed instructions on how to add a system user. A system user can launch a console viewer session.
Cannot access TS100 terminal serverIf the TS100 terminal server appears to be locked up, even after disconnecting and reconnecting power, you need to perform an emergency reset on the TS100 terminal server and then restore it to the factory defaults.
To perform an emergency reset:
1. Disconnect the DC power connector from the TS100 terminal server.2. Connect a terminal to the TS100 terminal server DB-9 connector.3. Insert the end of a straightened paper clip into the hole labeled ADM, which is the emergency
reset button (see Figure 2.3).
44 Cyclades TS100 Terminal Server Installer/User Guide
4. Continue to press the paper clip firmly into the hole while connecting the DC power to the TS100 terminal server. Hold the paper clip in place until the LEDs light up. The terminal will become active after a few seconds and will boot into single user mode after several minutes.
NOTE: You may also reset the TS100 terminal server to single user mode after connecting the power, if you insert the paper clip into the hole before the CPU and RDY LEDs light up.
The TS100 terminal server can now be set to the factory defaults (see the Setting the TS100 terminal server to factory defaults section on page 41).
Appendices 45
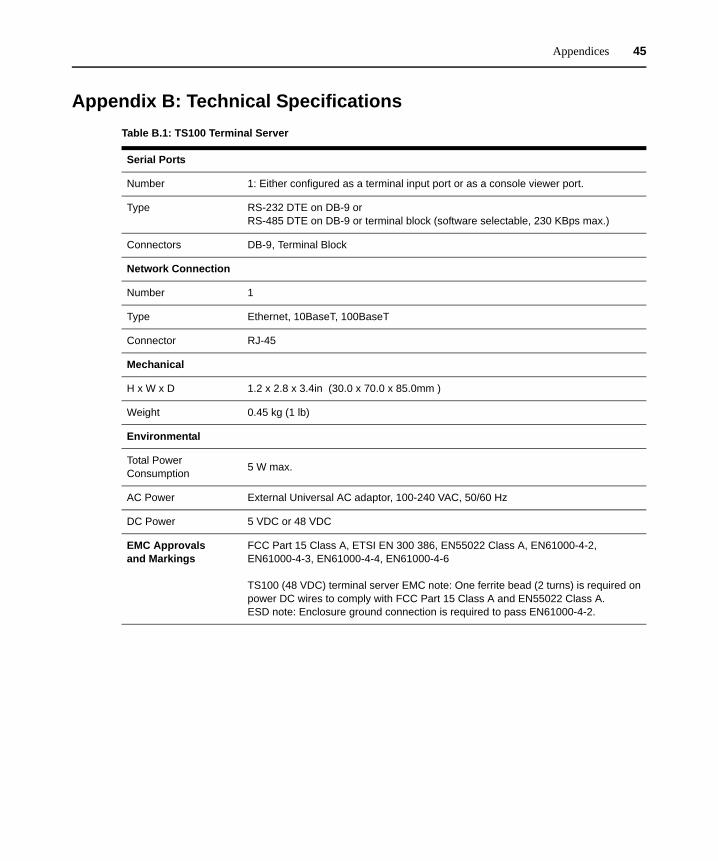
Appendix B: Technical Specifications Table B.1: TS100 Terminal Server
Serial Ports
Number 1: Either configured as a terminal input port or as a console viewer port.
Type RS-232 DTE on DB-9 orRS-485 DTE on DB-9 or terminal block (software selectable, 230 KBps max.)
Connectors DB-9, Terminal Block
Network Connection
Number 1
Type Ethernet, 10BaseT, 100BaseT
Connector RJ-45
Mechanical
H x W x D 1.2 x 2.8 x 3.4in (30.0 x 70.0 x 85.0mm )
Weight 0.45 kg (1 lb)
Environmental
Total Power Consumption 5 W max.
AC Power External Universal AC adaptor, 100-240 VAC, 50/60 Hz
DC Power 5 VDC or 48 VDC
EMC Approvals and Markings
FCC Part 15 Class A, ETSI EN 300 386, EN55022 Class A, EN61000-4-2, EN61000-4-3, EN61000-4-4, EN61000-4-6
TS100 (48 VDC) terminal server EMC note: One ferrite bead (2 turns) is required on power DC wires to comply with FCC Part 15 Class A and EN55022 Class A.ESD note: Enclosure ground connection is required to pass EN61000-4-2.
46 Cyclades TS100 Terminal Server Installer/User Guide
Appendix C: Technical SupportOur Technical Support staff is ready to assist you with any installation or operating issues you encounter with your Avocent product. If an issue should develop, follow the steps below for the fastest possible service.
To resolve an issue:
1. Check the pertinent section of this manual to see if the issue can be resolved by following the procedures outlined.
2. Visit www.avocent.com/support and use one of the following resources:Search the knowledge base or use the online service request. -or- Select Technical Support Contacts to find the Avocent Technical Support location nearest you.
47
INDEX
IndexAAC Adaptor Connector 4Additional Features 33
BBilling 26
CCAS mode 8Configuration 11Console Port Configuration 17
Ddate 40DSView 3 Software Configuration 22
EEditing Text Files 25emergency reset 43Ethernet Port 4
Ffactory defaults 41Features 1FTP 41ftpget 41ftpput 41
IInstallation 3
LLEDs 3
Linux Command Line 39
MMODBUS 34
NNavigation 11
PPhysical Features 3Power Management 23
Rregular users 15remote boot 31Restore Configuration 41restoreconf 41restoring to factory defaults 41RS-485 33
Ssaveconf 41Serial Port 4setup 5, 8SNMP 29Specifications 45Syslog 30system user 16
TTechnical Specifications 45Technical support 46TFTP Boot 31
48 Cyclades TS100 Terminal Server Installer/User Guide
Troubleshooting 43TS mode 5TS100 (48 VDC) Terminal Server 36
Wweb user access levels 13

USA Notification
Warning: Changes or modifications to this unit not expressly approved by the party responsible for compliance could void the user’s authority to operate the equipment.
Note: This equipment has been tested and found to comply with the limits for a Class A digital device, pursu-ant to Part 15 of the FCC Rules. These limits are designed to provide reasonable protection against harmful interference when the equipment is operated in a commercial environment. This equipment generates, uses and can radiate radio frequency energy and, if not installed and used in accordance with the instruction manual, may cause harmful interference to radio communications. Operation of this equipment in a residential area is likely to cause harmful interference in which case the user will be required to correct the interference at his own expense.
Canadian Notification
This digital apparatus does not exceed the Class A limits for radio noise emissions from digital apparatus set out in the Radio Interference Regulations of the Canadian Department of Communications.
Le présent appareil numérique n’émet pas de bruits radioélectriques dépassant les limites applicables aux appareils numériques de la classe A prescrites dans le Règlement sur le brouillage radioélectrique édicté par le Ministère des Communications du Canada.
Japanese Approvals
EMC Approvals and Markings
FCC Part 15 Class A, ETSI EN 300 386, EN55022 Class A, EN61000-4-2, EN61000-4-3, EN61000-4-4, EN61000-4-6
Installer/User GuideFor Technical Support:
590-695-501A
www.avocent.com/support
Cyclades® TS100Terminal Server
Related Documents