Cryoserver V9 Administration Guide December 2018 FCS +44(0)800 280 0525 [email protected] www.cryoserver.com

Welcome message from author
This document is posted to help you gain knowledge. Please leave a comment to let me know what you think about it! Share it to your friends and learn new things together.
Transcript
Cryoserver V9 Administration Guide
December 2018
FCS
+44(0)800 280 0525
www.cryoserver.com
Cryoserver V9 Administration Guide 2 | P a g e
Contents
Cryoserver V9 Administration Guide 3 | P a g e
Contents
Contents
Contents............................................................................................................................................ 3
1 Introduction .............................................................................................................................. 8
1.1 Roadmap ........................................................................................................................... 8 Revision History ................................................................................................................................. 9
2 Welcome to Cryoserver ........................................................................................................... 10
2.1 Types of Cryoserver systems ............................................................................................ 11 2.1.1 Multi-Tenant Cryoserver ........................................................................................... 11 2.1.2 Mirrored Cryoserver ................................................................................................. 12
2.2 Documentation for different user types ........................................................................... 12 2.3 What’s new in Version 9 Administration ........................................................................... 13
3 Getting Started ........................................................................................................................ 14
3.1 Installing .......................................................................................................................... 14 3.2 Setup / Licensing your Cryoserver .................................................................................... 15
3.2.1 Setup / Licensing a New Cryoserver .......................................................................... 15 3.2.2 Following an Upgrade ............................................................................................... 23
3.3 Basic Setup ....................................................................................................................... 25 3.4 Current Mail - Journaling .................................................................................................. 26
3.4.1 Exchange 2007/10/13/16 and Office 365 .................................................................. 26 3.4.2 IBM Lotus Domino Notes: ......................................................................................... 26 3.4.3 Novell GroupWise .................................................................................................... 26
3.5 Monitoring – what is happening? ..................................................................................... 27 3.6 Legacy Mail ...................................................................................................................... 27 3.7 Web Certificate ................................................................................................................ 28 3.8 Starting & Stopping Cryoserver ........................................................................................ 29
4 Essential Topics........................................................................................................................ 30
4.1 Accessing Cryoserver ........................................................................................................ 30 4.1.1 The standard URL ..................................................................................................... 30 4.1.2 General Login for Multi-Tenant Systems ................................................................... 32 Accessing the............................................................................................................ 33 4.1.3 Outlook interface ..................................................................................................... 33 4.1.4 Folder Replica view ................................................................................................... 34 4.1.5 The “Create Outlook Folder link to Cryoserver” feature ............................................ 35
4.2 Mail Journaling ................................................................................................................. 35 4.2.1 Plain Email format (RFC822) ..................................................................................... 37 4.2.2 Exchange Envelope Wrapper format ......................................................................... 38 4.2.3 RFC3462 Delivery Report format .............................................................................. 38 4.2.4 Lotus Notes ‘Journal Recipient’ format ..................................................................... 39
4.3 Getting Mail into Cryoserver ............................................................................................ 40 4.3.1 SMTP email .............................................................................................................. 40 4.3.2 CryoSMTP service ..................................................................................................... 41 4.3.3 IMAP / POP3 / EWS collection .................................................................................. 41 4.3.4 .EML files (Legacy Exported mail) .............................................................................. 42 4.3.5 Mailbox Reader Services ........................................................................................... 42
4.4 Getting mail out of Cryoserver ......................................................................................... 42 4.5 Cryoserver User Types ...................................................................................................... 44 4.6 Email De-Duplication ........................................................................................................ 45
Cryoserver V9 Administration Guide 4 | P a g e
Contents
4.6.1 Message ID and Thread Index ................................................................................... 47 4.7 Additional Services ........................................................................................................... 48
4.7.1 Legacy Mail Import ................................................................................................... 48 4.7.2 Mail Stubbing ........................................................................................................... 49 4.7.3 PST Creator .............................................................................................................. 50 4.7.4 GroupWise email collector ....................................................................................... 51 4.7.5 Lync / Skype for Business utility ................................................................................ 51 4.7.6 Bulk Export from Cryoserver ..................................................................................... 51
4.8 Document types (email / im / voice) ................................................................................. 51 4.9 Web Certificates............................................................................................................... 52
4.9.1 Create a Self-Signed Certificate ................................................................................. 53 4.9.2 Signing a Certificate .................................................................................................. 54 4.9.3 Re-Issuing a certificate .............................................................................................. 58 4.9.4 The Windows CA system........................................................................................... 58
4.10 Backup or Mirroring? ....................................................................................................... 59 4.10.1 Symantec Backup Exec ............................................................................................. 60 4.10.2 Cryoserver Mirroring ................................................................................................ 61 4.10.3 Cryoserver Email Copy feature.................................................................................. 62
5 Basic Configuration .................................................................................................................. 63
5.1 Company Settings ............................................................................................................ 63 5.1.1 Company & Contact details ...................................................................................... 64 5.1.2 Login ‘Remember Me’ .............................................................................................. 65 5.1.3 Outlook Folder Link .................................................................................................. 66 5.1.4 Recovering Emails - Forwarding options ................................................................... 70 5.1.5 Recovering Emails - Restore to Inbox (via EWS or IMAP) ........................................... 71 5.1.6 Message Summary ................................................................................................... 72 5.1.7 Search Results page size ........................................................................................... 73 5.1.8 Disclaimer Message .................................................................................................. 73 5.1.9 Header Links ............................................................................................................. 73
5.2 Outbound Email & Alerts .................................................................................................. 74 5.2.1 (Outbound) Mail Server ............................................................................................ 74 5.2.2 Email Domains .......................................................................................................... 75 5.2.3 Raise and Alert if no mail is processed ...................................................................... 76 5.2.4 Current User Email Address ...................................................................................... 76 5.2.5 Alert and Audit addresses ......................................................................................... 76
5.3 Data Guardians (and Identity Switching) ........................................................................... 79 5.3.1 Login Restriction Settings ......................................................................................... 79 5.3.2 Data Guardian settings ............................................................................................. 80 5.3.3 Identity Switching ..................................................................................................... 82
5.4 Local User Accounts ......................................................................................................... 84 5.4.1 Administrator user type ............................................................................................ 85 5.4.2 Privilege / Privilege & Delete User types ................................................................... 85 5.4.3 Basic User type ......................................................................................................... 86 5.4.4 Filtering the User List ................................................................................................ 88
5.5 Restore and Authentication.............................................................................................. 88 5.5.1 Authentication ......................................................................................................... 89 5.5.2 Restore ..................................................................................................................... 90
5.6 LDAP Servers .................................................................................................................... 90 5.6.1 Username and the Login process .............................................................................. 92 5.6.2 Constructing the User-ID from the Username ........................................................... 92 5.6.3 Using the Email Address as a Login Username .......................................................... 93
Cryoserver V9 Administration Guide 5 | P a g e
Contents
5.6.4 Restricting Users by Search DN’s (OU Groups) .......................................................... 94 5.6.5 Email Domains .......................................................................................................... 94 5.6.6 Other LDAP Settings – Fields and Patterns ................................................................ 95 5.6.7 Email Address Expansion .......................................................................................... 97 5.6.8 Disabling LDAP email-address expansion .................................................................. 98 5.6.9 LDAP Performance – Cache size ................................................................................ 98 5.6.10 LDAP Services: Disabling an LDAP Connection ........................................................... 99 5.6.11 Dual / Linked LDAP Servers ....................................................................................... 99 5.6.12 Testing LDAP & Address Lookups ............................................................................ 100
5.7 User Directory ................................................................................................................ 101 5.7.1 Adding Extra Addresses to an LDAP User Account ................................................... 102 5.7.2 Linking One Account to Another Account ............................................................... 104 5.7.3 Obtaining your Local Email Domains list ................................................................. 104 5.7.4 User Directory Search with Dual (linked) LDAP Connections ................................... 104
5.8 Mail Collector (IMAP or EWS) ......................................................................................... 105 5.9 SMTP Service (optional) ................................................................................................. 107
6 Advanced Configuration ........................................................................................................ 108
6.1 Single Sign On (SSO) ....................................................................................................... 108 6.2 NTP Configuration .......................................................................................................... 109 6.3 Web Server Certificate ................................................................................................... 110 6.4 Adv. Company Configuration .......................................................................................... 110 6.5 Retention Limit .............................................................................................................. 114 6.6 Reports Limits ................................................................................................................ 115 6.7 Case Folder Limits .......................................................................................................... 116 6.8 Global Settings ............................................................................................................... 117 6.9 Global SMTP Settings (optional) ..................................................................................... 122 6.10 Web Security Settings .................................................................................................... 122 6.11 System Alert Settings ..................................................................................................... 123 6.12 LDAP Search Attributes .................................................................................................. 126
6.12.1 Usage of LDAP Filters .............................................................................................. 126 6.13 Company Summary ........................................................................................................ 127 6.14 Date Formats ................................................................................................................. 128 6.15 IM Configuration ............................................................................................................ 130
6.15.1 Making IM Search options visible to End Users ....................................................... 132 7 Management Tasks ................................................................................................................ 133
7.1 Stopping & Restarting (Server and services) ................................................................... 133 7.1.1 Global Alert Message .............................................................................................. 133 7.1.2 Restart Cryoserver .................................................................................................. 133 7.1.3 Restart Cryoserver Appliance .................................................................................. 133 7.1.4 Restart WebServer ................................................................................................. 134 7.1.5 Restart Mail Collector ............................................................................................. 134 7.1.6 Restart SMTP Service (optional) .............................................................................. 134
7.2 Get System Logs ............................................................................................................. 134 7.3 WebService Manager (for Stubbing services).................................................................. 135
8 Storage Management ............................................................................................................ 136
9 Email Management ................................................................................................................ 137
9.1 Error Mail Manager ........................................................................................................ 137 9.2 Exclusion Rule Manager ................................................................................................. 139 9.3 Import Mail Manager ..................................................................................................... 139 9.4 Folder Management ....................................................................................................... 140
10 Mailbox Reader ..................................................................................................................... 141
Cryoserver V9 Administration Guide 6 | P a g e
Contents
10.1 Mailbox Reader Connections .......................................................................................... 141 10.1.1 Mailbox Reader Connection settings ....................................................................... 142 10.1.2 Advanced Connection settings ................................................................................ 144 10.1.3 Connection Settings for on premise Exchange ........................................................ 145 10.1.4 Connection settings for Office365 ........................................................................... 145 10.1.5 Connection Settings for GMAIL ............................................................................... 145 10.1.6 Connection settings for Hotmail / Live mail............................................................. 146
10.2 Mailbox Reader - User Accounts ..................................................................................... 146 10.2.1 Creating a User Account entry ................................................................................ 146 10.2.2 Adding users from LDAP ......................................................................................... 147 10.2.3 Testing & Starting Collection Downloading ............................................................. 148 10.2.4 Mailbox Reader Option Buttons .............................................................................. 149 10.2.5 Mailbox Reader – Grid of User Accounts ................................................................. 150 10.2.6 User Account - Download Counts & Statistics ......................................................... 152 10.2.7 Monitor Page - Reader Summary ............................................................................ 153
Impersonation & Throttling ....................................................................................................... 153 10.2.8 Testing EWS............................................................................................................ 154
11 Folder Replication .................................................................................................................. 156
11.1 Connection Settings ....................................................................................................... 157 11.2 Folder Replication – User Configuration ......................................................................... 158 11.3 Public Folder Replication ................................................................................................ 159
12 Business Continuity................................................................................................................ 161
13 Support Engineer tasks .......................................................................................................... 163
13.1 SMTP mail server (IIS or Postfix) ..................................................................................... 163 13.1.1 SMTP ‘Sniffer’ ......................................................................................................... 163
13.2 Disk Management .......................................................................................................... 163 13.3 IP Address changes......................................................................................................... 163 13.4 Switching to Disaster Recovery Mode............................................................................. 163
14 Troubleshooting .................................................................................................................... 164
14.1 Login Failures ................................................................................................................. 164 14.2 General Error screen ...................................................................................................... 164 14.3 Please Wait panel shows for considerable time .............................................................. 164 14.4 Alerts / Forward to Inbox not being sent ........................................................................ 165
15 Conclusion ............................................................................................................................. 166
List of Figures Figure 1 - The standard Login page ................................................................................................. 32 Figure 2 - The ‘unknown tenant’ Login page..................................................................................... 32 Figure 3 - The "Outlook" User Search Interface ................................................................................ 34 Figure 4 - Example email headers ................................................................................................... 37 Figure 5 – An example Envelope Wrapped Email ............................................................................ 38 Figure 6 - A delivery report .............................................................................................................. 38 Figure 7 - Deduplication options in Cryoserver ................................................................................. 46 Figure 8 – Mailbox Reader deduplication settings (for Legacy Import) .............................................. 47 Figure 9 - Example of a Stubbed Email ............................................................................................ 50 Figure 10 - Creating a Self-Signed Certificate .................................................................................. 53 Figure 11 - Selecting Cryoserver files in Backup Exec...................................................................... 60 Figure 12 - Halting & Resume Cryoserver in BackupExec ................................................................ 61 Figure 14 - Login Remember-Me and Outlook Folder Links administrator options ............................ 66 Figure 15 - The Outlook Folder Link on the Login Page, if enabled. .................................................. 66 Figure 16 - The Save Search Outlook Folder Link ............................................................................ 67

Cryoserver V9 Administration Guide 7 | P a g e
Contents
Figure 17 - Forwarding Options ....................................................................................................... 70 Figure 17 - Action Icons & the hover-over action text ....................................................................... 70 Figure 18 - Forward to Inbox, showing the default message text ...................................................... 71 Figure 19 - In-line forwarded email, showing default Message Text .................................................. 71 Figure 20 - Message Summary Options ........................................................................................... 72 Figure 21 - No message summary ................................................................................................... 72 Figure 22 – Example of 600 character message summary ............................................................... 72 Figure 23 - Outbound Email and Alerts ............................................................................................ 74 Figure 23 - Using the Identity Switch feature .................................................................................... 83 Figure 24 - Identity switch links on the Primary Email address.......................................................... 84 Figure 25 - Adding a Basic User ...................................................................................................... 87 Figure 26 - A folder with share capabilities ....................................................................................... 87 Figure 28 - What the user will see if "Enable Sample Search" is selected ......................................... 87 Figure 28 - Restore and Authentication ............................................................................................ 89 Figure 27 - Additional LDAP configuration options............................................................................ 95 Figure 28 - Adding a Mail Collector connection .............................................................................. 105 Figure 29 - Enabling Single Sign On (SSO).................................................................................... 108 Figure 30 - NTP Configuration ....................................................................................................... 109 Figure 31 - The Adv. Company Config page .................................................................................. 110 Figure 32 - Reports - the threshold date ......................................................................................... 115 Figure 33 - Web Security Settings .................................................................................................. 123 Figure 34 - LDAP Search Attributes ............................................................................................... 126 Figure 35 - Company Summary ..................................................................................................... 127 Figure 36 - Management - Get System Logs .................................................................................. 134 Figure 37 – Cryoserver’s WebService response if it is correctly deployed ....................................... 135 Figure 38 - Error Email Manager .................................................................................................... 138 Figure 39 - Adding an Exclusion Rule ............................................................................................ 139 Figure 40 - Import Mail Manager .................................................................................................... 140 Figure 41 - Creating a Mailbox Reader connection ......................................................................... 142
Cryoserver V9 Administration Guide 8 | P a g e
Introduction
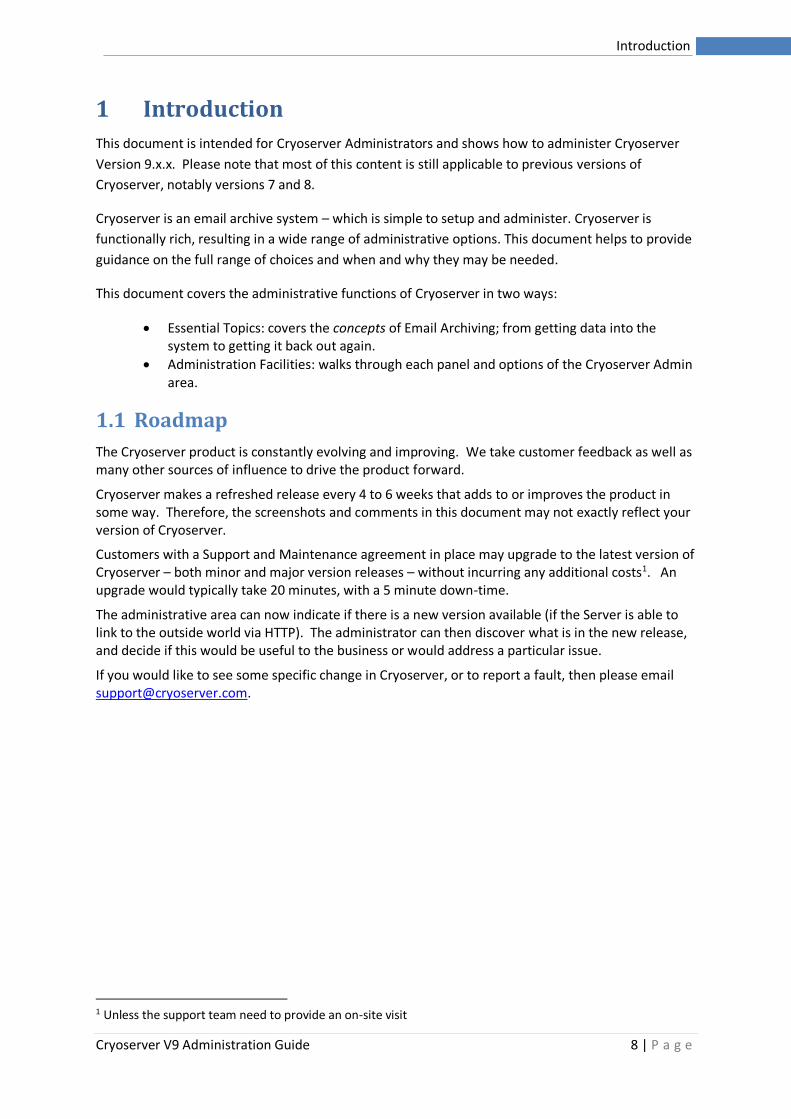
1 Introduction
This document is intended for Cryoserver Administrators and shows how to administer Cryoserver
Version 9.x.x. Please note that most of this content is still applicable to previous versions of
Cryoserver, notably versions 7 and 8.
Cryoserver is an email archive system – which is simple to setup and administer. Cryoserver is
functionally rich, resulting in a wide range of administrative options. This document helps to provide
guidance on the full range of choices and when and why they may be needed.
This document covers the administrative functions of Cryoserver in two ways:
• Essential Topics: covers the concepts of Email Archiving; from getting data into the system to getting it back out again.
• Administration Facilities: walks through each panel and options of the Cryoserver Admin area.
1.1 Roadmap
The Cryoserver product is constantly evolving and improving. We take customer feedback as well as many other sources of influence to drive the product forward.
Cryoserver makes a refreshed release every 4 to 6 weeks that adds to or improves the product in some way. Therefore, the screenshots and comments in this document may not exactly reflect your version of Cryoserver.
Customers with a Support and Maintenance agreement in place may upgrade to the latest version of Cryoserver – both minor and major version releases – without incurring any additional costs1. An upgrade would typically take 20 minutes, with a 5 minute down-time.
The administrative area can now indicate if there is a new version available (if the Server is able to link to the outside world via HTTP). The administrator can then discover what is in the new release, and decide if this would be useful to the business or would address a particular issue.
If you would like to see some specific change in Cryoserver, or to report a fault, then please email [email protected].
1 Unless the support team need to provide an on-site visit
Cryoserver V9 Administration Guide 9 | P a g e
Revision History
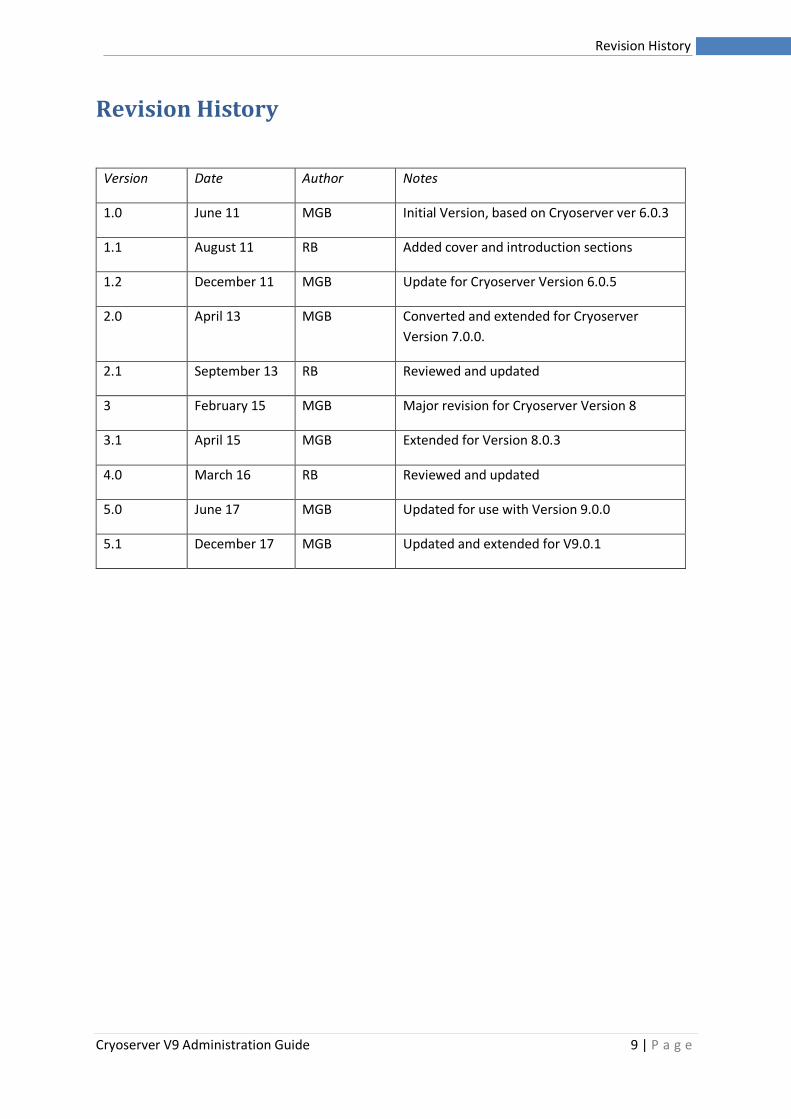
Revision History
Version Date Author Notes
1.0 June 11 MGB Initial Version, based on Cryoserver ver 6.0.3
1.1 August 11 RB Added cover and introduction sections
1.2 December 11 MGB Update for Cryoserver Version 6.0.5
2.0 April 13 MGB Converted and extended for Cryoserver
Version 7.0.0.
2.1 September 13 RB Reviewed and updated
3 February 15 MGB Major revision for Cryoserver Version 8
3.1 April 15 MGB Extended for Version 8.0.3
4.0 March 16 RB Reviewed and updated
5.0 June 17 MGB Updated for use with Version 9.0.0
5.1 December 17 MGB Updated and extended for V9.0.1
Cryoserver V9 Administration Guide 10 | P a g e
Welcome to Cryoserver
2 Welcome to Cryoserver
Cryoserver is a system that can store vast quantities of email or IM transcripts (completed Instant
Message conversations). It indexes the content of each item and attachment data so that these
items can be searched and displayed quickly and efficiently. This guide focusses on the
administrative side of Cryoserver.
The administrator(s) of a Cryoserver system has a number of tasks to perform in order to:
• Appropriately install and configure the system
• Setup the data feeds that will fill the system with data
• To provide access to this data to users
• To manage and monitor the system over time
The emails and IM data to archive into Cryoserver can be delivered in a variety of methods:
• New mail, Journaled2 from a Mail Server (e.g. Exchange/Lotus Notes)
• Sent over SMTP or Collected from a mailbox using POP3, IMAP or EWS
• Existing mails, extracted from various sources – such as PST or read from user mailboxes
Cryoserver can be accessed in a variety of ways and for a number purposes.
Throughout this document, we refer to different types of user. Cryoserver supports a small set of
user types, though each type can have quite a variety of capabilities that the administrator can allow
or deny or restrict – either to all users or to just selected accounts.
Administrators cannot search or view the archive data. However, this account is used to create or
configure the other users of the system; as well as nearly all other configurational aspects.
This document describes the full set of actions that an Administrator should be able to perform.
Some administrators (typically on a “cloud” or multi-tenant system) will only have restricted access
and will not see all of the features described here.
Basic / Active Directory (LDAP) Users can, by default, search only their own emails.
Please note that Single Sign On [SSO] using ADFS / SAML is supported, resulting in a Basic User
account type.
There are many ways to extend or restrict the scope of a Basic User, as described in later sections.
Privileged Users can search across the whole repository, unless restricted by a searchable domain.
Privilege and Delete Users are privileged uses who can authorise an audited deletion of archived
data. The search query that contains the set of data to remove must be prepared by a different
2 Journaling is a very reliable way to get all currently flowing mail into an archive. However, there are times – typically with multiple Email Exchanges or when one is added – when a portion of mail is NOT journaled. This will result in incomplete data in Cryoserver, and is not easy to detect in an automated way.
Cryoserver V9 Administration Guide 11 | P a g e
Welcome to Cryoserver
privileged user. Please Note that this special user type is only provided on application, and is
normally disabled.
Data Guardians are simply email addresses to which ‘transcripts’ are sent. A transcript is a summary
of actions taken by administrative and privileged users. Some ‘basic’ users may also raise audit
transcripts – as described in the Local Accounts (see section 5.4 below). And a data guardian that
reviews the emails of a search transcript will also be audited.
A data guardian does not have a special login account. When the user logs in with their Active
Directory (LDAP) or local basic user account – and their primary email address matches one of the
Data Guardians, then that user will see extra menu options specifically for data guardians (e.g.
Transcript Search, as described in the Cryoserver user guide).
2.1 Types of Cryoserver systems
Cryoserver may be installed as either a single company system; or as a multi-tenant system capable
of hosting several companies’ data.
Cryoserver can also work as a single standalone server, or be spanned over multiple servers (a
distributed configuration) or as a paired “Primary – Mirror” system.
This document describes the Administration of a single company system and the master company
of a Multi-Tenant server.
2.1.1 Multi-Tenant Cryoserver
The words “Tenant”, “Company” and “Customer” in this administration guide are used to mean the
same thing in the context of Cryoserver. A typical on premise Cryoserver system is designed to
support a single tenant - the company that purchased the product. However, it is possible to
provision a multi-tenant Cryoserver that will support completely separate email archives of more
than one company.
A multi-tenant Cryoserver can be used to:
• Separately contain email data from different business units for the same parent company or
group. A “Super Privileged” user type can search across multiple ‘companies’.
• Be used as a “Cloud Cryoserver Service” which will host data for a number of remote,
unconnected customers.
A standard cryoserver system can support up to about 250 separate companies.
• A special Cryoserver edition will be available later in 2017 to support many thousands of
companies.
Every Multi-Tenant system will have a “master” company – typically the first company in that
system. An administrator of the master company will access the full set of administration menus and
facilities that are documented in this guide.
For Multi-Tenant servers, there are additional administrative user types – required to add,
administrate and control the tenants. These are not documented here:
Cryoserver V9 Administration Guide 12 | P a g e
Welcome to Cryoserver
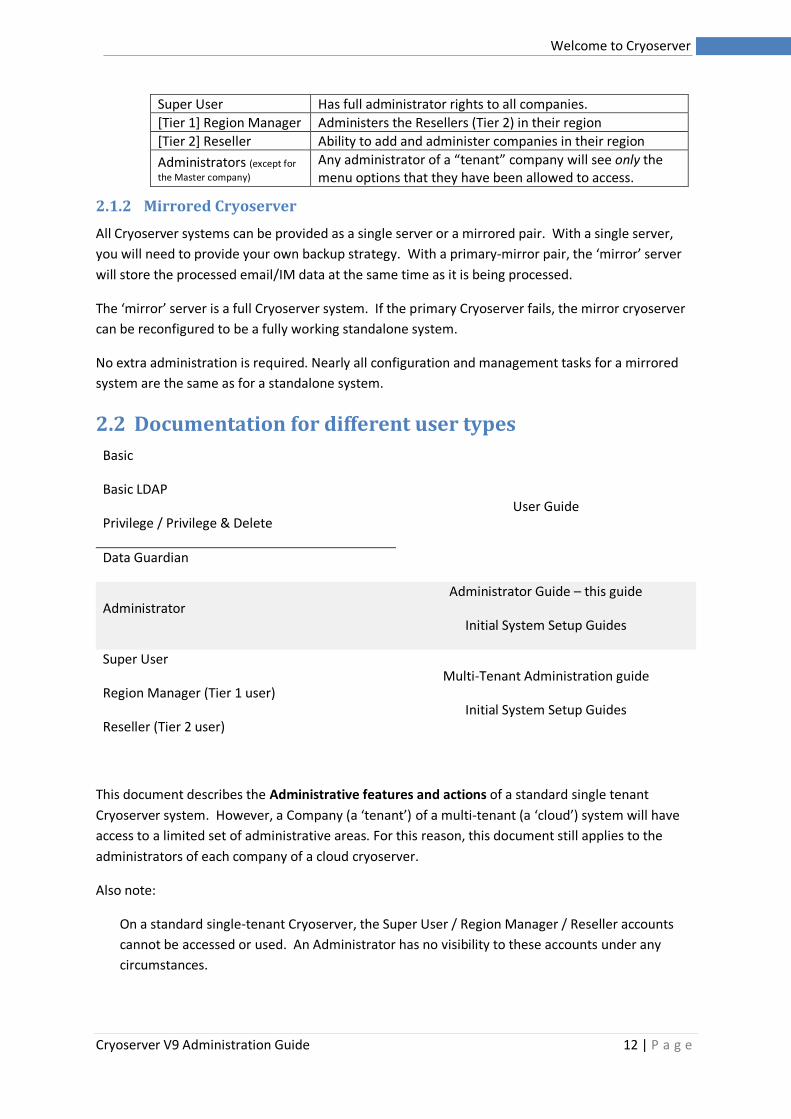
Super User Has full administrator rights to all companies.
[Tier 1] Region Manager Administers the Resellers (Tier 2) in their region
[Tier 2] Reseller Ability to add and administer companies in their region
Administrators (except for
the Master company) Any administrator of a “tenant” company will see only the menu options that they have been allowed to access.
2.1.2 Mirrored Cryoserver
All Cryoserver systems can be provided as a single server or a mirrored pair. With a single server,
you will need to provide your own backup strategy. With a primary-mirror pair, the ‘mirror’ server
will store the processed email/IM data at the same time as it is being processed.
The ‘mirror’ server is a full Cryoserver system. If the primary Cryoserver fails, the mirror cryoserver
can be reconfigured to be a fully working standalone system.
No extra administration is required. Nearly all configuration and management tasks for a mirrored
system are the same as for a standalone system.
2.2 Documentation for different user types
Basic
User Guide Basic LDAP
Privilege / Privilege & Delete
Data Guardian
Administrator Administrator Guide – this guide
Initial System Setup Guides
Super User Multi-Tenant Administration guide
Initial System Setup Guides Region Manager (Tier 1 user)
Reseller (Tier 2 user)
This document describes the Administrative features and actions of a standard single tenant
Cryoserver system. However, a Company (a ‘tenant’) of a multi-tenant (a ‘cloud’) system will have
access to a limited set of administrative areas. For this reason, this document still applies to the
administrators of each company of a cloud cryoserver.
Also note:
On a standard single-tenant Cryoserver, the Super User / Region Manager / Reseller accounts
cannot be accessed or used. An Administrator has no visibility to these accounts under any
circumstances.
Cryoserver V9 Administration Guide 13 | P a g e
Welcome to Cryoserver
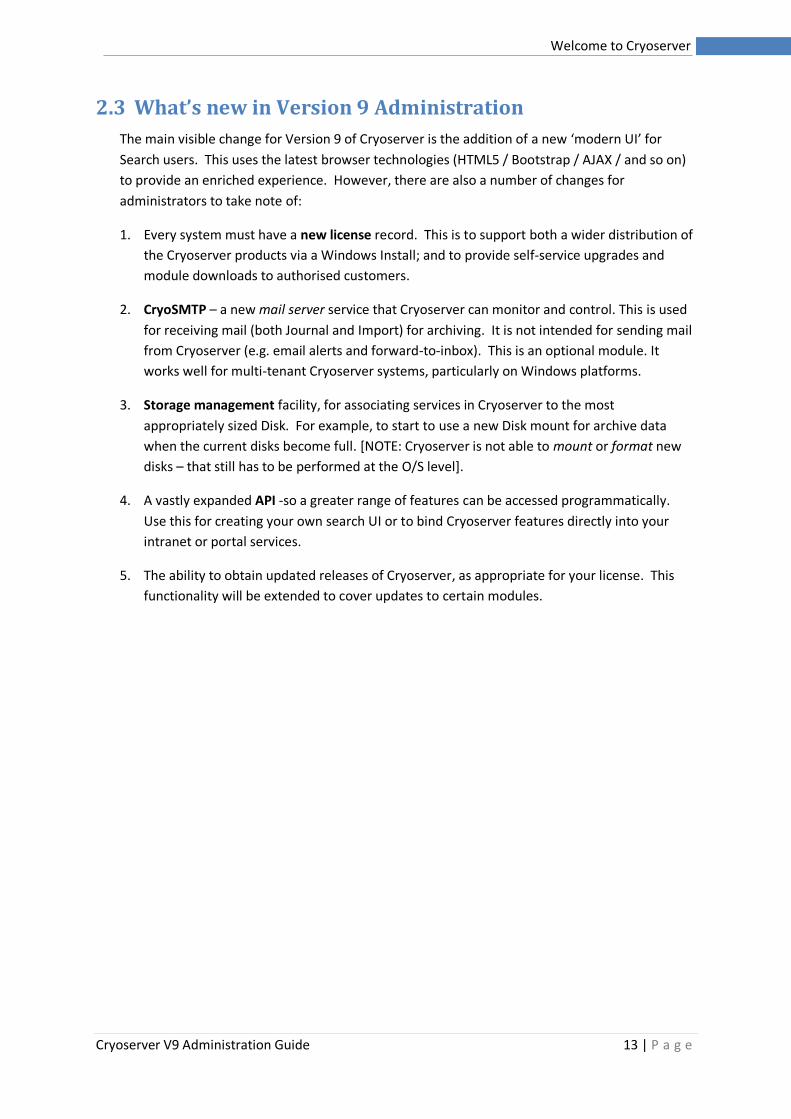
2.3 What’s new in Version 9 Administration
The main visible change for Version 9 of Cryoserver is the addition of a new ‘modern UI’ for
Search users. This uses the latest browser technologies (HTML5 / Bootstrap / AJAX / and so on)
to provide an enriched experience. However, there are also a number of changes for
administrators to take note of:
1. Every system must have a new license record. This is to support both a wider distribution of
the Cryoserver products via a Windows Install; and to provide self-service upgrades and
module downloads to authorised customers.
2. CryoSMTP – a new mail server service that Cryoserver can monitor and control. This is used
for receiving mail (both Journal and Import) for archiving. It is not intended for sending mail
from Cryoserver (e.g. email alerts and forward-to-inbox). This is an optional module. It
works well for multi-tenant Cryoserver systems, particularly on Windows platforms.
3. Storage management facility, for associating services in Cryoserver to the most
appropriately sized Disk. For example, to start to use a new Disk mount for archive data
when the current disks become full. [NOTE: Cryoserver is not able to mount or format new
disks – that still has to be performed at the O/S level].
4. A vastly expanded API -so a greater range of features can be accessed programmatically.
Use this for creating your own search UI or to bind Cryoserver features directly into your
intranet or portal services.
5. The ability to obtain updated releases of Cryoserver, as appropriate for your license. This
functionality will be extended to cover updates to certain modules.
Cryoserver V9 Administration Guide 14 | P a g e
Getting Started
3 Getting Started
This part of the documentation will briefly run through the process needed to establish a Cryoserver
system.
3.1 Installing
Cryoserver can be provided as in a wide variety of formats, depending on your needs and budget.
The initial installation process will vary depending on you chosen format, after which the Cryoserver
configuration should be similar for all installation types.
In general, we request new customers to complete a Questionnaire. The aim is to provide some key
details that will be needed to assist during the initial install and setup – like IP addresses or the
company and contact details and the names and email addresses of administrators and data
guardians. It will also indicate the type of email server that you have and if any importation tasks
are required.
Install type Installation Process Setup Process
Software Cryoserver Support will install the software on your hardware and provide setup guidance.
After install, this guide can be used for a standard single-company setup. For a multi-tenant system or any re-branding, some additional support would be required.
VM Image or Hyper-V image
Request a Trial via our website or from one of our resellers. Complete a questionnaire. Instructions will be provided on how to download and install the VM Image, set IP addresses and get started.
After install, follow the VM image setup guide. Additional information for all aspects of Cryoserver will be found in this guide.
Windows Install Windows installers are being developed for Version 9. Unlike a typical Linux (or VM) install, you will have full access to the O/S – so IP address and disk allocations will be set up without special support requirements.
After installing, follow the guidance set out here.
Upgrade / Update an existing Cryoserver
Cryoserver Support or authorised resellers will need to update your system to Version 9.
If you are updating from any previous version of Cryoserver to Version 9, then you will need to complete the License Setup Wizard. After this no further setup is required – but you may wish to make use of some of the new modules – such as CryoSMTP service.
A tenant on a Cloud Cryoserver system
There is no Install as such. The customer should complete a “cloud customer questionnaire”.
The Cloud provider will add the new Company to their Cryoserver following the Multi-Tenant setup guide.
Cryoserver V9 Administration Guide 15 | P a g e
Getting Started
Administrative tasks for that Company are detailed in this guide, but many of the options may not be available to the customer unless the Cloud provider allows it.
After installing Cryoserver, you may need to follow any provided instructions for your chosen
platform to set the Hostname and IP address, set up DNS entries and add any extra disk allocations.
After this, you may start to access the Cryoserver system. At this point the first thing to complete is
the Setup and License Wizard.
We strongly recommend that you create a suitable DNS name for the Cryoserver system, that will be
used as the Web address for users to access it.
Now you can browse to the cryoserver system – just enter the IP Address or Server Hostname or DNS
Name into a Browser. The first time of using Cryoserver Version 9 you will be presented with the
Setup Wizard.
3.2 Setup / Licensing your Cryoserver
From Version 9, all Cryoserver systems will need to be formally licensed. This will help when
providing support and guidance – and will enable self-help features such as obtaining Upgrade
packages and apps / modules.
The single license is associated with a Cryoserver ‘instance’, which could be any of:
• A single standalone Cryoserver
• A Primary – Mirror pair
• A distributed set of servers controlled by a single ‘primary’ Cryoserver.
• Any of the above, when set in Multi-Tenant mode.
Every new Cryoserver system will default to run in “TRIAL” mode, if no other license has been
provided. This will allow for 30 days usage for all modules. After that they would need to arrange
an extension to the trial period, or to raise a purchase order to convert the license into a full license.
Every existing Cryoserver system that is to be upgraded to Version 9 will need a license to be set up
before the upgrade process.
The resellers and distributors of cryoserver will have access to the Licence allocation system, and
should be able to provide customers with the appropriate license keys.
3.2.1 Setup / Licensing a New Cryoserver
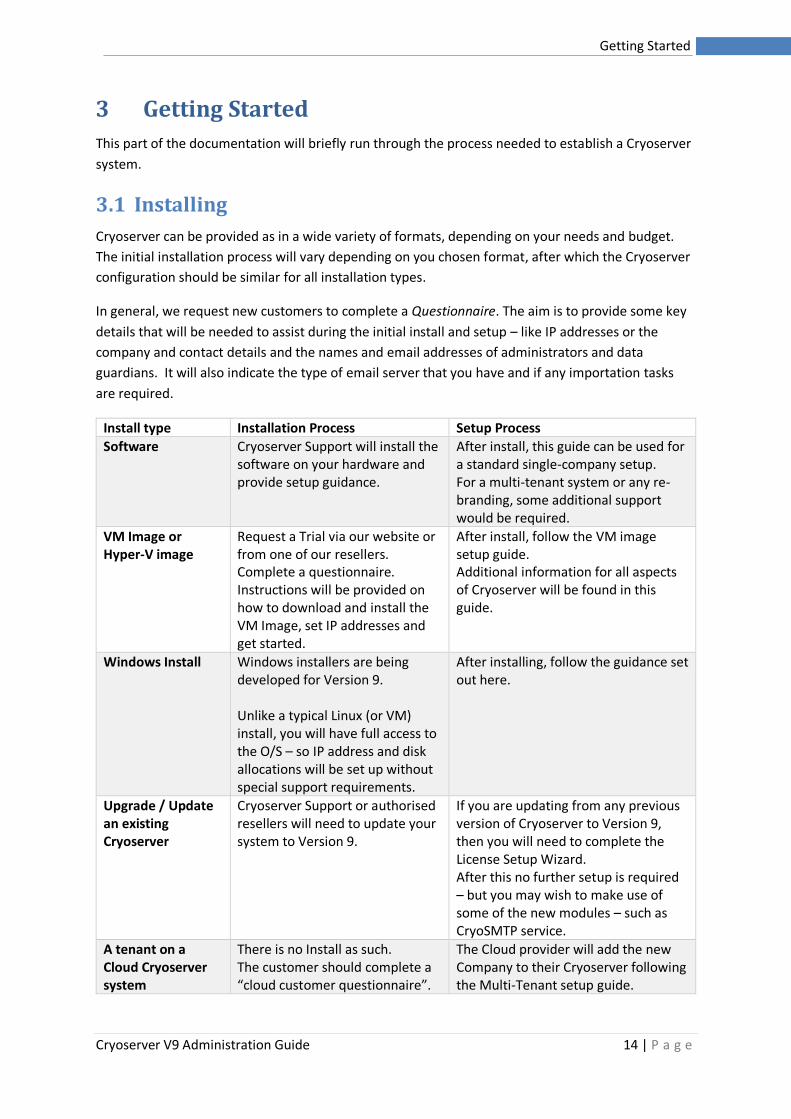
A newly installed Cryoserver system will provide a setup wizard to guide you through the
initialisation of key settings.
Cryoserver V9 Administration Guide 16 | P a g e
Getting Started
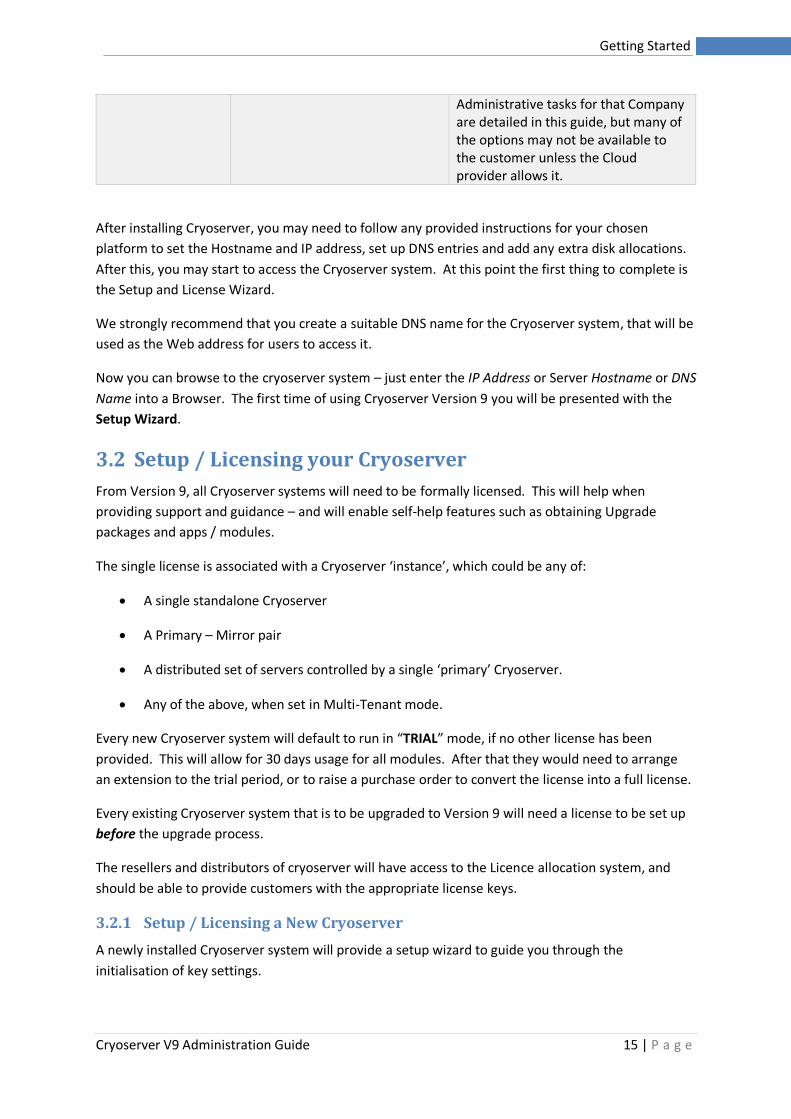
You will be asked to provide your Details – for the License.
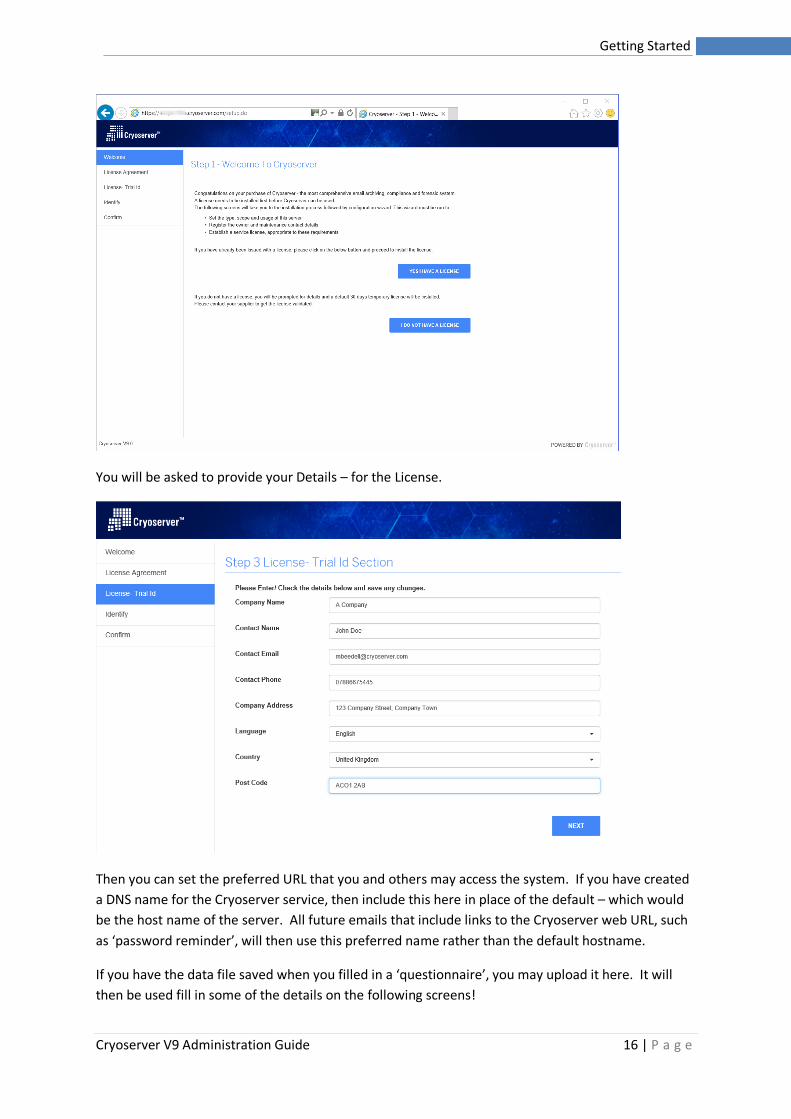
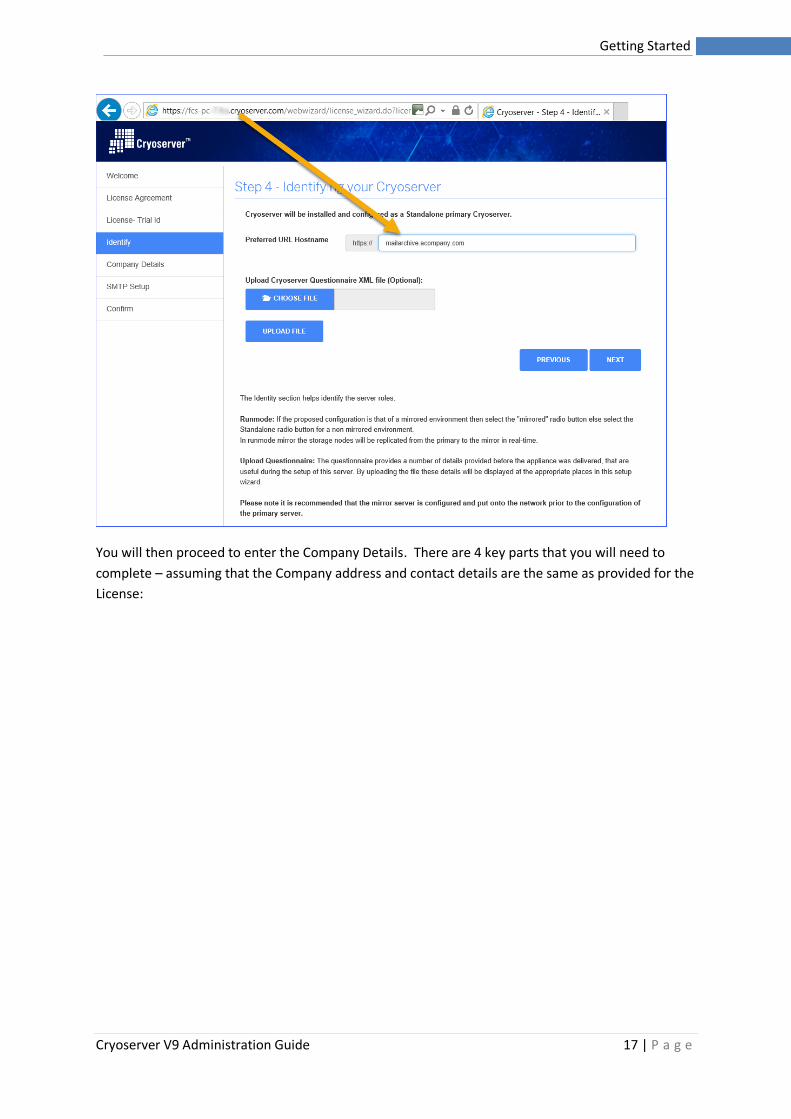
Then you can set the preferred URL that you and others may access the system. If you have created
a DNS name for the Cryoserver service, then include this here in place of the default – which would
be the host name of the server. All future emails that include links to the Cryoserver web URL, such
as ‘password reminder’, will then use this preferred name rather than the default hostname.
If you have the data file saved when you filled in a ‘questionnaire’, you may upload it here. It will
then be used fill in some of the details on the following screens!
Cryoserver V9 Administration Guide 17 | P a g e
Getting Started
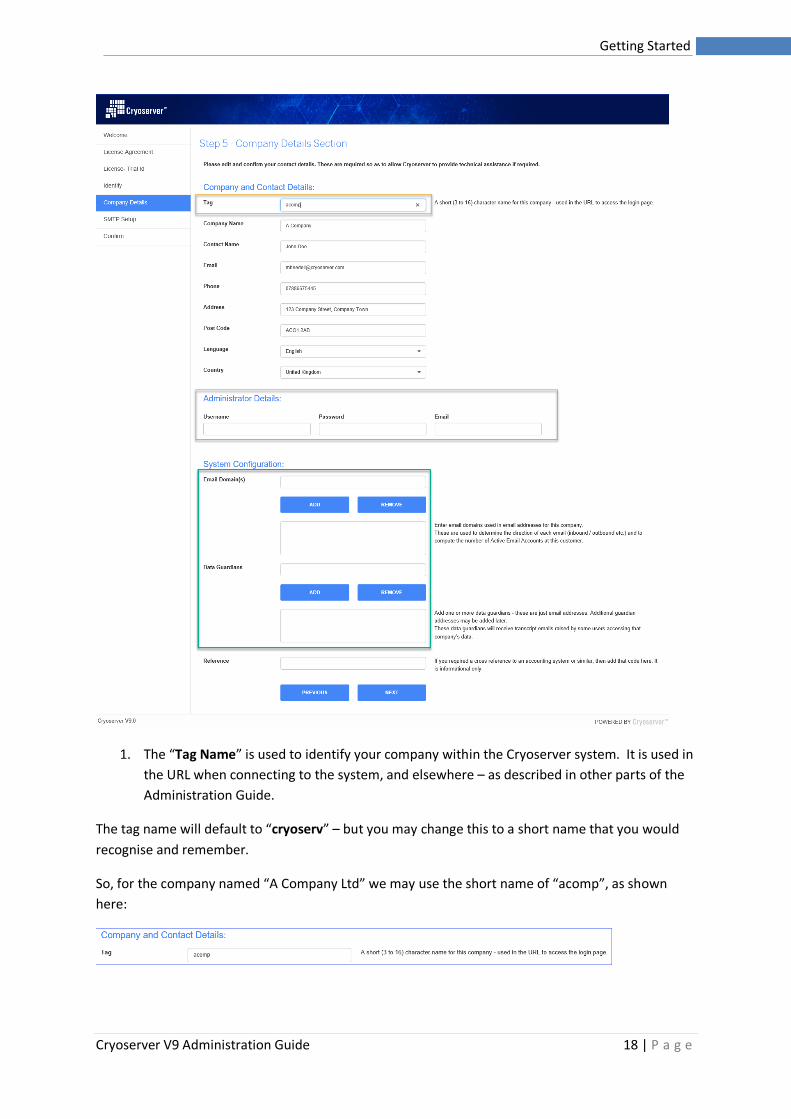
You will then proceed to enter the Company Details. There are 4 key parts that you will need to
complete – assuming that the Company address and contact details are the same as provided for the
License:
Cryoserver V9 Administration Guide 18 | P a g e
Getting Started
1. The “Tag Name” is used to identify your company within the Cryoserver system. It is used in
the URL when connecting to the system, and elsewhere – as described in other parts of the
Administration Guide.
The tag name will default to “cryoserv” – but you may change this to a short name that you would
recognise and remember.
So, for the company named “A Company Ltd” we may use the short name of “acomp”, as shown
here:
Cryoserver V9 Administration Guide 19 | P a g e
Getting Started
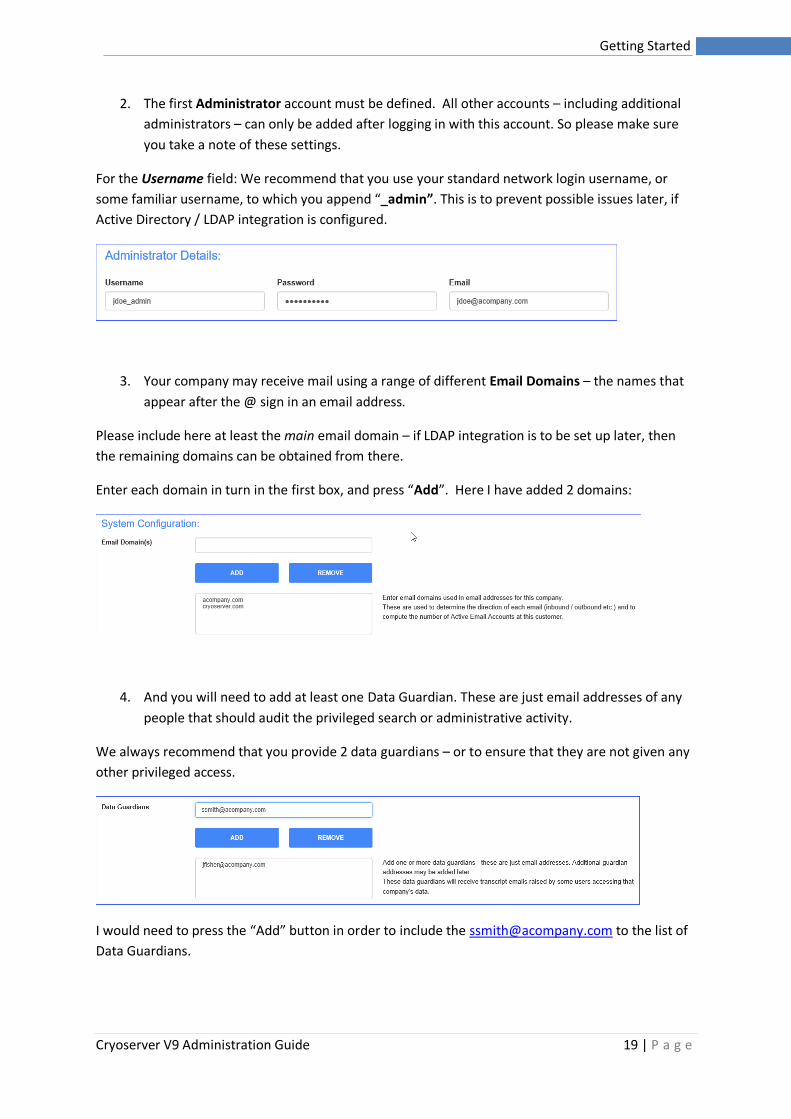
2. The first Administrator account must be defined. All other accounts – including additional
administrators – can only be added after logging in with this account. So please make sure
you take a note of these settings.
For the Username field: We recommend that you use your standard network login username, or
some familiar username, to which you append “_admin”. This is to prevent possible issues later, if
Active Directory / LDAP integration is configured.
3. Your company may receive mail using a range of different Email Domains – the names that
appear after the @ sign in an email address.
Please include here at least the main email domain – if LDAP integration is to be set up later, then
the remaining domains can be obtained from there.
Enter each domain in turn in the first box, and press “Add”. Here I have added 2 domains:
4. And you will need to add at least one Data Guardian. These are just email addresses of any
people that should audit the privileged search or administrative activity.
We always recommend that you provide 2 data guardians – or to ensure that they are not given any
other privileged access.
I would need to press the “Add” button in order to include the [email protected] to the list of
Data Guardians.
Cryoserver V9 Administration Guide 20 | P a g e
Getting Started
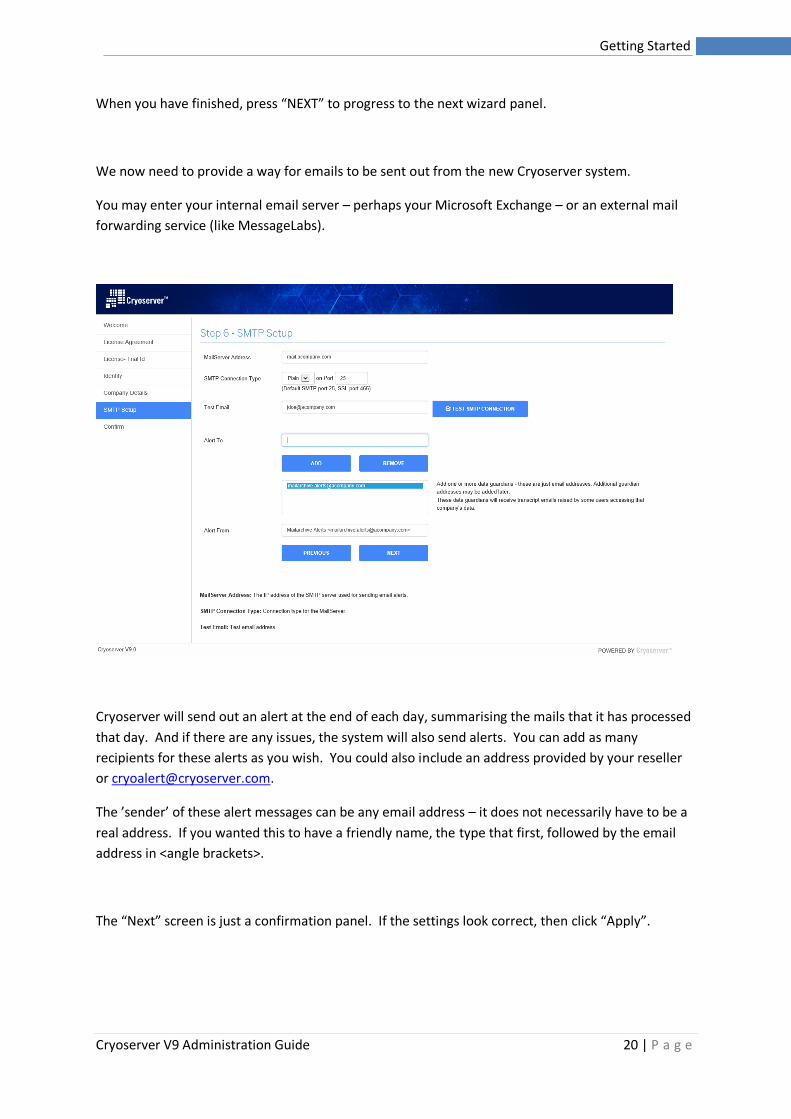
When you have finished, press “NEXT” to progress to the next wizard panel.
We now need to provide a way for emails to be sent out from the new Cryoserver system.
You may enter your internal email server – perhaps your Microsoft Exchange – or an external mail
forwarding service (like MessageLabs).
Cryoserver will send out an alert at the end of each day, summarising the mails that it has processed
that day. And if there are any issues, the system will also send alerts. You can add as many
recipients for these alerts as you wish. You could also include an address provided by your reseller
The ’sender’ of these alert messages can be any email address – it does not necessarily have to be a
real address. If you wanted this to have a friendly name, the type that first, followed by the email
address in <angle brackets>.
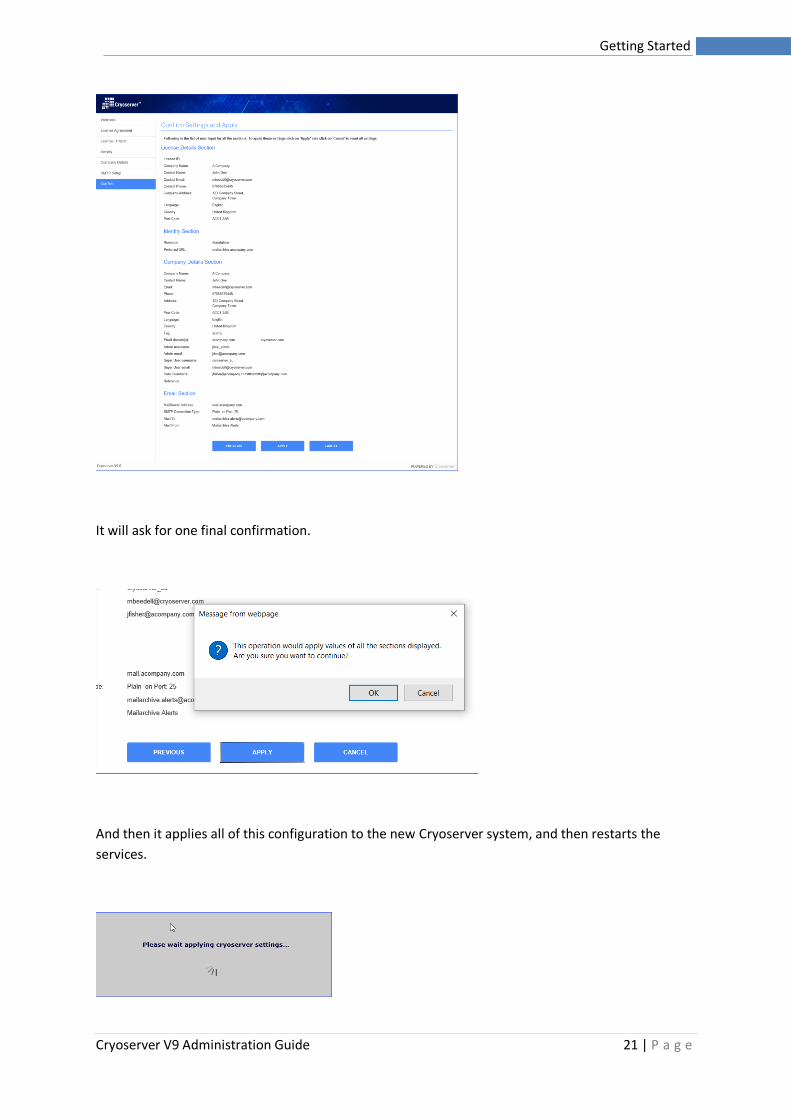
The “Next” screen is just a confirmation panel. If the settings look correct, then click “Apply”.
Cryoserver V9 Administration Guide 21 | P a g e
Getting Started
It will ask for one final confirmation.
And then it applies all of this configuration to the new Cryoserver system, and then restarts the
services.
Cryoserver V9 Administration Guide 22 | P a g e
Getting Started
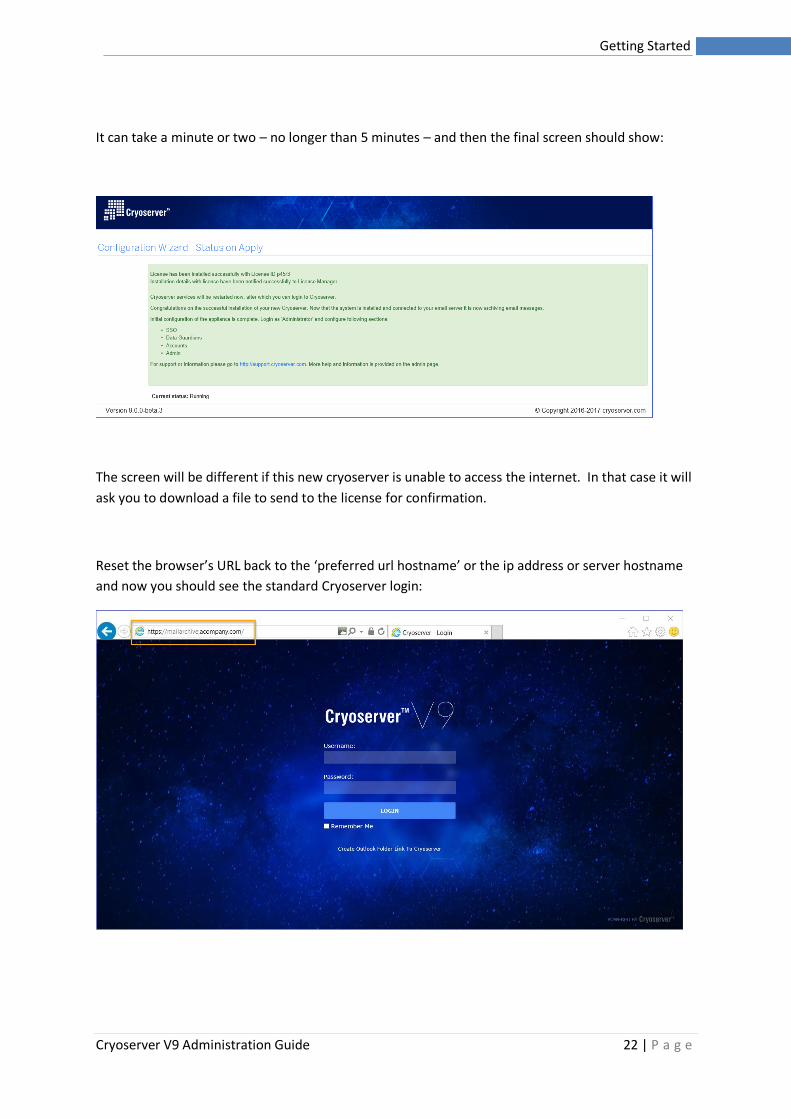
It can take a minute or two – no longer than 5 minutes – and then the final screen should show:
The screen will be different if this new cryoserver is unable to access the internet. In that case it will
ask you to download a file to send to the license for confirmation.
Reset the browser’s URL back to the ‘preferred url hostname’ or the ip address or server hostname
and now you should see the standard Cryoserver login:
Cryoserver V9 Administration Guide 23 | P a g e
Getting Started
You will now need to log in using the administrative Username and Password that you entered in the
Setup Wizard. The default administrator login, as documented in the Administrators Guide will not
be available.
The system will now be in “Trial Mode” and useable for 30 days – unless you have obtained a license
with different limits and applied this at the start of the Setup Wizard.
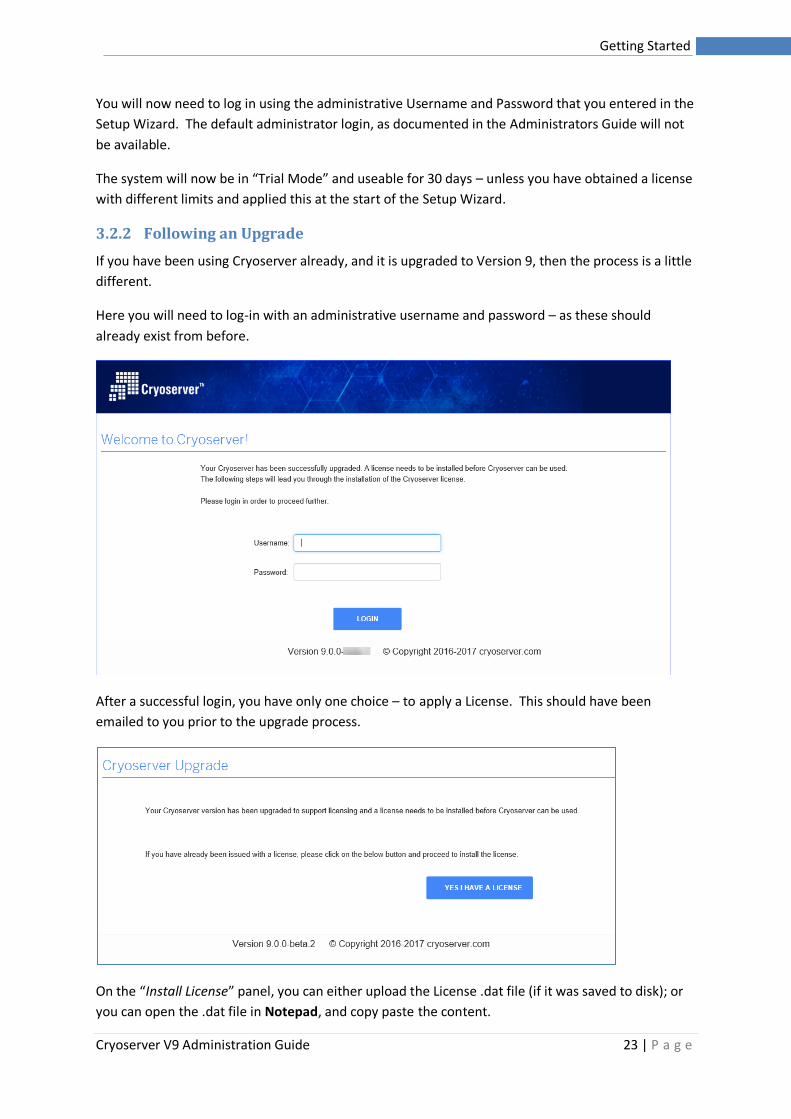
3.2.2 Following an Upgrade
If you have been using Cryoserver already, and it is upgraded to Version 9, then the process is a little
different.
Here you will need to log-in with an administrative username and password – as these should
already exist from before.
After a successful login, you have only one choice – to apply a License. This should have been
emailed to you prior to the upgrade process.
On the “Install License” panel, you can either upload the License .dat file (if it was saved to disk); or
you can open the .dat file in Notepad, and copy paste the content.
Cryoserver V9 Administration Guide 24 | P a g e
Getting Started
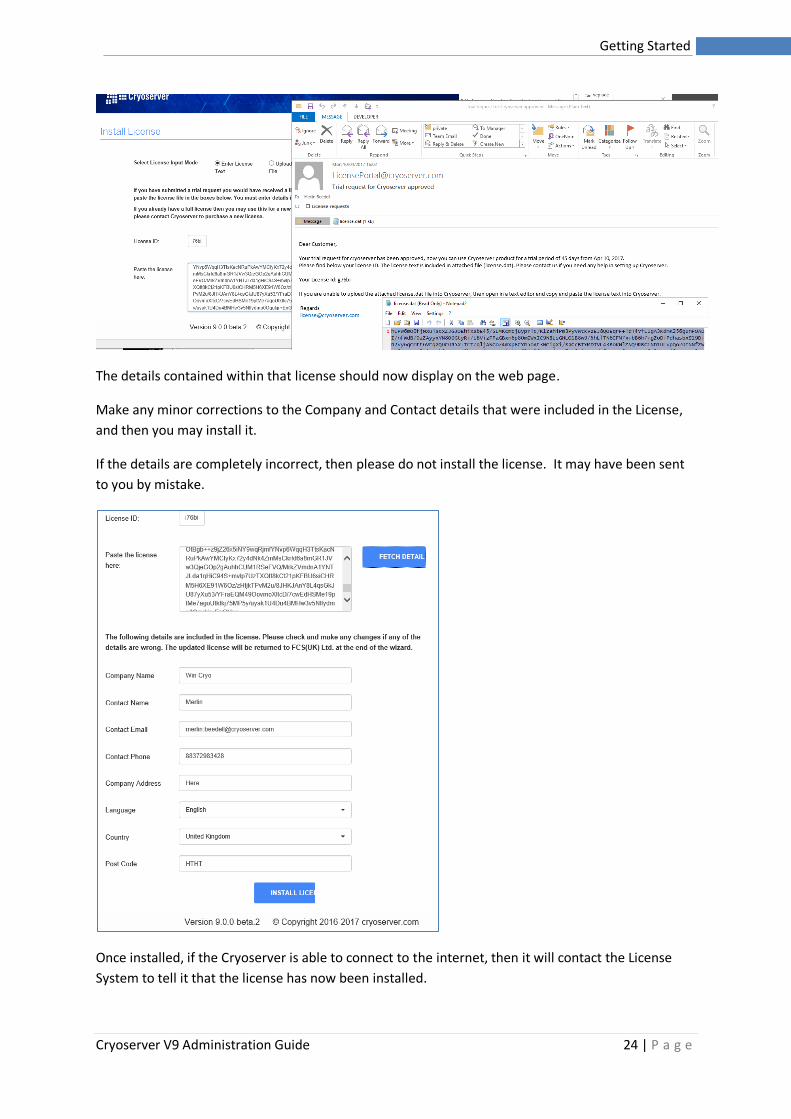
The details contained within that license should now display on the web page.
Make any minor corrections to the Company and Contact details that were included in the License,
and then you may install it.
If the details are completely incorrect, then please do not install the license. It may have been sent
to you by mistake.
Once installed, if the Cryoserver is able to connect to the internet, then it will contact the License
System to tell it that the license has now been installed.
Cryoserver V9 Administration Guide 25 | P a g e
Getting Started
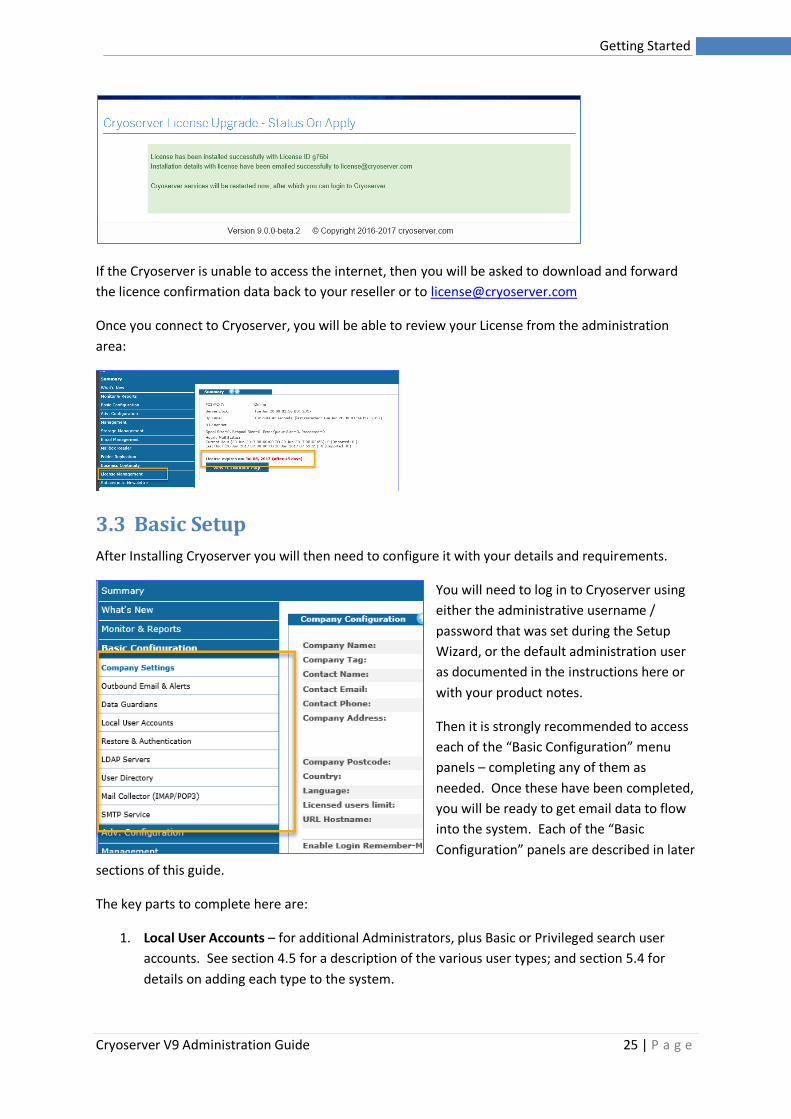
If the Cryoserver is unable to access the internet, then you will be asked to download and forward
the licence confirmation data back to your reseller or to [email protected]
Once you connect to Cryoserver, you will be able to review your License from the administration
area:
3.3 Basic Setup
After Installing Cryoserver you will then need to configure it with your details and requirements.
You will need to log in to Cryoserver using
either the administrative username /
password that was set during the Setup
Wizard, or the default administration user
as documented in the instructions here or
with your product notes.
Then it is strongly recommended to access
each of the “Basic Configuration” menu
panels – completing any of them as
needed. Once these have been completed,
you will be ready to get email data to flow
into the system. Each of the “Basic
Configuration” panels are described in later
sections of this guide.
The key parts to complete here are:
1. Local User Accounts – for additional Administrators, plus Basic or Privileged search user
accounts. See section 4.5 for a description of the various user types; and section 5.4 for
details on adding each type to the system.
Cryoserver V9 Administration Guide 26 | P a g e
Getting Started
2. LDAP Connection – if the Cryoserver can access your Active Directory or eDirectory or
Domino LDAP service, then it can be used for a range of useful purposes – but mostly to
allow your staff to log in to view their own emails.
Please refer to later sections of this guide that detail each of the Basic Configuration panels.
3.4 Current Mail - Journaling
Getting mail into Cryoserver is the next main step. “Journaling” is the common term for taking a
copy of new mail being received or sent from an organisation. Microsoft Exchange / Office 365 have
very good facilities for Journaling; and Lotus Notes have a similar system. Many other mail servers
have a journaling type facility too. And for others, like Gmail or Hotmail, Cryoserver can use facilities
like the “Mailbox Reader” in a polling mode to extract recent emails.
Please review section 4.2 - Mail Journaling for full details on the setup of Journaling for a variety of
mail servers. Here is a short summary
3.4.1 Exchange 2007/10/13/16 and Office 365
• Add an SMTP Outbound Connector for complianceinternet.co.uk (or the domain that you have been advised to use) to the ip address or DNS name of the Cryoserver. Ensure the cost is less than the default (*) connector. i.e. this cost is 1, and the default cost is 2.
• Add a Contact for [email protected] or the email address that you have been advised to use.
• Send a test email to the contact – it should pop into Cryoserver and show on the monitor page as processed.
• Add a Journal Rule, at the HUB transport level or at each Mail-Store containing mailboxes that you need to journal. Set the Journal Recipient to be the contact / email address that you have been advised to use for Cryoserver.
3.4.2 IBM Lotus Domino Notes:
• Add an SMTP Outbound Connector document for complianceinternet.co.uk (or the domain that you have been advised to use) to the ip address or dns name of the Cryoserver.
• Edit the [global] server document to enable Journaling [can be tricky to find this tab] TO a ‘mail-in’ database with the email address [email protected] (or the address you have been advised to use).
• Add a Journal Rule, to specify that all mail is to be journaled.
• Add the SMTP Outbound Security to allow specific journal headers to be transmitted to the Cryoserver.
3.4.3 Novell GroupWise
• GroupWise does not offer a Journaling function – instead it uses the combination of a Trusted Application (that has access to all mailboxes) and a retention flag (to hold deleted items until archived).
• Cryoserver has a separate Trusted Application utility that uses IMAP to extract new and legacy email.
Cryoserver V9 Administration Guide 27 | P a g e
Getting Started
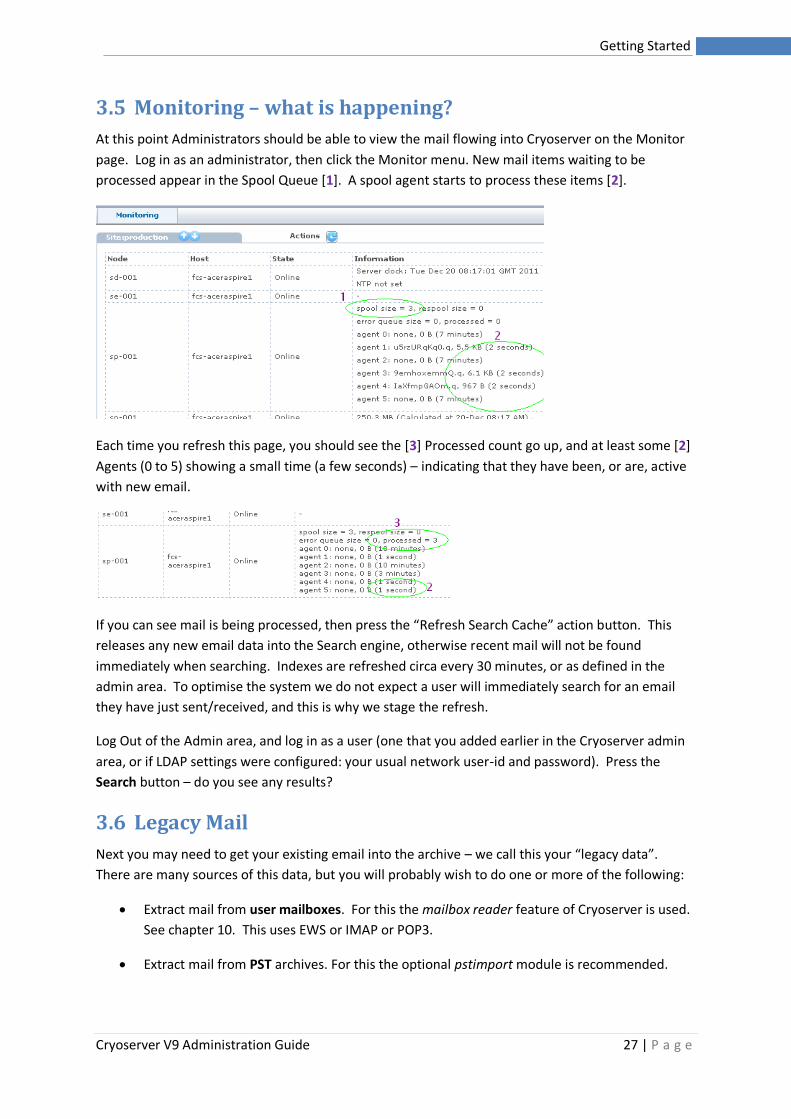
3.5 Monitoring – what is happening?
At this point Administrators should be able to view the mail flowing into Cryoserver on the Monitor
page. Log in as an administrator, then click the Monitor menu. New mail items waiting to be
processed appear in the Spool Queue [1]. A spool agent starts to process these items [2].
Each time you refresh this page, you should see the [3] Processed count go up, and at least some [2]
Agents (0 to 5) showing a small time (a few seconds) – indicating that they have been, or are, active
with new email.
If you can see mail is being processed, then press the “Refresh Search Cache” action button. This
releases any new email data into the Search engine, otherwise recent mail will not be found
immediately when searching. Indexes are refreshed circa every 30 minutes, or as defined in the
admin area. To optimise the system we do not expect a user will immediately search for an email
they have just sent/received, and this is why we stage the refresh.
Log Out of the Admin area, and log in as a user (one that you added earlier in the Cryoserver admin
area, or if LDAP settings were configured: your usual network user-id and password). Press the
Search button – do you see any results?
3.6 Legacy Mail
Next you may need to get your existing email into the archive – we call this your “legacy data”.
There are many sources of this data, but you will probably wish to do one or more of the following:
• Extract mail from user mailboxes. For this the mailbox reader feature of Cryoserver is used.
See chapter 10. This uses EWS or IMAP or POP3.
• Extract mail from PST archives. For this the optional pstimport module is recommended.
Cryoserver V9 Administration Guide 28 | P a g e
Getting Started
• Transfer mail that already exists in .eml format. For this the import manager feature of
Cryoserver is used. See section 9.3.
• Extract mail from other sources – a range of other services are available. Please discuss the
requirements with our technicians for advice.
Please review section 4.3 for details on a variety of methods of getting mail into Cryoserver.
3.7 Web Certificate
To be able to view Cryoserver within the Outlook client – and to remove any “certificate warning”
that you may see in any standard browsers – you will need to create a suitable Web Certificate. See
section 4.9 for full details on certificate creation and signing. Below is a short summary of two
approaches.
If you do not have a suitable certificate already, then these are the steps to create one:
1. Generate a “Self Signed Certificate” from the Cryoserver admin area.
2. Obtain the “Certificate Request” – a small text file, typically with the file extention .csr. You
should be able to view it using notepad.
3. Register this certificate request with a Certificate Authority (CA) – either a service internal to
your network domain; or one of the many paid for public authorities.
4. Wait for the response from the CA – which may be a few minutes for a standard certificate,
to a few days for a fully verified merchant grade certificate.
5. Upload the intermediate (chain) certificates together with your signed certificate. If this
step fails, then it may relate to the “root” certificate (of the CA) not yet being included in the
java runtime on the Cryoserver’s server. Obtain the appropriate root certificate from the CA
and upload this as well as the intermediates and signed certificate again.
If you already have a “Wildcard certificate” (one that starts with a * - like *.acompany.com) that is
used on a number of different servers in your organisation, then a simplified approach could be
used:
1. Export your ‘wildcard’ certificate:
a. From any Windows IIS server where the certificate is already registered. This
generates a “.pfx” file (a PKCS-12 format file) that is encrypted with a password that
you set during the export.
b. If you do not use IIS or a Windows CA, then you can export the certificate using
openSSL commands from a Linux system as appropriate for use with a Tomcat web
server.
2. Upload this .pfx file into the Cryoserver, together with the file’s password. Do this using the
Administration, web certificate panel. It will replace any existing certificate on the
Cryoserver.
Cryoserver V9 Administration Guide 29 | P a g e
Getting Started
You will need to restart Cryoserver’s Web Server to make the new certificate become active. If you
have any issues accessing Cryoserver after this, then try using the plain “http:” connection. You may
need to try a few times to get past Cryoserver’s redirect to the https:.
3.8 Starting & Stopping Cryoserver
You would not usually need to restart or stop Cryoserver, but if you did then please do not simply hit
the power button except as a last resort! The safest way is to use one of the following methods:
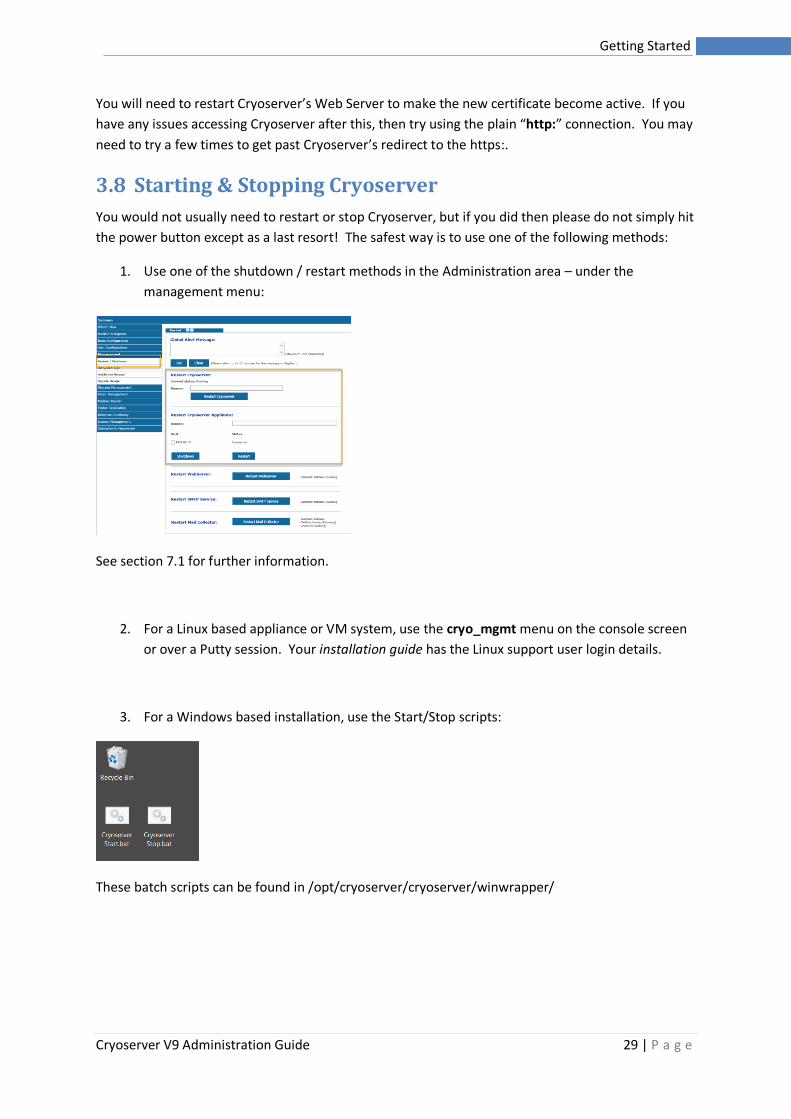
1. Use one of the shutdown / restart methods in the Administration area – under the
management menu:
See section 7.1 for further information.
2. For a Linux based appliance or VM system, use the cryo_mgmt menu on the console screen
or over a Putty session. Your installation guide has the Linux support user login details.
3. For a Windows based installation, use the Start/Stop scripts:
These batch scripts can be found in /opt/cryoserver/cryoserver/winwrapper/
Cryoserver V9 Administration Guide 30 | P a g e
Essential Topics
4 Essential Topics
This chapter summarises the key aspects of the Cryoserver Archive system, which will help
Administrators understand how it functions.
4.1 Accessing Cryoserver
Cryoserver is accessed via a Web Browser – even when using the “Outlook Interface”. This section
looks the various ways to access the Cryoserver web interface and how the Administrator may
control or set this access to others.
It is also possible to access Cryoserver via a web-enabled API (Application Programming Interface).
This is SOAP based. It can be used to embed Cryoserver into a Portal or used to access the search
features from other devices – like a mobile phone.
4.1.1 The standard URL
If you just enter the Cryoserver hostname into your browser, then the system should resolve to the
standard Cryoserver interface (https://your-cryoserver ).
Please Note: The hostname of the server may be different to the web address that you would like to
use. For example, the server may have the hostname IC-UKLONDC-CRY1. But you would want users
to access it with a more friendly name of mailarchive.acompany.com – to do this you would need to
add an ‘A’ record to your internal DNS for mailarchive in your acompany.com domain.
Also Note: The Cryoserver web application name can be configured to be optional:
Usually the web application name is always appended, and is usually named “cryoserver”
https://your-cryoserver/cryoserver
But this is not always required, and the web server can be configured to not need a name:
https://your-cryoserver
And, if desired, Cryoserver can be re-branded (on application) to have an alternate name, both in the
URL and in most places where the word “Cryoserver” is used – both on-screen and in emails:
https://your-cryoserver/aco-mailvault
The default interface provides a login for Basic / LDAP Basic / Privileged and Administrators. If
Single-Sign-On (SSO) is enabled, you may need to log-out in order to log in with an administrative
account; or use the “Switch Identity” feature, if available (see later for details).
The default Cryoserver Administrative Login is:
Username: cryoserver_admin
Password: cryoserver
Email address: [email protected] (where any password reset would be sent)
Administrators are encouraged to either:
• Reset email address of this account and then reset the password
Cryoserver V9 Administration Guide 31 | P a g e
Essential Topics
• Or add extra administrative accounts, one for each member of staff that requires
administrative access. Then disable the default account.
All of these steps are described later in this document.
* All Cryoserver systems up to version 9 came with a default “company” with a company tag of
“cryoserv”. You will often see the “cryoserv” name being added to the URL. From version 9, the
company tag and company name and contact details are set during the setup wizard.
A company tag is:
• Is a short name (between 3 and 16 characters) for a company in Cryoserver.
• Uses only lowercase letters and numbers – no spaces.
• It is used in the URL to identify a specific company’s archive that you need to access (on
multi-tenant systems).
• Is saved as a ‘cookie’ in your browser, so you may find that it connects you correctly without
including the company tag.
• Keeps your data separate on the server: archived data is stored on the server under the
company tag name.
• Can be used for the email address (company-tag@your-cryoserver) when “journaling”
emails to the Cryoserver system.
• It can only be changed on request.
Therefore, you will often see the URL in your browser including the company tag:
https://your-cryoserver/cryoserver/cryoserv
or
https://your-cryoserver/cryoserv
But if it is not included, then the web page will then try to use the tag name stored in a cookie.
Cryoserver V9 Administration Guide 32 | P a g e
Essential Topics
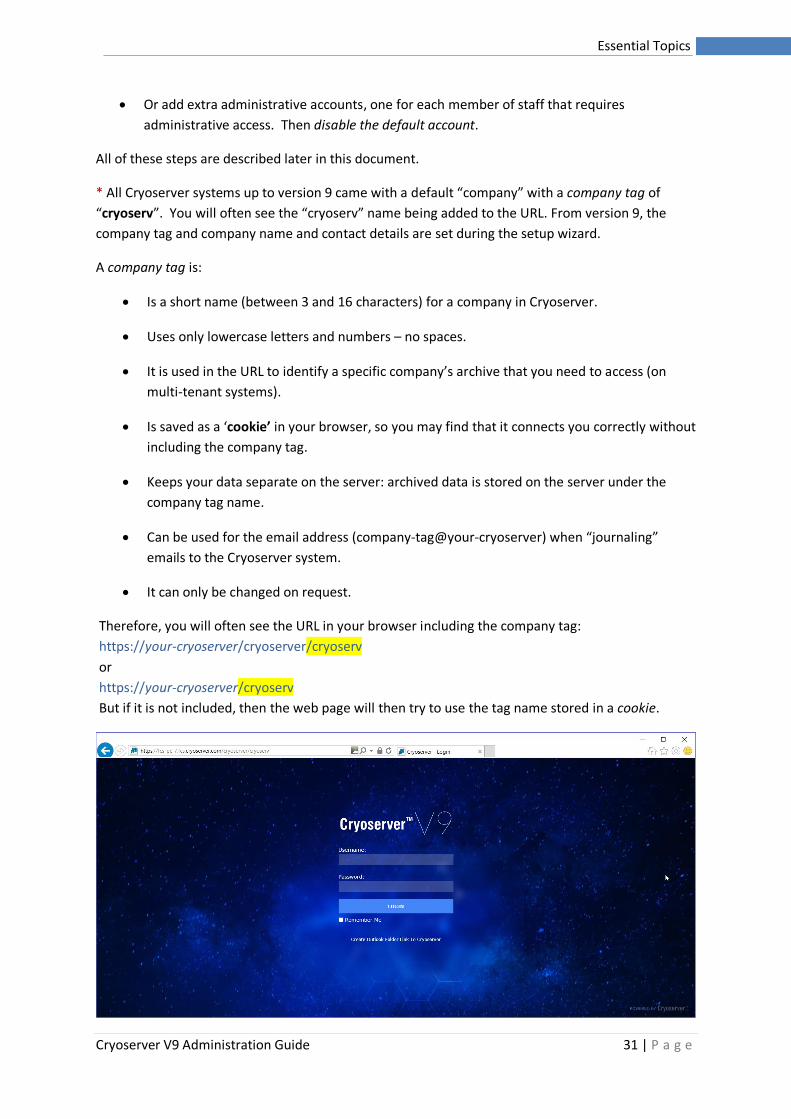
Figure 1 - The standard Login page
There are several placeholders the Administrator can control on the Login page:
1. The administrator can enable two extra options that would appear next to the login button:
If “Single Sign On” (SSO) is enabled for the company, then you will see the “Quick Connect
(SSO)” button. This uses your current Windows Login Token to validate with Active
Directory.
Alternatively, you can tick the “Remember Me”. This will remember your Username &
Password as an encrypted cookie, until you explicitly log-out.
[See Basic Company Configuration & Advanced Configuration -> Single Sign On]
2. The “Create Outlook Folder Link” will download and run a VBS script that adds a folder
entry to the user’s Outlook Client (all current versions). This Folder will show the
Cryoserver Web Page within Outlook.
[This option is enabled by an Administrator. See Outlook Folder Link]
3. An optional ‘Disclaimer’ message can be added. The content is entirely up to the
administrator, including its font size and colour. [See Basic Company Configuration]
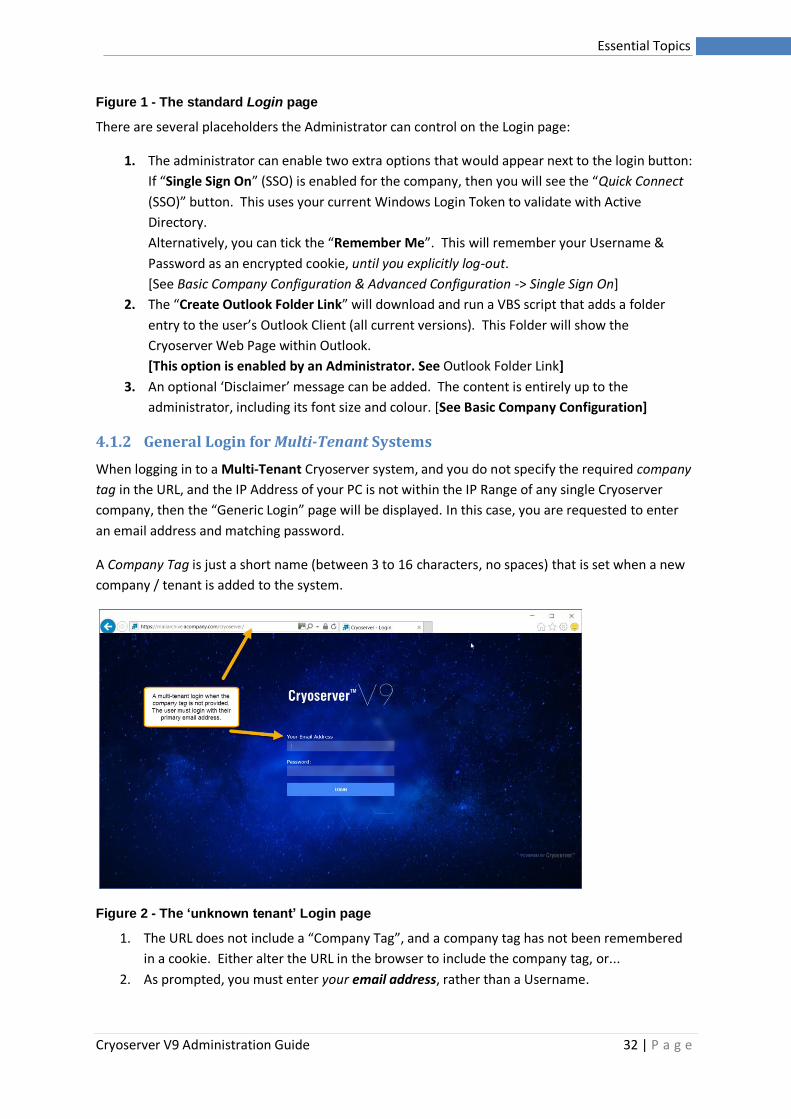
4.1.2 General Login for Multi-Tenant Systems
When logging in to a Multi-Tenant Cryoserver system, and you do not specify the required company
tag in the URL, and the IP Address of your PC is not within the IP Range of any single Cryoserver
company, then the “Generic Login” page will be displayed. In this case, you are requested to enter
an email address and matching password.
A Company Tag is just a short name (between 3 to 16 characters, no spaces) that is set when a new
company / tenant is added to the system.
Figure 2 - The ‘unknown tenant’ Login page
1. The URL does not include a “Company Tag”, and a company tag has not been remembered
in a cookie. Either alter the URL in the browser to include the company tag, or...
2. As prompted, you must enter your email address, rather than a Username.
Cryoserver V9 Administration Guide 33 | P a g e
Essential Topics
4.1.3 Accessing the Outlook interface
Adding the word outlook to the end of the standard Cryoserver URL will result in a simplified web
interface that is more suited for displaying within the Microsoft Outlook client (Windows only –
Apple’s version does not support web folders). It is best used when Single-Sign On (SSO) is enabled –
as it is only usable by Basic users.
The full URL, with the “cryoserver” web application name and a company tag (cryoserv):
https://your-cryoserver/cryoserver/cryoserv/outlook
Though it could also be configured to a shorter URL:
https://your-cryoserver/cryoserv/outlook
And if the company tag name is already stored as a cookie in your browser, it could just be:
https://your-cryoserver/outlook
Please note: Outlook will start a fresh browser session whenever you access the Cryoserver Folder
shortcut. Previous search criteria and results will be cleared.
Administrative Notes:
1. Outlook will only display https: web pages that have a valid SSL certificate. This means that
the certificate must:
* Match the URL hostname (the certificate’s cn=NAME matches the https://NAME)
* The certificate date range must still be valid
* The certificate is recognised as a “trusted root” OR is signed by a recognised Certificating
Authority (CA).
All of these points will be explored later in this document.
2. For SSO (Single Sign On) to work, the URL must be recognised as an “intranet”. You may
need to add the Cryoserver URL into the browsers intranet site list.
Cryoserver V9 Administration Guide 34 | P a g e
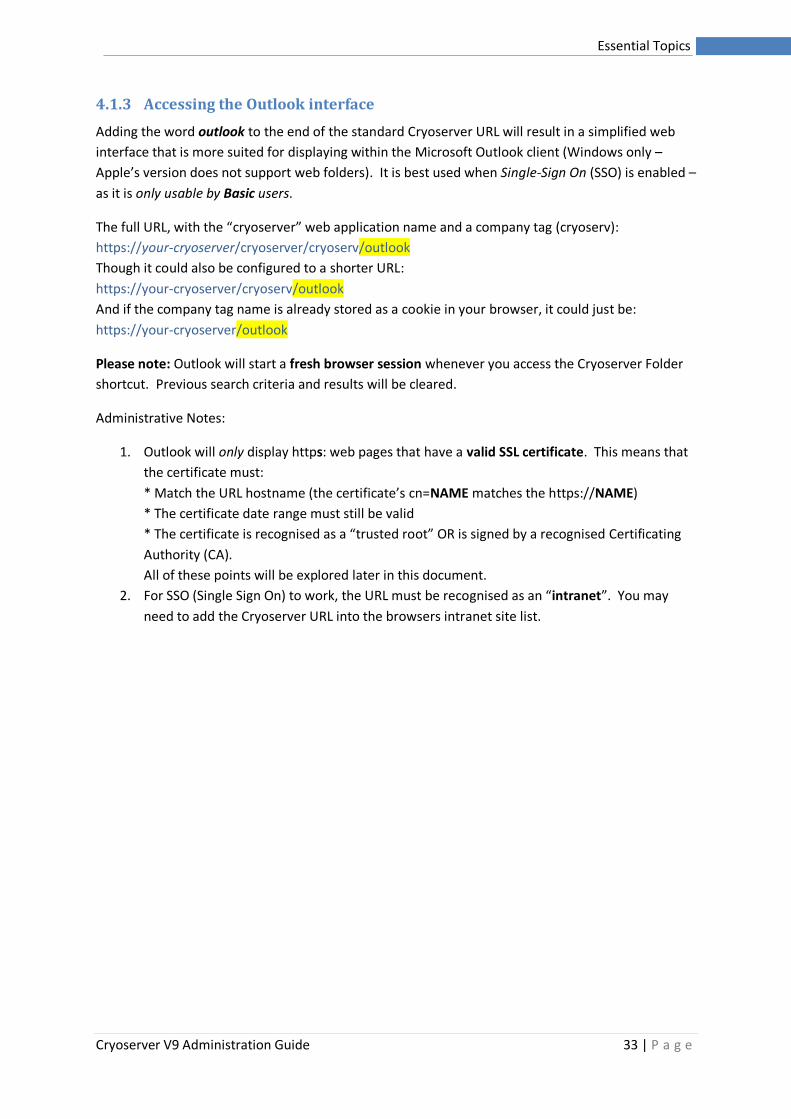
Essential Topics
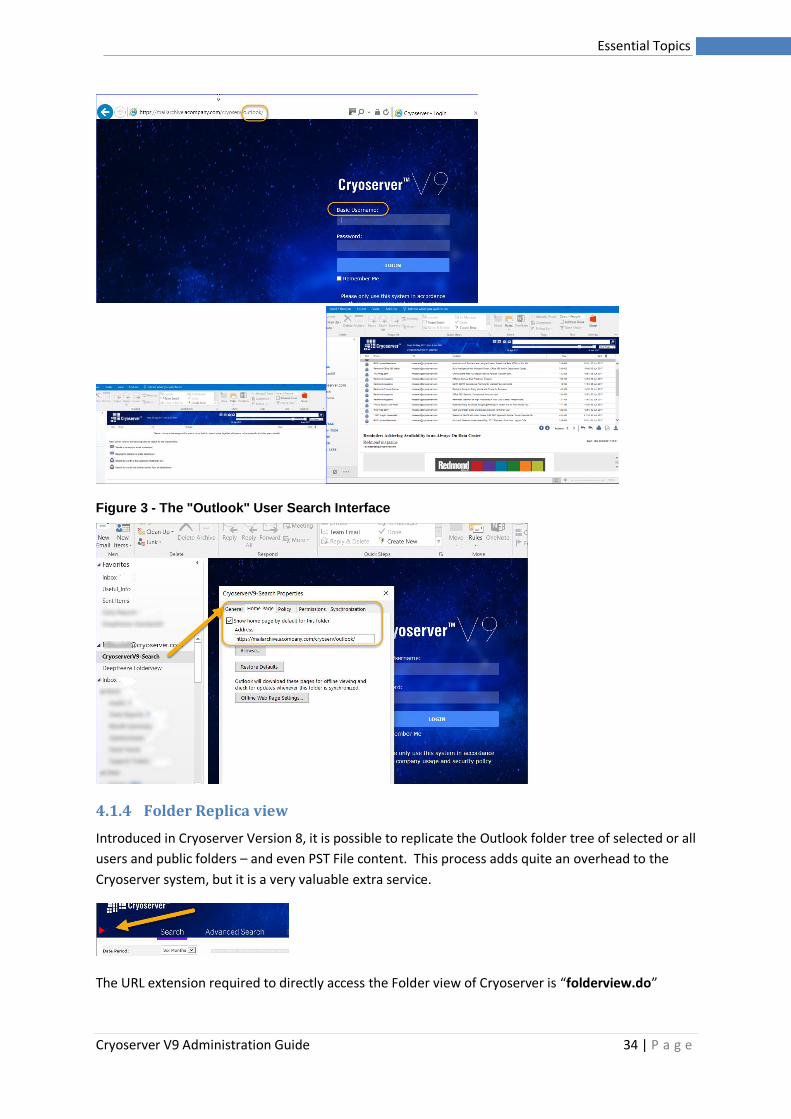
Figure 3 - The "Outlook" User Search Interface
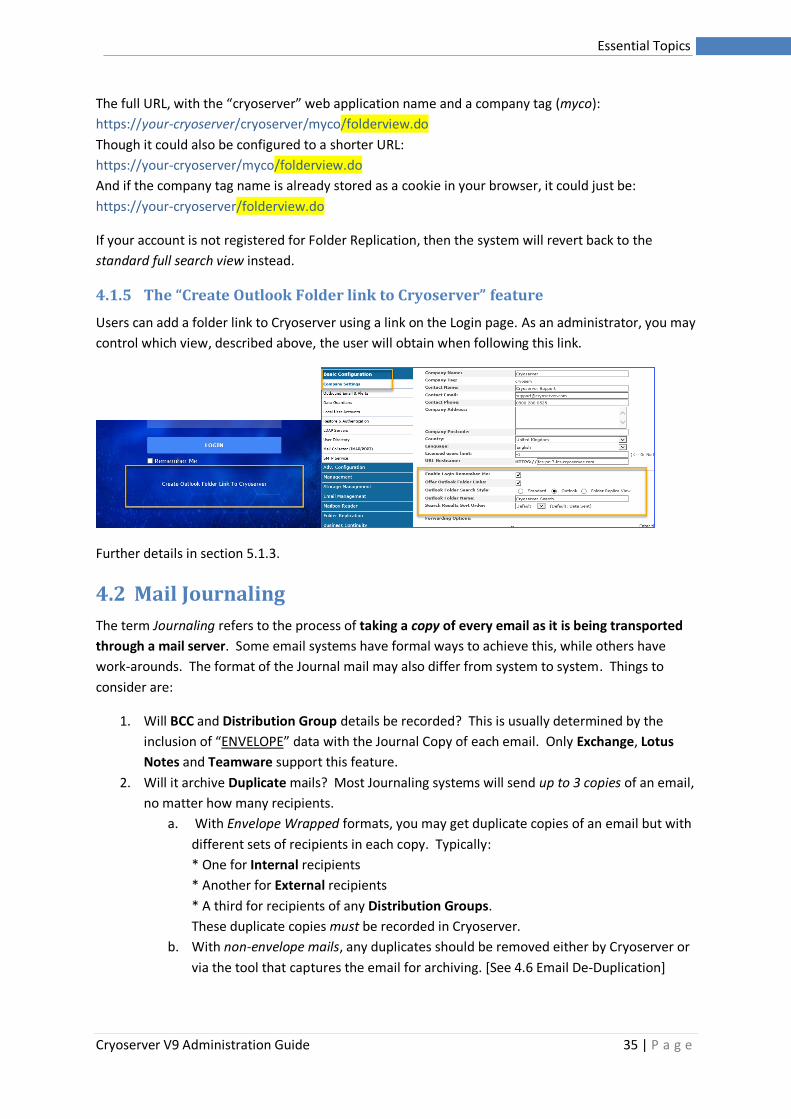
4.1.4 Folder Replica view
Introduced in Cryoserver Version 8, it is possible to replicate the Outlook folder tree of selected or all
users and public folders – and even PST File content. This process adds quite an overhead to the
Cryoserver system, but it is a very valuable extra service.
The URL extension required to directly access the Folder view of Cryoserver is “folderview.do”
Cryoserver V9 Administration Guide 35 | P a g e
Essential Topics
The full URL, with the “cryoserver” web application name and a company tag (myco):
https://your-cryoserver/cryoserver/myco/folderview.do
Though it could also be configured to a shorter URL:
https://your-cryoserver/myco/folderview.do
And if the company tag name is already stored as a cookie in your browser, it could just be:
https://your-cryoserver/folderview.do
If your account is not registered for Folder Replication, then the system will revert back to the
standard full search view instead.
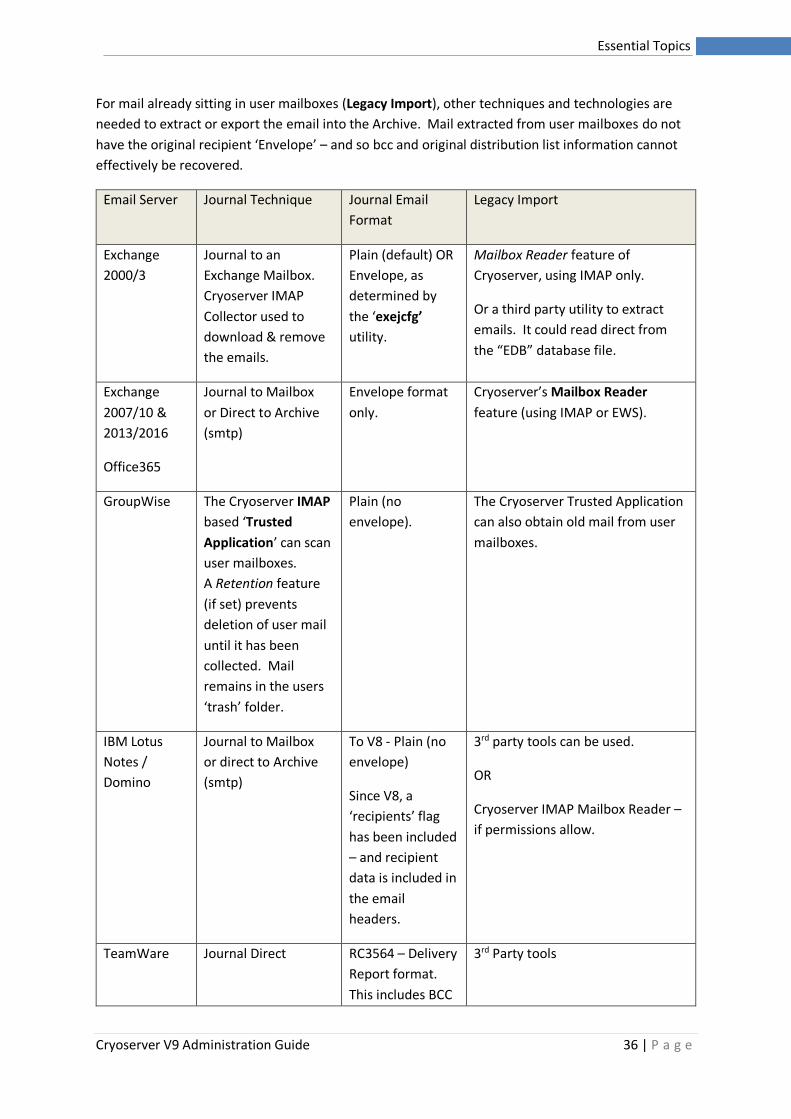
4.1.5 The “Create Outlook Folder link to Cryoserver” feature
Users can add a folder link to Cryoserver using a link on the Login page. As an administrator, you may
control which view, described above, the user will obtain when following this link.
Further details in section 5.1.3.
4.2 Mail Journaling
The term Journaling refers to the process of taking a copy of every email as it is being transported
through a mail server. Some email systems have formal ways to achieve this, while others have
work-arounds. The format of the Journal mail may also differ from system to system. Things to
consider are:
1. Will BCC and Distribution Group details be recorded? This is usually determined by the
inclusion of “ENVELOPE” data with the Journal Copy of each email. Only Exchange, Lotus
Notes and Teamware support this feature.
2. Will it archive Duplicate mails? Most Journaling systems will send up to 3 copies of an email,
no matter how many recipients.
a. With Envelope Wrapped formats, you may get duplicate copies of an email but with
different sets of recipients in each copy. Typically:
* One for Internal recipients
* Another for External recipients
* A third for recipients of any Distribution Groups.
These duplicate copies must be recorded in Cryoserver.
b. With non-envelope mails, any duplicates should be removed either by Cryoserver or
via the tool that captures the email for archiving. [See 4.6 Email De-Duplication]
Cryoserver V9 Administration Guide 36 | P a g e
Essential Topics
For mail already sitting in user mailboxes (Legacy Import), other techniques and technologies are
needed to extract or export the email into the Archive. Mail extracted from user mailboxes do not
have the original recipient ‘Envelope’ – and so bcc and original distribution list information cannot
effectively be recovered.
Email Server Journal Technique Journal Email
Format
Legacy Import
Exchange
2000/3
Journal to an
Exchange Mailbox.
Cryoserver IMAP
Collector used to
download & remove
the emails.
Plain (default) OR
Envelope, as
determined by
the ‘exejcfg’
utility.
Mailbox Reader feature of
Cryoserver, using IMAP only.
Or a third party utility to extract
emails. It could read direct from
the “EDB” database file.
Exchange
2007/10 &
2013/2016
Office365
Journal to Mailbox
or Direct to Archive
(smtp)
Envelope format
only.
Cryoserver’s Mailbox Reader
feature (using IMAP or EWS).
GroupWise The Cryoserver IMAP
based ‘Trusted
Application’ can scan
user mailboxes.
A Retention feature
(if set) prevents
deletion of user mail
until it has been
collected. Mail
remains in the users
‘trash’ folder.
Plain (no
envelope).
The Cryoserver Trusted Application
can also obtain old mail from user
mailboxes.
IBM Lotus
Notes /
Domino
Journal to Mailbox
or direct to Archive
(smtp)
To V8 - Plain (no
envelope)
Since V8, a
‘recipients’ flag
has been included
– and recipient
data is included in
the email
headers.
3rd party tools can be used.
OR
Cryoserver IMAP Mailbox Reader –
if permissions allow.
TeamWare Journal Direct RC3564 – Delivery
Report format.
This includes BCC
3rd Party tools
Cryoserver V9 Administration Guide 37 | P a g e
Essential Topics
and Distribution
Group recipients.
Scalix Journal Direct (bcc all
setting)
Plain only 3rd Party tools
MDaemon BCC Journal – though
rules are needed to
capture group
addressed emails
Plain only .EML File copy direct into
Cryoserver.
SendMail Requires a plug-in
filter
Plain only 3rd Party tools
Most Others Typically a “BCC all”
option
Plain only 3rd Party tools
4.2.1 Plain Email format (RFC822)
All internet mail is in this format – but for the purposes of this discussion, we are referring to mail
that does not include one of the “envelope wrapper” sections.
An email always starts with a HEADER. This shows key elements of the email – such as the Subject:,
Date:, From: and To:.
However, the from/to/cc text does not need to tally with the actual recipients. The text can be
quite random. The actual recipients [for a single domain] are provided and validated completely
separately to the email text and are included only in the envelope part of the smtp conversation.
The envelope would include BCC recipients – which are never included in the email headers [except
for Lotus Notes 8+ with the Journal Recipients option turned ON].
Received: from localhost.localdomain (localhost.localdomain [127.0.0.1])
by mailhost3 (Postfix) with ESMTP
id 11342AB2BBA; Mon, 13 Dec 2016 15:30:42 -0500 (EST)
From: "whatis.com" <[email protected]>
To: "James Hardy" <[email protected]>
Subject: Word-of-the-Day: positron
content-type: text/plain; charset=ISO-8859-1
content-Transfer-Encoding: 7bit
X-Mailer: TargetMail E-Mail By TechTarget.com
Message-Id: <20021216203042.11342AB2BBA@mailhost3>
Date: Mon, 13 Dec 2016 15:30:42 -0500 (EST)
Figure 4 - Example email headers
The remainder of the email is made up of the various parts – body text, attachments etc.
The problem with plain email journaling and usually also for imported emails is that:
1. BCC Information will never be included; and
2. Email addresses can include Distribution Groups and Secondary email addresses. In both
cases Cryoserver will use LDAP, if configured, to expand these addresses as follows:
Cryoserver V9 Administration Guide 38 | P a g e
Essential Topics
• For any email addresses found in the From/To/CC headers that match any of the Local Email Domains that you registered with Cryoserver…
o Convert secondary email addresses to the corresponding primary email address
o Expand Distribution groups, to collect the primary addresses of every recipient.
This expansion of plain mail email addresses can be disabled via the administration area (see Adv.
Company Configuration).
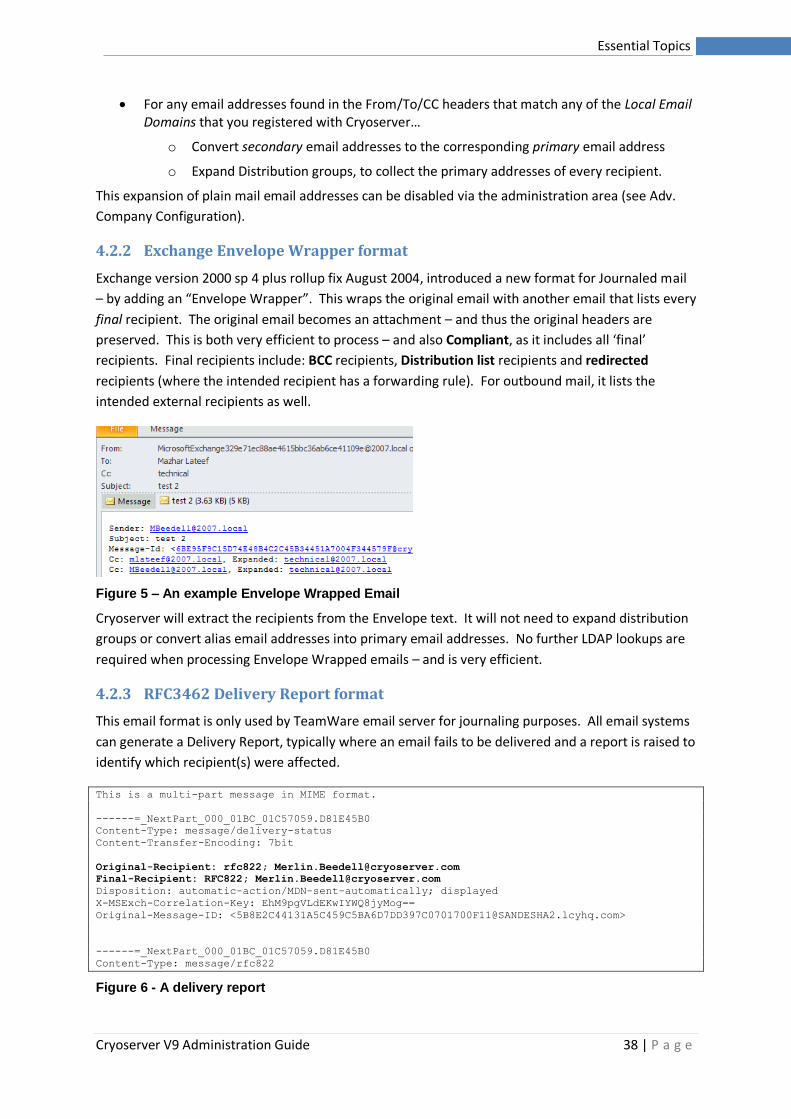
4.2.2 Exchange Envelope Wrapper format
Exchange version 2000 sp 4 plus rollup fix August 2004, introduced a new format for Journaled mail
– by adding an “Envelope Wrapper”. This wraps the original email with another email that lists every
final recipient. The original email becomes an attachment – and thus the original headers are
preserved. This is both very efficient to process – and also Compliant, as it includes all ‘final’
recipients. Final recipients include: BCC recipients, Distribution list recipients and redirected
recipients (where the intended recipient has a forwarding rule). For outbound mail, it lists the
intended external recipients as well.
Figure 5 – An example Envelope Wrapped Email
Cryoserver will extract the recipients from the Envelope text. It will not need to expand distribution
groups or convert alias email addresses into primary email addresses. No further LDAP lookups are
required when processing Envelope Wrapped emails – and is very efficient.
4.2.3 RFC3462 Delivery Report format
This email format is only used by TeamWare email server for journaling purposes. All email systems
can generate a Delivery Report, typically where an email fails to be delivered and a report is raised to
identify which recipient(s) were affected.
This is a multi-part message in MIME format.
------=_NextPart_000_01BC_01C57059.D81E45B0
Content-Type: message/delivery-status
Content-Transfer-Encoding: 7bit
Original-Recipient: rfc822; [email protected]
Final-Recipient: RFC822; [email protected]
Disposition: automatic-action/MDN-sent-automatically; displayed
X-MSExch-Correlation-Key: EhM9pgVLdEKwIYWQ8jyMog==
Original-Message-ID: <[email protected]>
------=_NextPart_000_01BC_01C57059.D81E45B0
Content-Type: message/rfc822
Figure 6 - A delivery report
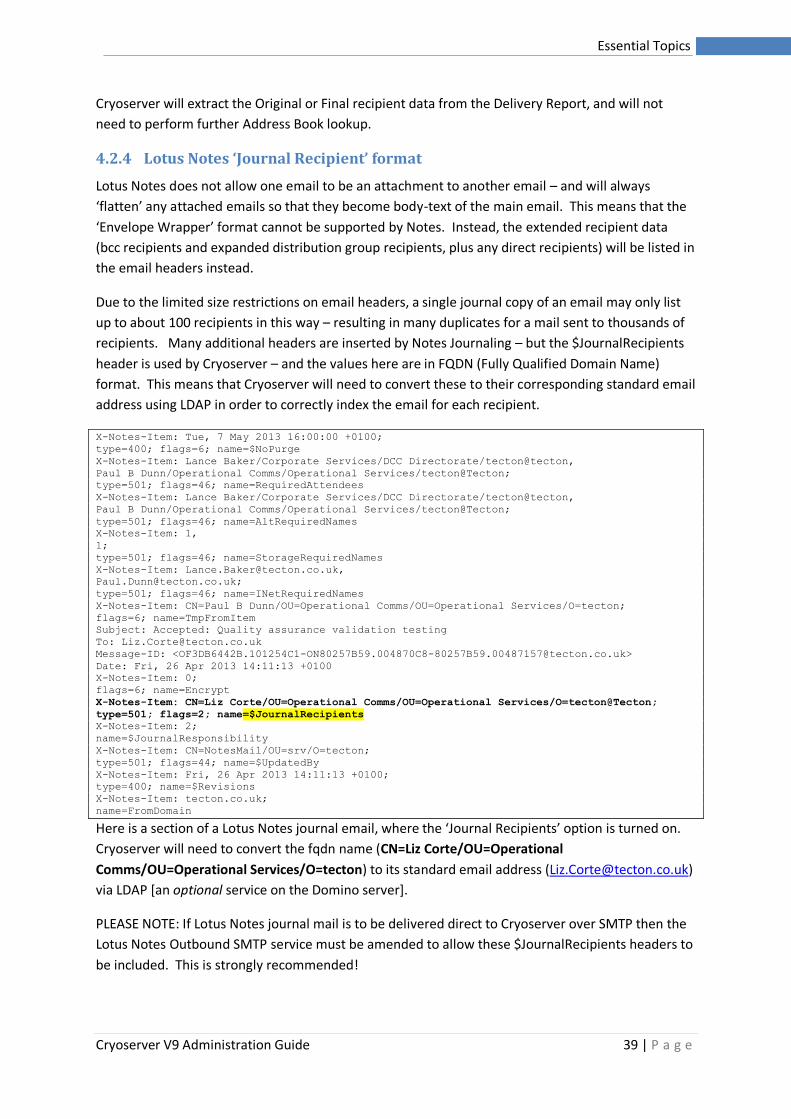
Cryoserver V9 Administration Guide 39 | P a g e
Essential Topics
Cryoserver will extract the Original or Final recipient data from the Delivery Report, and will not
need to perform further Address Book lookup.
4.2.4 Lotus Notes ‘Journal Recipient’ format
Lotus Notes does not allow one email to be an attachment to another email – and will always
‘flatten’ any attached emails so that they become body-text of the main email. This means that the
‘Envelope Wrapper’ format cannot be supported by Notes. Instead, the extended recipient data
(bcc recipients and expanded distribution group recipients, plus any direct recipients) will be listed in
the email headers instead.
Due to the limited size restrictions on email headers, a single journal copy of an email may only list
up to about 100 recipients in this way – resulting in many duplicates for a mail sent to thousands of
recipients. Many additional headers are inserted by Notes Journaling – but the $JournalRecipients
header is used by Cryoserver – and the values here are in FQDN (Fully Qualified Domain Name)
format. This means that Cryoserver will need to convert these to their corresponding standard email
address using LDAP in order to correctly index the email for each recipient.
X-Notes-Item: Tue, 7 May 2013 16:00:00 +0100;
type=400; flags=6; name=$NoPurge
X-Notes-Item: Lance Baker/Corporate Services/DCC Directorate/tecton@tecton,
Paul B Dunn/Operational Comms/Operational Services/tecton@Tecton;
type=501; flags=46; name=RequiredAttendees
X-Notes-Item: Lance Baker/Corporate Services/DCC Directorate/tecton@tecton,
Paul B Dunn/Operational Comms/Operational Services/tecton@Tecton;
type=501; flags=46; name=AltRequiredNames
X-Notes-Item: 1,
1;
type=501; flags=46; name=StorageRequiredNames
X-Notes-Item: [email protected],
type=501; flags=46; name=INetRequiredNames
X-Notes-Item: CN=Paul B Dunn/OU=Operational Comms/OU=Operational Services/O=tecton;
flags=6; name=TmpFromItem
Subject: Accepted: Quality assurance validation testing
Message-ID: <OF3DB6442B.101254C1-ON80257B59.004870C8-80257B59.00487157@tecton.co.uk>
Date: Fri, 26 Apr 2013 14:11:13 +0100
X-Notes-Item: 0;
flags=6; name=Encrypt
X-Notes-Item: CN=Liz Corte/OU=Operational Comms/OU=Operational Services/O=tecton@Tecton;
type=501; flags=2; name=$JournalRecipients
X-Notes-Item: 2;
name=$JournalResponsibility
X-Notes-Item: CN=NotesMail/OU=srv/O=tecton;
type=501; flags=44; name=$UpdatedBy
X-Notes-Item: Fri, 26 Apr 2013 14:11:13 +0100;
type=400; name=$Revisions
X-Notes-Item: tecton.co.uk;
name=FromDomain
Here is a section of a Lotus Notes journal email, where the ‘Journal Recipients’ option is turned on.
Cryoserver will need to convert the fqdn name (CN=Liz Corte/OU=Operational
Comms/OU=Operational Services/O=tecton) to its standard email address ([email protected])
via LDAP [an optional service on the Domino server].
PLEASE NOTE: If Lotus Notes journal mail is to be delivered direct to Cryoserver over SMTP then the
Lotus Notes Outbound SMTP service must be amended to allow these $JournalRecipients headers to
be included. This is strongly recommended!
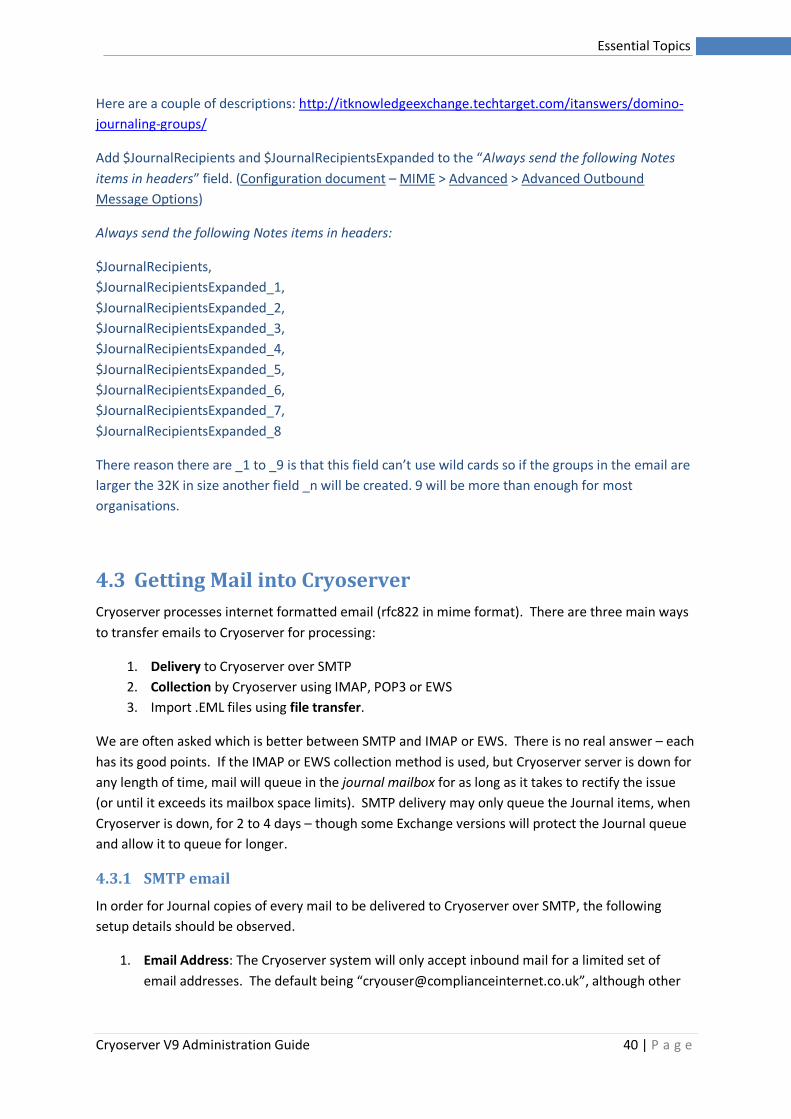
Cryoserver V9 Administration Guide 40 | P a g e
Essential Topics
Here are a couple of descriptions: http://itknowledgeexchange.techtarget.com/itanswers/domino-
journaling-groups/
Add $JournalRecipients and $JournalRecipientsExpanded to the “Always send the following Notes
items in headers” field. (Configuration document – MIME > Advanced > Advanced Outbound
Message Options)
Always send the following Notes items in headers:
$JournalRecipients,
$JournalRecipientsExpanded_1,
$JournalRecipientsExpanded_2,
$JournalRecipientsExpanded_3,
$JournalRecipientsExpanded_4,
$JournalRecipientsExpanded_5,
$JournalRecipientsExpanded_6,
$JournalRecipientsExpanded_7,
$JournalRecipientsExpanded_8
There reason there are _1 to _9 is that this field can’t use wild cards so if the groups in the email are
larger the 32K in size another field _n will be created. 9 will be more than enough for most
organisations.
4.3 Getting Mail into Cryoserver
Cryoserver processes internet formatted email (rfc822 in mime format). There are three main ways
to transfer emails to Cryoserver for processing:
1. Delivery to Cryoserver over SMTP
2. Collection by Cryoserver using IMAP, POP3 or EWS
3. Import .EML files using file transfer.
We are often asked which is better between SMTP and IMAP or EWS. There is no real answer – each
has its good points. If the IMAP or EWS collection method is used, but Cryoserver server is down for
any length of time, mail will queue in the journal mailbox for as long as it takes to rectify the issue
(or until it exceeds its mailbox space limits). SMTP delivery may only queue the Journal items, when
Cryoserver is down, for 2 to 4 days – though some Exchange versions will protect the Journal queue
and allow it to queue for longer.
4.3.1 SMTP email
In order for Journal copies of every mail to be delivered to Cryoserver over SMTP, the following
setup details should be observed.
1. Email Address: The Cryoserver system will only accept inbound mail for a limited set of
email addresses. The default being “[email protected]”, although other
Cryoserver V9 Administration Guide 41 | P a g e
Essential Topics
addresses can be made available. Cryoserver will not “relay” any emails that are sent to it
by mistake.
2. Routing: you may need to add an “Outbound SMTP connector” to tell your mail server how
to route mail to the Cryoserver system. This may be required when:
a. Cryoserver’s DNS name does not have an MX record. Without an MX record for the
email domain then mail servers will not be able to discover the server to deliver the
mail to.
b. Bypass “anti-virus” filters. You would generally need the journal copies to go direct
to the Cryoserver and not flow via another 3rd party mail service. Often these
external mail agents would either be unable to route the mail to Cryoserver or be
unwilling to transfer journal format mails.
On-Premise Cryoserver systems
By default, Cryoserver systems will accept mail sent to “[email protected]”. This
email domain (complianceinternet.co.uk) does not have a public “MX” record – and is not
deliverable in the public internet. Therefore, you must define an Outbound SMTP Connector in your
email system in order route mail for ‘complianceinternet.co.uk’ to the IP address of the Cryoserver
system.
Cloud Cryoserver systems
Multi-Tenant or hosted Cryoserver systems will need to have a public IP address and host name. In
this case it would typically also have an MX record, so that journal email can route to it without the
need for an “Outbound SMTP Connector”. However, you can still add an Outbound SMTP Connector
to ensure that the journal mail routes direct from your email server (or Office 365) to the Cryoserver
system avoiding any mail filtering systems (like MessageLabs) that you may be using.
4.3.2 CryoSMTP service
This service is new for Cryoserver version 9. It is an email server service, using SMTP, that allows the
mail flow – both inbound and outbound to be configured and monitored by the Cryoserver
Administrative area. It replaces the two platform specific services – Postfix on Linux and Windows
SMTP Server. It is based upon the Apache James open source mail server service.
4.3.3 IMAP / POP3 / EWS collection
Email can be journaled to a user mailbox on an email server, and then Cryoserver can collect those
emails using IMAP or POP3.
Cryoserver’s Email Collector (CryoPull) uses a read-and-delete sequence, so that mail will be
removed from the Inbox as it being read into Cryoserver.
Cryoserver provides a simple Administration tool to create one or more IMAP/POP3 collectors.
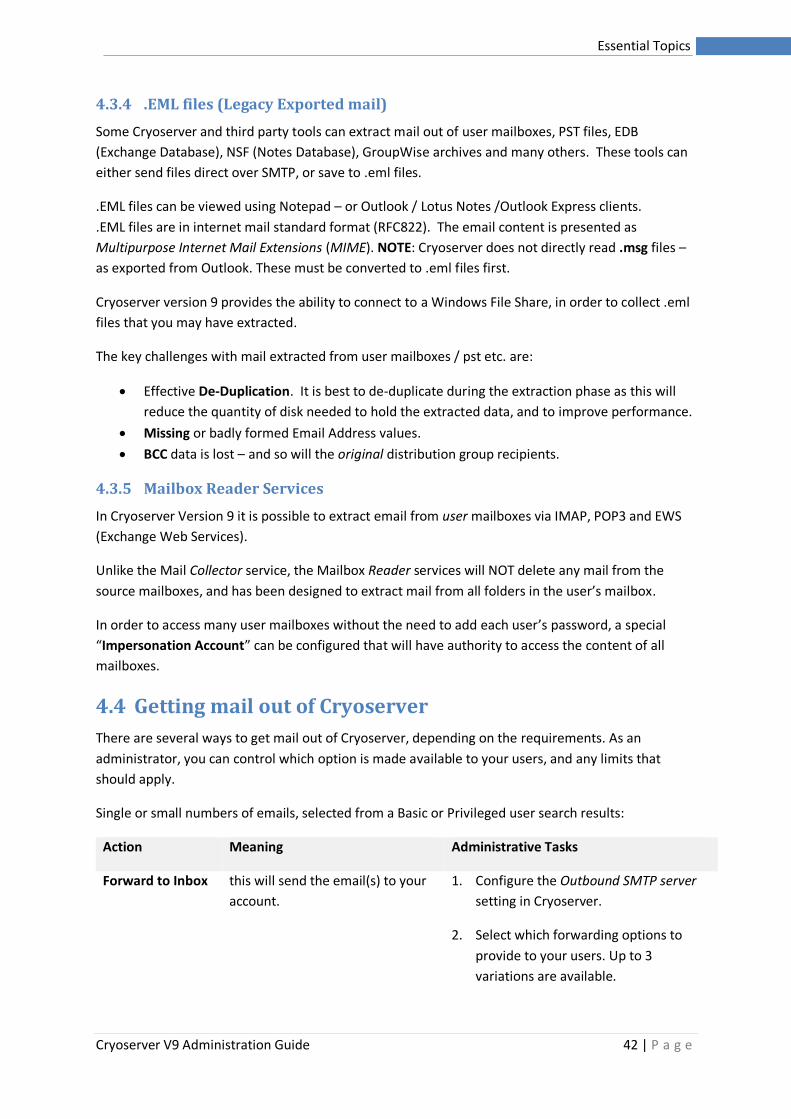
Cryoserver V9 Administration Guide 42 | P a g e
Essential Topics
4.3.4 .EML files (Legacy Exported mail)
Some Cryoserver and third party tools can extract mail out of user mailboxes, PST files, EDB
(Exchange Database), NSF (Notes Database), GroupWise archives and many others. These tools can
either send files direct over SMTP, or save to .eml files.
.EML files can be viewed using Notepad – or Outlook / Lotus Notes /Outlook Express clients.
.EML files are in internet mail standard format (RFC822). The email content is presented as
Multipurpose Internet Mail Extensions (MIME). NOTE: Cryoserver does not directly read .msg files –
as exported from Outlook. These must be converted to .eml files first.
Cryoserver version 9 provides the ability to connect to a Windows File Share, in order to collect .eml
files that you may have extracted.
The key challenges with mail extracted from user mailboxes / pst etc. are:
• Effective De-Duplication. It is best to de-duplicate during the extraction phase as this will
reduce the quantity of disk needed to hold the extracted data, and to improve performance.
• Missing or badly formed Email Address values.
• BCC data is lost – and so will the original distribution group recipients.
4.3.5 Mailbox Reader Services
In Cryoserver Version 9 it is possible to extract email from user mailboxes via IMAP, POP3 and EWS
(Exchange Web Services).
Unlike the Mail Collector service, the Mailbox Reader services will NOT delete any mail from the
source mailboxes, and has been designed to extract mail from all folders in the user’s mailbox.
In order to access many user mailboxes without the need to add each user’s password, a special
“Impersonation Account” can be configured that will have authority to access the content of all
mailboxes.
4.4 Getting mail out of Cryoserver
There are several ways to get mail out of Cryoserver, depending on the requirements. As an
administrator, you can control which option is made available to your users, and any limits that
should apply.
Single or small numbers of emails, selected from a Basic or Privileged user search results:
Action Meaning Administrative Tasks
Forward to Inbox this will send the email(s) to your
account.
1. Configure the Outbound SMTP server
setting in Cryoserver.
2. Select which forwarding options to
provide to your users. Up to 3
variations are available.
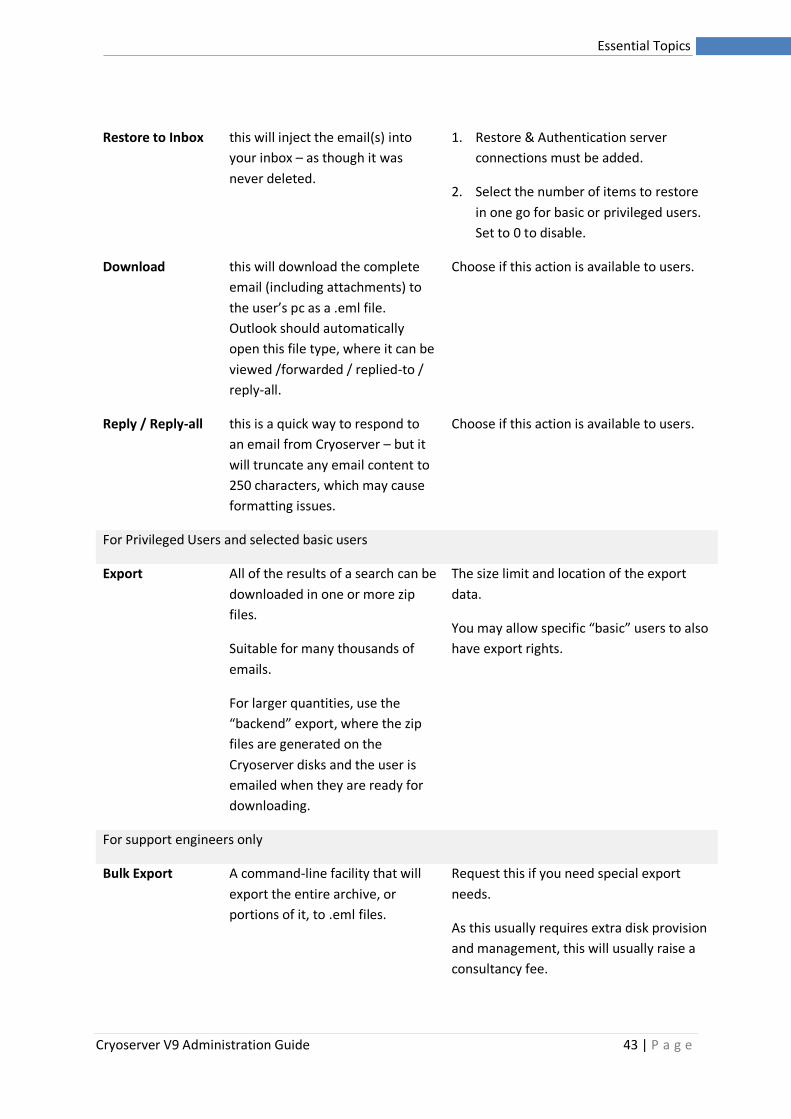
Cryoserver V9 Administration Guide 43 | P a g e
Essential Topics
Restore to Inbox this will inject the email(s) into
your inbox – as though it was
never deleted.
1. Restore & Authentication server
connections must be added.
2. Select the number of items to restore
in one go for basic or privileged users.
Set to 0 to disable.
Download this will download the complete
email (including attachments) to
the user’s pc as a .eml file.
Outlook should automatically
open this file type, where it can be
viewed /forwarded / replied-to /
reply-all.
Choose if this action is available to users.
Reply / Reply-all this is a quick way to respond to
an email from Cryoserver – but it
will truncate any email content to
250 characters, which may cause
formatting issues.
Choose if this action is available to users.
For Privileged Users and selected basic users
Export All of the results of a search can be
downloaded in one or more zip
files.
Suitable for many thousands of
emails.
For larger quantities, use the
“backend” export, where the zip
files are generated on the
Cryoserver disks and the user is
emailed when they are ready for
downloading.
The size limit and location of the export
data.
You may allow specific “basic” users to also
have export rights.
For support engineers only
Bulk Export A command-line facility that will
export the entire archive, or
portions of it, to .eml files.
Request this if you need special export
needs.
As this usually requires extra disk provision
and management, this will usually raise a
consultancy fee.
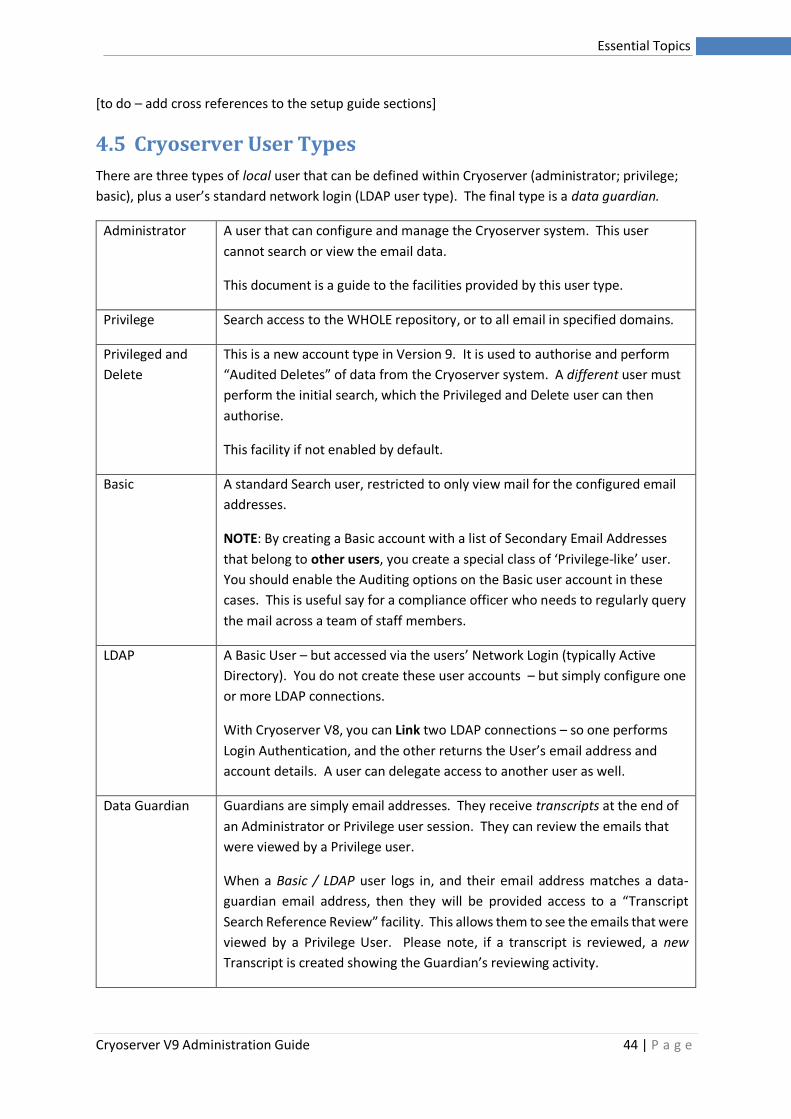
Cryoserver V9 Administration Guide 44 | P a g e
Essential Topics
[to do – add cross references to the setup guide sections]
4.5 Cryoserver User Types
There are three types of local user that can be defined within Cryoserver (administrator; privilege;
basic), plus a user’s standard network login (LDAP user type). The final type is a data guardian.
Administrator A user that can configure and manage the Cryoserver system. This user
cannot search or view the email data.
This document is a guide to the facilities provided by this user type.
Privilege Search access to the WHOLE repository, or to all email in specified domains.
Privileged and
Delete
This is a new account type in Version 9. It is used to authorise and perform
“Audited Deletes” of data from the Cryoserver system. A different user must
perform the initial search, which the Privileged and Delete user can then
authorise.
This facility if not enabled by default.
Basic A standard Search user, restricted to only view mail for the configured email
addresses.
NOTE: By creating a Basic account with a list of Secondary Email Addresses
that belong to other users, you create a special class of ‘Privilege-like’ user.
You should enable the Auditing options on the Basic user account in these
cases. This is useful say for a compliance officer who needs to regularly query
the mail across a team of staff members.
LDAP A Basic User – but accessed via the users’ Network Login (typically Active
Directory). You do not create these user accounts – but simply configure one
or more LDAP connections.
With Cryoserver V8, you can Link two LDAP connections – so one performs
Login Authentication, and the other returns the User’s email address and
account details. A user can delegate access to another user as well.
Data Guardian Guardians are simply email addresses. They receive transcripts at the end of
an Administrator or Privilege user session. They can review the emails that
were viewed by a Privilege user.
When a Basic / LDAP user logs in, and their email address matches a data-
guardian email address, then they will be provided access to a “Transcript
Search Reference Review” facility. This allows them to see the emails that were
viewed by a Privilege User. Please note, if a transcript is reviewed, a new
Transcript is created showing the Guardian’s reviewing activity.
Cryoserver V9 Administration Guide 45 | P a g e
Essential Topics
4.6 Email De-Duplication
Most email servers with a Journaling capability will send a single copy of each email to Cryoserver –
regardless of the number of recipients. However, there are a range of reasons why duplicate emails
are valid – and for that reason Cryoserver will process duplicate emails without attempting to de-
duplicate them.
Examples of valid Duplicates, where each copy should be kept in Cryoserver:
• Exchange Journaled mails in a “journal wrapped” format;
• Lotus Notes with the Journal Recipients option enabled, will send duplicates for every 100 (approx.) recipients.
Duplicates that should be rejected by Cryoserver can include:
• Any Mail that is NOT in a Wrapped format.
• If you have multiple email domains (@company.com and @another.co.uk), the sender’s email system may see these as two separate email systems, and will send separate copies to recipients of each email domain.
• Some email sending systems may send an email to each recipient as separate SMTP connections.
• If recipient mailboxes are spread across separate servers: o Each server may Journal Separately (i.e. Scalix) o A single journal point will set a ‘has been Journaled’ flag, and no further journaling
will occur (Lotus Notes). However – sometimes separate Journaling is exactly what is needed, for example: where each server represents a separate business unit or operating country, each with independent Journal/Archive needs.
o Exchange will check the chosen Journal Endpoint. If an email is archived once already (and has a ‘has been journaled’ flag set BUT the journal recipient is different on the second server, then duplicate journaling will occur. This is particularly noticeable where:
▪ Some remote Exchange servers have different Administrators – the journal recipient details will not transfer correctly and all sorts of issues arise (no journaling or duplicate journaling). This occurs when separate Exchange systems are brought together under a new Domain tree.
▪ We have seen some customers upgrading from Ex2003 to Ex2007/10 to have caused duplicates. Please contact [email protected] for guidance on this.
Import Email / Mailbox Reader Extraction:
• Importing ‘Legacy’ email will typically read each user mailbox separately – hence the same email sent to two users will appear twice in the Importer.
• Mailbox Reader systems – such as the GroupWise GCIDaemon – will extract mail from each user mailbox.
• In these cases, a strategy of local de-duplication followed up with “Does this email exist in Cryoserver” web-service call to Cryoserver should ensure that as few duplicates are exported as possible.
Some multi-server Email servers – like Scalix – will journal independently from each server, meaning
that duplicates will occur. The journal copies, in this case, are in plain (rfc822) mail format without
an envelope part. These need to be de-duplicated by Cryoserver.
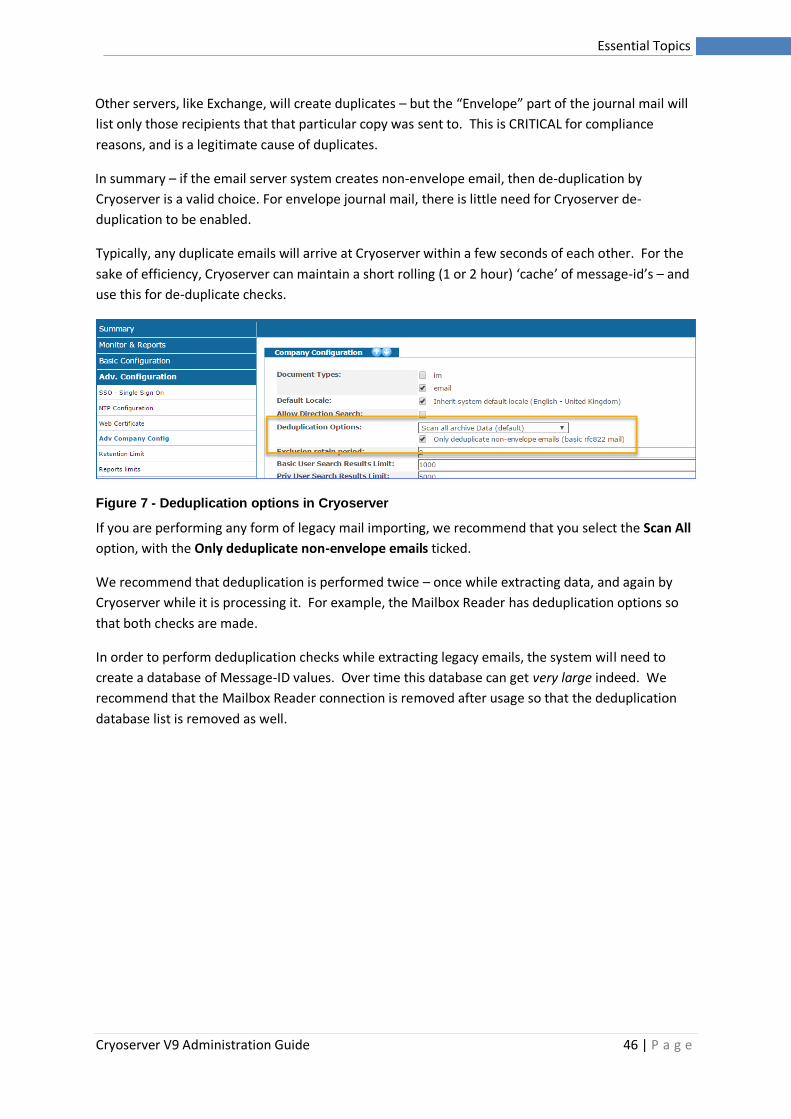
Cryoserver V9 Administration Guide 46 | P a g e
Essential Topics
Other servers, like Exchange, will create duplicates – but the “Envelope” part of the journal mail will
list only those recipients that that particular copy was sent to. This is CRITICAL for compliance
reasons, and is a legitimate cause of duplicates.
In summary – if the email server system creates non-envelope email, then de-duplication by
Cryoserver is a valid choice. For envelope journal mail, there is little need for Cryoserver de-
duplication to be enabled.
Typically, any duplicate emails will arrive at Cryoserver within a few seconds of each other. For the
sake of efficiency, Cryoserver can maintain a short rolling (1 or 2 hour) ‘cache’ of message-id’s – and
use this for de-duplicate checks.
Figure 7 - Deduplication options in Cryoserver
If you are performing any form of legacy mail importing, we recommend that you select the Scan All
option, with the Only deduplicate non-envelope emails ticked.
We recommend that deduplication is performed twice – once while extracting data, and again by
Cryoserver while it is processing it. For example, the Mailbox Reader has deduplication options so
that both checks are made.
In order to perform deduplication checks while extracting legacy emails, the system will need to
create a database of Message-ID values. Over time this database can get very large indeed. We
recommend that the Mailbox Reader connection is removed after usage so that the deduplication
database list is removed as well.
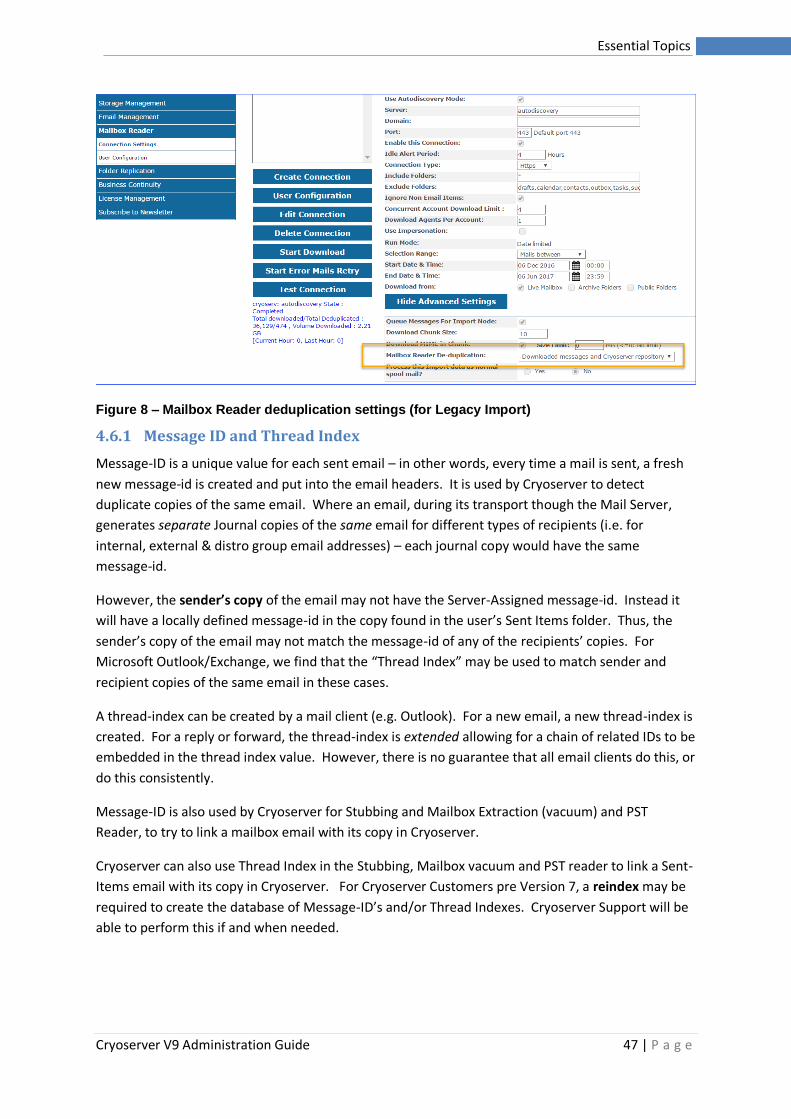
Cryoserver V9 Administration Guide 47 | P a g e
Essential Topics
Figure 8 – Mailbox Reader deduplication settings (for Legacy Import)
4.6.1 Message ID and Thread Index
Message-ID is a unique value for each sent email – in other words, every time a mail is sent, a fresh
new message-id is created and put into the email headers. It is used by Cryoserver to detect
duplicate copies of the same email. Where an email, during its transport though the Mail Server,
generates separate Journal copies of the same email for different types of recipients (i.e. for
internal, external & distro group email addresses) – each journal copy would have the same
message-id.
However, the sender’s copy of the email may not have the Server-Assigned message-id. Instead it
will have a locally defined message-id in the copy found in the user’s Sent Items folder. Thus, the
sender’s copy of the email may not match the message-id of any of the recipients’ copies. For
Microsoft Outlook/Exchange, we find that the “Thread Index” may be used to match sender and
recipient copies of the same email in these cases.
A thread-index can be created by a mail client (e.g. Outlook). For a new email, a new thread-index is
created. For a reply or forward, the thread-index is extended allowing for a chain of related IDs to be
embedded in the thread index value. However, there is no guarantee that all email clients do this, or
do this consistently.
Message-ID is also used by Cryoserver for Stubbing and Mailbox Extraction (vacuum) and PST
Reader, to try to link a mailbox email with its copy in Cryoserver.
Cryoserver can also use Thread Index in the Stubbing, Mailbox vacuum and PST reader to link a Sent-
Items email with its copy in Cryoserver. For Cryoserver Customers pre Version 7, a reindex may be
required to create the database of Message-ID’s and/or Thread Indexes. Cryoserver Support will be
able to perform this if and when needed.
Cryoserver V9 Administration Guide 48 | P a g e
Essential Topics
4.7 Additional Services
There are several utility applications that work well with Cryoserver to provide solutions to a range
of business tasks. This document is a very quick overview of most of these utilities.
Some of the utilities described here are Windows PC installed applications that can be freely
downloaded. Some will require a license to remove any trial limits.
https://apps.cryoserver.com
4.7.1 Legacy Mail Import
Importing mail that already exists in an email system, or in other archives, can be a difficult task.
• How to access the emails o With valid permissions – to access a range of different user mailboxes o At an acceptable speed – selection of a suitable API can be critical
• How to de-duplicate (both within the utility and with Cryoserver).
• How to stop-start an export, so that it continues from where it left off (keeping a progress database)
• What limiting criteria to use (date range, email size, mailbox selection etc).
• How to fill-in missing data o PSTs do not contain email addresses for the local domain’s address book – so to
patch in email addresses from, say, LDAP. o Cleanse old internal-style email addresses (Lotus Notes hierarchical names to email
address conversion)
• Good error logging, so that issues can be quickly resolved.
• How to get the export data to Cryoserver (as files or delivered over smtp)
4.7.1.1 GroupWise Mail Collector (GCIDaemon)
This utility can run on the Cryoserver, or on any pc. It uses IMAP as a ‘Trusted Application’ in order
to visit every user mailbox on any PostOffice servers. To obtain a ‘Trusted Application’ key code, a
separate registration utility must be run on a PC that has the GroupWise admin tools (ConsoleOne)
installed, and has access to the domain server path.
It can run either as a legacy collector, or as a live mail collector – in which case the ‘retention’ flag
should be enabled to prevent mail from being deleted before it is collected by this utility.
See section 4.7.4 for further details.
Mailbox Readers (IMAP / POP3 / EWS)
This feature introduced into Cryoserver version 7 allows legacy mail to be extracted from specific
user mailboxes using IMAP, POP3 or EWS (Exchange Web Services). Unlike other extraction
methods, this requires a login to each user mailbox that you wish to extract mail from. Except for
EWS, you cannot provide a single login to access a range of different user accounts.
EWS (Exchange Web Services) allows for Impersonation. A single User Login may be extended via
PowerScript commands, to have full access rights to any number of user mailboxes. This may be
used instead of the separate Exchange “Vacuum” utility to extract out mail from many Exchange
mailboxes.
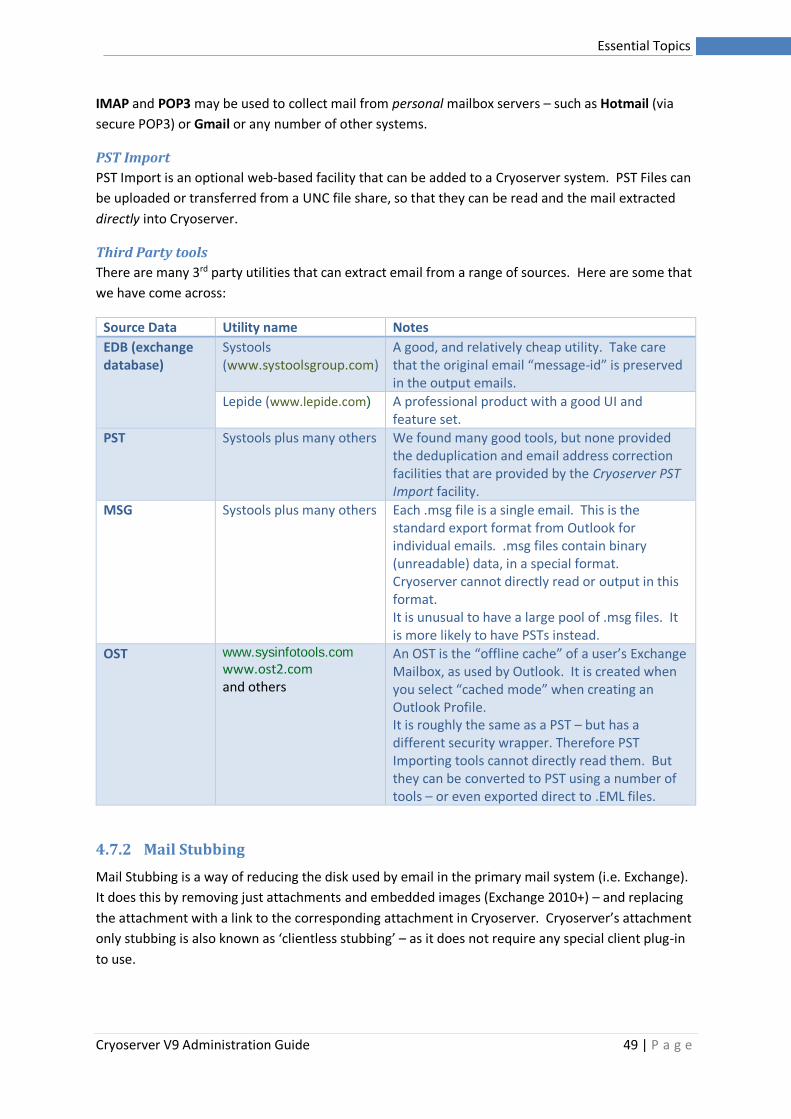
Cryoserver V9 Administration Guide 49 | P a g e
Essential Topics
IMAP and POP3 may be used to collect mail from personal mailbox servers – such as Hotmail (via
secure POP3) or Gmail or any number of other systems.
PST Import
PST Import is an optional web-based facility that can be added to a Cryoserver system. PST Files can
be uploaded or transferred from a UNC file share, so that they can be read and the mail extracted
directly into Cryoserver.
Third Party tools
There are many 3rd party utilities that can extract email from a range of sources. Here are some that
we have come across:
Source Data Utility name Notes
EDB (exchange database)
Systools (www.systoolsgroup.com)
A good, and relatively cheap utility. Take care that the original email “message-id” is preserved in the output emails.
Lepide (www.lepide.com) A professional product with a good UI and feature set.
PST Systools plus many others We found many good tools, but none provided the deduplication and email address correction facilities that are provided by the Cryoserver PST Import facility.
MSG Systools plus many others Each .msg file is a single email. This is the standard export format from Outlook for individual emails. .msg files contain binary (unreadable) data, in a special format. Cryoserver cannot directly read or output in this format. It is unusual to have a large pool of .msg files. It is more likely to have PSTs instead.
OST www.sysinfotools.com
www.ost2.com
and others
An OST is the “offline cache” of a user’s Exchange Mailbox, as used by Outlook. It is created when you select “cached mode” when creating an Outlook Profile. It is roughly the same as a PST – but has a different security wrapper. Therefore PST Importing tools cannot directly read them. But they can be converted to PST using a number of tools – or even exported direct to .EML files.
4.7.2 Mail Stubbing
Mail Stubbing is a way of reducing the disk used by email in the primary mail system (i.e. Exchange).
It does this by removing just attachments and embedded images (Exchange 2010+) – and replacing
the attachment with a link to the corresponding attachment in Cryoserver. Cryoserver’s attachment
only stubbing is also known as ‘clientless stubbing’ – as it does not require any special client plug-in
to use.
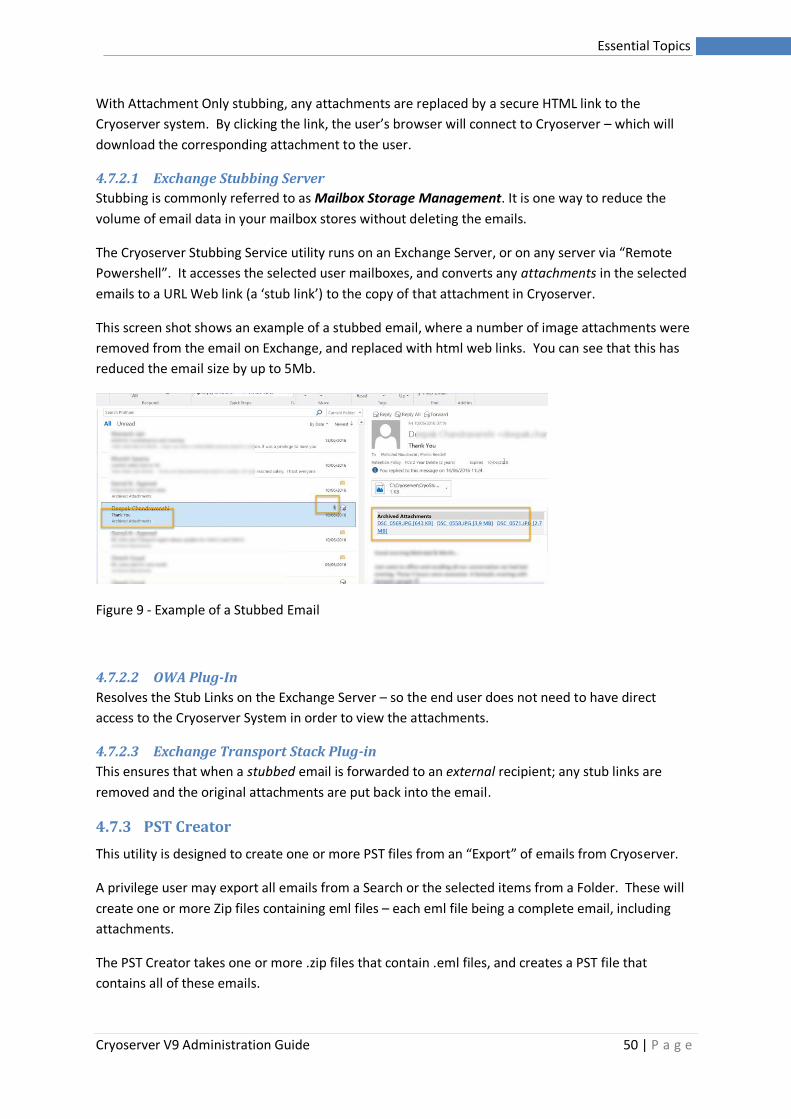
Cryoserver V9 Administration Guide 50 | P a g e
Essential Topics
With Attachment Only stubbing, any attachments are replaced by a secure HTML link to the
Cryoserver system. By clicking the link, the user’s browser will connect to Cryoserver – which will
download the corresponding attachment to the user.
4.7.2.1 Exchange Stubbing Server
Stubbing is commonly referred to as Mailbox Storage Management. It is one way to reduce the
volume of email data in your mailbox stores without deleting the emails.
The Cryoserver Stubbing Service utility runs on an Exchange Server, or on any server via “Remote
Powershell”. It accesses the selected user mailboxes, and converts any attachments in the selected
emails to a URL Web link (a ‘stub link’) to the copy of that attachment in Cryoserver.
This screen shot shows an example of a stubbed email, where a number of image attachments were
removed from the email on Exchange, and replaced with html web links. You can see that this has
reduced the email size by up to 5Mb.
Figure 9 - Example of a Stubbed Email
4.7.2.2 OWA Plug-In
Resolves the Stub Links on the Exchange Server – so the end user does not need to have direct
access to the Cryoserver System in order to view the attachments.
4.7.2.3 Exchange Transport Stack Plug-in
This ensures that when a stubbed email is forwarded to an external recipient; any stub links are
removed and the original attachments are put back into the email.
4.7.3 PST Creator
This utility is designed to create one or more PST files from an “Export” of emails from Cryoserver.
A privilege user may export all emails from a Search or the selected items from a Folder. These will
create one or more Zip files containing eml files – each eml file being a complete email, including
attachments.
The PST Creator takes one or more .zip files that contain .eml files, and creates a PST file that
contains all of these emails.
Cryoserver V9 Administration Guide 51 | P a g e
Essential Topics
This utility can be obtained from http://apps.cryoserver.com
4.7.4 GroupWise email collector
GroupWise does not have a Journaling facility. Instead it offers a ‘Trusted Application facility –
allowing the application to have the privilege to access every user mailbox. And it offers a
‘Retention Flag’ system, where emails are prevented from being permanently deleted until the
Trusted Application has read the emails, and updated the retention flag (a date/time stamp) on that
users’ mailbox.
The GroupWise email collector (GCIDaemon) is used to read emails from all Postoffice Mailboxes,
and transfer them to Cryoserver. It uses IMAP with a Trusted Connection to gain access to every
user’s mailbox. It can be used to read current ‘live’ email, as well as bulk reading all existing emails.
Configurations are done by Cryoserver Support personnel.
4.7.5 Lync / Skype for Business utility
It is possible to extract Instant Messaging (IM) conversations from Lync or Skype for Business (S4B)
using a PowerShell command. However, to pass this data over to a Cryoserver system, on a regular
basis requires an application.
Cryoserver has a utility application that can regularly extract these Lync / S4B conversations and
send each as a specially formatted transcript. It will send them using SMTP – as standard emails – to
the required Cryoserver system, meaning that it supports both on-premise and cloud hosted
archives.
4.7.6 Bulk Export from Cryoserver
If there is a need to export some emails from Cryoserver, any Privilege user has the ability to export
a few thousand emails. The output will be one or more .Zip files, each containing up to 20,000 email
files (.eml files). This works well when the quantity of emails is moderately limited (up to 10Gb
exports).
If a huge export is required – say for 200 Gb or more – then this is possible to perform directly on the
server. However, this service will need to be performed by a Cryoserver Support Engineer by
request. This would be a chargeable service due to the time and complexities that these exports
often encounter.
This service can be used to Export out mail for a particular domain or that reference one of a
number of email addresses (typically used if a company splits off a business unit). It can also select
mail from a date range.
The Cryoserver Export facilities can create Envelope Wrapped emails – which will include the BCC
and expanded Distribution Group recipients (if these were available in the original email).
4.8 Document types (email / im / voice)
Cryoserver is designed to work with Email type data. However, some emails can be containers for
additional types of data. One type is Instant Messaging (IM) transcripts – an MSN ‘chat’ log / Lync /
Skype for Business conversations.
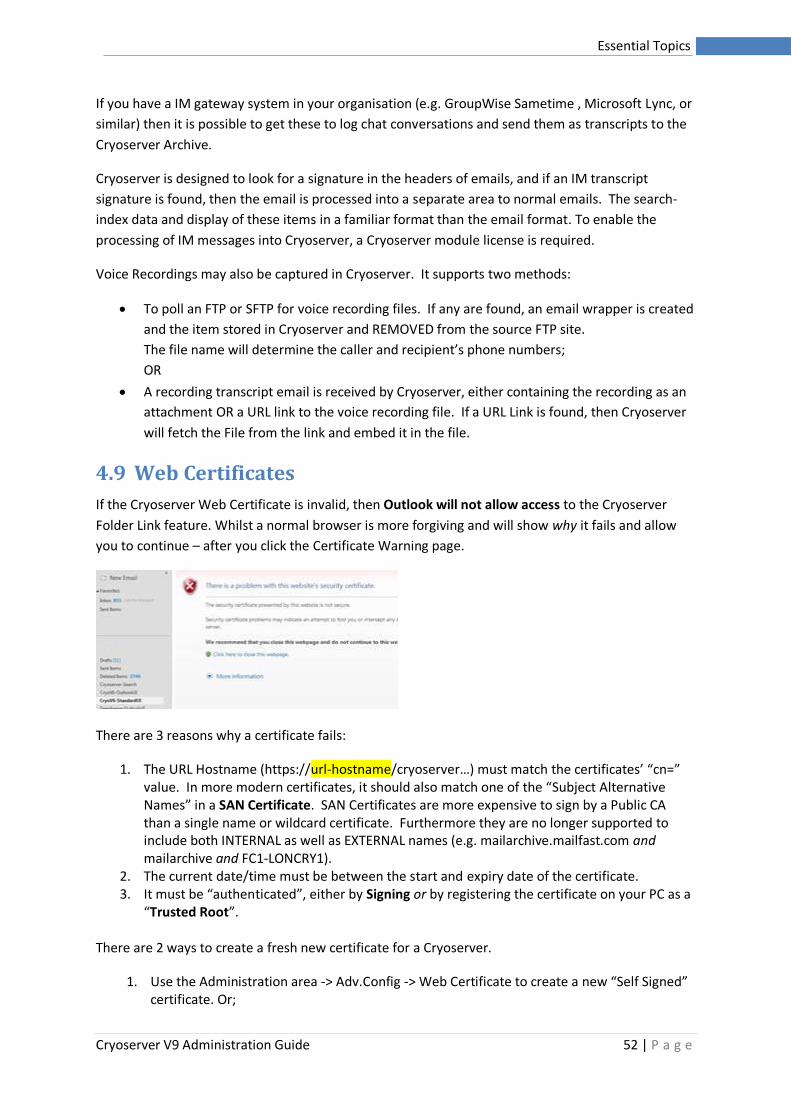
Cryoserver V9 Administration Guide 52 | P a g e
Essential Topics
If you have a IM gateway system in your organisation (e.g. GroupWise Sametime , Microsoft Lync, or
similar) then it is possible to get these to log chat conversations and send them as transcripts to the
Cryoserver Archive.
Cryoserver is designed to look for a signature in the headers of emails, and if an IM transcript
signature is found, then the email is processed into a separate area to normal emails. The search-
index data and display of these items in a familiar format than the email format. To enable the
processing of IM messages into Cryoserver, a Cryoserver module license is required.
Voice Recordings may also be captured in Cryoserver. It supports two methods:
• To poll an FTP or SFTP for voice recording files. If any are found, an email wrapper is created
and the item stored in Cryoserver and REMOVED from the source FTP site.
The file name will determine the caller and recipient’s phone numbers;
OR
• A recording transcript email is received by Cryoserver, either containing the recording as an
attachment OR a URL link to the voice recording file. If a URL Link is found, then Cryoserver
will fetch the File from the link and embed it in the file.
4.9 Web Certificates
If the Cryoserver Web Certificate is invalid, then Outlook will not allow access to the Cryoserver
Folder Link feature. Whilst a normal browser is more forgiving and will show why it fails and allow
you to continue – after you click the Certificate Warning page.
There are 3 reasons why a certificate fails:
1. The URL Hostname (https://url-hostname/cryoserver…) must match the certificates’ “cn=” value. In more modern certificates, it should also match one of the “Subject Alternative Names” in a SAN Certificate. SAN Certificates are more expensive to sign by a Public CA than a single name or wildcard certificate. Furthermore they are no longer supported to include both INTERNAL as well as EXTERNAL names (e.g. mailarchive.mailfast.com and mailarchive and FC1-LONCRY1).
2. The current date/time must be between the start and expiry date of the certificate. 3. It must be “authenticated”, either by Signing or by registering the certificate on your PC as a
“Trusted Root”. There are 2 ways to create a fresh new certificate for a Cryoserver.
1. Use the Administration area -> Adv.Config -> Web Certificate to create a new “Self Signed” certificate. Or;
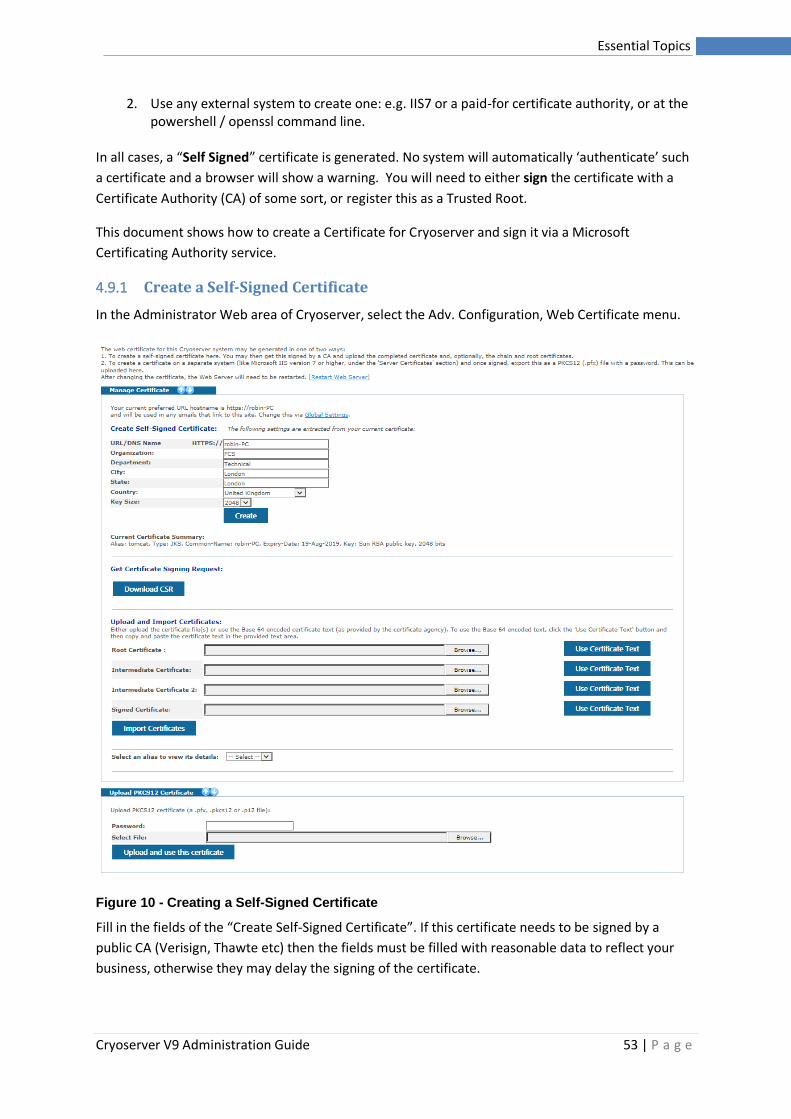
Cryoserver V9 Administration Guide 53 | P a g e
Essential Topics
2. Use any external system to create one: e.g. IIS7 or a paid-for certificate authority, or at the powershell / openssl command line.
In all cases, a “Self Signed” certificate is generated. No system will automatically ‘authenticate’ such
a certificate and a browser will show a warning. You will need to either sign the certificate with a
Certificate Authority (CA) of some sort, or register this as a Trusted Root.
This document shows how to create a Certificate for Cryoserver and sign it via a Microsoft
Certificating Authority service.
4.9.1 Create a Self-Signed Certificate
In the Administrator Web area of Cryoserver, select the Adv. Configuration, Web Certificate menu.
Figure 10 - Creating a Self-Signed Certificate
Fill in the fields of the “Create Self-Signed Certificate”. If this certificate needs to be signed by a
public CA (Verisign, Thawte etc) then the fields must be filled with reasonable data to reflect your
business, otherwise they may delay the signing of the certificate.
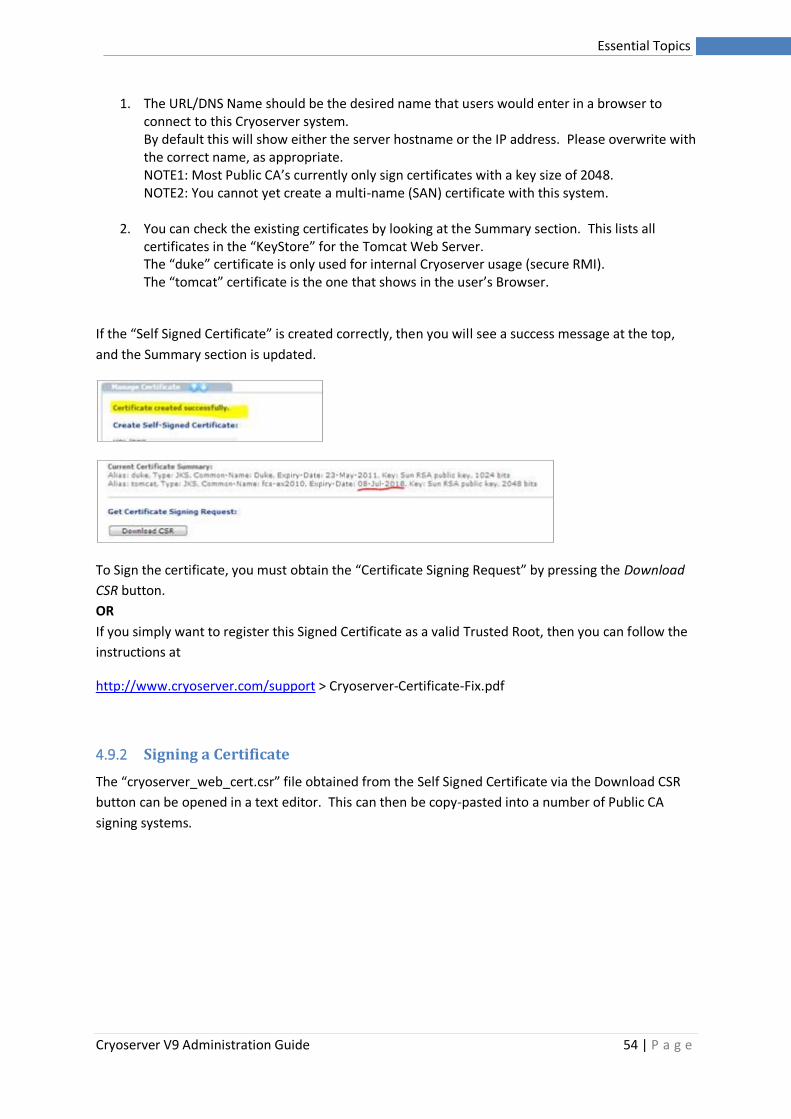
Cryoserver V9 Administration Guide 54 | P a g e
Essential Topics
1. The URL/DNS Name should be the desired name that users would enter in a browser to connect to this Cryoserver system. By default this will show either the server hostname or the IP address. Please overwrite with the correct name, as appropriate. NOTE1: Most Public CA’s currently only sign certificates with a key size of 2048. NOTE2: You cannot yet create a multi-name (SAN) certificate with this system.
2. You can check the existing certificates by looking at the Summary section. This lists all certificates in the “KeyStore” for the Tomcat Web Server. The “duke” certificate is only used for internal Cryoserver usage (secure RMI). The “tomcat” certificate is the one that shows in the user’s Browser.
If the “Self Signed Certificate” is created correctly, then you will see a success message at the top,
and the Summary section is updated.
To Sign the certificate, you must obtain the “Certificate Signing Request” by pressing the Download
CSR button.
OR
If you simply want to register this Signed Certificate as a valid Trusted Root, then you can follow the
instructions at
http://www.cryoserver.com/support > Cryoserver-Certificate-Fix.pdf
4.9.2 Signing a Certificate
The “cryoserver_web_cert.csr” file obtained from the Self Signed Certificate via the Download CSR
button can be opened in a text editor. This can then be copy-pasted into a number of Public CA
signing systems.
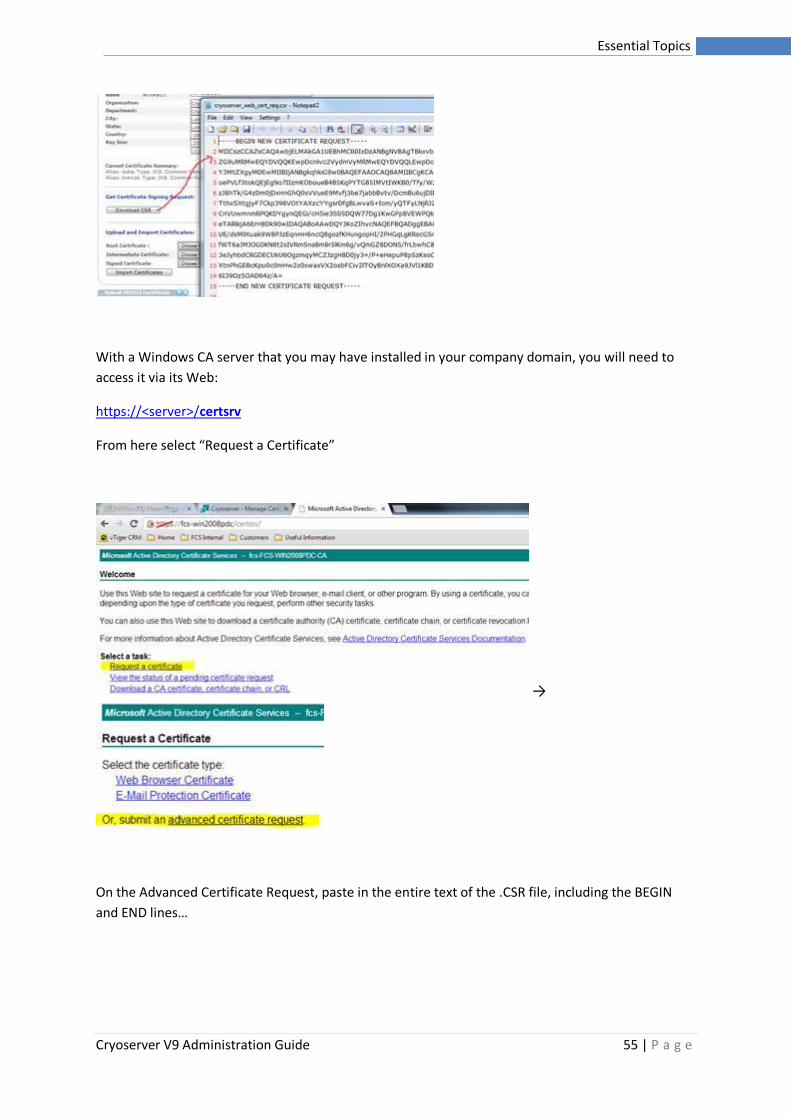
Cryoserver V9 Administration Guide 55 | P a g e
Essential Topics
With a Windows CA server that you may have installed in your company domain, you will need to
access it via its Web:
https://<server>/certsrv
From here select “Request a Certificate”
→
On the Advanced Certificate Request, paste in the entire text of the .CSR file, including the BEGIN
and END lines…
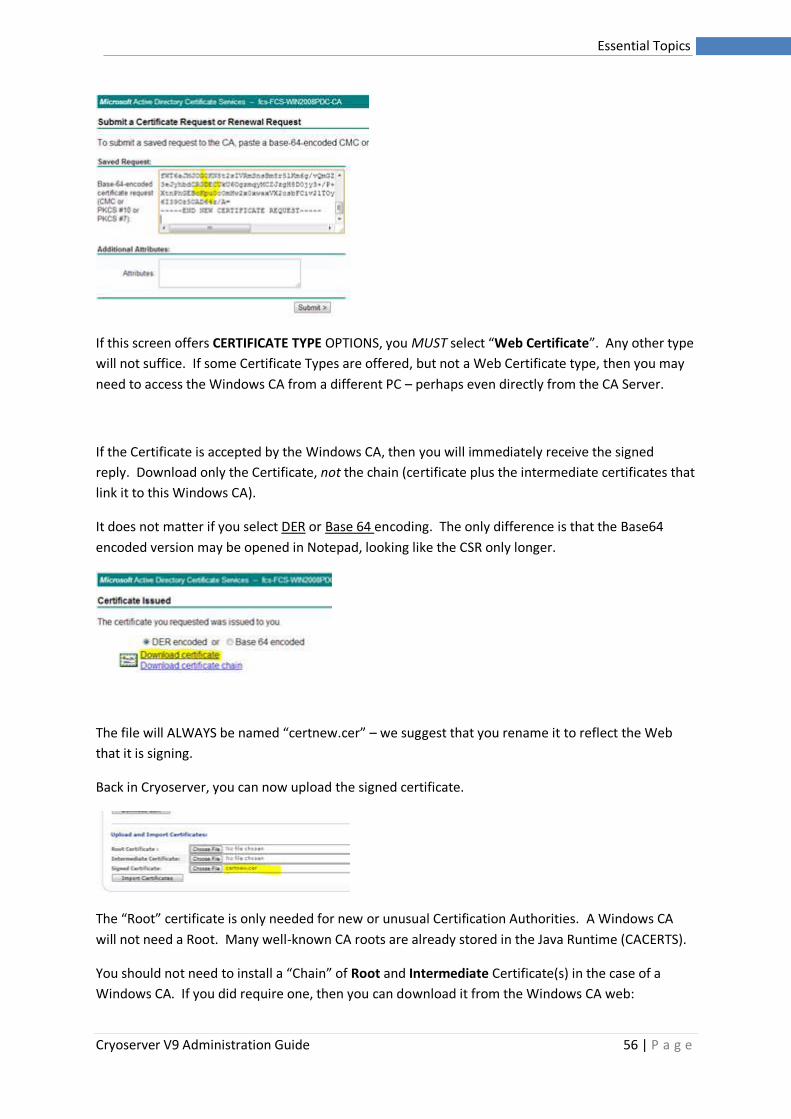
Cryoserver V9 Administration Guide 56 | P a g e
Essential Topics
If this screen offers CERTIFICATE TYPE OPTIONS, you MUST select “Web Certificate”. Any other type
will not suffice. If some Certificate Types are offered, but not a Web Certificate type, then you may
need to access the Windows CA from a different PC – perhaps even directly from the CA Server.
If the Certificate is accepted by the Windows CA, then you will immediately receive the signed
reply. Download only the Certificate, not the chain (certificate plus the intermediate certificates that
link it to this Windows CA).
It does not matter if you select DER or Base 64 encoding. The only difference is that the Base64
encoded version may be opened in Notepad, looking like the CSR only longer.
The file will ALWAYS be named “certnew.cer” – we suggest that you rename it to reflect the Web
that it is signing.
Back in Cryoserver, you can now upload the signed certificate.
The “Root” certificate is only needed for new or unusual Certification Authorities. A Windows CA
will not need a Root. Many well-known CA roots are already stored in the Java Runtime (CACERTS).
You should not need to install a “Chain” of Root and Intermediate Certificate(s) in the case of a
Windows CA. If you did require one, then you can download it from the Windows CA web:
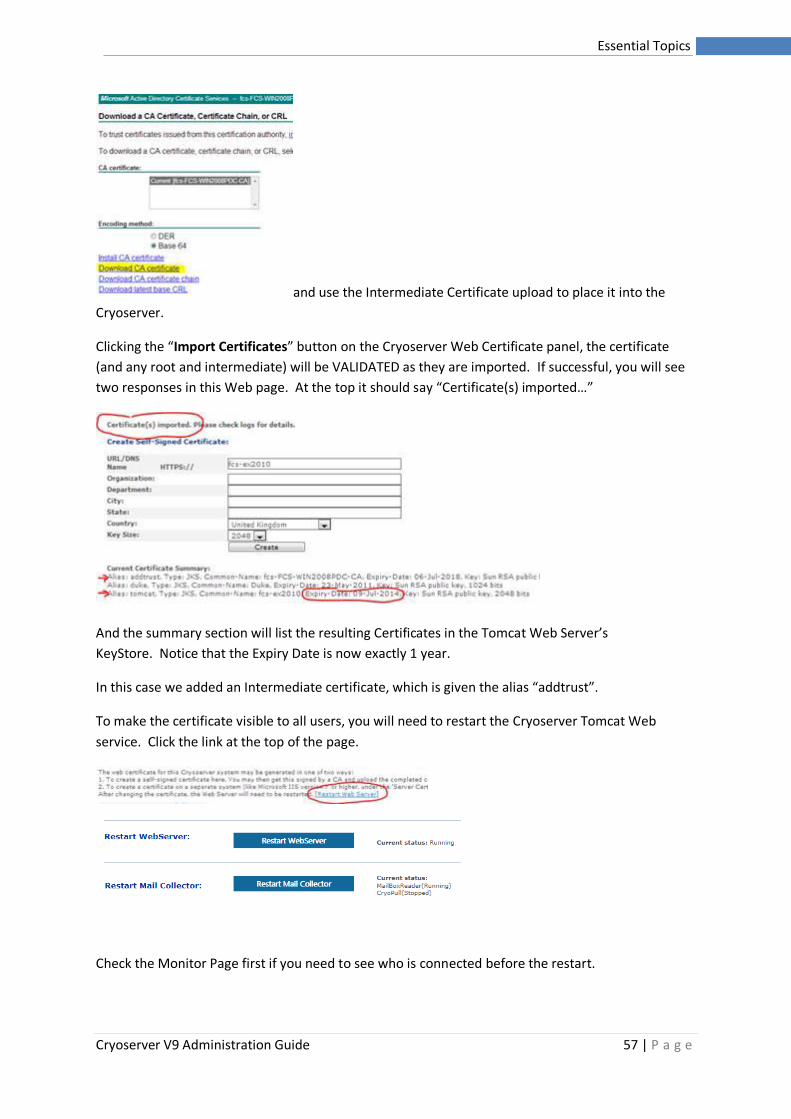
Cryoserver V9 Administration Guide 57 | P a g e
Essential Topics
and use the Intermediate Certificate upload to place it into the
Cryoserver.
Clicking the “Import Certificates” button on the Cryoserver Web Certificate panel, the certificate
(and any root and intermediate) will be VALIDATED as they are imported. If successful, you will see
two responses in this Web page. At the top it should say “Certificate(s) imported…”
And the summary section will list the resulting Certificates in the Tomcat Web Server’s
KeyStore. Notice that the Expiry Date is now exactly 1 year.
In this case we added an Intermediate certificate, which is given the alias “addtrust”.
To make the certificate visible to all users, you will need to restart the Cryoserver Tomcat Web
service. Click the link at the top of the page.
Check the Monitor Page first if you need to see who is connected before the restart.
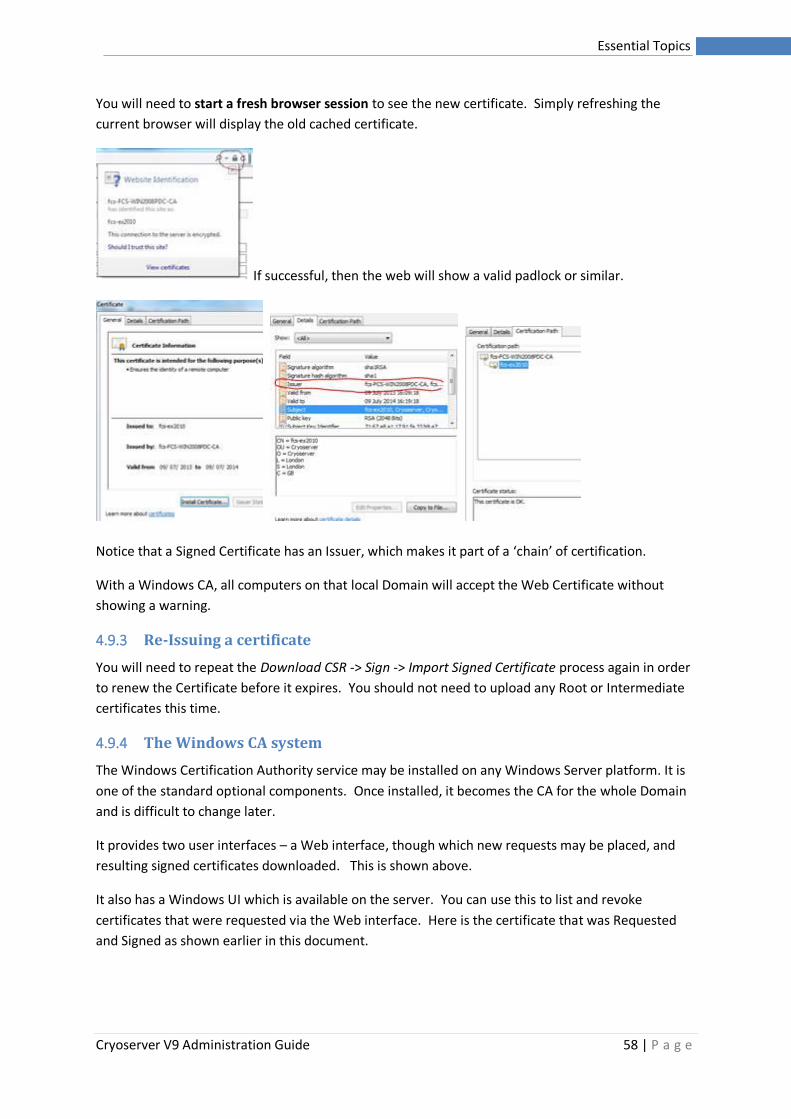
Cryoserver V9 Administration Guide 58 | P a g e
Essential Topics
You will need to start a fresh browser session to see the new certificate. Simply refreshing the
current browser will display the old cached certificate.
If successful, then the web will show a valid padlock or similar.
Notice that a Signed Certificate has an Issuer, which makes it part of a ‘chain’ of certification.
With a Windows CA, all computers on that local Domain will accept the Web Certificate without
showing a warning.
4.9.3 Re-Issuing a certificate
You will need to repeat the Download CSR -> Sign -> Import Signed Certificate process again in order
to renew the Certificate before it expires. You should not need to upload any Root or Intermediate
certificates this time.
4.9.4 The Windows CA system
The Windows Certification Authority service may be installed on any Windows Server platform. It is
one of the standard optional components. Once installed, it becomes the CA for the whole Domain
and is difficult to change later.
It provides two user interfaces – a Web interface, though which new requests may be placed, and
resulting signed certificates downloaded. This is shown above.
It also has a Windows UI which is available on the server. You can use this to list and revoke
certificates that were requested via the Web interface. Here is the certificate that was Requested
and Signed as shown earlier in this document.
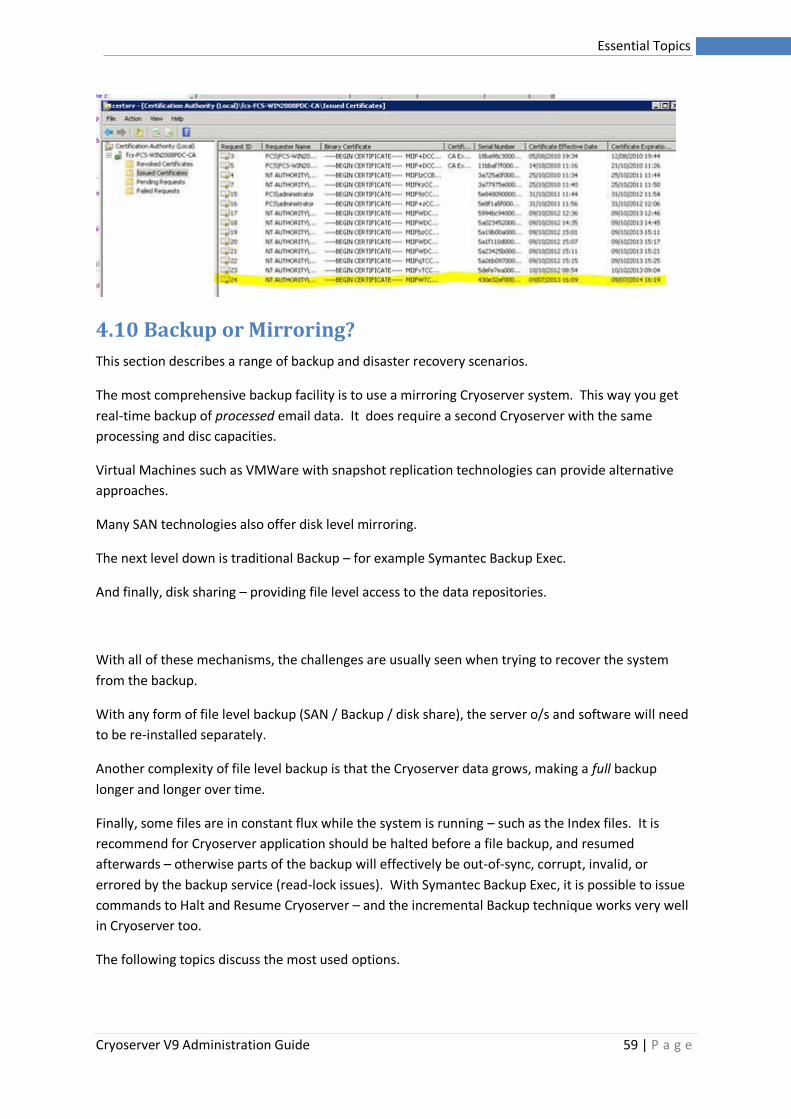
Cryoserver V9 Administration Guide 59 | P a g e
Essential Topics
4.10 Backup or Mirroring?
This section describes a range of backup and disaster recovery scenarios.
The most comprehensive backup facility is to use a mirroring Cryoserver system. This way you get
real-time backup of processed email data. It does require a second Cryoserver with the same
processing and disc capacities.
Virtual Machines such as VMWare with snapshot replication technologies can provide alternative
approaches.
Many SAN technologies also offer disk level mirroring.
The next level down is traditional Backup – for example Symantec Backup Exec.
And finally, disk sharing – providing file level access to the data repositories.
With all of these mechanisms, the challenges are usually seen when trying to recover the system
from the backup.
With any form of file level backup (SAN / Backup / disk share), the server o/s and software will need
to be re-installed separately.
Another complexity of file level backup is that the Cryoserver data grows, making a full backup
longer and longer over time.
Finally, some files are in constant flux while the system is running – such as the Index files. It is
recommend for Cryoserver application should be halted before a file backup, and resumed
afterwards – otherwise parts of the backup will effectively be out-of-sync, corrupt, invalid, or
errored by the backup service (read-lock issues). With Symantec Backup Exec, it is possible to issue
commands to Halt and Resume Cryoserver – and the incremental Backup technique works very well
in Cryoserver too.
The following topics discuss the most used options.
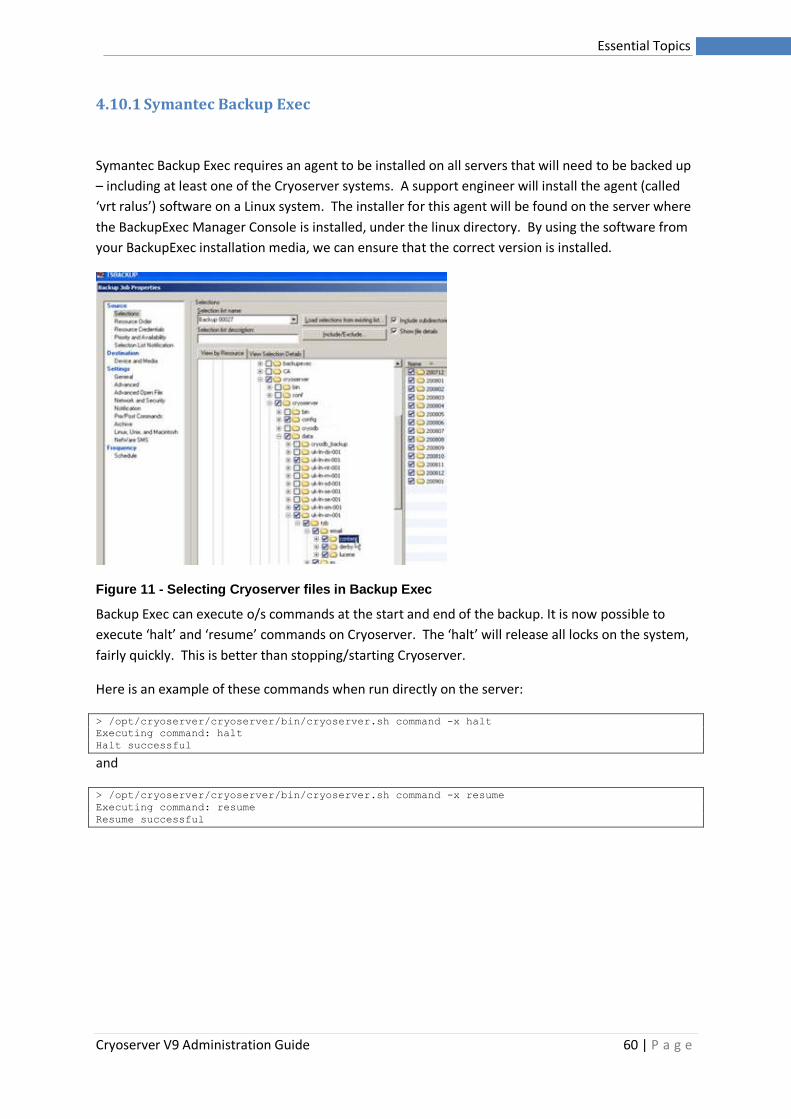
Cryoserver V9 Administration Guide 60 | P a g e
Essential Topics
4.10.1 Symantec Backup Exec
Symantec Backup Exec requires an agent to be installed on all servers that will need to be backed up
– including at least one of the Cryoserver systems. A support engineer will install the agent (called
‘vrt ralus’) software on a Linux system. The installer for this agent will be found on the server where
the BackupExec Manager Console is installed, under the linux directory. By using the software from
your BackupExec installation media, we can ensure that the correct version is installed.
Figure 11 - Selecting Cryoserver files in Backup Exec
Backup Exec can execute o/s commands at the start and end of the backup. It is now possible to
execute ‘halt’ and ‘resume’ commands on Cryoserver. The ‘halt’ will release all locks on the system,
fairly quickly. This is better than stopping/starting Cryoserver.
Here is an example of these commands when run directly on the server:
> /opt/cryoserver/cryoserver/bin/cryoserver.sh command -x halt
Executing command: halt
Halt successful
and
> /opt/cryoserver/cryoserver/bin/cryoserver.sh command -x resume
Executing command: resume
Resume successful
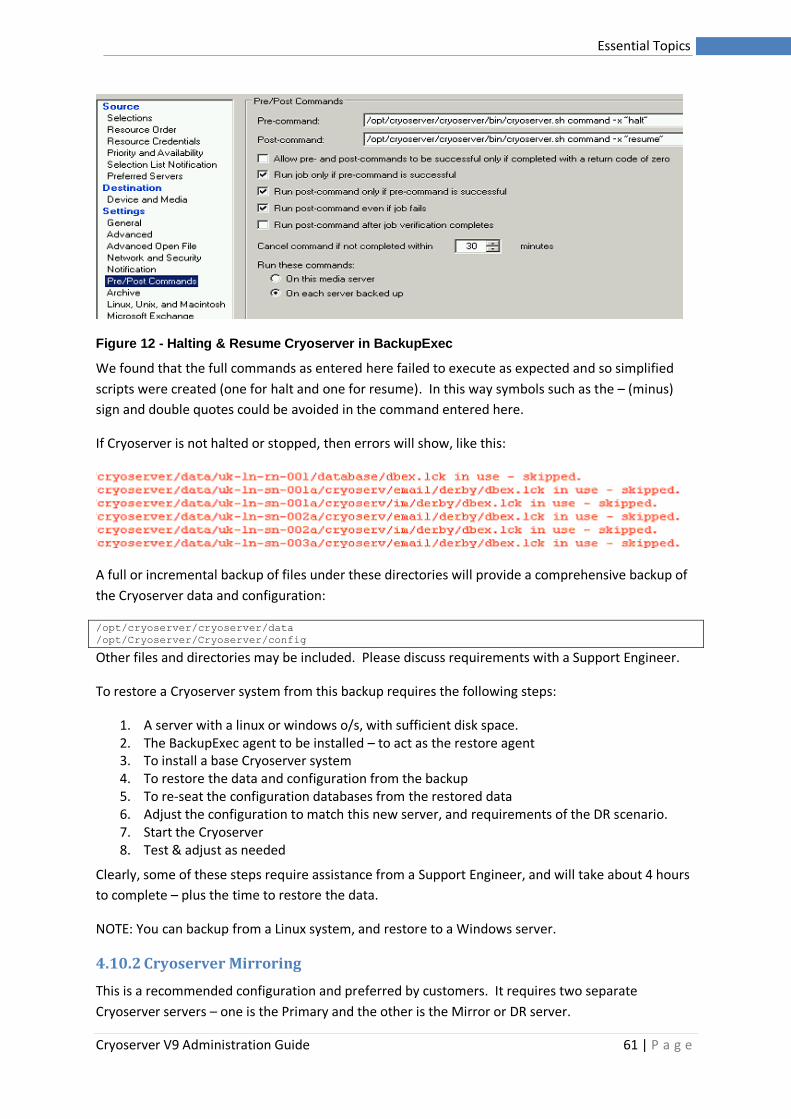
Cryoserver V9 Administration Guide 61 | P a g e
Essential Topics
Figure 12 - Halting & Resume Cryoserver in BackupExec
We found that the full commands as entered here failed to execute as expected and so simplified
scripts were created (one for halt and one for resume). In this way symbols such as the – (minus)
sign and double quotes could be avoided in the command entered here.
If Cryoserver is not halted or stopped, then errors will show, like this:
A full or incremental backup of files under these directories will provide a comprehensive backup of
the Cryoserver data and configuration:
/opt/cryoserver/cryoserver/data
/opt/Cryoserver/Cryoserver/config
Other files and directories may be included. Please discuss requirements with a Support Engineer.
To restore a Cryoserver system from this backup requires the following steps:
1. A server with a linux or windows o/s, with sufficient disk space. 2. The BackupExec agent to be installed – to act as the restore agent 3. To install a base Cryoserver system 4. To restore the data and configuration from the backup 5. To re-seat the configuration databases from the restored data 6. Adjust the configuration to match this new server, and requirements of the DR scenario. 7. Start the Cryoserver 8. Test & adjust as needed
Clearly, some of these steps require assistance from a Support Engineer, and will take about 4 hours
to complete – plus the time to restore the data.
NOTE: You can backup from a Linux system, and restore to a Windows server.
4.10.2 Cryoserver Mirroring
This is a recommended configuration and preferred by customers. It requires two separate
Cryoserver servers – one is the Primary and the other is the Mirror or DR server.
Cryoserver V9 Administration Guide 62 | P a g e
Journal Mail flows to the Primary server, where it queues up as a set of simple text files – in the
‘spool queue’. These are not mirrored.
Cryoserver then processes each mail in the spool queue, and if a mirror server is configured, then
the email data is set over to the mirror server at that time. Any issues that occur will result in the
email(s) being errored – ensuring that both servers have matching data in their stores.
Other benefits of a Mirroring configuration:
• Searches will be performed across both servers – ensuring that CPU and disk activity is spread across systems. [This can be adjusted to target specific servers]
• The Status of the all servers is visible on the Monitor page.
• Re-spooled error emails will continue their processing from the point that they last reached – ensuring that the two servers are in sync.
• The synchronisation is in Real-Time – unlike a backup which can become several hours out of date.
A Mirror Cryoserver can be made into a complete standalone server, when a DR situation arises.
Currently a Support Engineer is required to oversee the process, but it should only take a few
minutes to get the system up and running again.
4.10.3 Cryoserver Email Copy feature
This feature, historically known as “Trash-Copy”, is a way to have two entirely independent
Cryoserver systems with one server sending a copy of every mail – in Scheduled Batches – to the
other server, where they are processed again.
In this scenario, the second or ‘central’ Cryoserver system could potentially take copy feeds from
multiple satellite Cryoserver systems.
As all systems are effectively independent full working Cryoservers’, they are all immediately
searchable, and can be maintained (stopped/started/upgraded etc.) independently of each other.
The copy feature will ensure that each email is held in a copy queue until it has been successfully
copied to the target server. If the target server is off-line for some days, the synchronisation queue
will grow and grow until the target server is back online.
A Cryoserver System Engineer is required to enable the trash-copy feature.
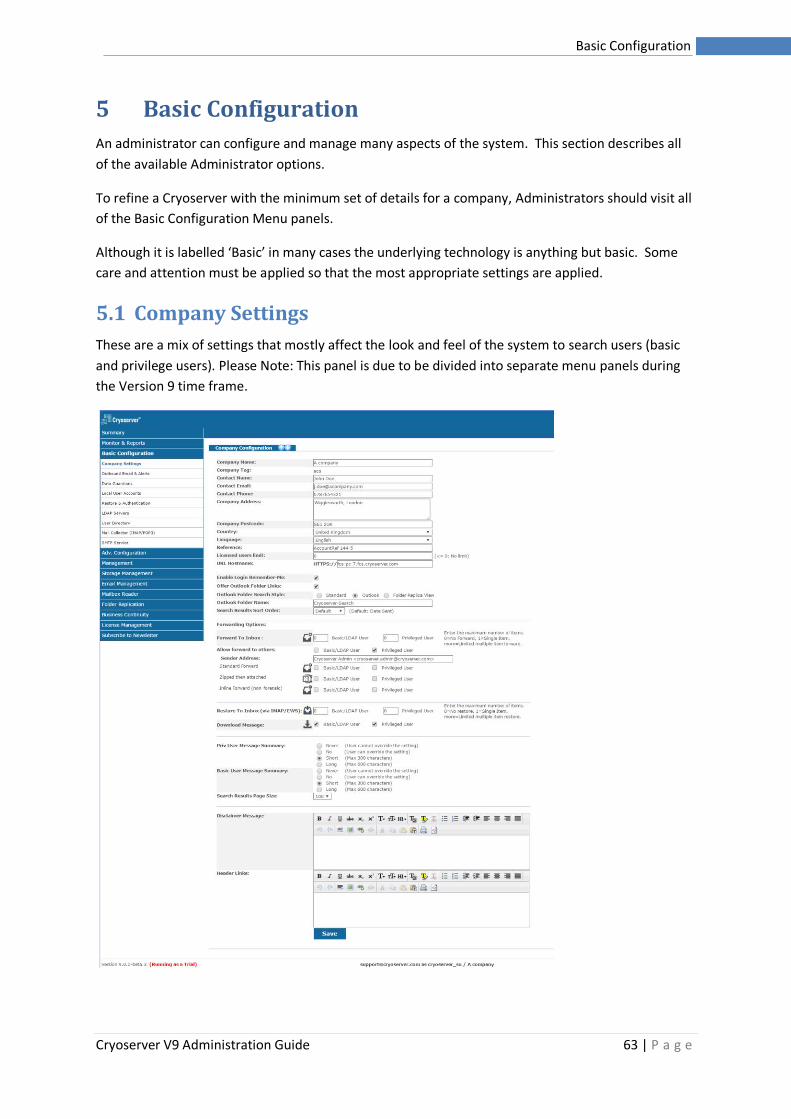
Cryoserver V9 Administration Guide 63 | P a g e
Basic Configuration
5 Basic Configuration
An administrator can configure and manage many aspects of the system. This section describes all
of the available Administrator options.
To refine a Cryoserver with the minimum set of details for a company, Administrators should visit all
of the Basic Configuration Menu panels.
Although it is labelled ‘Basic’ in many cases the underlying technology is anything but basic. Some
care and attention must be applied so that the most appropriate settings are applied.
5.1 Company Settings
These are a mix of settings that mostly affect the look and feel of the system to search users (basic
and privilege users). Please Note: This panel is due to be divided into separate menu panels during
the Version 9 time frame.

Cryoserver V9 Administration Guide 64 | P a g e
Basic Configuration
5.1.1 Company & Contact details
The Company Name should be set, as this is displayed throughout the system.
Set the name of the company and the contact details. The contact details are currently information
only.
The contact details are initially set during the Setup Wizard for all new Cryoserver installations, and
this contact is copied to the License Details. You can change the License Contact independently from
the Company Contact on this panel.
Company Name
The full name of the company. It will appear on the login page and in the footer line of all
subsequent pages, and on some alert emails.
Company Tag
This is a short ID name for the company. For multi-tenant Cryoserver systems, each company will
have a different Company-Tag.
This name can be used in the URL to access a specific company’s Login.
https://<cryo-hostname>/cryoserver/aco
This name cannot be changed (via the Admin area) after the company has been created.
The company tag is also displayed in any “Preferences” pop-up panel:
Contact Name / Email / Phone
Although these details are not currently used anywhere in Cryoserver, it is a good idea to ensure
that these are modified to include the best contact at the company for queries about Cryoserver –
both by your staff and users, and for Cryoserver Support technicians.
Cryoserver V9 Administration Guide 65 | P a g e
Basic Configuration
Reference
You may include any text as a “reference”. This could be used to link to an Accounting system,
project number or any other reference desired.
Cryoserver supports an API, allowing remote systems to connect and query various aspects of the
system. This reference, in combination with the API, could be used to automate some business
process.
Licensed Users Limit
This is the number of ‘active’ mailboxes that you believe should be being recorded by Cryoserver. As
emails are being archived, Cryoserver will be computing an “Active Mailbox Count”.
When the computed ‘active mailbox count’ exceeds this expected ‘licensed mailboxes’ then it
highlights the usage data to the administrator.
NOTE: “Active Accounts” are computed by Cryoserver as the number of unique ‘local’ email
addresses that were used for both sending and receiving mail. It is computed on a daily basis, and
averaged over the month. ‘Local’ addresses are defined as those that match the configured local
email domains.
URL Hostname
This is the base URL that you would prefer all of your users to access the system by. This should be
the fully qualified name [FQDN]. By this I mean the full URL including the company’s network
domain – typically in the form: hostname.company.com
By default the Cryoserver will use the server’s hostname as the base URL. This is often not the best
name to use – and instead a more suitable name is added into DNS. Now Cryoserver can be
accessed using 3 different URL’s:
https://server-hostname
https://dns-name
https://ip-address
So that cryoserver can generate emails that contain links to parts of the system: Password Reminder,
Export completed emails, scheduled search emails, stubbing attachment links; it is important to tell
Cryoserver which URL you would prefer to use.
And the Web Certificate should be created to match the preferred URL name. With a SAN
Certificate, you can also include all of the alternate URL names that should be accepted by browsers.
5.1.2 Login ‘Remember Me’
If this option is enabled, then a “Remember My Login” tick-box will show on the login page.
If a user ticks this option when they login, then their username and password will be encrypted and
stored in a browser cookie. The next time they access Cryoserver, the login page will be skipped.
This is particularly useful for the OUTLOOK folder link.
Use this if Single Sign On (SSO) facilities are not available.

Cryoserver V9 Administration Guide 66 | P a g e
Basic Configuration
NOTE: If the user explicitly ‘Logs Out’ of Cryoserver by clicking , then the ‘Remember-Me’
cookie is reset, and the user will need to re-enter their password.
5.1.3 Outlook Folder Link
Figure 13 - Login Remember-Me and Outlook Folder Links administrator options
The Outlook Folder Links are provided in TWO places. Firstly, on the Login Page:
Figure 14 - The Outlook Folder Link on the Login Page, if enabled.
The Folder in Outlook that is created when the user clicks the link will be given the name entered
here.
And secondly place that offers Outlook Folder Links is on the “Saved Search” panel. In this case the
Folder Link in Outlook is given the same name as the Saved Search.

Cryoserver V9 Administration Guide 67 | P a g e
Basic Configuration
Or..
Figure 15 - The Save Search Outlook Folder Link
When an end user clicks on one of these links, Cryoserver will download a bespoke Cryoserver VBS
Script to the user’s PC which can be executed if the Browser Permissions and any Global Policy
restrictions allow.
The effect of this VBS Script is to add a folder entry to the users Outlook Client, which has a “Home
Page” link to the Cryoserver URL.
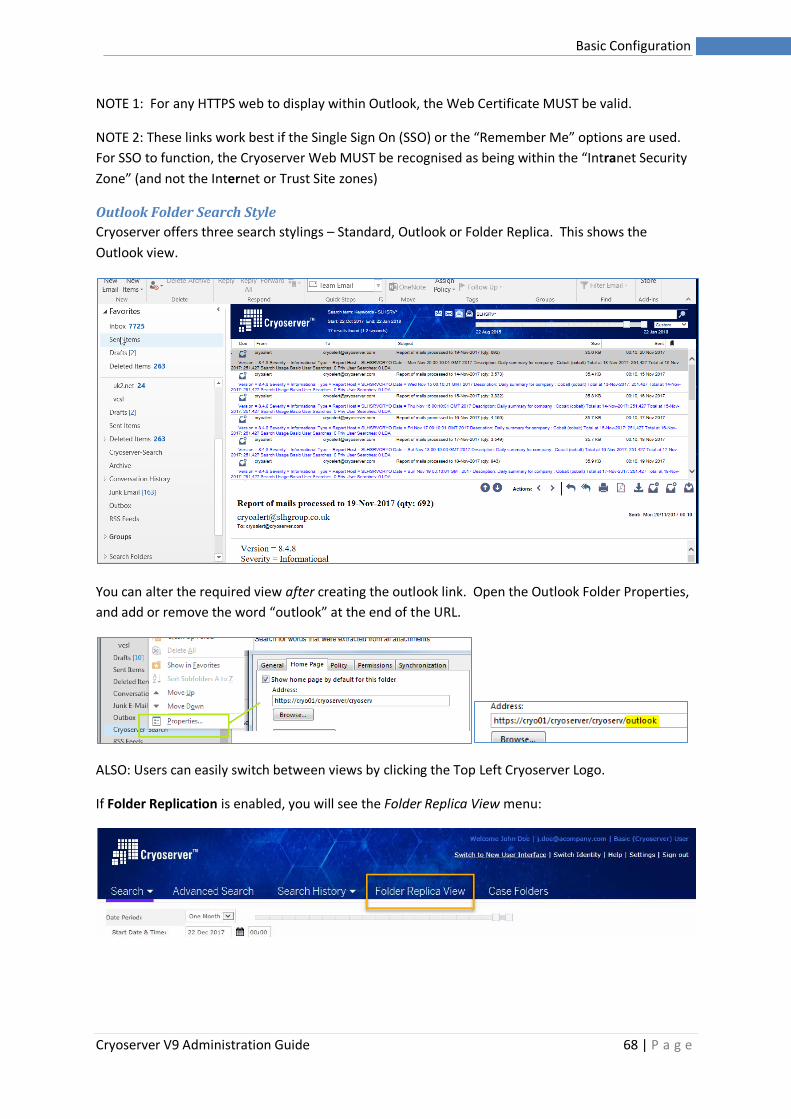
Cryoserver V9 Administration Guide 68 | P a g e
Basic Configuration
NOTE 1: For any HTTPS web to display within Outlook, the Web Certificate MUST be valid.
NOTE 2: These links work best if the Single Sign On (SSO) or the “Remember Me” options are used.
For SSO to function, the Cryoserver Web MUST be recognised as being within the “Intranet Security
Zone” (and not the Internet or Trust Site zones)
Outlook Folder Search Style
Cryoserver offers three search stylings – Standard, Outlook or Folder Replica. This shows the
Outlook view.
You can alter the required view after creating the outlook link. Open the Outlook Folder Properties,
and add or remove the word “outlook” at the end of the URL.
ALSO: Users can easily switch between views by clicking the Top Left Cryoserver Logo.
If Folder Replication is enabled, you will see the Folder Replica View menu:
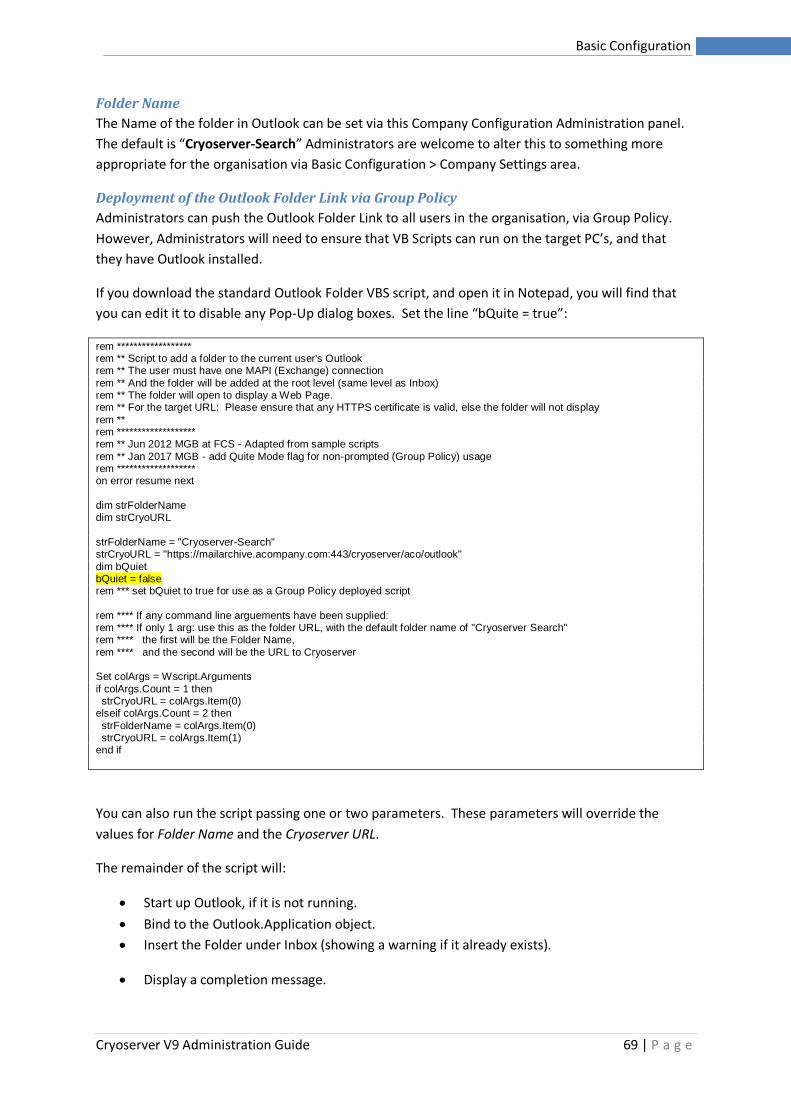
Cryoserver V9 Administration Guide 69 | P a g e
Basic Configuration
Folder Name
The Name of the folder in Outlook can be set via this Company Configuration Administration panel.
The default is “Cryoserver-Search” Administrators are welcome to alter this to something more
appropriate for the organisation via Basic Configuration > Company Settings area.
Deployment of the Outlook Folder Link via Group Policy
Administrators can push the Outlook Folder Link to all users in the organisation, via Group Policy.
However, Administrators will need to ensure that VB Scripts can run on the target PC’s, and that
they have Outlook installed.
If you download the standard Outlook Folder VBS script, and open it in Notepad, you will find that
you can edit it to disable any Pop-Up dialog boxes. Set the line “bQuite = true”:
rem ****************** rem ** Script to add a folder to the current user's Outlook rem ** The user must have one MAPI (Exchange) connection
rem ** And the folder will be added at the root level (same level as Inbox) rem ** The folder will open to display a Web Page. rem ** For the target URL: Please ensure that any HTTPS certificate is valid, else the folder will not display
rem ** rem ******************* rem ** Jun 2012 MGB at FCS - Adapted from sample scripts
rem ** Jan 2017 MGB - add Quite Mode flag for non-prompted (Group Policy) usage rem ******************* on error resume next
dim strFolderName dim strCryoURL
strFolderName = "Cryoserver-Search" strCryoURL = "https://mailarchive.acompany.com:443/cryoserver/aco/outlook"
dim bQuiet bQuiet = false rem *** set bQuiet to true for use as a Group Policy deployed script
rem **** If any command line arguements have been supplied: rem **** If only 1 arg: use this as the folder URL, with the default folder name of "Cryoserver Search" rem **** the first will be the Folder Name,
rem **** and the second will be the URL to Cryoserver Set colArgs = Wscript.Arguments
if colArgs.Count = 1 then strCryoURL = colArgs.Item(0) elseif colArgs.Count = 2 then
strFolderName = colArgs.Item(0) strCryoURL = colArgs.Item(1) end if
You can also run the script passing one or two parameters. These parameters will override the
values for Folder Name and the Cryoserver URL.
The remainder of the script will:
• Start up Outlook, if it is not running.
• Bind to the Outlook.Application object.
• Insert the Folder under Inbox (showing a warning if it already exists).
• Display a completion message.
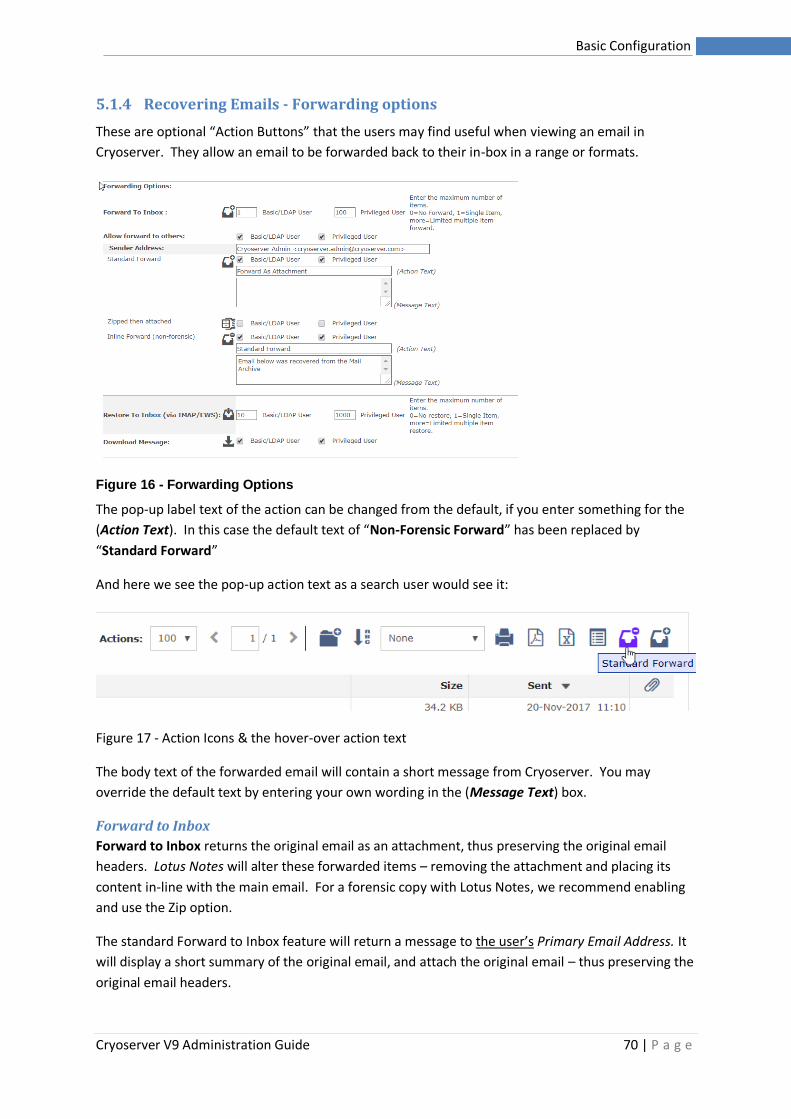
Cryoserver V9 Administration Guide 70 | P a g e
Basic Configuration
5.1.4 Recovering Emails - Forwarding options
These are optional “Action Buttons” that the users may find useful when viewing an email in
Cryoserver. They allow an email to be forwarded back to their in-box in a range or formats.
Figure 16 - Forwarding Options
The pop-up label text of the action can be changed from the default, if you enter something for the
(Action Text). In this case the default text of “Non-Forensic Forward” has been replaced by
“Standard Forward”
And here we see the pop-up action text as a search user would see it:
Figure 17 - Action Icons & the hover-over action text
The body text of the forwarded email will contain a short message from Cryoserver. You may
override the default text by entering your own wording in the (Message Text) box.
Forward to Inbox
Forward to Inbox returns the original email as an attachment, thus preserving the original email
headers. Lotus Notes will alter these forwarded items – removing the attachment and placing its
content in-line with the main email. For a forensic copy with Lotus Notes, we recommend enabling
and use the Zip option.
The standard Forward to Inbox feature will return a message to the user’s Primary Email Address. It
will display a short summary of the original email, and attach the original email – thus preserving the
original email headers.
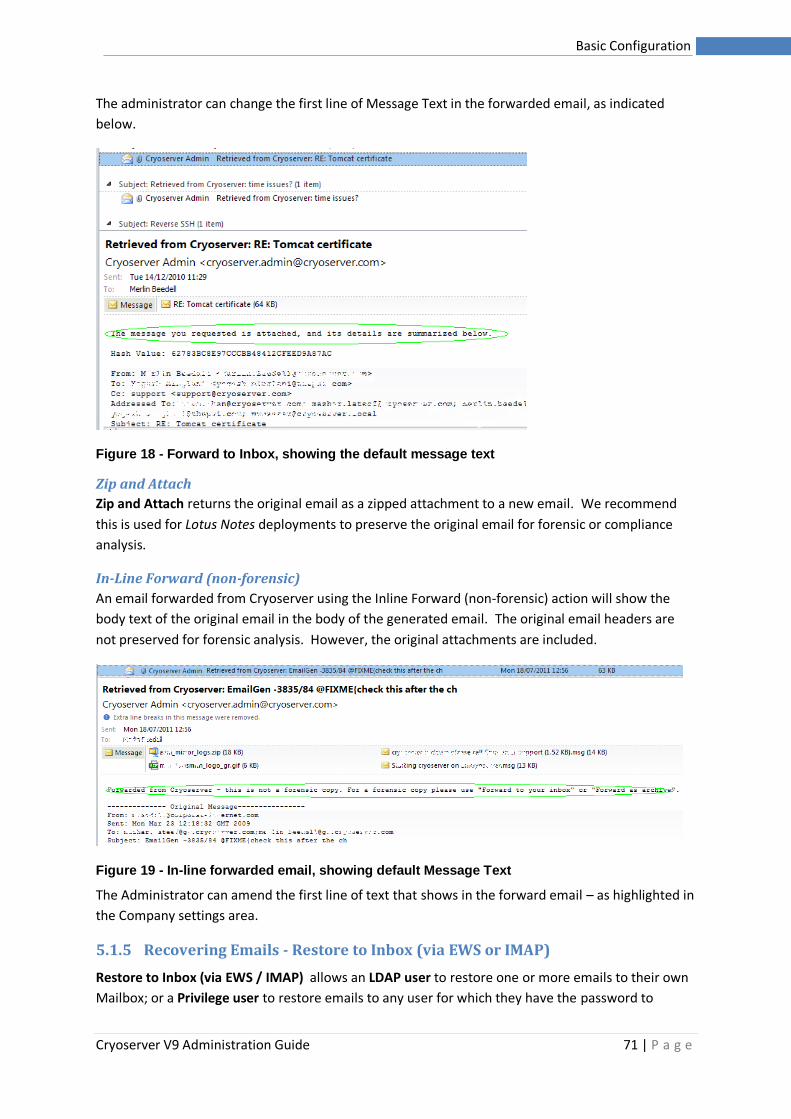
Cryoserver V9 Administration Guide 71 | P a g e
Basic Configuration
The administrator can change the first line of Message Text in the forwarded email, as indicated
below.
Figure 18 - Forward to Inbox, showing the default message text
Zip and Attach
Zip and Attach returns the original email as a zipped attachment to a new email. We recommend
this is used for Lotus Notes deployments to preserve the original email for forensic or compliance
analysis.
In-Line Forward (non-forensic)
An email forwarded from Cryoserver using the Inline Forward (non-forensic) action will show the
body text of the original email in the body of the generated email. The original email headers are
not preserved for forensic analysis. However, the original attachments are included.
Figure 19 - In-line forwarded email, showing default Message Text
The Administrator can amend the first line of text that shows in the forward email – as highlighted in
the Company settings area.
5.1.5 Recovering Emails - Restore to Inbox (via EWS or IMAP)
Restore to Inbox (via EWS / IMAP) allows an LDAP user to restore one or more emails to their own
Mailbox; or a Privilege user to restore emails to any user for which they have the password to
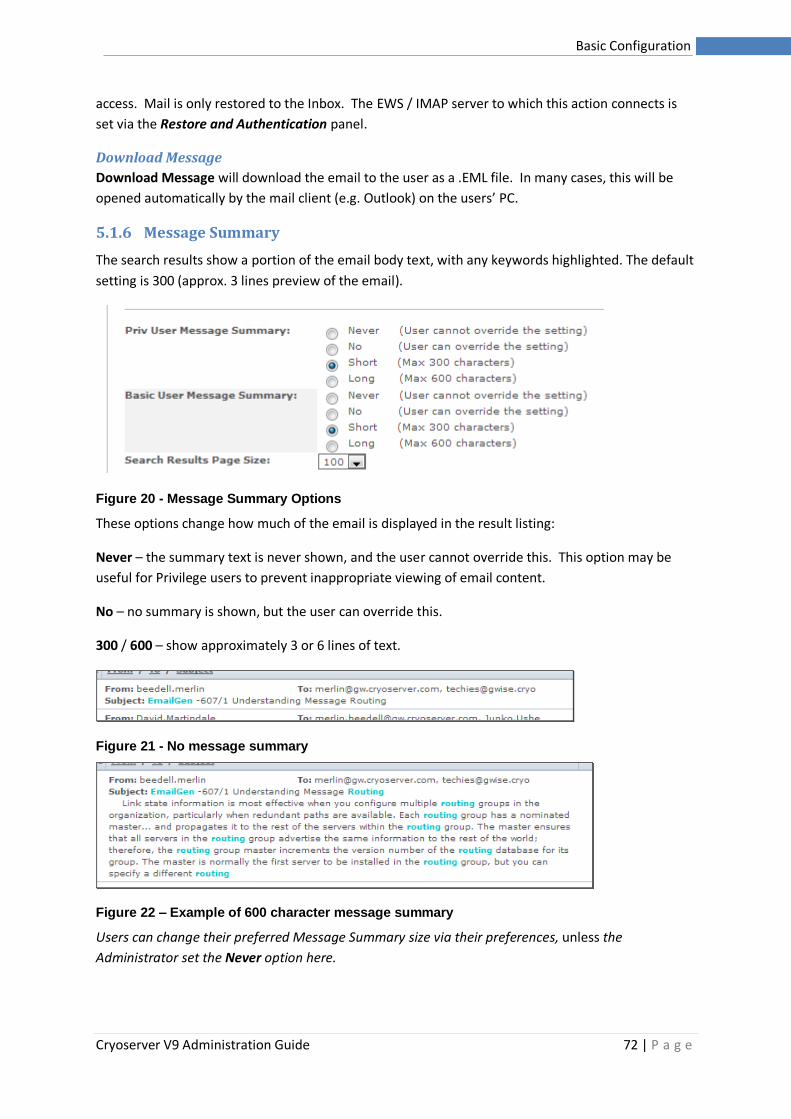
Cryoserver V9 Administration Guide 72 | P a g e
Basic Configuration
access. Mail is only restored to the Inbox. The EWS / IMAP server to which this action connects is
set via the Restore and Authentication panel.
Download Message
Download Message will download the email to the user as a .EML file. In many cases, this will be
opened automatically by the mail client (e.g. Outlook) on the users’ PC.
5.1.6 Message Summary
The search results show a portion of the email body text, with any keywords highlighted. The default
setting is 300 (approx. 3 lines preview of the email).
Figure 20 - Message Summary Options
These options change how much of the email is displayed in the result listing:
Never – the summary text is never shown, and the user cannot override this. This option may be
useful for Privilege users to prevent inappropriate viewing of email content.
No – no summary is shown, but the user can override this.
300 / 600 – show approximately 3 or 6 lines of text.
Figure 21 - No message summary
Figure 22 – Example of 600 character message summary
Users can change their preferred Message Summary size via their preferences, unless the
Administrator set the Never option here.
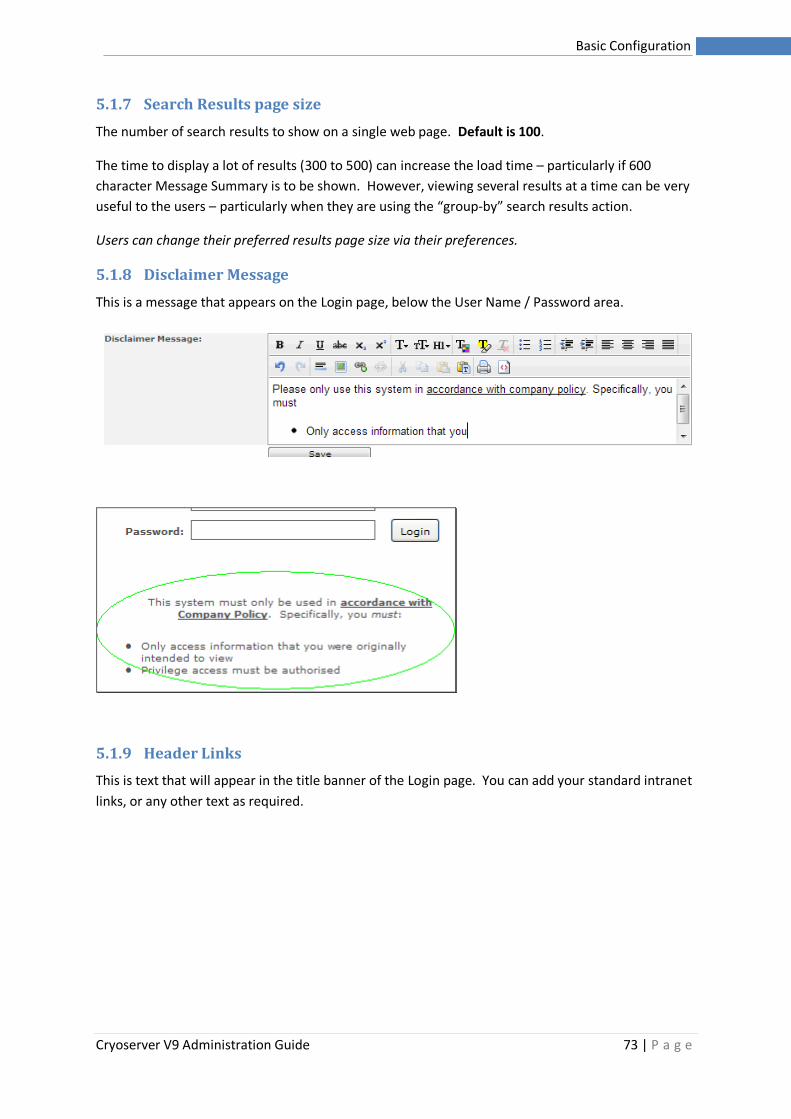
Cryoserver V9 Administration Guide 73 | P a g e
Basic Configuration
5.1.7 Search Results page size
The number of search results to show on a single web page. Default is 100.
The time to display a lot of results (300 to 500) can increase the load time – particularly if 600
character Message Summary is to be shown. However, viewing several results at a time can be very
useful to the users – particularly when they are using the “group-by” search results action.
Users can change their preferred results page size via their preferences.
5.1.8 Disclaimer Message
This is a message that appears on the Login page, below the User Name / Password area.
5.1.9 Header Links
This is text that will appear in the title banner of the Login page. You can add your standard intranet
links, or any other text as required.
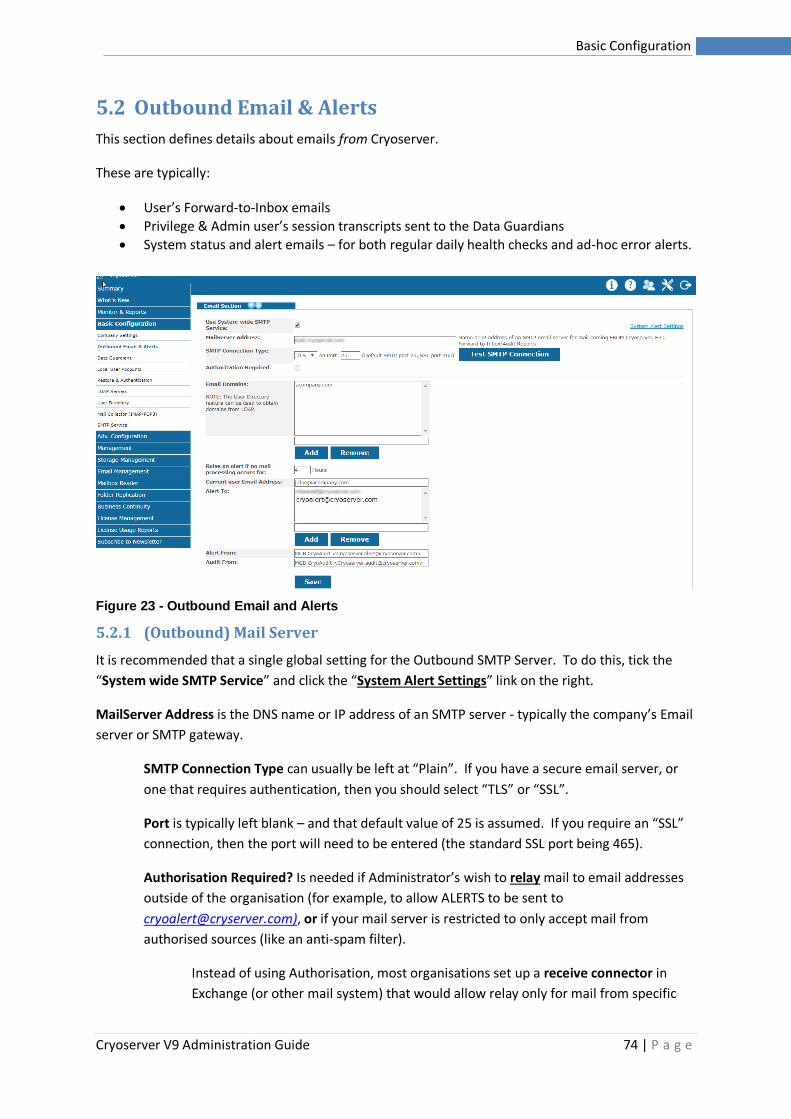
Cryoserver V9 Administration Guide 74 | P a g e
Basic Configuration
5.2 Outbound Email & Alerts
This section defines details about emails from Cryoserver.
These are typically:
• User’s Forward-to-Inbox emails
• Privilege & Admin user’s session transcripts sent to the Data Guardians
• System status and alert emails – for both regular daily health checks and ad-hoc error alerts.
Figure 23 - Outbound Email and Alerts
5.2.1 (Outbound) Mail Server
It is recommended that a single global setting for the Outbound SMTP Server. To do this, tick the
“System wide SMTP Service” and click the “System Alert Settings” link on the right.
MailServer Address is the DNS name or IP address of an SMTP server - typically the company’s Email
server or SMTP gateway.
SMTP Connection Type can usually be left at “Plain”. If you have a secure email server, or
one that requires authentication, then you should select “TLS” or “SSL”.
Port is typically left blank – and that default value of 25 is assumed. If you require an “SSL”
connection, then the port will need to be entered (the standard SSL port being 465).
Authorisation Required? Is needed if Administrator’s wish to relay mail to email addresses
outside of the organisation (for example, to allow ALERTS to be sent to
[email protected]), or if your mail server is restricted to only accept mail from
authorised sources (like an anti-spam filter).
Instead of using Authorisation, most organisations set up a receive connector in
Exchange (or other mail system) that would allow relay only for mail from specific
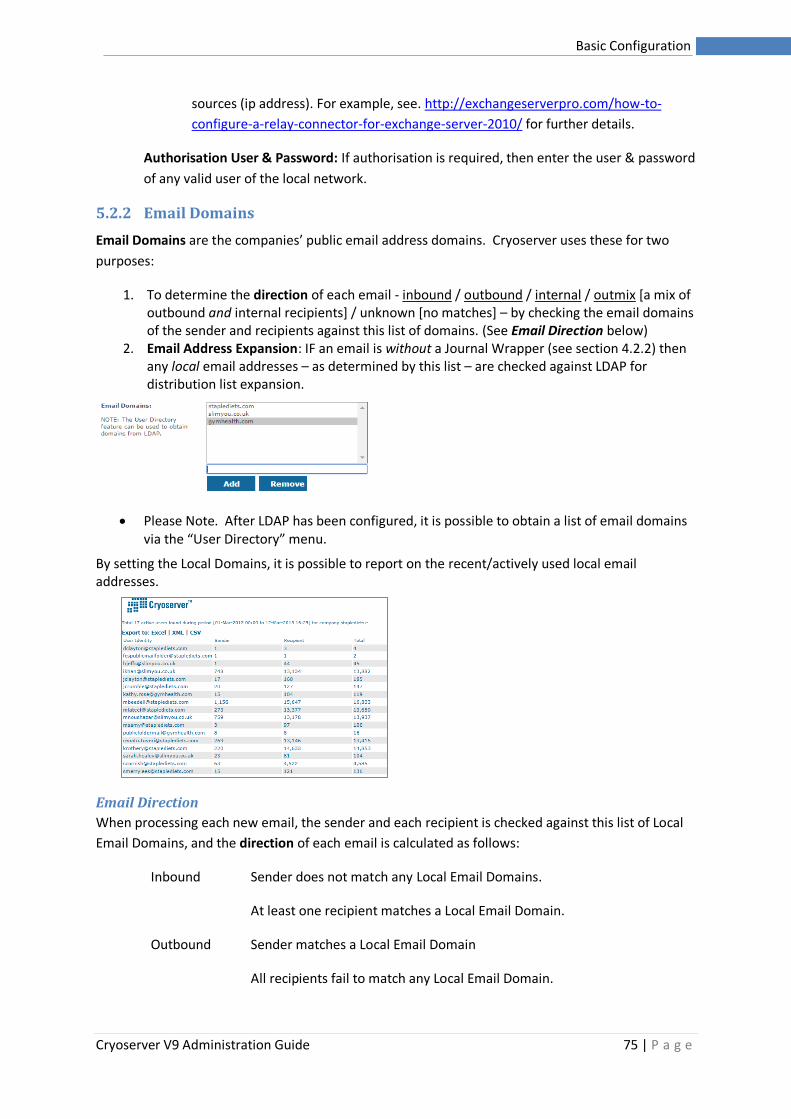
Cryoserver V9 Administration Guide 75 | P a g e
Basic Configuration
sources (ip address). For example, see. http://exchangeserverpro.com/how-to-
configure-a-relay-connector-for-exchange-server-2010/ for further details.
Authorisation User & Password: If authorisation is required, then enter the user & password
of any valid user of the local network.
5.2.2 Email Domains
Email Domains are the companies’ public email address domains. Cryoserver uses these for two
purposes:
1. To determine the direction of each email - inbound / outbound / internal / outmix [a mix of outbound and internal recipients] / unknown [no matches] – by checking the email domains of the sender and recipients against this list of domains. (See Email Direction below)
2. Email Address Expansion: IF an email is without a Journal Wrapper (see section 4.2.2) then any local email addresses – as determined by this list – are checked against LDAP for distribution list expansion.
• Please Note. After LDAP has been configured, it is possible to obtain a list of email domains via the “User Directory” menu.
By setting the Local Domains, it is possible to report on the recent/actively used local email addresses.
Email Direction
When processing each new email, the sender and each recipient is checked against this list of Local
Email Domains, and the direction of each email is calculated as follows:
Inbound Sender does not match any Local Email Domains.
At least one recipient matches a Local Email Domain.
Outbound Sender matches a Local Email Domain
All recipients fail to match any Local Email Domain.
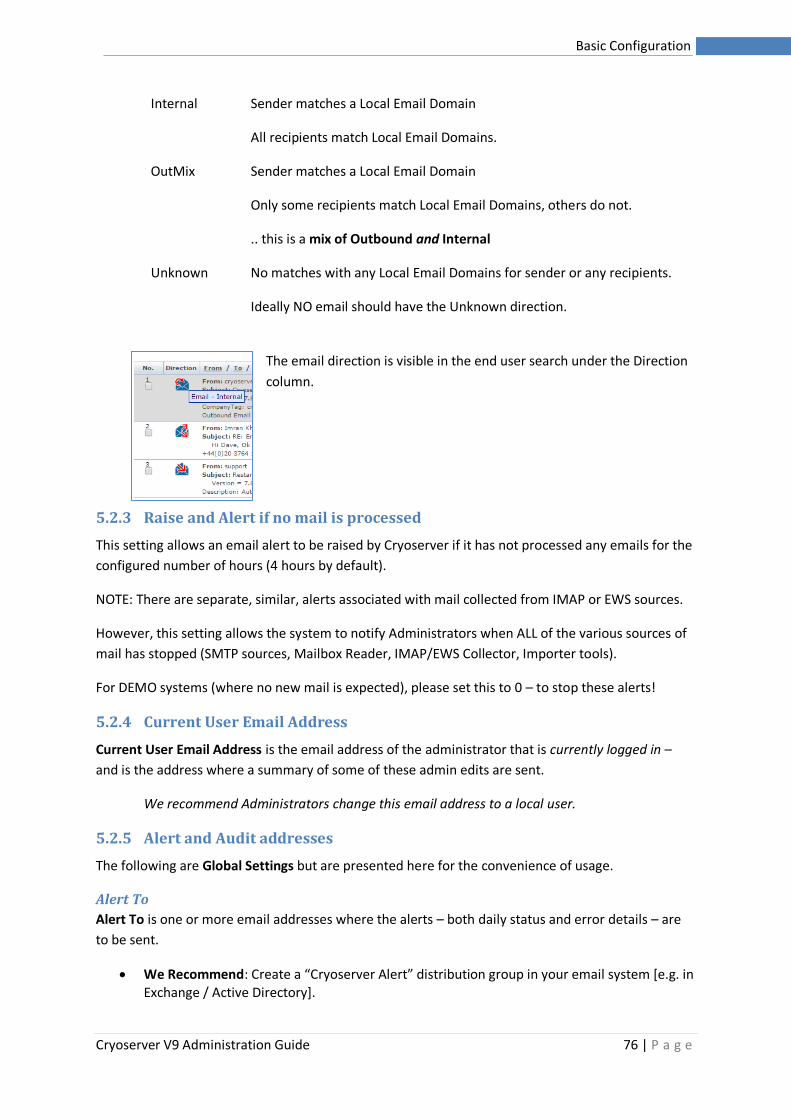
Cryoserver V9 Administration Guide 76 | P a g e
Basic Configuration
Internal Sender matches a Local Email Domain
All recipients match Local Email Domains.
OutMix Sender matches a Local Email Domain
Only some recipients match Local Email Domains, others do not.
.. this is a mix of Outbound and Internal
Unknown No matches with any Local Email Domains for sender or any recipients.
Ideally NO email should have the Unknown direction.
The email direction is visible in the end user search under the Direction
column.
5.2.3 Raise and Alert if no mail is processed
This setting allows an email alert to be raised by Cryoserver if it has not processed any emails for the
configured number of hours (4 hours by default).
NOTE: There are separate, similar, alerts associated with mail collected from IMAP or EWS sources.
However, this setting allows the system to notify Administrators when ALL of the various sources of
mail has stopped (SMTP sources, Mailbox Reader, IMAP/EWS Collector, Importer tools).
For DEMO systems (where no new mail is expected), please set this to 0 – to stop these alerts!
5.2.4 Current User Email Address
Current User Email Address is the email address of the administrator that is currently logged in –
and is the address where a summary of some of these admin edits are sent.
We recommend Administrators change this email address to a local user.
5.2.5 Alert and Audit addresses
The following are Global Settings but are presented here for the convenience of usage.
Alert To
Alert To is one or more email addresses where the alerts – both daily status and error details – are
to be sent.
• We Recommend: Create a “Cryoserver Alert” distribution group in your email system [e.g. in Exchange / Active Directory].
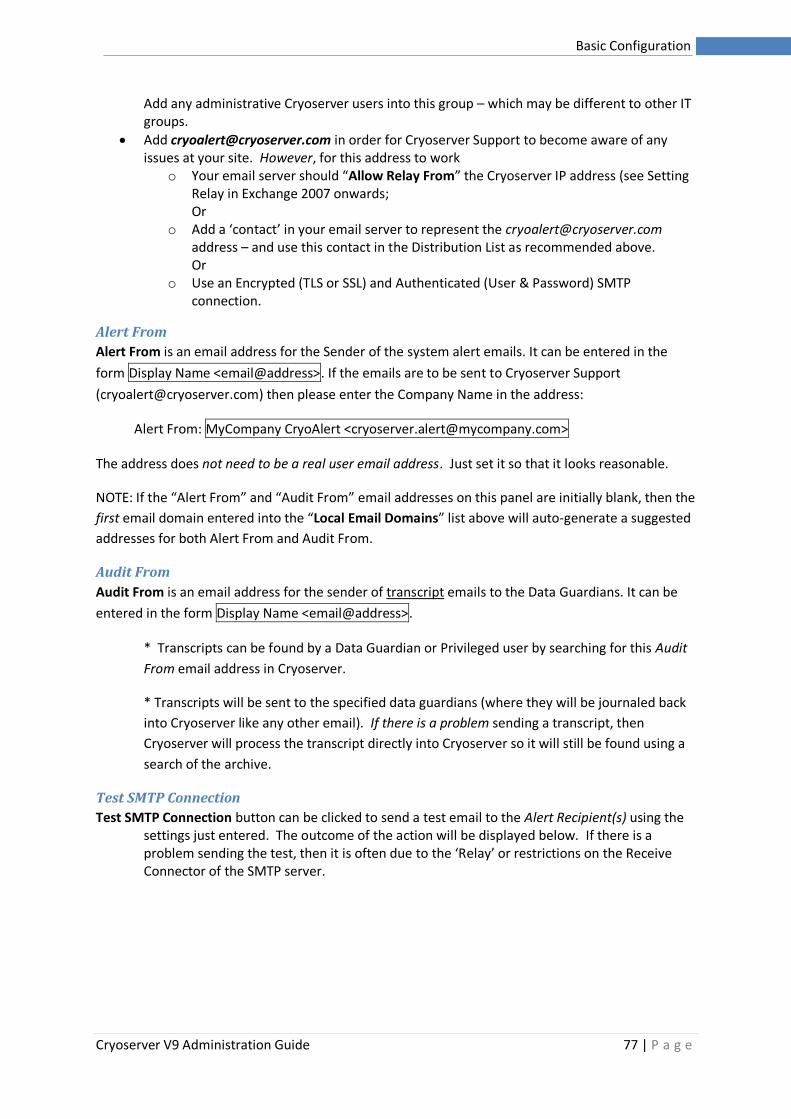
Cryoserver V9 Administration Guide 77 | P a g e
Basic Configuration
Add any administrative Cryoserver users into this group – which may be different to other IT groups.
• Add [email protected] in order for Cryoserver Support to become aware of any issues at your site. However, for this address to work
o Your email server should “Allow Relay From” the Cryoserver IP address (see Setting Relay in Exchange 2007 onwards; Or
o Add a ‘contact’ in your email server to represent the [email protected] address – and use this contact in the Distribution List as recommended above. Or
o Use an Encrypted (TLS or SSL) and Authenticated (User & Password) SMTP connection.
Alert From
Alert From is an email address for the Sender of the system alert emails. It can be entered in the
form Display Name <email@address>. If the emails are to be sent to Cryoserver Support
([email protected]) then please enter the Company Name in the address:
Alert From: MyCompany CryoAlert <[email protected]>
The address does not need to be a real user email address. Just set it so that it looks reasonable.
NOTE: If the “Alert From” and “Audit From” email addresses on this panel are initially blank, then the
first email domain entered into the “Local Email Domains” list above will auto-generate a suggested
addresses for both Alert From and Audit From.
Audit From
Audit From is an email address for the sender of transcript emails to the Data Guardians. It can be
entered in the form Display Name <email@address>.
* Transcripts can be found by a Data Guardian or Privileged user by searching for this Audit
From email address in Cryoserver.
* Transcripts will be sent to the specified data guardians (where they will be journaled back
into Cryoserver like any other email). If there is a problem sending a transcript, then
Cryoserver will process the transcript directly into Cryoserver so it will still be found using a
search of the archive.
Test SMTP Connection
Test SMTP Connection button can be clicked to send a test email to the Alert Recipient(s) using the settings just entered. The outcome of the action will be displayed below. If there is a problem sending the test, then it is often due to the ‘Relay’ or restrictions on the Receive Connector of the SMTP server.
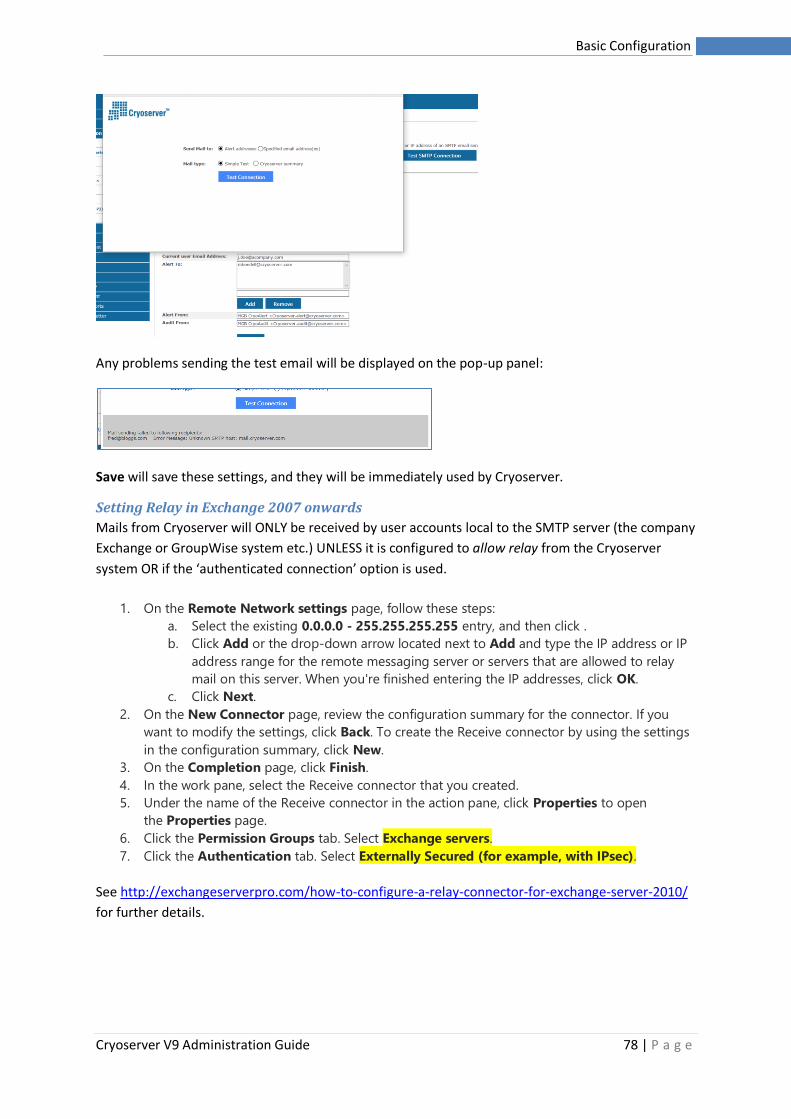
Cryoserver V9 Administration Guide 78 | P a g e
Basic Configuration
Any problems sending the test email will be displayed on the pop-up panel:
Save will save these settings, and they will be immediately used by Cryoserver.
Setting Relay in Exchange 2007 onwards
Mails from Cryoserver will ONLY be received by user accounts local to the SMTP server (the company
Exchange or GroupWise system etc.) UNLESS it is configured to allow relay from the Cryoserver
system OR if the ‘authenticated connection’ option is used.
1. On the Remote Network settings page, follow these steps: a. Select the existing 0.0.0.0 - 255.255.255.255 entry, and then click .
b. Click Add or the drop-down arrow located next to Add and type the IP address or IP
address range for the remote messaging server or servers that are allowed to relay
mail on this server. When you're finished entering the IP addresses, click OK.
c. Click Next.
2. On the New Connector page, review the configuration summary for the connector. If you
want to modify the settings, click Back. To create the Receive connector by using the settings
in the configuration summary, click New.
3. On the Completion page, click Finish.
4. In the work pane, select the Receive connector that you created.
5. Under the name of the Receive connector in the action pane, click Properties to open
the Properties page.
6. Click the Permission Groups tab. Select Exchange servers.
7. Click the Authentication tab. Select Externally Secured (for example, with IPsec).
See http://exchangeserverpro.com/how-to-configure-a-relay-connector-for-exchange-server-2010/
for further details.
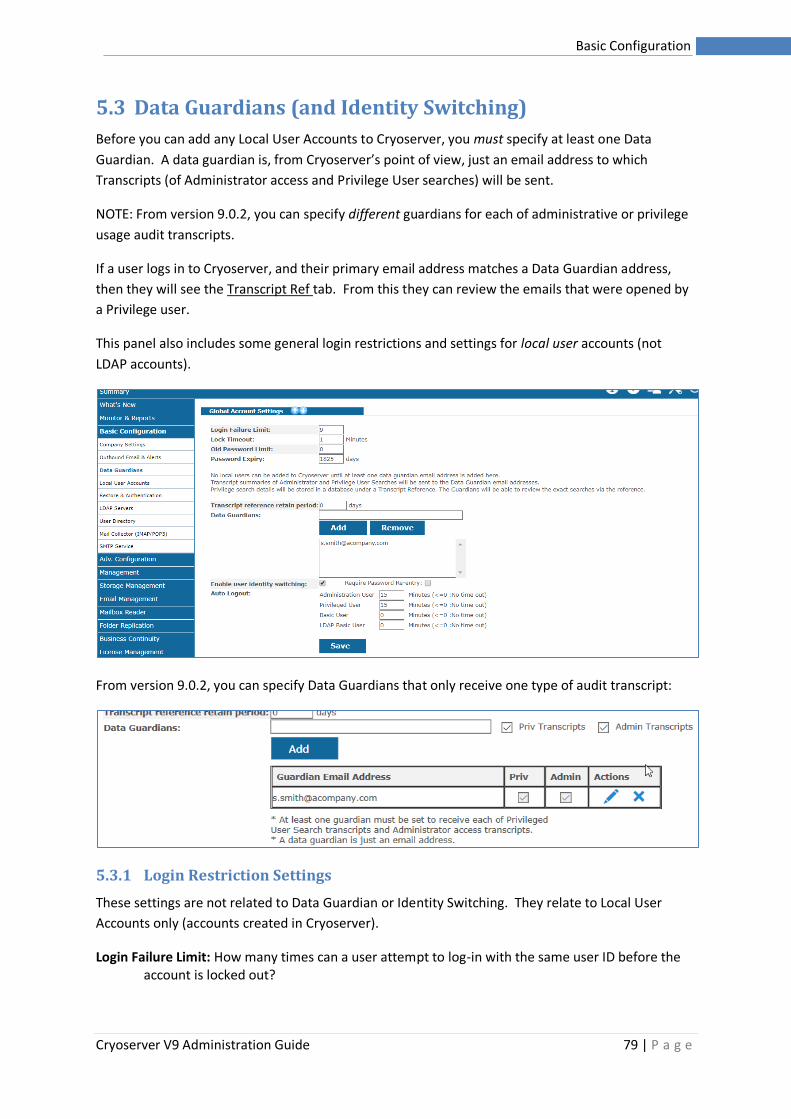
Cryoserver V9 Administration Guide 79 | P a g e
Basic Configuration
5.3 Data Guardians (and Identity Switching)
Before you can add any Local User Accounts to Cryoserver, you must specify at least one Data
Guardian. A data guardian is, from Cryoserver’s point of view, just an email address to which
Transcripts (of Administrator access and Privilege User searches) will be sent.
NOTE: From version 9.0.2, you can specify different guardians for each of administrative or privilege
usage audit transcripts.
If a user logs in to Cryoserver, and their primary email address matches a Data Guardian address,
then they will see the Transcript Ref tab. From this they can review the emails that were opened by
a Privilege user.
This panel also includes some general login restrictions and settings for local user accounts (not
LDAP accounts).
From version 9.0.2, you can specify Data Guardians that only receive one type of audit transcript:
5.3.1 Login Restriction Settings
These settings are not related to Data Guardian or Identity Switching. They relate to Local User
Accounts only (accounts created in Cryoserver).
Login Failure Limit: How many times can a user attempt to log-in with the same user ID before the account is locked out?
Cryoserver V9 Administration Guide 80 | P a g e
Basic Configuration
Lock Timeout: The number of Minutes that the user account will be locked for after an incorrect password was entered more than the Login Failure Limit number of times. Minimum is 1.
Old Password Limit: If a user’s password has expired and must be changed, must it be different to the last few passwords? Enter 0 to tell Cryoserver that the user can re-enter the same password again.
Password Expiry: The number of days before a password expires, after which it must be changed. A user is given one ‘grace’ log-in with their old password.
5.3.2 Data Guardian settings
Transcript reference retain period: The number of days that the details of each email viewed by a Privilege User, and summarised under a Transcript Reference, will be held in Cryoserver. The default is 0 (the transcript reference details will never be deleted). If a value other than 0 is used, then the Data Guardian will not be able to review a Privilege User search that was performed more than that number of days ago.
Data Guardians: Add in the email addresses of each person who should oversee the activities of Administrators and Privilege users.
Recommended Data Guardian candidates are:
• HR Manager
• Compliance Manager/Officer
• IT Manager
• CEO / senior staff
• Union Leader
Example transcripts:
This is a transcript resulting from a Privileged User access. In this case the user named “partner” performed a search and viewed some of the results (highlighted below).
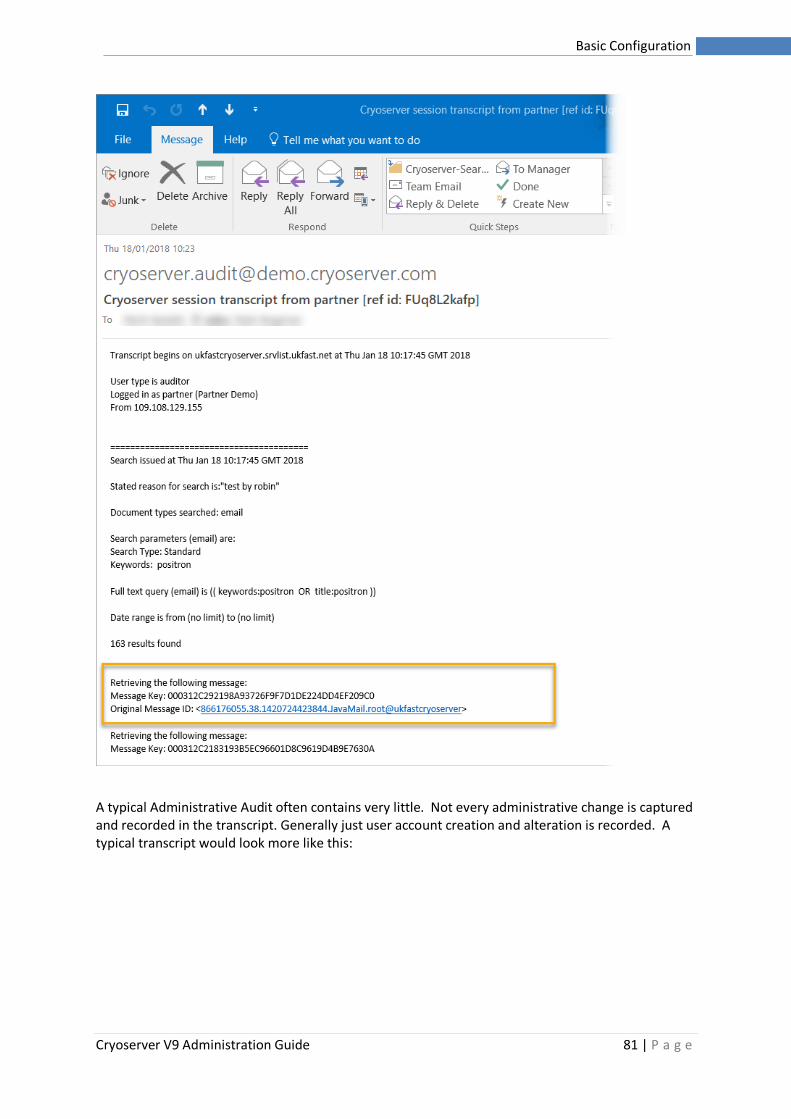
Cryoserver V9 Administration Guide 81 | P a g e
Basic Configuration
A typical Administrative Audit often contains very little. Not every administrative change is captured and recorded in the transcript. Generally just user account creation and alteration is recorded. A typical transcript would look more like this:
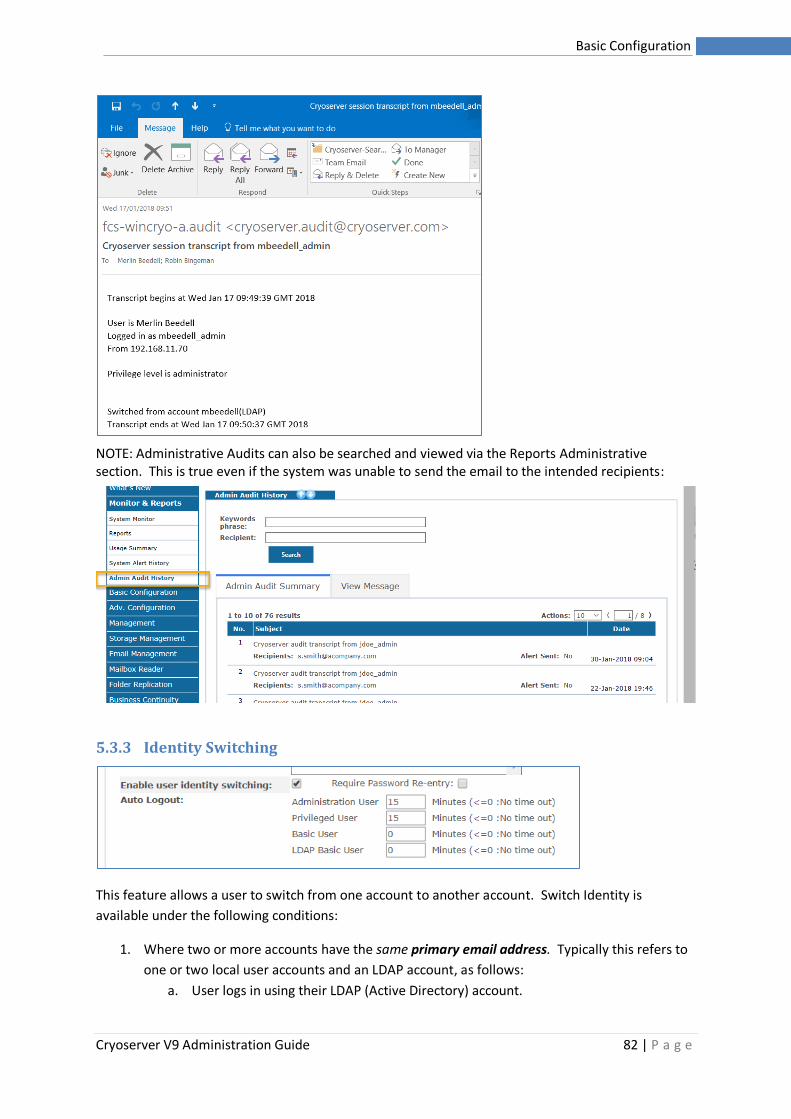
Cryoserver V9 Administration Guide 82 | P a g e
Basic Configuration
NOTE: Administrative Audits can also be searched and viewed via the Reports Administrative section. This is true even if the system was unable to send the email to the intended recipients:
5.3.3 Identity Switching
This feature allows a user to switch from one account to another account. Switch Identity is
available under the following conditions:
1. Where two or more accounts have the same primary email address. Typically this refers to
one or two local user accounts and an LDAP account, as follows:
a. User logs in using their LDAP (Active Directory) account.
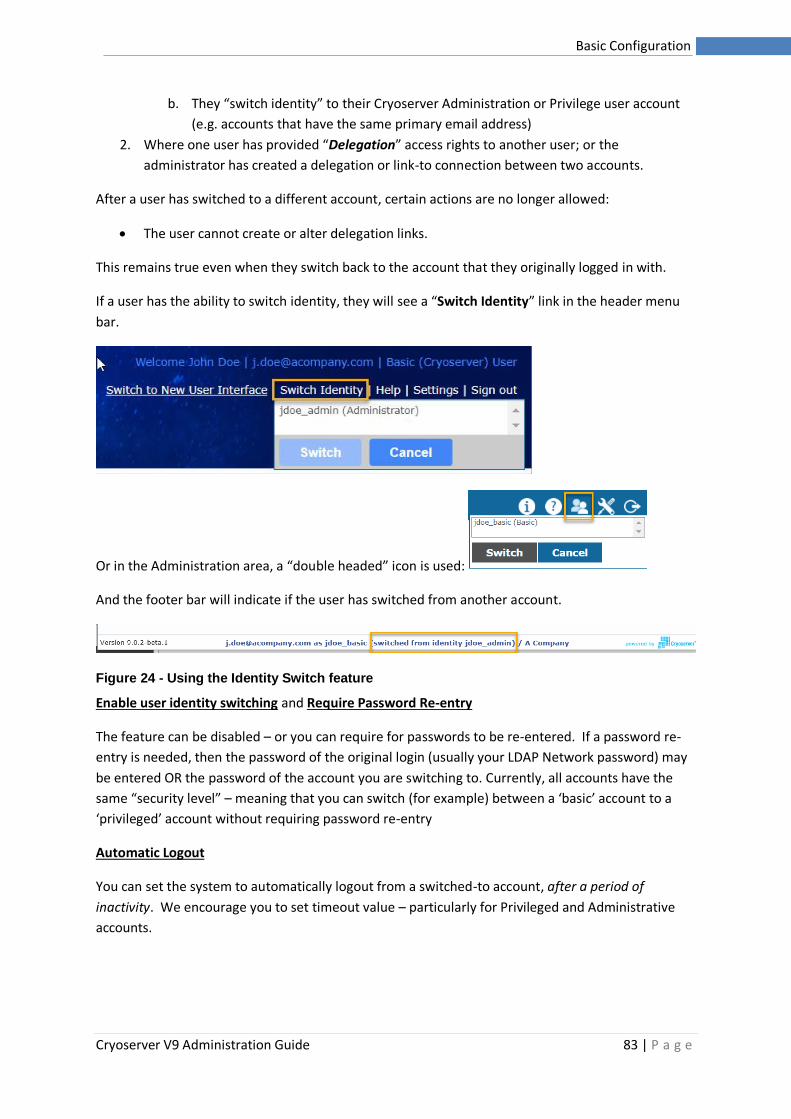
Cryoserver V9 Administration Guide 83 | P a g e
Basic Configuration
b. They “switch identity” to their Cryoserver Administration or Privilege user account
(e.g. accounts that have the same primary email address)
2. Where one user has provided “Delegation” access rights to another user; or the
administrator has created a delegation or link-to connection between two accounts.
After a user has switched to a different account, certain actions are no longer allowed:
• The user cannot create or alter delegation links.
This remains true even when they switch back to the account that they originally logged in with.
If a user has the ability to switch identity, they will see a “Switch Identity” link in the header menu
bar.
Or in the Administration area, a “double headed” icon is used:
And the footer bar will indicate if the user has switched from another account.
Figure 24 - Using the Identity Switch feature
Enable user identity switching and Require Password Re-entry
The feature can be disabled – or you can require for passwords to be re-entered. If a password re-
entry is needed, then the password of the original login (usually your LDAP Network password) may
be entered OR the password of the account you are switching to. Currently, all accounts have the
same “security level” – meaning that you can switch (for example) between a ‘basic’ account to a
‘privileged’ account without requiring password re-entry
Automatic Logout
You can set the system to automatically logout from a switched-to account, after a period of
inactivity. We encourage you to set timeout value – particularly for Privileged and Administrative
accounts.
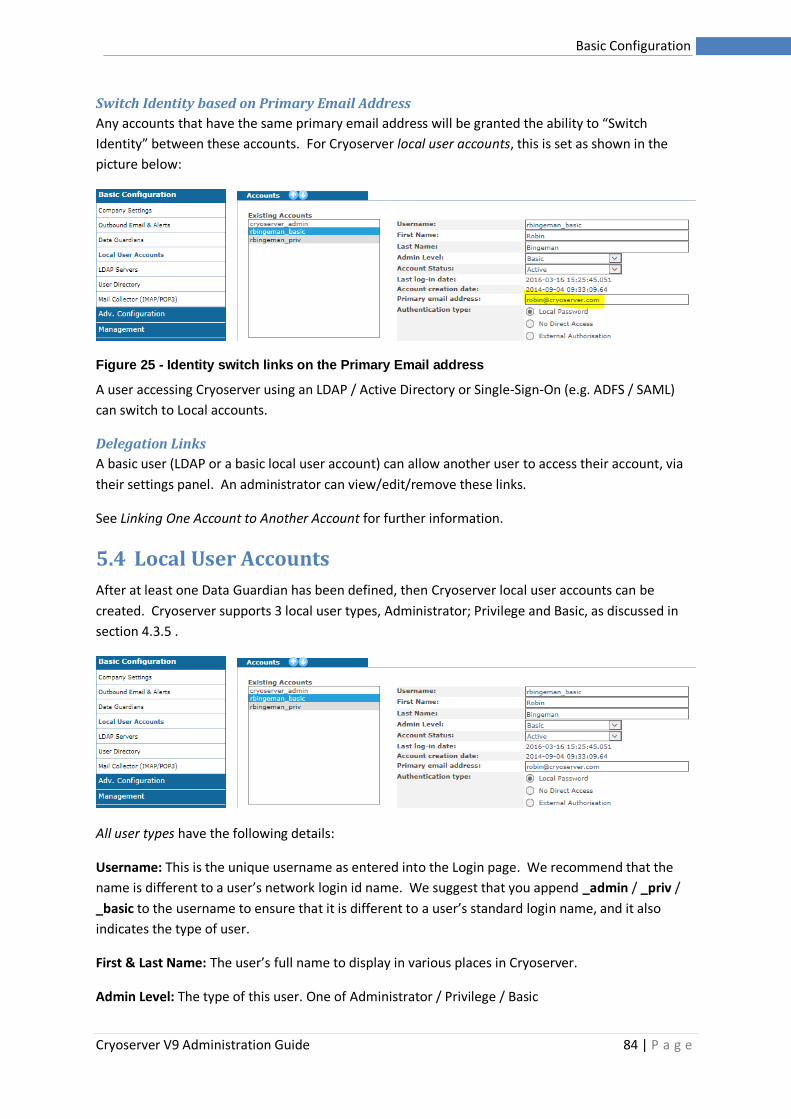
Cryoserver V9 Administration Guide 84 | P a g e
Basic Configuration
Switch Identity based on Primary Email Address
Any accounts that have the same primary email address will be granted the ability to “Switch
Identity” between these accounts. For Cryoserver local user accounts, this is set as shown in the
picture below:
Figure 25 - Identity switch links on the Primary Email address
A user accessing Cryoserver using an LDAP / Active Directory or Single-Sign-On (e.g. ADFS / SAML)
can switch to Local accounts.
Delegation Links
A basic user (LDAP or a basic local user account) can allow another user to access their account, via
their settings panel. An administrator can view/edit/remove these links.
See Linking One Account to Another Account for further information.
5.4 Local User Accounts
After at least one Data Guardian has been defined, then Cryoserver local user accounts can be
created. Cryoserver supports 3 local user types, Administrator; Privilege and Basic, as discussed in
section 4.3.5 .
All user types have the following details:
Username: This is the unique username as entered into the Login page. We recommend that the
name is different to a user’s network login id name. We suggest that you append _admin / _priv /
_basic to the username to ensure that it is different to a user’s standard login name, and it also
indicates the type of user.
First & Last Name: The user’s full name to display in various places in Cryoserver.
Admin Level: The type of this user. One of Administrator / Privilege / Basic

Cryoserver V9 Administration Guide 85 | P a g e
Basic Configuration
Account Status: One of Active or Locked.
Primary Email Address: This address is where any email from Cryoserver will be sent for this user.
This will include reset Password and Forward-to-inbox emails.
Once a new account is saved, a random password is assigned and emailed to the new users’ Primary
Email Address. If Cryoserver is unable to send this email, then the password will be displayed on this
screen.
Other details for the different account types are discussed below.
5.4.1 Administrator user type
An administrator cannot search.
Only administrators can reset passwords – and access the ‘Forgotten your Password?’ login facility.
• NOTE: If an administrator uses the ‘Forgotten your Password?’ feature, a new password will be emailed to the Administrator’s Primary Email Address.
There is a single default Administrator (cryoserver_admin) which is used to set-up the initial
Cryoserver system. Please ensure that the email address of this account is changed – typically via
the “Outbound Email & Alerts” menu, Current User Email Address setting.
We recommend that additional administrator accounts are added – one for each member of IT staff
who may need to administer the Cryoserver system. Then the Data Guardian transcripts will
indicate which user had logged in.
There are no further Details required for the Administrators account.
5.4.2 Privilege / Privilege & Delete User types
This user can search across ALL email in that Cryoserver system (or that Cryoserver Company, when
in multi-tenant mode) unless one or more searchable domains are added. A Privilege & Delete user
type has the ability to authorise a deletion request. This account type will only become available if
you have a license to use it. In all other respects, this account type is the same as a standard
Privilege account. Any searches made by Privileged users will raise an audit transcript that is sent to
the Data Guardian(s).
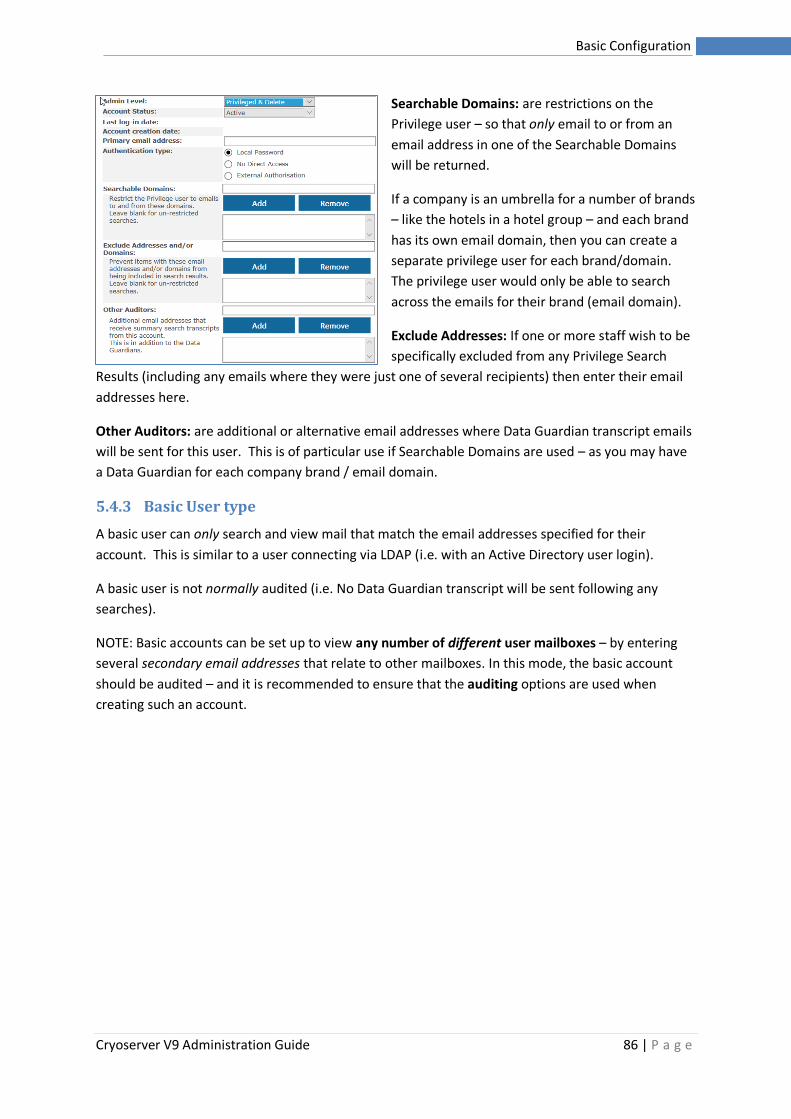
Cryoserver V9 Administration Guide 86 | P a g e
Basic Configuration
Searchable Domains: are restrictions on the
Privilege user – so that only email to or from an
email address in one of the Searchable Domains
will be returned.
If a company is an umbrella for a number of brands
– like the hotels in a hotel group – and each brand
has its own email domain, then you can create a
separate privilege user for each brand/domain.
The privilege user would only be able to search
across the emails for their brand (email domain).
Exclude Addresses: If one or more staff wish to be
specifically excluded from any Privilege Search
Results (including any emails where they were just one of several recipients) then enter their email
addresses here.
Other Auditors: are additional or alternative email addresses where Data Guardian transcript emails
will be sent for this user. This is of particular use if Searchable Domains are used – as you may have
a Data Guardian for each company brand / email domain.
5.4.3 Basic User type
A basic user can only search and view mail that match the email addresses specified for their
account. This is similar to a user connecting via LDAP (i.e. with an Active Directory user login).
A basic user is not normally audited (i.e. No Data Guardian transcript will be sent following any
searches).
NOTE: Basic accounts can be set up to view any number of different user mailboxes – by entering
several secondary email addresses that relate to other mailboxes. In this mode, the basic account
should be audited – and it is recommended to ensure that the auditing options are used when
creating such an account.
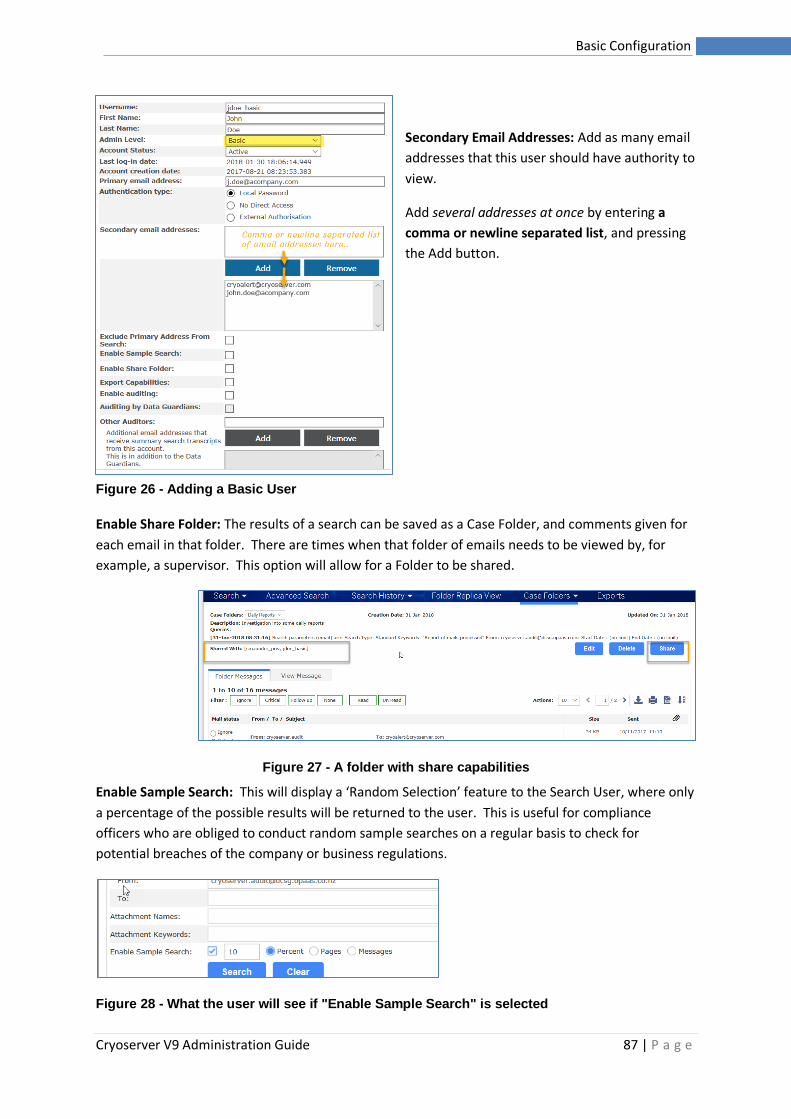
Cryoserver V9 Administration Guide 87 | P a g e
Basic Configuration
Secondary Email Addresses: Add as many email
addresses that this user should have authority to
view.
Add several addresses at once by entering a
comma or newline separated list, and pressing
the Add button.
Enable Share Folder: The results of a search can be saved as a Case Folder, and comments given for
each email in that folder. There are times when that folder of emails needs to be viewed by, for
example, a supervisor. This option will allow for a Folder to be shared.
Figure 27 - A folder with share capabilities
Enable Sample Search: This will display a ‘Random Selection’ feature to the Search User, where only
a percentage of the possible results will be returned to the user. This is useful for compliance
officers who are obliged to conduct random sample searches on a regular basis to check for
potential breaches of the company or business regulations.
Figure 28 - What the user will see if "Enable Sample Search" is selected
Figure 26 - Adding a Basic User
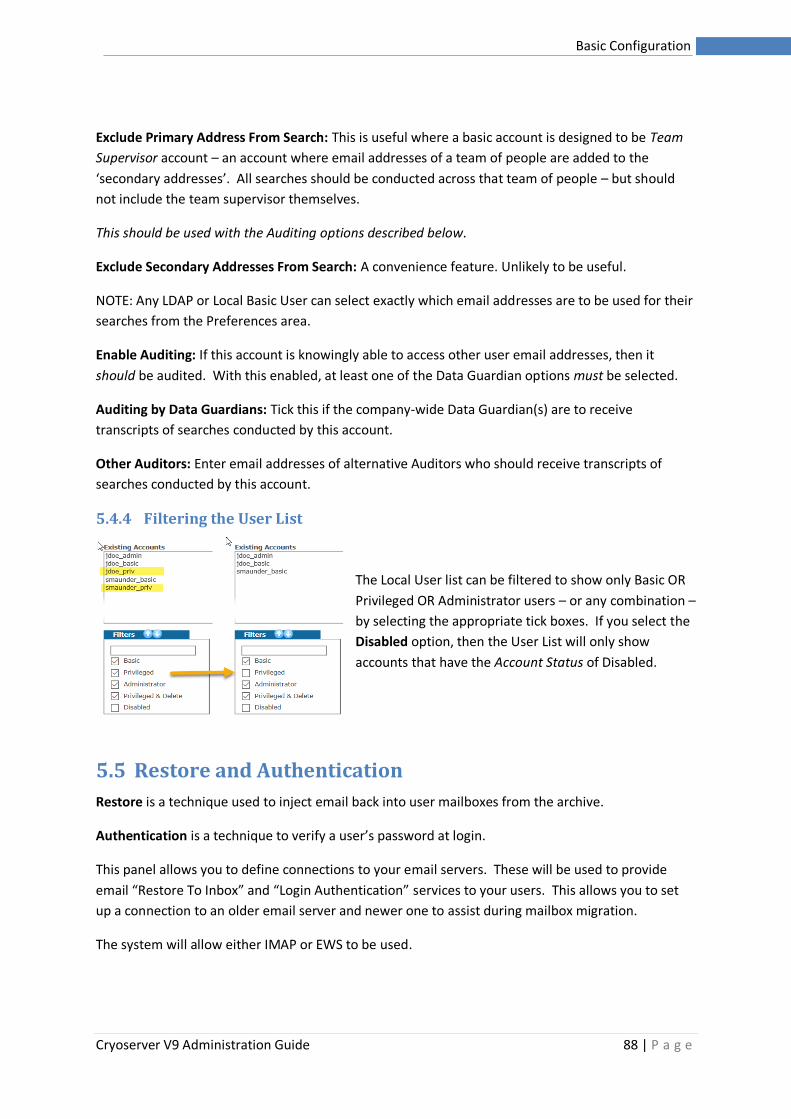
Cryoserver V9 Administration Guide 88 | P a g e
Basic Configuration
Exclude Primary Address From Search: This is useful where a basic account is designed to be Team
Supervisor account – an account where email addresses of a team of people are added to the
‘secondary addresses’. All searches should be conducted across that team of people – but should
not include the team supervisor themselves.
This should be used with the Auditing options described below.
Exclude Secondary Addresses From Search: A convenience feature. Unlikely to be useful.
NOTE: Any LDAP or Local Basic User can select exactly which email addresses are to be used for their
searches from the Preferences area.
Enable Auditing: If this account is knowingly able to access other user email addresses, then it
should be audited. With this enabled, at least one of the Data Guardian options must be selected.
Auditing by Data Guardians: Tick this if the company-wide Data Guardian(s) are to receive
transcripts of searches conducted by this account.
Other Auditors: Enter email addresses of alternative Auditors who should receive transcripts of
searches conducted by this account.
5.4.4 Filtering the User List
The Local User list can be filtered to show only Basic OR
Privileged OR Administrator users – or any combination –
by selecting the appropriate tick boxes. If you select the
Disabled option, then the User List will only show
accounts that have the Account Status of Disabled.
5.5 Restore and Authentication
Restore is a technique used to inject email back into user mailboxes from the archive.
Authentication is a technique to verify a user’s password at login.
This panel allows you to define connections to your email servers. These will be used to provide
email “Restore To Inbox” and “Login Authentication” services to your users. This allows you to set
up a connection to an older email server and newer one to assist during mailbox migration.
The system will allow either IMAP or EWS to be used.
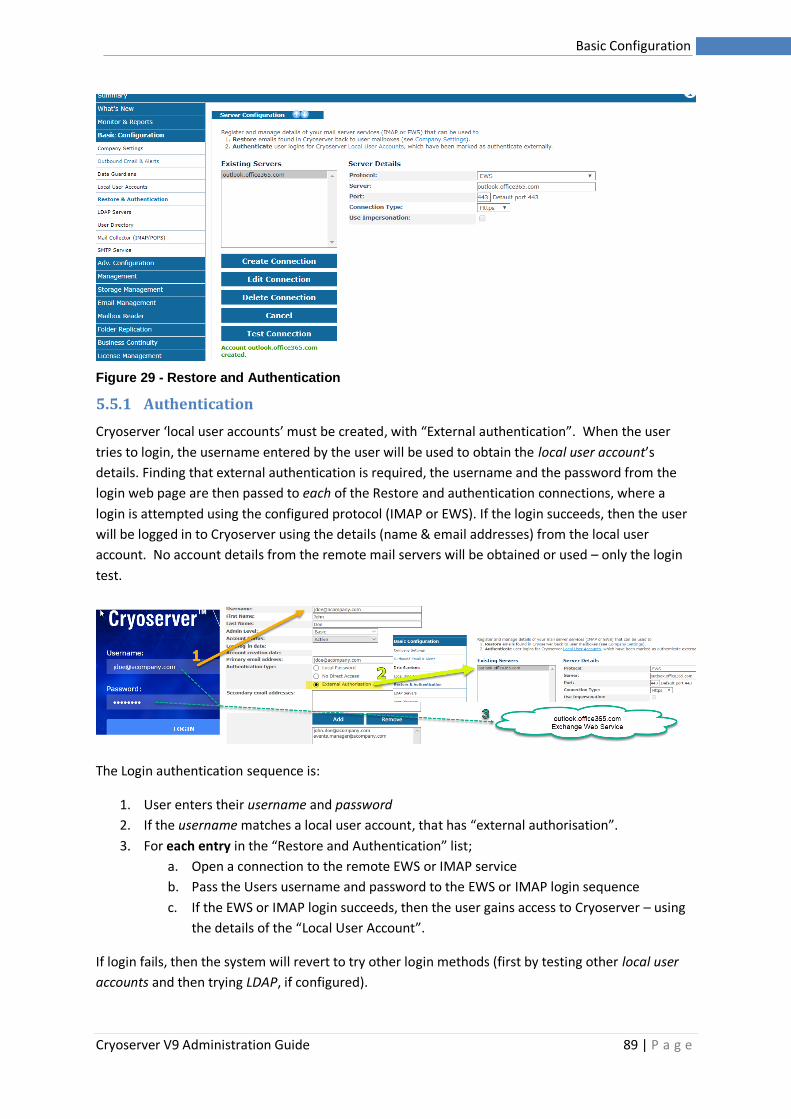
Cryoserver V9 Administration Guide 89 | P a g e
Basic Configuration
Figure 29 - Restore and Authentication
5.5.1 Authentication
Cryoserver ‘local user accounts’ must be created, with “External authentication”. When the user
tries to login, the username entered by the user will be used to obtain the local user account’s
details. Finding that external authentication is required, the username and the password from the
login web page are then passed to each of the Restore and authentication connections, where a
login is attempted using the configured protocol (IMAP or EWS). If the login succeeds, then the user
will be logged in to Cryoserver using the details (name & email addresses) from the local user
account. No account details from the remote mail servers will be obtained or used – only the login
test.
The Login authentication sequence is:
1. User enters their username and password
2. If the username matches a local user account, that has “external authorisation”.
3. For each entry in the “Restore and Authentication” list;
a. Open a connection to the remote EWS or IMAP service
b. Pass the Users username and password to the EWS or IMAP login sequence
c. If the EWS or IMAP login succeeds, then the user gains access to Cryoserver – using
the details of the “Local User Account”.
If login fails, then the system will revert to try other login methods (first by testing other local user
accounts and then trying LDAP, if configured).
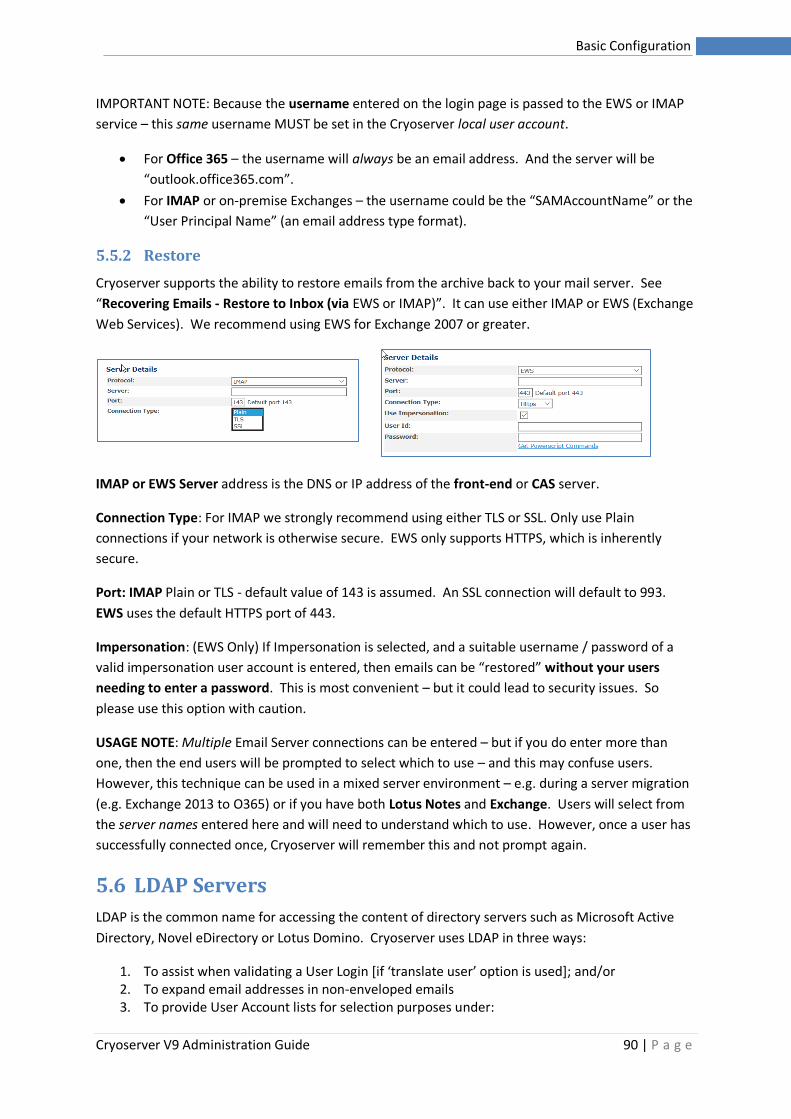
Cryoserver V9 Administration Guide 90 | P a g e
Basic Configuration
IMPORTANT NOTE: Because the username entered on the login page is passed to the EWS or IMAP
service – this same username MUST be set in the Cryoserver local user account.
• For Office 365 – the username will always be an email address. And the server will be
“outlook.office365.com”.
• For IMAP or on-premise Exchanges – the username could be the “SAMAccountName” or the
“User Principal Name” (an email address type format).
5.5.2 Restore
Cryoserver supports the ability to restore emails from the archive back to your mail server. See
“Recovering Emails - Restore to Inbox (via EWS or IMAP)”. It can use either IMAP or EWS (Exchange
Web Services). We recommend using EWS for Exchange 2007 or greater.
IMAP or EWS Server address is the DNS or IP address of the front-end or CAS server.
Connection Type: For IMAP we strongly recommend using either TLS or SSL. Only use Plain
connections if your network is otherwise secure. EWS only supports HTTPS, which is inherently
secure.
Port: IMAP Plain or TLS - default value of 143 is assumed. An SSL connection will default to 993.
EWS uses the default HTTPS port of 443.
Impersonation: (EWS Only) If Impersonation is selected, and a suitable username / password of a
valid impersonation user account is entered, then emails can be “restored” without your users
needing to enter a password. This is most convenient – but it could lead to security issues. So
please use this option with caution.
USAGE NOTE: Multiple Email Server connections can be entered – but if you do enter more than
one, then the end users will be prompted to select which to use – and this may confuse users.
However, this technique can be used in a mixed server environment – e.g. during a server migration
(e.g. Exchange 2013 to O365) or if you have both Lotus Notes and Exchange. Users will select from
the server names entered here and will need to understand which to use. However, once a user has
successfully connected once, Cryoserver will remember this and not prompt again.
5.6 LDAP Servers
LDAP is the common name for accessing the content of directory servers such as Microsoft Active
Directory, Novel eDirectory or Lotus Domino. Cryoserver uses LDAP in three ways:
1. To assist when validating a User Login [if ‘translate user’ option is used]; and/or 2. To expand email addresses in non-enveloped emails 3. To provide User Account lists for selection purposes under:
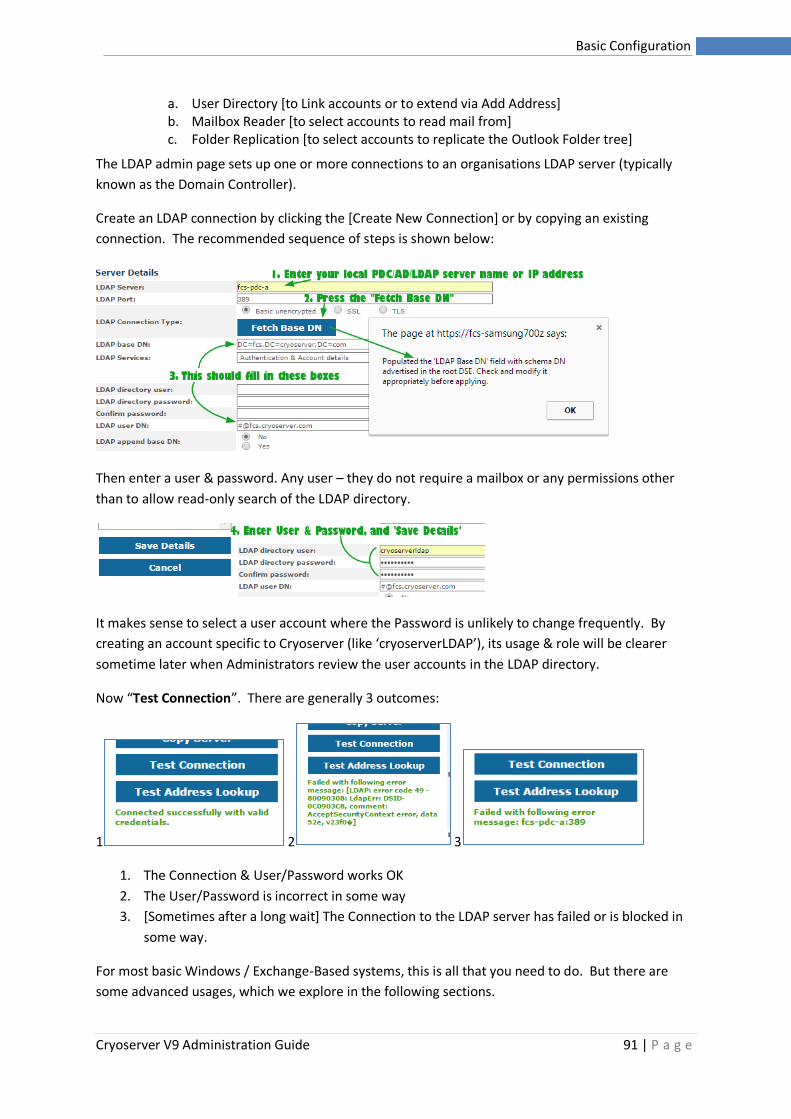
Cryoserver V9 Administration Guide 91 | P a g e
Basic Configuration
a. User Directory [to Link accounts or to extend via Add Address] b. Mailbox Reader [to select accounts to read mail from] c. Folder Replication [to select accounts to replicate the Outlook Folder tree]
The LDAP admin page sets up one or more connections to an organisations LDAP server (typically
known as the Domain Controller).
Create an LDAP connection by clicking the [Create New Connection] or by copying an existing
connection. The recommended sequence of steps is shown below:
Then enter a user & password. Any user – they do not require a mailbox or any permissions other
than to allow read-only search of the LDAP directory.
It makes sense to select a user account where the Password is unlikely to change frequently. By
creating an account specific to Cryoserver (like ‘cryoserverLDAP’), its usage & role will be clearer
sometime later when Administrators review the user accounts in the LDAP directory.
Now “Test Connection”. There are generally 3 outcomes:
1 2 3
1. The Connection & User/Password works OK
2. The User/Password is incorrect in some way
3. [Sometimes after a long wait] The Connection to the LDAP server has failed or is blocked in
some way.
For most basic Windows / Exchange-Based systems, this is all that you need to do. But there are
some advanced usages, which we explore in the following sections.
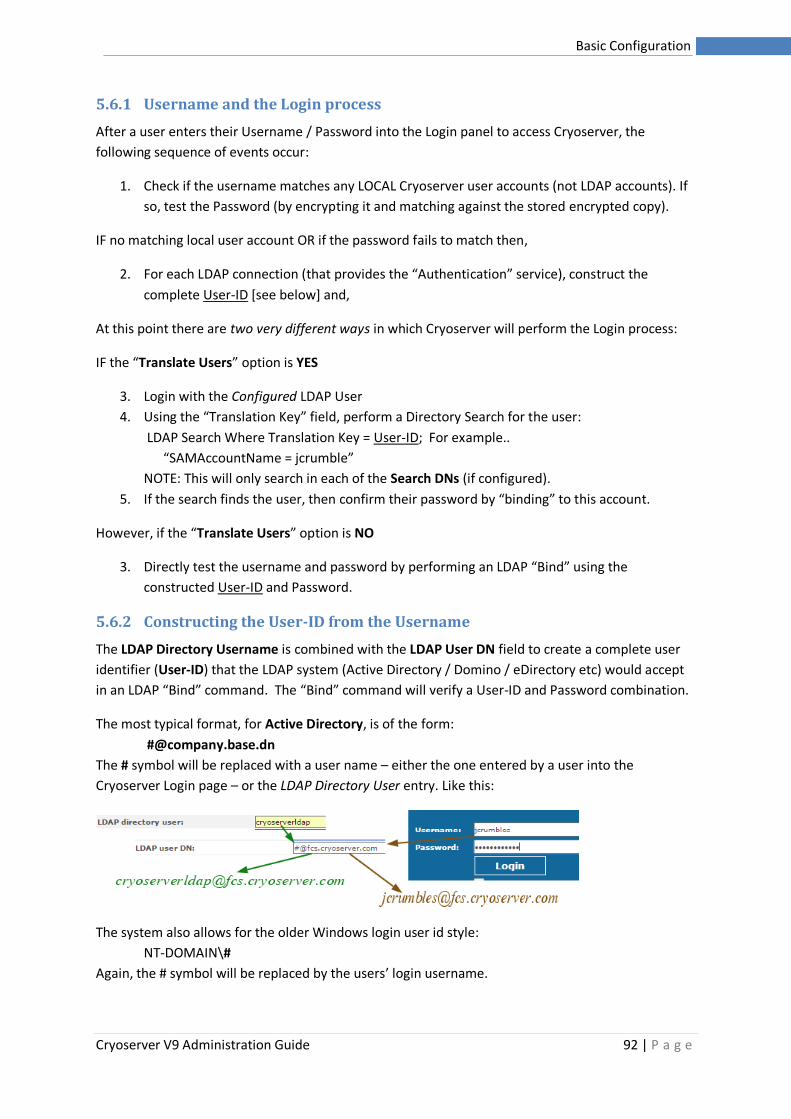
Cryoserver V9 Administration Guide 92 | P a g e
Basic Configuration
5.6.1 Username and the Login process
After a user enters their Username / Password into the Login panel to access Cryoserver, the
following sequence of events occur:
1. Check if the username matches any LOCAL Cryoserver user accounts (not LDAP accounts). If
so, test the Password (by encrypting it and matching against the stored encrypted copy).
IF no matching local user account OR if the password fails to match then,
2. For each LDAP connection (that provides the “Authentication” service), construct the
complete User-ID [see below] and,
At this point there are two very different ways in which Cryoserver will perform the Login process:
IF the “Translate Users” option is YES
3. Login with the Configured LDAP User
4. Using the “Translation Key” field, perform a Directory Search for the user:
LDAP Search Where Translation Key = User-ID; For example..
“SAMAccountName = jcrumble”
NOTE: This will only search in each of the Search DNs (if configured).
5. If the search finds the user, then confirm their password by “binding” to this account.
However, if the “Translate Users” option is NO
3. Directly test the username and password by performing an LDAP “Bind” using the
constructed User-ID and Password.
5.6.2 Constructing the User-ID from the Username
The LDAP Directory Username is combined with the LDAP User DN field to create a complete user
identifier (User-ID) that the LDAP system (Active Directory / Domino / eDirectory etc) would accept
in an LDAP “Bind” command. The “Bind” command will verify a User-ID and Password combination.
The most typical format, for Active Directory, is of the form:
#@company.base.dn
The # symbol will be replaced with a user name – either the one entered by a user into the
Cryoserver Login page – or the LDAP Directory User entry. Like this:
The system also allows for the older Windows login user id style:
NT-DOMAIN\#
Again, the # symbol will be replaced by the users’ login username.
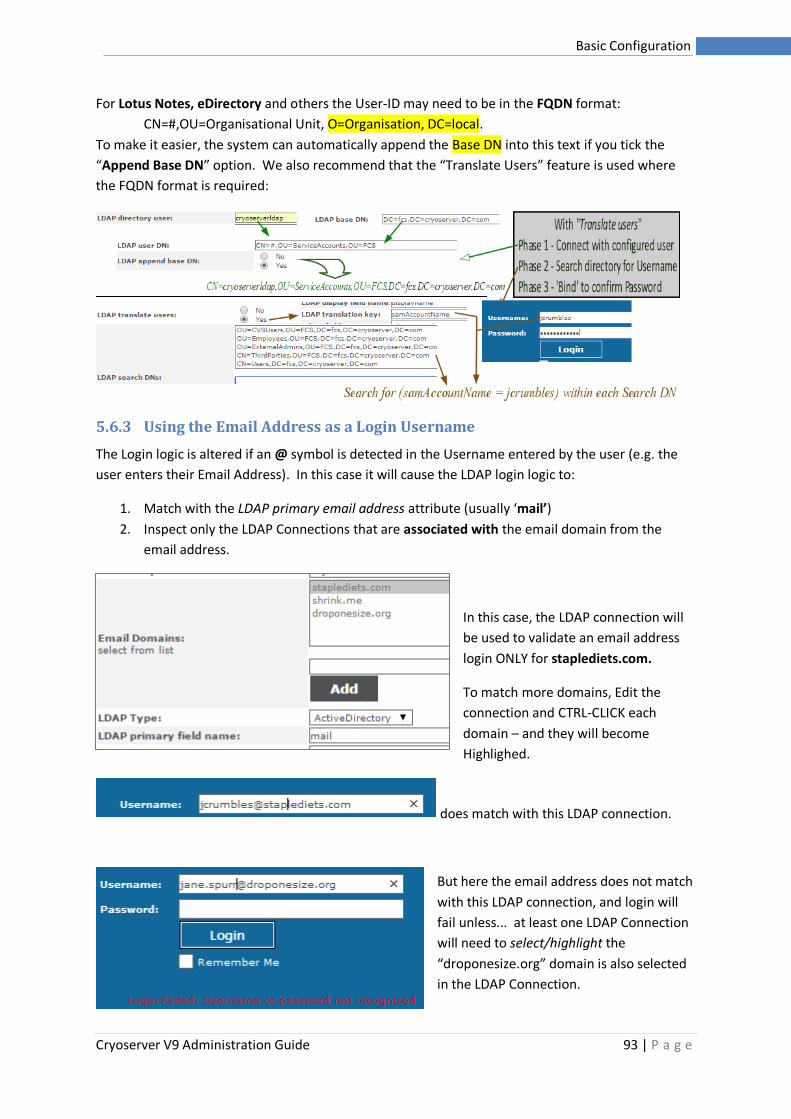
Cryoserver V9 Administration Guide 93 | P a g e
Basic Configuration
For Lotus Notes, eDirectory and others the User-ID may need to be in the FQDN format:
CN=#,OU=Organisational Unit, O=Organisation, DC=local.
To make it easier, the system can automatically append the Base DN into this text if you tick the
“Append Base DN” option. We also recommend that the “Translate Users” feature is used where
the FQDN format is required:
5.6.3 Using the Email Address as a Login Username
The Login logic is altered if an @ symbol is detected in the Username entered by the user (e.g. the
user enters their Email Address). In this case it will cause the LDAP login logic to:
1. Match with the LDAP primary email address attribute (usually ‘mail’)
2. Inspect only the LDAP Connections that are associated with the email domain from the
email address.
In this case, the LDAP connection will
be used to validate an email address
login ONLY for staplediets.com.
To match more domains, Edit the
connection and CTRL-CLICK each
domain – and they will become
Highlighed.
does match with this LDAP connection.
But here the email address does not match
with this LDAP connection, and login will
fail unless... at least one LDAP Connection
will need to select/highlight the
“droponesize.org” domain is also selected
in the LDAP Connection.
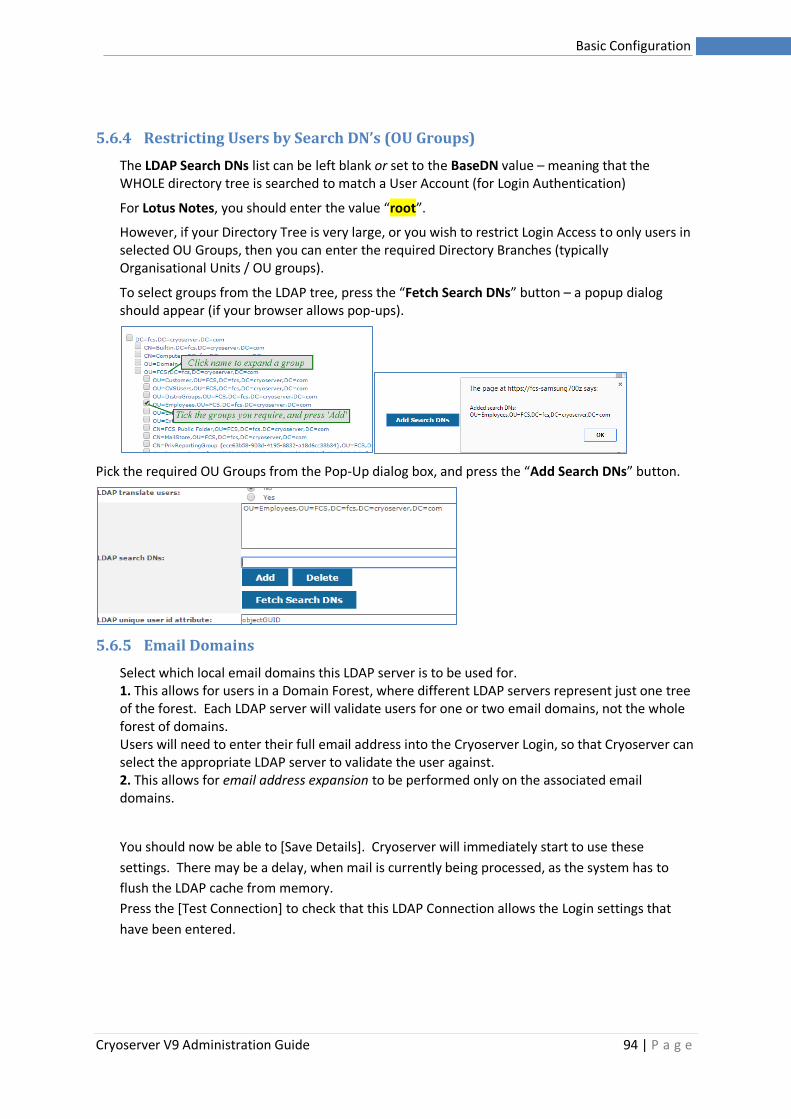
Cryoserver V9 Administration Guide 94 | P a g e
Basic Configuration
5.6.4 Restricting Users by Search DN’s (OU Groups)
The LDAP Search DNs list can be left blank or set to the BaseDN value – meaning that the WHOLE directory tree is searched to match a User Account (for Login Authentication)
For Lotus Notes, you should enter the value “root”.
However, if your Directory Tree is very large, or you wish to restrict Login Access to only users in selected OU Groups, then you can enter the required Directory Branches (typically Organisational Units / OU groups).
To select groups from the LDAP tree, press the “Fetch Search DNs” button – a popup dialog should appear (if your browser allows pop-ups).
Pick the required OU Groups from the Pop-Up dialog box, and press the “Add Search DNs” button.
5.6.5 Email Domains
Select which local email domains this LDAP server is to be used for. 1. This allows for users in a Domain Forest, where different LDAP servers represent just one tree of the forest. Each LDAP server will validate users for one or two email domains, not the whole forest of domains. Users will need to enter their full email address into the Cryoserver Login, so that Cryoserver can select the appropriate LDAP server to validate the user against. 2. This allows for email address expansion to be performed only on the associated email domains.
You should now be able to [Save Details]. Cryoserver will immediately start to use these
settings. There may be a delay, when mail is currently being processed, as the system has to
flush the LDAP cache from memory.
Press the [Test Connection] to check that this LDAP Connection allows the Login settings that
have been entered.
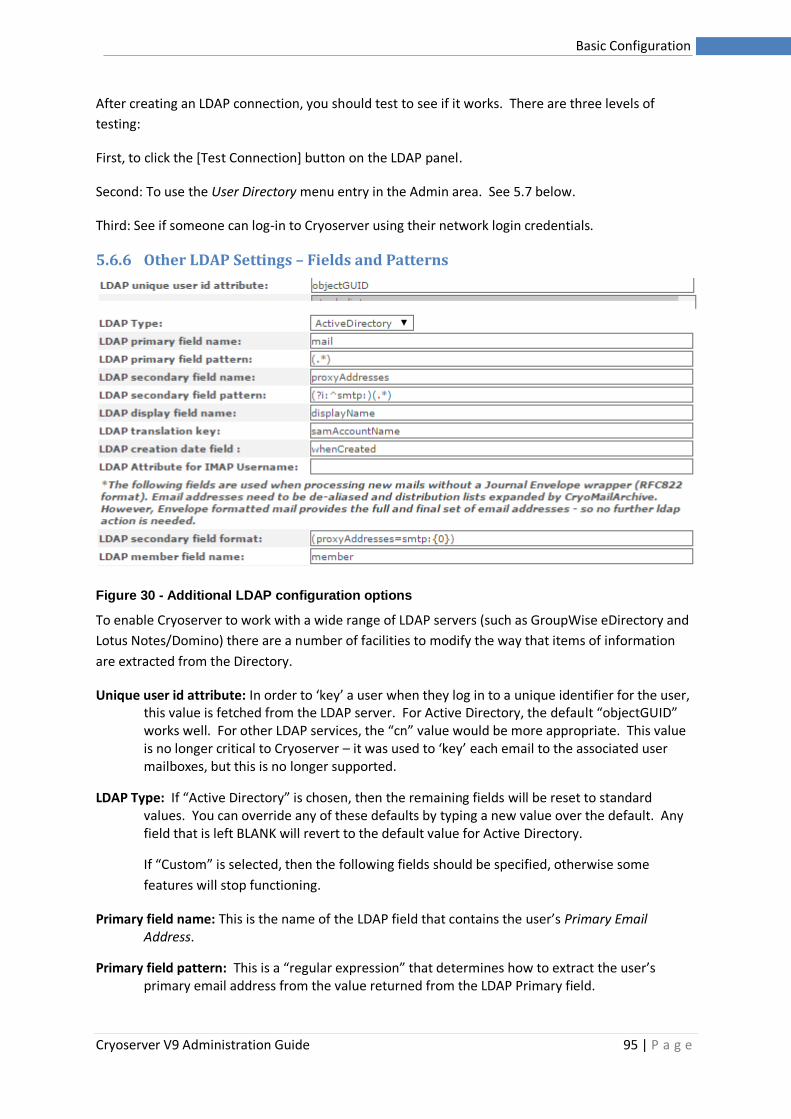
Cryoserver V9 Administration Guide 95 | P a g e
Basic Configuration
After creating an LDAP connection, you should test to see if it works. There are three levels of
testing:
First, to click the [Test Connection] button on the LDAP panel.
Second: To use the User Directory menu entry in the Admin area. See 5.7 below.
Third: See if someone can log-in to Cryoserver using their network login credentials.
5.6.6 Other LDAP Settings – Fields and Patterns
Figure 30 - Additional LDAP configuration options
To enable Cryoserver to work with a wide range of LDAP servers (such as GroupWise eDirectory and
Lotus Notes/Domino) there are a number of facilities to modify the way that items of information
are extracted from the Directory.
Unique user id attribute: In order to ‘key’ a user when they log in to a unique identifier for the user, this value is fetched from the LDAP server. For Active Directory, the default “objectGUID” works well. For other LDAP services, the “cn” value would be more appropriate. This value is no longer critical to Cryoserver – it was used to ‘key’ each email to the associated user mailboxes, but this is no longer supported.
LDAP Type: If “Active Directory” is chosen, then the remaining fields will be reset to standard values. You can override any of these defaults by typing a new value over the default. Any field that is left BLANK will revert to the default value for Active Directory.
If “Custom” is selected, then the following fields should be specified, otherwise some
features will stop functioning.
Primary field name: This is the name of the LDAP field that contains the user’s Primary Email Address.
Primary field pattern: This is a “regular expression” that determines how to extract the user’s primary email address from the value returned from the LDAP Primary field.

Cryoserver V9 Administration Guide 96 | P a g e
Basic Configuration
The default of (.*) will extract ALL text.
Secondary field name: This is the name of an LDAP field that contains the user’s Secondary or Alias email addresses. LDAP Servers will return an array (list) of values.
Secondary field pattern: This is a “regular expression” that Cryoserver uses to extract an email address out of each value returned from the LDAP server for the Secondary field name. This can be quite complex! Servers like Active Directory will return a whole host of different types of address – such as X500 addresses, and cc-mail addresses (if the gateway is installed), as well as typical email addresses. This MUST use a bracketed group, and any text returned in the second group will be used.
The default pattern of (?i:^smtp:)(.*) will extract any text that follows the prompt “smtp:”.
Please refer to a good tutorial on regular expressions – as they are very cryptic and beyond
the scope of this guide.
Display field name: This is the LDAP field that contains a nice-to-display name for the user. There are usually quite a few candidate fields that could be used!
Translation key: The LDAP field containing a user’s Login ID. This value is used in conjunction with the Translate Users (Yes/No) option when a user Logs in to Cryoserver. This is explained in Constructing the User-ID from the Username
Attribute for IMAP Username: We find that logging in to IMAP may require a non-standard username – for example, when using a Linked Exchange in a Forest Domain.
Secondary field format: This is used when processing new mail into Cryoserver, to convert an alias email address into a primary email address. It places the email address extracted from the email into the {0} part of the format text.
This is ONLY used when the email being processed is NOT enveloped. AND where the email
domain in the email address extracted from the mail headers matches one of the domains
selected for this LDAP connection in Cryoserver.
The default value is (proxyAddresses=smtp:{0}) meaning that Cryoserver will connect using
the configured LDAP Directory User, for each applicable email address perform an LDAP
Search like this (proxyAddresses=smtp:[email protected])
Member field name: This is the LDAP field that contains a list of Distribution Group members. Each member will be a FQDN pointer to the LDAP entry for that group member – which would be either user entries, or another distribution group.
Use display name in search? : If Administrators have imported from PST files without using an LDAP Feature within the PST Extraction Utility, then you will find that all local users will ONLY show their Display Name. The email address will have vanished. This is because the PST data discards email addresses in favour of an internal active directory identifier (X400 address) and the display name. The extraction process will typically only export the display name. Cryoserver can help here – as it can search and find emails based on the Display Name – as though this was a real email address.
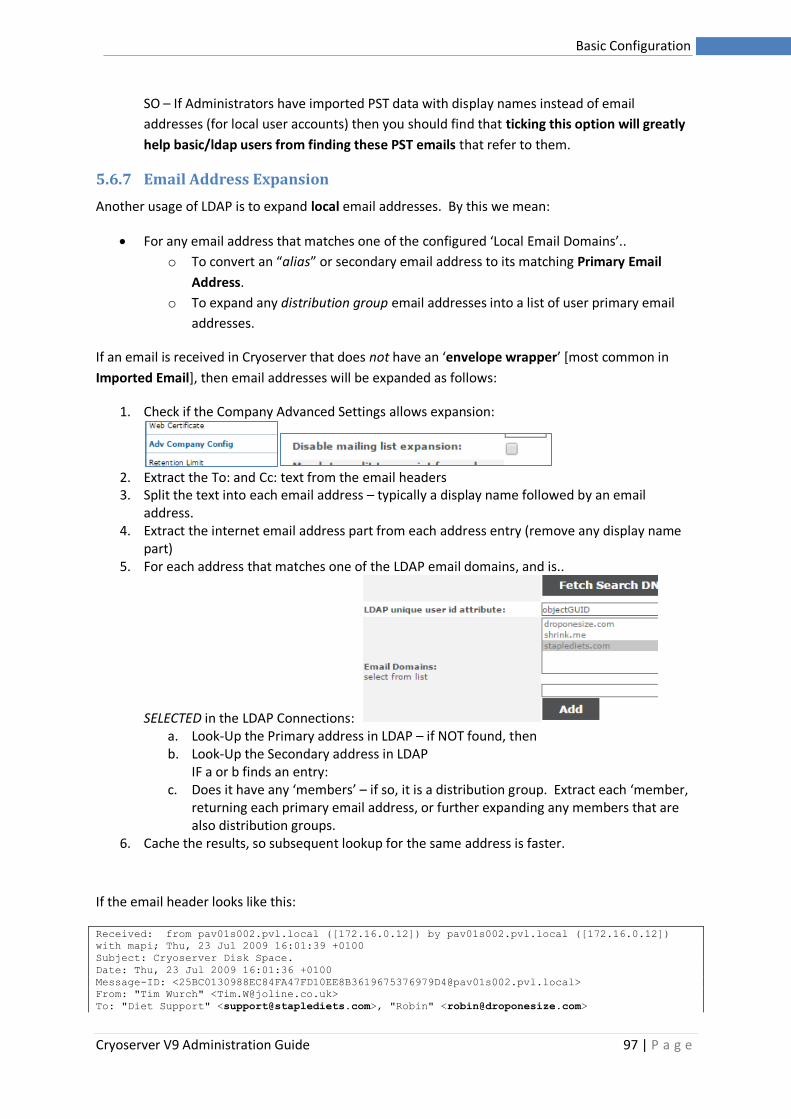
Cryoserver V9 Administration Guide 97 | P a g e
Basic Configuration
SO – If Administrators have imported PST data with display names instead of email
addresses (for local user accounts) then you should find that ticking this option will greatly
help basic/ldap users from finding these PST emails that refer to them.
5.6.7 Email Address Expansion
Another usage of LDAP is to expand local email addresses. By this we mean:
• For any email address that matches one of the configured ‘Local Email Domains’..
o To convert an “alias” or secondary email address to its matching Primary Email
Address.
o To expand any distribution group email addresses into a list of user primary email
addresses.
If an email is received in Cryoserver that does not have an ‘envelope wrapper’ [most common in
Imported Email], then email addresses will be expanded as follows:
1. Check if the Company Advanced Settings allows expansion:
2. Extract the To: and Cc: text from the email headers 3. Split the text into each email address – typically a display name followed by an email
address. 4. Extract the internet email address part from each address entry (remove any display name
part) 5. For each address that matches one of the LDAP email domains, and is..
SELECTED in the LDAP Connections: a. Look-Up the Primary address in LDAP – if NOT found, then b. Look-Up the Secondary address in LDAP
IF a or b finds an entry: c. Does it have any ‘members’ – if so, it is a distribution group. Extract each ‘member,
returning each primary email address, or further expanding any members that are also distribution groups.
6. Cache the results, so subsequent lookup for the same address is faster.
If the email header looks like this:
Received: from pav01s002.pvl.local ([172.16.0.12]) by pav01s002.pvl.local ([172.16.0.12])
with mapi; Thu, 23 Jul 2009 16:01:39 +0100
Subject: Cryoserver Disk Space.
Date: Thu, 23 Jul 2009 16:01:36 +0100
Message-ID: <[email protected]>
From: "Tim Wurch" <[email protected]>
To: "Diet Support" <[email protected]>, "Robin" <[email protected]>
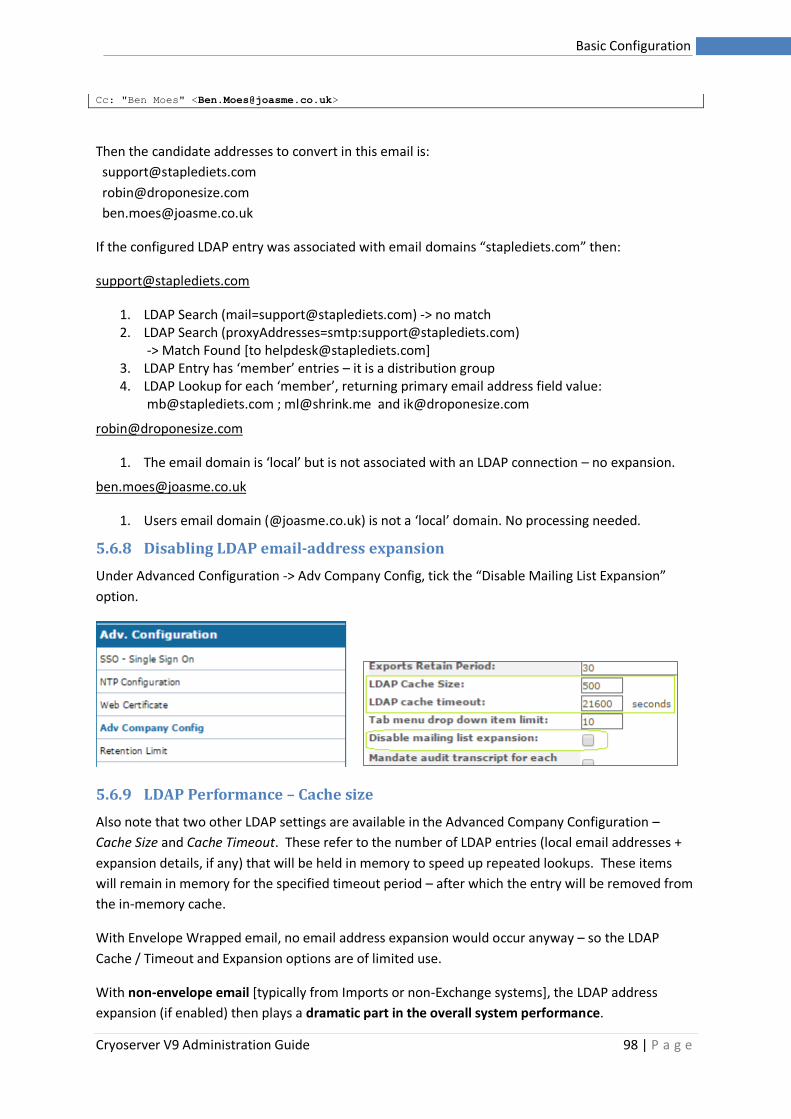
Cryoserver V9 Administration Guide 98 | P a g e
Basic Configuration
Cc: "Ben Moes" <[email protected]>
Then the candidate addresses to convert in this email is:
If the configured LDAP entry was associated with email domains “staplediets.com” then:
1. LDAP Search ([email protected]) -> no match 2. LDAP Search (proxyAddresses=smtp:[email protected])
-> Match Found [to [email protected]] 3. LDAP Entry has ‘member’ entries – it is a distribution group 4. LDAP Lookup for each ‘member’, returning primary email address field value:
[email protected] ; [email protected] and [email protected]
1. The email domain is ‘local’ but is not associated with an LDAP connection – no expansion.
1. Users email domain (@joasme.co.uk) is not a ‘local’ domain. No processing needed.
5.6.8 Disabling LDAP email-address expansion
Under Advanced Configuration -> Adv Company Config, tick the “Disable Mailing List Expansion”
option.
5.6.9 LDAP Performance – Cache size
Also note that two other LDAP settings are available in the Advanced Company Configuration –
Cache Size and Cache Timeout. These refer to the number of LDAP entries (local email addresses +
expansion details, if any) that will be held in memory to speed up repeated lookups. These items
will remain in memory for the specified timeout period – after which the entry will be removed from
the in-memory cache.
With Envelope Wrapped email, no email address expansion would occur anyway – so the LDAP
Cache / Timeout and Expansion options are of limited use.
With non-envelope email [typically from Imports or non-Exchange systems], the LDAP address
expansion (if enabled) then plays a dramatic part in the overall system performance.
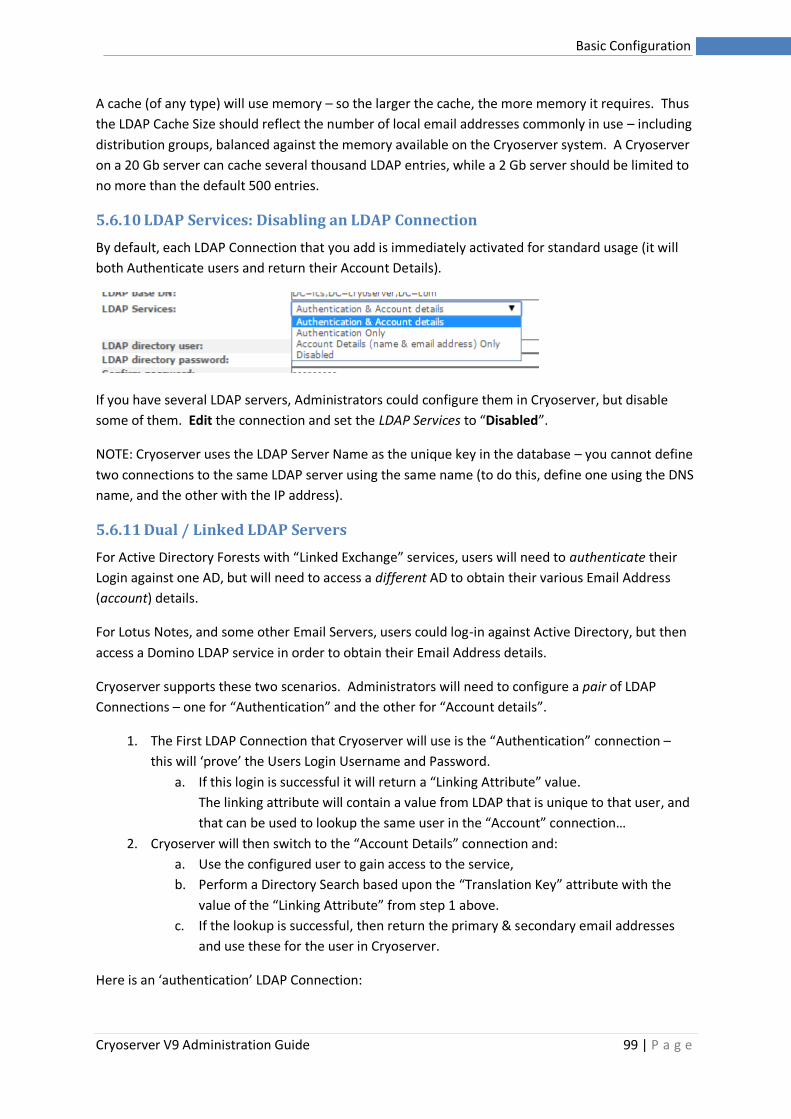
Cryoserver V9 Administration Guide 99 | P a g e
Basic Configuration
A cache (of any type) will use memory – so the larger the cache, the more memory it requires. Thus
the LDAP Cache Size should reflect the number of local email addresses commonly in use – including
distribution groups, balanced against the memory available on the Cryoserver system. A Cryoserver
on a 20 Gb server can cache several thousand LDAP entries, while a 2 Gb server should be limited to
no more than the default 500 entries.
5.6.10 LDAP Services: Disabling an LDAP Connection
By default, each LDAP Connection that you add is immediately activated for standard usage (it will
both Authenticate users and return their Account Details).
If you have several LDAP servers, Administrators could configure them in Cryoserver, but disable
some of them. Edit the connection and set the LDAP Services to “Disabled”.
NOTE: Cryoserver uses the LDAP Server Name as the unique key in the database – you cannot define
two connections to the same LDAP server using the same name (to do this, define one using the DNS
name, and the other with the IP address).
5.6.11 Dual / Linked LDAP Servers
For Active Directory Forests with “Linked Exchange” services, users will need to authenticate their
Login against one AD, but will need to access a different AD to obtain their various Email Address
(account) details.
For Lotus Notes, and some other Email Servers, users could log-in against Active Directory, but then
access a Domino LDAP service in order to obtain their Email Address details.
Cryoserver supports these two scenarios. Administrators will need to configure a pair of LDAP
Connections – one for “Authentication” and the other for “Account details”.
1. The First LDAP Connection that Cryoserver will use is the “Authentication” connection –
this will ‘prove’ the Users Login Username and Password.
a. If this login is successful it will return a “Linking Attribute” value.
The linking attribute will contain a value from LDAP that is unique to that user, and
that can be used to lookup the same user in the “Account” connection…
2. Cryoserver will then switch to the “Account Details” connection and:
a. Use the configured user to gain access to the service,
b. Perform a Directory Search based upon the “Translation Key” attribute with the
value of the “Linking Attribute” from step 1 above.
c. If the lookup is successful, then return the primary & secondary email addresses
and use these for the user in Cryoserver.
Here is an ‘authentication’ LDAP Connection:
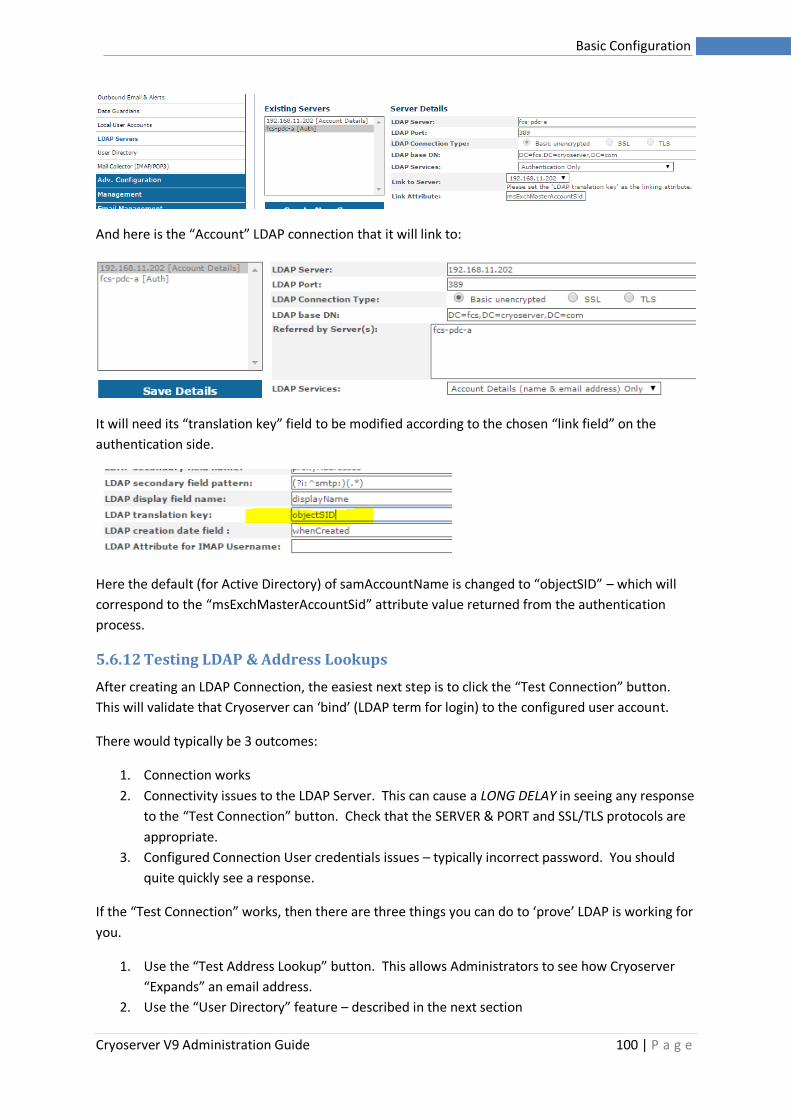
Cryoserver V9 Administration Guide 100 | P a g e
Basic Configuration
And here is the “Account” LDAP connection that it will link to:
It will need its “translation key” field to be modified according to the chosen “link field” on the
authentication side.
Here the default (for Active Directory) of samAccountName is changed to “objectSID” – which will
correspond to the “msExchMasterAccountSid” attribute value returned from the authentication
process.
5.6.12 Testing LDAP & Address Lookups
After creating an LDAP Connection, the easiest next step is to click the “Test Connection” button.
This will validate that Cryoserver can ‘bind’ (LDAP term for login) to the configured user account.
There would typically be 3 outcomes:
1. Connection works
2. Connectivity issues to the LDAP Server. This can cause a LONG DELAY in seeing any response
to the “Test Connection” button. Check that the SERVER & PORT and SSL/TLS protocols are
appropriate.
3. Configured Connection User credentials issues – typically incorrect password. You should
quite quickly see a response.
If the “Test Connection” works, then there are three things you can do to ‘prove’ LDAP is working for
you.
1. Use the “Test Address Lookup” button. This allows Administrators to see how Cryoserver
“Expands” an email address.
2. Use the “User Directory” feature – described in the next section
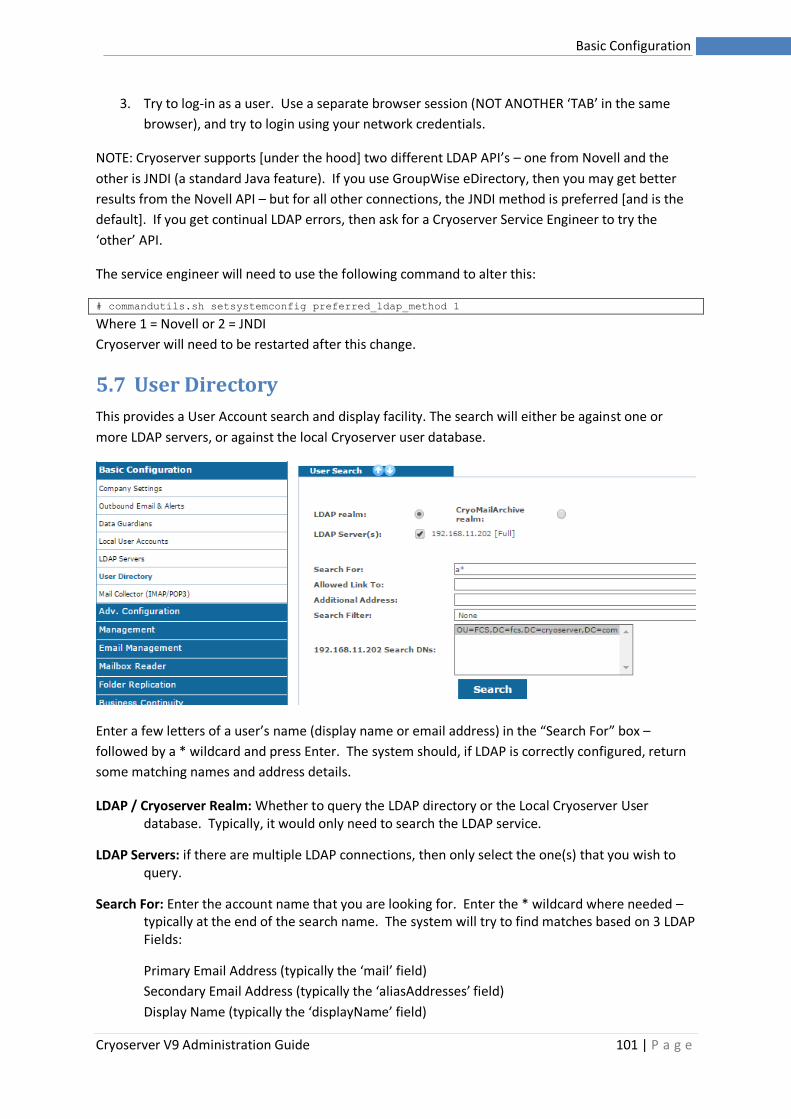
Cryoserver V9 Administration Guide 101 | P a g e
Basic Configuration
3. Try to log-in as a user. Use a separate browser session (NOT ANOTHER ‘TAB’ in the same
browser), and try to login using your network credentials.
NOTE: Cryoserver supports [under the hood] two different LDAP API’s – one from Novell and the
other is JNDI (a standard Java feature). If you use GroupWise eDirectory, then you may get better
results from the Novell API – but for all other connections, the JNDI method is preferred [and is the
default]. If you get continual LDAP errors, then ask for a Cryoserver Service Engineer to try the
‘other’ API.
The service engineer will need to use the following command to alter this:
# commandutils.sh setsystemconfig preferred_ldap_method 1
Where 1 = Novell or 2 = JNDI
Cryoserver will need to be restarted after this change.
5.7 User Directory
This provides a User Account search and display facility. The search will either be against one or
more LDAP servers, or against the local Cryoserver user database.
Enter a few letters of a user’s name (display name or email address) in the “Search For” box –
followed by a * wildcard and press Enter. The system should, if LDAP is correctly configured, return
some matching names and address details.
LDAP / Cryoserver Realm: Whether to query the LDAP directory or the Local Cryoserver User database. Typically, it would only need to search the LDAP service.
LDAP Servers: if there are multiple LDAP connections, then only select the one(s) that you wish to query.
Search For: Enter the account name that you are looking for. Enter the * wildcard where needed – typically at the end of the search name. The system will try to find matches based on 3 LDAP Fields:
Primary Email Address (typically the ‘mail’ field)
Secondary Email Address (typically the ‘aliasAddresses’ field)
Display Name (typically the ‘displayName’ field)

Cryoserver V9 Administration Guide 102 | P a g e
Basic Configuration
So if you search for a* the system will return ANY matches on
mail=a* OR aliasAddresses=a* OR displayName =a*
Allowed Link To: Instead of searching for an LDAP user, this lets you find users with Links.
Leave the Search For: blank and this field is not used.
Enter a linked email address or just * into this box, to list accounts with matching links.
See the ‘Link Accounts’ section for further information on Account Linking.
Additional Address: Any LDAP user account can be extended in Cryoserver with extra email
addresses. Use this search instead of the Search For, to locate any user accounts that have
had added addresses.
See “Adding Additional Addresses” section for further details.
Search Filter: Filters can be used to refine LDAP searches for specific purposes. You can create filters
to only return User accounts or only Distribution Groups, or to remove Service accounts
from the results.
See “LDAP Search Filters” section for more information.
Search DNs: If the LDAP Connection has one or more Search DN’s defined, then you can narrow
down your search to just one or two of these DNs.
5.7.1 Adding Extra Addresses to an LDAP User Account
When a user logs in with their LDAP credentials, Cryoserver will obtain all of their various email
addresses – and use these for Search purposes (e.g. to search only mail sent / received by any of
their email addresses, both old and new). It is sometimes desirable to add extra email addresses to
LDAP user accounts in Cryoserver, typically for one of these reasons:
1. To give access to another users email: e.g. a manager’s email to their PA. [However, we
suggest that you use the ‘Link Account’ feature instead.
2. To include a user’s private mail (e.g. Hotmail) when they search. This assumes that private
mail is being collected as well as business mail. Cryoserver’s “Mailbox Reader” makes this
possible.
3. To cope with Import Mail, where the old email contains non-standard email address values.
4. For Lotus Notes / GroupWise, where secondary/alias email address data is not shared with
the LDAP Directory.
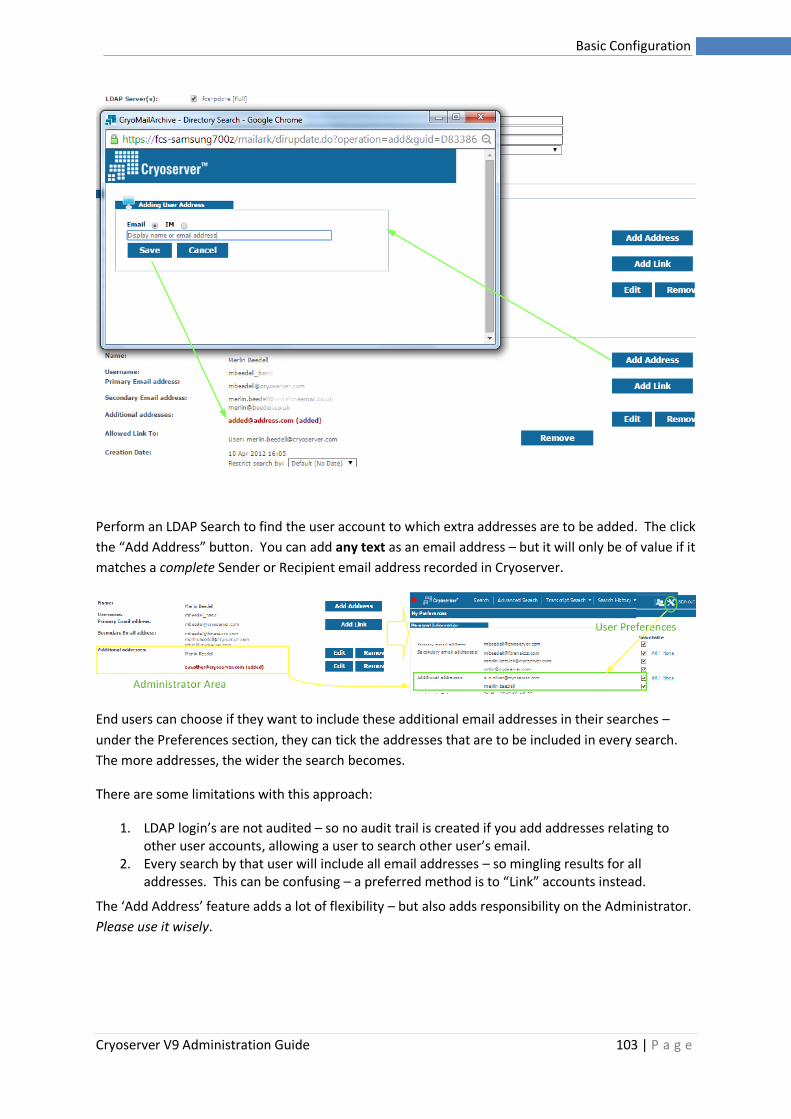
Cryoserver V9 Administration Guide 103 | P a g e
Basic Configuration
Perform an LDAP Search to find the user account to which extra addresses are to be added. The click
the “Add Address” button. You can add any text as an email address – but it will only be of value if it
matches a complete Sender or Recipient email address recorded in Cryoserver.
End users can choose if they want to include these additional email addresses in their searches –
under the Preferences section, they can tick the addresses that are to be included in every search.
The more addresses, the wider the search becomes.
There are some limitations with this approach:
1. LDAP login’s are not audited – so no audit trail is created if you add addresses relating to other user accounts, allowing a user to search other user’s email.
2. Every search by that user will include all email addresses – so mingling results for all addresses. This can be confusing – a preferred method is to “Link” accounts instead.
The ‘Add Address’ feature adds a lot of flexibility – but also adds responsibility on the Administrator.
Please use it wisely.
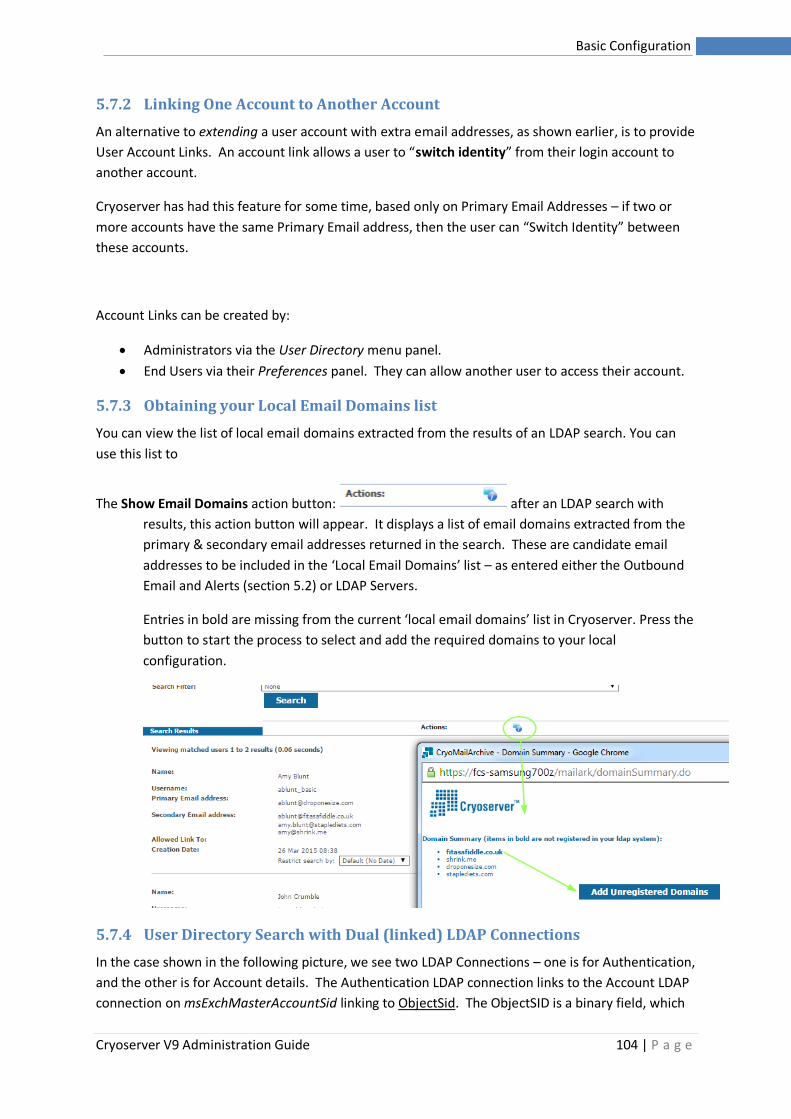
Cryoserver V9 Administration Guide 104 | P a g e
Basic Configuration
5.7.2 Linking One Account to Another Account
An alternative to extending a user account with extra email addresses, as shown earlier, is to provide
User Account Links. An account link allows a user to “switch identity” from their login account to
another account.
Cryoserver has had this feature for some time, based only on Primary Email Addresses – if two or
more accounts have the same Primary Email address, then the user can “Switch Identity” between
these accounts.
Account Links can be created by:
• Administrators via the User Directory menu panel.
• End Users via their Preferences panel. They can allow another user to access their account.
5.7.3 Obtaining your Local Email Domains list
You can view the list of local email domains extracted from the results of an LDAP search. You can
use this list to
The Show Email Domains action button: after an LDAP search with
results, this action button will appear. It displays a list of email domains extracted from the
primary & secondary email addresses returned in the search. These are candidate email
addresses to be included in the ‘Local Email Domains’ list – as entered either the Outbound
Email and Alerts (section 5.2) or LDAP Servers.
Entries in bold are missing from the current ‘local email domains’ list in Cryoserver. Press the
button to start the process to select and add the required domains to your local
configuration.
5.7.4 User Directory Search with Dual (linked) LDAP Connections
In the case shown in the following picture, we see two LDAP Connections – one is for Authentication,
and the other is for Account details. The Authentication LDAP connection links to the Account LDAP
connection on msExchMasterAccountSid linking to ObjectSid. The ObjectSID is a binary field, which
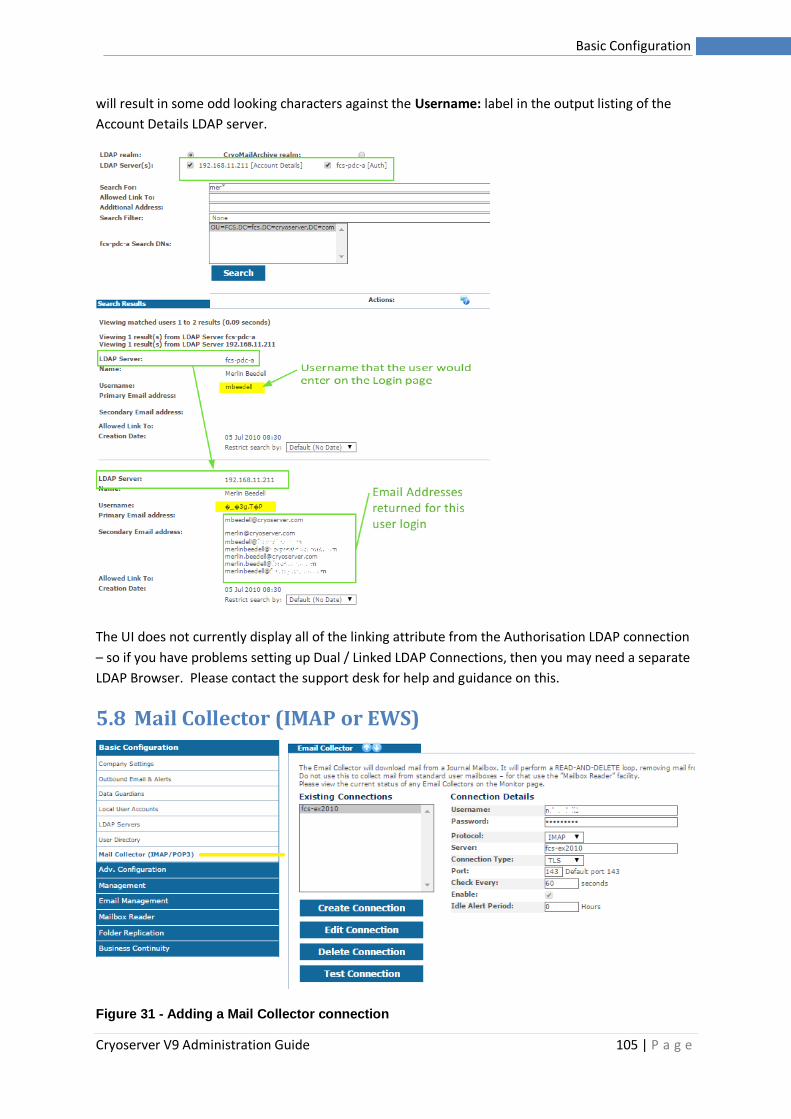
Cryoserver V9 Administration Guide 105 | P a g e
Basic Configuration
will result in some odd looking characters against the Username: label in the output listing of the
Account Details LDAP server.
The UI does not currently display all of the linking attribute from the Authorisation LDAP connection
– so if you have problems setting up Dual / Linked LDAP Connections, then you may need a separate
LDAP Browser. Please contact the support desk for help and guidance on this.
5.8 Mail Collector (IMAP or EWS)
Figure 31 - Adding a Mail Collector connection
Cryoserver V9 Administration Guide 106 | P a g e
Basic Configuration
The mail collector is one way of getting emails into Cryoserver. It uses a Read-and-Delete routine –
so mail will be deleted from the selected user account. Only the Inbox is read – sub-folders are
ignored.
Its purpose is to obtain “Journal Mail” from a Journal User Mailbox. Journal Mail is normally a copy
of mail as it was being transported over SMTP and may include additional delivery information
compared to the original email.
IMAP is the default and preferred protocol. It has been successfully used for many years. However,
EWS has been recently added for Exchange systems.
Idle Alert Period setting can be used to detect if the collector stops collecting (but where emails
from other sources continue to be received – meaning that other ‘fail flow’ alerts would not be
invoked).
With Exchange 2007+
• Journal Mail can be delivered direct to Cryoserver over SMTP, instead of to a Journal Mailbox. Use this method if you prefer IMAP/EWS over SMTP for Journal Mail. > The ONLY benefit of Mail Collection over direct SMTP delivery is that will hold the queue of mail for much longer if Cryoserver is down for any reason.
• You may use the EWS protocol instead of IMAP. Some additional options will become available relating to a couple of strategies to delete the downloaded emails as efficiently as possible. Please try each of the options to see which works best after some time in your environment.
• If using IMAP service may need to be installed and enabled for the journal account. Exchange no longer installs this by default. NOTE: On a Paired Exchange, you would need to enable the IMAP service on the Load Balancer NOT on each Exchange.
• The ‘SSL Enabled’ option should be selected here – unless the default settings in the Exchange are changed.
• The user mailbox details entered here should be one selected in the/a Journal Rule in the Organisation -> Hub Transport level, or in the Server -> Mail-Store level.
With Exchange 2000 & 2003
• IMAP Collection from the Journal Mailbox is the preferred method to obtain Journal mail from Exchange 2003. It is the ONLY method that Exchange supports with the “Journal Wrapper” support (which includes BCC recipient data into the Journal copy).
• You can enter the Exchange Mailbox Server that holds the Journal Mailbox account OR a front-end / CAS Exchange server.
• You can use ‘plain’ unencrypted connection – but TLS encryption is preferred (else the account login is passed unencrypted).
• NOTE: On a Paired Exchange, you would need to enable the IMAP service on the Load Balancer NOT on each Exchange.
With GroupWise
• This requires a very special IMAP reader (known as the ‘GCIDaemon’). Do not use the Mail Collector specified here. A Cryoserver engineer will need to deploy the GCIDaemin to be installed and configured for your site.
With Lotus Notes
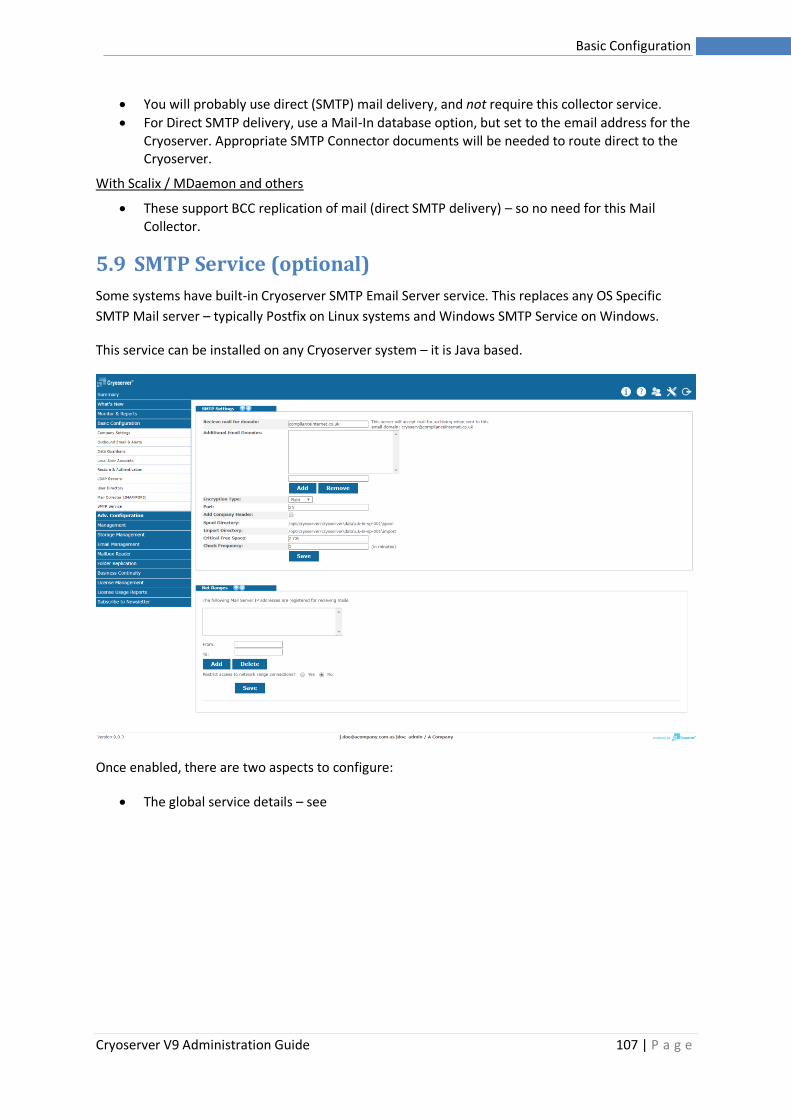
Cryoserver V9 Administration Guide 107 | P a g e
Basic Configuration
• You will probably use direct (SMTP) mail delivery, and not require this collector service.
• For Direct SMTP delivery, use a Mail-In database option, but set to the email address for the Cryoserver. Appropriate SMTP Connector documents will be needed to route direct to the Cryoserver.
With Scalix / MDaemon and others
• These support BCC replication of mail (direct SMTP delivery) – so no need for this Mail Collector.
5.9 SMTP Service (optional)
Some systems have built-in Cryoserver SMTP Email Server service. This replaces any OS Specific
SMTP Mail server – typically Postfix on Linux systems and Windows SMTP Service on Windows.
This service can be installed on any Cryoserver system – it is Java based.
Once enabled, there are two aspects to configure:
• The global service details – see
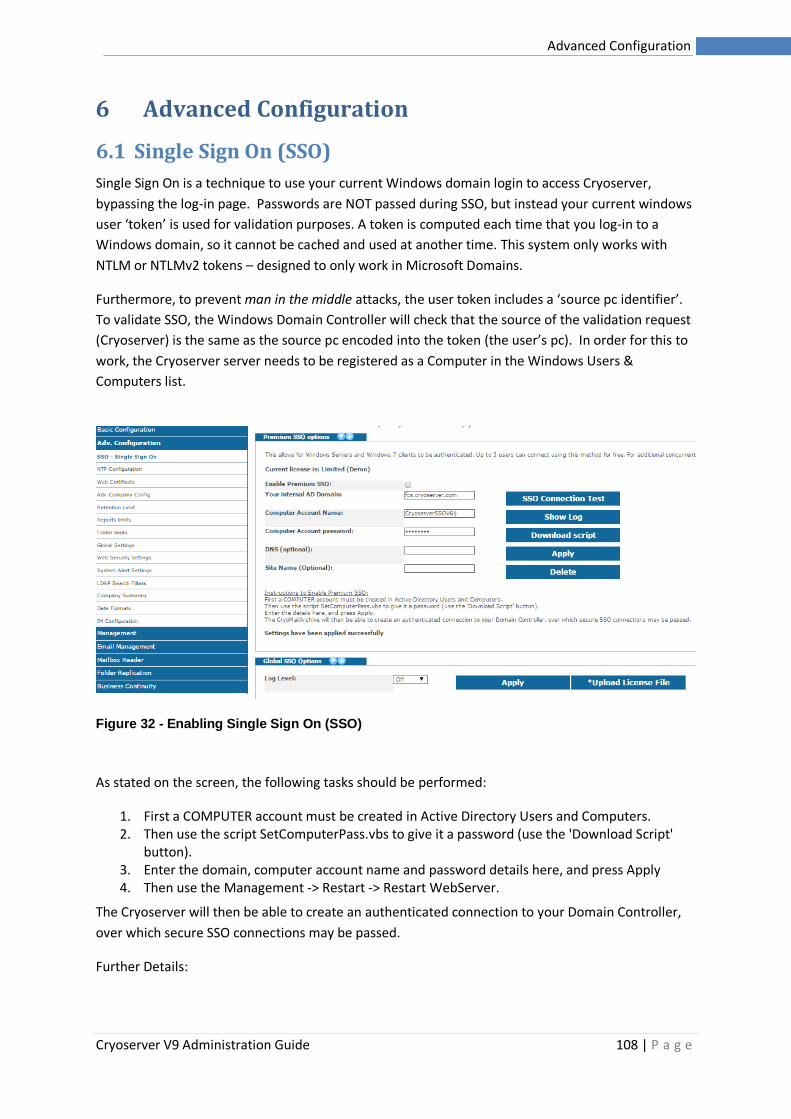
Cryoserver V9 Administration Guide 108 | P a g e
Advanced Configuration
6 Advanced Configuration
6.1 Single Sign On (SSO)
Single Sign On is a technique to use your current Windows domain login to access Cryoserver,
bypassing the log-in page. Passwords are NOT passed during SSO, but instead your current windows
user ‘token’ is used for validation purposes. A token is computed each time that you log-in to a
Windows domain, so it cannot be cached and used at another time. This system only works with
NTLM or NTLMv2 tokens – designed to only work in Microsoft Domains.
Furthermore, to prevent man in the middle attacks, the user token includes a ‘source pc identifier’.
To validate SSO, the Windows Domain Controller will check that the source of the validation request
(Cryoserver) is the same as the source pc encoded into the token (the user’s pc). In order for this to
work, the Cryoserver server needs to be registered as a Computer in the Windows Users &
Computers list.
Figure 32 - Enabling Single Sign On (SSO)
As stated on the screen, the following tasks should be performed:
1. First a COMPUTER account must be created in Active Directory Users and Computers. 2. Then use the script SetComputerPass.vbs to give it a password (use the 'Download Script'
button). 3. Enter the domain, computer account name and password details here, and press Apply 4. Then use the Management -> Restart -> Restart WebServer.
The Cryoserver will then be able to create an authenticated connection to your Domain Controller,
over which secure SSO connections may be passed.
Further Details:
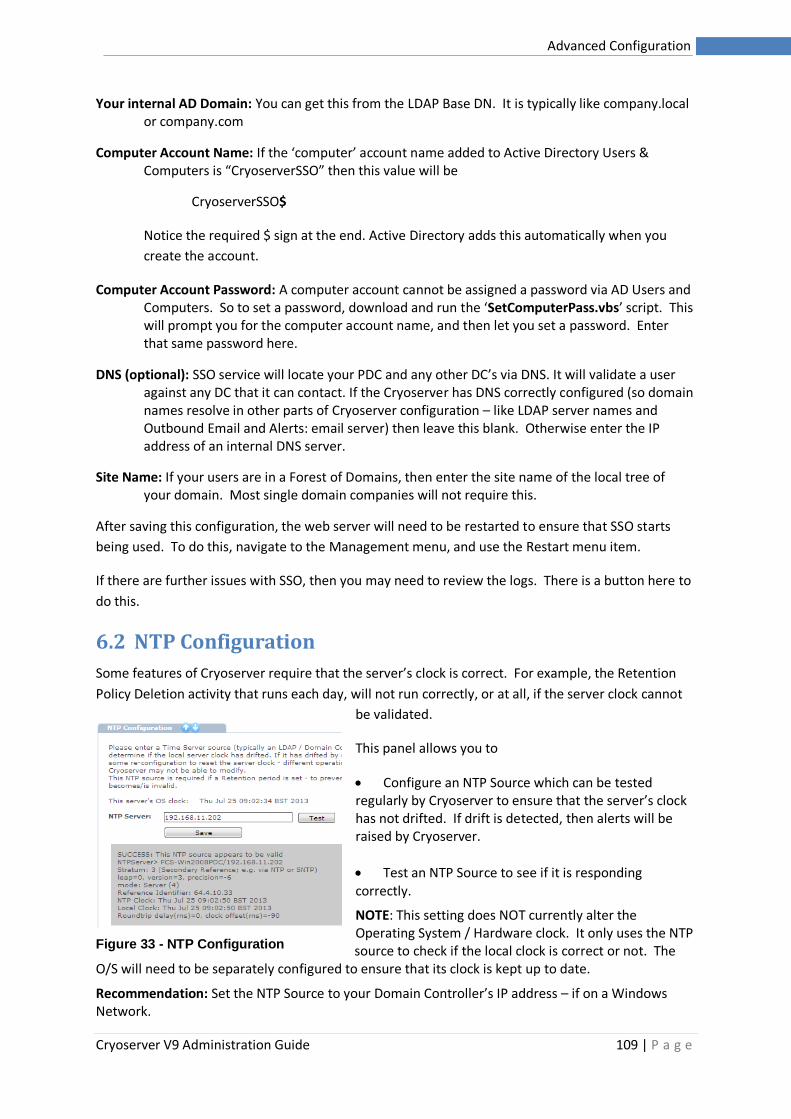
Cryoserver V9 Administration Guide 109 | P a g e
Advanced Configuration
Your internal AD Domain: You can get this from the LDAP Base DN. It is typically like company.local or company.com
Computer Account Name: If the ‘computer’ account name added to Active Directory Users & Computers is “CryoserverSSO” then this value will be
CryoserverSSO$
Notice the required $ sign at the end. Active Directory adds this automatically when you
create the account.
Computer Account Password: A computer account cannot be assigned a password via AD Users and Computers. So to set a password, download and run the ‘SetComputerPass.vbs’ script. This will prompt you for the computer account name, and then let you set a password. Enter that same password here.
DNS (optional): SSO service will locate your PDC and any other DC’s via DNS. It will validate a user against any DC that it can contact. If the Cryoserver has DNS correctly configured (so domain names resolve in other parts of Cryoserver configuration – like LDAP server names and Outbound Email and Alerts: email server) then leave this blank. Otherwise enter the IP address of an internal DNS server.
Site Name: If your users are in a Forest of Domains, then enter the site name of the local tree of your domain. Most single domain companies will not require this.
After saving this configuration, the web server will need to be restarted to ensure that SSO starts
being used. To do this, navigate to the Management menu, and use the Restart menu item.
If there are further issues with SSO, then you may need to review the logs. There is a button here to
do this.
6.2 NTP Configuration
Some features of Cryoserver require that the server’s clock is correct. For example, the Retention
Policy Deletion activity that runs each day, will not run correctly, or at all, if the server clock cannot
be validated.
This panel allows you to
• Configure an NTP Source which can be tested regularly by Cryoserver to ensure that the server’s clock has not drifted. If drift is detected, then alerts will be raised by Cryoserver.
• Test an NTP Source to see if it is responding correctly.
NOTE: This setting does NOT currently alter the Operating System / Hardware clock. It only uses the NTP source to check if the local clock is correct or not. The
O/S will need to be separately configured to ensure that its clock is kept up to date.
Recommendation: Set the NTP Source to your Domain Controller’s IP address – if on a Windows Network.
Figure 33 - NTP Configuration
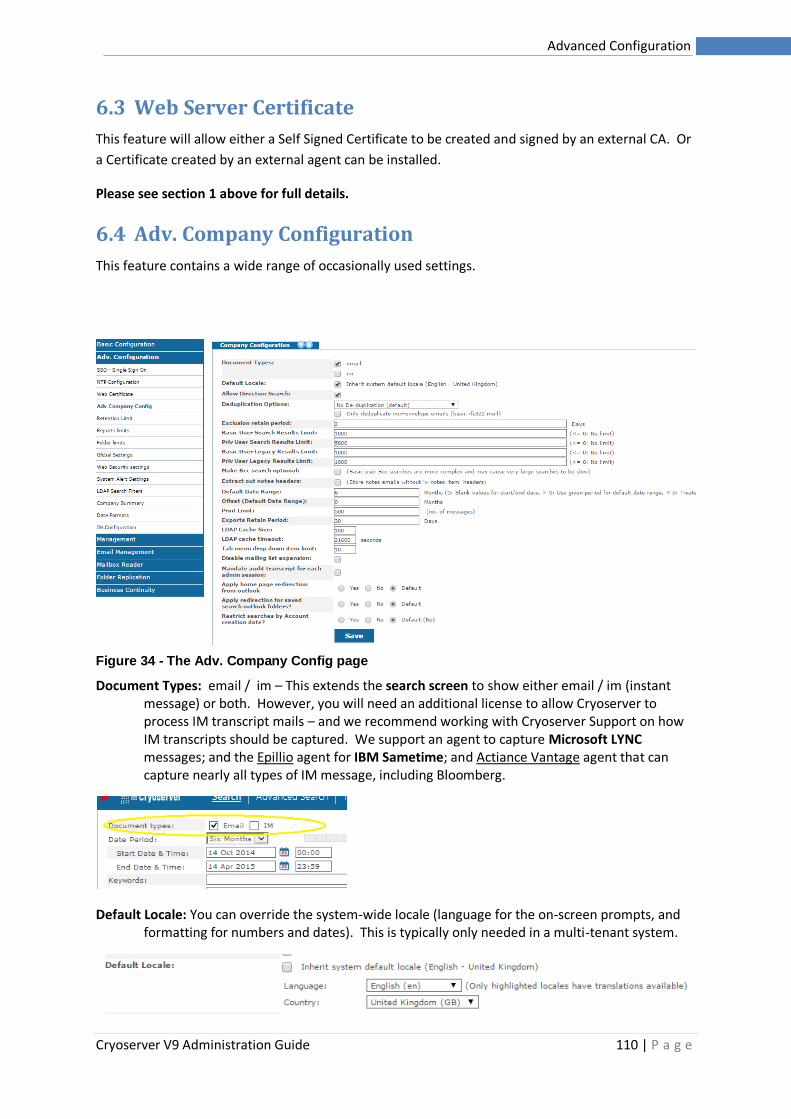
Cryoserver V9 Administration Guide 110 | P a g e
Advanced Configuration
6.3 Web Server Certificate
This feature will allow either a Self Signed Certificate to be created and signed by an external CA. Or
a Certificate created by an external agent can be installed.
Please see section 1 above for full details.
6.4 Adv. Company Configuration
This feature contains a wide range of occasionally used settings.
Figure 34 - The Adv. Company Config page
Document Types: email / im – This extends the search screen to show either email / im (instant message) or both. However, you will need an additional license to allow Cryoserver to process IM transcript mails – and we recommend working with Cryoserver Support on how IM transcripts should be captured. We support an agent to capture Microsoft LYNC messages; and the Epillio agent for IBM Sametime; and Actiance Vantage agent that can capture nearly all types of IM message, including Bloomberg.
Default Locale: You can override the system-wide locale (language for the on-screen prompts, and formatting for numbers and dates). This is typically only needed in a multi-tenant system.
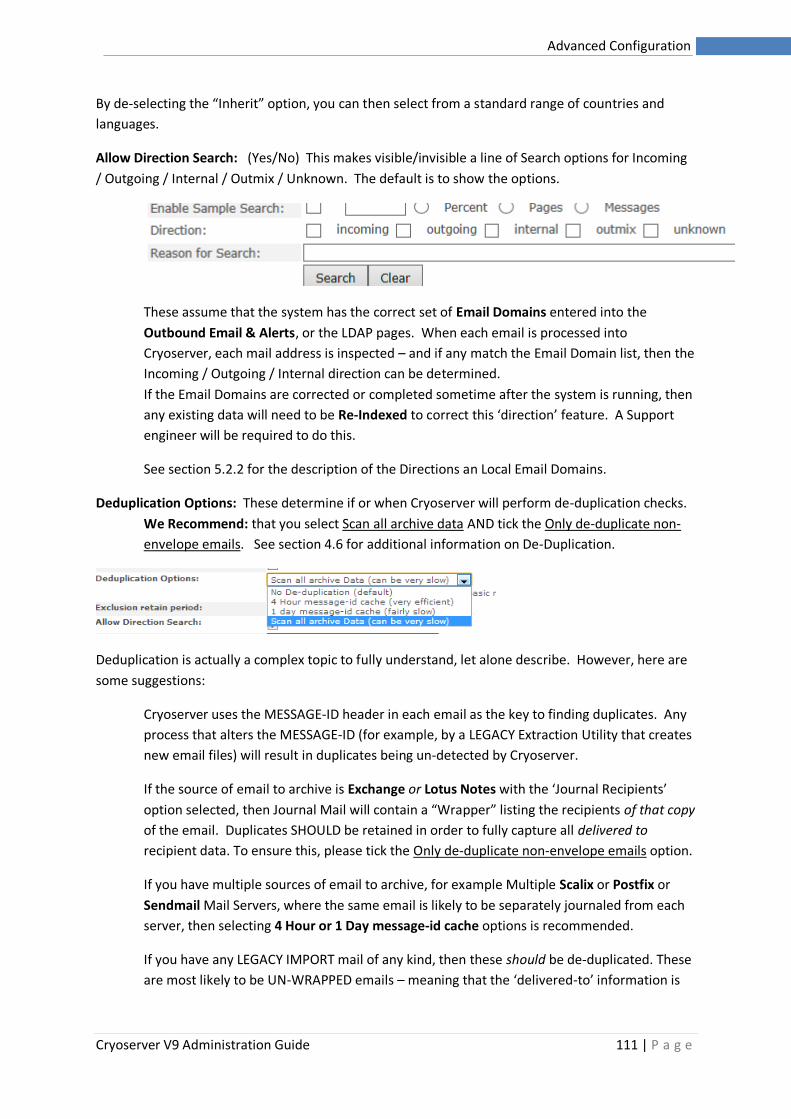
Cryoserver V9 Administration Guide 111 | P a g e
Advanced Configuration
By de-selecting the “Inherit” option, you can then select from a standard range of countries and
languages.
Allow Direction Search: (Yes/No) This makes visible/invisible a line of Search options for Incoming
/ Outgoing / Internal / Outmix / Unknown. The default is to show the options.
These assume that the system has the correct set of Email Domains entered into the
Outbound Email & Alerts, or the LDAP pages. When each email is processed into
Cryoserver, each mail address is inspected – and if any match the Email Domain list, then the
Incoming / Outgoing / Internal direction can be determined.
If the Email Domains are corrected or completed sometime after the system is running, then
any existing data will need to be Re-Indexed to correct this ‘direction’ feature. A Support
engineer will be required to do this.
See section 5.2.2 for the description of the Directions an Local Email Domains.
Deduplication Options: These determine if or when Cryoserver will perform de-duplication checks.
We Recommend: that you select Scan all archive data AND tick the Only de-duplicate non-
envelope emails. See section 4.6 for additional information on De-Duplication.
Deduplication is actually a complex topic to fully understand, let alone describe. However, here are
some suggestions:
Cryoserver uses the MESSAGE-ID header in each email as the key to finding duplicates. Any
process that alters the MESSAGE-ID (for example, by a LEGACY Extraction Utility that creates
new email files) will result in duplicates being un-detected by Cryoserver.
If the source of email to archive is Exchange or Lotus Notes with the ‘Journal Recipients’
option selected, then Journal Mail will contain a “Wrapper” listing the recipients of that copy
of the email. Duplicates SHOULD be retained in order to fully capture all delivered to
recipient data. To ensure this, please tick the Only de-duplicate non-envelope emails option.
If you have multiple sources of email to archive, for example Multiple Scalix or Postfix or
Sendmail Mail Servers, where the same email is likely to be separately journaled from each
server, then selecting 4 Hour or 1 Day message-id cache options is recommended.
If you have any LEGACY IMPORT mail of any kind, then these should be de-duplicated. These
are most likely to be UN-WRAPPED emails – meaning that the ‘delivered-to’ information is
Cryoserver V9 Administration Guide 112 | P a g e
Advanced Configuration
no longer available and duplicates will be identical in all respects [unless edited by the end
user, which is possible in Outlook and many email clients].
Exclusion retain period: The number of Days to keep emails that have been excluded from Cryoserver via an Exclusion rule. Default is 2 days.
Currently this queue of retained mails is not visible in Cryoserver – it is there so that
Cryoserver Support can verify that the excluded mail is the complete and correct data set.
Search Limits
The following four options determine the number of items each index will yield for each search. As
Cryoserver data is split over several indexes, the actual maximum number of results shown to a user
can be much higher than these limits AND the user will see a ‘Full Search’ button that will override
the limits. However, these are used to limit the amount of server memory for each user search. And
because a search resulting in many thousand results may require more refinement.
Basic User Search Results Limit: (<= 0: No limit)
Priv User Search Results Limit: (<= 0: No limit)
Basic User Legacy Results Limit: (<= 0: No limit)
Priv User Legacy Results Limit: (<= 0: No limit)
The value “less than zero” means “no limit” i.e. -1. Any positive number will limit the result count
yielded from each search index.
Make Bcc search optional: This makes visible a tick-box on the Privilege User search screen, next to the Recipients names search box. It determines which index field is used for search purposes – meaning that the search can be performed against the DELIVERED TO recipients (from the mail ‘Envelope’) rather than the standard ORIGINAL RECIPIENTS list (the visible recipients from the standard Headers).
Extract out notes headers: Lotus Notes (from ver 8) has a ‘journal recipients’ feature that adds a whole host of ‘meta-data’ including the final recipients [inc. BCC & Distribution Group recipients] into each email, as x-notes-item header entries. These should be removed from the final email that the user sees within Cryoserver – but it can help to resolve some issues if these are left in the emails during the initial acceptance phase of Cryoserver.
The following two options change the default date range shown on the users search screen.
Default Date Range: Default is 6 Months
Use 0 for Demo Cryoserver systems – which will leave the start/end dates as Blank values
Offset (Default Date Range): Default is 0 Months (ie, 6 months up to today’s date)
Print Limit: The maximum number of messages that the Print Results list feature will support. We recommend a setting of 500 or lower, or you may find the printer will print 500+ pages.
Exports Retain Period: The number of Days to keep any Back-End export’s on the Cryoserver disk. After that period, the export files will be deleted during the nightly housekeeping tasks.
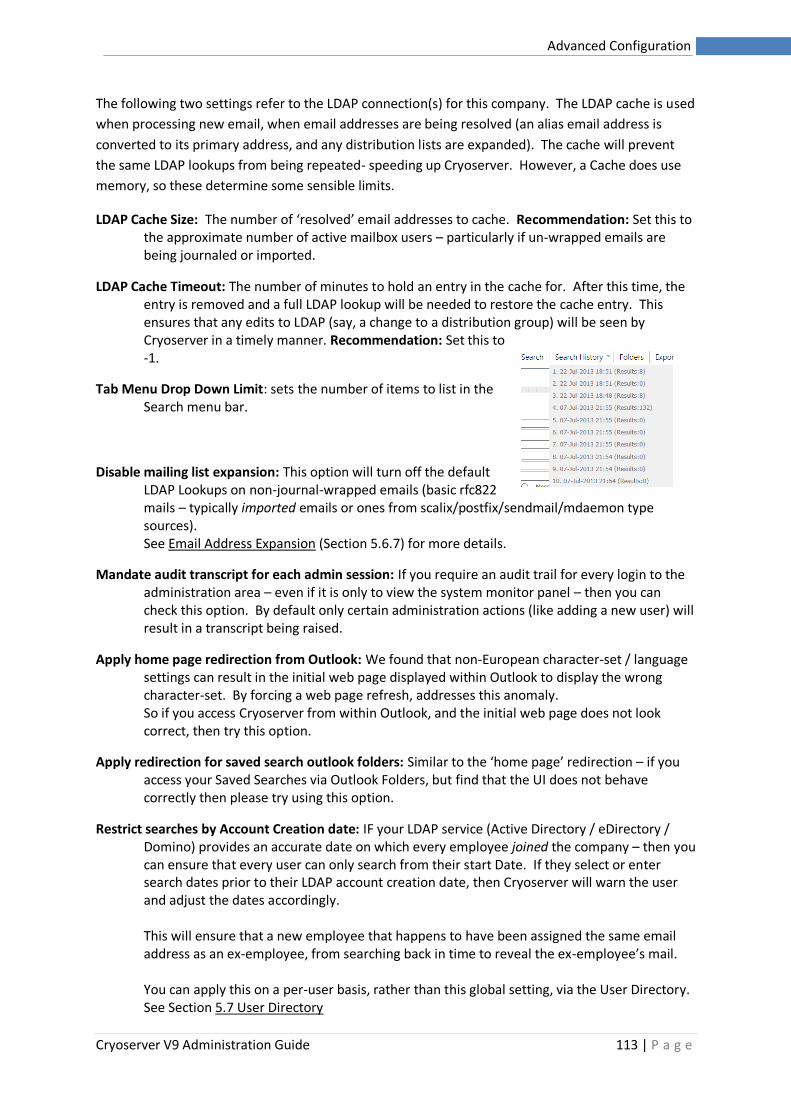
Cryoserver V9 Administration Guide 113 | P a g e
Advanced Configuration
The following two settings refer to the LDAP connection(s) for this company. The LDAP cache is used
when processing new email, when email addresses are being resolved (an alias email address is
converted to its primary address, and any distribution lists are expanded). The cache will prevent
the same LDAP lookups from being repeated- speeding up Cryoserver. However, a Cache does use
memory, so these determine some sensible limits.
LDAP Cache Size: The number of ‘resolved’ email addresses to cache. Recommendation: Set this to the approximate number of active mailbox users – particularly if un-wrapped emails are being journaled or imported.
LDAP Cache Timeout: The number of minutes to hold an entry in the cache for. After this time, the entry is removed and a full LDAP lookup will be needed to restore the cache entry. This ensures that any edits to LDAP (say, a change to a distribution group) will be seen by Cryoserver in a timely manner. Recommendation: Set this to -1.
Tab Menu Drop Down Limit: sets the number of items to list in the Search menu bar.
Disable mailing list expansion: This option will turn off the default LDAP Lookups on non-journal-wrapped emails (basic rfc822 mails – typically imported emails or ones from scalix/postfix/sendmail/mdaemon type sources). See Email Address Expansion (Section 5.6.7) for more details.
Mandate audit transcript for each admin session: If you require an audit trail for every login to the administration area – even if it is only to view the system monitor panel – then you can check this option. By default only certain administration actions (like adding a new user) will result in a transcript being raised.
Apply home page redirection from Outlook: We found that non-European character-set / language settings can result in the initial web page displayed within Outlook to display the wrong character-set. By forcing a web page refresh, addresses this anomaly. So if you access Cryoserver from within Outlook, and the initial web page does not look correct, then try this option.
Apply redirection for saved search outlook folders: Similar to the ‘home page’ redirection – if you access your Saved Searches via Outlook Folders, but find that the UI does not behave correctly then please try using this option.
Restrict searches by Account Creation date: IF your LDAP service (Active Directory / eDirectory / Domino) provides an accurate date on which every employee joined the company – then you can ensure that every user can only search from their start Date. If they select or enter search dates prior to their LDAP account creation date, then Cryoserver will warn the user and adjust the dates accordingly. This will ensure that a new employee that happens to have been assigned the same email address as an ex-employee, from searching back in time to reveal the ex-employee’s mail. You can apply this on a per-user basis, rather than this global setting, via the User Directory. See Section 5.7 User Directory
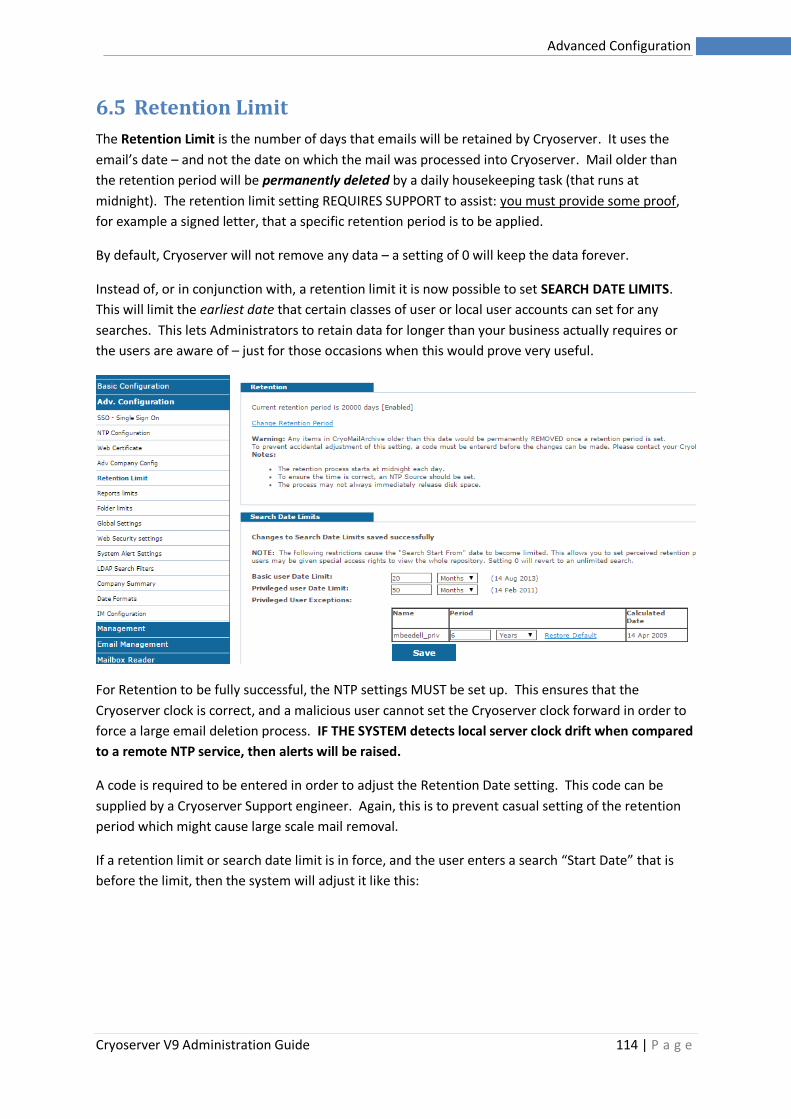
Cryoserver V9 Administration Guide 114 | P a g e
Advanced Configuration
6.5 Retention Limit
The Retention Limit is the number of days that emails will be retained by Cryoserver. It uses the
email’s date – and not the date on which the mail was processed into Cryoserver. Mail older than
the retention period will be permanently deleted by a daily housekeeping task (that runs at
midnight). The retention limit setting REQUIRES SUPPORT to assist: you must provide some proof,
for example a signed letter, that a specific retention period is to be applied.
By default, Cryoserver will not remove any data – a setting of 0 will keep the data forever.
Instead of, or in conjunction with, a retention limit it is now possible to set SEARCH DATE LIMITS.
This will limit the earliest date that certain classes of user or local user accounts can set for any
searches. This lets Administrators to retain data for longer than your business actually requires or
the users are aware of – just for those occasions when this would prove very useful.
For Retention to be fully successful, the NTP settings MUST be set up. This ensures that the
Cryoserver clock is correct, and a malicious user cannot set the Cryoserver clock forward in order to
force a large email deletion process. IF THE SYSTEM detects local server clock drift when compared
to a remote NTP service, then alerts will be raised.
A code is required to be entered in order to adjust the Retention Date setting. This code can be
supplied by a Cryoserver Support engineer. Again, this is to prevent casual setting of the retention
period which might cause large scale mail removal.
If a retention limit or search date limit is in force, and the user enters a search “Start Date” that is
before the limit, then the system will adjust it like this:
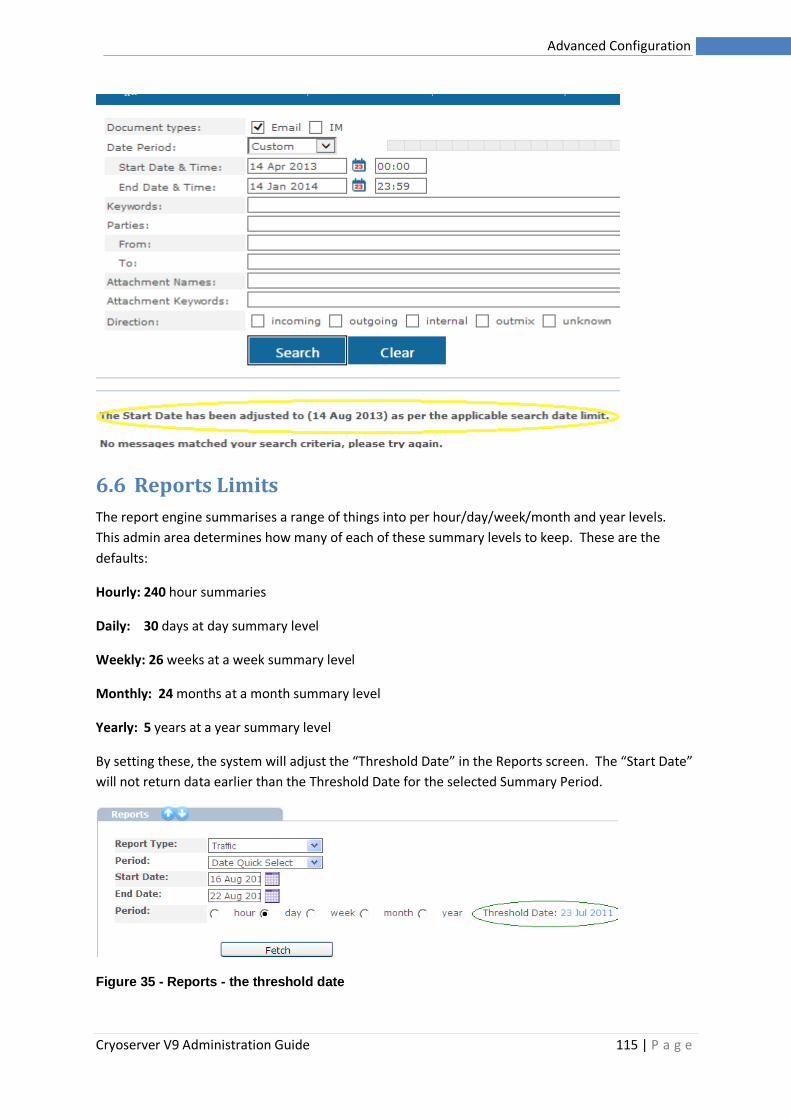
Cryoserver V9 Administration Guide 115 | P a g e
Advanced Configuration
6.6 Reports Limits
The report engine summarises a range of things into per hour/day/week/month and year levels.
This admin area determines how many of each of these summary levels to keep. These are the
defaults:
Hourly: 240 hour summaries
Daily: 30 days at day summary level
Weekly: 26 weeks at a week summary level
Monthly: 24 months at a month summary level
Yearly: 5 years at a year summary level
By setting these, the system will adjust the “Threshold Date” in the Reports screen. The “Start Date”
will not return data earlier than the Threshold Date for the selected Summary Period.
Figure 35 - Reports - the threshold date
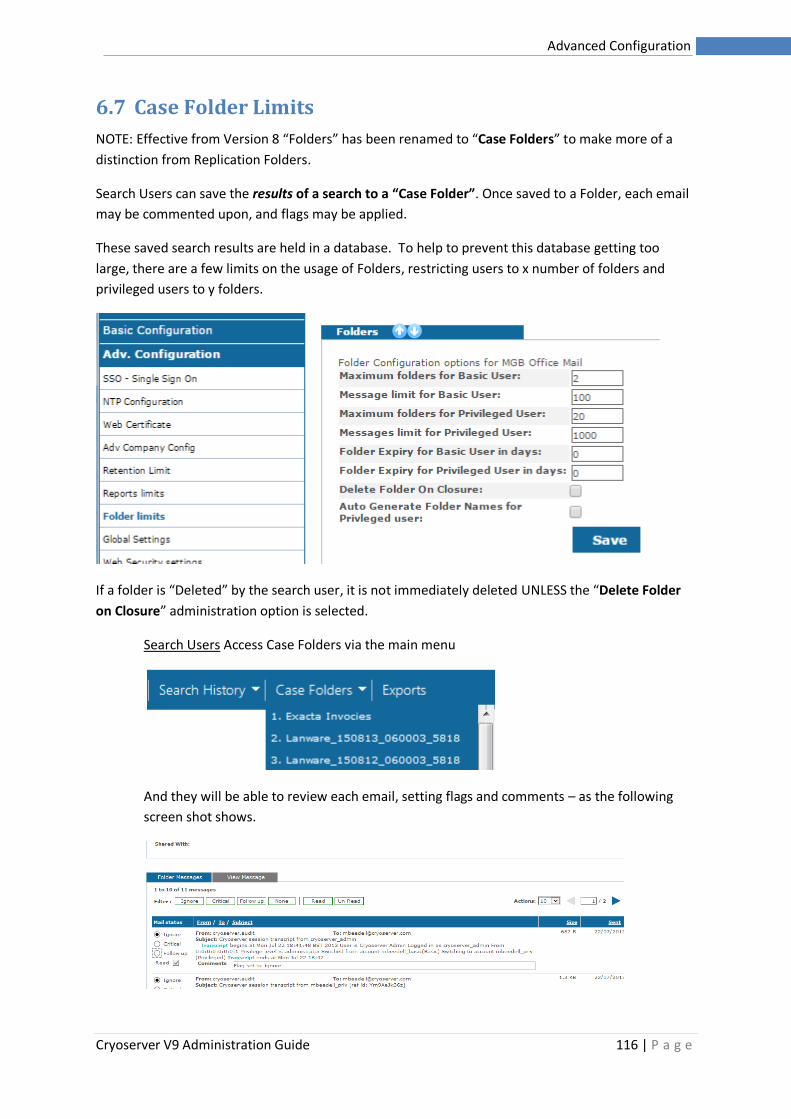
Cryoserver V9 Administration Guide 116 | P a g e
Advanced Configuration
6.7 Case Folder Limits
NOTE: Effective from Version 8 “Folders” has been renamed to “Case Folders” to make more of a
distinction from Replication Folders.
Search Users can save the results of a search to a “Case Folder”. Once saved to a Folder, each email
may be commented upon, and flags may be applied.
These saved search results are held in a database. To help to prevent this database getting too
large, there are a few limits on the usage of Folders, restricting users to x number of folders and
privileged users to y folders.
If a folder is “Deleted” by the search user, it is not immediately deleted UNLESS the “Delete Folder
on Closure” administration option is selected.
Search Users Access Case Folders via the main menu
And they will be able to review each email, setting flags and comments – as the following
screen shot shows.
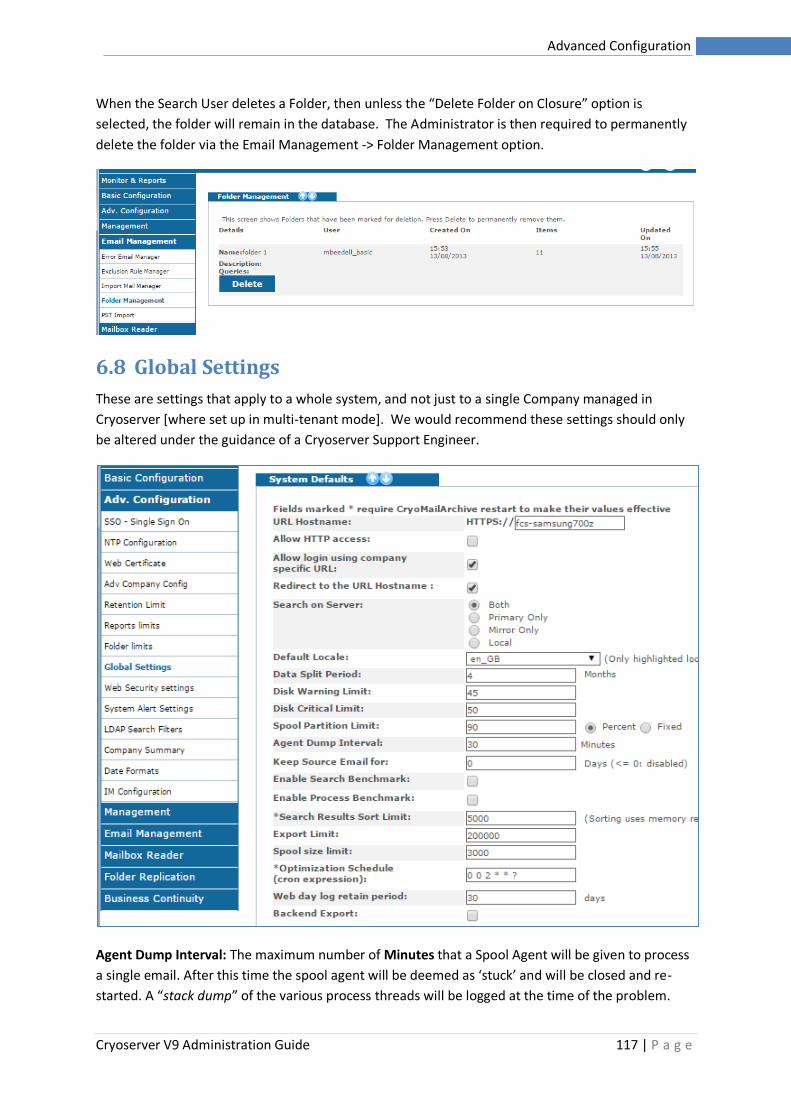
Cryoserver V9 Administration Guide 117 | P a g e
Advanced Configuration
When the Search User deletes a Folder, then unless the “Delete Folder on Closure” option is
selected, the folder will remain in the database. The Administrator is then required to permanently
delete the folder via the Email Management -> Folder Management option.
6.8 Global Settings
These are settings that apply to a whole system, and not just to a single Company managed in
Cryoserver [where set up in multi-tenant mode]. We would recommend these settings should only
be altered under the guidance of a Cryoserver Support Engineer.
Agent Dump Interval: The maximum number of Minutes that a Spool Agent will be given to process
a single email. After this time the spool agent will be deemed as ‘stuck’ and will be closed and re-
started. A “stack dump” of the various process threads will be logged at the time of the problem.
Cryoserver V9 Administration Guide 118 | P a g e
Advanced Configuration
This logged information can be used to determine the cause of the problem, and to help design a
solution. The email(s) will be re-queued for re-processing later (up to 3 tries) – if it still fails to
process, then it will be ‘errored’.
*Separate Legacy JVM: If your system has been upgraded from an old Cryoserver Version 1.3, then
this data is made available via a “Bridge” to the old 1.3 code. The old 1.3 code, if required, will
normally run in the same Java work space (memory & threads). This option will prevent the V1.3
code from starting up with the Version 6 code – and allow the old 1.3 code to run independently –
perhaps even on a separate server. Other adjustments will be required to actually configure and run
the V1.3 code elsewhere – which support engineers will be able to set up.
Keep Source Email for: Set the number of Days (or <= 0 for ‘disabled’) that Cryoserver will hold
each raw email file, as received by the Cryoserver system via smtp or imap etc., after it has been
processed. When set to 0, the feature is turned off, and the mail files will be deleted after being
successfully processed into Cryoserver.
This feature was previously known as the “trash period”.
If your Cryoserver is set to use the Trash-Copy method to keep two separate independent
Cryoserver systems in-sync with the same email data (rather than the usual mirroring system), then
a positive number MUST be entered here. Typically, 1 or 2 is needed. If the mail fails to be copied
from one server to another, then the source mails will NOT be deleted, and will remain in the trash-
copy queue until they are successfully copied. Support engineers will be required to set up the Trash
Copy facility.
Disk Warning Limit: Cryoserver will send Alert emails if any disk partition used by Cryoserver is filled
beyond this limit. Default is 90 Percent.
Disk Critical Limit: Cryoserver will stop processing emails if any writeable storage node’s disk
partition fills by more than this limit. Default is 95 Percent.
Default Locale: A locale is a two-part setting, of a LANGUAGE and a COUNTRY. There are a range of
standard locales in Cryoserver. The default is English / England (en_GB).
Some locales will result in the labels shown on the Cryoserver web pages to show in the selected
language.
The locales also determine some formatting layouts for Numbers and Dates.
Enable Search Benchmark: Select this if you wish to obtain detailed information about the
performance of each and every stage of every Search. To see the log, you would need to use the
‘get logs’ administrative facility, found under the Management menu.
Cryoserver V9 Administration Guide 119 | P a g e
Advanced Configuration
Enable Process Benchmark: Select this if you wish to obtain detailed information about the
performance of each and every stage used when processing each email. This can generate a lot of
information. The log will ‘roll’ so it will not get too large. To see the log, you would need to use the
‘get logs’ administrative facility, found under the Management menu.
*Optimization Schedule (cron expression): A nightly task that will optimise the indexes of any new
data processed that day. During Optimisation, the disk usage will rise – depending on the volume of
new data processed that day. After Optimisation, the indexes will be (much) smaller than before.
The scheduler expression is Second Minute Hour Day-of-Week Month Command
So the default of [ 0 0 2 * * ? ] says,
“every 0th second and 0th minute on the 2nd Hour, of every day and month, run the command” (the ?
is replaced by Cryoserver with the required command)
Above expression states: – the optimise is run at 2am every day when the system is at it’s quietest.
*Search Results Sort Limit: To try to limit the amount of server memory used when displaying
Search Results to users, the system will only sort results if less than this limit. A large sort can be
very slow too.
Export Limit: A very large export may indicate a user trying to extract information for un-authorised
purposes. To prevent accidental or invalid use of the export facility, this will prevent any exports
where the search returns more results than this limit.
Backend Export: A flag to turn on or off the facility to perform Backend Exports (where an export is
performed to the Cryoserver local disks and on completion an email is sent to the end user with a
link to retrieve the download files).
The only case for turning this feature off, is where the local Cryoserver disks are already quite full.
A support engineer can direct exports to a non-default disk partition, i.e. one with the most space.
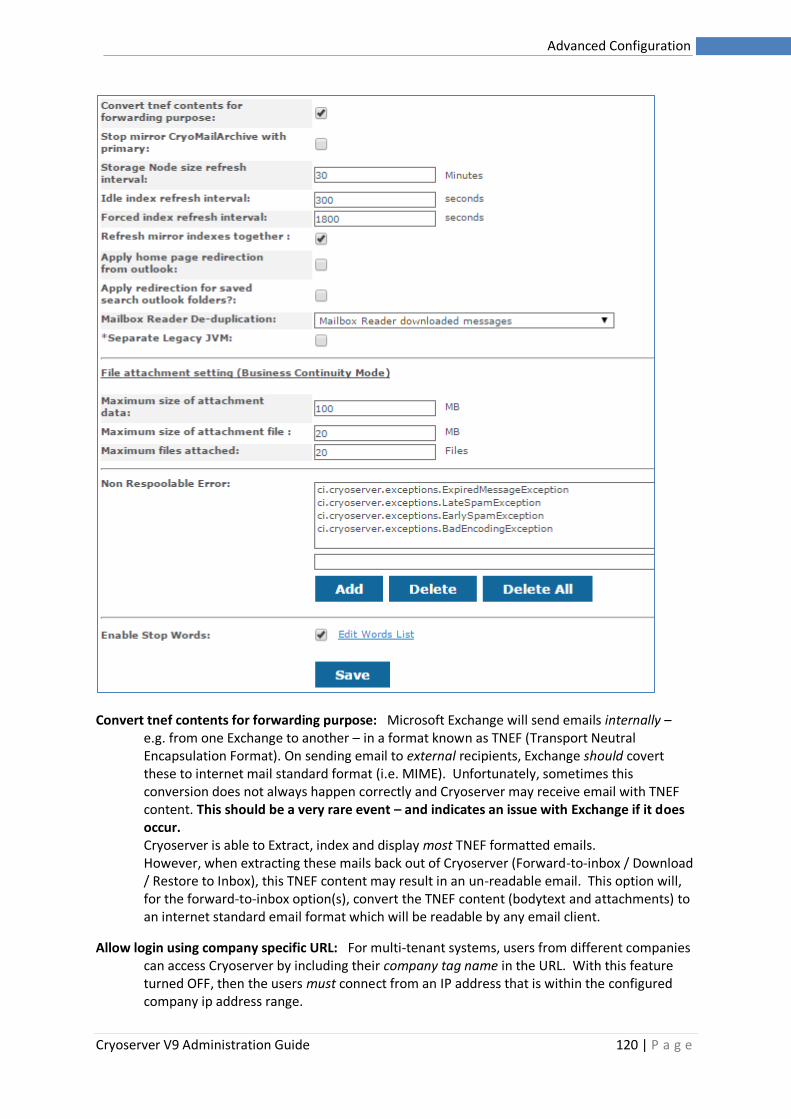
Cryoserver V9 Administration Guide 120 | P a g e
Advanced Configuration
Convert tnef contents for forwarding purpose: Microsoft Exchange will send emails internally – e.g. from one Exchange to another – in a format known as TNEF (Transport Neutral Encapsulation Format). On sending email to external recipients, Exchange should covert these to internet mail standard format (i.e. MIME). Unfortunately, sometimes this conversion does not always happen correctly and Cryoserver may receive email with TNEF content. This should be a very rare event – and indicates an issue with Exchange if it does occur. Cryoserver is able to Extract, index and display most TNEF formatted emails. However, when extracting these mails back out of Cryoserver (Forward-to-inbox / Download / Restore to Inbox), this TNEF content may result in an un-readable email. This option will, for the forward-to-inbox option(s), convert the TNEF content (bodytext and attachments) to an internet standard email format which will be readable by any email client.
Allow login using company specific URL: For multi-tenant systems, users from different companies can access Cryoserver by including their company tag name in the URL. With this feature turned OFF, then the users must connect from an IP address that is within the configured company ip address range.
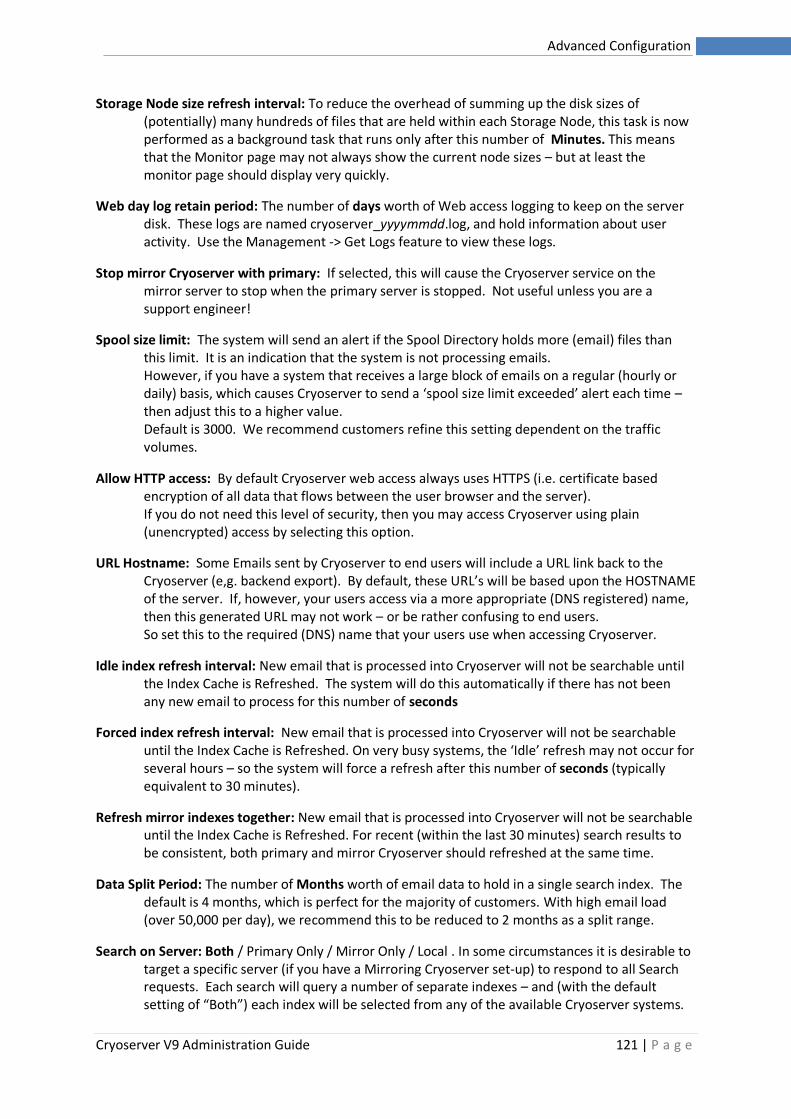
Cryoserver V9 Administration Guide 121 | P a g e
Advanced Configuration
Storage Node size refresh interval: To reduce the overhead of summing up the disk sizes of (potentially) many hundreds of files that are held within each Storage Node, this task is now performed as a background task that runs only after this number of Minutes. This means that the Monitor page may not always show the current node sizes – but at least the monitor page should display very quickly.
Web day log retain period: The number of days worth of Web access logging to keep on the server disk. These logs are named cryoserver_yyyymmdd.log, and hold information about user activity. Use the Management -> Get Logs feature to view these logs.
Stop mirror Cryoserver with primary: If selected, this will cause the Cryoserver service on the mirror server to stop when the primary server is stopped. Not useful unless you are a support engineer!
Spool size limit: The system will send an alert if the Spool Directory holds more (email) files than this limit. It is an indication that the system is not processing emails. However, if you have a system that receives a large block of emails on a regular (hourly or daily) basis, which causes Cryoserver to send a ‘spool size limit exceeded’ alert each time – then adjust this to a higher value. Default is 3000. We recommend customers refine this setting dependent on the traffic volumes.
Allow HTTP access: By default Cryoserver web access always uses HTTPS (i.e. certificate based encryption of all data that flows between the user browser and the server). If you do not need this level of security, then you may access Cryoserver using plain (unencrypted) access by selecting this option.
URL Hostname: Some Emails sent by Cryoserver to end users will include a URL link back to the Cryoserver (e,g. backend export). By default, these URL’s will be based upon the HOSTNAME of the server. If, however, your users access via a more appropriate (DNS registered) name, then this generated URL may not work – or be rather confusing to end users. So set this to the required (DNS) name that your users use when accessing Cryoserver.
Idle index refresh interval: New email that is processed into Cryoserver will not be searchable until the Index Cache is Refreshed. The system will do this automatically if there has not been any new email to process for this number of seconds
Forced index refresh interval: New email that is processed into Cryoserver will not be searchable until the Index Cache is Refreshed. On very busy systems, the ‘Idle’ refresh may not occur for several hours – so the system will force a refresh after this number of seconds (typically equivalent to 30 minutes).
Refresh mirror indexes together: New email that is processed into Cryoserver will not be searchable until the Index Cache is Refreshed. For recent (within the last 30 minutes) search results to be consistent, both primary and mirror Cryoserver should refreshed at the same time.
Data Split Period: The number of Months worth of email data to hold in a single search index. The default is 4 months, which is perfect for the majority of customers. With high email load (over 50,000 per day), we recommend this to be reduced to 2 months as a split range.
Search on Server: Both / Primary Only / Mirror Only / Local . In some circumstances it is desirable to target a specific server (if you have a Mirroring Cryoserver set-up) to respond to all Search requests. Each search will query a number of separate indexes – and (with the default setting of “Both”) each index will be selected from any of the available Cryoserver systems.
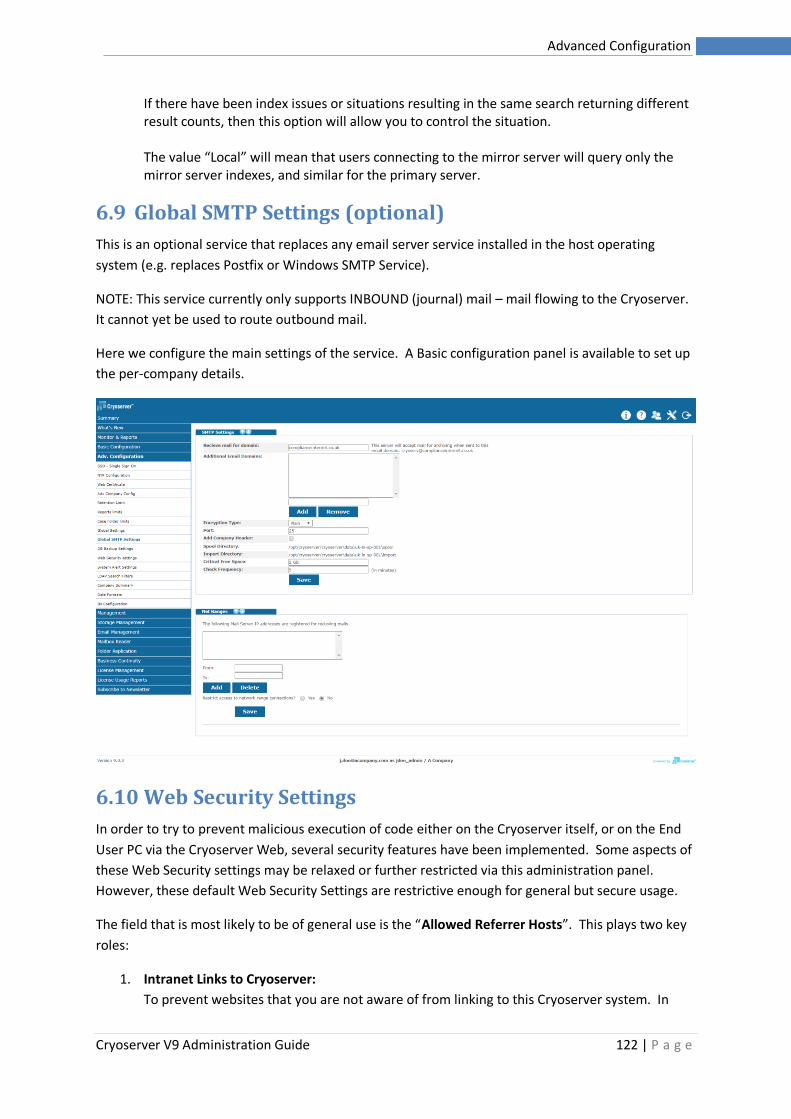
Cryoserver V9 Administration Guide 122 | P a g e
Advanced Configuration
If there have been index issues or situations resulting in the same search returning different result counts, then this option will allow you to control the situation. The value “Local” will mean that users connecting to the mirror server will query only the mirror server indexes, and similar for the primary server.
6.9 Global SMTP Settings (optional)
This is an optional service that replaces any email server service installed in the host operating
system (e.g. replaces Postfix or Windows SMTP Service).
NOTE: This service currently only supports INBOUND (journal) mail – mail flowing to the Cryoserver.
It cannot yet be used to route outbound mail.
Here we configure the main settings of the service. A Basic configuration panel is available to set up
the per-company details.
6.10 Web Security Settings
In order to try to prevent malicious execution of code either on the Cryoserver itself, or on the End
User PC via the Cryoserver Web, several security features have been implemented. Some aspects of
these Web Security settings may be relaxed or further restricted via this administration panel.
However, these default Web Security Settings are restrictive enough for general but secure usage.
The field that is most likely to be of general use is the “Allowed Referrer Hosts”. This plays two key
roles:
1. Intranet Links to Cryoserver:
To prevent websites that you are not aware of from linking to this Cryoserver system. In
Cryoserver V9 Administration Guide 123 | P a g e
Advanced Configuration
theory, a malicious third party web site may try to mask the Cryoserver web behind its own
UI. Therefore, for your internal Intranet web or any other portals that you know about that
link to the Cryoserver Web – you will need to add their hostname to the referrer list here.
Without this your users will see an “Unknown Referrer – access denied” message – showing
the referrer host name that is not known to Cryoserver. If this host is OK – then enter it into
this admin page.
2. Stubbing URL Links when Security is enabled (transport agent / OWA Plugin):
Stubbing services will convert attachments in Exchange Emails to URL links. These URL links
will open the attachment from Cryoserver. If Stubbing URL Security is enabled (a tick box on
this admin page) then every time a Stub URL link is followed, Cryoserver will try to obtain the
users Login username to see if they are valid to view the attachment [a sender or recipient
of the email containing the attachment].
However, to allow the “Transport Agent” and the “OWA Plug-in” will also follow these URL
links – but they will need to bypass the Security check. So please enter the server name / IP
address on which the Transport Agent and OWA Plug-In are installed.
Figure 36 - Web Security Settings
6.11 System Alert Settings
These are a range of System-Wide settings that affect the number and types of Alert email that the
system will generate. Please Note that all alerts are recorded to a database and can be reviewed via
the Monitor & Reports admin area (and the “System Alert History” link is provided here to access it).
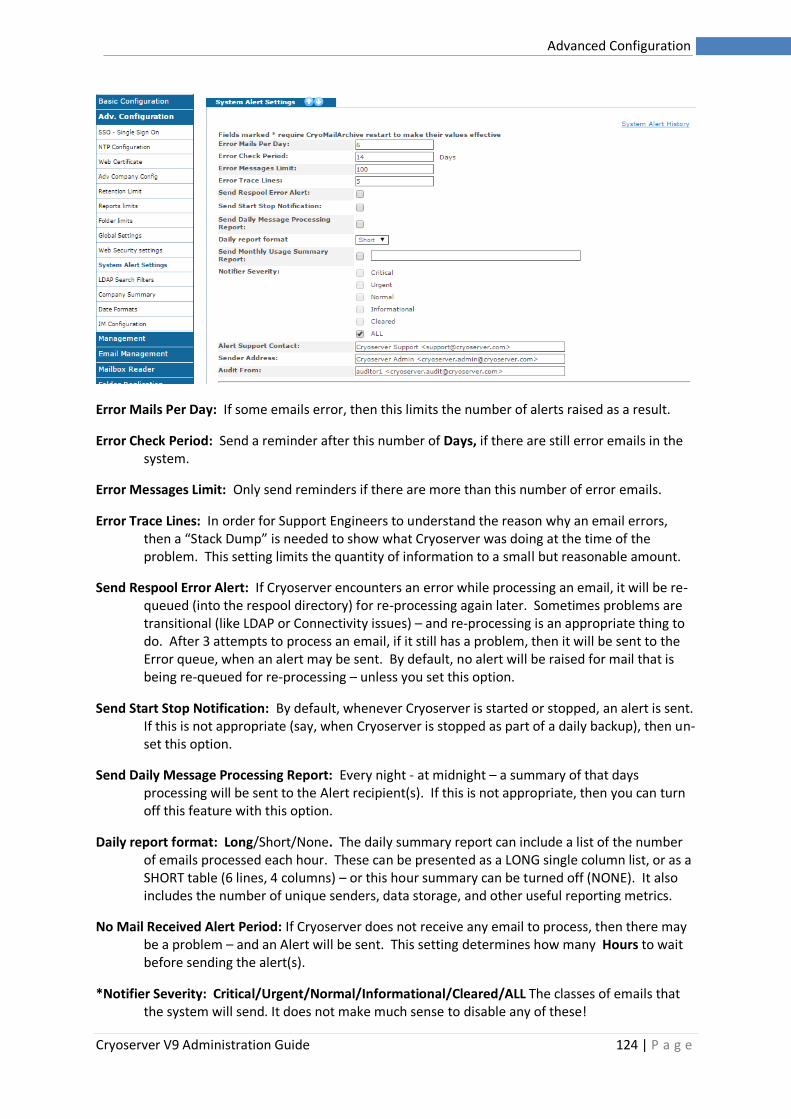
Cryoserver V9 Administration Guide 124 | P a g e
Advanced Configuration
Error Mails Per Day: If some emails error, then this limits the number of alerts raised as a result.
Error Check Period: Send a reminder after this number of Days, if there are still error emails in the system.
Error Messages Limit: Only send reminders if there are more than this number of error emails.
Error Trace Lines: In order for Support Engineers to understand the reason why an email errors, then a “Stack Dump” is needed to show what Cryoserver was doing at the time of the problem. This setting limits the quantity of information to a small but reasonable amount.
Send Respool Error Alert: If Cryoserver encounters an error while processing an email, it will be re-queued (into the respool directory) for re-processing again later. Sometimes problems are transitional (like LDAP or Connectivity issues) – and re-processing is an appropriate thing to do. After 3 attempts to process an email, if it still has a problem, then it will be sent to the Error queue, when an alert may be sent. By default, no alert will be raised for mail that is being re-queued for re-processing – unless you set this option.
Send Start Stop Notification: By default, whenever Cryoserver is started or stopped, an alert is sent. If this is not appropriate (say, when Cryoserver is stopped as part of a daily backup), then un-set this option.
Send Daily Message Processing Report: Every night - at midnight – a summary of that days processing will be sent to the Alert recipient(s). If this is not appropriate, then you can turn off this feature with this option.
Daily report format: Long/Short/None. The daily summary report can include a list of the number of emails processed each hour. These can be presented as a LONG single column list, or as a SHORT table (6 lines, 4 columns) – or this hour summary can be turned off (NONE). It also includes the number of unique senders, data storage, and other useful reporting metrics.
No Mail Received Alert Period: If Cryoserver does not receive any email to process, then there may be a problem – and an Alert will be sent. This setting determines how many Hours to wait before sending the alert(s).
*Notifier Severity: Critical/Urgent/Normal/Informational/Cleared/ALL The classes of emails that the system will send. It does not make much sense to disable any of these!
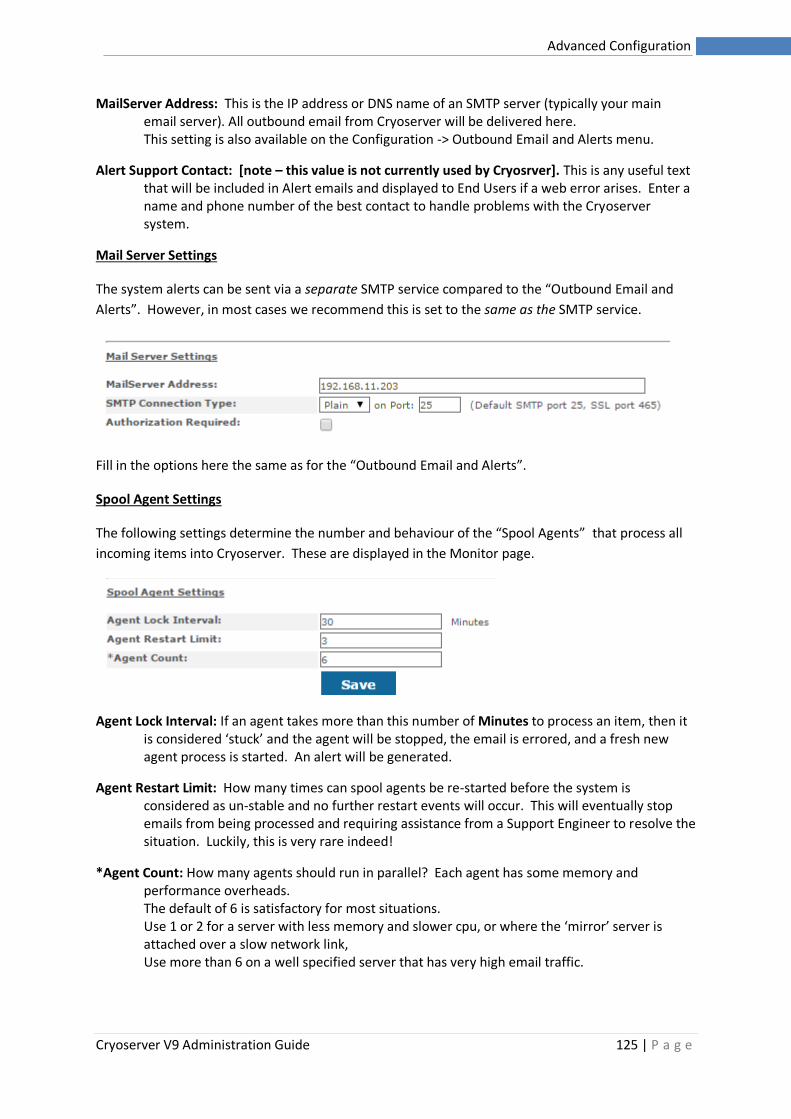
Cryoserver V9 Administration Guide 125 | P a g e
Advanced Configuration
MailServer Address: This is the IP address or DNS name of an SMTP server (typically your main email server). All outbound email from Cryoserver will be delivered here. This setting is also available on the Configuration -> Outbound Email and Alerts menu.
Alert Support Contact: [note – this value is not currently used by Cryosrver]. This is any useful text that will be included in Alert emails and displayed to End Users if a web error arises. Enter a name and phone number of the best contact to handle problems with the Cryoserver system.
Mail Server Settings
The system alerts can be sent via a separate SMTP service compared to the “Outbound Email and
Alerts”. However, in most cases we recommend this is set to the same as the SMTP service.
Fill in the options here the same as for the “Outbound Email and Alerts”.
Spool Agent Settings
The following settings determine the number and behaviour of the “Spool Agents” that process all
incoming items into Cryoserver. These are displayed in the Monitor page.
Agent Lock Interval: If an agent takes more than this number of Minutes to process an item, then it is considered ‘stuck’ and the agent will be stopped, the email is errored, and a fresh new agent process is started. An alert will be generated.
Agent Restart Limit: How many times can spool agents be re-started before the system is considered as un-stable and no further restart events will occur. This will eventually stop emails from being processed and requiring assistance from a Support Engineer to resolve the situation. Luckily, this is very rare indeed!
*Agent Count: How many agents should run in parallel? Each agent has some memory and performance overheads. The default of 6 is satisfactory for most situations. Use 1 or 2 for a server with less memory and slower cpu, or where the ‘mirror’ server is attached over a slow network link, Use more than 6 on a well specified server that has very high email traffic.
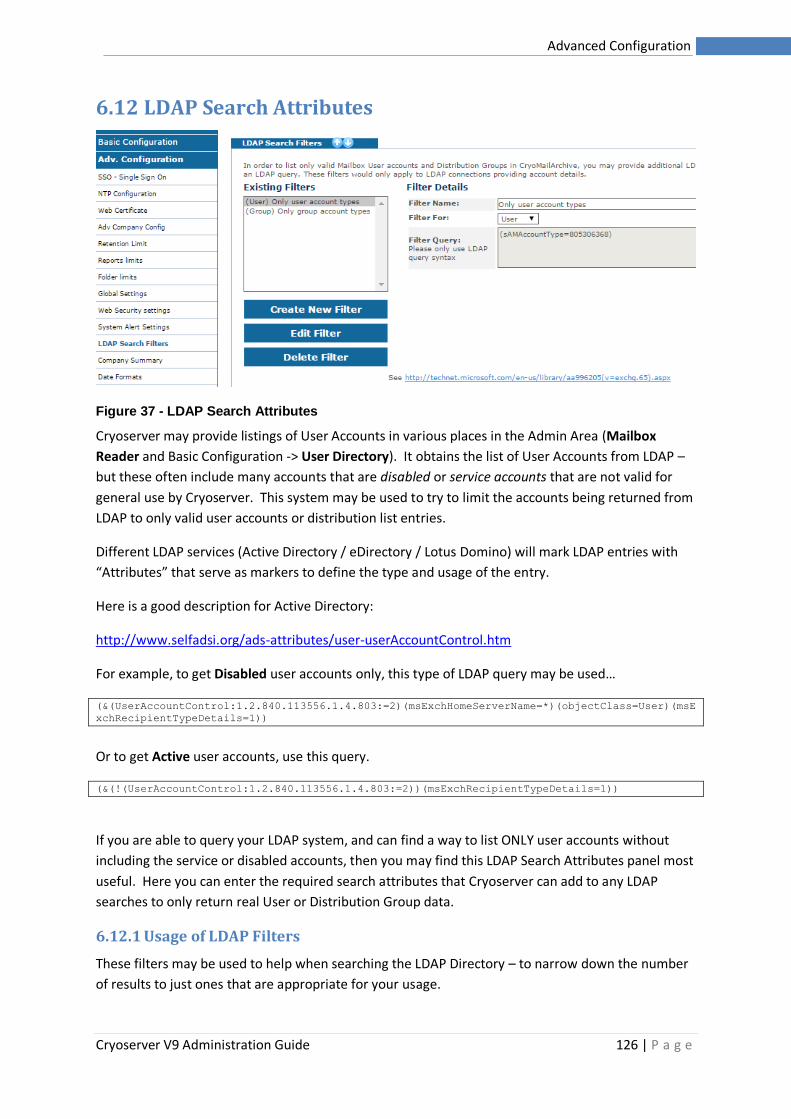
Cryoserver V9 Administration Guide 126 | P a g e
Advanced Configuration
6.12 LDAP Search Attributes
Figure 37 - LDAP Search Attributes
Cryoserver may provide listings of User Accounts in various places in the Admin Area (Mailbox
Reader and Basic Configuration -> User Directory). It obtains the list of User Accounts from LDAP –
but these often include many accounts that are disabled or service accounts that are not valid for
general use by Cryoserver. This system may be used to try to limit the accounts being returned from
LDAP to only valid user accounts or distribution list entries.
Different LDAP services (Active Directory / eDirectory / Lotus Domino) will mark LDAP entries with
“Attributes” that serve as markers to define the type and usage of the entry.
Here is a good description for Active Directory:
http://www.selfadsi.org/ads-attributes/user-userAccountControl.htm
For example, to get Disabled user accounts only, this type of LDAP query may be used…
(&(UserAccountControl:1.2.840.113556.1.4.803:=2)(msExchHomeServerName=*)(objectClass=User)(msE
xchRecipientTypeDetails=1))
Or to get Active user accounts, use this query.
(&(!(UserAccountControl:1.2.840.113556.1.4.803:=2))(msExchRecipientTypeDetails=1))
If you are able to query your LDAP system, and can find a way to list ONLY user accounts without
including the service or disabled accounts, then you may find this LDAP Search Attributes panel most
useful. Here you can enter the required search attributes that Cryoserver can add to any LDAP
searches to only return real User or Distribution Group data.
6.12.1 Usage of LDAP Filters
These filters may be used to help when searching the LDAP Directory – to narrow down the number
of results to just ones that are appropriate for your usage.
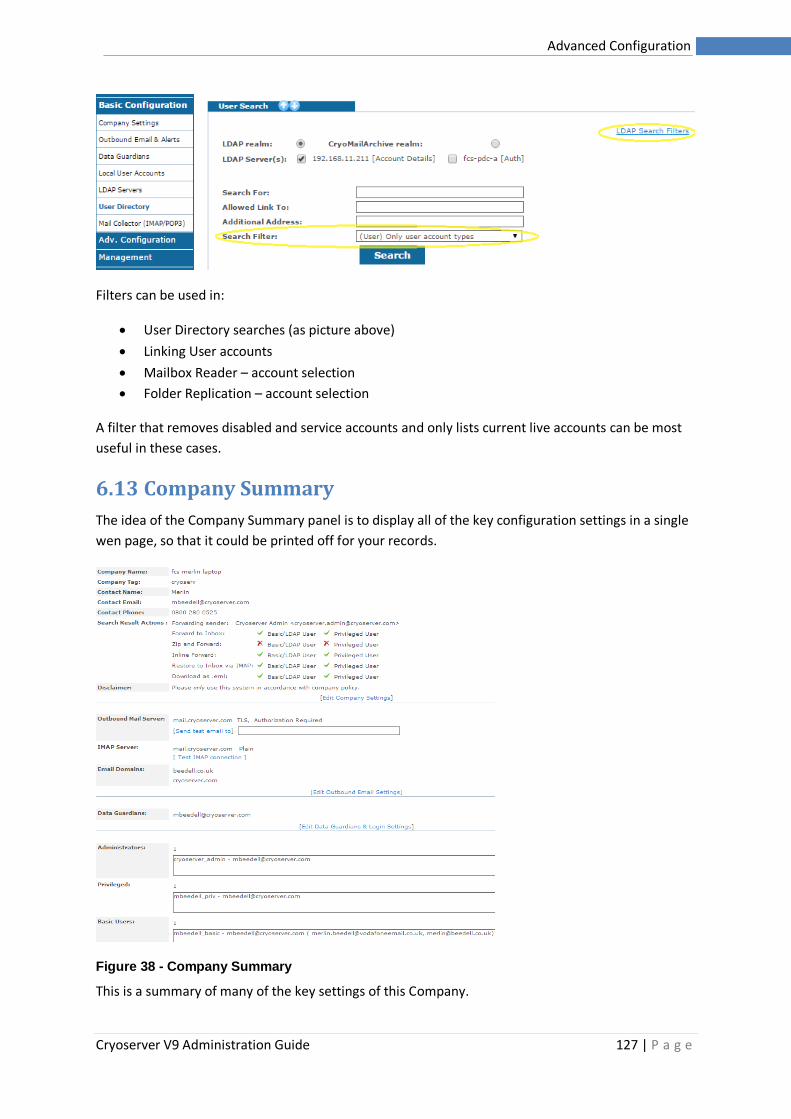
Cryoserver V9 Administration Guide 127 | P a g e
Advanced Configuration
Filters can be used in:
• User Directory searches (as picture above)
• Linking User accounts
• Mailbox Reader – account selection
• Folder Replication – account selection
A filter that removes disabled and service accounts and only lists current live accounts can be most
useful in these cases.
6.13 Company Summary
The idea of the Company Summary panel is to display all of the key configuration settings in a single
wen page, so that it could be printed off for your records.
Figure 38 - Company Summary
This is a summary of many of the key settings of this Company.
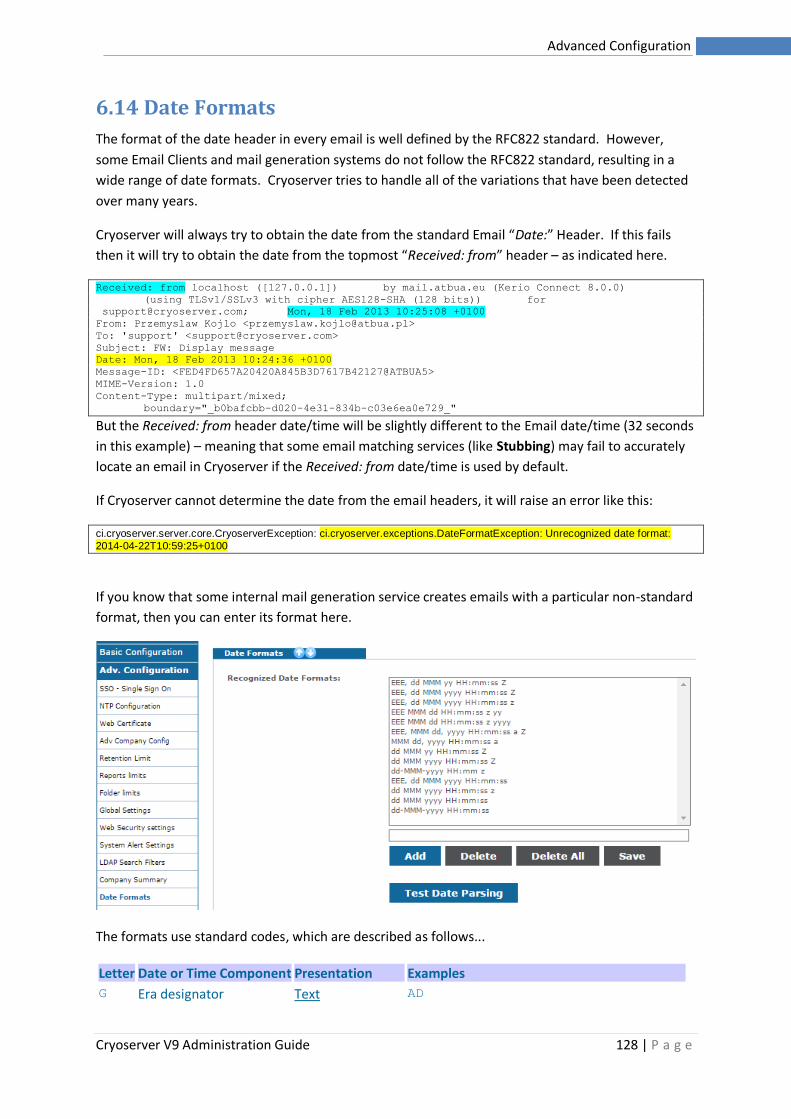
Cryoserver V9 Administration Guide 128 | P a g e
Advanced Configuration
6.14 Date Formats
The format of the date header in every email is well defined by the RFC822 standard. However,
some Email Clients and mail generation systems do not follow the RFC822 standard, resulting in a
wide range of date formats. Cryoserver tries to handle all of the variations that have been detected
over many years.
Cryoserver will always try to obtain the date from the standard Email “Date:” Header. If this fails
then it will try to obtain the date from the topmost “Received: from” header – as indicated here.
Received: from localhost ([127.0.0.1]) by mail.atbua.eu (Kerio Connect 8.0.0)
(using TLSv1/SSLv3 with cipher AES128-SHA (128 bits)) for
[email protected]; Mon, 18 Feb 2013 10:25:08 +0100
From: Przemyslaw Kojlo <[email protected]>
To: 'support' <[email protected]>
Subject: FW: Display message
Date: Mon, 18 Feb 2013 10:24:36 +0100
Message-ID: <FED4FD657A20420A845B3D7617B42127@ATBUA5>
MIME-Version: 1.0
Content-Type: multipart/mixed;
boundary="_b0bafcbb-d020-4e31-834b-c03e6ea0e729_"
But the Received: from header date/time will be slightly different to the Email date/time (32 seconds
in this example) – meaning that some email matching services (like Stubbing) may fail to accurately
locate an email in Cryoserver if the Received: from date/time is used by default.
If Cryoserver cannot determine the date from the email headers, it will raise an error like this:
ci.cryoserver.server.core.CryoserverException: ci.cryoserver.exceptions.DateFormatException: Unrecognized date format:
2014-04-22T10:59:25+0100
If you know that some internal mail generation service creates emails with a particular non-standard
format, then you can enter its format here.
The formats use standard codes, which are described as follows...
Letter Date or Time Component Presentation Examples
G Era designator Text
AD
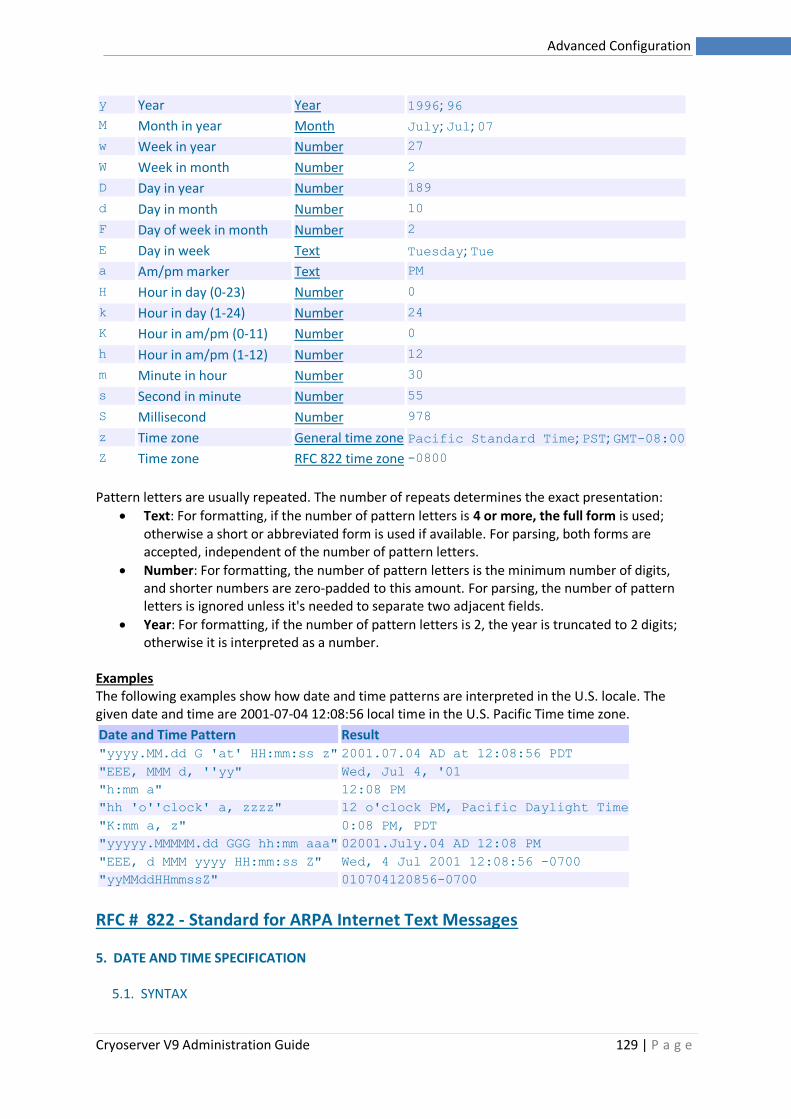
Cryoserver V9 Administration Guide 129 | P a g e
Advanced Configuration
y Year Year 1996; 96
M Month in year Month July; Jul; 07
w Week in year Number
27
W Week in month Number
2
D Day in year Number
189
d Day in month Number
10
F Day of week in month Number
2
E Day in week Text Tuesday; Tue
a Am/pm marker Text
PM
H Hour in day (0-23) Number
0
k Hour in day (1-24) Number
24
K Hour in am/pm (0-11) Number
0
h Hour in am/pm (1-12) Number
12
m Minute in hour Number
30
s Second in minute Number
55
S Millisecond Number
978
z Time zone General time zone Pacific Standard Time; PST; GMT-08:00
Z Time zone RFC 822 time zone
-0800
Pattern letters are usually repeated. The number of repeats determines the exact presentation:
• Text: For formatting, if the number of pattern letters is 4 or more, the full form is used; otherwise a short or abbreviated form is used if available. For parsing, both forms are accepted, independent of the number of pattern letters.
• Number: For formatting, the number of pattern letters is the minimum number of digits, and shorter numbers are zero-padded to this amount. For parsing, the number of pattern letters is ignored unless it's needed to separate two adjacent fields.
• Year: For formatting, if the number of pattern letters is 2, the year is truncated to 2 digits; otherwise it is interpreted as a number.
Examples The following examples show how date and time patterns are interpreted in the U.S. locale. The given date and time are 2001-07-04 12:08:56 local time in the U.S. Pacific Time time zone.
Date and Time Pattern Result "yyyy.MM.dd G 'at' HH:mm:ss z" 2001.07.04 AD at 12:08:56 PDT "EEE, MMM d, ''yy" Wed, Jul 4, '01 "h:mm a" 12:08 PM "hh 'o''clock' a, zzzz" 12 o'clock PM, Pacific Daylight Time "K:mm a, z" 0:08 PM, PDT "yyyyy.MMMMM.dd GGG hh:mm aaa" 02001.July.04 AD 12:08 PM "EEE, d MMM yyyy HH:mm:ss Z" Wed, 4 Jul 2001 12:08:56 -0700 "yyMMddHHmmssZ" 010704120856-0700
RFC # 822 - Standard for ARPA Internet Text Messages
5. DATE AND TIME SPECIFICATION 5.1. SYNTAX
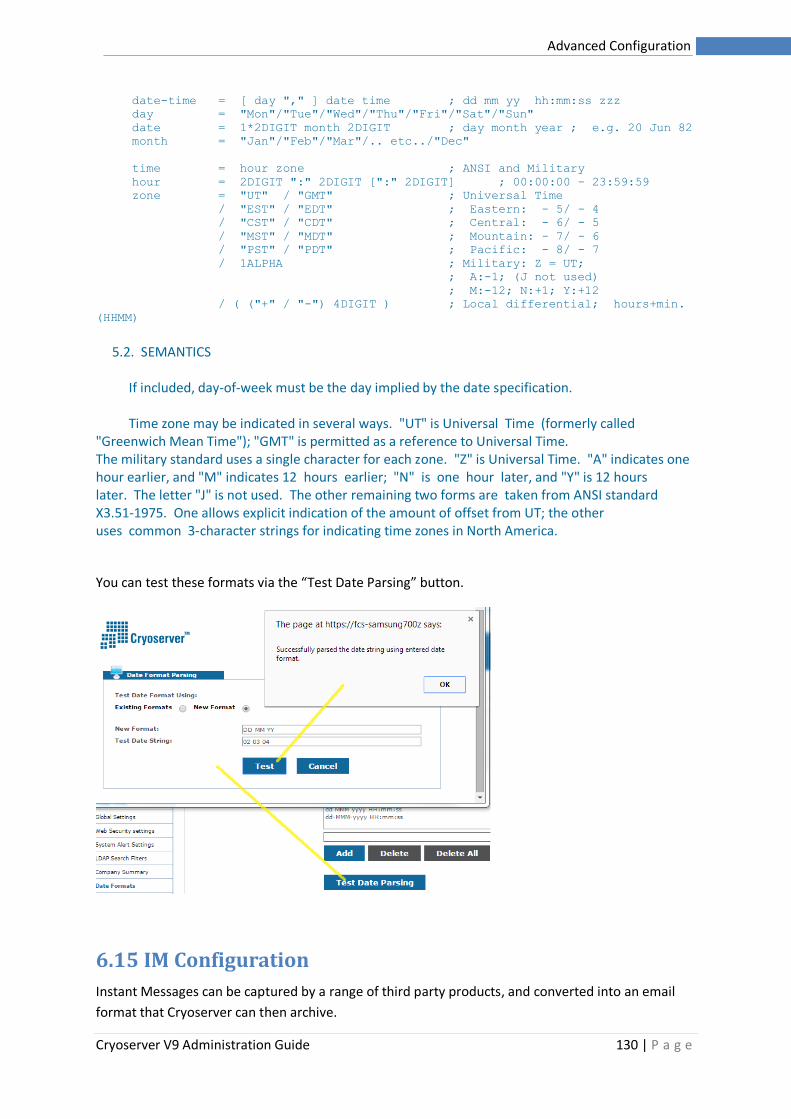
Cryoserver V9 Administration Guide 130 | P a g e
Advanced Configuration
date-time = [ day "," ] date time ; dd mm yy hh:mm:ss zzz day = "Mon"/"Tue"/"Wed"/"Thu"/"Fri"/"Sat"/"Sun" date = 1*2DIGIT month 2DIGIT ; day month year ; e.g. 20 Jun 82 month = "Jan"/"Feb"/"Mar"/.. etc../"Dec" time = hour zone ; ANSI and Military hour = 2DIGIT ":" 2DIGIT [":" 2DIGIT] ; 00:00:00 - 23:59:59 zone = "UT" / "GMT" ; Universal Time / "EST" / "EDT" ; Eastern: - 5/ - 4 / "CST" / "CDT" ; Central: - 6/ - 5 / "MST" / "MDT" ; Mountain: - 7/ - 6 / "PST" / "PDT" ; Pacific: - 8/ - 7 / 1ALPHA ; Military: Z = UT; ; A:-1; (J not used) ; M:-12; N:+1; Y:+12 / ( ("+" / "-") 4DIGIT ) ; Local differential; hours+min.
(HHMM) 5.2. SEMANTICS If included, day-of-week must be the day implied by the date specification. Time zone may be indicated in several ways. "UT" is Universal Time (formerly called "Greenwich Mean Time"); "GMT" is permitted as a reference to Universal Time. The military standard uses a single character for each zone. "Z" is Universal Time. "A" indicates one hour earlier, and "M" indicates 12 hours earlier; "N" is one hour later, and "Y" is 12 hours later. The letter "J" is not used. The other remaining two forms are taken from ANSI standard X3.51-1975. One allows explicit indication of the amount of offset from UT; the other uses common 3-character strings for indicating time zones in North America.
You can test these formats via the “Test Date Parsing” button.
6.15 IM Configuration
Instant Messages can be captured by a range of third party products, and converted into an email
format that Cryoserver can then archive.
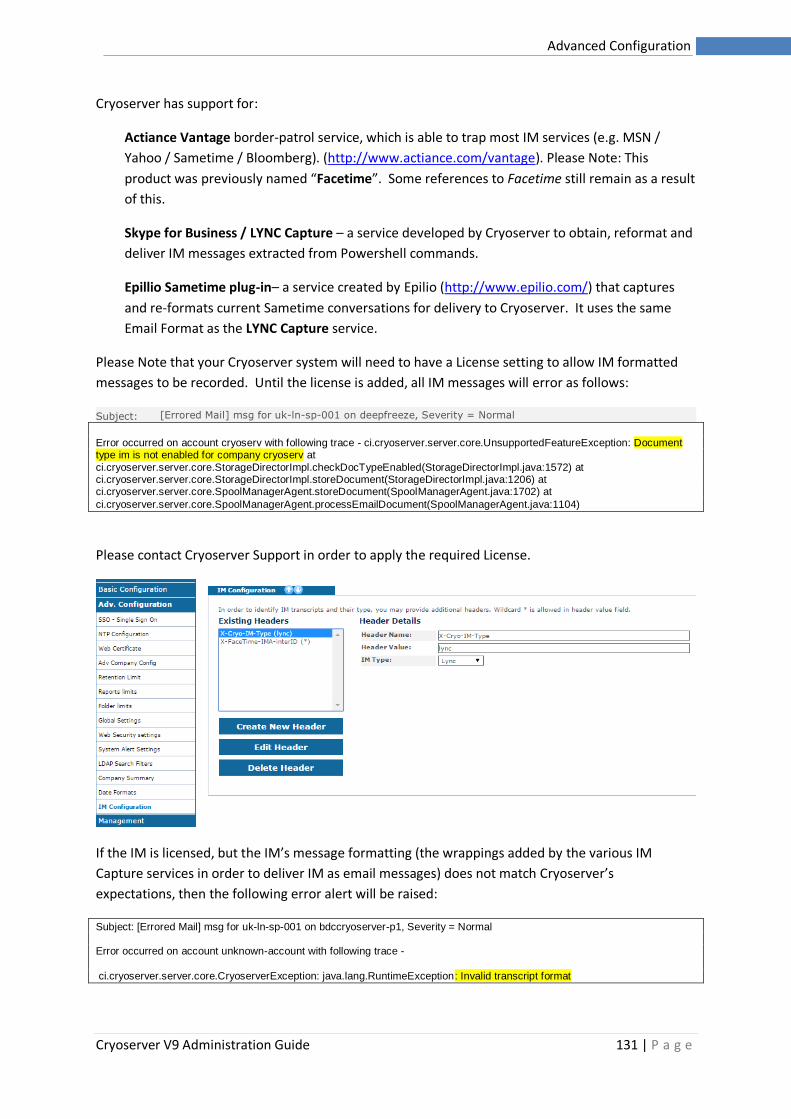
Cryoserver V9 Administration Guide 131 | P a g e
Advanced Configuration
Cryoserver has support for:
Actiance Vantage border-patrol service, which is able to trap most IM services (e.g. MSN /
Yahoo / Sametime / Bloomberg). (http://www.actiance.com/vantage). Please Note: This
product was previously named “Facetime”. Some references to Facetime still remain as a result
of this.
Skype for Business / LYNC Capture – a service developed by Cryoserver to obtain, reformat and
deliver IM messages extracted from Powershell commands.
Epillio Sametime plug-in– a service created by Epilio (http://www.epilio.com/) that captures
and re-formats current Sametime conversations for delivery to Cryoserver. It uses the same
Email Format as the LYNC Capture service.
Please Note that your Cryoserver system will need to have a License setting to allow IM formatted
messages to be recorded. Until the license is added, all IM messages will error as follows:
Subject: [Errored Mail] msg for uk-ln-sp-001 on deepfreeze, Severity = Normal
Error occurred on account cryoserv with following trace - ci.cryoserver.server.core.UnsupportedFeatureException: Document type im is not enabled for company cryoserv at
ci.cryoserver.server.core.StorageDirectorImpl.checkDocTypeEnabled(StorageDirectorImpl.java:1572) at ci.cryoserver.server.core.StorageDirectorImpl.storeDocument(StorageDirectorImpl.java:1206) at ci.cryoserver.server.core.SpoolManagerAgent.storeDocument(SpoolManagerAgent.java:1702) at
ci.cryoserver.server.core.SpoolManagerAgent.processEmailDocument(SpoolManagerAgent.java:1104)
Please contact Cryoserver Support in order to apply the required License.
If the IM is licensed, but the IM’s message formatting (the wrappings added by the various IM
Capture services in order to deliver IM as email messages) does not match Cryoserver’s
expectations, then the following error alert will be raised:
Subject: [Errored Mail] msg for uk-ln-sp-001 on bdccryoserver-p1, Severity = Normal Error occurred on account unknown-account with following trace -
ci.cryoserver.server.core.CryoserverException: java.lang.RuntimeException: Invalid transcript format
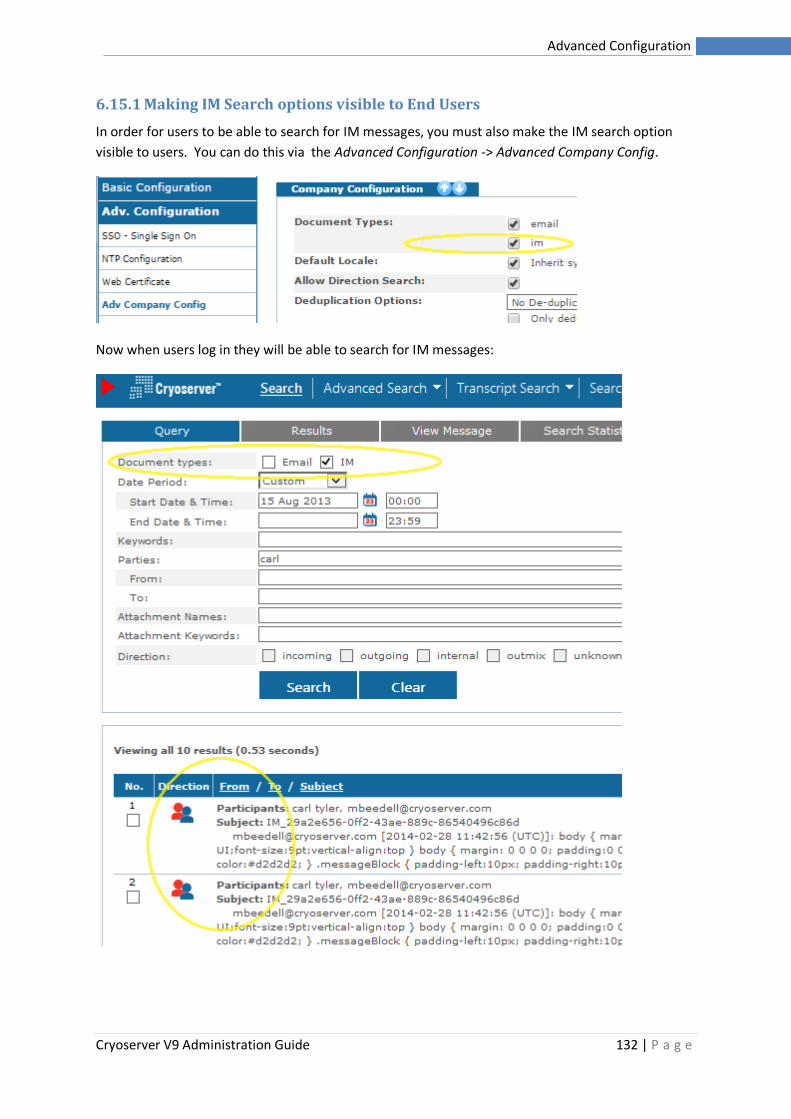
Cryoserver V9 Administration Guide 132 | P a g e
Advanced Configuration
6.15.1 Making IM Search options visible to End Users
In order for users to be able to search for IM messages, you must also make the IM search option
visible to users. You can do this via the Advanced Configuration -> Advanced Company Config.
Now when users log in they will be able to search for IM messages:

Cryoserver V9 Administration Guide 133 | P a g e
Management Tasks
7 Management Tasks
7.1 Stopping & Restarting (Server and services)
7.1.1 Global Alert Message
This will set a message that will pop-up on any user’s browser if they are logged in to Cryoserver.
You could use this to inform users about forthcoming works.
7.1.2 Restart Cryoserver
This will restart the Cryoserver services (the executable application) on all servers.
For compliance requirements, a reason needs to be stated prior to the restart for the audit trail.
7.1.3 Restart Cryoserver Appliance
These options will shutdown or restart the selected appliance server. A shutdown will power-down
the server – typically for expected server-room maintenance, or so that the server can be moved to
a new location.
An audit trail comment is required.
NOTE: If the Cryoserver appliance has an IPMI interface, and it has been configured and connected
to the network, then the server can be powered-down and powered-up via the IPMI web portal.
IPMI is also known as Integrated-Lights-Out (ILO) on HP servers, and DRAC on DELL servers.
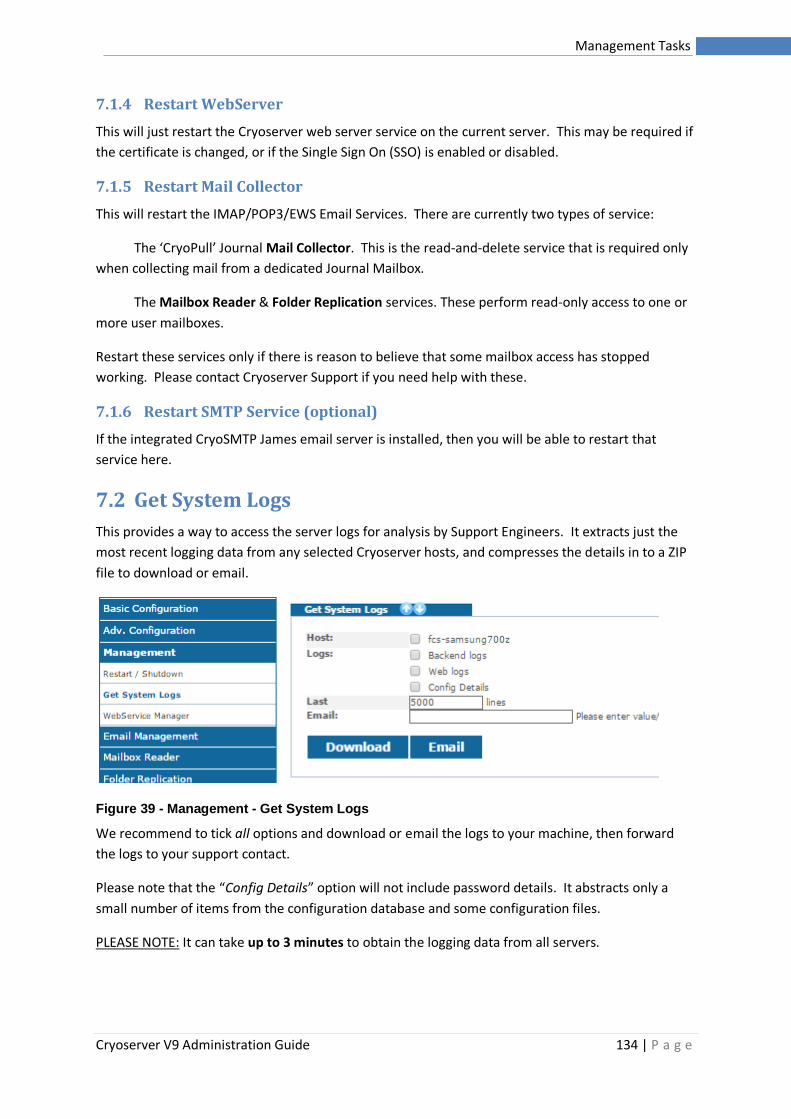
Cryoserver V9 Administration Guide 134 | P a g e
Management Tasks
7.1.4 Restart WebServer
This will just restart the Cryoserver web server service on the current server. This may be required if
the certificate is changed, or if the Single Sign On (SSO) is enabled or disabled.
7.1.5 Restart Mail Collector
This will restart the IMAP/POP3/EWS Email Services. There are currently two types of service:
The ‘CryoPull’ Journal Mail Collector. This is the read-and-delete service that is required only
when collecting mail from a dedicated Journal Mailbox.
The Mailbox Reader & Folder Replication services. These perform read-only access to one or
more user mailboxes.
Restart these services only if there is reason to believe that some mailbox access has stopped
working. Please contact Cryoserver Support if you need help with these.
7.1.6 Restart SMTP Service (optional)
If the integrated CryoSMTP James email server is installed, then you will be able to restart that
service here.
7.2 Get System Logs
This provides a way to access the server logs for analysis by Support Engineers. It extracts just the
most recent logging data from any selected Cryoserver hosts, and compresses the details in to a ZIP
file to download or email.
Figure 39 - Management - Get System Logs
We recommend to tick all options and download or email the logs to your machine, then forward
the logs to your support contact.
Please note that the “Config Details” option will not include password details. It abstracts only a
small number of items from the configuration database and some configuration files.
PLEASE NOTE: It can take up to 3 minutes to obtain the logging data from all servers.
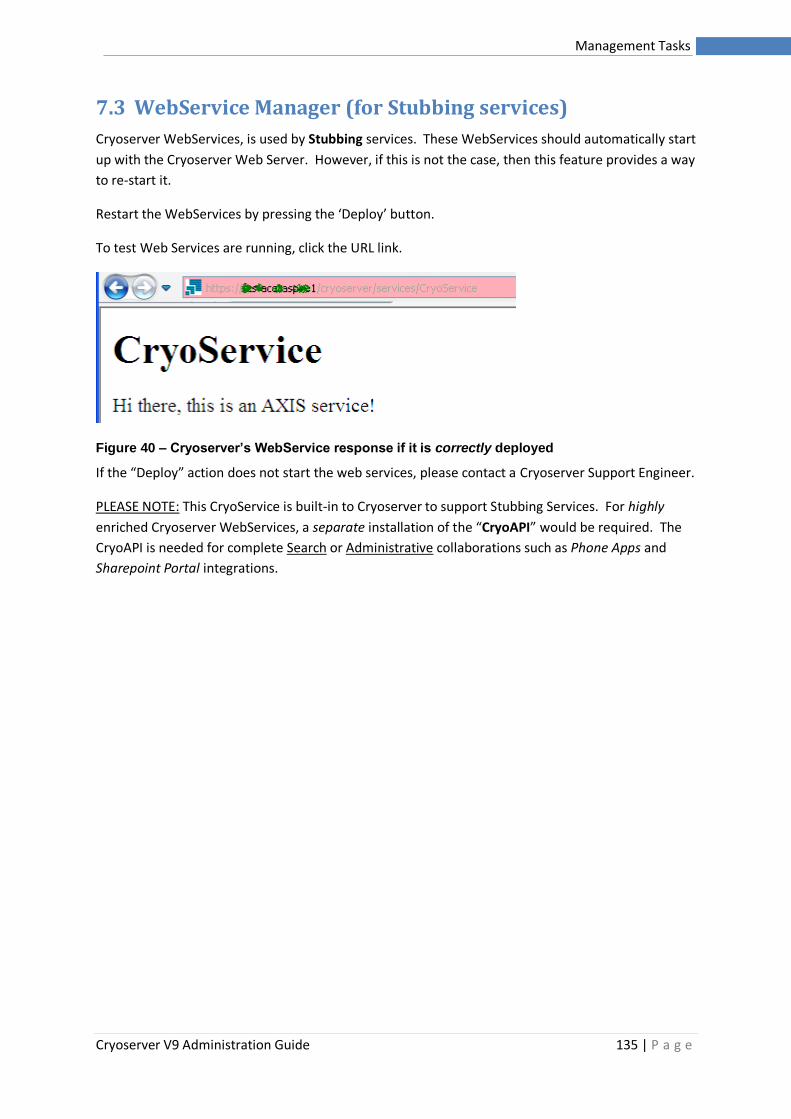
Cryoserver V9 Administration Guide 135 | P a g e
Management Tasks
7.3 WebService Manager (for Stubbing services)
Cryoserver WebServices, is used by Stubbing services. These WebServices should automatically start
up with the Cryoserver Web Server. However, if this is not the case, then this feature provides a way
to re-start it.
Restart the WebServices by pressing the ‘Deploy’ button.
To test Web Services are running, click the URL link.
Figure 40 – Cryoserver’s WebService response if it is correctly deployed
If the “Deploy” action does not start the web services, please contact a Cryoserver Support Engineer.
PLEASE NOTE: This CryoService is built-in to Cryoserver to support Stubbing Services. For highly
enriched Cryoserver WebServices, a separate installation of the “CryoAPI” would be required. The
CryoAPI is needed for complete Search or Administrative collaborations such as Phone Apps and
Sharepoint Portal integrations.
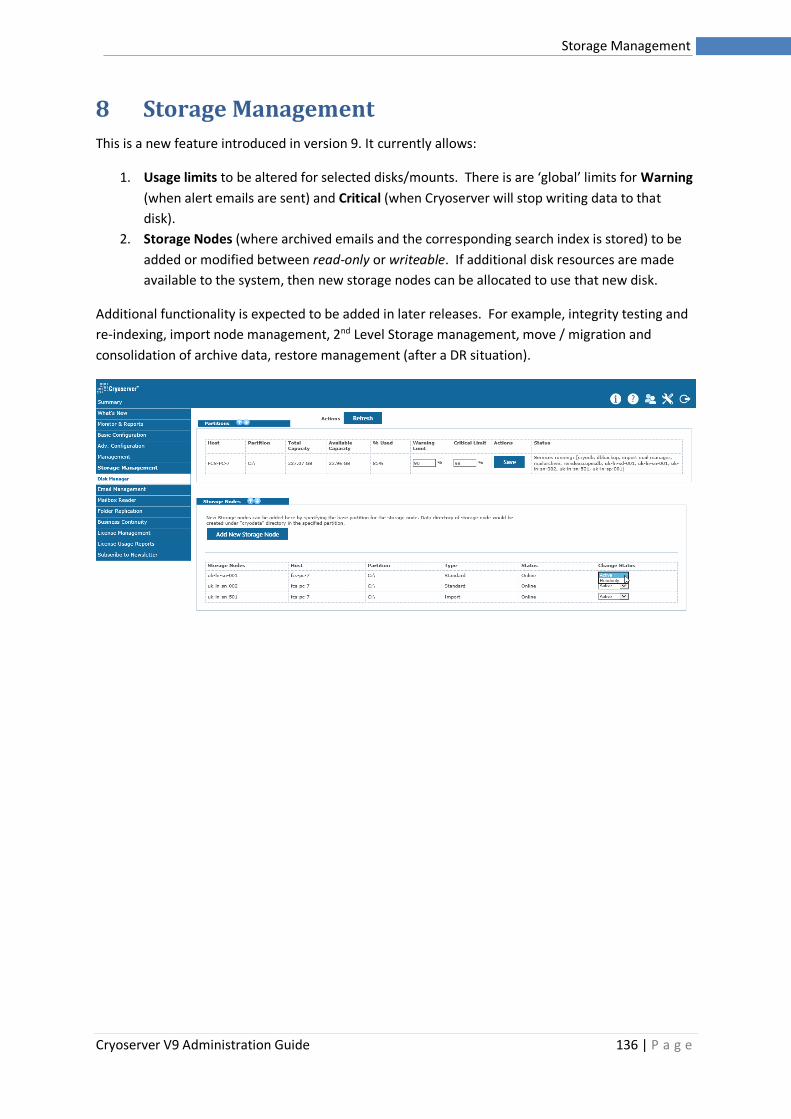
Cryoserver V9 Administration Guide 136 | P a g e
Storage Management
8 Storage Management
This is a new feature introduced in version 9. It currently allows:
1. Usage limits to be altered for selected disks/mounts. There is are ‘global’ limits for Warning
(when alert emails are sent) and Critical (when Cryoserver will stop writing data to that
disk).
2. Storage Nodes (where archived emails and the corresponding search index is stored) to be
added or modified between read-only or writeable. If additional disk resources are made
available to the system, then new storage nodes can be allocated to use that new disk.
Additional functionality is expected to be added in later releases. For example, integrity testing and
re-indexing, import node management, 2nd Level Storage management, move / migration and
consolidation of archive data, restore management (after a DR situation).
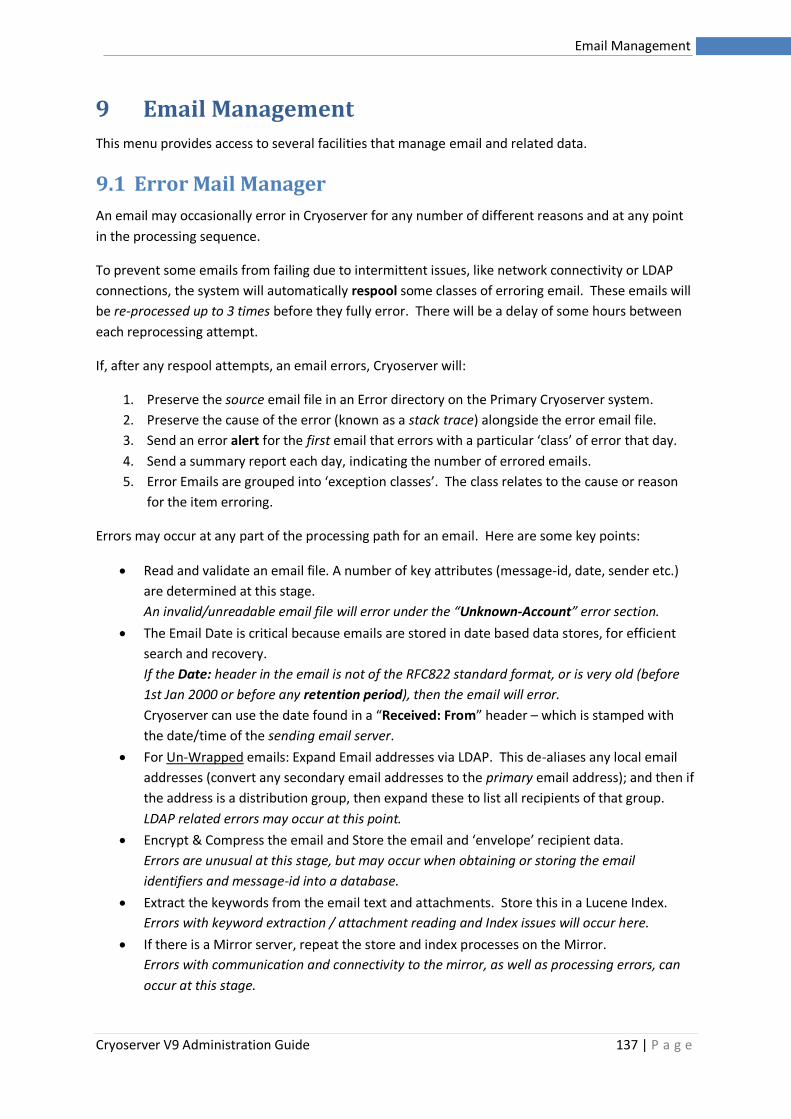
Cryoserver V9 Administration Guide 137 | P a g e
Email Management
9 Email Management
This menu provides access to several facilities that manage email and related data.
9.1 Error Mail Manager
An email may occasionally error in Cryoserver for any number of different reasons and at any point
in the processing sequence.
To prevent some emails from failing due to intermittent issues, like network connectivity or LDAP
connections, the system will automatically respool some classes of erroring email. These emails will
be re-processed up to 3 times before they fully error. There will be a delay of some hours between
each reprocessing attempt.
If, after any respool attempts, an email errors, Cryoserver will:
1. Preserve the source email file in an Error directory on the Primary Cryoserver system.
2. Preserve the cause of the error (known as a stack trace) alongside the error email file.
3. Send an error alert for the first email that errors with a particular ‘class’ of error that day.
4. Send a summary report each day, indicating the number of errored emails.
5. Error Emails are grouped into ‘exception classes’. The class relates to the cause or reason
for the item erroring.
Errors may occur at any part of the processing path for an email. Here are some key points:
• Read and validate an email file. A number of key attributes (message-id, date, sender etc.)
are determined at this stage.
An invalid/unreadable email file will error under the “Unknown-Account” error section.
• The Email Date is critical because emails are stored in date based data stores, for efficient
search and recovery.
If the Date: header in the email is not of the RFC822 standard format, or is very old (before
1st Jan 2000 or before any retention period), then the email will error.
Cryoserver can use the date found in a “Received: From” header – which is stamped with
the date/time of the sending email server.
• For Un-Wrapped emails: Expand Email addresses via LDAP. This de-aliases any local email
addresses (convert any secondary email addresses to the primary email address); and then if
the address is a distribution group, then expand these to list all recipients of that group.
LDAP related errors may occur at this point.
• Encrypt & Compress the email and Store the email and ‘envelope’ recipient data.
Errors are unusual at this stage, but may occur when obtaining or storing the email
identifiers and message-id into a database.
• Extract the keywords from the email text and attachments. Store this in a Lucene Index.
Errors with keyword extraction / attachment reading and Index issues will occur here.
• If there is a Mirror server, repeat the store and index processes on the Mirror.
Errors with communication and connectivity to the mirror, as well as processing errors, can
occur at this stage.

Cryoserver V9 Administration Guide 138 | P a g e
Email Management
The Error Email Manager provides visibility to the headers of mail that failed to successfully process
into the archive. It also shows the Cause of the Error (the stack dump). From this you may decide
what should be done with these emails.
Figure 41 - Error Email Manager
The Error Email Manager groups issues under the Company name or the “Unknown-Account”. And
then further groups under the Exception Class name which caused those emails to error.
Click on an Exception Class name and up to 10 errored items will be listed. Click the “Review Email
Headers and Error Trace” and a pop-up web page will display further details:
For all emails within the selected Exception Classes, you have 3 choices:
Normal Respool This simply moves the error items back into the spool queue where they
will be re-processed again.
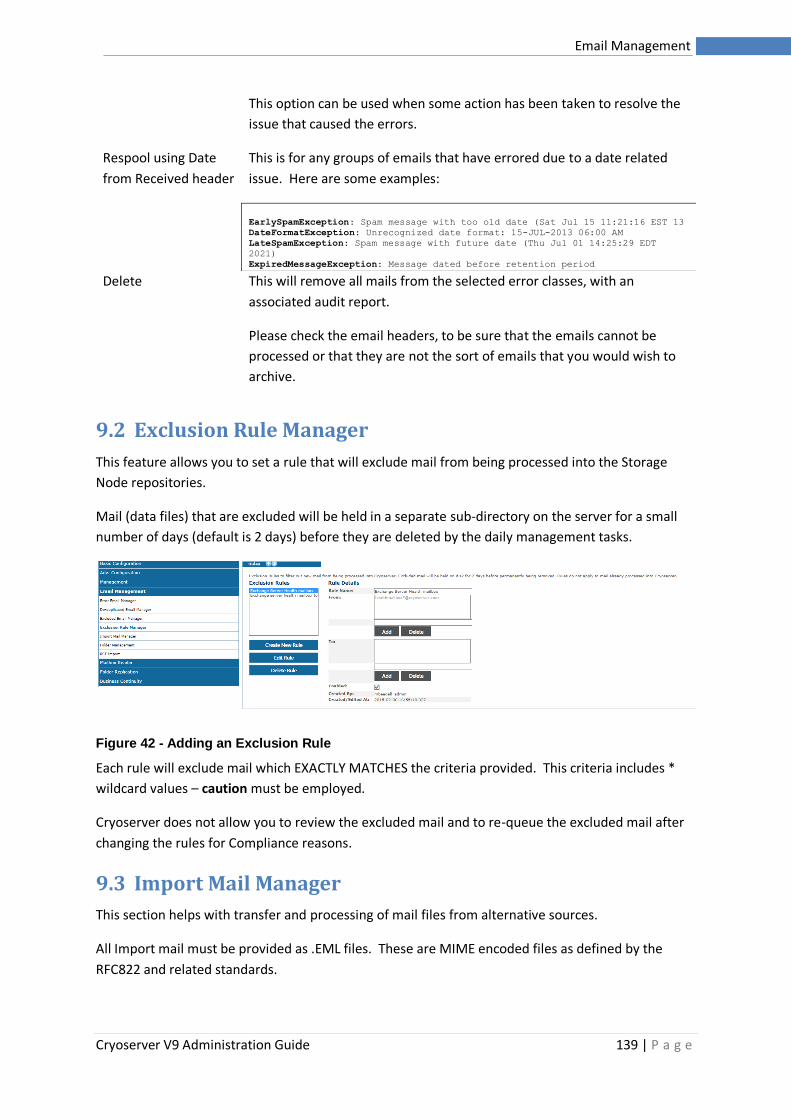
Cryoserver V9 Administration Guide 139 | P a g e
Email Management
This option can be used when some action has been taken to resolve the
issue that caused the errors.
Respool using Date
from Received header
This is for any groups of emails that have errored due to a date related
issue. Here are some examples:
EarlySpamException: Spam message with too old date (Sat Jul 15 11:21:16 EST 13
DateFormatException: Unrecognized date format: 15-JUL-2013 06:00 AM
LateSpamException: Spam message with future date (Thu Jul 01 14:25:29 EDT
2021)
ExpiredMessageException: Message dated before retention period
Delete This will remove all mails from the selected error classes, with an
associated audit report.
Please check the email headers, to be sure that the emails cannot be
processed or that they are not the sort of emails that you would wish to
archive.
9.2 Exclusion Rule Manager
This feature allows you to set a rule that will exclude mail from being processed into the Storage
Node repositories.
Mail (data files) that are excluded will be held in a separate sub-directory on the server for a small
number of days (default is 2 days) before they are deleted by the daily management tasks.
Figure 42 - Adding an Exclusion Rule
Each rule will exclude mail which EXACTLY MATCHES the criteria provided. This criteria includes *
wildcard values – caution must be employed.
Cryoserver does not allow you to review the excluded mail and to re-queue the excluded mail after
changing the rules for Compliance reasons.
9.3 Import Mail Manager
This section helps with transfer and processing of mail files from alternative sources.
All Import mail must be provided as .EML files. These are MIME encoded files as defined by the
RFC822 and related standards.
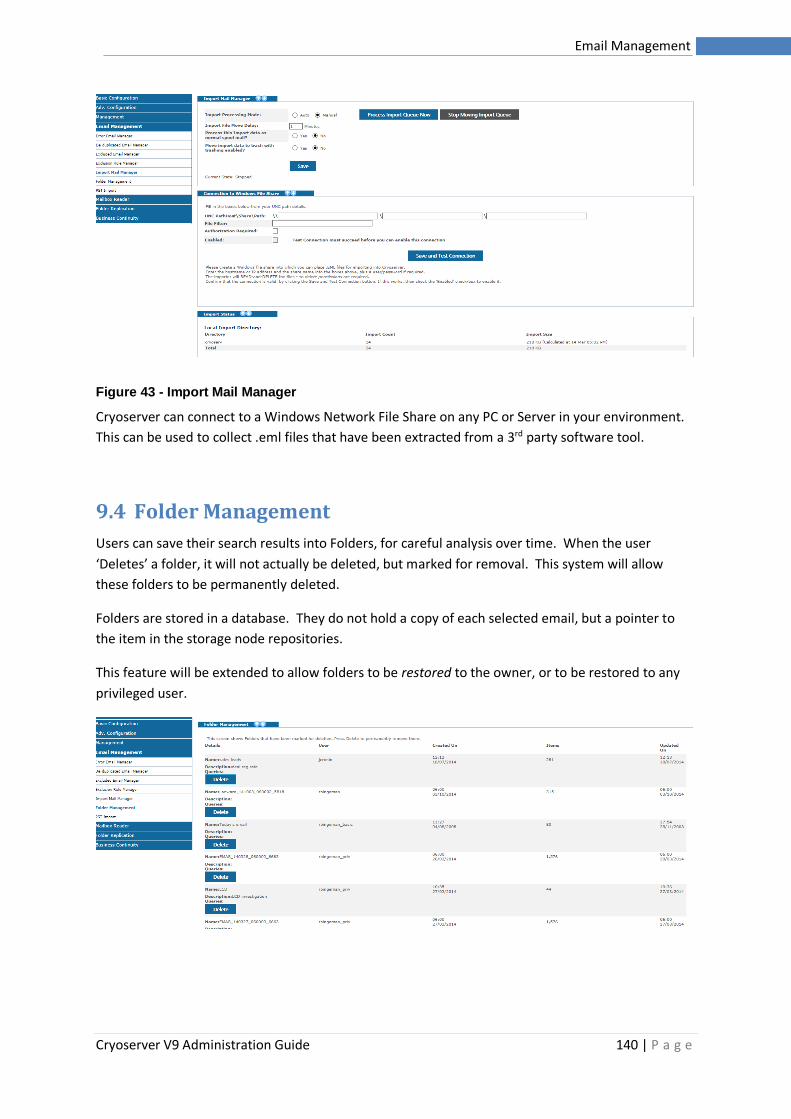
Cryoserver V9 Administration Guide 140 | P a g e
Email Management
Figure 43 - Import Mail Manager
Cryoserver can connect to a Windows Network File Share on any PC or Server in your environment.
This can be used to collect .eml files that have been extracted from a 3rd party software tool.
9.4 Folder Management
Users can save their search results into Folders, for careful analysis over time. When the user
‘Deletes’ a folder, it will not actually be deleted, but marked for removal. This system will allow
these folders to be permanently deleted.
Folders are stored in a database. They do not hold a copy of each selected email, but a pointer to
the item in the storage node repositories.
This feature will be extended to allow folders to be restored to the owner, or to be restored to any
privileged user.
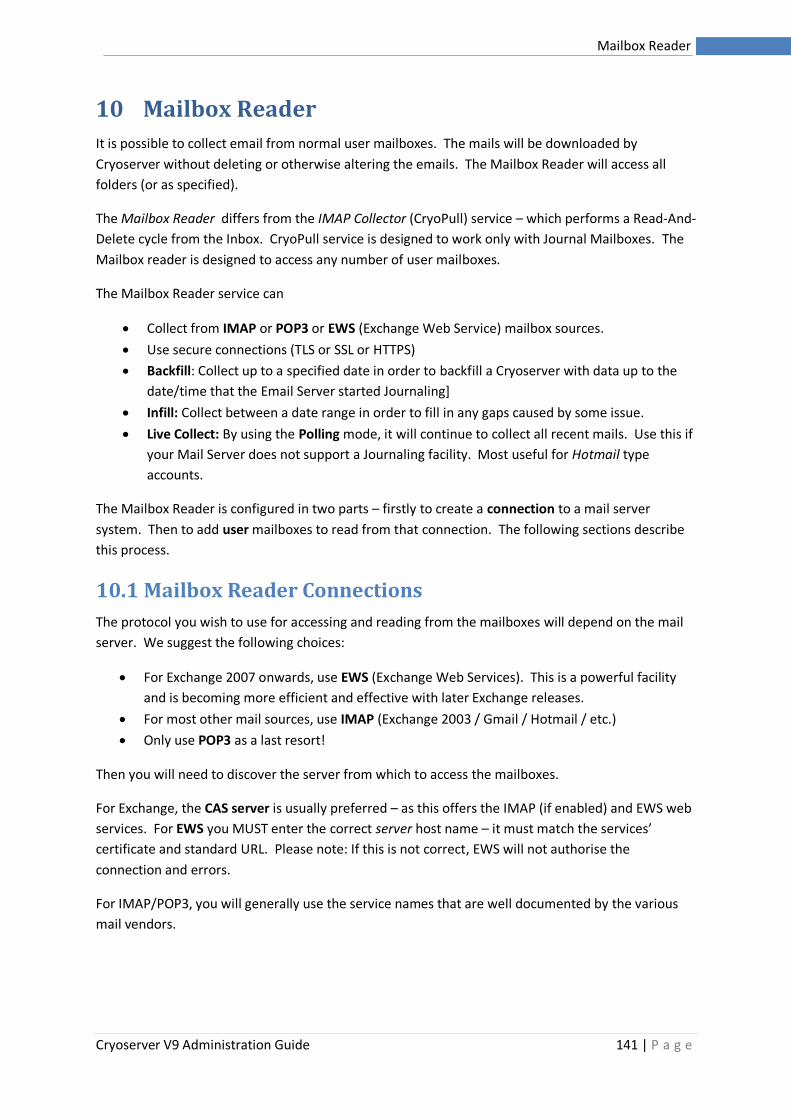
Cryoserver V9 Administration Guide 141 | P a g e
Mailbox Reader
10 Mailbox Reader
It is possible to collect email from normal user mailboxes. The mails will be downloaded by
Cryoserver without deleting or otherwise altering the emails. The Mailbox Reader will access all
folders (or as specified).
The Mailbox Reader differs from the IMAP Collector (CryoPull) service – which performs a Read-And-
Delete cycle from the Inbox. CryoPull service is designed to work only with Journal Mailboxes. The
Mailbox reader is designed to access any number of user mailboxes.
The Mailbox Reader service can
• Collect from IMAP or POP3 or EWS (Exchange Web Service) mailbox sources.
• Use secure connections (TLS or SSL or HTTPS)
• Backfill: Collect up to a specified date in order to backfill a Cryoserver with data up to the
date/time that the Email Server started Journaling]
• Infill: Collect between a date range in order to fill in any gaps caused by some issue.
• Live Collect: By using the Polling mode, it will continue to collect all recent mails. Use this if
your Mail Server does not support a Journaling facility. Most useful for Hotmail type
accounts.
The Mailbox Reader is configured in two parts – firstly to create a connection to a mail server
system. Then to add user mailboxes to read from that connection. The following sections describe
this process.
10.1 Mailbox Reader Connections
The protocol you wish to use for accessing and reading from the mailboxes will depend on the mail
server. We suggest the following choices:
• For Exchange 2007 onwards, use EWS (Exchange Web Services). This is a powerful facility
and is becoming more efficient and effective with later Exchange releases.
• For most other mail sources, use IMAP (Exchange 2003 / Gmail / Hotmail / etc.)
• Only use POP3 as a last resort!
Then you will need to discover the server from which to access the mailboxes.
For Exchange, the CAS server is usually preferred – as this offers the IMAP (if enabled) and EWS web
services. For EWS you MUST enter the correct server host name – it must match the services’
certificate and standard URL. Please note: If this is not correct, EWS will not authorise the
connection and errors.
For IMAP/POP3, you will generally use the service names that are well documented by the various
mail vendors.
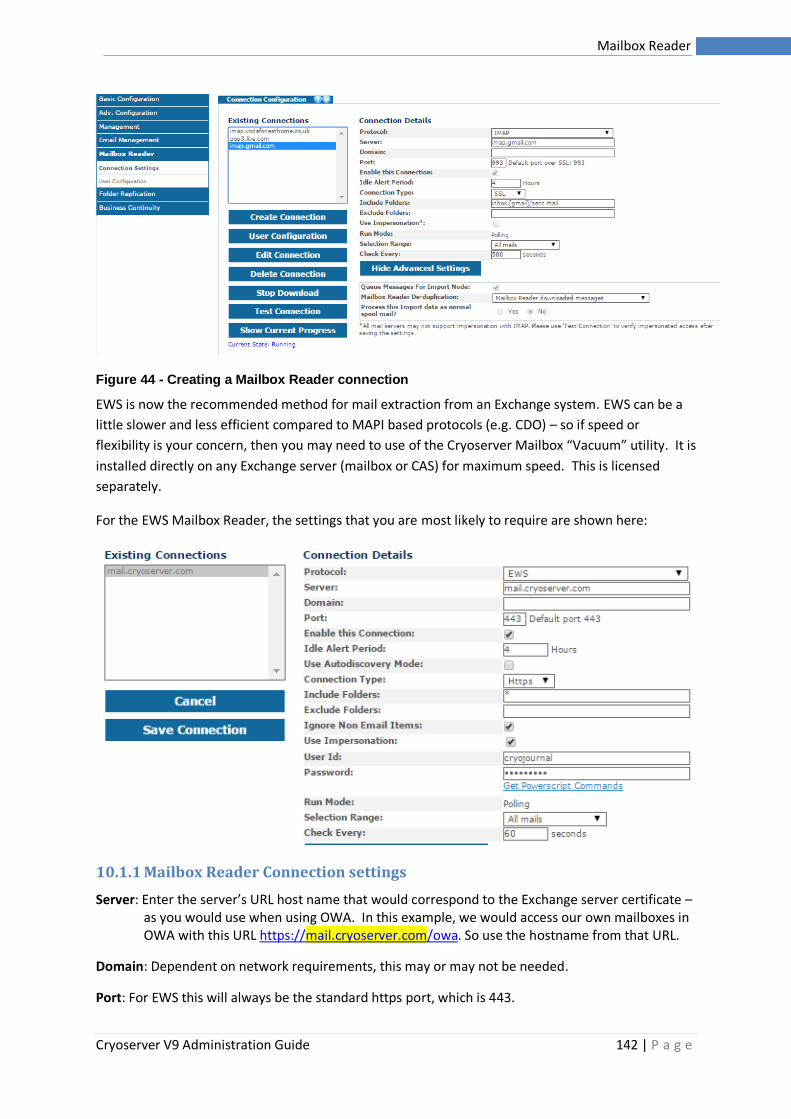
Cryoserver V9 Administration Guide 142 | P a g e
Mailbox Reader
Figure 44 - Creating a Mailbox Reader connection
EWS is now the recommended method for mail extraction from an Exchange system. EWS can be a
little slower and less efficient compared to MAPI based protocols (e.g. CDO) – so if speed or
flexibility is your concern, then you may need to use of the Cryoserver Mailbox “Vacuum” utility. It is
installed directly on any Exchange server (mailbox or CAS) for maximum speed. This is licensed
separately.
For the EWS Mailbox Reader, the settings that you are most likely to require are shown here:
10.1.1 Mailbox Reader Connection settings
Server: Enter the server’s URL host name that would correspond to the Exchange server certificate – as you would use when using OWA. In this example, we would access our own mailboxes in OWA with this URL https://mail.cryoserver.com/owa. So use the hostname from that URL.
Domain: Dependent on network requirements, this may or may not be needed.
Port: For EWS this will always be the standard https port, which is 443.
Cryoserver V9 Administration Guide 143 | P a g e
Mailbox Reader
Idle Alert Period: This will cause an alert emails to be sent by Cryoserver to the alert recipients if no mail is collected by this connection over the specified period.
Use Autodiscovery Mode: This will initialise the connection details via the email addresses of the user mailboxes that are to be collected from. In essence, Autodiscovery is another web based service (which will also require a valid web certificate) that returns all of the server / domain / url and other details for a given email address.
Connectivity Type: for EWS this will always be https:
Include Folders: This is the set of Outlook Folders that you require to download email from. Generally, this will be from ALL folders – so the * wildcard can be used. Otherwise a comma separated set of folder names can be provided. For Sub Folders, you will need to enter the full path – each part separated by a forward slash. For example: inbox/archive mail/*,sent mail PLEASE NOTE that the * will mean that non-email folders will be accessed
Exclude Folders: If you wish to exclude specific folders that would otherwise be Included, then enter a comma separated set of folders here.
Concurrent Account Download Limit: The number of mailboxes that will be queried in parallel.
Ignore Non Email Items: This tells the Collector to only attempt to download items that have recognised flags indicating the content is a standard email. Some imported emails or post-processed emails (like stubbed items) will have a different ‘item class’ flag – and you can ensure these are not collected via this option. If the collector is ‘skipping’ items that you believe should be collected, then try un-ticking this option and re-running the collection.
Use impersonation: This is a technique that allows a special user login account to have read/write access to all mailboxes in the Exchange. Without Impersonation you would need to provide the password for every mailbox that you wish to collect mail from. Impersonation is needed when you wish to collect mail from more than one mailbox. See section Impersonation & Throttling below for more information.
Run Mode: This will say “Polling” if there is no END DATE for mail collection. Without an end date, the system will need to repeatedly scan mailboxes – a technique used to archive mail from systems that do not have a Journaling feature (like Hotmail / Gmail / Live mail / other IMAP or POP3 sources). If an end-date is specified, then the Run Mode will say “Date Limited”. The summary information that is displayed during mailbox collection will be different between Polling mode vs Date Limited mode.
Selection Range / Start / End date & Time: This sets the required period over which mail is to be collected. For most new archive setups for Exchange or Lotus Notes, we recommend that you use the “All mail up-to” option, and set the end date/time to the time when Journaling was enabled.
Check Every: (seconds) This option shows only for “Polling” connections. After each complete pass over every user account, the system will pause for the duration specified in the Check Every. This allows you to scan mailboxes in hourly or daily intervals, if desired.
Cryoserver V9 Administration Guide 144 | P a g e
Mailbox Reader
10.1.2 Advanced Connection settings
Queue Messages For Import Node: This tells the system to queue the imported mails into the “Import Node” feature of Cryoserver. This allows mails to be queued but not necessarily processed straight away.
Download Chunk Size: This tells the underlying system how many emails to transfer over the connection in each query request. Having a larger number will increase performance at the cost of greater memory and network usage. It is unlikely that you will need to alter this except under the advice of the Support team – following some performance/memory or network issues.
Download MIME in Chunk: Size Limit: MB (<=0: No limit). This specifies if the email content is to be transferred along with the ‘chunk’ of email headers. By default the list of mail headers will be transferred along with the email contents – but only if the content is less that the provided size limit. If an email is larger, then it will be transferred using a byte steam instead.
Mailbox Reader De-duplication: These choices help to identify duplicate emails prior to downloading from user mailboxes. De-Duplication is based upon the “MESSAGE-ID” value. Regardless of these settings.. De-Duplication may still be performed by Cryoserver as the mails are being processed into the archive repositories. Please check the Advanced Company Settings to see if de-duplication is applied [to ‘basic’ rfc822 mail].
• No Deduplication – all mail will be downloaded. Repeated downloading will obtain the
same emails again. Mails that appear in several user mailboxes will be downloaded
regardless.
• Mailbox Reader Downloaded Messages – only mails that have not previously been
downloaded will be chosen. Cryoserver will create a private database of message-id’s to
support this option.
WARNING: With very large data sets [i.e., over 10 million emails] , the database can become
significantly large – which can affect the local disk usage and the systems internal nightly
backup (where the databases are copied to the local disk, then transferred to the Mirror
server, if used)
• Downloaded messages AND Cryoserver repository – this will check for duplicates in the
downloaded message-id database [see the previous description & warning] AND in the
Cryoserver repositories as well. Use this option only if there is significant overlap between
the Collection source and the mail already in the Archive. For example, during an “In-filling”
process where only some mails were missing from the archive for some reason.
Process this Import data as normal spool mail? Yes/No: Mail that is collected by the reader should be marked as ‘Imported’. This allows for two main aspects to be used:
1. The mails, when viewed in Cryoserver, will show that it was Imported (and thus its
authenticity cannot be guaranteed). And
2. That the mail is placed into a separate data storage node from the ‘Live’ mail. This allows
for the imported mail to be removed on-mass if there was any problem.
Cryoserver V9 Administration Guide 145 | P a g e
Mailbox Reader
By de-selecting this option the mails will NOT be marked as ‘Imported’ in the archive and
will be processed into the same data files as ‘live’ mail – making it much harder to bulk
remove only the Imported data set.
IMPORTANT NOTE: If a de-duplication option is used (and this is both the default and is
recommended), then a local database of message-ids will be created. Once collection has been fully
completed, then the Mailbox Reader connection should be DELETED – and in doing so, the message-
id database will be removed, releasing disk space and speeding up the internal system backups.
10.1.3 Connection Settings for on premise Exchange
We recommend EWS with Impersonation for Exchange. Connect to your CAS server and not direct
to any single mailbox server, even if that one server holds the accounts to extract from.
Protocol: EWS
Server: <fully qualified DNS name for the CAS server>
Domain: <your network domain may be provided or left blank>
Port: 443
Connection Type: HTTPS
Autodiscovery Mode: <use this option if manual server/domain settings fail>
Include Folders: *
Exclude Folders: drafts,calendar,contacts,outbox,tasks,suggested contacts
10.1.4 Connection settings for Office365
You must use EWS with Impersonation for Office365. With Office365, the user’s login Username is
normally the same as their primary Email Address.
Protocol: EWS
Server: <fully qualified DNS name for your O365 account>
Domain: <blank>
Port: 443
Connection Type: HTTPS
Autodiscovery Mode: <use this option if manual server/domain settings fail>
Include Folders: *
Exclude Folders: drafts,calendar,contacts,outbox,tasks,suggested contacts
Impersonation: Office365 offers a limited web-based Power Script feature. It is possible to enable
Impersonation.
Hybrid Deployments:– A mixture of On-Premise and Office365. This should not affect the Mailbox
Reader requirements.
10.1.5 Connection Settings for GMAIL
The connection settings are published by Google. Please note the Include Folders setting – this is
recommended as some [gmail]/subfolders simply contain subsets of the inbox that have been
filtered in some way.
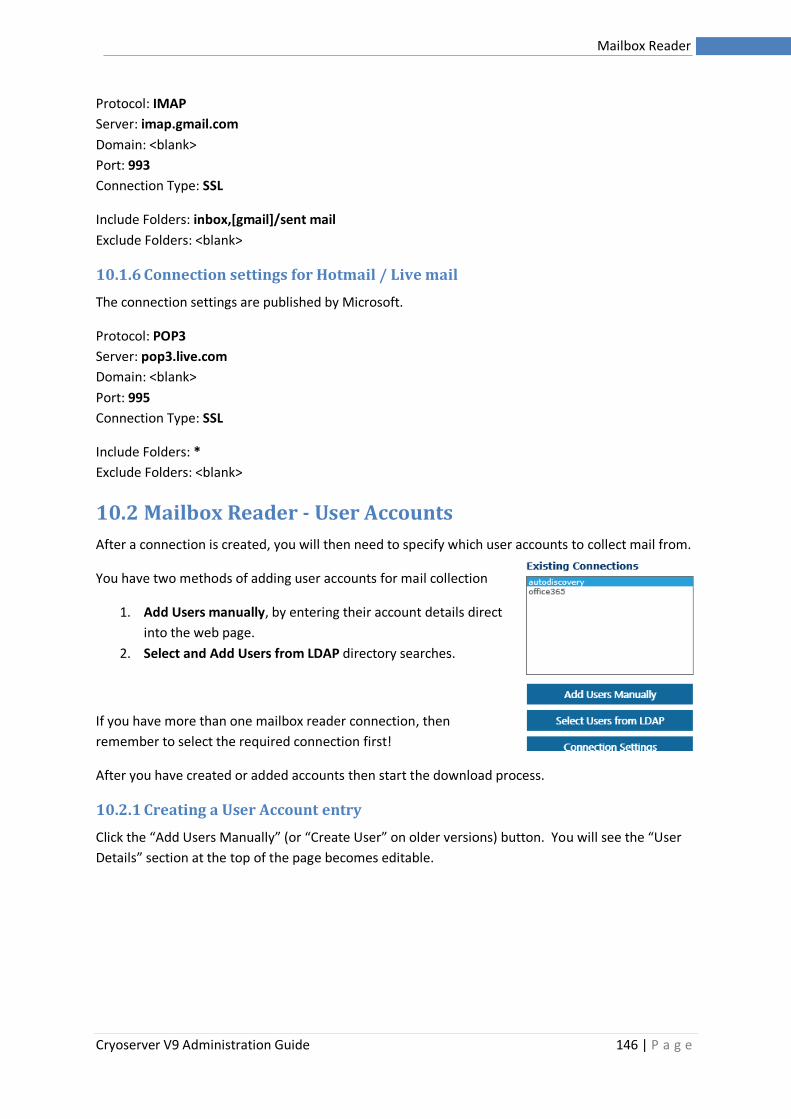
Cryoserver V9 Administration Guide 146 | P a g e
Mailbox Reader
Protocol: IMAP
Server: imap.gmail.com
Domain: <blank>
Port: 993
Connection Type: SSL
Include Folders: inbox,[gmail]/sent mail
Exclude Folders: <blank>
10.1.6 Connection settings for Hotmail / Live mail
The connection settings are published by Microsoft.
Protocol: POP3
Server: pop3.live.com
Domain: <blank>
Port: 995
Connection Type: SSL
Include Folders: *
Exclude Folders: <blank>
10.2 Mailbox Reader - User Accounts
After a connection is created, you will then need to specify which user accounts to collect mail from.
You have two methods of adding user accounts for mail collection
1. Add Users manually, by entering their account details direct
into the web page.
2. Select and Add Users from LDAP directory searches.
If you have more than one mailbox reader connection, then
remember to select the required connection first!
After you have created or added accounts then start the download process.
10.2.1 Creating a User Account entry
Click the “Add Users Manually” (or “Create User” on older versions) button. You will see the “User
Details” section at the top of the page becomes editable.
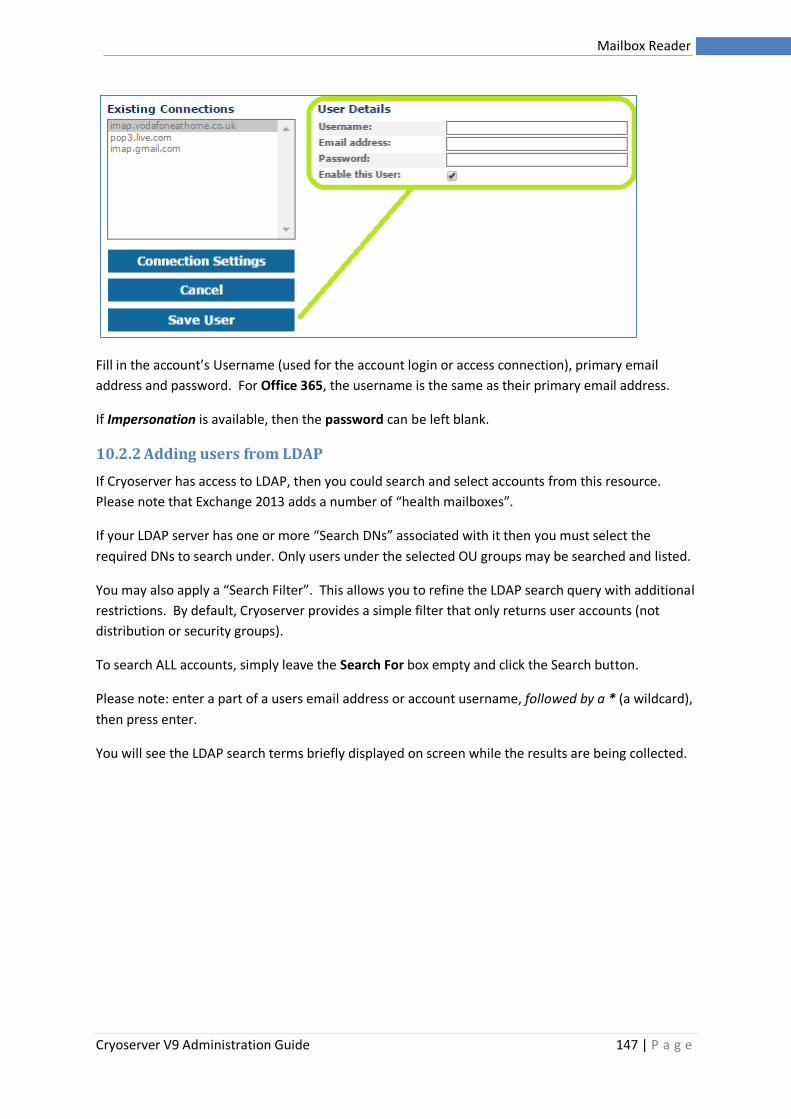
Cryoserver V9 Administration Guide 147 | P a g e
Mailbox Reader
Fill in the account’s Username (used for the account login or access connection), primary email
address and password. For Office 365, the username is the same as their primary email address.
If Impersonation is available, then the password can be left blank.
10.2.2 Adding users from LDAP
If Cryoserver has access to LDAP, then you could search and select accounts from this resource.
Please note that Exchange 2013 adds a number of “health mailboxes”.
If your LDAP server has one or more “Search DNs” associated with it then you must select the
required DNs to search under. Only users under the selected OU groups may be searched and listed.
You may also apply a “Search Filter”. This allows you to refine the LDAP search query with additional
restrictions. By default, Cryoserver provides a simple filter that only returns user accounts (not
distribution or security groups).
To search ALL accounts, simply leave the Search For box empty and click the Search button.
Please note: enter a part of a users email address or account username, followed by a * (a wildcard),
then press enter.
You will see the LDAP search terms briefly displayed on screen while the results are being collected.
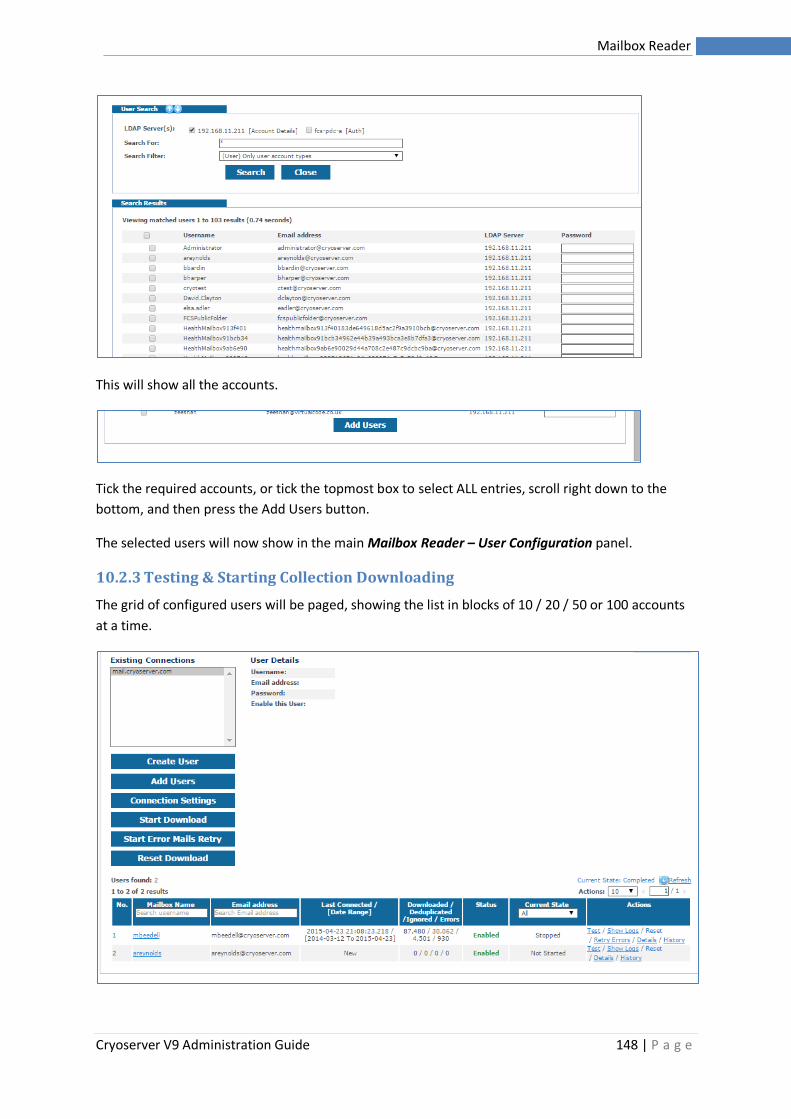
Cryoserver V9 Administration Guide 148 | P a g e
Mailbox Reader
This will show all the accounts.
Tick the required accounts, or tick the topmost box to select ALL entries, scroll right down to the
bottom, and then press the Add Users button.
The selected users will now show in the main Mailbox Reader – User Configuration panel.
10.2.3 Testing & Starting Collection Downloading
The grid of configured users will be paged, showing the list in blocks of 10 / 20 / 50 or 100 accounts
at a time.
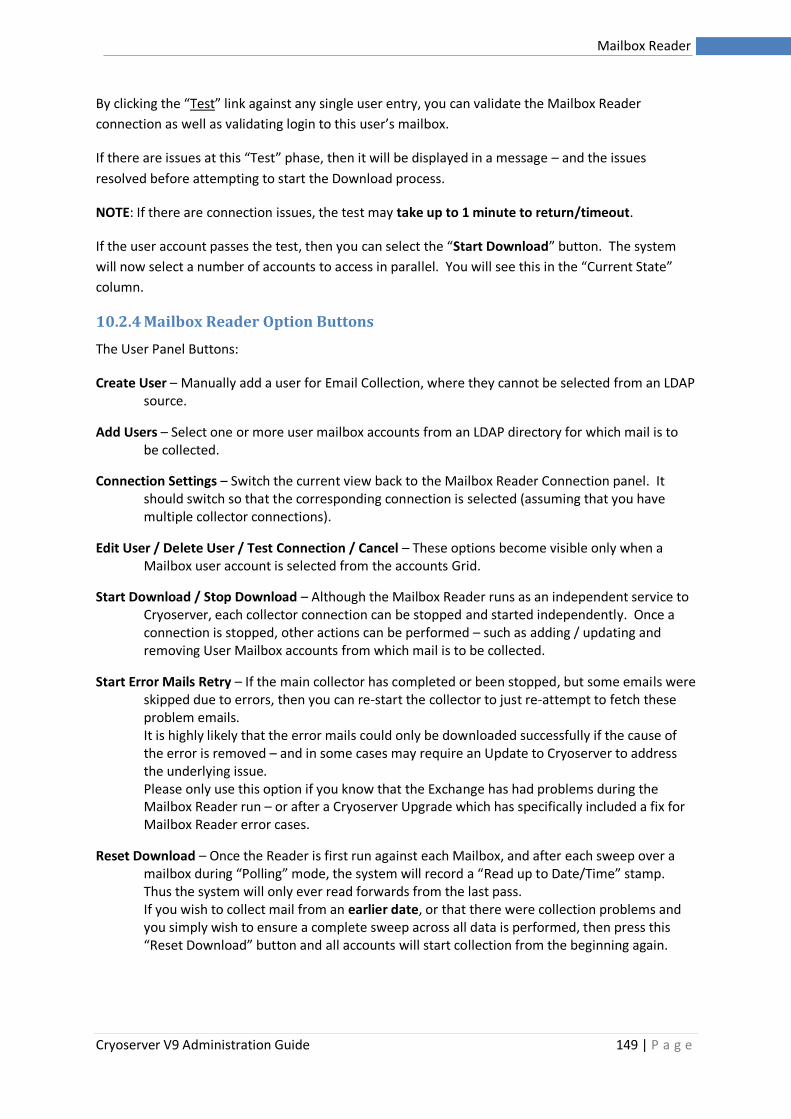
Cryoserver V9 Administration Guide 149 | P a g e
Mailbox Reader
By clicking the “Test” link against any single user entry, you can validate the Mailbox Reader
connection as well as validating login to this user’s mailbox.
If there are issues at this “Test” phase, then it will be displayed in a message – and the issues
resolved before attempting to start the Download process.
NOTE: If there are connection issues, the test may take up to 1 minute to return/timeout.
If the user account passes the test, then you can select the “Start Download” button. The system
will now select a number of accounts to access in parallel. You will see this in the “Current State”
column.
10.2.4 Mailbox Reader Option Buttons
The User Panel Buttons:
Create User – Manually add a user for Email Collection, where they cannot be selected from an LDAP source.
Add Users – Select one or more user mailbox accounts from an LDAP directory for which mail is to be collected.
Connection Settings – Switch the current view back to the Mailbox Reader Connection panel. It should switch so that the corresponding connection is selected (assuming that you have multiple collector connections).
Edit User / Delete User / Test Connection / Cancel – These options become visible only when a Mailbox user account is selected from the accounts Grid.
Start Download / Stop Download – Although the Mailbox Reader runs as an independent service to Cryoserver, each collector connection can be stopped and started independently. Once a connection is stopped, other actions can be performed – such as adding / updating and removing User Mailbox accounts from which mail is to be collected.
Start Error Mails Retry – If the main collector has completed or been stopped, but some emails were skipped due to errors, then you can re-start the collector to just re-attempt to fetch these problem emails. It is highly likely that the error mails could only be downloaded successfully if the cause of the error is removed – and in some cases may require an Update to Cryoserver to address the underlying issue. Please only use this option if you know that the Exchange has had problems during the Mailbox Reader run – or after a Cryoserver Upgrade which has specifically included a fix for Mailbox Reader error cases.
Reset Download – Once the Reader is first run against each Mailbox, and after each sweep over a mailbox during “Polling” mode, the system will record a “Read up to Date/Time” stamp. Thus the system will only ever read forwards from the last pass. If you wish to collect mail from an earlier date, or that there were collection problems and you simply wish to ensure a complete sweep across all data is performed, then press this “Reset Download” button and all accounts will start collection from the beginning again.
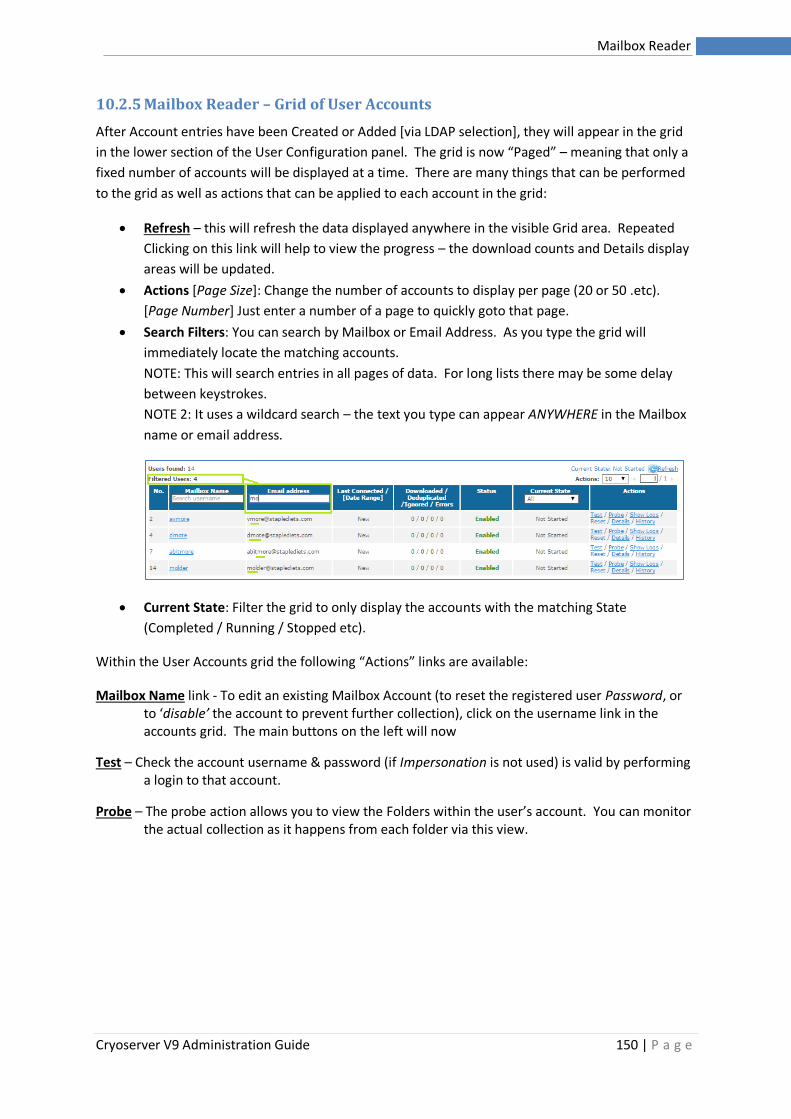
Cryoserver V9 Administration Guide 150 | P a g e
Mailbox Reader
10.2.5 Mailbox Reader – Grid of User Accounts
After Account entries have been Created or Added [via LDAP selection], they will appear in the grid
in the lower section of the User Configuration panel. The grid is now “Paged” – meaning that only a
fixed number of accounts will be displayed at a time. There are many things that can be performed
to the grid as well as actions that can be applied to each account in the grid:
• Refresh – this will refresh the data displayed anywhere in the visible Grid area. Repeated
Clicking on this link will help to view the progress – the download counts and Details display
areas will be updated.
• Actions [Page Size]: Change the number of accounts to display per page (20 or 50 .etc).
[Page Number] Just enter a number of a page to quickly goto that page.
• Search Filters: You can search by Mailbox or Email Address. As you type the grid will
immediately locate the matching accounts.
NOTE: This will search entries in all pages of data. For long lists there may be some delay
between keystrokes.
NOTE 2: It uses a wildcard search – the text you type can appear ANYWHERE in the Mailbox
name or email address.
• Current State: Filter the grid to only display the accounts with the matching State
(Completed / Running / Stopped etc).
Within the User Accounts grid the following “Actions” links are available:
Mailbox Name link - To edit an existing Mailbox Account (to reset the registered user Password, or to ‘disable’ the account to prevent further collection), click on the username link in the accounts grid. The main buttons on the left will now
Test – Check the account username & password (if Impersonation is not used) is valid by performing a login to that account.
Probe – The probe action allows you to view the Folders within the user’s account. You can monitor the actual collection as it happens from each folder via this view.
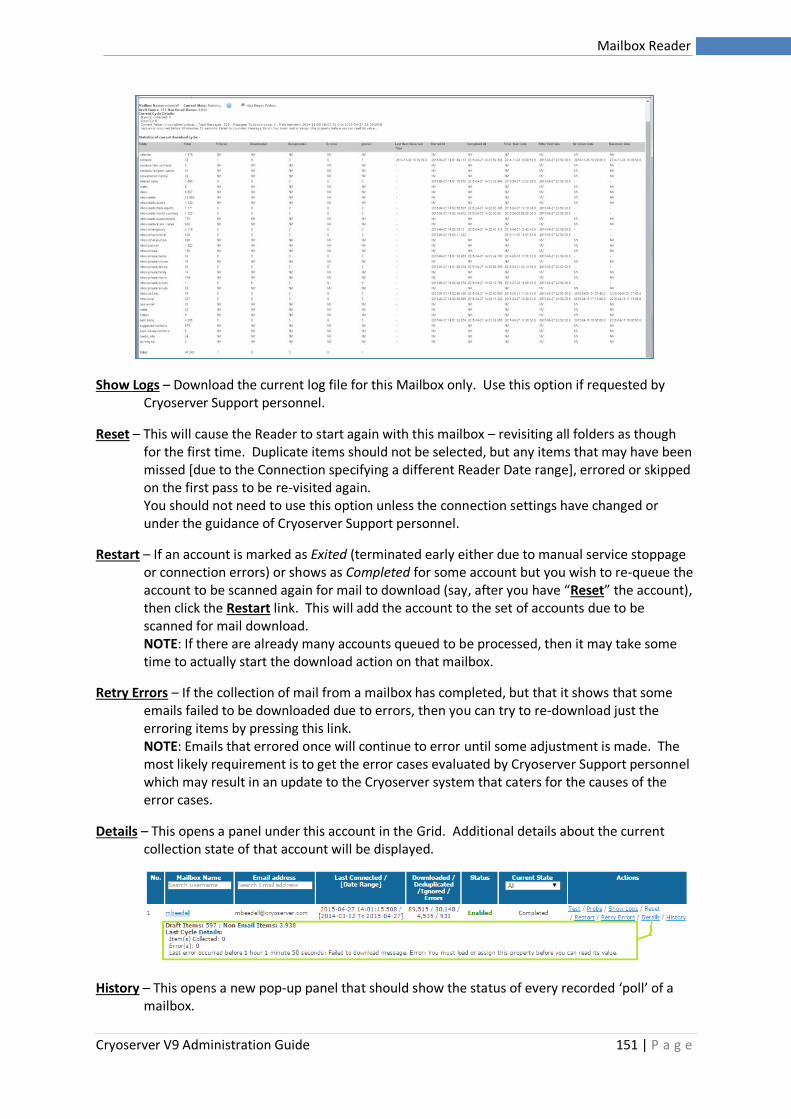
Cryoserver V9 Administration Guide 151 | P a g e
Mailbox Reader
Show Logs – Download the current log file for this Mailbox only. Use this option if requested by Cryoserver Support personnel.
Reset – This will cause the Reader to start again with this mailbox – revisiting all folders as though for the first time. Duplicate items should not be selected, but any items that may have been missed [due to the Connection specifying a different Reader Date range], errored or skipped on the first pass to be re-visited again. You should not need to use this option unless the connection settings have changed or under the guidance of Cryoserver Support personnel.
Restart – If an account is marked as Exited (terminated early either due to manual service stoppage or connection errors) or shows as Completed for some account but you wish to re-queue the account to be scanned again for mail to download (say, after you have “Reset” the account), then click the Restart link. This will add the account to the set of accounts due to be scanned for mail download. NOTE: If there are already many accounts queued to be processed, then it may take some time to actually start the download action on that mailbox.
Retry Errors – If the collection of mail from a mailbox has completed, but that it shows that some emails failed to be downloaded due to errors, then you can try to re-download just the erroring items by pressing this link. NOTE: Emails that errored once will continue to error until some adjustment is made. The most likely requirement is to get the error cases evaluated by Cryoserver Support personnel which may result in an update to the Cryoserver system that caters for the causes of the error cases.
Details – This opens a panel under this account in the Grid. Additional details about the current collection state of that account will be displayed.
History – This opens a new pop-up panel that should show the status of every recorded ‘poll’ of a mailbox.
Cryoserver V9 Administration Guide 152 | P a g e
Mailbox Reader
10.2.6 User Account - Download Counts & Statistics
Multiple user accounts will be accessed in parallel – typically up to 10 mailboxes at the same time.
As the mailboxes are visited this sequence of events will occur:
1. Account Login. In some cases a number of attempts will be made to connect to an account,
each with different Username / domain format combinations.
NOTE: Very large mailboxes can take many minutes to complete the login phase. For
example, under IMAP all emails must be sequentially numbered – and so the first IMAP
connection to a mailbox may cause much activity on the Email Server.
2. Read the Folder tree, obtaining the complete item counts in each. Typically a fast action.
3. For each Folder, obtain the list of emails in date sort order, filtered by the current date-
range criteria. As a mailbox can be scanned multiple times, so the date-of-last scan is
retained so that subsequent scans only read new data.
WARNING: A very large mailbox folder can take over 30 minutes to sort by date. This has
been seen with folders with over 20 million items.
If you have mailboxes like this (over 20 million items in one folder) then the Mailbox Reader
can be forced to read items in “Natural Order” – which will prevent this sort action.
However, this is not recommended for mailboxes where the content is likely to change
during the Download process.
Recommendation: PLEASE Contact Cryoserver Support for guidance and best practices.
4. Mails are read, a ‘chunk’ at a time – depending on the Connection Settings. By default this
means that up to 10 emails will be downloaded at any time, unless this exceeds a size limit.
Progress can be monitored in the Mailbox Reader - User Configuration grid. Press the “Refresh” link
to keep the grid updated. The following statistics are displayed:
Last Connected / Date Range: This shows the date that this collector attempted to login and download mail from this mailbox. It also shows the Date Range for that collection.
Total-to-Date Counts
Downloaded: A [total to date] count of successfully downloaded emails. NOTE: Depending on the Mailbox Reader and Cryoserver’s deduplication settings, there is a chance that some of these will be de-duplicated when processed into the archive repository. Or they could be rejected due to Exclusion Rules that you may have set in Cryoserver.
Deduplicated: If Mailbox Reader de-duplication options are used, then this is a count of items that have the same Message-ID as a previously downloaded email.
Ignored: This is a count of items that are not emails, or not valid for download purposes. Items could be Calendar appointments, Notes, ToDo lists and so on. Or it could be items created by a third party app that your organisation uses, which uses Exchange as its data store.
Errors: This is a count of emails that failed to be downloaded for any reason.
The sum of Downloaded + Deduplicated + Ignored + Errored should = the Filtered count from the
Probe panel [but only on the first pass].

Cryoserver V9 Administration Guide 153 | P a g e
Mailbox Reader
10.2.7 Monitor Page - Reader Summary
You can check on the progress of a range of aspects of Cryoserver via the Monitor Page. In the
Components section you will find a section summarising the Mailbox Reader:
This shows the Volume downloaded and the current hour / previous hour download counts.
Impersonation & Throttling
Impersonation is a way to access many mailboxes using only a single user Login. This feature applies
to both IMAP [but only if supported by the Email Provider], and EWS [including Office 365].
For IMAP on non-Exchange systems or those prior to Exchange 2007, an administrative account may
be needed. After Exchange 2007, the Impersonation features as described below for EWS would
also apply here.
For EWS, any user account can be given Impersonation rights – it does not need to be an
administrative account. To promote a user to have impersonation rights requires the use of
Exchange PowerShell commands. Cryoserver provides template PowerShell Scripts for you to use
for this purpose. Please enter the Username of the account that you wish to give Impersonation
rights to, and then click the “Get Powerscript Commands” link. In this case the scripts will be edited
to include this username.
These can ONLY be run under the “Exchange Management Shell” PowerShell environment. A
standard windows PowerShell will not have the Exchange script libraries loaded.
To run one of these scripts, you can either view the script in Notepad, and copy-paste the script text
into the Exchange Management Shell. Or you could run the .ps1 file from within the Exchange
Management Shell by adding an & (ampersand) before the full path to the script file. NOTE: You
should be able to drag-drop a ‘ps1’ script file from File Manager or the Desktop into the
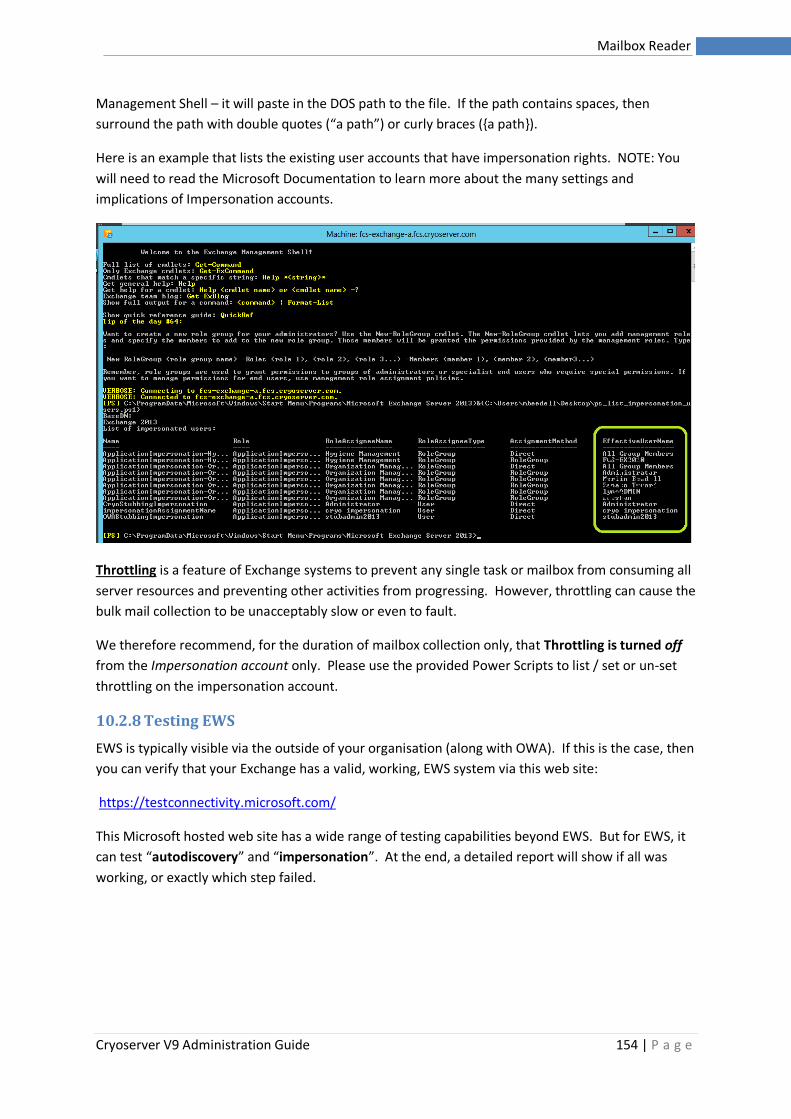
Cryoserver V9 Administration Guide 154 | P a g e
Mailbox Reader
Management Shell – it will paste in the DOS path to the file. If the path contains spaces, then
surround the path with double quotes (“a path”) or curly braces ({a path}).
Here is an example that lists the existing user accounts that have impersonation rights. NOTE: You
will need to read the Microsoft Documentation to learn more about the many settings and
implications of Impersonation accounts.
Throttling is a feature of Exchange systems to prevent any single task or mailbox from consuming all
server resources and preventing other activities from progressing. However, throttling can cause the
bulk mail collection to be unacceptably slow or even to fault.
We therefore recommend, for the duration of mailbox collection only, that Throttling is turned off
from the Impersonation account only. Please use the provided Power Scripts to list / set or un-set
throttling on the impersonation account.
10.2.8 Testing EWS
EWS is typically visible via the outside of your organisation (along with OWA). If this is the case, then
you can verify that your Exchange has a valid, working, EWS system via this web site:
https://testconnectivity.microsoft.com/
This Microsoft hosted web site has a wide range of testing capabilities beyond EWS. But for EWS, it
can test “autodiscovery” and “impersonation”. At the end, a detailed report will show if all was
working, or exactly which step failed.
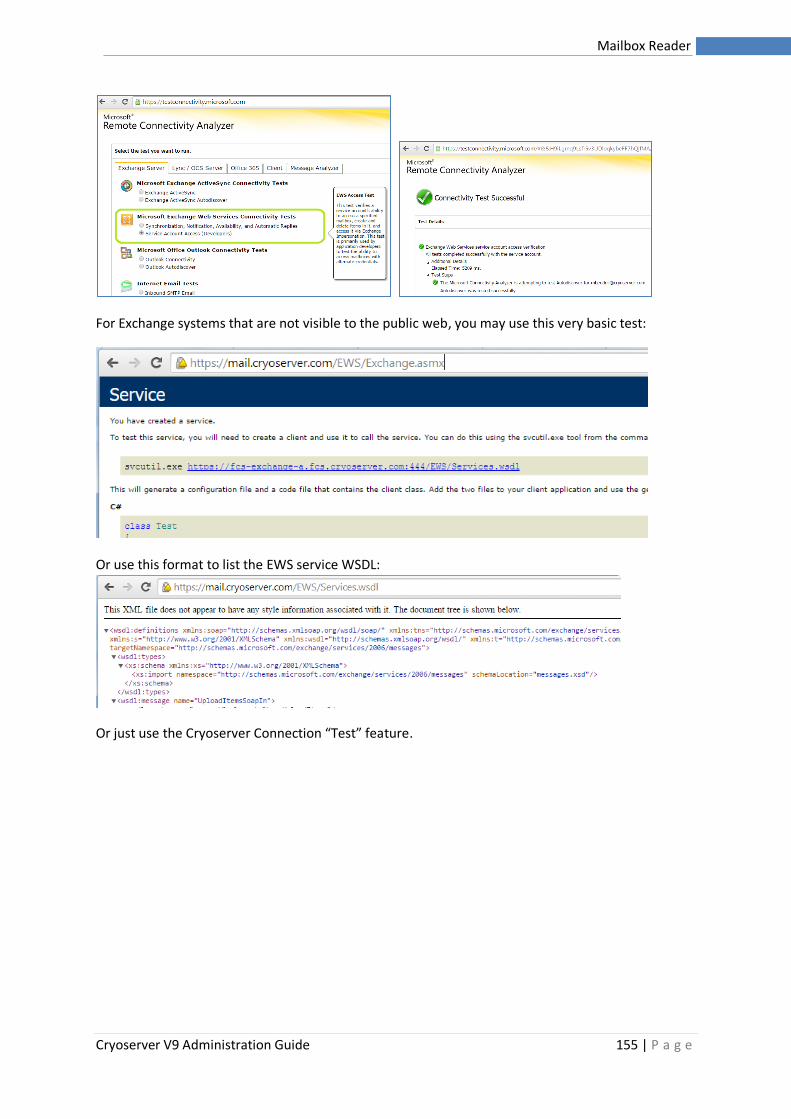
Cryoserver V9 Administration Guide 155 | P a g e
Mailbox Reader
For Exchange systems that are not visible to the public web, you may use this very basic test:
Or use this format to list the EWS service WSDL:
Or just use the Cryoserver Connection “Test” feature.
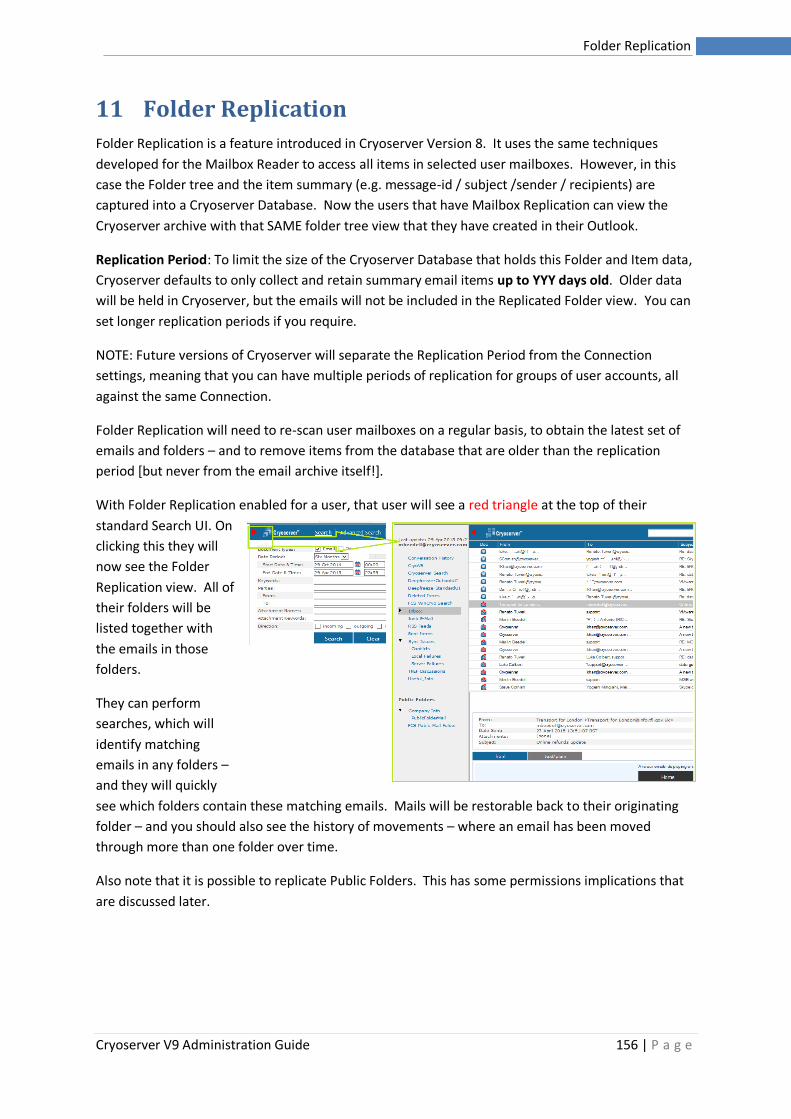
Cryoserver V9 Administration Guide 156 | P a g e
Folder Replication
11 Folder Replication
Folder Replication is a feature introduced in Cryoserver Version 8. It uses the same techniques
developed for the Mailbox Reader to access all items in selected user mailboxes. However, in this
case the Folder tree and the item summary (e.g. message-id / subject /sender / recipients) are
captured into a Cryoserver Database. Now the users that have Mailbox Replication can view the
Cryoserver archive with that SAME folder tree view that they have created in their Outlook.
Replication Period: To limit the size of the Cryoserver Database that holds this Folder and Item data,
Cryoserver defaults to only collect and retain summary email items up to YYY days old. Older data
will be held in Cryoserver, but the emails will not be included in the Replicated Folder view. You can
set longer replication periods if you require.
NOTE: Future versions of Cryoserver will separate the Replication Period from the Connection
settings, meaning that you can have multiple periods of replication for groups of user accounts, all
against the same Connection.
Folder Replication will need to re-scan user mailboxes on a regular basis, to obtain the latest set of
emails and folders – and to remove items from the database that are older than the replication
period [but never from the email archive itself!].
With Folder Replication enabled for a user, that user will see a red triangle at the top of their
standard Search UI. On
clicking this they will
now see the Folder
Replication view. All of
their folders will be
listed together with
the emails in those
folders.
They can perform
searches, which will
identify matching
emails in any folders –
and they will quickly
see which folders contain these matching emails. Mails will be restorable back to their originating
folder – and you should also see the history of movements – where an email has been moved
through more than one folder over time.
Also note that it is possible to replicate Public Folders. This has some permissions implications that
are discussed later.
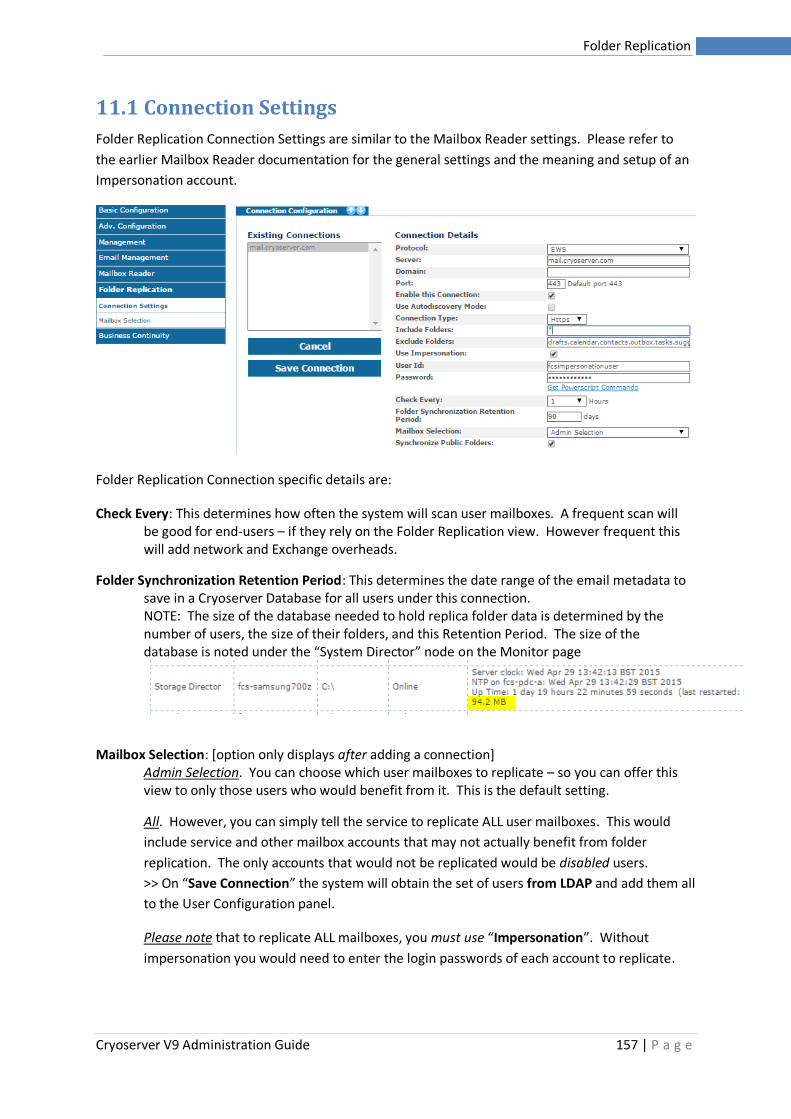
Cryoserver V9 Administration Guide 157 | P a g e
Folder Replication
11.1 Connection Settings
Folder Replication Connection Settings are similar to the Mailbox Reader settings. Please refer to
the earlier Mailbox Reader documentation for the general settings and the meaning and setup of an
Impersonation account.
Folder Replication Connection specific details are:
Check Every: This determines how often the system will scan user mailboxes. A frequent scan will be good for end-users – if they rely on the Folder Replication view. However frequent this will add network and Exchange overheads.
Folder Synchronization Retention Period: This determines the date range of the email metadata to save in a Cryoserver Database for all users under this connection. NOTE: The size of the database needed to hold replica folder data is determined by the number of users, the size of their folders, and this Retention Period. The size of the database is noted under the “System Director” node on the Monitor page
Mailbox Selection: [option only displays after adding a connection] Admin Selection. You can choose which user mailboxes to replicate – so you can offer this view to only those users who would benefit from it. This is the default setting.
All. However, you can simply tell the service to replicate ALL user mailboxes. This would
include service and other mailbox accounts that may not actually benefit from folder
replication. The only accounts that would not be replicated would be disabled users.
>> On “Save Connection” the system will obtain the set of users from LDAP and add them all
to the User Configuration panel.
Please note that to replicate ALL mailboxes, you must use “Impersonation”. Without
impersonation you would need to enter the login passwords of each account to replicate.
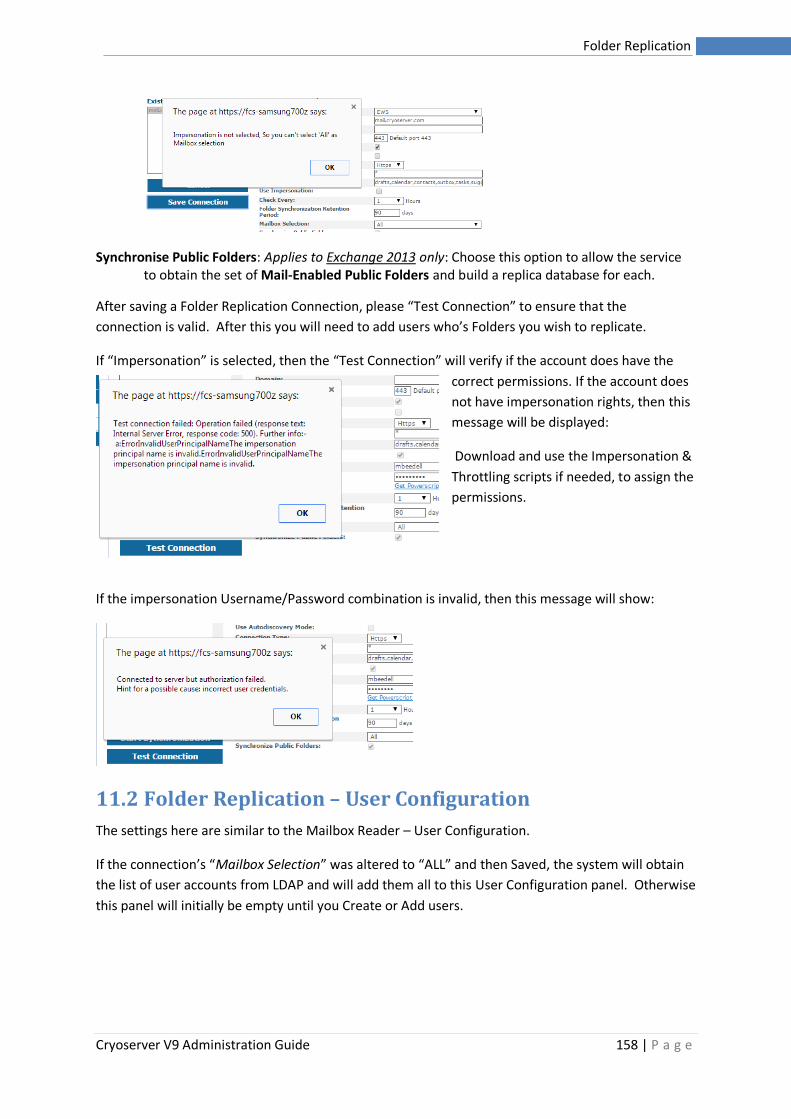
Cryoserver V9 Administration Guide 158 | P a g e
Folder Replication
Synchronise Public Folders: Applies to Exchange 2013 only: Choose this option to allow the service to obtain the set of Mail-Enabled Public Folders and build a replica database for each.
After saving a Folder Replication Connection, please “Test Connection” to ensure that the
connection is valid. After this you will need to add users who’s Folders you wish to replicate.
If “Impersonation” is selected, then the “Test Connection” will verify if the account does have the
correct permissions. If the account does
not have impersonation rights, then this
message will be displayed:
Download and use the Impersonation &
Throttling scripts if needed, to assign the
permissions.
If the impersonation Username/Password combination is invalid, then this message will show:
11.2 Folder Replication – User Configuration
The settings here are similar to the Mailbox Reader – User Configuration.
If the connection’s “Mailbox Selection” was altered to “ALL” and then Saved, the system will obtain
the list of user accounts from LDAP and will add them all to this User Configuration panel. Otherwise
this panel will initially be empty until you Create or Add users.
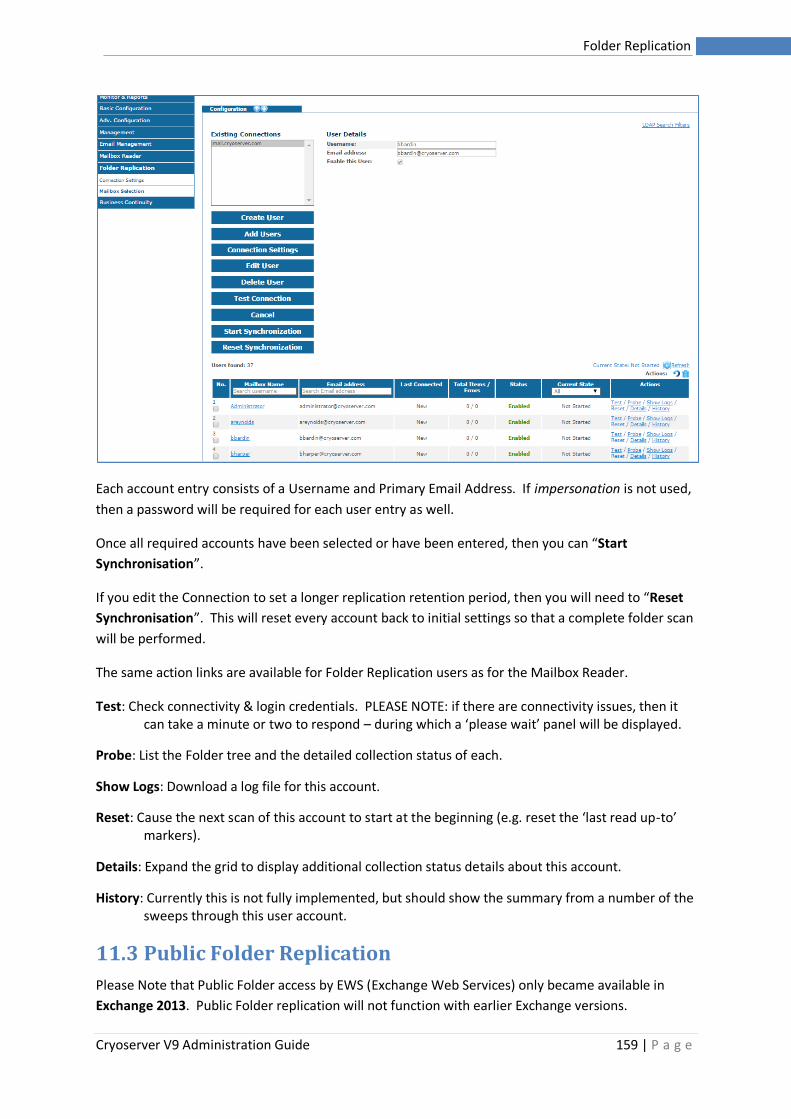
Cryoserver V9 Administration Guide 159 | P a g e
Folder Replication
Each account entry consists of a Username and Primary Email Address. If impersonation is not used,
then a password will be required for each user entry as well.
Once all required accounts have been selected or have been entered, then you can “Start
Synchronisation”.
If you edit the Connection to set a longer replication retention period, then you will need to “Reset
Synchronisation”. This will reset every account back to initial settings so that a complete folder scan
will be performed.
The same action links are available for Folder Replication users as for the Mailbox Reader.
Test: Check connectivity & login credentials. PLEASE NOTE: if there are connectivity issues, then it can take a minute or two to respond – during which a ‘please wait’ panel will be displayed.
Probe: List the Folder tree and the detailed collection status of each.
Show Logs: Download a log file for this account.
Reset: Cause the next scan of this account to start at the beginning (e.g. reset the ‘last read up-to’ markers).
Details: Expand the grid to display additional collection status details about this account.
History: Currently this is not fully implemented, but should show the summary from a number of the sweeps through this user account.
11.3 Public Folder Replication
Please Note that Public Folder access by EWS (Exchange Web Services) only became available in
Exchange 2013. Public Folder replication will not function with earlier Exchange versions.
Cryoserver V9 Administration Guide 160 | P a g e
Folder Replication
Public Folders are unlike standard user folders in a number of respects:
• They often contain items that are not sent to or from the Public Folder email address. Items
are placed into Public Folders via drag/drop actions in Outlook.
• They are typically project oriented – containing mail related to a specific case or matter.
Only users who are part of that Project will have visibility to that Public Folder.
These facts mean that special handling is needed by Cryoserver to allow the content of Public folders
to be effective.
1. The content of a Public Folder would need to be replicated over a much longer period –
effectively over all time. This is to capture all of the items placed there by drag-and-drop
techniques.
2. A user viewing a Public Folder in Cryoserver would need to have “Privileged” style access –
as they will be viewing items not send either to or from themselves, and also not sent
to/from the Public Folder email address either.
3. Every folder replication cycle visits all user mailboxes in scope of replication. For every user,
it first gets the list of root of normal folders, and synchronizes them (over last remembered
synchronization state). Then it gets the root of public folders accessible to the user. If the
user has access to any public folder, those folders are returned in this list. Then it
synchronizes those public folders, and stores the public folder item entries in a table
common to all users (unlike normal folders synchronized under per-user tables), also
recording the identity of the synchronized public folder and userid of the respective user
who has access the public folder. Now if a subsequent user account visited in folder
replication cycle also has access to the same public folder, folder replication would know
that respective public folder (with specific identity) has already been synchronized in the
current replication cycle. So it would not re-sync it again, but just add the userid to the table
column maintaining list of users for respective public folder. When a user opens folder
replica view, he is able to see those public folders (under replica view), the tables of which
have his userid under the users column.

Cryoserver V9 Administration Guide 161 | P a g e
Business Continuity
12 Business Continuity
Business Continuity is the ability to use the Cryoserver product for Replying and Sending new emails
when the companies main Email Server is down.
When enabled the Menu list to Cryoserver enhances.
To enable Business Continuity Mode login to the Administator area > Business Continuity. Ticking
Business Continuity Mode and pressing Save will enable the service.

Cryoserver V9 Administration Guide 162 | P a g e
Business Continuity
Typically the mail server address will be a SMTP relay service for the organisation, such as a Gateway
device. Please note Business Continuity would only be used if the organisation are not able to use
the mail server, and need to use Cryoserver to reply / send emails.
Cryoserver V9 Administration Guide 163 | P a g e
Support Engineer tasks
13 Support Engineer tasks
To prevent support issues, some tasks require Cryoserver support to be contacted. These include:
13.1 SMTP mail server (IIS or Postfix)
Mail that is delivered TO a Cryoserver system will be routed via an SMTP server service on
Cryoserver’s host operating system. These will need to be set up and configured outside of the
Cryoserver administration UI.
On a Linux based system, postfix is used as the SMTP mail server. It is pre-configured with suitable
settings for Cryoserver usage.
On a Windows system, the Windows SMTP service that runs under IIS (version 6) is typically used.
Cryoserver Support can assist to set up or alter the configuration to match your requirements.
13.1.1 SMTP ‘Sniffer’
A separate utility service is available that can ‘sniff’ SMTP packets that are travelling on the network
segment that the unit is connected to. If the Cryoserver is connected to a hub sitting on the gateway
link to the outside, then it should be able to sniff all inbound and outbound mail.
13.2 Disk Management
Addition of extra disk partitions / SAN Luns / NFS shares / USB Drives etc. will require a Support
Engineer to assist.
13.3 IP Address changes
Changing the IP address of a Cryoserver server is typically performed by a support engineer. It is
important to adjust some configuration files accordingly – otherwise Cryoserver will not start up
correctly.
However, for VM Server Images now provide a Management User Login to the o/s that provides
commands to change a number of basic things – including the IP address. For more information
please review the VMdeployment guides.
13.4 Switching to Disaster Recovery Mode
In a Disaster Recovery scenario, the Mirror Cryoserver system will need to act as a standalone
server. A support engineer is required to manually re-configure the system for this purpose, and to
re-set and re-sync the systems after the DR period. The switch from a Mirroring configuration to a
DR Standalone configuration take less than 10 minutes. The switch back to the full Mirroring
configuration will take a little longer, as the data collected during the DR period would need to be
copied to the Primary server.
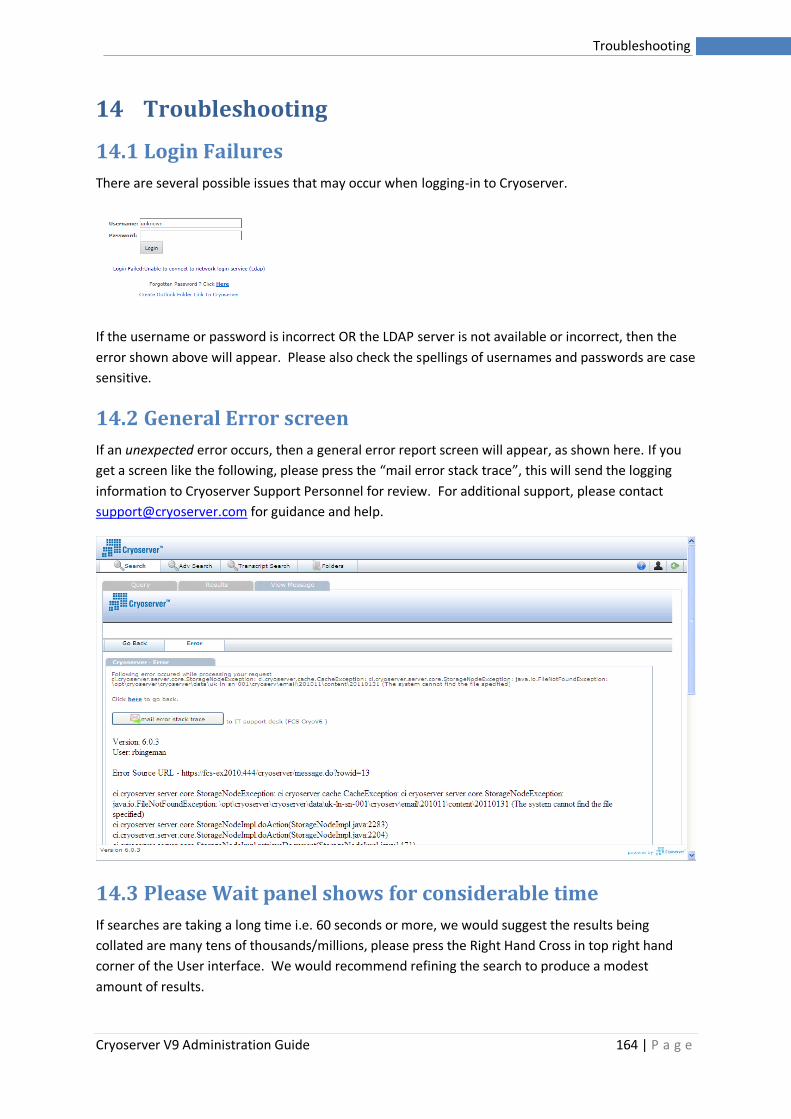
Cryoserver V9 Administration Guide 164 | P a g e
Troubleshooting
14 Troubleshooting
14.1 Login Failures
There are several possible issues that may occur when logging-in to Cryoserver.
If the username or password is incorrect OR the LDAP server is not available or incorrect, then the
error shown above will appear. Please also check the spellings of usernames and passwords are case
sensitive.
14.2 General Error screen
If an unexpected error occurs, then a general error report screen will appear, as shown here. If you
get a screen like the following, please press the “mail error stack trace”, this will send the logging
information to Cryoserver Support Personnel for review. For additional support, please contact
[email protected] for guidance and help.
14.3 Please Wait panel shows for considerable time
If searches are taking a long time i.e. 60 seconds or more, we would suggest the results being
collated are many tens of thousands/millions, please press the Right Hand Cross in top right hand
corner of the User interface. We would recommend refining the search to produce a modest
amount of results.
Cryoserver V9 Administration Guide 165 | P a g e
Troubleshooting
Some browsers (Internet Explorer v 9) will not auto-hide this panel unless the compatibility mode is
enabled. Sometimes this is located in the URL bar or under the Tools menu.
14.4 Alerts / Forward to Inbox not being sent
If the ‘daily alert’ or any other alerts, fail then check the Outbound Email and Alerts settings. The
configured SMTP server may block the sending of emails to any email address that is NOT in the local
domain – as this is regarded as Relaying. So ensure that all Alert Recipients are in the local domain
OR that you configure your SMTP server to ‘Allow relay from’ the Cryoserver IP address.
NOTE: Since Cryoserver version 6.0.6 you can use an authenticated SMTP connection [over TLS/SSL].
In this way the Cryoserver becomes a first class email client and is able to send mail to any email
address without requiring any relay settings on the Exchange (or other email server).
Cryoserver V9 Administration Guide 166 | P a g e
Conclusion
15 Conclusion
We would like to thank you for reading this Administration guide and using Cryoserver.
Cryoserver is constantly evolving around customer requests and we would appreciate your feedback
with using the demo system.
For support requests please speak with your administrator and as a second point of contact FCS at
www.cryoserver.com or emailing [email protected]
Last edited December 2018
Related Documents