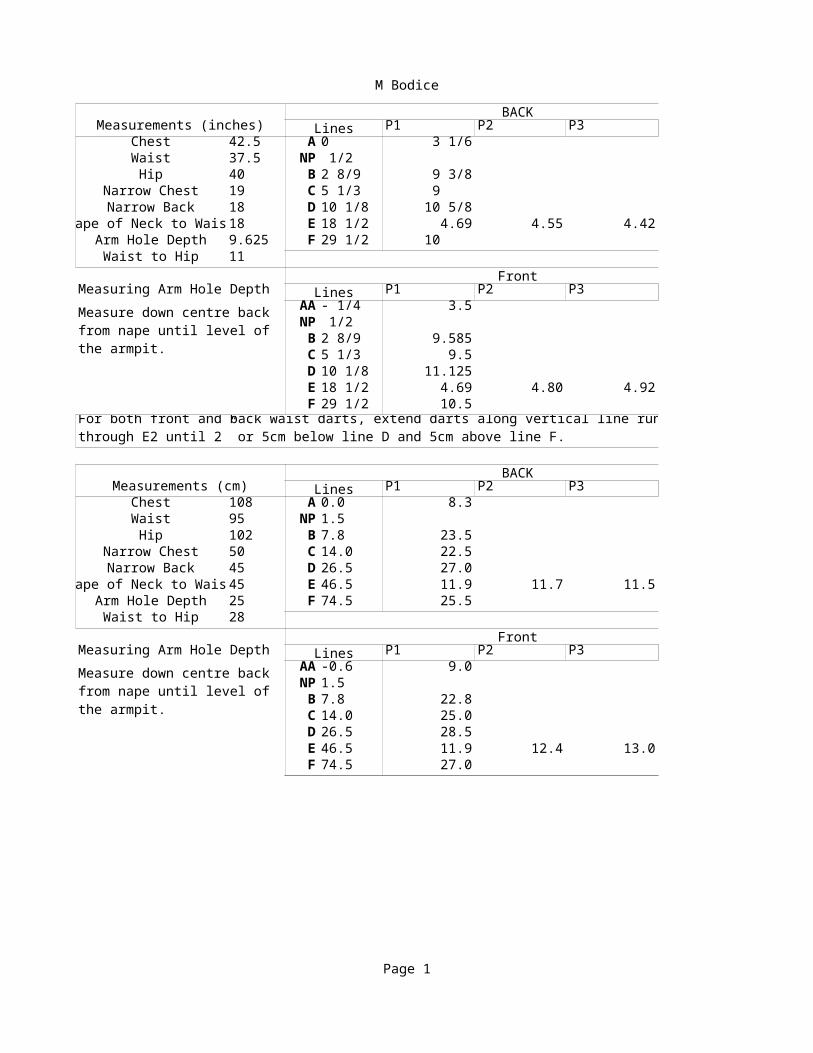
M Bodice Page 1 Measurements (inches) BACK Lines P1 P2 P3 Chest 42.5 A 0 3 1/6 Waist 37.5 NP 1/2 Hip 40 B 2 8/9 9 3/8 Narrow Chest 19 C 5 1/3 9 Narrow Back 18 D 10 1/8 10 5/8 ape of Neck to Wais 18 E 18 1/2 4.69 4.55 4.42 Arm Hole Depth 9.625 F 29 1/2 10 Waist to Hip 11 Front Measuring Arm Hole Depth Lines P1 P2 P3 AA - 1/4 3.5 NP 1/2 B 2 8/9 9.585 C 5 1/3 9.5 D 10 1/8 11.125 E 18 1/2 4.69 4.80 4.92 F 29 1/2 10.5 Measurements (cm) BACK Lines P1 P2 P3 Chest 108 A 0.0 8.3 Waist 95 NP 1.5 Hip 102 B 7.8 23.5 Narrow Chest 50 C 14.0 22.5 Narrow Back 45 D 26.5 27.0 ape of Neck to Wais 45 E 46.5 11.9 11.7 11.5 Arm Hole Depth 25 F 74.5 25.5 Waist to Hip 28 Front Measuring Arm Hole Depth Lines P1 P2 P3 AA -0.6 9.0 NP 1.5 B 7.8 22.8 C 14.0 25.0 D 26.5 28.5 E 46.5 11.9 12.4 13.0 F 74.5 27.0 Measure down centre back from nape until level of the armpit. For both front and back waist darts, extend darts along vertical line run through E2 until 2” or 5cm below line D and 5cm above line F. Measure down centre back from nape until level of the armpit.

Welcome message from author
This document is posted to help you gain knowledge. Please leave a comment to let me know what you think about it! Share it to your friends and learn new things together.
Transcript
M Bodice
Page 1
Measurements (inches)BACK
Lines P1 P2 P3Chest 42.5 A 0 3 1/6Waist 37.5 NP 1/2Hip 40 B 2 8/9 9 3/8
Narrow Chest 19 C 5 1/3 9 Narrow Back 18 D 10 1/8 10 5/8
Nape of Neck to Waist18 E 18 1/2 4.69 4.55 4.42Arm Hole Depth 9.625 F 29 1/2 10 Waist to Hip 11
FrontMeasuring Arm Hole Depth Lines P1 P2 P3
AA - 1/4 3.5NP 1/2B 2 8/9 9.585C 5 1/3 9.5D 10 1/8 11.125E 18 1/2 4.69 4.80 4.92F 29 1/2 10.5
Measurements (cm)BACK
Lines P1 P2 P3Chest 108 A 0.0 8.3Waist 95 NP 1.5Hip 102 B 7.8 23.5
Narrow Chest 50 C 14.0 22.5Narrow Back 45 D 26.5 27.0
Nape of Neck to Waist45 E 46.5 11.9 11.7 11.5Arm Hole Depth 25 F 74.5 25.5Waist to Hip 28
FrontMeasuring Arm Hole Depth Lines P1 P2 P3
AA -0.6 9.0NP 1.5B 7.8 22.8C 14.0 25.0D 26.5 28.5E 46.5 11.9 12.4 13.0F 74.5 27.0
Measure down centre back from nape until level of the armpit.
For both front and back waist darts, extend darts along vertical line running through E2 until 2” or 5cm below line D and 5cm above line F.
Measure down centre back from nape until level of the armpit.
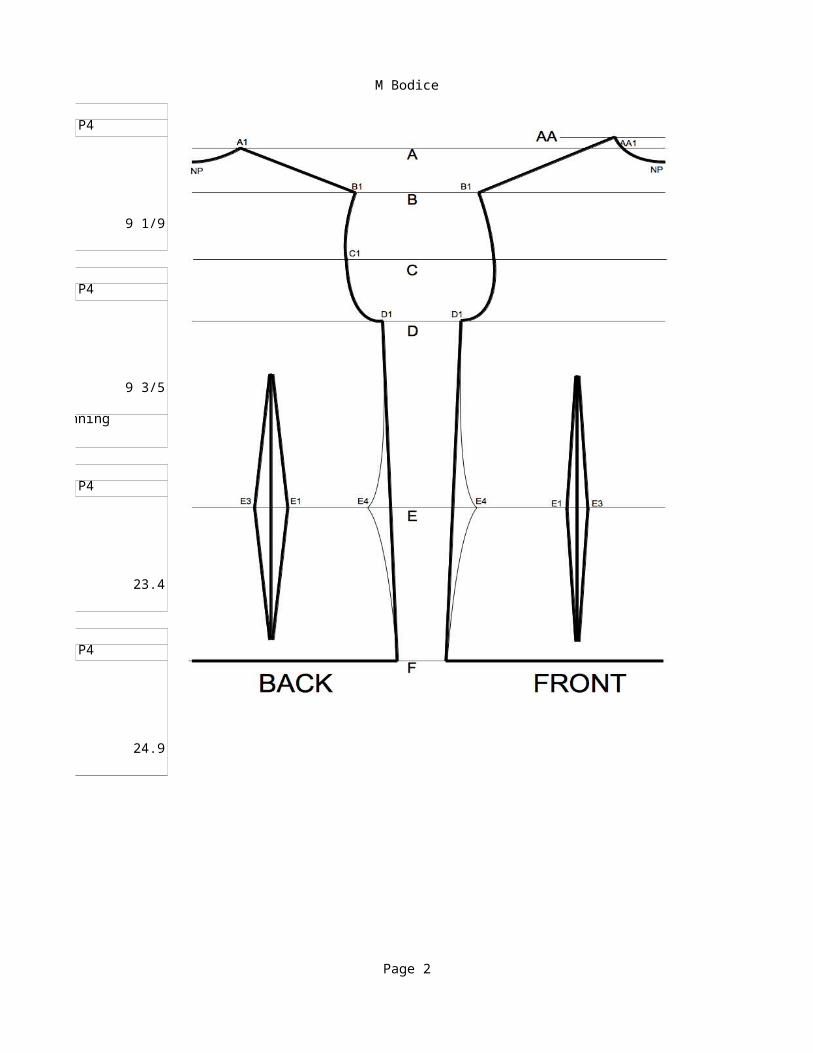
M Bodice
Page 2
BACKP4
9 1/9
FrontP4
9 3/5
BACKP4
23.4
FrontP4
24.9
For both front and back waist darts, extend darts along vertical line running
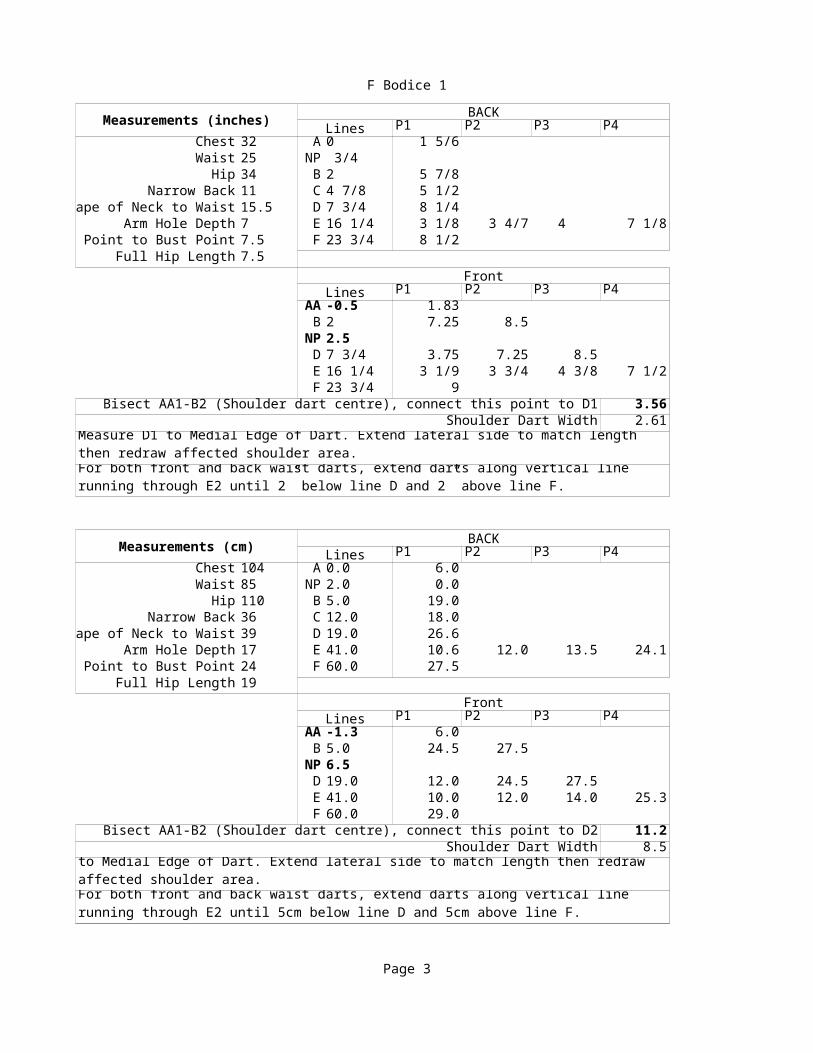
F Bodice 1
Page 3
Measurements (inches) BACKLines P1 P2 P3 P4
Chest 32 A 0 1 5/6Waist 25 NP 3/4
Hip 34 B 2 5 7/8Narrow Back 11 C 4 7/8 5 1/2
ape of Neck to Waist 15.5 D 7 3/4 8 1/4Arm Hole Depth 7 E 16 1/4 3 1/8 3 4/7 4 7 1/8
Point to Bust Point 7.5 F 23 3/4 8 1/2Full Hip Length 7.5
FrontLines P1 P2 P3 P4
AA -0.5 1.83B 2 7.25 8.5NP 2.5D 7 3/4 3.75 7.25 8.5E 16 1/4 3 1/9 3 3/4 4 3/8 7 1/2F 23 3/4 9
Bisect AA1-B2 (Shoulder dart centre), connect this point to D1 3.56Shoulder Dart Width 2.61
Measurements (cm) BACKLines P1 P2 P3 P4
Chest 104 A 0.0 6.0Waist 85 NP 2.0 0.0
Hip 110 B 5.0 19.0Narrow Back 36 C 12.0 18.0
ape of Neck to Waist 39 D 19.0 26.6Arm Hole Depth 17 E 41.0 10.6 12.0 13.5 24.1
Point to Bust Point 24 F 60.0 27.5Full Hip Length 19
FrontLines P1 P2 P3 P4
AA -1.3 6.0B 5.0 24.5 27.5NP 6.5D 19.0 12.0 24.5 27.5E 41.0 10.0 12.0 14.0 25.3F 60.0 29.0
Bisect AA1-B2 (Shoulder dart centre), connect this point to D2 11.2Shoulder Dart Width 8.5
Because of angle, centre side of shoulder dart is longer than lateral. Measure D1 to Medial Edge of Dart. Extend lateral side to match length then redraw affected shoulder area.For both front and back waist darts, extend darts along vertical line running through E2 until 2” below line D and 2” above line F.
Because of angle, centre side of dart is longer than lateral. Measure D2 to Medial Edge of Dart. Extend lateral side to match length then redraw affected shoulder area.For both front and back waist darts, extend darts along vertical line running through E2 until 5cm below line D and 5cm above line F.
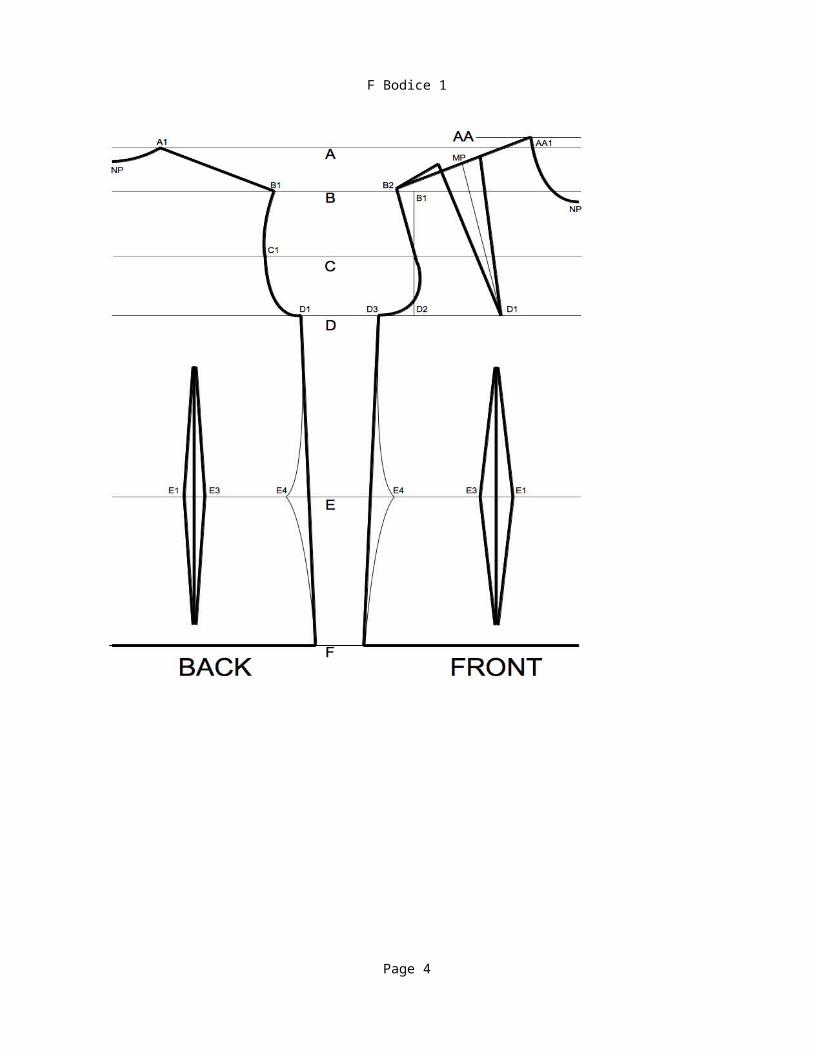
F Bodice 1
Page 4
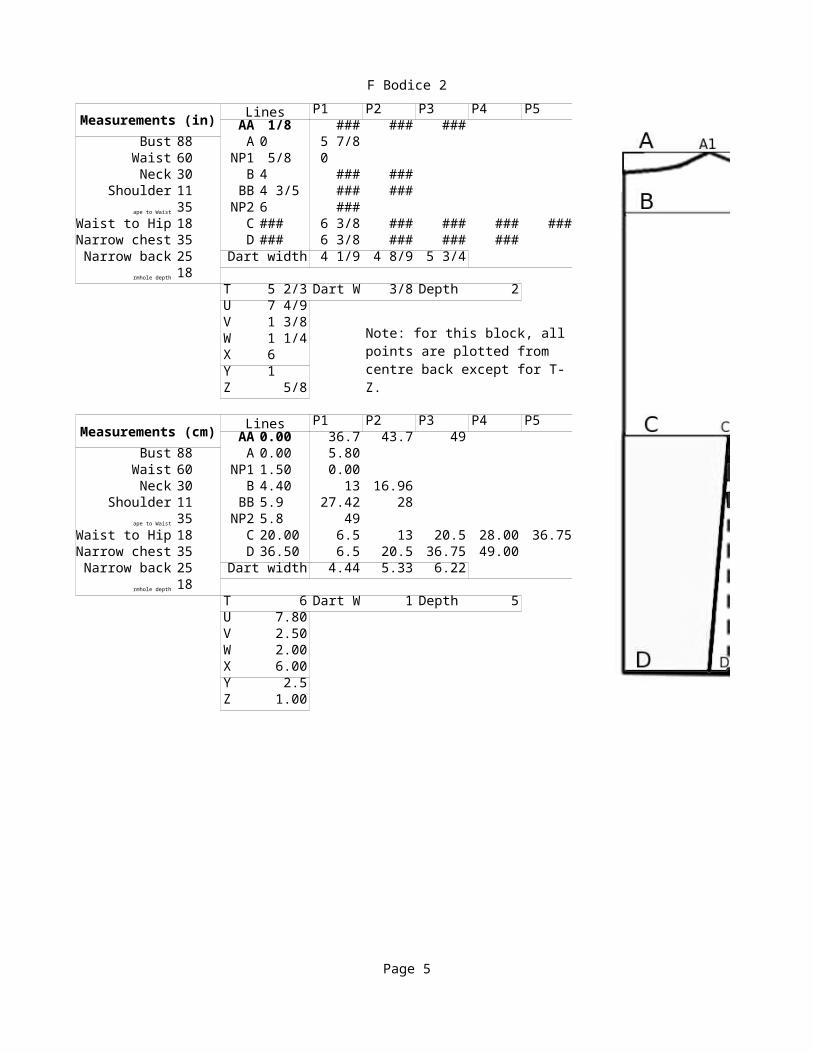
F Bodice 2
Page 5
Measurements (in) Lines P1 P2 P3 P4 P5AA 1/8 ### ### ###
Bust 88 A 0 5 7/8Waist 60 NP1 5/8 0 Neck 30 B 4 ### ###
Shoulder 11 BB 4 3/5 ### ###ape to Waist 35 NP2 6 ###
Waist to Hip 18 C ### 6 3/8 ### ### ### ###Narrow chest 35 D ### 6 3/8 ### ### ###Narrow back 25 Dart width 4 1/9 4 8/9 5 3/4
rmhole depth 18T 5 2/3 Dart W 3/8 Depth 2U 7 4/9V 1 3/8W 1 1/4X 6 Y 1 Z 5/8
Measurements (cm) Lines P1 P2 P3 P4 P5AA 0.00 36.7 43.7 49
Bust 88 A 0.00 5.80Waist 60 NP1 1.50 0.00Neck 30 B 4.40 13 16.96
Shoulder 11 BB 5.9 27.42 28ape to Waist 35 NP2 5.8 49
Waist to Hip 18 C 20.00 6.5 13 20.5 28.00 36.75Narrow chest 35 D 36.50 6.5 20.5 36.75 49.00Narrow back 25 Dart width 4.44 5.33 6.22
rmhole depth 18T 6 Dart W 1 Depth 5U 7.80V 2.50W 2.00X 6.00Y 2.5Z 1.00
Note: for this block, all points are plotted from centre back except for T-Z.
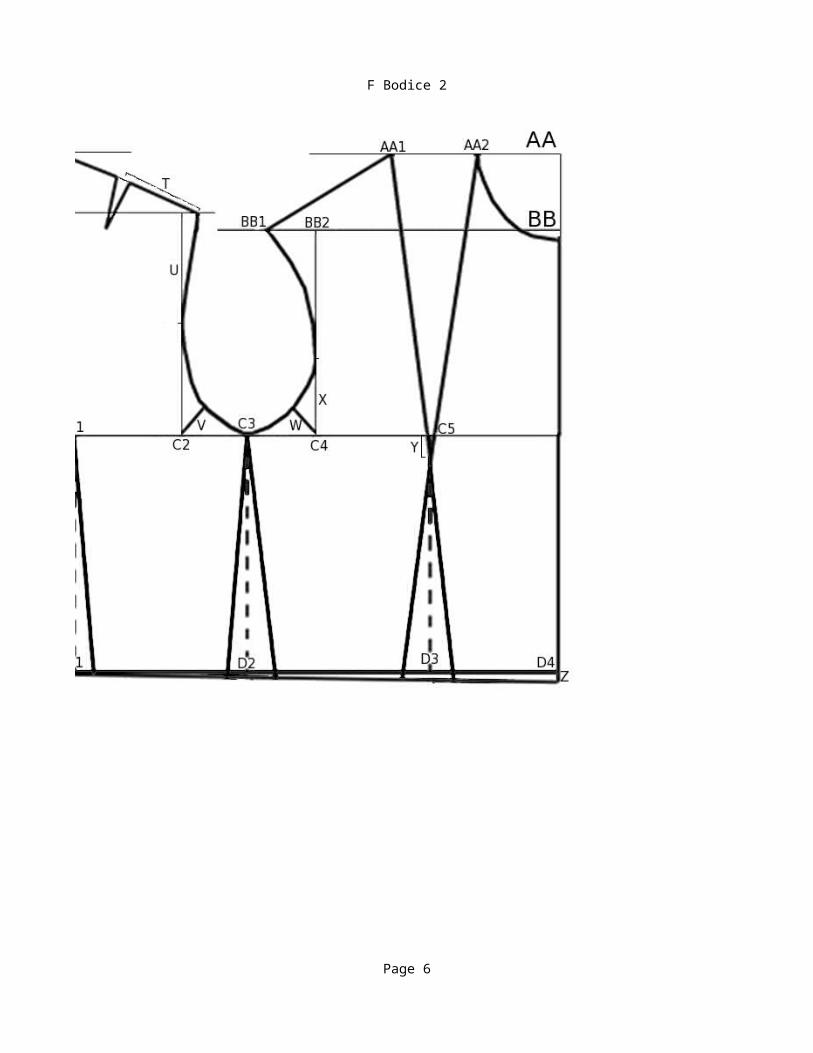
F Bodice 2
Page 6
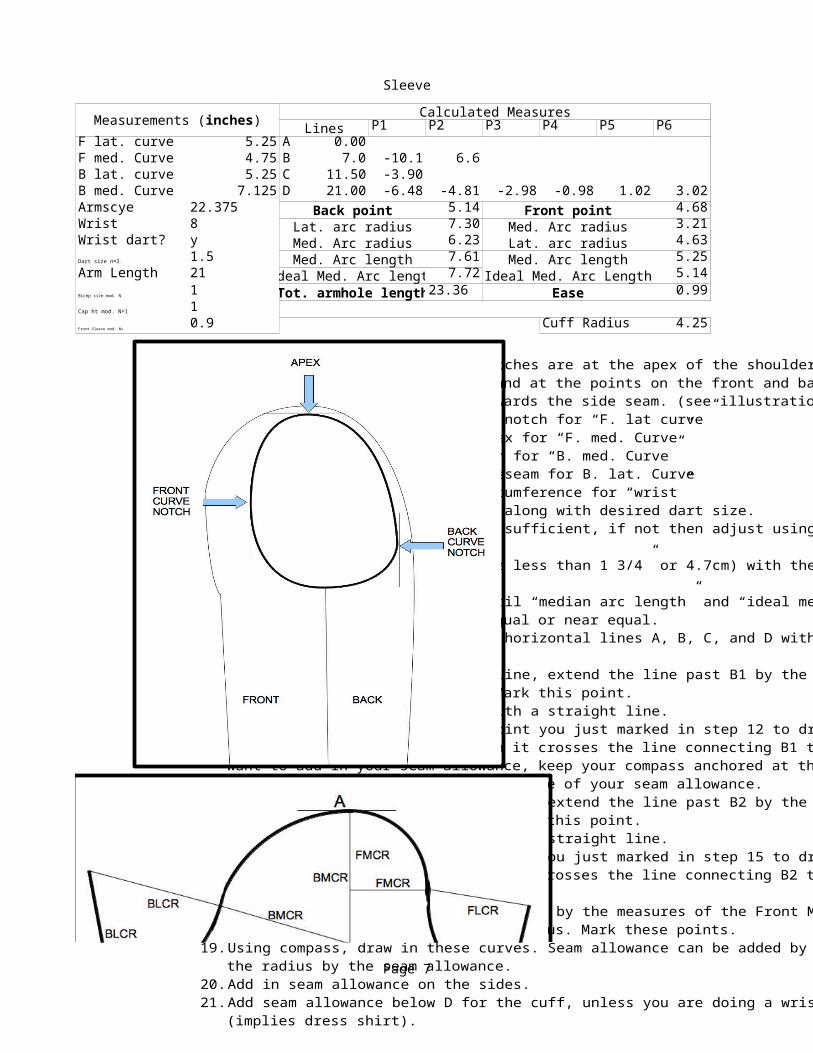
Sleeve
Page 7
Calculated MeasuresLines P1 P2 P3 P4 P5 P6
F lat. curve 5.25 A 0.00F med. Curve 4.75 B 7.0 -10.1 6.6B lat. curve 5.25 C 11.50 -3.90B med. Curve 7.125 D 21.00 -6.48 -4.81 -2.98 -0.98 1.02 3.02Armscye 22.375 Back point 5.14 Front point 4.68Wrist 8 Lat. arc radius 7.30 Med. Arc radius 3.21Wrist dart? y Med. Arc radius 6.23 Lat. arc radius 4.63Dart size n=2. 1.5 Med. Arc length 7.61 Med. Arc length 5.25Arm Length 21 Ideal Med. Arc length 7.72 Ideal Med. Arc Length 5.14Bicep size mod. N 1 Tot. armhole length23.36 Ease 0.99Cap ht mod. N=1 1Front Sleeve mod. N= 0.9 Cuff Radius 4.25
Measurements (inches)
Instructions1. On bodice armscye, make sure notches are at the apex of the shoulder (may not
correspond with shoulder seam) and at the points on the front and back where thearmscye begins to curve back towards the side seam. (see illustration)
2. Measure sideseam to front curve notch for “F. lat curve”3. Measure front curve notch to apex for “F. med. Curve”4. Measure apex to back curve notch for “B. med. Curve”5. Measure back curve notch to sideseam for B. lat. Curve6. Enter desired finished cuff circumference for “wrist”7. Enter “Y” or “N” for wrist dart along with desired dart size.8. Ensure bicep size from B1-B2 is sufficient, if not then adjust using “bicep
size modifier”9. Adjust amount of ease (should be less than 1 3/4” or 4.7cm) with the “Cap ht
mod.”10.Adjust Front Sleeve constant until “median arc length” and “ideal med. Arc
length” on front and back are equal or near equal.11.Draw vertical centre line, then horizontal lines A, B, C, and D with points
plotted on the lines.12.Connect D1 to B1 with straight line, extend the line past B1 by the measure of
the Back Lateral Curve Radius. Mark this point.13.Connect B1 to A at the centre with a straight line.14.Use a compass anchored at the point you just marked in step 12 to draw a curve
starting at B1 and stopping when it crosses the line connecting B1 to A. If you want to add in your seam allowance, keep your compass anchored at the same pointand shorten your radius by the measure of your seam allowance.
15.Connect D6 to B2 with straight line, extend the line past B2 by the measure of the Front Lateral Curve Radius. Mark this point.
16.Connect B2 to A at the centre with a straight line.17.Use a compass anchored at the point you just marked in step 15 to draw a curve
starting at B2 and stopping when it crosses the line connecting B2 to A. Seam allowance can be done as in step 14.
18.Measure down the vertical line from A by the measures of the Front Medial CurveRadius and the Back Medial Curve Radius. Mark these points.
19.Using compass, draw in these curves. Seam allowance can be added by lengtheningthe radius by the seam allowance.
20.Add in seam allowance on the sides.21.Add seam allowance below D for the cuff, unless you are doing a wrist dart
(implies dress shirt).WRIST DART INSTRUCTIONS
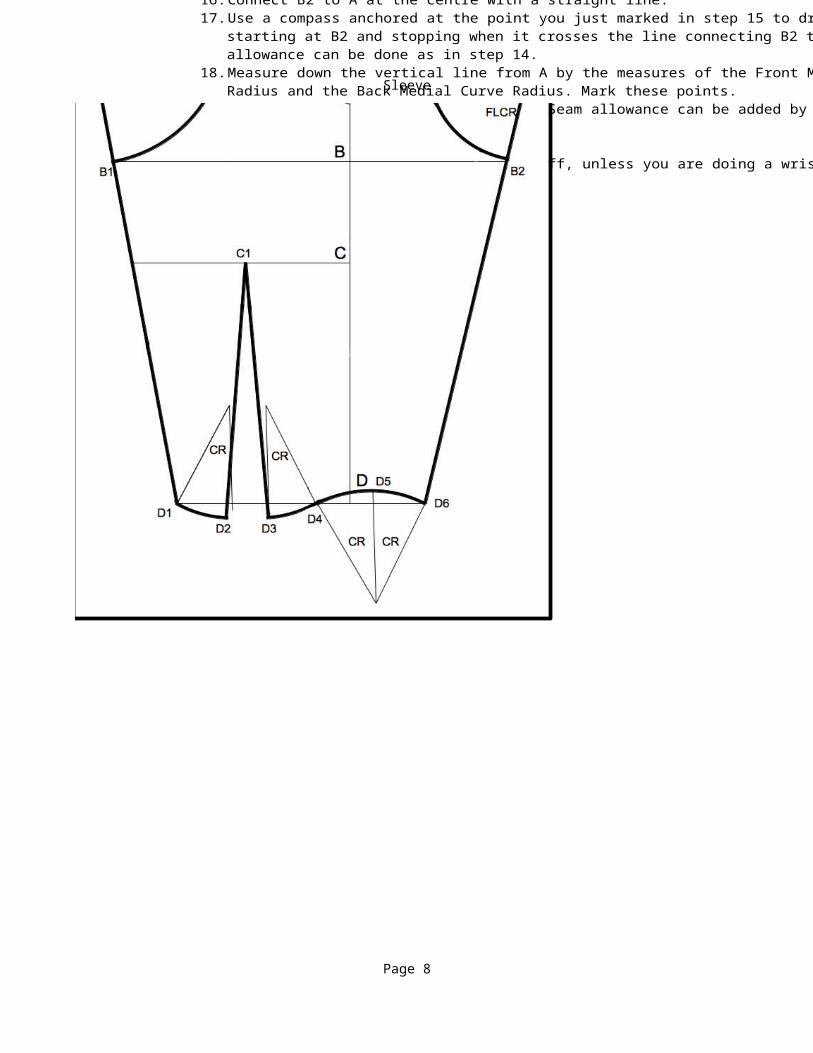
Sleeve
Page 8
Instructions1. On bodice armscye, make sure notches are at the apex of the shoulder (may not
correspond with shoulder seam) and at the points on the front and back where thearmscye begins to curve back towards the side seam. (see illustration)
2. Measure sideseam to front curve notch for “F. lat curve”3. Measure front curve notch to apex for “F. med. Curve”4. Measure apex to back curve notch for “B. med. Curve”5. Measure back curve notch to sideseam for B. lat. Curve6. Enter desired finished cuff circumference for “wrist”7. Enter “Y” or “N” for wrist dart along with desired dart size.8. Ensure bicep size from B1-B2 is sufficient, if not then adjust using “bicep
size modifier”9. Adjust amount of ease (should be less than 1 3/4” or 4.7cm) with the “Cap ht
mod.”10.Adjust Front Sleeve constant until “median arc length” and “ideal med. Arc
length” on front and back are equal or near equal.11.Draw vertical centre line, then horizontal lines A, B, C, and D with points
plotted on the lines.12.Connect D1 to B1 with straight line, extend the line past B1 by the measure of
the Back Lateral Curve Radius. Mark this point.13.Connect B1 to A at the centre with a straight line.14.Use a compass anchored at the point you just marked in step 12 to draw a curve
starting at B1 and stopping when it crosses the line connecting B1 to A. If you want to add in your seam allowance, keep your compass anchored at the same pointand shorten your radius by the measure of your seam allowance.
15.Connect D6 to B2 with straight line, extend the line past B2 by the measure of the Front Lateral Curve Radius. Mark this point.
16.Connect B2 to A at the centre with a straight line.17.Use a compass anchored at the point you just marked in step 15 to draw a curve
starting at B2 and stopping when it crosses the line connecting B2 to A. Seam allowance can be done as in step 14.
18.Measure down the vertical line from A by the measures of the Front Medial CurveRadius and the Back Medial Curve Radius. Mark these points.
19.Using compass, draw in these curves. Seam allowance can be added by lengtheningthe radius by the seam allowance.
20.Add in seam allowance on the sides.21.Add seam allowance below D for the cuff, unless you are doing a wrist dart
(implies dress shirt).WRIST DART INSTRUCTIONS
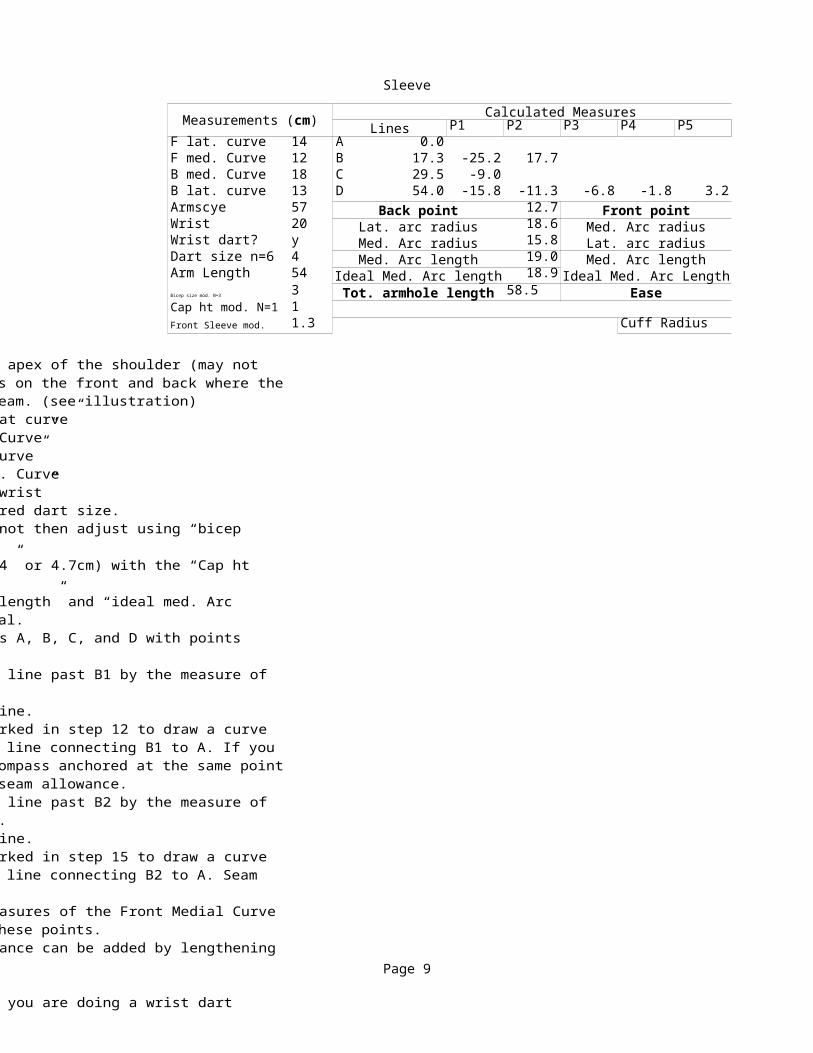
Sleeve
Page 9
Calculated MeasuresLines P1 P2 P3 P4 P5
F lat. curve 14 A 0.0F med. Curve 12 B 17.3 -25.2 17.7B med. Curve 18 C 29.5 -9.0B lat. curve 13 D 54.0 -15.8 -11.3 -6.8 -1.8 3.2Armscye 57 Back point 12.7 Front pointWrist 20 Lat. arc radius 18.6 Med. Arc radiusWrist dart? y Med. Arc radius 15.8 Lat. arc radiusDart size n=6 4 Med. Arc length 19.0 Med. Arc lengthArm Length 54 Ideal Med. Arc length 18.9 Ideal Med. Arc LengthBicep size mod. N=3 3 Tot. armhole length 58.5 EaseCap ht mod. N=1 1Front Sleeve mod. 1.3 Cuff Radius
Measurements (cm)
Instructions1. On bodice armscye, make sure notches are at the apex of the shoulder (may not
correspond with shoulder seam) and at the points on the front and back where thearmscye begins to curve back towards the side seam. (see illustration)
2. Measure sideseam to front curve notch for “F. lat curve”3. Measure front curve notch to apex for “F. med. Curve”4. Measure apex to back curve notch for “B. med. Curve”5. Measure back curve notch to sideseam for B. lat. Curve6. Enter desired finished cuff circumference for “wrist”7. Enter “Y” or “N” for wrist dart along with desired dart size.8. Ensure bicep size from B1-B2 is sufficient, if not then adjust using “bicep
size modifier”9. Adjust amount of ease (should be less than 1 3/4” or 4.7cm) with the “Cap ht
mod.”10.Adjust Front Sleeve constant until “median arc length” and “ideal med. Arc
length” on front and back are equal or near equal.11.Draw vertical centre line, then horizontal lines A, B, C, and D with points
plotted on the lines.12.Connect D1 to B1 with straight line, extend the line past B1 by the measure of
the Back Lateral Curve Radius. Mark this point.13.Connect B1 to A at the centre with a straight line.14.Use a compass anchored at the point you just marked in step 12 to draw a curve
starting at B1 and stopping when it crosses the line connecting B1 to A. If you want to add in your seam allowance, keep your compass anchored at the same pointand shorten your radius by the measure of your seam allowance.
15.Connect D6 to B2 with straight line, extend the line past B2 by the measure of the Front Lateral Curve Radius. Mark this point.
16.Connect B2 to A at the centre with a straight line.17.Use a compass anchored at the point you just marked in step 15 to draw a curve
starting at B2 and stopping when it crosses the line connecting B2 to A. Seam allowance can be done as in step 14.
18.Measure down the vertical line from A by the measures of the Front Medial CurveRadius and the Back Medial Curve Radius. Mark these points.
19.Using compass, draw in these curves. Seam allowance can be added by lengtheningthe radius by the seam allowance.
20.Add in seam allowance on the sides.21.Add seam allowance below D for the cuff, unless you are doing a wrist dart
(implies dress shirt).WRIST DART INSTRUCTIONS

Sleeve
Page 10
Instructions1. On bodice armscye, make sure notches are at the apex of the shoulder (may not
correspond with shoulder seam) and at the points on the front and back where thearmscye begins to curve back towards the side seam. (see illustration)
2. Measure sideseam to front curve notch for “F. lat curve”3. Measure front curve notch to apex for “F. med. Curve”4. Measure apex to back curve notch for “B. med. Curve”5. Measure back curve notch to sideseam for B. lat. Curve6. Enter desired finished cuff circumference for “wrist”7. Enter “Y” or “N” for wrist dart along with desired dart size.8. Ensure bicep size from B1-B2 is sufficient, if not then adjust using “bicep
size modifier”9. Adjust amount of ease (should be less than 1 3/4” or 4.7cm) with the “Cap ht
mod.”10.Adjust Front Sleeve constant until “median arc length” and “ideal med. Arc
length” on front and back are equal or near equal.11.Draw vertical centre line, then horizontal lines A, B, C, and D with points
plotted on the lines.12.Connect D1 to B1 with straight line, extend the line past B1 by the measure of
the Back Lateral Curve Radius. Mark this point.13.Connect B1 to A at the centre with a straight line.14.Use a compass anchored at the point you just marked in step 12 to draw a curve
starting at B1 and stopping when it crosses the line connecting B1 to A. If you want to add in your seam allowance, keep your compass anchored at the same pointand shorten your radius by the measure of your seam allowance.
15.Connect D6 to B2 with straight line, extend the line past B2 by the measure of the Front Lateral Curve Radius. Mark this point.
16.Connect B2 to A at the centre with a straight line.17.Use a compass anchored at the point you just marked in step 15 to draw a curve
starting at B2 and stopping when it crosses the line connecting B2 to A. Seam allowance can be done as in step 14.
18.Measure down the vertical line from A by the measures of the Front Medial CurveRadius and the Back Medial Curve Radius. Mark these points.
19.Using compass, draw in these curves. Seam allowance can be added by lengtheningthe radius by the seam allowance.
20.Add in seam allowance on the sides.21.Add seam allowance below D for the cuff, unless you are doing a wrist dart
(implies dress shirt).WRIST DART INSTRUCTIONS

Sleeve
Page 11
Calculated MeasuresP6
8.211.48.1
13.412.612.61.5
13.0Instructions1. On bodice armscye, make sure notches are at the apex of the shoulder (may not
correspond with shoulder seam) and at the points on the front and back where thearmscye begins to curve back towards the side seam. (see illustration)
2. Measure sideseam to front curve notch for “F. lat curve”3. Measure front curve notch to apex for “F. med. Curve”4. Measure apex to back curve notch for “B. med. Curve”5. Measure back curve notch to sideseam for B. lat. Curve6. Enter desired finished cuff circumference for “wrist”7. Enter “Y” or “N” for wrist dart along with desired dart size.8. Ensure bicep size from B1-B2 is sufficient, if not then adjust using “bicep
size modifier”9. Adjust amount of ease (should be less than 1 3/4” or 4.7cm) with the “Cap ht
mod.”10.Adjust Front Sleeve constant until “median arc length” and “ideal med. Arc
length” on front and back are equal or near equal.11.Draw vertical centre line, then horizontal lines A, B, C, and D with points
plotted on the lines.12.Connect D1 to B1 with straight line, extend the line past B1 by the measure of
the Back Lateral Curve Radius. Mark this point.13.Connect B1 to A at the centre with a straight line.14.Use a compass anchored at the point you just marked in step 12 to draw a curve
starting at B1 and stopping when it crosses the line connecting B1 to A. If you want to add in your seam allowance, keep your compass anchored at the same pointand shorten your radius by the measure of your seam allowance.
15.Connect D6 to B2 with straight line, extend the line past B2 by the measure of the Front Lateral Curve Radius. Mark this point.
16.Connect B2 to A at the centre with a straight line.17.Use a compass anchored at the point you just marked in step 15 to draw a curve
starting at B2 and stopping when it crosses the line connecting B2 to A. Seam allowance can be done as in step 14.
18.Measure down the vertical line from A by the measures of the Front Medial CurveRadius and the Back Medial Curve Radius. Mark these points.
19.Using compass, draw in these curves. Seam allowance can be added by lengtheningthe radius by the seam allowance.
20.Add in seam allowance on the sides.21.Add seam allowance below D for the cuff, unless you are doing a wrist dart
(implies dress shirt).WRIST DART INSTRUCTIONS

Sleeve
Page 12
Instructions1. On bodice armscye, make sure notches are at the apex of the shoulder (may not
correspond with shoulder seam) and at the points on the front and back where thearmscye begins to curve back towards the side seam. (see illustration)
2. Measure sideseam to front curve notch for “F. lat curve”3. Measure front curve notch to apex for “F. med. Curve”4. Measure apex to back curve notch for “B. med. Curve”5. Measure back curve notch to sideseam for B. lat. Curve6. Enter desired finished cuff circumference for “wrist”7. Enter “Y” or “N” for wrist dart along with desired dart size.8. Ensure bicep size from B1-B2 is sufficient, if not then adjust using “bicep
size modifier”9. Adjust amount of ease (should be less than 1 3/4” or 4.7cm) with the “Cap ht
mod.”10.Adjust Front Sleeve constant until “median arc length” and “ideal med. Arc
length” on front and back are equal or near equal.11.Draw vertical centre line, then horizontal lines A, B, C, and D with points
plotted on the lines.12.Connect D1 to B1 with straight line, extend the line past B1 by the measure of
the Back Lateral Curve Radius. Mark this point.13.Connect B1 to A at the centre with a straight line.14.Use a compass anchored at the point you just marked in step 12 to draw a curve
starting at B1 and stopping when it crosses the line connecting B1 to A. If you want to add in your seam allowance, keep your compass anchored at the same pointand shorten your radius by the measure of your seam allowance.
15.Connect D6 to B2 with straight line, extend the line past B2 by the measure of the Front Lateral Curve Radius. Mark this point.
16.Connect B2 to A at the centre with a straight line.17.Use a compass anchored at the point you just marked in step 15 to draw a curve
starting at B2 and stopping when it crosses the line connecting B2 to A. Seam allowance can be done as in step 14.
18.Measure down the vertical line from A by the measures of the Front Medial CurveRadius and the Back Medial Curve Radius. Mark these points.
19.Using compass, draw in these curves. Seam allowance can be added by lengtheningthe radius by the seam allowance.
20.Add in seam allowance on the sides.21.Add seam allowance below D for the cuff, unless you are doing a wrist dart
(implies dress shirt).WRIST DART INSTRUCTIONS
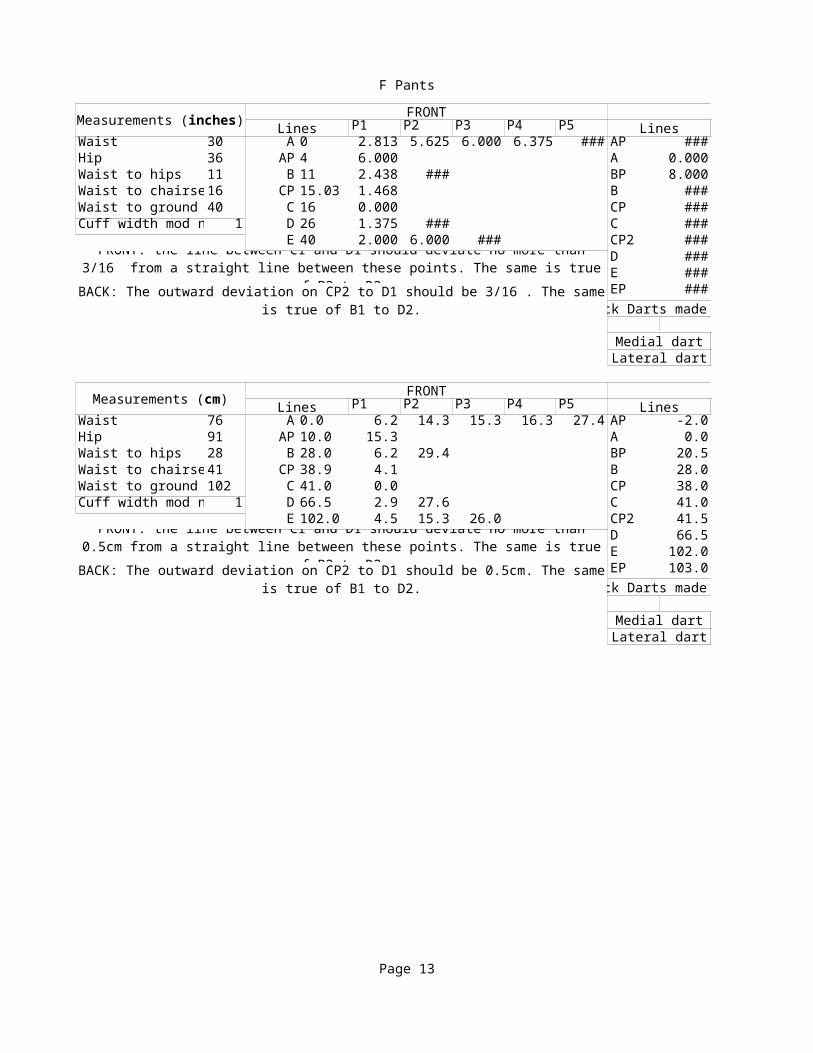
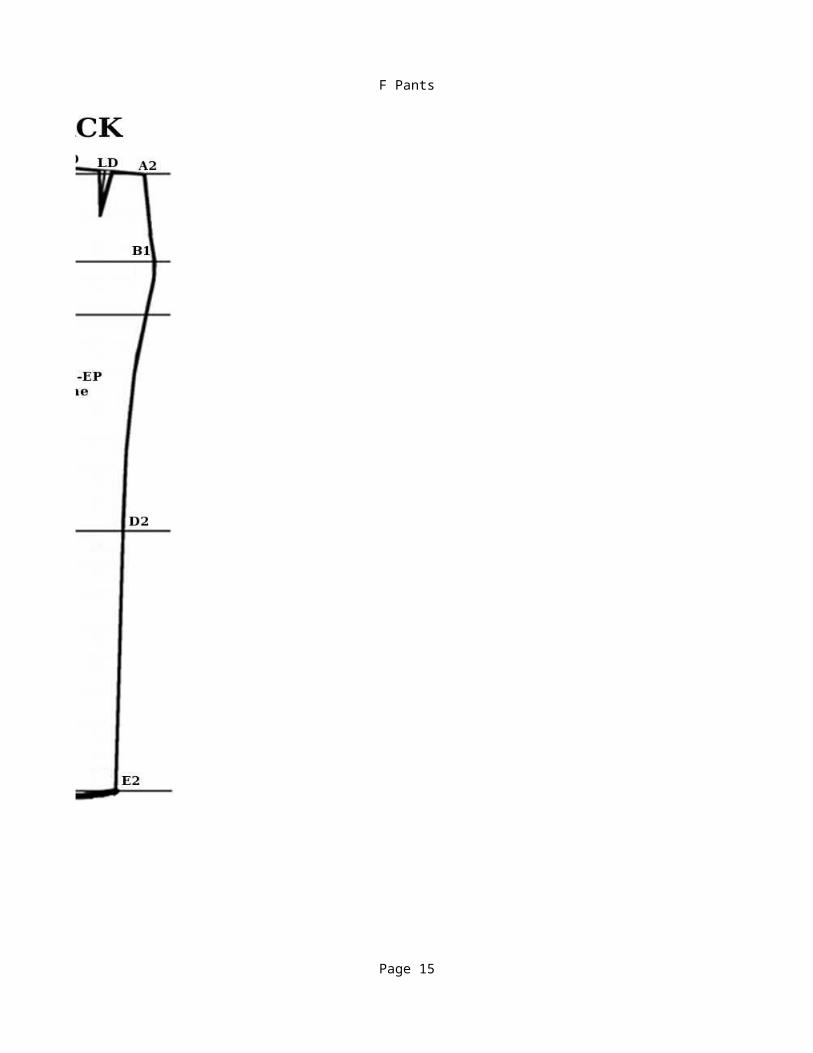
F Pants
Page 13
FRONT BACKLines P1 P2 P3 P4 P5 Lines
Waist 30 A 0 2.813 5.625 6.000 6.375 ### AP ###Hip 36 AP 4 6.000 A 0.000Waist to hips 11 B 11 2.438 ### BP 8.000Waist to chairse16 CP 15.03 1.468 B ###Waist to ground 40 C 16 0.000 CP ###Cuff width mod n 1 D 26 1.375 ### C ###
E 40 2.000 6.000 ### CP2 ###D ###E ###EP ###
Back Darts made perpendicular to AP-A2 line.
Medial dartLateral dart
FRONT BACKLines P1 P2 P3 P4 P5 Lines
Waist 76 A 0.0 6.2 14.3 15.3 16.3 27.4 AP -2.0Hip 91 AP 10.0 15.3 A 0.0Waist to hips 28 B 28.0 6.2 29.4 BP 20.5Waist to chairse41 CP 38.9 4.1 B 28.0Waist to ground 102 C 41.0 0.0 CP 38.0Cuff width mod n 1 D 66.5 2.9 27.6 C 41.0
E 102.0 4.5 15.3 26.0 CP2 41.5D 66.5E 102.0EP 103.0
Back Darts made perpendicular to AP-A2 line.
Medial dartLateral dart
Measurements (inches)
FRONT: the line between C1 and D1 should deviate no more than 3/16” from a straight line between these points. The same is true
of B2 to D2.BACK: The outward deviation on CP2 to D1 should be 3/16”. The same is true of B1 to D2.
Measurements (cm)
FRONT: the line between C1 and D1 should deviate no more than 0.5cm from a straight line between these points. The same is true
of B2 to D2.BACK: The outward deviation on CP2 to D1 should be 0.5cm. The same is true of B1 to D2.
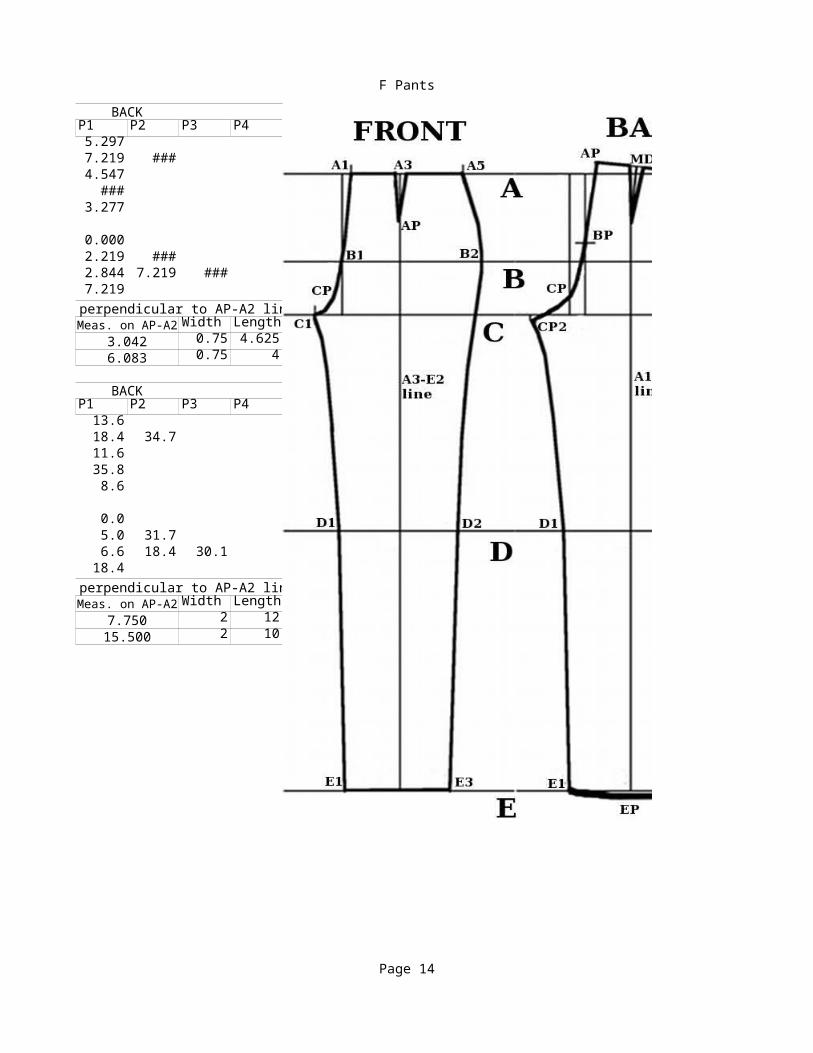
F Pants
Page 14
BACKP1 P2 P3 P45.2977.219 ###4.547###
3.277
0.0002.219 ###2.844 7.219 ###7.219
Back Darts made perpendicular to AP-A2 line.Meas. on AP-A2 Width Length
3.042 0.75 4.6256.083 0.75 4
BACKP1 P2 P3 P413.618.4 34.711.635.88.6
0.05.0 31.76.6 18.4 30.1
18.4Back Darts made perpendicular to AP-A2 line.
Meas. on AP-A2 Width Length7.750 2 1215.500 2 10
F Pants
Page 15
Related Documents


