Cricut Explore Manual Design Space Glossary Page 1 Grid On/Off button Top menu Panel menu Side menu

Welcome message from author
This document is posted to help you gain knowledge. Please leave a comment to let me know what you think about it! Share it to your friends and learn new things together.
Transcript

Cricut Explore ManualDesign Space Glossary
Page 1
Grid On/O� button Top menu Panel menu
Side menu
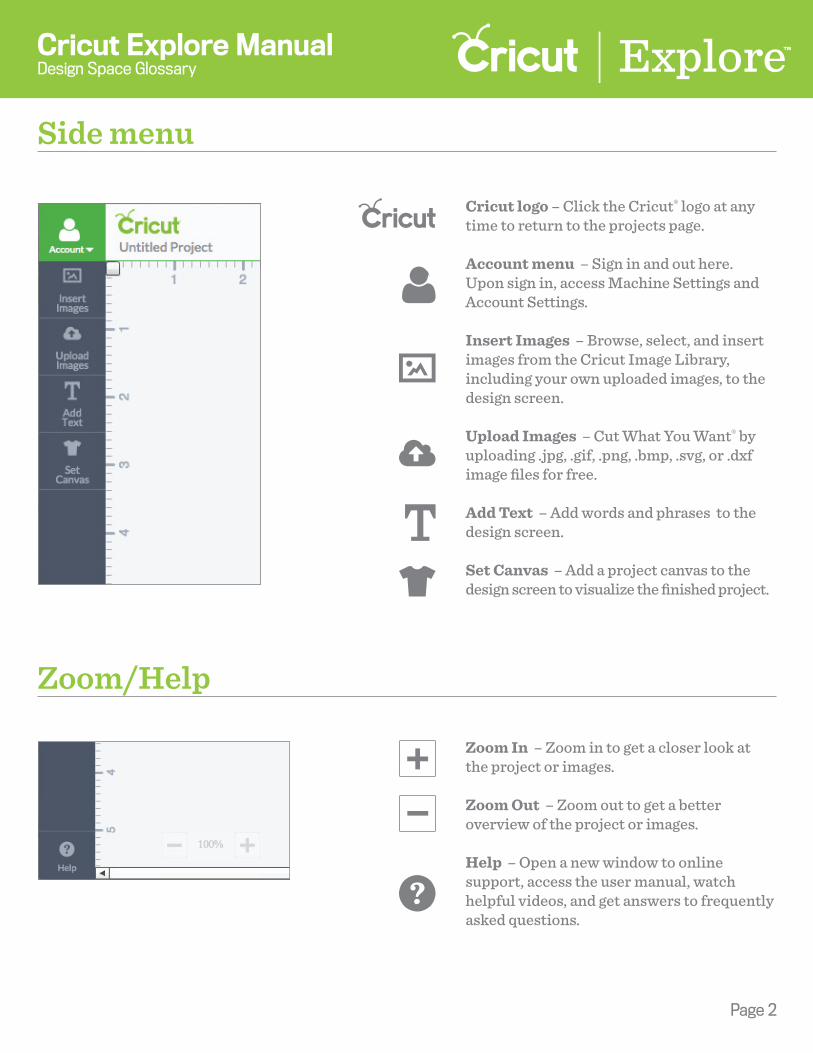
Cricut logo – Click the Cricut® logo at any time to return to the projects page.
Account menu – Sign in and out here. Upon sign in, access Machine Settings and Account Settings.
Insert Images – Browse, select, and insert images from the Cricut Image Library, including your own uploaded images, to the design screen.
Upload Images – Cut What You Want® by uploading .jpg, .gif, .png, .bmp, .svg, or .dxf image files for free.
Add Text – Add words and phrases to the design screen.
Set Canvas – Add a project canvas to the design screen to visualize the finished project.
Side menu
Zoom/Help
Zoom In – Zoom in to get a closer look at the project or images.
Zoom Out – Zoom out to get a better overview of the project or images.
Help – Open a new window to online support, access the user manual, watch helpful videos, and get answers to frequently asked questions.
Page 2
Cricut Explore ManualDesign Space Glossary
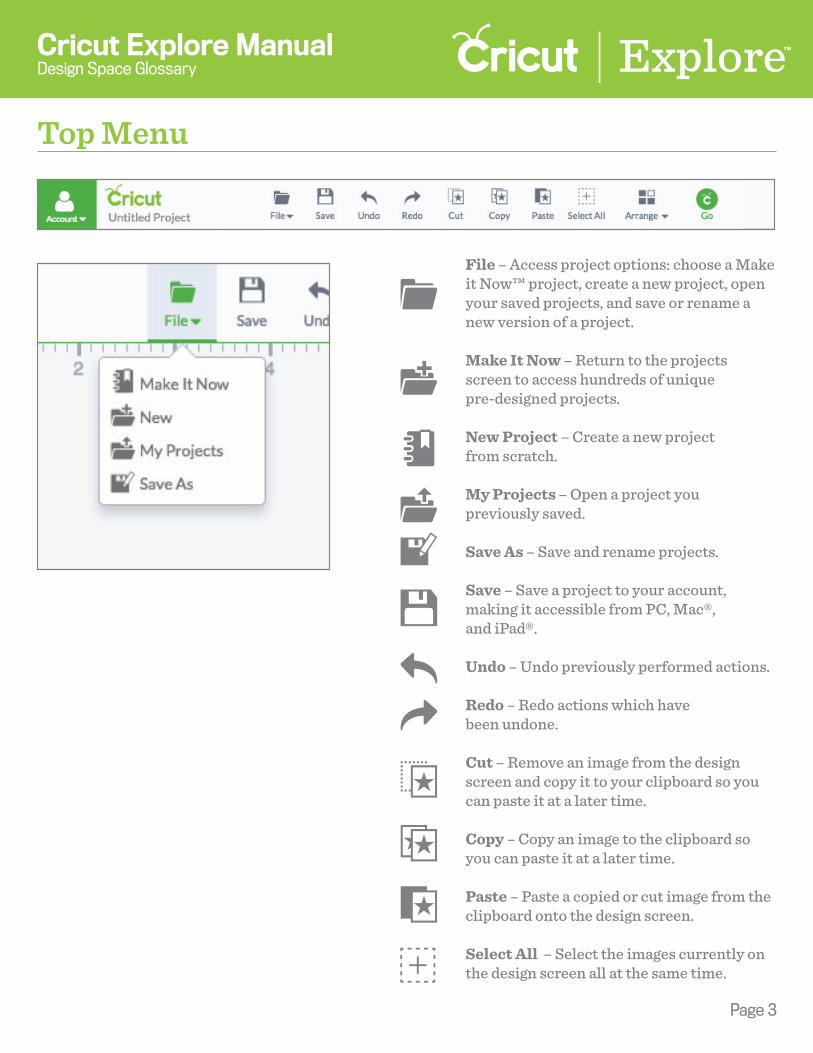
File – Access project options: choose a Make it Now™ project, create a new project, open your saved projects, and save or rename a new version of a project.
Make It Now – Return to the projects screen to access hundreds of unique pre-designed projects.
New Project – Create a new project from scratch.
My Projects – Open a project you previously saved.
Save As – Save and rename projects.
Save – Save a project to your account, making it accessible from PC, Mac®, and iPad®.
Undo – Undo previously performed actions.
Redo – Redo actions which have been undone.
Cut – Remove an image from the design screen and copy it to your clipboard so you can paste it at a later time.
Copy – Copy an image to the clipboard so you can paste it at a later time.
Paste – Paste a copied or cut image from the clipboard onto the design screen.
Select All – Select the images currently on the design screen all at the same time.
Top Menu
Page 3
Cricut Explore ManualDesign Space Glossary

Arrange – Change the order in which layers and images appear on the design screen, including send backward, bring forward, send to back and bring to front. Changes will be reflected in the Layers panel.
Move Backward – Move the selected image or layer one layer backward in stacking order.
Move Forward – Move the selected image or layer one layer forward in stacking order.
Move to Back – Send the selected image or layer to the back of the stacking order.
Move to Front – Bring the selected image or layer to the front of the stacking order.
Go – Proceed to the mat preview window to begin the cutting process.
Layers panel –Access image features such as: slice, weld, attach, flatten and contour. Also make changes to image layers such as: group, ungroup, duplicate, delete, define line type, and layer color
Edit panel – Make changes to selected text, images, or layers. Edits include size, rotate, mirror, and position. For text, you can also change the font, alignment, letter spacing, and line spacing.
Top Menu (continued)
Page 4
Cricut Explore ManualDesign Space Glossary
Panel Menu
Edit
Layers

Sync panel – Use the Sync panel to sync up layer colors to reduce the number of mats in your project.
Canvas panel – Add a project canvas to the design screen to help you visualize your final project. Define project canvas type, size, and color.
Panel Menu (continued)
Edit Panel, Images & Fonts
Page 5
Cricut Explore ManualDesign Space Glossary
Sync
Canvas
X
Y
Lock – Lock the aspect ratio so image size changes in proportion.
Unlock – Unlock the aspect ratio so you can stretch horizontally or vertically without keeping proportions the same.
Rotate – Adjust the angle of rotation of the selected object.
Mirror Horizontal – Flip an image horizontally.
Mirror Vertical – Flip an image vertically.
Horizontal Position – Position an image horizontally from the top left corner of the design screen to the top left corner of the image bounding box.
Vertical Position – Position an image vertically from the top left corner of the design screen to the top left corner of the image bounding box.

Font Filter Menu – Filter the fonts by category to change which fonts appear in the font type menu.
• All Fonts –Display all fonts available for use.
• System Fonts – Display fonts found on your computer.
• Cricut® Fonts – Display fonts from the Cricut® library.
• Single Layer Fonts – Display fonts that only contain one layer.
• Writing Style Fonts – Display fonts specifically designed to be written with a pen. While most fonts will trace the outside of the letters, writing style fonts feature letters with single strokes to make them similar to handwritten text.
Font Type Menu – Displays fonts based on the chosen font filters. Scroll through fonts for di�erent choices; click on a font to apply to the selected text.
Font Style – Choose the font style, regular, bold, italic, bold italic and (when available) writing style. System font styles may di�er from Cricut font styles.
Align Left – Align text along the left side of the text box.
Align Center – Align text in the center of the text box.
Align Right – Align text along the right side of the text box.
Edit Panel, Fonts
Page 6
Cricut Explore ManualDesign Space Glossary

Isolate Letters – Ungroup letters in a text box so that each letter grouped with its layers shows up in the Layers panel as an image. You can now move and resize each letter independently, keeping each letter’s layers grouped together.
Distribute Letters to Layers – Ungroup multi-layered text so that each layer group shows in the Layers panel as an image. Letters will remain grouped together allowing you to edit each layer independently. Text will be convert to an image.
Letter Spacing – Adjust the space of each letter within a text box.
Line Spacing – Adjust the space between each line within a text box.
Slice – Split two overlapping layers into separate parts.
Weld – Join multiple layers together to create one shape, removing any overlapping cut lines.
Attach – Hold your cuts in position so that images on the cutting mat will appear exactly as they show up on the design screen. Attach can also fasten a draw or score layer to a cut layer to tell the machine on which image layer text or score line should be placed.
Detach – Separate attached layers so they are no longer connected and will cut or draw independently from all other layers.
Flatten – Turn any image into a printable image, merging all selected layers into a single layer.
Unflatten – Separate layers from a single printable image into individual printable layers.
Edit Panel, Fonts (Continued)
Layers Panel
Page 7
Cricut Explore ManualDesign Space Glossary
Contour – Hide or unhide contour lines or cut paths on a layer.
Cut – Set the layer to cut.
Write – Set the layer to write.
Score – Set the layer to score.
Print – Turn a layer into a printable image which will be printed on a printer and then cut on the Cricut® machine. Use flatten to make the entire image print as a object.
Hidden Layer – Layer is hidden from view on the design screen. Click to unhide layer. Hidden layers will not cut, print, write, or score.
Visible layer – Layer is visible on the design screen.
Group – Group multiple layers, images, or text together so they move and size together while working with them on the design screen (will not a�ect how images are laid out on the cutting mats).
Ungroup – Ungroup a set of layers, images, or text so they move and size independently from one another on the design screen (will not a�ect how images are laid out on the cutting mats). Ungrouping text allows you to move and resize each layer of text independently, but keeps the letters grouped together.
Duplicate – Copy and paste an image in one step to create multiples of the same image.
Delete – Remove selected item from the design screen.
Edit Panel, Fonts (Continued)
Page 8
Cricut Explore ManualDesign Space Glossary

Page 9
Cricut Explore ManualDesign Space Glossary
Sync panel – Consolidate colors of a project in order to reduce the number of di�erent materials you plan to use. Sync by dragging an image layer and dropping it on another layer whose color you want to match.
Sync Panel
Page 10
Cricut Explore ManualDesign Space Glossary
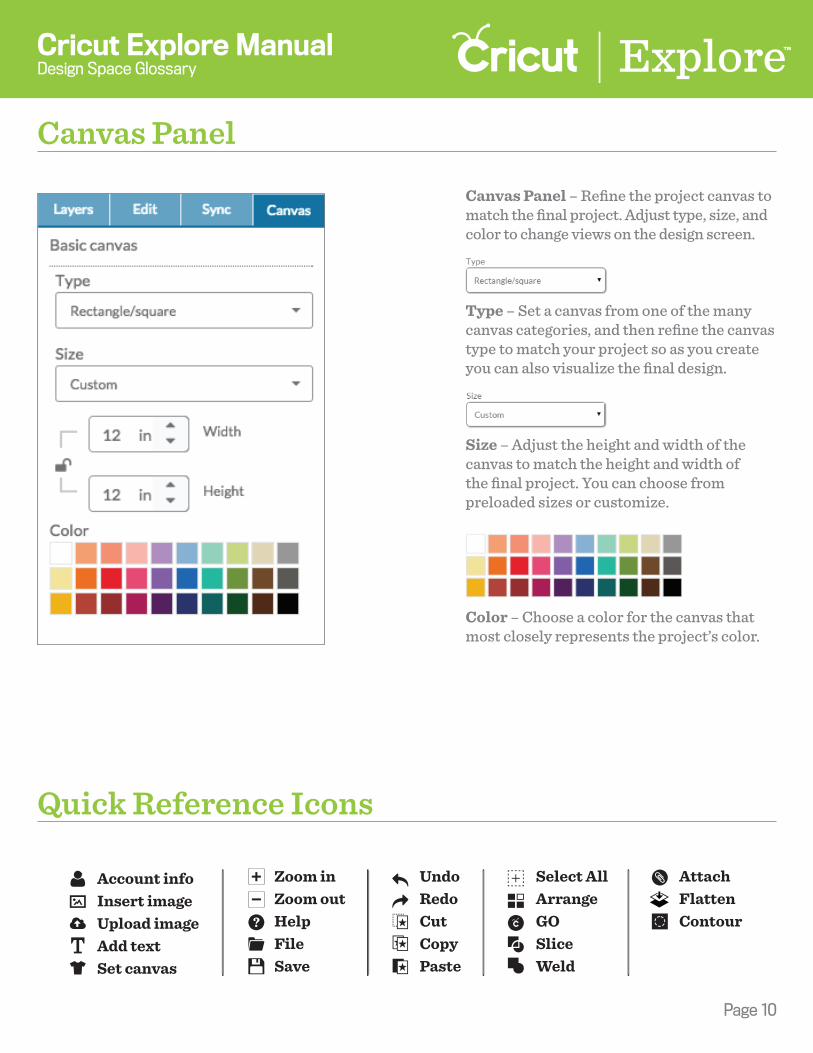
Canvas Panel – Refine the project canvas to match the final project. Adjust type, size, and color to change views on the design screen.
Type – Set a canvas from one of the many canvas categories, and then refine the canvas type to match your project so as you create you can also visualize the final design.
Size – Adjust the height and width of the canvas to match the height and width of the final project. You can choose from preloaded sizes or customize.
Color – Choose a color for the canvas that most closely represents the project’s color.
Account infoInsert imageUpload imageAdd textSet canvas
Canvas Panel
Quick Reference Icons
Zoom inZoom outHelpFileSave
UndoRedoCutCopyPaste
Select AllArrangeGOSliceWeld
AttachFlattenContour
Related Documents