Creating Greeting Cards with LibreOffice Writer Creating Greeting Cards with LibreOffice Writer Introduction Introduction If you want to create your own greeting cards, but you do not want to spend money on special software, you are in luck. It turns out that with just a little effort you can use LibreOffice Writer to create custom greeting cards. The instructions in this document were created using LibreOffice Writer 7.2. The following instructions are for creating a four page greeting card by folding an 8 ½ by 11 sheet of paper in half twice. Most office supply stores in the USA carry envelopes that are designed to fit this size card. Look for envelopes that are 4 3/8 by 5 3/4 inches. (If you are outside the USA, adjust measurements as required.) Plan Ahead Plan Ahead The first step is to determine the relative orientation of the four pages of your greeting card. (This example uses a portrait layout card. Landscape layout could also be used.) Take a piece of paper and fold it twice. For the vertical por- trait format book fold card in this project, the sheet must be folded in half twice as shown. ✔ First, fold the sheet in half along a horizontal line (with the sheet in portrait mode).; then fold the sheet a second time. ✔ When you have folded the sheet, write the names of the four pages of the final card on each page (see Figure-1). When you unfold the sheet you will see how the four pages have to be arranged. ✔ Open a new LibreOffice Writer document. ✔ Select File, Save As, adjust the Save As folder as required, and enter a file Name for your greeting card. Page 1 Figure-1, A greeting card layout page. Figure-2, New greeting card document.

Welcome message from author
This document is posted to help you gain knowledge. Please leave a comment to let me know what you think about it! Share it to your friends and learn new things together.
Transcript
Creating Greeting Cards with LibreOffice WriterCreating Greeting Cards with LibreOffice Writer
IntroductionIntroduction
If you want to create your own greeting cards, but you do not want to spend money on special software, you are in luck. It turns out that with just a little effort you can use LibreOffice Writer to create custom greeting cards.
The instructions in this document were created using LibreOffice Writer 7.2.
The following instructions are for creating a four page greeting card by folding an 8 ½ by 11 sheet of paper in half twice. Most office supply stores in theUSA carry envelopes that are designed to fit this size card.Look for envelopes that are 4 3/8 by 5 3/4 inches. (If you areoutside the USA, adjust measurements as required.)
Plan AheadPlan Ahead
The first step is to determine the relative orientation ofthe four pages of your greeting card. (This example uses aportrait layout card. Landscape layout could also be used.)Take a piece of paper and fold it twice. For the vertical por-trait format book fold card in this project, the sheet must befolded in half twice as shown.
✔ First, fold the sheet in half along a horizontal line (withthe sheet in portrait mode).; then fold the sheet asecond time.
✔ When you have folded the sheet, write the names ofthe four pages of the final card on each page (seeFigure-1).
When you unfoldthe sheet you will seehow the four pageshave to be arranged.
✔ Open a newLibreOfficeWriterdocument.
✔ Select File, SaveAs, adjust the Save As folderas required, andenter a file Name for yourgreeting card.
Page 1
Figure-1, A greeting card layout page.
Figure-2, New greeting card document.

Creating Greeting Cards with LibreOffice Writer
The LibreOffice Writer display is shown in Figure-2.
✔ If the Sidebar is not shown, from the Menubar select View, Sidebar. ✔ In the Sidebar, select the Styles option (1).✔ If there are any Custom Paragraph or Page Styles shown in the Custom Styles list, delete
them (2).✔ If the Drawing Toolbar is not shown, from the Menubar select View, Toolbars, Drawing
(3,4).
We will create acustom Page Style forour cards.
✔ In the SidebarStyles andFormattingoption, selectthe PageStylesoption(1).
✔ With the Customlist on thedisplay, rightclick in thestyles list andselect New.
✔ In the PageStyle dialog boxOrganizer TAB,enter My Card Page for the Name and Next style.
✔ In the Page TAB, enter 0.50 for all four margins (2).✔ Make sure Headers and Footers are off(3). Then, select OK to close the dialog box.✔ In the Styles, Page Styles sidebar, double click on the My Card Page entry.
Setting the card page margins to 0.5 will make it easier to calculate precise locations for the dif-ferent objects placed in the front and back areas of the card.
Page 2
Figure-3, Creating a Page Style.
Creating A Card Layout
Creating A Card LayoutCreating A Card Layout
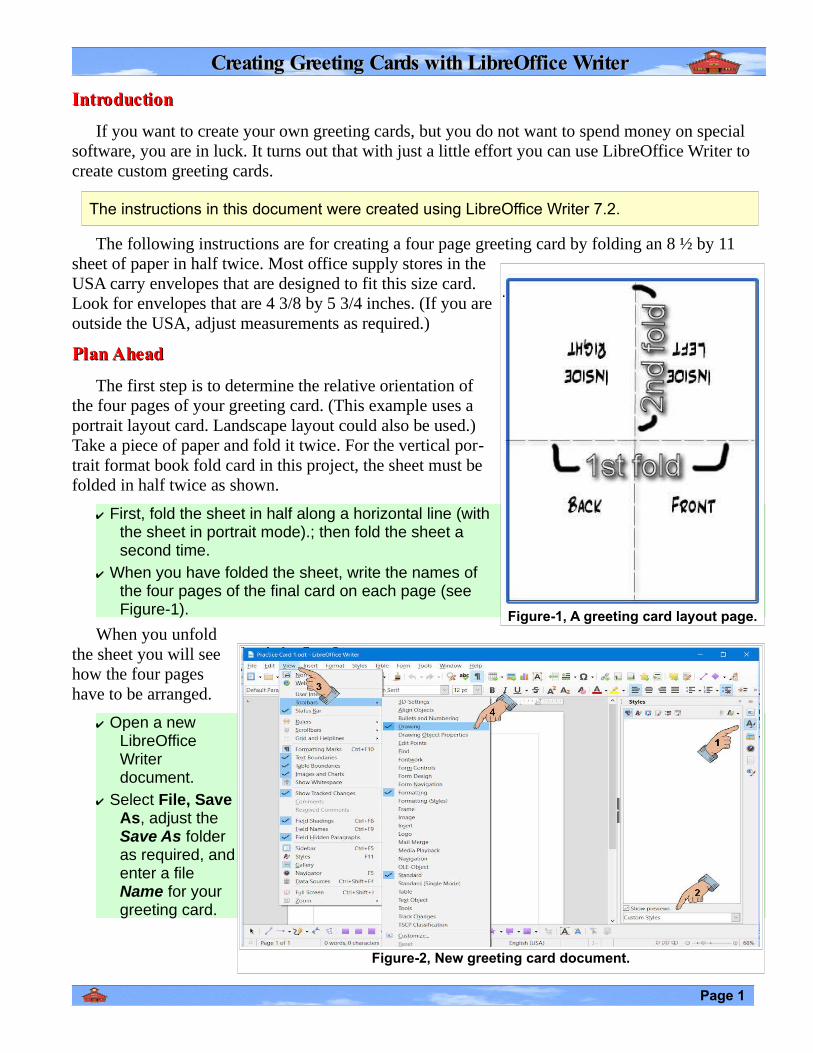
Making the four sections of the card fit the page nicely after it isprinted and folded is a bit tricky. In the next section, we will create acard layout document with rectangles that can be used as guides toproperly locate objects on the different parts of the card. These rec-tangles can easily be deleted when the card design is finished.
Drag a drawing object means click at the a corner of the object,hold the left mouse button down and drag the mouse cursor tothe opposite corner of the object. The Drag function works thesame on any Drawing object.
✔ From the Drawing Tool Bar, select the Rectangle tool.✔ Drag a rectangle from the upper left margin down and to the
right a couple of inches.
Don’t worry about the size. We will set it precisely in the nextstep.
✔ Right click on the rectangle and select the Position and Size option from the context menu.✔ In the Position and Size dialog box, enter a width of 3.25, and a Height of 4.5.✔ Set the Anchor to To Page.✔ Set the Horizontal and Vertical positions to 0.50 from the left and top of the page; then
select OK to close the dialog box.✔ In the Sidebar, Select the Properties option, then adjust the Transparency to 90%.
Increasing the Transparency willsave printer ink or toner. Now weneed three more rectangle. The copyand paste trick will help.
✔ Right click on the rectangle,then select Copy.
✔ Click away from the rectangle, right click, and select Paste.
You should memorize the short-cuts for Copy [Ctrl+C] and Paste[Ctrl+V].
The copy of the rectangle will besuperimposed on the original. Youcan right click on the copy,select the position and sizeoption, and adjust the position of the copy.
Page 3
Figure 4, Adding a rectangle.
Figure-3, Greeting a cardlayout.
Creating Greeting Cards with LibreOffice Writer
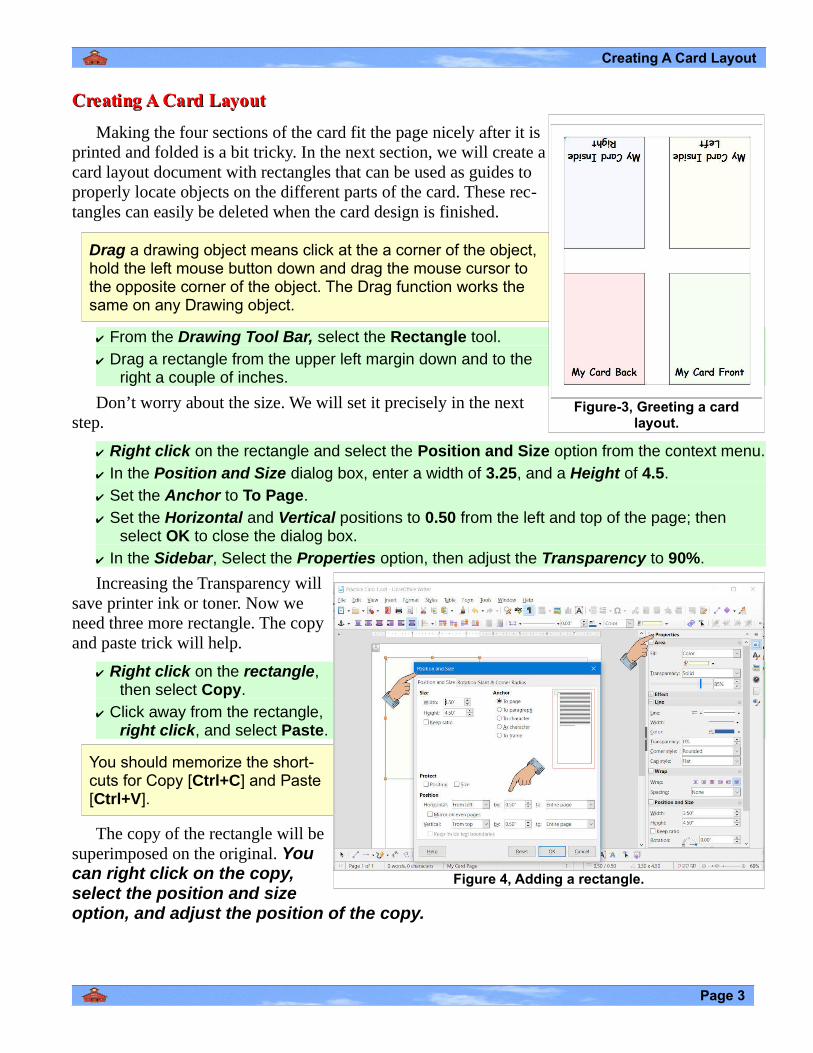
✔ Right click on the newrectangle, select the Positionand Size option from thecontext menu, and adjust the Horizontal position to be 4.5from the left.
✔ Repeat the Copy and Paste tricktwo more times. The Verticalposition of the lower tworectangles should be 6.0 fromthe top.
Adding Text:Adding Text:
Next, you will see how to add textto your card.
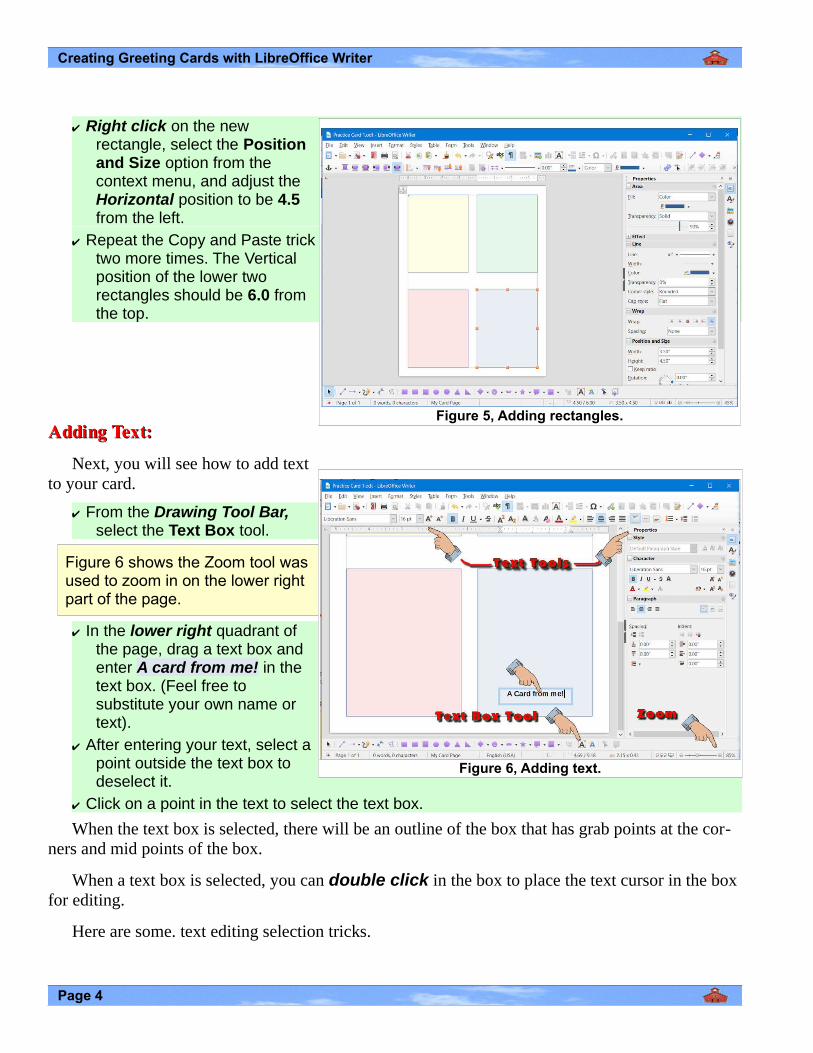
✔ From the Drawing Tool Bar,select the Text Box tool.
Figure 6 shows the Zoom tool wasused to zoom in on the lower rightpart of the page.
✔ In the lower right quadrant ofthe page, drag a text box andenter A card from me! in thetext box. (Feel free tosubstitute your own name ortext).
✔ After entering your text, select apoint outside the text box todeselect it.
✔ Click on a point in the text to select the text box.
When the text box is selected, there will be an outline of the box that has grab points at the cor-ners and mid points of the box.
When a text box is selected, you can double click in the box to place the text cursor in the box for editing.
Here are some. text editing selection tricks.
Page 4
Figure 5, Adding rectangles.
Figure 6, Adding text.
Adding Text:
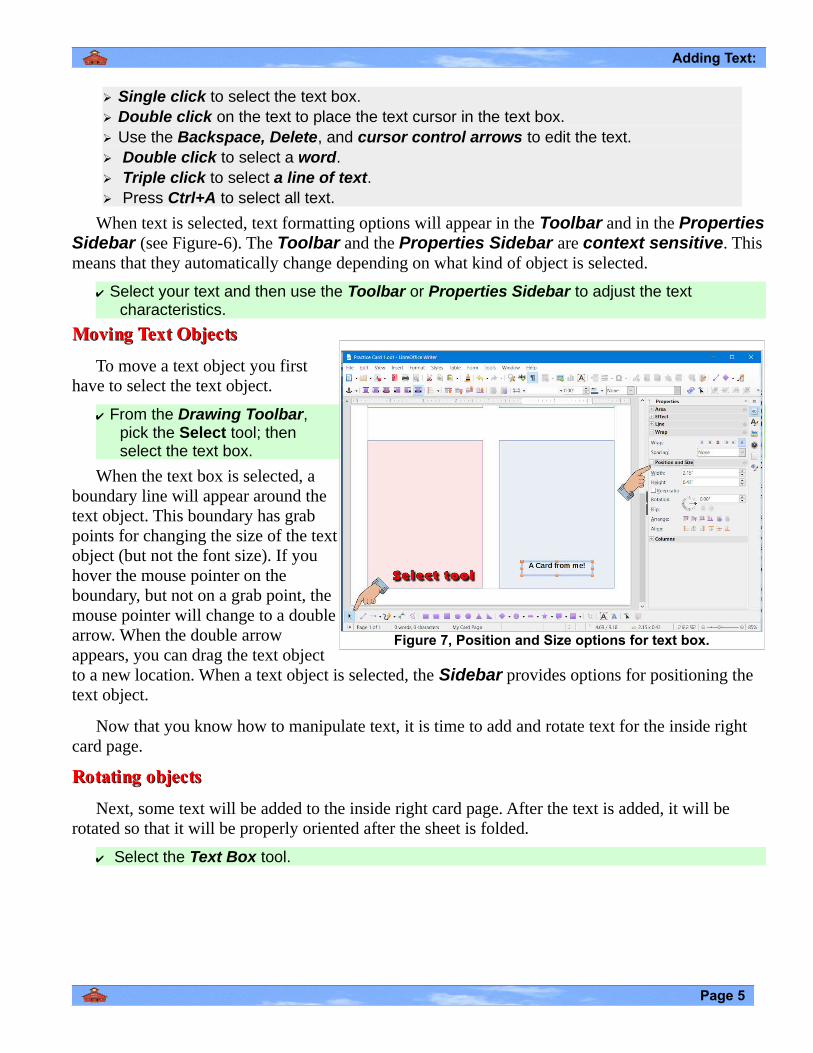
➢ Single click to select the text box. ➢ Double click on the text to place the text cursor in the text box.➢ Use the Backspace, Delete, and cursor control arrows to edit the text.➢ Double click to select a word.➢ Triple click to select a line of text.➢ Press Ctrl+A to select all text.
When text is selected, text formatting options will appear in the Toolbar and in the PropertiesSidebar (see Figure-6). The Toolbar and the Properties Sidebar are context sensitive. Thismeans that they automatically change depending on what kind of object is selected.
✔ Select your text and then use the Toolbar or Properties Sidebar to adjust the text characteristics.
Moving Text ObjectsMoving Text Objects
To move a text object you firsthave to select the text object.
✔ From the Drawing Toolbar,pick the Select tool; thenselect the text box.
When the text box is selected, aboundary line will appear around thetext object. This boundary has grabpoints for changing the size of the textobject (but not the font size). If youhover the mouse pointer on theboundary, but not on a grab point, themouse pointer will change to a doublearrow. When the double arrowappears, you can drag the text objectto a new location. When a text object is selected, the Sidebar provides options for positioning the text object.
Now that you know how to manipulate text, it is time to add and rotate text for the inside right card page.
Rotating objectsRotating objects
Next, some text will be added to the inside right card page. After the text is added, it will be rotated so that it will be properly oriented after the sheet is folded.
✔ Select the Text Box tool.
Page 5
Figure 7, Position and Size options for text box.
Creating Greeting Cards with LibreOffice Writer
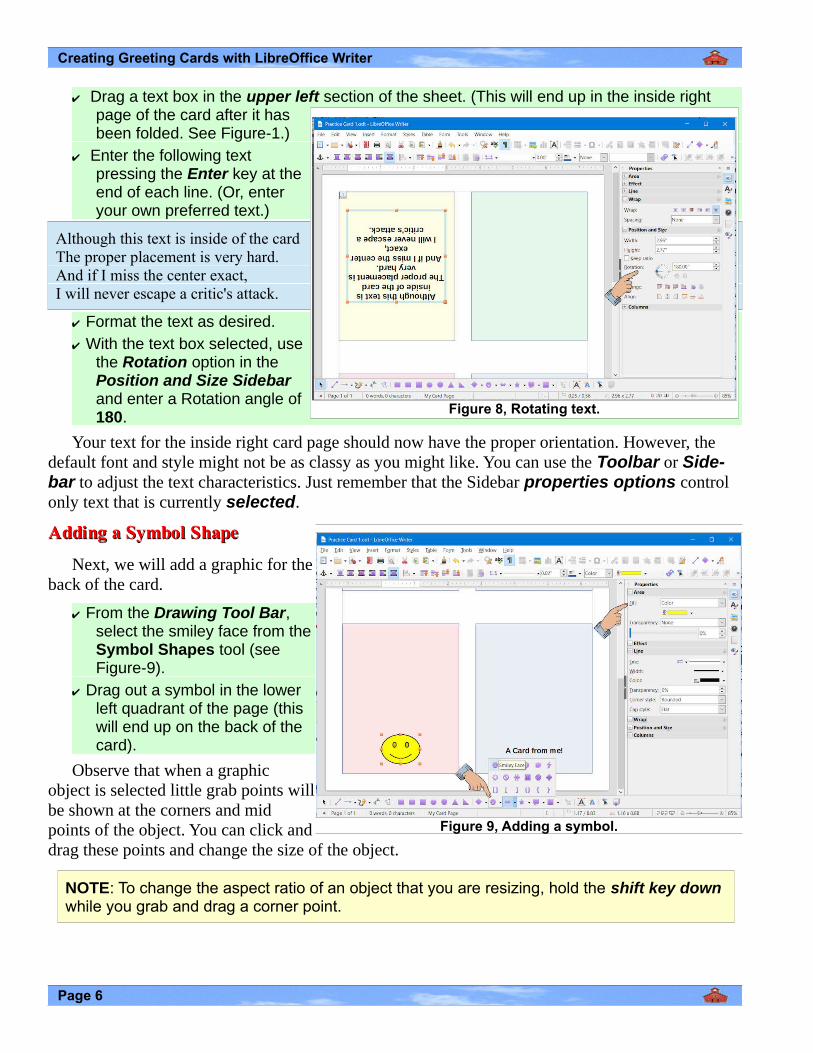
✔ Drag a text box in the upper left section of the sheet. (This will end up in the inside right page of the card after it hasbeen folded. See Figure-1.)
✔ Enter the following textpressing the Enter key at theend of each line. (Or, enteryour own preferred text.)
Although this text is inside of the cardThe proper placement is very hard.And if I miss the center exact,I will never escape a critic's attack.
✔ Format the text as desired.✔ With the text box selected, use
the Rotation option in the Position and Size Sidebarand enter a Rotation angle of 180.
Your text for the inside right card page should now have the proper orientation. However, the default font and style might not be as classy as you might like. You can use the Toolbar or Side-bar to adjust the text characteristics. Just remember that the Sidebar properties options control only text that is currently selected.
Adding a Symbol ShapeAdding a Symbol Shape
Next, we will add a graphic for theback of the card.
✔ From the Drawing Tool Bar,select the smiley face from theSymbol Shapes tool (seeFigure-9).
✔ Drag out a symbol in the lowerleft quadrant of the page (thiswill end up on the back of thecard).
Observe that when a graphicobject is selected little grab points willbe shown at the corners and midpoints of the object. You can click anddrag these points and change the size of the object.
NOTE: To change the aspect ratio of an object that you are resizing, hold the shift key down while you grab and drag a corner point.
Page 6
Figure 8, Rotating text.
Figure 9, Adding a symbol.
Adding a Symbol Shape
When you move the mouse cursor over a selected graphic object the cursor will change to crossed arrows. With the crossed arrows cursor you can drag the object to a new position.
✔ Move the happy face to the lower center of the back of the card section.✔ With the happy face symbol selected, use either the Toolbar or Sidebar Properties options
to select a new Fill color for the happy face and the happy face line.
Adding Pictures:Adding Pictures:
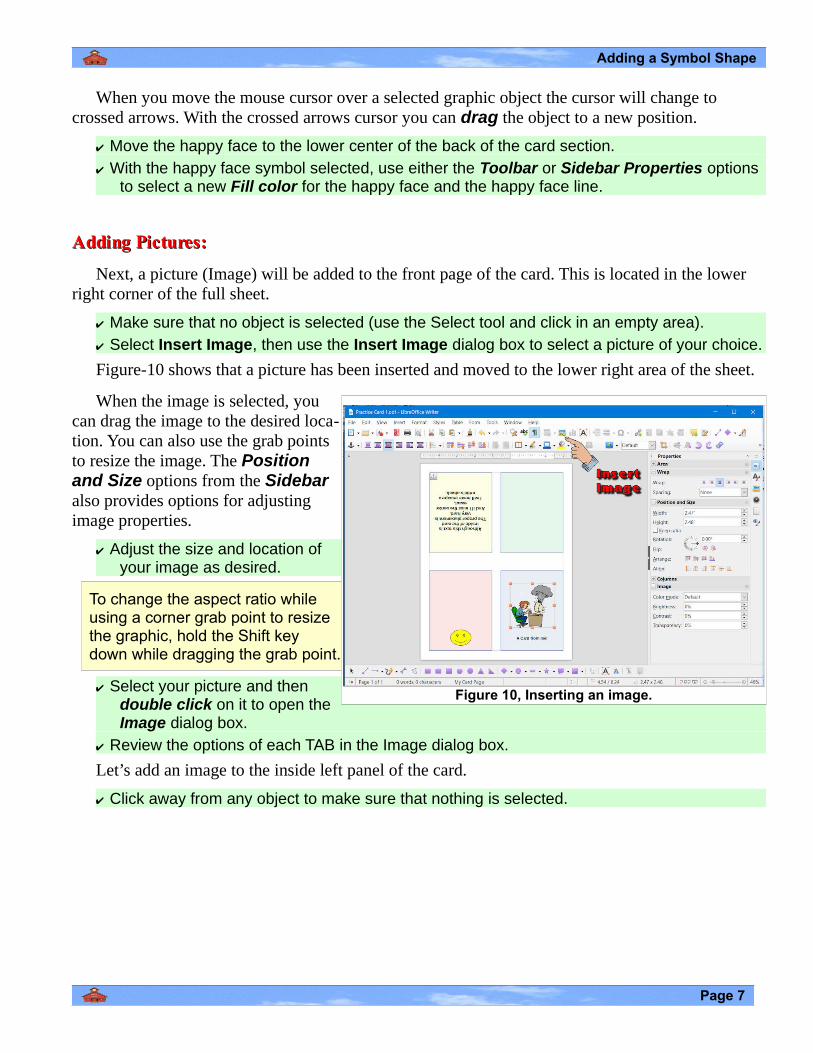
Next, a picture (Image) will be added to the front page of the card. This is located in the lower right corner of the full sheet.
✔ Make sure that no object is selected (use the Select tool and click in an empty area).✔ Select Insert Image, then use the Insert Image dialog box to select a picture of your choice.
Figure-10 shows that a picture has been inserted and moved to the lower right area of the sheet.
When the image is selected, youcan drag the image to the desired loca-tion. You can also use the grab pointsto resize the image. The Positionand Size options from the Sidebar also provides options for adjustingimage properties.
✔ Adjust the size and location ofyour image as desired.
To change the aspect ratio whileusing a corner grab point to resizethe graphic, hold the Shift keydown while dragging the grab point.
✔ Select your picture and then double click on it to open the Image dialog box.
✔ Review the options of each TAB in the Image dialog box.
Let’s add an image to the inside left panel of the card.
✔ Click away from any object to make sure that nothing is selected.
Page 7
Figure 10, Inserting an image.
Creating Greeting Cards with LibreOffice Writer
NOTE: If an image is selected when you insert a new image, the new image will replace the selected image.
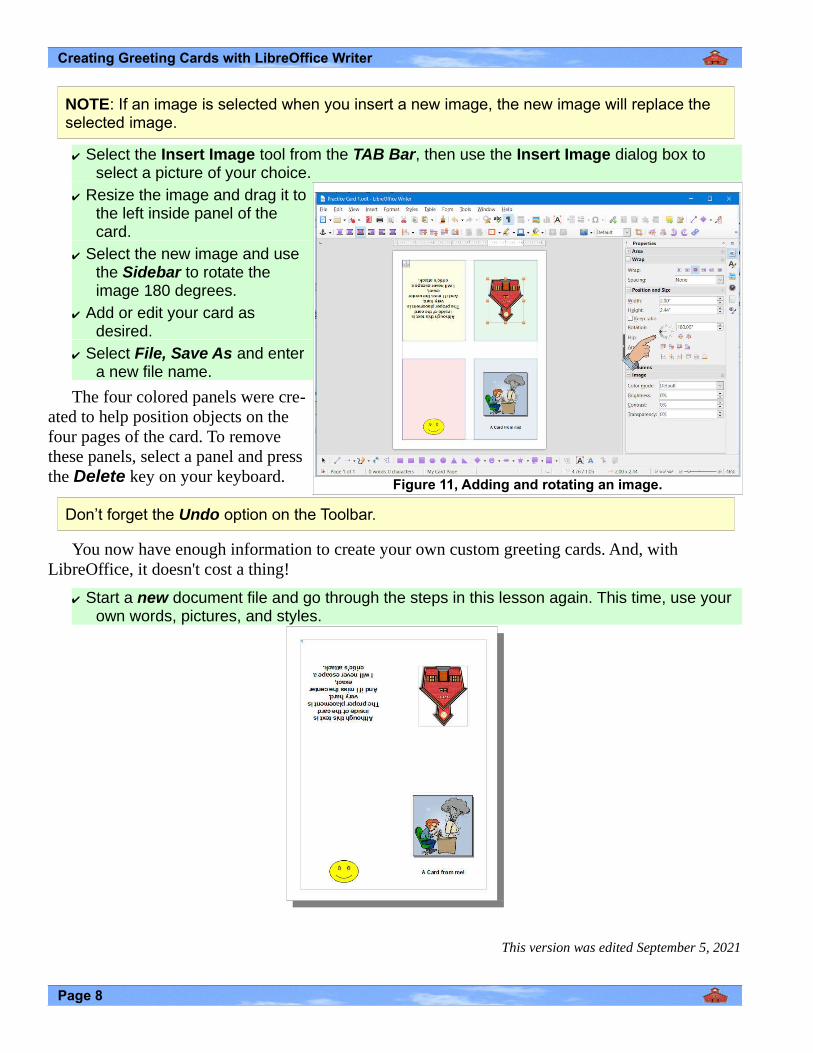
✔ Select the Insert Image tool from the TAB Bar, then use the Insert Image dialog box to select a picture of your choice.
✔ Resize the image and drag it tothe left inside panel of thecard.
✔ Select the new image and usethe Sidebar to rotate theimage 180 degrees.
✔ Add or edit your card asdesired.
✔ Select File, Save As and entera new file name.
The four colored panels were cre-ated to help position objects on thefour pages of the card. To removethese panels, select a panel and pressthe Delete key on your keyboard.
Don’t forget the Undo option on the Toolbar.
You now have enough information to create your own custom greeting cards. And, with LibreOffice, it doesn't cost a thing!
✔ Start a new document file and go through the steps in this lesson again. This time, use your own words, pictures, and styles.
This version was edited September 5, 2021
Page 8
Figure 11, Adding and rotating an image.
Related Documents