Creating a Customized List of Classes Using Microsoft Access 2000® Stephen J. Woods Idaho State University

Creating a Customized List of Classes Using Microsoft Access 2000® Stephen J. Woods Idaho State University.
Mar 30, 2015
Welcome message from author
This document is posted to help you gain knowledge. Please leave a comment to let me know what you think about it! Share it to your friends and learn new things together.
Transcript

Creating a Customized List of Classes Using
Microsoft Access 2000®
Stephen J. WoodsIdaho State University

Tutorial ObjectivesLearn how to open Microsoft Access® Create a database named item_numbersDownload and import the current List of Classes into a MS Access table.Download and import your libraries current item profile into a MS Access table.Merge the current List of Classes and your libraries item profile.Download and import the discontinued and inactive item numbers.

Systems Requirements
Microsoft Access (this tutorial is based on MS 2000) Unzip software (this tutorial utilizes a PowerArchiver available for free) http://www.powerarchiver.com/Access to the Internet via a browser (this tutorial utilizes Internet Explorer).

Objective One: Opening Microsoft Access
Step One: Click on the button labeled Start Step Two: Select and click on the Icon labeled Microsoft Access.

Objective Two Create a Database Named
Item_Numbers

Objective Two: Step 1-2
Step One: Select the radio button labeled Blank Access database. Step Two: Click on the button labeled OK

Objective Two: Step 3-4
Step Three: highlight the text in the File name field db1.mdb and type in the text item_numbers.mdb Don’t forget to include the underscore and the extension mdb. Step Four: make sure the
database is stored in the folder My Documents.

Objective Two: Step 5
Step Five: maximize the window by clicking on the icon

Overview of Microsoft Access
Objects: are the different types of database features that you can create. We will only use Tables and Queries for this tutorial.
We will create three tables:
Data from the List of Classes
Data from the Item Lister
Data from Discontinued and Inactive Items
Once this is done we will use Queries to merge data from each of the tables

Objective Three Download and Import the Current List
of Classes into a MS Access table

Objective Three: Step 1-3Step One: keep Microsoft Access open in one Window and open Internet Explorer (or a browser of your choice) in another window. Step Two: enter the following URL in your browser:http://govdoc.wichita.edu/ddm/GdocFrames.asp
Step Three: click on the link labeled Tools-Configuration.

Objective Three: Step 4
This will download a zipped Excel file. Although the List of Classes is also available through the FDLP. This file contains some added value. Although you could technically import classlist.csv instead of classlist.zip the data in classlist.zip seems to be cleaner.
Step Four: click on the link labeled classlist.zip

Objective Three: Step 5
Step Five: select the radio button labeled Save this file to disk. Then click on the button labeled OK

Objective Three: Step 6
Step Six: make sure that you save the file classlist.zip into the folder My Documents. You will notice that this file automatically saved this ZIP file as a PowerArchiver ZIP file.

Objective Three: Step 7
Step Seven: you should see a box labeled Download complete. Click on the button labeled Open.

Objective Three: Step 8
Step Eight: click on the button labeled Extract. You will notice that the file you are extracting is classlist.csv. As I said earlier, this file seems to contain cleaner data. Csv is an extension that is used for Excel, but don’t worry we will be able to convert this data into MS Access.

Objective Three: Step 9
Step Nine: PowerArchiver will prompt you by asking you what folder you want to extract the information to. Select C:/my documents.

Objective Three: Step 10-11
Step Ten: now that you have downloaded and extracted the file classlist.csv go to the window that you previously opened when we were using Microsoft Access. You can find this easily by moving your cursor to the bottom of the windows page. Step Eleven: click on the drop down menu File and move the cursor to Get External Data and click on the Icon
Import.

Objective Three: Step 12
Step Twelve: make sure that you are looking in the folder labeled My Documents AND that you have selected Files of type Text Files Click on the file classlist.csv Click on the icon labeled Import

Objective Three: Step 13
Step Thirteen: MS Access has correctly guessed that your data is delimited by commas. You can go ahead and click on the button labeled Next >
Objective Three: Step 14
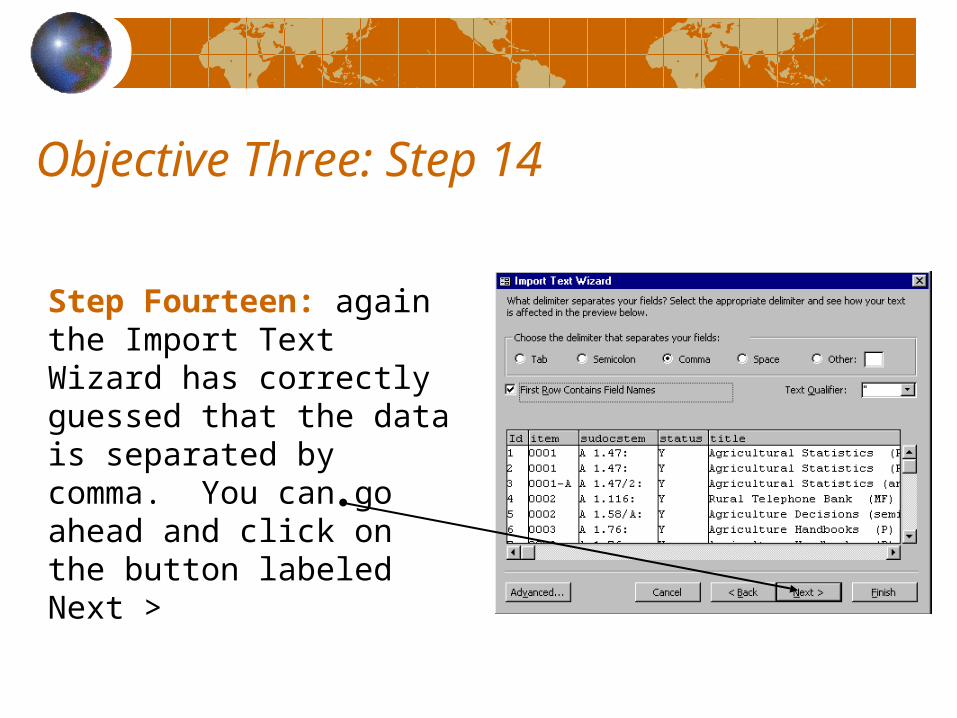
Step Fourteen: again the Import Text Wizard has correctly guessed that the data is separated by comma. You can go ahead and click on the button labeled Next >

Objective Three: Step 15
Step Fifteen: make sure that the radio button labeled In a New Table is selected and click on the button labeled Next >

Objective Three: Step 16
Step Sixteen: you do not want MS Access in this case to define a primary key for you. Click on the radio button labeled No Primary key.

Objective Three: Step 17
Step Seventeen: your table should look exactly like the picture. You can go ahead and click on the button labeled Next >

Objective Three: Step 18-19
Step Eighteen: you have now successfully provided MS Access with all of the necessary information. To finish the import click on the button labeled Finish.
Step Nineteen: click on the button labeled OK.

View Data
To view the data that you just loaded into MS Access. Click on the file Classlist found in your database.

Data Fields
Your data should have 8 rows: ID – unique numberitem – item numbersudocstem – SUDOC numberstatus – whether or not the item is still activetitle – title of the stemagencycode – issuing agencyfrequency – how often the stem is publishedformat – what format the item number represents

Objective Four Download and Import Your Libraries
Current Item Profile

Objective Four: Step 1-3
Step One: keep Microsoft Access open in one Window and open Internet Explorer (or a browser of your choice) in another window. Step Two: enter the following URL in yourbrowser: http://www.access.gpo.gov/su_docs/fdlp/tools/itemlist.html Step Three: click on the link labeled Selections and Nonselections – Single
Column
Objective Four: Step 4
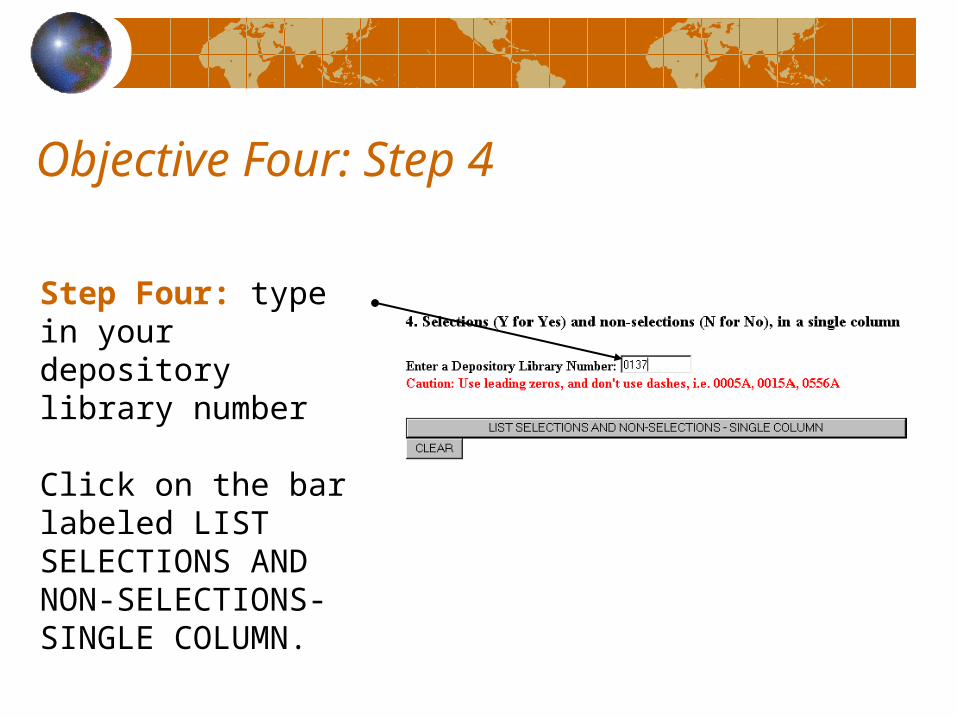
Step Four: type in your depository library number Click on the bar labeled LIST SELECTIONS AND NON-SELECTIONS-SINGLE COLUMN.

Objective Four: Step 5
Step Five: click on the drop down menu labeled File and click on the selection SaveAs

Objective Four: Step 6
Step Six: make sure that you select My Documents folder in the Save in box Change the file name to list Change the Save as type to Text File (*.txt) Click on the Icon labeled Save

Objective Four: Step 7
Step Seven: you will need to open the file that you just save to the folder My Documents in a text editor for massaging before you try to import the information into MS Access. Right click on the icon Start and select the menu choice Explore

Objective Four: Step 8Step Eight: select the folder My Documents. You should see a file labeled list.txt. Click on the file list.txt. You will get the following message. You may click on the Icon labeled Yes. This will open a text editor known as WordPad

Objective Four: Step 9
Step Nine: the file should have been opened in WordPad. Delete the text in the header highlighted in the picture to the right.
Objective Four: Step 10
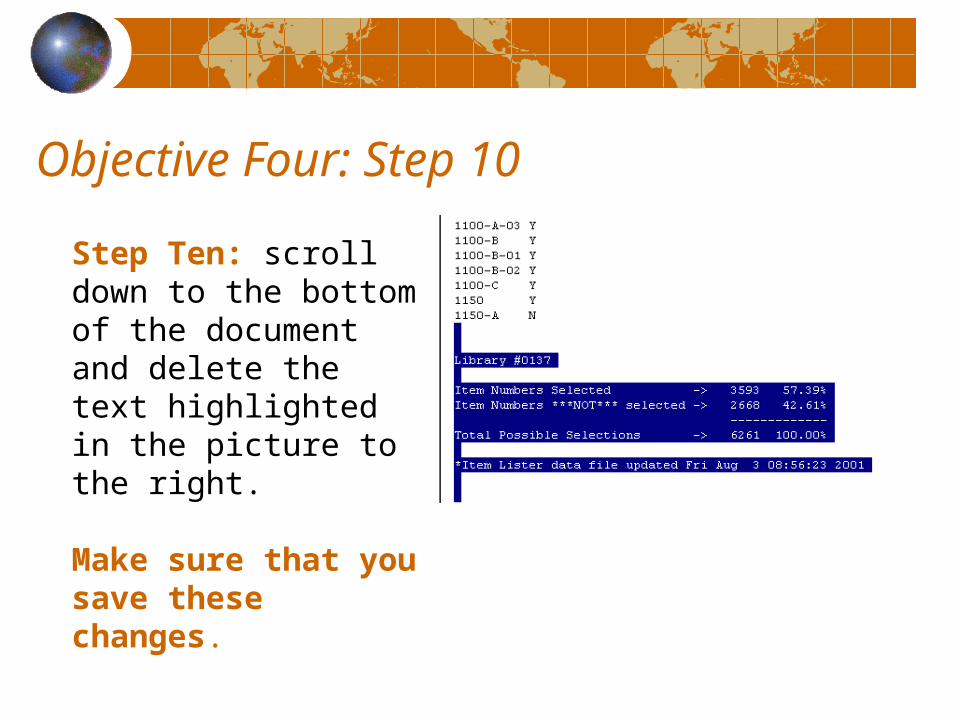
Step Ten: scroll down to the bottom of the document and delete the text highlighted in the picture to the right. Make sure that you save these changes.
Objective Four: Step 11-12
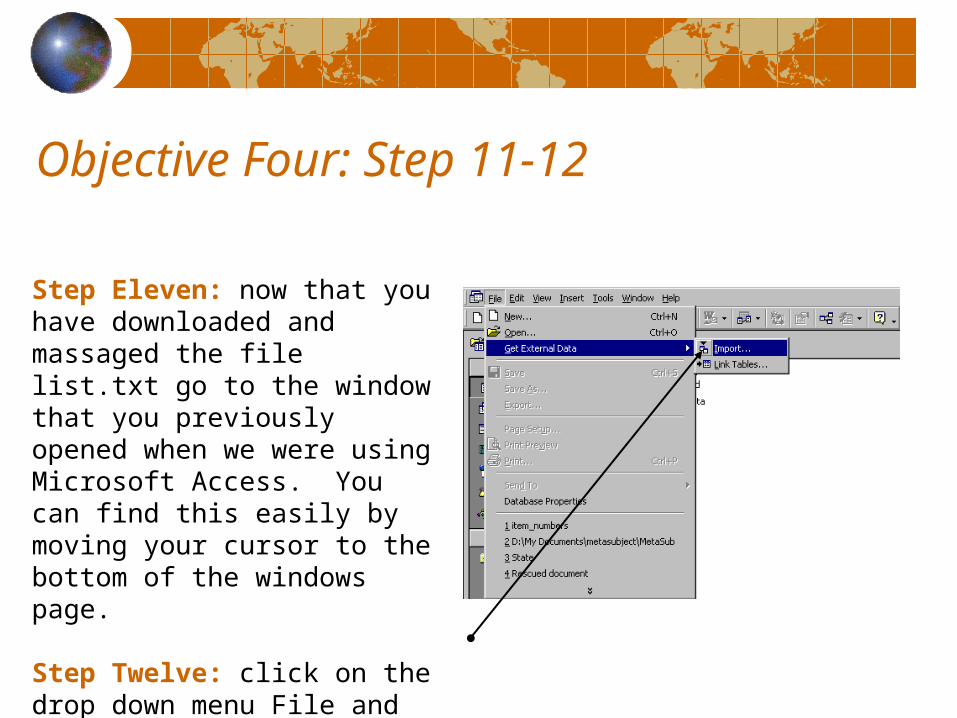
Step Eleven: now that you have downloaded and massaged the file list.txt go to the window that you previously opened when we were using Microsoft Access. You can find this easily by moving your cursor to the bottom of the windows page. Step Twelve: click on the drop down menu File and move the cursor to Get External Data and click on the Icon
Import.

Objective Four: Step 13
Step Thirteen: make sure that you are looking in the folder labeled My Documents AND that you have selected Files of type Text Files Click on the file list.text Click on the button labeled Import

Objective Four: Step 14
Step Fourteen: MS Access has correctly guessed that the data is separated by Fixed Widths. You can go ahead and click on the button labeled Next >

Objective Four: Step 15
Step Fifteen: the Import Text Wizard has correctly placed the break line between the two fields. You can go ahead and click on the button labeled Next >

Objective Four: Step 16
Step Sixteen: make sure that the radio button labeled In a New Table is selected. You can go ahead and click on the button labeled Next >

Objective Four: Step 17
Step Seventeen: change the text in the box Field Name to item. This will match the field name in our table Classlist. You can go ahead and click on the button labeled Next >
Objective Four: Step 18
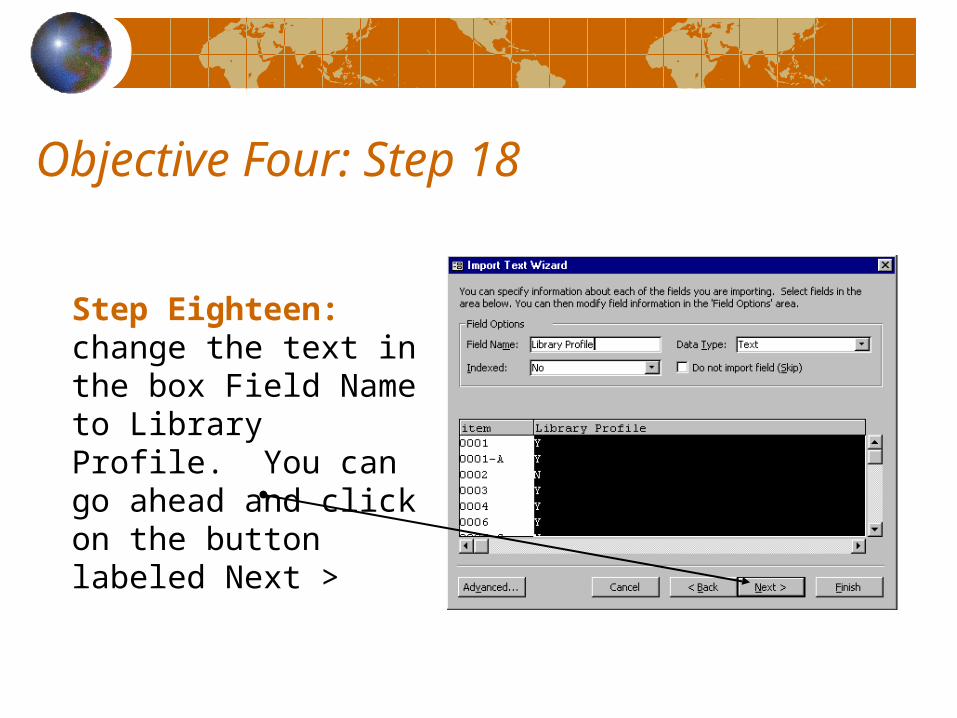
Step Eighteen: change the text in the box Field Name to Library Profile. You can go ahead and click on the button labeled Next >

Objective Four: Step 19
Step Nineteen: click on the radio button labeled No primary key. You can go ahead and click on the button labeled Next >

Objective Four: Step 20
Step Twenty: you have now completed all the information that the wizard needs to create the table list. Click on the button labeled Finish
You will be prompted by the wizard with another text box. Click on the button labeled OK.
View Data
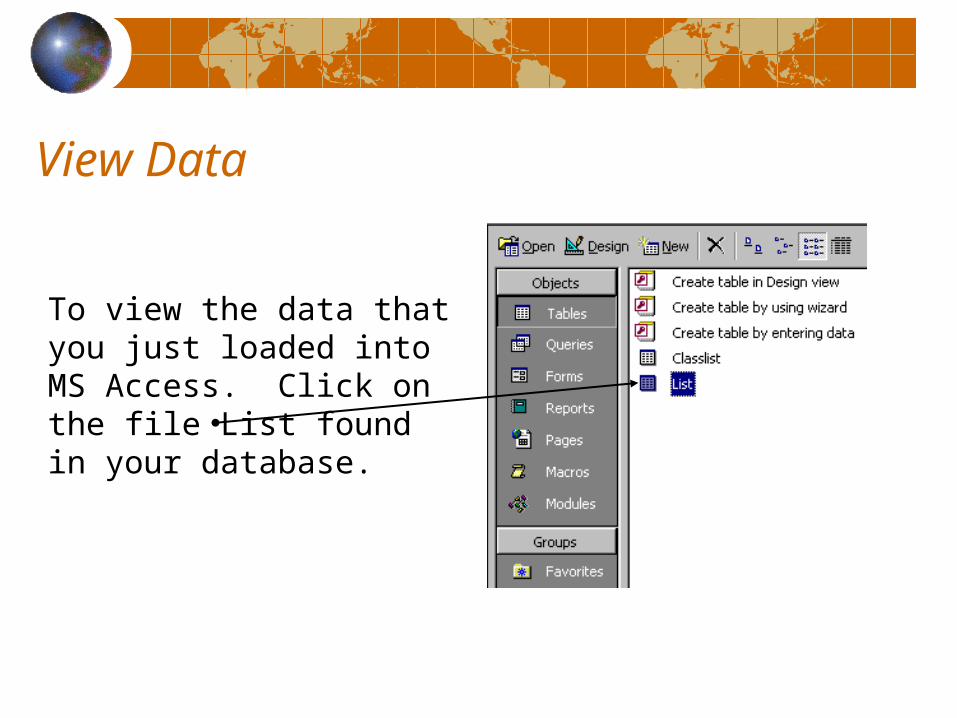
To view the data that you just loaded into MS Access. Click on the file List found in your database.

Data Fields
Your data should have 2 rows: item – item number Library Profile – indicates whether or not your library selects that particular item number.

Objective Five Merge the Table that Contains the
Current List of Classes with the Table that Contains Your Libraries Profile

Objective Five: Step 1-2
Step One: click on the button labeled Queries Step Two: click on the icon labeled New

Objective Five: Step 3
Step Three: select design view and click on the button labeled OK.
Objective Five: Step 4
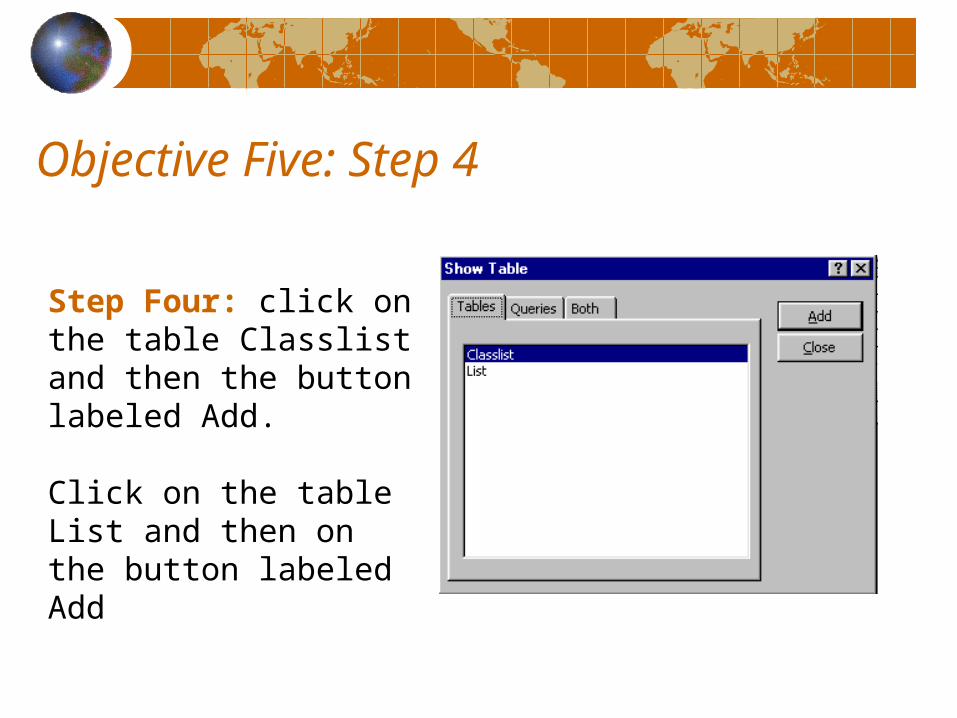
Step Four: click on the table Classlist and then the button labeled Add. Click on the table List and then on the button labeled Add
Objective Five: Step 5
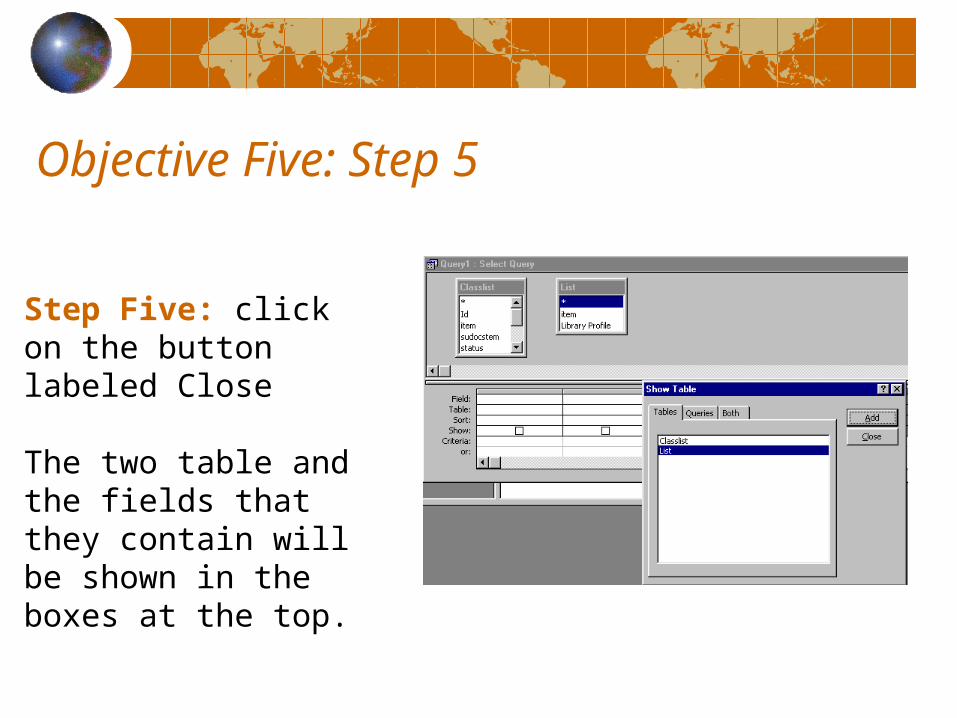
Step Five: click on the button labeled Close The two table and the fields that they contain will be shown in the boxes at the top.

Objective Five: Step 6
Step Six: highlight the field “item” in the table Classlist. Keeping your finger in the left mouse button drag the cursor to the field “item” in the table List. This tells MS Access what the relationship is between these two tables. In sum, it will match information from the two tables based on this field.

Objective Five: Step 7
Step Seven: click on each of the fields in the table Classlist. This will add them to the table below. Click on the field Library Profile in the table List to add it to the table below.

Objective Five: Step 8
Step Eight: to merge the two table into a separate table click on drop down menu with the icon and select the text Make-Table Query.

Objective Five: Step 9
Step Nine: you will be prompted by MS Access to give the new table a name. Type in the name Current Profile and click on the button labeled OK Make sure the radio button Current Database is selected.

Objective Five: Step 10
Step Ten: to generate the new table click on the icon.
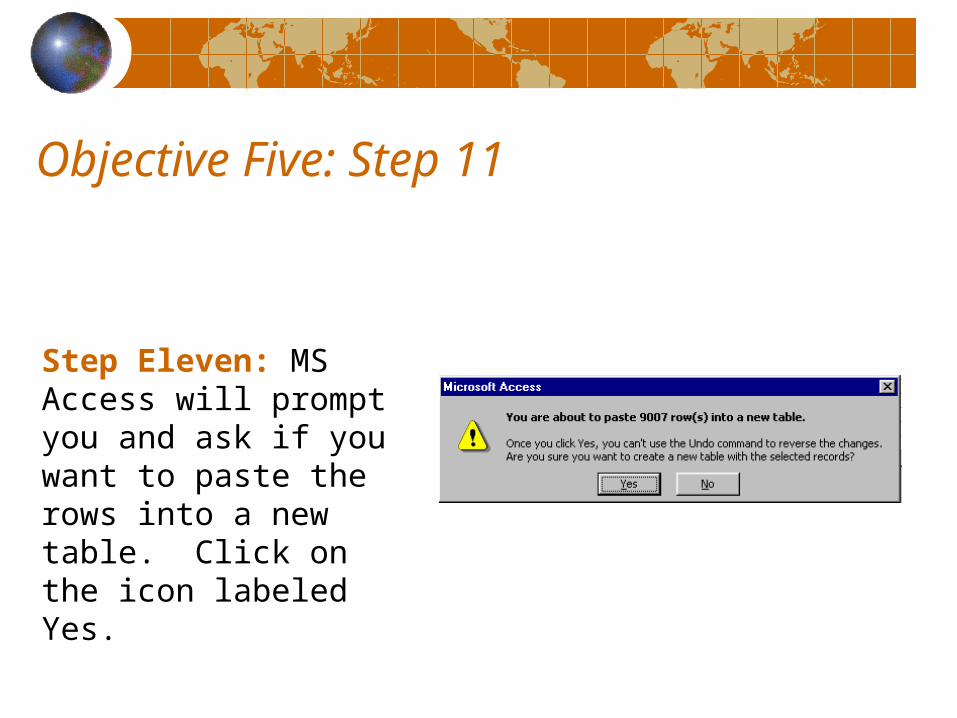
Objective Five: Step 11
Step Eleven: MS Access will prompt you and ask if you want to paste the rows into a new table. Click on the icon labeled Yes.
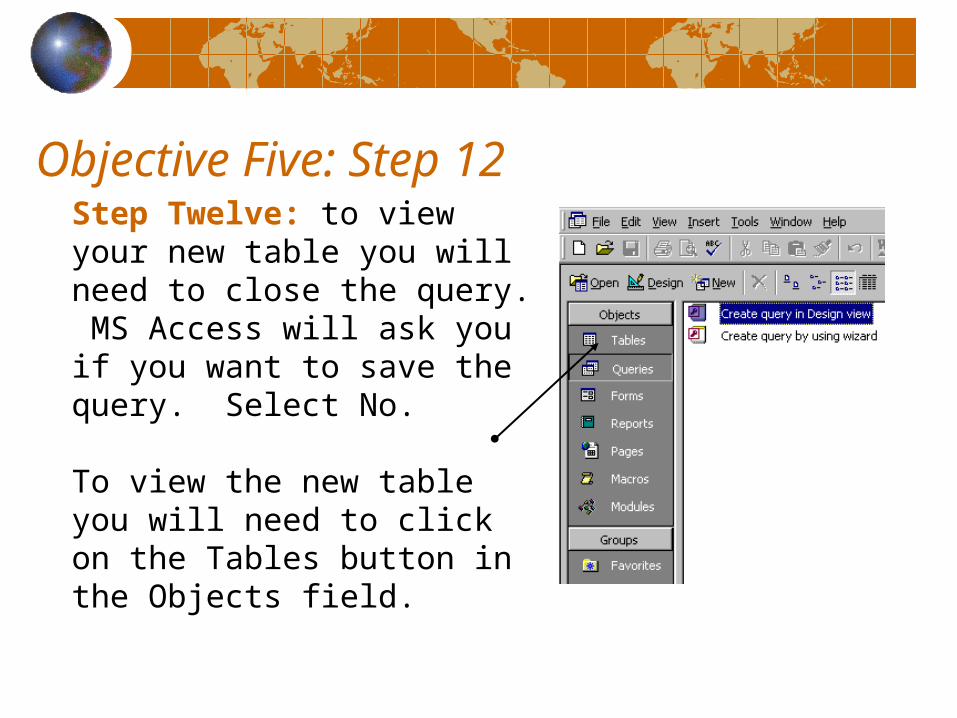
Objective Five: Step 12Step Twelve: to view your new table you will need to close the query. MS Access will ask you if you want to save the query. Select No. To view the new table you will need to click on the Tables button in the Objects field.
Objective Five: Step 13
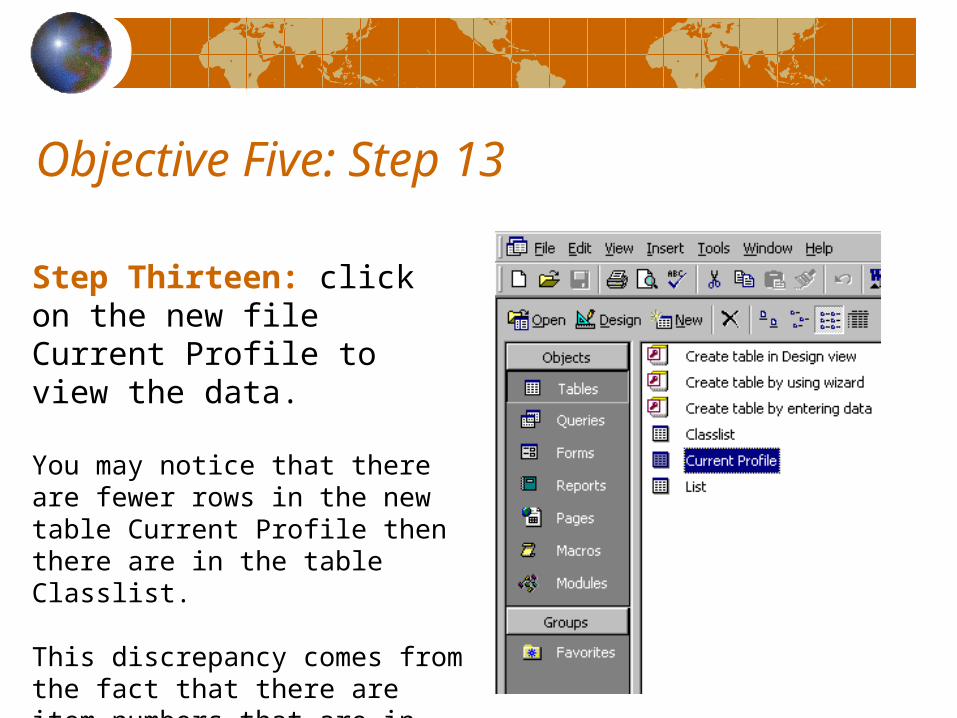
Step Thirteen: click on the new file Current Profile to view the data. You may notice that there are fewer rows in the new table Current Profile then there are in the table Classlist. This discrepancy comes from the fact that there are item numbers that are in the current List of Classes that are not
included in the Item Lister.

Objective Six Download and Import the List of Inactive and Discontinued Item
Numbers

Objective Six: Step 1-3Step One: keep Microsoft Access open in one Window and open Internet Explorer (or a browser of your choice) in another window. Step Two: enter the following URL in your browser:http://govdoc.wichita.edu/ddm/GdocFrames.asp
Step Three: click on the link labeled Tools-Configuration.

Objective Six: Step 4
Step Four: click on the file labeled classina.zip

Objective Six: Step 5
Step Five: select the radio button labeled Save this file to disk. Then click on the button labeled OK

Objective Six: Step 6
Step Six: make sure that you save the file classina.zip into the folder My Documents. You will notice that this file automatically saved this ZIP file as a PowerArchiver ZIP file.
Objective Six: Step 7
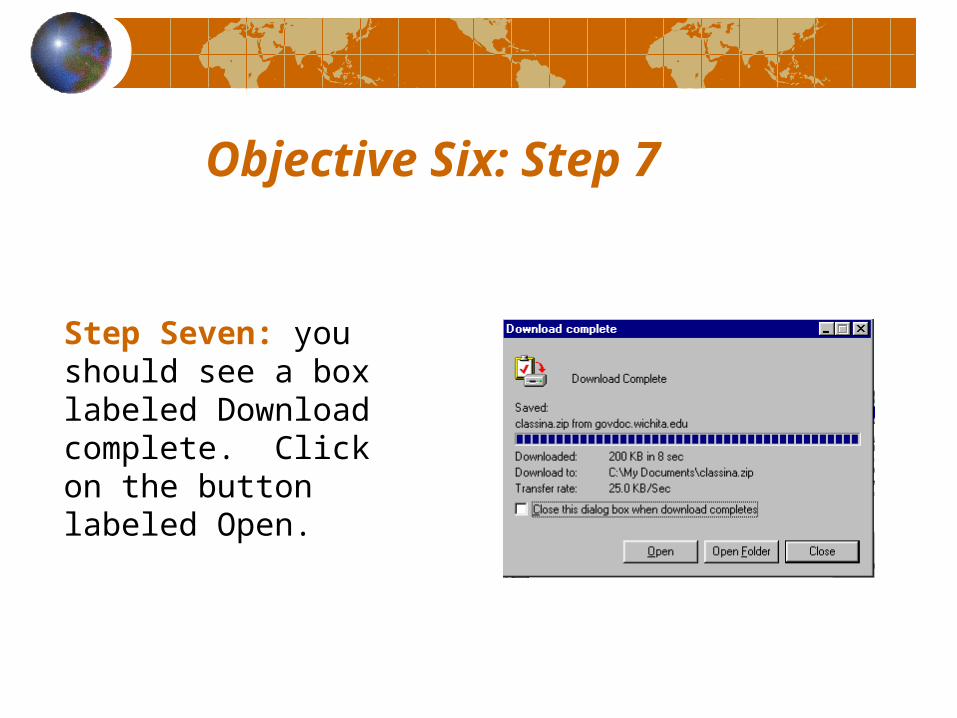
Step Seven: you should see a box labeled Download complete. Click on the button labeled Open.

Objective Six: Step 8
Step Eight: click on the button labeled Extract. You will notice that the file you are extracting is classina.csv. As I said earlier, this file seems to contain cleaner data. Csv is an extension that is used for Excel, but don’t worry we will be able to convert this data into MS Access.

Objective Six: Step 9
Step Nine: PowerArchiver will prompt you by asking you what folder you want to extract the information to. Select C:/my documents.

Objective Six: Step 10-11
Step Ten: now that you have downloaded and extracted the file classina.csv go to the window that you previously opened when we were using Microsoft Access. You can find this easily by moving your cursor to the bottom of the windows page. Step Eleven: click on the drop down menu File and move the cursor to Get External Data and click on the Icon
Import.

Objective Six: Step 12
Step Twelve: make sure that you are looking in the folder labeled My Documents AND that you have selected Files of type Text Files Click on the file classlist.csv Click on the icon labeled Import

Objective Six: Step 13
Step Thirteen: MS Access has correctly guessed that your data is delimited by commas. You can go ahead and click on the button labeled Next >

Objective Six: Step 14
Step Fourteen: again the Import Text Wizard has correctly guessed that the data is separated by comma. You can go ahead and click on the button labeled Next >

Objective Six: Step 15-16
Step 15: Click on the radio button labeled In an Existing table.
Step 16: from the menu select the table Current Profile.You can go ahead and click on the button labeled Next >

Objective Six: Step 17
Step Seventeen: you have now completed all the information that the wizard needs to import the information to the table Current Profile. Click on the button labeled Finish

Objective Six: Step 18
Step 18: open the table Current Profile by clicking on the file.
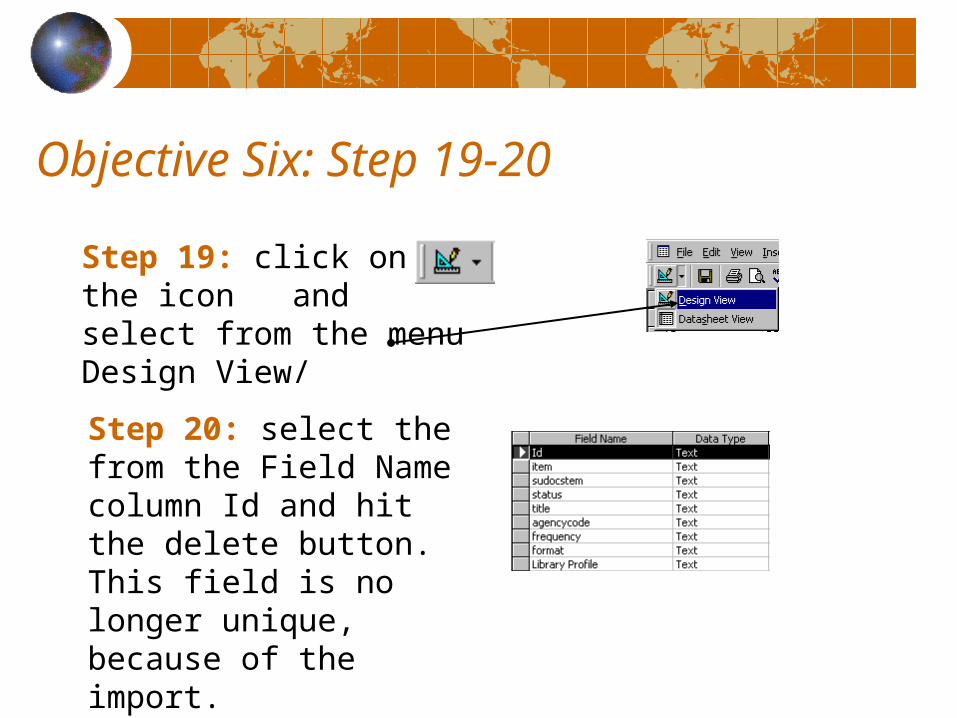
Objective Six: Step 19-20
Step 19: click on the icon and select from the menu Design View/
Step 20: select the from the Field Name column Id and hit the delete button. This field is no longer unique, because of the import.

Objective Six: Step 21
Step 21: to get back to the table or datasheet view click on the icon

DataScroll down the data keeping an eye on the Library Profile field. At about 9,000 or so records this field will be blank. The status filed will also contain an N for Inactive. The information in the Library Profile field will need to be updated from your 3X5 records.

Adding Fields for Maintenance (Suggestions)
Step 1: click on the icon and select from the menu Design View/
Step 2: type in the field name Date (this will be the date range your library collected that particular item number).
Step 3: from the pull down menu select Date/Time

Adding Fields for Maintenance (Suggestions)
Step 4: type in the next field Weeded for class numbers that you have systematically checked for relevance.
Step 5: select from the pull down menu Yes/No
Related Documents