Categories Learning Guides Forum Design & Illustration This post is part of a series called Web and Interface Design With Vector. Quick Tip: How to Create a Simple Register Form Design Learn a Professional Workflow for Illustrating a Comic-Style Header Image I N T E R F A C E D E S I G N Create a Stylized Navigation Bar and Slice it for Web by Andrei Marius 5 Sep 2012 16 Comments 2 3 3 converted by Web2PDFConvert.com

Create a Stylized Navigation Bar and Slice It for Web
Dec 09, 2015
In the following tutorial you will learn how to create a stylized navigation bar. You will
learn how to use the Appearance Panel to style a navigation bar, and how to use the
Slice Tool to cut and export the images so they can be used as part of a website. Let's
begin!
learn how to use the Appearance Panel to style a navigation bar, and how to use the
Slice Tool to cut and export the images so they can be used as part of a website. Let's
begin!
Welcome message from author
This document is posted to help you gain knowledge. Please leave a comment to let me know what you think about it! Share it to your friends and learn new things together.
Transcript
Categories Learning Guides Forum
Design & Illustration
This post is part of a series called Web and Interface Design With Vector.
Quick Tip: How to Create a Simple Register Form Design
Learn a Professional Workflow for Illustrating a Comic-Style Header Image
I N T E R F A C E D E S I G N
Create a Stylized Navigation Barand Slice it for Webby Andrei Marius 5 Sep 2012 16 Comments
2 3 3
converted by Web2PDFConvert.com

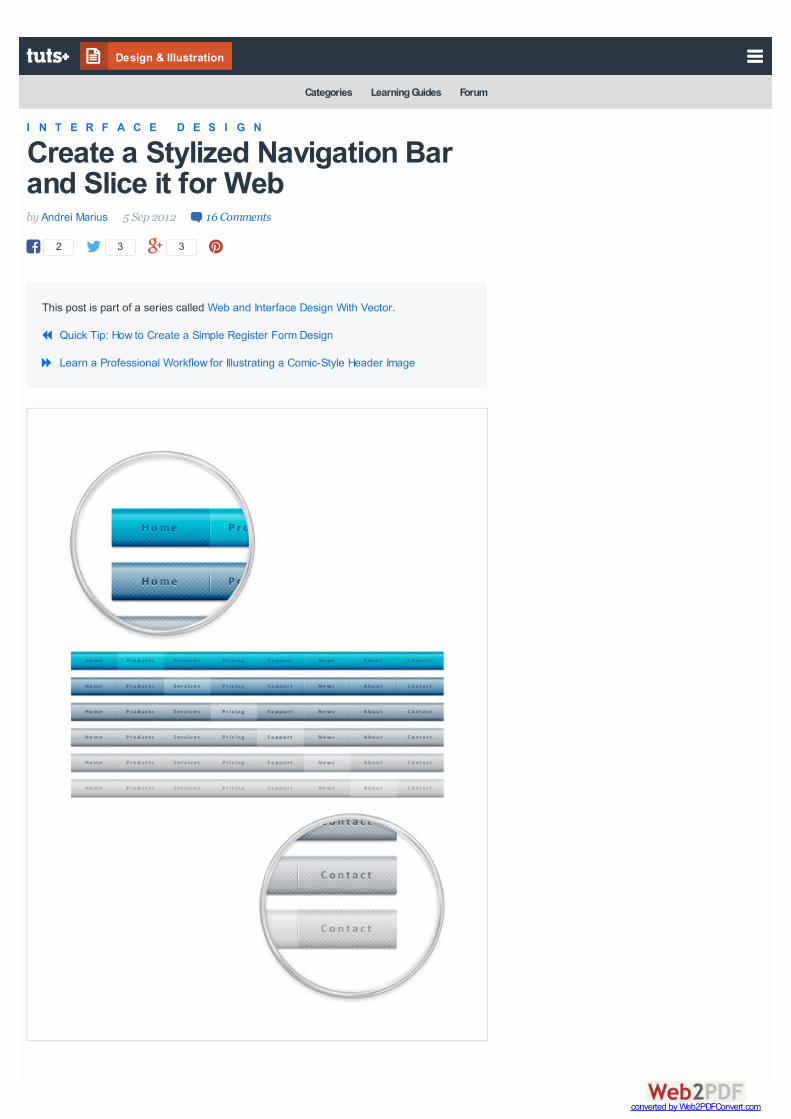
In the following tutorial you will learn how to create a stylized navigation bar. You willlearn how to use the Appearance Panel to style a navigation bar, and how to use theSlice Tool to cut and export the images so they can be used as part of a website. Let'sbegin!
Step 1
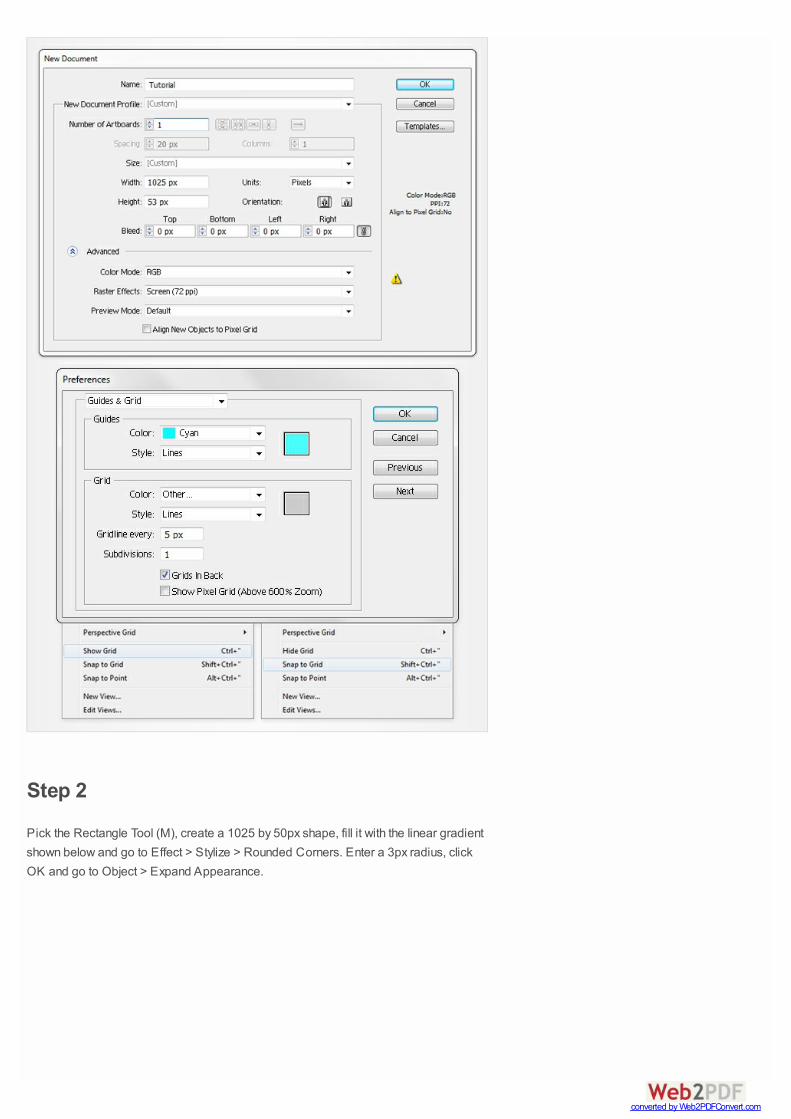
Press Command + N to create a new document. Enter 1025 in the width box and 53 inthe height box then click on the Advanced button. Select RGB, Screen (72ppi) andmake sure that the "Align New Objects to Pixel Grid" box is unchecked before yourclick OK. Enable the Grid (View > Show Grid) and the Snap to Grid (View > Snap toGrid).
Next, you'll need a grid every 5px. Go to Edit > Preferences > Guides & Grid, enter 5 inthe Gridline every box and 1 in the Subdivisions box. You can also open the Info panel(Window > Info) for a live preview with the size and position of your shapes. Do notforget to replace the unit of measurement to pixels from Edit > Preferences > Unit >General. All these options will significantly increase your work speed.
converted by Web2PDFConvert.com
Step 2
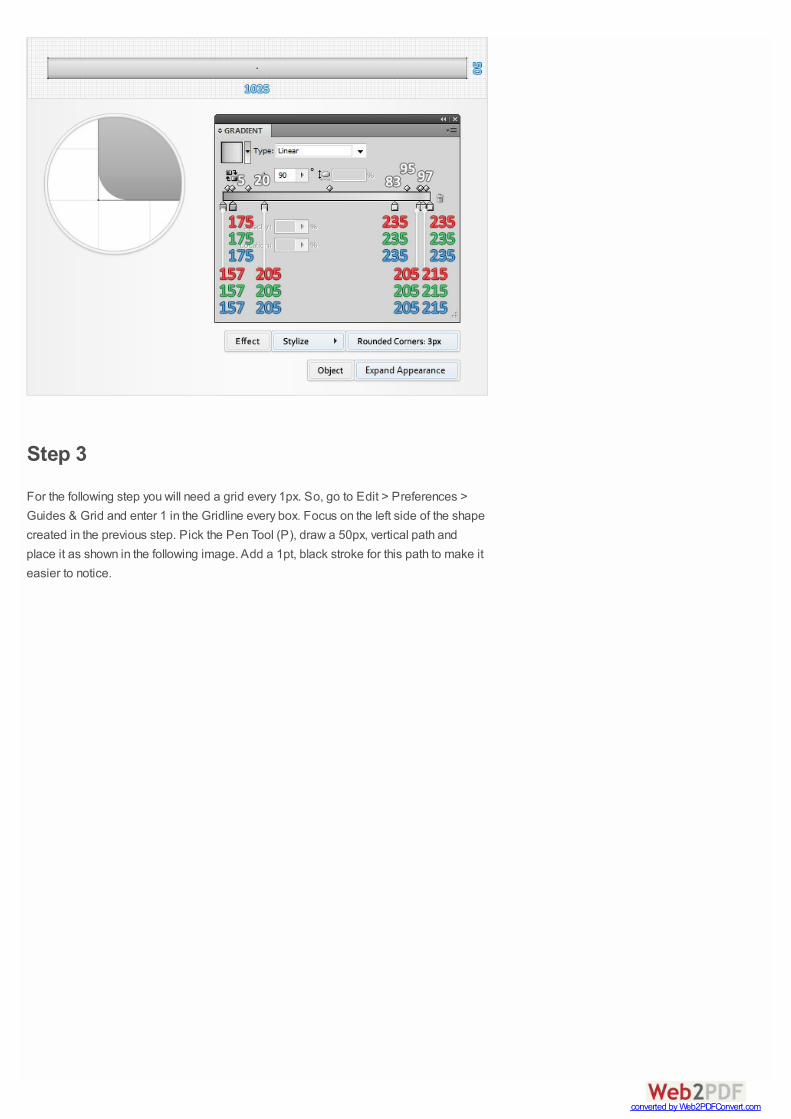
Pick the Rectangle Tool (M), create a 1025 by 50px shape, fill it with the linear gradientshown below and go to Effect > Stylize > Rounded Corners. Enter a 3px radius, clickOK and go to Object > Expand Appearance.
converted by Web2PDFConvert.com
Step 3
For the following step you will need a grid every 1px. So, go to Edit > Preferences >Guides & Grid and enter 1 in the Gridline every box. Focus on the left side of the shapecreated in the previous step. Pick the Pen Tool (P), draw a 50px, vertical path andplace it as shown in the following image. Add a 1pt, black stroke for this path to make iteasier to notice.
converted by Web2PDFConvert.com

Step 4
Reselect the vertical path created in the previous step and drag it 128px to the right.You can do it manually or by going to Object > Transform > Move options. Simply, enter128 in the Horizontal box then Press enter.
Step 5
Reselect that vertical path and go to Effect > Distort & Transform > Transform. Enterthe data shown in the following image, click OK and go to Object > Expand
converted by Web2PDFConvert.com

Appearance.
Step 6
Select the group of vertical paths created in the previous step along with the roundedrectangle created in the second step, open the Pathfinder panel and click on the Dividebutton. Move to the Layers panel, select the resulting group and ungroup it (Shift +Control + G). Keep focusing on the Layers panel and name your shapes from the "1" to"8" (start with the left shape).
converted by Web2PDFConvert.com

Step 7
Disable the Snap to Grid (View > Snap to Grid) then go to Edit > Preferences >General and make sure that the Keyboard Increment is set at 1px. Select shape "1"and make two copies in front (Control + C > Control + F > Control + F). Select the topcopy and move it 1px to the left using the left arrow from your keyboard. Reselect bothcopies and click on the Minus Front button from the Pathfinder panel. Bring theresulting shape to front (Shift + Control + Right Square Bracket), fill it with black andchange its blending mode to Overlay.
Step 8
Select shape "1" and make two new copies in front (Control + C > Control + F >Control + F). Focus on the Layers panel, select the bottom copy and move it 1px to theright using the right arrow from your keyboard. Reselect both copies and click on theMinus Front button from the Pathfinder panel. Bring the resulting shape to front (Shift +
converted by Web2PDFConvert.com

Control + Right Square Bracket), fill it with white and change its blending mode toOverlay.
Step 9
Reselect the two shapes created in the last two steps and group them (Control + G).Make a copy of this group (Control + C > Control + F), select it and click on the Unitebutton from the Pathfinder panel. Fill the resulting shape with the linear gradient shownin the second image.
converted by Web2PDFConvert.com

Step 10
Open the Transparency panel. Reselect the shape and the group created in theprevious step, open the fly-out menu of the Transparency panel and click on MakeOpacity Mask. In the end your masked group should look like in the second image.
converted by Web2PDFConvert.com

Step 11
Reselect the masked group created in the previous step and go to Object > Transform> Move. Enter 128 in the Horizontal box and click on the Copy button. Obviously, thiswill add a copy of your group 128px to the right. Select this copy and repeat the Movecommand. Keep repeating this technique until you have seven masked groups.
converted by Web2PDFConvert.com

Step 12
Enable the Snap to Grid (View > Snap to Grid). Pick the Rectangle Tool (M), create afour, 3px squares and place them as shown in the following image. Also, fill them withblack and white as shown below. Select all four shapes and simply drag them inside theSwatches panel to turn them into a pattern. Once you got your pattern you can deletethe four squares from the Layers panel.
converted by Web2PDFConvert.com

Step 13
Disable the Grid (View > Show Grid) and the Snap to Grid (View > Snap to Grid).Return to shape "1". Select it, focus on the Appearance panel and add a second fillusing the Add New Fill button. Select it, set the color at R=28 G=117 B=188 andchange its blending mode to Color Burn.
converted by Web2PDFConvert.com

Step 14
Reselect shape "1", focus on the Appearance panel and add a third fill. Select it, lowerthe opacity to 15%, change its blending mode to Soft Light and add the pattern madein the twelfth step.
converted by Web2PDFConvert.com

Step 15
Reselect shape "1", focus on the Appearance panel, make sure that no fill or stroke isselected and go to Effect > Stylize > Drop Shadow. Enter the data shown in the topwindow, click OK and go again to Effect > Stylize > Drop Shadow. Enter the datashown in the middle window, click OK and go once again to Effect > Stylize > DropShadow. Enter the data shown in the bottom window and click OK.
Step 16
converted by Web2PDFConvert.com

Now you need to copy the properties used for shape "1" and paste them onto the restof the shapes. Here is how you can easily do it. Go to the Layers panel, focus on theright side and you'll notice that every shape comes with a little grey circle. It's called atarget icon. Hold Alt, click on the target icon that stands for shape "1" and drag onto thecircle that stands for shape "2". Use this technique to add the same properties for theother six shapes.
Step 17
Select shape "2", focus on the Appearance panel and add fourth fill. Select it, make itwhite, lower the opacity to 50% and change its blending mode to Soft Light. This will bethe hover mode for your navigation bar.
converted by Web2PDFConvert.com
Step 18
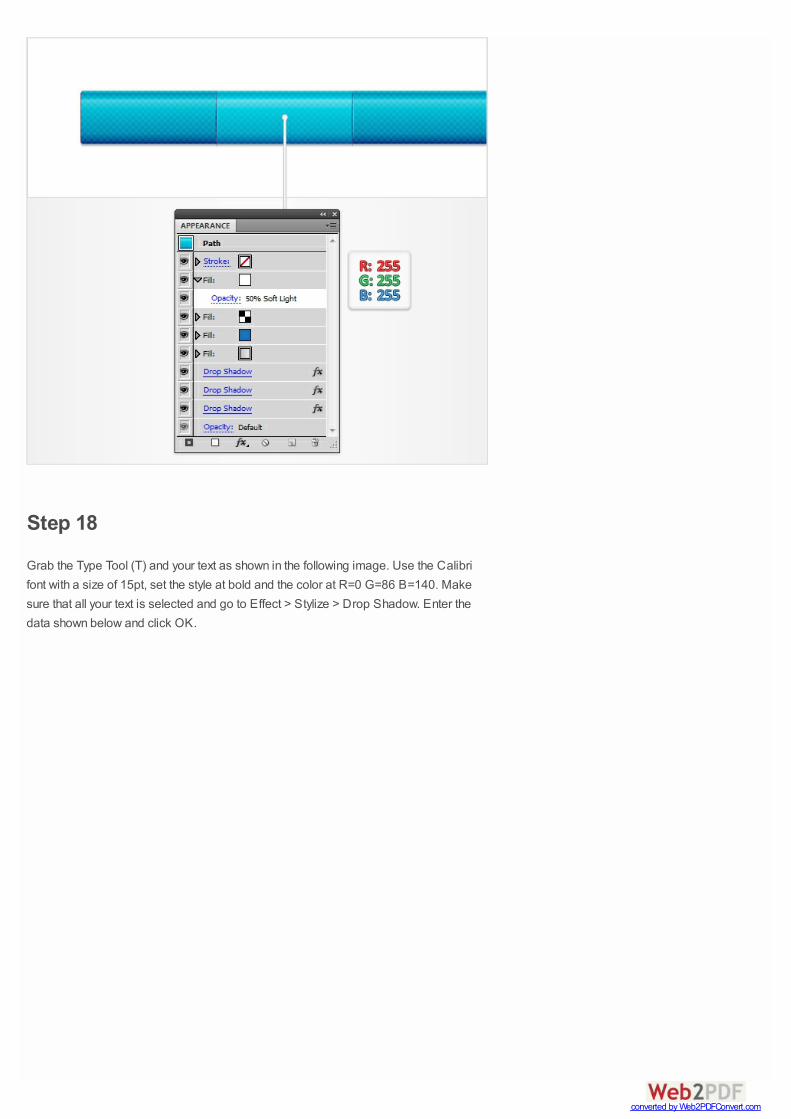
Grab the Type Tool (T) and your text as shown in the following image. Use the Calibrifont with a size of 15pt, set the style at bold and the color at R=0 G=86 B=140. Makesure that all your text is selected and go to Effect > Stylize > Drop Shadow. Enter thedata shown below and click OK.
converted by Web2PDFConvert.com

Step 19
Now, let's slice this menu. Focus on left masked group and select the Slice Tool (Shift +K). First, draw a 6 by 53px slice along shape "1" as shown in the following image.Continue with the Slice Tool (Shift + K) and draw a second 6 by 53px slice along shape"2" as shown below.
converted by Web2PDFConvert.com
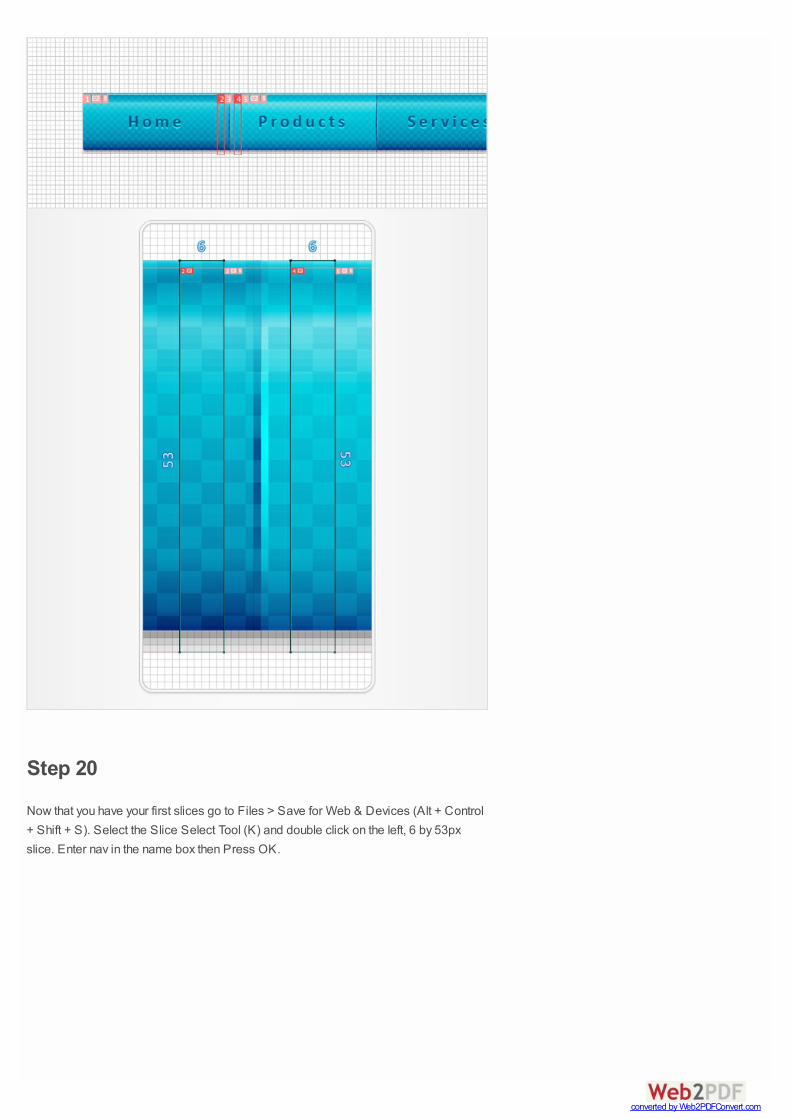
Step 20
Now that you have your first slices go to Files > Save for Web & Devices (Alt + Control+ Shift + S). Select the Slice Select Tool (K) and double click on the left, 6 by 53pxslice. Enter nav in the name box then Press OK.
converted by Web2PDFConvert.com

Focus on the second 6 by 53px slice. Double click on it, enter "nav.hoover" in the Namesection and Press OK. Select PNG-24 from the Preset drop down menu and clickSave. Pick a location for the images that you're about to save then click Save. Move tothat location and you'll find a new folder with a bunch of new images. Drag "nav.png"and "nav.hoover.png" outside the folder then delete the folder.
Step 21
Return to your Ai file, select the Slice Tool (Shift + K) and draw a 2 by 53px slice alongthat left masked group. Move to the Layers panel and turn off the visibility for all the
converted by Web2PDFConvert.com
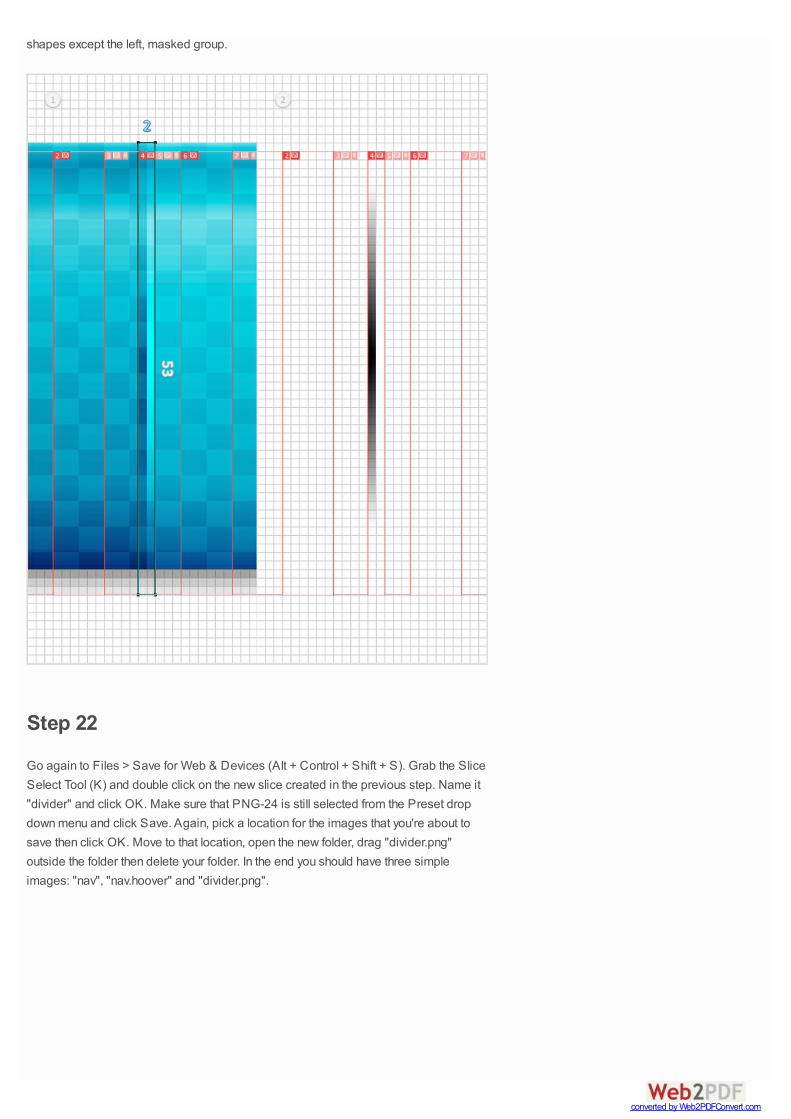
shapes except the left, masked group.
Step 22
Go again to Files > Save for Web & Devices (Alt + Control + Shift + S). Grab the SliceSelect Tool (K) and double click on the new slice created in the previous step. Name it"divider" and click OK. Make sure that PNG-24 is still selected from the Preset dropdown menu and click Save. Again, pick a location for the images that you're about tosave then click OK. Move to that location, open the new folder, drag "divider.png"outside the folder then delete your folder. In the end you should have three simpleimages: "nav", "nav.hoover" and "divider.png".
converted by Web2PDFConvert.com

Advertisement
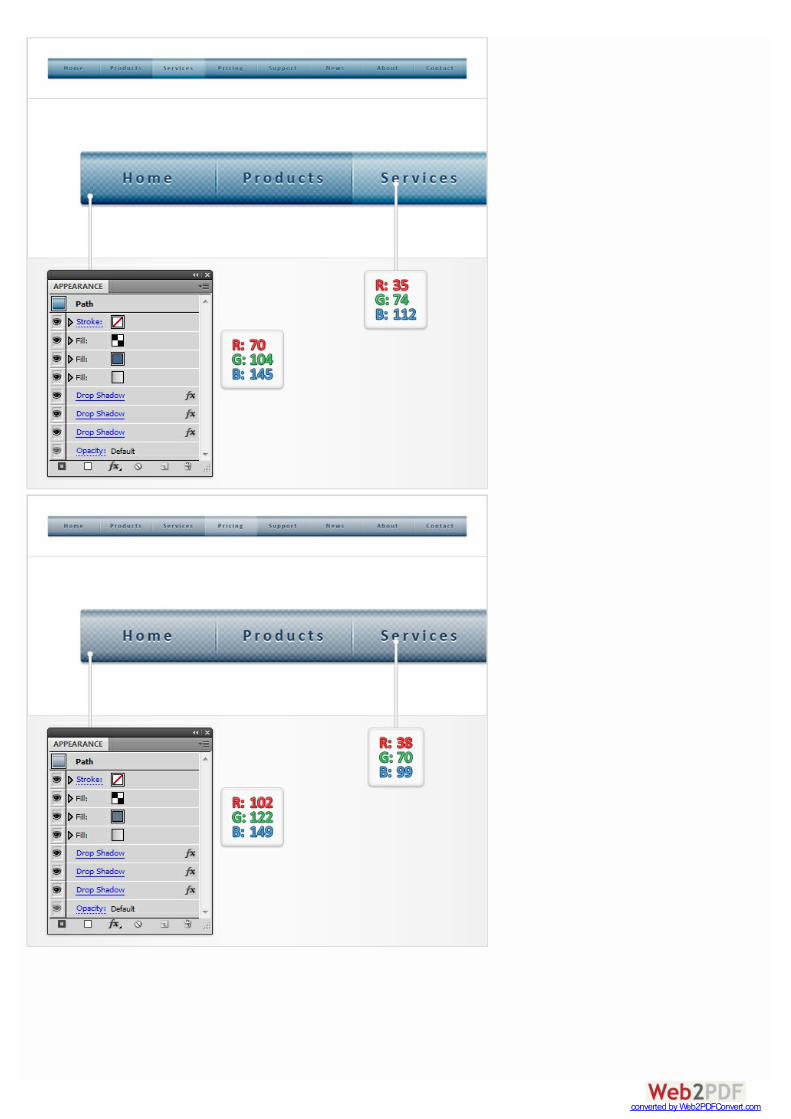
Step 23
Finally, you can easily change the colors used for your navigation bar. Simply replacethe color used for the text and the second fill with some of the colors shown in thefollowing images.
converted by Web2PDFConvert.com
converted by Web2PDFConvert.com

converted by Web2PDFConvert.com

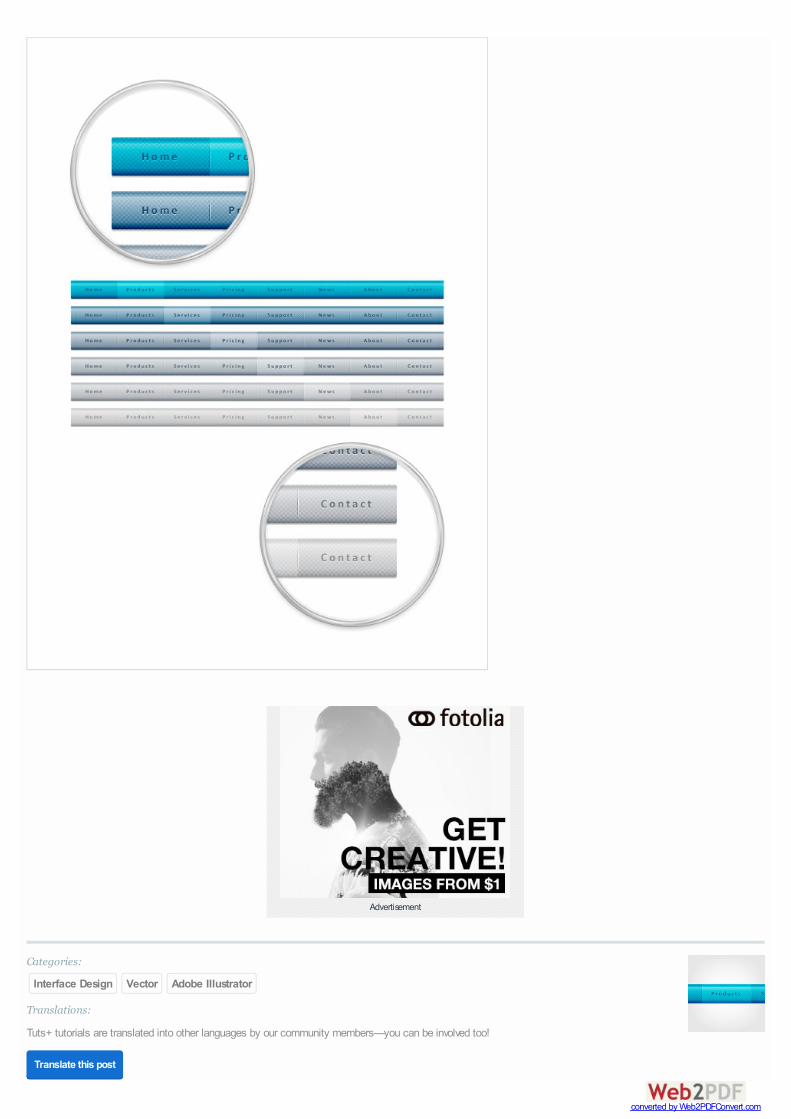
Conclusion
Now your work is done, this is how it should look.
converted by Web2PDFConvert.com
Advertisement
Categories:
Interface Design Vector Adobe Illustrator
Translations:
Tuts+ tutorials are translated into other languages by our community members—you can be involved too!
Translate this post
converted by Web2PDFConvert.com

Advertisement
Suggested Tuts+ Course
Related Tutorials
Download Attachment
About Andrei Marius
+ Expand Bio
I'm a self taught vector artist trying to make a living doing something that I like. I spend most of my time working in Adobe Illustrator, avoiding the Pen Tooland struggling to find the perfect colors. You can find all my vector experiments at this little website dedicate to Illustrator, VforVectors.com.
Vector Avatar Creation for Beginners $15
Create a Copper Pipe Text Effect in Adobe IllustratorDesign & Illustration
How to Create a Twisted Balloon Text Effect in Adobe IllustratorDesign & Illustration
converted by Web2PDFConvert.com

Jobs
Envato Market Item
What Would You Like to Learn?
Suggest an idea to the content editorial team at Tuts+.
16 Comments Vectortuts+ Login1
Share⤤ Sort by Best
Join the discussion…
• Reply •
harrie • 3 years ago
youve got rounded corners, how can you hit pathfinder -> divide without screwing the whole thing up?step 6
1
• Reply •
Duc Su • 3 years ago
I love your color pallet on all your illustration. I believe there is a typo for the navbar height. Step 1 says a height of 25px but step 3 ask toinput a height of 50px for the divider.
1
• Reply •
Sharon Milne • 3 years ago> Duc Su
Hey Duc Su,
Andrei indeed contact us with a replacement image and the article has now been updated.
• Reply •
Duc Su • 3 years ago> Sharon Milne
I go through both the written part and images when I do tutorials. Just happened to spot both typos. :D
• Reply •
Duc Su • 3 years ago> Sharon Milne
Great. You may also want to update the written part as well in step 2. It still reads 25px and not 50px.
Recommend
Share ›
Share ›
Share ›
Share ›
Share ›
How to Create the S.H.I.E.L.D. Logo in Adobe IllustratorDesign & Illustration
Front-End Engineerat Indegene Inc in Los Angeles, CA, USA
Junior eCommerce Web Developerat Gauge Interactive in Savannah, GA, USA
converted by Web2PDFConvert.com

• Reply •
Sharon Milne • 3 years ago> Duc Su
You're on the ball today :P
• Reply •
Andrei Marius • 3 years ago> Duc Su
You're right. I contacted the editor and she'll make the correction. The correct size is 1025 by 50px. Thanks for pointing it. I'm really sorry, I have no idea how I missed it.
• Reply •
Sharon Milne • 3 years ago> Andrei Marius
Thank you Andrei :)
• Reply •
Logan Zen • 4 months ago
Just started this tutorial but when I click make mask like in step 10 my shape disappears, on the transparency panel the mask square isempty unlike on the example image... WHat am I doing wrong?
• Reply •
Arnab Ghosh • 8 months ago
Can anyone help me with the step 6 explanation.After hitting "Shift+Ctrl+G", not ungrouping the divided tabs, and no changes in the layer box.I re-checked everything from step 1... but still same problem is happening.... :(
I' using CS4, But I don't think, that's the problem...!!!Every option is working fine... o.O
• Reply •
L • 3 years ago
very nice tutorial, the second work in AI https://www.dropbox.com/s/2yce...I also sliced it and saved nav, nav.hoover and divider, no problems at all...very easy and well explained..feel free to tell me if you like it or not guys :P
Thanks Andrei and staff :)
• Reply •
Jorge Domínguez • 3 years ago
Thanks for this tutorial! REALLY GREAT!!!
• Reply •
Unaiz • 3 years ago
great tut.. i am going to try this.
• Reply •
Joe Hamid • 3 years ago
And?
It's like the tutorial just stopped.
How about something like: "Now, head over to Webdesigntuts+ and we'll show you how to implement it. "?
• Reply •
Kate McInnes • 3 years ago> Joe Hamid
We can definitely arrange that for future tutorials :)
• Reply •
Jacky Young • 3 years ago> Kate McInnes
yeah i have learned so much,,Thank u
Subscribe✉ Add Disqus to your sited Privacy�
Share ›
Share ›
Share ›
Share ›
Share ›
Share ›
Share ›
Share ›
Share ›
Share ›
Share ›
converted by Web2PDFConvert.com

20,097 Tutorials 582 Video Courses
Custom digital services like logo design, WordPress installation, video production and more.
Check out Envato Studio
Choose from over 5 million royalty-free photos and images priced from $1. No subscription required.
Browse Photos on PhotoDune
Advertisement
Teaching skills to millions worldwide.
Follow Us
Help and Support
FAQTerms of UseContact SupportAbout Tuts+AdvertiseTeach at Tuts+Translate for Tuts+Meetups
Email Newsletters
Get Tuts+ updates, news, surveys &offers.
Email Address
Subscribe
Privacy Policy
© 2015 Envato Pty Ltd. Trademarks and brands are the property of their respective owners.
converted by Web2PDFConvert.com
Related Documents