Crazy Contraptions Page Copyright © TeacherGeek 2007 teachergeek.org/crazy_contraptions.pdf ™ Innovate. Inspire. ™ Crazy Contraptions Build a jaw dropping, innovative, Rube Goldburg style machine 1. Ball rolls down ramps onto lever 2. Lever pivots and tosses dime 3. Dime lands in funnel and falls onto 2nd lever 4. Ramp tilts and car rolls down it into cup 5. Cup pulls string running around pulleys and turns wheel and axle 6. Wheel and axle winds string 7. String pulls wedge 8. Wedge releases lever 9. Lever pivots and raises flag Activity Guide Revision 3.0

Welcome message from author
This document is posted to help you gain knowledge. Please leave a comment to let me know what you think about it! Share it to your friends and learn new things together.
Transcript

Crazy Contraptions Page �
Copyright © TeacherGeek 2007 teachergeek.org/crazy_contraptions.pdf
™
Innovate. Inspire.
™
Crazy Contraptions
Build a jaw dropping, innovative, Rube Goldburg style machine
1. Ball rolls down ramps onto lever2. Lever pivots and tosses dime3. Dime lands in funnel and falls onto 2nd lever4. Ramp tilts and car rolls down it into cup5. Cup pulls string running around pulleys and turns wheel and axle6. Wheel and axle winds string7. String pulls wedge8. Wedge releases lever9. Lever pivots and raises flag
Activity Guide
Revision 3.0
Crazy Contraptions Page �
Copyright © TeacherGeek 2007 teachergeek.org/crazy_contraptions.pdf
™
The Guide
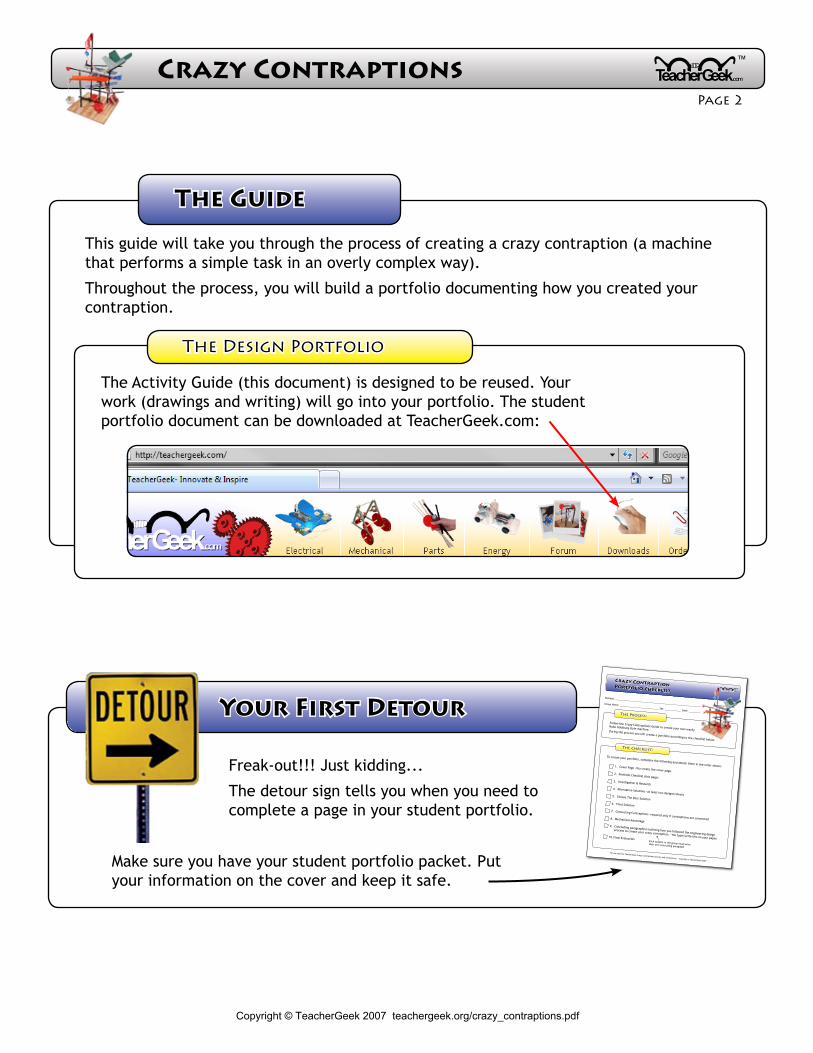
This guide will take you through the process of creating a crazy contraption (a machine that performs a simple task in an overly complex way).
Throughout the process, you will build a portfolio documenting how you created your contraption.
The Activity Guide (this document) is designed to be reused. Your work (drawings and writing) will go into your portfolio. The student portfolio document can be downloaded at TeacherGeek.com:
The Design Portfolio
Crazy ContraptionPortfolio ChecklistName(s): __________________________________________________________________Group Name: ______________________________ Set: ____________ Date: _________
Cover Page -You create the cover page.Portfolio Checklist (this page)Investigation & Research
Alternative Solutions -at least two designs/sheetsChoose The Best Solution
Final Solution
Connecting Contraptions -required only if contraptions are connectedMechanical Advantage
Concluding paragraph(s) outlining how you followed the engineering design
process to create your crazy contraption. -You type/write this on your paper.Final Evaluation
1.
2.
3.
4.
5.
6.
7.
8.
9.
10.
Follow the Crazy Contraptions Guide to create your own wacky Rube Goldburg style machine.During the process you will create a portfolio according to the checklist below.
To create your portfolio, complete the following and attach them in the order shown:
For use with the TeacherGeek Crazy Contraptions Activity and components. Copyright © TeacherGeek 2007
Each student in the group must write their own concluding paragraph
™
The Process:
The Checklist:
Freak-out!!! Just kidding...
The detour sign tells you when you need to complete a page in your student portfolio.
Make sure you have your student portfolio packet. Put your information on the cover and keep it safe.
Your First Detour

Crazy Contraptions Page �
Copyright © TeacherGeek 2007 teachergeek.org/crazy_contraptions.pdf
™
The Engineering Design Process is a series of steps that engineers use to guide them as they solve problems. You will use the Engineering Design Process to help you create your Crazy Contraption.
The Engineering Design Process
1
2
3
4
5
6 The Engineering
DesignProcess
A group of connected parts that work together to accomplish a task.
Something you never wanted to know...
Mechanical systems are referred to as machines. Machines are made up of subsystems called mechanisms. A machine is a combination of two or more mechanisms that work together to perform a task.
System (Machine)
Subsystem (Mechanism)
A mechanism or group of mechanisms that fits into a larger system (machine).
1. Identify the Problem
2. Investigation and Research
3. Generate Alternative Solutions
4. Choose the Best Solution
5. Prototyping
6. Test and Evaluate
Your contraption will be made from many subsystems that link together to form a system.
Systems and Subsystems

Crazy Contraptions Page �
Copyright © TeacherGeek 2007 teachergeek.org/crazy_contraptions.pdf
™
Design and build a machine that performs a simple task through an extremely complex process.
About this step: The problem statement provides information that justifies the need for a solution to a problem. The design brief helps us focus on the problem and gives guidelines that we will adhere to while designing a solution. These guidelines are referred to as Design Constraints.
Problem Statement
Contraption
1
Option 1: Contraptions will function independent of each other.
Option 2: Contraptions will be connected in series. The first contraption triggers the second, which triggers the third and so forth until the last contraption is reached. The last contraption must perform a simple task.
Contraption
2Contraption
3Contraption
4
Each contraption must perform a simple task such as popping a balloon, lighting a light bulb, cracking an egg, raising a flag...
Don’t stop at 4. Create as many contraptions as you can.
Subsystem
System
Contraption
1Contraption
2Contraption
3Contraption
4
The last contraption must perform a simple task such as popping a balloon, lighting a light bulb, cracking an egg, raising a flag...
Don’t stop at 4. Create as many contraptions as you can.
Check out the next page for your design brief and evaluation criteria.
1 The Engineering Design Process
Identify the ProblemStep

Crazy Contraptions Page �
Copyright © TeacherGeek 2007 teachergeek.org/crazy_contraptions.pdf
™
Evaluation Criteria
Design Brief
The contraption must:
1. transfer energy through a series of mechanisms. Each mechanism will link with the next mechanism to transfer energy from start to finish.2. operate completely on its own, once started.3. fit into the area directly above its 12” x 12” base, other than any components designated to trigger another contraption. There is no limit to the height of your subsystem, but it must be free-standing.4. be constructed from the parts specified on page 2, or other teacher approved materials (from the classroom or home). 5. use 4 or more simple machines (the more simple machines, the better).6. take more than 4 seconds to transfer energy through its system.7. not involve any living creatures (other than a person to start it).8. be safe (it may not contain potentially hazardous items or operate in a hazardous way).9. not damage other contraptions.
• Design Brief • The machine should fit the design brief (look above).• Function • The machine should complete its task with no human intervention. • The machine should be reliable.• Creativity • The machine’s steps should be innovative. • Materials/Components should be used in unique ways.• Complexity • Your machine should have at least 4 steps using at least 4 different simple machines. • Five points will be awarded for each additional step beyond 4. • All steps should be unique from each other and of reasonable complexity.• Participation & Teamwork • Team members must actively participate throughout the activity.• Mechanical Advantage • Mechanical advantage should be calculated for at least 2 of the simple machines in the contraption.• Portfolio • A design portfolio must be created for your contraption • Requirements are listed in the student portfolio document.
Crazy Contraptions Page �
Copyright © TeacherGeek 2007 teachergeek.org/crazy_contraptions.pdf
™
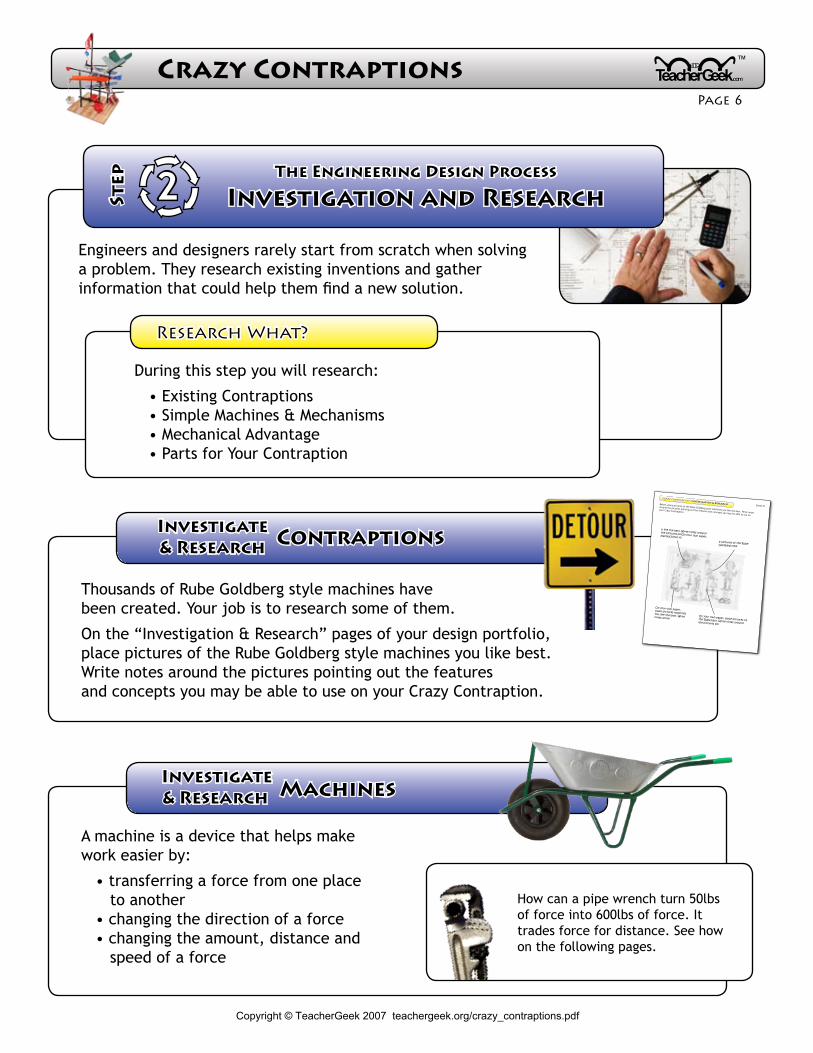
Engineers and designers rarely start from scratch when solving a problem. They research existing inventions and gather information that could help them find a new solution.
2 The Engineering Design Process
Investigation and ResearchStep
Thousands of Rube Goldberg style machines have been created. Your job is to research some of them.
On the “Investigation & Research” pages of your design portfolio, place pictures of the Rube Goldberg style machines you like best. Write notes around the pictures pointing out the features and concepts you may be able to use on your Crazy Contraption.
u like the best. Write notes around the pictures poiOn your own paper, placmachines yo
On your own paper, place pictures of the Rube best. Write notes around the pictures poi
On your own paper, place pictures machines you like the best. Write notes aroun
e pictures of the Rube Goldberg style
Research What?
During this step you will research:
• Existing Contraptions • Simple Machines & Mechanisms • Mechanical Advantage • Parts for Your Contraption
Crazy Contraptions Investigation & ResearchBelow, place pictures of the Rube Goldberg style machines you like the best. Write notes
around the pictures pointing out the features and concepts you may be able to use on
your Crazy Contraption.
Sheet #1
Machines
How can a pipe wrench turn 50lbs of force into 600lbs of force. It trades force for distance. See how on the following pages.
Investigate & Research Contraptions
Investigate & Research
A machine is a device that helps make work easier by:
• transferring a force from one place to another • changing the direction of a force • changing the amount, distance and speed of a force

Crazy Contraptions Page �
Copyright © TeacherGeek 2007 teachergeek.org/crazy_contraptions.pdf
™
Mechanical Advantage is the relationship between
the input force (work in) and the output force (work out).
Forcein• Distancein = Forceout• Distanceout
Workin
Workout
Mechanical Advantage
Workin = Workout
Work equals force times distance, so we can say...
Input ForceAlso called “Effort”
The distance over which the input force is applied
The distance over which the output force is applied
Force For Distance
The “hammer” acts as a lever, trading force from the spring for distance.
Mechanical Advantage =Forcein
ForceoutDistancein
Distanceout=
Work = Force • Distance
Distance: The amount the object moves. Force
Distance
WorkThe scientific definition of work: Using a force to move an object a distance.
Force: The pull or the push on an object, resulting in its movement.
Distance for Force
The screw trades distance (revolutions) for forceto clamp.
or
Output Force

Crazy Contraptions Page �
Copyright © TeacherGeek 2007 teachergeek.org/crazy_contraptions.pdf
™
Copyright © TeacherGeek 2007 teachergeek.org/crazy_contraptions.pdf
Above we calculated the ideal mechanical advantage. Not all forces were considered. We didn’t account for friction losses or the mass of the machine.
We could find actual mechanical advantage by measuring the input and output forces. The measurements would show how its mechanical advantage is reduced by energy lost.
Mechanical Advantage (continued)
That’s Nuts...
Forcein
Forceout
Mechanical Advantage =Forcein
ForceoutDistancein
Distanceout=
How does a nutcracker use mechanical advantage?
Mechanical Advantage =10lbs
Forceout 1in
.25in=
1
2
3 Mechanical Advantage =
Solve for: Forceout Forceout = 40lbs
We can use the proportions or to find mechanical advantage.Forcein
ForceoutDistancein
Distanceout
10lbs40lbs
Mechanical Advantage = 4:1
What does this mean? • For every 1lb of input force, you will get 4lbs of output force. • For every 1in of input distance, you will get a 1/4in output distance.
Ideal vs. Actual Mechanical Advantage
=
Forcein • Distancein
10lbs • 1in Forceout • Distance
out??? • .25in

Copyright © TeacherGeek 2007 teachergeek.org/crazy_contraptions.pdf
Crazy Contraptions Page �
Copyright © TeacherGeek 2007 teachergeek.org/crazy_contraptions.pdf
™
Lever
Wedge
InclinePlane
Line & Pulley(Block & Tackle)
Screw
Wheel & Axle
Gears
Belt &Pulley
Pulley
SimpleMachines

Crazy Contraptions Page �0
Copyright © TeacherGeek 2007 teachergeek.org/crazy_contraptions.pdf
™
Copyright © TeacherGeek 2007 teachergeek.org/crazy_contraptions.pdf
Types of Levers
Levers
Class One Lever
Class Two Lever
The load is located between the fulcrum and the effort. A 2nd class lever does not change the direction of force.
Fulcrum
Fulcrum
It causes the load to increase in force, but decrease in speed and distance.
EffortArm
LoadArm
Fulcrum
Load
EffortArm
LoadArm
The fulcrum is located between the effort and the load. 1st class levers always change the direction of force.
Forcein
Forceout
Load Arm Length
Effort Arm Length
Distanceout
Distancein= =
Ideal Mechanical Advantage
Force out
Force in
Forceout
Forcein
Forceout
Forcein Load
Fulcrum
Forcein
Also known as the “effort”
Forceout
Effort
Fulcrum Load
The “load” is the force that opposes the Forceout
(Forcein) ForceoutA lever consists of a rigid bar pivoted on a “fulcrum” (fixed point). It is used to move a load.

Copyright © TeacherGeek 2007 teachergeek.org/crazy_contraptions.pdf
Crazy Contraptions Page ��
Copyright © TeacherGeek 2007 teachergeek.org/crazy_contraptions.pdf
™
Force = 20lbs
Radius= 1ft
Class Three Lever
The effort is located between the fulcrum and the load.
Types of Levers (Continued)
Fulcrum
A 2nd class lever does not change the direction of force. It causes the load to decrease in force but gain speed and distance.
Mechanisms with Levers
1. ball drops in cup
2. lever pivots3. ball rolls
2. car is released
1. string pulls
1. string is pulled
2. lever Pivots
3. ball rolls
1. ball drops
2. lever pivots
3. stick is pushed up
1. car hits lever2. lever pivots
3. lever hits ball4. ball
rolls
Fulcrum
Load
EffortArm
LoadArm
Mechanical Advantage =
ForceoutForcein
Force in
Force out
Torque is a turning or twisting force.
Torque = Force • Lever ArmTorque = 1ft • 20lbsTorque = 20ft•lbs (20 foot-pounds)
What is Torque?
(The distance of the Forcein from the axis)
What is the torque applied to the pipe?

Crazy Contraptions Page ��
Copyright © TeacherGeek 2007 teachergeek.org/crazy_contraptions.pdf
™
Copyright © TeacherGeek 2007 teachergeek.org/crazy_contraptions.pdf
Wheel & Axle
The Windlass (Winch)
A windlass is really a wheel and axle (with a cable wrapped around the axle).
A wheel works like a lever revolving around an axis.
The Wheel & Axle
To be a “wheel and axle,” the wheel and axle must be connected and turn together.
Not a Wheel & Axle
Outpu
t
Input
A
BOut
put
Input
C
D
Wheel RadiusAxle Radius
Ideal Mechanical Advantage
Torquein
Torqueout
Output Radius
Input Radius=
Axle C(Input)
Wheel D(Output)
Circumference (distance the
force is applied)Smaller Larger
Torque More Less
Wheel A(Input)
Axle B(Output)
Circumference (distance the
force is applied)Smaller Larger
Torque More Less
If the input force is applied to the wheel…
Mechanical Advantage: The ratio between the input and output radius.
If the input force is applied to the axle…
RPM = Revolutions Per Minute
What is RPM?
(The number of times something spins around in a minute)Cars have RPM guages
Copyright © TeacherGeek 2007 teachergeek.org/crazy_contraptions.pdf
Crazy Contraptions Page ��
Copyright © TeacherGeek 2007 teachergeek.org/crazy_contraptions.pdf
™
Torquein
Torqueout
Output Pulley Radius
Input Pulley Radius
Driven Pulley RPM (Distanceout)
Driving Pulley RPM (Distancein)= =
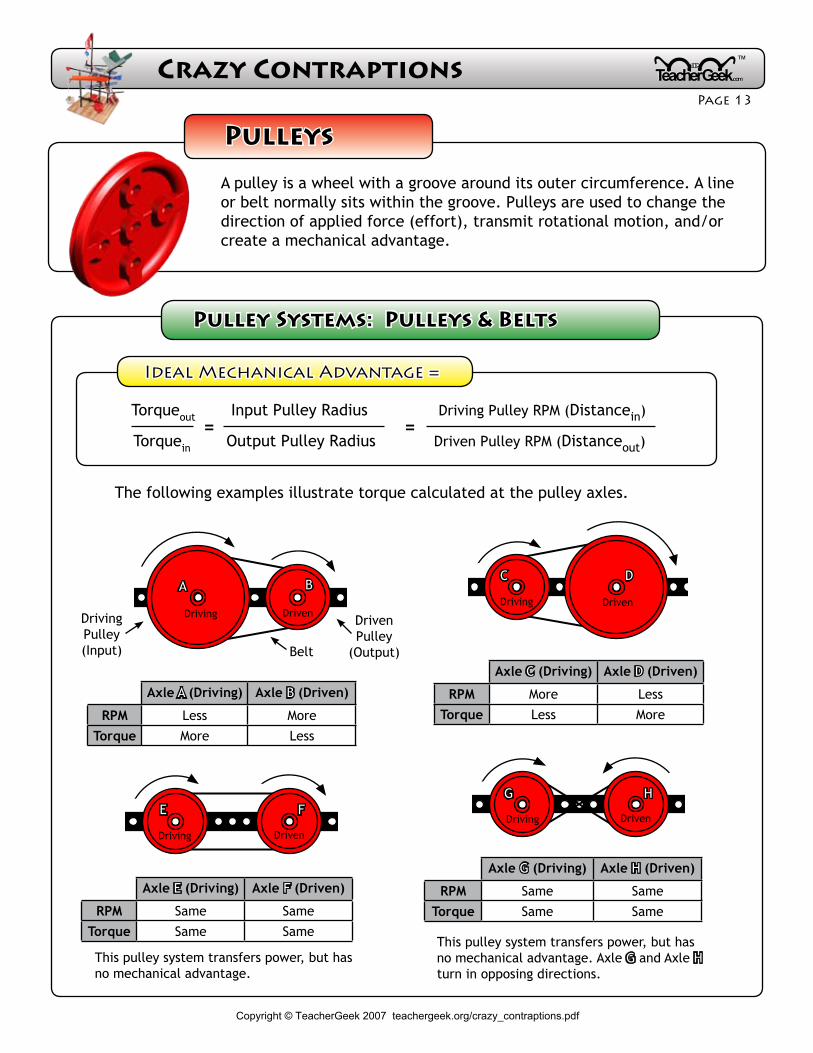
Pulley Systems: Pulleys & Belts
Pulleys
Ideal Mechanical Advantage =
A pulley is a wheel with a groove around its outer circumference. A line or belt normally sits within the groove. Pulleys are used to change the direction of applied force (effort), transmit rotational motion, and/or create a mechanical advantage.
This pulley system transfers power, but has no mechanical advantage. Axle G and Axle H turn in opposing directions.
Belt
A BC D
E FG H
Axle A (Driving) Axle B (Driven)
RPM Less More
Torque More Less
Axle C (Driving) Axle D (Driven)
RPM More Less
Torque Less More
This pulley system transfers power, but has no mechanical advantage.
Axle E (Driving) Axle F (Driven)
RPM Same Same
Torque Same Same
Axle G (Driving) Axle H (Driven)
RPM Same Same
Torque Same Same
Driving DrivenDriving Driven
Driving DrivenDriving Driven
The following examples illustrate torque calculated at the pulley axles.
Torquein
Torqueout
Output Radius
Input Radius=
DrivingPulley(Input)
Driven Pulley
(Output)

Crazy Contraptions Page ��
Copyright © TeacherGeek 2007 teachergeek.org/crazy_contraptions.pdf
™
Copyright © TeacherGeek 2007 teachergeek.org/crazy_contraptions.pdf
Ideal Mechanical Advantage of pulley systems can be calculated by counting the number of lines supporting the load.
Forcein= 100lbs
Dis
tanc
e out
= 1f
t
Distancein = ft
Forceout=100lbs
Forcein =50lbs
Dis
tanc
e out
= 1f
t
Distancein = 2ft
1
1 2
Fixed Pulley
Movable Pulley
Forceout=100lbs
Forcein=50lbs
Distance
out = 1ft
Dis
tanc
e in=
2ft
Dis
tanc
e in=
4ft D
istanceout = 1ft
1 2 12
3 4
1 Line Supporting the Load = Mechanical Advantage of 1 (no mechanical advantage)
The fixed pulley changes the direction the effort is applied. 2 Lines Supporting the Load =
Mechanical Advantage of 2
2 Lines Supporting the Load = Mechanical Advantage of 2
4 Lines Supporting the Load = Mechanical Advantage of 4
Pulley Systems: The Block & Tackle
Forceout= 100lbs
Forcein=25lbs
Forceout=100lbs
Forcein
Forceout
1
# of Lines Supporting the Load
Distanceout
Distancein= =

Copyright © TeacherGeek 2007 teachergeek.org/crazy_contraptions.pdf
Crazy Contraptions Page ��
Copyright © TeacherGeek 2007 teachergeek.org/crazy_contraptions.pdf
™
Mechanisms with Pulleys
GearsA gear is a wheel with evenly spaced teeth around its perimeter.
The teeth on multiple gears can mesh to form a gear train. Gear trains (meshing gears) can transmit force, create a mechanical advantage, or change the direction of force.
Ideal Mechanical Advantage
Torquein
Torqueout
# of Teeth on the Driving Gear
Driven Gear RPM (Distanceout)
Driving Gear RPM (Distancein)= =
# of Teeth on the Driven Gear
Gears change the direction of rotation.
DrivingGear
(Input)
Driven Gear
(Output)
Axle A (Driving Gear)
Axle B (Driven Gear)
RPM Less More
Torque More Less
The following examples illustrate torque calculated at the gear axles.
A B
Driven Gear
(Output)
DrivingGear
(Input)
C D
Axle C (Driving Gear)
Axle D (Driven Gear)
RPM More Less
Torque Less More

Crazy Contraptions Page ��
Copyright © TeacherGeek 2007 teachergeek.org/crazy_contraptions.pdf
™
Mechanisms with Gears
Incline Plane
An incline plane is a sloped surface. By moving an object up an inclined plane rather than directly from one height to another, the amount of effort required is reduced, but the effort must be applied over a greater distance (the object must travel a greater distance).
Ideal Mechanical Advantage
RampLength
RampHeight
Load
Forcein
Forceout
Ramp Height
Ramp Length=
Distanceout
Distancein=
Distance in
DistanceoutForceout
Force in

Crazy Contraptions Page ��
Copyright © TeacherGeek 2007 teachergeek.org/crazy_contraptions.pdf
™
Wedge
Screw
A wedge is a portable inclined plane used either to separate objects, lift an object, or hold an object in place. It converts the input force to force perpendicular to the wedges inclined surfaces.
A screw is a shaft with a helical groove or thread around its perimeter. Screws are used as a fastener to hold objects together and as a simple machine used to translate torque into linear force.
Ideal Mechanical Advantage
Forcein
Forceout
Wedge Width
Wedge Height=
Ideal Mechanical Advantage
A screw is really an inclined plane wrapped around a shaft.
Wedge Width
LoadLoad
Forceout
Forcein
WedgeHeight
Forcein
Forceout 2π(Lever Length)
Distanceout
Distancein= =
Pitch
Pitch
Lever Length: The distance from the axis of rotation to the applied force. This could also be the diameter of a screwdriver handle, or knob.
Wrench
The pitch of a screw is the distance between threads (the distance it advances in one rotation).
Forceout
Forcein
Distanceout
Distancein
(Torquein)
=
Distancein = The distance the Forcein travels around the axis.Distanceout = The distance the screw moves up or down.
Distancein
Distanceout

Crazy Contraptions Page ��
Copyright © TeacherGeek 2007 teachergeek.org/crazy_contraptions.pdf
™
Part Description: QTY: Picture:
Connector Strips
Birch Dowels.5mm x 620mm
Wood Strips5mm x 10mm
x 620mm
Large Glass Marbles
70mm Pulleys
50mm Pulleys
30mm Pulleys
50 Tooth Gears
20 Tooth Gears
Die-Cast Cars
#12 Screws
Part Description: QTY: Picture:
Paper Cups
Cardboard Sheets
Rolls of Thin Wire
Slide-Stop Material
Additional Supplies NeededPart Description
12” x 12” x 1/2” Wooden Bases (Particle Board, MDF, Plywood, etc.)www.TeacherGeek.com Part# TG201
Hot Glue Sticks + GunMasking Tape
StringScrap Paper
Recycled Items (Cardboard Tubes, Yogurt Containers,
Corrugated Cardboard, etc.)
Additional Equipment NeededPart Description
Easy Engineering Tool SetClass Pack
Hot Glue GunsOne Hole Paper Punch
ScissorsDrill (Optional)
Safety Glasses
What “junk” can you find to add to your Crazy Contraption?
What supplies will you have to make your contraption?
Your SuppliesInvestigate & Research

Crazy Contraptions Page ��
Copyright © TeacherGeek 2007 teachergeek.org/crazy_contraptions.pdf
™
Nothing is more dangerous than an idea, when it is the only one you have.-Emile Chartier
There is always more than one possible solution to a problem. Your first idea (possible solution) is rarely your best one. This step is about generating multiple, possible, creative solutions to the problem.
• Be imaginative. • Challenge basic assumptions. • Refer to the problem statement and design brief.
3 The Engineering Design Process
Generate Alternative SolutionsStep
Draw two different Crazy Contraption machines on the “Alternative Design” pages of your portfolio. The designs should be clean, comprehensive and innovative. Additional alternative designs can be stapled to your portfolio.
Alternative Solutions
Energy Transfer
Energy Transfer
Energy Transfer
Energy Transfer
Energy Transfer
Energy Transfer
Step
/ M
echa
nism
#8
Step
/ M
echa
nism
#7
Step
/ M
echa
nism
#6
Step
/ M
echa
nism
#5
Step
/ M
echa
nism
#4
Step
/ M
echa
nism
#3
Step
/ M
echa
nism
#2
Step
/ M
echa
nism
#1
Need space for more steps? Use another sheet.
For
use
with
the
Teac
herG
eek
Cra
zy C
ontra
ptio
ns A
ctiv
ity a
nd c
ompo
nent
s.
Cop
yrig
ht ©
Tea
cher
Gee
k 20
07
Cr
azy
Co
ntr
apt
ion
s A
lter
na
tiv
e So
luti
on
#__
___
Gro
up N
ame:
Dat
e:
Set:
Gro
up M
embe
rs:
Energy Transfer
Energy Transfer
Energy Transfer
Energy Transfer
Energy Transfer
Energy Transfer
Energy Transfer
Step
/ M
echa
nism
#8
Step
/ M
echa
nism
#7
Step
/ M
echa
nism
#6
Step
/ M
echa
nism
#5
Step
/ M
echa
nism
#4
Step
/ M
echa
nism
#3
Step
/ M
echa
nism
#2
Step
/ M
echa
nism
#1
Need space for more steps? Use another sheet.
For
use
with
the
Teac
herG
eek
Cra
zy C
ontra
ptio
ns A
ctiv
ity a
nd c
ompo
nent
s.
Cop
yrig
ht ©
Tea
cher
Gee
k 20
07
Cr
azy
Co
ntr
apt
ion
s A
lter
na
tiv
e So
luti
on
#__
___
Gro
up N
ame:
Dat
e:
Set:
Gro
up M
embe
rs:
Energy Transfer
Contraption
1Contraption
2Contraption
3Contraption
4
If your contraption will be linked to other contraptions (Option #2), meet with the connecting contraption groups to complete the “Connecting Contraptions” sheet in your portfolio.
Will Your Contraption Link?
Possible
Crazy Contraptions Page �0
Copyright © TeacherGeek 2007 teachergeek.org/crazy_contraptions.pdf
™
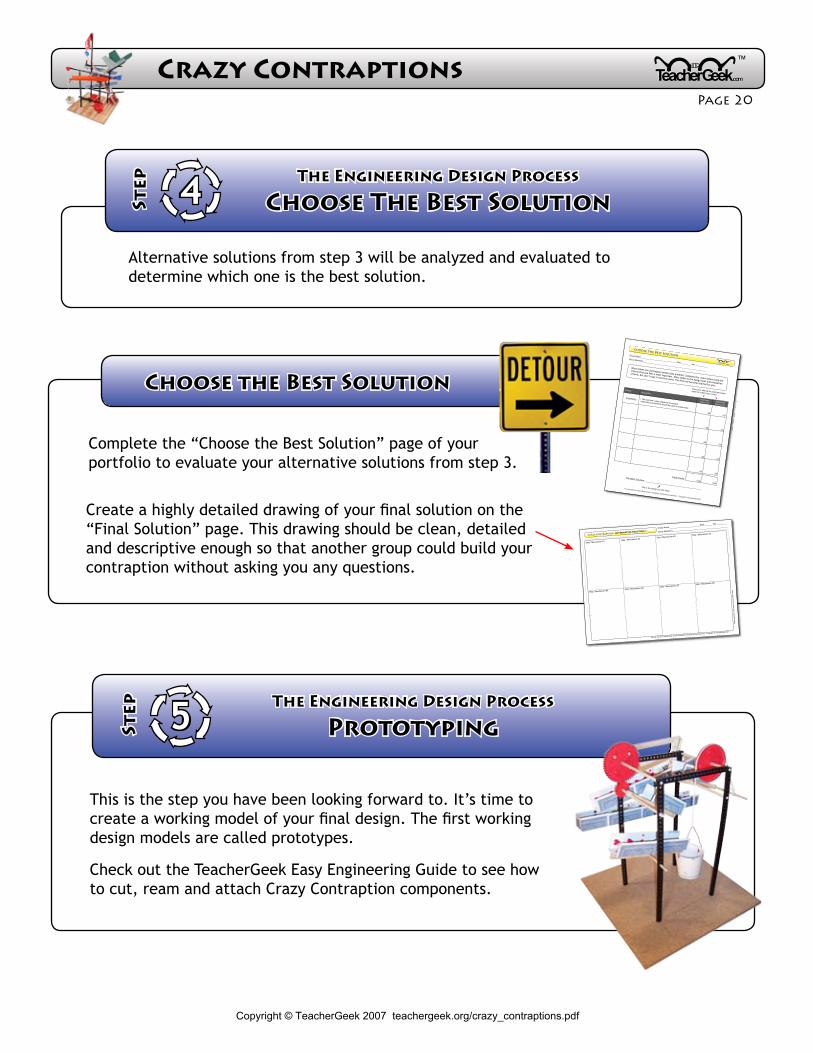
This is the step you have been looking forward to. It’s time to create a working model of your final design. The first working design models are called prototypes.
Check out the TeacherGeek Easy Engineering Guide to see howto cut, ream and attach Crazy Contraption components.
5 The Engineering Design Process
PrototypingStep
4 The Engineering Design Process
Choose The Best SolutionStep
Choose the Best Solution
En
ergy
Tra
nsfe
r
En
ergy
Tra
nsfe
r
En
ergy
Tra
nsfe
r
En
ergy
Tra
nsfe
r
En
ergy
Tra
nsfe
r
En
ergy
Tra
nsfe
r
Step / Mechanism #8
Step / Mechanism #7
Step / Mechanism #6
Step / Mechanism #5
Step / Mechanism #4
Step / Mechanism #3
Step / Mechanism #2
Step / Mechanism #1
Nee
d sp
ace
for m
ore
step
s? U
se a
noth
er s
heet
.
For use with the TeacherGeek Crazy Contraptions Activity and components. Copyright © TeacherGeek 2007
Crazy Contraptions Alternative Solution #_____Group Name:
Date: Set:
Group Members:
Ene
rgy
Tran
sfer
Alternative solutions from step 3 will be analyzed and evaluated to determine which one is the best solution.
Complete the “Choose the Best Solution” page of your portfolio to evaluate your alternative solutions from step 3.
Create a highly detailed drawing of your final solution on the “Final Solution” page. This drawing should be clean, detailed and descriptive enough so that another group could build your contraption without asking you any questions.
Choose The Best SolutionGroup Name: Date: Set:
Group Members: ™
Criteria:Description:
AlternativeSolution #1AlternativeSolution #2
Creativity • The machine’s steps should be innovative• Materials/Components should be used in unique ways
/20/20
/20/20
/20/20
/20/20
/20/20
Total Points: /100
/100
For use with the TeacherGeek Crazy Contraptions Activity and components. Copyright © TeacherGeek 2007
This step will ask you to take a look at the alternative solutions you generated and decide
which one is the best. Fill out the table below by ranking each of your solutions based on the
given criteria. Give each solution a rank of 1 (probably not) - 5 (definitely) for each criteria. To
tal your scores for each solution and record the totals in the blanks provided.
Criteria:Meets the Design ConstraintsFunction
ComplexityCreativity
Which solution ranked higher?Note: If both solutions ranked low you should develop some more alternative solutions that meet the criteria.
What makes one contraption better than another? Complete the chart below using the
criteria that you feel is most important. Note: Refer to the design brief and evaluation
criteria, but don’t copy it word-for-word. The first row has been started for you.
The Best Solution: _____________________________________________This is the design you will build.
Score your alternative solutions based upon the criteria you create.

Crazy Contraptions Page ��
Copyright © TeacherGeek 2007 teachergeek.org/crazy_contraptions.pdf
™
Step #�
A. Cut two 150mm (5 7/8”) dowel sections. B. Cut one connector strip in ½ to get two 150mm (5 7/8”) dowels.C. Assemble the dowels and connector strips as shown. Dowels should extend 5mm (3/16”) past the connector strips.
Step #�
You will need a base. The base can be purchased from TeacherGeek, or made using the base template.
Step #�
Insert 4 connector strips, facing the same way, into the base.
Step #�
Attach the assembly from step 3, as shown, into the assembly from step 2.
The frame will support the contraption mechanisms.
Your frame is done!!!
Building The Frame

Crazy Contraptions Page ��
Copyright © TeacherGeek 2007 teachergeek.org/crazy_contraptions.pdf
™
6 The Engineering Design Process
Test & EvaluateStep
Build Your Contraption !!!
This is the step you have been looking forward to!!!
Add mechanisms and other components to your frame to build the contraption shown on your final solution sheet.
Test your prototype and evaluate how well it satisfies the original design problem.
1. Identify Problems with the Existing Design2. Investigation and Research ways to fix it3. Generate Alternative Solutions4. Choose the Best Solution5. Tweak/Redesign the Prototyping6. Test and Evaluate
Improve/Fix the D
esign
Complete the Mechanical Advantage Page
Continue around the design process until your teacher tells you to stop.
Complete the Final Evaluation Page write a concluding paragraph.
Final Evaluation: All the Crazy Contraptions are tested together.
Assemble your design portfolio and submit it to your teacher.
Congratulations!!! You’re Done.
Create iterations (new versions of your contraption) using the Iterations Sheets in your design portfolio.
Related Documents