Seagate Crystal Reports™ 7.0 Technical Reference Volume I - Development Tools Overview Seagate Software, Inc. 840 Cambie Street Vancouver, B.C., Canada V6B 4J2

Welcome message from author
This document is posted to help you gain knowledge. Please leave a comment to let me know what you think about it! Share it to your friends and learn new things together.
Transcript

Seagate Crystal Reports� 7.0Technical ReferenceVolume I - Development ToolsOverview
Seagate Software, Inc. 840 Cambie Street
Vancouver, B.C., Canada V6B 4J2
© 1999 (manual and software) Seagate Software, Inc. All Rights Reserved.
Seagate Software, Seagate, and the Seagate logo are registered trademarks ofSeagate Technology, Inc., or one of its subsidiaries. Seagate Crystal Reports,Seagate Crystal Info, Seagate Info, the Seagate Crystal Reports logo, and SmartNavigation are trademarks or registered trademarks of Seagate Software, Inc. Allother product names referenced are believed to be the registered trademarks oftheir respective companies.
Manual written by:
ELUCIDEX655 Stuart Road
Bellingham, WA 98226http://www.elucidex.com
1999
C O N T E N T S
Chapter 1 - Crystal Web Report ServerSeagate Crystal Web Reports Server Overview . . . . . . . . . . . . . . . . . . . . . . . . . . . . . . . 2Implementing the Web Reports Server . . . . . . . . . . . . . . . . . . . . . . . . . . . . . . . . . . . . . 8Crystal Web Reports Server Administration . . . . . . . . . . . . . . . . . . . . . . . . . . . . . . . . . 16Web Reports Server Commands . . . . . . . . . . . . . . . . . . . . . . . . . . . . . . . . . . . . . . . . . 28Web Reports Server Architecture . . . . . . . . . . . . . . . . . . . . . . . . . . . . . . . . . . . . . . . . 37Chapter 2 - Building Active Web SitesSeagate Crystal Report Engine Automation Server . . . . . . . . . . . . . . . . . . . . . . . . . . . . 44Visual InterDev Design-time ActiveX Control . . . . . . . . . . . . . . . . . . . . . . . . . . . . . . . 44Editing Active Server Pages . . . . . . . . . . . . . . . . . . . . . . . . . . . . . . . . . . . . . . . . . . . . . 47Sample Web Site. . . . . . . . . . . . . . . . . . . . . . . . . . . . . . . . . . . . . . . . . . . . . . . . . . . . . 48
Chapter 3 - Configuring the Crystal Smart ViewersCrystal Smart Viewer Overview . . . . . . . . . . . . . . . . . . . . . . . . . . . . . . . . . . . . . . . . . 50Crystal Smart Viewer for HTML. . . . . . . . . . . . . . . . . . . . . . . . . . . . . . . . . . . . . . . . . . 53Crystal Smart Viewer for Java . . . . . . . . . . . . . . . . . . . . . . . . . . . . . . . . . . . . . . . . . . . 55Crystal Smart Viewer for ActiveX . . . . . . . . . . . . . . . . . . . . . . . . . . . . . . . . . . . . . . . . 57
Chapter 4 - Crystal Report EngineIntroduction to the Crystal Report Engine . . . . . . . . . . . . . . . . . . . . . . . . . . . . . . . . . . 64Before using the Crystal Report Engine in your application . . . . . . . . . . . . . . . . . . . .65Using the Crystal Report Engine . . . . . . . . . . . . . . . . . . . . . . . . . . . . . . . . . . . . . . . . . 66Crystal Report Engine API . . . . . . . . . . . . . . . . . . . . . . . . . . . . . . . . . . . . . . . . . . . . . 68Exporting reports. . . . . . . . . . . . . . . . . . . . . . . . . . . . . . . . . . . . . . . . . . . . . . . . . . . . . 94Handling Preview Window Events . . . . . . . . . . . . . . . . . . . . . . . . . . . . . . . . . . . . . . . 97Distributing Crystal Report Engine Applications . . . . . . . . . . . . . . . . . . . . . . . . . . . . 102Additional Sources of Information. . . . . . . . . . . . . . . . . . . . . . . . . . . . . . . . . . . . . . . 102
Chapter 5 - Visual Basic Solutions Using the Crystal Report Engine API in Visual Basic . . . . . . . . . . . . . . . . . . . . . . . . . 104Crystal ActiveX Controls . . . . . . . . . . . . . . . . . . . . . . . . . . . . . . . . . . . . . . . . . . . . . . 108Crystal Report Engine Automation Server . . . . . . . . . . . . . . . . . . . . . . . . . . . . . . . . . 111Active Data Driver . . . . . . . . . . . . . . . . . . . . . . . . . . . . . . . . . . . . . . . . . . . . . . . . . . 118Crystal Data Object . . . . . . . . . . . . . . . . . . . . . . . . . . . . . . . . . . . . . . . . . . . . . . . . . 128Crystal Data Source Type Library . . . . . . . . . . . . . . . . . . . . . . . . . . . . . . . . . . . . . . . 131Grid Controls and the Crystal Report Engine . . . . . . . . . . . . . . . . . . . . . . . . . . . . . . . 139
i

Chapter 6 - The Report Designer Component The Seagate Crystal Report Designer Component - Introduction . . . . . . . . . . . . . . . .146The Seagate Crystal Report Designer Component - Features . . . . . . . . . . . . . . . . . . .146The Report Designer Component vs. Seagate Crystal Reports . . . . . . . . . . . . . . . . . .147Installing the Report Designer Component . . . . . . . . . . . . . . . . . . . . . . . . . . . . . . . .151Using the Seagate Crystal Report Designer Component . . . . . . . . . . . . . . . . . . . . . .151Working with data . . . . . . . . . . . . . . . . . . . . . . . . . . . . . . . . . . . . . . . . . . . . . . . . .158Report Designer Overview . . . . . . . . . . . . . . . . . . . . . . . . . . . . . . . . . . . . . . . . . . . .169Report Designer Object Model Programming . . . . . . . . . . . . . . . . . . . . . . . . . . . . . .173Report Distribution Considerations . . . . . . . . . . . . . . . . . . . . . . . . . . . . . . . . . . . . .190
Chapter 7 - Seagate Crystal Visual Component LibraryVCL Component Overview . . . . . . . . . . . . . . . . . . . . . . . . . . . . . . . . . . . . . . . . . . .194Installation . . . . . . . . . . . . . . . . . . . . . . . . . . . . . . . . . . . . . . . . . . . . . . . . . . . . . . . .194Programming Overview . . . . . . . . . . . . . . . . . . . . . . . . . . . . . . . . . . . . . . . . . . . . . .199Programming Tips . . . . . . . . . . . . . . . . . . . . . . . . . . . . . . . . . . . . . . . . . . . . . . . . . .209TCrpeString . . . . . . . . . . . . . . . . . . . . . . . . . . . . . . . . . . . . . . . . . . . . . . . . . . . . . . .212Using Variables with Formulas . . . . . . . . . . . . . . . . . . . . . . . . . . . . . . . . . . . . . . . . .215About Section Names . . . . . . . . . . . . . . . . . . . . . . . . . . . . . . . . . . . . . . . . . . . . . . .221C++ Builder 3 . . . . . . . . . . . . . . . . . . . . . . . . . . . . . . . . . . . . . . . . . . . . . . . . . . . . .224Known Problems . . . . . . . . . . . . . . . . . . . . . . . . . . . . . . . . . . . . . . . . . . . . . . . . . . .226Technical Support . . . . . . . . . . . . . . . . . . . . . . . . . . . . . . . . . . . . . . . . . . . . . . . . . .227
Index
ii
Volume1
1 Crystal Web Report Server
What you will find in this chapter...
Note: This chapter contains information specific to the Professional Edition of Seagate Crystal Reports.
Seagate Crystal Web Reports Server Overview, Page 2
...including an introduction to the features of the Web Reports Server with the new features in Version 7.0, Web Reports Server vs. Active Server Pages, and sample web sites.
Implementing the Web Reports Server, Page 8
...including choosing, installing and confirming installation of a Web Reports Server, virtual directories, creating a web site, and additional resources.
Crystal Web Reports Server Administration, Page 16
...including configuring the Web Reports Server, the Page and Image Servers, smart navigation, drilling down on data, and database location.
Web Reports Server Commands, Page 28
...including the Web Reports Server Command Expert, constructing, exporting and refreshing reports, changing selection formulas, and SQL and ODBC data sources including stored procedures and parameter fields.
Web Reports Server Architecture, Page 37
...including the Web Reports Server extension, the Page and Image Servers, report processing, and an overview of the Job Manager.
Crystal Web Report Server 1

Seagate Crystal Web Reports Server Overview
The Seagate Crystal Web Reports Server is the reporting solution for web sites running on Microsoft and Netscape web servers and most CGI compliant web servers running in the Microsoft Windows environment. The Web Reports Server provides the perfect interface for instantly displaying up-to-date reports in the familiar environment of the web browser. In addition, page-on-demand technology and report caching optimize the performance of the Web Reports Server for fast delivery of report data.
The following topics are discussed in this section.
What is the Web Reports Server?, Page 2
Who should use the Web Reports Server?, Page 3
Web Reports Server Features, Page 3
New Features in Version 7, Page 5
The Web Reports Server vs. Active Server Pages, Page 5
Sample Web Sites, Page 6
What is the Web Reports Server?
The Web Reports Server consists of an extension to your existing web server software along with back-end report and image processing applications. Your web server sends URL requests for reports to the Web Reports Server, which then processes the requests and delivers the information in the form of HTML pages or an advanced format viewable through a Java based or ActiveX Smart Viewer embedded in a lightweight HTML page.
This topic is only supported by the Professional Edition of Seagate Crystal Reports.
Crystal Web Report Server 2
Who should use the Web Reports Server?
The Web Reports Server is for network administrators and web masters who find a need to provide access to corporate and other business reports via a web site, on a corporate intranet or on the internet. The Web Reports Server has been improved and expanded to support large workgroups needing frequent access to information based on current data. The fact that it is web based means that sales and marketing staff can get to the information they need, even on a sales call thousands of miles away.
The exact number of users who can work together on a single Web Reports Server depends on your network and server resources. More resources means more users, so consider the size and capabilities of your system before implementing a web site in your organization.
For high traffic sites web site administrators will enjoy the simplicity of setting up a powerful Web Reports Server to handle most, if not all, of their report distribution needs.
NOTE: An alternative approach is to use Seagate Crystal Reports Automation Server with Active Server Pages. However this approach does not employ page caching and is not recommended for high traffic web sites. For further information refer to The Web Reports Server vs. Active Server Pages, Page 5.
Web Reports Server Features
Version 7 of Seagates Crystal Reports has provided a Web Reports Server that includes cutting-edge technology for the most efficient handling of data and reports over the web.
Page On Demand
Page On Demand means report pages are delivered when demanded. Sometimes a user may only need one or two pages of information out of a 100 page report. Rather than tie up your network by frequently transferring massive amounts of data, the Web Reports Server delivers reports a page at a time as requested by the client. When a report page is requested for the first time the report is generated. The requested page is delivered to the client and stored in a cache. The next time the client requests the same page it is retrieved from the cache rather than being generated again (note, however, that cached reports can be updated either by the client, if allowed by the administrator, or periodically).
By handling requests on a per page basis, the Web Reports Server can quickly handle large numbers of requests, limiting the delay in delivery for any one single request. Caching report pages also allows report information to be shared among clients more efficiently as multiple requests for the same report will not require that the report be generated multiple times.
Smart Navigation
When reports are displayed inside a browser, they can include a navigation tree that speeds access to the information your users need. The navigation tree works much like the directory structure presented in Windows Explorer but provides access to specific groups and records within the report. Smart search controls allow navigation to a specific data value. Rather than waste time flipping through pages of data to locate the information that is most important, users jump right to what they need through Smart Navigation.
Crystal Web Report Server 3
Supports Secured Databases
Do your reports connect to ODBC and SQL data sources that require secure log on information? Do users need to specify user Ids and passwords before data can be generated for a report? The Web Reports Server will automatically prompt users for Ids, passwords, and data source information when necessary. Alternatively, you can use Web Reports Server commands to automatically handle security through hyperlinks or other web links to reports. Seagate Crystal Reports continues to support the security procedures you have already established on your data, even over the web.
NOTE: Commands can be passed to the Web Reports Server by way of HTML links or forms.
Supports Stored Procedures and Parameter Fields
Stored procedures often improve performance and data selection in large SQL databases. Additionally, Seagate Crystal Reports parameter fields can provide on-the-fly data selection inside your reports. Both of these powerful features are supported by the Web Reports Server.
If your reports are based on stored procedures, or if they include Seagate Crystal Reports parameter fields, the Web Reports Server can automatically prompt users for parameter values when the report is generated. URL parameters in hyperlinks, or HTML forms can also specify values for parameter fields or stored procedures.
Exploits Microsoft and Netscape Web Server Extensions
If you are using a Microsoft or Netscape web server to distribute reports, the Seagate Crystal Web Reports Server can directly exploit the power of your web server through the ISAPI or NSAPI programming interfaces. The Web Reports Server supports both APIs in a single file: CRWEB.DLL. The APIs improve web application performance through direct extensions to the web server itself.
For more information on ISAPI, refer to Microsoft documentation. For more information on NSAPI, refer to Netscape documentation.
Crystal Smart Viewers
The Web Reports Server handles report generation and distribution on the server side. The client, however, actually views a report using one of the Crystal Smart Viewers. These browser based viewers provide complete access to report information without the need for installing any applications on the client machine other than a web browser.
Two of the Smart Viewers are based on the HTML 3.02 standard, delivering reports in plain HTML format or HTML with frames. These viewers can be used on any web browser that supports the HTML 3.02 standard. The Java based viewer sits inside an HTML page as a standard Java applet. Reports are displayed inside the Java viewer using the advanced Encapsulated Page File (EPF) format. EPF is a report format that retains almost all of the original report formatting options and settings while producing files that are smaller than HTML files. The result is faster access to reports. Finally, the ActiveX viewer is a standard ActiveX control that also displays reports using the EPF format. Each viewer has its advantages, and you have the option of choosing the viewer that works best for your web site. If you do not specify a viewer, the Web Reports Server will automatically use a specific viewer based on the web browser used to request the report.
For complete information on the Crystal Smart Viewers, see Crystal Smart Viewer Overview, Page 50.
Crystal Web Report Server 4
New Features in Version 7
Version 7 of Seagate Crystal Reports has also added several new features to improve Web Reports Server options, accessibility, and performance. The new Web Reports Server brings you information anytime and anywhere.
Supports Multi-threaded Job Handling
The Crystal Web Reports Server makes use of multi-threading in the 32-bit Windows environment. Each time a request is made by a client, the Web Reports Server generates a new worker thread that handles the actual request. By generating a new thread for each task, the server can exploit the inherent power of multi-tasking in the operating system, delivering reports in the most efficient manner.
New CGI Version Supports Most Current Web Servers
Previously, the Seagate Crystal Web Reports Server was available only as a web server extension that supported the ISAPI and NSAPI programming interfaces for Microsoft and Netscape servers. Now, a second version of the same application, CRWEB.EXE, supports the CGI web application standard. Since most web servers support the CGI standard, you can safely and easily distribute reports using the Web Reports Server on almost any existing web server you may have already implemented.
Improvements for Larger Sites
Many internal improvements have been made to this version of the Web Reports Server in an effort to establish efficient handling of large numbers of requests. Generated report pages can be cached on the server for easy page distribution to multiple clients. If the same report is requested on a repeat basis, the server need only generate it once, then distribute it multiple times, reducing impact on server resources. Report pages are delivered as requested, avoiding network traffic for large amounts of data. Additionally, large numbers of requests are quickly and efficiently handled through the Crystal Reports Job Manager (Job Manager Overview, Page 41). Many of these features were available in a previous version of the Web Reports Server, but Seagate Software has worked to improve the power and speed with which jobs are handled internally. The Seagate Crystal Web Reports Server provides the most powerful solution for fast report delivery over a web site.
The Web Reports Server vs. Active Server Pages
The Crystal Web Reports Server is designed as a fully functional report distribution system for your web server. When you install the Web Reports Server, it is immediately ready for use, and you can simply begin designing your site.
Seagate Crystal Reports also provides an Automation Server that can be used with Active Server Pages on a Microsoft web server. Using the Crystal Report Engine Automation Server, you can design ASP pages that also deliver reports to clients through a web site. Additionally, your ASP pages can incorporate the Crystal Smart Viewers, much like the Web Reports Server does.
Crystal Web Report Server 5

NOTE: If you are not using a Microsoft or other ISAPI compliant web server, the Automation Server and Active Server Pages are not available as a means of distributing reports from a web site.
As a web site administrator, you must decide when to use the Web Reports Server, and when to use the Automation Server in Active Server Pages. A simple means of deciding is to determine if you are a web developer, or a web administrator.
If you are doing web development, writing scripts and applications to customize the functionality of your site, you may want to consider using the Automation Server and Active Server Pages. The Automation Server provides complete control over how reports are presented and delivered to a client. Powerful features are available at runtime such as changing the source of data used or manipulating existing report formulas. However, the Automation Server requires extensive programming inside the Active Server Page environment. Familiarity with a scripting language such as VBScript or JScript is required. For complete information on using the Automation Server for web sites, see Building Active Web Sites, Page 43.
The Web Reports Server, on the other hand, can be set up quickly and easily. You simply store reports inside a directory accessible by your web server, then create standard HTML style links to the reports in your web pages. The Web Reports Server does allow some runtime changes to reports, such as record selection and the ability to change stored parameters. However, these options are limited in both scope and functionality. If your reports require little manipulation at runtime, and you need to produce a site quickly, use the Web Reports Server (see Web Reports Server Commands, Page 28).
Sample Web Sites
The default installation of the Crystal Web Reports Server also installs several web samples on your Internet or intranet server system. These samples provide live demonstrations of reports being distributed over the web. To access these samples:
Select "Web samples and Utilities Page" from the Seagate Crystal Reports Program group menu
or
Enter the following URL at your web browser:
http://localhost/scrsamples/
«localhost is the name of your web server domain.»
This address will open the Seagate Crystal Reports Web Samples/Utilities Page.
Web Reports Server Samples
The Web Reports Server samples are available by clicking the Reports Server Samples link on the Web Samples page, or by using the following URL:
http://localhost/scrreports/
Crystal Web Report Server 6
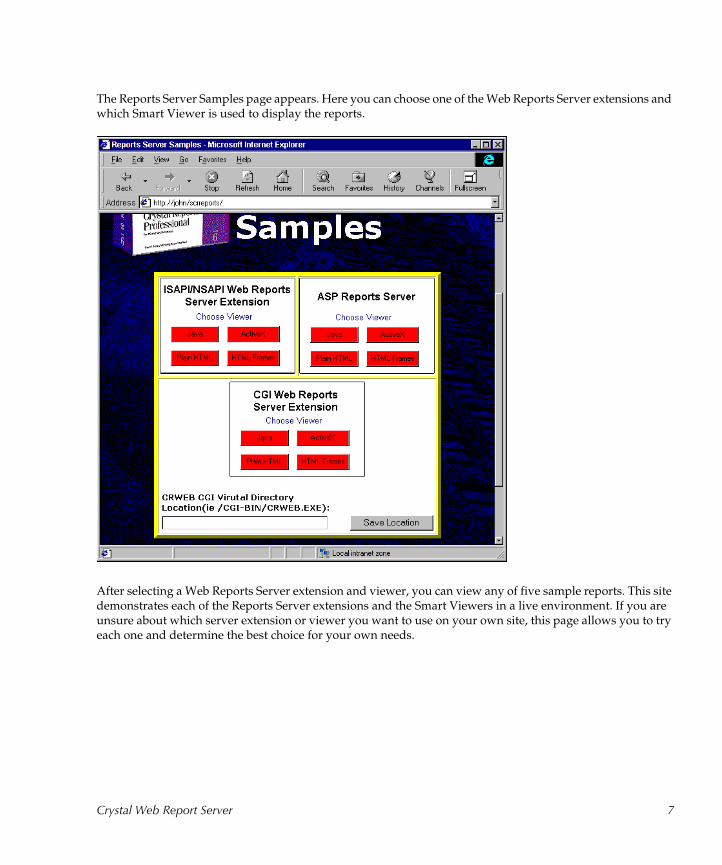
The Reports Server Samples page appears. Here you can choose one of the Web Reports Server extensions and which Smart Viewer is used to display the reports.
After selecting a Web Reports Server extension and viewer, you can view any of five sample reports. This site demonstrates each of the Reports Server extensions and the Smart Viewers in a live environment. If you are unsure about which server extension or viewer you want to use on your own site, this page allows you to try each one and determine the best choice for your own needs.
Crystal Web Report Server 7

Implementing the Web Reports Server This section guides you through the process of implementing the Seagate Crystal Web Reports Server on your own web server system. It provides information on selecting a version of the Web Reports Server, installing the Web Reports Server on your web server system, and designing a simple web site that uses the Web Reports Server to deliver reports to clients.
The following topics are discussed in this section.
Choosing a Web Reports Server, Page 8
System Requirements, Page 9
Installing the Web Reports Server, Page 9
Confirming Correct Installation, Page 12
Virtual Directories, Page 14
Creating a Web Site, Page 14
For More Information, Page 15
Choosing a Web Reports Server
There are two versions of the Web Reports Server:
1. A Web Reports Server extension using Microsoft and Netscape programming interfaces, and
2. A Web Reports Server application using the CGI standard.
Which version of the Web Reports Server you implement on your own system depends primarily on the system you have set up already.
NOTE: You may also choose to implement the Seagate Crystal Report Engine Automation Server inside Active Server Pages to distribute reports. This technique is substantially different from the Web Reports Server, though, and is discussed in Building Active Web Sites, Page 43.
The Web Reports Server extension for the Web Reports Server (CRWEB.DLL) implements both ISAPI and NSAPI programming interfaces. These interfaces provide powerful direct connections to Microsoft (ISAPI) and Netscape (NSAPI) web servers. If you are using a web server from either of these companies, you should consider using the Web Reports Server extension first.
The web server CGI extension application (CRWEB.EXE) is designed to support the CGI standard. Since most web servers support CGI, the Web Reports Server can be installed with most any existing web server. Additionally, you may have security or other considerations that prevent you from choosing the web report server extension.
Ultimately, the decision is straightforward. If you are using a Microsoft or Netscape web server, and no internal corporate or other business policies prevent you, you should use the ISAPI/NSAPI server extension. Otherwise, use the CGI web server application.
Crystal Web Report Server 8
System Requirements
The Seagate Crystal Web Reports Server supports the following operating systems:
Windows NT Server 4.0 or later with:
Microsoft Internet Information Server (IIS) 2.0 or later, or
Netscape Enterprise Server 2.0 or later
Windows NT Workstation 4.0 or later with:
Microsoft Personal Web Server, or
Netscape FastTrack 2.0 or later
Windows 95/98 with Microsoft Personal Web Server
The Seagate Crystal Web Reports Server has been successfully tested with the following web server applications:
Microsoft Internet Information Server (IIS) 2.0 or later
Microsoft Personal Web Server
Netscape Enterprise Server
Netscape FastTrack 2.0 or later
O’Reilly
Lotus Domino
Additionally, the CGI version of the Web Reports Server is compatible with many other CGI compliant web servers not listed here.
Installing the Web Reports Server
The following instructions guide you through the steps to install the Seagate Crystal Web Reports Server. The procedure assumes that you have already installed a web server and have confirmed that it is running correctly. You must be logged on to the web server system under an account that has permission to administrate the local machine. The procedure also assumes that you are installing the Web Reports Server without any other components of Seagate Crystal Reports.
NOTE: Make sure that your web server has been stopped before beginning the install procedure.
Installing from the CD-ROM
Begin by inserting the Seagate Crystal Reports CD into your CD-ROM drive.
1 When the splash screen appears, click Install Win 32 to begin installation. The Seagate Crystal Reports Setup window appears with the Welcome dialog on-screen (if the splash screen does not appear, run SETUP.EXE from the root directory of the CD).
Crystal Web Report Server 9

2 Read the Welcome dialog, and click Next. The End User License Agreement appears.
3 Read the license agreement completely and make sure you fully understand the Seagate Crystal Reports licensing requirements. Click Yes if you agree with the terms in the license. If you do not agree, you can not install Seagate Crystal Reports.
4 In the next dialog that appears, enter your CD Key to install the software. Click Next to continue. Enter your name and organization. Click Next.
5 In the Installation Type dialog box choose Typical to install all Crystal Components including Web Reports Server (recommended) or Custom to select the Components you specify. Continue at step 10 for the Typical installation or include steps 6 through 9 below if you are doing the Custom installation. If you do choose the Custom installation, then select Web Reports Server along with the following required components: Database Access, Developers Files, Exporting, MapInfo, Mapx, PGEditor, Sample Files, Seagate Crystal Reports Help.
NOTE: The Web Reports Server can also be installed through any of the other choices on the Choose Installation Type dialog, but you must then select Custom Installation in the Installation Options dialog box and specifically check the Web Report Servers check box in the Custom Installation Options dialog box. You may want to consider installing the entire Seagate Crystal Reports product on your web server system. With the entire product installed, problems with web reports can be quickly and easily analyzed by opening them inside the Report Designer directly on the web server system.
6 In the Installation Options dialog box, select a directory to install Seagate Crystal Reports files in, or accept the default directory.
7 Select Custom installation, and click Next. The Custom Installation Options dialog box appears.
8 Ensure Web Report Server is checked.
9 Continue making any other changes to the custom installation options that you find necessary. This may include database drivers and export formats. Click Next in the Custom Installation Options dialog box.
10 Click Next to continue. If your web server is Netscape 2.0 or later, or IIS 2.0 or later then the Choose Web Server To Configure dialog box appears.
11 The Setup application attempts to detect the web server you are currently running. If it does, the dialog box will enable the check box for that particular server. If you have more than one web server running on the machine, Setup will allow you to configure all of the web servers to use the Web Reports Server. Check the check box for all web servers that you want to configure, and click Next.
12 The Web Server Startup Option Dialog Box will appear. If you want to install the Crystal Web Page Server and the Crystal Web Image Server as system services then click Yes. Click Next. A similar dialog box will appear. If you want to install the Seagate Query Server as a system service click Yes. Click Next.
13 The Choose Program Group dialog box will appear. Select a Program Group for your Seagate Crystal Reports program icons, and click Next. Setup will begin installing the necessary files for the Web Reports Server.
14 After the files have been installed the Web Reports Server Configuration dialog box will appear. If you make changes to the default configuration settings remember to click Apply before leaving the dialog box (by clicking OK).
15 Setup will now complete installation. After installation is completed a dialog box will appear indicating that your machine must be restarted before the new settings will take effect. Click OK and manually reboot your machine.
Crystal Web Report Server 10
Installed Files
The following is a list of primary files installed for the Web Reports Server and their default installation directories.
● CRWEB.DLL: C:\Program Files\Seagate Software\Crystal Reports
● CRWEB.EXE: C:\Program Files\Seagate Software\Crystal Reports
● CRPGSVR.EXE: C:\Program Files\Seagate Software\Crystal Reports
● CRIMGSVR.EXE: C:\Program Files\Seagate Software\Crystal Reports
● CRJM32.DLL: C:\Program Files\Seagate Software\Crystal Reports
NOTE: This is not a complete list of files installed when you install the Seagate Crystal Web Reports Server. It is only a list of principal Web Reports Server files. Refer to Crystal Reports on line Developers Help for the complete list.
Configuring NT Services
If you have installed the Seagate Crystal Web Reports Server on a Windows NT system, then The Seagate Crystal Web Page Server, Page 39, and The Seagate Crystal Web Image Server, Page 39 were installed under the System account. The following steps indicate how to correctly set up the Crystal Page Server and Crystal Image Server as NT Services under an NT Domain Administrator account.
1 While logged on as a Windows NT Domain Administrator, open the User Manager for Domains application. If you are not familiar with this application, refer to Microsoft Windows NT documentation.
2 Select the New User command from the User menu in the User Manager for Domains. The New User dialog box appears.
3 Enter a new user name to be used by the Web Reports Server. For instance: CRWEBUSER.
4 Provide a password that you will remember.
5 Toggle off the User Must Change Password at Next Logon check box.
6 Toggle on the User Cannot Change Password check box.
7 Toggle on the Password Never Expires check box.
8 Click the Groups button, and make this user a member of the Administrators group.
9 Click OK to close the New User dialog box, and exit the User Manager for Domains application.
10 Open the Services Control Panel. If you are not sure how to do this, refer to Microsoft Windows NT documentation.
11 Select Crystal Web Image Server in the Service list box, and click Startup. The Service dialog box appears.
12 Click Automatic in the Startup Type section of the dialog box.
13 Click This Account in the Log On As section of the dialog box.
Crystal Web Report Server 11

14 Click the Browse button next to the This Account text box, then locate and select the user you just created (CRWEBUSER).
15 Enter the correct password for the user in the appropriate text boxes.
16 Click OK in the Service dialog box to save your changes.
17 Repeat steps 11 through 16 for the Crystal Web Page Server service.
18 Click Close in the Services control panel.
Confirming Correct Installation
Once Setup finishes installing the Web Reports Server, and you have successfully restarted your system, your web server should be automatically restarted. Verify that it has been, and, if not, restart it manually. For more information on starting your web server, refer to the documentation for you web server software.
After confirming that the web server has been restarted, you need to verify that the Web Reports Server has been correctly installed.
1 Select "Web Samples and Utilities Page" from the Crystal Reports Program Group menu
or
Open a browser (such as Internet Explorer or Netscape Navigator), and enter the following URL address:
http://localhost/scrsamples
The Seagate Crystal Reports Web Samples/Utilities Page appears in your browser.
2 Click the Reports Server Samples link. The Reports Server Samples page appears.
3 Select whether the ISAPI/NSAPI Web Reports Server Extension, or the CGI Web Reports Server Extension, and click a viewer option supported by your web browser. A page appears with a list of five sample reports.
4 Click the link for one of the sample reports. The report should be generated and displayed inside your browser using the viewer you selected.
If you have trouble getting the Web Reports Server running correctly on your web server, you may need to check the configuration on the web server itself. The following sections demonstrate how to do this in Microsoft’s Internet Information Server and Netscape’s Enterprise Server.
Microsoft Internet Information Server 4.0To determine if the Crystal Web Reports Server is configured correctly in Microsoft IIS version 4.0, follow these steps:
1 Start the Internet Service Manager.
2 Under Console Root, double-click the Internet Information Server to expose the machine you are using as the server.
3 Right-click on the machine icon and choose Properties from the shortcut menu.
Crystal Web Report Server 12
4 In the Properties dialog box, select WWW Service in the Master Properties section and click the Edit button.
5 Click the Home Directory Tab to activate it.
6 Click the Configuration button.
7 Locate the extension .rpt and ensure that it points to the correct path for the file crweb.dll. By default, this file is installed in the default directory for Seagate Crystal Reports which you specified at runtime.
8 Verify that the .cri extension also points to the correct path for the Web Reports Server extension.
Netscape ServersTo determine if the Crystal Web Reports Server is configured correctly on Netscape web servers, follow these steps:
1 Locate the MIME.TYPES file and the OBJ.CONF file. These files are normally located in the following directories:
● Netscape Enterprise 3.51:<dir>\Netscape\SuiteSpot\https-<machinename>\config
● Netscape Enterprise 3.0:<dir>\Netscape\SuiteSpot\https-<machinename>\config
● Netscape Enterprise 2.0 and Netscape FastTrack:<dir>\Netscape\server\https-<machinename>\config
2 In MIME.TYPES, verify the following lines appear:
type=magnus-internal/rpt exts=rpttype=magnus-internal/cri exts=cri
3 In OBJ.CONF, verify that the following line appears:
Init fn="load-modules" funcs="CrystalReportServer"shlib="C:/Program Files/Seagate Software/Crystal Reports/crweb.dll"
4 In OBJ.CONF, under the heading <Object name="default"> verify that the following lines appear:
NameTrans fn="pfx2dir" from="/viewer"dir="C:/Program Files/Seagate Software/Viewers"
NameTrans fn="pfx2dir" from="/scrsamples"dir="C:/Program Files/Seagate Software/Crystal reports/sample"
NameTrans fn="pfx2dir" from="/scrreports"dir="C:/Program Files/Seagate Software/Crystal Reports/Reports"
Service fn="CrystalReportServer" method="(GET|POST)"type="magnus-internal/rpt"
Service fn="CrystalReportServer" method="(GET|POST)"type="magnus-internal/cri"
5 If any of these lines are missing, add them to the appropriate file.
6 Shut down the Netscape web server and reboot your web server system.
Crystal Web Report Server 13

Virtual Directories
The following virtual directories should be set up on your web server pointing to the indicated paths:
● /viewer: C:\Program Files\Seagate Software\Viewers
● /scrreports: C:\Program Files\Seagate Software\Crystal Reports\Reports
● /scrsamples: C:\Program Files\Seagate Software\Crystal Reports\Sample
Creating a Web Site
Once you have installed and set up the Seagate Crystal Web Reports Server, you will, undoubtedly, want to create a web page that uses your new online reporting features. The following steps lead you through the process of creating a simple web page that links to two sample reports installed with Seagate Crystal Reports.
First, you must decide on a location for your new web page, then create a virtual directory for the site that points to the new directory.
1 Create a new directory on the server where your page will be located. For this example, we will use the directory
c:\webroot\newsite
NOTE: For information on the location of your web server�s root directory, refer to your web server software documentation. The directory shown here is intended only as an example.
2 Use your web server administration software to create a new virtual directory that points to the physical directory you just created. For this example, we will use the virtual directory
http://localhost/newsite
3 Next, you must create a new physical directory and virtual directory for the reports your site will link to.
http://localhost/scrreports/accounting
4 Using a simple text editor, such as Notepad, or your favorite HTML editor, create the following HTML code.
<HTML><HEAD><TITLE>Index of Reports</TITLE></HEAD>
<BODY>
<H1>Check out these reports!</H1><HR>
Crystal Web Report Server 14

<UL><LI><A HREF="http://localhost/scrreports/accounting/hr.rpt">
Employee Profile</A></LI><LI><A HREF="http://localhost/scrreports/accounting/mkpcat1p.rpt">
Product Catalog</A></LI>
</UL>
</BODY></HTML>
5 Save the file as reportlist.htm in the c:\wwwroot\newsite directory.
6 Open your web browser, and open the following URL:
http://localhost/newsite/reportlist.htm
7 Click one of the two links in your new web page to generate and display the report inside your browser.
In this example, you specified two RPT files using standard URL addresses. The RPT extension is analyzed by your web server, and is determined to be an extension that should be handled by the Web Reports Server application. The URL is handed off, and the Web Reports Server determines how to handle the requested RPT.
When the report is displayed inside your browser, the Web Reports Server analyzes the type of browser you are using and delivers the report using a Smart Viewer it determines is appropriate. For example, if you are using Internet Explorer 4.0, you will see the report inside the Crystal Smart Viewer/ActiveX. If you are using Netscape Navigator 4.0, you will see the report inside the Crystal Smart Viewer/Java.
As a web site designer, you can specify which viewer is used when the report is requested, overriding the default viewer used according to the browser. For example, the following URL forces the Java viewer to be used, even if you are running Internet Explorer or any other web browser:
http://localhost/scrreports/accounting/mkpcat1p.rpt?init=java
NOTE: If the browser you are using does not support the technology used by the viewer specified, Java in this case, an error will occur or an empty web page will be displayed.
In this URL, INIT is a parameter recognized by the Web Reports Server. By setting the INIT parameter equal to java, you can force the Web Reports Server to use the Java viewer when displaying the report inside a browser. The Web Reports Server supports several parameters for controlling how reports are generated and displayed. For more information, see Web Reports Server Commands, Page 28.
For More Information
For the latest information on configuring the Seagate Crystal Web Reports Server, refer to the Seagate Software Tech Support site at:
http://www.seagatesoftware.com/crystalreports/
or visit:
http://webacd.seagatesoftware.com
Crystal Web Report Server 15
Crystal Web Reports Server Administration
The Seagate Crystal Web Reports Server provides the Web Reports Server Configuration application for complete control over how reports are delivered and accessed over your web site. In addition to these settings, though, there are several issues you should consider when setting up the Web Reports Server and creating reports for distribution over an intranet or the internet. The following sections discuss configuration options and report design issues.
The following topics are discussed in this section.
The Web Reports Server Configuration Application, Page 16
Page Server Tab, Page 17
Image Server Tab, Page 20
Report Exporting Tab, Page 21
Server Mappings Tab, Page 22
Report Viewing Tab, Page 23
The Page Server and the Image Server, Page 26
Smart Navigation, Page 26
Drilling Down on Data, Page 27
Database Location, Page 27
The Web Reports Server Configuration Application
Although the Crystal Web Reports Server is installed with the most common settings selected (by default), an application is provided that allows changes and customization of the Web Reports Server. The Web Reports Server Configuration application (WEBCONF.EXE) is installed, by default, in the main application directory you specified for Seagate Crystal Reports during installation. An icon is also available in the Seagate Crystal Reports Program Group. When run, the application displays a tabbed dialog box. By making changes in this dialog box, you can customize the Crystal Web Reports Server according to your needs. The following sections describe the options available on each tab of the application dialog box. This information is also available as context sensitive Help for the application itself.
NOTE: All changes made in the Web reports Server Configuration utility are stored in the Windows Registry. Any changes made in webconf.exe will not be effective until the web server is stopped and restarted.
Crystal Web Report Server 16

Page Server Tab
Use the Page Server Tab to specify the TCP/IP port used by the Seagate Crystal Web Page Server, and to specify the virtual directory where the ActiveX and Java viewers are located. The Advanced settings for this tab also allow you to specify the maximum number of threads and jobs that can be started by the Crystal WebPage Server, as well as a setting for the database refresh time (see Database Refresh Time, Page 19) and how long to wait before closing an idle job.
Server Port
Use this text box to specify a TCP/IP port number for the Page Server to listen for requests and to return information. For valid values for this port, refer to your web server software or TCP/IP documentation. The default port, if available, is 2000. This port must match the port specified for Report (.rpt) files in the Server Mappings Tab, Page 22.
Virtual Path
This setting specifies the virtual path for the ActiveX and Java versions of the Seagate Crystal Smart Viewers. When you install the Web Reports Server, this path is set to:
http://localhost/Viewer
by default. If this path is not available, you must specify a different virtual path using your web server administration software.
Crystal Web Report Server 17

The default physical path for the Crystal Smart Viewers, when you install Seagate Crystal Reports, is:
C:\Program Files\Seagate Software\Viewers
Use your web server administration software to set the virtual path to this directory, then specify that virtual path on the Page Server Tab for the Web Reports Server Configuration application.
Advanced Settings
Click the Advanced Setting button to access the Page Server - Advanced Settings dialog box.
Use this dialog box to make changes to the advanced configuration options of the Page Server. This dialog box exposes the following options:
Threads
The Page Server is a multi-threaded application that generates a new thread for processing every request it receives. Threads consume system memory and resources, though, and large numbers of threads can slow down the overall performance of a system.
By specifying the maximum number of threads that can be generated by the Page Server, you control how much of the systems resources can be dedicated to responding to requests at any given time. If the number of requests received by the Page Server exceeds the number of threads specified, additional requests are held until threads are available.
When determining a maximum number of threads, you should consider the available memory on the server system and the size of the reports that are commonly accessed. The larger the report, the more time that is required, thus tying up threads for longer periods.
Crystal Web Report Server 18
Jobs
This option refers to the maximum number of report jobs that can be generated by the Job Manager. Every time a new report is requested, a new job is created. Set this to the maximum number of jobs that the Web Reports Server can have open at one time. More jobs allows faster report processing. However, each job require more memory resources, thus slowing down overall system performance. A balance must be found that allows fast report processing without slowing down the system. As a result once the maximum number of jobs has been exceeded older jobs are removed according do a Least Recently Used (LRU) algorithm.
Database Refresh Time
This setting controls how often the data in cached reports is refreshed by querying the database. If a report has been cached for a long period of time, the data in the report may be old and invalid. If the Database Refresh Time has passed since the report was first cached, the Web Reports Server can refresh the data in the cached report the next time a user requests it.
By controlling how often data in reports is refreshed, you can minimize the impact of client requests on the database. If clients are allowed to refresh the data themselves, they may put a large load on the database server. Instead, as the administrator, you can control how often data is refreshed.
Keep in mind that the Crystal Smart Viewers include a Refresh button by default. If you set a database refresh time, and a client uses the Refresh button in a Smart Viewer, the user will cause a refresh on the cached report, forcing a hit on the database. You may want to turn off the Refresh button (see Report Viewing Tab, Page 23) for Smart Viewers. If you set the Database Refresh Time to 0, then the data will be refreshed each time a report is requested.
Idle Time
Idle time is a period of time during which no actions occur. If a job, for instance, is unused for a large amount of time, it should be discarded by the Web Reports Server to allow those resources to be freed up for other jobs and requests. There are two types of idle time that you can set a maximum time for:
Close a job
A job refers to an actual report that has been generated and cached on the server. If no users request the report for the time specified, the report job will be closed and discarded. Thus, if someone requests the report after the job has been closed, a new job will need to be generated, causing an initial delay.
Close a client
Every request Id stored by the Page Server includes an Id for the client that made the request. If that client does not make any new requests or does not interact with an open report for the specified period of time, all requests corresponding to that client will be closed. If that client makes a new request after their client Id has been closed, they will experience a slight delay while the Page Server establishes a new request for them.
Crystal Web Report Server 19
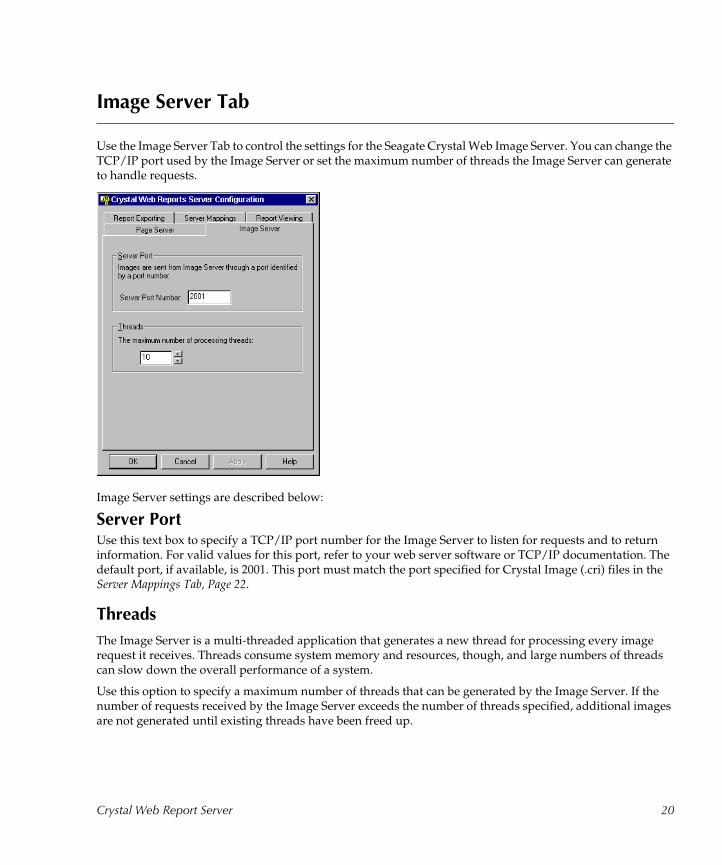
Image Server Tab
Use the Image Server Tab to control the settings for the Seagate Crystal Web Image Server. You can change the TCP/IP port used by the Image Server or set the maximum number of threads the Image Server can generate to handle requests.
Image Server settings are described below:
Server PortUse this text box to specify a TCP/IP port number for the Image Server to listen for requests and to return information. For valid values for this port, refer to your web server software or TCP/IP documentation. The default port, if available, is 2001. This port must match the port specified for Crystal Image (.cri) files in the Server Mappings Tab, Page 22.
Threads
The Image Server is a multi-threaded application that generates a new thread for processing every image request it receives. Threads consume system memory and resources, though, and large numbers of threads can slow down the overall performance of a system.
Use this option to specify a maximum number of threads that can be generated by the Image Server. If the number of requests received by the Image Server exceeds the number of threads specified, additional images are not generated until existing threads have been freed up.
Crystal Web Report Server 20
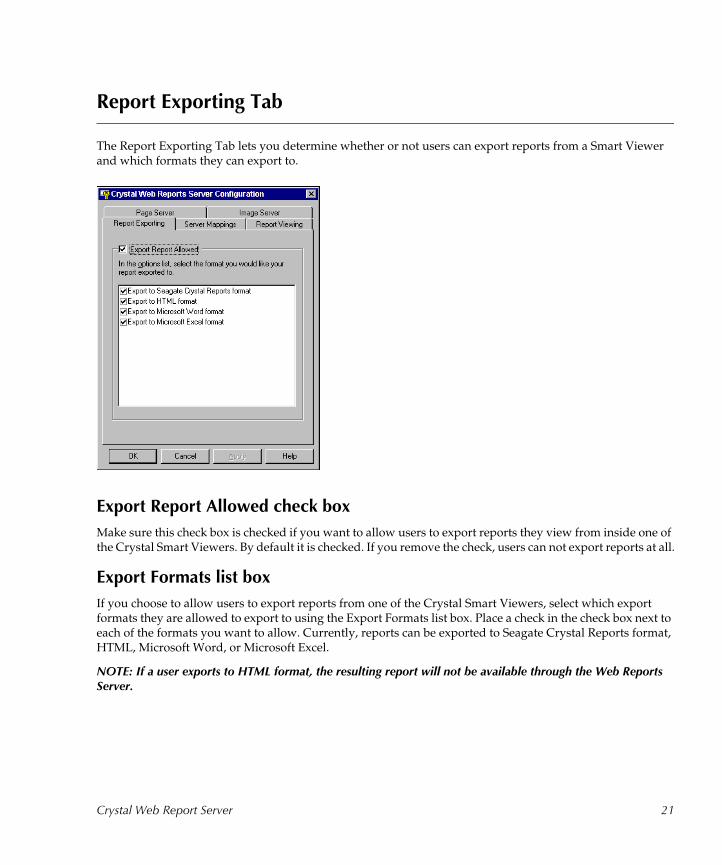
Report Exporting Tab
The Report Exporting Tab lets you determine whether or not users can export reports from a Smart Viewer and which formats they can export to.
Export Report Allowed check box
Make sure this check box is checked if you want to allow users to export reports they view from inside one of the Crystal Smart Viewers. By default it is checked. If you remove the check, users can not export reports at all.
Export Formats list box
If you choose to allow users to export reports from one of the Crystal Smart Viewers, select which export formats they are allowed to export to using the Export Formats list box. Place a check in the check box next to each of the formats you want to allow. Currently, reports can be exported to Seagate Crystal Reports format, HTML, Microsoft Word, or Microsoft Excel.
NOTE: If a user exports to HTML format, the resulting report will not be available through the Web Reports Server.
Crystal Web Report Server 21

Server Mappings Tab
Use the Server Mappings Tab to map the TCP/IP ports used by the Page Server and Image Server to specific file extensions (.rpt and .cri). These ports must correspond to the ports specified on the Page Server Tab, Page 17, and the Image Server Tab, Page 20.
Server Mappings list boxThis list box contains information about each of the file extensions used by the Web Reports Server. Each item in the list contains the file extension being mapped, the name of the Web Reports Server that you are configuring, and the TCP/IP port used by the Web Reports Server application that handles the corresponding file type.
When the Web Reports Server is first installed, the Server Mappings Tab should contain entries for Report (.rpt) files and Crystal Image (.cri) files. The ports specified for each file type should match the port specified on the Page Server Tab, Page 17, and the Image Server Tab, Page 20, respectively.
Add button
Use the Add button to add a new file type mapping for the Web Reports Server. When you click Add, a dialog box appears asking for the file extension of the new file type, the TCP/IP hostname of the server, and the TCP/IP port used by the application that handles that file type.
NOTE: In most cases, you do not need to add a file type mapping unless upgrading to another Seagate Software product.
Crystal Web Report Server 22
Edit button
Use this button to change information about any of the file types listed in the Server Mappings list box. Select the item in the list, then click Edit. The Edit Mapping dialog box appears and allows you to make changes to the file extension, the TCP/IP host name of the server, or the TCP/IP port used by the application that handles that file type. For example, if the TCP/IP port used by the Page Server is changed on the Page Server Tab, Page 17, then you will also need to change the port setting for the .rpt file extension in the Server Mappings list box.
Delete button
Use Delete to remove any of the entries in the Server Mappings list box. Simply select the item in the list, and click Delete. You will be prompted to verify the delete before it is actually performed.
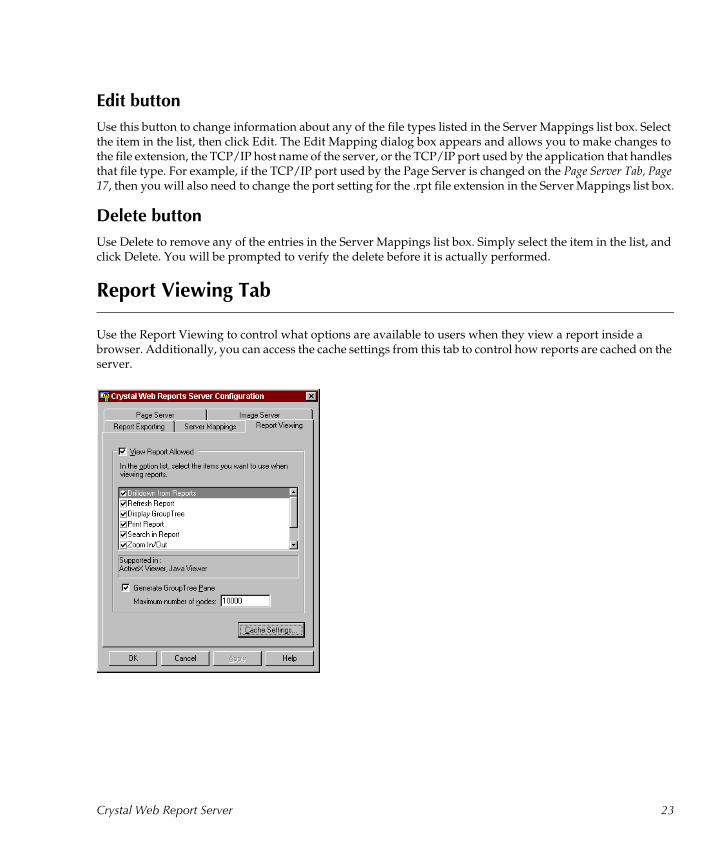
Report Viewing Tab
Use the Report Viewing to control what options are available to users when they view a report inside a browser. Additionally, you can access the cache settings from this tab to control how reports are cached on the server.
Crystal Web Report Server 23

The Report Viewing Tab provides the following options:
View Report Allowed check box
In some environments, you may want to design a web site that allows only exporting of reports, but no on-screen viewing. In such cases, you can remove the check from the View Report Allowed check box. If this check box is not checked, no one may use the Web Reports Server to view reports inside a browser.
Smart Viewer options list box
NOTE: The following doesn�t apply for Crystal Smart Viewers which are accessed via an Applet or Object tag in an HTML page. In that case options viewer options are set via parameter tags in the page.
Use the items in this list box to control the options available to users viewing reports inside one of the Crystal Smart Viewers. If, for instance, you do not want the user to have the ability to refresh report data then remove the check from the Refresh Report check box. Refer to Database Refresh Time, Page 19 for more information on allowing users to refresh report data.
Each of the items in this list box corresponds to a control that appears in the Crystal Smart Viewers. Add and remove checks in the check boxes to turn on and off the availability of each option.
Generate Group Tree Pane check box
Use this check box to control whether or not a Group Tree is generated for Smart Navigation inside Crystal Smart Viewers. Generating a group tree for a report requires that the Web Reports Server make an additional pass through the report data to create the Group Tree. This can cause response delays and requires additional system resources, especially if the report contains a large number of groups or multiple groups within groups. For more information, see Smart Navigation, Page 26.
Maximum number of nodes text box
If you allow Group Trees to be generated for Smart Navigation in reports, you may want to specify a maximum number of nodes that can appear in the Group Tree, limiting the time spent by the Web Reports Server to generate the Group Tree. This may be especially helpful if you are distributing large reports with extremely large numbers of groups.
Crystal Web Report Server 24
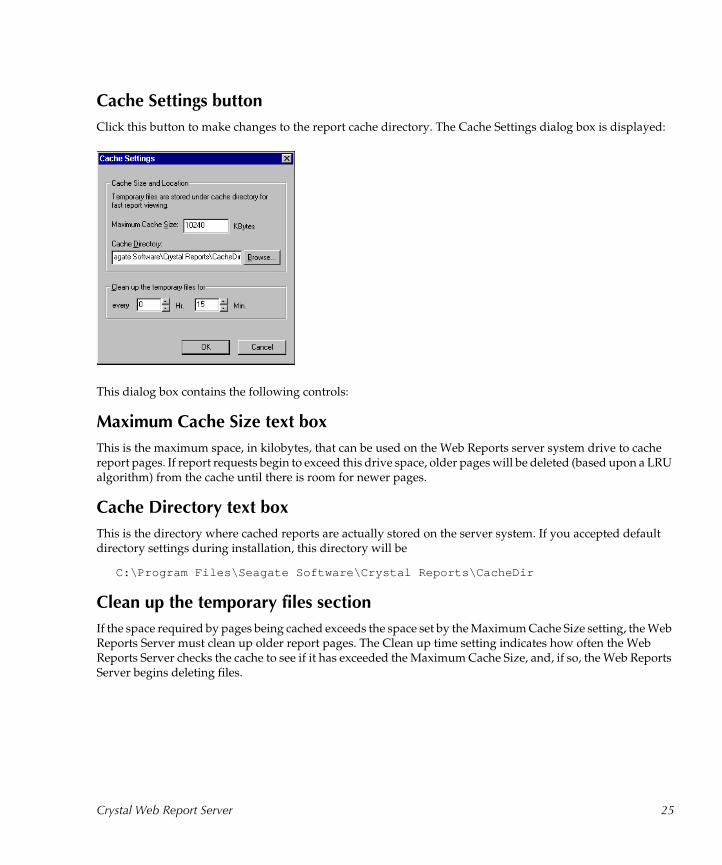
Cache Settings button
Click this button to make changes to the report cache directory. The Cache Settings dialog box is displayed:
This dialog box contains the following controls:
Maximum Cache Size text box
This is the maximum space, in kilobytes, that can be used on the Web Reports server system drive to cache report pages. If report requests begin to exceed this drive space, older pages will be deleted (based upon a LRU algorithm) from the cache until there is room for newer pages.
Cache Directory text box
This is the directory where cached reports are actually stored on the server system. If you accepted default directory settings during installation, this directory will be
C:\Program Files\Seagate Software\Crystal Reports\CacheDir
Clean up the temporary files section
If the space required by pages being cached exceeds the space set by the Maximum Cache Size setting, the Web Reports Server must clean up older report pages. The Clean up time setting indicates how often the Web Reports Server checks the cache to see if it has exceeded the Maximum Cache Size, and, if so, the Web Reports Server begins deleting files.
Crystal Web Report Server 25
The Page Server and the Image Server
The Web Reports Server package includes three components: the Web Reports Server web server extension, the Seagate Crystal Web Page Server, and the Seagate Crystal Web Image Server. Most administration tasks relate primarily to the Web Reports Server extension (CRWEB.DLL or CRWEB.EXE). However, the Page Server and Image Server must be running on the web server system for the Web Reports Server to correctly generate and deliver reports.
The Page Server and Image Server can run as simple applications (processes) or, on Windows NT systems, can run as NT services. If you are using an NT system as your web server, you should consider using the Page Server and Image Server as NT services (note that if you select this option during installation the Crystal Web Image Server, and Crystal Web Page server are installed, by default, as system services).
To run the applications as simple executables, locate the CRPGSVR.EXE and CRIMGSVR.EXE applications in the \Program Files\Seagate Software\Crystal Reports directory (or the directory in which you installed Seagate Crystal Reports). Double-click these applications to start them running, or right-click each and select the Open command from the menu that appears.
To run the applications as NT services, see the section Configuring NT Services, Page 11.
Smart Navigation
Smart Navigation, a feature of several of the Crystal Smart Viewers, presents your users with a tree control much like the tree control in Windows Explorer. The Web Reports Server dynamically analyzes a report when it is first requested, then populates the tree control with branches for each group in the report.
Once displayed in your browser, the Smart Navigation Group Tree works like the Group Tree in the Seagate Crystal Reports Preview Tab. Simply expand and collapse branches in the Group Tree to find the section of the report you are most interested in. Click a branch to quickly jump to that part of the report.
Web administrators can control access to Smart Navigation and the Group Tree by setting the Display Group Tree check box in the Smart Viewer options list box of the Report Viewing Tab, Page 23 in the Web Reports Server Configuration utility. The Configuration utility also allows you to control the maximum number of groups that are read and added to the Group Tree.
If you choose to allow users to make use of the Smart Navigation Group Tree, keep in mind that generating the Group Tree forces the Web Reports Server to make an extra pass across the report, gathering group information and generating the Group Tree. This extra step in generating a report can tie up system resources and cause extensive delays in returning report data to the user, depending on the size of the report and how deep the grouping is. Consider the information your users need before deciding if Smart Navigation is right for your web site.
GROUP BY (Server Side Processing)If your reports contain server-side processing of SQL GROUP BY statements, the Smart Navigation Group Tree will be affected when reports are displayed through the Web Reports Server. In such cases, only summary information is returned to the client. Detail records are evaluated by the SQL server and grouping and summary values are calculated then sent to the client without the detail records.
Crystal Web Report Server 26
Although this method greatly reduces the amount of data sent across the network, it also affects the Group Tree. Group names are listed in the Group Tree as they normally would be. However, if you expand a group in the Group Tree, the detail information will not be available. The server sent only the group summaries to the client. Instead, a magnifying glass will appear beneath the group name in the Group Tree indicating that detail data can be retrieved.
If the magnifying glass is clicked by the user, the Web reports Server will retrieve the detail data for that group and display detail groups or record names beneath the original group name. This process, however, requires querying the database. Keep in mind the time and resource requirements of such actions and design your reports and web site appropriately.
Drilling Down on Data
A feature unique to the Crystal Web Reports Server is the ability to perform drill-down analysis on report data - to view the details hidden behind subtotals and summary values. Users can click or double-click on summary values that allow drill-down in order to display the detail values on a separate page inside a web browser or Crystal Smart Viewer. A simple summary report comprising only a few lines can be expanded to show all of the data used to derive the summaries.
As a web administrator, you can minimize hits on the database server by designing brief summary reports that allow selective drill-downs on Group By reports. Calculation of additional data is limited to specific user requests. For example, if a report contains 10 groups, and each group contains 10 detail values, a report designed to display all values immediately will require obtaining or generating 110 pieces of data, 10 x 10 detail values plus the 10 summary values. However, if the report is designed as a drill-down report, and only the summary values appear when the report is first generated, only 10 values must be sent to the client initially. If the client chooses to drill-down on two groups, 20 more values are retrieved from the database, for a total of 30 values used by the client. This difference, 30 vs. 110, shows how network and database resources can be drastically reduced simply by designing a drill-down report for distribution.
Database Location
When moving report files to a web server, be aware of changes in database location. If a report is created on one machine, then moved to the Web Reports Server machine, the relative location of the database information used to create the report may change.
Installing the full Seagate Crystal reports package on your Web Reports Server system can often simplify report troubleshooting. By opening a report directly in the Report Designer, you can quickly determine the source of any problems accessing report data. For information on installation of the Web Reports Server, see Installing the Web Reports Server, Page 9.
Running Page Server and Image server as NT services with Domain Admin privileges allows the database to be stored across the network and still be accessible.
Crystal Web Report Server 27
Web Reports Server Commands Pre-defined reports created with Seagate Crystal Reports are instantly available to any user connected to your web site via the Internet or an internal intranet.
● Internal reports are available throughout the company with point-and-click simplicity.
● Sales or Management staff can obtain up-to-date data through remote access.
● Corporate information can be published on an extranet for easy access by stockholders and potential investors.
As a web server administrator, you must determine how data is accessed from your web site and exactly how much of the data is available. The Crystal Web Reports Server provides several commands that can be appended to URL requests in web page hyperlinks or passed via HTML Forms (this last option is recommended when accessing large sets of data). In addition, the Crystal Web Reports Server provides the option of automatically prompting users for security information, stored procedure parameters, and parameter field values. Use this section as your toolbox for designing Crystal Web Reports Server-enabled web sites.
NOTE: The features described here allow you to control access to report information on a limited basis. Although the commands described in this section provide a certain level of customization, you should consider using the Crystal Report Engine Automation Server, Page 111, to design web sites if you need more control over report data and formatting at runtime.
The following topics are discussed in this section.The Crystal Web Reports Server Command Expert, Page 29
Constructing Report Requests, Page 29
Changing Selection Formulas in Web Reports, Page 30
SQL and ODBC Data Sources, Page 31
SQL Stored Procedures and Parameter Fields, Page 34
Report Exporting, Page 36
Refreshing Web Report Data, Page 37
The following commands are discussed in this section.PROMPT# command, Page 35
GF command, Page 31
INIT command, Page 30
PASSWORD# command, Page 32
PROMPT# command, Page 35
PROMPT# command, Page 35
SF command, Page 31
USER# command, Page 33
Crystal Web Report Server 28
The Crystal Web Reports Server Command Expert
The Crystal Web Reports Server Command Expert was created to help streamline the creation and testing of Hypertext links or HTML forms for referencing reports. With this tool you can specify: the URL of a report to be viewed, database logon values, report parameter field values, Crystal Reports Web Server commands, how to display the report (Crystal Smart Viewer, or HTML page), etc. In addition to displaying the report the Command Expert returns an ISO Latin encoded string containing the report URL and the query string generated from the specifications. It also provides an environment for creating customized object or applet tags for the ActiveX and Java Smart Viewers. To access the Crystal Web Reports Server Command Expert (you must be using one of the following browsers: Netscape Navigator, 4.x or later, or Internet Explorer 4.01, or later,) do the following:
1 Select Web Samples and Utilities Page from the Seagate Crystal Reports Program Group menu
2 Click on Web Reports Server Command Expert
Constructing Report Requests
When requesting a report from the Crystal Web Reports Server, or when setting up a link to a report from another web page, there are several optional commands available for customizing the information returned. Commands are passed with a report request by appending the URL address of the report with a question mark followed by each query string command you want to use. Commands can be passed in any order and in any combination. All commands are optional; if you do not specify any commands, the original report will be returned.
The following is an example of using query string commands when requesting a report:
http://<localhost>/scrreports/Accounting/wsale.rpt?sf={customer.Sales}>10000
Note that each command is specified using the following syntax:
command=value
«Where command is the first name of the command, and value is the value you assign to that command. You should also note that the command is preceded by a question mark (?) and additional commands are separated by an ampersand (&).»
It will often be more convenient to embed the request in an HTML page and pass it to the Web Reports Server via a FORM tag, as in the following example:
<FORM ACTION='http://localhost/scrreports/Accounting/wsale.rpt?sf={customer.Sales}>1000' METHOD='post'>
<input type=submit value='Click Here To Launch the report: http://localhost/scrreports/Accounting/wsale.rpt?sf={customer.Sales}>1000'>
<input type=hidden name="init" value="html_page">
<input type=hidden name="rf" value="0">
<input type=hidden name="promptOnRefresh" value="0">
</FORM>
Crystal Web Report Server 29

The resulting URL and attached query string look like this:
http://localhost/scrreports/Accounting/wsale.rpt?sf={customer.Sales}>1000?init=html_page&rf=0&promptOnRefresh=0
INIT command
Specifies how the report should be displayed in the web browser. For example:
init=java
Possible values are:
● java - Crystal Smart Viewer for Java, Page 55
● actx - Crystal Smart Viewer for ActiveX, Page 57
● html_frame - Crystal Smart Viewer for HTML, Page 53 (with frames)
● html_page - Crystal Smart Viewer for HTML, Page 53 (standard)
If the INIT command is not specified, the Crystal Web Reports Server will detect the type of browser requesting a report and will provide a default viewer for that browser. For instance, if the browser is Netscape Navigator 4.0, the Crystal Web Reports Server will display the report using the Crystal Smart Viewer for Java.
NOTE: Not all browsers support all methods of viewing reports. For instance, both the ActiveX viewer and Java viewer are unavailable in versions of Internet Explorer previous to 3.02. Internet Explorer also requires that Authenticode 2.0 be installed. Netscape Navigator does not support the ActiveX viewer at all, and does not support the Java viewer in versions prior to 3.0.
Changing Selection Formulas in Web Reports
In addition to specifying a record or group selection formula when designing a report, you can also change the selection formula using a command appended to the URL of a report called through the Crystal Web Reports Server. As an administrator, you can create one report and design a web page that allows users to choose selection criteria for the information they need. The Crystal Web Reports Server then dynamically generates the requested report with only the selected records.
To specify a record selection in a request for a web report, use the parameter SF command, Page 31. For example:
http://server_name/reports/boxoffic.rpt? sf={studio.Studio}+%3d+'Universal'
This will override any selection formula already contained in BOXOFFIC.RPT. However, the new selection formula will not be saved with the original report file. It is only valid for the currently requested job. The GF command, Page 31 can be used to change a group selection formula in a report.
The Crystal Web Reports Server does not check the validity of any selection formulas you send to a report. If the selection formula you create is invalid, an error will be returned to the web browser. If you are designing a web site that passes selection formulas to reports, be sure to test the selection formulas before allowing users to access your site.
Crystal Web Report Server 30

GF command
Specifies a group selection formula. This command is similar to SF command, Page 31 (selection formula).
GF=<formula>
«<formula> is a selection formula in string format.»
For example:
GF= Sum({customer.Sales},{customer.Region})>10000
«Selects all groups in which the sum of all customer sales in each region is greater than 10,000.»
SF command
Specifies a selection formula.
SF=<formula>
«<formula> is a selection formula in string format.»
For example:
http://server_name/reports/boxoffic.rpt?sf={studio.Studio}+%3d+”Universal”
«Selects all records where the studio is Universal.»
NOTE: Reports that have the SF# or GF# commands applied will not have their pages shared. Caching will be by user.
SQL and ODBC Data Sources
The Seagate Crystal Web Reports Server opens reports based on SQL servers and ODBC data sources as easily as it opens reports based on smaller, desktop database files. If the data in a report requires access to a secure data source such as an SQL server or ODBC data source, the Web Reports Server will automatically prompt the user requesting the report to provide a user ID and password before it displays report data.Your existing database security continues to work, even over the web.
NOTE: Although the Web Reports Server requires users to log on before it displays reports that access secured databases, security conflicts can arise if several people attempt to access the same report simultaneously. To prevent such conflicts, you should add security to your web site, preventing users from seeing and accessing secured reports. Forcing users to log on to the intranet site is a common solution to providing complete system security.
Crystal Web Report Server 31
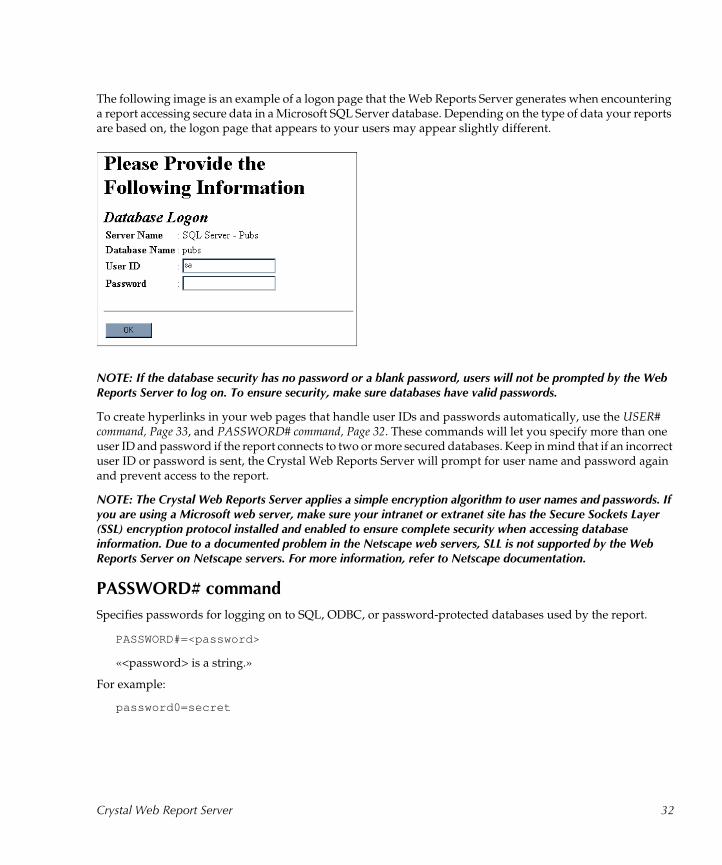
The following image is an example of a logon page that the Web Reports Server generates when encountering a report accessing secure data in a Microsoft SQL Server database. Depending on the type of data your reports are based on, the logon page that appears to your users may appear slightly different.
NOTE: If the database security has no password or a blank password, users will not be prompted by the Web Reports Server to log on. To ensure security, make sure databases have valid passwords.
To create hyperlinks in your web pages that handle user IDs and passwords automatically, use the USER# command, Page 33, and PASSWORD# command, Page 32. These commands will let you specify more than one user ID and password if the report connects to two or more secured databases. Keep in mind that if an incorrect user ID or password is sent, the Crystal Web Reports Server will prompt for user name and password again and prevent access to the report.
NOTE: The Crystal Web Reports Server applies a simple encryption algorithm to user names and passwords. If you are using a Microsoft web server, make sure your intranet or extranet site has the Secure Sockets Layer (SSL) encryption protocol installed and enabled to ensure complete security when accessing database information. Due to a documented problem in the Netscape web servers, SLL is not supported by the Web Reports Server on Netscape servers. For more information, refer to Netscape documentation.
PASSWORD# command
Specifies passwords for logging on to SQL, ODBC, or password-protected databases used by the report.
PASSWORD#=<password>
«<password> is a string.»
For example:
password0=secret
Crystal Web Report Server 32

If the report accesses more than one password-protected database, multiple passwords can be passed by incrementing the index number. For example:
password0=secret&password1=mystery&password2=unknown
PASSWORD# is normally used in conjunction with the USER# command, Page 33. For example:
user0=SmithJ&password0=secret&user1=JohnS&password1=mystery
If the report contains subreports that require passwords for logging on to SQL or ODBC data sources, use the following syntax in the URL:
password@subname#=<userid>
«subname is the name of the subreport.»
For example:
user@Crosstab0=jimmys&password$Crosstab0=jimmyz
NOTE: Make sure passwords appear in the URL in the same order in which the password-protected databases appear in the report. Additionally if passwords are not passed using the URL address, the user will be prompted for logon information at runtime.
USER# command
Specifies user IDs for logging on to SQL or ODBC databases used by the report.
USER#=<userids>
«<userids> is a string.»
For example:
user0=SmithJ
If the report accesses more than one password-protected database, multiple user IDs can be passed by incrementing the USER index number. For example:
user0=SmithJ&user1=JohnS&user2=JSmith
USER# is normally used in conjunction with the PASSWORD# command, Page 32. For example:
user0=SmithJ&password0=secret&user1=JohnS&password1=mystery
If the report contains subreports that require user IDs for logging on to SQL or ODBC data sources, use the following syntax in the URL:
user#@subreportname
For example:
user0@Crosstab=jimmys&password0Crosstab=jimmyz
Crystal Web Report Server 33
NOTE: If an existing report is inserted as the subreport, then the subreportname includes the file extension (for example, [email protected]). However, if the subreport was created inside the main report (with Insert | Subreport, and using the Report Expert to create the new report) then the name of the subreport usually does not contain a file extension (for example, user0@subreportname) unless one is added in the"Report Name" text box of the Insert | Subreport dialog box.
NOTE: Make sure user IDs appear in the URL in the same order in which the password-protected databases appear in the report. Additionally, subreport user IDs must appear in the same order that the subreports appear in the report. If user IDs are not passed using the URL address, the user will be prompted for logon information at runtime.
NOTE: Reports that have the USER# or PASSWORD# commands applied will not have their pages shared. Caching will be by user.
SQL Stored Procedures and Parameter Fields
Seagate Crystal Reports supports designing reports based on stored procedures in SQL databases. Additionally, the Report Designer allows you to create parameter fields in the report itself. Both stored procedures and parameter fields can prompt users at runtime for a value to base the report on. For instance, a sales person may want to see sales information for their region only. When they request the report, the report can prompt that sales person to enter a region name. The report then delivers data just for that region.
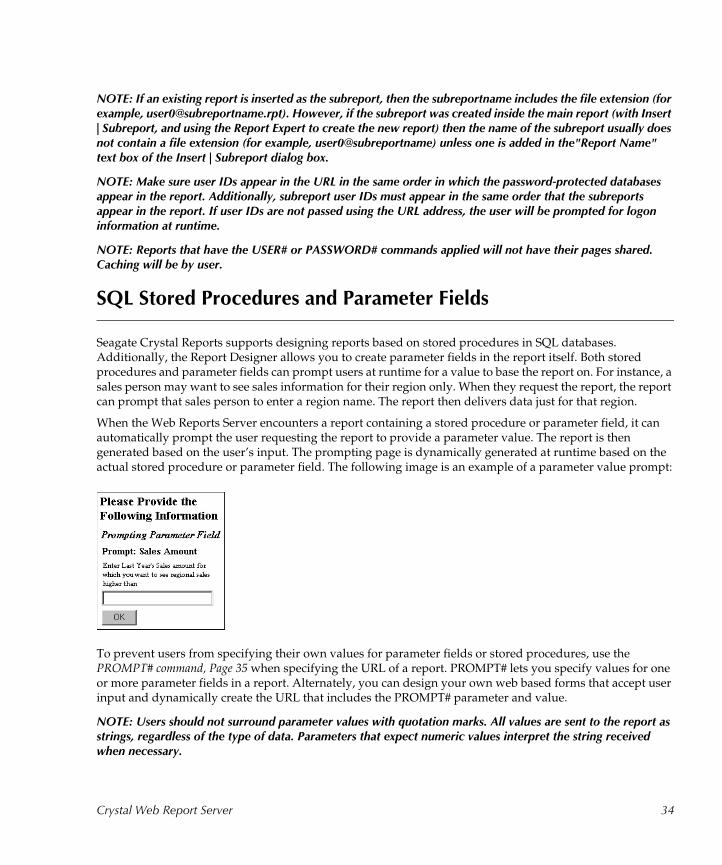
When the Web Reports Server encounters a report containing a stored procedure or parameter field, it can automatically prompt the user requesting the report to provide a parameter value. The report is then generated based on the user’s input. The prompting page is dynamically generated at runtime based on the actual stored procedure or parameter field. The following image is an example of a parameter value prompt:
To prevent users from specifying their own values for parameter fields or stored procedures, use the PROMPT# command, Page 35 when specifying the URL of a report. PROMPT# lets you specify values for one or more parameter fields in a report. Alternately, you can design your own web based forms that accept user input and dynamically create the URL that includes the PROMPT# parameter and value.
NOTE: Users should not surround parameter values with quotation marks. All values are sent to the report as strings, regardless of the type of data. Parameters that expect numeric values interpret the string received when necessary.
Crystal Web Report Server 34
The Crystal Web Reports Server does not validate any parameter values you specify for stored procedures or parameter fields. If the value you pass to the parameter is invalid, passing text information when a number is expected, for example, an error will not be returned to the web browser. In addition, the Crystal Web Reports Server does not allow you to change the format expected by parameters. Be sure to test any web site that accesses reports with stored procedures or parameter fields before allowing users to request such reports.
NOTE: Parameter fields and SQL stored procedures limit the effectiveness of report caching and job sharing. Since each report containing stored procedures or parameter fields may generate a different set of data every time it is requested, multiple requests for the same report may not be distributable among multiple users.
PROMPT# command
Specifies values for parameter fields in the report. parameter values are assigned to parameters in the order in which they exist in the report.
PROMPT#=<value>
«<value> is a string.»
For example:
prompt0=CA
NOTE: Do not use quotation marks around parameter values to indicate string values. All parameter values are passed to the report as strings. Intended numeric values are translated from strings to numbers by the report.
If the report contains more than one parameter field multiple values can be passed to parameters by incrementing the PROMPT index value. For example:
prompt0=CA&prompt1=1000
NOTE: Make sure parameter values appear in the URL in the same order in which the parameter fields and stored procedures appear in the report. If parameter values are not passed using the URL address, the user requesting the report will be prompted to provide values at runtime.
NOTE: Reports that have the PROMPT# command applied will not have their pages shared. Caching will be by user.
promptOnRefresh# command
Specifies whether report should prompt for parameter field values when refreshed.
promptOnRefresh#=<value>
«<value> is 0 or 1.»
For example:
promptOnRefresh=1
NOTE: Reports that have the promptOnRefresh command applied will not have their pages shared. Caching will be by user.
Crystal Web Report Server 35
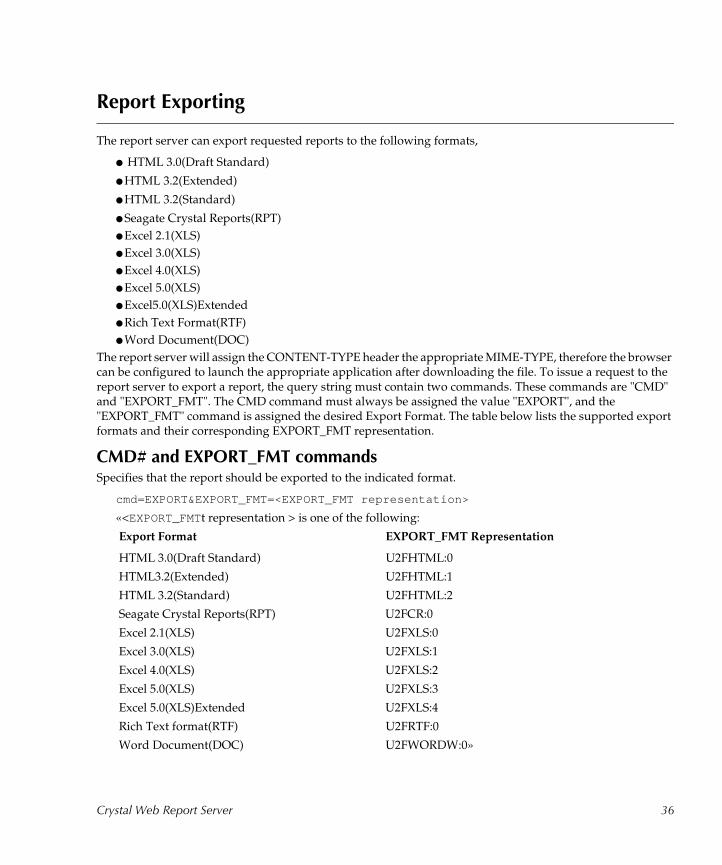
Report Exporting
The report server can export requested reports to the following formats,
● HTML 3.0(Draft Standard)
● HTML 3.2(Extended)
● HTML 3.2(Standard)
● Seagate Crystal Reports(RPT)● Excel 2.1(XLS)● Excel 3.0(XLS)● Excel 4.0(XLS)● Excel 5.0(XLS)● Excel5.0(XLS)Extended● Rich Text Format(RTF)● Word Document(DOC)
The report server will assign the CONTENT-TYPE header the appropriate MIME-TYPE, therefore the browser can be configured to launch the appropriate application after downloading the file. To issue a request to the report server to export a report, the query string must contain two commands. These commands are "CMD" and "EXPORT_FMT". The CMD command must always be assigned the value "EXPORT", and the "EXPORT_FMT" command is assigned the desired Export Format. The table below lists the supported export formats and their corresponding EXPORT_FMT representation.
CMD# and EXPORT_FMT commands Specifies that the report should be exported to the indicated format.
cmd=EXPORT&EXPORT_FMT=<EXPORT_FMT representation>
«<EXPORT_FMTt representation > is one of the following:
Export Format EXPORT_FMT Representation
HTML 3.0(Draft Standard) U2FHTML:0
HTML3.2(Extended) U2FHTML:1
HTML 3.2(Standard) U2FHTML:2
Seagate Crystal Reports(RPT) U2FCR:0
Excel 2.1(XLS) U2FXLS:0
Excel 3.0(XLS) U2FXLS:1
Excel 4.0(XLS) U2FXLS:2
Excel 5.0(XLS) U2FXLS:3
Excel 5.0(XLS)Extended U2FXLS:4
Rich Text format(RTF) U2FRTF:0
Word Document(DOC) U2FWORDW:0»
Crystal Web Report Server 36
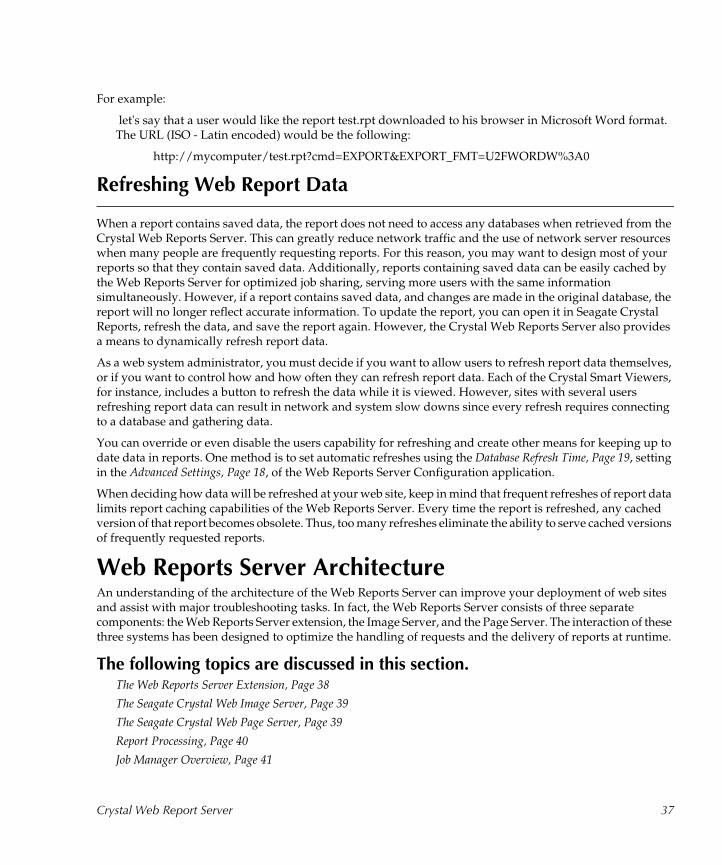
For example:
let's say that a user would like the report test.rpt downloaded to his browser in Microsoft Word format. The URL (ISO - Latin encoded) would be the following:
http://mycomputer/test.rpt?cmd=EXPORT&EXPORT_FMT=U2FWORDW%3A0
Refreshing Web Report Data
When a report contains saved data, the report does not need to access any databases when retrieved from the Crystal Web Reports Server. This can greatly reduce network traffic and the use of network server resources when many people are frequently requesting reports. For this reason, you may want to design most of your reports so that they contain saved data. Additionally, reports containing saved data can be easily cached by the Web Reports Server for optimized job sharing, serving more users with the same information simultaneously. However, if a report contains saved data, and changes are made in the original database, the report will no longer reflect accurate information. To update the report, you can open it in Seagate Crystal Reports, refresh the data, and save the report again. However, the Crystal Web Reports Server also provides a means to dynamically refresh report data.
As a web system administrator, you must decide if you want to allow users to refresh report data themselves, or if you want to control how and how often they can refresh report data. Each of the Crystal Smart Viewers, for instance, includes a button to refresh the data while it is viewed. However, sites with several users refreshing report data can result in network and system slow downs since every refresh requires connecting to a database and gathering data.
You can override or even disable the users capability for refreshing and create other means for keeping up to date data in reports. One method is to set automatic refreshes using the Database Refresh Time, Page 19, setting in the Advanced Settings, Page 18, of the Web Reports Server Configuration application.
When deciding how data will be refreshed at your web site, keep in mind that frequent refreshes of report data limits report caching capabilities of the Web Reports Server. Every time the report is refreshed, any cached version of that report becomes obsolete. Thus, too many refreshes eliminate the ability to serve cached versions of frequently requested reports.
Web Reports Server Architecture An understanding of the architecture of the Web Reports Server can improve your deployment of web sites and assist with major troubleshooting tasks. In fact, the Web Reports Server consists of three separate components: the Web Reports Server extension, the Image Server, and the Page Server. The interaction of these three systems has been designed to optimize the handling of requests and the delivery of reports at runtime.
The following topics are discussed in this section.The Web Reports Server Extension, Page 38
The Seagate Crystal Web Image Server, Page 39
The Seagate Crystal Web Page Server, Page 39
Report Processing, Page 40
Job Manager Overview, Page 41
Crystal Web Report Server 37
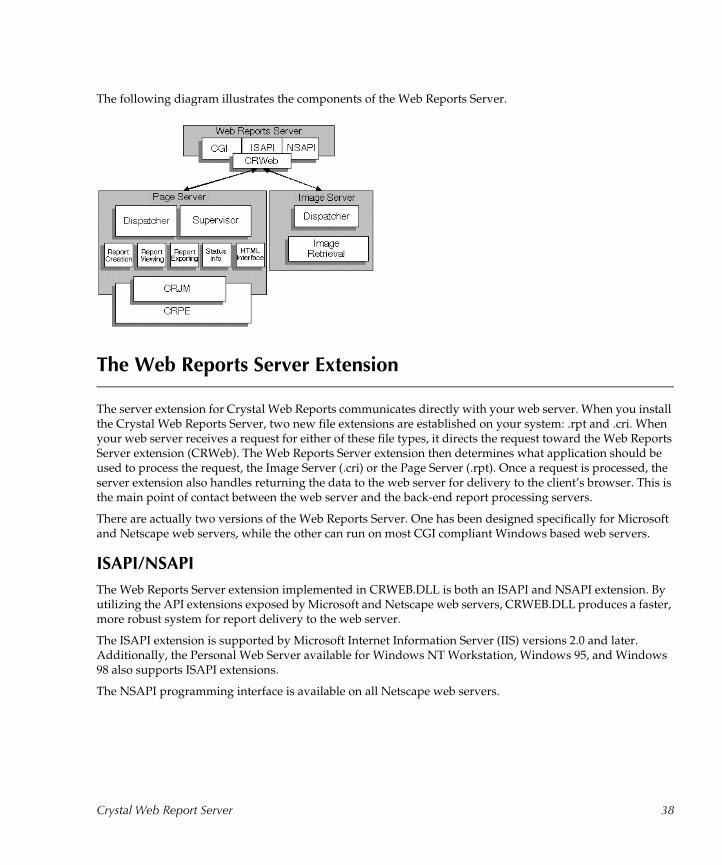
The following diagram illustrates the components of the Web Reports Server.
The Web Reports Server Extension
The server extension for Crystal Web Reports communicates directly with your web server. When you install the Crystal Web Reports Server, two new file extensions are established on your system: .rpt and .cri. When your web server receives a request for either of these file types, it directs the request toward the Web Reports Server extension (CRWeb). The Web Reports Server extension then determines what application should be used to process the request, the Image Server (.cri) or the Page Server (.rpt). Once a request is processed, the server extension also handles returning the data to the web server for delivery to the client’s browser. This is the main point of contact between the web server and the back-end report processing servers.
There are actually two versions of the Web Reports Server. One has been designed specifically for Microsoft and Netscape web servers, while the other can run on most CGI compliant Windows based web servers.
ISAPI/NSAPI
The Web Reports Server extension implemented in CRWEB.DLL is both an ISAPI and NSAPI extension. By utilizing the API extensions exposed by Microsoft and Netscape web servers, CRWEB.DLL produces a faster, more robust system for report delivery to the web server.
The ISAPI extension is supported by Microsoft Internet Information Server (IIS) versions 2.0 and later. Additionally, the Personal Web Server available for Windows NT Workstation, Windows 95, and Windows 98 also supports ISAPI extensions.
The NSAPI programming interface is available on all Netscape web servers.
Crystal Web Report Server 38

CGI
A second implementation of the Web Reports Server extension exists in the file CRWEB.EXE. This application conforms to the CGI standard. If you are using a web server other than a Microsoft or Netscape server, the CGI version of the Web Reports Server can easily be installed with your existing web server software.
The Seagate Crystal Web Image Server
When a report is rendered in HTML, graphic images, maps, graphs, charts, and OLE objects are rendered as Crystal Image (.CRI) files and stored by the Page Server module. When the Web Reports Server encounters a Crystal Image inside of the HTML report, it asks the Image Server to interpret it. The Image Server translates the image into a form that can be displayed by browsers (such as JPEG format), and sends the image back to the Web Reports Server for distribution through the web server.
NOTE: Crystal Image files are not used if the report is rendered as an Encapsulated Page File (EPF) for display inside the Crystal Smart Viewers for ActiveX, Java, or Java Beans.
Running Image Server as an NT Service
On Windows NT systems, the Image Server can be set up to run as an NT service. It is installed under a system account by default. NT services run in the background and do not require a user or administrator to be logged on to the web server machine. Most web server systems should run the Image Server as an NT service for best performance.
The Image Server appears as Crystal Web Image Server in the Windows NT Services control panel.
The Seagate Crystal Web Page Server
NOTE: This section refers to the Job Manger which is the component responsible for implementing report sharing and page caching among other thing. Refer to the section titled Job Manager overview for a general description of how page caching and report sharing are implemented.
The Page Server is the most complex piece of the Crystal Web Reports Server system. It is actually made up of several smaller components each responsible for handling specific parts of the report processing task. It’s primary job, though, is to receive a request for an .RPT report file from the Web Reports Server, generate the report, and return it in a form that can be viewed by a web browser.
NOTE: The Web Reports Server limits report caching features with reports based on SQL stored procedures or that include parameter fields. Such reports may generate a different set of data every time they are requested, due to the dynamic values passed to the parameter field or stored procedure. Thus, multiple requests for the same report may actually produce separate report jobs.
Crystal Web Report Server 39
Report Formats
When the Page Server generates a report, it will translate it into either HTML pages or Encapsulated Page File (EPF) pages. The output depends on how the report will be viewed in the browser. If the browser requests viewing a report as HTML or HTML frames, the Page Server will generate HTML pages containing Crystal Images where appropriate. (Crystal Images are, in turn, interpreted by the Image Server. See The Seagate Crystal Web Image Server, Page 39.) If the browser requests to view a report inside the Java viewer or the ActiveX viewer, then the Page Server generates EPF pages.
HTML and HTML frames can be viewed inside any browser that supports the HTML 3.02 standard. This general standard makes HTML reports ideal for sites that may use a wide range of browsers or in secure sites that do not allow ActiveX controls or Java applets. However, HTML is a limited display format, and reports may lose some of the design features available in Seagate Crystal Reports.
EPF is a Seagate format based on the Encapsulated Postscript format (EPS). As a result, EPF reports can handle complex layout and design descriptions. When viewed inside the browser, EPF reports retain most if not all of the design and layout elements of the report originally created in Seagate Crystal Reports, providing a cleaner, more accurate display of the information. As a proprietary format, though, EPF reports can only be displayed inside the ActiveX or Java based Smart Viewers.
NOTE: EPF files do not retain formatting information set by printer drivers. Examples of such formatting include page size and page orientation.
Report Processing
When the Page Server gets a request for a new report, it must obtain a new request Id from the Job Manager and determine if the Job Manager needs to obtain a new job Id from the Report Engine. If a new job Id is required, the Report Engine must actually generate a new report. The interaction between the Page Server, the Job Manager, and the Report Engine has been designed to maximize performance in intranet and extranet environments.
The Crystal Reports Job Manager must generate new request Ids for every request the Web Reports Server receives. If the Page Server determines that the requested report already exists in the cache, it will simply obtain a new request Id from the Job Manager, then match that request to the job Id of the existing report. If the report has not been cached, the Page Server must obtain a new job Id from the Job Manager, as well as a new request Id.
If the Page Server demands a new report job Id from the Job Manager, the Job Manager will start the Report Engine and have it generate the new report. The Report Engine creates a job Id for the new report and returns it to the Job Manager which, in turn, returns both the job Id and the request Id to the Page Server.
Report Engine
The Report Engine is the component which actually generates reports. The Report Engine opens a requested RPT file, locates the necessary data, and produces a complete report file. If you are an application developer, this is the same Report Engine that you can add to your own applications (see Crystal Report Engine, Page 63 for more information). Every report produced by the Report Engine has a unique job Id to identify that report. The Page Server uses the job Id to determine what actual report must be used for a specific client request.
Crystal Web Report Server 40
Running the Page Server as an NT Service
On Windows NT systems, the Page Server can be set up to run as an NT service. It is installed under a system account by default. NT services run in the background and do not require a user or administrator to be logged on to the web server machine. Most web server systems should run the Page Server as an NT service for best performance.
The Page Server appears as Crystal Web Page Server in the Windows NT Services control panel.
Job Manager Overview
Page caching and job sharing are implemented via the Job Manager (CRJM). This section provides a general description of the Job Managers function as it concerns Job Sharing and Page Caching:
When a client requests a report, that has not been requested before, the following occurs:
● A new report Job is created. A cache is created, which will hold report pages as they are requested. A reference to the report job is created. The reference has a unique id (Request Id) by which the client can access the job in the future.
● There is usually a refresh interval associated with a report job.This is the time interval (specified as the Database Refresh Time in the Configuration Manager) after which a new request for the same report will result in accessing the database for updated information. In other words if a new client requests the report after the refresh interval for the existing report job then new report job is created as a result.
● If a client referencing an existing report job selects refresh then a new report job is created and the client gets a reference to the new job.
Job Sharing
If the report contains saved data and there are no SF# and GF# commands or if a report does not have saved data and there ar no SF#,GF#,PASSWORD#,USER#,PROMPT# or promptOnRefresh# commands then the resulting report job can be shared. What this means is that requests for the same report (which occur within the same refresh interval) will result in references to the same report job.
There are conditions under which a shared report job will no longer be shared:
● If a client sharing an existing report job selects refresh then a new report job will be created and the client will receive a reference to the new report job.
● If a client sharing an existing report job submits a page request that includes one of the commands listed previously then a new report job will be created and the client will receive a reference to the new report job.
Page Caching
Associated with each report job is a cache to store requested pages. The pages are generated as requested, passed to the client and stored in the cache. If another client, who is sharing the same report job, requests a page which is already cached then that client will received the cached page. This can greatly reduce access time (subject to the traffic conditions of your network at any given time).
Crystal Web Report Server 41

Job Examples
Reports with Saved Data
A report that is saved with data and does NOT have the sf or gf parameters applied to it, will have its pages shared by all users. If the report has the gf or sf parameters applied, the caching will be by user (same as Crystal Reports 6.0).
Reports without Saved Data
A report without saved data that does NOT have the sf, gf, user#, password#,promptOnRefresh, or prompt# parameters applied to it, will have its pages shared by all users. Due to the reports not being saved with data, the user must specify the database refresh time interval in the Web Reports Server Configuration utility. This interval indicates how often the database will be accessed. For example:
1. The database refresh time is set to 5 minutes.
2. User A selects report A1 (without saved data). Since User A is the first person to select this report, the database is accessed.
3. Two minutes after User A requested Report A1, User B selects Report A1. User A and User B will share the report's pages because the report was requested before the database refresh time expired. Thus, the database is not accessed.
4. Six minutes after User A requested Report A1, User C selects Report A1. Since the database refresh time interval has expired (the setting is 5 minutes and 6 minutes have passed since the database was accessed for this report), the database will be accessed and User C will not share his pages with User A and User B.
5. One minute after User C requested Report A1, User A selects his viewer's refresh button. User A and User C will share cached pages because User A requested accessing the database inside the database refresh time interval. The database was accessed one minute before by User C, and the database refresh time is 5 minutes.
6. Four minutes after User C requested Report A1, User B selects his viewer's refresh button. User B, User A and User C will share cached pages because User B requested accessing the database inside the database refresh time interval. The database was accessed four minutes before by User C, and the database refresh time is 5 minutes.
7. If the report has the sf, gf, user#, password#, promptOnRefresh#, or prompt# parameters applied, the caching will be by user (same as Crystal Reports 6.0).
Crystal Web Report Server 42
Volume 1
2 Building Active Web Sites
What you will find in this chapter...
Note: This chapter contains information specific to the Professional Edition of Seagate Crystal Reports.
Seagate Crystal Report Engine Automation Server, Page 44
Visual InterDev Design-time ActiveX Control, Page 44
...including an overview, using an existing report, and building a report at runtime.
Editing Active Server Pages, Page 47
...including customizing the Smart Viewer, modifying the report, and session timeouts.
Sample Web Site, Page 48
Building Active Web Sites 43

Seagate Crystal Report Engine Automation Server
The Seagate Crystal Report Engine Automation Server allows you to build powerful active web sites with any web server that supports ActiveX and Active Server Pages. This section demonstrates how to bring the full power of the Report Engine Automation Server to your Microsoft Internet Information Server (IIS) web sites.
Although the Seagate Crystal Web Reports Server provides many features for viewing reports from a web browser, the ability to format and select data is limited to a few simple commands. The Seagate Crystal Report Engine Automation Server, on the other hand, gives you all the power of the Seagate Crystal Report Engine.
For adding the Report Engine Automation Server to a web site, Seagate Crystal Reports provides the Visual InterDev Design-time ActiveX Control for use with Microsoft Visual InterDev. In this chapter, you will learn how to use the Visual InterDev Design-time ActiveX Control to automatically set up VBScript code in your Active Server Pages that uses the Report Engine Automation Server and the Active Data Driver.
NOTE: For additional information on the objects, methods, and properties provided by the Seagate Crystal Report Engine Automation Serve, Please see Crystal Report Engine Object Model for the Automation Server, Volume 3, Chapter 6.
Visual InterDev Design-time ActiveX Control
When you install Seagate Crystal Reports, if you select the Custom installation option and choose to install the Development tools, the Crystal Report Engine Automation Server and the Visual InterDev Design-time ActiveX Control will be installed and registered on your system. However, to successfully use these tools with a web site, you must also install them on your web server system.
When used from within Active Server Pages, the Crystal Report Engine Automation Server dynamically produces reports that are displayed in a web browser by using one of the Crystal Smart Viewers (see Configuring the Crystal Smart Viewers, Page 49). Using the powerful server-side scripting capabilities of Active Server Pages, you can design useful web-based interfaces and query tools for accessing reports over an intranet or extranet.
The Visual InterDev Design-time ActiveX Control has been designed specifically for Microsoft Visual InterDev. With the Design-time ActiveX Control, you can quickly and easily add server-side VBScript code to your Active Server Pages. The design-time control lets you select an existing report, or build a dynamic report at runtime that accesses data from an ActiveX data source, such as ActiveX Data Objects (ADO).
This chapter takes you through the steps of building a basic web site inside Visual InterDev using the Design-time ActiveX control, the Report Engine Automation Server, and ADO. Use the examples in this chapter as a basis for building your own web sites. Most of the steps illustrated will work in either version 1.0 or 6.0 of Visual InterDev. Differences between the two versions, though, will be indicated with notes.
This topic is only supported by the Professional Edition of Seagate Crystal Reports.
Building Active Web Sites 44

The following topics are discussed in this section.Using an Existing Report, Page 45
Building a Report at Runtime, Page 46
Using an Existing Report
This section demonstrates how to add code to your Active Server Pages with the Visual InterDev Design-time ActiveX Control, in order to display an existing report in the Crystal Smart Viewer for ActiveX.
Use the following steps when working in version 1.0 of Visual InterDev:
1 With a web project open in Visual InterDev, add a new Active Server Page. For more information on opening web projects and adding ASP pages, refer to the Visual InterDev documentation. For this example, the web project will be named MySite and the new ASP page will be named ReportPage.asp.
2 Choose the ACTIVEX CONTROL command from the Insert|Into HTML menu. The Insert ActiveX Control dialog box appears.
3 Click the Design-Time Tab to display design-time ActiveX controls that are registered on your system.
4 Highlight the CrystalReport.DTC design-time control, and click OK.
5 Close the Properties dialog box if it appears. The Visual InterDev Design-time ActiveX Control appears in the Microsoft Developer Studio window.
6 Toggle the Use Existing Report check box on, if it is not on already. This disables most of the controls in the design-time control. If you have not added a data connection to your web project, this check box will automatically be toggled on and disabled.
7 Click Browse to select the report you want displayed in your web site. The Select Report Name dialog box appears.
8 Use this dialog box to locate and select the desired report. Enter a standard DOS path to the report. Do not use a URL address or a UNC path. Click Open when finished. The selected report appears in the Report Name text box of the design-time control.
9 From the Viewer drop-down list, select the Crystal Smart Viewer you want to use to display the report.
10 When finished, close the window that contains the Visual InterDev Design-time ActiveX Control.
Once you close the design-time control, the ReportServer Active Server Page (RPTSERVER.ASP) is added to your project, along with the report file you selected in the design-time control. The ReportServer Active Server Page contains the VBScript code that communicates with the Crystal Report Engine Automation Server. This page is required by any web project that uses the Crystal Report Engine Automation Server to display reports.
In addition, the design-time control adds several lines of VBScript code to your web page. This code is designed to work with the ReportServer Active Server Page and the Crystal Report Engine Automation Server to display the report selected inside the specified Crystal Smart Viewer. For information on how to edit this code, see Editing Active Server Pages, Page 47.
To test your new Active Server Page, save the file to your web server, select the page in your Project Workspace window, and choose the PREVIEW IN BROWSER command from the File menu. Visual InterDev will open your web browser and display the Active Server Page that contains the instructions to open the report.
Building Active Web Sites 45
Building a Report at Runtime
The Visual InterDev Design-time ActiveX Control can build a report dynamically at runtime based on an ActiveX data source such as ActiveX Data Objects. The design-time control uses the Crystal Active Data Driver to dynamically design a generic report based on tables and fields you select from a data source connected to your project. To use the dynamic reporting features of the design-time control, first add a data source to your web project.
1 With a project open in Visual InterDev, choose the DATA CONNECTION command from the Project|Add To Project menu. The Select Data Source dialog box appears.
2 To select an ODBC data source, click the Machine Data Source Tab.
3 Select a data source from the Data Source Name list, and click OK, or click NEW to create a new data source. Once you click OK in the Select Data Source dialog box, the data source will be added to your project.
4 Save your project.
NOTE: You may be required to specify logon information when you select a data source. For complete information on adding data sources to a web project, refer to your Visual InterDev documentation.
Now that your project contains a data source, the Visual InterDev Design-time ActiveX Control can be used to create an Active Server Page that dynamically creates and displays a report based on this data source.
1 Choose the NEW command from the File menu. The New dialog box appears.
2 On the Files Tab of the New dialog box, select Active Server Page.
3 Enter a name for the new Active Server Page in the File name text box, and click OK. The new Active Server Page is created and appears in the Microsoft Developer Studio.
4 Make sure the comment <!-- Insert HTML here --> is highlighted, and choose the ACTIVEX CONTROL command from the Insert|Into HTML menu. The Insert ActiveX Control dialog box appears.
5 Click the Design-Time Tab to display the design-time ActiveX controls that are registered on your system.
6 Highlight the CrystalReport.DTC design-time control, and click OK.
7 Close the Properties dialog box if it appears. The Visual InterDev Design-time ActiveX Control appears in the Microsoft Developer Studio window.
8 Toggle the Use existing report check box off, if it is not off already.
9 In the Data Connection drop-down list, select the database corresponding to the data source you added to your project.
10 In the Record Source drop-down list, select a database table from the database.
11 In the Columns list box, toggle the check box on for any field you want as a column in your report.
Building Active Web Sites 46
NOTE: If you are familiar with the SQL language, you may prefer to click the SQL option in the Source Type box and click the Builder button. The Builder button opens the Visual InterDev Query Builder, allowing you to design a SQL statement that retrieves data from your data source.
12 Select a Crystal Smart Viewer from the Viewer drop-down list.
13 Close the design-time control.
Once again, several lines of VBScript code are added to your Active Server Page. Microsoft IIS will run this code at runtime and will dynamically generate a report based on your data source.
Editing Active Server Pages Once the Visual InterDev Design-time ActiveX Control creates the code to generate and display reports on your web site, you can edit that code to customize how the Crystal Smart Viewer and the report appear in a web browser.
The following topics are discussed in this section.
Customizing the Crystal Smart Viewer, Page 47
Modifying the Report, Page 47
Session Timeout, Page 48
Customizing the Crystal Smart Viewer
The Crystal Smart Viewer for Java is a standard Java applet, while the Crystal Smart Viewer for ActiveX is an ActiveX control. Both can be customized using the <PARAM> tags that appear under the <OBJECT> tag created in your Active Server Page by the design-time control. In your Active Server Page, look for the OBJECT tag appearing below the VBScript code. For information on how to change and set parameter for either viewer, see Configuring the Crystal Smart Viewers, Page 49.
Modifying the Report
Although the Visual InterDev Design-time ActiveX Control provides all of the necessary VBScript code to display your reports in a web browser, you may want to customize the output of the actual report. By using the Report Engine Object Model, provided by the Report Engine Automation Server, you can change report format, grouping, selection formulas, and sort fields. For additional documentation, refer to Seagate Crystal Report Engine Automation Server, Page 44.
In your Active Server Page, look through the VBScript code created by the design-time control. Notice that all of the VBScript code generated is server-side script, making your web site compatible with any browser (depending on the Crystal Smart Viewer you specified).
Building Active Web Sites 47
In the VBScript code, the OpenReport call accesses the report file you specified in the design-time control, creating an instance of the Report object. A few lines below the OpenReport method, you will find the ReadRecords method. ReadRecords obtains data and generates the final report that will be displayed in the web browser. Using these two calls, you can modify the format and data displayed in the report.
As stated before, the VBScript code provided by the design-time control creates a Report object through which your reports can be manipulated. For instance, the following code sets a record selection formula for the report at runtime:
session(“oRpt”).RecordSelectionFormula = “{customer.Region} =’CA’"
Notice that the Report object is stored in the session object. For complete information on the session object, refer to the Microsoft documentation for Active Server Pages.
Session Timeout
By default, the session object provided by Visual InterDev for your project has a timeout value of 20 minutes. When designing web sites that use the Report Engine Automation Server and the Visual InterDev Design-time ActiveX Control, you will not be able to edit reports using Seagate Crystal Reports for 20 minutes after viewing them in a browser. Once your web site is designed and finished, this timeout period may be just fine. However, during the development process, you may want to alter the session timeout period.
The Session object has a Timeout property that determines how long the session waits before timing out. During development, add a line of code to your Active Server Pages to set the Timeout property to a much shorter timeout period, such as 1 minute. The following code demonstrates this:
session.Timeout = 1
Be sure to remove the line of code before making your web site available to other users.
Sample Web Site
Seagate Crystal Reports includes the Xtreme Mountain Bikes, Inc. sample web site (created using the Seagate Crystal Report Engine Automation Server and the Active Data Driver). This web site can be installed by selecting a Custom Installation when you install Seagate Crystal Reports, and then toggling the Xtreme Mountain Bike check box on under the Sample Files option in the Custom Installation Options dialog box. This site will be installed, by default, in the \Program Files\Seagate Software\Crystal Reports\sample\Xtreme\aspweb directory.
Once installed, this web site provides a complete example of an Internet or intranet site that generates and displays Inventory reports for a fictitious mountain bike distribution company. Simply log on as one of the company employees listed on the home page, and browse through the reports. Different options are available depending on which alias you use. The site also provides the option of viewing the source code for any Active Server Page.
Building Active Web Sites 48
Volume 1
3 Configuring theCrystal Smart Viewers
What you will find in this chapter...
Note: This chapter contains information specific to the Professional Edition of Seagate Crystal Reports.
Crystal Smart Viewer Overview, Page 50
...including an introduction and features, printing from the Smart Viewer, and using the Smart Viewer in applications.
Crystal Smart Viewer for HTML, Page 53
...including an introduction and limitations of HTML reports.
Crystal Smart Viewer for Java, Page 55
...including an introduction, adding a Smart Viewer with Java, and an example.
Crystal Smart Viewer for ActiveX, Page 57
...including an introduction, AuthentiCode certification, adding a Smart Viewer with ActiveX including the download, and an example.
Configuring the Crystal Smart Viewers 49
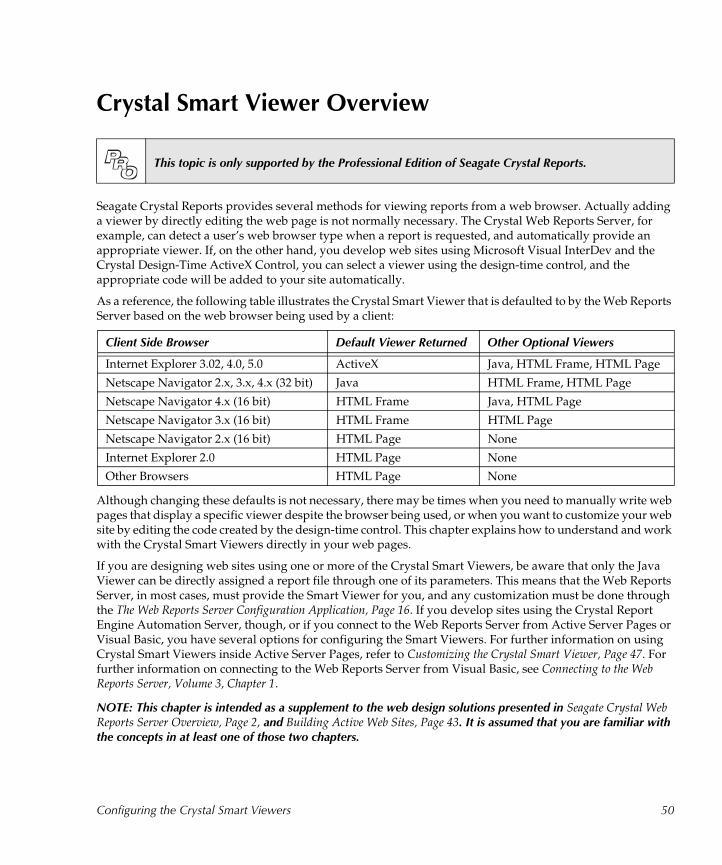
Crystal Smart Viewer Overview
Seagate Crystal Reports provides several methods for viewing reports from a web browser. Actually adding a viewer by directly editing the web page is not normally necessary. The Crystal Web Reports Server, for example, can detect a user’s web browser type when a report is requested, and automatically provide an appropriate viewer. If, on the other hand, you develop web sites using Microsoft Visual InterDev and the Crystal Design-Time ActiveX Control, you can select a viewer using the design-time control, and the appropriate code will be added to your site automatically.
As a reference, the following table illustrates the Crystal Smart Viewer that is defaulted to by the Web Reports Server based on the web browser being used by a client:
Although changing these defaults is not necessary, there may be times when you need to manually write web pages that display a specific viewer despite the browser being used, or when you want to customize your web site by editing the code created by the design-time control. This chapter explains how to understand and work with the Crystal Smart Viewers directly in your web pages.
If you are designing web sites using one or more of the Crystal Smart Viewers, be aware that only the Java Viewer can be directly assigned a report file through one of its parameters. This means that the Web Reports Server, in most cases, must provide the Smart Viewer for you, and any customization must be done through the The Web Reports Server Configuration Application, Page 16. If you develop sites using the Crystal Report Engine Automation Server, though, or if you connect to the Web Reports Server from Active Server Pages or Visual Basic, you have several options for configuring the Smart Viewers. For further information on using Crystal Smart Viewers inside Active Server Pages, refer to Customizing the Crystal Smart Viewer, Page 47. For further information on connecting to the Web Reports Server from Visual Basic, see Connecting to the Web Reports Server, Volume 3, Chapter 1.
NOTE: This chapter is intended as a supplement to the web design solutions presented in Seagate Crystal Web Reports Server Overview, Page 2, and Building Active Web Sites, Page 43. It is assumed that you are familiar with the concepts in at least one of those two chapters.
This topic is only supported by the Professional Edition of Seagate Crystal Reports.
Client Side Browser Default Viewer Returned Other Optional Viewers
Internet Explorer 3.02, 4.0, 5.0 ActiveX Java, HTML Frame, HTML Page
Netscape Navigator 2.x, 3.x, 4.x (32 bit) Java HTML Frame, HTML Page
Netscape Navigator 4.x (16 bit) HTML Frame Java, HTML Page
Netscape Navigator 3.x (16 bit) HTML Frame HTML Page
Netscape Navigator 2.x (16 bit) HTML Page None
Internet Explorer 2.0 HTML Page None
Other Browsers HTML Page None
Configuring the Crystal Smart Viewers 50

Features of the Crystal Smart Viewers
Seagate Crystal Reports provides rich and powerful reporting features for data analysis and presentation. Ideally, web presentations of reports will maintain those report features. Several of the Crystal Smart Viewers are designed to provide this power asit exists in the original report.
Web administrators often have important reasons for choosing one web technology over another when presenting information on a web site. When deciding on the Smart Viewer technology used on your web site, you should consider the reporting features provided by each Smart Viewer and be aware of any limits that a particular web technology might impose on the Crystal Smart Viewers.
The following table illustrates what major reporting features are available in each of the Crystal Smart Viewers:
If your reports make use of a particular reporting feature, verify that feature is available in the Smart Viewer you choose before designing your site.
Printing from the Crystal Smart Viewers
When you create a report in Seagate Crystal Reports, the program analyzes the printer that is currently selected for your system to determine font size and how to size and position objects, such as field objects and text objects on the report. If the report is then printed to a printer other than the one selected when it was created, problems with font size, clipped text, and pagination may arise.
With this in mind, consider what may happen when a report is created on one machine, served over the network by a web server on a second machine, and viewed or printed from a web browser through a Crystal Smart Viewer on a third machine. If each of these machines is connected to a different printer, report formatting problems may be compounded.
Features ActiveX Java Java Bean HTML Frames
HTML Page
View Graphs Yes Yes Yes Yes Yes
View embedded maps Yes Yes Yes Yes Yes
Smart Navigation Tree Yes Yes Yes Yes
Drill down on graphs & summarized data Yes Yes Yes
Export to Word, Excel, HTML, RPT Yes Yes Yes
Change Record Selection Expert Yes Yes Yes
Search for specific data value Yes Yes Yes Yes Yes
View subreports Yes Yes Yes Yes Yes
Drill on out of place subreports Yes Yes Yes
Configuring the Crystal Smart Viewers 51
Consider a report that is designed and formatted on the first machine, where printer settings are used to determine font size and the size and position of objects in the report. When the web server generates that report, the printer it is connected to may force the length and size of a font to change. However, the field and text objects will maintain a fixed size and position. Thus, generating the report on the web server may cause text to be clipped or may create extra blank spaces between fields.
If, however, some report objects are formatted with the Can Grow formatting option, these objects will resize themselves as the size of the text font is resized by the new printer. Once resized, though, those objects may change the pagination.
The Crystal Smart Viewer for Java and the Crystal Smart Viewer for HTML will display the report in a web browser as it is generated by the web server, so these formatting problems may affect how reports appear to users. The Crystal Smart Viewer for Java does not allow a user to print a report from the web browser due to restrictions in the Java language. The Crystal Smart Viewer for HTML will simply print the HTML page exactly as it appears in your web browser. In contrast, the Crystal Smart Viewer for ActiveX allows you to print a formatted report from a web browser. As a result, an additional level of formatting problems may appear in the printed report if the machine on which the web browser is running is connected to a third printer with different settings.
When designing reports that will be viewed through one of the Crystal Smart Viewers, use report fonts common on all systems to prevent resizing and pagination problems, and always test reports on a client machine before distributing them to users.
Using Crystal Smart Viewers in Applications
Viewing reports is not exclusive to web sites, and you may find a need for client side applications that display reports on screen to users. The Crystal Smart Viewer/ActiveX and the Crystal Smart Viewer/Java Bean are fully functional components that can be added to applications written in Microsoft Visual Basic, Borland Delphi, Symantec Visual Cafe, and many other development environments that support ActiveX controls or Java Beans.
NOTE: The Crystal Smart Viewer/Java Bean is intended primarily for application development and is, therefore, not discussed in this chapter. Instead, this chapter concentrates on the Smart Viewers intended for web site development and that can be distributed by the Web Reports Server or added using the Crystal Design-Time ActiveX control.
A common use of the Crystal Smart Viewers in application development is when designing N-tier applications that may use the Crystal Web Report Server, Page 1, the Seagate Crystal Report Engine Automation Server, Page 44, or the The Report Designer Component, Page 145, as a middle tier and the Smart Viewer as part of the client user interface. For more information on using the ActiveX and Java Bean versions of the Crystal Smart Viewers in application design, see Application Development with Crystal Smart Viewers, Volume 3, Chapter 1.
Configuring the Crystal Smart Viewers 52
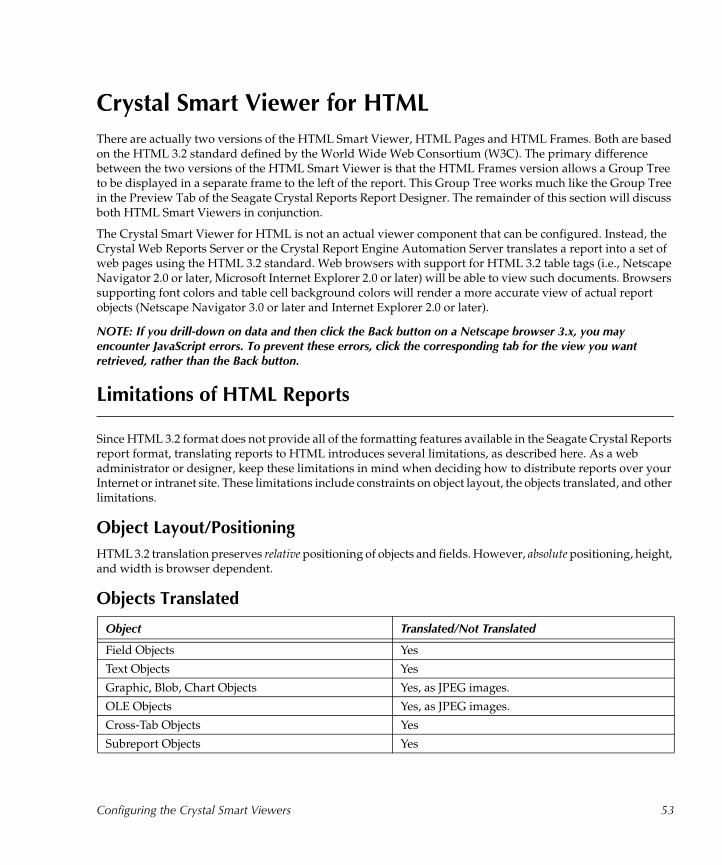
Crystal Smart Viewer for HTML
There are actually two versions of the HTML Smart Viewer, HTML Pages and HTML Frames. Both are based on the HTML 3.2 standard defined by the World Wide Web Consortium (W3C). The primary difference between the two versions of the HTML Smart Viewer is that the HTML Frames version allows a Group Tree to be displayed in a separate frame to the left of the report. This Group Tree works much like the Group Tree in the Preview Tab of the Seagate Crystal Reports Report Designer. The remainder of this section will discuss both HTML Smart Viewers in conjunction.
The Crystal Smart Viewer for HTML is not an actual viewer component that can be configured. Instead, the Crystal Web Reports Server or the Crystal Report Engine Automation Server translates a report into a set of web pages using the HTML 3.2 standard. Web browsers with support for HTML 3.2 table tags (i.e., Netscape Navigator 2.0 or later, Microsoft Internet Explorer 2.0 or later) will be able to view such documents. Browsers supporting font colors and table cell background colors will render a more accurate view of actual report objects (Netscape Navigator 3.0 or later and Internet Explorer 2.0 or later).
NOTE: If you drill-down on data and then click the Back button on a Netscape browser 3.x, you may encounter JavaScript errors. To prevent these errors, click the corresponding tab for the view you want retrieved, rather than the Back button.
Limitations of HTML Reports
Since HTML 3.2 format does not provide all of the formatting features available in the Seagate Crystal Reports report format, translating reports to HTML introduces several limitations, as described here. As a web administrator or designer, keep these limitations in mind when deciding how to distribute reports over your Internet or intranet site. These limitations include constraints on object layout, the objects translated, and other limitations.
Object Layout/Positioning
HTML 3.2 translation preserves relative positioning of objects and fields. However, absolute positioning, height, and width is browser dependent.
Objects Translated
Object Translated/Not Translated
Field Objects Yes
Text Objects Yes
Graphic, Blob, Chart Objects Yes, as JPEG images.
OLE Objects Yes, as JPEG images.
Cross-Tab Objects Yes
Subreport Objects Yes
Configuring the Crystal Smart Viewers 53
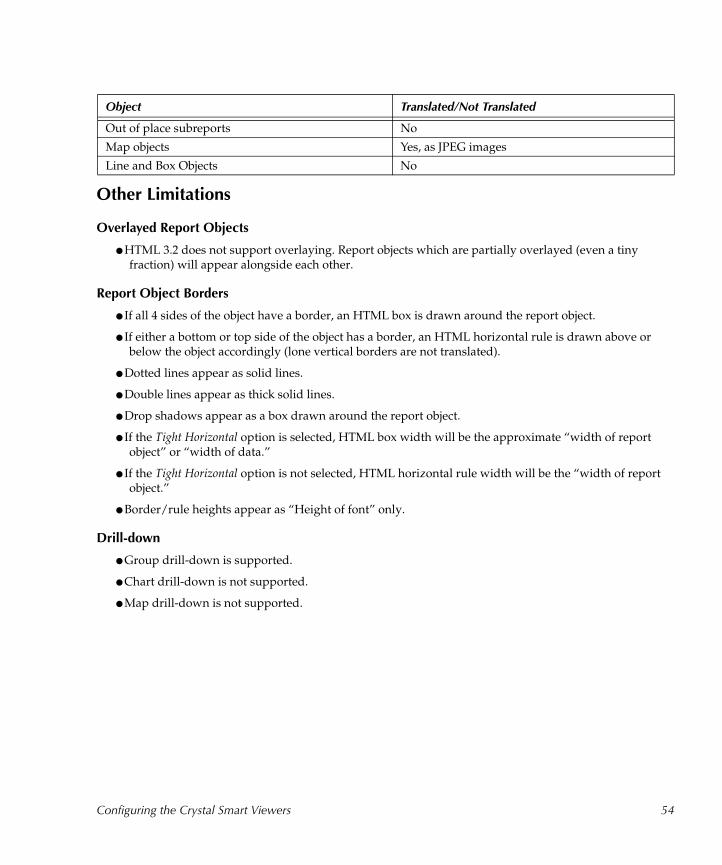
Other Limitations
Overlayed Report Objects
● HTML 3.2 does not support overlaying. Report objects which are partially overlayed (even a tiny fraction) will appear alongside each other.
Report Object Borders
● If all 4 sides of the object have a border, an HTML box is drawn around the report object.
● If either a bottom or top side of the object has a border, an HTML horizontal rule is drawn above or below the object accordingly (lone vertical borders are not translated).
● Dotted lines appear as solid lines.
● Double lines appear as thick solid lines.
● Drop shadows appear as a box drawn around the report object.
● If the Tight Horizontal option is selected, HTML box width will be the approximate “width of report object” or “width of data.”
● If the Tight Horizontal option is not selected, HTML horizontal rule width will be the “width of report object.”
● Border/rule heights appear as “Height of font” only.
Drill-down
● Group drill-down is supported.
● Chart drill-down is not supported.
● Map drill-down is not supported.
Out of place subreports No
Map objects Yes, as JPEG images
Line and Box Objects No
Object Translated/Not Translated
Configuring the Crystal Smart Viewers 54

Crystal Smart Viewer for Java
The Crystal Smart Viewer for Java is a standard Java applet that can be placed inside an HTML page and viewed through any browser that supports Java. Netscape Navigator (version 2.0 and later) will display reports using the Crystal Smart Viewer for Java by default.
NOTE: If you drill-down on data inside the Java viewer, and then click the Back button on a Netscape browser 3.x, you may encounter JavaScript errors. To prevent these errors, click the corresponding tab for the view you want retrieved, rather than the Back button.
Adding the Viewer to a Web Page
As a Java applet, the Crystal Smart Viewer can be added to a web page using the standard HTML tag APPLET. The name of the public class exposed by the applet is ReportViewer. Thus, the following code displays the Crystal Smart Viewer for Java:
<APPLET CODE=”ReportViewer.class”CODEBASE=”http://<domain>/viewer/JavaViewer”WIDTH=600 HEIGHT=400></APPLET>
When you install Seagate Crystal Reports or the Crystal Web Reports Server, the Java viewer is installed under \Program Files\Seagate Software\Viewers\JavaViewer. Additionally, a virtual directory named /viewer is set up on your web server, which points to the \Program Files\Seagate Software\Viewers directory.
The Crystal Smart Viewer for Java provides several optional parameters to customize the look of the viewer and to control its functionality. Apply values to these parameters using the standard PARAM tag in your HTML code.
Parameters
The Crystal Smart Viewer for Java provides the following parameters:
CanDrillDown
Indicates whether or not the user can drill-down on summary data, graphs, or charts in the report. Use TRUE to allow drill-down, FALSE to prevent drill-down.
HasExportButton
Indicates whether or not an Export button appears on the Smart Viewer. The export button allows users to export reports displayed in the Smart Viewer to Microsoft Word, Microsoft Excel, HTML 3.2, or Seagate Crystal Reports format. Use TRUE to allow exporting, FALSE to prevent it. This setting can be overridden by settings made in the Web Reports Server Configuration utility. See the Export Report Allowed check box, Page 21.
Configuring the Crystal Smart Viewers 55
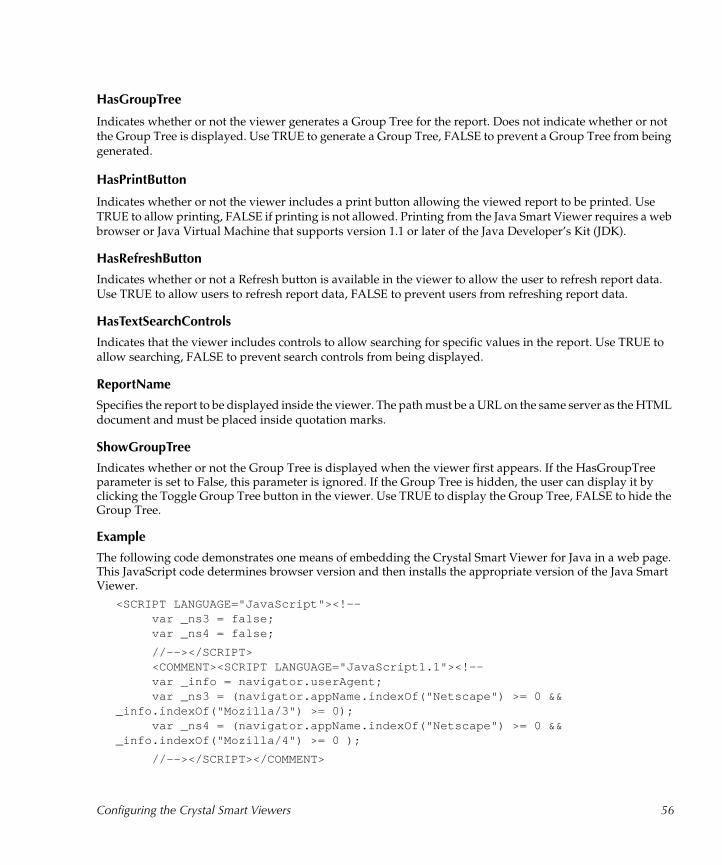
HasGroupTree
Indicates whether or not the viewer generates a Group Tree for the report. Does not indicate whether or not the Group Tree is displayed. Use TRUE to generate a Group Tree, FALSE to prevent a Group Tree from being generated.
HasPrintButton
Indicates whether or not the viewer includes a print button allowing the viewed report to be printed. Use TRUE to allow printing, FALSE if printing is not allowed. Printing from the Java Smart Viewer requires a web browser or Java Virtual Machine that supports version 1.1 or later of the Java Developer’s Kit (JDK).
HasRefreshButton
Indicates whether or not a Refresh button is available in the viewer to allow the user to refresh report data. Use TRUE to allow users to refresh report data, FALSE to prevent users from refreshing report data.
HasTextSearchControls
Indicates that the viewer includes controls to allow searching for specific values in the report. Use TRUE to allow searching, FALSE to prevent search controls from being displayed.
ReportName
Specifies the report to be displayed inside the viewer. The path must be a URL on the same server as the HTML document and must be placed inside quotation marks.
ShowGroupTree
Indicates whether or not the Group Tree is displayed when the viewer first appears. If the HasGroupTree parameter is set to False, this parameter is ignored. If the Group Tree is hidden, the user can display it by clicking the Toggle Group Tree button in the viewer. Use TRUE to display the Group Tree, FALSE to hide the Group Tree.
Example
The following code demonstrates one means of embedding the Crystal Smart Viewer for Java in a web page. This JavaScript code determines browser version and then installs the appropriate version of the Java Smart Viewer.
<SCRIPT LANGUAGE="JavaScript"><!-- var _ns3 = false; var _ns4 = false;
//--></SCRIPT> <COMMENT><SCRIPT LANGUAGE="JavaScript1.1"><!-- var _info = navigator.userAgent; var _ns3 = (navigator.appName.indexOf("Netscape") >= 0 &&
_info.indexOf("Mozilla/3") >= 0); var _ns4 = (navigator.appName.indexOf("Netscape") >= 0 &&
_info.indexOf("Mozilla/4") >= 0 );
//--></SCRIPT></COMMENT>
Configuring the Crystal Smart Viewers 56
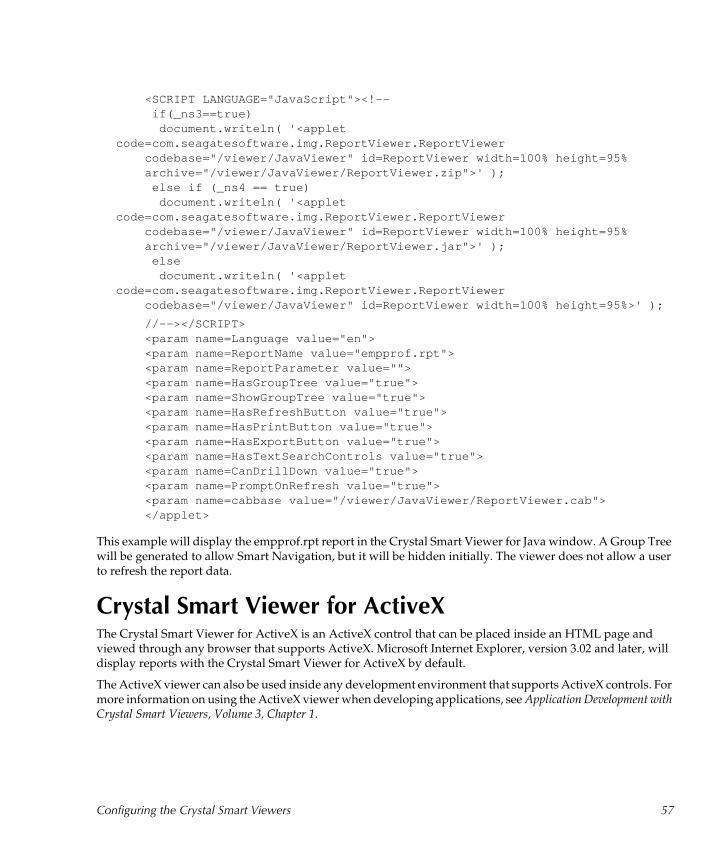
<SCRIPT LANGUAGE="JavaScript"><!-- if(_ns3==true) document.writeln( '<applet
code=com.seagatesoftware.img.ReportViewer.ReportViewercodebase="/viewer/JavaViewer" id=ReportViewer width=100% height=95%archive="/viewer/JavaViewer/ReportViewer.zip">' ); else if (_ns4 == true) document.writeln( '<applet
code=com.seagatesoftware.img.ReportViewer.ReportViewercodebase="/viewer/JavaViewer" id=ReportViewer width=100% height=95%archive="/viewer/JavaViewer/ReportViewer.jar">' ); else document.writeln( '<applet
code=com.seagatesoftware.img.ReportViewer.ReportViewercodebase="/viewer/JavaViewer" id=ReportViewer width=100% height=95%>' );
//--></SCRIPT> <param name=Language value="en"> <param name=ReportName value="empprof.rpt"> <param name=ReportParameter value=""> <param name=HasGroupTree value="true"> <param name=ShowGroupTree value="true"> <param name=HasRefreshButton value="true"> <param name=HasPrintButton value="true"> <param name=HasExportButton value="true"> <param name=HasTextSearchControls value="true"> <param name=CanDrillDown value="true"> <param name=PromptOnRefresh value="true"> <param name=cabbase value="/viewer/JavaViewer/ReportViewer.cab"> </applet>
This example will display the empprof.rpt report in the Crystal Smart Viewer for Java window. A Group Tree will be generated to allow Smart Navigation, but it will be hidden initially. The viewer does not allow a user to refresh the report data.
Crystal Smart Viewer for ActiveX The Crystal Smart Viewer for ActiveX is an ActiveX control that can be placed inside an HTML page and viewed through any browser that supports ActiveX. Microsoft Internet Explorer, version 3.02 and later, will display reports with the Crystal Smart Viewer for ActiveX by default.
The ActiveX viewer can also be used inside any development environment that supports ActiveX controls. For more information on using the ActiveX viewer when developing applications, see Application Development with Crystal Smart Viewers, Volume 3, Chapter 1.
Configuring the Crystal Smart Viewers 57

AuthentiCode Certification
The Crystal Smart Viewer for ActiveX is certified by Microsoft AuthentiCode 2.0. This certification requires Microsoft Internet Explorer 3.02 or later in order to open the ActiveX control. If you do not have a recent version of Internet Explorer, refer to the Microsoft web site to upgrade or use a different Crystal Smart Viewer when designing your web sites.
Adding the Viewer to a Web Page
Microsoft’s Internet Explorer web browser supports the OBJECT tag in HTML. This tag can be used to add the Crystal Smart Viewer for ActiveX to a web page. Use code similar to the following:
<OBJECT ID=”CRViewer” WIDTH=100% HEIGHT=95%CLASSID=”CLSID:C4847596-972C-11D0-9567-00A0C9273C2A”>
</OBJECT>
NOTE: For additional information on the OBJECT tag, refer to your Microsoft documentation.
When you install the Crystal Web Report Server, the Crystal Smart Viewer for ActiveX is installed under \Program Files\Seagate Software\Viewers\ActiveXViewer. Additionally, a virtual directory named /viewer is set up on your web server, which points to the \Program Files\Seagate Software\Viewers directory.
Downloading the Viewer from the Server
In order for a web browser to use an ActiveX control stored on the web server, the browser must be able to download the control from the server and register it locally. The CODEBASE attribute of the OBJECT tag allows you to specify the location of the original ActiveX control, relative to the current page. For example:
<OBJECT ID=”CRViewer” WIDTH=100% HEIGHT=95%CLASSID=”CLSID:C4847596-972C-11D0-9567-00A0C9273C2A”CODEBASE=”/viewer/ActiveXViewer/CRViewer.dll#Version=1.0.0.0>
</OBJECT>
The first part of the CODEBASE attribute value indicates the location and file name of the ActiveX control as a URL address relative to the current web page. The Version attribute that appears after the # symbol is optional and allows you to specify which version of the Crystal Smart Viewer for ActiveX you want to provide for your users. If you specify 1.0.0.0, the most recent version available on wither the server or the client will automatically be used by the browser.
When a web browser opens this page, it first checks the CLASSID attribute to see if the control is already registered on the client system. If not, or if the version number of the viewer is lower than the current viewer registered on the system, the browser uses the CODEBASE attribute to find the control and download it. Once downloaded, the control can be registered and displayed by the browser.
Configuring the Crystal Smart Viewers 58

Parameters
The Crystal Smart Viewer for ActiveX provides several optional parameters to customize the look of the viewer and to control its functionality. Apply values to these parameters by using the standard PARAM tag in your HTML code:
DisplayGroupTree
Indicates whether the Group Tree is displayed when the viewer first appears. If the Has Group Tree parameter is set to false, this parameter is ignored. If the Group Tree is hidden, the user can display it by clicking the Toggle Group Tree button in the viewer.
● A value of 1 (TRUE) displays the Group Tree.
● A value of 0 (FALSE) hides the Group Tree.
EnableAnimationControl
Indicates whether the viewer displays the Animation Control. The Animation Control runs while a report is being generated and downloaded. Once the report completely arrives at the client web browser, the animation stops.
● A value of 1 (TRUE) displays the Animation Control.
● A value of 0 (FALSE) prevents the Animation Control from being displayed.
EnableDrillDown
Indicates whether a user can drill-down on summary values in a drill-down report. In a drill-down report that appears in the Crystal Smart Viewer for ActiveX, the mouse pointer becomes a magnifying glass over any group or value that can be drilled down on. Double-click the group or value to display a separate Drill-Down Tab inside the viewer.
● A value of 1 (TRUE) indicates the user can drill-down on reports.
● A value of 0 (FALSE) indicates the user is not allowed to drill-down on reports.
EnableExportButton
Indicates whether or not the Export button appears in the Smart Viewer. If the Export button appears, the user can export the displayed report to Microsoft Word, Microsoft Excel, HTML 3.2, or Seagate Crystal Reports format.
● A value of 1 (TRUE) displays the Export button.
● A value of 0 (FALSE) prevents the Export button from being displayed.
Configuring the Crystal Smart Viewers 59
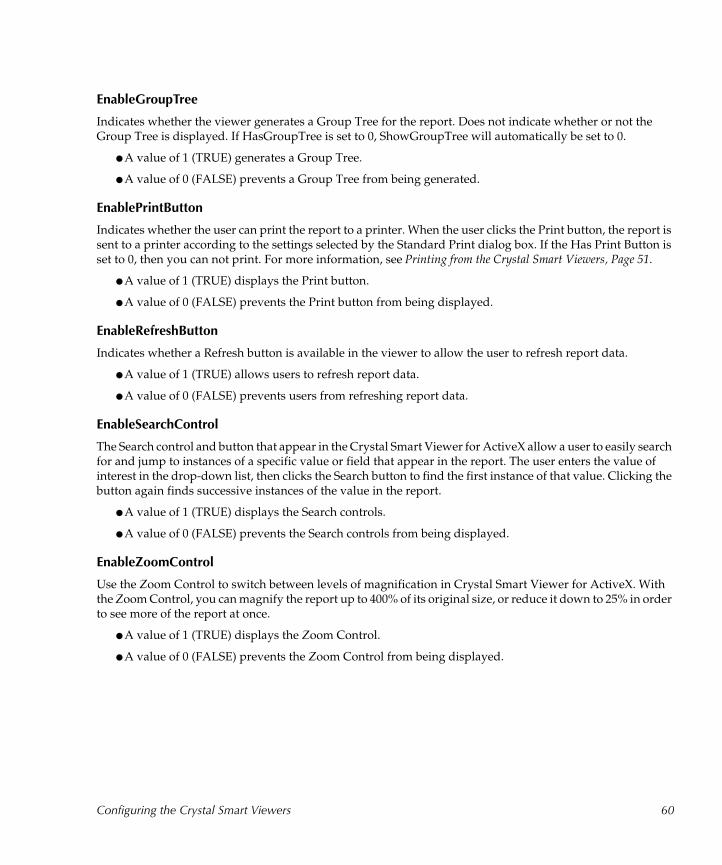
EnableGroupTree
Indicates whether the viewer generates a Group Tree for the report. Does not indicate whether or not the Group Tree is displayed. If HasGroupTree is set to 0, ShowGroupTree will automatically be set to 0.
● A value of 1 (TRUE) generates a Group Tree.
● A value of 0 (FALSE) prevents a Group Tree from being generated.
EnablePrintButton
Indicates whether the user can print the report to a printer. When the user clicks the Print button, the report is sent to a printer according to the settings selected by the Standard Print dialog box. If the Has Print Button is set to 0, then you can not print. For more information, see Printing from the Crystal Smart Viewers, Page 51.
● A value of 1 (TRUE) displays the Print button.
● A value of 0 (FALSE) prevents the Print button from being displayed.
EnableRefreshButton
Indicates whether a Refresh button is available in the viewer to allow the user to refresh report data.
● A value of 1 (TRUE) allows users to refresh report data.
● A value of 0 (FALSE) prevents users from refreshing report data.
EnableSearchControl
The Search control and button that appear in the Crystal Smart Viewer for ActiveX allow a user to easily search for and jump to instances of a specific value or field that appear in the report. The user enters the value of interest in the drop-down list, then clicks the Search button to find the first instance of that value. Clicking the button again finds successive instances of the value in the report.
● A value of 1 (TRUE) displays the Search controls.
● A value of 0 (FALSE) prevents the Search controls from being displayed.
EnableZoomControl
Use the Zoom Control to switch between levels of magnification in Crystal Smart Viewer for ActiveX. With the Zoom Control, you can magnify the report up to 400% of its original size, or reduce it down to 25% in order to see more of the report at once.
● A value of 1 (TRUE) displays the Zoom Control.
● A value of 0 (FALSE) prevents the Zoom Control from being displayed.
Configuring the Crystal Smart Viewers 60

ActiveX Viewer Example
The following HTML code demonstrates one means of embedding the Crystal Smart Viewer for ActiveX in a web page using the OBJECT tag:
<OBJECT ID="CRViewer" CLASSID="CLSID:C4847596-972C-11D0-9567-00A0C9273C2A" WIDTH=100% HEIGHT=95% CODEBASE="/viewer/activeXViewer/activexviewer.cab#Version=2,2,4,36"> <PARAM NAME="EnableRefreshButton" VALUE=1> <PARAM NAME="EnableGroupTree" VALUE=1> <PARAM NAME="DisplayGroupTree" VALUE=1> <PARAM NAME="EnablePrintButton" VALUE=1> <PARAM NAME="EnableExportButton" VALUE=1> <PARAM NAME="EnableDrillDown" VALUE=1> <PARAM NAME="EnableSearchControl" VALUE=1> <PARAM NAME="EnableAnimationControl" VALUE=1> <PARAM NAME="EnableZoomControl" VALUE=1> </OBJECT>
<SCRIPT LANGUAGE="VBScript"> <!-- Sub Page_Initialize On Error Resume Next Dim webBroker Set webBroker = CreateObject("WebReportBroker.WebReportBroker") if ScriptEngineMajorVersion < 2 then window.alert "IE 3.02 users on NT4 need to get the latest version of
VBScript or install IE 4.01 SP1. IE3.02 users on Win95 need DCOM95 and latest version of VBScript, or install
IE 4.01 SP1. These files areavailable at Microsoft's web site." CRViewer.ReportName = Location.Protocol + "//" + Location.Host +
Location.Pathname else Dim webSource Set webSource = CreateObject("WebReportSource.WebReportSource") webSource.ReportSource = webBroker webSource.URL = Location.Protocol + "//" + Location.Host +
Location.Pathname webSource.PromptOnRefresh = True CRViewer.ReportSource = webSource end if CRViewer.ViewReport End Sub --> </SCRIPT>
Configuring the Crystal Smart Viewers 61
This example will display a Group Tree to allow Smart Navigation. Additionally, the user can drill-down on summary reports, refresh report data, and print the report to a printer.
Notice that reports can not be directly assigned to the ActiveX viewer. For information on using the ActiveX viewer inside web pages, see Customizing the Crystal Smart Viewer, Page 47. For information on using the ActiveX viewer inside other applications and development environments, see Seagate Crystal Smart Viewer for ActiveX, Volume 3, Chapter 1.
Configuring the Crystal Smart Viewers 62

Volume 1
4 Crystal Report Engine
What you will find in this chapter...
Introduction to the Crystal Report Engine, Page 64
...including comments about sample applications, SQL and ODBC, and exporting reports.
Before using the Crystal Report Engine in your application, Page 65
Using the Crystal Report Engine, Page 66
...including creating reports, designing the user interface, adding the Crystal Report Engine to your application, and applications in Delphi.
Crystal Report Engine API, Page 68
...including declarations; using the API; Print-Only and Custom-Print Links; and working with parameter values and ranges, section codes including Visual Basic, variable length strings, API structures, subreports and report formats.
Exporting reports, Page 94
...including comments about PEExportTo function and PEExportOptions structure.
Handling Preview Window Events, Page 97
Distributing Crystal Report Engine Applications, Page 102
Additional Sources of Information, Page 102
Crystal Report Engine 63

Introduction to the Crystal Report Engine
The following topics are included in this introduction:
Sample Applications, Page 64
SQL and ODBC, Page 65
Exporting Reports, Page 65
Besides acting as a powerful stand-alone report creation application, Seagate Crystal Reports provides a report writing module that you can add to your own applications. As a developer using C, C++, Visual Basic, ObjectVision, Turbo Pascal, Visual dBASE, Delphi, or any programming language that can access a DLL, you can add sophisticated report generating and printing capabilities to your applications without the time-consuming task of writing your own code.
The Crystal Report Engine is a Dynamic Link Library (DLL) that allows your applications to access the same powerful report printing features that are available in Seagate Crystal Reports. As a licensed user of Seagate Crystal Reports, you receive royalty-free rights to ship the Crystal Report Engine DLL (CRPE.DLL or CRPE32.DLL) and all of its support files with any application you create.
NOTE: For more information regarding current runtime file requirements, see the Runtime File Requirements online Help.
From your application, you can access the Crystal Report Engine through any of several Crystal Report Engine development tools:
● Crystal ActiveX Controls, Page 108 (CRYSTL16.OCX or CRYSTL32.OCX)
● Crystal Report Engine Automation Server, Page 111 (CPEAUT.DLL or CPEAUT32.DLL)
● Seagate Crystal Visual Component Library, Page 193 (UCRPE.DCU or UCRPE32.DCU)
● The Crystal Report Engine Class Library, Volume 2, Chapter 2 (PEPLUS.H and PEPLUS.CPP)
● The Crystal NewEra Class Library, Volume 3, Chapter 7
● Crystal Report Engine API, Page 68 (CRPE.DLL or CRPE32.DLL)
When your application runs, it links with the Crystal Report Engine to access report writing functionality. Reporting can be simple, producing only a single report that is sent to a printer or preview window with no options available to the user, or it can be complex, allowing the user to change such things as record selection, sorting, grouping, or export options.
NOTE: All references to CRPE32.DLL are for the 32-bit version. If you plan on using the 16-bit version, it is called CRPE.DLL.
Sample Applications
Seagate Crystal Reports comes with a number of sample applications that show you how to incorporate the capabilities of the Crystal Report Engine. Use these applications to further your understanding of the Crystal Report Engine and how to use it in various programming environments.
Crystal Report Engine 64
SQL and ODBC
The Crystal Report Engine is fully compatible with most popular SQL DBMS applications, including Sybase SQL Server, Oracle, Gupta SQLBase, and Microsoft SQL Server. The Crystal Report Engine includes options for logging on to and off of SQL servers and ODBC data sources and also includes the ability to edit the SQL statement passed through to an SQL or ODBC database.
Exporting Reports
The Crystal Report Engine enables you to print to a printer or a preview window with simple function calls. In addition, you can export a file in multiple formats and to multiple destinations. For example:
● through e-mail to another person or group of people
● directly to disk
● to HTML for updating a web site
● to a Microsoft Exchange folder
● to a Lotus Notes folder
● to an ODBC data source
The report can be exported in any of several word processing, spreadsheet, database file, or data exchange formats including HTML.
Before using the Crystal Report Engine in your application Before you add the Crystal Report Engine to your application, you should be familiar with some key features of the Crystal Report Engine. Review the following points, and make sure you understand each before attempting to make calls to the Crystal Report Engine from your application.
● The Crystal Report Engine outputs existing reports. You can not create report files using the functionality of the Crystal Report Engine. Reports must be created using the Seagate Crystal Reports application described in the Seagate Crystal Reports User’s Guide. Make sure you understand the report creation process before trying to print reports with the Crystal Report Engine.
NOTE: Visual Basic programmers can use the Active Data Driver, along with the Crystal Report Engine API or the Crystal Report Engine Automation Server to create reports dynamically at runtime. For more information, refer to Active Data Driver, Page 118.
● The Crystal Report Engine provides a convenient add-on to your existing application development project. With just a few lines of code, you can produce a powerful report writing and distribution tool that would take thousands of lines of code and weeks to produce otherwise.
● The Crystal Report Engine does not require the use of a fixed user interface. The Crystal Report Engine is designed to work with your existing development project and allows you to define the user interface your customers and users are familiar with and expect from your application.
Crystal Report Engine 65
Using the Crystal Report Engine
Any development project that incorporates the Crystal Report Engine requires three steps:
Step 1: Creating reports, Page 66 (The reports that your users access.)
Step 2: Designing the user interface that drives the Crystal Report Engine, Page 66.
Step 3: Adding the Crystal Report Engine to your application, Page 67.
See also: Using the Crystal Report Engine API in Delphi, Page 68
Step 1: Creating reports
Creating reports to include with your applications is identical to creating reports for your own use; there are no restrictions. Using the procedures outlined in the Seagate Crystal Reports User’s Guide and Seagate Crystal Reports online Help, create as many kinds of reports as you want to make available to your users. You can make the reports as simple or as sophisticated as your needs dictate.
While designing reports, though, keep in mind their ultimate destination. Some export formats do not support all of the formatting options available in Seagate Crystal Reports. For example, if you will be exporting reports to HTML to automatically update a web site, HTML may not support all of the fonts available on your system. This is not a limit of the Crystal Report Engine export functionality, but a limit of the HTML format itself.
If you are a Visual Basic programmer or you are using any development environment that supports Automation Servers, you may want to have reports dynamically designed for you at runtime using the Active data driver. For complete information on using the Active data driver, see Active Data Driver, Page 118.
Visual Basic programmers can also take advantage of the Visual Basic data control or the TrueGrid ActiveX control at runtime to dynamically produce report files. See Grid Controls and the Crystal Report Engine, Page 139, for information on using these controls with the Crystal Report Engine.
Step 2: Designing the user interface that drives the Crystal Report Engine
The interface you develop to allow users to print reports is limited only by your needs and your imagination. The kind of user interface you select is unimportant to the Crystal Report Engine.
Common methods of using the Crystal Report Engine include a single menu command that produces a single report, a dialog box allowing several options for printing reports, or a completely separate front-end application that is called by your application. All are acceptable techniques, and each has its advantages. How you design your user interface can depend on any or all of the following:
● The purpose of your application.
● The types of reports your application will use.
● The printing options you want to make available with those reports.
● Whether your application will offer only one report or a choice of several reports.
Consider your application and your reporting needs carefully, and design a User Interface that will use the Crystal Report Engine most efficiently.
Crystal Report Engine 66

Step 3: Adding the Crystal Report Engine to your application
Several different Crystal Report Engine development tools can be used to add the Crystal Report Engine to your application:
● Crystal ActiveX Controls, Page 108
● Crystal Report Engine Automation Server, Page 111
● Seagate Crystal Visual Component Library, Page 193
● The Crystal Report Engine Class Library, Volume 2, Chapter 2
● The Crystal NewEra Class Library, Volume 3, Chapter 7
● Crystal Report Engine API, Page 68
Be aware that you can not use two or more of these tools in the same application. For example, you can not create a Visual Basic application that contains the Crystal ActiveX control and also makes calls to the functions in the Crystal Report Engine API. You must choose one tool to implement the Crystal Report Engine in your project and stick with that tool.
When choosing a Crystal Report Engine tool, consider the following:
● What is your development environment?
● What is your programming ability?
● Do you need to implement the entire Crystal Report Engine or just a few features of it?
For example, the Crystal Class Library for NewEra is specifically designed for Informix NewEra. Therefore, if you are programming in Visual Basic, the Crystal Class Library for NewEra is not an option. The Crystal Report Engine Class Library, on the other hand, is based on the Microsoft Foundation Class Library for C++. To use the Crystal Report Engine Class Library, you must be using a C++ development tool, and you must be using the MFC library.
If you are an experienced programmer, you might consider the Crystal Report Engine API or the Crystal Report Engine Class Library. Novice programmers, on the other hand, may want to take advantage of the easy-to-use features of the Crystal ActiveX control, or the Visual Component Library.
The Crystal Report Engine API consists of a large number of functions exposed directly from the Crystal Report Engine DLL. These functions provide a wide range of power and flexibility for adding report writing features to your own applications.The rest of this chapter discusses the process required to use the Crystal Report Engine API in your own applications.
Although the examples in the following sections concentrate on the C programming language, the concepts should be studied by anyone using the API functions in any language. Additional information specific to Visual Basic programmers using the API can be found in Using the Crystal Report Engine API in Visual Basic, Page 104. Additional information for Delphi programmers is located in Using the Crystal Report Engine API in Delphi, Page 68. If you wish to use a Crystal Report Engine development tool other than the Crystal Report Engine API, refer to the table of contents for this manual, or search for the name of the programming language or development environment you are using in Developer’s online Help.
Crystal Report Engine 67
Using the Crystal Report Engine API in Delphi
All versions of Delphi can make direct calls to the functions in the Crystal Report Engine API. The Delphi unit file CRPE.PAS (CRPE32.PAS for 32-bit systems) includes complete declarations for all Report Engine API functions and records. When you need to add the Report Engine API to your own Delphi unit, simply add the Crystal Report Engine API unit to your project and refer to the unit in your uses clause. For example:
Usescrpe32;
The implementation section of the Crystal Report Engine API unit contains all of the Crystal Report Engine API functions defined as external and as part of the CRPE or CRPE32 DLL.
The Using the Crystal Report Engine, Page 66, includes Delphi declarations for all Report Engine API functions and records. In addition, the Developer’s online Help includes Delphi sample code using many of the functions and records defined in CRPE.PAS. Search for Report Engine Functions - Sample Code in Delphi in the Developer’s online Help.
NOTE: Many functions and records are defined differently for 16-bit and 32-bit systems. When referring to declarations in reference sections, make sure you are using the correct version of the function or record for the operating system environment you are working in.
Crystal Report Engine API
The following topics are discussed in this section:
Declarations for the Crystal Report Engine API (REAPI), Page 70
Using the Crystal Report Engine API, Page 70
The Print-Only Link, Page 71
PEPrintReport Arguments, Page 71
Example code for a Print-Only Link, Page 73
The Custom-Print Link, Page 74
Coding a Custom-Print Link, Page 75
Custom-Print Link Step 1: Open the Crystal Report Engine, Page 75
Custom-Print Link Step 2: Open a print job, Page 76
Custom-Print Link Step 3: Set the output destination, Page 76
Custom-Print Link Step 4: Start the print job, Page 77
Custom-Print Link Step 5: Close the print job, Page 77
Custom-Print Link Step 6: Close the Crystal Report Engine, Page 77
A Sample Custom-Print Link, Page 78
Code Evaluation, Page 80
Crystal Report Engine 68
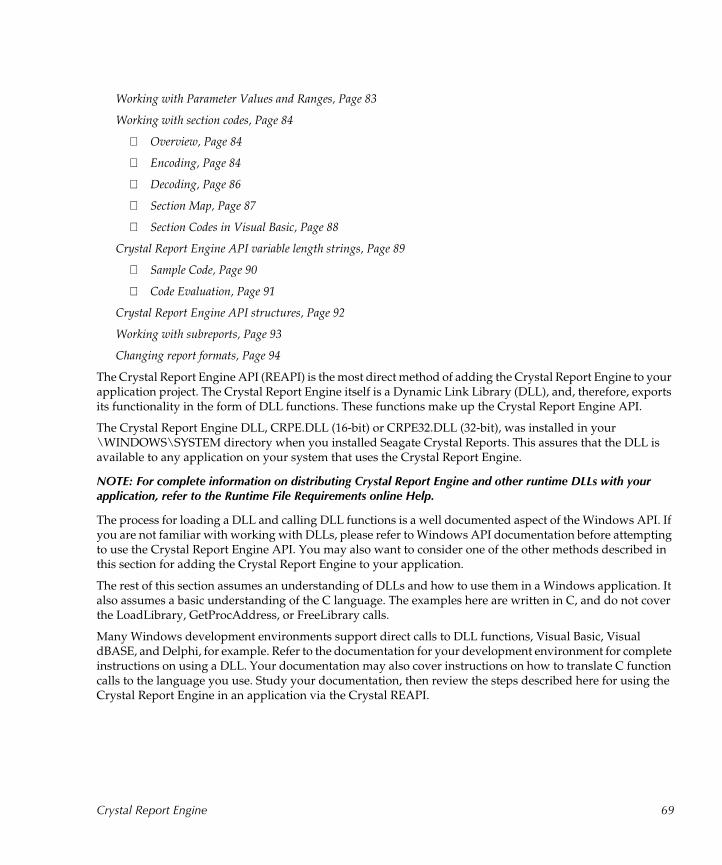
Working with Parameter Values and Ranges, Page 83
Working with section codes, Page 84
Overview, Page 84
Encoding, Page 84
Decoding, Page 86
Section Map, Page 87
Section Codes in Visual Basic, Page 88
Crystal Report Engine API variable length strings, Page 89
Sample Code, Page 90
Code Evaluation, Page 91
Crystal Report Engine API structures, Page 92
Working with subreports, Page 93
Changing report formats, Page 94
The Crystal Report Engine API (REAPI) is the most direct method of adding the Crystal Report Engine to your application project. The Crystal Report Engine itself is a Dynamic Link Library (DLL), and, therefore, exports its functionality in the form of DLL functions. These functions make up the Crystal Report Engine API.
The Crystal Report Engine DLL, CRPE.DLL (16-bit) or CRPE32.DLL (32-bit), was installed in your \WINDOWS\SYSTEM directory when you installed Seagate Crystal Reports. This assures that the DLL is available to any application on your system that uses the Crystal Report Engine.
NOTE: For complete information on distributing Crystal Report Engine and other runtime DLLs with your application, refer to the Runtime File Requirements online Help.
The process for loading a DLL and calling DLL functions is a well documented aspect of the Windows API. If you are not familiar with working with DLLs, please refer to Windows API documentation before attempting to use the Crystal Report Engine API. You may also want to consider one of the other methods described in this section for adding the Crystal Report Engine to your application.
The rest of this section assumes an understanding of DLLs and how to use them in a Windows application. It also assumes a basic understanding of the C language. The examples here are written in C, and do not cover the LoadLibrary, GetProcAddress, or FreeLibrary calls.
Many Windows development environments support direct calls to DLL functions, Visual Basic, Visual dBASE, and Delphi, for example. Refer to the documentation for your development environment for complete instructions on using a DLL. Your documentation may also cover instructions on how to translate C function calls to the language you use. Study your documentation, then review the steps described here for using the Crystal Report Engine in an application via the Crystal REAPI.
Crystal Report Engine 69

Declarations for the Crystal Report Engine API (REAPI)
Seagate Crystal Reports provides several source code files that declare the functions in the Crystal REAPI for several popular development languages. These files were installed in the Seagate Crystal Reports directory (\CRW by default) and are ready to be immediately added to your project. The following Crystal REAPI declaration files are available:
● CRPE.H declares all Crystal Report Engine API functions for C/C++.
● GLOBAL.BAS and GLOBAL32.BAS declare all Crystal Report Engine API functions for Visual Basic. For more information on using the Crystal Report Engine API with Visual Basic, see Using the Crystal Report Engine API in Visual Basic, Page 104.
● CRPEDB.H declares several Crystal Report Engine functions for Visual dBASE. Because of limits in the dBASE language, not all Crystal Report Engine functions are available to dBASE programmers. Refer to the individual function in Developer’s online Help for information on dBASE availability.
● CRPE.PAS and CRPE32.PAS declare all Crystal Report Engine API functions for Delphi. For more information on using the Crystal Report Engine API with Delphi, see Using the Crystal Report Engine API in Delphi, Page 68.
NOTE: Functions can be declared on an individual basis, but unless you will only be using a few of the Crystal Report Engine functions in your code, it is easiest to simply copy one of the previously mentioned code files into your project directory and add it to your project.
Using the Crystal Report Engine API
The Crystal REAPI provides two options for processing and producing reports from within an application:
1. The Print-Only Link, Page 71
2. The Custom-Print Link, Page 74
The Print-Only Link is the fastest, easiest method for producing a report with the Crystal REAPI. A Print-Only Link, however, provides a very limited functionality. It allows a report to be printed on a default printer or previewed in a window on-screen. It does not allow you to customize a report in any way before printing it, though.
A Custom-Print Link, on the other hand, provides all the report processing power of Seagate Crystal Reports itself. By coding a Custom-Print Link into your application, you can change record selection, record sorting, group creation, group selecting, group sorting, exporting to disk files, e-mail, Exchange and Lotus Notes folders, ODBC data sources, selecting specific printers for printing, logging on to SQL servers and ODBC data sources, editing formulas, formatting report sections, and much more. A Custom-Print Link is, however, a more complex process to code than a Print-Only Link.
The first time you use the Crystal REAPI in your application project, you may want to start by coding a simple Print-Only Link to produce basic reporting functionality. As your project develops and you become more familiar with the Crystal REAPI, you can expand the reporting functionality with a Custom-Print Link.
Crystal Report Engine 70
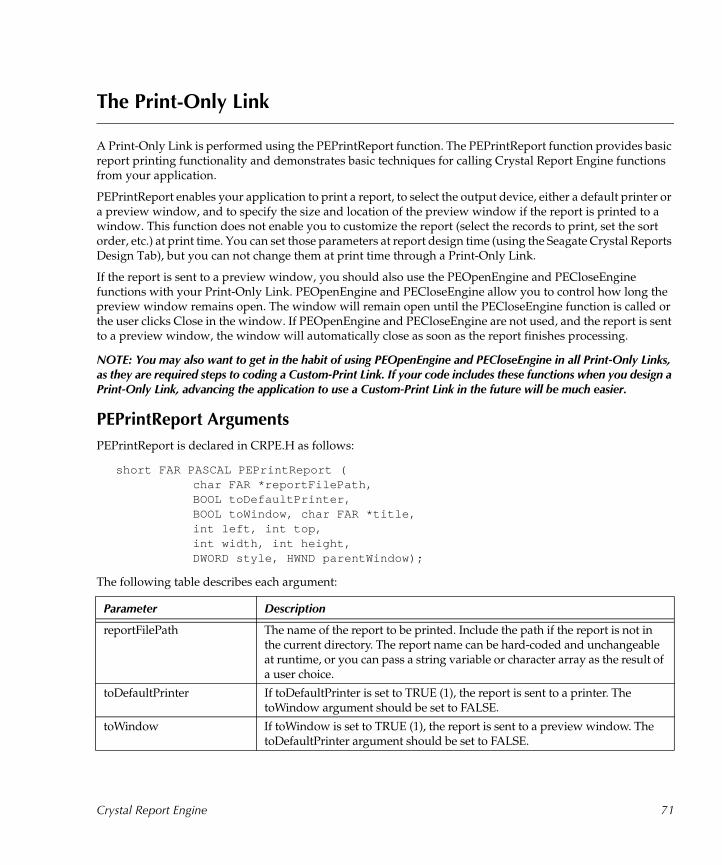
The Print-Only Link
A Print-Only Link is performed using the PEPrintReport function. The PEPrintReport function provides basic report printing functionality and demonstrates basic techniques for calling Crystal Report Engine functions from your application.
PEPrintReport enables your application to print a report, to select the output device, either a default printer or a preview window, and to specify the size and location of the preview window if the report is printed to a window. This function does not enable you to customize the report (select the records to print, set the sort order, etc.) at print time. You can set those parameters at report design time (using the Seagate Crystal Reports Design Tab), but you can not change them at print time through a Print-Only Link.
If the report is sent to a preview window, you should also use the PEOpenEngine and PECloseEngine functions with your Print-Only Link. PEOpenEngine and PECloseEngine allow you to control how long the preview window remains open. The window will remain open until the PECloseEngine function is called or the user clicks Close in the window. If PEOpenEngine and PECloseEngine are not used, and the report is sent to a preview window, the window will automatically close as soon as the report finishes processing.
NOTE: You may also want to get in the habit of using PEOpenEngine and PECloseEngine in all Print-Only Links, as they are required steps to coding a Custom-Print Link. If your code includes these functions when you design a Print-Only Link, advancing the application to use a Custom-Print Link in the future will be much easier.
PEPrintReport Arguments
PEPrintReport is declared in CRPE.H as follows:
short FAR PASCAL PEPrintReport (char FAR *reportFilePath,BOOL toDefaultPrinter,BOOL toWindow, char FAR *title,int left, int top,int width, int height,DWORD style, HWND parentWindow);
The following table describes each argument:
Parameter Description
reportFilePath The name of the report to be printed. Include the path if the report is not in the current directory. The report name can be hard-coded and unchangeable at runtime, or you can pass a string variable or character array as the result of a user choice.
toDefaultPrinter If toDefaultPrinter is set to TRUE (1), the report is sent to a printer. The toWindow argument should be set to FALSE.
toWindow If toWindow is set to TRUE (1), the report is sent to a preview window. The toDefaultPrinter argument should be set to FALSE.
Crystal Report Engine 71
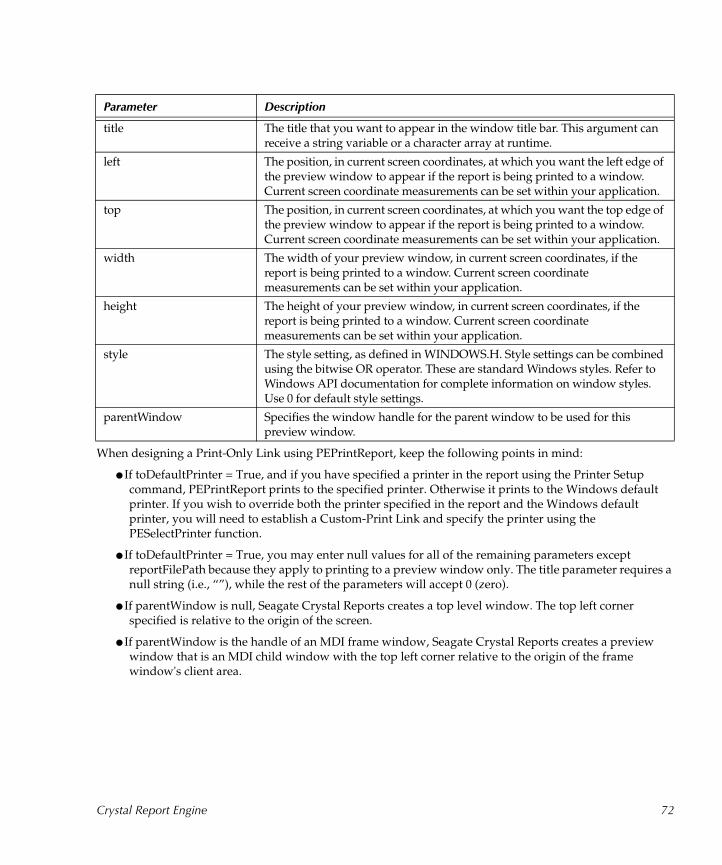
When designing a Print-Only Link using PEPrintReport, keep the following points in mind:
● If toDefaultPrinter = True, and if you have specified a printer in the report using the Printer Setup command, PEPrintReport prints to the specified printer. Otherwise it prints to the Windows default printer. If you wish to override both the printer specified in the report and the Windows default printer, you will need to establish a Custom-Print Link and specify the printer using the PESelectPrinter function.
● If toDefaultPrinter = True, you may enter null values for all of the remaining parameters except reportFilePath because they apply to printing to a preview window only. The title parameter requires a null string (i.e., “”), while the rest of the parameters will accept 0 (zero).
● If parentWindow is null, Seagate Crystal Reports creates a top level window. The top left corner specified is relative to the origin of the screen.
● If parentWindow is the handle of an MDI frame window, Seagate Crystal Reports creates a preview window that is an MDI child window with the top left corner relative to the origin of the frame window's client area.
title The title that you want to appear in the window title bar. This argument can receive a string variable or a character array at runtime.
left The position, in current screen coordinates, at which you want the left edge of the preview window to appear if the report is being printed to a window. Current screen coordinate measurements can be set within your application.
top The position, in current screen coordinates, at which you want the top edge of the preview window to appear if the report is being printed to a window. Current screen coordinate measurements can be set within your application.
width The width of your preview window, in current screen coordinates, if the report is being printed to a window. Current screen coordinate measurements can be set within your application.
height The height of your preview window, in current screen coordinates, if the report is being printed to a window. Current screen coordinate measurements can be set within your application.
style The style setting, as defined in WINDOWS.H. Style settings can be combined using the bitwise OR operator. These are standard Windows styles. Refer to Windows API documentation for complete information on window styles. Use 0 for default style settings.
parentWindow Specifies the window handle for the parent window to be used for this preview window.
Parameter Description
Crystal Report Engine 72
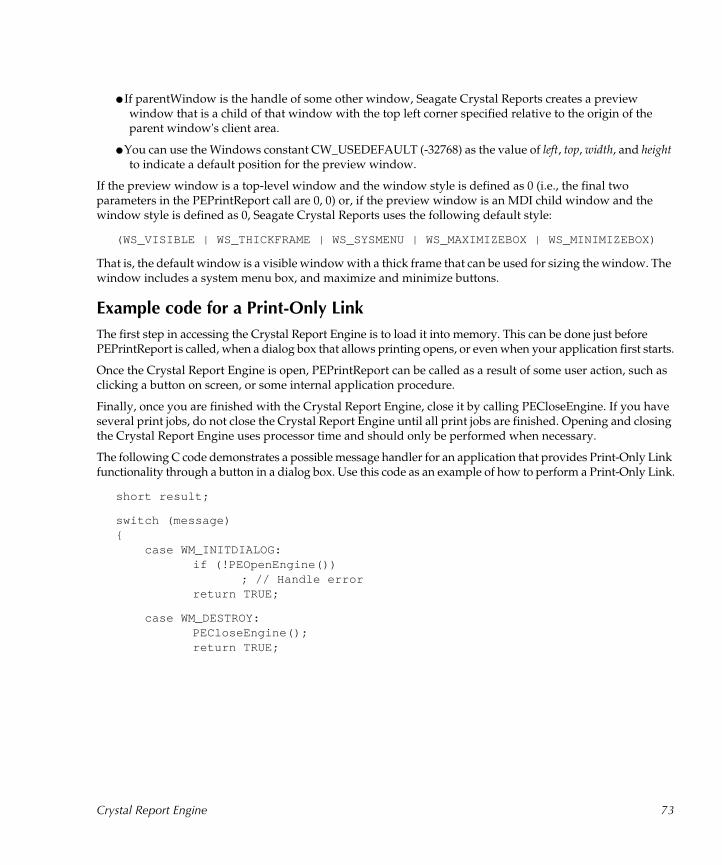
● If parentWindow is the handle of some other window, Seagate Crystal Reports creates a preview window that is a child of that window with the top left corner specified relative to the origin of the parent window's client area.
● You can use the Windows constant CW_USEDEFAULT (-32768) as the value of left, top, width, and height to indicate a default position for the preview window.
If the preview window is a top-level window and the window style is defined as 0 (i.e., the final two parameters in the PEPrintReport call are 0, 0) or, if the preview window is an MDI child window and the window style is defined as 0, Seagate Crystal Reports uses the following default style:
(WS_VISIBLE | WS_THICKFRAME | WS_SYSMENU | WS_MAXIMIZEBOX | WS_MINIMIZEBOX)
That is, the default window is a visible window with a thick frame that can be used for sizing the window. The window includes a system menu box, and maximize and minimize buttons.
Example code for a Print-Only Link
The first step in accessing the Crystal Report Engine is to load it into memory. This can be done just before PEPrintReport is called, when a dialog box that allows printing opens, or even when your application first starts.
Once the Crystal Report Engine is open, PEPrintReport can be called as a result of some user action, such as clicking a button on screen, or some internal application procedure.
Finally, once you are finished with the Crystal Report Engine, close it by calling PECloseEngine. If you have several print jobs, do not close the Crystal Report Engine until all print jobs are finished. Opening and closing the Crystal Report Engine uses processor time and should only be performed when necessary.
The following C code demonstrates a possible message handler for an application that provides Print-Only Link functionality through a button in a dialog box. Use this code as an example of how to perform a Print-Only Link.
short result;
switch (message){
case WM_INITDIALOG:if (!PEOpenEngine())
; // Handle errorreturn TRUE;
case WM_DESTROY:PECloseEngine();return TRUE;
Crystal Report Engine 73
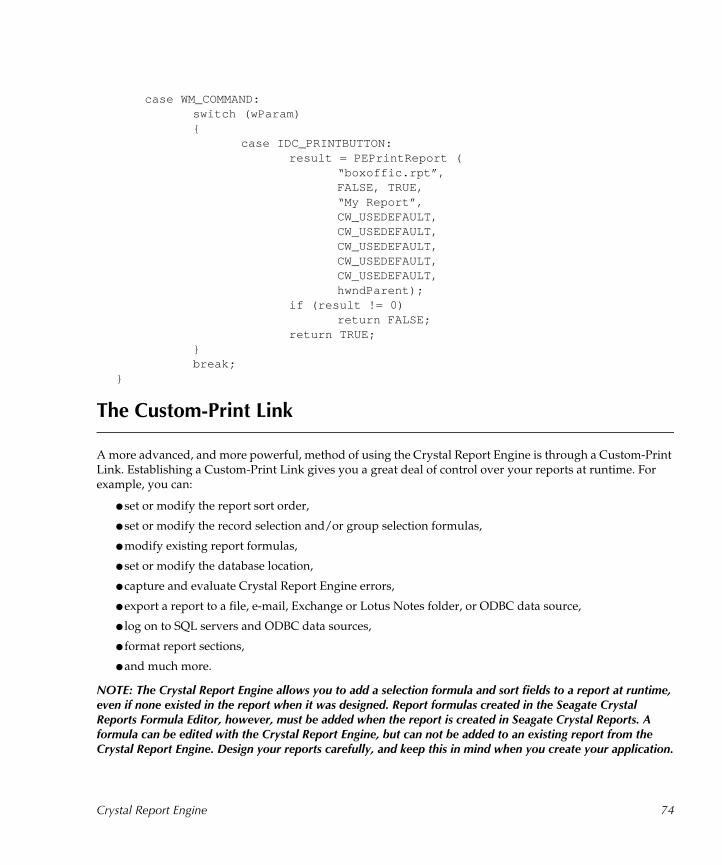
case WM_COMMAND:switch (wParam){
case IDC_PRINTBUTTON:result = PEPrintReport (
“boxoffic.rpt”,FALSE, TRUE,“My Report”,CW_USEDEFAULT,CW_USEDEFAULT,CW_USEDEFAULT,CW_USEDEFAULT,CW_USEDEFAULT,hwndParent);
if (result != 0)return FALSE;
return TRUE;}break;
}
The Custom-Print Link
A more advanced, and more powerful, method of using the Crystal Report Engine is through a Custom-Print Link. Establishing a Custom-Print Link gives you a great deal of control over your reports at runtime. For example, you can:
● set or modify the report sort order,
● set or modify the record selection and/or group selection formulas,
● modify existing report formulas,
● set or modify the database location,
● capture and evaluate Crystal Report Engine errors,
● export a report to a file, e-mail, Exchange or Lotus Notes folder, or ODBC data source,
● log on to SQL servers and ODBC data sources,
● format report sections,
● and much more.
NOTE: The Crystal Report Engine allows you to add a selection formula and sort fields to a report at runtime, even if none existed in the report when it was designed. Report formulas created in the Seagate Crystal Reports Formula Editor, however, must be added when the report is created in Seagate Crystal Reports. A formula can be edited with the Crystal Report Engine, but can not be added to an existing report from the Crystal Report Engine. Design your reports carefully, and keep this in mind when you create your application.
Crystal Report Engine 74
Coding a Custom-Print Link
There are six required steps to coding a Custom-Print Link in your application. Each uses a different REAPI function. These steps are:
Custom-Print Link Step 1: Open the Crystal Report Engine, Page 75 (PEOpenEngine).
Custom-Print Link Step 2: Open a print job, Page 76 (PEOpenPrintJob).
Custom-Print Link Step 3: Set the output destination, Page 76 (PEOutputToPrinter, PEOutputToWindow, or PEExportTo).
Custom-Print Link Step 4: Start the print job, Page 77 (PEStartPrintJob).
Custom-Print Link Step 5: Close the print job, Page 77 (PEClosePrintJob).
Custom-Print Link Step 6: Close the Crystal Report Engine, Page 77 (PECloseEngine).
In addition to these six steps, you can add several optional tasks any time after Step 2, opening the print job, and before Step 4, starting the print job. These optional tasks include changing selection formulas, editing report formulas, selecting export options, and sorting report fields.
Some REAPI functions can be called at special times to retrieve information about the print job or Crystal Report Engine. For example, PEGetVersion retrieves the current version of the Crystal Report Engine being used and can be called at any time, even without the Crystal Report Engine being open. Another example, PEGetJobStatus, can be called after Step 4 to obtain information about the current status of a job being printed. For more information on all REAPI functions, see Seagate Crystal Report Engine Reference, Volume 2, Chapter 1 or search for functions by name in Developer’s online Help.
NOTE: The steps described here apply to a single print job. It is possible to have more than one print job open at once.
Custom-Print Link Step 1: Open the Crystal Report Engine
Example
PEOpenEngine();
Description
This step starts the Crystal Report Engine and prepares it to accept a print job. The Crystal Report Engine must be open before a print job can be established. You should open the Crystal Report Engine before the user has a chance to try to print a report. For example, if your application uses a dialog box as the user interface to the Crystal Report Engine, open the Crystal Report Engine immediately after the dialog box is created at runtime. Your dialog box can allow the user to establish a print job and make changes to the report while the Crystal Report Engine is already open.
Every time the Crystal Report Engine is opened, it should be closed once your application is finished accessing it (Custom-Print Link Step 6: Close the Crystal Report Engine, Page 77). For example, if you open the Crystal Report Engine when a dialog box is created, close the Crystal Report Engine when that dialog box is destroyed.
Crystal Report Engine 75

Custom-Print Link Step 2: Open a print job
Example
job = PEOpenPrintJob(“BOXOFFIC.RPT”);
Description
When you open a print job, the Crystal Report Engine returns a Job Handle for the print job. This handle is important to identifying the print job in the rest of your code.
To establish a print job, PEOpenPrintJob, Volume 2, Chapter 1, requires the path and name of the report that is to be printed. This argument can be hard-coded into the function call, as in the example above, or you can prompt the user to choose a report for printing and pass a variable argument to the function.
To close a print job, refer to Custom-Print Link Step 5: Close the print job, Page 77. In most cases, you should open the print job immediately before printing and close the print job as soon as the job is finished and the preview window is closed or printing is complete.
Custom-Print Link Step 3: Set the output destination
Example
PEOutputToWindow (job, ReportTitle, CW_USEDEFAULT, CW_USEDEFAULT, CW_USEDEFAULT, CW_USEDEFAULT, 0, NULL);
Description
The Crystal Report Engine must know where to send the final report. The report can be printed to a printer, displayed in a preview window, exported to a disk file, exported to another database, or exported to an e-mail address. The example above sends the report to the preview window.
Although you can choose any of the several destinations for report output, you must establish a destination for the report to print. You can, however, write code in your application that allows your users to decide on a destination themselves.
NOTE: This step does not actually print the report, it only establishes a destination for the report when printed. The report is actually printed in Step 4 using the PEStartPrintJob function.
The following functions are available to establish a print destination:
● PEOutputToWindow, Volume 2, Chapter 1Printing a report to a window requires no other print destination code other than the function itself.
● PEOutputToPrinter, Volume 2, Chapter 1Printing a report to a printer requires no other print destination code other than the function itself. However, PESelectPrinter, Volume 2, Chapter 1, can be used to select a printer other than the default printer at runtime. The PESelectPrinter function uses the Windows structure DEVMODE, Volume 2, Chapter 1. For more information on this structure, refer to the Windows SDK.
● PEExportTo, Volume 2, Chapter 1The PEExportTo function works with the PEExportOptions Structure (page 95) and several DLLs that control a report’s export destination and format. The information required by PEExportTo can be set in
Crystal Report Engine 76
your code at design time or it can work with options in your application to allow a user to specify export destination and format. If you would like to allow your users to set the destination and format of a report file, but you do not wish to program the interface to do this, use the PEGetExportOptions, Volume 2, Chapter 1 function to have the Crystal Report Engine provide dialog boxes that query the user for export information at runtime.
Custom-Print Link Step 4: Start the print job
Example
PEStartPrintJob(job, TRUE);
Description
This function actually sends the report to the output device indicated in Step 3. Once PEStartPrintJob, Volume 2, Chapter 1, is called, the Crystal Report Engine begins generating the report. The Crystal Report Engine displays a dialog box that indicates the status of the report being generated. If the report is sent to the preview window, the window will appear as soon as PEStartPrintJob is called. The preview window can be closed by a call to PECloseWindow, Volume 2, Chapter 1, by closing the Crystal Report Engine (as in Step 6), or by the user clicking the Close button.
As a general rule, you should avoid making any formatting changes to a print job once you call PEStartPrintJob, especially if the report is being displayed in a preview window (via PEOutputToWindow). Formatting changes made to a report while it is still being generated and displayed in the preview window may produce undesired results, and can cause errors in the Crystal Report Engine.
Custom-Print Link Step 5: Close the print job
Example
PEClosePrintJob(job);
Description
Once the print job has completed, it can be closed using PEClosePrintJob, Volume 2, Chapter 1. If you wish to make more changes to the report and print it again, you can do so before closing the job. However, once your application is finished with a report, it should close the print job to free up memory in the user’s system.
Custom-Print Link Step 6: Close the Crystal Report Engine
Example
PECloseEngine();
Description
This function closes the Crystal Report Engine entirely. No other Crystal Report Engine functions relating to print jobs may be called once the Crystal Report Engine is closed. Therefore, you should keep the Crystal Report Engine open until it is no longer needed in your application. For example, if the Crystal Report Engine is accessed through a dialog box in your application, you should wait to close the Crystal Report Engine until the dialog box is exited and destroyed by Windows.
Crystal Report Engine 77
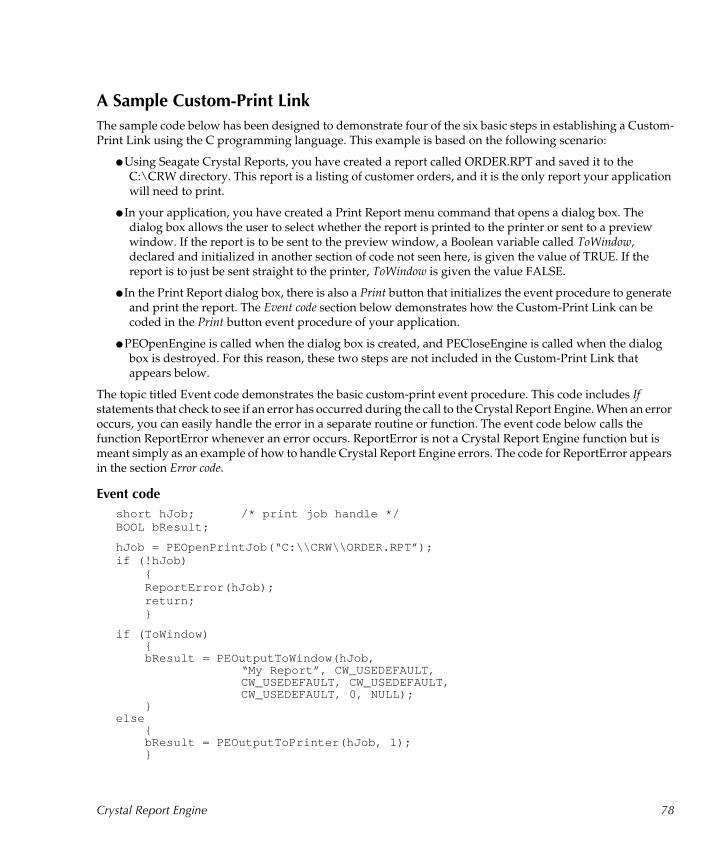
A Sample Custom-Print Link
The sample code below has been designed to demonstrate four of the six basic steps in establishing a Custom-Print Link using the C programming language. This example is based on the following scenario:
● Using Seagate Crystal Reports, you have created a report called ORDER.RPT and saved it to the C:\CRW directory. This report is a listing of customer orders, and it is the only report your application will need to print.
● In your application, you have created a Print Report menu command that opens a dialog box. The dialog box allows the user to select whether the report is printed to the printer or sent to a preview window. If the report is to be sent to the preview window, a Boolean variable called ToWindow, declared and initialized in another section of code not seen here, is given the value of TRUE. If the report is to just be sent straight to the printer, ToWindow is given the value FALSE.
● In the Print Report dialog box, there is also a Print button that initializes the event procedure to generate and print the report. The Event code section below demonstrates how the Custom-Print Link can be coded in the Print button event procedure of your application.
● PEOpenEngine is called when the dialog box is created, and PECloseEngine is called when the dialog box is destroyed. For this reason, these two steps are not included in the Custom-Print Link that appears below.
The topic titled Event code demonstrates the basic custom-print event procedure. This code includes If statements that check to see if an error has occurred during the call to the Crystal Report Engine. When an error occurs, you can easily handle the error in a separate routine or function. The event code below calls the function ReportError whenever an error occurs. ReportError is not a Crystal Report Engine function but is meant simply as an example of how to handle Crystal Report Engine errors. The code for ReportError appears in the section Error code.
Event code
short hJob; /* print job handle */BOOL bResult;
hJob = PEOpenPrintJob(“C:\\CRW\\ORDER.RPT”);if (!hJob)
{ReportError(hJob);return;}
if (ToWindow){bResult = PEOutputToWindow(hJob,
“My Report”, CW_USEDEFAULT,CW_USEDEFAULT, CW_USEDEFAULT,CW_USEDEFAULT, 0, NULL);
}else
{bResult = PEOutputToPrinter(hJob, 1);}
Crystal Report Engine 78
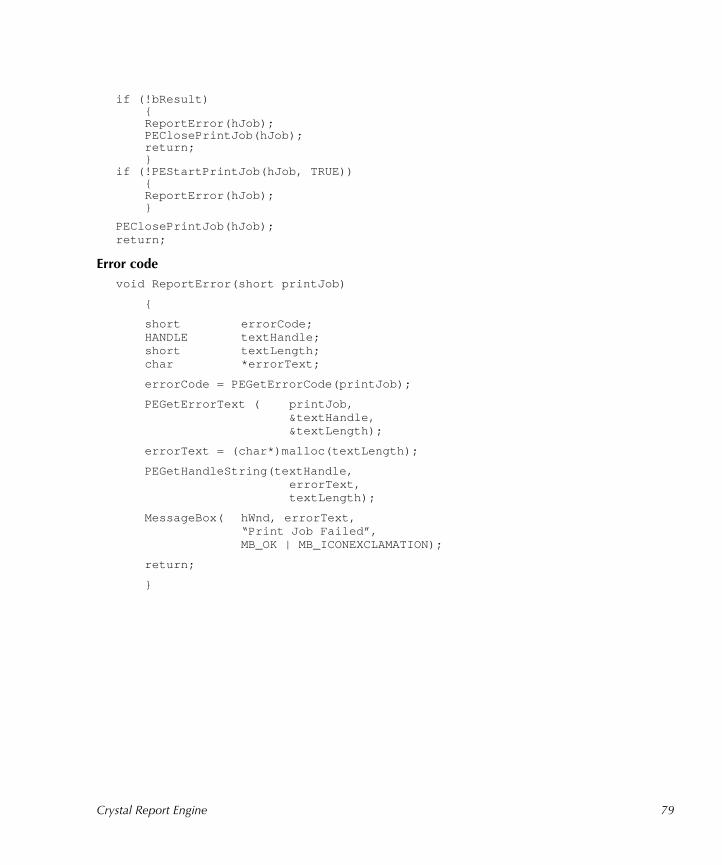
if (!bResult){ReportError(hJob);PEClosePrintJob(hJob);return;}
if (!PEStartPrintJob(hJob, TRUE)){ReportError(hJob);}
PEClosePrintJob(hJob);return;
Error code
void ReportError(short printJob)
{
short errorCode;HANDLE textHandle;short textLength;char *errorText;
errorCode = PEGetErrorCode(printJob);
PEGetErrorText ( printJob,&textHandle,&textLength);
errorText = (char*)malloc(textLength);
PEGetHandleString(textHandle,errorText,textLength);
MessageBox( hWnd, errorText,“Print Job Failed”,MB_OK | MB_ICONEXCLAMATION);
return;
}
Crystal Report Engine 79
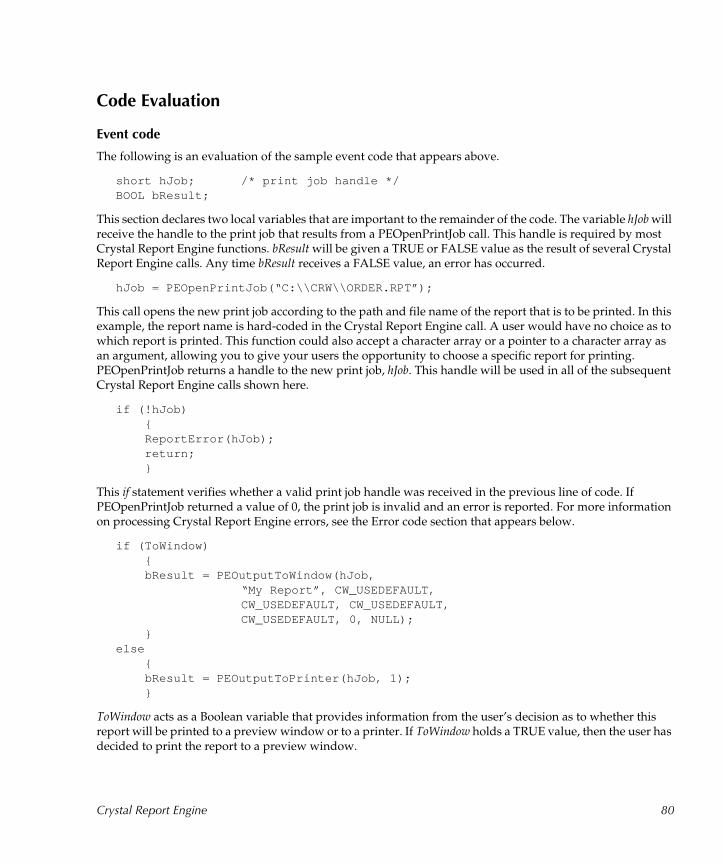
Code Evaluation
Event code
The following is an evaluation of the sample event code that appears above.
short hJob; /* print job handle */BOOL bResult;
This section declares two local variables that are important to the remainder of the code. The variable hJob will receive the handle to the print job that results from a PEOpenPrintJob call. This handle is required by most Crystal Report Engine functions. bResult will be given a TRUE or FALSE value as the result of several Crystal Report Engine calls. Any time bResult receives a FALSE value, an error has occurred.
hJob = PEOpenPrintJob(“C:\\CRW\\ORDER.RPT”);
This call opens the new print job according to the path and file name of the report that is to be printed. In this example, the report name is hard-coded in the Crystal Report Engine call. A user would have no choice as to which report is printed. This function could also accept a character array or a pointer to a character array as an argument, allowing you to give your users the opportunity to choose a specific report for printing. PEOpenPrintJob returns a handle to the new print job, hJob. This handle will be used in all of the subsequent Crystal Report Engine calls shown here.
if (!hJob){ReportError(hJob);return;}
This if statement verifies whether a valid print job handle was received in the previous line of code. If PEOpenPrintJob returned a value of 0, the print job is invalid and an error is reported. For more information on processing Crystal Report Engine errors, see the Error code section that appears below.
if (ToWindow){bResult = PEOutputToWindow(hJob,
“My Report”, CW_USEDEFAULT,CW_USEDEFAULT, CW_USEDEFAULT,CW_USEDEFAULT, 0, NULL);
}else
{bResult = PEOutputToPrinter(hJob, 1);}
ToWindow acts as a Boolean variable that provides information from the user’s decision as to whether this report will be printed to a preview window or to a printer. If ToWindow holds a TRUE value, then the user has decided to print the report to a preview window.
Crystal Report Engine 80
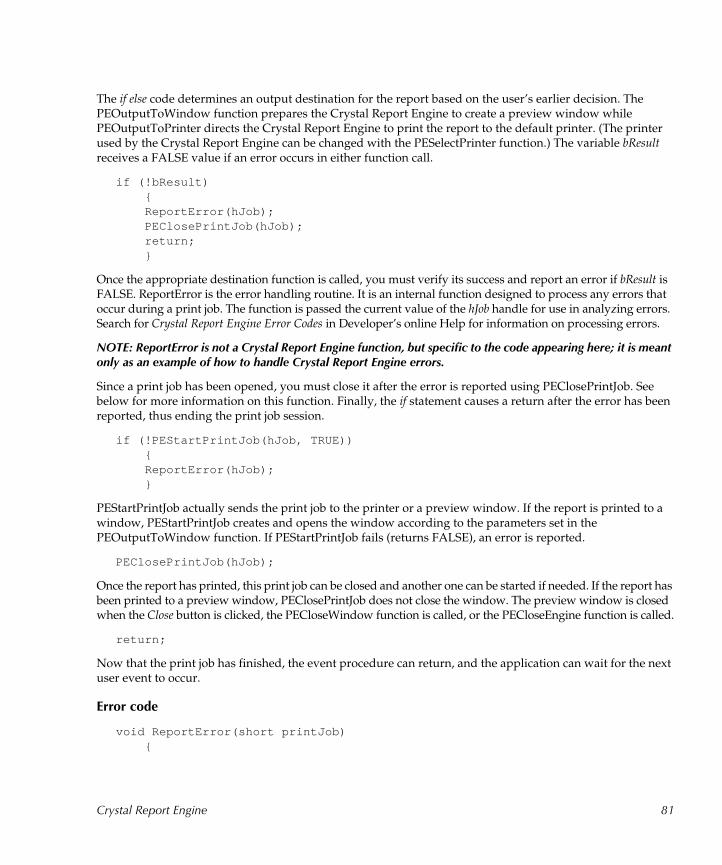
The if else code determines an output destination for the report based on the user’s earlier decision. The PEOutputToWindow function prepares the Crystal Report Engine to create a preview window while PEOutputToPrinter directs the Crystal Report Engine to print the report to the default printer. (The printer used by the Crystal Report Engine can be changed with the PESelectPrinter function.) The variable bResult receives a FALSE value if an error occurs in either function call.
if (!bResult){ReportError(hJob);PEClosePrintJob(hJob);return;}
Once the appropriate destination function is called, you must verify its success and report an error if bResult is FALSE. ReportError is the error handling routine. It is an internal function designed to process any errors that occur during a print job. The function is passed the current value of the hJob handle for use in analyzing errors. Search for Crystal Report Engine Error Codes in Developer’s online Help for information on processing errors.
NOTE: ReportError is not a Crystal Report Engine function, but specific to the code appearing here; it is meant only as an example of how to handle Crystal Report Engine errors.
Since a print job has been opened, you must close it after the error is reported using PEClosePrintJob. See below for more information on this function. Finally, the if statement causes a return after the error has been reported, thus ending the print job session.
if (!PEStartPrintJob(hJob, TRUE)){ReportError(hJob);}
PEStartPrintJob actually sends the print job to the printer or a preview window. If the report is printed to a window, PEStartPrintJob creates and opens the window according to the parameters set in the PEOutputToWindow function. If PEStartPrintJob fails (returns FALSE), an error is reported.
PEClosePrintJob(hJob);
Once the report has printed, this print job can be closed and another one can be started if needed. If the report has been printed to a preview window, PEClosePrintJob does not close the window. The preview window is closed when the Close button is clicked, the PECloseWindow function is called, or the PECloseEngine function is called.
return;
Now that the print job has finished, the event procedure can return, and the application can wait for the next user event to occur.
Error code
void ReportError(short printJob){
Crystal Report Engine 81
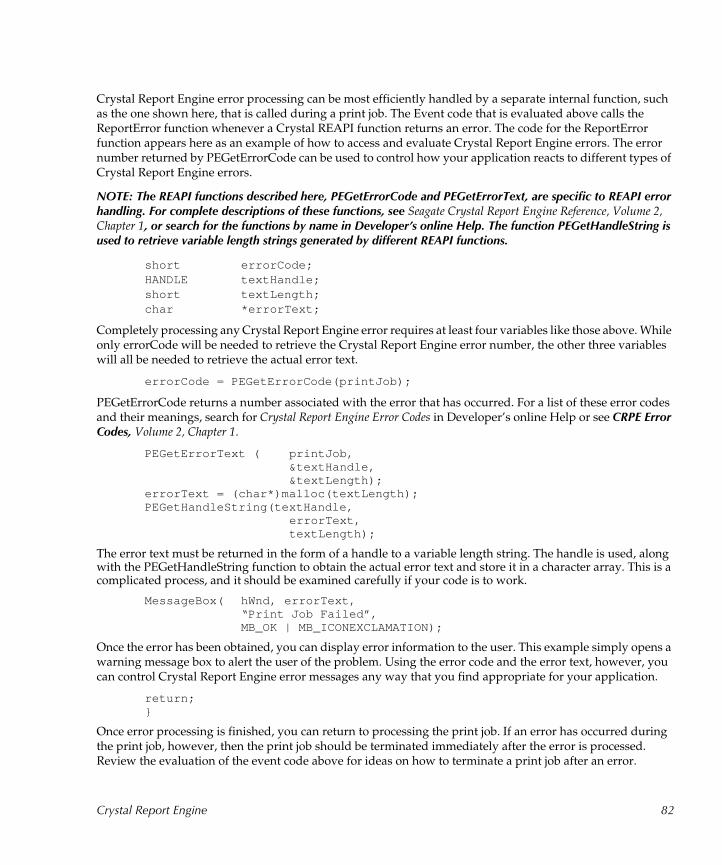
Crystal Report Engine error processing can be most efficiently handled by a separate internal function, such as the one shown here, that is called during a print job. The Event code that is evaluated above calls the ReportError function whenever a Crystal REAPI function returns an error. The code for the ReportError function appears here as an example of how to access and evaluate Crystal Report Engine errors. The error number returned by PEGetErrorCode can be used to control how your application reacts to different types of Crystal Report Engine errors.
NOTE: The REAPI functions described here, PEGetErrorCode and PEGetErrorText, are specific to REAPI error handling. For complete descriptions of these functions, see Seagate Crystal Report Engine Reference, Volume 2, Chapter 1, or search for the functions by name in Developer�s online Help. The function PEGetHandleString is used to retrieve variable length strings generated by different REAPI functions.
short errorCode;HANDLE textHandle;short textLength;char *errorText;
Completely processing any Crystal Report Engine error requires at least four variables like those above. While only errorCode will be needed to retrieve the Crystal Report Engine error number, the other three variables will all be needed to retrieve the actual error text.
errorCode = PEGetErrorCode(printJob);
PEGetErrorCode returns a number associated with the error that has occurred. For a list of these error codes and their meanings, search for Crystal Report Engine Error Codes in Developer’s online Help or see CRPE Error Codes, Volume 2, Chapter 1.
PEGetErrorText ( printJob,&textHandle,&textLength);
errorText = (char*)malloc(textLength);PEGetHandleString(textHandle,
errorText,textLength);
The error text must be returned in the form of a handle to a variable length string. The handle is used, along with the PEGetHandleString function to obtain the actual error text and store it in a character array. This is a complicated process, and it should be examined carefully if your code is to work.
MessageBox( hWnd, errorText,“Print Job Failed”,MB_OK | MB_ICONEXCLAMATION);
Once the error has been obtained, you can display error information to the user. This example simply opens a warning message box to alert the user of the problem. Using the error code and the error text, however, you can control Crystal Report Engine error messages any way that you find appropriate for your application.
return;}
Once error processing is finished, you can return to processing the print job. If an error has occurred during the print job, however, then the print job should be terminated immediately after the error is processed. Review the evaluation of the event code above for ideas on how to terminate a print job after an error.
Crystal Report Engine 82
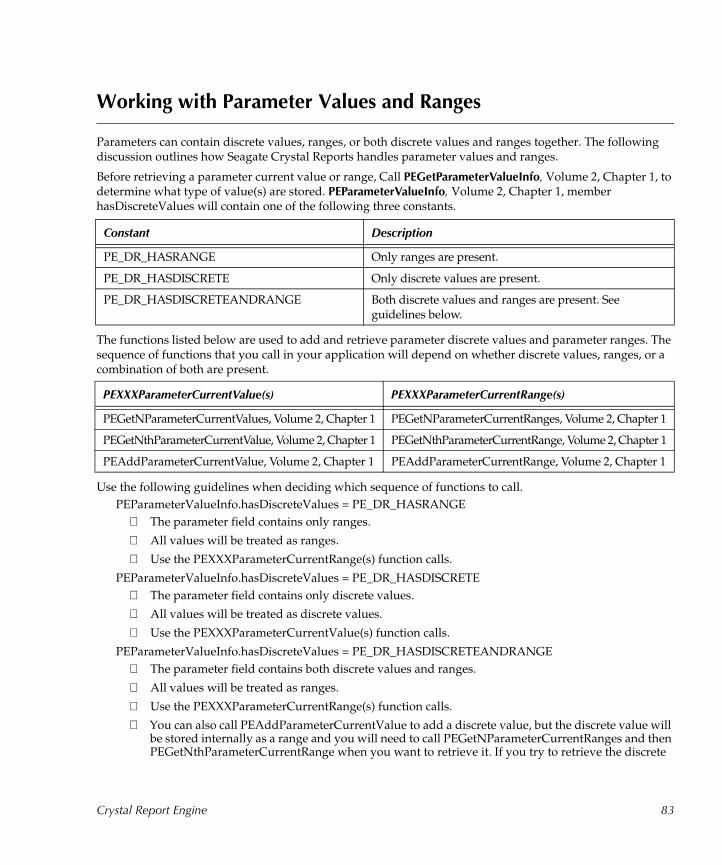
Working with Parameter Values and Ranges
Parameters can contain discrete values, ranges, or both discrete values and ranges together. The following discussion outlines how Seagate Crystal Reports handles parameter values and ranges.
Before retrieving a parameter current value or range, Call PEGetParameterValueInfo, Volume 2, Chapter 1, to determine what type of value(s) are stored. PEParameterValueInfo, Volume 2, Chapter 1, member hasDiscreteValues will contain one of the following three constants.
The functions listed below are used to add and retrieve parameter discrete values and parameter ranges. The sequence of functions that you call in your application will depend on whether discrete values, ranges, or a combination of both are present.
Use the following guidelines when deciding which sequence of functions to call.PEParameterValueInfo.hasDiscreteValues = PE_DR_HASRANGE
The parameter field contains only ranges.
All values will be treated as ranges.
Use the PEXXXParameterCurrentRange(s) function calls.
PEParameterValueInfo.hasDiscreteValues = PE_DR_HASDISCRETE The parameter field contains only discrete values.
All values will be treated as discrete values.
Use the PEXXXParameterCurrentValue(s) function calls.
PEParameterValueInfo.hasDiscreteValues = PE_DR_HASDISCRETEANDRANGE The parameter field contains both discrete values and ranges.
All values will be treated as ranges.
Use the PEXXXParameterCurrentRange(s) function calls.
You can also call PEAddParameterCurrentValue to add a discrete value, but the discrete value will be stored internally as a range and you will need to call PEGetNParameterCurrentRanges and then PEGetNthParameterCurrentRange when you want to retrieve it. If you try to retrieve the discrete
Constant Description
PE_DR_HASRANGE Only ranges are present.
PE_DR_HASDISCRETE Only discrete values are present.
PE_DR_HASDISCRETEANDRANGE Both discrete values and ranges are present. See guidelines below.
PEXXXParameterCurrentValue(s) PEXXXParameterCurrentRange(s)
PEGetNParameterCurrentValues, Volume 2, Chapter 1 PEGetNParameterCurrentRanges, Volume 2, Chapter 1
PEGetNthParameterCurrentValue, Volume 2, Chapter 1 PEGetNthParameterCurrentRange, Volume 2, Chapter 1
PEAddParameterCurrentValue, Volume 2, Chapter 1 PEAddParameterCurrentRange, Volume 2, Chapter 1
Crystal Report Engine 83

value using PEGetNParameterCurrentValues, 0 will be returned.
Working with section codes
The following topics relating to section codes are presented in this section.
Overview, Page 84
Encoding, Page 84
Decoding, Page 86
Section Map, Page 87
Section Codes in Visual Basic, Page 88
Overview
A report, by default, contains five areas: Report Header, Page Header, Details, Report Footer, and Page Footer. Each of those areas can contain one or more sections. When you add groups, subtotals, or other summaries to your report, the program adds Group Header and Group Footer areas as needed, and each of those areas can contain one or more sections as well. Since one report can have a totally different section configuration from the next, Seagate Crystal Reports uses calculated section codes to identify the sections in each report.
In Seagate Crystal Report Engine API functions that affect report sections, the sectionCode parameter encodes the section type, the group number (if the section is a Group Header or Group Footer section), and the section number (if there are multiple sections in an area) together in a single value.
The Seagate Crystal Report Engine API also includes macros for encoding section codes (PE_SECTION_CODE, for use with functions that require a section code) and for decoding section codes (PE_SECTION_TYPE, PE_GROUP_N, and PE_SECTION_N, for use with functions that return a section code). The examples that follow show how the encoding and decoding macros can be used.
NOTE: You can not pass the above values directly to a function as section codes. You must use the encoding macro to create a valid section code based on one of the above constants.
Encoding
The PE_SECTION_CODE macro allows you to define a section code to pass as a parameter in Seagate Crystal Report Engine functions that require a section code. The syntax for the macro is:
PE_SECTION_CODE (sectionType, groupNumber, sectionNumber)
The PE_AREA_CODE macro allows you to define a corresponding area code. The following syntax is used:
PE_AREA_CODE(sectionType,groupN)
Crystal Report Engine 84

sectionType
This indicates the report area or section type that the section is in. For section type, use any of the following constants:
groupNumber
Indicates which group the section is in. If the sectionType value indicated is PE_SECT_GROUP_HEADER or PE_SECT_GROUP_FOOTER, the groupNumber is a zero (0) based index for the group section. If the sectionType value is not one of these group section constants, the groupNumber value should always be zero.
sectionNumber
If the report area has been split into more than one section, sectionNumber indicates which section within the area you are using. This value is a zero (0) based index. In other words, the first section in an area is 0, the next section is 1, etc.
NOTE: The macro PE_SECTION_CODE calculates and returns the section code number; it does not return an error code.
The following example demonstrates how to obtain a section code using the PE_SECTION_CODE macro. The section code obtained here is for the second section in the Group Header 1 area:
code = PE_SECTION_CODE(PE_SECT_GROUP_HEADER, 0, 1);PESetSectionFormat(job, code, &mySectionOptions);
In this case you pass the section type (PE_SECT_GROUP_HEADER), the group number (since this is the first group, use the zero indexed group number 0) and section number (since this is the second section in the Group Header, use the zero indexed section number 1). The program uses the encoding macro and returns a section code which is then passed in the PESetSectionFormat call.
Section Type Constant Value Description
PE_SECT_REPORT_HEADER 1 Report Header Section
PE_SECT_PAGE_HEADER 2 Page Header Section
PE_SECT_GROUP_HEADER 3 Group Header Section
PE_SECT_DETAIL 4 Detail Section
PE_SECT_GROUP_FOOTER 5 Group Footer Section
PE_SECT_PAGE_FOOTER 7 Page Footer Section
PE_SECT_REPORT_FOOTER 8 Report Footer Section
PE_ALLSECTIONS 0 All Report Sections
Crystal Report Engine 85
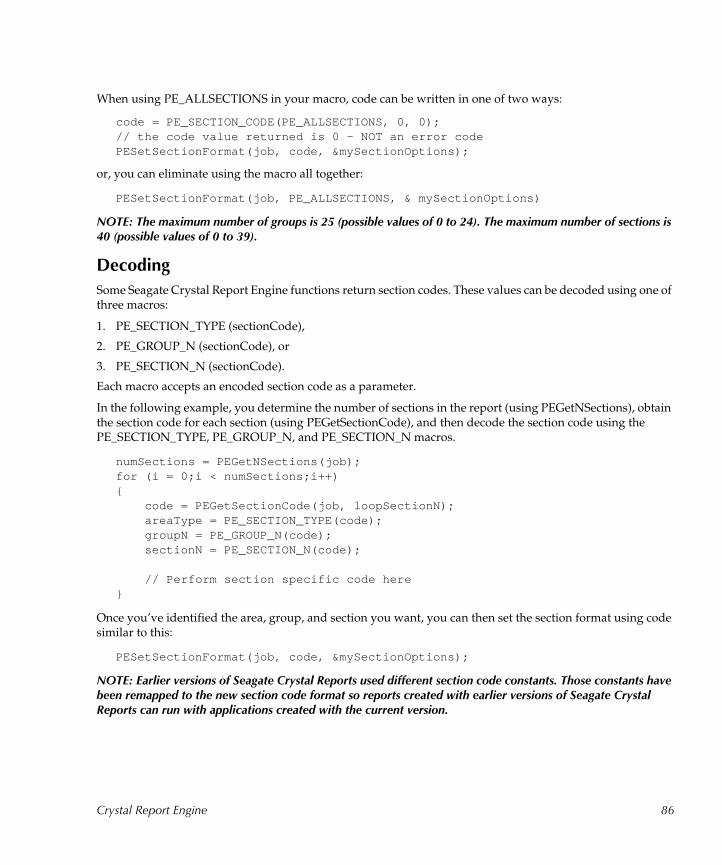
When using PE_ALLSECTIONS in your macro, code can be written in one of two ways:
code = PE_SECTION_CODE(PE_ALLSECTIONS, 0, 0);// the code value returned is 0 - NOT an error codePESetSectionFormat(job, code, &mySectionOptions);
or, you can eliminate using the macro all together:
PESetSectionFormat(job, PE_ALLSECTIONS, & mySectionOptions)
NOTE: The maximum number of groups is 25 (possible values of 0 to 24). The maximum number of sections is 40 (possible values of 0 to 39).
Decoding
Some Seagate Crystal Report Engine functions return section codes. These values can be decoded using one of three macros:
1. PE_SECTION_TYPE (sectionCode),
2. PE_GROUP_N (sectionCode), or
3. PE_SECTION_N (sectionCode).
Each macro accepts an encoded section code as a parameter.
In the following example, you determine the number of sections in the report (using PEGetNSections), obtain the section code for each section (using PEGetSectionCode), and then decode the section code using the PE_SECTION_TYPE, PE_GROUP_N, and PE_SECTION_N macros.
numSections = PEGetNSections(job);for (i = 0;i < numSections;i++){
code = PEGetSectionCode(job, loopSectionN);areaType = PE_SECTION_TYPE(code);groupN = PE_GROUP_N(code);sectionN = PE_SECTION_N(code);
// Perform section specific code here}
Once you’ve identified the area, group, and section you want, you can then set the section format using code similar to this:
PESetSectionFormat(job, code, &mySectionOptions);
NOTE: Earlier versions of Seagate Crystal Reports used different section code constants. Those constants have been remapped to the new section code format so reports created with earlier versions of Seagate Crystal Reports can run with applications created with the current version.
Crystal Report Engine 86

Section Map
The following map shows the pattern of section code assignment:
Report Header
1000 First Section in Report Header Area
1025 Second Section in Report Header Area
1050 Third Section in Report Header Area
1075 Fourth Section in Report Header Area
up to 1975 40th Section in Report Header Area
Page Header
2000 First Section in Page Header Area
2025 Second Section in Page Header Area
2050 Third Section in Page Header Area
2075 Fourth Section in Page Header Area
up to 2975 40th Section in Page Header Area
GH1
3000 First Section in First Group Header Area
3025 Second Section in First Group Header Area
3050 Third Section in First Group Header Area
3075 Fourth Section in First Group Header Area
GH2
3001 First Section in Second Group Header Area
3026 Second Section in Second Group Header Area
3051 Third Section in Second Group Header Area
3076 Fourth Section in Second Group Header Area
Details
4000 First Section in Details Area
4025 Second Section in Details Area
4050 Third Section in Details Area
4075 Fourth Section in Details Area
Crystal Report Engine 87
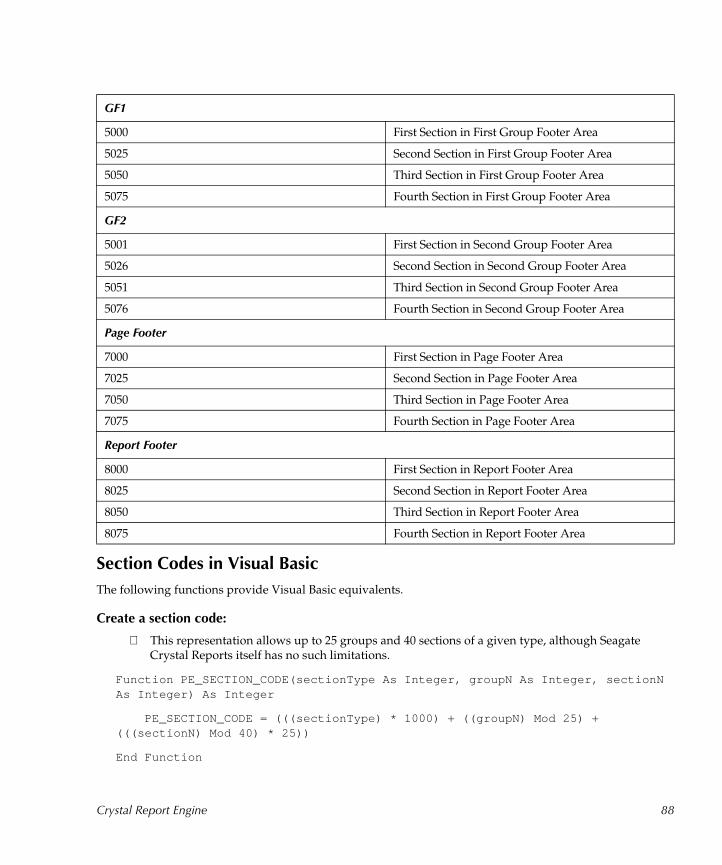
Section Codes in Visual Basic
The following functions provide Visual Basic equivalents.
Create a section code:
This representation allows up to 25 groups and 40 sections of a given type, although Seagate Crystal Reports itself has no such limitations.
Function PE_SECTION_CODE(sectionType As Integer, groupN As Integer, sectionN As Integer) As Integer
PE_SECTION_CODE = (((sectionType) * 1000) + ((groupN) Mod 25) + (((sectionN) Mod 40) * 25))
End Function
GF1
5000 First Section in First Group Footer Area
5025 Second Section in First Group Footer Area
5050 Third Section in First Group Footer Area
5075 Fourth Section in First Group Footer Area
GF2
5001 First Section in Second Group Footer Area
5026 Second Section in Second Group Footer Area
5051 Third Section in Second Group Footer Area
5076 Fourth Section in Second Group Footer Area
Page Footer
7000 First Section in Page Footer Area
7025 Second Section in Page Footer Area
7050 Third Section in Page Footer Area
7075 Fourth Section in Page Footer Area
Report Footer
8000 First Section in Report Footer Area
8025 Second Section in Report Footer Area
8050 Third Section in Report Footer Area
8075 Fourth Section in Report Footer Area
Crystal Report Engine 88

Create an area code:
Function PE_AREA_CODE(sectionType As Integer, groupN As Integer) As Integer
PE_AREA_CODE = PE_SECTION_CODE(sectionType, groupN, 0)
End Function
Decode a group number from a section code:
Function PE_GROUP_N(sectionCode As Integer) As Integer
PE_GROUP_N = ((sectionCode) Mod 25)
End Function
Decode a section number from a section code:
Function PE_SECTION_N(sectionCode) As Integer
PE_SECTION_N = (((sectionCode \ 25) Mod 40))
End Function
Decode a section type from a section code:
Function PE_SECTION_TYPE(sectionCode As Integer) As Integer
PE_SECTION_TYPE = ((sectionCode) \ 1000)
End Function
Crystal Report Engine API variable length strings
Several REAPI functions provide information in the form of a variable length string value or character array. When your program calls an REAPI function that produces a variable-length string, the Crystal Report Engine saves the string, creates a string handle which refers to the string, and returns that handle along with a value indicating the length of the string. To retrieve the contents of the string, you must call PEGetHandleString, Volume 2, Chapter 1. This approach allows you to allocate a buffer of the exact size needed to hold the string before obtaining the actual string.
If your development language can not allocate a buffer at runtime, you should declare a reasonably large buffer. Field names and error messages will generally be less than 100 bytes, but formulas may be 1000 bytes or longer. You can control how much data is copied to the buffer when you call PEGetHandleString.
Here is the procedure to follow when obtaining a variable length string:
1 Call-up the function which produces the string. This returns the string handle and length. The length includes all characters in the string plus a terminating null byte.
2 If necessary, allocate the string buffer.
3 Call-up PEGetHandleString to copy the string from the handle into the buffer.
Crystal Report Engine 89
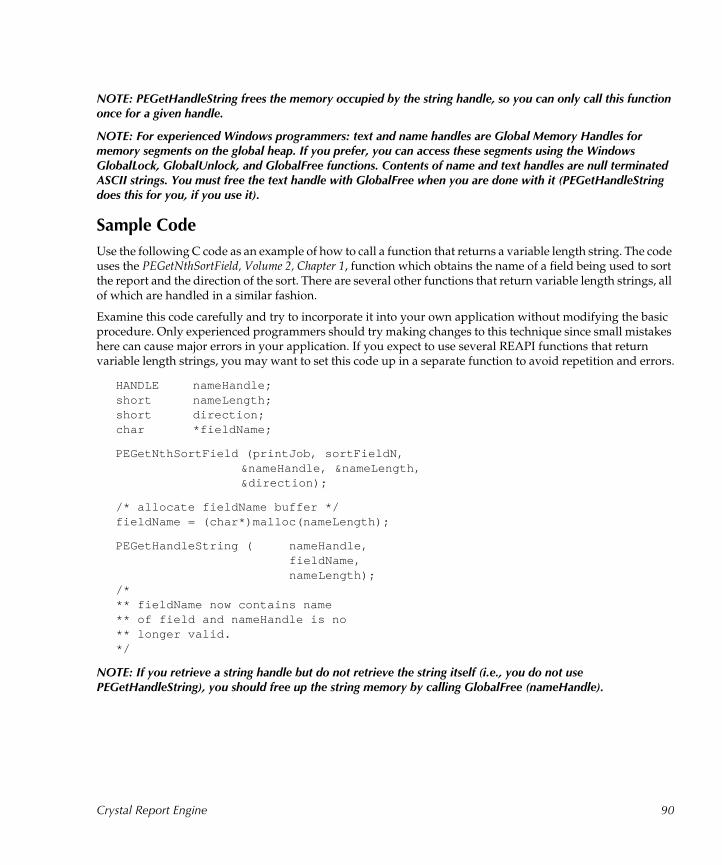
NOTE: PEGetHandleString frees the memory occupied by the string handle, so you can only call this function once for a given handle.
NOTE: For experienced Windows programmers: text and name handles are Global Memory Handles for memory segments on the global heap. If you prefer, you can access these segments using the Windows GlobalLock, GlobalUnlock, and GlobalFree functions. Contents of name and text handles are null terminated ASCII strings. You must free the text handle with GlobalFree when you are done with it (PEGetHandleString does this for you, if you use it).
Sample Code
Use the following C code as an example of how to call a function that returns a variable length string. The code uses the PEGetNthSortField, Volume 2, Chapter 1, function which obtains the name of a field being used to sort the report and the direction of the sort. There are several other functions that return variable length strings, all of which are handled in a similar fashion.
Examine this code carefully and try to incorporate it into your own application without modifying the basic procedure. Only experienced programmers should try making changes to this technique since small mistakes here can cause major errors in your application. If you expect to use several REAPI functions that return variable length strings, you may want to set this code up in a separate function to avoid repetition and errors.
HANDLE nameHandle;short nameLength;short direction;char *fieldName;
PEGetNthSortField (printJob, sortFieldN,&nameHandle, &nameLength,&direction);
/* allocate fieldName buffer */fieldName = (char*)malloc(nameLength);
PEGetHandleString ( nameHandle,fieldName,nameLength);
/*** fieldName now contains name ** of field and nameHandle is no ** longer valid.*/
NOTE: If you retrieve a string handle but do not retrieve the string itself (i.e., you do not use PEGetHandleString), you should free up the string memory by calling GlobalFree (nameHandle).
Crystal Report Engine 90

Code Evaluation
HANDLE nameHandle;short nameLength;short direction;char *fieldName;
Any time you evaluate a function that returns a variable length string, you will need at least three variables:
1. a handle to the string,
2. a short integer to hold the length of the string, and
3. a character array or pointer to a character array.
The direction variable in this example will hold the sort direction and is specific to PEGetNthSQLExpression, Volume 2, Chapter 1.
It is important to note that although the PEGetNthSortField function is defined in the Crystal Report Engine as accepting a pointer to a handle (HANDLE*) and a pointer to a short (short*), nameHandle and nameLength are not defined as pointer variables. Instead, they are defined simply as a HANDLE and a short integer, then passed to PEGetNthSortField with the & operator. This technique automatically initializes the variables with the address of the variable itself. Since the PEGetNthSortField function requires the address in memory to place the information, this is the most convenient method to define and pass the variables.
PEGetNthSortField (printJob, sortFieldN,&nameHandle, &nameLength,&direction);
The PEGetNthSortField function places a handle to the sort field name in the nameHandle location and the length of the field name (all characters in the name plus a terminating null byte) in the nameLength location. These values will be used to extract the actual field name.
/*allocate fieldName buffer*/fieldName = (char*)malloc(nameLength);
Now that you know the actual length of the field name you are trying to obtain, you can allocate exactly the right amount of memory to store that name. The malloc function does this.
NOTE: Malloc is defined in the C runtime library stdlib.h.
PEGetHandleString ( nameHandle,fieldName,nameLength);
PEGetHandleString, Volume 2, Chapter 1, uses the string handle to retrieve the field name and store it in fieldName. At the same time, nameHandle is invalidated. Now, the text can be used like any other character string.
NOTE: This code is meant as a basis for your own code. Although these elements shown here are necessary for extracting a variable length string from certain Crystal Report Engine functions, experienced programmers may wish to expand the code to trap errors or handle the string text differently.
Crystal Report Engine 91

The following is a list of the Crystal REAPI functions that return variable length strings:
PEGetAreaFormatFormula, Volume 2, Chapter 1
PEGetErrorText, Volume 2, Chapter 1
PEGetFormula, Volume 2, Chapter 1
PEGetGroupOptions, Volume 2, Chapter 1
PEGetGroupSelectionFormula, Volume 2, Chapter 1
PEGetNthFormula, Volume 2, Chapter 1
PEGetNthGroupSortField, Volume 2, Chapter 1
PEGetNthParam, Volume 2, Chapter 1
PEGetNthSortField, Volume 2, Chapter 1
PEGetReportTitle, Volume 2, Chapter 1
PEGetSectionFormatFormula, Volume 2, Chapter 1
PEGetSelectedPrinter, Volume 2, Chapter 1
PEGetSelectionFormula, Volume 2, Chapter 1
PEGetSQLQuery, Volume 2, Chapter 1
Crystal Report Engine API structures
Several REAPI functions require a structure or user-defined variable type to be passed as one or more arguments. Some of these functions require that you assign values to all members of the structure before calling the function so that the information can be used to make various settings in the Crystal Report Engine. Other functions require only the size of the structure be assigned to the StructSize member. These functions fill in the rest of the structure members for you, providing you with valuable information about a print job.
NOTE: The term structure is used here to mean both C structures and other user-defined types or records in languages such as Visual Basic and Delphi. If you are unfamiliar with this type of data, refer to the documentation for the programming language you are using.
Each structure used by REAPI is defined and explained in Developer’s online Help with a link to the function that uses it. Functions that use structures also have hypertext links to the structure definitions.
Some of the structures, PEMouseClickEventInfo(Other Declares), Volume 2, Chapter 1, for example, are complex, requiring other structures be passed as member values. Not all programming languages support this feature. If you are using a programming language that does not allow the use of a structure variable as a member variable defined inside other structures, declare the member variable as another data type, such as an integer or a variant data type, and assign it a value of 0 (zero) at runtime. The Crystal Report Engine will automatically provide default values or will request information from the user.
NOTE: Structure variables can not be created using Visual dBASE. Crystal Report Engine functions requiring structures as parameters are not available to dBASE.
Crystal Report Engine 92
Working with subreports
Your application can have much of the same control over subreports that it has over primary reports. The only exceptions are:
● you can not open or close a print job while a subreport is open, and
● you can only work with report sections that are actually in the subreport.
For example, subreports do not have page header sections like primary reports do, so you can not do anything with a subreport that requires a page header section.
Most Crystal Report Engine functions require a print job handle as a parameter. When you supply the handle to a primary report, the functions act on the primary report. When you supply the handle to a subreport, the functions act on the subreport. Getting the handle requires a number of steps.
Opening the primary report
You must first open the primary report using the PEOpenPrintJob, Volume 2, Chapter 1 function. When you do this, the program returns a handle to the primary report.
Retrieving an interim subreport handle
You must then identify the subreport you want to open, using the PEGetNSubreportsInSection, Volume 2, Chapter 1, and PEGetNthSubreportInSection, Volume 2, Chapter 1, functions to do this. When you run the PEGetNthSubreportInSection function, the Crystal Report Engine returns an interim, double-word handle to the subreport you specified.
Retrieving the subreport name
Once you have the handle, use the PEGetSubreportInfo, Volume 2, Chapter 1 function to retrieve the name of the subreport. When you run this function, the double-word handle is passed as the subreportHandle argument. The program retrieves the subreport name as the name member of the PESubreportInfo, Volume 2, Chapter 1 structure.
Opening the subreport and retrieving the job handle
Now that you have the name of the subreport (the name you assigned the subreport when you created it in Seagate Crystal Reports), use the PEOpenSubreport, Volume 2, Chapter 1 function to open the subreport. When using this function, you pass the name (or pointer to the name, depending on your development tool) as the subreportName argument. The program then opens the specified subreport and returns a job handle.
Running other Crystal Report Engine functions
Once you have the job handle, you can run any of the other Crystal Report Engine functions with the subreport, passing the subreport job handle as the printJob argument.
Crystal Report Engine 93
Changing report formats
When sending reports to a preview window using PEOutputToWindow, Volume 2, Chapter 1, you should always avoid making any formatting changes to a print job once you call PEStartPrintJob, Volume 2, Chapter 1. If the first page of a report has been displayed in the preview window, and you make formatting changes to the print job, subsequent pages of the report, if requested, may appear formatted differently than the first page. Depending on the changes made, trying to change report formatting after calling PEStartPrintJob can even cause errors in the Crystal Report Engine.
To avoid such formatting problems, you should get in the habit of formatting the report before starting the print job with PEStartPrintJob. Adding a routine to monitor job status using PEGetJobStatus, Volume 2, Chapter 1, can also help avoid conflicts. If you need to display the same report with different formatting options, create two separate print jobs, format each separately, and start each separately.
Exporting reports
The following topics are discussed in this section:
PEExportTo Overview, Page 95
PEExportOptions Structure, Page 95
Considerations when using the export functions, Page 97
Using the Professional Edition of Seagate Crystal Reports, you can give your applications the ability to export reports in a number of word processor and spreadsheet formats, and in a variety of popular data interchange formats as well.
The program includes two export functions, PEExportTo, Volume 2, Chapter 1, and PEGetExportOptions, Volume 2, Chapter 1. PEExportTo can be used by itself or in conjunction with PEGetExportOptions.
● Use PEExportTo by itself if you want your application to export reports in a fixed format to a fixed destination. Use this alternative, for example, if you want to preset the format and destination for a report and have the application export the report according to your specifications in response to user input.
● Use PEExportTo in conjunction with PEGetExportOptions to export reports in the format and destination your user selects from the Export dialog box at Print time.
PEGetExportOptions can only be used in conjunction with PEExportTo.
Crystal Report Engine 94
PEExportTo Overview
The PEExportTo, Volume 2, Chapter 1 function uses a structure, PEExportOptions, Volume 2, Chapter 1, as part of its argument list. This structure passes format and destination data to the function.
When using the PEExportTo function by itself, you hard code the format and destination data into the structure. Then, when you issue a call to PEStartPrintJob, Volume 2, Chapter 1, the program exports the report using the format and destination you specified in the code.
● Most of the format and destination data that you need to enter can be taken from the table in the PEExportTo topic.
● To hard code an export file name or e-mail header information, you will have to pass a second structure as an argument to the PEExportOptions structure. This second structure is defined in the *.h file that corresponds with the destination DLL you have selected.
When using the PEExportTo function in conjunction with the PEGetExportOptions function, you run the PEGetExportOptions function first to:
● retrieve the format and destination data that the user specifies in the Export dialog box, and
● pass that data to the PEExportOptions structure (again, part of the PEExportTo argument list).
Then, when you issue a call to PEEnableEventInfo, Volume 2, Chapter 1, the program exports the report using the format and destination specified by the user.
PEExportOptions Structure
struct PEExportOptions{WORD StructSize;
// the size of the structure. Initialize to sizeof PEExportOptionschar formatDLLName [PE_DLL_NAME_LEN];
// Each export format is defined in a DLL. This is the name of the// DLL for the format you select. From table in PEExportTo topic.// Requires a null-terminated string. Does not need to include// drive, path or extension. For example, uxfsepv is an example of// a valid formatDLLName.
DWORD formatType;// Some DLLs are used for more than one format. Enter the// appropriate value from the table under PEExportTo.
void FAR *formatOptions;// Some formats offer additional options (see table in the// PEExportTo topic). You can set this element to 0. Then, If the// DLLs require more information, they will prompt the user// for it. To hard code this information, see the note immediately
Crystal Report Engine 95
// following this structure.char destinationDLLName [PE_DLL_NAME_LEN];
// Each export destination is defined in a DLL. This is the name of// the DLL for the destination you select. From table in PEExportTo// topic. Requires a null-terminated string. Does not need to// include drive, path or extension. For example, uxddisk is an// example of a valid destination DLLName.
DWORD destinationType;// At the present time, each DLL implements only one destination.// You must specify a type here, nonetheless, because the DLL may// implement more than one destination someday. See the table under// PEExportTo for values to enter here.
void FAR *destinationOptions;// Some destinations offer additional options (see table in the// PEExportTo topic). You can set this element to 0. Then, If the// DLLs require more information, they will prompt the user for// it. To hard code this information, see the note immediately// following this structure.
WORD nFormatOptionsBytes;// Set by 'PEGetExportOptions', ignored by 'PEExportTo'. Both// functions use the same structure. PEGetExportOptions uses this// information in communicating with the application. The// application needs to know how many options bytes are being// returned because it may need to copy the options. PEExportTo// expects a filled in structure and does not need the byte// information because it is not going to copy the options. It uses// only a subset of the structure that does not include byte information.
WORD nDestinationOptionsBytes;// Set by 'PEGetExportOptions', ignored by 'PEExportTo'. See// comments for nFormatOptionsBytes above.
};
NOTE: You may choose to hard code the data for formatOptions and destinationOptions. You can set the formatOptions and destinationOptions elements to 0 as indicated. If the DLLs require more information than this, however, they will prompt the user to include more information. To hard code this information, you must define and fill in a structure of the appropriate kind. See the header file for the specified DLL for examples. Once the structure is defined, set the formatOptions or destinationOptions element to the address of the structure. Once PEExportTo returns or finishes, deallocate the formatOptions and destinationOptions structures. You should also deallocate the PEExportOptions structure once PEExportTo returns.
Crystal Report Engine 96

Considerations when using the export functions
The export functions are complex function calls. To avoid errors when exporting report files from your application, keep the following things in mind:
● In order to use PEGetExportOptions, Volume 2, Chapter 1 and PEExportOptions, Volume 2, Chapter 1, you must be using the version of the Crystal Report Engine (CRPE32.DLL) that came with the Professional Edition of Seagate Crystal Reports. If you have an earlier version of CRPE32.DLL installed on your machine and its earlier in the path, the program may find it first and not find the export functions. This can happen particularly if you are upgrading to the Professional Edition of Seagate Crystal Reports from the version of Seagate Crystal Reports that was shipped with Visual Basic Professional Edition. Visual Basic included an earlier version of CRPE32.DLL. Search your disk and delete or rename earlier versions of CRPE32.DLL, or make appropriate adjustments to your path statement.
● Make sure all format DLLs and destination DLLs are located in the same directory as CRPE32.DLL. Once Windows finds CRPE32.DLL, it will expect all of the DLL files to be in the same directory. Format DLLs are all UXF*.DLL files and Destination DLLs are all UXD*.DLL files. As a general rule, it is best to keep all of these files in the \CRW directory or the directory into which you installed Seagate Crystal Reports. Also, make certain that the PATH statement in your AUTOEXEC.BAT file includes \CRW.
● The UXF*.H and UXD*.H header files are only necessary when compiling your application. These files should be copied to the same directory as your application's source files.
Handling Preview Window Events Using the Crystal Report Engine API, you can create a Windows CALLBACK function to handle events that occur in a preview window. For instance, if a user clicks on a button in the toolbar of the preview window, such as the Zoom button or the Next Page button, Windows registers an event for the preview window.
Using the Event functions in the Crystal REAPI, you can add instructions to your own applications to perform specific actions according to events that occur in a preview window. The sample code below demonstrates how to handle preview window events by creating a CALLBACK function for the preview window, then initializing the preview window with that CALLBACK function in your Crystal Report Engine code. The code can handle toolbar button events, Group Tree events, and even drill-down events.
The Crystal Report Engine API Event functions are only valid when a print job is sent to a preview window using PEOutputToWindow.
#include “crpe.h”#include “Windows.h”
// The EventCallback function is defined as a standard// Windows CALLBACK procedure. Return TRUE to allow the// Crystal Report Engine to provide default behavior.// Return FALSE to prevent default behavior from being carried out.
Crystal Report Engine 97

// The comment TODO indicates where you need to add event// handling code specific to your application.
#if defined (WIN32)BOOL CALLBACK EventCallback (short eventID,
void *param, void *userData)#elseBOOL CALLBACK __export EventCallback (short eventID,
void *param, void *userData)#endif{
switch(eventID){
case PE_CLOSE_PRINT_WINDOW_EVENT:case PE_PRINT_BUTTON_CLICKED_EVENT:case PE_EXPORT_BUTTON_CLICKED_EVENT:case PE_FIRST_PAGE_BUTTON_CLICKED_EVENT:case PE_PREVIOUS_PAGE_BUTTON_CLICKED_EVENT:case PE_NEXT_PAGE_BUTTON_CLICKED_EVENT:case PE_LAST_PAGE_BUTTON_CLICKED_EVENT:case PE_CANCEL_BUTTON_CLICKED_EVENT:case PE_ACTIVATE_PRINT_WINDOW_EVENT:case PE_DEACTIVATE_PRINT_WINDOW_EVENT:case PE_PRINT_SETUP_BUTTON_CLICKED_EVENT:case PE_REFRESH_BUTTON_CLICKED_EVENT:{
PEGeneralPrintWindowEventInfo * eventInfo =(PEGeneralPrintWindowEventInfo *) param;
ASSERT(eventInfo != 0 && eventInfo->StructSize ==PE_SIZEOF_GENERAL_PRINT_WINDOW_EVENT_INFO);
// TODO
}break;
case PE_ZOOM_LEVEL_CHANGING_EVENT:{
PEZoomLevelChangingEventInfo * eventInfo =(PEZoomLevelChangingEventInfo *) param;
ASSERT(eventInfo != 0 && eventInfo->StructSize ==PE_SIZEOF_ZOOM_LEVEL_CHANGING_EVENT_INFO);
// TODO
}break;
Crystal Report Engine 98

case PE_GROUP_TREE_BUTTON_CLICKED_EVENT:{
PEGroupTreeButtonClickedEventInfo * eventInfo =(PEGroupTreeButtonClickedEventInfo *)param;
ASSERT(eventInfo != 0 && eventInfo->StructSize == PE_SIZEOF_GROUP_TREE_BUTTON_CLICKED_EVENT_INFO);
// TODO
}break;
case PE_CLOSE_BUTTON_CLICKED_EVENT:{
PECloseButtonClickedEventInfo *eventInfo =(PECloseButtonClickedEventInfo *)param;
ASSERT(eventInfo != 0 && eventInfo->StructSize ==PE_SIZEOF_CLOSE_BUTTON_CLICKED_EVENT_INFO);
// TODO
}break;
case PE_SEARCH_BUTTON_CLICKED_EVENT:{
PESearchButtonClickedEventInfo *eventInfo =(PESearchButtonClickedEventInfo *)param;
ASSERT(eventInfo != 0 && eventInfo->StructSize ==PE_SIZEOF_SEARCH_BUTTON_CLICKED_EVENT_INFO);
// TODO
}break;
case PE_SHOW_GROUP_EVENT:{
PEShowGroupEventInfo * eventInfo =(PEShowGroupEventInfo *)param;
ASSERT(eventInfo != 0 && eventInfo->StructSize ==PE_SIZEOF_SHOW_GROUP_EVENT_INFO);
// TODO
}break;
case PE_DRILL_ON_GROUP_EVENT:{
PEDrillOnGroupEventInfo * eventInfo =
Crystal Report Engine 99
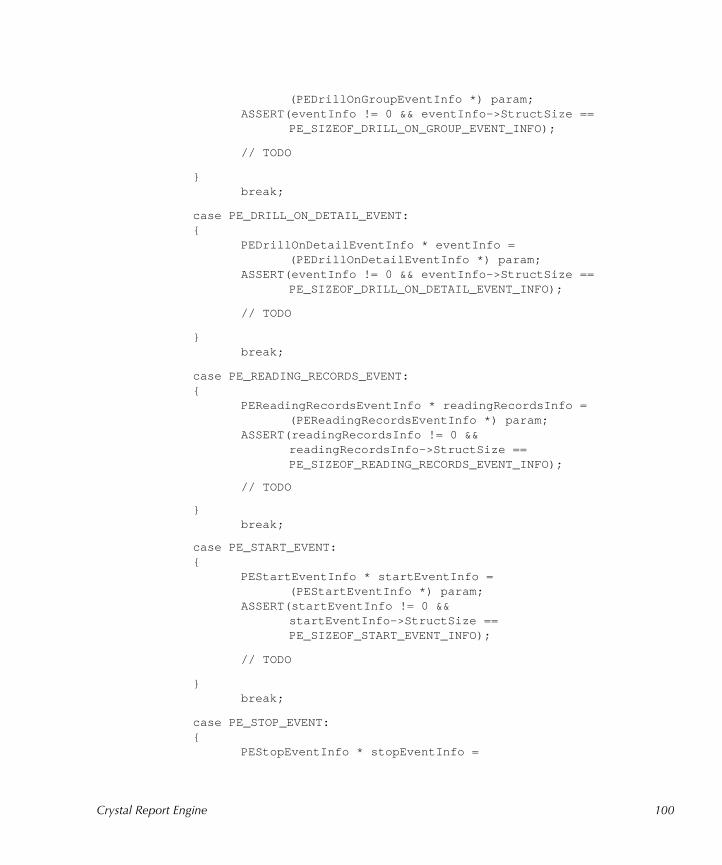
(PEDrillOnGroupEventInfo *) param;ASSERT(eventInfo != 0 && eventInfo->StructSize ==
PE_SIZEOF_DRILL_ON_GROUP_EVENT_INFO);
// TODO
}break;
case PE_DRILL_ON_DETAIL_EVENT:{
PEDrillOnDetailEventInfo * eventInfo =(PEDrillOnDetailEventInfo *) param;
ASSERT(eventInfo != 0 && eventInfo->StructSize ==PE_SIZEOF_DRILL_ON_DETAIL_EVENT_INFO);
// TODO
}break;
case PE_READING_RECORDS_EVENT:{
PEReadingRecordsEventInfo * readingRecordsInfo =(PEReadingRecordsEventInfo *) param;
ASSERT(readingRecordsInfo != 0 &&readingRecordsInfo->StructSize ==PE_SIZEOF_READING_RECORDS_EVENT_INFO);
// TODO
}break;
case PE_START_EVENT:{
PEStartEventInfo * startEventInfo =(PEStartEventInfo *) param;
ASSERT(startEventInfo != 0 &&startEventInfo->StructSize ==PE_SIZEOF_START_EVENT_INFO);
// TODO
}break;
case PE_STOP_EVENT:{
PEStopEventInfo * stopEventInfo =
Crystal Report Engine 100
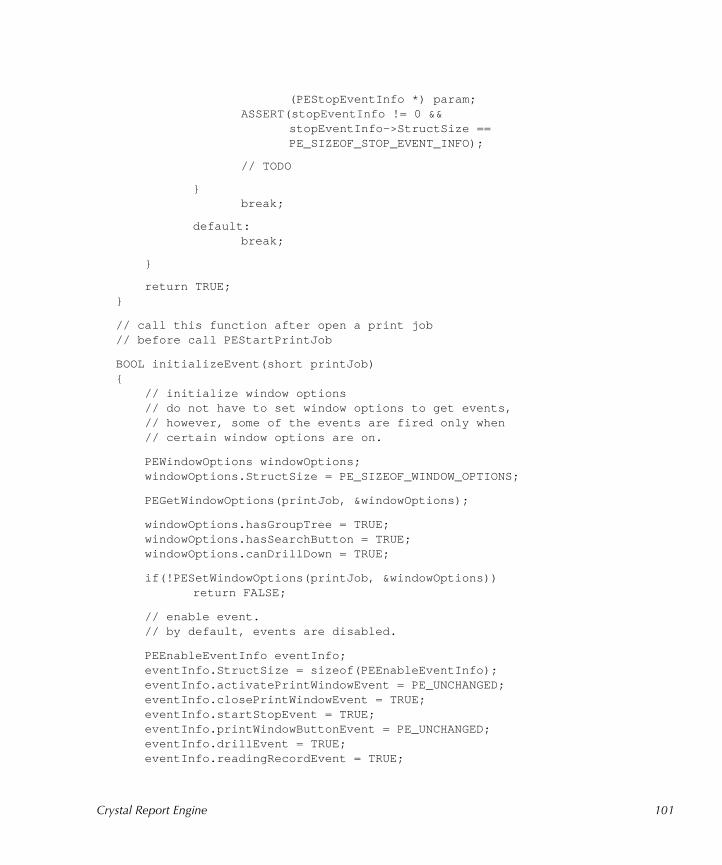
(PEStopEventInfo *) param;ASSERT(stopEventInfo != 0 &&
stopEventInfo->StructSize ==PE_SIZEOF_STOP_EVENT_INFO);
// TODO
}break;
default:break;
}
return TRUE;}
// call this function after open a print job// before call PEStartPrintJob
BOOL initializeEvent(short printJob){
// initialize window options// do not have to set window options to get events,// however, some of the events are fired only when// certain window options are on.
PEWindowOptions windowOptions;windowOptions.StructSize = PE_SIZEOF_WINDOW_OPTIONS;
PEGetWindowOptions(printJob, &windowOptions);
windowOptions.hasGroupTree = TRUE;windowOptions.hasSearchButton = TRUE;windowOptions.canDrillDown = TRUE;
if(!PESetWindowOptions(printJob, &windowOptions))return FALSE;
// enable event. // by default, events are disabled.
PEEnableEventInfo eventInfo;eventInfo.StructSize = sizeof(PEEnableEventInfo);eventInfo.activatePrintWindowEvent = PE_UNCHANGED;eventInfo.closePrintWindowEvent = TRUE;eventInfo.startStopEvent = TRUE;eventInfo.printWindowButtonEvent = PE_UNCHANGED;eventInfo.drillEvent = TRUE;eventInfo.readingRecordEvent = TRUE;
Crystal Report Engine 101
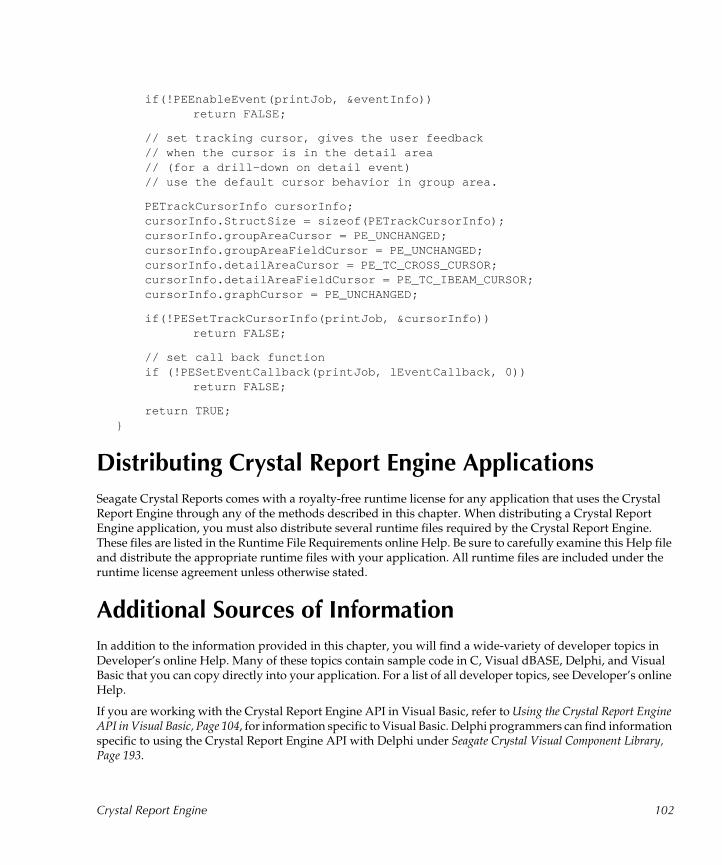
if(!PEEnableEvent(printJob, &eventInfo))return FALSE;
// set tracking cursor, gives the user feedback// when the cursor is in the detail area// (for a drill-down on detail event)// use the default cursor behavior in group area.
PETrackCursorInfo cursorInfo;cursorInfo.StructSize = sizeof(PETrackCursorInfo);cursorInfo.groupAreaCursor = PE_UNCHANGED;cursorInfo.groupAreaFieldCursor = PE_UNCHANGED;cursorInfo.detailAreaCursor = PE_TC_CROSS_CURSOR;cursorInfo.detailAreaFieldCursor = PE_TC_IBEAM_CURSOR;cursorInfo.graphCursor = PE_UNCHANGED;
if(!PESetTrackCursorInfo(printJob, &cursorInfo))return FALSE;
// set call back functionif (!PESetEventCallback(printJob, lEventCallback, 0))
return FALSE;
return TRUE;}
Distributing Crystal Report Engine Applications
Seagate Crystal Reports comes with a royalty-free runtime license for any application that uses the Crystal Report Engine through any of the methods described in this chapter. When distributing a Crystal Report Engine application, you must also distribute several runtime files required by the Crystal Report Engine. These files are listed in the Runtime File Requirements online Help. Be sure to carefully examine this Help file and distribute the appropriate runtime files with your application. All runtime files are included under the runtime license agreement unless otherwise stated.
Additional Sources of Information
In addition to the information provided in this chapter, you will find a wide-variety of developer topics in Developer’s online Help. Many of these topics contain sample code in C, Visual dBASE, Delphi, and Visual Basic that you can copy directly into your application. For a list of all developer topics, see Developer’s online Help.
If you are working with the Crystal Report Engine API in Visual Basic, refer to Using the Crystal Report Engine API in Visual Basic, Page 104, for information specific to Visual Basic. Delphi programmers can find information specific to using the Crystal Report Engine API with Delphi under Seagate Crystal Visual Component Library, Page 193.
Crystal Report Engine 102

Volume 1
5 Visual Basic Solutions
What you will find in this chapter...
Using the Crystal Report Engine API in Visual Basic, Page 104
...including comments regarding opening and closing the Crystal Report Engine, embedded quotes in VB calls, identifying string issues, passing dates and date ranges, hard coded nulls in User Defined Types and VB Wrapper DLL.
Crystal ActiveX Controls, Page 108
...including comments regarding adding and using ActiveX Controls in your project, and upgrading Crystal Custom Controls.
Crystal Report Engine Automation Server, Page 111
...including comments regarding adding, using and distributing Automation Server in your projects, Object name conflicts, preview window events, viewing the Object Library, and sample applications.
Active Data Driver, Page 118
...including comments regarding using Active Data Driver, Data Definition Files, and using ActiveX Data Sources at design time.
Crystal Data Object, Page 128
...including comments regarding Crystal Data Object, the Object Model, and the Crystal Data Source Type Library
Crystal Data Source Type Library, Page 131
...including adding and implementing the Crystal Data Source Type Library, Crystal Data Source Projects, and passing DataSource objects to the Active Data Driver.
Grid Controls and the Crystal Report Engine, Page 139
...including comments regarding Control Properties, bound and formatted bound reports, and a sample application.
Visual Basic Solutions 103
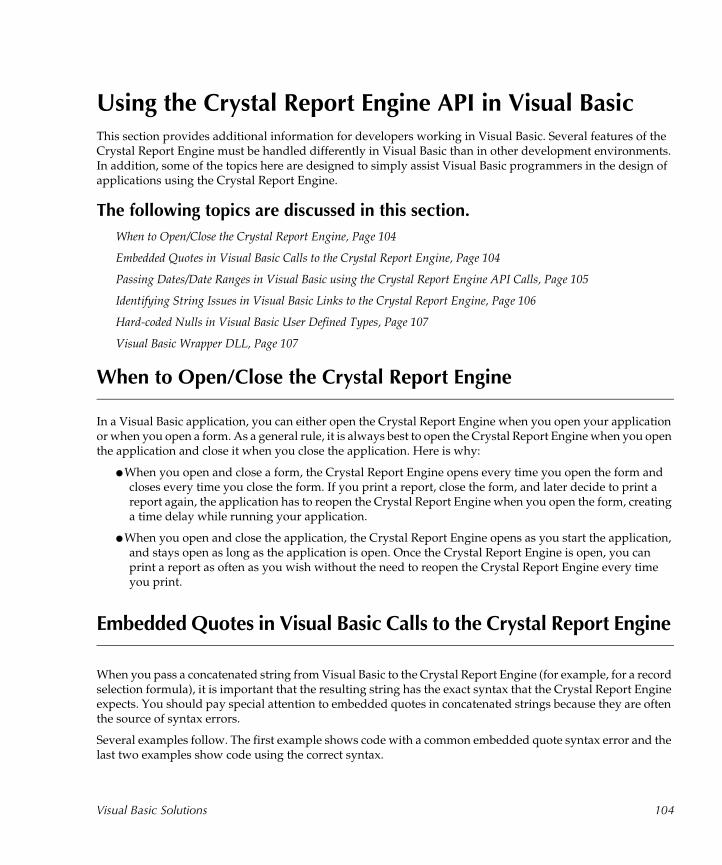
Using the Crystal Report Engine API in Visual Basic This section provides additional information for developers working in Visual Basic. Several features of the Crystal Report Engine must be handled differently in Visual Basic than in other development environments. In addition, some of the topics here are designed to simply assist Visual Basic programmers in the design of applications using the Crystal Report Engine.
The following topics are discussed in this section.
When to Open/Close the Crystal Report Engine, Page 104
Embedded Quotes in Visual Basic Calls to the Crystal Report Engine, Page 104
Passing Dates/Date Ranges in Visual Basic using the Crystal Report Engine API Calls, Page 105
Identifying String Issues in Visual Basic Links to the Crystal Report Engine, Page 106
Hard-coded Nulls in Visual Basic User Defined Types, Page 107
Visual Basic Wrapper DLL, Page 107
When to Open/Close the Crystal Report Engine
In a Visual Basic application, you can either open the Crystal Report Engine when you open your application or when you open a form. As a general rule, it is always best to open the Crystal Report Engine when you open the application and close it when you close the application. Here is why:
● When you open and close a form, the Crystal Report Engine opens every time you open the form and closes every time you close the form. If you print a report, close the form, and later decide to print a report again, the application has to reopen the Crystal Report Engine when you open the form, creating a time delay while running your application.
● When you open and close the application, the Crystal Report Engine opens as you start the application, and stays open as long as the application is open. Once the Crystal Report Engine is open, you can print a report as often as you wish without the need to reopen the Crystal Report Engine every time you print.
Embedded Quotes in Visual Basic Calls to the Crystal Report Engine
When you pass a concatenated string from Visual Basic to the Crystal Report Engine (for example, for a record selection formula), it is important that the resulting string has the exact syntax that the Crystal Report Engine expects. You should pay special attention to embedded quotes in concatenated strings because they are often the source of syntax errors.
Several examples follow. The first example shows code with a common embedded quote syntax error and the last two examples show code using the correct syntax.
Visual Basic Solutions 104
Incorrect syntaxVBNameVariable$ = “John”Recselct$ = “{file.LASTNAME} = “ + VBNameVariable$
This code results in the string:
{file.LASTNAME} = John
Since John is a literal string, the Formula Checker expects to see it enclosed in quotes. Without the quotes, the syntax is incorrect.
Correct syntaxVBNameVariable$ = “John”Recselct$ = “{file.LASTNAME} = “ + (chr$(39) + VBNameVariable + chr$(39)
This code results in the string:
{file.LASTNAME} = 'John'
This is the correct syntax for use in a Seagate Crystal Reports record selection formula. This is the syntax you would use if you were entering a selection formula directly into Seagate Crystal Reports.
VBNameVariable$ = “John”Recselct$ = “{file.Lastname} = “ (+ “'” + VBNameVariable + “'”
This code also results in the string:
{file.LASTNAME} = 'John'
Again, the correct syntax.
Passing Dates/Date Ranges in Visual Basic using the Crystal Report Engine API Calls
You may want to pass date or date range information from your Visual Basic application to the Crystal Report Engine for use in formulas, selection formulas, etc. Here is an example showing a way to do it successfully:
1 Start by opening a print job and assigning the print job handle to a variable.
JobHandle% = PEOpenPrintJob (“C:\CRW\CUSTOMER.RPT”)
2 Create variables that hold the year, month, and day for both the start and end of the range.
StartYear$ = 1992StartMonth$ = 01StartDay$ = 01EndYear$ = 1993EndMonth$ = 12EndDay$ = 31
Visual Basic Solutions 105

3 Now build a string to pass to the record selection formula. This is done in two steps:
● First, build the starting and ending dates for the date range.
Assign the starting date string to the variable StrtSelect$.
Assign the ending date string to the variable EndSelect$.
StrtSelect$ = “{filea.STARTDATE} < Date (“ + StartYear$ + “, “ + StartMonth$ + “, “ + StartDay$ +“)”
EndSelect$ = “{filea.ENDDATE} < Date (“ + EndYear$ + “, “ + EndMonth$ + “, “ + EndDay$ +“)”
● Second, build the selection formula using the StrtSelect$ and EndSelect$ variables.
Recselct$ = StrtSelect$ + “ AND “ + EndSelect$
4 Once your formula is built, set the record selection formula for the report.
RetCode% = PESetSelectionFormula (JobHandle%, RecSelect$)
5 Finally, print the report.
RetCode% = PEStartPrintJob (JobHandle, 1)RetCode% = PEClosePrintJob (JobHandle, 1)
6 Modify this code to fit your needs.
Identifying String Issues in Visual Basic Links to the Crystal Report Engine
When passing a string to the Crystal Report Engine as part of the Custom-Print Link, you may think that you are passing one thing when the program, in fact, is passing something entirely different. This can happen easily, for example, when you are passing a concatenated string that you have built using variables. A small syntax error (with embedded quotes, for example) can lead to an error message and a failed call. A simple debugging procedure follows.
To Identify a String Issue (bug)To identify a string bug, have the program display what it is passing in a message box. To do so, put a line of code similar to the following immediately after the call in question:
MsgBox (variablename)
Visual Basic Solutions 106
Look at the string that is displayed and make certain that it is exactly what Seagate Crystal Reports expects for a string.
● If the syntax is incorrect, look for errors in the concatenated string you have built.
● If the syntax is correct, look for other problems that could have caused the call to fail.
● If you are not sure if the syntax is correct, write down the string from the message box, enter it in the Seagate Crystal Reports Formula Editor, and click the Check button. If there is an error in the string, the Formula Checker will identify it for you.
Hard-coded Nulls in Visual Basic User Defined Types
When you assign a string to a user defined type in Visual Basic, it is necessary to hard-code a null immediately after the string. For example:
myStruct.stringField = “Hello” + CHR$(0)
Visual Basic Wrapper DLL
Some of the features of the Crystal Report Engine API are not directly available to Visual Basic programmers, due to restrictions in the Visual Basic language, while others present technological issues that are better handled differently from what was originally designed in the Report Engine API. To avoid problems calling functions in the API, you may want to consider using the Crystal ActiveX Controls, Page 108, or the Crystal Report Engine Automation Server, Page 111. However, if you prefer to work with the API, Seagate Crystal Reports includes the Visual Basic Wrapper DLL, CRWRAP16.DLL (16-bit) and CRWRAP32.DLL (32-bit).
The Visual Basic Wrapper DLL has been designed specifically for programming in the Visual Basic environment and can be used to build Crystal Report Engine applications in Visual Basic 4.0 or later. The CRWRAP.BAS module, installed by default in the \Seagate Software\Crystal Reports directory, redefines many of the functions and structures defined in GLOBAL.BAS. When working with the Crystal Report Engine API, add both modules to your Visual Basic project.
The functions and structures defined in the Visual Basic Wrapper DLL provide an interface for handling export formats, parameter fields, SQL server and ODBC logon information, graphs, printing, and more. For complete information on each of the structures and functions included, search for Visual Basic Wrapper for the Crystal Report Engine in the Developer’s online Help. In most cases, each function or structure has a corresponding function or structure in the original Crystal Report Engine API with a similar name. When working in Visual Basic though, you must use the functions and structures provided by the Visual Basic Wrapper DLL.
Visual Basic Solutions 107

Crystal ActiveX Controls
ActiveX controls bring more powerful applications to desktops and networks. ActiveX moves beyond applications that produce static documents to a Windows environment that provides active controls, documents, and client applications that can operate and interact not only with each other, but also with network intranets and the global Internet.
ActiveX controls provide plug-in capabilities that let you add application components, and even entire applications, to your own development projects without writing a line of code. Seagate Crystal Reports includes the Crystal ActiveX Control. Use the ActiveX Control to easily add all of the report processing power of Seagate Crystal Reports to your own Visual Basic, Visual C++, Borland C++, Delphi, and other applications.
NOTE: The development tools may refer to an ActiveX Control by any of the following names: OLE Control, OCX Control, Custom Control, or ActiveX Control. As long as the term used refers to a control with an .OCX filename extension, it is synonymous with the term ActiveX Control used here.
NOTE: Seagate Crystal Reports also includes a Visual Basic Custom Control (CRYSTAL.VBX). However, the ActiveX Control is based on more advanced technology and provides more features. You should use the ActiveX Control for development of any new Visual Basic projects. To upgrade an existing project to use the ActiveX Control, see Upgrading from the Crystal Custom Control, Page 110. If, for some reason, you choose to use the VBX in your project rather than the ActiveX Control, the VBX has been fully documented in Developer�s online Help.
The following topics are discussed in this section.
Adding the ActiveX Control to your Project, Page 108
Using the ActiveX Controls, Page 109
Upgrading from the Crystal Custom Control, Page 110
Adding the ActiveX Control to your Project
This section demonstrates how to add the Crystal ActiveX Control to an application project being designed in Visual Basic versions 5.0 and 6.0. If you wish to use the ActiveX Control in a different development environment or a different version of Visual Basic, please refer to the documentation that came with your development tools for information on adding an ActiveX or OLE Control (OCX) to your project.
The Crystal ActiveX Control was installed in the \WINDOWS\SYSTEM directory when you installed Seagate Crystal Reports. You add the ActiveX Control to your Visual Basic project using the COMPONENTS command on the Visual Basic Project menu.
1 Open Visual Basic.
2 Open the project to which you want to add the ActiveX Control.
Visual Basic Solutions 108
3 Choose COMPONENTS from the Project menu. The Components dialog box appears.
● If Crystal Report Control appears in the Available Controls list, click the check box next to it, click OK, and skip to Step 6.
● If Crystal Report Control does not appear in the Available Controls list, click Browse. The Add ActiveX Control dialog box appears.
NOTE: Crystal Report Control is the name of the Crystal ActiveX Control when it is added to a development project. The term ActiveX Control refers to a type of control, while Crystal Report Control is the name of the ActiveX Control provided by Seagate Crystal Reports.
4 Use the controls in the Add ActiveX Control dialog box to locate and select the CRYSTL32.OCX file. This file was installed in your \WINDOWS\SYSTEM directory when you installed Seagate Crystal Reports. Once you locate and select the file, click Open.
5 Crystal Report Control will now appear in the Available Controls list box. Click the check box next to the name of the control, and click OK.Visual Basic adds the Crystal ActiveX Control to your toolbox. The tool looks like this:
6 To add the ActiveX Control to a form, double-click the tool in the toolbox and Visual Basic installs it on the active form.
NOTE: For instructions on how to add an ActiveX Control or OLE control to development applications other than Visual Basic, refer to the documentation that came with the development application you are using.
Using the ActiveX Controls
Once you have the ActiveX Control object on your form, you build the connection between your application and Seagate Crystal Reports by setting the object's properties at design time or changing properties at runtime. The ActiveX properties let you specify:
● the name of the report you want to print in response to an application event,
● the destination for that report (window, file, or printer),
● the number of copies you want to print (if your report is going to the printer),
● print file information (if your report is going to a file),
● preview window sizing and positioning information (if your report is going to a window),
● selection formula information (if you want to limit the records in your report),
● sorting information, and
● other related properties.
Crystal ActiveX Control properties can be changed either at design time or at runtime. Note, however, some properties are available only at runtime. These properties do not appear in the Properties list at design time.
NOTE: For a complete description of each property in the Crystal ActiveX Control, refer to the Crystal ActiveX Control Reference, Volume 3, Chapter 5.
Visual Basic Solutions 109
Changing Properties for the ActiveX Control 1 Click the ActiveX control on your form to select it.
2 Right-click and choose CRYSTAL PROPERTIES from the shortcut menu. The Property Pages dialog box appears.
3 Use the tabs and controls in this dialog box to change the ActiveX Control properties at design time.
NOTE: ActiveX Control properties also appear in the Visual Basic Properties list box. For instructions on using the Properties list box, refer to your Visual Basic documentation.
Changing Properties at Runtime
You can set most of the ActiveX Control properties at runtime by adding simple entries to your procedure code. Runtime property settings replace settings you make via the Properties list at design time.
Use the Action property (Page 994) or the PrintReport method (Page 1119) to actually process the report at runtime. The Action property and the PrintReport method can only be used at runtime, and are the only means by which a report can actually be generated by the ActiveX Control.
For information on how to set ActiveX Control properties at runtime, refer to their syntax by searching for each property by name in the Developer’s online Help. Included are examples of how to set each property at runtime.
Upgrading from the Crystal Custom Control
If you are using the Crystal Custom Control (CRYSTAL.VBX) in a Visual Basic project, you can upgrade your project to use the more powerful Crystal ActiveX control. All previous code and settings will be retained when you upgrade your project.
Normally, Visual Basic versions 4.0 and 5.0 automatically upgrade the control used in your project when you simply open the project in the Visual Basic environment. If Visual Basic does not upgrade your Crystal Custom Control correctly, open the VB.INI file in a text editor, such as Notepad, and verify the following settings exist in the appropriate sections.
For 16-bit environments:
[VBX Conversions16]crystal.vbx={00025600-0000-0000-C000-000000000046}
#5.0#0;c:\windows\system\crystl16.ocx
For 32-bit environments:
[VBX Conversions32]crystal.vbx={00025600-0000-0000-C000-000000000046}
#5.0#0;c:\windows\system\crystl32.ocx
NOTE: The actual path indicated should correspond to the location of the Crystal ActiveX Control. The path on your system may or may not be the same as the path shown here. In addition, each entry should appear on a single line in your VB.INI file.
Visual Basic Solutions 110

Crystal Report Engine Automation Server
The Crystal Report Engine Automation Server has been designed as both an object-oriented approach to adding Crystal Report Engine features to your applications, and as an ideal method for displaying reports in web pages. If you work in a development environment that supports access to COM-based automation servers, such as Visual Basic, you will quickly make full use of the Crystal Report Engine Automation Server to add powerful reporting to your applications. In addition, if you manage a web server that supports Active Server Pages, such as Microsoft’s Internet Information Server (IIS) or Personal Web Server, the Crystal Report Engine Automation Server satisfies all of your dynamic reporting needs.
Seagate Crystal Reports provides both 16-bit (CPEAUT16.DLL) and 32-bit (CPEAUT32.DLL) versions of the Crystal Report Engine Automation Server, depending on the version of Seagate Crystal Reports you installed. The Crystal Report Engine Automation Server was installed in your \WINDOWS\SYSTEM directory when you installed Seagate Crystal Reports.
The Crystal Report Engine Automation Server is an in-process automation server based on the Component Object Model (COM). This automation server provides an IDispatch interface, but is not programmable through a vtable interface. For Visual Basic programmers and in Active Server Pages, handling the IDispatch interface is almost transparent. For more information on the Component Object Model and COM interfaces, refer to Microsoft documentation.
The following topics are discussed in this section.
Adding the Automation Server to your Visual Basic Project, Page 111
Using the Automation Server in Visual Basic, Page 112
Object Name Conflicts, Page 114
Viewing the Crystal Report Engine Object Library, Page 115
Handling Preview Window Events, Page 115
Distributing the Automation Server with Visual Basic Applications, Page 117
Sample Applications, Page 117
Adding the Automation Server to your Visual Basic Project
Before you can use the Crystal Report Engine Automation Server with a Visual Basic project, it must be registered on your system, and you must add it to your project. If you selected to install Development Tools when you installed Seagate Crystal Reports, the automation server will have already been registered on your system. If you did not select Development Tools, run the Seagate Crystal Reports setup application again, select Custom installation, and make sure Development Tools are installed.
NOTE: The following procedures demonstrate the use of the Report Engine Automation Server in versions 5.0 and later of Visual Basic. For information on using automation servers in earlier versions of Visual Basic, or in other development environments, please refer to the documentation that came with your software.
Visual Basic Solutions 111
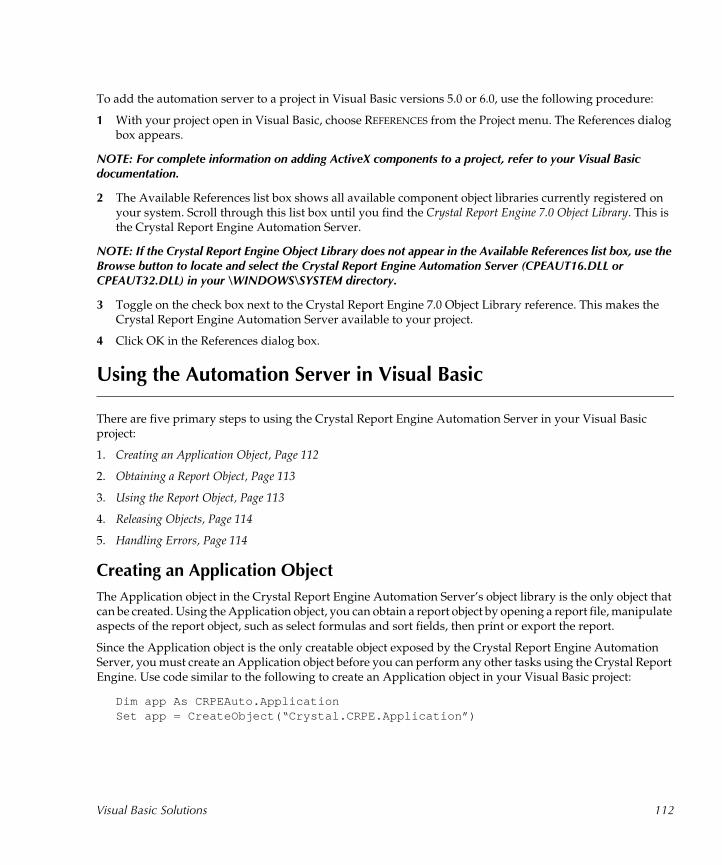
To add the automation server to a project in Visual Basic versions 5.0 or 6.0, use the following procedure:
1 With your project open in Visual Basic, choose REFERENCES from the Project menu. The References dialog box appears.
NOTE: For complete information on adding ActiveX components to a project, refer to your Visual Basic documentation.
2 The Available References list box shows all available component object libraries currently registered on your system. Scroll through this list box until you find the Crystal Report Engine 7.0 Object Library. This is the Crystal Report Engine Automation Server.
NOTE: If the Crystal Report Engine Object Library does not appear in the Available References list box, use the Browse button to locate and select the Crystal Report Engine Automation Server (CPEAUT16.DLL or CPEAUT32.DLL) in your \WINDOWS\SYSTEM directory.
3 Toggle on the check box next to the Crystal Report Engine 7.0 Object Library reference. This makes the Crystal Report Engine Automation Server available to your project.
4 Click OK in the References dialog box.
Using the Automation Server in Visual Basic
There are five primary steps to using the Crystal Report Engine Automation Server in your Visual Basic project:
1. Creating an Application Object, Page 112
2. Obtaining a Report Object, Page 113
3. Using the Report Object, Page 113
4. Releasing Objects, Page 114
5. Handling Errors, Page 114
Creating an Application Object
The Application object in the Crystal Report Engine Automation Server’s object library is the only object that can be created. Using the Application object, you can obtain a report object by opening a report file, manipulate aspects of the report object, such as select formulas and sort fields, then print or export the report.
Since the Application object is the only creatable object exposed by the Crystal Report Engine Automation Server, you must create an Application object before you can perform any other tasks using the Crystal Report Engine. Use code similar to the following to create an Application object in your Visual Basic project:
Dim app As CRPEAuto.ApplicationSet app = CreateObject(“Crystal.CRPE.Application”)
Visual Basic Solutions 112
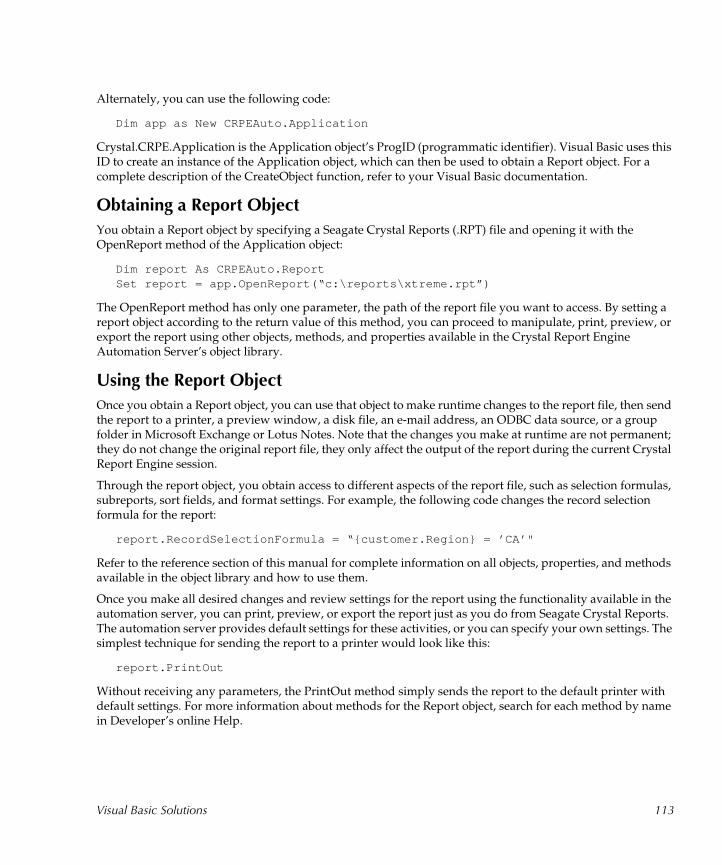
Alternately, you can use the following code:
Dim app as New CRPEAuto.Application
Crystal.CRPE.Application is the Application object’s ProgID (programmatic identifier). Visual Basic uses this ID to create an instance of the Application object, which can then be used to obtain a Report object. For a complete description of the CreateObject function, refer to your Visual Basic documentation.
Obtaining a Report Object
You obtain a Report object by specifying a Seagate Crystal Reports (.RPT) file and opening it with the OpenReport method of the Application object:
Dim report As CRPEAuto.ReportSet report = app.OpenReport(“c:\reports\xtreme.rpt”)
The OpenReport method has only one parameter, the path of the report file you want to access. By setting a report object according to the return value of this method, you can proceed to manipulate, print, preview, or export the report using other objects, methods, and properties available in the Crystal Report Engine Automation Server’s object library.
Using the Report Object
Once you obtain a Report object, you can use that object to make runtime changes to the report file, then send the report to a printer, a preview window, a disk file, an e-mail address, an ODBC data source, or a group folder in Microsoft Exchange or Lotus Notes. Note that the changes you make at runtime are not permanent; they do not change the original report file, they only affect the output of the report during the current Crystal Report Engine session.
Through the report object, you obtain access to different aspects of the report file, such as selection formulas, subreports, sort fields, and format settings. For example, the following code changes the record selection formula for the report:
report.RecordSelectionFormula = “{customer.Region} = ’CA’"
Refer to the reference section of this manual for complete information on all objects, properties, and methods available in the object library and how to use them.
Once you make all desired changes and review settings for the report using the functionality available in the automation server, you can print, preview, or export the report just as you do from Seagate Crystal Reports. The automation server provides default settings for these activities, or you can specify your own settings. The simplest technique for sending the report to a printer would look like this:
report.PrintOut
Without receiving any parameters, the PrintOut method simply sends the report to the default printer with default settings. For more information about methods for the Report object, search for each method by name in Developer’s online Help.
Visual Basic Solutions 113
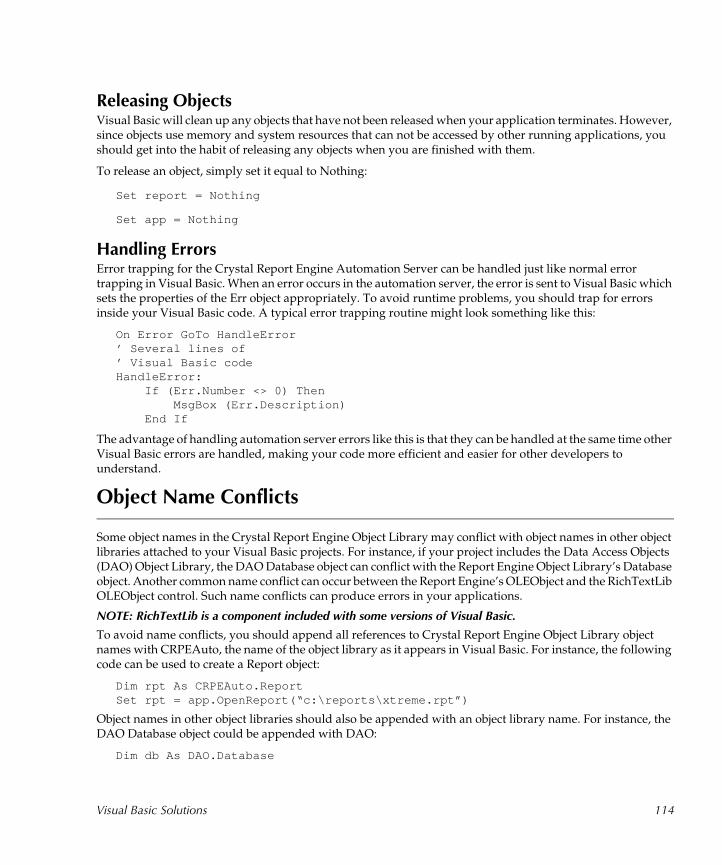
Releasing Objects Visual Basic will clean up any objects that have not been released when your application terminates. However, since objects use memory and system resources that can not be accessed by other running applications, you should get into the habit of releasing any objects when you are finished with them.
To release an object, simply set it equal to Nothing:
Set report = Nothing
Set app = Nothing
Handling Errors Error trapping for the Crystal Report Engine Automation Server can be handled just like normal error trapping in Visual Basic. When an error occurs in the automation server, the error is sent to Visual Basic which sets the properties of the Err object appropriately. To avoid runtime problems, you should trap for errors inside your Visual Basic code. A typical error trapping routine might look something like this:
On Error GoTo HandleError’ Several lines of’ Visual Basic codeHandleError: If (Err.Number <> 0) Then MsgBox (Err.Description) End If
The advantage of handling automation server errors like this is that they can be handled at the same time other Visual Basic errors are handled, making your code more efficient and easier for other developers to understand.
Object Name Conflicts
Some object names in the Crystal Report Engine Object Library may conflict with object names in other object libraries attached to your Visual Basic projects. For instance, if your project includes the Data Access Objects (DAO) Object Library, the DAO Database object can conflict with the Report Engine Object Library’s Database object. Another common name conflict can occur between the Report Engine’s OLEObject and the RichTextLib OLEObject control. Such name conflicts can produce errors in your applications.
NOTE: RichTextLib is a component included with some versions of Visual Basic.
To avoid name conflicts, you should append all references to Crystal Report Engine Object Library object names with CRPEAuto, the name of the object library as it appears in Visual Basic. For instance, the following code can be used to create a Report object:
Dim rpt As CRPEAuto.ReportSet rpt = app.OpenReport(“c:\reports\xtreme.rpt”)
Object names in other object libraries should also be appended with an object library name. For instance, the DAO Database object could be appended with DAO:
Dim db As DAO.Database
Visual Basic Solutions 114
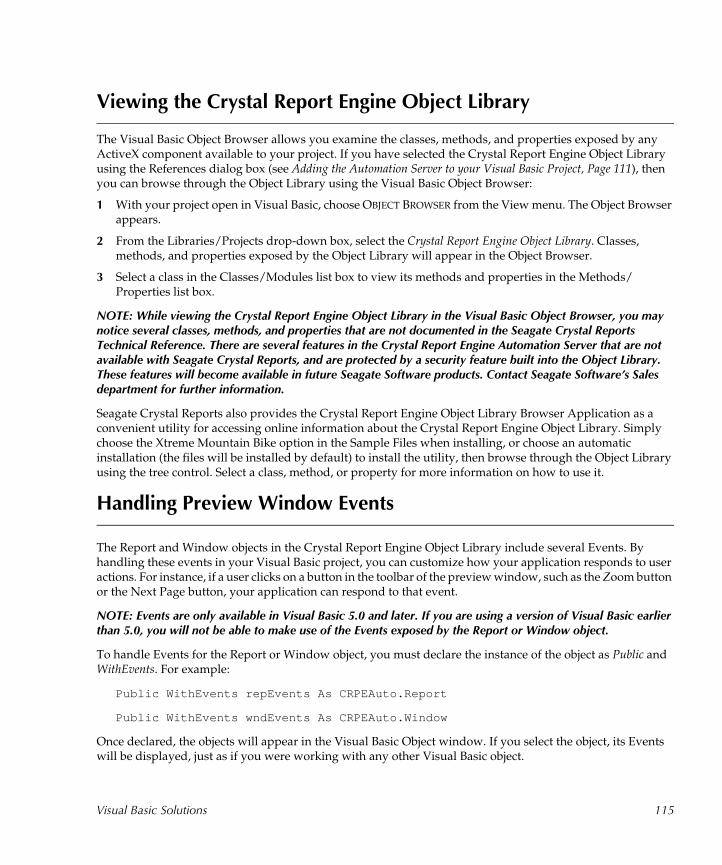
Viewing the Crystal Report Engine Object Library
The Visual Basic Object Browser allows you examine the classes, methods, and properties exposed by any ActiveX component available to your project. If you have selected the Crystal Report Engine Object Library using the References dialog box (see Adding the Automation Server to your Visual Basic Project, Page 111), then you can browse through the Object Library using the Visual Basic Object Browser:
1 With your project open in Visual Basic, choose OBJECT BROWSER from the View menu. The Object Browser appears.
2 From the Libraries/Projects drop-down box, select the Crystal Report Engine Object Library. Classes, methods, and properties exposed by the Object Library will appear in the Object Browser.
3 Select a class in the Classes/Modules list box to view its methods and properties in the Methods/Properties list box.
NOTE: While viewing the Crystal Report Engine Object Library in the Visual Basic Object Browser, you may notice several classes, methods, and properties that are not documented in the Seagate Crystal Reports Technical Reference. There are several features in the Crystal Report Engine Automation Server that are not available with Seagate Crystal Reports, and are protected by a security feature built into the Object Library. These features will become available in future Seagate Software products. Contact Seagate Software�s Sales department for further information.
Seagate Crystal Reports also provides the Crystal Report Engine Object Library Browser Application as a convenient utility for accessing online information about the Crystal Report Engine Object Library. Simply choose the Xtreme Mountain Bike option in the Sample Files when installing, or choose an automatic installation (the files will be installed by default) to install the utility, then browse through the Object Library using the tree control. Select a class, method, or property for more information on how to use it.
Handling Preview Window Events
The Report and Window objects in the Crystal Report Engine Object Library include several Events. By handling these events in your Visual Basic project, you can customize how your application responds to user actions. For instance, if a user clicks on a button in the toolbar of the preview window, such as the Zoom button or the Next Page button, your application can respond to that event.
NOTE: Events are only available in Visual Basic 5.0 and later. If you are using a version of Visual Basic earlier than 5.0, you will not be able to make use of the Events exposed by the Report or Window object.
To handle Events for the Report or Window object, you must declare the instance of the object as Public and WithEvents. For example:
Public WithEvents repEvents As CRPEAuto.Report
Public WithEvents wndEvents As CRPEAuto.Window
Once declared, the objects will appear in the Visual Basic Object window. If you select the object, its Events will be displayed, just as if you were working with any other Visual Basic object.
Visual Basic Solutions 115

NOTE: The Window object events are only valid when a report is sent to a preview window using the Preview method.
The following code demonstrates how to set up and use events for both the Report object and the Window object. Actual event handling code is left for you to fill in. You are limited only by the restrictions of the Visual Basic language.
Option ExplicitPublic WithEvents rpt1 As CRPEAuto.ReportPublic vw1 As CRPEAuto.ViewPublic WithEvents wnd1 As CRPEAuto.Window
Private Sub Command1_Click()Set vw1 = rpt1.PreviewSet wnd1 = vw1.Parent
End Sub
Private Sub Form_Load()Set app1 = CreateObject(“Crystal.CRPE.Application”)Set rpt1 = app1.OpenReport(“c:\crw\rt01.rpt”)
rpt1.EventInfo.ActivatePrintWindowEventEnabled = Truerpt1.EventInfo.ClosePrintWindowEventEnabled = Truerpt1.EventInfo.GroupEventEnabled = Truerpt1.EventInfo.PrintWindowButtonEventEnabled = Truerpt1.EventInfo.ReadingRecordEventEnabled = Truerpt1.EventInfo.StartStopEventEnabled = True
End Sub
Private Sub rpt1_Start(ByVal Destination As _CRPEAuto.CRPrintingDestination, _useDefault As Boolean)
' Put event handling code here.
End Sub
Private Sub rpt1_Stop (ByVal Destination AsCRPEAuto.CRPrintingDestination,ByVal Status As CRPEAuto.CRPrintingProgress)
' Put event handling code here.
End Sub
Private Sub wnd1_ActivatePrintWindow()
' Put event handling code here.
End Sub
Visual Basic Solutions 116
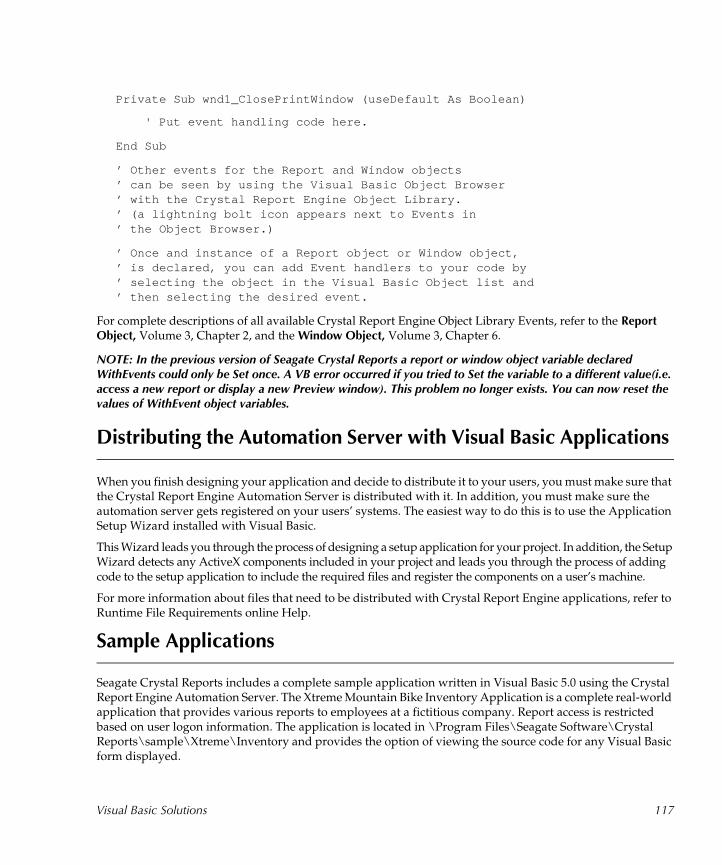
Private Sub wnd1_ClosePrintWindow (useDefault As Boolean)
' Put event handling code here.
End Sub
’ Other events for the Report and Window objects’ can be seen by using the Visual Basic Object Browser’ with the Crystal Report Engine Object Library.’ (a lightning bolt icon appears next to Events in’ the Object Browser.)
’ Once and instance of a Report object or Window object,’ is declared, you can add Event handlers to your code by’ selecting the object in the Visual Basic Object list and’ then selecting the desired event.
For complete descriptions of all available Crystal Report Engine Object Library Events, refer to the Report Object, Volume 3, Chapter 2, and the Window Object, Volume 3, Chapter 6.
NOTE: In the previous version of Seagate Crystal Reports a report or window object variable declared WithEvents could only be Set once. A VB error occurred if you tried to Set the variable to a different value(i.e. access a new report or display a new Preview window). This problem no longer exists. You can now reset the values of WithEvent object variables.
Distributing the Automation Server with Visual Basic Applications
When you finish designing your application and decide to distribute it to your users, you must make sure that the Crystal Report Engine Automation Server is distributed with it. In addition, you must make sure the automation server gets registered on your users’ systems. The easiest way to do this is to use the Application Setup Wizard installed with Visual Basic.
This Wizard leads you through the process of designing a setup application for your project. In addition, the Setup Wizard detects any ActiveX components included in your project and leads you through the process of adding code to the setup application to include the required files and register the components on a user’s machine.
For more information about files that need to be distributed with Crystal Report Engine applications, refer to Runtime File Requirements online Help.
Sample Applications
Seagate Crystal Reports includes a complete sample application written in Visual Basic 5.0 using the Crystal Report Engine Automation Server. The Xtreme Mountain Bike Inventory Application is a complete real-world application that provides various reports to employees at a fictitious company. Report access is restricted based on user logon information. The application is located in \Program Files\Seagate Software\Crystal Reports\sample\Xtreme\Inventory and provides the option of viewing the source code for any Visual Basic form displayed.
Visual Basic Solutions 117
In addition, a self-extracting executable located in the \Program Files\Seagate Software\Crystal Reports\sample\sam32aut (or sam16aut) directory contains three small sample applications that demonstrate various aspects of the Crystal Report Engine Automation Server. Simply run the SAM32AUT.EXE (32-bit) or SAM16AUT.EXE (16-bit) application to install the samples. The three samples are:
● AUBASIC Demonstrates the basic code required to open a report and print, preview, or export it using the Crystal Report Engine Automation Server.
● AUBROWSEDemonstrates how to browse through the areas of a report and access the objects in each area.
● AUFMLADemonstrates how to get and set record selection formulas, group selection formulas, and SQL queries stored with a report.
Active Data Driver Modern Visual Basic applications often use advanced ActiveX components to connect to data sources. These data sources may include Data Access Objects (DAO), Remote Data Objects (RDO), OLE DB providers, such as ActiveX Data Objects (ADO), or the Visual Basic data controls. Using the Active Data Driver for Seagate Crystal Reports, you can design reports for your Visual Basic applications that use these same ActiveX data sources. The Active Data Driver also supports Crystal Data Objects (CDO) and the Crystal Data Source Type Library. For more information on RDO, DAO, and ADO, refer to Microsoft documentation. For information on the Data Control, refer to your Visual Basic documentation. For information on CDO, see Crystal Data Object, Page 128. For information on the Crystal Data Source Type Library, see Crystal Data Source Type Library, Page 131.
Occasionally, you may also need to create a report when the data source is not actually available at design time. Highly dynamic data may only be available at runtime. In such cases, the Active Data Driver supports the use of Data definition files, tab separated text files that define the fields in a data source but not the actual data.
Normally, developing applications using the Crystal Report Engine requires designing and saving one or more report files in advance to be accessed by the application at runtime. This process requires that the programmer has access to the data during design time, and that the application, upon installation, also installs whatever database drivers and files are required to make sure the reports can connect to the required data.
An alternative to runtime connectivity, of course, is to save data with the report files. The data is neatly packaged and available whenever the report is requested from your custom application. However, saving data with a report increases the file size of the report, wasting disk space. Furthermore, this technique produces a static report file in which the data can not be updated without connectivity to the database.
The Crystal Active Data Driver allows you to create report files at design time without specifying an actual data source. Instead, the report is based on a data definition file, an ASCII text file with place holders to represent database fields. At runtime, you add code to your application to specify the actual source of data for the report.
Visual Basic Solutions 118
The following topics are discussed in this section.Data Definition Files, Page 119
Using the Active Data Driver, Page 119
Creating Data Definition Files, Page 123
Using ActiveX Data Sources at Design Time, Page 126
Data Definition Files
A report file designed using a data definition file, instead of a specific database or ODBC data source, contains information about the kind of data to place in the report instead of information about an actual data source. It looks for field types, rather than actual fields. For an example of a data definition file, refer to the file ORDERS.TTX installed in the \Program Files\Seagate Software\Crystal Reports directory.
At design time, you create your report based on the data definition file. Previewing or printing the report at design time has little value except to format field placement and style. Since there is no real data in the text file, you can not preview or print any data at design time.
NOTE: You can add sample data to the data definition file so that values will appear for each field in the Preview Tab at design time, but the values will be identical for all records, and grouping will not be available.
At runtime, your application opens the report file, just as it would any other report file. Instead of simply formatting and printing the file at runtime, though, you change the data source pointed at by the Crystal Active Data Driver, which is the data definition file, to a Recordset or Rowset object for an ActiveX data source such as ADO, RDO, DAO, or the Crystal Data Sources (see Crystal Data Object, Page 128), and the Crystal Data Source Type Library (see Crystal Data Source Type Library, Page 131).
Once the Crystal Active Data Driver obtains the Recordset from the runtime data source, the Crystal Report Engine can generate the actual report using existing data. The entire process saves you time designing reports and produces reports that are much more flexible and portable at runtime. For more information on data definition files, see Creating Data Definition Files, Page 123.
Using the Active Data Driver
Designing and generating reports using the Crystal Active Data Driver is a straightforward process, but requires several specific steps:
1. Select the design time data source, Page 120
2. Design the Report, Page 120
3. Obtain a Recordset from the Runtime Data Source, Page 121
4. Open the Report, Page 122
5. Pass the Recordset to the Active Data Driver, Page 122
6. Print the Report, Page 123
Visual Basic Solutions 119
The following sections demonstrate this process using the Crystal Active Data Driver with the Crystal Automation Server in Visual Basic 4.0.
Select the design time data source
When designing a report for your Visual Basic application, you can specify any ActiveX data source using the Active Data Driver, or you can specify a data definition file so that the actual data is specified at runtime only. The following example uses the sample data definition file included with Seagate Crystal Reports:
1 Click New Report in the Seagate Crystal Reports Welcome dialog box, or click the New button on the Seagate Crystal Reports toolbar. The Report Gallery appears.
2 Click a Report Expert button in the Report Gallery. In this example, you can click Standard. The Create Report Expert appears.
3 On the Data Tab, scroll down until you see the Active Data button. If this button does not appear on the Data Tab, you have not correctly installed the Active Data Driver. Run Seagate Crystal Reports Setup again.
4 Click the Active Data button, and the Select Data Source dialog box appears.
5 Click the Data Definition option in the Select Data Source dialog box, and click Browse to locate a data definition file. The Select Data Definition File dialog box appears.
6 Locate the ORDERS.TTX file in the \Program Files\Seagate Software\Crystal Reports directory, and click Open. The specified file appears in the text box for the Data Definition option of the Select Data Source dialog box.
7 Click Finish, and orders appears on the Data Tab of the Report Expert in Seagate Crystal Reports.
NOTE: For information on specifying an OLE DB provider or other ActiveX data source at design time instead of a data definition file, see Using ActiveX Data Sources at Design Time, Page 126.
Design the Report
Once you have selected a data definition file or an ActiveX data source, you can design your report just as you would design any other report.
1 Click the Fields Tab of the Report Expert. The data definition file orders appears as a database table in the Database Fields list box. Each of the fields defined in orders.ttx appears as a field in the orders table.
2 Add fields to your report just as you would normally add fields to a report using the Report Expert.
3 Continue designing the report using the Report Expert. When finished, click Design Report. Since the report is based on a data definition file, there is no point in previewing it at this time.
4 Apply any formatting or other changes that you feel are necessary to fine-tune the look of your report. Save the report when finished.
NOTE: Before saving your report, be sure to turn off the Save Data with Report option under the File menu. The sample data stored with the data definition file is unnecessary at runtime, and will only increase the size of your report file.
Visual Basic Solutions 120
Obtain a Recordset from the Runtime Data SourceOnce you have selected a data source or data definition file and designed a report based on that data source or file, you can begin programming your Visual Basic application to obtain a recordset from an ActiveX data source, open the report file, set the report file to use the recordset object from the ActiveX data source, then print or export the report file. This process requires using the functionality of the Crystal Active Data Driver in conjunction with the Crystal Report Engine.
Either the Crystal Report Engine API or the Crystal Report Engine Automation Server can be used with the Active Data Driver. However, the following tutorials use the Crystal Report Engine Automation Server in Visual Basic 5.0. This section assumes a familiarity with the Crystal Report Engine Automation Server. If you need more information on how to use the automation server, see the Crystal Report Engine Automation Server, Page 111.
To begin, you must obtain a Recordset object from a runtime ActiveX data source. This data source can be opened through DAO, RDO, ADO, the Visual Basic Data Control, Crystal Data Objects (CDO), or a class that implements the Crystal Data Source Type Library. For information on DAO, RDO, and ADO, refer to Microsoft documentation. For information on the Visual Basic Data Control, refer to your Visual Basic documentation. For information on CDO, see Crystal Data Object (page 128). For information on the Crystal Data Source Type Library, see Crystal Data Source Type Library, Page 131.
This tutorial creates a Recordset object from the Orders table of the XTREME.MDB sample database using DAO. The Recordset concept is used by DAO, ADO, and the Crystal Data Source Type Library. If you are using RDO, you will need to obtain a rdoResultSet object. If you are using CDO, you will need to obtain a Rowset object (see Crystal Data Object (page 128)).
NOTE: You must add the Data Access Objects component to your Visual Basic project before performing the following steps. For instructions on using DAO with Visual Basic, refer to your Visual Basic documentation.
1. Declare variables for the Database and Recordset objects in your Visual Basic application. This can be handled in the declarations section of a form or module. Use code similar to this:
Dim db As New DAO.DatabaseDim rs As DAO.Recordset
2. Obtain a Database object from the Xtreme database.
Set db = DBEngine.Workspaces(0).OpenDatabase( _“c:\Program Files\Seagate Software\Crystal Reports\xtreme.mdb”)
3. Obtain a Recordset object from the Orders table of the Xtreme database.
Set rs = db.OpenRecordset(“Orders”, dbOpenTable)
Visual Basic Solutions 121
Open the Report
Once you have obtained a Recordset object, you can begin working with the report file you created earlier. This example uses the Crystal Report Engine Automation Server to open a report file.
NOTE: You must add the Crystal Report Engine Automation Server component to your Visual Basic project before performing the following steps. For complete information on using the Automation Server, see Crystal Report Engine Automation Server, Page 111.
1. Declare variables for the Application and Report objects that you will obtain from the Crystal Report Engine Object Library in the automation server. This can be handled in the declarations section of a form or module.
Dim app As CRPEAuto.ApplicationDim report As CRPEAuto.Report
2. Create an Application object with the Crystal Report Engine Automation Server.
Set app = CreateObject(“Crystal.CRPE.Application”)
3. Obtain a Report object by opening the report file you created earlier. This example uses the file ORDERS.RPT.
Set report = app.OpenReport(“c:\reports\Orders.rpt”)
Pass the Recordset to the Active Data Driver
The Recordset object gets passed to the Active Data Driver through the SetPrivateData method of the DatabaseTable object in the Crystal Report Engine Object Library. You must first obtain a DatabaseTable object from the Report object, then you must use the SetPrivateData method to set the report to point at the recordset object for your Active data source. The Crystal Report Engine Automation Server uses the Active Data Driver itself to replace the data definition file, at runtime, with the Active data source.
The following code demonstrates how to obtain a DatabaseTable object from the Report object:
Dim reportDb As CRPEAuto.DatabaseDim reportTables As CRPEAuto.DatabaseTablesDim reportTable As CRPEAuto.DatabaseTable
Set reportDb = report.DatabaseSet reportTables = reportDb.TablesSet reportTable = reportTables.Item(1)
The Item property in the DatabaseTables collection lets you specify which table in the database you are replacing. Since the data definition file acts as a database with a single table, you should pass 1 to the Item property.
Once you have a DatabaseTable object for the Report object, you can pass the Active data source to the Report object using the SetPrivateData method. This method requires two parameters. The first is a value indicating that the data source you are passing to the report is an ActiveX data source. This value must be 3. The second parameter is the data source itself. For example:
reportTable.SetPrivateData(3, rs)
Visual Basic Solutions 122
Print the Report
Now that the data source for the report has been set to the DAO Recordset, you can print, preview, or export the report normally. For instance, the following code prints the report to the default printer:
report.PrintOut
Once the data source has been set in the report object, runtime reporting can proceed normally. All features of the Crystal Report Engine are available to you. For more information, refer to the sections of this manual appropriate to the Report Engine development tool you are using.
Creating Data Definition Files
A data definition file is a tab-separated text file that contains information about field names, field types, and sample field data. Field names used in the data definition file must match the field names that will appear in the ActiveX data source that is specified at runtime. Field type information indicates the type of data in each field (string, numeric, date, etc.) and, if it is a string field, the maximum length of the string. Finally, sample field data is simply sample data that Seagate Crystal Reports can display in the preview window while you design the report.
For complete information on creating data definition files, see Creating Data Definition Files, Page 123. Seagate Crystal Reports installs a sample data definition file in the \Program Files\Seagate Software\Crystal Reports directory on your system. This file is named ORDERS.TTX and can be used with the Orders table in the XTREME.MDB sample database or the Xtreme sample data ODBC data source that was created when you installed Seagate Crystal Reports.
The following is an example of how fields are defined in a data definition file:
Order ID Long 1
Customer Name String 50 Sample string value
Order Date Date Jan 5, 2000
Order Amount Currency $1.00
The Active Data Driver supports the following data types in a data definition file:
Data Type Description
BLOB Fields that contain bitmap images.
Boolean True/False Boolean value.
Byte 8-bit integer value.
Currency 64-bit floating-point value that can include a currency or percent sign.
Visual Basic Solutions 123
NOTE: The data type BLOB is supported when connecting to RDO, ADO, DAO and the data control at runtime but not when connecting to CDO.
Although data definition files can be created manually using a text editor such as Notepad, Seagate Crystal Reports provides tools for simplifying the process. Each tool has its advantages. Review the process for using each tool described below to determine which best suits your own environment and development process.
● Database Definition Tool, Page 124
● Active Data Driver Functions, Page 125
Database Definition Tool The Database Definition Tool is available from the Select Data Source dialog box when you begin designing a report based on the Active Data Driver. This tool allows you to design a data definition file as the first step of designing your report. From the Data Tab of the Create Report Expert:
1 Scroll down and click the Active Data button. The Select Data Source dialog box appears.
2 Click the Data Definition option in the dialog box to create a report based on a data definition file.
3 Click New to create a new data definition file. The Database Definition Tool appears.
4 Use the Database Definition Tool to create fields for your data definition file. Use the controls to enter field names, field types, and sample data that will appear in the Seagate Crystal Reports Preview Tab. If you select String as the field type, you will also be asked to specify a maximum string length.
5 Click Add to add each new field to your data definition file. Each field appears in the list box at the bottom of the Database Definition Tool.
6 Continue adding as many fields as necessary for your data definition file by entering the information in the controls of the Database Definition Tool, and clicking Add each time.
7 You can delete a field that you have created by selecting the field in the list box and clicking Delete.
Date Any date/time value. Examples include:● Jan 5, 1999
● 07/11/97 5:06:07
● 07/11/97
● 23:30:01
Long, int32 32-bit integer value.
Memo Any string value over 254 characters long. You must indicate the maximum number of characters for the string.
Number 64-bit floating-point value.
Short, int16 16-bit integer value.
String Any string value under 254 characters long, such as a name, description, or identification number that is not meant to be interpreted numerically. You must indicate the maximum number of characters for the string.
Data Type Description
Visual Basic Solutions 124
8 Click the Close button in the upper right of the Database Definition Tool dialog box when you are finished designing your data definition file. A message appears asking if you want to save the data definition file.
9 Click Yes, and a Save File As dialog box appears.
10 Save the data definition file where it can be accessed by your report file. When finished, the new data definition file will appear in the Data Definition text box in the Select Data Source dialog box.
11 Continue creating your report.
Active Data Driver Functions
The Active Data Driver (P2SMON.DLL) is a standard dynamic link library that is normally used by Seagate Crystal Reports (or the Crystal Report Engine) to access ActiveX data sources such as DAO and ADO. The DLL is installed, by default, in your \WINDOWS\SYSTEM directory. In addition, the Active Data Driver exports functions that can be used at runtime from within your application to dynamically design a data definition file based on your data source, and a report file based on the data definition file. These functions are available to any development environment that supports DLL function calls.
NOTE: To use the functions in the Active Data Driver DLL, you must declare the functions first. Refer to your Visual Basic documentation for information on declaring DLL functions. Search for Crystal Active Data Driver Reference in Developer�s online Help for information about declaring the Active Data Driver functions.
To use the Active Data Driver Functions from Visual Basic:
1 Obtain a valid Recordset object from your DAO, ADO, or Data Control data source, or a valid Rowset object using CDO.
2 Call the function CreateReportOnRuntimeDS to create a data definition file based on your Recordset or Rowset object. For example:
CreateReportOnRuntimeDS(daoRs, “c:\reports\orders.rpt”,“c:\reports\orders.ttx”, True, False)
This example creates a data definition file named ORDERS.TTX, then creates a simple report file based on this data definition file and names it ORDERS.RPT. If the last argument is set to True, Seagate Crystal Reports, if installed on the system, will open automatically on the user’s machine, allowing them to make changes to the report file.
Notice that the first argument is a DAO Recordset object. If you are using this function in a language such as C or C++, you would pass a pointer to an IUnknown derived interface to the Recordset.
NOTE: For complete information on the functions provided by the Active Data Driver, search for Crystal Active Data Driver Reference in Developer�s online Help.
Visual Basic Solutions 125
Using ActiveX Data Sources at Design Time
The Active Data Driver is intended to allow reports to be based on ActiveX data sources such as ADO and DAO. Data definition files allow you to avoid specifying an actual data source until runtime. However, you may often need to simply specify an ADO data source at design time for the report.
The Select Data Source dialog opens when you click the Active Data button on the Data Tab of the Report Expert. This dialog box provides four options for selecting a data source to use in your report: specify an ODBC data source for ADO or RDO, specify an ADO connection string for OLE DB, specify a DAO recordset, or specify a data definition file. The Data Definition option has been thoroughly discussed earlier in this section. The remainder of this section will discuss selecting an ADO, RDO, or DAO data source.
The following topics are discussed in this section.
ODBC with ADO and RDO, Page 126
ADO and OLE DB, Page 127
DAO, Page 127
ODBC with ADO and RDO
1 Click the ODBC option in the Select Data Source dialog box. This option allows you to connect to an ODBC data source through ADO or RDO. The currently selected data objects technology appears in parentheses next to the ODBC option.
● Use the drop-down list box to select an ODBC data source that is available on your system.
● Click the New button to create a new ODBC data source. Refer to Microsoft ODBC documentation for information on creating ODBC data sources.
● Click the Advanced button to select ADO or RDO as the data objects technology used. This should match the technology used in your Visual Basic application.
2 After you select your data source and data objects technology, you can click Next in the Select Data Source dialog box. The Select Recordset dialog box appears.
3 If the ODBC data source requires log on information, specify a user name and password to log on.
4 Determine if you want to create a Recordset or Resultset using an object available from your data source, such as a database table, or if you prefer to specify a SQL statement. Select the appropriate option in the Recordset section of the Select Recordset dialog box.
NOTE: For simplicity, RDO Resultsets are also referred to as Recordsets in this dialog box.
5 If you want to connect to a database object, use the Object Type drop-down list box to select the type of database object, such as a Table, then select the object itself from the Object drop-down list box.
6 If you want to obtain a Recordset using a SQL statement, write the SQL statement in the text box provided, or click Build to use the Microsoft Query application and Query Wizard to visually design your SQL statement.
Visual Basic Solutions 126
7 Click Finish in the Select Recordset dialog box. Either ado or rdo will appear in the list box on the Data Tab of the Report Expert.
8 Continue creating your report normally. While creating your report, the ado or rdo specification will act like a database table, providing all fields that have been obtained from your ADO Recordset or RDO Resultset.
ADO and OLE DB
1 Click the ADO and OLE DB option in the Select Data Source dialog box. This option is designed to allow you to specify an ADO connection string that can connect to any OLE DB provider.
2 Type the ADO connection string into the text box provided. You must be familiar with ADO to create a proper connection string. The following are examples of an acceptable connection string for ADO:
3 DSN=Xtreme sample data;
4 DATABASE=pubs;DSN=Publishers;UID=sa;Password=;
5 Type in the first example shown here to follow along in this tutorial. Click Next in the Select Data Source dialog box when finished. The Select Recordset dialog box appears.
6 Determine if you want to create a Recordset using an object available from your data source, such as a database table, or if you prefer to specify a SQL statement. Select the appropriate option in the Recordset section of the Select Recordset dialog box.
7 If you want to connect to a database object, use the Object Type drop-down list box to select the type of database object, such as a Table, then select the object itself from the Object drop-down list box.
8 If you want to obtain a Recordset using a SQL statement, write the SQL statement in the text box provided, or click Build to use the Microsoft Query application and Query Wizard to visually design your SQL statement.
9 Click Finish in the Select Recordset dialog box. You will see ado in the list box on the Data Tab of the Report Expert.
10 Continue creating your report normally. While creating your report, the ado specification will act like a database table, providing all fields that have been obtained from your ADO Recordset.
DAO
1 Click the DAO option in the Select Data Source dialog box. This option allows you to connect to a database file through Data Access Objects (DAO).
2 Select a database type from the Database drop-down list box. This list displays all DAO compatible database drivers installed on your system. Seagate Crystal Reports installs many DAO drivers for you. For this example, you can select Access as the database type.
3 Use the Browse button to open the Select Database File dialog box. Use this dialog box to locate and select a database file. Seagate Crystal Reports includes several sample databases in the \Program Files\Seagate Software\Crystal Reports directory by default. You can select the XTREME.MDB Access file from this directory for this example.
Visual Basic Solutions 127

4 Click Open in the Select Database File dialog box, and the path and file name of the database you selected appear in the DAO text box on the Select Data Source dialog box.
5 Click Next, and the Select Recordset dialog box appears.
6 If the database requires log on information, specify a user name and password to log on.
7 Determine if you want to create a Recordset using an object available from your database, such as a database table, or if you prefer to specify a SQL statement. Select the appropriate option in the Recordset section of the Select Recordset dialog box.
8 If you want to connect to a database object, use the Object Type drop-down list box to select the type of database object, such as a Table, then select the object itself from the Object drop-down list box.
9 If you want to obtain a Recordset using a SQL statement, write the SQL statement in the text box provided and click Next.
10 Click Finish in the Select Recordset dialog box. You will see dao in the list box on the Data Tab of the Report Expert.
11 Continue creating your report normally. While creating your report, the dao specification will act like a database table, providing all fields that have been obtained from your DAO Recordset.
Crystal Data Object
The Crystal Data Object (CDO) is an ActiveX data source that allows you to define fields and records at runtime based on data that exists only at runtime. Through CDO, any data can become a virtual database and can be reported on using the power of the Crystal Report Engine.
CDO, like DAO and ADO, is based on the Component Object Model (COM). Any development environment that supports COM interfaces can dynamically generate a set of data for a report without relying on a database that exists at design time.
Applications that produce data that does not exist outside of the running application have been unable, until now, to take advantage of the most powerful reporting features in the industry. CDO, however, solves that problem. For instance, applications that monitor system or network resources, or any constantly operating environment, can produce a current report on such information at any time. No longer does data need to be dumped to a separate database before analysis. Through CDO, the Active Data Driver, and the Crystal Report Engine, analysis is instant and up-to-date.
The following topics are discussed in this section.
CDO vs. the Crystal Data Source Type Library, Page 129Using the Crystal Data Object, Page 129Crystal Data Object Model, Page 131
Visual Basic Solutions 128
CDO vs. the Crystal Data Source Type Library
Seagate Crystal Reports also supports the Crystal Data Source Type Library, Page 131, for implementing in a Visual Basic class definition. Crystal Data Source objects can also be passed to the Active Data Driver as ActiveX data sources. However, the Crystal Data Source Type Library exposes a complete COM interface that must be implemented in your class. CDO, on the other hand, provides a fast and simple method for producing an internal customized ActiveX data source.
If you need to implement a complete data source in your application that allows runtime movement through records and fields, or if you intend to implement your data source as a separate ActiveX component, consider using the Crystal Data Source Type Library. However, if you need to create a quick and simple means of storing a large amount of data in a convenient package for reporting on, and the data will remain inside the same application as the reporting functionality, then use Crystal Data Objects.
Using the Crystal Data Object
The Crystal Data Object is an ActiveX DLL that can be accessed from any Windows development environment that supports ActiveX. By creating a Rowset object, similar to a Recordset, and filling it with fields and data, you design a virtual database table that can be passed as an ActiveX data source to the Crystal Active Data Driver.
Once the CDO Rowset has been created, it can be used just like any other active data source such as DAO or ADO. Use a procedure, much like the procedure described in Using the Active Data Driver, Page 119, to print, preview, or export a report at runtime that is based on the CDO data source. Simply replace the steps that explain how to pass a DAO Recordset to the Active Data Driver with appropriate steps for passing your CDO Rowset.
The rest of this section explains how to create a CDO Rowset in Visual Basic. However, as an ActiveX DLL, CDO can be used by any application development environment that supports ActiveX.
To create a CDO Rowset:
1. Obtain a CDO Rowset Object, Page 129
2. Add Fields to the Rowset Object, Page 130
3. Obtain Data as Rows, Page 130
4. Add Rows to the Rowset Object, Page 131
Use these steps as a guideline for creating your own CDO Rowsets for use with the Active Data Driver.
Obtain a CDO Rowset ObjectAs stated earlier, CDO is a standard automation server. A Rowset object can be obtained from CDO using the Visual Basic CreateObject function:
Public CDOSet As ObjectSet CDOSet = CreateObject(“CrystalDataObject.CrystalComObject”)
This Rowset object is, essentially, equivalent to a Recordset object you might obtain from DAO or another active data source. It is the Rowset object that you eventually pass to the Active Data Driver.
Visual Basic Solutions 129

Add Fields to the Rowset Object
Once you have a Rowset object, you need to define fields for the Rowset. These fields act as the virtual database fields. The field names you specify must match the field names specified in the data definition file. For more information on data definition files, see Creating Data Definition Files, Page 123.
Fields are added to a CDO Rowset using the AddField method:
CDOSet.AddField “Order ID”, vbStringCDOSet.AddField “Company Name”, vbStringCDOSet.AddField “Order Date”, vbDateCDOSet.AddField “Order Amount”, vbCurrency
This code adds four fields to the Rowset with the specified field names, and field types. The field types are based on constant values for the Variant data type. The constant names used here are from Visual Basic. For information on valid constant values, see the AddField method in the Crystal Data Object Reference in Developer’s online Help.
Obtain Data as Rows
Data to be added as rows in the Rowset can be collected in a two dimensional array. The first dimension indicates rows, while the second dimension specifies fields for each row. The number of possible fields indicated by the second dimension must not exceed the number of fields you added to the Rowset using the AddField method. For example, you might define an array such as this:
Dim Rows(12, 4) As Variant
This specifies an array named Rows that contains 12 rows (0 to 11) and 4 columns (0 to 3). Notice that the four fields are defined with the AddField method, so the 4 columns in the Rows array are also defined. In addition, room has been made for 12 rows or records. Finally, since each field holds a different type of data, the array is defined as a Variant type.
NOTE: If your Rowset contains only a single field, you can use a one dimensional array instead of two dimensional. The single dimension indicates the number of rows or records in your Rowset.
Now that you have defined an array to hold data, you can begin adding values to the array. These array values will become the actual field values for the virtual database. Most likely, you will want to design a routine in your application that adds runtime data generated by your application into each cell of the array. The following code, however, demonstrates how you can explicitly add values to the array:
Rows(0, 0) = “1002” ’The first Order IDRows(0, 1) = “Cyclist's Trail Co.” ’The first Company NameRows(0, 2) = #12/2/94# ’The first Order DateRows(0, 3) = 5060.2725 ’The first Order Amount
From here, you could continue by adding a value to the first field of the second record, Rows (1, 0). You continue filling in data record by record and field by field. This technique, of course, requires a lot of code and is not very practical. Most real applications would contain a looping procedure that progressively filled in values for the array.
Visual Basic Solutions 130
Add Rows to the Rowset Object
At this point, you have created a CDO Rowset object, added fields to the Rowset, and collected data in an array that will become part of a virtual runtime database. All that is left is to pass the data from the array to the Rowset object. This step is handled with a single method:
CDOSet.AddRows Rows
The AddRows method accepts a two-dimensional array containing the values you want added to the Rowset and, ultimately, added to a report file that is printed or exported. A one-dimensional array is used to add a single row with multiple fields.
Rows can be added to a CDO Rowset with multiple calls to the AddRows method. However, once you begin adding rows of data to a Rowset, you can not add any new fields to the Rowset. Any call to AddFields after a successful call to AddRows will fail.
Once you finish populating your virtual database in the CDO Rowset object, you can pass this object as an active data source to the Active Data Driver using the SetPrivateData method in the Crystal Report Engine Automation Server. For complete instructions on doing this, see Pass the Recordset to the Active Data Driver, Page 122.
Crystal Data Object Model
Crystal Data Objects support several methods and properties that can be used to work with the Rowset object. The object model for CDO is completely defined and described in the section Crystal Data Objects, Volume 3, Chapter 3.
Crystal Data Source Type Library
The Crystal Data Source Type Library, like Crystal Data Objects, provides a means for designing customized data sources that can be reported off of using the Active Data Driver. Crystal Data Source, however, unlike CDO, is a type library with an interface that can be implemented in a standard Visual Basic class. Once implemented, the Crystal Data Source interface allows your data to be fully manipulated much like a standard Recordset object in ADO or DAO.
NOTE: The Crystal Data Source type library is designed for Visual Basic 5.0 or later.
If you simply need a quick means for packaging some data in a form that can easily be reported off of, you should consider using Crystal Data Objects. Crystal Data Source, on the other hand, is designed for developers who need more flexibility when working with custom data sources. Keep in mind, though, once you add the Crystal Data Source interface to your class, you must implement all methods and properties exposed by the interface.
Visual Basic Solutions 131
The following topics are discussed in this section.
Creating a new project and class, Page 132
Adding the type library, Page 134
Implementing the functions, Page 135
Passing the CRDataSource object to the Active Data Driver, Page 137
Crystal Data Source Projects, Page 139
Creating a new project and class
The Crystal Data Source interface can be implemented inside almost any type of application. You might want to create and internal data source, for instance, inside the same standard executable application that you are implementing the Crystal Designer Component or the Automation Server. On the other hand, you could create an ActiveX DLL that did nothing except implement Crystal Data Source. Your ActiveX DLL then could work as a separate data source to be accessed from other applications, much like ADO, RDO, and DAO are used.
The following topics are discussed in this section.
When to use the Crystal Data Source Type Library, Page 132
Creating a new project, Page 132
Adding a class module to a project, Page 133
Adding a Sub Main() procedure, Page 133
When to use the Crystal Data Source Type Library
The Crystal Data Source interface, as stated before, is designed to allow developers to create full-fledged data sources that work much like the ADO Recordset object. In fact, the interface has been designed to support properties and methods with names identical to several corresponding properties and methods in the ADO Recordset object. Through your existing knowledge of ADO, you can quickly familiarize yourself with the Crystal Data Source interface.
If you are designing an application or component that must produce a fully featured data source with methods and properties for easily navigating through records and fields, Crystal Data Source is the ideal solution. Not only is the interface easy to learn and use, it also follows a Recordset standard currently being developed by Microsoft.
Creating a new projectFor this tutorial, you will implement the Crystal Data Source interface in an ActiveX DLL that can be referenced by other applications. One such application may be a standard executable that uses the Active Data Driver with the Crystal Designer Component or the Crystal Report Engine to produce reports based on this new ActiveX data source.
Visual Basic Solutions 132

1 With Visual Basic running, select New Project from the File menu. The New Project dialog box appears.
2 Select ActiveX DLL from the New Project dialog box, and click OK. Your new ActiveX DLL project is created.
3 Select Class1 in the Project window, and make sure the Properties window is displayed. To display the Properties window, press the F4 key or select Properties Window from the View menu.
NOTE: If you are not creating an ActiveX DLL, you may not have a class module in your project. See the next section, Adding a class module to a project.
4 Change the value of the (Name) property for Class1 to MyDataSource.
5 Select Project1 in the Project window, and change the value of the (Name) property for Project1 to MyDataSourcePrj.
6 Save the project. Use MyDataSource as the name of the class file and the project file.
Adding a class module to a project
Since you are creating an ActiveX DLL, your project already contains a class module that we can use to implement the Crystal Data Source interface. However, if you are creating a project that does not automatically include a class module, such as a Standard EXE project, you will need to use the following steps.
1. From the Project menu, select the Add Class Module command. The Add Class Module dialog box appears.
2. Make sure Class Module is selected, and click Open. The new class module is added to your project, and the code window for the module appears.
Adding a Sub Main() procedure
Although a Sub Main() procedure is not required by ActiveX DLLs created in Visual Basic 5.0 or later, you may want to create a Sub Main() procedure to handle initialization processes. Developers working in Visual Basic 4.0 are required to add the Main subroutine to an Automation Server DLL project and specify that the project use Sub Main() as the entry point. If you are creating an ActiveX EXE in Visual Basic 4.0 or later, you should add the Sub Main() procedure to allow your code to determine if it is being started as a stand-alone application or as an out-of-process automation server.
The following steps demonstrate how to add a Sub Main() procedure in Visual Basic versions 5.0 and 6.0. If you add this procedure to the MyDataSource project, you can leave the procedure empty.
1. From the Project menu in Visual Basic, select the Add Module command. The New Module dialog box appears.
2. Leave the default Module type selected, and click Open. A new module, Module1, is added to your project.
3. In the code window for the new module, add the following code:
Sub Main()End Sub
Visual Basic Solutions 133
Adding the type library
The Crystal Data Source interface is a standard COM (Component Object Model) interface that is defined in a type library (.TLB) file. To implement the Crystal Data Source interface in your Visual Basic application, you must first add a reference to the type library, implement the interface in your class module with the Implements statement, and, finally, create code for each of the properties and methods defined by the interface.
The following topics are discussed in this section.Adding a reference to the Crystal Data Source Type Library, Page 134
Viewing in the Object Browser, Page 134
Using Implements in the class declaration, Page 135
Adding a reference to the Crystal Data Source Type LibraryIf this is the first time you are using the Crystal Data Source type library, you may need to tell Visual Basic where the type library is located before you can add a reference.
1 From the Project menu, select the References command. The References dialog box appears.
2 Scroll through the Available References list to locate the CRDataSource 1.0 Type Library. If you find the reference, skip to step 6. Otherwise, continue with the next step.
3 In the References dialog box, click the Browse button to locate the type library file. The Add Reference dialog box appears.
4 Locate the CRSOURCE.TLB type library file in the same directory that you installed Seagate Crystal Reports. If you accepted the default directory when you installed the product, this directory will be C:\Program Files\Seagate Software\Crystal Reports.
5 Select CRSOURCE.TLB, and click Open. CRDataSource 1.0 Type Library will now appear in the Available References list in the References dialog box.
6 Place a check mark in the check box next to CRDataSource 1.0 Type Library if one does not appear already.
7 Click OK to add the reference to your project.
Viewing in the Object BrowserBefore continuing with the design of your ActiveX DLL project, it may be helpful to look at the object model provided by the Crystal Data Source interface.
1 From the View menu, select the Object Browser command. The Object Browser appears.
2 Switch the Object Browser to display just the CRDataSourceLib object library.
Notice that the Crystal Data Source interface contains a single object: CRDataSource. This object is similar to the Recordset object you would see if you added a reference to the Microsoft ActiveX Data Objects Recordset 2.0 Library to your project. This is also the object you would pass to the Active Data Driver (Page 306) when producing a report at runtime.
Take a moment to review the properties and methods provided by the CRDataSource object. Close the Object Browser when finished.
Visual Basic Solutions 134

Using Implements in the class declaration
The next step is to add the Crystal Data Source interface to your class module.
1 With the code window for the MyDataSource class module open, add the following code to the General Declarations section of the class.
Implements CRDataSourceLib.CRDataSource
2 Open the drop-down list of objects in the upper left of the code window. You will see a new object has been added to the list: CRDataSource.
3 Select CRDataSource from the list of objects. A new Property Get procedure is added to the class module for the FieldCount property of the CRDataSource object. Remember that in COM interfaces, properties are actually implemented as Get and Let procedures. For more information, refer to your Visual Basic documentation.
4 Open the drop-down list in the upper right of the class module code window. Notice that several procedures appear corresponding to the properties and methods of the Crystal Data Source interface. In fact, the properties and methods you saw in the Object Browser are the same properties and methods listed here in the code window.
Implementing the functions
Once you have added the Crystal Data Source interface to your class module, you must implement all of the properties and methods in the interface to successfully produce a data source that can be compiled into an ActiveX DLL and used with the Active Data Driver. The first step to implementing all of the properties and methods is to add procedures to your class for each of the Crystal Data Source procedures.
The following topics are discussed in this section.
Adding procedures, Page 135
Implementing procedures, Page 136
Compiling the ActiveX DLL, Page 137
Adding procedures
When you selected the CRDataSource object in the object list in the previous section, you automatically added a procedure to the class for the FieldCount property. This property procedure appears in bold in the list of CRDataSource methods and properties to indicate that it has already been added.
1 With the CRDataSource object selected in the code window, select Bookmark [Property Get] from the drop-down list in the upper right corner of the code window. A Property Get procedure appears in the class for the Bookmark property of CRDataSource.
2 Repeat the process for the Property Let procedure of the Bookmark property. Keep in mind that Property Get procedures allow values to be retrieved from properties while Property Let procedures allow values to be assigned to properties.
Visual Basic Solutions 135
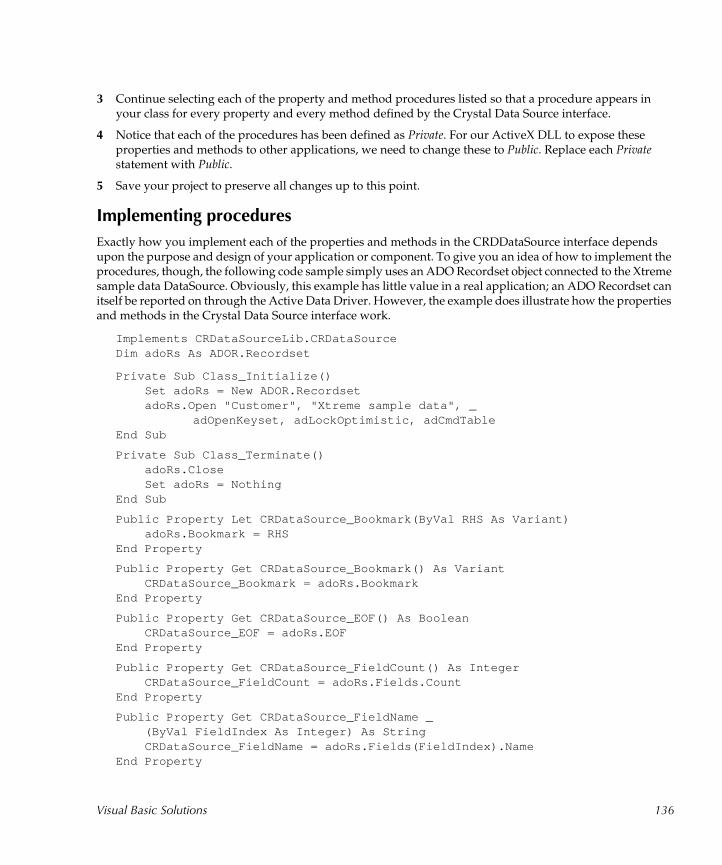
3 Continue selecting each of the property and method procedures listed so that a procedure appears in your class for every property and every method defined by the Crystal Data Source interface.
4 Notice that each of the procedures has been defined as Private. For our ActiveX DLL to expose these properties and methods to other applications, we need to change these to Public. Replace each Private statement with Public.
5 Save your project to preserve all changes up to this point.
Implementing procedures
Exactly how you implement each of the properties and methods in the CRDDataSource interface depends upon the purpose and design of your application or component. To give you an idea of how to implement the procedures, though, the following code sample simply uses an ADO Recordset object connected to the Xtreme sample data DataSource. Obviously, this example has little value in a real application; an ADO Recordset can itself be reported on through the Active Data Driver. However, the example does illustrate how the properties and methods in the Crystal Data Source interface work.
Implements CRDataSourceLib.CRDataSourceDim adoRs As ADOR.Recordset
Private Sub Class_Initialize()Set adoRs = New ADOR.RecordsetadoRs.Open "Customer", "Xtreme sample data", _
adOpenKeyset, adLockOptimistic, adCmdTableEnd Sub
Private Sub Class_Terminate()adoRs.CloseSet adoRs = Nothing
End Sub
Public Property Let CRDataSource_Bookmark(ByVal RHS As Variant)adoRs.Bookmark = RHS
End Property
Public Property Get CRDataSource_Bookmark() As VariantCRDataSource_Bookmark = adoRs.Bookmark
End Property
Public Property Get CRDataSource_EOF() As BooleanCRDataSource_EOF = adoRs.EOF
End Property
Public Property Get CRDataSource_FieldCount() As IntegerCRDataSource_FieldCount = adoRs.Fields.Count
End Property
Public Property Get CRDataSource_FieldName _(ByVal FieldIndex As Integer) As StringCRDataSource_FieldName = adoRs.Fields(FieldIndex).Name
End Property
Visual Basic Solutions 136
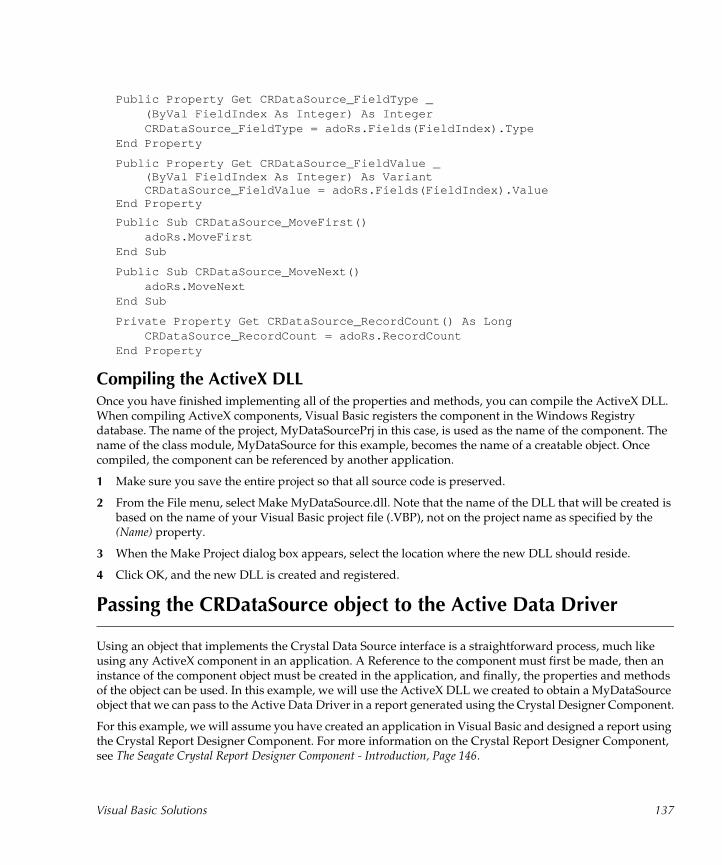
Public Property Get CRDataSource_FieldType _(ByVal FieldIndex As Integer) As IntegerCRDataSource_FieldType = adoRs.Fields(FieldIndex).Type
End Property
Public Property Get CRDataSource_FieldValue _(ByVal FieldIndex As Integer) As VariantCRDataSource_FieldValue = adoRs.Fields(FieldIndex).Value
End Property
Public Sub CRDataSource_MoveFirst()adoRs.MoveFirst
End Sub
Public Sub CRDataSource_MoveNext()adoRs.MoveNext
End Sub
Private Property Get CRDataSource_RecordCount() As LongCRDataSource_RecordCount = adoRs.RecordCount
End Property
Compiling the ActiveX DLLOnce you have finished implementing all of the properties and methods, you can compile the ActiveX DLL. When compiling ActiveX components, Visual Basic registers the component in the Windows Registry database. The name of the project, MyDataSourcePrj in this case, is used as the name of the component. The name of the class module, MyDataSource for this example, becomes the name of a creatable object. Once compiled, the component can be referenced by another application.
1 Make sure you save the entire project so that all source code is preserved.
2 From the File menu, select Make MyDataSource.dll. Note that the name of the DLL that will be created is based on the name of your Visual Basic project file (.VBP), not on the project name as specified by the (Name) property.
3 When the Make Project dialog box appears, select the location where the new DLL should reside.
4 Click OK, and the new DLL is created and registered.
Passing the CRDataSource object to the Active Data Driver
Using an object that implements the Crystal Data Source interface is a straightforward process, much like using any ActiveX component in an application. A Reference to the component must first be made, then an instance of the component object must be created in the application, and finally, the properties and methods of the object can be used. In this example, we will use the ActiveX DLL we created to obtain a MyDataSource object that we can pass to the Active Data Driver in a report generated using the Crystal Designer Component.
For this example, we will assume you have created an application in Visual Basic and designed a report using the Crystal Report Designer Component. For more information on the Crystal Report Designer Component, see The Seagate Crystal Report Designer Component - Introduction, Page 146.
Visual Basic Solutions 137
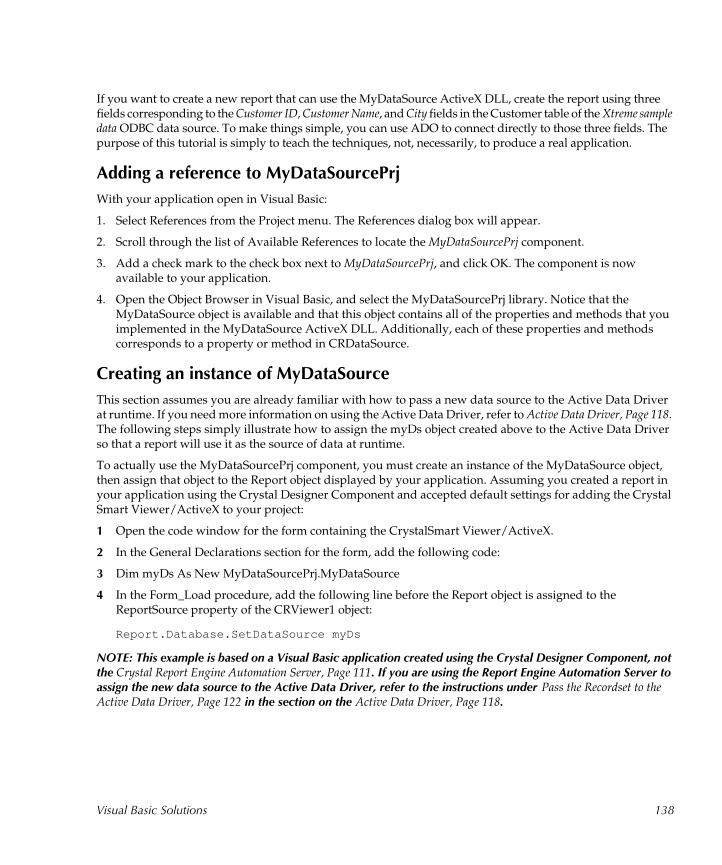
If you want to create a new report that can use the MyDataSource ActiveX DLL, create the report using three fields corresponding to the Customer ID, Customer Name, and City fields in the Customer table of the Xtreme sample data ODBC data source. To make things simple, you can use ADO to connect directly to those three fields. The purpose of this tutorial is simply to teach the techniques, not, necessarily, to produce a real application.
Adding a reference to MyDataSourcePrj
With your application open in Visual Basic:
1. Select References from the Project menu. The References dialog box will appear.
2. Scroll through the list of Available References to locate the MyDataSourcePrj component.
3. Add a check mark to the check box next to MyDataSourcePrj, and click OK. The component is now available to your application.
4. Open the Object Browser in Visual Basic, and select the MyDataSourcePrj library. Notice that the MyDataSource object is available and that this object contains all of the properties and methods that you implemented in the MyDataSource ActiveX DLL. Additionally, each of these properties and methods corresponds to a property or method in CRDataSource.
Creating an instance of MyDataSource
This section assumes you are already familiar with how to pass a new data source to the Active Data Driver at runtime. If you need more information on using the Active Data Driver, refer to Active Data Driver, Page 118. The following steps simply illustrate how to assign the myDs object created above to the Active Data Driver so that a report will use it as the source of data at runtime.
To actually use the MyDataSourcePrj component, you must create an instance of the MyDataSource object, then assign that object to the Report object displayed by your application. Assuming you created a report in your application using the Crystal Designer Component and accepted default settings for adding the Crystal Smart Viewer/ActiveX to your project:
1 Open the code window for the form containing the CrystalSmart Viewer/ActiveX.
2 In the General Declarations section for the form, add the following code:
3 Dim myDs As New MyDataSourcePrj.MyDataSource
4 In the Form_Load procedure, add the following line before the Report object is assigned to the ReportSource property of the CRViewer1 object:
Report.Database.SetDataSource myDs
NOTE: This example is based on a Visual Basic application created using the Crystal Designer Component, not the Crystal Report Engine Automation Server, Page 111. If you are using the Report Engine Automation Server to assign the new data source to the Active Data Driver, refer to the instructions under Pass the Recordset to the Active Data Driver, Page 122 in the section on the Active Data Driver, Page 118.
Visual Basic Solutions 138

The first line of code creates an instance of the MyDataSource object in your application, much like you might create an instance of an ADO Recordset object. The second line of code added uses the SetDataSource method inside the Crystal Designer Component library to dynamically change the source of data used by your report.
If you designed your report using an ADO, DAO, or RDO data source, or by using a Data Definition file, then your report uses the Active Data Driver to access the report data at runtime. Since the Active Data Driver also supports data sources that expose the Crystal Data Source interface, you can easily assign the MyDataSource object to your report.
Crystal Data Source Projects
Now that you have seen the extensive power of the Crystal Data Source interface implemented inside a Visual Basic class, you can begin to consider the extensive possibilities for its use. Many computer based operations produce continuous streams of data in real-time. In your own work, you may encounter needs for gathering data from process control systems, data acquisition applications, or computer-based instrumentation.
In these kinds of applications, data is usually gathered and stored for later analysis. Systems running in real-time, however, may need real-time monitoring and reporting. With objects that implement the Crystal Data Source interface, you can gather and move through data as it is generated, then produce up to the instant analysis through reports.
Programmer’s building n-tier applications that operate across a network may often find themselves designing business objects and other business rules components. By implementing the Crystal Data Source interface in business object components, you can design reports that produce real-time information about data traveling across the network. Even Microsoft Transaction Server components can implement a fully functional ActiveX data source for reporting. Crystal Data Source takes your applications from runtime to real time.
Grid Controls and the Crystal Report Engine
In Seagate Crystal Reports, a Crystal ActiveX Control can be bound directly to a Visual Basic Data Control. Using the Visual Basic Data Control with the Crystal ActiveX Control offers the following benefits:
● Generating reports in Visual Basic programs is made even easier and does not require an existing .RPT file.
● A powerful feature of Visual Basic is ad-hoc queries that are run by executing SQL statements in the RecordSource property of the Data Control. By directly binding a Crystal Custom Control to a Data Control, users can now create reports of dynaset data which are the results of such ad-hoc queries.
This topic is only supported by the Professional Edition of Seagate Crystal Reports.
Visual Basic Solutions 139
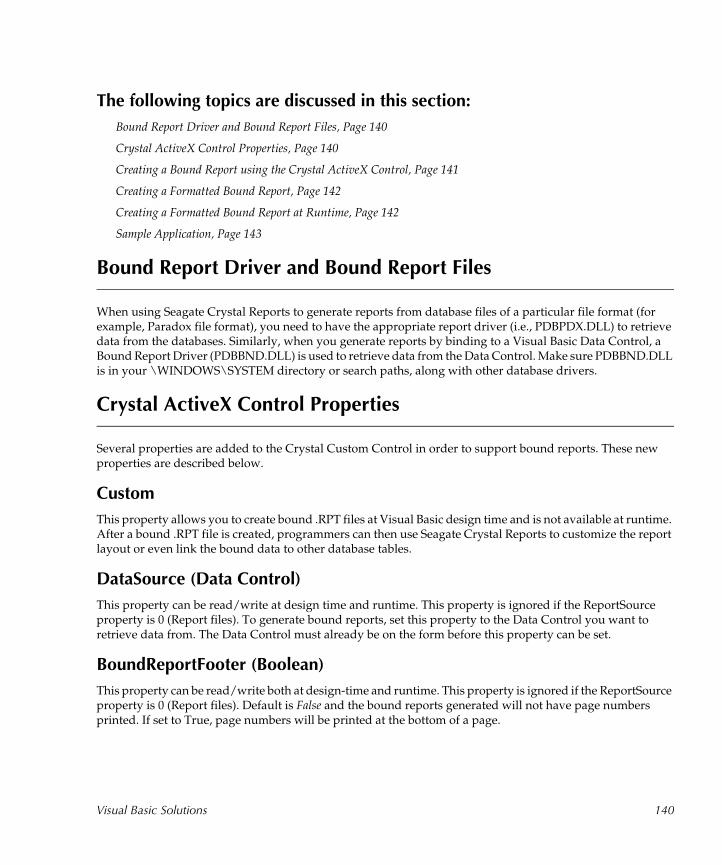
The following topics are discussed in this section:
Bound Report Driver and Bound Report Files, Page 140
Crystal ActiveX Control Properties, Page 140
Creating a Bound Report using the Crystal ActiveX Control, Page 141
Creating a Formatted Bound Report, Page 142
Creating a Formatted Bound Report at Runtime, Page 142
Sample Application, Page 143
Bound Report Driver and Bound Report Files
When using Seagate Crystal Reports to generate reports from database files of a particular file format (for example, Paradox file format), you need to have the appropriate report driver (i.e., PDBPDX.DLL) to retrieve data from the databases. Similarly, when you generate reports by binding to a Visual Basic Data Control, a Bound Report Driver (PDBBND.DLL) is used to retrieve data from the Data Control. Make sure PDBBND.DLL is in your \WINDOWS\SYSTEM directory or search paths, along with other database drivers.
Crystal ActiveX Control Properties
Several properties are added to the Crystal Custom Control in order to support bound reports. These new properties are described below.
Custom
This property allows you to create bound .RPT files at Visual Basic design time and is not available at runtime. After a bound .RPT file is created, programmers can then use Seagate Crystal Reports to customize the report layout or even link the bound data to other database tables.
DataSource (Data Control)
This property can be read/write at design time and runtime. This property is ignored if the ReportSource property is 0 (Report files). To generate bound reports, set this property to the Data Control you want to retrieve data from. The Data Control must already be on the form before this property can be set.
BoundReportFooter (Boolean)
This property can be read/write both at design-time and runtime. This property is ignored if the ReportSource property is 0 (Report files). Default is False and the bound reports generated will not have page numbers printed. If set to True, page numbers will be printed at the bottom of a page.
Visual Basic Solutions 140

BoundReportHeading (string expression)
This property can be read/write both at design time and runtime. This property is ignored if the ReportSource property is 0 (Report files). It specifies the report title at the beginning of a bound report. If it is blank, no report title will be printed.
ReportSource (numeric expression)
This property can be read/write both at design time and runtime. The allowed values are:
0 - Report files
1 - Bound TrueDBGrid Control
3 - All Data Control Fields
The default value is 0 - Report files, and the ReportFileName property must be assigned to an existing report path name (.RPT). This is equivalent to when the new bound report features were not available and all reports were generated from existing .RPT files.
When set to 1 or 3, the ReportFileName property will be ignored and no .RPT file is needed. Reports will be created using data retrieved from Data Control. The reports generated directly from the Data Control are identical to the reports generated from the respective bound .RPT files created using the (Custom) property described above.
Creating a Bound Report using the Crystal ActiveX Control
1 Add the following controls to your Visual Basic form:
2 On the Data Control:
3 Set the DatabaseName property to the name of the database being reported on.
4 Set the RecordSource property (this can be a database table or a SQL query statement).
5 On the Crystal ActiveX Control:
6 Set the DataSource property to the Data Control (for example, Data1).
7 Set the ReportSource to 3 - All Data Control Fields.
8 On the Command Button, add the following code for the Click event:
Private Sub Command1_Click()CrystalReport1.Action = 1
End Sub
Run the application, click the command button, and the Crystal ActiveX Control will retrieve data from the Data Control and create the report. The report will appear as a simple columnar report. There are no runtime properties to control any report formatting. However, this can be accomplished at design-time by editing the report designed by the ActiveX control (a report template) in Seagate Crystal Reports.
Visual Basic Solutions 141
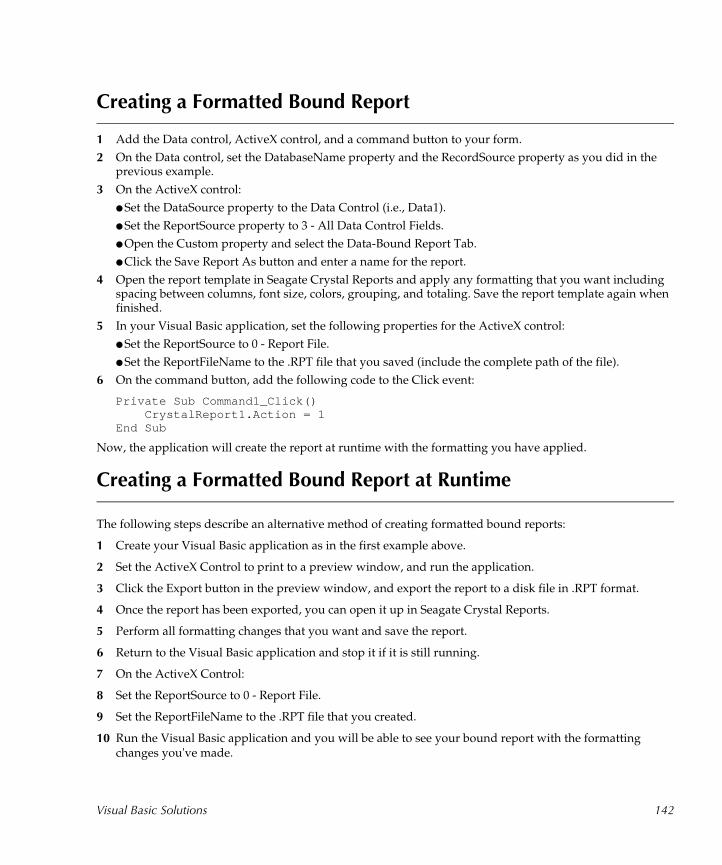
Creating a Formatted Bound Report
1 Add the Data control, ActiveX control, and a command button to your form.2 On the Data control, set the DatabaseName property and the RecordSource property as you did in the
previous example.
3 On the ActiveX control:● Set the DataSource property to the Data Control (i.e., Data1).● Set the ReportSource property to 3 - All Data Control Fields.● Open the Custom property and select the Data-Bound Report Tab.● Click the Save Report As button and enter a name for the report.
4 Open the report template in Seagate Crystal Reports and apply any formatting that you want including spacing between columns, font size, colors, grouping, and totaling. Save the report template again when finished.
5 In your Visual Basic application, set the following properties for the ActiveX control:● Set the ReportSource to 0 - Report File.● Set the ReportFileName to the .RPT file that you saved (include the complete path of the file).
6 On the command button, add the following code to the Click event:
Private Sub Command1_Click()CrystalReport1.Action = 1
End Sub
Now, the application will create the report at runtime with the formatting you have applied.
Creating a Formatted Bound Report at Runtime
The following steps describe an alternative method of creating formatted bound reports:
1 Create your Visual Basic application as in the first example above.
2 Set the ActiveX Control to print to a preview window, and run the application.
3 Click the Export button in the preview window, and export the report to a disk file in .RPT format.
4 Once the report has been exported, you can open it up in Seagate Crystal Reports.
5 Perform all formatting changes that you want and save the report.
6 Return to the Visual Basic application and stop it if it is still running.
7 On the ActiveX Control:
8 Set the ReportSource to 0 - Report File.
9 Set the ReportFileName to the .RPT file that you created.
10 Run the Visual Basic application and you will be able to see your bound report with the formatting changes you've made.
Visual Basic Solutions 142

NOTE: When creating formatted reports for use with the bound data control in Visual Basic, you will not be able to refresh the data from within Seagate Crystal Reports since the data does not exist outside of the Visual Basic application.
NOTE: If you plan on using a formatted bound report, you will not be able to modify anything in the SELECT statement of the data control. The report needs all these fields and will fail if they are not all there. The formatted report can not report on any new fields.
When passing properties at runtime using bound reports (i.e., SortFields), the syntax is slightly different. For example, the following syntax would be used for the Formulas and SortFields properties in a normal report:
CrystalReport1.Formulas(0) = “COMMISSION= {TableName.FIELDNAME}”
CrystalReport1.SortFields(0) = “+{TableName.FIELDNAME}”
However, for a bound report, the following syntax would be used:
CrystalReport1.Formulas(0) = “COMMISSION= {Bound Control.FIELDNAME}”
CrystalReport1.SortFields(0) = “+{Bound Control.FIELDNAME}”
Sample Application
Seagate Crystal Reports includes a complete sample application written in Visual Basic 5.0 using the Crystal Report Engine Automation Server and the Microsoft Data Bound Grid control. The Xtreme Mountain Bike Inventory Application is a complete real-world application that provides various reports to employees at a fictitious company. The Microsoft Data Bound Grid control is used for an order-entry page that dynamic reports are produced from. The application is installed, by default, in the \Program Files\Seagate Software \Crystal Reports\sample\Xtreme\Invntory directory.
Visual Basic Solutions 143
Volume 1
6 The Report Designer Component
What you will find in this chapter...
The Seagate Crystal Report Designer Component - Introduction, Page 146
The Seagate Crystal Report Designer Component - Features, Page 146
The Report Designer Component vs. Seagate Crystal Reports, Page 147
...including comments regarding data access, copying between components, conditional formatting, application distribution, preview windows, pictures, guidelines, subreports, and the dual formula environment.
Installing the Report Designer Component, Page 151
...including system requirements and installation.
Using the Seagate Crystal Report Designer Component, Page 151
...including comments regarding adding the component to a project, selecting data, the Report Expert, adding Smart Viewer, running the application, and sample code.
Working with data, Page 158
...including comments regarding ADO, OLEDB, RDO, DAO, and connecting to those data sources; Data Environments, Data Definition Files; Report Templates; and ODBC, SQL, and PC data sources.
Report Designer Overview, Page 169
...including an introduction and comments regarding the Report Designer Component architecture at design time and runtime, and also the dual interface.
Report Designer Object Model Programming, Page 173
...a tutorial on the object model from the programming point of view.
Report Distribution Considerations, Page 190
...including comments regarding distributing and saving reports and data.
The Report Designer Component 145
The Seagate Crystal Report Designer Component - Introduction
The Seagate Crystal Report Designer Component is an ActiveX designer that simplifies the process of adding powerful reporting features to applications designed with Visual Basic version 5.0 or later. With the Report Designer Component, you get all of the power of Seagate Crystal Reports right inside your Visual Basic projects. You create sophisticated reports without leaving the Visual Basic IDE.
While simply adding reports to Visual Basic applications has never been easier, the Report Designer Component also provides a complete object model. By working with the component objects, methods, properties, and events, you can design custom interfaces that provide users with the ability to control report data at runtime. The Report Designer Component gives you a simple design time interface with powerful runtime capabilities.
ActiveX designers
ActiveX designers provide a design environment inside of the Visual Basic Integrated Development Environment (IDE) for visual development of an application feature. An example is the Microsoft UserConnection designer that comes with Visual Basic. The UserConnection designer allows you to visually design ODBC database connections accessible from within your Visual Basic application. For more information on the UserConnection designer, refer to your Visual Basic documentation.
The Seagate Crystal Report Designer Component lets you visually add reporting functionality to your applications. The Report Designer window and the Create Report Expert provide the tools to visually design a report and implement it within your project at design time. The Report Designer object model provides a complete set of objects, properties, and methods to write code that manipulates your report and its data at runtime.
The Seagate Crystal Report Designer Component - Features
The Report Designer Component makes it easy to create reports when using Visual Basic. There’s no need to open a different environment. You simply add the Report Designer Component to your project and use it to create reports from within the Visual Basic IDE.
The Report Designer Component is not a subset of a larger reporting tool. Nor is it a limited-function tool created to offer only minimal reporting capabilities. It is, instead, an ActiveX designer that holds virtually all of the power of the world’s most popular Windows report designer, Seagate Crystal Reports. And since it has been designed to work seamlessly within Visual Basic, while leveraging Visual Basic capabilities, reporting is easier to learn and easier to perform than ever before.
The Report Designer Component 146
With the Report Designer Component, you build a report much like the way you build a form in Visual Basic:
● call up the designer,
● add objects,
● set properties,
● code events and methods, and
● move on to the next part of your application, all without leaving Visual Basic.
The Report Designer Component vs. Seagate Crystal Reports
If you have used Seagate Crystal Reports, you will notice several similarities between the Report Designer Component’s design window and the Seagate Crystal Reports Design Tab. However, there are some major differences to building reports inside Visual Basic with the Report Designer Component.
● Each section of the report is itself an object which has a Format event associated with it. When you double-click on any of the sections of the report, the Visual Basic code window opens displaying an event procedure for the Format event of that section. The Format event is invoked at runtime whenever the section is displayed and formatted.
● Because the Report Designer Component produces Visual Basic executable code, you can use Visual Basic for creating calculated fields and formulas in addition to using the built-in formula language.
● Your reports typically become an embedded part of the executable. This has implications for individuals who might want to later modify reports using standalone versions of Seagate Crystal Reports.
Despite these facts, you will find that you can quickly leverage your existing Seagate Crystal Reports knowledge to develop reports. While working with the Seagate Crystal Report Designer Component, though, keep in mind all of the following features.
The following topics are discussed in this section:Data Access, Page 148
No drag and drop between reports – use copy and paste, Page 148
Conditional Formatting, Page 148
Preview Window, Page 149
Pictures, Page 149
Guidelines, Page 149
Subreports, Page 149
The dual formula environment, Page 150
Application Distribution, Page 151
The Report Designer Component 147
Data Access
The Report Designer Component supports data access through Data Access Objects (DAO), Remote Data Objects (RDO), and ActiveX Data Objects (ADO). Through these three access methods, you can connect to most ISAM, ODBC, and SQL data sources available to Windows applications. In addition, you can create DAO Recordsets, RDO Resultsets, or ADO Recordsets in Visual Basic, then replace the data source used by a report at runtime by calling the SetDataSource method of the report Designer object model’s Report object.
The Report Designer Component also provides the ability to design reports based on Data Definition files, text files that define the fields and field types of a database without actually serving as a source of data. Using Data Definition files, you can design a report without depending on the existence of a database at design time, then dynamically create the data at runtime and assign it to the Report object of the Report Designer Component.
If you have installed the full Seagate Crystal Reports product, you also have the ability to use the Report Designer Component to connect to any data source that Seagate Crystal Reports can connect to. In such a case, the Report Designer Component implements the Seagate Crystal Reports user interface that you are already familiar with, so you can quickly connect to any existing data.
Finally, the Report Designer Component also supports Data Environments in Visual Studio 6.0. If your project includes a data environment, the Report Designer Component will allow you to select the data environment as a data source at design time. Runtime reports make full use of the data exposed by a data environment by working with the standard connection, command, or recordset objects provided, much like working directly with an ADO object.
For complete information on data access, refer to Working with data, Page 158.
No drag and drop between reports � use copy and paste
When you have multiple Report Designer Components open within the Visual Basic IDE, you cannot drag and drop objects, such as fields, text objects, subreports, lines and boxes, and formulas between reports. To move or copy objects between reports, use the standard Windows Cut, Copy, and Paste commands.
Conditional Formatting
Conditional formatting is created using formulas. With the Report Designer Component, you can produce conditional formatting results using all of the power of the Visual Basic language. If you have used Seagate Crystal Reports before, you may already be familiar with conditional formatting and the Seagate Crystal Reports formula language. The formula language is still available within the Report Designer Component, but you also have the option of making full use of the entire Visual Basic programming language. For more information on using Visual Basic to produce conditional formatting, refer to Designing Reports in the Visual Basic Integrated Development Environment.
The Report Designer Component 148
Preview Window
Unlike Seagate Crystal Reports, the Report Designer Component does not have a Preview window or tab. Although you can use the methods of the Report object in the Report Designer object model to print or export a report, you must use the Seagate Crystal Smart Viewer for ActiveX to display reports on screen. The Smart Viewer is a standard ActiveX control that can be placed inside any development environment that supports ActiveX controls.
By passing in a Report object created using the Report Designer Component or its object model, you can easily display a report at runtime inside the Smart Viewer. The Smart Viewer window provides several controls and features that allow users to easily navigate and work with your reports. Additionally, the Smart Viewer, as an ActiveX control, can be programmed to create custom features and functionality specific to your application.
For complete information on using the Seagate Crystal Smart Viewer ActiveX control in a Visual Basic application, see Smart Viewer Object Model Programming.
Pictures
Images can now be dynamically displayed in a report at runtime using OLE objects. You may need to display images of products, corporate logos, employee pictures, or any other type of image in your report, but you may want to control which images are displayed based on variables that exist in your application only at runtime.
By adding OLE objects to your report, then changing the image at runtime using the FormattedImage property of the OLE object in the Report Designer object model, you can produce exciting, visually attractive reports for your users. For complete information working with OLE images, see Changing OLE object images.
Guidelines
Guidelines are not implemented in the Report Designer Component’s design window as they are in the Seagate Crystal Reports Design Tab. However, new alignment and sizing options have been added to eliminate much of the need for guidelines.
Subreports
Subreports are supported by the Report Designer Component, but they must be designed from within the main report. In Seagate Crystal Reports, you are able to create subreports from within the main report. You are also able to import existing report files as subreports. With the Report Designer Component, however, you are better off to create your subreports within the main report if you include Visual Basic code in your subreport.
● If you create a report in the Report Designer Component and use Visual Basic code in the report, any report calculations or formatting that you performed using that code are dependent on that code being in place. If you save such a report to a Crystal Report file (.rpt), you will lose all the embedded Visual
The Report Designer Component 149
Basic code; the .rpt file format does not support it. (For more information, see Report Distribution Considerations.) If you later insert that report as a subreport using the Report Designer Component, the subreport will not perform as expected.
● If you create a subreport from within a main report in the Report Designer Component, all of the Visual Basic code used in the subreport will be stored as part of the executable. Thus, when you run the report, the subreport will perform as it should.
If you want to insert an existing report as a subreport in the Report Designer Component, make certain that you have used the Seagate Crystal Reports formula language for any calculations or conditional formatting in that report.
The dual formula environment
The Report Designer Component supports all of the same formula design capabilities that exist in Seagate Crystal Reports, including the complete Seagate Crystal Reports formula language. However, the Seagate Crystal Report Designer Component, as an ActiveX designer for use inside Visual Basic, also supports the Visual Basic language. By exposing much of its functionality through the Report Designer object model, the Report Designer Component allows you to create powerful functions and procedures that control not only the look of a report, but also the results displayed in a report. With this capability, you are able to leverage your experience with Visual Basic to do more sophisticated reporting. You’ll have:
● access to the robust functionality of Visual Basic,
● a familiar programming environment, and
● no need to learn an additional scripting language.
While you will still be able to use the Seagate Crystal Reports formula language, you won’t need to use it for your calculations and conversions.
On a high level, the way you create calculated fields in the Report Designer using Visual Basic is to:
● create a text object,
● enter the text object where you want the calculated value to appear,
● create a variable to capture the result of the Visual Basic calculation, and
● code the calculation.
Finally, you have the text object display the value in the variable via the SetText method.
You can also use Visual Basic code when implementing the Format event procedure of a section in the report. You can open a Format event procedure for a section by double-clicking the section in the Report Designer window or selecting the section and clicking the View Code button in the Visual Basic Project window.
The Report Designer Component 150
Application Distribution
Although the Seagate Crystal Report Designer Component is similar to Seagate Crystal Reports, it is made up of a separate group of files. If you will be distributing your application, you need to familiarize yourself with the new runtime distribution library. Before releasing your Visual Basic applications, review the list of files in the Runtime File Requirements in online Help.
Installing the Report Designer Component The Report Designer Component can be installed as part of the standard Seagate Crystal Reports installation process. The following sections describe installation steps specific to the Report Designer Component.
System Requirements
The Seagate Crystal Report Designer Component has the following system requirements:
Microsoft Windows 95, Windows 98, or Windows NT 4 (Server or Workstation)
Visual Basic versions 5.0 and 6.0 (Professional or Enterprise Edition)
Netscape Navigator or Microsoft Internet Explorer (Version 3.0 or higher)
x86 processor or higher
32 MB RAM (minimum)
22 MB hard drive space (minimum for a full installation)
CD-ROM drive
Installation
NOTE: The Seagate Crystal Report Designer Component is available with Microsoft Visual Basic 6.0 or as a download from the Seagate Software web site (www.seagatesoftware.com).
Using the Seagate Crystal Report Designer Component This section is intended as a complete tutorial that introduces you to using the Report Designer Component in Visual Basic. First, you will add the Report Designer to a Visual Basic project. The tutorial then takes you through the steps of selecting data, designing a report through the Create Report Expert, and adding the Smart Viewer component to a Visual Basic form. Finally, you will run your application and display the report in the Smart Viewer.
Following the tutorial, you will examine the objects and the code that were added to your Visual Basic project. By understanding how a Report Designer project is created, you can leverage your knowledge of Visual Basic to customize and control how reports are displayed in your application.
NOTE: The instructions given here can be used in either version 5 or 6 of Visual Basic, except where specifically noted.
The Report Designer Component 151

The following topics are discussed in this section:
The tutorial that follows in Part One will take you through the basic steps of adding the Report Designer Component to a Visual Basic project, connecting to a database through ActiveX Data Objects, designing a report in the Create Report Expert, adding the Smart Viewer control to a form, and viewing the report at runtime. Most of this work is handled through visual interfaces and Experts designed to simplify the process. However, when you create your own applications, you will quickly find the need to work directly with the controls and objects that have been added to your project, discussed in Part Two.
Part OneAdding the Report Designer Component to a Project, Page 152
Selecting Data, Page 153
The Report Expert, Page 154
Adding the Smart Viewer, Page 155
Running the Application, Page 155
Part TwoCrystalReport1 - The Report Designer Component, Page 156
CRViewer1 - The Smart Viewer Control, Page 156
The Code, Page 157
Report Packages, Page 158
Adding the Report Designer Component to a Project
The Report Designer Component is an ActiveX Designer, and a reference to the component must be added to your project. Once a reference is made from Visual Basic, the Report Designer Component can be added directly to your project.
1 With Visual Basic running, select New Project from the File menu. The New Project dialog box appears.
2 Select the Standard EXE icon and click OK. Visual Basic creates a new project for you with a single form.
3 From the Project menu, select the Components command. The Components dialog box is displayed.
4 Click the Designers Tab in the Components dialog box to see a list of all available ActiveX Designers.
5 Select the Crystal Reports 7.0 ActiveX designer. The check box for this component should be toggled on.
6 Click OK when finished.
7 From the Project menu, select the Add ActiveX Designer submenu, then select the Crystal Reports 7.0 command that appears. A new Report Designer component is added to your project, and the Report Gallery appears inside the Visual Basic IDE.
NOTE: In Visual Basic 6.0, the command Add Crystal Reports 7.0 will appear directly on the Project menu.
The Report Designer Component 152

Selecting Data
The first step to creating any report is selecting the source of the data that will be displayed. The Report Designer Component supports data sources exposed through Data Access Objects (DAO), Remote Data Objects (RDO), ActiveX Data Objects (ADO), Crystal Data Objects (CDO) through a Data Definition File, and Visual Basic Data Environments. If you have installed the full Seagate Crystal Reports product, you can also access any source of data supported by Seagate Crystal Reports, including SQL servers and ODBC data sources. In the following steps, you will connect to a data source using ADO.
1 In the Report Gallery, click the Standard button to design a standard report using the Report Designer Component. The Create Report Expert appears with the Data Tab active.
NOTE: If you close the Report Gallery dialog box without selecting a report type, the Report Designer Component will assume that you wish to use an Empty Report. You will be prompted to add the Smart Viewer control to your project.
2 In the Data Source section of the Data Tab, click the Project button to select a data source for your Visual Basic project. The Select Data Source dialog box appears.
NOTE: The VB Data Environment button on the Data Tab allows you to connect to an existing Visual Basic Data Environment. The Custom button allows you to connect to a data source other than RDO, ADO, DAO, or a Data Definition File. This option is only available if you have performed a complete install of Seagate Crystal Reports. For more information, refer to Working with data, Page 158.
3 Verify that the first option in the dialog box, ODBC, is selected. This option allows you to connect to an ODBC data source through ADO or RDO.
4 In the drop-down list below the ODBC option, select Xtreme sample data. This is a sample database and ODBC data source created when you installed Seagate Crystal Reports.
5 Click the Advanced button. The Advanced Options dialog box appears.
6 Make sure the ADO option is selected in the Advanced Options dialog box. You will connect to the Xtreme sample data data source through ActiveX Data Objects.
7 Click OK in the Advanced Options dialog box, and notice that ADO appears in parentheses next to the ODBC option.
8 Click Next in the Select Data Source dialog box. The Select Recordset dialog box appears. Now that you have specified a data source and a connection type (ADO), you must specify the data within the data source that will be used for the report.
9 From the Object drop-down list, select Customer. This is the Customer table in the Xtreme database. Note that if you are familiar with the SQL query language, you could also use the SQL option and write a SELECT statement. The Build button next to the SQL option opens Microsoft Query so that you can visually build a SQL statement.
10 Click Finish to return to the Create Report Expert. Notice that ado now appears in the Tables list of the Data Tab, indicating that you have selected an ActiveX Data Objects data source. You are now ready to design your report.
The Report Designer Component 153
The Report Expert
Once you’ve selected a data source, you can continue designing your report through the Report Expert. The Report Expert in the Report Designer Component works exactly like the Report Expert in the Report Designer for Seagate Crystal Reports.
1 Select the Fields Tab in the Create Report Expert. The Database Fields list box lists the ADO connection that you made, and all available fields from the table you selected.
2 Select Customer Name in the Database Fields list box, drag and drop the field into the Report Fields list box. ado.Customer Name will appear in the list box. You have just specified that data from the Customer Name field appear in your report.
3 Continue using the drag and drop procedure, or use the Add button on the Fields Tab, to add the Last Year’s Sales, City, and Region fields to your report.
4 Click the Sort Tab to sort the data in your report.
5 Once again, use either the drag and drop method or the Add button to select the ado.Region field, then the ado.City field and add them to the list of Sort Fields. The records in the report will be sorted first by Region, then by City within each Region.
6 Select each field in the Sort Fields list box, in turn, and verify that in ascending order is specified in the Order drop-down list.
7 Select the Total Tab in the Create Report Expert. For each Region, your report will specify a subtotal of the Last Year’s Sales values.
8 If ado.Last Year’s Sales does not appear in the Total Fields list box, select the field from the Report Fields list box and add it now.
9 With ado.Last Year’s Sales selected in the Total Fields list box, verify that sum is selected in the drop-down list below.
10 Click the TopN Tab to obtain the Top N regions. Top N of Sum of ado.Last Year’s Sales should already be selected in the tab.
11 Change the 5 in the where N is text box to 10. Your report will display the top 10 regions.
12 Click the Graph Tab to create a graph for the report. The Graph Expert appears inside the Graph Tab.
13 Click the Pie button on the Type Tab, then proceed to the Data Tab.
14 Review the settings on the Data Tab. A single graph will appear in your report that contains a separate pie slice for each grouping of the Region field. The sizes of the pie slices will be determined by the subtotal obtained by adding together the values in the Last Year’s Sales field.
15 Click the Style Tab of the Create Report Expert. The Expert can automatically generate an overall style or look for your report.
16 Select Executive, Leading Break, and notice the image next to the list. This is the look that your report will have.
17 You have finished designing your first report in the Seagate Crystal Report Designer Component. Click Finish.
The Report Designer Component 154
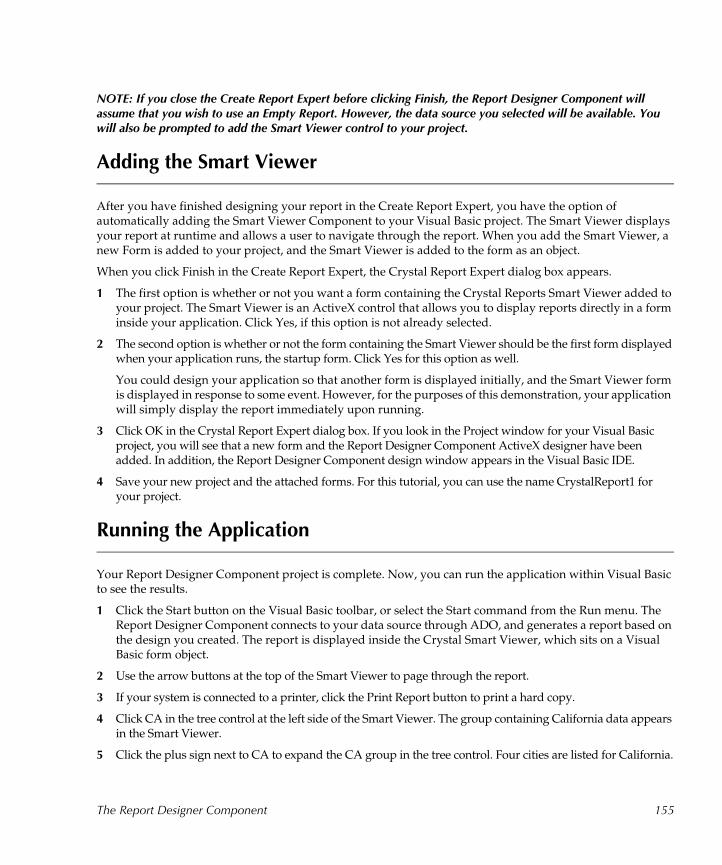
NOTE: If you close the Create Report Expert before clicking Finish, the Report Designer Component will assume that you wish to use an Empty Report. However, the data source you selected will be available. You will also be prompted to add the Smart Viewer control to your project.
Adding the Smart Viewer
After you have finished designing your report in the Create Report Expert, you have the option of automatically adding the Smart Viewer Component to your Visual Basic project. The Smart Viewer displays your report at runtime and allows a user to navigate through the report. When you add the Smart Viewer, a new Form is added to your project, and the Smart Viewer is added to the form as an object.
When you click Finish in the Create Report Expert, the Crystal Report Expert dialog box appears.
1 The first option is whether or not you want a form containing the Crystal Reports Smart Viewer added to your project. The Smart Viewer is an ActiveX control that allows you to display reports directly in a form inside your application. Click Yes, if this option is not already selected.
2 The second option is whether or not the form containing the Smart Viewer should be the first form displayed when your application runs, the startup form. Click Yes for this option as well.
You could design your application so that another form is displayed initially, and the Smart Viewer form is displayed in response to some event. However, for the purposes of this demonstration, your application will simply display the report immediately upon running.
3 Click OK in the Crystal Report Expert dialog box. If you look in the Project window for your Visual Basic project, you will see that a new form and the Report Designer Component ActiveX designer have been added. In addition, the Report Designer Component design window appears in the Visual Basic IDE.
4 Save your new project and the attached forms. For this tutorial, you can use the name CrystalReport1 for your project.
Running the Application
Your Report Designer Component project is complete. Now, you can run the application within Visual Basic to see the results.
1 Click the Start button on the Visual Basic toolbar, or select the Start command from the Run menu. The Report Designer Component connects to your data source through ADO, and generates a report based on the design you created. The report is displayed inside the Crystal Smart Viewer, which sits on a Visual Basic form object.
2 Use the arrow buttons at the top of the Smart Viewer to page through the report.
3 If your system is connected to a printer, click the Print Report button to print a hard copy.
4 Click CA in the tree control at the left side of the Smart Viewer. The group containing California data appears in the Smart Viewer.
5 Click the plus sign next to CA to expand the CA group in the tree control. Four cities are listed for California.
The Report Designer Component 155

6 Click San Diego in the CA group. Data for San Diego is highlighted in the Smart Viewer window.
7 Select Vancouver from the drop-down list next to the Search Text button.
NOTE: If you are unsure of the name of a toolbar button, hold the mouse pointer over the button for a couple of seconds, and a tool tip will appear that indicates the button�s name.
8 Click the Search Text button. Data for Vancouver is highlighted in the Smart Viewer.
9 When you are finished reviewing the report in the Smart Viewer window, close the window. Your application stops running as well.
Part Two
CrystalReport1 - The Report Designer Component
The Report Designer Component is an ActiveX Designer, and an instance of the designer has been added to the Designers section of your project. The default name for the designer is CrystalReport1. Since ActiveX designers are, by definition, visual interfaces that simplify an application design task, the CrystalReport1 designer also appears inside the Visual Basic IDE.
The CrystalReport1 designer provides a simple, yet powerful environment for controlling how text and data appear inside your report. The design environment allows simple changes to text font and color, but also allows complex manipulation of data such as custom grouping. Furthermore, the design environment has been completely integrated with Visual Basic.
1 Select the CrystalReport1 designer in the Project window, and click the View Code button in the Project window's toolbar. A code page appears for the CrystalReport1 designer.
2 In the drop-down list at the upper left of the Code page, notice that the entire report, along with each section within the report, is represented by a separate object.
3 Select one of the Section objects in the code page. You will see that Section objects have Format events. Code written for a Format event will be executed when that particular section is formatted and displayed inside the Smart Viewer.
4 Close the Code page for the CrystalReport1 designer.
CRViewer1 - The Smart Viewer Control
The Smart Viewer is a standard ActiveX control that can be added to any ActiveX container. In Visual Basic, a form is the most commonly used container. When you finished designing your report in the Create Report Expert, the Crystal Report Expert dialog box allowed you to automatically add a new form to your project containing the Smart Viewer control.
The Smart Viewer is the window within which your report is actually displayed. It provides a standard set of controls and features that allow you to interact with the report, moving through pages, drilling-down on groups, and even printing the report. A report can be printed or exported to a different file format without the use of the Smart Viewer, but if you want your users to be able to review the report on screen, you will need to include the Smart Viewer in your project.
1 Choose the COMPONENTS command from the Project menu. The Components dialog box appears.
The Report Designer Component 156
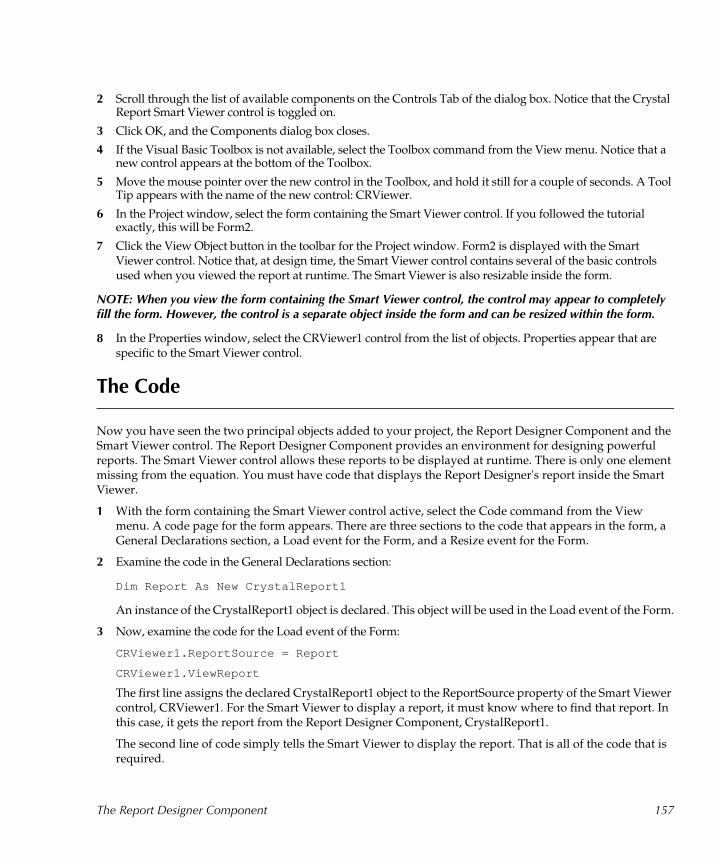
2 Scroll through the list of available components on the Controls Tab of the dialog box. Notice that the Crystal Report Smart Viewer control is toggled on.
3 Click OK, and the Components dialog box closes.
4 If the Visual Basic Toolbox is not available, select the Toolbox command from the View menu. Notice that a new control appears at the bottom of the Toolbox.
5 Move the mouse pointer over the new control in the Toolbox, and hold it still for a couple of seconds. A Tool Tip appears with the name of the new control: CRViewer.
6 In the Project window, select the form containing the Smart Viewer control. If you followed the tutorial exactly, this will be Form2.
7 Click the View Object button in the toolbar for the Project window. Form2 is displayed with the Smart Viewer control. Notice that, at design time, the Smart Viewer control contains several of the basic controls used when you viewed the report at runtime. The Smart Viewer is also resizable inside the form.
NOTE: When you view the form containing the Smart Viewer control, the control may appear to completely fill the form. However, the control is a separate object inside the form and can be resized within the form.
8 In the Properties window, select the CRViewer1 control from the list of objects. Properties appear that are specific to the Smart Viewer control.
The Code
Now you have seen the two principal objects added to your project, the Report Designer Component and the Smart Viewer control. The Report Designer Component provides an environment for designing powerful reports. The Smart Viewer control allows these reports to be displayed at runtime. There is only one element missing from the equation. You must have code that displays the Report Designer's report inside the Smart Viewer.
1 With the form containing the Smart Viewer control active, select the Code command from the View menu. A code page for the form appears. There are three sections to the code that appears in the form, a General Declarations section, a Load event for the Form, and a Resize event for the Form.
2 Examine the code in the General Declarations section:
Dim Report As New CrystalReport1
An instance of the CrystalReport1 object is declared. This object will be used in the Load event of the Form.
3 Now, examine the code for the Load event of the Form:
CRViewer1.ReportSource = Report
CRViewer1.ViewReport
The first line assigns the declared CrystalReport1 object to the ReportSource property of the Smart Viewer control, CRViewer1. For the Smart Viewer to display a report, it must know where to find that report. In this case, it gets the report from the Report Designer Component, CrystalReport1.
The second line of code simply tells the Smart Viewer to display the report. That is all of the code that is required.
The Report Designer Component 157
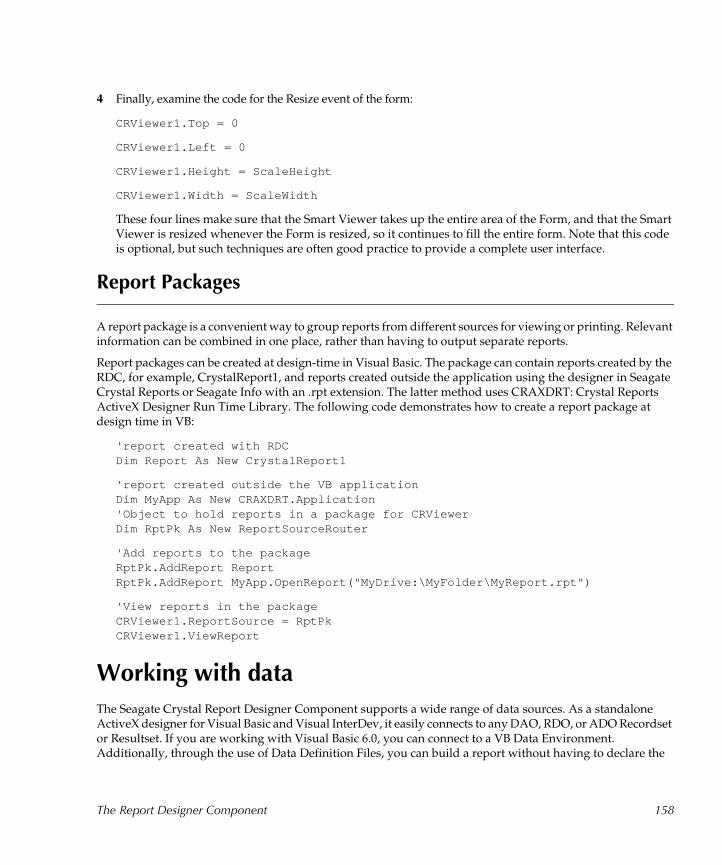
4 Finally, examine the code for the Resize event of the form:
CRViewer1.Top = 0
CRViewer1.Left = 0
CRViewer1.Height = ScaleHeight
CRViewer1.Width = ScaleWidth
These four lines make sure that the Smart Viewer takes up the entire area of the Form, and that the Smart Viewer is resized whenever the Form is resized, so it continues to fill the entire form. Note that this code is optional, but such techniques are often good practice to provide a complete user interface.
Report Packages
A report package is a convenient way to group reports from different sources for viewing or printing. Relevant information can be combined in one place, rather than having to output separate reports.
Report packages can be created at design-time in Visual Basic. The package can contain reports created by the RDC, for example, CrystalReport1, and reports created outside the application using the designer in Seagate Crystal Reports or Seagate Info with an .rpt extension. The latter method uses CRAXDRT: Crystal Reports ActiveX Designer Run Time Library. The following code demonstrates how to create a report package at design time in VB:
'report created with RDCDim Report As New CrystalReport1
'report created outside the VB applicationDim MyApp As New CRAXDRT.Application'Object to hold reports in a package for CRViewerDim RptPk As New ReportSourceRouter
'Add reports to the packageRptPk.AddReport ReportRptPk.AddReport MyApp.OpenReport("MyDrive:\MyFolder\MyReport.rpt")
'View reports in the packageCRViewer1.ReportSource = RptPkCRViewer1.ViewReport
Working with data
The Seagate Crystal Report Designer Component supports a wide range of data sources. As a standalone ActiveX designer for Visual Basic and Visual InterDev, it easily connects to any DAO, RDO, or ADO Recordset or Resultset. If you are working with Visual Basic 6.0, you can connect to a VB Data Environment. Additionally, through the use of Data Definition Files, you can build a report without having to declare the
The Report Designer Component 158

actual data source until runtime. This option can be especially helpful if you need to manipulate the data at runtime in response to user actions or other conditions.
If you have installed the full Seagate Crystal Reports product, all of the data source drivers provided by Seagate Crystal Reports are also available to the Report Designer Component. Instant and convenient report design based on SQL servers, NT event logs, ODBC data sources, and web server log files is provided right inside the Visual Basic environment.
With so many options for connecting to data, selecting a single data access technology can become daunting. The following sections describe each data access option and suggest guidelines for choosing a specific technique. Keep in mind, though, the ultimate decision for data access should depend on your particular data.
The following topics are discussed in this section.
ADO and OLEDB, Page 159
Connecting to data with ADO, Page 160
RDO, Page 161
Connecting to data with RDO, Page 162
DAO, Page 162
Connecting to data with DAO, Page 163
Data Environments, Page 163
Data Definition Files, Page 164
Report Templates, Page 167
ODBC, SQL, and PC data sources, Page 168
ADO and OLEDB
ActiveX Data Objects (ADO) and OLEDB are the new data connection technologies designed to provide a common interface for working with relational databases, mail messaging, event logs, and most any form of data storage. In addition, ADO provides a method of working with data that is easier and faster than previous technologies such as DAO and RDO. For more information on ADO, refer to Microsoft documentation.
ADO can be used to connect to any ODBC or OLE DB compliant data source when you design your report in the Report Designer Component. The resulting ADO Recordset is not directly available from the Report Designer Component, but it can be replaced by alternative Recordset objects. For example, if your Visual Basic application allows users to make choices that can affect the set of data displayed by a report, simply create a new ADO Recordset at runtime, then pass it to the Report Designer Component using the SetDataSource method. The only restriction is that the fields in the new Recordset match the fields originally used to design the report. For more information on using the SetDataSource method, see Setting a new data source for the report.
The Report Designer Component 159

ADO is the most flexible option for data access. It provides a means of connecting to all kinds of data, including mail messaging, event logs, and Web server site data. In addition, it has been designed, ultimately, to replace DAO and RDO. Developers creating new applications using Visual Basic should strongly consider ADO for data connections. In addition, Web site developers working with Visual InterDev will have an advantage using ADO with Active Server Pages.
Connecting to data with ADO
The Report Designer Component provides two options for connecting to a data source via ADO: specifying an ODBC data source or specifying an ADO connection string.
To specify an ODBC data source:
1 On the Data Tab of the Create Report Expert, click Project. The Select Data Source dialog box appears.
2 Verify the ODBC option is selected, and click Advanced. The Advanced Options dialog box appears.
3 Verify ADO is selected as the technology to connect to your data source, and click OK.
4 Select an ODBC data source from ODBC option drop-down list. For this example, select Xtreme sample data.
5 Click Next in the Select Data Source dialog box. The Select Recordset dialog box appears.
6 If the data source requires log on information, enter a user name and password in the Logon section of the dialog box.
7 In the Recordset section of the dialog box, select either Pick from a list of Database Objects or SQL.
● The Pick from a list option provides a list of object types and objects for each type. For this example, verify that Pick from a list is selected.
● The SQL option allows you to write a SQL query statement. The Build button next to the SQL option opens the Microsoft Query Builder and allows you to visually design a SQL query.
8 Select Table from the Object Type drop-down list.
9 From the Object drop-down list, select Customer.
10 Click Finish in the Select Recordset dialog box. ado appears in the list of Tables on the Data Tab of the Create Report Expert.
To specify a connection string:
1 On the Data Tab of the Create Report Expert, click Project. The Select Data Source dialog box appears.
2 Select the ADO and OLEDB option in the dialog box.
3 In the Connection String text box, enter a valid ADO connection string. A connection string can simply indicate the name of an ODBC data source, or it can contain complete information for connecting to the data source. For example, the following string connects to the Xtreme sample data ODBC data source:
DSN=Xtreme sample data;
The Report Designer Component 160

The following string, however, connects to the pubs database in Microsoft SQL Server using the data source name Publishers:
DATABASE=pubs;DSN=Publishers;UID=sa;Password=;
For more information on connection strings, refer to the Microsoft documentation on ADO.
4 This example uses the first connection string shown above, a simple connection to the Xtreme sample data ODBC data source. Click Next after you enter the connection string. The Select Recordset dialog box appears.
5 If the data source requires log on information, enter a user name and password in the Logon section of the dialog box.
6 In the Recordset section of the dialog box, select either Pick from a list of Database Objects or SQL.● The SQL option allows you to write a SQL query statement. The Build button next to the SQL option
opens the Microsoft Query Builder and allows you to visually design a SQL query.
● The Pick from a list option provides a list of object types and objects for each type. For this example, verify that Pick from a list is selected.
7 Select Table from the Object Type drop-down list.
8 Select Customer from the Object drop-down list.
9 Click Finish in the Select Recordset dialog box. ado appears in the list of data source Tables on the Data Tab of the Create Report Expert.
RDO
Remote Data Objects (RDO) is designed specifically for working with remote data sources. This includes ODBC and most common SQL database systems. In fact, RDO acts as an object-oriented wrapper around the ODBC API. The flexibility of ODBC is available to Visual Basic programmers through the simplicity of a COM based object model. Already a common choice for developers of client/server systems, RDO allows the execution of stored procedures and the processing of asynchronous operations, meaning your users can continue to work while your application processes a data query in the background.
The basic object used to manipulate data in RDO is a Resultset (specifically, the rdoResultset object). A new Resultset can be defined in your Visual Basic application and passed to the Report Designer Component at runtime using the SetDataSource method. The RDO data source used to initially create your report at design time, however, is not available for direct manipulation. Instead, information about the connection to the data source is stored inside the instance of the Report Designer Component that you add to your application. By creating a new Resultset at runtime, though, and passing the Resultset to the Report Designer Component, you can control the data in a report based on user requests and responses. For more information on using the SetDataSource method, see Setting a new data source for the report, Page 176.
RDO provides a powerful connection to remote data sources through ODBC. If you are designing a client/server application, or any application that needs to connect to a large database system such as Microsoft SQL Server, Oracle, or Sybase Adaptive Server, RDO can provide a strong solution. However, RDO limits your application to standard relational database systems. Other sources of data, such as e-mail and messaging servers, system logs, and Internet/intranet server logs are unavailable to RDO. Developers designing web-based applications using Visual InterDev would also be served better by ActiveX Data Objects (ADO).
The Report Designer Component 161

Connecting to data with RDO
Use the following steps as a guide for connecting to an ODBC data source through RDO:
1 On the Data Tab of the Create Report Expert, click Project. The Select Data Source dialog box appears.
2 Verify the ODBC option is selected, and click Advanced. The Advanced Options dialog box appears.
3 Select RDO as the technology to connect to your data source, and click OK.
4 Select an ODBC data source from the ODBC option drop-down list. For this example, select Xtreme sample data.
5 Click Next in the Select Data Source dialog box. The Select Recordset dialog box appears.
6 If the data source requires logon information, enter a user name and password in the Logon section of the dialog box.
7 In the Recordset section of the dialog box, select either Pick from a list of Database Objects or SQL.
● The Pick from a list option provides a list of object types and objects for each type. For this example, verify that Pick from a list is selected.
● The SQL option allows you to write a SQL query statement. The Build button next to the SQL option opens the Microsoft Query Builder and allows you to visually design a SQL query.
8 Select Table from the Object Type drop-down list.
9 Select Customer from the Object drop-down list.
10 Click Finish in the Select Recordset dialog box. rdo appears in the list of Tables on the Data Tab of the Create Report Expert.
DAO
Data Access Objects (DAO) is designed primarily for use with local and ISAM (Indexed Sequential Access Method) data sources created through applications such as Microsoft Access, Microsoft FoxPro, and Borland dBASE. Although DAO can be used to connect to ODBC data sources, RDO and ADO provide more powerful options for such data. However, DAO is the oldest of the three technologies, giving it the advantage of being familiar to many Visual Basic programmers. As a result, DAO is also frequently found in existing applications, and applications created with older versions of Visual Basic.
If you are adding the Report Designer Component to a Visual Basic application that already uses DAO, or if you are connecting to a local data source such as an Access or dBASE file, you should consider using DAO to design your reports. Experienced Visual Basic programmers familiar with the DAO object model may also want to stick with a known technology. However, if you are working with ODBC or other remote data sources, RDO and ADO may be a better solution.
Once you design your report in the Report Designer Component, information about the connection to your DAO data source is stored with the report, and can not be accessed directly. However, you can change the data displayed by a report by changing the data source at runtime using the SetDataSource method. A DAO Recordset object may be passed to the report through this method. Keep in mind, though, the Recordset must have fields identical to those in the original data source used at design time.
For more information on using the SetDataSource method, see Setting a new data source for the report.
The Report Designer Component 162

Connecting to data with DAO
Use the following steps as a guide for connecting to a data source through DAO:
1 On the Data Tab of the Create Report Expert, click Project. The Select Data Source dialog box appears.
2 Click the DAO option to connect to your data through DAO. The DAO controls are activated.
3 From the Database drop-down list, select the database format you want to use for your report. For this example, select Access.
4 In the DAO text box, enter the path and file name of the database you want to use, or use the Browse button to locate the database. For this example, select the Xtreme.mdb file. It is located in the Seagate Crystal Reports directory on your system (C:\Program Files\Seagate Software\Crystal Reports by default).
5 When the path and file name of the database appear in the DAO text box, click Next in the Select Data Source dialog box. The Select Recordset dialog box appears.
6 If the database requires logon information, enter a user name and password in the Logon section of the dialog box.
7 In the Recordset section of the dialog box, select either Pick from a list of Database Objects or SQL.
● The Pick from a list option provides a list of object types and objects for each type. For this example, verify that Pick from a list is selected.
● The SQL option allows you to write an SQL query statement.
8 From the Object Type drop-down list, select Table to see a list of database tables.
9 From the Object drop-down list, select Customer.
10 Click Finish in the Select Recordset dialog box. dao appears in the list of Tables on the Data Tab of the Create Report Expert.
Data Environments
Data Environments (introduced with VB 6) allow for interactive creation of ADO Objects at design time, and easy access to data at run time. Through the Data Environment Designer you create Data Environment objects to connect with Data sources (Connection Objects), and access data from those sources (via Command Objects) at design time and run time.
The following steps illustrate how to create and connect to Data Environment objects for Microsoft Access type data sources (.mdb files). This algorithm can be used as a general guide for any data source for which an OLE DB provider exists. Consult the Microsoft documentation for more detailed information on the Data Environment Designer.
Add the Seagate Crystal Report Designer Component and the Data Environment Designer to your project1 Select Components from the project menu.
2 In the Components dialog box, click on the Designers tab.
3 Click on the Crystal Reports 7 checkbox and the Data Environment checkbox.
The Report Designer Component 163
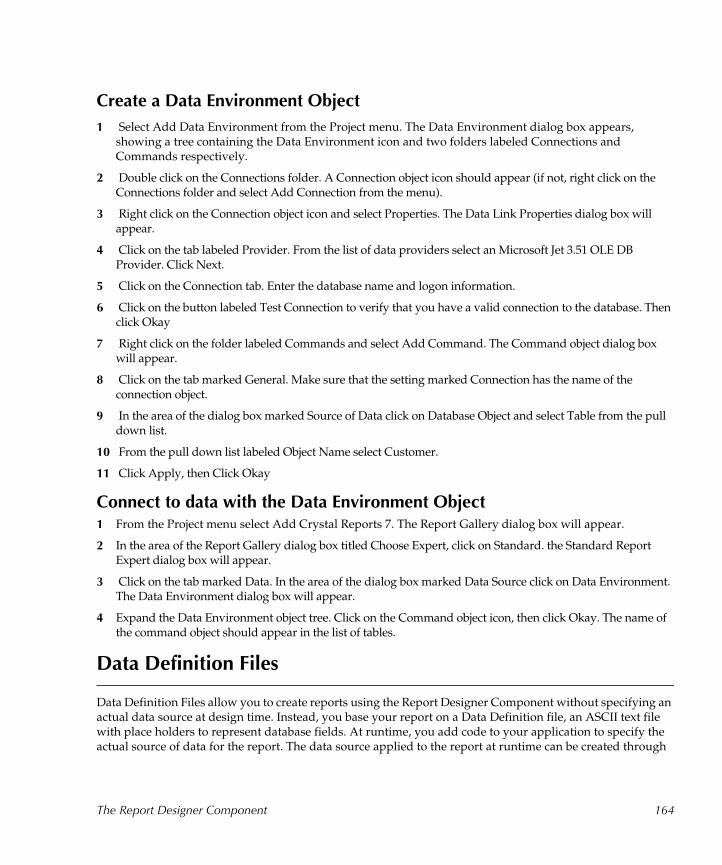
Create a Data Environment Object
1 Select Add Data Environment from the Project menu. The Data Environment dialog box appears, showing a tree containing the Data Environment icon and two folders labeled Connections and Commands respectively.
2 Double click on the Connections folder. A Connection object icon should appear (if not, right click on the Connections folder and select Add Connection from the menu).
3 Right click on the Connection object icon and select Properties. The Data Link Properties dialog box will appear.
4 Click on the tab labeled Provider. From the list of data providers select an Microsoft Jet 3.51 OLE DB Provider. Click Next.
5 Click on the Connection tab. Enter the database name and logon information.
6 Click on the button labeled Test Connection to verify that you have a valid connection to the database. Then click Okay
7 Right click on the folder labeled Commands and select Add Command. The Command object dialog box will appear.
8 Click on the tab marked General. Make sure that the setting marked Connection has the name of the connection object.
9 In the area of the dialog box marked Source of Data click on Database Object and select Table from the pull down list.
10 From the pull down list labeled Object Name select Customer.
11 Click Apply, then Click Okay
Connect to data with the Data Environment Object 1 From the Project menu select Add Crystal Reports 7. The Report Gallery dialog box will appear.
2 In the area of the Report Gallery dialog box titled Choose Expert, click on Standard. the Standard Report Expert dialog box will appear.
3 Click on the tab marked Data. In the area of the dialog box marked Data Source click on Data Environment. The Data Environment dialog box will appear.
4 Expand the Data Environment object tree. Click on the Command object icon, then click Okay. The name of the command object should appear in the list of tables.
Data Definition Files
Data Definition Files allow you to create reports using the Report Designer Component without specifying an actual data source at design time. Instead, you base your report on a Data Definition file, an ASCII text file with place holders to represent database fields. At runtime, you add code to your application to specify the actual source of data for the report. The data source applied to the report at runtime can be created through
The Report Designer Component 164

Data Access Objects (DAO), Remote Data Objects (RDO), or ActiveX Data Objects (ADO).
A report designed with a Data Definition File contains information about the kind of data to place in the report instead of information about an actual data source. It looks for field types, rather than actual fields. These field types are specified in the Data Definition File. For example, the following is an example of the contents of a Data Definition file that could be replaced at runtime by the Orders table in the Xtreme database:
Order ID long 1
Order Amount currency 1.00
Customer ID long 1
Employee ID long 1
Order Date date Jan 5, 1994
Required Date date Jan 5, 1994
Ship Date date Jan 5, 1994
Ship Via string 20 string sample value
Shipped boolean TRUE
PO# string 50 string sample value
Payment Received boolean TRUE
As you can see, the Data Definition File is a simple ASCII text file with fields listed on separate lines. Each field in the text file represents a field that must exist in the true ADO, RDO, or DAO data source that replaces the Data Definition file at runtime. At design time, you create your report based on the Data Definition file. The three columns of the file provide the name of the fields, the data type for the fields, and a sample value. String fields, as you can see, also require a value for the length of the string. The values in the sample value column are optional and will only be used if you neglect to replace the Data Definition file with a true data source.
At runtime, you change the data source pointed at by the report using the SetDataSource method. The new data source can be a Recordset or Resultset object produced using DAO, RDO, ADO, or through the Visual Basic Data Control. Once the Report Designer Component obtains the Recordset or Resultset object from the runtime data source, it can produce and display the final report using actual data. The process saves you the time of creating a complete data source prior to designing the report and your application.
Passing fields in the correct order
When defining a Recordset or Resultset object to pass to your report at runtime, you must pay attention to the order in which the fields are added to the recordset. Fields must appear in the recordset in the same order in which they appear in the Data Definition file. In addition, all fields that appear in a Data Definition file must be included in the recordset, whether or not they are actually used in the report. For more information, see Passing fields in the correct order, Page 177.
The Report Designer Component 165

Creating a Data Definition File
The Report Designer Component provides the Database Definition Tool, a built in tool for designing and producing Data Definition Files. The following steps explain how to design a Data Definition File. From the Data Tab of the Create Report Expert:
1 Click the Project button. The Select Data Source dialog box appears.
2 Click the Data Definition option to create a report based on a Data Definition File.
3 Click the New button next to the Data Definition text box. The Database Definition Tool appears.
4 Use the Database Definition Tool to create fields for your Data Definition File. Use the controls to enter a field name, field type, and sample data. If you select String as the field type, you will also be asked to specify a maximum string length.
5 Click Add to add each new field to your file. The new field will appear in the list at the bottom of the Database Definition Tool.
6 Continue adding as many fields as necessary for your Data Definition File by entering the information in the controls of the Database Definition Tool, and clicking Add each time.
7 You can delete a field that you have created by selecting the field in the list box and clicking Delete.
8 Click the Close button in the right corner of the title bar when you are finished designing your Data Definition File. You will be prompted to save the new file.
9 Click Yes, and the Save File As dialog box appears. Save the file in a convenient directory for your Visual Basic application. The resulting path and file name appear in the Data Definition text box of the Select Data Source dialog box.
10 Click Finish. The name of the Data Definition File appears in the Tables list of the Data Tab in the Create Report Expert.
11 Continue designing your report using the Create Report Expert and the Report Designer Component.
Obtaining a Recordset from the Runtime Data Source
Once you have created the Data Definition File and designed a report based on that file, you can begin programming your application to obtain a Recordset or Resultset object from a runtime data source. This data source can be opened through DAO, RDO, ADO, or the Visual Basic Data Control. The following tutorial briefly demonstrates how you can obtain a simple ADO Recordset object.
1 Declare an instance of the ADO Recordset object in your Visual Basic application. This can be handled in the declarations section of a form or module.
Dim rs As New ADODB.Recordset
2 Obtain a set of records from an ODBC data source.
rs.Open “SELECT * FROM Customer”, “DSN=Xtreme sample data;”, adOpenKeyset
The Report Designer Component 166
Passing the Recordset to the Report Designer Component
The Recordset object gets passed to the Report Designer Component through the SetDataSource method. Using the Recordset object from the example above, and assuming your report object is named Report, the following demonstrates how to assign a new data source at runtime:
Report.Database.SetDataSource rs
For more complete information, see Setting a new data source for the report.
Report Templates
If a Crystal Report file already exists that closely resembles the report you want to create, and it connects to the same or similar data and displays the data in a desirable fashion, you can use the existing report file as a report template. When you select the existing report, a copy of the report is created and set up as the basis of your new report in the Report Designer Component. The original report file is never changed.
To use a report template:
1 Begin by adding the Report Designer Component to your Visual Basic project (see Adding the Report Designer Component to a Project).
2 When the Report Gallery appears, click Import Report. The Open dialog box appears.
3 Use the Open dialog box to locate and select an existing Crystal Report file. These files have .rpt extensions.
4 Click Open. The Crystal Report Expert dialog box appears.
5 Indicate whether or not you want a form containing the Crystal Smart Viewer added to your report, and, if so, whether or not this form should be the start-up form for your application.
6 Click OK. An instance of the Report Designer Component appears in your project. The designer contains a new report design based on the report file you selected.
The data source accessed by the new report is identical to the data source used by the original report file. The following procedure describes how to change the location of the data source. Keep in mind, though, the structure of the new data source must match the original data source. For instance, relational databases must have identical tables and fields.
1 In the Field View of the Report Designer Component window, click the plus sign next to Database Fields. A list of all data connections will appear. If the report connects directly to a database, you will see a list of database tables. If the report uses a connection technology, such as ADO, you will see ado in the list.
2 Right-click one of the data connections in the list and select SET LOCATION from the shortcut menu. The Set Location dialog box appears.
3 In the Databases list, select the database table or other data connection that you want to change the location of, and click Set Location. A dialog box appropriate to the connection type appears. The remaining steps assume the data connection is an ADO connection.
4 With the Choose SQL Table dialog box open (the dialog box that appears when setting the location of an ADO data source), click Log On Server. The Log On Server dialog box appears.
The Report Designer Component 167
5 Highlight Active Data (ADO) in the Server Type drop-down list, and click OK. The Select Data Source dialog box appears. Use this dialog box to select a new ADO data source. For instructions on using this dialog box, see Selecting Data.
6 Click Next, and the Select Recordset dialog box appears. Specify a new recordset for your report.
7 Click Finish, and the new ADO connection appears in the SQL Databases list box of the Choose SQL Table dialog box.
8 Highlight the new ADO connection, and click OK. The new data source is reflected in the Set Location dialog box.
9 Click Done, and the report in the Report Designer Component window is updated.
ODBC, SQL, and PC data sources
Local and remote data sources not accessed through an object model (such as ADO or DAO) are available to the Report Designer Component if you have installed the full Seagate Crystal Reports product. The Report Designer Component can use the same database drivers that are available through Crystal Reports. This includes ODBC data sources, SQL server database systems, NT event logs, and Web server logs for Microsoft and Netscape web servers.
When connecting to an ODBC, SQL, or PC data source, the Report Designer Component provides an interface much like the Seagate Crystal Reports interface. If you click the Custom button on the Data Tab of the Create Report Expert, the Log On Server dialog box appears, providing access to ODBC data sources and SQL server database systems. If you then click the Database File button, the Choose Database File dialog box appears. Use this dialog to open xBase, Paradox, Btrieve, or Microsoft Access databases.
Connecting to an ODBC or SQL data source
The following tutorial shows how to connect to an ODBC or SQL data source while designing a report in the Report Designer Component. The tutorial begins from the Data Tab of the Create Report Expert. You could also begin by selecting the Add Database to Report command from a shortcut menu that appears when you right-click inside the Design window of the Report Designer Component.
1 On the Data Tab of the Create Report Expert, click Custom. The Log On Server dialog box appears.
2 If your data exists in a standard PC or ISAM database such as Microsoft Access, Borland dBASE, Btrieve, or Microsoft FoxPro, see the section below titled PC Databases. If your data is in a SQL or ODBC data source, continue with the next step.
3 Use the Server Type list box in the Log On Server dialog box to select the type of data source you will use in your report. For example, to connect to the Xtreme sample data ODBC data source, select ODBC - Xtreme sample data.
4 Click OK. If the SQL server or ODBC data source requires log on information, a dialog box will prompt you for the correct information. Log on to the data source as you normally do to access the data. The Choose SQL Table dialog box appears.
5 Use the SQL Tables list in the Choose SQL Table dialog box to select tables from the data source to use in your
The Report Designer Component 168
report. If you connected to Xtreme sample data, select the Customer table and click Add.
6 Continue selecting tables and clicking Add. Click Done when finished. The selected tables appear in the Data Tab of the Create Report Expert. If you selected more than one table, the Linking Tab will appear.
7 Proceed to design your report using the selected data.
PC Databases
This tutorial demonstrates how to connect to a Btrieve, xBase, Paradox, or Access database. Assuming you have clicked Custom on the Data Tab of the Create Report Expert:
1 From the Log On Server dialog box, click Database File. The Choose Database File dialog box appears.
2 Use the Choose Database File dialog box to locate and select the database file you want to use in your report, then click Add.
3 Continue selecting database files and clicking Add for every database you wish to use in your report.
4 Click Done when finished selecting databases. You will return to the Create Report Expert, and the Linking Tab will be activated.
5 Use the Linking Tab to specify links between database tables.
6 Continue designing your report.
Report Designer Overview
This section provides a brief explanation of what the Seagate Crystal Report Designer Component is and how it works with Visual Basic. An understanding of this material is not crucial to using the Report Designer Component, but it will help you understand how the designer works with Visual Basic and your data at both design time and runtime.
● What is the Report Designer Component?
● Report Designer Architecture
● Visual Basic Environment (Design Time)
● Visual Basic Environment (Runtime or Application EXE)
● Component Descriptions
● Dual - Interface
Introduction to the Report Designer Component
The Seagate Crystal Report Designer Component is an ActiveX designer which provides a design window inside of the Visual Basic Integrated Development Environment (IDE). An ActiveX designer component has a design window which allows visual modification of the object. At runtime, the object may take on a new appearance and behavior. A good example of a design object is the standard Visual Basic Form designer which
The Report Designer Component 169

provides a rich design time environment where you can add controls and other objects to the Form object to create a more sophisticated object that has a similar look but different behavior at runtime.
ActiveX designers created by Microsoft and other, third-party vendors work much like standard design objects but can be plugged in to Visual Basic or any other development environment that supports such designers. These components help expand what you can do with VB while behaving in a consistent fashion with the rest of the Visual Basic IDE.
The Report Designer Component is an ActiveX designer that specializes in simplifying reporting tasks such as connecting to Visual Basic project data and formatting and modifying report fields. In addition to making reporting in Visual Basic easier, the designer also exposes the Report Designer Component object library. This gives the Report Designer Component a simple design time interface with very powerful runtime capabilities.
Report Designer Architecture
The Seagate Crystal Report Designer Component includes several COM objects that work with the Visual Basic design and runtime environments. The following sections describe this interaction. For complete descriptions of all of the components in the Report Designer architecture, see Component Descriptions, Page 172.
The following topics are discussed in this section:
Design Time, Page 170
Runtime, Page 171
Component Descriptions, Page 172
Dual - Interface, Page 173
Design Time
At design time, the Report Designer Component provides a user interface that closely integrates with the Visual Basic IDE. Through the user interface, you design and manipulate reports and report data. This interface includes events that can be directly programmed from within Visual Basic.
The Report Designer Component uses the Active Data Driver(see Active Data Driver, Page 118) for connecting to ISAM, ODBC, and SQL databases through Data Access Objects (DAO), Remote Data Objects (RDO), ActiveX Data Objects (ADO), and Data Environments (Visual Basic 6.0 only). You can design the data set from within Visual Basic, then apply it to the report contained by the Report Designer Component.
When working in Visual Basic, you will often need to use the Seagate Crystal Report Smart Viewer for ActiveX as a user interface to display reports. The Smart Viewer is an ActiveX control that you can drop right on to a standard Visual Basic Form. The Smart Viewer is, ultimately, where your report is displayed at runtime.
The Report Designer Component 170

This is a diagram illustrating design time relationship with Visual Basic. Red arrows (1) indicate methods, properties and events that VB developers can manipulate directly; Green arrows (2) indicate internal communications between Crystal components.
Runtime
The user interface provided by the Report Designer Component at design time does not appear in your application at runtime, or when it is compiled into an executable file. Instead, the Report Designer Component is accessed directly by your Visual Basic code. The Report Designer object model provides a complete object hierarchy for direct manipulation in Visual Basic.
The Active Data Driver is also available at runtime, through the Report object of the Report Designer Component object model, and can be assigned a new set of data based on user interaction with your application. You design a Recordset or Resultset object in Visual Basic using the DAO, RDO, or ADO object model, and pass it to the report.
Finally, the Smart Viewer takes center stage at runtime, connecting to the Report Designer Component and displaying the embedded report. With careful design and placement on the Form, the Smart Viewer appears simply as a window inside your application.
The Report Designer Component 171

This is a diagram illustrating the runtime relationship with Visual Basic. Red arrows (1) indicate methods, properties and events that VB developers can manipulate directly; Green arrows (2) indicate internal communications between Crystal components.
Component Descriptions
Component Description
Crystal Report DesignerUI Component
This is a COM (Component Object Model) component that provides the user interface at design time for the user to interact with and create or modify the report.
Crystal Report DesignerDesign Time Component
This is an underlying COM component that provides services for the user interface component.
Crystal Report DesignerRun Time Component
This is the component that encapsulates all of the report objects and is responsible for doing all of the data processing and report layout.
Active Data Driver This is a data access driver that provides access to various types of object data sources including DAO, RDO, and ADO.
Crystal Reports SmartViewer for ActiveX
This component is an Active X control which can be drawn on a form and manipulated at design time. It provides a rich object model which can be used to modify user interaction with the report at runtime. This component is required only if a developer wants to provide on-screen display of reports at runtime.
The Report Designer Component 172

Dual - Interface
The object model for the Report Designer Component is exposed as a dual-interface. This means the component can be accessed and utilized easily in all kinds of development environments including Visual Basic, Visual InterDev, Visual C++, and Delphi. Although the component may not work as an ActiveX designer in all environments, the object model can be used as an automation server or ActiveX DLL in any development environment that supports ActiveX.
Report Designer Object Model Programming
The Seagate Crystal Report Designer Component provides a strong yet accessible object model for manipulating reports within your Visual Basic application. Through the object model, you can leverage the full power of Visual Basic to control the final look and content of your data.
Though easy to use, the object model requires knowing several basic techniques and strategies. This section provides examples of how to work directly with the object model to accomplish specific types of tasks. If you need information on report design using the Report Designer Component, refer to the Seagate Crystal Reports User’s Guide. Designing reports in the Report Designer Component is very similar to designing reports in the Report Designer for Seagate Crystal Reports.
Data Set One of the following:● Data Access Object (DAO) Recordset
● Remote Data Object (RDO) Resultset
● Active Data Object (ADO) Recordset
● VB Data Environment
● Crystal Data Object (CDO)
● Crystal Data Source Type Library object
● ODBC Direct
● Crystal Data Source Type Library object
These objects do not need to be valid at design time, for example you could construct a report template at design time without the data being available. This is handled through a Data Definition Files, Page 164. However, the data set objects must be present and valid at runtime to generate a report.
VB Form The Seagate Crystal Reports Smart Viewer Control must be embedded on a Visual Basic Form in order to display the report on screen. The Create Report Expert can automatically add a Form with the Smart Viewer embedded to the project when you finish designing a report with the Expert.
Component Description
The Report Designer Component 173

The tutorials in this section concentrate on the objects, properties, methods, and events of the object model exposed by the Report Designer Component. If you need to learn some general programming techniques that can be applied to all types of reports, review the topics listed below. The tutorials listed here do not assume that you are trying to create a specific type of report. Instead, they discuss the object model from a programming point of view, regardless of the report that you are trying to create.
The following topics are discussed in this section:
Report Designer Object Model Introduction, Page 175
Obtaining a Report object, Page 175
Displaying the report in the Smart Viewer, Page 175
Setting a new data source for the report, Page 176
Using ReadRecords, Page 177
Passing fields in the correct order, Page 177
Working with secure data in reports, Page 179
Handling the Format event, Page 179
...including comments regarding Calculating Results, Page 180
Changing the contents of a Text object, Page 180
Changing OLE object images, Page 182
Working with Sections, Page 182
Working with the ReportObjects collection, Page 183
Working with the FieldObject object, Page 184
Working with the SubreportObject object, Page 185
Working with the Database and DatabaseTables objects, Page 186
Working with the CrossTabObject object, Page 186
Exporting a report, Page 187
The Application object, Page 187
Report events, Page 188
Microsoft Access Sessions, Page 189
Programmatic ID, Page 189
Distributing reports as part of the application, Page 190
Saving reports as external files, Page 190
Saving data with reports, Page 191
The Report Designer Component 174
Report Designer Object Model Introduction
The Seagate Crystal Report Designer Object Model has been optimized for easy access to reports created using the Report Designer Component and the objects within those reports. Rather than forcing you to navigate through a complex hierarchy of collections and objects to get at a single report element, the Report Designer Object Model presents a flatter hierarchy that requires only obtaining, at most, a couple layers of objects to get at any report element. This hierarchy begins with the Report object.
Obtaining a Report object
Many existing ActiveX object models require declaring and creating a high level object, such as an Application object, before you can work directly with the data. The Report Designer Component, however, allows direct access to the Report object, giving you control over your reports with a small amount of Visual Basic code.
Assuming you have added the Report Designer Component to a Visual Basic application, and the (Name) property of that component is set to CrystalReport1, the following code demonstrates how to obtain a Report object representing that component:
Dim cr As CRAXDRT.ReportSet cr = New CrystalReport1
The first line declares cr as Report object from the CRAXDRT object library, the Report Designer Component’s object library. The second line of code defines cr as a new instance of the report in the CrystalReport1 component in your application.
Displaying the report in the Smart Viewer
Obtaining a Report object allows you to manipulate the report at runtime. Of course, once you make changes to the report, you will frequently want to display it through the Smart Viewer. The Smart Viewer is an ActiveX control that actually sits inside a Visual Basic form. Assuming you have added the Smart Viewer to a form named frmViewer, and the Smart Viewer control is named CRViewer1, the following code displays the report.
frmViewer.CRViewer1.ReportSource = cr
frmViewer.CRViewer1.ViewReport
frmViewer.CRViewer1.Visible = True
This code can be added to the Load event of the frmViewer form. When the form loads, the report is displayed.
After looking over the previous sections on obtaining a Report object and displaying the report in the Smart Viewer, you will quickly see how little code is required to perform the basic operations of displaying a report on screen. The Report Designer object model is designed to simplify your code and reduce project development time.
The Report Designer Component 175
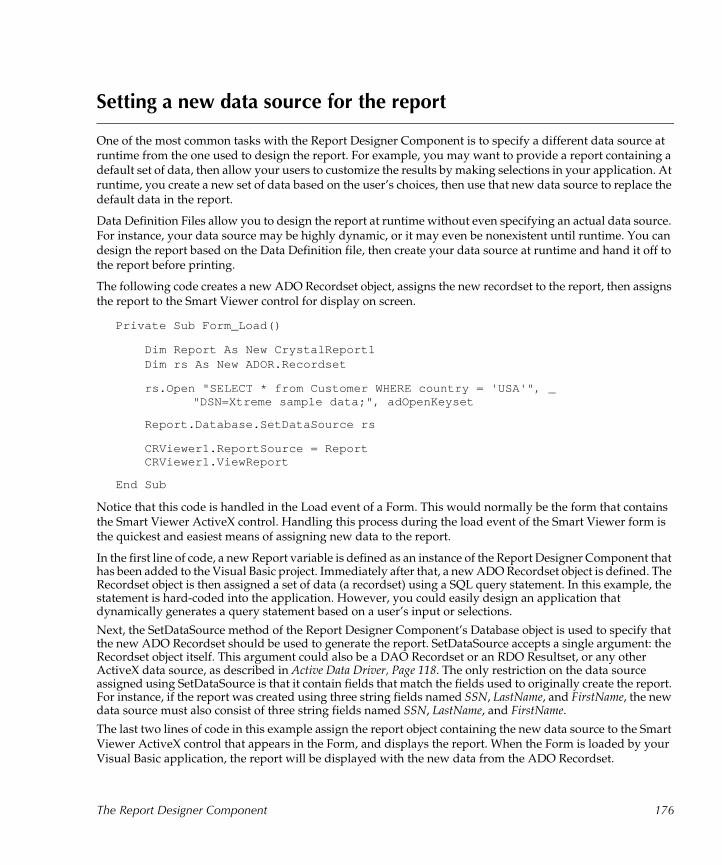
Setting a new data source for the report
One of the most common tasks with the Report Designer Component is to specify a different data source at runtime from the one used to design the report. For example, you may want to provide a report containing a default set of data, then allow your users to customize the results by making selections in your application. At runtime, you create a new set of data based on the user’s choices, then use that new data source to replace the default data in the report.
Data Definition Files allow you to design the report at runtime without even specifying an actual data source. For instance, your data source may be highly dynamic, or it may even be nonexistent until runtime. You can design the report based on the Data Definition file, then create your data source at runtime and hand it off to the report before printing.
The following code creates a new ADO Recordset object, assigns the new recordset to the report, then assigns the report to the Smart Viewer control for display on screen.
Private Sub Form_Load()
Dim Report As New CrystalReport1Dim rs As New ADOR.Recordset
rs.Open "SELECT * from Customer WHERE country = 'USA'", _"DSN=Xtreme sample data;", adOpenKeyset
Report.Database.SetDataSource rs
CRViewer1.ReportSource = ReportCRViewer1.ViewReport
End Sub
Notice that this code is handled in the Load event of a Form. This would normally be the form that contains the Smart Viewer ActiveX control. Handling this process during the load event of the Smart Viewer form is the quickest and easiest means of assigning new data to the report.
In the first line of code, a new Report variable is defined as an instance of the Report Designer Component that has been added to the Visual Basic project. Immediately after that, a new ADO Recordset object is defined. The Recordset object is then assigned a set of data (a recordset) using a SQL query statement. In this example, the statement is hard-coded into the application. However, you could easily design an application that dynamically generates a query statement based on a user’s input or selections.
Next, the SetDataSource method of the Report Designer Component’s Database object is used to specify that the new ADO Recordset should be used to generate the report. SetDataSource accepts a single argument: the Recordset object itself. This argument could also be a DAO Recordset or an RDO Resultset, or any other ActiveX data source, as described in Active Data Driver, Page 118. The only restriction on the data source assigned using SetDataSource is that it contain fields that match the fields used to originally create the report. For instance, if the report was created using three string fields named SSN, LastName, and FirstName, the new data source must also consist of three string fields named SSN, LastName, and FirstName.
The last two lines of code in this example assign the report object containing the new data source to the Smart Viewer ActiveX control that appears in the Form, and displays the report. When the Form is loaded by your Visual Basic application, the report will be displayed with the new data from the ADO Recordset.
The Report Designer Component 176
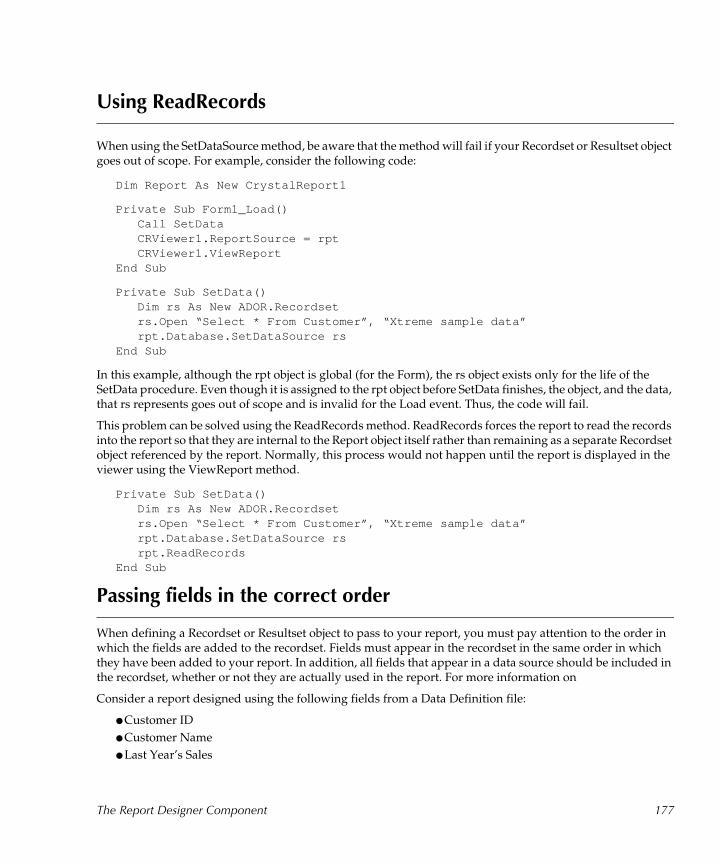
Using ReadRecords
When using the SetDataSource method, be aware that the method will fail if your Recordset or Resultset object goes out of scope. For example, consider the following code:
Dim Report As New CrystalReport1
Private Sub Form1_Load() Call SetData CRViewer1.ReportSource = rpt CRViewer1.ViewReportEnd Sub
Private Sub SetData() Dim rs As New ADOR.Recordset rs.Open “Select * From Customer”, “Xtreme sample data” rpt.Database.SetDataSource rsEnd Sub
In this example, although the rpt object is global (for the Form), the rs object exists only for the life of the SetData procedure. Even though it is assigned to the rpt object before SetData finishes, the object, and the data, that rs represents goes out of scope and is invalid for the Load event. Thus, the code will fail.
This problem can be solved using the ReadRecords method. ReadRecords forces the report to read the records into the report so that they are internal to the Report object itself rather than remaining as a separate Recordset object referenced by the report. Normally, this process would not happen until the report is displayed in the viewer using the ViewReport method.
Private Sub SetData() Dim rs As New ADOR.Recordset rs.Open “Select * From Customer”, “Xtreme sample data” rpt.Database.SetDataSource rs rpt.ReadRecordsEnd Sub
Passing fields in the correct order
When defining a Recordset or Resultset object to pass to your report, you must pay attention to the order in which the fields are added to the recordset. Fields must appear in the recordset in the same order in which they have been added to your report. In addition, all fields that appear in a data source should be included in the recordset, whether or not they are actually used in the report. For more information on
Consider a report designed using the following fields from a Data Definition file:
● Customer ID● Customer Name● Last Year’s Sales
The Report Designer Component 177
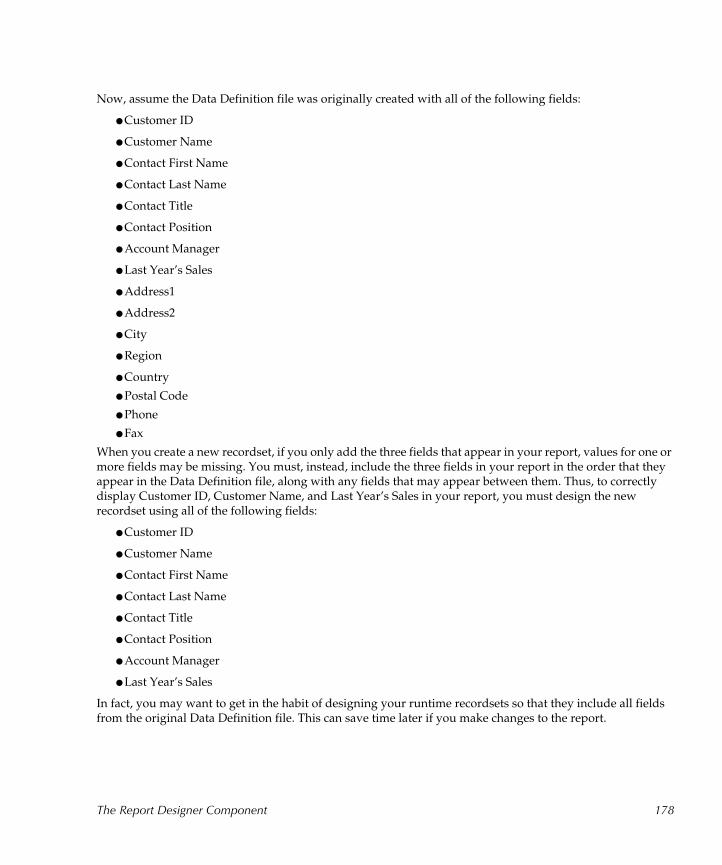
Now, assume the Data Definition file was originally created with all of the following fields:
● Customer ID
● Customer Name
● Contact First Name
● Contact Last Name
● Contact Title
● Contact Position
● Account Manager
● Last Year’s Sales
● Address1
● Address2
● City
● Region
● Country
● Postal Code
● Phone
● Fax
When you create a new recordset, if you only add the three fields that appear in your report, values for one or more fields may be missing. You must, instead, include the three fields in your report in the order that they appear in the Data Definition file, along with any fields that may appear between them. Thus, to correctly display Customer ID, Customer Name, and Last Year’s Sales in your report, you must design the new recordset using all of the following fields:
● Customer ID
● Customer Name
● Contact First Name
● Contact Last Name
● Contact Title
● Contact Position
● Account Manager
● Last Year’s Sales
In fact, you may want to get in the habit of designing your runtime recordsets so that they include all fields from the original Data Definition file. This can save time later if you make changes to the report.
The Report Designer Component 178

Working with secure data in reports
If your report connects to a secure data source that requires log on information, you will not be able to log off of the data source until the Report object has been closed or gone out of scope. Keep in mind that if you assign the Report object to the ReportSource property of the CRViewer object in the Seagate Crystal Reports Smart Viewer, the Report object can not be closed until you assign a new value to the Smart Viewer or close the CRViewer object. Thus, you will not be able to log off of a secure data source until the report is no longer displayed in the Smart Viewer.
Handling the Format event
The Seagate Crystal Report Designer Component provides a Format event for every section of your report. This allows you to dynamically control report formatting and output at runtime. For example, conditional formatting can be applied during the Format event, based on conditions that exist only at runtime.
The Format event is a standard Visual Basic event that can be programmed by displaying the Code View of the Report Designer Component. Assuming the Report Designer has been named CrystalReport1 in your Visual Basic project:
1 In the Visual Basic Project window, select the CrystalReport1 designer from the Designers folder.2 Click the View Code button in the toolbar at the top of the Project window. A Code window will appear for
the CrystalReport1 designer component.
3 In the object drop-down list box at the top left of the Code window, select a Section object that you want to apply code to. Notice that Section objects are numbered in the order that they appear on your report, from the top of the Report Design window to the bottom. For instance, if you select the Section1 object, your code will apply to the Report Header section of your report. These Section objects are labeled for you at the top of each section in the Report Designer window.
Notice that when you select a Section object, the Format event is automatically selected for you in the event drop-down list box at the top right of the Code window. Format is the only event available to the Section object.
When writing code for the Format event, keep in mind that not all properties and methods for all objects are available during the Format event. Many properties are available on a read-only basis. If you are not sure about a property or method, refer to the specific property or method name in the Report Designer Object Model reference section of this Help file.
The Format event receives a single argument from the Report Designer Component. The pFormattingInfo argument is an object of type FormattingInfo. The FormattingInfo object has only three properties:
● IsEndOfGroup - This property is true if the section being formatted is a Group Footer.
● IsRepeatedGroupHeader - This property is true if the section being formatted is a repeated Group Header. Repeated Group Headers appear when a group extends to two or more pages, and the group has been formatted to repeat information that appears in the Group Header on the second, third, etc. pages. This property is only true if the Group Header is the second, third, etc. instance of the Group Header. It is false for the original first instance of the Group Header.
● IsStartOfGroup - This property is true if the section being formatted is a Group Header.
The Report Designer Component 179
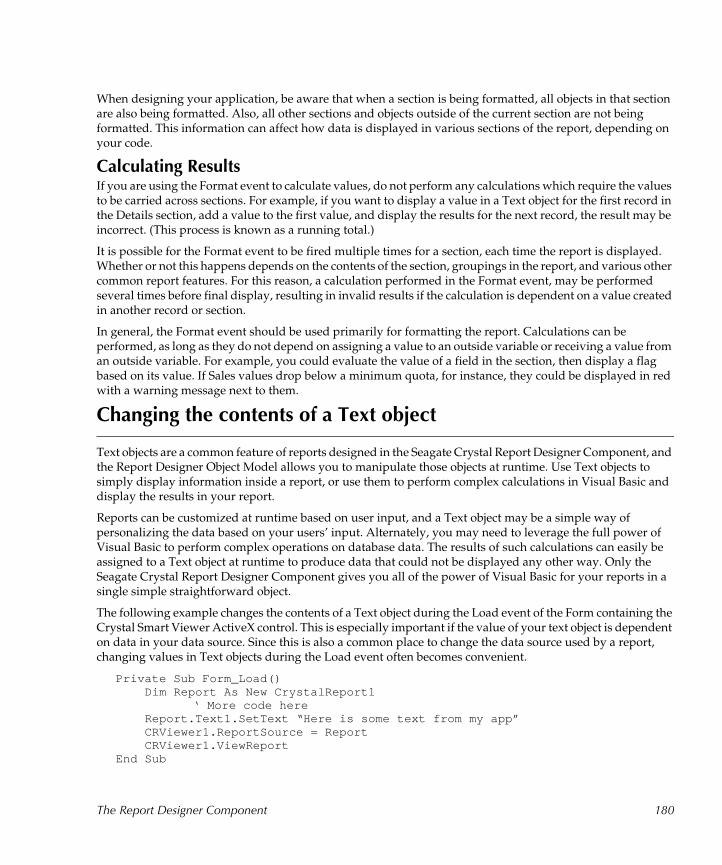
When designing your application, be aware that when a section is being formatted, all objects in that section are also being formatted. Also, all other sections and objects outside of the current section are not being formatted. This information can affect how data is displayed in various sections of the report, depending on your code.
Calculating ResultsIf you are using the Format event to calculate values, do not perform any calculations which require the values to be carried across sections. For example, if you want to display a value in a Text object for the first record in the Details section, add a value to the first value, and display the results for the next record, the result may be incorrect. (This process is known as a running total.)
It is possible for the Format event to be fired multiple times for a section, each time the report is displayed. Whether or not this happens depends on the contents of the section, groupings in the report, and various other common report features. For this reason, a calculation performed in the Format event, may be performed several times before final display, resulting in invalid results if the calculation is dependent on a value created in another record or section.
In general, the Format event should be used primarily for formatting the report. Calculations can be performed, as long as they do not depend on assigning a value to an outside variable or receiving a value from an outside variable. For example, you could evaluate the value of a field in the section, then display a flag based on its value. If Sales values drop below a minimum quota, for instance, they could be displayed in red with a warning message next to them.
Changing the contents of a Text object
Text objects are a common feature of reports designed in the Seagate Crystal Report Designer Component, and the Report Designer Object Model allows you to manipulate those objects at runtime. Use Text objects to simply display information inside a report, or use them to perform complex calculations in Visual Basic and display the results in your report.
Reports can be customized at runtime based on user input, and a Text object may be a simple way of personalizing the data based on your users’ input. Alternately, you may need to leverage the full power of Visual Basic to perform complex operations on database data. The results of such calculations can easily be assigned to a Text object at runtime to produce data that could not be displayed any other way. Only the Seagate Crystal Report Designer Component gives you all of the power of Visual Basic for your reports in a single simple straightforward object.
The following example changes the contents of a Text object during the Load event of the Form containing the Crystal Smart Viewer ActiveX control. This is especially important if the value of your text object is dependent on data in your data source. Since this is also a common place to change the data source used by a report, changing values in Text objects during the Load event often becomes convenient.
Private Sub Form_Load()Dim Report As New CrystalReport1
‘ More code hereReport.Text1.SetText “Here is some text from my app”CRViewer1.ReportSource = ReportCRViewer1.ViewReport
End Sub
The Report Designer Component 180

Notice that the SetText method is used to apply a new value. The Text property of the object model’s TextObject object is a read-only property, a convenient shortcut to get information about the existing value. However, SetText must be used to assign a new value.
The example above simply assigns a string to the Text1 object in the report. A more complicated technique may be to access data in a database and calculate a new value in Visual Basic, then display that value through a Text object on the report. In such cases, you could design your report in the Report Designer Component design window to specifically supply a Text object for such a result. The following code demonstrates this technique:
Private Sub Form_Load()
Dim maxValue As CurrencyDim maxValueString As StringDim Report As New CrystalReport1
Dim rs As New ADODB.Recordset
rs.Open “SELECT * FROM Customer”, _ “DSN=Xtreme sample data;”, adOpenKeyset
Report.Database.SetDataSource rs
maxValue = 0
rs.MoveFirst
Do While Not rs.EOF
If rs.Fields(“Last Year’s Sales”) > maxValue Then
maxValue = rs.Fields(“Last Year’s Sales”)
End If
rs.MoveNext
Loop
maxValueString = “The maximum value is “ & _Format(maxValue, “Currency”)
Report.Text1.SetText maxValueString
CRViewer1.ReportSource = ReportCRViewer1.ViewReport
End Sub
In this example, we are finding the maximum value of the Last Year’s Sales field of the new data source, formatting that value as Currency, then displaying a message containing the value through a Text object on the report. As you can see, Text objects provide many options for controlling the output of data in your reports.
The Report Designer Component 181

Changing OLE object images
OLE provides the means for incorporating many diverse file formats within your report. One of the most common and most valuable types of formats is images. However, data can change or be changed in a report, and images should reflect changes in data. It may be necessary to replace an OLE image with a new image at runtime.
The OLE Object provides the FormattedPicture property for getting and setting the current image displayed in an OLE object. This property can only be accessed during the Format event for the report Section containing the OLE image object.
The following examples demonstrate how to use the FormattedPicture property:
Private Sub Section1_Format(ByVal pFormattingInfo As Object)
Set Picture1.FormattedPicture = LoadPicture(“Xtreme.bmp”)
End Sub
NOTE: That if the image changes, the picture must be reloaded. OLE image controls can be assigned bitmaps (bmp), Windows metafiles (wmf), JPEG files (jpg), GIF files (gif), Icons (ico), and enhanced metafiles (emf).
NOTE: If you are familiar with COM interfaces, the FormattedPicture property can be assigned any image format that supports the IPictureDisp interface. Simply assign an instance of the interface to the property. Refer to the documentation that came with your image format tools to determine if the IPictureDisp interface is supported.
Working with Sections
All report objects, such as Fields and Text objects, are contained within Sections. Often, these can be obtained directly by referring to the name property of an object in your code. However, there may be times when you need to obtain an object through the report section it is in. For example, you may need to iterate through all objects in a section. At other times, you may have a need to make changes to the section itself.
Every report contains a collection of its sections, stored in the Sections property of the report object. Individual sections can be accessed through this collection. For example, the code below sets the height of the first section of the report (the Report Header) to half an inch (720 twips) and suppresses the second section of the report (the Page Header) so that it will not appear.
Dim Report As New CrystalReport1
Report.Sections.Item(1).Height = 720
Report.Sections.Item(2).Suppress = True
For information on how to obtain and work with other objects within a Section object, such as fields and text objects, refer to Working with the ReportObjects collection.
The Report Designer Component 182
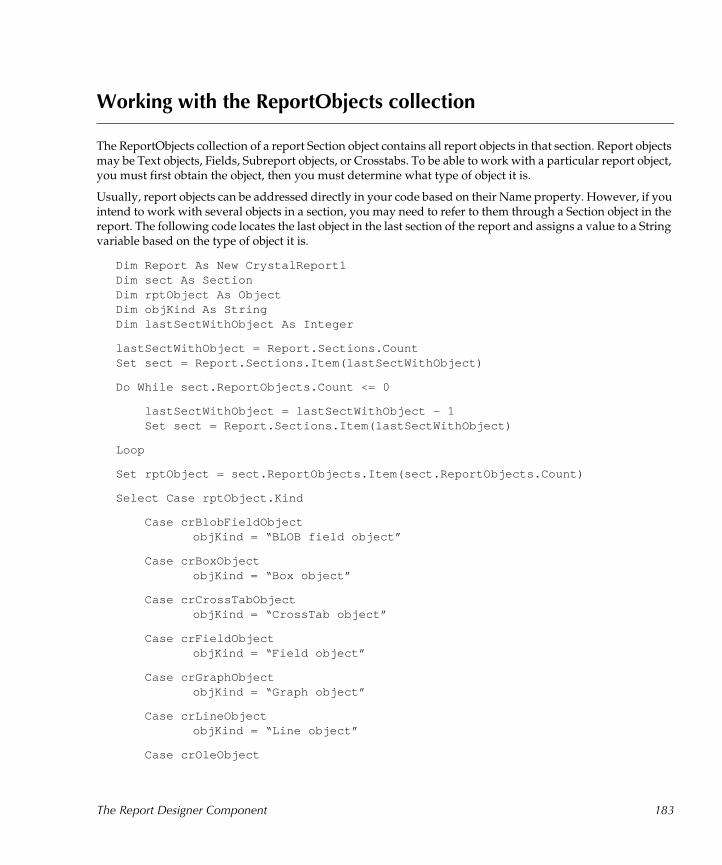
Working with the ReportObjects collection
The ReportObjects collection of a report Section object contains all report objects in that section. Report objects may be Text objects, Fields, Subreport objects, or Crosstabs. To be able to work with a particular report object, you must first obtain the object, then you must determine what type of object it is.
Usually, report objects can be addressed directly in your code based on their Name property. However, if you intend to work with several objects in a section, you may need to refer to them through a Section object in the report. The following code locates the last object in the last section of the report and assigns a value to a String variable based on the type of object it is.
Dim Report As New CrystalReport1Dim sect As SectionDim rptObject As ObjectDim objKind As StringDim lastSectWithObject As Integer
lastSectWithObject = Report.Sections.CountSet sect = Report.Sections.Item(lastSectWithObject)
Do While sect.ReportObjects.Count <= 0
lastSectWithObject = lastSectWithObject - 1Set sect = Report.Sections.Item(lastSectWithObject)
Loop
Set rptObject = sect.ReportObjects.Item(sect.ReportObjects.Count)
Select Case rptObject.Kind
Case crBlobFieldObjectobjKind = “BLOB field object”
Case crBoxObjectobjKind = “Box object”
Case crCrossTabObjectobjKind = “CrossTab object”
Case crFieldObjectobjKind = “Field object”
Case crGraphObjectobjKind = “Graph object”
Case crLineObjectobjKind = “Line object”
Case crOleObject
The Report Designer Component 183
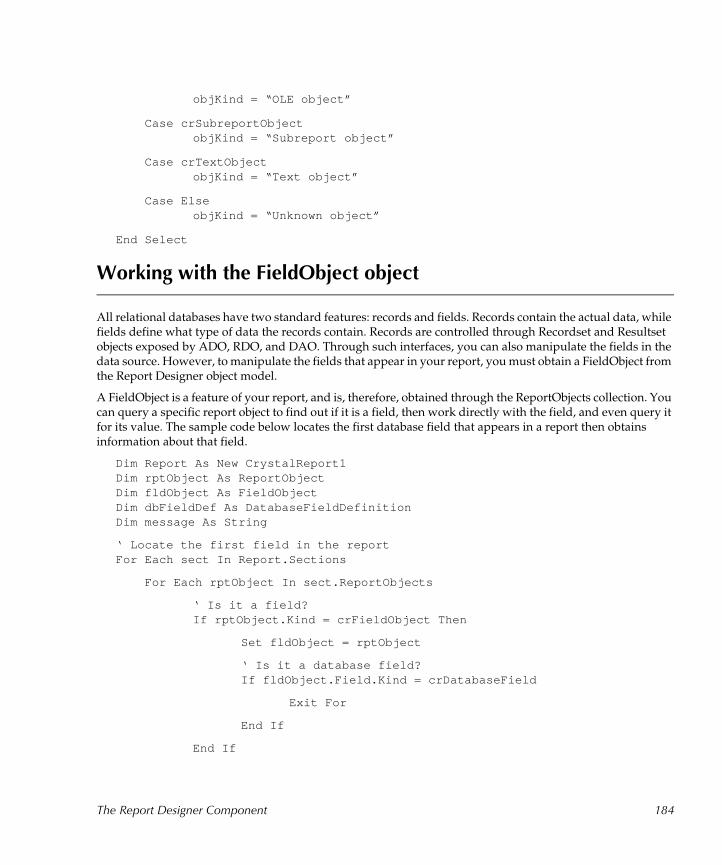
objKind = “OLE object”
Case crSubreportObjectobjKind = “Subreport object”
Case crTextObjectobjKind = “Text object”
Case ElseobjKind = “Unknown object”
End Select
Working with the FieldObject object
All relational databases have two standard features: records and fields. Records contain the actual data, while fields define what type of data the records contain. Records are controlled through Recordset and Resultset objects exposed by ADO, RDO, and DAO. Through such interfaces, you can also manipulate the fields in the data source. However, to manipulate the fields that appear in your report, you must obtain a FieldObject from the Report Designer object model.
A FieldObject is a feature of your report, and is, therefore, obtained through the ReportObjects collection. You can query a specific report object to find out if it is a field, then work directly with the field, and even query it for its value. The sample code below locates the first database field that appears in a report then obtains information about that field.
Dim Report As New CrystalReport1Dim rptObject As ReportObjectDim fldObject As FieldObjectDim dbFieldDef As DatabaseFieldDefinitionDim message As String
‘ Locate the first field in the reportFor Each sect In Report.Sections
For Each rptObject In sect.ReportObjects
‘ Is it a field?If rptObject.Kind = crFieldObject Then
Set fldObject = rptObject
‘ Is it a database field?If fldObject.Field.Kind = crDatabaseField
Exit For
End If
End If
The Report Designer Component 184
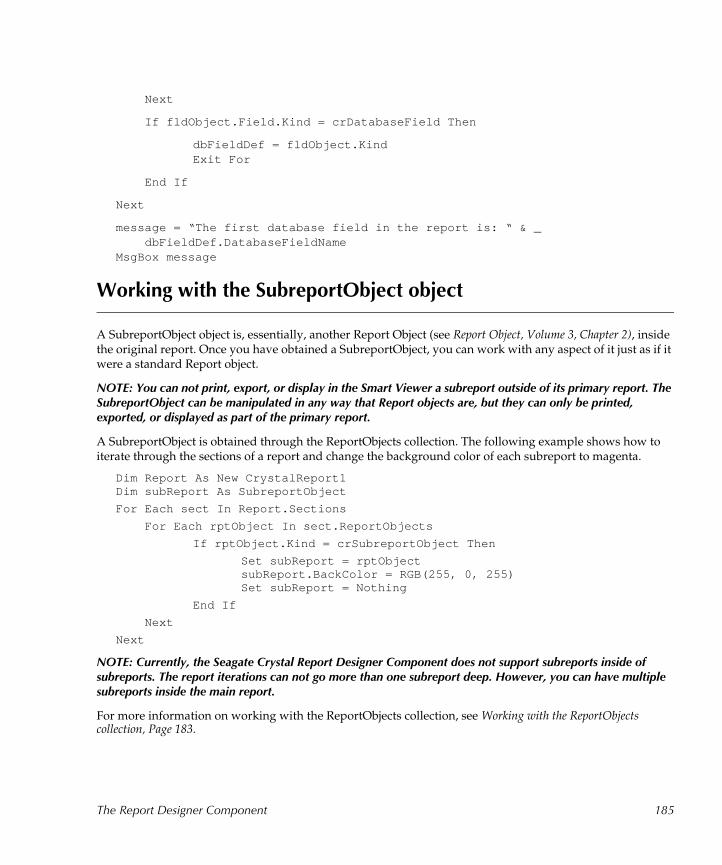
Next
If fldObject.Field.Kind = crDatabaseField Then
dbFieldDef = fldObject.KindExit For
End If
Next
message = “The first database field in the report is: “ & _dbFieldDef.DatabaseFieldName
MsgBox message
Working with the SubreportObject object
A SubreportObject object is, essentially, another Report Object (see Report Object, Volume 3, Chapter 2), inside the original report. Once you have obtained a SubreportObject, you can work with any aspect of it just as if it were a standard Report object.
NOTE: You can not print, export, or display in the Smart Viewer a subreport outside of its primary report. The SubreportObject can be manipulated in any way that Report objects are, but they can only be printed, exported, or displayed as part of the primary report.
A SubreportObject is obtained through the ReportObjects collection. The following example shows how to iterate through the sections of a report and change the background color of each subreport to magenta.
Dim Report As New CrystalReport1Dim subReport As SubreportObject
For Each sect In Report.Sections
For Each rptObject In sect.ReportObjects
If rptObject.Kind = crSubreportObject Then
Set subReport = rptObjectsubReport.BackColor = RGB(255, 0, 255)Set subReport = Nothing
End If
Next
Next
NOTE: Currently, the Seagate Crystal Report Designer Component does not support subreports inside of subreports. The report iterations can not go more than one subreport deep. However, you can have multiple subreports inside the main report.
For more information on working with the ReportObjects collection, see Working with the ReportObjects collection, Page 183.
The Report Designer Component 185
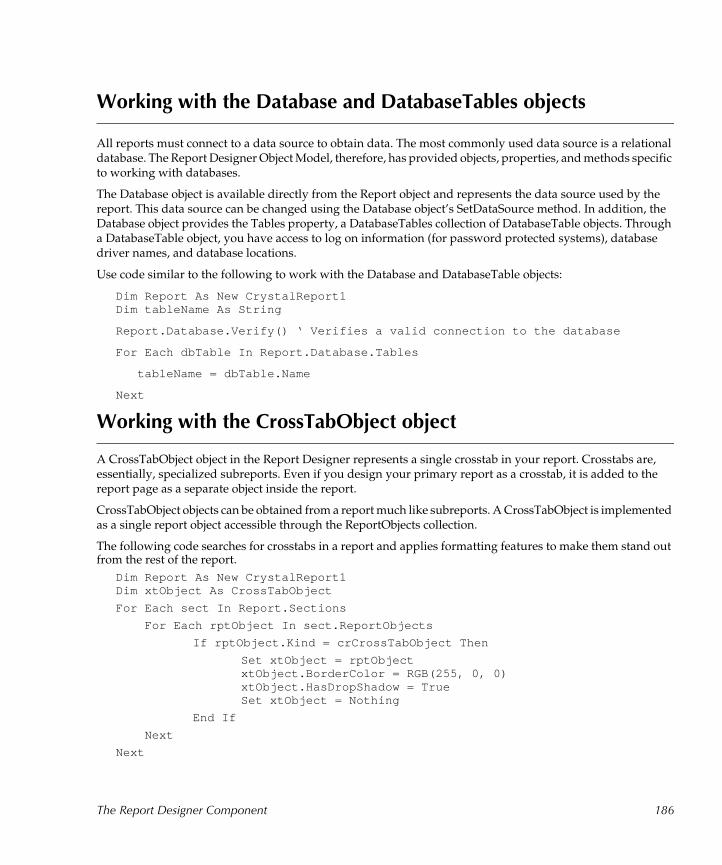
Working with the Database and DatabaseTables objects
All reports must connect to a data source to obtain data. The most commonly used data source is a relational database. The Report Designer Object Model, therefore, has provided objects, properties, and methods specific to working with databases.
The Database object is available directly from the Report object and represents the data source used by the report. This data source can be changed using the Database object’s SetDataSource method. In addition, the Database object provides the Tables property, a DatabaseTables collection of DatabaseTable objects. Through a DatabaseTable object, you have access to log on information (for password protected systems), database driver names, and database locations.
Use code similar to the following to work with the Database and DatabaseTable objects:
Dim Report As New CrystalReport1Dim tableName As String
Report.Database.Verify() ‘ Verifies a valid connection to the database
For Each dbTable In Report.Database.Tables
tableName = dbTable.Name
Next
Working with the CrossTabObject object
A CrossTabObject object in the Report Designer represents a single crosstab in your report. Crosstabs are, essentially, specialized subreports. Even if you design your primary report as a crosstab, it is added to the report page as a separate object inside the report.
CrossTabObject objects can be obtained from a report much like subreports. A CrossTabObject is implemented as a single report object accessible through the ReportObjects collection.
The following code searches for crosstabs in a report and applies formatting features to make them stand out from the rest of the report.
Dim Report As New CrystalReport1Dim xtObject As CrossTabObject
For Each sect In Report.Sections
For Each rptObject In sect.ReportObjects
If rptObject.Kind = crCrossTabObject Then
Set xtObject = rptObjectxtObject.BorderColor = RGB(255, 0, 0)xtObject.HasDropShadow = TrueSet xtObject = Nothing
End If
Next
Next
The Report Designer Component 186
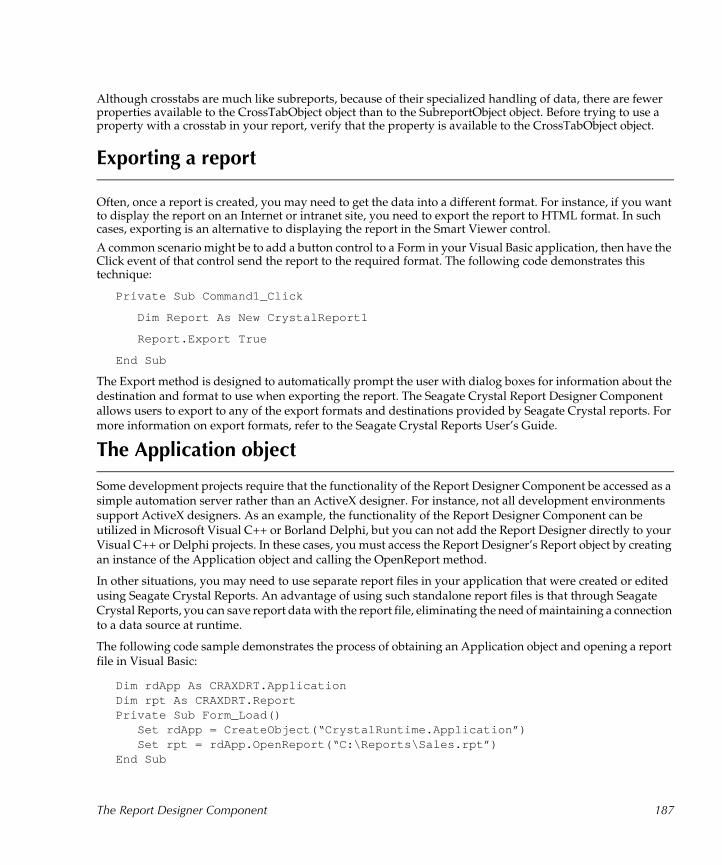
Although crosstabs are much like subreports, because of their specialized handling of data, there are fewer properties available to the CrossTabObject object than to the SubreportObject object. Before trying to use a property with a crosstab in your report, verify that the property is available to the CrossTabObject object.
Exporting a report
Often, once a report is created, you may need to get the data into a different format. For instance, if you want to display the report on an Internet or intranet site, you need to export the report to HTML format. In such cases, exporting is an alternative to displaying the report in the Smart Viewer control.
A common scenario might be to add a button control to a Form in your Visual Basic application, then have the Click event of that control send the report to the required format. The following code demonstrates this technique:
Private Sub Command1_Click
Dim Report As New CrystalReport1
Report.Export True
End Sub
The Export method is designed to automatically prompt the user with dialog boxes for information about the destination and format to use when exporting the report. The Seagate Crystal Report Designer Component allows users to export to any of the export formats and destinations provided by Seagate Crystal reports. For more information on export formats, refer to the Seagate Crystal Reports User’s Guide.
The Application object
Some development projects require that the functionality of the Report Designer Component be accessed as a simple automation server rather than an ActiveX designer. For instance, not all development environments support ActiveX designers. As an example, the functionality of the Report Designer Component can be utilized in Microsoft Visual C++ or Borland Delphi, but you can not add the Report Designer directly to your Visual C++ or Delphi projects. In these cases, you must access the Report Designer’s Report object by creating an instance of the Application object and calling the OpenReport method.
In other situations, you may need to use separate report files in your application that were created or edited using Seagate Crystal Reports. An advantage of using such standalone report files is that through Seagate Crystal Reports, you can save report data with the report file, eliminating the need of maintaining a connection to a data source at runtime.
The following code sample demonstrates the process of obtaining an Application object and opening a report file in Visual Basic:
Dim rdApp As CRAXDRT.ApplicationDim rpt As CRAXDRT.ReportPrivate Sub Form_Load() Set rdApp = CreateObject(“CrystalRuntime.Application”) Set rpt = rdApp.OpenReport(“C:\Reports\Sales.rpt”)End Sub
The Report Designer Component 187
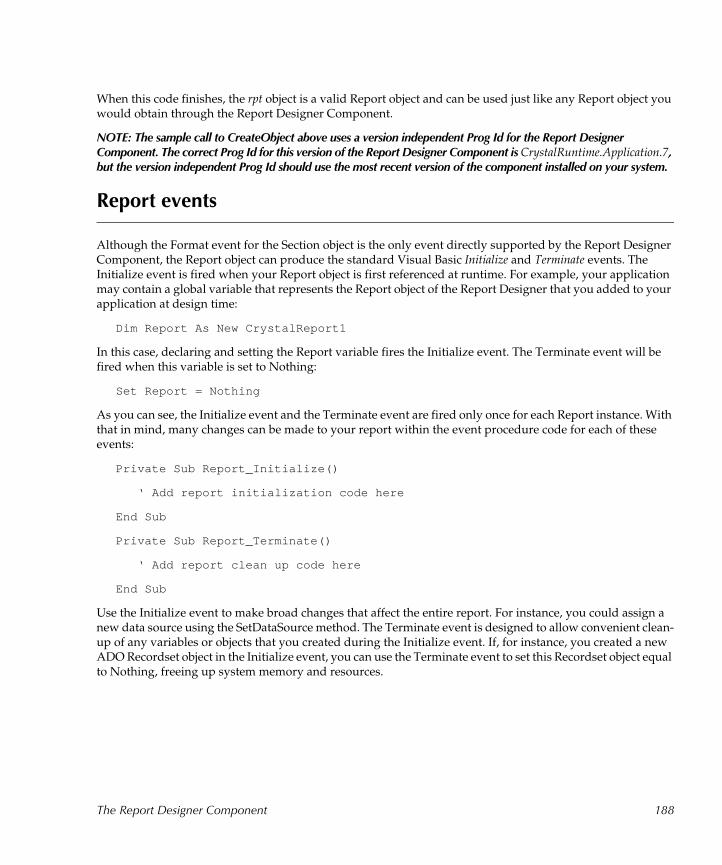
When this code finishes, the rpt object is a valid Report object and can be used just like any Report object you would obtain through the Report Designer Component.
NOTE: The sample call to CreateObject above uses a version independent Prog Id for the Report Designer Component. The correct Prog Id for this version of the Report Designer Component is CrystalRuntime.Application.7, but the version independent Prog Id should use the most recent version of the component installed on your system.
Report events
Although the Format event for the Section object is the only event directly supported by the Report Designer Component, the Report object can produce the standard Visual Basic Initialize and Terminate events. The Initialize event is fired when your Report object is first referenced at runtime. For example, your application may contain a global variable that represents the Report object of the Report Designer that you added to your application at design time:
Dim Report As New CrystalReport1
In this case, declaring and setting the Report variable fires the Initialize event. The Terminate event will be fired when this variable is set to Nothing:
Set Report = Nothing
As you can see, the Initialize event and the Terminate event are fired only once for each Report instance. With that in mind, many changes can be made to your report within the event procedure code for each of these events:
Private Sub Report_Initialize()
‘ Add report initialization code here
End Sub
Private Sub Report_Terminate()
‘ Add report clean up code here
End Sub
Use the Initialize event to make broad changes that affect the entire report. For instance, you could assign a new data source using the SetDataSource method. The Terminate event is designed to allow convenient clean-up of any variables or objects that you created during the Initialize event. If, for instance, you created a new ADO Recordset object in the Initialize event, you can use the Terminate event to set this Recordset object equal to Nothing, freeing up system memory and resources.
The Report Designer Component 188
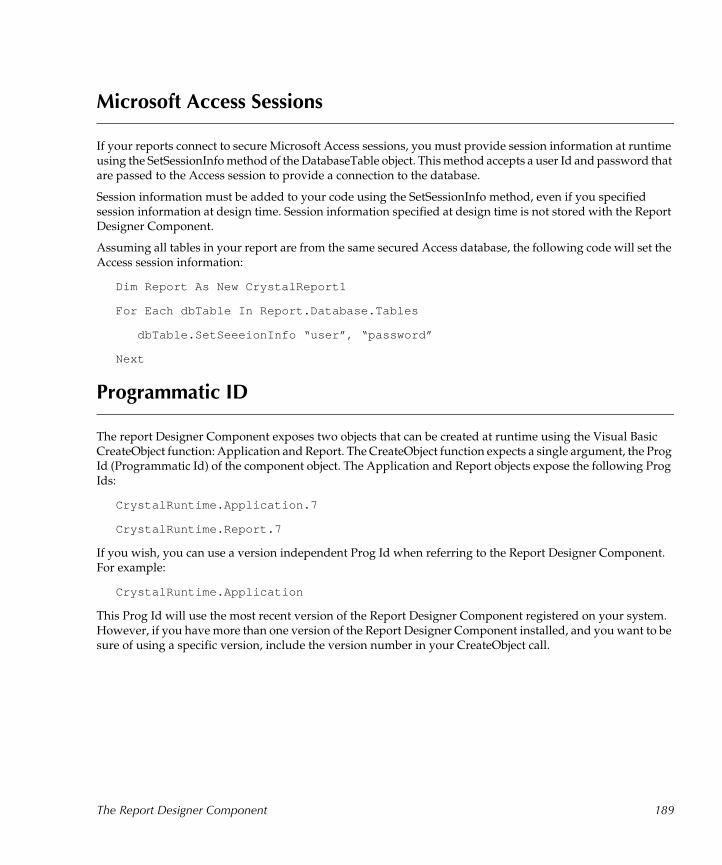
Microsoft Access Sessions
If your reports connect to secure Microsoft Access sessions, you must provide session information at runtime using the SetSessionInfo method of the DatabaseTable object. This method accepts a user Id and password that are passed to the Access session to provide a connection to the database.
Session information must be added to your code using the SetSessionInfo method, even if you specified session information at design time. Session information specified at design time is not stored with the Report Designer Component.
Assuming all tables in your report are from the same secured Access database, the following code will set the Access session information:
Dim Report As New CrystalReport1
For Each dbTable In Report.Database.Tables
dbTable.SetSeeeionInfo “user”, “password”
Next
Programmatic ID
The report Designer Component exposes two objects that can be created at runtime using the Visual Basic CreateObject function: Application and Report. The CreateObject function expects a single argument, the Prog Id (Programmatic Id) of the component object. The Application and Report objects expose the following Prog Ids:
CrystalRuntime.Application.7
CrystalRuntime.Report.7
If you wish, you can use a version independent Prog Id when referring to the Report Designer Component. For example:
CrystalRuntime.Application
This Prog Id will use the most recent version of the Report Designer Component registered on your system. However, if you have more than one version of the Report Designer Component installed, and you want to be sure of using a specific version, include the version number in your CreateObject call.
The Report Designer Component 189
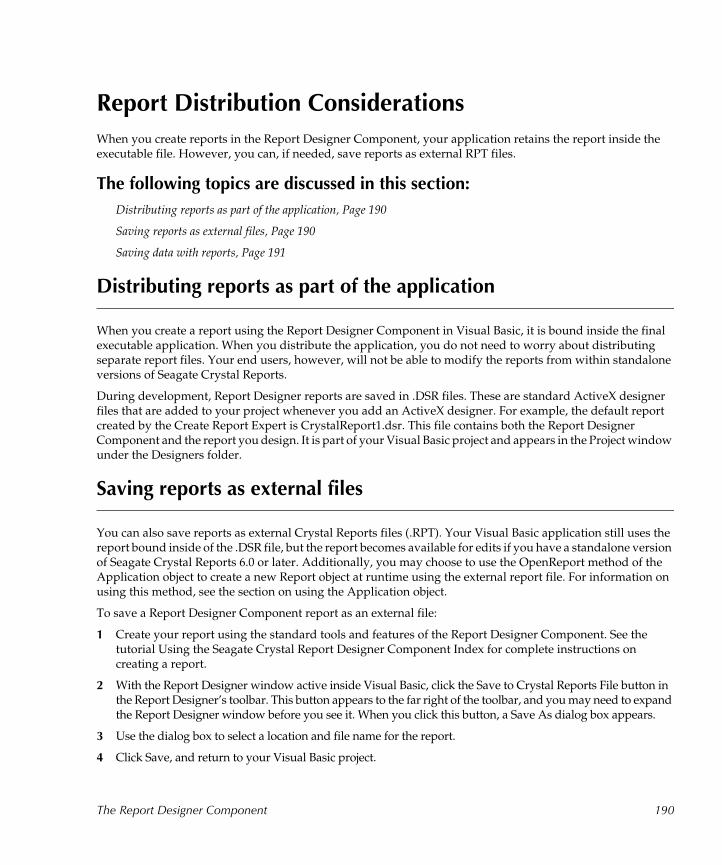
Report Distribution Considerations
When you create reports in the Report Designer Component, your application retains the report inside the executable file. However, you can, if needed, save reports as external RPT files.
The following topics are discussed in this section:
Distributing reports as part of the application, Page 190
Saving reports as external files, Page 190
Saving data with reports, Page 191
Distributing reports as part of the application
When you create a report using the Report Designer Component in Visual Basic, it is bound inside the final executable application. When you distribute the application, you do not need to worry about distributing separate report files. Your end users, however, will not be able to modify the reports from within standalone versions of Seagate Crystal Reports.
During development, Report Designer reports are saved in .DSR files. These are standard ActiveX designer files that are added to your project whenever you add an ActiveX designer. For example, the default report created by the Create Report Expert is CrystalReport1.dsr. This file contains both the Report Designer Component and the report you design. It is part of your Visual Basic project and appears in the Project window under the Designers folder.
Saving reports as external files
You can also save reports as external Crystal Reports files (.RPT). Your Visual Basic application still uses the report bound inside of the .DSR file, but the report becomes available for edits if you have a standalone version of Seagate Crystal Reports 6.0 or later. Additionally, you may choose to use the OpenReport method of the Application object to create a new Report object at runtime using the external report file. For information on using this method, see the section on using the Application object.
To save a Report Designer Component report as an external file:
1 Create your report using the standard tools and features of the Report Designer Component. See the tutorial Using the Seagate Crystal Report Designer Component Index for complete instructions on creating a report.
2 With the Report Designer window active inside Visual Basic, click the Save to Crystal Reports File button in the Report Designer’s toolbar. This button appears to the far right of the toolbar, and you may need to expand the Report Designer window before you see it. When you click this button, a Save As dialog box appears.
3 Use the dialog box to select a location and file name for the report.
4 Click Save, and return to your Visual Basic project.
The Report Designer Component 190
NOTE: If you create a report in the Report Designer Component and use Visual Basic code to create calculated fields and conditional formatting, you will lose that code (and thus the calculations and formatting) when you store the reports as an external file. The .RPT file format does not inherently support Visual Basic code. If you must retain calculated fields and conditional formatting, use only the Seagate Crystal Reports formula language to create your report formulas or do not save the report external to your application.
Saving data with reports
When working with the Report Designer Component, keep in mind that data is not stored with the report. The report maintains a connection to the data through the ActiveX data source connection used (e.g DAO or ADO). When the application is distributed, you must make sure that your users will still be able to access the data. If this is not possible, you may want to consider using external report files.
External report files created and/or edited in a standalone version of Seagate Crystal Reports can have data stored with the report file. This increases the size of the report file, but eliminates a dependency on a connection to the original data source.
By using the Report Designer Component as an automation server, and obtaining a Report object through the Application object’s OpenReport method, you can provide reports to your users without providing a data connection at runtime. Remember, though, you will have to distribute the report files with your application.
The Report Designer Component 191
Volume 1
7 Seagate Crystal Visual Component Library
What you will find in this chapter...
VCL Component Overview, Page 194
Installation, Page 194
Programming Overview, Page 199
Programming Tips, Page 209
TCrpeString, Page 212
Using Variables with Formulas, Page 215
About Section Names, Page 221
C++ Builder 3, Page 224
Known Problems, Page 226
Technical Support, Page 227
Seagate Crystal Visual Component Library 193
VCL Component Overview The Seagate Crystal Reports Component has been designed for the Visual Component Library (VCL) of the Inprise (formerly Borland) Delphi development environment. The Component encapsulates the functionality available in the Seagate Crystal Reports Print Engine DLL(CRPE32.DLL), and can be easily added to any Delphi project and compiled into your final executable application. At this time, the Component is not available in a 16-bit version. Like the Seagate Crystal ActiveX control, the Component provides all the report- processing power available in the Seagate Crystal Reports Print Engine for your Delphi projects.
Installation The following topics are covered in this section.
Delphi 2, Page 194
Delphi 3 & 4, Page 195
C++ Builder 3, Page 198
Delphi 2
Installing the Component1 Select Component | Install from the Delphi Main Menu.
2 Select Add from the Install Components Dialog Box.
3 Browse Files of type unit (*.DCU).
4 Select the UCRPE32.DCU file.
5 Click OK (in the Add Module dialog to return to the Install Components dialog). The directory where UCRPE32.DCU is selected will automatically be installed in the Component Search Path.
6 Select OK (in the Install Components dialog). When Delphi is finished rebuilding the Component Library, a Crystal Reports icon will appear on the Data Access page of the Component Palette.
Installing the Help file
1 Copy the UCRPE32.HLP, UCRPE32.CNT, and UCRPE32.KWF to the Delphi2 Help directory.
2 Run the HELPINST.EXE from the Delphi2 Help/Tools directory.
3 Choose File | Open and load the DELPHI.HDX file (normally in the Delphi2 Bin directory).
4 Click on the + button, or choose Add Keyword File... from the Keywords menu.
5 Choose the UCRPE32.KWF file that you copied to the Delphi2/Help directory, and then click OK.
6 Choose File | Save and then File | Exit. Context-sensitive help should now be available from the Delphi2 IDE (choosing the F1 key while a property is selected should bring up the appropriate item in the UCRPE32.HLP file).
Seagate Crystal Visual Component Library 194
Delphi 3 & 4
Installing the Component
The Package Collection file, CrystalVCL.dpc, contains all the files required for Delphi 3. If you are using Delphi 4, the Package Collection is called CrystalVCL4.dpc. To install this Package Collection, the following steps should be followed:
1 Go to the Component menu, choose Install Packages.
2 Choose Add.
3 Change the Files of Type extension to Package collection (*.dpc).
4 Locate the CrystalVCL.dpc, select it and choose Open.
5 Follow the steps in Delphi's Install Package Collection dialog. The install path can be changed, and the Sample App, Help, and Source files are optional and can be de-selected if desired.
When the install process is finished, The Crystal VCL should appear under the Data Access tab of the VCL Component palette.
NOTE: It is also necessary to add the Crystal VCL install path to Delphi's Library Path string (Tools | Environment Options | Library) in order for the Component files to be found by Delphi.
Problems
If another UCRPE32.DCU or CRYSTAL.DPL (CRYSTAL.BPL for Delphi 4) is found in the search path, the package might not install. Since the installation of the package comes after the files have been copied to the hard-drive, they should all be available in the directory chosen during install, and it is not necessary to run the install again. All that needs to be done in this case is to first remove any older copies of the component that Delphi found, and then add the package using one of the three ways described below.
1. The package included (DPL/BPL) can be directly installed.
2. The component (DCU) can be installed into a new package.
3. The component (DCU) can be installed into another package (Not recommended).
Installing the included Package1 Go to the Component menu, choose Install Packages.
2 Choose Add.
3 Locate the CRYSTAL.DPL (or CRYSTAL.BPL) file and load it.
4 Choose OK.
The Crystal VCL should appear under the Data Access tab of the VCL Component palette.
Seagate Crystal Visual Component Library 195
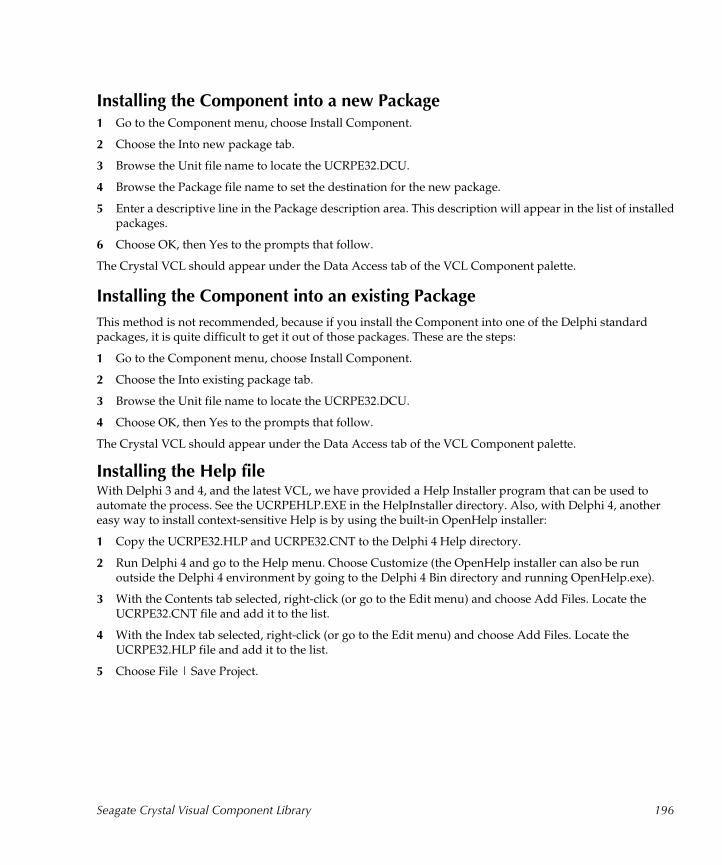
Installing the Component into a new Package1 Go to the Component menu, choose Install Component.
2 Choose the Into new package tab.
3 Browse the Unit file name to locate the UCRPE32.DCU.
4 Browse the Package file name to set the destination for the new package.
5 Enter a descriptive line in the Package description area. This description will appear in the list of installedpackages.
6 Choose OK, then Yes to the prompts that follow.
The Crystal VCL should appear under the Data Access tab of the VCL Component palette.
Installing the Component into an existing Package
This method is not recommended, because if you install the Component into one of the Delphi standard packages, it is quite difficult to get it out of those packages. These are the steps:
1 Go to the Component menu, choose Install Component.
2 Choose the Into existing package tab.
3 Browse the Unit file name to locate the UCRPE32.DCU.
4 Choose OK, then Yes to the prompts that follow.
The Crystal VCL should appear under the Data Access tab of the VCL Component palette.
Installing the Help fileWith Delphi 3 and 4, and the latest VCL, we have provided a Help Installer program that can be used to automate the process. See the UCRPEHLP.EXE in the HelpInstaller directory. Also, with Delphi 4, another easy way to install context-sensitive Help is by using the built-in OpenHelp installer:
1 Copy the UCRPE32.HLP and UCRPE32.CNT to the Delphi 4 Help directory.
2 Run Delphi 4 and go to the Help menu. Choose Customize (the OpenHelp installer can also be run outside the Delphi 4 environment by going to the Delphi 4 Bin directory and running OpenHelp.exe).
3 With the Contents tab selected, right-click (or go to the Edit menu) and choose Add Files. Locate the UCRPE32.CNT file and add it to the list.
4 With the Index tab selected, right-click (or go to the Edit menu) and choose Add Files. Locate the UCRPE32.HLP file and add it to the list.
5 Choose File | Save Project.
Seagate Crystal Visual Component Library 196
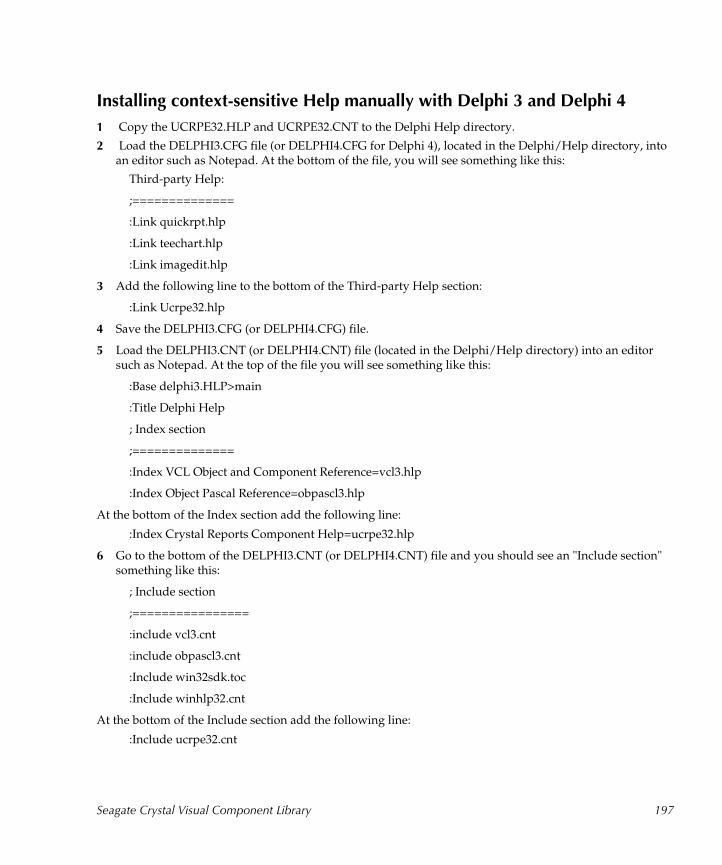
Installing context-sensitive Help manually with Delphi 3 and Delphi 4
1 Copy the UCRPE32.HLP and UCRPE32.CNT to the Delphi Help directory.
2 Load the DELPHI3.CFG file (or DELPHI4.CFG for Delphi 4), located in the Delphi/Help directory, into an editor such as Notepad. At the bottom of the file, you will see something like this:
Third-party Help:
;==============
:Link quickrpt.hlp
:Link teechart.hlp
:Link imagedit.hlp
3 Add the following line to the bottom of the Third-party Help section:
:Link Ucrpe32.hlp
4 Save the DELPHI3.CFG (or DELPHI4.CFG) file.
5 Load the DELPHI3.CNT (or DELPHI4.CNT) file (located in the Delphi/Help directory) into an editor such as Notepad. At the top of the file you will see something like this:
:Base delphi3.HLP>main
:Title Delphi Help
; Index section
;==============
:Index VCL Object and Component Reference=vcl3.hlp
:Index Object Pascal Reference=obpascl3.hlp
At the bottom of the Index section add the following line:
:Index Crystal Reports Component Help=ucrpe32.hlp
6 Go to the bottom of the DELPHI3.CNT (or DELPHI4.CNT) file and you should see an "Include section" something like this:
; Include section
;================
:include vcl3.cnt
:include obpascl3.cnt
:Include win32sdk.toc
:Include winhlp32.cnt
At the bottom of the Include section add the following line:
:Include ucrpe32.cnt
Seagate Crystal Visual Component Library 197
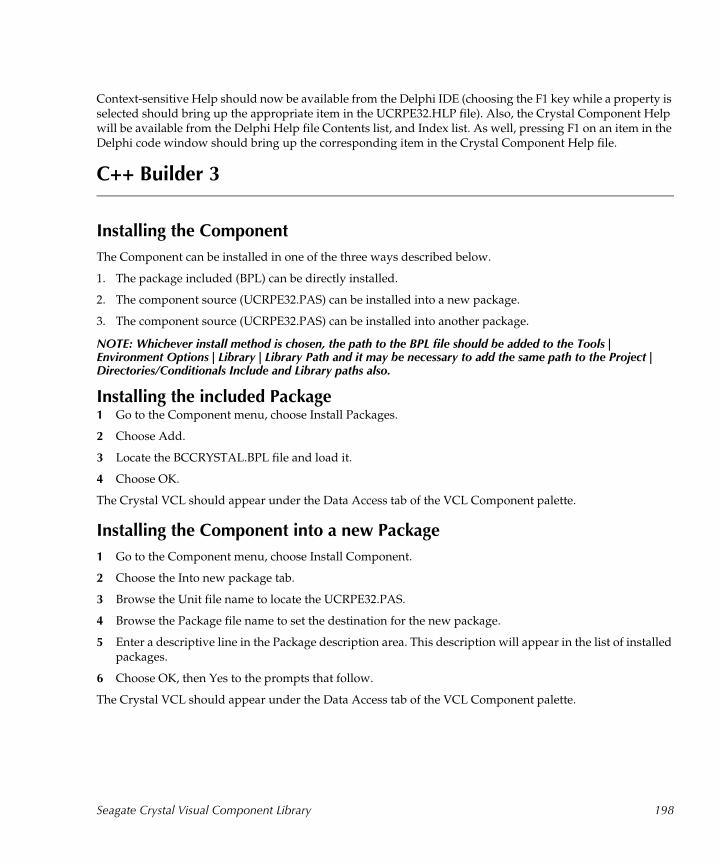
Context-sensitive Help should now be available from the Delphi IDE (choosing the F1 key while a property is selected should bring up the appropriate item in the UCRPE32.HLP file). Also, the Crystal Component Help will be available from the Delphi Help file Contents list, and Index list. As well, pressing F1 on an item in the Delphi code window should bring up the corresponding item in the Crystal Component Help file.
C++ Builder 3
Installing the Component
The Component can be installed in one of the three ways described below.
1. The package included (BPL) can be directly installed.
2. The component source (UCRPE32.PAS) can be installed into a new package.
3. The component source (UCRPE32.PAS) can be installed into another package.
NOTE: Whichever install method is chosen, the path to the BPL file should be added to the Tools | Environment Options | Library | Library Path and it may be necessary to add the same path to the Project | Directories/Conditionals Include and Library paths also.
Installing the included Package1 Go to the Component menu, choose Install Packages.
2 Choose Add.
3 Locate the BCCRYSTAL.BPL file and load it.
4 Choose OK.
The Crystal VCL should appear under the Data Access tab of the VCL Component palette.
Installing the Component into a new Package
1 Go to the Component menu, choose Install Component.
2 Choose the Into new package tab.
3 Browse the Unit file name to locate the UCRPE32.PAS.
4 Browse the Package file name to set the destination for the new package.
5 Enter a descriptive line in the Package description area. This description will appear in the list of installed packages.
6 Choose OK, then Yes to the prompts that follow.
The Crystal VCL should appear under the Data Access tab of the VCL Component palette.
Seagate Crystal Visual Component Library 198
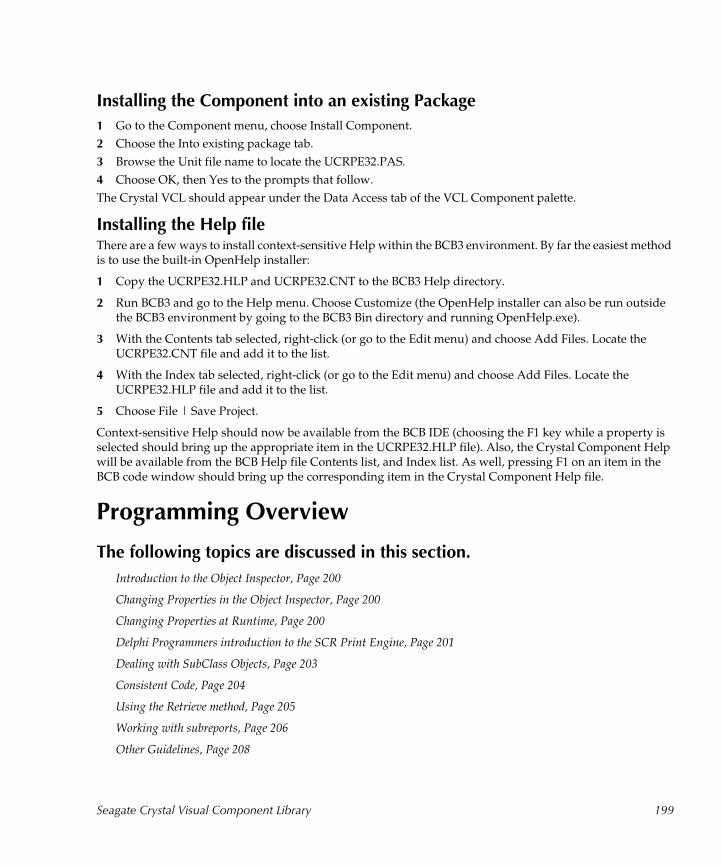
Installing the Component into an existing Package
1 Go to the Component menu, choose Install Component.
2 Choose the Into existing package tab.
3 Browse the Unit file name to locate the UCRPE32.PAS.
4 Choose OK, then Yes to the prompts that follow.The Crystal VCL should appear under the Data Access tab of the VCL Component palette.
Installing the Help fileThere are a few ways to install context-sensitive Help within the BCB3 environment. By far the easiest method is to use the built-in OpenHelp installer:
1 Copy the UCRPE32.HLP and UCRPE32.CNT to the BCB3 Help directory.
2 Run BCB3 and go to the Help menu. Choose Customize (the OpenHelp installer can also be run outside the BCB3 environment by going to the BCB3 Bin directory and running OpenHelp.exe).
3 With the Contents tab selected, right-click (or go to the Edit menu) and choose Add Files. Locate the UCRPE32.CNT file and add it to the list.
4 With the Index tab selected, right-click (or go to the Edit menu) and choose Add Files. Locate the UCRPE32.HLP file and add it to the list.
5 Choose File | Save Project.
Context-sensitive Help should now be available from the BCB IDE (choosing the F1 key while a property is selected should bring up the appropriate item in the UCRPE32.HLP file). Also, the Crystal Component Help will be available from the BCB Help file Contents list, and Index list. As well, pressing F1 on an item in the BCB code window should bring up the corresponding item in the Crystal Component Help file.
Programming Overview
The following topics are discussed in this section.
Introduction to the Object Inspector, Page 200
Changing Properties in the Object Inspector, Page 200
Changing Properties at Runtime, Page 200
Delphi Programmers introduction to the SCR Print Engine, Page 201
Dealing with SubClass Objects, Page 203
Consistent Code, Page 204
Using the Retrieve method, Page 205
Working with subreports, Page 206
Other Guidelines, Page 208
Seagate Crystal Visual Component Library 199
Introduction to the Object Inspector
Once you add the TCrpe component to a form in your project, build the connection between your Delphi application and the Crystal Report Engine by setting the Component's properties via the Object Inspector. Using the Object Inspector, you specify:
● the name of the report you want to print in response to an application event,
● the destination for that report (window, file, or printer),
● the number of copies you want to print (if your report is going to the printer),
● print file information (if your report is going to a file),
● preview window sizing and positioning information (if your report is going to a window),
● selection formula information (if you want to limit the records in your report),
● sorting information, and
● other related properties.
TCrpe component properties can be changed either at design time or at runtime. Note, however, some properties are available only at runtime. These properties will not appear on the Properties list in the Object Inspector. For a complete description of each property in the Crystal VCL Component, refer to Seagate Crystal Reports Technical Reference: Volume 4 - VCL Reference, which is available as a PDF file.
Changing Properties in the Object Inspector
To change the value for a property, click the property and then do the following:
● If a text box appears next to the property name, type in a value for the property.
● If a drop down list box appears next to the property name, click the arrow to open the drop down list and select a value from that list.
● If a text box with an ellipsis (...) button appears next to the property name, click the button to reveal a dialog box where you can define your setting for the property.
Changing Properties at Runtime
You can set most of the properties for the TCrpe component at runtime by adding simple entries to your procedure code. Runtime property settings replace settings you make via the Object Inspector at design time.
The Execute property is used to actually process the report at runtime. This property can only be set at runtime, and it is the only means by which a report can actually be generated by the TCrpe component.
For information on how to set component properties at runtime, refer to your Delphi documentation. Developer’s online Help contains code examples for each of the TCrpe component properties. Search for the property you are interested to view these examples.
Seagate Crystal Visual Component Library 200
Delphi Programmers introduction to the SCR Print Engine
Programmers who are new to the Seagate Crystal Reports Print Engine will want to spend a few moments reading the next few paragraphs. After installing the Component, you should see the Seagate Crystal Reports component icon on the Data Access tab of the VCL palette. Start a new project, and add the Component to the form.
After adding the Component to the form, there are only two basic calls that need to be made in order to run a report. First add a Button to your new form. Double click the button to start an OnClick event in the code for the form. Inside the OnClick event, type the following two lines:
Crpe1.ReportName := 'c:\MyReport.rpt';Crpe1.Execute;
Change 'c:\MyReport.rpt' to point to a valid Crystal Report file that exists on your computer. Now compile the new Project and run it. When it appears, click on the button. If all goes well, you should see a Crystal Report appear in the runtime Preview Window.
You will want to remember a basic rule at this point: always set the ReportName property first. The reason for this is that when the value of ReportName changes, most of the other properties are cleared. This is more fully explained later in this chapter in the Programming Tips section.
The next property you may want to experiment with is the Output property. By default this is set toWindow, but you can also set it toPrinter, or toExport. This can be done in code or with the Object Inspector. If you are using it in code, be sure to write it before the Execute command, or it will be ignored until the next Execute is called:
Crpe1.ReportName := 'c:\MyReport.rpt';Crpe1.Output := toPrinter;Crpe1.Execute;
The following list shows which properties control the options that are available for each Output type:
toWindow toPrinter toExport
WindowButtonBar Printer Export
WindowSize PrintOptions ProgressDialog
WindowState ProgressDialog
WindowStyle
WindowZoom
Seagate Crystal Visual Component Library 201
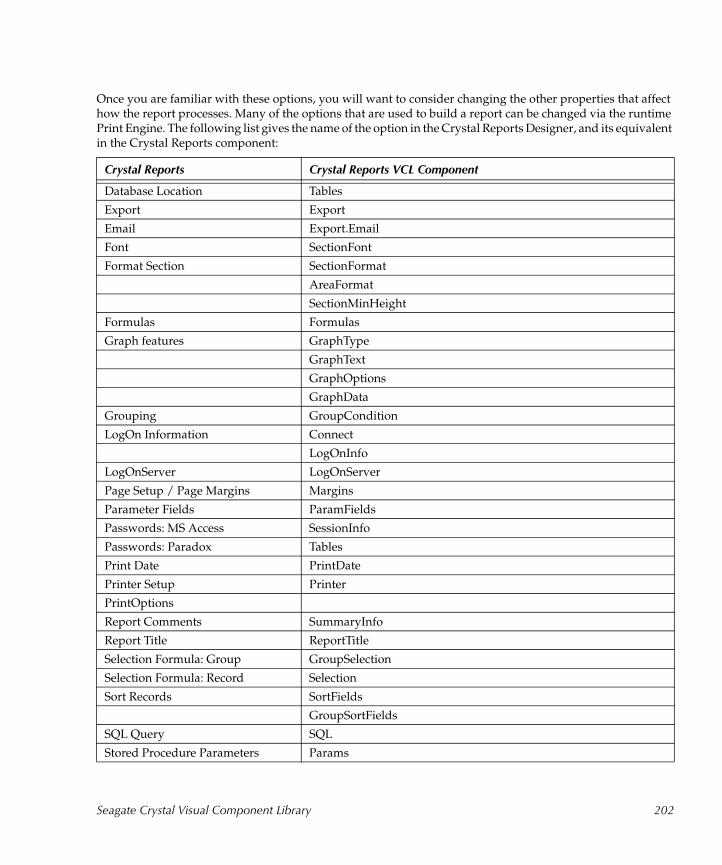
Once you are familiar with these options, you will want to consider changing the other properties that affect how the report processes. Many of the options that are used to build a report can be changed via the runtime Print Engine. The following list gives the name of the option in the Crystal Reports Designer, and its equivalent in the Crystal Reports component:
Crystal Reports Crystal Reports VCL Component
Database Location Tables
Export Export
Email Export.Email
Font SectionFont
Format Section SectionFormat
AreaFormat
SectionMinHeight
Formulas Formulas
Graph features GraphType
GraphText
GraphOptions
GraphData
Grouping GroupCondition
LogOn Information Connect
LogOnInfo
LogOnServer LogOnServer
Page Setup / Page Margins Margins
Parameter Fields ParamFields
Passwords: MS Access SessionInfo
Passwords: Paradox Tables
Print Date PrintDate
Printer Setup Printer
PrintOptions
Report Comments SummaryInfo
Report Title ReportTitle
Selection Formula: Group GroupSelection
Selection Formula: Record Selection
Sort Records SortFields
GroupSortFields
SQL Query SQL
Stored Procedure Parameters Params
Seagate Crystal Visual Component Library 202
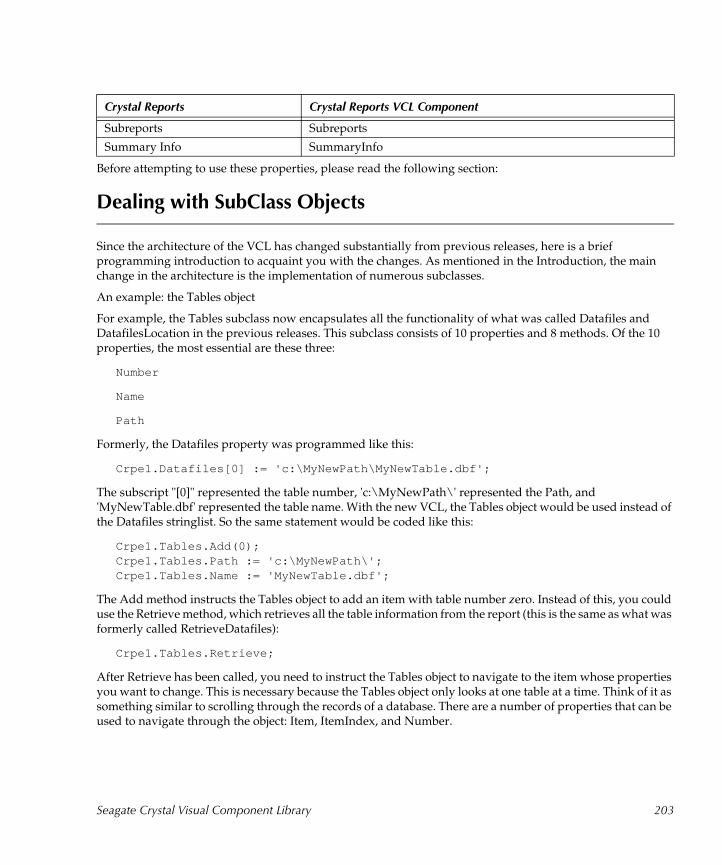
Before attempting to use these properties, please read the following section:
Dealing with SubClass Objects
Since the architecture of the VCL has changed substantially from previous releases, here is a brief programming introduction to acquaint you with the changes. As mentioned in the Introduction, the main change in the architecture is the implementation of numerous subclasses.
An example: the Tables object
For example, the Tables subclass now encapsulates all the functionality of what was called Datafiles and DatafilesLocation in the previous releases. This subclass consists of 10 properties and 8 methods. Of the 10 properties, the most essential are these three:
Number
Name
Path
Formerly, the Datafiles property was programmed like this:
Crpe1.Datafiles[0] := 'c:\MyNewPath\MyNewTable.dbf';
The subscript "[0]" represented the table number, 'c:\MyNewPath\' represented the Path, and 'MyNewTable.dbf' represented the table name. With the new VCL, the Tables object would be used instead of the Datafiles stringlist. So the same statement would be coded like this:
Crpe1.Tables.Add(0);Crpe1.Tables.Path := 'c:\MyNewPath\';Crpe1.Tables.Name := 'MyNewTable.dbf';
The Add method instructs the Tables object to add an item with table number zero. Instead of this, you could use the Retrieve method, which retrieves all the table information from the report (this is the same as what was formerly called RetrieveDatafiles):
Crpe1.Tables.Retrieve;
After Retrieve has been called, you need to instruct the Tables object to navigate to the item whose properties you want to change. This is necessary because the Tables object only looks at one table at a time. Think of it as something similar to scrolling through the records of a database. There are a number of properties that can be used to navigate through the object: Item, ItemIndex, and Number.
Subreports Subreports
Summary Info SummaryInfo
Crystal Reports Crystal Reports VCL Component
Seagate Crystal Visual Component Library 203

Each object in the Crystal VCL that can contain more than one item, uses an internal Index to maintain which item it is currently looking at, similar to the ItemIndex property of a list box. This Index is updated whenever the Item property is used (LogOnInfo[2], for example), or whenever the key property (if applicable) is assigned a new lookup value. Key properties are things like Formulas.Name, or SortFields.Number; properties that contain a unique value for each item, and which serve as look up properties. They appear as drop-down lists in the Object Inspector.
Number is the key property for the Tables object. Assigning a new value to the Number property will not overwrite the value stored there, but will rather cause the Tables object to try and find that new value, and point to the table that has the value. For example:
Crpe1.Tables.Number := 2;
This will cause the Tables object to look internally for a table with the number 2. If it finds it, the object will now point it's properties to that table and will remain pointing there until it is changed. That is one way of navigating through the tables.
The ItemIndex property can also be used to navigate through the Tables object:
Crpe1.Tables.ItemIndex := 2;
Although in this case, ItemIndex represents the position of the table in the internal Tables list, not necessarily the table number (although if Retrieve is used, these should be the same).
By far the easiest and most natural way of navigating through the Tables object is the default array property, Item. Since this is a default property, it does not need to be specified when making the call, so Tables[2] is the same as Tables.Item[2]. And since the Item property returns a reference to the Tables object, it is possible to add other properties to the end of the subscript:
Crpe1.Tables[2].Path := 'c:\MyNewPath\';
Crpe1.Tables[3].Name := 'MyNewTable.dbf';
While initially this might seem like a lot more work, it actually is much more powerful, especially when dealing with items that have a dozen properties, such as the SectionFormat object. With SectionFormat, the old method involved passing a large string of about a dozen items separated by semicolons. Even if you only wanted to set one property, you still had to pass the whole string. With the new object format, you only need to set the property that you want to change.
Consistent Code
One of the reasons for making the properties into objects is that the coding syntax is more consistent. For example, there are a number of methods associated with the Tables object:
Crpe1.Tables.Retrieve;
Crpe1.Tables.Count;
Crpe1.Tables.Clear;
Seagate Crystal Visual Component Library 204
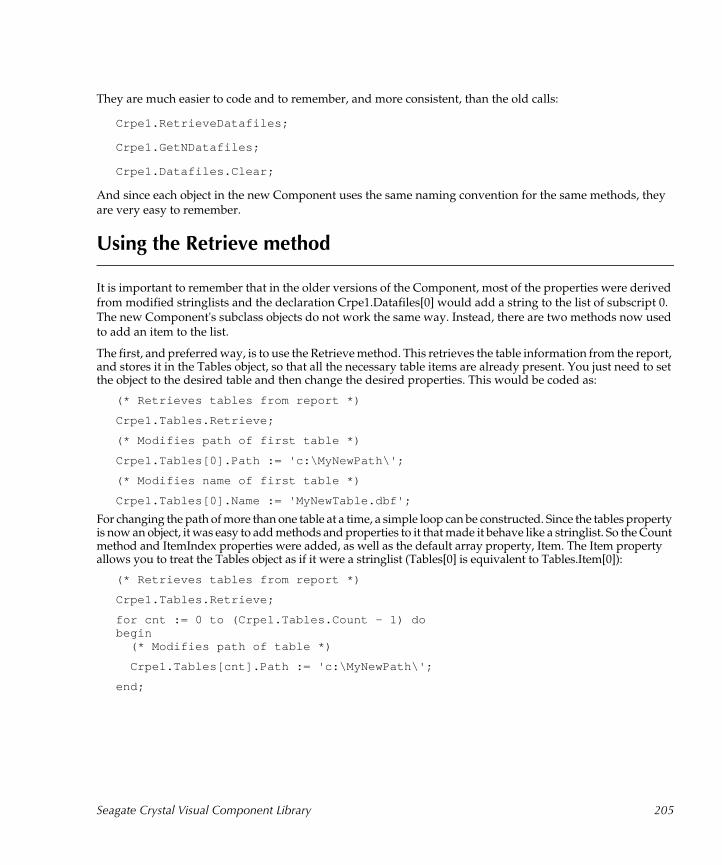
They are much easier to code and to remember, and more consistent, than the old calls:
Crpe1.RetrieveDatafiles;
Crpe1.GetNDatafiles;
Crpe1.Datafiles.Clear;
And since each object in the new Component uses the same naming convention for the same methods, they are very easy to remember.
Using the Retrieve method
It is important to remember that in the older versions of the Component, most of the properties were derived from modified stringlists and the declaration Crpe1.Datafiles[0] would add a string to the list of subscript 0. The new Component's subclass objects do not work the same way. Instead, there are two methods now used to add an item to the list.
The first, and preferred way, is to use the Retrieve method. This retrieves the table information from the report, and stores it in the Tables object, so that all the necessary table items are already present. You just need to set the object to the desired table and then change the desired properties. This would be coded as:
(* Retrieves tables from report *)
Crpe1.Tables.Retrieve;
(* Modifies path of first table *)
Crpe1.Tables[0].Path := 'c:\MyNewPath\';
(* Modifies name of first table *)
Crpe1.Tables[0].Name := 'MyNewTable.dbf';
For changing the path of more than one table at a time, a simple loop can be constructed. Since the tables property is now an object, it was easy to add methods and properties to it that made it behave like a stringlist. So the Count method and ItemIndex properties were added, as well as the default array property, Item. The Item property allows you to treat the Tables object as if it were a stringlist (Tables[0] is equivalent to Tables.Item[0]):
(* Retrieves tables from report *)
Crpe1.Tables.Retrieve;
for cnt := 0 to (Crpe1.Tables.Count - 1) dobegin (* Modifies path of table *)
Crpe1.Tables[cnt].Path := 'c:\MyNewPath\';
end;
Seagate Crystal Visual Component Library 205
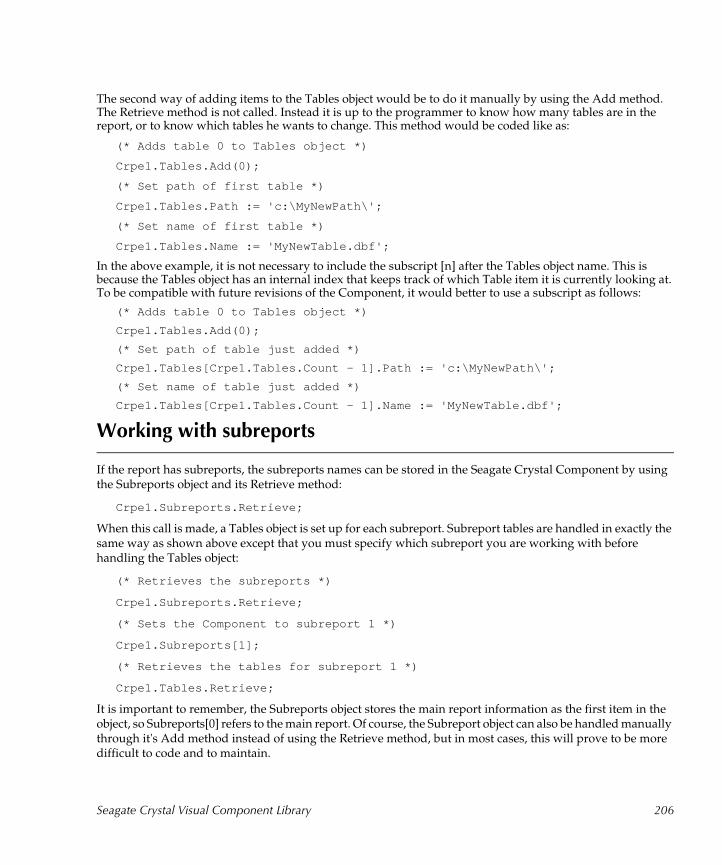
The second way of adding items to the Tables object would be to do it manually by using the Add method. The Retrieve method is not called. Instead it is up to the programmer to know how many tables are in the report, or to know which tables he wants to change. This method would be coded like as:
(* Adds table 0 to Tables object *)
Crpe1.Tables.Add(0);
(* Set path of first table *)
Crpe1.Tables.Path := 'c:\MyNewPath\';
(* Set name of first table *)
Crpe1.Tables.Name := 'MyNewTable.dbf';
In the above example, it is not necessary to include the subscript [n] after the Tables object name. This is because the Tables object has an internal index that keeps track of which Table item it is currently looking at. To be compatible with future revisions of the Component, it would better to use a subscript as follows:
(* Adds table 0 to Tables object *)
Crpe1.Tables.Add(0);
(* Set path of table just added *)
Crpe1.Tables[Crpe1.Tables.Count - 1].Path := 'c:\MyNewPath\';
(* Set name of table just added *)
Crpe1.Tables[Crpe1.Tables.Count - 1].Name := 'MyNewTable.dbf';
Working with subreports
If the report has subreports, the subreports names can be stored in the Seagate Crystal Component by using the Subreports object and its Retrieve method:
Crpe1.Subreports.Retrieve;
When this call is made, a Tables object is set up for each subreport. Subreport tables are handled in exactly the same way as shown above except that you must specify which subreport you are working with before handling the Tables object:
(* Retrieves the subreports *)
Crpe1.Subreports.Retrieve;
(* Sets the Component to subreport 1 *)
Crpe1.Subreports[1];
(* Retrieves the tables for subreport 1 *)
Crpe1.Tables.Retrieve;
It is important to remember, the Subreports object stores the main report information as the first item in the object, so Subreports[0] refers to the main report. Of course, the Subreport object can also be handled manually through it's Add method instead of using the Retrieve method, but in most cases, this will prove to be more difficult to code and to maintain.
Seagate Crystal Visual Component Library 206
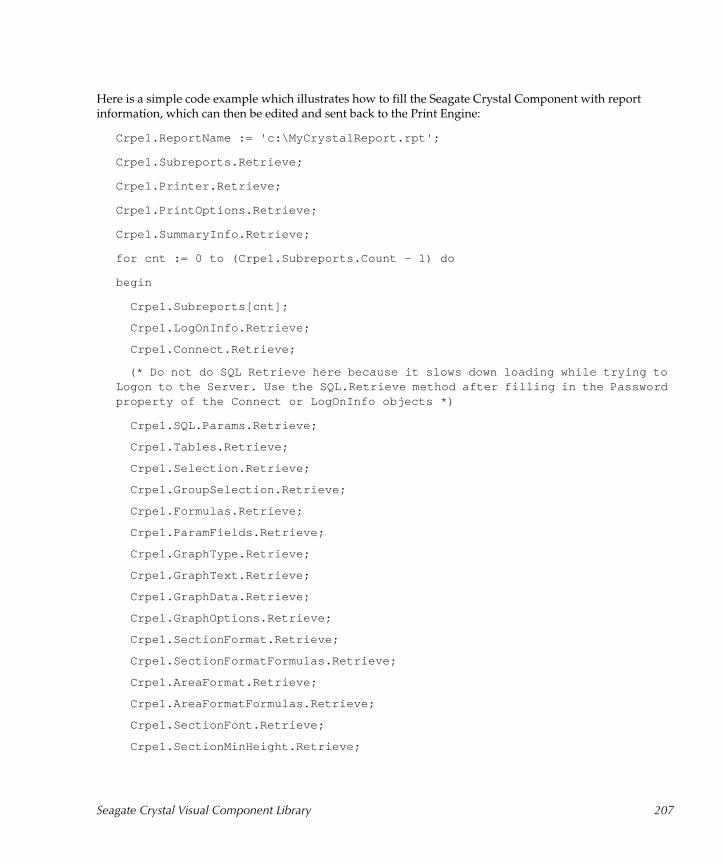
Here is a simple code example which illustrates how to fill the Seagate Crystal Component with report information, which can then be edited and sent back to the Print Engine:
Crpe1.ReportName := 'c:\MyCrystalReport.rpt';
Crpe1.Subreports.Retrieve;
Crpe1.Printer.Retrieve;
Crpe1.PrintOptions.Retrieve;
Crpe1.SummaryInfo.Retrieve;
for cnt := 0 to (Crpe1.Subreports.Count - 1) do
begin
Crpe1.Subreports[cnt];
Crpe1.LogOnInfo.Retrieve;
Crpe1.Connect.Retrieve;
(* Do not do SQL Retrieve here because it slows down loading while trying to Logon to the Server. Use the SQL.Retrieve method after filling in the Password property of the Connect or LogOnInfo objects *)
Crpe1.SQL.Params.Retrieve;
Crpe1.Tables.Retrieve;
Crpe1.Selection.Retrieve;
Crpe1.GroupSelection.Retrieve;
Crpe1.Formulas.Retrieve;
Crpe1.ParamFields.Retrieve;
Crpe1.GraphType.Retrieve;
Crpe1.GraphText.Retrieve;
Crpe1.GraphData.Retrieve;
Crpe1.GraphOptions.Retrieve;
Crpe1.SectionFormat.Retrieve;
Crpe1.SectionFormatFormulas.Retrieve;
Crpe1.AreaFormat.Retrieve;
Crpe1.AreaFormatFormulas.Retrieve;
Crpe1.SectionFont.Retrieve;
Crpe1.SectionMinHeight.Retrieve;
Seagate Crystal Visual Component Library 207
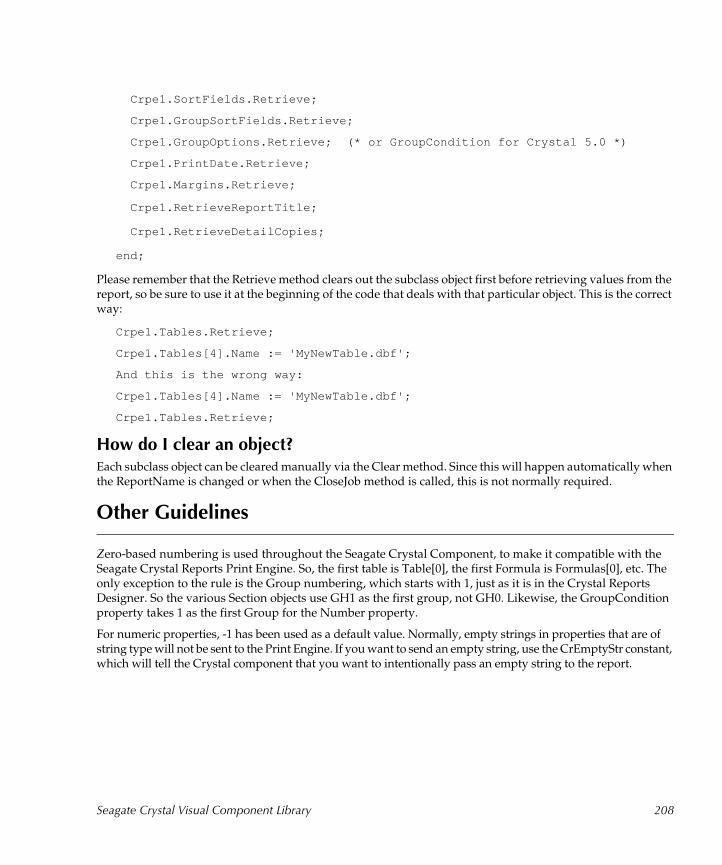
Crpe1.SortFields.Retrieve;
Crpe1.GroupSortFields.Retrieve;
Crpe1.GroupOptions.Retrieve; (* or GroupCondition for Crystal 5.0 *)
Crpe1.PrintDate.Retrieve;
Crpe1.Margins.Retrieve;
Crpe1.RetrieveReportTitle;
Crpe1.RetrieveDetailCopies;
end;
Please remember that the Retrieve method clears out the subclass object first before retrieving values from the report, so be sure to use it at the beginning of the code that deals with that particular object. This is the correct way:
Crpe1.Tables.Retrieve;
Crpe1.Tables[4].Name := 'MyNewTable.dbf';
And this is the wrong way:
Crpe1.Tables[4].Name := 'MyNewTable.dbf';
Crpe1.Tables.Retrieve;
How do I clear an object?Each subclass object can be cleared manually via the Clear method. Since this will happen automatically when the ReportName is changed or when the CloseJob method is called, this is not normally required.
Other Guidelines
Zero-based numbering is used throughout the Seagate Crystal Component, to make it compatible with the Seagate Crystal Reports Print Engine. So, the first table is Table[0], the first Formula is Formulas[0], etc. The only exception to the rule is the Group numbering, which starts with 1, just as it is in the Crystal Reports Designer. So the various Section objects use GH1 as the first group, not GH0. Likewise, the GroupCondition property takes 1 as the first Group for the Number property.
For numeric properties, -1 has been used as a default value. Normally, empty strings in properties that are of string type will not be sent to the Print Engine. If you want to send an empty string, use the CrEmptyStr constant, which will tell the Crystal component that you want to intentionally pass an empty string to the report.
Seagate Crystal Visual Component Library 208
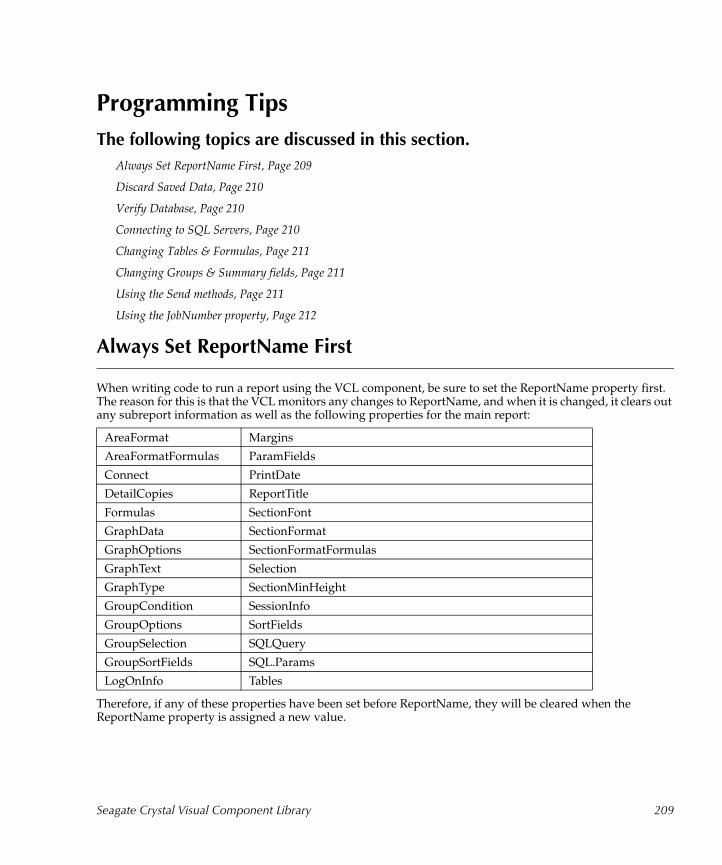
Programming Tips
The following topics are discussed in this section.
Always Set ReportName First, Page 209
Discard Saved Data, Page 210
Verify Database, Page 210
Connecting to SQL Servers, Page 210
Changing Tables & Formulas, Page 211
Changing Groups & Summary fields, Page 211
Using the Send methods, Page 211
Using the JobNumber property, Page 212
Always Set ReportName First
When writing code to run a report using the VCL component, be sure to set the ReportName property first. The reason for this is that the VCL monitors any changes to ReportName, and when it is changed, it clears out any subreport information as well as the following properties for the main report:
Therefore, if any of these properties have been set before ReportName, they will be cleared when the ReportName property is assigned a new value.
AreaFormat Margins
AreaFormatFormulas ParamFields
Connect PrintDate
DetailCopies ReportTitle
Formulas SectionFont
GraphData SectionFormat
GraphOptions SectionFormatFormulas
GraphText Selection
GraphType SectionMinHeight
GroupCondition SessionInfo
GroupOptions SortFields
GroupSelection SQLQuery
GroupSortFields SQL.Params
LogOnInfo Tables
Seagate Crystal Visual Component Library 209
Discard Saved Data
Beware of saving Reports from the Seagate Crystal Report Designer with the Saved Data toggle on (this option is located on the Report Options dialog box from the File menu), unless you want them that way. When they are run from Delphi, if you don't set the DiscardSavedData property to True, the report will run from the Saved Data (which is the default mode), and will not show the changes that have been made to the database.
After a report has been run via the VCL once, and the Print Job has not been closed (either via the CloseJob method or changing the ReportName property), the report that is currently in memory now has Saved Data. If you run it again, it will run with the Saved Data from the first run. This means that some of the changes you pass in the second time, may not have any effect. The solution is to set the DiscardSavedData property to True.
Verify Database
Under the Database menu in Seagate Crystal Report Designer, there are two menu items: Verify Database and Verify on Every Print. Since the database structure and index information are stored in a report file when it is saved, the report may have problems running if the database structure changes.
One solution is to load the report into the Designer, and choose Verify Database, then resave the report. This works fine during development, but if the database structure will be changing during runtime operation, there is no equivalent for these Verify commands in the runtime engine. Therefore, Verify on Every Print should be turned on in these instances. With this option on, the report will reread the database structure every time the report runs. The amount of time taken to do this extra step is usually minimal. If the database structure will not change after deployment, there is no reason to turn this feature on.
Connecting to SQL Servers
With this Component, you have three different ways of establishing a connection to an SQL DataSource or Server: LogOnServer, LogOnInfo, and Connect. We recommend you review these sections in the Help file to determine which method suits your needs best.
One thing to keep in mind when connecting to SQL databases, is that if the database is being accessed via ODBC drivers in the report, then the ServerName property of the above-mentioned methods represents the ODBC DataSource Name, not the actual Server Name. On the other hand, if the database is being accessed via Crystal's native SQL drivers, then the ServerName property of the LogOnServer, LogOnInfo, and Connect objects represents the actual SQL Server name.
Another thing to watch for is that some table locations are stored in a report as <db name>.<owner>.<table name>. Attempting to change the ServerName for such a report at runtime could cause it to look for the tables on the original Server instead of the new one, which usually results in a connection error. The solution is to remove the <db name> and <owner> prefixes so that just the table name is listed. This can be done in the report (Set Location dialog box in Crystal Reports), or via the Component’s Tables object.
Seagate Crystal Visual Component Library 210
Changing Tables & Formulas
When changing the table names that a report is based on, it is important to remember that formula fields will use the report's alias name for the table, and not the new table name.
For example, suppose you have a report which uses the Company1 table. When you added Company1 to the report, an Alias was created for it by Seagate Crystal Reports called Company1. When the field is used in a Formula, it appears like this:
(* company1.Field *)
However, company1 represents the alias and not the actual table name. So, in the Delphi program, when you change the table name from company1 to company2, the formula still sees the field as (* company1.Field *), and not (* company2.Field *), since the alias Seagate Crystal Reports assigned remains the same. One thing to remember in this respect is that Seagate Crystal Reports’ aliases can only be changed in the designer, not at runtime.
Changing Groups & Summary fields
When changing Grouping fields at runtime via the GroupCondition or GroupOptions object, remember that any inserted summary fields, or formulas containing summary fields in the report may cause errors, since they contain the grouping field name as the second element of their parameters. For example, take the following Summary field:
Sum((* company.SALES *), (* company.STATE *))
This formula sums the amount of company sales per State. This summary field assumes that (* company.STATE *) is one of the grouping fields. If the grouping field is changed from (* company.STATE *) to (* company.COUNTRY *), this formula field will generate an error.
The way to avoid this problem is to insert the grouping field into a formula field when designing the report. Then when you create the group, base it on the formula field. Any summary fields inserted will also look at the formula field as the grouping field, regardless of what it contains. Then to change the group field at runtime, simply pass a new (* table.field *) value to the formula field. All the summaries will automatically change.
Using the Send methods
Since the VCL's Execute method uses the Send methods from the VCL's sub-class objects, there is usually no need to call these methods in code. However, there are at least two cases where this can be advantageous:
1. For changing the order in which items get sent to the Print Engine. For example, the Execute method of the VCL sends the Formulas first, and then the Grouping information. If GroupOptions.Send is called just before Execute, this has the effect of sending in the Grouping information before the Formulas.
2. For testing the VCL and/or the Print Engine. Properties can be set and then passed from the VCL to the Print Engine by calling the Send method. Then the values can be retrieved using the Retrieve method and examined to make sure they are getting passed correctly.
Seagate Crystal Visual Component Library 211
Using the JobNumber property
The Crystal Reports Print Engine (CRPE32.DLL) assigns a specific Job Number to each open Print Job. This Job Number is used internally in the VCL component, and is used when making calls to the CRPE so that it knows which Print Job the call is going to. Because this number is exposed in the JobNumber property of the VCL, it can be used to make direct calls to the CRPE, bypassing the VCL layer. While this is not normally recommended, since making changes to the Print Job without the VCL knowing about the changes can lead to problems, there are also times when this can be a powerful feature.
For example, the Execute method of the VCL has Events available within it, such as OnExecuteEnd, OnPrintEnded, etc. These events have protection which prevents the programmer from calling another Execute within the event (which would lead to an infinite loop). However, by the use of direct Print Engine calls, this limitation can be worked around. The call to run a Report in the Print Engine is
function PEStartPrintJob( JobNum : Word; WaitUntilDone : Bool): Bool; stdcall ;
The second parameter "WaitUntilDone" should always be True, and the first Parameter is the Print Job number, which is available in the VCL via Crpe1.JobNumber. Therefore, making this call within the OnExecuteEnd event (just as an example, not because it is meaningful!), causes the Report to be run immediately.
For a complete list of the available Print Engine calls, consult the DEVELOPR.HLP that came with Crystal Reports, or take a look at the CRDELPHI.PAS (if you have Crystal Reports 7), or CRPE32.PAS, which are also in the Crystal Reports install directory, or some of the VCL source code files.
TCrpeString
The following topics are discussed in this section.
Introduction, Page 213
TCrpeString VCL Properties, Page 214
Using the TCrpeString, Page 214
Seagate Crystal Visual Component Library 212

Introduction
TCrpeString = class(TStringList)
TCrpeString is the same as Delphi's TStringList, except the Put method defaults to Add if the subscript is one number larger than the number of strings in the StringList. With a normal StringList, the following code would cause an error:
var slTemp : TStringList;begin slTemp := TStringList.Create; slTemp[0] := 'The first line';end ;
The reason for the error is the code attempts to access the first string in the stringlist, but the first string does not exist yet. The proper way to do this would be:
var slTemp : TStringList;begin slTemp := TStringList.Create; slTemp.Add('The first line');end ;
However, with the TCrpeString type, the first example would work as well as the second one. Therefore, this is perfectly legal with the TCrpeString type:
var slTemp : TCrpeString;begin slTemp := TCrpeString.Create; slTemp[0] := 'The first line';end ;
Seagate Crystal Visual Component Library 213
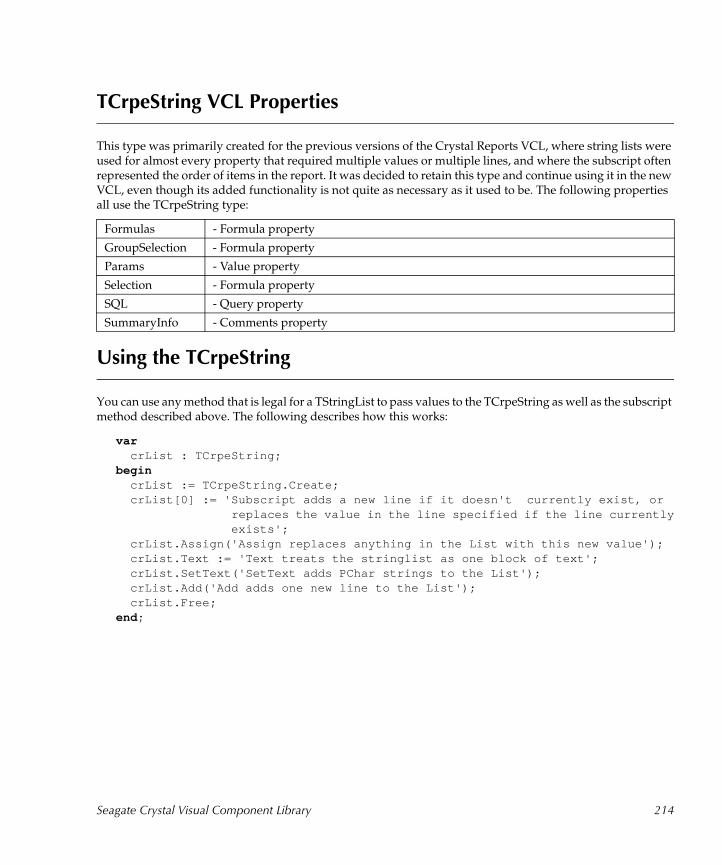
TCrpeString VCL Properties
This type was primarily created for the previous versions of the Crystal Reports VCL, where string lists were used for almost every property that required multiple values or multiple lines, and where the subscript often represented the order of items in the report. It was decided to retain this type and continue using it in the new VCL, even though its added functionality is not quite as necessary as it used to be. The following properties all use the TCrpeString type:
Using the TCrpeString
You can use any method that is legal for a TStringList to pass values to the TCrpeString as well as the subscript method described above. The following describes how this works:
var crList : TCrpeString;begin crList := TCrpeString.Create; crList[0] := 'Subscript adds a new line if it doesn't currently exist, or replaces the value in the line specified if the line currently exists'; crList.Assign('Assign replaces anything in the List with this new value'); crList.Text := 'Text treats the stringlist as one block of text'; crList.SetText('SetText adds PChar strings to the List'); crList.Add('Add adds one new line to the List'); crList.Free;end ;
Formulas - Formula property
GroupSelection - Formula property
Params - Value property
Selection - Formula property
SQL - Query property
SummaryInfo - Comments property
Seagate Crystal Visual Component Library 214

Using Variables with Formulas
The following topics are discussed in this section.
Introduction, Page 215
Examples, Page 216
Introduction
Delphi variables can be used with Crystal Reports Formulas and the Crystal Component's Formulas object if they are declared as string or converted to string (regardless of the actual data type) before being passed to the Report. The value of the variable passed to the Report must be in the same format and look exactly as if entered directly into the Crystal Reports Formula Editor:
● String data types must be surrounded by double quotes: "This is a String". Single quotes are also valid within Crystal Reports but because Delphi uses single quotes, all string data types passed to Crystal should use double quotes to avoid conflicts.
● Numbers do not need quotes: 1234
● Dates must be put in the Crystal Reports Date function format: Date(YYYY,MM,DD)
The VCL Formulas object can only be used to change formulas that already exist in Crystal Reports, not to create new formulas. The Formulas object can contain numerous Formula items, which can either be created by using the Retrieve method:
Crpe1.Formulas.Retrieve;
or the manual Add method:
Crpe1.Formulas.Add('FormulaOne');
NOTE: Although Crystal Reports automatically prefixes the @ symbol to each Formula Name when a Formula is created, the @ must not be included when using the Name or Add methods of the Formulas object in Delphi.
Once the Formulas object has items in it, the next step is to navigate to the desired item. This can be done in 3 different ways:
1. Use the default Item array property (subscript):
Crpe1.Formulas[0];
2. Use the Name lookup property:
Crpe1.Formulas.Name := 'FormulaOne';
3. Use the ItemIndex property:
Crpe1.Formulas.ItemIndex := 0;
Seagate Crystal Visual Component Library 215

Once the desired Formula has been located, the Formula property can be set. This is a stringlist that contains the actual Formula text. Since it is a stringlist, three different methods can be used to write to it:
1. The default Strings array (subscript):
{Clear the Formula first}Crpe1.Formulas.Formula.Clear;Crpe1.Formulas.Formula[0] := '"Formula String"';
NOTE: It is also acceptable, and perhaps easier to read, if the subscript specifying the Formulas item is also used in the expression, although since the VCL objects have an internal Index, it is not strictly necessary:
{Clear the Formula first}Crpe1.Formulas[0].Formula.Clear;Crpe1.Formulas[0].Formula[0] := '"Formula String"';
If the subscript value is not known, it can be obtained right after setting the Formula Name:
{Clear the Formula first}Crpe1.Formulas.Name := 'FormulaOne';i := Crpe1.Formulas.ItemIndex;Crpe1.Formulas[i].Formula.Clear;Crpe1.Formulas[i].Formula[0] := '"FormulaString"';
2. The Text property:
Crpe1.Formulas.Formula.Text := '23';
3. The Assign method
Crpe1.Formulas.Formula.Assign('Date(1998,01,01)');
Examples
The following examples are presented in this section.
Passing a variable from Delphi that results in a String data type in Crystal Reports, Page 216
Passing a variable from Delphi that results in a Numeric data type in Crystal Reports, Page 218
Passing a variable from Delphi that results in a Date data type in Crystal Reports, Page 219
Passing a variable from Delphi that results in a String data type in Crystal ReportsAs both Delphi and Crystal Reports require string values to be surrounded by quotes, a variable that results in a string data type in Crystal Reports requires two sets of quotes: one set for Delphi and one set for Crystal Reports. The first two examples show how to pass the variable when the value of the variable is hard-coded. The third example shows how to pass the variable when the value of the variable is entered via an EditBox at runtime.
Seagate Crystal Visual Component Library 216
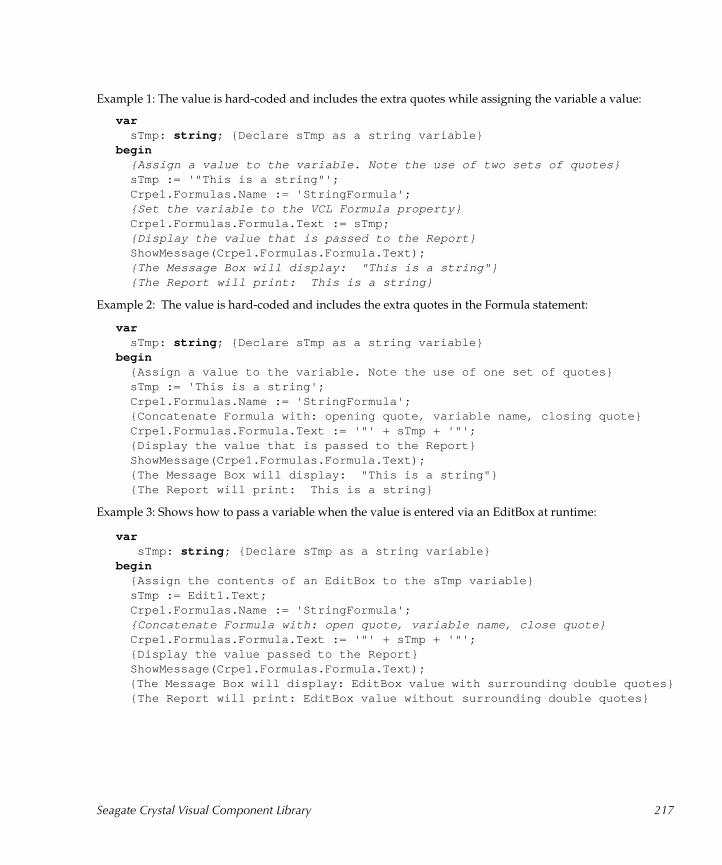
Example 1: The value is hard-coded and includes the extra quotes while assigning the variable a value:
var sTmp: string ; {Declare sTmp as a string variable}begin {Assign a value to the variable. Note the use of two sets of quotes} sTmp := '"This is a string"'; Crpe1.Formulas.Name := 'StringFormula'; {Set the variable to the VCL Formula property} Crpe1.Formulas.Formula.Text := sTmp; {Display the value that is passed to the Report} ShowMessage(Crpe1.Formulas.Formula.Text); {The Message Box will display: "This is a string"} {The Report will print: This is a string}
Example 2: The value is hard-coded and includes the extra quotes in the Formula statement:
var sTmp: string ; {Declare sTmp as a string variable}begin {Assign a value to the variable. Note the use of one set of quotes} sTmp := 'This is a string'; Crpe1.Formulas.Name := 'StringFormula'; {Concatenate Formula with: opening quote, variable name, closing quote} Crpe1.Formulas.Formula.Text := '"' + sTmp + '"'; {Display the value that is passed to the Report} ShowMessage(Crpe1.Formulas.Formula.Text); {The Message Box will display: "This is a string"} {The Report will print: This is a string}
Example 3: Shows how to pass a variable when the value is entered via an EditBox at runtime:
var sTmp: string ; {Declare sTmp as a string variable}begin {Assign the contents of an EditBox to the sTmp variable} sTmp := Edit1.Text; Crpe1.Formulas.Name := 'StringFormula'; {Concatenate Formula with: open quote, variable name, close quote} Crpe1.Formulas.Formula.Text := '"' + sTmp + '"'; {Display the value passed to the Report} ShowMessage(Crpe1.Formulas.Formula.Text); {The Message Box will display: EditBox value with surrounding double quotes} {The Report will print: EditBox value without surrounding double quotes}
Seagate Crystal Visual Component Library 217
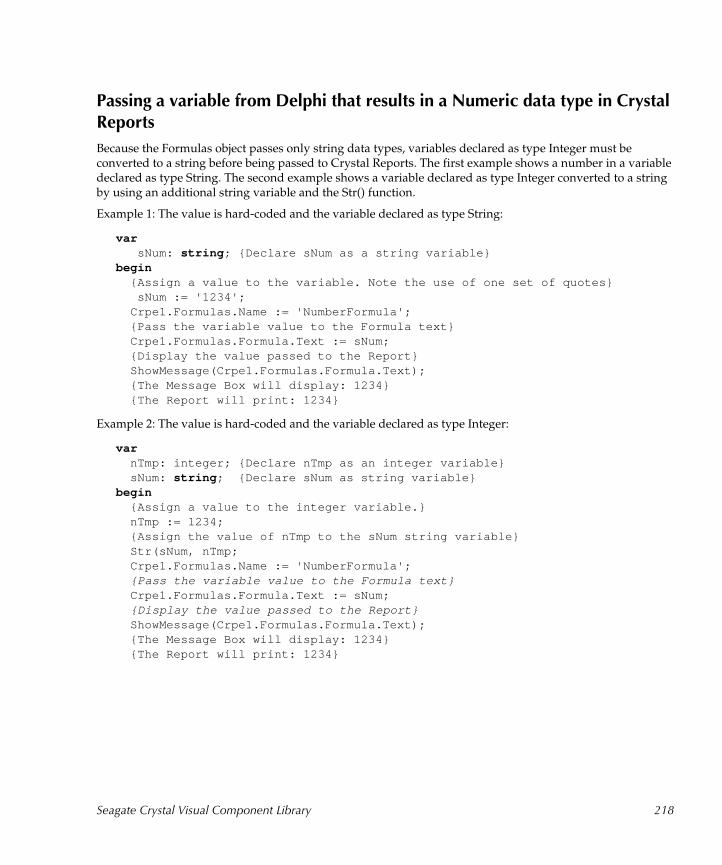
Passing a variable from Delphi that results in a Numeric data type in Crystal Reports
Because the Formulas object passes only string data types, variables declared as type Integer must be converted to a string before being passed to Crystal Reports. The first example shows a number in a variable declared as type String. The second example shows a variable declared as type Integer converted to a string by using an additional string variable and the Str() function.
Example 1: The value is hard-coded and the variable declared as type String:
var sNum: string ; {Declare sNum as a string variable}begin {Assign a value to the variable. Note the use of one set of quotes} sNum := '1234'; Crpe1.Formulas.Name := 'NumberFormula'; {Pass the variable value to the Formula text} Crpe1.Formulas.Formula.Text := sNum; {Display the value passed to the Report} ShowMessage(Crpe1.Formulas.Formula.Text); {The Message Box will display: 1234} {The Report will print: 1234}
Example 2: The value is hard-coded and the variable declared as type Integer:
var nTmp: integer; {Declare nTmp as an integer variable} sNum: string ; {Declare sNum as string variable}begin {Assign a value to the integer variable.} nTmp := 1234; {Assign the value of nTmp to the sNum string variable} Str(sNum, nTmp; Crpe1.Formulas.Name := 'NumberFormula'; {Pass the variable value to the Formula text} Crpe1.Formulas.Formula.Text := sNum; {Display the value passed to the Report} ShowMessage(Crpe1.Formulas.Formula.Text); {The Message Box will display: 1234} {The Report will print: 1234}
Seagate Crystal Visual Component Library 218
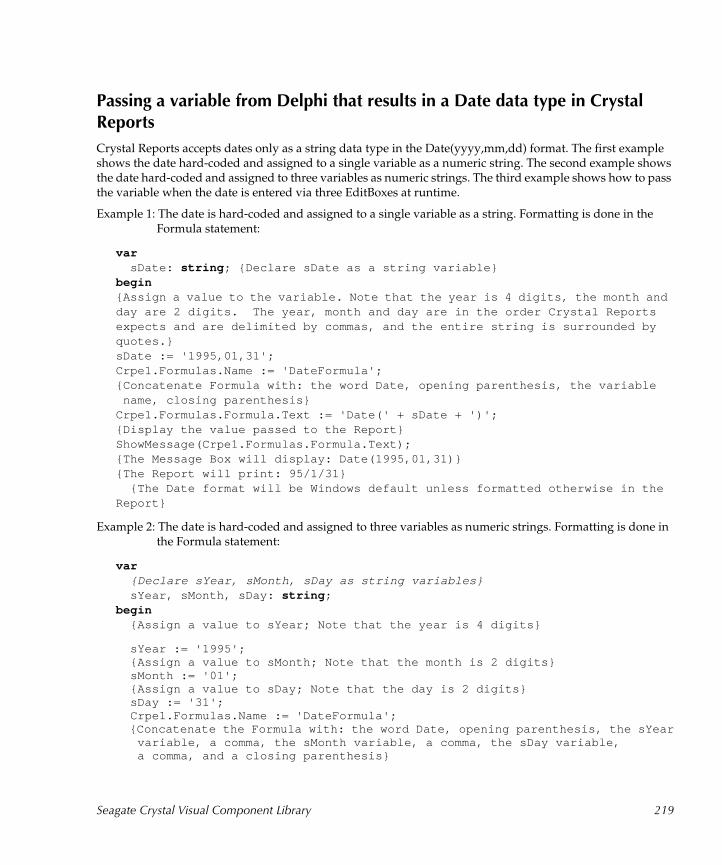
Passing a variable from Delphi that results in a Date data type in Crystal Reports
Crystal Reports accepts dates only as a string data type in the Date(yyyy,mm,dd) format. The first example shows the date hard-coded and assigned to a single variable as a numeric string. The second example shows the date hard-coded and assigned to three variables as numeric strings. The third example shows how to pass the variable when the date is entered via three EditBoxes at runtime.
Example 1: The date is hard-coded and assigned to a single variable as a string. Formatting is done in the Formula statement:
var sDate: string ; {Declare sDate as a string variable}begin{Assign a value to the variable. Note that the year is 4 digits, the month and day are 2 digits. The year, month and day are in the order Crystal Reports expects and are delimited by commas, and the entire string is surrounded by quotes.}sDate := '1995,01,31';Crpe1.Formulas.Name := 'DateFormula';{Concatenate Formula with: the word Date, opening parenthesis, the variable name, closing parenthesis}Crpe1.Formulas.Formula.Text := 'Date(' + sDate + ')';{Display the value passed to the Report}ShowMessage(Crpe1.Formulas.Formula.Text);{The Message Box will display: Date(1995,01,31)}{The Report will print: 95/1/31} {The Date format will be Windows default unless formatted otherwise in the Report}
Example 2: The date is hard-coded and assigned to three variables as numeric strings. Formatting is done in the Formula statement:
var {Declare sYear, sMonth, sDay as string variables} sYear, sMonth, sDay: string ;begin {Assign a value to sYear; Note that the year is 4 digits}
sYear := '1995'; {Assign a value to sMonth; Note that the month is 2 digits} sMonth := '01'; {Assign a value to sDay; Note that the day is 2 digits} sDay := '31'; Crpe1.Formulas.Name := 'DateFormula'; {Concatenate the Formula with: the word Date, opening parenthesis, the sYear variable, a comma, the sMonth variable, a comma, the sDay variable, a comma, and a closing parenthesis}
Seagate Crystal Visual Component Library 219
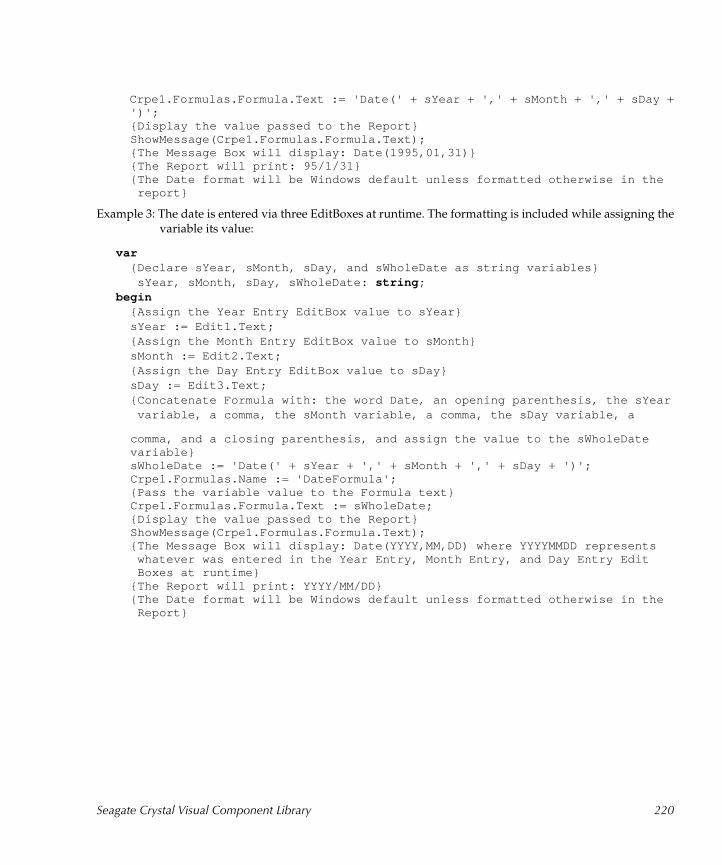
Crpe1.Formulas.Formula.Text := 'Date(' + sYear + ',' + sMonth + ',' + sDay + ')'; {Display the value passed to the Report} ShowMessage(Crpe1.Formulas.Formula.Text); {The Message Box will display: Date(1995,01,31)} {The Report will print: 95/1/31} {The Date format will be Windows default unless formatted otherwise in the report}
Example 3: The date is entered via three EditBoxes at runtime. The formatting is included while assigning the variable its value:
var {Declare sYear, sMonth, sDay, and sWholeDate as string variables} sYear, sMonth, sDay, sWholeDate: string ;begin {Assign the Year Entry EditBox value to sYear} sYear := Edit1.Text; {Assign the Month Entry EditBox value to sMonth} sMonth := Edit2.Text; {Assign the Day Entry EditBox value to sDay} sDay := Edit3.Text; {Concatenate Formula with: the word Date, an opening parenthesis, the sYear variable, a comma, the sMonth variable, a comma, the sDay variable, a
comma, and a closing parenthesis, and assign the value to the sWholeDate variable} sWholeDate := 'Date(' + sYear + ',' + sMonth + ',' + sDay + ')'; Crpe1.Formulas.Name := 'DateFormula'; {Pass the variable value to the Formula text} Crpe1.Formulas.Formula.Text := sWholeDate; {Display the value passed to the Report} ShowMessage(Crpe1.Formulas.Formula.Text); {The Message Box will display: Date(YYYY,MM,DD) where YYYYMMDD represents whatever was entered in the Year Entry, Month Entry, and Day Entry Edit Boxes at runtime} {The Report will print: YYYY/MM/DD} {The Date format will be Windows default unless formatted otherwise in the Report}
Seagate Crystal Visual Component Library 220
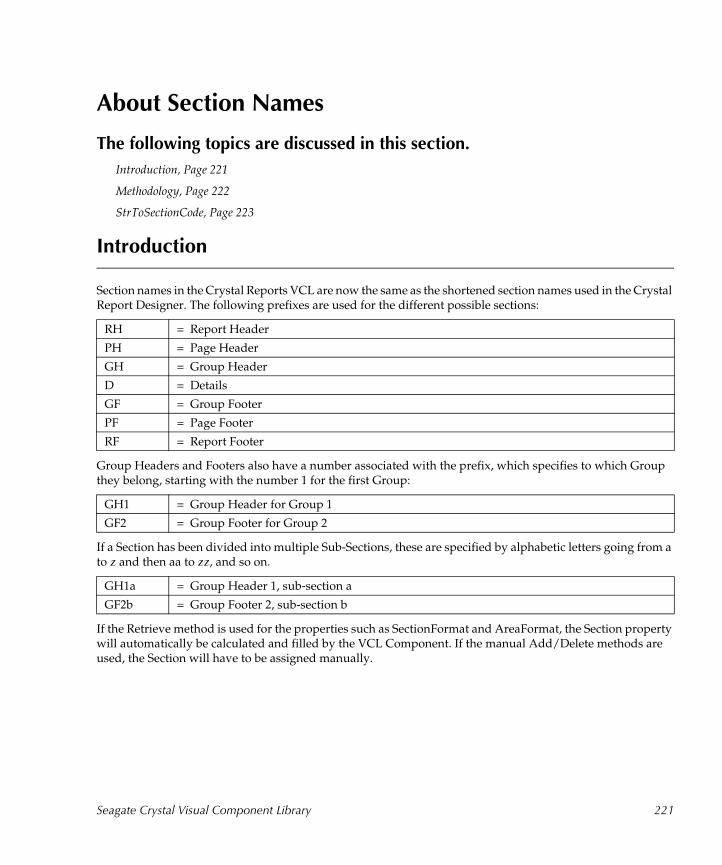
About Section Names
The following topics are discussed in this section.
Introduction, Page 221
Methodology, Page 222
StrToSectionCode, Page 223
Introduction
Section names in the Crystal Reports VCL are now the same as the shortened section names used in the Crystal Report Designer. The following prefixes are used for the different possible sections:
Group Headers and Footers also have a number associated with the prefix, which specifies to which Group they belong, starting with the number 1 for the first Group:
If a Section has been divided into multiple Sub-Sections, these are specified by alphabetic letters going from a to z and then aa to zz, and so on.
If the Retrieve method is used for the properties such as SectionFormat and AreaFormat, the Section property will automatically be calculated and filled by the VCL Component. If the manual Add/Delete methods are used, the Section will have to be assigned manually.
RH = Report Header
PH = Page Header
GH = Group Header
D = Details
GF = Group Footer
PF = Page Footer
RF = Report Footer
GH1 = Group Header for Group 1
GF2 = Group Footer for Group 2
GH1a = Group Header 1, sub-section a
GF2b = Group Footer 2, sub-section b
Seagate Crystal Visual Component Library 221

Methodology
The Crystal Reports Print Engine uses the following numbering division:
● 1000 for each main section
● 25 for each sub-section
● 0 to 24 for each Group
For example:
1000 is used for the report Header
2000 for the Page Header
3000 for the Group Header, etc.
Groups can be from 0 to 24, so:
Group Header 1 is 3000
Group Header 3 is 3002, etc.
Sub-sections are divided by 25, so:
Group Header 1a is 3000
Group Header 2b is 3026, etc.
This means a possible 40 divisions of 25 for each Section, since 40 * 25 = 1000. Therefore the print engine cannot access more than 40 sub-sections at runtime. Since the VCL Component uses the runtime print engine, it also has this limitation. While this is not usually a problem with most reports, the limit is reached if a report contains more than 40 Detail sections, for example. In such cases, the VCL Component will only retrieve the first 40 sections.
Using the information spelled out above, a simple example of the sections of a report, with their corresponding section code numbers is illustrated below:
Area / Sections Area / Section Numbers
Report Header 1000 Report Header a 1000 Report Header b 1025
Page Header 2000 Page Header a 2000 Page Header b 2025
Seagate Crystal Visual Component Library 222
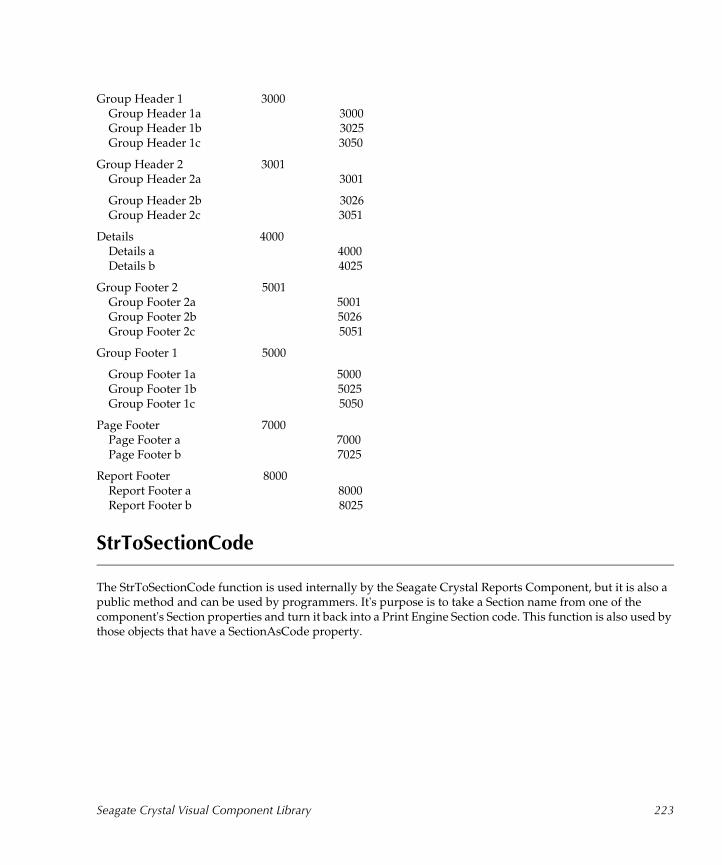
Group Header 1 3000 Group Header 1a 3000 Group Header 1b 3025 Group Header 1c 3050
Group Header 2 3001 Group Header 2a 3001
Group Header 2b 3026 Group Header 2c 3051
Details 4000 Details a 4000 Details b 4025
Group Footer 2 5001 Group Footer 2a 5001 Group Footer 2b 5026 Group Footer 2c 5051
Group Footer 1 5000
Group Footer 1a 5000 Group Footer 1b 5025 Group Footer 1c 5050
Page Footer 7000 Page Footer a 7000 Page Footer b 7025
Report Footer 8000 Report Footer a 8000 Report Footer b 8025
StrToSectionCode
The StrToSectionCode function is used internally by the Seagate Crystal Reports Component, but it is also a public method and can be used by programmers. It's purpose is to take a Section name from one of the component's Section properties and turn it back into a Print Engine Section code. This function is also used by those objects that have a SectionAsCode property.
Seagate Crystal Visual Component Library 223

C++ Builder 3
The following topics are discussed in this section.
Introduction, Page 224
Code Syntax, Page 224
Additional Code Examples, Page 225
Introduction
The Inprise (formerly Borland) C++ Builder 3 version of Seagate Crystal Reports 32-bit Delphi VCL Component has the same features as the Delphi version. In fact, it was recompiled from the Delphi source code. This component is released "as-is". It has slight modifications to the source (nothing that affects the properties or methods, just some compiler directives, etc.) made by a third party, to make it compile and run in the BCB3 environment. Currently, only limited support is offered for any problems arising from the use of this component. The Help file included is from the Delphi VCL Component, using Delphi code examples. Some notes regarding the BCB syntax are included below.
Note that it is always possible to use direct Print Engine calls to the CRPE32.DLL using the CRPE.H and other header files included with Crystal Reports as an alternative.
The installation of the C++ Builder Component was discussed earlier in this chapter in the installation section, C++ Builder 3, Page 198.
Code Syntax
The general guidelines for translating the Delphi code examples (in the Help file) to BCB are as follows:
1. Use the equals sign (=) instead of the colon-equals sign (:=) for assignment, and use the arrow pointer (->) instead of Delphi's dot (.) to specify class members.
//DelphiCrpe1.DetailCopies := 3;//C++BuilderCrpe1->DetailCopies = 3;
2. Use double quotes ("test") instead of single quotes ('test') for strings, and use double slashes for directories (\\) instead of single slashes (\).
//DelphiCrpe1.ReportName := 'C:\Report1.rpt';//C++BuilderCrpe1->ReportName = "C:\\Report1.rpt";
Seagate Crystal Visual Component Library 224
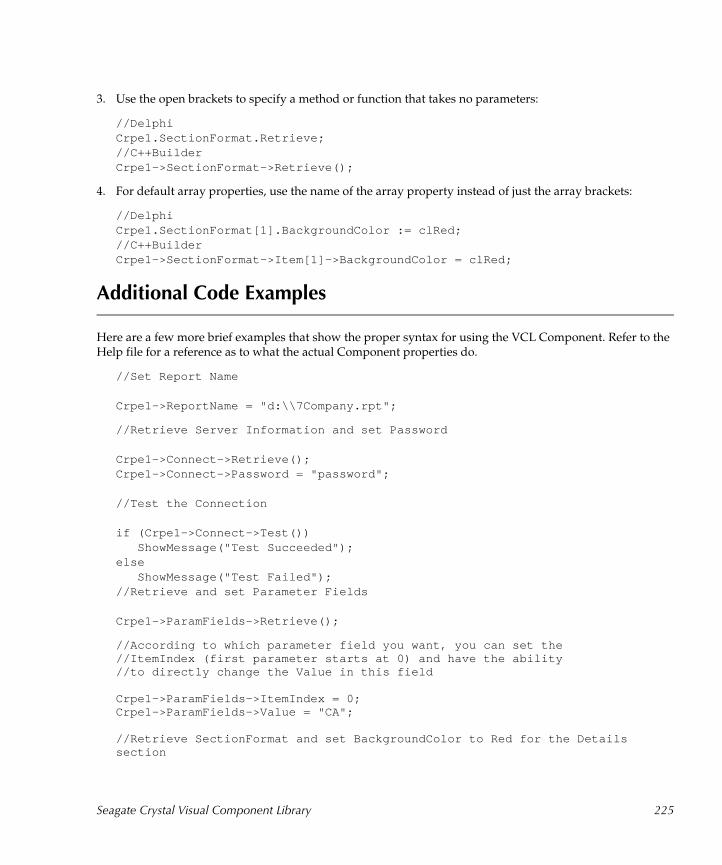
3. Use the open brackets to specify a method or function that takes no parameters:
//DelphiCrpe1.SectionFormat.Retrieve;//C++BuilderCrpe1->SectionFormat->Retrieve();
4. For default array properties, use the name of the array property instead of just the array brackets:
//DelphiCrpe1.SectionFormat[1].BackgroundColor := clRed;//C++BuilderCrpe1->SectionFormat->Item[1]->BackgroundColor = clRed;
Additional Code Examples
Here are a few more brief examples that show the proper syntax for using the VCL Component. Refer to the Help file for a reference as to what the actual Component properties do.
//Set Report Name
Crpe1->ReportName = "d:\\7Company.rpt";
//Retrieve Server Information and set Password
Crpe1->Connect->Retrieve();Crpe1->Connect->Password = "password";
//Test the Connection
if (Crpe1->Connect->Test()) ShowMessage("Test Succeeded");else ShowMessage("Test Failed");//Retrieve and set Parameter Fields
Crpe1->ParamFields->Retrieve();
//According to which parameter field you want, you can set the//ItemIndex (first parameter starts at 0) and have the ability//to directly change the Value in this field
Crpe1->ParamFields->ItemIndex = 0;Crpe1->ParamFields->Value = "CA";
//Retrieve SectionFormat and set BackgroundColor to Red for the Details section
Seagate Crystal Visual Component Library 225

Crpe1->SectionFormat->Retrieve();
Crpe1->SectionFormat->Section = "D";Crpe1->SectionFormat->BackgroundColor = clRed;
//The default array property Item can also be used
Crpe1->SectionFormat->Item[1]->BackgroundColor = clGreen;
//Run the Report
Crpe1->Execute();
Known Problems
The following topics are discussed in this section.
Retrieving ParamFields from a Subreport, Page 226
DialogParent and Temporary Forms, Page 226
Retrieving ParamFields from a Subreport
There is a known problem with the CRPE32.DLL of Crystal 7 when attempting to retrieve ParamFields when a Subreport is the current Report (that is, Subreports[n], where n is a number greater than zero). This does not prevent access to Subreport ParamFields, since retrieving Subreports from the main Report (Subreports[0]) will retrieve the Subreport Parameters as well. The only time this will be a problem is if a Subreport is being run as a separate Report (Crpe1.Subreports.SubExecute := True), and the Subreports class is pointing to a Subreport when the ParamFields.Retrieve method is called. If you need to do this, do not use the ParamFields.Retrieve method, simply build your ParamFields items manually with the Add method.
DialogParent and Temporary Forms
If the DialogParent property is set to a temporary Form, the Report is run, and then the temporary Form is destroyed, attempting to run the Report a second time will cause an Access Violation in CRPE32.DLL. This is because the CRPE stores the address of the DialogParent as long as the PrintJob is open. There seems to be no way, at this time, to set the CRPE's Dialog Parent memory location back to nil. There are a number of ways around this:
1 Set the DialogParent property of the VCL to a valid Form before running the Report a second time.
2 Close the Print Job (Crpe1.CloseJob) and open it again to run it the second time.
Seagate Crystal Visual Component Library 226
Technical Support Further help with Technical problems (including installation, implementation, and distribution of the VCL) can be obtained in the following ways:
Phone: (604) 669-8379 Monday to Friday, 8:00am to 5:00pm, PSTEmail: [email protected] Email Form: http://webacd.seagatesoftware.comFax: (604) 681-7163
The latest updates to the VCL can be obtained from:
Web site: http://www.seagatesoftware.com/crystalreports/updates/FTP site: ftp://ftp.img.seagatesoftware.com/pub/crystal/delphi/
Seagate Crystal Visual Component Library 227
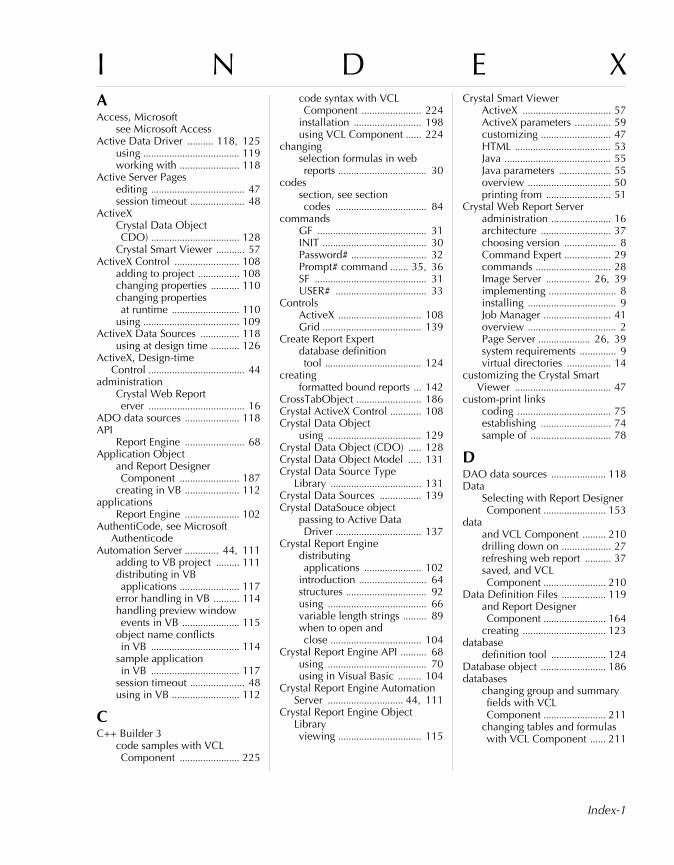
I N D E X
AAccess, Microsoftsee Microsoft AccessActive Data Driver .......... 118, 125
using ..................................... 119working with ....................... 118
Active Server Pagesediting .................................... 47session timeout ..................... 48
ActiveXCrystal Data Object CDO) .................................. 128
Crystal Smart Viewer ........... 57ActiveX Control ......................... 108
adding to project ................ 108changing properties ........... 110changing properties at runtime .......................... 110
using ..................................... 109ActiveX Data Sources ............... 118
using at design time ........... 126ActiveX, Design-time
Control ..................................... 44administration
Crystal Web Report erver ..................................... 16
ADO data sources ..................... 118API
Report Engine ....................... 68Application Object
and Report Designer Component ....................... 187
creating in VB ..................... 112applications
Report Engine ..................... 102AuthentiCode, see Microsoft
AuthenticodeAutomation Server ............. 44, 111
adding to VB project ......... 111distributing in VB applications ....................... 117
error handling in VB .......... 114handling preview window events in VB ...................... 115
object name conflicts in VB .................................. 114
sample application in VB .................................. 117
session timeout ..................... 48using in VB .......................... 112
CC++ Builder 3
code samples with VCL Component ....................... 225
code syntax with VCL Component ....................... 224
installation .......................... 198using VCL Component ...... 224
changingselection formulas in web reports .................................. 30
codessection, see section codes ................................... 84
commandsGF .......................................... 31INIT ........................................ 30Password# ............................. 32Prompt# command ....... 35, 36SF ........................................... 31USER# ................................... 33
ControlsActiveX ................................ 108Grid ...................................... 139
Create Report Expertdatabase definition tool ..................................... 124
creatingformatted bound reports ... 142
CrossTabObject ......................... 186Crystal ActiveX Control ............ 108Crystal Data Object
using .................................... 129Crystal Data Object (CDO) ..... 128Crystal Data Object Model ..... 131Crystal Data Source Type
Library ................................... 131Crystal Data Sources ................ 139Crystal DataSouce object
passing to Active Data Driver ................................. 137
Crystal Report Enginedistributing applications ...................... 102
introduction .......................... 64structures ............................... 92using ...................................... 66variable length strings ......... 89when to open and close ................................... 104
Crystal Report Engine API .......... 68using ...................................... 70using in Visual Basic ......... 104
Crystal Report Engine Automation Server ............................. 44, 111
Crystal Report Engine Object Libraryviewing ................................ 115
Crystal Smart ViewerActiveX .................................. 57ActiveX parameters .............. 59customizing ........................... 47HTML ..................................... 53Java ......................................... 55Java parameters .................... 55overview ................................ 50printing from ......................... 51
Crystal Web Report Serveradministration ....................... 16architecture ........................... 37choosing version .................... 8Command Expert .................. 29commands ............................. 28Image Server ................. 26, 39implementing .......................... 8installing .................................. 9Job Manager .......................... 41overview .................................. 2Page Server .................... 26, 39system requirements .............. 9virtual directories ................. 14
customizing the Crystal Smart Viewer ..................................... 47
custom-print linkscoding .................................... 75establishing ........................... 74sample of ............................... 78
DDAO data sources ..................... 118Data
Selecting with Report Designer Component ........................ 153
dataand VCL Component ......... 210drilling down on ................... 27refreshing web report .......... 37saved, and VCL Component ........................ 210
Data Definition Files ................. 119and Report Designer Component ........................ 164
creating ................................ 123database
definition tool ..................... 124Database object ......................... 186databases
changing group and summary fields with VCL Component ........................ 211
changing tables and formulas with VCL Component ...... 211
Index-1
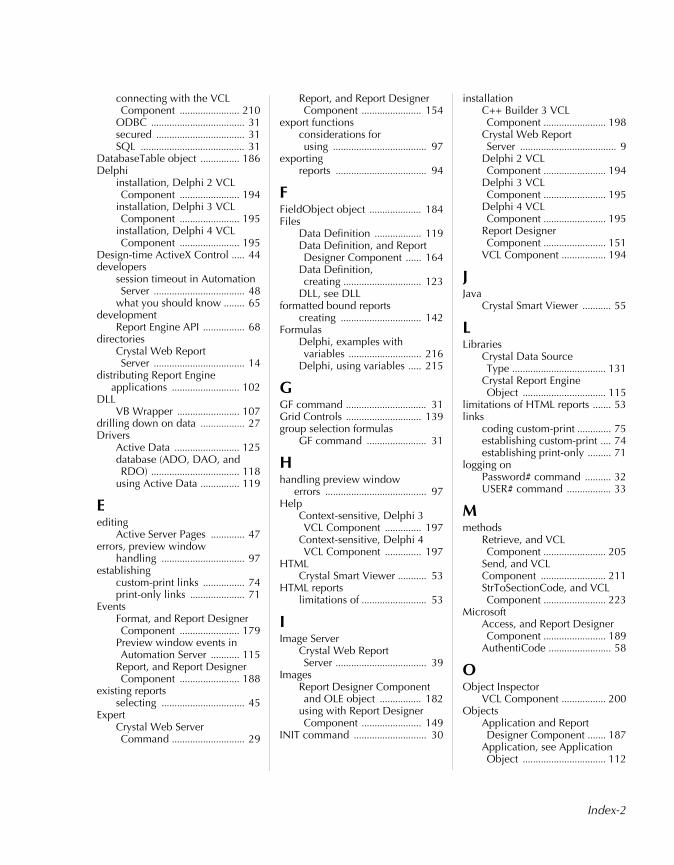
connecting with the VCL Component ....................... 210
ODBC .................................... 31secured .................................. 31SQL ........................................ 31
DatabaseTable object ............... 186Delphi
installation, Delphi 2 VCL Component ....................... 194
installation, Delphi 3 VCL Component ....................... 195
installation, Delphi 4 VCL Component ....................... 195
Design-time ActiveX Control ..... 44developers
session timeout in Automation Server ................................... 48
what you should know ........ 65development
Report Engine API ................ 68directories
Crystal Web Report Server ................................... 14
distributing Report Engine applications .......................... 102
DLLVB Wrapper ........................ 107
drilling down on data ................. 27Drivers
Active Data ......................... 125database (ADO, DAO, and RDO) .................................. 118
using Active Data ............... 119
Eediting
Active Server Pages ............. 47errors, preview window
handling ................................ 97establishing
custom-print links ................ 74print-only links ..................... 71
EventsFormat, and Report Designer Component ....................... 179
Preview window events in Automation Server ........... 115
Report, and Report Designer Component ....................... 188
existing reportsselecting ................................ 45
ExpertCrystal Web Server Command ............................ 29
Report, and Report Designer Component ....................... 154
export functionsconsiderations for using .................................... 97
exportingreports ................................... 94
FFieldObject object .................... 184Files
Data Definition .................. 119Data Definition, and Report Designer Component ...... 164
Data Definition, creating .............................. 123
DLL, see DLLformatted bound reports
creating ............................... 142Formulas
Delphi, examples with variables ............................ 216
Delphi, using variables ..... 215
GGF command ............................... 31Grid Controls ............................. 139group selection formulas
GF command ....................... 31
Hhandling preview window
errors ....................................... 97Help
Context-sensitive, Delphi 3 VCL Component .............. 197
Context-sensitive, Delphi 4 VCL Component .............. 197
HTMLCrystal Smart Viewer ........... 53
HTML reportslimitations of ......................... 53
IImage Server
Crystal Web Report Server ................................... 39
ImagesReport Designer Component and OLE object ................ 182
using with Report Designer Component ....................... 149
INIT command ............................ 30
installationC++ Builder 3 VCL Component ........................ 198
Crystal Web Report Server ..................................... 9
Delphi 2 VCL Component ........................ 194
Delphi 3 VCL Component ........................ 195
Delphi 4 VCL Component ........................ 195
Report Designer Component ........................ 151
VCL Component ................. 194
JJava
Crystal Smart Viewer ........... 55
LLibraries
Crystal Data Source Type .................................... 131
Crystal Report Engine Object ................................ 115
limitations of HTML reports ....... 53links
coding custom-print ............. 75establishing custom-print .... 74establishing print-only ......... 71
logging onPassword# command .......... 32USER# command ................. 33
Mmethods
Retrieve, and VCL Component ........................ 205
Send, and VCL Component ......................... 211StrToSectionCode, and VCL Component ........................ 223
MicrosoftAccess, and Report Designer Component ........................ 189
AuthentiCode ........................ 58
OObject Inspector
VCL Component ................. 200Objects
Application and Report Designer Component ....... 187
Application, see Application Object ................................ 112
Index-2
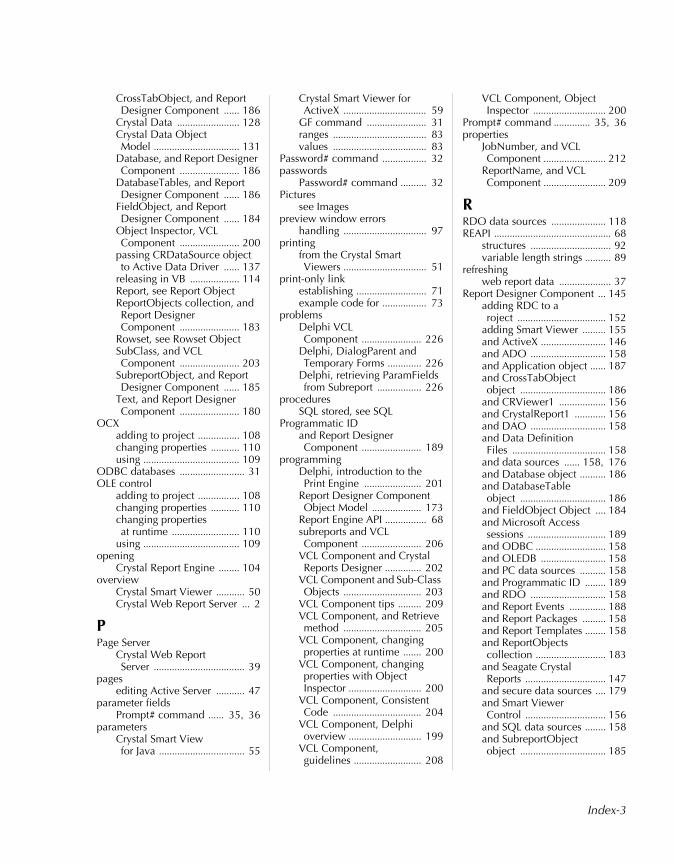
CrossTabObject, and Report Designer Component ...... 186
Crystal Data ........................ 128Crystal Data Object Model ................................. 131
Database, and Report Designer Component ....................... 186
DatabaseTables, and Report Designer Component ...... 186
FieldObject, and Report Designer Component ...... 184
Object Inspector, VCL Component ....................... 200
passing CRDataSource object to Active Data Driver ...... 137
releasing in VB ................... 114Report, see Report ObjectReportObjects collection, and Report Designer Component ....................... 183
Rowset, see Rowset ObjectSubClass, and VCL Component ....................... 203
SubreportObject, and Report Designer Component ...... 185
Text, and Report Designer Component ....................... 180
OCXadding to project ................ 108changing properties ........... 110using ..................................... 109
ODBC databases ......................... 31OLE control
adding to project ................ 108changing properties ........... 110changing properties at runtime .......................... 110
using ..................................... 109opening
Crystal Report Engine ........ 104overview
Crystal Smart Viewer ........... 50Crystal Web Report Server ... 2
PPage Server
Crystal Web Report Server ................................... 39
pagesediting Active Server ........... 47
parameter fieldsPrompt# command ...... 35, 36
parametersCrystal Smart View for Java ................................. 55
Crystal Smart Viewer for ActiveX ................................ 59
GF command ....................... 31ranges .................................... 83values .................................... 83
Password# command ................. 32passwords
Password# command .......... 32Pictures
see Imagespreview window errors
handling ................................ 97printing
from the Crystal Smart Viewers ................................ 51
print-only linkestablishing ........................... 71example code for ................. 73
problemsDelphi VCL Component ....................... 226
Delphi, DialogParent and Temporary Forms ............. 226
Delphi, retrieving ParamFields from Subreport ................. 226
proceduresSQL stored, see SQL
Programmatic IDand Report Designer Component ....................... 189
programmingDelphi, introduction to the Print Engine ...................... 201
Report Designer Component Object Model ................... 173
Report Engine API ................ 68subreports and VCL Component ....................... 206
VCL Component and Crystal Reports Designer .............. 202
VCL Component and Sub-Class Objects .............................. 203
VCL Component tips ......... 209VCL Component, and Retrieve method .............................. 205
VCL Component, changing properties at runtime ....... 200
VCL Component, changing properties with Object Inspector ............................ 200
VCL Component, Consistent Code .................................. 204
VCL Component, Delphi overview ............................ 199
VCL Component, guidelines .......................... 208
VCL Component, Object Inspector ............................ 200
Prompt# command .............. 35, 36properties
JobNumber, and VCL Component ........................ 212
ReportName, and VCL Component ........................ 209
RRDO data sources ..................... 118REAPI ............................................. 68
structures ............................... 92variable length strings .......... 89
refreshingweb report data .................... 37
Report Designer Component ... 145adding RDC to a roject .................................. 152
adding Smart Viewer ......... 155and ActiveX ......................... 146and ADO ............................. 158and Application object ...... 187and CrossTabObject object ................................. 186
and CRViewer1 .................. 156and CrystalReport1 ............ 156and DAO ............................. 158and Data Definition Files .................................... 158
and data sources ...... 158, 176and Database object .......... 186and DatabaseTable object ................................. 186
and FieldObject Object .... 184and Microsoft Access sessions .............................. 189
and ODBC ........................... 158and OLEDB ......................... 158and PC data sources .......... 158and Programmatic ID ........ 189and RDO ............................. 158and Report Events .............. 188and Report Packages ......... 158and Report Templates ........ 158and ReportObjects collection ........................... 183
and Seagate Crystal Reports ............................... 147
and secure data sources .... 179and Smart Viewer Control ............................... 156
and SQL data sources ........ 158and SubreportObject object ................................. 185
Index-3
and Text Objects ................ 180and the Format Event ......... 179and VB Data Environment ...................... 158
and Visual Basic ................. 150Architecture ........................ 170Conditional Formatting ..... 148Copy and Paste ................... 148data access .......................... 148Display code ....................... 157distributing reports ............. 190distribution of the Application ........................ 151
existing report as report template ............................. 167
exporting reports ................ 187features ................................ 146guidelines ............................ 149Images .................................. 149images, OLE object ............ 182installation ........................... 151introduction ........................ 146Object Model programming .................... 173
passing fields ...................... 177Pictures, see ImagesPreview Window ............... 149Report Expert ...................... 154running the application ..... 155section codes ...................... 182selecting data for a report .............................. 153
subreports ............................ 149system requirements .......... 151using the RDC .................... 151
Report EngineAPI .......................................... 68before using in your application .......................... 65
distributing applications ... 102introduction .......................... 64using ....................................... 66
Report Engine APIoverview ................................ 68structures ............................... 92using in Visual Basic ......... 104variable length strings ......... 89
Report Engine Automation Server ....................................... 44
Report Eventsand the Report Designer Component ....................... 188
Report Expert, Report Designer Component ........................... 154
Report Objectobtaining in VB .................. 113
using in VB ......................... 113Report Packages
and Report Designer Component ....................... 158
ReportObjects collection ......... 183reports
creating formatted bound ................................ 142
distributing with Report Designer Component ...... 190
establishing custom-print link ....................................... 74
exporting ............................... 94exporting in Report Designer Component ....................... 187
limitations of HTML ............ 53selecting existing ................. 45using existing as template in Report Designer
Component ......................... 167Rowset Object
adding fields ....................... 130
Ssample web site ........................... 48section codes
and Report Designer Component ....................... 182
and VCL Component ........ 221decoding ............................... 86working with ........................ 84
Section Map ................................. 87section names
and VCL Component ........ 221see also section codesVCL Component, StrToSectionCode
method ................................ 223secured databases ....................... 31selecting
existing reports to use ......... 45selection formulas
changing in web reports ..... 30SF command ......................... 31
ServerImage, see Crystal Web Report Server
Page, see Crystal Web Report Server
Server, Automation ..................... 44Session Timeout .......................... 48SF command ................................ 31Smart Navigation ........................ 26Smart Viewer
ActiveX .................................. 57
customizing ........................... 47HTML ..................................... 53Java ......................................... 55printing from ......................... 51see also Crystal Smart Viewer
SQLconnection to databases with VCL Component ............... 210
databases, and Web Reports Server ................................... 31
stored procedures, and Web Reports Server ..................... 34
stored procedures, SQLsee SQL
structuresReport Engine API ................ 92
SubClass Objectsand VCL Component ........................ 203
SubreportObject, and Report Designer Component .......... 185
subreportsand the VCL Component .. 206using with Report Designer Component ........................ 149
working with ......................... 93system requirements
Crystal Web Report Server .... 9Report Designer Component ......................... 151
TTCrpeString
and VCL Component ......... 212Technical Support
contacting ............................ 227Text Objects
and Report Designer Component ........................ 180
Uuser IDs
USER# command ................. 33USER# command ......................... 33using
Crystal Report Engine API in Visual Basic ....................... 104
existing reports ..................... 45the Crystal Report Engine .... 66the Crystal Report Engine API ............................. 70
Vvariable length strings ................. 89
Index-4
VCL Componentand C++ Builder 3 ............. 224and saved data ................... 210and section names ............. 221and subreports .................... 206changing database tables and formulas ............................. 211
changing group and summary fields ................................... 211
connecting to databases ........................... 210
Delphi programming overview ........................... 199
installation ........................... 194JobNumber property .......... 212know problems ................... 226overview .............................. 194programming guidlines ..... 208programming tips ............... 209properties, changing at runtime ............................ 200properties, changing with Object Inspector ............... 200
ReportName property ........ 209Retrieve method ................. 205Send method ....................... 211StrToSectionCode method ............................... 223
TCrpeString ......................... 212using variables .................... 215
Visual BasicActiveX Control, upgrading from Crystal Custom Control ............................... 110
ActiveX Controls ................ 108adding ActiveX Control to project ................................ 108
adding Automation Serverto project ........................... 111
changing properties for ActiveX Control ................ 110
changing properties for ActiveX Control at runtime ............ 110
dates and date ranges ........ 105embedded quotes in VB calls ......................... 104
hard coded nulls in VB user defined types ..................... 107
releasing objects ................. 114sample Automation Server application ........................ 117
section codes and ................ 88solutions .............................. 103string issues in VB links .............................. 106
using ActiveX Control ....... 109
using Automation Server .. 112using the Crystal Report Engine API in ................................. 104
Wrapper DLL ...................... 107Visual Basic applications
when to open Crystal Report Engine ................................ 104
Visual InterDev Design-time ActiveX Control ..................... 44
Wweb reports
changing selection formulas in .......................... 30
refreshing data ...................... 37web site
sample of .............................. 48working
with section codes ............... 84
Index-5