CQG Integrated Client 7.7 New Features User’s Guide March 2008 version 2008-02

Welcome message from author
This document is posted to help you gain knowledge. Please leave a comment to let me know what you think about it! Share it to your friends and learn new things together.
Transcript
CQG Integrated Client
7.7 New Features User’s Guide
March 2008
version 2008-02

Copyright © 2008 CQG Inc. All rights reserved.
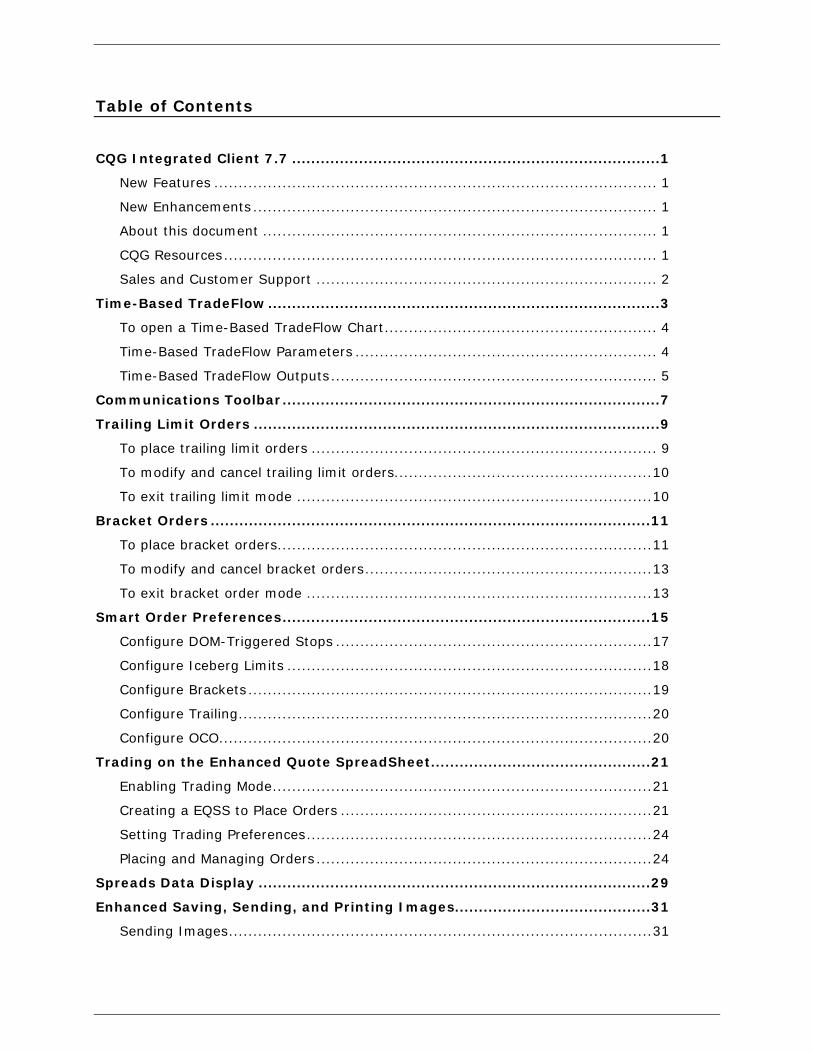
Table of Contents CQG Integrated Client 7.7 .............................................................................1
New Features ........................................................................................... 1 New Enhancements ................................................................................... 1 About this document ................................................................................. 1 CQG Resources......................................................................................... 1 Sales and Customer Support ...................................................................... 2
Time-Based TradeFlow..................................................................................3 To open a Time-Based TradeFlow Chart........................................................ 4 Time-Based TradeFlow Parameters .............................................................. 4 Time-Based TradeFlow Outputs................................................................... 5
Communications Toolbar...............................................................................7 Trailing Limit Orders .....................................................................................9
To place trailing limit orders ....................................................................... 9 To modify and cancel trailing limit orders.....................................................10 To exit trailing limit mode .........................................................................10
Bracket Orders ............................................................................................11 To place bracket orders.............................................................................11 To modify and cancel bracket orders...........................................................13 To exit bracket order mode .......................................................................13
Smart Order Preferences.............................................................................15 Configure DOM-Triggered Stops .................................................................17 Configure Iceberg Limits ...........................................................................18 Configure Brackets ...................................................................................19 Configure Trailing.....................................................................................20 Configure OCO.........................................................................................20
Trading on the Enhanced Quote SpreadSheet..............................................21 Enabling Trading Mode..............................................................................21 Creating a EQSS to Place Orders ................................................................21 Setting Trading Preferences.......................................................................24 Placing and Managing Orders .....................................................................24
Spreads Data Display ..................................................................................29 Enhanced Saving, Sending, and Printing Images.........................................31
Sending Images.......................................................................................31
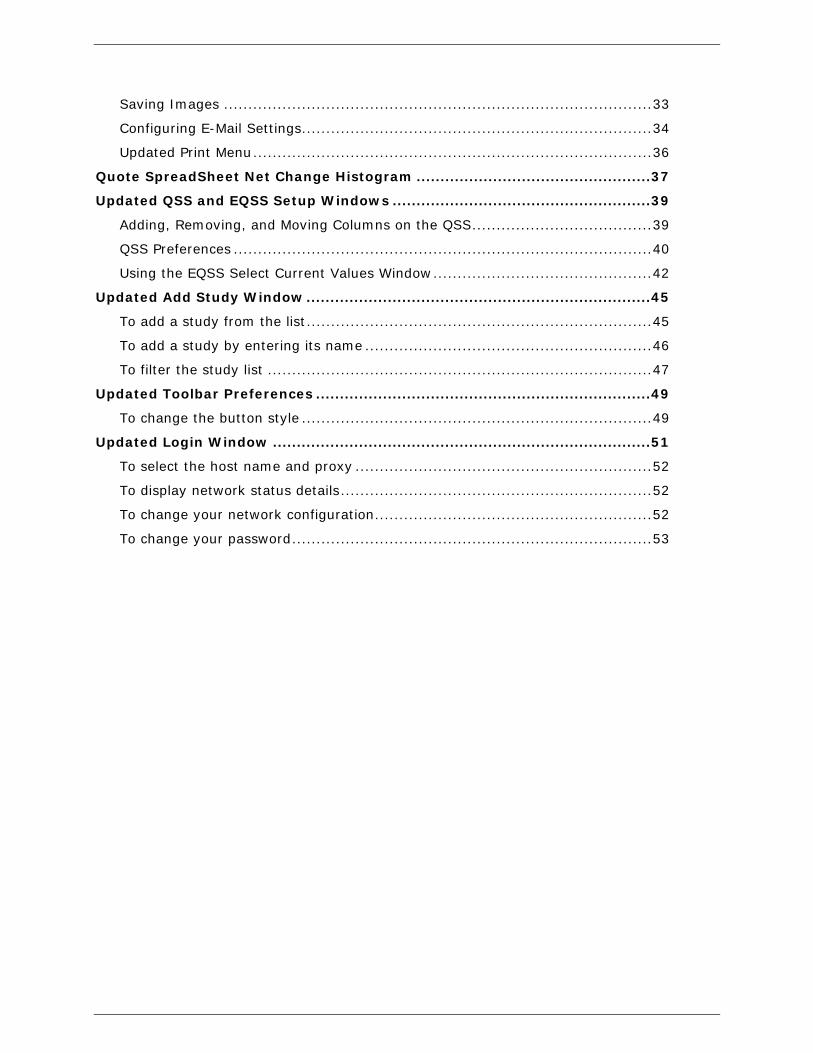
Saving Images ........................................................................................33 Configuring E-Mail Settings........................................................................34 Updated Print Menu..................................................................................36
Quote SpreadSheet Net Change Histogram .................................................37 Updated QSS and EQSS Setup Windows ......................................................39
Adding, Removing, and Moving Columns on the QSS.....................................39 QSS Preferences ......................................................................................40 Using the EQSS Select Current Values Window.............................................42
Updated Add Study Window........................................................................45 To add a study from the list.......................................................................45 To add a study by entering its name ...........................................................46 To filter the study list ...............................................................................47
Updated Toolbar Preferences ......................................................................49 To change the button style ........................................................................49
Updated Login Window ...............................................................................51 To select the host name and proxy .............................................................52 To display network status details................................................................52 To change your network configuration.........................................................52 To change your password..........................................................................53

Page 1
CQG Integrated Client 7.7 CQG is pleased to announce the release of CQG Integrated Client version 7.7. This release reflects the sophistication of our customers by introducing easy-to-use and easily accessible collaboration tools, by expanding our ever-growing number of trading options, and by updating several application windows.
New Features • Time-Based TradeFlow • Communications Toolbar
New Enhancements • Trailing Limit Orders • Bracket Orders • Smart Order Preferences • Trading on the Enhanced Quote SpreadSheet • Spreads Data Display • Enhanced Saving, Sending, and Printing Images • Quote SpreadSheet Net Change Histogram • Updated QSS and EQSS Setup Windows • Updated Add Study Window • Updated Toolbar Preferences • Updated Login Window
About this document This document provides instructions on how to use the new features and enhancements in CQG Integrated Client version 7.7. There are several ways to navigate this document. The .pdf provides bookmarks that are direct links to sections in the document. The Table of Contents also contains active links. Within the document, links are indicated by blue, underlined text. Because it is meant to be printed double-sided, you may notice blank pages in the .pdf. CQG Resources Web Site: www.cqg.com Downloads, Flyers, Newsletter, Articles: http://www.cqg.com/Support/Downloads.aspx Hartle & Flow Blog: http://www.hartleandflow.com/
7.7 User’s Guide
Page 2
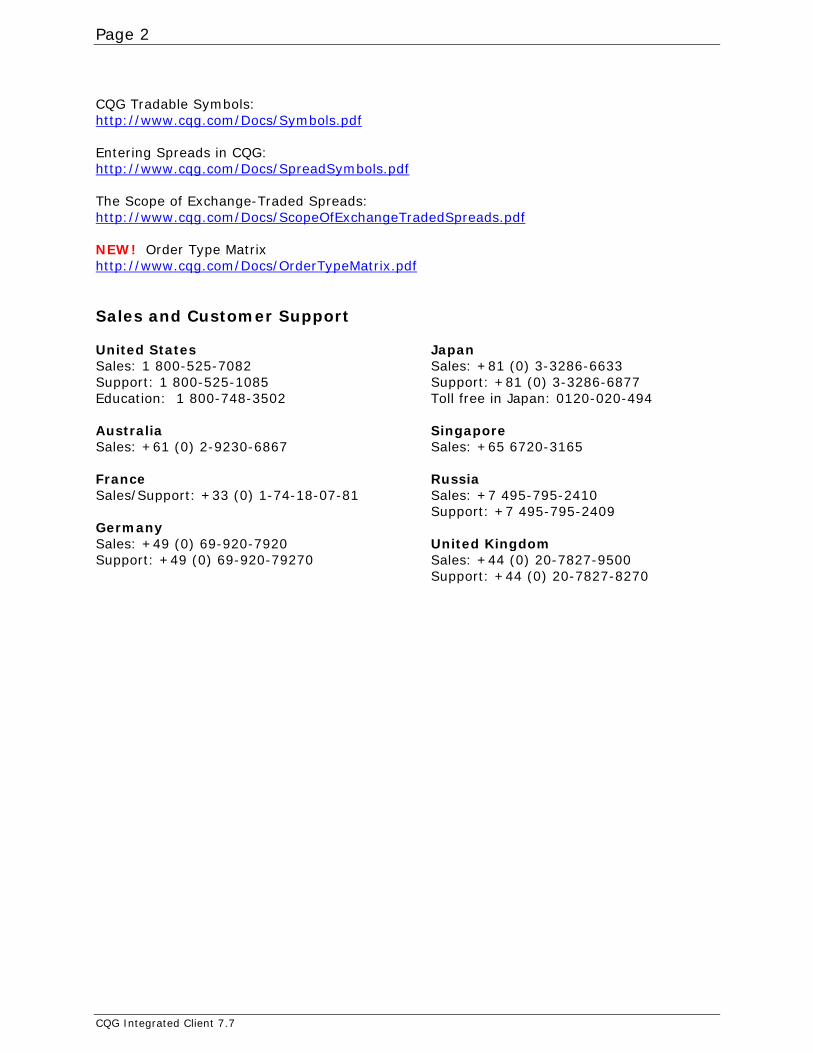
CQG Tradable Symbols: http://www.cqg.com/Docs/Symbols.pdf Entering Spreads in CQG: http://www.cqg.com/Docs/SpreadSymbols.pdf The Scope of Exchange-Traded Spreads: http://www.cqg.com/Docs/ScopeOfExchangeTradedSpreads.pdf NEW! Order Type Matrix http://www.cqg.com/Docs/OrderTypeMatrix.pdf Sales and Customer Support United States Sales: 1 800-525-7082 Support: 1 800-525-1085 Education: 1 800-748-3502 Australia Sales: +61 (0) 2-9230-6867 France Sales/Support: +33 (0) 1-74-18-07-81 Germany Sales: +49 (0) 69-920-7920 Support: +49 (0) 69-920-79270
Japan Sales: +81 (0) 3-3286-6633 Support: +81 (0) 3-3286-6877 Toll free in Japan: 0120-020-494 Singapore Sales: +65 6720-3165 Russia Sales: +7 495-795-2410 Support: +7 495-795-2409 United Kingdom Sales: +44 (0) 20-7827-9500 Support: +44 (0) 20-7827-8270
CQG Integrated Client 7.7
Page 3
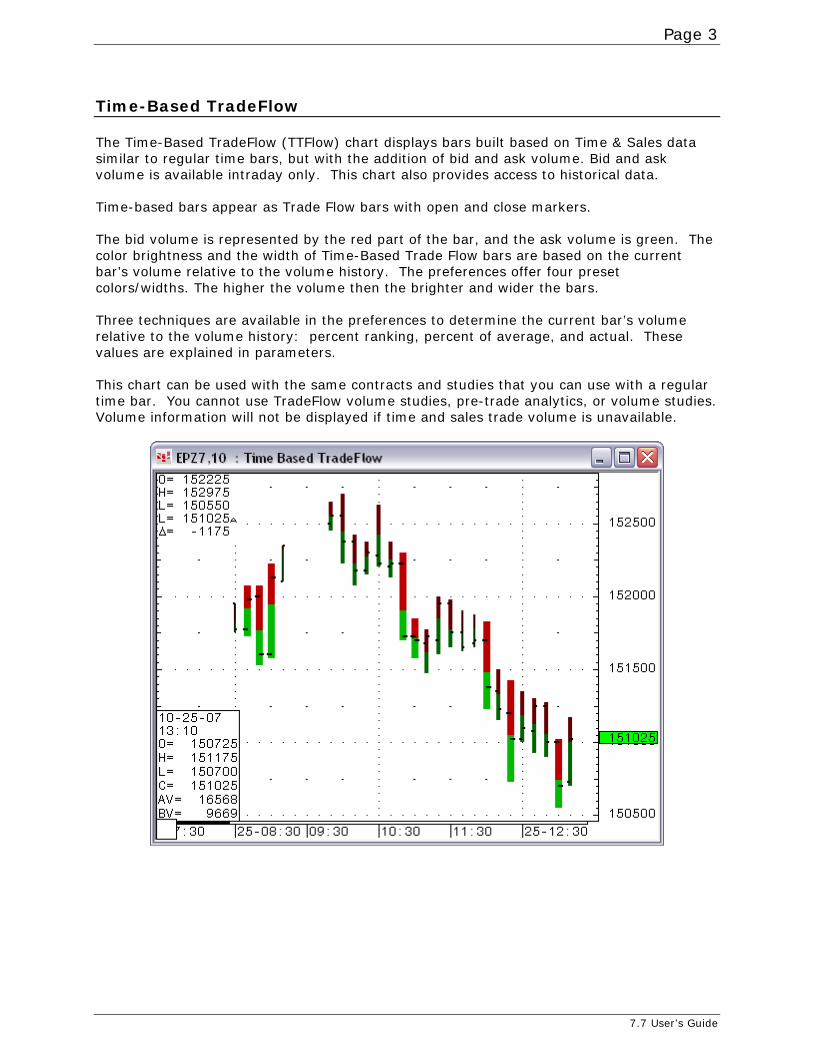
Time-Based TradeFlow The Time-Based TradeFlow (TTFlow) chart displays bars built based on Time & Sales data similar to regular time bars, but with the addition of bid and ask volume. Bid and ask volume is available intraday only. This chart also provides access to historical data. Time-based bars appear as Trade Flow bars with open and close markers. The bid volume is represented by the red part of the bar, and the ask volume is green. The color brightness and the width of Time-Based Trade Flow bars are based on the current bar’s volume relative to the volume history. The preferences offer four preset colors/widths. The higher the volume then the brighter and wider the bars. Three techniques are available in the preferences to determine the current bar’s volume relative to the volume history: percent ranking, percent of average, and actual. These values are explained in parameters. This chart can be used with the same contracts and studies that you can use with a regular time bar. You cannot use TradeFlow volume studies, pre-trade analytics, or volume studies. Volume information will not be displayed if time and sales trade volume is unavailable.
7.7 User’s Guide
Page 4
To open a Time-Based TradeFlow Chart
1. Click the Study button. 2. Click the Chart Types tab. 3. Click the TTFlow button. 4. Close the Add Study window. 5. Click the TTFlow button that is now located on the toolbar.
Time-Based TradeFlow Parameters Parameter Values
Volume Threshold
Choose Percent of Average, Percent Rank or Actual. Percent Rank The historical volume over a preset look-back period is ranked by size from the smallest to the largest. The current bar’s color/width is determined by which of the four percentile rankings of the distribution of the volume history the current volume reading lands in. The default range of the percentile rankings are:
1. Zero, up to 10 percent
2. 10 percent up to 50 percent
3. 50 percent up to 90 percent
4. Greater than 90 percent.
Percent-of-Average The four sets of colors/widths are based on the current bars volume relative to a percentage of the average of the previous same session’s volume:
1. Volume is above and up to and including the previous session’s average volume times zero percent.
2. Volume is above and up to and including the previous session’s average volume times 10 percent.
3. Volume is above and up to and including the previous session’s average volume times 50 percent.
4. Volume is above and up to and including the previous session’s average volume times 90 percent.
If the previous session’s average volume is not available, then the percent values are treated as actual volume values. Actual The four sets of colors/widths are based on the current bars volume being greater than a traded volume level, e.g., greater than 5,000 contracts. The preference's threshold parameters are set traded volume levels and the bar’s volume is compared to them directly. For example, the levels could be set to 1,000, 5,000, 10,000, and 25,000 contracts (each level marks a range greater than and up to the next level). If the current bar’s traded volume were 7,500 contracts, then the color/width would be based
Time-Based TradeFlow
Page 5
on the second group (5,000).
Bid Select the color for Bid volume bars for each size of bar.
Ask Select the color for Ask volume bars for each size of bar. Time-Based TradeFlow Outputs The cursor value box, QFormulas toolbox, mouse tool tips, and tabular display will all contain these outputs:
• Open • High • Low • Close • AV (toolbox value = AskTradeVol) • BV (toolbox value = BidTradeVol)
7.7 User’s Guide

Page 7
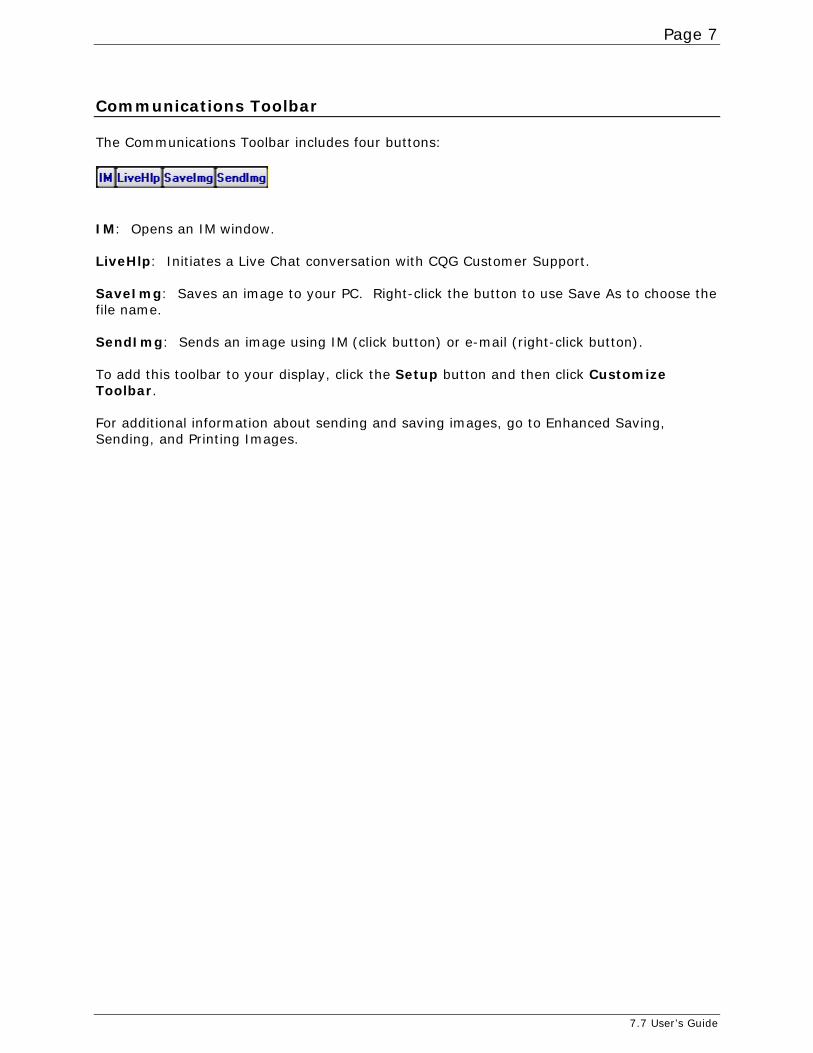
Communications Toolbar The Communications Toolbar includes four buttons:
IM: Opens an IM window. LiveHlp: Initiates a Live Chat conversation with CQG Customer Support. SaveImg: Saves an image to your PC. Right-click the button to use Save As to choose the file name. SendImg: Sends an image using IM (click button) or e-mail (right-click button). To add this toolbar to your display, click the Setup button and then click Customize Toolbar. For additional information about sending and saving images, go to Enhanced Saving, Sending, and Printing Images.
7.7 User’s Guide

Page 9
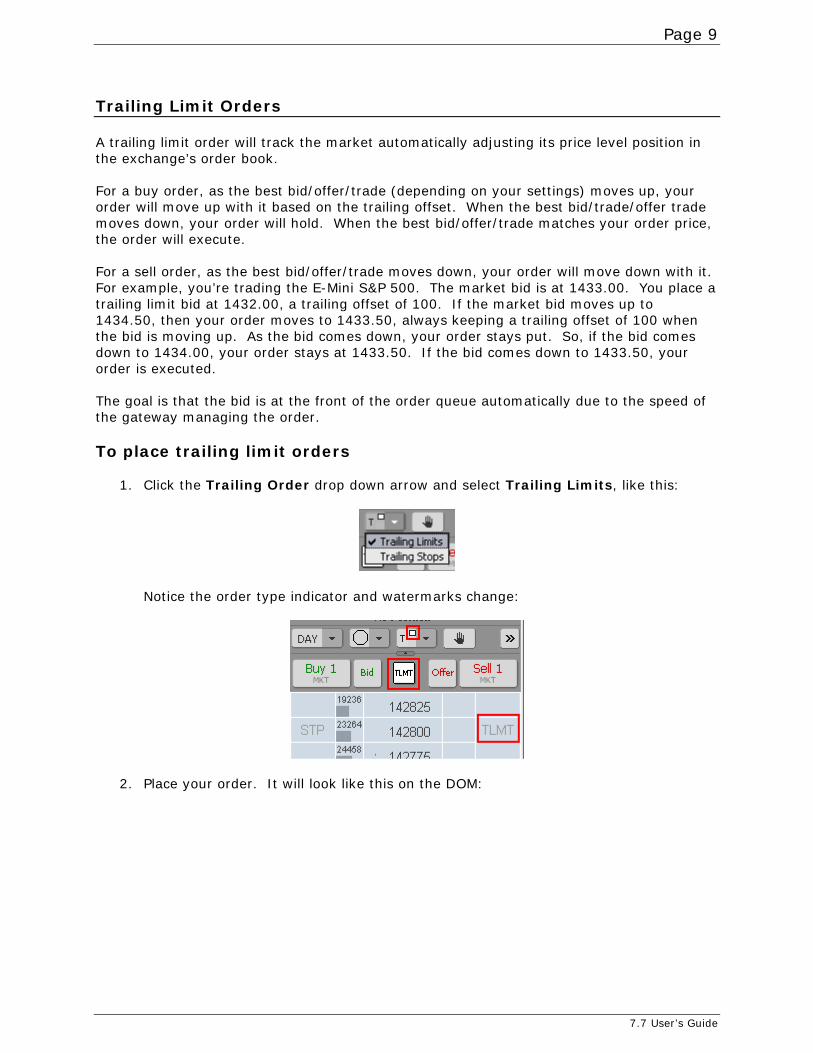
Trailing Limit Orders A trailing limit order will track the market automatically adjusting its price level position in the exchange’s order book. For a buy order, as the best bid/offer/trade (depending on your settings) moves up, your order will move up with it based on the trailing offset. When the best bid/trade/offer trade moves down, your order will hold. When the best bid/offer/trade matches your order price, the order will execute. For a sell order, as the best bid/offer/trade moves down, your order will move down with it. For example, you’re trading the E-Mini S&P 500. The market bid is at 1433.00. You place a trailing limit bid at 1432.00, a trailing offset of 100. If the market bid moves up to 1434.50, then your order moves to 1433.50, always keeping a trailing offset of 100 when the bid is moving up. As the bid comes down, your order stays put. So, if the bid comes down to 1434.00, your order stays at 1433.50. If the bid comes down to 1433.50, your order is executed. The goal is that the bid is at the front of the order queue automatically due to the speed of the gateway managing the order. To place trailing limit orders
1. Click the Trailing Order drop down arrow and select Trailing Limits, like this:
Notice the order type indicator and watermarks change:
2. Place your order. It will look like this on the DOM:
7.7 User’s Guide
Page 10
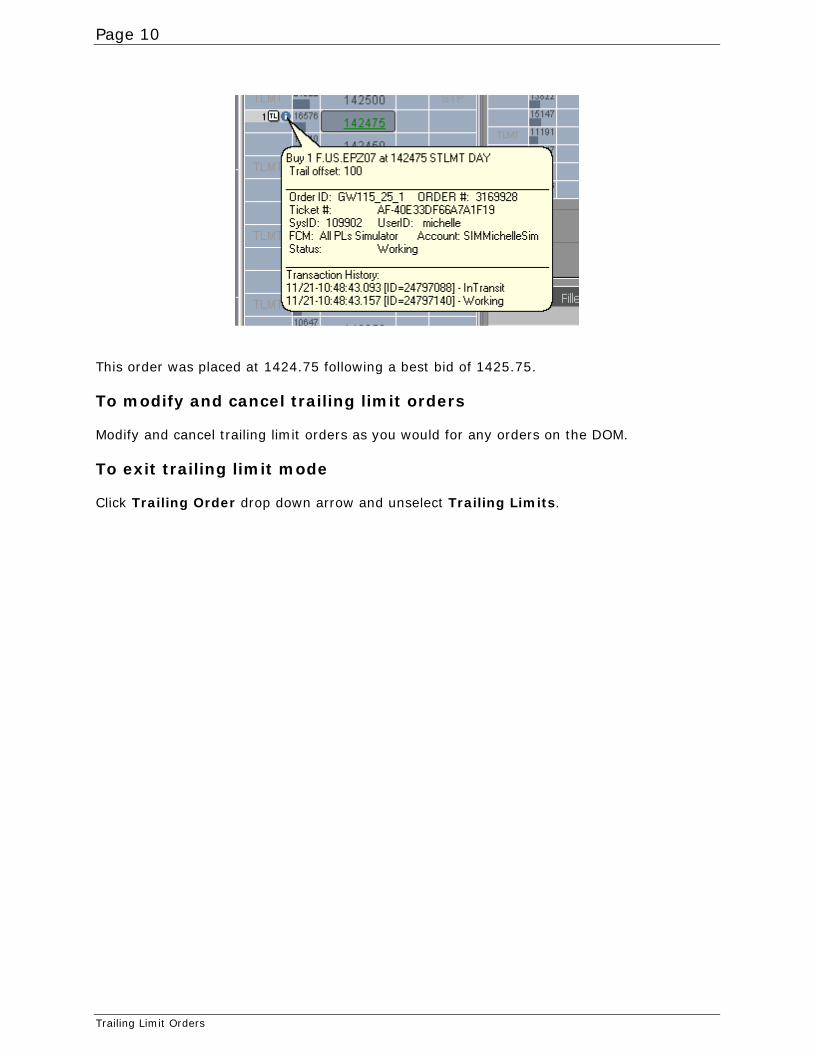
This order was placed at 1424.75 following a best bid of 1425.75. To modify and cancel trailing limit orders Modify and cancel trailing limit orders as you would for any orders on the DOM. To exit trailing limit mode Click Trailing Order drop down arrow and unselect Trailing Limits.
Trailing Limit Orders
Page 11
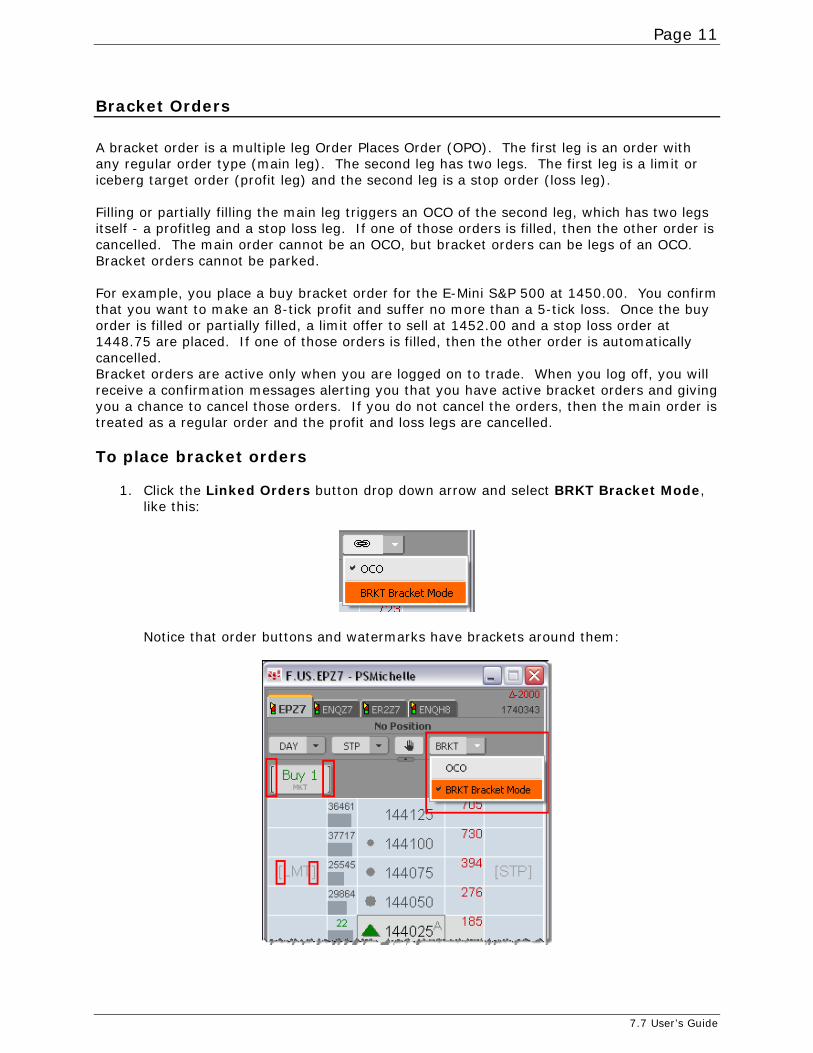
Bracket Orders A bracket order is a multiple leg Order Places Order (OPO). The first leg is an order with any regular order type (main leg). The second leg has two legs. The first leg is a limit or iceberg target order (profit leg) and the second leg is a stop order (loss leg). Filling or partially filling the main leg triggers an OCO of the second leg, which has two legs itself - a profitleg and a stop loss leg. If one of those orders is filled, then the other order is cancelled. The main order cannot be an OCO, but bracket orders can be legs of an OCO. Bracket orders cannot be parked. For example, you place a buy bracket order for the E-Mini S&P 500 at 1450.00. You confirm that you want to make an 8-tick profit and suffer no more than a 5-tick loss. Once the buy order is filled or partially filled, a limit offer to sell at 1452.00 and a stop loss order at 1448.75 are placed. If one of those orders is filled, then the other order is automatically cancelled. Bracket orders are active only when you are logged on to trade. When you log off, you will receive a confirmation messages alerting you that you have active bracket orders and giving you a chance to cancel those orders. If you do not cancel the orders, then the main order is treated as a regular order and the profit and loss legs are cancelled. To place bracket orders
1. Click the Linked Orders button drop down arrow and select BRKT Bracket Mode, like this:
Notice that order buttons and watermarks have brackets around them:
7.7 User’s Guide
Page 12
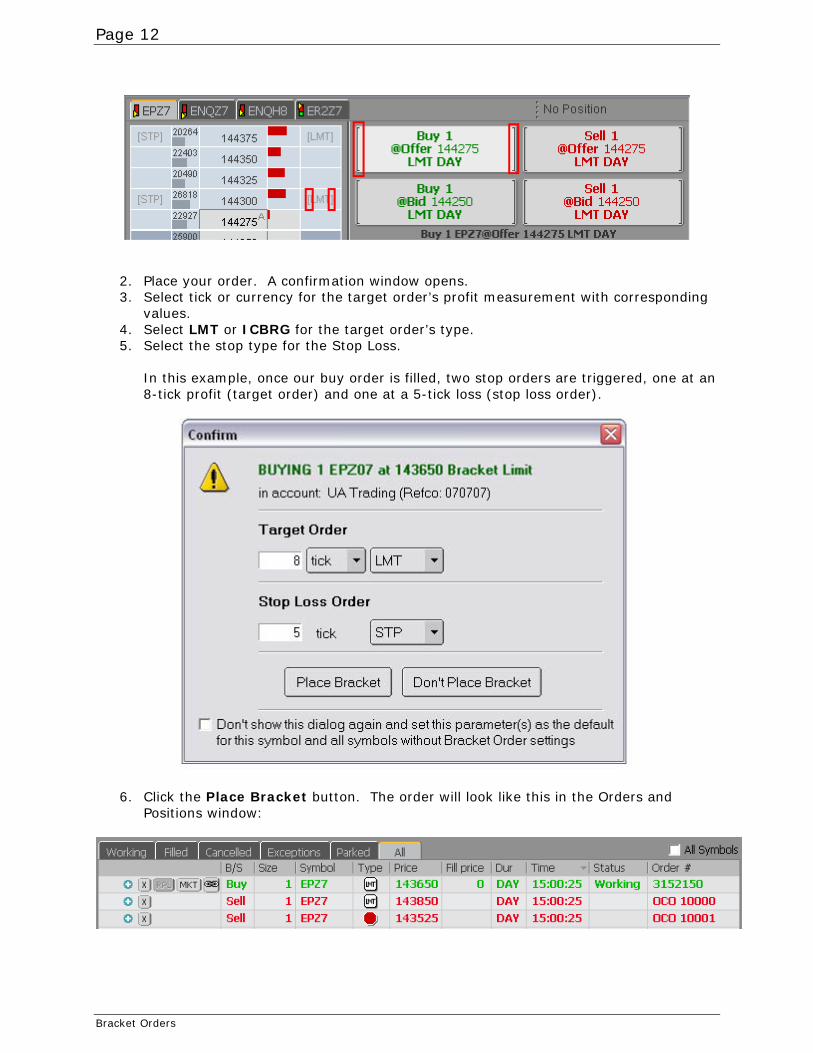
2. Place your order. A confirmation window opens. 3. Select tick or currency for the target order’s profit measurement with corresponding
values. 4. Select LMT or ICBRG for the target order’s type. 5. Select the stop type for the Stop Loss.
In this example, once our buy order is filled, two stop orders are triggered, one at an 8-tick profit (target order) and one at a 5-tick loss (stop loss order).
6. Click the Place Bracket button. The order will look like this in the Orders and Positions window:
Bracket Orders
Page 13
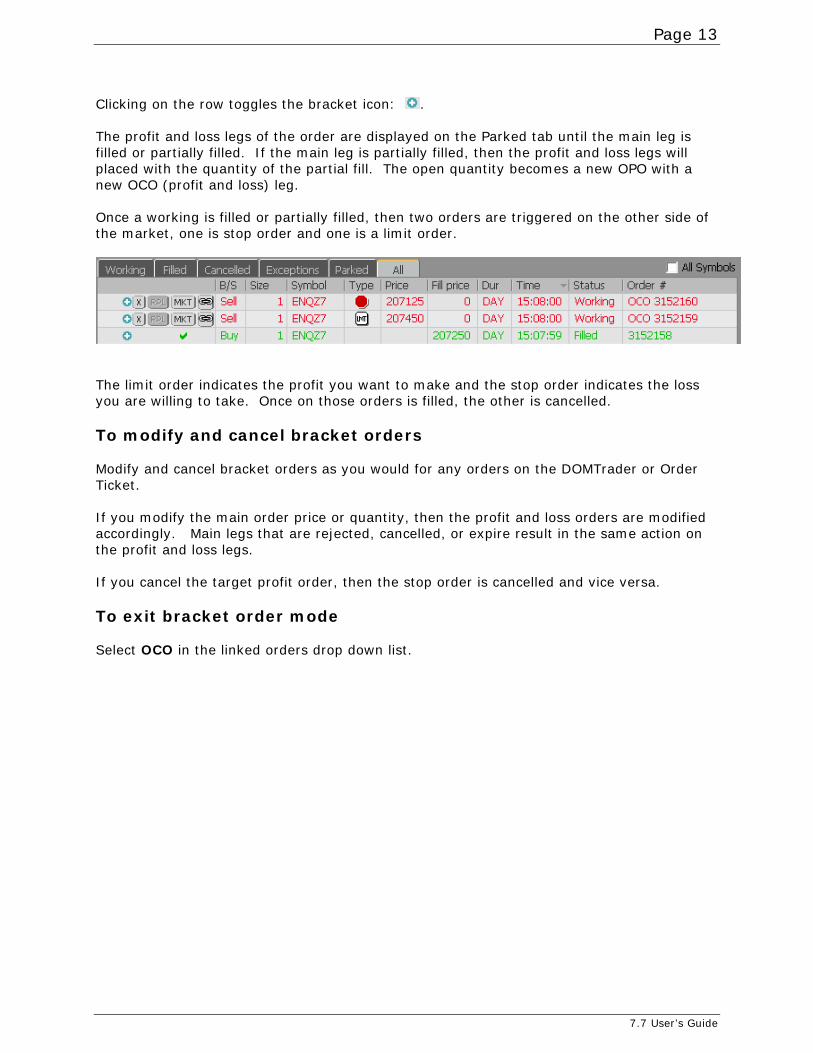
Clicking on the row toggles the bracket icon: . The profit and loss legs of the order are displayed on the Parked tab until the main leg is filled or partially filled. If the main leg is partially filled, then the profit and loss legs will placed with the quantity of the partial fill. The open quantity becomes a new OPO with a new OCO (profit and loss) leg. Once a working is filled or partially filled, then two orders are triggered on the other side of the market, one is stop order and one is a limit order.
The limit order indicates the profit you want to make and the stop order indicates the loss you are willing to take. Once on those orders is filled, the other is cancelled. To modify and cancel bracket orders Modify and cancel bracket orders as you would for any orders on the DOMTrader or Order Ticket. If you modify the main order price or quantity, then the profit and loss orders are modified accordingly. Main legs that are rejected, cancelled, or expire result in the same action on the profit and loss legs. If you cancel the target profit order, then the stop order is cancelled and vice versa. To exit bracket order mode Select OCO in the linked orders drop down list.
7.7 User’s Guide

Page 15
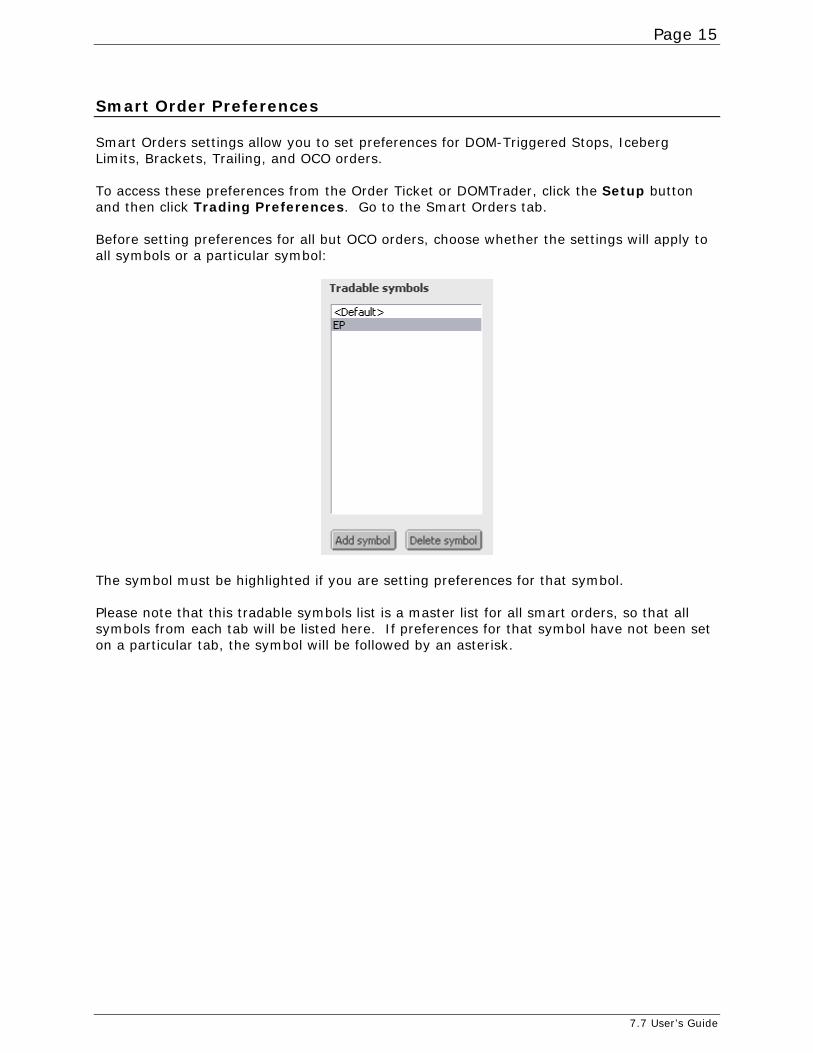
Smart Order Preferences Smart Orders settings allow you to set preferences for DOM-Triggered Stops, Iceberg Limits, Brackets, Trailing, and OCO orders. To access these preferences from the Order Ticket or DOMTrader, click the Setup button and then click Trading Preferences. Go to the Smart Orders tab. Before setting preferences for all but OCO orders, choose whether the settings will apply to all symbols or a particular symbol:
The symbol must be highlighted if you are setting preferences for that symbol. Please note that this tradable symbols list is a master list for all smart orders, so that all symbols from each tab will be listed here. If preferences for that symbol have not been set on a particular tab, the symbol will be followed by an asterisk.
7.7 User’s Guide

Page 16
Smart Order Preferences
Page 17
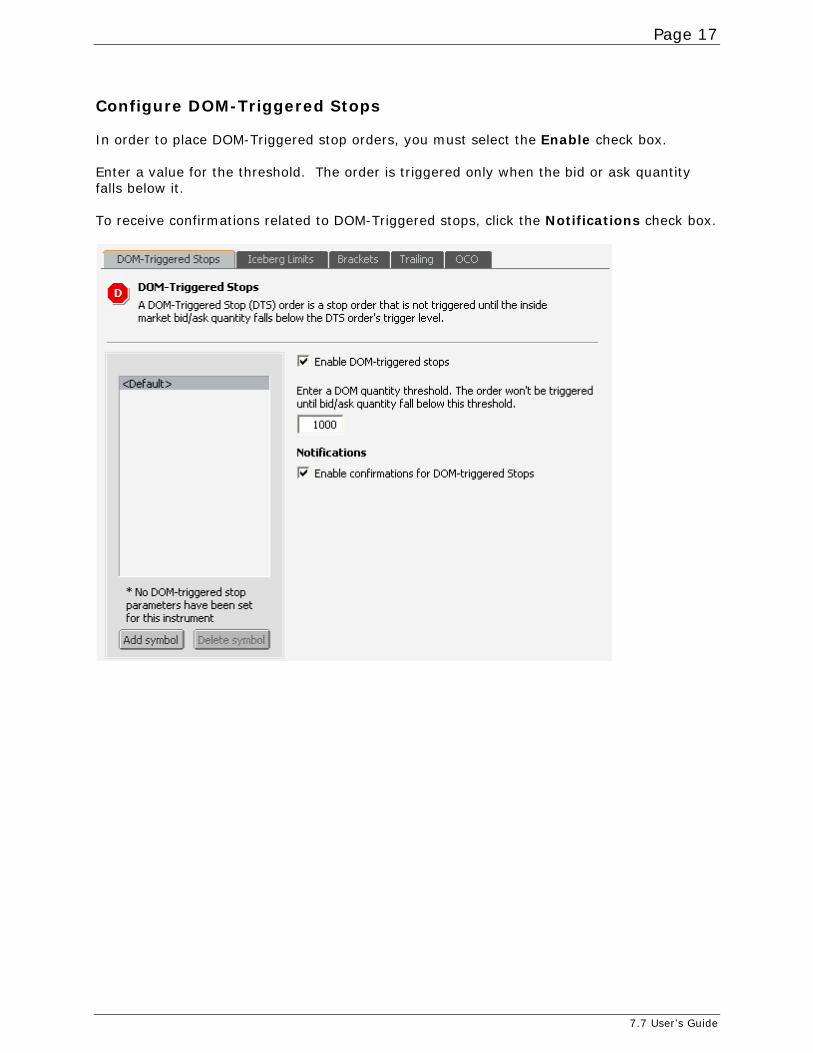
Configure DOM-Triggered Stops In order to place DOM-Triggered stop orders, you must select the Enable check box. Enter a value for the threshold. The order is triggered only when the bid or ask quantity falls below it. To receive confirmations related to DOM-Triggered stops, click the Notifications check box.
7.7 User’s Guide
Page 18
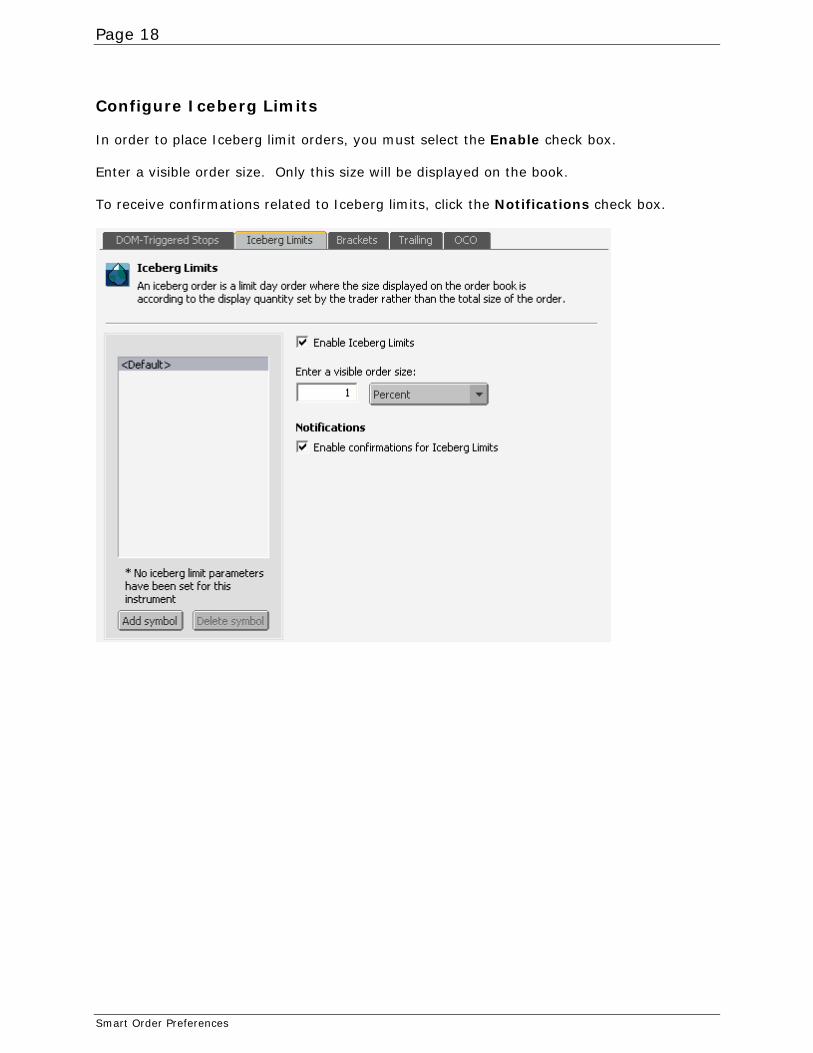
Configure Iceberg Limits In order to place Iceberg limit orders, you must select the Enable check box. Enter a visible order size. Only this size will be displayed on the book. To receive confirmations related to Iceberg limits, click the Notifications check box.
Smart Order Preferences
Page 19
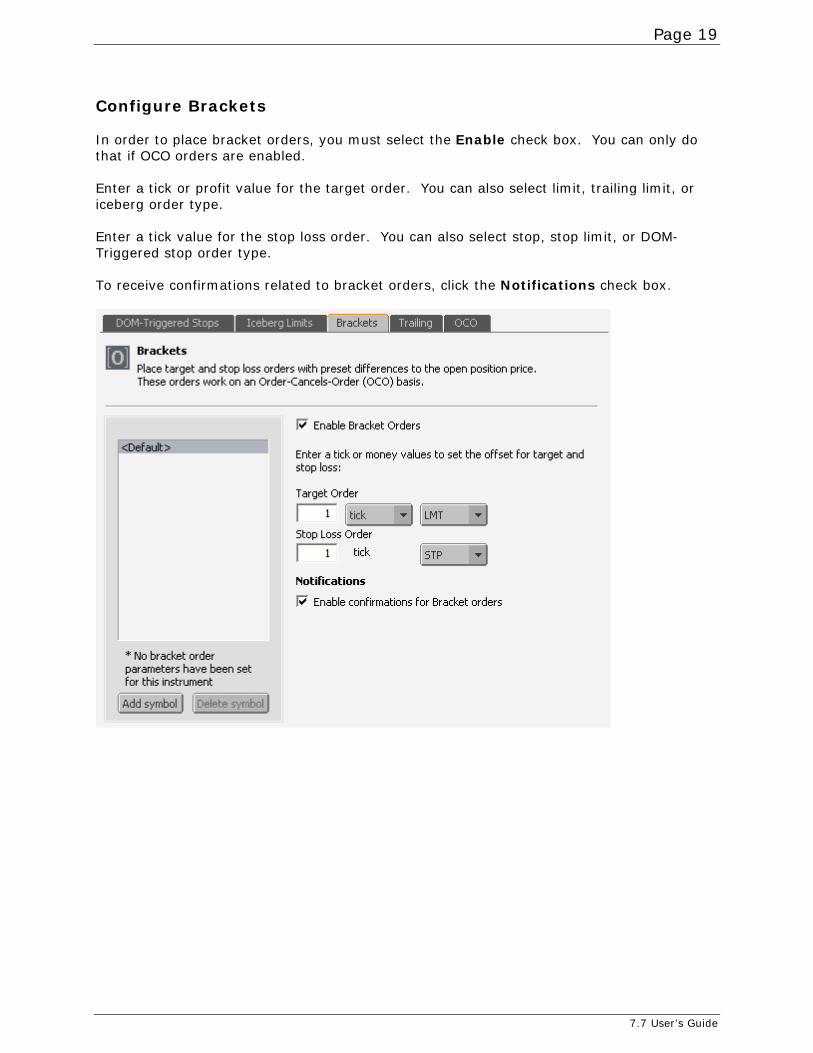
Configure Brackets In order to place bracket orders, you must select the Enable check box. You can only do that if OCO orders are enabled. Enter a tick or profit value for the target order. You can also select limit, trailing limit, or iceberg order type. Enter a tick value for the stop loss order. You can also select stop, stop limit, or DOM-Triggered stop order type. To receive confirmations related to bracket orders, click the Notifications check box.
7.7 User’s Guide
Page 20
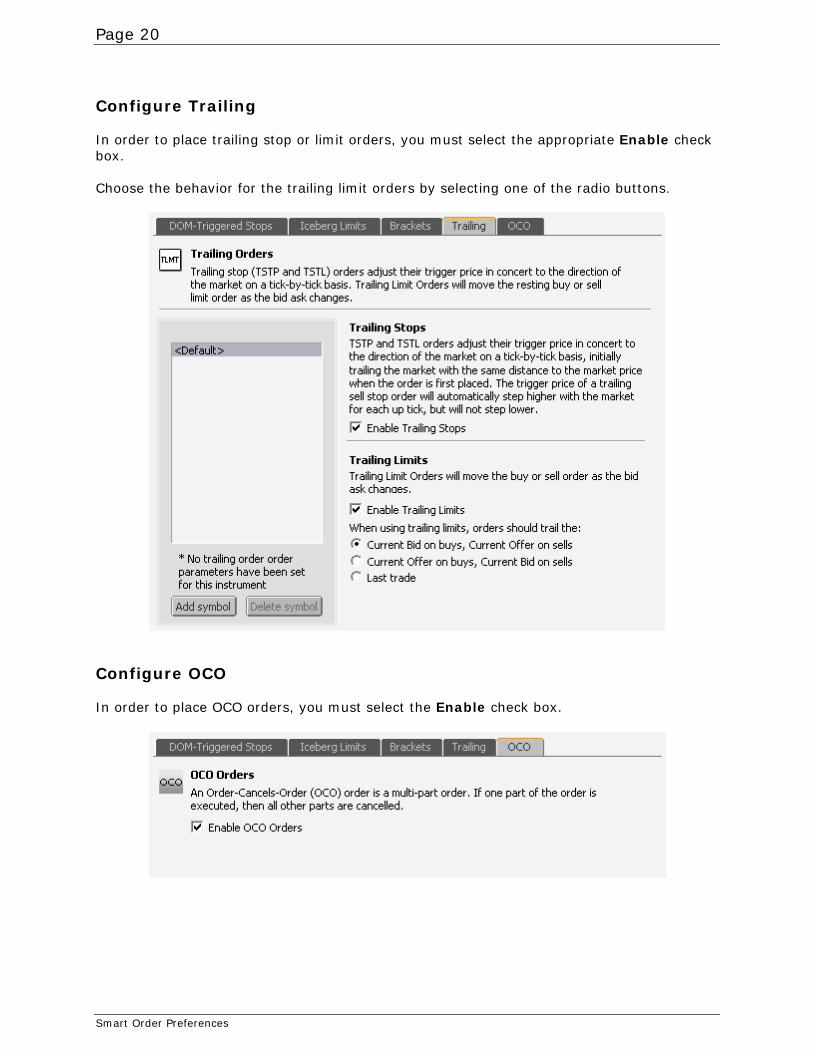
Configure Trailing In order to place trailing stop or limit orders, you must select the appropriate Enable check box. Choose the behavior for the trailing limit orders by selecting one of the radio buttons.
Configure OCO In order to place OCO orders, you must select the Enable check box.
Smart Order Preferences

Page 21
Trading on the Enhanced Quote SpreadSheet You can trade futures, options, FIT, and FX contracts on the Enhanced Quote SpreadSheet. You can also place market orders for synthetic spreads and QFormulas with synthetic spreads. Orders will be displayed on the DOMTrader and on the Orders and Positions window.
Enabling Trading Mode You must be in trading mode in order to display trading column values on the EQSS and to place orders. To see if trading mode is turned on, right-click anywhere on the EQSS. If trading mode is on, it will be checked, like this:
There are several ways to turn the trading mode on and off:
• Click the Trade button to launch the Order Routing Logon window and then sign in. • Right-click the Trade button and then click Logon or Logoff. • Right-click on the EQSS and select Trading mode. A checkmark indicates that
trading mode is on. Creating a EQSS to Place Orders To trade from a EQSS, you need to add the trading columns to the display. Market Direction, Order Size, Buy Market, Sell Market, Working Buy, Working Sell, Open Position and OTE columns were added for EQSS trading. Existing columns - including Bid, Ask, Last Bid, Last Ask, Volume Last Bid, and Volume Last Ask - can also be used for trading.
7.7 User’s Guide
Page 22
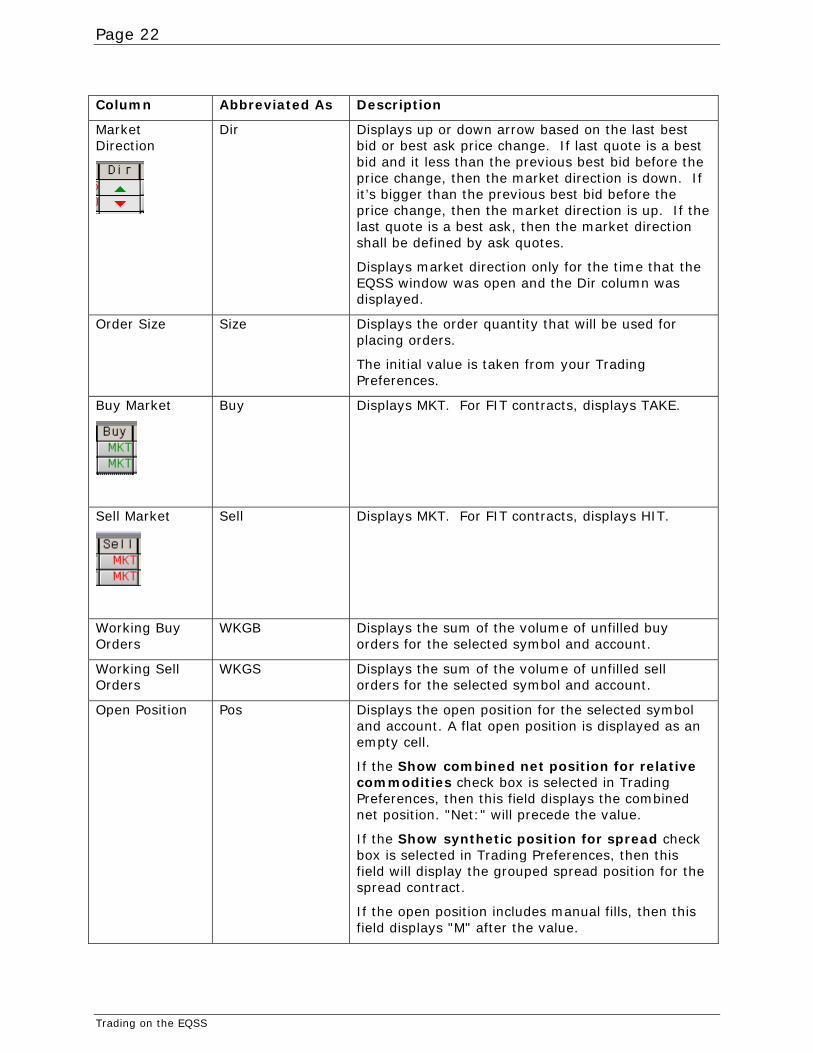
Column Abbreviated As Description
Market Direction
Dir Displays up or down arrow based on the last best bid or best ask price change. If last quote is a best bid and it less than the previous best bid before the price change, then the market direction is down. If it’s bigger than the previous best bid before the price change, then the market direction is up. If the last quote is a best ask, then the market direction shall be defined by ask quotes.
Displays market direction only for the time that the EQSS window was open and the Dir column was displayed.
Order Size Size Displays the order quantity that will be used for placing orders.
The initial value is taken from your Trading Preferences.
Buy Market
Buy Displays MKT. For FIT contracts, displays TAKE.
Sell Market
Sell Displays MKT. For FIT contracts, displays HIT.
Working Buy Orders
WKGB Displays the sum of the volume of unfilled buy orders for the selected symbol and account.
Working Sell Orders
WKGS Displays the sum of the volume of unfilled sell orders for the selected symbol and account.
Open Position Pos Displays the open position for the selected symbol and account. A flat open position is displayed as an empty cell.
If the Show combined net position for relative commodities check box is selected in Trading Preferences, then this field displays the combined net position. "Net:" will precede the value.
If the Show synthetic position for spread check box is selected in Trading Preferences, then this field will display the grouped spread position for the spread contract.
If the open position includes manual fills, then this field displays "M" after the value.
Trading on the EQSS
Page 23
Column Abbreviated As Description
Open Trade Equity
OTE
OTE+P/L
Displays the value for the selected symbol and account based on OTE Trading Preferences. Negative values are represented with parentheses. If OTE is not a whole number, then it is rounded down and a plus sign will follow it, such as 226+.
If the Show combined net position for relative commodities check box is selected in Trading Preferences, then this field displays the value for the combined net position. "Net:" will precede the value.
If the Show synthetic position for spread check box is selected in Trading Preferences, then this field will display the value for the grouped spread position for the spread contract.
If the open position includes manual fills, then this field displays "M" after the value.
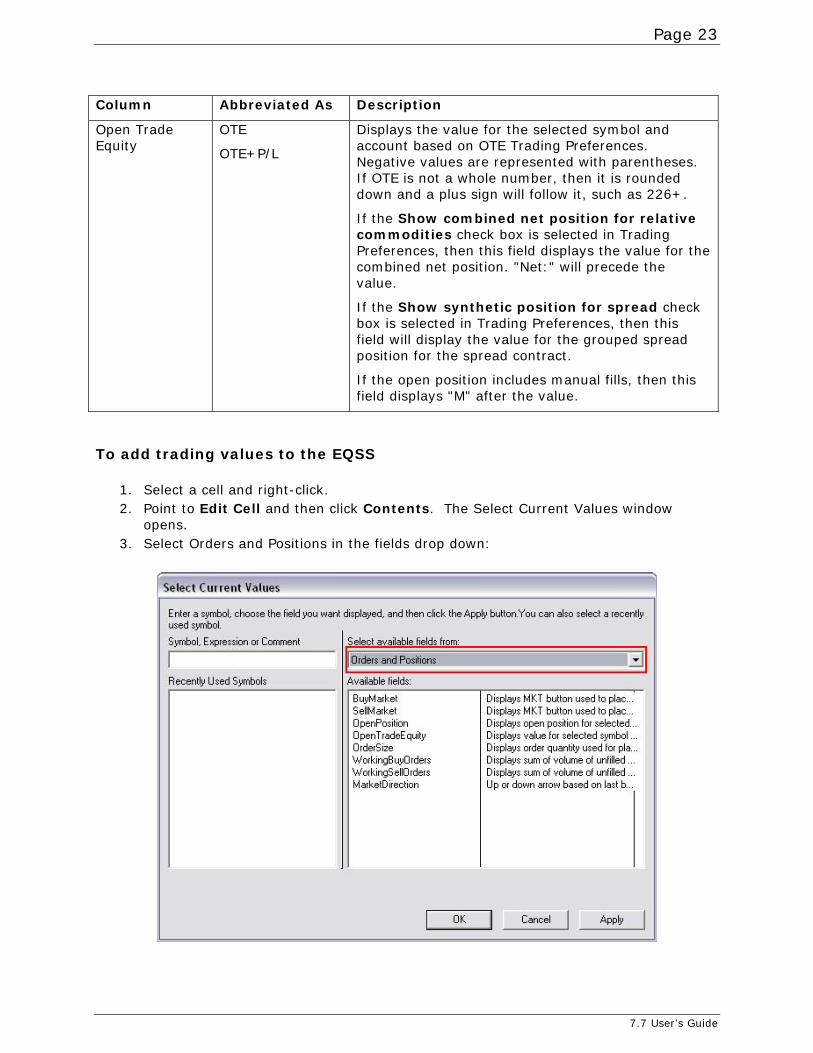
To add trading values to the EQSS
1. Select a cell and right-click. 2. Point to Edit Cell and then click Contents. The Select Current Values window
opens. 3. Select Orders and Positions in the fields drop down:
7.7 User’s Guide
Page 24
4. Select the field you wish to add to the EQSS. For example, to place a MKT button in a cell, select BuyMarket or SellMarket. To place an arrow indicating the market direction, select MarketDirection.
5. Click Apply. 6. Repeat for each field you want to add. 7. Click OK when you are finished adding fields.
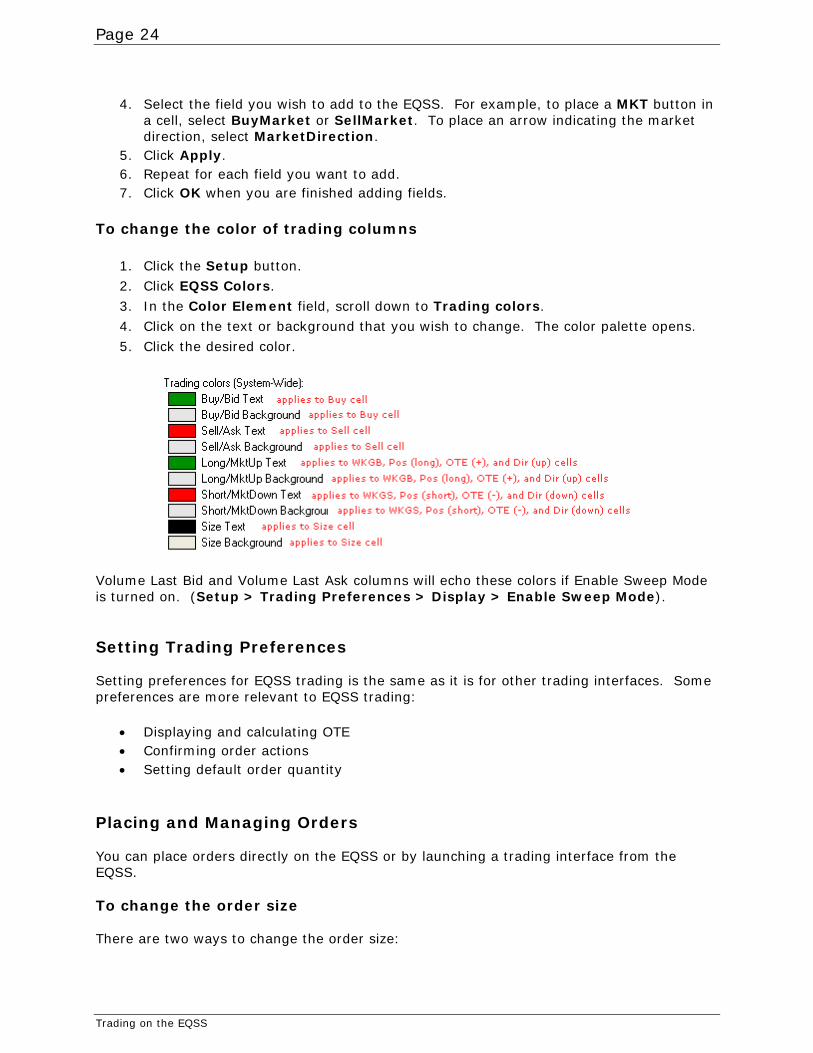
To change the color of trading columns
1. Click the Setup button.
2. Click EQSS Colors.
3. In the Color Element field, scroll down to Trading colors.
4. Click on the text or background that you wish to change. The color palette opens.
5. Click the desired color.
Volume Last Bid and Volume Last Ask columns will echo these colors if Enable Sweep Mode is turned on. (Setup > Trading Preferences > Display > Enable Sweep Mode). Setting Trading Preferences Setting preferences for EQSS trading is the same as it is for other trading interfaces. Some preferences are more relevant to EQSS trading:
• Displaying and calculating OTE • Confirming order actions • Setting default order quantity
Placing and Managing Orders You can place orders directly on the EQSS or by launching a trading interface from the EQSS. To change the order size There are two ways to change the order size:
Trading on the EQSS
Page 25
Click the Size field and then enter a new order quantity using your keyboard or mouse wheel. Click the Size field and then right-click to increase the quantity and left-click to decrease the quantity (down to 1). Right-clicking increases the quantity according to your order quantity settings. For example, if your custom order size buttons are 1, 5, 10, 20, 50, and 100, then right-clicking will increase the quantity from 1 to 5 to 20 to 50 to 100 and then by one hundred for each click. If the last custom value is 500, then each right-click after that value will increase by 500. (Setup > Trading Preferences > Risk > Order quantities for all symbols). To place a market order
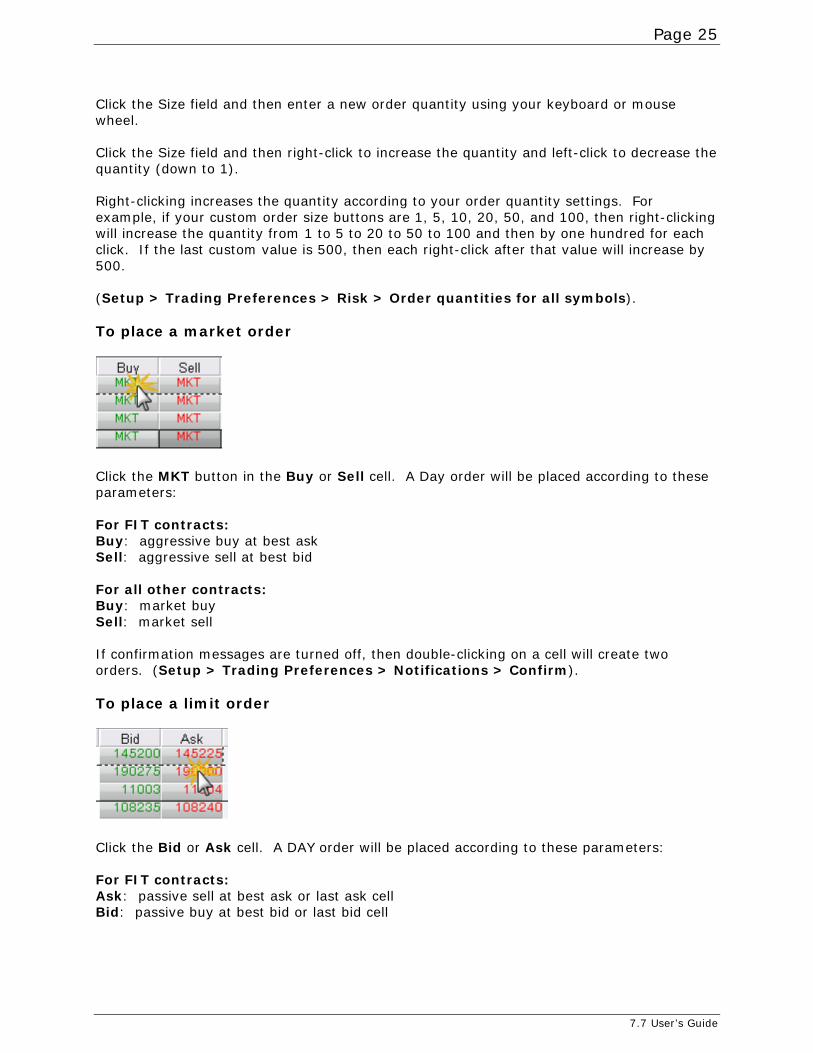
Click the MKT button in the Buy or Sell cell. A Day order will be placed according to these parameters: For FIT contracts: Buy: aggressive buy at best ask Sell: aggressive sell at best bid For all other contracts: Buy: market buy Sell: market sell If confirmation messages are turned off, then double-clicking on a cell will create two orders. (Setup > Trading Preferences > Notifications > Confirm). To place a limit order
Click the Bid or Ask cell. A DAY order will be placed according to these parameters: For FIT contracts: Ask: passive sell at best ask or last ask cell Bid: passive buy at best bid or last bid cell
7.7 User’s Guide
Page 26
For all other contracts: Ask: limit sell at best ask or last ask cell Bid: limit buy at best bid or last bid cell If confirmation messages are turned off, then double-clicking on a cell will create two orders. (Setup > Trading Preferences > Notifications > Confirm). To place an order at best price If enable sweep mode is selected, then you can also place orders by right-clicking on a cell. (Setup > Trading Preferences > Display > Enable Sweep Mode). Right-click the VolumeLastBid or VolumeLastAsk cell. A DAY order will be placed according to these parameters: For FIT contracts: VolumeLastAsk: passive buy at best ask with volume last ask quantity VolumeLastBid: passive sell at best bid with volume last bid quantity For all other contracts: VolumeLastAsk: Limit Buy at Best Ask with VolumeLastAsk quantity VolumeLastBid: Limit Sell at Best Bid with VolumeLastBid quantity Right-click the Bid, Last Bid, Ask, or Last Ask column. A DAY order will be placed according to these parameters: For FIT contracts: Ask or Last Ask: passive buy at best ask Bid or Last Bid: passive sell at best bid For all other contracts: Ask or Last Ask: limit buy at best ask Bid or Last Bid: limit sell at best bid To place an order using a trading interface
1. Right-click the symbol, bid, ask, direction, buy, sell, working buy, working sell, OTE, Volume Last Bid, or Volume Last Ask column.
2. Click Place an Order. The DOMTrader, Order Ticket, or Simple Order Ticket opens, based on your setting in System Preferences (Setup > System Preferences > Misc > Preferred Order Entry Display).
3. Use the DOMTrader or Order Ticket as usual to place the order.
Trading on the EQSS
Page 27
To launch the Orders & Positions window Click the Pos, WKGB, or WKGS cell. The Orders & Positions window opens. If a window is already open, then it will be filtered by the selected symbol and account and the Open Position Summary will be displayed. To liquidate a position
1. Right-click the Pos cell. 2. Click Liquidate this Position. A confirmation message will be displayed if your
preferences indicate so. 3. Click Liquidate.
To reverse a position
1. Right-click the Pos cell. 2. Click Reverse this Position. A confirmation message will be displayed if your
preferences indicate so. 3. Click Reverse.
To cancel an order
1. Right-click on the working order cell. A confirmation message will be displayed if your preferences indicate so.
2. Click Yes.
7.7 User’s Guide

Page 29
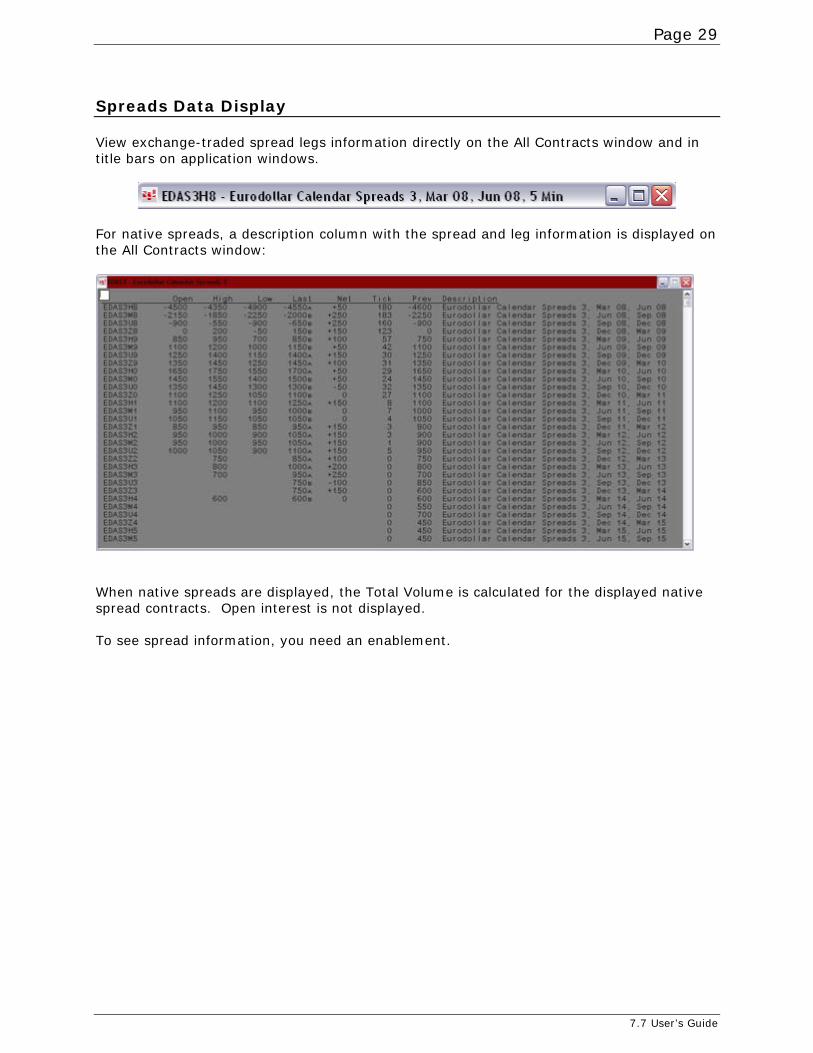
Spreads Data Display View exchange-traded spread legs information directly on the All Contracts window and in title bars on application windows.
For native spreads, a description column with the spread and leg information is displayed on the All Contracts window:
When native spreads are displayed, the Total Volume is calculated for the displayed native spread contracts. Open interest is not displayed. To see spread information, you need an enablement.
7.7 User’s Guide

Page 31
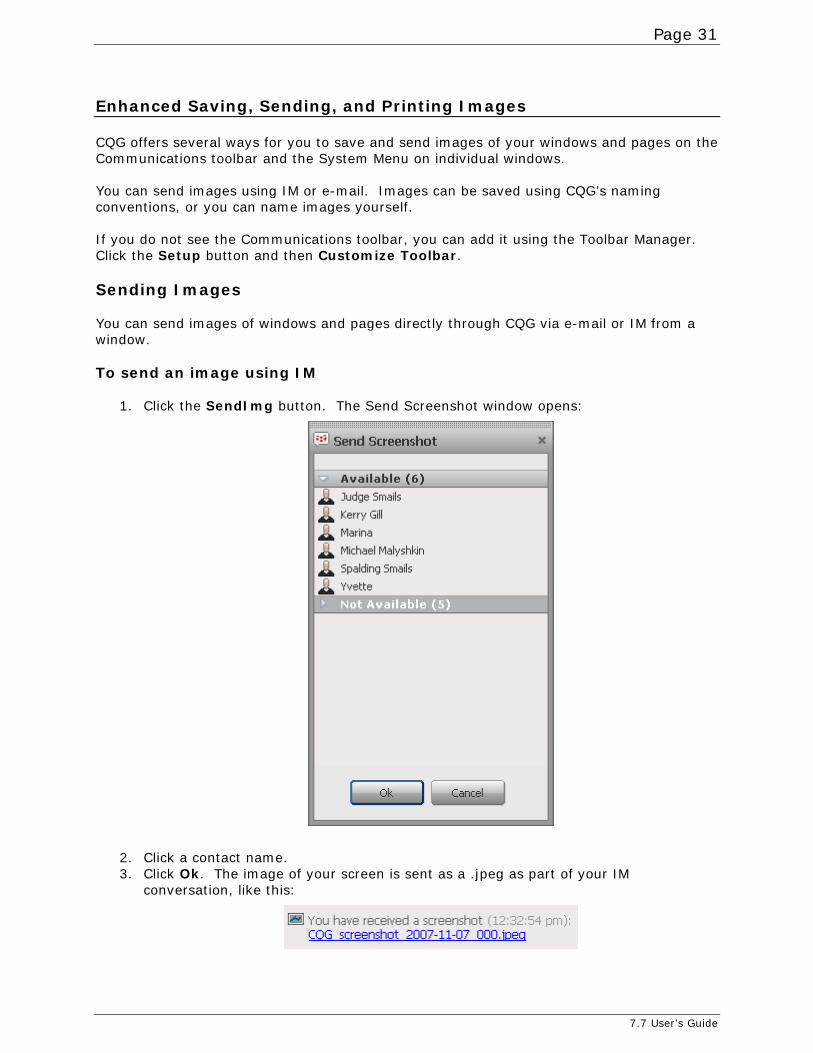
Enhanced Saving, Sending, and Printing Images CQG offers several ways for you to save and send images of your windows and pages on the Communications toolbar and the System Menu on individual windows. You can send images using IM or e-mail. Images can be saved using CQG’s naming conventions, or you can name images yourself. If you do not see the Communications toolbar, you can add it using the Toolbar Manager. Click the Setup button and then Customize Toolbar. Sending Images You can send images of windows and pages directly through CQG via e-mail or IM from a window. To send an image using IM
1. Click the SendImg button. The Send Screenshot window opens:
2. Click a contact name. 3. Click Ok. The image of your screen is sent as a .jpeg as part of your IM
conversation, like this:
7.7 User’s Guide
Page 32
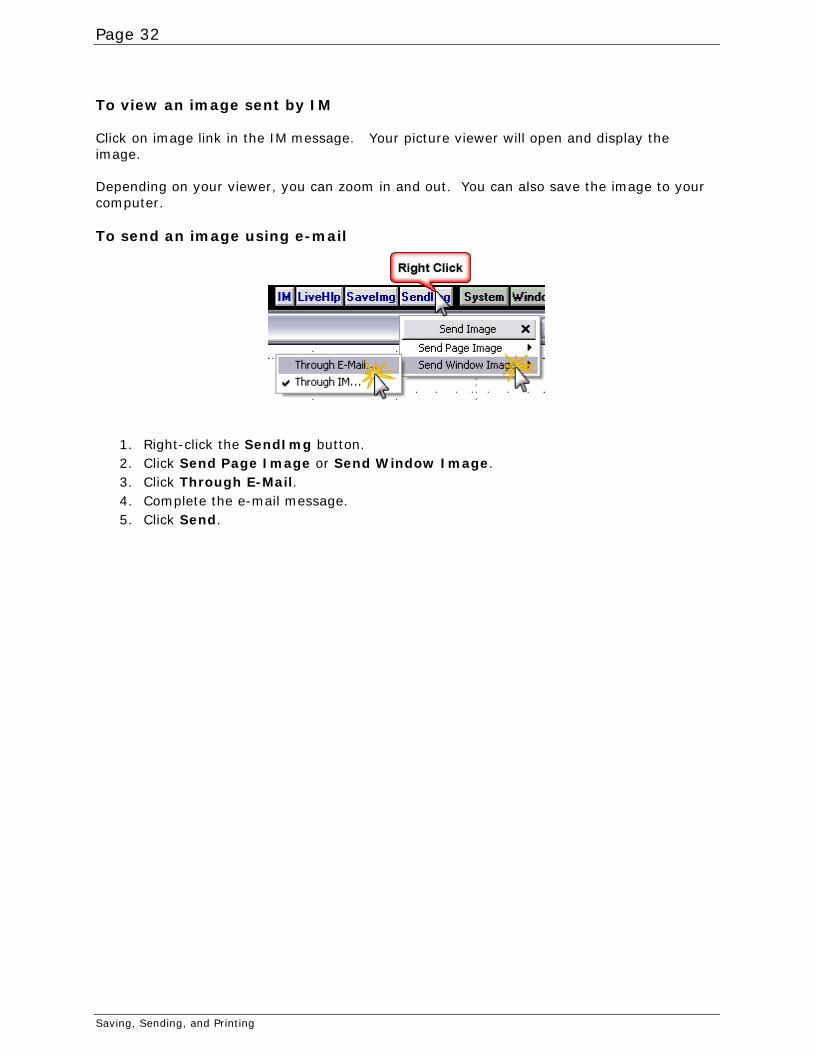
To view an image sent by IM Click on image link in the IM message. Your picture viewer will open and display the image. Depending on your viewer, you can zoom in and out. You can also save the image to your computer. To send an image using e-mail
1. Right-click the SendImg button. 2. Click Send Page Image or Send Window Image. 3. Click Through E-Mail. 4. Complete the e-mail message. 5. Click Send.
Saving, Sending, and Printing
Page 33
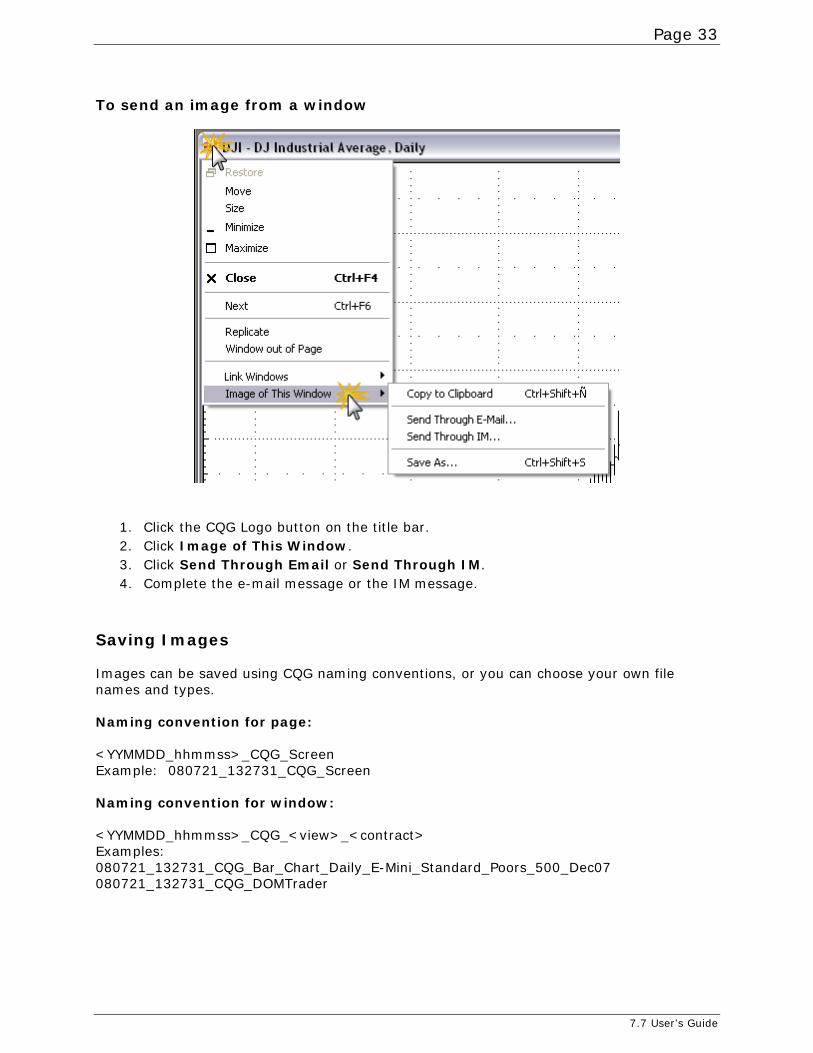
To send an image from a window
1. Click the CQG Logo button on the title bar. 2. Click Image of This Window. 3. Click Send Through Email or Send Through IM. 4. Complete the e-mail message or the IM message.
Saving Images Images can be saved using CQG naming conventions, or you can choose your own file names and types. Naming convention for page: <YYMMDD_hhmmss>_CQG_Screen Example: 080721_132731_CQG_Screen Naming convention for window: <YYMMDD_hhmmss>_CQG_<view>_<contract> Examples: 080721_132731_CQG_Bar_Chart_Daily_E-Mini_Standard_Poors_500_Dec07 080721_132731_CQG_DOMTrader
7.7 User’s Guide
Page 34
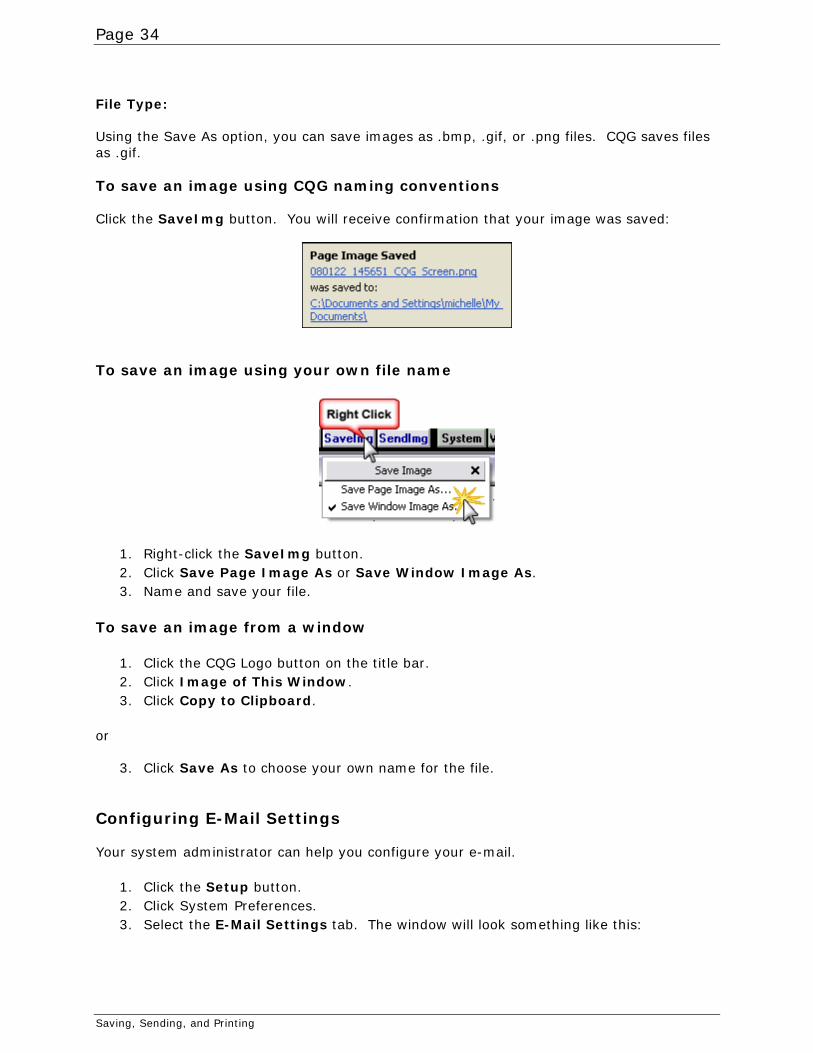
File Type: Using the Save As option, you can save images as .bmp, .gif, or .png files. CQG saves files as .gif. To save an image using CQG naming conventions Click the SaveImg button. You will receive confirmation that your image was saved:
To save an image using your own file name
1. Right-click the SaveImg button. 2. Click Save Page Image As or Save Window Image As. 3. Name and save your file.
To save an image from a window
1. Click the CQG Logo button on the title bar. 2. Click Image of This Window. 3. Click Copy to Clipboard.
or
3. Click Save As to choose your own name for the file. Configuring E-Mail Settings Your system administrator can help you configure your e-mail.
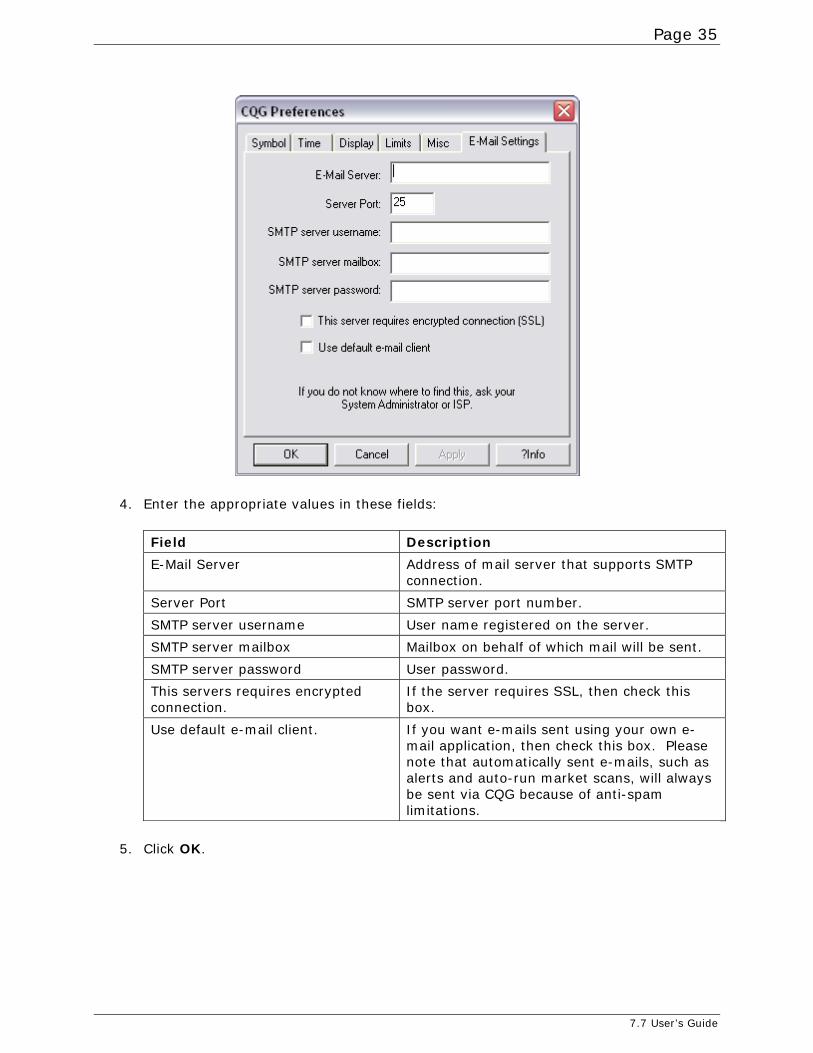
1. Click the Setup button. 2. Click System Preferences. 3. Select the E-Mail Settings tab. The window will look something like this:
Saving, Sending, and Printing
Page 35
4. Enter the appropriate values in these fields:
Field Description
E-Mail Server Address of mail server that supports SMTP connection.
Server Port SMTP server port number.
SMTP server username User name registered on the server.
SMTP server mailbox Mailbox on behalf of which mail will be sent.
SMTP server password User password.
This servers requires encrypted connection.
If the server requires SSL, then check this box.
Use default e-mail client. If you want e-mails sent using your own e-mail application, then check this box. Please note that automatically sent e-mails, such as alerts and auto-run market scans, will always be sent via CQG because of anti-spam limitations.
5. Click OK.
7.7 User’s Guide
Page 36
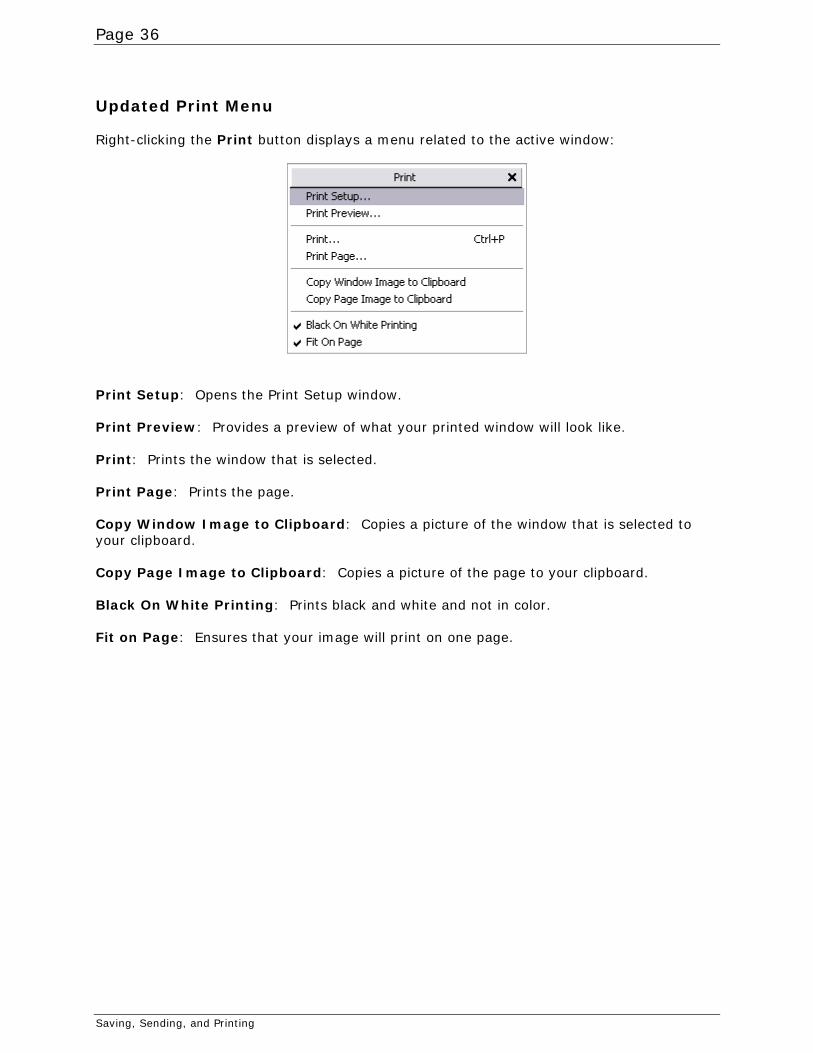
Updated Print Menu Right-clicking the Print button displays a menu related to the active window:
Print Setup: Opens the Print Setup window. Print Preview: Provides a preview of what your printed window will look like. Print: Prints the window that is selected. Print Page: Prints the page. Copy Window Image to Clipboard: Copies a picture of the window that is selected to your clipboard. Copy Page Image to Clipboard: Copies a picture of the page to your clipboard. Black On White Printing: Prints black and white and not in color. Fit on Page: Ensures that your image will print on one page.
Saving, Sending, and Printing
Page 37
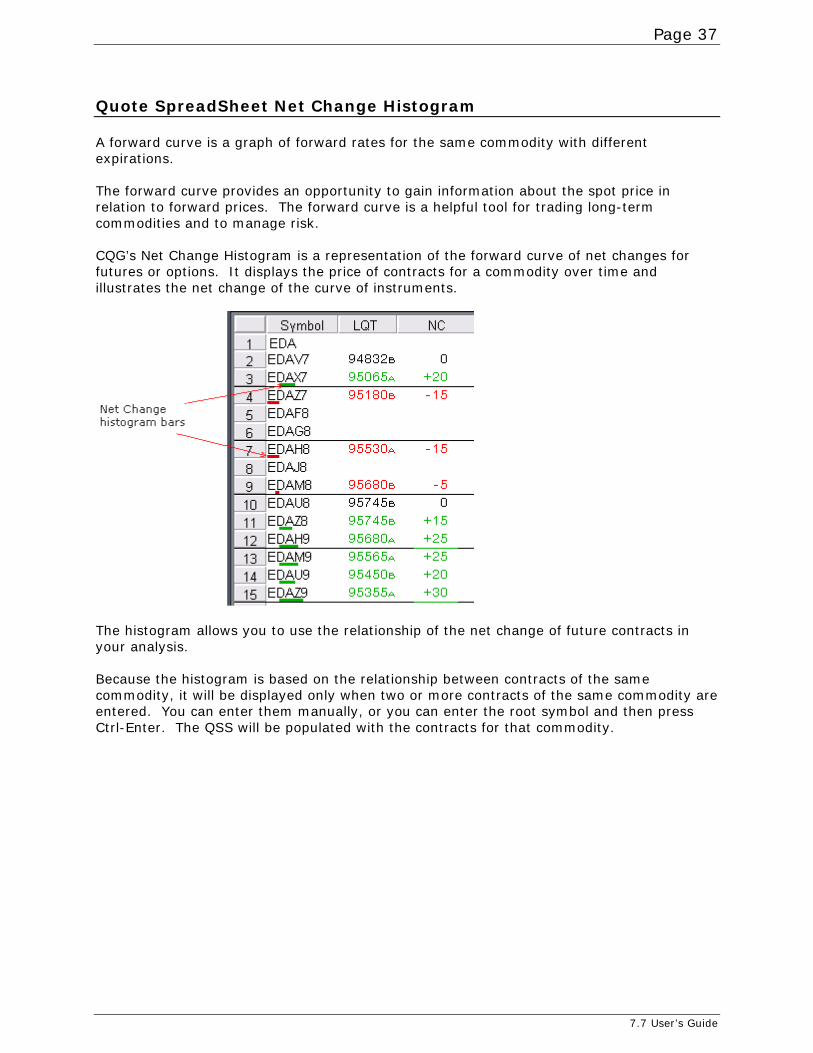
Quote SpreadSheet Net Change Histogram A forward curve is a graph of forward rates for the same commodity with different expirations. The forward curve provides an opportunity to gain information about the spot price in relation to forward prices. The forward curve is a helpful tool for trading long-term commodities and to manage risk. CQG’s Net Change Histogram is a representation of the forward curve of net changes for futures or options. It displays the price of contracts for a commodity over time and illustrates the net change of the curve of instruments.
The histogram allows you to use the relationship of the net change of future contracts in your analysis. Because the histogram is based on the relationship between contracts of the same commodity, it will be displayed only when two or more contracts of the same commodity are entered. You can enter them manually, or you can enter the root symbol and then press Ctrl-Enter. The QSS will be populated with the contracts for that commodity.
7.7 User’s Guide

Page 38
To enable the Net Change Histogram, go to Setup > Quote SpreadSheet Preferences and click the NC Histogram check box. Histogram bars are displayed:
• for futures and options only; • if there are two or more futures of the same commodity in the QSS window; and • if there are two or more options of the same commodity, expiration, and side in the
QSS window. If NetChangeLastTrade is 0 or empty for the contract, the histogram will not be displayed.
Net Change Histogram
Page 39
Updated QSS and EQSS Setup Windows
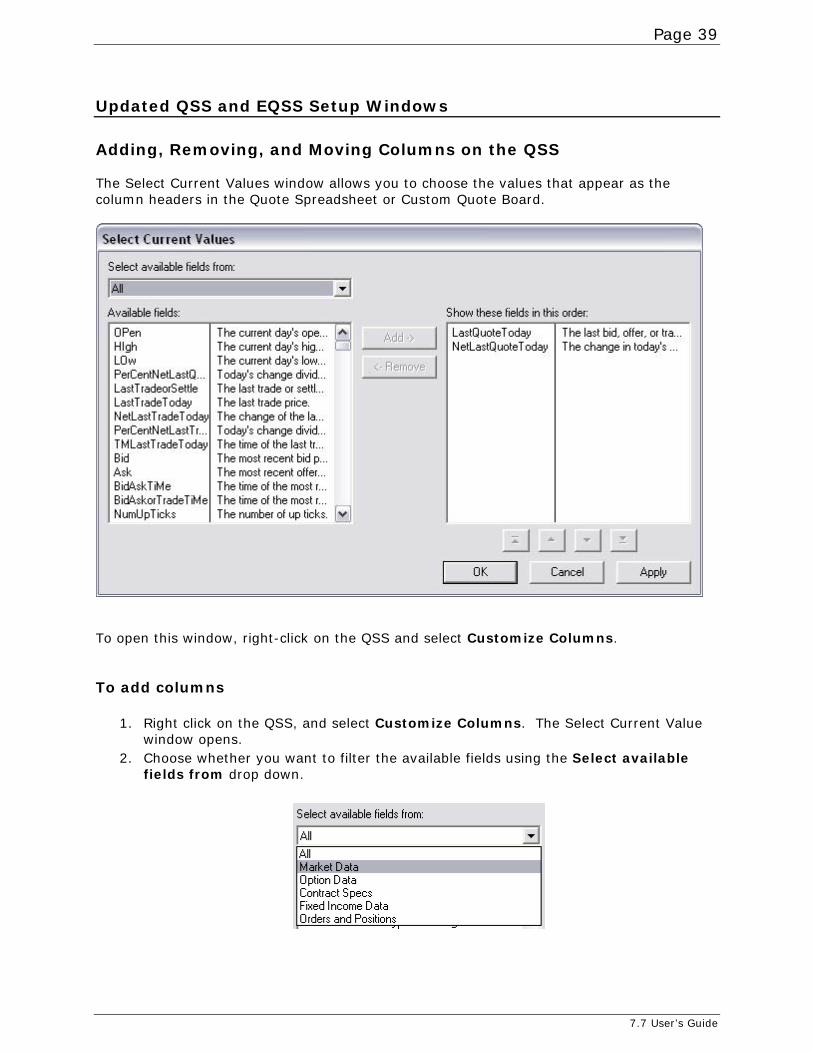
Adding, Removing, and Moving Columns on the QSS The Select Current Values window allows you to choose the values that appear as the column headers in the Quote Spreadsheet or Custom Quote Board.
To open this window, right-click on the QSS and select Customize Columns. To add columns
1. Right click on the QSS, and select Customize Columns. The Select Current Value window opens.
2. Choose whether you want to filter the available fields using the Select available fields from drop down.
7.7 User’s Guide
Page 40
3. Click an available field name. 4. Click the Add button.
To remove columns
1. Click a field name in the Show these fields list. 2. Click the Remove button.
To move columns Use the arrows at the bottom of the window to move the columns.
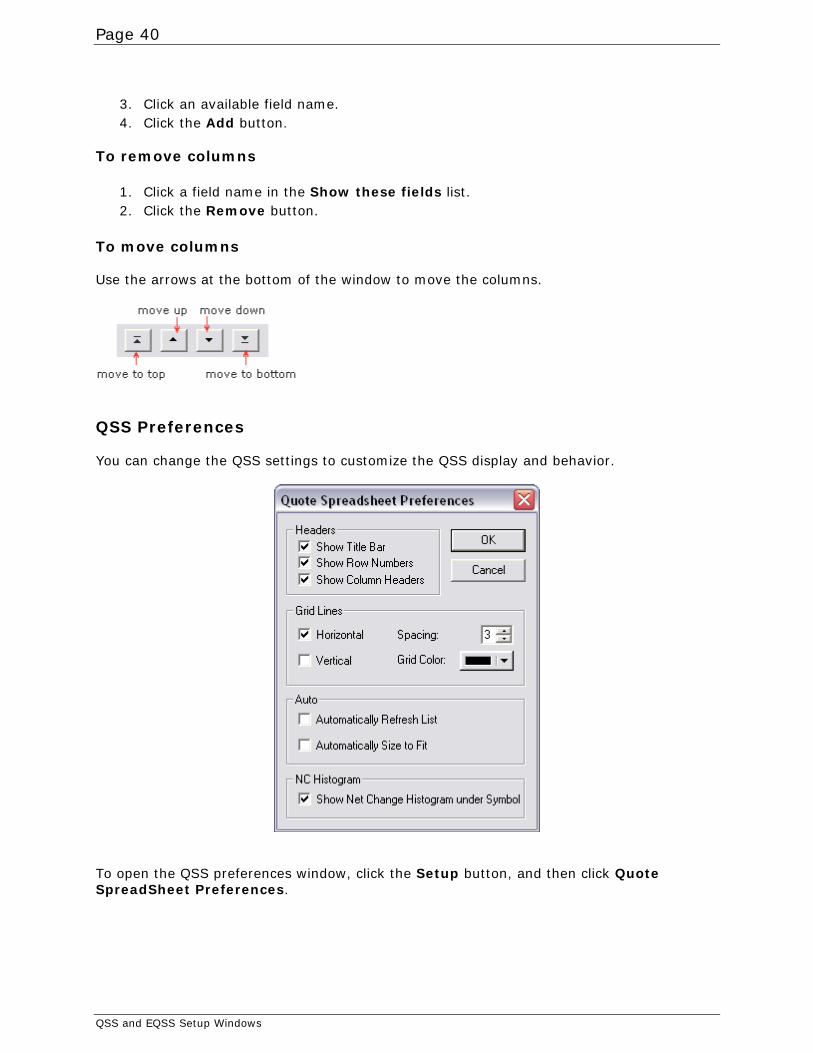
QSS Preferences You can change the QSS settings to customize the QSS display and behavior.
To open the QSS preferences window, click the Setup button, and then click Quote SpreadSheet Preferences.
QSS and EQSS Setup Windows
Page 41
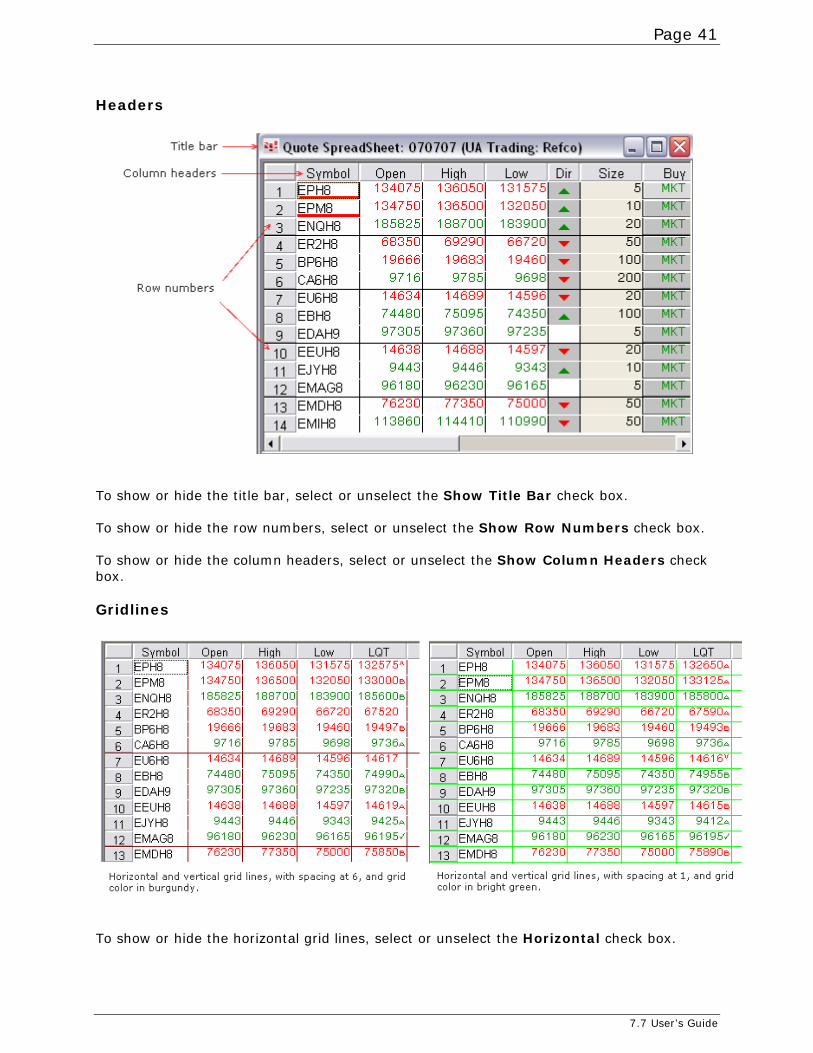
Headers
To show or hide the title bar, select or unselect the Show Title Bar check box. To show or hide the row numbers, select or unselect the Show Row Numbers check box. To show or hide the column headers, select or unselect the Show Column Headers check box. Gridlines
To show or hide the horizontal grid lines, select or unselect the Horizontal check box.
7.7 User’s Guide
Page 42
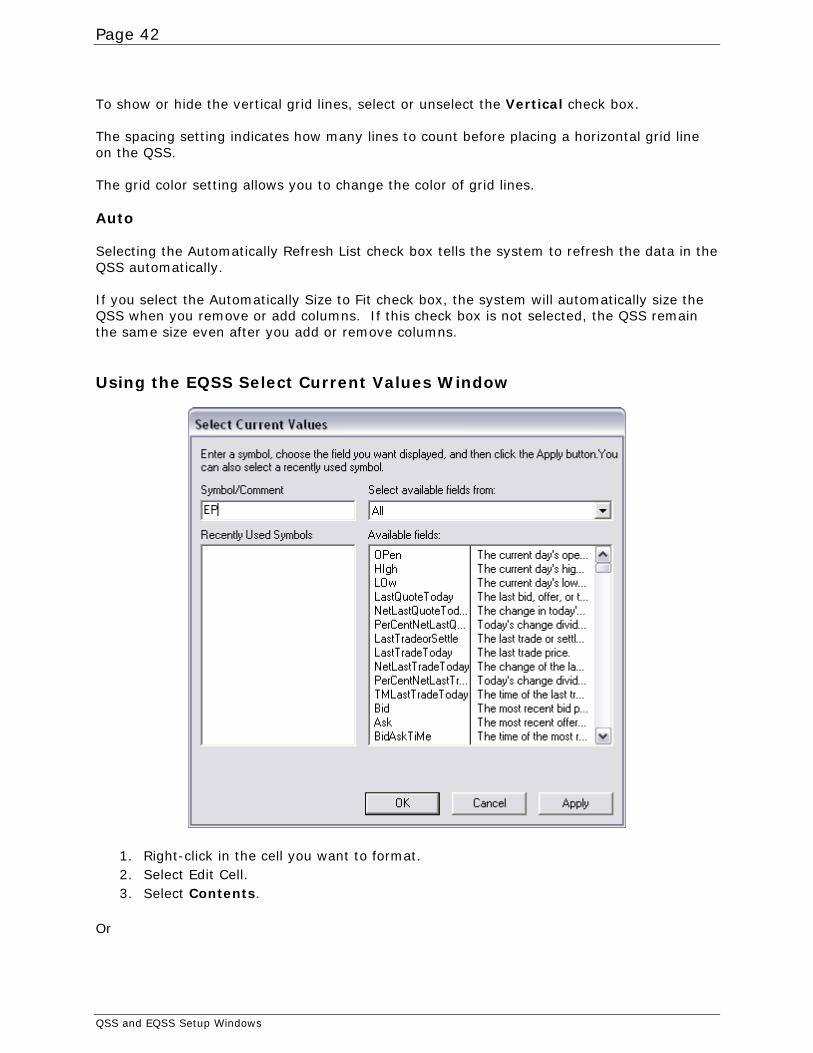
To show or hide the vertical grid lines, select or unselect the Vertical check box. The spacing setting indicates how many lines to count before placing a horizontal grid line on the QSS. The grid color setting allows you to change the color of grid lines. Auto Selecting the Automatically Refresh List check box tells the system to refresh the data in the QSS automatically. If you select the Automatically Size to Fit check box, the system will automatically size the QSS when you remove or add columns. If this check box is not selected, the QSS remain the same size even after you add or remove columns. Using the EQSS Select Current Values Window
1. Right-click in the cell you want to format. 2. Select Edit Cell. 3. Select Contents.
Or
QSS and EQSS Setup Windows
Page 43
1. Press the F2 button. 2. Enter a symbol in the Symbol/Comment field. If you have clicked in a cell with a
symbol, this field will be filled in already with that symbol. 3. To filter the list of available fields, use the drop down to choose the data you want to
filter by. 4. Click on a field name in the Available fields list. 5. To make these changes without closing the Select Current Values window, click the
Apply button. 6. When you are finished, click OK.
7.7 User’s Guide

Page 45
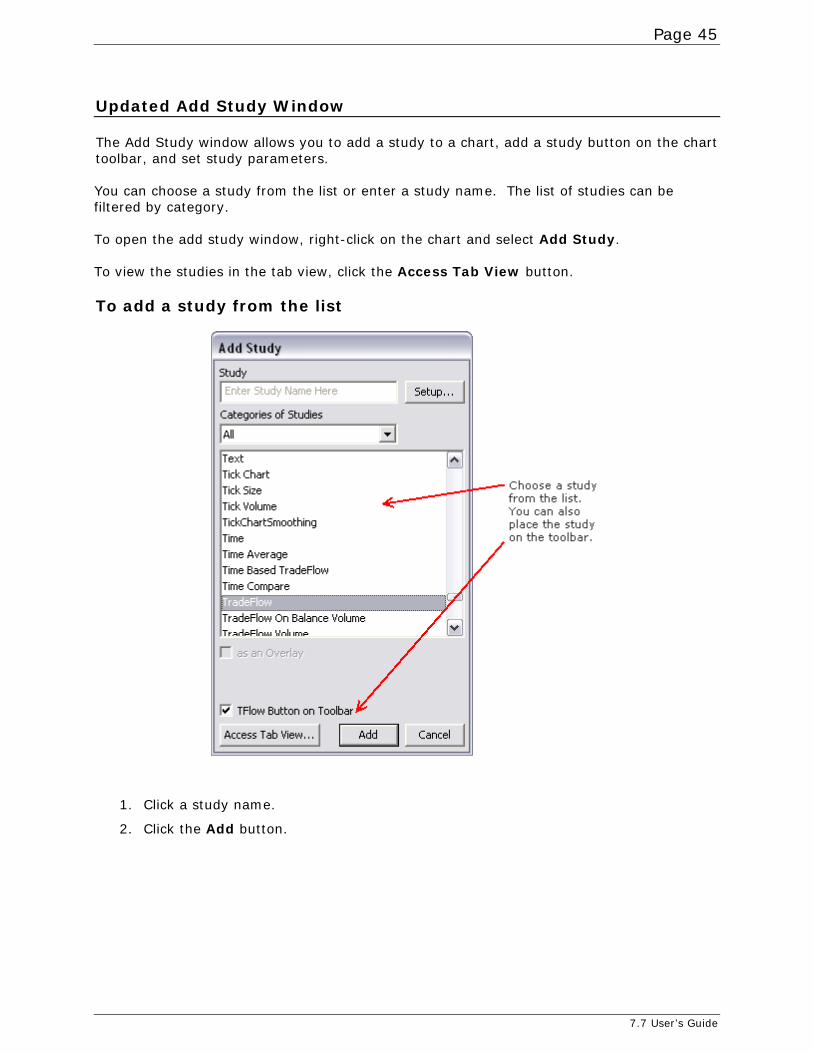
Updated Add Study Window The Add Study window allows you to add a study to a chart, add a study button on the chart toolbar, and set study parameters. You can choose a study from the list or enter a study name. The list of studies can be filtered by category. To open the add study window, right-click on the chart and select Add Study. To view the studies in the tab view, click the Access Tab View button. To add a study from the list
1. Click a study name.
2. Click the Add button.
7.7 User’s Guide
Page 46
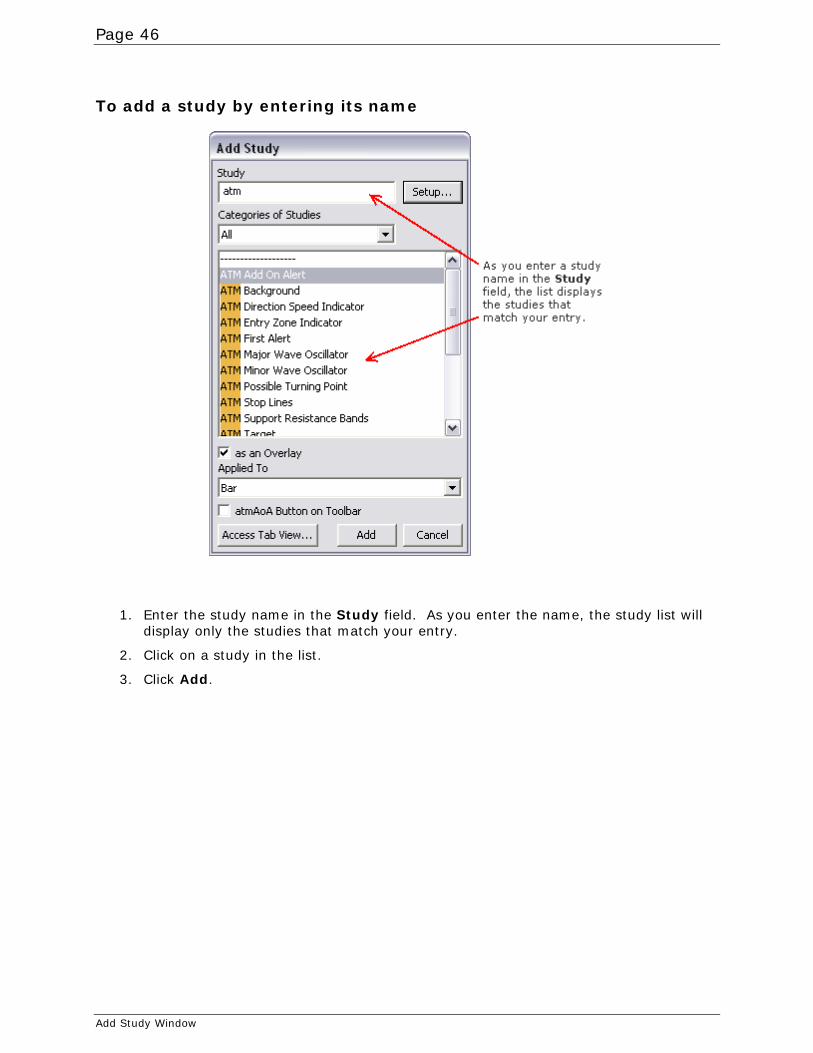
To add a study by entering its name
1. Enter the study name in the Study field. As you enter the name, the study list will display only the studies that match your entry.
2. Click on a study in the list.
3. Click Add.
Add Study Window
Page 47
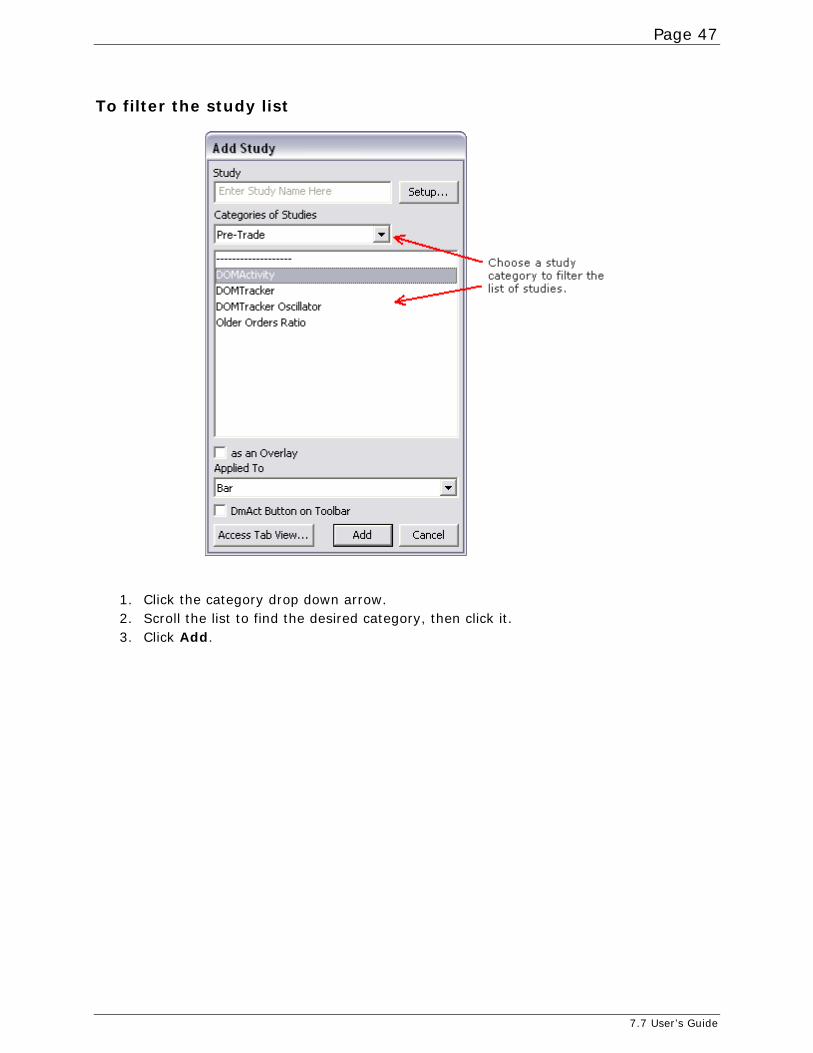
To filter the study list
1. Click the category drop down arrow. 2. Scroll the list to find the desired category, then click it. 3. Click Add.
7.7 User’s Guide

Page 49
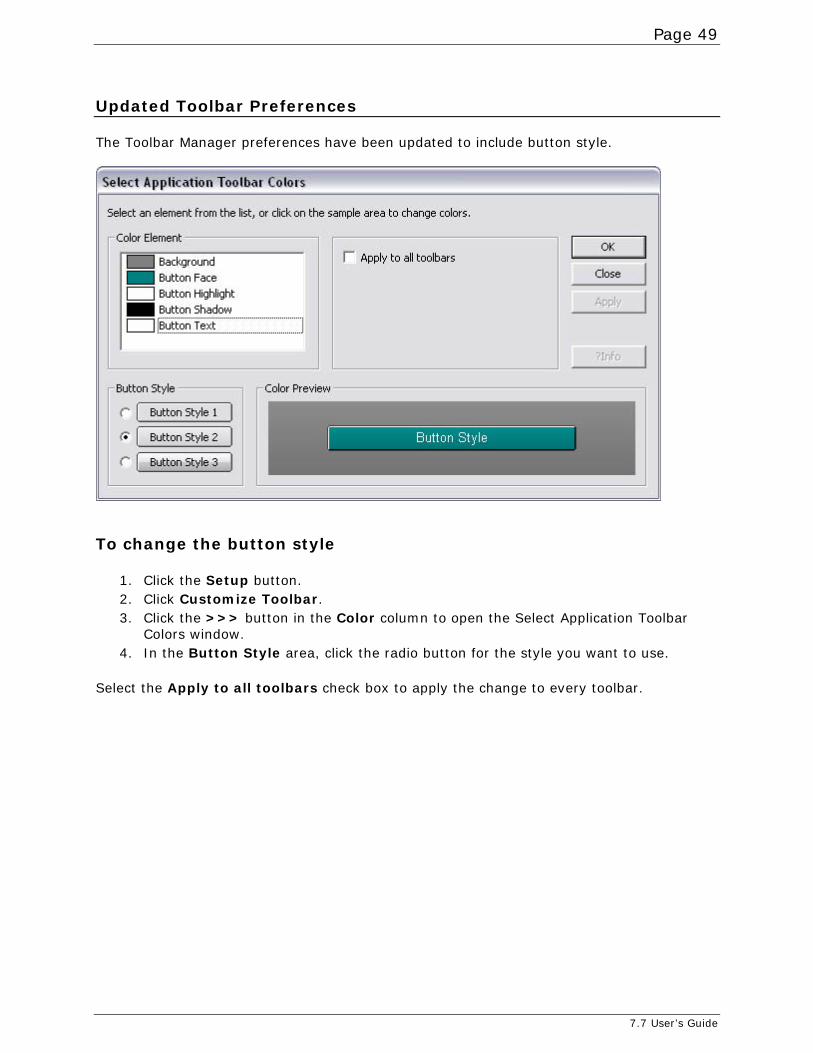
Updated Toolbar Preferences The Toolbar Manager preferences have been updated to include button style.
To change the button style
1. Click the Setup button. 2. Click Customize Toolbar. 3. Click the >>> button in the Color column to open the Select Application Toolbar
Colors window. 4. In the Button Style area, click the radio button for the style you want to use.
Select the Apply to all toolbars check box to apply the change to every toolbar.
7.7 User’s Guide


Page 51
Updated Login Window When you open version 7.7 of CQG IC, the new login window opens. The Login window with and without More Options selected:
Here, you can set your host name and proxy, display network status information, change your network configuration, and change your password.
7.7 User’s Guide

Page 52
To select the host name and proxy Click the Select Host button. The host name is changed when you are having problems logging on to CQG. Problems may include DNS resolution problems, routing issues, and corporate firewall issues. The proxy setting is applicable if you are connecting to the internet through a proxy.
To display network status details Click the Show Detail button. Network status details are used to help troubleshoot problems logging on to CQG.
To change your network configuration Click the Configure button. Only CQG LAN users use this option in order to turn the Synchronize personal files with CQG File Server on and off.
Updated Login Window
Page 53
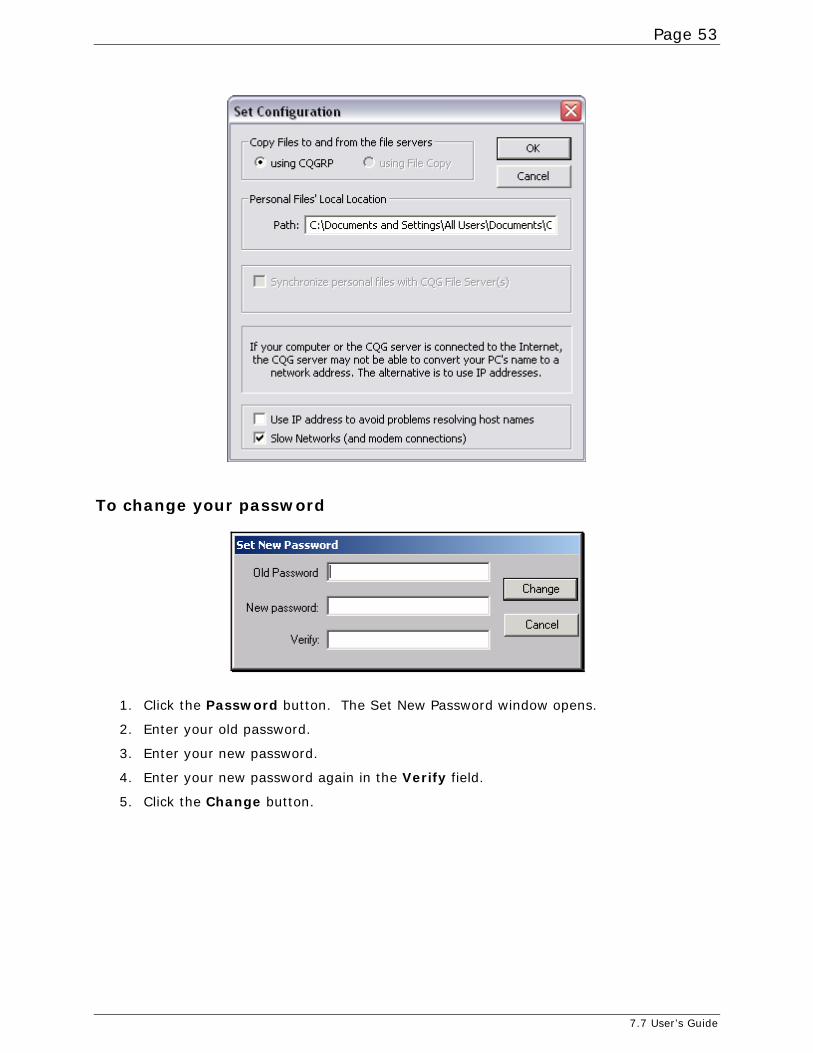
To change your password
1. Click the Password button. The Set New Password window opens.
2. Enter your old password.
3. Enter your new password.
4. Enter your new password again in the Verify field.
5. Click the Change button.
7.7 User’s Guide
Related Documents