Cornell Guide to Growing Fruit at Home Cooperative Extension

Welcome message from author
This document is posted to help you gain knowledge. Please leave a comment to let me know what you think about it! Share it to your friends and learn new things together.
Transcript

Cornell Guide to GrowingFruit at Home
Cooperative Extension

1 Before You Begin
14 Tree Fruits
43 Grapes
54 Strawberries
65 Brambles
77 Blueberries
84 Currants and Gooseberries
90 Elderberries
92 Hardy Kiwifruit
95 More Minor Fruits
103 For More Information

USDA Hardiness Zones
AcknowledgmentsThe following specialists in the Department of Horticulture, Cornell University, con-tributed to the development of this publication: Marcia Eames-Sheavly, Marvin Pritts,Craig Cramer, Lori Bushway, Ian Merwin, and Richard Reisinger. Steven McKay, acommercial fruit specialist with Cornell Cooperative Extension in the Hudson Valley,also shared his expertise.
Recipe for training young trees (page 28) adapted from materials by Terence Robinsonand Steve Hoying.
Average MinimumZone Temperature Range3a -40 to -35F -37 to -40C
3b -35 to -30F -34 to -37C
4a -30 to -25F -32 to -34C
4b -25 to -20F -29 to -32C
5a -20 to -15F -26 to -29C
5b -15 to -10F -23 to -26C
6a -10 to -5F -21 to -23C
6b -5 to 0F -18 to -21C
7a 0 to 5F -15 to -18C
Average Frost-FreeGrowing Season
Average Last Spring Frost
Before April 10
April 10–20
April 20–30
April 30–May 10
May 10–May 20
May 20–May 30
After May 30
Fewer than 103 days
103–123 days
123–143 days
143–163 days
163–183 days
183–203 days
More than 203 days

1
Before You Begin
Keys for Success
Table 1: Approximate nutrient composition (per 100 g) of various fruits
Calories Vitamin C Sodium Calcium Phosphorus Potassium Iron Magnesium ZincFruit (kcal) (mg) (mg) (mg) (mg) (mg) (mg) (mg) (mg)
Apple 55.4 12.0 3.0 7.1 12.0 144 0.48 6.4 0.12
Banana 49.4 12.0 1.0 8.7 28.0 393 0.55 36.0 0.22
Blueberry 62.4 22.0 1.0 10.0 9.1 65 0.74 2.4 0.10
Cherry 60.2 12.0 2.0 8.0 7.0 114 — 8.0 —
Currant 45.0 36.0 1.4 29.0 27.0 238 0.91 13.0 0.20
Elderberry 46.4 18.0 0.5 35.0 57.0 305 — — —
Orange 53.8 50.0 1.4 42.0 23.0 177 0.40 14.0 0.10
Peach 46.0 9.5 1.3 7.8 23.0 205 0.48 9.2 0.02
Pear 55.7 4.6 2.1 10.0 15.0 126 0.26 7.8 0.23
Raspberry 40.2 25.5 1.3 40.0 44.0 170 1.00 30.0 —
Strawberry 36.9 64.0 2.5 26.0 29.0 147 0.96 15.0 0.12
Plan ahead. Study thispublication, nurserycatalogs, and othersources of informationand develop a thought-ful plan before youprepare soil or orderplants.
Match plants to yoursite. Most fruit plantsneed full sun, well-drained soil, and goodair circulation. Somehave more specificneeds. To prevent prob-lems, make sure yourplants and your siteare a good match beforeyou start soil prepara-tion.
Growing fruit at home can be fun and provide your family with fresh, flavor-ful, and nutritious food. The benefits are many:
• You can grow large amounts of fruit in a relatively small area.
• Fruits are a good source of vitamins, minerals, carbohydrates, and fiber(see Table 1).
• If you carefully choose the kinds and cultivars (varieties) of a fruit beforeyou plant, you can harvest dessert-quality fruit from early summerthrough the fall.
• As an added bonus, the fruits you grow will taste much better than thefruits you find in the grocery store.
Before you begin, you need to invest considerable effort into site selection,soil preparation, and planting plans. Before you order plants, you also needto learn about their pollination needs, their winter hardiness, and how sus-ceptible they are to pests.
Some fruits are easier to grow than others. Strawberries aren’t much harderto grow than most annual garden crops and bear fruit quickly. Most treefruits, on the other hand, require a large commitment to pruning, pest man-agement, and care, and they won’t bear fruit right away. Make sure you areready to devote the time to your planting before you start.

2
The success of your home fruit planting will be determined largely by
• how susceptible your site is to frost.
• whether your site receives adequate sun.
• whether your site has well-drained soil at least 8 inches deep.
• whether you choose plants that are adapted to your site and arewinter hardy.
• your ability to prevent damage from diseases, insects, weeds, andwildlife.
• your ability to use good cultural practices, including providing ad-equate water.
• your ability to do what is required in a timely manner.
Site Selection and Soil PreparationFruit plants are most productive if you carefully match them with the properplanting site. Very few sites are naturally ideal. To succeed, you may have toovercome some combination of weeds, diseases, pests, poor drainage, lowsoil organic matter, and poor soil fertility.
Each of these can severely reduce the size of your harvest and the health ofyour plants. So it’s best to take care of them before planting. Once plants arein the ground, it is very difficult to reduce soil pest populations or correctnutrient deficiencies. The most important year for production is the onebefore planting when you modify the site to take care of these problems.This is very important, especially if you want to use a low-spray/no-sprayapproach to pest control.
A previously cultivated site is often preferable to a new site because youusually do not have to work the soil and perennial weeds are often alreadyunder control. But you should not plant strawberries or raspberries wherecrops that are susceptible to verticillium wilt have been grown (these in-clude potatoes, tomatoes, eggplants, and peppers). If you must plant straw-berries or raspberries following these crops (or following strawberries orraspberries), choose cultivars resistant to verticillium wilt.
While gooseberries and currants perform adequately in partial shade, otherfruits require direct sun for at least six hours a day, preferably more. Allfruits require well-drained soil with good water-holding capacity. Althougha commercial fruit grower may use tiling or grading and leveling to improvedrainage, these methods are not usually affordable for home gardeners. Forbest results, simply choose a well-drained site or plant on raised beds.
To reduce weed pressure, to increase soil organic matter, and to improvesoil structure and drainage, grow a cover crop before planting fruit. Plantrye or wheat in late summer or early fall as an overwintering cover crop
Solve site-relatedproblems the yearbefore planting.
3
Keys for Success
before a spring fruit planting. Oats planted at the same time will grow in thefall and then die over the winter, leaving a dead mulch on top of the soil. Foradditional soil improvement, plant buckwheat as a summer cover crop be-fore establishing the winter cover crop. Growing marigolds, Sudangrass, orcertain mustards (oilseed rape) for a year or two before planting fruit canhelp control certain parasitic nematodes, which are occasionally a problemin certain soils.
Weeds are extremely difficult to control once a planting is established, soeliminating most weeds before you plant is an important first step. Beforeplanting cover crops, kill existing vegetation and eliminate perennial weedssuch as dandelions and quackgrass. You can do this by applying apostemergent broad-spectrum herbicide that leaves no residue in the soil,by covering the area with black plastic for a year before planting, or by culti-vating the site regularly throughout the year before planting.
Because it’s difficult to correct nutrient deficiencies and adjust soil pH afteryou’ve planted, it is critical to test your soil before planting to see if you needto add lime and nutrients. Collect subsamples from several locations to pro-vide a representative sample of the site. (Contact your county Cornell Coop-erative Extension office for more information, or see www.cce.cornell.edu/local_offices.cfm.) The soil test will report the pH (relative acidity or alkalin-ity of the soil), the cation exchange capacity (a measure of the resistance ofthe soil to changes in pH), and the amounts of various nutrients present.
Fruit trees, grapes, strawberries, brambles (blackberries and raspberries),currants, and gooseberries grow best when the soil pH is between 6.0 and6.5. If your soil tests below this range, add lime to raise the pH as recom-mended on your soil test report.
Blueberries require acid soil with a pH of about 4.5. You can apply sulfur tolower the pH before planting. On some soils it may be too difficult to lowerthe pH enough to grow blueberries, especially soils with a natural pH of 7.0or higher.
Because it takes about a year for sulfur or lime to affect soil pH, you need toapply them the year before planting. Acidifying the soil with aluminum sul-fate is not recommended because it requires six times more chemical thanacidification with sulfur does. In addition, aluminum sulfate applicationsare expensive and can contaminate the soil with excess aluminum.
Phosphorus is important for root growth and flower bud formation, but itdoes not move easily through the soil. For this reason, incorporate fertilizerbased on your soil test recommendations into the top 8 inches of soil beforeplanting.
Plants need potassium to activate enzymes, move sugars into the fruit, openstomates, and assist in nitrogen uptake. The amount of potassium requiredby fruit plants depends on the soil type. It is important to incorporate phos-
Prepare the soil. Themost important year inthe life of your fruitplants is the year beforeyou plant them. Test thesoil and begin preparingit by adding organicmatter and plantingcover crops about a yearbefore you plan toestablish your planting.This is particularlyimportant if you needto adjust soil pH.
Start small. Considerhow much time youhave to care for yourplanting. You will prob-ably get more fruit—and satisfaction—froma small, well-tendedplanting than you willfrom a large, neglectedone.
What’s available lo-cally? If you alreadyhave a good localsource of a particularfruit, do you really wantto grow more? Youmight want to focusyour planting on hard-to-get species or variet-ies with special traits(such as good flavor,early harvest, diseaseresistance) that youcan’t find locally.

4
phorus and potassium before planting because severe deficiencies cannotbe corrected later.
A soil test also will include results for magnesium, which is necessary forchlorophyll formation, and calcium, which is essential for fruit development,pollen germination, and membrane integrity. Because lime contains vary-ing amounts of magnesium and calcium, choose a type of lime that willadjust calcium or magnesium levels as well as raise pH. If calcium is low,use calcitic lime. If magnesium is low, use dolomitic lime.
Levels of other nutrients needed by fruit crops are best indicated by a leafanalysis during the first growing season. (For more information about leafanalysis testing, contact the Cornell Nutrient and Elemental Analysis Labo-ratory, telephone: (607) 255-1785, web site: www.hort.cornell.edu/depart-ment/facilities/icp.)
A good strategy is to test the soil and carefully prepare and fertilize the soilat least a year before establishment. Then retest the soil to make sure thatsoil nutrient levels are adequate before planting. Once you’ve establishedthe planting, have the soil tested every three or four years. If you see signs ofnutrient deficiency that are not showing up in your soil test, have a leaftissue analysis done.
Climate ConcernsMinimum winter temperatures at your site largely determine which fruitcultivars you can grow successfully. In addition to the genetics of the culti-var (including both the tree and the rootstock in the case of fruit trees), manyother factors affect whether or not your trees or small fruits will survive overthe winter. If your soil is poorly drained, your plants are less likely to makeit to the spring. Likewise, other stresses will reduce the plants’ hardiness,including a heavy crop the previous season, too much or too little nitrogenor other nutritional problems, and defoliation or other pest damage.
Predicting winter hardiness is an inexact science, but a good place to start isby determining which USDA Hardiness Zone you live in (see HardinessZones map on the inside cover). The USDA Hardiness Zones are deter-mined by the average low temperature in winter. Keep in mind that theseare averages, and in extreme years the temperatures may get even colder.Compare your expected low temperatures with the information below.
Most cultivars of apple and pear trees can withstand winter lows of –25 de-grees F (USDA Hardiness Zone 4b).
Sour cherries, plums, and blueberries suffer winter injury when the mini-mum temperature is lower than –20 degrees F, so they are not reliably hardybeyond Zone 5a. Brambles will survive these temperatures but may not bearfruit the following season.
Poorly drainedsoil reduceswinter survival.

5
The wood of sweet cherries and peaches can sustain damage when tempera-tures approach –20 degrees F, and the flower buds of peach trees are usu-ally killed when temperatures reach –15 degrees F. Sweet cherries are usu-ally successful only in Zones 5 and warmer, and peaches in Zones 6 andwarmer.
During cold winters with little snow cover, unmulched strawberry plantsoften sustain winter injury. Although some grape cultivars such as Concordcan withstand temperatures around –20 degrees F, vinifera-type grapevinessurvive weather this cold only if they are buried for the winter.
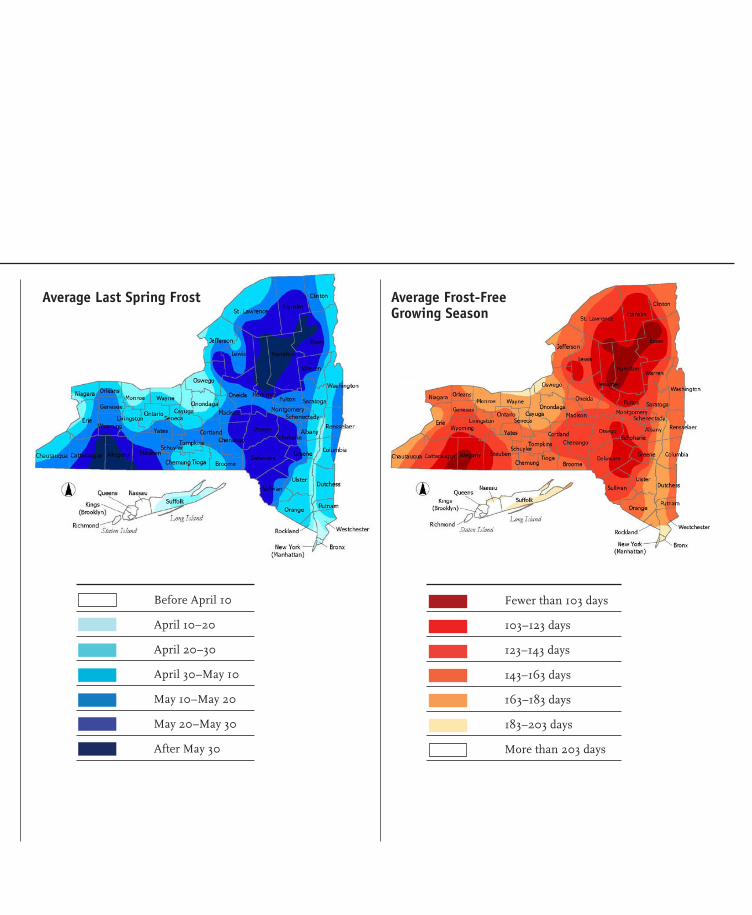
Keep in mind that winter hardiness is just one factor in determining whethera particular fruit cultivar will perform well on your site. Your location maynot have extremely low winter temperatures, but if it’s prone to late springfrosts, freezing temperatures may kill blossoms on early-flowering cultivars(see the Average Last Spring Frost map on the inside front cover). Expectlosses due to flower damage on many types of fruit where frost occurs fre-quently after May 10.
Temperatures in a given region can vary greatly depending on elevation,exposure, and proximity to large bodies of water. Cold air settles into lowareas, and even during periods of a hard freeze, temperatures at the middleor top of a slope can be several degrees warmer than at the bottom. If at allpossible, avoid planting fruit in these low-lying frost pockets.
The length of your growing season is also important, as some cultivars re-quire a long frost-free period to ripen fruit (see Average Frost-Free GrowingSeason map on the inside front cover). Some also require a minimum num-ber of “growing degree days” (GDDs), essentially a measure of how muchwarm weather you have at your site.
Carefully check hardiness information in nursery catalogs before orderingplants to make sure that they are winter hardy in your area and are wellmatched to the length of your growing season. If your location is prone tolate spring frosts, look for late-flowering varieties. The fruits of fall-bearingraspberries and early-blooming grapes are more likely to ripen in areas thathave early fall frosts.
Winter ProtectionWhile it’s important to select cultivars that are hardy for your area, otherstresses, such as insect and disease damage, can weaken plants and makethem more susceptible to winter injury.
Taking care of your trees throughout the year can minimize stress and im-prove their chances of surviving over the winter. One of the most importantfactors influencing cold hardiness is the nutrient status of your plants. Ifplants are deficient in one or more nutrients, winter injury is likely to occur.
Are you ready forcommitment?
Tree fruits, in particu-lar, require a lot of careand don’t come intofull production forseveral years. Strawber-ries, on the other hand,aren’t much moredifficult to grow thanmost garden crops.Most of the other smallfruits fall somewherein between but stillrequire regular pruningand care and, in somecases, trellising. If deeror other wildlife areabundant, plantingsmay require fencing orother protection. Makesure you are ready forthe commitment beforeyou jump in.
Keys for Success

6
Yet if plants have too much nitrogen in their tissues, they do not “harden”properly. Hardening is a physiological process that cold-climate plants gothrough, which includes storing carbohydrates and proteins in ways thatallow them to survive cold weather.
For most fruit plantings, nitrogen should be applied only in the spring (straw-berries are an exception). Late applications of nitrogen fertilizer can cause alate-season flush of growth and delay hardening, increasing the risk of win-ter injury.
To help plants harden off, do not water them after mid-September unlessthere is a severe drought. Many growers allow weeds to grow late in theseason to help remove water and excess nitrogen from the soil and therebyhelp plants harden properly. Others plant a cover crop. Mulch applicationshelp prevent soil heaving in new plantings.
Plants store energy collected from the sun through photosynthesis as carbo-hydrates. Those entering winter with few carbohydrates stored in their rootsand buds are likely to grow poorly in the spring or be injured by cold tem-peratures. Proper pruning at the right time allows plants to maximize sunexposure and improve carbohydrate storage. Pruning too late in the seasonmay cause a flush of growth and reduce a plant’s hardiness.
Mulching strawberries helps prevent significant winter injury, but mulch-ing too early can be as detrimental as not mulching at all. Early mulchingshades the leaves from sunlight and prevents the plant from accumulatingsufficient carbohydrates. Strawberry plants should not be mulched until thetemperature falls below 20 degrees F for three nights in any one week, usu-ally near Thanksgiving in much of New York State. It is best to mulch im-mediately before the first heavy snow and remove straw mulch before theend of March.
Designing a PlantingWhile growing fruit at home can be rewarding, it will cost time and money.To reduce these costs, carefully consider the design of your planting, in-cluding arrangement, spacing, cultivar selection, number of plants, andaesthetics.
One common mistake is to put the plants too close together. Allow ampleroom for growth so you can prune and perform other tasks.
Another common error is to put in more plants than you need. A smallplanting that receives proper care will yield more good-quality fruit than alarger planting that is neglected. Use Table 2 to help draw up a plantingdesign that will meet family and space requirements.
Many fruit plants are aesthetically pleasing and are good for “edible land-scaping.” But if production and ease of management are your primary goals,maintaining a home fruit planting will be easiest if you devote separate
A small, well-tended plantingwill yield morehigh-quality fruitthan a larger,neglected one.

7
Table 2: Planting and harvesting guidelines for various fruit crops
Spacing (ft.)
Between Between Age at MaturityFruit and Rootstock Plants Rows (years) (lb./plant) Harvest Period Cultural Demands
Tree fruitsApple, M.9 7 13 3–5 60 late July through Oct. High
Apple, M.26 10 15 3–5 100 late July through Oct. High
Apple, M.7, M.9/MM.106 12 18 4–5 250 late July through Oct. High
Apple, MM.106, MM.111 18 24 5 300 late July through Oct. High
Apricot 15 20 4 100 mid-July to early Aug. High
Cherry, sweet 24 30 7 300 early to mid-July High
Cherry, tart 18 24 4 100 mid- to late July Low
Nectarine 15 20 5 100 early Aug. to early Sept. High
Peach 15 20 4 100 late July to mid-Sept. High
Pear, Old Home/quince 15 15 4 100 mid-Aug. to Oct. Moderate
Pear, standard 20 20 5 100 mid-Aug. to Oct. Moderate
Plum 10 15 5 75 late July to mid-Sept. Moderate
GrapesAmerican type 8 9 3 20 early Sept. to Oct. Moderate
Vinifera type 8 9 3 10 early Sept. to Oct. High
Small fruitsBlackberry 2 10 2 2–3 late July to Aug. Moderate
Blueberry 4–5 10 3–6 3–10 late July to Sept. Low
Currant 4 8 2–4 6–8 July Low
Elderberry 6 10 2–4 4–8 Aug. to Sept. Low
Gooseberry 4 10 2–4 2–4 July to Aug. Moderate
Raspberry 2 8 2 1–2 July or Sept. Moderate
Strawberry (June-bearing) 2 4 2 1–3 June to early July Moderate
Strawberry (Day-neutral) 0–5 3–5 1 1 June through Oct. High
Bearing Potential Yield
8
areas to fruit trees, small fruits, and vegetables. Some people find a naturalsetting with plants placed throughout the landscape most aesthetically pleas-ing. But this makes maintenance more challenging.
Pollination and Fruit SetOne of the most common questions home fruit growers ask is, “Why won’tmy plants set fruit?” There are many possible reasons for poor fruit set,including
• a late spring frost.
• cold or rainy weather during bloom.
• disease.
• poor plant nutrition.
• inadequate pollination.
• lack of a compatible cultivar for cross-pollination in species that arenot “self-fruitful.”
Pollination and subsequent seed development are prerequisites for fruit set.With most fruits, flowers that appear in early spring begin as buds that formin the axils of the leaves during the previous year. Flowers of many fruitsbloom during early spring and can be damaged by frost. If temperatures fallbelow 30 degrees F when the flowers are vulnerable, some or all may bekilled, reducing or eliminating fruit set.
Pollination occurs after the flowers have opened. Some fruits, such as grapesand peaches, shed pollen from their anthers (the male part of the flower),which falls by gravity or is carried by wind currents to the pistil (female partof the flower).
With strawberries, blueberries, apples, plums, and sweet cherries, insectscarry the pollen from flower to flower. Heavy rains during bloom can inter-fere with pollen distribution or insect activity. Seed formation will be poor ifpollination is inadequate, and seed formation is essential for the growth anddevelopment of most fruits. For example, apples with only a few seeds willfall off the tree in June or remain small and misshapen.
Some fruits, such as strawberries, raspberries, peaches, tart cherries, andgrapes, are self-fruitful. Each plant can set fruit with just its own pollen.
Other fruits, such as apples, sweet cherries, pears, plums, apricots, and el-derberries, are not self-fruitful. They require cross-pollination from anothercultivar for fruit to set. Blueberry plants are self-fruitful, but berry size islarger with cross-pollination from another cultivar. Most nursery catalogsprovide information about which cultivars are good for pollinating eachother—for blueberries and other fruit crops as well.
Some fruitsrequire cross-pollination fromanother cultivar.

9
Certain apple cultivars, such as Jonagold and Rhode Island Greening, pro-duce pollen that is ineffective in setting fruit on other cultivars. To be sureof adequate cross-pollination, plant at least three different apple cultivars.
With groups of sweet cherry cultivars, the pollen of some cultivars is notcompatible with others within the group. Yet the cultivar Stella is cross-compatible with most sweet cherry cultivars and provides a good source ofpollen for other cultivars. Stella is also self-fruitful.
Many European plums (often called prune plums because of their high sugarcontent) are partially self-fruitful. But you can improve their fruit set by plant-ing two or more cultivars. You will need to plant two or more cultivars ofAsian plums because most are not self-fruitful.
Plant all fruit trees used as “pollenizers” within 100 feet of the cultivar to bepollinated. You may need fewer plants if you rely on neighbors’ trees aspollenizers, but you could have a major problem if those trees are destroyed.
Vertebrate Pest ControlVoles, deer, and birds are the three major vertebrate pests of fruit plantings.Voles are mouse-like mammals that eat the bark and roots of young fruittrees and thornless blackberries in winter and are frequently a serious prob-lem. Deer consume the new shoots of fruit trees. Birds damage the fruits ofblueberry, cherry, gooseberry, and grape plantings.
Two different vole species cause problems: the meadow vole (which livesaboveground) and the pine vole (which lives belowground). During the spring,summer, and fall, voles eat vegetable matter and seeds. But in the winterthey feed on the bark and roots of young trees, often girdling and killingthem.
To assess whether or not you might have vole problems before they do dam-age, place half an apple under a shingle or a 1-foot-square piece of plywoodin a grassy area near your trees. Check it the next day. If the apple is com-pletely gone, you’ve got problems that need treating. If there are only a fewnibbles, voles are probably present, so you should keep monitoring and con-sider control measures.
A good way to prevent meadow vole damage is to manage their abovegroundhabitat. Keep grass cut short so they have no place to hide. Keep weeds andgrass cleared out around trees (about 40 percent ground coverage is OK).Don’t use straw or fabric mulches, which provide the voles with shelter. Butwoodchips are OK.
To protect young trees from injury, enclose the base of each trunk with acylinder of quarter-inch hardware cloth. The cylinder should be about 8 inchesin diameter. Bury the bottom shallowly in the soil, being careful not to dis-turb the roots. The top should be about 18 inches tall and not interfere with
Voles feed onbark and roots ofyoung trees inwinter.

10
the lowest scaffold branch. Mound up pea gravel or mulch a few inchesaround the cylinder to hold it in place.
Hardware cloth cylinders are less effective with pine voles because you can’tinstall them deep enough to keep out these underground dwellers withoutdamaging tree roots. Because they come aboveground to feed, keeping grassmowed and clear areas around trees helps. But other control measures maybe called for.
Using poison baits in orchards can pose risks to pets and other wildlife. Boxtraps, “mouse hotels,” and similar control measures are surprisingly effec-tive with voles. Try using apples for bait. Encouraging natural predators suchas hawks and owls can also help keep rodent populations under control.
Deer will eat just about anything if they are hungry enough. In areas withheavy deer pressure, the most reliable method to keep them from destroy-ing fruit plantings is to construct an 8-foot-tall fence. Several repellents alsocan be effective in small home plantings if they are applied and reappliedproperly. Hanging a single unwrapped bar of fragrant soap from each treeor bush may discourage feeding if deer pressure is low.
Ripening fruits (especially cherries and berry crops) are frequently dam-aged by birds. Whether the birds are flocking or nonflocking, migratory orresident, the resulting fruit injury can cause significant losses. The extent ofdamage varies from year to year and depends on factors such as weatherconditions and food supplies.
Which bird species you can expect to damage fruit crops depends on thesurrounding environment. Plantings that border forests or brush, for ex-ample, attract different bird species than plantings surrounded by openfields or croplands. Plantings located near wooded areas, where birds findshelter and nesting sites, are particularly susceptible to damage. Fruitsplanted in an isolated area also are vulnerable because the fruit may be themain food source for birds. Some bird species are attracted to plantingsnear trees or power lines. Planting grass alleyways and controlling weedswithin and adjacent to the planting reduces problems with birds. Certainweed species supply food and cover to birds and attract them into the area.
In general, birds feed most heavily early in the morning and again in lateafternoon (starlings, which feed throughout the day, are an exception).Adjust your control schedule to coincide with the feeding schedules of thebirds.
Several nonlethal methods of bird control are available to home fruit grow-ers. Netting is a traditional and widely used strategy that physically pre-vents birds from reaching fruit. It is both quiet and effective, but you mustapply the netting before the birds discover the ripening fruit (the changesin color as fruit ripens signal the birds to start feeding).
Repellents orfencing can keepdeer at bay,depending on howhungry deer are.

11
Roll the netting out over the tops of plants and secure it to a support sys-tem such as a trellis. The major disadvantages of netting are the high ini-tial cost and the labor involved. Setting up and removing netting on a largescale can be difficult and may require specialized equipment.
Electronically recorded, species-specific distress calls are fairly expensive buteffective against certain bird species. The downside is that neighbors mayfind them as distressing as the birds do. Before purchasing the distress calls,know which species are eating your fruits. Distress calls are most effectivewhen supplemented with some type of visual scare device, such as one ofthe kite or balloon products bearing the silhouette of a hawk or owl.
Such visual scare devices don’t work with all species, however. The hawkkite, for example, scares away starlings, robins, and northern orioles but isnot effective with mockingbirds or brown thrashers. Another limitation islocal weather. Kites function best in breezy but not windy weather. Further-more, birds get used to them very quickly and they lose their effectivenessunless supplemented with a noise device.
There are no magic solutions to controlling bird damage. Assess the extentof damage and then determine what species of bird is doing the damage.Netting is probably the most effective but most expensive physical method.Scare devices should be used early to prevent birds from establishing a feed-ing pattern. A combination of techniques is usually most effective.
For more information, see these Cornell Cooperative Extension publications:
• Wildlife Damage Management in Fruit Orchards (1994)
• Managing White-Tailed Deer in Suburban Environments: A TechnicalGuide (2000)
For ordering information, see: “Related Cornell Cooperative Extension Pub-lications,” page 103.
Low-Spray/No-Spray Pest ManagementBecause of the cost of spray materials, the lack of equipment, or a concernfor their health and the environment, many home gardeners want to growfruit using little or no pesticide. But many gardeners become frustrated whenpests ruin a crop or render fruit inedible. The following suggestions canhelp you manage your fruit planting with fewer pesticides.
Closely monitor pest populations. This means checking plants every day orso. Too often, gardeners allow diseases and insects to build up to unaccept-able levels before taking steps to control them. By looking for pests everyday, you will develop a sharper eye for potential problems and can readilytreat or remove localized infestations. Commercially available sticky trapsor pheromone traps are helpful in monitoring levels of certain insectpopulations.
Check plantsevery day or so tonip pest problemsin the bud.

12
Plants that are healthy from the start are less likely to be attacked by pests.Do a good job of selecting a site and preparing the soil. Plant only top-qual-ity stock, and discard moldy planting stock. Avoid disease and winter injuryby planting disease-resistant, cold-hardy cultivars. For example, select onlystrawberry cultivars that are resistant to red stele and verticillium wilt. Manycane diseases attack bramble or blueberry plants that have been weakenedby winter damage.
Avoid planting fruits that require pesticides. In this regard, the apple culti-vars Freedom and Liberty are superior to McIntosh, and blueberries are pref-erable to day-neutral strawberries.
Closely follow the cultural practices recommended in the “Diseases and In-sects” section for each fruit in this bulletin. Clean up dropped fruit (and ifpossible, leaves) and compost them, preferably in a hot compost pile, or atleast bury them deeply in a cold compost pile. Remove and burn any branchesinfected with fire blight. Keep grass and debris away from the trunks andthe bases of plants. Many insects overwinter in or under surface debris suchas old boards, fallen leaves, brush, and other vegetation. Maintain a cleanhome fruit planting to reduce insect populations in successive years.
Destroy pest insect egg masses whenever possible. Plant cover crops suchas marigolds to deter nematodes, and use mulch to control weeds. Coverstrawberry plants with fabric row covers to prevent damage by tarnishedplant bugs and other pests.
Trellis brambles and prune blueberries, brambles, currants, gooseberries,elderberries, and fruit trees annually to increase light penetration and aircirculation. This can help reduce disease problems. Trellising also keepsfruit off the ground, reducing the likelihood of a dirty harvest. Harvest fruitas soon as it is ripe. Overripe fruit spoils, rots, and attracts insects.
Biological control measures involve encouraging the natural enemies of in-sect pests. Many of the insect and mite pests that attack fruits have naturalenemies that help keep them in check or under control. In particular, ladybeetles, parasitic wasps, aphid lions, ground beetles, and praying mantisesare effective against scales, aphids, and mites. Flowering ground covers inthe vicinity (not under fruit trees) can provide habitat and pollen and nectarfor these beneficial insects. Plants in the aster family are particularly good.(For more information, see “Biological Control: A Guide to Natural Enemiesin North America” at www.nysaes.cornell.edu/ent/biocontrol/.)
In general, maintaining a complex habitat surrounding your planting canbe helpful. Hedgerows can make it easier for foxes to hunt rodents. Perchesand nesting areas for raptors and owls can encourage them to stay and hunt.Providing roosting boxes for bats can encourage them to hunt insects atdusk.
Trellising berryplants increasesair circulationand decreasesdisease.

13
Money and Time DemandsHome fruit growers may find it more difficult and expensive to grow high-quality tree fruit than small-fruit plants, such as strawberries, grapes, blue-berries, and brambles. One reason for this is that many different pests anddiseases plague tree fruits. Summer rainfall and high relative humidity fa-vor the growth and spread of disease-causing organisms. Insects also are achallenge. Power-driven spray equipment is not practical for a small homeplanting, so getting spray into the canopy of a large fruit tree is difficult.Dwarf fruit trees are one solution because pesticides can be applied withhand-operated equipment.
Berries and grapes have definite advantages for home gardening. They re-quire a minimum of space for the amount of fruit produced, and they bearat an early age. Their small stature makes disease and insect control easierand less expensive than with most tree fruits. But do not assume that dis-eases and insects cause less damage to small-fruit plants than to fruit trees.
Before undertaking an extensive home fruit planting, carefully consider theamount of time required. Discuss this commitment with other family mem-bers. If this is your first attempt at growing fruit, consider planting on asmall scale to get a realistic idea of the demands.
Consider howmuch time youcan devotebefore planting.

14
Tree fruits became popular in America in the early 19th century, thanks, inpart, to the efforts of John Chapman, also known as Johnny Appleseed.
Today, New York is the nation’s second-leading apple producer. The North-east also produces significant quantities of sweet and tart cherries, peaches,pears, plums, nectarines, and apricots. The New York State AgriculturalExperiment Station at Geneva, New York, maintains one of the world’s fore-most tree fruit breeding programs and a collection of apple germplasm fromaround the world.
Tree fruits are classified according to the type of fruit they produce. Applesand pears are pome fruits. They are fleshy with several seed chambers. Stonefruits have a hard pit in their center and include cherries, peaches, plums,nectarines, and apricots.
Choosing CultivarsThere are so many cultivars (short for cultivated varieties) to choose from!Deciding what to plant is one of the most enjoyable tasks of growing fruittrees. But it also can be frustrating for those who are new to growing fruit.
Fortunately, there are many tried-and-true cultivars to consider (see Table 3and “Sure-Fire Winners,” pages 16 and 15, respectively). Lengthy test peri-ods have proven the value of many newer fruit tree cultivars that offer homefruit growers the widest choice ever of high-quality fruit with other desirablecharacteristics, such as disease resistance.
Many older cultivars are still available, but they are planted infrequently be-cause either the trees are too challenging to grow or the fruit they produce isoften of poor quality.
When choosing cultivars, look for those with outstanding hardiness, dis-ease resistance, and fruit quality. Many of the newer cultivars provide top-quality fruits not often available in local markets. For example, try growingthe disease-resistant apple cultivar Liberty rather than the popular but applescab–susceptible McIntosh. Home fruit growers whose livelihoods do notdepend on their garden harvest may find a lower-yielding yet higher-qualitycultivar the best choice.
Keep in mind that peaches and sour cherries are the only tree fruits grownin New York that are self-fruitful. When growing other tree fruits discussedin this publication, you need to plant at least two different cultivars to getgood pollination and fruit set (see “Pollination and Fruit Set,” page 8). Lookin nursery catalogs for information about which cultivars make good“pollenizers.”
Tree Fruits
Choose cultivars thatare hardy in your area.Dwarf cultivars bearfruit earlier than stan-dard trees and are easierto manage in homeplantings.
Except for peaches(which are self-fruitful),plant at least twodifferent cultivars forgood pollination.
Start with nursery-grown one- or two-year-old bare-root plants.Older plants are moredifficult to train.
Choose a site with goodair drainage that is notvulnerable to late springfrosts.
Plant trees in earlyspring as soon as thesoil has warmed anddrained. Begin prepar-ing soil (adjust pH andadd organic matter) andcontrolling weeds a yearbefore planting.
Mulch with bark orwood chips to providea grass-free zone within2 feet of each tree.
Stake dwarf and semi-dwarf trees, and committo timely pruning andfruit thinning.
Protect trees from deer,rodents, and other pestsand diseases.
Keys for Success
15
Cultivars also need to be winter hardy in your area. For more information,see “Climate Concerns,” page 4.
The cultivars listed in Table 3 are adapted to a wide range of conditions andyield fruit for eating fresh as well as for storing or preserving. By choosingearly-, mid-, and late-ripening cultivars from this list, you can stretch yourtree fruit harvest season.
RootstocksMost home gardeners prefer small, size-controlled fruit trees grown on“dwarfing” rootstocks. Smaller trees make picking, pruning, and pest con-trol easier, and they set fruit at a younger age than full-sized trees.
Rootstocks for apple trees are special apple varieties that control the heightof the tree and give it other special characteristics, such as resistance to in-sects or diseases, solid anchorage in the ground, and early fruit production.A cultivar is grafted onto this special rootstock, so you are essentially buyingtwo plants—the rootstock that anchors the tree and the cultivar that pro-duces the fruit.
In this publication and elsewhere, you may read references to “dwarf applecultivars.” This is usually shorthand for “apple cultivars grown on dwarfingrootstock.” For example, the cultivar Yellow Delicious can be grown on adwarfing rootstock or on a rootstock that allows it to grow into a full-sizedtree. This is different from most landscape trees, where dwarf cultivars aredistinctly different genetically from their full-sized relatives.
Mature tree size depends on the vigor of the rootstock, the scion cultivar(the cultivar grafted onto the rootstock), the depth and physical characteris-tics of the soil, and cultural practices. Fully dwarf apple trees grow just 8 feettall when fully mature at 15 to 20 years of age. The fruit of a small tree is asgood in flavor as, or better than, the fruit of the same cultivar grown onintermediate- or full-sized trees.
Common apple rootstocks include:
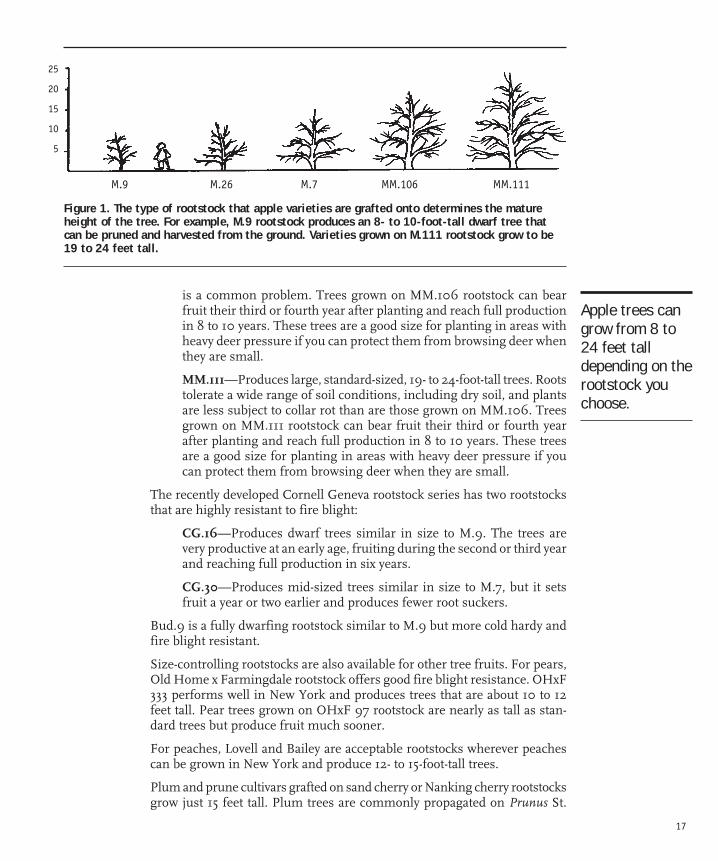
M.9—A strongly dwarfing rootstock that produces a very short, 8- to10-foot-tall tree (see Figure 1). It needs a soil with high water-holdingcapacity and good drainage. Plants should be staked or trellised, andthey are very susceptible to the disease fire blight. Trees grown on M.9rootstock can bear fruit the second or third year after planting andreach full production in six years.
M.26—Produces slightly larger, 11- to 14-foot-tall trees that tend to bepoorly anchored in the ground. Trees must be planted in well-drainedsoil but cannot tolerate very dry conditions. Trees grown on M.26 root-stock can bear fruit the second or third year after planting and reachfull production in six years.
These apple cultivarsare easy to prune andset fruit most everyyear. (You’ll still needto tend to pest man-agement.)
• Jonamac
• Sansa
• Liberty
• Empire
• Golden Delicious
• GoldRush
Sure-Fire Winners
Fruit treesgrown ondwarfingrootstock bearfruit soonerand are easierto manage.

16
M.7—Produces 15- to 18-foot-tall trees with deep roots. But if for anyreason the soil has a restrictive layer, trees will be poorly anchored.Roots also are susceptible to root rot and crown gall diseases. Treeswill take at least one year longer to fruit than those grown on M.9 orM.26 rootstocks, usually bearing in their third or fourth year after plant-ing and reaching full production in 8 to 10 years. These trees are agood size for planting in areas with heavy deer pressure if you canprotect them from browsing deer when they are small.
MM.106—Produces large, 18- to 20-foot tall trees, nearly standard size.Trees often grow late into the fall, making them more susceptible towinter injury. They will not tolerate poorly drained soils, and collar rot
Fruit Cultivar
Apple Williams Pride*Sansa*GalaJonamacFreedom*Priscilla*Liberty*EmpireGolden DeliciousKeepsakeGoldRush*
Apricot HarcotHarogemHarlayneGoldcot
Cherry, sweet StellaEmperor FrancisRoyaltonHartlandHedelfingen
Cherry, tart MontmorencyBalaton
Nectarine,yellow flesh Pocohontas
MericrestNectared 4Nectared 6
Fruit Cultivar
Nectarine,white flesh Morton
Nectacrest
Peach,yellow flesh Harrow Diamond
BrightonRedhavenMadisonCanadian HarmonyCresthaven
Peach,white flesh Surecrop
Raritan RoseEden
Pear BartlettGorhamBosc
Plum, European(prune) Green Gage
Richards Early ItalianStanleyFrench Damson
Plum, Asian Early GoldenShiroSeneca
Table 3: Recommended tree fruit cultivars (listed in order of ripening foreach fruit type)
* Scab-resistant apples
17
is a common problem. Trees grown on MM.106 rootstock can bearfruit their third or fourth year after planting and reach full productionin 8 to 10 years. These trees are a good size for planting in areas withheavy deer pressure if you can protect them from browsing deer whenthey are small.
MM.111—Produces large, standard-sized, 19- to 24-foot-tall trees. Rootstolerate a wide range of soil conditions, including dry soil, and plantsare less subject to collar rot than are those grown on MM.106. Treesgrown on MM.111 rootstock can bear fruit their third or fourth yearafter planting and reach full production in 8 to 10 years. These treesare a good size for planting in areas with heavy deer pressure if youcan protect them from browsing deer when they are small.
The recently developed Cornell Geneva rootstock series has two rootstocksthat are highly resistant to fire blight:
CG.16—Produces dwarf trees similar in size to M.9. The trees arevery productive at an early age, fruiting during the second or third yearand reaching full production in six years.
CG.30—Produces mid-sized trees similar in size to M.7, but it setsfruit a year or two earlier and produces fewer root suckers.
Bud.9 is a fully dwarfing rootstock similar to M.9 but more cold hardy andfire blight resistant.
Size-controlling rootstocks are also available for other tree fruits. For pears,Old Home x Farmingdale rootstock offers good fire blight resistance. OHxF333 performs well in New York and produces trees that are about 10 to 12feet tall. Pear trees grown on OHxF 97 rootstock are nearly as tall as stan-dard trees but produce fruit much sooner.
For peaches, Lovell and Bailey are acceptable rootstocks wherever peachescan be grown in New York and produce 12- to 15-foot-tall trees.
Plum and prune cultivars grafted on sand cherry or Nanking cherry rootstocksgrow just 15 feet tall. Plum trees are commonly propagated on Prunus St.
25
20
15
10
5
M.9 M.26 M.7 MM.106 MM.111
Figure 1. The type of rootstock that apple varieties are grafted onto determines the matureheight of the tree. For example, M.9 rootstock produces an 8- to 10-foot-tall dwarf tree thatcan be pruned and harvested from the ground. Varieties grown on M.111 rootstock grow to be19 to 24 feet tall.
Apple trees cangrow from 8 to24 feet talldepending on therootstock youchoose.

18
Julian A and myrobalan (Prunus cerasifera) rootstocks. Myrobalan grows in awide range of soils, including poorly drained sites.
Cherry trees were traditionally propagated mostly on Mahaleb and Mazzardrootstocks, which usually don’t produce fruit until about their seventh year.Mahaleb is the more winter hardy of the two and produces a smaller, 15- to18-foot-tall tree. However, it is damaged by collar rot in poorly drained soils.Mazzard rootstock generally produces larger, 24- to 28-foot-tall trees and ispreferred for sites with questionable drainage. Giessen rootstock, developedin Germany, produces smaller trees and begins fruiting as early as the thirdyear.
Nursery StockTo get off to a good start, buy high-quality plants from a reliable nursery.The most commonly sold stock are half-inch-diameter, bare-root, one-year-old “whips,” usually just a single stem. Nurseries sometimes sell two-year-old trees that may have several branches (sometimes called “feathers”). Thesetwo types of stock usually perform better than larger and older trees becausesmall trees are easier to transplant and train to a desired shape. When order-ing, request that plants arrive before growth has started, to prevent damagefrom shipping.
Improper care after plants arrive from the nursery can cause serious injury.The ground should be prepared and ready to plant before plants arrive. Ifthe ground hasn’t yet been prepared, unpack the plants immediately and“heel in” the trees in a well-drained, shady, cool location. Dig a temporarytrench about 1 foot deep, and set the trees close together in the trench. Packsoil firmly over all the roots, mounding it so excess water will drain away.Make every effort to set the plants in their permanent location before growthstarts, and never let the roots dry out or expose them to prolonged directsunlight.
You also can store plants in a walk-in cooler for a short time before plantingor heeling-in. But do not store them in coolers with ripening fruits, whichgive off ethylene gas that can damage the nursery stock.
PlantingEarly spring is the best time to plant fruit trees. Plant as soon as you canafter the soil has thawed and drained enough to work without destroying itsstructure and before your nursery stock starts to break bud and leaf out. It isbest to prepare the soil the year before planting. See the section “Before YouBegin” (page 1) for detailed instructions.
Before you plant trees, trim off broken or injured roots. Do not let the rootsdry out. Plants can die if roots are exposed to sun and wind. You may want tosoak the roots in a pail of clean, cool water for 6 to 12 hours before planting.
“Heel in” youngtrees if you can’tplant them imme-diately.

19
Dig planting holes large enough to accommodate the tree roots in their natu-ral position. Put aside the topsoil so you can replace it after planting. Don’tskimp on the digging and preparation of the planting hole. Your tree has amuch better chance of surviving and thriving if you do a good job.
Plant rootstocks with the graft union about 2 inches above ground level. Ifthe graft union is below the soil line, roots may develop on the base of thescion cultivar (upper portion of the graft), which results in the loss of theeffect of the rootstock.
Carefully spread the roots out over loose soil in the bottom of the hole. Movethe tree up and down slightly as you spread the first few shovels of topsoilback on top of the roots. This helps to settle the soil under and around theroots and gets rid of air spaces. Tamp the soil firmly while filling the hole.
Water trees immediately after planting and water at weekly intervals for fourto five weeks unless rainfall is adequate. Do not mix dry fertilizer with thesoil used to fill the hole. It can damage the tender new roots. Add 1 table-spoonful of starter solution (high-analysis, water-soluble fertilizer similar to20-20-20) to 1 gallon of water and apply this solution to the soil around eachtree immediately after planting.
The root system of M.9 rootstock is brittle, and trees on this stock may tipover when the tops become large enough to catch a strong wind. These treesneed the support of a stake, post, trellis, or fence. (You may want to stakeother trees as well, especially on exposed sites.) A 1-inch-diameter metalelectrical conduit pipe makes an ideal support. These are 10 feet long andare easy to pound into the ground. Place the post about 4 inches from thetrunk and about 2 feet into the soil. Secure the tree to the post with severalstrong, durable ties. Specially made tree ties or a heavy wire covered by asection of garden hose work well. Always be certain when tying trees orbranches to posts or other supports that the tie is loose enough to preventbinding or girdling as the trunk grows.
Managing Grass and WeedsYou need to minimize competition for water and nutrients from weeds andgrass growing adjacent to your trees. Two approaches commonly used inhome fruit plantings are mulches and permanent sod.
When planting trees into a lawn, follow the planting steps described previ-ously. In addition, remove the sod within 2 feet of the tree to prevent compe-tition between the tree and grass. If you don’t water your trees or if theyotherwise fail to thrive, you may want to expand this cleared area as the treegrows. Keep grass mowed short near the trees.
Mulches have several advantages. In addition to suppressing weed growth,they can reduce moisture loss, helping to keep the soil evenly moist. As they
Don’t plant a 10-dollar tree in a10-cent hole.
When planting intolawn, remove sodfrom within 2 feetof the tree.

20
decompose, they improve soil structure and release nutrients that the treescan take up and use. Mulches also cushion fruits that drop from the treesand reduce soil erosion.
Using mulches also has disadvantages, but if you recognize the drawbacksand deal with them, mulching is an excellent cultural practice. Mulches cancarry in noxious weed seeds, be a fire hazard, and attract rodents. They maybe expensive or difficult to obtain, and some people consider them unsightly.
In wet years or on poorly drained soils, mulches can hold excessive mois-ture, forcing growth that fails to harden off in the fall and resulting in winterinjury or collar rot. When using mulch, it is difficult to judge how muchnitrogen fertilizer to apply. If you use high-carbon materials, more fertilizermay be needed for the first few years. But as the mulch decays, less isrequired.
Although there are many different types of mulches, wood chips or barkmulch work best, in part because they are less attractive to voles, which candamage trees over the winter. Apply these mulches 4 inches deep, and theywill settle into a mat less than half this thickness. For good weed control,add more mulch as it decomposes to maintain a 2- to 4-inch layer. Themulched area should extend from near the tree trunk to a point just beyondthe spread of branches. To prevent tree injury by voles and other rodents, donot place mulches against the trunk of the tree, and place a hardware clothring around the trunk base. (See “Vertebrate Pest Control,” page 9.)
A thick layer of mulch slows soil warming in the spring. This can delayflowering, which can be an advantage if your site is prone to late springfrosts.
FertilizingFruit trees require little if any fertilizer the year they are planted, particularlyif you did a good job preparing the soil—adjusting pH and adding organicmatter—the previous year. A starter solution applied at planting usuallysupplies enough nutrients for the first season’s growth. In subsequent years,some fertilizer may be needed for good annual growth.
Most soils contain many of the elements essential for plant growth. Fruittrees have large root systems. Under favorable conditions, the roots tap alarge volume of soil, foraging for nutrients. Fertilizer is needed only whenplants are unable to get sufficient quantities of these elements from the soil.When trees can’t get enough nutrients from the soil, the result can be de-creased vegetative growth, light fruit set, and small fruit.
Whatever you do, don’t overdo the application of fertilizers! Too much fertil-izer can be as detrimental as too little, particularly when it comes to nitro-gen. Nitrogen fertilizers, represented by the first number on the fertilizer
Wood chip orbark mulch isleast attractiveto voles.

21
bag, fuel the annual extension growth in the trees (see Figure 12, page 31).Annual extension growth is the amount that a branch grows each year.
To gauge annual extension growth, measure the distance from the tip of thebranch back to the “ring” formed by the scars from the previous year’s budsthat encircle the branch, marking the end of the previous season’s growth.You generally should get about 18 to 24 inches of annual extension growthduring the first several years. Thereafter, 10 to 12 inches is sufficient formature trees.
As a general rule, determine how much fertilizer to apply based on the guide-lines in the chart below. These are the rates that you should apply if yourtrees are not producing enough annual extension growth as described above.
Note that the amounts are small, but don’t be tempted to overapply!Overfertilization with nitrogen, phosphorus, and potassium can cause defi-ciencies in other nutrients. If your young trees are growing as describedabove, then apply no fertilizer and reevaluate your need next year.
Ammonium nitrateNitrogen rate (33% N) 10-10-10 (10% N) 20-20-20 (20% N)
Young trees 0.04 lb./tree 2 0z./tree 6 0z./tree 3 0z./tree
Mature trees 0.08 lb./tree 4 0z./tree 12 0z./tree 6 0z./tree
If your trees flower every year but don’t produce fruit, a micronutrient defi-ciency might be the cause. After eliminating other possibilities, such as latefrosts, have a leaf tissue analysis done. (For more information about leafanalysis testing, contact the Cornell Nutrient and Elemental Analysis Labo-ratory, telephone: 607-255-1785, or via the web at www.hort.cornell.edu/de-partment/facilities/icp)
Pruning and Training BasicsApples, pears, cherries, and plums produce their best fruit on two- to three-year-old wood. Peaches bear their fruit on the last year’s vegetative growth.One of the prime reasons for annual pruning is to encourage lots of produc-tive fruiting wood—one-year-old wood on peaches and two- to three-year-old wood on the others. Unpruned trees can quickly become unproductive,while 70-year-old fruit trees can still bear lots of fruit because annual prun-ing promotes the right amounts and kinds of growth.
How you prune your trees affects how they grow as well as how much theyfruit (see Figures 3 and 4). The buds at the tip of each branch produce planthormones that suppress the growth of buds below the tip. You can manipu-late the effects of these hormones by pruning and bending branches. For
Too much fertilizeris as bad as toolittle.
Annual pruningkeeps treesproductive.

22
example, when you cut off buds while pruning the tip of a branch, you re-lease dormant buds farther back on the branch, which grow and producenew branches.
The effects of plant hormones are greatest on vertical shoots and least onhorizontal limbs. Spreading branches from vertical positions so that theyare nearly horizontal has an effect similar to that of pruning off the buds atthe tip of the branch. This spreading promotes new shoot development, ini-tiates fruit buds, and slows the extension growth at the branch tip. That iswhy most fruit trees are pruned and trained to produce horizontal branchesthat yield more fruit, while much of the vertical growth is pruned out of thetree (see Figures 3 and 4).
Central leader
Fruiting buds
Water sprout(sucker)
Scaffold
Improperly pruned stub
Improperly pruned stub
Heading cut
Thinning cut
Weak, narrow-angled crotch
Strong, wide-angled crotch
Root sucker
Figure 2. Pruning terminology
Adapted from Figure 6–25, TemperateZone Pomology by Melvin N. Westwood.Timber Press, Oregon. 1988

23
Figure 3. When pruning and training a young tree, it’s important to keep in mind the form of themature tree. Note the central leader and conical shape of the apple and pear trees and the morevase-like shape of the peach and cherry trees.
Apple
Pear
Peach
Cherry

24
The other reason for encouraging horizontal growth is that branches withnarrow crotch angles—where the angle formed between a branch and a ver-tical leader is less than about 60 degrees—are weak and break more easilyunder the weight of fruit. Narrow crotches also can serve as an entry pointfor organisms that cause disease and decay.
Each growing season, the diameter of each branch enlarges a bit, and eachbranch grows longer. You can follow the sets of “rings” on a branch to seehow much annual extension there has been in preceding years and studythe effects from past pruning, rainfall, and fertilization. Ten to 12 inches ofannual extension growth is about right for mature fruit trees.
You should do most of your pruning during the dormant season—after theleaves have fallen from the trees but before new growth starts in the spring.The ideal pruning time is usually from February to April. (Pruning in earlywinter can sometimes cause injury.) Other training tasks are carried out inthe spring and summer. Older trees sometimes need additional pruning inthe summer, but pruning too late in the season can encourage growth thatwon’t harden off by winter and can weaken the tree.
Many people tend to prune too much. Prune what needs pruning, but don’toverprune, either (Figure 5). Too much pruning can cause excessive vegeta-tive growth at the expense of fruiting.
To get started, you need to know three basic types of pruning cuts:
• Pinching—removing growth near the apical meristem (the growingtip of a shoot) while it is still young and succulent.
• Heading—removing some, but not all, of a branch or shoot (called ashortening cut on older wood).
• Thinning—removing an entire shoot at its point of origin (called arenewal cut on older wood).
Figure 4. Horizontal branches produce more fruit. The up-right branch produces lots of vegetative growth but littlefruit. What fruit it does produce is often soft and poorlycolored. The branch growing from the underside of a largerbranch is heavily shaded. As a result, it produces little veg-etative growth and small fruits of poor color. Therefore,prune to encourage horizontal branches. They produce mod-erate vegetative growth and are very fruitful. Because ofgood light exposure fruits have better color.
February to Aprilis the best timeto prune appleand pear trees.
25
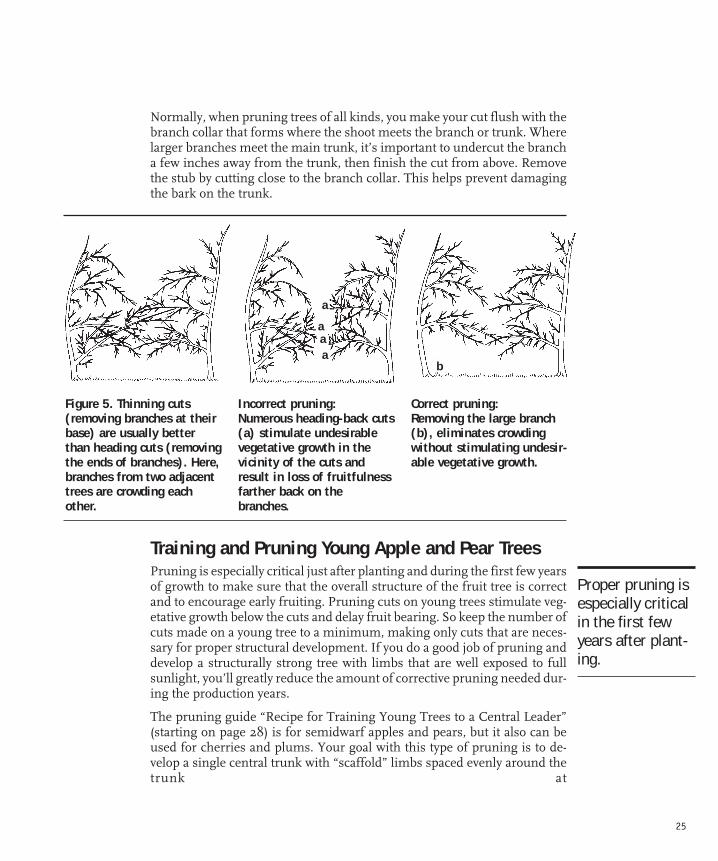
Normally, when pruning trees of all kinds, you make your cut flush with thebranch collar that forms where the shoot meets the branch or trunk. Wherelarger branches meet the main trunk, it’s important to undercut the brancha few inches away from the trunk, then finish the cut from above. Removethe stub by cutting close to the branch collar. This helps prevent damagingthe bark on the trunk.
Figure 5. Thinning cuts(removing branches at theirbase) are usually betterthan heading cuts (removingthe ends of branches). Here,branches from two adjacenttrees are crowding eachother.
Incorrect pruning:Numerous heading-back cuts(a) stimulate undesirablevegetative growth in thevicinity of the cuts andresult in loss of fruitfulnessfarther back on thebranches.
Correct pruning:Removing the large branch(b), eliminates crowdingwithout stimulating undesir-able vegetative growth.
aaa
a
b
Training and Pruning Young Apple and Pear TreesPruning is especially critical just after planting and during the first few yearsof growth to make sure that the overall structure of the fruit tree is correctand to encourage early fruiting. Pruning cuts on young trees stimulate veg-etative growth below the cuts and delay fruit bearing. So keep the number ofcuts made on a young tree to a minimum, making only cuts that are neces-sary for proper structural development. If you do a good job of pruning anddevelop a structurally strong tree with limbs that are well exposed to fullsunlight, you’ll greatly reduce the amount of corrective pruning needed dur-ing the production years.
The pruning guide “Recipe for Training Young Trees to a Central Leader”(starting on page 28) is for semidwarf apples and pears, but it also can beused for cherries and plums. Your goal with this type of pruning is to de-velop a single central trunk with “scaffold” limbs spaced evenly around thetrunk at
Proper pruning isespecially criticalin the first fewyears after plant-ing.

26
different levels, allowing for optimal exposure of the leaves to sunlight(see Figure 10). The tree will eventually assume a nearly conical shape, withlonger scaffolds at the bottom of the tree and shorter ones near the top (seethe apple and pear trees in Figure 3). In addition, you will need to spread ortrain the scaffold limbs so that they are nearly horizontal with the groundand their crotch angles (the angle formed where the limbs meet the centralleader) are at least 60 to 70 degrees (Figure 7).
Keep in mind that the “central leader” method is just one way of pruningtrees. There are many other methods—especially for high-density plantingsof dwarf apple trees—that are variations of this method and designed toproduce earlier harvests and high yields. (The general principles of centralleader training can be used on dwarf trees as well.) As long as you keep inmind the effects that the different pruning cuts will have on your tree, you
Figure 6. It’s important to prune youngapple trees to maintain the dominanceof a single central leader. After headingback at planting (a), several leaders willcompete for dominance (b). Remove allbut the strongest while they are stillsucculent (c).
a b c
Figure 7. Use spreaders to train scaffoldlimbs to wide angles. The narrow crotchangle and small, upright lateral branch makethis a poor scaffold without pruning andspreading. Incorrect pruning (b) does notimprove the crotch angle or limb position,and because the limb is near vertical, thecut will stimulate vigorous vegetativegrowth. The correct procedure (c) spreadsthe limb to improve the crotch angle andproperly positions the scaffold. Remove thelateral because it will be shaded by growthfrom the main scaffold limb.a b c
27
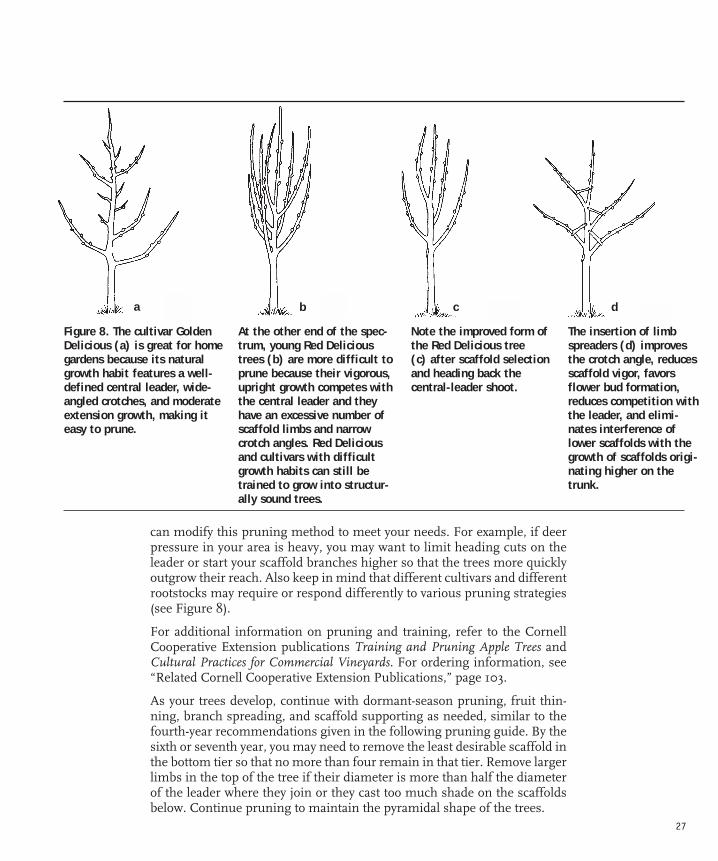
can modify this pruning method to meet your needs. For example, if deerpressure in your area is heavy, you may want to limit heading cuts on theleader or start your scaffold branches higher so that the trees more quicklyoutgrow their reach. Also keep in mind that different cultivars and differentrootstocks may require or respond differently to various pruning strategies(see Figure 8).
For additional information on pruning and training, refer to the CornellCooperative Extension publications Training and Pruning Apple Trees andCultural Practices for Commercial Vineyards. For ordering information, see“Related Cornell Cooperative Extension Publications,” page 103.
As your trees develop, continue with dormant-season pruning, fruit thin-ning, branch spreading, and scaffold supporting as needed, similar to thefourth-year recommendations given in the following pruning guide. By thesixth or seventh year, you may need to remove the least desirable scaffold inthe bottom tier so that no more than four remain in that tier. Remove largerlimbs in the top of the tree if their diameter is more than half the diameterof the leader where they join or they cast too much shade on the scaffoldsbelow. Continue pruning to maintain the pyramidal shape of the trees.
At the other end of the spec-trum, young Red Delicioustrees (b) are more difficult toprune because their vigorous,upright growth competes withthe central leader and theyhave an excessive number ofscaffold limbs and narrowcrotch angles. Red Deliciousand cultivars with difficultgrowth habits can still betrained to grow into structur-ally sound trees.
Note the improved form ofthe Red Delicious tree(c) after scaffold selectionand heading back thecentral-leader shoot.
The insertion of limbspreaders (d) improvesthe crotch angle, reducesscaffold vigor, favorsflower bud formation,reduces competition withthe leader, and elimi-nates interference oflower scaffolds with thegrowth of scaffolds origi-nating higher on thetrunk.
a b c d
Figure 8. The cultivar GoldenDelicious (a) is great for homegardens because its naturalgrowth habit features a well-defined central leader, wide-angled crotches, and moderateextension growth, making iteasy to prune.

28
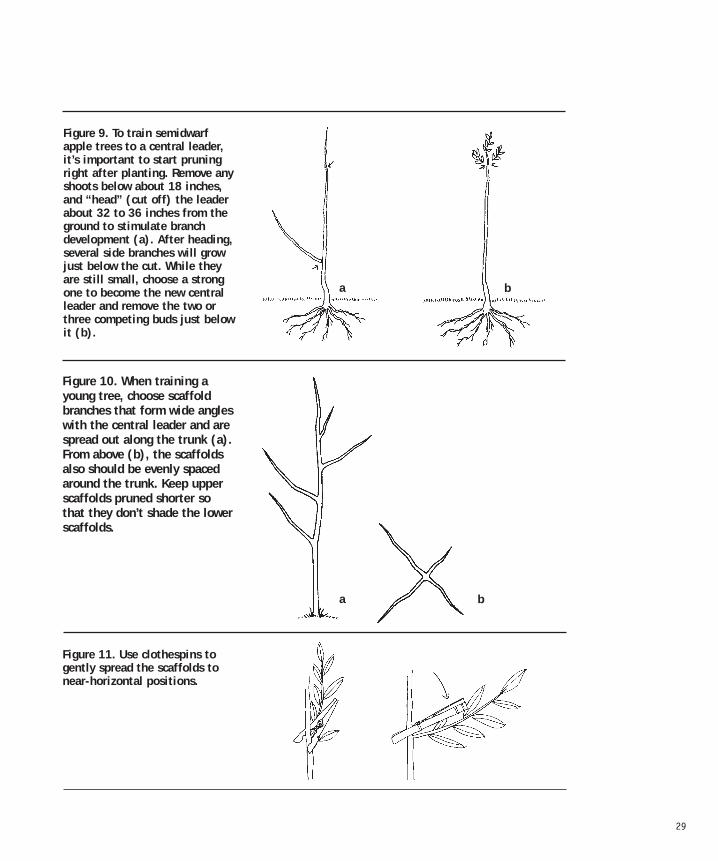
Plant so that the graft union is 2 inches above the soil level. (Tampsoil firmly.) Remove any shoots below about 18 inches. “Head” (cutoff) the leader at about 32 to 36 inches (26 inches for pear trees) tostimulate branch development (see Figure 9). If the tree is well-feathered (has lots of side branches), head the leader about 12 inchesabove the top branch.
Stake trees, especially those on M.9 rootstock (see “Planting,” page18).
Choose a strong bud (usually the one just below your heading cut)to be the central leader, and pinch off the two or three competingbuds below it. Remove any flowers that appear on the trees.
When: What to do:
Recipe for Training Young Trees to a Central Leader: First Year
At planting
Soon after planting
1/4 to 1 inch ofnew growth.
2 to 4 inches ofnew growth
Choose several sideshoots to become scaffolds. They should bespaced about 3 to 4 inches apart on dwarf varieties and up to 8 to 12inches apart on larger varieties. Make sure they are well distributedaround—as well as along—the central leader (see Figure 10). Espe-cially make sure that no two branches arise from the trunk at thesame height.
Attach clothespins to the main trunk so that their opposite endsgently spread the scaffolds to near-horizontal positions (see Figure11).
Remove any vigorous sideshoots that compete with the centralleader (see Figure 6). Tie the developing leader to the stake.
Remove clothespins. If any scaffolds are turning up at the end andtrying to grow vertically, hang one or more clothespins from nearthe end of the scaffold (attach extra weight to the clothespins ifnecessary) to bring them back closer to a horizontal position.
Install a permanent plastic tree tie above the first tier of scaffolds,leaving a 2-inch diameter loop to allow for trunk growth.
Remove any vigorous sideshoots that are competing with the cen-tral leader. The leader should have grown at least 18 inches theprevious season (see Figure 12).
Mid-July
Fall
When: What to do:
Recipe for Training Young Trees to a Central Leader, Second Year
29
Figure 9. To train semidwarfapple trees to a central leader,it’s important to start pruningright after planting. Remove anyshoots below about 18 inches,and “head” (cut off) the leaderabout 32 to 36 inches from theground to stimulate branchdevelopment (a). After heading,several side branches will growjust below the cut. While theyare still small, choose a strongone to become the new centralleader and remove the two orthree competing buds just belowit (b).
Figure 10. When training ayoung tree, choose scaffoldbranches that form wide angleswith the central leader and arespread out along the trunk (a).From above (b), the scaffoldsalso should be evenly spacedaround the trunk. Keep upperscaffolds pruned shorter sothat they don’t shade the lowerscaffolds.
a b
Figure 11. Use clothespins togently spread the scaffolds tonear-horizontal positions.
a b

30
If the leader grew more than 18 inches, head it back by about one-fourth to encourage the formation of sideshoots for scaffold selection.If growth was less than 18 inches, head the leader and scaffolds,removing about one-third of last year’s growth.
If the tree has less than three acceptable scaffold limbs, remove allscaffolds, rehead the leader at about 36 inches, and repeat the first-year training procedure.
If you are trying to encourage quick vertical growth or are growingdwarf trees that you want to encourage to fruit early, skip headingthe central leader.
As a rule of thumb, remove sideshoots that are more than one-halfto two-thirds of the diameter of the trunk where they meet.
Choose and clothespin the second tier of scaffolds growing fromone-year-old wood on last year’s leader, similar to your scaffold se-lection the previous year. Again, make sure they are well spacedalong the central leader and well distributed around the trunk.
Choose a new central leader (if you headed off the old one), andremove any vigorous sideshoots that compete with it.
Tie the developing leader to the stake and remove the clothespins.Remove any vigorous sideshoots that compete with the central leader.
Use “spreaders” of various lengths to spread vigorous scaffold limbsselected the previous year that have crotch angles less than 45 de-grees, bringing them down to nearly horizontal (see Figure 8d). Youcan make your own spreaders by cutting notches into the ends of awood lathe or driving finishing nails into the ends of one-by-twosand sharpening the protruding head. (The sharp ends hold fast inthe branches without doing permanent damage.) Alternatives tospreaders include hanging weights from the limbs or tying themdown to the base of the tree.
Make sure the tree is tied securely to the stake.
Remove any vigorous sideshoots that compete with the centralleader. Head the leader if needed, following the directions givenfor late winter of the second year.
Choose and clothespin more scaffolds growing from the one-year-old wood on last year’s leader, similar to the scaffold selection ofthe previous year. Again, make sure they are well spaced along thecentral leader and well distributed around the trunk.
Mid-July
Late winter
When: What to do:
Recipe for Training Young Trees to a Central Leader: Third Year
2 to 4 inches ofnew growth
Late winter
2 to 4 inches ofnew growth

31
Figure 13. As the tree matures,remove vigorous sideshoots thatcompete with the central leader(a), scaffolds that threaten toovertake and shade lower ones(b), and suckers (c).
Figure 14. Remove droopingbranches because they produceless fruit, are not well exposedto light, and usually shade otherbranches. Remove the ends ofsuch branches back to a lateralin a near-horizontal position,and remove all branches growingdownward from the bottom oflarger branches.
Extension growth
Figure 12. In late winterfollowing planting, removesideshoots competing withthe leader. The leader shouldhave grown at least 18 inches(extension growth) theprevious season.
a
b
c

32
Budbreak toMid-July
July
June
Choose a new central leader (if you headed off the old one), andremove any vigorous sideshoots that compete with it.
Hand-thin the fruit to singles spaced 6 inches apart (see “Thin-ning Fruit,” page 36).
Tie the developing leader to the stake and remove the clothespins.Remove any vigorous sideshoots that compete with the centralleader.
Use spreaders or alternatives to spread scaffolds with narrow crotchangles.
Use twine, heavy string, or wooden props to tie up permanent scaf-folds if it appears they will not support the fruit load.
Remove any vigorous sideshoots that compete with the centralleader (see Figure 13). Head the leader if needed.
Thin out overcrowded areas. Remove branches whose tips hangbelow horizontal, or prune them back to a new shoot that is point-ing up slightly (see Figure 14). Reposition the spreaders if neces-sary.
Remove any vigorous upper scaffolds so that they do not overtakeand shade the lower ones (see Figure 13). If the diameter of any ofthose branches is greater than half the diameter of the central leaderwhere they meet, remove them completely with a thinning cut.
Spread the scaffolds where necessary.
Hand-thin the fruit to singles spaced 6 inches apart (see “Thin-ning Fruit,” page 36).
Use twine, heavy string, or wooden props to tie up the permanentscaffolds if it appears they will not support the fruit load.
Recipe for Training Young Trees to a Central Leader: Fourth Year
Late winter
When: What to do:
June
2 to 4 inches ofnew growth
Mid-July

33
Pruning Bearing Apple and Pear TreesFor apples and pears, a cone-shaped tree—with longer scaffold branches atthe bottom of the tree and shorter ones at the top—intercepts light mostefficiently. While this shape is easy to maintain in a young tree, it is difficultto preserve as the tree ages. The top of the tree, which has the most vigorousgrowth, tends to spread and shade the lower limbs.
When pruning mature trees, avoid small cuts, which can encourage too muchvigorous vegetative growth. Making one or two large cuts, either removingan entire branch or cutting a major portion back to a vigorous fruitful lat-eral, is more effective. For fruit-bearing central leader trees, follow theseguidelines:
• First, remove diseased, broken, or dead branches completely.
• Make big strategic cuts first, especially high in the trees. Thinningcuts (removing entire branches at their bases) are almost always pref-erable to heading cuts, which can encourage unwanted vegetativegrowth just below them.
• If two limbs overshadow, cross, entangle, or otherwise compete witheach other for the same space, don’t head both of them. Instead,remove one of them completely with a thinning cut at its base.
• To reduce overall tree height, cut off the top just above a weaker sidelimb or sucker. Often, the top of the tree will take care of itself, withupright suckers bending into more horizontal positions under theweight of fruit or even breaking off, limiting the height of the tree.
• Remove any limb above the bottom tier of scaffolds that is more thanhalf the diameter of the branch that it originates from.
• Remove suckers or water sprouts (vigorous vertical limbs growingstraight up from nearly horizontal branches) that are larger than 1/4inch in diameter.
• Use a pruning saw or bypass blade (not anvil-type) pruning shears.Make cuts close to the branch collar at the base of the limb. Undercut large limbs first to avoid tearing the bark, which can damage thetree.
• Stand back from the tree frequently and check your work. Try todevelop a clear mental image of what you want the tree to look like.
While the central leader system works with pears as well as apples, pearshave some differences. They tend to grow more vertically, but branches withnarrow crotch angles are less likely to split. Branches that spread more than45 degrees tend to produce water sprouts from their bases. Because of therisk that fire blight may girdle the leader, pear trees are sometimes prunedto multiple leaders; if one dies it won’t take the whole tree.
Step back andpicture what youwant the tree tolook like.

34
Rejuvenating Old Apple and Pear TreesMany old, neglected apple trees can be rejuvenated by proper pruning dur-ing the dormant season. Many will have grown too tall to manage and har-vest conveniently. Most will have too much old wood and not enough young,productive fruiting wood. Here are some suggestions for bringing them backinto production, but keep in mind that it usually takes several years of cor-rective pruning. Don’t try to make up for years of neglect in a single season.
• Remove dead branches, rotten and diseased wood, and water sprouts(suckers).
• Next, make big thinning cuts to the top and middle of the tree, re-moving whole limbs from their point of origin. Reduce the height ofthe tree by as much as a third, cutting just above a large side branch.Remove water sprouts that grow just below those cuts in July andAugust to keep them from shading the center of the tree.
• Remove shoots that are growing toward the ground.
• Make thinning cuts to remove limbs that cross or compete with eachother.
• Leave some well-positioned vigorous shoots, which will eventuallyreplace older limbs and laterals.
Pruning and Training Cherry and Plum TreesUnlike apple and pear trees, the best time to prune cherry and plum trees islate spring, after the trees have flowered. At this point, you can see howpruning will affect your crop.
You can train young cherry and plum trees as central leader trees, as de-scribed for apples and pears (see the steps beginning on page 28). Or youcan train them as open-center (vase-shaped) trees (see “Pruning and Train-ing Peaches,” next page). Perhaps the best way is somewhere in between, asa modified central leader tree.
Weak unions between the rootstock and the scion cultivar are common withmost cultivars of sweet cherry. To prevent damage, stake young trees usingan elastic tie to prevent canker formation where the tie contacts the tree.
Training a tree as a modified central leader is similar to training a centralleader tree, except that after you’ve selected four or five good scaffold limbswith wide crotch angles where they meet the leader, you top the central leader.
After this initial training, cherry and plum trees need few corrective cutsduring the next five or six years or until the trees begin bearing. During thistime, limit pruning to removing water sprouts and limbs that cross and rub
After initialtraining, cherryand plum treesrequire lesspruning thanother fruit trees.

35
against a permanent branch. Also, prune to prevent the development of nar-row crotches that could split and ruin the shape of the tree when it bears acrop. A narrow crotch is a fork where two branches of equal length anddiameter arise at a common point. Generally, you can simply remove one ofthe branches of a narrow crotch.
Cherry and plum trees that have had proper corrective pruning from thebeginning need little if any pruning during their early bearing years. Butoverpruning during the formative years delays bearing.
Once mature, cherry and plum trees require the least pruning of all fruittrees. They bear fruit on spurs in two- to six-year-old wood, so prune to main-tain bearing wood in these age classes. When pruning, also observe the fol-lowing:
• Remove dead, broken, or diseased branches.
• To keep the tree from growing too tall, head back leaders to a stronglateral branch.
• Thin out branches to provide good light exposure to remaining limbs.
Pruning and Training PeachesLike cherry and plum trees, peach trees are best pruned in the late spring.They are unique among major tree fruits in that they bear most of their fruiton lateral buds in the lower half of vigorous one-year-old shoots. To main-tain a constant flush of this growth for the next crop, prune peaches hardevery year.
Peach and nectarine trees are very susceptible to perennial canker, which iscaused by a fungus that infects open wounds when temperatures are cool.Don’t prune them unless the weather is expected to be dry with tempera-tures over 60 degrees F for two to three days after pruning. Delaying prun-ing until flowering helps reduce the spread of this organism, and you cansee how your pruning will reduce the crop.
Because of the way they grow, you should not train peaches as central leaderor modified central leader trees. They are best trained as open-center trees,selecting three to five scaffold limbs that give the tree a vase-like shape.
One-year-old nursery peach trees are usually 3 to 6 feet tall with some lateralbranching. At planting
• head the leader back to about 8 inches above the first side shoot.
• prune off any side shoots below 18 inches from the ground.
• prune off all side shoots that have crotch angles of less than45 degrees.
Unlike most othertree fruits,peaches bear onone-year-oldwood.

36
• head back all remaining shoots so that each has just two budsremaining.
If you don’t have at least three to five branches with wide crotch angles,leave some narrow ones and spread them using clothespins, as describedfor apple trees. If you have more than five with wide angles, wait until earlyJune, after they’ve grown a few inches, and select three to five of the stron-gest. They should be spaced evenly around the trunk with about 4 to 6 inchesbetween them.
Later that summer, around late July, remove any additional shoots that startedgrowing closer than 18 inches from the ground or that have narrow crotchangles (less than 45 degrees).
In late spring of the second year, remove the central leader just above thefirst wide-angled side limb to create an open-centered tree. Keep only four tosix wide-angled scaffold limbs on the main trunk, and remove other limbs.Lightly head back the scaffolds to outward-growing laterals, and thin outshoots growing from the scaffolds that are less than pencil-sized.
The purpose of heading back scaffolds is to continue the development of anopen-center tree that will be low, strong, and spreading for convenient thin-ning, pest control, and harvesting. Leave some small shoots that cross in thecenter because they will bear the first fruits.
Pruning during the third and fourth years should be limited to removingdecidedly crowded limbs or low-hanging, shaded branches in the center ofthe tree. Also, head back main scaffold limbs to laterals if they are too highor out of balance with the others. Fruit will be produced on one-year-oldbranches, which should be spread evenly throughout the tree.
As trees reach full size, severe pruning maintains and renews vigorous fruit-ing wood throughout the tree. Terminal shoot growth of 12 to 18 inches isdesirable. If the shoot growth is weak or the lower limbs become too long,cut the branches back into two- or three-year-old wood. Make the cuts to anoutward-growing side branch.
After heading back all of the main branches, thin and space the fruitingshoots so they are about 6 to 8 inches apart. This spacing provides goodlight exposure to the fruiting shoot and allows development of new shootsfor next year’s crop. The fruiting shoots should not be headed back, but thefruits should be thinned because fruit set generally is excessive.
Thinning FruitYoung trees seldom set so much fruit that they need to be thinned. But onceapple, pear, peach, and plum trees start bearing well, thinning produceslarger, better-colored, and higher-quality fruit. If you don’t thin fruit, trees
Train peaches tovase-shapedtrees.

37
may expend so much energy ripening the crop that they will not rebloomthe following year.
The proper time to thin fruit is about two to three weeks after bloom, afterearly fruit drop when fruits are about the size of a quarter. The first step is toremove small and insect- or disease-injured fruit. Then remove all but onefruit where there are several in a single cluster, leaving the largest of thefruit.
Then with peaches remove additional fruit so that the remaining ones arespaced 4 to 8 inches apart (early cultivars require wider spacing). Thin plumsso the fruits are 4 inches apart (cherries do not require thinning).
Fruit thinning is especially important with apples. Excessive fruit set re-duces flower bud formation for the next season and results in alternate bear-ing—a heavy crop of small-sized fruit one year and little or no crop the next.Thinning within the month after bloom helps prevent alternate bearing.Space apples 4 to 6 inches apart so that one apple occupies every second orthird spur. Thinning actually requires very little time, and the improvementin size, quality, and repeat bloom is worth the effort.
Be cautious about postbloom use of the insecticide carbaryl (Sevin), whichalso acts as a fruit thinner.
Diseases and InsectsYour ability to grow terrific tree fruits depends in large part on your abilityto control pests and diseases. You will face many of the same challenges ascommercial growers, but it’s unlikely that you will have the same powerfulpest control tools that they have. For example, home fruit growers typicallyuse hand-operated sprayers or those run by small electric or gasoline mo-tors. Compared with commercial-sized sprayers, these machines have asmaller capacity and lower pressure and require more energy to do an effec-tive spraying job.
This makes it especially important for you to follow cultural practices thatkeep trees healthy and minimize disease and pest buildup. If you plan tospray your trees, it’s easier to get good coverage with home-scale equipmentif you plant dwarf or semidwarf cultivars.
In addition to doing a good job of site preparation, choosing a location withgood air drainage, and planting disease-resistant cultivars, there are severaleasy steps you can take to help prevent pest and disease problems:
• Maintain a complex ecosystem around your plantings that provideshabitat for beneficial insects.
• Prune out dead twigs and branches during the dormant season.
Without the pestcontrol tools ofcommercial grow-ers, you need tofollow best culturalpractices to keeptrees healthy.

38
• Rake up and destroy leaves and diseased fruit in the fall, after har-vest.
• Familiarize yourself with disease and insect life cycles so that youcan correctly time control measures.
• If sprays are necessary, always use pesticides according to the label.
One particularly effective treatment that home fruit growers should con-sider is the use of dormant oil spray. If applied when up to 1/2 inch of greenis showing on the buds, it can effectively control mites, scales, and pearpsylla.
Home gardeners should be aware of the following major diseases and in-sects of tree fruits. For a more complete description of pests and controlmethods, see the Cornell Cooperative Extension publication Pest Manage-ment around the Home: Part I, Cultural Methods. For ordering information,see: “Related Cornell Cooperative Extension Publications,” page 103.
Apple scab. This fungal disease is easily recognized by the olive-green toblack spots it causes on fruit and foliage. Severely infected leaves are dwarfed,cupped, or curled and drop prematurely. Fruits infected during the earlyseason may be severely deformed or may drop by early June. The scab or-ganism survives the winter in dead apple leaves on the ground. Primaryinfections occur during rainy periods from the time green tissue appears inthe spring until the end of June. Many secondary spores are produced withinthe primary lesions. These are washed from the lesions by rain and are spreadto other susceptible tissues, where, under appropriate environmental condi-tions, they cause secondary infections.
Good scab control early in the season makes control in late summer easier.Home gardeners should seriously consider selecting cultivars that are resis-tant to scab. McIntosh and Cortland are likely to become infected with applescab in home orchards. Freedom, Liberty, Prima, Jonafree, GoldRush, andMacFree are very resistant.
Powdery mildew. This fungal disease overwinters in dormant buds. Leavesthat emerge from infected buds are covered by a white, powdery fungalgrowth. Secondary spread of the disease to other plant tissues occurs fromthe time the buds open until the terminal buds form in late June. If powderymildew is a serious disease in your area every year, do not plant the suscep-tible cultivars Idared, Monroe, Rome Beauty, Jonathan, Paulared, Gingergold,or Cortland.
Fire blight. This bacterial disease causes severe damage to pear and appletrees during warm, rainy spring weather. Branches blacken and droop rap-idly as if scorched by fire. Fire blight bacteria overwinter between live barktissue and the tissue killed the previous season. In the spring, the bacteria
Dormant oilsprays cancontrol mites,scabs, and pearpsylla.
Choose scab-resistant applecultivars.

39
are spread by windblown rain, insects, or pruning tools. The disease usuallyaffects blossoms but also can directly infect succulent shoots during latespring and summer.
To avoid fire blight, do not grow trees on poorly drained, highly acidic, oroverfertilized soils. Cut off infected twigs and branches in late winter, mak-ing the cuts at least 6 inches below the dead area. If you are pruning duringthe summer, disinfect pruning tools with denatured alcohol or a 10 percentbleach solution between each cut. Be sure to clean and oil pruning toolsafter use. All pear cultivars except Seckel are very susceptible to fire blight.Susceptible apple cultivars are Idared, Jonagold, Jonathan, Lodi, Crispin(Mutsu), Greening, Paulared, Rome, Sir Prize, Spigold, Twenty Ounce, York,and Gala.
Brown rot. This fungus attacks peaches, plums, cherries, and nectarines.This disease is easy to diagnose by the unsightly brown rot that forms on thefruit, rendering it inedible. Spores are released during rainy periods in thespring and summer, infecting the blossoms and fruit. The fungus overwin-ters in infected twigs or fruits that remain on the tree or nearby on the ground.Remove and destroy diseased fruits to help reduce infection.
Black knot. This fungus infects plum and cherry trees, causing rough, blackenlargements on the twigs. The knots are often two to four times the diam-eter of the twigs and up to 8 inches long. Prune black knot–infected twigs atleast 8 inches below the knot in winter or early spring and destroy them. Donot allow this disease to build up, or severe pruning will be necessary.
Cytospora canker. This fungal disease is very devastating to peach trees andalso infects apricot, plum, nectarine, and cherry trees. Cytospora canker cangirdle scaffold branches, reducing yields or even killing trees. The diseasefirst appears in April or early May as an oozing, light amber to dark browngum near the point of infection. Beneath the gum, the inner bark begins tocollapse, leaving a depressed area on the surface. By the second year, thisarea develops into an elongated or elliptically shaped canker. Although thebark dries out, it usually remains intact during the first year. In later years,the bark becomes broken, malformed, and covered with a black fungal over-growth.
To avoid cytospora canker, plant cold-hardy cultivars, fertilize only in theearly spring, and follow proper pruning procedures. Do not apply excessivenitrogen, and do a good job of controlling other stressors, especially brownrot and insects such as the peach tree borer and the lesser peach tree borer.Trees already stressed are most likely to suffer from cytospora infection.
Cedar-apple rust. This fungus can defoliate apple trees and blemish fruit. Itrequires two hosts to complete its life cycle—an apple tree and an easternred cedar tree (Juniperus virginiana). It survives the winter in spherical galls
Remove anddestroy diseasedfruit to reducebrown rot.

40
on cedar trees. Spring rains promote the growth of hornlike structures thatextrude from the galls. These structures release spores that travel by wind toapple trees and cause orange pustules on the upper surfaces of the leaves.One to two months after the appearance of these pustules, the fungal rustproduces other structures on the undersides of the leaves or on the fruit.Fruit becomes infected during moist conditions when the temperature rangesbetween 46 degrees F and 75 degrees F. Spores produced on the leaves andfruit are released into the air during the dry conditions of summer and in-fect the leaves of cedar trees, completing the cycle.
Control strategies include applying fungicides, removing nearby red cedars,and using resistant cultivars. Very resistant apple cultivars include Delicious,Liberty, Nova Easygro, Novamac, and Tydeman. Susceptible cultivars areGolden Delicious, Jonathan, Lodi, Prima, Rome, Twenty Ounce, and York.
Apple maggot. This is the most destructive of all the insects that attack apples.The adult flies are slightly smaller than houseflies. They emerge from thesoil between mid-June and mid-August and feed for about a week. Then thefemales lay eggs under the skins of apples. After hatching, the maggots borethrough the fruit. In heavy infestations, many larvae can be found in a singlefruit. Picking up and destroying fallen fruit once a week from early Augustthrough harvest reduces the potential for maggot infestations the followingyear. Apple maggot emergence and activity can be monitored by hangingred ball sticky traps.
Cherry fruit fly. This pest is closely related to the apple maggot and has asimilar life cycle, but it attacks only sweet and tart cherries. Adults emergefor about a month beginning in early June. Use red ball sticky traps to moni-tor adult activity.
Plum curculio. This small, 1/4-inch-long weevil attacks all tree fruits. Adultsoverwinter in hedgerows or other sheltered areas and emerge in the springwhen newly formed fruit is exposed—around petal fall in apples and shucksplit in stone fruits. The most serious damage occurs when females depositeggs in the fruit, causing small crescent-shaped scars. The larvae bore to thecenter of the fruit to feed. Infested fruits often drop to the ground in June.Picking up and destroying all drops in early June helps reduce developinglarvae. If your planting is near woodland or other areas that provide goodshelter for overwintering adults, infestations can destroy the entire crop.Chemical control measures are usually directed at the adults during the threeweeks after bloom.
Apple tree borers. These pests are often found in home fruit plantings, es-pecially in the trunks of young, unsprayed trees. Roundheaded apple treeborers are a particular problem. Adults feed on the fruit, bark, and foliage,but larvae cause the most significant damage. Females make a longitudinalslit in the bark of trunks and insert an egg. When the egg hatches, the larvabores into the sapwood and moves along the trunk, developing and enlarg-

41
ing tunnels. These tunnels weaken the tree structurally, cut off the flow ofsap, and create a wound site that predisposes the tree to diseases and otherinsects. The downy woodpecker is the only known natural enemy of theroundheaded apple tree borer.
Pear psylla. This is the most common insect pest of pear trees. Adults re-semble tiny cicadas. The nymphs secrete a sticky exudate called honeydew,which supports the growth of an unsightly black, sooty mold that soils leavesand fruit. If not controlled, psylla can cause early defoliation and crop loss.
Peach tree borers. These pests feed on the inner bark of peach trees andother stone fruits, girdling the conductive tissue. The two species, the peachtree borer and the lesser peach tree borer, are both clear-winged moths thatlay eggs on the bark of the trees. The peach tree borer deposits its eggs at thebase of the trunk and can kill the entire tree. The lesser peach tree borerattacks individual branches. Look for a gummy exudate mixed with a saw-dust-like material excreted from small holes in the trunk. Gum secretionsalso can be caused by other injuries to the tree. To ensure positive identifica-tion of borers, cut away the bark and look for the larvae in their burrows.Avoid borers by painting tree trunks with a mixture of one part white latexpaint and one part water.
San Jose scale. This insect pest infests apple, pear, plum, sweet cherry, apri-cot, peach, and nectarine trees. It sucks sap from all parts of the tree, includ-ing the fruit, causing the tree to decline in vigor. Badly infested areas on thebark appear ashy gray with encrusted scales. Fruit spotting can occur, par-ticularly on apples. Females are about the size and shape of a pinhead anddo not look like insects. To control scale insects, prune infested branchesand suckers.
Codling moth. The larva of this moth is a worm found commonly in home-grown apples. As an adult, this iridescent gray moth deposits eggs on leavesand fruit. The eggs hatch about 6 to 20 days later, usually after the petalshave fallen. Although other generations may occur during the season, it ismost important to control this first generation, especially the adults beforethey lay eggs and the larvae that hatch from eggs deposited on fruit andfoliage. If you spray trees for plum curculio and apple maggot, codling mothsprobably won’t be a problem.
Aphids. These tiny insects—often called plant lice because of their smallsize and large populations—cause apple leaves to twist and roll. Two speciesare destructive—the rosy apple aphid and the green apple aphid. The rosyapple aphid damages fruit early and causes the fruit of certain apple culti-vars to become dwarfed and deformed. Both aphids secrete honeydew, andsooty spots may develop on fruit and foliage. Green apple aphids should notrequire chemical control in home orchards.
Mites. While technically not insects, these tiny pests can bronze or discolorthe leaves of many fruit trees. The European red mite and the two-spotted

42
mite are common in the Northeast and thrive in hot, dry weather. Both re-side on the undersides of leaves and cause damage by sucking plant juices.Natural enemies usually keep populations low.
HarvestFor best quality and flavor, allow fruit to ripen on the tree. The best way totell when they are ripe is to taste them. When they are sweet and full-fla-vored, they are ready to pick.
If you plan to store apples or pears, however, you should harvest them be-fore they are fully ripe. In general, early-ripening apple and pear cultivars donot keep well. Their fruit should be eaten or preserved as soon as possible.
Always harvest with care. Handle fruit gently to avoid bruising it. For long-term storage, keep fruit in a refrigerated area or cold cellar. Store only fruitthat is in excellent condition and of the highest quality. Do not store dis-eased or damaged fruit.

43
Grapes
Grapes have the longest history of all the cultivated fruits and are among themost widely grown. The fruits are used to make juice, jellies, wine, and pies,and the leaves can be used in cooking. Grapes also are delicious eaten fresh,and their popularity has increased since the development of new seedlesstable grape cultivars for the Northeast and the Southeast.
Choosing CultivarsHome gardeners can choose from a wide variety of grape cultivars, eachdiffering in time of ripening, productivity, vigor, hardiness, fruit size, color,and flavor. The grapes most widely cultivated in the Northeast are derivedprimarily from Vitis labrusca and are referred to as American bunch grapes.The following cultivars of this species produce well in much of New YorkState:
• Concord—the primary cultivar grown in the Northeast and the stan-dard for hardiness.
• Niagara—the leading white grape cultivar, though it is not as hardyas Concord and is moderately susceptible to several grape diseases.
• Catawba—a late-ripening red cultivar that requires a favorable siteand a long growing season to reach full maturity.
• Delaware—one of the highest-quality American bunch grapes, bothfor eating fresh and for making white wine. It ripens two weeks be-fore Concord. The tender skin of the red berries, however, is subjectto cracking, and the leaves are susceptible to fungal diseases. It re-quires a deep, fertile, well-drained soil for satisfactory vine growth.
• Ontario—the best of the early-ripening American cultivars. It pro-duces white fruit. Vines are vigorous but not as hardy as those ofConcord.
Another grape species, Vitis vinifera, is native to southern Europe and recog-nized throughout the world for its wine quality. Chardonnay, Riesling,Cabernet Sauvignon, and Gewurztraminer are cultivars derived from V. vin-ifera. Unfortunately, these cultivars are extremely sensitive to cold tempera-tures. Some are grown successfully in the Northeast by taking special pre-cautions, such as burying the canes each fall and tying them back up to atrellis in the spring.
Choose disease-resistantcultivars that are hardyfor your site.
Make sure your site getsfull sun and has goodair drainage.
Prune vines annuallyduring the dormantseason, removing up to90 percent of newgrowth.
Keys for Success
Vinifera grapesare too sensitiveto cold to begrown in thecoldest areas ofthe Northeast.

44
Several cultivars have been derived from crosses between species. The mostimportant group is from crosses between V. vinifera and V. labrusca. TheseFrench-American hybrids produce good wines yet are much hardier thanthe V. vinifera parent.
Baco Noir and De Chaunac are very vigorous red wine grape hybrids, butthey require cluster thinning to keep plants from producing too much fruitand weakening the vines. Aurore is one of the best white-wine grape hy-brids for consistency of production, but the berries tend to split. Seyval, Vidal,and Cayuga (white), Marechal Foch (black), Cascade (blue), and Chancellor(red) are all excellent wine grape hybrids. Horizon is a high-yielding cultivarthat produces neutral white blending wine grapes, and it is relatively free ofdefects that affect its culture or use for wine.
Seedless grapes for fresh consumption can be grown throughout the coun-try, but the cultural practices used to grow them are different from those forthe other three groups. See “Seedless Table Grapes,” page 52.
For more information on cultivar selection, see “Wine and Juice Grape Va-rieties for Cool Climates” at www.nysaes.cornell.edu/hort/faculty/reisch/bulletin/wine/index.html.
Purchasing or Propagating VinesPurchase grapevines from a reputable nursery. Place orders early to ensurethat the desired cultivars will be available. Request that the grapevines arrivein early spring, and plant as soon as possible after they arrive.
An alternative to purchasing vines is to propagate vines from cuttings of aknown variety. (It is illegal to propagate vines that are patented.) Makingyour own cuttings is inexpensive, requires no special equipment, and is usu-ally successful. Most grape cultivars root readily from dormant hardwoodcuttings.
First, choose healthy plants of moderate vigor growing in sunny areas tosupply cutting stock. Take cuttings (no more than one or two per plant)anytime from late fall after the leaves have dropped to early spring before
Figure 15. You can propagate yourown grape vines by making cut-tings from dormant one-year-oldcanes.
Basal endBud
Tip end

45
buds swell. Select one-year-old canes that are 1/4 to 1/3 inch in diameter (seeFigure 15).
Cut the bottom of the cane at a 45 degree angle just below a bud or node,and make an upper cut 1 inch above a bud. Each cutting should have aboutthree buds. Place cuttings in damp peat moss, seal in a plastic bag, and storeat 30 to 40 degrees F in a root cellar, refrigerator, or hole in the ground untilthe spring. If stored in the ground, place mulch over the top to maintainuniformly cold temperatures.
When planting in the spring, be sure to position the end of the cutting thatwas closest to the trunk in the ground and the end of the cutting that wasnearest the tip above ground. If planted in well-prepared soil, roots will formfrom the bottom of the cutting.
Site SelectionA favorable site and climate is essential for successful grape growing. Spe-cific requirements include
• full sun.
• good air drainage.
• a 150-day frost-free growing season.
• minimum winter temperatures above –25 degrees F (USDAHardiness Zone 4b or warmer).
• 2,000 growing degree days above 50 degrees F (see www.hort.cornell.edu/gardening/weather/ for more information on growing degreedays).
• soil that is neither excessively wet nor droughty.
Southern slopes or exposures protected by buildings or windbreaks are pref-erable to northern slopes and low ground, which tend to be cooler through-out the growing season and delay fruit ripening. Grapes tolerate a wide rangeof soil types and are not as sensitive to extremes in drainage as other fruitcrops. Still, they are most successfully grown on deep, well-drained sandyloams.
It’s important to choose cultivars that are well-matched to your site. Youcan grow grapes just about anywhere in New York, but not all varieties willsurvive (much less thrive) in every location. If you are in Zone 4 or Zone 5,be sure to carefully check nursery catalog information about hardiness.Cultivars vary in their susceptibility to winter injury. Temperatures below–15 degrees F can cause winter injury to all but the hardiest cultivars (seeTable 4).
Grapes toleratea wider varietyof soils thanmost otherfruits.
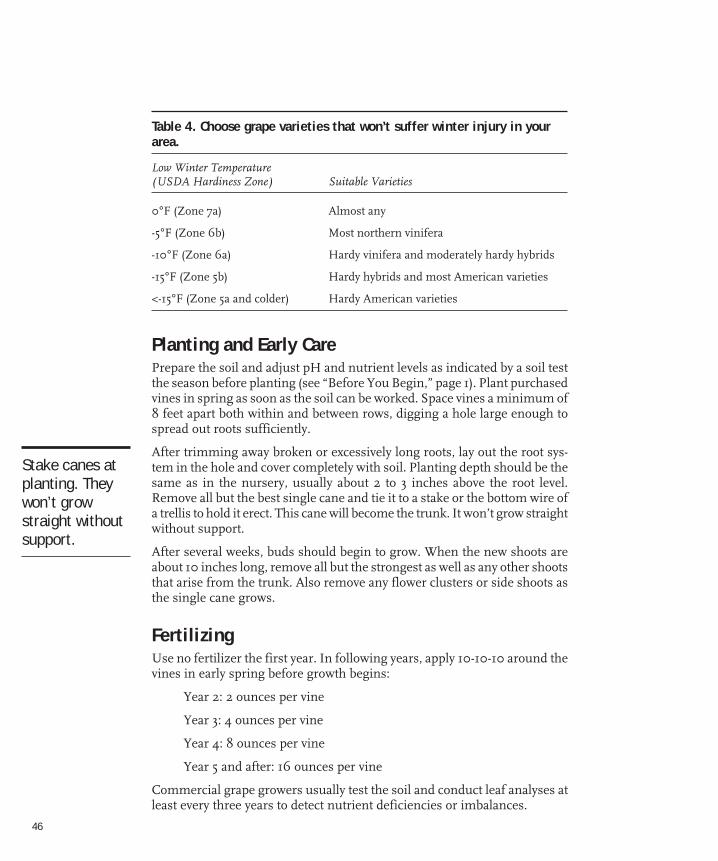
46
Planting and Early CarePrepare the soil and adjust pH and nutrient levels as indicated by a soil testthe season before planting (see “Before You Begin,” page 1). Plant purchasedvines in spring as soon as the soil can be worked. Space vines a minimum of8 feet apart both within and between rows, digging a hole large enough tospread out roots sufficiently.
After trimming away broken or excessively long roots, lay out the root sys-tem in the hole and cover completely with soil. Planting depth should be thesame as in the nursery, usually about 2 to 3 inches above the root level.Remove all but the best single cane and tie it to a stake or the bottom wire ofa trellis to hold it erect. This cane will become the trunk. It won’t grow straightwithout support.
After several weeks, buds should begin to grow. When the new shoots areabout 10 inches long, remove all but the strongest as well as any other shootsthat arise from the trunk. Also remove any flower clusters or side shoots asthe single cane grows.
FertilizingUse no fertilizer the first year. In following years, apply 10-10-10 around thevines in early spring before growth begins:
Year 2: 2 ounces per vine
Year 3: 4 ounces per vine
Year 4: 8 ounces per vine
Year 5 and after: 16 ounces per vine
Commercial grape growers usually test the soil and conduct leaf analyses atleast every three years to detect nutrient deficiencies or imbalances.
Table 4. Choose grape varieties that won’t suffer winter injury in yourarea.
Low Winter Temperature(USDA Hardiness Zone) Suitable Varieties
0°F (Zone 7a) Almost any
-5°F (Zone 6b) Most northern vinifera
-10°F (Zone 6a) Hardy vinifera and moderately hardy hybrids
-15°F (Zone 5b) Hardy hybrids and most American varieties
<-15°F (Zone 5a and colder) Hardy American varieties
Stake canes atplanting. Theywon’t growstraight withoutsupport.
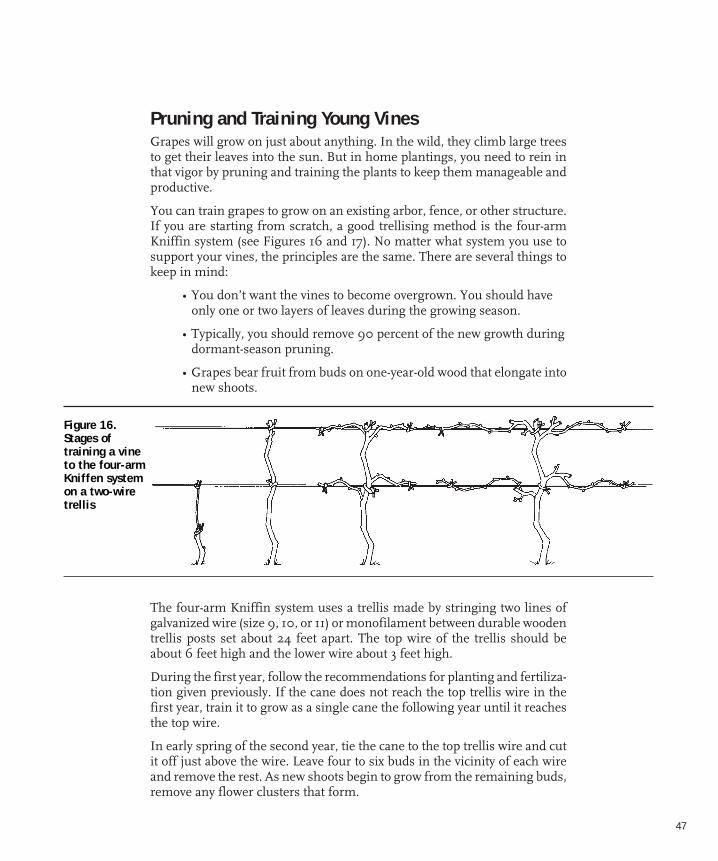
47
Pruning and Training Young VinesGrapes will grow on just about anything. In the wild, they climb large treesto get their leaves into the sun. But in home plantings, you need to rein inthat vigor by pruning and training the plants to keep them manageable andproductive.
You can train grapes to grow on an existing arbor, fence, or other structure.If you are starting from scratch, a good trellising method is the four-armKniffin system (see Figures 16 and 17). No matter what system you use tosupport your vines, the principles are the same. There are several things tokeep in mind:
• You don’t want the vines to become overgrown. You should haveonly one or two layers of leaves during the growing season.
• Typically, you should remove 90 percent of the new growth duringdormant-season pruning.
• Grapes bear fruit from buds on one-year-old wood that elongate intonew shoots.
The four-arm Kniffin system uses a trellis made by stringing two lines ofgalvanized wire (size 9, 10, or 11) or monofilament between durable woodentrellis posts set about 24 feet apart. The top wire of the trellis should beabout 6 feet high and the lower wire about 3 feet high.
During the first year, follow the recommendations for planting and fertiliza-tion given previously. If the cane does not reach the top trellis wire in thefirst year, train it to grow as a single cane the following year until it reachesthe top wire.
In early spring of the second year, tie the cane to the top trellis wire and cutit off just above the wire. Leave four to six buds in the vicinity of each wireand remove the rest. As new shoots begin to grow from the remaining buds,remove any flower clusters that form.
Figure 16.Stages oftraining a vineto the four-armKniffen systemon a two-wiretrellis

48
In early spring of the third year before growth starts, select four canes nearthe top wire and four canes near the bottom wire. Remove the rest. Tie onecane going in each direction on both wires. Allow these four arms to fruit upto the sixth bud along the arm. Cut the other four canes back to a stub con-taining two buds. These stubs are the “renewal spurs,” which will producefruiting canes next season.
Pruning Mature VinesIn early spring, remove the fruiting canes from the previous year. Tie one ofthe two canes from the renewal spur to the trellis wire and cut after the 10thbud. Cut the remaining cane to two buds for next year’s renewal spur.
Continue this pattern of choosing fruiting canes and renewal spurs eachseason, adjusting the number of buds on each fruiting arm. Too many budsresults in poor fruit quality and vegetative growth. A shortage of buds re-duces the crop.
Grape buds vary greatly in fruitfulness. The most productive buds form atthe top of the trellis where the shoots of the previous season were exposed tothe most light. The distance between leaves should be about 6 inches, andthe diameter of the cane between the leaves should be 1/4 inch or more.
Figure 17. Prune grapevines hard duringthe dormant season. Often, you need toremove 90 percent of the new growth.
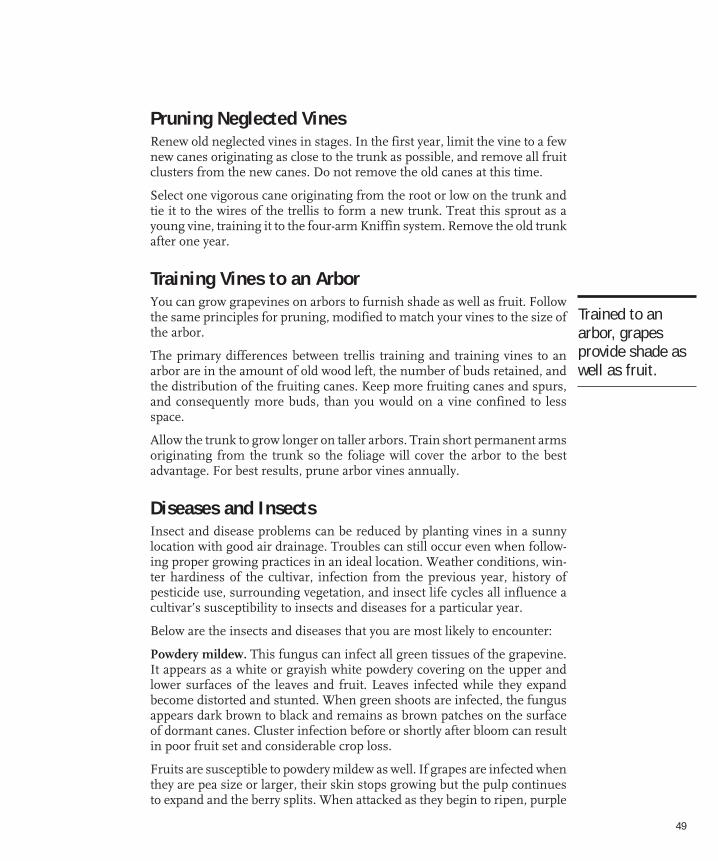
49
Pruning Neglected VinesRenew old neglected vines in stages. In the first year, limit the vine to a fewnew canes originating as close to the trunk as possible, and remove all fruitclusters from the new canes. Do not remove the old canes at this time.
Select one vigorous cane originating from the root or low on the trunk andtie it to the wires of the trellis to form a new trunk. Treat this sprout as ayoung vine, training it to the four-arm Kniffin system. Remove the old trunkafter one year.
Training Vines to an ArborYou can grow grapevines on arbors to furnish shade as well as fruit. Followthe same principles for pruning, modified to match your vines to the size ofthe arbor.
The primary differences between trellis training and training vines to anarbor are in the amount of old wood left, the number of buds retained, andthe distribution of the fruiting canes. Keep more fruiting canes and spurs,and consequently more buds, than you would on a vine confined to lessspace.
Allow the trunk to grow longer on taller arbors. Train short permanent armsoriginating from the trunk so the foliage will cover the arbor to the bestadvantage. For best results, prune arbor vines annually.
Diseases and InsectsInsect and disease problems can be reduced by planting vines in a sunnylocation with good air drainage. Troubles can still occur even when follow-ing proper growing practices in an ideal location. Weather conditions, win-ter hardiness of the cultivar, infection from the previous year, history ofpesticide use, surrounding vegetation, and insect life cycles all influence acultivar’s susceptibility to insects and diseases for a particular year.
Below are the insects and diseases that you are most likely to encounter:
Powdery mildew. This fungus can infect all green tissues of the grapevine.It appears as a white or grayish white powdery covering on the upper andlower surfaces of the leaves and fruit. Leaves infected while they expandbecome distorted and stunted. When green shoots are infected, the fungusappears dark brown to black and remains as brown patches on the surfaceof dormant canes. Cluster infection before or shortly after bloom can resultin poor fruit set and considerable crop loss.
Fruits are susceptible to powdery mildew as well. If grapes are infected whenthey are pea size or larger, their skin stops growing but the pulp continuesto expand and the berry splits. When attacked as they begin to ripen, purple
Trained to anarbor, grapesprovide shade aswell as fruit.

50
or red cultivars fail to color properly and look blotchy at harvest. High rela-tive humidity promotes infection. Infected shoots should be pruned anddestroyed. Good winter pruning increases air circulation and reduces thechances of heavy infection.
Susceptible cultivars include Aurore, Chancellor, Chardonnay, Delaware,Einset, Niagara, Riesling, and Cabernet Sauvignon. Less susceptible culti-vars include Canadice, Cayuga, Ives, and Steuben.
Black rot. This fungal disease can cause complete crop loss in warm, humidclimates. All green tissues can be infected. Leaves are susceptible for aboutone week after they unfold. When infected, they develop brown circular le-sions, and within a few days black spherical spore-producing bodies formwithin the lesions. Leaf stem infection causes the leaves to wilt. Shoots dis-play large, black elliptical lesions, weakening them and making them easilybroken by wind. Berries are susceptible from bloom until they begin to ripen,and fruit infection can result in substantial loss. An infected berry first ap-pears light brown, and then black spore-producing bodies develop on itssurface. Later, the berries shrivel and turn hard and black to become so-called mummies.
Warm, humid, or wet weather encourages the spread of black rot. Preven-tive measures include proper site selection and row orientation to maximizegood air drainage. Proper pruning, to open up the canopy to improve aircirculation and spray coverage, and spring cultivation of mummies are alsobeneficial. American cultivars and their hybrids vary widely in their suscep-tibility to disease. Susceptible cultivars include Concord, Dutchess, Niagara,Riesling, Seyval, Aurore, Catawba, Canadice, and Cabernet Sauvignon. Lesssusceptible cultivars include Cayuga, Chancellor, Elvira, Foch, Fredonia, Ives,and Remaily.
Downy mildew. This fungus can infect all green, actively growing parts ofthe vine. Leaves develop yellowish green lesions on their upper surfaces 7 to12 days after infection. As lesions expand, the affected areas become brown,withered, or mottled. A white “downy” fungus grows on the lower leaf sur-face within the borders of the lesion. Severely infected leaves curl and dropfrom the vine. The disease attacks older leaves in late summer and autumn,producing a mosaic of small, angular yellow to red-brown spots on the up-per leaf surface. When young shoots, leaf stems, tendrils, or cluster stemsare infected, they frequently become distorted, thickened, or curled with awhite downy appearance. Eventually, severely infected portions wither, turnbrown, and die. Infected green grapes turn light brown to purple, shrivel,and detach easily. White cottony spores are abundant on these berries dur-ing humid weather.
In general, Catawba, Chancellor, Chardonnay, Delaware, Fredonia, Ives,Niagara, White Riesling, and Rougeon are susceptible to downy mildew.Canadice, Cascade, Concord, Himrod, Remaily, and Steuben are less sus-

51
ceptible. Watch for this disease in warm, humid weather, and follow thecultural practices recommended for controlling black rot.
Botrytis. This fungus causes blight infection and bunch rot of grapes. Blightinfection begins on the leaves as a dull green spot (commonly surroundinga vein) that rapidly becomes a brown, withered lesion. The fungus also causesblossom blight or shoot blight, resulting in significant crop losses if notcontrolled. It can grow on dead blossom parts in the cluster and then, beforegrapes begin to ripen, move from berry to berry within the bunch, initiatingthe early development of sour rot. Botrytis occurs most commonly on ripen-ing berries, where infection and rot spread rapidly throughout the clusters.The berries of white cultivars become brown and shriveled, and those ofpurple cultivars develop a reddish color. Under proper weather conditions,the fungus produces a fluffy, grayish brown growth.
The fungus readily colonizes tissue injured by hail, wind, birds, or insects.Fog or dew and temperatures of about 60 to 80 degrees F are ideal for sporeproduction. Rainfall is not required for disease development. Again, goodcultural practices assist in controlling this disease. Aurore, Chardonnay,Elvira, and Riesling are susceptible cultivars.
Japanese beetles. Most gardeners will experience Japanese beetle damageon grapevines nearly every year. Fortunately, vines can tolerate a large amountof feeding before fruit quality or yields are reduced. But if populations arehigh enough, beetles can defoliate a grapevine in just a few days. Checkvines daily once beetles appear. Most gardeners either pick the beetles offthe vines and kill them or treat the vines with an insecticide.
Grape berry moth. Not frequently a problem, these small, inconspicuousbrown moths lay eggs singly on buds, stems, or newly formed berries inearly spring. Later, the moth usually deposits eggs directly on the grapes.The newly hatched larvae feed on tender stems, blossom buds, and berries,often inside protective silk webbings that can surround the entire cluster.When grapes are about 1/8 inch in diameter, the larvae burrow into them,creating sites for infection by fungi and attack by fruit flies. Infestations varygreatly from year to year and even within a vineyard.
With light infestations, remove injured berries by hand and destroy them(do not discard them on the ground because insects may continue to de-velop). You can control the moths somewhat by gathering the infected leavesin the fall and destroying them.
Grape cane girdler. Adults are small, shiny black weevils. In May the femalehollows out a small cavity in a shoot and deposits a single egg into it. Shethen girdles the cane just below and several inches above the egg cavity. Theshoot either breaks off at the girdled point or dies back to the first nodebelow the egg cavity and drops to the ground. The girdling by the femalecauses the terminal growth of new shoots to bend over above the upper

52
girdle and blacken, shrivel, and drop to the ground. Later the whole infestedshoot dies back to the lower girdle and falls from the vine. Vines “pruned”by the grape cane girdler have a ragged appearance, suggesting serious in-jury to the plant. But the actual damage is usually minor. Girdling of theterminal growth has little or no effect on the crop unless fruit-producingnodes are close to the attacked shoot tips
Grape leafhoppers. Populations of these insects fluctuate widely from placeto place and year to year. Adults begin feeding in May on grapes and otherplants such as strawberries, raspberries, and several woody plants. In June,they lay eggs singly, just beneath the underside of the leaf, producing a slightblister. Nymphs appear in late June and reach the adult stage by late July.Adults and immature leafhoppers feed on the undersides of leaves, suckingout the leaves’ juices. Feeding is limited initially to the lower leaves. Thetissue surrounding the feeding puncture turns pale white and eventuallydies. Plant injury shows up first along the veins, but later the whole leaf isaffected. Heavy feeding by leafhoppers causes premature leaf drop and low-ered sugar content, increased acidity, and poor fruit color. Ripening fruit isoften smutted or stained by the sticky excrement of the leafhoppers.
Cold, wet weather in the spring and fall decreases leafhopper populations,as do wet winters. Fall cultivation and cleaning up adjacent weedy land elimi-nate favorable overwintering sites in and near a vineyard.
HarvestHarvest grapes only after they are fully ripe. The sugar content of grapesdoes not increase after they are picked. Often grapes have good size andcolor one week before the sugar content is sufficiently high. After the sugarcontent has peaked, quality deteriorates rapidly.
Yields depend on the cultivar, the weather, the vigor of the vine, and yourmanagement. By the third year, you can expect each vine to produce 5 to 10pounds of fruit.
Grapes harvested in the best condition will store longest. Handle clusterswith care and remove any discolored, injured, or undesirable berries. Coolthem as soon as they are picked. Storing them in a refrigerator with thetemperature set around 35 degrees F is preferable to a cellar or other coolplace where temperatures fluctuate. Wrap grapes loosely in plastic materialto prevent excessive moisture loss.
Seedless Table GrapesSeedless grape cultivars suitable for the Northeast are a relatively recent de-velopment. They are more challenging to grow in home plantings than othercultivars and require different practices. While moderately hardy, they may
Pick grapes onlyafter they arefully ripe, abouta week after theyreach full sizeand color.

53
not perform well in colder sites. Even though they are less than perfect,their flavor far exceeds that of Thompson or Flame seedless grapes from theWest Coast.
Seedless cultivars suitable for the Northeast include:
• Canadice—a hardy, productive, and popular vine, but berry size issmall and bunch rot is often a problem.
• Himrod—a vigorous vine that has moderate resistance to disease,responds well to cultural practices, and produces a good white grape.
• Einset—a grape with excellent storage qualities, productivity, flavor,and hardiness, although some people do not like its thicker skin.
• Vanessa and Reliance—high-quality grapes, but with thin skins thatare susceptible to cracking and diseases.
Growing top-quality seedless grapes involves many time-consuming steps.Commercial growers spray gibberellic acid and use special tools to girdletrunks or individual fruiting canes to improve berry set and increase berrysize. They also increase berry size by thinning individual berries from eachcluster and thinning clusters before and after bloom.
Home gardeners can grow seedless grapes without using all these commer-cial practices. The grapes will be just as flavorful but smaller than thosefound in the supermarket.
A common system for training seedless grapes uses cross-arms on trellisposts up to 42 inches wide. Wires in the middle of the cross-arms supportfruit canes. Catch wires at the ends of the cross-arms support the shoots.The wires position the fruit for easy harvest.
Because seedless grapes tend to be large, they attract birds as well as rac-coons. Diseases and insects also can cause more problems than with othervarieties.
Homegrownseedless grapesare smaller butusually are moreflavorful thanstore-boughtgrapes.

53

54
Because they bear early and are relatively easy to grow, strawberries are agreat crop for you to start with in your home fruit planting. Strawberries arethe most widely grown fruit crop in the world. They can flourish from tropi-cal highlands to subarctic regions. The plants are hardy throughout NewYork State (if managed and mulched correctly) and can tolerate a wide rangeof soil types. Strawberries provide more vitamin C than oranges and havefewer calories than most other fruits (see Table 1, page 1).
Day-neutral cultivars, which bear fruit from June through October in theNortheast, are now available (see the section “Day-Neutral Strawberries” start-ing on page 62). The section below discusses traditional “June-bearing” cul-tivars that fruit in June and July.
Choosing CultivarsYou can find June-bearing cultivars adapted to northern climates in manynursery catalogs. Some cultivars perform better than others, but it is diffi-cult to predict which will grow best in a particular garden.
Cultivars differ in flavor, disease resistance, cold tolerance, when they ripen,and suitability for frozen storage. Perhaps the best way to decide which cul-tivars to grow is to find out what works well for your neighbors or localcommercial growers. Then try several promising cultivars before planting alarge area.
June-bearing strawberry cultivars are reliably winter hardy throughout NewYork (as cold as USDA Hardiness Zone 3), provided they are properly man-aged and mulched. Some cultivars that perform well include:
• Earliglow—perhaps the best-flavored cultivar, it is among the earli-est to ripen.
• Northeaster—ripens about the same time as Earliglow. It is resistantto red stele and does well on heavier clay soils. The berries are largeand have a hint of grape flavor, which some people love and othersdislike.
• Sable—has excellent flavor and also ripens early.
• Allstar—a reliable producer with large light red to orange, sweet-flavored berries.
• Honeoye, Cavendish, Kent, Raritan, Redchief, and Scott—goodmidseason strawberries.
Strawberries
Choose a site with fullsun, good drainage, anda pH between 5.5 and7.0. Begin improvingthe soil the year beforeplanting, especially ifthe pH needs adjusting.
Plant in early spring insoil where no strawber-ries, brambles, or cropsin the tomato family(including potatoes,peppers, and eggplants)have been grown forseveral years.
Strawberries are shallowrooted. Keep plants wellwatered, especially justafter planting.
Do a good job of earlyweed control during theestablishment year toprevent problems later.
If using the matted-rowsystem, pluck flowersthe first year to encour-age runners to fill outa 12- to 15-inch-widestrip, but don’t letplants get too crowded.
Keys for Success

55
Cover plants with mulchwhen nighttime tem-peratures approach 20degrees F. In earlyspring, rake mulch offthe plants into thespace between therows.
To get good productionand a long-lived plant-ing, renovate the plant-ing by mowing it afterharvest.
When the plantingstarts to decline, gener-ally after about thethird year of fruiting,start a new plantingwith virus-indexedplants purchased from areliable nursery.
Keys for Success• Jewel—the most widely grown variety in the Northeast, it has excel-lent flavor. It is productive and maintains a large fruit size through-out the season.
• Lateglow—a reliable late-season cultivar.
All these cultivars are cold hardy, yield well, and produce firm fruit withgood freezing quality. Allstar, Cavendish, and Jewel produce exceptionallylarge fruits.
Buying PlantsPurchase dormant, virus-indexed plants from a reliable nursery. (For anupdated list of nurseries, see www.hort.cornell.edu/nursery.) Nurseries usu-ally sell plants in bundles of 25. Ask that they be shipped in late April orearly May.
When plants arrive, check them for signs of winter injury, mold, and rootrot. Plants showing signs of winter injury—a brown- or orange-colored in-ternal crown—are likely to die if the weather quickly turns hot and dry afterplanting. A heavy mold on roots and crowns indicates that they weren’t storedproperly. If plants are moldy, discard them. Store healthy plants in a refrig-erator until you are ready to plant.
Site SelectionStrawberries grow best in a sunny location with deep, well-drained sandyloam soil with a pH of approximately 6.2. The plants do not tolerate ex-tremes in pH, either below 5.5 or above 7.0. Determine pH by testing thesoil, and follow recommendations to adjust the pH accordingly a year be-fore planting. (Contact your county’s Cornell Cooperative Extension officefor more soil test information. See www.cce.cornell.edu/local_offices.cfm.)Lime and other soil amendments that are used to adjust pH require at leasttwo months of warm weather to work, so don’t wait until the fall beforeplanting to apply them.
Plants can be productive over a broad range of soil types, but avoid extremes.Heavy clay soils retain moisture but are often poorly drained, while sandysoils drain well but require irrigation. Add organic matter to sandy or claysoils to reduce those shortcomings.
Adequate drainage is essential for healthy strawberries. If your site is poorlydrained, plant on ridges or in raised beds. Strawberry plants are shallowrooted and benefit from irrigation. Consider using irrigation to prevent yieldreductions caused by drought, particularly on raised beds, which can dry outquickly. Drip irrigation works well for home gardens.

56
Do not plant strawberries in an area where they were recently grown. Alsoavoid planting them where crops in the tomato family (Solanaceae, includ-ing eggplants, potatoes, and peppers) have been grown.
Before planting, find out about the soil and its history. It may harbor trouble-some pests, particularly perennial weeds or weed seeds, insects, soilbornediseases, or nematodes. Control insects that reduce strawberry yields, suchas white grubs, strawberry root weevils, and European chafers, by growing acrop other than strawberries for a year before planting.
In soils where the fungi causing red stele and verticillium wilt are known tobe present, plant only resistant cultivars. Northeaster, Allstar, Cavendish,Redchief, Scott, and Lateglow are resistant to both red stele and verticilliumwilt. Honeoye, Kent, Raritan, and Jewel are susceptible to these twodiseases.
Growing MethodsThere are several different systems that you can use to grow strawberries.You should decide which is best for you before ordering plants.
The matted-row system is the easiest to maintain. Set plants 12 to 24 inchesapart in rows that are 48 inches apart. Pluck off the flowers the first seasonto encourage vegetative growth. The plants will produce side stems withdaughter plants called runners. Ideally, you want about six to eight runnersper plant. Your goal is for the runners to fill out a strip about 12 to 15 incheswide (18 inches at the most). If you set the plants closer than 12 inches atplanting, you’ll have too many runners and the planting will be too crowded.You’ll have to either spend more time thinning the plants or settle for loweryields from the overcrowded plants and possibly more risk of disease.
Harvest fruit from these 12- to 15-inch-wide rows in subsequent years. Theplanting will be most productive on the edges. Rows any wider are harder toweed and harvest, and the plants are at greater risk of disease.
Use a rototiller or hoe to remove plants that stray into the area between therows. Within the rows, you want to keep the soil covered with plants, butyou don’t want them to be too crowded—no less than about 6 inches apart.Clip off runners to keep the plants from getting too crowded. Clipping run-ners is hard work, but it increases fruit size, decreases rotting, and makesharvest easier.
With most plantings, you can expect about three years of harvests before thestand declines seriously. As the planting ages, weeds will become more dif-ficult to control, and diseases often become more of a problem. At somepoint, you’ll want to start over at a new location. You may be tempted to userunners from your existing planting. But it’s usually best to purchase new,disease-free planting stock. Otherwise, you will just move any disease prob-lems right into your new planting.
Keep topsoilcovered withplants, but avoidovercrowding.

57
The ribbon-row system is more labor intensive and requires purchasing moreplants, but it produces fruit the first year. Space the plants just 4 inchesapart in rows 36 inches apart. Do not remove flowers, and clip all runners.Plants managed this way are very productive and produce large berries. Con-tinue harvesting berries for about three years or until productivity declines.
Planting and Early CareNo matter which planting system you use, plant strawberries as soon aspossible in the spring (fall planting is not recommended in the Northeast).Prepare soil the season before planting to speed soil warming and mini-mize the need to work the ground before planting. If the soil is still frozenwhen your plants arrive, refrigerate them until the ground has thawed.
Avoid exposing the plants to sun and wind. Cool, cloudy weather is ideal forplanting. Dig a hole large enough so that the roots can extend vertically,then cover the plants with soil to just below the crown (see Figure 18). Donot bury the crowns. You may need to cut the roots back to 4 inches beforeplanting to avoid J-shaped root systems. During the first few weeks afterplanting, make sure the plants have adequate water.
Figure 18. When setting out strawberryplants, do not bury the crown (a) or leaveroots exposed (c). The correct planting depthis indicated (b). You may need to trim rootsback to about 4 inches (d). a
bc
d
Several weeks after planting, the plants will begin to flower from buds formedwithin the crown the preceding fall. If you are using the matted-row system,remove these flowers to prevent fruiting and encourage runners. Berries onfirst-year plants rob the plants of energy necessary for growth, runner pro-duction, and winter survival. Although some strawberry cultivars produceonly one flower cluster per plant, others produce several sets, so you mayneed to check the planting and remove flowers several times.
About six weeks after planting, apply 2 pounds of 10-10-10 fertilizer per 100linear feet of row. Apply another 2 pounds in early September before flower
Plant straw-berries in earlyspring.

58
buds form. Sprinkle the fertilizer evenly over the row area, and try to avoidcontact with the foliage. Don’t work the fertilizer into the soil, or you maydamage the shallow roots.
Managing Your PlantingWatering. Because of their shallow root systems, keeping strawberries wellwatered is extremely important. There is a tendency to overfertilize straw-berries when actually a lack of water is holding back yields.
Strawberry plants need about 1 inch of water each week, either by rainfall orirrigation. Avoid watering in the very early morning or late evening so theplants are not wet for long periods.
When overnight frost threatens blooming plants, cover them with row cov-ers or use sprinklers to deliver a fine mist over the planting. Ice that formson the plants actually prevents the flowers from freezing. Apply the mistcontinually from the time the temperature falls below 34 degrees F until theice melts in the morning.
Weed control. Remove weeds by cultivation, hand hoeing, or pulling. Themost important time to keep the strawberry planting weed-free is the firstfew months after planting while the plants are sending out runners andnew plants are getting established. Do a good job of soil preparation andweeding early and you will have fewer weed problems later. Few herbicideoptions are available to home gardeners. Consult your local Cornell Coop-erative Extension office for specific recommendations.
Mulching. In the fall cover your strawberry plants with mulch to preventinjury from low temperatures. Mulching is particularly important on claysoils or those that remain wet for much of the year. Clean straw is tradition-ally the mulch of choice (avoid mulches that might contain weed seeds, suchas hay). Apply mulch when nighttime temperatures approach 20 degrees F,covering the plants 2 inches deep.
Remove the mulch in early spring—around the end of March to mid-April,after the threat of severely cold weather has passed. Strawberries are ever-green. The plants that have overwintered will have green leaves, and theywill begin photosynthesizing when you remove the mulch and expose themto the sun. Place the mulch between the rows to help smother weeds and tokeep mud from splashing onto the fruit.
If you remove mulch early, you can cover plants with a floating row cover toprovide additional protection and encourage early growth. Plants will flowerand set fruit earlier. But use caution in areas prone to late spring frosts thatcould kill the flower buds. (If you lose the first flowers to frost, fruits fromlater flowers usually compensate.) Remove row covers before flowers ap-pear so that insects can pollinate them. This also reduces the chance of Botrytisfungus causing fruit rot.
Don’toverfertilize orunderwater yourstrawberries.

59
In the Northeast strawberries typically flower in May and produce fruit inearly June through early July (depending on the cultivar and weather). Watchthe flowers for signs of insect damage, particularly by tarnished plant bugs.Fruits ripen about 30 days after the flowers open.
Renovation and fertilization. Renovate your strawberries immediately afterharvesting to help reduce disease, stimulate vigorous new growth, and pro-long the life of your planting. Mow or clip the plants to a height of 3 inches.If you can, collect your clippings in the mower bag or rake them off andremove them to the compost pile to help reduce disease.
Rototill the area between the rows to incorporate the mulch. While you aretilling, reduce the width of matted rows to about 12 inches. Rake or hoe soilfrom the alleyways to cover the plants left in the row to about 1 inch deep.
While renovating, fertilize at a rate of 5 pounds of 10-10-10 fertilizer per 100feet of row. Never fertilize with nitrogen before harvest because this increasesfruit mold. (The one exception is fertilizing at planting, but you remove flow-ers during the planting season when you use the matted-row system so thereis no harvest that year.) For more efficient fertilizer use, apply about two-thirds of that rate at renovation and one-third in September.
Diseases and PestsMany insects feed on unripened fruit and young vegetative growth, and sev-eral diseases render the berries inedible or attack the roots. Whenever pos-sible, select disease-resistant cultivars and virus-free plants. For assistancein diagnosing problems with strawberries and other berry crops, seewww.hort.cornell.edu/diagnostic.
Botrytis fruit rot (gray mold). This disease is the most common and seriousfungal disease of strawberry plants. It affects the flower petals, flower stalks,fruit caps, and fruit, and it is most prevalent during prolonged rainy andcloudy periods just before or during harvest. Blossoms are very susceptibleand often turn brown and dry into their stems. Blossom infection leads tofruit infection, which begins as soft, light-brown areas that enlarge rapidly.In later stages, a gray dust of spores covers the fruit as it shrivels and mum-mifies. Handling diseased fruit while picking spreads the fungus to healthyberries. Under conditions favorable for disease development, healthy-look-ing fruit can rot within two days of picking.
To prevent botrytis fruit rot, practice good weed control and provide adequatenutrition. In particular, be sure that calcium and potassium are sufficient,and do not overfertilize with nitrogen. Fungicides are most effective whenused during bloom.
Verticillium wilt. This fungal disease infects about 300 different host plants,including fruits, vegetables, woody ornamentals, flowers, and weeds. Once
After harvest, mowor clip plants to 3inches tall.
60
established in the soil, it infects plantings for many years. In new strawberryplantings, the first symptoms often appear about the time runners form.With older plants, symptoms appear just before the berries ripen. Symp-toms differ with cultivar susceptibility. Generally, the outer older leaves turnreddish or dark brown at the margins and between the veins. Then they wiltand drop. Few new leaves develop, and those that do emerge are stunted,wilted, and curled up along the midvein. Severe infections produce stuntedand flattened plants with small yellowish leaves. Many plants wilt and dierapidly. With less severe cases, occasional or scattered plants wilt and die.
To minimize verticillium wilt, always start with healthy plants, and do notplant them in low-lying wet areas. Always clean garden tools before use,particularly if they are borrowed, to prevent the spread of infection. Avoidplanting susceptible cultivars where other plants commonly infected by ver-ticillium wilt (tomatoes, potatoes, eggplants, peppers, brambles, or otherstrawberries) have been grown in the past several years.
Red stele. This fungal disease is commonly found in low-lying, poorly drainedareas of a strawberry planting. It can spread and become well distributedover an entire patch, especially during cool, wet springs. Infected plants arestunted, lose their shiny luster, and fail to send out runners. With the firsthot, dry weather of the season, diseased plants quickly wilt and die. To iden-tify the disease, dig up the plants and look at their roots. Infected plantsshow few new roots compared with healthy plants, whose roots are thickand bushy. Peel away the outer portion of the white roots and the centralpart (stele) appears pink to red or brownish red. Normally, the stele is yel-lowish white.
The best way to control red stele is to plant only resistant cultivars. When-ever possible, choose a well-drained site that has no history of red stele, andavoid planting in low-lying areas.
Leather rot. This disease infects primarily fruit at any stage of development,but it also can infect blossoms. It is common in poorly drained areas orwhere berries are in direct contact with the soil. Leather rot first appears asa darkened spot on the berry, but as the infection spreads, the entire berrybecomes brown, leathery, and rough. Infected berries have a distinctivelyunpleasant smell and taste. To confirm the presence of leather rot, cutthrough several berries and look for a marked darkening. Unfortunately,mild infections that go unnoticed can ruin a batch of jam or jelly. To helpprevent leather rot, mulch early in the season to prevent the fruit from con-tacting the soil and avoid planting in wet sites.
Leaf diseases. Leaf spot and leaf scorch generally appear in early to mid-spring. Severe infections cause premature death of the leaves and reducefruit quality. The most obvious symptoms of leaf spot are small round purple

61
spots on the upper surface of the leaf. Leaf scorch is characterized by roundto angular dark purple spots that enlarge to resemble small drops of tar.Strawberry leaf diseases are most prevalent on old weak plants. To mini-mize their occurrence, remove old and infected leaves from runner plants.Choose a site with full sun, well-drained soil, and good air circulation. Con-trol weeds and fertilize to keep the plants in good condition.
Tarnished plant bugs. The brownish adults are about 1/4 inch long andmarked with yellowish and black spots. The nymphs suck plant juices andinject toxic substances that kill the surrounding tissues in the bud. Injuredberries remain small, have a woody texture, and fail to mature. “Button berry,”or seediness around the tip of the fruit, is a serious problem that occurswhen the bug punctures young fruits before they fully develop. Tarnishedplant bugs are more troublesome in fields bordered by woods and fencerows,where weeds are plentiful. They appear in the strawberry patch when plantsstart to bloom. To confirm their presence, hold a shallow white dish underthe leaves and blossoms of a strawberry plant and tap the flower clustersover the dish. If several small green nymphs fall into the dish, considerusing an insecticide to prevent the formation of nubby, inedible berries.
Strawberry bud weevil. This insect typically cuts buds and partially seversstems, resulting in the loss of blossoms. Injury is most likely to occur instrawberry patches near woodlots or other protected sites where the weevilsoverwinter. The dark reddish brown weevils leave these hiding places in thespring when temperatures approach 60 degrees F and infest plants havingearly fruit buds. Injury is often noticed before bloom and during blossom-ing. Late cultivars usually suffer the most damage.
Spittlebugs. Named for the mass of frothy material that covers their bodies,nymphs of this insect appear in April or May and complete development infive to eight weeks. The adults have sharp beaks that they use to pierce thestems of plants and suck their juices. Spittlebugs also attack flower budclusters, leaf stems, and new crown growth. Although heavy feeding byspittlebugs can stunt berry and plant growth, the problems are generallycosmetic. Infestations are usually not severe enough to warrant the use ofan insecticide.
Spider mites. These pests often go unnoticed because of their small size,but their damage is easy to see. As spider mites feed and deposit eggs on theundersides of leaves, plants lose their healthy green luster and become acoppery bronze color. Severe infestations weaken strawberry plants and in-terfere with sugar production and other normal processes. Mite life cyclesvary with the season and weather. They can reproduce continuously fromearly spring until late fall. In general, hot, dry weather (particularly in Julyand August) and high nitrogen fertilizer rates favor rapid population in-creases. Insecticides are not effective because technically the mite is not aninsect. Avoid overfertilization and keep the plants watered. Natural enemiesoften keep mites in check.

62
Slugs. Few creatures evoke as much frustration for gardeners as the com-mon slug. These mollusks (related to snails and shellfish) come in all sizesand leave slimy trails. As they feed at night or on dark, overcast days, theymake small, moderately deep holes in ripening berries. Slugs overwinter inprotected places beneath mulch. Various homemade traps, such as shallowpans of beer placed at ground level, and handpicking can reduce popula-tions. Several control products and baits are available.
Day-Neutral StrawberriesUnlike the common June-bearing strawberries discussed above, day-neu-tral strawberries flower and produce fruit anytime temperatures are between35 and 85 degrees F. Instead of a bumper crop in June and July, harvest isspread out through the summer to as late as October, and plants yield wellduring the planting year. Because they do not send out runners as profuselyas June bearers, you need to manage them differently.
Cultivar selection. The most successful day-neutral cultivars for the North-east are Tribute, Tristar, and Seascape. All three are far more productivethan older “everbearing” types such as Ozark Beauty. They produce small-to medium-sized fruit, topping out at about 1 inch in diameter. But theirflavor is excellent, particularly Tristar.
Tristar produces a large amount of fruit early in the planting year, but thelarger-fruited Tribute surpasses its production by the middle of September.Seascape, from California, has the largest fruit—nearly as big as June-bear-ing cultivars—and is the most productive of the three.
Figure 19. You can plant day-neutral strawberries in single rows (a), but stag-gered double rows (b) are more productive.
42” 42”4”
5”-9”10”-18”
a b
Instead ofproducing abumper crop inJune, day-neutralstrawberries canbe harvestedthrough fall.

63
Early care. Day-neutral strawberries prefer the same soil and sites as theirJune-bearing cousins. Plant them in the early spring, at the same time asJune-bearing strawberries. They also are ideal for growing as annuals incontainers. Day-neutral cultivars do not produce runners profusely, so mat-ted-row management is not practical. Instead, plant them closer together—about 5 to 9 inches apart—in rows about 42 inches apart. Remove runnersfor the entire first season. This will increase yield significantly without ex-cessive plant costs.
Planting day-neutral strawberries in a staggered double row reduces compe-tition between plants and increases yields (see Figure 19). Space plants 10 to18 inches apart, alternating them in two narrow rows just 8 inches apart.Space these staggered double rows 42 inches apart on center.
Day-neutral strawberries perform best when mulched with straw immedi-ately after planting. Mulch reduces drought stress and keeps fruit clean.Remove flowers for several weeks after planting so plants can become estab-lished without premature fruiting.
If the summer is hot and dry, little fruit will be produced in the fall becauseday-neutral strawberries are sensitive to extreme heat and have very shallowroot systems.
Watering. Because of these shallow root systems, keeping day-neutral straw-berries well-watered is even more important than it is with June-bearers.Make sure they get at least an inch of water per week from rain and/or irri-gation.
Fertilizing. During their first year, apply 1 to 2 pounds of ammonium ni-trate or 3 to 6 pounds of 10-10-10 per 100 feet of row at the beginning ofeach month from June through September. Thereafter, apply the sameamount at the beginning of each month from May through September. Bevery careful to sidedress the fertilizer and avoid contact with the leaves, es-pecially when they are damp and the weather is hot. Instead of monthlyapplications, you can use annual applications of slow-release fertilizer thatdeliver the same amount of nitrogen.
Flowering and fruiting. Day-neutral plants produce flowers from the timeof planting through frost in autumn. Fruits form from open flowers in about30 days. Because the flowering season is so long, flowers are more suscep-tible to insect attack than those of June-bearing strawberries.
Many growers till under their day-neutral strawberries at the end of the firstyear and start over with a new batch of plants the following spring. If youdecide to hold your plants over for another year, cover them with mulch, asyou would June-bearing strawberries. The following spring, they will pro-duce a crop in June, then another crop in August. They will not fruit as longinto the fall as the first-year planting.
Because oftheir shallowroot systems,day-neutral straw-berries needmore attentionto watering thanJune-bearers.

64
Weed control. Because they are always fruiting and there is no good time forrenovation, controlling weeds can be a challenge with day-neutral strawber-ries. These cultivars are also more sensitive to herbicides than June-bearingplants. Planting through black plastic mulch aids in weed control and warmsthe soil early. But this can hurt Tristar and Tribute cultivars in the summerbecause they are sensitive to heat. The best approach for home gardeners isto stay ahead of the weed problem. This can be done with light, frequenthand pulling, with light cultivation that avoids damaging shallow roots, andby mulching with straw.
Diseases and insects. Tarnished plant bugs are a major insect pest of day-neutral strawberries. They can be an even greater problem than they are onJune-bearing plants because their populations can soar during the summermonths when day-neutral cultivars are struggling to cope with the heat. Graymold also can be a severe problem with day-neutral cultivars, because thefungus accumulates during the growing season, especially if you do not har-vest berries regularly. (For more information, see the section “Diseases andPests” for June-bearing strawberries, page 59.)
HarvestFor maximum sweetness and flavor, pick June-bearing and day-neutral ber-ries a day or two after they are fully red. Berries picked before they are com-pletely red will eventually turn red, but they will not sweeten. Slightly unripefruit can be used for making jam. Under favorable conditions, expect a totalyield of about 1 quart of fruit per foot of matted row. Immediately removeberries that do not ripen because they harbor diseases and attract insects.
For long-term storage of fresh berries, select firm berries that are not yetfully ripe and cool them immediately after harvest. Store as close to 33 de-grees F as possible, but be sure the berries do not freeze. Their quality shouldremain acceptable for several days. Freezing sliced strawberries with sugarand then eating them months later is a great way to recall spring during thecold winter.
Control weedswith frequenthand weeding,light cultivation,and mulch.

65
Choose a sunny sitewith well-drained soil.Brambles need lots ofmoisture, but they willnot tolerate soggy soil.
Do not plant bramblesin a site where straw-berries or plants in thetomato family (includ-ing potatoes, peppers,and eggplants) havebeen grown.
Prepare the soil at leasta year before planting,particularly if pH andnutrient levels need tobe adjusted. Get weedsunder control beforeplanting.
Trellis the plants foreasier management andharvesting and to keepthe fruit from coming incontact with the groundand rotting.
Be prepared for annualor even twice-a-yearpruning. With mosttypes of brambles, you’llneed to thin the plantsto get a good harvest ofhigh-quality fruit.
Keys for Success
Brambles
Brambles—raspberries and blackberries—are perhaps the most diversegroup of cultivated fruits in the world. Hundreds of species grow through-out northern temperate regions. Because brambles grew wild and abundantlyacross North America, they have been cultivated only relatively recently.
The demand for processed raspberries increased in the early 1900s. In re-sponse, New York growers planted more than 10,000 acres. But a viral dis-ease decimated the industry. The development of methods to control thisdisease has fueled a resurgence in raspberry cultivation in the Northeast.
Choosing CultivarsYou can tell the difference between raspberries and blackberries when youpick the fruit. When you pick a blackberry, the white core (receptacle) comesoff with the fruit. When you pick a raspberry, the core remains attached tothe plant, leaving a hollow center in the fruit.
Blackberries can be either thorny or thornless. Raspberries can be red, black,purple, or yellow. Some red and yellow raspberries are called fall-bearing (orsometimes everbearing). They produce fruit in the fall on primocanes (first-year canes) and in the summer on floricanes (second-year canes).
Blackberries and red raspberries produce many suckers and spread later-ally. Black raspberries and purple raspberries generally stay confined to thearea of the original planting hole.
There are many bramble cultivars for home gardening (see Table 4). For anupdated list of nurseries, see www.hort.cornell.edu/nursery. Choose culti-vars that can withstand the winter temperatures in your area. Also considerproductivity, use, season of ripening, and fruit quality when making yourselections. If your location is prone to early fall frosts, fall-bearing cultivarsmay not be a good choice.
In general, raspberries produce crops reliably only in USDA Hardiness Zone5 and warmer regions up to Zone 7. The plants will survive in colder re-gions. But in most winters the aboveground canes (which produce the flow-ers and fruit) will be damaged, reducing that year’s crop sometimes to zero.
The intimidating thorns on blackberries discourage most people from grow-ing them. Thornless blackberry cultivars may seem like a good alternative,but they have limitations as well. They are susceptible to rodent damage, areonly marginally hardy in most of the Northeast, and need to be planted inprotected areas.
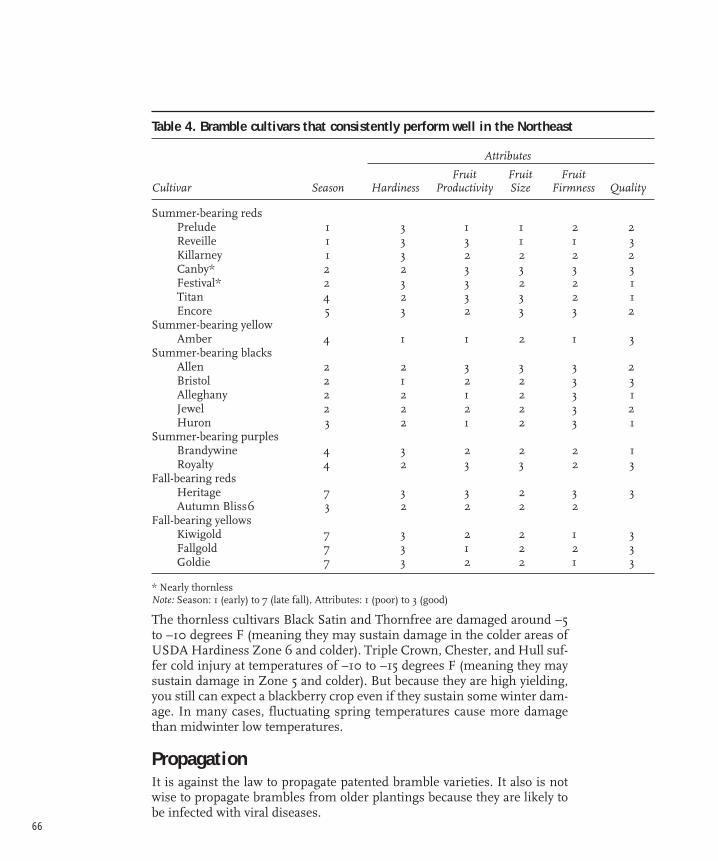
66
The thornless cultivars Black Satin and Thornfree are damaged around –5to –10 degrees F (meaning they may sustain damage in the colder areas ofUSDA Hardiness Zone 6 and colder). Triple Crown, Chester, and Hull suf-fer cold injury at temperatures of –10 to –15 degrees F (meaning they maysustain damage in Zone 5 and colder). But because they are high yielding,you still can expect a blackberry crop even if they sustain some winter dam-age. In many cases, fluctuating spring temperatures cause more damagethan midwinter low temperatures.
PropagationIt is against the law to propagate patented bramble varieties. It also is notwise to propagate brambles from older plantings because they are likely tobe infected with viral diseases.
Table 4. Bramble cultivars that consistently perform well in the Northeast
Attributes
Fruit Fruit FruitCultivar Season Hardiness Productivity Size Firmness Quality
Summer-bearing redsPrelude 1 3 1 1 2 2Reveille 1 3 3 1 1 3Killarney 1 3 2 2 2 2Canby* 2 2 3 3 3 3Festival* 2 3 3 2 2 1Titan 4 2 3 3 2 1Encore 5 3 2 3 3 2
Summer-bearing yellowAmber 4 1 1 2 1 3
Summer-bearing blacksAllen 2 2 3 3 3 2Bristol 2 1 2 2 3 3Alleghany 2 2 1 2 3 1Jewel 2 2 2 2 3 2Huron 3 2 1 2 3 1
Summer-bearing purplesBrandywine 4 3 2 2 2 1Royalty 4 2 3 3 2 3
Fall-bearing redsHeritage 7 3 3 2 3 3Autumn Bliss6 3 2 2 2 2
Fall-bearing yellowsKiwigold 7 3 2 2 1 3Fallgold 7 3 1 2 2 3Goldie 7 3 2 2 1 3
* Nearly thornlessNote: Season: 1 (early) to 7 (late fall), Attributes: 1 (poor) to 3 (good)

67
Nurseries traditionally propagate red and yellow raspberries by removingsuckers from the underground stems of virus-free plants. The suckers areharvested during the dormant season and referred to as one-year-old plantsin nursery catalogs. Often the suckers are transplanted in the nursery andgrown for an additional year. Then they are sold the following year and re-ferred to as transplants. Despite the extra year in the nursery, there is no realdifference in performance between one- and two-year-old plants when es-tablishing a planting.
Black raspberries and blackberries are propagated in late August by tip lay-ering. Tips of the current season’s canes are buried 2 to 4 inches deep in thesoil. The tips develop roots and form new plants before dormancy the sameyear. They are cut from the original plant before digging with about 6 inchesof the old cane left attached to the rooted tip.
Tissue culture is rapidly becoming the preferred technique for raspberrypropagation. Plants are cloned from tissues of virus-free stock in sterile sur-roundings. They are uniform and vigorous when planted in the field. Themain drawback of tissue-cultured plants is their initial sensitivity to herbi-cides and frost. You must take care not to plant them before the last frost inthe spring, and you should delay herbicide applications until plantings arewell established.
Site and Soil PreparationBrambles grow best on a sunny site in sandy loam soil with a pH between5.5 and 6.5. While they tolerate a broad range of soil types, the soil must bewell drained. Phytophthora root rot is a common cause of death in siteswhere there is excessive water, either on the soil surface or below. Excessivewater also can be troublesome during the winter when alternate freezingand thawing can heave plants from the soil.
For these reasons, do not plant brambles on sites where water accumulatesafter rainfall. If this is not possible, plant them on raised beds at least 10inches tall. Select a site somewhat higher than nearby land. This improvesdrainage and reduces the danger of cold injury and late spring frosts.
Adequate moisture during the growing season is essential for good canegrowth and fruit production, particularly during drought, so be sure to lo-cate plantings near a water source for irrigation.
Begin soil preparation at least a year before planting, especially if the pHneeds to be adjusted.
Wild brambles are the principal source of diseases, so choose a site as far aspossible from woodlots and old fields where wild brambles grow. If pos-sible, destroy any brambles growing nearby. A previously cultivated site isbest, but only if crops susceptible to verticillium wilt have not been grown
Brambles toleratea wide range ofsoils but not poordrainage.

68
there before. These include brambles, strawberries, tomatoes, potatoes, pep-pers, and eggplants. If you choose a new site, till the sod under and plant acover crop one year before planting.
PlantingSet plants 1 inch deeper than they were grown in the nursery and at least 30inches apart in rows 9 to 10 feet apart. Plant rooted canes in early spring andtissue culture plantlets after the danger of frost has passed.
Remove any old dead canes that are attached to the new living plant becausethey can be a source of disease. Do not fertilize at planting or for severalweeks after planting. Water liberally because brambles have shallow rootsystems.
CareBrambles are easily injured by too much fertilizer. Apply no more than 5pounds of 10-10-10 per 100 linear feet of row the first year and no more than10 pounds per 100 feet in subsequent years. Apply fertilizer only in the earlyspring before flowering. Sprinkle it evenly in about a 3-foot-wide band overthe row. Leave fertilizer on the soil surface because working it in could dam-age the plants’ shallow root systems. Avoid using fertilizers that containchlorides. For best results, test the soil every two to three years and followrecommendations based on the soil test.
Plants will likely need irrigation between bloom and harvest. Water themearly in the day, after they have dried from the morning dew. Plants thatremain wet during warm nights are more susceptible to disease.
Better yet, install a drip or trickle irrigation system to avoid wetting foliage.Drip tubes, tricklers, or emitters drip water continuously or intermittentlyinto the root zone around the plant so that the plant receives as much wateras it can use but no more. With this system, spaces between the rows re-main firm and dry, and the root zone remains moist at all times; very littlewater is lost from evaporation or wind drift. But you must monitor yoursystem carefully to make sure that the soil stays evenly moist and is notsaturated.
Commercial growers usually cultivate the area between rows from earlyspring to mid-July to control weeds and eliminate suckers. For homeplantings, keep about a 3-foot-wide strip cultivated around the plants, andmow the alleyways between the strips. To avoid injuring roots, cultivate nodeeper than 2 inches near the plants. Unlike some other fruit crops, withbrambles it is not a good idea to mulch the row area. Mulch can retain toomuch moisture and cause root disease problems.
Brambles areshallow rooted andwill probably needwatering betweenbloom and harvest.

69
Cane ManagementTo get good-quality fruit, you need to prune plantings annually. Some typesof brambles require thinning to keep the plants from getting too crowdedand producing poor-quality fruit. With others, you can mow off the canesannually to keep them under control. Proper pruning and cane manage-ment can reduce the incidence of disease and improve growth, yield, andfruit size, quality, and sweetness.
Different types of brambles require different kinds of management:
Primocane-fruiting raspberries (fall-bearing raspberries) produce fruit at thetop of first-year canes (primocanes) in late summer or early fall and on thelower portion of those same canes in early summer of the second year. If thegrowing season cooperates, you can expect fruit from primocane raspber-ries in the fall of the year of planting.
Most growers sacrifice the early-summer crop by pruning or mowing downcanes between fall harvest and bud break in early spring. Cut the primocanesas close to the ground as possible to force new buds to break below the soilsurface. New primocanes from these buds will grow and fruit in late sum-mer or early fall. This produces a smaller but higher-quality late summercrop.
If you plan to harvest your raspberries only in the fall, you want to maximizethe number of canes, so thinning isn’t needed. To harvest an early summercrop as well, manage the canes like floricane-fruiting brambles (see below),and remove the portion of the cane that’s fruited after harvest in the fall.
Floricane-fruiting raspberries and blackberries produce fruit from buds onsecond-year canes (floricanes). Unlike primocane types, the canes must re-main intact throughout the winter and until after harvest during the secondyear. After they bear fruit, the floricanes die. You can expect your first cropthe year after planting and full production in the summer of the third year.
While the floricanes are flowering and fruiting during their second year,new primocanes also are growing. Some of these will replace the floricanesnext season. But these new primocanes compete with the floricanes for sunand water, and they can interfere with spraying and harvesting. Proper prun-ing and trellising reduces this competition.
The traditional way to manage floricane-fruiting plants is to permitprimocanes to grow through their first season and fruit the following yearand then cut them off at ground level after harvest when they are dead. Thekey is to prune and thin the canes in early spring of their second season. Ingeneral, you remove any spent floricanes left from the previous season aswell as any diseased or winter-damaged wood. Then thin out the canes toabout three or four per foot. Finally, head back the remaining canes to aconvenient height for picking—about 4 to 5 feet—but by no more than
Good-quality fruitrequires annualpruning.

70
25 percent. (See “Pruning”, page 72, for more details about pruning differ-ent types of brambles.)
Another way to reduce plant interference and competition is to mow half ofthe planting alternately each year during the dormant season. During thespring after mowing, primocanes emerge and grow without interferencefrom fruiting canes. The following year, the floricanes flower and fruit, andthen you mow them to the ground once again. This system requires lesslabor because thinning and pruning are not necessary. It also reduces spraymaterial costs. But because of the high cane density, you can expect poorerquality fruit, smaller berries, and lower yields.
A third alternative is to select four or five primocanes per linear foot of rowin June that you will carry through to fruiting the following year and removethe rest. Cut the primocanes that you don’t want when they are about 8inches tall. They are much easier to prune out while they are still small andsucculent instead of large and thorny. This method also increases the fruitsize and yield of the current season’s crop. The disadvantage is that if any ofthese canes become diseased or damaged, you don’t have others to choosefrom to replace them.
TrellisingIt’s a good idea to trellis plants to keep them from drooping over to theground when they are heavy with fruit. Trellising makes harvesting fruiteasier and keeps berries from rotting when they come in contact with theground.
With primocane-fruiting raspberries, some growers use a temporary trellisduring the fall harvest season. One system that works well consists ofT-shaped wooden or metal posts approximately 7 feet tall with 3-foot-longcross-arms (see Figure 20).
Figure 20. Temporary trellises forprimocane-fruiting raspberriesmake it easy to mow canes dur-ing the dormant season.
3’ in ground
25’ apart
Twine
Prune primocaneswhile they aresmall and succu-lent, not big andthorny.
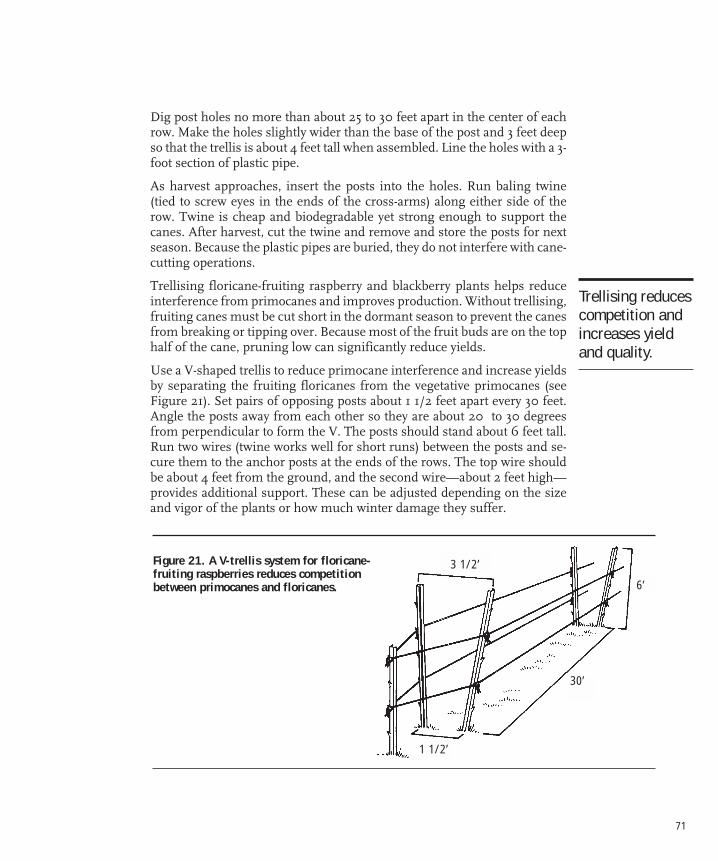
71
Dig post holes no more than about 25 to 30 feet apart in the center of eachrow. Make the holes slightly wider than the base of the post and 3 feet deepso that the trellis is about 4 feet tall when assembled. Line the holes with a 3-foot section of plastic pipe.
As harvest approaches, insert the posts into the holes. Run baling twine(tied to screw eyes in the ends of the cross-arms) along either side of therow. Twine is cheap and biodegradable yet strong enough to support thecanes. After harvest, cut the twine and remove and store the posts for nextseason. Because the plastic pipes are buried, they do not interfere with cane-cutting operations.
Trellising floricane-fruiting raspberry and blackberry plants helps reduceinterference from primocanes and improves production. Without trellising,fruiting canes must be cut short in the dormant season to prevent the canesfrom breaking or tipping over. Because most of the fruit buds are on the tophalf of the cane, pruning low can significantly reduce yields.
Use a V-shaped trellis to reduce primocane interference and increase yieldsby separating the fruiting floricanes from the vegetative primocanes (seeFigure 21). Set pairs of opposing posts about 1 1/2 feet apart every 30 feet.Angle the posts away from each other so they are about 20 to 30 degreesfrom perpendicular to form the V. The posts should stand about 6 feet tall.Run two wires (twine works well for short runs) between the posts and se-cure them to the anchor posts at the ends of the rows. The top wire shouldbe about 4 feet from the ground, and the second wire—about 2 feet high—provides additional support. These can be adjusted depending on the sizeand vigor of the plants or how much winter damage they suffer.
Figure 21. A V-trellis system for floricane-fruiting raspberries reduces competitionbetween primocanes and floricanes.
3 1/2’
30’
6’
1 1/2’
Trellising reducescompetition andincreases yieldand quality.

72
After thinning in early spring, tie the floricanes to the top wires. Allow theprimocanes to grow in the middle of the V where they won’t interfere orcompete with the floricanes for light. Spraying, harvesting, and pruning areeasier because trellising pulls the floricanes to the outside where they areaccessible. The presence of primocanes in the middle forces lateral growthby the floricanes outward. Studies of several raspberry cultivars showedhigher yields using V-trellises, primarily because the practice increases theamount of light reaching the canopy (see Figure 22).
You can build a similar system using T-shaped posts by adding a secondcross arm to support the lower wire. The disadvantage of the T-posts is thatthey aren’t as flexible when it comes to adjusting the height of the wires toaccommodate annual variation in cane height.
Select trellis posts and anchors from readily available materials. You canmake them from wood, steel fence posts, rebar, or similar materials.Monofilament plastic wire, now the material of choice for trellis systems, isas strong as wire but much lighter and easier to handle. Inexpensive devicesare available to hold the monofilament taut at the anchoring post and torejoin lines that have accidentally been cut. Consult nursery and commer-cial grower catalogs for more information on trellising materials. When de-signing a trellis and choosing materials, keep in mind the potential 15-yearlife of the planting. Strong anchor posts are essential for a good trellis.
PruningDifferent types of brambles require specific pruning methods.
Red raspberries. Around mid-March, thin canes leaving three or four perlinear foot of row (see Figure 23). Prune off winter-damaged tips. Cut topcanes no more than 1 foot beyond the top wire of the trellis but below thepoint of any winter injury. (Lower the trellis wire if damaged canes requirehard pruning.) Tie canes loosely to the trellis wire to prevent wind damage.
Black raspberries. In the summer when the primocanes reach about 2 feettall, cut back their tips at least 4 inches to encourage lateral growth. By theend of the season, primocanes will be branched with long laterals. These
Figure 22. With a V-trellis,primocanes grow in the center of theV the first year (left). During theirsecond season (when they becomefruit-bearing floricanes), tie them tothe trellis to keep them from shadingthe new primocanes (right). Thissystem also makes the berrieseasier to harvest.
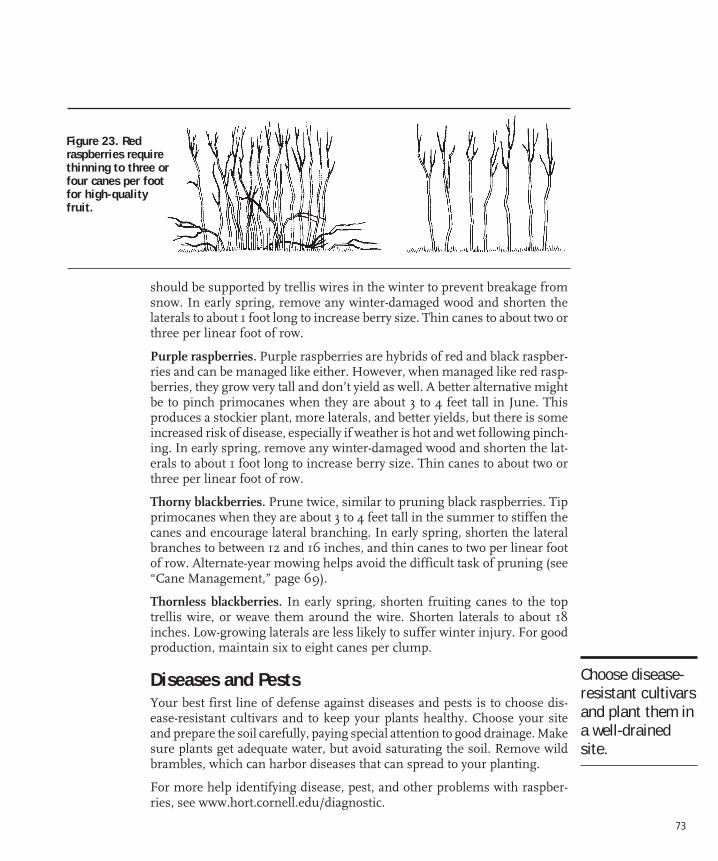
73
Figure 23. Redraspberries requirethinning to three orfour canes per footfor high-qualityfruit.
should be supported by trellis wires in the winter to prevent breakage fromsnow. In early spring, remove any winter-damaged wood and shorten thelaterals to about 1 foot long to increase berry size. Thin canes to about two orthree per linear foot of row.
Purple raspberries. Purple raspberries are hybrids of red and black raspber-ries and can be managed like either. However, when managed like red rasp-berries, they grow very tall and don’t yield as well. A better alternative mightbe to pinch primocanes when they are about 3 to 4 feet tall in June. Thisproduces a stockier plant, more laterals, and better yields, but there is someincreased risk of disease, especially if weather is hot and wet following pinch-ing. In early spring, remove any winter-damaged wood and shorten the lat-erals to about 1 foot long to increase berry size. Thin canes to about two orthree per linear foot of row.
Thorny blackberries. Prune twice, similar to pruning black raspberries. Tipprimocanes when they are about 3 to 4 feet tall in the summer to stiffen thecanes and encourage lateral branching. In early spring, shorten the lateralbranches to between 12 and 16 inches, and thin canes to two per linear footof row. Alternate-year mowing helps avoid the difficult task of pruning (see“Cane Management,” page 69).
Thornless blackberries. In early spring, shorten fruiting canes to the toptrellis wire, or weave them around the wire. Shorten laterals to about 18inches. Low-growing laterals are less likely to suffer winter injury. For goodproduction, maintain six to eight canes per clump.
Diseases and PestsYour best first line of defense against diseases and pests is to choose dis-ease-resistant cultivars and to keep your plants healthy. Choose your siteand prepare the soil carefully, paying special attention to good drainage. Makesure plants get adequate water, but avoid saturating the soil. Remove wildbrambles, which can harbor diseases that can spread to your planting.
For more help identifying disease, pest, and other problems with raspber-ries, see www.hort.cornell.edu/diagnostic.
Choose disease-resistant cultivarsand plant them ina well-drainedsite.
74
Mosaic virus. Aphids and leafhoppers infect and spread this disease throughbramble plantings. Leaves become mottled with yellowish or light greenblotches on a dark background. They also are smaller than normal and fre-quently deformed or cupped. The virus stunts infected plants, which pro-duce dry fruit of poor quality.
Royalty, a purple raspberry cultivar, is immune to the aphid that transmitsthis virus. Black raspberries are very susceptible. Red raspberries can carrythe virus without showing any symptoms, so do not plant black raspberriesnear red raspberries unless you are certain the red raspberries are virus-free.
To reduce the incidence of mosaic virus, plant only virus-indexed stock.Plantings located far away from wild brambles are less likely to become in-fected. Remove infected plants, because once infected, they cannot be cured.
Ringspot virus. This virus is transmitted by nematodes (tiny soil-dwelling,wormlike creatures) and causes berries to crumble when picked. Plantscannot be cured once they are infected. Plant only virus-indexed stock,and do not replant into a site where crumbly berry plants have been re-cently removed.
Phytophthora root rot. This disease causes plants to wilt or collapse duringthe heat of summer. It stunts leaves, which show poor color before wilting.Digging up plants will reveal that many of the roots are dead or chocolate-brown in color. This root-rotting disease is associated with wet sites. To avoidit, plant only in well-drained soils or on ridges or raised beds. Black rasp-berries are generally the least susceptible. Red raspberries vary in theirsusceptibility.
Verticillium wilt. This disease can be found in soil where strawberries ortomatoes, potatoes, peppers, eggplants, or other crops in the tomato familyhave been grown. It causes leaf wilting and yellowing from the bottom upand may appear on only a few canes of each plant. Verticillium wilt is mostsevere on black raspberries. Grow a cover crop of a grass species for a coupleof years before planting raspberries if the site was once used to grow any ofthe susceptible crops listed above.
Spur blight, cane blight, and anthracnose. These diseases infect canes andweaken plants. Spur blight is identified by chocolate-brown or purple can-kers around individual buds. Buds within the discolored areas fail to grow,or laterals from those buds collapse before fruiting. Cane blight cankersgrow around the entire cane below wilting branches. Symptoms of anthrac-nose include small purple spots on young canes in the spring. The spotsbecome sunken and turn gray with a purple border. This disease is mostsevere on black and purple raspberries.

75
To control these cane diseases, prune out and burn diseased canes beforenew canes emerge in the spring. Also, remove the fruiting canes after theyhave fruited, usually sometime in August. Fall-bearing raspberries that aremowed annually are not infected by these diseases.
Botrytis fruit rot. This fungus develops during cool rainy weather as a graymold over the fruit. Practices that improve air circulation reduce its inci-dence. Fungicides are most effective when applied during bloom.
Orange rust. This disease affects black raspberries and blackberries, turn-ing the undersides of new leaves orange in the spring. Plants produce newcanes that are weak, spindly, and thornless. The disease is systemic in theplants, returning every year.
Raspberry cane borers. Adults of this insect pest appear in June. The firstsymptoms are wilting tips on new canes and laterals. Closer examinationreveals two rows of punctures 1/2 inch apart encircling or girdling the stem.These marks are made by the female borer before she deposits her eggsbetween them. Larvae hatch from the eggs and burrow toward the base ofthe cane. They spend their second year in the roots and crown.
To avoid this insect, do not plant near wild brambles. When infestationsoccur, cut off the wilted tips below the girdle and crush the old stubs ofcanes in early spring.
Raspberry fruitworms. Early cultivars of red raspberries are most likely to beattacked by this pest. Larvae are usually first noticed at picking either insidethe berry or on the receptacle. Infected fruit is usually unfit for consump-tion. The adults can severely injure leaves by eating holes in them.
Spider mites. These tiny pests are most prevalent during hot, dry weather.They are found on the undersides of leaves, preferring older, less succulentones. Injury appears as bronzing on the leaf surface. Excessive fertilizationcan lead to high mite levels.
Blackberry leafminers. These insects feed on foliage, weakening the plantand causing poorly developed fruits. Larvae hatch from eggs laid in the leaftissue and excavate large blotched “mines” between the leaf surfaces. Twogenerations occur each year—the first in late May and the second in lateAugust.
Raspberry sawflies. Look for these small pale green larvae feeding first onthe outer edges or undersides of the leaves and then chewing holes in theleaves. In heavy infestations, all leaf surfaces except the vein are destroyed.
Japanese beetles. These familiar insects chew leaves randomly in midseason.They prefer particular cultivars. Plantings near grub-infested turf are par-ticularly susceptible.
76
HarvestRaspberries do not keep well on the plant and must be harvested every twoor three days. Expect a small crop the first year after planting. Fall-bearingraspberries may produce a small crop in the fall of the planting year. Pro-duction usually peaks about the third year after planting and slowly declinesafter that. Many growers replant after about 10 years.
Bramble berries are very fragile. The reason they are usually sold in shallow,half-pint containers is that in deeper containers the weight of the berries onthe top crushes the berries on the bottom. The rule of thumb is never to pilebramble berries more than four high. Unless you are planning to make jamor jelly from your crop, do not harvest berries into containers more than 1 or2 inches deep.
To store raspberries for later use, proper postharvest care is critical. Selectonly berries in good condition and immediately cool them as close as pos-sible to 33 degrees F without freezing.

77
Keys for Success
Blueberries
Blueberries, and their cousin the cranberry, are the only commercially pro-duced fruit crops that are native to North America. Wild blueberries grow inall regions of the country except in the High Plains and the desert South-west.
In the early 1900s, Elizabeth White of New Jersey and Fred Coville of theU.S. Department of Agriculture cooperated to develop the first hybrid blue-berries. Many of their cultivars are still grown commercially today.
Blueberries often are incorrectly called huckleberries. Huckleberries belongto the genus Gaylussacia. Unlike blueberries, they have 10 comparativelylarge seeds in each berry, which crunch between your teeth when you eatthem. Blueberries belong to the genus Vaccinium, and the 20 or more smallseeds in each berry are not noticeable when eaten.
The wild lowbush blueberry, Vaccinium angustifolium, is a hardy shrub thatusually grows no more than 15 inches tall. Many species of wild blueberrygrow naturally throughout the United States. The cultivated blueberry in-dustry is founded on cultivars developed by extensive breeding and selec-tion from the northern highbush blueberry, Vaccinium corymbosum, andseveral related species.
Choosing CultivarsSelecting appropriate cultivars for home plantings is not a simple matter. Inthe coldest areas of New York State, gardeners are limited to only the hardi-est cultivars, such as Northblue, Northcountry, and Northland, which willsurvive winters in most areas of USDA Hardiness Zone 3. Patriot, Bluecrop,Jersey, and Blueray will overwinter in most areas of Zone 4. Gardeners inwarmer areas can choose from these and less hardy cultivars, such as Herbert,Darrow, Spartan, and Bluejay.
Cultivars differ in the size, color, and flavor of their berries and when theyripen. Cultivars are self-fertile, but planting at least two different cultivarsimproves pollination and increases berry size. The following cultivars arelisted by harvest period, from early- to late-ripening blueberries. (For anupdated list of nurseries selling blueberry plants, see www.hort.cornell.edu/nursery.)
• Earliblue—hardy in Zones 5 to 7. Berries are large with light blueskin and have a soft flesh and mild flavor. The fruit does not shatter(drop easily) from the bush, and it is resistant to cracking. Plants arevigorous, productive, upright, and well shaped.
Your soil must beacidic, with a pH of lessthan 5.0. Test the soiland start reducing itspH at least a yearbefore planting. If thepH is more than 7.0,it may be too difficultto reduce pH. Considergrowing somethingelse instead.
Choose a sunny siteand avoid frost pockets.Plants require at leasta 140-day frost-freegrowing season.
Blueberry plants prefera moist but well-drained soil but willtolerate a wide range ofsoils (as long as the pHis less than 5.0). Plantsare sensitive to mois-ture stress, especiallythe first few years aftertransplanting.

78
• Duke—hardy in Zones 5 to 7. This productive newer variety fromNew Jersey has large fruit with good flavor.
• Blueray—hardy in Zones 4b to 7. Berries ripen in early midseasonand are crack resistant and very large with medium–light blue skin,firm flesh, and a strong flavor and aroma. The plants are upright,spreading, and consistently productive. It overproduces (producestoo much fruit, weakening the plant) unless carefully pruned.
• Patriot—hardy in Zones 4 to 7. It is partially resistant to phytophthoraroot rot and has excellent-tasting fruit. The plants are vigorous, pro-ductive, open, upright, and smaller than other cultivars.
• Berkeley—hardy in Zones 4 to 8. Berries are very large and light blueand have a mild flavor and firm flesh. Berries ripen in midseason,store well, resist cracking, and do not shatter from the bush. Theplants are vigorous, open, spreading, and easy to grow.
• Bluecrop—hardy in Zones 4b to 7. Berries are medium large andhave a light blue skin, an excellent flavor, and firm flesh. Berriesshatter somewhat from the bush, but they resist cracking. The plantsare vigorous, consistently productive, spreading, and drought toler-ant. This is the most popular variety in the world.
• Herbert—hardy in Zones 5 to 7. Berries ripen in late midseason, arevery large and medium blue, and have tender flesh and a very goodflavor. They resist cracking and do not shatter from the bush. Theplants are consistently productive, vigorous, open, and spreading.
• Darrow—hardy in Zones 5 to 7. Another variety with exceptional fla-vor for the home gardener.
• Jersey—hardy in Zones 4 to 8. Berries are medium sized with me-dium-blue skin and firm flesh. They keep well, resist cracking, andhave a good flavor. The plants are vigorous, productive, erect, andeasy to prune.
• Coville—hardy in Zones 5 to 8. Berries are large and aromatic withmedium-blue skin and a tart flavor. They do not shatter from thebush. The plants are productive and late ripening with vigorous, open,and spreading growth that is easily pruned.
• Lateblue—hardy in Zones 5 to 7. Berries are late ripening, firm, lightblue, and highly flavored. The plants are productive and vigorouswith erect growth. They ripen in a relatively short time, about sevendays after Coville.
• Elliot—hardy in Zones 4 to 7. These productive plants bear berriesthat are firm, light blue, and medium sized with a good, mild flavor.They ripen very late in the season, around Labor Day.
Test your soilbefore you eventhink aboutwhich cultivar togrow. Its pHmust be lessthan 5.0.

79
Site Selection and Soil PreparationFor best results, blueberries need a frost-free growing season of at least 140days. Cultivars differ greatly in their susceptibility to winter injury. The con-dition of the wood also determines whether cold temperatures will injurethe plants. Very vigorous plants that continue to grow late in the season areinjured more easily than plants growing normally.
Even when low winter temperatures kill the tops of the plants, the crownand roots are often protected by snow cover. The plants usually recover andput out new shoots that frequently bear fruit the following year. Where deepsnows prevail, much of the bush is protected from extreme low tempera-tures, but heavy snows can break canes.
An early fall frost sometimes kills back late-growing shoots from the tip, butin most cases this injury can be pruned away. A late spring frost, however,can injure partly opened flowers, causing a partial to total crop loss on someearly-flowering cultivars. Avoid these early cultivars if your site is prone tolate spring frosts.
Blueberries grow best on a sunny site in sandy peat soil, but they also do wellin heavy soils if they are well-drained, aerated, and high in organic matterand receive adequate moisture.
The most important requirement for growing blueberries is acidic soil. Fewsoils are naturally suitable for blueberry cultivation because the pH is above5. If the pH of your soil is greater than 5 but less than 7, you can increase theacidity with applications of sulfur or acid peat.
Soil acidity increases very slowly after applying sulfur, so it is important totest the soil and adjust the acidity and nutrient levels as needed the seasonbefore planting. Because it will take at least two months of warm weather forthe sulfur to lower the pH, don’t wait until the fall before a spring plantingto apply it. Also, incorporate organic matter such as compost or peat, par-ticularly if the soil is very light and sandy. It is impractical to reduce the pHof alkaline soils (those with a pH greater than 7) low enough to grow blue-berries.
PlantingBlueberries are difficult to propagate, and survival of rooted cuttings is poor.Purchase two- or three-year-old plants from a reliable nursery. Avoid one-year-old cuttings because they have a high mortality rate.
Planted properly, bare-root plants perform as well as container-grown plantsand usually cost less to ship. If container-grown plants are pot-bound, prunethe roots before planting.
Keys for Success
To control weeds earlyin the season, cultivatearound the plants nomore than 2 inchesdeep. After harvest,apply mulch to controlweeds and conserve soilmoisture.
Prune first-year growthso that just the twostrongest canes remain.Keep one or two canesfrom each year untilthey are eight yearsold. Remove nine-year-old canes in earlyspring.
Harvest early or protectthe fruit from birds.

80
As soon as possible after the plants arrive in early spring, plant them in soilthat you prepared the previous season. Soak the roots in water for severalhours before planting. Space the plants a minimum of 4 feet within rowsand 10 feet between rows. Set plants 1 inch deeper than they were grown inthe nursery, and prune them to half their original size. This will removemost of the flower buds, balancing the top growth with the still-small rootsystem.
Remove any flowers that appear the first year to divert energy and nutrientsto the vegetative growth. Keep plants well watered because blueberry plantsare extremely sensitive to dry conditions, particularly during the first twoyears after transplanting.
FertilizationDo not use fertilizer the year you set out the plants because the roots areeasily damaged at this time. When plants flower during the spring of thesecond year after transplanting, apply 4 ounces of ammonium sulfate or 2ounces of urea to each plant. Sprinkle the fertilizer in a ring around thebush, but don’t work it into the soil because it might damage the shallowroots. Never fertilize after flowering as it may make the plants more proneto winter injury.
Increase the amount of ammonium sulfate you apply to each plant by 1ounce each year (1/2 ounce for urea) until the sixth year. After that time, use8 ounces of ammonium sulphate (4 ounces of urea) per application. Fertil-izers containing chlorides or nitrates are not recommended because theycan harm blueberry roots.
Sometimes plants need supplemental fertilization with magnesium sulfateand a balanced fertilizer. To find out, you can test the soil. (Contact yourcounty’s Cornell Cooperative Extension office for soil testing information;see www.cce.cornell.edu/local_offices.cfm.) For a more precise assessment,you have a leaf analysis done (cost: about $30; for more information, contactthe Cornell Nutrient and Elemental Analysis Laboratory; phone 607-255-1785, on the web at www.hort.cornell.edu/department/facilities/icp).
Cultivation and MulchingTo avoid root damage, avoid cultivating within 2 feet of the plant, and nevercultivate more than 2 inches deep. Cultivation after July increases suscepti-bility to winter injury.
To conserve moisture and control weeds, apply mulch in mid to late sum-mer. Sawdust, wood chips, or chopped cornstalks make excellent mulch.Plant grass or another groundcover between rows.
Never cultivateblueberries morethan 2 inchesdeep. Applymulch to controlweeds and con-serve moisture.

81
PruningProper pruning practices contribute significantly to consistent production,high yields, and good fruit quality and help ensure a long life for yourplanting.
The best time to prune is in the early spring when you can assess and re-move winter injury. If you prune in the fall, wait until after the leaves falloff. Simply topping the canes to stimulate lateral growth is generally notrecommended. To prune properly, it helps to understand more about howblueberries grow and produce fruit.
The largest blueberry canes do not produce the most fruit. Rather, canesthat are 1/2 to 1 inch in diameter at their bases are the most productive. Infact, canes greater than 1 inch in diameter allocate increasing amounts ofenergy to the leaves at the expense of the fruit. Removing these old largecanes makes the bush behave like an efficient young plant, even though theunderground portion is quite old (see Figure 24).
The ideal blueberry plant should have at most 16 canes. The oldest one ortwo should be eight years old, and then there should be one or two left fromeach of the previous years. You can accomplish this by allowing only the twostrongest new canes to grow each year from the time the bushes are planteduntil they are eight years old. By that time, the oldest two canes should beabout 1 inch in diameter.
Early in the ninth year, prune out the two largest canes and all but the twolargest one-year-old canes. If repeated annually, this practice minimizesuneven growth and production. The oldest canes are continually replacedwith the same number of new canes, and the bushes remain the same size.
If you are pruning old neglected bushes, you can remove up to 20 percent ofthe basal area (the total diameter of all the main stems) of a bush without
Figure 24. Unprunedblueberry bushes (left)become unproductive whenolder canes dominate.Properly pruned bushes eachhave about 12 to 16 canes,with one or two that are fromone to eight years old.

82
adversely affecting the current year’s yield. Although pruning this hard willreduce the number of berries, the increase in fruit size compensates for thereduced number.
Flowering and FruitingBlueberries will produce a small crop the third year after planting and willreach full production in about eight years if you follow the recommendedpruning strategy. Most cultivars flower in May and the fruit ripens in July,August, or even as late as September, depending on the cultivar.
Blueberries can self-pollinate, but planting two different cultivars increasespollination, berry size, and total harvest. If you only pick two cultivars, don’tmake one of them a very early variety and one a very late variety. If you do,their bloom times may not overlap. A midseason variety such as Bluecrop islikely to overlap with the flowering of most any other variety.
Diseases and PestsFortunately for home gardeners, blueberries have fewer pest problems thanother fruits. There are, however, some diseases and insects to watch for,which are described below. For more help identifying these and other prob-lems with blueberries, see www.hort.cornell.edu/diagnostic.
Fusicoccum canker. Jersey, Earliblue, and Bluecrop are all very susceptible tothis disease, which appears as small reddish spots on the canes, frequently ata leaf scar near the ground. As the canker enlarges, a bull’s eye pattern devel-ops. Plant parts above the canker suddenly wilt and die during warm dryweather, calling attention to the disease. Prune diseased canes as they appear.Fusicoccum canker is relatively uncommon except in colder regions. If thisdisease is a problem in your area, plant the resistant cultivar Rancocas. Coville,Berkeley, Blueray, Burlington, and Rubel are moderately susceptible.
Phomopsis canker. This disease causes new shoots to wilt and die back fromthe tips toward the crown. The pith and wood of infected mature canes be-come discolored, and the canes suddenly wilt and collapse in the summer.If single canes suddenly die while the rest of the plant remains healthy, sus-pect phomopsis canker. Usually, infected plants were previously injured oralready in a weakened condition. Good preventive measures include main-taining your plants in a vigorous condition and taking all possible precautionsto minimize winter injury and early frost damage. To reduce the spread ofphomopsis canker, prune and burn diseased twigs and canes as they appear.
Mummyberry. This fungal disease causes young shoots and leaves to wilt,turn brown, and die. Infection is similar in appearance to frost damage. Thetissue at the base of flower clusters appears water soaked or brown. As har-vest approaches, berries that develop from infected blossoms become tan orcream-colored, shrivel into hard mummies, and shatter easily from the
Planting twodifferent cultivarsincreases berrysize and yield.

83
bushes. To limit the spread of the fungal spores, rake all old berries into theground before budbreak in spring, or cover the planting with 2 inches ofsawdust mulch. In most years, mummyberry is not common in the North-east. Resistant varieties include Burlington, Collins, Jersey, Darrow, Rubel,Bluetta, and Dixi. Earliblue and Blueray are most susceptible.
Blueberry maggot. While this is potentially a very destructive pest, it has notbeen a serious problem in the Northeast except in some areas of New Jersey.Small white maggots attack the berries, one per fruit, and usually causethem to drop, decreasing the yield. When infested berries remain on theplant, the crop is unacceptable for consumption.
Stem galls. These oblong swellings develop on the tips of canes anytimeduring the season. The best control is to prune and destroy the galls beforetheir insect inhabitants emerge as adults.
HarvestIf left on the bush after ripening, blueberries do not spoil for at least oneweek. Their flavor and sweetness continue to increase. Unfortunately, thismakes the berries very attractive to birds. (See suggestions for bird damagecontrol in the section “Before You Begin,” page 1.)
For the home gardener, covering plants with bird netting is a practical, thoughlabor-intensive, option. Another option is to pick the berries while they arestill slightly tart to avoid extensive losses to birds. Keeping the fruit at a cooltemperature after picking maximizes storage life.

84
Keys for Success
Check with your localCornell CooperativeExtension office to besure that it is legal togrow Ribes species inyour area.
Unlike most otherfruits, currants andgooseberries grow wellin partial shade. Theyprefer cool, moistlocations on a northslope or the northernside of a building, forexample.
Choose a site with goodair circulation to avoidpowdery mildew, adisease that commonlyplagues Ribes.
Currants and gooseber-ries prefer rich soil witha high water-holdingcapacity. To prepareyour site, incorporateorganic matter wellahead of planting,particularly if you havelight, sandy soil.
Ribes are heavy nitro-gen feeders. Mulcheshigh in nitrogen, suchas grass clippings, areideal. If you use high-carbon mulches, suchas straw, you may needto apply extra nitrogenfertilizer.
Prune annually toremove four-year-oldcanes. Mature plantsshould have abouteight bearing canes.
Currants and Gooseberries
Currants and gooseberries (Ribes species) are hardy and easy to grow. Theirsweet-tart fruits make excellent jams, pies, and jellies, and they are popularornamental plants. Although many people today are unfamiliar with thesefruits, New Yorkers grew 2,700 acres of them in the 1920s.
Choosing CultivarsThe Ribes are a very diverse species with hundreds of varieties that differ inplant size and form and fruit flavor, shape, texture, color, and hairiness.While most are hardy in Zone 3 or Zone 4, a few are hardy in Zone 2. Sev-eral types of interest to home gardeners include:
Red currants (Ribes rubrum, R. sativum, and R. petraeum). Fruits range incolor from dark red to pink, yellow, white, and beige, and they continue tosweeten on the bush even after they appear to be in full color. Many peopleconsider Rovada to be the best red currant cultivar. Plants are dependable,vigorous, late ripening, and very productive, bearing long-stemmed clustersof large red berries that are easy to pick.
White currants. A type of red currant, white currant cultivars are sold lessfrequently by nurseries. Blanka is most commonly available. The berries arelarge and mild in flavor with a pale yellow color. Most people prefer WhiteImperial or Primus if they are available.
Black currants (Ribes nigrum). Black currants are currently illegal to grow inNew York, but it may soon be legal to grow cultivars that are immune towhite pine blister rust (see “Legalities of Growing,” page 85).
Gooseberries. There are two types of gooseberry plants—American (Ribeshirtellum) and European (Ribes uva-crispa). Cultivars of the American typeare smaller but more resistant to powdery mildew. They tend to be healthierand more productive. American cultivars include:
• Poorman—one of the largest of the American cultivars. Productiveand vigorous, with medium-sized but high-quality fruit, it is a goodcultivar for the home garden.
• Oregon Champion—medium to large yellow-green berries; excel-lent for processing.
• Hinnonmaki Red and Hinnonmaki Yellow—medium-sized red andgreen fruit, respectively.

85
• Captivator—a cross of American and European cultivars, it has redteardrop-shaped fruit, is nearly thornless, and is resistant topowdery mildew.
• Pixwell—easy to propagate, commonly sold, and very productive, butits fruit quality is poor and it is hardy only to Zone 5.
The fruits of the European cultivars are larger and better flavored. They in-clude:
• Invicta—considered by some to be the best gooseberry available inNorth America, it is resistant to powdery mildew but susceptible toleaf spot and has very large fruit with a bland flavor.
• Leveller and Careless—the standards for British fruit production; yel-low and green fruit, respectively.
• Early Sulfur—yellow, hairy fruit with good flavor but susceptible topowdery mildew.
• Catherina—large green fruit.
• Achilles—large red fruit.
Gooseberries are easily propagated through tip layering or stool bedding(mound layering). Sources of gooseberry and currant plants can be found atwww.hort.cornell.edu/nursery.
Legalities of GrowingIn the early 1900s the federal and state governments outlawed the growingof currants and gooseberries to prevent the spread of white pine blister rust(Cronartium ribicola). This fungal disease attacks both Ribes and white pines,which must live in close proximity for the blister rust fungus to complete itslife cycle. Black currants (Ribes nigrum) and white pines (Pinus strobus) areextremely susceptible, and red currants and gooseberries exhibit varyingdegrees of susceptibility.
Although the federal ban was rescinded in 1966, some northern states, in-cluding New York, still prohibit the planting or cultivation of black currants.Some black currant types, such as the cultivars Consort, Crusader, and Tita-nia, are hybrids that are resistant to the blister rust fungus. They can beplanted in areas where other currants and gooseberries are permitted. Sometowns and counties, however, restrict the planting of any Ribes species, so itis best to check with your local Cornell Cooperative Extension office to de-termine the legality of growing currants and gooseberries in your particularlocation.
Check with yourlocal CooperativeExtension office tomake sure it islegal to grow Ribesspecies.

86
Site Selection and Soil PreparationUnlike most other fruit crops, currants and gooseberries tolerate partial shadeand prefer a cool, moist growing area. Northern slopes with protection fromdirect sun are ideal. Planting along the side of a building or shady arbor issuitable as well. Avoid sites with poor air circulation, which increases theincidence of powdery mildew. Sloping ground alleviates this condition.
Also avoid light-textured, sandy soils. Rich, well-drained soils that have ahigh moisture-holding capacity are best. Incorporate organic matter (com-post, peat, or manure) to improve the soil, particularly if it is somewhatsandy. The ideal soil pH is about 6.5.
PlantingPurchase strong, well-rooted plants from a reliable nursery, selecting eitherone- or two-year-old vigorous stock. Because currants and gooseberries be-gin growth very early in the spring, you should plant them in the early fall orvery early in the spring, before the plants begin to grow.
Before planting, remove damaged roots and head back the tops to 6 to 10inches. Do not allow the root systems to dry out. Set plants as soon as pos-sible in properly prepared soil, slightly deeper than they grew in the nurs-ery. Firm the soil around the roots.
Space plants according to the vigor of the cultivar, keeping in mind thatplants are more vigorous on very fertile soil. As a general rule, plants shouldbe spaced 3 to 5 feet apart in the row, with 8 to 10 feet between rows.
FertilizingCurrant and gooseberry plants are heavy feeders. To give the plants a healthystart, work manure into the soil before planting. Annual topdressings ofcomposted manure are beneficial as well. If plants are not vigorous, lightlybroadcast about 1/4 to 1/2 pound of 10-10-10 fertilizer per plant. Avoid fertil-izers containing muriate of potash (potassium chloride).
MulchingMulch keeps the soil cool in the summer, retains moisture, and controlsweeds. Spread 2 to 3 inches of mulch around plants and replenish it yearly.Suitable mulches include straw, lawn rakings, composted manure, compost,wood chips, or similar materials. Grass clippings make excellent mulch. Ifyou use fresh straw or sawdust, you may need to apply nitrogen fertilizerbecause these high-carbon mulches tie up nitrogen while they decompose.
Ribes toleratepartial shade andprefer cool, moistconditions.
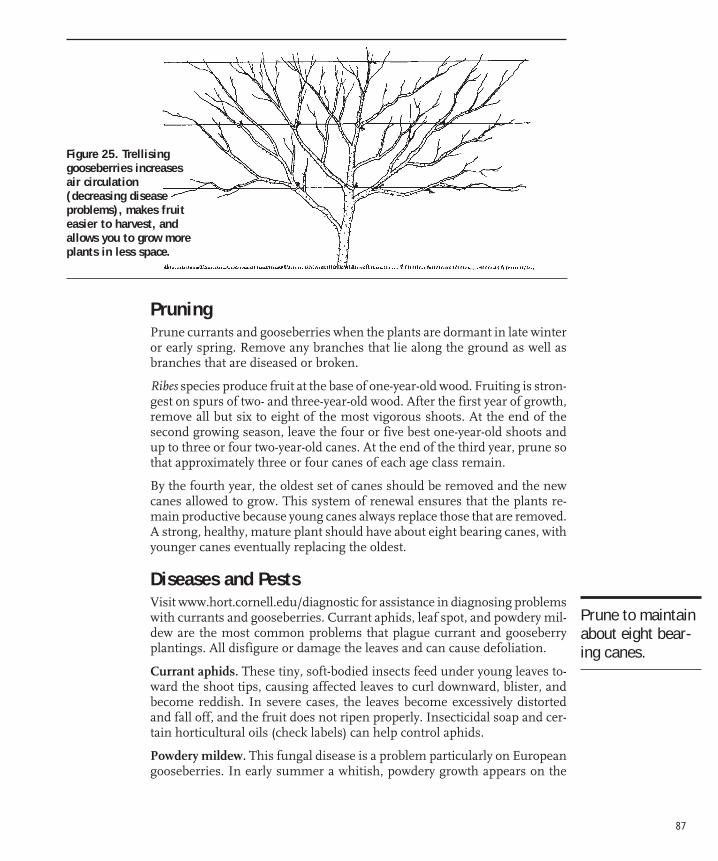
87
PruningPrune currants and gooseberries when the plants are dormant in late winteror early spring. Remove any branches that lie along the ground as well asbranches that are diseased or broken.
Ribes species produce fruit at the base of one-year-old wood. Fruiting is stron-gest on spurs of two- and three-year-old wood. After the first year of growth,remove all but six to eight of the most vigorous shoots. At the end of thesecond growing season, leave the four or five best one-year-old shoots andup to three or four two-year-old canes. At the end of the third year, prune sothat approximately three or four canes of each age class remain.
By the fourth year, the oldest set of canes should be removed and the newcanes allowed to grow. This system of renewal ensures that the plants re-main productive because young canes always replace those that are removed.A strong, healthy, mature plant should have about eight bearing canes, withyounger canes eventually replacing the oldest.
Diseases and PestsVisit www.hort.cornell.edu/diagnostic for assistance in diagnosing problemswith currants and gooseberries. Currant aphids, leaf spot, and powdery mil-dew are the most common problems that plague currant and gooseberryplantings. All disfigure or damage the leaves and can cause defoliation.
Currant aphids. These tiny, soft-bodied insects feed under young leaves to-ward the shoot tips, causing affected leaves to curl downward, blister, andbecome reddish. In severe cases, the leaves become excessively distortedand fall off, and the fruit does not ripen properly. Insecticidal soap and cer-tain horticultural oils (check labels) can help control aphids.
Powdery mildew. This fungal disease is a problem particularly on Europeangooseberries. In early summer a whitish, powdery growth appears on the
Figure 25. Trellisinggooseberries increasesair circulation(decreasing diseaseproblems), makes fruiteasier to harvest, andallows you to grow moreplants in less space.
Prune to maintainabout eight bear-ing canes.

88
surface of leaves, shoots, and branch tips. If left unchecked, the fungus canprogress to the berries themselves. Later in the summer, the growth mayturn from white to brown. Warm, humid conditions and poor air circulationfavor powdery mildew. Prune and dispose of infected branch and shoot tipsin early spring. Some home gardeners are experimenting with trellisinggooseberries because it makes disease management and harvesting easier(see Figure 25). Certain horticultural oils (check labels) applied at the firstsign of powdery mildew can prevent its spread.
Anthracnose and leaf spot. Both these diseases can become serious prob-lems, especially in wet, humid years. Symptoms range from brown spotsand yellowing on leaves, young shoots, and stems to early defoliation. De-stroy affected leaves, and apply mulch after leaf drop.
San Jose scale. These insects occasionally infest currant and gooseberryplants. They feed by sucking valuable plant juices, and in severe cases theyaffect the fruit as well. Scale insects are easily seen on the dormant wood.Prune out and destroy infested canes before new growth begins in the spring.Certain horticultural oils (check labels) can help reduce infestations.
Currant borers. These moth larvae burrow in the pith of currant and goose-berry canes. Infested canes do not die in the fall, but they put out sicklygrowth in the spring. The adult, a clear-winged moth, appears in June andlays eggs in leaf axils. To prevent the next generation of moths from emerg-ing, remove and destroy infested canes before June 1. Proper pruning toremove old canes is the best control.
Currant stem girdler. This immature sawfly eats around, or girdles, the tipsof new shoots, which eventually die and fall off. Cut off affected tips in Mayor June about 3 to 4 inches below the girdle, or if left until later in the sea-son, about 8 inches below the girdle.
Imported currantworm and other sawflies. As soon as leaves expand in thespring, adults deposit eggs on the undersides of leaves along the major veins.A week to 10 days later, tiny larvae emerge and begin eating holes in theleaves. If numerous, they can strip a bush of its foliage in a few days. Re-move leaves harboring eggs by hand.
Gooseberry fruitworm. This greenish caterpillar feeds in the fruit, causingit to color prematurely and fall off. The adult moth lays eggs on the fruit,and the larvae enter the developing berries and feed on the pulp, movingfrom one fruit to another. Several berries may be tied together by a silkenwebbing. Handpick infested berries before larvae move to adjacent ones.

89
HarvestRemove any flowers so that the plants don’t develop fruit during their firstseason of growth. Expect a light crop the second year and a full crop by thethird. Currants and gooseberries ripen over a two-week period in June. Ber-ries do not drop immediately upon ripening, so they usually can be har-vested in one or two pickings. Currants can be picked in clusters, and goose-berries are picked as individual fruits. Expect mature plants to yield about90 to 150 pounds per 100 feet of row.
Wait for the fruit to turn color before picking. Gooseberries come off easilywhen they are ripe. Determing the right time to pick currants requires sometrial and error.

90
Elderberries
Elderberries are popular for their unusual taste in pies, jellies, and jams.They are occasionally used in making wine. The plants are very hardy (usu-ally in areas no colder than Zone 4 but some kinds in Zone 3), and becausethey flower in late June, the crop is seldom damaged by a late spring frost.They are attractive and easy to grow and are great in landscape plantings.Elderberries contain more phosphorus and potassium than any other tem-perate fruit crop. The fruits also are rich in vitamin C.
Choosing CultivarsElderberries belong to the genus Sambucus. Individual flowers are smalland white and appear in large compound clusters. They are nearly self-un-fruitful, so plant two different cultivars within 60 feet of each other to pro-vide adequate cross-pollination.
Adams No. 1 and Adams No. 2 are two old cultivars introduced by the NewYork State Agricultural Experiment Station in 1926. They are strong, vigor-ous, productive, and hardy in areas up to Zone 4, and they bear large fruitclusters. They also ripen late, with fruit maturing in early September. Othercultivars with large clusters and berries include York, Johns, Kent, Nova,and Scotia. York is somewhat more productive than the Adams series, andthe berries tend to be larger.
PlantingElderberries grow best in moist, fertile, well-drained soil with a pH between5.5 and 6.5. But they will tolerate a wide range of soil texture, fertility, andacidity. It’s a myth that they prefer swampy areas. In fact, they do not toler-ate poor drainage.
Plant elderberries in the spring as soon as possible after they arrive fromthe nursery to prevent plants from drying out. Space plants 6 to 10 feetapart. Elderberries are shallow rooted, so keep them well watered duringthe first season.
Plants are easy to propagate from hardwood cuttings taken when plants aredormant.
FertilizingElderberries respond well to fertilization. In addition to incorporating ma-nure or compost before planting, apply additional fertilizer annually in early
Keys for Success
Avoid disturbing theshallow root system.
Prune to remove canesmore than four yearsold.
Plants tolerate a widerange of soils and arerelatively pest free.

91
spring. Apply 1/8 pound of ammonium nitrate (or 1/2 pound of 10-10-10)for each year of the plant’s age, up to 1 pound per plant (or up to 4 pounds10-10-10).
Weed ControlThe most difficult problem you will face when growing elderberries is weedcontrol. Because they have shallow roots, do not cultivate deeper than 2inches. After the first year, it is best to avoid disturbing the soil at all becausethe slightest injury can damage the fibrous root system or kill one of thenew upright shoots. To control weeds without disturbing the elderberry roots,use a combination of pulling weeds by hand—especially while they are stillsmall—and mowing and mulching. Once you develop a thick hedgerow ofplants, elderberries can suppress weeds quite well.
PruningElderberries send up many new canes each year. The canes usually reachfull height in one season and develop lateral branches in the second. Flow-ers and fruit develop on the tips of the current season’s growth—often onthe new canes but especially on laterals.
Second-year elderberry canes with good lateral development are the mostfruitful. In the third or fourth year, older wood tends to lose vigor and be-come weak. In late winter to early spring while the plants are dormant, re-move all dead, broken, or weak canes plus all canes more than three yearsold. Leave an equal number of one-, two-, and three-year-old canes.
Diseases and InsectsElderberry plants are generally free of pests, which makes them great forlandscape plantings. Powdery mildew is a problem in some years, especiallywhen it affects the fruit. Cane borers occasionally cause damage but areusually not present in large numbers. Pruning out infested canes is the bestremedy for home gardeners.
HarvestHarvest elderberries in late August through early September, depending onthe cultivar. When ripe, the entire fruit cluster should be removed and theberries stripped from the cluster for use. Uncooked berries have a dark purplejuice and are astringent and inedible. Use the fruit as soon as possible orkeep it at a cool temperature for later use. It is difficult to transport elderber-ries because the fruits fall off the cluster during transit.
Avoid disturbingthe soil, becausethe shallow rootsystem is easilydamaged.

92
Hardy Kiwifruit
While their tastes are similar, hardy kiwifruits are different from the kiwi-fruits you find in the produce aisle at the supermarket. The hardy kiwifruit(Actinidia arguta) is native to northeastern Asia, while its commercially avail-able cousin (A. chinensis) is native to southern China. In the eastern UnitedStates, the commercial kiwifruit grows only as far north as Maryland andthen only in protected spots.
Hardy kiwifruit plants tolerate temperatures as low as -25 degrees F or so,but they are sensitive to late spring frosts. The fruits, which are about thesize of a large grape, are not covered with fuzz, have small seeds, and can beeaten out of hand without peeling. They have an excellent flavor, can bedried or made into wine, and are higher in vitamin C than most citrus fruits.Some people find they have a strong laxative effect.
Choosing CultivarsThe hardy kiwifruit plant is a strong-growing perennial vine with small leavesand bright red stems. It can grow to 40 feet in length. If not pruned andtrained, the vines will grow up trees and over fences.
Most plants are dioecious—they bear either male or female flowers but notboth. For this reason, you need to plant both a male and a female plant if youwant to harvest fruit. Some nurseries sell hermaphroditic plants, which bearflowers of both sexes, but their performance has been poor.
In early summer, the vines bear small white flowers with chocolate-coloredcenters on the previous season’s spur growth. They have a fragrance similarto that of lily-of-the-valley and are pollinated by wind or insects. Greenishyellow fruits develop in the summer and into the fall and ripen very late inthe season. Plants usually fruit by their fourth year and bear full crops afterthe eighth year. Once established, plants can live for 50 or more years.
Several cultivars are available through various nurseries. Improved selec-tions that perform well in New York include Ananasnaja, Geneva, Meader,MSU, and the 74 series.
PropagationKiwifruit can be propagated from cuttings or seeds. Take hardwood cuttingsanytime after the plant has received 500 hours of chilling, or make softwoodcuttings in July. Kiwifruits also can be propagated by layering.
To grow plants from seed, remove the seeds from a mature fruit and letthem dry for two days. Refrigerate them in moist perlite at 40 degrees F for
Keys for Success
Be sure to choosecultivars of Actinidiaaruguta, the hardykiwifruit—not A.chinensis, which willnot survive New Yorkwinters.
Purchase at least onemale plant for everynine female plants toensure pollination andfruit set.
Avoid planting in frostpockets. Sites withnorthern exposure aregood because theydelay early growth inthe spring, which canbe damaged by latefrosts.
Construct a trellissystem or otherwisesupport the vines.
Prune plants at leasttwo or three timesduring the growingseason and onceduring the winter.

93
four months. Then plant the seeds no deeper than 1/8 inch in a sterile pot-ting mix and cover the container to keep the humidity high. The soil shouldbe moist but not wet. As soon as the plants germinate, uncover the con-tainer. After the seedlings are up, put a thin layer of clean sand on top of themedium. When plants have four true leaves, transplant them to individualpots. At this time, use a low rate of liquid fertilizer. Transplant the seedlingsto the site where they will grow when they are several inches tall.
Site Selection and Soil PreparationKiwifruit can be grown in any garden soil provided the pH is between 5.5 and7.0. The plants thrive in moist soils but do not tolerate poorly drained soils.They benefit from the incorporation of organic matter before planting.
While most cultivars are hardy in areas up to Zone 4, they require about a150-day frost-free season. Vines perform best in full sun, but on such sitesthey tend to break dormancy too early in the spring, when late frosts candamage new growth. Planting them with a northern exposure delays earlygrowth and minimizes this risk. Early fall frosts also can cause damage, soavoid planting in frost pockets. Plants usually regrow if damaged by a springfrost, but this will delay fruit development. The succulent growth is alsosusceptible to wind damage and hot, dry conditions. Protected moderatemicroclimates are best, as kiwifruit also do not like sudden changes in tem-peratures.
PlantingPlant kiwifruit 10 feet apart in mid-May, or after the danger of frost is past.Plant one male for every nine females. Plants require frequent wateringfrom the time they are transplanted.
It is important to select one or two new canes and train them to grow verti-cally. Do not allow them to twist around the support pole or wire.
TrellisingKiwifruit require a trellis or other support structure. Set trellis posts 10 feetapart. Trellis wire should have 300 pounds of tension. Kiwifruit trellises areusually in the shape of a T, with the cross-arm about 7 feet off the groundand about seven wires across the 5-foot-long cross-arm. Train the main caneup the pole to the height of the cross-arm, then train arms along the centerwire. Laterals grow from these arms and can be tied to the outside wires.(Fastening them will help keep them from breaking off, especially on windysites.) The fruit hang down through the trellis wires, where they are easy toharvest.
Kiwifruit do best inprotected loca-tions.

94
Pruning and MulchingPruning is necessary during both the dormant season and the growing sea-son. Two or three times during the summer, cut nonflowering laterals backto the outside wire on the trellis. Trim flowering shoots back to four to sixleaves beyond the last flower.
In the dormant season, remove canes that fruited during the previous sea-son as well as dead, diseased, or tangled canes. Keep the best one-year-oldlateral canes that haven’t fruited, spaced about a foot apart along the arms.Trim them back to about eight buds.
Plants benefit from a thick layer of organic mulch, which helps control weeds,adds organic matter to the soil, and aids in moisture retention. Keep thetrunks of young vines from cracking in cold temperatures by wrapping themwith cloth or painting them with white latex paint.
FertilizationDo not fertilize kiwifruit the year of planting. In early spring of the secondyear, spinkle 2 ounces of 10-10-10 around each plant. Increase this amountby 2 ounces each year until the plants are receiving 8 ounces, then do notexceed this amount.
HarvestKiwifruit will not reach maturity and flower until about their fifth year. Thefruit matures in October, which is after the date of the first frost in manynorthern regions. For this reason it is difficult to harvest vine-ripened fruit.Fruits will ripen in the refrigerator, but their storage life is much shorterthan that of commercially available kiwifruit. Flavor is better, however, inthe fuzzless hardy kiwifruit.
For more information, see Oregon State University’s web site on kiwifruitproduction at http://berrygrape.orst.edu/fruitgrowing/berrycrops/kiwifruit.htm.
95
More Minor Fruits
You likely won’t find the fruits discussed next in the grocery store. That’sbecause, for one reason or another, they aren’t suited to commercial pro-duction and marketing. About the only way you’ll enjoy their unique flavorsis to grow them yourself. As a bonus, many of these trees and bushes makefine landscape plants.
PersimmonsDiospyros virginianaThis attractive tree can grow up to 30 feet tall. Persimmons are more com-mon in the South but are hardy in Zones 4 to 9. They require full sun andwell-drained soil for optimum growth.
Persimmon trees have a pendulous branching habit and a narrow, some-what rounded shape. The leaves are shiny and dark green and the flowersare greenish yellow. Most trees are either male or female, so plant severaltrees to ensure pollination.
Persimmon fruits range from 3/4 to 2 inches in diameter. They are paleyellow to deep orange with reddish cheeks. Unripe, the fruits are extremelyastringent. When fully ripe, they are soft, nearly free of astringency, andhave a mild flavor.
The fruits also are highly ornamental and remain on the tree for a long timeafter the leaves fall. Frost is not necessary to ripen the fruit and will ruinimmature fruit. In colder regions, the season is not long enough to ripenmany of the late cultivars, so choose only early-ripening ones.
Persimmon trees have a bark with an interesting texture and attractive fallfoliage, making them a good accent plant in landscaping. They’re also wellsuited to espalier training.
Growing PersimmonsIn addition to full sun and well-drained soil, persimmons require a soil thathas adequate fertility, but it need not be extremely rich. Some gardenershave found that excessive nitrogen can cause fruit drop. Trees are droughtresistant but benefit from deep watering during extremely dry weather.
Begin training trees early to four to five main stems to produce an attractivestructure. They should require little maintenance beyond that, and plantstypically are not very prone to pests and diseases.

96
American types are hardier and better adapted to cold climates than Asiantypes. But they still benefit from planting in somewhat protected locationsand perform best in milder parts of New York State. Cultivars include:
• Garretson—a superior cultivar for northern areas. Blooms are heavyand the fruit ripens in early October. The fruit, about 1 1/2 inches indiameter, is light orange with a reddish blush and it has tender skinand soft flesh.
• John Rick—produces larger, more attractive fruit than Garretson.
• Early Golden—not as productive as some of the other cultivars, butfruit is of good quality.
• Hicks and Juhl—perform well but are not as good as Garretson.
See also California Rare Fruit Growers at www.crfg.org/pubs/ff/persimmon.html
PawpawsAsimina trilobaPawpaws are small deciduous trees that are hardy in Zones 5 to 8 and usu-ally grow 15 to 20 feet tall (up to 40 feet under ideal conditions). They areattractive, with large showy leaves and a pyramidal shape. Sometimes suck-ers form, creating a pawpaw thicket. Like persimmon trees, they are morecommonly grown in the South.
Pawpaw flowers are maroon and inconspicuous, about 1 1/2 inches across,and appear in late May before the leaves expand. Depending on pollination,trees bear clusters of one to six fruits. The fruits are usually 4 to 6 incheslong with thin green skin and whitish flesh.
Two unrelated pawpaws are required for successful pollination. Hand polli-nation can increase fruiting because bees show little interest in the flowers.Flies can pollinate pawpaw flowers, so some growers hang pieces of rottingmeat from the plants to attract them.
When ripe, the fruits turn yellowish black, resembling overripe bananas inlooks and texture and somewhat in flavor. The flesh is rich and sweet with acustard consistency, has a very distinctive flavor, and has many dark brownseeds about the size of lima beans. The fruits ripen from mid-Septemberuntil frost. They are very perishable and too fragile for commercial han-dling. While usually eaten fresh, some gardeners dry or freeze them.
Growing PawpawsPawpaws prefer full sun and fertile, moist but well-drained soil. They aredifficult to transplant and should be moved to their final location while stillsmall. Keep them weed-free, especially as they are getting established. They

97
are not as cold hardy or drought tolerant as persimmons. Water plants deeplyduring dry periods.
Insect pests and diseases are seldom a problem. The principal maintenanceconcern is removing suckers. If you want a single-stemmed plant, removeall the suckers as they appear. If you prefer a hedge or screen of pawpawplants, allow them to grow. Suckering diminishes as the tree ages.
Some cultivars for New York home gardens include Davis, Sunflower, Tay-lor, and Taytwo. Seedlings are interesting to grow because of the variablefruit size and quality. Fruit from seedlings may fail to ripen before frost.You can harvest fruit before frost and allow it to ripen indoors. Select onlydark-fleshed cultivars because white-fleshed fruit may be bitter.
See also:California Rare Fruit Growers at www.crfg.org/pubs/ff/pawpaw.html
Kentucky State University Pawpaw Planting Guide at www.pawpaw.kysu.edu/pawpaw/ppg.html
MulberriesMorus spp.Mulberry trees are as ornamental as they are fruitful. The mulberry wasonce considered the “king of the tree crops.” But its weedy invasiveness andsoft fruit caused it to fall out of favor.
Mulberry flowers are small and inconspicuous. The fruits are numerousand resemble slender blackberries. They do not ripen all at once, but whenthey are ready they drop from the tree. They can be gathered by covering theground with a sheet or canvas and shaking the tree. The fruits are used forjelly, wine, and desserts. The fruits also attract birds in large numbers andcan be messy, making the tree unsuitable for public spaces. Plant mulber-ries to draw birds away from the fruit crops.
Growing MulberriesMulberries are generally hardy in Zones 4 or 5 to 8. They perform best infull sun and good soils—but will tolerate part shade—and do surprisinglywell on a wide range of adverse soil conditions, including thin, gravely soil;rocky slopes; dry, wet, or alkaline soils; and other difficult areas. This makesthem well adapted for erosion control. They are easy to transplant and salttolerant and produce fruit reliably in frost pockets and exposed areas.
Three species are commonly grown in the Northeast:
Black mulberries (M. nigra) produce the most flavorful fruit but are onlyadapted to the mildest parts of New York State (Zone 6 and warmer). Theyare native to western Asia.
Plant mulberriesto draw birdsaway from otherfruit crops.
98
Red mulberries (M. rubra) are hardier than black mulberries and may growto become very large trees. These North American natives prefer deep, richsoils and are usually found on bottom lands and along streams. Young treesare not as hardy as older ones. Superior red mulberry selections includeHicks Everbearing, Johnson, Stubbs, Townsend, Illinois Everbearing, andTravis.
White mulberries (M. alba) are the most widely grown in New York State.Many cultivars have been selected for their foliage for silkworms (this spe-cies was originally imported from China to feed silkworms); several alsohave excellent fruit. New American is considered the best, but Trowbridge,Thorburn, and Victoria are very good. There is little cultivar developmenttoday. Seedlings are very variable in performance.
See also California Rare Fruit Growers at www.crfg.org/pubs/ff/mulberry.html
JuneberriesAmelanchier spp.More than 25 species of Juneberries—also known as shadbush, Alleghanyserviceberry, sugar pear, and Saskatoon—are native to North America. Thefruit is technically a pome (like an apple), not a berry. These small treesgrow up to 25 feet tall and are very attractive, with plentiful white flowersthat bloom in late April to early May, usually showing before the fine-tex-tured leaves fully develop. Juneberries have attractive gray bark, an uprightbranching habit that becomes horizontal with age, and showy red fall foli-age. Use a dark background to emphasize these fine landscaping qualities.
The fruits are 1/4 to 3/8 inch in diameter and fleshy red, turning purplishblue to black. They are juicy with a mild flavor, ripening in late June. Birdsare fond of Juneberries. Native Americans and early settlers gathered themand dried them for winter use. Juneberries are commonly used in pies andpreserves, and lemon enhances their flavor.
Growing JuneberriesMost Juneberries are hardy in Zones 3 to 9 (some are hardy in Zone 2) andgrow well throughout most of New York State. They prefer full sun andacidic, moist, well-drained soil, but they will tolerate shade and a wide rangeof soil types. Red spider mites are an occasional pest problem on dry sites,and Juneberries are susceptible to common apple pests.
Naturalistic sites are ideal for Juneberries. They are difficult to train to asingle stem. You can remove suckers to train to a single-stemmed small treeor leave them for a multistemmed shrubby effect. Otherwise, they requirelittle or no pruning.
Shannon and Indian are very productive cultivars with large fruit. Smokyand Pembina have the best flavor. Success and Dwarf Mountain are com-mon older cultivars.

99
Highbush CranberriesViburnum trilobum, Viburnum opulus var. americanaHighbush cranberries (also known as American cranberry bush) are in thesame family as elderberries. The size and color of the fruit are the only char-acteristics this species has in common with commercial cranberries.
Bushes grow to 15 feet tall and become rather formal and rounded in shape.They make a great hedge or privacy screen. The flowers are very small andwhite and are borne in large terminal cymes that are 3 to 4 inches across,similar to other ornamental viburnums. The fruits are 3/8 inch in diameter,showy red, and very persistent, remaining on the bushes well after frost andbrightening the winter landscape. Harvest the fruits in late summer or fallto avoid astringency. Freezing and thawing softens the fruits, which are sel-dom eaten by birds. Use the fruits in jelly, preserves, or sauces.
Growing Highbush CranberriesHighbush cranberries are very winter hardy and grow well in Zones 2 to 7.They are easy to transplant, grow in both sun and partial shade, and per-form well on a wide range of soils. They tend to decline if subjected to toomuch moisture stress.
Bushes require pruning only when they become overgrown. Make thinningcuts to remove larger, older stems at the base, and remove broken branches.Pests are usually not a problem. However, the bushes are among the vibur-num species that are most susceptible to the viburnum leaf beetle, whichhas recently spread across most of New York State.
Most highbush cranberries are sold simply as the species, but some culti-vars are available. Wentworth, Andrews, and Hahs were selected for theirhigh-quality fruit.
Viburnum opulus, the European cranberry bush, is similar in appearancebut has astringent fruits with large seeds and high acidity and is plagued byaphids. If you intend to eat the fruit, make sure that you only grow the Ameri-can species.
Cornelian CherriesCornus masCornelian cherry is the only species of dogwood that produces edible fruit.It is a small, upright to spreading, 15- to 20-foot-tall tree that bears smallyellow flowers very early—in late winter or early spring, before leaves de-velop. Flower buds are conspicuous and attractive in the winter, and thebark is flaky, exfoliating, and gray brown to brown. Foliage turns purplishred in the fall.
The fruits, about the size and shape of a medium-sized olive, ripen to a darkreddish maroon in late summer. They are delightful in jellies, tarts, and
100
sweetmeats and also are used to flavor sherbets and distilled spirits. Fruitscontain twice the vitamin C by weight as oranges.
Growing Cornelian CherriesCornelian cherries are hardy in Zones 5 to 8. They grow in full sun andpartial shade and prefer fertile, well-drained soils but tolerate a wide rangeof soil types. They are easy to transplant when young but take a while to getestablished. Cornelian cherries tend to be multistemmed with branches tothe ground, but they can be pruned and trained into single-stemmed trees.This tree is one of the few small landscape trees with edible fruit that youcan plant in shady areas under large trees. Plants are usually pest-free.
Cultivars include Aureo-elegantissima, which has creamy-white variegatedleaves; Flava, which has yellow fruits that are larger and sweeter than theother species; and Golden Glory, which has upright branching and bearslarge, abundant flowers and large red fruit.
Beach PlumsPrunus maritimaBeach plums are stone fruits, related to other plums, cherries, and peaches.They are native shrubs common to coastal sand dunes from Maryland tosouthern Maine. Plants grow 4 to 10 feet tall and produce a profusion ofwhite or pink flowers in mid-May, later than most other stone fruits.
The 1/2- to 1-inch diameter fruits ripen in late summer and are generallyreddish to deep purple with a waxy bloom. They are quite acid with a crisp,tart, juicy flesh and a cherry-like pit and can be substituted for cherries orplums in recipes. Mostly wild-gathered fruits are used to make jams andjellies, which are often sold in resort areas along the coast.
Plants are often quite thorny and can be used as a low-growing hedge. Sea-side plantings become gnarled and picturesque with age. The foliage is at-tractive, and the bark is dark and shiny.
Growing Beach PlumsGrow beach plums as you would other stone fruit. While found almost ex-clusively on sandy soils in the wild, beach plums will tolerate heavier soils ifthey have good drainage. They require full sun and are hardy in Zones 3 to 7.Beach plums are popular for erosion control and seaside plantings becausethey tolerate sandy soil and salt spray. Tent caterpillars and brown rot areoccasionally troublesome, and birds especially enjoy these fruits.
Cultivars are not easy to come by. Autum has a spreading, low-growing habitand produces a large annual crop with good-size, high-quality fruit. Stearnsis a good ornamental with fruit that processes well. Northneck andSquibnocket are recommended as ornamentals and soil binders.

101
Cornell researchers are working with growers to revitalize the once-vibrantbeach plum industry. For more information, see www.beachplum.cornell.edu.
Other lesser-known Prunus species include:
Western sand cherries (Prunus besseyi)—small, spreading shrubs that growup to 4 feet tall and are hardy in Zones 3 to 6. This cultivar bears 1/2-inchwhite flowers in late April or early May that ripen into 3/4-inch purple-blackfruits in late summer. The fruit is astrigent but sweet and used in jellies orjams and in combination with apples in pies. Plants are native to the GreatPlains and very tolerant of dry, sandy soils.
Nanking cherries (Prunus tomentosa)—an attractive, dense shrub from Chinathat grows 6 to 10 feet tall and spreads to 15 feet. Also known as Manchucherry, this species bears fragrant white flowers very early in the spring,which ripen into bright red fruit about half the size of a sour cherry. Thefruits are covered with inconspicuous hairs and are juicy and slightly acid.Plants are very winter hardy and grow in Zones 2 to 7.
BuffaloberriesShepherdia agenteaAlso known as the silver buffaloberry, this thorny shrub or 6- to 10-foot-tall tree has an overall silvery or whitened appearance. The leaves are nar-row and silvery white on both sides, and the flowers are very small andyellow and are borne on small branches. The scarlet to yellow fruits areborne in small clusters and vary in size from that of a currant to a smallgooseberry. They ripen in July and may remain on the bushes until frostor later. Its silvery appearance and attractive fruit make this plant a pleas-ing ornamental.
Early settlers served the berries as a sauce with buffalo meat. They can bedried and stored or used in jellies, sauces, and conserves. Their agreeableflavor lends well to out-of-hand eating, but harvest is difficult due to the 1- to2-inch thorns. Like legumes, these plants fix nitrogen from the atmosphere.
Growing BuffaloberriesPlant buffaloberries in sites with full sun but cool northern exposures todelay flowering and avoid damage to flower buds by late spring frosts. Oth-erwise, the plant is very hardy, growing in Zones 3 to 7. While buffaloberriesprefer moist, well-drained soil, they tolerate poor dry soils and a high pHquite well. Plants are slow growing.
To ensure successful pollination, plant both male and female plants. Maleflowers are sessile (stalkless) and clustered at the nodes. Female flowersare smaller and more slender with stalked buds arranged in less compactclusters.

102
Birds enjoy buffaloberries. If any fruit remains after frost and bird feeding,they can be gathered anytime during the winter.
A related species, the russet buffaloberry (Shepherdia canadensis) is thorn-less but has bitter, sour berries.
QuincesCydonia oblongaQuinces are small, irregularly shaped trees that grow to about 15 feet tall.They often are used as rootstock for dwarf pears. The trees bear white orpink showy flowers at the ends of leafy shoots in the spring. The flowers aresusceptible to winter injury at temperatures below about –15 degrees F, buttrees are hardy in Zones 5 to 9. As they mature, the trees take on an unusualgnarled form.
The foliage is deep green with a fine soft fuzz underneath and turns yel-low in the fall. The fruits are very fragrant and are commonly used to makejelly. Harvest them when they are golden yellow. Quince is a good sourceof pectin.
Don’t confuse these quinces with several other quince-like species grownfor ornamental purposes. There are many varieties of Japanese quince(Chaenomeles japonica) and common flowering quince (C. speciosa, C.lagenaria)—attractive shrubs bearing showy pink, red, or orange flowers inearly spring but most producing fruits that are hard and nearly inedible.These fruits do, however, have a high pectin content and are occasionallymixed with other fruits in jellies and preserves.
Growing QuincesQuinces prefer a fertile site in full sun. They are slightly more tolerant ofwet soils and drought than apples and will fruit more reliably on moist butwell-drained soil. Cross-pollination is needed for good fruiting. Plant quincesin a protected area because they respond poorly to rapid changes in tem-perature and exposure.
Although quinces were once grown extensively in New York, pest problemslimit their use today. Flower bud injury, fire blight, borers, codling moth,curculio, scale, and tent caterpillars all can cause problems. To avoid fireblight, do not use excessive nitrogen and keep pruning to a minimum. Thinout suckers in winter or early spring. Although quinces are attractive andhave interesting fruit, an aggressive maintenance program may be neededif you use these plants extensively in your landscape.
The cultivars Angers, Orange, Pineapple, Champion, and Smyrna are gen-erally available.

103
For More Information
Web SitesCornell Gardening Resources
www.gardening.cornell.edu
Cornell Fruit Resources
www.fruit.cornell.edu
New York State Agricultural Experiment Station
www.nysaes.cornell.edu
USDA Plant Genetics Resource Unit, Geneva, N.Y.
www.ars-grin.gov/gen
Related Cornell Cooperative Extension PublicationsFor descriptions and ordering information visit:
www.cce.cornell.edu/publications/catalog.html
Or write:
Media and Technology Services Resource CenterCornell University7 Cornell Business and Technology ParkIthaca, NY 14850Telephone: 607-255-2080Fax: 607-255-9946E-mail: [email protected]
The Appealing Apple
Biology and Management of Apple Arthropods
Bramble Production Guide
Conservation Practices for Vineyards
Cultural Practices for Commercial Vineyards
Day-Neutral Strawberry Production Guide
Economics of Apple Orchard Planting Systems
Fire Blight—Its Nature, Prevention, and Control
Garden Strawberry
Highbush Blueberry Production Guide
Integrated Weed and Soil Management in Fruit Plantings

104
Managing White-Tailed Deer in Suburban Environments
Orchard Nutrition Management
Pest Management around the Home: Part I, Cultural Methods
Pest Management around the Home: Part 2, Pesticides
Pollination and Fruit Set of Fruit Crops
Pruning Grapes
Simplified Insect Management Program: A Guide for Apple SamplingProcedures in New York
Strawberries (Integrated Pest Management in)
Strawberry IPM Scouting Procedures: A Guide to Sampling for CommonPests
Table Grape Varieties for Cool Climates
Training and Pruning Apple Trees
Wildlife Damage Management in Fruit Orchards
Wine and Juice Grape Varieties for Cool Climates

This publication is issued to further Cooperative Extension work mandated by acts of Con-gress of May 8 and June 30, 1914. It was produced with the cooperation of the U.S. Depart-ment of Agriculture; Cornell Cooperative Extension; and College of Agriculture and LifeSciences, College of Human Ecology, and College of Veterinary Medicine at Cornell Uni-versity. Cornell Cooperative Extension provides equal program and employment opportu-nities. Helene Dillard, Director.
Alternative formats of this publication are available on request to persons with disabilitieswho cannot use the printed format. For information call or write the Office of the Director,Cornell Cooperative Extension, 365 Roberts Hall, Ithaca, NY 14853 (607-255-2237).
This information is presented with the understandng that no product discrimination isintended and no endorsement of any product mentioned, or criticism of unnamed prod-ucts, is implied.
Produced by Media and Technology Services, Cornell UniversityPrinted on recycled paper© 2003 Cornell University
142IB156 5/03 699/999 7.5M CP MTS10737
Cooperative Extension

Home-grown fruit. Nothing tastes better or is more satisfying tocultivate.
In simple language and informative graphics, the Cornell Guide toGrowing Fruit at Home tells you how to grow and harvest thefreshest, highest-quality fruit right in your own backyard, including
• choosing the best varieties.
• site selection.
• soil preparation.
• planting.
• pruning and training.
• pest and disease management.
From easy-to-grow berries that you can plant and harvest thisseason to more challenging grapes and fruit trees that can providea lifetime of crops, it’s all here. There’s even a section on little-known fruits that make handsome landscape plants as well asprovide tasty harvests.
In just a few short years, you can turn your yard into an ediblelandscape. Here’s how…
Additional copies of this publication can be purchased from
Cornell University, Media and Technology Services Resource Center7 Cornell Business and Technology ParkIthaca, NY 14850Phone: 607-255-2080. Fax: 607-255-9946. E-mail: [email protected]
A free catalog of Cornell Cooperative Extension publications and audiovisuals isavailable from the same address, or from any Cornell Cooperative Extensionoffice. The catalog also can be accessed at the following web site:www.cce.cornell.edu/publications/catalog.html
ISBN 1-57753-302-x
Related Documents


