1 Care, Use and Installation Booklet Contents Warnings and Safety Instructions, 2 Important Safety Instructions Washer Description, 3 The front, the back Control panel Start and Programs, 4-6 Choosing a Program Table of control panel lights Table of preset wash programs Table of washing options Dispenser, 7 Automatic dispenser drawer Dispenser compartments About using bleach Table of laundry aids Maintenance and Care, 8-9 When to switch off electricity and water faucets After washing is complete Clean the exterior, interior & dispenser drawer Clear the coin trap Check the rubber inlet hoses yearly Winterization Troubleshooting, 10-11 Spare parts Technical Details, 12 Recessed, closet, alcove installations Installation Requirements, 13-15 Tools and Parts Location Water Inlet Requirements Drain System Requirements Electrical Requirements Installation Instructions, 16-17-18 Remove Transit Screws/Spacers Connect the Inlet Hoses Route and Secure the Drain Hose Level the Washer Final Installation Checklist FRONT-LOADING WASHER AW122

Welcome message from author
This document is posted to help you gain knowledge. Please leave a comment to let me know what you think about it! Share it to your friends and learn new things together.
Transcript
1
Care, Use and Installation Booklet
ContentsWarnings and Safety Instructions, 2
Important Safety Instructions
Washer Description, 3The front, the backControl panel
Start and Programs, 4-6Choosing a ProgramTable of control panel lightsTable of preset wash programsTable of washing options
Dispenser, 7Automatic dispenser drawerDispenser compartmentsAbout using bleachTable of laundry aids
Maintenance and Care, 8-9When to switch off electricity and water faucetsAfter washing is completeClean the exterior, interior & dispenser drawerClear the coin trapCheck the rubber inlet hoses yearlyWinterization
Troubleshooting, 10-11Spare parts
Technical Details, 12Recessed, closet, alcove installations
Installation Requirements, 13-15Tools and PartsLocationWater Inlet RequirementsDrain System RequirementsElectrical Requirements
Installation Instructions, 16-17-18Remove Transit Screws/SpacersConnect the Inlet HosesRoute and Secure the Drain HoseLevel the WasherFinal Installation Checklist
FRONT-LOADING WASHER
AW122
2
Read all instructions before using the appliance.Do not wash articles that have been previously cleaned in, washed in, or spotted with gasoline, dry cleaning solvents, other flammable or explosive substances as they emit vapors that could ignite or explode.Do not allow children to play on or in the appliance. Close supervision of children is necessary when the appliance is used near children.Before the appliance is removed from service or dis-carded, remove the door.Do not reach into the appliance if the tub or drum is moving.Do not install or store this appliance where it will be exposed to the weather.Do not tamper with controls.Do not repair or replace any part of the appliance or at-tempt any servicing unless specifically recommended in the user-maintenance instructions or in published user-repair instructions that you understand or have the skills to carry out.Do not add gasoline, dry-cleaning solvents, or other flammable or explosive substances to the wash water. These substances give off vapors, that could ignite or explode.
1.2.
3.
4.
5.
6.
7.8.
9.
Under certain conditions, Hydrogen gas may be pro-duced in a hot water system that has not been used for 2 weeks or more. HYDROGEN GAS IS EXPLOSIVE. If the hot water system has not been used for such a period, before using a washing machine, turn on all hot water faucets and let the water flow from each for several minutes. This will release any accumulated Hydrogen.Check the Coin Trap every few months to remove coins, buttons or similar size objects.This appliance must be properly grounded (see Grounding Instructions).Clothes, cleaning rags, mop heads and the like which have traces of any flammable substances, such as veg-
etable oil, petroleum based oils or distillates, etc. must not be placed in the washing machine. These items may contain flammable substances after laundering which may smoke or catch fire by itself.Always be sure to unplug the washing machine from the electrical supply before attempting any service.Do not insert/pull out the mains plug with wet hands.Do not pull out the mains plug by tugging the cable.Do not use an extension cord or an adapter to connect the washing machine to the electrical power supply. Caution when draining hot water.The washing machine must only be used for it’s in-tended purpose. Make sure drum is empty before loading washer.Make sure that all water connections to the wash-ing machine have shut-off valve(s) and that they are readily accessible. Close the washing machine shut-off valves at the end of each wash day.Check the fill hose connections on a regular basis to assure that they are tight and not leaking.Do not machine wash fiberglass materials. Small par-ticles can stick to fabrics washed in following loads and cause skin irritation.Check the inlet hoses periodically for bulges, kinks, cuts, wear or leaks and replace them every five years.
10.
11.
12.
13.
14.
15.16.17.
18.19.
20.21.
22.
23.
24.
Warnings and Safety Instructions
ELECTRICAL SHOCK HAZARD
Plug washer-dryer into a grounded 3 prong outlet.
Do not remove ground prong.
Do not use adapter.
Do not use an extension cord.
Failure to follow these instructions can result in death, fire, or electrical shock.
WARNING!
ELECTRICAL SHOCK HAZARD
Disconnect power before servicing.
Replace all panels before operating.
Failure to do so can result in death or electrical shock.
WARNING!
EXCESSIVE WEIGHT HAZARD
Use two or more people to move and install the washer-dryer.
Failure to do so can result in back or other injury
WARNING!
WARNING!To reduce the risk of fire, electrical shock, or injury to persons when using your appliance,
follow basic precautions including the following:
SAVE THESE INSTRUCTIONS
The machine was designed and built in compliance with the appliance international safety regulations.The information on this page is provided for your safety and should be read carefully.
3
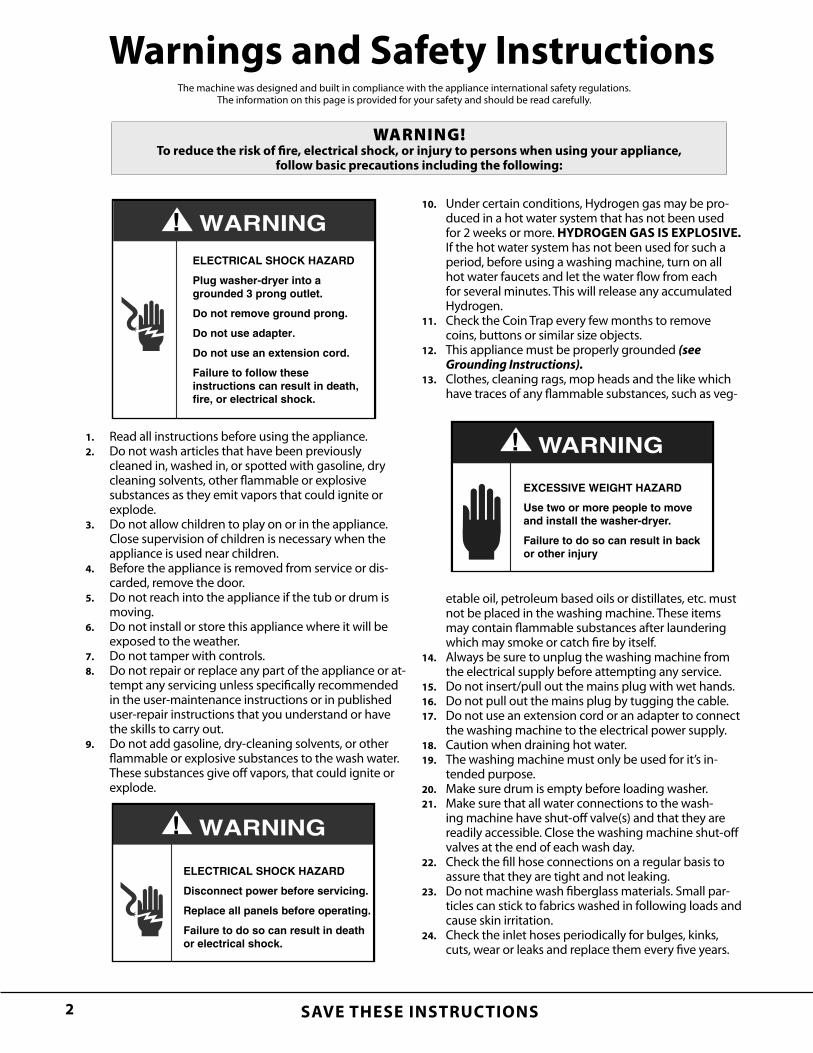
Washer Description
Programs dial
Wash Temperature
Spin Speed
Soaking
Extra Rinse
Easy Iron
PreWash
ON-OFF
Dispenser drawer
Program key(Pull on Grey Tab)
Knobs are hidden. To extract them, gently press the middle of each knob.
D
IntroductionCongratulations on the purchase of your new Ariston washing machine. It is a highly sophisticated engineered product that will give you many years of satisfaction. Please read this Owners Manual. It will show you ways to best utilize your valuable purchase.
Control panelDispenser drawer
Coin Trap
O
D = Door Lock LightO = ON-OFF Light
Transit bolts
Power cord
Drain hose
Hot and coldwater inlet
Serial No.
Model No.

4
Start and Programs
Choosing a programPlug the washer into the electrical socket.
Sort your laundry according to similar colors, fabrics and degree of soil. For best results, do not load more than the maximum capacity:
Fabric Maximum LoadCottons 12 lbs.Synthetics 6 lbs.Delicate Fabrics 5 lbs.Wools 3 lbs.Bathrobes 5 lbs.
3. Open the door. Load the machine and make sure the items are not in the way of the door seal.
4. Close the door.
5. Choose the wash program by checking the Programs table (see Preset Washing Programs) as well as the fabric care tags found on your clothing.
Select a washing cycle by rotating the PROGRAMS dial clockwise.Set the wash water temperature with the TEMPERATURE knob.Set the high spin speed with the
1.
2.
•
•••
SPIN SPEED knob.To further customize the program, press one of the four WASH OPTIONS buttons (see Washing Options).
6. Open the dispenser drawer and add laundry aids (see Dispenser drawer).
Note: If your previous washing machine was a top-loader, initial loads may require little to no detergent. Old detergent trapped in the clothes will be released during the tumble action.
7. Close the dispenser drawer.
8. Press the ON-OFF button (in) to begin. During the washing program, you cannot open
the door.
9. When the cycle is complete, wait for the DOOR LOCK Light to extinguish. Open the door and take your laundry out.
10. Unplug the washer.
•
Light What it means... Note
DOOR LOCK
Indicates when the door is locked
Light ON = LockedLight OFF = Unlocked
••
The door will stay locked for up to 2 minutes after the program is completedNEVER attempt to open the door when the DOOR LOCK light is ON
•
•
ON-OFF Indicates the status of the washer
Slow Flash = Ready; awaiting instructionsSolid Light = Program accepted; in operationQuick Flash = Program competed, but door still locked
•
•
•
This washer can perform self-diagnostics in the event of a problem. If needed, this light will indicate a fault code by displaying a specific series of blinking lights.
•
Lights
!
5
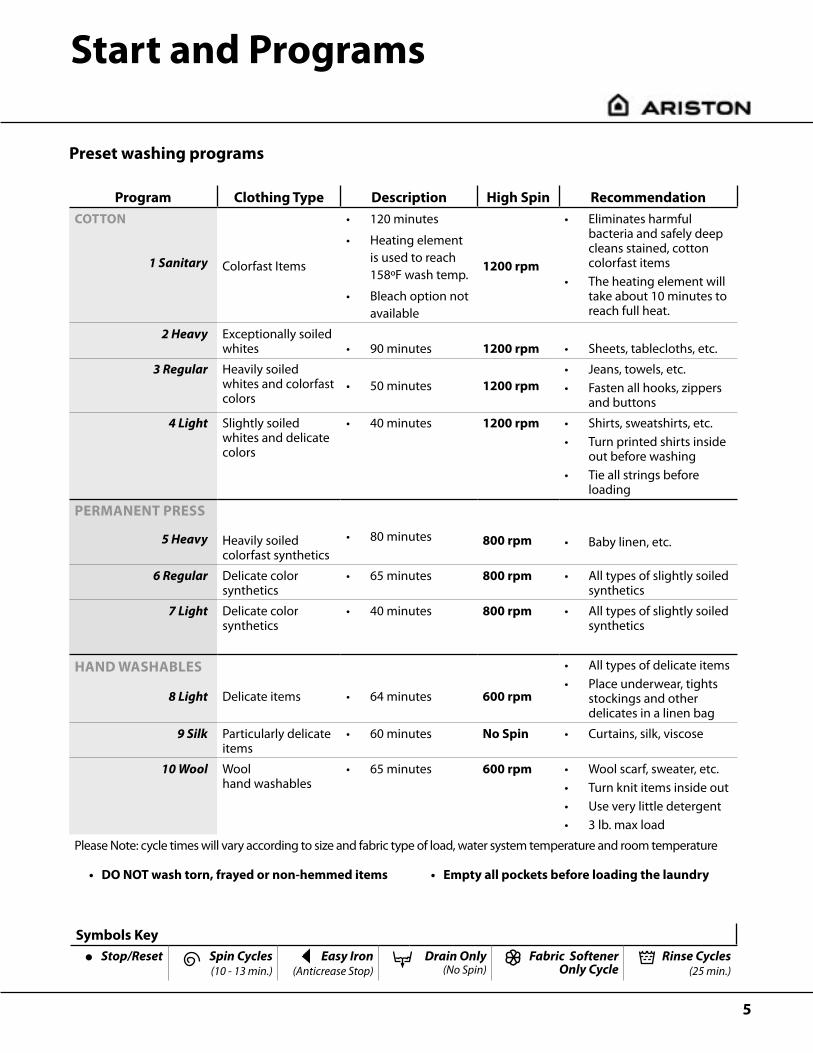
Symbols Key Stop/Reset Spin Cycles
(10 - 13 min.)Easy Iron
(Anticrease Stop)Drain Only
(No Spin)Fabric Softener
Only CycleRinse Cycles
(25 min.)
Preset washing programs
Program Clothing Type Description High Spin Recommendation
COTTON
1 Sanitary Colorfast Items
120 minutes
Heating element is used to reach 158ºF wash temp.
Bleach option not available
•
•
•
1200 rpm
Eliminates harmful bacteria and safely deep cleans stained, cotton colorfast itemsThe heating element will take about 10 minutes to reach full heat.
•
•
2 Heavy Exceptionally soiled whites 90 minutes• 1200 rpm Sheets, tablecloths, etc.•
3 Regular Heavily soiled whites and colorfast colors
50 minutes• 1200 rpm Jeans, towels, etc.Fasten all hooks, zippers and buttons
••
4 Light Slightly soiled whites and delicate colors
40 minutes• 1200 rpm Shirts, sweatshirts, etc.Turn printed shirts inside out before washing Tie all strings before loading
••
•
PERMANENT PRESS
5 Heavy Heavily soiled colorfast synthetics
80 minutes• 800 rpm Baby linen, etc.•
6 Regular Delicate color synthetics
65 minutes• 800 rpm All types of slightly soiled synthetics
•
7 Light Delicate color synthetics
40 minutes• 800 rpm All types of slightly soiled synthetics
•
HAND WASHABLES
8 Light Delicate items 64 minutes• 600 rpm
All types of delicate itemsPlace underwear, tights stockings and other delicates in a linen bag
••
9 Silk Particularly delicate items
60 minutes• No Spin Curtains, silk, viscose•
10 Wool Wool hand washables
65 minutes• 600 rpm Wool scarf, sweater, etc.Turn knit items inside outUse very little detergent3 lb. max load
••••
Please Note: cycle times will vary according to size and fabric type of load, water system temperature and room temperature
• DO NOT wash torn, frayed or non-hemmed items • Empty all pockets before loading the laundry
Start and Programs

6
Washing Options
Option What it does... How to set it... NoteKNOBS
TEMPERATURE
Changes the preset wash water temperature of the selected program
Rotate TEMPERATURE knob to the desired wash temperature
Rinse water is always COLD
•
SPIN SPEED Changes/excludes the preset spin cycle of the selected program
Rotate SPIN SPEED knob to the desired speed
Select for No SpinFaster spinning will extract more water from highly absorbent fabrics
••
BUTTONSSoaking
Adds a one hour soak to the selected washing program
Press SOAKING button (in)
During soaking, laun-dry is gently tumbled
•
Extra Rinse Adds one extra rinse to the selected Cotton Heavy Duty or Permanent Press program
Press EXTRA RINSE button (in)
Recommended for very large loads, when too much detergent is used or for detergent contact allergies.
•
Easy Iron
Automatically stops the selected Permanent Press or Hand Washables program before the spin cycle begins. Laundry soaks in water until the Easy Iron button is pressed again.
Press EASY IRON button (in) Program will stop when it reaches the symbol on the Programs dial.
To resume the program,Press EASY IRON button again (out)
Prevents wrinkles caused when laundry is not removed promptly from the drum.Use this option when you know you won’t be able to remove the laundry until long after the cycle is finished.
•
•
Pre-Wash Adds an extra wash to the selected program (Not available in “Wool” cycle)
Press PRE-WASH button (in)
Recommended for heavily soiled loads like work clothes or children’s clothes.
•
On PROGRAMS Dial
DELAY TIMER Delay’s the start of the washing program by 1, 3, 9 or 12 hours so laundry is ready when you are.
Rotate PROGRAMS dial clockwise and select 1h, 3h, 9h, or 12h.Press ON-OFF button (in).Wait 5 seconds for the ON-OFF light to stop flashing.Rotate the PROGRAMS dial clockwise and select a washing program.
1.
2.3.
4.
The On-Off lamp will flash (1 second on, 4 seconds off) to indicate a Delay Start has been set. The door can be opened or closed at any time before the cycle begins.
•
Stop/Reset Cancels/Interrupts the selected program
Rotate the PROGRAMS dial clockwise to a Stop/Reset position.Wait 5 seconds.Rotate the PROGRAMS knob to the desired washing program or Drain (see right).
1.
2.3.
To cancel a program completely, select (Drain). After the washer drains, wait for the DOOR LOCK light to extinguish before attempting to open the door.
•
Start and Programs

7
HE Laundry PowderFor best results, use HE (High Efficiency) detergent. HE laundry detergents dissolve more quickly in less water and won’t overfoam in front loading washers.
About Using Bleach (Compartment 4) Bleach can only be used when HOT is selected on the TEMPERATURE knobIf bleaching is necessary, the Bleach Compart-ment 4 (provided) must be inserted into com-partment 1.Always dilute bleach before using.If used, you will see water in the Bleach compart-ment after the washing program is complete. This is normal.Bleach cannot be used during the “Silk” washing program.Using the Bleach compartment excludes the possibility of using the PreWash cycle.DO NOT exceed the Max level (shown above). If you overfill the bleach dispenser, bleach will run directly into the machine and may possibly damage clothes.
•
•
••
•
•
•
Dispenser Drawer
Automatic Dispenser DrawerOnce loaded in the proper compartment(s) in the dis-penser drawer, Detergent, Fabric Softener and Bleach will automatically be added at the appropriate time during the washing program.
Dispenser Compartments (above)
Detergent for Pre-Washing (powder only)Detergent for Washing (powder or liquid)Liquid Fabric SoftenerLiquid Bleach
1.2.3.4.
Laundry Aid Amount Special Note Detergent Facts
COMPARTMENTS 1, 2
Powder Detergent1 to 2 Tablespoon(s)
Powder detergent is recommended.
•
Never use too much detergent or additives. Using too much will cause excessive sudsing, and scaling which may reduce perfor-mance and cause possible damage to your washer.
NEVER use detergent for “hand washing” or a detergent that is not designated for “machine use.”
When washing in COLD water, reduce amount of detergent
•
•
•
COMPARTMENT 2
Liquid Detergent ¼ to ½ Tablespoon
If using liquid detergent, ALWAYS add detergent to compartment no more than a few seconds before the start of the wash cycle.
•
COMPARTMENT 3
Liquid Fabric Softener
½ to 1 Tablespoon
Using a liquid fabric softener (or a detergent with a built-in soft-ener) fluffs clothes. This helps speed drying times and reduce wrinkles.Fabric perfumes can be used in this compartment.Using more than the recommend-ed amount of fabric softener can impair wash results.
•
•
•
Bleach “Max” level
Splendide All-Natural Premium Laundry Powder (Part No. 1005)
8
When you should switch off the electricity and turn off the water faucetsUnplug the washer and turn off the water faucets when not using it, when cleaning it and during maintenance activities.
After washing is complete, alwaysTurn off the water faucets to relieve pressure on the inlet hoses.Wipe the inside of washer door with a soft cloth.
Clean the ExteriorAs needed, clean the exterior with a rag dipped in luke-warm water and soap. Never use polish of any kind.
Clean the InteriorIn hard water areas or where heavily soiled items are frequently washed, you may periodically need to remove body oils or detergent that has accumulated in the drum. To remove this build-up, run the washer through a complete cycle using HOT water and 2 cups of a non-precipitating water softener.
Periodically, apply a thin coat of paste wax to the inner door (especially the area that is immediately next to the door window) to protect it from laundry aid spills and discoloration.
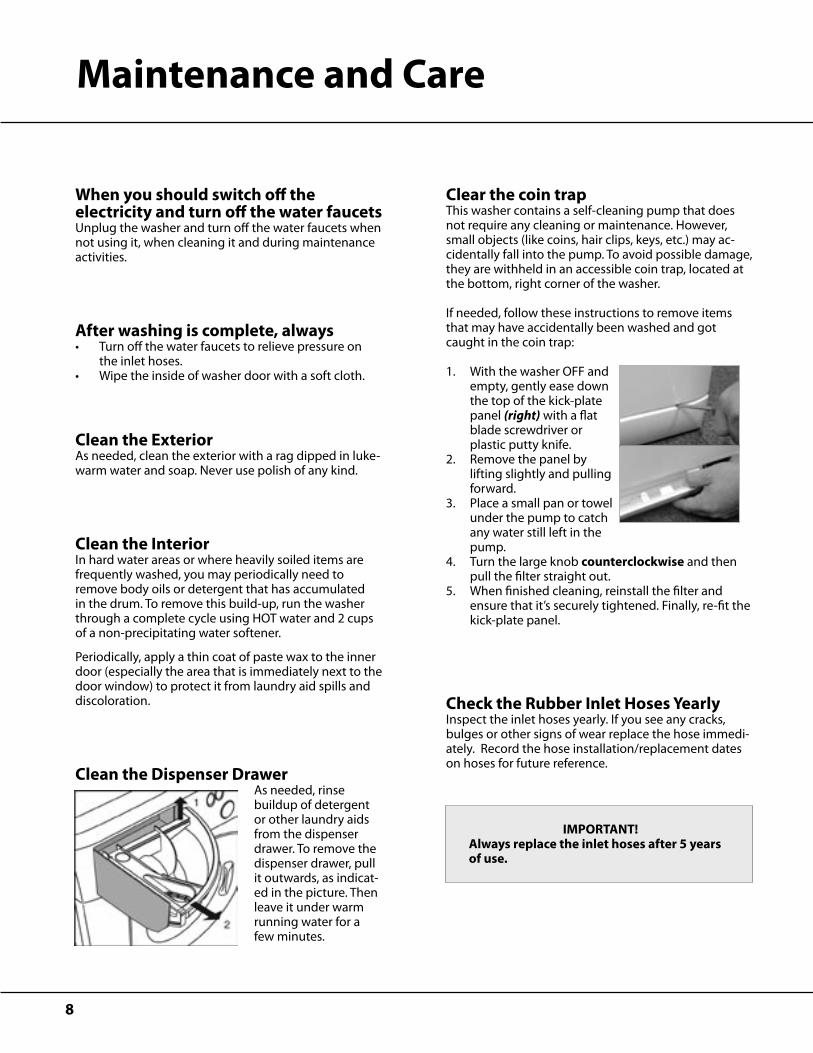
Clean the Dispenser DrawerAs needed, rinse buildup of detergent or other laundry aids from the dispenser drawer. To remove the dispenser drawer, pull it outwards, as indicat-ed in the picture. Then leave it under warm running water for a few minutes.
•
•
Clear the coin trapThis washer contains a self-cleaning pump that does not require any cleaning or maintenance. However, small objects (like coins, hair clips, keys, etc.) may ac-cidentally fall into the pump. To avoid possible damage, they are withheld in an accessible coin trap, located at the bottom, right corner of the washer.
If needed, follow these instructions to remove items that may have accidentally been washed and got caught in the coin trap:
With the washer OFF and empty, gently ease down the top of the kick-plate panel (right) with a flat blade screwdriver or plastic putty knife. Remove the panel by lifting slightly and pulling forward. Place a small pan or towel under the pump to catch any water still left in the pump.Turn the large knob counterclockwise and then pull the filter straight out. When finished cleaning, reinstall the filter and ensure that it’s securely tightened. Finally, re-fit the kick-plate panel.
Check the Rubber Inlet Hoses YearlyInspect the inlet hoses yearly. If you see any cracks, bulges or other signs of wear replace the hose immedi-ately. Record the hose installation/replacement dates on hoses for future reference.
1.
2.
3.
4.
5.
Maintenance and Care
IMPORTANT!Always replace the inlet hoses after 5 years of use.
9
Maintenance and Care
A) To winterize your washer-dryerWith machine power OFF, pour ½ quart of RV-type antifreeze into washer drum
Close door. Advance Program Dial to a ‘Spin’ position
Press ON-OFF Button (IN). Wait 1-2 minutes
Press ON-OFF Button (OUT). Unplug washer-dryer from electrical outlet (or disconnect power)
Turn water supply faucets OFF. Disconnect inlet hoses from faucets. Drain remaining water from the hoses. FINISHED.
Optional RV Winterization - If currently pumping antifreeze through a fresh water system
With machine power OFF, turn WASH TEMP knob to HOT
Advance Program Dial to cycle 3
Press ON-OFF button (IN). Let machine fill until antifreeze is in the drum
Advance Program Dial to ‘RESET’. Wait 5 seconds
Advance Program Dial to a ‘Spin’ position. Let the antifreeze drain from the drum
Advance Program Dial to ‘RESET’. Wait 5 seconds.
Press the ON-OFF button (OUT)
Turn WASH TEMP knob to COLD
Repeat steps 2 through 7. FINISHED.
1)
2)
3)
4)
5)
1)
2)
3)
4)
5)
6)
7)
8)
9)
B) To use again, flush water pipes, thenReconnect water inlet hoses to corresponding HOT/COLD faucets. Turn faucets ON. NOTE: Check water inlet hoses and pump periodically (see Us-ers Guide).
Plug washer-dryer in to appropriate electrical out-let (see Users Guide) - or reconnect power supply
With ON-OFF button in the OFF (OUT) position, pour ½ TBSP. of powder detergent (or liquid equiv.) into the ‘Detergent’ compartment inside the Dispenser Drawer (see Users Guide).
Advance Program Dial to cycle 4
Press ON-OFF button (IN). Allow machine to run through complete cycle to clean out any remain-ing antifreeze. FINISHED.
1)
2)
3)
4)
5)
Winterization (for RV or marine installs)

10
Before you call our Customer Care Department, go through the following troubleshooting suggestions
Troubleshooting
Problem: Possible Causes / Solutions:
The washer won’t start.
The plug is not plugged into the socket, or not making contact.There has been a power outage.The fuse has blown.The door is not closed securely.The ON-OFF button is not pressed (in)The Programs dial has not been set correctly (see Preset Washing Programs)The water supply faucets are not turned on
•••••••
The washer won’t fill.
The hose is not correctly connected to the tap.The inlet hose filter screens need to be cleaned. If work has recently been carried out on the water piping, or if water is very hard, the filters could be clogged with particles or debris.The rubber hoses are kinked or squashed.
••
•
The Programs dial keeps turning.
Wait for the washer to drain, then Stop/Reset the washer (see Washing Options). Set another program. If the knob continues to turn, contact our Customer Care Department.
•
The washer is continuously filling
and draining with water.
The drain hose is positioned too low. It must be installed at a height ranging from 25” to 34”.The end of the drain hose is under water.The wall drainage system does not have a breather pipe.There may be a problem with your drain trap if the washer is installed on an upper floor of a building.
•
•••
The washer does not drain or spin.
The Easy Iron function is selected (see Washing Options)The Coin Trap is clogged (see Clear the Coin Trap)The drain hose is kinked or squashed.The drain hose is clogged or positioned incorrectly so it is blocking water flow.
••••
The washer vibrates excessively during
the spin cycle.
The shipping bolts and spacers have not been removed.The washer is not leveled correctly.
••
The washer leaks.
The inlet hoses are not secured properly. They should be tightened by hand but not forced.The detergent dispenser needs to be cleaned (see Clean the Detergent Dispenser)The drain hose is not secured properly.
•
••
There is too much foam.
Improper detergent for this washer (see Dispenser Drawer)Too much detergent has been used (see Dispenser Drawer)To clear excess suds, set the Programs dial to “Rinse” and allow the machine to rinse out.
•••
If you still have a problem, call Westland Sales: 1-800-356-0766Please have the following info ready when you call:
1) Nature of the malfunction 2) Model no. (AW122NA) 3) Serial number (i.e. S/N...)
11
Spare Parts
This washer is a complex machine. Repairing it yourself or having a non-authorized person try to repair it could cause harm to one or more persons and to the machine, and could invalidate the warranty.
Always call Westland Sales first if you experience any problems with this machine. Contact number: 1-800-356-0766 or 503-656-2280.
12
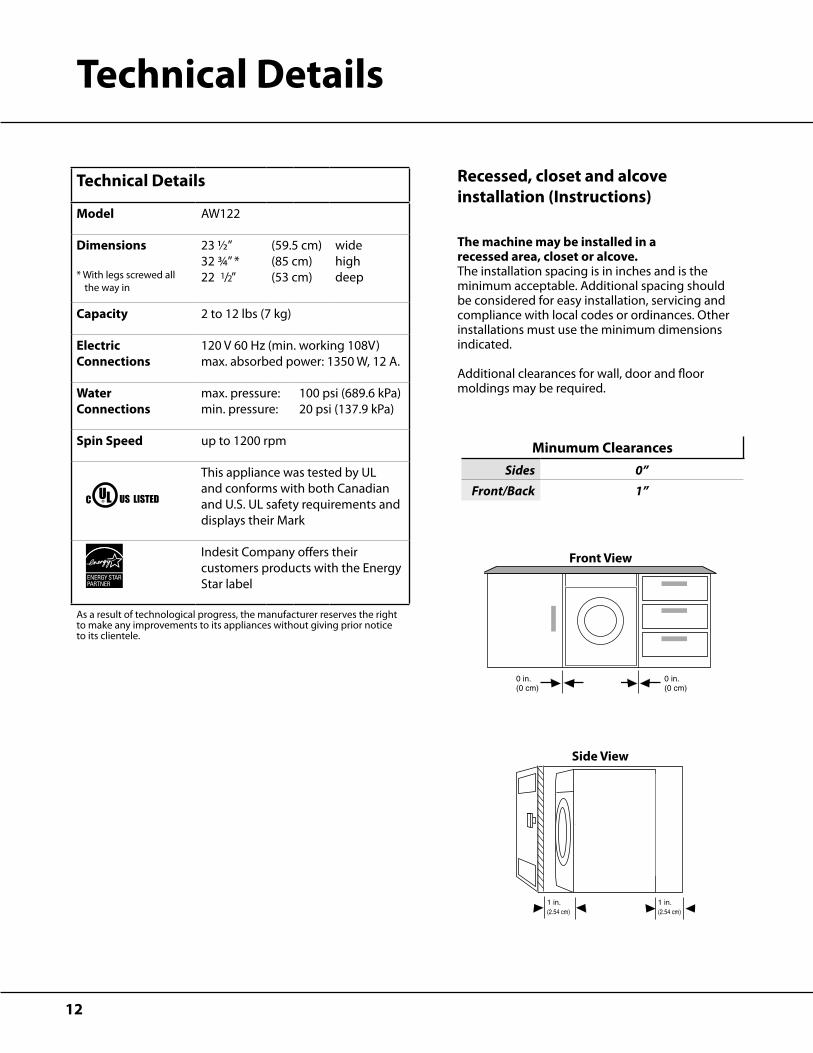
Recessed, closet and alcove installation (Instructions)
The machine may be installed in a recessed area, closet or alcove.The installation spacing is in inches and is the minimum acceptable. Additional spacing should be considered for easy installation, servicing and compliance with local codes or ordinances. Other installations must use the minimum dimensions indicated.
Additional clearances for wall, door and floor moldings may be required.
Minumum Clearances
Sides 0”
Front/Back 1”
Technical Details
Technical Details
Model AW122
Dimensions
* With legs screwed all the way in
23 ½”32 ¾” *22 1/2”
(59.5 cm)(85 cm)(53 cm)
widehighdeep
Capacity 2 to 12 lbs (7 kg)
Electric Connections
120 V 60 Hz (min. working 108V)max. absorbed power: 1350 W, 12 A.
Water Connections
max. pressure: min. pressure:
100 psi (689.6 kPa)20 psi (137.9 kPa)
Spin Speed up to 1200 rpm
This appliance was tested by UL and conforms with both Canadian and U.S. UL safety requirements and displays their Mark
Indesit Company offers their customers products with the Energy Star label
As a result of technological progress, the manufacturer reserves the right to make any improvements to its appliances without giving prior notice to its clientele.
23-1/2 in.(59.7 cm)
0 in.(0 cm)
0 in.(0 cm)
0 in.(0 cm)
33-1/4 in.(84.5 cm)
*Depth dimension varies with model.
18-1/4 to 24 1/4 in.*(46.4 to 61.6 cm)
1 in.(2.54 cm)
1 in.(2.54 cm)
Front View
Side View
C UL US LISTED®
13
Tools and PartsAssemble the necessary tools and supplies before beginning the washer installation. The parts supplied are in the drum.
Tools needed for installation:10mm Wrench, Screwdriver
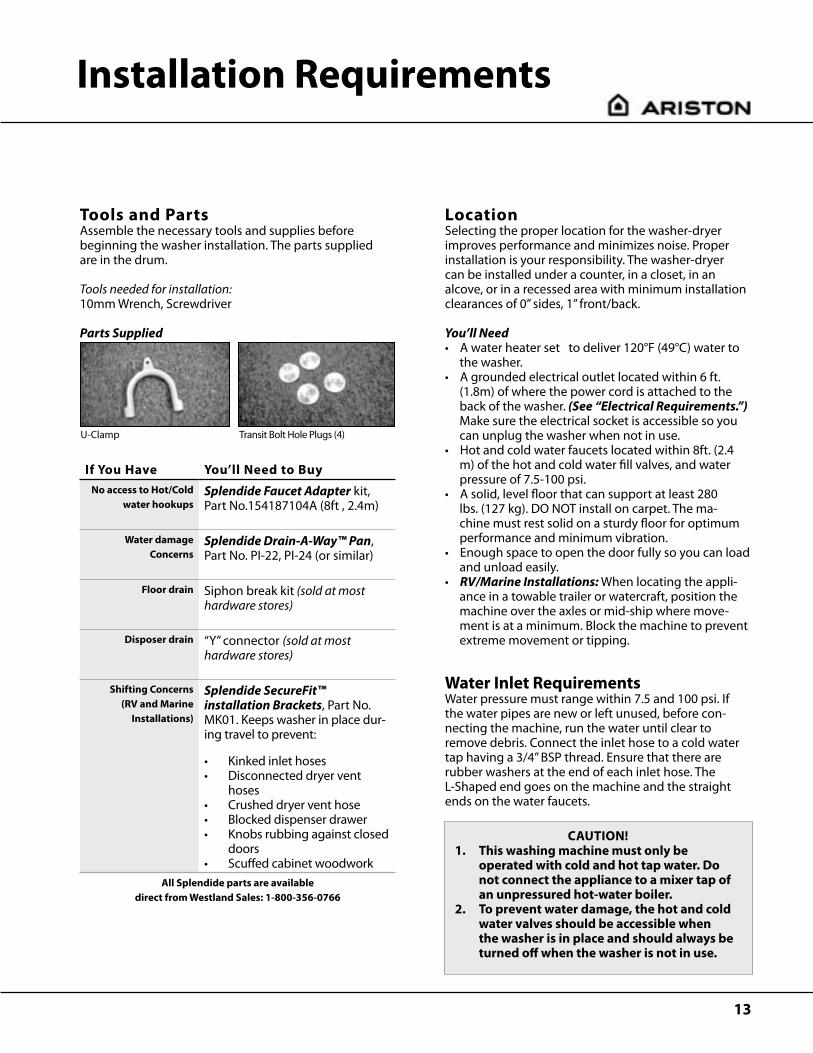
Parts Supplied
U-Clamp Transit Bolt Hole Plugs (4)
If You Have You’ll Need to Buy
No access to Hot/Cold water hookups
Splendide Faucet Adapter kit, Part No.154187104A (8ft , 2.4m)
Water damage Concerns
Splendide Drain-A-Way™ Pan, Part No. PI-22, PI-24 (or similar)
Floor drain Siphon break kit (sold at most hardware stores)
Disposer drain “Y” connector (sold at most hardware stores)
Shifting Concerns (RV and Marine
Installations)
Splendide SecureFit™ installation Brackets, Part No. MK01. Keeps washer in place dur-ing travel to prevent:
Kinked inlet hosesDisconnected dryer vent hosesCrushed dryer vent hoseBlocked dispenser drawerKnobs rubbing against closed doorsScuffed cabinet woodwork
••
•••
•All Splendide parts are available
direct from Westland Sales: 1-800-356-0766
LocationSelecting the proper location for the washer-dryer improves performance and minimizes noise. Proper installation is your responsibility. The washer-dryer can be installed under a counter, in a closet, in an alcove, or in a recessed area with minimum installation clearances of 0” sides, 1” front/back.
You’ll Need• A water heater set to deliver 120°F (49°C) water to
the washer.• A grounded electrical outlet located within 6 ft.
(1.8m) of where the power cord is attached to the back of the washer. (See “Electrical Requirements.”) Make sure the electrical socket is accessible so you can unplug the washer when not in use.
• Hot and cold water faucets located within 8ft. (2.4 m) of the hot and cold water fill valves, and water pressure of 7.5-100 psi.
• A solid, level floor that can support at least 280 lbs. (127 kg). DO NOT install on carpet. The ma-chine must rest solid on a sturdy floor for optimum performance and minimum vibration.
• Enough space to open the door fully so you can load and unload easily.
• RV/Marine Installations: When locating the appli-ance in a towable trailer or watercraft, position the machine over the axles or mid-ship where move-ment is at a minimum. Block the machine to prevent extreme movement or tipping.
Water Inlet RequirementsWater pressure must range within 7.5 and 100 psi. If the water pipes are new or left unused, before con-necting the machine, run the water until clear to remove debris. Connect the inlet hose to a cold water tap having a 3/4” BSP thread. Ensure that there are rubber washers at the end of each inlet hose. The L-Shaped end goes on the machine and the straight ends on the water faucets.
Installation Requirements
CAUTION!This washing machine must only be operated with cold and hot tap water. Do not connect the appliance to a mixer tap of an unpressured hot-water boiler.To prevent water damage, the hot and cold water valves should be accessible when the washer is in place and should always be turned off when the washer is not in use.
1.
2.
14
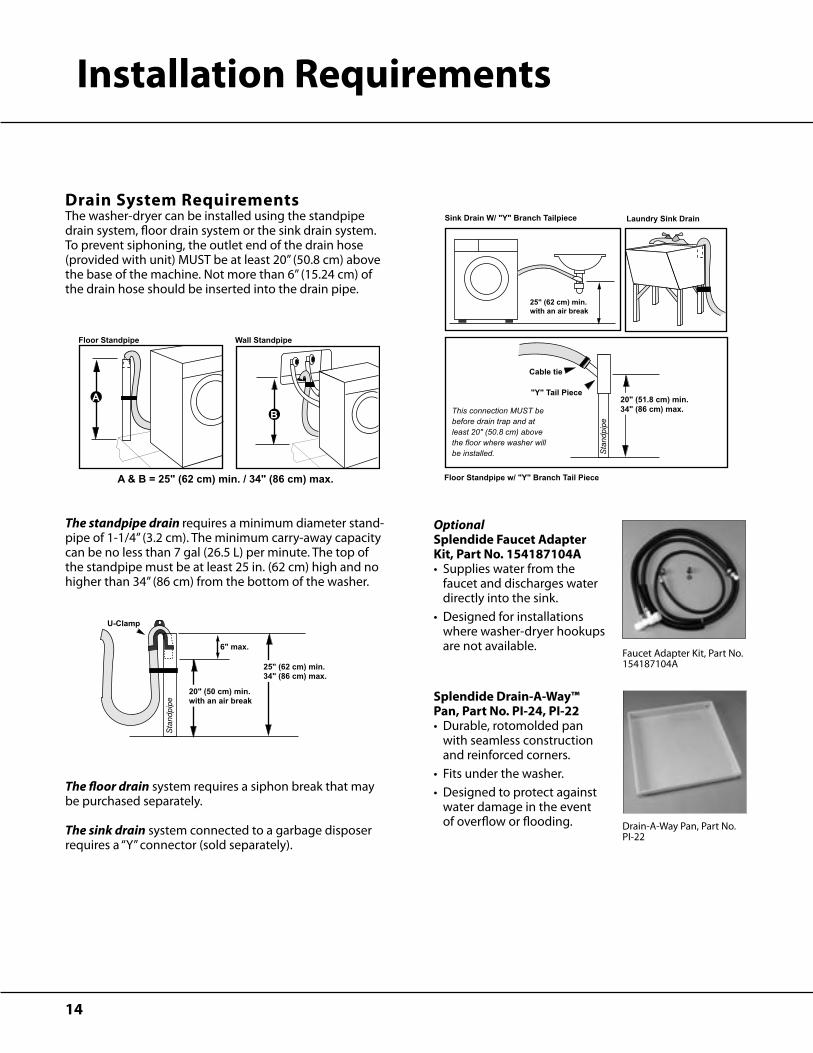
Drain System RequirementsThe washer-dryer can be installed using the standpipe drain system, floor drain system or the sink drain system. To prevent siphoning, the outlet end of the drain hose (provided with unit) MUST be at least 20” (50.8 cm) above the base of the machine. Not more than 6” (15.24 cm) of the drain hose should be inserted into the drain pipe.
The standpipe drain requires a minimum diameter stand-pipe of 1-1/4” (3.2 cm). The minimum carry-away capacity can be no less than 7 gal (26.5 L) per minute. The top of the standpipe must be at least 25 in. (62 cm) high and no higher than 34” (86 cm) from the bottom of the washer.
The floor drain system requires a siphon break that may be purchased separately.
The sink drain system connected to a garbage disposer requires a “Y” connector (sold separately).
A & B = 25" (62 cm) min. / 34" (86 cm) max.
Floor Standpipe Wall Standpipe
A
B
20" (50 cm) min.with an air break
25" (62 cm) min. 34" (86 cm) max.
6" max.
Standpipe
U-Clamp
20" (51.8 cm) min. 34" (86 cm) max.
Sta
ndpi
pe
"Y" Tail Piece
This connection MUST be before drain trap and at least 20" (50.8 cm) above the floor where washer will be installed.
Cable tie
Floor Standpipe w/ "Y" Branch Tail Piece Fig. 7
25" (62 cm) min.with an air break
Laundry Sink DrainSink Drain W/ "Y" Branch Tailpiece
Faucet Adapter Kit, Part No. 154187104A
OptionalSplendide Faucet Adapter Kit, Part No. 154187104A • Supplies water from the
faucet and discharges water directly into the sink.
• Designed for installations where washer-dryer hookups are not available.
Splendide Drain-A-Way™ Pan, Part No. PI-24, PI-22 • Durable, rotomolded pan
with seamless construction and reinforced corners.
• Fits under the washer.• Designed to protect against
water damage in the event of overflow or flooding.
Installation Requirements
Drain-A-Way Pan, Part No. PI-22
15
Electrical Requirements
• A 120-volt, 60-Hz., AC-only, 15 or 20-amp, fused electrical supply is required. Time-delay fuse or circuit breaker is recommended. It is recommended that a separate circuit serving only this appliance be provided.
• This washer-dryer is equipped with a 6’ power supply cord having a 3-prong ground plug.
• To minimize possible shock hazard, the cord must be plugged into a properly grounded (3) prong electrical outlet capable of 120 Volt, 60 Hz and grounded in ac-cordance with local codes and ordinances. If a mating outlet is not available, it is the personal responsibility and obligation of the customer to have the properly grounded outlet installed by a qualified electrician. The outlet shouldn’t be controlled by a wall switch or pull cord which can be turned off accidentally.
• If codes permit and a separate ground wire is used, it is recommended that a qualified electrician determine that the ground path is adequate.
• Do not ground to a plastic plumbing lines, gas lines or water pipes.
• Check with a qualified electrician if you are not sure the washer is properly grounded.
• DO NOT use an extension cord.• DO NOT have a fuse in the neutral or ground circuit.• DO NOT install or store this appliance where it will be
exposed to weather or in an area where gasoline or other flammables are stored.
GROUNDING INSTRUCTIONSElectrical Shock Hazard
(Death, Fire, or Electric Shock)
This appliance must be grounded.
This appliance should be connected to an Individual Branch Circuit with N.14 AWG Wire and Protected by 15A fuse
In the event of a malfunction, or breakdown, grounding will reduce the risk of electric shock by providing a path of least resistance for electric current. This appliance is equipped with a cord having an equipment grounding conductor and grounding plug. The plug must be plugged into an appropriate outlet that is properly installed and grounded in accordance with all local codes and ordinances. DO NOT modify the plug provided with the appliance. If it will not fit the outlet, have the proper out-let installed by a qualified electrician.
WARNING: Improper connection of the equipment-grounding conductor can result in a risk of electric shock. Check with a qualified electrician or serviceman if you are in doubt as to whether the appliance is properly grounded.
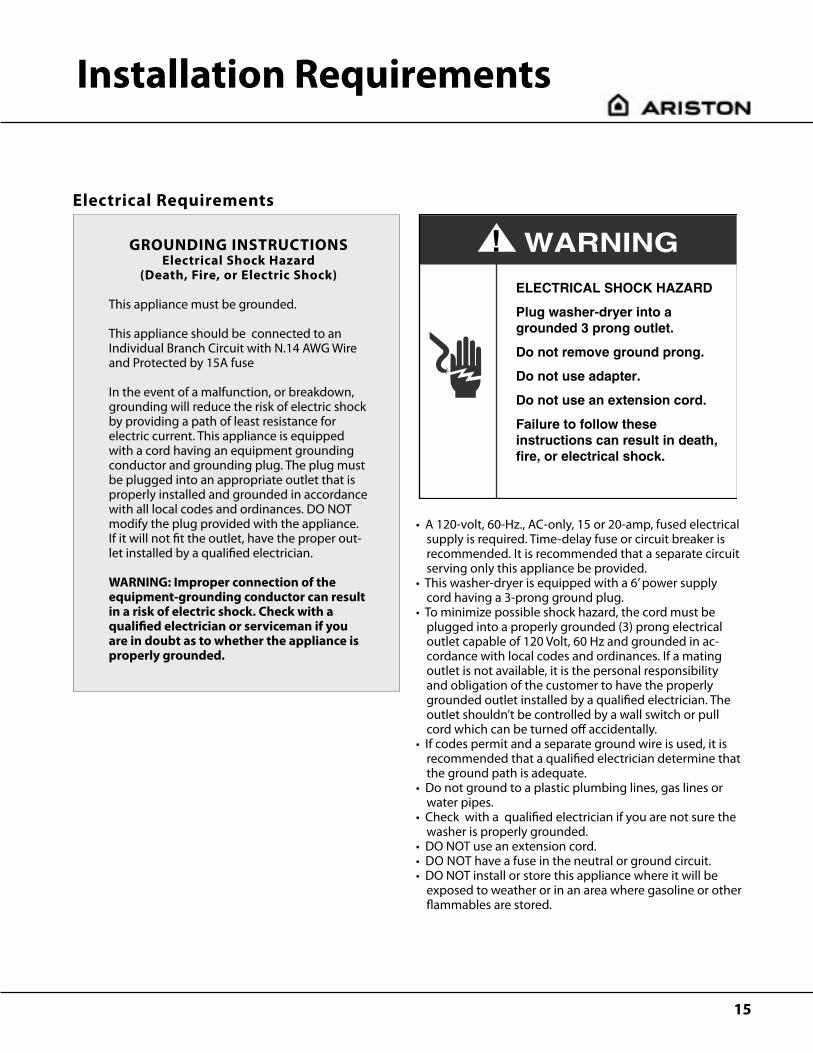
ELECTRICAL SHOCK HAZARD
Plug washer-dryer into a grounded 3 prong outlet.
Do not remove ground prong.
Do not use adapter.
Do not use an extension cord.
Failure to follow these instructions can result in death, fire, or electrical shock.
WARNING!
Installation Requirements
16
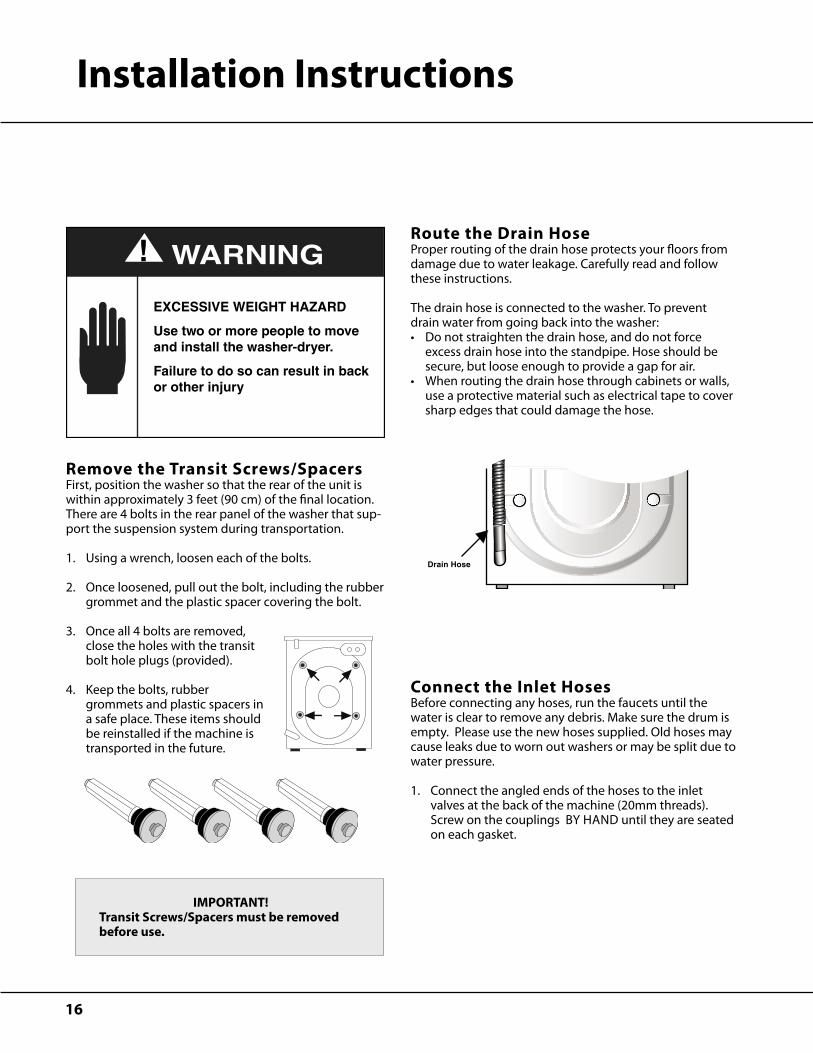
Remove the Transit Screws/SpacersFirst, position the washer so that the rear of the unit is within approximately 3 feet (90 cm) of the final location. There are 4 bolts in the rear panel of the washer that sup-port the suspension system during transportation.
1. Using a wrench, loosen each of the bolts.
2. Once loosened, pull out the bolt, including the rubber grommet and the plastic spacer covering the bolt.
3. Once all 4 bolts are removed, close the holes with the transit bolt hole plugs (provided).
4. Keep the bolts, rubber grommets and plastic spacers in a safe place. These items should be reinstalled if the machine is transported in the future.
Route the Drain HoseProper routing of the drain hose protects your floors from damage due to water leakage. Carefully read and follow these instructions.
The drain hose is connected to the washer. To prevent drain water from going back into the washer:• Do not straighten the drain hose, and do not force
excess drain hose into the standpipe. Hose should be secure, but loose enough to provide a gap for air.
• When routing the drain hose through cabinets or walls, use a protective material such as electrical tape to cover sharp edges that could damage the hose.
Connect the Inlet HosesBefore connecting any hoses, run the faucets until the water is clear to remove any debris. Make sure the drum is empty. Please use the new hoses supplied. Old hoses may cause leaks due to worn out washers or may be split due to water pressure.
1. Connect the angled ends of the hoses to the inlet valves at the back of the machine (20mm threads). Screw on the couplings BY HAND until they are seated on each gasket.
EXCESSIVE WEIGHT HAZARD
Use two or more people to move and install the washer-dryer.
Failure to do so can result in back or other injury
WARNING!
Drain Hose
Installation Instructions
IMPORTANT!Transit Screws/Spacers must be removed before use.

17
2. Attach the hose connected to the ‘H’ valve to the hot water faucet. Screw on the coupling BY HAND until it is seated on the gasket. DO NOT OVERTIGHTEN.
3. Attach the hose con-nected to the ‘C’ valve to the cold water faucet. Screw on the coupling BY HAND until it is seated on the gasket. DO NOT OVERTIGHTEN.
4. Turn on the water faucets and check for leaks.
Secure the Drain Hose1. Drape the power cord over the washer top.
2. Secure the drain hose to the laundry tub leg or standpipe with a strap or cable-tie.
3. Use the U-Clamp (provided) and insert the drain hose into the standpipe or sink. DO NOT force excess drain hose into the standpipe. There should be only 6” of drain hose in the stand pipe.
Level the Washer-DryerAfter positioning the washer in it’s final installation location, you must level the washer.
The front feet are self locking and adjustable.Your machine will be noisy if the two front feet are not adjusted so the machine stands firm and level.
1. Tilt the machine back, leaning it against the wall.
2. Adjust the front feet up or down to ensure the washer is resting solid and does not rock side-to-side or front-to back when the machine is upright.
H C
20" (50 cm) min.with an air break
25" (62 cm) min. 34" (86 cm) max.
6" max.
Standpipe
U-Clamp
IMPORTANT!The couplings should be tightened BY HAND, a tool should only be used if a leak occurs. Do not use excessive force.
Installation Instructions
IMPORTANT!When moving washer to it’s final location, take care not to kink the inlet or drain hoses.
DID YOU KNOW?The majority of problems with noisy machines or excessive vibration are due to the transit SCREWS/SPACERS NOT BEING REMOVED or the FEET NOT BEING ADJUSTED correctly to level the machine.
SecureFit Brackets, Part No. MKO1
OptionalSplendide SecureFit™ Installation Brackets, Part No. MK01• Hook around two front feet
and screw into the floor. • Designed to keep the washer
from shifting front-to-back or left-to right.
• Recommended for RV or Marine Installations.
18
Installation Instructions
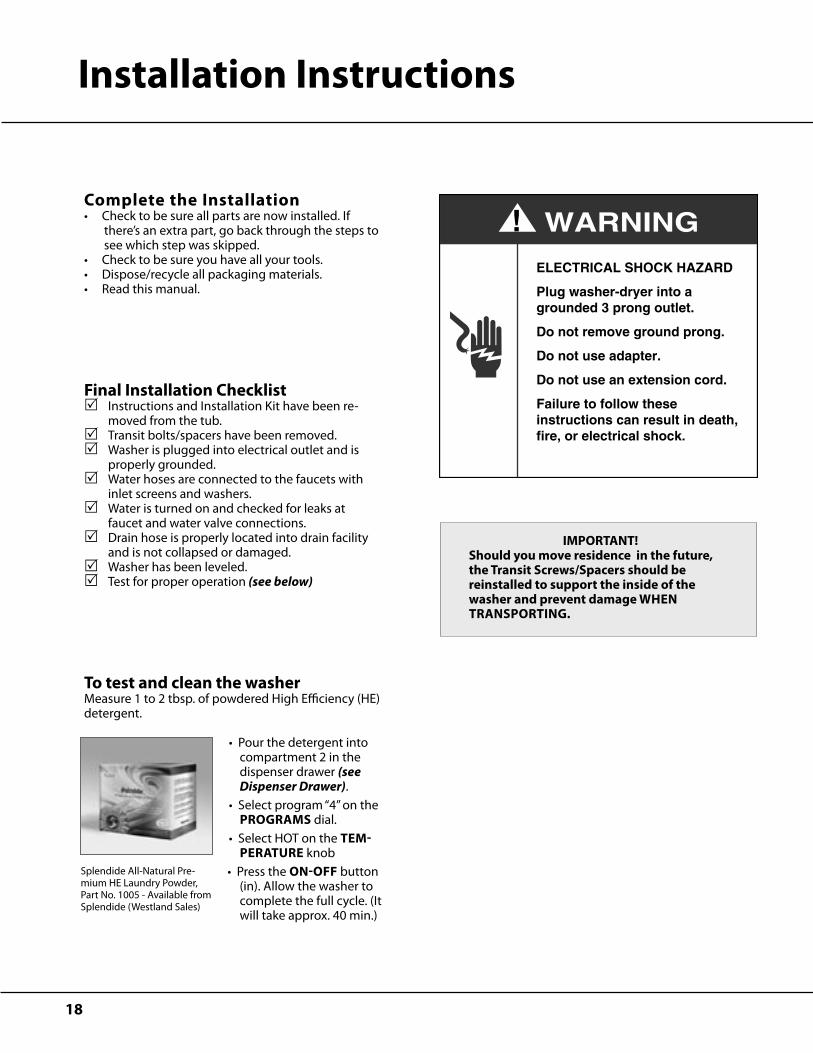
ELECTRICAL SHOCK HAZARD
Plug washer-dryer into a grounded 3 prong outlet.
Do not remove ground prong.
Do not use adapter.
Do not use an extension cord.
Failure to follow these instructions can result in death, fire, or electrical shock.
WARNING!Complete the Installation• Check to be sure all parts are now installed. If
there’s an extra part, go back through the steps to see which step was skipped.
• Check to be sure you have all your tools.• Dispose/recycle all packaging materials.• Read this manual.
Final Installation ChecklistInstructions and Installation Kit have been re-moved from the tub.Transit bolts/spacers have been removed.Washer is plugged into electrical outlet and is properly grounded.Water hoses are connected to the faucets with inlet screens and washers.Water is turned on and checked for leaks at faucet and water valve connections.Drain hose is properly located into drain facility and is not collapsed or damaged.Washer has been leveled.Test for proper operation (see below)
To test and clean the washerMeasure 1 to 2 tbsp. of powdered High Efficiency (HE) detergent.
• Pour the detergent into compartment 2 in the dispenser drawer (see Dispenser Drawer).
• Select program “4” on the PROGRAMS dial.
• Select HOT on the TEM-PERATURE knob
• Press the ON-OFF button (in). Allow the washer to complete the full cycle. (It will take approx. 40 min.)
IMPORTANT!Should you move residence in the future, the Transit Screws/Spacers should be reinstalled to support the inside of the washer and prevent damage WHEN TRANSPORTING.

19
Notes

© Copyright 2006, Westland Sales, Clackamas, OR 97015
1-800-356-0766www.westlandsales.com
Related Documents