Linux Board Port Lab Lab Steps 1. If you have not already done so connect the ethernet cable to the beaglebone 2. If you have not already done so insert the micro-SD card o This card should be modified as described in the Prerequisites section above. 3. If you have not already done so connect the USB to Mini-USB cable to the beaglebone. The board should now have the LED light on indicating it is powered on. 4. If you do not already have a serial console connection to the beaglebone use the following steps to connect the beaglebone to your VMWare and open a minicom serial connection. o Verify that the future devices beaglebone/xds100v2 device is connected to your VMWare by going to Virtual Machine -> Removable Devices And make sure that there is a check mark next to the future devices beaglebone/xds100v2. If not then select the device and choose connect. o Open a terminal and run the following command # minicom -w o You should now see a minicom window. Pressing ENTER should give you a u-boot prompt like U-Boot# Template Board File Description This section will cover the addition of a template board file and how to verify basic booting of the kernel prior to adding additional device support. Prerequisites Serial connection to the target device git and gitk installed on your Linux host The Sitara Linux SDK installed to provide the cross-compile toolchain

Welcome message from author
This document is posted to help you gain knowledge. Please leave a comment to let me know what you think about it! Share it to your friends and learn new things together.
Transcript

Linux Board Port Lab
Lab Steps
1. If you have not already done so connect the ethernet cable to the beaglebone 2. If you have not already done so insert the micro-SD card
o This card should be modified as described in the Prerequisites section above. 3. If you have not already done so connect the USB to Mini-USB cable to the beaglebone. The board
should now have the LED light on indicating it is powered on. 4. If you do not already have a serial console connection to the beaglebone use the following steps to
connect the beaglebone to your VMWare and open a minicom serial connection. o Verify that the future devices beaglebone/xds100v2 device is connected to your VMWare by
going to Virtual Machine -> Removable Devices And make sure that there is a check mark next to the future devices beaglebone/xds100v2. If not then select the device and choose connect.
o Open a terminal and run the following command
# minicom -w
o You should now see a minicom window. Pressing ENTER should give you a u-boot prompt like U-Boot#
Template Board File Description
This section will cover the addition of a template board file and how to verify basic booting of the kernel prior to adding additional device support.
Prerequisites
Serial connection to the target device git and gitk installed on your Linux host The Sitara Linux SDK installed to provide the cross-compile toolchain

Know the SDK version you are using so you can use that version in the lab steps where ever you see <SDK version>. For example the version may look like 06.00.00.00.
A TFTP server configured for transferring kernel images
Key Points
Adding a basic board file for the am335x device that will allow the Linux kernel to boot There is additional work required to support a root file system from persistent storage Navigating the git tree to find the sources and see the changes
Lab Steps
1. Open a new terminal window (leaving the minicom window open and running) 2. Browse to the board port Linux kernel sources, which is a git tree containing the board port files for the
Linux kernel.
cd /home/sitara/board-port/sitara-board-port-linux
3. Checkout the tag in the git tree that corresponds to the Linux kernel with a template board file added. This template file has just the basics required to boot the Linux kernel and display the kernel boot messages on the serial console.
git checkout <SDK version>-template
4. To view the changes made to add the template file use gitk to see the files affected and the diff of the changes. By default the active commit will be the one for the template file since that is the version of the repository checked out.
gitk --all

o In the above gitk you can see The list of commits in the git tree The list of files modified by that commit The differences in those files
o NOTE: You can also see the changes using the command git diff 06.00.00.00-remove-board-file..06.00.00.00-template which provides a diff of the changes between the commit which removed the old board file and the commit adding the template file.
5. Configure the Linux kernel to get ready for compilation. NOTE: In the TI labs this kernel has already been configured and a base compile has been performed to save time. You can and should still run the steps below but the build time will be reduced.
make ARCH=arm CROSS_COMPILE=/home/sitara/ti-sdk-am335x-evm-06.00.00.00/linux-devkit/sysroots/i686-arago-linux/usr/bin/arm-linux-gnueabihf- tisdk_am335x-evm_defconfig
6. Compile the Linux kernel with this template board file. This kernel will have limited functionality but will be useful to validate that the kernel supports the device sufficiently to begin further development. NOTE: You can always recall the previous command using the up arrow. You can then just change the build target to avoid re-typing the whole command line.
make ARCH=arm CROSS_COMPILE=/home/sitara/ti-sdk-am335x-evm-06.00.00.00/linux-devkit/sysroots/i686-arago-linux/usr/bin/arm-linux-gnueabihf- uImage
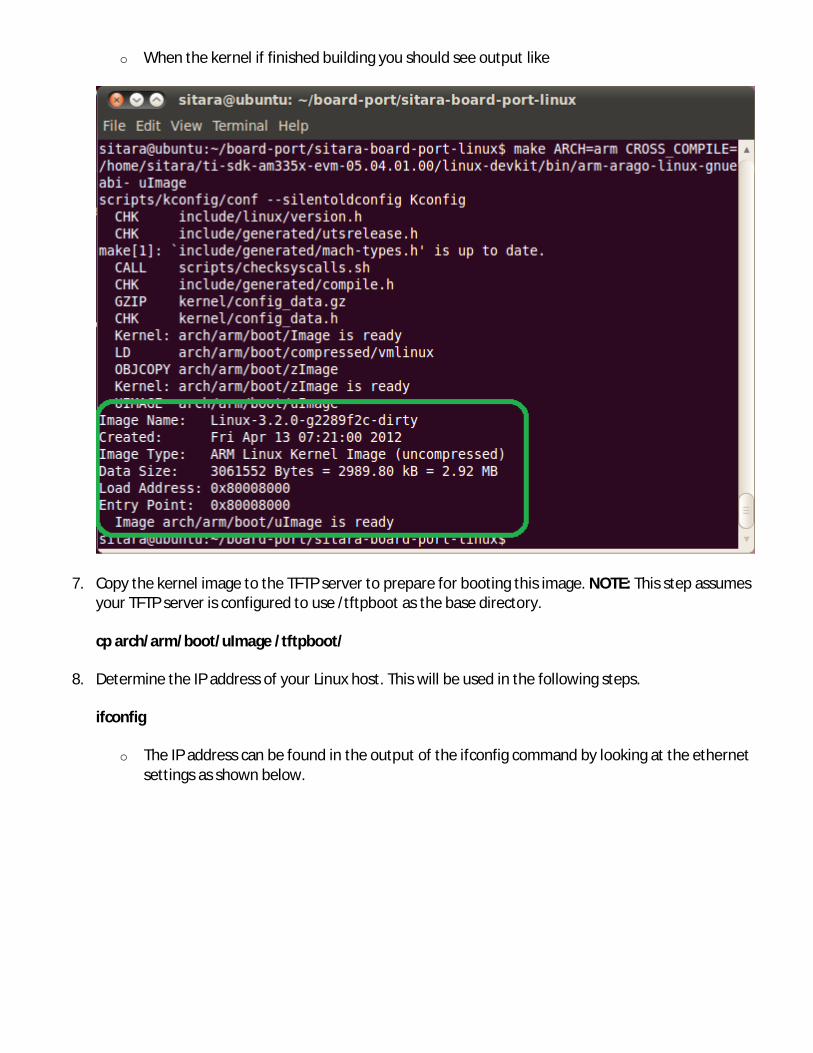
o When the kernel if finished building you should see output like
7. Copy the kernel image to the TFTP server to prepare for booting this image. NOTE: This step assumes your TFTP server is configured to use /tftpboot as the base directory.
cp arch/arm/boot/uImage /tftpboot/
8. Determine the IP address of your Linux host. This will be used in the following steps.
ifconfig
o The IP address can be found in the output of the ifconfig command by looking at the ethernet settings as shown below.
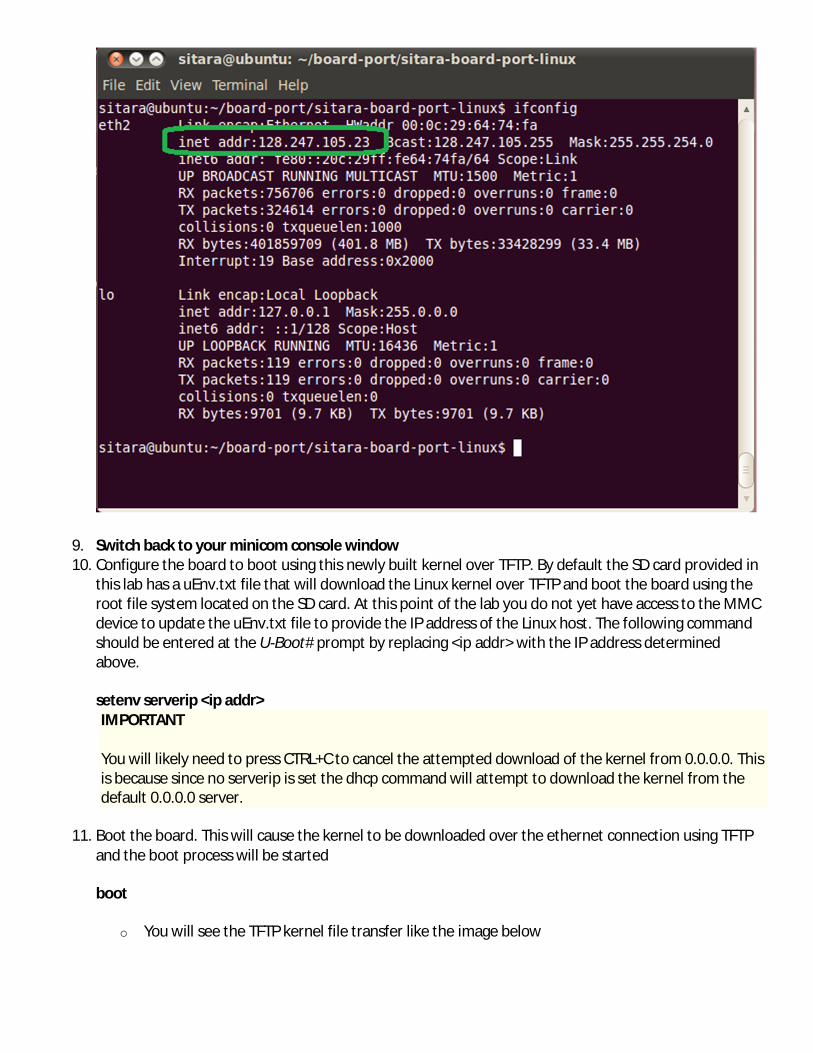
9. Switch back to your minicom console window 10. Configure the board to boot using this newly built kernel over TFTP. By default the SD card provided in
this lab has a uEnv.txt file that will download the Linux kernel over TFTP and boot the board using the root file system located on the SD card. At this point of the lab you do not yet have access to the MMC device to update the uEnv.txt file to provide the IP address of the Linux host. The following command should be entered at the U-Boot# prompt by replacing <ip addr> with the IP address determined above.
setenv serverip <ip addr> IMPORTANT You will likely need to press CTRL+C to cancel the attempted download of the kernel from 0.0.0.0. This is because since no serverip is set the dhcp command will attempt to download the kernel from the default 0.0.0.0 server.
11. Boot the board. This will cause the kernel to be downloaded over the ethernet connection using TFTP and the boot process will be started
boot
o You will see the TFTP kernel file transfer like the image below
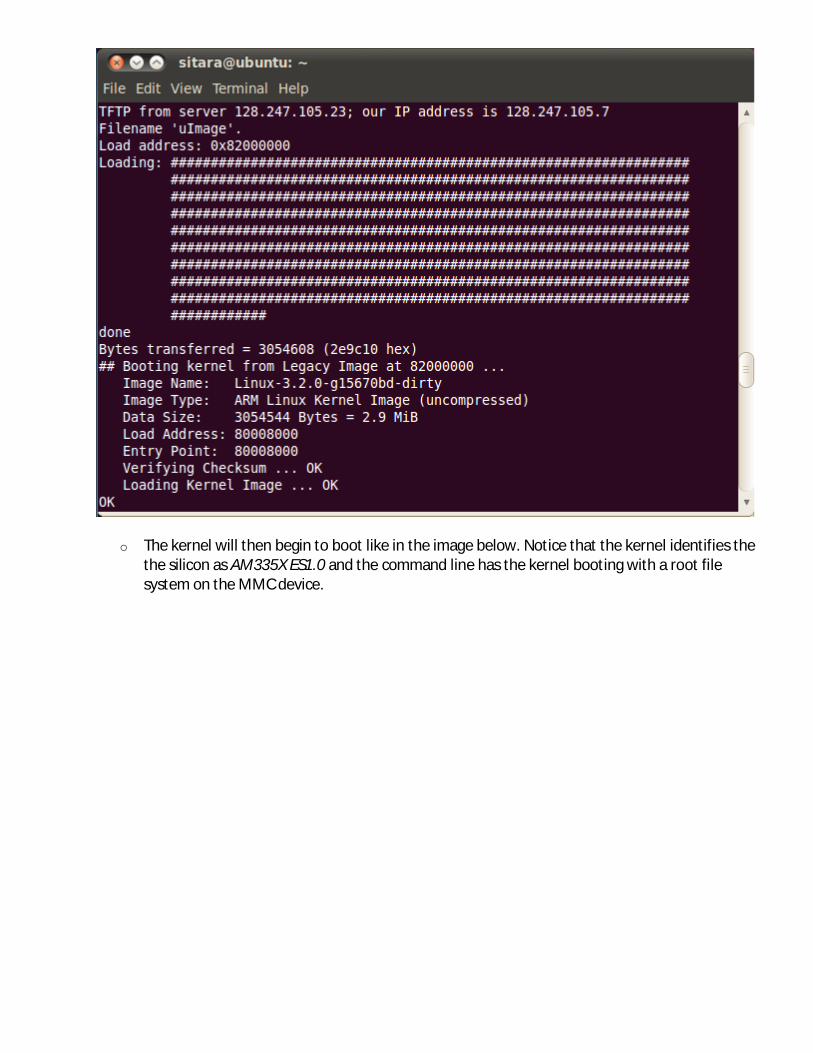
o The kernel will then begin to boot like in the image below. Notice that the kernel identifies the the silicon as AM335X ES1.0 and the command line has the kernel booting with a root file system on the MMC device.

o You will notice that the boot process is now hanging while waiting for the root device like in the output below. This makes sense because you configured the kernel to boot the root file system from the MMC device, but the basic template file does not have support the the MMC device. The next lab will walk you through adding the MMC device support to the Linux kernel.

Adding MMC/SD Support Description
In this section you will apply changes that add MMC support and observe the kernel being able to access the MMC device for its root file system.
Prerequisites
SD card with a root file system inserted into the SD card slot of the target board
Key Points
How to modify the Linux kernel to add support for MMC card devices Rebuilding the Linux kernel with MMC support and booting the root file system from SD Accessing the SD card using Linux to update the uEnv.txt
Lab Steps
1. Switch back to the Linux console instead of the minicom console 2. Checkout the tag in the git tree that corresponds to adding MMC support. This source revision builds
on the previous one by adding MMC support to the board file.
git checkout <SDK version>-mmc
3. To view the changes made to add MMC support use gitk --all again. This time the active commit will be moved to the one adding MMC support because that is the state of the tree due to the git checkout command run above.
o NOTE: You can also see the changes using the command git diff 06.00.00.00-template..06.00.00.00-mmc which provides a diff of the changes between the commit adding the template file and the commit adding the mmc support.
4. Rebuild the Linux kernel to pickup the source changes that added MMC support. You do not need to reconfigure the kernel since the default configuration has MMC support turned on, the board file just did not add that support to the kernel.
make ARCH=arm CROSS_COMPILE=/home/sitara/ti-sdk-am335x-evm-06.00.00.00/linux-devkit/sysroots/i686-arago-linux/usr/bin/arm-linux-gnueabihf- uImage
5. Copy the kernel image to the TFTP server to prepare for booting this image.
cp arch/arm/boot/uImage /tftpboot/
6. Switch back to your minicom console window 7. 'Reboot you board by pressing and holding the small black button near the ethernet port. (if the LCD is
attached you will not be able to access the reset button on the board, use the one on the LCD board) NOTE:'Do not unplug the USB cable to cycle the power as this will cause you to lose your serial connection.
8. Configure the board to boot using this newly built kernel over TFTP.
setenv serverip <ip addr> IMPORTANT You will likely need to press CTRL+C to cancel the attempted download of the kernel from 0.0.0.0. This is because since no serverip is set the dhcp command will attempt to download the kernel from the default 0.0.0.0 server.
9. Boot the board. This will cause the kernel to be downloaded over the ethernet connection using TFTP and the boot process will be started
boot
10. This time you will see that the kernel continues past the point of waiting for the root device and continues booting into the file system. Once the boot is finished you should be left with a screen like the one below with a login prompt.

11. Login using the user name "root" 12. The partitions on the SD card are automatically mounted by the Linux file system to the media
directory. You can use the following command to observe the mount points
mount

13. You can now modify the uEnv.txt file stored on the boot partition to add the serverip setting so that you do not have to type that in on the serial console anymore. This also allows you to validate that you have full read/write access (aside from the boot process) to the SD card. Use the step below to add the serverip line to the uEnv.txt file, Make sure to use the >> symbol and replace the xx.xx.xx.xx with your serverip
echo "serverip=xx.xx.xx.xx" >> /media/mmcblk0p1/uEnv.txt
14. Reboot your board and notice that this time the boot process no longer hangs because the serverip is now set and the kernel can be transferred using TFTP by default.
init 6
15. Once the board has rebooted login using "root" again. It would be nice to run remote Matrix to interact with the board. However running ifconfig shows that there is no network connectivity. The next lab section will walk you through adding network support to the Linux kernel.
ifconfig

Adding Ethernet Support Description
This section will cover adding Ethernet support and verifying that the target device can get an IP address and be accessed over the network.
Prerequisites
SD card with a root file system inserted into the SD card slot of the target board
Key Points
How to modify the Linux kernel to add support for Ethernet Rebuilding the Linux kernel with Ethernet support and booting the root file system from SD Using the Ethernet connection to connect to remote matrix
Lab Steps
1. Switch back to the Linux console instead of the minicom console

2. Checkout the tag in the git tree that corresponds to adding Ethernet support. This source revision builds on the previous one by adding Ethernet support to the board file and adding some helper functions and defines to additional files.
git checkout <SDK version>-ethernet
3. To view the changes made to add ethernet support use gitk --all again. This time the active commit will be moved to the one adding Ethernet support because that is the state of the tree due to the git checkout command run above.
o NOTE: You can also see the changes using the command git diff 06.00.00.00-mmc..06.00.00.00-ethernet which provides a diff of the changes between the commit adding the MMC support and the commit adding the Ethernet support.
4. Rebuild the Linux kernel to pickup the source changes that added Ethernet support. You do not need to reconfigure the kernel since the default configuration has Ethernet support turned on, the board file just did not add that support to the kernel.
make ARCH=arm CROSS_COMPILE=/home/sitara/ti-sdk-am335x-evm-06.00.00.00/linux-devkit/sysroots/i686-arago-linux/usr/bin/arm-linux-gnueabihf- uImage
5. Copy the kernel image to the TFTP server to prepare for booting this image.
cp arch/arm/boot/uImage /tftpboot/
6. Switch back to your minicom console window 7. Your board should still be logged in, so reboot using the init 6 command. NOTE: Do not unplug the USB
cable to cycle the power as this will cause you to lose your serial connection.
init 6
8. Since you replaced the uImage file on the TFTP server you should now be booting the new kernel image with Ethernet support.
9. Login using the user name "root" 10. You can now verify that you have an IP address using the ifconfig command
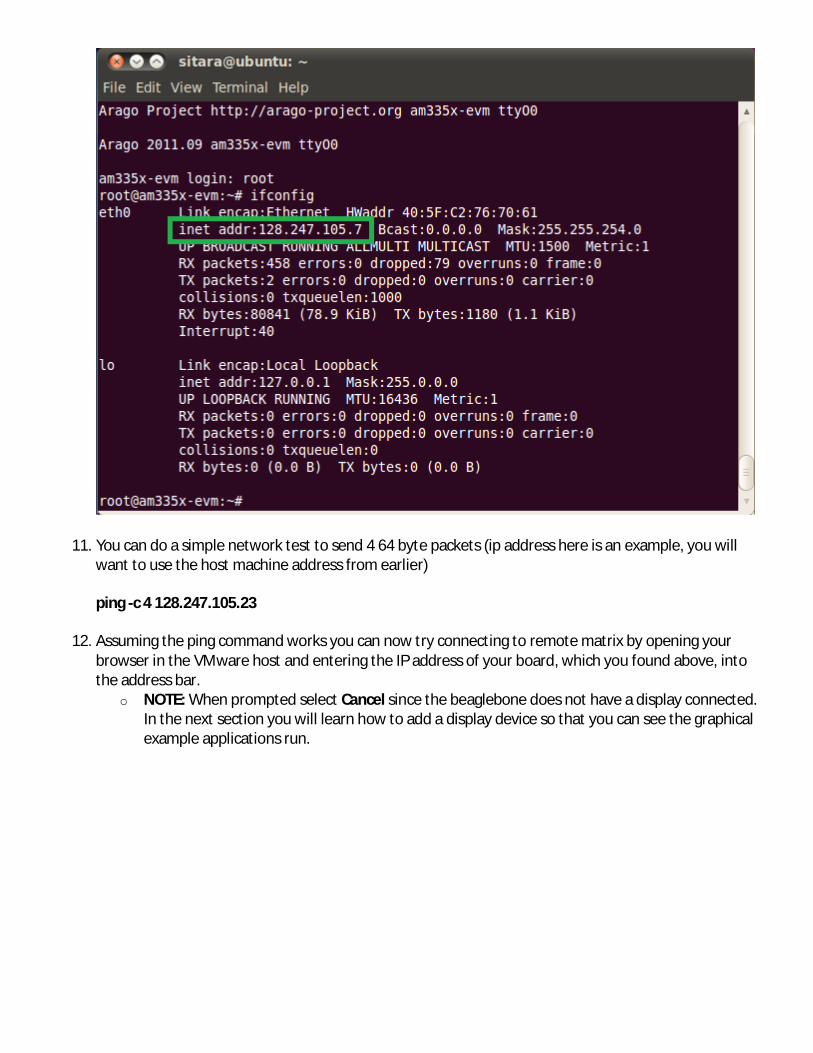
11. You can do a simple network test to send 4 64 byte packets (ip address here is an example, you will want to use the host machine address from earlier)
ping -c 4 128.247.105.23
12. Assuming the ping command works you can now try connecting to remote matrix by opening your browser in the VMware host and entering the IP address of your board, which you found above, into the address bar.
o NOTE: When prompted select Cancel since the beaglebone does not have a display connected. In the next section you will learn how to add a display device so that you can see the graphical example applications run.
Related Documents