Version 4.86 Part No. 311644-F Rev 00 November 2003 600 Technology Park Drive Billerica, MA 01821-4130 Configuring the Contivity VPN Client

Welcome message from author
This document is posted to help you gain knowledge. Please leave a comment to let me know what you think about it! Share it to your friends and learn new things together.
Transcript

Version 4.86
Part No. 311644-F Rev 00November 2003
600 Technology Park DriveBillerica, MA 01821-4130
Configuring the Contivity VPN Client
2
Copyright © 2003 Nortel Networks
All rights reserved. November 2003.
The information in this document is subject to change without notice. The statements, configurations, technical data, and recommendations in this document are believed to be accurate and reliable, but are presented without express or implied warranty. Users must take full responsibility for their applications of any products specified in this document. The information in this document is proprietary to Nortel Networks Inc.
The software described in this document is furnished under a license agreement and may be used only in accordance with the terms of that license. The software license agreement is included in this document.
Trademarks
Nortel Networks, the Nortel Networks logo, the Globemark, Unified Networks, and Contivity are trademarks of Nortel Networks.
ActivCard is a trademark of ActivCard Incorporated.
Adobe and Acrobat Reader are trademarks of Adobe Systems Incorporated.
America Online is a trademark of America Online, Inc.
Datakey is a trademark of Datakey, Inc.
Entrust is a trademark of Entrust Technologies Inc.
iPass is a trademark of iPass Inc.
Java and Sun Microsystems are trademarks of Sun Microsystems, Inc.
Microsoft, Windows, and Windows NT are trademarks of Microsoft Corporation.
Netscape and Netscape Navigator are trademarks of Netscape Communications Corporation.
SecurID is a trademark of RSA Security Inc.
VeriSign is a trademark of VeriSign Incorporated.
The asterisk after a name denotes a trademarked item.
Restricted rights legend
Use, duplication, or disclosure by the United States Government is subject to restrictions as set forth in subparagraph (c)(1)(ii) of the Rights in Technical Data and Computer Software clause at DFARS 252.227-7013.
Notwithstanding any other license agreement that may pertain to, or accompany the delivery of, this computer software, the rights of the United States Government regarding its use, reproduction, and disclosure are as set forth in the Commercial Computer Software-Restricted Rights clause at FAR 52.227-19.
Statement of conditions
In the interest of improving internal design, operational function, and/or reliability, Nortel Networks Inc. reserves the right to make changes to the products described in this document without notice.
Nortel Networks Inc. does not assume any liability that may occur due to the use or application of the product(s) or circuit layout(s) described herein.
Portions of the code in this software product may be Copyright © 1988, Regents of the University of California. All rights reserved. Redistribution and use in source and binary forms of such portions are permitted, provided that the above copyright notice and this paragraph are duplicated in all such forms and that any documentation, advertising materials,
311644-F Rev 00

3
and other materials related to such distribution and use acknowledge that such portions of the software were developed by the University of California, Berkeley. The name of the University may not be used to endorse or promote products derived from such portions of the software without specific prior written permission.
SUCH PORTIONS OF THE SOFTWARE ARE PROVIDED “AS IS” AND WITHOUT ANY EXPRESS OR IMPLIED WARRANTIES, INCLUDING, WITHOUT LIMITATION, THE IMPLIED WARRANTIES OF MERCHANTABILITY AND FITNESS FOR A PARTICULAR PURPOSE.
In addition, the program and information contained herein are licensed only pursuant to a license agreement that contains restrictions on use and disclosure (that may incorporate by reference certain limitations and notices imposed by third parties).
Nortel Networks Inc. software license agreement
This Software License Agreement (“License Agreement”) is between you, the end-user (“Customer”) and Nortel Networks Corporation and its subsidiaries and affiliates (“Nortel Networks”). PLEASE READ THE FOLLOWING CAREFULLY. YOU MUST ACCEPT THESE LICENSE TERMS IN ORDER TO DOWNLOAD AND/OR USE THE SOFTWARE. USE OF THE SOFTWARE CONSTITUTES YOUR ACCEPTANCE OF THIS LICENSE AGREEMENT. If you do not accept these terms and conditions, return the Software, unused and in the original shipping container, within 30 days of purchase to obtain a credit for the full purchase price.
“Software” is owned or licensed by Nortel Networks, its parent or one of its subsidiaries or affiliates, and is copyrighted and licensed, not sold. Software consists of machine-readable instructions, its components, data, audio-visual content (such as images, text, recordings or pictures) and related licensed materials including all whole or partial copies. Nortel Networks grants you a license to use the Software only in the country where you acquired the Software. You obtain no rights other than those granted to you under this License Agreement. You are responsible for the selection of the Software and for the installation of, use of, and results obtained from the Software.
1. Licensed Use of Software. Nortel Networks grants Customer a nonexclusive license to use a copy of the Software on only one machine at any one time or to the extent of the activation or authorized usage level, whichever is applicable. To the extent Software is furnished for use with designated hardware or Customer furnished equipment (“CFE”), Customer is granted a nonexclusive license to use Software only on such hardware or CFE, as applicable. Software contains trade secrets and Customer agrees to treat Software as confidential information using the same care and discretion Customer uses with its own similar information that it does not wish to disclose, publish or disseminate. Customer will ensure that anyone who uses the Software does so only in compliance with the terms of this Agreement. Customer shall not a) use, copy, modify, transfer or distribute the Software except as expressly authorized; b) reverse assemble, reverse compile, reverse engineer or otherwise translate the Software; c) create derivative works or modifications unless expressly authorized; or d) sublicense, rent or lease the Software. Licensors of intellectual property to Nortel Networks are beneficiaries of this provision. Upon termination or breach of the license by Customer or in the event designated hardware or CFE is no longer in use, Customer will promptly return the Software to Nortel Networks or certify its destruction. Nortel Networks may audit by remote polling or other reasonable means to determine Customer’s Software activation or usage levels. If suppliers of third party software included in Software require Nortel Networks to include additional or different terms, Customer agrees to abide by such terms provided by Nortel Networks with respect to such third party software.
2. Warranty. Except as may be otherwise expressly agreed to in writing between Nortel Networks and Customer, Software is provided “AS IS” without any warranties (conditions) of any kind. NORTEL NETWORKS DISCLAIMS ALL WARRANTIES (CONDITIONS) FOR THE SOFTWARE, EITHER EXPRESS OR IMPLIED, INCLUDING, BUT NOT LIMITED TO THE IMPLIED WARRANTIES OF MERCHANTABILITY AND FITNESS FOR A PARTICULAR PURPOSE AND ANY WARRANTY OF NON-INFRINGEMENT. Nortel Networks is not obligated to provide support of any kind for the Software. Some jurisdictions do not allow exclusion of implied warranties, and, in such event, the above exclusions may not apply.
Configuring the Contivity VPN Client

4
3. Limitation of Remedies. IN NO EVENT SHALL NORTEL NETWORKS OR ITS AGENTS OR SUPPLIERS BE LIABLE FOR ANY OF THE FOLLOWING: a) DAMAGES BASED ON ANY THIRD PARTY CLAIM; b) LOSS OF, OR DAMAGE TO, CUSTOMER’S RECORDS, FILES OR DATA; OR c) DIRECT, INDIRECT, SPECIAL, INCIDENTAL, PUNITIVE, OR CONSEQUENTIAL DAMAGES (INCLUDING LOST PROFITS OR SAVINGS), WHETHER IN CONTRACT, TORT OR OTHERWISE (INCLUDING NEGLIGENCE) ARISING OUT OF YOUR USE OF THE SOFTWARE, EVEN IF NORTEL NETWORKS, ITS AGENTS OR SUPPLIERS HAVE BEEN ADVISED OF THEIR POSSIBILITY. The forgoing limitations of remedies also apply to any developer and/or supplier of the Software. Such developer and/or supplier is an intended beneficiary of this Section. Some jurisdictions do not allow these limitations or exclusions and, in such event, they may not apply.
4. General
a. If Customer is the United States Government, the following paragraph shall apply: All Nortel Networks Software available under this License Agreement is commercial computer software and commercial computer software documentation and, in the event Software is licensed for or on behalf of the United States Government, the respective rights to the software and software documentation are governed by Nortel Networks standard commercial license in accordance with U.S. Federal Regulations at 48 C.F.R. Sections 12.212 (for non-DoD entities) and 48 C.F.R. 227.7202 (for DoD entities).
b. Customer may terminate the license at any time. Nortel Networks may terminate the license if Customer fails to comply with the terms and conditions of this license. In either event, upon termination, Customer must either return the Software to Nortel Networks or certify its destruction.
c. Customer is responsible for payment of any taxes, including personal property taxes, resulting from Customer’s use of the Software. Customer agrees to comply with all applicable laws including all applicable export and import laws and regulations.
d. Neither party may bring an action, regardless of form, more than two years after the cause of the action arose.e. The terms and conditions of this License Agreement form the complete and exclusive agreement between
Customer and Nortel Networks.f. This License Agreement is governed by the laws of the country in which Customer acquires the Software. If
the Software is acquired in the United States, then this License Agreement is governed by the laws of the state of New York.
311644-F Rev 00

5
Contents
Preface . . . . . . . . . . . . . . . . . . . . . . . . . . . . . . . . . . . . . . . . . . . . . . . . . . . . . . 13
Before you begin . . . . . . . . . . . . . . . . . . . . . . . . . . . . . . . . . . . . . . . . . . . . . . . . . . . . . 13
Text conventions . . . . . . . . . . . . . . . . . . . . . . . . . . . . . . . . . . . . . . . . . . . . . . . . . . . . . . 14
Related publications . . . . . . . . . . . . . . . . . . . . . . . . . . . . . . . . . . . . . . . . . . . . . . . . . . . 15
Acronyms and terms . . . . . . . . . . . . . . . . . . . . . . . . . . . . . . . . . . . . . . . . . . . . . . . . . . 16
How to get help . . . . . . . . . . . . . . . . . . . . . . . . . . . . . . . . . . . . . . . . . . . . . . . . . . . . . . 16
Chapter 1Installing the client. . . . . . . . . . . . . . . . . . . . . . . . . . . . . . . . . . . . . . . . . . . . . 19
Windows installations . . . . . . . . . . . . . . . . . . . . . . . . . . . . . . . . . . . . . . . . . . . . . . . . . . 19
Windows Domain Logon . . . . . . . . . . . . . . . . . . . . . . . . . . . . . . . . . . . . . . . . . . . . . . . 24
Two step domain logon . . . . . . . . . . . . . . . . . . . . . . . . . . . . . . . . . . . . . . . . . . . . . 24
GINA . . . . . . . . . . . . . . . . . . . . . . . . . . . . . . . . . . . . . . . . . . . . . . . . . . . . . . . . . . . 24
Logging on through client connection . . . . . . . . . . . . . . . . . . . . . . . . . . . . . . . 25
First domain logon . . . . . . . . . . . . . . . . . . . . . . . . . . . . . . . . . . . . . . . . . . . . . . 27
Enabling and disabling Connect Before Logon . . . . . . . . . . . . . . . . . . . . . . . . 28
Uninstalling the client . . . . . . . . . . . . . . . . . . . . . . . . . . . . . . . . . . . . . . . . . . . 28
Chapter 2Customizing the client. . . . . . . . . . . . . . . . . . . . . . . . . . . . . . . . . . . . . . . . . . 29
Configuring client profiles . . . . . . . . . . . . . . . . . . . . . . . . . . . . . . . . . . . . . . . . . . . . . . . 29
Setup.ini file . . . . . . . . . . . . . . . . . . . . . . . . . . . . . . . . . . . . . . . . . . . . . . . . . . . . . . . . . 31
Customizing the setup.ini file . . . . . . . . . . . . . . . . . . . . . . . . . . . . . . . . . . . . . . . . . 32
Installation modes and options . . . . . . . . . . . . . . . . . . . . . . . . . . . . . . . . . . . . . . . 37
Verbose mode . . . . . . . . . . . . . . . . . . . . . . . . . . . . . . . . . . . . . . . . . . . . . . . . . 37
Skip Screens mode . . . . . . . . . . . . . . . . . . . . . . . . . . . . . . . . . . . . . . . . . . . . . 37
Silent mode . . . . . . . . . . . . . . . . . . . . . . . . . . . . . . . . . . . . . . . . . . . . . . . . . . . 37
Quiet mode . . . . . . . . . . . . . . . . . . . . . . . . . . . . . . . . . . . . . . . . . . . . . . . . . . . 37
Configuring the Contivity VPN Client

6 Contents
Reboot Only mode . . . . . . . . . . . . . . . . . . . . . . . . . . . . . . . . . . . . . . . . . . . . . 38
Silent with Forced Reboot mode . . . . . . . . . . . . . . . . . . . . . . . . . . . . . . . . . . . 38
Setting up the group.ini file . . . . . . . . . . . . . . . . . . . . . . . . . . . . . . . . . . . . . . . . . . . . . . 38
Custom icons . . . . . . . . . . . . . . . . . . . . . . . . . . . . . . . . . . . . . . . . . . . . . . . . . . . . . . . . 40
Create your icons . . . . . . . . . . . . . . . . . . . . . . . . . . . . . . . . . . . . . . . . . . . . . . . . . . 40
Client application icon (eacapp.ico) . . . . . . . . . . . . . . . . . . . . . . . . . . . . . . . . . . . . 41
Contivity VPN Client task bar icons . . . . . . . . . . . . . . . . . . . . . . . . . . . . . . . . . . . . 42
Custom bitmaps . . . . . . . . . . . . . . . . . . . . . . . . . . . . . . . . . . . . . . . . . . . . . . . . . . . . . . 43
Client dialog bitmap (eacdlg.bmp) . . . . . . . . . . . . . . . . . . . . . . . . . . . . . . . . . . . . . 43
Client status bitmap (eacstats.bmp) . . . . . . . . . . . . . . . . . . . . . . . . . . . . . . . . . . . 44
Client GINA bitmap (nnginadlg.bmp) . . . . . . . . . . . . . . . . . . . . . . . . . . . . . . . . . . . 45
Installing a custom client . . . . . . . . . . . . . . . . . . . . . . . . . . . . . . . . . . . . . . . . . . . . . . . 45
Controlling the client from a third-party application . . . . . . . . . . . . . . . . . . . . . . . . . . . 47
Running in silent success mode . . . . . . . . . . . . . . . . . . . . . . . . . . . . . . . . . . . . . . 49
Remotely changing the group password . . . . . . . . . . . . . . . . . . . . . . . . . . . . . . . . 49
GINA chaining . . . . . . . . . . . . . . . . . . . . . . . . . . . . . . . . . . . . . . . . . . . . . . . . . . . . . . . 52
Chapter 3Using certificates . . . . . . . . . . . . . . . . . . . . . . . . . . . . . . . . . . . . . . . . . . . . . . 55
MS CryptoAPI . . . . . . . . . . . . . . . . . . . . . . . . . . . . . . . . . . . . . . . . . . . . . . . . . . . . . . . 55
MS-CAPI feature dependencies and backward compatibility . . . . . . . . . . . . . . . . 56
Microsoft CA digital certificate generation . . . . . . . . . . . . . . . . . . . . . . . . . . . . . . . 56
Steps from browser running on client system or CA system . . . . . . . . . . . . . . 57
Netscape digital certificate generation . . . . . . . . . . . . . . . . . . . . . . . . . . . . . . . . . . 57
Importing a digital certificate into MS-CAPI store . . . . . . . . . . . . . . . . . . . . . . . . . 58
Microsoft CA digital certificate retrieval . . . . . . . . . . . . . . . . . . . . . . . . . . . . . . 58
Netscape digital certificate retrieval . . . . . . . . . . . . . . . . . . . . . . . . . . . . . . . . 59
Configuring Contivity VPN Client for MS stored certificates . . . . . . . . . . . . . . . . . 59
Server certificate CRL checking . . . . . . . . . . . . . . . . . . . . . . . . . . . . . . . . . . . . . . 60
Entrust certificate-based authentication . . . . . . . . . . . . . . . . . . . . . . . . . . . . . . . . . . . . 60
Custom installation . . . . . . . . . . . . . . . . . . . . . . . . . . . . . . . . . . . . . . . . . . . . . . . . 61
Entrust certificate enrollment procedure . . . . . . . . . . . . . . . . . . . . . . . . . . . . . . . . 62
Entrust certificate enrollment tunnel . . . . . . . . . . . . . . . . . . . . . . . . . . . . . . . . . . . 63
Direct access enrollment process . . . . . . . . . . . . . . . . . . . . . . . . . . . . . . . . . . . . . 64
Entrust certificate enrollment process . . . . . . . . . . . . . . . . . . . . . . . . . . . . . . . . . . 64
311644-F Rev 00

Contents 7
VeriSign certificate-based authentication . . . . . . . . . . . . . . . . . . . . . . . . . . . . . . . . . . . 66
How the client uses VeriSign certificates . . . . . . . . . . . . . . . . . . . . . . . . . . . . . . . . 66
Overview of administrator’s tasks . . . . . . . . . . . . . . . . . . . . . . . . . . . . . . . . . . . . . 68
Overview of client user’s tasks . . . . . . . . . . . . . . . . . . . . . . . . . . . . . . . . . . . . . . . 69
VeriSign certificate enrollment procedure . . . . . . . . . . . . . . . . . . . . . . . . . . . . . . . . . . 69
Initial enrollment and creating the configuration file . . . . . . . . . . . . . . . . . . . . . . . 69
Prerequisites before starting . . . . . . . . . . . . . . . . . . . . . . . . . . . . . . . . . . . . . . 70
Running the initial enrollment . . . . . . . . . . . . . . . . . . . . . . . . . . . . . . . . . . . . . 70
Creating the VeriSign custom client installation . . . . . . . . . . . . . . . . . . . . . . . . . . . 74
Modifying the setup.ini file . . . . . . . . . . . . . . . . . . . . . . . . . . . . . . . . . . . . . . . . 74
Creating the cert.ini file . . . . . . . . . . . . . . . . . . . . . . . . . . . . . . . . . . . . . . . . . . 74
Repackaging the new custom installation program . . . . . . . . . . . . . . . . . . . . . 76
Files in the custom installation . . . . . . . . . . . . . . . . . . . . . . . . . . . . . . . . . . . . 76
Certificate configuration file and certificate files . . . . . . . . . . . . . . . . . . . . . . . . . . 77
Creating a connection profile using the custom installation . . . . . . . . . . . . . . . . . . 79
Using VeriSign certificates to connect to a switch . . . . . . . . . . . . . . . . . . . . . . . . . 82
Recovering expired certificates . . . . . . . . . . . . . . . . . . . . . . . . . . . . . . . . . . . . . . . 83
Additional VeriSign features . . . . . . . . . . . . . . . . . . . . . . . . . . . . . . . . . . . . . . . . . . 84
CRL retrieval . . . . . . . . . . . . . . . . . . . . . . . . . . . . . . . . . . . . . . . . . . . . . . . . . . 84
Certificate renewal . . . . . . . . . . . . . . . . . . . . . . . . . . . . . . . . . . . . . . . . . . . . . 84
Error messages . . . . . . . . . . . . . . . . . . . . . . . . . . . . . . . . . . . . . . . . . . . . . . . . 84
Tools menu . . . . . . . . . . . . . . . . . . . . . . . . . . . . . . . . . . . . . . . . . . . . . . . . . . . . . . 85
Options . . . . . . . . . . . . . . . . . . . . . . . . . . . . . . . . . . . . . . . . . . . . . . . . . . . . . . 85
Recover Certificate . . . . . . . . . . . . . . . . . . . . . . . . . . . . . . . . . . . . . . . . . . . . . 85
View Configuration File . . . . . . . . . . . . . . . . . . . . . . . . . . . . . . . . . . . . . . . . . . 85
View Certificate Details . . . . . . . . . . . . . . . . . . . . . . . . . . . . . . . . . . . . . . . . . . 85
Change Password . . . . . . . . . . . . . . . . . . . . . . . . . . . . . . . . . . . . . . . . . . . . . . 85
Appendix AClient logging . . . . . . . . . . . . . . . . . . . . . . . . . . . . . . . . . . . . . . . . . . . . . . . . . 87
Index . . . . . . . . . . . . . . . . . . . . . . . . . . . . . . . . . . . . . . . . . . . . . . . . . . . . . . . . 91
Configuring the Contivity VPN Client

8 Contents
311644-F Rev 00

9
Figures
Figure 1 Welcome screen . . . . . . . . . . . . . . . . . . . . . . . . . . . . . . . . . . . . . . . . . . . . 20
Figure 2 License Agreement screen . . . . . . . . . . . . . . . . . . . . . . . . . . . . . . . . . . . . 20
Figure 3 Destination screen . . . . . . . . . . . . . . . . . . . . . . . . . . . . . . . . . . . . . . . . . . 21
Figure 4 Program folder screen . . . . . . . . . . . . . . . . . . . . . . . . . . . . . . . . . . . . . . . 21
Figure 5 Install and run screen . . . . . . . . . . . . . . . . . . . . . . . . . . . . . . . . . . . . . . . . 22
Figure 6 Start Copying Files screen. . . . . . . . . . . . . . . . . . . . . . . . . . . . . . . . . . . . 22
Figure 7 Connect Before Logon screen . . . . . . . . . . . . . . . . . . . . . . . . . . . . . . . . . 26
Figure 8 Contivity VPN Client log on screen . . . . . . . . . . . . . . . . . . . . . . . . . . . . . . 26
Figure 9 Options menu . . . . . . . . . . . . . . . . . . . . . . . . . . . . . . . . . . . . . . . . . . . . . . 28
Figure 10 Client application icon . . . . . . . . . . . . . . . . . . . . . . . . . . . . . . . . . . . . . . . . 41
Figure 11 Sample icon . . . . . . . . . . . . . . . . . . . . . . . . . . . . . . . . . . . . . . . . . . . . . . . 42
Figure 12 Blink none (blinknone.ico) . . . . . . . . . . . . . . . . . . . . . . . . . . . . . . . . . . . . . 42
Figure 13 Blink right (blinkright.ico) . . . . . . . . . . . . . . . . . . . . . . . . . . . . . . . . . . . . . 42
Figure 14 Blink left (blinkleft.ico) . . . . . . . . . . . . . . . . . . . . . . . . . . . . . . . . . . . . . . . . 42
Figure 15 Both (blinkboth.ico)\ . . . . . . . . . . . . . . . . . . . . . . . . . . . . . . . . . . . . . . . . . 43
Figure 16 Client connecting icons . . . . . . . . . . . . . . . . . . . . . . . . . . . . . . . . . . . . . . . 43
Figure 17 Contivity VPN Client bitmap . . . . . . . . . . . . . . . . . . . . . . . . . . . . . . . . . . . 44
Figure 18 Client status bitmap . . . . . . . . . . . . . . . . . . . . . . . . . . . . . . . . . . . . . . . . . 44
Figure 19 GINA bitmap . . . . . . . . . . . . . . . . . . . . . . . . . . . . . . . . . . . . . . . . . . . . . . . 45
Figure 20 An Entrust PKI server can be located in three places . . . . . . . . . . . . . . . 63
Figure 21 Layout for VeriSign . . . . . . . . . . . . . . . . . . . . . . . . . . . . . . . . . . . . . . . . . . 67
Figure 22 Contents of the custom installation file . . . . . . . . . . . . . . . . . . . . . . . . . . . 77
Configuring the Contivity VPN Client

10 Figures
311644-F Rev 00

11
Tables
Table 1 Acronyms and terms . . . . . . . . . . . . . . . . . . . . . . . . . . . . . . . . . . . . . . . . . 16
Table 2 Supported UseTokens and TokenType settings . . . . . . . . . . . . . . . . . . . . 30
Table 3 [Options] section and keyword settings for setup.ini file . . . . . . . . . . . . . . 32
Table 4 Settings for group.ini file . . . . . . . . . . . . . . . . . . . . . . . . . . . . . . . . . . . . . . 39
Table 5 Command line parameters . . . . . . . . . . . . . . . . . . . . . . . . . . . . . . . . . . . . 47
Table 6 Entries in the cert.ini file . . . . . . . . . . . . . . . . . . . . . . . . . . . . . . . . . . . . . . 75
Table 7 Entries for the certkit.cfg file . . . . . . . . . . . . . . . . . . . . . . . . . . . . . . . . . . . 78
Table 8 Client error messages . . . . . . . . . . . . . . . . . . . . . . . . . . . . . . . . . . . . . . . 87
Configuring the Contivity VPN Client

12 Tables
311644-F Rev 00

13
Preface
This guide introduces you to the steps for installing the Nortel Networks* Contivity VPN Client. Topics include:
• Installing the client
• Creating custom icons
• Installing a custom client
• Using certificates on a client
This guide is intended for network managers who are responsible for setting up client software for the switch. This guide assumes that you have the following background:
• Experience with windowing systems or graphical user interfaces (GUIs)
• Familiarity with network management
Complete details for configuring and monitoring the Contivity* Secure IP Services Gateway are in Configuring Basic Features for the Contivity Secure IP Services Gateway.
Before you begin
The minimum PC requirements for running the Contivity VPN Client are:
• Windows 95 or better
• 200 MHz Pentium
• 64 MB memory
• 10 MB free hard disk space
Configuring the Contivity VPN Client

14 Preface
Text conventions
This guide uses the following text conventions:
angle brackets (< >) Indicate that you choose the text to enter based on the description inside the brackets. Do not type the brackets when entering the command.Example: If the command syntax isping <ip_address>, you enterping 192.32.10.12
bold Courier text Indicates command names and options and text that you need to enter.Example: Use the show health command. Example: Enter terminal paging {off | on}.
braces ({}) Indicate required elements in syntax descriptions where there is more than one option. You must choose only one of the options. Do not type the braces when entering the command.Example: If the command syntax is ldap-server source {external | internal}, you must enter either ldap-server source external or ldap-server source internal, but not both.
brackets ([ ]) Indicate optional elements in syntax descriptions. Do not type the brackets when entering the command.Example: If the command syntax isshow ntp [associations], you can entereither show ntp or show ntp associations.
Example: If the command syntax is default rsvp [token-bucket {depth | rate}], you can enter default rsvp, default rsvp token-bucket depth, or default rsvp token-bucket rate.
ellipsis points (. . . ) Indicate that you repeat the last element of the command as needed.Example: If the command syntax ismore diskn:<directory>/...<file_name>,you enter more and the fully qualified name of the file.
311644-F Rev 00

Preface 15
Related publications
For more information about the Contivity VPN Client and the Contivity VPN Switch, refer to the following publications:
• Release notes for the client and the switch provide the latest information, including brief descriptions of the new features, problems fixed in the release, and known problems and workarounds.
• Configuring the Contivity VPN Switch provides procedural information to help you configure, monitor, and troubleshoot your switch.
• Reference for the Contivity VPN Switch Command Line Interface describes the commands that you can use from the command line interface.
italic text Indicates new terms, book titles, and variables in command syntax descriptions. Where a variable is two or more words, the words are connected by an underscore.Example: If the command syntax isping <ip_address>, ip_address is one variable and you substitute one value for it.
plain Courier text
Indicates system output, for example, prompts and system messages.Example: File not found.
separator ( > ) Shows menu paths. Example: Choose Status > Health Check.
vertical line ( | ) Separates choices for command keywords and arguments. Enter only one of the choices. Do not type the vertical line when entering the command.Example: If the command syntax isterminal paging {off | on}, you enter eitherterminal paging off or terminal paging on, but not both.
Configuring the Contivity VPN Client

16 Preface
Acronyms and terms
This guide uses the following acronyms and terms (Table 1).
How to get help
If you purchased a service contract for your Nortel Networks product from a distributor or authorized reseller, contact the technical support staff for that distributor or reseller for assistance.
If you purchased a Nortel Networks service program, contact Nortel Networks Technical Support. To obtain contact information online, go to the www.nortelnetworks.com/cgi-bin/comments/comments.cgi URL, then click on Technical Support.
Table 1 Acronyms and terms
Certification path Ordered sequence of certificates, leading from a certificate whose public key is known by a client to a certificate whose public key is to be validated by the client.
Certificate revocation list (CRL) List of revoked but unexpired certificates issued by a CA.
Digital certificate Digitally signed data structure defined in the X.509 standard that binds the identity of a certificate holder (or subject) to a public key.
Public Key Cryptography Standards (PKCS)
Collection of de facto standards produced by RSA covering the use and manipulation of public-private keys and certificates.
PKCS #7 Cryptographic Message Standard. (Reply with digital certificate)
PKCS #10 Certification Request Syntax Standard.
PKCS #12 Personal Information Exchange Syntax.
X.509 Standard certificate format.
311644-F Rev 00

Preface 17
From the Technical Support page, you can open a Customer Service Request online or find the telephone number for the nearest Technical Solutions Center. If you are not connected to the Internet, you can call 1-800-4NORTEL (1-800-466-7835) to learn the telephone number for the nearest Technical Solutions Center.
An Express Routing Code (ERC) is available for many Nortel Networks products and services. When you use an ERC, your call is routed to a technical support person who specializes in supporting that product or service. To locate an ERC for your product or service, go to the http://www.nortelnetworks.com/help/contact/erc/index.html URL.
Configuring the Contivity VPN Client

18 Preface
311644-F Rev 00

19
Chapter 1Installing the client
This chapter provides information about how to install the client on Microsoft* Windows XP, Windows 2000, Windows Me, Windows NT*, and Windows* 98 systems. It also includes information on Windows Domain Login and Nortel Networks graphical identification and authentication (NNGINA).
Windows installations
To install the client on a Windows 2000, Windows XP, Windows Me, Windows NT or Windows 98, you must copy the Contivity VPN Client (EAC486D.EXE) that is on the Contivity VPN Switch CD in the Client folder onto your hard drive.
1 Double-click on EAC486D.EXE. The Welcome screen appears.
Note: When using Smart Cards for digital certificates on Windows 98, install the items in the following order: Contivity VPN Client, Smart Card, and then MS Smart Card utilities.
Configuring the Contivity VPN Client

20 Chapter 1 Installing the client
Figure 1 Welcome screen
2 Click on Next. The License Agreement screen appears.
Figure 2 License Agreement screen
3 Click on Yes to accept the license. The destination screen appears.
311644-F Rev 00

Chapter 1 Installing the client 21
Figure 3 Destination screen
4 Click on Next to accept the default installation location or click on Browse to install in another directory. The Select Program Folder screen appears.
Figure 4 Program folder screen
5 Click on Next to select the default program folder or choose one of the listed program folders. The Install and run Contivity VPN Client screen appears.
Configuring the Contivity VPN Client

22 Chapter 1 Installing the client
Figure 5 Install and run screen
6 Select the method that you want to use to install and run the client:
• Application (default)
• Windows service (Two step Domain Logon); see“Two step domain logon” on page 24
• Windows GINA (Connect Before Logon); see “GINA” on page 24
Click on Next. The Start Copying Files screen appears.
Figure 6 Start Copying Files screen.
7 Click on Next to continue the installation.
311644-F Rev 00

Chapter 1 Installing the client 23
8 When prompted at the end of the installation, reboot your system.
9 Double-click on the Contivity VPN Client icon.
a Enter a new Connection name.
b Optionally, enter a description for the connection.
c Create a new Dial-up Connection. Click on Tool (next to the Dial-up Connection list box), select New, and follow the wizard.
d If you have made any changes in the Network Control Panel, click on OK, and then reboot the system.
If you are using the client over a dial-up connection, be sure to check the following for your system:
• Windows 2000: Install the Remote Access Service under the Network Control Panel (from the Start menu, select Settings > Control Pane, then double-click on the Network icon to open the Network Control Panel). Select the Services tab and click on Add. Scroll down to select Remote Access Service and click on OK.
• Windows XP: Install the Remote Access Service under the Network Control Panel (from the Start menu, select Settings > Control Pane, then double-click on the Network icon to open the Network Control Panel). Select the Network Connection icon and click on Create a New Connection to bring up the New Connection Wizard.
• Windows 98: Under the Network Control Panel (from the Start menu, select Settings > Control Panel), select Add > Adapter > Microsoft > Dial-up Adapter.
• Windows Me: Under the Network Control Panel (from the Start menu, select Settings > Control Panel), select Dial-up Networking.
• Windows NT: Install the Remote Access Service under the Network Control Panel (from the Start menu, select Settings > Control Panel, then double-click on the Network icon to open the Network Control Panel). Select the Services tab and click on Add. Scroll down to select Remote Access Service and click OK.
Note: In Windows 2000 and Windows XP, the Contivity VPN Client adapter is not displayed in the Network Control Panel. However, if you run a utility such as IPCONFIG, it will respond.
Configuring the Contivity VPN Client

24 Chapter 1 Installing the client
• Under the Protocols tab for Windows NT or under the Network Control Panel for Windows 98, Windows Me, Windows XP and Windows 2000, verify that NetBEUI is not installed. If NetBEUI is listed, click on it, then click on Remove. This forces the Network Neighborhood to use NetBIOS over TCP/IP, which is compatible with the switch. Click on OK and reboot your system.
Windows Domain Logon
There are two ways to logon to the Windows domain:
• Windows service (Two-step Domain Logon)
• Windows GINA (Connect Before Logon)
Two step domain logon
You can log on to an existing Windows domain that exists on the private side of the switch. You must have a valid Windows domain account that is accessible from the private side of the switch. To log in to the Windows domain:
1 Launch the Contivity VPN Client.
2 Make a connection to the switch that has the Windows NT domain.
3 Press Ctrl + Alt + Delete to log in to the Windows NT domain from the already established connection to the switch.
GINA
A graphical identification and authentication (GINA) DLL provides an automated process to complete a Windows domain logon through a VPN tunnel. GINA implements the authentication policy of the interactive logon and performs all identification and authentication user interactions for the Windows system. You do not need to log in locally to launch the client, then log out of the local system to authenticate to the Windows domain.
311644-F Rev 00

Chapter 1 Installing the client 25
The Nortel Networks GINA (nngina.dll) launches and synchronizes a successful tunnel creation with the Contivity VPN Client and disconnects the Contivity tunnel when you log off. After making a successful Contivity VPN connection, the Windows domain logon is continued through the established Contivity VPN tunnel connection. GINA chaining detects the presence of a previously installed third-party GINA and passes all pass-through calls to that particular GINA (see Chapter 2, “Customizing the client,” on page 52.
This feature is supported on:
• Windows 2000
• Windows XP Professional
• Windows NT
To install GINA, select the Windows Gina (Connect Before Logon) option on the Install and run Contivity VPN Client screen. When prompted at the end of the installation, reboot your system.
Logging on through client connection
After the client installation is complete, use the following procedure to log on through a Contivity VPN Client connection.
1 Press Control + Alt + Delete. The Contivity VPN Client GINA interface appears. This is a Contivity GINA dialog (not the Windows GINA dialog).
Note: When you install GINA, Windows disables fast user switching.
Note: Auto domain logon is the default.
Configuring the Contivity VPN Client

26 Chapter 1 Installing the client
Figure 7 Connect Before Logon screen
2 Enter your Windows credentials, which are used to perform a local system logon. The Contivity VPN client is launched.
Figure 8 Contivity VPN Client log on screen
3 Enter the Contivity VPN tunnel credentials. A successful VPN tunnel connection is completed from the Contivity VPN client. The Windows domain logon is automatically executed using the authentication credentials
Note: If you do not want to use the Connect Before Logon feature after it is installed, click on Cancel and the Windows domain logon screen will appear.
311644-F Rev 00

Chapter 1 Installing the client 27
provided in the Contivity Client GINA dialog. The Domain logon is established using the existing Contivity VPN tunnel connection.
First domain logon
You can also logon to the system using an existing local account to establish the Contivity VPN Tunnel by logging on using a local system account and creating the tunnel connection. You would then be logged into the local system with the credentials provided.
To enable a completely automated Windows domain logon, you are authenticated locally, requiring a previously successful user logon to the target Windows domain. The first time you attempts a domain logon directly through the Contivity GINA, without a prior and successful Windows domain logon from the local system, the initial user logon attempt fails.
You can either execute the current Contivity VPN Client Windows domain logon or use the Contivity Client Gina by deselecting the “Auto Domain Logon” option and log on using an existing local user account. The Windows GINA screen appears to complete the domain logon.
Note: When the Contivity VPN Client is running as a service under Windows 2000 or Windows XP, you may not be able to logoff after you log in and log off several times. This is a known Windows issue when an NT Service is involved with an active GUI interface. To work around the problem, you must first disconnect the Contivity VPN CLient service and then log off.
Note: The client system must have been previously configured to allow access to the desired Windows Domain. This can be setup by the Windows Domain administrator.
Configuring the Contivity VPN Client

28 Chapter 1 Installing the client
Enabling and disabling Connect Before Logon
To enable or disable Connect Before Logon, go to the Options menu (Figure 9) and either select or deselect the Connect Before Logon option. The Contivity VPN Client GINA dialog provides simultaneous Windows NT domain logon when logging on to the workstation. The Contivity VPN Client must be installed with the GINA option to be available.
Figure 9 Options menu
Uninstalling the client
You cannot uninstall NNGINA unless it is at the top of the GINA chain. If it is not on top of the GINA list, uninstalling it could break the GINA chain. The software notifies you that you must uninstall NNGINA before GINA can be uninstalled. This could occur multiple times until GINA is at the top of the chain.
311644-F Rev 00

29
Chapter 2Customizing the client
This chapter provides information to help you customize your client, including configuring client profiles, creating custom icons and bitmaps, and distributing the custom client installation. You can also reconfigure client behavior and control the client from a third-party application.
The Contivity VPN Client supports dynamic DNS registration, which you can configure at the group level on the Contivity switch.
Configuring client profiles
To preconfigure the client with profiles, including information like the authentication type and destination, you must distribute a baynet.tbk file that contains the custom installation files. If you use the client to create user profiles, a baynet.tbk file is automatically created in your installation directory and you can distribute it to your users. Simply edit the file to remove the user name reference so that a user can enter his own user name before adding it to the custom install.
As long as the file resides in the installation directory (where setup.exe is located), the installation procedure copies the file to the appropriate directory and overwrites the existing baynet.tbk file.
Each connection profile is defined between square brackets [ ], for example [MyVPNConnection].
Note: You must save a new baynet.tbk file in text document format. If the file is saved in RTF or in Word document format, the client will not recognize some of the formatting and as a result, the users will not be defined in the client.
Configuring the Contivity VPN Client

30 Chapter 2 Customizing the client
The following entries represent the baynet.tbk file that resides in each Profile section:
• Description—user interface description field.
• Dialup—dial-up profile. The value (None) indicates there is no dial-up profile.
• Username—user interface user name, or when using Entrust* authentication this is the user’s .epf file.
• TokenType—used in combination with UseTokens to indicate the type of authentication being used. The following combined settings are supported (Table 2):
• UsePAPGroup—0 indicates no RADIUS authentication; 1 indicates RADIUS authentication.
• GroupName—Options > Authentication Options dialog box Group Name field.
• SavePassword—0 indicates that the user did not save the PIN/Password; 1 indicates that the user saved the PIN/Password.
• Server—IP address or host name of the Extranet server with which to establish a connection.
Table 2 Supported UseTokens and TokenType settings
UseTokens TokenType
0 0. Username/password authentication type
1 1. AXENT* hardware token
1 2. Security Dynamics hardware token
0 3. Radius authentication
1 4. AXENT software token
1 5. Security Dynamics SoftID software token
0 6. Entrust certificate
0 7. Verisign certificate
0 8. (Reserved)
0 9. Microsoft CAPI stored Certificate
311644-F Rev 00

Chapter 2 Customizing the client 31
Sample baynet.tbk file
[VPN Your City]Description=Company NameDialup=(None)Username=smithUseTokens=0TokenType=3GroupName=Contivity_VPNSavePassword=0Server=130.130.130.13
Setup.ini file
The setup.ini file resides in the CD’s Client\Custom directory along with the other custom installation files. For example:
Client\Custom\Domestic
This file and its settings are created by InstallShield when the distribution media is made.
The EnableLangDlg=Y parameter is set when this is a localized version of an installation, allowing a Language dialog to appear during installation and from which a user can select the language to install.
The [Languages] section is the list of supported languages in the kit. This is the list presented in the Language dialog mentioned above when EnableLangDlg is enabled (EnableLangDlg=Y).
The [ISUPDATE] is an InstallShield update URL. It is not used by the Contivity VPN Client.
Configuring the Contivity VPN Client

32 Chapter 2 Customizing the client
Following is an example of the setup.ini file.
[Startup]AppName=Nortel Networks Contivity VPN ClientFreeDiskSpace=970EnableLangDlg=Y[ISUPDATE]UpdateURL=http://[Languages]Default=0x0009count=1key0=0x0009
Customizing the setup.ini file
You can customize the default behavior of the client by modifying the setup.ini file. To customize your client, add to the setup.ini file the [Options] section and the listed keywords described in Table 3.
The default settings are noted in the right-hand column, as well as details on the significance and manner of handling each keyword.
Table 3 [Options] section and keyword settings for setup.ini file
Field Description
[Options] The name of the section that the installation looks for in the setup.ini file. You must use this field as the heading for the keywords described in this table.
AddDesktopShortcut=1 If set to 1, a shortcut is added to the Desktop for the client. The default is 0 and the shortcut is not created.
CustomReadme If set to 1, the switch will overwrite the existing readme.txt file with a customized readme.txt file. The readme.txt file must be in the installation directory where the setup.exe file was placed. The default is 0 and the existing readme.txt file remains.
DisableAutoConnectOverRide=1 If set to 1, stops a user from being able to disable this feature from their clients. This feature can be overridden from the client. If the server has the AutoConnect feature enabled and a user does not want to use it, they can choose to disable AutoConnect from the client Options menu. The default is 0 and the user can override it.
311644-F Rev 00

Chapter 2 Customizing the client 33
DisableKeepAlives If set to 1, the menu item will initially be checked. The default is 0 (False) and the item in not checked.
DisableLoggingConfig=1 If set to 1, you cannot configure logging from client UI. The default is 0 and allows you to configure logging.
DisplayPasscode=1 If set to 1, the Passcode screen for tokens is used instead of the standard token and PIN screen. The default is 0 and the standard token and PIN screens are used.
DisplayReboot=0 If SkipScreens=1 and DisplayReboot=0, the Reboot dialog box is skipped. The default is 0 and it skips the screens and reboots. If SkipScreens=1 and DisplayReboot=0, and ForcedReboot=1, the Reboot dialog box appears and then reboots.If SkipScreens=1 and DisplayReboot=0, and ForcedReboot=0, the Dialog box appears and recommends that you reboot.
EnableLogging=1 If set to 1, client is installed with the logging option turned on. The default is 0 and logging is turned off.
FolderName=Folder Name Nortel Networks.
ForcedReboot If set to 1, this switch will reboot the system immediately after the installation completes. The forced reboot will only be activated when running in Skip Screens Mode or in Silent Mode. The SkipScreens installation switch must be asserted. The SkipLicenseAgreement switch can be used with the ForcedReboot switch and has no effect on the reboot switch. The default is 0 and the reboot will not occur.
GroupIniFile=group.ini Indicates the name of the .ini file that has been added to the installation, which should be used to preconfigure group passwords in the registry. The format of the file is described in the next section.
HiddenInstall=1 If set to 1, prevents the client from appearing in the Add/Remove window of the Control Panel and the Start Menu programs. The default is 0 and the client appears in the Start Menu.
Table 3 [Options] section and keyword settings for setup.ini file (continued)
Field Description
Configuring the Contivity VPN Client
34 Chapter 2 Customizing the client
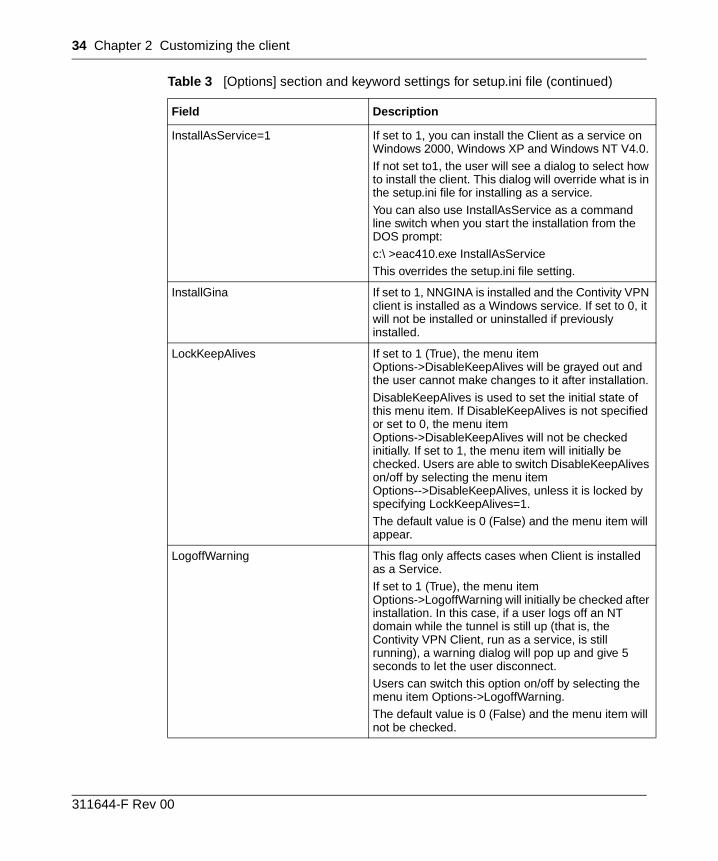
InstallAsService=1 If set to 1, you can install the Client as a service on Windows 2000, Windows XP and Windows NT V4.0.
If not set to1, the user will see a dialog to select how to install the client. This dialog will override what is in the setup.ini file for installing as a service.
You can also use InstallAsService as a command line switch when you start the installation from the DOS prompt:
c:\ >eac410.exe InstallAsServiceThis overrides the setup.ini file setting.
InstallGina If set to 1, NNGINA is installed and the Contivity VPN client is installed as a Windows service. If set to 0, it will not be installed or uninstalled if previously installed.
LockKeepAlives If set to 1 (True), the menu item Options->DisableKeepAlives will be grayed out and the user cannot make changes to it after installation.
DisableKeepAlives is used to set the initial state of this menu item. If DisableKeepAlives is not specified or set to 0, the menu item Options->DisableKeepAlives will not be checked initially. If set to 1, the menu item will initially be checked. Users are able to switch DisableKeepAlives on/off by selecting the menu item Options-->DisableKeepAlives, unless it is locked by specifying LockKeepAlives=1.The default value is 0 (False) and the menu item will appear.
LogoffWarning This flag only affects cases when Client is installed as a Service. If set to 1 (True), the menu item Options->LogoffWarning will initially be checked after installation. In this case, if a user logs off an NT domain while the tunnel is still up (that is, the Contivity VPN Client, run as a service, is still running), a warning dialog will pop up and give 5 seconds to let the user disconnect.
Users can switch this option on/off by selecting the menu item Options->LogoffWarning. The default value is 0 (False) and the menu item will not be checked.
Table 3 [Options] section and keyword settings for setup.ini file (continued)
Field Description
311644-F Rev 00

Chapter 2 Customizing the client 35
MSDUN13PATH=Path The path to the directory where MSDUN13.exe is located on the CD; the path specified for this variable is searched.
NoChangeProfiles=1 Restricts modifications to client profiles from the client, and no new profiles can be added or users can change only the dial-up numbers (if appropriate), their user name and password (tokencode/pin fields, if appropriate), certificate and password, and nothing else.If set to 1, only the prepackaged baynet.tbk file is used, and no new profiles can be added.
Without any changes to the setup.ini file, the remote user can change profiles by default.
PreserveTBKFile=1 During custom installation, if a baynet.tbk file is in the installation directory, the file will be copied to the user during installation. By default, if PreserveTBKFile is not present in the setup.ini file, or if it is set to 0, the baynet.tbk file in the installation directory will always overwrite the one in the user's directory (compatible with previous versions' default behavior).If set to 1, the baynet.tbk file will only be copied if there is not an existing one in the user's directory. Otherwise, the original file will be preserved.
ProductName=New Product Name Client, if nothing is set.
RemovePPTP=1 If set to 1, this always removes PPTP on Windows 98, if detected during installation. A user can verify that PPTP has been removed by opening the Network Control Panel and verifying that Dial-up Adapter #2 and the Microsoft Virtual Private Network Adapter have been removed. The default is 0 and does not remove PPTP.
ReceiveBuffers=200 Allows receive buffers to be set to an integer greater than or equal to 8 and less than or equal to 500. If not set, the default value is 20.
SendBuffers=200 Allows send buffers to be set to an integer greater than or equal to 8 and less than or equal to 500. If not set, the default value is 20.
SkipAutoDial=1 If set to 1, the autodial application is not added to the Run key in the Registry so autodial must be started manually by launching autoext.exe. The default is 0 and the application is added.
Table 3 [Options] section and keyword settings for setup.ini file (continued)
Field Description
Configuring the Contivity VPN Client

36 Chapter 2 Customizing the client
Sample setup.ini file [Options] section:
[Options]AddDesktopShortcut=1DisplayPasscode=1GroupIniFile=group.ini
SkipAutoDialPrompt = 1 If set to 1, the AutoConnect process closes the Dialup and Extranet Connections that were launched automatically through the AutoConnect process. The user is not asked, and the connection closes automatically. If set to 0, a prompt appears by default asking whether the Extranet and Dialup connection should be closed.
SkipBindCheck=1 If set to 1, the binding check is skipped. The binding check verifies that fewer than four adapters are bound to TCP/IP when adding the Extranet Adapter. The default is 0 and the binding check occurs.
SkipLicenseAgreement If set to 1, the License Agreement screen is skipped. This option is used with other commands described in the section “Installation modes and options.”
IMPORTANT: By suppressing presentation of the Nortel Software License Agreement you agree to accept the terms of the agreement on behalf of the users receiving the client software from you. The Nortel Software License agreement can be found onPage 3 of this document or the package containing the client software and documentation CD.If you do not wish to accept the license terms on behalf of the users, then do not suppress presentation of the agreement. Note: SkipLicenseAgreement is not available from the command line.
SkipScreens=1 If set to 1, all installation screens, except the License Agreement, are skipped and the client is installed with default settings. If set to 0, installation screens are not skipped, and you can customize the installation. The default is 0 and the screens appear.
Table 3 [Options] section and keyword settings for setup.ini file (continued)
Field Description
311644-F Rev 00

Chapter 2 Customizing the client 37
Installation modes and options
Verbose mode
This is the default installation mode. All dialog boxes are displayed. The user must respond to each dialog during the installation.
Skip Screens mode
In this mode, the dialog boxes do not appear. The license agreement dialog does appear, and the message Setup Complete...Restart the System before using the Contivity VPN Client is shown for 4 seconds. No reboot is performed.
In setup.ini set the following:
[Options]SkipScreens=1
Silent mode
In this mode, no license agreement appears, and the message Setup Complete...Restart the System before using the Contivity VPN Client is shown for 4 seconds. No reboot is performed.
In setup.ini set the following:
[Options]SkipLicenseAgreement=1SkipScreens=1
Quiet mode
In this mode, the user must dismiss the license agreement and then the reboot/finish dialog. The user can choose to reboot now or at a later time.
In setup.ini set the following:
[Options]SkipScreens=1DisplayReboot=1
Configuring the Contivity VPN Client

38 Chapter 2 Customizing the client
Reboot Only mode
No license agreement appears, and the reboot/finish dialog appears and must be dismissed by the user. The user can choose to reboot now or at a later time.
In setup.ini set the following:
[Options]SkipScreens=1DisplayReboot=1SkipLicenseAgreement=1
Silent with Forced Reboot mode
This switch will reboot the system immediately after the installation completes. The forced reboot will only be activated when you are running in Skip Screens mode or in Silent mode. The SkipScreens installation switch must be asserted. The SkipLicenseAgreement switch can be used with the ForcedReboot switch and has no effect on the reboot switch.
In the following case, no license agreement is displayed, and the Contivity VPN Client setup completes. The system will now reboot and the message disappears after 4 seconds.
In setup.ini set the following:
[Options]SkipScreens=1ForcedReboot=1SkipLicenseAgreement=1
Setting up the group.ini file
The group.ini file format is for distributing preconfigured group passwords in conjunction with preconfigured Profiles (Table 4). You create this file and include it with the custom files (just like the custom icons) along with your preconfigured baynet.tbk file. The installation configures the registry with the temporary text group passwords. The text group passwords are encrypted and deleted the first
311644-F Rev 00

Chapter 2 Customizing the client 39
time the client is run after the installation. By distributing the group passwords this way, users never need to enter the information, and they can instead rely on their token cards and PINs, or RADIUS passwords for connection protection. You cannot preconfigure PINs or user-level passwords, only group-level passwords.
Sample group.ini:
[ProfileNames]1=VPN Your City[VPN Your City]GroupPW=passwordNoSavePassword=1
The following list describes the changes you can make:
• Change the product name that is displayed during the installation process. This also changes the product name that is added to the program folder. This does not change the name that is displayed on the boxes of the application itself, only the names displayed in the Start→Programs folder. The product name is Contivity VPN Client by default.
• You can change the program folder name to which the product shortcuts are added. The folder name is Nortel Networks by default.
Table 4 Settings for group.ini file
Field Description
[ProfileNames] Name of the section that the installation looks for to send the names that are configured within this file. You must use this field as the heading.
1=MyExtranetConnection Profile name that exists in baynet.tbk.
2=OtherExtranetConnection Profile name that exists in baynet.tbk.
3=AnotherExtranetConnection Profile name that exists in baynet.tbk.
GroupPW=mygrouppassword Text group password taken from the switch under Groups→Edit: IPSec Configure settings.
NoSavePassword=1 Prevents the user from trying to save the user password or PIN; this is also done from Groups→Edit: IPSec Configure settings.
[MyExtranetConnection] Profile name of your connection.
Configuring the Contivity VPN Client

40 Chapter 2 Customizing the client
• You can skip the check that is made for the number of existing TCP/IP bindings. You can also do this from the command line using the switch:-SKIPBINDCHECK
If both the setup.ini switch and command line switch are used, the command line switch takes priority.
• You can skip all the installation screens (except for the license screen). This is the same as using -AUTO on the command line. If used in conjunction with -AUTO, the command line switch takes priority.
You can skip adding the password change icon in the program folder. You can change the password from the menu of the task bar icon that is created when the tunnel is established. The password change application is unnecessary but is maintained for backward compatibility.
Custom icons
The custom client icon facility allows you to insert your corporate icons in place of the existing icons for the client. There are four Nortel Networks icon groups that you can replicate, and within each of the four, you should create different indicators that imply activities such as sending or receiving data or establishing a connection.
The customizable installation files are in the \client\custom directory on the Nortel Networks CD. Select all of the files and paste them into an empty directory on your PC called, for example, Custom Install.
Create your icons
There are three steps involved in creating a custom icon:
1 Create the icon.
2 Rename the icon according to the Nortel Networks custom icon conventions.
3 Copy the renamed icon to the custom installation directory.
311644-F Rev 00

Chapter 2 Customizing the client 41
You must follow these steps for each of the following icon groups:
• Contivity VPN Client application icon
• Contivity VPN Client task bar icons
• Contivity VPN Client connecting icons
Within each group you have from two to four different representations of the group icon. You can create icon bitmaps in whatever style you prefer; however, the Nortel Networks icons are intended to convey a message for the given action, such as data transfer activity or establishing a connection.
The following sections describe the icon type that you should create, and also show you where the icon appears in the client application.
Client application icon (eacapp.ico)
The client application icon eacapp.ico (Figure 10)is used in place of the corporate icon, in the upper-left corner of the main application window, while the connection is being established and during disconnection.
Figure 10 Client application icon
This icon is also used as the Desktop Shortcut icon when you create an Auto-Connect shortcut from the Create Shortcut selection under the Contivity VPN Client file menu. Additionally, it appears in the program folder that is created during the installation process:
Start→Program Files→Nortel Networks→Contivity VPN Client
To replace the Contivity VPN Client application icon, create an icon called eacapp.ico. Next, copy the icon to your custom installation directory with all of the custom installation files.
Configuring the Contivity VPN Client

42 Chapter 2 Customizing the client
Contivity VPN Client task bar icons
These icons appear in the task bar to indicate data activity through the tunnel. To replace task bar icons, create four icons (blinknone.ico, blinkright.ico, blinkleft.ico, blinkboth.ico), and copy them into your custom installation directory with all of the custom installation files.
Figure 11 Sample icon
Figure 12 is a task bar icon that indicates that the client is running, but that no data is currently being transferred.
Figure 12 Blink none (blinknone.ico))
Figure 13 is a task bar icon that indicates that the client is transmitting data through the tunnel.
Figure 13 Blink right (blinkright.ico)
Figure 14 is a task bar icon that indicates that the client is receiving data into the tunnel.
Figure 14 Blink left (blinkleft.ico)
Figure 15 is a task bar icon that indicates that data is being both transmitted and received through the tunnel.
311644-F Rev 00

Chapter 2 Customizing the client 43
Figure 15 Both (blinkboth.ico)\
Figure 16 is an icon group that shows activity during the client connection process. Activity is shown through a cycle of four different icons with an arrow pointing clockwise through each of the four quadrants of the circular icon.
Figure 16 Client connecting icons
To replace the client connection icons, create a series of icons and rename them (connect1.ico, connect2.ico, connect3.ico, connect4.ico), then copy them into your custom installation directory with all of the custom installation files.
Custom bitmaps
This section describes how to insert custom bitmaps in the main client dialog box message, the client status message, and the Extranet Connection Manager dialog box.
Client dialog bitmap (eacdlg.bmp)
This is the bitmap on the main dialog box of the client.
Configuring the Contivity VPN Client

44 Chapter 2 Customizing the client
Figure 17 Contivity VPN Client bitmap
To replace it with a custom bitmap:
1 Create a 16-color bitmap that is 93 x 279 pixels.
2 Name the bitmap eacdlg.bmp.
3 Copy it into the custom installation directory with the other custom icons and installation files.
Client status bitmap (eacstats.bmp)
Figure 18 shows the bitmap on the status dialog box of the client. It is accessible only when a tunnel has been established.
Figure 18 Client status bitmap
To replace the status bitmap with a custom bitmap:
1 Create a 16-color bitmap that is 303 x 32 pixels.
2 Name the bitmap eacstats.bmp.
311644-F Rev 00

Chapter 2 Customizing the client 45
3 Copy it into the custom installation directory with the other custom icons and installation files.
You can copy all of the files from your custom installation directory onto diskettes, or you can put them into a network directory for corporate clients to retrieve.
Client GINA bitmap (nnginadlg.bmp)
You can brand or customize the Contivity VPN Client NNGINA dialog. You can customize and replace the bitmap that is displayed on the Gina dialog (Figure 19).
Figure 19 GINA bitmap
The client checks for a new customized bitmap each time the dialog is initialized. The NNGINA looks for a custom bitmap named nnginadlg.bmp in the installation directory under the icons folder. If the Contivity VPN Client was installed into the D:\Program Files\Nortel Networks directory, the NNGINA will look for the custom bitmap as D:\Program Files\Nortel Networks\icons\ nnginadlg.bmp. The Contivity VPN Client NNGINA bitmap is 417 X 113; any custom bitmaps of a varying size will be scaled to fit.
The Contivity VPN Client must be installed as a service and the NNGINA checks that this is the case.
Installing a custom client
To automatically install the Extranet applications along with the custom icons, double-click on the setup.exe file. The installation program detects the presence of the custom icons and bitmaps and copies the custom files into a subdirectory of the target installation directory called Icons. By default, this directory is:
C:\Program Files\Nortel Networks\Icons
Configuring the Contivity VPN Client

46 Chapter 2 Customizing the client
To repackage your custom installation with the new icons and bitmaps into a self-extracting executable, and to make it simpler to distribute the custom installation to users (as one file instead of many), you can use PackageForTheWeb, available from InstallShield:
http://support.installshield.com
To automate the Contivity VPN Client installation use the command line option AUTO when running the installation. This causes the Contivity VPN Client installation to install with all default options selected. To run the automatic installation, enter the following under Start > Run:
eac410d.exe AUTO
If you are running a custom installation that is not packaged as a self-extracting executable (such as eac260d.exe), run the setup as follows from the Start > Run menu item:
setup.exe AUTO
You must respond to the license screen. The only other interaction required is if the installation requires files from the Windows installation CD.
You can use the command line switch PreserveTBKFile to specify whether to overwrite an existing baynet.tbk file during the installation. If PreserveTBKFile is set to 1, the baynet.tbk file will only be copied if there is not an existing one in the users directory. Otherwise, the original file will be preserved.
You can create and use your own README.TXT file for your custom installation.
1 Create the README.TXT with a text editor and save it in ASCII text format.
2 Set CustomReadme=1 in the setup.ini file under the [Options] section.
3 Copy the file into the setup directory. This will override the README.TXT CAB file that is included in the client software.
311644-F Rev 00

Chapter 2 Customizing the client 47
Controlling the client from a third-party application
You can write an application and then have it establish a tunnel with command-line switches. For example, you can collect a user name, password, and destination address in your application, and with that information launch the client (extranet.exe) to establish a tunnel.
You can launch the client from your application using the call:
ShellExecute() or CreateProcess()
To pass the user name and password that the user supplied to the application in the command line (the destination is the remote switch), use one of the following commands.
• If you are using an LDAP user name and password for authentication:
Extranet.exe -U username,password,destination
• If you are using a RADIUS user name and password for authentication:
Extranet.exe -R username,password,destination,groupid,grouppassword
If the application also supplies a Windows message and Windows handle for the application, the Contivity VPN Client will notify the application when the connection is established. Table 5 lists all the command-line parameters that the client recognizes.
Table 5 Command line parameters
Switch User entry Description
-h <Windows handle> The Windows handle of the application launching the client.
-m <message handle> The Windows message to post to the handle, passed in -h, when the connection is established or fails to be established.
-a <profile> Activates the connection profile to use.
-o <profile> Opens the profile (allows the user to edit a profile).
Configuring the Contivity VPN Client

48 Chapter 2 Customizing the client
A sample command line string to launch the client and get a message posted back to the launching application is:
Extranet.exe -h 1234 -m 1225 -a MyExtraNetConnection
Following the example above, when the tunnel either connects or fails to connect, the IPsec client responds:PostMessage(1234, 1225, (IPsec Hwnd), True/False).
When the message is posted back to the Windows handle of your application, wParam is the Windows handle of the IPsec client (so that it can be programmatically disconnected), and lParam indicates success or failure.
When the tunnel is established, lParam is True; when tunnel establishment fails, lParam is False. The switch does not report additional error handling, because the IPsec client tells the user why the connection failed.
-d <profile> Indicates the connection profile to delete.
-n n/a Creates a new connection profile using the Connection Wizard.
-u <username,password,destination> Activate a connection with the supplied LDAP user information.
-r <username,password,destination,groupid,grouppassword>
Activate a connection with the supplied RADIUS user information.
-e <Entrust.epf, password, destination>
Activate the connection to the switch.
-t / -T n/a Shuts down the VPN tunnel connection and terminates the VPN client application.
-l / - log n/a Enables logging.
-s / -S -a, -e, -r, or -u Runs in silent success mode, which hides the dialog boxes that display during the connection.
Table 5 Command line parameters (continued)
Switch User entry Description
311644-F Rev 00

Chapter 2 Customizing the client 49
To programmatically disconnect the Extranet connection, post a WM_USER Message (PostMessage) to the Windows handle of the IPsec client (passed above in wParam). Set lParam to True to disconnect the tunnel. If you set lParam to False, and issue a SendMessage instead of a PostMessage, then the IPsec client can tell you if it is connected (True) or not (False).
Running in silent success mode
The client application can be launched with -s or -S option from the command line for running in silent success mode. This mode hides the common dialogs which are displayed during the connection providing less user interaction with the client.
Use -s -a <profile> to use connection profile.
Use -s -u <username,password,destination> to activate a connection with the LDAP authentication.
Use -s -r <username,password,destination,groupid, grouppassword> to activate a connection with the RADIUS authentication.
Use -s-e <entrust.epf, password> to activate a connection with Entrust authentication.
Remotely changing the group password
To provide a method to overwrite the group password information, the Contivity VPN Client has a set of command line options for the different authentication methods.
Note: To successfully terminate the client by command line with a relative path argument (as required by DOS), the Contivity VPN Client path must be included in the DOS PATH environment variable. Alternatively, you can pass the absolute path to the client by command line if it is within quotation marks. For example, from Windows Start>Run>Open, c:\program files\nortel networks\extranet.exe -t will fail unless the path to the client is contained in the PATH environment variable. However, “C:\Program Files\Nortel Networks\Extranet.exe” -t will successfully terminate the Contivity VPN Client application.
Configuring the Contivity VPN Client

50 Chapter 2 Customizing the client
The syntax is:
extranet.exe -auth <authentication type> -user <username> -pwd <password> -gid <gid> -gpwd <group password> -serverip <server ip> -pin <PIN> -code <tokenCode> -profile <profile name> -axentPath <axentpath>
The <authentication type> can be:
0: User name, password login 1: Axent hardware token 2: SecureId hardware token 3: Simple GroupId, Password 4: Axent software token 5: SecureId software token 6: Entrust 9: MSCAPI 10: From profile
For example, if -auth=10, the authentication type is decided by profile. The commandline switch always overwrites the ones in profile.
Some switches may be optional when using a profile as an authentication method. If you provide them, it overwrites the one specified in profile. Some switches, such as password and group password, are required. If the password or group password is saved in the registry, they are optional. If you provide them, it will overwrite the one saved in registry.
Previous command line options did not cover all of the authentication methods (using comma to separate authentication information), but they will continue to work.
The following examples describe the different authentication methods.
If you are using user name, password login:
extranet.exe -auth 0 -user <username> -pwd <password> -serverip <server ip>
extranet.exe -auth 10 -profile <profilename> -user <username> -pwd <password> -serverip <server ip>
If you are using the Axent hardware token:
311644-F Rev 00
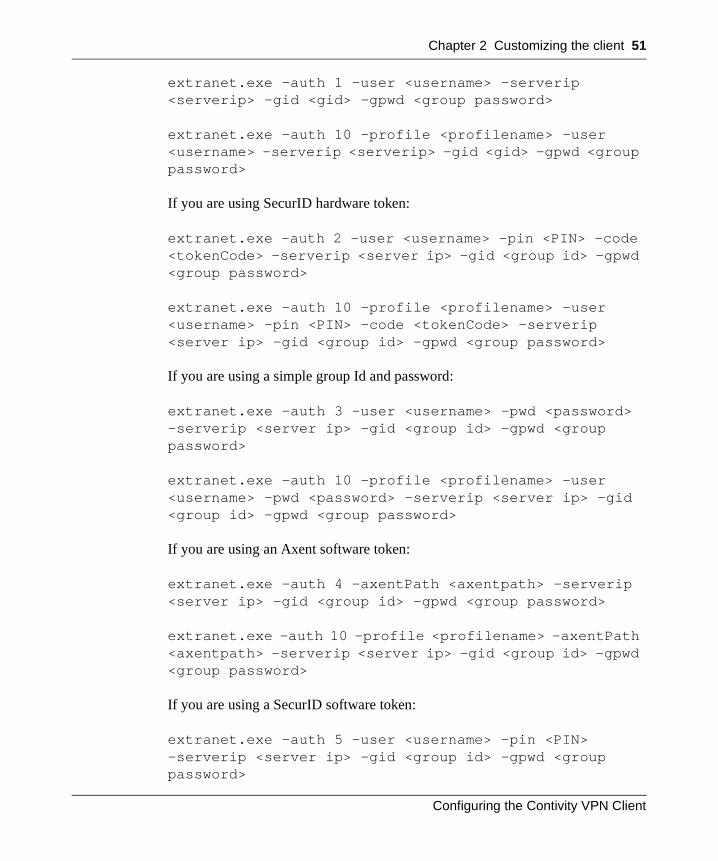
Chapter 2 Customizing the client 51
extranet.exe -auth 1 -user <username> -serverip <serverip> -gid <gid> -gpwd <group password>
extranet.exe -auth 10 -profile <profilename> -user <username> -serverip <serverip> -gid <gid> -gpwd <group password>
If you are using SecurID hardware token:
extranet.exe -auth 2 -user <username> -pin <PIN> -code <tokenCode> -serverip <server ip> -gid <group id> -gpwd <group password>
extranet.exe -auth 10 -profile <profilename> -user <username> -pin <PIN> -code <tokenCode> -serverip <server ip> -gid <group id> -gpwd <group password>
If you are using a simple group Id and password:
extranet.exe -auth 3 -user <username> -pwd <password> -serverip <server ip> -gid <group id> -gpwd <group password>
extranet.exe -auth 10 -profile <profilename> -user <username> -pwd <password> -serverip <server ip> -gid <group id> -gpwd <group password>
If you are using an Axent software token:
extranet.exe -auth 4 -axentPath <axentpath> -serverip <server ip> -gid <group id> -gpwd <group password>
extranet.exe -auth 10 -profile <profilename> -axentPath <axentpath> -serverip <server ip> -gid <group id> -gpwd <group password>
If you are using a SecurID software token:
extranet.exe -auth 5 -user <username> -pin <PIN> -serverip <server ip> -gid <group id> -gpwd <group password>
Configuring the Contivity VPN Client
52 Chapter 2 Customizing the client
extranet.exe -auth 10 -profile <profilename> -user <username> -pin <PIN> -serverip <server ip> -gid <group id> -gpwd <group password>
If you are using Entrust:
extranet.exe -auth 6 -user <entrust profile path> -pwd <entrust profile password> -serverip <server ip>
extranet.exe -auth 10 -profile <profilename> -user <entrust profile path> -pwd <entrust profile password> -serverip <server ip>
If you are using MSCAPI:
extranet.exe -auth 9 -user <MACAPI certificate string> -serverip <server ip>
extranet.exe -auth 10 -profile <profilename> -user <MACAPI certificate string> -serverip <server ip>
GINA chaining
GINA chaining detects the presence of a previously installed third-party GINA and passes all pass-through calls to that particular GINA. Because it is possible that some third-party GINAs could conflict with NNGINA, a list of conflicting third-party GINAs is available to determine if the installation should proceed. The GinaList.ini file is located in the custom installation directory so that you can add additional conflicting third-party GINAs.
311644-F Rev 00

Chapter 2 Customizing the client 53
Format of GinaList.ini:
#Following Ginas conflict with Nortel Networks' NNGINA.
#The comment line right above the Gina DLL will be shown to users if it's detected.
#Cisco Gina DLL
CSGina.dll
#X Gina DLL
X.dll
The comment preceding the identified conflicting GINA will be displayed to the installing user if the specified GINA is detected during installation.
Configuring the Contivity VPN Client

54 Chapter 2 Customizing the client
311644-F Rev 00

55
Chapter 3Using certificates
This chapter provides information to help you customize your client to use certificates.
MS CryptoAPI
The Contivity VPN Client supports retrieval of X.509v3 certificates from Microsoft Certificate storage through the Microsoft CryptoAPI (MS CAPI). Microsoft provides a Public Key Infrastructure (PKI) that adheres to the Public-Key Cryptography Standards (PKCS).
Using the Microsoft Certificate storage allows the Contivity VPN Client full access to the Microsoft Certificate storage and management tools. The Microsoft Certificate storage and management tools use PKCS standards-based messages and protocols to manage key pair generation and storage.
Microsoft Certificate storage also provides a mechanism to import digital certificates granted by third-party Certification Authorities through the use of standard messages (PKCS #12). This allows the Contivity VPN Client and switch to make use of Certification Authorities, such as Netscape, that have not been tightly integrated with the Contivity VPN Client and switch.
Digital certificates are currently supported by the Contivity ISAKMP key management protocol. Both the Contivity VPN Client and the Contivity VPN Switch can be configured to mutually authenticate using digital certificates during the IKE negotiation.
Note: You can use any tools provided by a Certification Authority (CA) that support and have been integrated with MS CAPI to create certificate requests.
Configuring the Contivity VPN Client

56 Chapter 3 Using certificates
MS-CAPI feature dependencies and backward compatibility
The Contivity VPN Client has dependencies on the Microsoft Crypto-API. Due to the varying availability of these required features on the different Windows platforms, the following requirements exist:
• When using a Microsoft Enterprise CA, the Contivity VPN Client Version 4.10 installed on Windows Me, Windows NT 4.0 SP6a, Windows 2000 or later, and using certificates in MS-CAPI store, is backwards compatible with the Contivity VPN Switch version 3.65 or later due to the required certificate extension processing feature on the switch.
• Contivity VPN Clients using MS-CAPI for certificate authentication installed on Windows 98 only authenticate when connecting to Contivity VPN Switch version 4.0 or later. Connecting to any switch running a software version earlier than version 4.0 will result in an authentication failure when using certificates stored in the MS-CAPI store.
Microsoft CA digital certificate generation
There are two methods for requesting and retrieving a digital certificate from the Microsoft CA:
• A digital certificate can be created on the trusted CA system and distributed through PKCS #12 BER encoded messages or files.
• A digital certificate can be requested from the client system itself, if the trusted CA is accessible from the client making the request through an MS Internet Explorer browser.
The steps needed to create the actual digital certificate request (PKCS #10) are always the same no matter how you make the request. The difference is where the private key material is created and, more importantly, stored.
When you make the digital certificate request from the client, the private key material is generated and stored locally. The PKCS #10 message does not contain private key material. Generally a user would want to keep all private key information and key material private and protected. The digital certificate is then retrieved as a PKCS #7 message and imported into the MS-CAPI store through the Internet Explorer browser, or the Internet options CertMgr tool.
311644-F Rev 00

Chapter 3 Using certificates 57
When you request a digital certificate from the system housing the Microsoft CA, the private key material is generated and stored locally, on the CA system. Therefore the CA can generate a PKCS #12 message that is a password-protected BER-encoded message. The resulting PKCS #12 message contains public/private key material as well as the associated digital certificate. The PKCS #12 message can then be distributed to certificate holders in a secure manner and can then be imported into the MS-CAPI store on the local client system.
It is easier to make requests and import the resulting certificates from the client.
Steps from browser running on client system or CA system
1 Attach to your CA through your browser.
2 Select Request a certificate.
3 Select Advanced request.
4 Select Submit a certificate request to this CA using a form.
5 Fill out Identifying Information: (Subject DN).
6 Fill out Intended Purpose: (Client Authentication Certificate and IPsec Certificate). The CSP is the Crypto Provider that will generate the key pair.
7 Click on Submit. Be sure to remember the request ID.
Netscape digital certificate generation
1 Connect to Netscape CA.
2 Select Manual Object Signing Enrollment or Object Signing (Browser).
3 Fill out User's Identity.
4 Specify Contact Information.
5 Select the key size (512,1024).
6 Click on Submit. Be sure to remember the request ID.
Configuring the Contivity VPN Client

58 Chapter 3 Using certificates
Importing a digital certificate into MS-CAPI store
There are two scenarios when you are importing a digital certificate into the MS-CAPI store:
• When you are using the Microsoft CA, the import process can be done directly from Internet Explorer when retrieving the digital certificate from the CA.
• When using other CA certificates, the client user or CA administrator additionally needs to produce a PKCS #12 message that contains the private/public key pair as well as the digital certificate. This can then be imported into the MS-CAPI store through the Internet options tools or the Internet Explorer browser.
Microsoft CA digital certificate retrieval
After the Microsoft CA administrator has approved the certificate, it can be retrieved through the Internet Explorer browser and imported directly into the MS-CAPI store.
1 Attach to your CA from your browser.
2 Select Check on a pending certificate (next ->).
3 Select the desired certificate request (PKCS #7). Please select the certificate request you want to check:.
To import the PKCS #7 request into the MS-CAPI store, select Certificate Issued - install this certificate?
You will see the message Certificate Installed and your new certificate has been successfully installed.
Note: When importing a certificate into the MS-CAPI store, you will also need to import the issuing CA certificate.
Note: You cannot use the Netscape browser, because it fails to see the certificates approved.
311644-F Rev 00

Chapter 3 Using certificates 59
Netscape digital certificate retrieval
After the Netscape CA administrator has approved the certificate, it can be retrieved through the Netscape browser and imported directly into the MS-CAPI store.
1 Attach to the Netscape CA from your browser.
2 Select the Retrieval tab.
3 Type in the Request ID from the digital certificate request and click on submit.
4 Click on Issued certificate: #
5 To import the certificate into your Netscape client certificate store, go to the bottom of the page and click on Import Your Certificate.
Your public/private key material as well as your digital certificate are now stored in the Netscape certificate store.
Configuring Contivity VPN Client for MS stored certificates
You can use the Connection wizard from the Contivity VPN Client to configure the client connection to use Microsoft stored certificates. You can also configure MS stored certificates by selecting Options > Authentication.
1 Double-click on the Contivity VPN Client icon.
The Contivity VPN Client screen appears.
2 Select File > Connection Wizard.
The New Connection Profile screen appears.
3 Enter a name and description, then click on Next.
The Authentication Type screen appears.
4 Select Digital Certificate; then click on Next.
The Digital Certificate Type screen appears.
5 Select Microsoft Stored Certificate; then click on Next.
Configuring the Contivity VPN Client

60 Chapter 3 Using certificates
The Microsoft Certificate Store screen appears. By default, this screen lists all of the certificates available, including the key usage field for the certificate. If you check the “Display Only Signature Certificate” box, only the digital signature is displayed.
Server certificate CRL checking
MS CAPI support on the Contivity VPN client provides checking the revocation status of the server certificate. The client always checks for a CRL upon connection.
If you receive a message indicating that the server certificate used for mutual authentication has been revoked or cannot be validated, it indicates that the server certificate has actually been revoked or the CRL distribution point is inaccessible, as defined in the CRL distribution point extension of the servers X.509 certificate.
The actual message is "The Server's Certificate has been revoked, or could not be validated. Please check with your remote access administrator. The Connection has been terminated." Be sure that the CRL distribution point is accessible to the PC after the client tunnel connection has completed. The CRL distribution point must be reachable by the client. An example CRL distribution point, as defined from the issuing CA, is http://sf1.certificates.com/CertEnroll/SF1.crl.
Entrust certificate-based authentication
The following sections describe Entrust certificate activities related to the client.
The Contivity VPN Client supports Entrust Version 6.0 for Entrust single login. The single login feature allows you to automatically authenticate to all certificate-enabled applications with a single access to your certificate (either a .epf or .tkn file) during a login session. If you have already presented your certificate to authenticate one application, you are not prompted to present the certificate for other applications during the login session.
To use single sign on:
1 Install the Contivity VPN Client as application.
2 Configure the Contivity VPN Switch for an Entrust user.
311644-F Rev 00

Chapter 3 Using certificates 61
3 Install the Entrust Entelligent Client.
4 Double-click on the Entrust icon.
5 Log in to the Entrust Entelligent Client.
6 Create an Entrust profile on the Contivity VPN Client. The password field is grayed out on the Contivity VPN Client because the user is already logged in.
7 Click on Connect to establish VPN connection.
Custom installation
You do not need to perform the following steps if users have installed the Entrust Entelligence* software version 4.0 or later.
You can customize the IPSec client to allow remote users to generate new certificates through the client. To create an IPSec client installation that also installs the necessary Entrust components to do Entrust certificate-based authentication, you must include the following two files in the Client\Custom directory as you would for custom icon files:
• The Entrust DLLs, which are on the Contivity VPN Client CD in the Client\Entrust directory. The Entrust DLLs are kmpapi32.dll and enterr.dll.
• The Entrust .ini file (entrust.ini), which was created when you set up the Entrust PKI* server.
The Entrust error messages DLL file, enterr.dll allows you to see more detailed Entrust error messages and information. Solutions to many of these error situations can be obtained through the Entrust knowledge base at http://www.entrust.com/support/index.htm. A valid support contract is required to register and access the knowledge base. Utilizing the Entrust error messages DLL, enterr.dll, and the Entrust knowledge base can help you solve many Entrust error situations.
Entrust passwords must conform to the following rules:
• Must be at least 8 characters long
• Must contain an uppercase character
• Must contain a lowercase character
• Must contain a numeric character
Configuring the Contivity VPN Client

62 Chapter 3 Using certificates
• Must not contain a portion of the profile name longer than half its length
• Must not repeat a character more than half the length of the password
Entrust certificate enrollment procedure
There are three possible situations in which remote users can access an Entrust PKI server to obtain a certificate for tunnel authentication:
• An external PKI server accessible from the Internet (directly accessible).
• A PKI server located behind the firewall, but in front of the switch. The firewall must be set to allow ports 389 and 709 to access the PKI (directly accessible).
• A PKI server located behind the firewall and the switch (not directly accessible).
The first two situations are similar because the PKI server is located in front of the switch and it is directly accessible from the Internet. When you provide access to the PKI through the firewall from ports 389 and 709, the second situation is the same as the first. The third situation requires remote users to also have an LDAP user name and password so that a temporary tunnel can be established to get access to the PKI.
Figure 20 shows the Entrust PKI server placed in each of these three places.
Note: The Entrust tool kit settings determine the protocol and port number used for certificate enrollment. See your Entrust documentation for information about the ports that need to be open on your firewall.
311644-F Rev 00

Chapter 3 Using certificates 63
Figure 20 An Entrust PKI server can be located in three places
Entrust certificate enrollment tunnel
To facilitate Entrust certificate enrollment from an IPSec client that does not have direct connectivity to the Entrust PKI, it is necessary to create a special group. This group is used only to access the Entrust PKI to generate a new certificate. This group should have a filter applied to it that restricts access through the tunnel to the PKI only. You could name this group, for example, Certificate Enrollment. Add a user with a “common” user ID and password; for example:
User ID: enrolleePassword: certificate
The switch must be set up with the correct filters to allow only PKI access through the tunnel filter set and the firewall to the PKI server. The TCP firewall filter ports are 389 and 709. Nortel Networks has preconfigured a filter rule called Entrust PKI that allows access to the Entrust PKI server. You can choose this filter for any group from the Profiles→Groups→Edit→Connectivity: Configure screen. Set this filter along with a “deny all” filter on the “semi-public” account that is set up. The Entrust PKI filter is made up of the following rules and should be customized by the administrator if the default Entrust port values are not used:
• TCP, src port > 1023, dest port 389, in
• TCP, src port 389, dest port > 1023, out
• TCP, src port > 1023, dest port 709, in
• TCP, src port 709, dest port > 1023, out
Configuring the Contivity VPN Client

64 Chapter 3 Using certificates
Direct access enrollment process
The following steps describe what remote users must do to obtain an authentication certificate when the PKI server is directly accessible from the Internet.
1 Choose a directory in which to store the .epf file.
2 Name the .epf file.
3 Select a password.
4 Enter the Entrust Reference Number and Authorization Code (provided to the remote user by the network administrator).
5 If you have a PKI server located behind the firewall and the switch, enter the LDAP user name and password and the IP address or host name of the switch.
6 Choose whether to dial in automatically.
7 Click on Finish.
Entrust certificate enrollment process
The following procedures describe getting a certificate when the Entrust PKI server is located either behind the firewall in front of the switch, or behind both the firewall and the switch.
1 Double-click on the Contivity VPN Client icon.
The Contivity VPN Client screen appears.
2 Select File→Connection Wizard.
The New Connection Profile screen appears.
3 Enter a name and description; then click on Next.
The Authentication Type screen appears.
4 Select Digital Certificate; then click on Next.
The Digital Certificate Type screen appears.
5 Select Entrust Digital Certificate; then click on Next.
The Entrust Certificate Profile Selection screen appears.
311644-F Rev 00
Chapter 3 Using certificates 65
6 Click on Create a new Profile; then click on Next.
The Create Entrust Profile screen appears.
7 Follow the screen prompts indicating where you want to store the Entrust Profile; then click on Next.
The Entrust Profile Name screen appears.
8 Enter a profile name (this is the name of the local .epf file -- do not include the .epf extension) and password; then click on Next.
The Reference Number and Authorization Code screen appears.
9 Enter the reference number and authorization code (provided to the remote user by the administrator -- the administrator gets this information after entering a new user into the PKI); then click on Next.
The Entrust Certificate PKI Accessibility screen appears.
10 Click on the appropriate button indicating where the Entrust Certificate PKI is located, or click on I Don’t Know, if that is the case. Then click on Next.
When the PKI server is located on the Internet or behind the firewall, the server is considered directly accessible. When the PKI server is behind the switch, it is considered to be not directly accessible. The test option (I Don’t Know where the PKI server is) attempts to establish a TCP connection to ports 389 and 709 to the PKI listed in the entrust.ini file. It tries for 30 seconds before timing out. If the connection times out or is refused, the wizard moves to Step 11, assuming that the PKI is not directly accessible.
11 Select a dial-up connection to dial from the list of Dial-Up Networking Profiles if a dial-up connection is necessary to access the Internet; then review the information on the Generate Certificate screen. This screen shows the information that is used to generate the authentication certificate and appears only if the PKI server is located behind the firewall. If everything is correct, click on Finish; a connection to the PKI is established that generates a new certificate.
This completes the required information when your PKI Entrust Certificate server is located behind a firewall.
Configuring the Contivity VPN Client

66 Chapter 3 Using certificates
In the situation where the PKI Entrust Certificate server is located behind the firewall and the switch, then you must also provide an LDAP user ID and password via the User Identification screen. This is needed to establish a temporary tunnel used only to get a new certificate. When the certificate has been generated, the user no longer needs the temporary LDAP user ID and password, since the new certificate is used.
This information must have already been provided to you by the network administrator. The administrator must have created a special group for this username and password so that a filter only allows access to the PKI for this user.
12 Enter the host name or IP address of the remote switch; then click on Next.
The Dialup Connection screen appears.
13 Determine whether to establish a dial-up connection to the Internet.
If you select Yes, a list appears so that you can select the Dial-up Networking Profile to use to establish a connection to the Internet.
Otherwise, click on Next and the Generate Certificate screen appears. The Generate Certificate screen shows you the key information that is used by the PKI Entrust server for the temporary VPN connection, excluding the password.
14 Click on Finish.
The Success screen appears, or an error message indicates why the certificate was not generated.
VeriSign certificate-based authentication
This section describes the VeriSign* certificate activities related to the client. It includes an overview of administrator’s tasks describes the administrative tasks for supporting VeriSign certificates and an overview of client user’s tasks describes the steps for connecting to a switch using VeriSign certificates.
How the client uses VeriSign certificates
Typically, remote client users obtain a VeriSign certificate from an external VeriSign PKI server that is accessible from the Internet.
311644-F Rev 00

Chapter 3 Using certificates 67
Figure 21 Layout for VeriSign
Remote clients use the client’s connection wizard to complete the following steps:
1 For the initial connection, clients request a certificate from the VeriSign certificate authority (CA) server. This involves a series of steps using the client Connection Wizard to create a new Connection Profile.
2 The client then waits for approval from the CA. There are two methods for getting approval:
• Without Pass Code mode means a user is notified by e-mail. This might take minutes or even days, depending upon the response of the VeriSign OnSite administrator. After the certificate request is approved, the client starts a connection to the switch. This connection attempt triggers a second request to the VeriSign CA Server, which retrieves the certificate to the client’s PC.
Client
Internet
Switch
Company
RA
VeriSign
IPSec Tunnel
CA
CA
CALDAP
LDAP
LDAP Bee Corp.
Delta, Inc.
Acme, Inc.
http-based CRScertificate management
Configuring the Contivity VPN Client

68 Chapter 3 Using certificates
• With Pass Code mode means the certificate is immediately approved, during enrollment, by OnSite and the certificate is retrieved to the client.
3 When the certificate is retrieved, the client connects to the switch.
For subsequent connections to the switch, the user starts the client, then selects the Connection Profile, which then uses the existing certificate.
Overview of administrator’s tasks
From the administrator’s viewpoint, the overall process of setting up a VeriSign environment involves the following operations. Setting up your OnSite accounts is described in the VeriSign OnSite documentation. Steps 3 through 5 are described in this section.
1 Prepare your two OnSite accounts.
Set up your IPSec device OnSite account and your Client OnSite account.
2 Configure your switch.
Set up your switch to support VeriSign certificates and obtain the certificate for the IPSec OnSite account.
Set up the user/groups for the client users who want to connect to the switch.
3 Complete the initial VeriSign enrollment to create the VeriSign configuration file.
Install the standard client on your PC.
Run the connection wizard to perform the initial VeriSign enrollment, which creates the configuration file that you include in your custom installation.
Retrieve a VeriSign certificate and connect to the switch.
4 Create the custom installation for your clients.
Create and package the custom installation for your client users. The custom installation includes a default configuration file, a modified setup.ini file, and a new cert.ini file.
In many organizations, the CA duties and the switch administrative duties are performed by the same person or group.
311644-F Rev 00

Chapter 3 Using certificates 69
Overview of client user’s tasks
A remote user of the client, who uses VeriSign certificates to connect to a switch, must complete the following tasks:
1 Complete the initial VeriSign enrollment to retrieve a VeriSign certificate.
a Install the custom client.
b Run the connection wizard to perform the initial VeriSign enrollment, using the existing configuration file.
c Retrieve a VeriSign certificate and connect to the switch.
2 Perform any subsequent connections to the switch.
After the initial VeriSign enrollment is successful, remote users use the existing client connection profile to connect to the switch.
VeriSign certificate enrollment procedure
The IPSec client provides a connection wizard that you use for the VeriSign certificate enrollment process.
The VeriSign certificate enrollment procedure consists of the following:
• Creating the configuration file
• VeriSign certificate request (enrollment)
• VeriSign certificate retrieval
• Other VeriSign features
• VeriSign tools menu
Initial enrollment and creating the configuration file
The following procedure describes the procedure an administrator would complete for the initial Verisign enrollment. This initial enrollment creates a “default” configuration file. The configuration file is then included in the custom installation kit that you provide to remote client users.
Configuring the Contivity VPN Client

70 Chapter 3 Using certificates
Prerequisites before starting
Before starting your initial enrollment, make sure that you have the following:
• Contivity VPN Client kit (for example eac410d.exe)
• The URL for your VeriSign OnSite account
• The Organization Name and Organization Unit that you provided to VeriSign when you set up your Private Client OnSite account
Running the initial enrollment
1 Install the client.
2 On your client PC, go to the C:\Program Files\Nortel Networks\VeriSign PKI\Production directory.
3 Under the Production directory, create a new directory, such as <MyConnection>.
4 To get the CA certificate for your VeriSign account, access the VeriSign URL for your organization, such as https://onsite.verisign.com/services/MyCorpMyDept/digitalidCenter.htm.
5 Copy the certificate from the VeriSign Web site to your PC. Either download the certificate in binary format to your <MyConnection> directory and give the file a .509 extension, or cut and paste the certificate, in base64 format, using the following steps:
a Create a new text file (for example, using Notepad).
b Cut and paste the certificate from the Web site into the text file.
c Save the text file to your MyConnection directory. Give the file an extension of .b64. The .b64 file type is associated with the WinZip utility. If the WinZip utility is installed on your PC, .b64 file names appear (for example in Internet Explorer) with the WinZip icon. However, if you want to view the contents of the file, you must use Notepad, not the WinZip utility.
6 Next, run the Contivity VPN Client. Double-click the Contivity VPN Client icon. The Contivity VPN Client screen appears.
7 Select File→Connection Wizard.
The New Connection Profile screen appears.
311644-F Rev 00

Chapter 3 Using certificates 71
The connection profile gathers information for use in your connections to the switch.
8 Follow the instructions to complete the two fields; then click on Next.
The Authentication Type screen appears.
9 In the Authentication Type screen select Digital Certificate; then click on Next.
The Digital Certificate Type dialog box appears.
10 In the Digital Certificate Type dialog box, select VeriSign Digital Certificate and click on Next.
The Certificate Configuration Setup screen appears.
11 In the Certificate Configuration Setup dialog box, click on the Create a new Configuration File button.
The Create New Certificate Configuration File dialog box appears.
12 In the Create New Certificate Configuration File dialog box, complete these three steps:
• Use the browse function to select the C:\Program Files\Nortel Networks\VeriSign PKI\Production\MyConnection directory as the location where you want the configuration file to be stored.
• Check that the URL of your VeriSign certificate authority is filled in.
• Use the drop-down menu to select your CA root certificate file. There are three files with similar names and a .509 extension. These are the files that you obtained in step 4. The CA root certificate file has RA in its name. If your configuration file is not located under the /Production directory, no certificate files appear in the drop-down menu.
13 Click on the Other Options button in the Create New Certificate Configuration File screen.
The Certificate File Options dialog box appears.
14 In the Certificate File Options dialog box, fill in the Organization Unit and the Organization Name with the exact names that you provided to VeriSign when you set up your account. You can select the Options tab to specify additional information to include in your configuration file.
Configuring the Contivity VPN Client

72 Chapter 3 Using certificates
When you are finished adding the optional information, click on OK to return to the Create New Certificate Configuration File dialog box. The following steps test the certificate retrieval process and the subsequent connection to your switch.
15 In the Create New Certificate Configuration File dialog box, click on Next.
The Digital Certificate Store Password dialog box appears.
16 In the Digital Certificate Store Password dialog box, follow the screen instructions to enter and verify the password for the certificate store.
The store password enables you to gain access to the configuration files. The password must consist of a combination of eight numbers, and upper and lowercase letters. Click on Next.
The Subject Name Information Page 1 dialog box appears.
17 In the Subject Name Information Page 1 dialog box, you must fill out the Common Name, Email Address, and Challenge Phrase fields (the challenge phrase is used during certificate renewal operations).
• Make sure the e-mail address is absolutely correct; otherwise the user can never have notification return.
• The Passcode field is required if you have set up the OnSite account to use With Pass Code mode.
• Click on Next. The Subject Name Information Page 2 dialog box appears.
18 The Subject Name Information Page 2 dialog box contains additional optional fields, such as Organization Unit and Name.
a Click on the Advanced button to display additional fields for Encryption Strength and Certificate Type. Edit these fields as needed.
b Click on OK to return to the Subject Name Information Page 2 dialog box.
Note that this is the last time you can change the key size on the certificate. The default size is 1024.
c Click on Next. The Certificate Authority Accessibility dialog box appears.
19 The Certificate Authority Accessibility dialog box enables you to specify how the Contivity VPN Client communicates with the certificate authority when creating a new digital certificate. Select Certificate Authority IS directly accessible.
311644-F Rev 00

Chapter 3 Using certificates 73
The Digital Certificate Enrollment dialog box appears.
20 The Digital Certificate Enrollment dialog box displays the information that is used to generate your digital certificate. Review the information, then click on Finish to send your certificate request to the preconfigured URL at the VeriSign OnSite for processing.
If your account uses Without Pass Code mode, the following screen informs you that your certificate request has been sent to the OnSite administrator. You can then click on the Close button. You are notified by an e-mail from the OnSite administrator when your certificate is ready for retrieval.
If your account uses With Pass Code mode, your certificate request is automatically approved by OnSite and your certificate is retrieved to your client’s certificate store.
21 Click on the Finish button to end the wizard. A dialog box informs you that you have completed the VeriSign enrollment process.
22 In the next dialog box, enter the IP address of the switch to which you want your client to connect. Then click on Next.
23 A series of dialog boxes guides you through the process of setting up the way the client connects to the switch. The last dialog box informs you that your connection profile is complete.
The standard Contivity VPN Client connection screen appears. Note that the Certificate field is filled in.
24 Enter your password and click on Connect.
• If you are using With Pass Code mode, the connection to the switch is started, using the certificate you retrieved in step 20.
• If you are using Without Pass Code mode, another dialog box appears. If you have received notification that your certificate is ready, click on OK to retrieve it. Otherwise, click on Cancel and wait until you receive notification. This dialog box appears again when you attempt to connect after you receive notification.
When you retrieve your certificate, follow the screen prompts to connect to the switch.
This completes the initial enrollment, certificate retrieval, and creation of the configuration file. You are now ready to create the custom installation for remote users who use VeriSign certificates to connect to a switch.
Configuring the Contivity VPN Client

74 Chapter 3 Using certificates
Creating the VeriSign custom client installation
When you have completed the initial VeriSign enrollment, which creates the related configuration file, you are ready to create the custom installation for the client kit. This kit is distributed to users who use VeriSign certificates to connect to the switch.
To create the custom installation, you must complete the following tasks:
1 Modify the setup.ini file.
2 Create the cert.ini file.
3 Package the custom installation program.
Modifying the setup.ini file
The first part of creating a VeriSign custom client installation is to modify the setup.ini file. This file is distributed on the Nortel Networks CD, in the client\custom directory. Modifying the file allows you to change the default behavior of the client.
1 Use a text editor, such as Notepad, to edit the setup.ini file.
2 Create the options section of the setup.ini file, then add the line:
CertIniFile=cert.ini.
For example,
[options]CertIniFile=cert.ini
Creating the cert.ini file
Next, you must create the cert.ini file. The information in this file is used to customize the installation for your client users. The cert.ini file should reside in the same directory as the setup.ini file. These files are just used for installation purposes.
311644-F Rev 00

Chapter 3 Using certificates 75
Table 6 describes the sections and entries that you add to the cert.ini file.
Table 6 Entries in the cert.ini file
Field Description
[ConfigurationNames] The installation looks for this section name, which is a required heading. This section contains the names of configurations that are described in later sections of this file.
[First Configuration] This section identifies the start of the configuration information for the first configuration name.
1=First Configuration This is the name of a configuration that is specified in the following section. This is a custom name that you choose.
2=Second Configuration This is the name of another configuration.
SrcFolder=first-source This field specifies the source folder from which all the necessary files, such as the configuration file and certificate files, are copied to the target folder. This source file resides in the same directory as the setup.ini file.
TargetFolder=first-target This field specifies the target folder where the files from the source folder are copied. If no explicit target folder is specified, a default target folder is created with the same name as the source folder name. This default target folder is created in the following path: \Program files\Nortel Networks\VeriSign PKI\Production\default-target-folder.
RemoveWhenUninstall=1 1 indicates to InstallShield to remove all the associated files during uninstallation. 0 indicates that all the files should remain in place during uninstallation.
[Second Configuration] This section identifies the configuration for the second configuration name.
SrcFolder=second-source Source folder for the second configuration.
TargetFolder= Target folder for the second configuration.
RemoveWhenUninstall=0 Instructions for the second configuration.
Configuring the Contivity VPN Client

76 Chapter 3 Using certificates
Sample cert.ini File
[ConfigurationNames]1=Finance Department2=Maintenance Division[Finance Department]Srcfolder=finance-sourcetargetFolder=Finance DepartmentRemoveWhenUninstall=1[Maintenance Division]SrcFolder=maintenance-sourceRemoveWhenUninstall=0
Repackaging the new custom installation program
After creating the custom installation, you must repackage the new installation into a self-extracting executable with a name that is meaningful to your users. For example, fin_eac.exe might be the name of the custom installation file for members of the Finance Department. Repackaging into a self-extracting executable makes it simpler to distribute the custom installation to users (as one file instead of many). To create the self-extracting executable, you can use programs such as the InstallShield PackageForTheWeb, which is available from InstallShield at http://support.installshield.com.
Many utilities that create self-extracting installations truncate long file names into eight characters. This truncation causes problems during a custom installation. You should make sure that you do not use file names or folder names longer than eight characters, or ensure that you are using a utility that supports long file names.
Files in the custom installation
Your repackaged self-extracting custom installation file must include the following files. (Figure 22 illustrates the contents of your custom installation file.)
• All files that were included in your original client’s Custom\<your_product> folder (where your_product is the version you installed, such as Domestic or Export)
• Your modified setup.ini file
• Your new cert.ini file
• A new folder
311644-F Rev 00

Chapter 3 Using certificates 77
This is the source folder that you specified in the cert.ini file. In the new folder is:
— Your new certkit.cfg file--the configuration file you created during your initial VeriSign enrollment
— Any certificate files--files with .509 and .b64 extensions
Figure 22 Contents of the custom installation file
Certificate configuration file and certificate files
The configuration file (certkit.cfg) was created when you clicked on the Create a new Configuration File button (in step 11 on page 71) and completed the client connection wizard procedure. This file specifies settings for the certificate process. Generating a new certificate or using an existing certificate is based upon information contained in the configuration file.
The initial configuration file includes at a minimum the URL to which CRS messages are sent, the private certificate, the remote entity certificate, and other certificates. During each initialization of the VeriSign library toolkit, the client looks into the configuration file and loads all the certificates specified into the user’s certificate store.
The configuration file and all the CA certificate files must be in the same subdirectory you created during the initial VeriSign enrollment, for example: C:\Program Files\Nortel Networks\VeriSign PKI\Production\MyConnection).
The following list shows the file names and descriptions of the configuration file and CA certificate files:
client
custom
export
finance department• certkit.cfg (the configuration file you created)• aaa.509• aaa.b64 (any certificate files)
(your source folder -- from yourconfiguration file)
• all files that were in this folder originally• setup.ini• cert.ini
(your modified setup.ini and new cert.ini files)
Contents of theRepackaged Custom Installation File
Configuring the Contivity VPN Client

78 Chapter 3 Using certificates
• certkit.cfg--contains configuration settings for the VeriSign certificate process
• aaa.509--the certificate file in BER/DER encoding format
• aaa.b64--the certificate file in base64 encoding format
Table 7 describes the information contained in the certkit.cfg file.
Table 7 Entries for the certkit.cfg file
Parameter name Mandatory Description
CA Address Yes The URL to which all the requests are sent.The URL for the Test System Account is:
http://secure-test-fe.bbtest.net/cgi-bin/crs.exeThe URL for the Production System Account is:http://onsite-admin.verisign.com:80/cgi-bin/crs.exe
Private Certificate Yes The certificate file specifies the issuer certificate, for example, RootCA.509.
Remote Entity Yes The certificate file specifies the remote entity (RA) that handles all the requests, for example, OnSiteRACert.509.
Other Certificate No The certificate file is needed to load to the certificate store. Usually, these files contain the CA or subordinate CA of the RA. The configuration file could contain more than one “other certificate.”
Renew Lifetime No Specify when to renew the certificate (%).
Key Size No Specify the size of the key pair generated during the creation of PKCS #10 CertRequest.
Organization No Information used to create the Distinguished Name.
Organization Unit No Information used to create the Distinguished Name.
Locality No Information used to create the Distinguished Name.
State No Information used to create the Distinguished Name.
County No Information used to create the Distinguished Name.
311644-F Rev 00
Chapter 3 Using certificates 79
Sample certkit.cfg configuration file
CA Address = http://onsite-admin.verisign.com:80/cgi-bin/crs.exePrivate Certificate = RootCert.509Remote Entity = ProdAARA.509Other Certificate = ProdAACA.509Other Certificate = ProdPCA3.509Organization = company xyzOrganization Unit = finance departmentLocality = NoneState = NoneCountry = NoneKey Size = 1024Cert Type = end-user
Creating a connection profile using the custom installation
By providing your users with a custom installation procedure, you reduce the number of steps and the complexity required for their VeriSign enrollment process. This section describes the procedure for using VeriSign certificates with a custom client.
Prior to starting the VeriSign enrollment process, custom client users must run the setup program to install the custom client kit (for example, fin_eac.exe). You must also have the password for your certificate store (the certificate configuration file).
To run the VeriSign enrollment process:
1 Run the Contivity VPN Client (double-click on the Contivity VPN Client icon).
The Contivity VPN Client screen appears.
2 Select File→Connection Wizard.
The New Connection Profile screen appears. The connection profile gathers information for use in your connections to the switch.
Note: If you create a profile for a switch that allows the password-save feature, but has fail over to a switch that does not allow the feature, you must re-enable the password setting on the client main screen and save the new profile.
Configuring the Contivity VPN Client

80 Chapter 3 Using certificates
3 Follow the instructions to complete the two fields, then click on Next.
The Authentication Type screen appears.
4 On the Authentication Type screen select Digital Certificate, then click on Next.
The Digital Certificate Type dialog box appears.
5 In the Digital Certificate Type dialog box, select VeriSign Digital Certificate and click on Next.
The Certificate Configuration Setup screen appears.
6 In the Certificate Configuration Setup dialog box, click on the Use an existing Configuration File button.
The Certificate Configuration File dialog box appears.
7 In the Certificate Configuration File dialog box, complete these two steps:
a Use the browse function to select the directory where your configuration file is located (this is the target folder listed in the configuration file); for example, C:\Program Files\Nortel Networks\VeriSign PKI\Production\Finance Department.
b Enter, then verify, the password for the certificate store. Click on the Next button. The Certificate Selection dialog box appears.
8 In the Certificate Selection dialog box, click on Create a new Certificate. Note that for the initial enrollment, there are no existing certificates. The Subject Name Information Page 1 dialog box appears.
9 In the Subject Name Information Page 1 dialog box, the Common Name, Email Address, and Challenge Phrase fields are required entries (the Challenge Phrase is used when renewing certificates).
Make sure the e-mail address is absolutely correct; otherwise your OnSite Administrator will be unable to contact you if you are using Without Pass Code mode.
The Passcode field is required if you have set up the OnSite account to use With Pass Code mode.
Click on Next. The Subject Name Information Page 2 dialog box appears.
10 The Subject Name Information Page 2 dialog box contains additional optional fields, such as Organization Unit and Name. This information is taken from the configuration file (certkit.cfg). Typically, users do not need to edit any
311644-F Rev 00

Chapter 3 Using certificates 81
existing entries. The Advanced button displays additional fields for Encryption Strength and Certificate Type settings. Click on Next. The Certificate Authority Accessibility dialog box appears.
11 The Certificate Authority Accessibility dialog box enables you to specify how your client communicates with the OnSite Certificate Authority when creating a new digital certificate. Select the method, then click on Next.
• If you selected the Certificate Authority IS directly accessible option, the Digital Certificate Enrollment dialog box appears.
• If you selected the Certificate Authority IS NOT directly accessible option, a series of interim dialog boxes appear. First, you must enter the user name and password that enable you to connect to the remote network. Next, you must enter the IP address of the switch that connects you to the Internet. Next, you must select how you initiate a dial-up connection to the remote network. Finally, you can test the connection. After the test, the Digital Certificate Enrollment dialog box appears.
• If you selected I Don’t Know..., an interim dialog box appears, and you must select how you initiate a dial-up connection to the remote network. A second dialog box enables you to test the connection. After the test, the Digital Certificate Enrollment dialog box appears.
12 The Digital Certificate Enrollment dialog box displays the information that is used to generate your digital certificate. Review the information, then click on Finish to send your certificate request to the preconfigured URL at VeriSign OnSite for processing.
If your account uses Without Pass Code mode, the following screen informs you that your certificate request has been sent to the OnSite administrator. You can then click on the Close button. You are notified by e-mail from the OnSite administrator when your certificate is ready for retrieval.
If your account uses With Pass Code mode, your certificate request is automatically approved by OnSite and the certificate is retrieved to the certificate store on your client.
13 Click on the Finish button to end the wizard. A dialog box informs you that you have completed the VeriSign enrollment process.
14 In the next dialog box, enter the IP address of the switch to which you want your client to connect. Then click on Next.
Configuring the Contivity VPN Client

82 Chapter 3 Using certificates
15 A series of dialog boxes guides you through the process of setting up the way the client connects to the switch. The last dialog box informs you that your Connection Profile is complete.
The standard Contivity VPN Client connection screen appears. Note that the Certificate field is filled in.
16 Enter your password and click on Connect.
• If you are using With Pass Code mode, the connection to the switch is started, using the certificate you retrieved in step 12.
• If you are using Without Pass Code mode, another dialog box appears. If you have received notification that your certificate is ready, click on OK to retrieve it. Otherwise, click on Cancel and wait until you receive notification. This dialog box appears again when you attempt to connect after you receive notification.
When you retrieve your certificate, follow the screen prompts to connect to the switch.
This completes your initial VeriSign enrollment and certificate retrieval.
Using VeriSign certificates to connect to a switch
When remote client users have completed their initial VeriSign enrollment and retrieved their VeriSign certificate, they use the following procedure to connect a tunnel session to a switch:
1 Double-click on the Contivity VPN Client icon to run the client.
2 In the Contivity VPN Client dialog box, select the connection profile that has been set up for VeriSign certificates.
3 Enter the password for the certificate.
4 Click on the Connect button. The VeriSign authentication process verifies that you are authorized to connect to the switch, then starts the secure connection.
311644-F Rev 00

Chapter 3 Using certificates 83
Recovering expired certificates
VeriSign certificates eventually expire. When you attempt to connect to a switch using an expired certificate, an error message informs you that the certificate has expired. To recover the expired certificate, complete the following procedure:
1 Go to the client’s certificate Tools Menu and select Recover Certificate.
This starts the client Connection wizard, which displays the Certificate Configuration File dialog box.
2 In the Certificate Configuration File dialog box, the name of your configuration file is already entered. Click on Next.
The Certificate Selection dialog box appears.
3 In the Certificate Selection dialog box, select your expired certificate, then click on Next.
The next dialog box informs you that the wizard has found the expired certificate.
4 In the dialog box that shows the expired certificate, click on Next.
The Subject Name Information Page 1 dialog box appears.
5 In the Subject Name Information Page 1 dialog box, complete the required information, then click on Next.
The Subject Name Information Page 2 dialog box appears.
6 In the Subject Name Information Page 2 dialog box, make sure the information is correct, then click on Next.
The Certificate Authority Accessibility dialog box appears.
7 In the Certificate Authority Accessibility dialog box, specify the access method and click on Next to send your certificate request to the preconfigured URL at VeriSign OnSite for processing.
Configuring the Contivity VPN Client

84 Chapter 3 Using certificates
Additional VeriSign features
CRL retrieval
CRL (Certificate Revocation List) checking is done automatically on the client, whenever it is necessary prior to tunnel establishment. The CRL Staleness Tolerance determines how often the client does the CRL retrieval. Currently this period is set to be one day. Note that this means the client attempts to do CRL retrieval only once in a 24-hour period.
Certificate renewal
You can (if allowed) specify the renewal time for the certificate. For example, renewal could be carried out when 30%, 50%, 60%, or 90% of the lifetime of the certificate.
The client keeps track of the expiration period of the certificate. The client checks the lifetime of the certificate each time the user attempts to connect to the switch. Currently VeriSign allows certificate renewal when the certificate has fewer than 30 days left in its lifetime.
Error messages
The client displays message dialog boxes whenever an error has been encountered during certificate enrollment, retrieval and renewal, and the CRL retrieval process.
Use the following steps to find the VeriSign OnSite Error Codes and Messages document, as well as other OnSite documentation:
1 Connect to the OnSite Control Center using the VeriSign OnSite documentation.
2 Click on the Download link.
3 Follow the Documents link.
VeriSign recommends that, at a minimum, you read the Administrator's Handbook and the Technical Reference.
311644-F Rev 00

Chapter 3 Using certificates 85
Tools menu
The Tools menu provides a quick method for viewing, changing, and setting some of the information associated with the current profile. You access the Tools menu from the Certificate field browse button on the client main screen (first screen). Note that you must first provide a password in the password field of this same screen in order to get access to the various menu options. The password consists of eight numbers, and upper- and lowercase letters.
Options
Use the Options choice to specify when to renew your certificate. Click on Options and the Advanced Options dialog box appears.
Recover Certificate
Use the Recover Certificate choice to recover your certificate. Click on Recover Certificate and the Create Configuration file screen appears.
View Configuration File
Use the View Configuration File choice to view and edit a configuration file. Click on View Configuration File and use the Edit button to edit the Configuration file.
View Certificate Details
Use the View Certificate Details choice to view information about your VeriSign certificate. Click on View Certificate Details.
Change Password
Use the Change Password choice to change your password.
Configuring the Contivity VPN Client

86 Chapter 3 Using certificates
311644-F Rev 00

87
Appendix AClient logging
Table 8 describes client error messages.
Table 8 Client error messages
Message Description
LOG_AUTH_FAILED Authentication failed. Check user authentication parameters.
LOG_CLI_UNKNOWN Command line detected unknown command. Check command line launch parameters. See Reference for the Contivity VPN Switch Command Line Interface for further information.
LOG_CONNLOST_ERROR Connection lost due to unknown error. See the Contivity VPN Switch log for further information.
LOG_CONNLOST_KEEPALIVE Switch did not respond to keep alives. Connection lost. Check connection to the switch and the dialup connection for failure.
LOG_NO_PROPOSAL Encryption mismatch.The 56-bit client is attempting to connect to the switch configured as 3DES.
LOG_REMOVE Unable to remove previous session log file. Check for DOS file protection issue.
LOG_RENAME Unable to rename previous session log file. Check for DOS file protection issue.
IDP_SOCKETS_INIT_FAILED Windows socket initialization failed.
IDS_CANTOPENDHCP Failed to create a DHCP socket; connection will be closed.
IDS_CONNECTIONLOST Secure connection has been lost; click Connect to reestablish connection
Configuring the Contivity VPN Client

88 Appendix A Client logging
IDS_DHCPFAILEDCONTINUE Failed to obtain DNS and WINS configuration information; connection closed. This usually indicates that a firewall is preventing IPSecurity packets from reaching the switch.
IDS_DHPCRECVERR A receive error occurred on the DHCP connection; connection closed.
IDS_LOGINFAILED Login failed; see the switch log for further information.
IDS_SALOSTDURINGDHCP The security association was lost while retrieving DNS and WINS configuration information; connection failed.
IDS_SESSION_MAX Maximum number of sessions reached.
LOG_CAL_EXPIRED Pre-production client has expired. Update the client to a generally available version.
LOG_CONNECTION_LOST The physical network connection has been lost. Restore the dialup connection or LAN connection before reconnecting.
LOG_CONNECTION_TERMINATE This message is used with the security violation messages; the violation message appears, followed by the connection terminated message.
LOG_CP_VIOLATE Connection terminated due to client policy violation. Contact the switch administrator.
LOG_INSTALL_REBOOT Reboot not performed after installation.
LOG_IPSEC_SVC_DISABLED IPSec service is disabled. Restart the service and/or reboot the PC.
LOG_NO_RESPONSE No response received; connection failed. Check the connection to the switch.
LOG_NOKEEPALIVE Connection lost due to no response from keep alives or no incoming packets for two minutes. Check the connection and /or the dialup to the switch.
LOG_ONEINSTANCE Only one instance of the client can be running a at time.
LOG_SEC_ROUTES_CHANGED Routing table changes violate security policy.
LOG_SEC_SS_CHANGED Screen saver changes now violate security policy; screen saver must be enabled and the wait time must be compatible with the switch.
Table 8 Client error messages (continued)
Message Description
311644-F Rev 00

Appendix A Client logging 89
LOG_SSP_VIOLATE Connection terminated due to null screen saver password violation. Enter the screen saver password.
LOG_AUTOCONNECT_REBOOT Change takes effect on next reboot.
LOG_AUTOCONNECT_UNINSTALLED The auto connection feature has been uninstalled by the switch.
LOG_CES_DISCONNECT A disconnect message was received from the switch. See the switch log for further information.
LOG_CLEAR_DNS Windows 9x Clear DNS is set.
LOG_FAIL_ACTIVATE Client failover invoked.
LOG_FAIL_CLEAR Failover list set to none.
LOG_FORCED_KEEPALIVES NAT traversal forcing use of keep alives.
LOG_LOAD_BALANCED Server load balancing; client connection redirected.
LOG_REM_WINSDNS Removing WINS/DNS servers.
LOG_ADD_WINSDNS Adding WINS/DNS servers.
Table 8 Client error messages (continued)
Message Description
Configuring the Contivity VPN Client

90 Appendix A Client logging
311644-F Rev 00
91
Index
AAddDesktopShortcut 32
application icon 41
Ccert.ini file
creating in VeriSign 74sample 76
certificate renewal options 85
certkit.cfg fileentries 78sample 79
change password 85
client profilesconfiguring 29
command lineSkipLicenseAgreement 36
connecting icons 42
connection profilecreating 79
conventions, text 14
CRL 84
custom bitmaps 43
custom clientdistributing 45
custom installationfiles 76repackaging 76
customer support 16
CustomReadme 32
DDisableAutoConnectOverRide 32
DisableKeepAlive 33
DisableLoggingConfig 33
DisplayPasscode 33
DisplayReboot 33
domain loginWindows NT 24
EEnableLogging 33
Entrustauthentication overview 61certificate enrollment process 64certificate enrollment tunnel 63enrollment procedure 62
Entrust knowledge base 61
Entrust single login 60
error messages 84
Extranet Access Client dialog box 43
Extranet Access Client Status 44
FFolderName 33
ForcedReboot 33
Ggraphical identification and authentication
(GINA) 24
group.ini file
Configuring the Contivity VPN Client

92 Index
setting up 38
group.ini file settings 39
GroupIniFile 33
HHiddenInstall 33
IInstallAsService 34
installationWindows 98 19Windows NT 19
Installation modes and optionsQuiet mode 37Reboot Only mode 38Silent mode 37Silent with Forced Reboot mode 38Skip Screens mode 37Verbose mode 37
InstallGina 34
LLicense Agreement 36
LockKeepAlives 34
LogoffWarning 34
MMSDUN13PATH 35
NNoChangeProfiles 35
Nortel Software License Agreement 36
Ooptions
certificate renewal 85
PPackageForTheWeb 46
PKCS #12 55
PreserveTBKFile 35
product support 16
ProductName 35
RREADME.TXT 46
reboot 33
ReceiveBuffers 35
recover certificate 85
RemovePPTP 35
SSendBuffers 35
setup.ini 31
setup.ini filemodifying 32modifying for VeriSign 74settings 32
single login (Entrust) 60
SkipAutoDial 35
SkipAutoDialPrompt 36
SkipBindCheck 36
SkipLicenseAgreement 36command line 36
SkipScreens 36
support, Nortel Networks 16
Supported UseTokens and TokenType Settings 30
Ttask bar icons 42
technical support 16
terms 36
text conventions 14
311644-F Rev 00

Index 93
TokenType 30
tools menu 85
UUseTokens 30
VVeriSign 66
administrator’s tasks 68authentication overview 66cert.ini file 74certificate renewal 84certkit.cfg (configuration file) 77client tasks 69client tools menu 85creating configuration file 69creating custom client installation 74custom client installation 74enrollment procedure 69entries in cert.ini file 75expired certificate 83initial client enrollment 79initial enrollment 69OnSite accounts 68prerequisites 70recovering certificate 83recovering expired certificates 83running initial enrollment 70setup.ini file 74using to connect to a CES 82
view certificate details 85
view configuration 85
WWindows 98 installation 19
Windows NTdomain login 24installation 19
Configuring the Contivity VPN Client

94 Index
311644-F Rev 00
Related Documents