Corporate Headquarters: Cisco Systems, Inc., 170 West Tasman Drive, San Jose, CA 95134-1706 USA Copyright © 2000. Cisco Systems, Inc. All rights reserved. OL-0486-01 Configuring the Bulk Administration Tool (BAT) This document describes the Bulk Administration Tool (BAT) and includes the following sections: • BAT Overview, page 1 • Adding Phones, page 4 • Modifying Phones, page 13 • Adding Users, page 16 • Adding Phones and Users Combinations, page 18 • Troubleshooting, page 20 • Service and Support, page 21 • Cisco Connection Online, page 21 • Documentation CD-ROM, page 22 BAT Overview The Bulk Administration Tool (BAT) is a plug-in application to the CiscoCallManager. BAT enables you to add up to 10,000 phones and users to the Cisco CallManager application. Using BAT, you can also perform bulk modifications to phones and delete several phones at one time. This document provides you with information about using the BAT application. Audience This document is written for network administrators and engineers responsible for managing the Cisco CallManager system. A knowledge of telephony and IP networking technology is required.

Welcome message from author
This document is posted to help you gain knowledge. Please leave a comment to let me know what you think about it! Share it to your friends and learn new things together.
Transcript
:
lesu can
.
Configuring the Bulk Administration Tool (BAT)
This document describes the Bulk Administration Tool (BAT) and includes the following sections
• BAT Overview, page 1
• Adding Phones, page 4
• Modifying Phones, page 13
• Adding Users, page 16
• Adding Phones and Users Combinations, page 18
• Troubleshooting, page 20
• Service and Support, page 21
• Cisco Connection Online, page 21
• Documentation CD-ROM, page 22
BAT OverviewThe Bulk Administration Tool (BAT) is a plug-in application to the Cisco CallManager. BAT enabyou to add up to 10,000 phones and users to the Cisco CallManager application. Using BAT, yoalso perform bulk modifications to phones and delete several phones at one time.
This document provides you with information about using the BAT application.
AudienceThis document is written for network administrators and engineers responsible for managing theCisco CallManager system. A knowledge of telephony and IP networking technology is required
Corporate Headquarters: Cisco Systems, Inc., 170 West Tasman Drive, San Jose, CA 95134-1706 USA
Copyright © 2000. Cisco Systems, Inc. All rights reserved. OL-0486-01
Related Documents
ions:
soft
e
e
Related DocumentsRefer to the following documents for more information on Cisco CallManager and related applicat
• Cisco CallManager Administration Guide
• Release Notes for Cisco CallManager Release 3.0
BAT SpecificationsThe following specifications apply to BAT Release 3.0:
• BAT Release 3.0 is compatible with Cisco CallManager Release 3.0.
• BAT must be installed on the Cisco CallManager, the primary publisher database, and MicroPosting Acceptor.
• The BAT application uses approximately 7 MB of disk space for the executable and the onlindocumentation.
• The BAT application requires no maintenance other than possible upgrades whenCisco CallManager is upgraded.
• Only administrators have access to BAT.
• The expected performance of BAT is as follows:
– Two phone/user transactions per second for updates and deletes
– One phone/user transaction per second for inserts.
User InterfaceBAT is accessible through Cisco CallManager Administration using Internet Explorer 4.01 ServicPack 2 or later, or Netscape 4.5. BAT has a common look and feel to the Cisco CallManagerAdministration window.
From the BAT Application menu, you can go to the Cisco CallManager Administration window.
Launching BAT
Procedure
Step 1 Click Start > Program Files > Cisco CallManager 3.0 > CallManager Administration
The Cisco CallManager Administration main window displays.
Step 2 SelectApplication > BAT
TheCisco CallManager Bulk Administration Tool window displays.
2Configuring the Bulk Administration Tool (BAT)
OL-0486-01
Obtaining Online Help
ger
Obtaining Online HelpYou can access the BAT online Help system from any of the BAT pages by selecting:
Help > Contents and Index
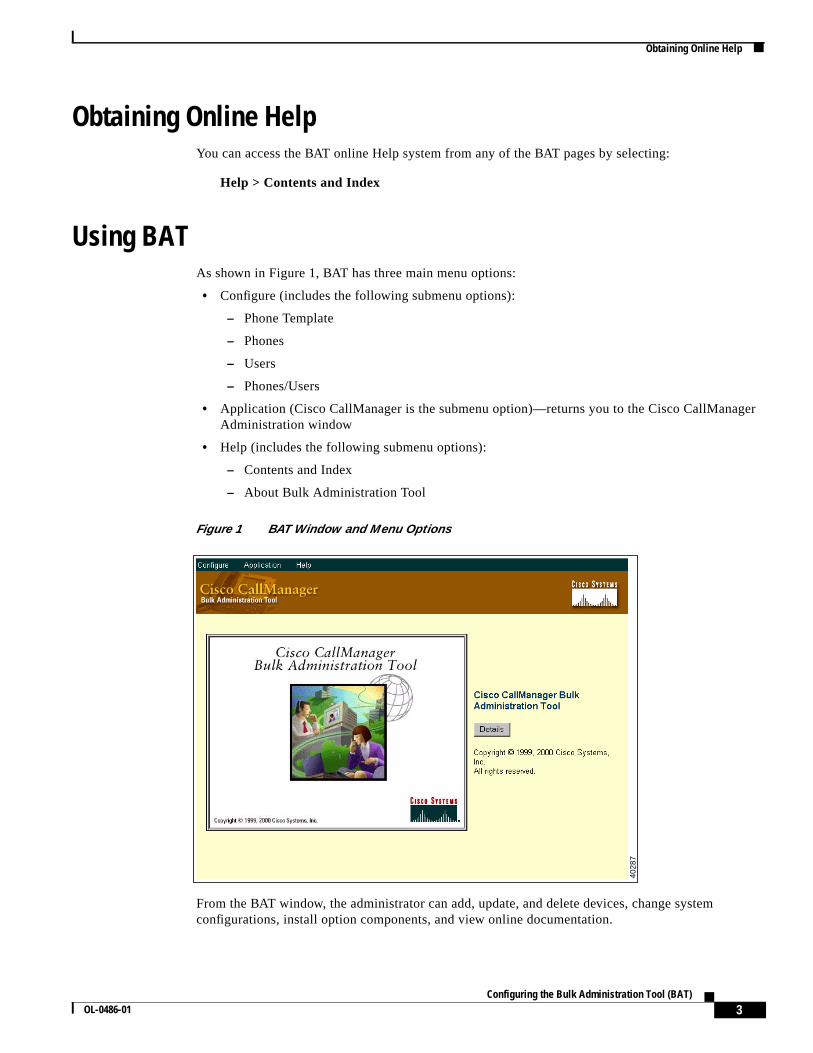
Using BATAs shown in Figure 1, BAT has three main menu options:
• Configure (includes the following submenu options):
– Phone Template
– Phones
– Users
– Phones/Users
• Application (Cisco CallManager is the submenu option)—returns you to the Cisco CallManaAdministration window
• Help (includes the following submenu options):
– Contents and Index
– About Bulk Administration Tool
Figure 1 BAT Window and Menu Options
From the BAT window, the administrator can add, update, and delete devices, change systemconfigurations, install option components, and view online documentation.
4028
7
3Configuring the Bulk Administration Tool (BAT)
OL-0486-01
Adding Phones
re
atches,
nt to
asedaturesed and
as itsore
opriate
Caution BAT should only be used during initial installation or during off-peak hours. Otherwise,bulk transactions could affect the Cisco CallManager performance and call processingmay be adversely affected if BAT is used during peak hours.
BAT provides statistical data on the time it takes to complete a bulk transaction. The statistics aapproximations for a standard recommended configuration.
Adding PhonesYou can use BAT to add hardware-based Cisco IP Phones to the Cisco CallManager database in brather than adding each phone individually.
To add phones to Cisco CallManager, you must:
• Create a phone template to define common values for a set of phones
• Create a Comma Separate Values (CSV) file to define individual values for each phone you waadd
Related Topics
• Creating a Phone Template, page 4
• Creating the CSV File for Phones, page 9
• Adding Phones to Cisco CallManager, page 10
Creating a Phone TemplateThe phone template and Comma Separate Values (CSV) files work together in bulk transactions. Bon the type of phone you want to add in batch, you can create a template that has the common fefor all the phones in a batch, such as the Model, Device Pool, and so on. These templates are storare reusable for other phone batches. For example, you can configure a template for theCisco 30 VIP Model with only two lines configured and another with four lines configured.
The CSV file has the details of all the phones that are individualistic in nature to a phone, such Name, Description, and so on. See “Creating the CSV File for Phones” section on page 9 for mdetails on the CSV file.
To create a phone template, you must first enter the required phone settings and then add the apprnumber of lines to the phone.
Related Topics
• Entering Phone Settings, page 5
• Adding Line Information, page 7
4Configuring the Bulk Administration Tool (BAT)
OL-0486-01
Adding Phones
hen
lected
Entering Phone Settings
The phone settings required for the phone template are similar to the phone settings required wadding a phone to Cisco CallManager.
Procedure
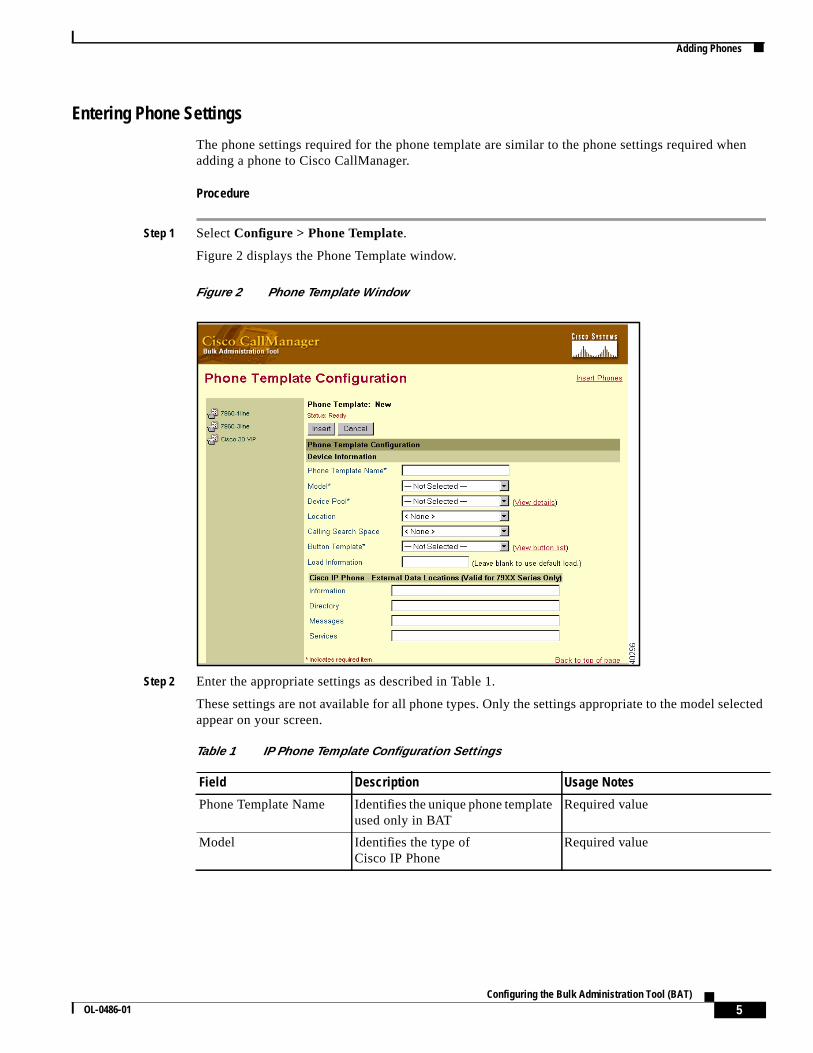
Step 1 SelectConfigure > Phone Template.
Figure 2 displays the Phone Template window.
Figure 2 Phone Template Window
Step 2 Enter the appropriate settings as described in Table 1.
These settings are not available for all phone types. Only the settings appropriate to the model seappear on your screen.
Table 1 IP Phone Template Configuration Settings
Field Description Usage Notes
Phone Template Name Identifies the unique phone templateused only in BAT
Required value
Model Identifies the type ofCisco IP Phone
Required value
5Configuring the Bulk Administration Tool (BAT)
OL-0486-01
Adding Phones
m
l
Step 3 Click Insert.
Step 4 Click Add Line .
Device Pool Defines sets of commoncharacteristics for devices, such asregion, date/time group,Cisco CallManager group, andcalling search space forauto-registration
Required value
Location Specifies the remote locationaccessed using restricted bandwidthconnections
Calling Search Space Specifies the collection of RoutePartitions searched to determinehow a dialed number should berouted
Optional
Button Template Determines the configuration ofbuttons on a phone and identifieswhich feature (line, speed dial, andso on) is used for each button
Required value
Note If values appear in the previous fields, these values were previously configured in the systethrough the CallManager Administration.
Load Information Specifies custom software for aCisco IP phone
Values entered here override thedefault values for the current mode
Information Specifies the help text for theinformation button
Used only for theCisco IP Phone 7940 andCisco IP Phone 7960
Directory Specifies the primary and secondaryservers from which the phoneobtains directory information
Used for the Cisco IP Phone 79xxseries only
Messages Voice messaging access A soft key for theCisco IP Phone 7910; a fixed key onthe Cisco IP Phone 7940 andCisco IP Phone 7960
Services Information access Used only for theCisco IP Phone 7940 and theCisco IP Phone 7960
Table 1 IP Phone Template Configuration Settings (continued)
Field Description Usage Notes
6Configuring the Bulk Administration Tool (BAT)
OL-0486-01
Adding Phones
ates
Adding Line Information
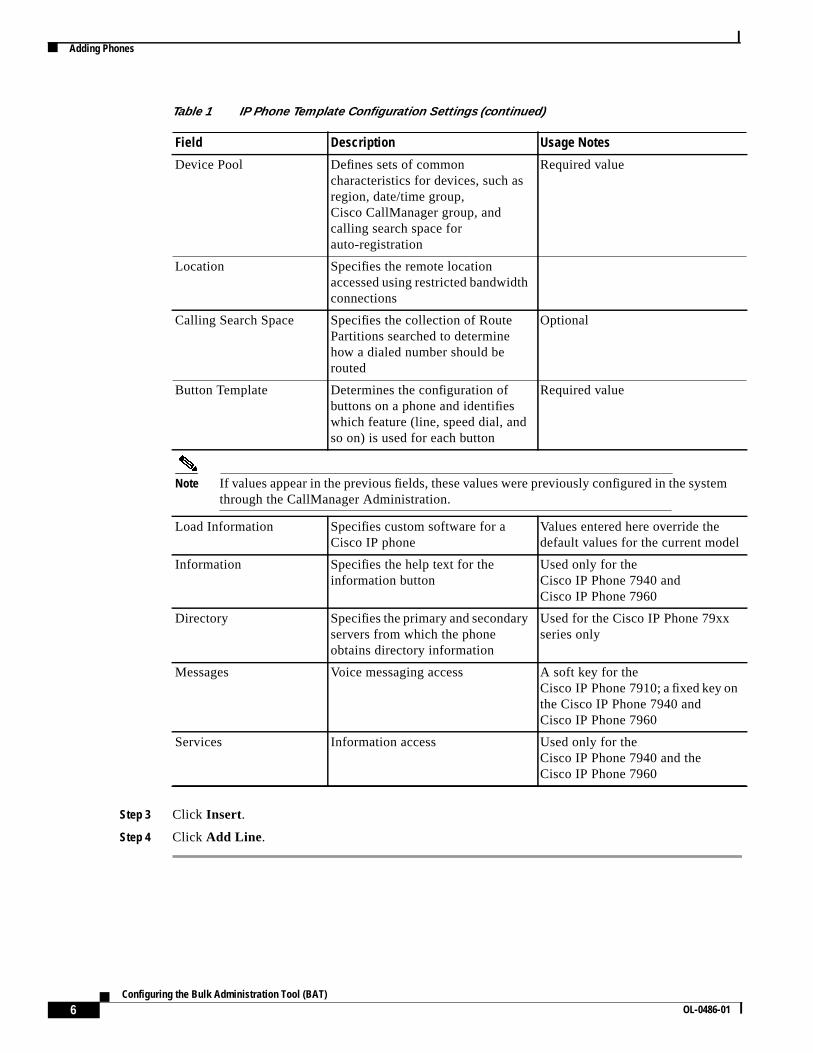
For each template, add only the number of lines you want to define for all phones. Figure 3 illustrthe template for a Cisco IP Phone 7960.
Figure 3 Add Line Window
Procedure
Step 1 Click one of the phone templates you created.
Step 2 In theLine Details section, click on the Line number you want to configure.
Step 3 Enter the appropriate settings as described in Table 2.
4029
4
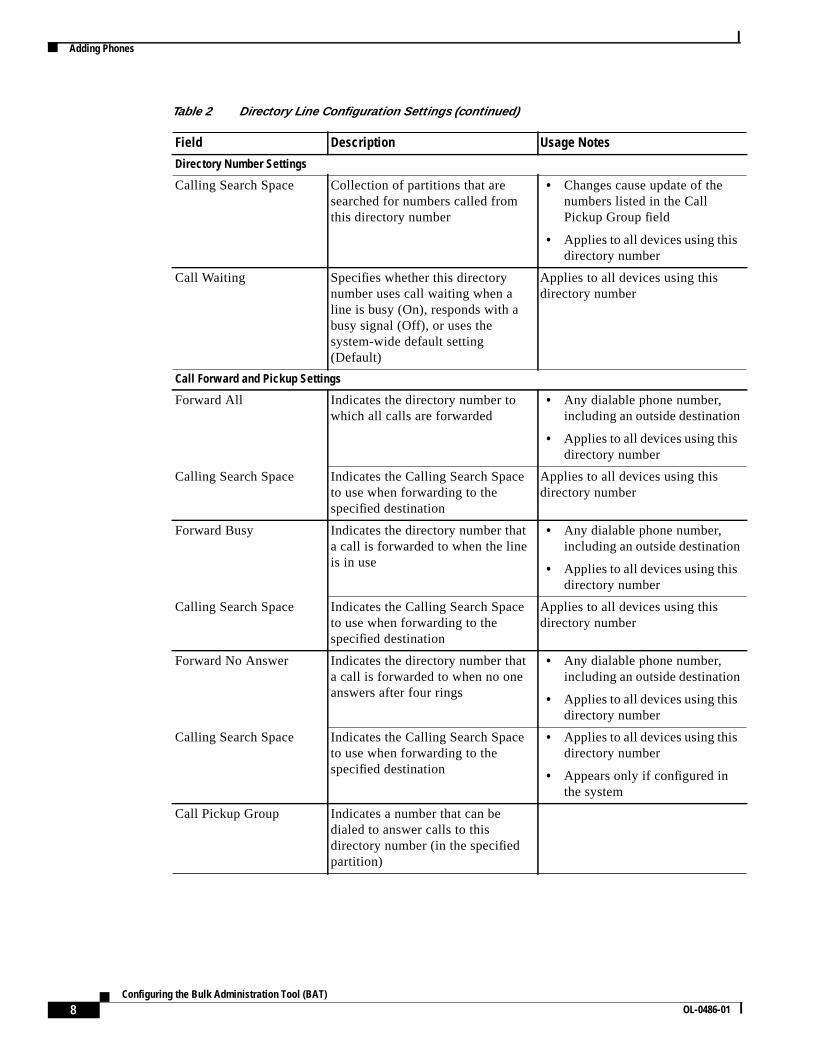
Table 2 Directory Line Configuration Settings
Field Description Usage Notes
Directory Number
Partition Indicates the route partition towhich the directory number belongs
• Can appear in more than onepartition
• Unique in combination with theDirectory Number
• Required value
7Configuring the Bulk Administration Tool (BAT)
OL-0486-01
Adding Phones
Directory Number Settings
Calling Search Space Collection of partitions that aresearched for numbers called fromthis directory number
• Changes cause update of thenumbers listed in the CallPickup Group field
• Applies to all devices using thisdirectory number
Call Waiting Specifies whether this directorynumber uses call waiting when aline is busy (On), responds with abusy signal (Off), or uses thesystem-wide default setting(Default)
Applies to all devices using thisdirectory number
Call Forward and Pickup Settings
Forward All Indicates the directory number towhich all calls are forwarded
• Any dialable phone number,including an outside destination
• Applies to all devices using thisdirectory number
Calling Search Space Indicates the Calling Search Spaceto use when forwarding to thespecified destination
Applies to all devices using thisdirectory number
Forward Busy Indicates the directory number thata call is forwarded to when the lineis in use
• Any dialable phone number,including an outside destination
• Applies to all devices using thisdirectory number
Calling Search Space Indicates the Calling Search Spaceto use when forwarding to thespecified destination
Applies to all devices using thisdirectory number
Forward No Answer Indicates the directory number thata call is forwarded to when no oneanswers after four rings
• Any dialable phone number,including an outside destination
• Applies to all devices using thisdirectory number
Calling Search Space Indicates the Calling Search Spaceto use when forwarding to thespecified destination
• Applies to all devices using thisdirectory number
• Appears only if configured inthe system
Call Pickup Group Indicates a number that can bedialed to answer calls to thisdirectory number (in the specifiedpartition)
Table 2 Directory Line Configuration Settings (continued)
Field Description Usage Notes
8Configuring the Bulk Administration Tool (BAT)
OL-0486-01
Adding Phones
Theouldr allones.
efile
Step 4 Repeat steps 2 and 3 until all lines are configured.
Step 5 Click Insert andClose.
After setting up the lines for the template, use the template to add phones with CSV files.
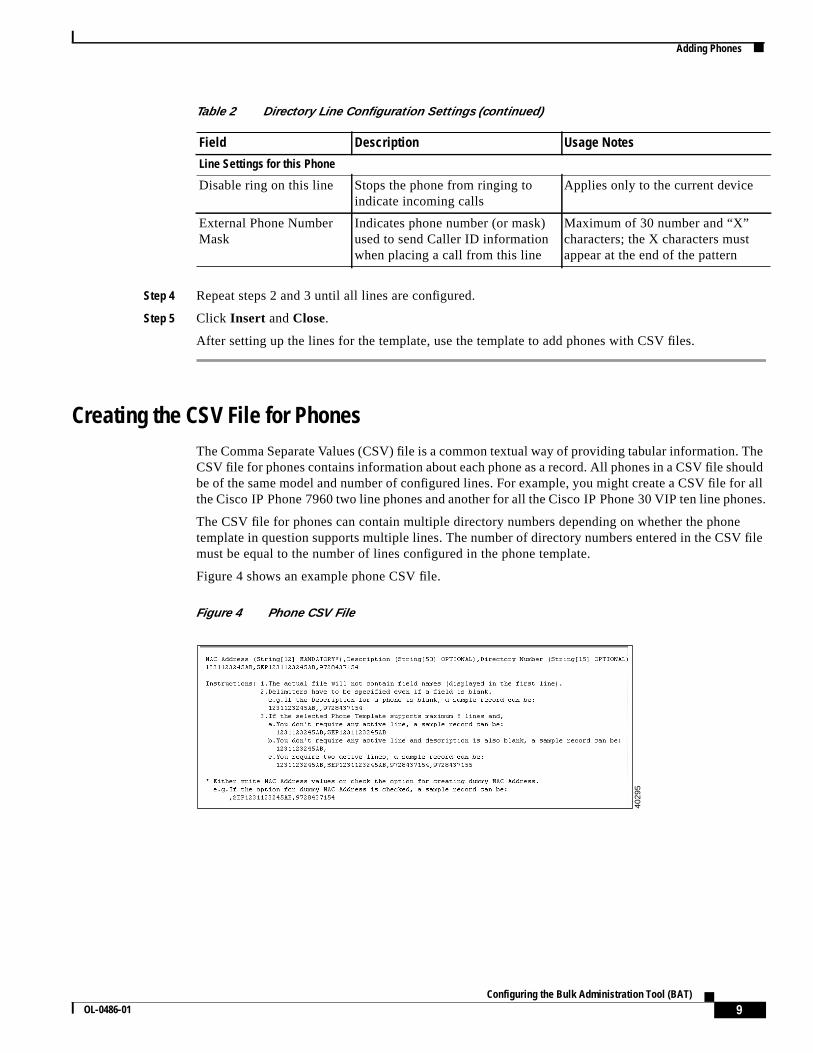
Creating the CSV File for PhonesThe Comma Separate Values (CSV) file is a common textual way of providing tabular information.CSV file for phones contains information about each phone as a record. All phones in a CSV file shbe of the same model and number of configured lines. For example, you might create a CSV file fothe Cisco IP Phone 7960 two line phones and another for all the Cisco IP Phone 30 VIP ten line ph
The CSV file for phones can contain multiple directory numbers depending on whether the phontemplate in question supports multiple lines. The number of directory numbers entered in the CSVmust be equal to the number of lines configured in the phone template.
Figure 4 shows an example phone CSV file.
Figure 4 Phone CSV File
Line Settings for this Phone
Disable ring on this line Stops the phone from ringing toindicate incoming calls
Applies only to the current device
External Phone NumberMask
Indicates phone number (or mask)used to send Caller ID informationwhen placing a call from this line
Maximum of 30 number and “X”characters; the X characters mustappear at the end of the pattern
Table 2 Directory Line Configuration Settings (continued)
Field Description Usage Notes
4029
5
9Configuring the Bulk Administration Tool (BAT)
OL-0486-01
Adding Phones
e line
t you
Procedure
Step 1 Open a text editor or any application that allows you to export or create a CSV file.
Step 2 Enter the following values for each phone you want to add to Cisco CallManager using a separatfor each phone:
MAC Address,Description,Directory Number
You must enter the MAC address or use the dummy MAC address option on theInsert Phones page(the MAC address updates when a phone is plugged in). You can leave the other fields empty, bumust include the comma separators.
Note An error occurs if there are any blank lines in the CSV file.
Step 3 Save the file.
Adding Phones to Cisco CallManagerFollow this procedure to add several phones to Cisco CallManager.
Before You Begin
You must create a phone template and CSV file before you add phones to Cisco CallManager.
Procedure
Step 1 SelectConfigure > Phones.
The Insert Phones window displays as shown in Figure 5.
10Configuring the Bulk Administration Tool (BAT)
OL-0486-01
Adding Phones
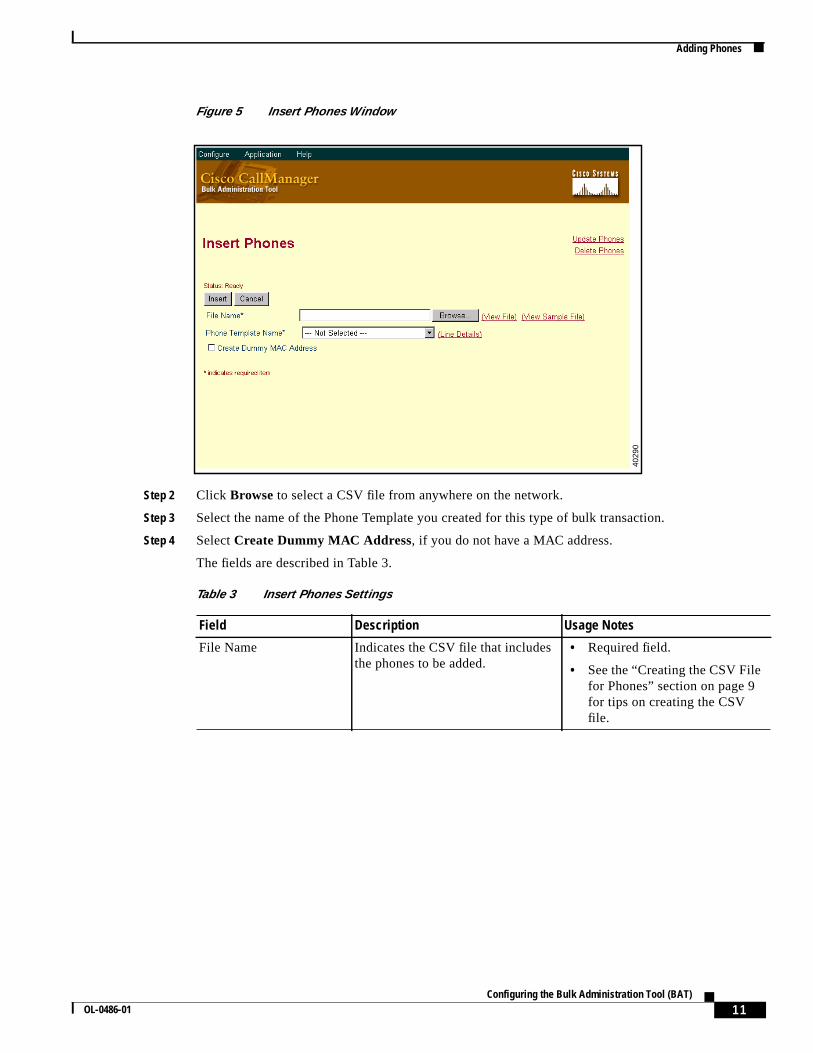
Figure 5 Insert Phones Window
Step 2 Click Browse to select a CSV file from anywhere on the network.
Step 3 Select the name of the Phone Template you created for this type of bulk transaction.
Step 4 Select Create Dummy MAC Address, if you do not have a MAC address.
The fields are described in Table 3.
4029
0
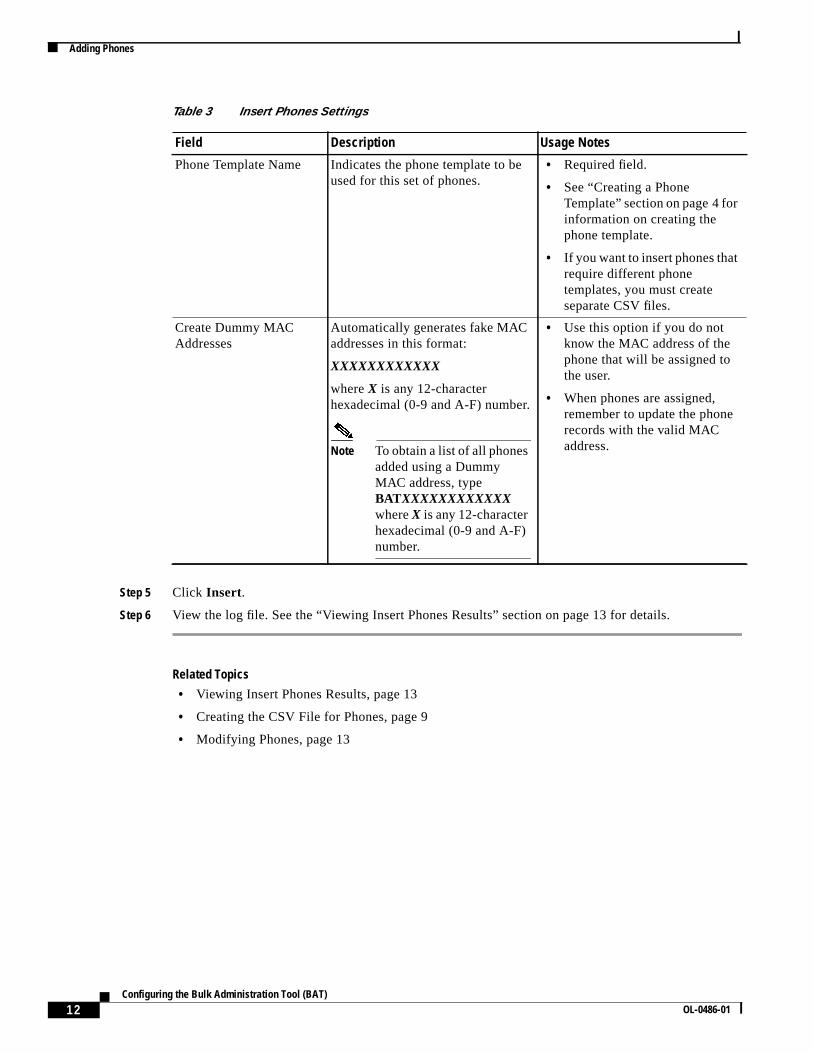
Table 3 Insert Phones Settings
Field Description Usage Notes
File Name Indicates the CSV file that includesthe phones to be added.
• Required field.
• See the “Creating the CSV Filefor Phones” section on page 9for tips on creating the CSVfile.
11Configuring the Bulk Administration Tool (BAT)
OL-0486-01
Adding Phones
Step 5 Click Insert.
Step 6 View the log file. See the “Viewing Insert Phones Results” section on page 13 for details.
Related Topics
• Viewing Insert Phones Results, page 13
• Creating the CSV File for Phones, page 9
• Modifying Phones, page 13
Phone Template Name Indicates the phone template to beused for this set of phones.
• Required field.
• See “Creating a PhoneTemplate” section on page 4 forinformation on creating thephone template.
• If you want to insert phones thatrequire different phonetemplates, you must createseparate CSV files.
Create Dummy MACAddresses
Automatically generates fake MACaddresses in this format:
XXXXXXXXXXXX
whereX is any 12-characterhexadecimal (0-9 and A-F) number.
Note To obtain a list of all phonesadded using a DummyMAC address, typeBATXXXXXXXXXXXXwhereX is any 12-characterhexadecimal (0-9 and A-F)number.
• Use this option if you do notknow the MAC address of thephone that will be assigned tothe user.
• When phones are assigned,remember to update the phonerecords with the valid MACaddress.
Table 3 Insert Phones Settings
Field Description Usage Notes
12Configuring the Bulk Administration Tool (BAT)
OL-0486-01
Modifying Phones
cords, see
eously.
betton.
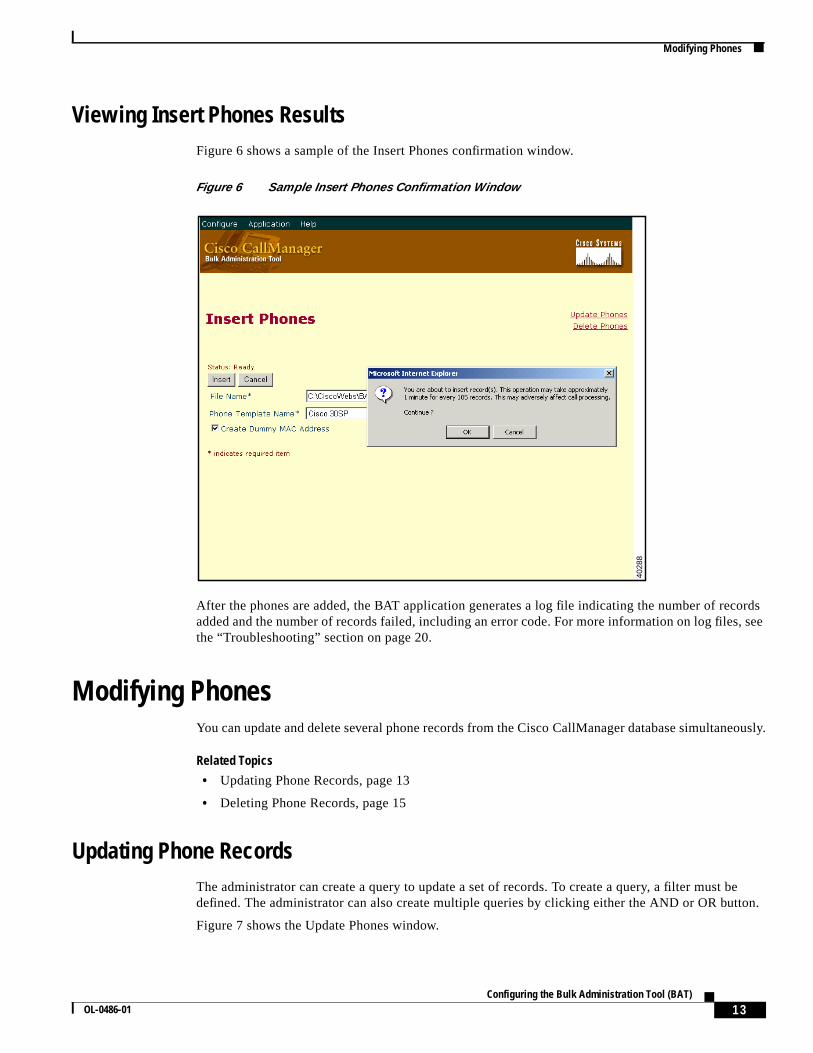
Viewing Insert Phones ResultsFigure 6 shows a sample of the Insert Phones confirmation window.
Figure 6 Sample Insert Phones Confirmation Window
After the phones are added, the BAT application generates a log file indicating the number of readded and the number of records failed, including an error code. For more information on log filesthe “Troubleshooting” section on page 20.
Modifying PhonesYou can update and delete several phone records from the Cisco CallManager database simultan
Related Topics
• Updating Phone Records, page 13
• Deleting Phone Records, page 15
Updating Phone RecordsThe administrator can create a query to update a set of records. To create a query, a filter mustdefined. The administrator can also create multiple queries by clicking either the AND or OR bu
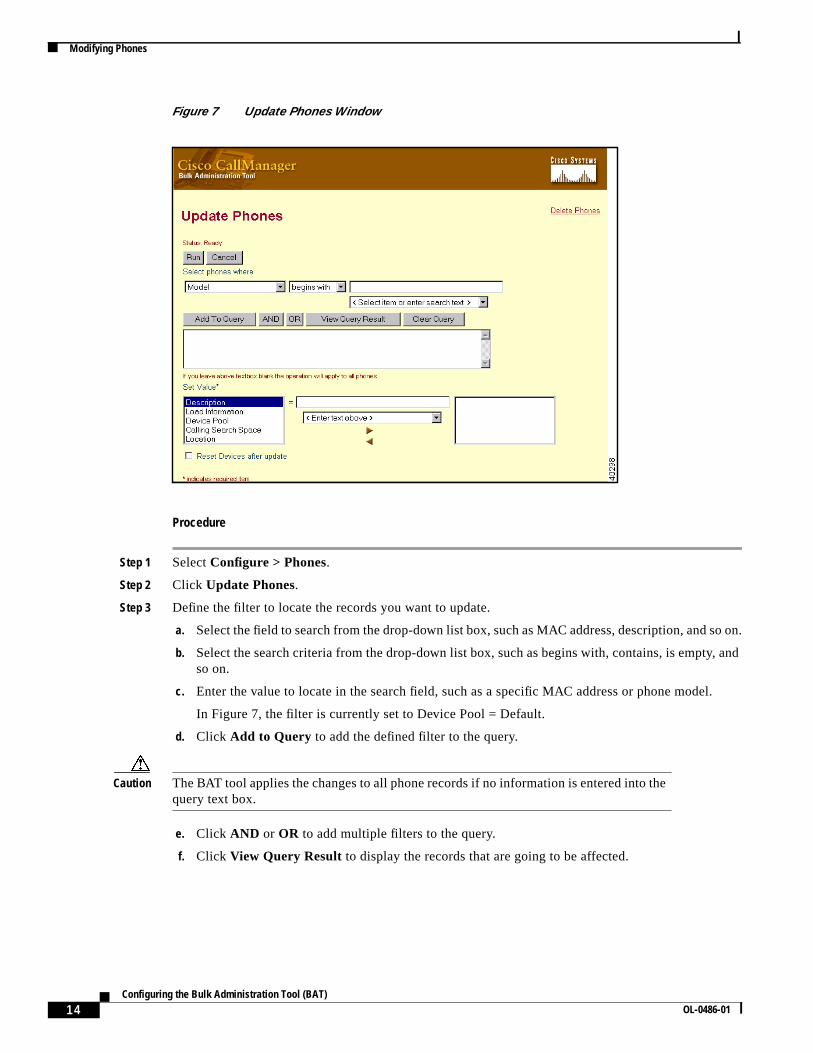
Figure 7 shows the Update Phones window.
4028
8
13Configuring the Bulk Administration Tool (BAT)
OL-0486-01
Modifying Phones
so on.
, and
l.
Figure 7 Update Phones Window
Procedure
Step 1 SelectConfigure > Phones.
Step 2 Click Update Phones.
Step 3 Define the filter to locate the records you want to update.
a. Select the field to search from the drop-down list box, such as MAC address, description, and
b. Select the search criteria from the drop-down list box, such as begins with, contains, is emptyso on.
c. Enter the value to locate in the search field, such as a specific MAC address or phone mode
In Figure 7, the filter is currently set to Device Pool = Default.
d. Click Add to Query to add the defined filter to the query.
Caution The BAT tool applies the changes to all phone records if no information is entered into thequery text box.
e. Click AND or OR to add multiple filters to the query.
f. Click View Query Result to display the records that are going to be affected.
14Configuring the Bulk Administration Tool (BAT)
OL-0486-01
Modifying Phones
e are
o on.
nd so
Step 4 Specify the setting you want to update.
a. Select a setting from theSet Value list box.
b. Enter the new value.
c. Use the arrows to add the specified field and field values to the update box to indicate that thesthe fields that will change.
Step 5 Click Run to apply the new updates to the records.
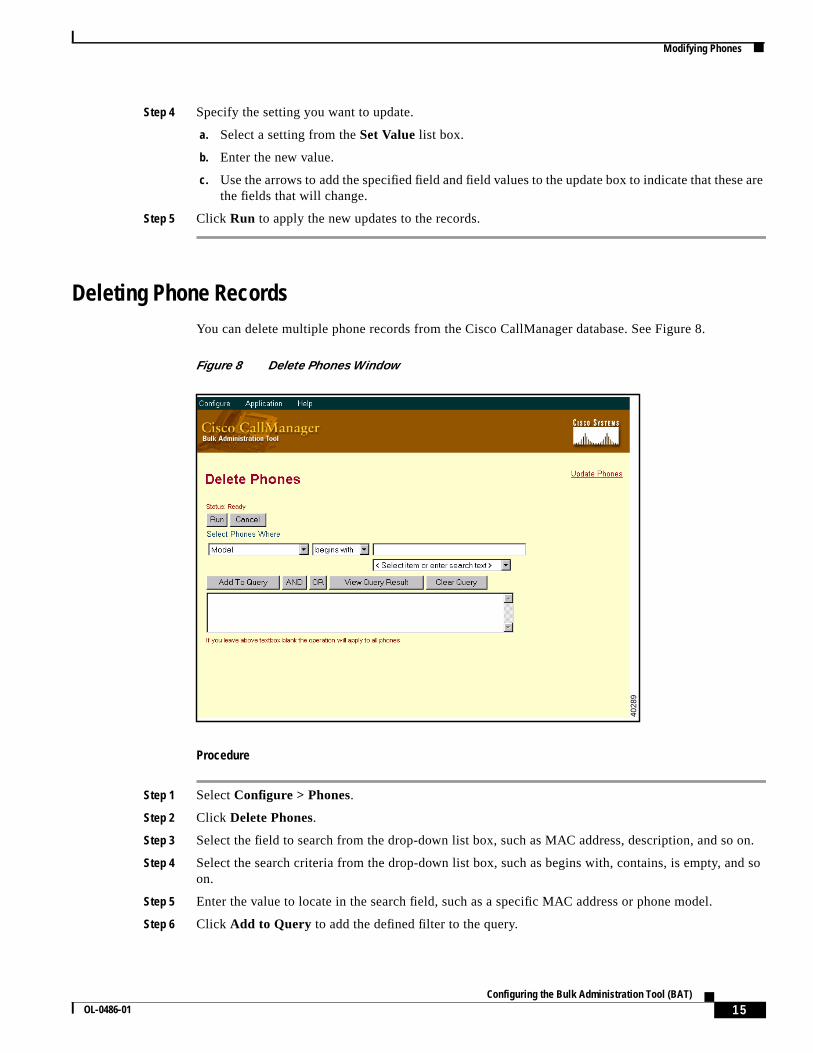
Deleting Phone RecordsYou can delete multiple phone records from the Cisco CallManager database. See Figure 8.
Figure 8 Delete Phones Window
Procedure
Step 1 SelectConfigure > Phones.
Step 2 Click Delete Phones.
Step 3 Select the field to search from the drop-down list box, such as MAC address, description, and s
Step 4 Select the search criteria from the drop-down list box, such as begins with, contains, is empty, aon.
Step 5 Enter the value to locate in the search field, such as a specific MAC address or phone model.
Step 6 Click Add to Query to add the defined filter to the query.
4028
9
15Configuring the Bulk Administration Tool (BAT)
OL-0486-01
Adding Users
g thewing
ure 9
Caution All phone records are deleted if no information is entered into the query text box.
Step 7 Click AND or OR to add multiple filters to the query.
Step 8 Click View Query Results to verify the records that are going to be deleted.
Step 9 Click Run to delete the records.
Viewing Update Phones ResultsAfter the phones are updated in Cisco CallManager, the application generates a log file indicatinnumber of records updated and the number of records failed, including an error code. See the “VieInsert Phones Results” section on page 13 for information on confirmation windows.
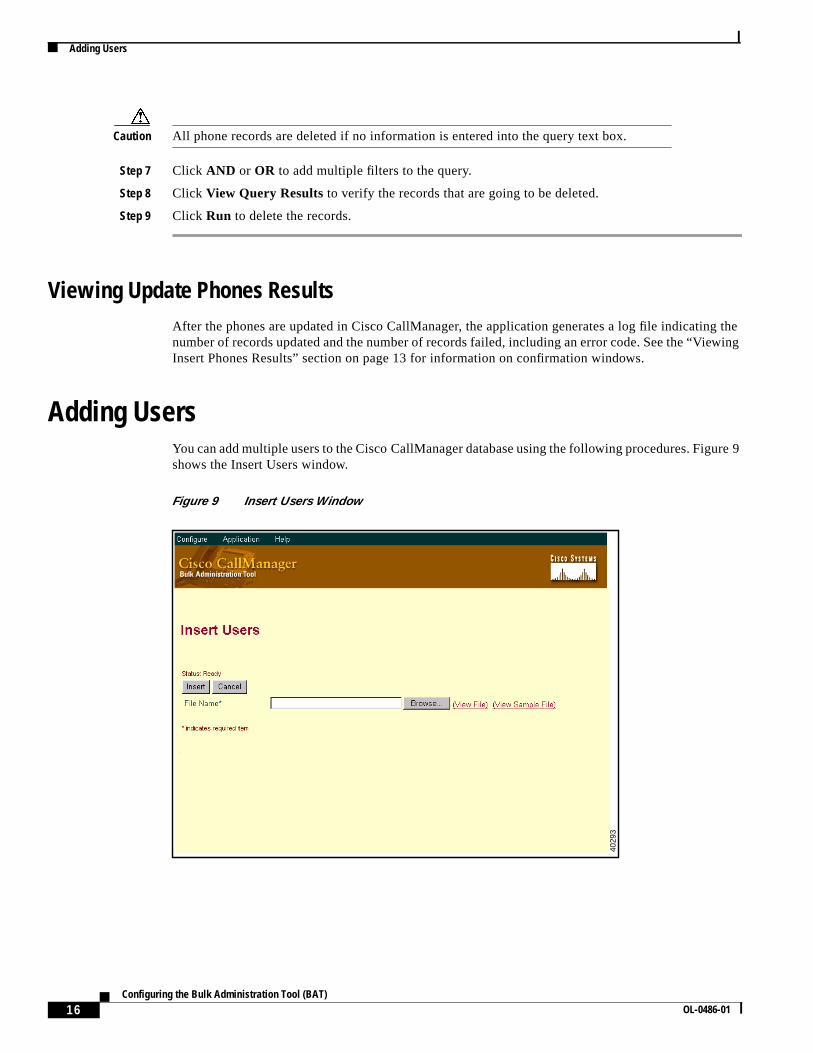
Adding UsersYou can add multiple users to the Cisco CallManager database using the following procedures. Figshows the Insert Users window.
Figure 9 Insert Users Window
4029
3
16Configuring the Bulk Administration Tool (BAT)
OL-0486-01
Adding Users
CSV
n thefields
ger.
Related Topics
• Creating the CSV File for Users, page 17
• Adding Users to Cisco CallManager, page 17
• Viewing Insert Users Results, page 18
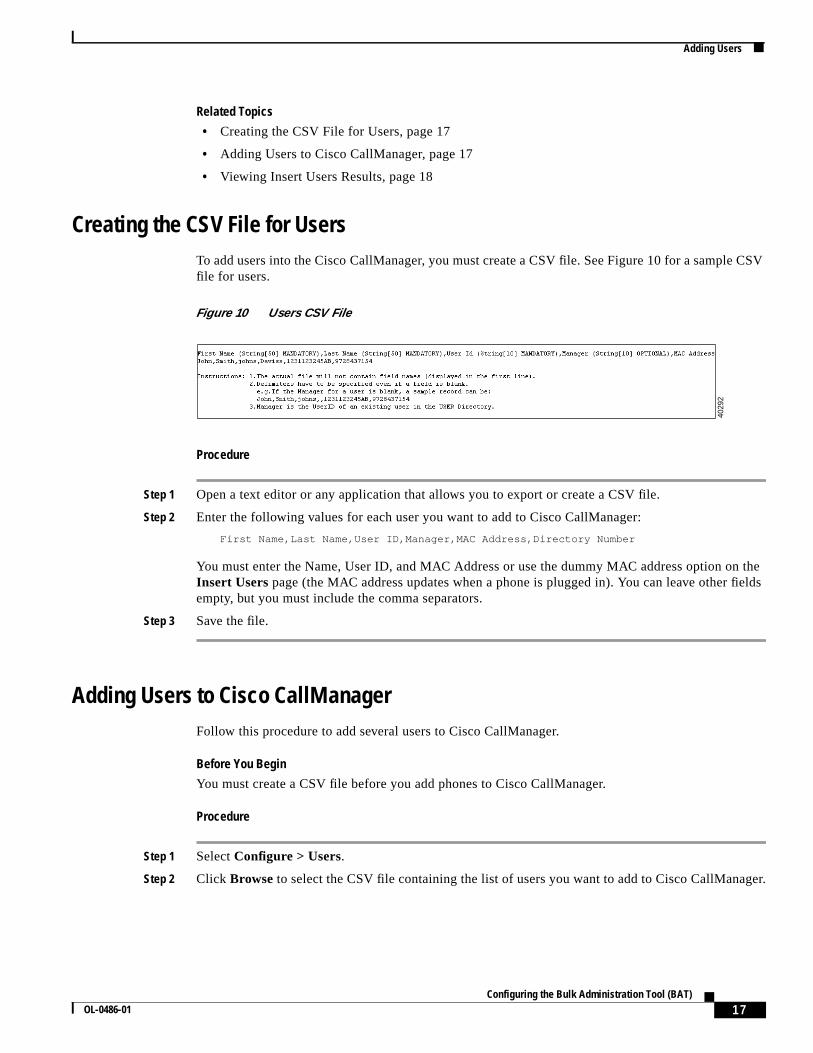
Creating the CSV File for UsersTo add users into the Cisco CallManager, you must create a CSV file. See Figure 10 for a samplefile for users.
Figure 10 Users CSV File
Procedure
Step 1 Open a text editor or any application that allows you to export or create a CSV file.
Step 2 Enter the following values for each user you want to add to Cisco CallManager:
First Name,Last Name,User ID,Manager,MAC Address,Directory Number
You must enter the Name, User ID, and MAC Address or use the dummy MAC address option oInsert Userspage (the MAC address updates when a phone is plugged in). You can leave other empty, but you must include the comma separators.
Step 3 Save the file.
Adding Users to Cisco CallManagerFollow this procedure to add several users to Cisco CallManager.
Before You Begin
You must create a CSV file before you add phones to Cisco CallManager.
Procedure
Step 1 SelectConfigure > Users.
Step 2 Click Browse to select the CSV file containing the list of users you want to add to Cisco CallMana
4029
2
17Configuring the Bulk Administration Tool (BAT)
OL-0486-01
Adding Phones and Users Combinations
eewing
ing the
Step 3 Click Insert.
Step 4 View the log file. See the “Viewing Insert Users Results” section on page 18 for details.
Viewing Insert Users ResultsAfter the users are added to Cisco CallManager, the application generates a log file indicating thnumber of records added and the number of records failed, including an error code. See the “ViInsert Phones Results” section on page 13 for information on the confirmation screen.
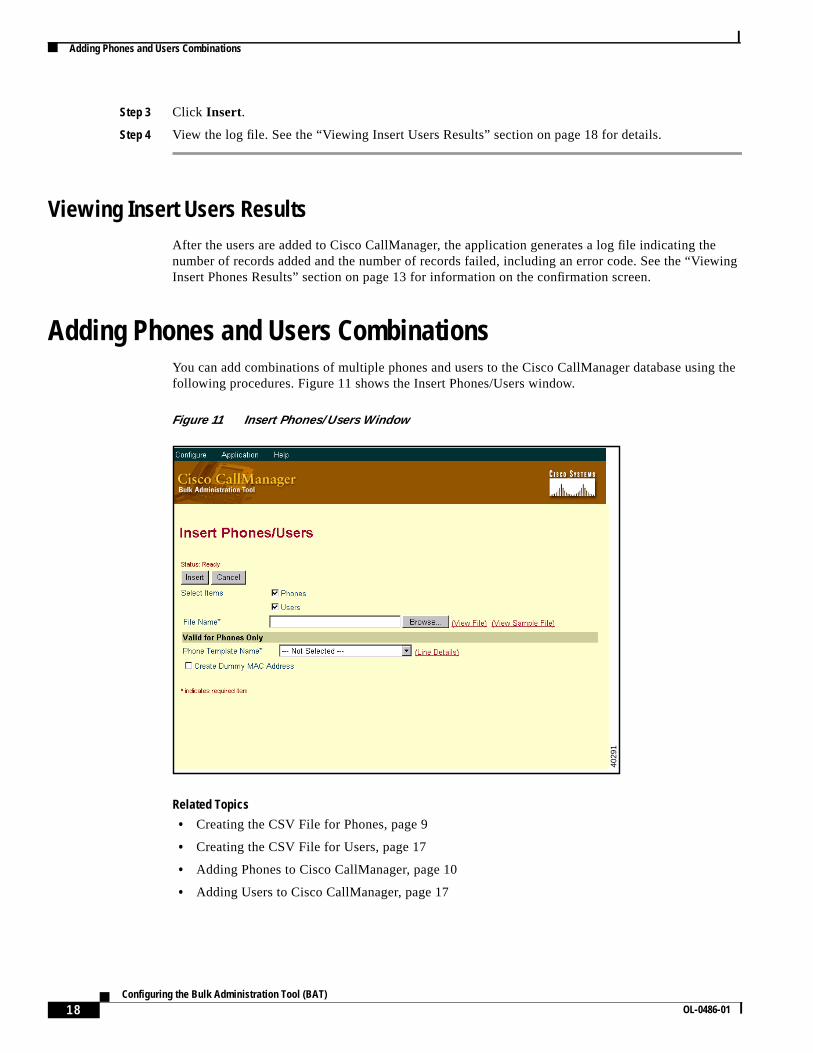
Adding Phones and Users CombinationsYou can add combinations of multiple phones and users to the Cisco CallManager database usfollowing procedures. Figure 11 shows the Insert Phones/Users window.
Figure 11 Insert Phones/Users Window
Related Topics
• Creating the CSV File for Phones, page 9
• Creating the CSV File for Users, page 17
• Adding Phones to Cisco CallManager, page 10
• Adding Users to Cisco CallManager, page 17
4029
1
18Configuring the Bulk Administration Tool (BAT)
OL-0486-01
Adding Phones and Users Combinations
CSV
ination
n theay
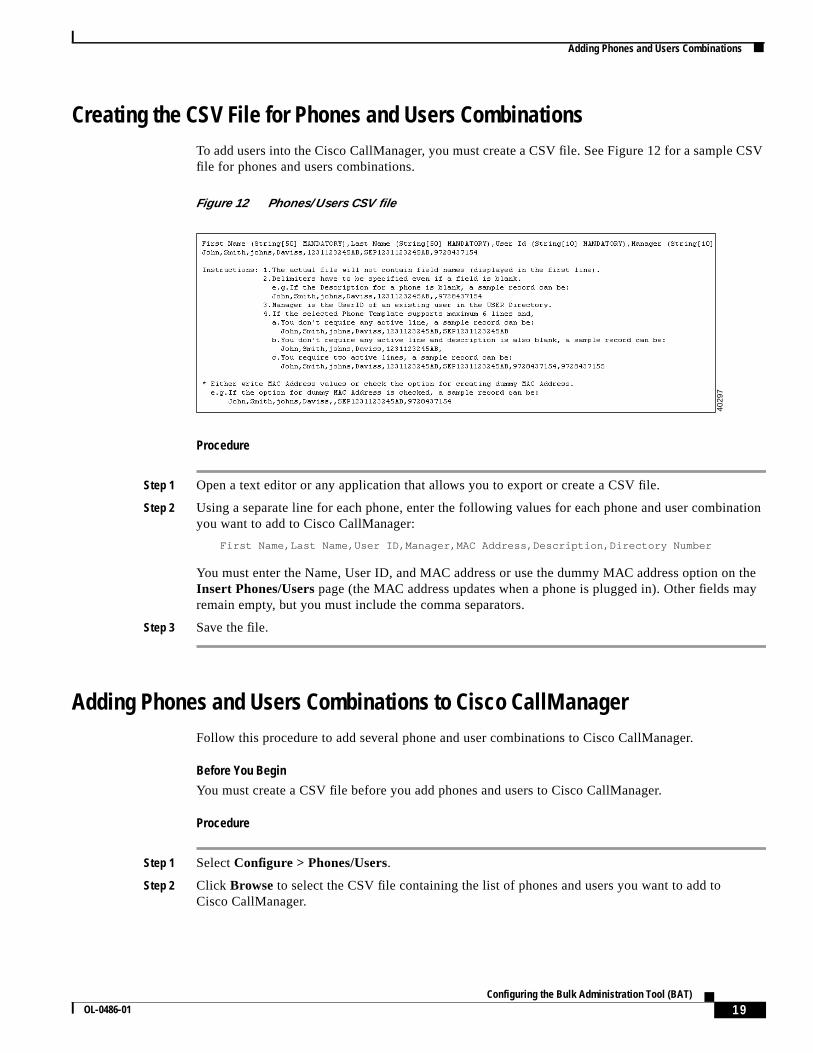
Creating the CSV File for Phones and Users CombinationsTo add users into the Cisco CallManager, you must create a CSV file. See Figure 12 for a samplefile for phones and users combinations.
Figure 12 Phones/Users CSV file
Procedure
Step 1 Open a text editor or any application that allows you to export or create a CSV file.
Step 2 Using a separate line for each phone, enter the following values for each phone and user combyou want to add to Cisco CallManager:
First Name,Last Name,User ID,Manager,MAC Address,Description,Directory Number
You must enter the Name, User ID, and MAC address or use the dummy MAC address option oInsert Phones/Users page (the MAC address updates when a phone is plugged in). Other fields mremain empty, but you must include the comma separators.
Step 3 Save the file.
Adding Phones and Users Combinations to Cisco CallManagerFollow this procedure to add several phone and user combinations to Cisco CallManager.
Before You Begin
You must create a CSV file before you add phones and users to Cisco CallManager.
Procedure
Step 1 SelectConfigure > Phones/Users.
Step 2 Click Browse to select the CSV file containing the list of phones and users you want to add toCisco CallManager.
4029
7
19Configuring the Bulk Administration Tool (BAT)
OL-0486-01
Important Notes
eewing
ection
ord.hen
mary
lete,
Step 3 Click Insert.
Step 4 View the log file. See the “Viewing Insert Users Results” section on page 18 for details.
Viewing Insert Phones/Users ResultsAfter the users are added to Cisco CallManager, the application generates a log file indicating thnumber of records added and the number of records failed, including an error code. See the “ViInsert Phones Results” section on page 13 for information on the confirmation screen.
Important NotesThe latest documentation and release notes for Cisco CallManager are available on Cisco ConnOnline (CCO) at:
http://www.cisco.com/kobayashi/sw-center/internet/callmgr/callmgr.html
Cisco Year 2000 product compliance information can be found at:
http://www.cisco.com/warp/public/752/2000/
A local copy of the Help is installed with Cisco CallManager and is available by clickingStart >Programs > Cisco CallManager> Cisco Help> System Guide. However, the most currentCisco CallManager documentation can be found on the Web at:
http://www.cisco.com/documentation/ccm/v24/index.htm
TroubleshootingLog files are generated for each bulk transaction and stored in a log file folder for viewing.
The log file will also show the key value of a record so the administrator may re-examine the recThe key value when adding, updating, or modifying phones is the MAC address of the phone. Wadding users, the key value is the User ID.
A confirmation screen occurs after each bulk transaction. The confirmation screen shows the sumview for the bulk transaction as well as the detail view for the failures.
Note The confirmation screen is the log file.
If the administrator performs several mouse clicks while waiting for the bulk transaction to compthe BAT application concludes with the last mouse click and you lose the ability to view theconfirmation message.
To view the log file for the bulk operation, go to the following location:
C:\CiscoWebs\BAT\LogFile
Note The log files are named for the operation performed and the time the operation ended.
20Configuring the Bulk Administration Tool (BAT)
OL-0486-01
Service and Support
nce
rvices
notes,.
e Webl, and
ings up
The time-stamp format for the log file name is “mmddyyyyhhmmss”.
Table 4shows examples of commands and LogFiles names.
Service and SupportService and support is provided by the Cisco Technical Assistance Center (TAC) at:
http://www.cisco.com/warp/public/687/Directory/DirTAC.shtml
Cisco Connection OnlineCisco Connection Online (CCO) is Cisco Systems’ primary, real-time support channel. Maintenacustomers and partners can self-register on CCO to obtain additional information and services.
Available 24 hours a day, 7 days a week, CCO provides a wealth of standard and value-added seto Cisco customers and business partners. CCO services include product information, productdocumentation, software updates, release notes, technical tips, the Bug Navigator, configurationbrochures, descriptions of service offerings, and download access to public and authorized files
CCO serves a wide variety of users through two interfaces that are updated and enhancedsimultaneously: a character-based version and a multimedia version that resides on the World Wid(WWW). The character-based CCO supports Zmodem, Kermit, Xmodem, FTP, and Internet e-maiit is excellent for quick access to information over lower bandwidths. The WWW version of CCOprovides richly formatted documents with photographs, figures, graphics, and video, as well ashyperlinks to related information.
You can access CCO in the following ways:
• WWW: http://www.cisco.com
• WWW: http://www-europe.cisco.com
• WWW: http://www-china.cisco.com
• Telnet: cco.cisco.com
• Modem: From North America, 408 526-8070; from Europe, 33 1 64 46 40 82. Use the followterminal settings: VT100 emulation; databits: 8; parity: none; stop bits: 1; and connection rateto 28.8 kbps.
For a copy of CCO’s Frequently Asked Questions (FAQ), contact [email protected].
For additional information, contact [email protected].
Table 4 Log File Names
Command Log File Name Example
Insert FileName#TimeStamp.log File1#05022000133431
Update UpdatePhone#TimeStamp.log UpdatePhone#05022000133431
Delete DeletePhone#TimeStamp.log DeletePhone#05022000133431
21Configuring the Bulk Administration Tool (BAT)
OL-0486-01
Documentation CD-ROM
withtedes ofheccess
om,
nts
e
Note If you are a network administrator and need personal technical assistance with a Ciscoproduct that is under warranty or covered by a maintenance contract, contact CiscoTechnical Assistance Center (TAC) at 800 553-2447, 408 526-7209, or [email protected]. Toobtain general information about Cisco Systems, Cisco products, or upgrades, contact800 553-6387, 408 526-7208, or [email protected].
Documentation CD-ROMCisco documentation and additional literature are available in a CD-ROM package, which shipsyour product. The Documentation CD-ROM, a member of the Cisco Connection Family, is updamonthly. Therefore, it might be more current than printed documentation. To order additional copithe Documentation CD-ROM, contact your local sales representative or call customer service. TCD-ROM package is available as a single package or as an annual subscription. You can also aCisco documentation on the World Wide Web at http://www.cisco.com, http://www-china.cisco.cor http://www-europe.cisco.com.
If you are reading Cisco product documentation on the World Wide Web, you can submit commeelectronically. ClickFeedbackin the toolbar and selectDocumentation. After you complete the form,click Submit to send it to Cisco. We appreciate your comments.
Access Registrar, AccessPath, Any to Any, Are You Ready, AtmDirector, Browse with Me, CCDA, CCDE, CCDP, CCIE, CCNA, CCNP, CCSI, CD-PAC, the Cisco logo, CiscoCertified Internetwork Expert logo,CiscoLink, the Cisco Management Connection logo, the Cisco NetWorks logo, the Cisco Powered Network logo, Cisco Systems Capital, thCisco Systems Capital logo, Cisco Systems Networking Academy, the Cisco Systems Networking Academy logo, the Cisco Technologies logo, Fast Step, FireRunner, Follow MeBrowsing, FormShare, GigaStack, IGX, Intelligence in the Optical Core, Internet Quotient, IP/VC, IQ Breakthrough, IQ Expertise, IQ FastTrack, IQ Readiness Scorecard, The IQLogo, Kernel Proxy, MGX, Natural Network Viewer, NetSonar, Network Registrar, the Networkers logo,Packet, PIX, Point and Click Internetworking, Policy Builder, Precept,RateMUX, ReyMaster, ReyView, ScriptShare, Secure Script, Shop with Me, SlideCast, SMARTnet, SVX,The Cell, TrafficDirector, TransPath, VlanDirector, Voice LAN,Wavelength Router, Workgroup Director, and Workgroup Stack are trademarks; Changing the Way We Work, Live, Play, and Learn, Empowering the Internet Generation, TheInternet Economy, and The New Internet Economy are service marks; and Aironet, ASIST, BPX, Catalyst, Cisco, Cisco IOS, the Cisco IOS logo, Cisco Systems, the Cisco Systemslogo, the Cisco Systems Cisco Press logo, CollisionFree, Enterprise/Solver, EtherChannel, EtherSwitch, FastHub, FastLink, FastPAD, FastSwitch, GeoTel, IOS, IP/TV, IPX,LightStream, LightSwitch, MICA, NetRanger, Post-Routing, Pre-Routing, Registrar, StrataView Plus, Stratm, TeleRouter, and VCO are registered trademarks of Cisco Systems,Inc. or its affiliates in the U.S. and certain other countries. All other trademarks mentioned in this document are the property of their respective owners. The use of the word partnerdoes not imply a partnership relationship between Cisco and any other company. (0005R)
Copyright © 2000, Cisco Systems, Inc.All rights reserved.
22Configuring the Bulk Administration Tool (BAT)
OL-0486-01
Related Documents