Sign in | Register IBM Search IBM Configuring SPNEGO SSO for IBM OpenPages GRC (on WebSphere) Using the Microsoft Active Federation Directory (ADFS) Brian Laskey | Mar 16 2018 | Visits (6461) Contributors: SUDARSAN AVS, YUHONG YIN Introduction Introduction SPNEGO, or the Simple and Protected GSSAPI Negotiation Mechanism, enables a straightforward Single Sign-on (SSO) and extends Kerberos to Web applications through the standard HTTP protocol. This document is intended to provide sample instructions to configure SPNEGO SSO for the IBM OpenPages GRC Platform (on WebSphere). Blogs Search This Blog The GRC Power Plant Log in to participate GRC Power Plant GRC Power Plant Overview Overview Recent Updates Recent Updates Status Updates Status Updates Members Members Blog Blog Bookmarks Bookmarks Files Files The developerWorks Connections Platform is now in read-only mode and content is only available for viewing. No new wiki pages, posts, or messages may be added. Please see our FAQ for more information. The developerWorks Connections platform will officially shut down on March 31, 2020 and content will no longer be available. More details available on our FAQ. (Read in Japanese.)

Welcome message from author
This document is posted to help you gain knowledge. Please leave a comment to let me know what you think about it! Share it to your friends and learn new things together.
Transcript

Sign in | RegisterIBM
Search IBM
Configuring SPNEGO SSO for IBM OpenPages GRC (on WebSphere) Using the Microsoft Active Federation Directory (ADFS) Brian Laskey | Mar 16 2018 | Visits (6461)
Contributors: SUDARSAN AVS, YUHONG YIN
IntroductionIntroduction
SPNEGO, or the Simple and Protected GSSAPI
Negotiation Mechanism, enables a straightforward
Single Sign-on (SSO) and extends Kerberos to Web
applications through the standard HTTP protocol.
This document is intended to provide sample instructions
to configure SPNEGO SSO for the IBM OpenPages GRC
Platform (on WebSphere).
Blogs SearchThis Blog
The GRC Power Plant Log in to participate
GRC Power Plant GRC Power Plant
OverviewOverview
Recent UpdatesRecent Updates
Status UpdatesStatus Updates
MembersMembers
BlogBlog
BookmarksBookmarks
FilesFiles
The developerWorks Connections Platform
is now in read-only mode and content is only
available for viewing. No new wiki pages, posts,
or messages may be added. Please see our
FAQ for more information. The developerWorks
Connections platform will officially shut down on
March 31, 2020 and content will no longer be
available. More details available on our FAQ.
(Read in Japanese.)
Pre-requirements & TopologyPre-requirements & Topology
1. An ADFS (Active Directory Federation Server)
is set up and ready to use. For instructions on
ADFS set up, please refer to “Single Sign On
(SSO) for OpenPages (on WebSphere) using the
Microsoft Active Directory Federation Server (A
DFS)”.
2. OpenPages GRC Platform is deployed to a
WebSphere Application server and ready to use.
In this example, an all-in-one server OpenPages
environment is used.
3. Both the ADFS Server and the IBM WebSphere
server should be on the same ADFS domain.
4. A client machine to access the OpenPages
Application server using a browser should also be
part of the same domain as the ADFS and IBM
WebSphere servers.
The topology in this example looks like this:
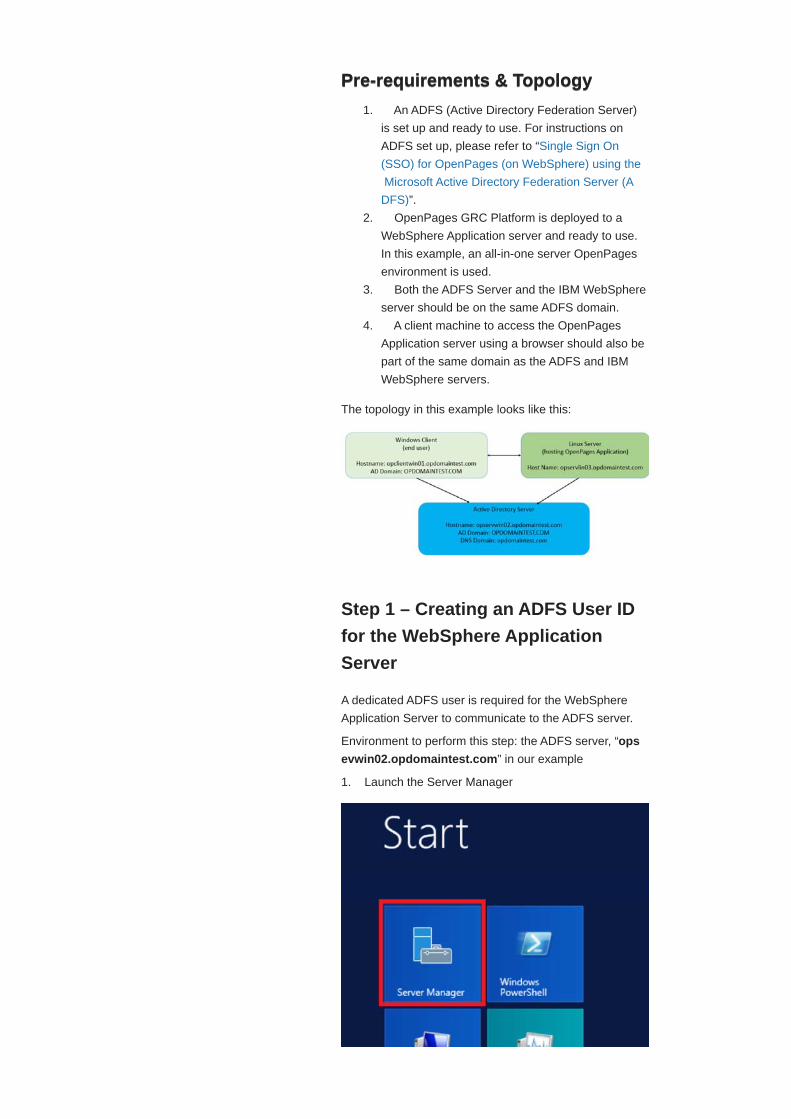
Step 1 – Creating an ADFS User ID
for the WebSphere Application
Server
A dedicated ADFS user is required for the WebSphere
Application Server to communicate to the ADFS server.
Environment to perform this step: the ADFS server, “ops
evwin02.opdomaintest.com” in our example
1. Launch the Server Manager
2. From “Tools” menu, click “Active Directory Users and
Computers” option as show below:
3. Create a domain user named “wastest”
4. Set the “password never expire” option as shown
below:

Step 2 – Assigning the Service
Principal Name and Create Key File
Environment to perform this step: the ADFS server, “ops
evwin02.opdomaintest.com” in our example.
After the account has been created, we need to map this
account to the Kerberos Service Principal
Name (SPN) and create a key file that WebSphere can
use to log into the domain with.
Please note that SPNs and keytabs are only required for
the WebSphere Application Server instance and not the
Windows client users who will be logging in to the domain
via the domain sign-on screen.
To create the key, open a command window on the Active
Directory server, and issue the
‘ktpass’ command in the following manner:
ktpass -out <keyfile name>
-princ HTTP/fully qualified hostname@AD
DOMAIN NAME
-mapuser <AD user> -pass <password> -ptype
KRB5_NT_PRINCIPAL
Example,
In our example, the key file “appserver1.keytab” is
created in the c:\temp\keys directory.
Please note that case is very important here. HTTP must
be all in capital letters as well as the AD
domain name. If you get this wrong, authentication will
not work.
Now, return to the account properties for the user, you will
see the following:

Note the ‘User logon name’ field. It now contains the
Service Principal Name (or SPN) of the ID.
Step 3 – Setting up Kerberos
Configuration on the WebSphere
Application Server for OpenPages
Environment to perform this step: the OpenPages
Application server, “opsevlin03.opdomaintest.com” in
our example.
Copy the key file from the ADFS machine to a directory
on your OpenPages application server. This can be any
directory you like, but you will need to make sure you
specify the exact path to the key file in the Kerberos
configuration file that you will be creating. In our example,
the key file is copied to /home/opuser/krb5/ directory.
After the key file has been copied, the Kerberos
configuration file needs to be set up on server hosting the
OpenPages GRC Platform on WebSphere.
Run wsadmin on the command line, then issue the
“$AdminTask createKrbConfigFile” command in the
following manner:
$AdminTask createKrbConfigFile {-krbPath
<config file name>
–realm <KERBEROS REALM> -kdcHost <AD
hostname> -dns <dns domain>
–keytabPath /etc/krb5/<keytab filename>}
Example,
$AdminTask createKrbConfigFile {-krbPath
/home/opuser/krb5/krb5.conf -realm
OPDOMAINTEST.COM -kdcHost opservwin02.opdo
maintest.com -dns opdomaintest.com -
keytabPath /home/opuser/krb5/appserver1
.keytab}
This will create the krb5.conf file (in the
/home/opuser/krb5 directory), as shown below:

The krb5.conf file contains all of the information the
WebSphere application server will need to authenticate
itself with ADFS, as well as authenticate Kerberos clients
via the SPNEGO protocol.
Step 4 – Enabling Application
Security and Configuring the
Standard LDAP Registry in
WebSphere
1. Launch the WebSphere admin console, and login
with a WAS Administrator.
https://opservlin03.opdomaintest.com:9043/ibm/consol
e
2. Navigate to the ‘Security->Global security’ page, and
enable security on the application server:
Next click apply button and save the changes.
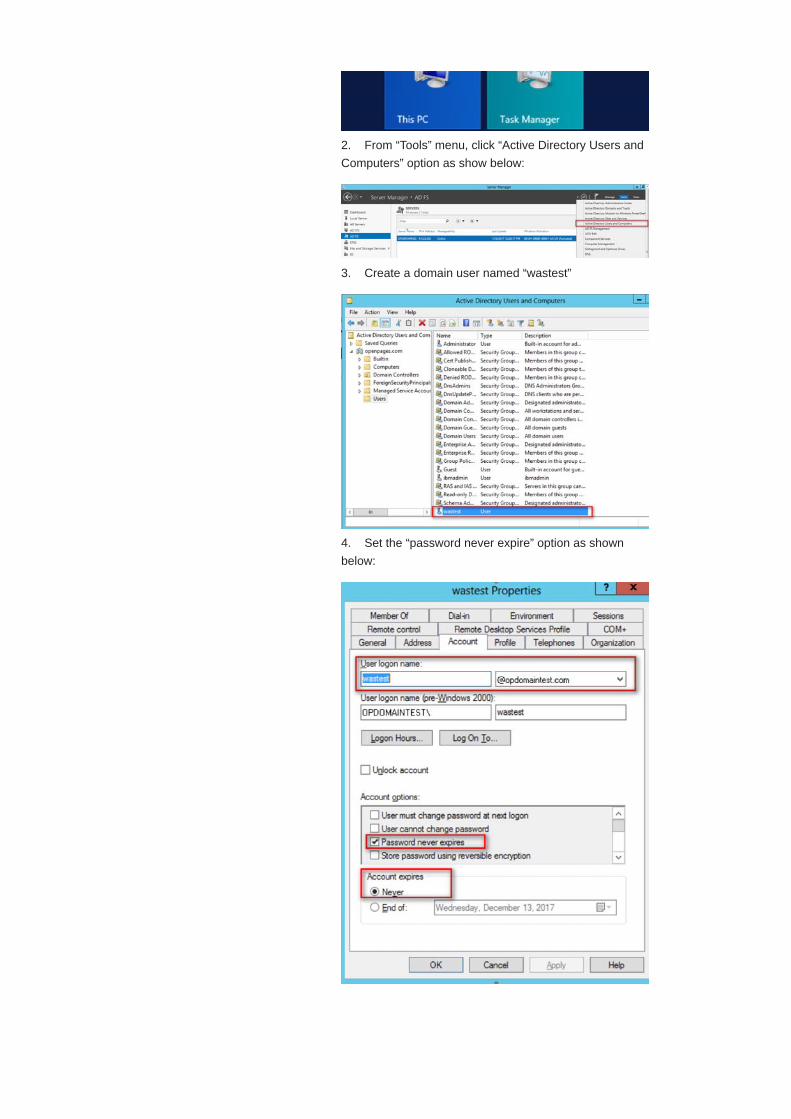
3. Select the “Standalone LDAP registry” and click
Configure..
4. Type in the following details and test the connection:
Primary Administrative User name: ADFS server Admin
user name
Type of LDAP server: Microsoft Active Directory and the
server details
Base distinguished name (DN): The domain name, in the
format blow
DC=opdomaintest,DC=com
Bind distinguished name (DN): Domain name and user
name in the format below
CN=wastest,CN=Users,DC=opdomaintest,DC=com
Click Apply and Save the settings, then click the OK
button it will return to the below screen:
Select “Standalone LDAP registry” and click “Set as
current” button, it will populate the Realm name and
current realm definition as shown above.
Next click the “Apply” button at the bottom of the page
and Save the settings
Step 5 – Enabling Single Sign-On
(SSO) in Webphere
1. In the WebSphere admin console, navigate to the
‘Security->Global Security-> Web and SIP Security-
>Single sign-on (SSO)’ page

2. Provide the domain name and click OK
3. Next save the settings
Step 6 – Enabling SPNEGO in
WebSphere
1. In the WebSphere admin console, navigate to
Security->Global security->Web and SIP security-
>SPNEGO Web authentication:
2. Select the krb5.conf file and then click OK
3. Ensure the options below are selected then click the
New button under SPNEGO Filters section:

4. Enter in your local hostname and your Kerberos
realm name. Select the ‘Trim Kerberos realm from
principal name’ checkbox. Click the OK button, click on
the OK button again, then save the changes to the master
configuration.
5. Ensure the values below are set currectly and then
click Apply and Save:
Step 7 – Configuring Kerberos in
WebSphere
1. In the WebSphere admin console, navigate to
Security->Global security->Kerberos Configuration:
2. Select the Kerberos configuration file and keytab files
then click Apply and OK button.

Step 8 – Configuring the
GRCSecurityDomain in Webphere
1. In the WebSphere admin console, navigate to
Security->Security domains then click
“GRCSecurityDomain” link
2. Ensure that you select the highlighted options below:

3. Click OK and Save the changes
4. Click “GRCSecurityDomain” link again
5. Expand the JAAS System Logins configuration:
6. Click “System logins” link
7. Click “WEB_INBOUND” link:

8. Click JAAS module class name
9. Change the Authentication strategy to “OPTIONAL”
and then click OK
10. Click OK and Save
11. After saving, ensure that SPNEGO web
authentication is selected to “Customize for this domain”
option if not selected then click the SPNEGO web
authentication hyperlink and “OK” then SAVE the settings
again
12. Click SPNEGO web authentication hyperlink and
ensure “Use the alias host name for the application
server” option is unchecked
13. Click “OK” and Save the settings
Step 9 (Optional) – Turning on
SPNEGO Logging and Tracing in
WebSphere
This step is optional. You can turn on SPENGO logging
and tracing for validation or for troubleshooting purpose.
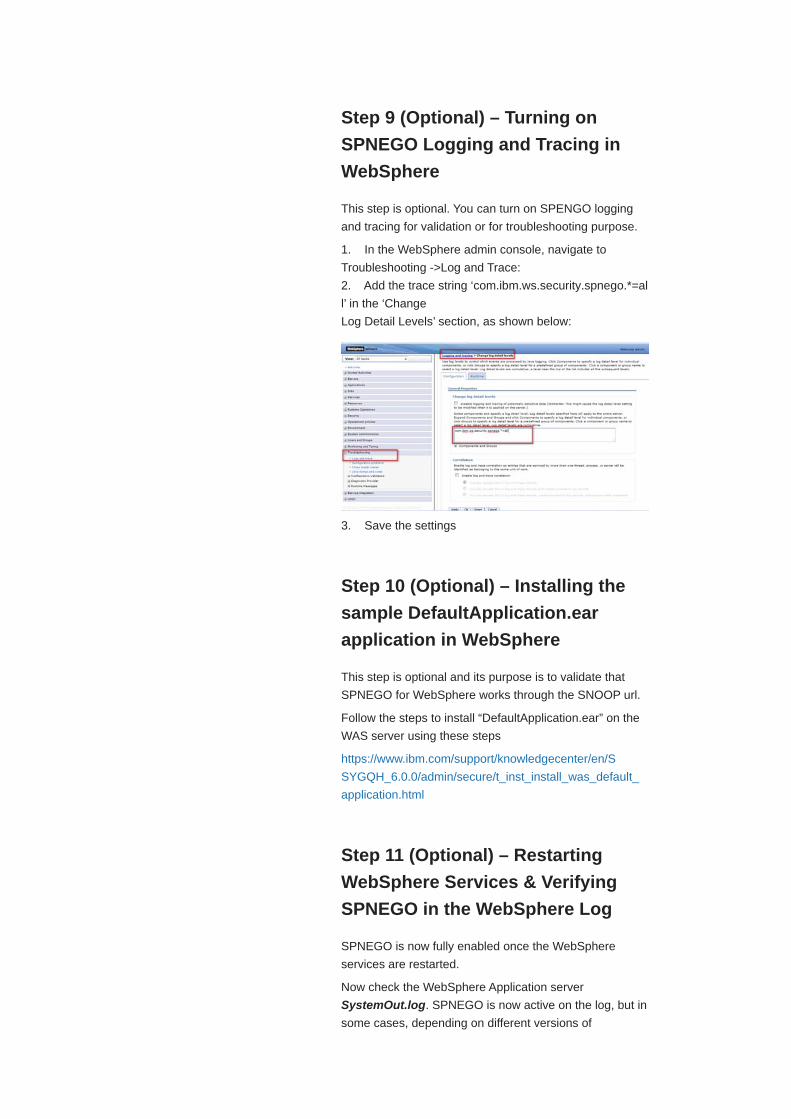
1. In the WebSphere admin console, navigate to
Troubleshooting ->Log and Trace:
2. Add the trace string ‘com.ibm.ws.security.spnego.*=al
l’ in the ‘Change
Log Detail Levels’ section, as shown below:
3. Save the settings
Step 10 (Optional) – Installing the
sample DefaultApplication.ear
application in WebSphere
This step is optional and its purpose is to validate that
SPNEGO for WebSphere works through the SNOOP url.
Follow the steps to install “DefaultApplication.ear” on the
WAS server using these steps
https://www.ibm.com/support/knowledgecenter/en/S
SYGQH_6.0.0/admin/secure/t_inst_install_was_default_
application.html
Step 11 (Optional) – Restarting
WebSphere Services & Verifying
SPNEGO in the WebSphere Log
SPNEGO is now fully enabled once the WebSphere
services are restarted.
Now check the WebSphere Application server
SystemOut.log. SPNEGO is now active on the log, but in
some cases, depending on different versions of
WebSphere Application Server, the related SPNEGO
message may not be displayed until after the first access
attempt.
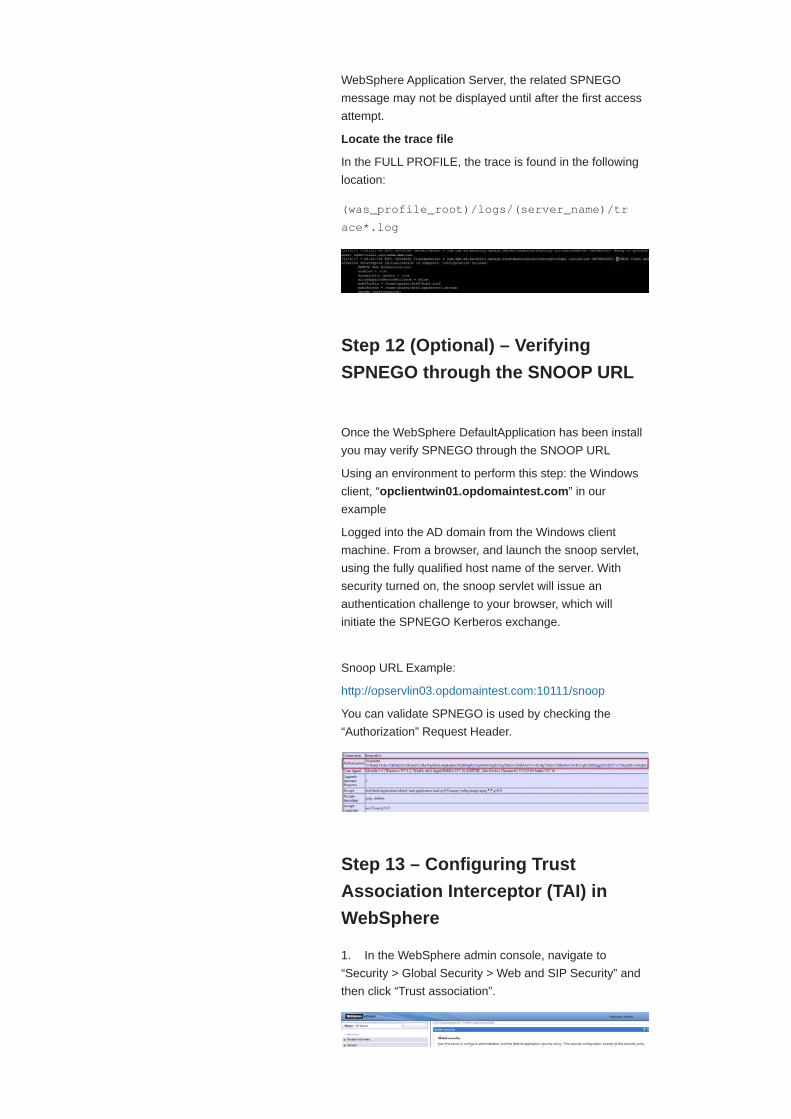
Locate the trace file
In the FULL PROFILE, the trace is found in the following
location:
(was_profile_root)/logs/(server_name)/tr
ace*.log
Step 12 (Optional) – Verifying
SPNEGO through the SNOOP URL
Once the WebSphere DefaultApplication has been install
you may verify SPNEGO through the SNOOP URL
Using an environment to perform this step: the Windows
client, “opclientwin01.opdomaintest.com” in our
example
Logged into the AD domain from the Windows client
machine. From a browser, and launch the snoop servlet,
using the fully qualified host name of the server. With
security turned on, the snoop servlet will issue an
authentication challenge to your browser, which will
initiate the SPNEGO Kerberos exchange.
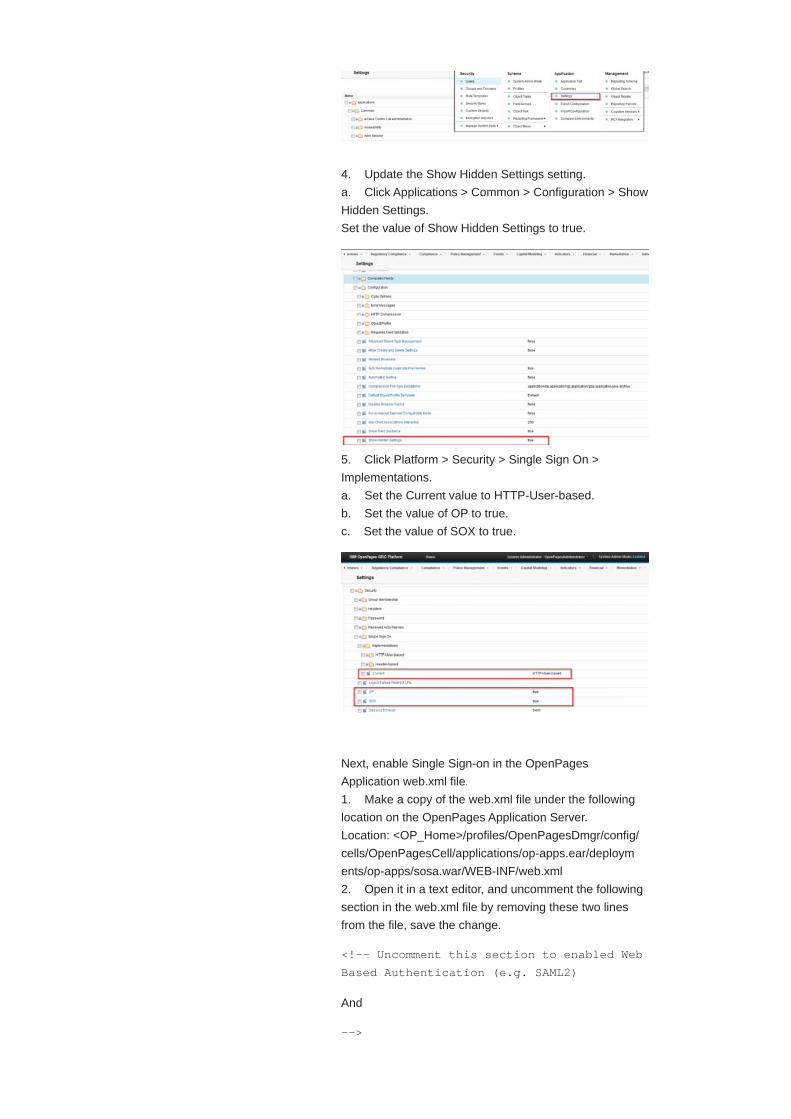
Snoop URL Example:
http://opservlin03.opdomaintest.com:10111/snoop
You can validate SPNEGO is used by checking the
“Authorization” Request Header.
Step 13 – Configuring Trust
Association Interceptor (TAI) in
WebSphere
1. In the WebSphere admin console, navigate to
“Security > Global Security > Web and SIP Security” and
then click “Trust association”.

2. Check the Enable trust association and click OK and
Save and then click the Interceptors link
3. Click New button
4. Enter the Interceptor Class name com.ibm.ws.secur
ity.web.saml.ACSTrustAssociationInterceptor
5. Enter the custome properties below, and click “Apply”
Name: sso_1.sp.filter
Value: remote-address!=127.0.0.1;request-url%=/
Click “OK” and “Save”

6. Navigate to “Application Type -> WebSphere
enterprise applications -> op-apps”, then click “Security
role to user/group mapping”
7. Select the “AllAuthenticated” role and then click “Map
Special Subjects -> All Authenticated in Application’s
Realm”
8. Click “OK” and “Save” the settings
Step 14 – Configuring OpenPages
Application to use SSO
Now you are ready to configure OpenPages Application
to use SPNEGO SSO. Please make sure you have set up
ADFS users with account names matching the
corresponding users in OpenPages GRC platform.
First, enable Single Sign-on from the OpenPages
Application.
1. Open a web browser, go to the current OpenPages
application.
https://opservlin03.opdomaintest.com:10111/openpages
2. Log on as a user with administrative permissions.
3. Navigate to “Administration -> Settings”
4. Update the Show Hidden Settings setting.
a. Click Applications > Common > Configuration > Show
Hidden Settings.
Set the value of Show Hidden Settings to true.
5. Click Platform > Security > Single Sign On >
Implementations.
a. Set the Current value to HTTP-User-based.
b. Set the value of OP to true.
c. Set the value of SOX to true.
Next, enable Single Sign-on in the OpenPages
Application web.xml file.
1. Make a copy of the web.xml file under the following
location on the OpenPages Application Server.
Location: <OP_Home>/profiles/OpenPagesDmgr/config/
cells/OpenPagesCell/applications/op-apps.ear/deploym
ents/op-apps/sosa.war/WEB-INF/web.xml
2. Open it in a text editor, and uncomment the following
section in the web.xml file by removing these two lines
from the file, save the change.
<!-- Uncomment this section to enabled Web
Based Authentication (e.g. SAML2)
And
-->
Example,
Then, modify the OpenPages Application index.jsp file.
1. Make a copy of the index.jsp file under the following
location on the OpenPages Application Server
Location: <OpenPages Install Folder>/profiles/<Server
Name>-OPNode1/InstalledApps/OpenPagesCell/op-app
s.ear/sosa.war/index.jsp
2. Open it in a text editor, and change the log.on.do
redirect to home.do, save the change.
<struts_logic:redirect href="log.on.do" />
The above line needs to be replaced with the below line
<struts_logic:redirect href="home.do" />
Step 15 – Restarting the
OpenPages Services
Run the Sync Nodes command on the WebSphere server
to sync up recent configuration changes, and restart
OpenPages services.
Sample commands,
Step 16 – Validating SPNEGO SSO
for OpenPages Application
Environment to perform this step: the Window client
machine, “opclientwin01.opdomaintest.com” in our
example.
Now SPENGO Single Sign-on is effective. When a user
hits the OpenPages URL, he/she should be redirected to
ADFS server and prompt for login using his/her ADFS
domain account username and password.
1. Open the browser and enter the OpenPages
Application URL
https://opservlin03.opdomaintest.com:10111/openpages
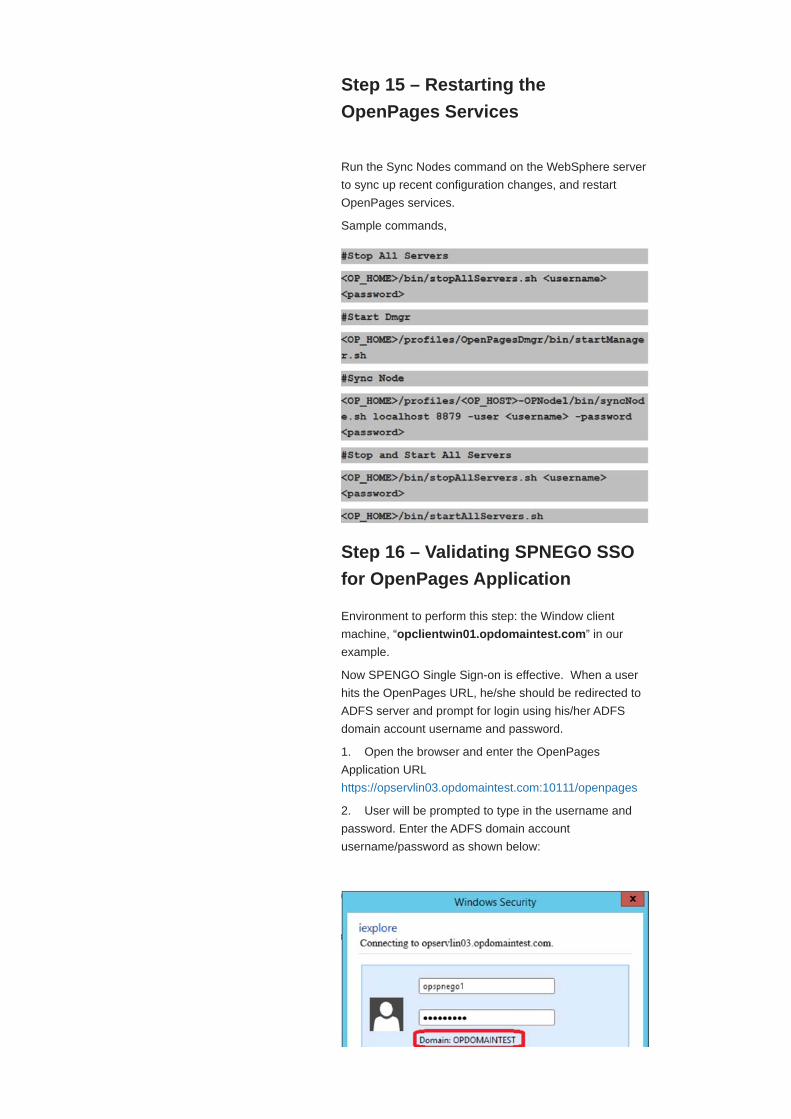
2. User will be prompted to type in the username and
password. Enter the ADFS domain account
username/password as shown below:

Comments (0)Add a Comment More Actions
Contact Privacy Terms of use Accessibility Cookie
Preferences
3. User should now be logged into the OpenPages
application without seeing the OpenPages Logon dialog.
Browser Considerations
Microsoft Internet Explorer
Note that the client needs set options in the Microsoft
Internet Explorer browser to be able to use SPNEGO
Single Sign-On. Please refer to this documentation:
Configuring the client browser to use SPNEGO
Chrome
You don’t need to make any changes to Chrome browser.
Things just work.
Tags: security spnego adfs authentication singlesignon
activedirectory sso
Add a Comment More Actions
There are no comments to display
Previous Entry Main Next Entry
Related Documents