Configuring SAP Accounts Receivable & Accounts Payable SAP S/4HANA Finance

Welcome message from author
This document is posted to help you gain knowledge. Please leave a comment to let me know what you think about it! Share it to your friends and learn new things together.
Transcript

Configuring SAP Accounts Receivable & Accounts Payable SAP S/4HANA Finance


Narayanan Veeriah
Configuring SAP Accounts Receivable & Accounts Payable SAP S/4HANA Finance
© Narayanan Veeriah
1st Edition, 2020
All rights reserved. Neither this publication nor any part of it may be copied or reproduced in any form / manner or by any means
or translated into another language, without the prior and explicit consent of the author (Narayanan Veeriah).
The author / publisher makes no warranties or representations with respect to the content hereof and specifically disclaims any
implied warranties of merchantability or fitness for any purpose. The author / publisher is not responsible for any errors that
may appear in this publication.
All the screenshots reproduced in this book are subject to copyright © SAP SE, Dietmar-Hopp-Allee 16, 69190 Walldorf, Germany.
SAP, the SAP logo, ABAP, Ariba, Concur, SAP ArchiveLink, SAP Ariba, SAP Business By Design, SAP Business Explorer, SAP Business
Objects, SAP Business Objects Explorer, SAP Business Objects Web Intelligence, SAP Activate, SAP Business One, SAP Business
Workflow, SAP Crystal Reports, SAP Fieldglass, HANA, HANA 2.0, SAP HANA, SAP S/4HANA, SAP S/4HANA Finance, SAP GoingLive,
SAP Hybris, SAP R/1, SAP R/2, SAP R/3, SAP ECC, SAP ERP, SAP SQL Anywhere, SAP SD, SAP MM, SAP PP, SAP PM, SAP PS, SAP
SEM, SAP SuccessFactors, SAP Query are registered or unregistered trademarks of SAP SE, Walldorf, Germany.
All other products mentioned in this book are the registered or unregistered trademarks of their respective companies.

Acknowledgements
I acknowledge the understanding and adjustments made by my family, especially my wife, for
all the encouragement and letting me concentrate working on this book, as with previous
other books. I thank Narayanan Krishnan, who helps in checking out the content for its
correctness.


7 Preface
Preface
This book (Configuring SAP Accounts Receivable & Accounts Payable – SAP S/4HANA Finance),
as with my other books on SAP, follows a case-study approach to make your learning easy.
Every effort has been taken to guide you, step-by-step, in configuring your SAP system in
implementing SAP Accounts Receivable and Accounts Payable, in SAP S/4HANA (1909), to
meet your exact business needs. Each configuration activity has been discussed with
appropriate screen shots (from an SAP system) and illustrations to help you ‘see’ what is being
discussed in that activity / step. You will see a lot of additional information, provided across
the Chapters and the Sections, to help you understand better a topic or a setting or a concept.
The entire content of the book, vide various Chapters, has been presented as in SAP IMG
(Implementation Guide) for easy comprehension. You will come across with appropriate
menu paths and Transactions, to help you to navigate the various configuration activities.
As mentioned already, this book follows a case-study approach with a story-board technique,
that provides you with the required business background for a given configuration activity.
The Case Study Chapter discusses the Project Dolphin, setting up the tone for further
discussions in the remaining Chapters.
The Chapter 1 introduces you to SAP Accounts Receivable and Accounts Payable.
The Chapter 2 deals with the customer accounts. It provides an overview of master data, the
preparations that you need to make to create the master data and how to change / delete
them. It also provides you with the details of configuration that you need to complete for
displaying line item and account balances.
The Chapter 3 discusses vendor accounts, and is similar to Chapter 2. Here, you will also come
across on how to define a threshold to flag when an overdue payment to a vendor should
actually be termed as ‘critically overdue’.
The Chapter 4 deals with incoming invoices / credit memos. As a part of the discussions, you
will make/check various document settings including document types, posting keys,
validations / substitution in accounting documents, field status variant, screen variants for
document entry, text IDs, line layout for document & line items, document change rules etc.
You will also understand the various settings for document parking: workflow variants,
release approval groups / paths / procedure, resetting release approvals and so on. You will
also learn about maintaining terms of payment and cash discount base for incoming invoices.
In Chapter 5, you will understand the configuration relating to payment release. You will learn
to define payment block reasons for payment release.
8 Configuring SAP Accounts Receivable & Accounts Payable (SAP S/4HANA Finance)
The Chapter 6 is devoted for incoming payments. You will learn about configuring outgoing
payments global settings, manual and automatic outgoing payments. You will also learn about
defining various accounts for cash discount taken / lost, overpayments / underpayments,
exchange rate differences, rounding differences etc. You will, then, learn about tolerances
including vendor tolerances, reason codes and cross-company code manual payments. In
configuring automatic payments, you will understand the concept of house banks, how to
define them, setting up the company code(s) for payment transactions, payment methods,
bank determination, value date rules, payment grouping etc.
The Chapter 7 is on outgoing invoices / credit memos. The settings are similar to the ones that
you will come across in in Chapter 4. Besides that, here, you will learn to define cash discount
base for outgoing invoices, tax accounts and posting key for outgoing invoices.
The Chapter 8 will deal with incoming payments. You will notice that the settings discussed
for outgoing payments (Chapter 6) will also apply for incoming payments. Additionally, you
will learn about SEPA mandates and how to configure that in the system.
The Chapter 9 is on payments with payment cards. You will learn about payment cards, and
the central settings that you need to make on the FI side.
The Chapter 10 deals dunning in detail. You will understand the basic settings including the
dunning areas, dunning keys, dunning block reasons and dunning forms. You will learn about
dunning procedures, dunning groups and interest rates. You will also learn how to set up the
dunning forms. You will understand the dunning process flow, and comprehend how the
system selects the items to be dunned, how to create /edit / execute a dunning proposal.
The configuration relating to open item clearing is discussed in Chapter 11. Here, you will
learn about processing of open items, preparing the system for automatic clearing and how
to handle the clearing differences.
The Chapters 12 & 13 deal with down payment received and down payment made,
respectively. You will learn about setting up of reconciliation / alternate reconciliation
accounts, tax accounts and tax clearing accounts towards the required configuration.
In Chapter 14, you will learn about adjustment posting / reversal. You will learn about
negative posting and also the reasons for reversal.
The Chapter 15 is devoted for interest calculation. You will learn the fields, in customer /
vendor master, that are relevant for interest calculation. You will understand the interest
calculation process: the prerequisites, item selection for interest calculation and the actual
process of item interest calculation. You will learn to configure the settings for interest
calculation global settings, item interest calculation, interest posting and interest printouts.
9 Preface
In Chapter 16, you will learn about the various closing processes relating to FI-A/R and FI-A/P.
You will understand how to configure the system for carrying out the closing operations like
count, valuate and reclassify.
You will learn the details of standard evaluations, as a part of accounts receivable / payable
information system in Chapter 17.
In the last Chapter (Chapter 18), you will learn about the important Fiori Apps for Finance,
that are available for your accounts payable accountants / managers, accounts receivable
accountants / managers, and credit controllers.
In all, you can use this book as a desktop-reference for configuring SAP Accounts Receivable
and Accounts Payable. As the Chapters have been progressively elaborated, with the help of
a case-study, you will that informative and easy to comprehend. The screenshots, in each of
the Chapters, will help you understand the settings better and will enable for a better
learning.


Contents at a Glance
Case Study 23
Accounts Receivable and Accounts Payable 45
Customer Accounts 49
Vendor Accounts 81
Incoming Invoices/Credit Memos 99
Release for Payments 155
Outgoing Payments 157
Outgoing Invoices/Credit Memos 225
Incoming Payments 229
Payments with Payment Cards 237
Dunning 243
Open Item Clearing 273
Down Payment Received 281
Down Payment Made 285
Adjustment Posting/Reversal 289
Interest Calculation 295
Closing 325
Information System 377
Apps for FI-A/R & FI-A/P 383
About the Author
Index
List of Figures
List of Tables
Latest Books by the Author
Other Books by the Author


Table of Contents
Case Study 23
1 Accounts Receivable and Accounts Payable 45
1.1 Conclusion 48
2 Customer Accounts 49
2.1 Master Data 49
2.1.1 Preparations for Creating Customer Master Data 52 2.1.1.1 Define Account Groups with Screen Layout (Customers) 53 2.1.1.2 Define Screen Layout per Company Code (Customers) 57 2.1.1.3 Define Screen Layout per Activity (Customers) 58 2.1.1.4 Change Message Control for Customer Master Data 59 2.1.1.5 Define Accounting Clerks 59 2.1.1.6 Define Industries 60 2.1.1.7 Create Number Ranges for Customer Accounts 62 2.1.1.8 Assign Number Ranges to Customer Account Groups 63 2.1.1.9 Define Accounts Receivable Pledging Indicator 63 2.1.1.10 Define Sensitive Fields for Dual Control (Customers) 66
2.1.2 Preparations for Changing Customer Master Data 70 2.1.2.1 Define Field Groups for Customer Master Records 70 2.1.2.2 Group Fields for Customer Master Records 71
2.1.3 Delete Customer Master Data 73
2.2 Line Items 75
2.2.1 Display Line Items 75
2.2.2 Open Item Processing 75
2.2.3 Correspondence 75 2.2.3.1 Define Period Types for Customers 76
2.3 Balances 77
2.3.1 Maintain Worklist for Displaying Balances 77
2.3.2 Maintain Users and Accounts for Internet Services 79
2.1 Conclusion 80
14 Configuring SAP Accounts Receivable & Accounts Payable (SAP S/4HANA Finance)
3 Vendor Accounts 81
3.1 Master Data 81
3.1.1 Preparations for Creating Vendor Master Data 84 3.1.1.1 Define Account Groups with Screen Layout (Vendors) 84 3.1.1.2 Define Screen Layout per Company Code (Vendors) 85 3.1.1.3 Define Screen Layout per Activity (Vendors) 86 3.1.1.4 Create Number Ranges for Vendor Accounts 87 3.1.1.5 Assign Number Ranges to Vendor Account Groups 88 3.1.1.6 Define Sensitive Fields for Dual Control (Vendors) 89
3.1.2 Preparations for Changing Vendor Master Data 91 3.1.2.1 Define Field Groups for Vendor Master Records 91 3.1.2.2 Group Fields for Vendor Master Records 92
3.1.3 Delete Vendor Master Data 94
3.2 Line Items 94
3.2.1 Display Line Items 94
3.2.2 Open Item Processing 95
3.2.3 Correspondence 95 3.2.3.1 Define Period Types for Vendors 95
3.3 Define Thresholds for Vendor Account Groups 96
3.4 Conclusion 97
4 Incoming Invoices/Credit Memos 99
4.1 Make and Check Document Settings 99
4.1.1 Define Document Types 100
4.1.2 Define Posting Keys 104
4.1.3 Validation in Accounting Documents 111
4.1.4 Define Default Values 116
4.1.5 Define Field Status Variants 118
4.1.6 Assign Company Code Field Status Variants 122
4.1.7 Define Subscreens for Coding Blocks 123
4.1.8 Screen Variants for Document Entry 125
4.1.9 Substitution in Accounting Documents 126
4.1.10 Text IDs for Documents and Line Items 127 4.1.10.1 Define Text IDs for Documents 129 4.1.10.2 Define Text Identifications for Line Items 129 4.1.10.3 Define Texts for Line Items 130
4.1.11 Define Line Layout for Document Posting Overview 133
4.1.12 Define Line Layout for Document Change/Display 133

15 Contents
4.1.13 Select Standard Line Layout for Document Change/Display 134
4.1.14 Document Change Rules, Document Header 135
4.1.15 Maintain Fast Entry Screens for G/L Account Items 136
4.2 Make and Check Settings for Document Parking 137
4.2.1 Define Entry Screens for Parking Documents 138
4.2.2 Create Workflow Variant for Parking Documents 138
4.2.3 Assign Company Code to a Workflow Variant for Parking Documents 139
4.2.4 Define Release Approval Groups for Parking Documents 140
4.2.5 Define Release Approval Paths for Parking Documents 141
4.2.6 Assign Release Approval Paths for Parking Documents 141
4.2.7 Assign Release Approval Procedure for Parking Documents 142
4.2.8 Define Users with Release Authorization for Parking Documents 143
4.2.9 Reset Release Approval (Customers) 145
4.2.10 Reset Release Approval (Vendors) 146
4.3 Maintain Terms of Payment 146
4.4 Define Terms of Payment for Installment Payments 151
4.5 Define Cash Discount Base for Incoming Invoices 152
4.6 Conclusion 153
5 Release for Payment 155
5.1 Define Payment Block Reason for Payment Release 155
5.2 Conclusion 156
6 Outgoing Payments 157
6.1 Outgoing Payments Global Settings 157
6.1.1 Make and Check Document Settings 157
6.1.2 Define Accounts for Cash Discount Taken 158
6.1.3 Define Accounts for Lost Cash Discount 158
6.1.4 Define Accounts for Overpayments/Underpayments 159
6.1.5 Define Accounts for Exchange Rate Differences 160
6.1.6 Define Account for Rounding Differences 161
6.1.7 Define Accounts for Payment Differences with Altern. Currency 162
6.1.8 Define Accounts for Bank Charges (Vendors) 163
6.1.9 Define Posting Keys for Clearing 163
6.1.10 Enable Translation Posting 165

16 Configuring SAP Accounts Receivable & Accounts Payable (SAP S/4HANA Finance)
6.1.11 Payment Block Reasons 165 6.1.11.1 Define Payment Block Reasons 165 6.1.11.2 Define Default Values for Payment Block 166
6.2 Manual Outgoing Payments 166
6.2.1 Tolerances (Vendors) 167 6.2.1.1 Define Tolerance Groups for Employees 167 6.2.1.2 Define Tolerance Groups for G/L Accounts 174 6.2.1.3 Define Tolerances (Vendors) 176
6.2.2 Define Reason Codes (Manual Outgoing Payments) 180
6.2.3 Cross-Company Code Manual Payments 182 6.2.3.1 Cross-Company Code Transactions 182 6.2.3.2 Prepare Cross-Company Code Manual Payments 184
6.2.4 Configure Manual Payments 186
6.3 Automatic Outgoing Payments 187
6.3.1 Define House Banks 189
6.3.2 Set Up All Company Codes for Payment Transactions 194
6.3.3 Set Up Paying Company Codes for Payment Transactions 197
6.3.4 Set Up Payment Methods per Country for Payment Transactions 200
6.3.5 Set Up Payment Methods per Company Code for Payment Transactions 204
6.3.6 Set a Payment Medium Format per Company Code 210
6.3.7 Set Up Bank Determination for Payment Transactions 211
6.3.8 Define Value Date Rules 217
6.3.9 Assign Payment Method to Bank Transaction 218
6.3.10 Define Payment Groupings 218
6.3.11 Prepare Automatic Postings for Payment Program 219
6.3.12 Prepare Automatic Posting for Payment Requests 220
6.3.13 Select Search Fields for Payments 220
6.3.14 Select Search Fields for Line Item Display 221
6.4 Conclusion 222
7 Outgoing Invoices/Credit Memos 225
7.1 Define Cash Discount Base for Outgoing Invoices 225
7.2 Define Tax Accounts for Outgoing Invoices 226
7.3 Define Posting Key for Outgoing Invoices/Credit Memos 227
7.4 Conclusion 227
17 Contents
8 Incoming Payments 229
8.1 Incoming Payment Global Settings 229
8.1.1 Define Accounts for Cash Discount Granted 229
8.2 Manual Incoming Payments 230
8.3 Automatic Incoming Payments 230
8.4 Management of SEPA Mandates 230
8.4.1 General Settings 231
8.4.2 Define Available Function Modules for Generating Mandate IDs 232
8.4.3 Select Function Module for Generating Mandate IDs 232
8.4.4 Define Number Range Intervals 233
8.4.5 Assign Number Range Intervals 233
8.5 Conclusion 234
9 Payments with Payment Cards 237
9.1 Make Central Settings for Payment Cards 237
9.2 Assign G/L Account to Cash Clearing Account 239
9.3 Conclusion 240
10 Dunning 243
10.1 Basic Settings for Dunning 245
10.1.1 Define Dunning Areas 245
10.1.2 Define Dunning Keys 247
10.1.3 Define Dunning Block Reasons 248
10.1.4 Define Dunning Forms 249
10.2 Dunning Procedure 251
10.2.1 Define Dunning Procedures 251
10.2.2 Define Dunning Groups 260
10.2.3 Define Interest Rates 260 10.2.3.1 Define Interest Calculation Types 261
10.3 Printout 262
10.3.1 Define Dunning Forms (with SAPScript) 263
10.3.2 Define Dunning Forms (with SAP Smart Forms) 263
10.3.3 Assign Dunning Forms 263

18 Configuring SAP Accounts Receivable & Accounts Payable (SAP S/4HANA Finance)
10.3.4 Define Sender Details for Dunning Forms 265
10.4 Generate List for Dunning Program Configuration 266
10.5 Dunning Process Flow 267
10.6 Conclusion 270
11 Open Item Clearing 273
11.1 Make Settings for Processing Open Items 276
11.2 Prepare Automatic Clearing 276
11.3 Clearing Differences 278
11.3.1 Define Accounts for Clearing Differences 278
11.4 Conclusion 279
12 Down Payment Received 281
12.1 Define Reconciliation Accounts for Customer Down Payments 281
12.2 Define Tax Accounts for Down Payments Received 282
12.3 Define Account for Tax Clearing 283
12.4 Conclusion 284
13 Down Payment Made 285
13.1 Define Alternative Reconciliation Account for Down Payments 285
13.2 Define Account for Tax Clearing 286
13.3 Conclusion 287
14 Adjustment Posting / Reversal 289
14.1 Permit Negative Posting 289
14.2 Define Reasons for Reversal 291
14.3 Conclusion 293
19 Contents
15 Interest Calculation 295
15.1 Fields Relevant for Item Interest Calculation 295
15.2 Item Interest Calculation Process 297
15.2.1 Prerequisites 297
15.2.2 Executing Item Interest Calculation Program 298
15.2.3 The Interest Calculation Process 299 15.2.3.1 Item Selection 299 15.2.3.2 Interest Calculation 301 15.2.3.3 Interest Posting 302 15.2.3.4 Printout 302 15.2.3.5 Others 302 15.2.3.6 Old and New Interest Calculation Programs 303
15.3 Interest Calculation Global Settings 304
15.3.1 Define Interest Calculation Types 304
15.3.2 Define Number Ranges for Interest Forms 304
15.3.3 Prepare Item Interest Calculation 305
15.3.4 Prepare Account Balance Interest Calculation 309
15.4 Interest Calculation 313
15.4.1 Define Reference Interest Rates 313
15.4.2 Define Time-Dependent Terms 313
15.4.3 Enter Interest Values 315
15.4.4 Define Fixed Amounts for Interest Calculation 315
15.5 Interest Posting 317
15.5.1 A/R: Calculation of Interest on Arrears 317
15.5.2 Interest on Arrears Calculation (Vendors) 320
15.5.3 A/R: Balance Interest Calculation 320
15.5.4 A/P: Balance Interest Calculation 321
15.6 Printout 322
15.6.1 Assign Forms for Interest Indicators 322
15.6.2 Define Sender Details for Interest Forms 322
15.7 Conclusion 323
20 Configuring SAP Accounts Receivable & Accounts Payable (SAP S/4HANA Finance)
16 Closing 325
16.1 Count 325
16.1.1 Generate Default Customizing 326
16.1.2 General Settings 330 16.1.2.1 Communication Support 330 16.1.2.2 Define Reconciliation Process Attributes 334 16.1.2.3 Create Additional Fields 334 16.1.2.4 Activate Processes 335 16.1.2.5 Activate Transaction Data Tables 336 16.1.2.6 Maintain Field Catalogs 338
16.1.3 Data Selection and Storage 339 16.1.3.1 Define Reconciliation Process Detail Attributes 339 16.1.3.2 Define Ledger 341 16.1.3.3 Define Enhancements 341 16.1.3.4 Companies to be Reconciled 342
16.1.4 Data Assignment 343 16.1.4.1 Maintain Number Range for Group Reference Numbers 343 16.1.4.2 Define Rules for Document Assignments 344
16.1.5 Data Reconciliation 345 16.1.5.1 Set Up Reconciliation Display 345 16.1.5.2 Define Sets 346 16.1.5.3 Set Up Object Groups and Subgroups 347 16.1.5.4 Define Possible Status for Documents 349 16.1.5.5 Define Enhancements 350
16.1.6 Balance Confirmation Correspondence 351 16.1.6.1 Define Reply Addresses for Balance Confirmation 351 16.1.6.2 Specify Selection Criteria for Balance Confirmation 351
16.2 Valuate 353
16.2.1 Foreign Currency Valuation 353 16.2.1.1 Define Valuation Methods 355 16.2.1.2 Valuation Areas 356 16.2.1.3 Check Assignment of Accounting Principle to Ledger Group 357 16.2.1.4 Assign Valuation Areas and Accounting Principles 358 16.2.1.5 Activate Delta Logic 358 16.2.1.6 Prepare Automatic Postings for Foreign Currency Valuation 359 16.2.1.7 Activate Additional Fields for Foreign Currency Valuation 361 16.2.1.8 Define Account Determination for Currency Translation 362
16.2.2 Reserve for Bad Debt / Writing Off of Bad Debt 362 16.2.2.1 Individual Value Adjustment 362 16.2.2.2 Flat-Rate Valuation Adjustment 363
16.2.3 Valuations 364
21 Contents
16.2.3.1 Define Value Adjustment Key 364 16.2.3.2 Define Interest Calculation Types 365 16.2.3.3 Define Accounts 366 16.2.3.4 Determine Base Value 367 16.2.3.5 Determine Values for Line Item Display 368
16.3 Reclassify 368
16.3.1 Define Adjustment Accounts for GR/IR Clearing 368
16.3.2 Define Accounts for Subsequent Adjustment 369
16.3.3 Define Sort Method and Adjustment Accts for Regrouping Receivables / Payables
371
16.3.4 Define Adjustment Accounts for Receivables/Payables by Maturity 372
16.4 Conclusion 374
17 Information System 377
17.1 Standard Evaluations 377
17.1.1 Copy Standard Evaluations 377
17.1.2 Select Standard Evaluations 378
17.1.3 Enhance Standard Evaluations 381
17.2 Conclusion 382
18 Apps for FI-A/R & A/P 383
18.1 Apps for Accounts Payable Accountants 383
18.2 Apps for Accounts Payable Managers 387
18.3 Apps for Accounts Receivable Accountants 389
18.1 Apps for Accounts Receivable Managers 393
18.2 Apps for Credit Controllers 397
18.3 Conclusion 397


Case Study
he case study, Project Dolphin, relates to BEST Machinery, also known as BESTM, is the
corporate group having companies operating out of both United States of America
(USA) and India, among other countries. The case study is, however, limited to the
operations in USA and India. BESTM group has three companies namely, BESTM Agro, BESTM
Construction and BESTM Drives. All the three companies are operating out of USA from the
same address as that of the corporate group at Glen Ridge, New Jersey:
✓ BESTM Agro is the flagship company and is made up of four company codes – two in
USA and two in India. This company, through its various legal entities, is in the
business of manufacturing, supplying and servicing tractors for agricultural and other
uses, agricultural implements, lawn & garden mowers, and equipments required by
the forestry industry.
✓ BESTM Construction manufactures and services all kinds of trucks and heavy
machinery used in the construction industry like dump trucks, track & crawler loaders,
excavators, dozers etc. It has two company codes both of which are operating out of
USA.
✓ BESTM Drives is in the business of making and servicing industrial diesel engines
including diesel generators, and drivetrain related equipments like transmissions,
axles, gear drives etc. This company is comprising of two USA-based company codes.
BESTM group had been using a variety of software applications, built and bought over a period
of years, to meet all their business requirements. Because of a plethora of applications, which
were often different between USA and India, the corporate was finding it difficult to integrate
the information that hampered their decision making. Calling for a lot of manual interventions
and time-consuming reconciliations, they were finding it hard to close their books in time.
Also, there were lot of redundancies and duplicity as the applications were not fully
integrated. Hence, the corporate group was thinking of to go in for an ERP that would
overcome all these shortcomings, and they wanted to bring in the latest in ERP so that they
would have an enterprise solution that would not only be state-of-the-art, but also insulate
them from becoming obsolete in the near future. Accordingly, the management had taken
decision to implement the SAP S/4HANA suite of applications, and it was decided to deploy
the application on-premise.
T

24 Configuring SAP Accounts Receivable & Accounts Payable (SAP S/4HANA Finance)
BESTM decided to partner with a leading IT firm to manage the implementation and the
transition to SAP S/4HANA. The implementation was code named as ‘Project Dolphin’. The
project team had several discussions and workshops with the BESTM management at various
levels, and what you see in the following pages is the outcome of those discussions /
workshops.
The project team will define three companies in SAP, as shown in Table 0.1:
Company Company ID Country Currency
BESTM Agro B1000 USA USD
BESTM Construction B2000 USA USD
BESTM Drives B3000 USA USD
Table 0:1 BESTM - Companies
BESTM Agro company has the following legal entities (company codes) operating out of USA:
1. BESTM Farm Machinery
2. BESTM Garden & Forestry Equipments
BESTM Agro also operates in India through the following company codes:
1. BESTM Farm Machinery
2. BESTM Garden & Forestry Equipments
BESTM Construction company is made up of the following legal units functioning out of USA:
1. BESTM Trucks
2. BESTM Other Construction Equipments
BESTM Drives manages the following legal units:
1. BESTM Drives
2. BESTM Engines
All the company codes, except the ones in India, will have USD as their company code
currency; the ones in India will have INR as the company code currency. All the company codes
will use English as the official language. Each of these company codes will have 4-digit
numerical identifier as indicated in the Table 0.2.
Company Code Company Code ID Country Currency
BESTM Farm Machinery 1110 USA USD
BESTM Garden & Forestry Equipments 1120 USA USD
BESTM Farm Machinery 1210 India INR
BESTM Garden & Forestry Equipments 1220 India INR
BESTM Trucks 2100 USA USD
BESTM Other Construction Equipments 2200 USA USD

25 Case Study
BESTM Drives 3100 USA USD
BESTM Engines 3200 USA USD
Table 0:2 BESTM - Company Codes, Country and Currency
There will be a total of four credit control areas: one each for the companies B2000 (BESTM
Construction) and B3000 (BESTM Drives), and two credit control areas for company B1000
(BESTM Agro). These credit control areas will be denoted by a 4-character numeric identifier.
The details of credit control area, currency etc will be as shown in Table 0.3
Company Company Code Credit Control Area (CCA)
CCA Currency
Default Credit Limit
B1000
1110 1100 USD
10,000 1120
1210 1200 INR
700,000 1220
B2000
2100 2000 USD
20,000 2200
B3000
3100 3000 USD 30,000
3200 Table 0:3 BESTM – Credit Control Areas
Since it has been decided to default some of the credit control data while creating the
customer master records in each of the company codes, a default credit limit has been
mentioned per credit control area as denoted in the table above. BESTM wants the users not
to be allowed to change the default credit control area during document posting.
BESTM group requires several business areas cutting across company codes (Table 0.4) to
report and monitor the operations of different operational areas like agri. tractor business,
agri. equipments, after-sales services, garden equipments etc.
Business Area Business Area Identifier
Agri Tractor Business ATRA
Agri Equipments AEQP
After-sales Service ASER
Garden Equipments GEQP
Forestry Equipments FEQP
Construction Machinery CONM
Drives & Engines DREN
Military Sales MILI
Table 0:4 BESTM – Business Areas

26 Configuring SAP Accounts Receivable & Accounts Payable (SAP S/4HANA Finance)
BESTM group plans to create their own functional areas with easy-to-remember IDs. The
project team shall copy the SAP supplied functional areas into the new ones, like BM20
(Production), BM25 (Consulting/Services), BM30 (Sales & Distribution) and so on. BESTM
wants the project team to configure the system to derive the functional areas automatically.
BESTM requires the following four FM (Financial Management) areas:
• BF11: FM area for USA-based company codes of BESTM Agro
• BF12: FM area for India-based company codes of BESTM Agro
• BF21: FM area for USA-based company codes of BESTM
• BF31: FM area for USA-based company codes of BESTM Drives
BESTM requires the following business segments to be defined for segment reporting. BESTM
wants to have a 10-character alpha-numeric ID segments, with the first three indicating the
company code (say, B11/B12/B13 for company B1000, B21/B22 for company 2000 and so on),
and the last seven characters, a meaningful abbreviation of the segment description.
• B11FMTRACT Farm Tractors
• B12HARCOMB Harvester Combines
• B12FMIMPLE Farm Implements
• B12FORESTY Forestry Equipments
• B13LANTRAC Lawn Tractors
• B13LANMOWR Lawn Mowers
• B13GRDNUTL Garden Utility Vehicles
• B13GOLFSPR Golf and Sports Equipments
• B21LODRDOZ Loaders and Dozers
• B22EXCAVAT Excavators and other Construction Equipments
• B31DRVTRAN Drivetrain Components
• B32GENERAT Generators
• B33INDSENGN Industrial Diesel Engines
• B33MARENGN Marine Engines
BESTM group has decided to have three controlling areas, BESTM Agro (B1000), BESTM
Construction (B2000) and BESTM Drives (B3000) with USD as CO area currency. They will need
to be denoted as B100, B200 and B300 respectively.
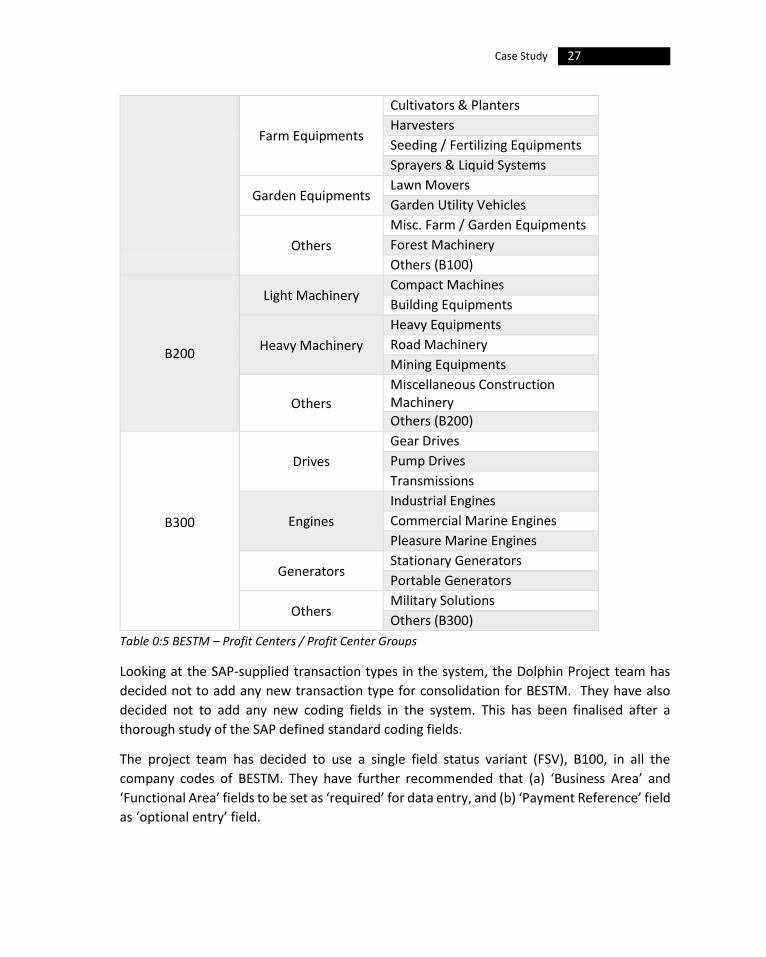
BESTM group has indicated that they need profit centers, defined in such a way, to represent
the actual internal management as in Table 0.5:
Controlling Area Profit Center Group Profit Center
B100 Tractors
Farm Tractors
Lawn Tractors
Speciality Tractors
27 Case Study
Table 0:5 BESTM – Profit Centers / Profit Center Groups
Looking at the SAP-supplied transaction types in the system, the Dolphin Project team has
decided not to add any new transaction type for consolidation for BESTM. They have also
decided not to add any new coding fields in the system. This has been finalised after a
thorough study of the SAP defined standard coding fields.
The project team has decided to use a single field status variant (FSV), B100, in all the
company codes of BESTM. They have further recommended that (a) ‘Business Area’ and
‘Functional Area’ fields to be set as ‘required’ for data entry, and (b) ‘Payment Reference’ field
as ‘optional entry’ field.
Farm Equipments
Cultivators & Planters
Harvesters
Seeding / Fertilizing Equipments
Sprayers & Liquid Systems
Garden Equipments Lawn Movers
Garden Utility Vehicles
Others
Misc. Farm / Garden Equipments
Forest Machinery
Others (B100)
B200
Light Machinery Compact Machines
Building Equipments
Heavy Machinery
Heavy Equipments
Road Machinery
Mining Equipments
Others
Miscellaneous Construction Machinery
Others (B200)
B300
Drives
Gear Drives
Pump Drives
Transmissions
Engines
Industrial Engines
Commercial Marine Engines
Pleasure Marine Engines
Generators Stationary Generators
Portable Generators
Others Military Solutions
Others (B300)

28 Configuring SAP Accounts Receivable & Accounts Payable (SAP S/4HANA Finance)
The team has recommended to use different ledgers to meet the different statutory
requirements of the company codes: (1) BESTM group of companies will use the SAP supplied
standard ledger 0L as their leading ledger and that will meet the International Accounting
Standards (IAS), (2) US-based company codes will use a non-leading ledger (BU) to meet the
local accounting requirements (US GAAP) and (3) India-based company codes will use another
leading ledger (BI) to meet India’s legal reporting (Ind-AS). BESTM management is of the
opinion that the project team combines the leading ledger (0L) and the non-leading ledger
(BU) into a ledger group called B1 as the accounting principles of IAS (0L) and US GAAP (BU)
are the same as there will almost be identical postings to both of these accounting principles.
BESTM wants to leverage the ‘extension edger’ functionality of SAP S/4HANA. Accordingly,
the project team has proposed to define four extension ledgers: one for general purpose, the
other for simulation, the third for prediction & commitment and the fourth for valuation
purposes accounting for valuation differences. In all the cases, BESTM wants manual postings.
BESTM does not want to create new fiscal year variants (FYVs), but shall use the SAP supplied
ones. Accordingly, FYV ‘K4’ will be used for all the US-based company codes and V3 will be
used by India-based company codes. To simplify opening and closing of posting periods in the
system without much complications, it has been decided to define separate posting period
variant (PPV) per company code.
There will be two new charts of accounts defined in the system, BEUS for US-based company
codes and BEIN for India-based company codes. The respective Financial Statement Version
(FSV) will also be created in the same name as that of the chart of accounts. For all the US-
based company codes, both the operative and country chart of accounts will be the same:
BEUS. In the case of India-based company codes, the operative chart of accounts will be BEUS
and the country chart of accounts will be BEIN. A suitable document entry screen variant that
facilitates country-specific processing of withholding tax needs to be used in all the US-based
company codes.
If there is a difference in currency translation due to exchange rate fluctuations during
transaction posting, then, a maximum of 10% has to be allowed as the permitted deviation.
However, this will not be applicable to the tax postings as all the tax items have to be
translated using the exchange rate from the document header. All the US-based company
codes will use a single variant as the workflow variant. It has been decided to allow negative
postings, thereby avoiding inflated trial balance.
BESTM wants to activate Cost of Sales (CoS) accounting, in all the company codes, to
understand the outflow of economic resources engaged in making the company’s revenue. It
has also been decided that suitable configuration to be made to enable drawing up of financial
statements per business area. Further, it has been requested that the system should clear the
foreign currency open items into local currency using the prevailing exchange rate instead of

29 Case Study
using the original exchange rate; any gain/loss arising out of this, needs to be posted to the
designated G/L accounts.
BESTM does not want the system to propose fiscal year during document change or document
display functions, as it expects all the company codes to work with year-independent
document numbers. However, the current date can be defaulted to as the ‘value date’ while
entering the line items in a document.
Since USA makes use of the jurisdiction codes for tax calculation, BESTM wants the tax base
to remain at the jurisdiction code level, for all the US-based company codes. For the company
codes in India, the tax base has to be configured as the net of discount of the invoice amount.
BESTM does not want to define any new document type, and has decided to use the standard
ones. It has also been decided to use the same document type for document reversals. To
restrict the access to the closing operations, BESTM wants to make use of user authorization
through document type CL. To make cross-verification easier, the project team has decided
to make the ‘Reference’ field mandatory for data input for invoice postings and credit memos.
There will be no change in the default document type / posting key for the common
transactions. The posting date = system date, when posting a parked document.
BESTM does not want to define any new posting keys in the system. However, BESTM has
requested to configure the posting keys in such a way that (a) 'Invoice Reference' to be made
mandatory for all payment transactions, (b) 'Payment Reference' is optional for document
reversals and (c) a valid reason to be mandatory for all payment difference postings.
BESTM wants numerical number ranges for all the document types, in all the company codes.
The project team has decided to define a number range 91 (9100000000 to 9199999999) for
document type CL in non-leading ledgers. All the number ranges are to have a validity of 9,999
years, so as to overcome any additional configurations every year.
BESTM management has indicated that it requires two additional tolerance groups, besides
the null tolerance group, to be configured in the system: the tolerance group TGUS will be for
all the US-based company codes, and TGIN for the India-based company codes. It is further
stipulated that these special tolerance groups will have only a handful of employees assigned,
in each company code, to handle special situations and high-value customers / vendors, as
these additional groups will have liberal tolerances in comparison to the null group.
All the employees who are allocated to the tolerance group TGUS will be allowed to post
accounting documents of maximum value USD 999,999,999 per document, with a limit of USD
99,999,999 per open item. However, they can process cash discounts at 5% per line item, with
the system allowing a maximum payment difference of 3%, subject to an absolute maximum
of USD 500. The cash discount adjustment amount will be USD 100.

30 Configuring SAP Accounts Receivable & Accounts Payable (SAP S/4HANA Finance)
As already indicated, the tolerance group TGIN will be for the two India-based company codes
(1210 and 1220). The select employees who are part of this group will be allowed to post
accounting documents of maximum value INR 999,999,999 per document with a limit of INR
99,999,999 per open item. However, they can process cash discounts at 5% per line item, with
the system allowing a maximum payment difference of 3%, subject to an absolute maximum
of INR 5,000. The cash discount adjustment amount will be INR 1,000.
The null tolerance group will be applicable for all the employees, and will be the default
tolerance group for all the company codes of BESTM, both in USA and India:
✓ For all the US-based company codes, this null tolerance group will enable posting of
accounting documents with values not exceeding USD 999,000 per document with a
limit of USD 99,000 per open item. The maximum cash discount allowed is 2% per line
item, and the maximum payment difference is 1%, with an amount cap of USD 50.
The cash discount adjustment limit has to be set at USD 5.
✓ In the case of India-based company codes, the null group enables posting of
accounting documents of value up to INR 1,500,000 per document with the line item
limit of INR 1,000,000. The maximum cash discount allowed will be 2% per line item,
with the maximum allowed payment difference of 1% with an amount cap of INR
1,000. The cash discount adjustment limit will be at INR 100.
BESTM wanted to know if they can go in for the summarization functionality of SAP. However,
the project team, after careful consideration of the current and future data volume for each
of the company codes, has advised the management that this functionality will be useful only
in the case of exceptionally large volume of data, as in the case of – for example – companies
operating in telecommunications, and not for BESTM entities.
BESTM wants to implement the following changes (Table 0.6) to the standard messages:
Message description Changes to be made for
Online processing Batch input processing
Amount is zero - line item will be ignored
Warning (W) Switch off message (-)
Check whether document has already been entered under number & & &
Warning (W) Error (E)
Vendor is subject to withholding tax Note in window (I) Switch off message (-)
Terms of payment changed; Check Warning (W) Warning (W) Table 0:6 BESTM – Standard Messages and Changes Required for BESTM
BESTM has requested to explore the possibility of using validation rules for preventing posting
of documents, based on certain pre-defined account assignment combinations. For example,
they have indicated that for the cost center 11101101 and G/L account 11001099
combination, the validation rule set in the system should reject the posting. Similar
31 Case Study
combinations are to be built in for various cost center-G/L account combinations, as decided
by the FI Manager of various company codes for BESTM. This is to prevent posting with
incorrect account assignment combinations.
To enable auditing and other purposes, BESTM corporate has decided that the documents /
accounts should not be archived until they cross a minimum life of 1000 days (about 3 years),
as it was felt that SAP’s default of 9,999 days may put pressure on system performance.
However, it was clarified, that even after archiving, the documents / accounts need to be
fetched faster from respective archives, at least, for another year (365 days).
The project management team has recommended to make use of standard correspondence
types supplied by SAP. Accordingly, it has been decided not to create any new correspondence
type except a few like SAP01, SAP06 and SAP08 which will be copied into new correspondence
types namely YB01, YB06 and YB08 for use in cross-company code correspondence, for
company codes 2100 and 2200. Also, the project team has recommended using standard print
programs associated with the correspondence types, in all the company codes of BESTM but
use different variants to meet individual company code’s reporting requirements. To make
use of ‘cross-company code correspondence’ functionality in respect of company codes 2100
and 2200, the company code 2100 needs to be designated as the ‘correspondence company
code’ that will manage the correspondence for company code 2200 as well.
The BESTM management has recommended to make use of the standard settings in SAP for
tax calculation and posting, for both India and USA. As regards USA, the team has planned to
take care of the jurisdiction requirement of taxation, by interfacing with the external tax
system, ‘Vertex’. The project team will properly structure the tax jurisdiction code
identification in the SAP system to make it fully compatible with Vertex. The project team,
accordingly, indicated that the tax on sales and purchases, for all the US-based company
codes, is to be calculated at the line item level. Any decision to tax a particular transaction has
to come from Vertex. As the tax calculation is from this external tax application, no user is
required to enter the tax amount in SAP system. If that is not the case, the system needs to
issue a warning, if the tax amount entered by the user is different from the amount calculated
automatically in Vertex. No new tax code will be defined by the project team. The posting
date will be the baseline date, for tax calculation. The tax amounts should be translated using
the exchange rate of the tax base amounts.
The BESTM management has requested the project team to complete the required
configurations settings for extended withholding tax (EWT) in the system. They have
requested the project team to make use of the standard (a) withholding tax keys, (b) reasons
for exemptions and (c) recipient types in the system for EWT. The project team, per
instructions from BESTM management, has decided to configure the message control to be
valid for all users; no separate configuration will be done for individual users. For online
32 Configuring SAP Accounts Receivable & Accounts Payable (SAP S/4HANA Finance)
transactions, the project team will configure message control in such a way to enable the
system to issue warning messages, yet allowing users to correct errors, if any. For batch input
processing, the project team will make use of standard message control settings of SAP, for
all the message numbers relevant for withholding tax processing.
The Dolphin project team has decided to define the following withholding tax types to support
invoice posting:
• 42: 1042 Compensation
• FW: 1099 Federal Withholding Tax
• IN: 1099 Independent Contractor Status
• SW: 1099 State Withholding Tax
• EW: Exempted from WT
BESTM has instructed the project team to make it possible to manually enter the withholding
base amount / tax amount, to provide some flexibility in transaction posting. However, these
fields should not be made as ‘required’ in the relevant field status settings, so as not to hold
up a transaction. The management also indicated that the minimum / maximum amount
settings to be done at the tax code level and not at the tax type level.
BESTM management has informed the project team to define the required withholding tax
types for payment postings relating to government payments (1099-G). Accordingly, the
project team has decided to define two withholding tax types for payment posting: GX -
1099G reporting excluding WT and GN - 1099G reporting including WT. Besides, BESTM made
it clear to the project team that all the company codes will be using the exchange rate of
payment, when translating the withholding tax from foreign currency to a local currency.
BESTM has indicated to the project team to make use of standard default withholding tax
codes relating to 1099-MISC reporting. If any additional tax codes (to comply with 1099-G,
1099-INT etc) are required, BESTM suggested that the project team creates them in
accordance with the reporting requirements in USA, to cover both the federal and state
provisions.
The Dolphin project team has recommended to BESTM management to have separate G/L
accounts (from 21613000 to 21614000), differentiated by withholding tax types. However,
they also indicated that it may not be required to have these accounts separated according
to the tax codes for all the third-party transactions. It has also been recommended to have a
single account (21603000) for self-withholding tax. No explicit withholding tax certificate
numbering is required for withholding tax reporting in USA as the requirement is fulfilled
through TIN, EIN, and SSN numbers.

33 Case Study
The project team has been instructed by the BESTM management to configure only one
retained earnings account for each of the company codes. Accordingly, the G/L account
33000000 has been designated as the retained earnings account (in the chart of accounts
area) of the operative chart of accounts BEUS.
The project team has suggested to the BESTM management to make use of sample accounts
in creating some of the G/L account master records, to facilitate quicker and easier master
data creation. Accordingly, it has been agreed to use sample accounts, in all the company
codes, to create G/L account master records for bank accounts. The project team will create
the required data transfer rules. Two sample rule types (or sample rule variants) will be
created; one for the US-based company codes, and the other for Indian based company codes.
For the rule type for US-based company codes, following data transfer rules will be applicable:
✓ The FSG ‘YB32’ (bank accounts with obligatory value / due dates) set in the sample
account, will be transferred to the newly created G/L account but the users will not
be able to change the values in the newly created G/L accounts. So also, with the field
‘Valuation Group’. However, the fields ‘Exchange Rate Difference Key’, ‘Account
Currency’, ‘Sort Key’ and ‘House Bank’ will be configured in such a way that the non-
blank value in the sample account will be transferred and can be overwritten, after
transfer to the new G/L account master record that is being created.
For the rule type for all the Indian-based company codes, the above data transfer rules will
also apply, except that the reconciliation account (‘Recon. Account for Account Type’) will be
transferred from the sample account which can be changed, if required, after the transfer.
BESTM wants the project team to have thorough validation of all the G/L accounts of the
chart of accounts BEUS, to ensure that (a) the accounts have been properly identified as B/S
or P&L type, (b) the correct functional area has been assigned to them and (c) the account
groups are correct for each of the accounts. Also, the short / long texts need to be properly
modified; for example: instead of ‘Bank1 Main Account’, it should be changed to ‘BoA Main
Account’. Bank 2 should be renamed as ‘Chase’, Bank 3 as ‘Citi’, Bank 4 as ‘PNC’ and so on.
BESTM requires a similar verification be done, in the company code area data as well, to
ensure that the accounts have been correctly identified for open item management, line item
display, balance in local currency etc.
BESTM wants to make use of document splitting functionality for all the company codes, both
in US and India. Accordingly, the project team has suggested the following, which was later
agreed upon with the BESTM management:
✓ The configuration will make use of SAP’s default and standard document splitting
method 0000000012; no new method will be defined. Also, no new item categories,

34 Configuring SAP Accounts Receivable & Accounts Payable (SAP S/4HANA Finance)
document types, business transactions, and business transaction types will be defined
as the project feels that the standard offerings from SAP will be enough to meet all
the document splitting requirements of BESTM company codes. The ‘Business Area’,
‘Profit Center’ and the ‘Segment’ will be used as the document splitting
characteristics, with a zero-balance setting. Additionally, the team will make
appropriate settings for ‘Segment’, as BESTM requires a complete balance sheet, per
segment, for which inaccuracies due to non-assigned postings cannot be tolerated.
The characteristics ‘Order’, ‘Cost Center’ and ‘WBS Element’ need to be used as the
document splitting characteristics for CO. The cash discount that is applied in the
payment of an asset-relevant invoice should be capitalized to the asset.
The BESTM Corporate wants to take care of cross-company code transactions as the company
code 1110 will be the central purchasing organization for all the company codes in US.
Besides, the company code 1120 will make sales of their products through company code
1110 which will act as the merchandiser. A similar scenario was envisaged for India-based
company codes, as well, with regard to the central purchasing by the company code 1210.
The Dolphin Project team has recommended, to the BESTM management, that there is no
need to define any new clearing procedures. They also recommended not to change any of
the default posting keys for these procedures, as tinkering with the standard posting keys may
result in system-wide unforeseen discrepancies.
The project team suggested using a single set of accounts, to take care of automatic posting
of the exchange rate differences realized in clearing open items: for loss it will be 72010000,
and for the gains it will be 72510000. For valuation adjustments, the loss will be posted to
72040000 and the gains to 72540000; B/S adjustments will go to the G/L account 11001099.
The Dolphin Project team has recommended not to go for any additional clearing grouping
criteria. The BESTM management, after some discussion with the project team, requested to
configure four more user-criteria for grouping clearing items for automatic clearing, for more
flexibility: ‘Assignment Number’, ‘Business Area’, ‘Trading Partner’ and ‘Contract Number’ for
customer and vendor, and ‘Segment’ (in the place of ‘Contract Number’) for G/L accounts.
The project team has suggested to configure two separate G/L accounts for posting of clearing
differences: G/L account 52080000 will be configured for debits and 52580000 for credits.
The project team has been advised by the BESTM management to configure three G/L
tolerance groups: a null tolerance group and two special tolerance groups:
a) The null tolerance group will be applicable for all employees, and will be the
default tolerance group for all the company codes of BESTM, both in USA and
India. This will have a tolerance of USD 1 (in absolute terms), with 0.5% as the
35 Case Study
limit for US-based company codes; the absolute limit will be INR 10 and the
percentage limit will be the same at 0.5%, for Indian company codes.
Besides the null tolerance group, there will be two more special tolerance groups defined in
the system: one for US-based company codes, and the other for India-based company codes:
b) BGLU: This will be for the selected employees of US-based company codes
allowing a tolerance of USD 10, in absolute terms, both for debit and credit
transactions; in percentage terms the limit will be 1%.
c) BGLI: This will be for the India-based company codes; the percentage will be the
same at 1%, but the absolute amount in INR will be 100.
In all the three tolerance groups, lower of the absolute amount or percentage will apply.
BESTM has decided to use two different interest indicators, besides the standard. The new
interest indicators will be used for calculating account balance interest on staff loan accounts;
one indicator for US-based company codes and the other for India-based company codes.
BESTM management wants the two new interest indicators with the details as under:
✓ The interest calculation frequency is to be set at six months for the staff loans, for
both India and USA. The Gregorian calendar needs to be used for interest calculations.
The interest settlement should be configured to be on the last day of the month. The
interest needs to be charged on a graduated scale for all the staff loan accounts, for
US-based company codes, at 2% interest up to $10,000; 3% up to $25,000; and 4% in
excess of $25,000; for India, the corresponding figures will be: 8% for loans up to INR
200,000, 9% up to INR 500,000 and 10.5% for above INR 500,000. The interest will
have to be settled when the interest amount calculated is in excess of $10 and INR
100, respectively for US and India-based company codes. The interest needs to be
paid within 10 days of interest posting to the respective accounts. The interest posting
is to be made to the appropriate G/L accounts, one for interest paid (71100000) and
another for interest received (70100000). The system should use the document type
SA for interest posting.
In addition to allowing negative postings in all the company codes of BESTM, the project team
has been asked to configure suitable ‘document reversal reasons’ in the system, to handle the
reversal transactions. It has been clarified to the team that:
• If reversal is happening in the current period, then, the system should allow negative
posting; but, should not allow to change posting date (of the document to be
reversed).
• If reversal is to happen in a closed period, then, following conditions should be met:
36 Configuring SAP Accounts Receivable & Accounts Payable (SAP S/4HANA Finance)
o Negative postings can be allowed, but without altering the posting date (of
the document to be reversed).
o Negative postings cannot be allowed, but the posting date (of the document
to be reversed) can be altered.
BESTM Corporate wants to have single valuation method that will be used worldwide.
However, there needs to be different valuation areas to take care of the different valuation
needs and requirements of each of the accounting principles. Besides, the corporate also
wants to make use of the ‘delta logic’ functionality in foreign currency valuation to ensure
that the system does not execute any reversal postings, for the valuation postings in the
subsequent period. Besides the default account assignment fields for foreign currency
valuation, BESTM wants to include ‘Functional Area’ and ‘Cost Center’ as the additional
account assignments to have more flexibility.
BESTM management has indicated to the project team that they want to set up appropriate
adjustment accounts to post the results of P&L and B/S adjustments, so as to assign line items
to specific account assignment objects like ‘Business Area’, ‘Profit Center’ etc. This is to avoid
posting the adjustment line items to the original accounts.
In closing, for regrouping receivables and payables, BESM wants the configuration team to
stick to the SAP’s standard sort method. The team has been tasked to assign the suitable G/L
accounts as adjustment accounts for this default sort method.
The BESTM management has indicated that they want additional account assignments during
carryforward, in the case of B/S accounts, on ‘Order Number’ and ‘Account Type’, besides the
standard account assignments in the system. In the case of P&L accounts, BESTM does not
want to have any additional account assignments than that of the standard settings.
BESTM management has asked the Dolphin project manager to create a fairly large number
of account groups like sold-to-party (0001), goods recipient (0002), payer (0003), bill to party
(0004), one-time accounts OTA (0099) and consumer (0170). Besides, additional account
groups are to be created, to suitably number the customer accounts that are transferred from
the external system are also be created.
The project team has recommended to the BESTM management, to control the field status
through accounts groups, for both customers and vendors. Accordingly, no new screen layout
settings are to be defined for the company codes (of BESTM) or for transactions. As BESTM
wants its company codes to participate in ‘factoring’, the project team has decided to activate
A/R pledging for each of the company codes, both in USA and India. Also, the field ‘Accts
recble pledging ind.’ is to be set as an ‘optional’ field in the customer account group and the
company code (customers) screen layout.
37 Case Study
BESTM requested the project team create six number ranges from B1 to B5, and B9, for both
customers and vendors, with the specifications that B5 should be used for one-time accounts
(OTA) and B9 for external numbering to accommodate the customer / vendor accounts
transferred from the external systems.
BESTM wants the project team to manage ‘Payment Terms’, ‘Alternate Payer’ and ‘House
Bank’ as the sensitive fields. Accordingly, these fields need to be brought under dual control
to avoid any misuse.
BESTM management has indicated that they want to include additional fields like ‘Alternative
Payer’, ‘House Bank’, ‘Payment Terms’, ‘Reconciliation Account’, ‘Customer Classification’,
‘Payment Block’ and ‘Credit Control Area’ in logging the changes made by users while
changing the customer master records. However, they have indicated that they do not want
to exercise restricting the changes to these fields as such action for some of the fields
(‘Alternative Payer’, ‘House Bank’ and ‘Payment Terms’) are better handled by dual control of
sensitive fields.
The project team has recommended to the BESTM corporate to stick to the line item display
using the ABAP List View (ALV). Also, they have suggested not to define additional fields for
customer / vendor line item display, as that may result in performance issues. Besides, they
are also of the view that no additional settings would be required than the default ones, for
processing open items.
BESTM management has asked the Dolphin project manager to create elaborate account
groups like vendor (0001), goods supplier (0002), alternate payer (0003), invoice presented
by (0004), forwarding agent (0005), special vendor (0010) and one-time vendors (0099)
besides separate account groups to take care of vendor accounts that are transferred from
the external system.
BESTM wants to have a strict control of unauthorized changes to some of the important fields
in vendor master records. Accordingly, they wanted to bring ‘Alternative Payee’, ‘Payment
Block’, Bank Account’, ‘Account with Vendor’ and ‘Tolerance Group’ fields under dual control
by denoting them as ‘sensitive’ fields. Only the supervisor or manager, will have the required
authorization to confirm or reject the changes made to these sensitive fields.
BESTM management wants to include additional fields like ‘Alternative Payee’, ‘House Bank’,
‘Reconciliation Account’, ‘ABC Indicator’, ‘Payment Block’ and ‘Interest Indicator’ in logging
the changes made by users, while changing the vendor master records. However, they have
indicated that they do not want to exercise restricting the changes to these fields as such
action for some of the fields (‘Alternative Payee’, ‘House Bank’ etc) are better handled by dual
control. BESTM wants to go with default settings for parking document entry screens.

38 Configuring SAP Accounts Receivable & Accounts Payable (SAP S/4HANA Finance)
BESTM wants to have separate release approval groups, for customers / vendors, who have
been classified into A, B and C buckets, for parking documents. They want to include fields
like ‘House Bank’, ‘Tolerance Group’, ‘Payment Terms’, ‘Payment Method’, ‘Alternative Payer’
and ‘Payment Block’ to be checked by the system. If any changes are found for these fields,
then, the system should cancel the document release. For vendors, the fields will include
‘Alternate Payee’, ‘Interest Indicator’, ‘House Bank’ and ‘Payment Block’.
BESTM wants to have different set of payment terms for customers and vendors so that if
there is a change that needs to be done for either customer or vendor, then, that can be
carried out without affecting the other. However, there will a single payment term that will
apply for both customers and vendors when the due date is immediate.
• For customers, the three payment terms will cover a credit period of 90 / 60 / 30 days:
1) BC90: 15 Days 3%, 45/2%, 90 Net (there will be a discount of 3% if paid within 15
days, 2% discount for payment within 45 days, and no discount beyond that).
2) BC60: 15 Days 3%, 30/2%, 60 Net.
3) BC30: 15 Days 4%, 30 Net.
• Similar payment terms will be configured for vendors, but the key will be changed to
BV90, BV60 etc.
• A common payment term B001 will also be configured for immediate payment
without any discount, and this can be used for both customers and vendors.
• For instalment payments, BESTM wants the system to be configured with the
payment terms key, BINS. The number of instalments will be three, with the first
instalment at 20%, second at 30% and the third being 50%. All the instalments need
to be paid within a maximum of 30 days, with 4% discount for early birds but within
15days.
• BESTM will be using default payment block reasons and will not require anything new.
BESTM wants to:
• Have a single G/L account (70040000) to manage all cash discounts received.
• Capture the difference between the originally calculated cash discount and the actual
cash discount received, and post that difference, as an expense (discount lost) to a
single G/L account (71040000).
• Use G/L account 44000000 for accounting overpayments / underpayments.
• Configure G/L accounts 72020000 and 72520000 for currency rounding off during
clearing.
• Use G/L accounts 72010000 and 72510000, to handle to handle payment differences
(gain/ loss), when working with alternative currencies for payment.
• Use G/L account 71000000 to take care of posting of vendor bank charges.
39 Case Study
• Enable posting of translation gain/loss for clearing open items in foreign currency, in
all the company codes both US-based and India-based.
BESTM does not want to propose a default blocking key via payment terms, for postings
customer / vendor accounts.
BESTM wants to have two tolerance groups: a strict tolerance group (also known as ‘null
tolerance group’) that will be for most the vendors and a liberal one that will be applied to
specific vendors.
For all the US-based company codes:
• The ‘null tolerance group’ which will be the default, when a vendor is not assigned
with a specific tolerance group. For this tolerance group, the permitted payment
difference will be $50 for gains (1%) and $10 for losses (0.5%), with a maximum
adjustment cash discount being $5. For automatic write-off of payment differences,
the amount and percent values will be $5 and 0.25% respectively, both for revenue
and expense.
• For the specific tolerance group, which will be termed as BEU1, the corresponding
permitted payment difference is $500 for gains (2%) and $250 for losses (1%). The
maximum cash discount that can be adjusted, will be $50. The amount and
percentage values for automatic write-off of payment differences (revenue or
expense) will be $25 and 0.5% respectively.
For all the India-based company codes the tolerance amount, tolerance percentage, and the
cash discount amount that can be adjusted, the amount and percentage for automatic write-
off of payment differences will be the same as that of US company codes but the amount will
be in INR. The corresponding tolerance group will be termed as BEI1.
The project team has suggested to create new reason codes to cover situations like cash
discount period exceeded, cash discount rate not kept to, cash discount deducted for net
terms, discount period exceeded & rate incorrect, calculation error on customer side, debit
paid twice, credit memo paid instead of reduction, credit memo reduced twice etc.
BESTM has indicated that the company code 1110 will need to be configured in such a way
the it can carry out manual payments and other clearing procedures on behalf of company
code 1120. Similarly, the cross-company code manual payments need to be enabled for the
pair of company codes as shown in Table 0.7. Accordingly, the project team has decided to
configure the settings to cover the clearing procedures like incoming payment, outgoing
payment, credit memo and transfer posting with clearing.
40 Configuring SAP Accounts Receivable & Accounts Payable (SAP S/4HANA Finance)
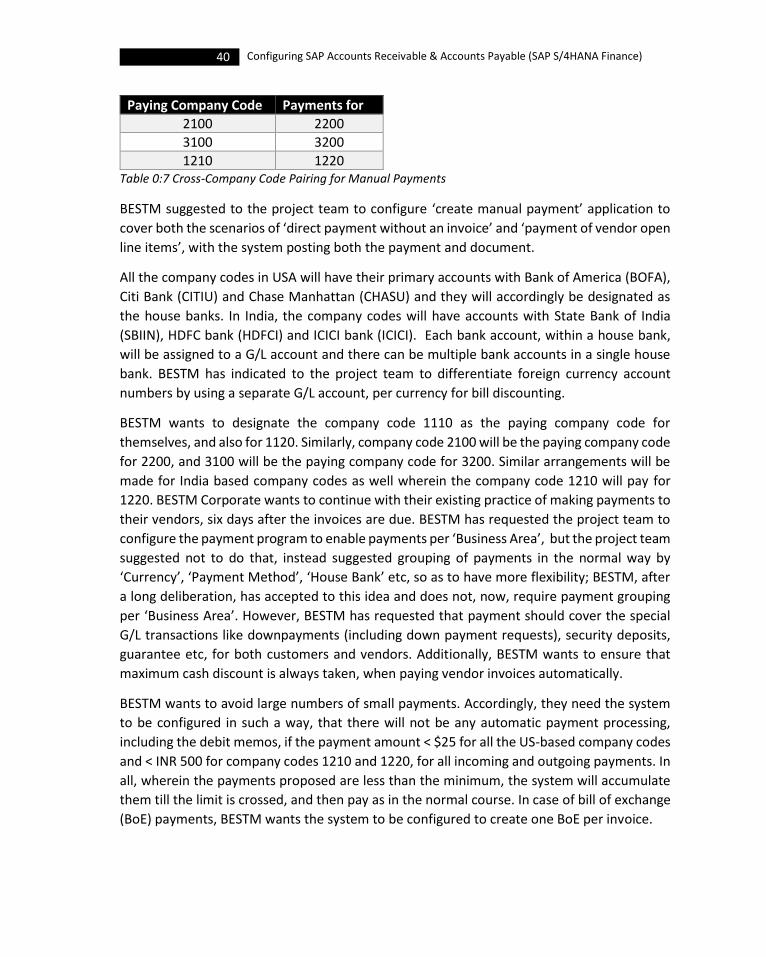
Paying Company Code Payments for
2100 2200
3100 3200
1210 1220 Table 0:7 Cross-Company Code Pairing for Manual Payments
BESTM suggested to the project team to configure ‘create manual payment’ application to
cover both the scenarios of ‘direct payment without an invoice’ and ‘payment of vendor open
line items’, with the system posting both the payment and document.
All the company codes in USA will have their primary accounts with Bank of America (BOFA),
Citi Bank (CITIU) and Chase Manhattan (CHASU) and they will accordingly be designated as
the house banks. In India, the company codes will have accounts with State Bank of India
(SBIIN), HDFC bank (HDFCI) and ICICI bank (ICICI). Each bank account, within a house bank,
will be assigned to a G/L account and there can be multiple bank accounts in a single house
bank. BESTM has indicated to the project team to differentiate foreign currency account
numbers by using a separate G/L account, per currency for bill discounting.
BESTM wants to designate the company code 1110 as the paying company code for
themselves, and also for 1120. Similarly, company code 2100 will be the paying company code
for 2200, and 3100 will be the paying company code for 3200. Similar arrangements will be
made for India based company codes as well wherein the company code 1210 will pay for
1220. BESTM Corporate wants to continue with their existing practice of making payments to
their vendors, six days after the invoices are due. BESTM has requested the project team to
configure the payment program to enable payments per ‘Business Area’, but the project team
suggested not to do that, instead suggested grouping of payments in the normal way by
‘Currency’, ‘Payment Method’, ‘House Bank’ etc, so as to have more flexibility; BESTM, after
a long deliberation, has accepted to this idea and does not, now, require payment grouping
per ‘Business Area’. However, BESTM has requested that payment should cover the special
G/L transactions like downpayments (including down payment requests), security deposits,
guarantee etc, for both customers and vendors. Additionally, BESTM wants to ensure that
maximum cash discount is always taken, when paying vendor invoices automatically.
BESTM wants to avoid large numbers of small payments. Accordingly, they need the system
to be configured in such a way, that there will not be any automatic payment processing,
including the debit memos, if the payment amount < $25 for all the US-based company codes
and < INR 500 for company codes 1210 and 1220, for all incoming and outgoing payments. In
all, wherein the payments proposed are less than the minimum, the system will accumulate
them till the limit is crossed, and then pay as in the normal course. In case of bill of exchange
(BoE) payments, BESTM wants the system to be configured to create one BoE per invoice.
41 Case Study
BESTM wants does not want to define any new payment method. Instead, they have indicated
that, they will go ahead using the default payment methods that have been configured in the
standard system, for both USA and India.
As regards payments through automatic payment program, BESTM wants to have the system
configured to reflect the following:
• All the line items that are due on a particular date, should be grouped and paid in a
single payment. If line items are associated with a payment method explicitly, then,
the system should pay those items; else, if the payment method is not specified
explicitly in the line item, and if the system selects the payment method
automatically, then, several items can be paid together. The ‘extended individual
payment’ should be activated to make it possible to include and offset all available
credit memos for a payment group. For payment methods like bank transfer, the
system should make payments abroad, using the business partners’ banks in their
respective countries. The system should be able to make payments - for all payment
methods - in other currencies, other than the company code currency. BESTM wants
bank optimization using their own house banks and business partners’ banks so as to
optimize international payments.
• As regards payments, if the payment method is check, then, all in-country payments
should not be less than $25 (for US-based company codes) and INR 500 for Indian
company codes. If the payment is more than $5,000 (or INR 250,000) then, it has to
be made through bank transfer or direct debit. For direct debit, bank transfer or card
payment, there is no lower limit for payment. In cases of composite payments, BESTM
wants the system to split the payment by grouping the invoices, with the appropriate
credit memos, for payments exceeding $10,000 in the case of US-based company
codes (or INR 500,000 for all the India-based company codes), for all the allowed
payment methods, for both domestic and international payments.
• The BESTM Corporate has indicated to the project team that Bank of America will be
the primary bank for all the payment methods, followed by Chase Manhattan and Citi
Bank, in that ranking order. It has been envisaged to provide an amount limit of
$9,999,999,999 for Bank of America for facilitating automatic payment transactions
(outgoing payments). The limit for the other two banks would be $999,999,999, in
each case. In the case of incoming payments, there should not be any limit restriction.
The value date should be 1 day after, for all the payments through electronic format;
however, it would be 3 days after, for all the checks denominated in local currency.
For house banks in India, the limits will be the same but denominated in INR.
• The project team has suggested not to go in for any additional search fields for
payments (and line item display) as the standard fields are sufficient to be used as the
42 Configuring SAP Accounts Receivable & Accounts Payable (SAP S/4HANA Finance)
criteria for maintaining proposal run, besides displaying the payment proposal /
payment run.
BESTM wants to configure the system to take care of payment through payment cards as well.
In the process, it has been outlined, that the system needs to be configured to retain the
customer line items in FI department, during transfer of payment card data from SD
department. This decision has been taken, consciously, after several deliberations knowing
fully well that this will call for more database space; BESTM is ok with this, as the configuration
will provide (a) the advantage of displaying the receivables on the debit side and (b) the ability
to the department personnel to deal with any settlement problems of the payment cards.
The Dolphin project team has suggested to configure six dunning block reasons in the system:
disputed (A), promised to pay (B), clarification required from SD side (C), blocked by legal
department (D), other reasons (E) and blocked by invoice verification (R).
The project team has suggested to copy and adapt the SAPScript forms provided by SAP to
meet dunning needs of BESTM group of company codes. Accordingly, there will be five forms
that will be created anew by copying the standard ones: the form F150_BE_DUNN_01
(without interest) will be copied as ZF150_BE_DUNN_01 and will be used both for the single-
level dunning procedure and also for the first dunning level of the 5-level dunning procedure.
The standard form F150_BE_DUNN_02 (with interest) will be copied to create the other four
levels for the 5-level procedure. Also, separate spool lists will be created by copying the
standard LIST1S spool list, and five new spool lists will be created, prefixed with the company
code name like 1110-1, 1110-2 etc.
The BESTM management has decided to have two dunning procedures, in each of the
countries (USA and India) where the company is operating:
1. A dunning procedure that will be used to remind the VIP business partners, which will
be single level dunning procedure. This will just be a ‘payment reminder’ and there
will not be any charges / interest associated with this dunning.
2. The multi-level dunning procedure will be used for all other business partners. This
will have a maximum of 5 dunning levels, with a dunning interval of 7 days. There
needs to be a cushion of three days for dunning levels 2 and 3, and five days for levels
4 and 5. Also, there will be a grace period of five days at the account level. Further, if
the due date falls on a holiday, the dunning program should take the next working
day as payment due date based on respective country’s public calendar. The dunning
charges, for the multi-level dunning procedure, will be as in the Table 0.8:
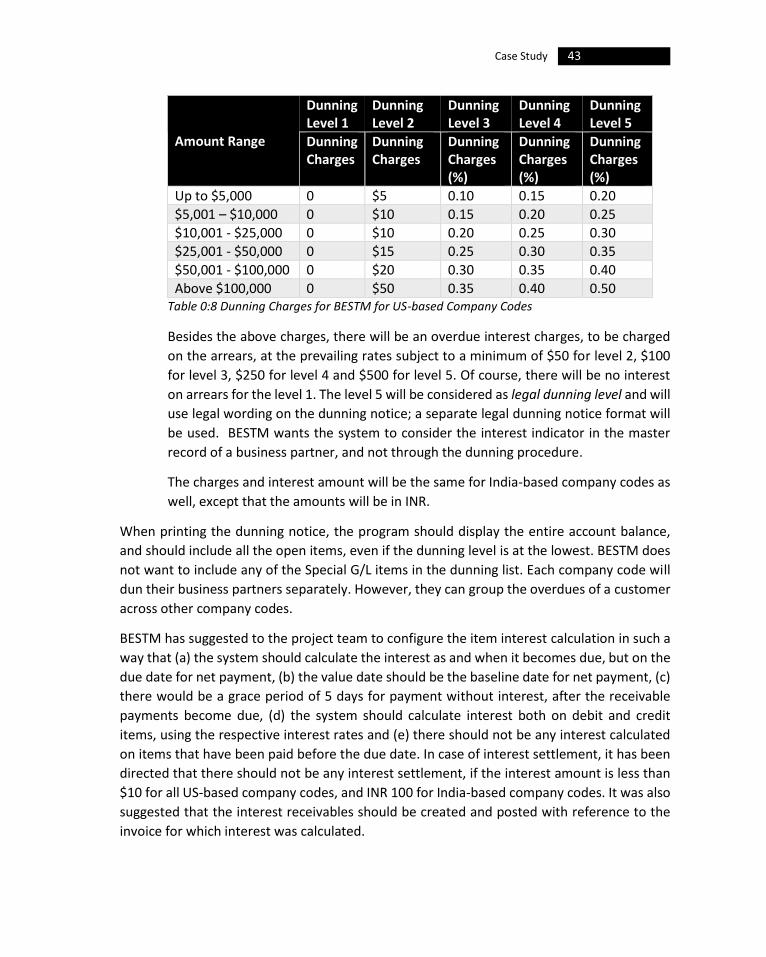
43 Case Study
Amount Range
Dunning Level 1
Dunning Level 2
Dunning Level 3
Dunning Level 4
Dunning Level 5
Dunning Charges
Dunning Charges
Dunning Charges (%)
Dunning Charges (%)
Dunning Charges (%)
Up to $5,000 0 $5 0.10 0.15 0.20
$5,001 – $10,000 0 $10 0.15 0.20 0.25
$10,001 - $25,000 0 $10 0.20 0.25 0.30
$25,001 - $50,000 0 $15 0.25 0.30 0.35
$50,001 - $100,000 0 $20 0.30 0.35 0.40
Above $100,000 0 $50 0.35 0.40 0.50 Table 0:8 Dunning Charges for BESTM for US-based Company Codes
Besides the above charges, there will be an overdue interest charges, to be charged
on the arrears, at the prevailing rates subject to a minimum of $50 for level 2, $100
for level 3, $250 for level 4 and $500 for level 5. Of course, there will be no interest
on arrears for the level 1. The level 5 will be considered as legal dunning level and will
use legal wording on the dunning notice; a separate legal dunning notice format will
be used. BESTM wants the system to consider the interest indicator in the master
record of a business partner, and not through the dunning procedure.
The charges and interest amount will be the same for India-based company codes as
well, except that the amounts will be in INR.
When printing the dunning notice, the program should display the entire account balance,
and should include all the open items, even if the dunning level is at the lowest. BESTM does
not want to include any of the Special G/L items in the dunning list. Each company code will
dun their business partners separately. However, they can group the overdues of a customer
across other company codes.
BESTM has suggested to the project team to configure the item interest calculation in such a
way that (a) the system should calculate the interest as and when it becomes due, but on the
due date for net payment, (b) the value date should be the baseline date for net payment, (c)
there would be a grace period of 5 days for payment without interest, after the receivable
payments become due, (d) the system should calculate interest both on debit and credit
items, using the respective interest rates and (e) there should not be any interest calculated
on items that have been paid before the due date. In case of interest settlement, it has been
directed that there should not be any interest settlement, if the interest amount is less than
$10 for all US-based company codes, and INR 100 for India-based company codes. It was also
suggested that the interest receivables should be created and posted with reference to the
invoice for which interest was calculated.
44 Configuring SAP Accounts Receivable & Accounts Payable (SAP S/4HANA Finance)
Note that this is not a complete case study, but relates to the portions that are required
for configuring SAP Accounts Receivable and Accounts Payable. Also, there are portions
relating to FI enterprise structure, FI global settings and company code global parameters,
that are included in this Chapter, to provide the necessary background for the discussion. For
the full case study of Project Dolphin, you may refer to the other book ‘Configuring SAP
Financial Accounting – Vol. II: SAP S/4HANA Finance’
(https://www.amazon.com/dp/B08CXPWH4B) that is available both as Amazon Paperback
and Kindle editions.
1 Accounts Receivable and Accounts Payable
ully integrated with the SAP General Ledger Accounting (SAP G/L), the accounts
receivable (FI-A/R) and accounts payable (FI-A/P) components of SAP help in dealing
with your customers and vendors, respectively, for managing the amounts that your
business would receive from (customers) and pay to (vendors). Besides SAP G/L, these
modules are also integrated with SAP-SD, SAP-MM and FI-AA. These components help in
managing the master data (of customers and vendors) and the various business transactions
associated with the receivable and payable.
Allowing you to record and manage accounts receivable data of all customers, the ‘Accounts
Receivable’(FI-A/R) component, takes care of all postings to A/R that are triggered in response
to operative transactions in sales and logistics, besides updating the FI-G/L simultaneously. It
updates different G/L accounts such as receivables, down payments, bills of exchange etc.,
depending on the transaction involved. It also clears customer line items with the incoming
payments. With the functionality, you (a) can monitor open items by using, for example, due
date lists and a flexible dunning function, (b) can adjust the correspondence forms, payment
notices, balance confirmations, account statements, interest calculations etc., to suit your
requirements, and (c) can assign incoming payments to receivables due. With its wide range
of tools, you can evaluate balance lists, journals, balance audit trails and other standard
reports.
The key features of FI-A/R are outlined in Table 1.1:
Key Feature Details
Master data
You can manage and store your customer data as business partner data. You can create and change customer data using the business partner, so that you do changes, for example, in address data, only once.
Monitoring of receivables Besides displaying overdue receivables and customer balances, you can process individual customer items.
Posting business transactions
You can post accounting data for customers in A/R and the data entered is transferred to G/L which is updated
F
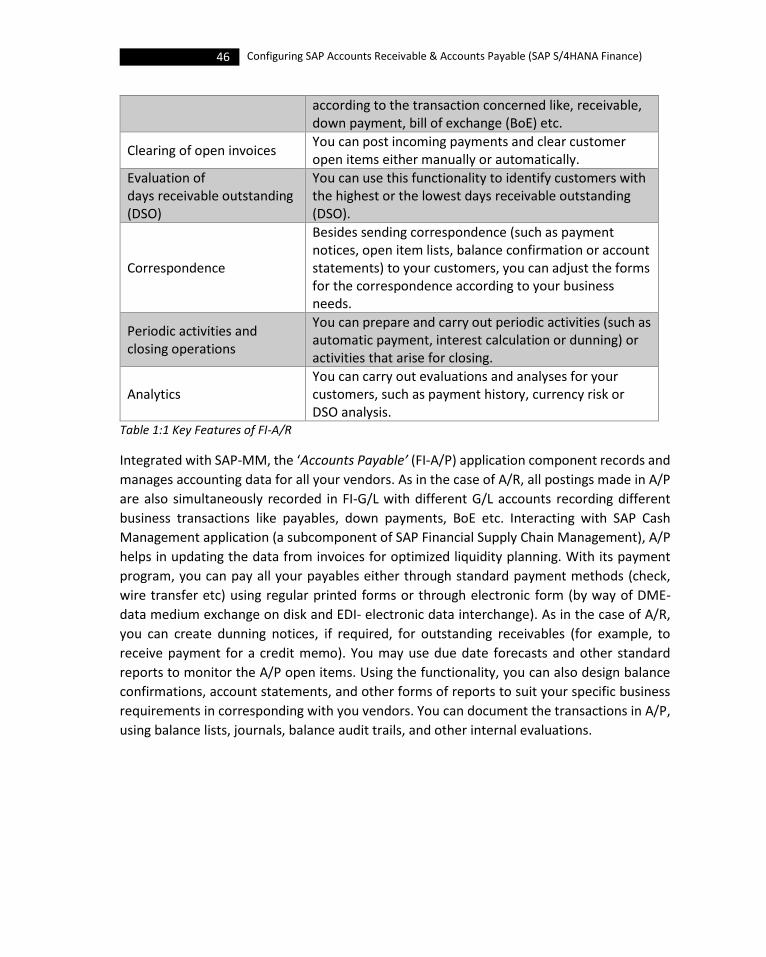
46 Configuring SAP Accounts Receivable & Accounts Payable (SAP S/4HANA Finance)
according to the transaction concerned like, receivable, down payment, bill of exchange (BoE) etc.
Clearing of open invoices You can post incoming payments and clear customer open items either manually or automatically.
Evaluation of days receivable outstanding (DSO)
You can use this functionality to identify customers with the highest or the lowest days receivable outstanding (DSO).
Correspondence
Besides sending correspondence (such as payment notices, open item lists, balance confirmation or account statements) to your customers, you can adjust the forms for the correspondence according to your business needs.
Periodic activities and closing operations
You can prepare and carry out periodic activities (such as automatic payment, interest calculation or dunning) or activities that arise for closing.
Analytics You can carry out evaluations and analyses for your customers, such as payment history, currency risk or DSO analysis.
Table 1:1 Key Features of FI-A/R
Integrated with SAP-MM, the ‘Accounts Payable’ (FI-A/P) application component records and
manages accounting data for all your vendors. As in the case of A/R, all postings made in A/P
are also simultaneously recorded in FI-G/L with different G/L accounts recording different
business transactions like payables, down payments, BoE etc. Interacting with SAP Cash
Management application (a subcomponent of SAP Financial Supply Chain Management), A/P
helps in updating the data from invoices for optimized liquidity planning. With its payment
program, you can pay all your payables either through standard payment methods (check,
wire transfer etc) using regular printed forms or through electronic form (by way of DME-
data medium exchange on disk and EDI- electronic data interchange). As in the case of A/R,
you can create dunning notices, if required, for outstanding receivables (for example, to
receive payment for a credit memo). You may use due date forecasts and other standard
reports to monitor the A/P open items. Using the functionality, you can also design balance
confirmations, account statements, and other forms of reports to suit your specific business
requirements in corresponding with you vendors. You can document the transactions in A/P,
using balance lists, journals, balance audit trails, and other internal evaluations.
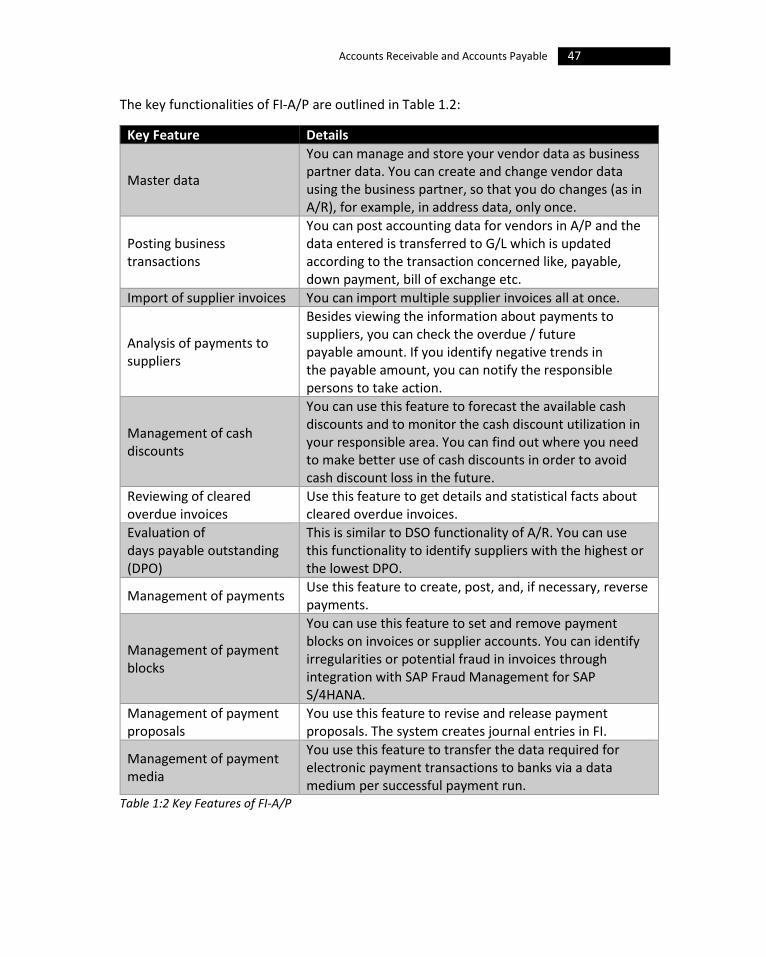
47 Accounts Receivable and Accounts Payable
The key functionalities of FI-A/P are outlined in Table 1.2:
Key Feature Details
Master data
You can manage and store your vendor data as business partner data. You can create and change vendor data using the business partner, so that you do changes (as in A/R), for example, in address data, only once.
Posting business transactions
You can post accounting data for vendors in A/P and the data entered is transferred to G/L which is updated according to the transaction concerned like, payable, down payment, bill of exchange etc.
Import of supplier invoices You can import multiple supplier invoices all at once.
Analysis of payments to suppliers
Besides viewing the information about payments to suppliers, you can check the overdue / future payable amount. If you identify negative trends in the payable amount, you can notify the responsible persons to take action.
Management of cash discounts
You can use this feature to forecast the available cash discounts and to monitor the cash discount utilization in your responsible area. You can find out where you need to make better use of cash discounts in order to avoid cash discount loss in the future.
Reviewing of cleared overdue invoices
Use this feature to get details and statistical facts about cleared overdue invoices.
Evaluation of days payable outstanding (DPO)
This is similar to DSO functionality of A/R. You can use this functionality to identify suppliers with the highest or the lowest DPO.
Management of payments Use this feature to create, post, and, if necessary, reverse payments.
Management of payment blocks
You can use this feature to set and remove payment blocks on invoices or supplier accounts. You can identify irregularities or potential fraud in invoices through integration with SAP Fraud Management for SAP S/4HANA.
Management of payment proposals
You use this feature to revise and release payment proposals. The system creates journal entries in FI.
Management of payment media
You use this feature to transfer the data required for electronic payment transactions to banks via a data medium per successful payment run.
Table 1:2 Key Features of FI-A/P
48 Configuring SAP Accounts Receivable & Accounts Payable (SAP S/4HANA Finance)
To be co-deployed with SAP S/4HANA, ‘SAP Fraud Management for SAP S/4HANA’ is not
part of SAP S/4HANA Enterprise Management, but part of the add-on ‘SAP Assurance and
Compliance Software’ for SAP S/4HANA, for which you need a separate license.
In this Chapter, we will discuss:
• Customer Accounts
• Vendor Accounts
• Incoming Invoices/Credit Memos
• Release for Payment
• Outgoing Payments
• Outgoing Invoices/Credit Memos
• Incoming Payments
• Payments with Payment Cards
• Dunning
• Open Item Clearing
• Down Payment Received
• Down Payment Made
• Adjustment Posting/Reversal
• Interest Calculation
• Closing
• Information System
• Apps for FI-A/R & A/P
This completes our discussion on the overview of a SAP Accounts Receivable and Accounts Payable.
1.1 Conclusion
In this Chapter, you saw on overview of SAP Accounts Receivable (FI-A/R) and Accounts
Payable (FI-A/P) modules. You understood that, fully integrated with the SAP General Ledger
Accounting (SAP G/L), the FI-A/R and FI-A/P components help in dealing with your customers
and vendors for managing the amounts that your business would receive from (customers)
and pay to (vendors). Besides SAP G/L, you understood that these modules are also integrated
with SAP-SD, SAP-MM and FI-AA.
Let us start with the customer accounts, first, in the next Chapter.
2 Customer Accounts
nder customer accounts, we shall discuss the configuration settings relating to master data, line items and balances. Let us, first, understand the settings and the preparations that are required, before you can create a customer master data.
2.1 Master Data
As all transactions in SAP are posted to and managed in accounts. You need to create one master record for each customer account that you require in the system. Both the financial accounting (FI-A/R) and the sales (SAP SD) departments of your organization use the same master records. By creating and storing customer master data centrally, you enable their access throughout the organization, and this avoids (a) the need to enter the same information more than once and (b) the inconsistencies in master data that may creep in if not maintained centrally. If the address of one of your customers changes, for example, you have to enter this change only once; your accounting and sales departments will always have the updated details.
You should have implemented the SAP Sales and Distribution (SAP SD) application component in order to enter / process customer master records for processing the sales related business transactions.
A customer can be a person (individual), an organization or a group. A typical customer master data is made up of four areas (segments) as shown in Figure 2.1:
• General Data
• Company Code Data (FI area)
• Sales and Distribution Data (SD area)
• ETM Data
The ‘general data’ such as the information relating to address, control data, payment transactions, status etc., will be at the Client level and hence is valid across all the company codes. The ‘company code data’ (account management, payment transactions, insurance, correspondence etc) is valid only for the specific company code in which the customer has been created. The ‘sales and distribution data’ is made up of information relating to sales area (sales organization, distribution channel and division), shipping, orders, billing, customer texts, billing partner functions, documents, additional data etc., and will be valid across sales areas. The ‘ETM data’ contains the industry specific equipment and tools data for customers.
U

50 Configuring SAP Accounts Receivable & Accounts Payable (SAP S/4HANA Finance)
Figure 2.1 Customer Master Data Areas
The ETM (Equipment and Tools Management) data is used, basically, in engineering and construction industry, and it deals with optimal process flow in enterprise areas of (construction) companies or equipment rental companies etc., for planning, processing, settlement and evaluation of resources (materials and equipment). To use ETM, you should have implemented the SAP application components like Sales and Distribution (SD), Plant Maintenance (PM), Financial Accounting (FI) and Controlling (CO). It is also advisable to use the other SAP application components like Asset Accounting (AA) and Project System (PS).
The specifications that you make in a customer master record are used (a) as default values when you post items to the account (for example, the terms of payment you specify in the master record are defaulted for document entry), (b) for processing business transactions like dunning for which the date of the last dunning notice and the address are required for the automatic dunning process, (c) for working with master records so as to, for example, prevent unauthorized users (through appropriate authorization groups) from accessing an account, (d) for communication with the customer using the address details and (e) in the sales department for order processing, shipping, and billing.
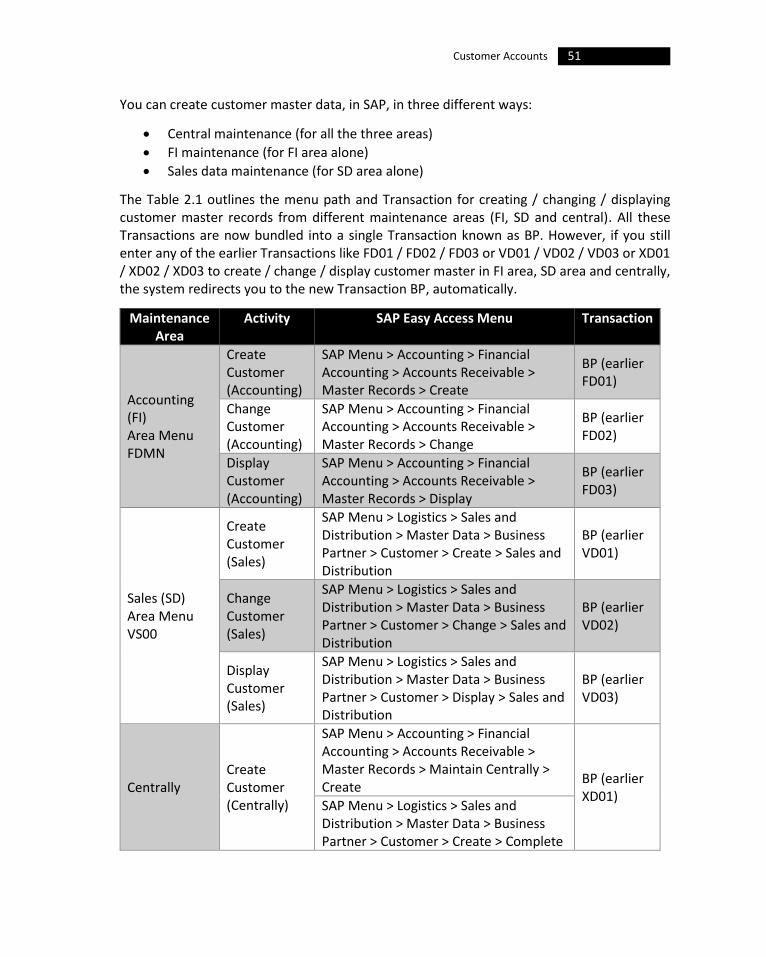
51 Customer Accounts
You can create customer master data, in SAP, in three different ways:
• Central maintenance (for all the three areas)
• FI maintenance (for FI area alone)
• Sales data maintenance (for SD area alone)
The Table 2.1 outlines the menu path and Transaction for creating / changing / displaying customer master records from different maintenance areas (FI, SD and central). All these Transactions are now bundled into a single Transaction known as BP. However, if you still enter any of the earlier Transactions like FD01 / FD02 / FD03 or VD01 / VD02 / VD03 or XD01 / XD02 / XD03 to create / change / display customer master in FI area, SD area and centrally, the system redirects you to the new Transaction BP, automatically.
Maintenance Area
Activity SAP Easy Access Menu Transaction
Accounting (FI) Area Menu FDMN
Create Customer (Accounting)
SAP Menu > Accounting > Financial Accounting > Accounts Receivable > Master Records > Create
BP (earlier FD01)
Change Customer (Accounting)
SAP Menu > Accounting > Financial Accounting > Accounts Receivable > Master Records > Change
BP (earlier FD02)
Display Customer (Accounting)
SAP Menu > Accounting > Financial Accounting > Accounts Receivable > Master Records > Display
BP (earlier FD03)
Sales (SD) Area Menu VS00
Create Customer (Sales)
SAP Menu > Logistics > Sales and Distribution > Master Data > Business Partner > Customer > Create > Sales and Distribution
BP (earlier VD01)
Change Customer (Sales)
SAP Menu > Logistics > Sales and Distribution > Master Data > Business Partner > Customer > Change > Sales and Distribution
BP (earlier VD02)
Display Customer (Sales)
SAP Menu > Logistics > Sales and Distribution > Master Data > Business Partner > Customer > Display > Sales and Distribution
BP (earlier VD03)
Centrally Create Customer (Centrally)
SAP Menu > Accounting > Financial Accounting > Accounts Receivable > Master Records > Maintain Centrally > Create
BP (earlier XD01)
SAP Menu > Logistics > Sales and Distribution > Master Data > Business Partner > Customer > Create > Complete

52 Configuring SAP Accounts Receivable & Accounts Payable (SAP S/4HANA Finance)
Change Customer (Centrally)
SAP Menu > Accounting > Financial Accounting > Accounts Receivable > Master Records > Maintain Centrally > Change BP (earlier
XD02) SAP Menu > Logistics > Sales and Distribution > Master Data > Business Partner > Customer > Change > Complete
Display Customer (Centrally)
SAP Menu > Accounting > Financial Accounting > Accounts Receivable > Master Records > Maintain Centrally > Display
BP (earlier XD03)
SAP Menu > Logistics > Sales and Distribution > Master Data > Business Partner > Customer > Display > Complete
Table 2:1 Customer Master Maintenance
In some companies, the accounting (FI) and sales (SD) departments maintain the general data together and their own FI and Sales areas separately. In other companies, customer master records are maintained centrally (for all the areas).
2.1.1 Preparations for Creating Customer Master Data
There are certain pre-requisites - like defining number ranges, creating customer account groups and maintaining field status - which you need to complete before you create master data for your customers:
• Define Number Ranges: As in G/L account master records, you need to have appropriate number ranges defined for the customer master records for the system to allocate a suitable number from a number range when creating a master record. In doing so, you also determine if the numbers are to be assigned internally by the system or to be supplied by the user who is creating the master record.
Pay attention in doing this exercise by taking into account the current number of existing customers and the expected increase of new customers in future, and define the number range intervals accordingly, so that you do not run out of numbers midcourse.
• Create Account Groups: You are already aware that an account group is used to control the creation of master records as it determines which fields have to be filled compulsorily (mandatory) and which ones can be optionally filled when creating the master record, besides allocating a number (external or internal) to the master

53 Customer Accounts
record. You normally create the master records using the same account group, if the accounts require the same master record fields and use the same number range. You will be creating customer master records, by entering the account group in the initial screen. In FI, once a customer account is created, its account group cannot be changed. However, when using partner functions in SD, in some cases, the account group of a customer can be changed from, say, ‘ship-to address’ to an ‘ordering address’.
The number of account groups which you need depends on whether you use these groups for the layout of the screens. For example, you may want two account groups: one group for ‘standard accounts’ and another for ‘one-time accounts’. The other consideration should be the number ranges. The number of ‘number ranges’ will give you an initial clue as to the number of account groups. If you have determined that you require five number ranges, for example, then, you must create at least five account groups. There should at least be one account group in the system.
• Maintain Field Status: You are aware that the field status definitions determine the status of the fields on the screens for the master data. Though by default all the fields would be ‘suppressed’, the field status can be (a) optional - field visible, enabled for input but entry not mandatory, (b) required - field visible, enabled for input, entry mandatory and (c) suppressed - field invisible, hidden from display, no entry is possible. The field status is normally determined based on the account group. However, you may also determine the field status depending upon the processing type (transaction) with which you create the master record, and based on the company code in which you define the master record. It is also possible to vary the field status based on a posting key for a transaction. If there is a conflicting situation to arrive at the final field status, you already know that SAP follows the ‘link rules’ to overcome the situation.
Let us start with the first activity of defining the account groups.
2.1.1.1 Define Account Groups with Screen Layout (Customers)
Use this step to create the accounts groups that you will require for creating the master records of your customers. While defining the account groups, specify - per account group - the number range interval for the account numbers, the type of number assignment (external or internal), whether it is a one-time account and the field status. You can also define ‘reference account groups’ for one-time accounts, and use them to control the field status of the one-time account screen. When creating a one-time customer account, specify an account group: if not, all fields of the one-time account screen are ready for input during document entry.

54 Configuring SAP Accounts Receivable & Accounts Payable (SAP S/4HANA Finance)
If you create new account groups, do not forget to maintain the field status; else, all corresponding fields are shown. Always control the field status via the account groups; however, in exceptional cases, you may control the field status either via company code (refer Section 2.1.1.2) or transaction (refer Section 2.1.1.3).
As in the case of G/L account groups, (a) you can delete an account group, from the system, only if there are no master records referencing that account group; else, you cannot display or change the master record; (b) if you hide a field at a later stage in which you had already made an entry, the field contents are still valid; and (c) you can increase the upper limit of the number interval as long as there is no other overlapping interval.
Do not attempt to allocate the accounts to accounting clerks via the account groups or group customers together according to countries. Do this via special master record fields.
You can have several customer account groups like sold-to-party (0001), goods recipient (0002), payer (0003), bill to party (0004), one-time accounts OTA (0099), consumer (0170) and so on or create fewer number of account groups like domestic customers, export customers, one-time customers etc.
Project Dolphin
BESTM management has asked the Dolphin project manager to create a fairly large number of account groups like sold-to-party (0001), goods recipient (0002), payer (0003), bill to party (0004), one-time accounts OTA (0099) and consumer (0170). Besides, additional account groups are to be created, to suitably number the customer accounts that are transferred from the external system.
The project team has recommended to the BESTM management, to control the field status through accounts groups. Accordingly, no new screen layout settings are to be defined for the company codes (of BESTM) or for transactions. However, as BESTM wants its company codes to participate in ‘Factoring’, necessary field status needs to be configured: the field ‘Accts recble pledging ind.’ is to be set as an ‘optional’ field in the customer account group and the company code (customers) screen layout.
Use the menu path: SAP Customizing Implementation Guide > Financial Accounting > Accounts Receivable and Accounts Payable > Customer Accounts > Master Data > Preparations for Creating Customer Master Data > Define Account Groups with Screen Layout (Customers), to create new account groups. You may also use Transaction OBD2:

55 Customer Accounts
i. On the resulting screen, click on ‘New Entries’ to create a new account group (Figure 2.2), and enter a 4-character identifier for the new ‘Account Group’, say 001B.
Figure 2.2 Customer Account Group - New
ii. Under ‘General Data’, enter an explanation for the group in the ‘Meaning’ field, select ‘One-Time Account’ check-box if the account group is for creating one-time accounts, and enter a suitable output determination procedure (DB0001, DB0002 etc), if required, in ‘Output determ.proc.’ field.
The ‘Output determ.proc.’ field defines the output categories (for example, order confirmation and electronic mail message) that are allowed in a document, and the sequence in which the output categories appear in the document.
iii. Now, to manage the field status, place the cursor on ‘General data’, or Company code data’ or ‘Sales data’ under ‘Field status’ block and click on ‘Expand Field Status’. For example, as we need to ensure that the accounts receivable pledging indicator (‘Accts recble pledging ind.’) field is configured with ‘optional entry’ field status, for BESTM, double-click on ‘Company Code Data’ under ‘Field Status’ on the initial screen, double-click on ‘Payment transactions’ group on the next screen and ensure that the radio-button for ‘Accts recble pledging ind.’ is selected under ‘Opt. entry’ field status column (Figure 2.3).
iv. You can, similarly, maintain any other field statuses, as required.

56 Configuring SAP Accounts Receivable & Accounts Payable (SAP S/4HANA Finance)
Figure 2.3 Making AR Pledging Indicator Field as Optional
v. Once done, ‘Save’ the settings, and create/change other account groups, accordingly. Now you have created the required account groups (Figure 2.4) with the required field status, for BESTM.
Figure 2.4 Customer Account Groups for BESTM

57 Customer Accounts
Let us move on to the next step of defining the screen layout per company code, for customer accounts.
2.1.1.2 Define Screen Layout per Company Code (Customers)
As already stated, you should try to control, as for as possible, the field status via the account groups. However, in exceptional cases, you may define company-code specific field status, for example, if the company codes are in different countries or some company codes do not use automatic payment processing for customers.
Use the menu path: SAP Customizing Implementation Guide > Financial Accounting > Accounts Receivable and Accounts Payable > Customer Accounts > Master Data > Preparations for Creating Customer Master Data > Define Screen Layout per Company Code (Customers), to define the necessary settings if fields are to have an alternative status depending on the company code. Once you are into the Transaction, specify the company code and determine the status of the fields as required. In the process, you can determine, depending on the company code, which company code-dependent master record fields (a) are ready for input, (b) require an entry and (c) are hidden. This specification is linked (via ‘link rules’) to the field status of the account group and a specification for the transaction. By the linkage, you can see which status the fields have on the entry screen for master data: the fields take on the status which has the highest priority: ‘hiding’ a field has the highest priority, followed by ‘display’, ‘required’ and ‘optional’ in that order.
In the standard system, you will see default settings that are valid for all the company codes as denoted by ‘*’ in the ‘Company Code’ field (Figure 2.5). You may create new settings by clicking on ‘New Entries’ for specific company codes, or use the default settings as such or with some modifications. As we need to ensure that the ‘Accts recble pledging ind.’ field is managed as ‘optional entry’ for all the company codes of BESTM, double-click on the ‘Company Code’ row with ‘*’, double-click on ‘Payment transactions’ on the next screen and ensure that this field is set to the ‘optional entry’ field status.
Figure 2.5 Defining Screen Layout per Company Code
Since all the company codes of BESTM needs to participate in factoring, you need to make
sure that the field ‘Accts recble pledging ind.’ is set to ‘optional entry’ field status.
Let us, now, see how to configure the field status settings per activity (transaction).
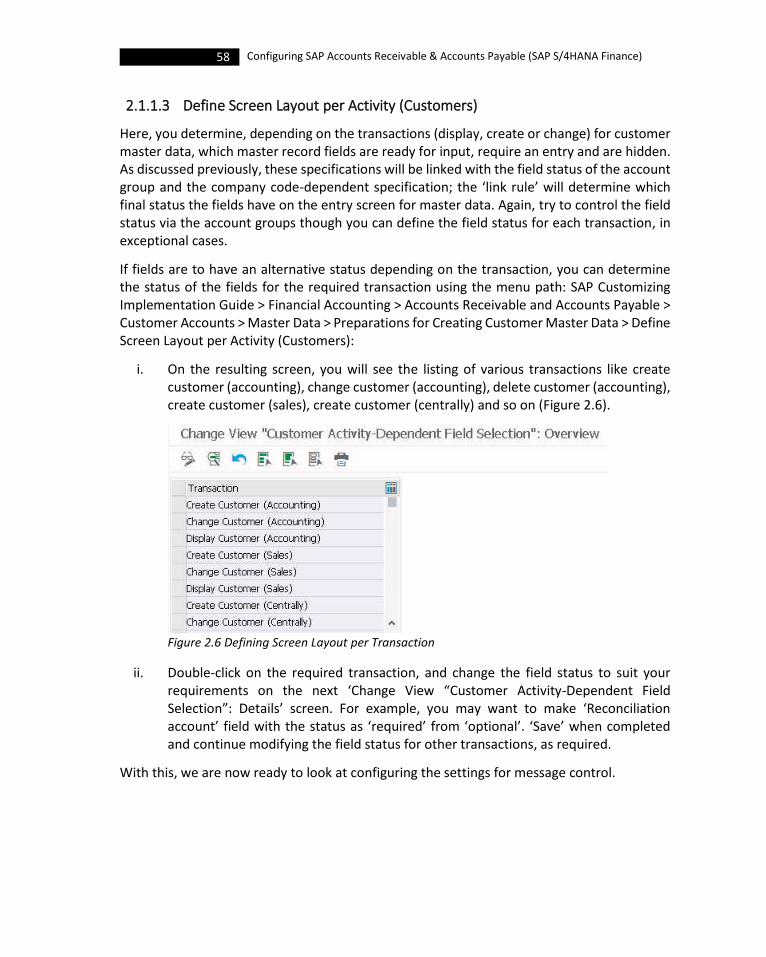
58 Configuring SAP Accounts Receivable & Accounts Payable (SAP S/4HANA Finance)
2.1.1.3 Define Screen Layout per Activity (Customers)
Here, you determine, depending on the transactions (display, create or change) for customer master data, which master record fields are ready for input, require an entry and are hidden. As discussed previously, these specifications will be linked with the field status of the account group and the company code-dependent specification; the ‘link rule’ will determine which final status the fields have on the entry screen for master data. Again, try to control the field status via the account groups though you can define the field status for each transaction, in exceptional cases.
If fields are to have an alternative status depending on the transaction, you can determine the status of the fields for the required transaction using the menu path: SAP Customizing Implementation Guide > Financial Accounting > Accounts Receivable and Accounts Payable > Customer Accounts > Master Data > Preparations for Creating Customer Master Data > Define Screen Layout per Activity (Customers):
i. On the resulting screen, you will see the listing of various transactions like create customer (accounting), change customer (accounting), delete customer (accounting), create customer (sales), create customer (centrally) and so on (Figure 2.6).
Figure 2.6 Defining Screen Layout per Transaction
ii. Double-click on the required transaction, and change the field status to suit your requirements on the next ‘Change View “Customer Activity-Dependent Field Selection”: Details’ screen. For example, you may want to make ‘Reconciliation account’ field with the status as ‘required’ from ‘optional’. ‘Save’ when completed and continue modifying the field status for other transactions, as required.
With this, we are now ready to look at configuring the settings for message control.
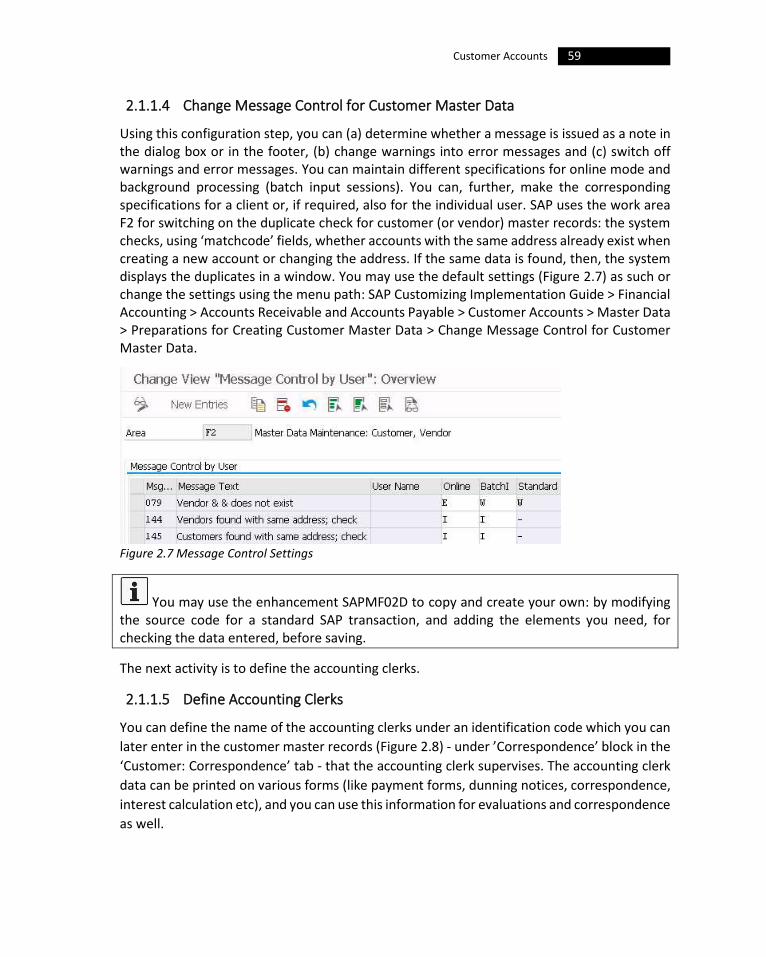
59 Customer Accounts
2.1.1.4 Change Message Control for Customer Master Data
Using this configuration step, you can (a) determine whether a message is issued as a note in the dialog box or in the footer, (b) change warnings into error messages and (c) switch off warnings and error messages. You can maintain different specifications for online mode and background processing (batch input sessions). You can, further, make the corresponding specifications for a client or, if required, also for the individual user. SAP uses the work area F2 for switching on the duplicate check for customer (or vendor) master records: the system checks, using ‘matchcode’ fields, whether accounts with the same address already exist when creating a new account or changing the address. If the same data is found, then, the system displays the duplicates in a window. You may use the default settings (Figure 2.7) as such or change the settings using the menu path: SAP Customizing Implementation Guide > Financial Accounting > Accounts Receivable and Accounts Payable > Customer Accounts > Master Data > Preparations for Creating Customer Master Data > Change Message Control for Customer Master Data.
Figure 2.7 Message Control Settings
You may use the enhancement SAPMF02D to copy and create your own: by modifying the source code for a standard SAP transaction, and adding the elements you need, for checking the data entered, before saving.
The next activity is to define the accounting clerks.
2.1.1.5 Define Accounting Clerks
You can define the name of the accounting clerks under an identification code which you can
later enter in the customer master records (Figure 2.8) - under ’Correspondence’ block in the
‘Customer: Correspondence’ tab - that the accounting clerk supervises. The accounting clerk
data can be printed on various forms (like payment forms, dunning notices, correspondence,
interest calculation etc), and you can use this information for evaluations and correspondence
as well.
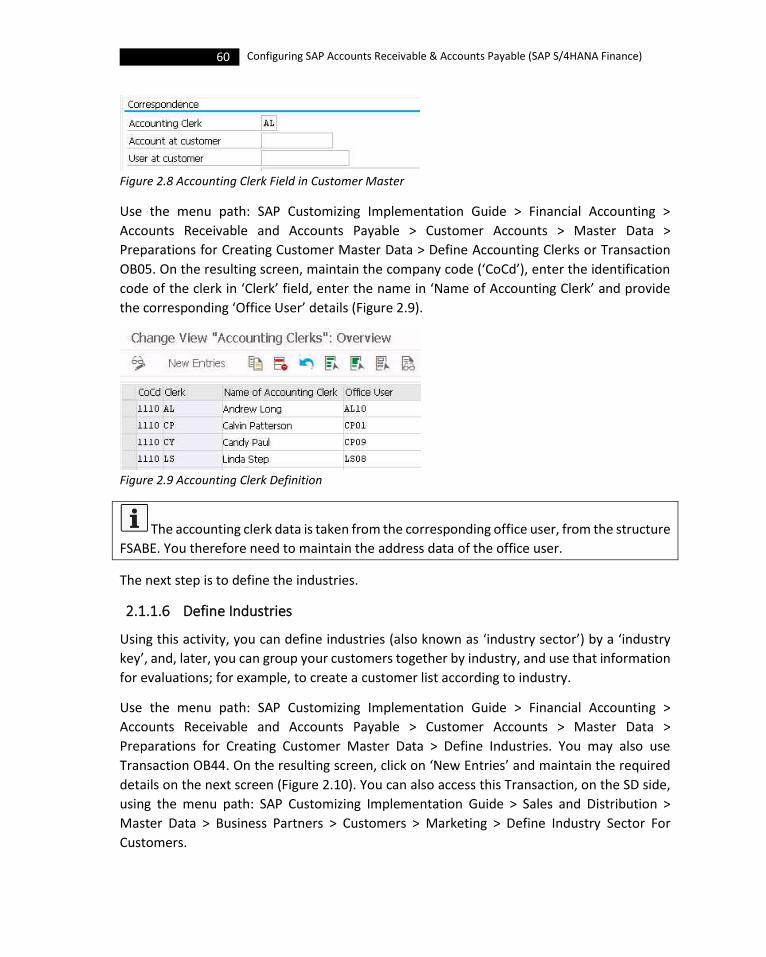
60 Configuring SAP Accounts Receivable & Accounts Payable (SAP S/4HANA Finance)
Figure 2.8 Accounting Clerk Field in Customer Master
Use the menu path: SAP Customizing Implementation Guide > Financial Accounting >
Accounts Receivable and Accounts Payable > Customer Accounts > Master Data >
Preparations for Creating Customer Master Data > Define Accounting Clerks or Transaction
OB05. On the resulting screen, maintain the company code (‘CoCd’), enter the identification
code of the clerk in ‘Clerk’ field, enter the name in ‘Name of Accounting Clerk’ and provide
the corresponding ‘Office User’ details (Figure 2.9).
Figure 2.9 Accounting Clerk Definition
The accounting clerk data is taken from the corresponding office user, from the structure
FSABE. You therefore need to maintain the address data of the office user.
The next step is to define the industries.
2.1.1.6 Define Industries
Using this activity, you can define industries (also known as ‘industry sector’) by a ‘industry
key’, and, later, you can group your customers together by industry, and use that information
for evaluations; for example, to create a customer list according to industry.
Use the menu path: SAP Customizing Implementation Guide > Financial Accounting >
Accounts Receivable and Accounts Payable > Customer Accounts > Master Data >
Preparations for Creating Customer Master Data > Define Industries. You may also use
Transaction OB44. On the resulting screen, click on ‘New Entries’ and maintain the required
details on the next screen (Figure 2.10). You can also access this Transaction, on the SD side,
using the menu path: SAP Customizing Implementation Guide > Sales and Distribution >
Master Data > Business Partners > Customers > Marketing > Define Industry Sector For
Customers.

61 Customer Accounts
Figure 2.10 Defining Industries
The Standard Industrial Classification (SIC) include four-digit codes categorizing the
industries that companies belong to, while organizing the industries by their business
activities. The SIC codes were created by the U.S. government in 1937 to help analyze
economic activity across various industries and government agencies. However, SIC codes
were partly replaced in 1997 by a system of six-digit codes called the North American Industry
Classification System (NAICS). The NAICS codes were adopted, in part, to standardize industry
data collection and analysis in between Canada, the United States, and Mexico, under the
North American Free Trade Agreement. Despite having been replaced, the government
agencies and companies still use the SIC codes even now, for classifying the industry that
companies belong to, by matching their business activity with similar companies.
Depending on the standards your organization uses (for example, SIC), you can configure SIC
codes in SAP using the menu path: SAP Customizing Implementation Guide > Sales and
Distribution > Master Data > Business Partners > Customers > Marketing > Define Industry
Sector Codes. Once done, you may enter the appropriate code in the customer master record
(Customer: General Data). You can assign more than one industry code to a customer (Figure
2.11).
Figure 2.11 Assigning Industry Code in Customer Master Record
With this, we can, now, move on to define the number ranges for the customer accounts.
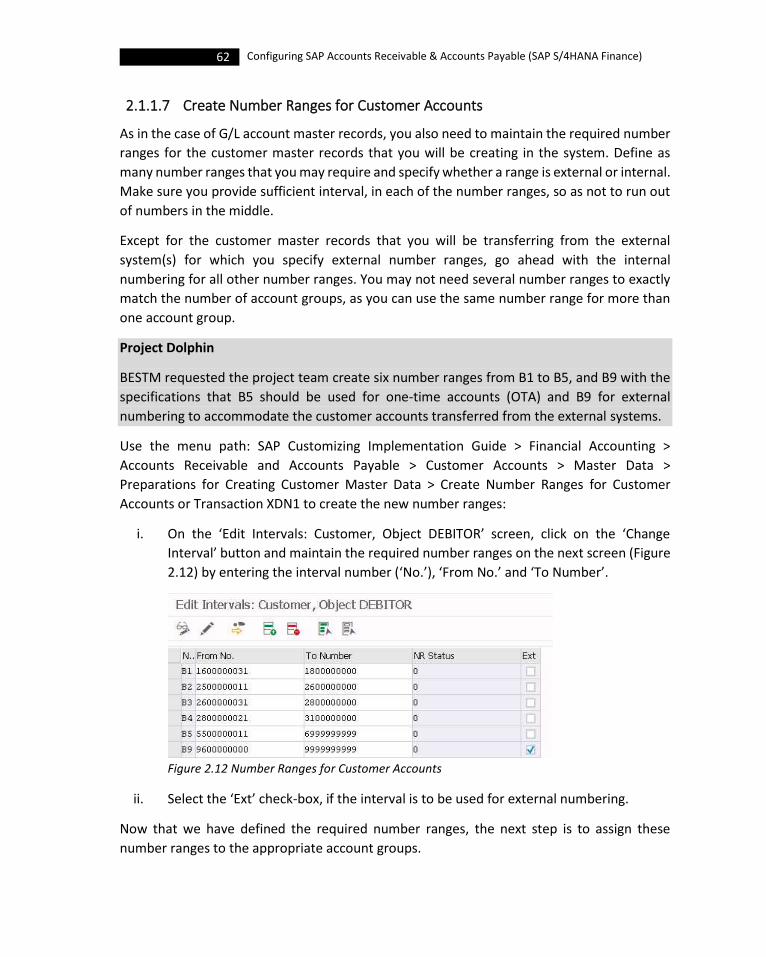
62 Configuring SAP Accounts Receivable & Accounts Payable (SAP S/4HANA Finance)
2.1.1.7 Create Number Ranges for Customer Accounts
As in the case of G/L account master records, you also need to maintain the required number
ranges for the customer master records that you will be creating in the system. Define as
many number ranges that you may require and specify whether a range is external or internal.
Make sure you provide sufficient interval, in each of the number ranges, so as not to run out
of numbers in the middle.
Except for the customer master records that you will be transferring from the external
system(s) for which you specify external number ranges, go ahead with the internal
numbering for all other number ranges. You may not need several number ranges to exactly
match the number of account groups, as you can use the same number range for more than
one account group.
Project Dolphin
BESTM requested the project team create six number ranges from B1 to B5, and B9 with the
specifications that B5 should be used for one-time accounts (OTA) and B9 for external
numbering to accommodate the customer accounts transferred from the external systems.
Use the menu path: SAP Customizing Implementation Guide > Financial Accounting >
Accounts Receivable and Accounts Payable > Customer Accounts > Master Data >
Preparations for Creating Customer Master Data > Create Number Ranges for Customer
Accounts or Transaction XDN1 to create the new number ranges:
i. On the ‘Edit Intervals: Customer, Object DEBITOR’ screen, click on the ‘Change
Interval’ button and maintain the required number ranges on the next screen (Figure
2.12) by entering the interval number (‘No.’), ‘From No.’ and ‘To Number’.
Figure 2.12 Number Ranges for Customer Accounts
ii. Select the ‘Ext’ check-box, if the interval is to be used for external numbering.
Now that we have defined the required number ranges, the next step is to assign these
number ranges to the appropriate account groups.

63 Customer Accounts
2.1.1.8 Assign Number Ranges to Customer Account Groups
Use this configuration step to assign a number range to an account group. As indicated
already, you can assign the same number range to more than one account group.
Figure 2.13 Assigning Number Ranges to Customer Account Groups
Use the menu path: SAP Customizing Implementation Guide > Financial Accounting >
Accounts Receivable and Accounts Payable > Customer Accounts > Master Data >
Preparations for Creating Customer Master Data > Assign Number Ranges to Customer
Account Groups or Transaction OBAR. On the resulting screen, enter the number range
against each of the account groups and ‘Save’ the details (Figure 2.13).
The next activity is to define the A/R pledging indicator.
2.1.1.9 Define Accounts Receivable Pledging Indicator
You can use the A/R factoring (or pledging) indicator to select customer master records and
line items, within a company code, to participate in the factoring procedure.
Project Dolphin
As BESTM wants customer master records and line items within a company code to
participate in the factoring procedure, the project team has decided to activate A/R pledging
for each of the company codes, both in USA and India.

64 Configuring SAP Accounts Receivable & Accounts Payable (SAP S/4HANA Finance)
In order to use the functionality:
i. You need to activate the A/R factoring procedure in the required company code (s).
You may do this by following the menu path: SAP Customizing Implementation Guide
> Financial Accounting > Financial Accounting Global Settings > Global Parameters for
Company Code > Activate Accounts Receivable Pledging Procedure per Company
Code. Since BESTM wants to enable all the company codes to participate in factoring,
select the ‘AR Pledg.’ check-box for all the company codes of BESTM group (Figure
2.14).
Figure 2.14 Activating AR Pledging Indicator
ii. You need to make sure that the accounts receivable factoring indicator (‘Accts recble
pledging ind.’) field is set as an ‘optional’ or ‘required’ entry field in the customer
account group and the company code (customers) screen layout. We have already
completed this in Section 2.1.1.1 and 2.1.1.2 of this Chapter.
iii. You also need to adapt a line layout variant for the customer line item display to take
care of this. Alternatively, you can create your own line layout variant for the A/R
factoring procedure. You can do this using the menu path: SAP Customizing
Implementation Guide > Financial Accounting > Accounts Receivable and Accounts
Payable > Customer Accounts > Line Items > Display Line Items > Define Additional
Fields for Line Item Display.
To define the A/R pledging indicator:
i. Use the menu path: SAP Customizing Implementation Guide > Financial Accounting >
Accounts Receivable and Accounts Payable > Customer Accounts > Master Data >
Preparations for Creating Customer Master Data > Define Accounts Receivable
Pledging Indicator.
ii. On the resulting screen, click on ‘New Entries’ and maintain the details on the next
screen as indicated in Figure 2.15. The ‘AR Pled. Stat.’ (Accounts Receivable Pledging
Status) field indicates the type of A/R pledging procedure and assigns the factoring
indicator (‘AR Pled. Stat.’) to the open (1) or closed (2) procedure. This pledging status
appears as additional information in the customer master record and is therefore
visible, to you, in the line item and open item list.
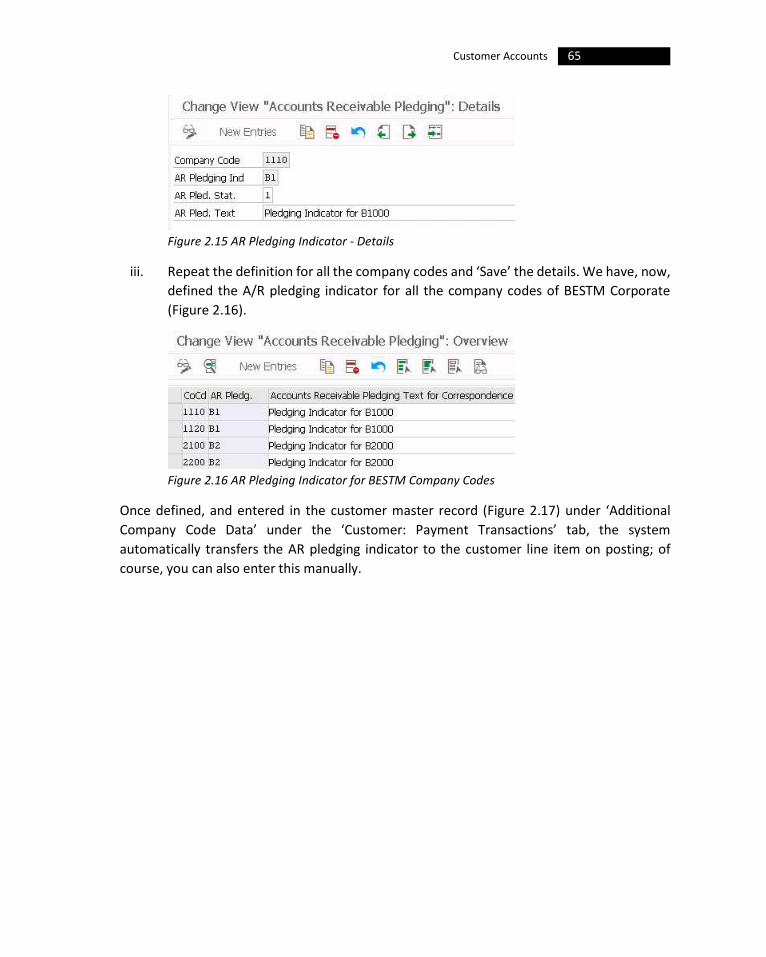
65 Customer Accounts
Figure 2.15 AR Pledging Indicator - Details
iii. Repeat the definition for all the company codes and ‘Save’ the details. We have, now,
defined the A/R pledging indicator for all the company codes of BESTM Corporate
(Figure 2.16).
Figure 2.16 AR Pledging Indicator for BESTM Company Codes
Once defined, and entered in the customer master record (Figure 2.17) under ‘Additional
Company Code Data’ under the ‘Customer: Payment Transactions’ tab, the system
automatically transfers the AR pledging indicator to the customer line item on posting; of
course, you can also enter this manually.

66 Configuring SAP Accounts Receivable & Accounts Payable (SAP S/4HANA Finance)
Figure 2.17 AR Pledging Indicator in Customer Master
With this, we are, now, ready to configure the sensitive fields for dual control.
2.1.1.10 Define Sensitive Fields for Dual Control (Customers)
Here, you define the ‘sensitive fields’ for dual control in the customer (or vendor) master
records. If you define a field (say, payment terms) in the customer (or vendor) master record
as ‘sensitive’, then, the system blocks corresponding customer (or vendor) account for the
payment run if there is a change to the entry. The system will, however, remove the block
when a second person, with proper authorization, checks the change and confirms the same.

67 Customer Accounts
Project Dolphin
BESTM wants the project team to manage ‘Payment Terms’, ‘Alternate Payer’ and ‘House
Bank’ as the sensitive fields. Accordingly, these fields need to be brought under dual control
to avoid any misuse.
To define the sensitive fields for dual control:
i. Use the menu path: SAP Customizing Implementation Guide > Financial Accounting >
Accounts Receivable and Accounts Payable > Customer Accounts > Master Data >
Preparations for Creating Customer Master Data > Define Sensitive Fields for Dual
Control (Customers). You may also use Transaction S_ALR_87003378.
ii. On the resulting screen, click on ‘New Entries’ and select the required fields in ‘Field
name’ and ‘Save’ the details when done (Figure 2.18). With these settings, now, if
anyone changes the field content of any of these sensitive fields, the system brings
up a message when saving the master record. Though the system will eventually allow
to save the data, it will not allow this account to be included in any payment run
unless the change is verified and confirmed (or rejected) by another user, other than
the one who has changed the field contents.
Figure 2.18 Sensitive Fields for Dual Control
Suppose that you have changed the payment terms (for customer 9500000027) to 0001 from
the previous value:
i. The system pops-up a message that the changes you have done are yet to be
confirmed (Figure 2.19).
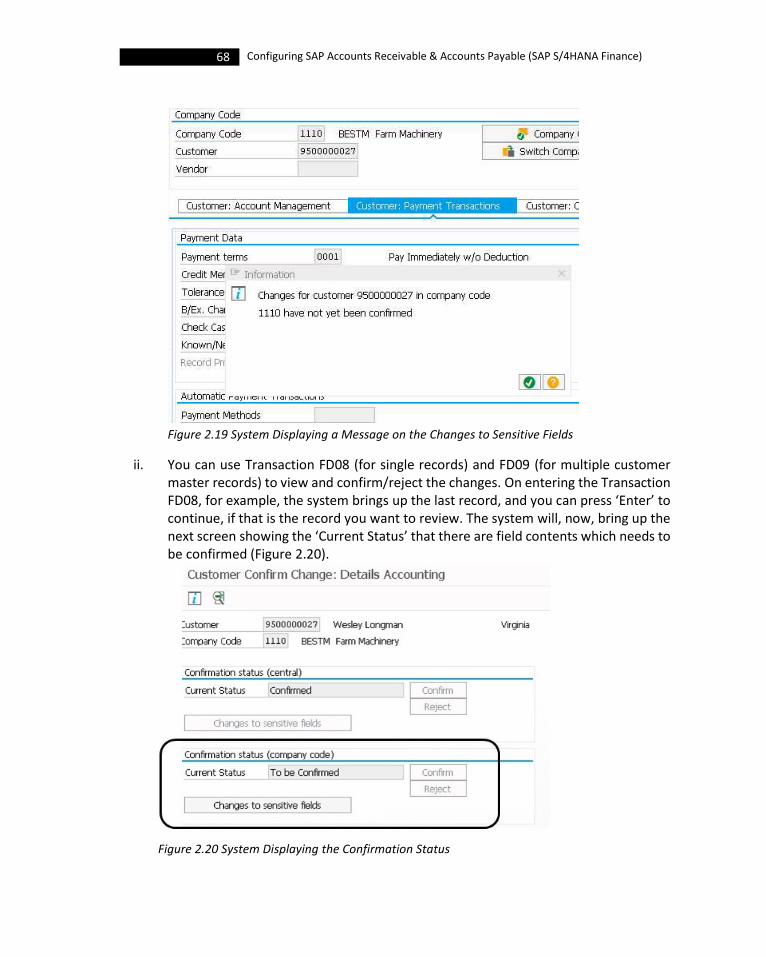
68 Configuring SAP Accounts Receivable & Accounts Payable (SAP S/4HANA Finance)
Figure 2.19 System Displaying a Message on the Changes to Sensitive Fields
ii. You can use Transaction FD08 (for single records) and FD09 (for multiple customer master records) to view and confirm/reject the changes. On entering the Transaction FD08, for example, the system brings up the last record, and you can press ‘Enter’ to continue, if that is the record you want to review. The system will, now, bring up the next screen showing the ‘Current Status’ that there are field contents which needs to be confirmed (Figure 2.20).
Figure 2.20 System Displaying the Confirmation Status
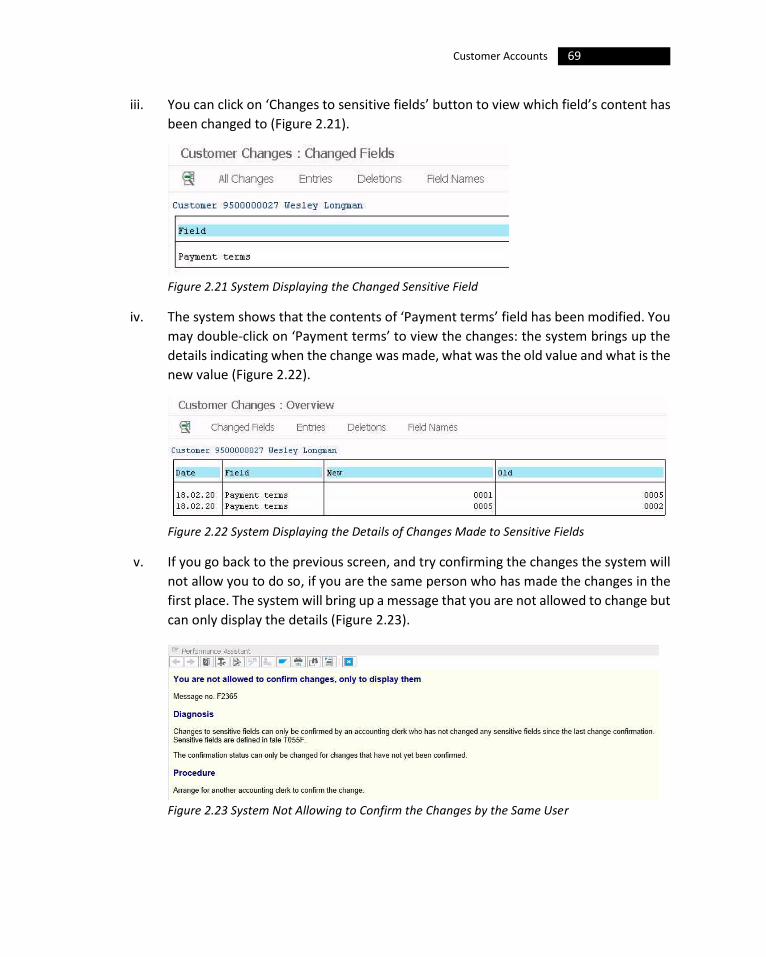
69 Customer Accounts
iii. You can click on ‘Changes to sensitive fields’ button to view which field’s content has
been changed to (Figure 2.21).
Figure 2.21 System Displaying the Changed Sensitive Field
iv. The system shows that the contents of ‘Payment terms’ field has been modified. You
may double-click on ‘Payment terms’ to view the changes: the system brings up the
details indicating when the change was made, what was the old value and what is the
new value (Figure 2.22).
Figure 2.22 System Displaying the Details of Changes Made to Sensitive Fields
v. If you go back to the previous screen, and try confirming the changes the system will
not allow you to do so, if you are the same person who has made the changes in the
first place. The system will bring up a message that you are not allowed to change but
can only display the details (Figure 2.23).
Figure 2.23 System Not Allowing to Confirm the Changes by the Same User
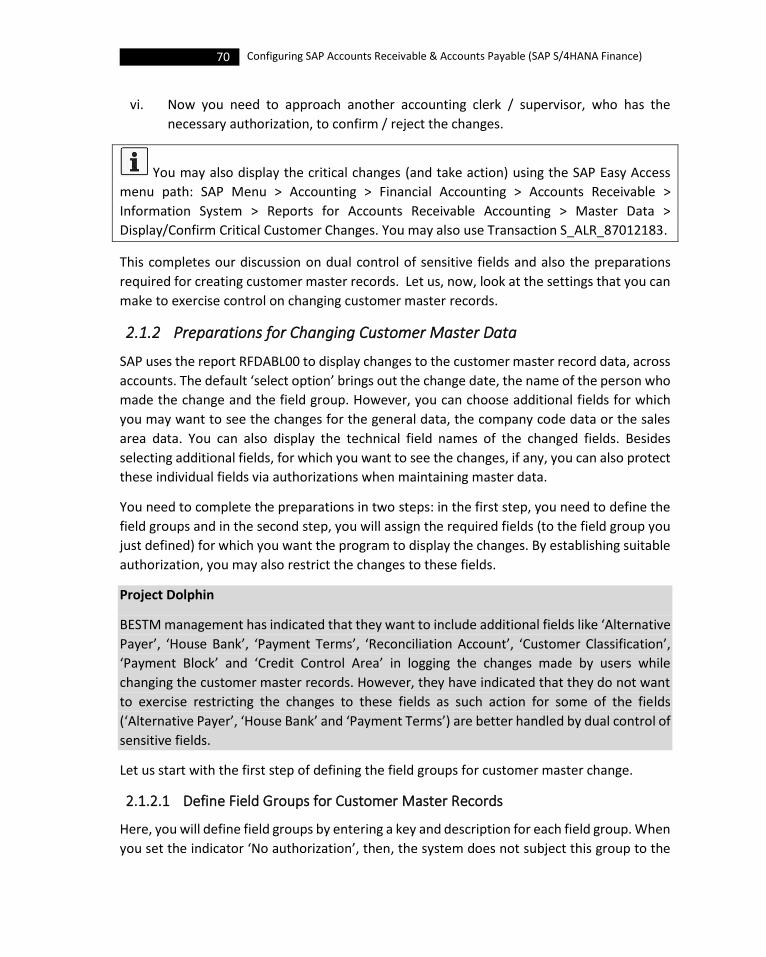
70 Configuring SAP Accounts Receivable & Accounts Payable (SAP S/4HANA Finance)
vi. Now you need to approach another accounting clerk / supervisor, who has the
necessary authorization, to confirm / reject the changes.
You may also display the critical changes (and take action) using the SAP Easy Access
menu path: SAP Menu > Accounting > Financial Accounting > Accounts Receivable >
Information System > Reports for Accounts Receivable Accounting > Master Data >
Display/Confirm Critical Customer Changes. You may also use Transaction S_ALR_87012183.
This completes our discussion on dual control of sensitive fields and also the preparations
required for creating customer master records. Let us, now, look at the settings that you can
make to exercise control on changing customer master records.
2.1.2 Preparations for Changing Customer Master Data
SAP uses the report RFDABL00 to display changes to the customer master record data, across
accounts. The default ‘select option’ brings out the change date, the name of the person who
made the change and the field group. However, you can choose additional fields for which
you may want to see the changes for the general data, the company code data or the sales
area data. You can also display the technical field names of the changed fields. Besides
selecting additional fields, for which you want to see the changes, if any, you can also protect
these individual fields via authorizations when maintaining master data.
You need to complete the preparations in two steps: in the first step, you need to define the
field groups and in the second step, you will assign the required fields (to the field group you
just defined) for which you want the program to display the changes. By establishing suitable
authorization, you may also restrict the changes to these fields.
Project Dolphin
BESTM management has indicated that they want to include additional fields like ‘Alternative
Payer’, ‘House Bank’, ‘Payment Terms’, ‘Reconciliation Account’, ‘Customer Classification’,
‘Payment Block’ and ‘Credit Control Area’ in logging the changes made by users while
changing the customer master records. However, they have indicated that they do not want
to exercise restricting the changes to these fields as such action for some of the fields
(‘Alternative Payer’, ‘House Bank’ and ‘Payment Terms’) are better handled by dual control of
sensitive fields.
Let us start with the first step of defining the field groups for customer master change.
2.1.2.1 Define Field Groups for Customer Master Records
Here, you will define field groups by entering a key and description for each field group. When
you set the indicator ‘No authorization’, then, the system does not subject this group to the

71 Customer Accounts
authorization check when maintaining master data; the system uses this field group only for
selecting the fields via the report (RFDABL00) for displaying changes.
To define the required field groups:
i. Use the menu path: SAP Customizing Implementation Guide > Financial Accounting >
Accounts Receivable and Accounts Payable > Customer Accounts > Master Data >
Preparations for Changing Customer Master Data > Define Field Groups for Customer
Master Records.
ii. On the resulting screen (Figure 2.24) click on ‘New Entries’ and enter a 1 or 2-digit
numeric identifier for the new ‘Field group’, provide a ‘Description’ and select the ‘No
authorization’ check-box to prevent any authorization checks on this field group,
when changing the master records.
iii. ‘Save’ the details and create more field groups, if required.
Figure 2.24 Field Group for Customer Master Change Control
With the definition of field group, we are now ready to assign individual fields (to the field
group) for which you want to show the changes, while displaying the customer master
changes.
2.1.2.2 Group Fields for Customer Master Records
Using this activity, you will, now, assign the customer master record fields to the field group(s)
that you have defined in the previous step. Once done, you can enter this field group in
program RFDABL00 afterwards, to display the changes.
To include the fields to the field group:
i. Use the menu path: SAP Customizing Implementation Guide > Financial Accounting >
Accounts Receivable and Accounts Payable > Customer Accounts > Master Data >
Preparations for Changing Customer Master Data > Group Fields for Customer Master
Records.
ii. On the resulting ‘Change View “Customer field group fields”: Overview’ screen (Figure
2.25), click on ‘New Entries’, enter the field group identifier (‘Field grp’) and add the
customer master fields (‘Fld name’) that you want to include in report RFDABL00,
under this field group. ‘Save’ when completed; the system brings up the ‘Field Label’
for each of these fields.
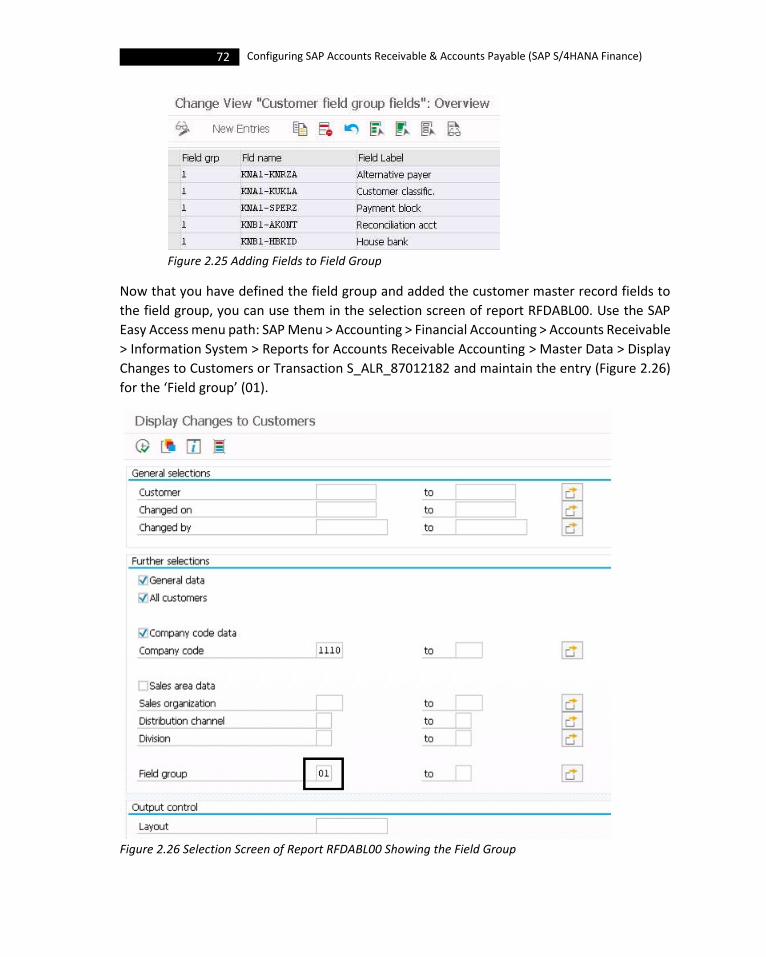
72 Configuring SAP Accounts Receivable & Accounts Payable (SAP S/4HANA Finance)
Figure 2.25 Adding Fields to Field Group
Now that you have defined the field group and added the customer master record fields to
the field group, you can use them in the selection screen of report RFDABL00. Use the SAP
Easy Access menu path: SAP Menu > Accounting > Financial Accounting > Accounts Receivable
> Information System > Reports for Accounts Receivable Accounting > Master Data > Display
Changes to Customers or Transaction S_ALR_87012182 and maintain the entry (Figure 2.26)
for the ‘Field group’ (01).
Figure 2.26 Selection Screen of Report RFDABL00 Showing the Field Group

73 Customer Accounts
When you execute the report, the system brings up the list displaying the changes made to
the fields, including the ones in the field group (01), for example. You can notice (Figure 2.27)
that the system is displaying the changes for the additional fields (for example, ‘Recon.
Account’), besides the sensitive fields (for example, ‘Payt terms) for which there were changes
in the master record.
Figure 2.27 Report RFDABL00 Displaying Changes
This completes our discussion on the settings required to control changing of customer
master records. Let us, now, see the deletion of customer master records.
2.1.3 Delete Customer Master Data
Using this configuration step, you can delete the customer master records through the
standard SAP program SAPF019. The system deletes general customer master data for
customers who are not created as customers in SAP SD.
You will be able to delete master records for accounts which do not have any transaction data.
The other condition is that the company code for which you are trying to delete the master
records should not have been flagged as ‘productive’. Use this program only in the test phase.
To delete, use the menu path: SAP Customizing Implementation Guide > Financial Accounting
> Accounts Receivable and Accounts Payable > Customer Accounts > Master Data > Delete
Customer Master Data or Transaction OBR2. Maintain the required selection parameters on
the resulting screen and run the program. As you can see, you will be using the same program
to delete G/L and vendor master records as well.
You can use the program SAPF019 to delete master data in FI. You can use it to delete
customer master data, vendor master data and G/L account master data. You can run this for:
(1) deleting general master data (in the case of G/L accounts, in one chart of accounts), (2)
deleting master data dependent on company code and (3) deleting general master data and
master data dependent on company code. For each of the deletion run, you can specify
74 Configuring SAP Accounts Receivable & Accounts Payable (SAP S/4HANA Finance)
whether or not the system should take into account the deletion flag in master records by
selecting or deselecting the ‘Delete per deletion flag only’ check-box. The system checks the
deletion block always at general data and company code-dependent data level: if there is a
block at company code-dependent data level, then the general data is not deleted either. The
‘deletion block’ (NODEL) takes precedence over the ‘deletion flag ‘(LOVEM).
In the case of customer master records, the program deletes general master data, bank
details, VAT registration numbers, addresses, classifications, credit management (across
control areas and centrally), unloading points, tax indicators, contact persons, licenses,
partner function limit, shipping data, master data in the company code, dunning data and the
linked data. As regards the vendor master records are concerned, the program deletes
general master data, bank details, contact persons, VAT registration numbers, addresses,
classifications, master data in the company code, dunning data and the linked data. In the
case of G/L accounts, the program deletes, general master data in the chart of accounts,
names in the chart of accounts, key word list in the chart of accounts, master data in the
company code and sample accounts, if selected in the selection screen. Besides the above,
the program also deletes the change documents for master data and the SAPScript text files.
The general master data can only be deleted if no other application makes reference to that
account. If you want to delete only general master data, master data dependent on company
code should not have been created in FI. If a customer or vendor is referenced by another
customer or vendor (for example, via alternative payee), you can only delete the referenced
master record by deleting the referencing master record at the same time. Also, you can
delete master data in FI, only if no transactions have been posted to the corresponding
accounts; if there are transaction figures in any of the selected accounts, then, you have to
manually run the program SAPF020 (to reset transaction data from company code) before
deleting that account.
After execution, the log lists every table which is processed in the program selection. You can
also create a detail log, for each account type, to find out why certain data was not deleted.
The detail logs show you what other company codes and applications use the data and how
customers and vendors are linked to one another. Since deleting or displaying even smaller
volumes of data can result in runtime problems, you should always run this program only as
a background job.
This completes our discussion on preparations for creating / changing / deleting customer
master records. Let is now see the settings required for line items.

75 Customer Accounts
2.2 Line Items
The settings that are required to be configured for customer line items can be grouped into
three categories viz., (1) display open items, (2) open item processing and (3) correspondence.
2.2.1 Display Line Items
In the case of ‘display open items’, you will have to make the settings for the line item display
using the ABAP List View (ALV). By default, the system displays the line items with the ALV.
However, if you do not wish to use ALV, you can continue to use line item display without
ALV, as a modification. To enable this, you have to complete the settings listed under the
configuration step ‘Display Line Items without ALV’. You can access this IMG node through
the menu path: SAP Customizing Implementation Guide > Financial Accounting > Accounts
Receivable and Accounts Payable > Customer Accounts > Line Items > Display Line Items >
Display Line Items without ALV.
Project Dolphin
The project team has recommended to the BESTM Corporate to stick to the line item display
using the ABAP List View. Also, they have suggested not to define additional fields for
customer line item display as that may result in performance issues. Besides, they are also of
the view that no additional settings would be required than the default ones, for processing
open items.
You may use ‘Define Additional Fields for Line Item Display’ (menu path: SAP Customizing
Implementation Guide > Financial Accounting > Accounts Receivable and Accounts Payable >
Customer Accounts > Line Items > Display Line Items > Define Additional Fields for Line Item
Display) to include additional fields (such as, ‘User’ or ‘Quantity’ etc) for display. However,
consider carefully whether you really need to enhance the line item display, as such
enhancements can reduce performance since the system has to read more table entries.
2.2.2 Open Item Processing
As in display of line items, you may make additional settings for open item processing. Follow
the menu path: SAP Customizing Implementation Guide > Financial Accounting > Accounts
Receivable and Accounts Payable > Customer Accounts > Line Items > Open Item Processing,
and complete the individual configuration steps there on.
2.2.3 Correspondence
In the case of settings for correspondence, you can make new settings for correspondence
using the menu path: SAP Customizing Implementation Guide > Financial Accounting >
Accounts Receivable and Accounts Payable > Customer Accounts > Line Items >
Correspondence, or check your existing settings to ensure completeness. We have already

76 Configuring SAP Accounts Receivable & Accounts Payable (SAP S/4HANA Finance)
discussed the settings for correspondence when we configured the FI global settings. Of
course, you can check here, now, whether the settings are correct / complete. If you have not
yet made any settings earlier, you can do so here.
2.2.3.1 Define Period Types for Customers
Additionally, you can create account statements automatically by entering a key (say, 1 for
monthly statements, 2 for quarterly statements, 3 for half-yearly statements and so on)
specifying with which frequency the account statements are to be created in the ‘Bank
Statement’ field in the customer master and ’Account Statement’ field in the vendor master
records. You may specify this key as a selection criterion for the program for creating account
statements periodically.
Use the menu path: SAP Customizing Implementation Guide > Financial Accounting >
Accounts Receivable and Accounts Payable > Customer Accounts > Line Items >
Correspondence > Define Period Types for Customers. On the resulting screen, enter the
identifier for the frequency key (‘Acct Stmnt’) and provide an explanation in the ‘Text’ field
(Figure 2.28).
Figure 2.28 Periodic Account Statement Indicator
You need to determine the customer accounts for which you plan to generate periodic
account statements. Once done, you need to enter the appropriate key (from the above
definition) in the appropriate field in customer (‘Bank Statement’) / vendor master (‘Account
Statement’) record (Figure 2.29). The system, now, creates the account statements, for all the
customers / vendors whose master record is entered with this key, through the report
program as per the periodicity defined in the key.

77 Customer Accounts
Figure 2.29 Periodic Account Statement Indicator in Customer / Vendor Master Record
This completes our discussion on the settings required for line items. Let us move on to discuss
the settings required for displaying account balances.
2.3 Balances
There are two settings that you can make to configure account balance display, for both
customer and vendor:
• Maintain Worklist for Displaying Balances
• Maintain Users and Accounts for Internet Services
2.3.1 Maintain Worklist for Displaying Balances
It is possible that your company codes receive goods from the same vendor. In such a case,
if you may want to display the vendor items in all these company codes at the same time,
then, you can combine these company codes in one worklist. You can create these worklists
either manually or use the worklists that are automatically maintained: in either case, you
need to determine what objects (company code, customer or vendor accounts) should go into
the worklist.
In the case of ‘manual worklists’, you need to specify the required keys of the objects (for
example, the customer account numbers) to be processed in the same manner. On the other
hand, for ‘automatic worklists’, first specify a rule according to which the name of the worklist
is to be formed. Then, start the structure of the worklist once. The system creates a worklist

78 Configuring SAP Accounts Receivable & Accounts Payable (SAP S/4HANA Finance)
automatically for every alternative payer, and for every corporate group number which is
used in the master records. If other customers or vendors refer to an alternative payer or to
a corporate group account number, then, the system allocates them automatically to the
existing worklists, or creates new worklists for them. Your accounting clerks can decide if they
want to work with worklists or individual objects, when processing business transactions.
To configure the work lists, use menu path: SAP Customizing Implementation Guide >
Financial Accounting > Accounts Receivable and Accounts Payable > Customer Accounts >
Balances > Maintain Worklist for Displaying Balances. You may also use Transaction OB55.
Project Dolphin
BESTM management wants to create various worklists by grouping the company codes, in
each of the companies, for displaying the account balances together. Accordingly, one
worklist will be created, for example, combining company codes of 1110 and 1120, another
for 1210 and 1220, another for 2100 and 2200 and one more for 3100 and 3200.
On the initial screen, you need to decide whether you want to create the worklist by
combining company codes or customers or vendors or G/L Accounts. Accordingly, you need
to double-click on that object (say, Company Code) on the ‘Maintain Worklists: Objects’
screen. On the next screen, click on ‘Create’. On the resulting pop-up screen, enter the
identifier and a name of the work list. On the next ‘Maintain Worklists: Values’ screen, enter
the company codes that need to be grouped under the work list (Figure 2.30).
Figure 2.30 Manual Worklist for BESTM
To use worklists:
Go to ‘Settings -> Editing Options’ on the menu bar, when processing the open items. Select
the ‘Use Worklists’ check-box for the open items (Figure 2.31). You can, then, enter the key
for the work list in the ‘Account’ field. If both an account and a work list exist for one key,
then, the worklist has priority.

79 Customer Accounts
Figure 2.31 Enabling Worklist Entry during Open Item Processing
The next activity is to maintain users / accounts for internet services.
2.3.2 Maintain Users and Accounts for Internet Services
Here, in this activity, you decide which of your users can carry out which ‘Financial Accounting
Internet’ services. While doing that, you can specify which accounts / company codes these
users can view. By this, you can ensure that an internet user cannot have unauthorized access
to the data of other users.
To configure, use menu path: SAP Customizing Implementation Guide > Financial Accounting
> Accounts Receivable and Accounts Payable > Customer Accounts > Balances > Local
Reporting for Account Balances > Maintain Users and Accounts for Internet Services.
On the resulting screen, click on ‘New Entries’ and maintain the details on the next screen:
select a ‘User’, select appropriate ‘Action’ from the drop-down values for that user, enter the
limiting conditions for accounts (‘From acct’ and ‘To acct’) and company code (‘Fm co.code’
and ‘To co.code’. ‘Save’ the details when completed (Figure 2.32).
Figure 2.32 Maintaining Users / Accounts for Internet Services
With this, we have completed the discussion on configuring the customer accounts.
80 Configuring SAP Accounts Receivable & Accounts Payable (SAP S/4HANA Finance)
2.1 Conclusion
In this Chapter on ‘Customer Accounts’, you learned that a customer can be a person
(individual), an organization or a group. You understood that a typical customer master data
is made up of four areas (segments) namely: general data, company code data (FI area), sales
& distribution data (SD area) and ETM data. You learned that you can create customer master
data, in SAP, in three different ways: central maintenance (for all the three areas), FI
maintenance (for FI area alone) and sales data maintenance (for SD area alone). You
understood that there are certain pre-requisites - like defining number ranges, creating
customer account groups and maintaining field status - which you need to complete before
you can create master data for your customers. You learned how to define the ‘sensitive
fields’ for dual control in the customer (or vendor) master records.
You also saw the preparations that you need to make for changing / deleting customer master
records. You understood that you will be able to delete master records for accounts which do
not have any transaction data, with the additional condition that the company code for which
you are trying to delete the master records should not have been flagged as ‘productive’.
Later, you learned about the settings that are required to be configured for customer line items for displaying open items, open item processing and correspondence.
Finally, you learned about the settings that you need to make for configuring the account balance display, for both customer and vendor.
Let us, now, move on to discuss the vendor accounts in the next Chapter.
3 Vendor Accounts
s in the case of customer accounts, we shall see the settings that are required for
configuring vendor accounts in this Chapter. Besides master data and line items, we
shall discuss the settings required for overdue payables as well here.
Let us start with the vendor master data.
3.1 Master Data
As in the case of customer accounts, you need to create one master record for each vendor account that you require in the system. Both the financial accounting (FI-A/P) and the purchasing (SAP MM) departments of your organization use the same master records. By creating and storing vendor master data centrally, you enable their access throughout the organization, and this avoids (a) the need to enter the same information twice and (b) inconsistencies in master data that may creep in if not maintained centrally. If the address of one of your vendors changes, for example, you only have to enter this change once and your accounting and purchasing departments will always have the updated details.
A vendor, like a customer, can be a person (individual), an organization or a group. A typical vendor master data is made up of three areas (segments) as shown in Figure 3.1:
• General Data
• Company Code Data (FI area data)
• Purchasing Organization Data (MM area data)
As in the case of a customer account, the ‘general data’ with the information such as address, control data, payment transactions, status, legal data etc., will be at the Client level and hence is valid across company codes. The ‘company code data’ (account management, payment transactions, withholding tax, correspondence etc) is valid only for the specific company code in which the vendor has been created. The ‘purchasing organization data’ is made up of information relating to purchasing organization, purchasing data (conditions, sales data, control data, default values for material etc), additional purchasing data and texts and will be valid for the purchasing organization.
The specifications you make in a vendor master record are used (a) as default values when you post items to the account (for example, the terms of payment you specify in the master record are defaulted for document entry), (b) for processing business transactions like payment processing for which the date of the last payment run is required for the automatic payment program, (c) for working with master records so as to, for example, prevent certain
A
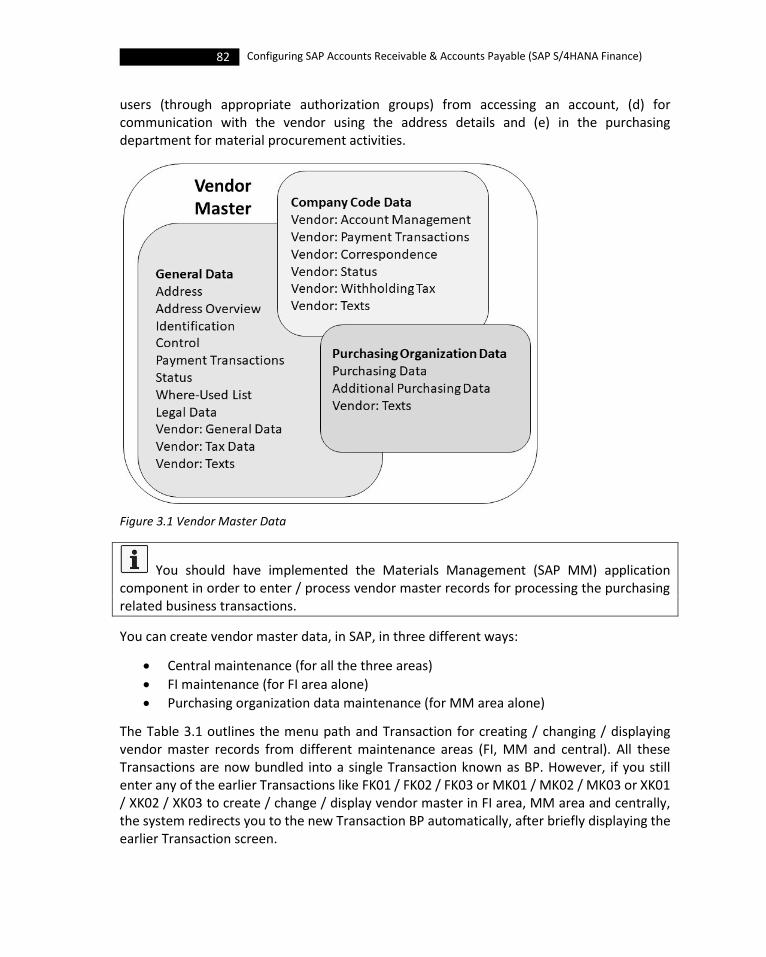
82 Configuring SAP Accounts Receivable & Accounts Payable (SAP S/4HANA Finance)
users (through appropriate authorization groups) from accessing an account, (d) for communication with the vendor using the address details and (e) in the purchasing department for material procurement activities.
Figure 3.1 Vendor Master Data
You should have implemented the Materials Management (SAP MM) application component in order to enter / process vendor master records for processing the purchasing related business transactions.
You can create vendor master data, in SAP, in three different ways:
• Central maintenance (for all the three areas)
• FI maintenance (for FI area alone)
• Purchasing organization data maintenance (for MM area alone)
The Table 3.1 outlines the menu path and Transaction for creating / changing / displaying vendor master records from different maintenance areas (FI, MM and central). All these Transactions are now bundled into a single Transaction known as BP. However, if you still enter any of the earlier Transactions like FK01 / FK02 / FK03 or MK01 / MK02 / MK03 or XK01 / XK02 / XK03 to create / change / display vendor master in FI area, MM area and centrally, the system redirects you to the new Transaction BP automatically, after briefly displaying the earlier Transaction screen.
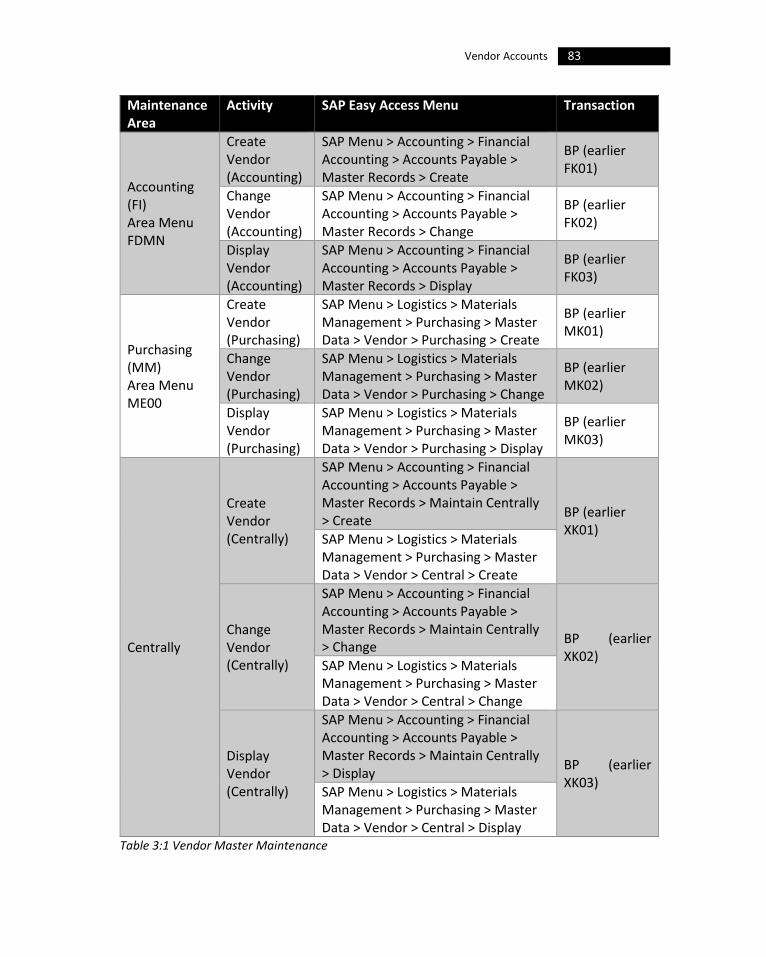
83 Vendor Accounts
Maintenance Area
Activity SAP Easy Access Menu Transaction
Accounting (FI) Area Menu FDMN
Create Vendor (Accounting)
SAP Menu > Accounting > Financial Accounting > Accounts Payable > Master Records > Create
BP (earlier FK01)
Change Vendor (Accounting)
SAP Menu > Accounting > Financial Accounting > Accounts Payable > Master Records > Change
BP (earlier FK02)
Display Vendor (Accounting)
SAP Menu > Accounting > Financial Accounting > Accounts Payable > Master Records > Display
BP (earlier FK03)
Purchasing (MM) Area Menu ME00
Create Vendor (Purchasing)
SAP Menu > Logistics > Materials Management > Purchasing > Master Data > Vendor > Purchasing > Create
BP (earlier MK01)
Change Vendor (Purchasing)
SAP Menu > Logistics > Materials Management > Purchasing > Master Data > Vendor > Purchasing > Change
BP (earlier MK02)
Display Vendor (Purchasing)
SAP Menu > Logistics > Materials Management > Purchasing > Master Data > Vendor > Purchasing > Display
BP (earlier MK03)
Centrally
Create Vendor (Centrally)
SAP Menu > Accounting > Financial Accounting > Accounts Payable > Master Records > Maintain Centrally > Create
BP (earlier XK01)
SAP Menu > Logistics > Materials Management > Purchasing > Master Data > Vendor > Central > Create
Change Vendor (Centrally)
SAP Menu > Accounting > Financial Accounting > Accounts Payable > Master Records > Maintain Centrally > Change
BP (earlier XK02)
SAP Menu > Logistics > Materials Management > Purchasing > Master Data > Vendor > Central > Change
Display Vendor (Centrally)
SAP Menu > Accounting > Financial Accounting > Accounts Payable > Master Records > Maintain Centrally > Display
BP (earlier XK03)
SAP Menu > Logistics > Materials Management > Purchasing > Master Data > Vendor > Central > Display
Table 3:1 Vendor Master Maintenance

84 Configuring SAP Accounts Receivable & Accounts Payable (SAP S/4HANA Finance)
As in the case of customer accounts, in some companies, accounting (FI) and purchasing (MM) departments maintain the general data together but FI and purchasing organization data separately. In other companies, vendor master records are maintained centrally (for all the areas).
3.1.1 Preparations for Creating Vendor Master Data
As in the case of customer master records, you need to complete certain pre-requisites - like defining number ranges, creating vendor account groups and maintaining field status - before you can create master data for your vendors. Since we have discussed them in details in Section 2.1.1 of Chapter 2, we are not repeating the details here. It is sufficient to note that you need to (a) decide on suitable numbering (internal / external) for the vendor master records with appropriate number range intervals, (b) have adequate vendor account groups for creation of vendor master records as the account group determines which fields have to be filled compulsorily (mandatory) and which ones can be optionally filled when creating the master records besides allocating a number (external or internal) to the master record and (c) have field status definitions - suitably defined for the account group (and also for the company code and/transactions) - to determine the status of the fields on the screens for the master data creation.
Let us start with the creation of (vendor) account groups.
3.1.1.1 Define Account Groups with Screen Layout (Vendors)
This is similar to the one that we have seen earlier for customers. Use this activity to define the required account groups for crating you vendors (suppliers). As in the case of customer, you can have more detailed classification of vendor account groups like domestic vendor (0001), goods supplier (0002), alternate payer (0003), invoice presented by (0004), forwarding agent (0005), special vendor (0010), one-time vendors (0099) and so on or you can have limited ones like domestic vendors, foreign vendors etc.
Project Dolphin
BESTM management has asked the Dolphin project manager to create elaborate account groups like vendor (0001), goods supplier (0002), alternate payer (0003), invoice presented by (0004), forwarding agent (0005), special vendor (0010) and one-time vendors (0099) besides separate account groups to take care of vendor accounts that are transferred from the external system.
The project team has recommended to the BESTM management, to control the field status through accounts groups. Accordingly, no new screen layout settings are to be defined for the company codes (of BESTM) or for transactions.
Use the menu path: SAP Customizing Implementation Guide > Financial Accounting > Accounts Receivable and Accounts Payable > Vendor Accounts > Master Data > Preparations
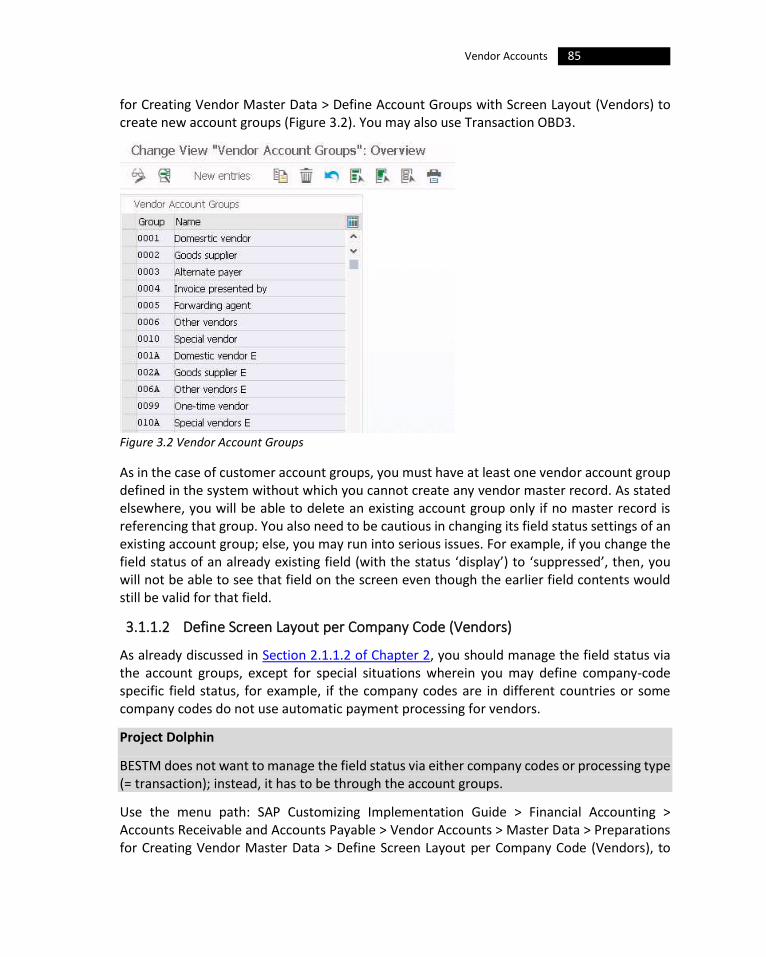
85 Vendor Accounts
for Creating Vendor Master Data > Define Account Groups with Screen Layout (Vendors) to create new account groups (Figure 3.2). You may also use Transaction OBD3.
Figure 3.2 Vendor Account Groups
As in the case of customer account groups, you must have at least one vendor account group defined in the system without which you cannot create any vendor master record. As stated elsewhere, you will be able to delete an existing account group only if no master record is referencing that group. You also need to be cautious in changing its field status settings of an existing account group; else, you may run into serious issues. For example, if you change the field status of an already existing field (with the status ‘display’) to ‘suppressed’, then, you will not be able to see that field on the screen even though the earlier field contents would still be valid for that field.
3.1.1.2 Define Screen Layout per Company Code (Vendors)
As already discussed in Section 2.1.1.2 of Chapter 2, you should manage the field status via the account groups, except for special situations wherein you may define company-code specific field status, for example, if the company codes are in different countries or some company codes do not use automatic payment processing for vendors.
Project Dolphin
BESTM does not want to manage the field status via either company codes or processing type (= transaction); instead, it has to be through the account groups.
Use the menu path: SAP Customizing Implementation Guide > Financial Accounting > Accounts Receivable and Accounts Payable > Vendor Accounts > Master Data > Preparations for Creating Vendor Master Data > Define Screen Layout per Company Code (Vendors), to
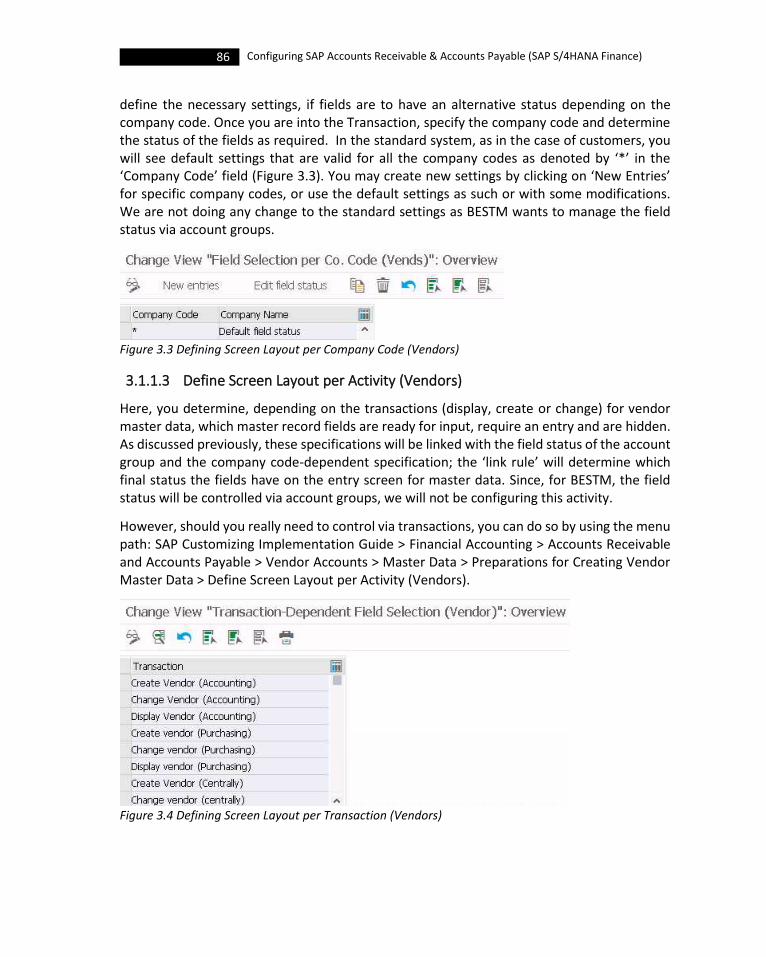
86 Configuring SAP Accounts Receivable & Accounts Payable (SAP S/4HANA Finance)
define the necessary settings, if fields are to have an alternative status depending on the company code. Once you are into the Transaction, specify the company code and determine the status of the fields as required. In the standard system, as in the case of customers, you will see default settings that are valid for all the company codes as denoted by ‘*’ in the ‘Company Code’ field (Figure 3.3). You may create new settings by clicking on ‘New Entries’ for specific company codes, or use the default settings as such or with some modifications. We are not doing any change to the standard settings as BESTM wants to manage the field status via account groups.
Figure 3.3 Defining Screen Layout per Company Code (Vendors)
3.1.1.3 Define Screen Layout per Activity (Vendors)
Here, you determine, depending on the transactions (display, create or change) for vendor master data, which master record fields are ready for input, require an entry and are hidden. As discussed previously, these specifications will be linked with the field status of the account group and the company code-dependent specification; the ‘link rule’ will determine which final status the fields have on the entry screen for master data. Since, for BESTM, the field status will be controlled via account groups, we will not be configuring this activity.
However, should you really need to control via transactions, you can do so by using the menu path: SAP Customizing Implementation Guide > Financial Accounting > Accounts Receivable and Accounts Payable > Vendor Accounts > Master Data > Preparations for Creating Vendor Master Data > Define Screen Layout per Activity (Vendors).
Figure 3.4 Defining Screen Layout per Transaction (Vendors)

87 Vendor Accounts
On the resulting screen (Figure 3.4), you will see the listing of various transactions like create
vendor (accounting), change vendor (accounting), delete vendor (accounting), create vendor
(purchasing), create customer (centrally) and so on. You may double-click on the required
transaction, and change the field status, as required, on the ‘Change View “Transaction-
Dependent Field Selection (Vendor)”: Details’ screen.
We will not be discussing (a) change message control, (b) define accounting clerks and (c)
define industries, again in this Section, as we have already discussed them in Section 2.1.1.4,
2.1.1.5 and 2.1.1.6 (of Chapter 2) respectively, when we discussed the customer accounts.
You do not need to repeat defining industries. However, you can define the accounting clerks
who will handle vendor accounts, using the menu path SAP Customizing Implementation
Guide > Financial Accounting > Accounts Receivable and Accounts Payable > Vendor Accounts
> Master Data > Preparations for Creating Vendor Master Data > Define Accounting Clerks.
Similarly, you can change the standard message control (or define new) by using the menu
path: SAP Customizing Implementation Guide > Financial Accounting > Accounts Receivable
and Accounts Payable > Vendor Accounts > Master Data > Preparations for Creating Vendor
Master Data > Change Message Control for Vendor Master Data.
With this we are now ready to define the number ranges for vendor master records.
3.1.1.4 Create Number Ranges for Vendor Accounts
As with number ranges for customer accounts, you will use this configuration step to maintain
the required number range intervals for the vendor accounts. You can have several number
ranges with each range being allocated to a single account group, or have fewer number
ranges wherein you will allocate more than one account group with the same number range.
Project Dolphin
BESTM wants numbering the vendor accounts similar to that of the customer accounts.
Accordingly, the project team wants to create six number ranges from B1 to B5, and B9 with
the specifications that B5 should be used for one-time vendors and B9 for external numbering
to accommodate the vendor accounts transferred from the external systems.
The configuration is similar to the one that we have discussed in Section 2.1.1.7 of Chapter 2
when we defined the number ranges for customer accounts. Use the menu path: SAP
Customizing Implementation Guide > Financial Accounting > Accounts Receivable and
Accounts Payable > Vendor Accounts > Master Data > Preparations for Creating Vendor
Master Data > Create Number Ranges for Vendor Accounts or Transaction XKN1 to create the
required number ranges (Figure 3.5). While defining, select ‘Ext’ check-box if you need to
denote one or more number ranges as external. For all the number ranges which are external,
you will need to supply the account number while creating the master records; for all other

88 Configuring SAP Accounts Receivable & Accounts Payable (SAP S/4HANA Finance)
cases, the system will automatically supply the number ranges, internally, from the respective
number range intervals.
Figure 3.5 Number Ranges for Vendor Accounts
Now that we have defined the required number ranges, the next step is to assign these
number ranges to the appropriate (vendor)account groups.
3.1.1.5 Assign Number Ranges to Vendor Account Groups
Use the menu path: SAP Customizing Implementation Guide > Financial Accounting >
Accounts Receivable and Accounts Payable > Vendor Accounts > Master Data > Preparations
for Creating Vendor Master Data > Assign Number Ranges to Vendor Account Groups or
Transaction XKN2 to assign the number ranges to the vendor account groups (Figure 3.6). As
already indicated, you can have a single number range assigned to more than one account
group, if required. For example, in the case of BESTM, we have assigned the number range
B3, B4 and B9 to more than one account group.
Figure 3.6 Assigning Number Ranges to Vendor Account Groups
With this, we are now ready define the sensitive fields for dual control.
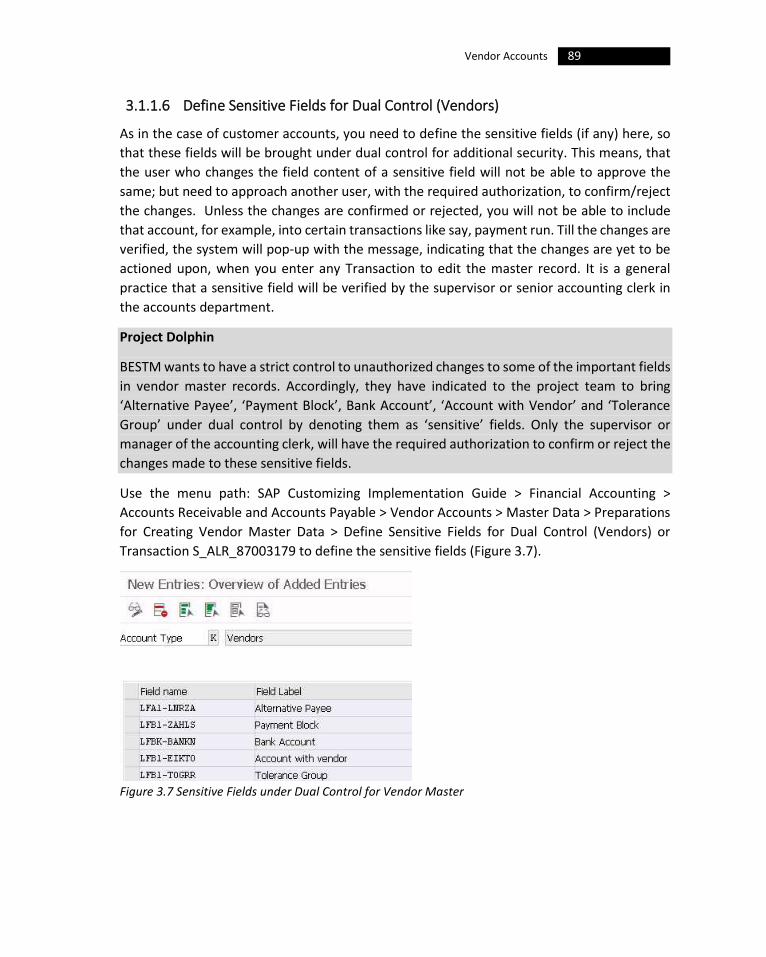
89 Vendor Accounts
3.1.1.6 Define Sensitive Fields for Dual Control (Vendors)
As in the case of customer accounts, you need to define the sensitive fields (if any) here, so
that these fields will be brought under dual control for additional security. This means, that
the user who changes the field content of a sensitive field will not be able to approve the
same; but need to approach another user, with the required authorization, to confirm/reject
the changes. Unless the changes are confirmed or rejected, you will not be able to include
that account, for example, into certain transactions like say, payment run. Till the changes are
verified, the system will pop-up with the message, indicating that the changes are yet to be
actioned upon, when you enter any Transaction to edit the master record. It is a general
practice that a sensitive field will be verified by the supervisor or senior accounting clerk in
the accounts department.
Project Dolphin
BESTM wants to have a strict control to unauthorized changes to some of the important fields
in vendor master records. Accordingly, they have indicated to the project team to bring
‘Alternative Payee’, ‘Payment Block’, Bank Account’, ‘Account with Vendor’ and ‘Tolerance
Group’ under dual control by denoting them as ‘sensitive’ fields. Only the supervisor or
manager of the accounting clerk, will have the required authorization to confirm or reject the
changes made to these sensitive fields.
Use the menu path: SAP Customizing Implementation Guide > Financial Accounting >
Accounts Receivable and Accounts Payable > Vendor Accounts > Master Data > Preparations
for Creating Vendor Master Data > Define Sensitive Fields for Dual Control (Vendors) or
Transaction S_ALR_87003179 to define the sensitive fields (Figure 3.7).
Figure 3.7 Sensitive Fields under Dual Control for Vendor Master
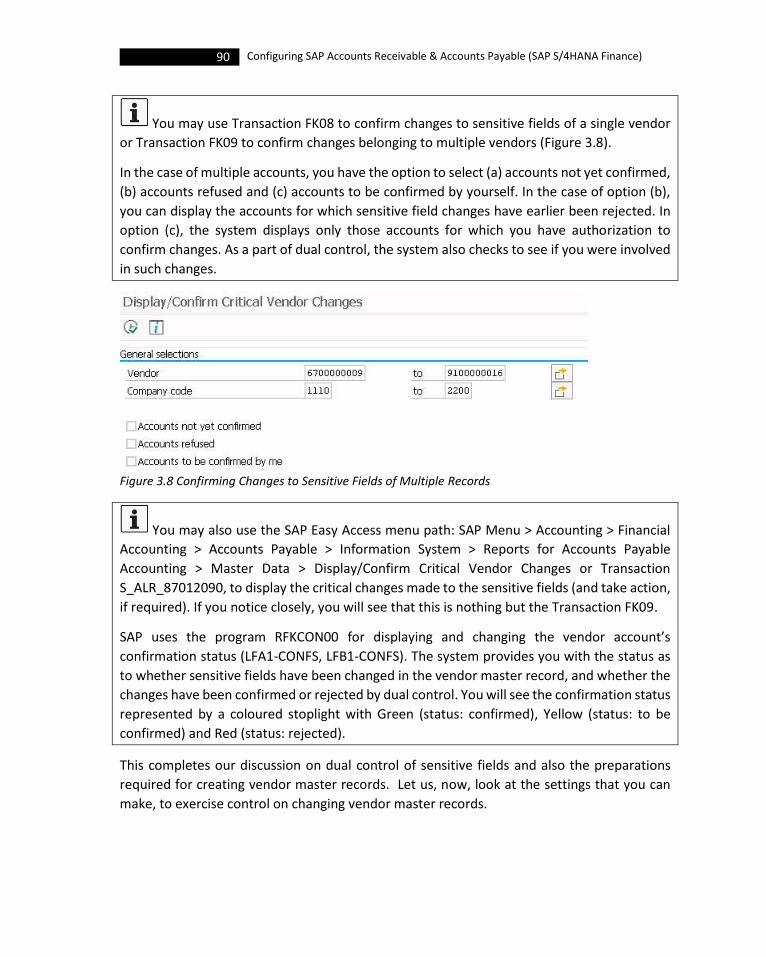
90 Configuring SAP Accounts Receivable & Accounts Payable (SAP S/4HANA Finance)
You may use Transaction FK08 to confirm changes to sensitive fields of a single vendor
or Transaction FK09 to confirm changes belonging to multiple vendors (Figure 3.8).
In the case of multiple accounts, you have the option to select (a) accounts not yet confirmed,
(b) accounts refused and (c) accounts to be confirmed by yourself. In the case of option (b),
you can display the accounts for which sensitive field changes have earlier been rejected. In
option (c), the system displays only those accounts for which you have authorization to
confirm changes. As a part of dual control, the system also checks to see if you were involved
in such changes.
Figure 3.8 Confirming Changes to Sensitive Fields of Multiple Records
You may also use the SAP Easy Access menu path: SAP Menu > Accounting > Financial
Accounting > Accounts Payable > Information System > Reports for Accounts Payable
Accounting > Master Data > Display/Confirm Critical Vendor Changes or Transaction
S_ALR_87012090, to display the critical changes made to the sensitive fields (and take action,
if required). If you notice closely, you will see that this is nothing but the Transaction FK09.
SAP uses the program RFKCON00 for displaying and changing the vendor account’s
confirmation status (LFA1-CONFS, LFB1-CONFS). The system provides you with the status as
to whether sensitive fields have been changed in the vendor master record, and whether the
changes have been confirmed or rejected by dual control. You will see the confirmation status
represented by a coloured stoplight with Green (status: confirmed), Yellow (status: to be
confirmed) and Red (status: rejected).
This completes our discussion on dual control of sensitive fields and also the preparations
required for creating vendor master records. Let us, now, look at the settings that you can
make, to exercise control on changing vendor master records.

91 Vendor Accounts
3.1.2 Preparations for Changing Vendor Master Data
This is exactly similar to that preparations for changing customer master data. SAP uses a
similar report, as that of customer, RFKABL00 to display changes to the vendor master record
data across various accounts. As in the case of customer accounts, first, you need to define
one or more field groups, and then in the second step you will assign the additional fields to
the field group(s) thus defined. Once done, when you run the report, you can include this field
group in the ‘select option’ so as to enable the program to display changes made to these
fields as well, besides the default display of, for example, date of change, person who has
made the changes etc. Also, by establishing suitable authorization, you can restrict the
changes to these fields.
Project Dolphin
BESTM management has indicated that they want to include additional fields Like ‘Alternative
Payee’, ‘House Bank’, ‘Reconciliation Account’, ‘ABC Indicator’, ‘Payment Block’ and ‘Interest
Indicator’ in logging the changes made by users while changing the vendor master records.
However, they have indicated that they do not want to exercise restricting the changes to
these fields as such action for some of the fields (‘Alternative Payee’, ‘House Bank’ etc) are
better handled by dual control of sensitive fields.
Let us start with the first step of defining the field group(s) for vendor master change.
3.1.2.1 Define Field Groups for Vendor Master Records
Define the required field group(s) by entering a key and a description for each field group.
Select the indicator ‘No authorization’, if you do not want the system to subject this group to
the authorization check when maintaining master data; in this case, the system uses this field
group only for selecting the fields via the report () for displaying changes.
To define the required field groups:
i. Use the menu path: SAP Customizing Implementation Guide > Financial Accounting >
Accounts Receivable and Accounts Payable > Vendor Accounts > Master Data >
Preparations for Changing Vendor Master Data > Define Field Groups for Vendor
Master Records.
ii. On the resulting screen, click on ‘New Entries’ and enter a 1 or 2-digit numeric
identifier for the new ‘Field group’, provide a ‘Description’ and select the ‘No
authorization’ check-box to prevent authorization checks on this field group when
changing the master records (Figure 3.9). ‘Save’ the details and create more field
groups, if required.

92 Configuring SAP Accounts Receivable & Accounts Payable (SAP S/4HANA Finance)
Figure 3.9 Field Group for Vendor Master Change Control
With the definition of field group, we are now ready assign individual fields (to the field group)
for which you want to show the changes made, while displaying the vendor master changes.
3.1.2.2 Group Fields for Vendor Master Records
Assign the required vendor master record fields to the field group(s) that you have defined in
the previous step. Once done, you can enter this field group in program RFKABL00 afterwards,
on the selection screen, to display the changes.
To include the fields to the field group:
i. Use the menu path: SAP Customizing Implementation Guide > Financial Accounting >
Accounts Receivable and Accounts Payable > Vendor Accounts > Master Data >
Preparations for Changing Vendor Master Data > Group Fields for Vendor Master
Records.
ii. On the resulting ‘Change View “Fields of the Vendor Field Groups”: Overview’ screen,
click on ‘New Entries’, enter the field group identifier (‘Field grp’) and add the vendor
master record fields (‘Fld name’) that you want to include in report RFKABL00 under
this field group. ‘Save’ when completed; the system brings up the ‘Field Label’ for
each of these fields (Figure 3.10).
Figure 3.10 Assigning Fields to Field Group for Vendor Master Change Control
As you have now defined the field group (10) and added the vendor master record fields to
that you can, now, use this field group in the selection screen of report RFKABL00. Use the
SAP Easy Access menu path: SAP Menu > Accounting > Financial Accounting > Accounts
Payable > Information System > Reports for Accounts Payable Accounting > Master Data >

93 Vendor Accounts
Display Changes to Vendors or Transaction S_ALR_87012089. On the resulting selection
screen, you may enter ‘Field group’ (10), among other entries (Figure 3.11).
Figure 3.11 Selection Screen of Report RFDABL00 Showing the Field Group
When you execute the report, the system brings up a list displaying (Figure 3.12) the changes
made to the fields, including the ones in the field group 10.
Figure 3.12 Report Output of RFKABL00 with List/Detail of Changes to Vendor Records

94 Configuring SAP Accounts Receivable & Accounts Payable (SAP S/4HANA Finance)
You can notice that the system is displaying the changes for the additional fields in the field
group 10 (for example, ‘Interest indic.’ And ‘Alternat. Payee’), besides the sensitive fields (if
any) for which there were changes in the vendor master record.
This completes our discussion on settings required to control changing of vendor master
records. Let us, now, see the deletion of vendor master records.
3.1.3 Delete Vendor Master Data
Using this configuration step, you can delete the vendor master records through the standard
SAP program SAPF019. The system deletes general vendor master data for vendors who are
not created as vendors through Purchasing in SAP MM. As discussed in Section 2.1.3 of
Chapter 2, you will be able to delete master records for accounts which do not have any
transaction data. The other conditions are similar to the deletion of customer master records.
To delete, use the menu path: SAP Customizing Implementation Guide > Financial Accounting
> Accounts Receivable and Accounts Payable > Vendor Accounts > Master Data > Delete
Vendor Master Data or Transaction OBR2. Maintain the required selection parameters on the
resulting screen and run the program. As you can see, you will be using the same program to
delete G/L and customer master records as well. Refer to Section 2.1.3 of Chapter 2 for
additional details on the program SAPF019.
This completes our discussion on preparations for creating / changing / deleting vendor
master records. Let is, now, see the settings required for vendor line items.
3.2 Line Items
The settings that are required to be configured for vendor line items, are similar to the ones
we have discussed for customers, and can be grouped into three categories viz., (1) display
open items, (2) open item processing and (3) correspondence.
Let us start with the settings for displaying open items, for vendors.
3.2.1 Display Line Items
In the case of ‘display open items’, you will have to make the settings for the line item display
using the ABAP List View (ALV). By default, the system displays the line items with the ALV.
However, if you do not wish to use ALV, you can continue to use line item display without ALV
as a modification. To enable this, you have to complete the settings listed under the
configuration step ‘Display Line Items without ALV’. You can access this IMG node through
the menu path: SAP Customizing Implementation Guide > Financial Accounting > Accounts
Receivable and Accounts Payable > Vendor Accounts > Line Items > Display Line Items >
Display Line Items without ALV.
95 Vendor Accounts
Project Dolphin
The project team has recommended to the BESTM Corporate to stick to the default and
standard line item display settings using the ABAP List View. Also, they have suggested not to
define additional fields for vendor line item display as that may result in performance issues.
Besides, they also of the view that no additional settings would be required than the default
ones, for processing open items.
You may use ‘Define Additional Fields for Line Item Display’ (menu path: SAP Customizing
Implementation Guide > Financial Accounting > Accounts Receivable and Accounts Payable >
Vendor Accounts > Line Items > Display Line Items > Define Additional Fields for Line Item
Display) to include additional fields (such as, ‘User’ or ‘Quantity’ etc) for display. However,
consider carefully whether you really need to enhance the line item display, as such
enhancements can result in performance issues since the system has to read more table
entries to bring up the display.
3.2.2 Open Item Processing
As in display of vendor line items, you may make additional settings for open item processing.
Follow the menu path: SAP Customizing Implementation Guide > Financial Accounting >
Accounts Receivable and Accounts Payable > Vendors Accounts > Line Items > Open Item
Processing, and complete the individual configuration steps there on. We have not configured
this, as BESTM wants to stick on to the default settings for the open item processing.
3.2.3 Correspondence
In the case of settings for correspondence, you can make new settings for correspondence
using the menu path: SAP Customizing Implementation Guide > Financial Accounting >
Accounts Receivable and Accounts Payable > Vendor Accounts > Line Items >
Correspondence, or check your existing settings to ensure completeness. We have already
discussed the settings for correspondence, when we configured the FI global settings. You can
check those settings, here, and make additional or new settings, if required.
3.2.3.1 Define Period Types for Vendors
The settings we have defined in Section 2.2.3.1 of Chapter 2, for customers, are valid as
‘period types’ for vendors as well. Use the menu path: SAP Customizing Implementation
Guide > Financial Accounting > Accounts Receivable and Accounts Payable > Customer
Accounts > Line Items > Correspondence > Define the ‘Period Types’ for Vendors, if you have
not created these keys, earlier. Refer Section 2.2.3.1 of Chapter 2, for the configuration steps
and how to use this key in vendor master records.

96 Configuring SAP Accounts Receivable & Accounts Payable (SAP S/4HANA Finance)
This completes our discussion on the settings required for line items. Let us move on to discuss
defining the overdue thresholds for vendor account groups.
3.3 Define Thresholds for Vendor Account Groups
Here, you can define a threshold (in percentage) to flag when an overdue payment to a vendor
should actually be termed as ‘critically overdue’. The system flags an overdue payable amount
as ‘critically overdue’, when the actual overdue payable amount to the total payable is equal
to or greater than the defined threshold. You can differentiate the settings, per company
code, and make that as more stringent or relaxed (called as ‘exceptional threshold’) that will
then override the ‘generic threshold’ defined for a particular account group.
Use the menu path: SAP Customizing Implementation Guide > Financial Accounting >
Accounts Receivable and Accounts Payable > Vendor Accounts > Overdue Payables > Define
Thresholds for Vendor Account Groups. On the resulting screen, define the required
thresholds per vendor group (and company code).
For example, as depicted in Figure 3.13, the ‘generic threshold’ for account group 0001 is 80%.
However, since there is another entry for the same account group with the specification of
company code (1110), the ‘company code-vendor account group’ entry of 70% is considered
as the ‘exceptional threshold’.
Figure 3.13 Overdue Thresholds for Vendor Account Groups
Now, consider a situation wherein the actual overdue payable amount is $7,690 against the
total payable amount of $10,000, for a vendor, who has been assigned with the account group
of 0001, in company code 1110:

97 Vendor Accounts
• When there is both a generic entry and also a (more stringent) company code-specific
entry, (for the account group 0001), with the overdue payable being 76.9%, the
system flags the vendor’s payable as ‘critically overdue’ based on the ‘exceptional
threshold’ definition (70%), even though the ‘generic threshold’ definition (80%) does
not make that as critically overdue.
• When there is no company code specific entry (for account group 0001), but only the
generic entry (80%), then, this overdue is not be considered as ‘critically overdue’ as
the actual overdue payable to the total payable is less than 80%.
This completes our discussion on settings that are required for vendor accounts.
3.4 Conclusion
You learned that, as in the case of customer accounts, you need to create one master record for each vendor account that you require in the system. You understood that both the financial accounting (FI-A/P) and the purchasing (SAP MM) departments of your organization use the same master records. You further understood that by creating and storing vendor master data centrally, you enable their access throughout the organization, thereby avoiding the need to enter the same information twice and also the inconsistencies in master data that may creep in if not maintained centrally.
You learned that a vendor, like a customer, can be a person (individual), an organization or a group, and a typical vendor master data is made up of three areas (segments): the general data, the company code data (FI area data) and the purchasing organization data (MM area data).
You learned that, as in customer master records, you need to complete certain pre-requisites
before you can create / change / delete master data for your vendors. You also learned about
the settings that you are required to configure for vendor line items: for displaying open
items, open item processing and for correspondence.
Finally, towards the end of the Chapter, you learned that you can define a threshold (in
percentage) to flag when an overdue payment to a vendor should actually be termed as
‘critically overdue’. Once defined, you learned that the system flags an overdue payable
amount as ‘critically overdue’, when the actual overdue payable amount to the total payable
is equal to or greater than the defined threshold. You also learned that you can differentiate
the settings, per company code, and make that as more stringent / relaxed (called as
‘exceptional threshold’) that will, then, override the ‘generic threshold’ defined for a
particular account group.
Let us, now, move on to discuss the settings that you need to make for some of the important
business transactions in both A/R and A/P. Let us start with incoming invoices / credit memos,
in the next Chapter.

4 Incoming Invoices/Credit Memos
here are a couple of tasks which you need to complete, for configuring ‘incoming
invoice’ / ‘credit memo’ business transaction, including making / checking document
settings, making / checking settings for document parking, defining terms of payment
and defining cash discount base for incoming invoices. The first task will be to make / check
the document settings.
4.1 Make and Check Document Settings
Towards checking and making document settings for incoming invoices / credit memos, you
need to complete the following activities, if you have not already completed them while
configuring FI Global Settings:
• Define Document Types
• Define Posting Keys
• Validation in Accounting Documents
• Define Default Values
• Define Field Status Variants
• Assign Company Code to Field Status Variants
• Define Subscreens for Coding Blocks
• Screen Variants for Document Entry
• Substitution in Accounting Documents
• Define Text IDs for Documents and Line Items
• Define Line Layout for Document Posting Overview
• Define Line Layout for Document Change/Display
• Select Standard Line Layout for Document Change/Display
• Document Change Rules, Document Header
• Maintain Fast Entry Screens for G/L Account Items
If you have already made these settings while configuring FI global settings, you can
check them, here.
T
100 Configuring SAP Accounts Receivable & Accounts Payable (SAP S/4HANA Finance)
Let us start with the definition of document types.
4.1.1 Define Document Types As you are aware, the ‘document type’, in SAP, is used to classify accounting documents and
distinguish between business transactions to be posted. Entered in the document header, it
applies to the whole document. You define your document types at the client level. You will
specify a number range key for each document type. You create the desired number range
intervals, for each number range key based on the company code.
A document type helps to:
• Differentiate between business transactions: you can always tell what type of
business transaction is involved, as the document type is shown for every line item.
You can also use the document type for evaluation purposes.
• Control the posting to the appropriate account types: the document type controls as
to what type of account namely vendor, customer, or G/L, you can post to.
• Assign document numbers: you will assign a number range to every document type.
The document numbers are chosen from this number range. You can use the same
number range for several document types.
• Apply the vendor net procedure: the applicable discount and the net amount are
calculated (and posted) when the vendor invoice is posted.
You can establish the link between the original document and the processing document,
by storing them correctly. If you want to store original documents (paper documents) along
with their corresponding processing documents (EDP documents) generated in the system,
then, store all them together with the same document type. If you want to store several
document types together, assign a separate number range to each document type. For
example, suppose you want to store the original invoice (say, CD-2019-44444) along with the
processing document (8888899999) posted in SAP for invoice posting. You just need to enter
CD-2019-44444 in the ‘Reference’ field of the document 8888899999. In doing so, you can
always cross-reference these two documents, besides using the ‘Reference’ field in the search
criteria.
Store your original documents (paper documents) under the EDP number of the SAP System.
You should write the EDP document number (say, 8888899999) on the original document
(say, CD-2019-44444). In this way, the original document for a business transaction can be
found at any time.
As in other cases, SAP comes delivered with several (40+, actually) standard document types
(Table 4.1), that you can use as such or change to create new. The standard document types
cover business transactions relating to G/L accounting, A/R, A/P, AA and consolidation in SAP

101 Incoming Invoices/Credit Memos
FI. In SAP MM & SD, there are standard documents to meet business transactions involving
GR/IR, invoicing (incoming and outgoing), stock taking (inventory) etc.
Type Description Type Description
AA Asset Posting KR Vendor Invoice
AB Journal Entry KZ Vendor payment
AD Accruals/Deferrals ML ML Settlement
AF Depreciation Pstngs PR Price Change
AN Net Asset Posting RA Sub.Cred.Memo Stlmt
AP Periodic asset post RE Invoice - Gross
CC Sec. Cost CrossComp. RK Invoice Reduction
CL CL/OP FY Postings RN Invoice - Net
CO Secondary Cost RV Billing doc.transfer
DA Customer document SA G/L Account Document
DG Customer credit memo SB G/L Account Posting
DR Customer invoice SC Transfer P&L to B/S
DV Customer interests SE Inventory Postings
DZ Customer Payment SK Cash Document
ER Manual Expense Travel SU Intercomp./Clearing
EU Euro Rounding Diff. UE Data Transfer
EX External Number WA Goods Issue
KA Vendor Document WE Goods Receipt
KG Vendor Credit Memo WI Inventory Document
KN Net vendors WL Goods Issue/Delivery
KP Account maintenance WN Net Goods Receipt Table 4:1 Default Document Types
If you want to delete any of the already available document types in system, check if it
is currently being used. If already in use, you will not be able to delete those document types.
Project Dolphin
BESTM does not want to define any new document type, and has decided to use the standard
ones available in the system. It has also been decided to use the same document type for
document reversals. To restrict the access to the closing operations, BESTM wants to make
use of user authorization through document type CL. To make cross-verification easier, the
project team has recommended to the BESTM management to make the ‘Reference’ field
mandatory for data input for invoice postings (customer and vendor) and credit memos.
Let us configure the settings relating to document types.
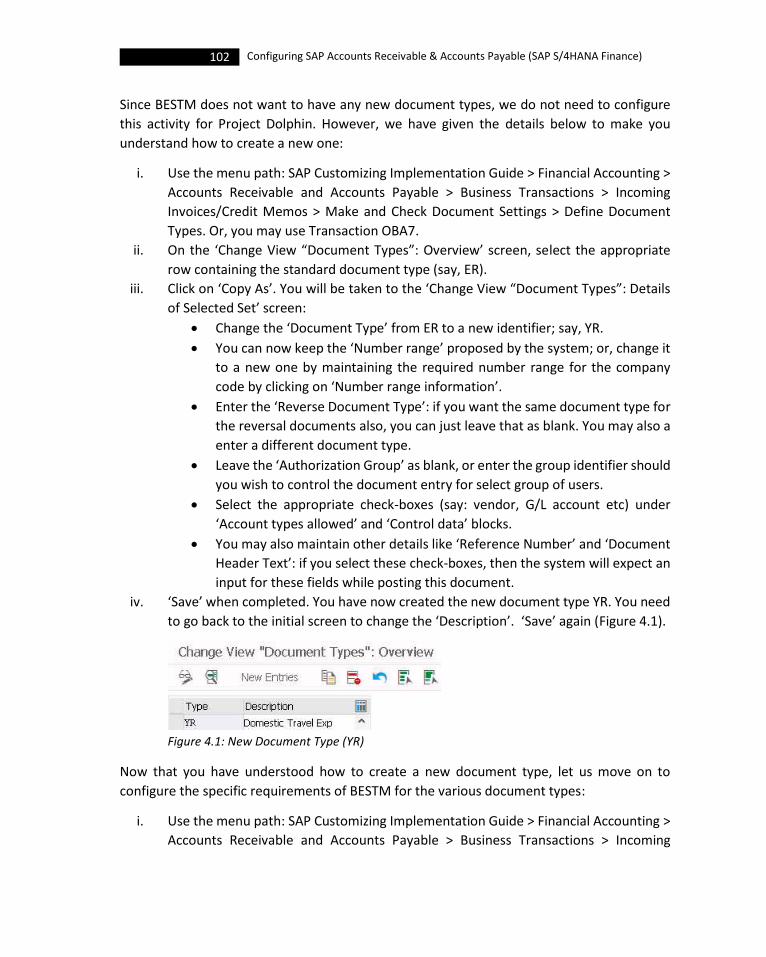
102 Configuring SAP Accounts Receivable & Accounts Payable (SAP S/4HANA Finance)
Since BESTM does not want to have any new document types, we do not need to configure
this activity for Project Dolphin. However, we have given the details below to make you
understand how to create a new one:
i. Use the menu path: SAP Customizing Implementation Guide > Financial Accounting >
Accounts Receivable and Accounts Payable > Business Transactions > Incoming
Invoices/Credit Memos > Make and Check Document Settings > Define Document
Types. Or, you may use Transaction OBA7.
ii. On the ‘Change View “Document Types”: Overview’ screen, select the appropriate
row containing the standard document type (say, ER).
iii. Click on ‘Copy As’. You will be taken to the ‘Change View “Document Types”: Details
of Selected Set’ screen:
• Change the ‘Document Type’ from ER to a new identifier; say, YR.
• You can now keep the ‘Number range’ proposed by the system; or, change it
to a new one by maintaining the required number range for the company
code by clicking on ‘Number range information’.
• Enter the ‘Reverse Document Type’: if you want the same document type for
the reversal documents also, you can just leave that as blank. You may also a
enter a different document type.
• Leave the ‘Authorization Group’ as blank, or enter the group identifier should
you wish to control the document entry for select group of users.
• Select the appropriate check-boxes (say: vendor, G/L account etc) under
‘Account types allowed’ and ‘Control data’ blocks.
• You may also maintain other details like ‘Reference Number’ and ‘Document
Header Text’: if you select these check-boxes, then the system will expect an
input for these fields while posting this document.
iv. ‘Save’ when completed. You have now created the new document type YR. You need
to go back to the initial screen to change the ‘Description’. ‘Save’ again (Figure 4.1).
Figure 4.1: New Document Type (YR)
Now that you have understood how to create a new document type, let us move on to
configure the specific requirements of BESTM for the various document types:
i. Use the menu path: SAP Customizing Implementation Guide > Financial Accounting >
Accounts Receivable and Accounts Payable > Business Transactions > Incoming
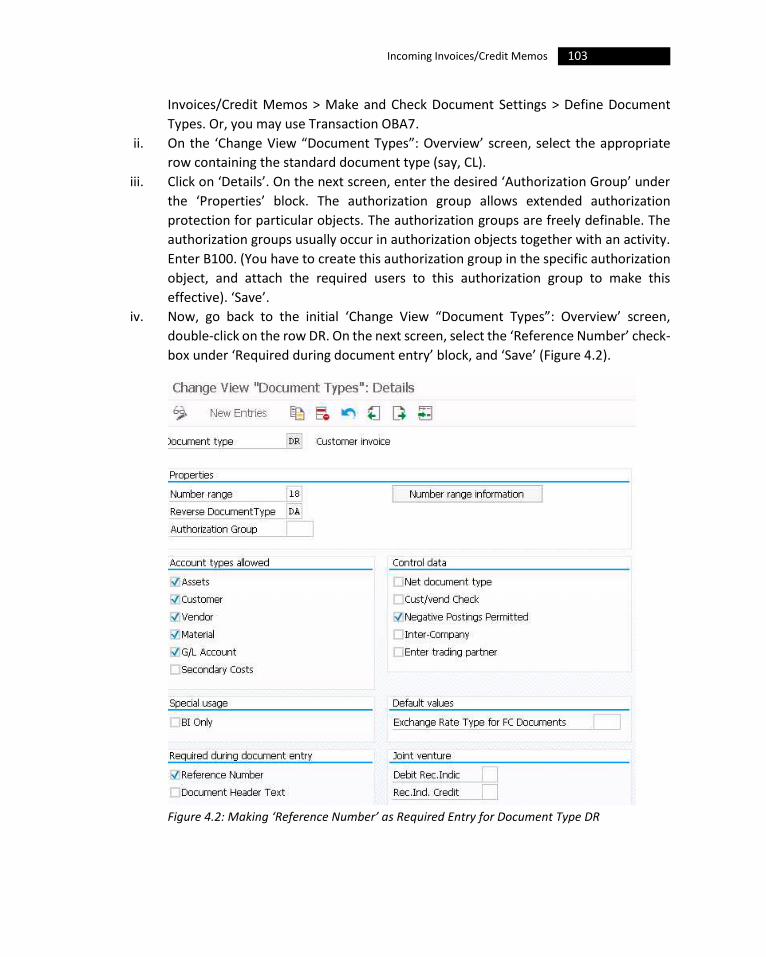
103 Incoming Invoices/Credit Memos
Invoices/Credit Memos > Make and Check Document Settings > Define Document
Types. Or, you may use Transaction OBA7.
ii. On the ‘Change View “Document Types”: Overview’ screen, select the appropriate
row containing the standard document type (say, CL).
iii. Click on ‘Details’. On the next screen, enter the desired ‘Authorization Group’ under
the ‘Properties’ block. The authorization group allows extended authorization
protection for particular objects. The authorization groups are freely definable. The
authorization groups usually occur in authorization objects together with an activity.
Enter B100. (You have to create this authorization group in the specific authorization
object, and attach the required users to this authorization group to make this
effective). ‘Save’.
iv. Now, go back to the initial ‘Change View “Document Types”: Overview’ screen,
double-click on the row DR. On the next screen, select the ‘Reference Number’ check-
box under ‘Required during document entry’ block, and ‘Save’ (Figure 4.2).
Figure 4.2: Making ‘Reference Number’ as Required Entry for Document Type DR

104 Configuring SAP Accounts Receivable & Accounts Payable (SAP S/4HANA Finance)
v. Repeat the steps and select the ‘Reference Number’ check-box for the remaining
document types (KR, DG and KG).
You have now made the ‘Reference Number’ (displayed as ‘Reference’ in the document
header) as a mandatory field for data entry for document types DR, KR, DG and KG as required
by BESTM management. With this let us move on to discuss the posting keys.
4.1.2 Define Posting Keys The ‘posting key’ controls how a line item is entered and processed in a document. You will
specify a posting key, for each of the line items in a document. For each posting key, you will
define (a) which side of an account it can post to, (b) which type of account it can post to and
(c) which fields the system should display on the entry screen and whether an entry must be
made (field status). SAP comes delivered with several standard posting keys (Table 4.2).
Posting Key
Name Cr/Dr Indicator
A/c Type Reversal Key
01 Invoice Debit Customer (D) 12
02 Reverse Credit Memo Debit Customer (D) 11
03 Bank Charges Debit Customer (D) 13
04 Other receivables Debit Customer (D) 14
05 Outgoing payment Debit Customer (D) 15
06 Payment difference Debit Customer (D) 16
07 Other clearing Debit Customer (D) 17
08 Payment clearing Debit Customer (D) 18
09 Special G/L debit Debit Customer (D) 19
0A Bill.doc. Deb Debit Customer (D) 1A
0B CH Cancel.Cred.memoD Debit Customer (D) 1B
0C CH Clearing Deb Debit Customer (D) 1C
0X CH Clearing Cred Debit Customer (D) 1X
0Y CH Credit memo Cred Debit Customer (D) 1Y
0Z CH Cancel.BillDocDeb Debit Customer (D) 1Z
11 Credit memo Credit Customer (D) 02
12 Reverse invoice Credit Customer (D) 01
13 Reverse charges Credit Customer (D) 03
14 Other payables Credit Customer (D) 04
15 Incoming payment Credit Customer (D) 05
16 Payment difference Credit Customer (D) 06
17 Other clearing Credit Customer (D) 07
18 Payment clearing Credit Customer (D) 08
19 Special G/L credit Credit Customer (D) 09
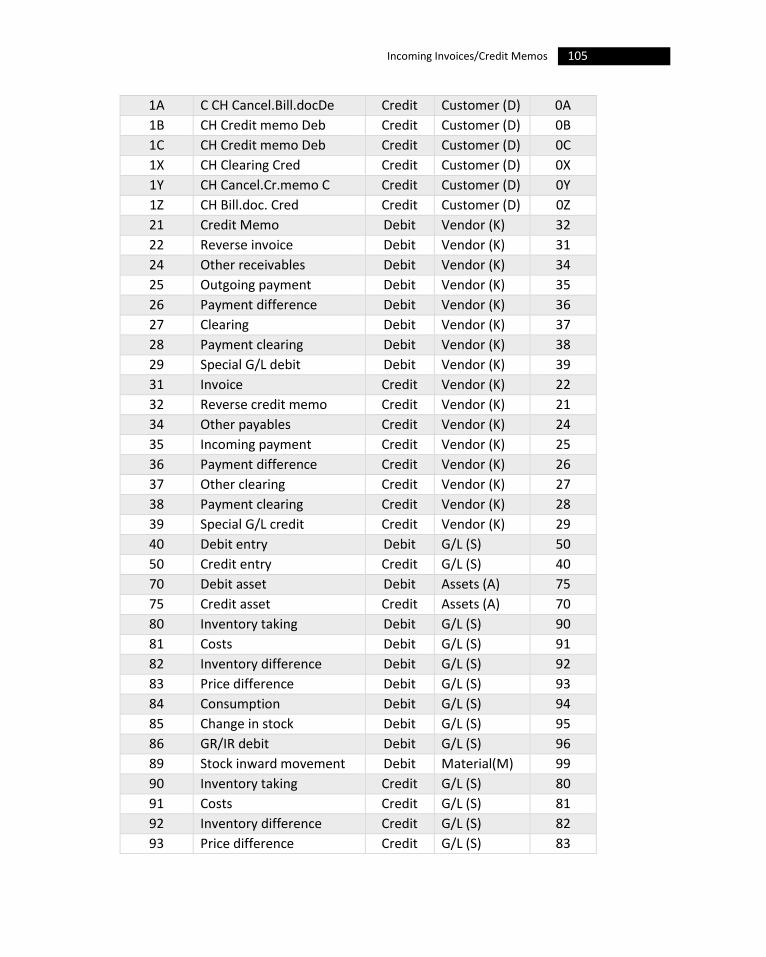
105 Incoming Invoices/Credit Memos
1A C CH Cancel.Bill.docDe Credit Customer (D) 0A
1B CH Credit memo Deb Credit Customer (D) 0B
1C CH Credit memo Deb Credit Customer (D) 0C
1X CH Clearing Cred Credit Customer (D) 0X
1Y CH Cancel.Cr.memo C Credit Customer (D) 0Y
1Z CH Bill.doc. Cred Credit Customer (D) 0Z
21 Credit Memo Debit Vendor (K) 32
22 Reverse invoice Debit Vendor (K) 31
24 Other receivables Debit Vendor (K) 34
25 Outgoing payment Debit Vendor (K) 35
26 Payment difference Debit Vendor (K) 36
27 Clearing Debit Vendor (K) 37
28 Payment clearing Debit Vendor (K) 38
29 Special G/L debit Debit Vendor (K) 39
31 Invoice Credit Vendor (K) 22
32 Reverse credit memo Credit Vendor (K) 21
34 Other payables Credit Vendor (K) 24
35 Incoming payment Credit Vendor (K) 25
36 Payment difference Credit Vendor (K) 26
37 Other clearing Credit Vendor (K) 27
38 Payment clearing Credit Vendor (K) 28
39 Special G/L credit Credit Vendor (K) 29
40 Debit entry Debit G/L (S) 50
50 Credit entry Credit G/L (S) 40
70 Debit asset Debit Assets (A) 75
75 Credit asset Credit Assets (A) 70
80 Inventory taking Debit G/L (S) 90
81 Costs Debit G/L (S) 91
82 Inventory difference Debit G/L (S) 92
83 Price difference Debit G/L (S) 93
84 Consumption Debit G/L (S) 94
85 Change in stock Debit G/L (S) 95
86 GR/IR debit Debit G/L (S) 96
89 Stock inward movement Debit Material(M) 99
90 Inventory taking Credit G/L (S) 80
91 Costs Credit G/L (S) 81
92 Inventory difference Credit G/L (S) 82
93 Price difference Credit G/L (S) 83
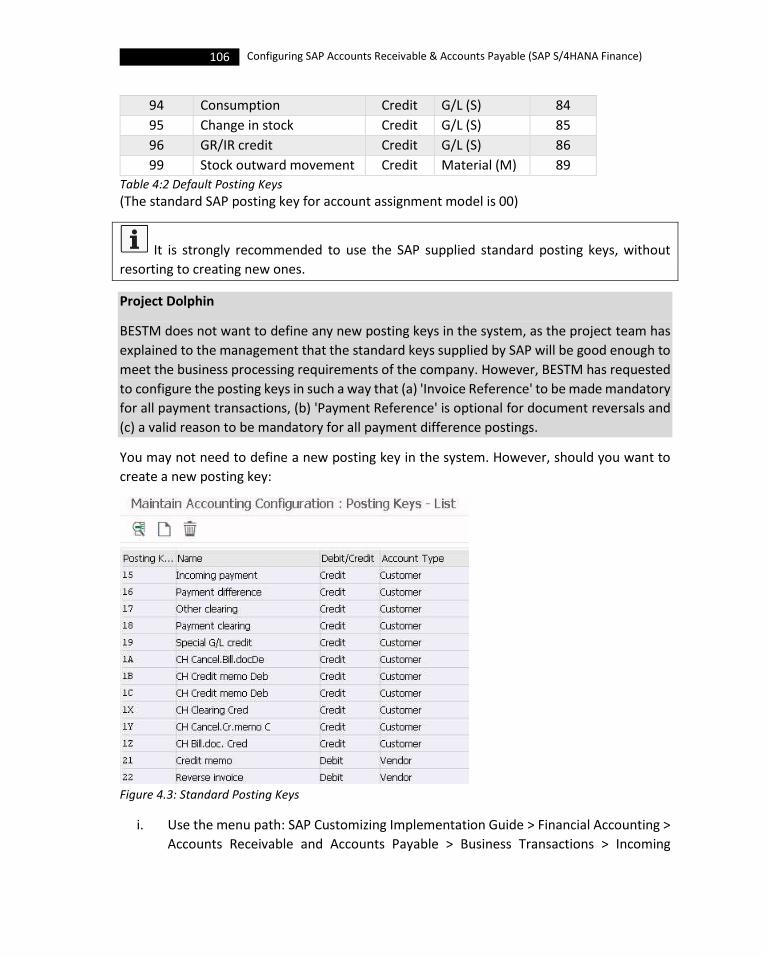
106 Configuring SAP Accounts Receivable & Accounts Payable (SAP S/4HANA Finance)
94 Consumption Credit G/L (S) 84
95 Change in stock Credit G/L (S) 85
96 GR/IR credit Credit G/L (S) 86
99 Stock outward movement Credit Material (M) 89
Table 4:2 Default Posting Keys
(The standard SAP posting key for account assignment model is 00)
It is strongly recommended to use the SAP supplied standard posting keys, without
resorting to creating new ones.
Project Dolphin
BESTM does not want to define any new posting keys in the system, as the project team has
explained to the management that the standard keys supplied by SAP will be good enough to
meet the business processing requirements of the company. However, BESTM has requested
to configure the posting keys in such a way that (a) 'Invoice Reference' to be made mandatory
for all payment transactions, (b) 'Payment Reference' is optional for document reversals and
(c) a valid reason to be mandatory for all payment difference postings.
You may not need to define a new posting key in the system. However, should you want to
create a new posting key:
Figure 4.3: Standard Posting Keys
i. Use the menu path: SAP Customizing Implementation Guide > Financial Accounting >
Accounts Receivable and Accounts Payable > Business Transactions > Incoming

107 Incoming Invoices/Credit Memos
Invoices/Credit Memos > Make and Check Document Settings > Define Posting Keys.
Or, you may use Transaction OB41.
ii. On the ‘Maintain Accounting Configuration: Posting Keys – List’ screen, you will see
the list of SAP supplied standard posting keys that are already available in the system
(Figure 4.3), arranged according to the account type.
iii. Double-click on any of the rows, to see the details of the configuration settings for
that posting key (Figure 4.4) on the ‘Maintain Accounting Configuration: Posting Keys
– Details Screen’:
Figure 4.4: Settings for a Posting Key
• You will see the ‘Debit/credit Indicator’ indicating to which side of the
account the posting key posts to.
• You will also see the ‘Account type’ indicating to which account, the key posts
to. Each posting key can be used for a specific account type. In setting the
account type indicator, you specify whether the document type is valid for
asset accounts (A), material accounts (M), customer accounts (D), vendor
accounts (K), or G/L accounts (S).
• You will see other details including the ‘Reversal Posting Key’ and whether
this relates to ‘Payment Transaction’.
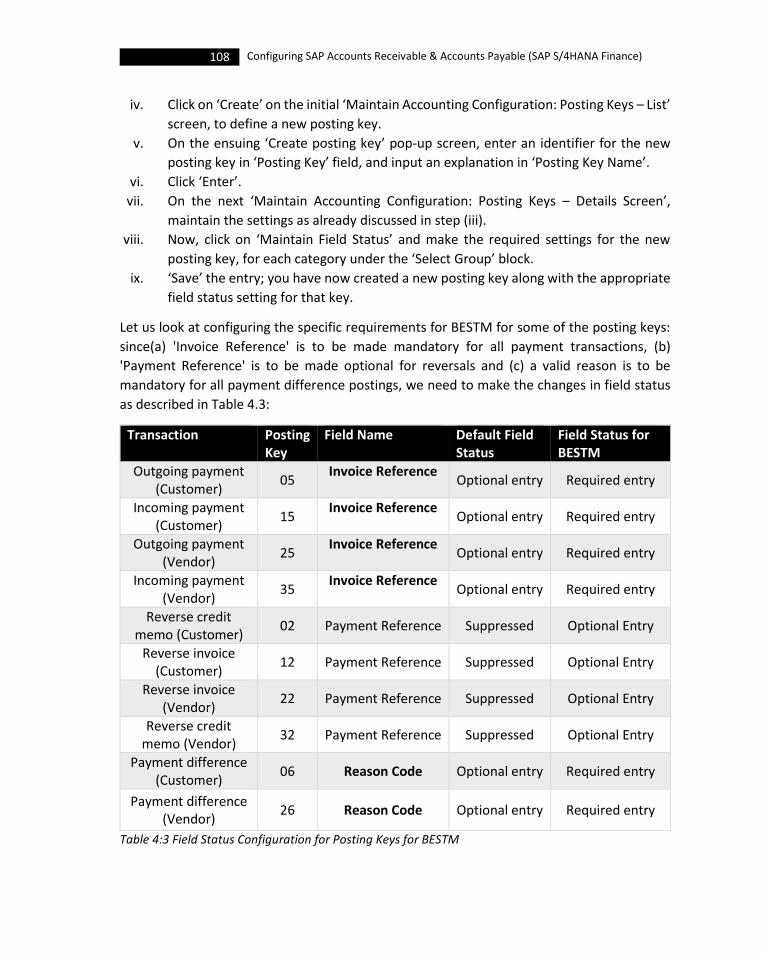
108 Configuring SAP Accounts Receivable & Accounts Payable (SAP S/4HANA Finance)
iv. Click on ‘Create’ on the initial ‘Maintain Accounting Configuration: Posting Keys – List’
screen, to define a new posting key.
v. On the ensuing ‘Create posting key’ pop-up screen, enter an identifier for the new
posting key in ‘Posting Key’ field, and input an explanation in ‘Posting Key Name’.
vi. Click ‘Enter’.
vii. On the next ‘Maintain Accounting Configuration: Posting Keys – Details Screen’,
maintain the settings as already discussed in step (iii).
viii. Now, click on ‘Maintain Field Status’ and make the required settings for the new
posting key, for each category under the ‘Select Group’ block.
ix. ‘Save’ the entry; you have now created a new posting key along with the appropriate
field status setting for that key.
Let us look at configuring the specific requirements for BESTM for some of the posting keys:
since(a) 'Invoice Reference' is to be made mandatory for all payment transactions, (b)
'Payment Reference' is to be made optional for reversals and (c) a valid reason is to be
mandatory for all payment difference postings, we need to make the changes in field status
as described in Table 4.3:
Transaction Posting Key
Field Name Default Field Status
Field Status for BESTM
Outgoing payment (Customer)
05 Invoice Reference
Optional entry Required entry
Incoming payment (Customer)
15 Invoice Reference
Optional entry Required entry
Outgoing payment (Vendor)
25 Invoice Reference
Optional entry Required entry
Incoming payment (Vendor)
35 Invoice Reference
Optional entry Required entry
Reverse credit memo (Customer)
02 Payment Reference Suppressed Optional Entry
Reverse invoice (Customer)
12 Payment Reference Suppressed Optional Entry
Reverse invoice (Vendor)
22 Payment Reference Suppressed Optional Entry
Reverse credit memo (Vendor)
32 Payment Reference Suppressed Optional Entry
Payment difference (Customer)
06 Reason Code Optional entry Required entry
Payment difference (Vendor)
26 Reason Code Optional entry Required entry
Table 4:3 Field Status Configuration for Posting Keys for BESTM
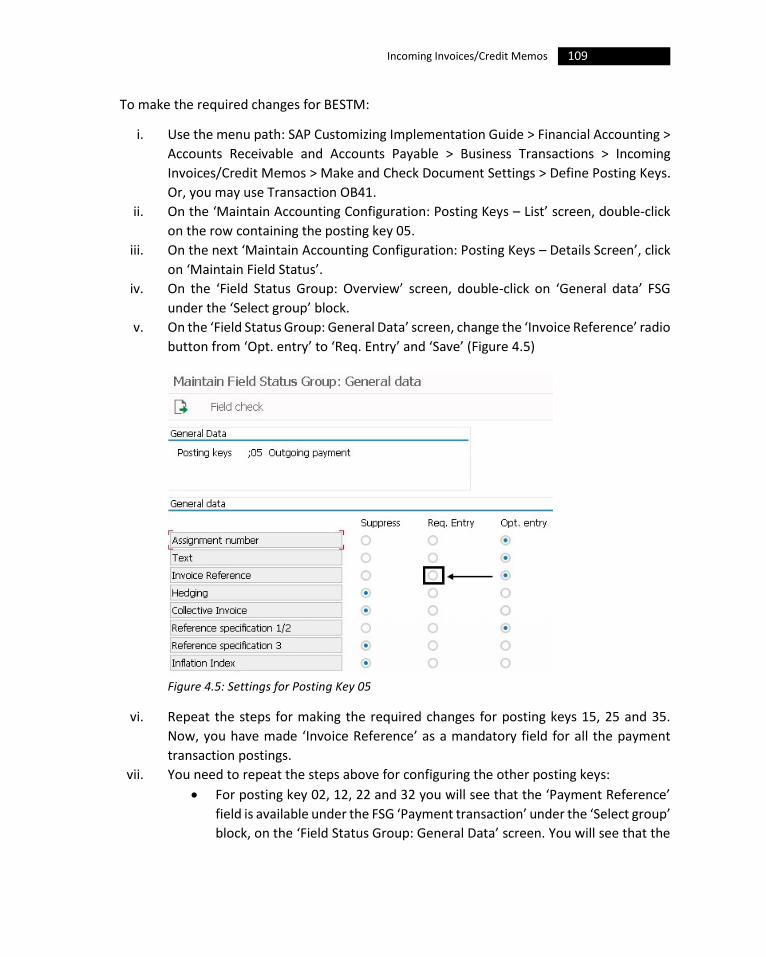
109 Incoming Invoices/Credit Memos
To make the required changes for BESTM:
i. Use the menu path: SAP Customizing Implementation Guide > Financial Accounting >
Accounts Receivable and Accounts Payable > Business Transactions > Incoming
Invoices/Credit Memos > Make and Check Document Settings > Define Posting Keys.
Or, you may use Transaction OB41.
ii. On the ‘Maintain Accounting Configuration: Posting Keys – List’ screen, double-click
on the row containing the posting key 05.
iii. On the next ‘Maintain Accounting Configuration: Posting Keys – Details Screen’, click
on ‘Maintain Field Status’.
iv. On the ‘Field Status Group: Overview’ screen, double-click on ‘General data’ FSG
under the ‘Select group’ block.
v. On the ‘Field Status Group: General Data’ screen, change the ‘Invoice Reference’ radio
button from ‘Opt. entry’ to ‘Req. Entry’ and ‘Save’ (Figure 4.5)
Figure 4.5: Settings for Posting Key 05
vi. Repeat the steps for making the required changes for posting keys 15, 25 and 35.
Now, you have made ‘Invoice Reference’ as a mandatory field for all the payment
transaction postings.
vii. You need to repeat the steps above for configuring the other posting keys:
• For posting key 02, 12, 22 and 32 you will see that the ‘Payment Reference’
field is available under the FSG ‘Payment transaction’ under the ‘Select group’
block, on the ‘Field Status Group: General Data’ screen. You will see that the

110 Configuring SAP Accounts Receivable & Accounts Payable (SAP S/4HANA Finance)
field ‘Payment Reference’ is having a default field status as ‘Suppress’; you
need to change that to ‘Opt. entry’ (Figure 4.6)
Figure 4.6: Settings for Posting Key 02
• For posting keys 06 and 26, we need to make the field ‘Reason Code’ as a
mandatory for input.
Figure 4.7: Field Status Settings for Posting Key 06
You will see that this field is available under the FSG ‘Payment transaction’
under the ‘Select group’ block, on the ‘Field Status Group: General Data’
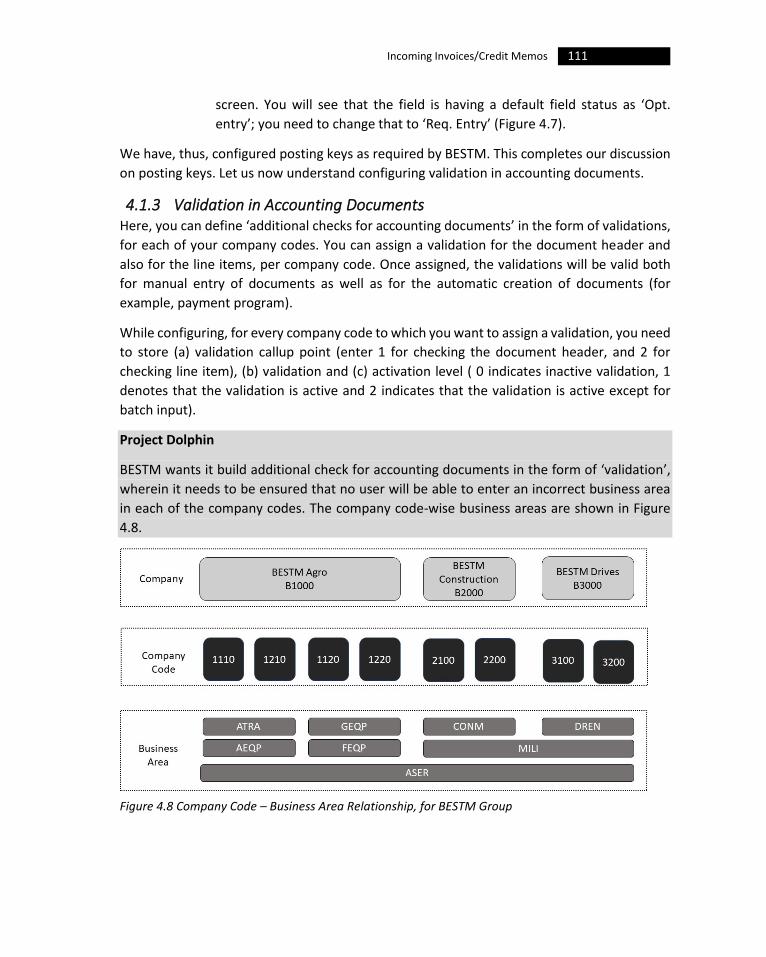
111 Incoming Invoices/Credit Memos
screen. You will see that the field is having a default field status as ‘Opt.
entry’; you need to change that to ‘Req. Entry’ (Figure 4.7).
We have, thus, configured posting keys as required by BESTM. This completes our discussion
on posting keys. Let us now understand configuring validation in accounting documents.
4.1.3 Validation in Accounting Documents Here, you can define ‘additional checks for accounting documents’ in the form of validations,
for each of your company codes. You can assign a validation for the document header and
also for the line items, per company code. Once assigned, the validations will be valid both
for manual entry of documents as well as for the automatic creation of documents (for
example, payment program).
While configuring, for every company code to which you want to assign a validation, you need
to store (a) validation callup point (enter 1 for checking the document header, and 2 for
checking line item), (b) validation and (c) activation level ( 0 indicates inactive validation, 1
denotes that the validation is active and 2 indicates that the validation is active except for
batch input).
Project Dolphin
BESTM wants it build additional check for accounting documents in the form of ‘validation’,
wherein it needs to be ensured that no user will be able to enter an incorrect business area
in each of the company codes. The company code-wise business areas are shown in Figure
4.8.
Figure 4.8 Company Code – Business Area Relationship, for BESTM Group
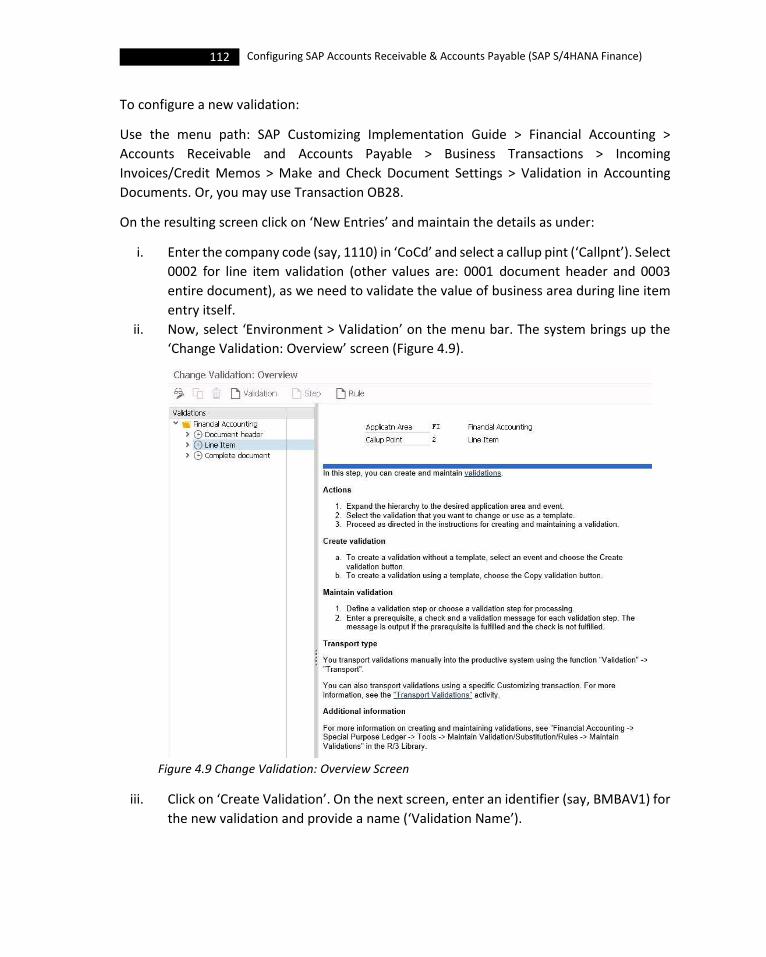
112 Configuring SAP Accounts Receivable & Accounts Payable (SAP S/4HANA Finance)
To configure a new validation:
Use the menu path: SAP Customizing Implementation Guide > Financial Accounting >
Accounts Receivable and Accounts Payable > Business Transactions > Incoming
Invoices/Credit Memos > Make and Check Document Settings > Validation in Accounting
Documents. Or, you may use Transaction OB28.
On the resulting screen click on ‘New Entries’ and maintain the details as under:
i. Enter the company code (say, 1110) in ‘CoCd’ and select a callup pint (‘Callpnt’). Select
0002 for line item validation (other values are: 0001 document header and 0003
entire document), as we need to validate the value of business area during line item
entry itself.
ii. Now, select ‘Environment > Validation’ on the menu bar. The system brings up the
‘Change Validation: Overview’ screen (Figure 4.9).
Figure 4.9 Change Validation: Overview Screen
iii. Click on ‘Create Validation’. On the next screen, enter an identifier (say, BMBAV1) for
the new validation and provide a name (‘Validation Name’).
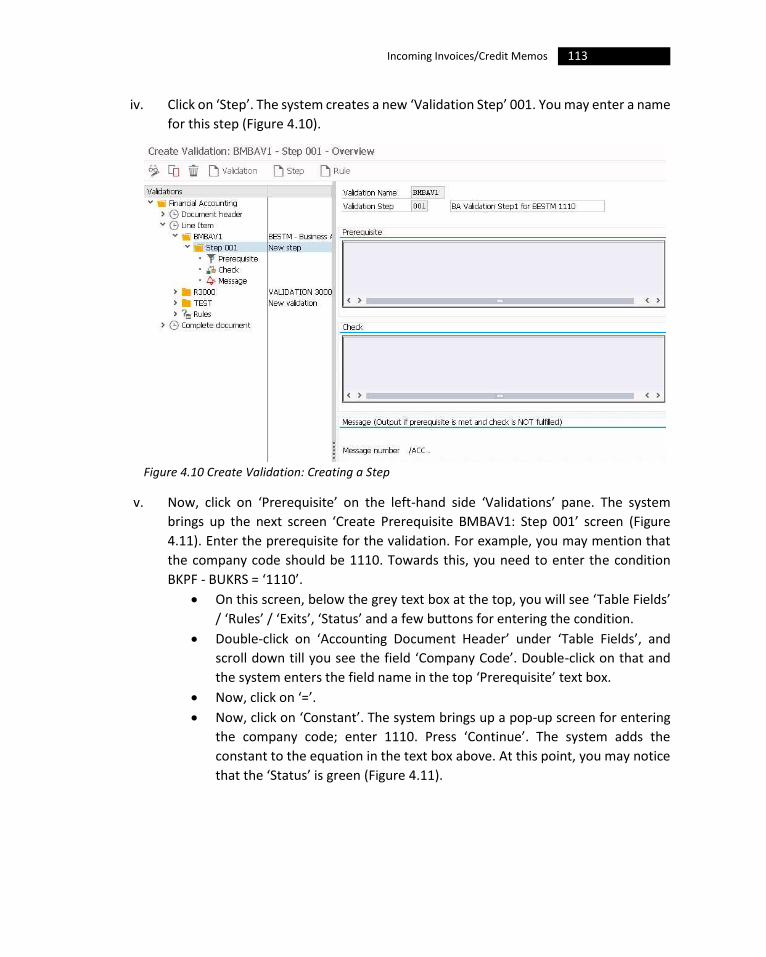
113 Incoming Invoices/Credit Memos
iv. Click on ‘Step’. The system creates a new ‘Validation Step’ 001. You may enter a name
for this step (Figure 4.10).
Figure 4.10 Create Validation: Creating a Step
v. Now, click on ‘Prerequisite’ on the left-hand side ‘Validations’ pane. The system
brings up the next screen ‘Create Prerequisite BMBAV1: Step 001’ screen (Figure
4.11). Enter the prerequisite for the validation. For example, you may mention that
the company code should be 1110. Towards this, you need to enter the condition
BKPF - BUKRS = ‘1110’.
• On this screen, below the grey text box at the top, you will see ‘Table Fields’
/ ‘Rules’ / ‘Exits’, ‘Status’ and a few buttons for entering the condition.
• Double-click on ‘Accounting Document Header’ under ‘Table Fields’, and
scroll down till you see the field ‘Company Code’. Double-click on that and
the system enters the field name in the top ‘Prerequisite’ text box.
• Now, click on ‘=’.
• Now, click on ‘Constant’. The system brings up a pop-up screen for entering
the company code; enter 1110. Press ‘Continue’. The system adds the
constant to the equation in the text box above. At this point, you may notice
that the ‘Status’ is green (Figure 4.11).
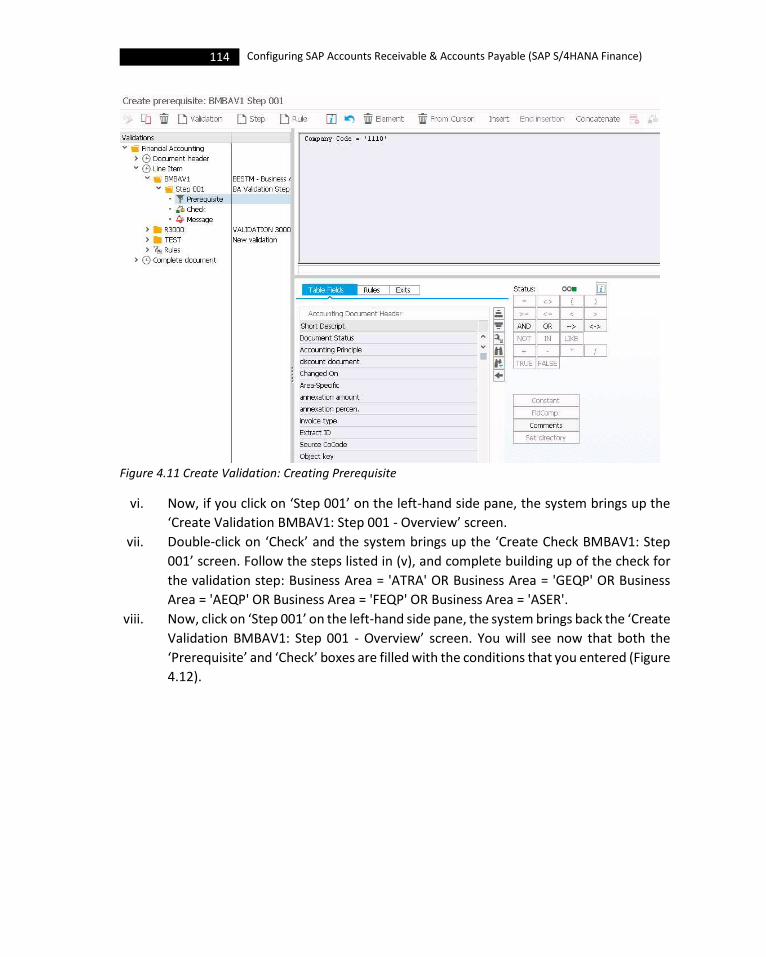
114 Configuring SAP Accounts Receivable & Accounts Payable (SAP S/4HANA Finance)
Figure 4.11 Create Validation: Creating Prerequisite
vi. Now, if you click on ‘Step 001’ on the left-hand side pane, the system brings up the
‘Create Validation BMBAV1: Step 001 - Overview’ screen.
vii. Double-click on ‘Check’ and the system brings up the ‘Create Check BMBAV1: Step
001’ screen. Follow the steps listed in (v), and complete building up of the check for
the validation step: Business Area = 'ATRA' OR Business Area = 'GEQP' OR Business
Area = 'AEQP' OR Business Area = 'FEQP' OR Business Area = 'ASER'.
viii. Now, click on ‘Step 001’ on the left-hand side pane, the system brings back the ‘Create
Validation BMBAV1: Step 001 - Overview’ screen. You will see now that both the
‘Prerequisite’ and ‘Check’ boxes are filled with the conditions that you entered (Figure
4.12).

115 Incoming Invoices/Credit Memos
Figure 4.12 Create Validation: Prerequisite and Check Configured
ix. The final step is to define the message, for the validation result. Double-click on
‘Message’ on the left-hand side pane.
x. You will reach the ‘Create Validation BMBAV1: Step 001 - Message’ screen. Under
‘Message (Output if prerequisite is met and check is NOT fulfilled)’ enter the ‘Message
number’ and adapt or create the appropriate message text.
xi. If you click on ‘Step 001’, now, on the left-hand side pane, the system brings back the
‘Create Validation BMBAV1: Step 001 - Overview’ screen, and you will see that all the
three requirements (prerequisite, check and message), for Step 001, have now been
completed.
xii. ‘Save’ the details (Figure 4.13).
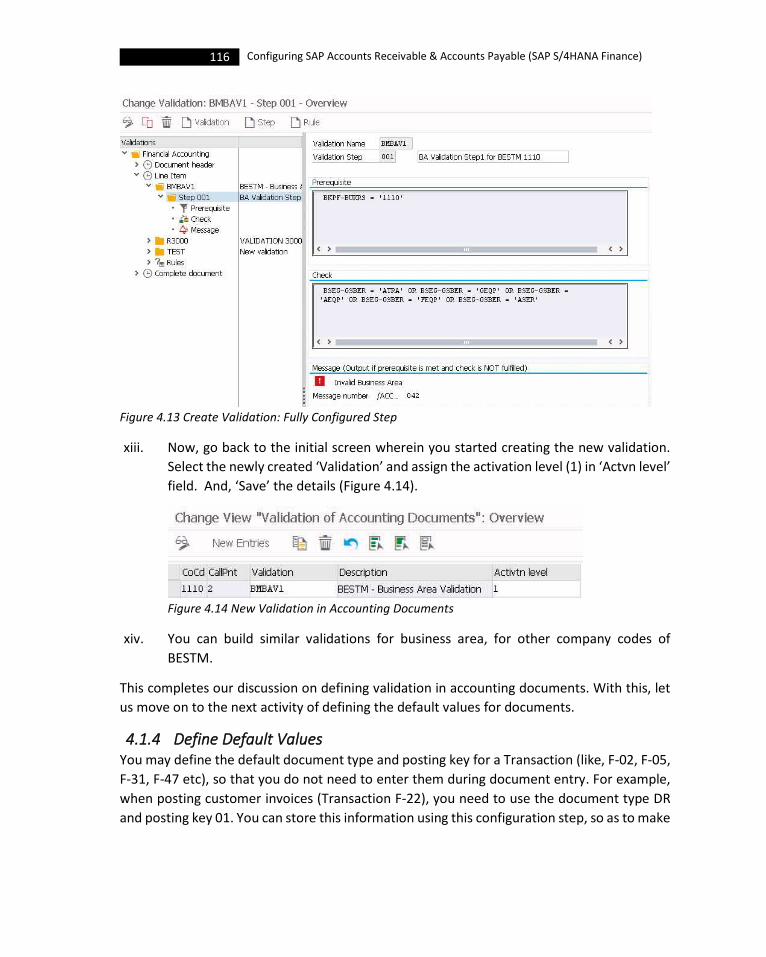
116 Configuring SAP Accounts Receivable & Accounts Payable (SAP S/4HANA Finance)
Figure 4.13 Create Validation: Fully Configured Step
xiii. Now, go back to the initial screen wherein you started creating the new validation.
Select the newly created ‘Validation’ and assign the activation level (1) in ‘Actvn level’
field. And, ‘Save’ the details (Figure 4.14).
Figure 4.14 New Validation in Accounting Documents
xiv. You can build similar validations for business area, for other company codes of
BESTM.
This completes our discussion on defining validation in accounting documents. With this, let
us move on to the next activity of defining the default values for documents.
4.1.4 Define Default Values You may define the default document type and posting key for a Transaction (like, F-02, F-05,
F-31, F-47 etc), so that you do not need to enter them during document entry. For example,
when posting customer invoices (Transaction F-22), you need to use the document type DR
and posting key 01. You can store this information using this configuration step, so as to make
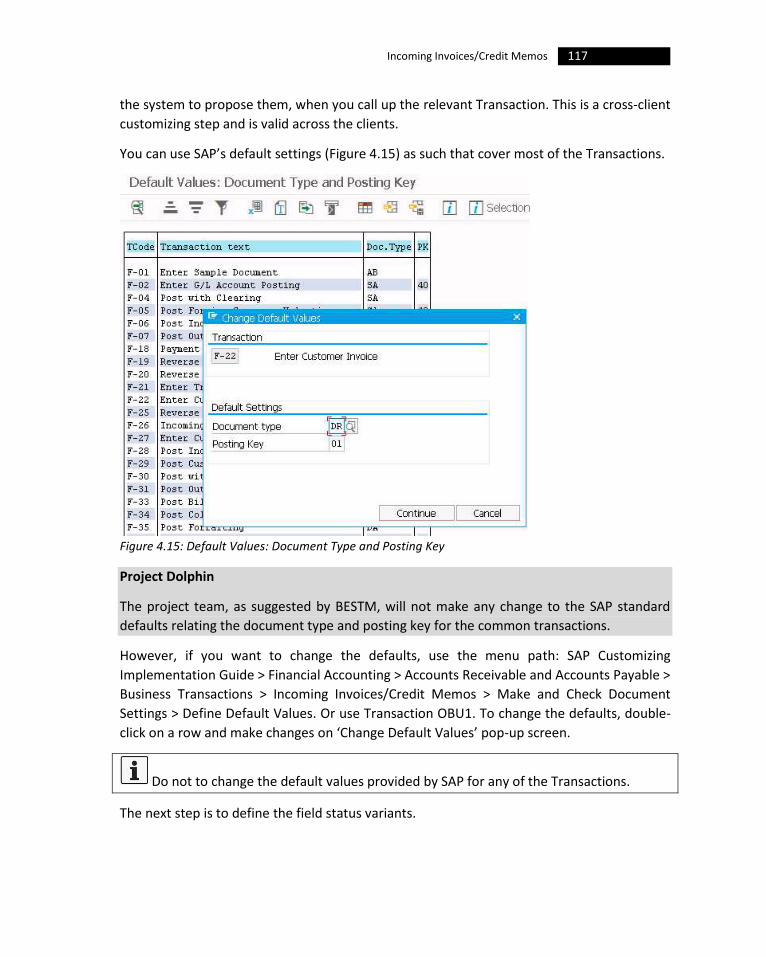
117 Incoming Invoices/Credit Memos
the system to propose them, when you call up the relevant Transaction. This is a cross-client
customizing step and is valid across the clients.
You can use SAP’s default settings (Figure 4.15) as such that cover most of the Transactions.
Figure 4.15: Default Values: Document Type and Posting Key
Project Dolphin
The project team, as suggested by BESTM, will not make any change to the SAP standard
defaults relating the document type and posting key for the common transactions.
However, if you want to change the defaults, use the menu path: SAP Customizing
Implementation Guide > Financial Accounting > Accounts Receivable and Accounts Payable >
Business Transactions > Incoming Invoices/Credit Memos > Make and Check Document
Settings > Define Default Values. Or use Transaction OBU1. To change the defaults, double-
click on a row and make changes on ‘Change Default Values’ pop-up screen.
Do not to change the default values provided by SAP for any of the Transactions.
The next step is to define the field status variants.
118 Configuring SAP Accounts Receivable & Accounts Payable (SAP S/4HANA Finance)
4.1.5 Define Field Status Variants Before discussing ‘field status variant’ (FSV), let us first understand what is a ‘field status’, and
what is a ‘field status group’ (FSG). As you might be aware of, every field has a ‘status’ which
controls the behaviour of that field on a screen: whether it is displayed or hidden
(suppressed), and whether that field is a required (mandatory) or optional for data entry.
Hence, the ‘field status’ refers to the characteristic or behaviour of a field on a data entry
screen as to its display and/or receiving a data entry input. Though all fields on a form will
normally have a field status, there are some fields - for example, fields on a document header
- for which you cannot attach a field status; however, you can define some fields from the
document header also as ‘required’ or ‘optional’ fields in the document type.
Keep only the most important fields as ‘required entry’ or ‘suppressed’, with all others
as ‘optional entry’ to prevent unnecessary issues while transaction entry.
A ‘field status group’ (FSG) is a collection of field statuses, defined in the company code data
of G/L account, and is used to determine which fields are ready for data entry input
(required/mandatory or optional), and which needs to be hidden. By default, every field is
displayed; only by applying one of the three statuses, you decide if that field needs to be
required one, optional or suppressed (hidden). Additional account assignments (for example,
cost centers or orders), if any, are only possible if the corresponding fields are ready for input.
The FSG that you enter in the reconciliation accounts affects the corresponding customer /
vendor accounts when posting.
In addition to the FSG, the other factors that influence the field status are the (a) posting key
and (b) document type. The status ‘optional entry’ field has been assigned to the standard
G/L account posting keys 40 and 50 in the standard SAP system. As regards document type,
you can – for example - specify that a ‘reference number’ and a ‘document header’ must
always be entered. There are several FSGs defined in the standard SAP system, all starting
with ‘Y’: for example, YB01 (General with text & assignment), YB05 (Bank Accounts), YB29
(Revenue Accounts) and so on (Figure 4.16).
Each FSG is made up of sub-groups that include general data, additional account assignments,
materials management, payment transactions, asset accounting, taxes, foreign payments,
consolidation, real estate management and financial assets management that group the
associated fields. You will see sub-groups in both blue and black letters: the fields in black
groups will all have the ‘suppressed’ field status because they are not relevant to that
particular FSG.
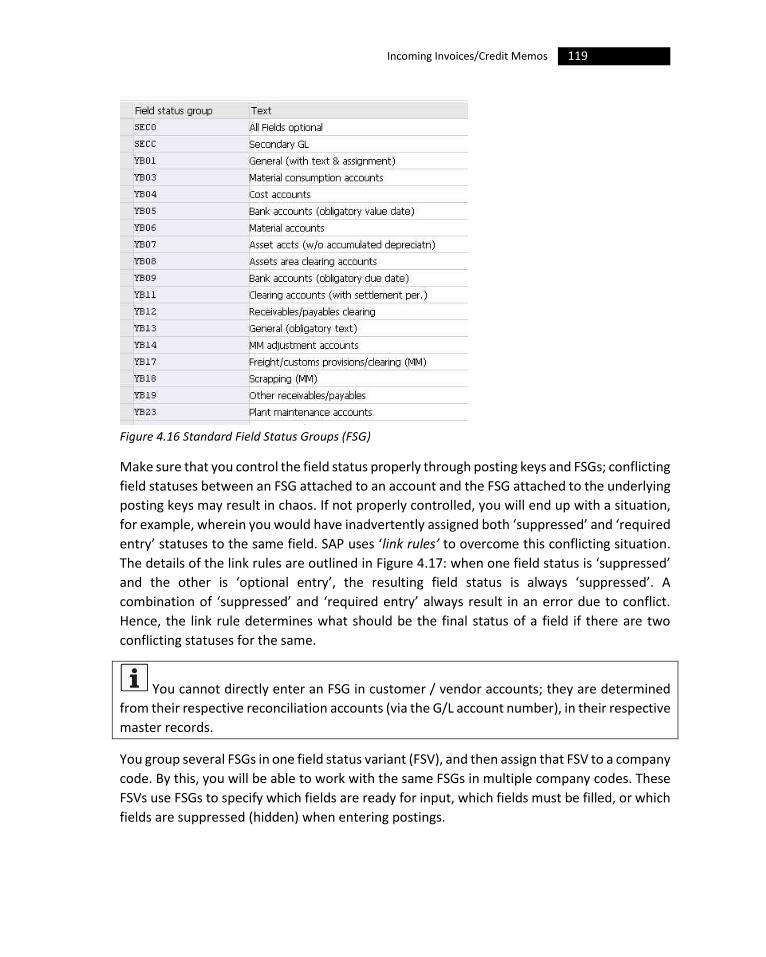
119 Incoming Invoices/Credit Memos
Figure 4.16 Standard Field Status Groups (FSG)
Make sure that you control the field status properly through posting keys and FSGs; conflicting
field statuses between an FSG attached to an account and the FSG attached to the underlying
posting keys may result in chaos. If not properly controlled, you will end up with a situation,
for example, wherein you would have inadvertently assigned both ‘suppressed’ and ‘required
entry’ statuses to the same field. SAP uses ‘link rules’ to overcome this conflicting situation.
The details of the link rules are outlined in Figure 4.17: when one field status is ‘suppressed’
and the other is ‘optional entry’, the resulting field status is always ‘suppressed’. A
combination of ‘suppressed’ and ‘required entry’ always result in an error due to conflict.
Hence, the link rule determines what should be the final status of a field if there are two
conflicting statuses for the same.
You cannot directly enter an FSG in customer / vendor accounts; they are determined
from their respective reconciliation accounts (via the G/L account number), in their respective
master records.
You group several FSGs in one field status variant (FSV), and then assign that FSV to a company
code. By this, you will be able to work with the same FSGs in multiple company codes. These
FSVs use FSGs to specify which fields are ready for input, which fields must be filled, or which
fields are suppressed (hidden) when entering postings.
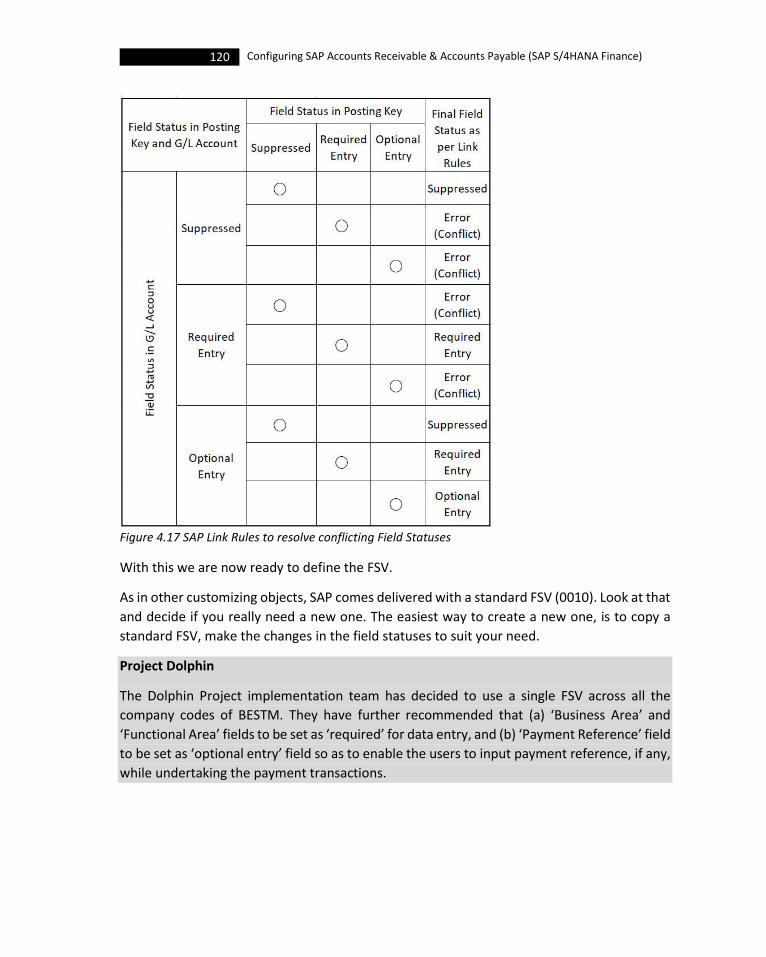
120 Configuring SAP Accounts Receivable & Accounts Payable (SAP S/4HANA Finance)
Figure 4.17 SAP Link Rules to resolve conflicting Field Statuses
With this we are now ready to define the FSV.
As in other customizing objects, SAP comes delivered with a standard FSV (0010). Look at that
and decide if you really need a new one. The easiest way to create a new one, is to copy a
standard FSV, make the changes in the field statuses to suit your need.
Project Dolphin
The Dolphin Project implementation team has decided to use a single FSV across all the
company codes of BESTM. They have further recommended that (a) ‘Business Area’ and
‘Functional Area’ fields to be set as ‘required’ for data entry, and (b) ‘Payment Reference’ field
to be set as ‘optional entry’ field so as to enable the users to input payment reference, if any,
while undertaking the payment transactions.

121 Incoming Invoices/Credit Memos
Let us now define the FSV for BESTM:
i. Use the menu path: SAP Customizing Implementation Guide > Financial Accounting >
Accounts Receivable and Accounts Payable > Business Transactions > Incoming
Invoices/Credit Memos > Make and Check Document Settings > Define Field Status
Variants. You may also use Transaction OBC4.
ii. On the ‘Change View “Field status variants”: Overview’ screen, select the FSV row
0010, and click on ‘Copy as’ button.
iii. You will now be taken to ‘Change View “Field status variants”: Overview of Selected
Set’ screen. Rename the ‘FStV’ (say, B100) and ‘Field Status Name’ fields to suit your
naming conventions.
iv. Press ‘Enter’ and go ahead with ‘Copy All’; the system completes copying all the
dependent entries; they are nothing but the FSGs associated with this FSV. ‘Save’
(Figure 4.18).
Figure 4.18 Defining FSV ‘B100’ for BESTM
v. Now, select the row containing the FSV B100. You can double-click on ‘Field status
group’ folder on the dialog-box on the left pane.
vi. You are now looking at the ‘Change View “Field status groups”: Overview’ screen. You
can see all the FSGs associated with the FSV B100, on the right-hand side of the dialog
box (Figure 4.19).
Figure 4.19 FSGs associated with FSV ‘B100’

122 Configuring SAP Accounts Receivable & Accounts Payable (SAP S/4HANA Finance)
vii. Double-click on the FSG ‘YB01’. You will reach ‘Maintain Field Status Group: Overview’
screen; double-click on ‘Additional account assignments’ under ‘Select Group’ block.
viii. On the next screen ‘Maintain Field Status Group: Additional account assignments’,
you will see that the fields ‘Business Area’ and ‘Functional Area’ have ‘suppressed’
field status at this point of time. Since, you need to make them ‘required’ for BESTM,
select the ‘Req. Entry’ radio button against these fields.
Figure 4.20 Field Status change for ‘Payment Reference’ field
ix. ‘Save’, and you are taken back to ‘Change View “Field status groups”: Overview’
screen. Now, double-click on the FSG YB09 {Bank accounts (obligatory due date)}, on
the next screen double-click ‘Payment transactions’ group, and change the
‘suppressed’ field status of ‘Payment Reference’ to ‘optional entry’ by selecting the
‘Opt. entry’ radio button against this field. And, ‘Save’ (Figure 4.20).
You have now defined the FSV ‘B100’ and made the required field status changes to some of
the fields as required by BESTM. Now, we are ready to assign this FSV to the company codes.
4.1.6 Assign Company Code Field Status Variants Now that we have defined the FSV in the previous Section 4.1.5, it is time we assign the
company codes to this FSV, so that they can use the variant. As already indicated, you can use
the same FSV across multiple company codes:
i. Use the menu path: SAP Customizing Implementation Guide > Financial Accounting >
Accounts Receivable and Accounts Payable > Business Transactions > Incoming
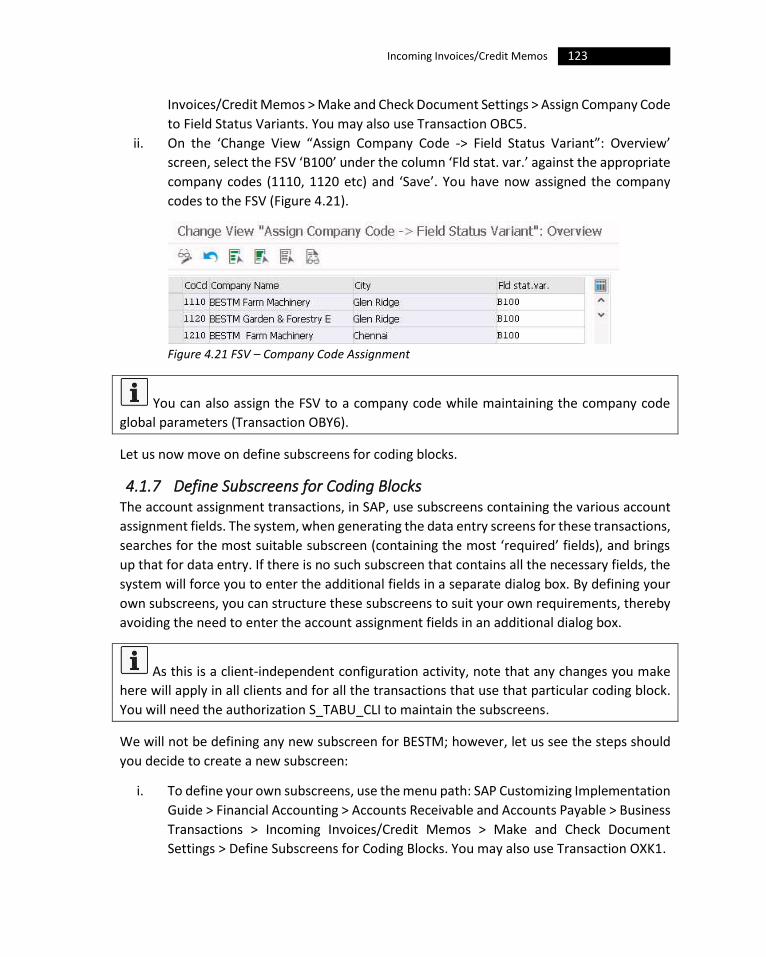
123 Incoming Invoices/Credit Memos
Invoices/Credit Memos > Make and Check Document Settings > Assign Company Code
to Field Status Variants. You may also use Transaction OBC5.
ii. On the ‘Change View “Assign Company Code -> Field Status Variant”: Overview’
screen, select the FSV ‘B100’ under the column ‘Fld stat. var.’ against the appropriate
company codes (1110, 1120 etc) and ‘Save’. You have now assigned the company
codes to the FSV (Figure 4.21).
Figure 4.21 FSV – Company Code Assignment
You can also assign the FSV to a company code while maintaining the company code
global parameters (Transaction OBY6).
Let us now move on define subscreens for coding blocks.
4.1.7 Define Subscreens for Coding Blocks The account assignment transactions, in SAP, use subscreens containing the various account
assignment fields. The system, when generating the data entry screens for these transactions,
searches for the most suitable subscreen (containing the most ‘required’ fields), and brings
up that for data entry. If there is no such subscreen that contains all the necessary fields, the
system will force you to enter the additional fields in a separate dialog box. By defining your
own subscreens, you can structure these subscreens to suit your own requirements, thereby
avoiding the need to enter the account assignment fields in an additional dialog box.
As this is a client-independent configuration activity, note that any changes you make
here will apply in all clients and for all the transactions that use that particular coding block.
You will need the authorization S_TABU_CLI to maintain the subscreens.
We will not be defining any new subscreen for BESTM; however, let us see the steps should
you decide to create a new subscreen:
i. To define your own subscreens, use the menu path: SAP Customizing Implementation
Guide > Financial Accounting > Accounts Receivable and Accounts Payable > Business
Transactions > Incoming Invoices/Credit Memos > Make and Check Document
Settings > Define Subscreens for Coding Blocks. You may also use Transaction OXK1.
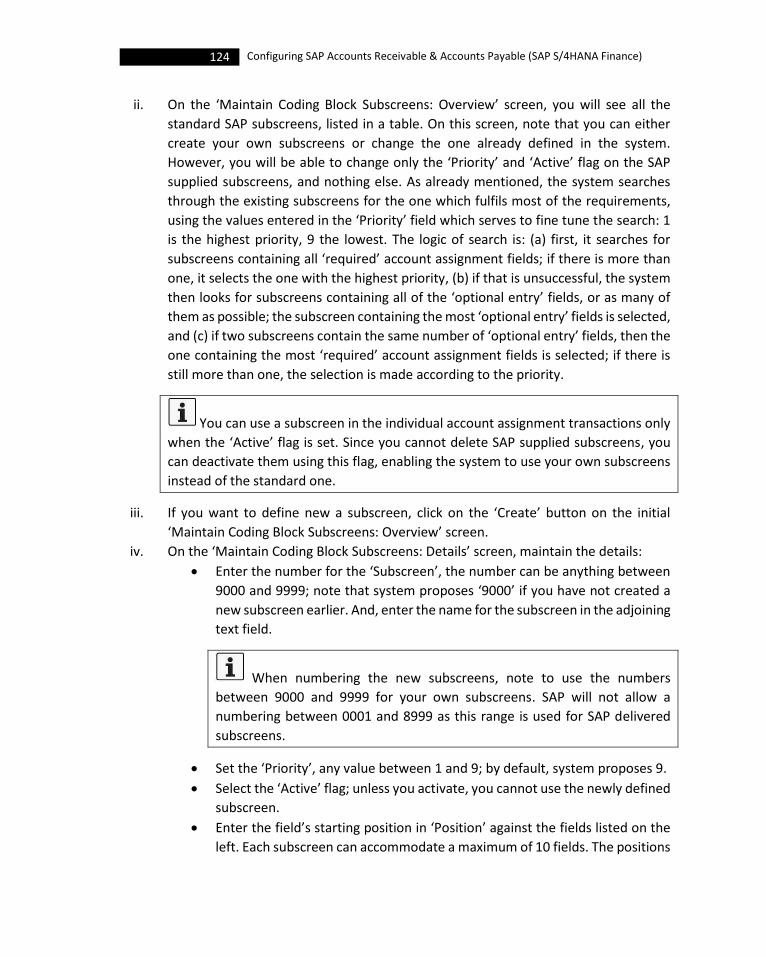
124 Configuring SAP Accounts Receivable & Accounts Payable (SAP S/4HANA Finance)
ii. On the ‘Maintain Coding Block Subscreens: Overview’ screen, you will see all the
standard SAP subscreens, listed in a table. On this screen, note that you can either
create your own subscreens or change the one already defined in the system.
However, you will be able to change only the ‘Priority’ and ‘Active’ flag on the SAP
supplied subscreens, and nothing else. As already mentioned, the system searches
through the existing subscreens for the one which fulfils most of the requirements,
using the values entered in the ‘Priority’ field which serves to fine tune the search: 1
is the highest priority, 9 the lowest. The logic of search is: (a) first, it searches for
subscreens containing all ‘required’ account assignment fields; if there is more than
one, it selects the one with the highest priority, (b) if that is unsuccessful, the system
then looks for subscreens containing all of the ‘optional entry’ fields, or as many of
them as possible; the subscreen containing the most ‘optional entry’ fields is selected,
and (c) if two subscreens contain the same number of ‘optional entry’ fields, then the
one containing the most ‘required’ account assignment fields is selected; if there is
still more than one, the selection is made according to the priority.
You can use a subscreen in the individual account assignment transactions only
when the ‘Active’ flag is set. Since you cannot delete SAP supplied subscreens, you
can deactivate them using this flag, enabling the system to use your own subscreens
instead of the standard one.
iii. If you want to define new a subscreen, click on the ‘Create’ button on the initial
‘Maintain Coding Block Subscreens: Overview’ screen.
iv. On the ‘Maintain Coding Block Subscreens: Details’ screen, maintain the details:
• Enter the number for the ‘Subscreen’, the number can be anything between
9000 and 9999; note that system proposes ‘9000’ if you have not created a
new subscreen earlier. And, enter the name for the subscreen in the adjoining
text field.
When numbering the new subscreens, note to use the numbers
between 9000 and 9999 for your own subscreens. SAP will not allow a
numbering between 0001 and 8999 as this range is used for SAP delivered
subscreens.
• Set the ‘Priority’, any value between 1 and 9; by default, system proposes 9.
• Select the ‘Active’ flag; unless you activate, you cannot use the newly defined
subscreen.
• Enter the field’s starting position in ‘Position’ against the fields listed on the
left. Each subscreen can accommodate a maximum of 10 fields. The positions
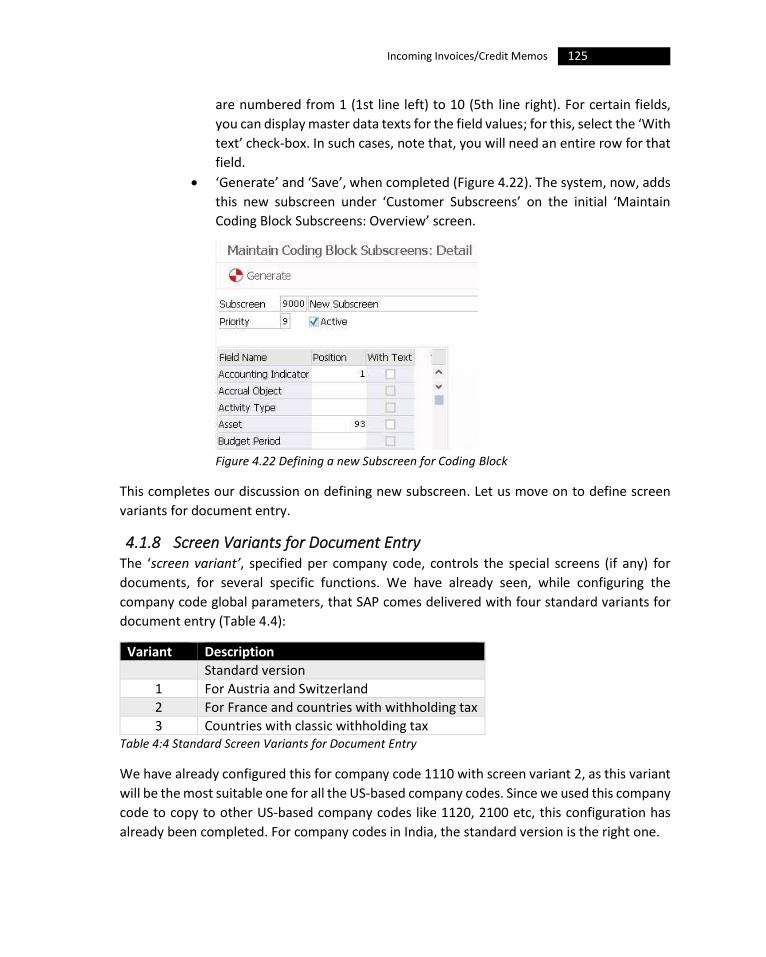
125 Incoming Invoices/Credit Memos
are numbered from 1 (1st line left) to 10 (5th line right). For certain fields,
you can display master data texts for the field values; for this, select the ‘With
text’ check-box. In such cases, note that, you will need an entire row for that
field.
• ‘Generate’ and ‘Save’, when completed (Figure 4.22). The system, now, adds
this new subscreen under ‘Customer Subscreens’ on the initial ‘Maintain
Coding Block Subscreens: Overview’ screen.
Figure 4.22 Defining a new Subscreen for Coding Block
This completes our discussion on defining new subscreen. Let us move on to define screen
variants for document entry.
4.1.8 Screen Variants for Document Entry The ‘screen variant’, specified per company code, controls the special screens (if any) for
documents, for several specific functions. We have already seen, while configuring the
company code global parameters, that SAP comes delivered with four standard variants for
document entry (Table 4.4):
Variant Description
Standard version
1 For Austria and Switzerland
2 For France and countries with withholding tax
3 Countries with classic withholding tax Table 4:4 Standard Screen Variants for Document Entry
We have already configured this for company code 1110 with screen variant 2, as this variant
will be the most suitable one for all the US-based company codes. Since we used this company
code to copy to other US-based company codes like 1120, 2100 etc, this configuration has
already been completed. For company codes in India, the standard version is the right one.

126 Configuring SAP Accounts Receivable & Accounts Payable (SAP S/4HANA Finance)
However, to assign/change the screen variant for document entry, then:
i. Use the menu path: SAP Customizing Implementation Guide > Financial Accounting >
Accounts Receivable and Accounts Payable > Business Transactions > Incoming
Invoices/Credit Memos > Make and Check Document Settings > Screen Variants for
Document Entry.
ii. On the ‘Change View “Document Entry Screen Variant”: Overview’ screen, select the
appropriate screen variant for the company codes, and ‘Save’ (Figure 4.23).
Figure 4.23: Screen Variant for Document Entry
Let us now move on to discuss substitution in accounting documents.
4.1.9 Substitution in Accounting Documents Similar to that of ‘validation’ in accounting documents that we discussed in Section 4.13, you
can define ‘substitution’ to replace of the field contents, per company. Here also, you can
make changes both in the document header and in the line item, and the defined
substitutions will be valid for both the manual entry of documents and for the automatic
creation of documents (for example, payment program). In each of the company codes to
which you plan to assign substitution, you need to define the (a) time of substitution (within
the document header, within the line item level or for the whole document), (b) details of the
substitution and (c) activation.
Project Dolphin
BETM wants to derive the value of ‘Region’ from ‘State’ for all both US-based and India-based
company codes.
To configure a new validation:
Use the menu path: SAP Customizing Implementation Guide > Financial Accounting >
Accounts Receivable and Accounts Payable > Business Transactions > Incoming
Invoices/Credit Memos > Make and Check Document Settings > Substitution in Accounting
Documents. Or, you may use Transaction OBBH.
The configuration step is similar to that validation. You shall define the prerequisite and, then,
complete the substitution rule, if the prerequisite is met (Figure 4.24).
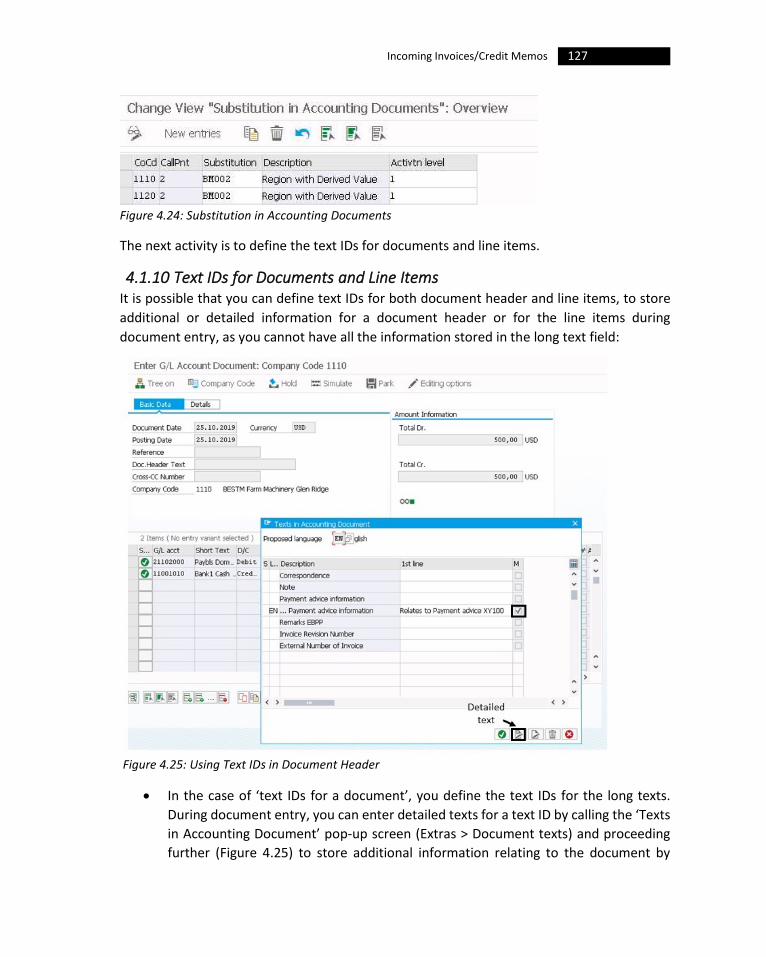
127 Incoming Invoices/Credit Memos
Figure 4.24: Substitution in Accounting Documents
The next activity is to define the text IDs for documents and line items.
4.1.10 Text IDs for Documents and Line Items It is possible that you can define text IDs for both document header and line items, to store
additional or detailed information for a document header or for the line items during
document entry, as you cannot have all the information stored in the long text field:
Figure 4.25: Using Text IDs in Document Header
• In the case of ‘text IDs for a document’, you define the text IDs for the long texts.
During document entry, you can enter detailed texts for a text ID by calling the ‘Texts
in Accounting Document’ pop-up screen (Extras > Document texts) and proceeding
further (Figure 4.25) to store additional information relating to the document by
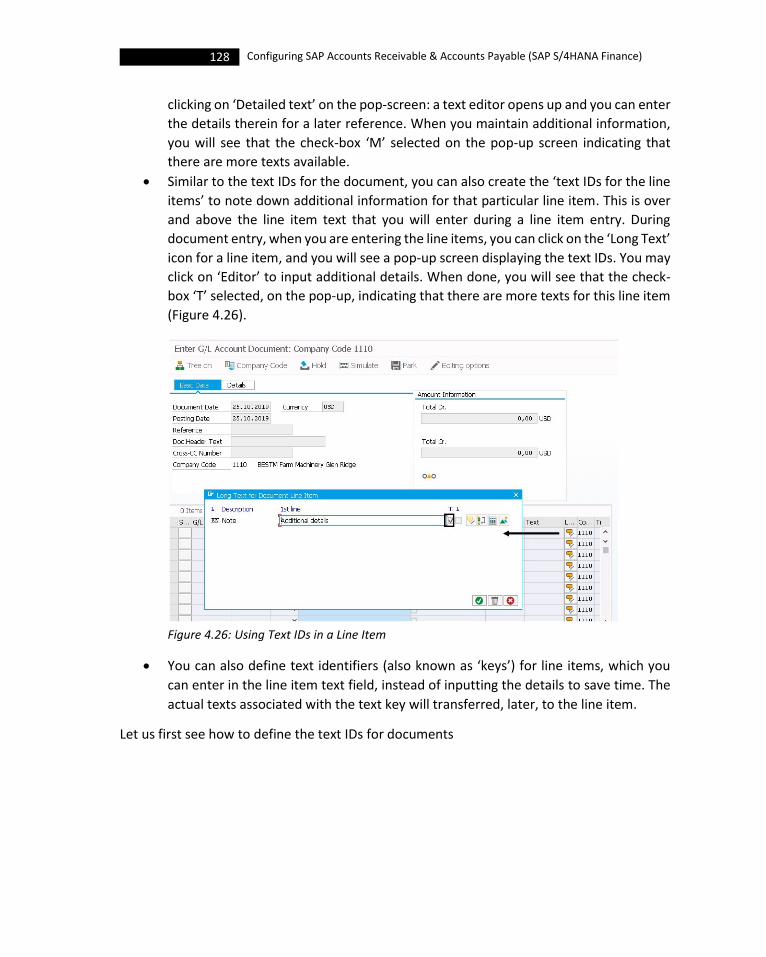
128 Configuring SAP Accounts Receivable & Accounts Payable (SAP S/4HANA Finance)
clicking on ‘Detailed text’ on the pop-screen: a text editor opens up and you can enter
the details therein for a later reference. When you maintain additional information,
you will see that the check-box ‘M’ selected on the pop-up screen indicating that
there are more texts available.
• Similar to the text IDs for the document, you can also create the ‘text IDs for the line
items’ to note down additional information for that particular line item. This is over
and above the line item text that you will enter during a line item entry. During
document entry, when you are entering the line items, you can click on the ‘Long Text’
icon for a line item, and you will see a pop-up screen displaying the text IDs. You may
click on ‘Editor’ to input additional details. When done, you will see that the check-
box ‘T’ selected, on the pop-up, indicating that there are more texts for this line item
(Figure 4.26).
Figure 4.26: Using Text IDs in a Line Item
• You can also define text identifiers (also known as ‘keys’) for line items, which you
can enter in the line item text field, instead of inputting the details to save time. The
actual texts associated with the text key will transferred, later, to the line item.
Let us first see how to define the text IDs for documents
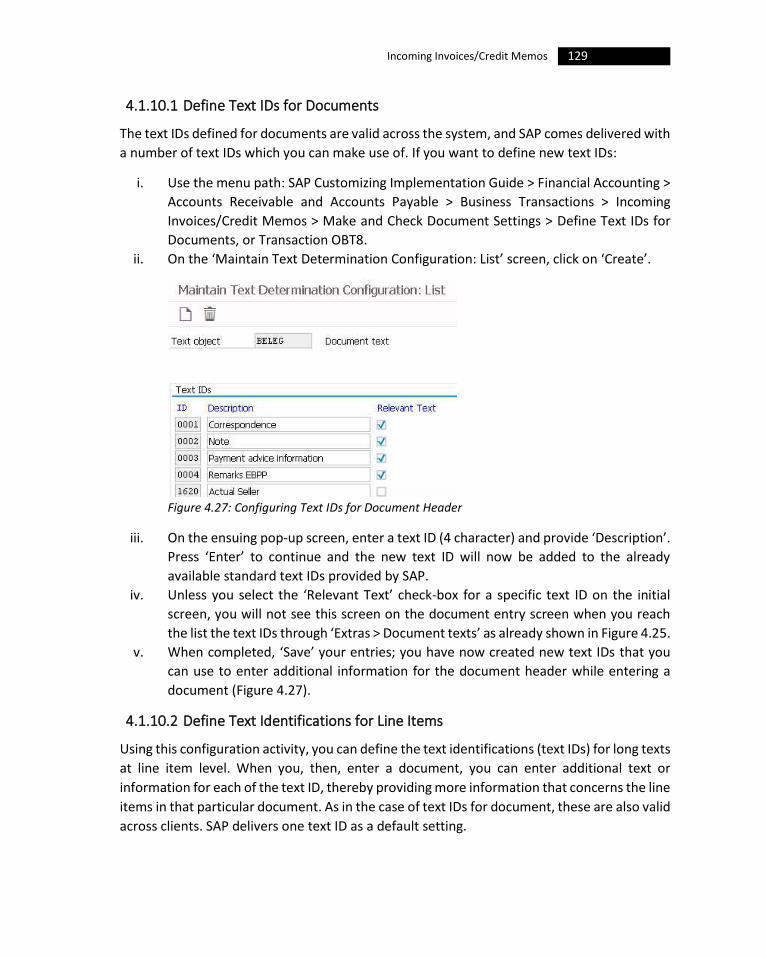
129 Incoming Invoices/Credit Memos
4.1.10.1 Define Text IDs for Documents
The text IDs defined for documents are valid across the system, and SAP comes delivered with
a number of text IDs which you can make use of. If you want to define new text IDs:
i. Use the menu path: SAP Customizing Implementation Guide > Financial Accounting >
Accounts Receivable and Accounts Payable > Business Transactions > Incoming
Invoices/Credit Memos > Make and Check Document Settings > Define Text IDs for
Documents, or Transaction OBT8.
ii. On the ‘Maintain Text Determination Configuration: List’ screen, click on ‘Create’.
Figure 4.27: Configuring Text IDs for Document Header
iii. On the ensuing pop-up screen, enter a text ID (4 character) and provide ‘Description’.
Press ‘Enter’ to continue and the new text ID will now be added to the already
available standard text IDs provided by SAP.
iv. Unless you select the ‘Relevant Text’ check-box for a specific text ID on the initial
screen, you will not see this screen on the document entry screen when you reach
the list the text IDs through ‘Extras > Document texts’ as already shown in Figure 4.25.
v. When completed, ‘Save’ your entries; you have now created new text IDs that you
can use to enter additional information for the document header while entering a
document (Figure 4.27).
4.1.10.2 Define Text Identifications for Line Items
Using this configuration activity, you can define the text identifications (text IDs) for long texts
at line item level. When you, then, enter a document, you can enter additional text or
information for each of the text ID, thereby providing more information that concerns the line
items in that particular document. As in the case of text IDs for document, these are also valid
across clients. SAP delivers one text ID as a default setting.
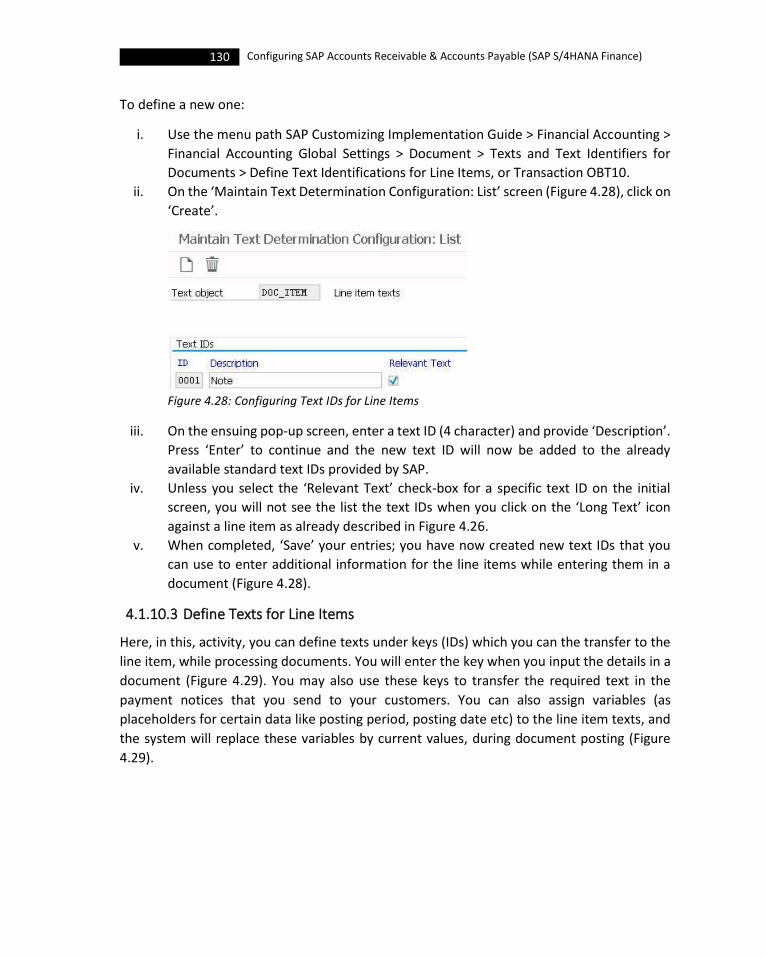
130 Configuring SAP Accounts Receivable & Accounts Payable (SAP S/4HANA Finance)
To define a new one:
i. Use the menu path SAP Customizing Implementation Guide > Financial Accounting >
Financial Accounting Global Settings > Document > Texts and Text Identifiers for
Documents > Define Text Identifications for Line Items, or Transaction OBT10.
ii. On the ‘Maintain Text Determination Configuration: List’ screen (Figure 4.28), click on
‘Create’.
Figure 4.28: Configuring Text IDs for Line Items
iii. On the ensuing pop-up screen, enter a text ID (4 character) and provide ‘Description’.
Press ‘Enter’ to continue and the new text ID will now be added to the already
available standard text IDs provided by SAP.
iv. Unless you select the ‘Relevant Text’ check-box for a specific text ID on the initial
screen, you will not see the list the text IDs when you click on the ‘Long Text’ icon
against a line item as already described in Figure 4.26.
v. When completed, ‘Save’ your entries; you have now created new text IDs that you
can use to enter additional information for the line items while entering them in a
document (Figure 4.28).
4.1.10.3 Define Texts for Line Items
Here, in this, activity, you can define texts under keys (IDs) which you can the transfer to the
line item, while processing documents. You will enter the key when you input the details in a
document (Figure 4.29). You may also use these keys to transfer the required text in the
payment notices that you send to your customers. You can also assign variables (as
placeholders for certain data like posting period, posting date etc) to the line item texts, and
the system will replace these variables by current values, during document posting (Figure
4.29).
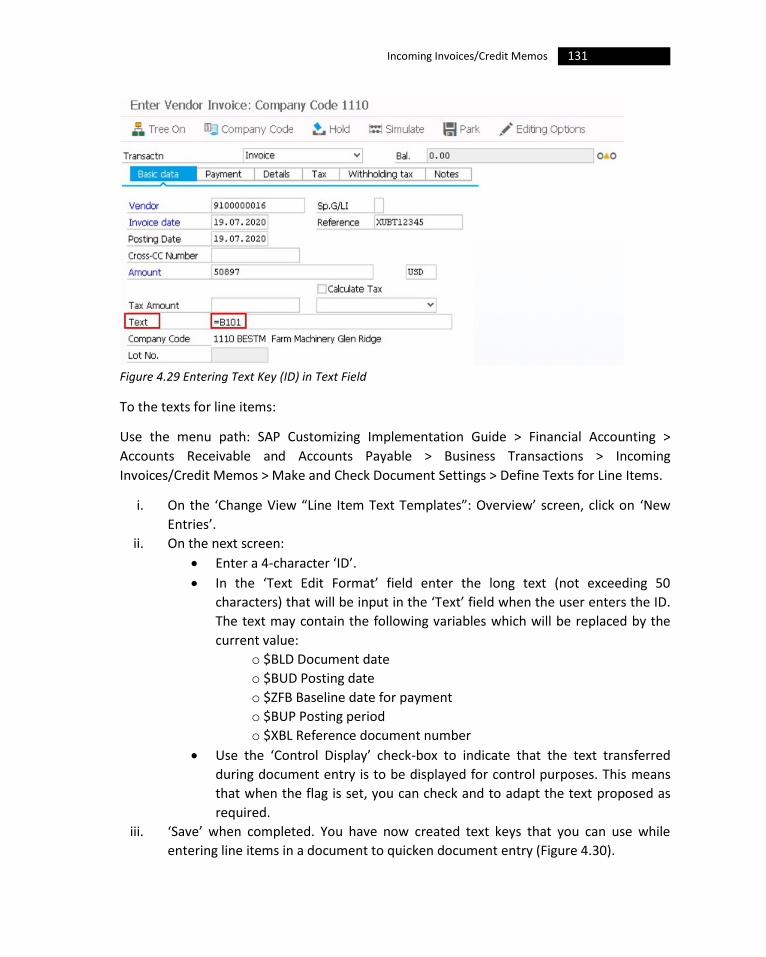
131 Incoming Invoices/Credit Memos
Figure 4.29 Entering Text Key (ID) in Text Field
To the texts for line items:
Use the menu path: SAP Customizing Implementation Guide > Financial Accounting >
Accounts Receivable and Accounts Payable > Business Transactions > Incoming
Invoices/Credit Memos > Make and Check Document Settings > Define Texts for Line Items.
i. On the ‘Change View “Line Item Text Templates”: Overview’ screen, click on ‘New
Entries’.
ii. On the next screen:
• Enter a 4-character ‘ID’.
• In the ‘Text Edit Format’ field enter the long text (not exceeding 50
characters) that will be input in the ‘Text’ field when the user enters the ID.
The text may contain the following variables which will be replaced by the
current value:
o $BLD Document date
o $BUD Posting date
o $ZFB Baseline date for payment
o $BUP Posting period
o $XBL Reference document number
• Use the ‘Control Display’ check-box to indicate that the text transferred
during document entry is to be displayed for control purposes. This means
that when the flag is set, you can check and to adapt the text proposed as
required.
iii. ‘Save’ when completed. You have now created text keys that you can use while
entering line items in a document to quicken document entry (Figure 4.30).
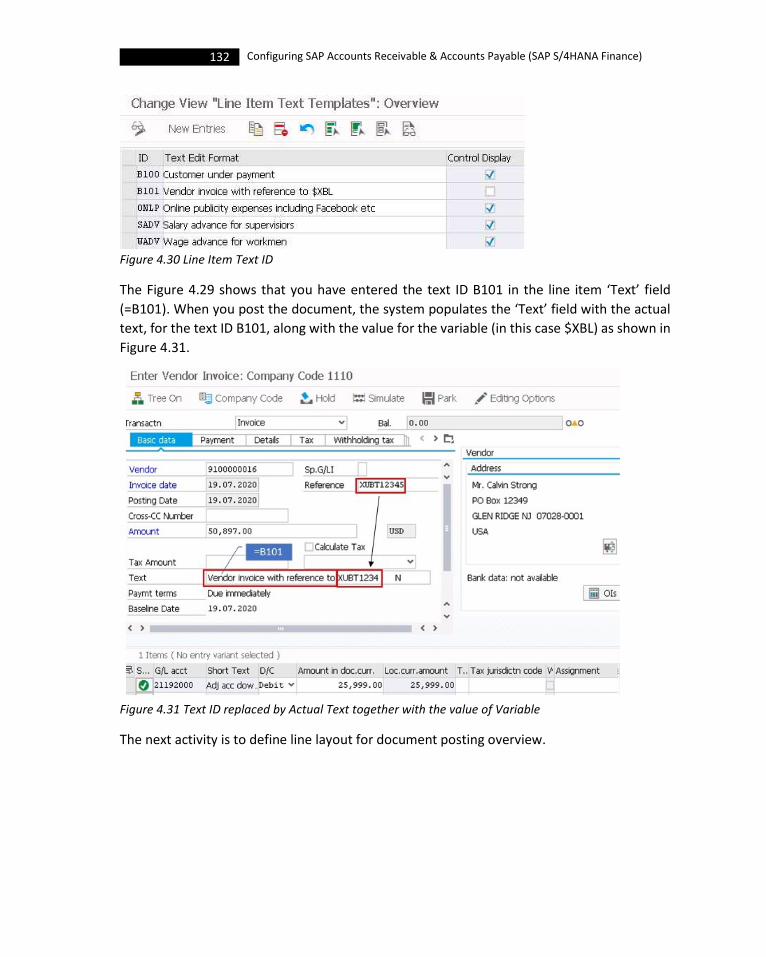
132 Configuring SAP Accounts Receivable & Accounts Payable (SAP S/4HANA Finance)
Figure 4.30 Line Item Text ID
The Figure 4.29 shows that you have entered the text ID B101 in the line item ‘Text’ field
(=B101). When you post the document, the system populates the ‘Text’ field with the actual
text, for the text ID B101, along with the value for the variable (in this case $XBL) as shown in
Figure 4.31.
Figure 4.31 Text ID replaced by Actual Text together with the value of Variable
The next activity is to define line layout for document posting overview.
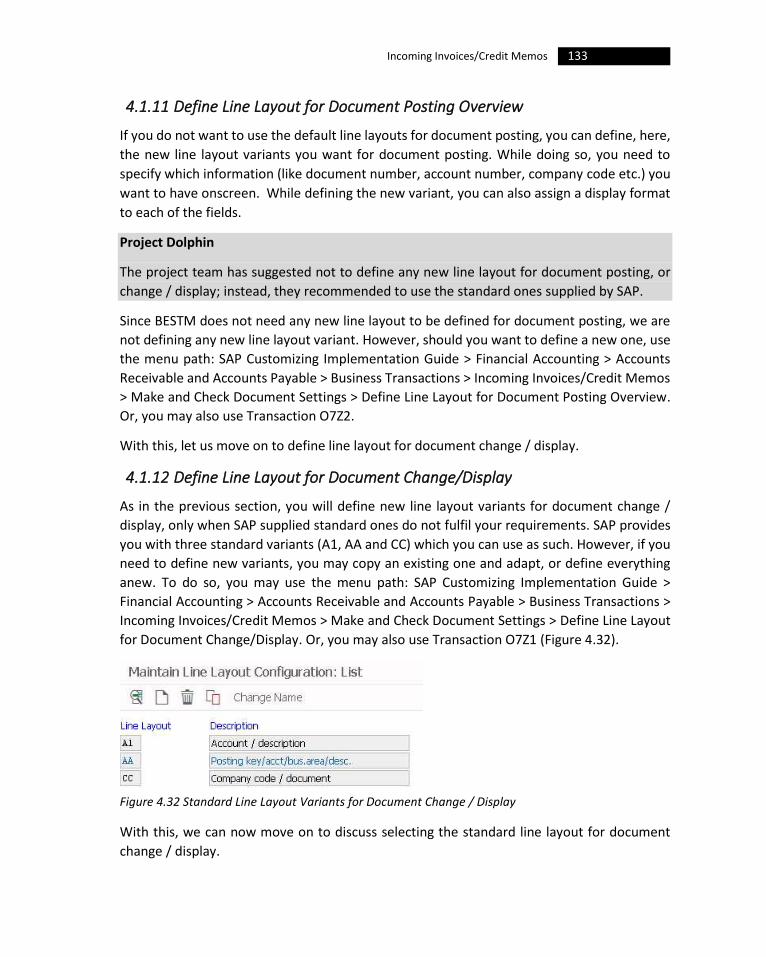
133 Incoming Invoices/Credit Memos
4.1.11 Define Line Layout for Document Posting Overview
If you do not want to use the default line layouts for document posting, you can define, here,
the new line layout variants you want for document posting. While doing so, you need to
specify which information (like document number, account number, company code etc.) you
want to have onscreen. While defining the new variant, you can also assign a display format
to each of the fields.
Project Dolphin
The project team has suggested not to define any new line layout for document posting, or
change / display; instead, they recommended to use the standard ones supplied by SAP.
Since BESTM does not need any new line layout to be defined for document posting, we are
not defining any new line layout variant. However, should you want to define a new one, use
the menu path: SAP Customizing Implementation Guide > Financial Accounting > Accounts
Receivable and Accounts Payable > Business Transactions > Incoming Invoices/Credit Memos
> Make and Check Document Settings > Define Line Layout for Document Posting Overview.
Or, you may also use Transaction O7Z2.
With this, let us move on to define line layout for document change / display.
4.1.12 Define Line Layout for Document Change/Display
As in the previous section, you will define new line layout variants for document change /
display, only when SAP supplied standard ones do not fulfil your requirements. SAP provides
you with three standard variants (A1, AA and CC) which you can use as such. However, if you
need to define new variants, you may copy an existing one and adapt, or define everything
anew. To do so, you may use the menu path: SAP Customizing Implementation Guide >
Financial Accounting > Accounts Receivable and Accounts Payable > Business Transactions >
Incoming Invoices/Credit Memos > Make and Check Document Settings > Define Line Layout
for Document Change/Display. Or, you may also use Transaction O7Z1 (Figure 4.32).
Figure 4.32 Standard Line Layout Variants for Document Change / Display
With this, we can now move on to discuss selecting the standard line layout for document
change / display.

134 Configuring SAP Accounts Receivable & Accounts Payable (SAP S/4HANA Finance)
4.1.13 Select Standard Line Layout for Document Change/Display
Use this configuration activity to select the standard line layout variant for (a) displaying /
changing documents and (b) displaying / processing payment proposals. When you do not
specify a variant during these functions, then, the system uses these as the default variants.
Use the menu path: SAP Customizing Implementation Guide > Financial Accounting >
Accounts Receivable and Accounts Payable > Business Transactions > Incoming
Invoices/Credit Memos > Make and Check Document Settings > Select Standard Line Layout
for Document Change/Display. Or, you may also use Transaction O7V1.
On the resulting screen, you will see the standard Transaction Codes for display / change /
process various functions. Double-click on a Transaction Code to bring out the default line
layout variant for that function. If you have not defined a new line layout variant, then, you
just need to go ahead the system-proposed defaults; else, if you have defined new variants,
as outlined in the previous Section 4.1.12, then, select the appropriate one from the drop-
down list. Since we have not defined any new line layout variant, we are going ahead with the
system defaults (Figure 4.33).
Figure 4.33 Selecting Default Line Layout Variant for Document Change / Display
With this, let us move on to discuss the document change rules for document header in the
next Section.

135 Incoming Invoices/Credit Memos
4.1.14 Document Change Rules, Document Header
In general, it is not recommended to try changing an already posted document, as that goes
against the document principle of maintaining and preserving the integrity of documents. The
system itself determines, for a number of fields, that you can no longer change them after
posting. This includes all the fields - like, the amount posted and the account - which are
central to the principles of orderly accounting. However, there could be instances when you
may want to change the contents of some of the fields, of an already posted document,
without undermining the document principle. SAP’s document change rules will help you in
those circumstances. Even with these rules, the system will prevent you from changing the
update objects like cost center, profit center, business area etc., in an already posted
document.
The update objects are elements in the system, for which transaction figures or line
items are updated. You shall enter them, as additional account assignments during posting.
There are two rules for changing documents: (a) rules for changing the header and (b) rules
for changing the line items.
Let us now understand the rules for changing the header.
The document change rules have special provisions only for transaction types A (down
payments) and W (bills of exchange). For all other transaction types, you will use the <blank>
rule for transaction type. If you make entries for document change rules with transaction
types other than <blank>, A or W, then the system will ignore that.
It is recommended that you do not change the default document change rules (for document
header) which you can display using the menu path: SAP Customizing Implementation Guide
> Financial Accounting > Accounts Receivable and Accounts Payable > Business Transactions
> Incoming Invoices/Credit Memos > Make and Check Document Settings > Document Change
Rules, Document Header. Or Transaction OB32. From the ‘Change View “Rules for Changing
Documents”: Overview’, you will see that you can change the contents of the fields ‘Text’
(document header text) and ‘Reference’ in a document header, even after posting (Figure
4.34)
Figure 4.34: Document Change Rules for Document Header
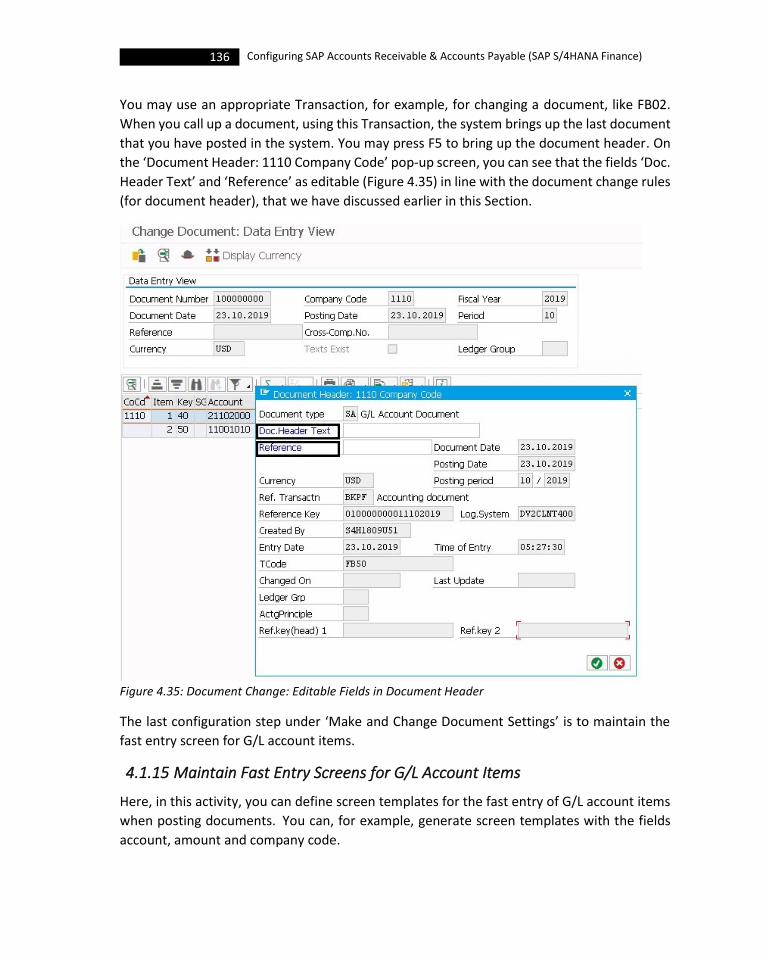
136 Configuring SAP Accounts Receivable & Accounts Payable (SAP S/4HANA Finance)
You may use an appropriate Transaction, for example, for changing a document, like FB02.
When you call up a document, using this Transaction, the system brings up the last document
that you have posted in the system. You may press F5 to bring up the document header. On
the ‘Document Header: 1110 Company Code’ pop-up screen, you can see that the fields ‘Doc.
Header Text’ and ‘Reference’ as editable (Figure 4.35) in line with the document change rules
(for document header), that we have discussed earlier in this Section.
Figure 4.35: Document Change: Editable Fields in Document Header
The last configuration step under ‘Make and Change Document Settings’ is to maintain the
fast entry screen for G/L account items.
4.1.15 Maintain Fast Entry Screens for G/L Account Items
Here, in this activity, you can define screen templates for the fast entry of G/L account items
when posting documents. You can, for example, generate screen templates with the fields
account, amount and company code.
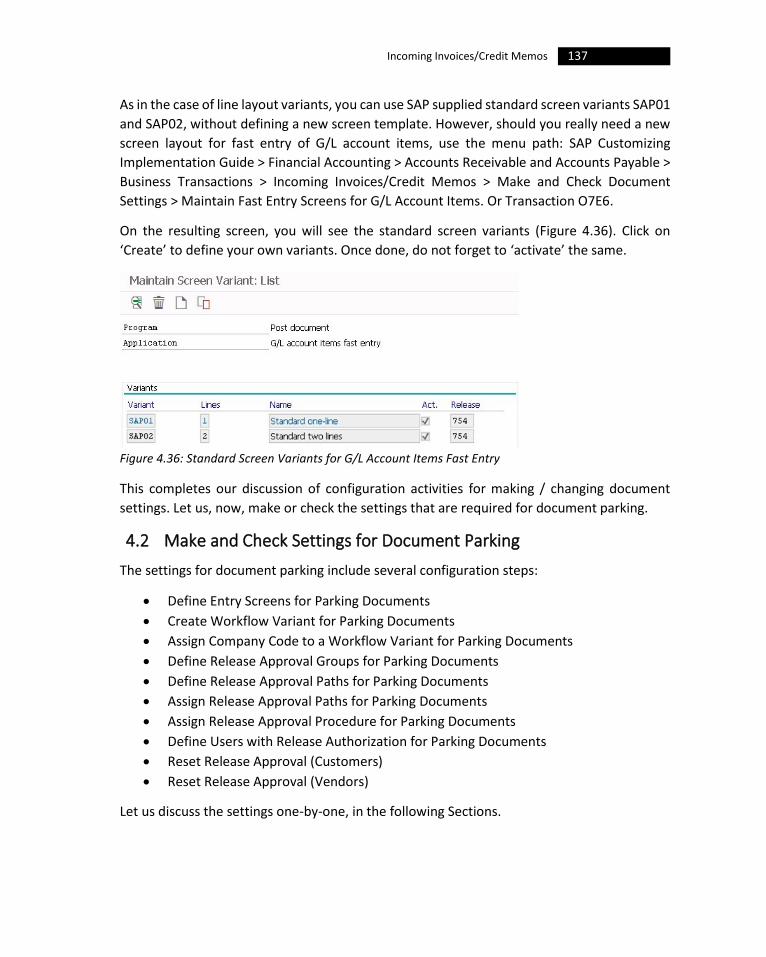
137 Incoming Invoices/Credit Memos
As in the case of line layout variants, you can use SAP supplied standard screen variants SAP01
and SAP02, without defining a new screen template. However, should you really need a new
screen layout for fast entry of G/L account items, use the menu path: SAP Customizing
Implementation Guide > Financial Accounting > Accounts Receivable and Accounts Payable >
Business Transactions > Incoming Invoices/Credit Memos > Make and Check Document
Settings > Maintain Fast Entry Screens for G/L Account Items. Or Transaction O7E6.
On the resulting screen, you will see the standard screen variants (Figure 4.36). Click on
‘Create’ to define your own variants. Once done, do not forget to ‘activate’ the same.
Figure 4.36: Standard Screen Variants for G/L Account Items Fast Entry
This completes our discussion of configuration activities for making / changing document
settings. Let us, now, make or check the settings that are required for document parking.
4.2 Make and Check Settings for Document Parking
The settings for document parking include several configuration steps:
• Define Entry Screens for Parking Documents
• Create Workflow Variant for Parking Documents
• Assign Company Code to a Workflow Variant for Parking Documents
• Define Release Approval Groups for Parking Documents
• Define Release Approval Paths for Parking Documents
• Assign Release Approval Paths for Parking Documents
• Assign Release Approval Procedure for Parking Documents
• Define Users with Release Authorization for Parking Documents
• Reset Release Approval (Customers)
• Reset Release Approval (Vendors)
Let us discuss the settings one-by-one, in the following Sections.

138 Configuring SAP Accounts Receivable & Accounts Payable (SAP S/4HANA Finance)
4.2.1 Define Entry Screens for Parking Documents
As in the case of fast entry screens for G/L account items (Section 4.1.15), you can also define
entry screens for parking of documents.
Project Dolphin
BESTM wants to go with the standard default settings for parking document entry screens.
As BESTM has decided to go on with the standard settings for entry screens for parking
documents, we have not defined anything new. However, should you want to define a new
one, use the menu path: SAP Customizing Implementation Guide > Financial Accounting >
Accounts Receivable and Accounts Payable > Business Transactions > Incoming
Invoices/Credit Memos > Make and Check Document Settings for Parking Documents > Define
Entry Screens for Parking Documents. Or Transaction O7E4.
Let us now see how to create workflow variant for parking documents.
4.2.2 Create Workflow Variant for Parking Documents
While defining the workflow for parking documents, you can make specifications as to (a) if a
posting release is required (the system triggers a workflow within the release for posting),
and (b) the amount limit beyond which the release for payment is to take place. Once defined,
you can attach the variant(s) to the appropriate company codes. SAP comes delivered with
the standard workflow 0001 that can be copied and required changes made to suit your
requirements.
a) You will define a workflow using the menu path: SAP Customizing Implementation
Guide > Financial Accounting > Accounts Receivable and Accounts Payable > Business
Transactions > Incoming Invoices/Credit Memos > Make and Check Settings for
Document Parking > Create Workflow Variant for Parking Documents, or Transaction
OBWA.
b) On the ‘Change view “Preliminary Posting Workflow Link”: Overview’ screen, you can
highlight the row containing the variant 0001 and press ‘Copy As’. On the next screen,
enter the details:
• Provide the identifier for the workflow variant in “Workflow var.’ field (US01).
• Change the ‘Currency’ to USD if the currency is other than USD.
• Enter a ‘Name’.
c) Under ‘Preliminary posting release’, select the ‘Posting Release’ check-box if you want
to ensure that a release has to take place before a document can be posted. Do not
enter the subworkflow which we will do later when we discuss release approval later
in this Section, wherein we shall control both the document release and payment

139 Incoming Invoices/Credit Memos
release through release groups and approval paths for various payment levels (single
level, two level and three level) of control.
d) Under ‘Payment release’, set the indicator ‘Release Payts’ to ensure that a payment
release must take place before you can pay a document (if the indicator is not set, no
payment release is necessary).
e) ‘Save’ the details, and you have now created the workflow variant US01 for the
release of payment for BESTM (Figure 4.37). Repeat the steps and create another
variant, by copying US01, in the name IN01 to be used by Indian company codes of
BESTM.
Figure 4.37 Defining Workflow Variant US01
This completes our discussion on creating a new workflow variant. Let us now proceed to
assign company codes to a workflow variant for parking documents.
4.2.3 Assign Company Code to a Workflow Variant for Parking Documents
In this step, you need to assign the company codes to the workflow variant that you have
defined in the previous Section. If you do not assign a company code to a workflow variant,
then, you cannot carryout document release.
Use the menu path: SAP Customizing Implementation Guide > Financial Accounting >
Accounts Receivable and Accounts Payable > Business Transactions > Incoming

140 Configuring SAP Accounts Receivable & Accounts Payable (SAP S/4HANA Finance)
Invoices/Credit Memos > Make and Check Settings for Document Parking > Assign Company
Code to a Workflow Variant for Parking Documents, or Transaction OBWJ, to assign the
required company codes to the workflow variant (Figure 4.38).
Figure 4.38 Assigning Workflow Variant US01 to Company Code
The currency of the workflow variant and of the corresponding company codes must be
the same.
Let us now look at defining release approval groups for parking documents.
4.2.4 Define Release Approval Groups for Parking Documents
Define the release approval groups and later enter them in the master records of your
customers / vendors. You will need these approval groups for the next steps like assigning
release approval paths / release approval procedures for parking documents. Based on the
release approval path and amount specified, the system will determine the subworkflow to
be triggered by the payment release; it also determines who needs to release the payment.
Project Dolphin
BESTM wants to have separate release approval groups, for customers / vendors who have
been classified into A, B and C buckets, for parking documents.
To define new release approval groups:
i. Use the menu path: SAP Customizing Implementation Guide > Financial Accounting >
Accounts Receivable and Accounts Payable > Business Transactions > Incoming
Invoices/Credit Memos > Make and Check Settings for Document Parking > Define
Release Approval Groups for Parking Documents.
ii. On the resulting screen, click on ‘New Entries’ and create the required entries and
‘Save’ the details (Figure 4.39).
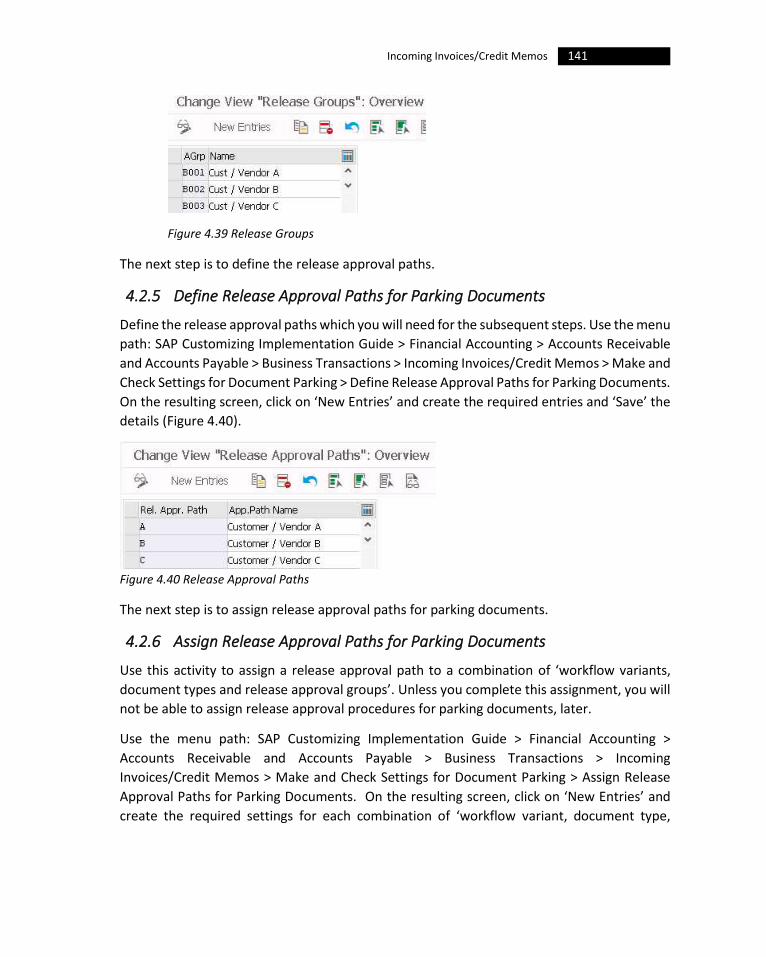
141 Incoming Invoices/Credit Memos
Figure 4.39 Release Groups
The next step is to define the release approval paths.
4.2.5 Define Release Approval Paths for Parking Documents
Define the release approval paths which you will need for the subsequent steps. Use the menu
path: SAP Customizing Implementation Guide > Financial Accounting > Accounts Receivable
and Accounts Payable > Business Transactions > Incoming Invoices/Credit Memos > Make and
Check Settings for Document Parking > Define Release Approval Paths for Parking Documents.
On the resulting screen, click on ‘New Entries’ and create the required entries and ‘Save’ the
details (Figure 4.40).
Figure 4.40 Release Approval Paths
The next step is to assign release approval paths for parking documents.
4.2.6 Assign Release Approval Paths for Parking Documents
Use this activity to assign a release approval path to a combination of ‘workflow variants,
document types and release approval groups’. Unless you complete this assignment, you will
not be able to assign release approval procedures for parking documents, later.
Use the menu path: SAP Customizing Implementation Guide > Financial Accounting >
Accounts Receivable and Accounts Payable > Business Transactions > Incoming
Invoices/Credit Memos > Make and Check Settings for Document Parking > Assign Release
Approval Paths for Parking Documents. On the resulting screen, click on ‘New Entries’ and
create the required settings for each combination of ‘workflow variant, document type,
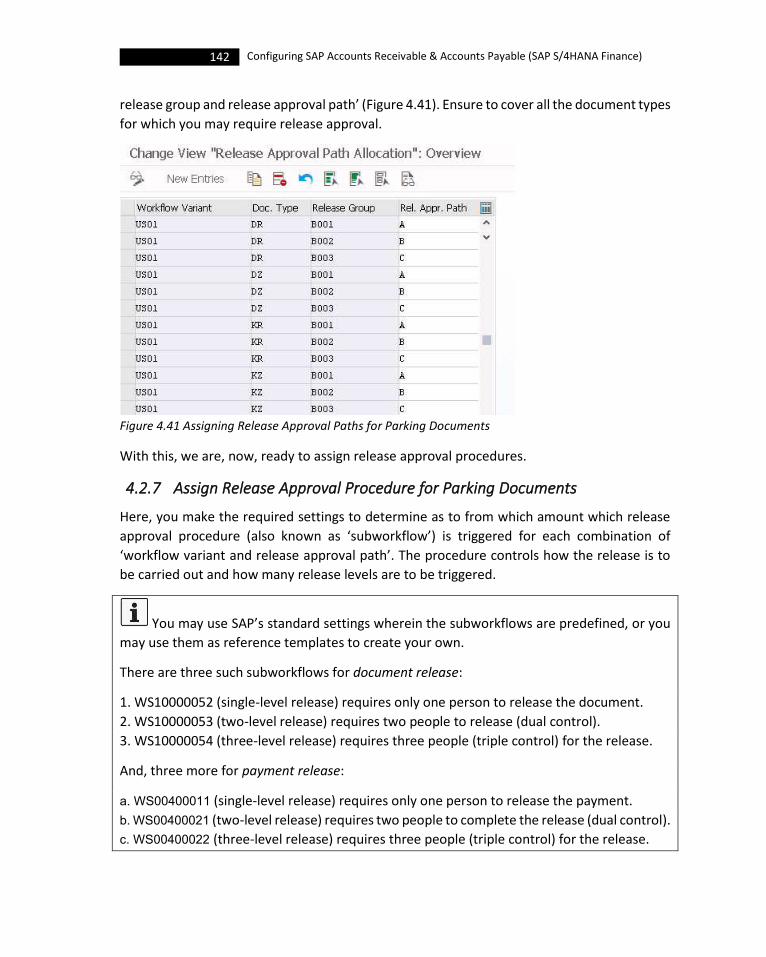
142 Configuring SAP Accounts Receivable & Accounts Payable (SAP S/4HANA Finance)
release group and release approval path’ (Figure 4.41). Ensure to cover all the document types
for which you may require release approval.
Figure 4.41 Assigning Release Approval Paths for Parking Documents
With this, we are, now, ready to assign release approval procedures.
4.2.7 Assign Release Approval Procedure for Parking Documents
Here, you make the required settings to determine as to from which amount which release
approval procedure (also known as ‘subworkflow’) is triggered for each combination of
‘workflow variant and release approval path’. The procedure controls how the release is to
be carried out and how many release levels are to be triggered.
You may use SAP’s standard settings wherein the subworkflows are predefined, or you
may use them as reference templates to create your own.
There are three such subworkflows for document release:
1. WS10000052 (single-level release) requires only one person to release the document.
2. WS10000053 (two-level release) requires two people to release (dual control).
3. WS10000054 (three-level release) requires three people (triple control) for the release.
And, three more for payment release:
a. WS00400011 (single-level release) requires only one person to release the payment.
b. WS00400021 (two-level release) requires two people to complete the release (dual control).
c. WS00400022 (three-level release) requires three people (triple control) for the release.
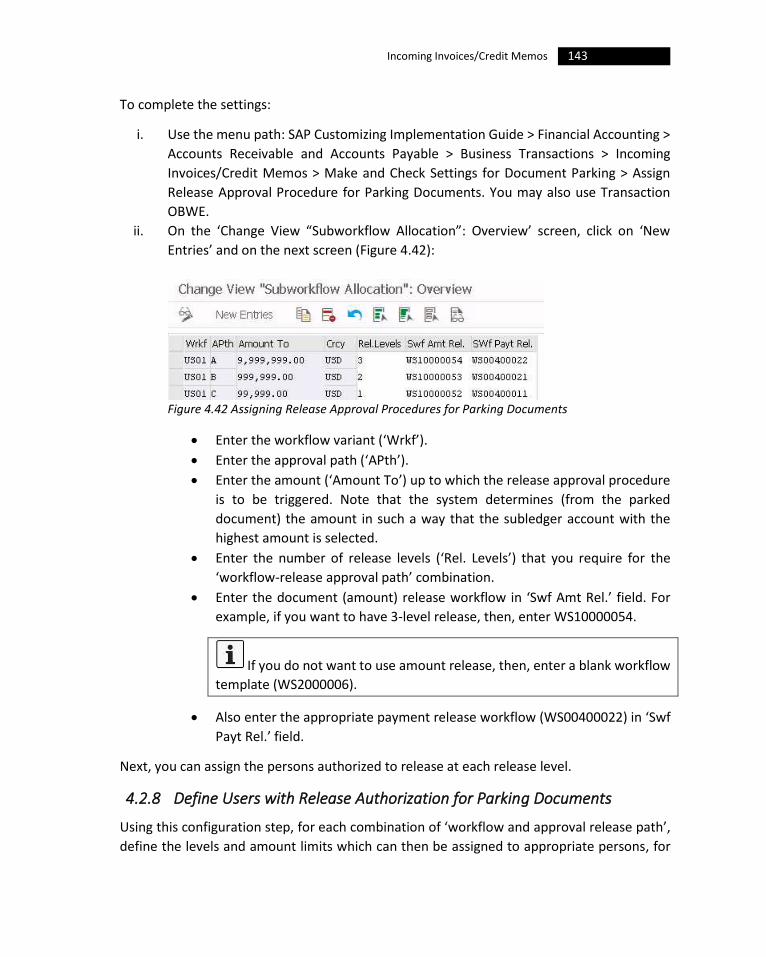
143 Incoming Invoices/Credit Memos
To complete the settings:
i. Use the menu path: SAP Customizing Implementation Guide > Financial Accounting >
Accounts Receivable and Accounts Payable > Business Transactions > Incoming
Invoices/Credit Memos > Make and Check Settings for Document Parking > Assign
Release Approval Procedure for Parking Documents. You may also use Transaction
OBWE.
ii. On the ‘Change View “Subworkflow Allocation”: Overview’ screen, click on ‘New
Entries’ and on the next screen (Figure 4.42):
Figure 4.42 Assigning Release Approval Procedures for Parking Documents
• Enter the workflow variant (‘Wrkf’).
• Enter the approval path (‘APth’).
• Enter the amount (‘Amount To’) up to which the release approval procedure
is to be triggered. Note that the system determines (from the parked
document) the amount in such a way that the subledger account with the
highest amount is selected.
• Enter the number of release levels (‘Rel. Levels’) that you require for the
‘workflow-release approval path’ combination.
• Enter the document (amount) release workflow in ‘Swf Amt Rel.’ field. For
example, if you want to have 3-level release, then, enter WS10000054.
If you do not want to use amount release, then, enter a blank workflow
template (WS2000006).
• Also enter the appropriate payment release workflow (WS00400022) in ‘Swf
Payt Rel.’ field.
Next, you can assign the persons authorized to release at each release level.
4.2.8 Define Users with Release Authorization for Parking Documents
Using this configuration step, for each combination of ‘workflow and approval release path’,
define the levels and amount limits which can then be assigned to appropriate persons, for

144 Configuring SAP Accounts Receivable & Accounts Payable (SAP S/4HANA Finance)
effecting the required releases. For example, in the case of 3-level release, you need to have
three rows defined with the amount for each of the levels.
To define the settings:
i. Use the menu path: SAP Customizing Implementation Guide > Financial Accounting >
Accounts Receivable and Accounts Payable > Business Transactions > Incoming
Invoices/Credit Memos > Make and Check Settings for Document Parking > Define
Users with Release Authorization for Parking Documents. You may also use
Transaction OBWF.
ii. On the resulting screen, click on ‘New Entries’ and define the amount limits for each
level (‘Lv’) for each combination of workflow and approval release path (Figure 4.43).
Figure 4.43 Release Levels with Amount Limit
iii. Now, select the desired row and choose ‘Goto -> Detail (OrgObject)’ on the menu bar
and create and/or assign the required organizational object for the level of release
(Figure 4.44). Repeat and make the settings for all the levels, and ‘Save’ the details.
Figure 4.44 Allocating Organization Object to Release Levels
The next action is to define the fields for reset release approval for customers.

145 Incoming Invoices/Credit Memos
4.2.9 Reset Release Approval (Customers)
Here, you can include the fields that are to be checked in case of changes to the customer
document. If the system detects changes to any of the fields included here, then, the system
cancels the document release and the process is reset.
Project Dolphin
The project has suggested to the BESTM management, to include fields like ‘House Bank’,
‘Tolerance Group’, ‘Payment Terms’, ‘Payment Method’, ‘Alternative Payer’ and ‘Payment
Block’ to be checked by the system. If any changes are found for these fields, then, the system
should cancel customer document release. For vendors, the fields will include ‘Alternate
Payee’, ‘Interest Indicator’, ‘House Bank’ and ‘Payment Block’.
To define the settings, use the menu path: SAP Customizing Implementation Guide > Financial
Accounting > Accounts Receivable and Accounts Payable > Business Transactions > Incoming
Invoices/Credit Memos > Make and Check Settings for Document Parking > Reset Release
Approval (Customers). You may also use Transaction OBWG.
On the resulting screen, click on ‘New Entries’, select ‘Customers’ as the account type (‘Acct
type’), and enter the ‘Field name’. You may select ‘Incomplete’ check-box, if you want the
system to cancel the document release when someone attempts to change the contents of
such fields when the document is incomplete. When you do not select the ‘Incomplete’ check-
box, the system restarts the document release for such fields only when the document is
complete (Figure 4.45).
Figure 4.45 Customer Line Item Fields for Resetting Document Release
Similarly, we need to define the vendor line items fields for reset of release approval.
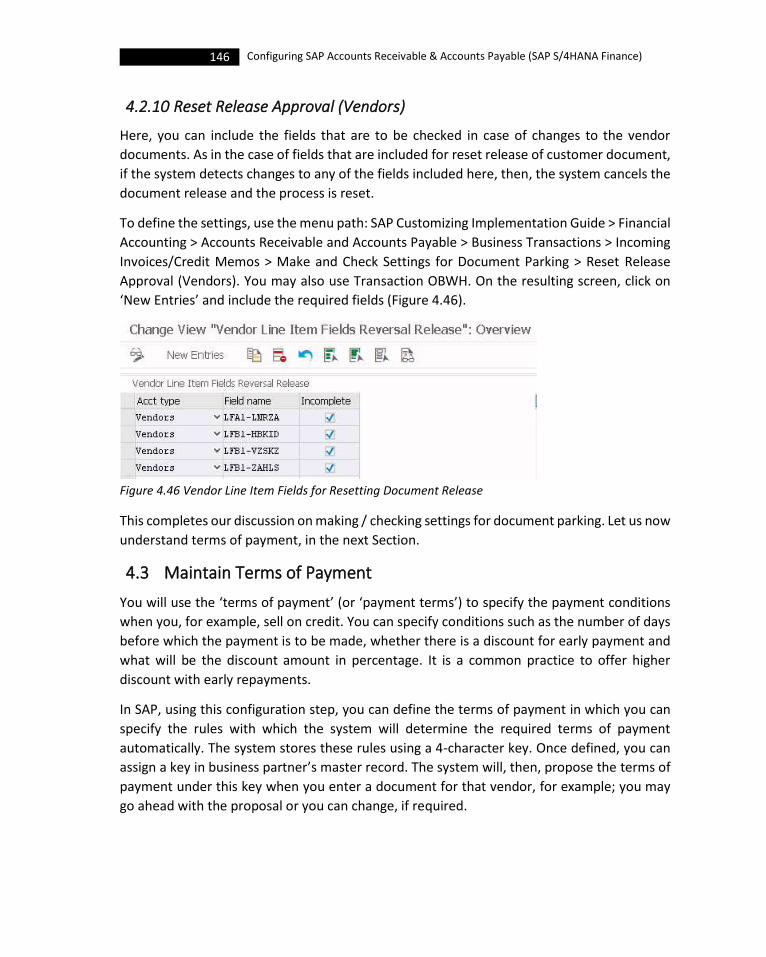
146 Configuring SAP Accounts Receivable & Accounts Payable (SAP S/4HANA Finance)
4.2.10 Reset Release Approval (Vendors)
Here, you can include the fields that are to be checked in case of changes to the vendor
documents. As in the case of fields that are included for reset release of customer document,
if the system detects changes to any of the fields included here, then, the system cancels the
document release and the process is reset.
To define the settings, use the menu path: SAP Customizing Implementation Guide > Financial
Accounting > Accounts Receivable and Accounts Payable > Business Transactions > Incoming
Invoices/Credit Memos > Make and Check Settings for Document Parking > Reset Release
Approval (Vendors). You may also use Transaction OBWH. On the resulting screen, click on
‘New Entries’ and include the required fields (Figure 4.46).
Figure 4.46 Vendor Line Item Fields for Resetting Document Release
This completes our discussion on making / checking settings for document parking. Let us now
understand terms of payment, in the next Section.
4.3 Maintain Terms of Payment
You will use the ‘terms of payment’ (or ‘payment terms’) to specify the payment conditions
when you, for example, sell on credit. You can specify conditions such as the number of days
before which the payment is to be made, whether there is a discount for early payment and
what will be the discount amount in percentage. It is a common practice to offer higher
discount with early repayments.
In SAP, using this configuration step, you can define the terms of payment in which you can
specify the rules with which the system will determine the required terms of payment
automatically. The system stores these rules using a 4-character key. Once defined, you can
assign a key in business partner’s master record. The system will, then, propose the terms of
payment under this key when you enter a document for that vendor, for example; you may
go ahead with the proposal or you can change, if required.
147 Incoming Invoices/Credit Memos
Though you may use the same key, for the terms of payment, for both customers and vendors
who needs to be associated with the same payment terms, it is recommended to use different
keys for customers and vendors thereby limiting the permitted account type within the terms
of payment itself. By this, you can – for example – change the payment term for a customer
without affecting the vendor having the same payment terms.
You may use the standard payment terms pre-defined in the system or you can create your
own to meet your business requirements.
Project Dolphin
BESTM wants to have different set of payment terms for customers and vendors so that if
there is a change that needs to be done for either customer or vendor, then, that can be
carried out without affecting the other. However, there will a single payment term that will
apply for both customers and vendors when the due date is immediate.
For customers, the three payment terms will cover a credit period of 90 days, 60 days, and 30
days.
1). BC90: 15 Days 3%, 45/2%, 90 Net (there will be a discount of 3% if paid within 15 days, 2%
discount for within 45 days and no discount beyond that).
2). BC60: 15 Days 3%, 30/2%, 60 Net
3). BC30: 15 Days 4%, 30 Net
Similar payment terms will need to be configured for vendors but the key will be changed to
BV90, BV60 etc. A common payment term B001 will also be configured for immediate
payment without any discount, and this can be used for both customers and vendors.
To configure:
i. Use the menu path: SAP Customizing Implementation Guide > Financial Accounting >
Accounts Receivable and Accounts Payable > Business Transactions > Incoming
Invoices/Credit Memos > Maintain Terms of Payment. You may also use Transaction
OBB8.
ii. On the resulting screen, click on ‘New Entries’ and make the required settings on the
next screen (Figure 4.47):

148 Configuring SAP Accounts Receivable & Accounts Payable (SAP S/4HANA Finance)
Figure 4.47 Configuring Payment Terms BC90 for BESTM
• Enter a 4-character key to identify the ‘Payment terms’.
• Enter the appropriate ‘Sales text’ like ‘5 Days 3%, 45/2%, 90 Net’. When you
enter in this format, then the system automatically fills the ‘Explanations’ (at
the bottom of the screen) as ‘within 15 days 3 % cash discount’, ‘within 45
days 2 % cash discount’ and ‘within 90 days Due net’.
• Enter a description in ‘Own Explanation’, if that will be different to the
automatically created explanations. Only specify such an explanation, here, if
you want to use this text instead of the automatically created ‘Explanations’
by the system.
• Select the ‘Account type’: Select ‘Customers’ if this is only for customer
accounts, or ‘Vendors’ if for vendors only, and select both the check-boxes if
this will be valid for both customers and vendors.
• You may maintain additional details under ‘Baseline date calculation’: if you
enter a calendar day number in ‘Fixed Day’ field, the system overwrites the
day of the baseline date for payment of the line item; an entry in the

149 Incoming Invoices/Credit Memos
‘Additional Month’ will be added to the calendar month of the baseline date
for payment. For example, if the baseline date is 02-15-2020, and you enter
02 in this field, then, the system calculates the baseline date as 04-15-2020.
• Under ‘Pmnt block/pmnt method default’, you may enter a default value for
the payment blocking key in ‘Block Key’ field. The system proposes this block
key along with the payment terms when you enter a document. If you leave
the field as blank, then, it means, the document is free for payment.
• The check-box adjacent to ‘Block Key’ controls whether the payment block is
transferred if the terms of payment key is changed in an invoice item: if set,
the system transfer the payment block from the terms of payment when the
item is first entered and also when the terms of payment key is changed; if
not set, the system only transfers the payment block from the terms of
payment when the item is first entered.
• You may enter a ‘Payment Method’ associated with this payment terms. If
you want to control payment methods through customer / vendor master
record, then, leave this field as blank.
In general, you enter the default payment methods in the customer /
vendor master record. You can also enter a specific payment method to be
applied for a particular open item in the that line item. However, in case, you
want the system to apply specific payment method applied based upon
payment terms, then, you can enter the same while configuring the payment
terms in the ‘Payment Method’ field.
• Similar to the ‘Block Key’ check-box, the ‘Payment Method’ check-box
controls whether the system transfers the payment method in an invoice
item, if the payment terms key is changed. If set, the system transfers the
payment method from the terms of payment when the item is first entered
and also when the payment terms key is changed. If not set, then, the system
only transfers the payment method from the terms of payment when the
item is first entered.
• Select ‘Posting Date’ as the ‘Default baseline date’. Do not select the ‘No
Default Option’; otherwise, you need to enter the baseline date, manually,
every time you process a document.
• Maintain the details of ‘Payment terms’ as indicated in Figure 10.51. Instead
of an entry in the ‘No. of Days’ field, you may also maintain ‘Fixed Date’ of
‘Additional Months’ in defining the payment terms.
• Do not select ‘Installment Payments’ for payment terms that are associated
with normal payments.

150 Configuring SAP Accounts Receivable & Accounts Payable (SAP S/4HANA Finance)
Use the menu path SAP Customizing Implementation Guide > Financial
Accounting > Accounts Receivable and Accounts Payable > Business
Transactions > Incoming Invoices/Credit Memos > Define Terms of Payment
for Installment Payments or Transaction OBB9 to define payment terms for
instalment payment. Note to maintain a separate payment term key for
instalment payment terms (using Transaction OBB8), before getting into
Transaction OBB9. Refer Section 4.4, for more details on payment terms for
instalment payments.
• Select ‘Rec Entries: Supplement frm Master’ check-box if you want the system
to take the payment terms in a recurring entry from the customer / vendor
master record, when there is no payment terms key available in the recurring
entry original document.
iii. ‘Save’ the settings. Repeat the steps and define the other payment terms like BC60
and BC30 for use with BESTM customers (Figure 4.48).
Figure 4.48 Payment Terms for BESTM
iv. Also define payment terms with the keys BV90, BV60 and BV30 for BESTM vendors;
in that case, select ‘Vendors’ check-box for ‘Account type’. When defining the
payment terms for vendors, you will not be able to maintain the ‘Sales text’; instead,
enter ‘Own Explanation’.
v. Finally, define the payment term B0001 to be used for both customers and vendors
of BESTM.
The next step is to understand how to define the payment terms for instalment payments.
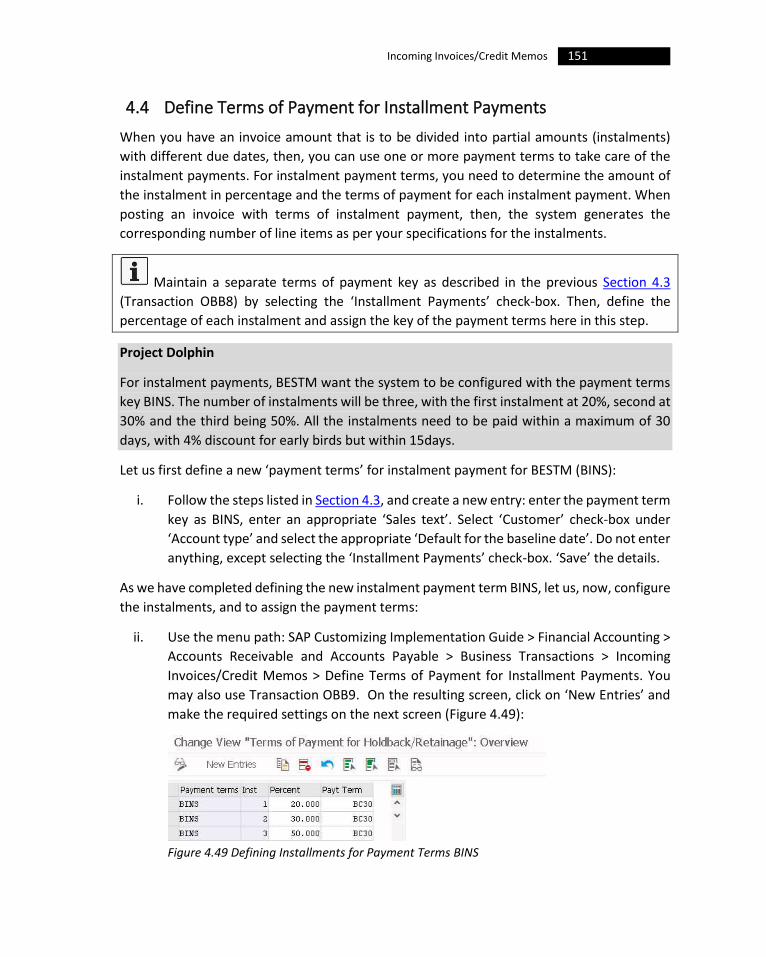
151 Incoming Invoices/Credit Memos
4.4 Define Terms of Payment for Installment Payments
When you have an invoice amount that is to be divided into partial amounts (instalments)
with different due dates, then, you can use one or more payment terms to take care of the
instalment payments. For instalment payment terms, you need to determine the amount of
the instalment in percentage and the terms of payment for each instalment payment. When
posting an invoice with terms of instalment payment, then, the system generates the
corresponding number of line items as per your specifications for the instalments.
Maintain a separate terms of payment key as described in the previous Section 4.3
(Transaction OBB8) by selecting the ‘Installment Payments’ check-box. Then, define the
percentage of each instalment and assign the key of the payment terms here in this step.
Project Dolphin
For instalment payments, BESTM want the system to be configured with the payment terms
key BINS. The number of instalments will be three, with the first instalment at 20%, second at
30% and the third being 50%. All the instalments need to be paid within a maximum of 30
days, with 4% discount for early birds but within 15days.
Let us first define a new ‘payment terms’ for instalment payment for BESTM (BINS):
i. Follow the steps listed in Section 4.3, and create a new entry: enter the payment term
key as BINS, enter an appropriate ‘Sales text’. Select ‘Customer’ check-box under
‘Account type’ and select the appropriate ‘Default for the baseline date’. Do not enter
anything, except selecting the ‘Installment Payments’ check-box. ‘Save’ the details.
As we have completed defining the new instalment payment term BINS, let us, now, configure
the instalments, and to assign the payment terms:
ii. Use the menu path: SAP Customizing Implementation Guide > Financial Accounting >
Accounts Receivable and Accounts Payable > Business Transactions > Incoming
Invoices/Credit Memos > Define Terms of Payment for Installment Payments. You
may also use Transaction OBB9. On the resulting screen, click on ‘New Entries’ and
make the required settings on the next screen (Figure 4.49):
Figure 4.49 Defining Installments for Payment Terms BINS
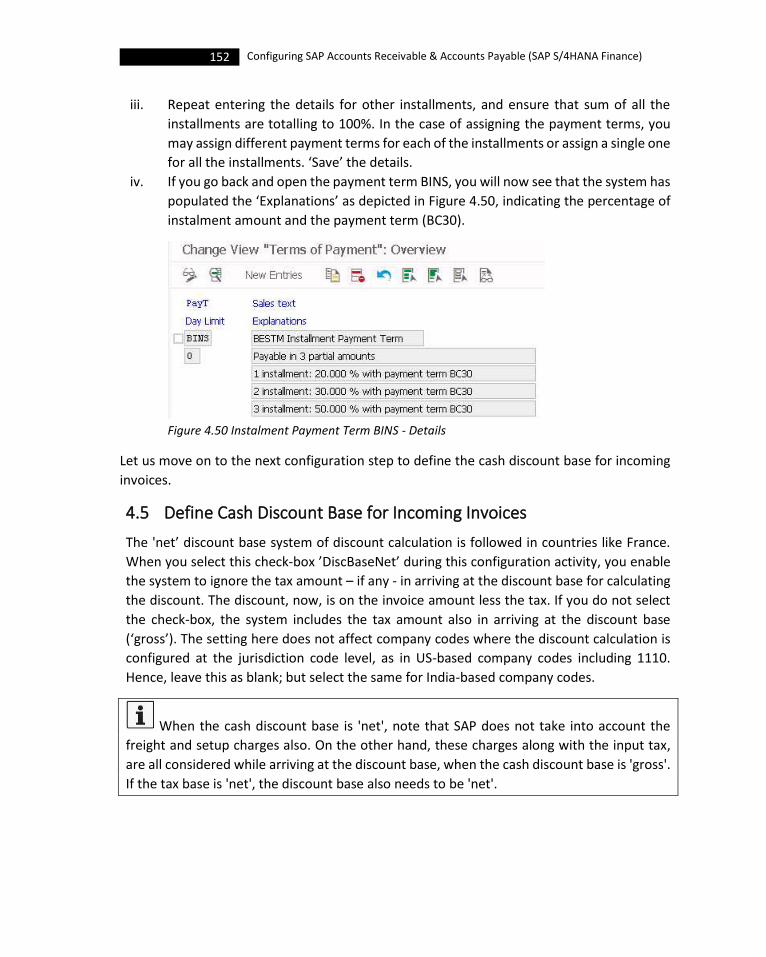
152 Configuring SAP Accounts Receivable & Accounts Payable (SAP S/4HANA Finance)
iii. Repeat entering the details for other installments, and ensure that sum of all the
installments are totalling to 100%. In the case of assigning the payment terms, you
may assign different payment terms for each of the installments or assign a single one
for all the installments. ‘Save’ the details.
iv. If you go back and open the payment term BINS, you will now see that the system has
populated the ‘Explanations’ as depicted in Figure 4.50, indicating the percentage of
instalment amount and the payment term (BC30).
Figure 4.50 Instalment Payment Term BINS - Details
Let us move on to the next configuration step to define the cash discount base for incoming
invoices.
4.5 Define Cash Discount Base for Incoming Invoices
The 'net’ discount base system of discount calculation is followed in countries like France.
When you select this check-box ’DiscBaseNet’ during this configuration activity, you enable
the system to ignore the tax amount – if any - in arriving at the discount base for calculating
the discount. The discount, now, is on the invoice amount less the tax. If you do not select
the check-box, the system includes the tax amount also in arriving at the discount base
(‘gross’). The setting here does not affect company codes where the discount calculation is
configured at the jurisdiction code level, as in US-based company codes including 1110.
Hence, leave this as blank; but select the same for India-based company codes.
When the cash discount base is 'net', note that SAP does not take into account the
freight and setup charges also. On the other hand, these charges along with the input tax,
are all considered while arriving at the discount base, when the cash discount base is 'gross'.
If the tax base is 'net', the discount base also needs to be 'net'.

153 Incoming Invoices/Credit Memos
You may use the menu path SAP Customizing Implementation Guide > Financial Accounting >
Accounts Receivable and Accounts Payable > Business Transactions > Incoming
Invoices/Credit Memos > Define Cash Discount Base for Incoming Invoices, or Transaction
OB70 or to configure the settings (Figure 4.51).
Figure 4.51 Configuring Cash Discount Base
You can also configure this setting while configuring the company code global parameters. In
that case you will use the menu path: SAP Customizing Implementation Guide > Financial
Accounting > Financial Accounting Global Settings > Global Parameters for Company Code >
Enter Company Code Global Parameters, or Transaction OBY6, and configure the ‘Discount
base is net value’ check-box as per your requirements.
This completes our discussion of settings required for incoming invoices / credit memos.
4.6 Conclusion
Here, in this Chapter, you learned about the various configuration settings relating to the
business transaction, ‘incoming invoice’ / ‘credit memo’.
Towards that, first, you learned about the various document settings including document
types, posting keys, validation & substitution in accounting documents, fiscal status variant,
screen variant etc. In that, you learned that the ‘document type’, in SAP, is used to classify
accounting documents and distinguish between business transactions to be posted. You
learned that the ‘posting key’ controls how a line item is entered and processed in a
document. You learned that you can define ‘additional checks for accounting documents’ in
the form of validations, for each of your company codes. You learned that you can define the
default document type and posting key for various Transactions so that you do not need to
input them during document entry. You learned about field status, field status group (FSG)
and field status variant (FSV). You understood that an FSG is a collection of field statuses,
defined in the company code data of G/L account, and is used to determine which fields are
ready for data entry input (required or mandatory / optional), and which needs to be hidden.
You also learned that SAP uses ‘link rules’ to overcome conflicting field status situations. You
understood that you can group several FSGs in one field status variant (FSV), and then assign
that FSV to a company code. By this, you learned that, you will be able to work with the same
FSGs in multiple company codes. Similar to that of ‘validation’ in accounting documents, you

154 Configuring SAP Accounts Receivable & Accounts Payable (SAP S/4HANA Finance)
learned that you can define ‘substitution’ to replace of the field contents, per company and
that the defined substitutions would be valid for both the manual entry of documents and for
the automatic creation of documents. You understood that you can define text IDs for both
document header and line items, to store additional (or detailed) information for a document
header or for the line items during document entry, as you cannot have all the information
stored in the ‘long text’ field. Then, you learned about the configuration settings relating to
line layouts for document posting, change and display. You also learned about document
change rules and how to maintain the fast entry screens for G/L account items.
Then, you learned about the settings required for document parking, including the
configuration of entry screens for parking documents, creating & assigning workflow variant
for parking documents, the release approval process including release approval groups /
paths, and so on. While defining the workflow for parking documents, you learned that you
can make specifications as to whether a posting release is required, and the amount limit
beyond which the release for payment is to take place. You understood that you can attach
the workflow variant to the appropriate company codes. You also understood that you need
to define the release approval groups and later enter them in the master records of your
customers / vendors, because you would need these approval groups for the next steps like
assigning release approval paths / release approval procedures for parking documents. You
learned that, based on the release approval path and amount specified, the system would
determine the subworkflow to be triggered for the payment release. You, then, learned about
how to reset release approval, both for customers and vendors.
You, then, went on to learn ‘terms of payment’ (or ‘payment terms’) in which you specify
payment conditions such as the number of days before which the payment is to be made,
whether there is a discount for early payment etc. You also learned to set up the payment
terms including payment terms for installment payments.
Finally, you learned about defining the cash discount base for incoming invoices. You
understood that when the cash discount base is 'net', the system does not take into account
the freight and setup charges in arriving at the base. However, you learned that these charges
along with the input tax, are all considered while arriving at the discount base, when the cash
discount base is 'gross'. If the tax base is 'net', you understood that the discount base also
needs to be 'net'.
Let us, now, move on to the configuration relating to release for payment, in the next Chapter.
5 Release for Payment
e have, already, discussed creating the required workflow variant (US01) for
release of document / payment, in Section 4.2 of Chapter4, when we discussed
the settings for document parking. Later, we assigned this variant to all the
required company codes. And, we discussed the different steps that need to be configured
for release approval of parked documents. We configured the release approval groups (B001,
B002 and B003) and release approval paths (A, B and C), and later assigned release approval
paths to each combination of ‘workflow variant, document type and release group’; we also
assigned release approval procedures (subworkflows) for each level of release to the
combination of ‘workflow and approval path’ in which we assigned the workflow for both
document release and payment release, and finally defined the users (with appropriate
authorization) for approval of the releases.
The only activity that needs to be configured is the definition of payment block reasons for
payment release. Let us do that now.
5.1 Define Payment Block Reason for Payment Release
You will be able to differentiate why invoices are to be blocked for payment in the system, by
using ‘payment block reasons’ defined under ‘block indicators’. The payment block reasons
that you define here will be valid across company codes. Using the block indicators, you can
prevent items from being processed manually with the clearing procedures (both incoming
and outgoing payments). So, for each of the block indicators, you need to decide what
changes can be allowed in the payment proposal and whether the blocked items can always
be transferred or reversed.
The default settings in the standard system include a number of payment block reasons
like R (blocked by invoice verification’, ‘blank’ (free for payment) etc.
Project Dolphin
BESTM will be using the default payment block reasons and will not require anything new.
W
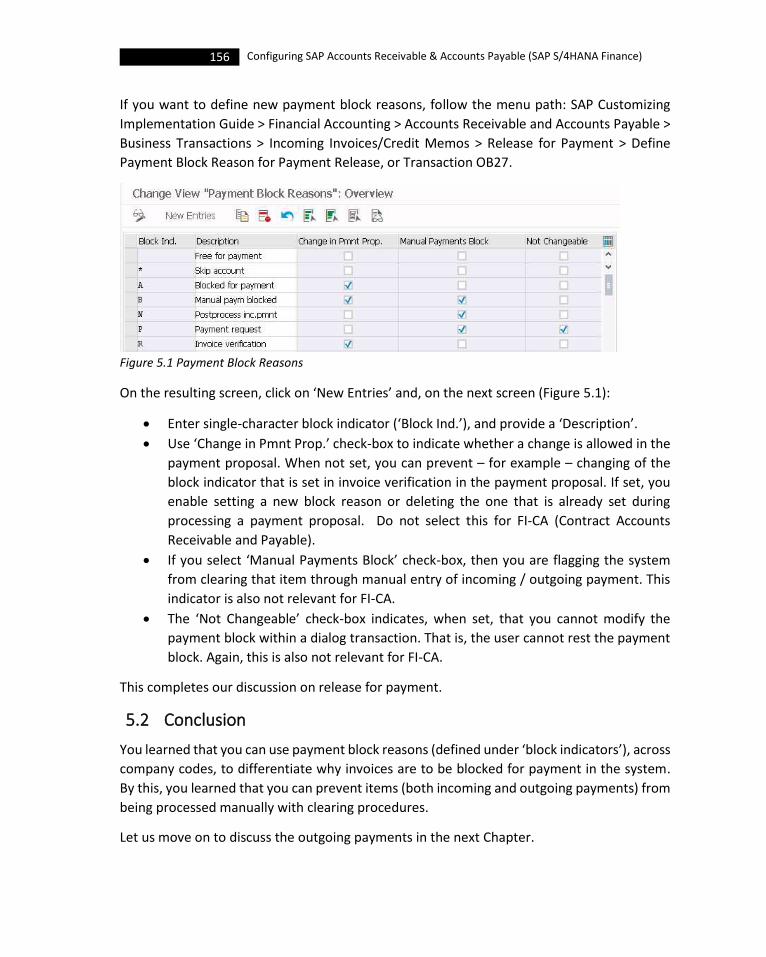
156 Configuring SAP Accounts Receivable & Accounts Payable (SAP S/4HANA Finance)
If you want to define new payment block reasons, follow the menu path: SAP Customizing
Implementation Guide > Financial Accounting > Accounts Receivable and Accounts Payable >
Business Transactions > Incoming Invoices/Credit Memos > Release for Payment > Define
Payment Block Reason for Payment Release, or Transaction OB27.
Figure 5.1 Payment Block Reasons
On the resulting screen, click on ‘New Entries’ and, on the next screen (Figure 5.1):
• Enter single-character block indicator (‘Block Ind.’), and provide a ‘Description’.
• Use ‘Change in Pmnt Prop.’ check-box to indicate whether a change is allowed in the
payment proposal. When not set, you can prevent – for example – changing of the
block indicator that is set in invoice verification in the payment proposal. If set, you
enable setting a new block reason or deleting the one that is already set during
processing a payment proposal. Do not select this for FI-CA (Contract Accounts
Receivable and Payable).
• If you select ‘Manual Payments Block’ check-box, then you are flagging the system
from clearing that item through manual entry of incoming / outgoing payment. This
indicator is also not relevant for FI-CA.
• The ‘Not Changeable’ check-box indicates, when set, that you cannot modify the
payment block within a dialog transaction. That is, the user cannot rest the payment
block. Again, this is also not relevant for FI-CA.
This completes our discussion on release for payment.
5.2 Conclusion
You learned that you can use payment block reasons (defined under ‘block indicators’), across
company codes, to differentiate why invoices are to be blocked for payment in the system.
By this, you learned that you can prevent items (both incoming and outgoing payments) from
being processed manually with clearing procedures.
Let us move on to discuss the outgoing payments in the next Chapter.

6 Outgoing Payments
he outgoing payments represent the payments you make to your external business
partners (vendors or suppliers) and internal business partners (staff or group
companies). Here, in this Chapter, we will discuss the (a) global settings for outgoing
payments, the settings for (b) manual outgoing payments and (c) automatic outgoing
payments.
6.1 Outgoing Payments Global Settings
There are various global settings that you need to complete to make your system to handle
both the manual and automatic payments. These settings include:
• Make and Check Document Settings
• Define Accounts for Cash Discount Taken
• Define Accounts for Lost Cash Discount
• Define Accounts for Overpayments/Underpayments
• Define Accounts for Exchange Rate Differences
• Define Account for Rounding Differences
• Define Accounts for Payment Differences with Altern. Currency
• Define Accounts for Bank Charges (Vendors)
• Define Posting Keys for Clearing
• Enable Translation Posting
• Define Payment Block Reasons
Let us start with defining / checking document settings.
6.1.1 Make and Check Document Settings
As we have already completed all tasks relating to making / checking document settings vide
Section 4.1 of Chapter 4, we are not repeating them here.
Let us, hence, start with the definition of cash discount taken (received).
T

158 Configuring SAP Accounts Receivable & Accounts Payable (SAP S/4HANA Finance)
6.1.2 Define Accounts for Cash Discount Taken
Define the G/L account number(s) for accounting the cash discount received. During open
item clearing, the system posts the cash discount to the account(s) defined here. If necessary,
you may differentiate the accounts by tax codes.
Project Dolphin
BESTM wants to have a single G/L account (70040000) to manage all cash discounts received.
Use the menu path: SAP Customizing Implementation Guide > Financial Accounting >
Accounts Receivable and Accounts Payable > Business Transactions > Outgoing Payments >
Outgoing Payments Global Settings > Define Accounts for Cash Discount Taken, or Transaction
OBXU. Enter the chart of accounts (say, BEUS) on the resulting pop-up screen, and enter the
appropriate G/L accounts on the next screen (Figure 6.1).
Figure 6.1 G/L Account for Cash Discount Received
Let us move on to define the accounts for cash discount lost.
6.1.3 Define Accounts for Lost Cash Discount
Here, you will define the G/L account numbers for cash discount lost. In case of nett invoices
posted, the system automatically posts the difference between the originally calculated cash
discount and the actual cash discount received, as an expense, to this G/L account.
Project Dolphin
BESTM wants to capture the difference between the originally calculated cash discount and
the actual cash discount received, and post that difference as an expense (lost discount) to a
single G/L account (71040000).
Use the menu path: SAP Customizing Implementation Guide > Financial Accounting >
Accounts Receivable and Accounts Payable > Business Transactions > Outgoing Payments >
Outgoing Payments Global Settings > Define Accounts for Lost Cash Discount, or Transaction
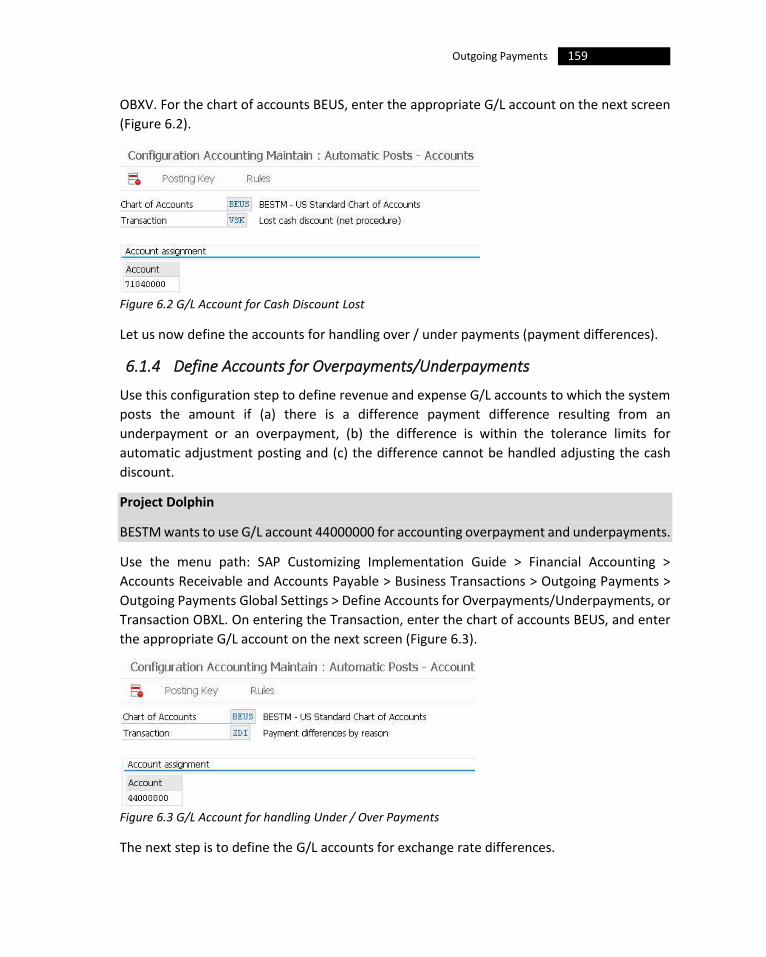
159 Outgoing Payments
OBXV. For the chart of accounts BEUS, enter the appropriate G/L account on the next screen
(Figure 6.2).
Figure 6.2 G/L Account for Cash Discount Lost
Let us now define the accounts for handling over / under payments (payment differences).
6.1.4 Define Accounts for Overpayments/Underpayments
Use this configuration step to define revenue and expense G/L accounts to which the system
posts the amount if (a) there is a difference payment difference resulting from an
underpayment or an overpayment, (b) the difference is within the tolerance limits for
automatic adjustment posting and (c) the difference cannot be handled adjusting the cash
discount.
Project Dolphin
BESTM wants to use G/L account 44000000 for accounting overpayment and underpayments.
Use the menu path: SAP Customizing Implementation Guide > Financial Accounting >
Accounts Receivable and Accounts Payable > Business Transactions > Outgoing Payments >
Outgoing Payments Global Settings > Define Accounts for Overpayments/Underpayments, or
Transaction OBXL. On entering the Transaction, enter the chart of accounts BEUS, and enter
the appropriate G/L account on the next screen (Figure 6.3).
Figure 6.3 G/L Account for handling Under / Over Payments
The next step is to define the G/L accounts for exchange rate differences.

160 Configuring SAP Accounts Receivable & Accounts Payable (SAP S/4HANA Finance)
6.1.5 Define Accounts for Exchange Rate Differences
Here, you will define G/L account numbers to which you want the system to automatically
post exchange rate differences (gain or loss) realized, when clearing open items. To enable
posting of exchange rate differences, when clearing open items of customers / vendors, you
have to specify the reconciliation G/L accounts for customers / vendors in the ‘G/L account’
field in the respective master records. To automatically post exchange rate differences, when
clearing bank sub-accounts, enter the bank sub-account number in the ‘G/L account’ field.
Using this task, you can also define the accounts for valuating open items. You can define
separate accounts, for each type of currency, to post the exchange rate differences per
currency. Once you make the first valuation run, you should not change your accounts for
valuation postings; else, you will not be able to reverse valuation postings.
Project Dolphin
The project team has recommended to use a single set of accounts to take care of automatic
posting of the exchange rate differences realized while clearing open items: for loss it will be
72010000, and for the gains it will be 72510000. For valuation adjustments, the loss will be
posted to 72040000 and the gains to 72540000; the B/S adjustments will go to the G/L
account 11001099.
To make the required settings:
i. Use the menu path: SAP Customizing Implementation Guide > Financial Accounting >
Accounts Receivable and Accounts Payable > Business Transactions > Outgoing
Payments > Outgoing Payments Global Settings > Define Accounts for Exchange Rate
Differences. You may also use Transaction OB09.
ii. Enter the ‘Chart of Accounts’ on the pop-up screen. Press ‘Continue’.
iii. The system brings up the G/L accounts, on the next screen, for which you need to
maintain the account(s) for automatic posting of exchange rate differences.
iv. Select a row (G/L account), click on ‘New Entries’ and maintain the details, on the next
screen (Figure 6.4):
• Leave the ‘Currency’ and ‘Currency Type’ field as blank so that the G/L
accounts entered here will be used for all the currencies / currency types. If
you decide to define individual accounts for separate currencies / currency
types, then, maintain the ‘Currency’ and ‘Currency Type’.
• Enter the appropriate G/L account for ‘Loss’ and ‘Gain’ under the ‘Exchange
rate difference realized’ block. Similarly, enter the G/L accounts for valuation
loss / gain in the ‘Valuation’ block.

161 Outgoing Payments
v. ‘Save’ when completed, and repeat the steps to define the G/L accounts, for posting
the gain / loss, for both exchange rate differences and valuation, for other G/L
accounts by using the ‘Next Entry’ button.
Figure 6.4 G/L Accounts for Posting Exchange Rate Differences during OI Clearing
We have defined a single set of G/L accounts to take care of automatic posting of the
exchange rate differences realized in clearing open items: for loss it will be 72010000, and for
the gains it will be 72510000. For valuation adjustments, the loss will be posted to 72040000
and the gains to 72540000; the B/S adjustments will go to the G/L account 11001099.
Let us now define the account for handling rounding differences.
6.1.6 Define Account for Rounding Differences
During clearing open items, the system posts the gains / losses realised from exchange rate
differences. Hence, you need to define the appropriate revenue / expense G/L accounts for
automatically posting of the gain / loss arising out of currency rounding off during clearing.
Project Dolphin
BESTM has asked the project team to configure G/L account 72020000 and 72520000 to
handle currency rounding off during clearing.
Use the menu path: SAP Customizing Implementation Guide > Financial Accounting >
Accounts Receivable and Accounts Payable > Business Transactions > Outgoing Payments >
Outgoing Payments Global Settings > Define Account for Rounding Differences, or Transaction

162 Configuring SAP Accounts Receivable & Accounts Payable (SAP S/4HANA Finance)
OB00. On the resulting screen (Figure 6.5), for the chart of accounts BEUS, define appropriate
G/L accounts: one for revenue and one for expense, to take care currency rounding off.
Figure 6.5 G/L Accounts for handling Rounding Differences
You also need to define a separate set of G/L accounts to handle payment differences if you
work with any alternative payment currencies in manual or automatic payments. Let us
configure the same, next.
6.1.7 Define Accounts for Payment Differences with Altern. Currency
As in the previous case, define the appropriate G/L accounts (debit and credit) to handle
payment differences (gain/ loss) when you work with alternative currencies for payment –
both manual and automatic.
Project Dolphin
BESTM has asked the project team to use G/L account 72010000 and 72510000 to handle to
handle payment differences (gain/ loss) when working with alternative currencies for
payment.
Use the menu path: SAP Customizing Implementation Guide > Financial Accounting >
Accounts Receivable and Accounts Payable > Business Transactions > Outgoing Payments >
Outgoing Payments Global Settings > Define Accounts for Payment Differences with Altern.
Currency, or Transaction OBXO.
Figure 6.6 G/L Accounts for Payment Differences with Alternative Currencies

163 Outgoing Payments
On the resulting screen, for the chart of accounts BEUS, define the appropriate G/L accounts,
one for revenue and one for expense (Figure 6.6).
The next activity is to define the G/L account to post vendor bank charges.
6.1.8 Define Accounts for Bank Charges (Vendors)
Define the G/L account number(s) for your bank charges accounts. Once defined, the system
posts the charges that you specify for a bank item when settling payment to these accounts.
Project Dolphin
BESTM has asked the project team to use G/L account 71000000 to take care of posting of
vendor bank charges.
Use the menu path: SAP Customizing Implementation Guide > Financial Accounting >
Accounts Receivable and Accounts Payable > Business Transactions > Outgoing Payments >
Outgoing Payments Global Settings > Define Accounts for Bank Charges (Vendors), or
Transaction OBXK. On the resulting screen, double-click on ‘Bank charges’ (Transaction BSP)
procedure, and define appropriate G/L account(s), for the chart of accounts BEUS (Figure 6.7).
Figure 6.7 G/L Account for Bank Charges (Vendors)
The next step is to define the posting keys for clearing.
6.1.9 Define Posting Keys for Clearing
Use this configuration task, to define the posting keys the system uses to create line items,
automatically, during clearing transactions. The payment program also uses these posting
keys. For each of the clearing transactions (or procedures) namely AUSGZAHL (outgoing
payment), EINGZAHL (incoming payment), GUTSCHRI (credit memo), JVACLEAR (JVA clearing)
and UMBUCHNG (transfer posting with clearing), you will see that there are posting keys
already defined in the standard system that you can use without making any change.
However, if you want to make a change or define your own (normally, not recommended),
you may use the menu path: SAP Customizing Implementation Guide > Financial Accounting

164 Configuring SAP Accounts Receivable & Accounts Payable (SAP S/4HANA Finance)
> Accounts Receivable and Accounts Payable > Business Transactions > Outgoing Payments >
Outgoing Payments Global Settings > Define Posting Keys for Clearing, or Transaction OBXH .
On the ‘Maintain Accounting Configuration: Clearing Procedures – List’ screen, you will see a
list of pre-defined standard clearing procedures like AUSGZAHL, EINGZAHL etc (Figure 6.8).
Figure 6.8 List of Clearing Transactions
You may double-click on a row, to look at the details of default posting keys for that clearing
procedure on the next screen (Figure 6.9). We are neither changing any of the standard
posting keys nor defining any new key, for BESTM.
Figure 6.9 Standard Posting Keys for the Clearing Procedure ‘Incoming Payment’

165 Outgoing Payments
Do not to change the standard settings of posting keys for the clearing transactions.
The next step is to enable company codes for translation postings.
6.1.10 Enable Translation Posting
When you enable translation posting for a company code, you determine that the translation
gain / loss for clearing open items, in foreign currency, is to be posted by the system to the
appropriate accounts. The system posts the translations if the item to be cleared has already
been revalued once during foreign currency valuation. The system, then, posts the valuation
difference to a separate G/L account (translation account), with an offsetting entry to a
clearing account.
Project Dolphin
BESTM wants the project team to enable posting of translation gain/loss for clearing open
items in foreign currency, in all the company codes both US-based and India-based.
Use the menu path: SAP Customizing Implementation Guide > Financial Accounting >
Accounts Receivable and Accounts Payable > Business Transactions > Outgoing Payments >
Outgoing Payments Global Settings > Enable Translation Posting. On the resulting screen,
enable translation posting by selecting the ‘Post Translation’ check-box for all the required
company codes (Figure 6.10).
Figure 6.10 Enabling Company Code for Posting Translation Gain / Loss
The next step is to define the settings for payment block reasons.
6.1.11 Payment Block Reasons
There are two settings you need to make: one is to define the payment block reasons and the
other is to define the default values for payment block.
6.1.11.1 Define Payment Block Reasons
We have already discussed payment block reasons in Section 5.1 of Chapter 5.
Let us, now, look at the last configuration step in global settings for outgoing payments:
defining default values for payment block.

166 Configuring SAP Accounts Receivable & Accounts Payable (SAP S/4HANA Finance)
6.1.11.2 Define Default Values for Payment Block
Using this step, you can change the payment blocking key value that is proposed as a default,
per payment terms, when entering postings to customer / vendor accounts.
Project Dolphin
BESTM does not want to propose a default blocking key via payment terms, for postings
customer / vendor accounts.
Use the menu path: SAP Customizing Implementation Guide > Financial Accounting >
Accounts Receivable and Accounts Payable > Business Transactions > Outgoing Payments >
Outgoing Payments Global Settings > Payment Block Reasons > Define Default Values for
Payment Block. On the resulting screen, enter the payment block key in ‘Block Key’ field that
should be proposed as the default, for each of the payment terms. If you do not want the
system to propose a default payment blocking key based on the terms of payment, you just
need to leave this field as blank, as we have done for BESTM (Figure 6.11).
Figure 6.11 Default Block Key Configuration via Payment Terms
This completes our discussion on global settings for outgoing payments. Let us move on to
discuss manual outgoing payments, in the next Section.
6.2 Manual Outgoing Payments
There are several settings you need to make to configure manual outgoing payments,
including defining accounts for payment differences and checking payment block reasons. As
you are aware, we have already configured the G/L account for taking care of payment
differences (Section 6.1.4), and defined the payment block reasons in Section 6.1.11, when
configuring the global settings for outgoing payments. Let us now look at the remaining
settings, in this Chapter, that include the following:
• Tolerances (Vendors)
• Define Reason Codes (Manual Outgoing Payments)
• Cross-Company Code Manual Payments
• Configure Manual Payments
Let us start with the definition of vendor tolerances.
167 Outgoing Payments
6.2.1 Tolerances (Vendors)
Before getting into defining tolerances for vendors, let us understand what is tolerance and
tolerance group.
You need to define a ‘tolerance’ in the system for dealing with the payment differences arising
out of transaction posting in FI. By defining a tolerance, you are instructing the system as to
how to proceed further: (a) what are the amounts or percentage rates up to which the system
is to automatically post to a separate expense or revenue account, if it is not possible to
correct the cash discount or (b) up to what difference amounts the system is to correct the
cash discount; the cash discount is automatically increased or decreased by the amount in
difference using ‘tolerance groups’.
You will come across three types of tolerances:
• Employee tolerance
• G/L account clearing tolerance
• Customer / vendor tolerance
In SAP, you manage the tolerances through tolerance group. Since the same rules usually
apply to a group of employees, you can maintain the values, per employee group. This way
you can, then, enter amount limits and tolerances, per employee group and company code.
You can also define tolerances without specifying a tolerance group: the stored tolerances are
then valid for all employees who are not allocated to a group. As it is possible to specify
tolerances for clearing procedures for your customers / vendors, the system takes into
account the lower limits from the customer/vendor specifications and employee group during
clearing transactions.
SAP comes delivered with sample tolerances which you can copy and tailor to your own
requirements. You can also additionally differentiate these settings by company code: there
should at least be one entry per company code (usually a blank in the tolerance group field,
called the ‘null tolerance group’) to enable transaction posting without any glitch.
Let us now understand how to define the tolerance groups for employees.
6.2.1.1 Define Tolerance Groups for Employees
For every company code, you need to find out which tolerances are to be determined and
whether a differentiation according to employee group is necessary. If you want to define
different tolerances for your employees, specify the amount limits for each of the groups. If
the tolerance limits are to apply to all employees, leave the 'Group' field empty. Define the
tolerances correspondingly. You pre-define various amount limits for your employees with
which you determine:
168 Configuring SAP Accounts Receivable & Accounts Payable (SAP S/4HANA Finance)
• The maximum document amount the employee is authorized to post.
• The maximum amount the employee can enter as a line item in a customer or vendor
account.
• The maximum cash discount percentage the employee can grant in a line item.
• The maximum acceptable tolerance for payment differences for the employee.
If you have defined different tolerance groups, you then have to assign your employees to a
certain tolerance group. To do this, select the activity 'Assign users to tolerance groups' and
enter your employees under the relevant groups. You should also define separate tolerances
for employees and business partners. When clearing the open items, the system checks both
the tolerances and clears the transaction with the lowest tolerance.
It is possible that you can manage payment difference transactions with just one
tolerance group (also known as ‘null tolerance group’) per company code, that is applicable
to all the employees. However, we recommend that you to have at least one more tolerance
group, attached to a select group of employees, with relatively larger tolerances to handle
special situations or your most valued customers / vendors. Your null tolerance group, of
course, will be the most restrictive one and will apply to most of the employees.
Project Dolphin
BESTM management has indicated that it requires two additional tolerance groups, besides
the null tolerance group, to be configured in the system: one will be for taking care of all the
US-based company codes, and the other for the India-based company codes. It is further
stipulated that these special tolerance groups will have only a handful of employees assigned,
in each company code, to handle special situations and high-value customers / vendors as
these groups will have liberal tolerances in comparison to the null group.
Accordingly, the project has decided to have the following tolerance groups: TGUS and TGIN.
The tolerance group TGUS will be for all the US-based company codes. All the employees who
are allocated to this group will be allowed to post accounting documents of maximum value
USD 999,999,999 per document, with a limit of USD 99,999,999 per open item. However, they
can process cash discounts at 5% per line item, with the system allowing a maximum payment
difference of 3%, subject to an absolute maximum of USD 500. The cash discount adjustment
amount will be USD 100.
The tolerance group TGIN will be for the two India-based company codes (1210 and 1220).
The select employees who are part of this group will be allowed to post accounting documents
of maximum value INR 999,999,999, per document with a limit of INR 99,999,999 per open
item. However, they can process cash discounts at 5% per line item, with the system allowing

169 Outgoing Payments
a maximum payment difference of 3%, subject to an absolute maximum of INR 5,000. The
cash discount adjustment amount will be INR 1,000.
The null tolerance group will be applicable for all the employee, and will be the default
tolerance group for all the company codes of BESTM, both in USA and India:
(a) For all the US-based company codes, this null group will enable posting of accounting
documents with values not exceeding USD 999,000, per document with a limit of USD 99,000
per open item. The maximum cash discount allowed is 2% per line item, and the maximum
payment difference is 1%, with an amount cap of USD 50. The cash discount adjustment limit
has to be set at USD 5.
(b) In the case of India-based company codes, the null group enables posting of accounting
documents of value up to INR 1,500,000, per document with the line item limit of INR
1,000,000. The maximum cash discount allowed will be 2% per line item, with the maximum
allowed payment difference of 1% with an amount cap of INR 1,000. The cash discount
adjustment limit will be at INR 100.
Let us define the tolerance groups, for BESTM, as detailed out below:
i. Use the menu path: SAP Customizing Implementation Guide > Financial Accounting >
Financial Accounting Global Settings > Document > Tolerance Groups > Define
Tolerance Groups for Employees. You may also use Transaction OBA4.
ii. On the ‘Change View “FI Tolerance Group for Users”: Overview’ screen, click on ‘New
Entries’. On the next screen (Figure 6.12):
Figure 6.12: Tolerance Group TGUS for Company Code 1110

170 Configuring SAP Accounts Receivable & Accounts Payable (SAP S/4HANA Finance)
• Enter the identifier for the tolerance group in ‘Group’, say, TGUS.
• Enter the ‘Company code’. Let that be 1110.
• Enter the ‘Amount per document’ as 999,999,999 under ‘Upper limits for
posting procedures’ block; enter the ‘Amount per open item account item’ as
99,999,999; the ‘Cash discount per line item’ will be 5%. Note that the
maximum permitted amount entered in the ‘Amount per open item account
item’ field will not apply to the automatically created line items, as in the case
of line items created by automatic payment program.
• Maintain the ‘Permitted Payment Differences’ as set out in Figure 6.12:
o The ‘Revenue’ row describes the settings controlling overpayments
from customers. A payment difference handled in this row, is to the
advantage of the specific company code as it increases the revenue,
and is posted automatically to a revenue account. For BESTM, enter
500 in the ‘Amount’ field and enter 3 in ‘Percent’ field. Specify the
‘Cash discnt.adj.to’ (100 in our case) which is normally set to be lower
than the ‘Amount’ field: the system uses this field to adjust the
payment difference up to this amount, which is then posted using a
cash discount adjustment.
o Similar to the ‘Revenue’, the 'Expense' row denotes customer
underpayment that lowers your revenue, and is handled and posted
automatically to an expense account. You may maintain the same
amount or percentage limit as that of the revenue row or you can
define different amount / percentage. The ‘Cash discnt.adj.to’ field in
‘Expense’ row is, again, similar to that of the ‘Cash discnt.adj.to’ field
in the ‘Revenue’ row.
• Once completed, ‘Save’ your entries.
iii. You have defined the tolerance group TGUS.
iv. Go back to the initial ‘Change View “FI Tolerance Group for Users”: Overview’ screen,
and you will see that the tolerance group TGUS attached to the company code 1110.
v. Select the row containing TGUS /1110, and click on ‘Copy As’. On the next screen,
change the company code to 1120, and ‘Save’. You have now copied the tolerance
group TGUS to the company code 1120. Repeat this step to copy TGUS to all the US-
based company codes.
vi. Now, configure the null tolerance group, as required by BESTM, for company code
1110 by following the steps explained above and then copy this null/1110 to other
US-based company codes (Figure 6.13).
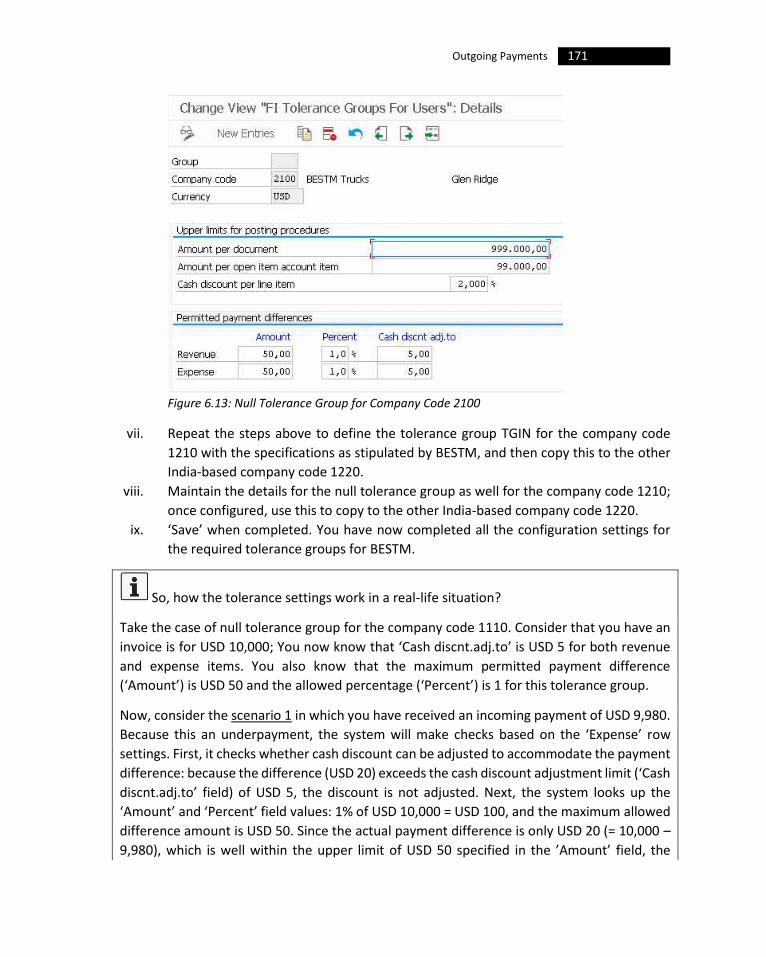
171 Outgoing Payments
Figure 6.13: Null Tolerance Group for Company Code 2100
vii. Repeat the steps above to define the tolerance group TGIN for the company code
1210 with the specifications as stipulated by BESTM, and then copy this to the other
India-based company code 1220.
viii. Maintain the details for the null tolerance group as well for the company code 1210;
once configured, use this to copy to the other India-based company code 1220.
ix. ‘Save’ when completed. You have now completed all the configuration settings for
the required tolerance groups for BESTM.
So, how the tolerance settings work in a real-life situation?
Take the case of null tolerance group for the company code 1110. Consider that you have an
invoice is for USD 10,000; You now know that ‘Cash discnt.adj.to’ is USD 5 for both revenue
and expense items. You also know that the maximum permitted payment difference
(‘Amount’) is USD 50 and the allowed percentage (‘Percent’) is 1 for this tolerance group.
Now, consider the scenario 1 in which you have received an incoming payment of USD 9,980.
Because this an underpayment, the system will make checks based on the ‘Expense’ row
settings. First, it checks whether cash discount can be adjusted to accommodate the payment
difference: because the difference (USD 20) exceeds the cash discount adjustment limit (‘Cash
discnt.adj.to’ field) of USD 5, the discount is not adjusted. Next, the system looks up the
‘Amount’ and ‘Percent’ field values: 1% of USD 10,000 = USD 100, and the maximum allowed
difference amount is USD 50. Since the actual payment difference is only USD 20 (= 10,000 –
9,980), which is well within the upper limit of USD 50 specified in the ’Amount’ field, the

172 Configuring SAP Accounts Receivable & Accounts Payable (SAP S/4HANA Finance)
system proceeds to book the loss of USD 20 to an expense account, and the transaction is
posted through.
Consider the scenario 2 in which the incoming payment is USD 9,890. Because this also an
underpayment, as in the case of scenario 1, the system will make checks based on the
‘Expense’ row settings. First, the system checks whether the cash discount can be adjusted to
accommodate the payment difference: as the difference (USD 110) exceeds the maximum
permitted cash discount adjustment limit (‘Cash discnt.adj.to’ field) of USD 5, the system does
not adjust the discount. Now, the system looks up the ‘Amount’ and ‘Percent’ field values: 1%
of 10,000 = 100, and the maximum allowed difference in amount is USD 50; but the actual
payment difference is USD 110 (= 10,000 – 9,890). As the system can tolerate only to a
maximum of USD 50, the system does not allow posting the transaction.
Let us consider another situation (scenario 3), wherein the incoming payment is USD 9,998.
Because this also an underpayment, as in the case of scenarios 1 & 2, the system will make
checks based on the ‘Expense’ row settings. First, the system checks whether the cash
discount can be adjusted to accommodate the payment difference: as the payment difference
is only USD 2 which is well within the maximum permitted (‘Cash discnt.adj.to’) amount of
USD 5, the cash discount amount is adjusted to USD 2, and the transaction is posted to.
Now, consider the scenario 4 in which the incoming payment is USD 10,040. Being an
overpayment, the system will take into account the settings specified in ‘Revenue’ row. The
system, first, checks whether the cash discount can be adjusted to accommodate the payment
difference: since the difference (USD 40) exceeds the maximum permitted cash discount
adjustment limit of USD 5 (‘Cash discnt.adj.to’ field), the system does not adjust the cash
discount. Instead, the system now looks up the ‘Amount’ and ‘Percent’ field values: 1% of
10,000 = 100, and the maximum allowed payment difference in amount is USD 50; but the
actual payment difference is an overpayment of USD 40 (= 10,040 - 10,000). As the system
can allow overpayments up to a maximum of USD 50, the system books the profit by posting
USD 40 to a revenue account and clears the payment transaction.
Now, consider yet another situation (scenario 5) in which the incoming payment is USD
10,070. Being an overpayment as in scenario 4, the system will take into account the settings
specified in ‘Revenue’ row. The system, first, checks whether the cash discount can be
adjusted to accommodate the payment difference: since the difference (USD 70) exceeds the
maximum permitted cash discount adjustment limit of USD 5 (‘Cash discnt.adj.to’ field), the
system does not adjust the cash discount. Instead, the system now looks up the ‘Amount’ and
‘Percent’ field values: 1% of 10,000 = 100, and the maximum allowed payment difference in
amount is USD 50; but the actual payment difference is an overpayment of USD 70 (= 10,070
- 10,000). As the system can tolerate overpayments only up to a maximum of USD 50, the
system does not allow you to proceed further with the transaction.
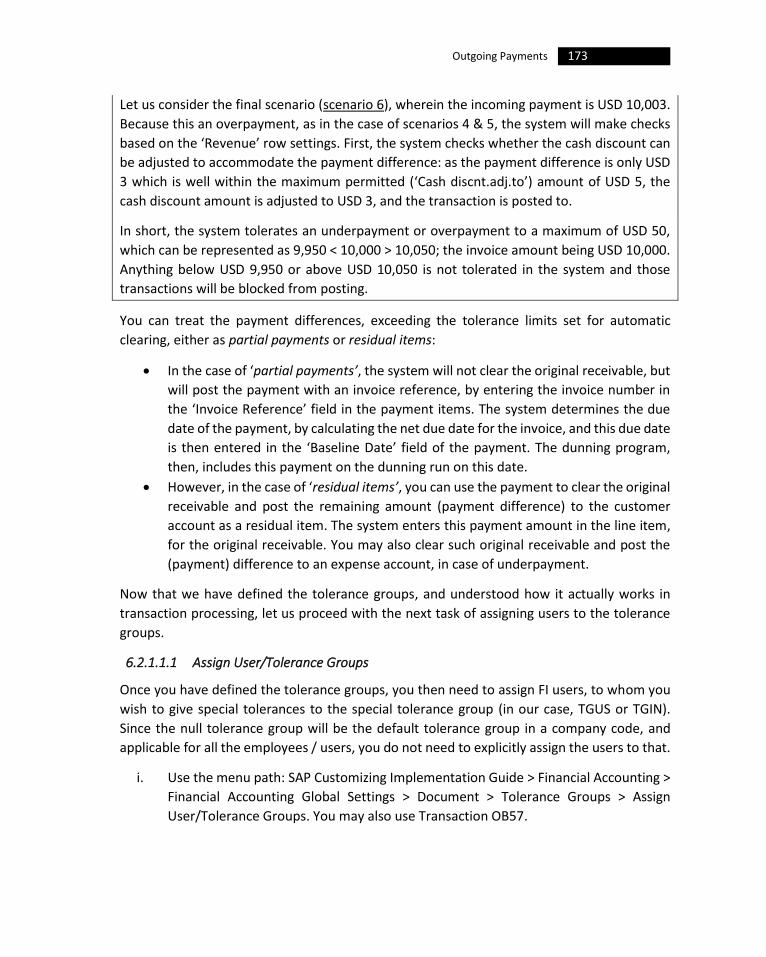
173 Outgoing Payments
Let us consider the final scenario (scenario 6), wherein the incoming payment is USD 10,003.
Because this an overpayment, as in the case of scenarios 4 & 5, the system will make checks
based on the ‘Revenue’ row settings. First, the system checks whether the cash discount can
be adjusted to accommodate the payment difference: as the payment difference is only USD
3 which is well within the maximum permitted (‘Cash discnt.adj.to’) amount of USD 5, the
cash discount amount is adjusted to USD 3, and the transaction is posted to.
In short, the system tolerates an underpayment or overpayment to a maximum of USD 50,
which can be represented as 9,950 < 10,000 > 10,050; the invoice amount being USD 10,000.
Anything below USD 9,950 or above USD 10,050 is not tolerated in the system and those
transactions will be blocked from posting.
You can treat the payment differences, exceeding the tolerance limits set for automatic
clearing, either as partial payments or residual items:
• In the case of ‘partial payments’, the system will not clear the original receivable, but
will post the payment with an invoice reference, by entering the invoice number in
the ‘Invoice Reference’ field in the payment items. The system determines the due
date of the payment, by calculating the net due date for the invoice, and this due date
is then entered in the ‘Baseline Date’ field of the payment. The dunning program,
then, includes this payment on the dunning run on this date.
• However, in the case of ‘residual items’, you can use the payment to clear the original
receivable and post the remaining amount (payment difference) to the customer
account as a residual item. The system enters this payment amount in the line item,
for the original receivable. You may also clear such original receivable and post the
(payment) difference to an expense account, in case of underpayment.
Now that we have defined the tolerance groups, and understood how it actually works in
transaction processing, let us proceed with the next task of assigning users to the tolerance
groups.
6.2.1.1.1 Assign User/Tolerance Groups
Once you have defined the tolerance groups, you then need to assign FI users, to whom you
wish to give special tolerances to the special tolerance group (in our case, TGUS or TGIN).
Since the null tolerance group will be the default tolerance group in a company code, and
applicable for all the employees / users, you do not need to explicitly assign the users to that.
i. Use the menu path: SAP Customizing Implementation Guide > Financial Accounting >
Financial Accounting Global Settings > Document > Tolerance Groups > Assign
User/Tolerance Groups. You may also use Transaction OB57.
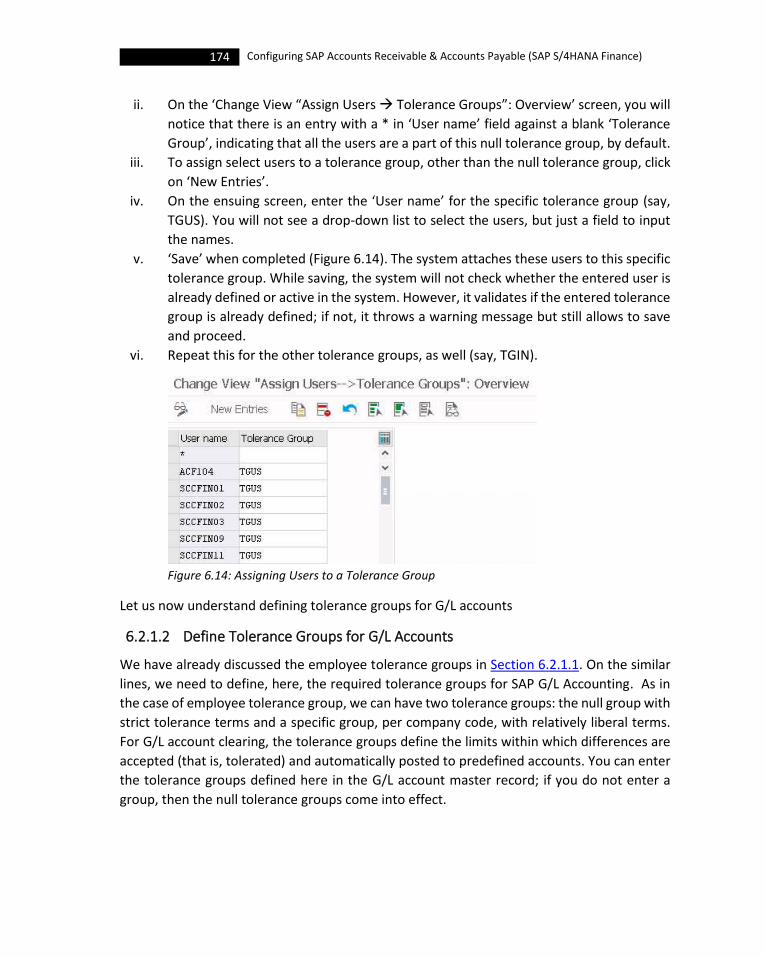
174 Configuring SAP Accounts Receivable & Accounts Payable (SAP S/4HANA Finance)
ii. On the ‘Change View “Assign Users → Tolerance Groups”: Overview’ screen, you will
notice that there is an entry with a * in ‘User name’ field against a blank ‘Tolerance
Group’, indicating that all the users are a part of this null tolerance group, by default.
iii. To assign select users to a tolerance group, other than the null tolerance group, click
on ‘New Entries’.
iv. On the ensuing screen, enter the ‘User name’ for the specific tolerance group (say,
TGUS). You will not see a drop-down list to select the users, but just a field to input
the names.
v. ‘Save’ when completed (Figure 6.14). The system attaches these users to this specific
tolerance group. While saving, the system will not check whether the entered user is
already defined or active in the system. However, it validates if the entered tolerance
group is already defined; if not, it throws a warning message but still allows to save
and proceed.
vi. Repeat this for the other tolerance groups, as well (say, TGIN).
Figure 6.14: Assigning Users to a Tolerance Group
Let us now understand defining tolerance groups for G/L accounts
6.2.1.2 Define Tolerance Groups for G/L Accounts
We have already discussed the employee tolerance groups in Section 6.2.1.1. On the similar
lines, we need to define, here, the required tolerance groups for SAP G/L Accounting. As in
the case of employee tolerance group, we can have two tolerance groups: the null group with
strict tolerance terms and a specific group, per company code, with relatively liberal terms.
For G/L account clearing, the tolerance groups define the limits within which differences are
accepted (that is, tolerated) and automatically posted to predefined accounts. You can enter
the tolerance groups defined here in the G/L account master record; if you do not enter a
group, then the null tolerance groups come into effect.
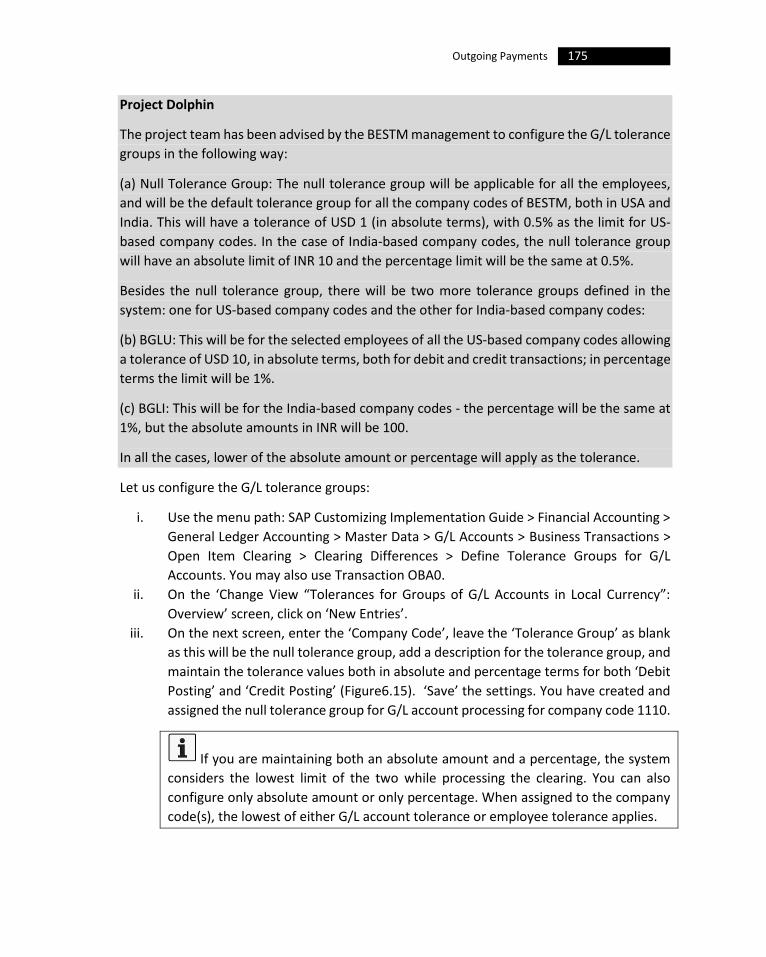
175 Outgoing Payments
Project Dolphin
The project team has been advised by the BESTM management to configure the G/L tolerance
groups in the following way:
(a) Null Tolerance Group: The null tolerance group will be applicable for all the employees,
and will be the default tolerance group for all the company codes of BESTM, both in USA and
India. This will have a tolerance of USD 1 (in absolute terms), with 0.5% as the limit for US-
based company codes. In the case of India-based company codes, the null tolerance group
will have an absolute limit of INR 10 and the percentage limit will be the same at 0.5%.
Besides the null tolerance group, there will be two more tolerance groups defined in the
system: one for US-based company codes and the other for India-based company codes:
(b) BGLU: This will be for the selected employees of all the US-based company codes allowing
a tolerance of USD 10, in absolute terms, both for debit and credit transactions; in percentage
terms the limit will be 1%.
(c) BGLI: This will be for the India-based company codes - the percentage will be the same at
1%, but the absolute amounts in INR will be 100.
In all the cases, lower of the absolute amount or percentage will apply as the tolerance.
Let us configure the G/L tolerance groups:
i. Use the menu path: SAP Customizing Implementation Guide > Financial Accounting >
General Ledger Accounting > Master Data > G/L Accounts > Business Transactions >
Open Item Clearing > Clearing Differences > Define Tolerance Groups for G/L
Accounts. You may also use Transaction OBA0.
ii. On the ‘Change View “Tolerances for Groups of G/L Accounts in Local Currency”:
Overview’ screen, click on ‘New Entries’.
iii. On the next screen, enter the ‘Company Code’, leave the ‘Tolerance Group’ as blank
as this will be the null tolerance group, add a description for the tolerance group, and
maintain the tolerance values both in absolute and percentage terms for both ‘Debit
Posting’ and ‘Credit Posting’ (Figure6.15). ‘Save’ the settings. You have created and
assigned the null tolerance group for G/L account processing for company code 1110.
If you are maintaining both an absolute amount and a percentage, the system
considers the lowest limit of the two while processing the clearing. You can also
configure only absolute amount or only percentage. When assigned to the company
code(s), the lowest of either G/L account tolerance or employee tolerance applies.
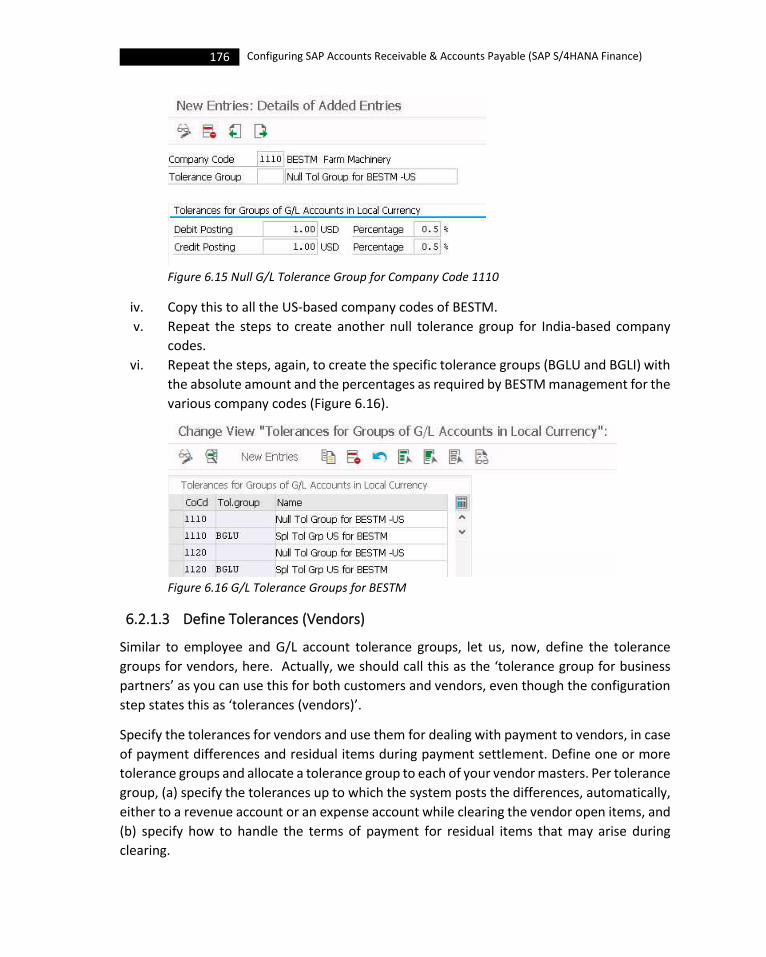
176 Configuring SAP Accounts Receivable & Accounts Payable (SAP S/4HANA Finance)
Figure 6.15 Null G/L Tolerance Group for Company Code 1110
iv. Copy this to all the US-based company codes of BESTM.
v. Repeat the steps to create another null tolerance group for India-based company
codes.
vi. Repeat the steps, again, to create the specific tolerance groups (BGLU and BGLI) with
the absolute amount and the percentages as required by BESTM management for the
various company codes (Figure 6.16).
Figure 6.16 G/L Tolerance Groups for BESTM
6.2.1.3 Define Tolerances (Vendors)
Similar to employee and G/L account tolerance groups, let us, now, define the tolerance
groups for vendors, here. Actually, we should call this as the ‘tolerance group for business
partners’ as you can use this for both customers and vendors, even though the configuration
step states this as ‘tolerances (vendors)’.
Specify the tolerances for vendors and use them for dealing with payment to vendors, in case
of payment differences and residual items during payment settlement. Define one or more
tolerance groups and allocate a tolerance group to each of your vendor masters. Per tolerance
group, (a) specify the tolerances up to which the system posts the differences, automatically,
either to a revenue account or an expense account while clearing the vendor open items, and
(b) specify how to handle the terms of payment for residual items that may arise during
clearing.

177 Outgoing Payments
Since there is an employee tolerance defined and set in the system, during clearing, the
system takes into account the lower of the specifications in employee tolerance and vendor
tolerance.
Project Dolphin
BESTM wants to have two tolerance groups: a strict tolerance group that will be for most the
vendors and a liberal one that will be applied to specific vendors.
For all the US-based company codes:
The strict tolerance group will be called as the ‘null tolerance group’ which will be the default
when a vendor is not assigned with a specific tolerance group. For this tolerance group, the
permitted payment difference will be $50 for gains (1%) and $10 for losses (0.5%), with a
maximum adjustment cash discount being $5. For automatic write-off of payment
differences, the amount and percent values will be $5 and 0.25% respectively, both for
revenue and expense.
For the specific tolerance group, which will be termed as BEU1, the corresponding permitted
payment difference is $500 for gains (2%) and $250 for losses (1%). The maximum cash
discount that can be adjusted, will be $50. The amount and percentage values for automatic
write-off of payment differences (revenue or expense) will be $25 and 0.5% respectively.
For all the India-based company codes:
The tolerance amount, tolerance percentage, and the cash discount amount that can be
adjusted, the amount and percentage for automatic write-off of payment differences will be
the same as that of US company codes but the amount will be in INR. The corresponding
tolerance group for BEU1 will be BEI1.
Let us configure the tolerance group BEU1:
i. Use the menu path: SAP Customizing Implementation Guide > Financial Accounting >
Accounts Receivable and Accounts Payable > Business Transactions > Outgoing
Payments > Manual Outgoing Payments > Define Tolerances (Vendors). You may also
use Transaction OBA3.
ii. Click on ‘New Entries’ on the resulting screen, to configure the settings (Figure 6.17):
• Enter the ‘Company code’. The system brings up the company code
‘Currency’ when you save the details.
• Enter an identifier for ‘Tolerance Group’ (BEU1), and provide a description.
• You may enter the ‘Specifications for Clearing Transactions’. When you enter
a number in ‘Grace Days Due Date’ field, then, the system adds this to the
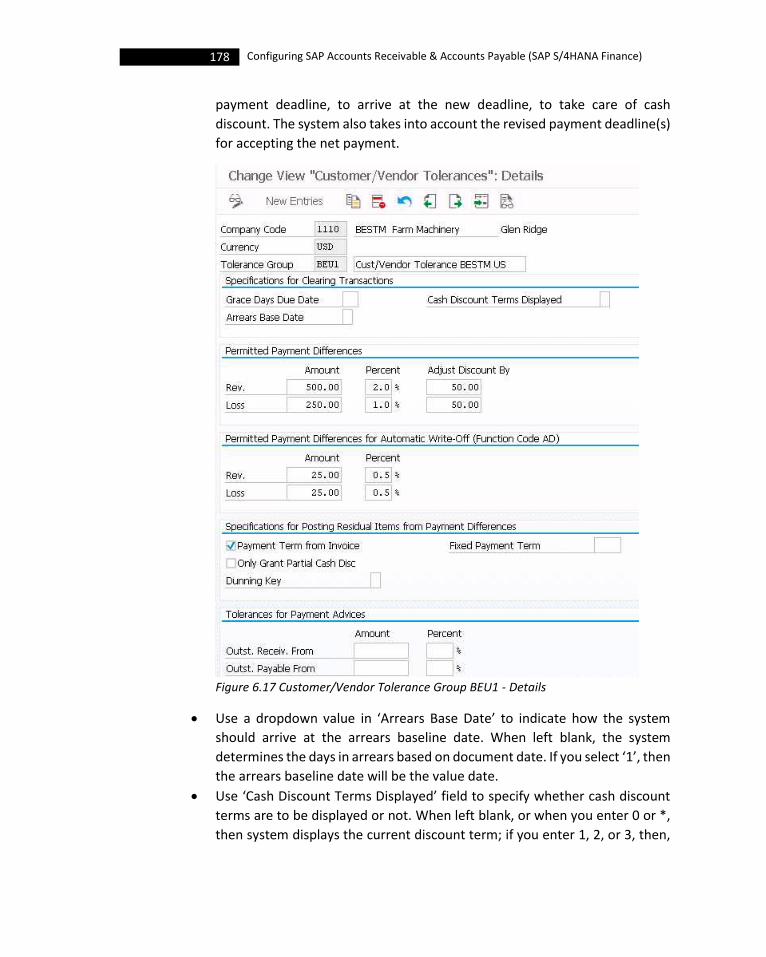
178 Configuring SAP Accounts Receivable & Accounts Payable (SAP S/4HANA Finance)
payment deadline, to arrive at the new deadline, to take care of cash
discount. The system also takes into account the revised payment deadline(s)
for accepting the net payment.
Figure 6.17 Customer/Vendor Tolerance Group BEU1 - Details
• Use a dropdown value in ‘Arrears Base Date’ to indicate how the system
should arrive at the arrears baseline date. When left blank, the system
determines the days in arrears based on document date. If you select ‘1’, then
the arrears baseline date will be the value date.
• Use ‘Cash Discount Terms Displayed’ field to specify whether cash discount
terms are to be displayed or not. When left blank, or when you enter 0 or *,
then system displays the current discount term; if you enter 1, 2, or 3, then,
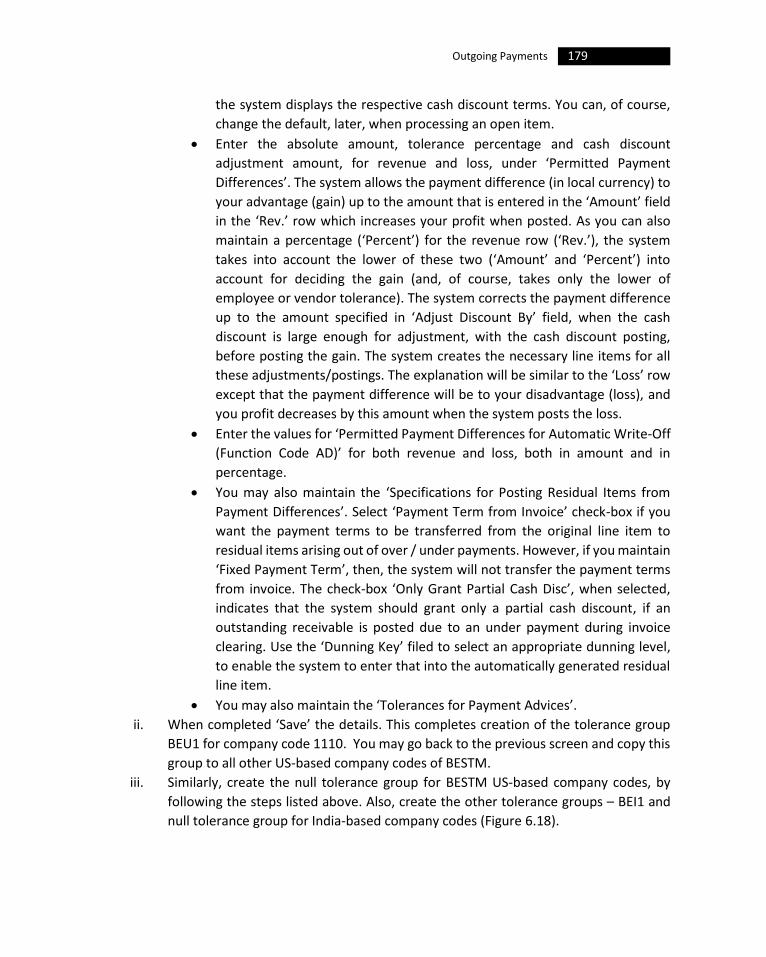
179 Outgoing Payments
the system displays the respective cash discount terms. You can, of course,
change the default, later, when processing an open item.
• Enter the absolute amount, tolerance percentage and cash discount
adjustment amount, for revenue and loss, under ‘Permitted Payment
Differences’. The system allows the payment difference (in local currency) to
your advantage (gain) up to the amount that is entered in the ‘Amount’ field
in the ‘Rev.’ row which increases your profit when posted. As you can also
maintain a percentage (‘Percent’) for the revenue row (‘Rev.’), the system
takes into account the lower of these two (‘Amount’ and ‘Percent’) into
account for deciding the gain (and, of course, takes only the lower of
employee or vendor tolerance). The system corrects the payment difference
up to the amount specified in ‘Adjust Discount By’ field, when the cash
discount is large enough for adjustment, with the cash discount posting,
before posting the gain. The system creates the necessary line items for all
these adjustments/postings. The explanation will be similar to the ‘Loss’ row
except that the payment difference will be to your disadvantage (loss), and
you profit decreases by this amount when the system posts the loss.
• Enter the values for ‘Permitted Payment Differences for Automatic Write-Off
(Function Code AD)’ for both revenue and loss, both in amount and in
percentage.
• You may also maintain the ‘Specifications for Posting Residual Items from
Payment Differences’. Select ‘Payment Term from Invoice’ check-box if you
want the payment terms to be transferred from the original line item to
residual items arising out of over / under payments. However, if you maintain
‘Fixed Payment Term’, then, the system will not transfer the payment terms
from invoice. The check-box ‘Only Grant Partial Cash Disc’, when selected,
indicates that the system should grant only a partial cash discount, if an
outstanding receivable is posted due to an under payment during invoice
clearing. Use the ‘Dunning Key’ filed to select an appropriate dunning level,
to enable the system to enter that into the automatically generated residual
line item.
• You may also maintain the ‘Tolerances for Payment Advices’.
ii. When completed ‘Save’ the details. This completes creation of the tolerance group
BEU1 for company code 1110. You may go back to the previous screen and copy this
group to all other US-based company codes of BESTM.
iii. Similarly, create the null tolerance group for BESTM US-based company codes, by
following the steps listed above. Also, create the other tolerance groups – BEI1 and
null tolerance group for India-based company codes (Figure 6.18).

180 Configuring SAP Accounts Receivable & Accounts Payable (SAP S/4HANA Finance)
Figure 6.18 Customer/Vendor Tolerance Groups for BESTM
Let us now move on to discuss the next configuration activity under manual outgoing
payments, namely, defining reason codes.
6.2.2 Define Reason Codes (Manual Outgoing Payments)
You will use ‘reason codes’ to handle business situations like, when the cash discount period
has been exceeded, or if cash discount has been taken when payment is net due etc. Define
the reason codes, per company code, for handling payment differences in the form of residual
items, partial payments and/or postings on account. For each of the reason codes, you can
decide for which of the company codes it is valid, for which correspondence type (say,
payment notice) it is connected to and an explanation in the form of both short and long text.
You can also set the clearing indicator, for each of the reason codes, so that the payment
difference is cleared using a separate G/L account. If you do not set the indicator, then, the
system generates a new item as an outstanding receivable in the customer's account.
Project Dolphin
The project team has suggested to create new reason codes to cover situations like cash
discount period exceeded, cash discount rate not kept to, cash discount deducted for net
terms, discount period exceeded & rate incorrect, calculation error on customer side, debit
paid twice, credit memo paid instead of reduction, credit memo reduced twice etc.
To configure new reason codes:
i. Use the menu path: SAP Customizing Implementation Guide > Financial Accounting >
Accounts Receivable and Accounts Payable > Business Transactions > Outgoing
Payments > Manual Outgoing Payments > Overpayment/Underpayment > Define
Reason Codes (Manual Outgoing Payments) or Transaction OBBE.
ii. Enter the company code on the resulting ‘Determine Work Area: Entry’ pop-up
screen. On the resulting screen, click on ‘New Entries’ and on the next screen (Figure
6.19):

181 Outgoing Payments
Figure 6.19 Reason Codes for Manual Outgoing Payments
• Enter a 3-character identified for the reason code (‘RCd’).
• Enter a ‘Short Text’ and a ‘Long Text’.
• Select the appropriate correspondence type (‘Corr T’) from the drop-down
list like SAP01 (payment notice with line items), SAP02 (payment notice
without line items, SAP06 (account statement), SAP11 (customer credit
memo), SAP12 (failed payments), SAP19 (customer invoice) etc.
• Select check-box ‘C’ if the payment differences with this reason code are to
be charged off via a separate G/L account.
• Select check-box ‘D’ if payment differences with this reason code should lead
to a disputed item when creating a residual item.
The ‘disputed items’ will not increase the total A/R against a customer.
You can display them separately in the line item display as well as in credit
management. The system does not take into account the disputed items, in
credit reviews, against the oldest open items or against that percentage of
open items with a specific number of days in arrears.
• When you set ‘Do Not Copy Text’ indicator, then, the system does not copy
the text of the reason code into the segment text of the residual item / partial

182 Configuring SAP Accounts Receivable & Accounts Payable (SAP S/4HANA Finance)
payment. You need to select this check-box only when you want to manually
enter the segment text.
iii. ‘Save’ when completed, and create any other reason code(s) that will be required for
you specific business need (Figure 6.19).
With this, we can, now, move on to the last activity of preparing for cross-company code
manual payments.
6.2.3 Cross-Company Code Manual Payments
Use this configuration activity to maintain the company codes which carry out manual
payments and other clearing procedures, on behalf of other company codes in a corporate
group. The pre-requisite is that you should have maintained the clearing accounts for cross-
company transactions while configuring the G/L Accounting. To recall, you can read through
the Section below:
6.2.3.1 Cross-Company Code Transactions
The cross-company code postings happen (a) when purchasing or payment is made centrally
by a company code (say, 1110) on behalf of several company codes (say, 1120, 2100, 2200
etc) in a corporate group, and/or (b) if one of the company codes (say, company code 1120),
of the corporate group, is a manufacturer and another (say, company code 1110) is a
merchandiser (seller). In the manufacturer-merchandiser scenario, the manufacturer sells its
products first to the merchandiser, and in turn the merchandiser sells them to the end
customers. In this case, the system posts the transactions between the merchandising
company code (say, 1110) and the manufacturing company code (say, 1210): the system
creates two documents, one for each company code for every transaction.
You may also come across a situation where in the customers (of, say, company code 1120)
make payment to the wrong company code (say, 1110) in the corporate group. In such cases,
you can use cross-company code transactions to minimize the number of entries for posting
this incorrect payment: you debit the bank account of company code 1110 and credit the
customer account of company code 1120, and the system automatically generates clearing
entries between these two company codes.
The company codes participating in cross-company code transactions should be part of
the single legal entity. You can set up cross-company code transactions for clearing customer
/ vendor accounts as well as G/L accounts. If one of the participating company codes is an
external one, you can only do this for G/L accounts clearing, and not for customer / vendor
accounts.
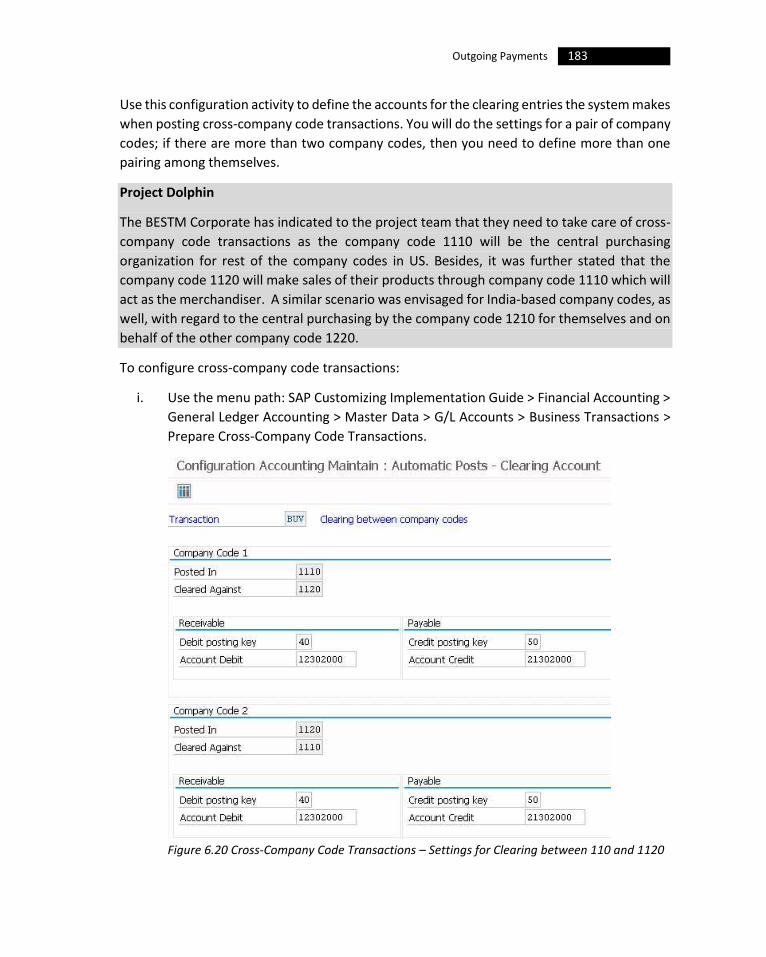
183 Outgoing Payments
Use this configuration activity to define the accounts for the clearing entries the system makes
when posting cross-company code transactions. You will do the settings for a pair of company
codes; if there are more than two company codes, then you need to define more than one
pairing among themselves.
Project Dolphin
The BESTM Corporate has indicated to the project team that they need to take care of cross-
company code transactions as the company code 1110 will be the central purchasing
organization for rest of the company codes in US. Besides, it was further stated that the
company code 1120 will make sales of their products through company code 1110 which will
act as the merchandiser. A similar scenario was envisaged for India-based company codes, as
well, with regard to the central purchasing by the company code 1210 for themselves and on
behalf of the other company code 1220.
To configure cross-company code transactions:
i. Use the menu path: SAP Customizing Implementation Guide > Financial Accounting >
General Ledger Accounting > Master Data > G/L Accounts > Business Transactions >
Prepare Cross-Company Code Transactions.
Figure 6.20 Cross-Company Code Transactions – Settings for Clearing between 110 and 1120

184 Configuring SAP Accounts Receivable & Accounts Payable (SAP S/4HANA Finance)
ii. On the ensuing ‘Company Code Clearing’ pop-up screen, enter 1110 as ‘Company
code 1’ and 1120 as ‘Company code 2’. And, press ‘Continue’.
iii. On the ‘Configuration Accounting Maintain: Automatic Posts – Clearing Accounts’
screen, maintain the required details as indicated below (Figure 6.20):
• Under ‘Company code 1’ block, for ‘Posted In’ the company code 1110 and
‘Clearing Against’ the 1120, enter the Debit and Credit posting keys (40 and
50 respectively). Also, enter the appropriate G/L account for receivable
(‘Receivables affiliated companies adjustments’ - 12302000) and payable
(‘Payables affiliated companies adjustments’ - 21302000) in the respective
fields as shown in Figure 6.20.
• Repeat the entries for ‘Company code 2’ block for ‘Posted In’ the company
code 1120 and ‘Clearing Against’ the company code 1110, and ‘Save’.
iv. Maintain similar configuration for other pairs of company codes as well. When
completed, click on ‘List’ on the ‘Configuration Accounting Maintain: Automatic Posts
– Clearing Accounts’ screen, to see the pairing of company codes for cross-company
code transactions for BESTM (Figure 6.21). You may also use the ‘Create’ button on
this screen to make settings between a pair of company codes.
Figure 6.21 List of Company Codes paired for Cross-Company Code Transactions
With this let us now look at how to make the specifications for cross-company code manual
payments.
6.2.3.2 Prepare Cross-Company Code Manual Payments
The specifications you make, here, for cross-company code payments are valid only for
manual payments, and they will not have any impact on the automatic payment program.
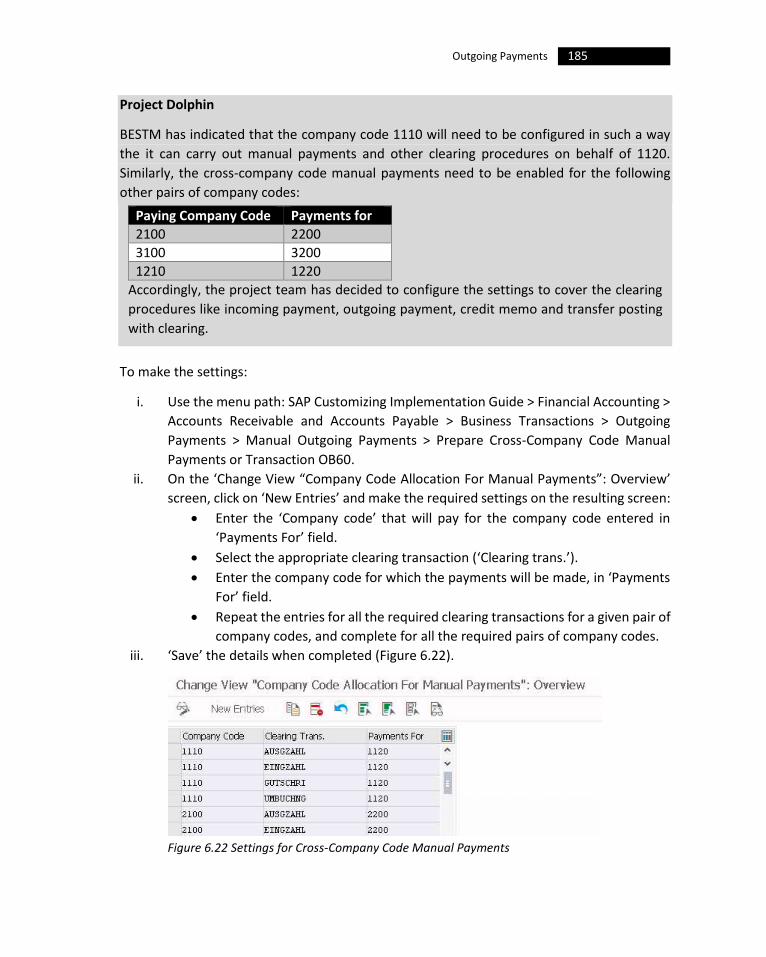
185 Outgoing Payments
Project Dolphin
BESTM has indicated that the company code 1110 will need to be configured in such a way
the it can carry out manual payments and other clearing procedures on behalf of 1120.
Similarly, the cross-company code manual payments need to be enabled for the following
other pairs of company codes:
To make the settings:
i. Use the menu path: SAP Customizing Implementation Guide > Financial Accounting >
Accounts Receivable and Accounts Payable > Business Transactions > Outgoing
Payments > Manual Outgoing Payments > Prepare Cross-Company Code Manual
Payments or Transaction OB60.
ii. On the ‘Change View “Company Code Allocation For Manual Payments”: Overview’
screen, click on ‘New Entries’ and make the required settings on the resulting screen:
• Enter the ‘Company code’ that will pay for the company code entered in
‘Payments For’ field.
• Select the appropriate clearing transaction (‘Clearing trans.’).
• Enter the company code for which the payments will be made, in ‘Payments
For’ field.
• Repeat the entries for all the required clearing transactions for a given pair of
company codes, and complete for all the required pairs of company codes.
iii. ‘Save’ the details when completed (Figure 6.22).
Figure 6.22 Settings for Cross-Company Code Manual Payments
Paying Company Code Payments for
2100 2200
3100 3200
1210 1220
Accordingly, the project team has decided to configure the settings to cover the clearing
procedures like incoming payment, outgoing payment, credit memo and transfer posting
with clearing.
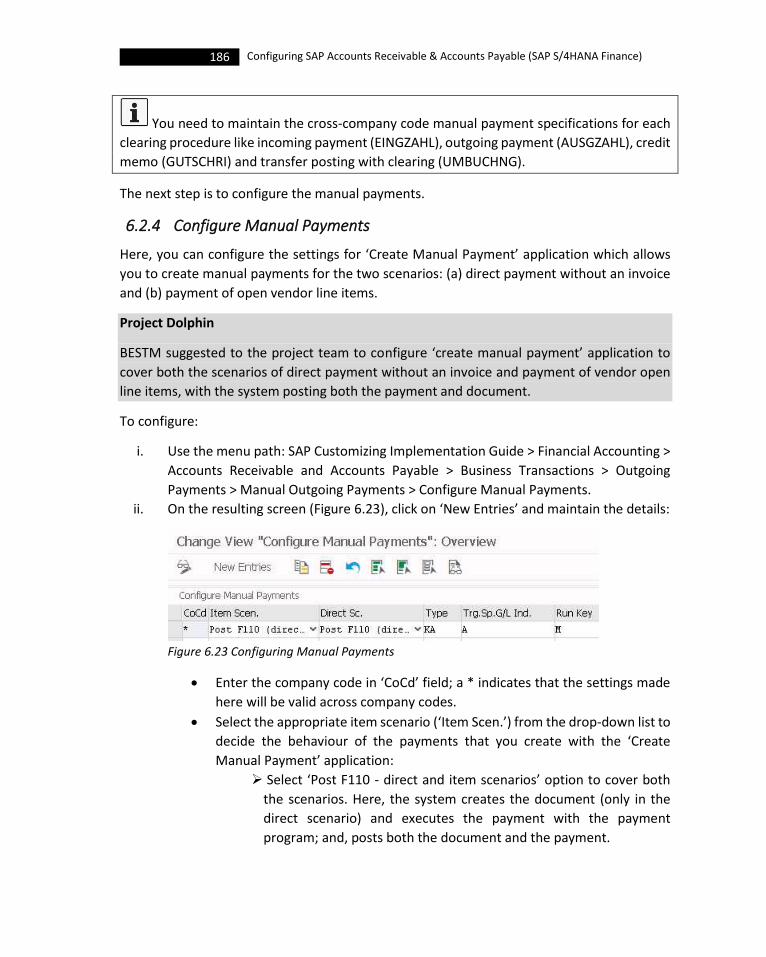
186 Configuring SAP Accounts Receivable & Accounts Payable (SAP S/4HANA Finance)
You need to maintain the cross-company code manual payment specifications for each
clearing procedure like incoming payment (EINGZAHL), outgoing payment (AUSGZAHL), credit
memo (GUTSCHRI) and transfer posting with clearing (UMBUCHNG).
The next step is to configure the manual payments.
6.2.4 Configure Manual Payments
Here, you can configure the settings for ‘Create Manual Payment’ application which allows
you to create manual payments for the two scenarios: (a) direct payment without an invoice
and (b) payment of open vendor line items.
Project Dolphin
BESTM suggested to the project team to configure ‘create manual payment’ application to
cover both the scenarios of direct payment without an invoice and payment of vendor open
line items, with the system posting both the payment and document.
To configure:
i. Use the menu path: SAP Customizing Implementation Guide > Financial Accounting >
Accounts Receivable and Accounts Payable > Business Transactions > Outgoing
Payments > Manual Outgoing Payments > Configure Manual Payments.
ii. On the resulting screen (Figure 6.23), click on ‘New Entries’ and maintain the details:
Figure 6.23 Configuring Manual Payments
• Enter the company code in ‘CoCd’ field; a * indicates that the settings made
here will be valid across company codes.
• Select the appropriate item scenario (‘Item Scen.’) from the drop-down list to
decide the behaviour of the payments that you create with the ‘Create
Manual Payment’ application:
➢ Select ‘Post F110 - direct and item scenarios’ option to cover both
the scenarios. Here, the system creates the document (only in the
direct scenario) and executes the payment with the payment
program; and, posts both the document and the payment.

187 Outgoing Payments
You may also look at the other two options:
➢ ‘Post down payment request only’ for direct payment scenario in
which the system creates document for direct payment but does not
post the payment.
➢ ‘Start payment media workbench – direct and item scenarios’ in
which the system creates the document (only in the direct scenario),
executes the same with the payment program, runs the payment
media workbench to create a payment file, and - of course - posts
both document and payment.
• Select the appropriate direct scenario process step as well for the ‘Direct Sc.’
field. Here, also, select ‘Post F110 - direct and item scenarios’ option to cover
both the scenarios.
• Select the appropriate document type (‘Type’), select also the target special
G/L indicator (‘Trg.Sp.G/L Ind.’) to derive the account for posting the down
payment request, and enter the identifier for payment run in the ‘Run Key’
field.
ii. ‘Save’ when completed.
This completes our discussion on configuring the system for manual outgoing payments. With
this we are, now, all set to discuss the most important aspect of outgoing payments:
configuring the automatic outgoing payments by payment program.
6.3 Automatic Outgoing Payments
With the payment program, in SAP, you can manage, automatically, both the incoming and
outgoing payments. Supporting several payment methods including check, bill of exchange
(BoE), direct debit, bank transfer, card payment etc., the payment program is delivered in the
standard SAP system with the appropriate print forms and print programs to take care of any
country-specific payment requirements of the world. Using this program, you can clear open
items of customers and vendors, manage intercompany payments, process domestic and
overseas payments, prevent a payment by payment block etc. You can create DME (data
medium exchange) file for transferring the payment data through electronic format. Via the
payment program, you can print the check, payment list and payment forms. By configuring
the program suitably, you can manage the ‘what, when and how’ of payments.
You have to determine, by suitable configuration, (a) which company codes are to be included
in payment transactions and which company code makes payments, (b) which payment
methods are to be used, (c) whether you need to use payment method supplements (c) from
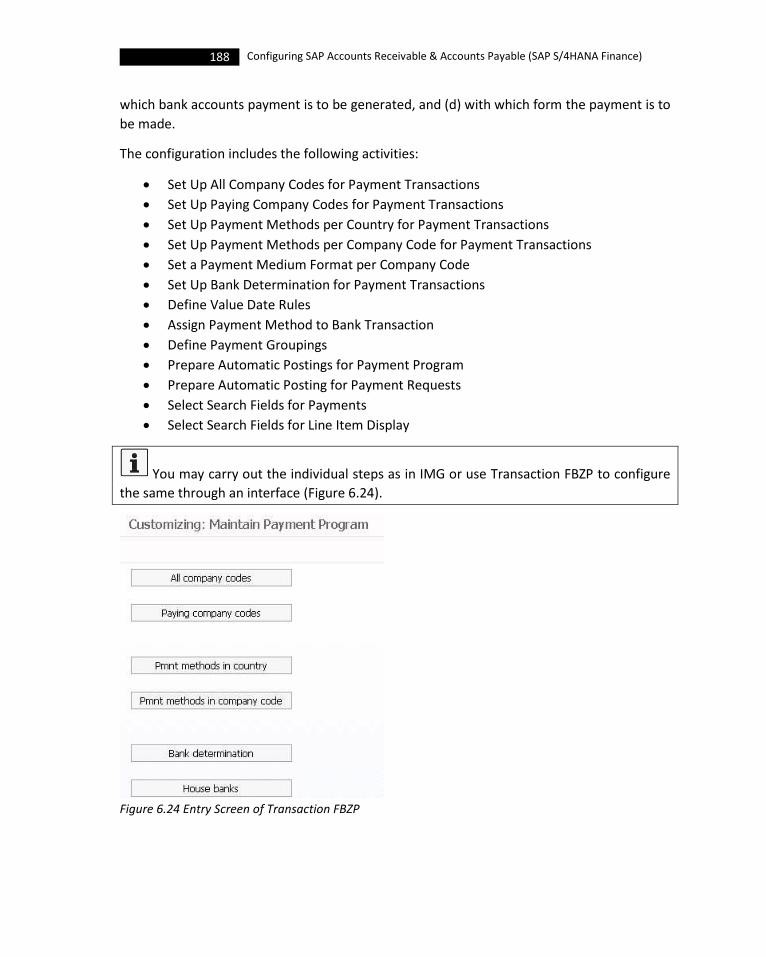
188 Configuring SAP Accounts Receivable & Accounts Payable (SAP S/4HANA Finance)
which bank accounts payment is to be generated, and (d) with which form the payment is to
be made.
The configuration includes the following activities:
• Set Up All Company Codes for Payment Transactions
• Set Up Paying Company Codes for Payment Transactions
• Set Up Payment Methods per Country for Payment Transactions
• Set Up Payment Methods per Company Code for Payment Transactions
• Set a Payment Medium Format per Company Code
• Set Up Bank Determination for Payment Transactions
• Define Value Date Rules
• Assign Payment Method to Bank Transaction
• Define Payment Groupings
• Prepare Automatic Postings for Payment Program
• Prepare Automatic Posting for Payment Requests
• Select Search Fields for Payments
• Select Search Fields for Line Item Display
You may carry out the individual steps as in IMG or use Transaction FBZP to configure
the same through an interface (Figure 6.24).
Figure 6.24 Entry Screen of Transaction FBZP

189 Outgoing Payments
Before you proceed to set up the configuration for automatic payment program, you need to
define a house bank without which you will not be able to complete the payment program
settings at a later stage.
6.3.1 Define House Banks
The bank that you will use for making payments is known as the ‘house bank’, in SAP. You can
have more than one house bank in a company code. You need to enter a house bank in the
master record of customer / vendor for the payment program to use that bank. If not, you
have to maintain a rule by which the payment program can determine the house bank
automatically.
A ‘bank directory’ consists of master data of all the banks that you have created either
manually or automatically. For automatic creation of bank master data, complete the
configuration step SAP Customizing Implementation Guide > Cross-Application Components
> Bank Directory > Bank Directory Data Transfer > Transfer Bank Directory Data – International
or Transfer Bank Directory Data - Country-Specific. Once you have created the bank directory,
you may designate one or more banks to be your house bank.
Project Dolphin
All the company codes in USA will have their primary accounts with Bank of America (BOFA),
Citi Bank (CITIU) and Chase Manhattan (CHASU) and they will accordingly be designated as
the house banks. In India, the company codes will have accounts with State Bank of India
(SBIIN), HDFC bank (HDFCI) and ICICI bank (ICICI). Each bank account in a house bank will be
assigned to a G/L account and there can be multiple bank accounts in a single house bank.
BESTM has indicated to the project team to differentiate foreign currency account numbers,
by using a separate G/L account per currency for bill discounting.
To define a new house bank:
i. You can use the SAP IMG menu path: SAP Customizing Implementation Guide >
Financial Accounting > Bank Accounting > Bank Accounts > Define House Banks, to
create your house banks, or SAP Easy Access Menu Path: SAP Menu > Accounting >
Financial Accounting > Banks > Master Data > House Banks and House Bank Accounts
> Manage House Banks and House Bank Accounts to create both house banks and
accounts within a house bank. You can also use Transaction FI12.
To create only house banks, you may use SAP Easy Access Menu Path: SAP Menu
> Accounting > Financial Accounting > Banks > Master Data > House Banks and House
Bank Accounts > Manage House Banks or Transaction FI12_HBANK.
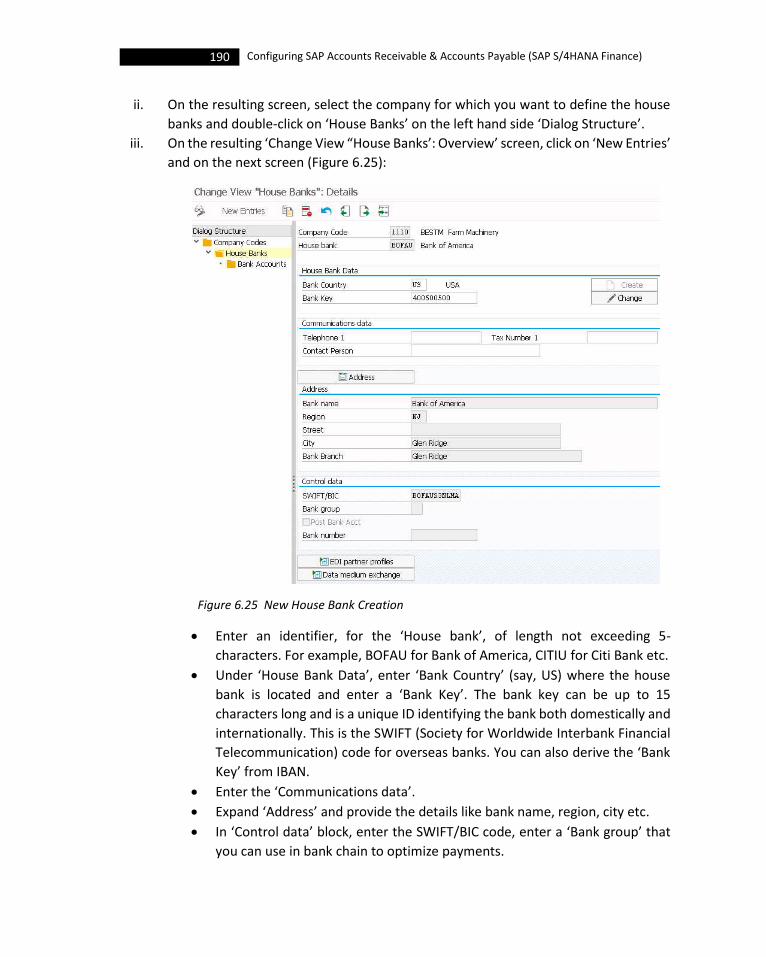
190 Configuring SAP Accounts Receivable & Accounts Payable (SAP S/4HANA Finance)
ii. On the resulting screen, select the company for which you want to define the house
banks and double-click on ‘House Banks’ on the left hand side ‘Dialog Structure’.
iii. On the resulting ‘Change View “House Banks’: Overview’ screen, click on ‘New Entries’
and on the next screen (Figure 6.25):
Figure 6.25 New House Bank Creation
• Enter an identifier, for the ‘House bank’, of length not exceeding 5-
characters. For example, BOFAU for Bank of America, CITIU for Citi Bank etc.
• Under ‘House Bank Data’, enter ‘Bank Country’ (say, US) where the house
bank is located and enter a ‘Bank Key’. The bank key can be up to 15
characters long and is a unique ID identifying the bank both domestically and
internationally. This is the SWIFT (Society for Worldwide Interbank Financial
Telecommunication) code for overseas banks. You can also derive the ‘Bank
Key’ from IBAN.
• Enter the ‘Communications data’.
• Expand ‘Address’ and provide the details like bank name, region, city etc.
• In ‘Control data’ block, enter the SWIFT/BIC code, enter a ‘Bank group’ that
you can use in bank chain to optimize payments.

191 Outgoing Payments
You use SWIFT (Society for Worldwide Interbank Financial
Telecommunication) code to identify a bank branch internationally, for
routing financial transactions. Used as the BIC (Bank Identifier Code), the
SWIFT is a combination of letters and numbers, and can have a total length
of 8 or 11. It, however, does not have the account number information of the
beneficiary who will receive the money. For example, the SWIFT code of
HDBC bank, Hyderabad branch, India is HDFCINBBHYD: the first 4-characters
(say HDFC) of a SWIFT will denote the bank and will always be in letters, the
next 2-characters (say, IN) denote the country , the next 2-character (say, BB)
can be characters or a mix of characters and numbers denoting the location,
and the last 3-characters (say, HYD) denoting the branch with the last 3-
characters being optional.
IBAN (International Bank Account Number), was developed originally in
Europe for standardizing international numbering for individual bank
accounts across the world, for simplifying bank transactions. All the European
banks use IBAN, though its usage is becoming popular in other countries as
well, excluding USA and Canada where they do not use IBAN but recognise
that. The IBAN is made up of a number string with the first two letters
denoting the country, followed by two check digits, and with up to 35
alphanumeric characters containing the bank identifier / bank code and
account number. The alphanumeric characters are known as the BBAN (Basic
Bank Account Number). The national banking association of a country is free
to decide the length of the BBAN to make it as a standard for that country. As
a result, the length of IBAN varies from country to country: for example, the
IBAN for UK, Ireland and Germany is 22, 27 for France, 28 for Poland and so
on. IBAN cannot contain any space in between two digits / characters, when
transmitted electronically (for example: DE89370400440532013999).
However, it is denoted in groups of 4-characters separated by single spaces
(with the last group of any variable length) when printed. An example of IBAN
in print format for Germany will be DE89 3704 0044 0532 0139 99: DE is the
country code, 89 is the check digit, 37040044 is the bank code (also called as
BLZ code) and the last 0532013999 denoting the account number.
While the SWIFT code identifies a specific bank (branch) in international
financial transactions, the IBAN, on the other hand, identifies not only the
bank/branch but also the individual account involved in the international
transaction.
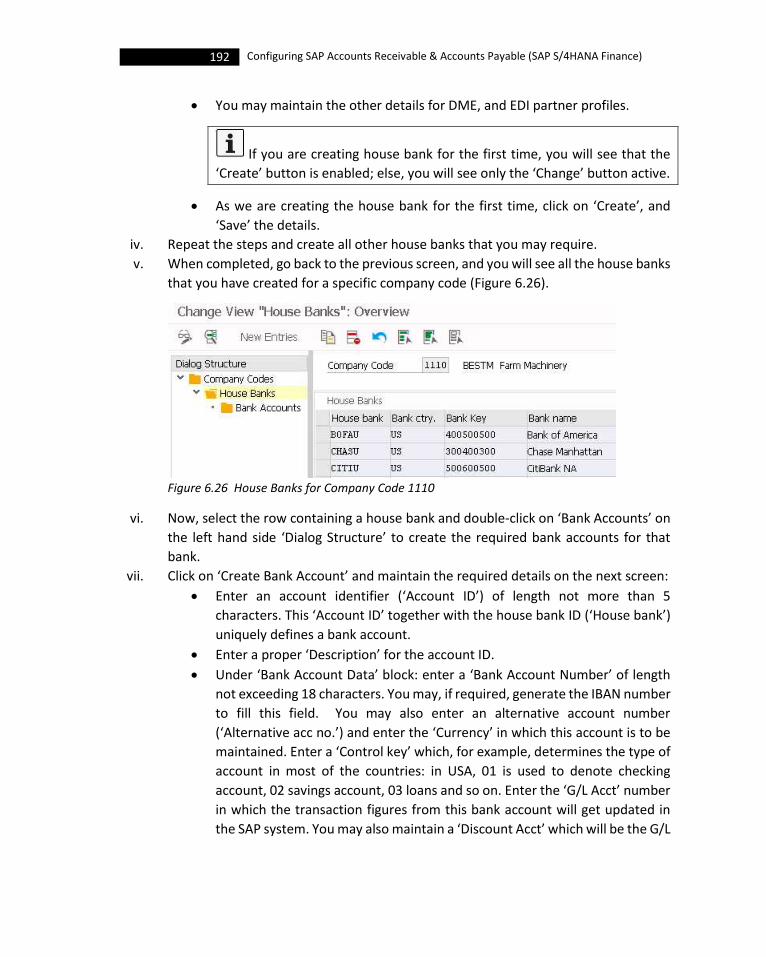
192 Configuring SAP Accounts Receivable & Accounts Payable (SAP S/4HANA Finance)
• You may maintain the other details for DME, and EDI partner profiles.
If you are creating house bank for the first time, you will see that the
‘Create’ button is enabled; else, you will see only the ‘Change’ button active.
• As we are creating the house bank for the first time, click on ‘Create’, and
‘Save’ the details.
iv. Repeat the steps and create all other house banks that you may require.
v. When completed, go back to the previous screen, and you will see all the house banks
that you have created for a specific company code (Figure 6.26).
Figure 6.26 House Banks for Company Code 1110
vi. Now, select the row containing a house bank and double-click on ‘Bank Accounts’ on
the left hand side ‘Dialog Structure’ to create the required bank accounts for that
bank.
vii. Click on ‘Create Bank Account’ and maintain the required details on the next screen:
• Enter an account identifier (‘Account ID’) of length not more than 5
characters. This ‘Account ID’ together with the house bank ID (‘House bank’)
uniquely defines a bank account.
• Enter a proper ‘Description’ for the account ID.
• Under ‘Bank Account Data’ block: enter a ‘Bank Account Number’ of length
not exceeding 18 characters. You may, if required, generate the IBAN number
to fill this field. You may also enter an alternative account number
(‘Alternative acc no.’) and enter the ‘Currency’ in which this account is to be
maintained. Enter a ‘Control key’ which, for example, determines the type of
account in most of the countries: in USA, 01 is used to denote checking
account, 02 savings account, 03 loans and so on. Enter the ‘G/L Acct’ number
in which the transaction figures from this bank account will get updated in
the SAP system. You may also maintain a ‘Discount Acct’ which will be the G/L

193 Outgoing Payments
account to which you can post the credit memos arising out of BoE at this
house bank account.
• ‘Save’ when completed. You have now, for example, created a bank account
called ‘BA100 at the house bank ‘BOFAU’ (checking account1 at Bank of
America) as shown in Figure 6.27.
Figure 6.27 Creating a Bank Account at House Bank
viii. Repeat the steps and create all other bank accounts at this specific house bank.
ix. Go back to the previous screen and create all the required bank accounts for the
various house banks (Figure 6.28).
Figure 6.28 Accounts at a House Bank
Now that we defined the required house banks (and the bank accounts) for BESTM, let us
continue with our discussion on configuring the automatic payment program. The first step
will be to set up all the company codes for payment transactions.

194 Configuring SAP Accounts Receivable & Accounts Payable (SAP S/4HANA Finance)
6.3.2 Set Up All Company Codes for Payment Transactions
Using this configuration step, you will make the settings for all company codes that are
involved in the payment transactions. Per company code, you will define: (a) the paying
company code (the company code that pays for itself and also for other company code), (b) if
separate payment is required per business area, (c) if payment method supplements are to
be used, (d) the cash discount and tolerance which the payment program uses to determine
the appropriate cash discount strategy, and (e) the special G/L transactions that need to be
settled, if any.
Project Dolphin
BESTM wants to designate the company code 1110 as the paying company code for
themselves and also for 1120. Similarly, company code 2100 will be the paying company code
for 2200, and 3100 will be the paying company code for 3200. Similar arrangements will be
made for India based company codes as well wherein the company code 1210 will pay for
1220. BESTM Corporate wants to continue with their existing practice of making payments to
their vendors, six days after the invoices are due. BESTM has requested the project team to
configure the payment program to enable payments per ‘Business Area’, but the project team
suggested not to do that, instead suggested grouping of payments in the normal way by
‘Currency’, ‘Payment Method’, ‘House Bank’ etc, so as to have more flexibility; BESTM, after
a long deliberation, has accepted this idea and does not now require payment grouping per
‘Business Area’. However, BESTM has requested that payment should cover the special G/L
transactions like down payments (including down payment requests), security deposits,
guarantee etc., for both customers and vendors. Additionally, BESTM wants to ensure that
maximum cash discount is always taken, when paying vendor invoices automatically.
To make the required settings:
i. Use the menu path: SAP Customizing Implementation Guide > Financial Accounting >
Accounts Receivable and Accounts Payable > Business Transactions > Outgoing
Payments > Automatic Outgoing Payments > Payment Method/Bank Selection for
Payment Program > Set Up All Company Codes for Payment Transactions.
ii. On the resulting screen, click on ‘New Entries’ and on the next screen (Figure 6.29):
• Enter the ‘Company code’ for which you are maintaining the settings (say,
1120).
• In ‘Control Data’, enter the ‘Sending company code’ that is known to your
customer / vendor as the one that is sending the payment. It can be paying
company code or different. If this field is left blank, then the system
understands that the paying company code is the same as that of the sending
company code. However, when the sending company code (1120) is not the

195 Outgoing Payments
paying company code (1110), then, the system incorporates the sending
company code in the payment transfer medium or payment advice as your
business partners (say, vendor) normally expect the sending company code
to send the payment. Also, the sending company code decides grouping of
items from different company codes: the items are grouped into one
payment for all the company codes that have the same paying company code
and sending company code.
• Enter the ‘Paying company code’ (say, 1110). This is the company code that
pays on behalf of other company codes; for example, here, the company code
1110 is the paying company code for 1120. In a setting like this, which is also
known as ‘centralized payment’, the system automatically creates the inter-
company postings in the system.
• Select ‘Separate Payment per Business Area’ check-box only if you want to
group payments per business area. If selected, you will not be able to use the
payment program’s default grouping based on the currency / payment
method / bank (mentioned in the line item).
Figure 6.29 Setting up All Company Codes for Payment Transactions

196 Configuring SAP Accounts Receivable & Accounts Payable (SAP S/4HANA Finance)
• Select ‘Pyt. Meth Suppl.’ check-box if payments are to be separated according
to a pre-set characteristic. When selected, you can pre-define a ‘payment
method supplement’ for customers / vendors of the company code. The
payment method supplement is a 2-character identifier with the first
character standing for priority (say, 2 for salary & wages, 4 for remittance of
taxes etc) and the 2nd character denoting the execution method (say, N for
clearing via electronic file). So, a payment method supplement 4N, for
example, indicates that the tax remittance should be via electronic file.
You can use a ‘payment method supplement’ to group payments, in
countries like Russia, and you can print the thus separated payments by
sorting them. Though the system will default the payment method
supplement during document entry, from the customer / vendor master, you
can overwrite them during payment processing.
• Under ‘Cash discount and tolerances’ data block, enter the ‘Tolerance Days
for Payable’ if required. Enter 6 for BESTM group of companies, as they plan
to pay only six days after the invoice becoming due.
The system adds up the number of days specified in ‘Tolerance Days for
Payable’ field, when calculating the cash discount period / due date for net
payment. Suppose that an invoice is due on 20th Mar 2020 and you have
maintained a tolerance of 6 days here in this field, then, the system arrives at
the invoice due date as 26th Mar 2020 and the invoice will not be paid until
that date even though the invoice due is on 20th Mar 2020.
• You can use the ‘Outgoing Pmnt with Cash Disc. From’ field to specify the
lower limit for payments with cash discount deduction. When maintained,
the system pays (after deducting the cash discount) only items having cash
discount percentage rate more than (or equal to) the one specified in this
field. If cash discount percentage rate is less than the one entered by you in
this field, then, the system makes the payment only at the due date for net
payment.
Enter 99 in the ‘Outgoing Pmnt with Cash Disc. From’ field, to delay the
payment as long as possible and to ensure that the payment is always net.
• Select ‘Max. Cash Discount’ check-box to ensure that maximum cash discount
is always deducted when paying your vendor invoices automatically.
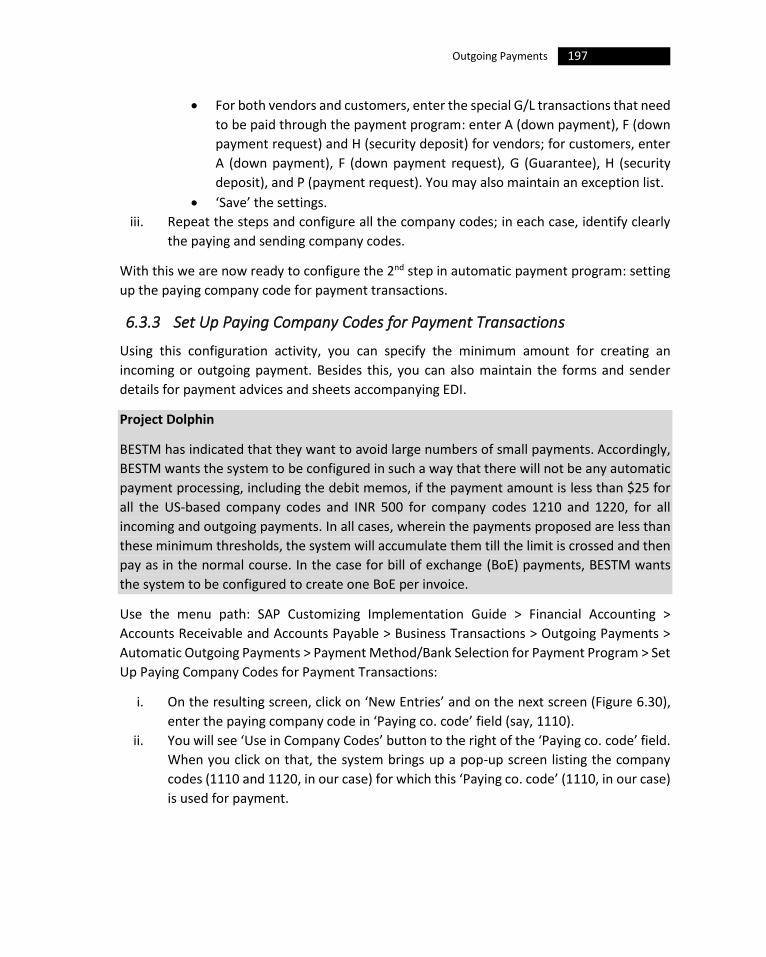
197 Outgoing Payments
• For both vendors and customers, enter the special G/L transactions that need
to be paid through the payment program: enter A (down payment), F (down
payment request) and H (security deposit) for vendors; for customers, enter
A (down payment), F (down payment request), G (Guarantee), H (security
deposit), and P (payment request). You may also maintain an exception list.
• ‘Save’ the settings.
iii. Repeat the steps and configure all the company codes; in each case, identify clearly
the paying and sending company codes.
With this we are now ready to configure the 2nd step in automatic payment program: setting
up the paying company code for payment transactions.
6.3.3 Set Up Paying Company Codes for Payment Transactions
Using this configuration activity, you can specify the minimum amount for creating an
incoming or outgoing payment. Besides this, you can also maintain the forms and sender
details for payment advices and sheets accompanying EDI.
Project Dolphin
BESTM has indicated that they want to avoid large numbers of small payments. Accordingly,
BESTM wants the system to be configured in such a way that there will not be any automatic
payment processing, including the debit memos, if the payment amount is less than $25 for
all the US-based company codes and INR 500 for company codes 1210 and 1220, for all
incoming and outgoing payments. In all cases, wherein the payments proposed are less than
these minimum thresholds, the system will accumulate them till the limit is crossed and then
pay as in the normal course. In the case for bill of exchange (BoE) payments, BESTM wants
the system to be configured to create one BoE per invoice.
Use the menu path: SAP Customizing Implementation Guide > Financial Accounting >
Accounts Receivable and Accounts Payable > Business Transactions > Outgoing Payments >
Automatic Outgoing Payments > Payment Method/Bank Selection for Payment Program > Set
Up Paying Company Codes for Payment Transactions:
i. On the resulting screen, click on ‘New Entries’ and on the next screen (Figure 6.30),
enter the paying company code in ‘Paying co. code’ field (say, 1110).
ii. You will see ‘Use in Company Codes’ button to the right of the ‘Paying co. code’ field.
When you click on that, the system brings up a pop-up screen listing the company
codes (1110 and 1120, in our case) for which this ‘Paying co. code’ (1110, in our case)
is used for payment.
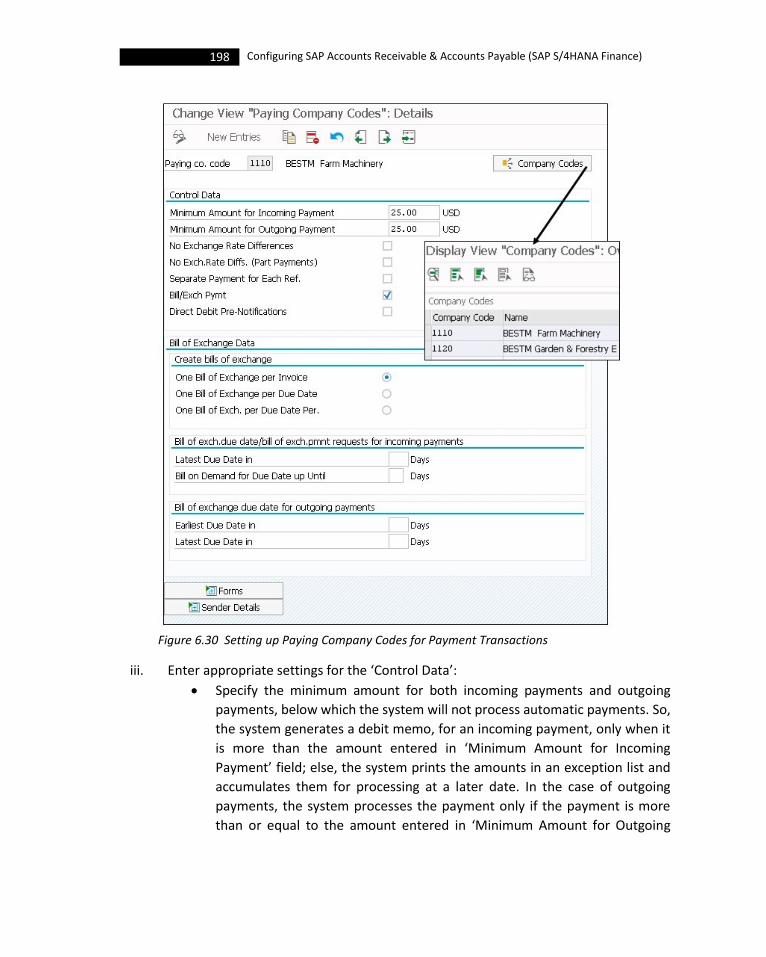
198 Configuring SAP Accounts Receivable & Accounts Payable (SAP S/4HANA Finance)
Figure 6.30 Setting up Paying Company Codes for Payment Transactions
iii. Enter appropriate settings for the ‘Control Data’:
• Specify the minimum amount for both incoming payments and outgoing
payments, below which the system will not process automatic payments. So,
the system generates a debit memo, for an incoming payment, only when it
is more than the amount entered in ‘Minimum Amount for Incoming
Payment’ field; else, the system prints the amounts in an exception list and
accumulates them for processing at a later date. In the case of outgoing
payments, the system processes the payment only if the payment is more
than or equal to the amount entered in ‘Minimum Amount for Outgoing

199 Outgoing Payments
Payment’ field; else, here, also such line items that are less than the threshold
limit is printed in an exception list and accumulated for payment in future.
• You may select ‘No Exchange Rate Differences’ check-box enabling the
system not to post exchange rate differences, if any, for foreign currency line
items, during automatic payment processing. Else, the system determines
exchange rate difference (using foreign exchange translation), and posts the
same automatically per payment.
• The behaviour of ‘No Exch.Rate Diffs (Part Payments)’ flag is similar to that of
‘No Exchange Rate Differences’ check-box except that this applies only to
partial payments.
• Select ‘Separate Payment for Each Ref.’ check-box to settle invoices and
credit memos having the same payment reference in one payment. Used in
countries like Norway, Finland etc, you should set this flag only if payment
methods need a payment reference for each payment.
You cannot generate an outgoing payment for payment references
referring to credit memos, when separate payments are made by payment
reference. Also, when you make payments, by payment reference, the
system will not offset between a customer and a vendor, unless the payment
reference in a customer line item is also the same payment reference in a
vendor line item.
• Select ‘Bill/Exch Pymt’ check-box to enable display of bill of exchange (BoE)
fields during payment transaction. You will select this if you want use BoE,
BoE payment requests, or the check/BoE procedure in the paying company
code. If not selected, but if you have already made the settings for payment
transactions with BoE, then, the system deletes all those settings.
Only when you select ‘Bill/Exch Pymt’ check-box, the system brings up
additional details on the screen under ‘Bill of Exchange Data’.
• Under ‘Create bills of exchange’, select the appropriate radio-button. You
need to select the first one namely ‘One Bill of Exchange per Invoice’ for
BESTM’s paying company codes. In the case of BoE due date or BoE payment
requests for incoming payments, you need to maintain the due date in the
appropriate fields.
• Maintain the form and sender details by expanding the data blocks ‘Forms’
and ‘Sender Details’.
• ‘Save’ the settings.

200 Configuring SAP Accounts Receivable & Accounts Payable (SAP S/4HANA Finance)
iv. Repeat the steps and configure the appropriate settings for all other paying company
codes of BESTM Corporate.
With this, let us move on to configure the payment methods, for each country, for the
payment transactions.
6.3.4 Set Up Payment Methods per Country for Payment Transactions
A ‘payment method’, in SAP, specifies how payment is made when you enter it in customer /
vendor master record, line items, or payment run (parameter). There are several payment
methods supported in SAP, including check (or cheque), bill of exchange, bank transfer, direct
debit etc.
Per payment method per country, you have to specify (a) if the payment method is to be used
for incoming payment or outgoing payment, (b) the characteristics for classifying the payment
method that includes type of payment method (like, check, bank transfer, bill of exchange
etc) and other features including, for example, if the payment method is valid for personnel
payments, (c) the master record control settings as to, for example, entering the bank details
(say, account number, SWIFT code etc), entering the address / postal details etc, (d) the
parameters for posting like document type for posting, clearing document type to be used
etc, and (e) the settings for payment medium. You also need to maintain the currencies that
can be used per payment method per country. If you do not specify any currency, then, you
can use that payment method, in that country, for payments in all currencies.
Figure 6.31 Payment Methods in Vendor Master

201 Outgoing Payments
You will maintain the payment method in a couple of places: in the customer / vendor
master record, in a line item of customer / vendor, and also while maintaining the payment
run parameter (‘Payment Methods’ under ‘Payment Control’) for executing the automatic
payment run.
You need to enter the payment method in vendor (or customer) in the ‘Payment Methods’
field under ‘Automatic Payment Transactions’ to enable the system to pick up the appropriate
payment method for that business partner for automatic payments. You can maintain more
than one payment method in the master record. However, the order in which you maintain
the payment methods is important: the system will try making payment using the first
method, then uses the second one if the first one is not successful and so on. Consider, for
example, you have maintained (Figure 6.31) CELMN as the payment methods: now, the
system will consider the payment method C with the first priority before considering E, L, M
and so on in the order it has been maintained.
Though you can maintain more than one payment method in a customer / vendor master
record, you can enter only one payment method (from those mentioned in the master record)
in a line item. The payment method entered in the line item takes precedence; it will override
the payment methods in the master record, irrespective of the order in which they have been
entered into. For example, you have maintained M (direct debit) as the payment method in a
vendor line item, and you have maintained CELMN as the payment methods in vendor master.
Now, the payment method M (entered in the line item) has the priority over the other
methods (CELMN) even though M is not at the first place in the ‘Payment Methods’ field in
the master record.
Take care not to enter a payment method in the ‘payment run parameter’ that is conflicting
with the payment methods already maintained in the master record or line item. Else, the
system will not process the automatic payment. For example, if you enter T [Bank transfer
(ACH CTX)] as the payment method, in payment run parameter, but have maintained M as
the payment method in a line item and CELMN as the payment methods in vendor master,
then, the system will not process the line item for payment as the payment method in
payment run parameter is in conflict with the payment method maintained in line items and
master record.
The standard system comes delivered with the default settings of applicable payment
methods for each of the countries (Figure 6.32). You may use that as such.
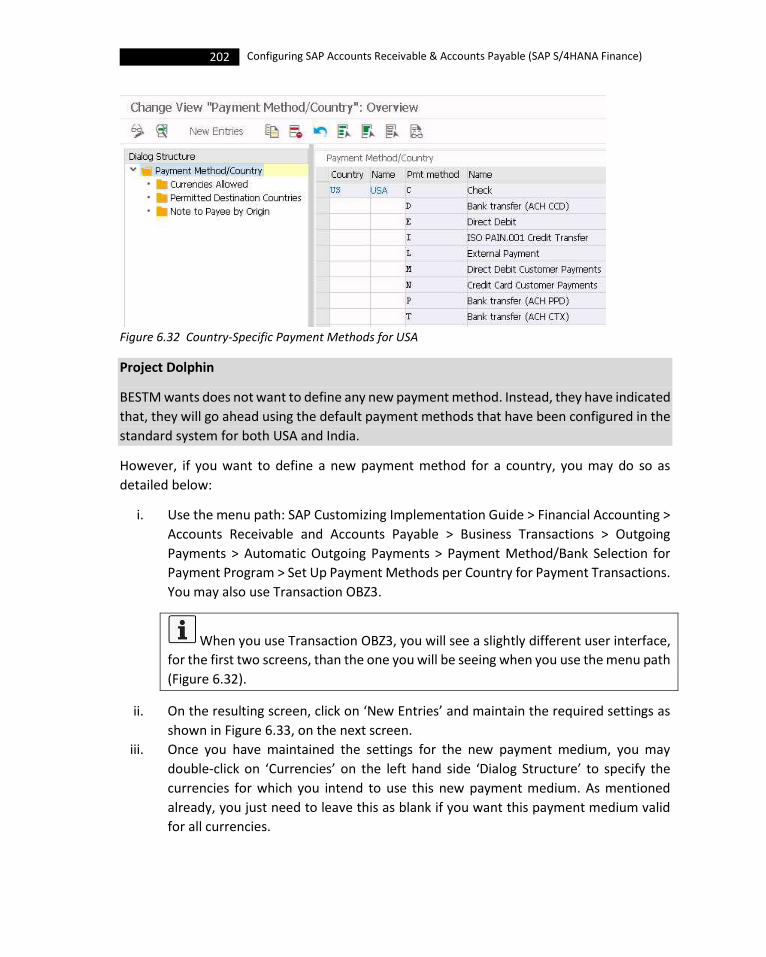
202 Configuring SAP Accounts Receivable & Accounts Payable (SAP S/4HANA Finance)
Figure 6.32 Country-Specific Payment Methods for USA
Project Dolphin
BESTM wants does not want to define any new payment method. Instead, they have indicated
that, they will go ahead using the default payment methods that have been configured in the
standard system for both USA and India.
However, if you want to define a new payment method for a country, you may do so as
detailed below:
i. Use the menu path: SAP Customizing Implementation Guide > Financial Accounting >
Accounts Receivable and Accounts Payable > Business Transactions > Outgoing
Payments > Automatic Outgoing Payments > Payment Method/Bank Selection for
Payment Program > Set Up Payment Methods per Country for Payment Transactions.
You may also use Transaction OBZ3.
When you use Transaction OBZ3, you will see a slightly different user interface,
for the first two screens, than the one you will be seeing when you use the menu path
(Figure 6.32).
ii. On the resulting screen, click on ‘New Entries’ and maintain the required settings as
shown in Figure 6.33, on the next screen.
iii. Once you have maintained the settings for the new payment medium, you may
double-click on ‘Currencies’ on the left hand side ‘Dialog Structure’ to specify the
currencies for which you intend to use this new payment medium. As mentioned
already, you just need to leave this as blank if you want this payment medium valid
for all currencies.

203 Outgoing Payments
iv. Double-click on ‘Permitted Destination Countries’ on the left hand side ‘Dialog
Structure’, to maintain the destination countries in which you want to use this
payment method. As in the case of currency settings, you can leave this table empty
so that the payment method is valid for all countries
Figure 6.33 Details of Payment Method Settings for ‘Check’ for USA
If bank details are required for a payment method, and, for example, if you have selected
‘EU Internal Transfer’ check-box for the payment method (in step ii), then, you have to enter
an EU country or one of the exception countries as the destination country in step (iii) without
which you will not be able to process the payment using this payment method.
v. ‘Save’ the settings when completed.
204 Configuring SAP Accounts Receivable & Accounts Payable (SAP S/4HANA Finance)
We have already seen that you can maintain the payment methods in a couple of places.
If that is the case, then, how the system selects the appropriate payment method for a
particular payment run?
Scenario 1: Payment method is maintained in all the three places: payment run parameter,
line item and customer / vendor master.
Suppose you have maintained C as the payment method in payment run parameter and also
in the line item. However, you have maintained multiple payment methods (ELMNC) in
customer / vendor master. Now, the payment program selects C as the payment method as
this is maintained both in the line item and also in payment run parameters notwithstanding
the payment methods mentioned in business partner’s master record.
Scenario 2: Payment method is maintained in two places: payment run parameter and
customer / vendor master. No payment method is maintained in the line item.
Suppose you have maintained C as the payment method in payment run parameter and have
maintained multiple payment methods (ELMNC) in customer / vendor master. Since there is
no payment method maintained in the line item, the program verifies if the payment method
entered in the business partner’s record is the same in payment run parameters also. If there
is a single payment method in master record and if it is the same in the payment run
parameter also, then the program uses that method. If more than one payment method has
been entered in the master record, then the program proceeds as under: (a) the program
checks the first payment method in the master record (E, in our case) and compares that with
the payment method maintained in the payment run parameter (C, in our case); if both are
same, then, the program uses that payment method, else (b) the payment program checks
the second entry of payment method in the master (L), and compares that again with the
method in the payment run parameters (C); if both are same, then, the program uses that
payment method, else (c) the program checks the 3rd method and the iteration goes on.
With this, we are now ready to configure the next step: setting up the payment methods per
company code.
6.3.5 Set Up Payment Methods per Company Code for Payment Transactions
Specify, here in this configuration activity, which payment methods you want to use per
(paying) company code. You can also determine the conditions under which a payment
method should be used. You can specify the amount limits (for payments) per payment
method, maintain the specifications for grouping items for payment (say, making a single
payment for all the marked items), enter the settings for foreign/foreign currency payments,
make the specifications for optimizing bank selection, enter the appropriate settings for the

205 Outgoing Payments
system to select the correct form for the payment medium and maintain the specifications
for issuing payment advice notes, if any.
While maintaining the amount limits for payment methods, always specify a maximum
amount; else, you will not be able to use that payment method. In case you maintain the
payment method in an open item, then, the system ignores the amount entered here, in this
configuration, as the limit for payment method.
Project Dolphin
As regards payments through automatic payment program, BESTM wants to have the system
configured to reflect the following:
All the line items that are due on a particular date should be grouped and paid in a single
payment. If line items are associated with a payment method explicitly, then, the system
should pay those items; else, if the payment method is not specified explicitly in the line item
and if the system selects the payment method automatically, then, several items can be paid
together. The ‘extended individual payment’ should be activated to make it possible to
include and offset all available credit memos for a payment group. For payment methods like
bank transfer, the system should make payments abroad using the business partners’ banks
in their respective countries. The system should be able to make payments – for all payment
methods - in other currencies, other than the company code currency. BESTM wants bank
optimization using their own house banks and business partners’ banks so as to optimize
international payments.
As regards payments, if the payment method is check, then, all in-country payments should
not be less than $25 (for US-based company codes) and INR 500 for Indian company codes. If
the payment is more than $5,000 (or INR 250,000) then, it has to be made through bank
transfer or direct debit. For direct debit, bank transfer or card payment, there is no lower limit
for payment. In cases of composite payments, BESTM wants the system to split the payment
by grouping the invoices with the appropriate credit memos, for payments exceeding $10,000
in the case of US-based company codes (or INR 500,000 for all the India-based company
codes), for all the allowed payment methods, for both domestic and international payments.
To configure the payment method per company code, for payment transactions:
i. Use the menu path: SAP Customizing Implementation Guide > Financial Accounting >
Accounts Receivable and Accounts Payable > Business Transactions > Outgoing
Payments > Automatic Outgoing Payments > Payment Method/Bank Selection for
Payment Program > Set Up Payment Methods per Company Code for Payment
Transactions.
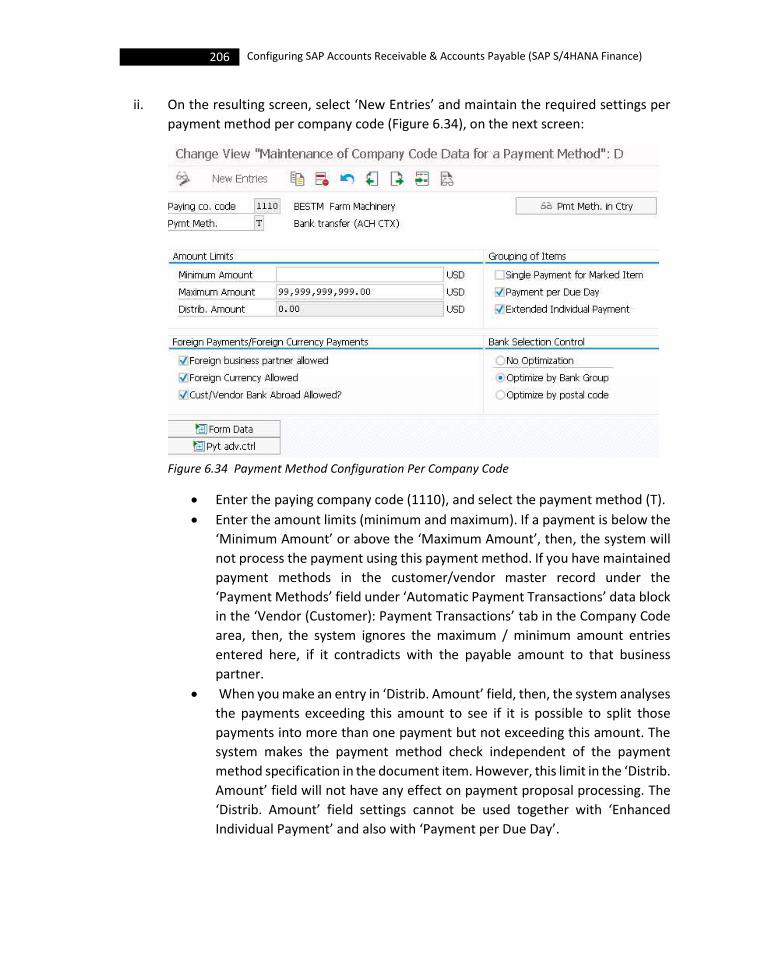
206 Configuring SAP Accounts Receivable & Accounts Payable (SAP S/4HANA Finance)
ii. On the resulting screen, select ‘New Entries’ and maintain the required settings per
payment method per company code (Figure 6.34), on the next screen:
Figure 6.34 Payment Method Configuration Per Company Code
• Enter the paying company code (1110), and select the payment method (T).
• Enter the amount limits (minimum and maximum). If a payment is below the
‘Minimum Amount’ or above the ‘Maximum Amount’, then, the system will
not process the payment using this payment method. If you have maintained
payment methods in the customer/vendor master record under the
‘Payment Methods’ field under ‘Automatic Payment Transactions’ data block
in the ‘Vendor (Customer): Payment Transactions’ tab in the Company Code
area, then, the system ignores the maximum / minimum amount entries
entered here, if it contradicts with the payable amount to that business
partner.
• When you make an entry in ‘Distrib. Amount’ field, then, the system analyses
the payments exceeding this amount to see if it is possible to split those
payments into more than one payment but not exceeding this amount. The
system makes the payment method check independent of the payment
method specification in the document item. However, this limit in the ‘Distrib.
Amount’ field will not have any effect on payment proposal processing. The
‘Distrib. Amount’ field settings cannot be used together with ‘Enhanced
Individual Payment’ and also with ‘Payment per Due Day’.
207 Outgoing Payments
Consider that the amount limit to be split and distribute for the payment
method ‘External Payment’ is, $10,000.
Scenario: 1. You have two invoices $15,000 & $11,000 and four credit memos
$2,800, $2,200, $700 & $800. You, now, have the group of document items
totalling $19,500 to be paid together. Once the system checks the ‘External
Transfer’ as the payment method successfully, it creates two payment
documents: one for $10,000 (clearing invoice of $15,000 and credits of
$2,800 & $2,200), and another for $9,500 (clearing invoice of $11,000 and
credits of $700 & $800).
Scenario: 2. You have two invoices $15,000 & $11,000 and two credit memos
$1,800, $900. Now, you have these group of documents totalling $23,300 to
be paid together. The check, for the payment method ‘External Payment’, will
not be successful as not all the invoice items, for this payment, can be
reduced by the corresponding credit memos to the maximum distribution
limit of $10,000. To proceed, you may select a different payment method.
Else, the system puts them in the exception list as no suitable payment
method is found.
Scenario: 3. You have two invoices $15,000 & $11,000 and a credit memo
$6,000. Now, you have these group of documents totalling $20,000 to be paid
together. The check, for the payment method ‘External Payment’, will not be
successful as no proportional distribution of credit to invoices can be made
(system does not bifurcate $6,000 to distribute to invoices as $5,000 and
$1,000).
iii. Under ‘Grouping of Items’:
• When you select 'Single Payment for Marked Item' check-box, then, it makes
the system to pay the open items, that contain this payment method,
individually. So, all the items with explicit payment method are paid
individually. However, you can pay several items together, when the payment
method is not specified explicitly, but instead is selected by the payment
program.
• Select ‘Payment per Due Day’ check-box to group payments that are due on
a particular due date. You can use this to leverage to get maximum cash
discount. When not selected, then, the payment program groups –
irrespective of due date - all the payments per vendor / customer. For
example, if the due date of a vendor line item is earlier than the payment
run’s posting date, the system replaces the due date with the payment run’s

208 Configuring SAP Accounts Receivable & Accounts Payable (SAP S/4HANA Finance)
posting date, so that all items that are overdue on the posting date are
grouped and paid together with a single payment. Suppose, if such a grouping
results in a credit balance, then, the system groups those items that have
debit balances with different due dates and then makes the payment.
If you set the ‘Single Payment’ indicator in the customer / vendor master
record (Figure 6.35), then, the system pays every customer/ vendor open
item separately during automatic payment. That is, the system does not
group open items together for payment.
Figure 6.35 Configuring ‘Single Payment’ in Vendor Master
• You can use the ‘Extended Individual Payment’ to process open items of a
payment group (to be defined separately) individually according to pre-
defined rules. You can include and offset all available credit memos for the
payment group. However, in case of individual payments, you can offset only
credit memos with invoice reference; you cannot offset credit memos
without invoice reference. You can form new payment groups with the rules

209 Outgoing Payments
like, items with the opposite payment direction (say, credit memos - F110)
have to be offset with the other items, invoice-related credit memos to be
offset always with the related invoice, credit memos w/o invoice reference
can be grouped together with any of the invoices for a payment group etc.
iv. For configuring ‘Foreign Payments / Foreign Currency Payments’:
• Select ‘Foreign business partner allowed’ to enable the payment method to
be used for payments with customers/vendors abroad.
• Select ‘Foreign Currency Allowed’ flag to use the payment method for
payments in foreign currency. Set this indicator if you can transmit the
currency key to the bank using the payment medium used.
Do not select this check-box for checks with the local currency key or for
payment methods for domestic DME, wherein the currency field is not
defined in the format description.
• Select ‘Cust/Vendor Bank Abroad Allowed?’ check-box to route the payment
from a bank of the customer/vendor who is abroad. You cannot use this
payment method if you do not set this flag and when the customer/vendor
does not have a bank account in paying company code’s country. You will
normally select this for payment methods such as bank transfer (T), and
external transfer. However, as a prerequisite, you need set up the required
bank settings in customer / vendor master records.
SAP supports a variety of bank transfers. The bank transfers happen via
different variants of ACH (Automated Clearing House) transactions. ACH
enables automatic fund transfer, across banks and financial institutions
through e-payments.
SAP supports various formats of ACH:
1. ACH-CCD where CCD refers to ‘Cash Concentration and Disbursement’ for
corporate credits and debits. This is the most common automated payment
for corporate (business) accounts.
2. ACH-PPD: with the PPD standing for ‘Prearranged Payment and Deposit’,
this is mainly used to pay (or receive) from consumer (personal) accounts, for
example, payroll payment to employee accounts.
3. ACH-CTX: here the CTX stand for 'Corporate Trade Exchange' and ACH-CTX
is used mainly by corporates and government for money transfer.
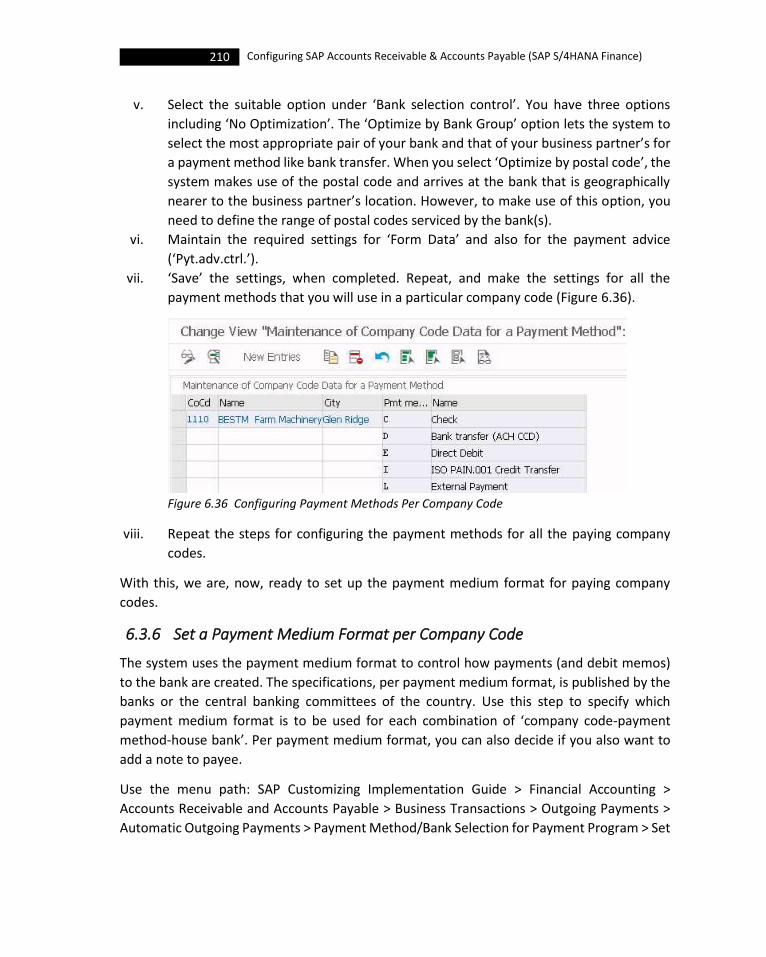
210 Configuring SAP Accounts Receivable & Accounts Payable (SAP S/4HANA Finance)
v. Select the suitable option under ‘Bank selection control’. You have three options
including ‘No Optimization’. The ‘Optimize by Bank Group’ option lets the system to
select the most appropriate pair of your bank and that of your business partner’s for
a payment method like bank transfer. When you select ‘Optimize by postal code’, the
system makes use of the postal code and arrives at the bank that is geographically
nearer to the business partner’s location. However, to make use of this option, you
need to define the range of postal codes serviced by the bank(s).
vi. Maintain the required settings for ‘Form Data’ and also for the payment advice
(‘Pyt.adv.ctrl.’).
vii. ‘Save’ the settings, when completed. Repeat, and make the settings for all the
payment methods that you will use in a particular company code (Figure 6.36).
Figure 6.36 Configuring Payment Methods Per Company Code
viii. Repeat the steps for configuring the payment methods for all the paying company
codes.
With this, we are, now, ready to set up the payment medium format for paying company
codes.
6.3.6 Set a Payment Medium Format per Company Code
The system uses the payment medium format to control how payments (and debit memos)
to the bank are created. The specifications, per payment medium format, is published by the
banks or the central banking committees of the country. Use this step to specify which
payment medium format is to be used for each combination of ‘company code-payment
method-house bank’. Per payment medium format, you can also decide if you also want to
add a note to payee.
Use the menu path: SAP Customizing Implementation Guide > Financial Accounting >
Accounts Receivable and Accounts Payable > Business Transactions > Outgoing Payments >
Automatic Outgoing Payments > Payment Method/Bank Selection for Payment Program > Set
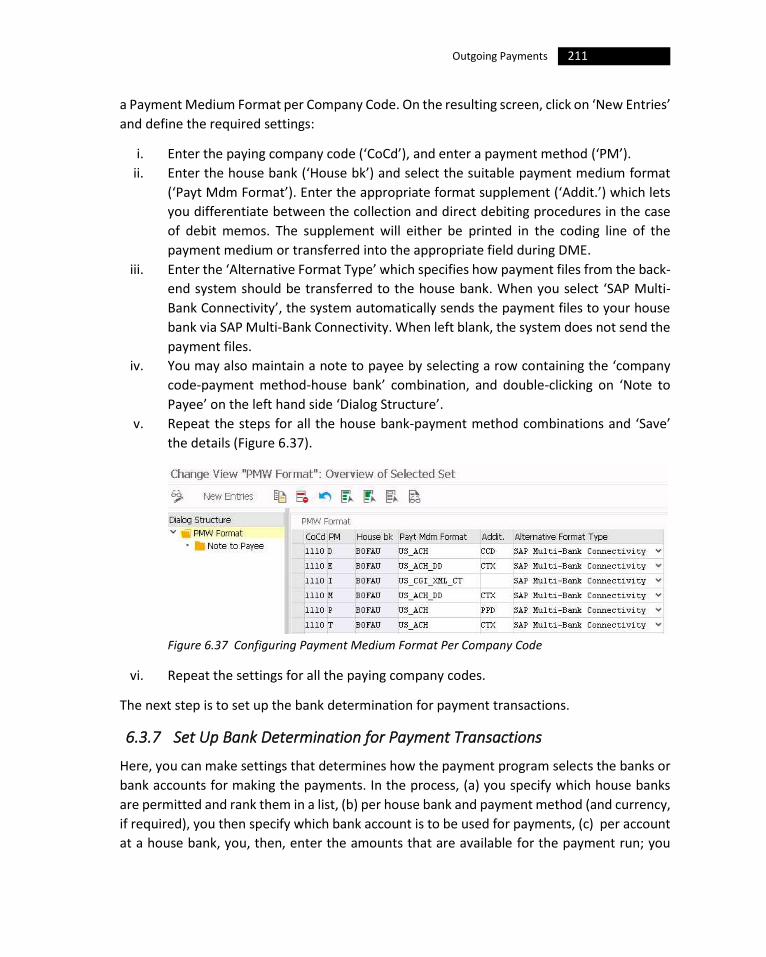
211 Outgoing Payments
a Payment Medium Format per Company Code. On the resulting screen, click on ‘New Entries’
and define the required settings:
i. Enter the paying company code (‘CoCd’), and enter a payment method (‘PM’).
ii. Enter the house bank (‘House bk’) and select the suitable payment medium format
(‘Payt Mdm Format’). Enter the appropriate format supplement (‘Addit.’) which lets
you differentiate between the collection and direct debiting procedures in the case
of debit memos. The supplement will either be printed in the coding line of the
payment medium or transferred into the appropriate field during DME.
iii. Enter the ‘Alternative Format Type’ which specifies how payment files from the back-
end system should be transferred to the house bank. When you select ‘SAP Multi-
Bank Connectivity’, the system automatically sends the payment files to your house
bank via SAP Multi-Bank Connectivity. When left blank, the system does not send the
payment files.
iv. You may also maintain a note to payee by selecting a row containing the ‘company
code-payment method-house bank’ combination, and double-clicking on ‘Note to
Payee’ on the left hand side ‘Dialog Structure’.
v. Repeat the steps for all the house bank-payment method combinations and ‘Save’
the details (Figure 6.37).
Figure 6.37 Configuring Payment Medium Format Per Company Code
vi. Repeat the settings for all the paying company codes.
The next step is to set up the bank determination for payment transactions.
6.3.7 Set Up Bank Determination for Payment Transactions
Here, you can make settings that determines how the payment program selects the banks or
bank accounts for making the payments. In the process, (a) you specify which house banks
are permitted and rank them in a list, (b) per house bank and payment method (and currency,
if required), you then specify which bank account is to be used for payments, (c) per account
at a house bank, you, then, enter the amounts that are available for the payment run; you

212 Configuring SAP Accounts Receivable & Accounts Payable (SAP S/4HANA Finance)
can maintain separate amounts for incoming and outgoing payments, (d) you also specify how
many days should elapse between the posting date of the payment run and the value date at
the bank; this will dependent on the payment method, bank account, payment amount, and
currency, and finally (e) you define the charges that are printed on the BoE forms, if any.
In determining the bank account, the system first runs ‘classic bank account
determination’. It uses the ‘enhanced settings’ only if it cannot determine an account in classic
bank account determination.
In the classic view, you can enter only one bank account with its account determination for
each combination of ‘house bank-payment method-currency’. The settings of classic bank
account determination may not be sufficient: (a) when posting the open items wherein you
have already defined which bank account is to be used, and (b) when you want to define a
ranking of multiple accounts for the same house bank. So, in both these cases you need to
define the account determination exclusively in the ‘Bank Accounts (Enhanced)’ view.
Project Dolphin
The BESTM Corporate has indicated to the project team that Bank of America will be the
primary bank for all the payment methods, followed by Chase Manhattan and Citi Bank in that
ranking order. It has been envisaged to provide an amount limit of $ 9,999,999,999 for Bank
of America for facilitating all the automatic payment transactions (outgoing payments). The
limit for the other two banks would be $ 999,999,999 in each case. In the case of incoming
payments, there should not be any limit restriction imposed. The value date should be 1 day
after, for all the payments through electronic format; however, it would be 3 days after for all
the checks denominated in the local currency. For house banks in India, the limits will be the
same but denominated in INR.
To configure the settings for bank determination:
i. Use the menu path: SAP Customizing Implementation Guide > Financial Accounting >
Accounts Receivable and Accounts Payable > Business Transactions > Outgoing
Payments > Automatic Outgoing Payments > Payment Method/Bank Selection for
Payment Program > Set Up Bank Determination for Payment Transactions. You may
also Transaction REMMHBACC.
ii. On the ‘Display View “Bank Selection’: Overview’ screen, select the row under ‘Bank
selection’ and double-click on ‘Ranking Order’ on the left hand side ‘Dialog Structure’.
iii. On the next screen, click on ‘New Entries’ and maintain the settings on the resulting
screen (Figure 6.38):
• Enter the payment method (‘PM’), currency (‘CrCy’), ranking order (‘Rank
Order’) and the house bank (‘House bk’). The ranking order is the sequence

213 Outgoing Payments
used in selecting a particular house bank. The house bank with a ranking
order of 1 will be the first bank to be picked up, by the system, for the
payment run for that payment method.
You can use the ‘House bk’ to denote the house bank that would pay
the BoE created with a check/bill of exchange payment. Also, you can use
‘Acct for Bill/Exch’ field to store the bank account at the local bank against
which a BoE should be paid from the check/bill of exchange payment.
Figure 6.38 Configuring Bank Determination – Ranking Order
• Repeat the entries to cover all payment methods, currency and house banks
that you may require in the ranking list. Since you can assign multiple
currencies and several house banks to a single payment method, you may
need to repeat the entries for a particular payment method to cover all
scenarios.
If you want a particular house bank and a particular currency to be valid
for all payment methods, then you need to leave the payment method (‘PM’)
field as blank. You can also leave the currency (‘Crcy’) field as blank so that
the particular row will be valid for all currencies for the given ‘payment
method-house bank combination’. For a single payment method, you can
maintain a maximum of 9,999 house banks with the appropriate ranking
order.
iv. Now, double-click on ‘Bank Accounts’ on the left hand side ‘Dialog Structure’ and
maintain the required accounts by clicking on ‘New Entries’ (Figure 6.39):
• Enter the house bank, payment method, currency (you can leave this as blank
to make the settings valid for all currencies), account identifier at the bank
(‘Account ID’) and the G/L account (‘Bank Subaccount’) to which the
transactions will be posted to in the SAP system.
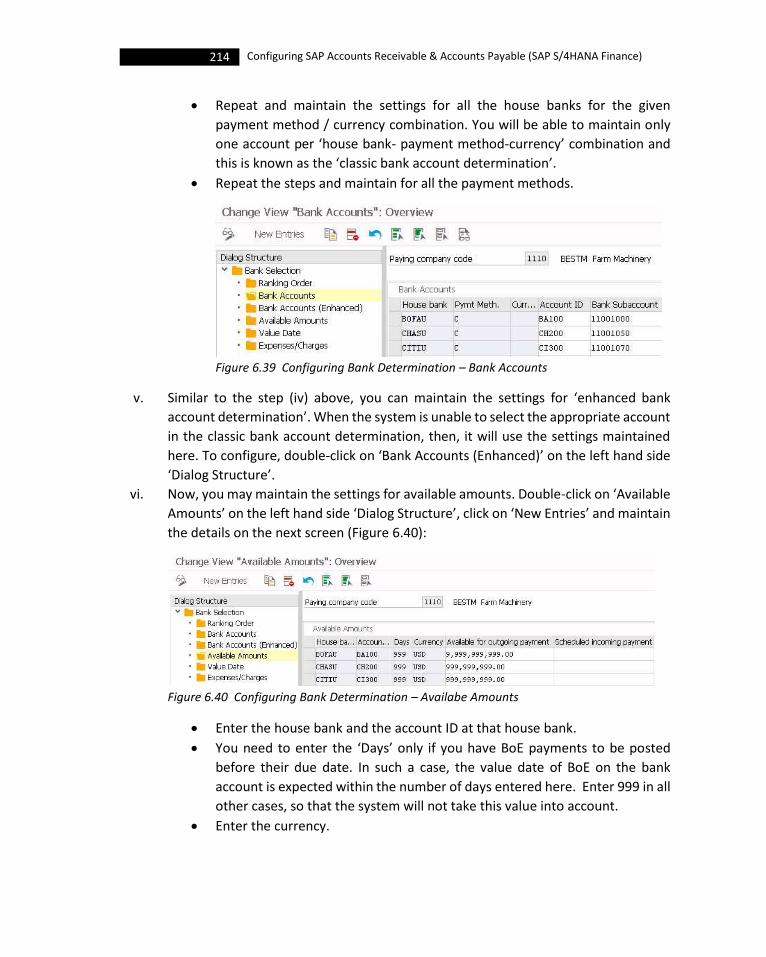
214 Configuring SAP Accounts Receivable & Accounts Payable (SAP S/4HANA Finance)
• Repeat and maintain the settings for all the house banks for the given
payment method / currency combination. You will be able to maintain only
one account per ‘house bank- payment method-currency’ combination and
this is known as the ‘classic bank account determination’.
• Repeat the steps and maintain for all the payment methods.
Figure 6.39 Configuring Bank Determination – Bank Accounts
v. Similar to the step (iv) above, you can maintain the settings for ‘enhanced bank
account determination’. When the system is unable to select the appropriate account
in the classic bank account determination, then, it will use the settings maintained
here. To configure, double-click on ‘Bank Accounts (Enhanced)’ on the left hand side
‘Dialog Structure’.
vi. Now, you may maintain the settings for available amounts. Double-click on ‘Available
Amounts’ on the left hand side ‘Dialog Structure’, click on ‘New Entries’ and maintain
the details on the next screen (Figure 6.40):
Figure 6.40 Configuring Bank Determination – Availabe Amounts
• Enter the house bank and the account ID at that house bank.
• You need to enter the ‘Days’ only if you have BoE payments to be posted
before their due date. In such a case, the value date of BoE on the bank
account is expected within the number of days entered here. Enter 999 in all
other cases, so that the system will not take this value into account.
• Enter the currency.
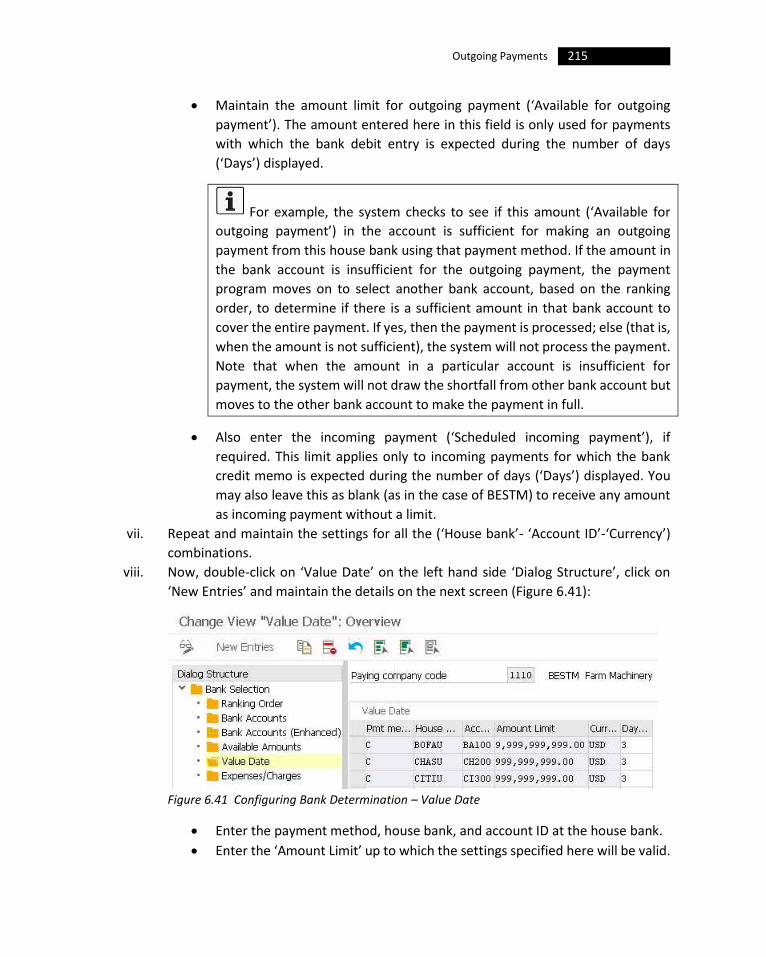
215 Outgoing Payments
• Maintain the amount limit for outgoing payment (‘Available for outgoing
payment’). The amount entered here in this field is only used for payments
with which the bank debit entry is expected during the number of days
(‘Days’) displayed.
For example, the system checks to see if this amount (‘Available for
outgoing payment’) in the account is sufficient for making an outgoing
payment from this house bank using that payment method. If the amount in
the bank account is insufficient for the outgoing payment, the payment
program moves on to select another bank account, based on the ranking
order, to determine if there is a sufficient amount in that bank account to
cover the entire payment. If yes, then the payment is processed; else (that is,
when the amount is not sufficient), the system will not process the payment.
Note that when the amount in a particular account is insufficient for
payment, the system will not draw the shortfall from other bank account but
moves to the other bank account to make the payment in full.
• Also enter the incoming payment (‘Scheduled incoming payment’), if
required. This limit applies only to incoming payments for which the bank
credit memo is expected during the number of days (‘Days’) displayed. You
may also leave this as blank (as in the case of BESTM) to receive any amount
as incoming payment without a limit.
vii. Repeat and maintain the settings for all the (‘House bank’- ‘Account ID’-‘Currency’)
combinations.
viii. Now, double-click on ‘Value Date’ on the left hand side ‘Dialog Structure’, click on
‘New Entries’ and maintain the details on the next screen (Figure 6.41):
Figure 6.41 Configuring Bank Determination – Value Date
• Enter the payment method, house bank, and account ID at the house bank.
• Enter the ‘Amount Limit’ up to which the settings specified here will be valid.
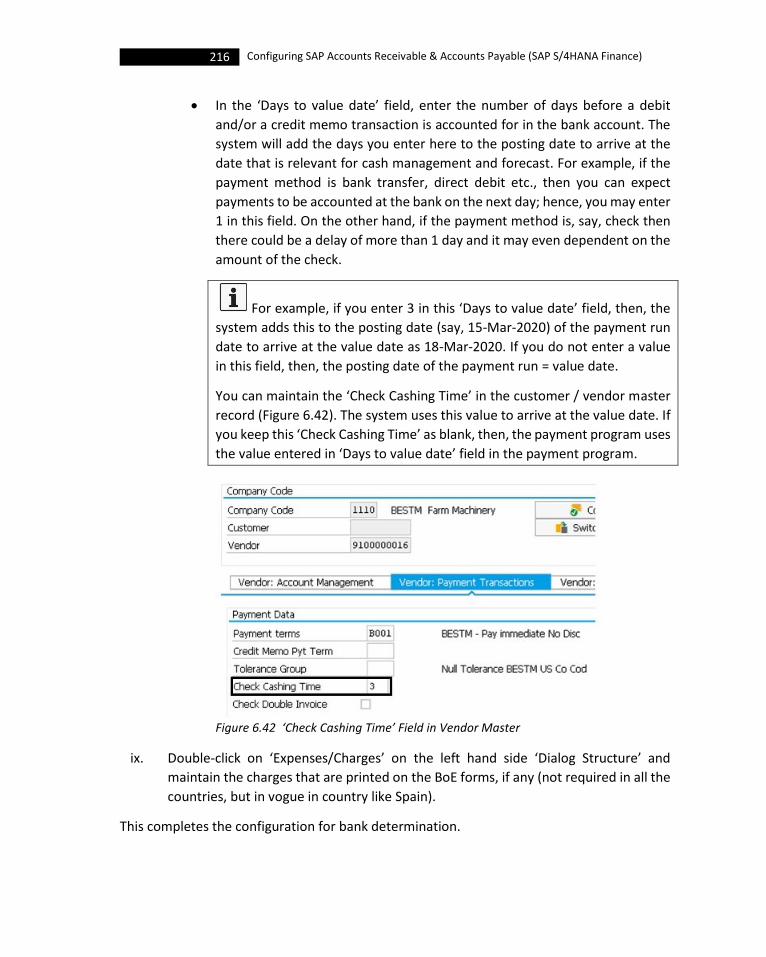
216 Configuring SAP Accounts Receivable & Accounts Payable (SAP S/4HANA Finance)
• In the ‘Days to value date’ field, enter the number of days before a debit
and/or a credit memo transaction is accounted for in the bank account. The
system will add the days you enter here to the posting date to arrive at the
date that is relevant for cash management and forecast. For example, if the
payment method is bank transfer, direct debit etc., then you can expect
payments to be accounted at the bank on the next day; hence, you may enter
1 in this field. On the other hand, if the payment method is, say, check then
there could be a delay of more than 1 day and it may even dependent on the
amount of the check.
For example, if you enter 3 in this ‘Days to value date’ field, then, the
system adds this to the posting date (say, 15-Mar-2020) of the payment run
date to arrive at the value date as 18-Mar-2020. If you do not enter a value
in this field, then, the posting date of the payment run = value date.
You can maintain the ‘Check Cashing Time’ in the customer / vendor master
record (Figure 6.42). The system uses this value to arrive at the value date. If
you keep this ‘Check Cashing Time’ as blank, then, the payment program uses
the value entered in ‘Days to value date’ field in the payment program.
Figure 6.42 ‘Check Cashing Time’ Field in Vendor Master
ix. Double-click on ‘Expenses/Charges’ on the left hand side ‘Dialog Structure’ and
maintain the charges that are printed on the BoE forms, if any (not required in all the
countries, but in vogue in country like Spain).
This completes the configuration for bank determination.

217 Outgoing Payments
So, how the payment program determines the correct house bank for the payment?
First, the payment program tries identifying a house bank for a given ‘payment method-
currency’ combination. If it is unable to find a house bank, for the given ‘payment method-
currency’ combination, it tries to find a house bank for the same payment method but without
the currency stipulation. If it is successful, then it goes ahead with the bank. Then, secondly,
it iterates to find out the suitable account at the selected house bank. Finally, it checks if the
amount limit at the selected house bank account is sufficient for the payment. The program,
during this process, finds only one house bank that matches the criteria; if more than one
bank is found, then, it makes use of the ‘ranking order’ to select the house bank with the
highest ranking order and uses that bank for the payment. This is, of course, assuming that
there is no bank optimization either via postal code or bank group. If there is such an
optimization, the selection will be based on the results of optimization.
If the payment program does not find a house bank fulfilling all the three criteria - house bank,
house bank account and available amount limit – it tries to locate another house bank that
fulfils these requirements for the given payment method. If it cannot find a house bank, then
it concludes that the payment cannot be made using that payment method. Now, it starts all
over, and begins checking for another payment method currency combination. This iteration
goes on till the program finds suitable house bank for a given payment method.
Let us, now, move on to discuss how to configure the value date rules.
6.3.8 Define Value Date Rules
We have already discussed, in the previous Section, the effect of adding the days in ‘Days to
value date’ for specific ‘payment method-house bank-account ID’ combination (while
configuring the value date in bank determination for payment transactions) and also the
effect of entering the ‘Check Cashing Time’ in business partner’s master record. Let us see,
now, in this Section, how you can make certain specifications for some of the bank
transactions like incoming checks, BoE etc., per house bank and per account.
Use the menu path: SAP Customizing Implementation Guide > Financial Accounting >
Accounts Receivable and Accounts Payable > Business Transactions > Outgoing Payments >
Automatic Outgoing Payments > Payment Method/Bank Selection for Payment Program >
Define Value Date Rules. You may also use Transaction OBBA.
On the resulting pop-up screen, maintain the company code and proceed to configure the
settings on the next screen. When fully configured, the system adds / subtracts the specified
days as deviation from the reference date (‘R’) which may be the document date or posting

218 Configuring SAP Accounts Receivable & Accounts Payable (SAP S/4HANA Finance)
date or due date. After this, the system checks the date thus arrived with a factory calendar
and decides the value date for that transaction.
You may configure the system to arrive at the value date by defining either the value
date rules (as above) or value date settings as in setting up the bank determination for
payment transactions that we discussed in the previous Section (6.3.7). Both are not required.
We will not be configuring this for BESTM as we have already configured the value date in
bank determination wherein we have maintained the ‘Days to value date’.
The next step is to assign the payment method to bank transactions to use the value date
rules that have been defined previously.
6.3.9 Assign Payment Method to Bank Transaction
Once you have defined the value date rules, you need to assign the payment method to each
house-bank related transaction using the menu path: SAP Customizing Implementation Guide
> Financial Accounting > Accounts Receivable and Accounts Payable > Business Transactions
> Outgoing Payments > Automatic Outgoing Payments > Payment Method/Bank Selection for
Payment Program > Assign Payment Method to Bank Transaction. You may also use
Transaction OBBB.
With this, we are ready to discuss payment groupings.
6.3.10 Define Payment Groupings
Using this activity, you can define the grouping keys which you can use to settle a customer
or vendor's open items together. Per grouping key, you may specify up to three fields (like,
ZUONR – Assignment Number) from the database tables BSIK (vendors) or BSID (customers).
The system, then, settles the items containing the same entries in these specified fields. You
can, then, enter the appropriate grouping key in the customer/vendor master record.
You will use grouping key if you do not want all the open items of a customer / vendor to be
paid together; instead, you want only those items which belong together, as defined in the
grouping key, to be grouped into a single payment. For example, if you use SAP Loan
Management, you may define a payment grouping so that the system uses that key for
grouping open items with the same loan number together.
Project Dolphin
BESTM has indicated that they do not want to use payment grouping; Instead, wanted to
make use of the default grouping of open items of customers / vendors in the automatic
payment program.

219 Outgoing Payments
To define a payment grouping key, which you can enter later in the customer / vendor master,
you may use the menu path: SAP Customizing Implementation Guide > Financial Accounting
> Accounts Receivable and Accounts Payable > Business Transactions > Outgoing Payments >
Automatic Outgoing Payments > Payment Method/Bank Selection for Payment Program >
Define Payment Groupings. You may also use Transaction OBAP.
The next activity is to prepare automatic posting for payment program.
6.3.11 Prepare Automatic Postings for Payment Program
Define the posting keys and special G/L indicators for postings that are required for the
automatic payment program. You can just go ahead with the default settings. However, you
may use this configuration step to check if the settings are correct.
Use the menu path: SAP Customizing Implementation Guide > Financial Accounting >
Accounts Receivable and Accounts Payable > Business Transactions > Outgoing Payments >
Automatic Outgoing Payments > Automatic Posting > Prepare Automatic Postings for
Payment Program. You may also use Transaction OBXC.
On the resulting screen, you will see three procedures namely, ZBA (Payment program: bank
posting), ZWE (Payt program: bill exch/bill payt reqst) and ZWO (Payt program: bank bill
liability) under the payment program group ZAH. You may double-click on any of the
procedures to check the associated settings (Figure 6.43).
Figure 6.43 Automatic Posting Settings for Payment Program
In the next step, let us define the posting keys and special G/L indicator for automatic posting
of payment requests.
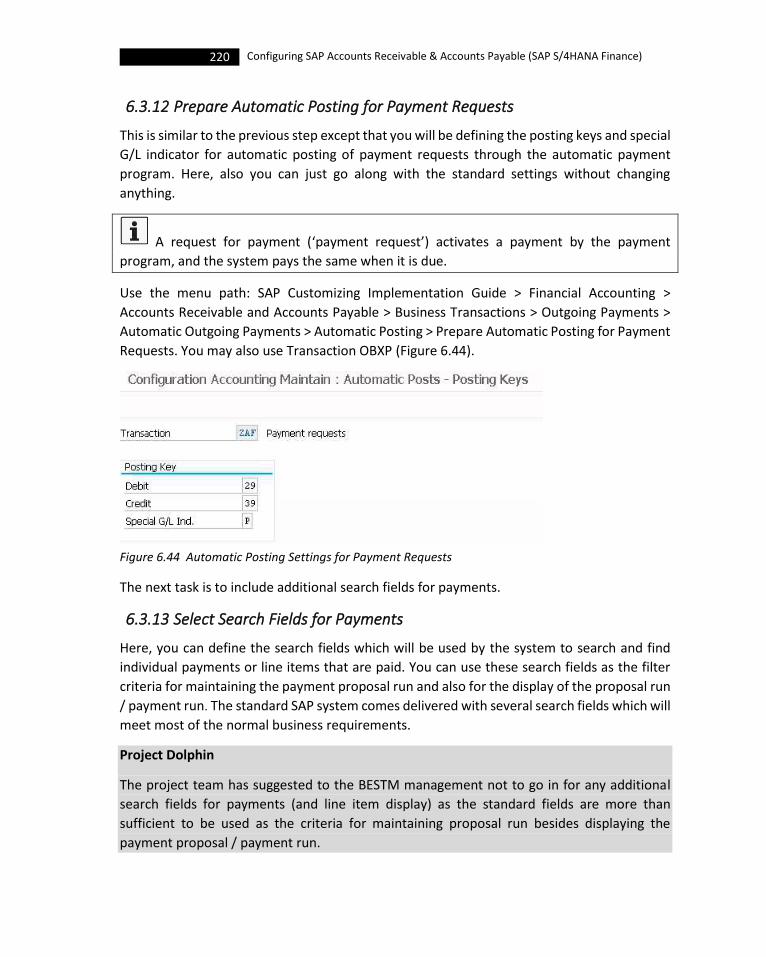
220 Configuring SAP Accounts Receivable & Accounts Payable (SAP S/4HANA Finance)
6.3.12 Prepare Automatic Posting for Payment Requests
This is similar to the previous step except that you will be defining the posting keys and special
G/L indicator for automatic posting of payment requests through the automatic payment
program. Here, also you can just go along with the standard settings without changing
anything.
A request for payment (‘payment request’) activates a payment by the payment
program, and the system pays the same when it is due.
Use the menu path: SAP Customizing Implementation Guide > Financial Accounting >
Accounts Receivable and Accounts Payable > Business Transactions > Outgoing Payments >
Automatic Outgoing Payments > Automatic Posting > Prepare Automatic Posting for Payment
Requests. You may also use Transaction OBXP (Figure 6.44).
Figure 6.44 Automatic Posting Settings for Payment Requests
The next task is to include additional search fields for payments.
6.3.13 Select Search Fields for Payments
Here, you can define the search fields which will be used by the system to search and find
individual payments or line items that are paid. You can use these search fields as the filter
criteria for maintaining the payment proposal run and also for the display of the proposal run
/ payment run. The standard SAP system comes delivered with several search fields which will
meet most of the normal business requirements.
Project Dolphin
The project team has suggested to the BESTM management not to go in for any additional
search fields for payments (and line item display) as the standard fields are more than
sufficient to be used as the criteria for maintaining proposal run besides displaying the
payment proposal / payment run.

221 Outgoing Payments
You may use the menu path: SAP Customizing Implementation Guide > Financial Accounting
> Accounts Receivable and Accounts Payable > Business Transactions > Outgoing Payments >
Automatic Outgoing Payments > Payment Run Display > Select Search Fields for Payments.
You may also use Transaction O7FC. On the resulting screen, you may retain all or delete some
or rearrange the order of appearance (Figure 6.45). If you want to add a new field, use the
‘Insert after’ button after positioning the cursor suitably, and select the fields by clicking on,
for example, ‘Standard Fields’ on the resulting pop-up screen.
Figure 6.45 Standard Search Fields for Payments in Payment Run
The next step is to look at the standard settings of search fields for line item display in
automatic payment program execution.
6.3.14 Select Search Fields for Line Item Display
This is similar to the previous activity except that the system uses the search fields for
displaying the line items paid. As in the case of search fields for payments, you can use these
search fields, as the filtering criteria, for maintaining the proposal run besides using them for
the display of proposal run or payment run.
You may use the menu path: SAP Customizing Implementation Guide > Financial Accounting
> Accounts Receivable and Accounts Payable > Business Transactions > Outgoing Payments >
Automatic Outgoing Payments > Payment Run Display > Select Search Fields for Line Item
Display. You may also use Transaction O7FE. On the resulting screen, you may retain all or
delete some or rearrange the order of appearance (Figure 6.46). If you want to add a new
field, use the ‘Insert after’ button after positioning the cursor suitably, and select the fields by
clicking on, for example, ‘Standard Fields’ on the resulting pop-up screen.

222 Configuring SAP Accounts Receivable & Accounts Payable (SAP S/4HANA Finance)
Figure 6.46 Standard Search Fields for Line Item Display in Payment Run
This completes our discussion on automatic outgoing payments, and also the discussion on
outgoing payments.
6.4 Conclusion
You learned the details about the global settings that are required for outgoing payments; during which you understood defining of various accounts for handling discount taken, overpayments / underpayments, exchange rate differences, rounding differences, translation settings, payment block reasons and so on.
You also learned about the settings required for both manual and automatic payments.
While discussing manual outgoing payments, you learned about the tolerances including
vendor tolerances, reason codes and also on how to prepare the system for handling cross-
company code manual payments. You learned that you need to define a ‘tolerance’ in the
system for dealing with the payment differences arising out of transaction posting in FI. By
defining a tolerance, you understood that you are instructing the system as to how to proceed
further: (a) what are the amounts or percentage rates up to which the system is to
automatically post to a separate expense or revenue account, if it is not possible to correct
the cash discount or (b) up to what difference amounts the system is to correct the cash
discount.
In configuring the automatic payment program, which can handle both incoming and
outgoing payments, you saw how to set up: the house banks, all / payment company codes
for payment transactions, the different payment methods etc. You understood that the bank
that you will use for making payments is known as the ‘house bank’, in SAP. You also
understood that you can have more than one house bank in a company code, and that you
need to enter a house bank in the master record of customer / vendor for the payment
program to use that bank. You learned that if you are not maintaining the house bank in
223 Outgoing Payments
customer / vendor master record, then, you have to maintain a rule by which the payment
program can determine the house bank automatically.
You understood how the system determines a suitable bank for a given payment transactions, besides understanding the value date rules, payment groupings, automatic payment posting etc. You did understand how the automatic payment program works from selecting the open item payables, to selecting the appropriate payment method, house bank, account and finally making and posting the payments, besides creating the payment media for electronic data transfer.
With this, we are now ready to discuss outgoing invoices / credit memos, in the next Chapter.

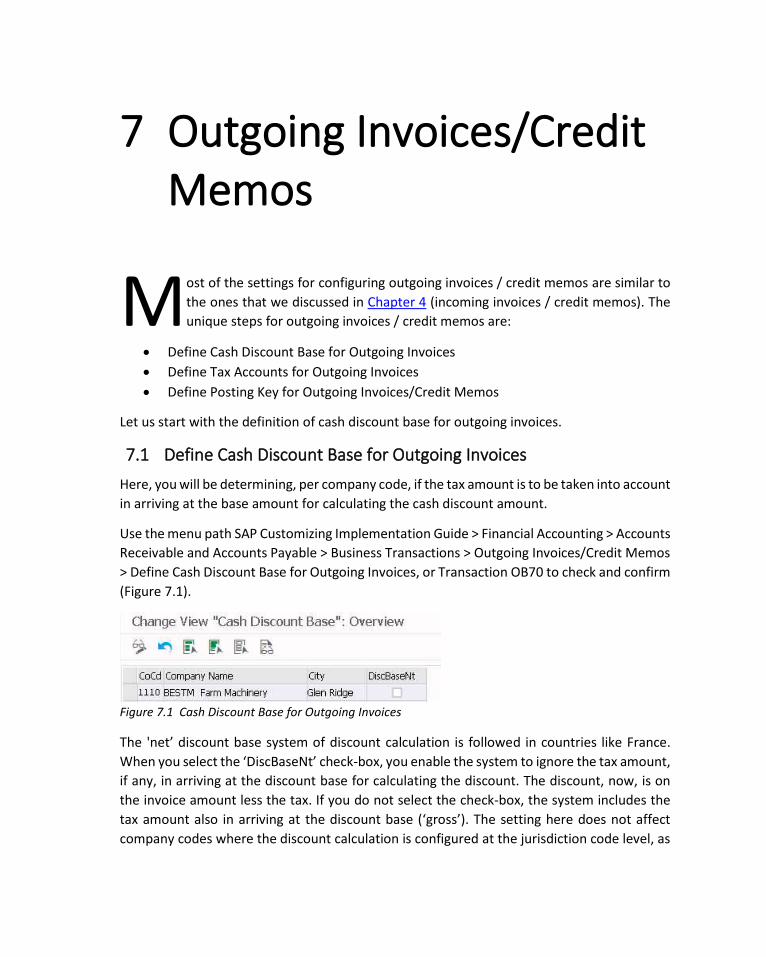
7 Outgoing Invoices/Credit Memos
ost of the settings for configuring outgoing invoices / credit memos are similar to
the ones that we discussed in Chapter 4 (incoming invoices / credit memos). The
unique steps for outgoing invoices / credit memos are:
• Define Cash Discount Base for Outgoing Invoices
• Define Tax Accounts for Outgoing Invoices
• Define Posting Key for Outgoing Invoices/Credit Memos
Let us start with the definition of cash discount base for outgoing invoices.
7.1 Define Cash Discount Base for Outgoing Invoices
Here, you will be determining, per company code, if the tax amount is to be taken into account
in arriving at the base amount for calculating the cash discount amount.
Use the menu path SAP Customizing Implementation Guide > Financial Accounting > Accounts
Receivable and Accounts Payable > Business Transactions > Outgoing Invoices/Credit Memos
> Define Cash Discount Base for Outgoing Invoices, or Transaction OB70 to check and confirm
(Figure 7.1).
Figure 7.1 Cash Discount Base for Outgoing Invoices
The 'net’ discount base system of discount calculation is followed in countries like France.
When you select the ‘DiscBaseNt’ check-box, you enable the system to ignore the tax amount,
if any, in arriving at the discount base for calculating the discount. The discount, now, is on
the invoice amount less the tax. If you do not select the check-box, the system includes the
tax amount also in arriving at the discount base (‘gross’). The setting here does not affect
company codes where the discount calculation is configured at the jurisdiction code level, as
M

226 Configuring SAP Accounts Receivable & Accounts Payable (SAP S/4HANA Finance)
in US-based company codes including 1110. Hence, leave this as blank; but select the same
for India-based company codes.
When the cash discount base is 'net', note that SAP does not take into account the freight
and setup charges also. On the other hand, these charges along with the input tax, are all
considered while arriving at the discount base, when the cash discount base is 'gross'. If the
tax base is 'net', the discount base also needs to be 'net'.
You can also configure this while maintaining the company code global parameters
(Transaction OBY6); there, you will need to select / deselect the ‘Discount base is net value’
check-box. Next, let us define the tax accounts for outgoing invoices.
7.2 Define Tax Accounts for Outgoing Invoices
Using this configuration step, you can define to which G/L accounts the system should post
the different tax types to, in automatic postings.
Use the menu path SAP Customizing Implementation Guide > Financial Accounting > Accounts
Receivable and Accounts Payable > Business Transactions > Outgoing Invoices/Credit Memos
> Define Tax Accounts for Outgoing Invoices, or Transaction OB40:
i. On the resulting screen, you will see the list of procedures like input tax (109), output
tax (190) etc., which have already been configured for the automatic posting. You just
need to maintain the G/L accounts for the required transactions like 109, 190 etc.
ii. Select a transaction / procedure, and double-click on the same to reach the posting
rules screen. Click on ‘Posting Key’ and define the keys (debit 40, credit 50) if that has
not been defined earlier. ‘Save’ and click on ‘Accounts’ and enter the G/L account in
‘Account Assignment’ (Figure 7.2).
iii. Repeat maintaining the posting key settings and G/L account entry for the other
procedures as well.
Figure 7.2 Tax Accounts for Outgoing Payments
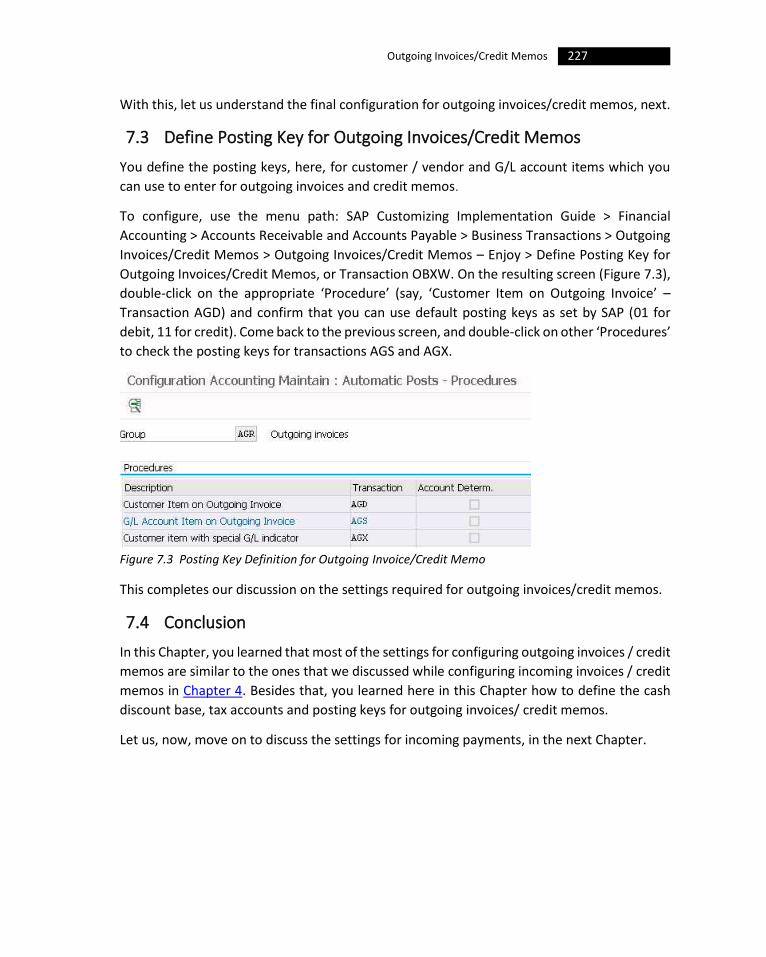
227 Outgoing Invoices/Credit Memos
With this, let us understand the final configuration for outgoing invoices/credit memos, next.
7.3 Define Posting Key for Outgoing Invoices/Credit Memos
You define the posting keys, here, for customer / vendor and G/L account items which you
can use to enter for outgoing invoices and credit memos.
To configure, use the menu path: SAP Customizing Implementation Guide > Financial
Accounting > Accounts Receivable and Accounts Payable > Business Transactions > Outgoing
Invoices/Credit Memos > Outgoing Invoices/Credit Memos – Enjoy > Define Posting Key for
Outgoing Invoices/Credit Memos, or Transaction OBXW. On the resulting screen (Figure 7.3),
double-click on the appropriate ‘Procedure’ (say, ‘Customer Item on Outgoing Invoice’ –
Transaction AGD) and confirm that you can use default posting keys as set by SAP (01 for
debit, 11 for credit). Come back to the previous screen, and double-click on other ‘Procedures’
to check the posting keys for transactions AGS and AGX.
Figure 7.3 Posting Key Definition for Outgoing Invoice/Credit Memo
This completes our discussion on the settings required for outgoing invoices/credit memos.
7.4 Conclusion
In this Chapter, you learned that most of the settings for configuring outgoing invoices / credit
memos are similar to the ones that we discussed while configuring incoming invoices / credit
memos in Chapter 4. Besides that, you learned here in this Chapter how to define the cash
discount base, tax accounts and posting keys for outgoing invoices/ credit memos.
Let us, now, move on to discuss the settings for incoming payments, in the next Chapter.


8 Incoming Payments
s in the case of outgoing payments that we discussed in Chapter 6, you can group the
configuration settings for incoming payments into the following three categories:
1. Incoming Payment Global Settings
2. Manual Incoming Payments
3. Automatic Incoming Payments
Let us start with the global settings for incoming payments.
8.1 Incoming Payment Global Settings
We have already discussed most of the settings like defining (a) accounts for
overpayments/underpayments, (b) accounts for exchange rate differences, (c) accounts for
rounding differences and (d) accounts for bank charges, (e) posting keys for clearing
transactions, (f) the settings for enabling translation, (g) payment block reasons and (h) the
default values for payment while discussing the global settings for outgoing payments in
Section 6.1 of Chapter 6. Hence, we are not repeating them here again. However, we shall
define the accounts that are required for posting the cash discount granted.
8.1.1 Define Accounts for Cash Discount Granted
Define the G/L account number(s) for posting the cash discount amount granted when
clearing open items. If necessary, as in the case of cash discount taken (in incoming payments)
you may differentiate the G/L accounts by tax codes.
To configure, use the menu path: SAP Customizing Implementation Guide > Financial
Accounting > Accounts Receivable and Accounts Payable > Business Transactions > Incoming
Payments > Incoming Payments Global Settings > Define Accounts for Cash Discount Granted,
or Transaction OBX1. On the resulting pop-up, enter the chart of accounts (BEUS, for BESTM)
and on the next screen enter the G/L account for the system to post the cash discount
expenses (Figure 8.1).
A

230 Configuring SAP Accounts Receivable & Accounts Payable (SAP S/4HANA Finance)
Figure 8.1 G/L Account for Posting Cash Discount Taken
With this, let us move on to understand the configuration requirements for manual incoming
payments.
8.2 Manual Incoming Payments
Here also, the configuration settings are similar to the ones that we have already discussed in
Section 6.2 of Chapter 6, for manual outgoing payments. The settings include defining &
assigning tolerance groups, settings to take care of clearing differences and preparing for
cross-company code transactions. As regards ‘Defining Tolerance Groups for Employees), we
have already completed this in Section 6.2.1.1 of Chapter 6.
Let us move on to discuss the automatic incoming payments, next.
8.3 Automatic Incoming Payments
We have already covered automatic incoming payments while we configured the automatic
outgoing payments in Section 6.3 of Chapter 6.
With this, let us move on to discuss how to manage SEPA mandates in the system.
8.4 Management of SEPA Mandates
SEPA (Single Euro Payments Area) is an initiative by the EU (European Union). It is to make
the cross-border electronic payments as inexpensive and easy like a local payment within a
country. All the customers, businesses, and the government in the EU can undertake SEPA
payments in the form of instant debit / credit by leveraging the SEPA architecture. The SEPA
payments are free and is expected to help international business in the EU. There are about
40 member countries including the 28 EU member states and others like Liechtenstein,
Iceland, Norway, Switzerland, Vatican City, Monaco, San Marino and Andorra.
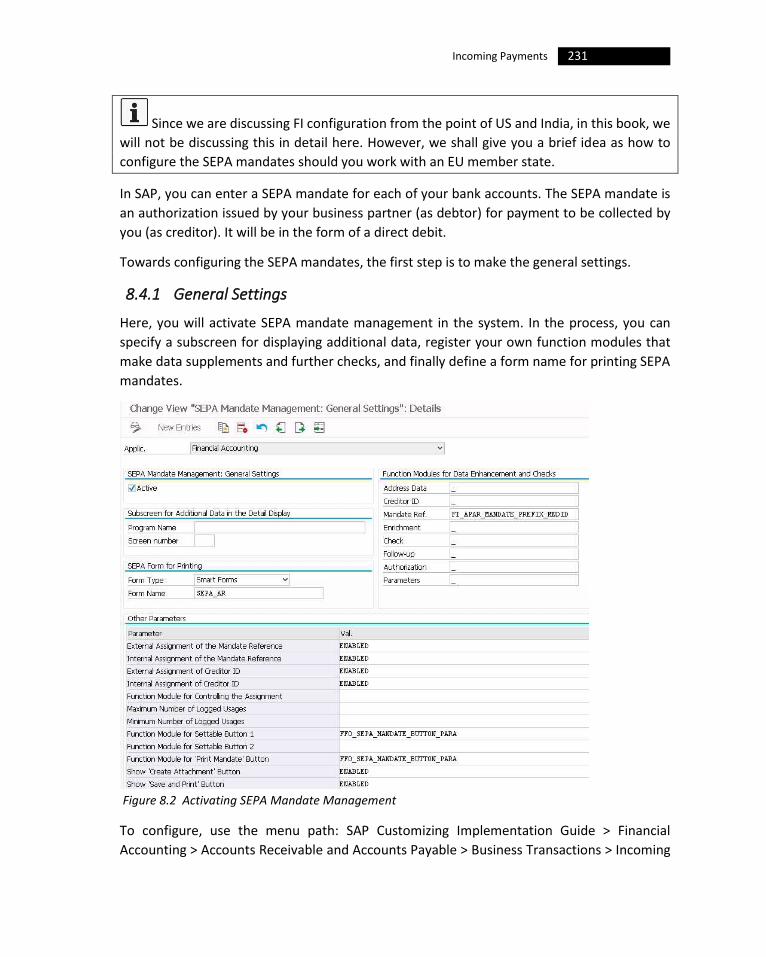
231 Incoming Payments
Since we are discussing FI configuration from the point of US and India, in this book, we
will not be discussing this in detail here. However, we shall give you a brief idea as how to
configure the SEPA mandates should you work with an EU member state.
In SAP, you can enter a SEPA mandate for each of your bank accounts. The SEPA mandate is
an authorization issued by your business partner (as debtor) for payment to be collected by
you (as creditor). It will be in the form of a direct debit.
Towards configuring the SEPA mandates, the first step is to make the general settings.
8.4.1 General Settings
Here, you will activate SEPA mandate management in the system. In the process, you can
specify a subscreen for displaying additional data, register your own function modules that
make data supplements and further checks, and finally define a form name for printing SEPA
mandates.
Figure 8.2 Activating SEPA Mandate Management
To configure, use the menu path: SAP Customizing Implementation Guide > Financial
Accounting > Accounts Receivable and Accounts Payable > Business Transactions > Incoming

232 Configuring SAP Accounts Receivable & Accounts Payable (SAP S/4HANA Finance)
Payments > Management of SEPA Mandates > General Settings, or Transaction
FI_APAR_SEPA_CUST. On the resulting screen, click on ‘New Entries’ and:
• Select the appropriate application (‘Applic.’).
• Activate SEPA Mandate Management.
• Add, your own program/screen details for displaying additional data, if any.
• Select the ‘Form Type’ and enter the ‘Form Name’ for printing SEPA form.
When ‘Saved’, the system brings up the appropriate functional modules for data
enhancement and checks besides filling in the ‘Other Parameters’ (Figure 8.2).
The next task is to define the available function modules for generating SEPA mandate IDs.
8.4.2 Define Available Function Modules for Generating Mandate IDs
Use the menu path: SAP Customizing Implementation Guide > Financial Accounting >
Accounts Receivable and Accounts Payable > Business Transactions > Incoming Payments >
Management of SEPA Mandates > Number Ranges for Mandates > Define Available Function
Modules for Generating Mandate IDs, or Transaction SEPA_MND_FM_MT. You can use the
standard settings, or you may enter your own function modules, if necessary, on the next
screen (Figure 8.3).
Figure 8.3 Function Module Configuration for Generating SEPA Mandate ID
The next step is to select the appropriate function module to generate the SEPA mandate ID.
8.4.3 Select Function Module for Generating Mandate IDs
You can select the appropriate function module to generate the SEPA mandate IDs with or
without the paying company code as the prefix. You can use either of the SAP-delivered
standard function modules: FI_APAR_MANDATE_PREFIX_MNDID (to generate mandate IDs
with the paying company code as the prefix) or FI_APAR_MANDATE_WOPREFIX_MNDID (to
generate mandate IDs without a prefix).
From the function modules made available in the previous task, you can select the
appropriate one in this step, by using the menu path: SAP Customizing Implementation Guide
> Financial Accounting > Accounts Receivable and Accounts Payable > Business Transactions

233 Incoming Payments
> Incoming Payments > Management of SEPA Mandates > Number Ranges for Mandates >
Select Function Module for Generating Mandate IDs, or Transaction SEPA_MND_FM_CUST.
On the resulting screen, click on ‘New Entries’ and select the appropriate function module on
the next screen, and ‘Save’ the details (Figure 8.4).
Figure 8.4 Selecting the Function for Generating SEPA Mandate ID
The next step is to define the number ranges for SEPA mandates.
8.4.4 Define Number Range Intervals
As in any other case of defining a number range for a company code, define the required
number range intervals for SEPA mandates for all the paying company codes.
Use the menu path SAP Customizing Implementation Guide > Financial Accounting > Accounts
Receivable and Accounts Payable > Business Transactions > Incoming Payments >
Management of SEPA Mandates > Number Ranges for Mandates > Define Number Range
Intervals, or Transaction SEPA_NR_MT. On the resulting screen, enter the (paying) ‘Company
Code’, click on ‘Change Intervals’ and maintain the required number range(s) on the next
screen under suitable number range key(s) (Figure 8.5).
Figure 8.5 Number Ranges for SEPA Mandate
Let us, now, assign the number range that we have defined in the previous Section to SEPA
mandates.
8.4.5 Assign Number Range Intervals
Here, you need to assign the number range interval for each combination of (‘Account Group
- ‘B2B’ Boolean-Payment Type’). The B2B Boolean decides if the mandate is for business to
business or otherwise. The ’Payment Type’ will identify if it is for a single usage or recurring
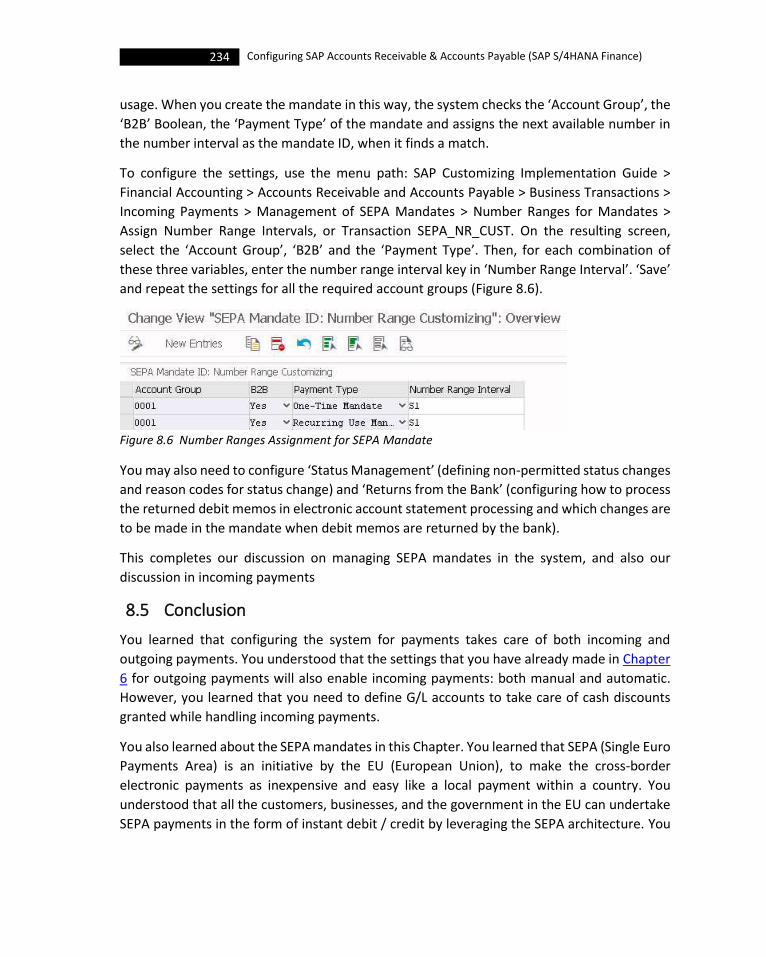
234 Configuring SAP Accounts Receivable & Accounts Payable (SAP S/4HANA Finance)
usage. When you create the mandate in this way, the system checks the ‘Account Group’, the
‘B2B’ Boolean, the ‘Payment Type’ of the mandate and assigns the next available number in
the number interval as the mandate ID, when it finds a match.
To configure the settings, use the menu path: SAP Customizing Implementation Guide >
Financial Accounting > Accounts Receivable and Accounts Payable > Business Transactions >
Incoming Payments > Management of SEPA Mandates > Number Ranges for Mandates >
Assign Number Range Intervals, or Transaction SEPA_NR_CUST. On the resulting screen,
select the ‘Account Group’, ‘B2B’ and the ‘Payment Type’. Then, for each combination of
these three variables, enter the number range interval key in ‘Number Range Interval’. ‘Save’
and repeat the settings for all the required account groups (Figure 8.6).
Figure 8.6 Number Ranges Assignment for SEPA Mandate
You may also need to configure ‘Status Management’ (defining non-permitted status changes
and reason codes for status change) and ‘Returns from the Bank’ (configuring how to process
the returned debit memos in electronic account statement processing and which changes are
to be made in the mandate when debit memos are returned by the bank).
This completes our discussion on managing SEPA mandates in the system, and also our
discussion in incoming payments
8.5 Conclusion
You learned that configuring the system for payments takes care of both incoming and
outgoing payments. You understood that the settings that you have already made in Chapter
6 for outgoing payments will also enable incoming payments: both manual and automatic.
However, you learned that you need to define G/L accounts to take care of cash discounts
granted while handling incoming payments.
You also learned about the SEPA mandates in this Chapter. You learned that SEPA (Single Euro
Payments Area) is an initiative by the EU (European Union), to make the cross-border
electronic payments as inexpensive and easy like a local payment within a country. You
understood that all the customers, businesses, and the government in the EU can undertake
SEPA payments in the form of instant debit / credit by leveraging the SEPA architecture. You
235 Incoming Payments
also understood that the SEPA payments are free and is expected to help international
business in the EU.
You learned that you need to first activate SEPA mandate management in the system and in
the process, you can specify a subscreen for displaying additional data, register your own
function modules that make data supplements and further checks, and finally define a form
name for printing SEPA mandates.
Let us move on to discuss the payments with payment cards, in the next Chapter.


9 Payments with Payment Cards
ou can use ‘Payment Cards’ - credit card, debit card, charge card, deferred charge card
etc - as a form of payment that offers your vendors with an almost-risk-free payment
guarantee, as the payment includes an authorization from the card issuing bank (or
financial organization) during payment transaction processing
SAP offers you with a wide range of functions both in SD and FI modules, for payment with
payment cards. It provides you with all the basic tools that you may need to handle payment
cards in different of business processes.
On the SD side, you configure the payment card types, payment card categories, payment
card plan types, authorization & settlement of payment cards, account determination for
payments through payment cards and so on. You can configure all these and much more
following the menu path: SAP Customizing Implementation Guide > Sales and Distribution >
Billing > Payment Cards.
On the FI side, you will need to configure only two settings:
1. Make Central Settings for Payment Cards
2. Assign G/L Account to Cash Clearing Account
Let us look at these two settings, here, in this Section, and let us start with the central settings
for payment cards.
9.1 Make Central Settings for Payment Cards
Here, in this configuration step, you can decide whether to retain the customer line items in
the accounting document when transferring data from SD component to FI. The advantage of
going in for this is that you can re-create the receivables against a customer automatically
(that is, the cleared items are reset) without the need for creating them again by a new
posting. You can, then, process these customer items in the dunning / payment program. You
can also specify the type of settlement document (that clears the G/L open items and creates
line items in a cash clearing account) when the settlement is made by the payment card
Y

238 Configuring SAP Accounts Receivable & Accounts Payable (SAP S/4HANA Finance)
company. Additionally, you can specify the document type for resetting cleared items when
the card company cannot make a settlement.
Project Dolphin
BESTM wants to configure the system to take care of payment through payment cards as well.
In the process, it has been outlined, that the system needs to be configured in such way to
retain the customer line items in FI department during transfer of payment card data from SD
department. This decision has been taken, consciously, after several deliberations knowing
fully well that this will call for more database space; BESTM is ok with this, as the configuration
will provide (a) the advantage of displaying the receivables on the debit side and (b) the ability
to the department personnel to deal with any settlement problems of the payment cards.
You configure the settings by following the menu path: SAP Customizing Implementation
Guide > Financial Accounting > Accounts Receivable and Accounts Payable > Business
Transactions > Payments with Payment Cards > Make Central Settings for Payment Cards. You
may also use Transaction OBZH.
On the resulting screen (Figure 9.1):
Figure 9.1 Central FI Settings for Payment Cards
i. Select the ‘Retain Cut. Item’ check-box under ‘Settings for forwarding documents to
FI’ to retain the customer line item details on FI side while transferring the data from

239 Payments with Payment Cards
SD. The system, then, clears the customer item as soon as the document is posted,
creates a corresponding identical cleared payment item, and also creates an open
‘account receivables from payment card transactions’ item. Because of this, a simple
document with two line items (customer/revenue) now becomes four line items
(customer/customer/payment card receivable/revenue). If you do not select the
check-box, then, the system replaces the customer line item with a receivable from
payment card transactions in the corresponding SAP G/L account.
Even though you would require more database space when you set the ‘Retain
Cut. Item’ indicator, as the system creates additional line items, the advantage is that
you will be able to display receivables on the debit side, besides the ability to deal
with any settlement problems easily.
ii. Enter an appropriate ‘Document Type’ for the settlement document and also for
handling resetting clearing when the settlement is unsuccessful. Also, enter an
appropriate ‘Reversal Reason’ (for example, B4-payment card settlement failed)
under ‘Settings for resetting clearing when settlement unsuccessful’. The system
defaults to this ‘Document Type’ (entered her in ‘Settings for the settlement
document’) on the initial screen of the settlement program RFCCSSTT in the ‘Journal
Entry Type’ field under ‘Data for Clearing Entry’ block (Transaction FCC1); you can, of
course, over-write the same.
iii. You may enter a ‘Text ID and ‘MAIL Text’ for using the standard texts as settlement
responses. If you do no enter a text module here, in the ‘MAIL Text’ field, then, this
message is only for statistical purposes.
iv. Set the ‘Define Index’ indicator to enable the system to enter the number of the
settlement run in the (already cleared) customer line item. Then, it becomes possible
for you to display all customer line items of a specific settlement run, for more than
one account, when carrying out the evaluations.
The next step is to assign a G/L account to cash clearing account.
9.2 Assign G/L Account to Cash Clearing Account
Assign the G/L account that the system will use to record the open items, per card type, to a
cash clearing account. That is, you will use this G/L account to record all the receivables that
you report to the credit card company using a settlement program; the settlement program,
then, posts these reported open items against the cash clearing account and clears them.
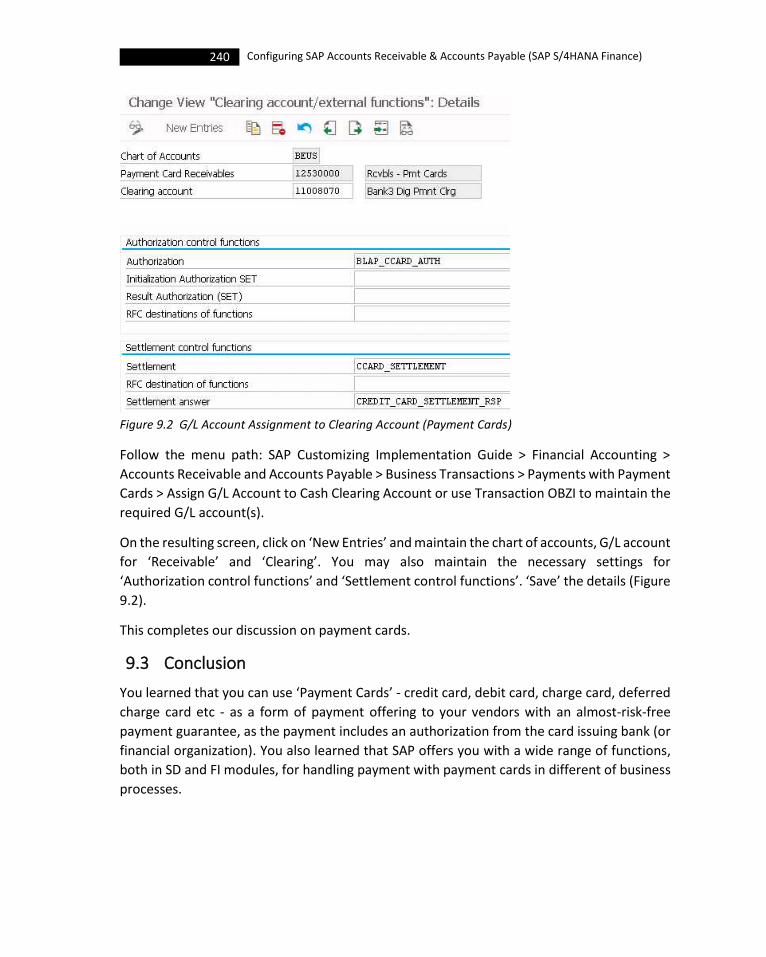
240 Configuring SAP Accounts Receivable & Accounts Payable (SAP S/4HANA Finance)
Figure 9.2 G/L Account Assignment to Clearing Account (Payment Cards)
Follow the menu path: SAP Customizing Implementation Guide > Financial Accounting >
Accounts Receivable and Accounts Payable > Business Transactions > Payments with Payment
Cards > Assign G/L Account to Cash Clearing Account or use Transaction OBZI to maintain the
required G/L account(s).
On the resulting screen, click on ‘New Entries’ and maintain the chart of accounts, G/L account
for ‘Receivable’ and ‘Clearing’. You may also maintain the necessary settings for
‘Authorization control functions’ and ‘Settlement control functions’. ‘Save’ the details (Figure
9.2).
This completes our discussion on payment cards.
9.3 Conclusion
You learned that you can use ‘Payment Cards’ - credit card, debit card, charge card, deferred
charge card etc - as a form of payment offering to your vendors with an almost-risk-free
payment guarantee, as the payment includes an authorization from the card issuing bank (or
financial organization). You also learned that SAP offers you with a wide range of functions,
both in SD and FI modules, for handling payment with payment cards in different of business
processes.
241 Payments with Payment Cards
You learned about configuring the system, on the FI side, for payments with payment cards.
In that, you learned that you can decide whether to retain or not the customer line items in
the accounting document when transferring data from SD component to FI. You understood
that the advantage of retaining the customer line items in the accounting document (when
transferring data from SD component), is that you can re-create the receivables against a
customer automatically, without the need for creating them again, by a new posting. You
understood that you can, then, process these customer items in the dunning / payment
program.
Let us move on to discuss dunning, in the next Chapter.

10 Dunning
he word ‘Dun’ means that you make a (persistent) demand for a payment of an
outstanding debt. ‘Dunning’, in SAP, is the process of reminding your business partners
(who are falling behind the payments) to pay the outstanding payment. It is, essentially,
sending a notice of reminder (‘dunning notice’). Using the dunning program, you can
automatically dun your business partners. The program selects the overdue open items of an
account, ascertains the ‘dunning level’ of the account and creates a dunning notice using the
pre-defined dunning notice format and text, and finally saves the dunning data so determined
for the line items / account which will be looked upon during the next dunning.
Normally, you use the program to dun your customers; but, you can also dun your vendors, if
the vendor has a debit balance (arising from a credit memo). You can enable the program to
offset between credit and debit balances and raise the dunning notice for the balance, when
your customer is also a vendor. You can use the program do dun all the customers / vendors
or only a select few. Again, you can dun the customers across several company codes (‘cross-
company code dunning’), in a single dunning run. If you have your business partners with head
office / branch organization structure, you can configure the dunning program to dun, for
example, the head office but send dunning notice to the branch office(s). The dunning
program uses the currency (local or foreign) in which you have posted all the open items in
an account. If the open items of an account are not posted in the same currency, then, the
dunning program uses the local currency of the company code; it displays the items in
document currency in the dunning notice, but shows the totals in local and foreign currency.
It is possible that you can dun a ‘one-time’ account as well, like any other account. While
dunning the one-time accounts, the system groups all the items of a one-time account having
the same address into a single dunning notice. Even though the program enters the dunning
date and dunning level in both the account master record and in the line item of the one-time
account, the system determines the dunning interval solely by what is entered in the line item
notwithstanding the entry in the master record.
You can use the dunning history to understand all of the dunning runs that you have executed
and the dunning notices that you have sent. You can view the details by account type,
company code, and/or customer or vendor.
You can use the following attributes to control the dunning process in the system:
T
244 Configuring SAP Accounts Receivable & Accounts Payable (SAP S/4HANA Finance)
• Dunning Procedure: You use the dunning procedure to control how the system carries
out dunning. You can define more than one dunning procedure. You may connect the
dunning procedure to a customer / vendor master or to a dunning area. The control
parameters of a dunning program include dunning frequency, dunning levels,
minimum dunning amounts (overdue threshold), dunning charges, dunning text etc.
• Dunning Level: The system calculates the dunning level based on the number of days
an open item is in arrears. Alternatively, you can have the system to calculate the
dunning levels based on the dunning amount or percentage paid. It is possible that
you can determine more than one dunning level per dunning procedure.
• Dunning Area: A ‘dunning area’ is an organizational unit (for example, a division or
sales organization etc) within a company code that you can use, as the responsibility
area, for dunning. Once defined, you may assign a dunning area to an open item. With
dunning areas defined, you can dun open items separately per dunning area.
However, it is optional to define a dunning area.
The dunning process is made up of several sub-processes like (1) creating the dunning
proposal, (2) editing the dunning proposal and (3) printing the dunning notices, which you
need to need to carry out the in the proper order:
1) Creating Dunning Proposal: When you start the dunning program, you will enter the
parameters for the dunning run: the dunning date, the date up to which the program
should select the posted documents, the company code(s) and also the optional
account restrictions to select the required account(s). Now, during the dunning run,
the dunning program determines the (a) accounts and items that must be dunned,
(b) dunning level, and (c) other details required for dunning. With these details, the
dunning program creates a dunning proposal (list).
You can create the dunning proposal list as often as you require. The system
does not update the dunning data for the item / account until the dunning notices
are actually printed.
2) Editing Dunning Proposal: While editing a dunning proposal, you essentially carry out
activities like setting / resetting the dunning blocks, and changing the dunning levels.
You can manually increase or decrease the dunning level of an item or account in the
proposal. You can block an item / account from dunning. Similarly, you can unblock
an item / account so that it will be included in the dunning proposal. As all the changes
are logged, you can look at the log and confirm that the changes are taken into
account before accepting the proposal. If not, you can go ahead and still edit. It is also
possible that you can view the sample print out of the dunning notices, on the screen,
to see and understand how the notices will look like when actually printed.

245 Dunning
While editing a dunning proposal, though you can lower the dunning level by
any number of levels (for example, from level 4 to 2 or 1), you can only raise by one
level, at a time, to its next higher level (for example, you can raise the level from 2 to
3 but not from 2 to 4). You will, normally, undertake lowering / raising the dunning
level only when you unblock an item / account in the dunning proposal.
3) Printing Dunning Notices: Once you complete the editing of dunning proposal, and
execute the program, (a) the print program prints the dunning notices and (b) the
dunning program stores the relevant dunning data (like dunning level, dunning date
etc) in the line items and in the master record of the customer / vendor. While
printing the dunning notices, the system uses the pre-defined dunning formats
together with the appropriate dunning texts, for that dunning level of that dunning
procedure. You will be able to restart printing, if there is an interruption.
With this understanding of dunning in SAP, let us move on to configure the required settings of BESTM. SAP has grouped these settings into three categories:
1. Basic Settings for Dunning 2. Dunning Procedure 3. Printout
Let us start with the basic settings for dunning.
10.1 Basic Settings for Dunning
The basic settings are the global settings for dunning in the system. They include:
• Define Dunning Areas
• Define Dunning Keys
• Define Dunning Block Reasons
• Define Dunning Forms
Let us discuss the dunning areas, first.
10.1.1 Define Dunning Areas
As already pointed out, defining a ‘dunning area’ is optional. You will use dunning areas if
there are different organizational units (distribution channel or business area or sales
organization, for example) that are responsible for carrying out dunning within the company
code. If you want to use dunning area, then, you can use the same or different dunning
procedures for these areas.
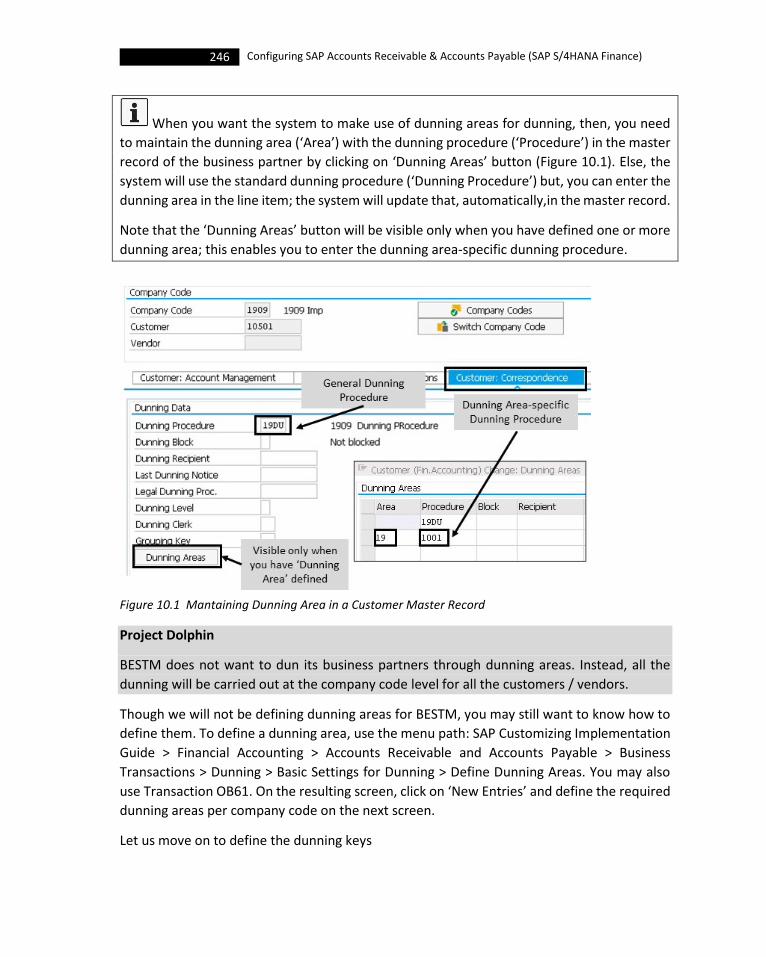
246 Configuring SAP Accounts Receivable & Accounts Payable (SAP S/4HANA Finance)
When you want the system to make use of dunning areas for dunning, then, you need
to maintain the dunning area (‘Area’) with the dunning procedure (‘Procedure’) in the master
record of the business partner by clicking on ‘Dunning Areas’ button (Figure 10.1). Else, the
system will use the standard dunning procedure (‘Dunning Procedure’) but, you can enter the
dunning area in the line item; the system will update that, automatically,in the master record.
Note that the ‘Dunning Areas’ button will be visible only when you have defined one or more
dunning area; this enables you to enter the dunning area-specific dunning procedure.
Figure 10.1 Mantaining Dunning Area in a Customer Master Record
Project Dolphin
BESTM does not want to dun its business partners through dunning areas. Instead, all the
dunning will be carried out at the company code level for all the customers / vendors.
Though we will not be defining dunning areas for BESTM, you may still want to know how to
define them. To define a dunning area, use the menu path: SAP Customizing Implementation
Guide > Financial Accounting > Accounts Receivable and Accounts Payable > Business
Transactions > Dunning > Basic Settings for Dunning > Define Dunning Areas. You may also
use Transaction OB61. On the resulting screen, click on ‘New Entries’ and define the required
dunning areas per company code on the next screen.
Let us move on to define the dunning keys

247 Dunning
10.1.2 Define Dunning Keys
The ‘dunning keys’, which are company code independent, enable you to limit the dunning
level for an item. While configuring a dunning key, you can, also, decide if some of the items
with a specific dunning key are to be displayed separately in the dunning notice.
Consider an example that you have an incoming payment and when posting you made
a residual item to carryforward, as the payment resulted in a payment difference. Now, as
you want to display this residual item in a separate section in the dunning notice, you can
accomplish this by defining a separate dunning key. You can also print the text for the dunning
key in the dunning notice.
Project Dolphin
BESTM wants to have five dunning keys defined. The first three keys should be used to initiate
the respective dunning levels, 1, 2 and 3. The 4th dunning key will be for denoting the
payments made with a separate line item display. The 5th key will be used for denoting
residual items arising out of payment differences and will also be displayed separately.
To configure the dunning keys:
i. Use the menu path: SAP Customizing Implementation Guide > Financial Accounting >
Accounts Receivable and Accounts Payable > Business Transactions > Dunning > Basic
Settings for Dunning > Define Dunning Keys, or Transaction OB17.
ii. On the resulting screen (Figure 10.2), click on ‘New Entries’ and define the required
dunning keys (‘Dunn.Key’) and provide a description in ‘Text’ field.
iii. Select ‘Print sep’ check-box to display the items separately on the dunning notice.
iv. Per dunning key, you also need to enter the maximum dunning level (‘Max. Level’)
that will be triggered for that key.
Figure 10.2 Defining Dunning Key
With this, we can now move on to discuss the last step in dunning basic settings: defining the
dunning block reasons.

248 Configuring SAP Accounts Receivable & Accounts Payable (SAP S/4HANA Finance)
10.1.3 Define Dunning Block Reasons
The ‘dunning blocks’ or ‘dunning block reasons’ help you to prevent an account or an item
from being dunned. You will define a dunning block reason using a blocking key and will enter
the same in the ‘Dunning block’ field of customer / vendor master record (Figure 10.3) or in
the line item. During a dunning run, the system checks for this dunning block key in the master
record or line item, and excludes the blocked accounts and/or items in the dunning run
proposal. You can see the details blocked accounts / items, printed in an exception list, with
the reason for the block.
Figure 10.3 Entering Dunning Block Reason in Customer Master Record
Project Dolphin
The Dolphin project team has suggested to configure six dunning block reasons in the system:
disputed (A), promised to pay (B), clarification required from SD side (C), blocked by legal
department (D), other reasons (E) and blocked by invoice verification (R).
To configure the dunning block reasons:
i. Use the menu path: SAP Customizing Implementation Guide > Financial Accounting >
Accounts Receivable and Accounts Payable > Business Transactions > Dunning > Basic
Settings for Dunning > Define Block Reasons, or Transaction OB18.
ii. On the resulting screen, click on ‘New Entries’ and define the required 1-character
block keys (‘Block’) and provide a description in ‘Text’ field (Figure 10.4). The blank in

249 Dunning
the ‘Block’ field will indicate that the item/account is not blocked and is free for
dunning.
Figure 10.4 Defining Dunning Block Reasons
With this, let us look at defining the dunning forms which you will be using to configure the
dunning procedure.
10.1.4 Define Dunning Forms
SAP provides you with the option of using either ‘SAP Smart Forms’ or ‘SAPScript’ forms for
use as the dunning forms. The standard dunning forms cater to different situations like forms
that have the provision for including the dunning interest or plain forms which you will
normally use for 1st level of dunning (or ‘payment reminders’). Depending upon whether you
want to have different layout or want to include interest etc., you will select the appropriate
form for a given level of dunning. You may need more than one form, and it is recommended
to copy the standard forms in SAP to create your own.
Project Dolphin
The project team has suggested to copy and adapt the SAPScript forms provided by SAP to
meet the business needs of BESTM group of company codes. Accordingly, there will be five
forms that will be created anew by copying the standard ones: the form F150_BE_DUNN_01
(without interest) will be copied as ZF150_BE_DUNN_01 and will be used both for the single-
level dunning procedure and also for the first dunning level of the 5-level dunning procedure.
The standard form F150_BE_DUNN_02 (with interest) will be copied to create the other four
levels for the 5-level procedure. Also, separate spool lists will be created by copying the
standard LIST1S spool list, and five new spool lists will be created prefixed with the company
code name like 1110-1, 1110-2 etc.

250 Configuring SAP Accounts Receivable & Accounts Payable (SAP S/4HANA Finance)
To copy and create new dunning forms for BESTM:
i. Use the menu path: SAP Customizing Implementation Guide > Financial Accounting >
Accounts Receivable and Accounts Payable > Business Transactions > Dunning >
Printout > Define Dunning Forms (with SAPScript), or Transaction SE71.
Figure 10.5 Defining a New Dunning Form (SAPScript) by Copying the Standard Form
ii. On the resulting screen, enter the form that you want to copy (say,
F150_BE_DUNN_01), and click on ‘Change’.
iii. On the next screen (Figure 10.5), click on ‘Form > Save As’ and input the name of the
new form (say, ZF150_BE_DUNN_01).
iv. Click ‘Activate’. You have now created the new form ZF150_BE_DUNN_01. This is the
form for dunning notice without interest.
v. You can, now, copy the other form F150_BE_DUNN_02 (with interest), to create the
new forms ZF150_BE_DUNN_02, ZF150_BE_DUNN_03, ZF150_BE_DUNN_04 and
ZF150_BE_DUNN_05.
This completes our discussion of configuring the basic settings required for dunning. We shall,
now, move on to discuss the settings relating to dunning procedure.

251 Dunning
10.2 Dunning Procedure
The ‘dunning procedure’ controls how the dunning program duns the business partners. It
contains specifications like dunning frequency / dunning interval with which the program
duns the open items, specifications relating to grace days and minimum number of days which
will be required to determine the open items to be dunned, details of the number of dunning
levels with the level determining the wording of the dunning notice and the specifications as
to whether to dun standard and/or Special G/L transactions.
You need to complete the following settings to complete configuring the dunning procedures
in the system:
• Define Dunning Procedures
• Define Dunning Groupings
• Define Interest Rates
Let us start with the definition of dunning procedures.
10.2.1 Define Dunning Procedures
As already outlined, you control the dunning program via the specifications maintained in the
dunning procedure. It is possible that you may need more than one dunning procedure to
take care of your dunning needs. For example, you may have business partners who need to
be reminded only once and in such a situation you will need a dunning procedure with only
one dunning level; on the other hand, you may have some customers who need to be followed
up several times to get back your receivables, and in such a case you may need a multi-level
dunning procedure with the wording in the dunning notice progressively changing to stricter
and legal tone with every increase in the dunning level. The dunning procedures are company
code independent.
Project Dolphin
The BESTM management has decided to have two dunning procedures in each of the
countries where the company is operating. Accordingly, they have asked the project team to
configure the following, both for India and USA:
1. A dunning procedure that will be used to remind the VIP business partners, which will be
single level dunning procedure. This will just be a ‘payment reminder’ and there will not be
any charges / interest associated with this dunning.
2. Another dunning procedure – multi-level dunning procedure – that will be used for all other
business partners. This will have a maximum of five dunning levels, with a dunning interval of
seven days. There needs to be a cushion of three days for dunning levels 2 and 3 and five days
for levels 4 and 5. Also, there will be a grace period of five days at the account level. Further,
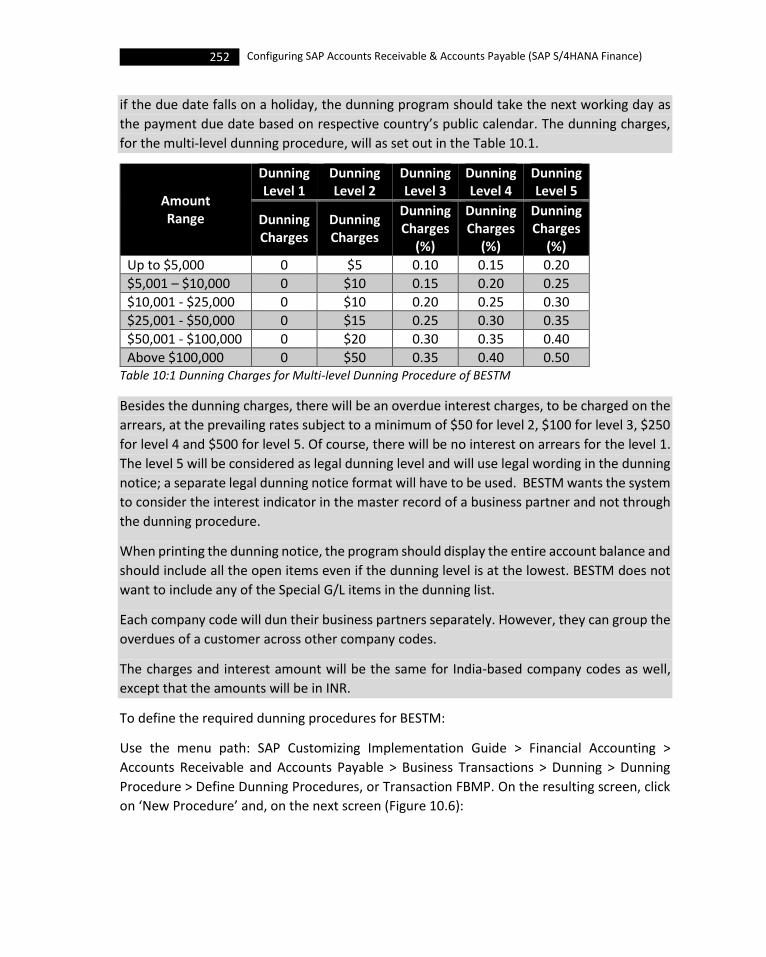
252 Configuring SAP Accounts Receivable & Accounts Payable (SAP S/4HANA Finance)
if the due date falls on a holiday, the dunning program should take the next working day as
the payment due date based on respective country’s public calendar. The dunning charges,
for the multi-level dunning procedure, will as set out in the Table 10.1.
Amount Range
Dunning Level 1
Dunning Level 2
Dunning Level 3
Dunning Level 4
Dunning Level 5
Dunning Charges
Dunning Charges
Dunning Charges
(%)
Dunning Charges
(%)
Dunning Charges
(%)
Up to $5,000 0 $5 0.10 0.15 0.20
$5,001 – $10,000 0 $10 0.15 0.20 0.25
$10,001 - $25,000 0 $10 0.20 0.25 0.30
$25,001 - $50,000 0 $15 0.25 0.30 0.35
$50,001 - $100,000 0 $20 0.30 0.35 0.40
Above $100,000 0 $50 0.35 0.40 0.50 Table 10:1 Dunning Charges for Multi-level Dunning Procedure of BESTM
Besides the dunning charges, there will be an overdue interest charges, to be charged on the
arrears, at the prevailing rates subject to a minimum of $50 for level 2, $100 for level 3, $250
for level 4 and $500 for level 5. Of course, there will be no interest on arrears for the level 1.
The level 5 will be considered as legal dunning level and will use legal wording in the dunning
notice; a separate legal dunning notice format will have to be used. BESTM wants the system
to consider the interest indicator in the master record of a business partner and not through
the dunning procedure.
When printing the dunning notice, the program should display the entire account balance and
should include all the open items even if the dunning level is at the lowest. BESTM does not
want to include any of the Special G/L items in the dunning list.
Each company code will dun their business partners separately. However, they can group the
overdues of a customer across other company codes.
The charges and interest amount will be the same for India-based company codes as well,
except that the amounts will be in INR.
To define the required dunning procedures for BESTM:
Use the menu path: SAP Customizing Implementation Guide > Financial Accounting >
Accounts Receivable and Accounts Payable > Business Transactions > Dunning > Dunning
Procedure > Define Dunning Procedures, or Transaction FBMP. On the resulting screen, click
on ‘New Procedure’ and, on the next screen (Figure 10.6):

253 Dunning
Figure 10.6 New Dunning Proceudre – Overview
i. Enter the identifier for the new dunning procedure in ‘Dunn.Procedure’, and provide
a description in the ‘Name’ field.
ii. Under ‘General Data’:
• Enter the ‘Dunning Interval in Days’. During every dunning run, the system
will check to see if the run date is at least this number of days since the last
dunning run. If not, then, the program will not select the account/ items for
dunning, even if they are overdue. For BESTM, the interval will be 7.
• Enter the highest dunning level that you want for this dunning procedure in
the ‘Number of Dunning Levels’ field. For BESTM, this will be 5.
You cannot have more than nine dunning levels in a dunning procedure.
• You will enter the dunning level from which you want the program to total all
the items, in ‘Total due items from dunning level’ field. Not required in most
of the countries.
• Enter the grace period, in days, at the account level in ‘Min.Days in Arrears
(Acct)’ field. This denotes the number of days that should be crossed, at least
254 Configuring SAP Accounts Receivable & Accounts Payable (SAP S/4HANA Finance)
by one item in an account, so as to create a dunning notice. This grace period
does not influence the way the system calculates the overdue.
For example, consider that you have entered 5 in ‘Min.Days in Arrears
(Acct)’ field. Now, suppose that there is an open item in the account 1235545
that is due on 20-Mar-2020. When you run the dunning on 24-Mar-2020, the
program will not select this account for dunning because as the line the item
has not crossed the minimum days of 5 in arrears (that is, the grace period)
after becoming due. But, if you run the dunning program on 26-Mar-2020,
then, the program selects this account for dunning as the item has crossed
the minimum days in arrears of 5 days.
• Enter the days in ‘Line Item Grace Periods’, if any. The system will consider
the grace period per line item, entered here, while determining the due date
for the dunning run. So, any item whose days in arrears is less than or equal
to the grace period entered here will be considered as not due yet for that
dunning notice, and hence will not be selected for dunning.
• Enter the ‘Interest Indicator’ for item interest calculation. If you do not enter
anything here, then, the entry maintained in the master record is taken into
account. Even if you enter an indicator here, the entry in the master record
has the highest priority. As BESTM wants to control the interest through the
entry in master record, we are not maintaining a value here.
• Select ‘Ignore Interest Indi. in Master Record’ check-box if you want the
system to take into account the entry in the ‘Interest Indicator’ field
notwithstanding what has been maintained in the master record.
The system ignores the interest indicator entered in the master record
if you have selected the ‘Ignore Interest Indi. in Master Record’ check-box
and have maintained a value in the ‘Interest Indicator’ field; it uses the
interest indicator in the dunning procedure to calculate the dunning interest.
However, if you have not maintained an interest indicator either in the
master record or in dunning procedure but you have selected the ‘Ignore
Interest Indi. in Master Record’ check-box, then, this setting does not have
any impact and the program will not calculate the dunning interest.
• Enter the country-specific public calendar ID in the ‘Public hol.cal.ID’ field to
enable the system to make use of the relevant calendar to arrive at the due
date that will be printed on the dunning notice, when the due date falls on a
public holiday.
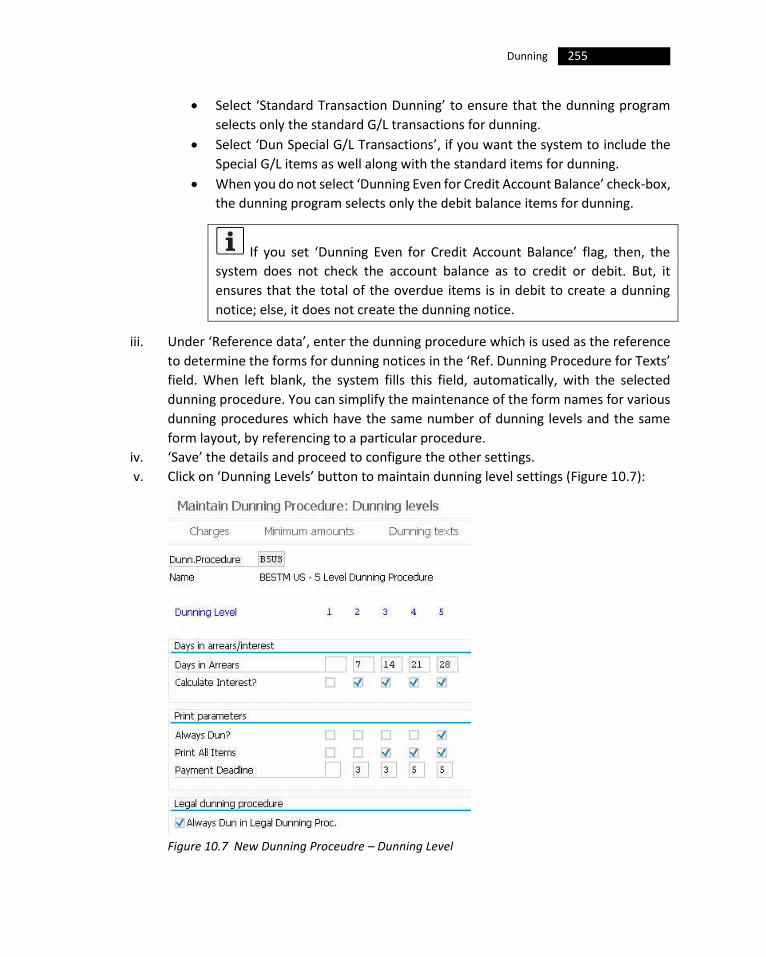
255 Dunning
• Select ‘Standard Transaction Dunning’ to ensure that the dunning program
selects only the standard G/L transactions for dunning.
• Select ‘Dun Special G/L Transactions’, if you want the system to include the
Special G/L items as well along with the standard items for dunning.
• When you do not select ‘Dunning Even for Credit Account Balance’ check-box,
the dunning program selects only the debit balance items for dunning.
If you set ‘Dunning Even for Credit Account Balance’ flag, then, the
system does not check the account balance as to credit or debit. But, it
ensures that the total of the overdue items is in debit to create a dunning
notice; else, it does not create the dunning notice.
iii. Under ‘Reference data’, enter the dunning procedure which is used as the reference
to determine the forms for dunning notices in the ‘Ref. Dunning Procedure for Texts’
field. When left blank, the system fills this field, automatically, with the selected
dunning procedure. You can simplify the maintenance of the form names for various
dunning procedures which have the same number of dunning levels and the same
form layout, by referencing to a particular procedure.
iv. ‘Save’ the details and proceed to configure the other settings.
v. Click on ‘Dunning Levels’ button to maintain dunning level settings (Figure 10.7):
Figure 10.7 New Dunning Proceudre – Dunning Level
256 Configuring SAP Accounts Receivable & Accounts Payable (SAP S/4HANA Finance)
• Enter the ‘Days in Arrears’ for each dunning level. You will notice that based
in the configuration in the previous step, the system has already filled up this
field for each dunning level. If you have entered any ‘Line Item Grace Periods’
previously, then, the system adds this to each level to arrive at the days in
arrears.
• Select ‘Calculate Interest?’ check-box for all the dunning levels for which you
want the program to calculate the dunning interest. For BESTM, we have
selected the check-box for all the levels except dunning level 1.
vi. Under ‘Print parameters’:
• Select ‘Always Dun?’ check-box, for the appropriate dunning levels, to
indicate that a dunning notice needs to be printed, even if no change has
been made to the dunning proposal since the last dunning run. Select this flag
for the highest dunning level.
You will consider that a dunning proposal has changed if at least one of
the items has reached another dunning level or a new item has been included
or there is a change in the dunning level of the account in question.
• Select ‘Print All Items’ check-box, to determine if you want the dunning
program to print all open items in the dunning notices that have the particular
dunning level. You will, normally, enable this for higher dunning levels so as
to give the customer/vendor an idea of the overall account balance.
Even if you select ‘Print All Items’ check-box, note that the blocked items
(for dunning) or items for which you have allowed automatic debit, are not
displayed. Also, this indicator does not have any effect, if you have opted for
separate dunning notices per dunning level for your company code(s).
• In ‘Payment Deadline’ field, enter the number of days that will be added to
the dunning run date to arrive at the payment deadline date, per dunning
level. The system also takes into account the public calendar for the country,
if you have maintained that in the earlier configuration step, when arriving at
the payment deadline so that it does not fall on an official holiday.
vii. Under ‘Legal dunning procedure’, select ‘Always Dun in Legal Dunning Proc.’, if you
want to send a dunning notice irrespective of the fact that there have not been any
further account movements since the last dunning.
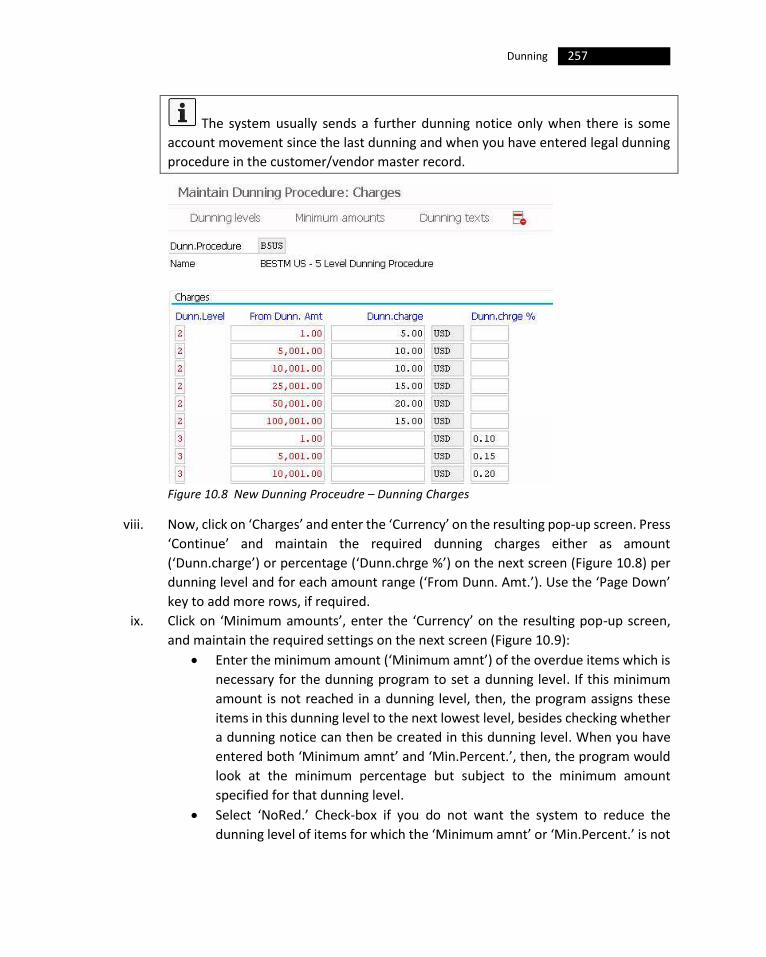
257 Dunning
The system usually sends a further dunning notice only when there is some
account movement since the last dunning and when you have entered legal dunning
procedure in the customer/vendor master record.
Figure 10.8 New Dunning Proceudre – Dunning Charges
viii. Now, click on ‘Charges’ and enter the ‘Currency’ on the resulting pop-up screen. Press
‘Continue’ and maintain the required dunning charges either as amount
(‘Dunn.charge’) or percentage (‘Dunn.chrge %’) on the next screen (Figure 10.8) per
dunning level and for each amount range (‘From Dunn. Amt.’). Use the ‘Page Down’
key to add more rows, if required.
ix. Click on ‘Minimum amounts’, enter the ‘Currency’ on the resulting pop-up screen,
and maintain the required settings on the next screen (Figure 10.9):
• Enter the minimum amount (‘Minimum amnt’) of the overdue items which is
necessary for the dunning program to set a dunning level. If this minimum
amount is not reached in a dunning level, then, the program assigns these
items in this dunning level to the next lowest level, besides checking whether
a dunning notice can then be created in this dunning level. When you have
entered both ‘Minimum amnt’ and ‘Min.Percent.’, then, the program would
look at the minimum percentage but subject to the minimum amount
specified for that dunning level.
• Select ‘NoRed.’ Check-box if you do not want the system to reduce the
dunning level of items for which the ‘Minimum amnt’ or ‘Min.Percent.’ is not
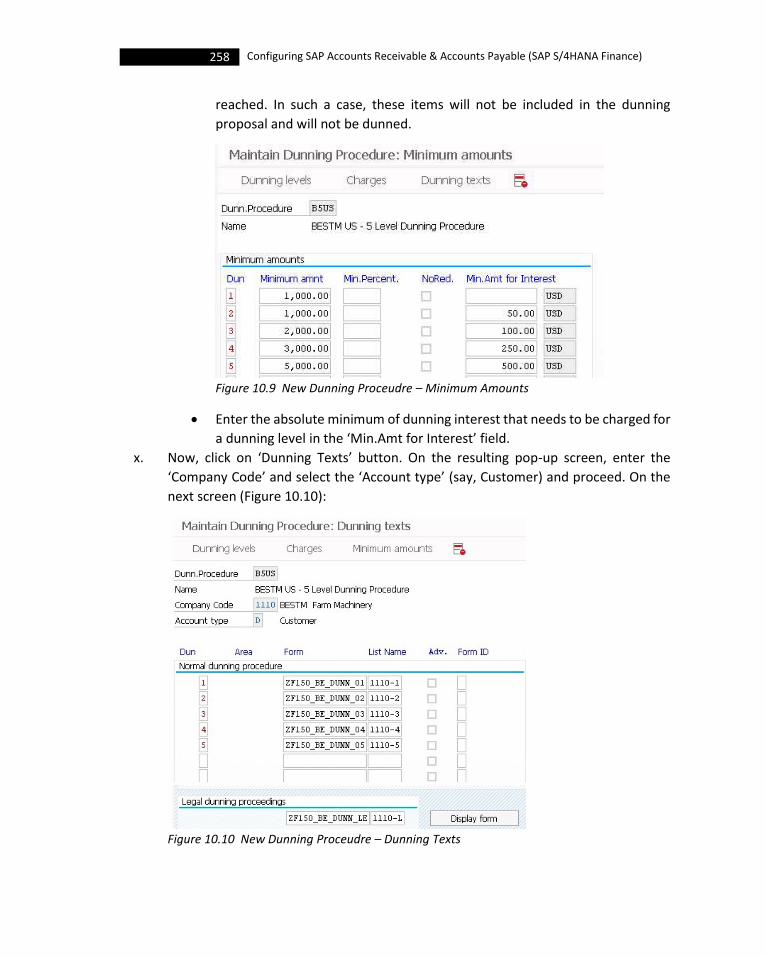
258 Configuring SAP Accounts Receivable & Accounts Payable (SAP S/4HANA Finance)
reached. In such a case, these items will not be included in the dunning
proposal and will not be dunned.
Figure 10.9 New Dunning Proceudre – Minimum Amounts
• Enter the absolute minimum of dunning interest that needs to be charged for
a dunning level in the ‘Min.Amt for Interest’ field.
x. Now, click on ‘Dunning Texts’ button. On the resulting pop-up screen, enter the
‘Company Code’ and select the ‘Account type’ (say, Customer) and proceed. On the
next screen (Figure 10.10):
Figure 10.10 New Dunning Proceudre – Dunning Texts

259 Dunning
• Under the ‘Normal dunning procedure’ block, enter the dunning level (‘Dun’),
and maintain the dunning form name (‘Form’) and the list name (‘List Name’)
for all the dunning levels. We have adapted the default dunning forms for
BESTM and renamed them starting with Z (refer Section 10.1.4). The form for
1st dunning level is without interest, but for other levels the form is with
interest.
In the ‘List Name’, you enter the name for the spool list for printing the
dunning notices. As you can store the dunning notices for different company
codes or different dunning levels in the spool as separate lists, it makes sense
to specify a different name. Of course, if you do not specify anything here,
then, the system uses the standard spool list ‘LIST1S’.
• Select ‘Adv.’ check-box to generate payment advice for that dunning level.
• You may also enter the ‘Form ID’ for the accompanying media.
• Repeat the settings for ‘Account type’ = Vendor (K) for the selected company
code, and do similar settings for all other company codes.
xi. Go back to the initial screen, and go to the menu ‘Environment > Company Code
Data’. Click on ‘New Entries’ and maintain the details as depicted in Figure 10.11.
Figure 10.11 New Dunning Proceudre – Company Code Dunning Control
• Enter the company code (‘CoCd’) for which you are maintaining the settings,
select the appropriate check boxes (‘By Dun.Ar.’ or ‘By Dun.Lev’) and enter
the reference company code (‘Ref.CoCode’) if any. The reference company
code is the one that will provide the required dunning forms.
• Enter the sorting variant: K1 for MHNK and P1 for MHND. You will not be able
to use these sort variants K1 and P1, when you plan to dun by dunning level.
• Also enter the dunning company code (‘Dun CoCd’) if the company code
entered in column 1 is not responsible for dunning (useful in cross-company
code dunning).
260 Configuring SAP Accounts Receivable & Accounts Payable (SAP S/4HANA Finance)
While printing the dunning notice, the system updates the dunning level
in the customer master record. If you are dunning by dunning level (‘By Dun.
Lev’ check-box selected), and sort the print in descending order (using the
sort variants K1 and/or P1), this may lead to an incorrect dunning level being
entered in the customer master record.
xii. ‘Save’ the details. This completes defining the multi-level dunning procedure for
BESTM. Repeat the settings and define the single level dunning procedure as well for
BESTM.
With this, let us understand how to use the dunning groups for dunning.
10.2.2 Define Dunning Groups
By default, the dunning program groups the dunning notices per customer / vendor. However,
you can plan to group the open items of your business partners according to certain pre-
defined criteria and dun those items together. For example, you may want to send your
business partner a separate dunning notice per leased property; for this, you can define a
grouping key referring to the contract number field and dunning all the open items, with the
same contract number, together.
We will not be using this configuration for BESTM. However, it may help to understand that
you can configure this by using the menu path: SAP Customizing Implementation Guide >
Financial Accounting > Accounts Receivable and Accounts Payable > Business Transactions >
Dunning > Dunning Procedure > Define Dunning Groups, or Transaction OBAQ.
With this we are now ready to configure the last configuration setting, under dunning
procedure.
10.2.3 Define Interest Rates
While you have discussed entering an interest indicator when configuring the dunning
procedure (Section 10.2.1), you can use this configuration step to define interest rate % (debit
/ credit), valid from and the currency, per interest indicator. Even though we have not entered
an interest indictor in the dunning procedure for BESTM mentioning that the interest
calculation will be controlled through the master record, you can use this step to maintain the
rates for the interest indicator which you will enter in the master record of customer or
vendor.
You would have already defined the required arrears (or item) interest indicators while
configuring ‘Interest Calculation Global Settings’ as a part of ‘Bank Account Interest
Calculation’ configuration activity. If not you can configure the same as detailed below:

261 Dunning
10.2.3.1 Define Interest Calculation Types
Using this configuration activity, you can create your interest indicators with the specification
that they are to be used for account balance interest calculation. You will, then, enter this
indicator in the G/L account master record of the relevant G/L accounts, enabling the system
to select these accounts automatically during interest calculation.
Project Dolphin
BESTM has decided to use two different interest indicators, apart from the standard ones
available in SAP. The new interest indicators will be used for calculating the account balance
interest on staff loan accounts, one indicator for US-based company codes and the other for
India-based company codes.
To define new interest indicators:
i. Use the menu path: SAP Customizing Implementation Guide > Financial Accounting >
General Ledger Accounting > Business Transactions > Bank Account Interest
Calculation > Interest Calculation Global Settings > Define Interest Calculation Types.
You may also use Transaction OB46.
ii. On the ‘Change View “Interest Settlement (Calculation Type)”: Overview’ screen,
select the row containing the standard balance calculation interest indicator (02) and
click on ‘Copy As’.
iii. On the next screen:
• Enter the identifier for the new interest indicator (say, 2U), and enter a
suitable ‘Name’. This will be used by US-based company codes of BESTM. The
standard interest indicators supplied by SAP are denoted as 01 (item interest
calculation) and 02 (balance interest calculation) by SAP.
• The account number as interest calculation indicator (‘Acct. no. as IntClcInd’)
check-box, determines whether the account number is to be used as an
extended interest indicator in the interest terms. You can set only the numeric
G/L account numbers as the extended interest indicator; if so, you need to
maintain the length of the G/L account number at 10 digits by padding the
account number with zeros from the left. As we will not use this, we will not
select this check-box.
• Select the appropriate interest calculation type (‘Int Calc. Type’) from the
drop-down list; select ‘S’ for balance interest calculation (‘P’ will be for item
or arrears interest calculation).
iv. ‘Save’ the settings and create the other balance interest indicator for India (2I).

262 Configuring SAP Accounts Receivable & Accounts Payable (SAP S/4HANA Finance)
v. Also create the required item (or arrears) interest indicators for BESTM (1I for India
and IU for USA). You have now defined the required new interest indicators for BESTM
(Figure 10.12).
Figure 10.12 Interest Indictors
Now that we have configure the interest indicators for BESTM, let us proceed to define the
dunning interest rates.
Use the menu path: SAP Customizing Implementation Guide > Financial Accounting >
Accounts Receivable and Accounts Payable > Business Transactions > Dunning > Dunning
Procedure > Define Interest Rates, or Transaction OB42. On the resulting screen, click on ‘New
Entries’ and maintain the interest rates for both the indicators, 1U and 1I to be used in US and
India respectively (Figure 10.13).
Figure 10.13 Dunning Interest Rates
With this, we are now ready to discuss the settings that are required for dunning printouts.
10.3 Printout
Under this, we will be discussing the configuration relating to the settings for printing dunning
notices. The dunning notices (forms) can be either in the form of SAPScript or SAP Smart
Forms. The settings include:
• Define Dunning Forms (with SAPScript)
• Define Dunning Forms (with SAP Smart Forms)
• Assign Dunning Forms
• Define Sender Details for Dunning Forms
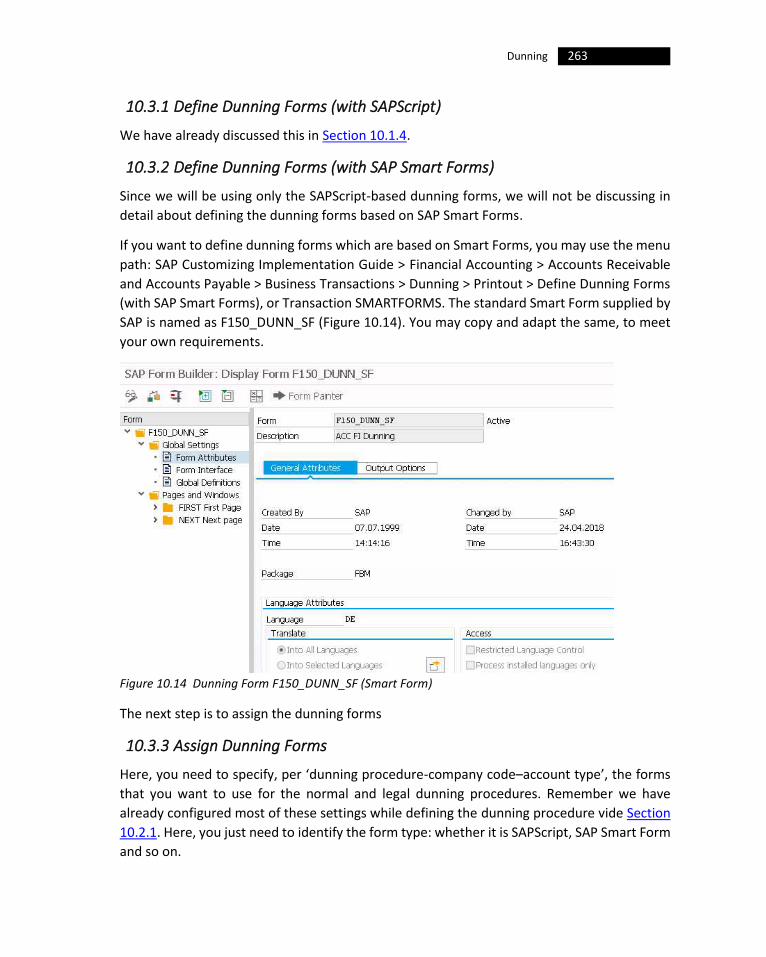
263 Dunning
10.3.1 Define Dunning Forms (with SAPScript)
We have already discussed this in Section 10.1.4.
10.3.2 Define Dunning Forms (with SAP Smart Forms)
Since we will be using only the SAPScript-based dunning forms, we will not be discussing in
detail about defining the dunning forms based on SAP Smart Forms.
If you want to define dunning forms which are based on Smart Forms, you may use the menu
path: SAP Customizing Implementation Guide > Financial Accounting > Accounts Receivable
and Accounts Payable > Business Transactions > Dunning > Printout > Define Dunning Forms
(with SAP Smart Forms), or Transaction SMARTFORMS. The standard Smart Form supplied by
SAP is named as F150_DUNN_SF (Figure 10.14). You may copy and adapt the same, to meet
your own requirements.
Figure 10.14 Dunning Form F150_DUNN_SF (Smart Form)
The next step is to assign the dunning forms
10.3.3 Assign Dunning Forms
Here, you need to specify, per ‘dunning procedure-company code–account type’, the forms
that you want to use for the normal and legal dunning procedures. Remember we have
already configured most of these settings while defining the dunning procedure vide Section
10.2.1. Here, you just need to identify the form type: whether it is SAPScript, SAP Smart Form
and so on.
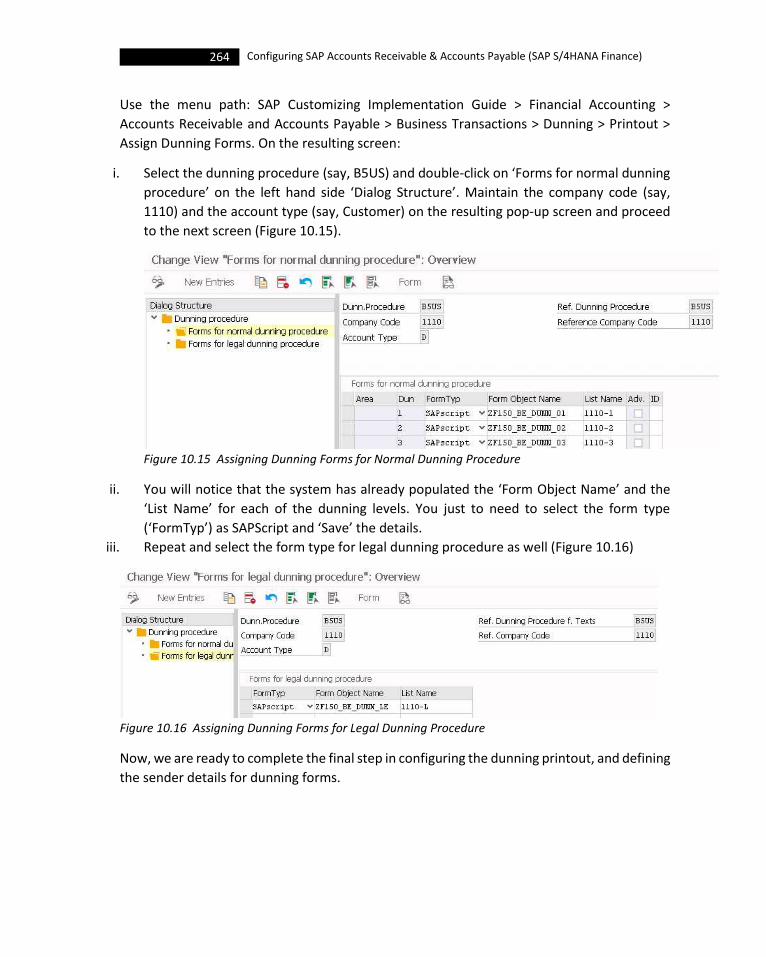
264 Configuring SAP Accounts Receivable & Accounts Payable (SAP S/4HANA Finance)
Use the menu path: SAP Customizing Implementation Guide > Financial Accounting >
Accounts Receivable and Accounts Payable > Business Transactions > Dunning > Printout >
Assign Dunning Forms. On the resulting screen:
i. Select the dunning procedure (say, B5US) and double-click on ‘Forms for normal dunning
procedure’ on the left hand side ‘Dialog Structure’. Maintain the company code (say,
1110) and the account type (say, Customer) on the resulting pop-up screen and proceed
to the next screen (Figure 10.15).
Figure 10.15 Assigning Dunning Forms for Normal Dunning Procedure
ii. You will notice that the system has already populated the ‘Form Object Name’ and the
‘List Name’ for each of the dunning levels. You just to need to select the form type
(‘FormTyp’) as SAPScript and ‘Save’ the details.
iii. Repeat and select the form type for legal dunning procedure as well (Figure 10.16)
Figure 10.16 Assigning Dunning Forms for Legal Dunning Procedure
Now, we are ready to complete the final step in configuring the dunning printout, and defining
the sender details for dunning forms.
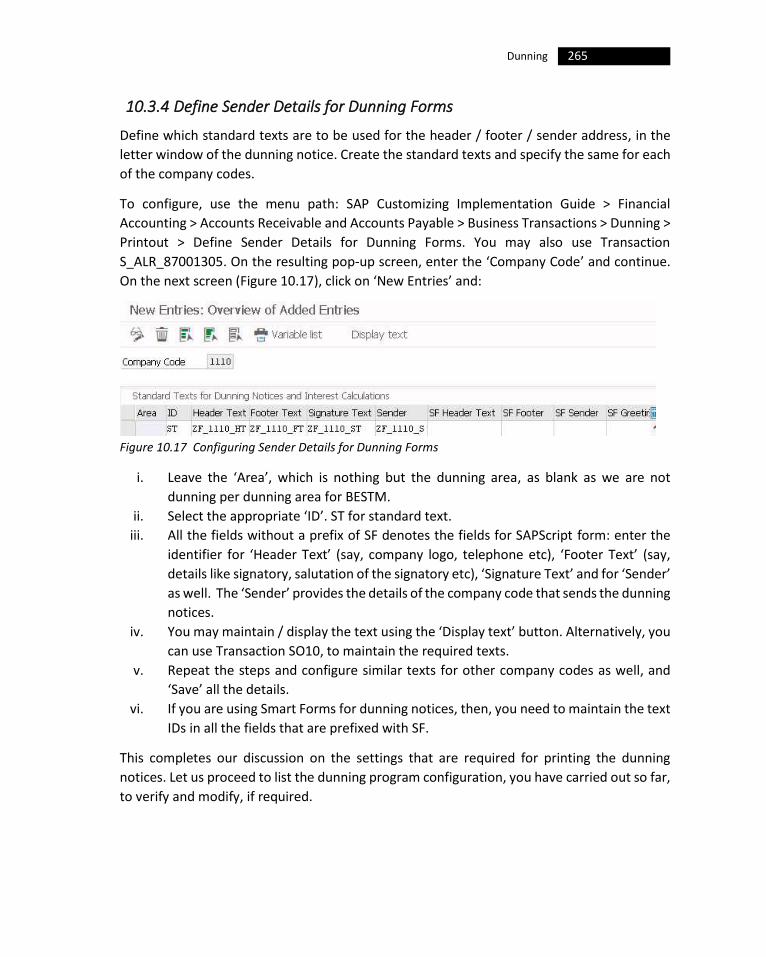
265 Dunning
10.3.4 Define Sender Details for Dunning Forms
Define which standard texts are to be used for the header / footer / sender address, in the
letter window of the dunning notice. Create the standard texts and specify the same for each
of the company codes.
To configure, use the menu path: SAP Customizing Implementation Guide > Financial
Accounting > Accounts Receivable and Accounts Payable > Business Transactions > Dunning >
Printout > Define Sender Details for Dunning Forms. You may also use Transaction
S_ALR_87001305. On the resulting pop-up screen, enter the ‘Company Code’ and continue.
On the next screen (Figure 10.17), click on ‘New Entries’ and:
Figure 10.17 Configuring Sender Details for Dunning Forms
i. Leave the ‘Area’, which is nothing but the dunning area, as blank as we are not
dunning per dunning area for BESTM.
ii. Select the appropriate ‘ID’. ST for standard text.
iii. All the fields without a prefix of SF denotes the fields for SAPScript form: enter the
identifier for ‘Header Text’ (say, company logo, telephone etc), ‘Footer Text’ (say,
details like signatory, salutation of the signatory etc), ‘Signature Text’ and for ‘Sender’
as well. The ‘Sender’ provides the details of the company code that sends the dunning
notices.
iv. You may maintain / display the text using the ‘Display text’ button. Alternatively, you
can use Transaction SO10, to maintain the required texts.
v. Repeat the steps and configure similar texts for other company codes as well, and
‘Save’ all the details.
vi. If you are using Smart Forms for dunning notices, then, you need to maintain the text
IDs in all the fields that are prefixed with SF.
This completes our discussion on the settings that are required for printing the dunning
notices. Let us proceed to list the dunning program configuration, you have carried out so far,
to verify and modify, if required.

266 Configuring SAP Accounts Receivable & Accounts Payable (SAP S/4HANA Finance)
10.4 Generate List for Dunning Program Configuration
Using this, you can generate the list displaying the dunning program configuration in the
system, per company code, per dunning procedure. The list will come handy to check the
settings and make a change, if required. The system uses the program SAPMSSY0 to bring out
the details.
Figure 10.18 System Generated Configuration List for Dunning Program
267 Dunning
To generate the list, use the menu path: SAP Customizing Implementation Guide > Financial
Accounting > Accounts Receivable and Accounts Payable > Business Transactions > Dunning >
Generate List for Dunning Program Configuration. You may also use Transaction OBL6.
On the resulting screen, enter the ‘Dunning procedure’ and ‘Company code’ and click on
‘Execute’. The system brings out all the details of the settings that you have maintained for
the dunning procedure (say, B5US) for the entered company code (say, 1110), on the next
screen (Figure 10.18). You will see all the details for basic settings, the configuration details
for the dunning procedure, details of forms used etc. Scan through the list, and, if you see a
setting that is incorrect or a setting that has not been maintained, revisit the appropriate
configuration step to correct or maintain the same.
With this, we have completed all the required settings for configuring the dunning program
in the system. In the next Section, let us understand how the system actually carries out the
dunning process.
10.5 Dunning Process Flow
1) Use the SAP Easy Access menu path: SAP Menu > Accounting > Financial accounting
> Accounts Receivable (or Accounts Payable) > Periodic processing > Dunning or use
Transaction F150, and begin the dunning process by Maintaining the Dunning
Parameters for the dunning run:
a. First enter the basic parameters like the dunning run execution date (‘Run
On’) and an identifier for the dunning run (‘Identification’).
b. Now, on the ‘Parameters’ tab, maintain the ‘Dunning Date’ (that will be
printed in the dunning notice), posting cut-off date for selection of
documents (‘Docmnts Posted up To’), ‘Company code’, and ‘Amount
Restrictions’ (for customer / vendor).
c. You may also make further restrictions in ‘Free Selection’ tab, wherein you
may enter up to eight additional selection criteria for accounts and
documents: you can use document fields (from tables BSID and BSIK),
customer master record fields (from tables KNA1, KNB1 and KNB5) and
vendor master record fields (from tables LFA1, LFB1 and LFB5) as selection
criteria.
d. When completed, ‘Save’ the details. The system will, now, display the current
status of the dunning run in the ‘Status’ tab.
2) Now, on the ‘Dunning’ initial screen, click on ‘Schedule’ to schedule the dunning run
for a later date / time or run the program immediately. If you do not select the
‘Dunn.Print with Scheduling’ check-box, then, the system prints the dunning notices
immediately after the dunning run, and you will not be able to edit the dunning
proposal manually or to delete a dunning proposal which has been created.

268 Configuring SAP Accounts Receivable & Accounts Payable (SAP S/4HANA Finance)
3) During the Creation of Dunning Proposal List, the system determines the accounts
and items to be dunned in two steps:
a. First, the dunning program checks the accounts. The dunning program
checks whether an account needs to be dunned:
i. It checks the fields ‘Dunning Procedure’ and ‘Last Dunning Notice’
(date of last run) in the customer master record to determine
whether the arrears date or the date of the last dunning run is in the
past.
ii. It checks whether the account is blocked for dunning, based on the
entry in the ‘Dunning Block’ field in the customer master record.
Following these two checks, the program determines if an account in
question is released for dunning or rejected.
b. Second, when the account is released for dunning, then, the dunning
program processes all open items that were posted to this account on or
before the date entered in the ‘Docmnts Posted up To’ field maintained in
the dunning parameters:
i. The program checks each open item, in an account, to decide if the
item:
• Is blocked for dunning?
• Is overdue according to the date of issue, the base date, the
payment conditions, and the number of grace days granted.
Following these checks, the open item in question is either released for
dunning or rejected.
c. If the open item is released for dunning, the dunning program, now, arrives
at:
i. How many days the open item is overdue?
ii. Which dunning level the open item has according to the dunning
levels specified in the dunning procedure?
From the above, the program determines the open items with specific
dunning levels for an account, and sets the highest dunning level to the
account, based on the highest dunning level of an open item of the account,
even though there are several items with different dunning levels.
d. Once the dunning program has ascertained which open items to dun and the
dunning level for the account, it processes each account by making the
following checks:
269 Dunning
i. Does the customer (or vendor) have a debit balance with regard to
overdue items and all open items?
• If NOT, the account is not dunned.
ii. If YES, is the total amount to be dunned and the percentage of all
open items more than the minimum amount and percentage defined
in the dunning procedure?
• If NOT, the account is not dunned.
iii. If YES, is the dunning level for the account or the overdue items
higher than it was for the last dunning run?
• If NOT, the account is not dunned.
iv. If YES, are there any new open items to be dunned (with a previous
dunning level = 0)?
• If NOT, the account is not dunned.
v. If YES, does the dunning procedure for this level specify that dunning
be repeated?
• If NOT, the account is not dunned.
vi. If YES, the account is released for dunning, and the program goes on
to check the next account as described above.
e. Now, the program creates a list (dunning proposal list) of all the accounts and
open items that have been proposed for dunning and assigns a dunning level
to the account according to the highest dunning level of an open item in the
account.
4) You can, now, Edit the Dunning Proposal List to manually raise or lower the dunning
level of an item or account. You can also block or unblock an item, account, or
document from being dunned. You can look at the log to confirm the changes you
have made to the dunning proposal; if you are not satisfied or want to make further
changes, you can edit further till you incorporate all the changes. You can also display
the sample printout of the dunning notice on the screen; you will be able to display
only the first 10 dunning notices.
5) Now, you are ready to Print the Dunning Notices. The program selects the dunning
form / text based upon the dunning levels. After you activate the print run, the
program prints the dunning notices besides updating the important details, such as
‘Dunning Level’ and ‘Last Dunning Notice’, in the customer (or vendor) master. You
can, always, restart an interrupted printing. You can optically archive the dunning
notices while they are getting printed.
This completes our discussion on dunning process flow. And, this also completes our
discussion on dunning.
270 Configuring SAP Accounts Receivable & Accounts Payable (SAP S/4HANA Finance)
10.6 Conclusion
You learned dunning in detail, in this Chapter.
You saw how to define the basic settings, including dunning areas, dunning keys, dunning
block reasons and dunning forms. You learned that though defining a ‘dunning area’ is
optional, you can use dunning areas if there are different organizational units (distribution
channel or business area or sales organization, for example) that are responsible for carrying
out dunning within the company code. You learned that the ‘dunning keys’, which are
company code independent, enable you to limit the dunning level for an item. While
configuring a dunning key, you understood that you can, also, decide if some of the items with
a specific dunning key are to be displayed separately in the dunning notice. You learned that
the ‘dunning blocks’ (or ‘dunning block reasons’) help you to prevent an account or an item
from being dunned. You understood that you will define a dunning block reason using a
blocking key and enter that in the customer / vendor master record or in the line item.
You learned that the ‘dunning procedure’ controls how the dunning program duns the
business partners. You learned that it contains specifications like dunning frequency / dunning
interval with which the program duns the open items, specifications relating to grace days
and minimum number of days which will be required to determine the open items to be
dunned, details of the number of dunning levels with the level determining the wording of
the dunning notice, and the specifications as to whether to dun standard and/or Special G/L
transactions. You learned that you may need more than one dunning procedure to take care
of your dunning needs. You learned that though by default, the dunning program groups the
dunning notices per customer / vendor, you can ‘group’ the open items of your business
partners, according to certain pre-defined criteria and dun those items together.
You, then, learned about the configuration relating to the settings for printing dunning
notices. You learned that SAP provides you with the option of using either ‘SAP Smart Forms’
or ‘SAPScript’ forms for use as the dunning forms, and that the dunning forms cater to
different situations: like forms that have the provision for including the dunning interest or
plain forms which you will normally use for 1st level of dunning (or ‘payment reminders’). You
understood that depending upon whether you want to have different layout or want to
include interest etc., you will select the appropriate form for a given level of dunning. You also
learned how to assign the dunning forms per ‘dunning procedure-company code–account
type’ combination, and defining the sender details for the forms.
You went on to learn how you can generate the list displaying the dunning program
configuration in the system, per company code, per dunning procedure. You learned that this
list will come handy to quickly check the settings and make a change, if required.

271 Dunning
Finally, towards the end of the Chapter, you learned about the dunning process flow: entering the dunning parameters, creating the dunning proposal, editing the dunning proposal, and finally printing the dunning notices.
We can, now, move on to discuss the configuration settings required for open item clearing,
in the next Chapter.

11 Open Item Clearing
n ‘open item’ is an uncleared transaction (say, an unpaid invoice from a vendor) that
can be cleared and closed, only when you post (say, a payment towards settling the
vendor invoice) an offsetting amount to that account: when the offsetting amount is
equal to the open item, then it is cleared in full; else, it is cleared partially as there is still a
residual amount that is ‘open’. In cases of partial clearing, the system stores the open residual
amount for the item and the cleared amount. For the open item, you can enter a due date for
net payment, due date for cash discount, or deferral date; when you enter a deferral date,
the system does not process (by dunning or payment program) that open item until that date
is passed. When clearing, the system enters a clearing document number and the clearing
date in the open items.
You can process several accounts of different account types (G/L, vendor, and customer),
including accounts from different company codes in a single clearing. The account balance is
always the total of the open items, as the sum of the items involved in any clearing transaction
is zero. The customer / vendor accounts are always managed on open item basis, allowing
you to monitor the outstanding A/R and A/P, respectively, at any point of time. However, you
need to define open item management for G/L accounts in their respective master records,
and you will normally set this option, for example, for bank sub-accounts and clearing
accounts so as to track whether the business transactions posted to these accounts are closed
yet or not.
You will be able to move a document to the ‘cold area’ of the database only if all the
open items have been cleared. This ensures that all the (open) items that are yet to be cleared
are always available in the system.
You can clear the open items either in the local currency (of the open item) or using a foreign
currency. When cleared in a foreign currency, the system translates the transaction using the
average rate between the two currencies: first translates the document currency into the
local currency, and then translates the local currency using the clearing currency. During such
a translation, if the system encounters any difference (loss or gain) due to currency
conversion, then, the system posts those differences (beyond the tolerance limits) to the pre-
defined G/L accounts.
A

274 Configuring SAP Accounts Receivable & Accounts Payable (SAP S/4HANA Finance)
Figure 11.1 Payment Difference Processing during Clearing
You will also encounter payment differences arising out of clearing transaction due to, for
example, a customer’s underpayment / overpayment, or the customer has made an
unauthorized deduction for cash discount. If the difference is immaterial, you usually clear
the receivable and post the difference. You can configure the system as how to handle the
payment differences (Figure 11.1). The options are:
• If the payment differences are well within the tolerance limits, the system
automatically adjusts the cash discount or posts the difference to a separate gain or
loss G/L account.
• If the payment difference exceeds the tolerance limits, you can, then, process the
payment as a partial payment or enter a residual item for the difference:
o When you enter a partial payment, the system does not clear the original
receivable, but posts the payment with an invoice reference.
o When you create a residual item, the system clears the original receivable
and posts the outstanding difference as residual item to the customer
account.
You can only clear open items that are posted to accounts which are managed on an open-
item basis. You should define while configuring the system, beforehand, as to which accounts
can be cleared automatically. You will not be able to clear certain open items if they trigger
another posting in the system, for example, exchange rate difference. You cannot also clear

275 Open Item Clearing
Special G/L transactions using SAP G/L Accounting clearing programs; you need to use the
special functions for that purpose.
You can clear open item either manually or automatically using the clearing program. You
can use the functions specified in Table 11.1:
Posting transaction
Business transaction details
You need to use (SAP Easy Access):
Incoming payment
Credit memo for a check deposited at the bank
SAP Menu > Financial Accounting > General Ledger > Document Entry > Incoming Payments
Outgoing payment
Debit memo for an issued check
SAP Menu > Financial Accounting > General Ledger > Document Entry > Outgoing Payments
Post with clearing
Clearing the GR/IR clearing account
SAP Menu > Financial Accounting > General Ledger > Document Entry > Post with clearing
Outgoing payment
Debit memo for an issued check
SAP Menu > Financial Accounting > General Ledger > Document Entry > Outgoing Payments
Table 11:1 Functions for Open Item Clearing
You will use manual clearing (a) for bank subaccounts and clearing accounts, (b) where you
have agreed a debit memo procedure and (c) if your vendor is making a refund. During manual
clearing, you manually select open items that balance to zero from an account. The system,
then, marks the items selected as ‘cleared’ and enters a clearing document number and the
clearing date in the document items. The clearing date can be the current date or a date that
you enter manually. The clearing document number is the number of the most recent
document involved in the clearing transaction.
The clearing functionality in SAP supports, besides the above, posting reversals / returns
(during reversal /returns, all the items that were cleared earlier becomes open items again)
and resetting of clearing (helps you to overcome accidental clearing transactions by resetting
to the original status).
To configure the system for open item clearing you need to complete the following tasks:
• Define Accounts for Exchange Rate Differences
• Define Account for Rounding Differences
• Define Posting Key for Clearing Open Items
• Make Settings for Processing Open Items
• Prepare Automatic Clearing
• Clearing Differences
276 Configuring SAP Accounts Receivable & Accounts Payable (SAP S/4HANA Finance)
You have already configured some of these settings as a part of ‘Outgoing Payments Global
Settings’ vide Chapter 6: for example, we have covered defining the accounts for exchange
rate differences in Section 6.1.5, defined the accounts for rounding differences in Section
6.1.6 and covered the posting keys definition for clearing in Section 6.1.9.
Let us, now, look at the settings that will be required for processing open items.
11.1 Make Settings for Processing Open Items
There are several settings under this configuration activity like:
• Define Line Layout for Document Change/Display
• Select Standard Line Layout for Document Change/Display
• Choose Selection Fields
• Choose Search Fields
• Choose Sort Fields
However, you need to check and/or change the settings specified in the above activities, only
if you are not using line item display without the ABAP List Viewer. Since, the Project Dolphin’s
team has recommended to use ABAP List Viewer for line item display, you do not need to
make any settings here.
With this, we are now ready to configure system for automatic clearing.
11.2 Prepare Automatic Clearing
The ‘automatic clearing program’ also uses the clearing transactions that are provided for
manual clearing. This includes, for example, automatic posting of exchange rate differences,
or automatic generation of transfer postings if items from different business areas / trading
partners are involved in clearing. Also, the program can clear journal entries that were posted
using the ‘net method’ and journal entries that contain parallel currencies.
Here, using this task, you need to specify the criteria for grouping open items, belonging to
an account, for automatic clearing. Besides the two standard criteria (account type and
account number or number interval), you can enter fiver more user-criteria. You, also, need
to specify a clearing date. The program clears the open items that are grouped together, if
their total balance equals zero in local and foreign currency.
277 Open Item Clearing
There are five user-criteria and a variety of fields you can choose from. Ensure that you
specify fields that have an internal length of up to 20 places only. You can enter separate
criteria for each account type, and use an account number interval to determine the accounts
to which the criteria should apply. If you want the system to continue to group open items by
business area or trading partner for automatic clearing, you have to maintain these as user-
criteria in the configuration settings.
Project Dolphin
The BESTM management, after some discussion with the project team, requested to
configure four more user-criteria for grouping clearing items for automatic clearing, for more
flexibility: ‘Assignment Number’, ‘Business Area’, ‘Trading Partner’ and ‘Contract Number’ for
customer and vendor, and ‘Segment’ (in the place of contract number) for G/L accounts.
To make the required settings:
i. Use the menu path: SAP Customizing Implementation Guide > Financial Accounting >
Accounts Receivable and Accounts Payable > Business Transactions > G/L Accounts >
Business Transactions > Open Item Clearing > Prepare Automatic Clearing. You may
also use Transaction OB74.
ii. On the ‘Change View “Additional Rules for Automatic Clearing”: Overview’ screen,
you will see the standard settings (for clearing grouping) that includes the account
type (‘AccTy’) and number interval (‘From Account’ and ‘To Account’). In the case of
account types D and K, adding both numeric and alpha-numeric number intervals will
give all the flexibility. If you leave the chart of accounts field as blank, then, the
settings you make here will be valid for all the charts in the system.
iii. You can include five more fields as user-criteria in the fields ‘Criterion 1’ to ‘Criterion
5’. As per BESTM management’s requirements, we need to include ‘Assignment
Number’ (ZUONR), ‘Business Area’ (GSBER), ‘Trading Partner’ (VBUND) and ‘Contract
Number’ (VERTN) as the additional user-criteria for the chart of accounts BEUS, for
the account types D & K. For the account type S (G/L), instead of the contract number,
we need to include ‘Segment’ (SEGMENT). Click on ‘New Entries’, maintain the user-
criteria on the next screen, and ‘Save’ the settings (Figure 11.2).
iv. Maintain similar settings for the chart of accounts BEIN as well.
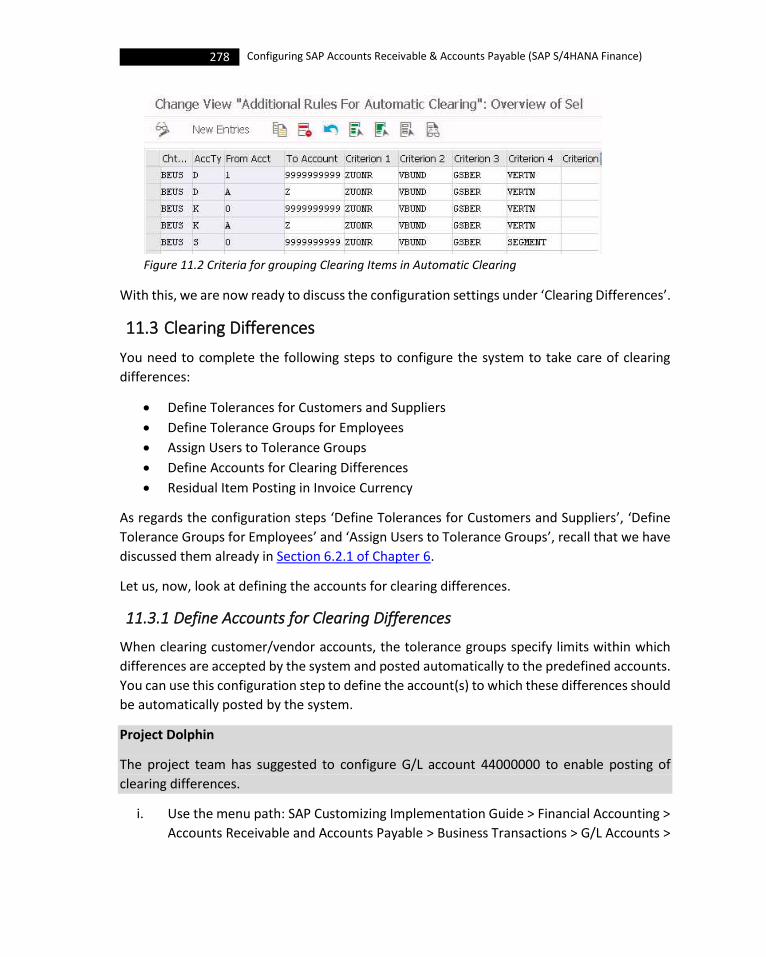
278 Configuring SAP Accounts Receivable & Accounts Payable (SAP S/4HANA Finance)
Figure 11.2 Criteria for grouping Clearing Items in Automatic Clearing
With this, we are now ready to discuss the configuration settings under ‘Clearing Differences’.
11.3 Clearing Differences
You need to complete the following steps to configure the system to take care of clearing
differences:
• Define Tolerances for Customers and Suppliers
• Define Tolerance Groups for Employees
• Assign Users to Tolerance Groups
• Define Accounts for Clearing Differences
• Residual Item Posting in Invoice Currency
As regards the configuration steps ‘Define Tolerances for Customers and Suppliers’, ‘Define
Tolerance Groups for Employees’ and ‘Assign Users to Tolerance Groups’, recall that we have
discussed them already in Section 6.2.1 of Chapter 6.
Let us, now, look at defining the accounts for clearing differences.
11.3.1 Define Accounts for Clearing Differences
When clearing customer/vendor accounts, the tolerance groups specify limits within which
differences are accepted by the system and posted automatically to the predefined accounts.
You can use this configuration step to define the account(s) to which these differences should
be automatically posted by the system.
Project Dolphin
The project team has suggested to configure G/L account 44000000 to enable posting of
clearing differences.
i. Use the menu path: SAP Customizing Implementation Guide > Financial Accounting >
Accounts Receivable and Accounts Payable > Business Transactions > G/L Accounts >

279 Open Item Clearing
Business Transactions > Open Item Clearing > Clearing Differences > Define Accounts
for Clearing Differences. You may also use Transaction OBXL.
ii. On the ensuing pop-up screen, enter the chart of accounts (BEUS), and on the next
screen, enter the appropriate G/L account, and ‘Save’ (Figure 11.3).
Figure 11.3 G/L Accounts for Posting Clearing Differences
iii. Repeat and enter the G/L accounts for the India chart of accounts, BEIN, and ‘Save’
the details.
iv. Do not change the default ‘Posting Keys’; 40 for ‘Debit’ and 50 for ‘Credit’.
v. Click on the ‘Rules’ and you will see that the default setting is that the accounts are
determined based on ‘Debit/ Credit’. Do not make any changes here also.
This completes our discussion on open item clearing.
11.4 Conclusion
You learned that an ‘open item’ is an uncleared transaction that can be cleared and closed,
only when you post an offsetting amount to that account: when the offsetting amount is equal
to the open item, then it is cleared in full; else, it is cleared partially as there is still a residual
amount that is ‘open’.
You understood that the ‘automatic clearing program’ also uses the clearing transactions that
are provided for manual clearing. For automatic clearing, you learned that you need to specify
the criteria for grouping open items, belonging to an account. Besides the two standard
criteria (account type and account number or number interval), you understood that you can
enter fiver more user-criteria. You learned that the program clears the open items that are
grouped together, if their total balance equals zero in local and foreign currency. You then
learned about the settings that you need to make to handle clearing differences, including
defining the accounts for clearing differences.
With this, we are now ready move on to discuss the settings required for handling down
payment received, in the next Chapter.


12 Down Payment Received
he ‘down payment received’ denotes the advance amounts that you receive from your
customers, and accounted in FI-A/R. The down payment received is also known as
‘customer down payments’. To manage down payments received, you need to
complete the following configuration steps in the SAP system:
• Define Reconciliation Accounts for Customer Down Payments
• Define Tax Accounts for Down Payments Received
• Define Account for Tax Clearing
Let us start with the configuration of reconciliation accounts for customer down payments.
12.1 Define Reconciliation Accounts for Customer Down Payments
Use this step to define the G/L accounts for managing the customer down payments (or down
payment requests). In this case, the system automatically posts to these accounts instead of
to the normal A/R reconciliation account. Maintain the required G/L account, per account
type (D = customer) and Special G/L indicator (A, F, etc.) combinations. Ensure if a down
payment or down payment request is to be displayed either as gross or net in the alternative
reconciliation account, via appropriate specification in the ‘Tax Category’ field.
To configure, use the menu path: SAP Customizing Implementation Guide > Financial
Accounting > Accounts Receivable and Accounts Payable > Business Transactions > Down
Payment Received > Define Reconciliation Accounts for Customer Down Payments, or
Transaction OBXR. On the ‘Maintain Accounting Configuration: Special G/L – List’ screen, you
will see the list of Special G/L transactions (Figure 12.1).
Figure 12.1 Special G/L List for Customer
T
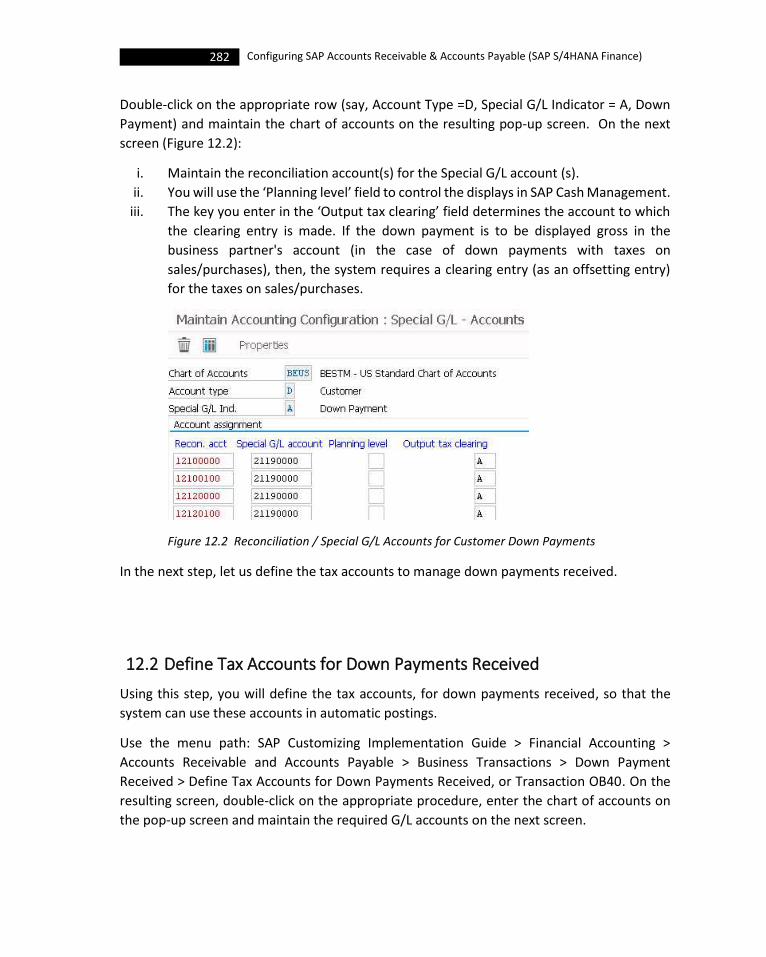
282 Configuring SAP Accounts Receivable & Accounts Payable (SAP S/4HANA Finance)
Double-click on the appropriate row (say, Account Type =D, Special G/L Indicator = A, Down
Payment) and maintain the chart of accounts on the resulting pop-up screen. On the next
screen (Figure 12.2):
i. Maintain the reconciliation account(s) for the Special G/L account (s).
ii. You will use the ‘Planning level’ field to control the displays in SAP Cash Management.
iii. The key you enter in the ‘Output tax clearing’ field determines the account to which
the clearing entry is made. If the down payment is to be displayed gross in the
business partner's account (in the case of down payments with taxes on
sales/purchases), then, the system requires a clearing entry (as an offsetting entry)
for the taxes on sales/purchases.
Figure 12.2 Reconciliation / Special G/L Accounts for Customer Down Payments
In the next step, let us define the tax accounts to manage down payments received.
12.2 Define Tax Accounts for Down Payments Received
Using this step, you will define the tax accounts, for down payments received, so that the
system can use these accounts in automatic postings.
Use the menu path: SAP Customizing Implementation Guide > Financial Accounting >
Accounts Receivable and Accounts Payable > Business Transactions > Down Payment
Received > Define Tax Accounts for Down Payments Received, or Transaction OB40. On the
resulting screen, double-click on the appropriate procedure, enter the chart of accounts on
the pop-up screen and maintain the required G/L accounts on the next screen.

283 Down Payment Received
With this, let us complete the final configuration step for down payment received namely,
defining the accounts for tax clearing.
12.3 Define Account for Tax Clearing
Here, you define an output tax clearing account that is needed, if you display down payments
(gross) in the customer account. Besides the account, you can also specify a key for the
differentiation which groups the Special G/L indicator, the account type and the reconciliation
account together.
Use the menu path: SAP Customizing Implementation Guide > Financial Accounting >
Accounts Receivable and Accounts Payable > Business Transactions > Down Payment
Received > Define Account for Tax Clearing, or Transaction OBXB. On the resulting screen, you
will see several procedures listed for down payments (group = ANZ). Double-click on the
appropriate procedure (‘Output tax clearing on down payments’ - transaction MVA) and
maintain the required G/L account(s) on the next screen (Figure 12.3).
Figure 12.3 Account for Output Tax Clearing on Down Payments
You may click on ‘Rules’ to look at the automatic posting settings (Figure 12.4). You can also
click on ‘Posting Key’ to see the associated keys for debit / credit posting.
Figure 12.4 Automatic Posting Rules for Output Tax Clearing on Down Payments

284 Configuring SAP Accounts Receivable & Accounts Payable (SAP S/4HANA Finance)
This completes our discussion on configuring the automatic posting rules for output tax
clearing on down payments. This also completes our discussion on the settings that are
required for configuring down payment received.
12.4 Conclusion
You learned that the ‘down payment received’ (also known as ‘customer down payments’)
denotes the advance amounts that you receive from your customers, and that they are
accounted in FI-A/R. You learned about the various configuration settings required to process
down payments received. In the process, you learned that you need to define alternate
reconciliation accounts so that the system automatically posts the down payments received
to these accounts, instead of to the normal A/R reconciliation account. You learned that you
also need to define tax accounts and tax clearing accounts for handling down payments
received.
With this, we can now proceed to discuss the settings that you need to make for down
payments made by you, in the next Chapter.
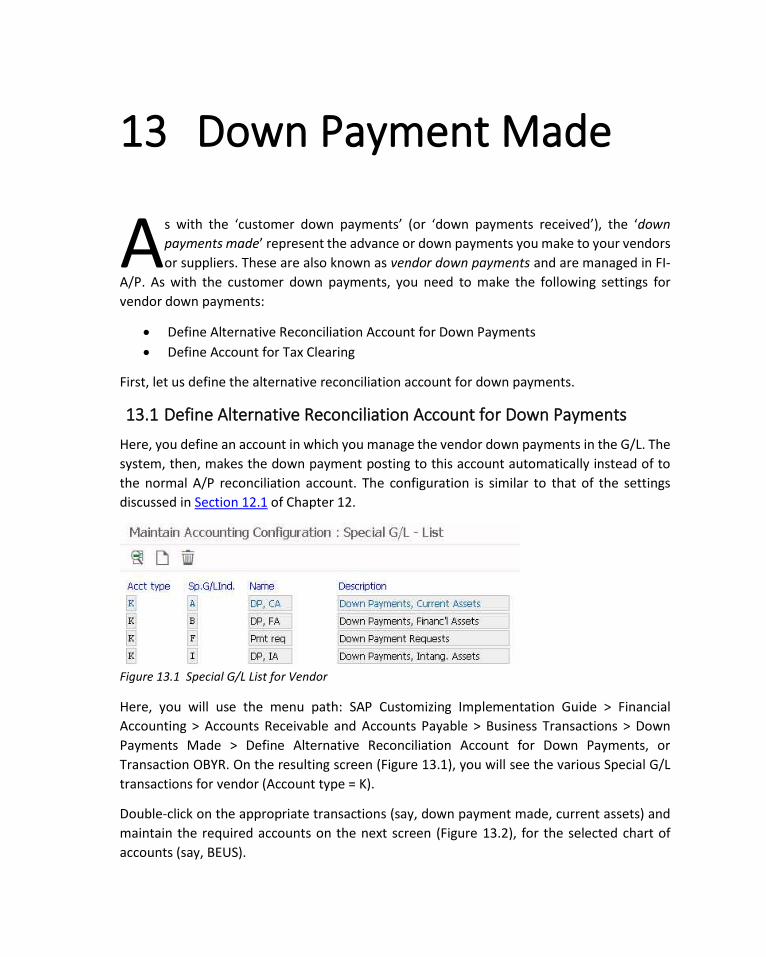
13 Down Payment Made
s with the ‘customer down payments’ (or ‘down payments received’), the ‘down
payments made’ represent the advance or down payments you make to your vendors
or suppliers. These are also known as vendor down payments and are managed in FI-
A/P. As with the customer down payments, you need to make the following settings for
vendor down payments:
• Define Alternative Reconciliation Account for Down Payments
• Define Account for Tax Clearing
First, let us define the alternative reconciliation account for down payments.
13.1 Define Alternative Reconciliation Account for Down Payments
Here, you define an account in which you manage the vendor down payments in the G/L. The
system, then, makes the down payment posting to this account automatically instead of to
the normal A/P reconciliation account. The configuration is similar to that of the settings
discussed in Section 12.1 of Chapter 12.
Figure 13.1 Special G/L List for Vendor
Here, you will use the menu path: SAP Customizing Implementation Guide > Financial
Accounting > Accounts Receivable and Accounts Payable > Business Transactions > Down
Payments Made > Define Alternative Reconciliation Account for Down Payments, or
Transaction OBYR. On the resulting screen (Figure 13.1), you will see the various Special G/L
transactions for vendor (Account type = K).
Double-click on the appropriate transactions (say, down payment made, current assets) and
maintain the required accounts on the next screen (Figure 13.2), for the selected chart of
accounts (say, BEUS).
A
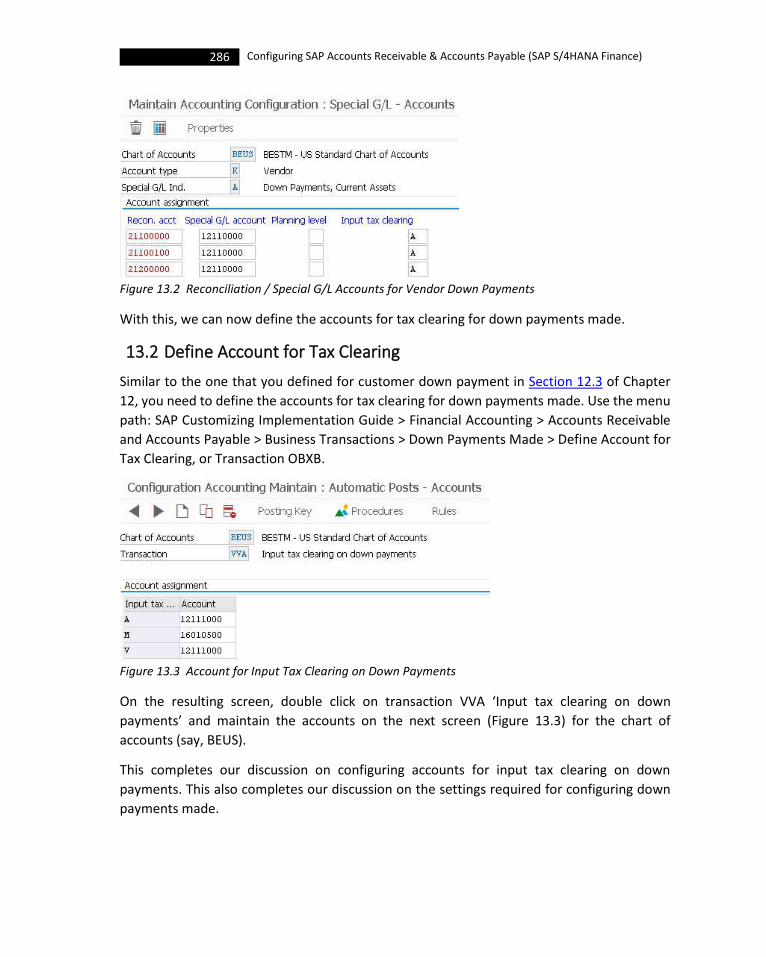
286 Configuring SAP Accounts Receivable & Accounts Payable (SAP S/4HANA Finance)
Figure 13.2 Reconciliation / Special G/L Accounts for Vendor Down Payments
With this, we can now define the accounts for tax clearing for down payments made.
13.2 Define Account for Tax Clearing
Similar to the one that you defined for customer down payment in Section 12.3 of Chapter
12, you need to define the accounts for tax clearing for down payments made. Use the menu
path: SAP Customizing Implementation Guide > Financial Accounting > Accounts Receivable
and Accounts Payable > Business Transactions > Down Payments Made > Define Account for
Tax Clearing, or Transaction OBXB.
Figure 13.3 Account for Input Tax Clearing on Down Payments
On the resulting screen, double click on transaction VVA ‘Input tax clearing on down
payments’ and maintain the accounts on the next screen (Figure 13.3) for the chart of
accounts (say, BEUS).
This completes our discussion on configuring accounts for input tax clearing on down
payments. This also completes our discussion on the settings required for configuring down
payments made.
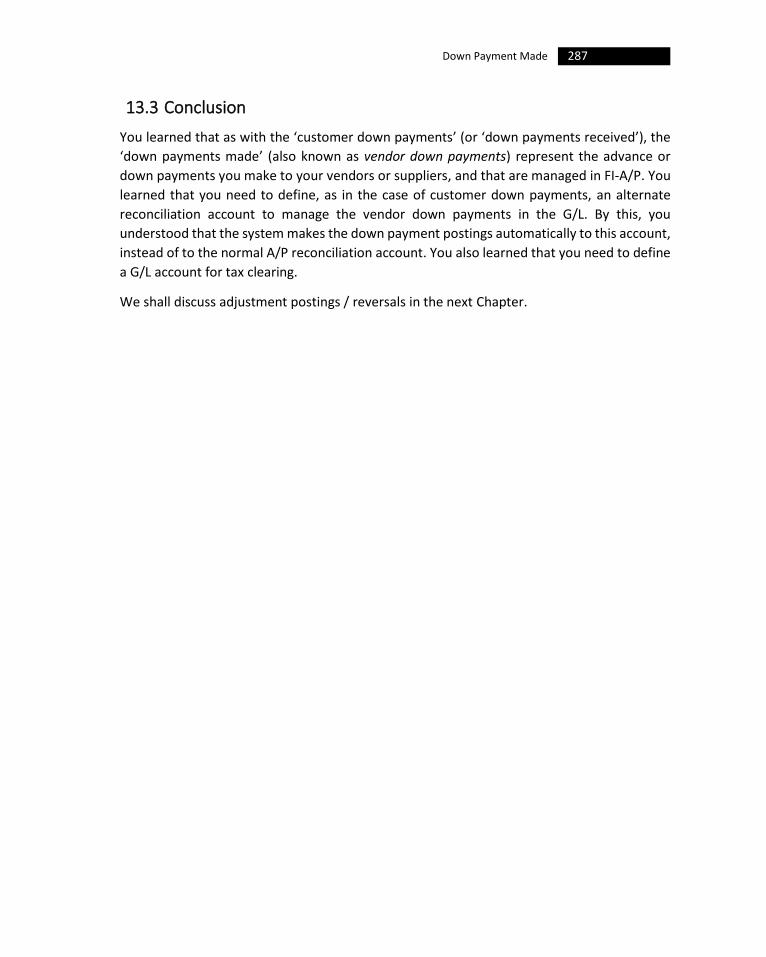
287 Down Payment Made
13.3 Conclusion
You learned that as with the ‘customer down payments’ (or ‘down payments received’), the
‘down payments made’ (also known as vendor down payments) represent the advance or
down payments you make to your vendors or suppliers, and that are managed in FI-A/P. You
learned that you need to define, as in the case of customer down payments, an alternate
reconciliation account to manage the vendor down payments in the G/L. By this, you
understood that the system makes the down payment postings automatically to this account,
instead of to the normal A/P reconciliation account. You also learned that you need to define
a G/L account for tax clearing.
We shall discuss adjustment postings / reversals in the next Chapter.


14 Adjustment Posting / Reversal
AP allows you to reverse a document that was entered incorrectly; the system clears
the open items as well. You can reverse a document only when (a) it contains no cleared
items, (b) it contains only customer, vendor, and G/L account items, (c) it was posted
with SAP FI, and (d) all the earlier entered values (such as business area, cost center, and tax
code) are still valid. You, normally, post the reversal document in the same posting period as
that of the corresponding original document. However, if the posting period of the original
document has been closed already, then, you may enter a date of an open posting period
(say, the current period) in the ‘Posting date’ field.
If a line item from a source document has been cleared, you can make a reversal only
after the clearing is reset. You can reverse the documents from SD with a credit memo, and
the documents from MM with functions in that component, because the FI reversal function
does not reverse all the values required.
When reversing a transaction, the system updates the transaction figures in two ways: (a) the
document and the reverse document increases the account’s transaction debit and credit
figures by the same amount or (b) after a document has been reversed, the balance of the
affected account is shown unchanged as if the document had never been posted to which is
also called as ‘negative posting’ (‘true reversal’).
You need to complete the following two tasks, to configure the system for adjustment or
reversal postings:
• Permit Negative Posting
• Define Reasons for Reversal
Let us complete the settings for negative postings, first.
14.1 Permit Negative Posting
When you mark the reversal and adjustment posting as ‘negative posting’, the system reduces
the transaction figures in customer, vendor and G/L Accounts. By this, the transaction figures
S
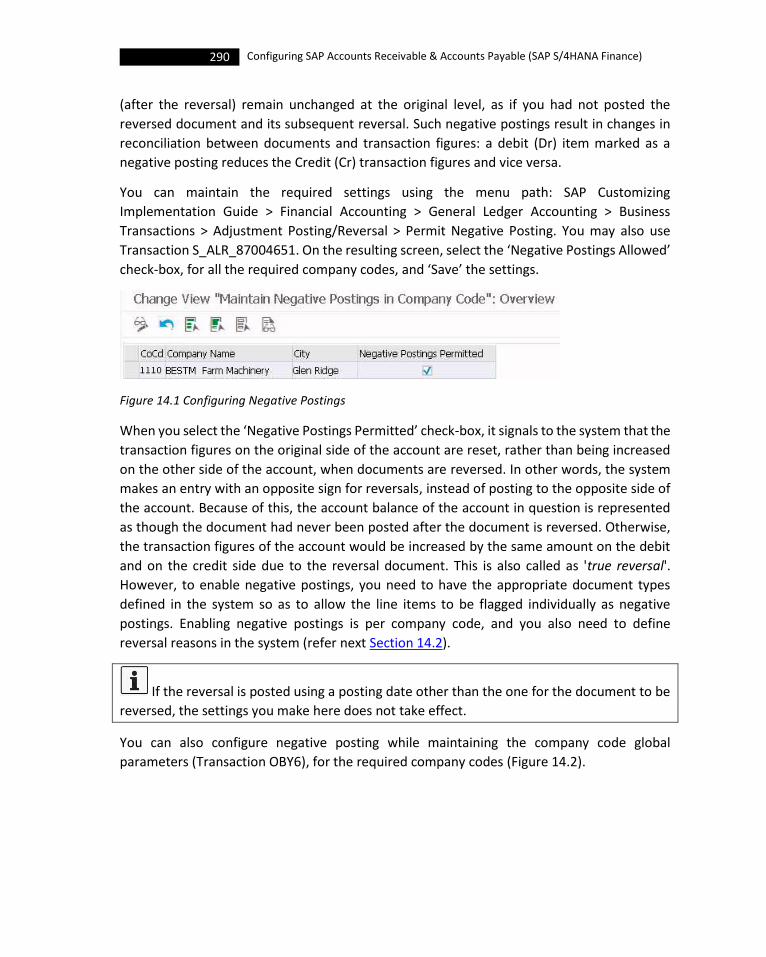
290 Configuring SAP Accounts Receivable & Accounts Payable (SAP S/4HANA Finance)
(after the reversal) remain unchanged at the original level, as if you had not posted the
reversed document and its subsequent reversal. Such negative postings result in changes in
reconciliation between documents and transaction figures: a debit (Dr) item marked as a
negative posting reduces the Credit (Cr) transaction figures and vice versa.
You can maintain the required settings using the menu path: SAP Customizing
Implementation Guide > Financial Accounting > General Ledger Accounting > Business
Transactions > Adjustment Posting/Reversal > Permit Negative Posting. You may also use
Transaction S_ALR_87004651. On the resulting screen, select the ‘Negative Postings Allowed’
check-box, for all the required company codes, and ‘Save’ the settings.
Figure 14.1 Configuring Negative Postings
When you select the ‘Negative Postings Permitted’ check-box, it signals to the system that the
transaction figures on the original side of the account are reset, rather than being increased
on the other side of the account, when documents are reversed. In other words, the system
makes an entry with an opposite sign for reversals, instead of posting to the opposite side of
the account. Because of this, the account balance of the account in question is represented
as though the document had never been posted after the document is reversed. Otherwise,
the transaction figures of the account would be increased by the same amount on the debit
and on the credit side due to the reversal document. This is also called as 'true reversal'.
However, to enable negative postings, you need to have the appropriate document types
defined in the system so as to allow the line items to be flagged individually as negative
postings. Enabling negative postings is per company code, and you also need to define
reversal reasons in the system (refer next Section 14.2).
If the reversal is posted using a posting date other than the one for the document to be
reversed, the settings you make here does not take effect.
You can also configure negative posting while maintaining the company code global
parameters (Transaction OBY6), for the required company codes (Figure 14.2).

291 Adjustment Posting / Reversal
Figure 14.2 Configuring Negative Postings using Transaction OBY6
Let us now go and define the reasons for reversals.
14.2 Define Reasons for Reversal
When performing a reversal, you must specify the ‘reason for reversal’ for the system to
display that in the reversed document’s header. You can define several reversal reasons in
the system: it could be an incorrect posting in the current period, an incorrect posting in a
closed period, a failed bill of exchange and so on. Specify, for each reversal reason, whether
(a) negative posting is to be created in the reversal document and (b) the reversal date can
differ from the posting date of the document that is to be reversed.
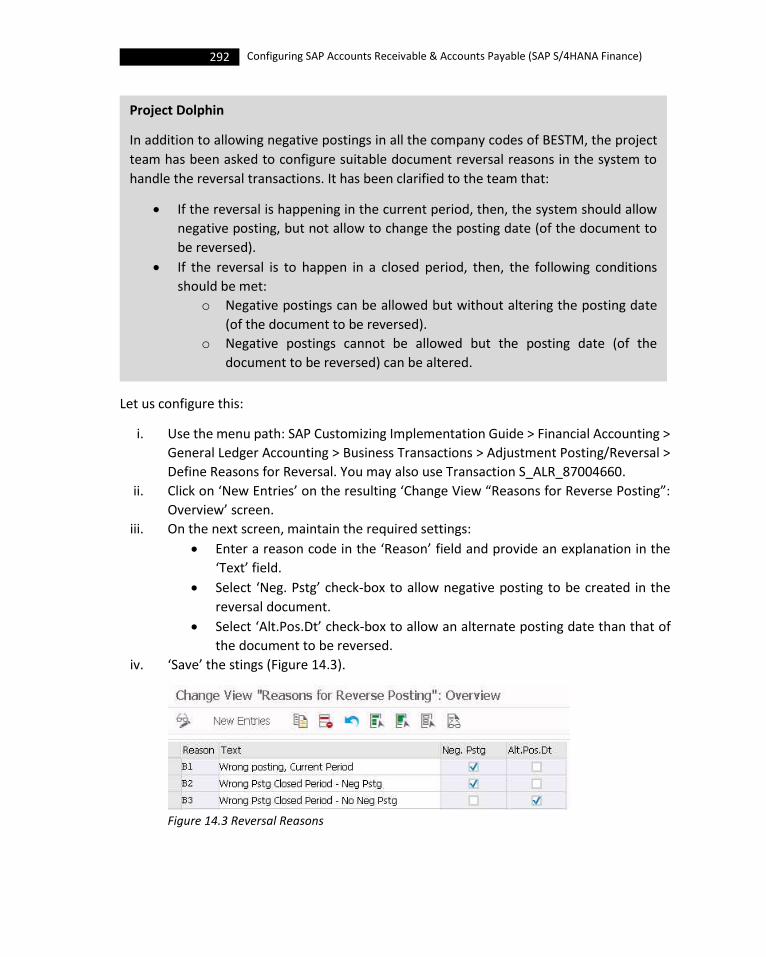
292 Configuring SAP Accounts Receivable & Accounts Payable (SAP S/4HANA Finance)
Let us configure this:
i. Use the menu path: SAP Customizing Implementation Guide > Financial Accounting >
General Ledger Accounting > Business Transactions > Adjustment Posting/Reversal >
Define Reasons for Reversal. You may also use Transaction S_ALR_87004660.
ii. Click on ‘New Entries’ on the resulting ‘Change View “Reasons for Reverse Posting”:
Overview’ screen.
iii. On the next screen, maintain the required settings:
• Enter a reason code in the ‘Reason’ field and provide an explanation in the
‘Text’ field.
• Select ‘Neg. Pstg’ check-box to allow negative posting to be created in the
reversal document.
• Select ‘Alt.Pos.Dt’ check-box to allow an alternate posting date than that of
the document to be reversed.
iv. ‘Save’ the stings (Figure 14.3).
Figure 14.3 Reversal Reasons
Project Dolphin
In addition to allowing negative postings in all the company codes of BESTM, the project
team has been asked to configure suitable document reversal reasons in the system to
handle the reversal transactions. It has been clarified to the team that:
• If the reversal is happening in the current period, then, the system should allow
negative posting, but not allow to change the posting date (of the document to
be reversed).
• If the reversal is to happen in a closed period, then, the following conditions
should be met:
o Negative postings can be allowed but without altering the posting date
(of the document to be reversed).
o Negative postings cannot be allowed but the posting date (of the
document to be reversed) can be altered.

293 Adjustment Posting / Reversal
The system will ignore the ‘negative posting allowed’ settings made here, if you have
not configured the company code to permit negative postings.
This completes our discussion on defining the reasons for reversal. This also completes our
discussion on adjustment posting / reversal.
14.3 Conclusion
You learned that you can reverse a document that was entered incorrectly, and that is
possible only when (a) it contains no cleared items, (b) it contains only customer, vendor, and
G/L account items, (c) it was posted with SAP FI, and (d) all the earlier entered values (such as
business area, cost center, and tax code) are still valid. You understood that you normally post
the reversal document in the same posting period as that of the corresponding original
document.
You learned that you can mark the reversal and adjustment posting as ‘negative posting’ (also
known as true reversal), so that the system reduces the transaction figures in customer,
vendor and G/L Accounts. By this, you understood that the transaction figures (after the
reversal) remain unchanged at the original level, as if you had not posted the reversed
document and its subsequent reversal. Such negative postings, you understood, will result in
changes in reconciliation between documents and transaction figures: a debit (Dr) item
marked as a negative posting reduces the Credit (Cr) transaction figures and vice versa.
When performing a reversal, you learned that you must specify the ‘reason for reversal’ for
the system to display that in the reversed document’s header. You also learned that you need
to specify, for each reversal reason, whether (a) negative posting is to be created in the
reversal document and (b) the reversal date can differ from the posting date of the document
that is to be reversed.
We can move on to discuss interest calculation in the next Chapter.

15 Interest Calculation
n SAP FI, you will come across two types of interest: balance interest (also known as ‘bank
interest’) and item interest (also known as ‘arrears interest’). You will use the ‘balance
interest calculation’ functionality, to calculate interest on the balance of G/L accounts that
are managed on open item basis. You may use this, for example, to double-check the interest
calculation made by the bank on your accounts. You will use the ‘item interest calculation’ to
calculate interest on you customer / vendor accounts.
Since you have already made the settings for bank account interest calculation as a part of
configuring SAP G/L Accounting, you are aware that the system controls the interest
calculation, for an account, by the settings that you make in the interest indicator that is found
in the master record. This indicator determines, among other things, whether you want to
calculate interest for open or cleared items, whether you want to post the interest, whether
you want to print an interest letter etc. The system always calculates the interest using the
debit interest rate defined for the interest indicator. Of course, you can also make the settings
to use credit interest rates to calculate interest on items that have been paid prior to their
due date.
Before discussing how the system calculates interest, let us first understand the fields (in
customer / vendor master record) that are relevant for interest calculation.
15.1 Fields Relevant for Item Interest Calculation
You will come across two fields, in the company code data area of customer / vendor master
records, that are relevant for the calculation of item interest. They are:
• Interest Indicator
• Last Key Date
To calculate item interest for customer / vendor accounts, the ‘interest calculation report’
references the ‘interest indicator’ from the account master record. The most important
specifications (such as, the rules used for interest calculation and the interest rate) for interest
calculation are stored in this indicator. It controls the interest calculation in the system. It
stores (a) the calendar type (say: bank, French, Japanese or Gregorian) that is used for defining
the days due for interest (b) interest rates and the conditions, and (c) the ‘Form’ for the lists.
The interest indicator must belong to the interest calculation type ‘Item interest calculation’
(P). All accounts that you want to be included in the automatic interest calculation run must
I
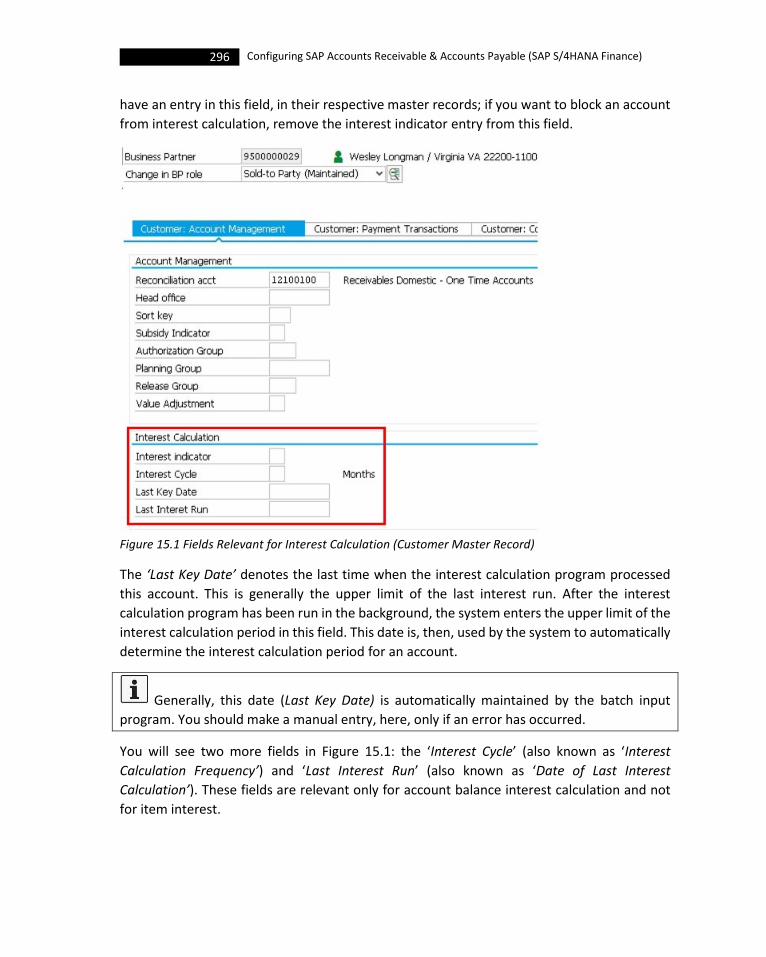
296 Configuring SAP Accounts Receivable & Accounts Payable (SAP S/4HANA Finance)
have an entry in this field, in their respective master records; if you want to block an account
from interest calculation, remove the interest indicator entry from this field.
Figure 15.1 Fields Relevant for Interest Calculation (Customer Master Record)
The ‘Last Key Date’ denotes the last time when the interest calculation program processed
this account. This is generally the upper limit of the last interest run. After the interest
calculation program has been run in the background, the system enters the upper limit of the
interest calculation period in this field. This date is, then, used by the system to automatically
determine the interest calculation period for an account.
Generally, this date (Last Key Date) is automatically maintained by the batch input
program. You should make a manual entry, here, only if an error has occurred.
You will see two more fields in Figure 15.1: the ‘Interest Cycle’ (also known as ‘Interest
Calculation Frequency’) and ‘Last Interest Run’ (also known as ‘Date of Last Interest
Calculation’). These fields are relevant only for account balance interest calculation and not
for item interest.
297 Interest Calculation
With this let us now understand how the system handles the interest calculation for item
interest.
15.2 Item Interest Calculation Process
Before getting into the item interest calculation process, let us first understand the
prerequisites that you should have configured, for item interest calculation.
15.2.1 Prerequisites
The following are the prerequisites that should be in place for item interest calculation.
i. You have defined an interest indicator for the item interest calculation (type P) and
made all other relevant specifications. You have also made the required
specifications, for example, whether the interest is to be posted and whether forms
are to be printed. Refer the subsequent Section 15.3.1 wherein we have defined the
interest calculation types, and refer Section 15.3.3 wherein we have completed the
specifications for item interest calculation.
ii. You have entered the interest indicator in the master records of the customers
concerned. Refer the previous Section 15.1 for more details.
iii. You have defined the required conditions for your interest indicators. Refer the
subsequent Section 15.5.2 for more details.
While defining the time-dependent terms, you will not use the ‘Amount from’
field as this is not relevant for item interest calculation, but valid for balance interest
calculation. Specifying an amount, in this field, allows you to specify interest rates
staggered on amounts.
iv. To send an interest letter, you should have created a Smart Form or PDF form, that is
stored in the system and used for the interest calculation. You may use the default
form F_INTITAR_SF as such, or you can use that as a template to create your own
form. Refer the subsequent Section 15.6 for more details.
v. You have defined the account determination for posting the interest and defined the
document type to be used. You should have configured the control parameters (for
the posting interface 0002). You should have also completed G/L account assignment
for interest revenue or interest expense). Refer the subsequent Section 15.5.1 for
more details.
With the prerequisites in place, let us understand how to execute the item interest calculation
program.
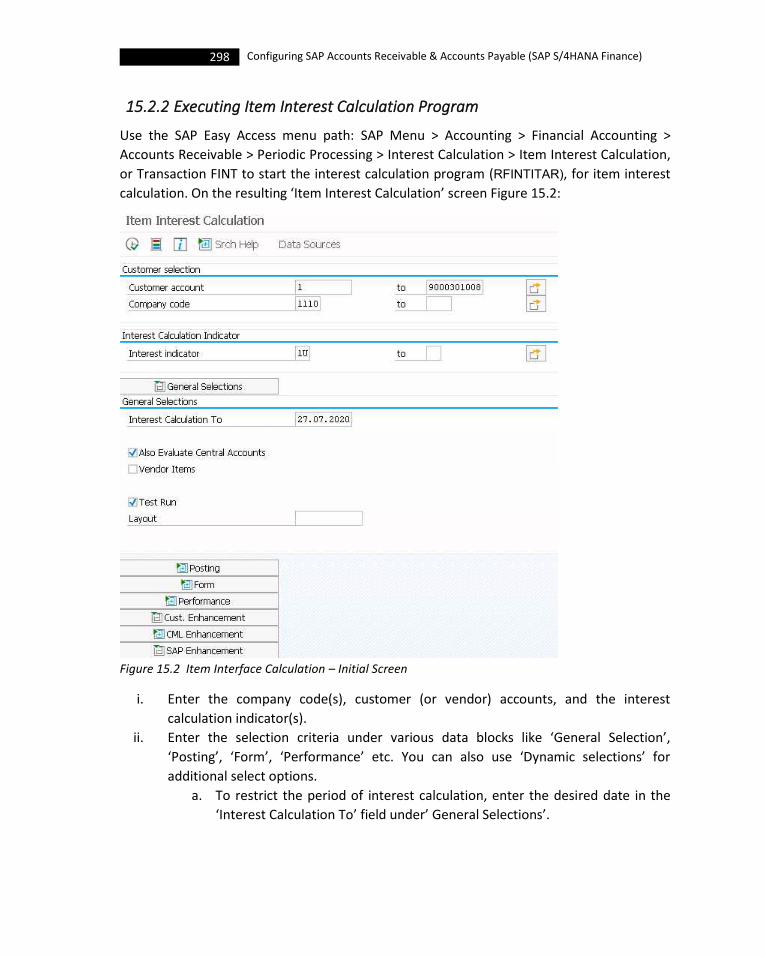
298 Configuring SAP Accounts Receivable & Accounts Payable (SAP S/4HANA Finance)
15.2.2 Executing Item Interest Calculation Program
Use the SAP Easy Access menu path: SAP Menu > Accounting > Financial Accounting >
Accounts Receivable > Periodic Processing > Interest Calculation > Item Interest Calculation,
or Transaction FINT to start the interest calculation program (RFINTITAR), for item interest
calculation. On the resulting ‘Item Interest Calculation’ screen Figure 15.2:
Figure 15.2 Item Interface Calculation – Initial Screen
i. Enter the company code(s), customer (or vendor) accounts, and the interest
calculation indicator(s).
ii. Enter the selection criteria under various data blocks like ‘General Selection’,
‘Posting’, ‘Form’, ‘Performance’ etc. You can also use ‘Dynamic selections’ for
additional select options.
a. To restrict the period of interest calculation, enter the desired date in the
‘Interest Calculation To’ field under’ General Selections’.
299 Interest Calculation
b. You need to select the ‘Also Evaluate Central Accounts’ check-box, under
‘General Selections’, if you work with the head and branch office relationship.
c. For configuring the form for printing interest letters, specify a form name also
specify the information, including the data of issuance of the letter that is to
be printed on the letter in ‘Form’ data block.
If you do not do this, the program uses a default standard form stored
in the system is used.
iii. Select the ‘Test Run’ under ‘General Selections’ and ‘Execute’. The system brings up
an overview of the items on which interest is to be calculated. The SAP standard ALV
variant is configured in such a way that items for which no interest is due are not
displayed. You can double-click the individual items to see the detailed information
for the interest calculation for the individual items.
From the overview list, you can also post / print a letter.
iv. When satisfied, deselect ‘Test Run’ check-box and ‘Execute’. The system makes the
update run: posts the interest and prints the interest letters, as per the settings that
you have made earlier.
In the case of FI-A/P, use the SAP Easy Access menu path: SAP Menu > Accounting >
Financial Accounting > Accounts Payable > Periodic Processing > Interest Calculation > Item
Interest Calculation, or Transaction FINTAP. For both FI-A/R and A/P, use Transaction
FINTSHOW to display the interest run.
With the specifications entered and the interest calculation program executed, let us now
understand how the system selects the items and process the item interest calculation.
15.2.3 The Interest Calculation Process
With the prerequisites set in the system (Section 15.2.1) and the select options put in as
described in the previous Section (15.2.2), the system carries out the item interest calculation
as described below:
15.2.3.1 Item Selection
The system identifies the items on which interest is to be calculated, based on the rules that
you have defined in the interest indicator (Section 15.3.3), the settlement date of the interest
run, and the date of the last interest calculation (‘Last Key Date’) in the master record. Besides,
it considers only the (a) items that have been posted to a customer account with a master
300 Configuring SAP Accounts Receivable & Accounts Payable (SAP S/4HANA Finance)
record that contains an interest calculation indicator, (b) items that are not blocked for
interest calculation and (c) items that do not contain a cash discount amount.
In the whole process of identifying the eligible items for item interest calculation, the program
iterates as under:
• As regards open items, the system calculates interest only on items that are currently
open. The system calculates the interest on these open items up to the upper limit of the
calculation period. It will not calculate interest on open items that are due after the upper
limit of the calculation period.
• With regards to the cleared items, the system calculates interest on all cleared items
whose clearing date (posting date of clearing) is before or equal to the upper limit of the
calculation period. The system also calculates interest on items whose clearing date is
after the upper limit of the calculation period, if interest is also calculated on those open
items. The system does not select the items whose clearing date is before or equal to the
key date for the last interest calculation as entered in the account master record (upper
limit of the last interest calculation) as they have already been included the calculation of
the interest. The program does not consider any of the cleared items, irrespective of the
clearing date.
• In the case of items cleared by payments, the system considers only the clearing
transactions that contain a payment; that is, it does not consider clearing transactions
that contain only invoices, credit memos, and offsetting items.
• The system calculates the interest on open items from their due date for net payment up
to the settlement date. It calculates the interest on cleared items from their due date for
net payment to the due date for net payment of the clearing document. If there is no line
item in the clearing document, then, the system calculates the interest up to the clearing
date.
• If an item is overdue and interest is to be calculated, the system compares the number of
days in arrears with the number of tolerance days. If the number of days in arrears is less
than or equal to the number of tolerance days, then, the system does not calculate
interest on that item.
• To make allowance for when payments take longer than usual to transfer or when the
relevant accounts are not cleared promptly, you can specify the transfer days for
incoming payments while configuring the interest indicator. The system, then, subtracts
these transfer days from the document date of the payment.
• With the factory calendar defining which days are non-working days, if the due date for a
receivable is a non-working day, then, the system moves the due date to the next working
day. If an incoming payment is received on a non-working day as a result of the transfer
days, then, the system moves the incoming payment receipt to the previous working day.

301 Interest Calculation
• If you have selected the ‘Calculate interest on items paid before due date’ (in interest
indicator), then, the system calculates interest also for items that have been paid before
the due date if the items were paid without cash discount being granted. It calculates
credit interest for debit items, and debit interest for credit items. The system also
calculates interest on partial payments made and down payment clearing carried out
before the invoice is due starting from the reference date, if you have selected this check-
box; if not, it calculates from the due date of the invoice.
• When you have selected the ‘Only calculate interest on debit items’ check-box (in interest
indicator), the system does not calculate interest on credit items. But, when not selected,
the system treats the credit item of a clearing transaction like an existing debit item, and
calculates interest for it with the same interest rate. This is because if the credit memo is
not cleared right away by the invoice, but cleared later, both the invoice and credit memo
will become overdue and should consequently balance out in terms of interest.
With the understanding of selection of items for the interest calculation, let us now proceed
to discuss how the system calculates the interest.
15.2.3.2 Interest Calculation
If an item qualifies for interest calculation according to the criteria described above, then the
system first calculates the days in arrears depending on the calendar type defined in the
interest indicator. Using the Gregorian or French calendar, the program calculates the exact
number of days. If you have selected the bank calendar or the Japanese calendar, the number
of days is calculated according to the bank calendar that is standard in Germany. Each month
in a bank calendar has 30 days.
Now, the system calculates interest using the reference interest rates that you have defined
(refer Section 15.4.1). The system determines the interest rates valid for a specific item using
conditions. You define these conditions (time-dependent terms) in the system in the key fields
‘Interest Indicator’, ‘Currency Key’, and ‘Eff. from’ (from which the condition is valid) and
‘Sequential Number’ for the valid interest reference (refer Section 15.4.2). The system
determines the final interest rate using a function module (the standard function modules are
DEBIT_INT_RATE_DETERMINE and CREDIT_INT_RATE_DETERMINE). It also adds the discount
or surcharge specified in the interest indicator to the reference interest.
In the standard system, the program calculates the interest on a linear basis. If you want
to use a different formula, you can use method INT_FORMULA of the BAdI FI_INT_CUS01.
In addition to the actual interest, you can also work with fixed amounts. The system
determines these fixed amounts, for each invoice for which interest is calculated. You can
either add the fixed amount fully to the interest, or you can set the fixed amount as a
302 Configuring SAP Accounts Receivable & Accounts Payable (SAP S/4HANA Finance)
minimum. In the second case, only the amount of the difference is added. Refer Section 15.4.4
for more details. The fixed amounts are added to items that are posted as debits (on the credit
side as credits), have a sales-relevant posting key, do not have a reference to an invoice, and
for which interest is due because the items are overdue.
In order to establish whether an interest settlement needs to be created, the system needs
to calculate interest for all items. If the interest amount determined for each interest letter is
less than the amount limit defined for the interest indicator, then, the system creates no
interest debit. If a credit interest amount arises that is at least equal to the amount limit, then,
the system creates no interest settlement when you have selected ‘No interest payment’
check-box while configuring the interest indicator (refer Section 15.3.3).
With this, let us move on to understand how the system carries out posting of the calculated
interest.
15.2.3.3 Interest Posting
While configuring the interest indicator, you can also define the terms of payment and the
tax on sales/purchases code to be used to post the interest (refer Section 15.3.3). If you have
selected the ‘Posting with Invoice Ref’ check-box, then, the system enters a reference, to the
items on which interest has been calculated, in all interest postings. The invoice reference
type here is F. In the calculation of interest on items that themselves refer to an invoice (entry
in field REBZG), the interest documents refer to the original invoice. If you want these interest
documents to have certain characteristics of the documents on which interest has been
calculated, you need to enter the corresponding characteristics in the ‘Transfer Content’ fields
(refer Section 15.3.3).
15.2.3.4 Printout
You can create an interest letter with a list of items for each customer, currency, and one
other grouping criterion. If you start the interest calculation report as a test run (Transaction
FINT), you see an overview of all the items on which interest has been calculated. If errors
occur, you receive an error log.
The system creates an interest intimation letter to your business partners with the
appropriate text, overview of the line items, interest rates and interest. You need to select
the ‘Print Interest per Int. Rate’ check-box (under ‘Form’ data block) to print an overview table
of the interest rates at the end of item list.
15.2.3.5 Others
You can use the report ‘Interest Run Display’ (RFINTITSHOW) to display interest runs that you
have performed, to reverse them, or to print forms again.

303 Interest Calculation
You can also delete entries from the interest tables INTITHE, INTITIT, and INTITPF using report
RFINTITDEL. However, you can only delete entries from the interest tables for items for which
interest has already been completely calculated. The program RFINTITDEL checks this
automatically. For items on which interest has been calculated in full, the program deletes
the detailed information about the interest calculation from table INTITIT without further
checking, based on the entries on the selection screen. For an item, for which the entries in
table INTITIT have been deleted, you can no longer track the interest history or determine the
amount of interest that was due on this item. Even after you have deleted tables INTITIT and
INTITPF for a specific item, table INTITHE still contains the information that interest has been
calculated on this item in full. This information is sufficient for any future calculation of
interest by program RFINTITAR. As long as the entry remains in table INTITHE, duplicate
calculation of interest on the item is not possible.
15.2.3.6 Old and New Interest Calculation Programs
The old interest calculation program RFDUZI00 has since been updated with the new program,
RFINTITAR. The new program contains the following changes and enhancements:
• The selection screen has been simplified; several of the selection criteria have been
moved to Customizing for the interest indicator.
• Using report RFINTITUSERXT, you can insert additional selection criteria in the
interest calculation. You can also use this report to define additional fields to be
displayed on the form.
• The form is now created with Smart Forms or PDF (previously: SAPscript).
• The interest posting is no longer triggered by running a batch input session; the report
posts the interest documents directly using the accounting interface. This means that
the document number for the interest posting can also be displayed on the form.
• The results of the interest calculation are created in detail on the database (Tables
INTITHE and INTITIT). As a result, now, you can (a) use report RFINTITSHOW to view
the interest runs that have been carried out, (b) print interest runs and (c) reverse
and repeat individual interest postings or complete interest runs.
• If you start the program as a test run instead of an update run, you receive an
overview of the items on which interest is to be calculated in the ABAP List Viewer
(ALV). To display the items on which no interest is to be calculated, delete the ALV
filter. You can double-click the individual items to view the detailed information. You
can display the letters to be created and trigger printing and updating of all letters or
selected letters. It is not possible to select individual items within an interest letter
for processing. It is also not possible to manually change the interest calculated.
• You can calculate interest on items from assigned vendors.
• The relationships between a branch and the head office are taken into account.
304 Configuring SAP Accounts Receivable & Accounts Payable (SAP S/4HANA Finance)
• The interest calculation using numerators is no longer supported.
With this, let us proceed to configure the system for item interest calculation.
We shall discuss the settings under the following four groups:
1. Interest Calculation Global Settings 2. Interest Calculation 3. Interest Posting 4. Printout
Let us start with the first group of settings, namely the global settings for interest calculation.
15.3 Interest Calculation Global Settings
The global settings for interest calculation include the following configuration steps:
• Define Interest Calculation Types
• Define Number Ranges for Interest Forms
• Prepare Item Interest Calculation
• Prepare Account Balance Interest Calculation
Let us get started with the first activity of defining the interest calculation types.
15.3.1 Define Interest Calculation Types
We have already completed this step vide Section 10.2.3.1 of Chapter 10, wherein we have defined two interest indicators (1I and 1U) for item (or arrears) interest calculation (type P), and two (2I and 2U) more for balance interest calculation (type S). In case you want to revise or check, you may use the menu path: SAP Customizing Implementation Guide > Financial Accounting > Accounts Receivable and Accounts Payable > Business Transactions > Interest Calculation > Interest Calculation Global Settings > Define Interest Calculation Types.
The next step is to define the number ranges for the interest forms.
15.3.2 Define Number Ranges for Interest Forms
You can define the number ranges for the interest forms, per company code, following the
menu path: SAP Customizing Implementation Guide > Financial Accounting > Accounts
Receivable and Accounts Payable > Business Transactions > Interest Calculation > Interest
Calculation Global Settings > Define Number Ranges for Interest Forms, or Transaction FBN1.
On the resulting screen, enter the company code and maintain a number range with internal
number assignment (Figure 15.3). If you are calculating interest on accounts from various
company codes, then, you need to define the same number range for each company code.
The system stores the number, in the ‘Reference’ field, while posting the interest.
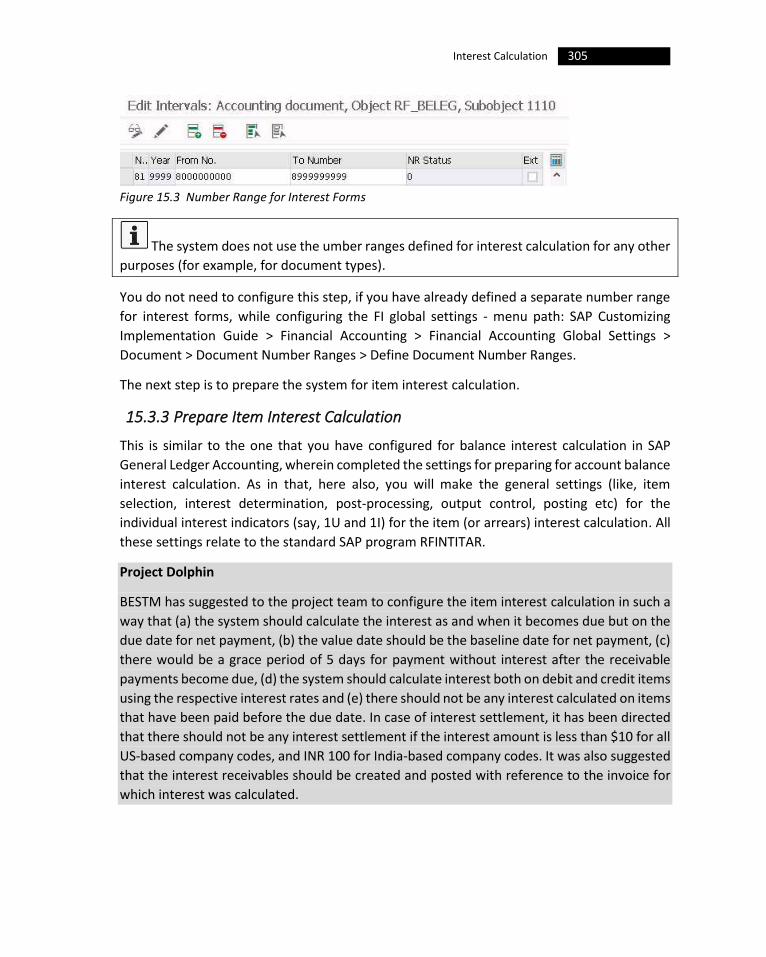
305 Interest Calculation
Figure 15.3 Number Range for Interest Forms
The system does not use the umber ranges defined for interest calculation for any other
purposes (for example, for document types).
You do not need to configure this step, if you have already defined a separate number range
for interest forms, while configuring the FI global settings - menu path: SAP Customizing
Implementation Guide > Financial Accounting > Financial Accounting Global Settings >
Document > Document Number Ranges > Define Document Number Ranges.
The next step is to prepare the system for item interest calculation.
15.3.3 Prepare Item Interest Calculation
This is similar to the one that you have configured for balance interest calculation in SAP
General Ledger Accounting, wherein completed the settings for preparing for account balance
interest calculation. As in that, here also, you will make the general settings (like, item
selection, interest determination, post-processing, output control, posting etc) for the
individual interest indicators (say, 1U and 1I) for the item (or arrears) interest calculation. All
these settings relate to the standard SAP program RFINTITAR.
Project Dolphin
BESTM has suggested to the project team to configure the item interest calculation in such a
way that (a) the system should calculate the interest as and when it becomes due but on the
due date for net payment, (b) the value date should be the baseline date for net payment, (c)
there would be a grace period of 5 days for payment without interest after the receivable
payments become due, (d) the system should calculate interest both on debit and credit items
using the respective interest rates and (e) there should not be any interest calculated on items
that have been paid before the due date. In case of interest settlement, it has been directed
that there should not be any interest settlement if the interest amount is less than $10 for all
US-based company codes, and INR 100 for India-based company codes. It was also suggested
that the interest receivables should be created and posted with reference to the invoice for
which interest was calculated.

306 Configuring SAP Accounts Receivable & Accounts Payable (SAP S/4HANA Finance)
Let us make the settings using the menu path: SAP Customizing Implementation Guide >
Financial Accounting > Accounts Receivable and Accounts Payable > Business Transactions >
Interest Calculation > Interest Calculation Global Settings > Prepare Item Interest Calculation.
On the resulting screen, click on ‘New Entries’ and make the appropriate settings on the next
screen (Figure 15.4):
i. Enter the interest indicator (say, 1U) for item interest calculation (‘Interest Ind.’).
ii. Under ‘Item Selection’, select the ‘Open Items’ check-box, and also select the ‘All
Cleared Items’ radio-button.
iii. On the ‘Interest Determination’ block:
• Do not select ‘Always Calculate Int. from Net Dte’ check-box. Else, the system
will calculate interest only as of the due date for net payment.
• Enter the value date in the ‘Ref Date’ field. Enter 1, here, as you want the
system to refer to the baseline date for net payment as the value date. The
other options include document date (2), posting date (3) and payment
baseline date (4).
• Enter the ‘Calendar Type’. Let this be ‘G’. Dependent on the calendar type, a
year has a different number of days: The bank calendar and French calendar
have 360 days, whereas, the Gregorian and Japanese calendars have either
365 or 366 days (leap years). If the interest period goes over the boundary
into a leap year, the length of the year is between 365 and 366, based on the
proportion of the interest period that falls in the leap year.
• Leave the ‘Transfer Days’ field as blank. The system recognizes the ‘transfer
days’ are only for incoming payments, and these days have no meaning for
open items.
• Enter ‘Tolerance Days’, if any. When entered, the system does not calculate
the interest, for these many grace days, on customer receivable even after
they become due. It will be 5 for BESTM.
• Select the ‘Calculate interest on items paid before date’ check-box if you want
the system to calculate the credit interest (using credit interest rates) for
items that are paid before their due date, subject to the condition that the
paid items were not subject to cash discount. We shall not select this for 1U.
• You have to select ‘Only calculate interest on debit items’ check-box, if you
want the system to calculate interest only on debit items ignoring the credit
ones.
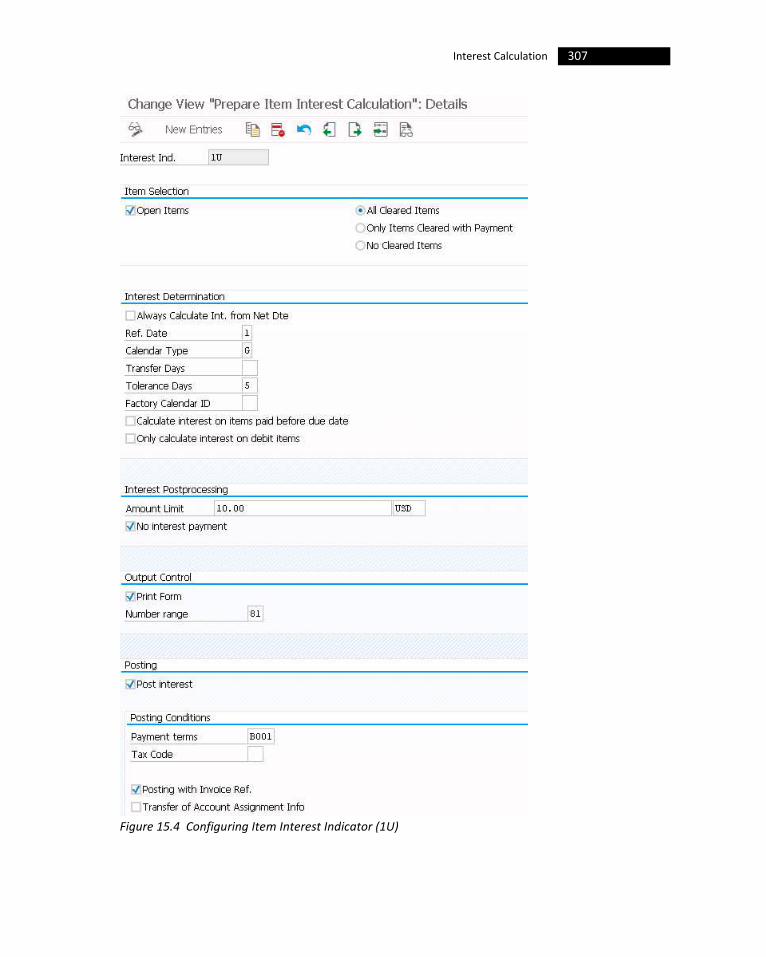
307 Interest Calculation
Figure 15.4 Configuring Item Interest Indicator (1U)
308 Configuring SAP Accounts Receivable & Accounts Payable (SAP S/4HANA Finance)
When ‘Only calculate interest on debit items’ check-box is not selected,
the system calculates interest on credit items as well, by treating them as
debit items by applying the same (debit) interest. This is because, if the credit
memo is not cleared immediately by the invoice, but cleared later, both the
invoice and credit memo will become overdue and will eventually balance out
in terms of interest.
iv. In the ‘Amount Limit’ field, under ‘Interest Postprocessing’, enter the amount limit
and the respective ‘Currency’ in the adjacent field. If the system-calculated interest is
below this threshold per currency per account, then the system does not generate an
interest settlement. Select the ‘No Interest Payment’ check-box, if you do not want
the system to create an interest settlement when an interest payment is produced.
The system produces an interest payment when the credit interest (on items
paid before the due date) is greater than the debit interest.
v. Under ‘Output Control’, do not select the ‘Print Form’ check-box if you want only an
account-level overview; else, select the flag. Enter the ‘Number Range’ for the
interest forms.
vi. Under ‘Posting’, select the ‘Post interest’ check-box enabling the system to post the
interest.
vii. Under ‘Posting Conditions’ you may also maintain the ‘Payment terms’ and ‘Tax
Code’. Select the ‘Posting with Invoice Ref.’ check-box, so that, the system creates the
interest receivable and posts the same with reference to each of the invoices for
which interest is calculated; the system creates a separate line item that contains the
corresponding invoice reference.
In the case of account balance interest calculation, the system posts the interest
by a batch input session, only when you ‘run’ the session. On the other hand, in the
item interest calculation, the system posts the interest when you start the program
as an ‘update’ run.
viii. ‘Save’ the settings, and create the other item interest indicator 1I for BESTM.
The next step is to make the settings for account balance interest calculation
309 Interest Calculation
15.3.4 Prepare Account Balance Interest Calculation
Define the general interest calculation specifications per interest indicator, in this step. The
specifications include the period determination, the interest determination, the interest
processing, the output controls, and the payment terms.
Project Dolphin
BESTM management wants the project team to configure the two new interest indicators
with the details as under:
The interest calculation frequency is to be set at six months for the staff loans, for both India
and USA, in the interest indicators. The Gregorian calendar needs to be used for interest
calculations. The interest settlement should be configured to be on the last day of the month.
The interest needs to be charged on a graduated scale for all the staff loan accounts, for US-
based company codes, at 2% interest up to $10,000; 3% up to $25,000; and 4% in excess of
$25,000; for India, the corresponding figures will be: 8% for loans up to INR 200,000, 9% up
to INR 500,000 and 10.5% for above INR 500,000. The interest will have to be settled when
the interest amount calculated is in excess of $10 and INR 100 respectively for US and India-
based company codes. The interest needs to be paid within 10 days of interest posting to the
respective accounts. The interest posting is to be made to the appropriate G/L accounts, one
for interest paid (71100000) and another for interest received (70100000). The system should
use the document type SA for interest posting.
To configure the global interest calculation specifications for the two new interest indicators
(2I and 2U), for account balance calculation, that we have created earlier:
i. Use the menu path: SAP Customizing Implementation Guide > Financial Accounting >
Accounts Receivable and Accounts Payable > Business Transactions > Interest
Calculation > Interest Calculation Global Settings > Prepare Account Balance Interest
Calculation. You may also use Transaction OBAA.
ii. On the resulting screen, click on ‘New Entries’ and maintain the details (Figure 15.5):
• Enter the ‘Interest Indicator’.
• In the ‘Period determination block’, enter the interest calculation frequency
(‘Interest calc. freq.’). This will be 6 for BESTM. An entry in this field
determines the interval (in months) for interest calculation for the accounts.
The system adds the interest calculation frequency entered here, to the date
of the last interest calculation to arrive at the upper limit for selecting the
accounts for the interest run. You can maintain the interest calculation
frequency, either here in the interest indicator or in the G/L account master
record. The entry in the master record has the precedence.

310 Configuring SAP Accounts Receivable & Accounts Payable (SAP S/4HANA Finance)
For example, if you enter 06 (as in our case) here in the interest
indicator, with the last interest calculation date being 6/30, the system
arrives at the upper limit as 12/31 for the next interest calculation. Also
consider the other example wherein you have specified the interest
calculation date (say, 15/12/2019) as a report parameter to determine
whether an account is included in a particular interest run. Then, the system
compares this new upper limit with the upper limit already calculated (using
the interest calculation frequency and last interest calculation date); if the
calculated upper limit (say, 12/31/2019) is after the new calculation period
based on the date entered in the report parameter (15/12/31), then, that
account is not included in the current interest run.
• Along with the interest calculation frequency and the key date of the last
interest calculation, the ‘Settlement day’ determines the upper limit of the
interest calculation period to be included in a program run. You can specify a
value between 01 and 31.
Consider the example where in the last interest calculation was on
6/30/2019, and the interest calculation frequency at 3 months. The system,
now, calculates the upper limit month as 9 from the upper limit date
9/31/2019. If the settlement day is mentioned as 25, then the upper limit is
arrived to be 9/25. In case this calculation results in an invalid date such as
6/31, for example, then the system sets this as to the end of that month, that
is 6/30. It also takes care of the year issues by automatically registering a
change to the next year when the month of the key date (say, 09) plus interest
calculation frequency (say, 06) exceeds 12; the upper limit will, then, be
arrived at 03.
• The ‘Calendar Type’ determines how many days per month and year are to
be used as the basis for calculating interest. The number of days in the year
is used as the divisor for the interest rate to calculate the daily interest rate
from the annual interest rate. You have the options like, bank calendar (B)
which is 30/360 (30 days in a month and 360 days in a year), French calendar
(F) which is made up of calendar months (30,28, 31 days) but 360 days in a
year, Gregorian calendar (G) which is the regular calendar (28, 30, 31/365)
and Japanese calendar (30 days in a month and 365 days in a year). Select G
for 2U.
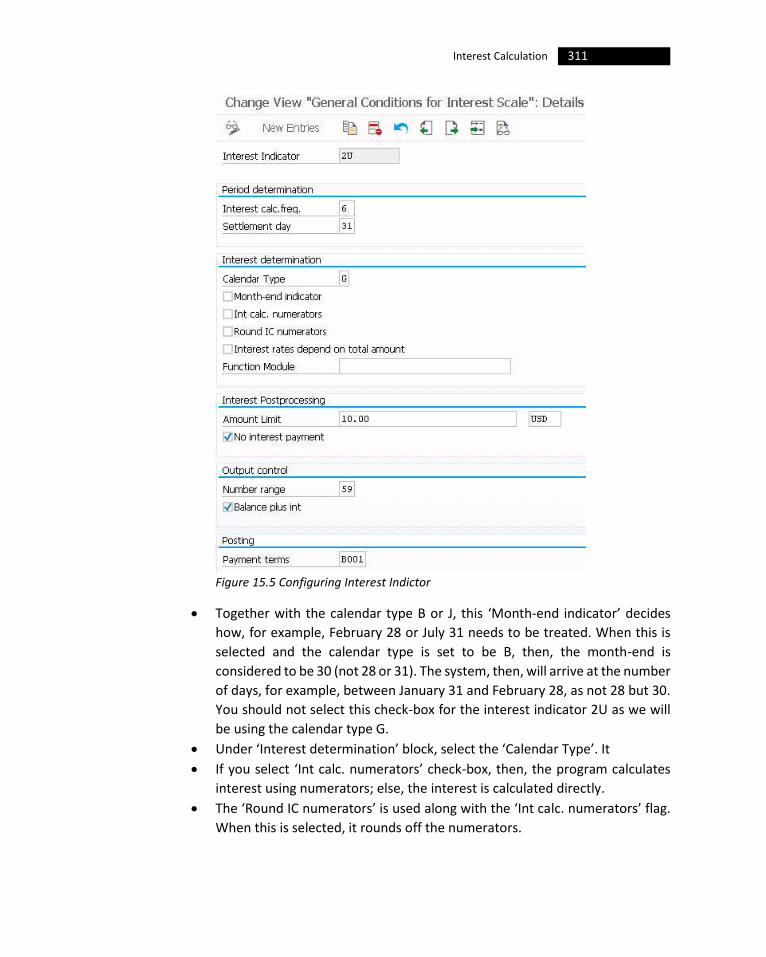
311 Interest Calculation
Figure 15.5 Configuring Interest Indictor
• Together with the calendar type B or J, this ‘Month-end indicator’ decides
how, for example, February 28 or July 31 needs to be treated. When this is
selected and the calendar type is set to be B, then, the month-end is
considered to be 30 (not 28 or 31). The system, then, will arrive at the number
of days, for example, between January 31 and February 28, as not 28 but 30.
You should not select this check-box for the interest indicator 2U as we will
be using the calendar type G.
• Under ‘Interest determination’ block, select the ‘Calendar Type’. It
• If you select ‘Int calc. numerators’ check-box, then, the program calculates
interest using numerators; else, the interest is calculated directly.
• The ‘Round IC numerators’ is used along with the ‘Int calc. numerators’ flag.
When this is selected, it rounds off the numerators.

312 Configuring SAP Accounts Receivable & Accounts Payable (SAP S/4HANA Finance)
• Select 'Interest rate depend on total amount' check-box if you want to use
the graduated (amount-dependent) interest rates for the total amount.
When unselected, the interest rates refer to each difference between the
amount (slabs) for which interest is calculated and the amount from which
the interest rate is valid.
Consider an example where the outstanding in the account is $15,000.
The interest rate is to be calculated as: 0% of amounts up to $5,000, 6% for
amounts up to $10,000, 10% on amounts above $10,000. when 'Interest rate
depend on total amount' check-box is selected: the interest is calculated at
the total outstanding of $15,000 @ 10% which will be $1,500 (=15000*0.10).
When 'Interest rate depend on total amount' check-box is not selected: the
interest is calculated for the first slab of $10,000 @ 6% and for the next
$5,000 @10%, and the interest will be $1,100 (=600+500).
• If you want the interest rate to be determined through a function module
instead of the standard method (via, transaction and business types), enter
the name of the function module here in this ‘Function Module’ field.
• Under ‘Interest processing’, enter the ‘Amount Limit’ beyond which only the
system will create an interest settlement; that is, if the calculated interest is
less than the amount entered here, then, there will be no interest settlement
made. This way, you can avoid interest settlements being created for small
amounts that will be meaningless if, for example, the cost of
settling/delivering that interest is higher than the interest amount calculated.
Along with the amount limit, you can also maintain the currency here.
• If you select ‘No interest payment’ flag, then, the system will not make an
interest payment even if there is an interest settlement.
• Under ‘Output control’, enter a ‘Number range’ to enable numbering of the
interest forms; when you post an interest document, then, the system uses a
number from this number range and stores the form number in the
‘Reference’ field. You may enter a range that has not been used earlier, but,
in that case you need to create that number range using Transaction FBN1.
• If you select ‘Balance plus int’ flag, then the system prints the balance plus
interest.
• Under ‘Posting’ select the appropriate ‘Payment terms’, if required.
iii. ‘Save’ the details. This completes the settings required for the interest indicator 2U.
iv. You may copy this and make the necessary changes to create the other account
balance interest indicator, 2I.

313 Interest Calculation
This completes our discussion on the global settings for interest calculation. Let us move on
to the settings required for interest calculation.
15.4 Interest Calculation
The configuration steps under this group, include the following:
• Define Reference Interest Rates
• Define Time-Based Terms
• Enter Interest Values
• Define Fixed Amounts for Interest Calculation
Let us start with the definition of reference interest rates.
15.4.1 Define Reference Interest Rates
Let us define the reference interest rates for item interest calculation, here. Use the menu
path: SAP Customizing Implementation Guide > Financial Accounting > Accounts Receivable
and Accounts Payable > Business Transactions > Interest Calculation > Interest Calculation >
Define Reference Interest Rates, or Transaction OBAC. Click on ‘New Entries’ and create the
required reference interest rates: one for credit and another for debit, on the next screen
(Figure 15.6).
Figure 15.6 Reference Interest Rate – Item Interest Calculation – Credit
The next step is to define the time dependent terms for each of the reference interest rates
that we have defined in the previous step.
15.4.2 Define Time-Dependent Terms
Here, you specify how the interest rate is to be determined for each of the item interest
indicators per currency and per validity date. Use the menu path: SAP Customizing
Implementation Guide > Financial Accounting > Accounts Receivable and Accounts Payable >

314 Configuring SAP Accounts Receivable & Accounts Payable (SAP S/4HANA Finance)
Business Transactions > Interest Calculation > Interest Calculation > Define Time-Dependent
Terms. You may also use Transaction OB81.
Figure 15.7 Time Dependent Interest Terms of Interest Indicator 1U
On the resulting screen, click on ‘New Entries’ and make the required settings for the item
interest indicator 1U, for both credit and debit reference interest rates (Figure 15.7). Note
that you need to select the appropriate ‘Term’ (for example, ‘Debit interest: arrears interest
calc’) corresponding to the ‘Ref. interest rate’ (for example, 1U-D). In the ‘Premium’ field,
enter the percentage rate that needs to be added to the reference interest rate. If you do not
make an entry in the ‘Ref. interest rate’ field, then, the system uses the value entered in the
‘Premium’ field as the interest rate, provided this value is positive.
Repeat and complete the configuration for the other item interest indicator 1I as well.
When fully configured, you have all the settings defined for both item and balance interest
indicators as shown in Figure 15.8.
Figure 15.8 Time Dependent Interest Terms for BESTM
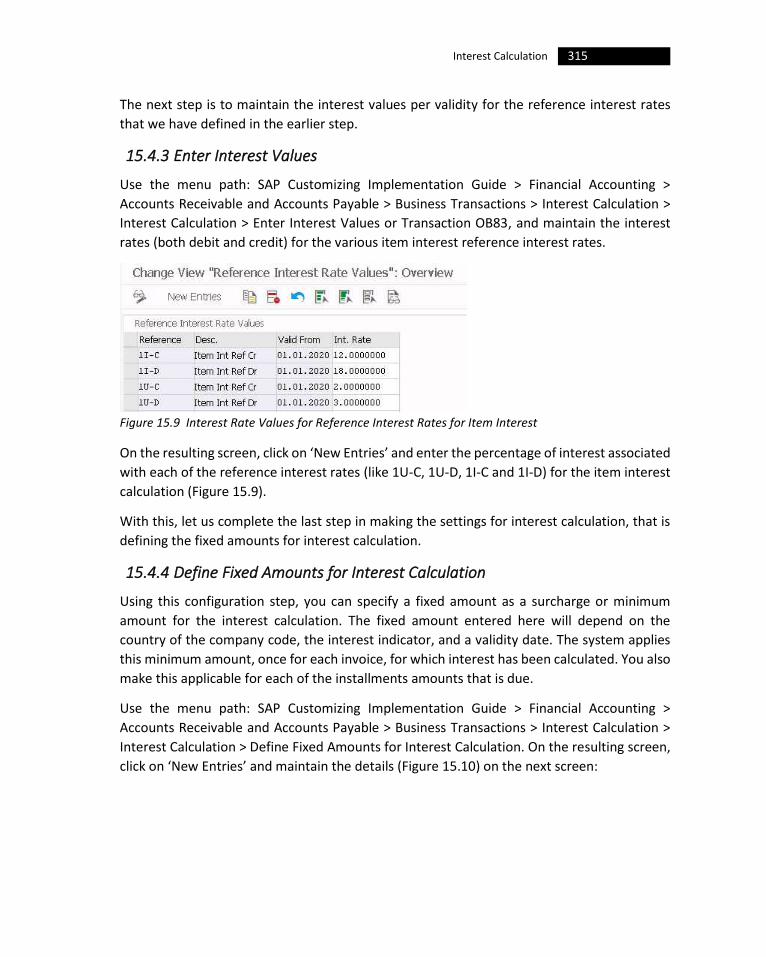
315 Interest Calculation
The next step is to maintain the interest values per validity for the reference interest rates
that we have defined in the earlier step.
15.4.3 Enter Interest Values
Use the menu path: SAP Customizing Implementation Guide > Financial Accounting >
Accounts Receivable and Accounts Payable > Business Transactions > Interest Calculation >
Interest Calculation > Enter Interest Values or Transaction OB83, and maintain the interest
rates (both debit and credit) for the various item interest reference interest rates.
Figure 15.9 Interest Rate Values for Reference Interest Rates for Item Interest
On the resulting screen, click on ‘New Entries’ and enter the percentage of interest associated
with each of the reference interest rates (like 1U-C, 1U-D, 1I-C and 1I-D) for the item interest
calculation (Figure 15.9).
With this, let us complete the last step in making the settings for interest calculation, that is
defining the fixed amounts for interest calculation.
15.4.4 Define Fixed Amounts for Interest Calculation
Using this configuration step, you can specify a fixed amount as a surcharge or minimum
amount for the interest calculation. The fixed amount entered here will depend on the
country of the company code, the interest indicator, and a validity date. The system applies
this minimum amount, once for each invoice, for which interest has been calculated. You also
make this applicable for each of the installments amounts that is due.
Use the menu path: SAP Customizing Implementation Guide > Financial Accounting >
Accounts Receivable and Accounts Payable > Business Transactions > Interest Calculation >
Interest Calculation > Define Fixed Amounts for Interest Calculation. On the resulting screen,
click on ‘New Entries’ and maintain the details (Figure 15.10) on the next screen:

316 Configuring SAP Accounts Receivable & Accounts Payable (SAP S/4HANA Finance)
Figure 15.10 Fixed Amounts for Interest Calculation
i. Enter the interest indicator (Int.Ind.’), select the country (‘Ctr’) and fill in the effective
date (‘Eff.from’).
ii. Enter the fixed interest amount (‘Fixed Interest Amt’) and select the currency (‘Crcy’).
iii. Select the ‘At Least’ check-box to make this as the minimum amount. If you do not
select this check-box, then, this is considered as a surcharge and added to the interest
calculated by the interest program.
iv. When you select the ‘PerInstlmt’ check-box, the settings are applied for each of the
instalments from the business partner.
v. Specify the exchange rate type (‘ExRt’) and the ‘Conversion Date’ to be used for
currency translation, in case of items posted in a foreign currency.
vi. Repeat the settings for the other item interest indicator, 1I, and ‘Save’ the details.
Consider that you have entered $50 in the ‘Fixed Interest Amt’ field.
Scenario 1: You have not selected ‘At Least’ check-box. Supposing that the system
calculates the overdue interest as $9.97, the system adds $50 as the surcharge and
customer has to pay a total interest of $59.97.
Scenario 2: You have selected ‘At Least’ check-box. Supposing that the system
calculates the overdue interest as $9.97, the system makes the minimum interest as
$50 to be paid by the customer. However, if the overdue interest arrived at is (say,
$55.67) more than the minimum amount (say, $50) the system does not add extra
charge and the customer will be paying only $55.67.
This completes our settings for interest calculation in the system. Let us move on to see the
settings that you will have to make for interest posting.

317 Interest Calculation
15.5 Interest Posting
You need to complete the following configuration steps, under this category:
• A/R: Calculation of Interest on Arrears
• Interest on Arrears Calculation (Vendors)
• A/R: Balance Interest Calculation
• A/P: Balance Interest Calculation
Let us get started with the first step: A/R: Calculation of Interest on Arrears.
15.5.1 A/R: Calculation of Interest on Arrears
Here, you will define the settings for posting the interest calculated as interest on arrears. The
system carries out the account determination via the posting interface 0002 (interest on
arrears). Make the required specifications for (a) account determination & posting keys, (b)
G/L accounts and (c) document type.
In the case of account determination & posting keys, decide which account determination
keys you need to use for the two business transactions: interest earned (1000) and interest
paid (2000). The other account determination keys like company code, interest indicator and
business area are all optional. Then, per account determination key, you also need to maintain
the debit / credit posting key and the posting details (account symbols). Use the account
symbol 1000 for customer posting. For each of the G/L accounts, you will have to specify the
account allocation for interest received and interest paid; if required, you can make separate
entries for different currencies. You can use the document type DA as recommended in the
standard system.
i. Use the menu path: SAP Customizing Implementation Guide > Financial Accounting >
Accounts Receivable and Accounts Payable > Business Transactions > Interest
Calculation > Interest Posting > A/R: Calculation of Interest on Arrears. You may also
use Transaction OBV1.
ii. On the resulting screen, you will see the default specifications from SAP; do not make
any changes to the standard account determination settings (Figure 15.11).

318 Configuring SAP Accounts Receivable & Accounts Payable (SAP S/4HANA Finance)
Figure 15.11 A/R: Calculation of Interest on Arrears – Account Determination Settings
iii. Choose ‘Goto > Control’ on the menu bar to view the posting interface (0002) and the
associated control parameters. You will see the various account determination keys
and their controls settings (Figure 15.12).
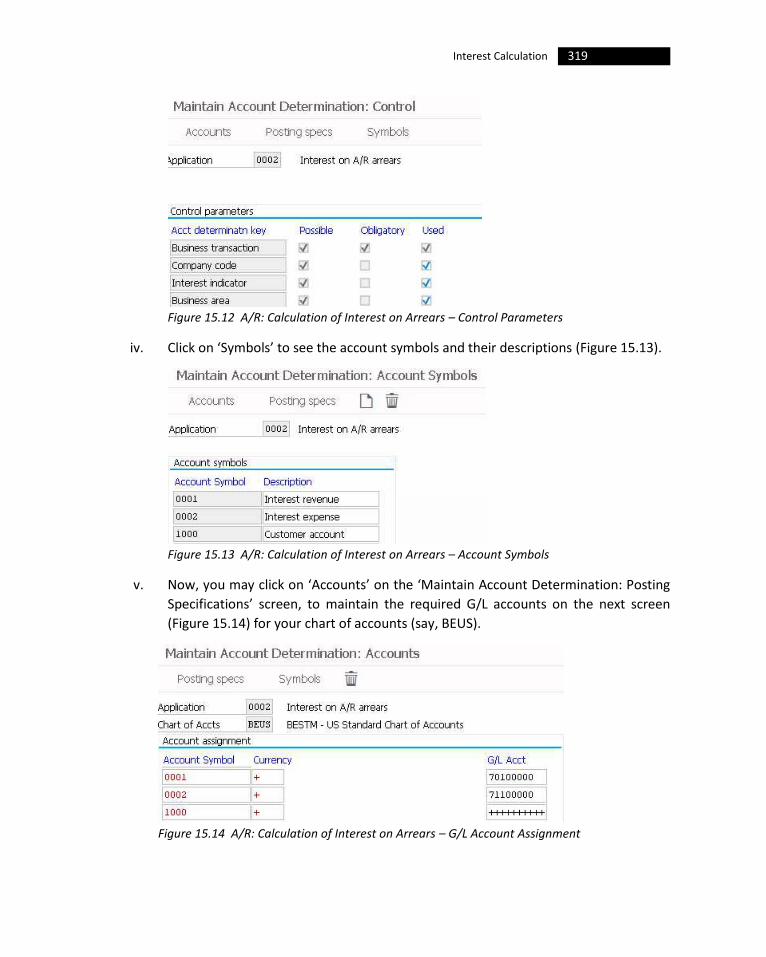
319 Interest Calculation
Figure 15.12 A/R: Calculation of Interest on Arrears – Control Parameters
iv. Click on ‘Symbols’ to see the account symbols and their descriptions (Figure 15.13).
Figure 15.13 A/R: Calculation of Interest on Arrears – Account Symbols
v. Now, you may click on ‘Accounts’ on the ‘Maintain Account Determination: Posting
Specifications’ screen, to maintain the required G/L accounts on the next screen
(Figure 15.14) for your chart of accounts (say, BEUS).
Figure 15.14 A/R: Calculation of Interest on Arrears – G/L Account Assignment

320 Configuring SAP Accounts Receivable & Accounts Payable (SAP S/4HANA Finance)
A ‘+’ in ‘Currency’ field indicates, that the settings are valid for all the currencies. A
masking entry of ++++++++, in the ‘G/L Acct’ field establishes (assuming that you want
to replace the G/L account) the actual G/L account which is to be posted to, after
possible modifications.
vi. Click on ‘Go To > Document type’ on the menu bar and specify the appropriate
document type in ‘Document type’ field (DV) for interest posting interest on arrears
(Figure 15.15).
Figure 15.15 A/R: Calculation of Interest on Arrears – Document Type Specification
The next step is to understand the settings relating to arrears interest calculation for vendors.
15.5.2 Interest on Arrears Calculation (Vendors)
This is similar to the previous step, except that the settings relate to vendors. Here, you will
use the menu path: SAP Customizing Implementation Guide > Financial Accounting > Accounts
Receivable and Accounts Payable > Business Transactions > Interest Calculation > Interest
Posting > Interest on Arrears Calculation (Vendors). You may also use Transaction OBV9.
Here, the system carries out the account determination via the posting interface 0009
(interest on A/P arrears).
The next step is to look at the settings for A/R balance interest calculation.
15.5.3 A/R: Balance Interest Calculation
This is also similar to the previous step discussed in Section 15.5.1, except that the posting
interface will be 0005 (customer interest scale). You will use the menu path: SAP Customizing
Implementation Guide > Financial Accounting > Accounts Receivable and Accounts Payable >
Business Transactions > Interest Calculation > Interest Posting > A/R: Balance Interest
Calculation. You may also use Transaction OBV3.
As in the previous step, you can click on ‘Accounts’ from the main posting specifications
screen to maintain the required G/L accounts for each of the account symbols (Figure 15.16).
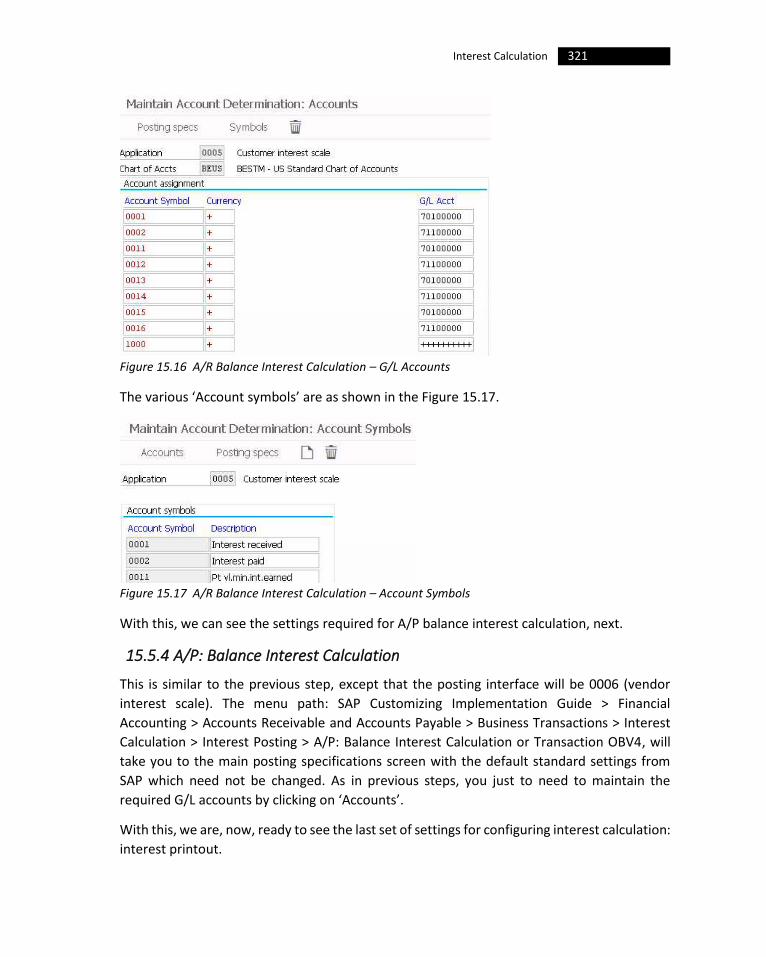
321 Interest Calculation
Figure 15.16 A/R Balance Interest Calculation – G/L Accounts
The various ‘Account symbols’ are as shown in the Figure 15.17.
Figure 15.17 A/R Balance Interest Calculation – Account Symbols
With this, we can see the settings required for A/P balance interest calculation, next.
15.5.4 A/P: Balance Interest Calculation
This is similar to the previous step, except that the posting interface will be 0006 (vendor
interest scale). The menu path: SAP Customizing Implementation Guide > Financial
Accounting > Accounts Receivable and Accounts Payable > Business Transactions > Interest
Calculation > Interest Posting > A/P: Balance Interest Calculation or Transaction OBV4, will
take you to the main posting specifications screen with the default standard settings from
SAP which need not be changed. As in previous steps, you just to need to maintain the
required G/L accounts by clicking on ‘Accounts’.
With this, we are, now, ready to see the last set of settings for configuring interest calculation:
interest printout.

322 Configuring SAP Accounts Receivable & Accounts Payable (SAP S/4HANA Finance)
15.6 Printout
There are two configuration activities relating to the printout settings for interest notices:
• Assign Forms for Interest Indicators
• Define Sender Details for Interest Forms
Let us start with the first activity of assigning appropriate forms for interest notices/printouts.
15.6.1 Assign Forms for Interest Indicators
Specify which form you want the system to use, for printing the letter on interest on arrears
or account balance interest, for each of the interest indicators. The system uses the forms
configured, here, if no other form has been specified when calculating interest.
Use the menu path: SAP Customizing Implementation Guide > Financial Accounting >
Accounts Receivable and Accounts Payable > Business Transactions > Interest Calculation >
Printout > Assign Forms for Interest Indicators. You may also use Transaction OB84.
On the resulting screen, click on ‘New Entries’ and maintain the appropriate form per interest
indicator per company code; the form can be ‘SAPScript Form’ or a ‘Smart Form’. Repeat the
entries to cover all the company codes and all the interest indicators (Figure 15.18).
Figure 15.18 Forms for Interest Calculation
The next activity is to define the sender details for the interest forms.
15.6.2 Define Sender Details for Interest Forms
This step is the same as what we have already discussed in Section 10.3.4 of Chapter 10, when
we talked about the printout settings for dunning / interest notices. You will define the
standard texts for the header, the footer, and the sender address in the letter window for
each company code. You may use the menu path: SAP Customizing Implementation Guide >
Financial Accounting > Accounts Receivable and Accounts Payable > Business Transactions >
Interest Calculation > Printout > Define Sender Details for Interest Forms.
This completes our discussion on interest calculation.
323 Interest Calculation
15.7 Conclusion
You learned that you will come across two types of interest, in SAP: balance interest (also
known as ‘bank interest’) and item interest (also known as ‘arrears interest’). You understood
that will use the ‘balance interest calculation’ functionality, to calculate interest on the
balance of G/L accounts that are managed on open item basis, and you will use the ‘item
interest calculation’ to calculate interest on you customer / vendor accounts.
You learned that there are two fields, namely the ‘Interest Indicator’ and the ‘Last Key Date’
in the company code data area of customer / vendor master records, that are relevant for the
calculation of item interest.
You learned about the item interest calculation process in detail: you learned the
prerequisites, the execution of item interest calculation and the actual interest calculation.
You learned that the system identifies the items on which interest is to be calculated, based
on the rules that you have defined in the interest indicator, the settlement date of the interest
run, and the date of the last interest calculation as in the master record.
While configuring the global settings for interest calculation, you defined the interest
calculation types, number ranges for interest forms and prepared the system for item /
account balance interest calculation. You learned that there are two interest calculation types
balance interest calculation (type S) and item (or arrears)interest calculation (type P). Towards
preparing for item interest calculation, you made the required general settings (like, item
selection, interest determination, post-processing, output control, posting etc) for the
individual interest indicators. You learned that the most important specifications (such as, the
rules used for interest calculation and the interest rate) for interest calculation are stored in
the interest indicator, which controls the interest calculation in the system. You learned that
it stores the calendar type that is used for defining the days due for interest, the interest rates
and the conditions, and also the ‘form’ for the interest lists. You learned that all accounts that
you want to be included in the automatic interest calculation run must have an entry in the
‘Interest Indicator’ field, in their respective master records. You also learned that if you want
to block an account from interest calculation, then, you need to remove the interest indicator
entry from this field.
Towards configuring the interest calculation in the system, you maintained the reference
interest rates, time-dependent terms, interest values and also the fixed amounts, if any, for
interest calculation. You understood that you need to specify how the interest rate is to be
determined for each of the item interest indicators, per currency and per validity date, using
the time-dependent terms. You also learned that you can specify a fixed amount as a
surcharge or minimum amount for the interest calculation, and the fixed amount entered will
depend on the country of the company code, the interest indicator, and a validity date. You

324 Configuring SAP Accounts Receivable & Accounts Payable (SAP S/4HANA Finance)
learned that the system applies this minimum amount, once for each invoice, for which
interest has been calculated. For interest posting, via the appropriate posting interface, you
made the required specifications for account determination & posting keys, the G/L accounts
and) the document type.
You also completed configuration activities relating to the printout settings for interest
notices.
Let us, next, see the settings associated with closing operations, in the next Chapter.
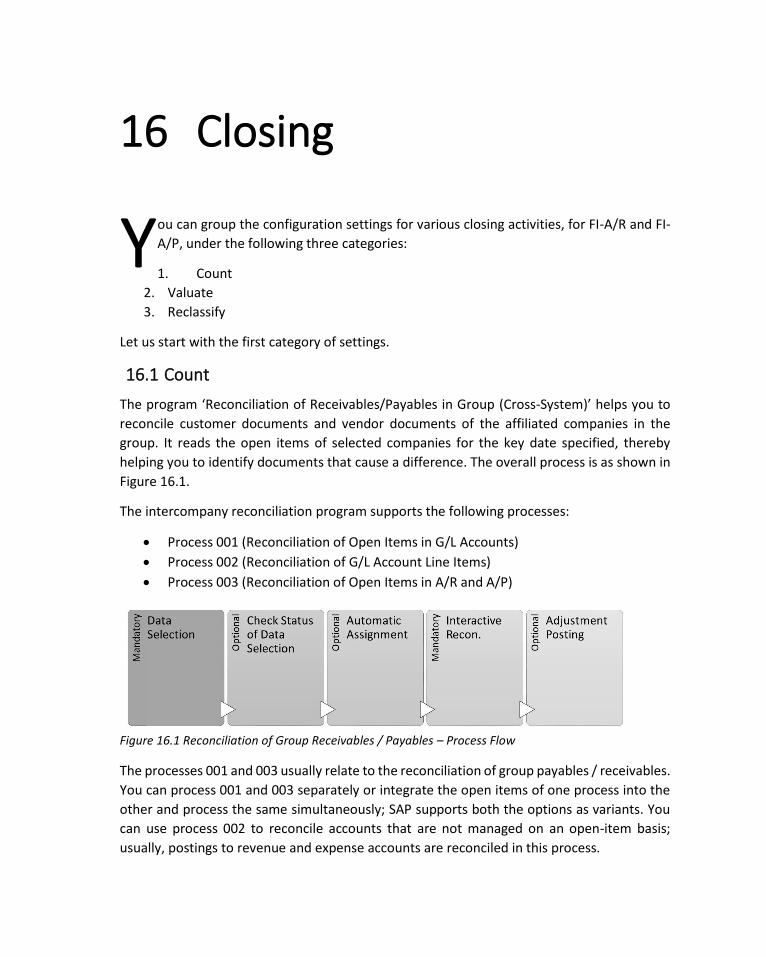
16 Closing
ou can group the configuration settings for various closing activities, for FI-A/R and FI-
A/P, under the following three categories:
1. Count
2. Valuate
3. Reclassify
Let us start with the first category of settings.
16.1 Count
The program ‘Reconciliation of Receivables/Payables in Group (Cross-System)’ helps you to
reconcile customer documents and vendor documents of the affiliated companies in the
group. It reads the open items of selected companies for the key date specified, thereby
helping you to identify documents that cause a difference. The overall process is as shown in
Figure 16.1.
The intercompany reconciliation program supports the following processes:
• Process 001 (Reconciliation of Open Items in G/L Accounts)
• Process 002 (Reconciliation of G/L Account Line Items)
• Process 003 (Reconciliation of Open Items in A/R and A/P)
Figure 16.1 Reconciliation of Group Receivables / Payables – Process Flow
The processes 001 and 003 usually relate to the reconciliation of group payables / receivables.
You can process 001 and 003 separately or integrate the open items of one process into the
other and process the same simultaneously; SAP supports both the options as variants. You
can use process 002 to reconcile accounts that are not managed on an open-item basis;
usually, postings to revenue and expense accounts are reconciled in this process.
Y

326 Configuring SAP Accounts Receivable & Accounts Payable (SAP S/4HANA Finance)
The pre-requisites are:
• On the master record side, ensure that (a) you have defined the number of the trading
partner in the customer / vendor master data, and (b) a trading partner was assigned
for relevant G/L items during posting, or the number of the trading partner is stored
in the G/L accounts.
• On the configuration side, ensure that you have made the required settings under
‘Cross-System Intercompany Reconciliation’ in the IMG.
There are several configuration settings that you need to make under ‘Cross-System
Intercompany Reconciliation’ for preparing the sender as well as the reconciliation systems.
The configuration settings that we discuss, here, in this Section relate mostly to the IMG node
‘Preparations in the Reconciliation System’.
For preparing the reconciliation system for cross-system intercompany reconciliation, you
need to complete the following configuration activities:
• Generate Default Customizing
• General Settings
• Data Selection and Storage
• Data Assignment
• Data Reconciliation
Let us, first, look at generating the default customizing.
16.1.1 Generate Default Customizing
When you execute this step, the program generates default settings for most of the activities
under the IMG node ‘Preparations in the Reconciliation System’. It will produce a log listing
out what has been completed. It generates the settings for all companies, for which you have
already maintained the master data when setting up the FI enterprise structure. You just need
to review the generated settings and adjust them, if required.
Before executing the program, however, you need to decide which reconciliation processes
(001 and 003, or 002) you want use for your company.
• Reconciliation Processes 001 and 003
Typically used to reconcile payables and receivables within the corporate group, both
the processes are for reconciling the open items.
o Though originally designed to support reconciliation of documents posted to
G/L accounts, you can include customer / vendor open items as well in the
‘Reconciliation Process 001’. Use the process 001 if most of your

327 Closing
intercompany documents are posted to G/L accounts or if you need to
reconcile G/L intercompany documents separately from customer / vendor
intercompany documents.
o Though meant for reconciling documents posted to customer / vendor
accounts, you can use the ‘Reconciliation Process 003’ to include G/L open
items as well. Use the process 003 if most of your intercompany documents
are posted to customer / vendor accounts or if you want reconciliation of
customer / vendor intercompany documents separately from G/L open items.
• Reconciliation Process 002
This process supports reconciliation of accounts without open item management, and
is typically used to reconcile revenues and expenses resulting from business
transactions within the corporate group.
Due to large volume of data relevant for reconciliation, you may need to create a Special
Purpose Ledger in operative SAP systems from which data is supposed to be extracted for
reconciliation.
Project Dolphin
BESTM Corporate wants to reconcile the payables and receivables within the corporate group.
Accordingly, the project team has suggested to configure the system appropriately. Though
most of the intercompany documents are posted to customer and vendor accounts, BESTM
also wants to include reconciliation of G/L open items.
To generate the default setting for most of the activities under the IMG node ‘Preparations in
the Reconciliation System’:
i. Use the menu path: SAP Customizing Implementation Guide > Financial Accounting >
Accounts Receivable and Accounts Payable > Business Transactions > Closing > Count
> Cross-System Intercompany Reconciliation > Preparations in the Reconciliation
System > Generate Default Customizing. You may also use Transaction FBICC.
ii. On the resulting ‘Intercompany Reconciliation: Create Default Customizing’ screen,
maintain the required details (Figure 16.2):
• Under ‘General Selection’, enter the value for the ‘Reconciliation Process’
field. Since BESTM primarily wants to reconcile customer / vendor open items
but also wants to include G/L account open items, enter 003 here in this field.
• Under ‘Options for Process 003’ select ‘Include GL Open Items’ check-box;
select a suitable ‘Default Transfer Type’ for data selection. Leave this as blank
to activate the default data transfer type (‘Asynchronous via Direct RFC
Connection’).

328 Configuring SAP Accounts Receivable & Accounts Payable (SAP S/4HANA Finance)
Figure 16.2 Creating Default Customizing for Intercompany Reconciliation
The data transfer type ‘Asynchronous via Direct RFC Connection’ is the
default transfer type for data selection. Though it enables a maximum
parallelization within the data selection process, it requires direct RFC
connections to the individual sender systems. Also, this type gives you the
option of scheduling data selections and automatic assignments as two steps
of the same job, which makes sense in an organization with a central
approach where data selection and automatic assignment are run centrally,
and the users only perform the manual reconciliation themselves.
The other data transfer type ‘Synchronous via XI’ was developed to enable
data selection using XI, while keeping the control with the data selection
program. This data transfer type uses transactional RFCs because
asynchronous RFCs are not possible through XI. In order to allow for some
parallelization, the data selection program will start several tasks within the
reconciliation system, each of which then performs a transactional RFC to the
sender system through XI. All of the data is collected and processed further
by the data selection program. Therefore, all information regarding the data
transfer is available in the log of the data selection program. This data
transfer type also gives you the option of scheduling data selections and
automatic assignments as two steps of the same job.
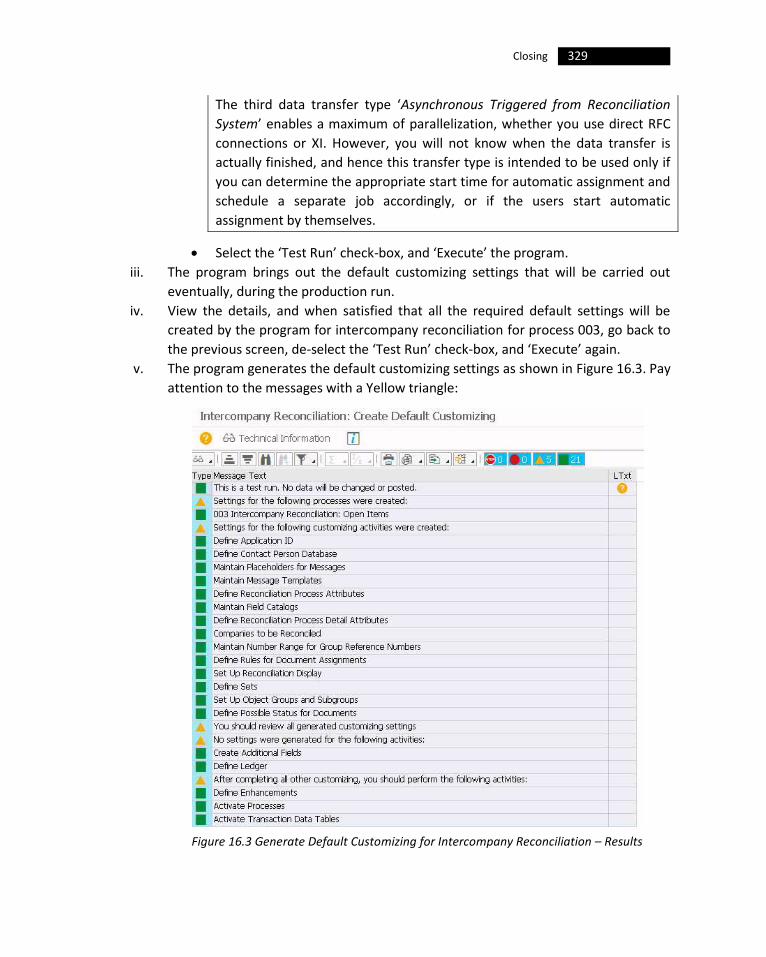
329 Closing
The third data transfer type ‘Asynchronous Triggered from Reconciliation
System’ enables a maximum of parallelization, whether you use direct RFC
connections or XI. However, you will not know when the data transfer is
actually finished, and hence this transfer type is intended to be used only if
you can determine the appropriate start time for automatic assignment and
schedule a separate job accordingly, or if the users start automatic
assignment by themselves.
• Select the ‘Test Run’ check-box, and ‘Execute’ the program.
iii. The program brings out the default customizing settings that will be carried out
eventually, during the production run.
iv. View the details, and when satisfied that all the required default settings will be
created by the program for intercompany reconciliation for process 003, go back to
the previous screen, de-select the ‘Test Run’ check-box, and ‘Execute’ again.
v. The program generates the default customizing settings as shown in Figure 16.3. Pay
attention to the messages with a Yellow triangle:
Figure 16.3 Generate Default Customizing for Intercompany Reconciliation – Results
330 Configuring SAP Accounts Receivable & Accounts Payable (SAP S/4HANA Finance)
• As you can see, the system lets you know that though the default settings
were created, you need to review them to make sure that the settings are
correct.
• There are couple of activities like ‘Create Additional Fields’ and ‘Define
Ledger’ for which the program has not generated the settings, and you may
need to manually complete that, if required.
• Also, it notifies that you can take up ‘Enhancements’, if required.
• And, when you check and complete the left out customizing activities, you
are informed to ‘Activate the Process’ and ‘Activate Transaction Data Tables’.
With the default Customizing generated, let us move to discuss the configuration activities
under ‘General Settings’.
16.1.2 General Settings
Under general settings, you need to complete the configuration ‘Communication Support’
and a host of other activities including:
• Define Reconciliation Process Attributes
• Create Additional Fields
• Activate Processes
• Activate Transaction Data Tables
• Maintain Field Catalogs
Let us first start with the settings for communication support.
16.1.2.1 Communication Support
Under this, you need to configure the following activities:
• Define Application ID
• Define Contact Person Database
• Maintain Placeholders for Messages
• Maintain Message Templates
In most of the cases, we shall be going ahead with the standard settings. Let us understand
the settings, one by one:
16.1.2.1.1 Define Application ID
Here, you need to define an application ID for intercompany reconciliation. The
communication support components of the system make use of these application IDs to
distinguish between data from different application IDs. SAP’s standard settings is ‘FBRC’ as

331 Closing
the application ID for intercompany reconciliation (Figure 16.4). You will not be able to define
anything new here.
Figure 16.4 Application ID for Intercompany Reconciliation
The next step is to define the contact person database.
16.1.2.1.2 Define Contact Person Database
You need to define at least one ‘contact person database’ for intercompany reconciliation. If
you use separate contact persons, for each individual reconciliation process, then, you have
to define one contact person database, per reconciliation process, and specify the
appropriate contact person database in the Customizing activity ‘Define Reconciliation
Process Attributes’ which we will discuss later in Section 16.1.2.2. The contact information
provided in the ‘contact person database’ helps in the communication between the
accountants involved in the reconciliation process.
Use the menu path: SAP Customizing Implementation Guide > Financial Accounting >
Accounts Receivable and Accounts Payable > Business Transactions > Closing > Count > Cross-
System Intercompany Reconciliation > Preparations in the Reconciliation System > General
Settings > Communication Support > Define Contact Person Database, or Transaction
FBRC010.
You will see, on the next screen (Figure 16.5), the default contact person database 003
(‘Contacts’) provided by SAP. If you need more than one, you can define the same here by
clicking on ‘New Entries’. You may click on ‘Maintain Contacts’ button under ‘Navigation’ to
specify the contact persons’ (accountants) communication details.
Figure 16.5 Contact Person Database
In the next step, you will define the placeholders for messages that you will use in the message
templates.
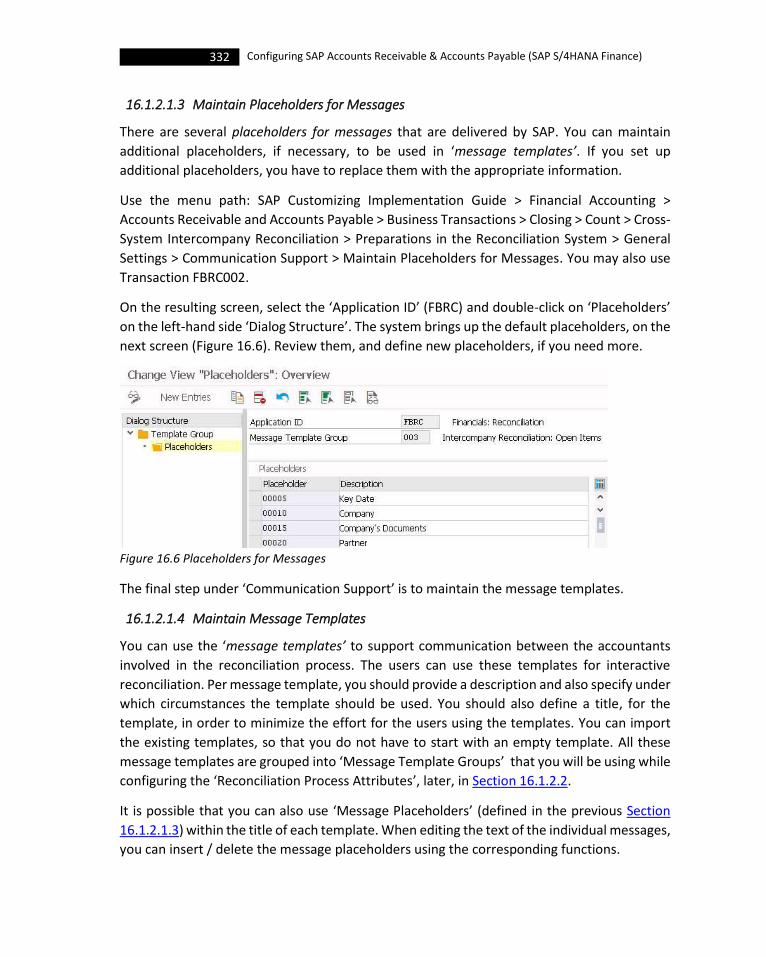
332 Configuring SAP Accounts Receivable & Accounts Payable (SAP S/4HANA Finance)
16.1.2.1.3 Maintain Placeholders for Messages
There are several placeholders for messages that are delivered by SAP. You can maintain
additional placeholders, if necessary, to be used in ‘message templates’. If you set up
additional placeholders, you have to replace them with the appropriate information.
Use the menu path: SAP Customizing Implementation Guide > Financial Accounting >
Accounts Receivable and Accounts Payable > Business Transactions > Closing > Count > Cross-
System Intercompany Reconciliation > Preparations in the Reconciliation System > General
Settings > Communication Support > Maintain Placeholders for Messages. You may also use
Transaction FBRC002.
On the resulting screen, select the ‘Application ID’ (FBRC) and double-click on ‘Placeholders’
on the left-hand side ‘Dialog Structure’. The system brings up the default placeholders, on the
next screen (Figure 16.6). Review them, and define new placeholders, if you need more.
Figure 16.6 Placeholders for Messages
The final step under ‘Communication Support’ is to maintain the message templates.
16.1.2.1.4 Maintain Message Templates
You can use the ‘message templates’ to support communication between the accountants
involved in the reconciliation process. The users can use these templates for interactive
reconciliation. Per message template, you should provide a description and also specify under
which circumstances the template should be used. You should also define a title, for the
template, in order to minimize the effort for the users using the templates. You can import
the existing templates, so that you do not have to start with an empty template. All these
message templates are grouped into ‘Message Template Groups’ that you will be using while
configuring the ‘Reconciliation Process Attributes’, later, in Section 16.1.2.2.
It is possible that you can also use ‘Message Placeholders’ (defined in the previous Section
16.1.2.1.3) within the title of each template. When editing the text of the individual messages,
you can insert / delete the message placeholders using the corresponding functions.
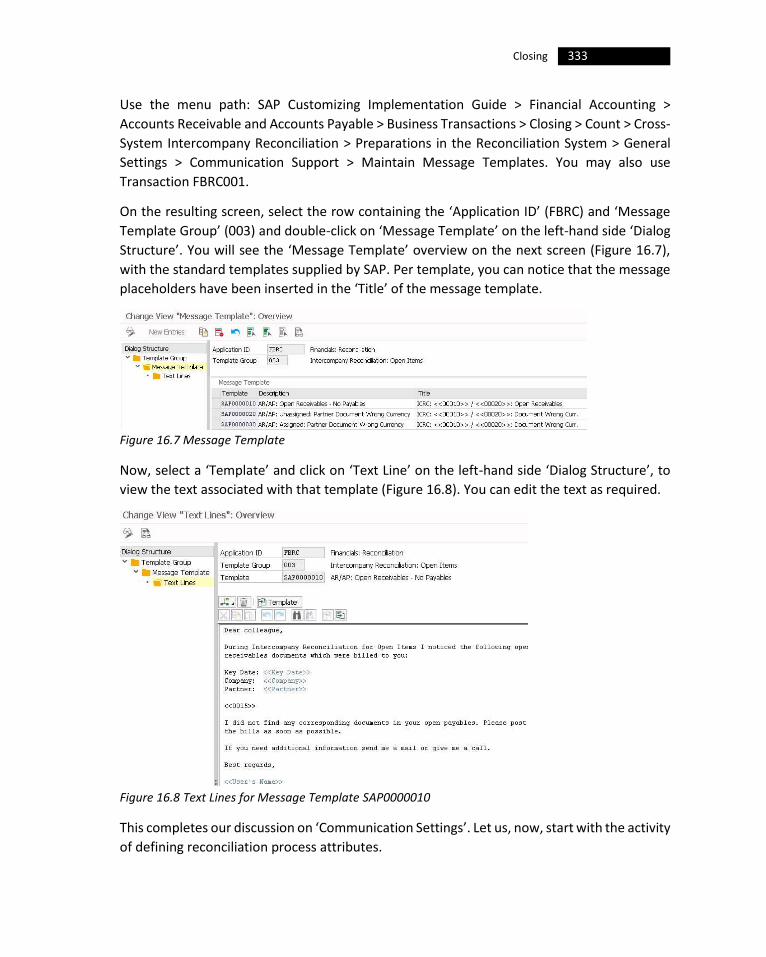
333 Closing
Use the menu path: SAP Customizing Implementation Guide > Financial Accounting >
Accounts Receivable and Accounts Payable > Business Transactions > Closing > Count > Cross-
System Intercompany Reconciliation > Preparations in the Reconciliation System > General
Settings > Communication Support > Maintain Message Templates. You may also use
Transaction FBRC001.
On the resulting screen, select the row containing the ‘Application ID’ (FBRC) and ‘Message
Template Group’ (003) and double-click on ‘Message Template’ on the left-hand side ‘Dialog
Structure’. You will see the ‘Message Template’ overview on the next screen (Figure 16.7),
with the standard templates supplied by SAP. Per template, you can notice that the message
placeholders have been inserted in the ‘Title’ of the message template.
Figure 16.7 Message Template
Now, select a ‘Template’ and click on ‘Text Line’ on the left-hand side ‘Dialog Structure’, to
view the text associated with that template (Figure 16.8). You can edit the text as required.
Figure 16.8 Text Lines for Message Template SAP0000010
This completes our discussion on ‘Communication Settings’. Let us, now, start with the activity
of defining reconciliation process attributes.
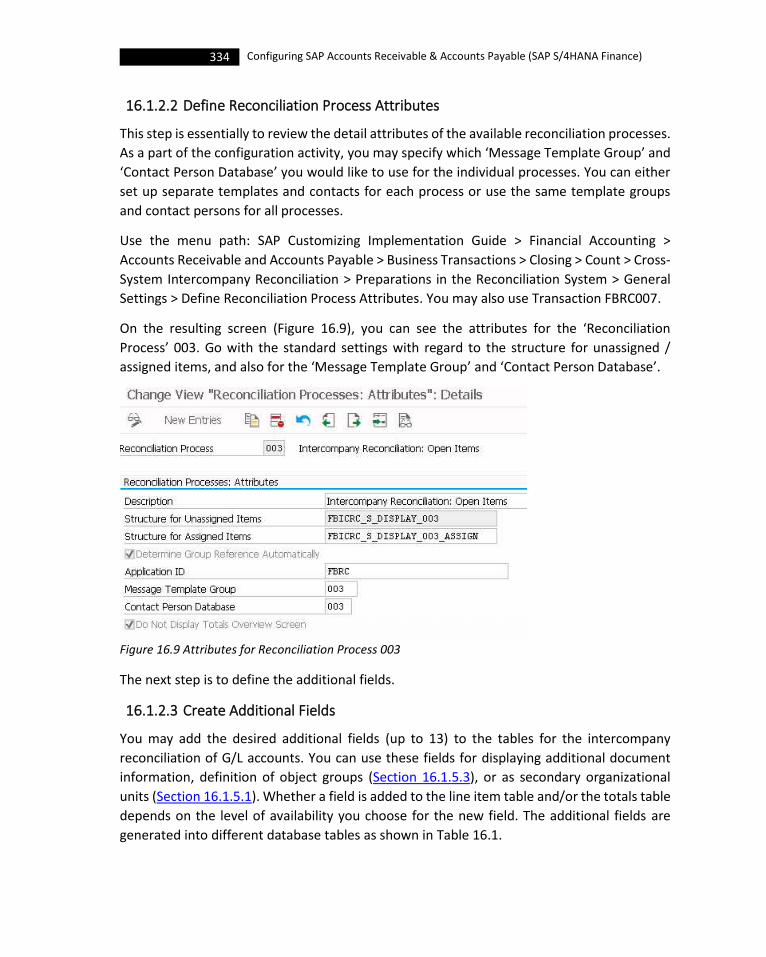
334 Configuring SAP Accounts Receivable & Accounts Payable (SAP S/4HANA Finance)
16.1.2.2 Define Reconciliation Process Attributes
This step is essentially to review the detail attributes of the available reconciliation processes.
As a part of the configuration activity, you may specify which ‘Message Template Group’ and
‘Contact Person Database’ you would like to use for the individual processes. You can either
set up separate templates and contacts for each process or use the same template groups
and contact persons for all processes.
Use the menu path: SAP Customizing Implementation Guide > Financial Accounting >
Accounts Receivable and Accounts Payable > Business Transactions > Closing > Count > Cross-
System Intercompany Reconciliation > Preparations in the Reconciliation System > General
Settings > Define Reconciliation Process Attributes. You may also use Transaction FBRC007.
On the resulting screen (Figure 16.9), you can see the attributes for the ‘Reconciliation
Process’ 003. Go with the standard settings with regard to the structure for unassigned /
assigned items, and also for the ‘Message Template Group’ and ‘Contact Person Database’.
Figure 16.9 Attributes for Reconciliation Process 003
The next step is to define the additional fields.
16.1.2.3 Create Additional Fields
You may add the desired additional fields (up to 13) to the tables for the intercompany
reconciliation of G/L accounts. You can use these fields for displaying additional document
information, definition of object groups (Section 16.1.5.3), or as secondary organizational
units (Section 16.1.5.1). Whether a field is added to the line item table and/or the totals table
depends on the level of availability you choose for the new field. The additional fields are
generated into different database tables as shown in Table 16.1.

335 Closing
Process ID Line Item Table Totals Table
001 FBICRC001A FBICRC001T
002 FBICRC002A FBICRC002T
003 FBICRC003A FBICRC003T Table 16:1 Database Tables for Additional Fields in Intercompany Reconciliation
To add additional fields:
i. Use the menu path: SAP Customizing Implementation Guide > Financial Accounting >
Accounts Receivable and Accounts Payable > Business Transactions > Closing > Count
> Cross-System Intercompany Reconciliation > Preparations in the Reconciliation
System > General Settings > Create Additional Fields. You may also use Transaction
FBIC006.
ii. On the ‘Display View “Reconciliation Processes”: Overview’ screen, select the
‘Reconciliation Process’ ID (003) and double-click on ‘Customer Defined Fields’ on the
left-hand side ‘Dialog Structure’.
iii. On the resulting screen, click on ‘New Entries’ and maintain the required fields, and
‘Save’ the settings.
We will not be including any additional fields for the intercompany reconciliation for BESTM.
Let us, now, move on to activate the reconciliation processes.
16.1.2.4 Activate Processes
Using this configuration step, you can activate the individual reconciliation processes. It is
important that you have created the Special Purpose Ledger in the system. For intercompany
reconciliation processes 001 and 003, you need to activate tables FBICRC001A and
FBICRC003A respectively, depending on which processes you are using. This step is only
mandatory in the reconciliation system for these processes.
Figure 16.10 Activating Processes for Intercompany Reconciliation
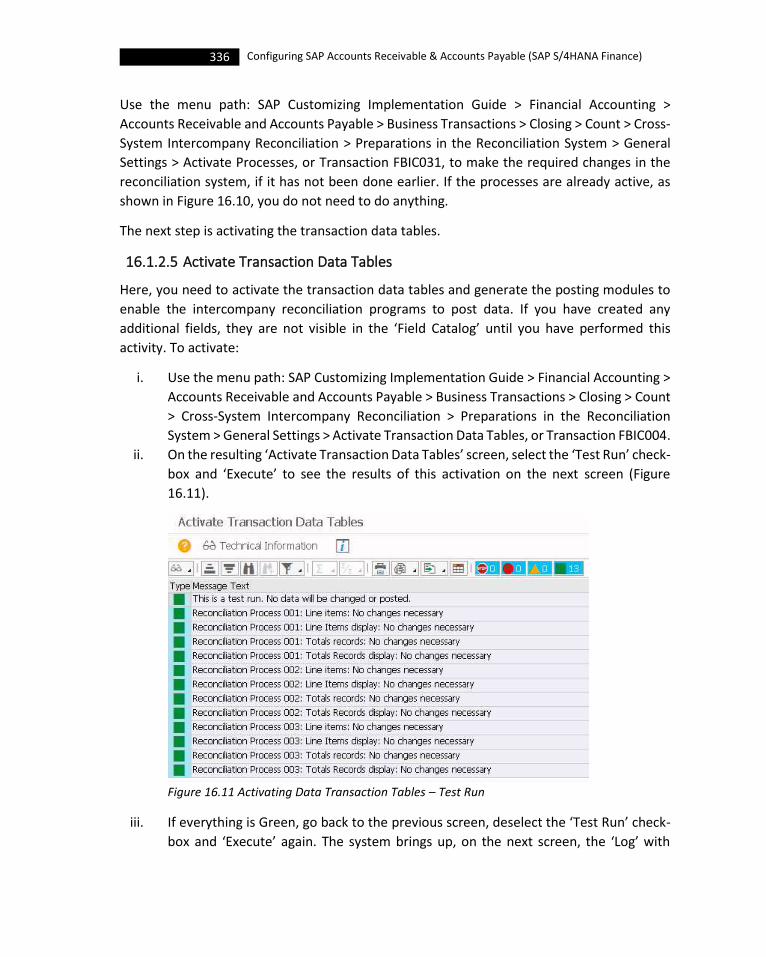
336 Configuring SAP Accounts Receivable & Accounts Payable (SAP S/4HANA Finance)
Use the menu path: SAP Customizing Implementation Guide > Financial Accounting >
Accounts Receivable and Accounts Payable > Business Transactions > Closing > Count > Cross-
System Intercompany Reconciliation > Preparations in the Reconciliation System > General
Settings > Activate Processes, or Transaction FBIC031, to make the required changes in the
reconciliation system, if it has not been done earlier. If the processes are already active, as
shown in Figure 16.10, you do not need to do anything.
The next step is activating the transaction data tables.
16.1.2.5 Activate Transaction Data Tables
Here, you need to activate the transaction data tables and generate the posting modules to
enable the intercompany reconciliation programs to post data. If you have created any
additional fields, they are not visible in the ‘Field Catalog’ until you have performed this
activity. To activate:
i. Use the menu path: SAP Customizing Implementation Guide > Financial Accounting >
Accounts Receivable and Accounts Payable > Business Transactions > Closing > Count
> Cross-System Intercompany Reconciliation > Preparations in the Reconciliation
System > General Settings > Activate Transaction Data Tables, or Transaction FBIC004.
ii. On the resulting ‘Activate Transaction Data Tables’ screen, select the ‘Test Run’ check-
box and ‘Execute’ to see the results of this activation on the next screen (Figure
16.11).
Figure 16.11 Activating Data Transaction Tables – Test Run
iii. If everything is Green, go back to the previous screen, deselect the ‘Test Run’ check-
box and ‘Execute’ again. The system brings up, on the next screen, the ‘Log’ with

337 Closing
details of changes made. You will notice that everything has been generated
successfully (Figure 16.12).
Figure 16.12 Activating Data Transaction Tables – Log from Productive Run
You should execute this function while no postings are being made in any client
of the system.
With this, let us move on to maintain the field catalogs.
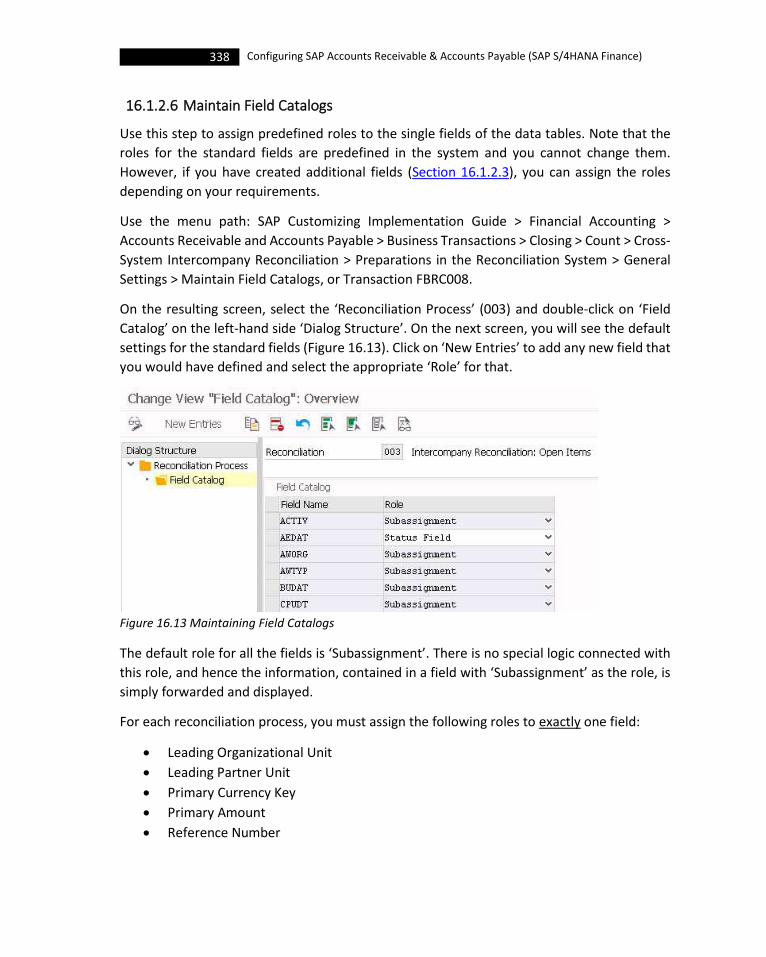
338 Configuring SAP Accounts Receivable & Accounts Payable (SAP S/4HANA Finance)
16.1.2.6 Maintain Field Catalogs
Use this step to assign predefined roles to the single fields of the data tables. Note that the
roles for the standard fields are predefined in the system and you cannot change them.
However, if you have created additional fields (Section 16.1.2.3), you can assign the roles
depending on your requirements.
Use the menu path: SAP Customizing Implementation Guide > Financial Accounting >
Accounts Receivable and Accounts Payable > Business Transactions > Closing > Count > Cross-
System Intercompany Reconciliation > Preparations in the Reconciliation System > General
Settings > Maintain Field Catalogs, or Transaction FBRC008.
On the resulting screen, select the ‘Reconciliation Process’ (003) and double-click on ‘Field
Catalog’ on the left-hand side ‘Dialog Structure’. On the next screen, you will see the default
settings for the standard fields (Figure 16.13). Click on ‘New Entries’ to add any new field that
you would have defined and select the appropriate ‘Role’ for that.
Figure 16.13 Maintaining Field Catalogs
The default role for all the fields is ‘Subassignment’. There is no special logic connected with
this role, and hence the information, contained in a field with ‘Subassignment’ as the role, is
simply forwarded and displayed.
For each reconciliation process, you must assign the following roles to exactly one field:
• Leading Organizational Unit
• Leading Partner Unit
• Primary Currency Key
• Primary Amount
• Reference Number
339 Closing
You can also assign the following roles to one field:
• Secondary Organizational Unit
• Secondary Partner Unit
However, you can also assign the role ‘Status Field’ to as many fields as required. But the fields
with ‘Status Role’ must of type NUMC3. You should assign the ‘Reference Number’ role to a
field of type CHAR18, as the reconciliation services determine reference numbers
automatically for data records that are assigned to each other.
Since we have not defined any additional fields, we are not adding anything here for BESTM.
This completes our configuration of ‘General Settings’. Let us move on to discuss the settings
relating to ‘Data Selection and Storage’.
16.1.3 Data Selection and Storage
The following are the configuration steps under this group of settings:
• Define Reconciliation Process Detail Attributes
• Define Ledger
• Define Enhancements
• Companies to be Reconciled
The first configuration step is to define the reconciliation process detail attributes.
16.1.3.1 Define Reconciliation Process Detail Attributes
We have already, vide Section 16.1.2.2, defined some of the attributes for reconciliation
process 003. Here, you can define some detail attributes for the reconciliation process.
Use the menu path: SAP Customizing Implementation Guide > Financial Accounting >
Accounts Receivable and Accounts Payable > Business Transactions > Closing > Count > Cross-
System Intercompany Reconciliation > Preparations in the Reconciliation System > Data
Selection and Storage > Define Reconciliation Process Detail Attributes, or Transaction
FBICO10.
On the resulting screen (Figure 16.9), you will see the reconciliation process detail attributes,
for the reconciliation process 003. You may review the default settings, and change, if
required (for example, the ‘Fiscal Year Variant’). You will notice that the ‘Group chrt/acts’ field
is not editable, because the data selection process tries to determine the group account
number in the sender system. What you are looking at Figure 16.14 is the reconciliation
system. You need to specify which group chart of accounts should be assigned to the
operative charts of accounts in the sender systems.
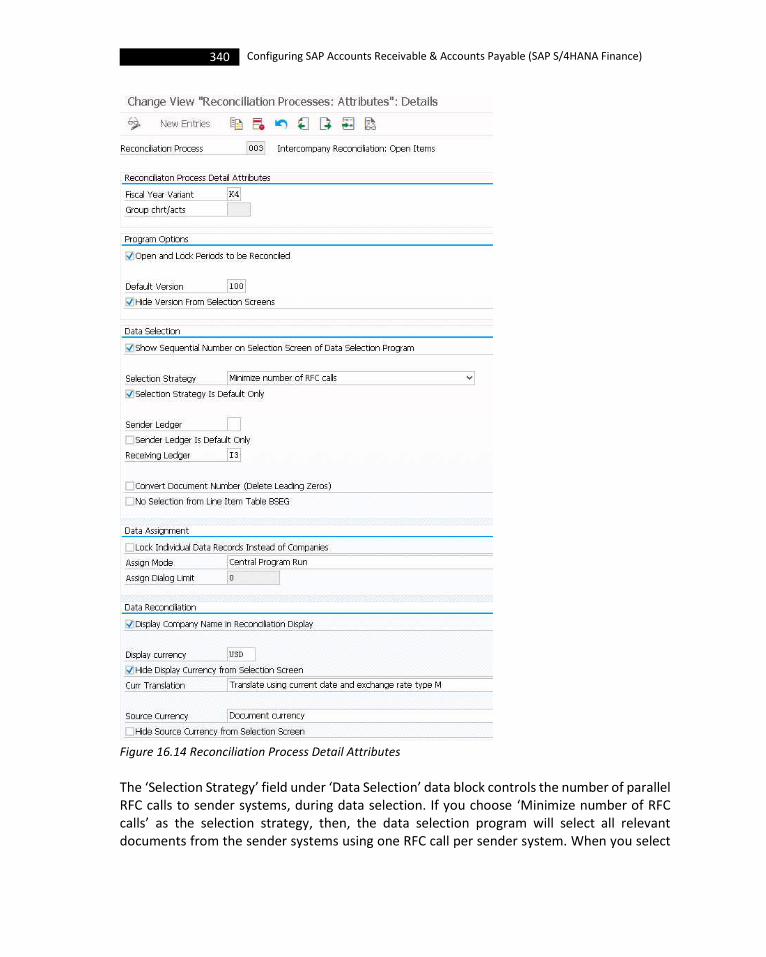
340 Configuring SAP Accounts Receivable & Accounts Payable (SAP S/4HANA Finance)
Figure 16.14 Reconciliation Process Detail Attributes
The ‘Selection Strategy’ field under ‘Data Selection’ data block controls the number of parallel RFC calls to sender systems, during data selection. If you choose ‘Minimize number of RFC calls’ as the selection strategy, then, the data selection program will select all relevant documents from the sender systems using one RFC call per sender system. When you select

341 Closing
the ‘Selection Strategy Is Default Only’ check-box, you can specify (for each company) whether the data of that company should be selected in the collective RFC call or in a separate one.
The next step is to define ledger.
16.1.3.2 Define Ledger
The ‘intercompany reconciliation’ uses Special Purpose Ledger functionality for storing data
that is to be reconciled. Though, from a technical point of view, it is not necessary to actually
create a Special Purpose Ledger only for data storage, specify a ledger name to make use of
the additional functions of Special Purpose Ledger (like, reporting or extraction of data to
BW), at a later point in time.
You can create and maintain a Special Purpose Ledger for facilitating inter-company
reconciliation in the system by following the menu path: SAP Customizing Implementation
Guide > Financial Accounting > Accounts Receivable and Accounts Payable > Business
Transactions > Closing > Count > Cross-System Intercompany Reconciliation > Preparations in
the Reconciliation System > Data Selection and Storage > Define Ledger.
On the ‘Select Activity’ pop-up screen, double-click on ‘Create Ledger’ and maintain the
required details, and ‘Save’ when completed. The ledger must have the property settings as
in Table 16.2. All other configuration switches should be set to ‘No’.
Property Value
Summary table FBICRC003T
Ledger postings allowed Yes
Write lines items Yes
Transaction currency Yes Table 16:2 Properties for Special Purpose Ledger used in Intercompany Reconciliation
Do not assign any companies / activities to this ledger.
With this, let us move on to the next activity of defining enhancements
16.1.3.3 Define Enhancements
You can use Business Add-In (BAdI) for intercompany reconciliation of customer/vendor open
Items. This BAdI provides for adding fields to be selected from database tables, add
information to data records selected from database tables, add or delete data records,
provide mapping for company IDs and supply data using non-standard logic, in document
selection.

342 Configuring SAP Accounts Receivable & Accounts Payable (SAP S/4HANA Finance)
Use the menu path: SAP Customizing Implementation Guide > Financial Accounting >
Accounts Receivable and Accounts Payable > Business Transactions > Closing > Count > Cross-
System Intercompany Reconciliation > Preparations in the Reconciliation System > Data
Selection and Storage > Define Enhancements.
The next step is to set up the companies that need to be reconciled.
16.1.3.4 Companies to be Reconciled
Here, specify for each company to be reconciled which data is supposed to be selected for
intercompany reconciliation and where from the data is supposed to be selected. You can set
up multiple data sources for each company, using a sequential number.
Figure 16.15 Company Attributes for Reconciliation
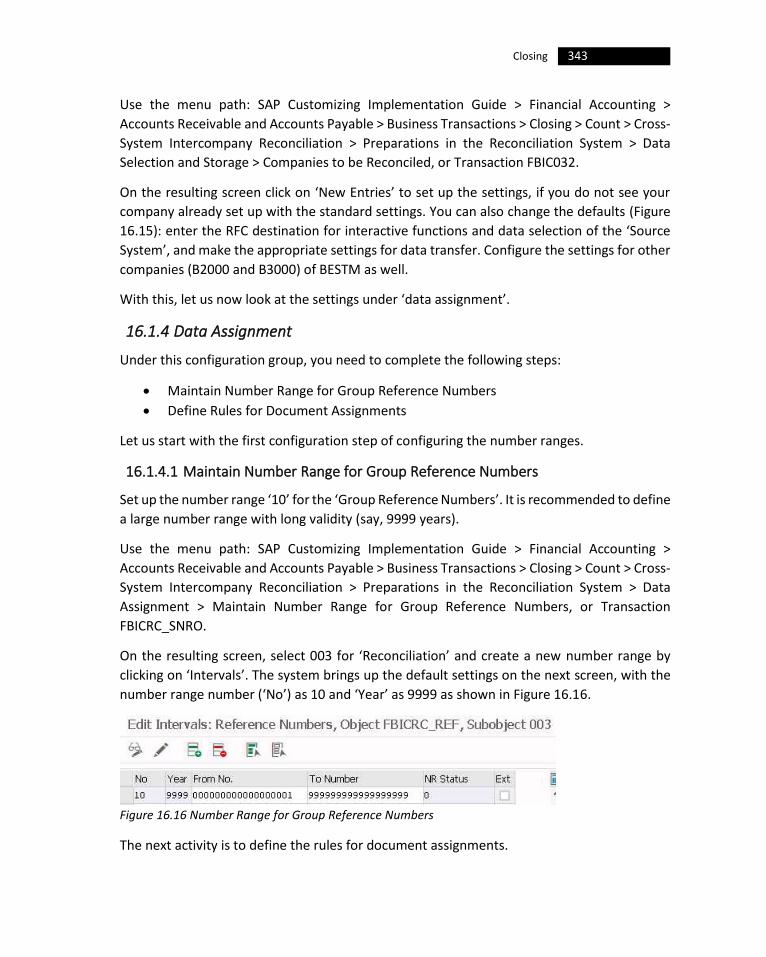
343 Closing
Use the menu path: SAP Customizing Implementation Guide > Financial Accounting >
Accounts Receivable and Accounts Payable > Business Transactions > Closing > Count > Cross-
System Intercompany Reconciliation > Preparations in the Reconciliation System > Data
Selection and Storage > Companies to be Reconciled, or Transaction FBIC032.
On the resulting screen click on ‘New Entries’ to set up the settings, if you do not see your
company already set up with the standard settings. You can also change the defaults (Figure
16.15): enter the RFC destination for interactive functions and data selection of the ‘Source
System’, and make the appropriate settings for data transfer. Configure the settings for other
companies (B2000 and B3000) of BESTM as well.
With this, let us now look at the settings under ‘data assignment’.
16.1.4 Data Assignment
Under this configuration group, you need to complete the following steps:
• Maintain Number Range for Group Reference Numbers
• Define Rules for Document Assignments
Let us start with the first configuration step of configuring the number ranges.
16.1.4.1 Maintain Number Range for Group Reference Numbers
Set up the number range ‘10’ for the ‘Group Reference Numbers’. It is recommended to define
a large number range with long validity (say, 9999 years).
Use the menu path: SAP Customizing Implementation Guide > Financial Accounting >
Accounts Receivable and Accounts Payable > Business Transactions > Closing > Count > Cross-
System Intercompany Reconciliation > Preparations in the Reconciliation System > Data
Assignment > Maintain Number Range for Group Reference Numbers, or Transaction
FBICRC_SNRO.
On the resulting screen, select 003 for ‘Reconciliation’ and create a new number range by
clicking on ‘Intervals’. The system brings up the default settings on the next screen, with the
number range number (‘No’) as 10 and ‘Year’ as 9999 as shown in Figure 16.16.
Figure 16.16 Number Range for Group Reference Numbers
The next activity is to define the rules for document assignments.

344 Configuring SAP Accounts Receivable & Accounts Payable (SAP S/4HANA Finance)
16.1.4.2 Define Rules for Document Assignments
Here, you can define the rules for document assignments, and can specify that the rules are
to be executed automatically: that is, the system assigns the data records automatically,
based on these rules, when the appropriate program is started:
• If you set up several rules for automatic assignment, the system processes these rules
sequentially in the same order as they are shown in the Customizing view. For
example, if you have two rules 100 and 200 with the sequence number 100 in each
case, then, the system processes the data records first by using rule 100. The system
excludes the data records assigned to a document group, as a result of processing
using this rule 100, for further processing and therefore these records will not be
analysed by rule 200.
• If you have multiple conditions within one rule, these conditions are linked with a
logical AND; that is, all conditions must be met to have documents assigned to each
other.
You can use the rules that are not to be used automatically, for manual reconciliation of data records
Use the menu path: SAP Customizing Implementation Guide > Financial Accounting > Accounts Receivable and Accounts Payable > Business Transactions > Closing > Count > Cross-System Intercompany Reconciliation > Preparations in the Reconciliation System > Data Assignment > Define Rules for Document Assignments:
i. On the resulting screen, select 003 as the ‘Reconciliation Process’ and double-click on ‘Rules’ on the left-hand side ‘Dialog Structure’.
ii. The system brings up the ‘Change View “Rules”: Overview’ screen (Figure 16.17). You will see the default rules with their description and also the settings as to whether that rule is to be used for assignment program run etc.
Figure 16.17 Rules for Document Assignment – Overview Screen

345 Closing
iii. Now, select a ‘Rule’ and double-click on the ‘Rule Definition’ on the left-hand side ‘Dialog Structure’. The system brings up the rule definition overview on the next screen (Figure 16.18).
Figure 16.18 Rules for Document Assignment – Rule Definition
With this, we are ready to discuss the settings that you need to make under the IMG node,
‘Data Reconciliation’.
16.1.5 Data Reconciliation
There are a couple of configuration steps that you need to complete, for configuring the
settings for data reconciliation. They are:
• Set Up Reconciliation Display
• Define Sets
• Set Up Object Groups and Subgroups
• Define Possible Status for Documents
• Define Enhancements
Let us start with the first step of setting up the reconciliation display.
16.1.5.1 Set Up Reconciliation Display
Here, in this step, you can specify - for each reconciliation process - whether you want to use
secondary organizational units in the hierarchy display. However, to use secondary
hierarchical units in reconciliation display, you should have defined the additional fields,
activated the data tables and maintained the field catalog including those additional fields.
Since we have not defined any additional field, we will not be able to set up the secondary
organizational units for hierarchy display, and we need to go ahead with the standard settings.
Use the menu path: SAP Customizing Implementation Guide > Financial Accounting >
Accounts Receivable and Accounts Payable > Business Transactions > Closing > Count > Cross-
System Intercompany Reconciliation > Preparations in the Reconciliation System > Data
Reconciliation > Set Up Reconciliation Display, or Transaction FBRC003.
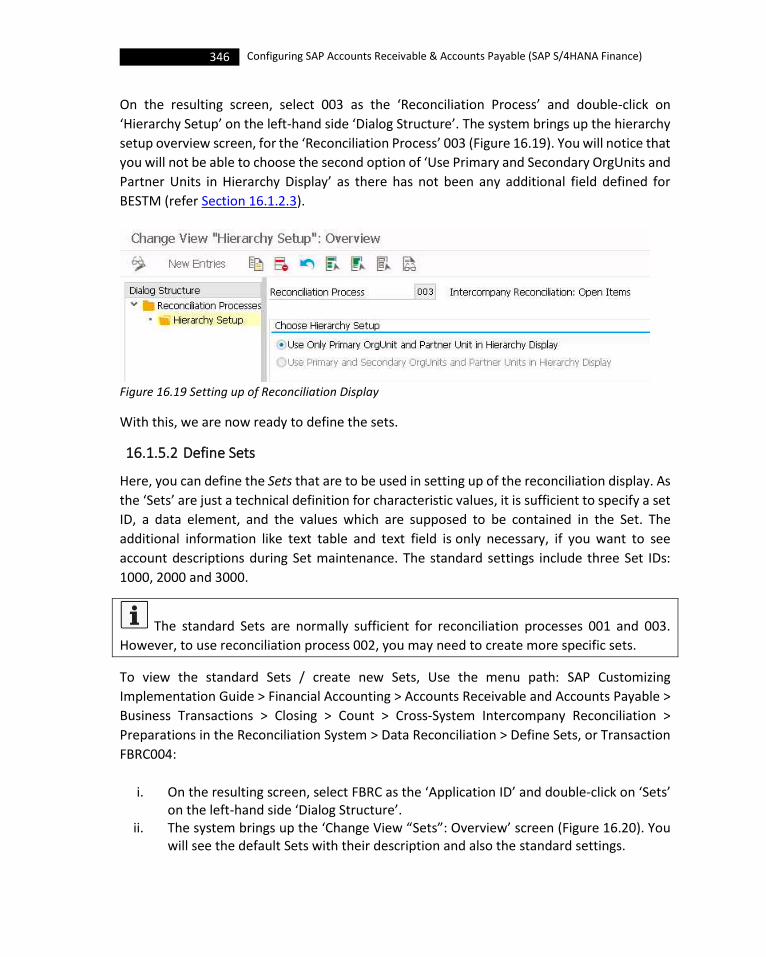
346 Configuring SAP Accounts Receivable & Accounts Payable (SAP S/4HANA Finance)
On the resulting screen, select 003 as the ‘Reconciliation Process’ and double-click on
‘Hierarchy Setup’ on the left-hand side ‘Dialog Structure’. The system brings up the hierarchy
setup overview screen, for the ‘Reconciliation Process’ 003 (Figure 16.19). You will notice that
you will not be able to choose the second option of ‘Use Primary and Secondary OrgUnits and
Partner Units in Hierarchy Display’ as there has not been any additional field defined for
BESTM (refer Section 16.1.2.3).
Figure 16.19 Setting up of Reconciliation Display
With this, we are now ready to define the sets.
16.1.5.2 Define Sets
Here, you can define the Sets that are to be used in setting up of the reconciliation display. As
the ‘Sets’ are just a technical definition for characteristic values, it is sufficient to specify a set
ID, a data element, and the values which are supposed to be contained in the Set. The
additional information like text table and text field is only necessary, if you want to see
account descriptions during Set maintenance. The standard settings include three Set IDs:
1000, 2000 and 3000.
The standard Sets are normally sufficient for reconciliation processes 001 and 003.
However, to use reconciliation process 002, you may need to create more specific sets.
To view the standard Sets / create new Sets, Use the menu path: SAP Customizing
Implementation Guide > Financial Accounting > Accounts Receivable and Accounts Payable >
Business Transactions > Closing > Count > Cross-System Intercompany Reconciliation >
Preparations in the Reconciliation System > Data Reconciliation > Define Sets, or Transaction
FBRC004:
i. On the resulting screen, select FBRC as the ‘Application ID’ and double-click on ‘Sets’ on the left-hand side ‘Dialog Structure’.
ii. The system brings up the ‘Change View “Sets”: Overview’ screen (Figure 16.20). You will see the default Sets with their description and also the standard settings.
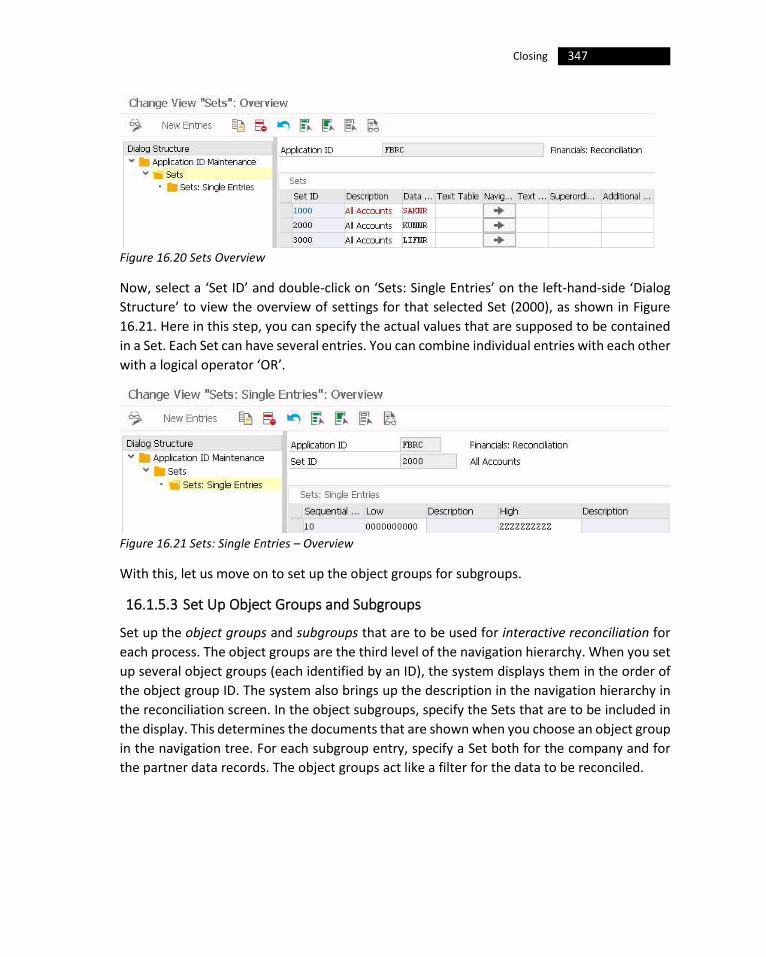
347 Closing
Figure 16.20 Sets Overview
Now, select a ‘Set ID’ and double-click on ‘Sets: Single Entries’ on the left-hand-side ‘Dialog
Structure’ to view the overview of settings for that selected Set (2000), as shown in Figure
16.21. Here in this step, you can specify the actual values that are supposed to be contained
in a Set. Each Set can have several entries. You can combine individual entries with each other
with a logical operator ‘OR’.
Figure 16.21 Sets: Single Entries – Overview
With this, let us move on to set up the object groups for subgroups.
16.1.5.3 Set Up Object Groups and Subgroups
Set up the object groups and subgroups that are to be used for interactive reconciliation for
each process. The object groups are the third level of the navigation hierarchy. When you set
up several object groups (each identified by an ID), the system displays them in the order of
the object group ID. The system also brings up the description in the navigation hierarchy in
the reconciliation screen. In the object subgroups, specify the Sets that are to be included in
the display. This determines the documents that are shown when you choose an object group
in the navigation tree. For each subgroup entry, specify a Set both for the company and for
the partner data records. The object groups act like a filter for the data to be reconciled.
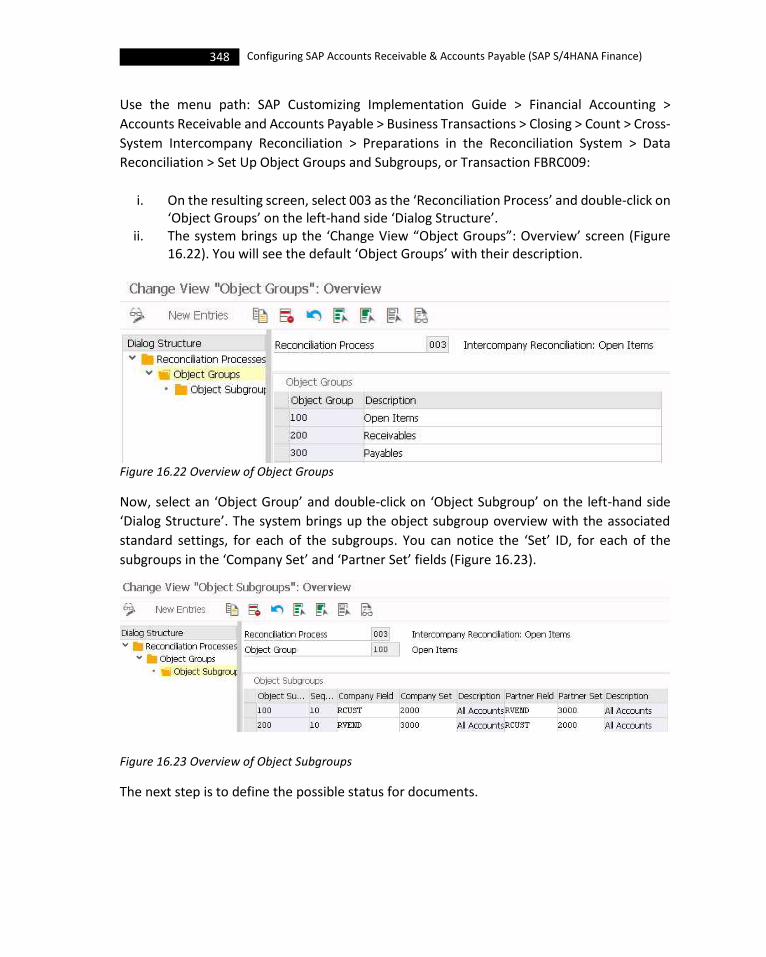
348 Configuring SAP Accounts Receivable & Accounts Payable (SAP S/4HANA Finance)
Use the menu path: SAP Customizing Implementation Guide > Financial Accounting >
Accounts Receivable and Accounts Payable > Business Transactions > Closing > Count > Cross-
System Intercompany Reconciliation > Preparations in the Reconciliation System > Data
Reconciliation > Set Up Object Groups and Subgroups, or Transaction FBRC009:
i. On the resulting screen, select 003 as the ‘Reconciliation Process’ and double-click on ‘Object Groups’ on the left-hand side ‘Dialog Structure’.
ii. The system brings up the ‘Change View “Object Groups”: Overview’ screen (Figure 16.22). You will see the default ‘Object Groups’ with their description.
Figure 16.22 Overview of Object Groups
Now, select an ‘Object Group’ and double-click on ‘Object Subgroup’ on the left-hand side
‘Dialog Structure’. The system brings up the object subgroup overview with the associated
standard settings, for each of the subgroups. You can notice the ‘Set’ ID, for each of the
subgroups in the ‘Company Set’ and ‘Partner Set’ fields (Figure 16.23).
Figure 16.23 Overview of Object Subgroups
The next step is to define the possible status for documents.

349 Closing
16.1.5.4 Define Possible Status for Documents
Here, you define possible status for documents. SAP delivers the fields ‘Communication
Status’ and ‘Processing Status’ as the standard functionality. These fields help users to
remember which actions have already been taken regarding the individual documents.
Use the menu path: SAP Customizing Implementation Guide > Financial Accounting >
Accounts Receivable and Accounts Payable > Business Transactions > Closing > Count > Cross-
System Intercompany Reconciliation > Preparations in the Reconciliation System > Data
Reconciliation > Define Possible Status for Documents, or Transaction FBRC006:
i. On the resulting screen, select 003 as the ‘Reconciliation Process’ and double-click on ‘Status Fields’ on the left-hand side ‘Dialog Structure’.
ii. The system brings up the ‘Change View “Status Fields”: Overview’ screen (Figure 16.24). You will see the default ‘Status Fields’ with their description.
Figure 16.24 Overview of Status Fields
iii. Now, select a ‘Status Field’ and double-click on ‘Status Icons and Values’ on the left-hand side ‘Dialog Structure’. You will see the status icons and the values for the selected ‘Status Field’ (PSAT, for example) in Figure 16.25.
Figure 16.25 Status Icons and Values
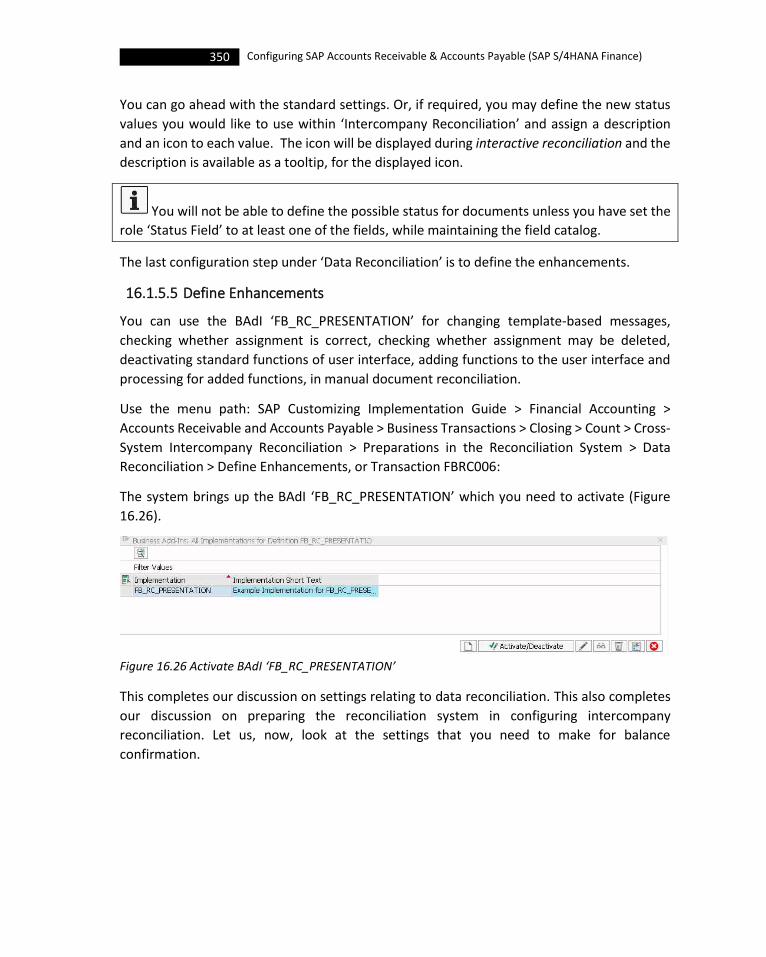
350 Configuring SAP Accounts Receivable & Accounts Payable (SAP S/4HANA Finance)
You can go ahead with the standard settings. Or, if required, you may define the new status
values you would like to use within ‘Intercompany Reconciliation’ and assign a description
and an icon to each value. The icon will be displayed during interactive reconciliation and the
description is available as a tooltip, for the displayed icon.
You will not be able to define the possible status for documents unless you have set the
role ‘Status Field’ to at least one of the fields, while maintaining the field catalog.
The last configuration step under ‘Data Reconciliation’ is to define the enhancements.
16.1.5.5 Define Enhancements
You can use the BAdI ‘FB_RC_PRESENTATION’ for changing template-based messages,
checking whether assignment is correct, checking whether assignment may be deleted,
deactivating standard functions of user interface, adding functions to the user interface and
processing for added functions, in manual document reconciliation.
Use the menu path: SAP Customizing Implementation Guide > Financial Accounting >
Accounts Receivable and Accounts Payable > Business Transactions > Closing > Count > Cross-
System Intercompany Reconciliation > Preparations in the Reconciliation System > Data
Reconciliation > Define Enhancements, or Transaction FBRC006:
The system brings up the BAdI ‘FB_RC_PRESENTATION’ which you need to activate (Figure
16.26).
Figure 16.26 Activate BAdI ‘FB_RC_PRESENTATION’
This completes our discussion on settings relating to data reconciliation. This also completes
our discussion on preparing the reconciliation system in configuring intercompany
reconciliation. Let us, now, look at the settings that you need to make for balance
confirmation.
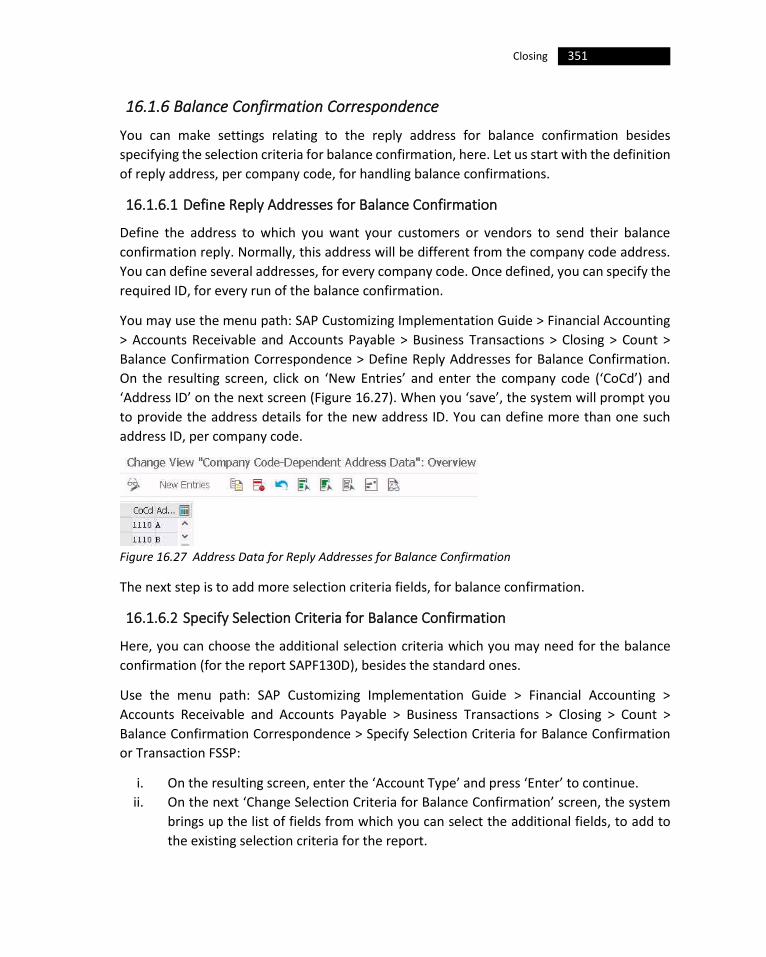
351 Closing
16.1.6 Balance Confirmation Correspondence
You can make settings relating to the reply address for balance confirmation besides
specifying the selection criteria for balance confirmation, here. Let us start with the definition
of reply address, per company code, for handling balance confirmations.
16.1.6.1 Define Reply Addresses for Balance Confirmation
Define the address to which you want your customers or vendors to send their balance
confirmation reply. Normally, this address will be different from the company code address.
You can define several addresses, for every company code. Once defined, you can specify the
required ID, for every run of the balance confirmation.
You may use the menu path: SAP Customizing Implementation Guide > Financial Accounting
> Accounts Receivable and Accounts Payable > Business Transactions > Closing > Count >
Balance Confirmation Correspondence > Define Reply Addresses for Balance Confirmation.
On the resulting screen, click on ‘New Entries’ and enter the company code (‘CoCd’) and
‘Address ID’ on the next screen (Figure 16.27). When you ‘save’, the system will prompt you
to provide the address details for the new address ID. You can define more than one such
address ID, per company code.
Figure 16.27 Address Data for Reply Addresses for Balance Confirmation
The next step is to add more selection criteria fields, for balance confirmation.
16.1.6.2 Specify Selection Criteria for Balance Confirmation
Here, you can choose the additional selection criteria which you may need for the balance
confirmation (for the report SAPF130D), besides the standard ones.
Use the menu path: SAP Customizing Implementation Guide > Financial Accounting >
Accounts Receivable and Accounts Payable > Business Transactions > Closing > Count >
Balance Confirmation Correspondence > Specify Selection Criteria for Balance Confirmation
or Transaction FSSP:
i. On the resulting screen, enter the ‘Account Type’ and press ‘Enter’ to continue.
ii. On the next ‘Change Selection Criteria for Balance Confirmation’ screen, the system
brings up the list of fields from which you can select the additional fields, to add to
the existing selection criteria for the report.
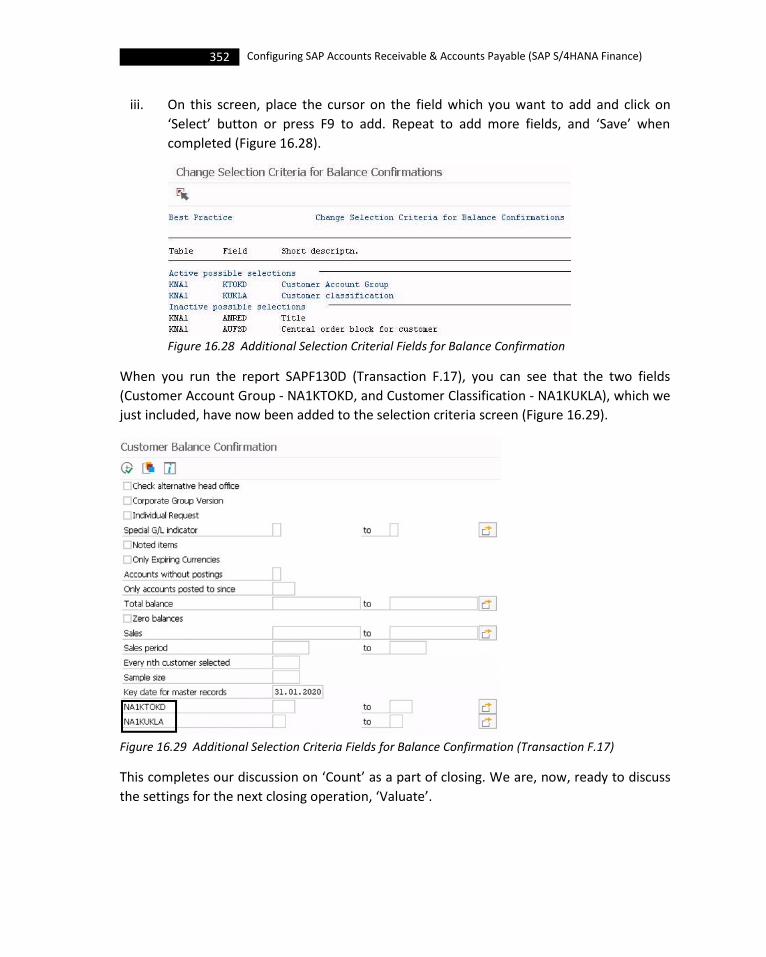
352 Configuring SAP Accounts Receivable & Accounts Payable (SAP S/4HANA Finance)
iii. On this screen, place the cursor on the field which you want to add and click on
‘Select’ button or press F9 to add. Repeat to add more fields, and ‘Save’ when
completed (Figure 16.28).
Figure 16.28 Additional Selection Criterial Fields for Balance Confirmation
When you run the report SAPF130D (Transaction F.17), you can see that the two fields
(Customer Account Group - NA1KTOKD, and Customer Classification - NA1KUKLA), which we
just included, have now been added to the selection criteria screen (Figure 16.29).
Figure 16.29 Additional Selection Criteria Fields for Balance Confirmation (Transaction F.17)
This completes our discussion on ‘Count’ as a part of closing. We are, now, ready to discuss
the settings for the next closing operation, ‘Valuate’.
353 Closing
16.2 Valuate
Under valuate, you need to make settings for the following:
• Foreign Currency Valuation
• Reserve for Bad Debt
• Valuations
Let us start with the foreign currency valuation.
16.2.1 Foreign Currency Valuation
To complete creation of financial statements, you need to perform foreign currency valuation.
For valuating in foreign currency, you have the option of (a) valuating in local currency
(company code currency) or a parallel currency (say, group currency), (b) using
different valuation methods like ‘lowest value principle’ and (c) automatic currency
translation (in accordance with FASB 52 of US GAAP) when translating additional currencies
from local currency.
The Financial Accounting Standards Board (FASB) issued Statement 52, Foreign Currency
Solution, in December 1981. Also known as Accounting Standard Codification 830, FAS 52
provides guidance on handling transactions and reporting that involves foreign currencies.
FAS 52 covers a lot of ground, including guidance on implementing currency rates under
ambiguous conditions.
More specifically, this Statement replaces FASB Statement No. 8 ('Accounting for the
Translation of Foreign Currency Transactions and Foreign Currency Financial Statements'),
and revises the existing accounting and reporting requirements for translation of foreign
currency transactions and foreign currency financial statements. It presents standards for
foreign currency translation that are designed to (1) provide information that is generally
compatible with the expected economic effects of a rate change on an enterprise's cash flows
and equity and (2) reflect in consolidated statements of the financial results and relationships,
as measured in the primary currency in which each entity conducts its business.
The standard SAP supports the following functions towards foreign currency valuation
(program FAGL_FCV):
1) Valuating Foreign Currency Balance Sheet Accounts: The foreign currency B/S
accounts are the G/L accounts that you manage in foreign currency. The balances of
G/L accounts that are not managed on an open item basis are valuated in foreign
currency.

354 Configuring SAP Accounts Receivable & Accounts Payable (SAP S/4HANA Finance)
2) Valuation of Open Items in Foreign Currencies: The items that are open on a key date
are valuated in foreign currency.
3) Saving the exchange rate differences determined from the valuation per document.
4) Posting account assignments in valuation documents: In case you are using document
splitting functionality in SAP G/L Accounting, then, the valuation documents are
posted with the account assignments that you have defined as the document splitting
characteristics. In the case of balance valuation, you can define additional account
assignment characteristics which get always updated (even if you do not use
document splitting). You can define the additional account assignment
characteristics, for foreign currency valuation, using the menu path SAP Customizing
Implementation Guide > Financial Accounting > General Ledger Accounting > Periodic
Processing > Valuate > Foreign Currency Valuation > Activate Additional Fields for
Foreign Currency Valuation or Transaction FINS_FCT. Refer the subsequent Section
16.2.1.7, for more details.
5) Performing the required adjustment postings.
You need to carry out the following configuration activities for performing foreign currency
valuation. You will find these IMG activities for the foreign currency valuation in Customizing
for General Ledger Accounting:
• Define Valuation Methods
• Define Valuation Areas
• Check Assignment of Accounting Principle to Ledger Group
• Assign Valuation Areas and Accounting Principles
• Activate Delta Logic
• Prepare Automatic Postings for Foreign Currency Valuation
• Activate Additional Fields for Foreign Currency Valuation
• Define Account Determination for Currency Translation
Project Dolphin
BESTM Corporate wants to have a single valuation method that will be used worldwide.
However, there needs to be different valuation areas to take care of the different valuation
needs and requirements of each of the accounting principles. Besides, the corporate also
wants to make use of the ‘delta logic’ functionality in foreign currency valuation to ensure
that the system does not execute any reversal postings for the valuation postings in the
subsequent period. Besides the default account assignment fields for foreign currency
valuation, BESTM wants to include ‘Functional Area’ and ‘Cost Center’ as the additional
account assignments to have more flexibility.
Let us start with the definition of valuation methods.
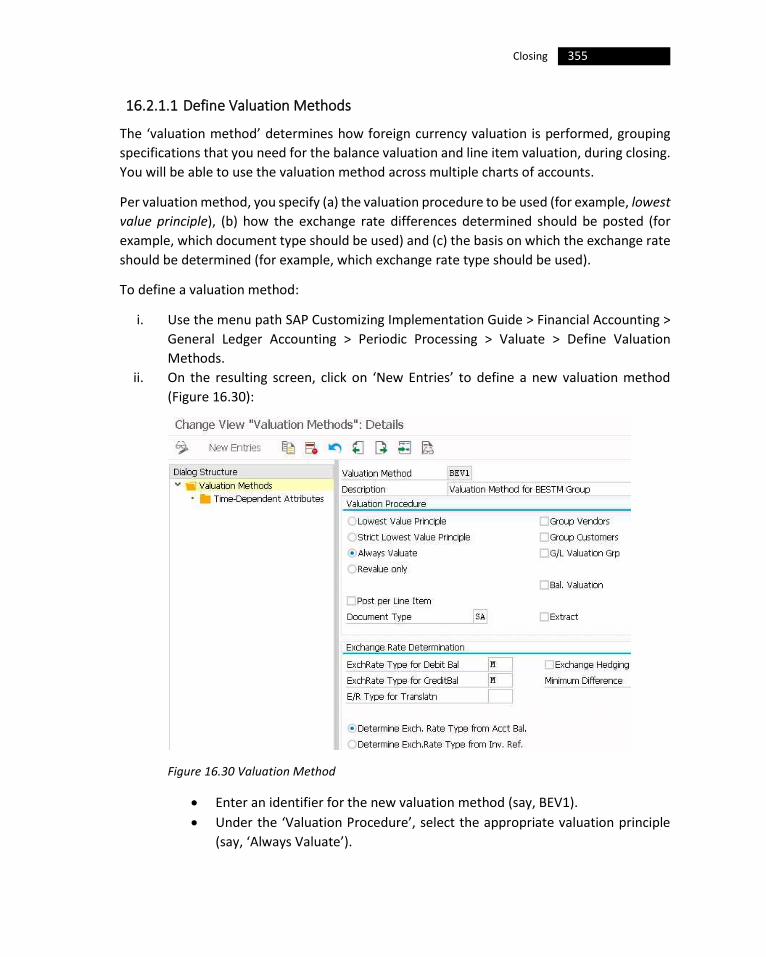
355 Closing
16.2.1.1 Define Valuation Methods
The ‘valuation method’ determines how foreign currency valuation is performed, grouping
specifications that you need for the balance valuation and line item valuation, during closing.
You will be able to use the valuation method across multiple charts of accounts.
Per valuation method, you specify (a) the valuation procedure to be used (for example, lowest
value principle), (b) how the exchange rate differences determined should be posted (for
example, which document type should be used) and (c) the basis on which the exchange rate
should be determined (for example, which exchange rate type should be used).
To define a valuation method:
i. Use the menu path SAP Customizing Implementation Guide > Financial Accounting >
General Ledger Accounting > Periodic Processing > Valuate > Define Valuation
Methods.
ii. On the resulting screen, click on ‘New Entries’ to define a new valuation method
(Figure 16.30):
Figure 16.30 Valuation Method
• Enter an identifier for the new valuation method (say, BEV1).
• Under the ‘Valuation Procedure’, select the appropriate valuation principle
(say, ‘Always Valuate’).

356 Configuring SAP Accounts Receivable & Accounts Payable (SAP S/4HANA Finance)
• Usually, the valuation results are posted in a summarized form. However,
select ‘Post per Line Item’ check-box, if required, to generate a line item for
each valuated item in the valuation posting as well as in the adjustment
account, such as the expense or revenue account.
• To evaluate a group of accounts, you need to select the appropriate check-
boxes. This has the effect that balances are created for several accounts.
Customer and vendor accounts are balanced and grouped according to the
group to which they belong. G/L accounts are balanced according to the
valuation group. During further processing, the group is then viewed as a
whole; for example, during foreign currency valuation the group balance is
used to determine the exchange rate type. You need to enter the group key
in the respective master record under ‘Group’.
• If you select ‘Extract’ check-box, then, you need provide a file name for the
valuation run. The system stores a series of information in this file for every
valuated line item. The format is determined by the F100FILE structure. You
can use this extract for downstream non-SAP applications.
• Enter a ‘Document Type’.
• Under ‘Exchange Rate Determination’, maintain the exchange rate type (say,
M) for both debit and credit balance, and select ‘Determine Exch. Rate Type
from Acct Bal.’ radio-button.
iii. ‘Save’ the settings and maintain the ‘Time-Dependent Attributes’ for the newly
created valuation method BEV1 (Figure 16.30).
With the definition of valuation method completed, the next step is to define the valuation
areas.
16.2.1.2 Valuation Areas
You can use the ‘valuation areas’ to report different valuation approaches and post to
different accounts. You can save the valuation result, separately for each document item and
use it for other closing operations (such as sorted lists).
To define valuation areas for your closing operations:
i. Use the menu path SAP Customizing Implementation Guide > Financial Accounting >
General Ledger Accounting > Periodic Processing > Valuate > Define Valuation Areas.
ii. On the resulting screen, click on ‘New Entries’, and:

357 Closing
Figure 16.31 Valuation Areas
• Enter a 2-character identifier for the new valuation area in the ‘Valuation’
field (say, B1)
• Enter the ‘Valuation Method’ (BEV1).
• You can select up to three currency types in the ‘Crcy type’ fields.
• Enter the appropriate financial statement version (‘FS vers’) and enter a
suitable explanation in the ‘Long Txt’.
• ‘Save’, when completed
iii. Repeat the steps and define all the other valuation areas for BESTM group (Figure
16.31).
The next step is to check the assignment of accounting principle to ledger group.
16.2.1.3 Check Assignment of Accounting Principle to Ledger Group
Using this step, you can check the assignment of accounting principle to ledger group which
you would have already completed, while configuring parallel accounting. If the assignment
was not done earlier, you can use this step to completed the assignment, now.
Assuming that you have already created the required ledger groups (G1) earlier while
configuring the activity ‘Define Settings for Ledgers and Currency Types’, let us now assign the
appropriate accounting principle to this ledger group:
Use the menu path SAP Customizing Implementation Guide > Financial Accounting > General
Ledger Accounting > Periodic Processing > Valuate > Check Assignment of Accounting
Principle to Ledger Group to check or define the assignments.
i. Use the menu path: SAP Customizing Implementation Guide > Financial Accounting >
Financial Accounting Global Settings > Ledgers > Parallel Accounting > Assign
Accounting Principle to Ledger Groups.
ii. On the ‘Change View “Assignment of Accounting Principle to Target Ledger Group”:
Overview, click on ‘New Entries’ and maintain the details on the next screen: Enter
the ‘Accounting Principle’ (IAUS), select the ‘Target Ledger Group’ (G1).
iii. ‘Save’ and you have now created the required accounting principles (Figure 16.32).
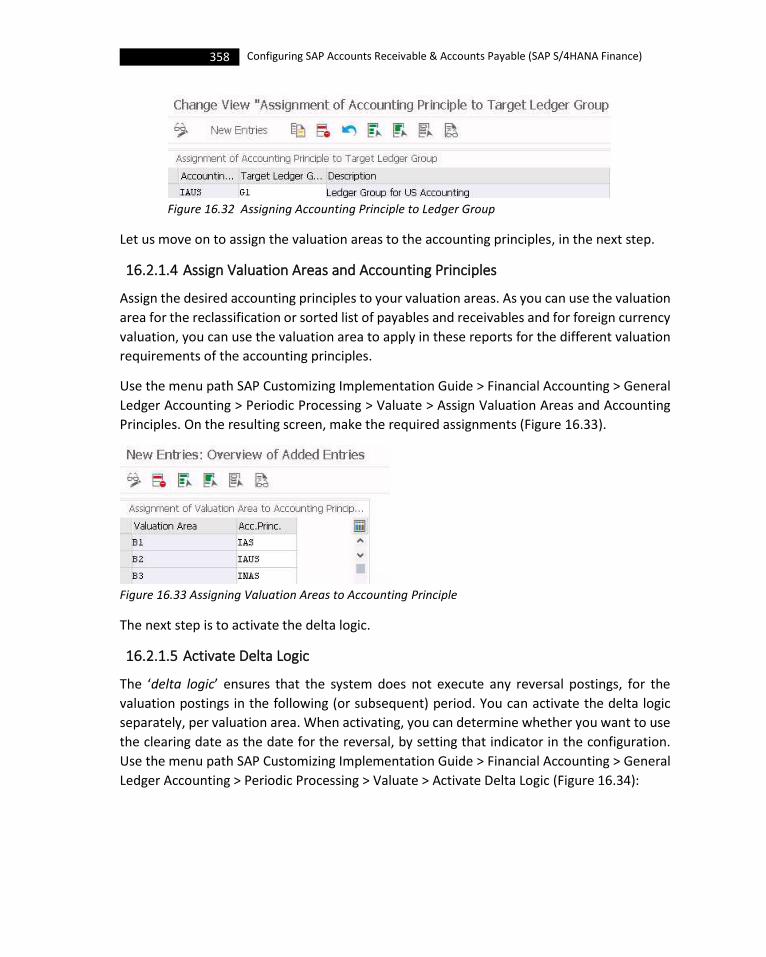
358 Configuring SAP Accounts Receivable & Accounts Payable (SAP S/4HANA Finance)
Figure 16.32 Assigning Accounting Principle to Ledger Group
Let us move on to assign the valuation areas to the accounting principles, in the next step.
16.2.1.4 Assign Valuation Areas and Accounting Principles
Assign the desired accounting principles to your valuation areas. As you can use the valuation
area for the reclassification or sorted list of payables and receivables and for foreign currency
valuation, you can use the valuation area to apply in these reports for the different valuation
requirements of the accounting principles.
Use the menu path SAP Customizing Implementation Guide > Financial Accounting > General
Ledger Accounting > Periodic Processing > Valuate > Assign Valuation Areas and Accounting
Principles. On the resulting screen, make the required assignments (Figure 16.33).
Figure 16.33 Assigning Valuation Areas to Accounting Principle
The next step is to activate the delta logic.
16.2.1.5 Activate Delta Logic
The ‘delta logic’ ensures that the system does not execute any reversal postings, for the
valuation postings in the following (or subsequent) period. You can activate the delta logic
separately, per valuation area. When activating, you can determine whether you want to use
the clearing date as the date for the reversal, by setting that indicator in the configuration.
Use the menu path SAP Customizing Implementation Guide > Financial Accounting > General
Ledger Accounting > Periodic Processing > Valuate > Activate Delta Logic (Figure 16.34):
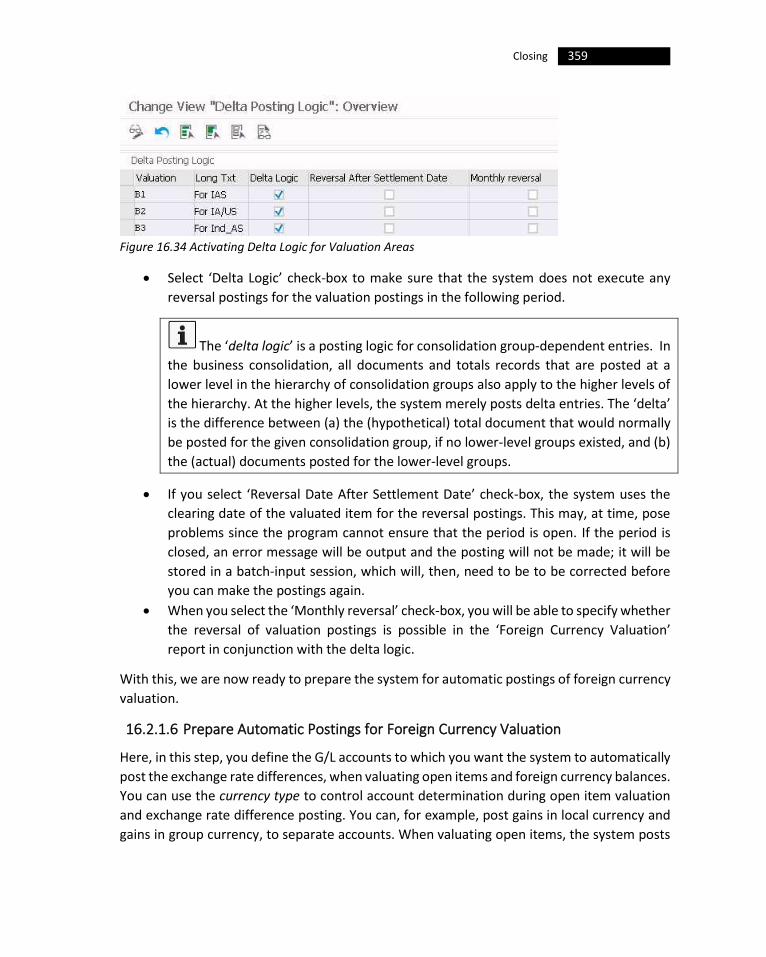
359 Closing
Figure 16.34 Activating Delta Logic for Valuation Areas
• Select ‘Delta Logic’ check-box to make sure that the system does not execute any
reversal postings for the valuation postings in the following period.
The ‘delta logic’ is a posting logic for consolidation group-dependent entries. In
the business consolidation, all documents and totals records that are posted at a
lower level in the hierarchy of consolidation groups also apply to the higher levels of
the hierarchy. At the higher levels, the system merely posts delta entries. The ‘delta’
is the difference between (a) the (hypothetical) total document that would normally
be posted for the given consolidation group, if no lower-level groups existed, and (b)
the (actual) documents posted for the lower-level groups.
• If you select ‘Reversal Date After Settlement Date’ check-box, the system uses the
clearing date of the valuated item for the reversal postings. This may, at time, pose
problems since the program cannot ensure that the period is open. If the period is
closed, an error message will be output and the posting will not be made; it will be
stored in a batch-input session, which will, then, need to be to be corrected before
you can make the postings again.
• When you select the ‘Monthly reversal’ check-box, you will be able to specify whether
the reversal of valuation postings is possible in the ‘Foreign Currency Valuation’
report in conjunction with the delta logic.
With this, we are now ready to prepare the system for automatic postings of foreign currency
valuation.
16.2.1.6 Prepare Automatic Postings for Foreign Currency Valuation
Here, in this step, you define the G/L accounts to which you want the system to automatically
post the exchange rate differences, when valuating open items and foreign currency balances.
You can use the currency type to control account determination during open item valuation
and exchange rate difference posting. You can, for example, post gains in local currency and
gains in group currency, to separate accounts. When valuating open items, the system posts

360 Configuring SAP Accounts Receivable & Accounts Payable (SAP S/4HANA Finance)
to a B/S adjustment account and to an account for exchange rate differences (gain/loss) that
occur during the valuation. Do not change the SAP-defined posting keys for the automatic
postings.
The valuation of foreign currency balances requires a special key that is assigned to the
gain and loss G/L accounts for posting any exchange rate differences that occur during
valuation. You can freely define this key. You then enter that in the master records of the
accounts that you want to valuate. To post the differences that are determined from a group
of G/L accounts to the same gain or loss accounts, enter the same key for all these G/L
accounts.
To configure the settings for automatic postings:
i. Use the menu path SAP Customizing Implementation Guide > Financial Accounting >
General Ledger Accounting > Periodic Processing > Valuate > Foreign Currency
Valuation > Prepare Automatic Postings for Foreign Currency Valuation. You may also
use Transaction OBA1.
ii. You will see a list of automatic posting procedures for posting exchange rate
differences, on the resulting screen. We have already defined the required G/L
accounts to take care of exchange rate differences arising out of open item clearing
(procedure KDF), in an earlier Section 6.1.5 of Chapter 6. Let us, now, configure the
accounts for the other required procedures (like KDB and KDW).
iii. Double-click the appropriate row (say, KDB); maintain the chart of accounts (say,
BEUS), and ‘Continue’.
Figure 16.35 Accounts for Automatic Postings of Foreign Currency Revaluation
iv. Enter the appropriate G/L accounts in ‘Expense account’ and ‘E/R gains acct’. The
‘Expense account’ is for posting the exchange rate losses; any loss resulting from
changes in exchange rates is posted to this account. Similarly, ‘E/R gains acct’ will be
used to record the gains from changes in exchange rates (Figure 16.35).
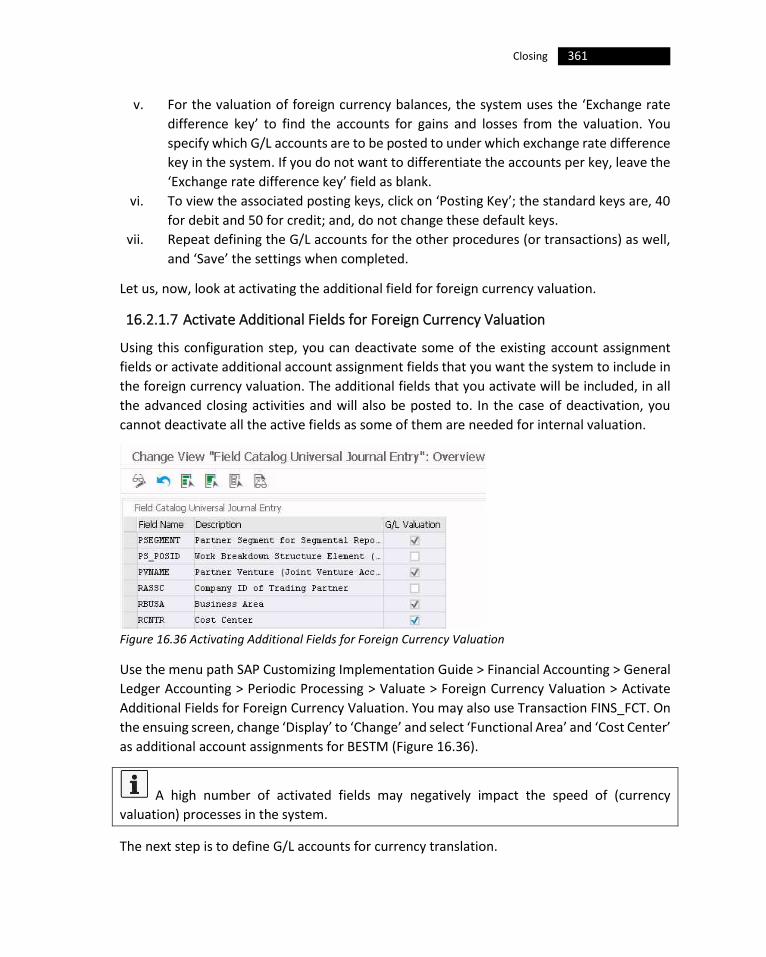
361 Closing
v. For the valuation of foreign currency balances, the system uses the ‘Exchange rate
difference key’ to find the accounts for gains and losses from the valuation. You
specify which G/L accounts are to be posted to under which exchange rate difference
key in the system. If you do not want to differentiate the accounts per key, leave the
‘Exchange rate difference key’ field as blank.
vi. To view the associated posting keys, click on ‘Posting Key’; the standard keys are, 40
for debit and 50 for credit; and, do not change these default keys.
vii. Repeat defining the G/L accounts for the other procedures (or transactions) as well,
and ‘Save’ the settings when completed.
Let us, now, look at activating the additional field for foreign currency valuation.
16.2.1.7 Activate Additional Fields for Foreign Currency Valuation
Using this configuration step, you can deactivate some of the existing account assignment
fields or activate additional account assignment fields that you want the system to include in
the foreign currency valuation. The additional fields that you activate will be included, in all
the advanced closing activities and will also be posted to. In the case of deactivation, you
cannot deactivate all the active fields as some of them are needed for internal valuation.
Figure 16.36 Activating Additional Fields for Foreign Currency Valuation
Use the menu path SAP Customizing Implementation Guide > Financial Accounting > General
Ledger Accounting > Periodic Processing > Valuate > Foreign Currency Valuation > Activate
Additional Fields for Foreign Currency Valuation. You may also use Transaction FINS_FCT. On
the ensuing screen, change ‘Display’ to ‘Change’ and select ‘Functional Area’ and ‘Cost Center’
as additional account assignments for BESTM (Figure 16.36).
A high number of activated fields may negatively impact the speed of (currency
valuation) processes in the system.
The next step is to define G/L accounts for currency translation.

362 Configuring SAP Accounts Receivable & Accounts Payable (SAP S/4HANA Finance)
16.2.1.8 Define Account Determination for Currency Translation
Per financial statement version and valuation area, you can define appropriate account
determination for currency translation for the various financial statement items, in this step.
Use the menu path SAP Customizing Implementation Guide > Financial Accounting > General
Ledger Accounting > Periodic Processing > Valuate > Foreign Currency Valuation > Define
Account Determination for Currency Translation.
Enter the chart of accounts, valuation area and financial statement version on the pop-up
screen, when you enter the Transaction. On continuing, on the next screen, click on ‘New
Entries’ and maintain the financial statement item, (say, 09) in ‘FS item field, enter the
exchange rate type (say, M) for debit/credit exchange rate type, enter the B/S adjustment
account and G/L accounts for value loss and value gain in the appropriate fields, and ‘Save’
the details.
This completes our discussion on configuring the system for foreign currency valuation. Let
us discuss the preparations that you need to make for posting of provisions for doubtful
receivables.
16.2.2 Reserve for Bad Debt / Writing Off of Bad Debt
You can create a bad debt reserve, or write the debt off, using ‘individual value adjustment’,
if you feel that a particular receivable is doubtful or if it is unlikely you will ever recover it. You
can also post a flat-rate value adjustment, using ‘flat-rate value adjustment’, on the balance
sheet key date, for the general risk of not recovering receivables.
Let us first understand the individual value adjustment.
16.2.2.1 Individual Value Adjustment
You can post an individual value adjustment for doubtful receivables, using a special G/L
transaction. You do this by posting the doubtful receivable to the customer account and to an
expense account.
The use of a special G/L transaction helps you as under:
• The A/R remains on the customer account and on the receivables account. You
manage the individual value adjustment, separately from the receivables themselves
on the customer account. This way, you can identify the individual value adjustments
posted to any customer account at any time.
• In the G/L, you post the doubtful receivable to a separate reconciliation account. You
do not need to transfer the doubtful receivable when creating the financial
statements.
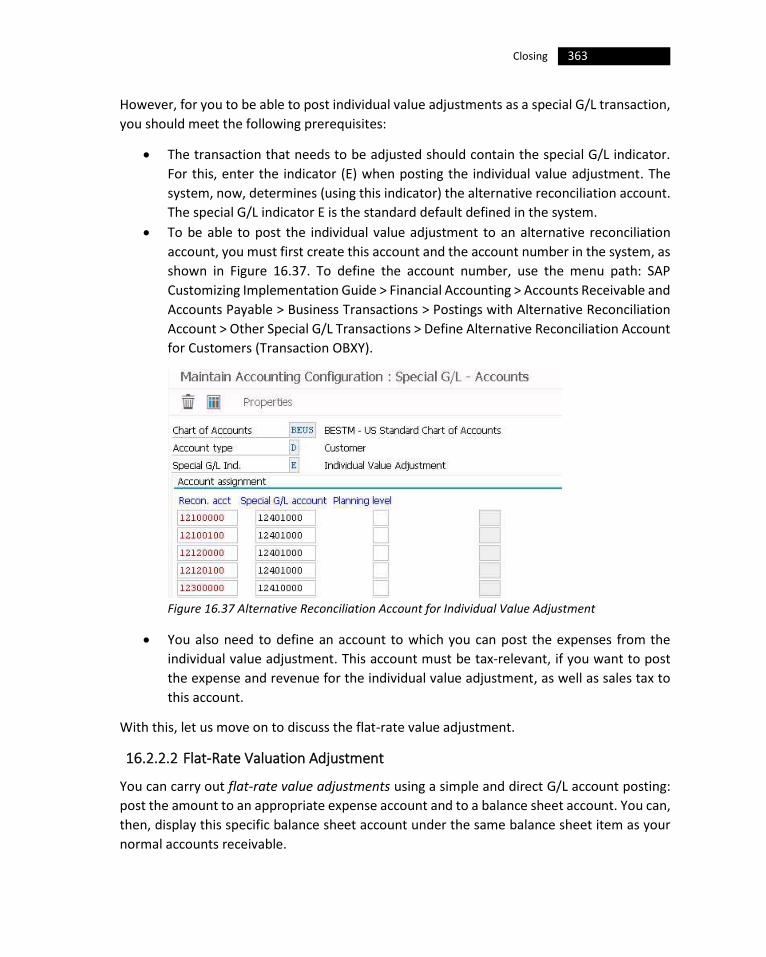
363 Closing
However, for you to be able to post individual value adjustments as a special G/L transaction,
you should meet the following prerequisites:
• The transaction that needs to be adjusted should contain the special G/L indicator.
For this, enter the indicator (E) when posting the individual value adjustment. The
system, now, determines (using this indicator) the alternative reconciliation account.
The special G/L indicator E is the standard default defined in the system.
• To be able to post the individual value adjustment to an alternative reconciliation
account, you must first create this account and the account number in the system, as
shown in Figure 16.37. To define the account number, use the menu path: SAP
Customizing Implementation Guide > Financial Accounting > Accounts Receivable and
Accounts Payable > Business Transactions > Postings with Alternative Reconciliation
Account > Other Special G/L Transactions > Define Alternative Reconciliation Account
for Customers (Transaction OBXY).
Figure 16.37 Alternative Reconciliation Account for Individual Value Adjustment
• You also need to define an account to which you can post the expenses from the
individual value adjustment. This account must be tax-relevant, if you want to post
the expense and revenue for the individual value adjustment, as well as sales tax to
this account.
With this, let us move on to discuss the flat-rate value adjustment.
16.2.2.2 Flat-Rate Valuation Adjustment
You can carry out flat-rate value adjustments using a simple and direct G/L account posting:
post the amount to an appropriate expense account and to a balance sheet account. You can,
then, display this specific balance sheet account under the same balance sheet item as your
normal accounts receivable.

364 Configuring SAP Accounts Receivable & Accounts Payable (SAP S/4HANA Finance)
To carry out the G/L account posting, use the SAP Easy Access Menu: SAP Menu > Accounting
> Financial Accounting > General Ledger > Document Entry > Enter G/L Account Document, or
Transaction FB50.
The system valuates the open customer items, during financial statement preparation.
Besides the foreign currency valuation (refer Section 16.2.1), you can also calculate a discount
for long-term receivables and a flat-rate individual value adjustment for unsecured or overdue
receivables. You can then use the adjusted receivables at a later time as the basis for the
sorted list and regrouping of outstanding receivables. After the valuation processing, you can
either reject the values created in the proposal run or transfer them to G/L accounting. During
the transfer, the system creates the posting in SAP G/L Accounting and saves the valuations
for each line item. You can, therefore, also display the valuation in the document display.
Valuations are only possible for customer items. You cannot valuate vendor and G/L
accounts.
You will see the necessary settings for Customizing the flat-rate individual value adjustments
and discounts, in the next Section.
16.2.3 Valuations
Here, you make the settings for flat-rate individual value adjustment and for discounting of
receivables. The following are the settings that you need to make, as a part of ‘valuate’ closing
operation:
• Define Value Adjustment Key
• Define Interest Calculation Types
• Define Accounts
• Determine Base Value
• Determine Values for Line Item Display
Let us start with the first step of defining value adjustment key.
16.2.3.1 Define Value Adjustment Key
The value adjustment key determines (a) whether you want to execute a valuation for a
different valuation area, (b) the percentage of the provision for the value adjustment
calculation and (c) whether the calculation is to be based on country and due date. Using this
configuration step, you can define a value adjustment key based on country or due date. Once
defined, you then enter the value adjustment key in the customer master record.
Use the menu path: SAP Customizing Implementation Guide > Financial Accounting >
Accounts Receivable and Accounts Payable > Business Transactions > Closing > Valuate >
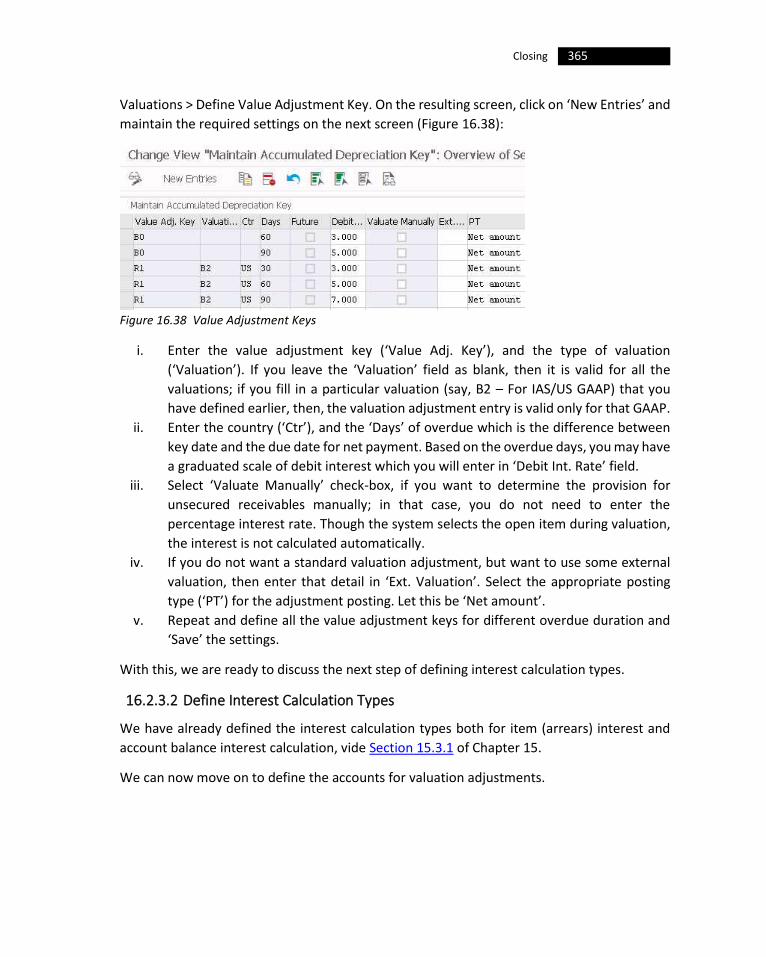
365 Closing
Valuations > Define Value Adjustment Key. On the resulting screen, click on ‘New Entries’ and
maintain the required settings on the next screen (Figure 16.38):
Figure 16.38 Value Adjustment Keys
i. Enter the value adjustment key (‘Value Adj. Key’), and the type of valuation
(‘Valuation’). If you leave the ‘Valuation’ field as blank, then it is valid for all the
valuations; if you fill in a particular valuation (say, B2 – For IAS/US GAAP) that you
have defined earlier, then, the valuation adjustment entry is valid only for that GAAP.
ii. Enter the country (‘Ctr’), and the ‘Days’ of overdue which is the difference between
key date and the due date for net payment. Based on the overdue days, you may have
a graduated scale of debit interest which you will enter in ‘Debit Int. Rate’ field.
iii. Select ‘Valuate Manually’ check-box, if you want to determine the provision for
unsecured receivables manually; in that case, you do not need to enter the
percentage interest rate. Though the system selects the open item during valuation,
the interest is not calculated automatically.
iv. If you do not want a standard valuation adjustment, but want to use some external
valuation, then enter that detail in ‘Ext. Valuation’. Select the appropriate posting
type (‘PT’) for the adjustment posting. Let this be ‘Net amount’.
v. Repeat and define all the value adjustment keys for different overdue duration and
‘Save’ the settings.
With this, we are ready to discuss the next step of defining interest calculation types.
16.2.3.2 Define Interest Calculation Types
We have already defined the interest calculation types both for item (arrears) interest and
account balance interest calculation, vide Section 15.3.1 of Chapter 15.
We can now move on to define the accounts for valuation adjustments.
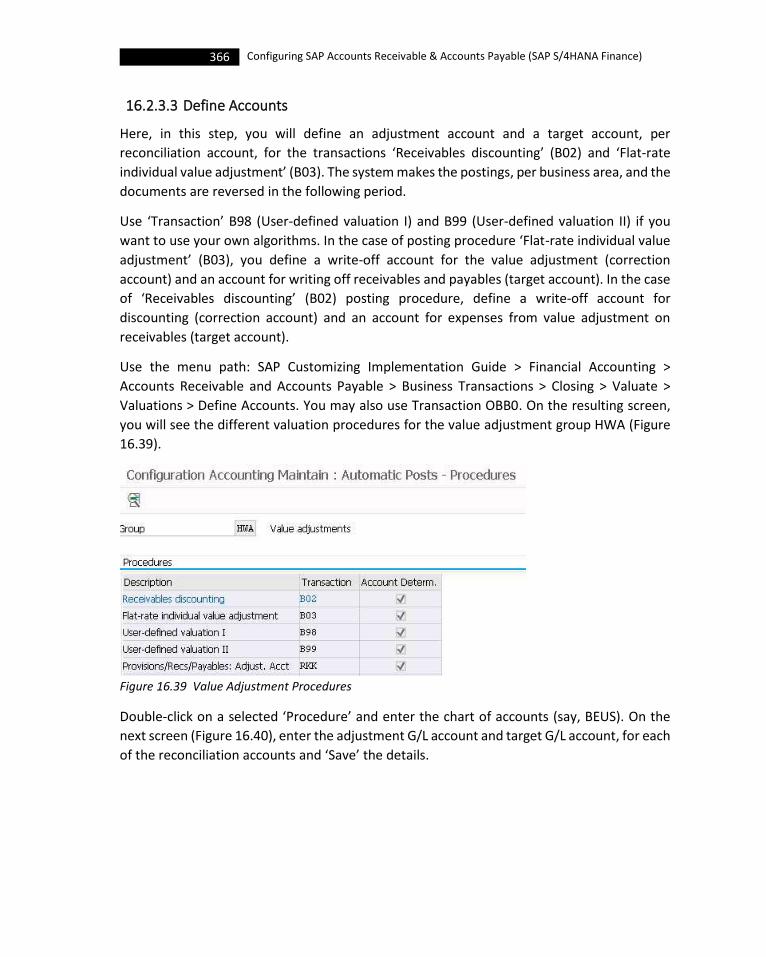
366 Configuring SAP Accounts Receivable & Accounts Payable (SAP S/4HANA Finance)
16.2.3.3 Define Accounts
Here, in this step, you will define an adjustment account and a target account, per
reconciliation account, for the transactions ‘Receivables discounting’ (B02) and ‘Flat-rate
individual value adjustment’ (B03). The system makes the postings, per business area, and the
documents are reversed in the following period.
Use ‘Transaction’ B98 (User-defined valuation I) and B99 (User-defined valuation II) if you
want to use your own algorithms. In the case of posting procedure ‘Flat-rate individual value
adjustment’ (B03), you define a write-off account for the value adjustment (correction
account) and an account for writing off receivables and payables (target account). In the case
of ‘Receivables discounting’ (B02) posting procedure, define a write-off account for
discounting (correction account) and an account for expenses from value adjustment on
receivables (target account).
Use the menu path: SAP Customizing Implementation Guide > Financial Accounting >
Accounts Receivable and Accounts Payable > Business Transactions > Closing > Valuate >
Valuations > Define Accounts. You may also use Transaction OBB0. On the resulting screen,
you will see the different valuation procedures for the value adjustment group HWA (Figure
16.39).
Figure 16.39 Value Adjustment Procedures
Double-click on a selected ‘Procedure’ and enter the chart of accounts (say, BEUS). On the
next screen (Figure 16.40), enter the adjustment G/L account and target G/L account, for each
of the reconciliation accounts and ‘Save’ the details.
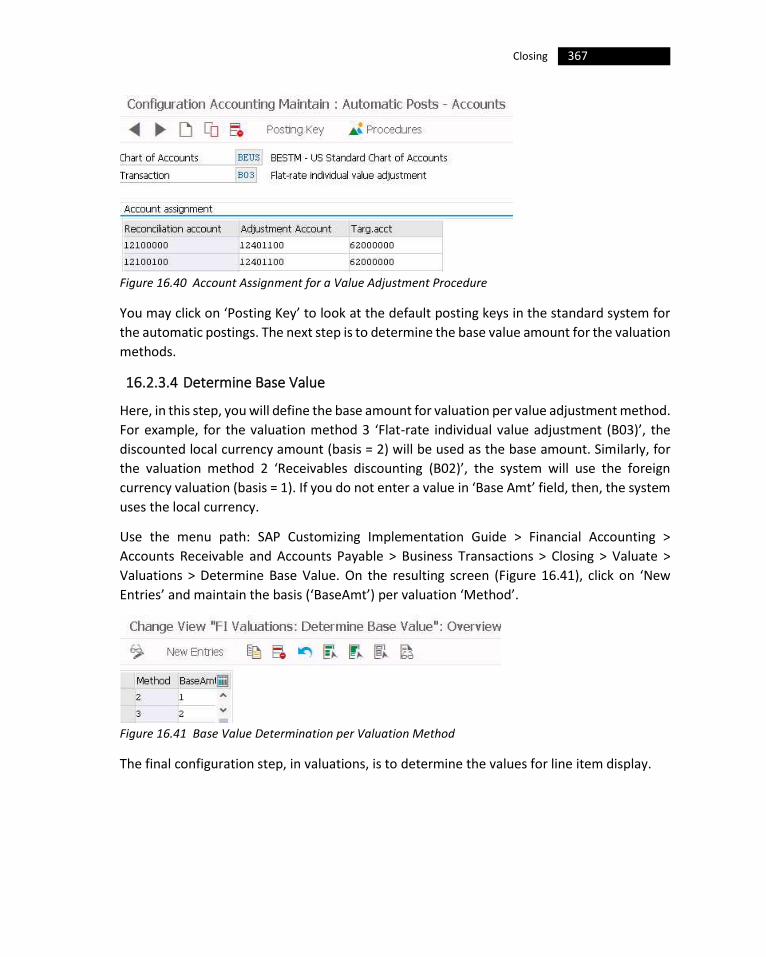
367 Closing
Figure 16.40 Account Assignment for a Value Adjustment Procedure
You may click on ‘Posting Key’ to look at the default posting keys in the standard system for
the automatic postings. The next step is to determine the base value amount for the valuation
methods.
16.2.3.4 Determine Base Value
Here, in this step, you will define the base amount for valuation per value adjustment method.
For example, for the valuation method 3 ‘Flat-rate individual value adjustment (B03)’, the
discounted local currency amount (basis = 2) will be used as the base amount. Similarly, for
the valuation method 2 ‘Receivables discounting (B02)’, the system will use the foreign
currency valuation (basis = 1). If you do not enter a value in ‘Base Amt’ field, then, the system
uses the local currency.
Use the menu path: SAP Customizing Implementation Guide > Financial Accounting >
Accounts Receivable and Accounts Payable > Business Transactions > Closing > Valuate >
Valuations > Determine Base Value. On the resulting screen (Figure 16.41), click on ‘New
Entries’ and maintain the basis (‘BaseAmt’) per valuation ‘Method’.
Figure 16.41 Base Value Determination per Valuation Method
The final configuration step, in valuations, is to determine the values for line item display.

368 Configuring SAP Accounts Receivable & Accounts Payable (SAP S/4HANA Finance)
16.2.3.5 Determine Values for Line Item Display
Here, in this step, you can determine which values you want the system to display in the
‘Valuation Difference’ field in the line item display. Per ‘valuation area, currency type and
valuation method’ combination, you can display up to six values in the line item display.
Use the menu path: SAP Customizing Implementation Guide > Financial Accounting >
Accounts Receivable and Accounts Payable > Business Transactions > Closing > Valuate >
Valuations > Determine Values for Line Item Display. On the resulting screen, click on ‘New
Entries’, enter the ‘Table’ (say, BSBV), select the ‘Field Name’ and maintain the other details
like currency type, ‘Valuation’ (local GAAP or IAS etc) and the valuation ‘Method’ (for example,
‘Flat-rate individual value adjustment’). ‘Save’ the details and repeat to maintain other values
(up to a maximum of six).
This completes our discussion on the settings required for ‘valuate’ closing operation. Let us
see the next item in closing, namely ‘reclassify’.
16.3 Reclassify
The system makes use of the GR / IR clearing account to make required postings, whenever
you receive goods that are yet to be invoiced or invoices for goods that are yet to be delivered.
The system needs G/L account numbers for such adjustments and the target accounts. The
system makes use of the ‘Reclassify’ program in analysing the GR/IR clearing account and
thereby making the required adjustments, by posting any outstanding amounts to an
adjustment account. In the process, the system creates an offsetting entry to the account for
(a) goods received but not invoiced (adjustment account) or (b) goods invoiced but not
delivered (target account).
You will see the IMG activities for transferring and sorting receivables and payables in
Customizing for General Ledger Accounting.
Let us define the adjustment accounts for GR/IR clearing for BESTM company codes.
16.3.1 Define Adjustment Accounts for GR/IR Clearing
Using this activity, you can define the G/L account numbers of the adjustment and target
accounts for the automatic postings for the GR/IR clearing account.
i. Use the menu path SAP Customizing Implementation Guide > Financial Accounting >
General Ledger Accounting > Periodic Processing > Reclassify > Define Adjustment
Accounts for GR/IR Clearing or Transaction OBYP.
ii. On the ensuing screen, you will see the two procedures, BNG and GNB, for which you
need to maintain the required accounts (Figure 16.42).
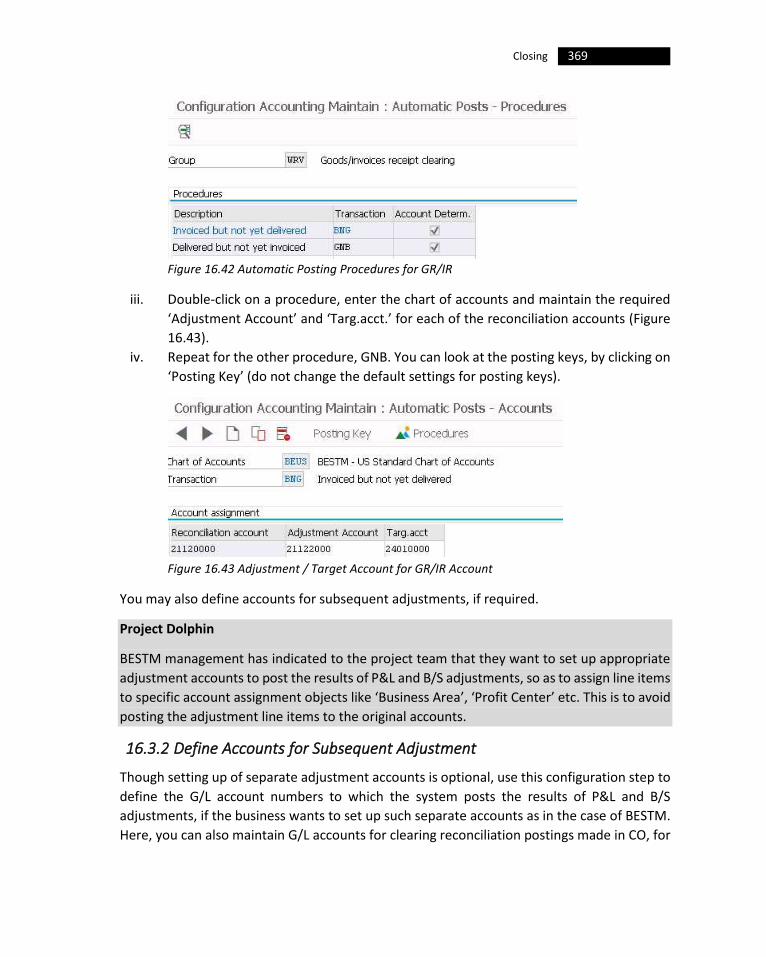
369 Closing
Figure 16.42 Automatic Posting Procedures for GR/IR
iii. Double-click on a procedure, enter the chart of accounts and maintain the required
‘Adjustment Account’ and ‘Targ.acct.’ for each of the reconciliation accounts (Figure
16.43).
iv. Repeat for the other procedure, GNB. You can look at the posting keys, by clicking on
‘Posting Key’ (do not change the default settings for posting keys).
Figure 16.43 Adjustment / Target Account for GR/IR Account
You may also define accounts for subsequent adjustments, if required.
Project Dolphin
BESTM management has indicated to the project team that they want to set up appropriate
adjustment accounts to post the results of P&L and B/S adjustments, so as to assign line items
to specific account assignment objects like ‘Business Area’, ‘Profit Center’ etc. This is to avoid
posting the adjustment line items to the original accounts.
16.3.2 Define Accounts for Subsequent Adjustment
Though setting up of separate adjustment accounts is optional, use this configuration step to
define the G/L account numbers to which the system posts the results of P&L and B/S
adjustments, if the business wants to set up such separate accounts as in the case of BESTM.
Here, you can also maintain G/L accounts for clearing reconciliation postings made in CO, for

370 Configuring SAP Accounts Receivable & Accounts Payable (SAP S/4HANA Finance)
allocations across business area / functional areas, in the transaction key GAO. Use
transaction key GA5, only if you want a user exit for processing the B/S adjustment accounts
which are not processed in the standard system.
An adjustment, retroactively, assigns line items to particular account assignment objects
(business areas, cost center, profit center, etc). The system, automatically, generates clearing
entries and adjustment postings while assigning these line items. If you do not set up an
adjustment account, the system posts the items to the original account. To separate the
adjustment postings from other postings, you should create separate adjustment accounts in
this activity and have the system post the items to them.
You have to set up a clearing account for the adjustment process so that the postings made,
per business area, do not affect the balances. You also have to set up adjustment accounts
for reconciliation accounts, tax accounts and any other accounts which cannot be directly
posted to. Note that you cannot make these adjustment accounts as relevant to tax; do not
enter a ‘Tax category’ in the G/L account master record for these accounts, and you should
select the ‘Posting without tax allowed’ check-box for all these accounts.
To configure the G/L accounts for subsequent adjustment:
i. Use the menu path SAP Customizing Implementation Guide > Financial Accounting >
General Ledger Accounting > Periodic Processing > Reclassify > Define Adjustment
Accounts for GR/IR Clearing or Transaction OBXM.
Figure 16.44 Procedures for defining G/L Accounts for Subsequent Adjustments
ii. On the resulting screen, you will see all the procedures (GA0 to GA5) relating to
financial statement readjustments (Figure 16.44)
iii. Double-click on each of the procedures, and define the appropriate G/L accounts on
the next screen to define the accounts for subsequent adjustments.

371 Closing
With this, we are, now, ready to discuss the settings that are required for transferring / sorting
receivables and payables in the system, as a part of closing process.
Project Dolphin
In closing, for regrouping receivables and payables, BESM wants the configuration team to
stick to the SAP’s standard sort method. The team has been tasked to assign the suitable G/L
accounts, as adjustment accounts, for this default sort method.
There are a couple of configuration steps in making the system ready to transfer / sort
receivables and payables during closing. The first activity is to define a sort method and then
assigning suitable adjustment accounts for regrouping.
16.3.3 Define Sort Method and Adjustment Accts for Regrouping Receivables /
Payables
To define the sort method and adjustment accounts for regrouping receivables and payables:
i. Use the menu path SAP Customizing Implementation Guide > Financial Accounting >
General Ledger Accounting > Periodic Processing > Reclassify > Transfer and Sort
Receivables and Payables > Define Sort Method and Adjustment Accts for Regrouping
Receivables/Payables or Transaction OBBU.
ii. On the resulting screen (Figure 16.45), you will see the default sort method (named
as SAP).
Figure 16.45 Overview Screen for Sort Methods and their Associated Settings
iii. Select that row, and double-click on ‘Receivables’ on the left-hand side ‘Dialog
Structure’, and make the required classifications (like, less than 1year, more than 1
year etc) on the next screen (Figure 16.46).

372 Configuring SAP Accounts Receivable & Accounts Payable (SAP S/4HANA Finance)
Figure 16.46 Classification Intervals for Sorting
iv. Click on ‘Account’ on a row, and maintain the required G/L accounts, for adjustment
and target for each of the reconciliation accounts on the next screen (Figure 16.47).
Figure 16.47 Adjustment Accounts for Receivables Regrouping
v. Repeat assigning the accounts for other intervals say, ‘Receivables > 1 year’.
vi. Repeat the steps for ‘Payables’ and ‘Save’ the configuration settings.
The next step is to define the G/L accounts for the adjustment postings for sorting receivables
/ payables according to their maturity (remaining term).
16.3.4 Define Adjustment Accounts for Receivables/Payables by Maturity
Here, you define the G/L account numbers required for the adjustment postings that sort the
receivables / payables according to their maturity (remaining term). The system makes
postings to these accounts to sort the open items which is necessary so that receivables /
payables can be displayed according to the legal requirements for creating balance sheets.
The customers (with a credit balance) and vendors (with a debit balance) are included in the
account determination for sorting.
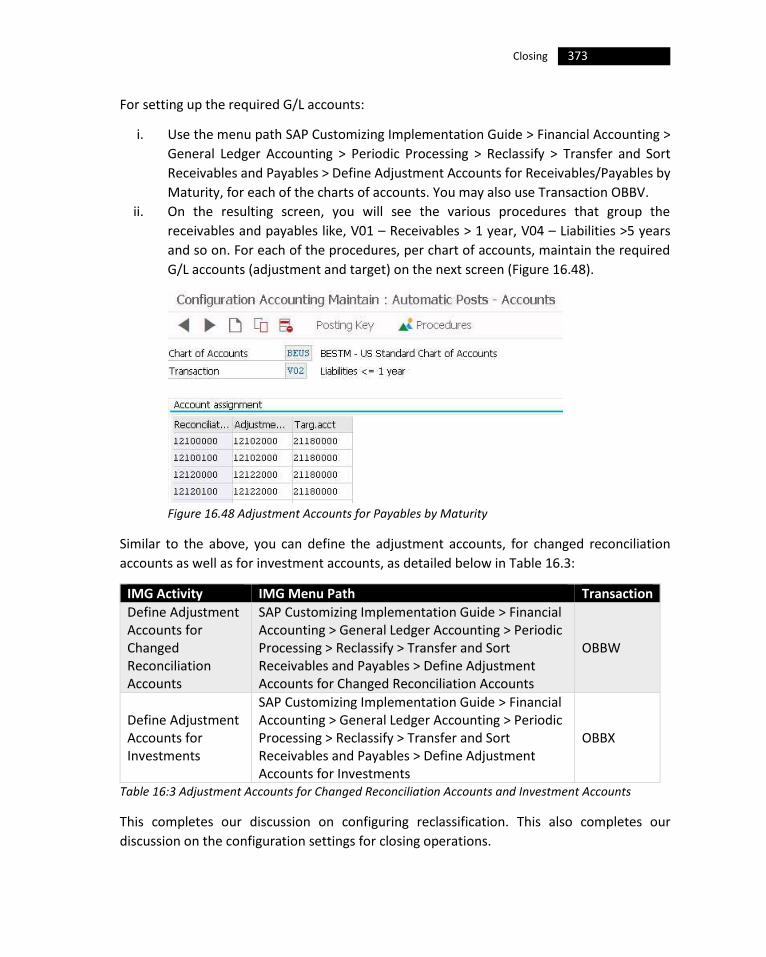
373 Closing
For setting up the required G/L accounts:
i. Use the menu path SAP Customizing Implementation Guide > Financial Accounting >
General Ledger Accounting > Periodic Processing > Reclassify > Transfer and Sort
Receivables and Payables > Define Adjustment Accounts for Receivables/Payables by
Maturity, for each of the charts of accounts. You may also use Transaction OBBV.
ii. On the resulting screen, you will see the various procedures that group the
receivables and payables like, V01 – Receivables > 1 year, V04 – Liabilities >5 years
and so on. For each of the procedures, per chart of accounts, maintain the required
G/L accounts (adjustment and target) on the next screen (Figure 16.48).
Figure 16.48 Adjustment Accounts for Payables by Maturity
Similar to the above, you can define the adjustment accounts, for changed reconciliation
accounts as well as for investment accounts, as detailed below in Table 16.3:
IMG Activity IMG Menu Path Transaction
Define Adjustment Accounts for Changed Reconciliation Accounts
SAP Customizing Implementation Guide > Financial Accounting > General Ledger Accounting > Periodic Processing > Reclassify > Transfer and Sort Receivables and Payables > Define Adjustment Accounts for Changed Reconciliation Accounts
OBBW
Define Adjustment Accounts for Investments
SAP Customizing Implementation Guide > Financial Accounting > General Ledger Accounting > Periodic Processing > Reclassify > Transfer and Sort Receivables and Payables > Define Adjustment Accounts for Investments
OBBX
Table 16:3 Adjustment Accounts for Changed Reconciliation Accounts and Investment Accounts
This completes our discussion on configuring reclassification. This also completes our
discussion on the configuration settings for closing operations.
374 Configuring SAP Accounts Receivable & Accounts Payable (SAP S/4HANA Finance)
16.4 Conclusion
In this Chapter, you learned about the configuration settings that you need to make for some
of the closing operations like count, valuate and reclassify.
While discussing about ‘count’, you learned that the program ‘Reconciliation of
Receivables/Payables in Group (Cross-System)’ helps you to reconcile customer documents
and vendor documents of the affiliated companies in the group. You learned that the program
reads the open items of selected companies for the key date specified, thereby helping you
to identify documents that cause a difference.
You learned that there are several configuration settings that you need to make under ‘Cross-
System Intercompany Reconciliation’ for preparing the sender as well as the reconciliation
systems. Towards preparing the reconciliation system, you learned how to generate the
default customizing and maintain the various general settings in the system. You learned that
you need to define an application ID for intercompany reconciliation (FBRC being the SAP
supplied standard ID) and that the communication support components of the system make
use of these application IDs to distinguish between data from different application IDs. Then,
you learned about defining contact person database, placeholders for messages and message
templates. Later, you defined the reconciliation process attributes, added the desired
additional fields (up to 13) to the tables for the intercompany reconciliation of G/L accounts,
activated the individual reconciliation processes, activated the transaction data tables &
generated the posting modules to enable the intercompany reconciliation programs to post
data, and assigned the predefined roles to the single fields of the data tables. Then, you
learned about the settings that you need to maintain for data selection & storage, data
assignment and data reconciliation.
Then, for configuring balance confirmation correspondence, you learned that you need to
make settings relating to the reply address besides specifying the selection criteria. You
learned to define the address (using an ‘Address ID’) to which you want your customers or
vendors to send their balance confirmation reply. While doing so, you understood that,
normally, this address will be different from the company code address. You also learned that
you can define several such addresses, for every company code, and that once defined, you
need to specify the required ID, for every run of the balance confirmation.
For ‘valuate’, you learned that you need to make the appropriate configuration for foreign
currency valuation, reserve for bad debt and valuations.
You learned that to complete creation of financial statements, you need to perform foreign
currency valuation and for valuating in foreign currency, you have the option of (a) valuating
in local currency (company code currency) or a parallel currency, (b) using different valuation
methods like ‘lowest value principle’ and (c) automatic currency translation (in accordance
375 Closing
with FASB 52 of US GAAP, for example) when translating additional currencies from local
currency. In foreign currency valuation, you learned about the ‘valuation method’ that
determines how foreign currency valuation is performed, the grouping specifications that you
need for the balance valuation and the line item valuation. You understood that you will be
able to use the valuation method across multiple charts of accounts. You also learned that
you can use the ‘valuation areas’ to report different valuation approaches and post to
different accounts. By this, you understood that you can save the valuation result, separately
for each document item and use it for other closing operations (such as sorted lists). Then,
you learned about the ‘delta logic’ which ensures that the system does not execute any
reversal postings, for the valuation postings in the following (or subsequent) period. You
learned that you can activate the delta logic separately, per valuation area, and while
activating, that you can determine whether you want to use the clearing date as the date for
the reversal, by setting that indicator in the configuration. Then, you defined the G/L accounts
to which you want the system to automatically post the exchange rate differences, when
valuating open items and foreign currency balances. You learned that you can deactivate
some of the existing account assignment fields or activate additional account assignment
fields, that you want the system to include in the foreign currency valuation. Finally, you
defined the appropriate account determination for currency translation, per financial
statement version and valuation area, for the various financial statement items.
You learned that you can create a bad debt reserve, or write the bad debt off, using ‘individual
value adjustment’, if you feel that a particular receivable is doubtful or if it is unlikely you will
ever recover it. You learned that you can also post a flat-rate value adjustment, using ‘flat-
rate value adjustment’, on the balance sheet key date, for the general risk of not recovering
receivables. You learned that you can post an individual value adjustment for doubtful
receivables, using a special G/L transaction, by posting the doubtful receivable to the
customer account and to an expense account. You also learned that you can carry out flat-
rate value adjustments using a simple and direct G/L account posting: post the amount to an
appropriate expense account and to a balance sheet account. You understood that you can,
then, display this specific balance sheet account under the same balance sheet item as your
normal accounts receivable. You learned that to make the settings for flat-rate individual
value adjustment and for discounting of receivables, you need the ‘value adjustment key’
which determines (a) whether you want to execute a valuation for a different valuation area,
(b) the percentage of the provision for the value adjustment calculation and (c) whether the
calculation is to be based on country and due date. You, then, defined an adjustment account
and a target account, per reconciliation account, for the ‘Receivables discounting’ and ‘Flat-
rate individual value adjustment’ transactions, enabling the system to make the postings, per
business area, and to reverse the documents in the following period.
376 Configuring SAP Accounts Receivable & Accounts Payable (SAP S/4HANA Finance)
In ‘reclassify’ closing operation, you learned that the system makes use of the GR / IR clearing
account to make required postings, whenever you receive goods that are yet to be invoiced
or invoices for goods that are yet to be delivered. You understood that the system needs G/L
account numbers for such adjustments and the target accounts, and that the system makes
use of the ‘Reclassify’ program in analysing the GR/IR clearing account for making the required
adjustments, by posting any outstanding amounts to an adjustment account. In the process,
you learned that the system creates an offsetting entry to the account for (a) goods received
but not invoiced (adjustment account) or (b) goods invoiced but not delivered (target
account). For configuring reclassify, you first defined the G/L account numbers for the
adjustment and target accounts for the automatic postings for the GR/IR clearing account.
Then, though setting up of separate adjustment accounts is optional, you understood that
this configuration (of defining the G/L account numbers to which the system posts the results
of P&L and B/S adjustments) comes handy, if the business wants to set up such separate
accounts for subsequent adjustments. Then, you defined the sort method and, finally, defined
the adjustment accounts for regrouping receivables and payables. You understood that these
adjustment G/L account numbers are required for the adjustment postings that sort the
receivables / payables according to their maturity (remaining term).
In the next Chapter, let us discuss the information system for FI-A/R and FI-A/P.
17 Information System
ou will come across several evaluations that are defined for customers and vendors, in
the standard SAP system. You can make a selection from the standard evaluations to
suit your needs, and you can enhance the same by including additional characteristics.
However, you cannot define new evaluations, here. Use the drilldown reports to define new
reports.
You need to complete the configuration settings discussed in the following Section to make
use of the standard evaluations. Let us first discuss the standard evaluations.
17.1 Standard Evaluations
Maintain the appropriate configuration by completing the following steps:
• Copy Standard Evaluations
• Select Standard Evaluations
• Enhance Standard Evaluations
Let us start with the copying of standard evaluations.
17.1.1 Copy Standard Evaluations
You need to copy the standard evaluations from the source system (client 000) to your
productive system. Use the menu path: SAP Customizing Implementation Guide > Financial
Accounting > Accounts Receivable and Accounts Payable > Information System > Accounts
Receivable > Standard Evaluations > Valuations > Copy Standard Evaluations. You can also use
Transaction FY01.
On the resulting screen, click ‘Yes’ on the ‘Customizing Transfer’ pop-up screen, to copy the
standard evaluations to your productive SAP client. The system carries out the copying and
brings up a log on the next screen. Use Transaction SCC3, and double-click on the log entry on
the resulting screen to view the details (Figure 17.1) of what has been copied.
Y
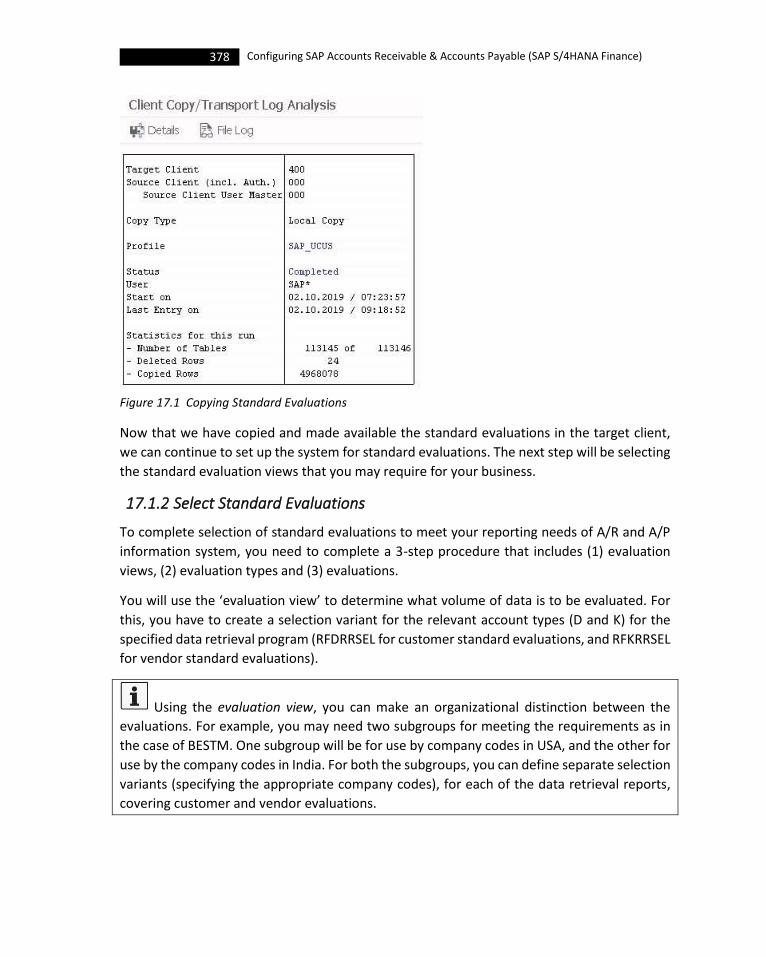
378 Configuring SAP Accounts Receivable & Accounts Payable (SAP S/4HANA Finance)
Figure 17.1 Copying Standard Evaluations
Now that we have copied and made available the standard evaluations in the target client,
we can continue to set up the system for standard evaluations. The next step will be selecting
the standard evaluation views that you may require for your business.
17.1.2 Select Standard Evaluations
To complete selection of standard evaluations to meet your reporting needs of A/R and A/P
information system, you need to complete a 3-step procedure that includes (1) evaluation
views, (2) evaluation types and (3) evaluations.
You will use the ‘evaluation view’ to determine what volume of data is to be evaluated. For
this, you have to create a selection variant for the relevant account types (D and K) for the
specified data retrieval program (RFDRRSEL for customer standard evaluations, and RFKRRSEL
for vendor standard evaluations).
Using the evaluation view, you can make an organizational distinction between the
evaluations. For example, you may need two subgroups for meeting the requirements as in
the case of BESTM. One subgroup will be for use by company codes in USA, and the other for
use by the company codes in India. For both the subgroups, you can define separate selection
variants (specifying the appropriate company codes), for each of the data retrieval reports,
covering customer and vendor evaluations.
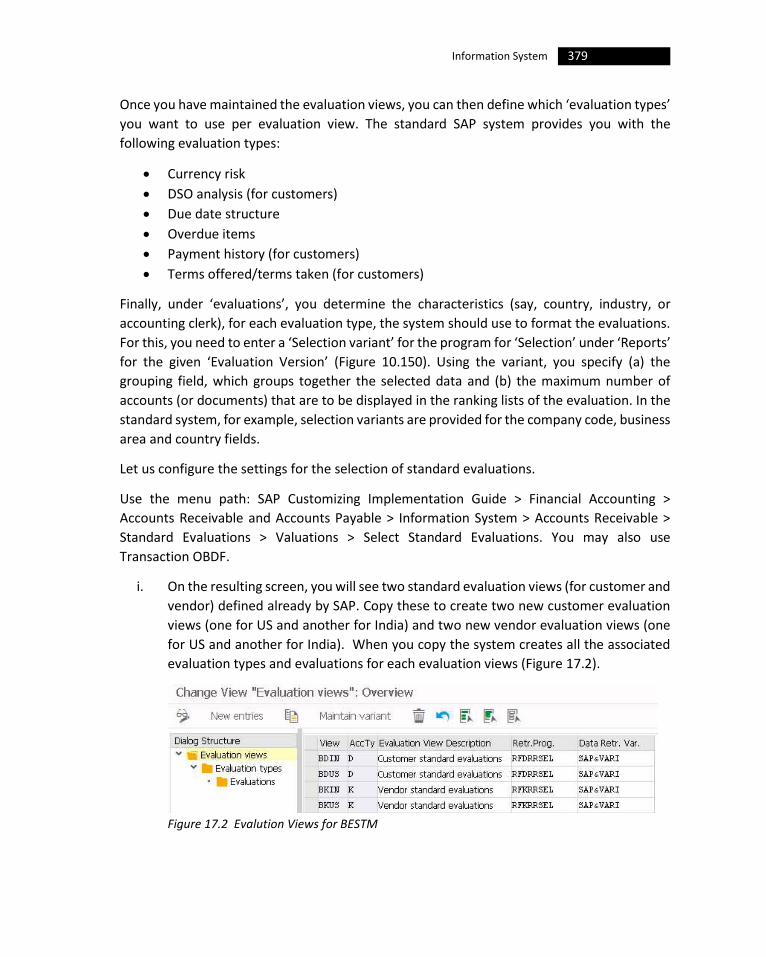
379 Information System
Once you have maintained the evaluation views, you can then define which ‘evaluation types’
you want to use per evaluation view. The standard SAP system provides you with the
following evaluation types:
• Currency risk
• DSO analysis (for customers)
• Due date structure
• Overdue items
• Payment history (for customers)
• Terms offered/terms taken (for customers)
Finally, under ‘evaluations’, you determine the characteristics (say, country, industry, or
accounting clerk), for each evaluation type, the system should use to format the evaluations.
For this, you need to enter a ‘Selection variant’ for the program for ‘Selection’ under ‘Reports’
for the given ‘Evaluation Version’ (Figure 10.150). Using the variant, you specify (a) the
grouping field, which groups together the selected data and (b) the maximum number of
accounts (or documents) that are to be displayed in the ranking lists of the evaluation. In the
standard system, for example, selection variants are provided for the company code, business
area and country fields.
Let us configure the settings for the selection of standard evaluations.
Use the menu path: SAP Customizing Implementation Guide > Financial Accounting >
Accounts Receivable and Accounts Payable > Information System > Accounts Receivable >
Standard Evaluations > Valuations > Select Standard Evaluations. You may also use
Transaction OBDF.
i. On the resulting screen, you will see two standard evaluation views (for customer and
vendor) defined already by SAP. Copy these to create two new customer evaluation
views (one for US and another for India) and two new vendor evaluation views (one
for US and another for India). When you copy the system creates all the associated
evaluation types and evaluations for each evaluation views (Figure 17.2).
Figure 17.2 Evalution Views for BESTM
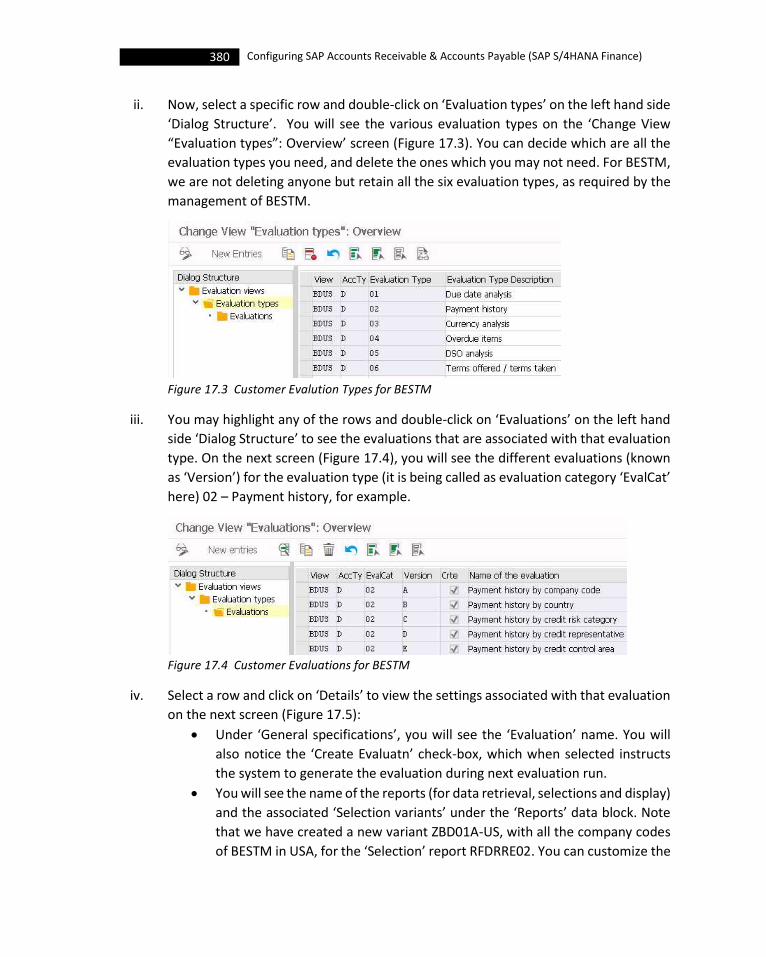
380 Configuring SAP Accounts Receivable & Accounts Payable (SAP S/4HANA Finance)
ii. Now, select a specific row and double-click on ‘Evaluation types’ on the left hand side
‘Dialog Structure’. You will see the various evaluation types on the ‘Change View
“Evaluation types”: Overview’ screen (Figure 17.3). You can decide which are all the
evaluation types you need, and delete the ones which you may not need. For BESTM,
we are not deleting anyone but retain all the six evaluation types, as required by the
management of BESTM.
Figure 17.3 Customer Evalution Types for BESTM
iii. You may highlight any of the rows and double-click on ‘Evaluations’ on the left hand
side ‘Dialog Structure’ to see the evaluations that are associated with that evaluation
type. On the next screen (Figure 17.4), you will see the different evaluations (known
as ‘Version’) for the evaluation type (it is being called as evaluation category ‘EvalCat’
here) 02 – Payment history, for example.
Figure 17.4 Customer Evaluations for BESTM
iv. Select a row and click on ‘Details’ to view the settings associated with that evaluation
on the next screen (Figure 17.5):
• Under ‘General specifications’, you will see the ‘Evaluation’ name. You will
also notice the ‘Create Evaluatn’ check-box, which when selected instructs
the system to generate the evaluation during next evaluation run.
• You will see the name of the reports (for data retrieval, selections and display)
and the associated ‘Selection variants’ under the ‘Reports’ data block. Note
that we have created a new variant ZBD01A-US, with all the company codes
of BESTM in USA, for the ‘Selection’ report RFDRRE02. You can customize the

381 Information System
‘Selection variant’ to include all or select company codes or credit control
areas, for example.
Figure 17.5 Customer Evaluation ‘Payment History’ – Details
• We have not selected any of the flags like ‘Bank data’, ‘Tax date’, ‘Credit
control data’ or ‘Dunn.data’ under ‘Evaluation requires’ data block, as reading
the data of these respective areas may have a negative effect on the system
performance when creating evaluations.
You can also enhance the standard evaluations. Let us look at that, now.
17.1.3 Enhance Standard Evaluations
You may use SAP enhancement RFDRRANZ for enhancing the standard evaluations. For
example, you may want to group the evaluations from the A/R information system, according
to the ‘Customer classification’ field (KNA1-KUKLA). You can use the enhancement route to
achieve this. Similarly, for A/P, you have to use the enhancement RFKRRANZ. For example,
you may want to group the evaluations from the A/P information system according to the
‘Industry’ field (LFA1-BRSCH). Again, you can use the enhancement route to achieve this.
In either case, use the menu path: SAP Customizing Implementation Guide > Financial
Accounting > Accounts Receivable and Accounts Payable > Information System > Accounts
Receivable > Standard Evaluations > Valuations > Enhance Standard Evaluations, or
Transaction CMOD. On the resulting screen, create a new ‘Project’ or use an existing one, use

382 Configuring SAP Accounts Receivable & Accounts Payable (SAP S/4HANA Finance)
SAP enhancement RFDRRANZ, activate and modify the source code EXIT_ RFDRRANZ_0001 to
enhance the standard evaluation to suit your exact business needs (Figure 17.6)
Figure 17.6 Enhancement of Standard Evaluation – Customer
What we have discussed in Section 17.1, is common for both A/R and A/P though you
will see two different entries in IMG as ‘Accounts Receivable > Standard Evaluations’ and
‘Accounts Payable > Standard Evaluations’.
This completes our discussion on standard evaluations of both customers and vendors, and
also completes our discussion on information system for A/R and A/P.
17.2 Conclusion
You learned that there are several evaluations that are defined for customers and vendors, in
the information system in standard SAP. You understood that you can make a selection from
these standard evaluations to suit your needs, and you can enhance the same by including
additional characteristics. However, you learned that you cannot define new evaluations,
here. You learned that you can use the drilldown reports to define new reports, to meet your
exact business needs.
You learned that to make use of the standard evaluations, you first need to copy the standard
evaluations from the source system (client 000) to your productive system, and then complete
adapting the standard evaluations to meet your reporting needs of A/R and A/P, by
completing a 3-step procedure that includes maintaining the evaluation views, evaluation
types and evaluations. You learned that you will use the ‘evaluation view’ to determine what
volume of data is to be evaluated, by creating selection variant(s) for the relevant account
types (D and K) for the specified data retrieval program. Then, you understood that you need
to define which ‘evaluation types’ that you want to use per evaluation view. Finally, under
‘evaluations’, you learned that you need to determine the characteristics (say, country,
industry, or accounting clerk) the system should use to format the evaluations, per evaluation
type.
Let us now discuss the apps for FI-A/P and FI-A/R in the next Chapter.

18 Apps for FI-A/R & A/P
esides the overall SAP S/4HANA installation tasks described in the ‘UI Technology
Guide for SAP S/4HANA’ and the implementation tasks specific to each App explained
in the SAP Fiori Apps Reference Library, you also need to perform the following
implementation tasks specific to Apps for Finance:
• Install Required Software Component Version for Job Scheduling Apps
• Create a System Alias for Design Studio Apps
• Activate Additional OData Services and ICF Nodes
However, if you use ‘SAP Fiori Cloud for SAP S/4HANA, you do not need to carry out the above
tasks. You just connect your back-end system to the SAP Cloud Platform.
We can broadly classify the Apps under FI-A/P and FI-A/R, into the following categories:
• Apps for Accounts Payable Accountants
• Apps for Accounts Payable Managers
• Apps for Accounts Receivable Accountants
• Apps for Accounts Receivable Managers
• Apps for Credit Controllers
Let us, first, look at the Apps that are available to accounts payable accountants.
18.1 Apps for Accounts Payable Accountants
The following are the important Apps that are available for accounts payable accountants:
1. Create Single Payment
With this App, you can make a direct payment to a supplier when no invoice exists
and you can also pay open supplier line items. When you make such a direct payment
to a supplier (without an invoice), you specify the supplier details, the bank details,
and the amount to be paid and, then, create the payment. The system posts the
payment as a down payment request, and uses that document to initiate the payment
run. When paying open supplier line items, select the open items that you want to
pay through the Manage Supplier Line Items App and create the payment to initiate
the payment run.
B
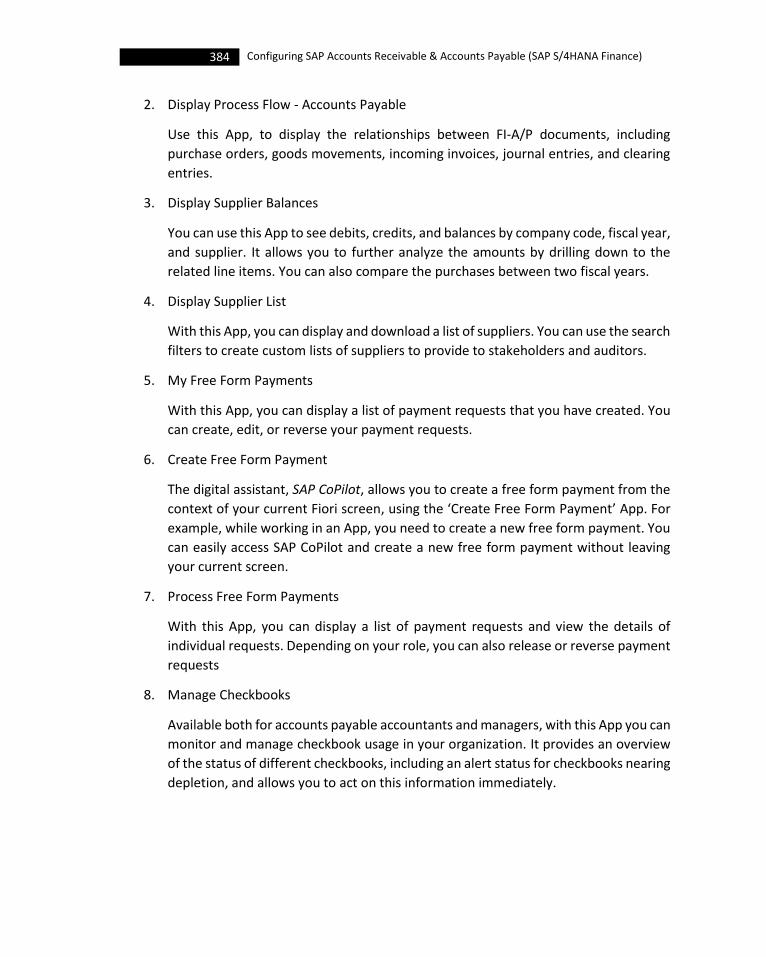
384 Configuring SAP Accounts Receivable & Accounts Payable (SAP S/4HANA Finance)
2. Display Process Flow - Accounts Payable
Use this App, to display the relationships between FI-A/P documents, including
purchase orders, goods movements, incoming invoices, journal entries, and clearing
entries.
3. Display Supplier Balances
You can use this App to see debits, credits, and balances by company code, fiscal year,
and supplier. It allows you to further analyze the amounts by drilling down to the
related line items. You can also compare the purchases between two fiscal years.
4. Display Supplier List
With this App, you can display and download a list of suppliers. You can use the search
filters to create custom lists of suppliers to provide to stakeholders and auditors.
5. My Free Form Payments
With this App, you can display a list of payment requests that you have created. You
can create, edit, or reverse your payment requests.
6. Create Free Form Payment
The digital assistant, SAP CoPilot, allows you to create a free form payment from the
context of your current Fiori screen, using the ‘Create Free Form Payment’ App. For
example, while working in an App, you need to create a new free form payment. You
can easily access SAP CoPilot and create a new free form payment without leaving
your current screen.
7. Process Free Form Payments
With this App, you can display a list of payment requests and view the details of
individual requests. Depending on your role, you can also release or reverse payment
requests
8. Manage Checkbooks
Available both for accounts payable accountants and managers, with this App you can
monitor and manage checkbook usage in your organization. It provides an overview
of the status of different checkbooks, including an alert status for checkbooks nearing
depletion, and allows you to act on this information immediately.
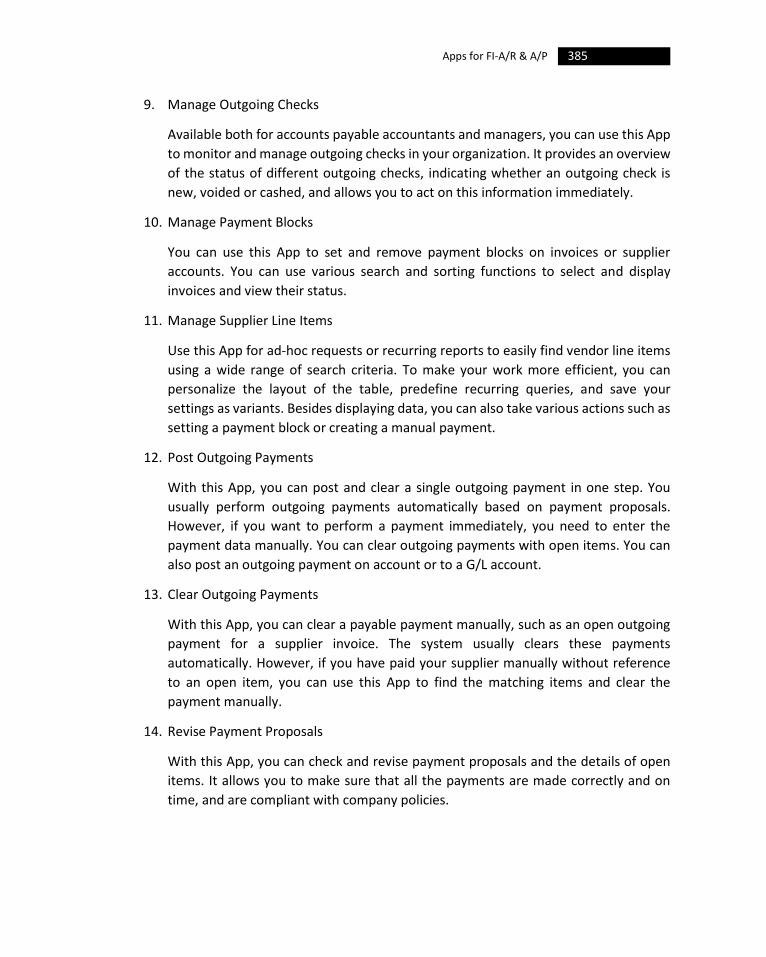
385 Apps for FI-A/R & A/P
9. Manage Outgoing Checks
Available both for accounts payable accountants and managers, you can use this App
to monitor and manage outgoing checks in your organization. It provides an overview
of the status of different outgoing checks, indicating whether an outgoing check is
new, voided or cashed, and allows you to act on this information immediately.
10. Manage Payment Blocks
You can use this App to set and remove payment blocks on invoices or supplier
accounts. You can use various search and sorting functions to select and display
invoices and view their status.
11. Manage Supplier Line Items
Use this App for ad-hoc requests or recurring reports to easily find vendor line items
using a wide range of search criteria. To make your work more efficient, you can
personalize the layout of the table, predefine recurring queries, and save your
settings as variants. Besides displaying data, you can also take various actions such as
setting a payment block or creating a manual payment.
12. Post Outgoing Payments
With this App, you can post and clear a single outgoing payment in one step. You
usually perform outgoing payments automatically based on payment proposals.
However, if you want to perform a payment immediately, you need to enter the
payment data manually. You can clear outgoing payments with open items. You can
also post an outgoing payment on account or to a G/L account.
13. Clear Outgoing Payments
With this App, you can clear a payable payment manually, such as an open outgoing
payment for a supplier invoice. The system usually clears these payments
automatically. However, if you have paid your supplier manually without reference
to an open item, you can use this App to find the matching items and clear the
payment manually.
14. Revise Payment Proposals
With this App, you can check and revise payment proposals and the details of open
items. It allows you to make sure that all the payments are made correctly and on
time, and are compliant with company policies.
386 Configuring SAP Accounts Receivable & Accounts Payable (SAP S/4HANA Finance)
15. Manage Automatic Payments
Use this App, to schedule payment proposals or schedule payments directly and get
an overview of the proposal or payment status. The App identifies the overdue
invoices and checks whether all the required payment information is complete.
16. Manage Payment Media
With this App, you can transfer the data required for electronic payment transactions
to banks, via a data medium. A payment medium is created with each successful
payment run. When you download a payment medium, the App automatically saves
it as a .txt or .xml file, according to its type.
17. Schedule Accounts Payable Jobs
Use this App to schedule accounts payable jobs.
18. Monitor Payments
With this App, you can display an overview of your payment batches. You can view
the statuses of batches and individual payments at different processing stages.
19. Import Supplier Invoices
With this App, you can import multiple supplier invoices into the system, all at once.
You download a template file, enter the invoice information, and upload the
completed file back to the App. You can, then, post the invoices from the App.
20. Manage Supplier Down Payment Requests
With this App, you can create down payment requests manually. In most cases, the
system automatically creates down payment requests from suppliers based on the
supplier’s purchase order. However, if a supplier requests a down payment, that was
not specified in the purchase order, for example by sending an email or a fax, you can
create it manually. Once the payment run has made the down payment, the payment
run also automatically clears the corresponding down payment request. In some
cases, you might need to clear the down payment request manually, for example if
differences occur because you paid less, split the payment, or made the payment
manually.
Let us look the Apps that are available to accounts payable managers.

387 Apps for FI-A/R & A/P
18.2 Apps for Accounts Payable Managers
The following are the important Apps that are available for your accounts payable managers:
1. Accounts Payable Overview
With this (analytical overview) App, you can monitor important accounts payable
indicators and access the relevant accounts payable Apps. You can use the filters to
limit the data behind the indicators to the information most relevant for you.
2. Aging Analysis
With this App, you can see the aging information across your organization so that you
can identify negative trends in the total payable amount, the net due amount, and
the overdue amount. This App allows you to timely react by having your team taking
appropriate actions to reverse these trends.
3. Approve Bank Payments
With this App, you can review and process payment batches. You can check the
payments within a batch and approve, reject, or defer individual payments or entire
batches.
4. Cash Discount Forecast
With this App, you can forecast the available cash discounts in the short term. You
can get a prediction over the discounted value of blocked invoices on the next
payment days.
5. Cash Discount Utilization
With this App, you can monitor, in real time, the cash discount utilization in your
responsibility area. You can find out which company code or location needs to make
better use of cash discounts. You can, also, find out about the reasons for cash
discount loss so that it can be avoided in the future.
6. Days Payable Outstanding
With this App, you can drill down to check the top 10 suppliers with the highest or
the lowest days payable outstanding (DPO). You can view the result in a chart or a
table according to company code, supplier, country of the supplier, and timeline.

388 Configuring SAP Accounts Receivable & Accounts Payable (SAP S/4HANA Finance)
7. Days Payable Outstanding - Detailed Analysis
With this (analytical) App, you can conduct a detailed analysis of your DPO. You can
use the predefined analysis steps to view your DPO by company code, supplier, and
country of supplier. You can look at those trends, over time, and focus your analysis
by using the filters to drill down.
8. Future Payables
With this App, you can drill down to check on the top 10 amounts payable, and the
numbers of open items for the relevant suppliers. In addition, you can view the future
amounts payable in a chart or a table according to company code, supplier, country
and region of the supplier, account group of the supplier, and payment blocking
reason.
9. Invoice Processing Analysis
With this App, you can view the total amount of posted invoices and the total number
of posted line items.
10. Overdue Payables
With this App, you can check the overdue payable amount to your suppliers by
supplier company code, supplier group, supplier, and reason for payment block. You
can monitor the status of the overdue payments for critical suppliers in your area of
responsibility. You can also find out about the potential risks and notify the
responsible persons to take action.
11. Supplier Payment Analysis (Open Payments)
With this App, you can get an overview of the open payments. You can view the
payment data by different dimensions, including company code, supplier, currency,
and user.
12. Supplier Payment Analysis (Manual and Automatic Payments)
With this App, you can view the payment data by different dimensions, including
company code, supplier, currency, and user.
Let us look the Apps that are available to accounts receivable accountants.

389 Apps for FI-A/R & A/P
18.3 Apps for Accounts Receivable Accountants
The following are some of the important Apps for account receivable accountants:
1. Accounts Receivable Overview
With this (analytical overview) App, you can monitor important A/R indicators and
access the relevant A/R Apps. Use the filters to limit the data.
2. Cash Collection Tracker - Accounts Receivable
With this (analytical) App, you can track your collection progress against due
receivables, for a selected period. You select a period or date and the App displays
the sums of all open invoices due in previous periods, invoices posted in previous
periods that are due in the selected period, and new invoices that are both posted
and due in the selected period.
3. Display Customer Balances
You can use this App to display customer balances and compare sales. You can display
debits, credits, and balances by company code, fiscal year, and customer, and further
analyze the amounts by displaying all related line items. You can also compare sales
figures between two fiscal years.
4. Manage Customer Line Items
Use this App for ad-hoc requests or recurring reports to easily find customer line
items using a wide range of search criteria. You can personalize the layout of the
table, predefine recurring queries, and save your settings as variants. Besides
displaying data, you can also take various actions such as setting a payment, export
the data to a file and collaborate with colleagues. The App also serves as a navigation
target from other apps, allowing users to drill down into the customer line items.
5. Manage Customer Down Payment Requests
You use this App to display down payment requests that have been created
automatically, based on a sales order. For example, if a customer wants to negotiate
the due date of the requested payment, you have to find the correct down payment
request to clarify the issue. In this case, you can use this App to find and change the
relevant down payment request. If an appropriate down payment request does not
exist, you can use this App to create one. If the sales order does not exist and
therefore the down payment request cannot be created automatically, you can use
this App to create the down payment request for this amount manually. Once the
customer has paid the down payment, the corresponding down payment request is
390 Configuring SAP Accounts Receivable & Accounts Payable (SAP S/4HANA Finance)
cleared automatically. In some cases, you might need to clear the down payment
request manually, for example if differences occur or the payment was split.
6. Post Incoming Payments
With this App, you can post and clear a single incoming payment, in one step. You
usually check for incoming payments using online banking. However, if payments are
not received using electronic bank statements, you need to enter the payment data
manually, and trigger a search for the matching open items. Ideally, the system
proposes a list of matching items for which you can post and clear the payment in one
step. If it’s not possible to clear the payment, you can post it on account or to a G/L
account.
7. Clear Incoming Payments
Use this App, to clear a receivable payment manually, such as an open incoming
payment for a customer invoice. The system usually clears these payments
automatically. However, sometimes customer information is missing and the system
cannot find appropriate open items that match the payment. In this case, you have
to clarify this payment, match it to the correct open invoices and credit memos as
aligned with your customer, and clear the payment manually.
8. Manage Bank Statements
You can use this App to manage manual and electronic bank statements. It provides
an overview of all bank statements for all house bank accounts. You can also view
detailed information, per bank statement.
9. Reprocess Bank Statement Items
You can use this App to reprocess bank statement items that were not processed
automatically. As you know, you can enter bank statements into the system
automatically (electronic bank statement) or manually. In both cases, rule-based
processing assigns and clears the payments automatically. If the automatic processing
is not successful, manual reprocessing is required. In this App, you can reprocess a
bank statement item, mark it as reprocessed, and enter a reason for reprocessing.
You can also add attachments to bank statement items.
10. Manage Bank Statement Reprocessing Rules
With this App, you can create and manage bank statement reprocessing rules. This
allows you to automate the reprocessing of bank statement items, which enables you
to spend more time on critical tasks.

391 Apps for FI-A/R & A/P
11. Manage Lockbox Batches - United States
You can use this App to manage your lockbox batches.
12. Reset Cleared Items
With this App, you can reset the clearing of line items as well as reverse the clearing
entry if required. You can use this function for line items of customer accounts or
supplier accounts as well as for line items of G/L accounts that are managed on an
open item basis.
13. Manage Incoming Payment Files
With this App you can manually import bank statements and lockbox batches, using
electronic payment files. After the bank statements and lockbox batches are imported
and posted, you can process them further using the ‘Manage Bank Statements’ and
‘Manage Lockbox Batches’ Apps, if needed.
14. Create Correspondence
With this App, you can preview, email, print, and download correspondence related
to your customers and suppliers. You can launch the App from the SAP Fiori
Launchpad or open from other Fiori Apps, including ‘Display Customer Balances’,
‘Display Supplier Balances’, ‘Manage Customer Line Items’, and ‘Manage Supplier Line
Items’.
15. Manage Payment Advices
With this App, you can create payment advices manually. You can also view, edit, and
delete existing payment advices.
16. Create Payment Advice
You can create a new payment advice using the ‘Create Payment Advice’ button or
using the ‘SAP CoPilot’ digital assistant if you have enabled SAP CoPilot.
17. Display Payment Card Data
With this App, you can display a list of card payments and related information,
including details of the card used, the payment authorization, and settlement.
18. Assign Open Items
With this App, you can view open items related to a customer, assign credit items to
matching debit items, and clear open items based on this assignment.

392 Configuring SAP Accounts Receivable & Accounts Payable (SAP S/4HANA Finance)
19. Process Collections Worklist
With this App, you can process your prioritized collections worklist. The worklist
enables you to focus on the most urgent customers, for example, those with the
highest overdue amount or where the amount has been overdue for a long time.
20. Process Receivables
With this App, you can access a list of A/R by an individual customer. You can then
create promises to pay and dispute cases. You start the App either by entering a
customer number directly, or by searching for a customer, or by drilling down to an
individual customer from the ‘Process Collections Worklist’ App.
21. Supervise Collections Worklist
With this App, you can display an overview of all open receivables for collection. You
can supervise the progress of your collection specialists on a daily basis, manage their
workloads, and redirect their efforts as required.
22. My Dunning Proposals
With this App, you can create dunning proposals, and then review the dunning notices
before they are sent to customers. If, for business reasons, you do not want to send
a dunning notice to a particular customer, you can choose to set a dunning block on
that notice. It will then not be included when the remaining dunning notices are sent.
23. Display Dunning History
Intended for collection specialists whose main task is to contact customers to request
payment of overdue receivables, you can use this App to see an overview of dunned
customers and view their individual dunning history.
24. Manage Dispute Cases
With this App, you can analyze and process receivables-related dispute cases. This
App helps you to structure your investigations and to distribute and manage the
results for all involved parties in your
25. Display Process Flow - Accounts Receivable
With this App, you can display the relationships between A/R documents, including
quotations, sales documents, delivery documents, billing documents, journal entries,
and clearing entries.

393 Apps for FI-A/R & A/P
26. Display Customer List
With this App, you can see master data for all your customers in one place.
27. Schedule Accounts Receivable Jobs
With this App, you can schedule A/R jobs using the templates and scheduling options.
With this, let us, now, proceed to discuss the Apps for account receivable managers.
18.1 Apps for Accounts Receivable Managers
The following are some of the important Apps for account receivable managers:
1. Overdue Receivables
Use this App, to view the Key Performance Indicator (KPI), ‘Overdue Receivables’. The
App helps you to drill down to analyze the 10 highest overdue receivables by
customer, enabling you to take quick action for reducing the high overdues. Besides
analysing the overdue receivables by company code or by accounting clerk, you can
view the overdue receivables in a chart or a table according to company code,
customer, country and region of the customer, and accounting clerk.
2. Overdue Receivables in Dispute
With this App, you can display the value of overdue receivables in dispute. Using this,
you can prioritize the open disputes that are delaying the payment of overdue
invoices.
3. Overdue Receivables by Risk Class
With this App, you can display overdue receivables by risk class. It can help you
analyze if your risk is appropriately diversified and provides you with insights to
support segmentation, credit, and payment term decision making.
4. Allowance for Doubtful Accounts
Use this App, to gain insight into allowance for doubtful accounts management, and
you can assess the adequacy of current allowance levels. The App gives you a clear
view of overdue receivables and their associated allowances, and you can drill down
for details of individual customer accounts at journal entry level.
5. Cash Collection Tracker - Collections Management
With this (analytical) App, you can track your collection progress against due
receivables for a given period. For the selected period or date, the App displays the

394 Configuring SAP Accounts Receivable & Accounts Payable (SAP S/4HANA Finance)
sums of all open invoices due in previous periods, invoices posted in previous periods
that are due in the selected period, and new invoices that are both posted and due in
the selected period. The sum of these due receivables forms the total target.
6. Doubtful Accounts Valuation
With this App, you gain insight into allowance for doubtful accounts management,
and you can assess the adequacy of current allowance levels. This refers to provisions
made to allow for expected credit losses, as required by IFRS 9. The App gives you a
clear view of overdue receivables and their associated allowances, and you can drill
down for details of individual customer accounts at journal entry level.
7. Dunning Level Distribution
The App displays the ‘Dunning Level Distribution’ KPI, which is open dunning
amounts, per customer and dunning level. Besides viewing the open dunning
amounts in a chart or a table according to dunning level and by the 10 customers with
the highest open dunning amounts, you can also drill down to analyze your dunning
level distribution according to account group, accounting clerk, company code,
country key, customer, customer classification, display currency, exchange rate type,
reconciliation account, or region.
8. Future Receivables
This (analytical) App displays ‘Future Receivables’ KPI. Using this, you can view the
results in a chart or table according to due period, company code, or the top 10
customers who have the highest amounts receivable. You can also drill down to see
the numbers of open items for the relevant customers. In addition, you can analyze
your future amounts receivable according to account group, accounting clerk,
company code, country key, customer, customer classification, display currency,
exchange rate type, G/L account, net due interval, region, or special G/L.
9. Manage Collection Strategies
You use this App to manage your collection strategies that are used to prioritize items
in a collection worklist, specify the currency in which items in the worklist are
displayed, and to determine the aging intervals into which open receivables should
be sorted. It allows you to copy the base SAP collection strategy and edit your copied
version to fit the collection needs of your business.
10. Total Receivables
This (analytical) App displays the ‘Total Receivables’ KPI. It helps to view the
receivables amount in total, by various dimensions and filter the results according to
395 Apps for FI-A/R & A/P
different criteria. You can also drill down to analyze your total receivables by account
group, company code, company code currency, country key, customer, customer
classification, display currency, exchange rate type, G/L account, reconciliation
account, region, or special G/L.
11. Days Sales Outstanding
This (analytical) App displays the ‘Days Sales Outstanding (DSO)’ KPI, which is the
number of days it takes, on an average, for your company to collect receivables. The
App displays the average number of days it takes for your company to collect
receivables. A high DSO figure can indicate that your company is taking too long to
collect money, and that your company is extending too lenient credit terms to
customers. The App clearly indicates when predefined thresholds have been
exceeded. You can view DSO figures in a chart or a table according to account group,
accounting clerk, calendar month, calendar year, company code, country key,
customer, customer classification, display currency, exchange rate type, G/L account,
reconciliation account, region, or special G/L. If your company has been in business
for a longer period of time, you may find the ‘Days Beyond Terms’ KPI more helpful.
12. Days Sales Outstanding - Detailed Analysis
With this (analytical) App, you can conduct a detailed analysis of your DSO. You can
use the predefined analysis steps to view your DSO by company code, due period,
and country of customer. You can look at your revenue and overdue receivables over
time and focus your analysis by using the filters to drill down.
13. Days Beyond Terms
This (analytical) App displays the ‘Days Beyond Terms (DBT)’ KPI, which shows how
effectively you collect your receivable payments. It provides you with an insight into
the payment history of your customers and indicates how effectively your company
collects payments. A high DBT figure indicates that your company is taking too long
to collect payments. The App clearly indicates when predefined thresholds have been
exceeded. You can view DBT figures in a chart or a table according to account group,
accounting clerk, calendar month or year, company code, country key, customer,
customer classification, display currency, exchange rate type, reconciliation account,
or region. If you have just started a new business, you may find the DSO more helpful.
14. Display Item Change Log
With this App, you can see details of changes made to all journal entries relevant to
your role. It displays changes to all log-enabled fields in the relevant documents, and
you can easily see what was changed, by whom, and when. This gives you a

396 Configuring SAP Accounts Receivable & Accounts Payable (SAP S/4HANA Finance)
demonstrable oversight of all changes made to journal entries within your area, which
can be useful in relation to auditing.
15. Reprocessing Rate of Incoming Payments
You can use this App, to display and analyze how many incoming payments (bank
statement items) have been manually reprocessed after automatic payment clearing
was unsuccessful. As manual reprocessing of incoming payments is expensive and
time-consuming, this App helps you to improve the automation of receivables
management by giving you detailed information on how often and under what
circumstances manual reprocessing is required. You can run analyses according to
reason, company, customer, or bank. In addition, you can initiate further steps to save
processing costs, such as sending an e-mail to a customer or informing management,
if settings are missing or wrong.
16. Credit Limit Utilization
The (analytical) App displays the ‘Credit Limit Utilization’ KPI, that is, the utilization of
a business partner’s credit limit as a percentage value and an absolute amount. You
can check which business partners are beyond the threshold value you defined. You
can view credit limit utilization and credit exposure according to business partner,
credit segment, country, and region. You can drill down by the top 10 business
partners with the highest credit limit utilization and by the top 10 business partners
with the highest credit exposure.
17. Supervise Collections Worklist
With this App, you can display an overview of all open receivables for collection. You
can supervise the progress of your collection specialists on a daily basis, manage their
workloads, and redirect their efforts as required.
18. Collection Progress
The (analytical) App displays the ‘Collection Progress’ KPI. You can view the overall
progress in collecting payments from the customers and the collection progress for
different collection specialists and collection groups.
19. Promises to Pay
The (analytical) App displays the ‘Promises to Pay’ KPI, that is, open promises to pay
as of today. You can view promised amounts in different periods as well as overdue
payment promises and broken promises according to company code, customer,
country and region of the customer, and collection specialist. You can view promises
397 Apps for FI-A/R & A/P
to pay in a chart or a table, and you can drill down by days, the top 10 customers with
the highest promised amounts, collection specialist, and broken promises.
20. Open Disputes
The (analytical) App displays the ‘Open Disputes’ KPI. The ‘open disputes’ refer to
dispute cases that are not closed, not confirmed, and not voided/deleted/cancelled.
You can view the open disputes in a chart or a table according to company code,
customer, processor, and dispute reason. You can drill down by dispute reason,
processor, and the top 10 customers with the highest disputed amounts.
With this let us now look at the important Apps that are available for account receivable credit
controllers.
18.2 Apps for Credit Controllers
Let us now understand the salient features of the two important Apps for credit controllers:
1. Display Credit Management Log
With this App, you can display credit management logs. This App gives you a clearly
structured overview, when you need to check (at a glance) if a credit check has failed
or if you want to view the details of a failed credit check.
2. Analyze Credit Exposure
With this App, you can analyze your credit exposure by several dimensions and
measures. It allows you to see your total credit exposure and provides you with
insights to support risk diversification, segmentation, credit, and payment term
decision making.
This completes our discussion on Apps for FI-A/R and FI-A/P.
18.3 Conclusion
In this Chapter, we understood what you need to do in terms of system configuration to make
use of the financial Apps, if you are not on ‘SAP Fiori Cloud for SAP S/4HANA’. Later, we
discussed the salient features of important Apps that are available for your accountants &
managers handling FI-A/R and FI-A/P. We also discussed the important Apps for credit
controllers.
***
398 Configuring SAP Accounts Receivable & Accounts Payable (SAP S/4HANA Finance)
We started this book with the case study (Project Dolphin) that paved the way for all the
discussions in the various Chapters. The case study provided you with the requirements that
need to be configured for setting up of FI-A/R and FI-A/P for a business enterprise.
You understood that accounts receivable (FI-A/R) and accounts payable (FI-A/P) components
of SAP, integrated fully with the SAP General Ledger Accounting (SAP G/L), help you in dealing
with the customers and vendors, respectively, for managing the amounts that your business
would receive from (customers) and pay to (vendors).
We discussed both the customer and vendor accounts, and you understood the preparations in terms of account groups, screen layout, message control, number ranges etc., for creating the master records of the business partners. You understood that a typical customer master record is made up of four data segments namely the general data, the company code area data, the sales & distribution area data and the ETM (Equipment and Tools Management) data. You, further, understood that you can create the customer master record, in SAP, in three different ways: central maintenance (for all the areas), FI maintenance (for FI area or company code area alone) and sales data maintenance (for SD area alone). Similar to the customer master data, you saw that a vendor master record is made up of three distinct data segments: general data, company code area data and purchasing organization data. And, you saw that you can create the vendor data also in three ways, as in the case of customer master records: centralised creation (for all the three area), FI maintenance (company code area data alone) and purchasing organization data maintenance (for MM area alone). You learned how the account groups play a major role in maintenance of these master data, both for customer and vendor. You also saw how to change or delete a customer / vendor master.
In the case of customers, besides the general specifications, you understood what are the sensitive fields and the need for dual control of these fields. You learned about the settings that are required, for both customers and vendors, for displaying line items, for open item processing and for correspondence.
Under business transactions, you have been exposed to the various configuration settings that you have to make for handling incoming / outgoing invoices, incoming / outgoing payments, processing down payments (received / made), open item clearing, adjustment posting / reversal, dunning, interest calculation and closing activities. You also learned about the settings that are required for document parking, and its subsequent release using approval groups, approval path and approval procedure.
You learned the details about the global settings that are required for outgoing / incoming payments, during which you understood defining of various accounts for handling discount (taken / given), overpayments / underpayments, exchange rate differences, rounding off differences, translation settings, payment block reasons, payment terms and so on. You also learned about the settings required for both manual and automatic payments. While discussing manual outgoing payments, you learned about the vendor tolerances, reason codes and also on how to prepare the system for handling cross-company code manual

399 Apps for FI-A/R & A/P
payments. In configuring the automatic payment program, which can handle both incoming and outgoing payments, you saw how to set up: the house banks, all / payment company codes for payment transactions, the different payment methods etc. You understood how the system determines a suitable bank for a given payment transactions, besides understanding the value date rules, payment groupings, automatic payment posting etc. You did understand how the automatic payment program works from selecting the open item payables, to selecting the appropriate payment method, house bank, account and finally making and posting the payments, besides creating the payment media for electronic data transfer.
You learned about SEPA mandates and the associated configuration. You also learned about the payments through payment cards and the settings that you may need to make on the FI side, for payment card integration with SAP SD.
You learned dunning in detail. You saw the basic settings, including dunning areas, dunning keys, dunning block reasons and dunning forms. You understood when you need to configure dunning, per dunning area. While discussing the dunning procedure, you saw that this is at the heart of the dunning program controlling how the program duns the business partners. You, further, saw that the dunning procedure contains specifications like dunning frequency / dunning interval, grace days, minimum number of days for open items to be dunned, the number of dunning levels (with the level determining the form and text of the dunning notice) and also the specifications as to whether to dun standard and/or special G/L transactions. For the dunning notice printouts, you understood defining the dunning forms and maintaining the sender details for those forms.
In interest calculation, you learned about the item (or arrears) interest calculation, the settings associated with that in terms of interest calculation types, reference interest rates, time-dependent terms, interest values etc. You also learned about the automatic account determination settings for item and balance interest calculation for both A/R and A/P. You did learn about the forms for interest printout and the associated settings.
While discussing the configuration settings for closing operations, you learned about settings for count, balance confirmation, valuate and reclassify. You also learned about the settings for valuation in terms of valuation adjustment keys and determination of base value for valuation.
Towards the end of the Chapter, you learned about the settings you will require to make use of SAP’s standard evaluations, for customers and vendors, as a part of A/R and A/P information system. You learned how to copy the standard evaluations to your productive system, how to select and enhance the required standard evaluations to meet your business reporting. At the end, in the last Chapter, you learned about the important Fiori Apps that are available to your accountants, managers and credit controllers.
This completes our discussion on accounts receivable (FI-A/R) and accounts payable (FI-A/P).


About the Author
Narayanan Veeriah is a Chartered Financial Analyst (CFA), a PMP
(from Project Management Institute), and IBM Certified Executive
Project Management Professional, having more than 35 years of
work experience, in finance, project management and information
technology (IT), including 20+ years of experience in SAP
implementation and consulting. A member of Certified Associate of
Indian Institute of Bankers (CAIIB), he brings along with him a strong
domain expertise in Banking and Finance with core competencies in
retail banking and credit management, along with SAP.
Narayanan has worked with several multi-national clients for consulting, implementing and
supporting SAP, across industries including automotive, banking & finance, electronics,
manufacturing, multimedia, pharmaceuticals etc. He has worked with several versions of SAP
right from SAP R/3 3.1H to the latest SAP S/4HANA, in new implementations, upgrades and
support.
Till recently, he was leading SAP practice, for a couple of industry verticals in a leading
multinational IT consulting company. He has authored several books on SAP Finance, besides
being a regular guest faculty at management institutions for ERP, SAP, banking & finance and
project management.
He is currently a freelance SAP consultant.
You can reach him at [email protected].


Index
A
ABAP List View, 37, 75, 94, 95
ABAP List Viewer, 276, 303
Account Assignment Model, 106
Account Blance Display, 77, 80
Account Determination Key, 317
Accounting Principles, 354, 357, 358
Accounts Payable, 45, 46; See: FI-A/P
Accounts Receivable, 45, 46; See: FI-A/R
Accounts Receivable Pledging Indicator, 63
ACH, 201, 209
ACH-CCD, 209
ACH-CTX, 209
ACH-PPD, 209
Additional Checks for Accounting Documents, 111,
153
Additional Fields, 64, 75, 95, 123, 330, 334, 335,
336, 354, 361, 374
Adjustment Accounts for GR/IR Clearing, 368
Application ID for Intercompany Reconciliation,
330, 374
Apps for Accounts Payable Accountants, 383
Clear Outgoing Payments, 385
Create Free Form Payment, 384
Create Single Payment, 383
Display Process Flow - Accounts Payable, 384
Display Supplier Balances, 384
Display Supplier List, 384
Import Supplier Invoices, 386
Manage Automatic Payments, 386
Manage Checkbooks, 384
Manage Outgoing Checks, 385
Manage Payment Blocks, 385
Manage Payment Media, 386
Manage Supplier Down Payment Requests, 386
Manage Supplier Line Items, 385
Monitor Payments, 386
My Free Form Payments, 384
Post Outgoing Payments, 385
Process Free Form Payments, 384
Revise Payment Proposals, 385
Schedule Accounts Payable Jobs, 386
Apps for Accounts Payable Managers, 383, 387
Accounts Payable Overview, 387
Aging Analysis, 387
Approve Bank Payments, 387
Cash Discount Forecast, 387
Cash Discount Utilization, 387
Days Payable Outstanding, 387
Days Payable Outstanding - Detailed Analysis,
388
Future Payables, 388
Invoice Processing Analysis, 388
Overdue Payables, 388
Supplier Payment Analysis (Manual and
Automatic Payments), 388
Supplier Payment Analysis (Open Payments),
388
Apps for Accounts Receivable Accountants, 383,
389
Accounts Receivable Overview, 389
Assign Open Items, 391
Cash Collection Tracker - Accounts Receivable,
389
Clear Incoming Payments, 390
Create Correspondence, 391
Create Payment Advice, 391
Display Customer Balances, 389
Display Customer List, 393
Display Dunning History, 392
Display Payment Card Data, 391
Display Process Flow - Accounts Receivable, 392
Manage Bank Statement Reprocessing Rules,
390
Manage Bank Statements, 390
Manage Customer Down Payment Requests,
389
Manage Customer Line Items, 389
Manage Dispute Cases, 392
Manage Incoming Payment Files, 391
Manage Lockbox Batches - United States, 391
Manage Payment Advices, 391
My Dunning Proposals, 392
Post Incoming Payments, 390
Process Collections Worklist, 392
Process Receivables, 392
404 Index
Reprocess Bank Statement Items, 390
Reset Cleared Items, 391
Schedule Accounts Receivable Jobs, 393
Supervise Collections Worklist, 392
Apps for Accounts Receivable Managers, 383, 393
Allowance for Doubtful Accounts, 393
Cash Collection Tracker - Collections
Management, 393
Collection Progress, 396
Credit Limit Utilization, 396
Days Beyond Terms, 395
Days Sales Outstanding, 395
Days Sales Outstanding - Detailed Analysis, 395
Display Item Change, 395
Doubtful Accounts Valuation, 394
Dunning Level Distribution, 394
Future Receivables, 394
Manage Collection Strategies, 394
Open Disputes, 397
Overdue Receivables, 393
Overdue Receivables by Risk Class, 393
Overdue Receivables in Dispute, 393
Promises to Pay, 396
Reprocessing Rate of Incoming Payments, 396
Supervise Collections Worklist, 396
Total Receivables, 394
Apps for Credit Controllers, 383, 397
Analyze Credit Exposure, 397
Display Credit Management Log, 397
Apps for Finance, 383
AR Pledging Indicator, 56, 64, 65, 66
Arrears Interest Calculation. See Item Interest
Calculation
Authorizations, 70
Automated Clearing House, 209
Automatic Clearing Program, 276, 279
Automatic Incoming Payments, 230
Automatic Outgoing Payments, 187
Automatic Postings for Foreign Currency Valuation,
359
Automatic Worklists, 77
B
Bad Debt Reserve. See: Reserve for Bad Debt
BAdI, 301, 341, 350
Balance Confirmation, 351
Balance Interest, 35, 261, 295, 296, 297, 304, 305,
308, 313, 314, 320, 321, 322, 323, 365, 399
Balance Interest Calculation, 261, 295, 296, 297,
304, 305, 308, 317, 320, 321, 323, 365, 399, See
Bank Account Interest Calculation, See: Balance
Account Interest Calculation
Bank Account Interest Calculation, 295, 323
Bank Chain, 190
Bank Directory, 189
Bank Identifier Code. See BIC
Bank Interest. See: Balance Interest
BIC, 190, 191
Bill of Exchange, 40, 46, 47, 187, 197, 199, 200, 213
Block Indicator, 155, 156
Business Add-In, 341; See: BAdI
Business Area, 135, 277, 289, 293, 370
C
Cash Clearing Account, 237, 239
Check Cashing Time, 217
Classic Bank Account Determination, 212
Classic Withholding Tax, 125
Clearing Differences, 278
Client, 100, 117, 123, 337
Coding Block, 123, 124, 125
Collection Strategies, 394
Company Code Currency, 353, 374
Company Code Global Parameters, 123, 125, 290
Contact Person Database, 330, 331, 334
Controlling, 170
Controlling Area, 26
Count, 325
Credit Interest Rates, 295
Critically Overdue, 96
Cross-company Code Postings, 182
Cross-System Intercompany Reconciliation, 326
Currency Type, 359
Customer Accounts, 48, 49
Customer Down Payments, 281
D
Data Medium Exchange, 46, 187; See: DME
Days Payable Outstanding, 47; See: DPO
Days Receivable Outstanding, 46; See: DSO
Debit Interest Rates, 295
Default Values, 99, 116, 117, 166

405 Index
Deletion Block, 74
Deletion Flag, 74
Delta Logic, 354, 358, 359, 375
Disputed Items, 181
DME, 46, 187, 192, 209, 211
Document
Document Change Rules, 135
Document Currency, 273
Document Header, 100, 104, 118, 127, 129, 135,
136, 154
Document Number, 100, 131, 273, 275
Document Parking, 99, 137, 146, 398
Document Release, 38, 142, 145, 146, 155
Document Splitting, 354
Document Type, 100, 101, 102, 104, 290
Down Payment, 40, 46, 47, 187, 194, 197, 279, 281,
282, 283, 284, 285, 286, 287
Down Payment Received, 281, 284
Down Payment Request, 40, 187, 194, 197, 281,
386, 389
Down Payments Made, 285, 287
DPO, 47
Drilldown Reports, 377, 382
DSO, 46, 47, 379
Dual Control, 37, 66, 67, 70, 80, 88, 89, 90, 91, 142,
398
Dunning, 243
Dunning Area, 244, 245, 246, 265, 270, 399
Dunning Block Reasons, 42, 247, 248, 270, 399
Dunning Blocks. See Dunning Block Reasons
Dunning Keys, 246, 247, 270, 399
Dunning Level, 42, 43, 179, 243, 244, 245, 247, 249,
251, 252, 253, 256, 257, 258, 259, 260, 268, 269,
270
Dunning Notice, 46, 59, 243, 244, 245, 255, 256,
259, 260, 262, 265, 267, 269, 270
Dunning Procedure, 42, 43, 244, 245, 246, 249,
250, 251, 252, 253, 254, 255, 256, 257, 259, 260,
263, 264, 266, 267, 268, 269, 270, 399
Dunning Proposal, 244, 245, 256, 258, 267, 269
E
EDI, 46, 192, 197
Electronic Bank Statement, 390
Electronic Data Interchange, 46; See: EDI
Enterprise Structure, 326
Entry Screens for Parking Documents, 138
Equipment and Tools Management Data, 50; See:
ETM
ETM Data, 50
EU Internal Transfer, 203
Evaluation Type, 380
Evaluation Version, 379
Evaluation View, 378
Exceptional Threshold, 96
Exchange Rate, 160, 161, 274, 276, 354, 355, 356,
359, 360, 361, 362, 375
Exchange Rate Type, 355, 356, 362
Extended Individual Payment, 208
F
Factoring, 54, 63
Factory Calendar, 218, 300
FASB, 353, 375
Fast Entry Screens for G/L Account Items, 136
FI-A/P, 45, 46, 47, 48, 81, 97, 285, 287, 325, 397,
398, 399
FI-A/R, 45, 46, 48, 49, 281, 284, 325, 398, 399
Field Catalogs, 330, 338
Field Status, 104, 108, 110, 111, 118, 119, 122, 153
Field Status Group, 118, 153
Field Status Variant, 118, 119, 153
Financial Accounting Internet Services, 79
Financial Statement Version, 28
Fiori, 424
Flat-rate Value Adjustment, 362, 363, 375
Functional Area, 120, 122, 354, 361
G
Generic Threshold, 96
Group Currency, 353, 359, 374
H
House Bank, 40, 189, 190, 192, 193, 210, 211, 212,
213, 214, 215, 217, 222, 223, 399
I
IBAN, 190, 191, 192
Incoming Payments, 229
Individual Value Adjustment, 362, 363, 364, 366,
367, 368, 375
406 Index
Input Tax, 152, 226
Interactive Reconciliation, 347, 350
Intercompany Reconciliation, 325, 326, 329, 330,
331, 334, 335, 336, 341, 342, 350, 374
Interest Calculation, 295
Interest Calculation Frequency, 309, 310
Interest Calculation Period, 296, 310
Interest Calculation Report, 295
Interest Calculation Types, 261, 304
Interest Forms, 322
Interest Indicator, 261, 295, 296, 309, 310, 312,
313, 323
Interest Letter, 295, 297, 302, 303
Interest Rates, 295, 312, 323
Interest Values, 315
International Bank Account Number. See IBAN
Item Interest, 43, 254, 261, 295, 296, 297, 298,
299, 300, 304, 305, 306, 308, 313, 314, 315, 316,
323
Item Interest Calculation, 43, 254, 261, 295, 297,
298, 299, 300, 304, 305, 306, 308, 313, 315, 323,
399
Item Interest Calculation Process, 297
K
Key Performance Indicator, 393; See: KPI
KPI, 393, 394, 395, 396, 397, See: Key Performance
Indicator
L
Ledger Group, 357
Line Item, 100, 104, 128, 129, 130, 153, 168, 169,
170, 173, 289, 334, 355, 356, 375
Line Layout for Document Change/Display, 133
Line Layout for Document Posting Overview, 133
Link Rules, 58, 86, 119, 153
Local Currency, 273, 353, 359, 374
M
Manual Incoming Payments, 230
Manual Outgoing Payments, 166
Manual Worklists, 77
Message Template Group, 332, 334
Message Templates, 332
N
NAICS. See North American Industry Classification
System
Negative Posting, 289, 290, 291, 292, 293
North American Industry Classification System, 61
Null Tolerance Group, 167, 168, 171
O
Object Groups, 334, 347
Object Subgroups, 347
Open Disputes, 393, 397
Open Item, 273, 279
Open Item Clearing, 158, 271, 398
Open Item Management, 273, 327
Overview for Experts, 7
P
Partial Payment, 173
Payment Block Reason, 155
Payment Cards, 237, 238, 240
Payment Grouping, 218
Payment Method, 41, 149, 187, 194, 195, 196, 200,
201, 202, 203, 204, 205, 206, 207, 209, 210, 211,
212, 213, 214, 215, 216, 217, 218, 223, 399
Payment Method Supplement, 196
Payment Program, 40, 41, 46, 81, 184, 186, 187,
189, 193, 194, 195, 197, 204, 205, 207, 211, 215,
216, 217, 218, 219, 220, 221, 222, 223, 237, 241,
399
Payment Release, 140, 142, 143, 154, 155
Payment Request, 197, 220
Payment Terms, 146, 151, 154
Placeholders for Messages, 330, 332, 333
Posting Key, 104, 106, 107, 108, 109, 116, 117, 118,
153
Posting Period, 289, 293
Profit Center, 135, 369, 370
Program
RFDRRSEL, 378
RFDUZI00, 303
RFINTITAR, 298, 303, 305
RFINTITDEL, 303
RFKCON00, 90
RFKRRSEL, 378
SAPF019, 73, 94
407 Index
SAPF020, 74
SAPMSSY0, 266
Purchasing Organization Data, 81, 97
R
Reason Codes, 39, 180, 222, 234, 398
Reason for Reversal, 291, 293
Receivables Discounting, 366, 367, 375
Reclassify, 368
Reconciliation of Receivables/Payables in Group,
325, 374
Reconciliation Process Attributes, 330, 331, 332,
334
Reference Interest Rates, 313
Report
RFDABL00, 70, 71
RFDRRE02, 380
RFINTITDEL, 303
RFINTITSHOW, 302, 303
RFINTITUSERXT, 303
RFKABL00, 91
SAPF130D, 351
Reserve for Bad Debt, 353, 362, 374
Residual Item, 173
Reversal Document, 102
Reversal Reason, 291, 293
Risk Class, 393
Rreference Interest Rates, 301, 313, 314, 315, 399
S
SAP Assurance and Compliance Software, 48
SAP Cash Management, 46, 282
SAP Cloud, 383
SAP Cloud Platform, 383
SAP CoPilot, 384, 391
SAP Enhancement, 381
SAP Financial Supply Chain Management, 46
SAP Fiori Apps, 383
SAP Fiori Apps Reference Library, 383
SAP Fiori Cloud for SAP S/4HANA, 383
SAP Fiori Launchpad, 391
SAP Fraud Management, 47, 48
SAP G/L, 45, 48, 239, 398
SAP G/L Accounting, 174, 275, 354, 373
SAP General Ledger Accounting, 45, 48, 398
SAP HANA, 23
SAP MM, 4, 45, 46, 48, 101
SAP PM, 4
SAP PP, 4
SAP PS, 4
SAP S/4HANA, 1, 3, 4, 23, 24, 28, 47, 48, 401, 421,
422, 423
SAP Fiori Cloud, 383
UI Technology Guide for SAP S/4HANA, 383
SAP S/4HANA Enterprise Management, 48
SAP S/4HANA Finance, 4
SAP Sales and Distribution, 49, 50, 51, 52, 60, 61,
237; See: SAP SD
SAP SD, 4, 45, 48, 49, 73, 399
SAP Smart Forms, 249, 262, 263, 270
SAPScript, 42, 74, 249, 250, 262, 263, 264, 265,
270, 322
Screen Layout, 53, 54, 57, 58, 84, 85, 86
Screen Variant, 125, 126
Security Deposit, 197
Sensitive Fields, 37, 66, 67, 69, 70, 73, 80, 88, 89,
90, 91, 94, 398
SEPA, 230, 231, 232, 233, 234, 235, 399
SEPA Mandates, 230; See: SEPA
Sets, 345, 346, 347
SIC. See Standard Industrial Classification
Single Euro Payments Area. See: SEPA
Society for Worldwide Interbank Financial
Telecommunication. See: SWIFT
Special Purpose Ledger, 327, 335, 341, See: Special
Ledger
Standard Evaluations, 377
Standard Fields, 221
Standard Industrial Classification, 61; See: SIC
Standard Line Layout for Document
Change/Display, 134
Subgroups, 347, 348, 378
Subscreen, 123, 124
Substitution, 126, 154
Substitution in Accounting Documents, 126
Subworkflow, 140, 142, 154
SWIFT, 190, 191, 200
T
Table
BSID, 218, 267
BSIK, 218, 267
FBICRC001A, 335

408 Index
FBICRC003A, 335
INTITHE, 303
INTITIT, 303
INTITPF, 303
KNA1, 267
KNB1, 267
KNB5, 267
LFA1, 267
LFB1, 267
LFB5, 267
Tax Code, 289, 293
Terms of Payment, 50, 81, 146, 147, 149, 151, 154,
166, 176, See Payment Terms
Text ID, 127, 128, 129, 130, 154
Text Lines for Message Template, 333
Texts for Line Items, 130
Thresholds for Vendor Account Groups, 96
Time-dependent Terms, 297, 301, 399
Tolerance, 167, 222
Tolerance Group, 167, 168, 169, 170, 171, 173,
174, 175, 176
Transaction
BP, 51, 82
CMOD, 381
F150, 267
F-22, 116
FB50, 364
FBICC, 327
FBIC004, 336
FBIC006, 335
FBIC031, 336
FBIC032, 343
FBICO10, 339
FBICRC_SNRO, 343
FBN1, 304
FBRC001, 333
FBRC002, 332
FBRC003, 345
FBRC004, 346
FBRC006, 349, 350
FBRC007, 334
FBRC008, 338
FBRC009, 348
FBRC010, 331
FBZP, 188
FD01, 51
FD02, 51
FD03, 51
FD08, 68
FD09, 68
FI_APAR_SEPA_CUST, 232
FI12, 189
FI12_HBANK, 189
FINS_FCT, 354, 361
FINT, 298, 302
FINTAP, 299
FINTSHOW, 299
FK01, 83
FK02, 83
FK03, 83
FK08, 90
FK09, 90
FSSP, 351
FY01, 377
MK01, 83
MK02, 83
MK03, 83
O7E4, 138
O7E6, 137
O7FC, 221
O7FE, 221
O7V1, 134
O7Z1, 133
O7Z2, 133
OB00, 162
OB05, 60
OB09, 160
OB17, 247
OB27, 156
OB28, 112
OB32, 135
OB40, 226, 283
OB41, 107, 109
OB44, 60
OB46, 261
OB55, 78
OB57, 173
OB60, 185
OB61, 246
OB70, 153, 225
OB74, 277
OB81, 314
OB83, 315
OB84, 322
OBA0, 175
OBA1, 360

409 Index
OBA3, 177
OBA4, 169
OBA7, 102, 103
OBAA, 309
OBAC, 313
OBAP, 219
OBAR, 63
OBB0, 366
OBB8, 147, 150, 151
OBB9, 150, 151
OBBA, 217
OBBB, 218
OBBE, 180
OBBH, 126
OBBU, 371
OBBV, 373
OBBW, 373
OBBX, 373
OBC4, 121
OBC5, 123
OBD2, 54
OBD3, 85
OBDF, 379
OBL6, 267
OBR2, 73, 94
OBT10, 130
OBT8, 129
OBU1, 117
OBV1, 317
OBV3, 320
OBV4, 321
OBV9, 320
OBWE, 143
OBWF, 144
OBWG, 145
OBWH, 146
OBWJ, 140
OBX1, 229
OBXB, 283, 286
OBXC, 219
OBXH, 164
OBXK, 163
OBXL, 159
OBXM, 370
OBXO, 162
OBXP, 220
OBXR, 281
OBXU, 158
OBXV, 159
OBXW, 227
OBXY, 363
OBXZ, 279
OBY6, 123
OBYP, 368
OBYR, 285
OBZ3, 202
OBZH, 238
OBZI, 240
OXK1, 123
REMMHBACC, 212
S_ALR_87001305, 265
S_ALR_87003179, 89
S_ALR_87003378, 67
S_ALR_87004651, 290
S_ALR_87004660, 292
S_ALR_87012089, 93
S_ALR_87012090, 90
S_ALR_87012182, 72
S_ALR_87012183, 70
SCC3, 377
SEPA_MND_FM_CUST, 233
SEPA_MND_FM_MT, 232
SEPA_NR_CUST, 234
SEPA_NR_MT, 233
SMARTFORMS, 263
SO10, 265
VD01, 51
VD02, 51
VD03, 51
XD01, 51
XD02, 52
XD03, 52
XDN1, 62
XK01, 83
XK02, 83
XK03, 83
XKN1, 87
XKN2, 88
Transfer Days, 300, 306
True Reversal, 289, 290
U
UI Technology Guide for SAP S/4HANA, 383
US GAAP, 353, 375
410 Index
V
Validation Callup Point, 111
Validation in Accounting Documents, 111
Validations, 111, 153
Valuate, 353
Valuation Area, 357, 358, 362, 375
Valuation Difference, 368
Valuation Method, 354, 355, 356, 375
Value Adjustment Key, 364, 375
Vendor Accounts, 48, 81
Vendor Down Payments, 285, 287
W
Work Flow, 138, 154
Workflow, 4, 28, 141, 142, 143, 144, 155
Workflow Variant, 28, 138, 139, 140, 141, 142, 143,
155
Worklist, 77
Writing Off of Bad Debt, 362
List of Figures
Figure 2.1 Customer Master Data Areas ............................................................................................... 50 Figure 2.2 Customer Account Group - New ........................................................................................... 55 Figure 2.3 Making AR Pledging Indicator Field as Optional ................................................................... 56 Figure 2.4 Customer Account Groups for BESTM .................................................................................. 56 Figure 2.5 Defining Screen Layout per Company Code ......................................................................... 57 Figure 2.6 Defining Screen Layout per Transaction ............................................................................... 58 Figure 2.7 Message Control Settings ..................................................................................................... 59 Figure 2.8 Accounting Clerk Field in Customer Master ......................................................................... 60 Figure 2.9 Accounting Clerk Definition .................................................................................................. 60 Figure 2.10 Defining Industries .............................................................................................................. 61 Figure 2.11 Assigning Industry Code in Customer Master Record ........................................................ 61 Figure 2.12 Number Ranges for Customer Accounts ............................................................................ 62 Figure 2.13 Assigning Number Ranges to Customer Account Groups ................................................... 63 Figure 2.14 Activating AR Pledging Indicator ........................................................................................ 64 Figure 2.15 AR Pledging Indicator - Details ........................................................................................... 65 Figure 2.16 AR Pledging Indicator for BESTM Company Codes ............................................................. 65 Figure 2.17 AR Pledging Indicator in Customer Master ......................................................................... 66 Figure 2.18 Sensitive Fields for Dual Control ......................................................................................... 67 Figure 2.19 System Displaying a Message on the Changes to Sensitive Fields...................................... 68 Figure 2.20 System Displaying the Confirmation Status ........................................................................ 68 Figure 2.21 System Displaying the Changed Sensitive Field .................................................................. 69 Figure 2.22 System Displaying the Details of Changes Made to Sensitive Fields .................................. 69 Figure 2.23 System Not Allowing to Confirm the Changes by the Same User ...................................... 69 Figure 2.24 Field Group for Customer Master Change Control ............................................................. 71 Figure 2.25 Adding Fields to Field Group .............................................................................................. 72 Figure 2.26 Selection Screen of Report RFDABL00 Showing the Field Group ....................................... 72 Figure 2.27 Report RFDABL00 Displaying Changes ................................................................................ 73 Figure 2.28 Periodic Account Statement Indicator................................................................................ 76 Figure 2.29 Periodic Account Statement Indicator in Customer / Vendor Master Record ................... 77 Figure 2.30 Manual Worklist for BESTM................................................................................................ 78 Figure 2.31 Enabling Worklist Entry during Open Item Processing ....................................................... 79 Figure 2.32 Maintaining Users / Accounts for Internet Services ........................................................... 79 Figure 3.1 Vendor Master Data ............................................................................................................. 82 Figure 3.2 Vendor Account Groups ....................................................................................................... 85 Figure 3.3 Defining Screen Layout per Company Code (Vendors) ........................................................ 86 Figure 3.4 Defining Screen Layout per Transaction (Vendors) .............................................................. 86 Figure 3.5 Number Ranges for Vendor Accounts .................................................................................. 88 Figure 3.6 Assigning Number Ranges to Vendor Account Groups ........................................................ 88

412 List of Figures
Figure 3.7 Sensitive Fields under Dual Control for Vendor Master ....................................................... 89 Figure 3.8 Confirming Changes to Sensitive Fields of Multiple Records ............................................... 90 Figure 3.9 Field Group for Vendor Master Change Control ................................................................... 92 Figure 3.10 Assigning Fields to Field Group for Vendor Master Change Control .................................. 92 Figure 3.11 Selection Screen of Report RFDABL00 Showing the Field Group ....................................... 93 Figure 3.12 Report Output of RFKABL00 with List/Detail of Changes to Vendor Records .................... 93 Figure 3.13 Overdue Thresholds for Vendor Account Groups .............................................................. 96 Figure 4.1: New Document Type (YR) .................................................................................................. 102 Figure 4.2: Making ‘Reference Number’ as Required Entry for Document Type DR ........................... 103 Figure 4.3: Standard Posting Keys ....................................................................................................... 106 Figure 4.4: Settings for a Posting Key .................................................................................................. 107 Figure 4.5: Settings for Posting Key 05 ................................................................................................ 109 Figure 4.6: Settings for Posting Key 02 ................................................................................................ 110 Figure 4.7: Field Status Settings for Posting Key 06 ............................................................................ 110 Figure 4.8 Company Code – Business Area Relationship, for BESTM Group ....................................... 111 Figure 4.9 Change Validation: Overview Screen .................................................................................. 112 Figure 4.10 Create Validation: Creating a Step.................................................................................... 113 Figure 4.11 Create Validation: Creating Prerequisite .......................................................................... 114 Figure 4.12 Create Validation: Prerequisite and Check Configured .................................................... 115 Figure 4.13 Create Validation: Fully Configured Step .......................................................................... 116 Figure 4.14 New Validation in Accounting Documents ....................................................................... 116 Figure 4.15: Default Values: Document Type and Posting Key ........................................................... 117 Figure 4.16 Standard Field Status Groups (FSG) .................................................................................. 119 Figure 4.17 SAP Link Rules to resolve conflicting Field Statuses ......................................................... 120 Figure 4.18 Defining FSV ‘B100’ for BESTM ......................................................................................... 121 Figure 4.19 FSGs associated with FSV ‘B100’ ...................................................................................... 121 Figure 4.20 Field Status change for ‘Payment Reference’ field ........................................................... 122 Figure 4.21 FSV – Company Code Assignment .................................................................................... 123 Figure 4.22 Defining a new Subscreen for Coding Block ..................................................................... 125 Figure 4.23: Screen Variant for Document Entry................................................................................. 126 Figure 4.24: Substitution in Accounting Documents ........................................................................... 127 Figure 4.25: Using Text IDs in Document Header ................................................................................ 127 Figure 4.26: Using Text IDs in a Line Item ............................................................................................ 128 Figure 4.27: Configuring Text IDs for Document Header..................................................................... 129 Figure 4.28: Configuring Text IDs for Line Items ................................................................................. 130 Figure 4.29 Entering Text Key (ID) in Text Field ................................................................................... 131 Figure 4.30 Line Item Text ID ............................................................................................................... 132 Figure 4.31 Text ID replaced by Actual Text together with the value of Variable ............................... 132 Figure 4.32 Standard Line Layout Variants for Document Change / Display ....................................... 133 Figure 4.33 Selecting Default Line Layout Variant for Document Change / Display ........................... 134 Figure 4.34: Document Change Rules for Document Header ............................................................. 135 Figure 4.35: Document Change: Editable Fields in Document Header................................................ 136 Figure 4.36: Standard Screen Variants for G/L Account Items Fast Entry ........................................... 137

413 List of Figures
Figure 4.37 Defining Workflow Variant US01 ..................................................................................... 139 Figure 4.38 Assigning Workflow Variant US01 to Company Code ...................................................... 140 Figure 4.39 Release Groups ................................................................................................................. 141 Figure 4.40 Release Approval Paths .................................................................................................... 141 Figure 4.41 Assigning Release Approval Paths for Parking Documents .............................................. 142 Figure 4.42 Assigning Release Approval Procedures for Parking Documents ..................................... 143 Figure 4.43 Release Levels with Amount Limit .................................................................................... 144 Figure 4.44 Allocating Organization Object to Release Levels ............................................................ 144 Figure 4.45 Customer Line Item Fields for Resetting Document Release ........................................... 145 Figure 4.46 Vendor Line Item Fields for Resetting Document Release ............................................... 146 Figure 4.47 Configuring Payment Terms BC90 for BESTM .................................................................. 148 Figure 4.48 Payment Terms for BESTM ............................................................................................... 150 Figure 4.49 Defining Installments for Payment Terms BINS ................................................................ 151 Figure 4.50 Instalment Payment Term BINS - Details .......................................................................... 152 Figure 4.51 Configuring Cash Discount Base ....................................................................................... 153 Figure 5.1 Payment Block Reasons ...................................................................................................... 156 Figure 6.1 G/L Account for Cash Discount Received ........................................................................... 158 Figure 6.2 G/L Account for Cash Discount Lost ................................................................................... 159 Figure 6.3 G/L Account for handling Under / Over Payments ............................................................. 159 Figure 6.4 G/L Accounts for Posting Exchange Rate Differences during OI Clearing ........................... 161 Figure 6.5 G/L Accounts for handling Rounding Differences ............................................................... 162 Figure 6.6 G/L Accounts for Payment Differences with Alternative Currencies .................................. 162 Figure 6.7 G/L Account for Bank Charges (Vendors) ........................................................................... 163 Figure 6.8 List of Clearing Transactions ............................................................................................... 164 Figure 6.9 Standard Posting Keys for the Clearing Procedure ‘Incoming Payment’ ............................ 164 Figure 6.10 Enabling Company Code for Posting Translation Gain / Loss ........................................... 165 Figure 6.11 Default Block Key Configuration via Payment Terms ....................................................... 166 Figure 6.12: Tolerance Group TGUS for Company Code 1110 ............................................................ 169 Figure 6.13: Null Tolerance Group for Company Code 2100 ............................................................... 171 Figure 6.14: Assigning Users to a Tolerance Group ............................................................................. 174 Figure 6.15 Null G/L Tolerance Group for Company Code 1110 ......................................................... 176 Figure 6.16 G/L Tolerance Groups for BESTM ..................................................................................... 176 Figure 6.17 Customer/Vendor Tolerance Group BEU1 - Details ......................................................... 178 Figure 6.18 Customer/Vendor Tolerance Groups for BESTM .............................................................. 180 Figure 6.19 Reason Codes for Manual Outgoing Payments ................................................................ 181 Figure 6.20 Cross-Company Code Transactions – Settings for Clearing between 110 and 1120 ........ 183 Figure 6.21 List of Company Codes paired for Cross-Company Code Transactions ............................ 184 Figure 6.22 Settings for Cross-Company Code Manual Payments ...................................................... 185 Figure 6.23 Configuring Manual Payments ......................................................................................... 186 Figure 6.24 Entry Screen of Transaction FBZP ..................................................................................... 188 Figure 6.25 New House Bank Creation ............................................................................................... 190 Figure 6.26 House Banks for Company Code 1110 ............................................................................. 192 Figure 6.27 Creating a Bank Account at House Bank .......................................................................... 193
414 List of Figures
Figure 6.28 Accounts at a House Bank ............................................................................................... 193 Figure 6.29 Setting up All Company Codes for Payment Transactions ............................................... 195 Figure 6.30 Setting up Paying Company Codes for Payment Transactions ........................................ 198 Figure 6.31 Payment Methods in Vendor Master .............................................................................. 200 Figure 6.32 Country-Specific Payment Methods for USA ................................................................... 202 Figure 6.33 Details of Payment Method Settings for ‘Check’ for USA ................................................ 203 Figure 6.34 Payment Method Configuration Per Company Code ...................................................... 206 Figure 6.35 Configuring ‘Single Payment’ in Vendor Master .............................................................. 208 Figure 6.36 Configuring Payment Methods Per Company Code ........................................................ 210 Figure 6.37 Configuring Payment Medium Format Per Company Code ............................................ 211 Figure 6.38 Configuring Bank Determination – Ranking Order .......................................................... 213 Figure 6.39 Configuring Bank Determination – Bank Accounts .......................................................... 214 Figure 6.40 Configuring Bank Determination – Availabe Amounts .................................................... 214 Figure 6.41 Configuring Bank Determination – Value Date ................................................................ 215 Figure 6.42 ‘Check Cashing Time’ Field in Vendor Master ................................................................. 216 Figure 6.43 Automatic Posting Settings for Payment Program .......................................................... 219 Figure 6.44 Automatic Posting Settings for Payment Requests ......................................................... 220 Figure 6.45 Standard Search Fields for Payments in Payment Run .................................................... 221 Figure 6.46 Standard Search Fields for Line Item Display in Payment Run ........................................ 222 Figure 7.1 Cash Discount Base for Outgoing Invoices......................................................................... 225 Figure 7.2 Tax Accounts for Outgoing Payments ................................................................................ 226 Figure 7.3 Posting Key Definition for Outgoing Invoice/Credit Memo ............................................... 227 Figure 8.1 G/L Account for Posting Cash Discount Taken ................................................................... 230 Figure 8.2 Activating SEPA Mandate Management ............................................................................ 231 Figure 8.3 Function Module Configuration for Generating SEPA Mandate ID ................................... 232 Figure 8.4 Selecting the Function for Generating SEPA Mandate ID .................................................. 233 Figure 8.5 Number Ranges for SEPA Mandate ................................................................................... 233 Figure 8.6 Number Ranges Assignment for SEPA Mandate ............................................................... 234 Figure 9.1 Central FI Settings for Payment Cards ............................................................................... 238 Figure 9.2 G/L Account Assignment to Clearing Account (Payment Cards) ....................................... 240 Figure 10.1 Mantaining Dunning Area in a Customer Master Record ................................................ 246 Figure 10.2 Defining Dunning Key ...................................................................................................... 247 Figure 10.3 Entering Dunning Block Reason in Customer Master Record .......................................... 248 Figure 10.4 Defining Dunning Block Reasons ..................................................................................... 249 Figure 10.5 Defining a New Dunning Form (SAPScript) by Copying the Standard Form .................... 250 Figure 10.6 New Dunning Proceudre – Overview............................................................................... 253 Figure 10.7 New Dunning Proceudre – Dunning Level ....................................................................... 255 Figure 10.8 New Dunning Proceudre – Dunning Charges .................................................................. 257 Figure 10.9 New Dunning Proceudre – Minimum Amounts ............................................................... 258 Figure 10.10 New Dunning Proceudre – Dunning Texts ..................................................................... 258 Figure 10.11 New Dunning Proceudre – Company Code Dunning Control ........................................ 259 Figure 10.12 Interest Indictors ............................................................................................................ 262 Figure 10.13 Dunning Interest Rates .................................................................................................. 262
415 List of Figures
Figure 10.14 Dunning Form F150_DUNN_SF (Smart Form) ............................................................... 263 Figure 10.15 Assigning Dunning Forms for Normal Dunning Procedure ............................................ 264 Figure 10.16 Assigning Dunning Forms for Legal Dunning Procedure ................................................ 264 Figure 10.17 Configuring Sender Details for Dunning Forms ............................................................. 265 Figure 10.18 System Generated Configuration List for Dunning Program ......................................... 266 Figure 11.1 Payment Difference Processing during Clearing .............................................................. 274 Figure 11.2 Criteria for grouping Clearing Items in Automatic Clearing .............................................. 278 Figure 11.3 G/L Accounts for Posting Clearing Differences ................................................................. 279 Figure 12.1 Special G/L List for Customer ........................................................................................... 281 Figure 12.2 Reconciliation / Special G/L Accounts for Customer Down Payments ............................ 282 Figure 12.3 Account for Output Tax Clearing on Down Payments ..................................................... 283 Figure 12.4 Automatic Posting Rules for Output Tax Clearing on Down Payments ........................... 283 Figure 13.1 Special G/L List for Vendor .............................................................................................. 285 Figure 13.2 Reconciliation / Special G/L Accounts for Vendor Down Payments ................................ 286 Figure 13.3 Account for Input Tax Clearing on Down Payments ........................................................ 286 Figure 14.1 Configuring Negative Postings .......................................................................................... 290 Figure 14.2 Configuring Negative Postings using Transaction OBY6 ................................................... 291 Figure 14.3 Reversal Reasons .............................................................................................................. 292 Figure 15.1 Fields Relevant for Interest Calculation (Customer Master Record) ................................ 296 Figure 15.2 Item Interface Calculation – Initial Screen ....................................................................... 298 Figure 15.3 Number Range for Interest Forms ................................................................................... 305 Figure 15.4 Configuring Item Interest Indicator (1U) ......................................................................... 307 Figure 15.5 Configuring Interest Indictor ............................................................................................ 311 Figure 15.6 Reference Interest Rate – Item Interest Calculation – Credit .......................................... 313 Figure 15.7 Time Dependent Interest Terms of Interest Indicator 1U ............................................... 314 Figure 15.8 Time Dependent Interest Terms for BESTM .................................................................... 314 Figure 15.9 Interest Rate Values for Reference Interest Rates for Item Interest ............................... 315 Figure 15.10 Fixed Amounts for Interest Calculation ......................................................................... 316 Figure 15.11 A/R: Calculation of Interest on Arrears – Account Determination Settings .................. 318 Figure 15.12 A/R: Calculation of Interest on Arrears – Control Parameters ...................................... 319 Figure 15.13 A/R: Calculation of Interest on Arrears – Account Symbols .......................................... 319 Figure 15.14 A/R: Calculation of Interest on Arrears – G/L Account Assignment .............................. 319 Figure 15.15 A/R: Calculation of Interest on Arrears – Document Type Specification ....................... 320 Figure 15.16 A/R Balance Interest Calculation – G/L Accounts .......................................................... 321 Figure 15.17 A/R Balance Interest Calculation – Account Symbols .................................................... 321 Figure 15.18 Forms for Interest Calculation ....................................................................................... 322 Figure 16.1 Reconciliation of Group Receivables / Payables – Process Flow ...................................... 325 Figure 16.2 Creating Default Customizing for Intercompany Reconciliation ...................................... 328 Figure 16.3 Generate Default Customizing for Intercompany Reconciliation – Results ..................... 329 Figure 16.4 Application ID for Intercompany Reconciliation ............................................................... 331 Figure 16.5 Contact Person Database ................................................................................................. 331 Figure 16.6 Placeholders for Messages ............................................................................................... 332 Figure 16.7 Message Template ............................................................................................................ 333
416 List of Figures
Figure 16.8 Text Lines for Message Template SAP0000010 ................................................................ 333 Figure 16.9 Attributes for Reconciliation Process 003 ........................................................................ 334 Figure 16.10 Activating Processes for Intercompany Reconciliation .................................................. 335 Figure 16.11 Activating Data Transaction Tables – Test Run ............................................................... 336 Figure 16.12 Activating Data Transaction Tables – Log from Productive Run ..................................... 337 Figure 16.13 Maintaining Field Catalogs ............................................................................................. 338 Figure 16.14 Reconciliation Process Detail Attributes ........................................................................ 340 Figure 16.15 Company Attributes for Reconciliation .......................................................................... 342 Figure 16.16 Number Range for Group Reference Numbers .............................................................. 343 Figure 16.17 Rules for Document Assignment – Overview Screen ..................................................... 344 Figure 16.18 Rules for Document Assignment – Rule Definition ........................................................ 345 Figure 16.19 Setting up of Reconciliation Display ............................................................................... 346 Figure 16.20 Sets Overview ................................................................................................................. 347 Figure 16.21 Sets: Single Entries – Overview ....................................................................................... 347 Figure 16.22 Overview of Object Groups ............................................................................................ 348 Figure 16.23 Overview of Object Subgroups ....................................................................................... 348 Figure 16.24 Overview of Status Fields ............................................................................................... 349 Figure 16.25 Status Icons and Values .................................................................................................. 349 Figure 16.26 Activate BAdI ‘FB_RC_PRESENTATION’ .......................................................................... 350 Figure 16.27 Address Data for Reply Addresses for Balance Confirmation ........................................ 351 Figure 16.28 Additional Selection Criterial Fields for Balance Confirmation ...................................... 352 Figure 16.29 Additional Selection Criteria Fields for Balance Confirmation (Transaction F.17) ......... 352 Figure 16.30 Valuation Method ........................................................................................................... 355 Figure 16.31 Valuation Areas .............................................................................................................. 357 Figure 16.32 Assigning Accounting Principle to Ledger Group ........................................................... 358 Figure 16.33 Assigning Valuation Areas to Accounting Principle ........................................................ 358 Figure 16.34 Activating Delta Logic for Valuation Areas ..................................................................... 359 Figure 16.35 Accounts for Automatic Postings of Foreign Currency Revaluation ............................... 360 Figure 16.36 Activating Additional Fields for Foreign Currency Valuation .......................................... 361 Figure 16.37 Alternative Reconciliation Account for Individual Value Adjustment ............................ 363 Figure 16.38 Value Adjustment Keys .................................................................................................. 365 Figure 16.39 Value Adjustment Procedures ....................................................................................... 366 Figure 16.40 Account Assignment for a Value Adjustment Procedure .............................................. 367 Figure 16.41 Base Value Determination per Valuation Method ........................................................ 367 Figure 16.42 Automatic Posting Procedures for GR/IR ....................................................................... 369 Figure 16.43 Adjustment / Target Account for GR/IR Account ........................................................... 369 Figure 16.44 Procedures for defining G/L Accounts for Subsequent Adjustments ............................. 370 Figure 16.45 Overview Screen for Sort Methods and their Associated Settings ................................. 371 Figure 16.46 Classification Intervals for Sorting .................................................................................. 372 Figure 16.47 Adjustment Accounts for Receivables Regrouping ......................................................... 372 Figure 16.48 Adjustment Accounts for Payables by Maturity ............................................................. 373 Figure 17.1 Copying Standard Evaluations ......................................................................................... 378 Figure 17.2 Evalution Views for BESTM .............................................................................................. 379

417 List of Figures
Figure 17.3 Customer Evalution Types for BESTM ............................................................................. 380 Figure 17.4 Customer Evaluations for BESTM .................................................................................... 380 Figure 17.5 Customer Evaluation ‘Payment History’ – Details ........................................................... 381 Figure 17.6 Enhancement of Standard Evaluation – Customer .......................................................... 382

List of Tables
Table 0:1 BESTM - Companies ............................................................................................................... 24 Table 0:2 BESTM - Company Codes, Country and Currency .................................................................. 25 Table 0:3 BESTM – Credit Control Areas ............................................................................................... 25 Table 0:4 BESTM – Business Areas ........................................................................................................ 25 Table 0:5 BESTM – Profit Centers / Profit Center Groups ..................................................................... 27 Table 0:6 BESTM – Standard Messages and Changes Required for BESTM .......................................... 30 Table 0:7 Cross-Company Code Pairing for Manual Payments ............................................................. 40 Table 0:8 Dunning Charges for BESTM for US-based Company Codes.................................................. 43 Table 1:1 Key Features of FI-A/R ........................................................................................................... 46 Table 1:2 Key Features of FI-A/P ........................................................................................................... 47 Table 2:1 Customer Master Maintenance ............................................................................................. 52 Table 3:1 Vendor Master Maintenance ................................................................................................. 83 Table 4:1 Default Document Types ..................................................................................................... 101 Table 4:2 Default Posting Keys ............................................................................................................ 106 Table 4:3 Field Status Configuration for Posting Keys for BESTM ....................................................... 108 Table 4:4 Standard Screen Variants for Document Entry .................................................................... 125 Table 10:1 Dunning Charges for Multi-level Dunning Procedure of BESTM ....................................... 252 Table 11:1 Functions for Open Item Clearing ...................................................................................... 275 Table 16:1 Database Tables for Additional Fields in Intercompany Reconciliation ............................. 335 Table 16:2 Properties for Special Purpose Ledger used in Intercompany Reconciliation ................... 341 Table 16:3 Adjustment Accounts for Changed Reconciliation Accounts and Investment Accounts ... 373

Latest Book by the Author
Configuring SAP Financial Accounting – Vol. II
(SAP S/4HANA Finance) (1st Edition)
Configure SAP Financial Accounting, in SAP S/4HANA Finance (1909), to suit your exact business needs!
Understand the concepts and learn configuring your SAP system step-by-step, through case-studies,
with numerous screenshots and illustrations covering:
• Case Study
• Accounts Receivable and Accounts Payable
• Contract Accounts Receivable and Payable
• Bank Accounting
• Asset Accounting
598 pages, 1st edition 2020
Formats: Kindle & Paperback
ISBN: B08CXPWH4B
https://www.amazon.com/dp/B08CXPWH4B
Latest Book by the Author
Configuring SAP Financial Accounting – Vol. I
(SAP S/4HANA Finance) (1st Edition)
Configure SAP Financial Accounting, in SAP S/4HANA Finance (1909), to suit your exact business needs!
Understand the concepts and learn configuring your SAP system step-by-step, through case-studies,
with numerous screenshots and illustrations covering:
• SAP HANA
• SAP S/4HANA
• SAP S/4HANA Finance
• Case Study
• FI Global Settings I (Ledgers, Field Status, Fiscal Year, Company Code Global Parameters etc.)
• FI Global Settings II (Documents, Inflation Accounting and Correspondence)
• FI Global Settings III (Taxes including Withholding Tax)
• General Ledger Accounting
564 pages, 1st edition 2020
Formats: Kindle & Paperback
ISBN: 979-8657784145
https://www.amazon.com/dp/B08C4DHF8Z
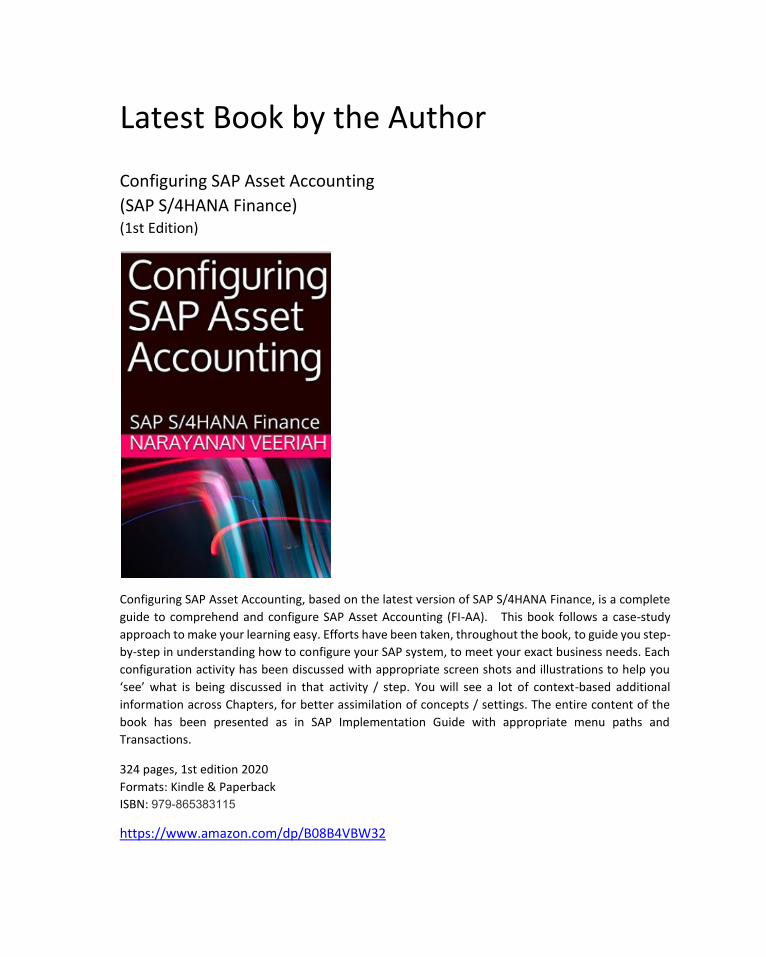
Latest Book by the Author Configuring SAP Asset Accounting
(SAP S/4HANA Finance) (1st Edition)
Configuring SAP Asset Accounting, based on the latest version of SAP S/4HANA Finance, is a complete
guide to comprehend and configure SAP Asset Accounting (FI-AA). This book follows a case-study
approach to make your learning easy. Efforts have been taken, throughout the book, to guide you step-
by-step in understanding how to configure your SAP system, to meet your exact business needs. Each
configuration activity has been discussed with appropriate screen shots and illustrations to help you
‘see’ what is being discussed in that activity / step. You will see a lot of context-based additional
information across Chapters, for better assimilation of concepts / settings. The entire content of the
book has been presented as in SAP Implementation Guide with appropriate menu paths and
Transactions.
324 pages, 1st edition 2020
Formats: Kindle & Paperback
ISBN: 979-865383115
https://www.amazon.com/dp/B08B4VBW32
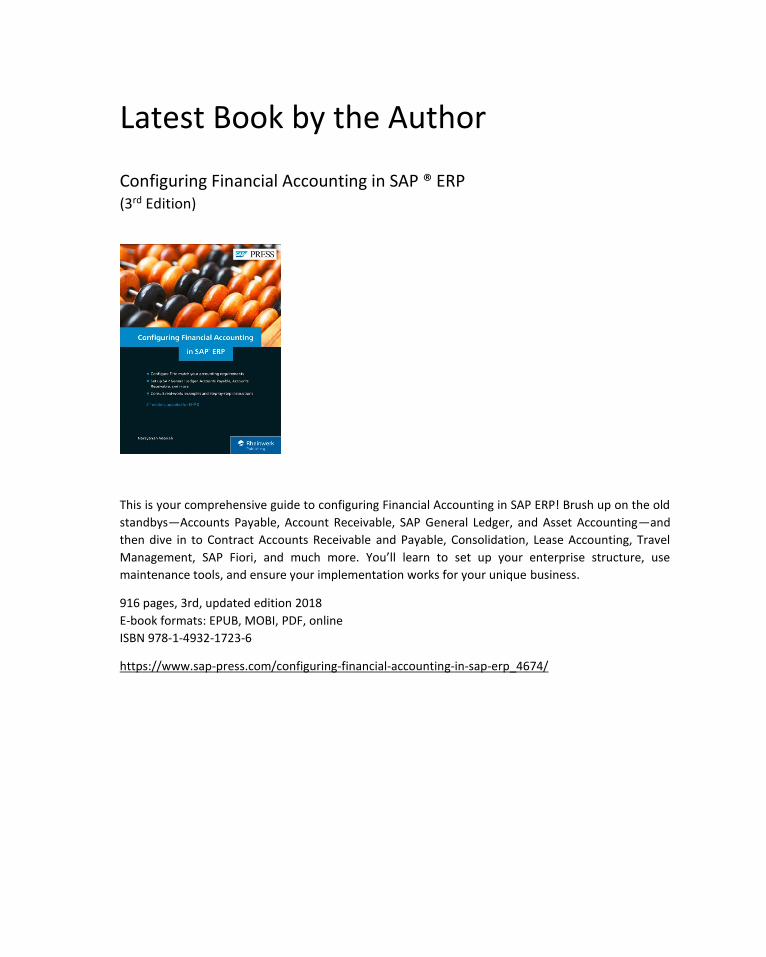
Latest Book by the Author Configuring Financial Accounting in SAP ® ERP (3rd Edition)
This is your comprehensive guide to configuring Financial Accounting in SAP ERP! Brush up on the old
standbys—Accounts Payable, Account Receivable, SAP General Ledger, and Asset Accounting—and
then dive in to Contract Accounts Receivable and Payable, Consolidation, Lease Accounting, Travel
Management, SAP Fiori, and much more. You’ll learn to set up your enterprise structure, use
maintenance tools, and ensure your implementation works for your unique business.
916 pages, 3rd, updated edition 2018
E-book formats: EPUB, MOBI, PDF, online
ISBN 978-1-4932-1723-6
https://www.sap-press.com/configuring-financial-accounting-in-sap-erp_4674/

Other Books by the Author
Title: SAP ERP: Quick Reference Guide
Edition: 2
Publisher: Mercury Learning & Information, 2020
ISBN: 1683920961, 9781683920960
Length: 500 pages
Title: SAP FI: Financial Accounting ERP ECC6, R/3 4.70
Edition: 2
Publisher: Mercury Learning & Information, 2017
ISBN: 1683921003, 9781683921004
Length: 350 pages
Title: SAP CO: Controlling
Edition: 2
Publisher: Mercury Learning & Information, 2017
ISBN: 168392102X, 9781683921028
Length: 350 pages
Title: Configuring Financial Accounting in SAP
Edition: 2, illustrated
Publisher: Galileo Press, 2014 (SAP Press)
ISBN: 1493210424, 9781493210428
Length: 907 pages
Title: Implementing SAP ERP Financials: A Configuration Guide
Edition: 2
Publisher: Tata McGraw Hill Publishing Co Ltd, 2013
ISBN-13: 978-0-0701-4297-8
Length: 965 pages
Title: SAP FI Financial Accounting: SAP ERP ECC 6.0, SAP R/3 4.70
Edition: 1, illustrated, reprint
Publisher: Mercury Learning & Information, 2013
ISBN 1937585646, 9781937585648
Length: 338 pages
Title: Customizing Financial Accounting in SAP
Edition: 1, illustrated
Publisher: Galileo Press, 2011 (SAP Press)
ISBN 1592293778, 9781592293773
Length: 792 pages
Title: Mastering SAP CO: Controlling
Edition: 1, illustrated
Publisher: BPB Publications, 2007
ISBN: 9788183333344
Length: 297 pages
Title: SAP FI
Edition: 1, illustrated
Publisher: BPB Publications, 2010
ISBN: 9788183333238
Length: 302 pages
Title: SAP FI/CO Demystified
Edition: 1, illustrated
Publisher: BPB Publications, 2008
ISBN: 8183332315, 9788183332316
Length: 370 pages
Title: SAP R/3 FI Transactions
Edition: 1, illustrated
Publisher: Jones & Bartlett Learning, 2007
ISBN: 1934015016, 9781934015018
Length: 530 pages
Title: Mastering SAP R/3 FI: Transaction Made Easy
Edition: 1, illustrated
Publisher: BPB Publications, 2007
ISBN: 8183331319, 9788183331319
Length: 472 pages
***
Related Documents