Tivoli ® IBM Tivoli OMEGAMON XE for CICS on z/OS Configuring IBM Tivoli OMEGAMON XE for CICS on z/OS Version 3.1.0 SC32-9424-00

Welcome message from author
This document is posted to help you gain knowledge. Please leave a comment to let me know what you think about it! Share it to your friends and learn new things together.
Transcript
Tivoli® IBM Tivoli OMEGAMON XE for CICS on z/OS
Configuring IBM Tivoli OMEGAMON XE for CICS on z/OS
Version 3.1.0
SC32-9424-00
���

Tivoli® IBM Tivoli OMEGAMON XE for CICS on z/OS
Configuring IBM Tivoli OMEGAMON XE for CICS on z/OS
Version 3.1.0
SC32-9424-00
���

Note
Before using this information and the product it supports, be sure to read the general information under “Notices” on page
177.
First edition (July 2005)
This edition applies to version 3 release 1 of IBM Tivoli OMEGAMON for CICS on z/OS (program number 5698-A58)
and to all subsequent versions, releases, and modifications until otherwise indicated in new editions. Make sure you
are using the correct edition for the level of the product.
Order publications through your IBM representative or the IBM branch office serving your locality. Publications are
not stocked at the address given below.
At the back of this publication is a page entitled “Sending your comments to IBM”.
When you send information to IBM, you grant IBM a nonexclusive right to use or distribute the information in any
way it believes appropriate without incurring any obligation to you.
© Copyright International Business Machines Corporation 2005. All rights reserved.
US Government Users Restricted Rights – Use, duplication or disclosure restricted by GSA ADP Schedule Contract
with IBM Corp.
Contents
Figures . . . . . . . . . . . . . . . . . . . . . . . . . . . vii
Tables . . . . . . . . . . . . . . . . . . . . . . . . . . . . xi
Preface . . . . . . . . . . . . . . . . . . . . . . . . . . . xiii
Who should read this guide . . . . . . . . . . . . . . . . . . . . xiii
Transition from Candle to IBM . . . . . . . . . . . . . . . . . . . xiii
What’s new in this release . . . . . . . . . . . . . . . . . . . . xiv
Publications . . . . . . . . . . . . . . . . . . . . . . . . . xvi
Tivoli technical training . . . . . . . . . . . . . . . . . . . . . xx
Support information . . . . . . . . . . . . . . . . . . . . . . xx
Conventions used in this guide . . . . . . . . . . . . . . . . . . xx
Terminology . . . . . . . . . . . . . . . . . . . . . . . . . xxi
Chapter 1. Configuration overview . . . . . . . . . . . . . . . . . 1
Features of the Configuration Tool . . . . . . . . . . . . . . . . . . 1
Checklist: Setting up the Configuration Tool . . . . . . . . . . . . . . 1
Setting up the Configuration Tool . . . . . . . . . . . . . . . . . . 2
Starting the Configuration Tool . . . . . . . . . . . . . . . . . . . 2
Setting up your work environment . . . . . . . . . . . . . . . . . 3
Setting up your configuration environment . . . . . . . . . . . . . . 5
Chapter 2. Configuring Tivoli OMEGAMON XE for CICS on z/OS in a single
z/OS image . . . . . . . . . . . . . . . . . . . . . . . . . 7
Introduction to runtime environments in single z/OS image . . . . . . . . . 8
Adding a new runtime environment . . . . . . . . . . . . . . . . . 8
Building runtime libraries . . . . . . . . . . . . . . . . . . . . 14
Configuring a hub Candle Management Server . . . . . . . . . . . . . 14
Configuring a persistent data store (Candle Management Server) . . . . . 20
Configuring Tivoli OMEGAMON II for CICS . . . . . . . . . . . . . . 23
Allocating task history data sets . . . . . . . . . . . . . . . . . . 25
Configuring Tivoli OMEGAMON XE for CICS on z/OS . . . . . . . . . . 28
Configuring a persistent data store (Tivoli OMEGAMON XE for CICS on
z/OS) . . . . . . . . . . . . . . . . . . . . . . . . . . 29
Configuring a Monitoring Agent . . . . . . . . . . . . . . . . . . 31
Configuring a persistent data store Monitoring Agent . . . . . . . . . . 33
Loading runtime libraries . . . . . . . . . . . . . . . . . . . . . 35
Completing the configuration . . . . . . . . . . . . . . . . . . . . 36
Modifying the CICS startup JCL . . . . . . . . . . . . . . . . . . . 37
Verifying the configuration . . . . . . . . . . . . . . . . . . . . . 38
Chapter 3. Configuring a local Candle Management Server on a distributed
system . . . . . . . . . . . . . . . . . . . . . . . . . . . 41
Installing Candle Management Server on Windows XP . . . . . . . . . . 42
Configuring Candle Management Server on Windows . . . . . . . . . 43
Configuring Tivoli OMEGAMON XE for CICS on Windows . . . . . . . . 49
Configuring a monitoring agent to work with a Candle Management Server on a
distributed system . . . . . . . . . . . . . . . . . . . . . . . 54
Introduction to runtime environments . . . . . . . . . . . . . . . . 55
Building runtime libraries (distributed Candle Management Server) . . . . . 61
Configuring Tivoli OMEGAMON II for CICS . . . . . . . . . . . . . 61
Configuring Tivoli OMEGAMON XE for CICS on z/OS for a Candle
Management Server on a distributed system . . . . . . . . . . . . 66
© Copyright IBM Corp. 2005 iii

Loading runtime libraries . . . . . . . . . . . . . . . . . . . . 74
Completing the configuration with a distributed Candle Management Server 75
Modifying the CICS started task . . . . . . . . . . . . . . . . . 76
Verifying your configuration . . . . . . . . . . . . . . . . . . . 77
Chapter 4. Configuring Tivoli OMEGAMON XE for CICS on z/OS in multiple
z/OS images . . . . . . . . . . . . . . . . . . . . . . . . . 79
Introduction to run-time environments in multiple z/OS images . . . . . . . 80
Configuring a hub Candle Management Server (RTE_1) . . . . . . . . . 81
Configuring a remote Candle Management Server (RTE_2) . . . . . . . 81
Configuring a remote Monitoring Agent (RTE_3) . . . . . . . . . . . . 82
Building a runtime environment . . . . . . . . . . . . . . . . . . . 82
Adding a new runtime environment . . . . . . . . . . . . . . . . 83
Specifying values on the Add Runtime Environment panels . . . . . . . 85
Building runtime libraries . . . . . . . . . . . . . . . . . . . . . 88
Configuring a Candle Management Server (RTE_1 and RTE_2) . . . . . . . 88
Configuring a persistent data store (Candle Management Server) . . . . . 94
Configuring OMEGAMON II for CICS (RTE_2 and RTE_3) . . . . . . . . . 97
Configuring Tivoli OMEGAMON XE for CICS on z/OS (RTE_2 and RTE_3) 99
Configuring a persistent data store . . . . . . . . . . . . . . . . 100
Configuring a Monitoring Agent (RTE_2 and RTE_3) . . . . . . . . . 101
Configuring a persistent data store (Monitoring Agent) . . . . . . . . . 103
Loading runtime libraries . . . . . . . . . . . . . . . . . . . . . 104
Completing the configuration . . . . . . . . . . . . . . . . . . . 104
Modifying the CICS started task . . . . . . . . . . . . . . . . . . 105
Verifying the configuration: Candle Management Server on different z/OS
images . . . . . . . . . . . . . . . . . . . . . . . . . . 106
Chapter 5. Configuring Candle Management Server and Monitoring Agent
in the same address space . . . . . . . . . . . . . . . . . . 109
Introduction to runtime environments . . . . . . . . . . . . . . . . 110
Adding a new runtime environment . . . . . . . . . . . . . . . . 110
Building runtime libraries . . . . . . . . . . . . . . . . . . . . . 116
Configuring Candle Management Server . . . . . . . . . . . . . . . 116
Configuring a persistent data store (Candle Management Server) . . . . . 122
Configuring a OMEGAMON II for CICS . . . . . . . . . . . . . . . 124
Configuring a monitoring agent for a Candle Management Server in the same
address space . . . . . . . . . . . . . . . . . . . . . . . . 126
Loading runtime libraries . . . . . . . . . . . . . . . . . . . . . 128
Completing the configuration . . . . . . . . . . . . . . . . . . . 129
Modifying the CICS started task . . . . . . . . . . . . . . . . . . 130
Verifying the configuration . . . . . . . . . . . . . . . . . . . . 131
Chapter 6. Installing CandleNet Portal server and client on Windows XP 133
Prerequisites . . . . . . . . . . . . . . . . . . . . . . . . . 134
Installing DB2 UDB . . . . . . . . . . . . . . . . . . . . . . . 134
Installing and configuring OMEGAMON platform . . . . . . . . . . . . 135
Installing and configuring Tivoli OMEGAMON XE for CICS on z/OS . . . . . 139
Starting CandleNet Portal . . . . . . . . . . . . . . . . . . . . 142
Deleting CandleNet Portal . . . . . . . . . . . . . . . . . . . . 143
Chapter 7. Updating and deleting runtime environments . . . . . . . . 145
Updating a runtime environment . . . . . . . . . . . . . . . . . . 145
Deleting a runtime environment . . . . . . . . . . . . . . . . . . 145
Chapter 8. Collecting and storing historical data . . . . . . . . . . . 147
iv Configuring IBM Tivoli OMEGAMON XE for CICS on z/OS
Collecting task history data . . . . . . . . . . . . . . . . . . . . 148
Features of task history data . . . . . . . . . . . . . . . . . . . 151
Chapter 9. Migrating . . . . . . . . . . . . . . . . . . . . . . 155
Migrating your profile from OMEGAMON II to OMEGAMON XE . . . . . . 155
Issues relating to migration from earlier releases . . . . . . . . . . . . 157
Migrating from Candle Management Workstation to CandleNet Portal . . . . 159
Seeding the Candle Management Server . . . . . . . . . . . . . . . 161
Chapter 10. Using advanced features in the Configuration Tool . . . . . 163
Enabling system variable support . . . . . . . . . . . . . . . . . . 163
Using batch mode processing . . . . . . . . . . . . . . . . . . . 164
Planning your RTE replication process . . . . . . . . . . . . . . . 165
Creating batch mode parameters . . . . . . . . . . . . . . . . . 167
Adding and configuring product parameter decks (optional) . . . . . . . 167
Transporting the RTE . . . . . . . . . . . . . . . . . . . . . 168
Index . . . . . . . . . . . . . . . . . . . . . . . . . . . . 173
Notices . . . . . . . . . . . . . . . . . . . . . . . . . . . 177
Trademarks . . . . . . . . . . . . . . . . . . . . . . . . . . 178
Sending your comments to IBM . . . . . . . . . . . . . . . . . 179
Contents v

vi Configuring IBM Tivoli OMEGAMON XE for CICS on z/OS
Figures
1. Main menu of the Configuration Tool . . . . . . . . . . . . . . . . . . . . . . . . 3
2. Specify options panel . . . . . . . . . . . . . . . . . . . . . . . . . . . . . . 4
3. Configure products panel . . . . . . . . . . . . . . . . . . . . . . . . . . . . 5
4. Set up the configuration tool panel . . . . . . . . . . . . . . . . . . . . . . . . . 6
5. A local configuration with Candle Management Server, agent on the same z/OS image as the CICS
regions . . . . . . . . . . . . . . . . . . . . . . . . . . . . . . . . . . . 7
6. Product selection menu . . . . . . . . . . . . . . . . . . . . . . . . . . . . . 8
7. Runtime environments panel . . . . . . . . . . . . . . . . . . . . . . . . . . . 9
8. Add runtime environment (1 of 2) panel . . . . . . . . . . . . . . . . . . . . . . 11
9. Add runtime environment (2 of 2) panel . . . . . . . . . . . . . . . . . . . . . . 13
10. Runtime environments panel . . . . . . . . . . . . . . . . . . . . . . . . . . 14
11. Product configuration selection menu . . . . . . . . . . . . . . . . . . . . . . . 15
12. Configure the Candle Management Server . . . . . . . . . . . . . . . . . . . . . 15
13. Create LU6.2 logmode panel . . . . . . . . . . . . . . . . . . . . . . . . . . 16
14. Specify configuration values panel . . . . . . . . . . . . . . . . . . . . . . . . 17
15. Specify CMS communication protocols . . . . . . . . . . . . . . . . . . . . . . . 17
16. Specify IP.PIPE communication protocol . . . . . . . . . . . . . . . . . . . . . . 18
17. Specify IP communication protocol panel . . . . . . . . . . . . . . . . . . . . . . 19
18. Specify SNA communication protocol panel . . . . . . . . . . . . . . . . . . . . . 20
19. Allocate persistent datastore menu . . . . . . . . . . . . . . . . . . . . . . . . 21
20. Product configuration selection menu . . . . . . . . . . . . . . . . . . . . . . . 23
21. Configure OMEGAMON II for CICS . . . . . . . . . . . . . . . . . . . . . . . . 23
22. OMEGAMON II for CICS configuration values panel . . . . . . . . . . . . . . . . . . 24
23. OMEGAMON II for CICS configuration values panel . . . . . . . . . . . . . . . . . . 24
24. Task history data set allocation panel . . . . . . . . . . . . . . . . . . . . . . . 26
25. Install or update CICS global data area modules . . . . . . . . . . . . . . . . . . . 27
26. Install Candle subsystem panel . . . . . . . . . . . . . . . . . . . . . . . . . 27
27. Run migration utility panel . . . . . . . . . . . . . . . . . . . . . . . . . . . 28
28. Product component selection panel . . . . . . . . . . . . . . . . . . . . . . . . 28
29. Configure IBM TIVOLI OMEGAMON XE for CICS on z/OS . . . . . . . . . . . . . . . 29
30. Specify persistent data store values panel . . . . . . . . . . . . . . . . . . . . . 30
31. Allocate persistent datastore menu . . . . . . . . . . . . . . . . . . . . . . . . 31
32. Configure IBM TIVOLI OMEGAMON XE for CICS on Z/OS panel . . . . . . . . . . . . . 32
33. Specify configuration parameters panel . . . . . . . . . . . . . . . . . . . . . . 32
34. Specify agent address space parameters panel . . . . . . . . . . . . . . . . . . . 32
35. Allocate persistent data store panel . . . . . . . . . . . . . . . . . . . . . . . . 33
36. Persistent data store specifications panel . . . . . . . . . . . . . . . . . . . . . . 34
37. Manage Candle Services . . . . . . . . . . . . . . . . . . . . . . . . . . . . 39
38. A configuration with the Candle Management Server on a distributed platform monitoring CICS
regions on a z/OS image . . . . . . . . . . . . . . . . . . . . . . . . . . . . 41
39. Select Features window, CandleNet Portal . . . . . . . . . . . . . . . . . . . . . 44
40. Setup Type window, CandleNet Portal . . . . . . . . . . . . . . . . . . . . . . . 45
41. Define CNP Host Information window, CandleNet Portal . . . . . . . . . . . . . . . . 45
42. CNPS Data Source Config Parameters dialog . . . . . . . . . . . . . . . . . . . . 46
43. CNP Server Configuration dialog . . . . . . . . . . . . . . . . . . . . . . . . . 46
44. CNP Server Configuration dialog . . . . . . . . . . . . . . . . . . . . . . . . . 47
45. Candle Management Server Configuration window . . . . . . . . . . . . . . . . . . 47
46. Hub CMS configuration window . . . . . . . . . . . . . . . . . . . . . . . . . 48
47. Seed CMS dialog . . . . . . . . . . . . . . . . . . . . . . . . . . . . . . 48
48. Select Product to Seed CMS dialog . . . . . . . . . . . . . . . . . . . . . . . . 48
49. Select features window, CandleNet Portal . . . . . . . . . . . . . . . . . . . . . . 50
50. Setup Type window, CandleNet Portal . . . . . . . . . . . . . . . . . . . . . . . 51
51. Define CNP Host information window, CandleNet Portal . . . . . . . . . . . . . . . . 51
© Copyright IBM Corp. 2005 vii
52. Candle Management Server Configuration window, CandleNet Portal . . . . . . . . . . . 52
53. Hub CMS Configuration window, CandleNet Portal . . . . . . . . . . . . . . . . . . 52
54. Seed CMS dialog, CandleNet Portal . . . . . . . . . . . . . . . . . . . . . . . . 53
55. Select product to seed CMS dialog, CandleNet Portal . . . . . . . . . . . . . . . . . 53
56. Seed data operation complete window, CandleNet Portal . . . . . . . . . . . . . . . . 53
57. Install Shield Wizard Complete window, CandleNet Portal . . . . . . . . . . . . . . . . 54
58. Product selection panel . . . . . . . . . . . . . . . . . . . . . . . . . . . . 55
59. Add runtime environment panel (1 of 2) . . . . . . . . . . . . . . . . . . . . . . 58
60. Add runtime environment panel (2 of 2) . . . . . . . . . . . . . . . . . . . . . . 60
61. Runtime environments panel . . . . . . . . . . . . . . . . . . . . . . . . . . 61
62. Product configuration selection panel . . . . . . . . . . . . . . . . . . . . . . . 62
63. Configure OMEGAMON II for CICS . . . . . . . . . . . . . . . . . . . . . . . . 62
64. OMEGAMON II for CICS configuration values panel . . . . . . . . . . . . . . . . . . 63
65. OMEGAMON II for CICS configuration values summary panel . . . . . . . . . . . . . . 63
66. Task history data set allocation panel . . . . . . . . . . . . . . . . . . . . . . . 64
67. Install or update CICS global data area modules . . . . . . . . . . . . . . . . . . . 65
68. Install Candle subsystem panel . . . . . . . . . . . . . . . . . . . . . . . . . 66
69. Run migration utility panel . . . . . . . . . . . . . . . . . . . . . . . . . . . 66
70. Product configuration selection menu . . . . . . . . . . . . . . . . . . . . . . . 67
71. Configure IBM TIVOLI OMEGAMON XE for CICS on Z/OS . . . . . . . . . . . . . . . 67
72. Specify configuration parameters panel . . . . . . . . . . . . . . . . . . . . . . 68
73. Specify agent address space parameters panel . . . . . . . . . . . . . . . . . . . 68
74. Communication selection panel . . . . . . . . . . . . . . . . . . . . . . . . . 69
75. Specify agent primary CMS values panel . . . . . . . . . . . . . . . . . . . . . . 69
76. Specify agent address space parameters panel . . . . . . . . . . . . . . . . . . . 70
77. Specify persistent datastore values panel . . . . . . . . . . . . . . . . . . . . . . 72
78. Persistent data store specifications panel . . . . . . . . . . . . . . . . . . . . . . 73
79. Manage Candle Services . . . . . . . . . . . . . . . . . . . . . . . . . . . . 78
80. A hub CMS and monitoring agent monitoring CICS regions on different z/OS images . . . . . . 79
81. Add runtime environment panel (1 of 2) . . . . . . . . . . . . . . . . . . . . . . 85
82. Add runtime environment panel (2 of 2) . . . . . . . . . . . . . . . . . . . . . . 87
83. Runtime environments panel . . . . . . . . . . . . . . . . . . . . . . . . . . 88
84. Product configuration selection menu . . . . . . . . . . . . . . . . . . . . . . . 89
85. Configure the CMS panel . . . . . . . . . . . . . . . . . . . . . . . . . . . . 90
86. Create LU6.2 logmode . . . . . . . . . . . . . . . . . . . . . . . . . . . . . 90
87. Specify configuration values panel . . . . . . . . . . . . . . . . . . . . . . . . 91
88. Specify CMS communication protocols panel . . . . . . . . . . . . . . . . . . . . 92
89. Specify IP.PIPE communication protocol panel . . . . . . . . . . . . . . . . . . . . 93
90. Allocate persistent datastore menu . . . . . . . . . . . . . . . . . . . . . . . . 95
91. OMEGAMON II for CICS configuration values summary panel . . . . . . . . . . . . . . 98
92. Manage Candle Services . . . . . . . . . . . . . . . . . . . . . . . . . . . 107
93. A local configuration with Candle Management Server, AAS on the same z/OS image in the
same address space . . . . . . . . . . . . . . . . . . . . . . . . . . . . . 109
94. Add runtime environment panel (1 of 2) . . . . . . . . . . . . . . . . . . . . . . 113
95. Add runtime environment panel (2 of 2) . . . . . . . . . . . . . . . . . . . . . . 115
96. Runtime environments panel . . . . . . . . . . . . . . . . . . . . . . . . . . 116
97. Product configuration selection menu . . . . . . . . . . . . . . . . . . . . . . . 117
98. Configure the Candle Management Server . . . . . . . . . . . . . . . . . . . . . 117
99. Create LU6.2 logmode panel . . . . . . . . . . . . . . . . . . . . . . . . . . 118
100. Specify configuration values panel . . . . . . . . . . . . . . . . . . . . . . . . 118
101. Specify CMS communication protocols . . . . . . . . . . . . . . . . . . . . . . 119
102. Specify IP.PIPE communication protocol . . . . . . . . . . . . . . . . . . . . . . 120
103. Specify IP communication protocol panel . . . . . . . . . . . . . . . . . . . . . 121
104. Specify SNA communication protocol panel . . . . . . . . . . . . . . . . . . . . 121
105. Allocate persistent datastore menu . . . . . . . . . . . . . . . . . . . . . . . . 122
106. Product component selection menu . . . . . . . . . . . . . . . . . . . . . . . 127
viii Configuring IBM Tivoli OMEGAMON XE for CICS on z/OS
107. Configure IBM TIVOLI OMEGAMON XE For CICS on Z/OS . . . . . . . . . . . . . . 128
108. Manage Candle Services . . . . . . . . . . . . . . . . . . . . . . . . . . . 131
109. Select Features window, CandleNet Portal . . . . . . . . . . . . . . . . . . . . . 137
110. Setup Type window, CandleNet Portal . . . . . . . . . . . . . . . . . . . . . . 137
111. CNPS Data Source Config Parameters dialog . . . . . . . . . . . . . . . . . . . . 138
112. CNP Server Configuration dialog . . . . . . . . . . . . . . . . . . . . . . . . 138
113. CNP Server Configuration dialog . . . . . . . . . . . . . . . . . . . . . . . . 139
114. Install Shield wizard - Select features . . . . . . . . . . . . . . . . . . . . . . . 140
115. Install Shield wizard- Setup Type . . . . . . . . . . . . . . . . . . . . . . . . 141
116. Install Shield wizard- Define CNP Host information . . . . . . . . . . . . . . . . . . 141
117. Install Shield wizard- complete . . . . . . . . . . . . . . . . . . . . . . . . . 142
118. Manage Candle services . . . . . . . . . . . . . . . . . . . . . . . . . . . 142
119. Removing programs dialog . . . . . . . . . . . . . . . . . . . . . . . . . . . 143
120. Enter User ID and Password . . . . . . . . . . . . . . . . . . . . . . . . . . 144
121. History collection configuration showing the status selected . . . . . . . . . . . . . . . 149
122. History data collection configuration with dispatcher summary selected . . . . . . . . . . 150
123. Online data viewing workspace . . . . . . . . . . . . . . . . . . . . . . . . . 151
124. Query editor showing the use if the “Return a subset of the string” function . . . . . . . . . 152
125. Query editor advanced options . . . . . . . . . . . . . . . . . . . . . . . . . 153
126. OMEGAMON II CUA interface showing export region profile panel . . . . . . . . . . . . 155
127. Select product to seed window . . . . . . . . . . . . . . . . . . . . . . . . . 157
128. Candle Management Workstation main container . . . . . . . . . . . . . . . . . . 159
129. Candle Management Workstation Reports folder . . . . . . . . . . . . . . . . . . . 159
130. Online Data Viewing workspace . . . . . . . . . . . . . . . . . . . . . . . . . 160
131. Service level analysis workspace . . . . . . . . . . . . . . . . . . . . . . . . 161
Figures ix

x Configuring IBM Tivoli OMEGAMON XE for CICS on z/OS
Tables
1. Setting up the Configuration Tool . . . . . . . . . . . . . . . . . . . . . . . . . 1
2. Summary of the RTE used in this configuration . . . . . . . . . . . . . . . . . . . . 8
3. Before you start this configuration . . . . . . . . . . . . . . . . . . . . . . . . 42
4. Summary of the RTE used in this configuration . . . . . . . . . . . . . . . . . . . . 55
5. Summary of the three RTEs used in this configuration . . . . . . . . . . . . . . . . . 80
6. Summary of the RTE used in this configuration . . . . . . . . . . . . . . . . . . . 110
7. Advanced Features Available in the Configuration tool . . . . . . . . . . . . . . . . . 163
8. System Variable Values . . . . . . . . . . . . . . . . . . . . . . . . . . . . 163
9. Add Runtime Environment Values . . . . . . . . . . . . . . . . . . . . . . . . 164
10. RTE Transport Methods . . . . . . . . . . . . . . . . . . . . . . . . . . . . 166
11. Trademarks . . . . . . . . . . . . . . . . . . . . . . . . . . . . . . . . 178
© Copyright IBM Corp. 2005 xi

xii Configuring IBM Tivoli OMEGAMON XE for CICS on z/OS
Preface
IBM® Tivoli® OMEGAMON® Extended Edition (XE) for CICS® on z/OS is a remote
monitoring agent that resides on z/OS® managed systems. It assists you in
anticipating trouble and warns you when critical events take place on your systems.
With IBM Tivoli OMEGAMON XE for CICS on z/OS, you can set threshold levels
and flags as desired to alert you when the system reaches these thresholds.
Using IBM Tivoli OMEGAMON XE for CICS on z/OS provides an overview of the
CandleNet Portal®, a description of a number of user scenarios, and a complete
reference section. The reference section includes all the attributes, situations,
workspaces, and messages for this product.
Who should read this guide
The primary audience for this book is the z/OS systems programmer or analyst who
is responsible for ensuring CICS availability. This person’s responsibilities include:
v Planning for and overseeing product installation
v Troubleshooting system and performance problems
v Analyzing performance data for problem determination
v Providing historical performance data for trend analysis
Users of this book should be familiar with the following topics:
v The z/OS operating system and its associated concepts
v CICS Transaction Server
v Database administration concepts
v Performance monitoring concepts
Transition from Candle to IBM
IBM recently acquired Candle® Corporation. The transition of Candle ordering and
service processes is complete. As you will see in this publication, this release is
part of a transition phase of this acquisition. Many changes have been made to this
product and its publications to deliver it as an IBM product.
You will notice that much of the Candle terminology and component names used to
describe the OMEGAMON products remain unchanged. However, in some cases,
the product release number has been modified. For example, the version of
CandleNet Portal required by this release is version 196. Publications that have
been modified, such as IBM Tivoli OMEGAMON Platform: Installing and Setting up
OMEGAMON Platform and CandleNet Portal on Windows and UNIX include the
new version 196 release number on the cover. Publications that have not been
modified, such as IBM Tivoli OMEGAMON Platform: Administering OMEGAMON
Products: CandleNet Portal Version 195 and IBM Tivoli OMEGAMON Platform:
Using OMEGAMON Products: CandleNet Portal Version 195 continue to carry the
previous version 195 release number. Note that the information provided in these
books is still valid for version 196. For a definitive list of the OMEGAMON platform
books used with this product release, see “OMEGAMON XE platform publications”
on page xviii.
Candle products have new IBM names, and during this transition period, some
publications use the old names while others use the new names. For example,
© Copyright IBM Corp. 2005 xiii
CandleNet Portal might be referred to by the new name Tivoli Management Portal.
For a mapping of previous Candle names and new IBM names, refer to
http://www-306.ibm.com/software/tivoli/products/product-matrix.html#candle
If you are an IBM customer new to Candle products, you should know that
OMEGAMON is an established name in the systems management environment with
a long and respected history. In discussions of OMEGAMON, you might see or hear
these terms:
v OMEGAMON Classic refers to the original 3270-based products that have
evolved since the 1970s. This is also known as the ″Menu system″ and the
″Common Interface″.
v OMEGAMON II is an implementation of the IBM Common User Access® (CUA®)
interface of the late 1980s. This generation of OMEGAMON products collects
information from one or more monitored systems and displays it on a single
3270-based, CUA-compliant mainframe screen.
v OMEGAMON XE, the Extended Edition, is the current OMEGAMON family of
products, used for monitoring most operating systems, subsystems, applications,
storage, and networks, through the use of a Java-based graphical interface. This
interface also gives you workflow policies to define and run complex automation
scenarios and lets you combine data from different agents in a single workspace.
v IBM Tivoli OMEGAMON Desktop Edition (DE) on z/OS is a package of
components that provide an integrated view of your mainframe enterprise and the
power to take corrective action when problems threaten system and application
availability. The components in the package include OMEGAVIEW and
OMEGAVIEW II® for the Enterprise.
This book is an introduction to the OMEGAMON XE zSeries products in general,
and to the IBM Tivoli OMEGAMON XE for CICS on z/OS product in particular.
What’s new in this release
With this release, IBM Tivoli OMEGAMON XE for CICS on z/OS acquires a lot of
the new data using the EXEC CICS INQUIRE or CEMT INQUIRE commands. This
applies to the following workspaces:
v Dispatcher Summary, Dispatcher Task Control Block (TCB) Mode, and Dispatcher
TCB Pool.
v Dump Details.
v Java™ Program Analysis.
v JVM Analysis, JVM Classcache Analysis, JVM Pool Statistics, and JVM Profile
Statistics.
v MVS™ TCB Summary and MVS TCB Details.
v Pagepool Summary and Pagepool Details.
v TCP/IP Service Statistics and TCP/IP Statistics.
This release supersedes OMEGAMON XE for CICSplex version 220.
Detailed task and transaction information now provided.
A wide range of statistics are now accessible from the Transaction Analysis
workspace. This allows you to examine in detail, each task that is running in
your CICS regions. For example, you can now select a task and find how
its elapsed time is distributed between CPU use and waiting for resources.
You can also examine the details of transaction and program definitions and
determine those areas that need modification.
xiv Configuring IBM Tivoli OMEGAMON XE for CICS on z/OS

Dispatcher and Transaction manager.
With the increase in the number of Task Control Blocks (TCB) that CICS is
using. These statistics enable you to determine the level of activity within
those blocks.
Comprehensive file statistics.
From the File Control Analysis workspace, you can now access information
about the various file types, for example, Journals, Logs, and Data Tables.
New workspaces have been included to show further details and statistics
related to file control.
Dump details
Dump details have been grouped to separate system and transaction
dumps.
Pagepool and subpool details.
The Pagepool details and summary workspaces describe the use that CICS
is making of virtual storage. This information includes details of each DSA
usage, free storage, high-water marks, largest free area, the number of
storage violations, and SOS occurrences. Many of these figures are
provided in bytes, kilobytes (KB) and megabytes (MB). As with all the table
views, you can customize the tables to move and remove columns to
provide a unique table view.
Java Programs.
This supplies all the data available about the Java programs in use in your
CICS regions. The JVM analysis workspace includes data about the age
since the JVM was initialized, the reusability and the phasing out status of
the JVM. There are three other workspaces that give details of the
classcache, the JVM pool and profiles for each of your CICS regions.
TCP/IP reporting.
Both TCP/IP Service Statistics and TCP/IP have been added for you to
monitor those connections. These have become more critical for businesses
with their increasing reliance on web sites.
Service Task details
Although this does not provide any information about CICS, it supplies
usedul diagnostics to understand why those workspaces that collect their
data through the EXEC CICS and CEMT INQUIRE commands may have
failed. From this workspace you can determine whether the OMEG INIT
transaction has started not. If it has not started those attribute groups will
not collect any data.
Expanded Temporary Storage data
From the navigation tree you can access details about main, auxiliary and
shared Temporary Storage.
AID and ICE workspaces
Both the Automatic Initiate Descriptor (AID) and the Interval Control
Element (ICE) workspaces have been added to the XE version. From the
Take Action panel it is possible to purge an AID or an ICE.
On-line data viewing.
This collects task historical data and can be used to analyze the transaction
response time.
CEKL FORCE/FORCEPURGE
From the Take Action interface you can use CEKL FORCE/FORCEPURGE
to remove a task.
Preface xv
Information delivery
The information for Tivoli OMEGAMON XE for CICS on z/OS is provided in
two formats: HTML and PDF. It is delivered as an information center that
contains links to both the HTML and the PDFs through a navigation tree.
The information center uses the IBM Eclipse Help System. This allows you
to add your unique groups of product documentation as they become
available in this format.
The latest documentation is available at the following web site:
With this product you will receive a publications CD that you can use
directly or copy the files to your hard drive.
All publications for this and all other Tivoli products are updated on the
Tivoli software information center Web site. Access the Tivoli software
information center by first going to the Tivoli software library at the following
Web address:
http://publib.boulder.ibm.com/tividd/td/tdprodlist.html
Scroll down and click the Product manuals link to access the Tivoli software
information center.
Publications
This section lists publications in the IBM Tivoli OMEGAMON XE for CICS on z/OS
product, the Tivoli OMEGAMON II for CICS on z/OS component, and the
OMEGAMON XE platform libraries. It also describes how to access Tivoli
publications online and how to order publications.
IBM Tivoli OMEGAMON XE for CICS on z/OS library
The following publications are included in the IBM Tivoli OMEGAMON XE for CICS
on z/OS library:
v IBM Tivoli OMEGAMON XE for CICS on z/OS: Getting Started, GC32-9422-00
Provides planning information for installing IBM Tivoli OMEGAMON XE for CICS
on z/OS and information about the OMEGAMON XE zSeries products.
v Configuring IBM Tivoli OMEGAMON XE for CICS on z/OS, SC32-9423-00 (this
book)
Documents the installation and configuration tasks necessary for the
implementation of IBM Tivoli OMEGAMON XE for CICS on z/OS. This document
is written for system administrators and others who are responsible for installing
and configuring IBM Tivoli OMEGAMON XE for CICS on z/OS.
v Using IBM Tivoli OMEGAMON XE for CICS on z/OS, SC32-9424-00
Introduces the features, workspaces, attributes, and predefined situations for the
IBM Tivoli OMEGAMON XE for CICS on z/OS product and supplements the user
assistance provided with this product. This document is written for system
operators.
v IBM Tivoli OMEGAMON XE for CICS on z/OS: Release Notes, GI11-4086-00
Contains information about the Tivoli OMEGAMON XE for CICS on z/OS platform
version 360 as well as information about the IBM Tivoli OMEGAMON XE for
CICS on z/OS product’s issues, limitation and workarounds. There is also an
http://publib.boulder.ibm.com/infocenter/tiv3help/index.jsp?toc=/com.ibm.omegamon.cics.doc/toc.xml
xvi Configuring IBM Tivoli OMEGAMON XE for CICS on z/OS
information map between new and old locations for information from previous
versions of the product library and between old product names and new product
names.
v IBM Tivoli OMEGAMON XE Platform: Candle Messages Manual Volume 1
(AOP-ETX), SC32-9216
IBM Tivoli OMEGAMON XE Platform: Candle Messages Manual Volume 2
(EU-KLVGM), SC32-9217
IBM Tivoli OMEGAMON XE Platform: Candle Messages Manual Volume 3
(KLVHS-KONCT), SC32-9218
IBM Tivoli OMEGAMON XE Platform: Candle Messages Manual Volume 4
(KONCV-OC), SC32-9219
IBM Tivoli OMEGAMON XE Platform: Candle Messages Manual Volume 5
(ODC-VEB and Appendixes), SC32-9220
These books contain the messages for most IBM Tivoli Candle products
organized alphabetically by prefix.
Tivoli OMEGAMON II for CICS on z/OS library
The following publications are in the Tivoli OMEGAMON II for CICS on z/OS library:
v IBM Tivoli OMEGAMON II for CICS Configuration and Customization Guide,
GC32-9242
Documents the configuration and customization tasks necessary for the
implementation of the Tivoli OMEGAMON II for CICS on z/OS product. This
document is written for system administrators and others who are responsible for
installing and configuring Tivoli OMEGAMON II for CICS on z/OS.
v IBM Tivoli OMEGAMON II for CICS User’s Guide, GC32-9249-00
Provides information about using the Tivoli OMEGAMON II for CICS on z/OS
Common User Access CUA interface to monitor your CICS system. The
document is written for personnel who are responsible for monitoring CICS
performance, system programmers, and performance analysts, and application
programmers who wish to monitor their programs.
v IBM Tivoli OMEGAMON II for CICS Reference Vol 1, GC32-9246
You should use this book in conjunction with volume 2 if you need to understand
how to use the CUA interface and menu system of Tivoli OMEGAMON II for
CICS on z/OS to access the data you need to analyze CICS performance
problems, create profiles, and define groups for monitoring purpose. Volume 1
provides information about the CUA interface.
v IBM Tivoli OMEGAMON II for CICS Reference Vol 2, GC32-9247
You should use this book if you need to understand how to use the CUA
interface and menu system of Tivoli OMEGAMON II for CICS on z/OS to access
the data you need to analyze CICS performance problems, create profiles, and
define groups for monitoring purpose. Volume 2 provides information about the
menu system interface.
v IBM Tivoli OMEGAMON II for CICS History Reporting Guide, GC32-9243
This book discusses the Tivoli OMEGAMON II for CICS on z/OS historical
reporting feature and describes the numerous reports that you can obtain. It
explains how to produce reports and provides examples, such as Response time
reports, transaction reports, terminal reports, User ID reports, file reports,
database reports, program reports, and system reports. It covers the use of SAS
historical reporting, user-defined exits, an internal macros and programs.
v IBM Tivoli End-to-End Response Time Feature Version 550: Reference Manual,
SC32-9376-00
Preface xvii

Provides a description of ETE™, an explanation of how to start ETE after
installation and customization have been completed, and a description of each
ETE command argument.
OMEGAMON XE platform publications
To use the information for the IBM Tivoli OMEGAMON XE for CICS on z/OS
product effectively, you must have some prerequisite knowledge about the
OMEGAMON XE platform and the CandleNet Portal interface, which you can obtain
from the following guides:
v IBM Tivoli OMEGAMON Platform: Installing and Setting up OMEGAMON
Platform and CandleNet Portal on Windows and UNIX, SC32-1768
Provides information on installing and setting up the component products of the
OMEGAMON Platform: Candle Management Server, CandleNet Portal, Candle
Management Workstation® (CMW), Warehouse Proxy, Candle Data Warehouse,
Alert Adapter for AF/REMOTE®, Alert Adapter for Tivoli Enterprise Console®, and
Alert Emitter for Tivoli Enterprise Console on Windows® and UNIX®.
v IBM Tivoli OMEGAMON Platform: Configuring Candle Management Server on
z/OS, GC32-9414
Describes how to configure and customize the Candle Management Server on
z/OS. The book also contains platform planning information and information
about setting up security on your Candle Management Server.
v IBM Tivoli OMEGAMON Platform: Historical Data Collection Guide for
OMEGAMON XE Products, Versions 360 and 195, GC32-9182
Describes the process of collecting historical data and either warehousing it or
converting it to delimited flat files for reporting purposes. It also describes how to
configure historical data collection and warehousing intervals using the
CandleNet Portal.
v IBM Tivoli OMEGAMON Platform: Administering OMEGAMON Products:
CandleNet Portal Version 195, GC32-9180
Describes how to perform administrative tasks associated with the CandleNet
Portal.
v IBM Tivoli OMEGAMON Platform: Using OMEGAMON Products: CandleNet
Portal Version 195, GC32-9182
Describes how to use the CandleNet Portal interface. It includes a tutorial about
monitoring that covers workspaces, navigation, views, and responding to alerts.
Different types of views and situations for event-based monitoring are also
included, as well as information on automation policies.
CICS publications
The following books from the CICS Transaction Server library have been used
extensively in the preparation of this documentation:
v IBM CICS Transaction Server: Problem Determination Guide
v IBM CICS Transaction Server: Performance Guide
v IBM CICS Transaction Server: System Programming Reference
v IBM CICS Transaction Server: CICS-Supplied Transactions
v IBM CICS Transaction Server: System Definition Guide
Use the books from the above list that relate to the release of CICS that you are
planning to monitor.
The CICS TS 3.1 Information Center is accessible from
http://publib.boulder.ibm.com/infocenter/cicsts31/index.jsp.
xviii Configuring IBM Tivoli OMEGAMON XE for CICS on z/OS

Related publications
The Tivoli Software Glossary includes definitions for many of the technical terms
related to Tivoli software. The Tivoli Software Glossary is available at the following
Tivoli software library Web site:
http://publib.boulder.ibm.com/tividd/td/tdprodlist.html
Access the glossary by clicking the Glossary link on the left pane of the Tivoli
software library window.
Accessing publications online
The documentation CD contains the publications that are in the product library. The
format of the publications is PDF or PDF and HTML. Refer to the readme file on the
CD for instructions on how to access the documentation.
IBM posts publications for this and all other Tivoli products, as they become
available and whenever they are updated, to the Tivoli software information center
Web site at the following Web address:
http://publib.boulder.ibm.com/tividd/td/tdprodlist.html
Note: If you print PDF documents on other than letter-sized paper, set the option in
the File > Print window that allows Adobe Reader to print letter-sized pages
on your local paper.
Accessing publications online
The documentation CD contains the publications that are in the product library. The
format of the publications is PDF and HTML.
IBM posts publications for this and all other Tivoli products, as they become
available and whenever they are updated, to the Tivoli software information center
Web site. Access the Tivoli software information center at the following Web
address:
http://publib.boulder.ibm.com/tividd/td/tdprodlist.html
Note: If you print PDF documents on other than letter-sized paper, set the option in
the File > Print window that allows Adobe Reader to print letter-sized pages
on your local paper.
Ordering publications
You can order many Tivoli publications online. If publications have been made
available for hardcopy, they can be ordered through the IBM Publications Center at
the following Web site:
http://www.elink.ibmlink.ibm.com/public/applications/publications/cgibin/pbi.cgi
You can also order by telephone by calling one of these numbers:
v In the United States: 800-879-2755
v In Canada: 800-426-4968
In other countries, contact your software account representative to order Tivoli
publications.
Preface xix

Tivoli technical training
For Tivoli technical training information, refer to the following IBM Tivoli Education
Web site:
http://www.ibm.com/software/tivoli/education
Support information
If you have a problem with your IBM software, you want to resolve it quickly. IBM
provides the following ways for you to obtain the support you need:
v Searching knowledge bases: You can search across a large collection of known
problems and workarounds, Technotes, and other information.
v Obtaining fixes: You can locate the latest fixes that are already available for your
product.
v Contacting IBM Software Support: If you still cannot solve your problem, and you
need to work with someone from IBM, you can use a variety of ways to contact
IBM Software Support.
Conventions used in this guide
This guide uses several conventions for special terms and actions and for operating
system-dependent commands and paths.
Typeface conventions
This guide uses the following typeface conventions:
Bold
v Lowercase commands and mixed case commands that are otherwise
difficult to distinguish from surrounding text
v Interface controls (check boxes, push buttons, radio buttons, spin
buttons, fields, folders, icons, list boxes, items inside list boxes,
multicolumn lists, containers, menu choices, menu names, tabs, property
sheets), labels (such as Tip:, and Operating system considerations:)
v Keywords and parameters in text
Italic
v Words defined in text
v Emphasis of words (words as words)
v New terms in text (except in a definition list)
v Variables and values you must provide
Monospace
v Examples and code examples
v File names, programming keywords, and other elements that are difficult
to distinguish from surrounding text
v Message text and prompts addressed to the user
v Text that the user must type
v Values for arguments or command options
Operating system-dependent variables and paths
This guide uses the UNIX convention for specifying environment variables and for
directory notation.
xx Configuring IBM Tivoli OMEGAMON XE for CICS on z/OS

When using the Windows command line, replace $variable with %variable% for
environment variables and replace each forward slash (/) with a backslash (\) in
directory paths. The names of environment variables are not always the same in
Windows and UNIX. For example, %TEMP% in Windows is equivalent to $tmp in
UNIX.
Note: If you are using the bash shell on a Windows system, you can use the UNIX
conventions.
Terminology
For a list of terms and definitions for Tivoli and other IBM products, refer to the IBM
terminology Web site:
http://www.ibm.com/ibm/terminology/
Preface xxi

xxii Configuring IBM Tivoli OMEGAMON XE for CICS on z/OS
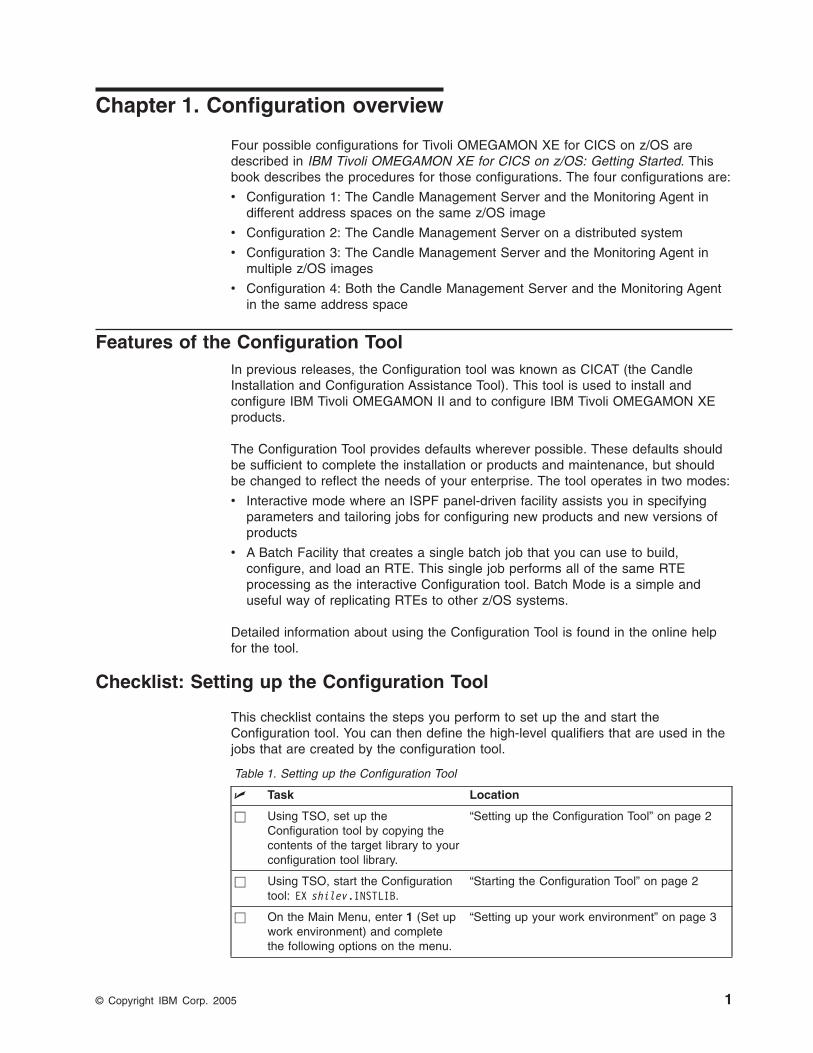
Chapter 1. Configuration overview
Four possible configurations for Tivoli OMEGAMON XE for CICS on z/OS are
described in IBM Tivoli OMEGAMON XE for CICS on z/OS: Getting Started. This
book describes the procedures for those configurations. The four configurations are:
v Configuration 1: The Candle Management Server and the Monitoring Agent in
different address spaces on the same z/OS image
v Configuration 2: The Candle Management Server on a distributed system
v Configuration 3: The Candle Management Server and the Monitoring Agent in
multiple z/OS images
v Configuration 4: Both the Candle Management Server and the Monitoring Agent
in the same address space
Features of the Configuration Tool
In previous releases, the Configuration tool was known as CICAT (the Candle
Installation and Configuration Assistance Tool). This tool is used to install and
configure IBM Tivoli OMEGAMON II and to configure IBM Tivoli OMEGAMON XE
products.
The Configuration Tool provides defaults wherever possible. These defaults should
be sufficient to complete the installation or products and maintenance, but should
be changed to reflect the needs of your enterprise. The tool operates in two modes:
v Interactive mode where an ISPF panel-driven facility assists you in specifying
parameters and tailoring jobs for configuring new products and new versions of
products
v A Batch Facility that creates a single batch job that you can use to build,
configure, and load an RTE. This single job performs all of the same RTE
processing as the interactive Configuration tool. Batch Mode is a simple and
useful way of replicating RTEs to other z/OS systems.
Detailed information about using the Configuration Tool is found in the online help
for the tool.
Checklist: Setting up the Configuration Tool
This checklist contains the steps you perform to set up the and start the
Configuration tool. You can then define the high-level qualifiers that are used in the
jobs that are created by the configuration tool.
Table 1. Setting up the Configuration Tool
U Task Location
h Using TSO, set up the
Configuration tool by copying the
contents of the target library to your
configuration tool library.
“Setting up the Configuration Tool” on page 2
h Using TSO, start the Configuration
tool: EX shilev.INSTLIB.
“Starting the Configuration Tool” on page 2
h On the Main Menu, enter 1 (Set up
work environment) and complete
the following options on the menu.
“Setting up your work environment” on page 3
© Copyright IBM Corp. 2005 1
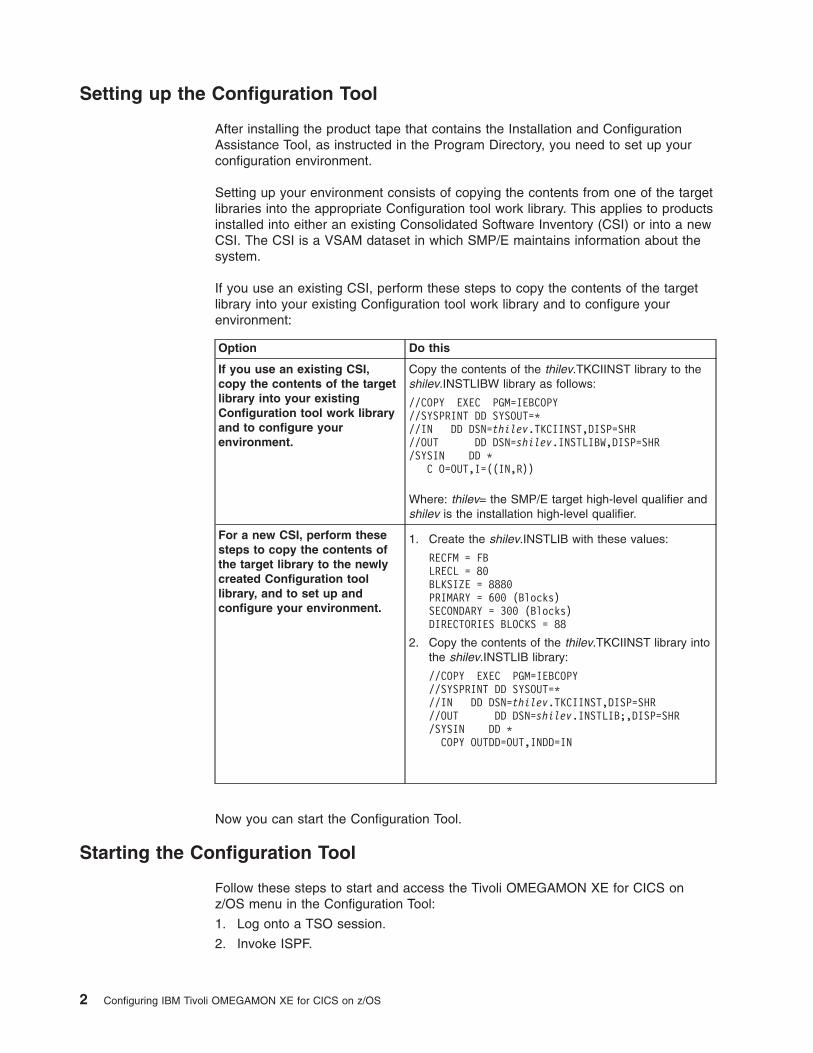
Setting up the Configuration Tool
After installing the product tape that contains the Installation and Configuration
Assistance Tool, as instructed in the Program Directory, you need to set up your
configuration environment.
Setting up your environment consists of copying the contents from one of the target
libraries into the appropriate Configuration tool work library. This applies to products
installed into either an existing Consolidated Software Inventory (CSI) or into a new
CSI. The CSI is a VSAM dataset in which SMP/E maintains information about the
system.
If you use an existing CSI, perform these steps to copy the contents of the target
library into your existing Configuration tool work library and to configure your
environment:
Option Do this
If you use an existing CSI,
copy the contents of the target
library into your existing
Configuration tool work library
and to configure your
environment.
Copy the contents of the thilev.TKCIINST library to the
shilev.INSTLIBW library as follows:
//COPY EXEC PGM=IEBCOPY
//SYSPRINT DD SYSOUT=*
//IN DD DSN=thilev.TKCIINST,DISP=SHR
//OUT DD DSN=shilev.INSTLIBW,DISP=SHR
/SYSIN DD *
C O=OUT,I=((IN,R))
Where: thilev= the SMP/E target high-level qualifier and
shilev is the installation high-level qualifier.
For a new CSI, perform these
steps to copy the contents of
the target library to the newly
created Configuration tool
library, and to set up and
configure your environment.
1. Create the shilev.INSTLIB with these values:
RECFM = FB
LRECL = 80
BLKSIZE = 8880
PRIMARY = 600 (Blocks)
SECONDARY = 300 (Blocks)
DIRECTORIES BLOCKS = 88
2. Copy the contents of the thilev.TKCIINST library into
the shilev.INSTLIB library:
//COPY EXEC PGM=IEBCOPY
//SYSPRINT DD SYSOUT=*
//IN DD DSN=thilev.TKCIINST,DISP=SHR
//OUT DD DSN=shilev.INSTLIB;,DISP=SHR
/SYSIN DD *
COPY OUTDD=OUT,INDD=IN
Now you can start the Configuration Tool.
Starting the Configuration Tool
Follow these steps to start and access the Tivoli OMEGAMON XE for CICS on
z/OS menu in the Configuration Tool:
1. Log onto a TSO session.
2. Invoke ISPF.
2 Configuring IBM Tivoli OMEGAMON XE for CICS on z/OS

3. Go to a TSO command line. (In most cases, this is option 6 on the ISPF
Primary Option Menu.)
4. Enter the following command: EX ’shilev.INSTLIB’ where shilev is the
high-level qualifier you specified for the Configuration Tool.
This displays the main menu of the Configuration Tool that looks like this:
If this is the first time that you have set up an RTE you need to set up your work
environment before proceeding to configure your products.
Setting up your work environment
Perform these steps to set up your work environment:
1. From the Main Menu, enter 1 (Set up work environment) and complete the
following options on the menu. This displays the Set Up Work Environment
menu that has two options.
a. Select Specify options to specify allocation and processing values that will
be used to create the work datasets that are needed by the Configuration
tool. This provides operational values for generating batch jobs.
b. Select Allocate work libraries to allocate the Configuration tool work
libraries. The initial library, INSTLIB, contains both the operational code and
the tables and jobs created by the installer. This job creates additional
libraries and populates them with the data initially stored in INSTLIB.
2. From the Set Up Work Environment menu, enter 1 (Specify Options) When
you have entered the relevant information, press Enter and this returns you to
the Set Up Work Environment menu.
SMP/E JCL REGION value
SMP/E batch jobs contain the REGION= parameter on the EXEC
statement The value of this parameter is taken from the CIGSMREG
variable. Change this value as required by your installation. The default
is OM.
---------------------------------- MAIN MENU ----------------------------------
OPTION ===>
Enter the number to select an option:
1 Set up work environment
2 Install products or maintenance
3 Configure products
I Installation information <=== Revised
S Services and utilities
Installation and Configuration Assistance Tool Version 310.01
(C) Copyright IBM Corp. 1992-2004
Licensed Material - Program Property of IBM
F1=Help F3=Back
Figure 1. Main menu of the Configuration Tool
Chapter 1. Configuration overview 3

Installation work datasets
Unit Specify the unit name to be used when allocating the SMP/E
datasets. If the SMP/E datasets are not to be SMS-managed,
this field is required. If your installation does not use the unit
name or if it is optional, you can leave this field blank.
Volser Specify the volume serial numbers to be used when allocating
the SMP/E datasets. If the SMP/E datasets are not to be
SMS-managed, this field is required. If your installation does not
use the volume serial number or if it is optional, you can leave
this field blank.
Storclas
If the SMP/E datasets are to be SMS-managed, specify the
SMS storage class to be used for allocation. If your installation
does not use the SMS Storclas parameter, or if it is optional,
leave this field blank.
Mgmtclas
If the SMP/E datasets are to be SMS-managed, specify the
SMS management class to be used for allocation. If your
installation does not use the SMS Storclas parameter, or if it is
optional, leave this field blank.
PDSE If the SMP/E datasets are to be SMS-managed, you can specify
Y to allocate PDSE datasets instead of standard PDS datasets.
It is recommended to use PDSE.
Job statement
Enter the standard jobcard that will be used for each of the batch jobs
that the Installation tool builds. This jobcard information is saved in the
PROFILE pool for each user.
------------------------------- SPECIFY OPTIONS -------------------------------
COMMAND ===>
Specify allocation and processing options:
SMP/E JCL REGION value ==> 0M (Specify K/M suffix)
Unit/ Storclas/
VolSer Mgmtclas PDSE
Installation work datasets ................ 3390 N
name
Specify the job statement for Installer-generated JCL:
==> //useridA JOB (ACCT),’NAME’,CLASS=A
==> //* DEFAULT JCL
==> //*
==> //*
Enter=Next F1=Help F3=Back
Figure 2. Specify options panel
4 Configuring IBM Tivoli OMEGAMON XE for CICS on z/OS
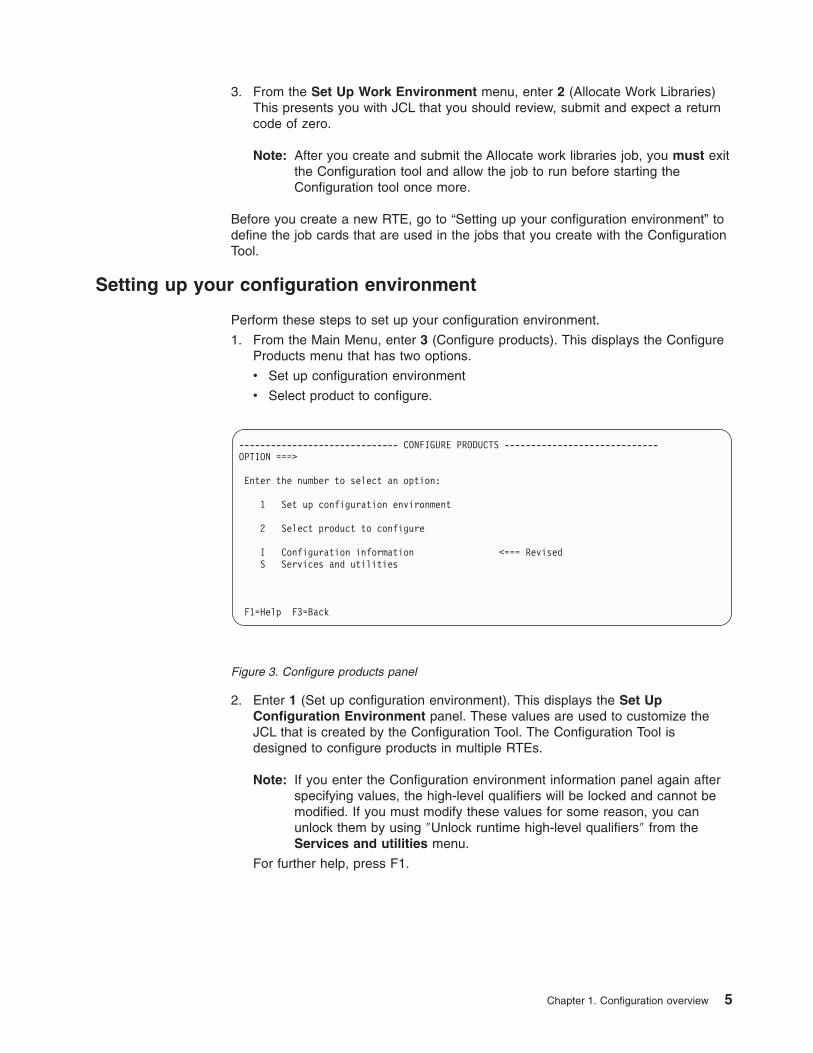
3. From the Set Up Work Environment menu, enter 2 (Allocate Work Libraries)
This presents you with JCL that you should review, submit and expect a return
code of zero.
Note: After you create and submit the Allocate work libraries job, you must exit
the Configuration tool and allow the job to run before starting the
Configuration tool once more.
Before you create a new RTE, go to “Setting up your configuration environment” to
define the job cards that are used in the jobs that you create with the Configuration
Tool.
Setting up your configuration environment
Perform these steps to set up your configuration environment.
1. From the Main Menu, enter 3 (Configure products). This displays the Configure
Products menu that has two options.
v Set up configuration environment
v Select product to configure.
2. Enter 1 (Set up configuration environment). This displays the Set Up
Configuration Environment panel. These values are used to customize the
JCL that is created by the Configuration Tool. The Configuration Tool is
designed to configure products in multiple RTEs.
Note: If you enter the Configuration environment information panel again after
specifying values, the high-level qualifiers will be locked and cannot be
modified. If you must modify these values for some reason, you can
unlock them by using ″Unlock runtime high-level qualifiers″ from the
Services and utilities menu.
For further help, press F1.
------------------------------ CONFIGURE PRODUCTS -----------------------------
OPTION ===>
Enter the number to select an option:
1 Set up configuration environment
2 Select product to configure
I Configuration information <=== Revised
S Services and utilities
F1=Help F3=Back
Figure 3. Configure products panel
Chapter 1. Configuration overview 5

where hilev is the name of your high-level qualifier, for example,
OMEGAMON.C5310.
Note: You should not use the same high-level qualifier as that used in your
SMPE libraries.
You should select one of the next four major topics. Each topic describes the
procedures that you should follow to setup a particular configuration as listed in
Chapter 1, “Configuration overview,” on page 1. They are also described more fully
in IBM Tivoli OMEGAMON XE for CICS on z/OS: Getting Started. Now go to your
selected configuration:
v Chapter 2, “Configuring Tivoli OMEGAMON XE for CICS on z/OS in a single
z/OS image,” on page 7.
v Chapter 3, “Configuring a local Candle Management Server on a distributed
system,” on page 41.
v Chapter 4, “Configuring Tivoli OMEGAMON XE for CICS on z/OS in multiple
z/OS images,” on page 79.
v Chapter 5, “Configuring Candle Management Server and Monitoring Agent in the
same address space,” on page 109.
----------------------- SET UP CONFIGURATION ENVIRONMENT ----------------------
COMMAND ===>
*** High-level qualifiers are locked.
RTE allocation routine ==> IKJEFT01 (IKJEFT01/IEFBR14)
Runtime Unit/ Storclas/
Datasets hilev VolSer Mgmtclas PDSE
VSAM hilev 3390 NONSMS
name
Non-VSAM hilev 3390 NONSMS N
name
Work ................................ 3390
SMP/E
Datasets High-Level Qualifier
Target hilev
Enter=Next F1=Help F3=Back
. . . . . . . . . . . . . . . . . . . . . . . . . . .
Figure 4. Set up the configuration tool panel
6 Configuring IBM Tivoli OMEGAMON XE for CICS on z/OS

Chapter 2. Configuring Tivoli OMEGAMON XE for CICS on
z/OS in a single z/OS image
This procedure describes the steps that you need to follow to configure Tivoli
OMEGAMON XE for CICS on z/OS when you have the Candle Management Server
and Monitoring Agent in different address spaces on the same z/OS image as
shown in Figure 5. This procedure assumes that you have already set up the work
and configuration of the configuration tool as described in “Checklist: Setting up the
Configuration Tool” on page 1.
Step 1 - Configure a runtime environment
This involves:
1. “Introduction to runtime environments in single z/OS image” on page 8
2. “Adding a new runtime environment” on page 8
a. “Specifying values on the add runtime environment panels” on page
113. “Building runtime libraries” on page 14
Step 2 - Configure the hub Candle Management Server.
This involves:
1. “Configuring a hub Candle Management Server” on page 14
2. Configuring a persistent data store. This is optional depending whether
you want to collect historical system data at the Candle Management
Server.
Step 3 - Configure OMEGAMON II for CICS.
This involves:
1. “Configuring Tivoli OMEGAMON II for CICS” on page 23
2. “Allocating task history data sets” on page 25
Step 4 - Configure Tivoli OMEGAMON XE for CICS on z/OS.
This involves:
1. “Configuring Tivoli OMEGAMON XE for CICS on z/OS” on page 28
2. Configuring a persistent data store. This is optional depending whether
you want to collect historical system data at the Monitoring Agent.
CandleNet Portal CandleNetPortal Server
Windows Client z/OS image
CandleManagement
Server
MonitoringAgent
Persistentdatastore
Persistentdatastore
Client
Browser
CICSregion A
CICSregion B
CICSregion C
Optional
Figure 5. A local configuration with Candle Management Server, agent on the same z/OS
image as the CICS regions
© Copyright IBM Corp. 2005 7

3. Configure the monitoring agent in its own z/OS image so that it refers to
the hub Candle Management Server. Again, configuring the persistent
data store is optional.
Step 5 - Loading the Libraries, modifying the CICS started job and completing
the configuration
This involves:
1. “Loading runtime libraries” on page 35.
2. “Completing the configuration” on page 36
3. “Modifying the CICS startup JCL” on page 37
Step 6 - Installing and configuring CandleNet Portal Server and CandleNet
Portal Configure the CandleNet Portal Server and CandleNet Portal on your
workstation.
To do this see Chapter 6, “Installing CandleNet Portal server and client on
Windows XP,” on page 133.
Introduction to runtime environments in single z/OS image
In this configuration you only need to create one runtime environment as shown in
Table 2.
Table 2. Summary of the RTE used in this configuration
Access to run-time
libraries
Candle Management Server with or
without persistent data stores
Monitoring Agent
with or without
persistent data
stores
Hub Remote
RTE 1 U U - U
A runtime environment provides access to the OMEGAMON libraries. Each Candle
Management Server requires its own runtime environment and a Monitoring Agent
requires its own runtime environment if it exists on a separate z/OS image to the
Candle Management Server.
Adding a new runtime environment
Follow these steps to add a new runtime environment.
1. Access the Configuration tool. From the Main Menu, enter 3 (Configure
products) and 2 (Select product to configure). This displays the Product
Selection menu, only those packages that are eligible to be configured are listed
on this panel.
. ---------------------------- PRODUCT SELECTION MENU ---------------------------
. COMMAND ===>
.
. Actions: S Select product
.
. S IBM Tivoli OMEGAMON XE for CICS on z/OS V3.1.0
. F1=Help F3=Back F5=Refresh F7=Up F8=Down
.
.
Figure 6. Product selection menu
8 Configuring IBM Tivoli OMEGAMON XE for CICS on z/OS
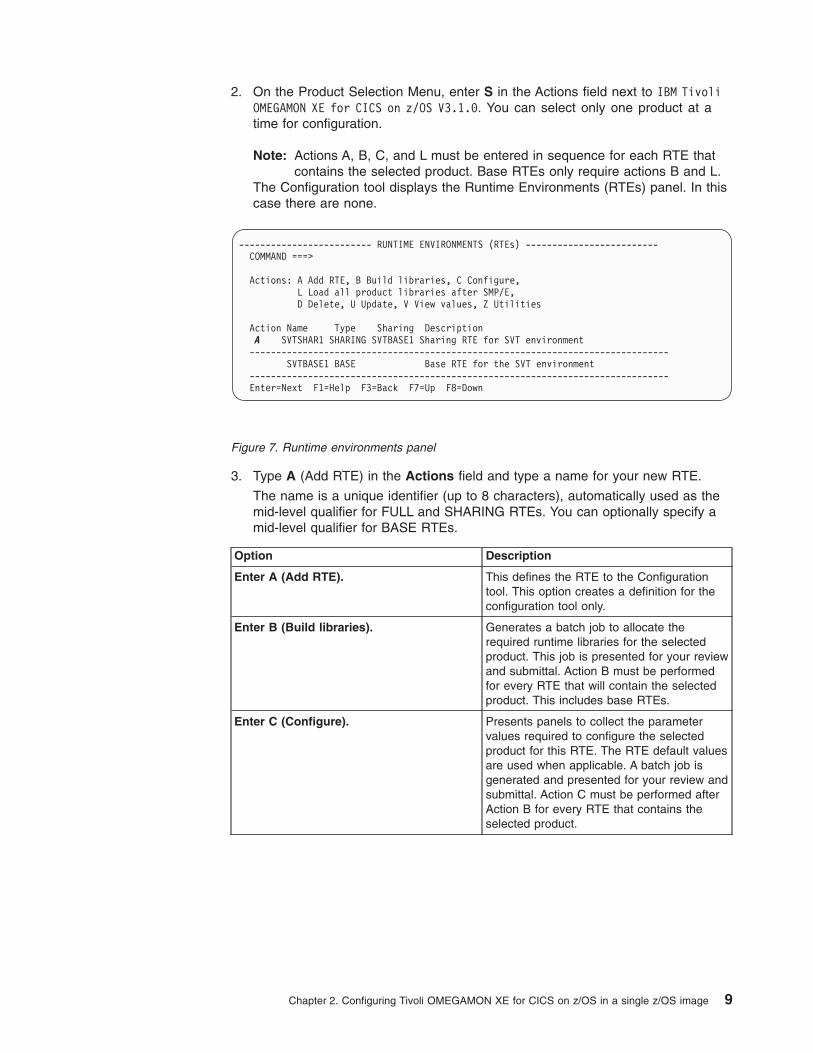
2. On the Product Selection Menu, enter S in the Actions field next to IBM Tivoli
OMEGAMON XE for CICS on z/OS V3.1.0. You can select only one product at a
time for configuration.
Note: Actions A, B, C, and L must be entered in sequence for each RTE that
contains the selected product. Base RTEs only require actions B and L.
The Configuration tool displays the Runtime Environments (RTEs) panel. In this
case there are none.
3. Type A (Add RTE) in the Actions field and type a name for your new RTE.
The name is a unique identifier (up to 8 characters), automatically used as the
mid-level qualifier for FULL and SHARING RTEs. You can optionally specify a
mid-level qualifier for BASE RTEs.
Option Description
Enter A (Add RTE). This defines the RTE to the Configuration
tool. This option creates a definition for the
configuration tool only.
Enter B (Build libraries). Generates a batch job to allocate the
required runtime libraries for the selected
product. This job is presented for your review
and submittal. Action B must be performed
for every RTE that will contain the selected
product. This includes base RTEs.
Enter C (Configure). Presents panels to collect the parameter
values required to configure the selected
product for this RTE. The RTE default values
are used when applicable. A batch job is
generated and presented for your review and
submittal. Action C must be performed after
Action B for every RTE that contains the
selected product.
------------------------- RUNTIME ENVIRONMENTS (RTEs) -------------------------
COMMAND ===>
Actions: A Add RTE, B Build libraries, C Configure,
L Load all product libraries after SMP/E,
D Delete, U Update, V View values, Z Utilities
Action Name Type Sharing Description
A SVTSHAR1 SHARING SVTBASE1 Sharing RTE for SVT environment
-------------------------------------------------------------------------------
SVTBASE1 BASE Base RTE for the SVT environment
-------------------------------------------------------------------------------
Enter=Next F1=Help F3=Back F7=Up F8=Down
Figure 7. Runtime environments panel
Chapter 2. Configuring Tivoli OMEGAMON XE for CICS on z/OS in a single z/OS image 9
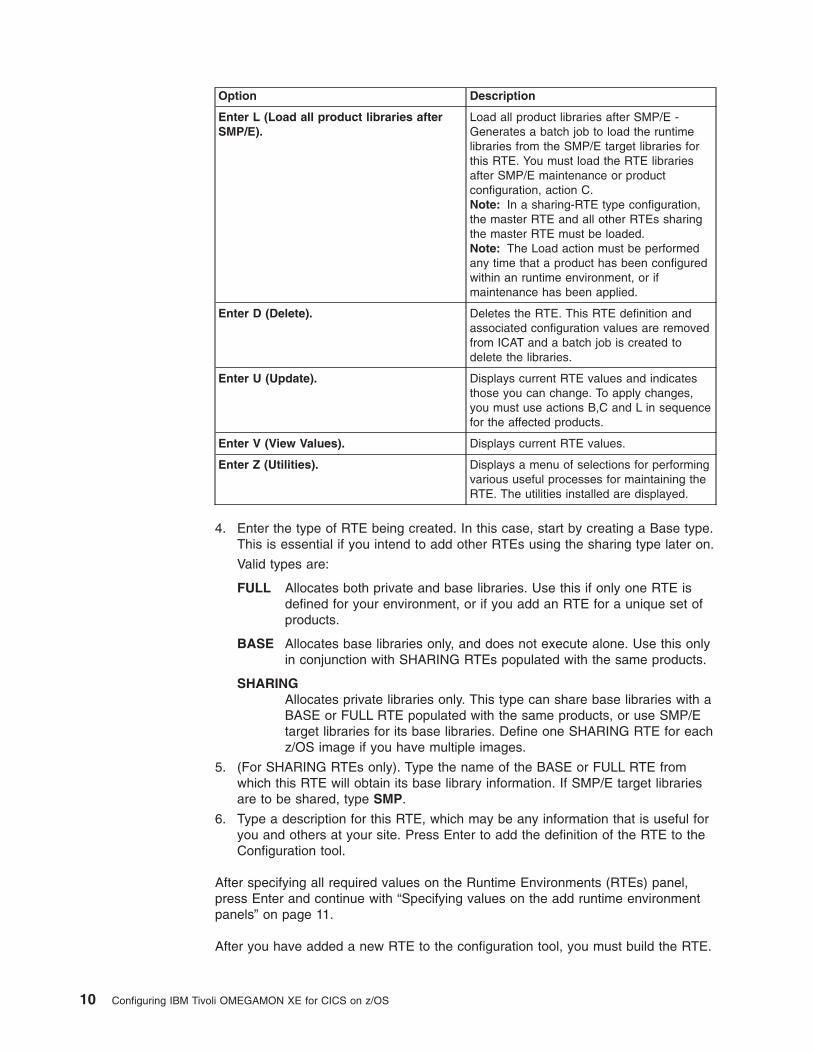
Option Description
Enter L (Load all product libraries after
SMP/E).
Load all product libraries after SMP/E -
Generates a batch job to load the runtime
libraries from the SMP/E target libraries for
this RTE. You must load the RTE libraries
after SMP/E maintenance or product
configuration, action C.
Note: In a sharing-RTE type configuration,
the master RTE and all other RTEs sharing
the master RTE must be loaded.
Note: The Load action must be performed
any time that a product has been configured
within an runtime environment, or if
maintenance has been applied.
Enter D (Delete). Deletes the RTE. This RTE definition and
associated configuration values are removed
from ICAT and a batch job is created to
delete the libraries.
Enter U (Update). Displays current RTE values and indicates
those you can change. To apply changes,
you must use actions B,C and L in sequence
for the affected products.
Enter V (View Values). Displays current RTE values.
Enter Z (Utilities). Displays a menu of selections for performing
various useful processes for maintaining the
RTE. The utilities installed are displayed.
4. Enter the type of RTE being created. In this case, start by creating a Base type.
This is essential if you intend to add other RTEs using the sharing type later on.
Valid types are:
FULL Allocates both private and base libraries. Use this if only one RTE is
defined for your environment, or if you add an RTE for a unique set of
products.
BASE Allocates base libraries only, and does not execute alone. Use this only
in conjunction with SHARING RTEs populated with the same products.
SHARING
Allocates private libraries only. This type can share base libraries with a
BASE or FULL RTE populated with the same products, or use SMP/E
target libraries for its base libraries. Define one SHARING RTE for each
z/OS image if you have multiple images.
5. (For SHARING RTEs only). Type the name of the BASE or FULL RTE from
which this RTE will obtain its base library information. If SMP/E target libraries
are to be shared, type SMP.
6. Type a description for this RTE, which may be any information that is useful for
you and others at your site. Press Enter to add the definition of the RTE to the
Configuration tool.
After specifying all required values on the Runtime Environments (RTEs) panel,
press Enter and continue with “Specifying values on the add runtime environment
panels” on page 11.
After you have added a new RTE to the configuration tool, you must build the RTE.
10 Configuring IBM Tivoli OMEGAMON XE for CICS on z/OS
Specifying values on the add runtime environment panels
Follow these steps to specify values to define your runtime environment.
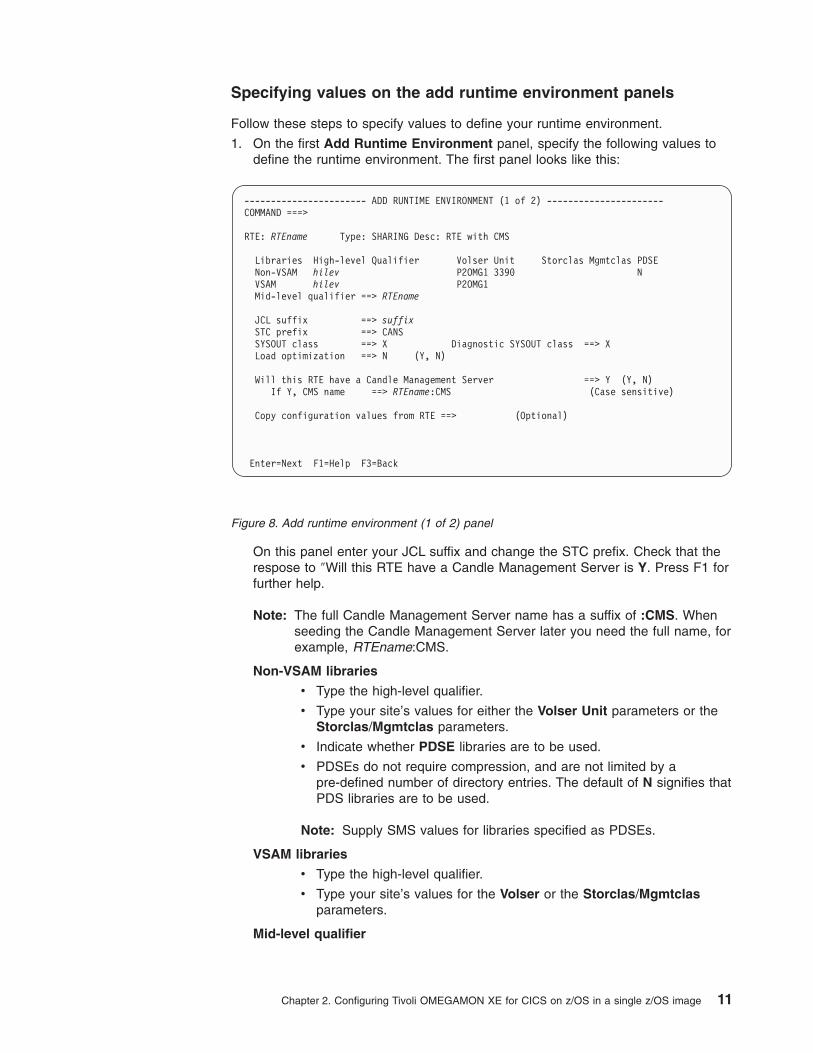
1. On the first Add Runtime Environment panel, specify the following values to
define the runtime environment. The first panel looks like this:
On this panel enter your JCL suffix and change the STC prefix. Check that the
respose to ″Will this RTE have a Candle Management Server is Y. Press F1 for
further help.
Note: The full Candle Management Server name has a suffix of :CMS. When
seeding the Candle Management Server later you need the full name, for
example, RTEname:CMS.
Non-VSAM libraries
v Type the high-level qualifier.
v Type your site’s values for either the Volser Unit parameters or the
Storclas/Mgmtclas parameters.
v Indicate whether PDSE libraries are to be used.
v PDSEs do not require compression, and are not limited by a
pre-defined number of directory entries. The default of N signifies that
PDS libraries are to be used.
Note: Supply SMS values for libraries specified as PDSEs.
VSAM libraries
v Type the high-level qualifier.
v Type your site’s values for the Volser or the Storclas/Mgmtclas
parameters.
Mid-level qualifier
----------------------- ADD RUNTIME ENVIRONMENT (1 of 2) ----------------------
COMMAND ===>
RTE: RTEname Type: SHARING Desc: RTE with CMS
Libraries High-level Qualifier Volser Unit Storclas Mgmtclas PDSE
Non-VSAM hilev P2OMG1 3390 N
VSAM hilev P2OMG1
Mid-level qualifier ==> RTEname
JCL suffix ==> suffix
STC prefix ==> CANS
SYSOUT class ==> X Diagnostic SYSOUT class ==> X
Load optimization ==> N (Y, N)
Will this RTE have a Candle Management Server ==> Y (Y, N)
If Y, CMS name ==> RTEname:CMS (Case sensitive)
Copy configuration values from RTE ==> (Optional)
Enter=Next F1=Help F3=Back
Figure 8. Add runtime environment (1 of 2) panel
Chapter 2. Configuring Tivoli OMEGAMON XE for CICS on z/OS in a single z/OS image 11
v For FULL and SHARING RTEs, accept the mid-level qualifier default
value (which is the RTE name you previously specified) or specify a
unique mid-level qualifier.
v For BASE RTEs, specify a unique mid-level qualifier or optionally
leave this field blank.
JCL suffix
Type a suffix for the JCL. The suffix (up to four characters) is appended
to all JCL that is generated in INSTJOBS. The JCL suffix uniquely
identifies the batch job members created by the Configuration tool for
this RTE.
STC prefix
(FULL and SHARING RTEs only). Type a global STC Prefix (from 1–4
characters) to be used in building started tasks names for products in
this RTE. The default is CANS.
SYSOUT class / Diagnostic SYSOUT class
Specify values for the non-diagnostic and diagnostic output DDNAMES.
Note: These values were previously hardcoded.
Load optimization
Indicate whether you want to optimize loading of this RTE. The default
is N. Refer to the online help (F1) for more details.
Will the RTE have a Candle Management Server?
(FULL and SHARING RTEs only) This configuration has a hub Candle
Management Server, enter Y. The default of Y allocates Candle
Management Server libraries.
You must enter the name of the Candle Management Server to be
configured. It is used by the other components that need to
communicate with this Candle Management Server. The name of the
runtime environment is used as a default.
Copied from RTE
(FULL and SHARING RTEs only - Optional)
Type the name of an existing RTE, from which configuration values will
be copied and used for this RTE.
Note: This procedure makes an exact copy of the existing RTE. If you
will not be using the same products in the new RTE, do not use
this procedure.
Install National Language components?
(FULL and SHARING RTEs only - NLS products only)
Specify Y to install National Language Components in this RTE for all
eligible products.
2. After specifying all required values on the first Add Runtime Environment
panel, press Enter. The second Add Runtime Environment panel is displayed.
12 Configuring IBM Tivoli OMEGAMON XE for CICS on z/OS
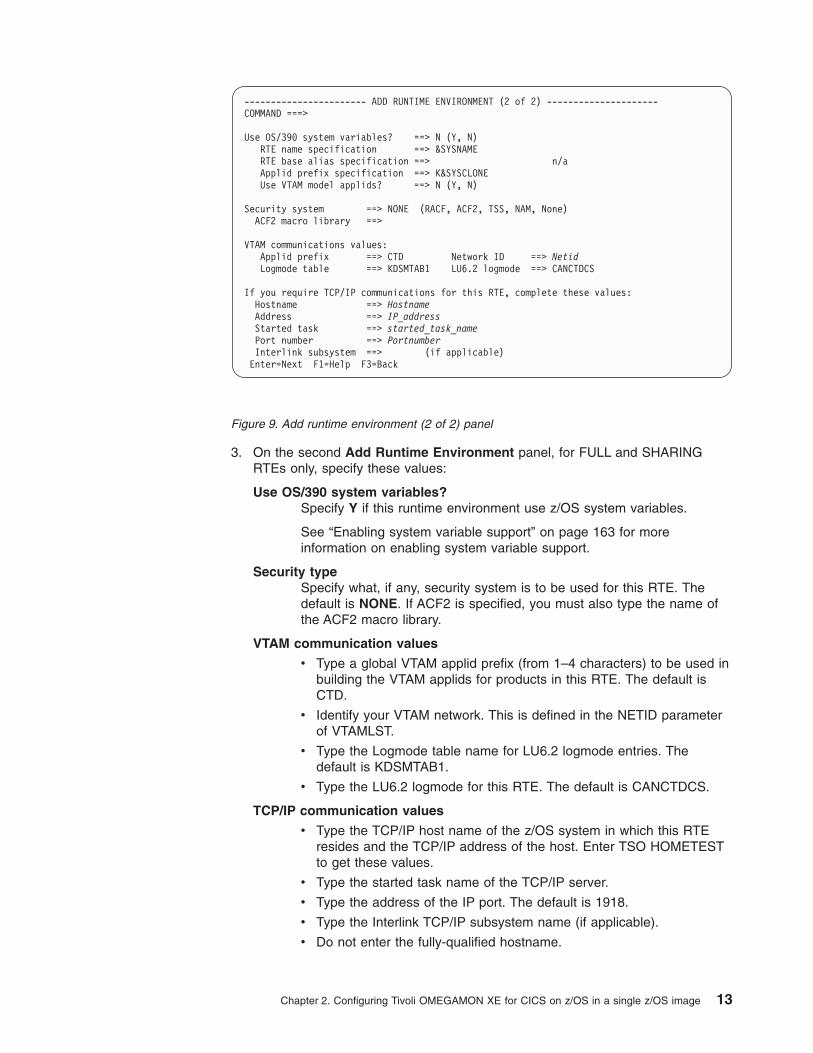
3. On the second Add Runtime Environment panel, for FULL and SHARING
RTEs only, specify these values:
Use OS/390 system variables?
Specify Y if this runtime environment use z/OS system variables.
See “Enabling system variable support” on page 163 for more
information on enabling system variable support.
Security type
Specify what, if any, security system is to be used for this RTE. The
default is NONE. If ACF2 is specified, you must also type the name of
the ACF2 macro library.
VTAM communication values
v Type a global VTAM applid prefix (from 1–4 characters) to be used in
building the VTAM applids for products in this RTE. The default is
CTD.
v Identify your VTAM network. This is defined in the NETID parameter
of VTAMLST.
v Type the Logmode table name for LU6.2 logmode entries. The
default is KDSMTAB1.
v Type the LU6.2 logmode for this RTE. The default is CANCTDCS.
TCP/IP communication values
v Type the TCP/IP host name of the z/OS system in which this RTE
resides and the TCP/IP address of the host. Enter TSO HOMETEST
to get these values.
v Type the started task name of the TCP/IP server.
v Type the address of the IP port. The default is 1918.
v Type the Interlink TCP/IP subsystem name (if applicable).
v Do not enter the fully-qualified hostname.
----------------------- ADD RUNTIME ENVIRONMENT (2 of 2) ---------------------
COMMAND ===>
Use OS/390 system variables? ==> N (Y, N)
RTE name specification ==> &SYSNAME
RTE base alias specification ==> n/a
Applid prefix specification ==> K&SYSCLONE
Use VTAM model applids? ==> N (Y, N)
Security system ==> NONE (RACF, ACF2, TSS, NAM, None)
ACF2 macro library ==>
VTAM communications values:
Applid prefix ==> CTD Network ID ==> Netid
Logmode table ==> KDSMTAB1 LU6.2 logmode ==> CANCTDCS
If you require TCP/IP communications for this RTE, complete these values:
Hostname ==> Hostname
Address ==> IP_address
Started task ==> started_task_name
Port number ==> Portnumber
Interlink subsystem ==> (if applicable)
Enter=Next F1=Help F3=Back
Figure 9. Add runtime environment (2 of 2) panel
Chapter 2. Configuring Tivoli OMEGAMON XE for CICS on z/OS in a single z/OS image 13
Note: Enter V (View Values) to verify the RTE information and U (Update) to make
any changes.
Do not add the fully qualified hostname. You should omit the domain name.
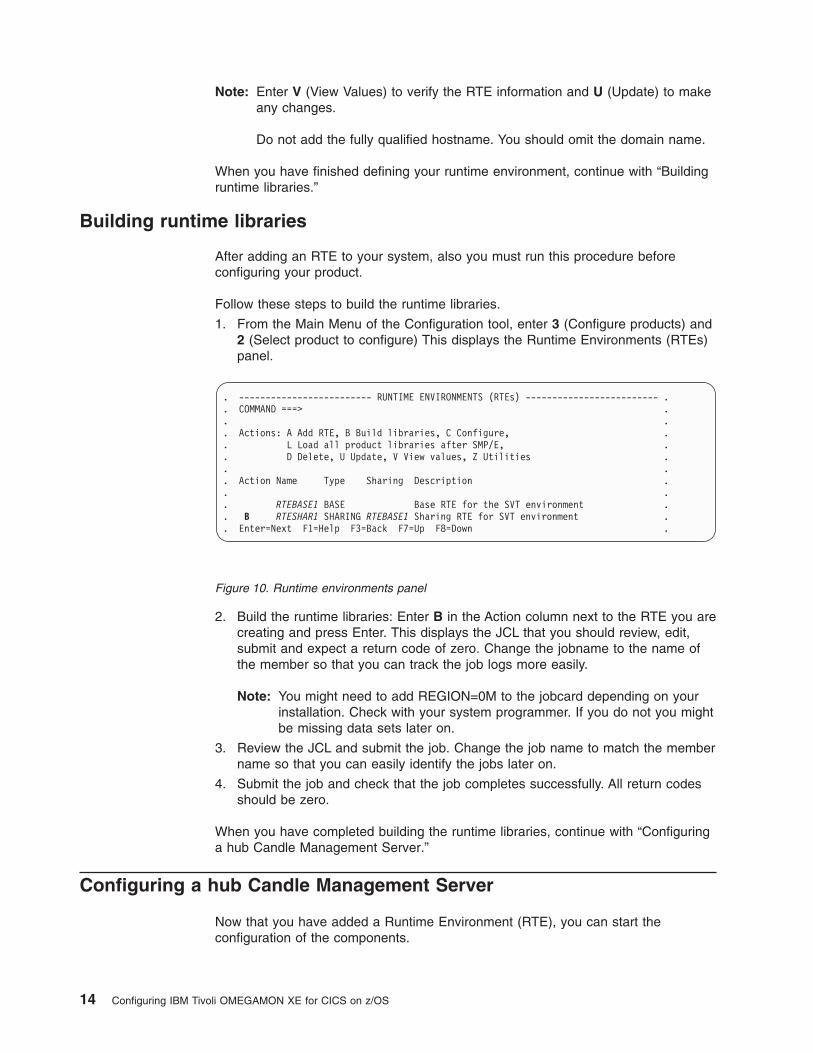
When you have finished defining your runtime environment, continue with “Building
runtime libraries.”
Building runtime libraries
After adding an RTE to your system, also you must run this procedure before
configuring your product.
Follow these steps to build the runtime libraries.
1. From the Main Menu of the Configuration tool, enter 3 (Configure products) and
2 (Select product to configure) This displays the Runtime Environments (RTEs)
panel.
2. Build the runtime libraries: Enter B in the Action column next to the RTE you are
creating and press Enter. This displays the JCL that you should review, edit,
submit and expect a return code of zero. Change the jobname to the name of
the member so that you can track the job logs more easily.
Note: You might need to add REGION=0M to the jobcard depending on your
installation. Check with your system programmer. If you do not you might
be missing data sets later on.
3. Review the JCL and submit the job. Change the job name to match the member
name so that you can easily identify the jobs later on.
4. Submit the job and check that the job completes successfully. All return codes
should be zero.
When you have completed building the runtime libraries, continue with “Configuring
a hub Candle Management Server.”
Configuring a hub Candle Management Server
Now that you have added a Runtime Environment (RTE), you can start the
configuration of the components.
. ------------------------- RUNTIME ENVIRONMENTS (RTEs) ------------------------- .
. COMMAND ===> .
. .
. Actions: A Add RTE, B Build libraries, C Configure, .
. L Load all product libraries after SMP/E, .
. D Delete, U Update, V View values, Z Utilities .
. .
. Action Name Type Sharing Description .
. .
. RTEBASE1 BASE Base RTE for the SVT environment .
. B RTESHAR1 SHARING RTEBASE1 Sharing RTE for SVT environment .
. Enter=Next F1=Help F3=Back F7=Up F8=Down .
Figure 10. Runtime environments panel
14 Configuring IBM Tivoli OMEGAMON XE for CICS on z/OS
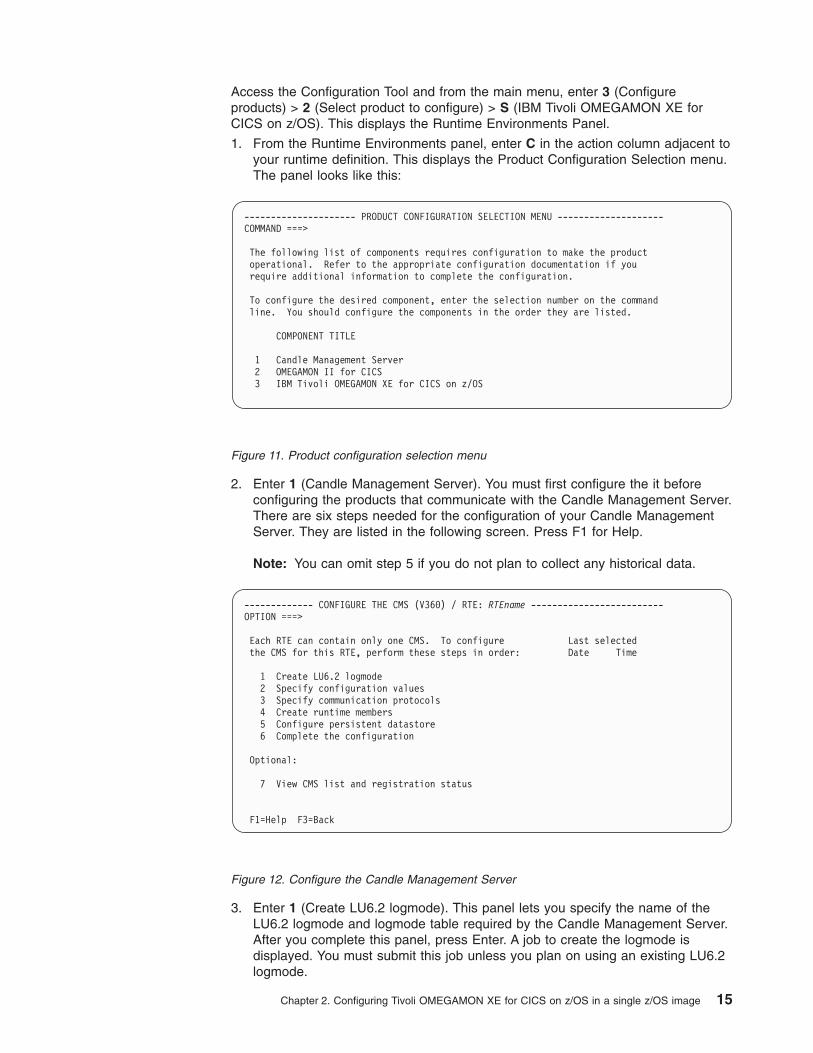
Access the Configuration Tool and from the main menu, enter 3 (Configure
products) > 2 (Select product to configure) > S (IBM Tivoli OMEGAMON XE for
CICS on z/OS). This displays the Runtime Environments Panel.
1. From the Runtime Environments panel, enter C in the action column adjacent to
your runtime definition. This displays the Product Configuration Selection menu.
The panel looks like this:
2. Enter 1 (Candle Management Server). You must first configure the it before
configuring the products that communicate with the Candle Management Server.
There are six steps needed for the configuration of your Candle Management
Server. They are listed in the following screen. Press F1 for Help.
Note: You can omit step 5 if you do not plan to collect any historical data.
3. Enter 1 (Create LU6.2 logmode). This panel lets you specify the name of the
LU6.2 logmode and logmode table required by the Candle Management Server.
After you complete this panel, press Enter. A job to create the logmode is
displayed. You must submit this job unless you plan on using an existing LU6.2
logmode.
--------------------- PRODUCT CONFIGURATION SELECTION MENU --------------------
COMMAND ===>
The following list of components requires configuration to make the product
operational. Refer to the appropriate configuration documentation if you
require additional information to complete the configuration.
To configure the desired component, enter the selection number on the command
line. You should configure the components in the order they are listed.
COMPONENT TITLE
1 Candle Management Server
2 OMEGAMON II for CICS
3 IBM Tivoli OMEGAMON XE for CICS on z/OS
Figure 11. Product configuration selection menu
------------- CONFIGURE THE CMS (V360) / RTE: RTEname -------------------------
OPTION ===>
Each RTE can contain only one CMS. To configure Last selected
the CMS for this RTE, perform these steps in order: Date Time
1 Create LU6.2 logmode
2 Specify configuration values
3 Specify communication protocols
4 Create runtime members
5 Configure persistent datastore
6 Complete the configuration
Optional:
7 View CMS list and registration status
F1=Help F3=Back
Figure 12. Configure the Candle Management Server
Chapter 2. Configuring Tivoli OMEGAMON XE for CICS on z/OS in a single z/OS image 15

Note: This panel lets you specify the name of the LU6.2 logmode and logmode
table required by the Candle Management Server. After you complete
this panel, press Enter, a job to create the logmode is displayed. Review
and edit (if necessary) this job. Submit this job unless you plan to use an
existing LU6.2 logmode. You should get a return code of zero.
At the end of this you are returned to the Configure the CMS (V360) menu.
Note: This screen shows the defaults. These are only suggestions. Follow the
guidelines for your site. Press F1 for further information.
LU6.2 logmode
This is the name LU6.2 logmode.
Logmode table name
This is the name of the logmode table that contains the LU6.2 logmode.
This is required even if you do not submit the job.
VTAMLIB load library
This is the name of the system library that is used to contain VTAM
logmode tables. This is usually SYS1.VTAMLIB. You can specify any
load library if you do not want to update your VTAMLIB directly.
VTAM macro library
This is the name of the system library that contains the VTAM macros.
This library is usually SYS1.SISTMAC.
4. Enter 2 (Specify Configuration values). This is the critical step where you
declare if this is either a hub or remote Candle Management Server.
For this configuration where there is only one Candle Management Server you
should specify Hub.
----------------------------- CREATE LU6.2 LOGMODE ----------------------------
COMMAND ===>
The CMS requires an LU6.2 logmode. Complete the items on this panel and
press ENTER to create a job that will assemble and link the required logmode.
LU6.2 logmode ==> CANCTDCS
Logmode table name ==> KDSMTAB1
VTAMLIB load library ==> SYS1.VTAMLIB
VTAM macro library ==> SYS1.SISTMAC1
Figure 13. Create LU6.2 logmode panel
16 Configuring IBM Tivoli OMEGAMON XE for CICS on z/OS

CMS Started Task
This is the name of the started task for the Candle Management Server.
This started task must be copied to your system procedure library. The
default is CANSDSST.
Hub or Remote
Specify whether the Candle Management Server you are creating is a
Hub or a Remote. For this configuration, enter HUB.
Security validation
Initially do not set this to Y to enable you to use the default userid,
sysadmin, of your CandleNet Portal. If you do, make sure that this
userid is defined to your external security manager. Specify this
parameter if you want Candle Management Server security access to
validate a user ID. The default is N.
Note: Do not enable security validation until your security is set. Before
you add security to your Candle Management Server:
v Make sure you have configured all products and verified that
they are operating properly.
v If you choose a third-party security package, verify that it is
installed and configured for your site. Ensure that any userid
to be used by the CandleNet Portal is defined to your external
security manager.
5. Enter 3 (Specify Candle Management Server communication protocols).
Specifies the communication protocol for the Candle Management Server. It
allows you to specify IP, SNA, and IPPIPE. This lists determines the priority for
the protocol.
------------------------- SPECIFY CONFIGURATION VALUES -----------------------
COMMAND ===>
To configure a CMS for your site, complete the items on this panel.
CMS started task ==> CMS_started_task_name
Hub or Remote? ==> HUB
Security validation? ==> N (Y, N)
Enter=Next F1=Help F3=Back F5=Advanced
Figure 14. Specify configuration values panel
--------------------- SPECIFY CMS COMMUNICATION PROTOCOLS ---------------------
COMMAND ===>
Specify communication protocols for CMS CMSName in priority sequence.
Protocol 1 ==> IPPIPE (SNA, IP, IPPIPE)
Protocol 2 (optional) ==> IP (SNA, IP, IPPIPE)
Protocol 3 (optional) ==> SNA (SNA, IP, IPPIPE)
Note: One of the protocols chosen must be SNA.
Figure 15. Specify CMS communication protocols
Chapter 2. Configuring Tivoli OMEGAMON XE for CICS on z/OS in a single z/OS image 17
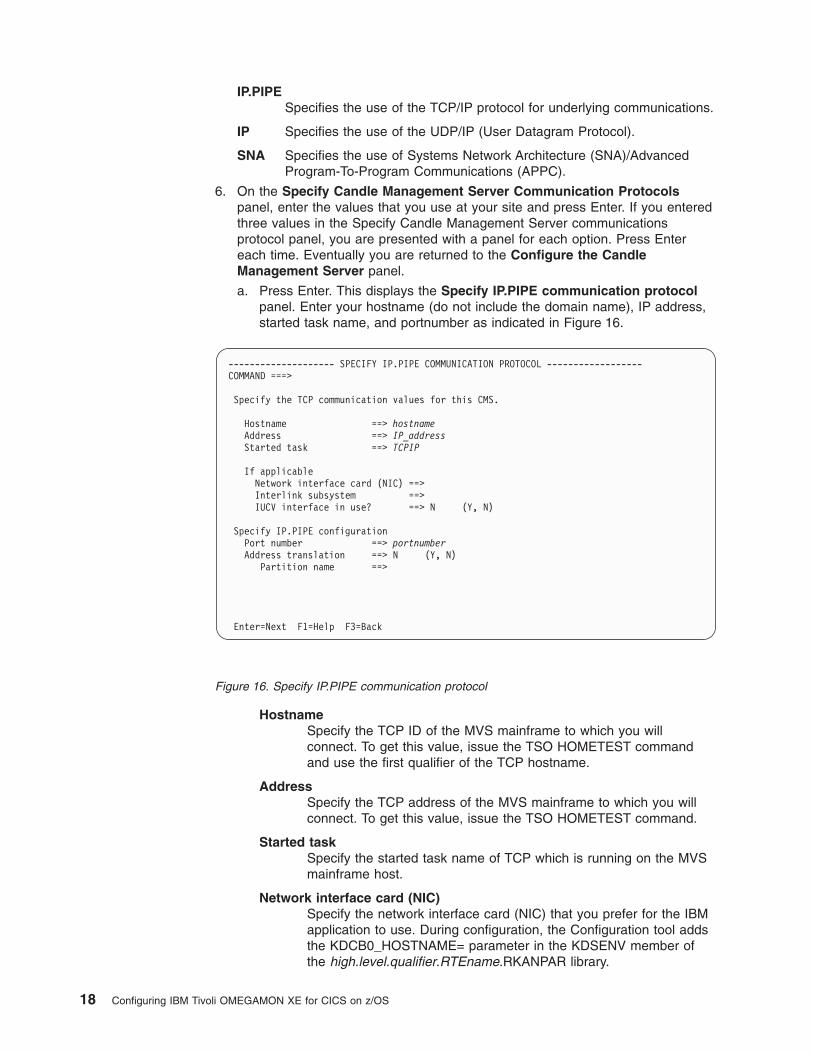
IP.PIPE
Specifies the use of the TCP/IP protocol for underlying communications.
IP Specifies the use of the UDP/IP (User Datagram Protocol).
SNA Specifies the use of Systems Network Architecture (SNA)/Advanced
Program-To-Program Communications (APPC).
6. On the Specify Candle Management Server Communication Protocols
panel, enter the values that you use at your site and press Enter. If you entered
three values in the Specify Candle Management Server communications
protocol panel, you are presented with a panel for each option. Press Enter
each time. Eventually you are returned to the Configure the Candle
Management Server panel.
a. Press Enter. This displays the Specify IP.PIPE communication protocol
panel. Enter your hostname (do not include the domain name), IP address,
started task name, and portnumber as indicated in Figure 16.
Hostname
Specify the TCP ID of the MVS mainframe to which you will
connect. To get this value, issue the TSO HOMETEST command
and use the first qualifier of the TCP hostname.
Address
Specify the TCP address of the MVS mainframe to which you will
connect. To get this value, issue the TSO HOMETEST command.
Started task
Specify the started task name of TCP which is running on the MVS
mainframe host.
Network interface card (NIC)
Specify the network interface card (NIC) that you prefer for the IBM
application to use. During configuration, the Configuration tool adds
the KDCB0_HOSTNAME= parameter in the KDSENV member of
the high.level.qualifier.RTEname.RKANPAR library.
-------------------- SPECIFY IP.PIPE COMMUNICATION PROTOCOL ------------------
COMMAND ===>
Specify the TCP communication values for this CMS.
Hostname ==> hostname
Address ==> IP_address
Started task ==> TCPIP
If applicable
Network interface card (NIC) ==>
Interlink subsystem ==>
IUCV interface in use? ==> N (Y, N)
Specify IP.PIPE configuration
Port number ==> portnumber
Address translation ==> N (Y, N)
Partition name ==>
Enter=Next F1=Help F3=Back
Figure 16. Specify IP.PIPE communication protocol
18 Configuring IBM Tivoli OMEGAMON XE for CICS on z/OS
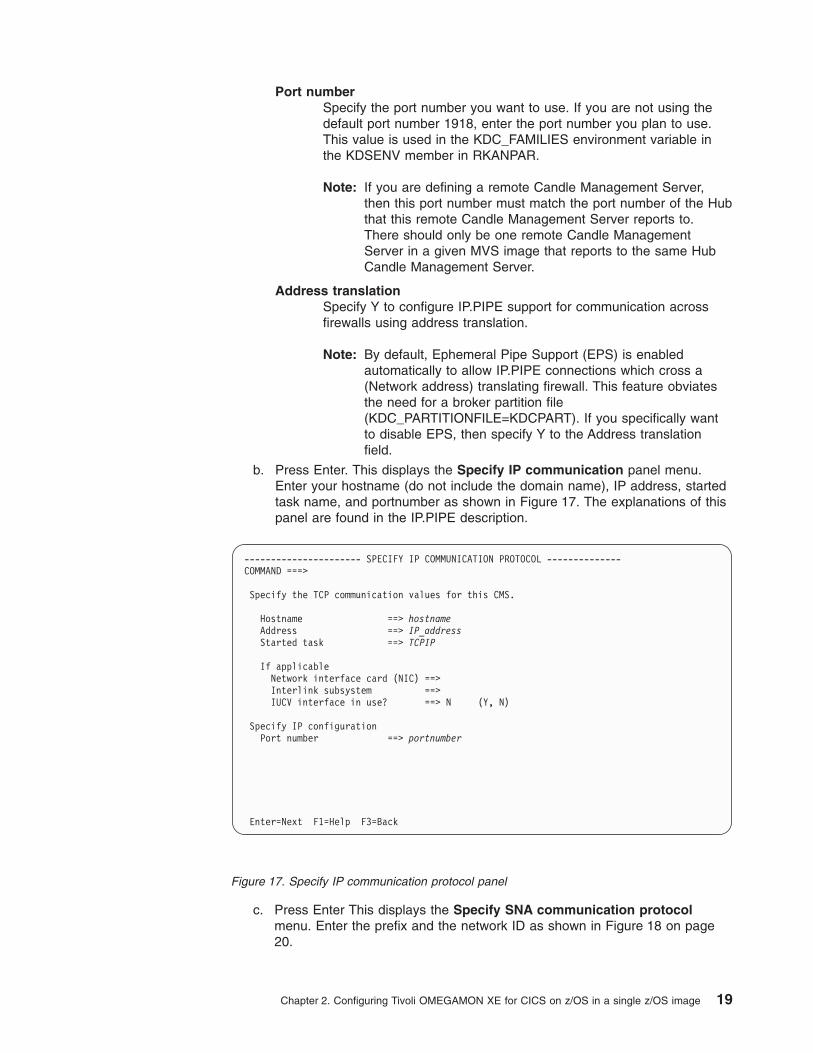
Port number
Specify the port number you want to use. If you are not using the
default port number 1918, enter the port number you plan to use.
This value is used in the KDC_FAMILIES environment variable in
the KDSENV member in RKANPAR.
Note: If you are defining a remote Candle Management Server,
then this port number must match the port number of the Hub
that this remote Candle Management Server reports to.
There should only be one remote Candle Management
Server in a given MVS image that reports to the same Hub
Candle Management Server.
Address translation
Specify Y to configure IP.PIPE support for communication across
firewalls using address translation.
Note: By default, Ephemeral Pipe Support (EPS) is enabled
automatically to allow IP.PIPE connections which cross a
(Network address) translating firewall. This feature obviates
the need for a broker partition file
(KDC_PARTITIONFILE=KDCPART). If you specifically want
to disable EPS, then specify Y to the Address translation
field.
b. Press Enter. This displays the Specify IP communication panel menu.
Enter your hostname (do not include the domain name), IP address, started
task name, and portnumber as shown in Figure 17. The explanations of this
panel are found in the IP.PIPE description.
c. Press Enter This displays the Specify SNA communication protocol
menu. Enter the prefix and the network ID as shown in Figure 18 on page
20.
---------------------- SPECIFY IP COMMUNICATION PROTOCOL --------------
COMMAND ===>
Specify the TCP communication values for this CMS.
Hostname ==> hostname
Address ==> IP_address
Started task ==> TCPIP
If applicable
Network interface card (NIC) ==>
Interlink subsystem ==>
IUCV interface in use? ==> N (Y, N)
Specify IP configuration
Port number ==> portnumber
Enter=Next F1=Help F3=Back
Figure 17. Specify IP communication protocol panel
Chapter 2. Configuring Tivoli OMEGAMON XE for CICS on z/OS in a single z/OS image 19
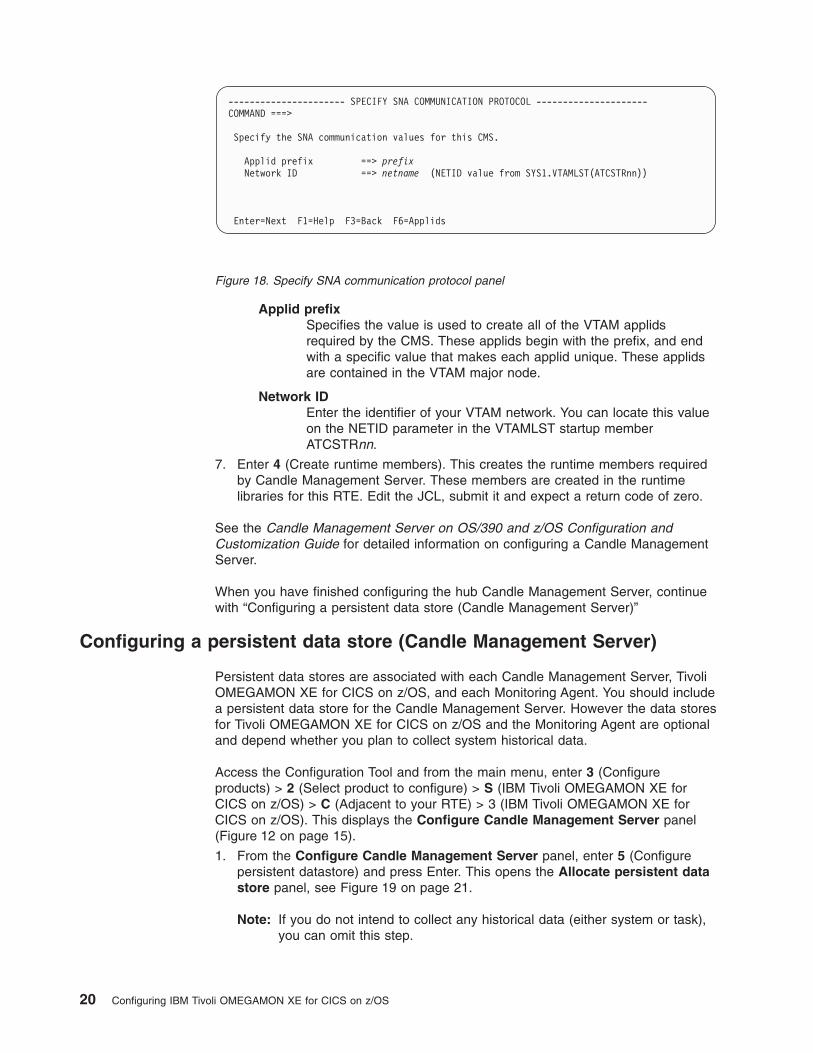
Applid prefix
Specifies the value is used to create all of the VTAM applids
required by the CMS. These applids begin with the prefix, and end
with a specific value that makes each applid unique. These applids
are contained in the VTAM major node.
Network ID
Enter the identifier of your VTAM network. You can locate this value
on the NETID parameter in the VTAMLST startup member
ATCSTRnn.
7. Enter 4 (Create runtime members). This creates the runtime members required
by Candle Management Server. These members are created in the runtime
libraries for this RTE. Edit the JCL, submit it and expect a return code of zero.
See the Candle Management Server on OS/390 and z/OS Configuration and
Customization Guide for detailed information on configuring a Candle Management
Server.
When you have finished configuring the hub Candle Management Server, continue
with “Configuring a persistent data store (Candle Management Server)”
Configuring a persistent data store (Candle Management Server)
Persistent data stores are associated with each Candle Management Server, Tivoli
OMEGAMON XE for CICS on z/OS, and each Monitoring Agent. You should include
a persistent data store for the Candle Management Server. However the data stores
for Tivoli OMEGAMON XE for CICS on z/OS and the Monitoring Agent are optional
and depend whether you plan to collect system historical data.
Access the Configuration Tool and from the main menu, enter 3 (Configure
products) > 2 (Select product to configure) > S (IBM Tivoli OMEGAMON XE for
CICS on z/OS) > C (Adjacent to your RTE) > 3 (IBM Tivoli OMEGAMON XE for
CICS on z/OS). This displays the Configure Candle Management Server panel
(Figure 12 on page 15).
1. From the Configure Candle Management Server panel, enter 5 (Configure
persistent datastore) and press Enter. This opens the Allocate persistent data
store panel, see Figure 19 on page 21.
Note: If you do not intend to collect any historical data (either system or task),
you can omit this step.
---------------------- SPECIFY SNA COMMUNICATION PROTOCOL ---------------------
COMMAND ===>
Specify the SNA communication values for this CMS.
Applid prefix ==> prefix
Network ID ==> netname (NETID value from SYS1.VTAMLST(ATCSTRnn))
Enter=Next F1=Help F3=Back F6=Applids
Figure 18. Specify SNA communication protocol panel
20 Configuring IBM Tivoli OMEGAMON XE for CICS on z/OS

2. Enter 1 (Modify and review datastore specifications) and press Enter. This panel
controls the size, the placement and the number of data sets that comprise the
Persistent Datastore, or press F3 to accept the values displayed.
--------------------- PERSISTENT DATASTORE SPECIFICATIONS ---- Row 1 to 1 of 1
COMMAND ===>
Modify persistent datastore allocation and maintenance information as required
Press Enter to accept values and then F3 to return.
Datastore high-level qualifier: hilev
Group -Datasets in Group- Volser/ Storclas/ -Est Cyl- -Maintenance-
Name Lowlev Count Unit Mgmtclas Space Backup Export Extrac
------------------------------------------------------------------------------
GENHIST RGENHIS 3 volser NONSMS__ 36__ N N N
________ ________
F1=Help F3=Back
Note: The settings on this screen are only suggestions. Follow the guidelines
for your site.
Group name
Is the name of the group. Each group contains the number of data sets
specified in the Group Count field.
Data Sets lowlev
Is the low-level qualifier of the data sets name. It is suffixed with a
1-character value (1-9, A-Z) that indicates the data set number within a
group. For example:
v high.level.qualifier.RTEname.RGENHIS1
v high.level.qualifier.RTEname.RGENHIS2
v high.level.qualifier.RTEname.RGENHIS3
Where RGENHISn is the low-level qualifier.
You may use the default values displayed or change them to meet your
site’s requirements.
Group Count
Indicates the number of data sets within the group.
Note: Three is the supported minimum setting for all but a limited
number of special purpose data sets. If you specify one,
---------------------- ALLOCATE PERSISTENT DATASTORE MENU -----------------
OPTION ===>
Last selected
Perform these configuration steps in order: Date Time
1 Modify and review datastore specifications
2 Create or edit PDS maintenance jobcard
3 Create runtime members
4 Edit and submit datastore allocation job
5 Complete persistent datastore configuration
F1=Help F3=Back
. . . . . . . . . . . . . . . . . . . . . . . . .
Figure 19. Allocate persistent datastore menu
Chapter 2. Configuring Tivoli OMEGAMON XE for CICS on z/OS in a single z/OS image 21
additional I/O is required to delete records when space is reused.
If you specify two, data becomes unavailable when a datastore
file fills up.
Est Cyl space
This field is used to allocate the number of datastore files you specified
for the group. The CT/PDS processing computes how much space is
needed to allocate the group datastore files, and how much additional
required space is needed to hold overhead information. Overhead
information includes the product dictionary, table records, index records,
and spare room for buffers that need to be reserved for when the data
set is full.
Backup, Export, and Extract
These fields are used for datastore maintenance functions. Specify Y to
turn on one of these maintenance functions for a group.
You can use the Backup facility if you want to keep old history data.
This facility does an MVS IEBGENER request to make an exact copy of
the data set being maintained. It is a simple copy of the data set to
either tape or DASD. A backed-up file also has the advantage that
nothing has to be done to the file to dynamically make the data
available to the Persistent Datastore again.
Each group contains the number of data sets specified in the Group Count field.
The Datasets Lowlev is suffixed with a 1-character value (1-9, A-Z) that
indicates the dataset number within a group. As an example, if these are the
values referenced on the Persistent Datastore Specifications panel, the
PD#Psuffix job creates the Persistent Datastore members that make reference
to these datastore files
3. Enter 2 (Create or edit PDS maintenance jobcard). Edit the job card and press
Enter. This specifies the job card to be used for the Persistent Datastore (PDS)
KPDPROC1, KPDPROCC and KPDPROC2 maintenance jobs. The job card
member (KPDJOBC) is created in the high.level.qualifier.RTEname..RKANSAM
library.
4. Enter 3 (Create runtime members). This opens JCL that you can edit and
submit. You should expect a return code of zero. This job creates the persistent
datastore members.
5. Enter 4 (Edit and submit datastore allocation job). This opens JCL that you can
edit and submit. You should expect a return code of zero. This job allocates and
initializes all data sets required for this product’s persistent datastore
Note: This job is applicable to define a brand new PDS configuration. If the
PDS data sets already exist, then delete or rename this product’s
persistent datastore files if you want the configuration tool to re-allocate
and re-initialize the datasets for this product’s persistent datastore.
6. Enter 5 (Complete persistent datastore configuration). This describes the steps
that you need to take to copy the procedures that you have created to your
procedures libraries. This step will be deferred until the completion of the
configuration of Tivoli OMEGAMON XE for CICS on z/OS, see “Completing the
configuration” on page 36.
When you have finished configuring the Candle Management Server, continue with
“Configuring Tivoli OMEGAMON II for CICS” on page 23.
Related reference
Chapter 8, “Collecting and storing historical data,” on page 147
22 Configuring IBM Tivoli OMEGAMON XE for CICS on z/OS
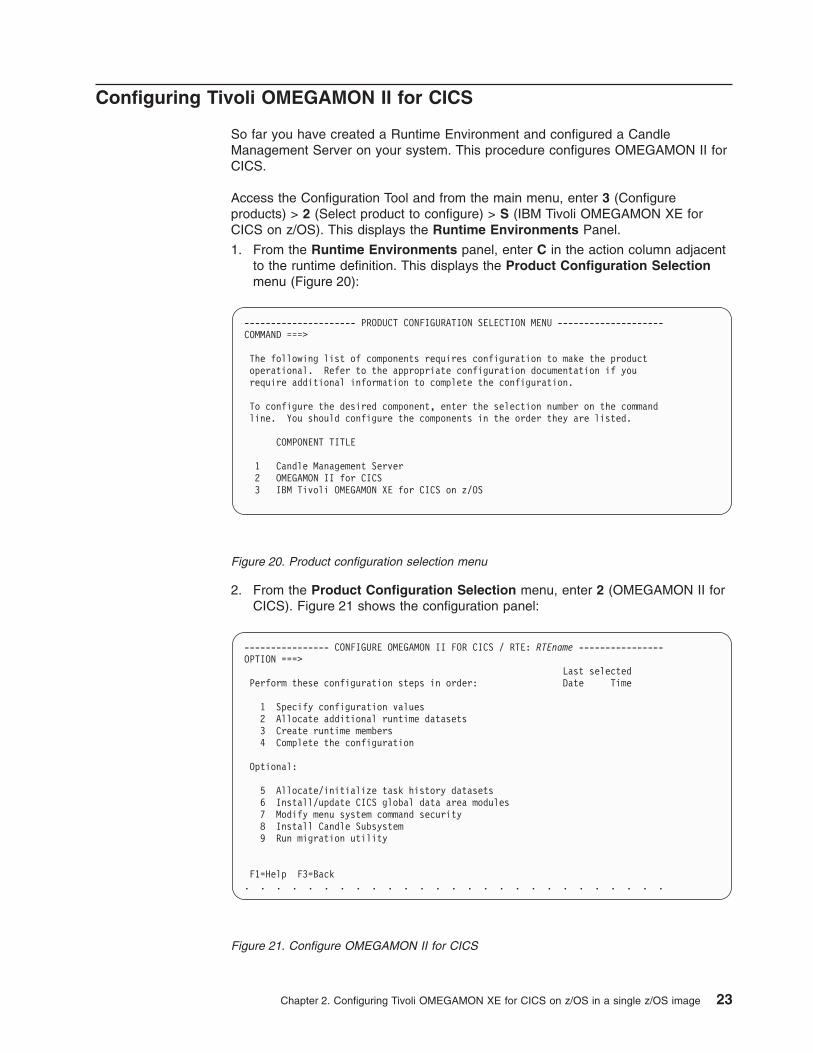
Configuring Tivoli OMEGAMON II for CICS
So far you have created a Runtime Environment and configured a Candle
Management Server on your system. This procedure configures OMEGAMON II for
CICS.
Access the Configuration Tool and from the main menu, enter 3 (Configure
products) > 2 (Select product to configure) > S (IBM Tivoli OMEGAMON XE for
CICS on z/OS). This displays the Runtime Environments Panel.
1. From the Runtime Environments panel, enter C in the action column adjacent
to the runtime definition. This displays the Product Configuration Selection
menu (Figure 20):
2. From the Product Configuration Selection menu, enter 2 (OMEGAMON II for
CICS). Figure 21 shows the configuration panel:
--------------------- PRODUCT CONFIGURATION SELECTION MENU --------------------
COMMAND ===>
The following list of components requires configuration to make the product
operational. Refer to the appropriate configuration documentation if you
require additional information to complete the configuration.
To configure the desired component, enter the selection number on the command
line. You should configure the components in the order they are listed.
COMPONENT TITLE
1 Candle Management Server
2 OMEGAMON II for CICS
3 IBM Tivoli OMEGAMON XE for CICS on z/OS
Figure 20. Product configuration selection menu
---------------- CONFIGURE OMEGAMON II FOR CICS / RTE: RTEname ----------------
OPTION ===>
Last selected
Perform these configuration steps in order: Date Time
1 Specify configuration values
2 Allocate additional runtime datasets
3 Create runtime members
4 Complete the configuration
Optional:
5 Allocate/initialize task history datasets
6 Install/update CICS global data area modules
7 Modify menu system command security
8 Install Candle Subsystem
9 Run migration utility
F1=Help F3=Back
. . . . . . . . . . . . . . . . . . . . . . . . . . .
Figure 21. Configure OMEGAMON II for CICS
Chapter 2. Configuring Tivoli OMEGAMON XE for CICS on z/OS in a single z/OS image 23
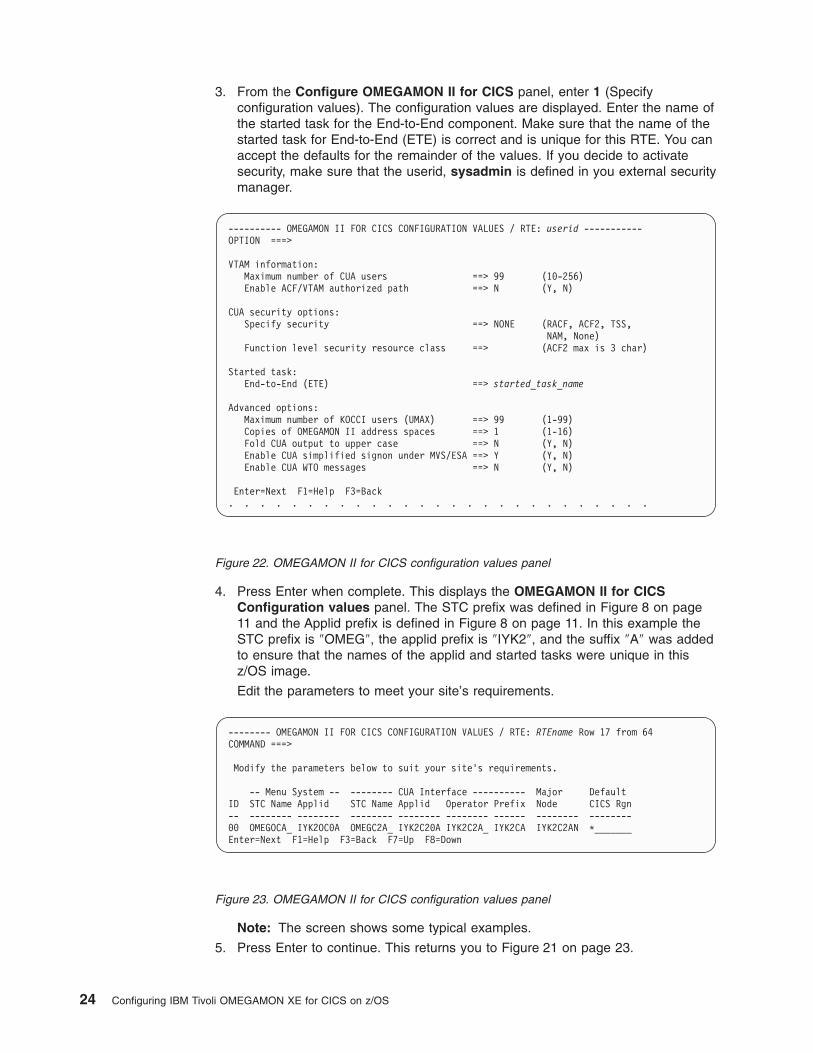
3. From the Configure OMEGAMON II for CICS panel, enter 1 (Specify
configuration values). The configuration values are displayed. Enter the name of
the started task for the End-to-End component. Make sure that the name of the
started task for End-to-End (ETE) is correct and is unique for this RTE. You can
accept the defaults for the remainder of the values. If you decide to activate
security, make sure that the userid, sysadmin is defined in you external security
manager.
4. Press Enter when complete. This displays the OMEGAMON II for CICS
Configuration values panel. The STC prefix was defined in Figure 8 on page
11 and the Applid prefix is defined in Figure 8 on page 11. In this example the
STC prefix is ″OMEG″, the applid prefix is ″IYK2″, and the suffix ″A″ was added
to ensure that the names of the applid and started tasks were unique in this
z/OS image.
Edit the parameters to meet your site’s requirements.
Note: The screen shows some typical examples.
5. Press Enter to continue. This returns you to Figure 21 on page 23.
---------- OMEGAMON II FOR CICS CONFIGURATION VALUES / RTE: userid -----------
OPTION ===>
VTAM information:
Maximum number of CUA users ==> 99 (10-256)
Enable ACF/VTAM authorized path ==> N (Y, N)
CUA security options:
Specify security ==> NONE (RACF, ACF2, TSS,
NAM, None)
Function level security resource class ==> (ACF2 max is 3 char)
Started task:
End-to-End (ETE) ==> started_task_name
Advanced options:
Maximum number of KOCCI users (UMAX) ==> 99 (1-99)
Copies of OMEGAMON II address spaces ==> 1 (1-16)
Fold CUA output to upper case ==> N (Y, N)
Enable CUA simplified signon under MVS/ESA ==> Y (Y, N)
Enable CUA WTO messages ==> N (Y, N)
Enter=Next F1=Help F3=Back
. . . . . . . . . . . . . . . . . . . . . . . . . . .
Figure 22. OMEGAMON II for CICS configuration values panel
-------- OMEGAMON II FOR CICS CONFIGURATION VALUES / RTE: RTEname Row 17 from 64
COMMAND ===>
Modify the parameters below to suit your site’s requirements.
-- Menu System -- -------- CUA Interface ---------- Major Default
ID STC Name Applid STC Name Applid Operator Prefix Node CICS Rgn
-- -------- -------- -------- -------- -------- ------ -------- --------
00 OMEGOCA_ IYK2OC0A OMEGC2A_ IYK2C20A IYK2C2A_ IYK2CA IYK2C2AN *_______
Enter=Next F1=Help F3=Back F7=Up F8=Down
Figure 23. OMEGAMON II for CICS configuration values panel
24 Configuring IBM Tivoli OMEGAMON XE for CICS on z/OS
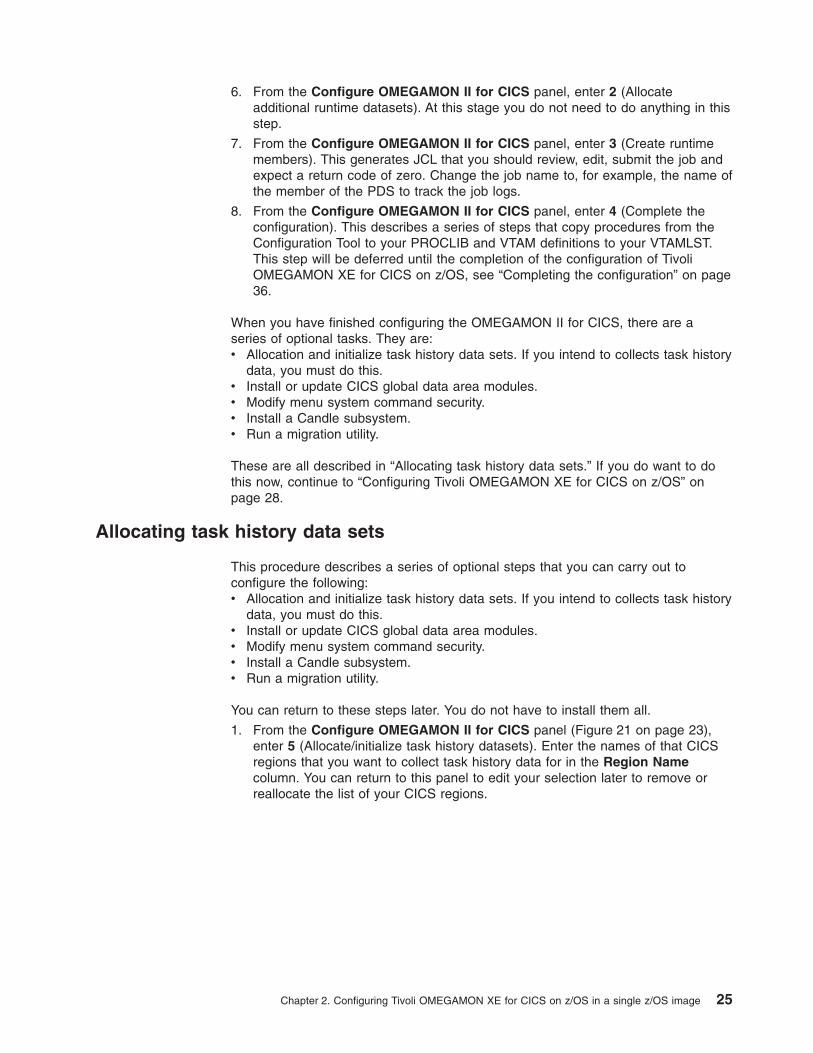
6. From the Configure OMEGAMON II for CICS panel, enter 2 (Allocate
additional runtime datasets). At this stage you do not need to do anything in this
step.
7. From the Configure OMEGAMON II for CICS panel, enter 3 (Create runtime
members). This generates JCL that you should review, edit, submit the job and
expect a return code of zero. Change the job name to, for example, the name of
the member of the PDS to track the job logs.
8. From the Configure OMEGAMON II for CICS panel, enter 4 (Complete the
configuration). This describes a series of steps that copy procedures from the
Configuration Tool to your PROCLIB and VTAM definitions to your VTAMLST.
This step will be deferred until the completion of the configuration of Tivoli
OMEGAMON XE for CICS on z/OS, see “Completing the configuration” on page
36.
When you have finished configuring the OMEGAMON II for CICS, there are a
series of optional tasks. They are:
v Allocation and initialize task history data sets. If you intend to collects task history
data, you must do this.
v Install or update CICS global data area modules.
v Modify menu system command security.
v Install a Candle subsystem.
v Run a migration utility.
These are all described in “Allocating task history data sets.” If you do want to do
this now, continue to “Configuring Tivoli OMEGAMON XE for CICS on z/OS” on
page 28.
Allocating task history data sets
This procedure describes a series of optional steps that you can carry out to
configure the following:
v Allocation and initialize task history data sets. If you intend to collects task history
data, you must do this.
v Install or update CICS global data area modules.
v Modify menu system command security.
v Install a Candle subsystem.
v Run a migration utility.
You can return to these steps later. You do not have to install them all.
1. From the Configure OMEGAMON II for CICS panel (Figure 21 on page 23),
enter 5 (Allocate/initialize task history datasets). Enter the names of that CICS
regions that you want to collect task history data for in the Region Name
column. You can return to this panel to edit your selection later to remove or
reallocate the list of your CICS regions.
Chapter 2. Configuring Tivoli OMEGAMON XE for CICS on z/OS in a single z/OS image 25
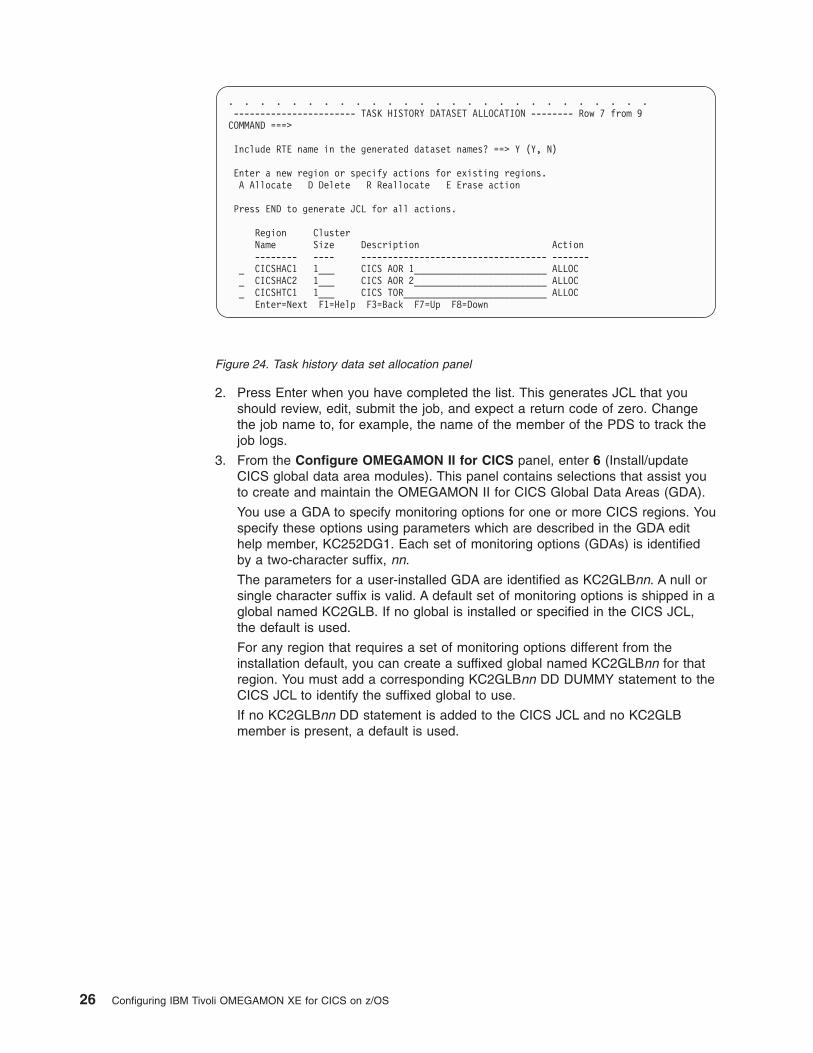
2. Press Enter when you have completed the list. This generates JCL that you
should review, edit, submit the job, and expect a return code of zero. Change
the job name to, for example, the name of the member of the PDS to track the
job logs.
3. From the Configure OMEGAMON II for CICS panel, enter 6 (Install/update
CICS global data area modules). This panel contains selections that assist you
to create and maintain the OMEGAMON II for CICS Global Data Areas (GDA).
You use a GDA to specify monitoring options for one or more CICS regions. You
specify these options using parameters which are described in the GDA edit
help member, KC252DG1. Each set of monitoring options (GDAs) is identified
by a two-character suffix, nn.
The parameters for a user-installed GDA are identified as KC2GLBnn. A null or
single character suffix is valid. A default set of monitoring options is shipped in a
global named KC2GLB. If no global is installed or specified in the CICS JCL,
the default is used.
For any region that requires a set of monitoring options different from the
installation default, you can create a suffixed global named KC2GLBnn for that
region. You must add a corresponding KC2GLBnn DD DUMMY statement to the
CICS JCL to identify the suffixed global to use.
If no KC2GLBnn DD statement is added to the CICS JCL and no KC2GLB
member is present, a default is used.
. . . . . . . . . . . . . . . . . . . . . . . . . . .
----------------------- TASK HISTORY DATASET ALLOCATION -------- Row 7 from 9
COMMAND ===>
Include RTE name in the generated dataset names? ==> Y (Y, N)
Enter a new region or specify actions for existing regions.
A Allocate D Delete R Reallocate E Erase action
Press END to generate JCL for all actions.
Region Cluster
Name Size Description Action
-------- ---- ----------------------------------- -------
_ CICSHAC1 1___ CICS AOR 1_________________________ ALLOC
_ CICSHAC2 1___ CICS AOR 2_________________________ ALLOC
_ CICSHTC1 1___ CICS TOR___________________________ ALLOC
Enter=Next F1=Help F3=Back F7=Up F8=Down
Figure 24. Task history data set allocation panel
26 Configuring IBM Tivoli OMEGAMON XE for CICS on z/OS

4. From the Configure OMEGAMON II for CICS panel, enter 7 (Modify menu
system command security). This is an optional step. This creates JCL that can
be used to modify the security of your OMEGAMON platform.
See IBM Tivoli OMEGAMON II for CICS: Configuration and Customization
Guide for more details.
5. From the Configure OMEGAMON II for CICS panel, enter 8 (Install Candle
Subsystem). This is an optional step.
The Candle Subsystem is an MVS subsystem that enables OMEGAMON to
monitor dynamic device activity. The Candle Subsystem runs in its own address
space providing dynamic I/O information to IBM products.
6. From the Configure OMEGAMON II for CICS panel, enter 9 (Run migration
utility) This is an optional step.
----------- INSTALL/UPDATE CICS GLOBAL DATA AREA MODULES (RTEname) ------------
OPTION ===> SCROLL ===>
1 Create/Update a single global
For option 1 only: Suffix ==> suffix
2 Update existing globals
3 Copy global definitions to RKANPAR
4 Convert prior version globals to new format
5 Display/Print global data area HELP documentation
Global Data Area library ==> hilev.INSTDATA
F1=Help F3=Back
Figure 25. Install or update CICS global data area modules
---------------------- INSTALL Candle Subsystem / RTE: RTEname ---------------
OPTION ===>
Perform these configuration steps in order:
Last selected
Date Time
1 Specify configuration parameters
2 Create runtime members
3 Complete the configuration
F1=Help F3=Back
Figure 26. Install Candle subsystem panel
Chapter 2. Configuring Tivoli OMEGAMON XE for CICS on z/OS in a single z/OS image 27
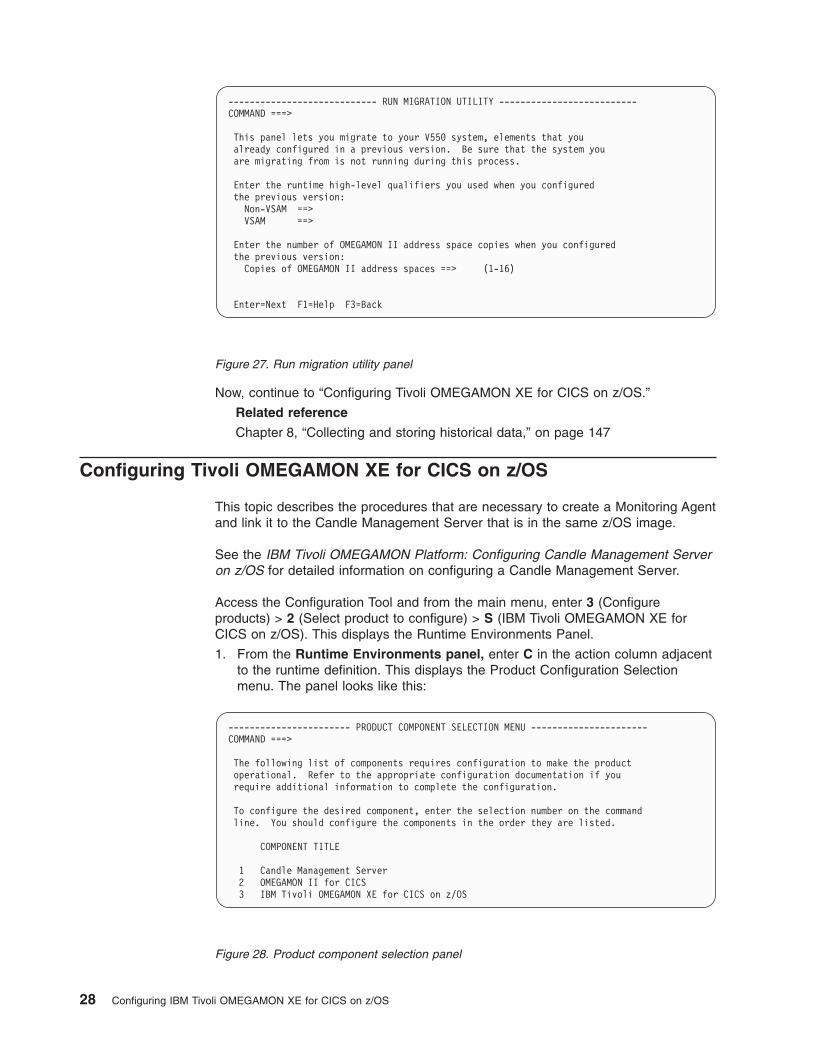
Now, continue to “Configuring Tivoli OMEGAMON XE for CICS on z/OS.”
Related reference
Chapter 8, “Collecting and storing historical data,” on page 147
Configuring Tivoli OMEGAMON XE for CICS on z/OS
This topic describes the procedures that are necessary to create a Monitoring Agent
and link it to the Candle Management Server that is in the same z/OS image.
See the IBM Tivoli OMEGAMON Platform: Configuring Candle Management Server
on z/OS for detailed information on configuring a Candle Management Server.
Access the Configuration Tool and from the main menu, enter 3 (Configure
products) > 2 (Select product to configure) > S (IBM Tivoli OMEGAMON XE for
CICS on z/OS). This displays the Runtime Environments Panel.
1. From the Runtime Environments panel, enter C in the action column adjacent
to the runtime definition. This displays the Product Configuration Selection
menu. The panel looks like this:
---------------------------- RUN MIGRATION UTILITY --------------------------
COMMAND ===>
This panel lets you migrate to your V550 system, elements that you
already configured in a previous version. Be sure that the system you
are migrating from is not running during this process.
Enter the runtime high-level qualifiers you used when you configured
the previous version:
Non-VSAM ==>
VSAM ==>
Enter the number of OMEGAMON II address space copies when you configured
the previous version:
Copies of OMEGAMON II address spaces ==> (1-16)
Enter=Next F1=Help F3=Back
Figure 27. Run migration utility panel
----------------------- PRODUCT COMPONENT SELECTION MENU ----------------------
COMMAND ===>
The following list of components requires configuration to make the product
operational. Refer to the appropriate configuration documentation if you
require additional information to complete the configuration.
To configure the desired component, enter the selection number on the command
line. You should configure the components in the order they are listed.
COMPONENT TITLE
1 Candle Management Server
2 OMEGAMON II for CICS
3 IBM Tivoli OMEGAMON XE for CICS on z/OS
Figure 28. Product component selection panel
28 Configuring IBM Tivoli OMEGAMON XE for CICS on z/OS
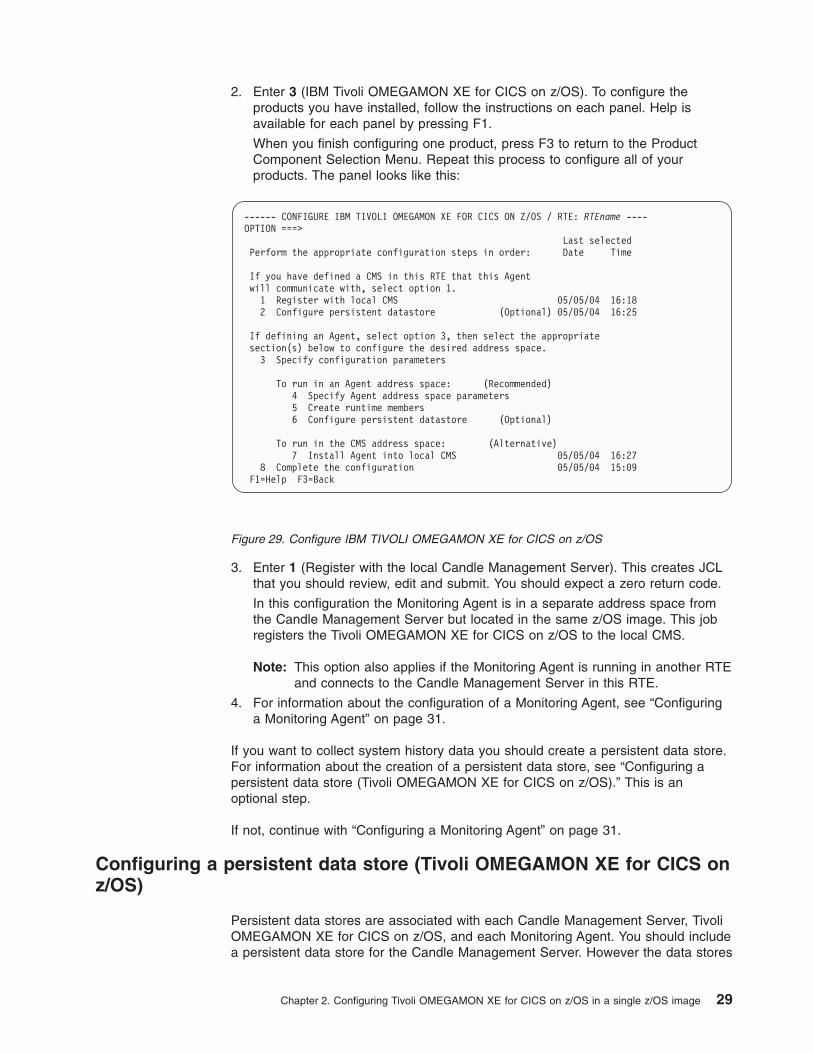
2. Enter 3 (IBM Tivoli OMEGAMON XE for CICS on z/OS). To configure the
products you have installed, follow the instructions on each panel. Help is
available for each panel by pressing F1.
When you finish configuring one product, press F3 to return to the Product
Component Selection Menu. Repeat this process to configure all of your
products. The panel looks like this:
3. Enter 1 (Register with the local Candle Management Server). This creates JCL
that you should review, edit and submit. You should expect a zero return code.
In this configuration the Monitoring Agent is in a separate address space from
the Candle Management Server but located in the same z/OS image. This job
registers the Tivoli OMEGAMON XE for CICS on z/OS to the local CMS.
Note: This option also applies if the Monitoring Agent is running in another RTE
and connects to the Candle Management Server in this RTE.
4. For information about the configuration of a Monitoring Agent, see “Configuring
a Monitoring Agent” on page 31.
If you want to collect system history data you should create a persistent data store.
For information about the creation of a persistent data store, see “Configuring a
persistent data store (Tivoli OMEGAMON XE for CICS on z/OS).” This is an
optional step.
If not, continue with “Configuring a Monitoring Agent” on page 31.
Configuring a persistent data store (Tivoli OMEGAMON XE for CICS on
z/OS)
Persistent data stores are associated with each Candle Management Server, Tivoli
OMEGAMON XE for CICS on z/OS, and each Monitoring Agent. You should include
a persistent data store for the Candle Management Server. However the data stores
------ CONFIGURE IBM TIVOLI OMEGAMON XE FOR CICS ON Z/OS / RTE: RTEname ----
OPTION ===>
Last selected
Perform the appropriate configuration steps in order: Date Time
If you have defined a CMS in this RTE that this Agent
will communicate with, select option 1.
1 Register with local CMS 05/05/04 16:18
2 Configure persistent datastore (Optional) 05/05/04 16:25
If defining an Agent, select option 3, then select the appropriate
section(s) below to configure the desired address space.
3 Specify configuration parameters
To run in an Agent address space: (Recommended)
4 Specify Agent address space parameters
5 Create runtime members
6 Configure persistent datastore (Optional)
To run in the CMS address space: (Alternative)
7 Install Agent into local CMS 05/05/04 16:27
8 Complete the configuration 05/05/04 15:09
F1=Help F3=Back
Figure 29. Configure IBM TIVOLI OMEGAMON XE for CICS on z/OS
Chapter 2. Configuring Tivoli OMEGAMON XE for CICS on z/OS in a single z/OS image 29
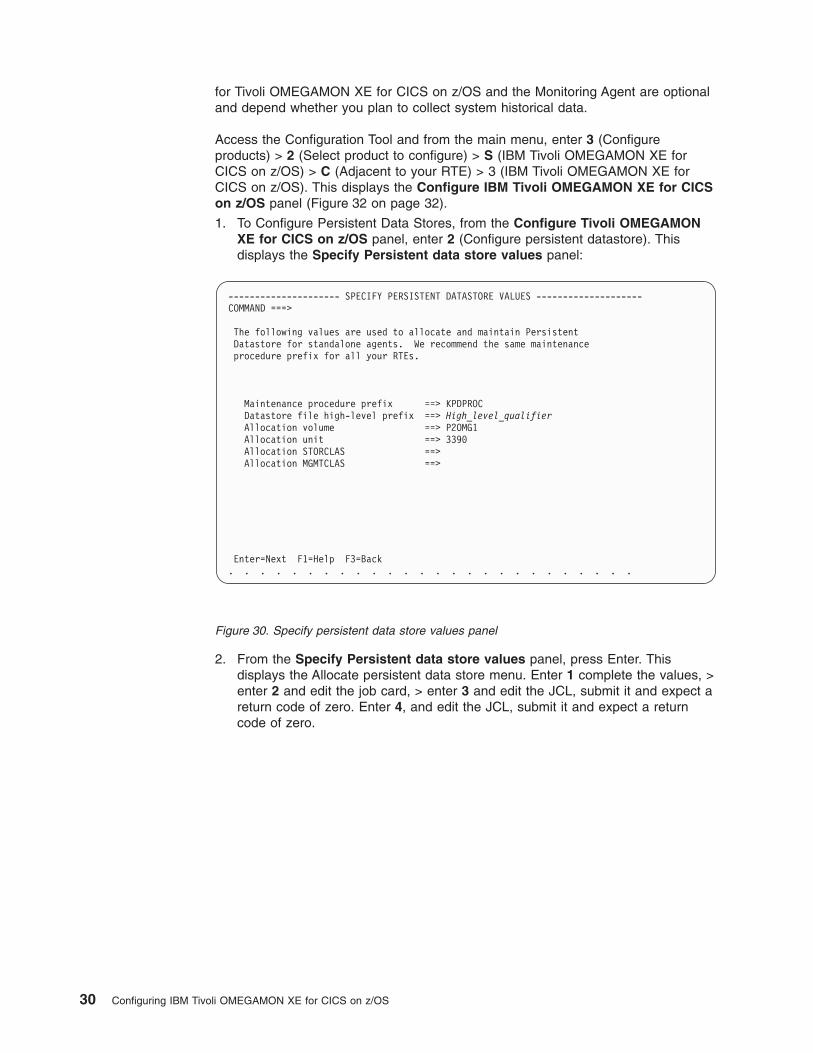
for Tivoli OMEGAMON XE for CICS on z/OS and the Monitoring Agent are optional
and depend whether you plan to collect system historical data.
Access the Configuration Tool and from the main menu, enter 3 (Configure
products) > 2 (Select product to configure) > S (IBM Tivoli OMEGAMON XE for
CICS on z/OS) > C (Adjacent to your RTE) > 3 (IBM Tivoli OMEGAMON XE for
CICS on z/OS). This displays the Configure IBM Tivoli OMEGAMON XE for CICS
on z/OS panel (Figure 32 on page 32).
1. To Configure Persistent Data Stores, from the Configure Tivoli OMEGAMON
XE for CICS on z/OS panel, enter 2 (Configure persistent datastore). This
displays the Specify Persistent data store values panel:
2. From the Specify Persistent data store values panel, press Enter. This
displays the Allocate persistent data store menu. Enter 1 complete the values, >
enter 2 and edit the job card, > enter 3 and edit the JCL, submit it and expect a
return code of zero. Enter 4, and edit the JCL, submit it and expect a return
code of zero.
--------------------- SPECIFY PERSISTENT DATASTORE VALUES --------------------
COMMAND ===>
The following values are used to allocate and maintain Persistent
Datastore for standalone agents. We recommend the same maintenance
procedure prefix for all your RTEs.
Maintenance procedure prefix ==> KPDPROC
Datastore file high-level prefix ==> High_level_qualifier
Allocation volume ==> P2OMG1
Allocation unit ==> 3390
Allocation STORCLAS ==>
Allocation MGMTCLAS ==>
Enter=Next F1=Help F3=Back
. . . . . . . . . . . . . . . . . . . . . . . . . .
Figure 30. Specify persistent data store values panel
30 Configuring IBM Tivoli OMEGAMON XE for CICS on z/OS

When you have finished configuring the persistent data stores, continue with
“Configuring a Monitoring Agent.”
Related reference
Chapter 8, “Collecting and storing historical data,” on page 147
Configuring a Monitoring Agent
Access the Configuration Tool and from the main menu, enter 3 (Configure
products) > 2 (Select product to configure) > S IBM Tivoli OMEGAMON XE for
CICS on z/OS > C next to your RTE definition and press Enter. This displays the
Configure IBM Tivoli OMEGAMON XE for CICS on z/OS Panel.
1. Enter 3 (IBM Tivoli OMEGAMON XE for CICS on z/OS). To configure the
products you have installed, follow the instructions on each Configuration tool
panel. Help is available for each panel by pressing F1.
When you finish configuring one product, press F3 to return to the Product
Component Selection Menu. Repeat this process to configure all of your
products. The panel looks like this:
---------------------- ALLOCATE PERSISTENT DATASTORE MENU --------------------
OPTION ===>
Last selected
Perform these configuration steps in order: Date Time
1 Modify and review datastore specifications
2 Create or edit PDS maintenance jobcard
3 Create runtime members
4 Edit and submit datastore allocation job
5 Complete persistent datastore configuration
F1=Help F3=Back
. . . . . . . . . . . . . . . . . . . . . . . . . .
Figure 31. Allocate persistent datastore menu
Chapter 2. Configuring Tivoli OMEGAMON XE for CICS on z/OS in a single z/OS image 31

2. From the Configure IBM Tivoli OMEGAMON XE for CICS on z/OS, enter 3
(Specify configuration parameters) You can modify the work load allocation.
Note: This screen shows the defaults. This is only a suggestion. Follow the
guidelines for your site.
3. Enter 4 (Specify Agent Address space parameters)
------ CONFIGURE IBM TIVOLI OMEGAMON XE FOR CICS ON Z/OS / RTE: RTEname ----
OPTION ===>
Last selected
Perform the appropriate configuration steps in order: Date Time
If you have defined a CMS in this RTE that this Agent
will communicate with, select option 1.
1 Register with local CMS 05/05/04 16:18
2 Configure persistent datastore (Optional) 05/05/04 16:25
If defining an Agent, select option 3, then select the appropriate
section(s) below to configure the desired address space.
3 Specify configuration parameters
To run in an Agent address space: (Recommended)
4 Specify Agent address space parameters
5 Create runtime members
6 Configure persistent datastore (Optional)
To run in the CMS address space: (Alternative)
7 Install Agent into local CMS 05/05/04 16:27
8 Complete the configuration 05/05/04 15:09
F1=Help F3=Back
Figure 32. Configure IBM TIVOLI OMEGAMON XE for CICS on Z/OS panel
----------------------- SPECIFY CONFIGURATION PARAMETERS ---------------------
OPTION ===>
Complete the items on this panel.
WLM block allocation ==> 236 (10-524287 blocks)
Figure 33. Specify configuration parameters panel
-------------------- SPECIFY AGENT ADDRESS SPACE PARAMETERS -------------------
COMMAND ===>
The following information is needed to define the Agent address space:
Agent started task ==> agent_started_task_name
Connect to Candle Management Server in this RTE ==> Y (Y, N)
Name of Primary Candle Management Server ==> CMSName
Specify communication protocols in priority sequence:
Protocol 1 ==> IPPIPE (SNA, IP, IPPIPE)
Protocol 2 (optional) ==> IP (SNA, IP, IPPIPE)
Protocol 3 (optional) ==> SNA (SNA, IP, IPPIPE)
Figure 34. Specify agent address space parameters panel
32 Configuring IBM Tivoli OMEGAMON XE for CICS on z/OS
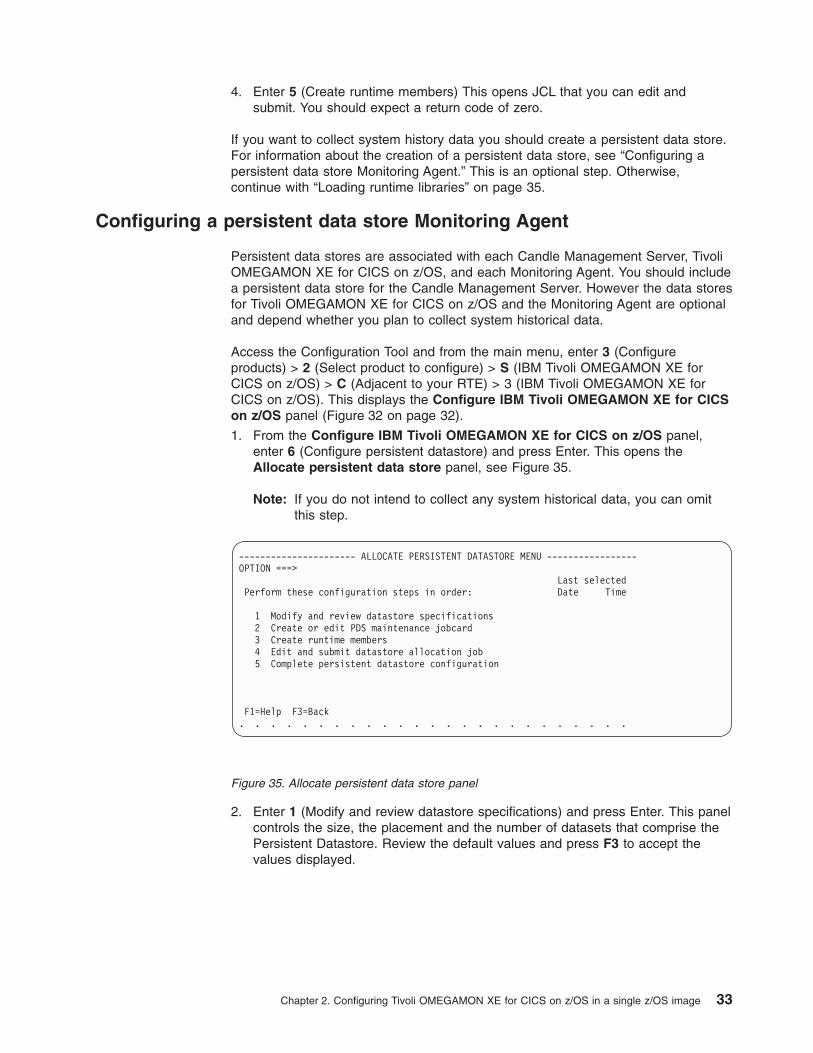
4. Enter 5 (Create runtime members) This opens JCL that you can edit and
submit. You should expect a return code of zero.
If you want to collect system history data you should create a persistent data store.
For information about the creation of a persistent data store, see “Configuring a
persistent data store Monitoring Agent.” This is an optional step. Otherwise,
continue with “Loading runtime libraries” on page 35.
Configuring a persistent data store Monitoring Agent
Persistent data stores are associated with each Candle Management Server, Tivoli
OMEGAMON XE for CICS on z/OS, and each Monitoring Agent. You should include
a persistent data store for the Candle Management Server. However the data stores
for Tivoli OMEGAMON XE for CICS on z/OS and the Monitoring Agent are optional
and depend whether you plan to collect system historical data.
Access the Configuration Tool and from the main menu, enter 3 (Configure
products) > 2 (Select product to configure) > S (IBM Tivoli OMEGAMON XE for
CICS on z/OS) > C (Adjacent to your RTE) > 3 (IBM Tivoli OMEGAMON XE for
CICS on z/OS). This displays the Configure IBM Tivoli OMEGAMON XE for CICS
on z/OS panel (Figure 32 on page 32).
1. From the Configure IBM Tivoli OMEGAMON XE for CICS on z/OS panel,
enter 6 (Configure persistent datastore) and press Enter. This opens the
Allocate persistent data store panel, see Figure 35.
Note: If you do not intend to collect any system historical data, you can omit
this step.
2. Enter 1 (Modify and review datastore specifications) and press Enter. This panel
controls the size, the placement and the number of datasets that comprise the
Persistent Datastore. Review the default values and press F3 to accept the
values displayed.
---------------------- ALLOCATE PERSISTENT DATASTORE MENU -----------------
OPTION ===>
Last selected
Perform these configuration steps in order: Date Time
1 Modify and review datastore specifications
2 Create or edit PDS maintenance jobcard
3 Create runtime members
4 Edit and submit datastore allocation job
5 Complete persistent datastore configuration
F1=Help F3=Back
. . . . . . . . . . . . . . . . . . . . . . . . .
Figure 35. Allocate persistent data store panel
Chapter 2. Configuring Tivoli OMEGAMON XE for CICS on z/OS in a single z/OS image 33

Note: The settings on this screen are only suggestions. Follow the guidelines
for your site.
Group name
Is the name of the group. Each group contains the number of data sets
specified in the Group Count field.
Data Sets lowlev
Is the low-level qualifier of the data sets name. It is suffixed with a
1-character value (1-9, A-Z) that indicates the data set number within a
group. As an example, if these are the values referenced on the
Persistent Datastore Specifications panel:
v high.level.qualifier.RKCPHIS1
v high.level.qualifier.RKCPHIS2
v high.level.qualifier.RKCPHIS3
Where RKCPHISn is the low-level qualifier.
You may use the default values displayed or change them to meet your
site’s requirements.
Group Count
Indicates the number of data sets within the group.
Note: Three is the supported minimum setting for all but a limited
number of special purpose data sets. If you specify one,
additional I/O is required to delete records when space is reused.
If you specify two, data becomes unavailable when a datastore
file fills up.
Est Cyl space
This field is used to allocate the number of datastore files you specified
for the group. The CT/PDS processing computes how much space is
needed to allocate the group datastore files, and how much additional
required space is needed to hold overhead information. Overhead
information includes the product dictionary, table records, index records,
and spare room for buffers that need to be reserved for when the data
set is full.
Backup, Export, and Extract
These fields are used for datastore maintenance functions. Specify Y to
turn on one of these maintenance functions for a group.
--------------------- PERSISTENT DATASTORE SPECIFICATIONS ---- Row 1 to 1 of 1
COMMAND ===>
Modify persistent datastore allocation and maintenance information as required
Press Enter to accept values and then F3 to return.
Datastore high-level qualifier: hilev
Group -Datasets in Group- Volser/ Storclas/ -Est Cyl- -Maintenance-
Name Lowlev Count Unit Mgmtclas Space Backup Export Extrac
------------------------------------------------------------------------------
GENHIST RKCPHIS 3 volser NONSMS__ 36__ N N N
________ ________
F1=Help F3=Back
Figure 36. Persistent data store specifications panel
34 Configuring IBM Tivoli OMEGAMON XE for CICS on z/OS

You can use the Backup facility if you want to keep old history data.
This facility does an MVS IEBGENER request to make an exact copy of
the data set being maintained. It is a simple copy of the data set to
either tape or DASD. A backed-up file also has the advantage that
nothing has to be done to the file to dynamically make the data
available to the Persistent Datastore again.
Each group contains the number of data sets specified in the Group Count field.
The Datasets Lowlev is suffixed with a 1-character value (1-9, A-Z) that
indicates the dataset number within a group. As an example, if these are the
values referenced on the Persistent Datastore Specifications panel, the PD#PJH
job creates the Persistent Datastore members that make reference to these
datastore files
3. Enter 2 (Create or edit PDS maintenance jobcard). Edit the job card and press
Enter. This specifies the job card to be used for the Persistent Datastore (PDS)
KPDPROC1, KPDPROCC and KPDPROC2 maintenance jobs. The job card
member (KPDJOBC) is created in the high.level.qualifier.RKANSAM library.
4. Enter 3 (Create runtime members). This opens JCL that you can edit and
submit. You should expect a return code of zero. This job creates the persistent
datastore members.
5. Enter 4 (Edit and submit datastore allocation job). This opens JCL that you can
edit and submit. You should expect a return code of zero. This job allocates and
initializes all the data sets required for this product’s persistent datastore
Note: This job is applicable to define a brand new PDS configuration. If the
PDS data sets already exist, then delete or rename this product’s
persistent datastore files if you want the configuration tool to re-allocate
and re-initialize the datasets for this product’s persistent datastore.
6. Enter 5 (Complete persistent datastore configuration). This describes the steps
that you need to take to copy the data sets that you have created to your
procedures libraries. This step will be deferred until the completion of the
configuration of Tivoli OMEGAMON XE for CICS on z/OS, see “Completing the
configuration” on page 36.
When you have finished configuring the persistent data stores, continue with
“Loading runtime libraries.”
Related reference
Chapter 8, “Collecting and storing historical data,” on page 147
Loading runtime libraries
You must load the runtime libraries after you:
v Install and configure the products you want in a new RTE
v Install and configure an additional product in an existing RTE
v Install maintenance, whether or not you reconfigure a product
v Change the configuration of Tivoli OMEGAMON XE for CICS on z/OS.
Note: The load job requires exclusive access to the runtime libraries.
Follow these steps to load the runtime libraries from the SMP/E target libraries.
Chapter 2. Configuring Tivoli OMEGAMON XE for CICS on z/OS in a single z/OS image 35
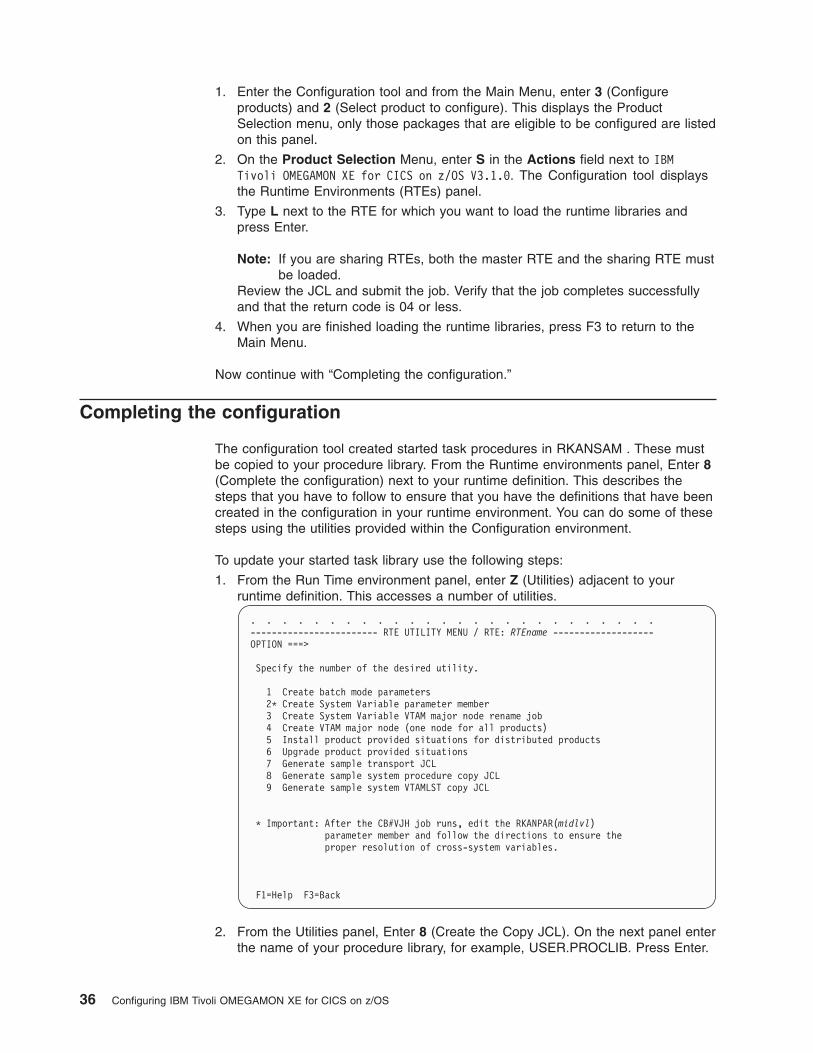
1. Enter the Configuration tool and from the Main Menu, enter 3 (Configure
products) and 2 (Select product to configure). This displays the Product
Selection menu, only those packages that are eligible to be configured are listed
on this panel.
2. On the Product Selection Menu, enter S in the Actions field next to IBM
Tivoli OMEGAMON XE for CICS on z/OS V3.1.0. The Configuration tool displays
the Runtime Environments (RTEs) panel.
3. Type L next to the RTE for which you want to load the runtime libraries and
press Enter.
Note: If you are sharing RTEs, both the master RTE and the sharing RTE must
be loaded.Review the JCL and submit the job. Verify that the job completes successfully
and that the return code is 04 or less.
4. When you are finished loading the runtime libraries, press F3 to return to the
Main Menu.
Now continue with “Completing the configuration.”
Completing the configuration
The configuration tool created started task procedures in RKANSAM . These must
be copied to your procedure library. From the Runtime environments panel, Enter 8
(Complete the configuration) next to your runtime definition. This describes the
steps that you have to follow to ensure that you have the definitions that have been
created in the configuration in your runtime environment. You can do some of these
steps using the utilities provided within the Configuration environment.
To update your started task library use the following steps:
1. From the Run Time environment panel, enter Z (Utilities) adjacent to your
runtime definition. This accesses a number of utilities.
. . . . . . . . . . . . . . . . . . . . . . . . . .
------------------------ RTE UTILITY MENU / RTE: RTEname -------------------
OPTION ===>
Specify the number of the desired utility.
1 Create batch mode parameters
2* Create System Variable parameter member
3 Create System Variable VTAM major node rename job
4 Create VTAM major node (one node for all products)
5 Install product provided situations for distributed products
6 Upgrade product provided situations
7 Generate sample transport JCL
8 Generate sample system procedure copy JCL
9 Generate sample system VTAMLST copy JCL
* Important: After the CB#VJH job runs, edit the RKANPAR(midlvl)
parameter member and follow the directions to ensure the
proper resolution of cross-system variables.
F1=Help F3=Back
2. From the Utilities panel, Enter 8 (Create the Copy JCL). On the next panel enter
the name of your procedure library, for example, USER.PROCLIB. Press Enter.
36 Configuring IBM Tivoli OMEGAMON XE for CICS on z/OS

Edit the JCL, submit the job. You should expect a return code of zero. This
generates JCL to create a member called KCISYPJB in
high.level.qualifier.rtename.RKANSAM.
3. Edit KCISYPJB and submit the job. This job copies all the required started tasks
from your RKANSAM library to the specified procedure library. You should
expect a return code of zero. Looking through the code you will see the names
of the started tasks that have been created during the configuration. There are
started tasks for:
v Candle Management Server
v OMEGAMON II for CICS
– The Menu
– CUAv Monitoring Agent
v End-to-End (ETE).
4. From the Utilities panel, Enter 9 (Create the VTAM definitions). Enter the name
of your VTAM node, press Enter. This sample system copy JCL copies the
VTAM definitions to VTAMLST. The Configuration tool created VTAM definitions
in RKANSAM. You should copy the VTAM major node from RKANSAM to your
system VTAMLST. This generates JCL to create a member called KCISYNJB in
high.level.qualifier.rtename.RKANSAM.
5. Edit KCISYNJB and submit the job. This job copies all the required VTAM
definitions from your RKANSAM library to the specified VTAMLST. You should
expect a return code of zero.
6. All runtime libraries concatenated in the STEPLIB DDNAME must be
APF-authorized.
7. Vary VTAM major node active. Vary the VTAM major node active, for example,
V NET,ACT,ID=OMEGAAN
8. Edit the started task for your Monitoring Agent. Add the following statement the
end of job: // RKCPXMnn DD DUMMY Where nn is a two digit value between 01-15
and is unique for your monitoring agent. This corresponds to the statement that
you add to the CICS started job.
9. Contact you local security administrator to grant the appropriate authorizations.
Now, you can verify your installation and configuration, continue with “Modifying the
CICS started task” on page 76 and “Verifying your configuration” on page 77.
If you are migrating data from previous releases or from OMEGAMON II to
OMEGAMON XE, see Chapter 9, “Migrating,” on page 155.
Modifying the CICS startup JCL
You can access the information from the Configure OMEGAMON II for CICS
panel, enter 4 (Complete the configuration). This provides information that you have
to add to your the JCL for your CICS regions. It is summarized in the following
points.
1. Add //KC2GLBnn DD DUMMY to your CICS started task. If you want to use the
monitoring options in a suffixed global data area (GDA), you must add this DD
statement to the CICS region JCL to identify the global.
2. Add //RKC2XMnn DD DUMMY to your CICS started task. If you want to use other
than the default OMEGAMON II address space pair (the defaults here are
CANSOC0 and CANSC20 as set on Configure OMEGAMON II for CICS option
1) to monitor a CICS region, you must add this DD statement to the CICS
region JCL to identify the address space pair.
Chapter 2. Configuring Tivoli OMEGAMON XE for CICS on z/OS in a single z/OS image 37
3. Add //RKCPXMnn DD DUMMY to your CICS started task.
4. Add the program KOCOME00. Program KOCOME00 is the only program loaded
from your CICS startup JCL’s DFHRPL concatenation. You can copy this
program to a separate DFHRPL to reduce PDS directory search times. If you
include program KOCOME00 in your PLTPI, you can ensure that the
OMEGAMON II address space is active before your CICS region completes
initializing. To do this, add the following DD statement to the CICS startup JCL:
//OCCIREQnn DD DUMMY
After you add the DD statement, program KOCOME00 checks the
cross-memory interface task (XMIT) is running as a subtask of the menu
system. If the subtask is active, initialization continues. If the subtask is not
active, the following WTOR message appears:
OC0806: XMCR OCCIREQ SPECIFIED IN THE STARTUP JCL BUT RKC2XMnn NOT ACTIVE.
REPLY ABEND, IGNORE,OR RETRY.
Where nn is the suffix specified in the //RKC2XMnn DD DUMMY statement in the
CICS startup JCL or, if no suffix was specified, by the default (00).
5. Add a DD statement for RKANMOD and concatenate the OMEGAMON II load
library to your DFHRPL DD statement. Here is an example of the additional
statements:
//DFHRPL......
// ... // ... //******************************************************************
//* OMEGAMON FOR CICS DATASETS
//******************************************************************
// DD DISP=SHR,DSN=high.level.qualifier.TKANMOD
// DD DISP=SHR,DSN=high.level.qualifier.RTEname.RKANMOD
//RKANMOD DD DISP=SHR,DSN=high.level.qualifier.TKANMOD
// DD DISP=SHR,DSN=high.level.qualifier.mid_level_qualifier.RKANMOD
//RKC2XMnn DD DUMMY
//RKCPXMnn DD DUMMY
//OCCIREQ DD DUMMY
//*
Now you have completed configuring IBM Tivoli OMEGAMON XE for CICS on
z/OS, you should install the CandleNet Portal Server and CandleNet Portal client on
your workstation. When you have done this continue with “Verifying the
configuration.”
Verifying the configuration
Now that you have completed the configuration you can verify that it has been
successful. Initially you can check that the logs generated from the jobs are clean
and contain no error messages.
Verification involves:
v Start three started tasks on your z/OS system:
– Candle Management Server
– OMEGAMON II for CICS
– Monitoring Agent
v Start your CICS regions.
v Starting the CandleNet Portal Server through Manage Candle Services from
your workstation.
38 Configuring IBM Tivoli OMEGAMON XE for CICS on z/OS
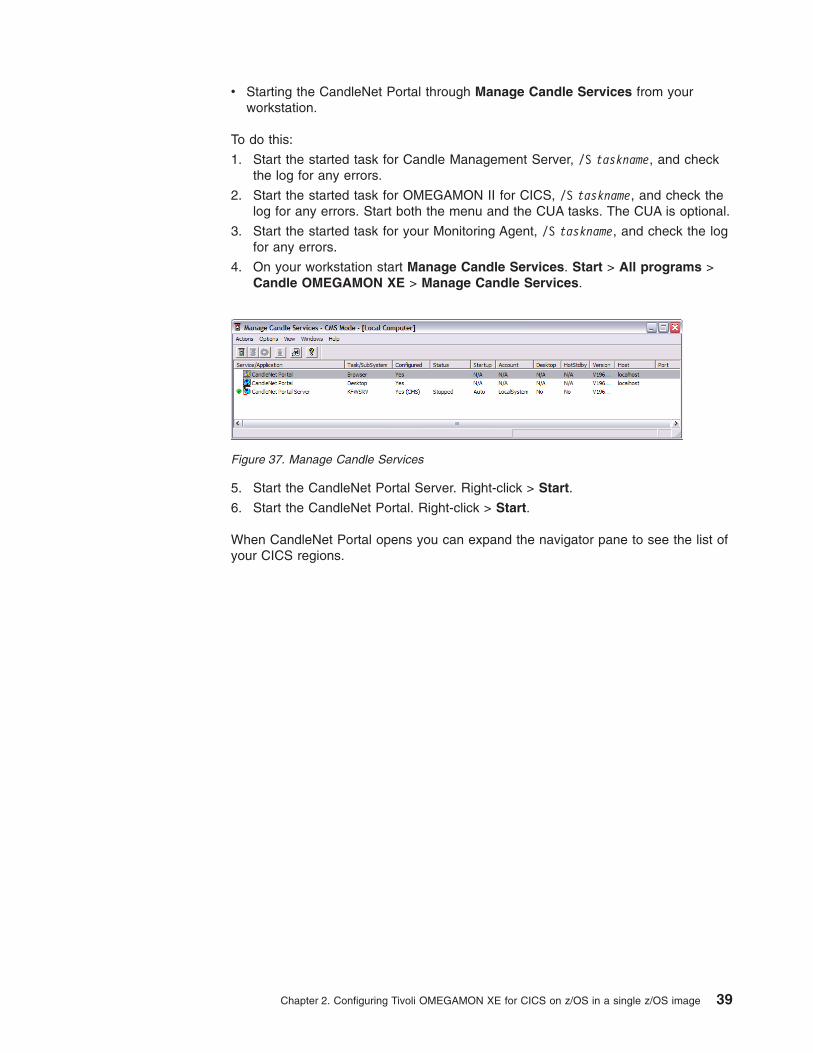
v Starting the CandleNet Portal through Manage Candle Services from your
workstation.
To do this:
1. Start the started task for Candle Management Server, /S taskname, and check
the log for any errors.
2. Start the started task for OMEGAMON II for CICS, /S taskname, and check the
log for any errors. Start both the menu and the CUA tasks. The CUA is optional.
3. Start the started task for your Monitoring Agent, /S taskname, and check the log
for any errors.
4. On your workstation start Manage Candle Services. Start > All programs >
Candle OMEGAMON XE > Manage Candle Services.
5. Start the CandleNet Portal Server. Right-click > Start.
6. Start the CandleNet Portal. Right-click > Start.
When CandleNet Portal opens you can expand the navigator pane to see the list of
your CICS regions.
Figure 37. Manage Candle Services
Chapter 2. Configuring Tivoli OMEGAMON XE for CICS on z/OS in a single z/OS image 39

40 Configuring IBM Tivoli OMEGAMON XE for CICS on z/OS

Chapter 3. Configuring a local Candle Management Server on
a distributed system
This procedure uses many of the steps described in Chapter 2, “Configuring Tivoli
OMEGAMON XE for CICS on z/OS in a single z/OS image,” on page 7. The key
difference is that you install and configure your Candle Management Server on a
distributed system. On your z/OS system you configure only a monitoring agent on
each z/OS system where you are monitoring a CICS region.
For your convenience all the steps are described as if you were installing Tivoli
OMEGAMON XE for CICS on z/OS for the first time. It is assumed that you have
set up your configuration tool as described in Chapter 1, “Configuration overview,”
on page 1.
Note: In this section, the procedure installs and configures the Candle
Management Server, CandleNet Portal Server, and CandleNet Portal on the
same workstation. However you can install these components on three
separate workstations.
The two major configuration steps in this process include the following:
CandleNet Portal CandleNetPortal Server
Windows Client
Windows z/OS image
CandleManagement
Server
MonitoringAgent
Localfiles
Client
Browser
CICSregion A
CICSregion B
CICSregion C
Persistentdatastore
Optional
Figure 38. A configuration with the Candle Management Server on a distributed platform
monitoring CICS regions on a z/OS image
© Copyright IBM Corp. 2005 41
Step 1 - Installing and configuring Candle Management Server, CandleNet
Portal, and CandleNet Portal Server on a workstation.
“Installing Candle Management Server on Windows XP” and this includes
the installation of the Candle Management Server on a windows system.
Step 2 - Configuring Monitoring Agent on z/OS
This involves:
1. Setting up a runtime environment, see “Introduction to runtime
environments” on page 55.
2. Configuring OMEGAMON II for CICS, see “Configuring Tivoli
OMEGAMON II for CICS” on page 61
3. Configuring just a Monitoring Agent as part of Tivoli OMEGAMON XE
for CICS on z/OS, see “Configuring Tivoli OMEGAMON XE for CICS on
z/OS for a Candle Management Server on a distributed system” on
page 66
Installing Candle Management Server on Windows XP
This section describes the background, and procedures that you should adopt when
Installing and configuring CandleNet Portal on a Window XP Professional platform.
The installation and configuration processes described in this information are limited
to Windows XP Professional Edition with Support pac 1.
Note: A fuller account of this process is found in theIBM Tivoli OMEGAMON
Platform: Installing and Setting up OMEGAMON Platform and CandleNet
Portal on Windows and UNIX manual.
This configuration installs a hub Candle Management Server on the same Windows
workstation as your CandleNet Portal Server and CandleNet Portal. However if you
decide to run the Candle Management Server on a separate Windows platform,
install them in the sequence listed as follows:
1. Hub Candle Management Server
2. CandleNet Portal Server
3. CandleNet Portal Desktop
After the Candle Management Server has been installed, the other components can
be installed in any sequence.
Other platforms where you can install Candle Management Server include AIX,
Solaris, and HP/UX.
Checklist: Before you start
There are a number of steps that you may have already carried out. They include:
Table 3. Before you start this configuration
U Task Location
h Installing a database on your
Windows workstation.
“Installing DB2 UDB” on page 134
IBM Tivoli OMEGAMON Platform: Installing and
Setting up OMEGAMON Platform and
CandleNet Portal on Windows and UNIX.
42 Configuring IBM Tivoli OMEGAMON XE for CICS on z/OS
Table 3. Before you start this configuration (continued)
U Task Location
h Using TSO, set up the
Configuration tool by copying the
contents of the target library to your
configuration tool library.
“Setting up the Configuration Tool” on page 2.
h Setting up the work environment of
the Configuration tool.
“Setting up your work environment” on page 3.
h Setting up the configuration
environment of the Configuration
tool.
“Setting up your configuration environment” on
page 5.
Deploying CandleNet Portal
As with other client and server applications, components of CandleNet Portal can
be installed on the same machine; however, it is more likely that you will install
each component on a separate machine in your network.
To deploy CandleNet Portal at your site:
v Install at least one CandleNet Portal Server for every hub Candle Management
Server. You can have more than one CandleNet Portal Server connected to the
same hub Candle Management Server, for example, to provide a separate test
and production environment.
Note: Install the CandleNet Portal Server on the same machine as the
Warehouse Proxy, if possible, for ease of administration. The CandleNet
Portal Server requires its own “Data Warehouse data” source if it is not
installed on the same machine as the Warehouse Proxy.
For CandleNet Portal, begin by installing and configuring the CandleNet Portal
Server and one Desktop Client application. Always install the CandleNet Portal
Server first. Before installing the CandleNet Portal Server, make sure a hub Candle
Management Server has been installed. After you verify that you can communicate
properly with your supported Candle products, install additional clients on as many
machines as you would like.
Configuring Candle Management Server on Windows
This procedure installs three components on your workstation:
v Candle Management Server
v CandleNet Portal Server
v CandleNet Portal, both the desktop and the browser version.
This procedure follows the steps that are necessary to install and configure a
Candle Management Server on your local workstation.
Follow these steps:
1. Log onto Windows using an ID with Administrator authority and close any
running applications.
2. Insert the IBM Tivoli OMEGAMON Platform CD into your CD ROM drive.
Installation begins automatically.
Chapter 3. Configuring a local Candle Management Server on a distributed system 43
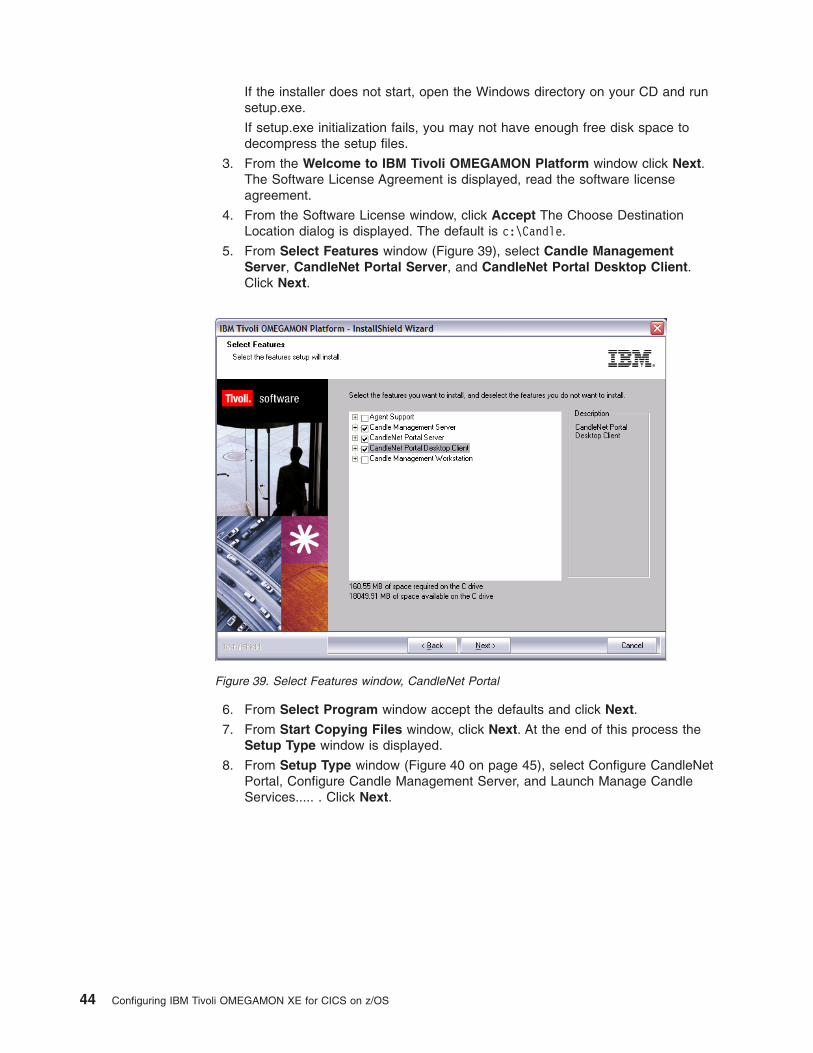
If the installer does not start, open the Windows directory on your CD and run
setup.exe.
If setup.exe initialization fails, you may not have enough free disk space to
decompress the setup files.
3. From the Welcome to IBM Tivoli OMEGAMON Platform window click Next.
The Software License Agreement is displayed, read the software license
agreement.
4. From the Software License window, click Accept The Choose Destination
Location dialog is displayed. The default is c:\Candle.
5. From Select Features window (Figure 39), select Candle Management
Server, CandleNet Portal Server, and CandleNet Portal Desktop Client.
Click Next.
6. From Select Program window accept the defaults and click Next.
7. From Start Copying Files window, click Next. At the end of this process the
Setup Type window is displayed.
8. From Setup Type window (Figure 40 on page 45), select Configure CandleNet
Portal, Configure Candle Management Server, and Launch Manage Candle
Services..... . Click Next.
Figure 39. Select Features window, CandleNet Portal
44 Configuring IBM Tivoli OMEGAMON XE for CICS on z/OS
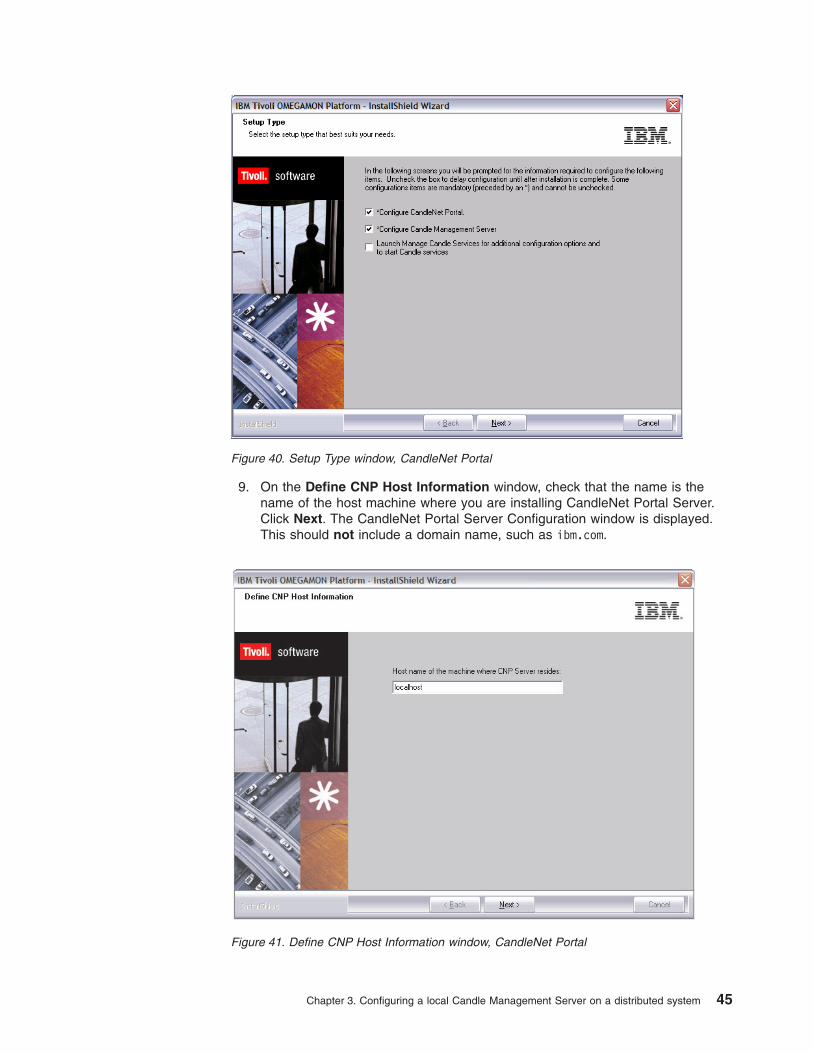
9. On the Define CNP Host Information window, check that the name is the
name of the host machine where you are installing CandleNet Portal Server.
Click Next. The CandleNet Portal Server Configuration window is displayed.
This should not include a domain name, such as ibm.com.
Figure 40. Setup Type window, CandleNet Portal
Figure 41. Define CNP Host Information window, CandleNet Portal
Chapter 3. Configuring a local Candle Management Server on a distributed system 45
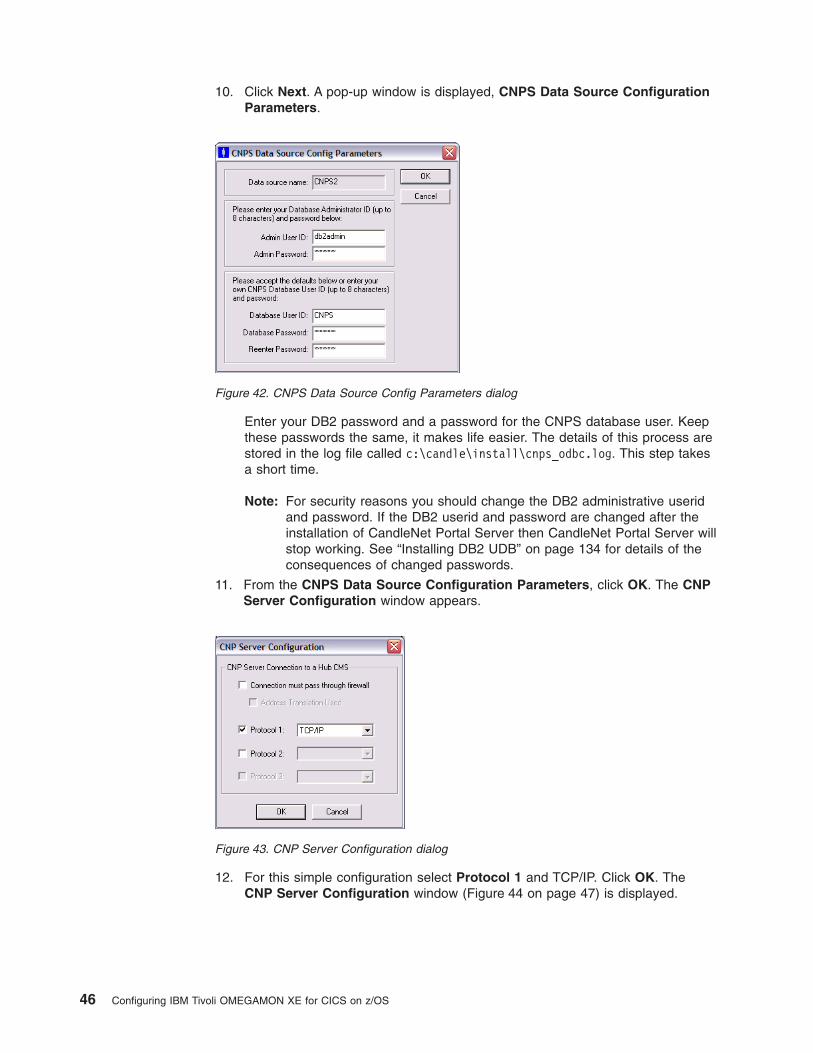
10. Click Next. A pop-up window is displayed, CNPS Data Source Configuration
Parameters.
Enter your DB2 password and a password for the CNPS database user. Keep
these passwords the same, it makes life easier. The details of this process are
stored in the log file called c:\candle\install\cnps_odbc.log. This step takes
a short time.
Note: For security reasons you should change the DB2 administrative userid
and password. If the DB2 userid and password are changed after the
installation of CandleNet Portal Server then CandleNet Portal Server will
stop working. See “Installing DB2 UDB” on page 134 for details of the
consequences of changed passwords.
11. From the CNPS Data Source Configuration Parameters, click OK. The CNP
Server Configuration window appears.
12. For this simple configuration select Protocol 1 and TCP/IP. Click OK. The
CNP Server Configuration window (Figure 44 on page 47) is displayed.
Figure 42. CNPS Data Source Config Parameters dialog
Figure 43. CNP Server Configuration dialog
46 Configuring IBM Tivoli OMEGAMON XE for CICS on z/OS
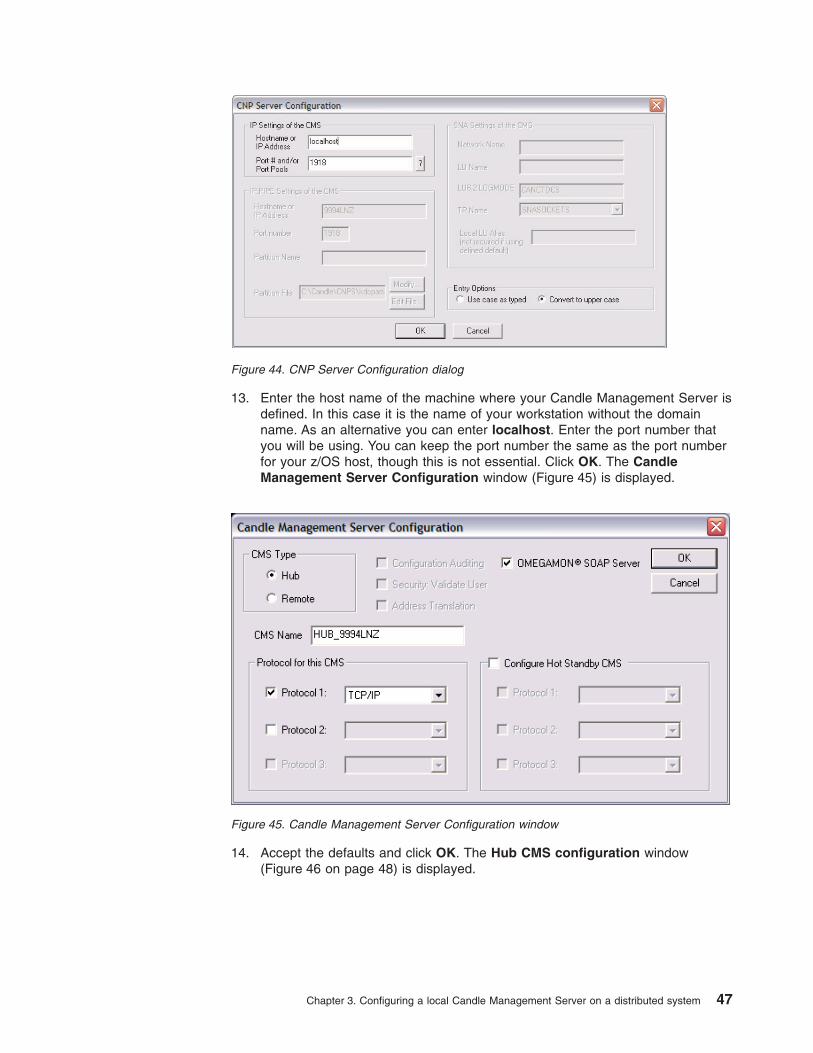
13. Enter the host name of the machine where your Candle Management Server is
defined. In this case it is the name of your workstation without the domain
name. As an alternative you can enter localhost. Enter the port number that
you will be using. You can keep the port number the same as the port number
for your z/OS host, though this is not essential. Click OK. The Candle
Management Server Configuration window (Figure 45) is displayed.
14. Accept the defaults and click OK. The Hub CMS configuration window
(Figure 46 on page 48) is displayed.
Figure 44. CNP Server Configuration dialog
Figure 45. Candle Management Server Configuration window
Chapter 3. Configuring a local Candle Management Server on a distributed system 47

15. Enter the hostname and the port number of the agent that this hub is
connecting to. As this is on a different host it should be the fully qualified
hostname. Leave the Entry Options as ″Convert to upper case″. Click OK. This
displays the Seed CMS (Figure 47) window.
This adds the default definitions to your Candle Management Server database.
Later you will be adding the predefined workspaces, situation and thresholds
that relate to CICS to your database.
16. Select On this computer and click OK. You are prompted that your Candle
Management Server has not been started and that it will be started to seed the
data. The Select product to seed CMS window (Figure 48) is displayed.
Figure 46. Hub CMS configuration window
Figure 47. Seed CMS dialog
Figure 48. Select Product to Seed CMS dialog
48 Configuring IBM Tivoli OMEGAMON XE for CICS on z/OS
17. Select all the products and click OK. A seed data operation complete message
appears. and the InstallShield Wizard Complete window appears.
18. Click Finish and check the Readme.
Now, you have added the IBM Tivoli OMEGAMON platform to your workstation, you
must configure at least one product on your workstation. To install the Tivoli
OMEGAMON XE for CICS on z/OS, see “Configuring Tivoli OMEGAMON XE for
CICS on Windows.”
Configuring Tivoli OMEGAMON XE for CICS on Windows
This procedure assumes that you have the IBM Tivoli OMEGAMON Platform and
have configured it to use a local Candle Management Server installed on your
workstation as described in “Configuring Candle Management Server on Windows”
on page 43.
This installation and configuration procedure adds the IBM Tivoli OMEGAMON XE
for CICS on z/OS enabling you to monitor your CICS regions.
To do this:
1. Log onto Windows using an ID with Administrator authority and close any
running applications.
2. Insert the IBM Tivoli Data Files for z/OS CD into your CD ROM drive.
Installation begins automatically.
If the installer does not start, go to your CD. Open the Windows directory and
run setup.exe.
If setup.exe initialization fails, you may not have enough free disk space to
decompress the setup files.
3. From the Welcome to IBM Tivoli OMEGAMON XE for CICS on z/OS window,
click Next. The Software License Agreement is displayed, read the software
license agreement.
4. From the Software License window, click Accept. The Select Features
window (Figure 49 on page 50) is displayed. If this is the first time that you
have installed CandleNet Portal and you followed the instructions in
“Configuring Candle Management Server on Windows” on page 43, there
should be three features available for selection: Candle Management Server,
CandleNet Portal Server, and CandleNet Portal Desktop Client.
Chapter 3. Configuring a local Candle Management Server on a distributed system 49
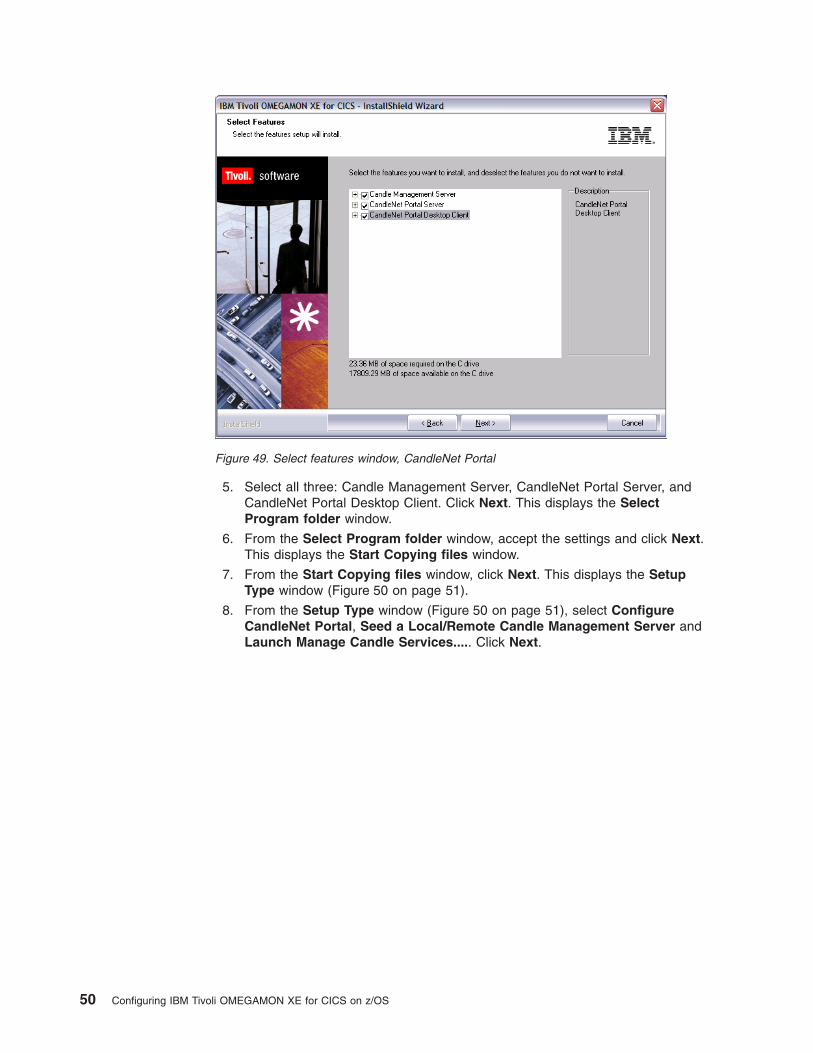
5. Select all three: Candle Management Server, CandleNet Portal Server, and
CandleNet Portal Desktop Client. Click Next. This displays the Select
Program folder window.
6. From the Select Program folder window, accept the settings and click Next.
This displays the Start Copying files window.
7. From the Start Copying files window, click Next. This displays the Setup
Type window (Figure 50 on page 51).
8. From the Setup Type window (Figure 50 on page 51), select Configure
CandleNet Portal, Seed a Local/Remote Candle Management Server and
Launch Manage Candle Services..... Click Next.
Figure 49. Select features window, CandleNet Portal
50 Configuring IBM Tivoli OMEGAMON XE for CICS on z/OS

This displays the Define CandleNet Portal Host Information window
(Figure 51).
9. Click Next.
10. From Define CandleNet Portal Host Information window (Figure 51), enter
the local hostname where your CandleNet Portal Server is defined. You can
Figure 50. Setup Type window, CandleNet Portal
Figure 51. Define CNP Host information window, CandleNet Portal
Chapter 3. Configuring a local Candle Management Server on a distributed system 51

enter localhost. You should not include the domain name of local machine.
Click Next. The Candle Management Server Configuration window
(Figure 52) is displayed.
11. From the Candle Management Server Configuration window, click OK. The
Hub CMS Configuration window (Figure 53) is displayed.
Enter the hostname and the port number of the agent that this hub is
connecting to. As this is on a different host it should be the fully qualified
hostname. Leave the Entry Options as ″Convert to upper case″. Click OK.
12. From the Hub CMS Configuration window, click OK. This displays the Seed
CMS dialog.
Figure 52. Candle Management Server Configuration window, CandleNet Portal
Figure 53. Hub CMS Configuration window, CandleNet Portal
52 Configuring IBM Tivoli OMEGAMON XE for CICS on z/OS
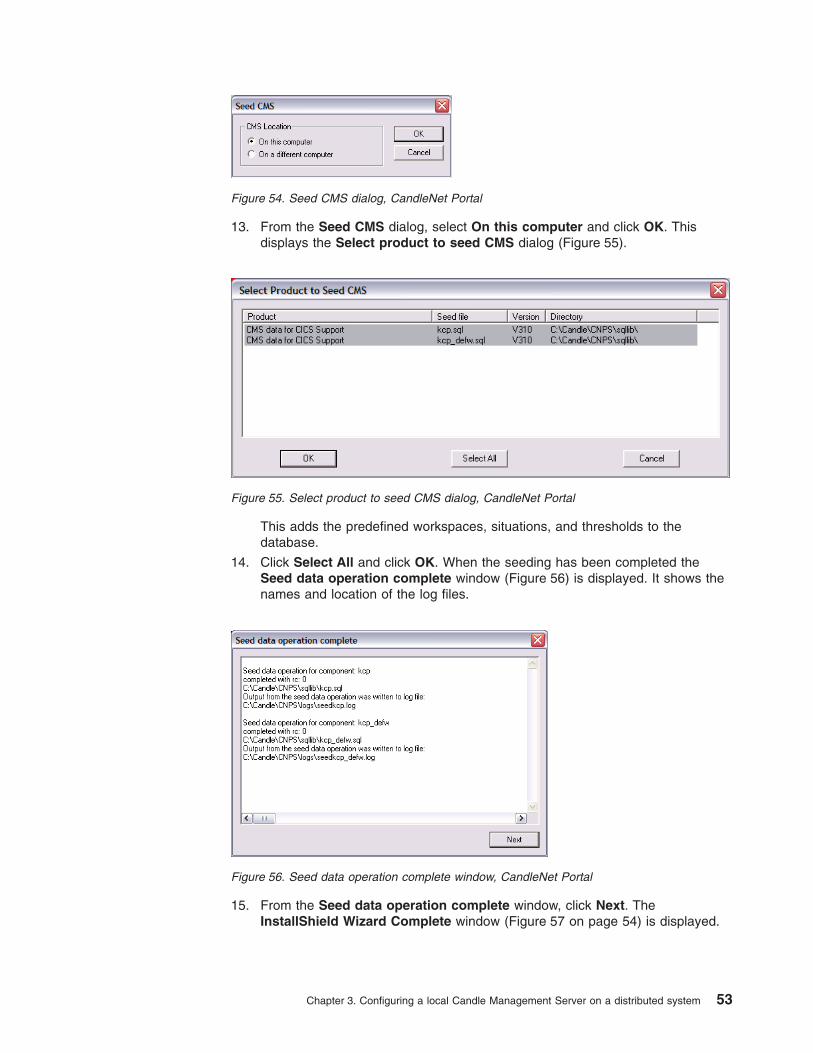
13. From the Seed CMS dialog, select On this computer and click OK. This
displays the Select product to seed CMS dialog (Figure 55).
This adds the predefined workspaces, situations, and thresholds to the
database.
14. Click Select All and click OK. When the seeding has been completed the
Seed data operation complete window (Figure 56) is displayed. It shows the
names and location of the log files.
15. From the Seed data operation complete window, click Next. The
InstallShield Wizard Complete window (Figure 57 on page 54) is displayed.
Figure 54. Seed CMS dialog, CandleNet Portal
Figure 55. Select product to seed CMS dialog, CandleNet Portal
Figure 56. Seed data operation complete window, CandleNet Portal
Chapter 3. Configuring a local Candle Management Server on a distributed system 53
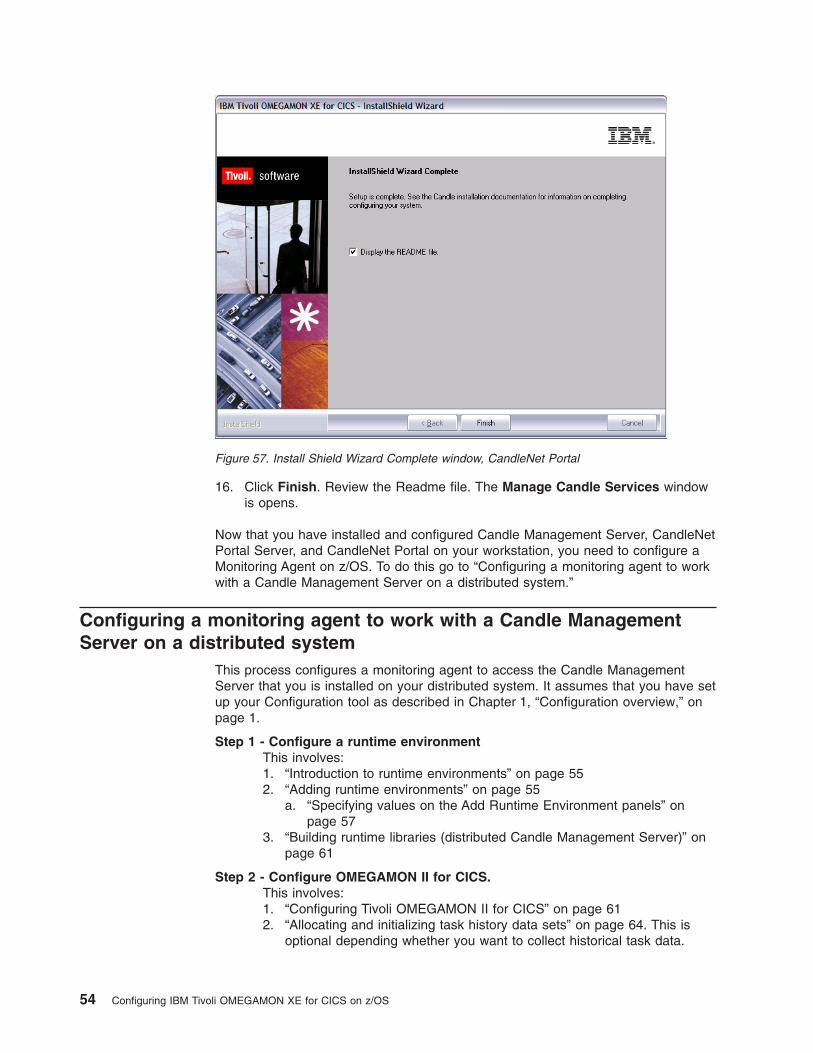
16. Click Finish. Review the Readme file. The Manage Candle Services window
is opens.
Now that you have installed and configured Candle Management Server, CandleNet
Portal Server, and CandleNet Portal on your workstation, you need to configure a
Monitoring Agent on z/OS. To do this go to “Configuring a monitoring agent to work
with a Candle Management Server on a distributed system.”
Configuring a monitoring agent to work with a Candle Management
Server on a distributed system
This process configures a monitoring agent to access the Candle Management
Server that you is installed on your distributed system. It assumes that you have set
up your Configuration tool as described in Chapter 1, “Configuration overview,” on
page 1.
Step 1 - Configure a runtime environment
This involves:
1. “Introduction to runtime environments” on page 55
2. “Adding runtime environments” on page 55
a. “Specifying values on the Add Runtime Environment panels” on
page 573. “Building runtime libraries (distributed Candle Management Server)” on
page 61
Step 2 - Configure OMEGAMON II for CICS.
This involves:
1. “Configuring Tivoli OMEGAMON II for CICS” on page 61
2. “Allocating and initializing task history data sets” on page 64. This is
optional depending whether you want to collect historical task data.
Figure 57. Install Shield Wizard Complete window, CandleNet Portal
54 Configuring IBM Tivoli OMEGAMON XE for CICS on z/OS
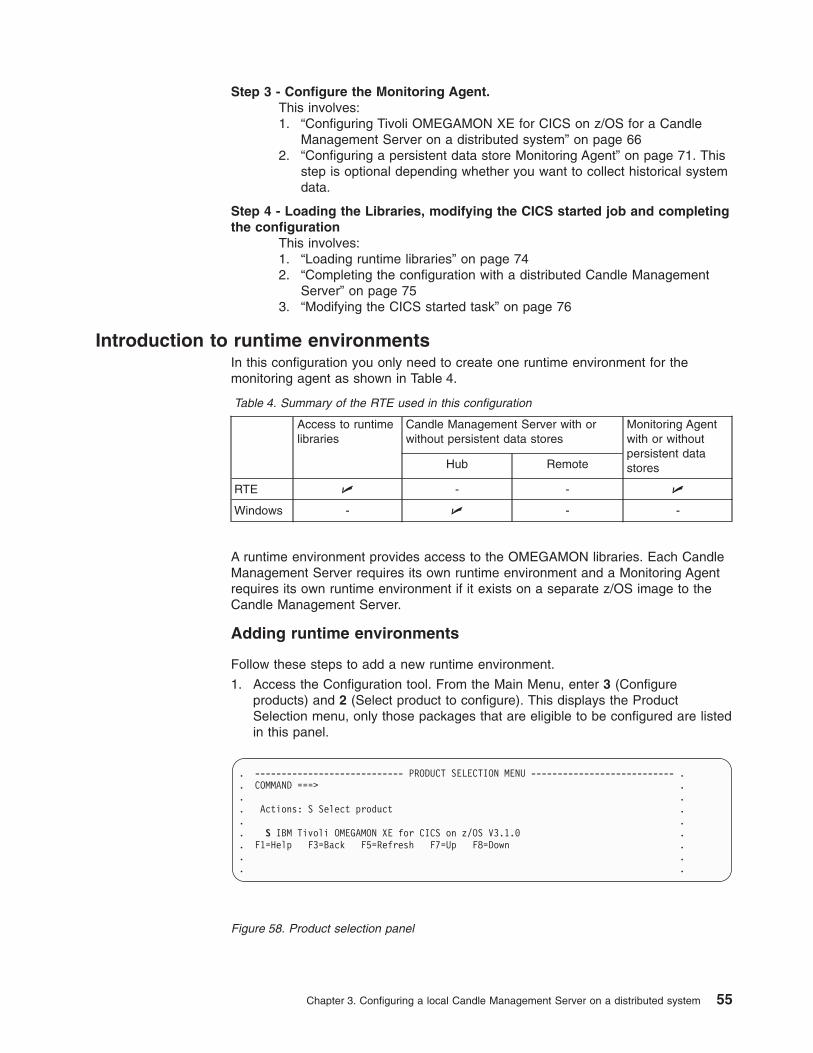
Step 3 - Configure the Monitoring Agent.
This involves:
1. “Configuring Tivoli OMEGAMON XE for CICS on z/OS for a Candle
Management Server on a distributed system” on page 66
2. “Configuring a persistent data store Monitoring Agent” on page 71. This
step is optional depending whether you want to collect historical system
data.
Step 4 - Loading the Libraries, modifying the CICS started job and completing
the configuration
This involves:
1. “Loading runtime libraries” on page 74
2. “Completing the configuration with a distributed Candle Management
Server” on page 75
3. “Modifying the CICS started task” on page 76
Introduction to runtime environments
In this configuration you only need to create one runtime environment for the
monitoring agent as shown in Table 4.
Table 4. Summary of the RTE used in this configuration
Access to runtime
libraries
Candle Management Server with or
without persistent data stores
Monitoring Agent
with or without
persistent data
stores
Hub Remote
RTE U - - U
Windows - U - -
A runtime environment provides access to the OMEGAMON libraries. Each Candle
Management Server requires its own runtime environment and a Monitoring Agent
requires its own runtime environment if it exists on a separate z/OS image to the
Candle Management Server.
Adding runtime environments
Follow these steps to add a new runtime environment.
1. Access the Configuration tool. From the Main Menu, enter 3 (Configure
products) and 2 (Select product to configure). This displays the Product
Selection menu, only those packages that are eligible to be configured are listed
in this panel.
. ---------------------------- PRODUCT SELECTION MENU --------------------------- .
. COMMAND ===> .
. .
. Actions: S Select product .
. .
. S IBM Tivoli OMEGAMON XE for CICS on z/OS V3.1.0 .
. F1=Help F3=Back F5=Refresh F7=Up F8=Down .
. .
. .
Figure 58. Product selection panel
Chapter 3. Configuring a local Candle Management Server on a distributed system 55
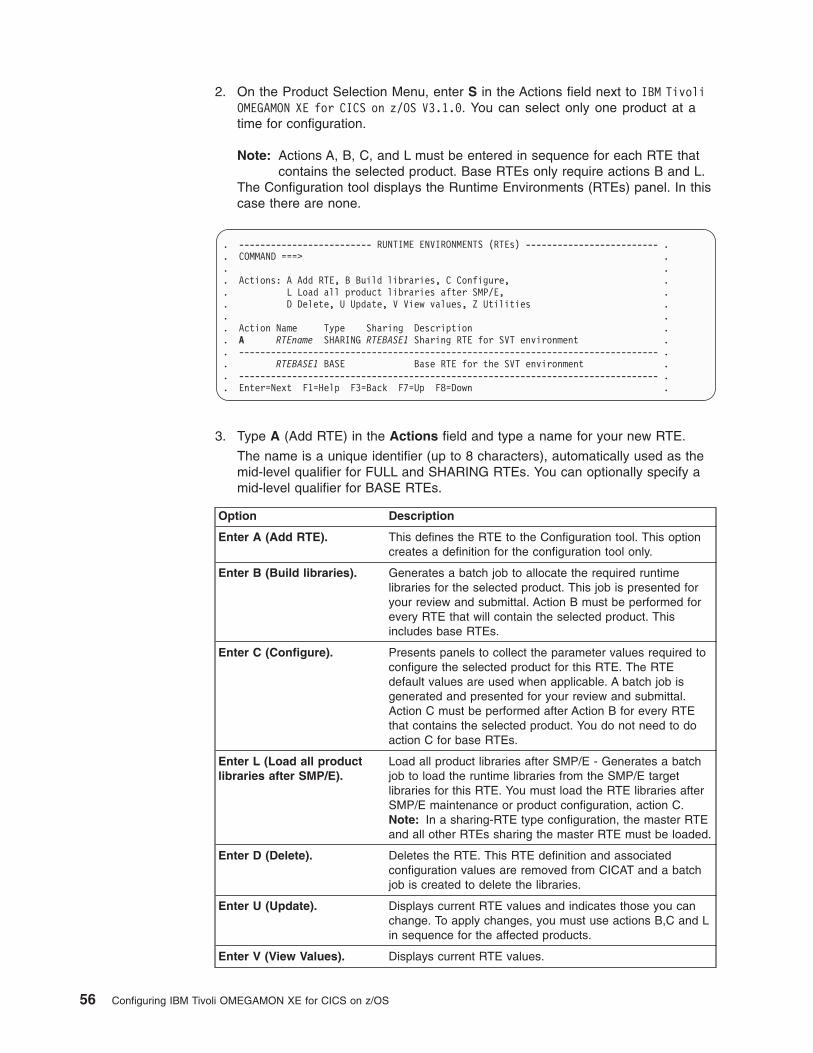
2. On the Product Selection Menu, enter S in the Actions field next to IBM Tivoli
OMEGAMON XE for CICS on z/OS V3.1.0. You can select only one product at a
time for configuration.
Note: Actions A, B, C, and L must be entered in sequence for each RTE that
contains the selected product. Base RTEs only require actions B and L.
The Configuration tool displays the Runtime Environments (RTEs) panel. In this
case there are none.
3. Type A (Add RTE) in the Actions field and type a name for your new RTE.
The name is a unique identifier (up to 8 characters), automatically used as the
mid-level qualifier for FULL and SHARING RTEs. You can optionally specify a
mid-level qualifier for BASE RTEs.
Option Description
Enter A (Add RTE). This defines the RTE to the Configuration tool. This option
creates a definition for the configuration tool only.
Enter B (Build libraries). Generates a batch job to allocate the required runtime
libraries for the selected product. This job is presented for
your review and submittal. Action B must be performed for
every RTE that will contain the selected product. This
includes base RTEs.
Enter C (Configure). Presents panels to collect the parameter values required to
configure the selected product for this RTE. The RTE
default values are used when applicable. A batch job is
generated and presented for your review and submittal.
Action C must be performed after Action B for every RTE
that contains the selected product. You do not need to do
action C for base RTEs.
Enter L (Load all product
libraries after SMP/E).
Load all product libraries after SMP/E - Generates a batch
job to load the runtime libraries from the SMP/E target
libraries for this RTE. You must load the RTE libraries after
SMP/E maintenance or product configuration, action C.
Note: In a sharing-RTE type configuration, the master RTE
and all other RTEs sharing the master RTE must be loaded.
Enter D (Delete). Deletes the RTE. This RTE definition and associated
configuration values are removed from CICAT and a batch
job is created to delete the libraries.
Enter U (Update). Displays current RTE values and indicates those you can
change. To apply changes, you must use actions B,C and L
in sequence for the affected products.
Enter V (View Values). Displays current RTE values.
. ------------------------- RUNTIME ENVIRONMENTS (RTEs) ------------------------- .
. COMMAND ===> .
. .
. Actions: A Add RTE, B Build libraries, C Configure, .
. L Load all product libraries after SMP/E, .
. D Delete, U Update, V View values, Z Utilities .
. .
. Action Name Type Sharing Description .
. A RTEname SHARING RTEBASE1 Sharing RTE for SVT environment .
. ------------------------------------------------------------------------------- .
. RTEBASE1 BASE Base RTE for the SVT environment .
. ------------------------------------------------------------------------------- .
. Enter=Next F1=Help F3=Back F7=Up F8=Down .
56 Configuring IBM Tivoli OMEGAMON XE for CICS on z/OS
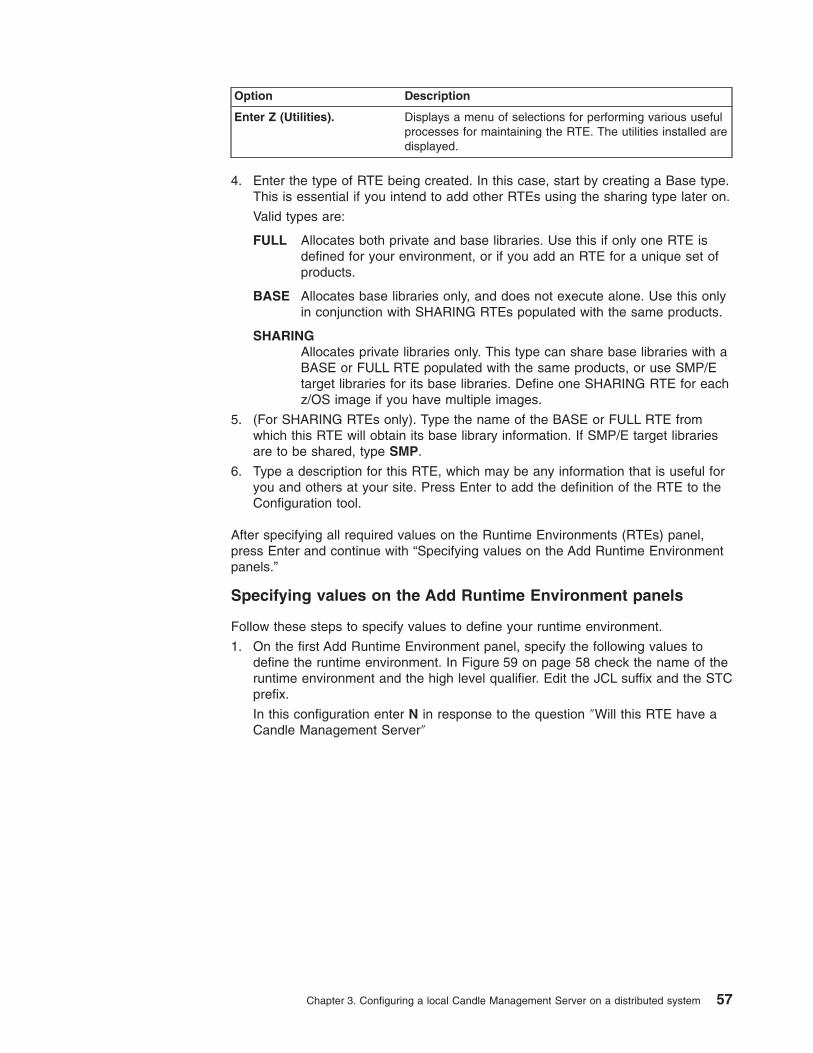
Option Description
Enter Z (Utilities). Displays a menu of selections for performing various useful
processes for maintaining the RTE. The utilities installed are
displayed.
4. Enter the type of RTE being created. In this case, start by creating a Base type.
This is essential if you intend to add other RTEs using the sharing type later on.
Valid types are:
FULL Allocates both private and base libraries. Use this if only one RTE is
defined for your environment, or if you add an RTE for a unique set of
products.
BASE Allocates base libraries only, and does not execute alone. Use this only
in conjunction with SHARING RTEs populated with the same products.
SHARING
Allocates private libraries only. This type can share base libraries with a
BASE or FULL RTE populated with the same products, or use SMP/E
target libraries for its base libraries. Define one SHARING RTE for each
z/OS image if you have multiple images.
5. (For SHARING RTEs only). Type the name of the BASE or FULL RTE from
which this RTE will obtain its base library information. If SMP/E target libraries
are to be shared, type SMP.
6. Type a description for this RTE, which may be any information that is useful for
you and others at your site. Press Enter to add the definition of the RTE to the
Configuration tool.
After specifying all required values on the Runtime Environments (RTEs) panel,
press Enter and continue with “Specifying values on the Add Runtime Environment
panels.”
Specifying values on the Add Runtime Environment panels
Follow these steps to specify values to define your runtime environment.
1. On the first Add Runtime Environment panel, specify the following values to
define the runtime environment. In Figure 59 on page 58 check the name of the
runtime environment and the high level qualifier. Edit the JCL suffix and the STC
prefix.
In this configuration enter N in response to the question ″Will this RTE have a
Candle Management Server″
Chapter 3. Configuring a local Candle Management Server on a distributed system 57
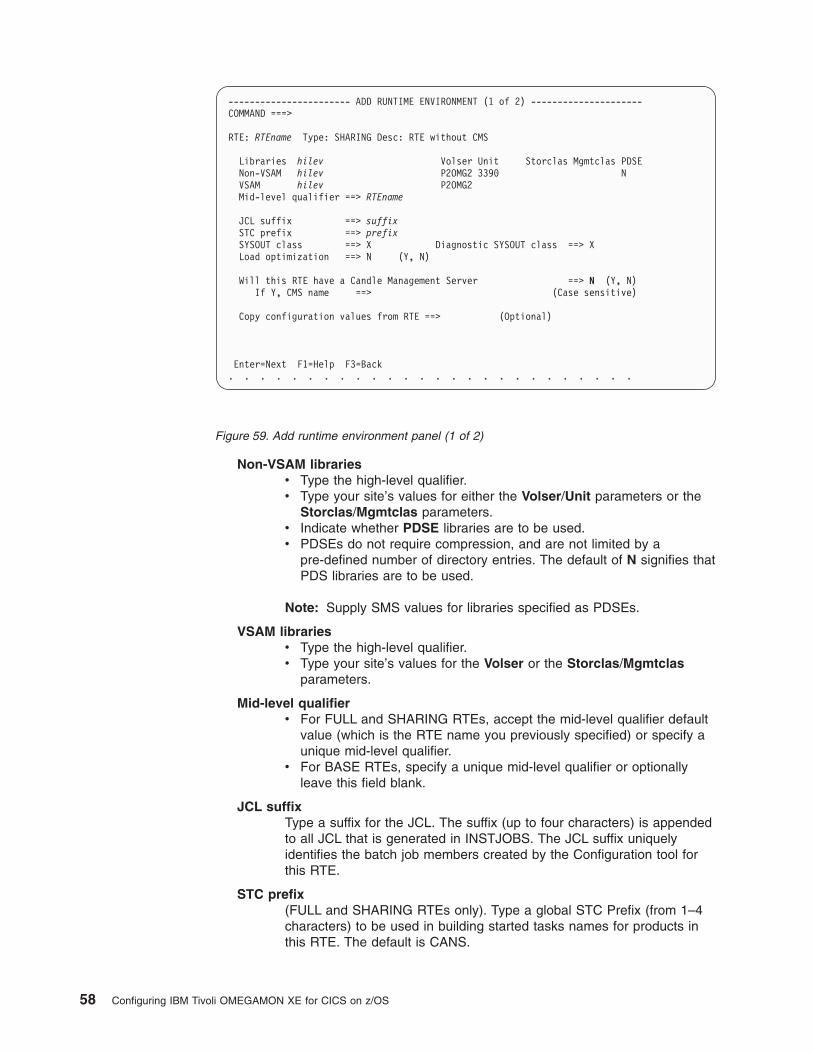
Non-VSAM libraries
v Type the high-level qualifier.
v Type your site’s values for either the Volser/Unit parameters or the
Storclas/Mgmtclas parameters.
v Indicate whether PDSE libraries are to be used.
v PDSEs do not require compression, and are not limited by a
pre-defined number of directory entries. The default of N signifies that
PDS libraries are to be used.
Note: Supply SMS values for libraries specified as PDSEs.
VSAM libraries
v Type the high-level qualifier.
v Type your site’s values for the Volser or the Storclas/Mgmtclas
parameters.
Mid-level qualifier
v For FULL and SHARING RTEs, accept the mid-level qualifier default
value (which is the RTE name you previously specified) or specify a
unique mid-level qualifier.
v For BASE RTEs, specify a unique mid-level qualifier or optionally
leave this field blank.
JCL suffix
Type a suffix for the JCL. The suffix (up to four characters) is appended
to all JCL that is generated in INSTJOBS. The JCL suffix uniquely
identifies the batch job members created by the Configuration tool for
this RTE.
STC prefix
(FULL and SHARING RTEs only). Type a global STC Prefix (from 1–4
characters) to be used in building started tasks names for products in
this RTE. The default is CANS.
----------------------- ADD RUNTIME ENVIRONMENT (1 of 2) ---------------------
COMMAND ===>
RTE: RTEname Type: SHARING Desc: RTE without CMS
Libraries hilev Volser Unit Storclas Mgmtclas PDSE
Non-VSAM hilev P2OMG2 3390 N
VSAM hilev P2OMG2
Mid-level qualifier ==> RTEname
JCL suffix ==> suffix
STC prefix ==> prefix
SYSOUT class ==> X Diagnostic SYSOUT class ==> X
Load optimization ==> N (Y, N)
Will this RTE have a Candle Management Server ==> N (Y, N)
If Y, CMS name ==> (Case sensitive)
Copy configuration values from RTE ==> (Optional)
Enter=Next F1=Help F3=Back
. . . . . . . . . . . . . . . . . . . . . . . . . .
Figure 59. Add runtime environment panel (1 of 2)
58 Configuring IBM Tivoli OMEGAMON XE for CICS on z/OS
SYSOUT class / Diagnostic SYSOUT class
Specify values for the non-diagnostic and diagnostic output DDNAMES.
Note: These values were previously hardcoded.
Load optimization
Indicate whether you want to optimize loading of this RTE. The default
is N. Refer to the online help (F1) for more details.
Will the RTE have a Candle Management Server?
In this configuration the CMS is on your Windows workstation, enter N.
The default of Y allocates Candle Management Server libraries.
You must enter the name of the Candle Management Server to be
configured. It is used by the other components that need to
communicate with this Candle Management Server. The name of the
runtime environment is used as a default.
Copied from RTE
(FULL and SHARING RTEs only - Optional)
Type the name of an existing RTE, from which configuration values will
be copied and used for this RTE.
Note: This procedure makes an exact copy of the existing RTE. If you
will not be using the same products in the new RTE, we
recommend that you not use this procedure.
Install National Language components?
(FULL and SHARING RTEs only - NLS products only)
Specify Y to install National Language Components in this RTE for all
eligible products.
2. After specifying all required values on the first Add Runtime Environment
panel, press Enter. In Figure 60 on page 60
Chapter 3. Configuring a local Candle Management Server on a distributed system 59

3. On the second Add Runtime Environment panel, for FULL and SHARING RTEs
only, specify these values:
Use OS/390 system variables?
Specify Y if this RTE will use z/OS system variables.
See “Enabling system variable support” on page 163 for more
information on enabling system variable support.
Security type
Specify what, if any, security system is to be used for this RTE. The
default is NONE. If ACF2 is specified, you must also type the name of
the ACF2 macro library.
VTAM communication values
v Type a global VTAM applid prefix (from 1–4 characters) to be used in
building the VTAM applids for products in this RTE. The default is
CTD.
v Identify your VTAM network. This is defined in the NETID parameter
of VTAMLST.
v Type the Logmode table name for LU6.2 logmode entries. The
default is KDSMTAB1.
v Type the LU6.2 logmode for this RTE. The default is CANCTDCS.
TCP/IP communication values
v Type the TCP/IP host name of the z/OS system in which this RTE
resides and the TCP/IP address of the host. Enter TSO HOMETEST
to get these values.
v Type the started task name of the TCP/IP server.
v Type the address of the IP port. The default is 1918.
v Type the Interlink TCP/IP subsystem name (if applicable).
v Do not enter the fully qualified hostname.
Note: Enter V (View Values) to verify the RTE information and U (Update) to make
the necessary changes.
. ----------------------- ADD RUNTIME ENVIRONMENT (2 of 2) ---------------------- .
. COMMAND ===> .
. .
. Use OS/390 system variables? ==> N (Y, N) .
. RTE name specification ==> RTEname .
. RTE base alias specification ==> .
. Applid prefix specification ==> applid_prefix .
. Use VTAM model applids? ==> N (Y, N) .
. .
. Security system ==> NONE (RACF, ACF2, TSS, NAM, None) .
. ACF2 macro library ==> .
. .
. VTAM communications values: .
. Applid prefix ==> applid Network ID ==> NETID .
. Logmode table ==> KDSMTAB1 LU6.2 logmode ==> CANCTDCS .
. .
. If you require TCP/IP communications for this RTE, complete these values: .
. Hostname ==> HostName .
. Address ==> IP_Address .
. Started task ==> Started_Task_Name .
. Port number ==> Port_Number .
. Interlink subsystem ==> (if applicable) .
. Enter=Next F1=Help F3=Back .
. .
Figure 60. Add runtime environment panel (2 of 2)
60 Configuring IBM Tivoli OMEGAMON XE for CICS on z/OS
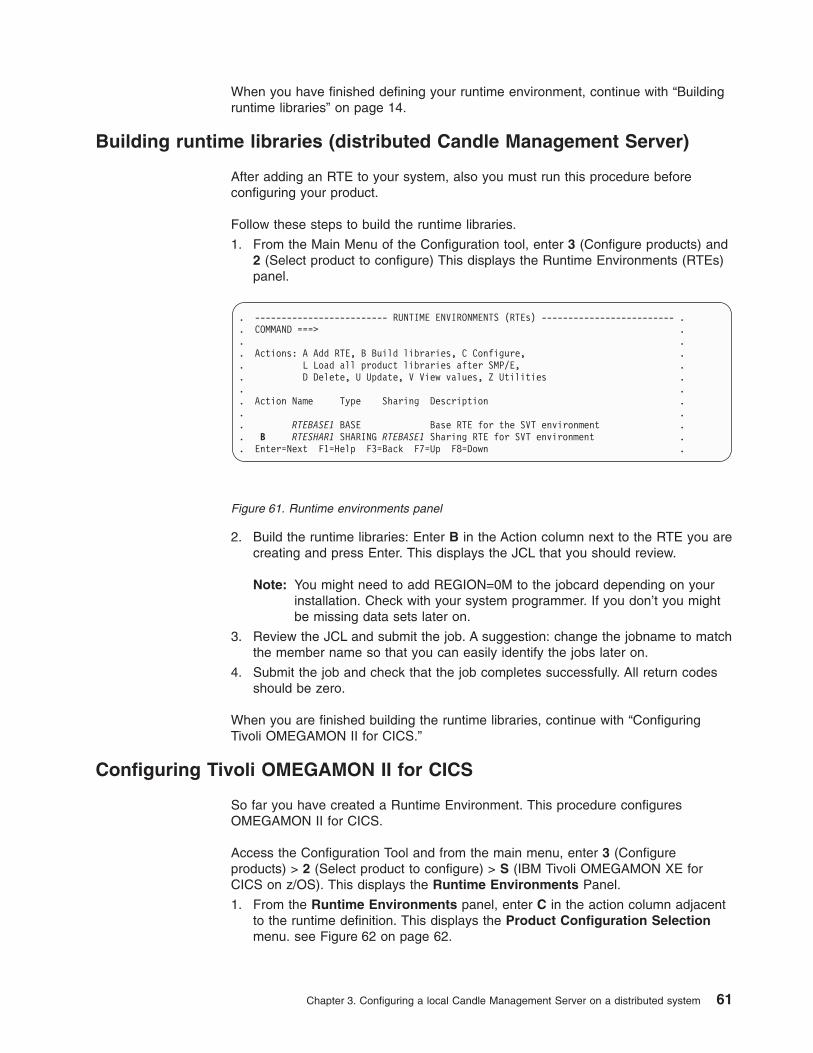
When you have finished defining your runtime environment, continue with “Building
runtime libraries” on page 14.
Building runtime libraries (distributed Candle Management Server)
After adding an RTE to your system, also you must run this procedure before
configuring your product.
Follow these steps to build the runtime libraries.
1. From the Main Menu of the Configuration tool, enter 3 (Configure products) and
2 (Select product to configure) This displays the Runtime Environments (RTEs)
panel.
2. Build the runtime libraries: Enter B in the Action column next to the RTE you are
creating and press Enter. This displays the JCL that you should review.
Note: You might need to add REGION=0M to the jobcard depending on your
installation. Check with your system programmer. If you don’t you might
be missing data sets later on.
3. Review the JCL and submit the job. A suggestion: change the jobname to match
the member name so that you can easily identify the jobs later on.
4. Submit the job and check that the job completes successfully. All return codes
should be zero.
When you are finished building the runtime libraries, continue with “Configuring
Tivoli OMEGAMON II for CICS.”
Configuring Tivoli OMEGAMON II for CICS
So far you have created a Runtime Environment. This procedure configures
OMEGAMON II for CICS.
Access the Configuration Tool and from the main menu, enter 3 (Configure
products) > 2 (Select product to configure) > S (IBM Tivoli OMEGAMON XE for
CICS on z/OS). This displays the Runtime Environments Panel.
1. From the Runtime Environments panel, enter C in the action column adjacent
to the runtime definition. This displays the Product Configuration Selection
menu. see Figure 62 on page 62.
. ------------------------- RUNTIME ENVIRONMENTS (RTEs) ------------------------- .
. COMMAND ===> .
. .
. Actions: A Add RTE, B Build libraries, C Configure, .
. L Load all product libraries after SMP/E, .
. D Delete, U Update, V View values, Z Utilities .
. .
. Action Name Type Sharing Description .
. .
. RTEBASE1 BASE Base RTE for the SVT environment .
. B RTESHAR1 SHARING RTEBASE1 Sharing RTE for SVT environment .
. Enter=Next F1=Help F3=Back F7=Up F8=Down .
Figure 61. Runtime environments panel
Chapter 3. Configuring a local Candle Management Server on a distributed system 61
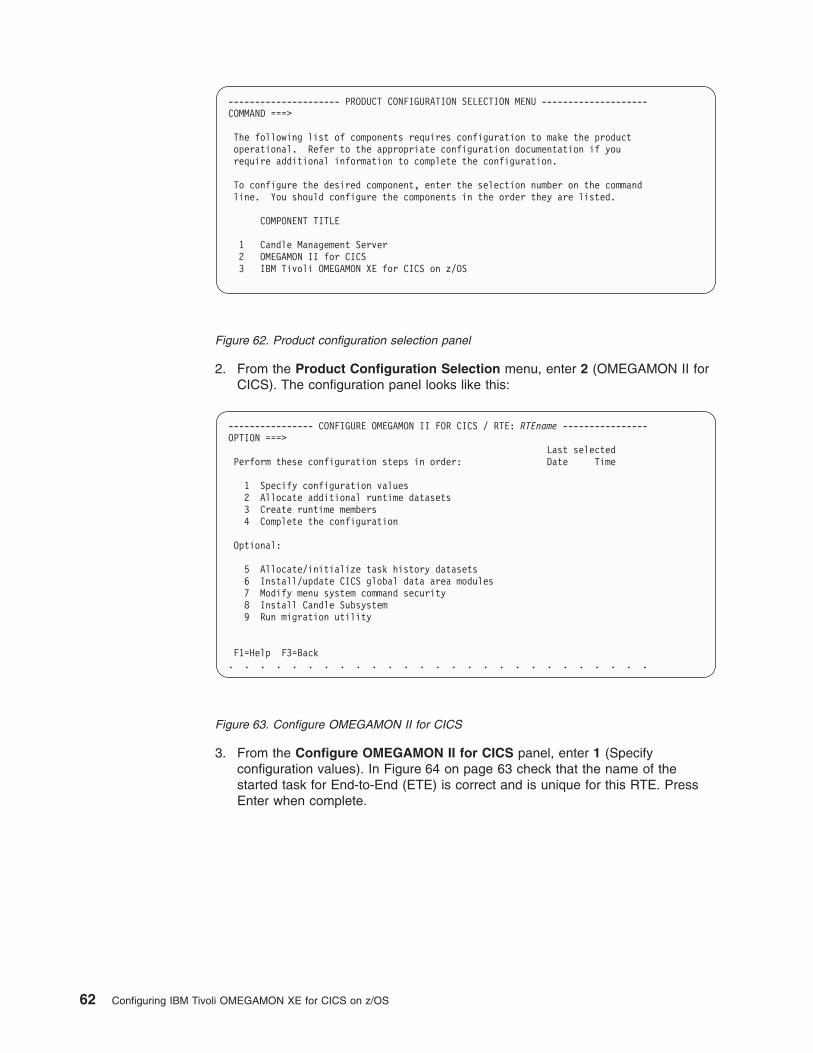
2. From the Product Configuration Selection menu, enter 2 (OMEGAMON II for
CICS). The configuration panel looks like this:
3. From the Configure OMEGAMON II for CICS panel, enter 1 (Specify
configuration values). In Figure 64 on page 63 check that the name of the
started task for End-to-End (ETE) is correct and is unique for this RTE. Press
Enter when complete.
--------------------- PRODUCT CONFIGURATION SELECTION MENU --------------------
COMMAND ===>
The following list of components requires configuration to make the product
operational. Refer to the appropriate configuration documentation if you
require additional information to complete the configuration.
To configure the desired component, enter the selection number on the command
line. You should configure the components in the order they are listed.
COMPONENT TITLE
1 Candle Management Server
2 OMEGAMON II for CICS
3 IBM Tivoli OMEGAMON XE for CICS on z/OS
Figure 62. Product configuration selection panel
---------------- CONFIGURE OMEGAMON II FOR CICS / RTE: RTEname ----------------
OPTION ===>
Last selected
Perform these configuration steps in order: Date Time
1 Specify configuration values
2 Allocate additional runtime datasets
3 Create runtime members
4 Complete the configuration
Optional:
5 Allocate/initialize task history datasets
6 Install/update CICS global data area modules
7 Modify menu system command security
8 Install Candle Subsystem
9 Run migration utility
F1=Help F3=Back
. . . . . . . . . . . . . . . . . . . . . . . . . . .
Figure 63. Configure OMEGAMON II for CICS
62 Configuring IBM Tivoli OMEGAMON XE for CICS on z/OS
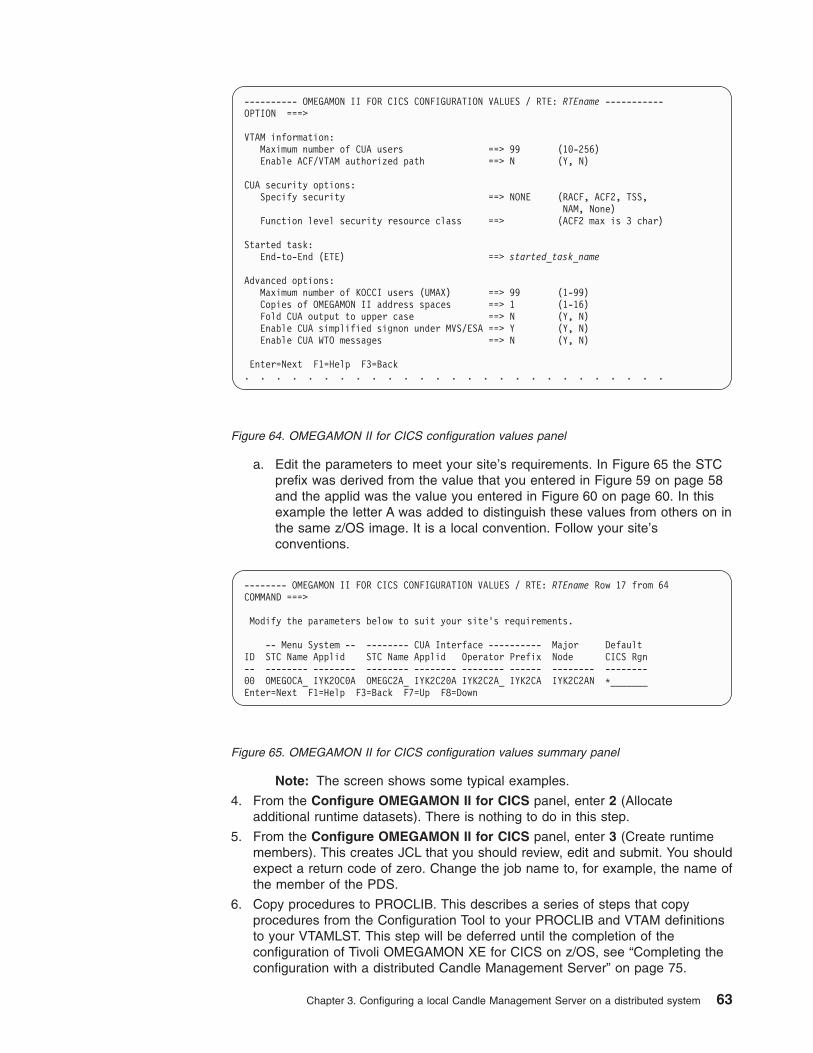
a. Edit the parameters to meet your site’s requirements. In Figure 65 the STC
prefix was derived from the value that you entered in Figure 59 on page 58
and the applid was the value you entered in Figure 60 on page 60. In this
example the letter A was added to distinguish these values from others on in
the same z/OS image. It is a local convention. Follow your site’s
conventions.
Note: The screen shows some typical examples.
4. From the Configure OMEGAMON II for CICS panel, enter 2 (Allocate
additional runtime datasets). There is nothing to do in this step.
5. From the Configure OMEGAMON II for CICS panel, enter 3 (Create runtime
members). This creates JCL that you should review, edit and submit. You should
expect a return code of zero. Change the job name to, for example, the name of
the member of the PDS.
6. Copy procedures to PROCLIB. This describes a series of steps that copy
procedures from the Configuration Tool to your PROCLIB and VTAM definitions
to your VTAMLST. This step will be deferred until the completion of the
configuration of Tivoli OMEGAMON XE for CICS on z/OS, see “Completing the
configuration with a distributed Candle Management Server” on page 75.
---------- OMEGAMON II FOR CICS CONFIGURATION VALUES / RTE: RTEname -----------
OPTION ===>
VTAM information:
Maximum number of CUA users ==> 99 (10-256)
Enable ACF/VTAM authorized path ==> N (Y, N)
CUA security options:
Specify security ==> NONE (RACF, ACF2, TSS,
NAM, None)
Function level security resource class ==> (ACF2 max is 3 char)
Started task:
End-to-End (ETE) ==> started_task_name
Advanced options:
Maximum number of KOCCI users (UMAX) ==> 99 (1-99)
Copies of OMEGAMON II address spaces ==> 1 (1-16)
Fold CUA output to upper case ==> N (Y, N)
Enable CUA simplified signon under MVS/ESA ==> Y (Y, N)
Enable CUA WTO messages ==> N (Y, N)
Enter=Next F1=Help F3=Back
. . . . . . . . . . . . . . . . . . . . . . . . . . .
Figure 64. OMEGAMON II for CICS configuration values panel
-------- OMEGAMON II FOR CICS CONFIGURATION VALUES / RTE: RTEname Row 17 from 64
COMMAND ===>
Modify the parameters below to suit your site’s requirements.
-- Menu System -- -------- CUA Interface ---------- Major Default
ID STC Name Applid STC Name Applid Operator Prefix Node CICS Rgn
-- -------- -------- -------- -------- -------- ------ -------- --------
00 OMEGOCA_ IYK2OC0A OMEGC2A_ IYK2C20A IYK2C2A_ IYK2CA IYK2C2AN *_______
Enter=Next F1=Help F3=Back F7=Up F8=Down
Figure 65. OMEGAMON II for CICS configuration values summary panel
Chapter 3. Configuring a local Candle Management Server on a distributed system 63

When you have finished configuring the OMEGAMON II for CICS, continue with
“Allocating and initializing task history data sets.” This is an optional step. If you do
not want to install task history data sets, continue with “Configuring Tivoli
OMEGAMON XE for CICS on z/OS for a Candle Management Server on a
distributed system” on page 66
Allocating and initializing task history data sets
This procedure describes a series of optional steps that you can carry out to
configure the following:
v Allocation and initialize task history data sets. If you intend to collects task history
data, you must do this.
v Install or update CICS global data area modules.
v Modify menu system command security.
v Install a Candle subsystem.
v Run a migration utility.
You can return to these steps later. You do not have to install them all.
1. From the Configure OMEGAMON II for CICS panel (Figure 21 on page 23),
enter 5 (Allocate/initialize task history datasets). Enter the names of that CICS
regions that you want to collect task history data for in the Region Name
column. You can return to this panel to edit your selection later to remove or
reallocate the list of your CICS regions.
2. Press Enter when you have completed the list. This generates JCL that you
should review, edit, submit the job and expect a return code of zero. Change
the job name to, for example, the name of the member of the PDS to track the
job logs.
3. From the Configure OMEGAMON II for CICS panel, enter 6 (Install/update
CICS global data area modules). This panel contains selections that assist you
to create and maintain the OMEGAMON II for CICS Global Data Areas (GDA).
You use a GDA to specify monitoring options for one or more CICS regions. You
specify these options using parameters which are described in the GDA edit
help member, KC252DG1. Each set of monitoring options (GDAs) is identified
by a two-character suffix, nn.
. . . . . . . . . . . . . . . . . . . . . . . . . . .
----------------------- TASK HISTORY DATASET ALLOCATION -------- Row 7 from 9
COMMAND ===>
Include RTE name in the generated dataset names? ==> Y (Y, N)
Enter a new region or specify actions for existing regions.
A Allocate D Delete R Reallocate E Erase action
Press END to generate JCL for all actions.
Region Cluster
Name Size Description Action
-------- ---- ----------------------------------- -------
_ CICSHAC1 1___ CICS AOR 1_________________________ ALLOC
_ CICSHAC2 1___ CICS AOR 2_________________________ ALLOC
_ CICSHTC1 1___ CICS TOR___________________________ ALLOC
Enter=Next F1=Help F3=Back F7=Up F8=Down
Figure 66. Task history data set allocation panel
64 Configuring IBM Tivoli OMEGAMON XE for CICS on z/OS
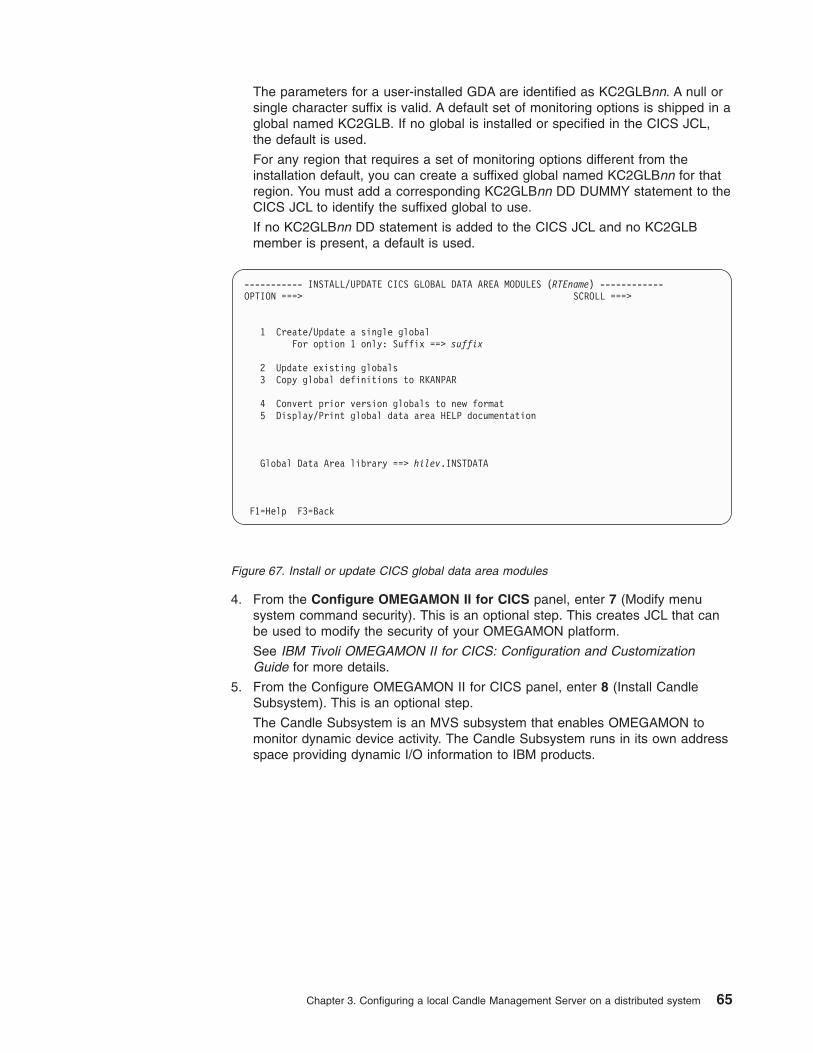
The parameters for a user-installed GDA are identified as KC2GLBnn. A null or
single character suffix is valid. A default set of monitoring options is shipped in a
global named KC2GLB. If no global is installed or specified in the CICS JCL,
the default is used.
For any region that requires a set of monitoring options different from the
installation default, you can create a suffixed global named KC2GLBnn for that
region. You must add a corresponding KC2GLBnn DD DUMMY statement to the
CICS JCL to identify the suffixed global to use.
If no KC2GLBnn DD statement is added to the CICS JCL and no KC2GLB
member is present, a default is used.
4. From the Configure OMEGAMON II for CICS panel, enter 7 (Modify menu
system command security). This is an optional step. This creates JCL that can
be used to modify the security of your OMEGAMON platform.
See IBM Tivoli OMEGAMON II for CICS: Configuration and Customization
Guide for more details.
5. From the Configure OMEGAMON II for CICS panel, enter 8 (Install Candle
Subsystem). This is an optional step.
The Candle Subsystem is an MVS subsystem that enables OMEGAMON to
monitor dynamic device activity. The Candle Subsystem runs in its own address
space providing dynamic I/O information to IBM products.
----------- INSTALL/UPDATE CICS GLOBAL DATA AREA MODULES (RTEname) ------------
OPTION ===> SCROLL ===>
1 Create/Update a single global
For option 1 only: Suffix ==> suffix
2 Update existing globals
3 Copy global definitions to RKANPAR
4 Convert prior version globals to new format
5 Display/Print global data area HELP documentation
Global Data Area library ==> hilev.INSTDATA
F1=Help F3=Back
Figure 67. Install or update CICS global data area modules
Chapter 3. Configuring a local Candle Management Server on a distributed system 65
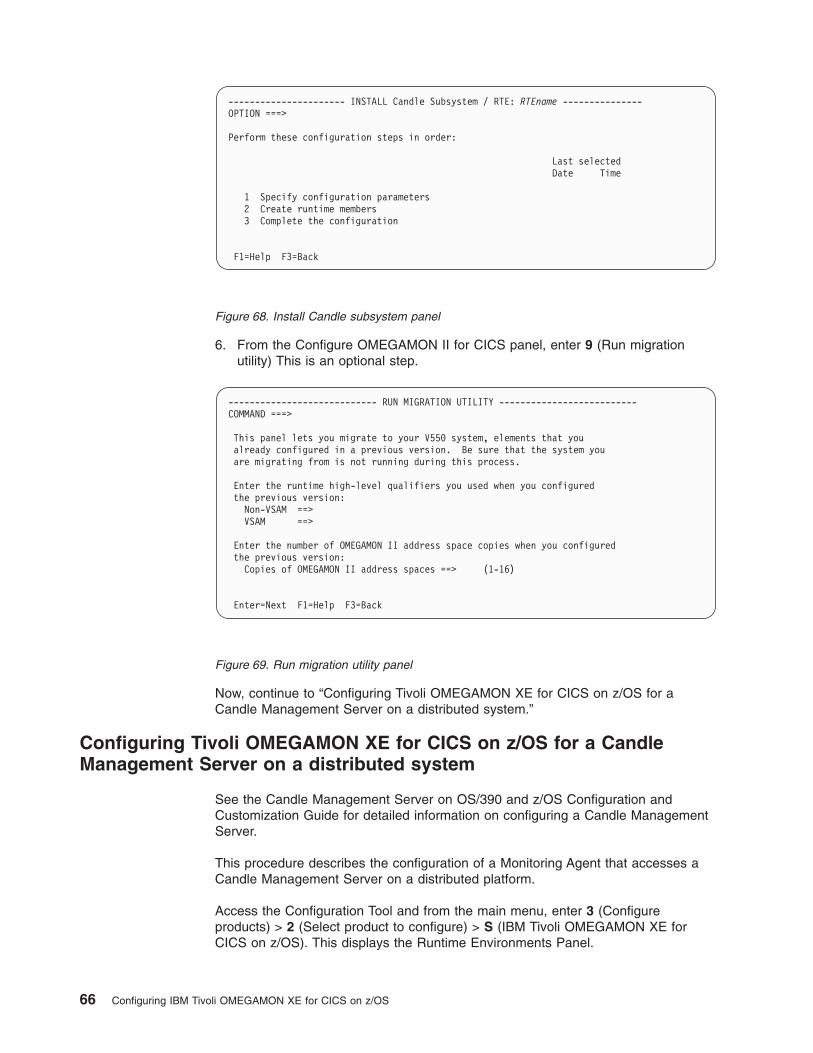
6. From the Configure OMEGAMON II for CICS panel, enter 9 (Run migration
utility) This is an optional step.
Now, continue to “Configuring Tivoli OMEGAMON XE for CICS on z/OS for a
Candle Management Server on a distributed system.”
Configuring Tivoli OMEGAMON XE for CICS on z/OS for a Candle
Management Server on a distributed system
See the Candle Management Server on OS/390 and z/OS Configuration and
Customization Guide for detailed information on configuring a Candle Management
Server.
This procedure describes the configuration of a Monitoring Agent that accesses a
Candle Management Server on a distributed platform.
Access the Configuration Tool and from the main menu, enter 3 (Configure
products) > 2 (Select product to configure) > S (IBM Tivoli OMEGAMON XE for
CICS on z/OS). This displays the Runtime Environments Panel.
---------------------- INSTALL Candle Subsystem / RTE: RTEname ---------------
OPTION ===>
Perform these configuration steps in order:
Last selected
Date Time
1 Specify configuration parameters
2 Create runtime members
3 Complete the configuration
F1=Help F3=Back
Figure 68. Install Candle subsystem panel
---------------------------- RUN MIGRATION UTILITY --------------------------
COMMAND ===>
This panel lets you migrate to your V550 system, elements that you
already configured in a previous version. Be sure that the system you
are migrating from is not running during this process.
Enter the runtime high-level qualifiers you used when you configured
the previous version:
Non-VSAM ==>
VSAM ==>
Enter the number of OMEGAMON II address space copies when you configured
the previous version:
Copies of OMEGAMON II address spaces ==> (1-16)
Enter=Next F1=Help F3=Back
Figure 69. Run migration utility panel
66 Configuring IBM Tivoli OMEGAMON XE for CICS on z/OS
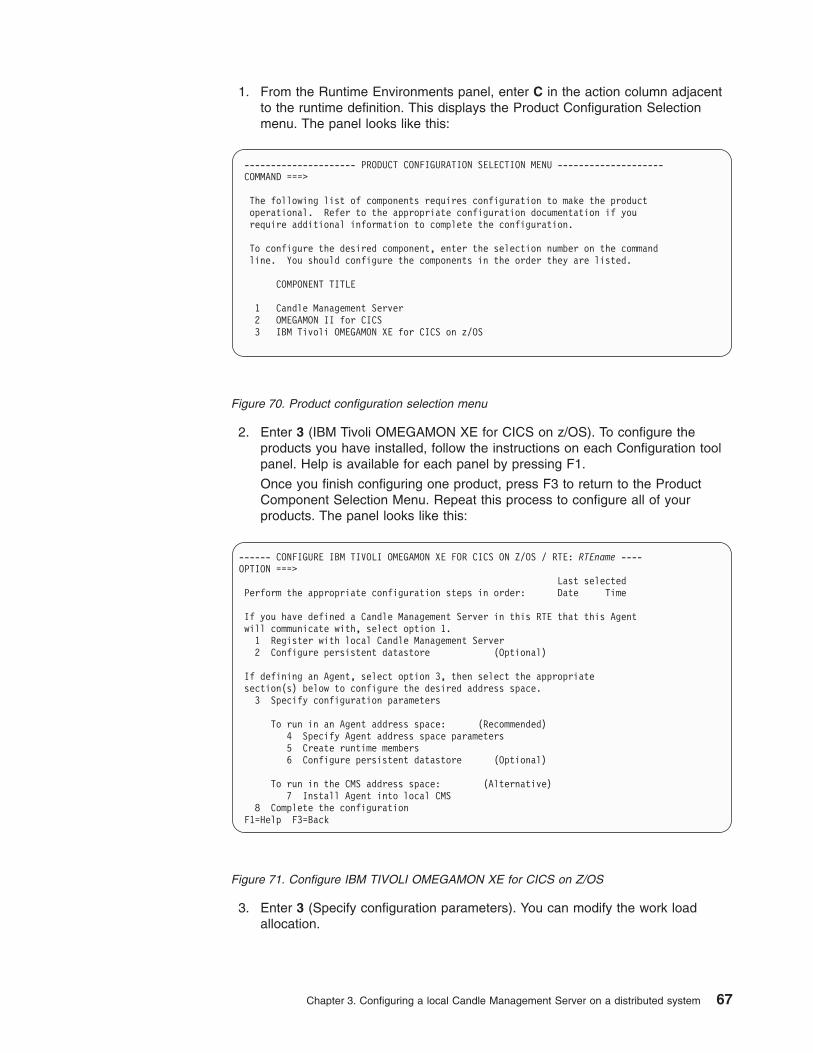
1. From the Runtime Environments panel, enter C in the action column adjacent
to the runtime definition. This displays the Product Configuration Selection
menu. The panel looks like this:
2. Enter 3 (IBM Tivoli OMEGAMON XE for CICS on z/OS). To configure the
products you have installed, follow the instructions on each Configuration tool
panel. Help is available for each panel by pressing F1.
Once you finish configuring one product, press F3 to return to the Product
Component Selection Menu. Repeat this process to configure all of your
products. The panel looks like this:
3. Enter 3 (Specify configuration parameters). You can modify the work load
allocation.
--------------------- PRODUCT CONFIGURATION SELECTION MENU --------------------
COMMAND ===>
The following list of components requires configuration to make the product
operational. Refer to the appropriate configuration documentation if you
require additional information to complete the configuration.
To configure the desired component, enter the selection number on the command
line. You should configure the components in the order they are listed.
COMPONENT TITLE
1 Candle Management Server
2 OMEGAMON II for CICS
3 IBM Tivoli OMEGAMON XE for CICS on z/OS
Figure 70. Product configuration selection menu
------ CONFIGURE IBM TIVOLI OMEGAMON XE FOR CICS ON Z/OS / RTE: RTEname ----
OPTION ===>
Last selected
Perform the appropriate configuration steps in order: Date Time
If you have defined a Candle Management Server in this RTE that this Agent
will communicate with, select option 1.
1 Register with local Candle Management Server
2 Configure persistent datastore (Optional)
If defining an Agent, select option 3, then select the appropriate
section(s) below to configure the desired address space.
3 Specify configuration parameters
To run in an Agent address space: (Recommended)
4 Specify Agent address space parameters
5 Create runtime members
6 Configure persistent datastore (Optional)
To run in the CMS address space: (Alternative)
7 Install Agent into local CMS
8 Complete the configuration
F1=Help F3=Back
Figure 71. Configure IBM TIVOLI OMEGAMON XE for CICS on Z/OS
Chapter 3. Configuring a local Candle Management Server on a distributed system 67
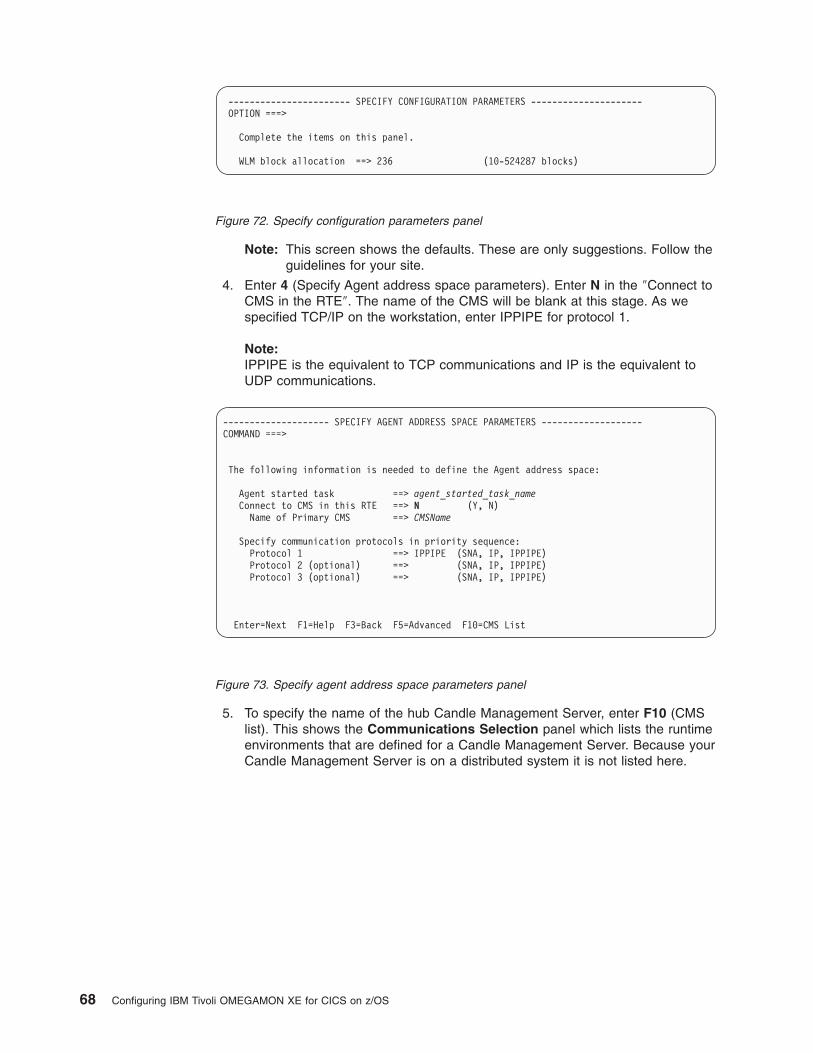
Note: This screen shows the defaults. These are only suggestions. Follow the
guidelines for your site.
4. Enter 4 (Specify Agent address space parameters). Enter N in the ″Connect to
CMS in the RTE″. The name of the CMS will be blank at this stage. As we
specified TCP/IP on the workstation, enter IPPIPE for protocol 1.
Note:
IPPIPE is the equivalent to TCP communications and IP is the equivalent to
UDP communications.
5. To specify the name of the hub Candle Management Server, enter F10 (CMS
list). This shows the Communications Selection panel which lists the runtime
environments that are defined for a Candle Management Server. Because your
Candle Management Server is on a distributed system it is not listed here.
----------------------- SPECIFY CONFIGURATION PARAMETERS ---------------------
OPTION ===>
Complete the items on this panel.
WLM block allocation ==> 236 (10-524287 blocks)
Figure 72. Specify configuration parameters panel
-------------------- SPECIFY AGENT ADDRESS SPACE PARAMETERS -------------------
COMMAND ===>
The following information is needed to define the Agent address space:
Agent started task ==> agent_started_task_name
Connect to CMS in this RTE ==> N (Y, N)
Name of Primary CMS ==> CMSName
Specify communication protocols in priority sequence:
Protocol 1 ==> IPPIPE (SNA, IP, IPPIPE)
Protocol 2 (optional) ==> (SNA, IP, IPPIPE)
Protocol 3 (optional) ==> (SNA, IP, IPPIPE)
Enter=Next F1=Help F3=Back F5=Advanced F10=CMS List
Figure 73. Specify agent address space parameters panel
68 Configuring IBM Tivoli OMEGAMON XE for CICS on z/OS

6. To define your hub Candle Management Server, enter F5 (Advanced) from the
Communications Selection panel. This shows the Specify Agent Primary
Candle Management Server values panel. Enter the name of your Candle
Management Server. It starts with HUB_ . Enter the Networks ID, the fully
qualified hostname and the IP address of your workstation. Enter the
portnumber for the IP.PIPE only.
7. From the Specify Agent Primary Candle Management Server values panel,
press Enter. This displays the Specify agent address space parameters
panel. The name of the started task and the CMS name are already
completed. Enter IPPIPE for protocol 1.
. . . . . . . . . . . . . . . . . . . . . . . . . . .
------------------- COMMUNICATION SELECTION PANEL FOR RTEname - Row 1 to 4 of 4
COMMAND ===>
Select the primary CMS to connect to this agent.
The currently selected primary CMS is:
The following lists eligible CMSs
(CMS) that you have configured. Enter S next to the CMS to connect
to this agent. To manually enter the CMS information, press F5.
CMS RTE name RTE
Type (mid-level) Description
-----------------------------------------------------------------------------
_ HUB system1 RTE with Candle Management Server
_ HUB system2 RTE with Candle Management Server
_ HUB system3 RTE with Candle Management Server
_ HUB MODEL RTE with Candle Management Server
F1=Help F3=Back F5=Advanced F7=Up F8=Down
Figure 74. Communication selection panel
--------------------- SPECIFY AGENT PRIMARY CMS VALUES -----------------------
COMMAND ===>
CMS name (case sensitive) ==> CMSname
Complete this section if the primary CMS requires SNA support:
LU6.2 logmode ==>
Logmode table name ==>
Local location broker applid ==>
Network ID ==> Netid
Complete this section if the primary CMS requires TCP support:
Hostname ==> Hostname
Address ==> IPaddress
Network interface card (NIC) ==>
IP port number ==>
IP.PIPE port number ==> portnumber
Address translation ==> N (Y, N)
Partition name ==>
Enter=Next F1=Help F3=Back
Figure 75. Specify agent primary CMS values panel
Chapter 3. Configuring a local Candle Management Server on a distributed system 69

8. From the Specify Agent Address Space Parameters panel, press Enter. At
the end of this step, you are returned to the Configure IBM Tivoli
OMEGAMON for CICS panel.
9. On the Agent Address Space parameters panel, press Enter. This shows the
Specify Agent IP.PIPE Configuration Values as shown. Confirm the values
and press Enter When this is complete you are returned to the Configure IBM
Tivoli OMEGAMON for CICS panel
------------------ SPECIFY AGENT IP.PIPE CONFIGURATION VALUES ----------------
COMMAND ===>
Specify the TCP communication values for this Agent:
Hostname ==> hostname
Address ==> IPAddress
Started task ==> StartedTask
If applicable
Network interface card (NIC) ==>
Interlink subsystem ==>
IUCV interface in use? ==> N (Y, N)
Specify Agent IP.PIPE configuration:
Address translation ==> N (Y, N)
Partition name ==>
Enter=Next F1=Help F3=Back
10. From Configure IBM Tivoli OMEGAMON for CICS panel, enter 5 (Create
runtime members) This opens JCL that you can review, edit, and submit. You
should expect a return code of zero. This completes the configuration stage.
11. To Configure Persistent Data Stores, from the Configure Tivoli OMEGAMON
XE for CICS , enter 6. This displays the Specify Persistent data store values
panel:
-------------------- SPECIFY AGENT ADDRESS SPACE PARAMETERS -------------------
COMMAND ===>
The following information is needed to define the Agent address space:
Agent started task ==> AgentStartedTask
Connect to CMS in this RTE ==> N (Y, N)
Name of Primary CMS ==> CMSName
Specify communication protocols in priority sequence:
Protocol 1 ==> IPPIPE (SNA, IP, IPPIPE)
Protocol 2 (optional) ==> (SNA, IP, IPPIPE)
Protocol 3 (optional) ==> (SNA, IP, IPPIPE)
Enter=Next F1=Help F3=Back F5=Advanced F10=CMS List
Figure 76. Specify agent address space parameters panel
70 Configuring IBM Tivoli OMEGAMON XE for CICS on z/OS
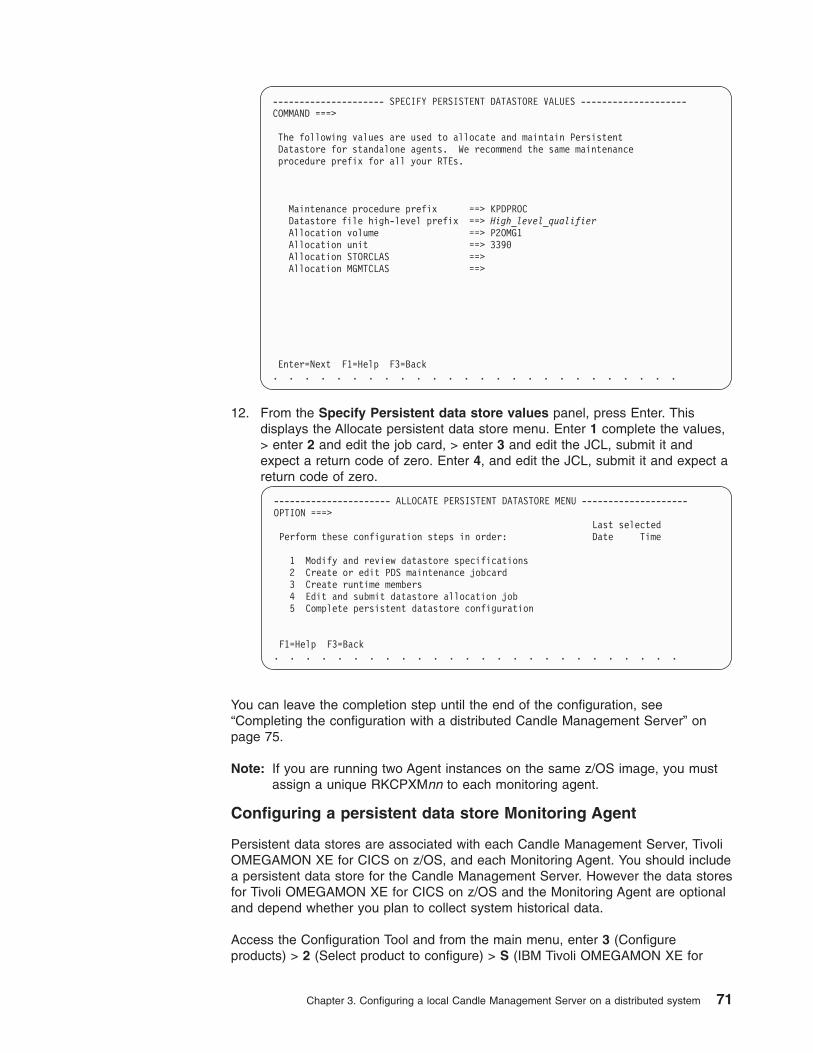
--------------------- SPECIFY PERSISTENT DATASTORE VALUES --------------------
COMMAND ===>
The following values are used to allocate and maintain Persistent
Datastore for standalone agents. We recommend the same maintenance
procedure prefix for all your RTEs.
Maintenance procedure prefix ==> KPDPROC
Datastore file high-level prefix ==> High_level_qualifier
Allocation volume ==> P2OMG1
Allocation unit ==> 3390
Allocation STORCLAS ==>
Allocation MGMTCLAS ==>
Enter=Next F1=Help F3=Back
. . . . . . . . . . . . . . . . . . . . . . . . . .
12. From the Specify Persistent data store values panel, press Enter. This
displays the Allocate persistent data store menu. Enter 1 complete the values,
> enter 2 and edit the job card, > enter 3 and edit the JCL, submit it and
expect a return code of zero. Enter 4, and edit the JCL, submit it and expect a
return code of zero.
---------------------- ALLOCATE PERSISTENT DATASTORE MENU --------------------
OPTION ===>
Last selected
Perform these configuration steps in order: Date Time
1 Modify and review datastore specifications
2 Create or edit PDS maintenance jobcard
3 Create runtime members
4 Edit and submit datastore allocation job
5 Complete persistent datastore configuration
F1=Help F3=Back
. . . . . . . . . . . . . . . . . . . . . . . . . .
You can leave the completion step until the end of the configuration, see
“Completing the configuration with a distributed Candle Management Server” on
page 75.
Note: If you are running two Agent instances on the same z/OS image, you must
assign a unique RKCPXMnn to each monitoring agent.
Configuring a persistent data store Monitoring Agent
Persistent data stores are associated with each Candle Management Server, Tivoli
OMEGAMON XE for CICS on z/OS, and each Monitoring Agent. You should include
a persistent data store for the Candle Management Server. However the data stores
for Tivoli OMEGAMON XE for CICS on z/OS and the Monitoring Agent are optional
and depend whether you plan to collect system historical data.
Access the Configuration Tool and from the main menu, enter 3 (Configure
products) > 2 (Select product to configure) > S (IBM Tivoli OMEGAMON XE for
Chapter 3. Configuring a local Candle Management Server on a distributed system 71

CICS on z/OS) > C (Adjacent to your RTE) > 3 (IBM Tivoli OMEGAMON XE for
CICS on z/OS). This displays the Configure IBM Tivoli OMEGAMON XE for CICS
on z/OS panel (Figure 32 on page 32).
1. To Configure Persistent Data Stores, from the Configure Tivoli OMEGAMON
XE for CICS , enter 6. This displays the Specify Persistent data store values
panel. Confirm that the high level qualifier and the Allocation volumes are
correct. Edit them if necessary.
2. From the Specify Persistent data store values panel, press Enter. This
displays the Allocate persistent Datastore Menu. Enter 1 complete the values,
> enter 2 and edit the job card, > enter 3 and edit the JCL, submit it and expect
a return code of zero. Enter 4, and edit the JCL, submit it and expect a return
code of zero.
---------------------- ALLOCATE PERSISTENT DATASTORE MENU --------------------
OPTION ===>
Last selected
Perform these configuration steps in order: Date Time
1 Modify and review datastore specifications
2 Create or edit PDS maintenance jobcard
3 Create runtime members
4 Edit and submit datastore allocation job
5 Complete persistent datastore configuration
F1=Help F3=Back
. . . . . . . . . . . . . . . . . . . . . . . . . .
3. Enter 1 (Modify and review datastore specifications) and press Enter. This panel
controls the size, the placement and the number of data sets that comprise the
Persistent Datastore. Review the default values and press F3 to accept the
values displayed.
--------------------- SPECIFY PERSISTENT DATASTORE VALUES --------------------
COMMAND ===>
The following values are used to allocate and maintain Persistent
Datastore for standalone agents. We recommend the same maintenance
procedure prefix for all your RTEs.
Maintenance procedure prefix ==> KPDPROC
Datastore file high-level prefix ==> Hilev
Allocation volume ==> volser
Allocation unit ==> 3390
Allocation STORCLAS ==>
Allocation MGMTCLAS ==>
Enter=Next F1=Help F3=Back
. . . . . . . . . . . . . . . . . . . . . . . . . .
Figure 77. Specify persistent datastore values panel
72 Configuring IBM Tivoli OMEGAMON XE for CICS on z/OS
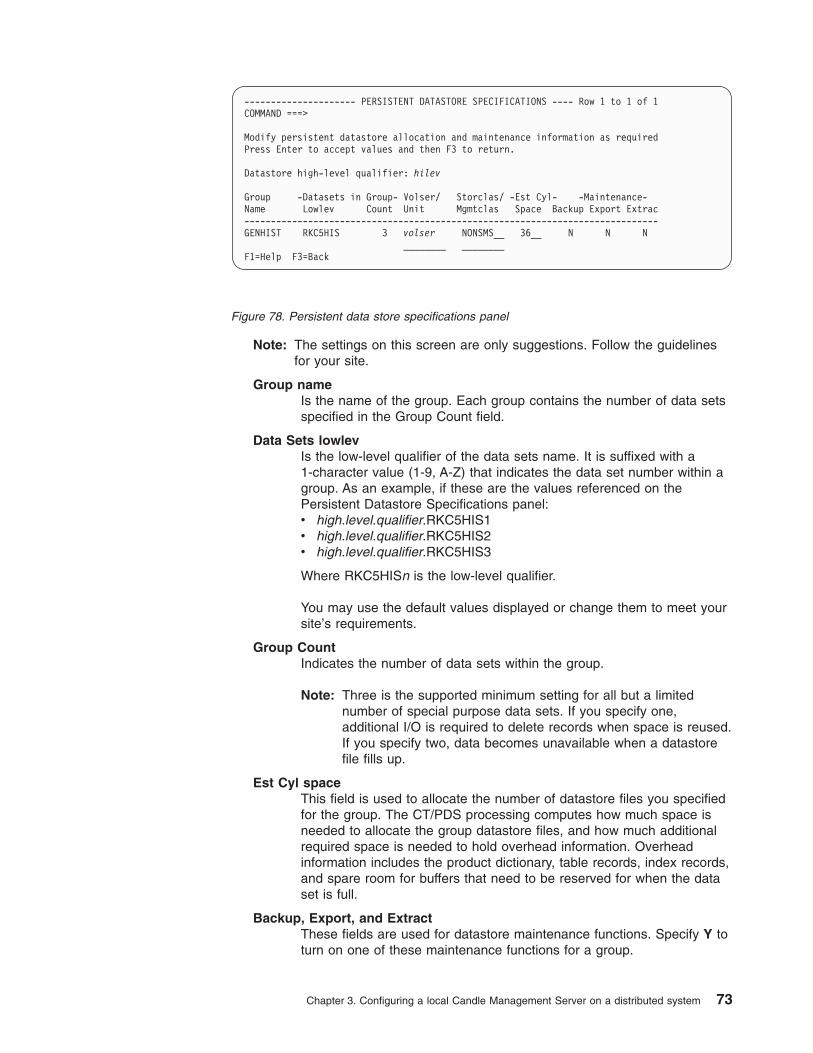
Note: The settings on this screen are only suggestions. Follow the guidelines
for your site.
Group name
Is the name of the group. Each group contains the number of data sets
specified in the Group Count field.
Data Sets lowlev
Is the low-level qualifier of the data sets name. It is suffixed with a
1-character value (1-9, A-Z) that indicates the data set number within a
group. As an example, if these are the values referenced on the
Persistent Datastore Specifications panel:
v high.level.qualifier.RKC5HIS1
v high.level.qualifier.RKC5HIS2
v high.level.qualifier.RKC5HIS3
Where RKC5HISn is the low-level qualifier.
You may use the default values displayed or change them to meet your
site’s requirements.
Group Count
Indicates the number of data sets within the group.
Note: Three is the supported minimum setting for all but a limited
number of special purpose data sets. If you specify one,
additional I/O is required to delete records when space is reused.
If you specify two, data becomes unavailable when a datastore
file fills up.
Est Cyl space
This field is used to allocate the number of datastore files you specified
for the group. The CT/PDS processing computes how much space is
needed to allocate the group datastore files, and how much additional
required space is needed to hold overhead information. Overhead
information includes the product dictionary, table records, index records,
and spare room for buffers that need to be reserved for when the data
set is full.
Backup, Export, and Extract
These fields are used for datastore maintenance functions. Specify Y to
turn on one of these maintenance functions for a group.
--------------------- PERSISTENT DATASTORE SPECIFICATIONS ---- Row 1 to 1 of 1
COMMAND ===>
Modify persistent datastore allocation and maintenance information as required
Press Enter to accept values and then F3 to return.
Datastore high-level qualifier: hilev
Group -Datasets in Group- Volser/ Storclas/ -Est Cyl- -Maintenance-
Name Lowlev Count Unit Mgmtclas Space Backup Export Extrac
------------------------------------------------------------------------------
GENHIST RKC5HIS 3 volser NONSMS__ 36__ N N N
________ ________
F1=Help F3=Back
Figure 78. Persistent data store specifications panel
Chapter 3. Configuring a local Candle Management Server on a distributed system 73
You can use the Backup facility if you want to keep old history data.
This facility does an MVS IEBGENER request to make an exact copy of
the data set being maintained. It is a simple copy of the data set to
either tape or DASD. A backed-up file also has the advantage that
nothing has to be done to the file to dynamically make the data
available to the Persistent Datastore again.
Each group contains the number of data sets specified in the Group Count field.
The Datasets Lowlev is suffixed with a 1-character value (1-9, A-Z) that
indicates the dataset number within a group. As an example, if these are the
values referenced on the Persistent Datastore Specifications panel, the PD#PJH
job creates the Persistent Datastore members that make reference to these
datastore files
4. Enter 2 (Create or edit PDS maintenance jobcard). Edit the job card and press
Enter. This specifies the job card to be used for the Persistent Datastore (PDS)
KPDPROC1, KPDPROCC and KPDPROC2 maintenance jobs. The job card
member (KPDJOBC) is created in the high.level.qualifier.RKANSAM library.
5. Enter 3 (Create runtime members). This generates JCL that you can review,
edit, and submit. You should expect a return code of zero. This job creates the
persistent datastore members.
6. Enter 4 (Edit and submit datastore allocation job). This generates JCL that you
can review, edit, and submit. You should expect a return code of zero. This job
allocates and initializes all the data sets required for this product’s persistent
datastore
Note: This job is applicable to define a brand new PDS configuration. If the
PDS data sets already exist, then delete or rename this product’s
persistent datastore files if you want the configuration tool to re-allocate
and re-initialize the datasets for this product’s persistent datastore.
7. Enter 5 (Complete persistent datastore configuration). This describes the steps
that you need to take to copy the data sets that you have created to your
procedures libraries. This step will be deferred until the completion of the
configuration of Tivoli OMEGAMON XE for CICS on z/OS, see “Completing the
configuration with a distributed Candle Management Server” on page 75.
When you have finished configuring the persistent data stores, continue with
“Loading runtime libraries.”
Loading runtime libraries
You must load the runtime libraries after you:
v Install and configure the products you want in a new RTE
v Install and configure an additional product in an existing RTE
v Install maintenance, whether or not you reconfigure a product
v Change the configuration of Tivoli OMEGAMON XE for CICS on z/OS.
Note: The load job requires exclusive access to the runtime libraries.
Follow these steps to load the runtime libraries from the SMP/E target libraries.
1. Enter the Configuration tool and from the Main Menu, enter 3 (Configure
products) and 2 (Select product to configure). This displays the Product
Selection menu, only those packages that are eligible to be configured are listed
on this panel.
74 Configuring IBM Tivoli OMEGAMON XE for CICS on z/OS
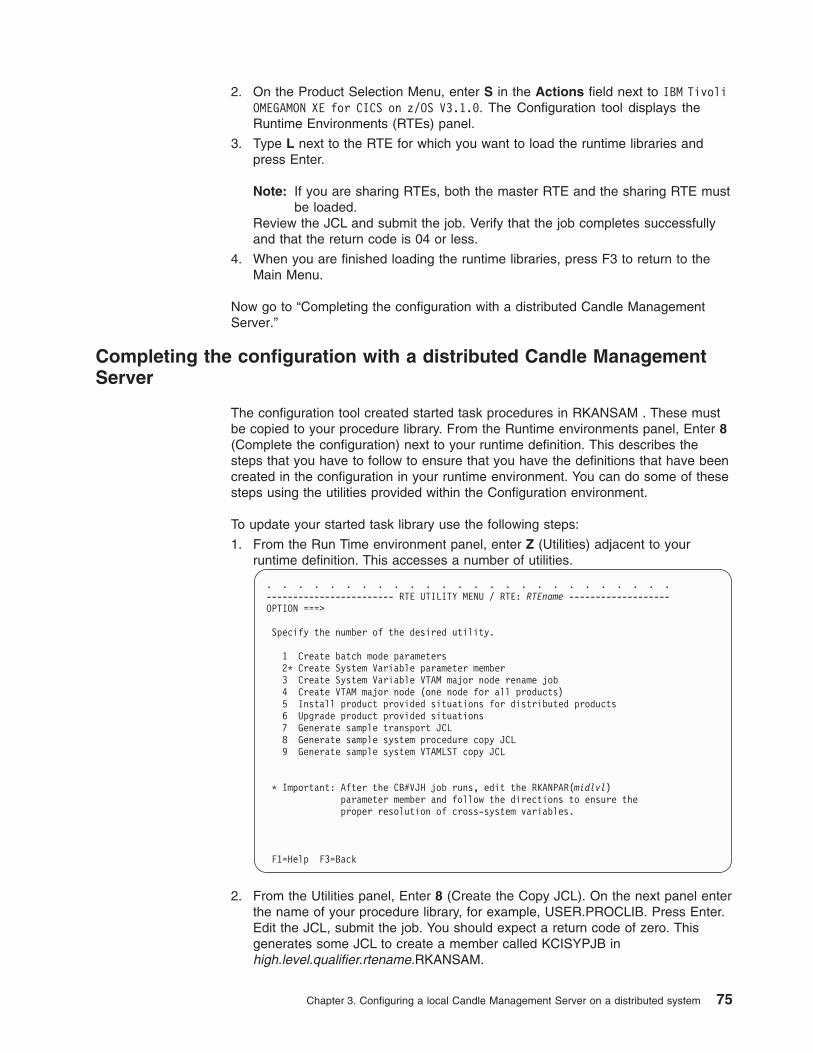
2. On the Product Selection Menu, enter S in the Actions field next to IBM Tivoli
OMEGAMON XE for CICS on z/OS V3.1.0. The Configuration tool displays the
Runtime Environments (RTEs) panel.
3. Type L next to the RTE for which you want to load the runtime libraries and
press Enter.
Note: If you are sharing RTEs, both the master RTE and the sharing RTE must
be loaded.Review the JCL and submit the job. Verify that the job completes successfully
and that the return code is 04 or less.
4. When you are finished loading the runtime libraries, press F3 to return to the
Main Menu.
Now go to “Completing the configuration with a distributed Candle Management
Server.”
Completing the configuration with a distributed Candle Management
Server
The configuration tool created started task procedures in RKANSAM . These must
be copied to your procedure library. From the Runtime environments panel, Enter 8
(Complete the configuration) next to your runtime definition. This describes the
steps that you have to follow to ensure that you have the definitions that have been
created in the configuration in your runtime environment. You can do some of these
steps using the utilities provided within the Configuration environment.
To update your started task library use the following steps:
1. From the Run Time environment panel, enter Z (Utilities) adjacent to your
runtime definition. This accesses a number of utilities.
. . . . . . . . . . . . . . . . . . . . . . . . . .
------------------------ RTE UTILITY MENU / RTE: RTEname -------------------
OPTION ===>
Specify the number of the desired utility.
1 Create batch mode parameters
2* Create System Variable parameter member
3 Create System Variable VTAM major node rename job
4 Create VTAM major node (one node for all products)
5 Install product provided situations for distributed products
6 Upgrade product provided situations
7 Generate sample transport JCL
8 Generate sample system procedure copy JCL
9 Generate sample system VTAMLST copy JCL
* Important: After the CB#VJH job runs, edit the RKANPAR(midlvl)
parameter member and follow the directions to ensure the
proper resolution of cross-system variables.
F1=Help F3=Back
2. From the Utilities panel, Enter 8 (Create the Copy JCL). On the next panel enter
the name of your procedure library, for example, USER.PROCLIB. Press Enter.
Edit the JCL, submit the job. You should expect a return code of zero. This
generates some JCL to create a member called KCISYPJB in
high.level.qualifier.rtename.RKANSAM.
Chapter 3. Configuring a local Candle Management Server on a distributed system 75
3. Edit KCISYPJB and submit the job. This job copies all the required started tasks
from your RKANSAM library to the specified procedure library. You should
expect a return code of zero. Looking through the code you will see the names
of the started tasks that have been created during the configuration. There are
started tasks for:
v OMEGAMON II for CICS
v Monitoring Agent
v End-to-End (ETE).
4. From the Utilities panel, Enter 9 (Create the VTAM definitions). Enter the name
of your VTAM node, press Enter. This sample system copy JCL copies the
VTAM definitions to VTAMLST. The Configuration tool created VTAM definitions
in RKANSAM. You should copy the VTAM major node from RKANSAM to your
system VTAMLST. This generates JCL to create a member called KCISYNJB in
high.level.qualifier.rtename.RKANSAM.
5. Edit KCISYNJB and submit the job. This job copies all the required VTAM
definitions from your RKANSAM library to the specified VTAMLST. You should
expect a return code of zero.
6. All runtime libraries concatenated in the STEPLIB DDNAME must be
APF-authorized.
7. Vary VTAM major node active. Vary the VTAM major node active, for example,
V NET,ACT,ID=OMEGAAN
8. Edit the started task for your Monitoring Agent. Add the following statement the
end of job: // RKCPXMnn DD DUMMY Where nn is a two digit value between 01-15
and is unique for your monitoring agent. This corresponds to the statement that
you add to the CICS started job.
9. Contact you local security administrator to grant the appropriate authorizations.
Now, you can verify your installation and configuration, continue with “Modifying the
CICS started task” and “Verifying your configuration” on page 77.
If you are migrating data from previous releases or from OMEGAMON II to
OMEGAMON XE, see Chapter 9, “Migrating,” on page 155.
Modifying the CICS started task
You can access the information from the Configure OMEGAMON II for CICS
panel, enter 4 (Complete the configuration). This provides information that you have
to add to your the JCL for your CICS regions. It is summarized in the following
points.
1. Add //KC2GLBnn DD DUMMY to your CICS started task. If you want to use the
monitoring options in a suffixed global data area (GDA), you must add this DD
statement to the CICS region JCL to identify the global.
2. Add //RKC2XMnn DD DUMMY to your CICS started task. If you want to use other
than the default OMEGAMON II address space pair (the defaults here are
CANSOC0 and CANSC20 as set on Configure OMEGAMON II for CICS option
1) to monitor a CICS region, you must add this DD statement to the CICS
region JCL to identify the address space pair.
3. Add //RKCPXMnn DD DUMMY to your CICS started task.
4. Add the program KOCOME00. Program KOCOME00 is the only program loaded
from your CICS startup JCL’s DFHRPL concatenation. You can copy this
program to a separate DFHRPL to reduce PDS directory search times. If you
include program KOCOME00 in your PLTPI, you can ensure that the
76 Configuring IBM Tivoli OMEGAMON XE for CICS on z/OS
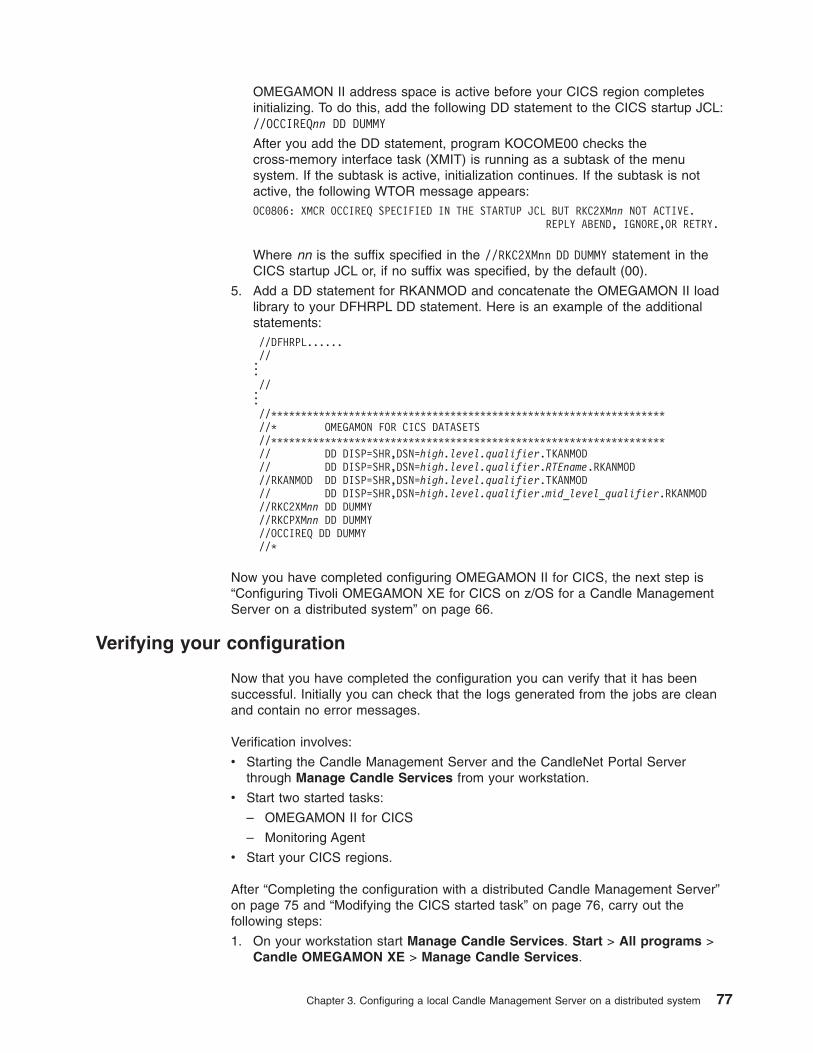
OMEGAMON II address space is active before your CICS region completes
initializing. To do this, add the following DD statement to the CICS startup JCL:
//OCCIREQnn DD DUMMY
After you add the DD statement, program KOCOME00 checks the
cross-memory interface task (XMIT) is running as a subtask of the menu
system. If the subtask is active, initialization continues. If the subtask is not
active, the following WTOR message appears:
OC0806: XMCR OCCIREQ SPECIFIED IN THE STARTUP JCL BUT RKC2XMnn NOT ACTIVE.
REPLY ABEND, IGNORE,OR RETRY.
Where nn is the suffix specified in the //RKC2XMnn DD DUMMY statement in the
CICS startup JCL or, if no suffix was specified, by the default (00).
5. Add a DD statement for RKANMOD and concatenate the OMEGAMON II load
library to your DFHRPL DD statement. Here is an example of the additional
statements:
//DFHRPL......
// ... // ... //******************************************************************
//* OMEGAMON FOR CICS DATASETS
//******************************************************************
// DD DISP=SHR,DSN=high.level.qualifier.TKANMOD
// DD DISP=SHR,DSN=high.level.qualifier.RTEname.RKANMOD
//RKANMOD DD DISP=SHR,DSN=high.level.qualifier.TKANMOD
// DD DISP=SHR,DSN=high.level.qualifier.mid_level_qualifier.RKANMOD
//RKC2XMnn DD DUMMY
//RKCPXMnn DD DUMMY
//OCCIREQ DD DUMMY
//*
Now you have completed configuring OMEGAMON II for CICS, the next step is
“Configuring Tivoli OMEGAMON XE for CICS on z/OS for a Candle Management
Server on a distributed system” on page 66.
Verifying your configuration
Now that you have completed the configuration you can verify that it has been
successful. Initially you can check that the logs generated from the jobs are clean
and contain no error messages.
Verification involves:
v Starting the Candle Management Server and the CandleNet Portal Server
through Manage Candle Services from your workstation.
v Start two started tasks:
– OMEGAMON II for CICS
– Monitoring Agent
v Start your CICS regions.
After “Completing the configuration with a distributed Candle Management Server”
on page 75 and “Modifying the CICS started task” on page 76, carry out the
following steps:
1. On your workstation start Manage Candle Services. Start > All programs >
Candle OMEGAMON XE > Manage Candle Services.
Chapter 3. Configuring a local Candle Management Server on a distributed system 77

2. Start the Candle Management Server Right-click > Start.
3. Start the CandleNet Portal Server Right-click > Start.
4. Start the started task for OMEGAMON II for CICS, /S taskname, and check the
log for any errors. Start both the menu and the CUA tasks. The CUA is optional.
5. Start the started task for your Monitoring Agent, /S taskname, and check the log
for any errors.
6. Start the CandleNet Portal Right-click > Start.
When CandleNet Portal opens you will see the list of CICS regions that are
associated with the agent in Navigator pane at the top left hand side of the
workspace.
Figure 79. Manage Candle Services
78 Configuring IBM Tivoli OMEGAMON XE for CICS on z/OS
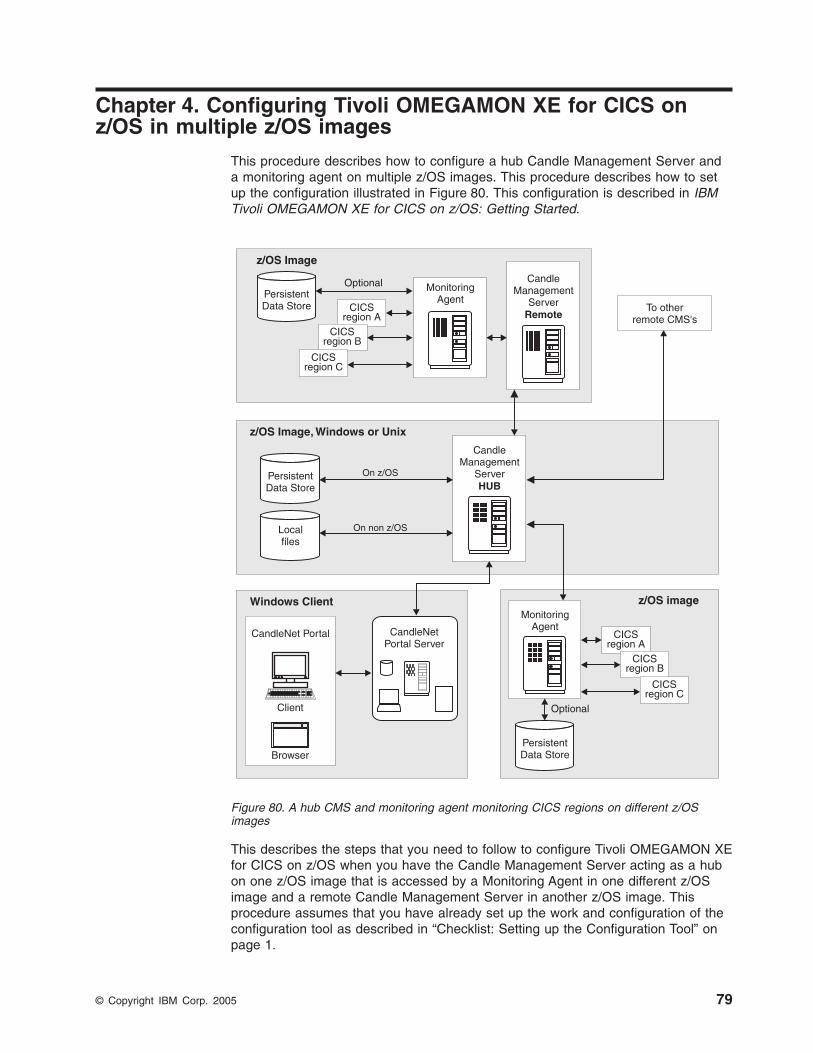
Chapter 4. Configuring Tivoli OMEGAMON XE for CICS on
z/OS in multiple z/OS images
This procedure describes how to configure a hub Candle Management Server and
a monitoring agent on multiple z/OS images. This procedure describes how to set
up the configuration illustrated in Figure 80. This configuration is described in IBM
Tivoli OMEGAMON XE for CICS on z/OS: Getting Started.
This describes the steps that you need to follow to configure Tivoli OMEGAMON XE
for CICS on z/OS when you have the Candle Management Server acting as a hub
on one z/OS image that is accessed by a Monitoring Agent in one different z/OS
image and a remote Candle Management Server in another z/OS image. This
procedure assumes that you have already set up the work and configuration of the
configuration tool as described in “Checklist: Setting up the Configuration Tool” on
page 1.
CandleNet Portal CandleNetPortal Server
Windows Client
z/OS Image
z/OS Image, Windows or Unix
z/OS image
CandleManagement
ServerRemote
CandleManagement
ServerHUB
MonitoringAgent
MonitoringAgent
To otherremote CMS's
PersistentData Store
PersistentData Store
PersistentData Store
Localfiles
Client
Browser
CICSregion A
CICSregion A
CICSregion B
CICSregion B
CICSregion C
CICSregion C
On z/OS
On non z/OS
Optional
Optional
Figure 80. A hub CMS and monitoring agent monitoring CICS regions on different z/OS
images
© Copyright IBM Corp. 2005 79
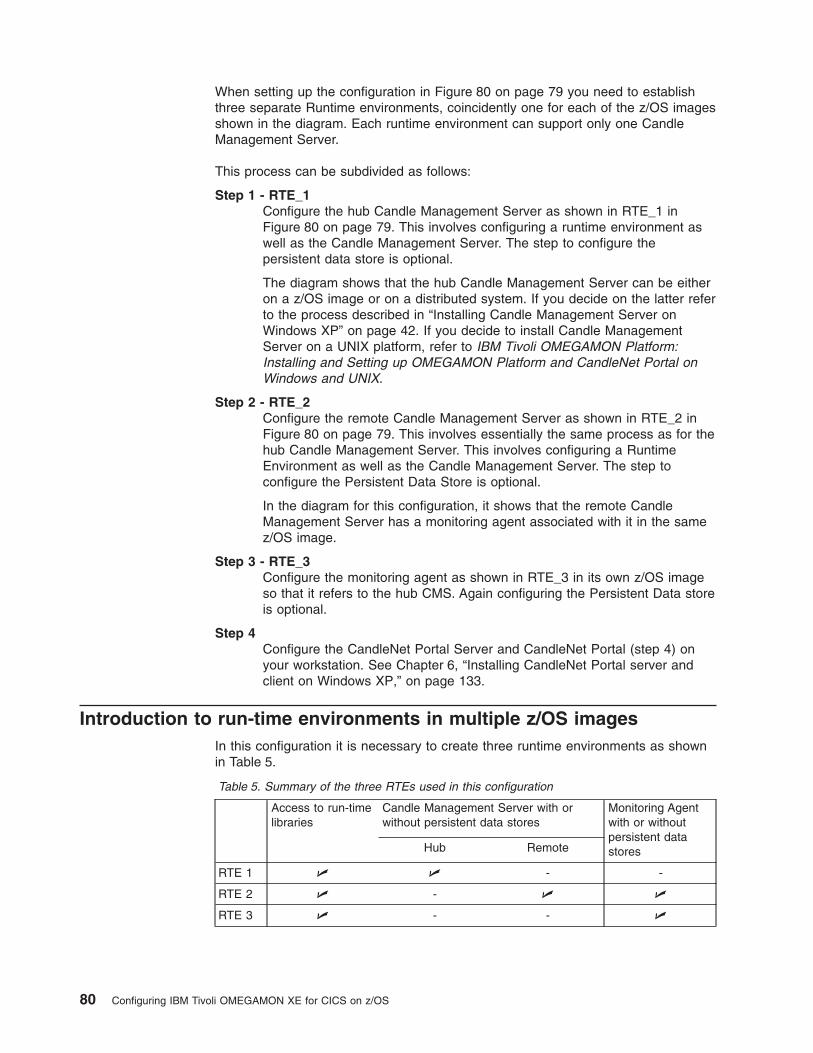
When setting up the configuration in Figure 80 on page 79 you need to establish
three separate Runtime environments, coincidently one for each of the z/OS images
shown in the diagram. Each runtime environment can support only one Candle
Management Server.
This process can be subdivided as follows:
Step 1 - RTE_1
Configure the hub Candle Management Server as shown in RTE_1 in
Figure 80 on page 79. This involves configuring a runtime environment as
well as the Candle Management Server. The step to configure the
persistent data store is optional.
The diagram shows that the hub Candle Management Server can be either
on a z/OS image or on a distributed system. If you decide on the latter refer
to the process described in “Installing Candle Management Server on
Windows XP” on page 42. If you decide to install Candle Management
Server on a UNIX platform, refer to IBM Tivoli OMEGAMON Platform:
Installing and Setting up OMEGAMON Platform and CandleNet Portal on
Windows and UNIX.
Step 2 - RTE_2
Configure the remote Candle Management Server as shown in RTE_2 in
Figure 80 on page 79. This involves essentially the same process as for the
hub Candle Management Server. This involves configuring a Runtime
Environment as well as the Candle Management Server. The step to
configure the Persistent Data Store is optional.
In the diagram for this configuration, it shows that the remote Candle
Management Server has a monitoring agent associated with it in the same
z/OS image.
Step 3 - RTE_3
Configure the monitoring agent as shown in RTE_3 in its own z/OS image
so that it refers to the hub CMS. Again configuring the Persistent Data store
is optional.
Step 4
Configure the CandleNet Portal Server and CandleNet Portal (step 4) on
your workstation. See Chapter 6, “Installing CandleNet Portal server and
client on Windows XP,” on page 133.
Introduction to run-time environments in multiple z/OS images
In this configuration it is necessary to create three runtime environments as shown
in Table 5.
Table 5. Summary of the three RTEs used in this configuration
Access to run-time
libraries
Candle Management Server with or
without persistent data stores
Monitoring Agent
with or without
persistent data
stores
Hub Remote
RTE 1 U U - -
RTE 2 U - U U
RTE 3 U - - U
80 Configuring IBM Tivoli OMEGAMON XE for CICS on z/OS
A runtime environment provides access to the OMEGAMON libraries. Each Candle
Management Server requires its own runtime environment and a Monitoring Agent
requires its own runtime environment if it exists on a separate z/OS image.
Configuring a hub Candle Management Server (RTE_1)
This is an overview of the steps that you need to follow to set up the configuration
of the first runtime environment (RTE_1) described in Figure 80 on page 79.
1. Configuring a runtime environment
a. “Adding a new runtime environment” on page 83
b. “Specifying values on the Add Runtime Environment panels” on page 85
c. “Building runtime libraries” on page 14
2. Configuring the hub Candle Management Server.
a. “Configuring a Candle Management Server (RTE_1 and RTE_2)” on page
88
b. “Configuring a persistent data store (Candle Management Server)” on page
94.
3. “Loading runtime libraries” on page 104
4. “Completing the configuration” on page 104
5. “Verifying the configuration: Candle Management Server on different z/OS
images” on page 106
Configuring a remote Candle Management Server (RTE_2)
This is an overview of the steps that you need to follow to configure a remote
Candle Management Server (RTE_2) together with a remote Monitoring Agent as
outlined in Figure 80 on page 79.
1. Configuring a Runtime Environment
a. “Adding a new runtime environment” on page 83
b. “Specifying values on the Add Runtime Environment panels” on page 85
c. “Building runtime libraries” on page 14
2. Configuring the remote Candle Management Server.
a. “Configuring a Candle Management Server (RTE_1 and RTE_2)” on page
88
b. “Configuring a persistent data store (Candle Management Server)” on page
94.
3. Configuring Tivoli OMEGAMON II for CICS.
a. “Configuring OMEGAMON II for CICS (RTE_2 and RTE_3)” on page 97
b. “Configuring a persistent data store” on page 100 (optional)
4. Configuring Tivoli OMEGAMON XE for CICS on z/OS
a. “Configuring Tivoli OMEGAMON XE for CICS on z/OS (RTE_2 and RTE_3)”
on page 99
b. “Configuring a Monitoring Agent (RTE_2 and RTE_3)” on page 101
c. “Configuring a persistent data store (Monitoring Agent)” on page 103
(optional)
5. “Loading runtime libraries” on page 104
6. “Completing the configuration” on page 104
7. “Modifying the CICS started task” on page 105
Chapter 4. Configuring Tivoli OMEGAMON XE for CICS on z/OS in multiple z/OS images 81
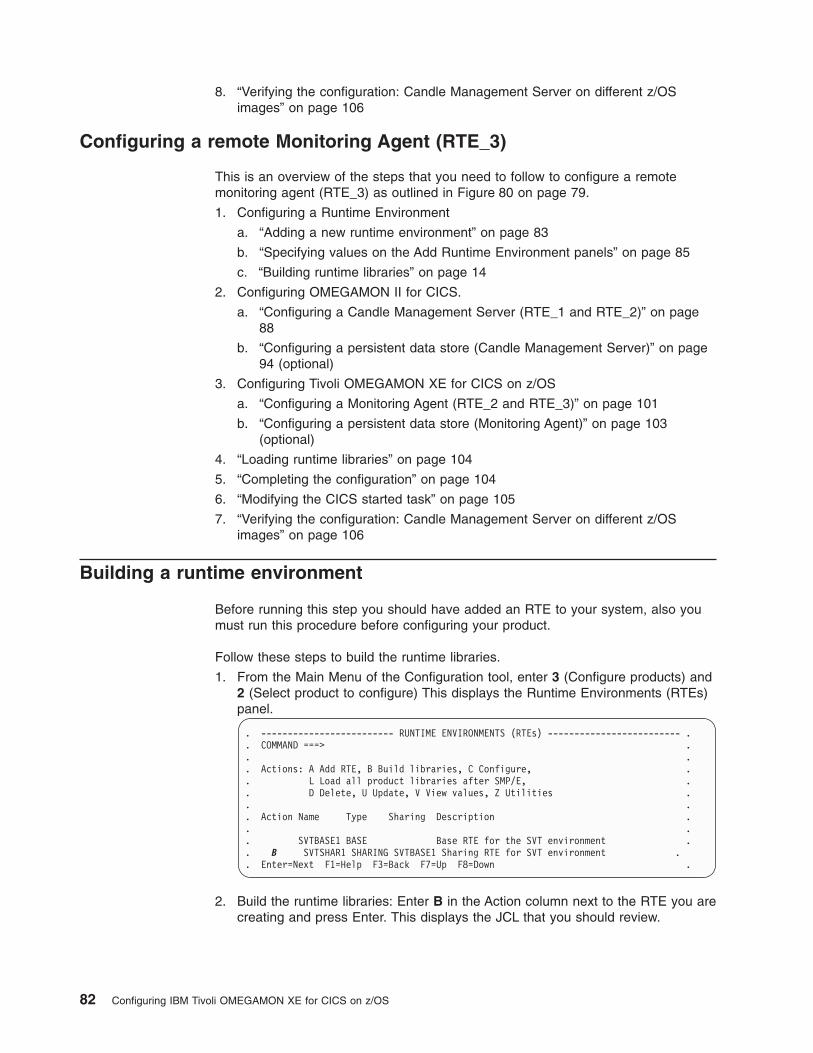
8. “Verifying the configuration: Candle Management Server on different z/OS
images” on page 106
Configuring a remote Monitoring Agent (RTE_3)
This is an overview of the steps that you need to follow to configure a remote
monitoring agent (RTE_3) as outlined in Figure 80 on page 79.
1. Configuring a Runtime Environment
a. “Adding a new runtime environment” on page 83
b. “Specifying values on the Add Runtime Environment panels” on page 85
c. “Building runtime libraries” on page 14
2. Configuring OMEGAMON II for CICS.
a. “Configuring a Candle Management Server (RTE_1 and RTE_2)” on page
88
b. “Configuring a persistent data store (Candle Management Server)” on page
94 (optional)
3. Configuring Tivoli OMEGAMON XE for CICS on z/OS
a. “Configuring a Monitoring Agent (RTE_2 and RTE_3)” on page 101
b. “Configuring a persistent data store (Monitoring Agent)” on page 103
(optional)
4. “Loading runtime libraries” on page 104
5. “Completing the configuration” on page 104
6. “Modifying the CICS started task” on page 105
7. “Verifying the configuration: Candle Management Server on different z/OS
images” on page 106
Building a runtime environment
Before running this step you should have added an RTE to your system, also you
must run this procedure before configuring your product.
Follow these steps to build the runtime libraries.
1. From the Main Menu of the Configuration tool, enter 3 (Configure products) and
2 (Select product to configure) This displays the Runtime Environments (RTEs)
panel.
. ------------------------- RUNTIME ENVIRONMENTS (RTEs) ------------------------- .
. COMMAND ===> .
. .
. Actions: A Add RTE, B Build libraries, C Configure, .
. L Load all product libraries after SMP/E, .
. D Delete, U Update, V View values, Z Utilities .
. .
. Action Name Type Sharing Description .
. .
. SVTBASE1 BASE Base RTE for the SVT environment .
. B SVTSHAR1 SHARING SVTBASE1 Sharing RTE for SVT environment .
. Enter=Next F1=Help F3=Back F7=Up F8=Down .
2. Build the runtime libraries: Enter B in the Action column next to the RTE you are
creating and press Enter. This displays the JCL that you should review.
82 Configuring IBM Tivoli OMEGAMON XE for CICS on z/OS
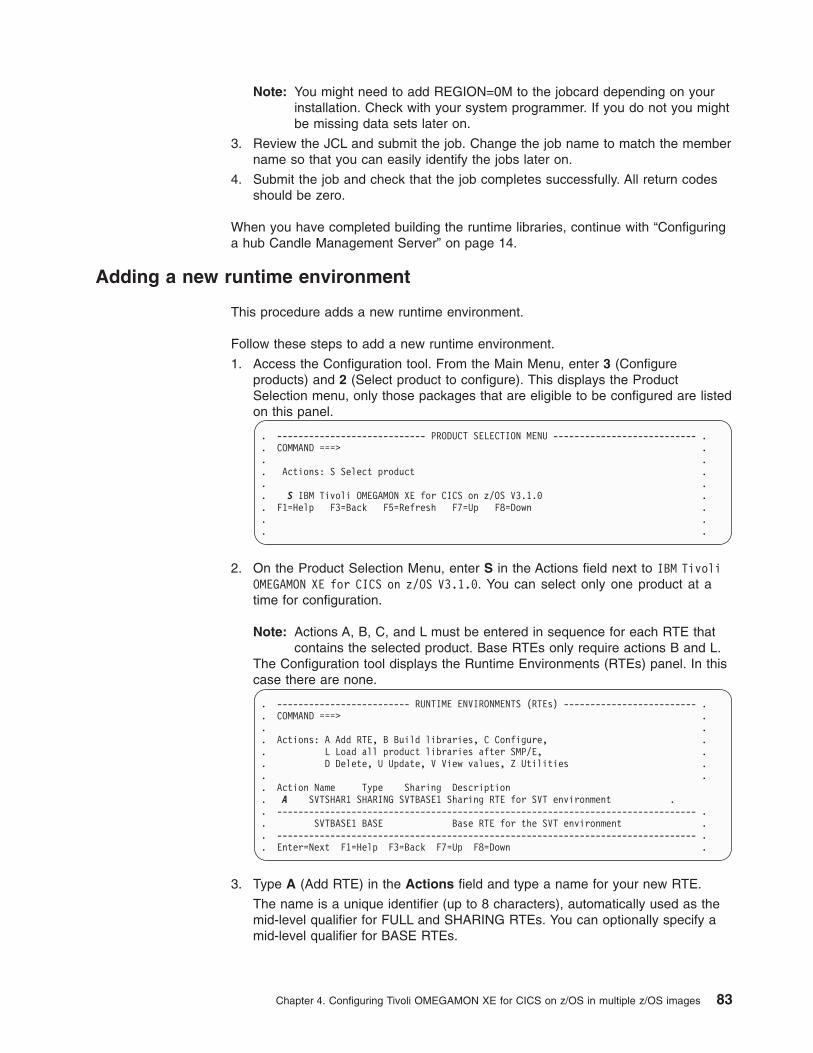
Note: You might need to add REGION=0M to the jobcard depending on your
installation. Check with your system programmer. If you do not you might
be missing data sets later on.
3. Review the JCL and submit the job. Change the job name to match the member
name so that you can easily identify the jobs later on.
4. Submit the job and check that the job completes successfully. All return codes
should be zero.
When you have completed building the runtime libraries, continue with “Configuring
a hub Candle Management Server” on page 14.
Adding a new runtime environment
This procedure adds a new runtime environment.
Follow these steps to add a new runtime environment.
1. Access the Configuration tool. From the Main Menu, enter 3 (Configure
products) and 2 (Select product to configure). This displays the Product
Selection menu, only those packages that are eligible to be configured are listed
on this panel.
. ---------------------------- PRODUCT SELECTION MENU --------------------------- .
. COMMAND ===> .
. .
. Actions: S Select product .
. .
. S IBM Tivoli OMEGAMON XE for CICS on z/OS V3.1.0 .
. F1=Help F3=Back F5=Refresh F7=Up F8=Down .
. .
. .
2. On the Product Selection Menu, enter S in the Actions field next to IBM Tivoli
OMEGAMON XE for CICS on z/OS V3.1.0. You can select only one product at a
time for configuration.
Note: Actions A, B, C, and L must be entered in sequence for each RTE that
contains the selected product. Base RTEs only require actions B and L.
The Configuration tool displays the Runtime Environments (RTEs) panel. In this
case there are none.
. ------------------------- RUNTIME ENVIRONMENTS (RTEs) ------------------------- .
. COMMAND ===> .
. .
. Actions: A Add RTE, B Build libraries, C Configure, .
. L Load all product libraries after SMP/E, .
. D Delete, U Update, V View values, Z Utilities .
. .
. Action Name Type Sharing Description
. A SVTSHAR1 SHARING SVTBASE1 Sharing RTE for SVT environment .
. ------------------------------------------------------------------------------- .
. SVTBASE1 BASE Base RTE for the SVT environment .
. ------------------------------------------------------------------------------- .
. Enter=Next F1=Help F3=Back F7=Up F8=Down .
3. Type A (Add RTE) in the Actions field and type a name for your new RTE.
The name is a unique identifier (up to 8 characters), automatically used as the
mid-level qualifier for FULL and SHARING RTEs. You can optionally specify a
mid-level qualifier for BASE RTEs.
Chapter 4. Configuring Tivoli OMEGAMON XE for CICS on z/OS in multiple z/OS images 83
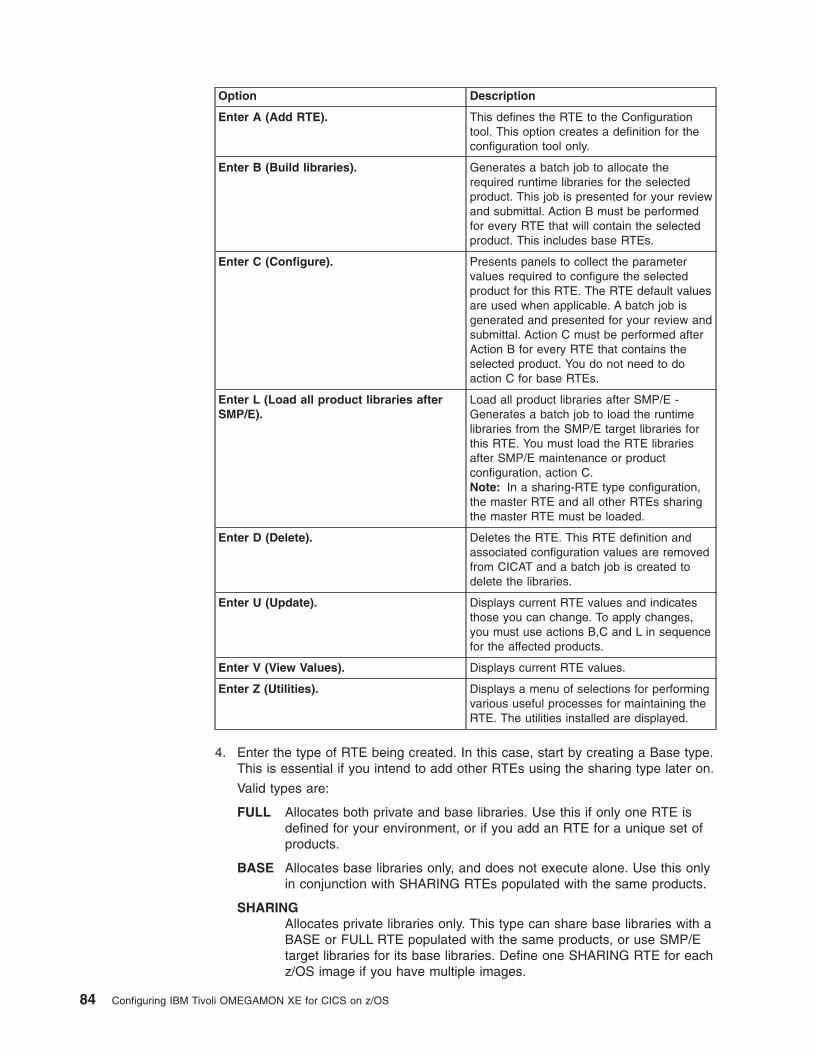
Option Description
Enter A (Add RTE). This defines the RTE to the Configuration
tool. This option creates a definition for the
configuration tool only.
Enter B (Build libraries). Generates a batch job to allocate the
required runtime libraries for the selected
product. This job is presented for your review
and submittal. Action B must be performed
for every RTE that will contain the selected
product. This includes base RTEs.
Enter C (Configure). Presents panels to collect the parameter
values required to configure the selected
product for this RTE. The RTE default values
are used when applicable. A batch job is
generated and presented for your review and
submittal. Action C must be performed after
Action B for every RTE that contains the
selected product. You do not need to do
action C for base RTEs.
Enter L (Load all product libraries after
SMP/E).
Load all product libraries after SMP/E -
Generates a batch job to load the runtime
libraries from the SMP/E target libraries for
this RTE. You must load the RTE libraries
after SMP/E maintenance or product
configuration, action C.
Note: In a sharing-RTE type configuration,
the master RTE and all other RTEs sharing
the master RTE must be loaded.
Enter D (Delete). Deletes the RTE. This RTE definition and
associated configuration values are removed
from CICAT and a batch job is created to
delete the libraries.
Enter U (Update). Displays current RTE values and indicates
those you can change. To apply changes,
you must use actions B,C and L in sequence
for the affected products.
Enter V (View Values). Displays current RTE values.
Enter Z (Utilities). Displays a menu of selections for performing
various useful processes for maintaining the
RTE. The utilities installed are displayed.
4. Enter the type of RTE being created. In this case, start by creating a Base type.
This is essential if you intend to add other RTEs using the sharing type later on.
Valid types are:
FULL Allocates both private and base libraries. Use this if only one RTE is
defined for your environment, or if you add an RTE for a unique set of
products.
BASE Allocates base libraries only, and does not execute alone. Use this only
in conjunction with SHARING RTEs populated with the same products.
SHARING
Allocates private libraries only. This type can share base libraries with a
BASE or FULL RTE populated with the same products, or use SMP/E
target libraries for its base libraries. Define one SHARING RTE for each
z/OS image if you have multiple images.
84 Configuring IBM Tivoli OMEGAMON XE for CICS on z/OS
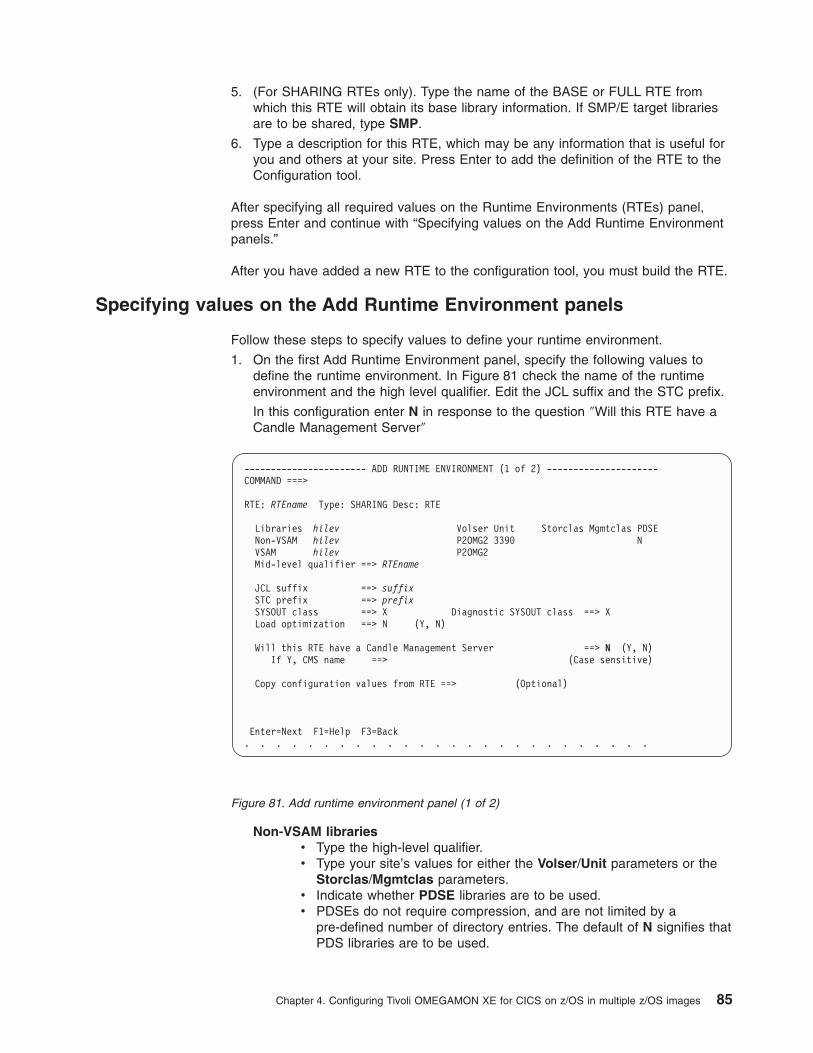
5. (For SHARING RTEs only). Type the name of the BASE or FULL RTE from
which this RTE will obtain its base library information. If SMP/E target libraries
are to be shared, type SMP.
6. Type a description for this RTE, which may be any information that is useful for
you and others at your site. Press Enter to add the definition of the RTE to the
Configuration tool.
After specifying all required values on the Runtime Environments (RTEs) panel,
press Enter and continue with “Specifying values on the Add Runtime Environment
panels.”
After you have added a new RTE to the configuration tool, you must build the RTE.
Specifying values on the Add Runtime Environment panels
Follow these steps to specify values to define your runtime environment.
1. On the first Add Runtime Environment panel, specify the following values to
define the runtime environment. In Figure 81 check the name of the runtime
environment and the high level qualifier. Edit the JCL suffix and the STC prefix.
In this configuration enter N in response to the question ″Will this RTE have a
Candle Management Server″
Non-VSAM libraries
v Type the high-level qualifier.
v Type your site’s values for either the Volser/Unit parameters or the
Storclas/Mgmtclas parameters.
v Indicate whether PDSE libraries are to be used.
v PDSEs do not require compression, and are not limited by a
pre-defined number of directory entries. The default of N signifies that
PDS libraries are to be used.
----------------------- ADD RUNTIME ENVIRONMENT (1 of 2) ---------------------
COMMAND ===>
RTE: RTEname Type: SHARING Desc: RTE
Libraries hilev Volser Unit Storclas Mgmtclas PDSE
Non-VSAM hilev P2OMG2 3390 N
VSAM hilev P2OMG2
Mid-level qualifier ==> RTEname
JCL suffix ==> suffix
STC prefix ==> prefix
SYSOUT class ==> X Diagnostic SYSOUT class ==> X
Load optimization ==> N (Y, N)
Will this RTE have a Candle Management Server ==> N (Y, N)
If Y, CMS name ==> (Case sensitive)
Copy configuration values from RTE ==> (Optional)
Enter=Next F1=Help F3=Back
. . . . . . . . . . . . . . . . . . . . . . . . . .
Figure 81. Add runtime environment panel (1 of 2)
Chapter 4. Configuring Tivoli OMEGAMON XE for CICS on z/OS in multiple z/OS images 85

Note: Supply SMS values for libraries specified as PDSEs.
VSAM libraries
v Type the high-level qualifier.
v Type your site’s values for the Volser or the Storclas/Mgmtclas
parameters.
Mid-level qualifier
v For FULL and SHARING RTEs, accept the mid-level qualifier default
value (which is the RTE name you previously specified) or specify a
unique mid-level qualifier.
v For BASE RTEs, specify a unique mid-level qualifier or optionally
leave this field blank.
JCL suffix
Type a suffix for the JCL. The suffix (up to four characters) is appended
to all JCL that is generated in INSTJOBS. The JCL suffix uniquely
identifies the batch job members created by the Configuration tool for
this RTE.
STC prefix
(FULL and SHARING RTEs only). Type a global STC Prefix (from 1–4
characters) to be used in building started tasks names for products in
this RTE. The default is CANS.
SYSOUT class / Diagnostic SYSOUT class
Specify values for the non-diagnostic and diagnostic output DDNAMES.
Note: These values were previously hardcoded.
Load optimization
Indicate whether you want to optimize loading of this RTE. The default
is N. Refer to the online help (F1) for more details.
Will the RTE have a Candle Management Server?
In this configuration for the runtime environments RTE_1 and RTE_2
enter Y, for RTE_3 enter N.
You must enter the name of the Candle Management Server to be
configured. It is used by the other components that need to
communicate with this Candle Management Server. The name of the
runtime environment is used as a default.
Copied from RTE
(FULL and SHARING RTEs only - Optional)
Type the name of an existing RTE, from which configuration values will
be copied and used for this RTE.
Note: This procedure makes an exact copy of the existing RTE. If you
will not be using the same products in the new RTE, we
recommend that you not use this procedure.
Install National Language components?
(FULL and SHARING RTEs only - NLS products only)
Specify Y to install National Language Components in this RTE for all
eligible products.
2. After specifying all required values on the first Add Runtime Environment
panel, press Enter. In Figure 82 on page 87
86 Configuring IBM Tivoli OMEGAMON XE for CICS on z/OS

3. On the second Add Runtime Environment panel, for FULL and SHARING RTEs
only, specify these values:
Use OS/390 system variables?
Specify Y if this RTE will use z/OS system variables.
See “Enabling system variable support” on page 163 for more
information on enabling system variable support.
Security type
Specify what, if any, security system is to be used for this RTE. The
default is NONE. If ACF2 is specified, you must also type the name of
the ACF2 macro library.
VTAM communication values
v Type a global VTAM applid prefix (from 1–4 characters) to be used in
building the VTAM applids for products in this RTE. The default is
CTD.
v Identify your VTAM network. This is defined in the NETID parameter
of VTAMLST.
v Type the Logmode table name for LU6.2 logmode entries. The
default is KDSMTAB1.
v Type the LU6.2 logmode for this RTE. The default is CANCTDCS.
TCP/IP communication values
v Type the TCP/IP host name of the z/OS system in which this RTE
resides and the TCP/IP address of the host. Enter TSO HOMETEST
to get these values.
v Type the started task name of the TCP/IP server.
v Type the address of the IP port. The default is 1918.
v Type the Interlink TCP/IP subsystem name (if applicable).
v Do not enter the fully qualified hostname.
Note: Enter V (View Values) to verify the RTE information and U (Update) to make
the necessary changes.
. ----------------------- ADD RUNTIME ENVIRONMENT (2 of 2) ---------------------- .
. COMMAND ===> .
. .
. Use OS/390 system variables? ==> N (Y, N) .
. RTE name specification ==> RTEname .
. RTE base alias specification ==> .
. Applid prefix specification ==> applid_prefix .
. Use VTAM model applids? ==> N (Y, N) .
. .
. Security system ==> NONE (RACF, ACF2, TSS, NAM, None) .
. ACF2 macro library ==> .
. .
. VTAM communications values: .
. Applid prefix ==> applid Network ID ==> NETID .
. Logmode table ==> KDSMTAB1 LU6.2 logmode ==> CANCTDCS .
. .
. If you require TCP/IP communications for this RTE, complete these values: .
. Hostname ==> HostName .
. Address ==> IP_Address .
. Started task ==> Started_Task_Name .
. Port number ==> Port_Number .
. Interlink subsystem ==> (if applicable) .
. Enter=Next F1=Help F3=Back .
. .
Figure 82. Add runtime environment panel (2 of 2)
Chapter 4. Configuring Tivoli OMEGAMON XE for CICS on z/OS in multiple z/OS images 87

When you have finished defining your runtime environment, continue with “Building
runtime libraries.”
Building runtime libraries
After adding an RTE to your system, also you must run this procedure before
configuring your product.
Follow these steps to build the runtime libraries.
1. From the Main Menu of the Configuration tool, enter 3 (Configure products) and
2 (Select product to configure) This displays the Runtime Environments (RTEs)
panel.
2. Build the runtime libraries: Enter B in the Action column next to the RTE you are
creating and press Enter. This displays the JCL that you should review, edit,
submit and expect a return code of zero. Change the jobname to the name of
the member so that you can track the job logs more easily.
Note: You might need to add REGION=0M to the jobcard depending on your
installation. Check with your system programmer. If you do not you might
be missing data sets later on.
3. Review the JCL and submit the job. Change the job name to match the member
name so that you can easily identify the jobs later on.
4. Submit the job and check that the job completes successfully. All return codes
should be zero.
When you have completed building the runtime libraries, continue with “Configuring
a Candle Management Server (RTE_1 and RTE_2).”
Configuring a Candle Management Server (RTE_1 and RTE_2)
Now that you have set up an RTE, you can start the configuration of Tivoli
OMEGAMON XE for CICS on z/OS. You must configure a hub Candle Management
Server before configuring the rest of the product.
You have two alternatives at this point:
v Configure your hub Candle Management Server on z/OS (RTE_1). To do this
continue using this topic.
. ------------------------- RUNTIME ENVIRONMENTS (RTEs) ------------------------- .
. COMMAND ===> .
. .
. Actions: A Add RTE, B Build libraries, C Configure, .
. L Load all product libraries after SMP/E, .
. D Delete, U Update, V View values, Z Utilities .
. .
. Action Name Type Sharing Description .
. .
. RTEBASE1 BASE Base RTE for the SVT environment .
. B RTESHAR1 SHARING RTEBASE1 Sharing RTE for SVT environment .
. Enter=Next F1=Help F3=Back F7=Up F8=Down .
Figure 83. Runtime environments panel
88 Configuring IBM Tivoli OMEGAMON XE for CICS on z/OS
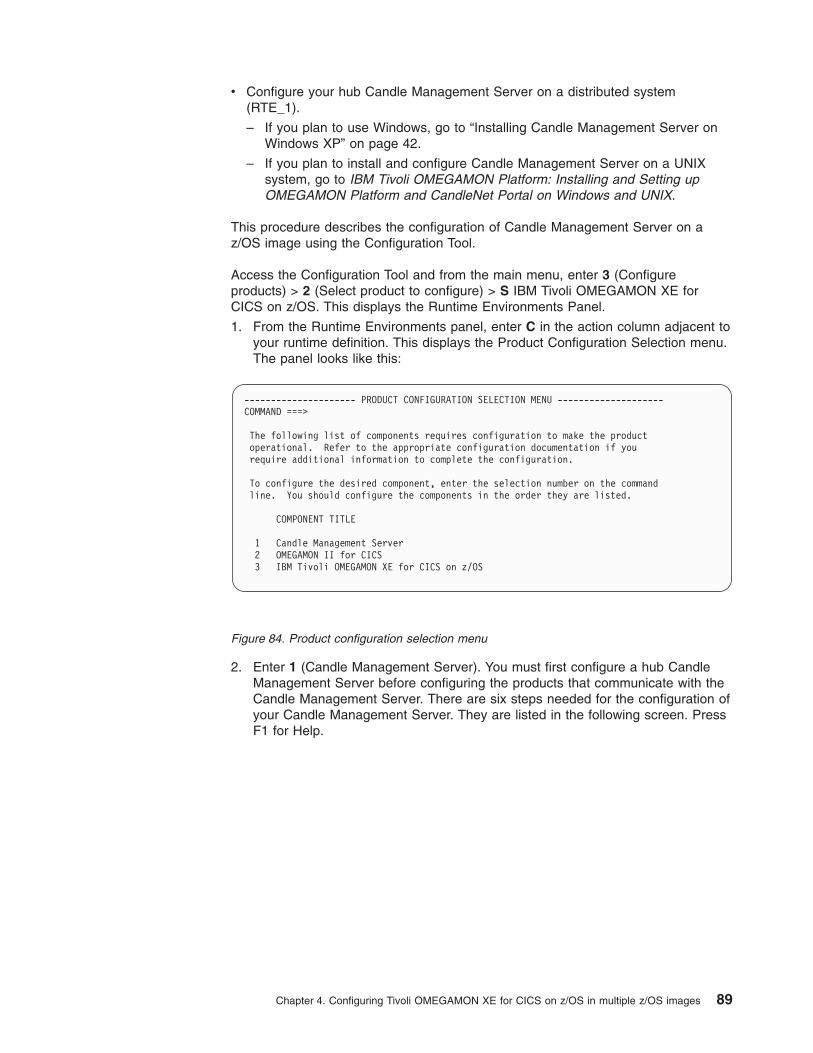
v Configure your hub Candle Management Server on a distributed system
(RTE_1).
– If you plan to use Windows, go to “Installing Candle Management Server on
Windows XP” on page 42.
– If you plan to install and configure Candle Management Server on a UNIX
system, go to IBM Tivoli OMEGAMON Platform: Installing and Setting up
OMEGAMON Platform and CandleNet Portal on Windows and UNIX.
This procedure describes the configuration of Candle Management Server on a
z/OS image using the Configuration Tool.
Access the Configuration Tool and from the main menu, enter 3 (Configure
products) > 2 (Select product to configure) > S IBM Tivoli OMEGAMON XE for
CICS on z/OS. This displays the Runtime Environments Panel.
1. From the Runtime Environments panel, enter C in the action column adjacent to
your runtime definition. This displays the Product Configuration Selection menu.
The panel looks like this:
2. Enter 1 (Candle Management Server). You must first configure a hub Candle
Management Server before configuring the products that communicate with the
Candle Management Server. There are six steps needed for the configuration of
your Candle Management Server. They are listed in the following screen. Press
F1 for Help.
--------------------- PRODUCT CONFIGURATION SELECTION MENU --------------------
COMMAND ===>
The following list of components requires configuration to make the product
operational. Refer to the appropriate configuration documentation if you
require additional information to complete the configuration.
To configure the desired component, enter the selection number on the command
line. You should configure the components in the order they are listed.
COMPONENT TITLE
1 Candle Management Server
2 OMEGAMON II for CICS
3 IBM Tivoli OMEGAMON XE for CICS on z/OS
Figure 84. Product configuration selection menu
Chapter 4. Configuring Tivoli OMEGAMON XE for CICS on z/OS in multiple z/OS images 89

3. Enter 1 (Create LU6.2 logmode). This panel lets you specify the name of the
LU6.2 logmode and logmode table required by the Candle Management Server.
After you complete this panel, press Enter. A job to create the logmode is
displayed. You must submit this job unless you plan on using an existing LU6.2
logmode.
Note: This panel lets you specify the name of the LU6.2 logmode and logmode
table required by the Candle Management Server. After you complete
this panel, press Enter. This generates JCL, review, edit and submit this
job unless you plan to use an existing LU6.2 logmode. You should get a
return code of zero.
At the end of this you are returned to the Configure the Candle Management
Server menu.
Note: This screen shows the defaults. These are only suggestions. You should
follow the guidelines for your site. Press F1 for further information.
LU6.2 logmode
This is the name LU6.2 logmode.
------------- CONFIGURE THE CMS (V360) / RTE: RTEname -------------------------
OPTION ===>
Each RTE can contain only one CMS. To configure Last selected
the CMS for this RTE, perform these steps in order: Date Time
1 Create LU6.2 logmode
2 Specify configuration values
3 Specify communication protocols
4 Create runtime members
5 Configure persistent datastore
6 Complete the configuration
Optional:
7 View CMS list and registration status
F1=Help F3=Back
Figure 85. Configure the CMS panel
----------------------------- CREATE LU6.2 LOGMODE ----------------------------
COMMAND ===>
The Candle Management Server requires an LU6.2 logmode. Complete the items on
this panel and press ENTER to create a job that will assemble and link the
required logmode.
LU6.2 logmode ==> CANCTDCS
Logmode table name ==> KDSMTAB1
VTAMLIB load library ==> SYS1.VTAMLIB
VTAM macro library ==> SYS1.SISTMAC1
Figure 86. Create LU6.2 logmode
90 Configuring IBM Tivoli OMEGAMON XE for CICS on z/OS
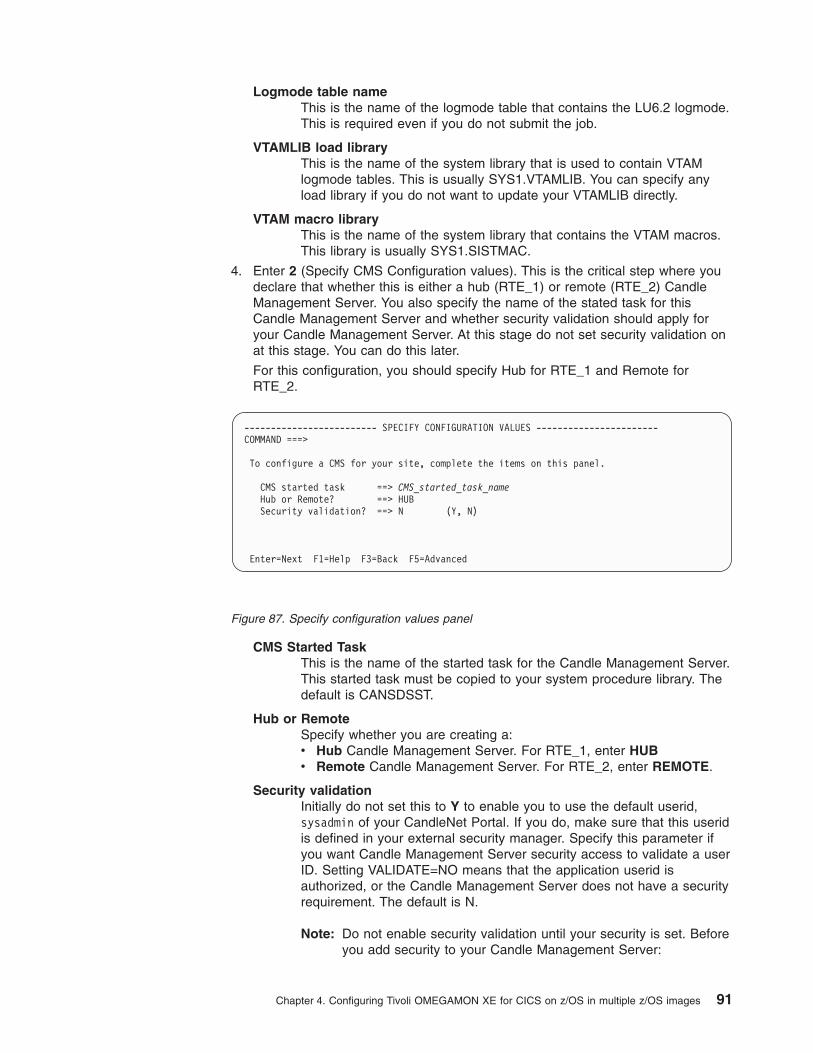
Logmode table name
This is the name of the logmode table that contains the LU6.2 logmode.
This is required even if you do not submit the job.
VTAMLIB load library
This is the name of the system library that is used to contain VTAM
logmode tables. This is usually SYS1.VTAMLIB. You can specify any
load library if you do not want to update your VTAMLIB directly.
VTAM macro library
This is the name of the system library that contains the VTAM macros.
This library is usually SYS1.SISTMAC.
4. Enter 2 (Specify CMS Configuration values). This is the critical step where you
declare that whether this is either a hub (RTE_1) or remote (RTE_2) Candle
Management Server. You also specify the name of the stated task for this
Candle Management Server and whether security validation should apply for
your Candle Management Server. At this stage do not set security validation on
at this stage. You can do this later.
For this configuration, you should specify Hub for RTE_1 and Remote for
RTE_2.
CMS Started Task
This is the name of the started task for the Candle Management Server.
This started task must be copied to your system procedure library. The
default is CANSDSST.
Hub or Remote
Specify whether you are creating a:
v Hub Candle Management Server. For RTE_1, enter HUB
v Remote Candle Management Server. For RTE_2, enter REMOTE.
Security validation
Initially do not set this to Y to enable you to use the default userid,
sysadmin of your CandleNet Portal. If you do, make sure that this userid
is defined in your external security manager. Specify this parameter if
you want Candle Management Server security access to validate a user
ID. Setting VALIDATE=NO means that the application userid is
authorized, or the Candle Management Server does not have a security
requirement. The default is N.
Note: Do not enable security validation until your security is set. Before
you add security to your Candle Management Server:
------------------------- SPECIFY CONFIGURATION VALUES -----------------------
COMMAND ===>
To configure a CMS for your site, complete the items on this panel.
CMS started task ==> CMS_started_task_name
Hub or Remote? ==> HUB
Security validation? ==> N (Y, N)
Enter=Next F1=Help F3=Back F5=Advanced
Figure 87. Specify configuration values panel
Chapter 4. Configuring Tivoli OMEGAMON XE for CICS on z/OS in multiple z/OS images 91
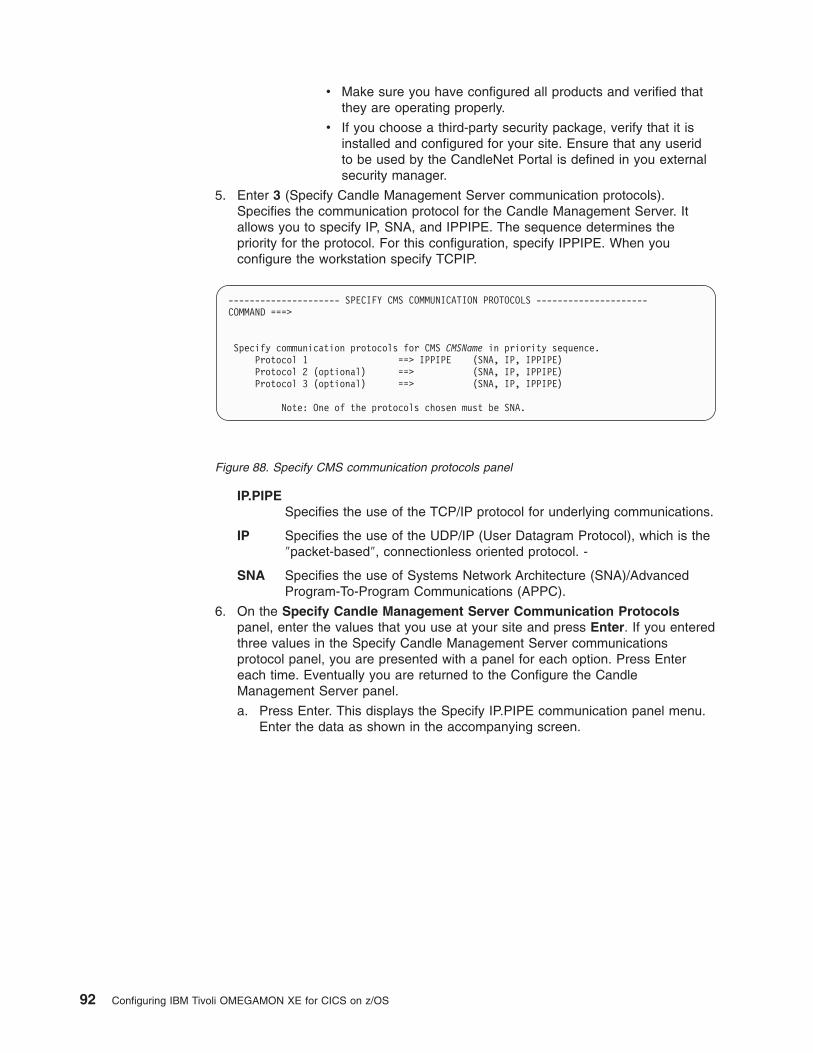
v Make sure you have configured all products and verified that
they are operating properly.
v If you choose a third-party security package, verify that it is
installed and configured for your site. Ensure that any userid
to be used by the CandleNet Portal is defined in you external
security manager.
5. Enter 3 (Specify Candle Management Server communication protocols).
Specifies the communication protocol for the Candle Management Server. It
allows you to specify IP, SNA, and IPPIPE. The sequence determines the
priority for the protocol. For this configuration, specify IPPIPE. When you
configure the workstation specify TCPIP.
IP.PIPE
Specifies the use of the TCP/IP protocol for underlying communications.
IP Specifies the use of the UDP/IP (User Datagram Protocol), which is the
″packet-based″, connectionless oriented protocol. -
SNA Specifies the use of Systems Network Architecture (SNA)/Advanced
Program-To-Program Communications (APPC).
6. On the Specify Candle Management Server Communication Protocols
panel, enter the values that you use at your site and press Enter. If you entered
three values in the Specify Candle Management Server communications
protocol panel, you are presented with a panel for each option. Press Enter
each time. Eventually you are returned to the Configure the Candle
Management Server panel.
a. Press Enter. This displays the Specify IP.PIPE communication panel menu.
Enter the data as shown in the accompanying screen.
--------------------- SPECIFY CMS COMMUNICATION PROTOCOLS ---------------------
COMMAND ===>
Specify communication protocols for CMS CMSName in priority sequence.
Protocol 1 ==> IPPIPE (SNA, IP, IPPIPE)
Protocol 2 (optional) ==> (SNA, IP, IPPIPE)
Protocol 3 (optional) ==> (SNA, IP, IPPIPE)
Note: One of the protocols chosen must be SNA.
Figure 88. Specify CMS communication protocols panel
92 Configuring IBM Tivoli OMEGAMON XE for CICS on z/OS
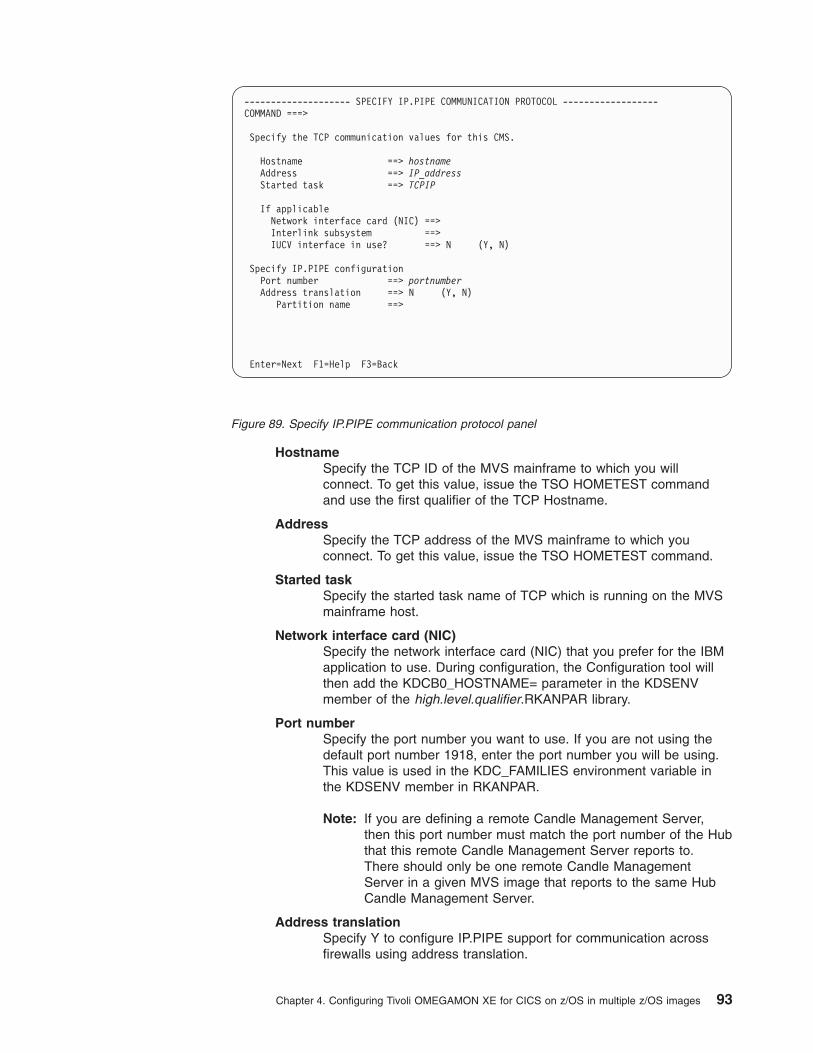
Hostname
Specify the TCP ID of the MVS mainframe to which you will
connect. To get this value, issue the TSO HOMETEST command
and use the first qualifier of the TCP Hostname.
Address
Specify the TCP address of the MVS mainframe to which you
connect. To get this value, issue the TSO HOMETEST command.
Started task
Specify the started task name of TCP which is running on the MVS
mainframe host.
Network interface card (NIC)
Specify the network interface card (NIC) that you prefer for the IBM
application to use. During configuration, the Configuration tool will
then add the KDCB0_HOSTNAME= parameter in the KDSENV
member of the high.level.qualifier.RKANPAR library.
Port number
Specify the port number you want to use. If you are not using the
default port number 1918, enter the port number you will be using.
This value is used in the KDC_FAMILIES environment variable in
the KDSENV member in RKANPAR.
Note: If you are defining a remote Candle Management Server,
then this port number must match the port number of the Hub
that this remote Candle Management Server reports to.
There should only be one remote Candle Management
Server in a given MVS image that reports to the same Hub
Candle Management Server.
Address translation
Specify Y to configure IP.PIPE support for communication across
firewalls using address translation.
-------------------- SPECIFY IP.PIPE COMMUNICATION PROTOCOL ------------------
COMMAND ===>
Specify the TCP communication values for this CMS.
Hostname ==> hostname
Address ==> IP_address
Started task ==> TCPIP
If applicable
Network interface card (NIC) ==>
Interlink subsystem ==>
IUCV interface in use? ==> N (Y, N)
Specify IP.PIPE configuration
Port number ==> portnumber
Address translation ==> N (Y, N)
Partition name ==>
Enter=Next F1=Help F3=Back
Figure 89. Specify IP.PIPE communication protocol panel
Chapter 4. Configuring Tivoli OMEGAMON XE for CICS on z/OS in multiple z/OS images 93

Note: By default, Ephemeral Pipe Support (EPS) is enabled
automatically to allow IP.PIPE connections which cross a
(Network address) translating firewall. This feature obviates
the need for a broker partition file
(KDC_PARTITIONFILE=KDCPART). If you specifically want
to disable EPS, then specify Y to the Address translation
field.
7. Enter 4 (Create runtime members). This creates the runtime members required
by Candle Management Server. These members are created in the runtime
libraries for this RTE. Edit the JCL, submit it and expect a return code of zero.
At the end of the step you can validate that the Candle Management Server is
running.
See the Candle Management Server on OS/390 and z/OS Configuration and
Customization Guide for detailed information on configuring a Candle Management
Server.
When you have completed configuring the Candle Management Server for both
RTE_1 and RTE_2, continue with “Configuring a persistent data store (Candle
Management Server).”
Configuring a persistent data store (Candle Management Server)
Persistent data stores are associated with each Candle Management Server, Tivoli
OMEGAMON XE for CICS on z/OS, and each Monitoring Agent. You should include
a persistent data store for the Candle Management Server. However the data stores
for Tivoli OMEGAMON XE for CICS on z/OS and the Monitoring Agent are optional
and depend whether you plan to collect system historical data.
Access the Configuration Tool and from the main menu, enter 3 (Configure
products) > 2 (Select product to configure) > S (IBM Tivoli OMEGAMON XE for
CICS on z/OS) > C (Adjacent to your RTE) > 3 (IBM Tivoli OMEGAMON XE for
CICS on z/OS). This displays the Configure Candle Management Server panel
(Figure 12 on page 15).
1. From the Configure Candle Management Server panel, enter 5 (Configure
persistent datastore) and press Enter. This opens the Allocate persistent data
store panel, see Figure 90 on page 95.
Note: If you do not intend to collect any historical data (either system or task),
you can omit this step.
94 Configuring IBM Tivoli OMEGAMON XE for CICS on z/OS
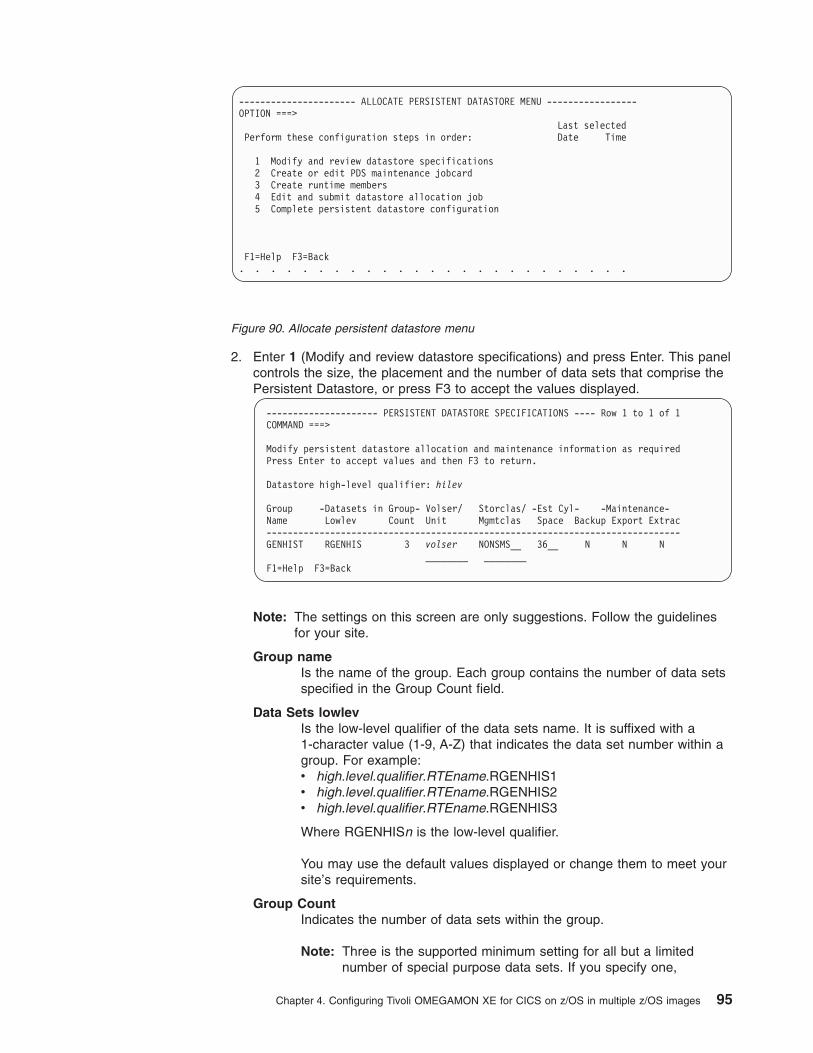
2. Enter 1 (Modify and review datastore specifications) and press Enter. This panel
controls the size, the placement and the number of data sets that comprise the
Persistent Datastore, or press F3 to accept the values displayed.
--------------------- PERSISTENT DATASTORE SPECIFICATIONS ---- Row 1 to 1 of 1
COMMAND ===>
Modify persistent datastore allocation and maintenance information as required
Press Enter to accept values and then F3 to return.
Datastore high-level qualifier: hilev
Group -Datasets in Group- Volser/ Storclas/ -Est Cyl- -Maintenance-
Name Lowlev Count Unit Mgmtclas Space Backup Export Extrac
------------------------------------------------------------------------------
GENHIST RGENHIS 3 volser NONSMS__ 36__ N N N
________ ________
F1=Help F3=Back
Note: The settings on this screen are only suggestions. Follow the guidelines
for your site.
Group name
Is the name of the group. Each group contains the number of data sets
specified in the Group Count field.
Data Sets lowlev
Is the low-level qualifier of the data sets name. It is suffixed with a
1-character value (1-9, A-Z) that indicates the data set number within a
group. For example:
v high.level.qualifier.RTEname.RGENHIS1
v high.level.qualifier.RTEname.RGENHIS2
v high.level.qualifier.RTEname.RGENHIS3
Where RGENHISn is the low-level qualifier.
You may use the default values displayed or change them to meet your
site’s requirements.
Group Count
Indicates the number of data sets within the group.
Note: Three is the supported minimum setting for all but a limited
number of special purpose data sets. If you specify one,
---------------------- ALLOCATE PERSISTENT DATASTORE MENU -----------------
OPTION ===>
Last selected
Perform these configuration steps in order: Date Time
1 Modify and review datastore specifications
2 Create or edit PDS maintenance jobcard
3 Create runtime members
4 Edit and submit datastore allocation job
5 Complete persistent datastore configuration
F1=Help F3=Back
. . . . . . . . . . . . . . . . . . . . . . . . .
Figure 90. Allocate persistent datastore menu
Chapter 4. Configuring Tivoli OMEGAMON XE for CICS on z/OS in multiple z/OS images 95
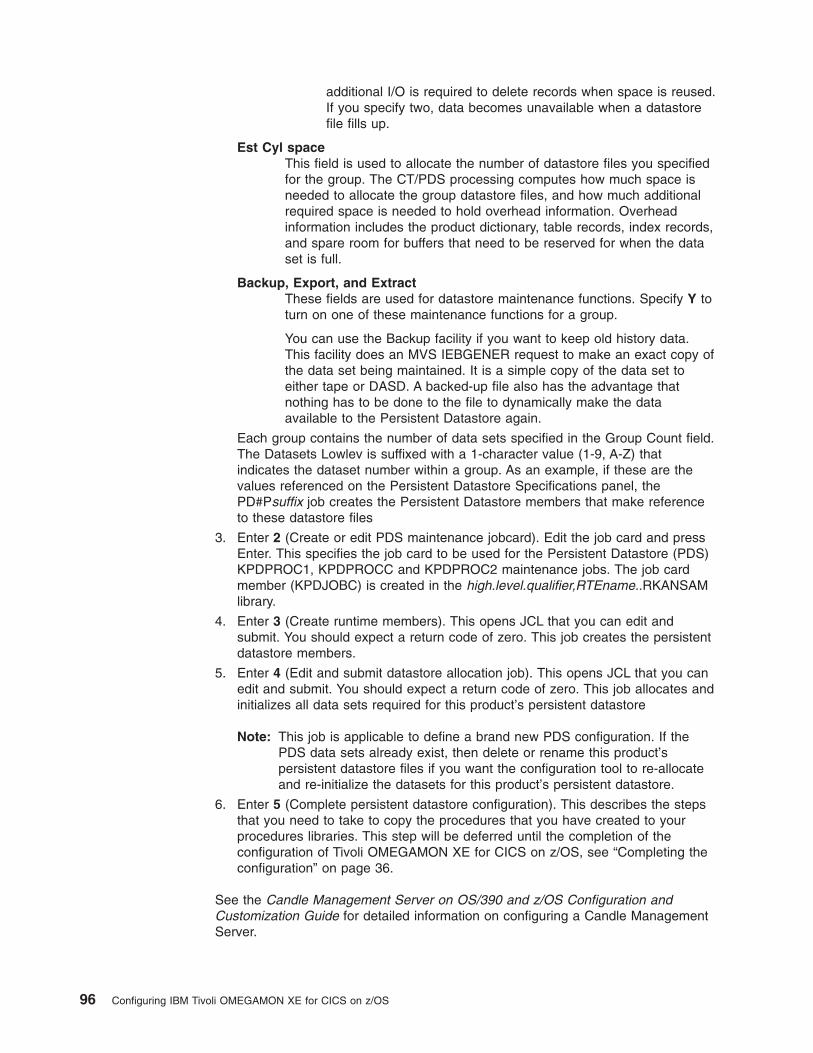
additional I/O is required to delete records when space is reused.
If you specify two, data becomes unavailable when a datastore
file fills up.
Est Cyl space
This field is used to allocate the number of datastore files you specified
for the group. The CT/PDS processing computes how much space is
needed to allocate the group datastore files, and how much additional
required space is needed to hold overhead information. Overhead
information includes the product dictionary, table records, index records,
and spare room for buffers that need to be reserved for when the data
set is full.
Backup, Export, and Extract
These fields are used for datastore maintenance functions. Specify Y to
turn on one of these maintenance functions for a group.
You can use the Backup facility if you want to keep old history data.
This facility does an MVS IEBGENER request to make an exact copy of
the data set being maintained. It is a simple copy of the data set to
either tape or DASD. A backed-up file also has the advantage that
nothing has to be done to the file to dynamically make the data
available to the Persistent Datastore again.
Each group contains the number of data sets specified in the Group Count field.
The Datasets Lowlev is suffixed with a 1-character value (1-9, A-Z) that
indicates the dataset number within a group. As an example, if these are the
values referenced on the Persistent Datastore Specifications panel, the
PD#Psuffix job creates the Persistent Datastore members that make reference
to these datastore files
3. Enter 2 (Create or edit PDS maintenance jobcard). Edit the job card and press
Enter. This specifies the job card to be used for the Persistent Datastore (PDS)
KPDPROC1, KPDPROCC and KPDPROC2 maintenance jobs. The job card
member (KPDJOBC) is created in the high.level.qualifier,RTEname..RKANSAM
library.
4. Enter 3 (Create runtime members). This opens JCL that you can edit and
submit. You should expect a return code of zero. This job creates the persistent
datastore members.
5. Enter 4 (Edit and submit datastore allocation job). This opens JCL that you can
edit and submit. You should expect a return code of zero. This job allocates and
initializes all data sets required for this product’s persistent datastore
Note: This job is applicable to define a brand new PDS configuration. If the
PDS data sets already exist, then delete or rename this product’s
persistent datastore files if you want the configuration tool to re-allocate
and re-initialize the datasets for this product’s persistent datastore.
6. Enter 5 (Complete persistent datastore configuration). This describes the steps
that you need to take to copy the procedures that you have created to your
procedures libraries. This step will be deferred until the completion of the
configuration of Tivoli OMEGAMON XE for CICS on z/OS, see “Completing the
configuration” on page 36.
See the Candle Management Server on OS/390 and z/OS Configuration and
Customization Guide for detailed information on configuring a Candle Management
Server.
96 Configuring IBM Tivoli OMEGAMON XE for CICS on z/OS
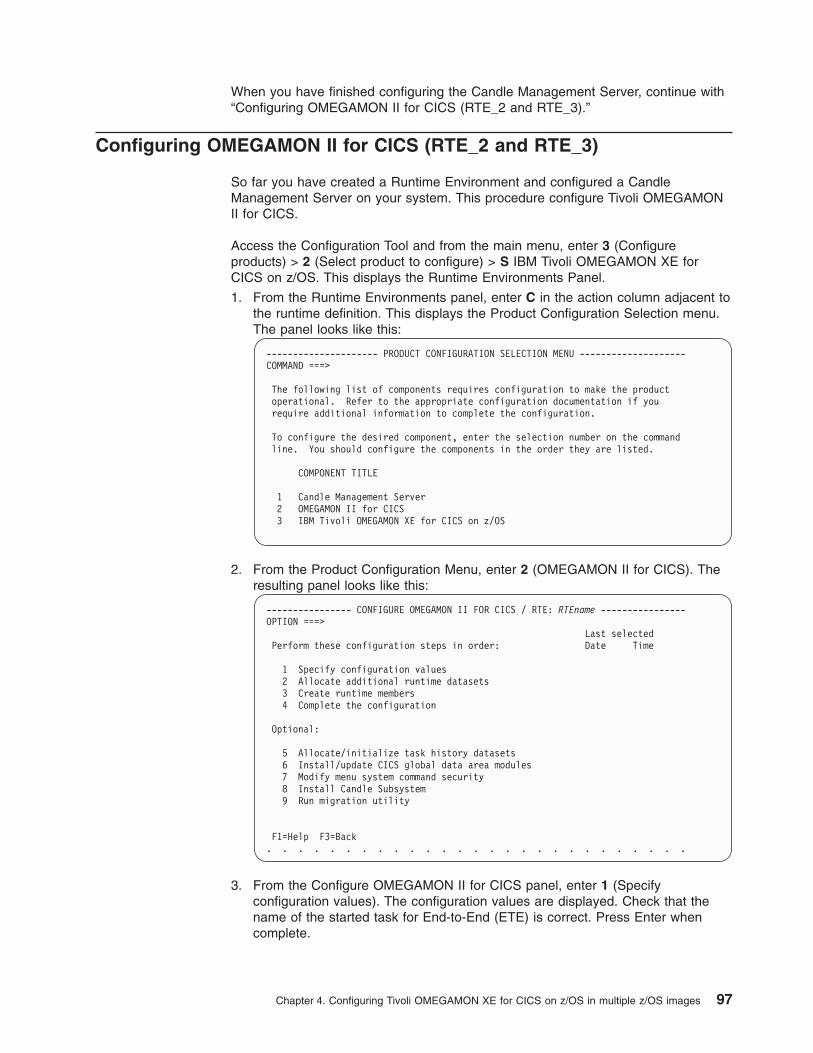
When you have finished configuring the Candle Management Server, continue with
“Configuring OMEGAMON II for CICS (RTE_2 and RTE_3).”
Configuring OMEGAMON II for CICS (RTE_2 and RTE_3)
So far you have created a Runtime Environment and configured a Candle
Management Server on your system. This procedure configure Tivoli OMEGAMON
II for CICS.
Access the Configuration Tool and from the main menu, enter 3 (Configure
products) > 2 (Select product to configure) > S IBM Tivoli OMEGAMON XE for
CICS on z/OS. This displays the Runtime Environments Panel.
1. From the Runtime Environments panel, enter C in the action column adjacent to
the runtime definition. This displays the Product Configuration Selection menu.
The panel looks like this:
--------------------- PRODUCT CONFIGURATION SELECTION MENU --------------------
COMMAND ===>
The following list of components requires configuration to make the product
operational. Refer to the appropriate configuration documentation if you
require additional information to complete the configuration.
To configure the desired component, enter the selection number on the command
line. You should configure the components in the order they are listed.
COMPONENT TITLE
1 Candle Management Server
2 OMEGAMON II for CICS
3 IBM Tivoli OMEGAMON XE for CICS on z/OS
2. From the Product Configuration Menu, enter 2 (OMEGAMON II for CICS). The
resulting panel looks like this:
---------------- CONFIGURE OMEGAMON II FOR CICS / RTE: RTEname ----------------
OPTION ===>
Last selected
Perform these configuration steps in order: Date Time
1 Specify configuration values
2 Allocate additional runtime datasets
3 Create runtime members
4 Complete the configuration
Optional:
5 Allocate/initialize task history datasets
6 Install/update CICS global data area modules
7 Modify menu system command security
8 Install Candle Subsystem
9 Run migration utility
F1=Help F3=Back
. . . . . . . . . . . . . . . . . . . . . . . . . . .
3. From the Configure OMEGAMON II for CICS panel, enter 1 (Specify
configuration values). The configuration values are displayed. Check that the
name of the started task for End-to-End (ETE) is correct. Press Enter when
complete.
Chapter 4. Configuring Tivoli OMEGAMON XE for CICS on z/OS in multiple z/OS images 97
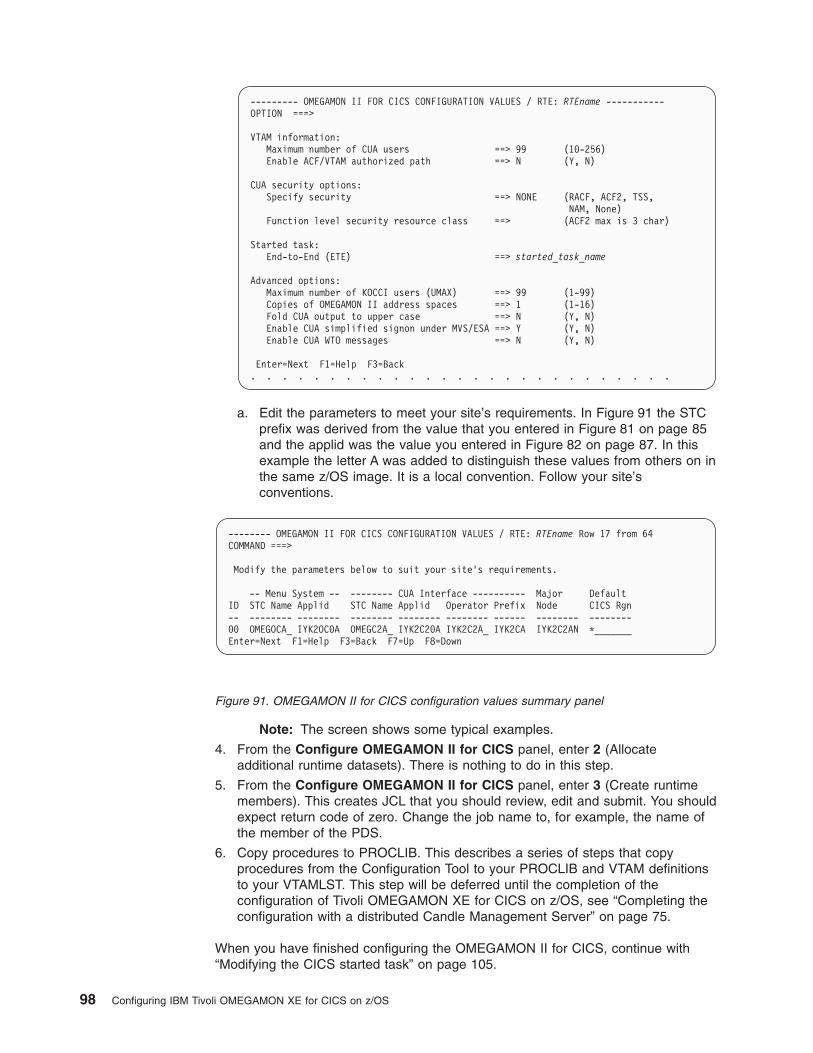
--------- OMEGAMON II FOR CICS CONFIGURATION VALUES / RTE: RTEname -----------
OPTION ===>
VTAM information:
Maximum number of CUA users ==> 99 (10-256)
Enable ACF/VTAM authorized path ==> N (Y, N)
CUA security options:
Specify security ==> NONE (RACF, ACF2, TSS,
NAM, None)
Function level security resource class ==> (ACF2 max is 3 char)
Started task:
End-to-End (ETE) ==> started_task_name
Advanced options:
Maximum number of KOCCI users (UMAX) ==> 99 (1-99)
Copies of OMEGAMON II address spaces ==> 1 (1-16)
Fold CUA output to upper case ==> N (Y, N)
Enable CUA simplified signon under MVS/ESA ==> Y (Y, N)
Enable CUA WTO messages ==> N (Y, N)
Enter=Next F1=Help F3=Back
. . . . . . . . . . . . . . . . . . . . . . . . . . .
a. Edit the parameters to meet your site’s requirements. In Figure 91 the STC
prefix was derived from the value that you entered in Figure 81 on page 85
and the applid was the value you entered in Figure 82 on page 87. In this
example the letter A was added to distinguish these values from others on in
the same z/OS image. It is a local convention. Follow your site’s
conventions.
Note: The screen shows some typical examples.
4. From the Configure OMEGAMON II for CICS panel, enter 2 (Allocate
additional runtime datasets). There is nothing to do in this step.
5. From the Configure OMEGAMON II for CICS panel, enter 3 (Create runtime
members). This creates JCL that you should review, edit and submit. You should
expect return code of zero. Change the job name to, for example, the name of
the member of the PDS.
6. Copy procedures to PROCLIB. This describes a series of steps that copy
procedures from the Configuration Tool to your PROCLIB and VTAM definitions
to your VTAMLST. This step will be deferred until the completion of the
configuration of Tivoli OMEGAMON XE for CICS on z/OS, see “Completing the
configuration with a distributed Candle Management Server” on page 75.
When you have finished configuring the OMEGAMON II for CICS, continue with
“Modifying the CICS started task” on page 105.
-------- OMEGAMON II FOR CICS CONFIGURATION VALUES / RTE: RTEname Row 17 from 64
COMMAND ===>
Modify the parameters below to suit your site’s requirements.
-- Menu System -- -------- CUA Interface ---------- Major Default
ID STC Name Applid STC Name Applid Operator Prefix Node CICS Rgn
-- -------- -------- -------- -------- -------- ------ -------- --------
00 OMEGOCA_ IYK2OC0A OMEGC2A_ IYK2C20A IYK2C2A_ IYK2CA IYK2C2AN *_______
Enter=Next F1=Help F3=Back F7=Up F8=Down
Figure 91. OMEGAMON II for CICS configuration values summary panel
98 Configuring IBM Tivoli OMEGAMON XE for CICS on z/OS
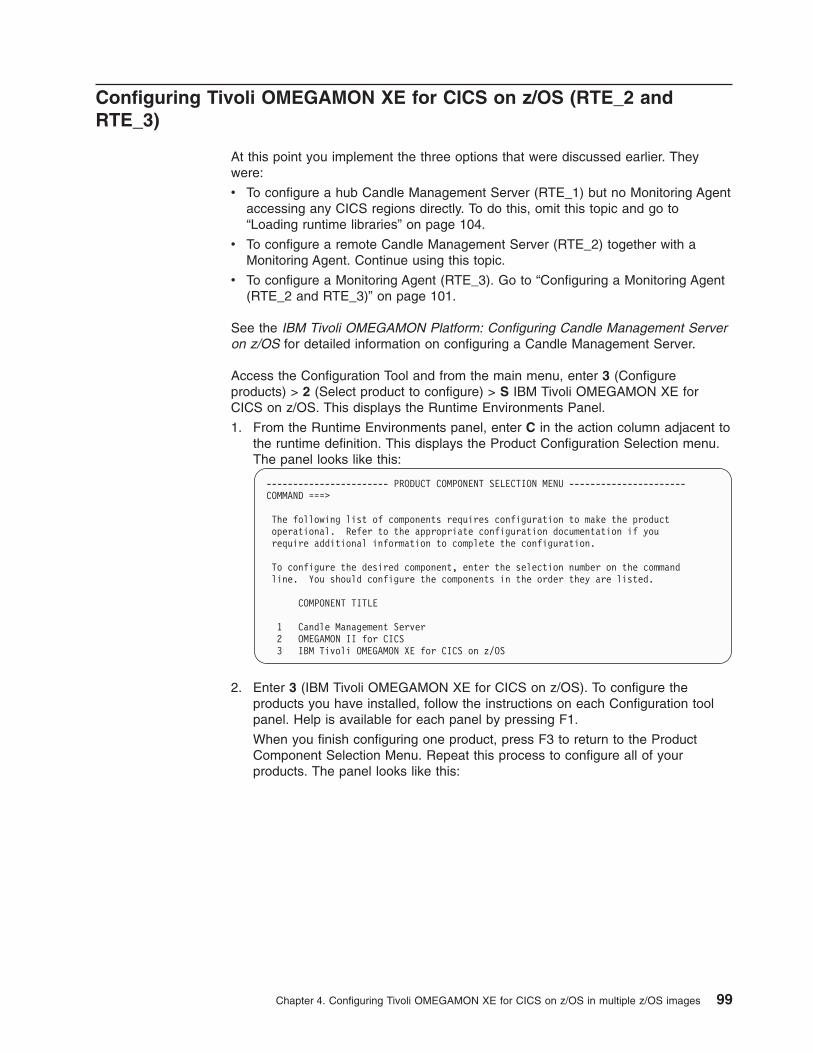
Configuring Tivoli OMEGAMON XE for CICS on z/OS (RTE_2 and
RTE_3)
At this point you implement the three options that were discussed earlier. They
were:
v To configure a hub Candle Management Server (RTE_1) but no Monitoring Agent
accessing any CICS regions directly. To do this, omit this topic and go to
“Loading runtime libraries” on page 104.
v To configure a remote Candle Management Server (RTE_2) together with a
Monitoring Agent. Continue using this topic.
v To configure a Monitoring Agent (RTE_3). Go to “Configuring a Monitoring Agent
(RTE_2 and RTE_3)” on page 101.
See the IBM Tivoli OMEGAMON Platform: Configuring Candle Management Server
on z/OS for detailed information on configuring a Candle Management Server.
Access the Configuration Tool and from the main menu, enter 3 (Configure
products) > 2 (Select product to configure) > S IBM Tivoli OMEGAMON XE for
CICS on z/OS. This displays the Runtime Environments Panel.
1. From the Runtime Environments panel, enter C in the action column adjacent to
the runtime definition. This displays the Product Configuration Selection menu.
The panel looks like this:
----------------------- PRODUCT COMPONENT SELECTION MENU ----------------------
COMMAND ===>
The following list of components requires configuration to make the product
operational. Refer to the appropriate configuration documentation if you
require additional information to complete the configuration.
To configure the desired component, enter the selection number on the command
line. You should configure the components in the order they are listed.
COMPONENT TITLE
1 Candle Management Server
2 OMEGAMON II for CICS
3 IBM Tivoli OMEGAMON XE for CICS on z/OS
2. Enter 3 (IBM Tivoli OMEGAMON XE for CICS on z/OS). To configure the
products you have installed, follow the instructions on each Configuration tool
panel. Help is available for each panel by pressing F1.
When you finish configuring one product, press F3 to return to the Product
Component Selection Menu. Repeat this process to configure all of your
products. The panel looks like this:
Chapter 4. Configuring Tivoli OMEGAMON XE for CICS on z/OS in multiple z/OS images 99
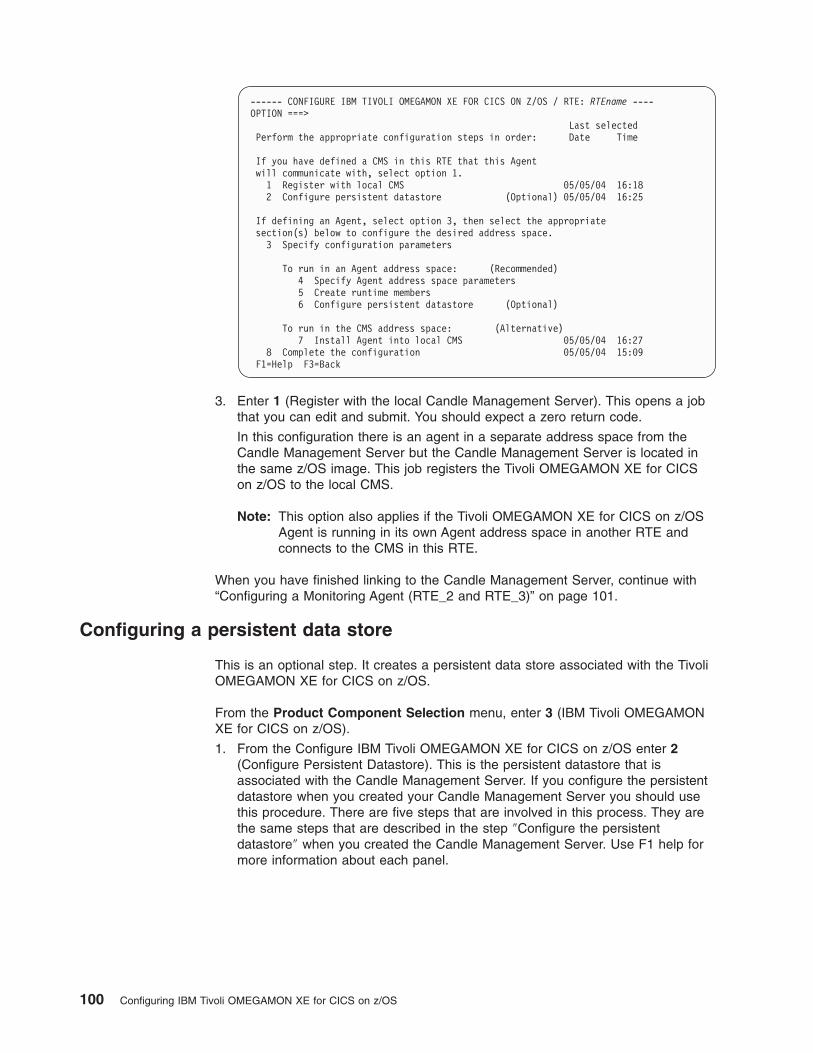
------ CONFIGURE IBM TIVOLI OMEGAMON XE FOR CICS ON Z/OS / RTE: RTEname ----
OPTION ===>
Last selected
Perform the appropriate configuration steps in order: Date Time
If you have defined a CMS in this RTE that this Agent
will communicate with, select option 1.
1 Register with local CMS 05/05/04 16:18
2 Configure persistent datastore (Optional) 05/05/04 16:25
If defining an Agent, select option 3, then select the appropriate
section(s) below to configure the desired address space.
3 Specify configuration parameters
To run in an Agent address space: (Recommended)
4 Specify Agent address space parameters
5 Create runtime members
6 Configure persistent datastore (Optional)
To run in the CMS address space: (Alternative)
7 Install Agent into local CMS 05/05/04 16:27
8 Complete the configuration 05/05/04 15:09
F1=Help F3=Back
3. Enter 1 (Register with the local Candle Management Server). This opens a job
that you can edit and submit. You should expect a zero return code.
In this configuration there is an agent in a separate address space from the
Candle Management Server but the Candle Management Server is located in
the same z/OS image. This job registers the Tivoli OMEGAMON XE for CICS
on z/OS to the local CMS.
Note: This option also applies if the Tivoli OMEGAMON XE for CICS on z/OS
Agent is running in its own Agent address space in another RTE and
connects to the CMS in this RTE.
When you have finished linking to the Candle Management Server, continue with
“Configuring a Monitoring Agent (RTE_2 and RTE_3)” on page 101.
Configuring a persistent data store
This is an optional step. It creates a persistent data store associated with the Tivoli
OMEGAMON XE for CICS on z/OS.
From the Product Component Selection menu, enter 3 (IBM Tivoli OMEGAMON
XE for CICS on z/OS).
1. From the Configure IBM Tivoli OMEGAMON XE for CICS on z/OS enter 2
(Configure Persistent Datastore). This is the persistent datastore that is
associated with the Candle Management Server. If you configure the persistent
datastore when you created your Candle Management Server you should use
this procedure. There are five steps that are involved in this process. They are
the same steps that are described in the step ″Configure the persistent
datastore″ when you created the Candle Management Server. Use F1 help for
more information about each panel.
100 Configuring IBM Tivoli OMEGAMON XE for CICS on z/OS
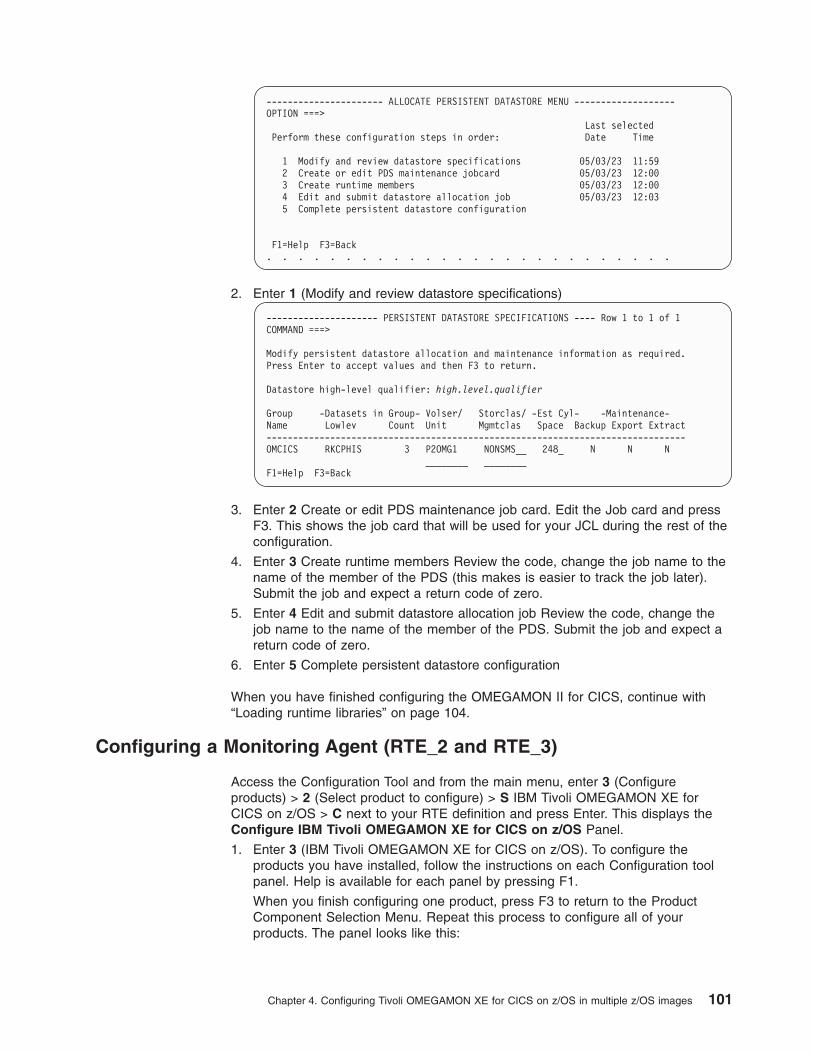
---------------------- ALLOCATE PERSISTENT DATASTORE MENU -------------------
OPTION ===>
Last selected
Perform these configuration steps in order: Date Time
1 Modify and review datastore specifications 05/03/23 11:59
2 Create or edit PDS maintenance jobcard 05/03/23 12:00
3 Create runtime members 05/03/23 12:00
4 Edit and submit datastore allocation job 05/03/23 12:03
5 Complete persistent datastore configuration
F1=Help F3=Back
. . . . . . . . . . . . . . . . . . . . . . . . . .
2. Enter 1 (Modify and review datastore specifications)
--------------------- PERSISTENT DATASTORE SPECIFICATIONS ---- Row 1 to 1 of 1
COMMAND ===>
Modify persistent datastore allocation and maintenance information as required.
Press Enter to accept values and then F3 to return.
Datastore high-level qualifier: high.level.qualifier
Group -Datasets in Group- Volser/ Storclas/ -Est Cyl- -Maintenance-
Name Lowlev Count Unit Mgmtclas Space Backup Export Extract
-------------------------------------------------------------------------------
OMCICS RKCPHIS 3 P2OMG1 NONSMS__ 248_ N N N
________ ________
F1=Help F3=Back
3. Enter 2 Create or edit PDS maintenance job card. Edit the Job card and press
F3. This shows the job card that will be used for your JCL during the rest of the
configuration.
4. Enter 3 Create runtime members Review the code, change the job name to the
name of the member of the PDS (this makes is easier to track the job later).
Submit the job and expect a return code of zero.
5. Enter 4 Edit and submit datastore allocation job Review the code, change the
job name to the name of the member of the PDS. Submit the job and expect a
return code of zero.
6. Enter 5 Complete persistent datastore configuration
When you have finished configuring the OMEGAMON II for CICS, continue with
“Loading runtime libraries” on page 104.
Configuring a Monitoring Agent (RTE_2 and RTE_3)
Access the Configuration Tool and from the main menu, enter 3 (Configure
products) > 2 (Select product to configure) > S IBM Tivoli OMEGAMON XE for
CICS on z/OS > C next to your RTE definition and press Enter. This displays the
Configure IBM Tivoli OMEGAMON XE for CICS on z/OS Panel.
1. Enter 3 (IBM Tivoli OMEGAMON XE for CICS on z/OS). To configure the
products you have installed, follow the instructions on each Configuration tool
panel. Help is available for each panel by pressing F1.
When you finish configuring one product, press F3 to return to the Product
Component Selection Menu. Repeat this process to configure all of your
products. The panel looks like this:
Chapter 4. Configuring Tivoli OMEGAMON XE for CICS on z/OS in multiple z/OS images 101
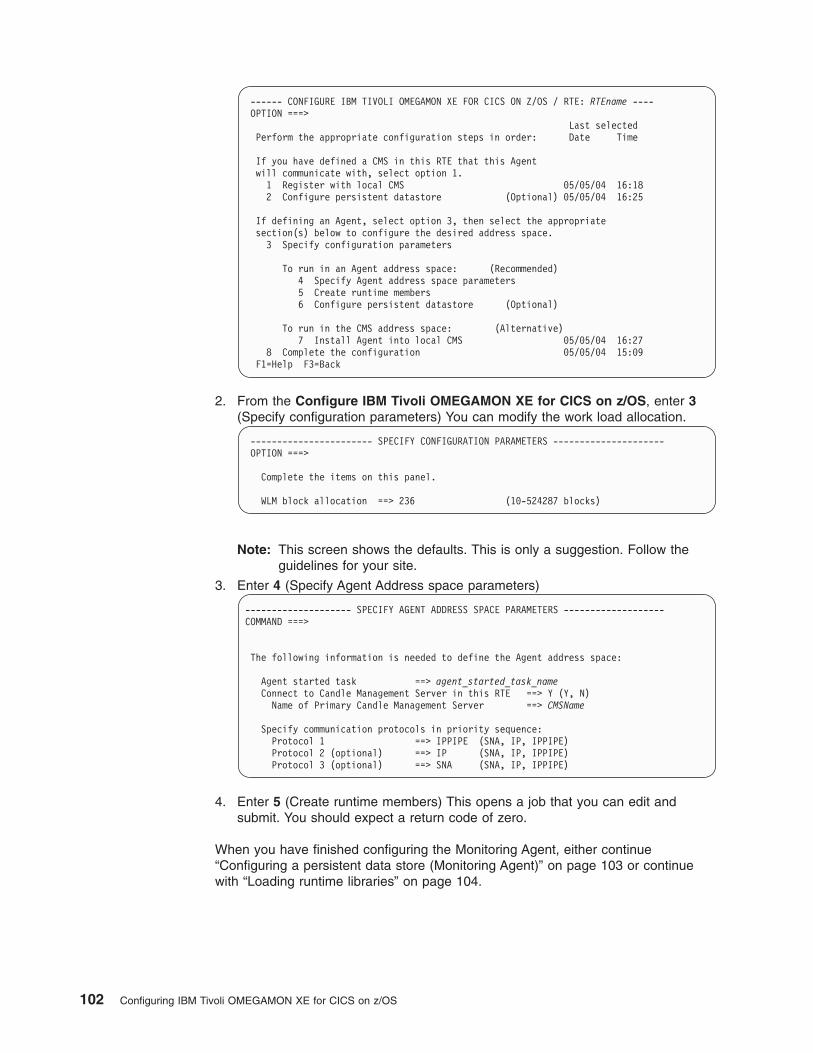
------ CONFIGURE IBM TIVOLI OMEGAMON XE FOR CICS ON Z/OS / RTE: RTEname ----
OPTION ===>
Last selected
Perform the appropriate configuration steps in order: Date Time
If you have defined a CMS in this RTE that this Agent
will communicate with, select option 1.
1 Register with local CMS 05/05/04 16:18
2 Configure persistent datastore (Optional) 05/05/04 16:25
If defining an Agent, select option 3, then select the appropriate
section(s) below to configure the desired address space.
3 Specify configuration parameters
To run in an Agent address space: (Recommended)
4 Specify Agent address space parameters
5 Create runtime members
6 Configure persistent datastore (Optional)
To run in the CMS address space: (Alternative)
7 Install Agent into local CMS 05/05/04 16:27
8 Complete the configuration 05/05/04 15:09
F1=Help F3=Back
2. From the Configure IBM Tivoli OMEGAMON XE for CICS on z/OS, enter 3
(Specify configuration parameters) You can modify the work load allocation.
----------------------- SPECIFY CONFIGURATION PARAMETERS ---------------------
OPTION ===>
Complete the items on this panel.
WLM block allocation ==> 236 (10-524287 blocks)
Note: This screen shows the defaults. This is only a suggestion. Follow the
guidelines for your site.
3. Enter 4 (Specify Agent Address space parameters)
-------------------- SPECIFY AGENT ADDRESS SPACE PARAMETERS -------------------
COMMAND ===>
The following information is needed to define the Agent address space:
Agent started task ==> agent_started_task_name
Connect to Candle Management Server in this RTE ==> Y (Y, N)
Name of Primary Candle Management Server ==> CMSName
Specify communication protocols in priority sequence:
Protocol 1 ==> IPPIPE (SNA, IP, IPPIPE)
Protocol 2 (optional) ==> IP (SNA, IP, IPPIPE)
Protocol 3 (optional) ==> SNA (SNA, IP, IPPIPE)
4. Enter 5 (Create runtime members) This opens a job that you can edit and
submit. You should expect a return code of zero.
When you have finished configuring the Monitoring Agent, either continue
“Configuring a persistent data store (Monitoring Agent)” on page 103 or continue
with “Loading runtime libraries” on page 104.
102 Configuring IBM Tivoli OMEGAMON XE for CICS on z/OS
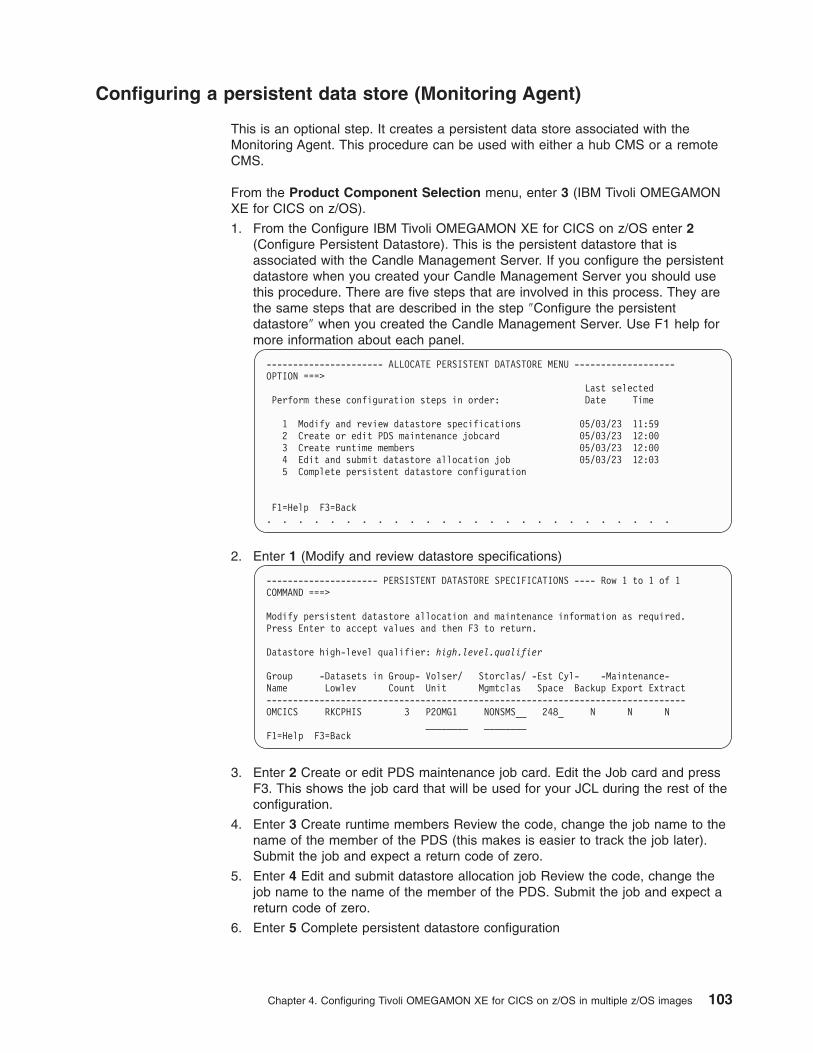
Configuring a persistent data store (Monitoring Agent)
This is an optional step. It creates a persistent data store associated with the
Monitoring Agent. This procedure can be used with either a hub CMS or a remote
CMS.
From the Product Component Selection menu, enter 3 (IBM Tivoli OMEGAMON
XE for CICS on z/OS).
1. From the Configure IBM Tivoli OMEGAMON XE for CICS on z/OS enter 2
(Configure Persistent Datastore). This is the persistent datastore that is
associated with the Candle Management Server. If you configure the persistent
datastore when you created your Candle Management Server you should use
this procedure. There are five steps that are involved in this process. They are
the same steps that are described in the step ″Configure the persistent
datastore″ when you created the Candle Management Server. Use F1 help for
more information about each panel.
---------------------- ALLOCATE PERSISTENT DATASTORE MENU -------------------
OPTION ===>
Last selected
Perform these configuration steps in order: Date Time
1 Modify and review datastore specifications 05/03/23 11:59
2 Create or edit PDS maintenance jobcard 05/03/23 12:00
3 Create runtime members 05/03/23 12:00
4 Edit and submit datastore allocation job 05/03/23 12:03
5 Complete persistent datastore configuration
F1=Help F3=Back
. . . . . . . . . . . . . . . . . . . . . . . . . .
2. Enter 1 (Modify and review datastore specifications)
--------------------- PERSISTENT DATASTORE SPECIFICATIONS ---- Row 1 to 1 of 1
COMMAND ===>
Modify persistent datastore allocation and maintenance information as required.
Press Enter to accept values and then F3 to return.
Datastore high-level qualifier: high.level.qualifier
Group -Datasets in Group- Volser/ Storclas/ -Est Cyl- -Maintenance-
Name Lowlev Count Unit Mgmtclas Space Backup Export Extract
-------------------------------------------------------------------------------
OMCICS RKCPHIS 3 P2OMG1 NONSMS__ 248_ N N N
________ ________
F1=Help F3=Back
3. Enter 2 Create or edit PDS maintenance job card. Edit the Job card and press
F3. This shows the job card that will be used for your JCL during the rest of the
configuration.
4. Enter 3 Create runtime members Review the code, change the job name to the
name of the member of the PDS (this makes is easier to track the job later).
Submit the job and expect a return code of zero.
5. Enter 4 Edit and submit datastore allocation job Review the code, change the
job name to the name of the member of the PDS. Submit the job and expect a
return code of zero.
6. Enter 5 Complete persistent datastore configuration
Chapter 4. Configuring Tivoli OMEGAMON XE for CICS on z/OS in multiple z/OS images 103
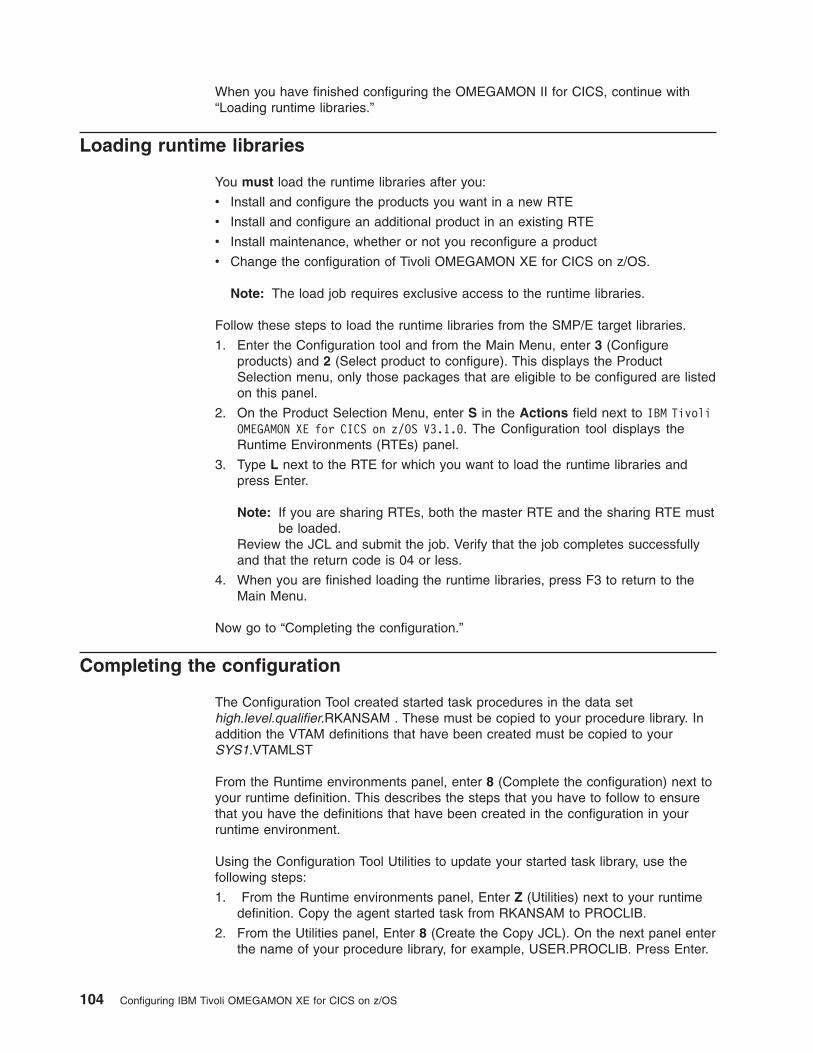
When you have finished configuring the OMEGAMON II for CICS, continue with
“Loading runtime libraries.”
Loading runtime libraries
You must load the runtime libraries after you:
v Install and configure the products you want in a new RTE
v Install and configure an additional product in an existing RTE
v Install maintenance, whether or not you reconfigure a product
v Change the configuration of Tivoli OMEGAMON XE for CICS on z/OS.
Note: The load job requires exclusive access to the runtime libraries.
Follow these steps to load the runtime libraries from the SMP/E target libraries.
1. Enter the Configuration tool and from the Main Menu, enter 3 (Configure
products) and 2 (Select product to configure). This displays the Product
Selection menu, only those packages that are eligible to be configured are listed
on this panel.
2. On the Product Selection Menu, enter S in the Actions field next to IBM Tivoli
OMEGAMON XE for CICS on z/OS V3.1.0. The Configuration tool displays the
Runtime Environments (RTEs) panel.
3. Type L next to the RTE for which you want to load the runtime libraries and
press Enter.
Note: If you are sharing RTEs, both the master RTE and the sharing RTE must
be loaded.Review the JCL and submit the job. Verify that the job completes successfully
and that the return code is 04 or less.
4. When you are finished loading the runtime libraries, press F3 to return to the
Main Menu.
Now go to “Completing the configuration.”
Completing the configuration
The Configuration Tool created started task procedures in the data set
high.level.qualifier.RKANSAM . These must be copied to your procedure library. In
addition the VTAM definitions that have been created must be copied to your
SYS1.VTAMLST
From the Runtime environments panel, enter 8 (Complete the configuration) next to
your runtime definition. This describes the steps that you have to follow to ensure
that you have the definitions that have been created in the configuration in your
runtime environment.
Using the Configuration Tool Utilities to update your started task library, use the
following steps:
1. From the Runtime environments panel, Enter Z (Utilities) next to your runtime
definition. Copy the agent started task from RKANSAM to PROCLIB.
2. From the Utilities panel, Enter 8 (Create the Copy JCL). On the next panel enter
the name of your procedure library, for example, USER.PROCLIB. Press Enter.
104 Configuring IBM Tivoli OMEGAMON XE for CICS on z/OS
Edit the JCL, submit the job. You should expect a return code of zero. This
generates some JCL to create a member called KCISYPJB in
high.level.qualifier.rtename.RKANSAM.
3. Edit KCISYPJB and submit the job. This job copies all the required started tasks
from your RKANSAM library to the specified procedure library. You should
expect a return code of zero. Looking through the code you will see the names
of the started tasks that have been created during the configuration. There are
started tasks for:
v Candle Management Server
v OMEGAMON II for CICS
v Tivoli OMEGAMON XE for CICS on z/OS
v End-to-End (ETE).
4. From the Utilities panel, Enter 9 (Create the VTAM definitions). Enter the name
of your VTAM node, press Enter. This sample system copy JCL copies the
VTAM definitions to VTAMLST. The Configuration tool created VTAM definitions
in RKANSAM. You should copy the VTAM major node from RKANSAM to your
system VTAMLST. This generates JCL to create a member called KCISYNJB in
high.level.qualifier.rtename.RKANSAM.
5. Edit KCISYNJB and submit the job. This job copies all the required VTAM
definitions from your RKANSAM library to the specified VTAMLST. You should
expect a return code of zero.
6. All runtime libraries concatenated in the STEPLIB DDNAME must be
APF-authorized.
7. Vary VTAM major node active. Vary the VTAM major node active, for example,
V NET,ACT,ID=OMEGAAN
8. Edit the started task for your Monitoring Agent. Add the following statement the
end of job: // RKCPXMnn DD DUMMY Where nn is a two digit value between 01-15
and is unique for your monitoring agent. This corresponds to the statement that
you add to the CICS started job.
9. Contact you local security administrator to grant the appropriate authorizations.
Now, you can verify your installation and configuration, continue with “Modifying the
CICS started task” and “Verifying the configuration: Candle Management Server on
different z/OS images” on page 106.
If you are migrating data from previous releases or from OMEGAMON II to
OMEGAMON XE, see Chapter 9, “Migrating,” on page 155.
Modifying the CICS started task
You can access the information from the Configure OMEGAMON II for CICS
panel, enter 4 (Complete the configuration). This provides information that you have
to add to your the JCL for your CICS regions. It is summarized in the following
points.
1. Add //KC2GLBnn DD DUMMY to your CICS started task. If you want to use the
monitoring options in a suffixed global data area (GDA), you must add this DD
statement to the CICS region JCL to identify the global.
2. Add //RKC2XMnn DD DUMMY to your CICS started task. If you want to use other
than the default OMEGAMON II address space pair (the defaults here are
CANSOC0 and CANSC20 as set on Configure OMEGAMON II for CICS option
1) to monitor a CICS region, you must add this DD statement to the CICS
region JCL to identify the address space pair.
Chapter 4. Configuring Tivoli OMEGAMON XE for CICS on z/OS in multiple z/OS images 105
3. Add //RKCPXMnn DD DUMMY to your CICS started task.
4. Add the program KOCOME00. Program KOCOME00 is the only program loaded
from your CICS startup JCL’s DFHRPL concatenation. You can copy this
program to a separate DFHRPL to reduce PDS directory search times. If you
include program KOCOME00 in your PLTPI, you can ensure that the
OMEGAMON II address space is active before your CICS region completes
initializing. To do this, add the following DD statement to the CICS startup JCL:
//OCCIREQnn DD DUMMY
After you add the DD statement, program KOCOME00 checks the
cross-memory interface task (XMIT) is running as a subtask of the menu
system. If the subtask is active, initialization continues. If the subtask is not
active, the following WTOR message appears:
OC0806: XMCR OCCIREQ SPECIFIED IN THE STARTUP JCL BUT RKC2XMnn NOT ACTIVE.
REPLY ABEND, IGNORE,OR RETRY.
Where nn is the suffix specified in the //RKC2XMnn DD DUMMY statement in the
CICS startup JCL or, if no suffix was specified, by the default (00).
5. Add a DD statement for RKANMOD and concatenate the OMEGAMON II load
library to your DFHRPL DD statement. Here is an example of the additional
statements:
//DFHRPL......
// ... // ... //******************************************************************
//* OMEGAMON FOR CICS DATASETS
//******************************************************************
// DD DISP=SHR,DSN=high.level.qualifier.TKANMOD
// DD DISP=SHR,DSN=high.level.qualifier.RTEname.RKANMOD
//RKANMOD DD DISP=SHR,DSN=high.level.qualifier.TKANMOD
// DD DISP=SHR,DSN=high.level.qualifier.mid_level_qualifier.RKANMOD
//RKC2XMnn DD DUMMY
//RKCPXMnn DD DUMMY
//OCCIREQ DD DUMMY
//*
Now you have completed configuring IBM Tivoli OMEGAMON XE for CICS on
z/OS, you should install the CandleNet Portal Server and CandleNet Portal client on
your workstation. When you have done this continue with “Verifying the
configuration” on page 38.
Verifying the configuration: Candle Management Server on different
z/OS images
Now that you have completed the configuration you can verify that it has been
successful. Initially you can check that the logs generated from the jobs are clean
and contain no error messages.
After “Completing the configuration” on page 104 and “Modifying the CICS started
task” on page 105, carry out the following steps:
RTE_1
Start the Candle Management Server.
RTE_2
Start the
106 Configuring IBM Tivoli OMEGAMON XE for CICS on z/OS

v Candle Management Server.
v OMEGAMON II for CICS.
v Monitoring Agent.
RTE_3
Start the
v OMEGAMON II for CICS.
v Monitoring Agent.
Start your CICS regions
1. Start the started task for hub Candle Management Server in RTE_1, /S
taskname, and check the log for any errors.
2. Start the started task for remote Candle Management Server in RTE_2, /S
taskname, and check the log for any errors.
3. Start the started task for remote OMEGAMON II for CICS in RTE_2, /S
taskname, and check the log for any errors.
4. Start the started task for your remote Monitoring Agent in RTE_2, /S taskname,
and check the log for any errors.
5. Start the started task for remote OMEGAMON II for CICS in RTE_3, /S
taskname, and check the log for any errors.
6. Start the started task for your Monitoring Agent in RTE_3, /S taskname, and
check the log for any errors.
7. On your workstation start Manage Candle Services. Start > All programs >
Candle OMEGAMON XE > Manage Candle Services.
8. Start the CandleNet Portal Server Right-click > Start.
9. Start the CandleNet Portal Right-click > Start.
When CandleNet Portal opens you will see the list of CICS regions that are
associated with the agents in Navigator pane at the top left hand side of the
workspace.
Figure 92. Manage Candle Services
Chapter 4. Configuring Tivoli OMEGAMON XE for CICS on z/OS in multiple z/OS images 107

108 Configuring IBM Tivoli OMEGAMON XE for CICS on z/OS
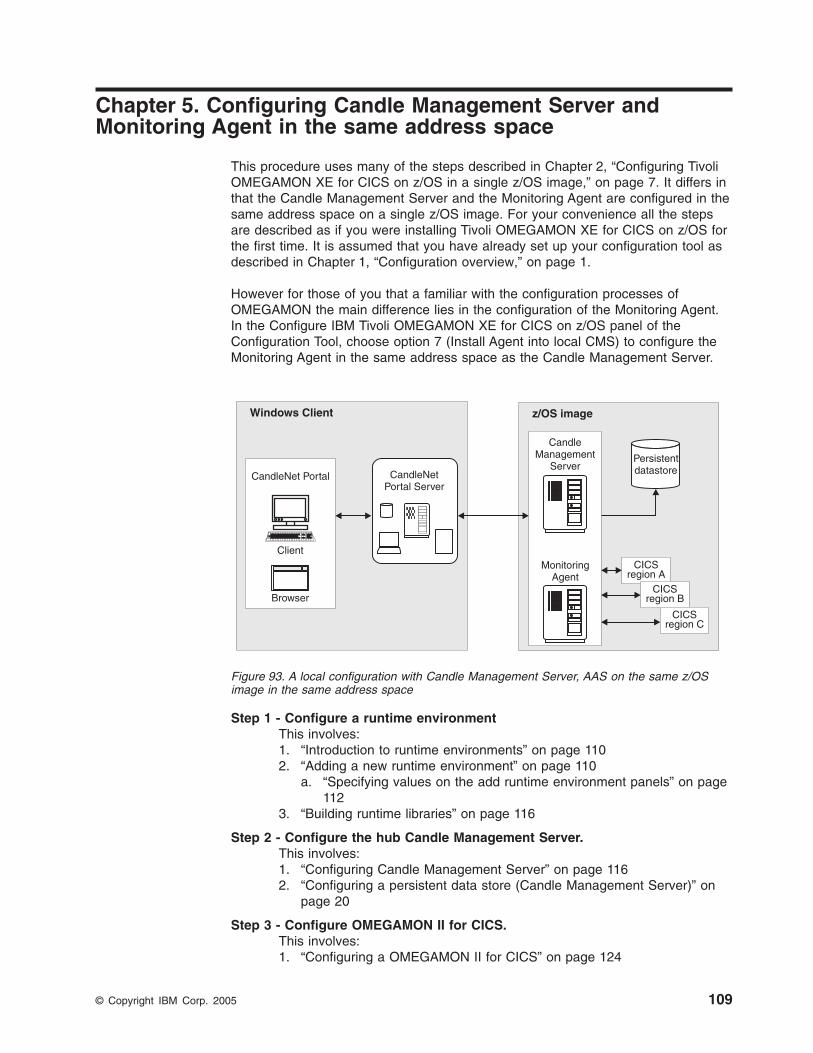
Chapter 5. Configuring Candle Management Server and
Monitoring Agent in the same address space
This procedure uses many of the steps described in Chapter 2, “Configuring Tivoli
OMEGAMON XE for CICS on z/OS in a single z/OS image,” on page 7. It differs in
that the Candle Management Server and the Monitoring Agent are configured in the
same address space on a single z/OS image. For your convenience all the steps
are described as if you were installing Tivoli OMEGAMON XE for CICS on z/OS for
the first time. It is assumed that you have already set up your configuration tool as
described in Chapter 1, “Configuration overview,” on page 1.
However for those of you that a familiar with the configuration processes of
OMEGAMON the main difference lies in the configuration of the Monitoring Agent.
In the Configure IBM Tivoli OMEGAMON XE for CICS on z/OS panel of the
Configuration Tool, choose option 7 (Install Agent into local CMS) to configure the
Monitoring Agent in the same address space as the Candle Management Server.
Step 1 - Configure a runtime environment
This involves:
1. “Introduction to runtime environments” on page 110
2. “Adding a new runtime environment” on page 110
a. “Specifying values on the add runtime environment panels” on page
1123. “Building runtime libraries” on page 116
Step 2 - Configure the hub Candle Management Server.
This involves:
1. “Configuring Candle Management Server” on page 116
2. “Configuring a persistent data store (Candle Management Server)” on
page 20
Step 3 - Configure OMEGAMON II for CICS.
This involves:
1. “Configuring a OMEGAMON II for CICS” on page 124
CandleNet Portal CandleNetPortal Server
Windows Client z/OS image
CandleManagement
Server
MonitoringAgent
Persistentdatastore
Client
Browser
CICSregion A
CICSregion B
CICSregion C
Figure 93. A local configuration with Candle Management Server, AAS on the same z/OS
image in the same address space
© Copyright IBM Corp. 2005 109
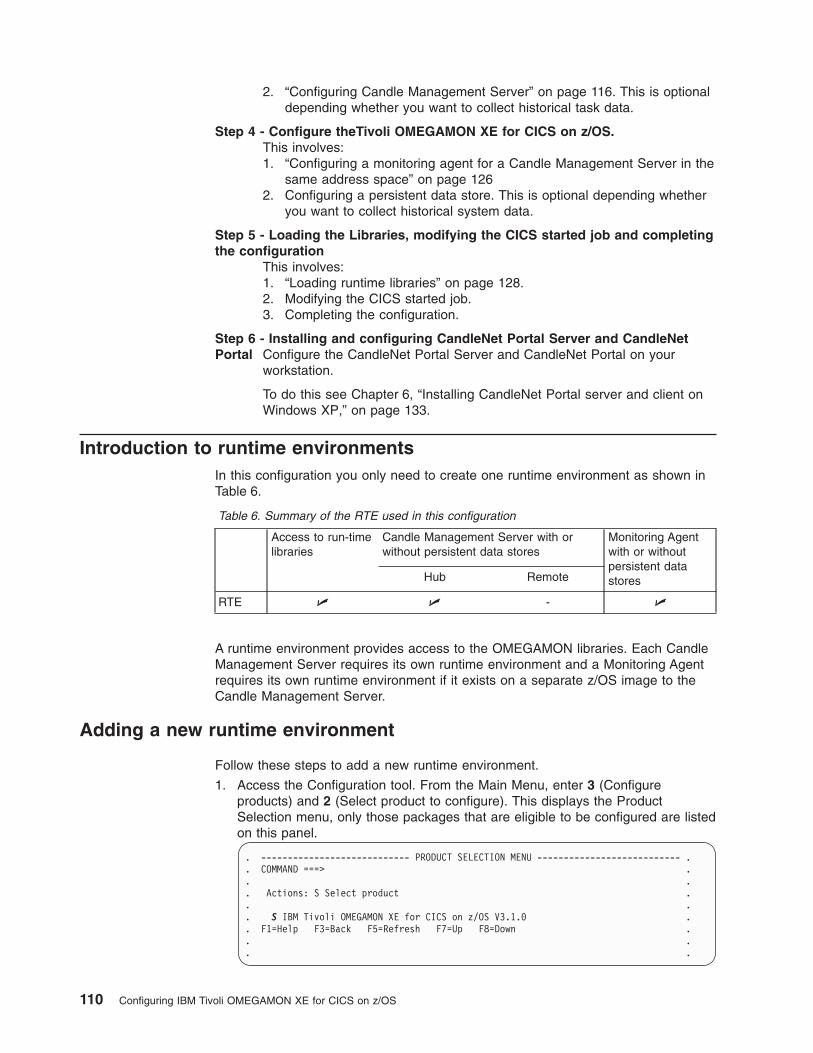
2. “Configuring Candle Management Server” on page 116. This is optional
depending whether you want to collect historical task data.
Step 4 - Configure theTivoli OMEGAMON XE for CICS on z/OS.
This involves:
1. “Configuring a monitoring agent for a Candle Management Server in the
same address space” on page 126
2. Configuring a persistent data store. This is optional depending whether
you want to collect historical system data.
Step 5 - Loading the Libraries, modifying the CICS started job and completing
the configuration
This involves:
1. “Loading runtime libraries” on page 128.
2. Modifying the CICS started job.
3. Completing the configuration.
Step 6 - Installing and configuring CandleNet Portal Server and CandleNet
Portal Configure the CandleNet Portal Server and CandleNet Portal on your
workstation.
To do this see Chapter 6, “Installing CandleNet Portal server and client on
Windows XP,” on page 133.
Introduction to runtime environments
In this configuration you only need to create one runtime environment as shown in
Table 6.
Table 6. Summary of the RTE used in this configuration
Access to run-time
libraries
Candle Management Server with or
without persistent data stores
Monitoring Agent
with or without
persistent data
stores
Hub Remote
RTE U U - U
A runtime environment provides access to the OMEGAMON libraries. Each Candle
Management Server requires its own runtime environment and a Monitoring Agent
requires its own runtime environment if it exists on a separate z/OS image to the
Candle Management Server.
Adding a new runtime environment
Follow these steps to add a new runtime environment.
1. Access the Configuration tool. From the Main Menu, enter 3 (Configure
products) and 2 (Select product to configure). This displays the Product
Selection menu, only those packages that are eligible to be configured are listed
on this panel.
. ---------------------------- PRODUCT SELECTION MENU --------------------------- .
. COMMAND ===> .
. .
. Actions: S Select product .
. .
. S IBM Tivoli OMEGAMON XE for CICS on z/OS V3.1.0 .
. F1=Help F3=Back F5=Refresh F7=Up F8=Down .
. .
. .
110 Configuring IBM Tivoli OMEGAMON XE for CICS on z/OS
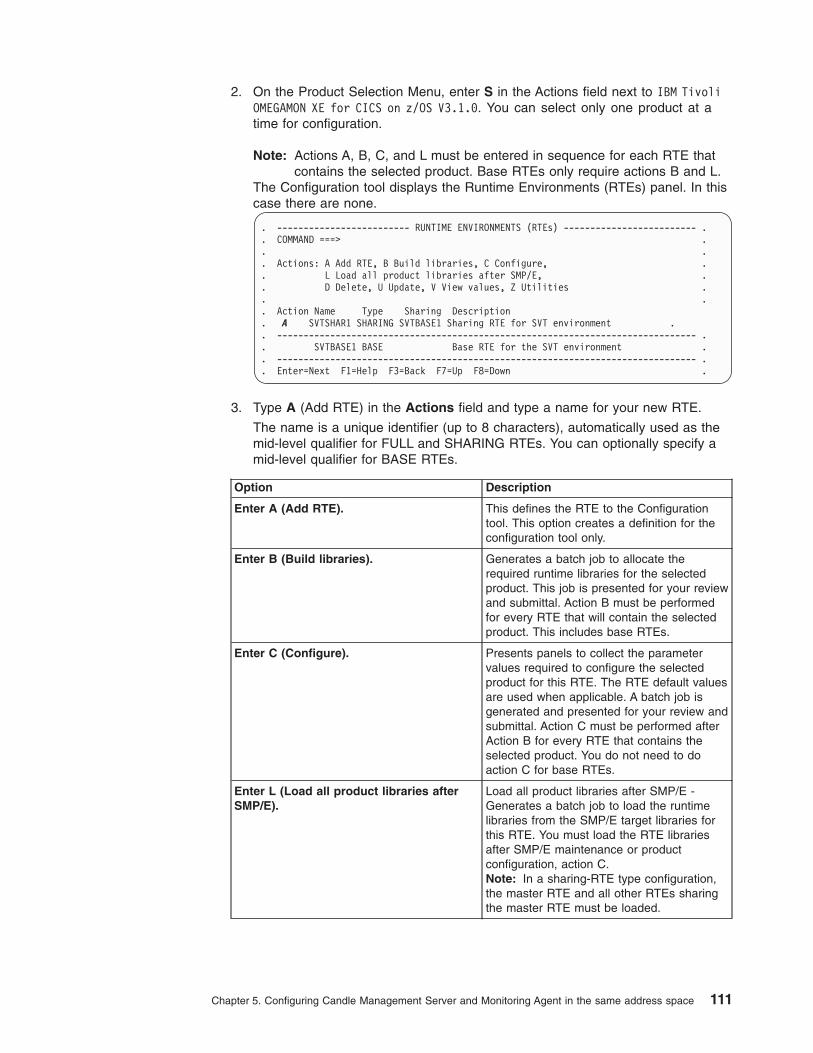
2. On the Product Selection Menu, enter S in the Actions field next to IBM Tivoli
OMEGAMON XE for CICS on z/OS V3.1.0. You can select only one product at a
time for configuration.
Note: Actions A, B, C, and L must be entered in sequence for each RTE that
contains the selected product. Base RTEs only require actions B and L.
The Configuration tool displays the Runtime Environments (RTEs) panel. In this
case there are none.
. ------------------------- RUNTIME ENVIRONMENTS (RTEs) ------------------------- .
. COMMAND ===> .
. .
. Actions: A Add RTE, B Build libraries, C Configure, .
. L Load all product libraries after SMP/E, .
. D Delete, U Update, V View values, Z Utilities .
. .
. Action Name Type Sharing Description
. A SVTSHAR1 SHARING SVTBASE1 Sharing RTE for SVT environment .
. ------------------------------------------------------------------------------- .
. SVTBASE1 BASE Base RTE for the SVT environment .
. ------------------------------------------------------------------------------- .
. Enter=Next F1=Help F3=Back F7=Up F8=Down .
3. Type A (Add RTE) in the Actions field and type a name for your new RTE.
The name is a unique identifier (up to 8 characters), automatically used as the
mid-level qualifier for FULL and SHARING RTEs. You can optionally specify a
mid-level qualifier for BASE RTEs.
Option Description
Enter A (Add RTE). This defines the RTE to the Configuration
tool. This option creates a definition for the
configuration tool only.
Enter B (Build libraries). Generates a batch job to allocate the
required runtime libraries for the selected
product. This job is presented for your review
and submittal. Action B must be performed
for every RTE that will contain the selected
product. This includes base RTEs.
Enter C (Configure). Presents panels to collect the parameter
values required to configure the selected
product for this RTE. The RTE default values
are used when applicable. A batch job is
generated and presented for your review and
submittal. Action C must be performed after
Action B for every RTE that contains the
selected product. You do not need to do
action C for base RTEs.
Enter L (Load all product libraries after
SMP/E).
Load all product libraries after SMP/E -
Generates a batch job to load the runtime
libraries from the SMP/E target libraries for
this RTE. You must load the RTE libraries
after SMP/E maintenance or product
configuration, action C.
Note: In a sharing-RTE type configuration,
the master RTE and all other RTEs sharing
the master RTE must be loaded.
Chapter 5. Configuring Candle Management Server and Monitoring Agent in the same address space 111
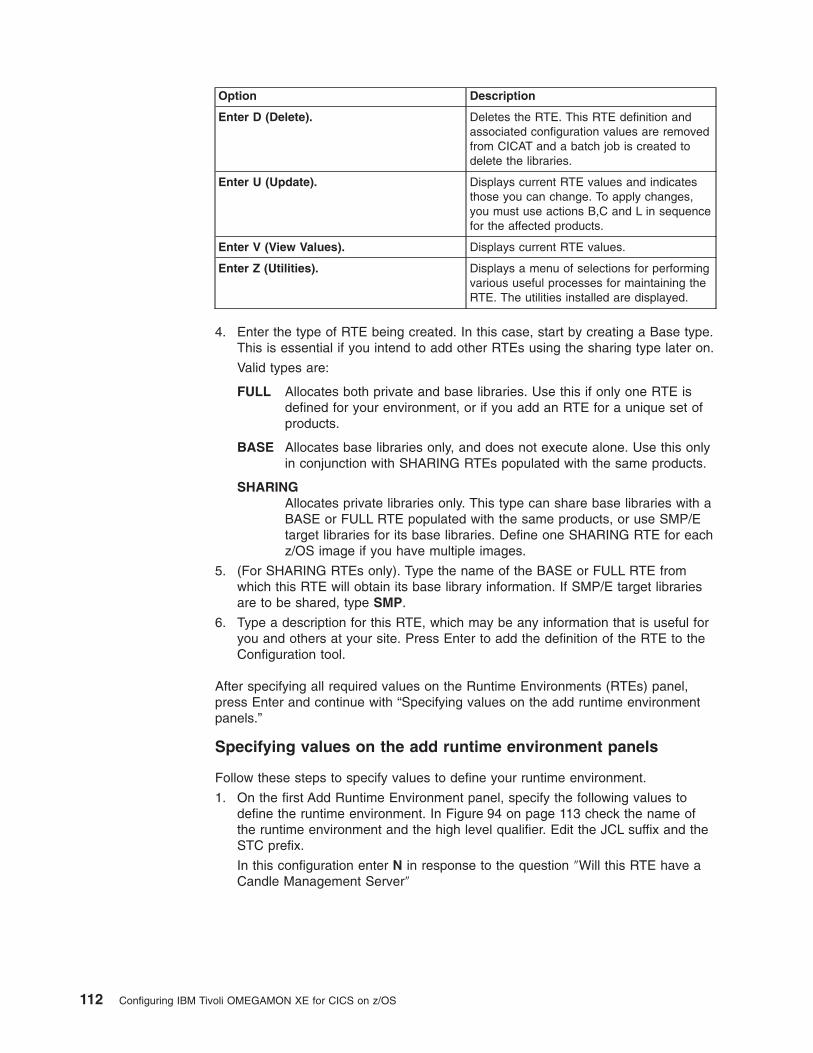
Option Description
Enter D (Delete). Deletes the RTE. This RTE definition and
associated configuration values are removed
from CICAT and a batch job is created to
delete the libraries.
Enter U (Update). Displays current RTE values and indicates
those you can change. To apply changes,
you must use actions B,C and L in sequence
for the affected products.
Enter V (View Values). Displays current RTE values.
Enter Z (Utilities). Displays a menu of selections for performing
various useful processes for maintaining the
RTE. The utilities installed are displayed.
4. Enter the type of RTE being created. In this case, start by creating a Base type.
This is essential if you intend to add other RTEs using the sharing type later on.
Valid types are:
FULL Allocates both private and base libraries. Use this if only one RTE is
defined for your environment, or if you add an RTE for a unique set of
products.
BASE Allocates base libraries only, and does not execute alone. Use this only
in conjunction with SHARING RTEs populated with the same products.
SHARING
Allocates private libraries only. This type can share base libraries with a
BASE or FULL RTE populated with the same products, or use SMP/E
target libraries for its base libraries. Define one SHARING RTE for each
z/OS image if you have multiple images.
5. (For SHARING RTEs only). Type the name of the BASE or FULL RTE from
which this RTE will obtain its base library information. If SMP/E target libraries
are to be shared, type SMP.
6. Type a description for this RTE, which may be any information that is useful for
you and others at your site. Press Enter to add the definition of the RTE to the
Configuration tool.
After specifying all required values on the Runtime Environments (RTEs) panel,
press Enter and continue with “Specifying values on the add runtime environment
panels.”
Specifying values on the add runtime environment panels
Follow these steps to specify values to define your runtime environment.
1. On the first Add Runtime Environment panel, specify the following values to
define the runtime environment. In Figure 94 on page 113 check the name of
the runtime environment and the high level qualifier. Edit the JCL suffix and the
STC prefix.
In this configuration enter N in response to the question ″Will this RTE have a
Candle Management Server″
112 Configuring IBM Tivoli OMEGAMON XE for CICS on z/OS
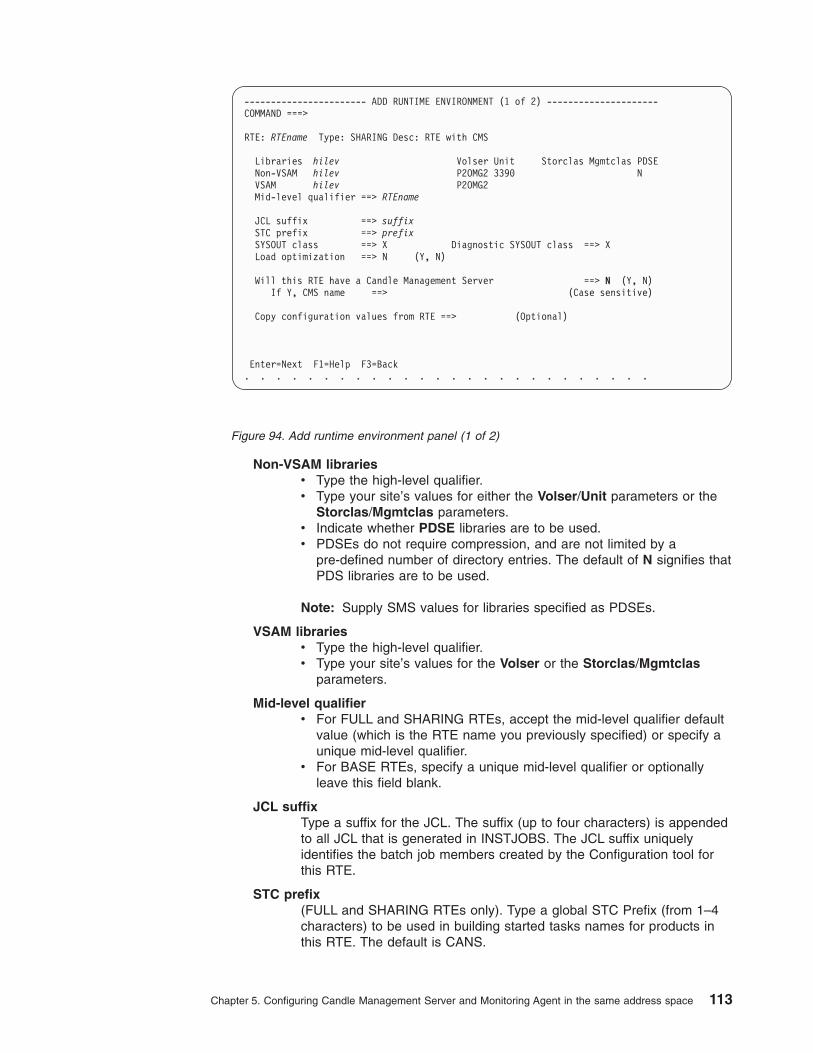
Non-VSAM libraries
v Type the high-level qualifier.
v Type your site’s values for either the Volser/Unit parameters or the
Storclas/Mgmtclas parameters.
v Indicate whether PDSE libraries are to be used.
v PDSEs do not require compression, and are not limited by a
pre-defined number of directory entries. The default of N signifies that
PDS libraries are to be used.
Note: Supply SMS values for libraries specified as PDSEs.
VSAM libraries
v Type the high-level qualifier.
v Type your site’s values for the Volser or the Storclas/Mgmtclas
parameters.
Mid-level qualifier
v For FULL and SHARING RTEs, accept the mid-level qualifier default
value (which is the RTE name you previously specified) or specify a
unique mid-level qualifier.
v For BASE RTEs, specify a unique mid-level qualifier or optionally
leave this field blank.
JCL suffix
Type a suffix for the JCL. The suffix (up to four characters) is appended
to all JCL that is generated in INSTJOBS. The JCL suffix uniquely
identifies the batch job members created by the Configuration tool for
this RTE.
STC prefix
(FULL and SHARING RTEs only). Type a global STC Prefix (from 1–4
characters) to be used in building started tasks names for products in
this RTE. The default is CANS.
----------------------- ADD RUNTIME ENVIRONMENT (1 of 2) ---------------------
COMMAND ===>
RTE: RTEname Type: SHARING Desc: RTE with CMS
Libraries hilev Volser Unit Storclas Mgmtclas PDSE
Non-VSAM hilev P2OMG2 3390 N
VSAM hilev P2OMG2
Mid-level qualifier ==> RTEname
JCL suffix ==> suffix
STC prefix ==> prefix
SYSOUT class ==> X Diagnostic SYSOUT class ==> X
Load optimization ==> N (Y, N)
Will this RTE have a Candle Management Server ==> N (Y, N)
If Y, CMS name ==> (Case sensitive)
Copy configuration values from RTE ==> (Optional)
Enter=Next F1=Help F3=Back
. . . . . . . . . . . . . . . . . . . . . . . . . .
Figure 94. Add runtime environment panel (1 of 2)
Chapter 5. Configuring Candle Management Server and Monitoring Agent in the same address space 113

SYSOUT class / Diagnostic SYSOUT class
Specify values for the non-diagnostic and diagnostic output DDNAMES.
Note: These values were previously hardcoded.
Load optimization
Indicate whether you want to optimize loading of this RTE. The default
is N. Refer to the online help (F1) for more details.
Will the RTE have a Candle Management Server?
In this configuration, enter Y.
The default of Y allocates Candle Management Server libraries.
You must enter the name of the Candle Management Server to be
configured. It is used by the other components that need to
communicate with this Candle Management Server. The name of the
runtime environment is used as a default.
Copied from RTE
(FULL and SHARING RTEs only - Optional)
Type the name of an existing RTE, from which configuration values will
be copied and used for this RTE.
Note: This procedure makes an exact copy of the existing RTE. If you
will not be using the same products in the new RTE, we
recommend that you not use this procedure.
Install National Language components?
(FULL and SHARING RTEs only - NLS products only)
Specify Y to install National Language Components in this RTE for all
eligible products.
2. After specifying all required values on the first Add Runtime Environment
panel, press Enter. In Figure 95 on page 115.
114 Configuring IBM Tivoli OMEGAMON XE for CICS on z/OS
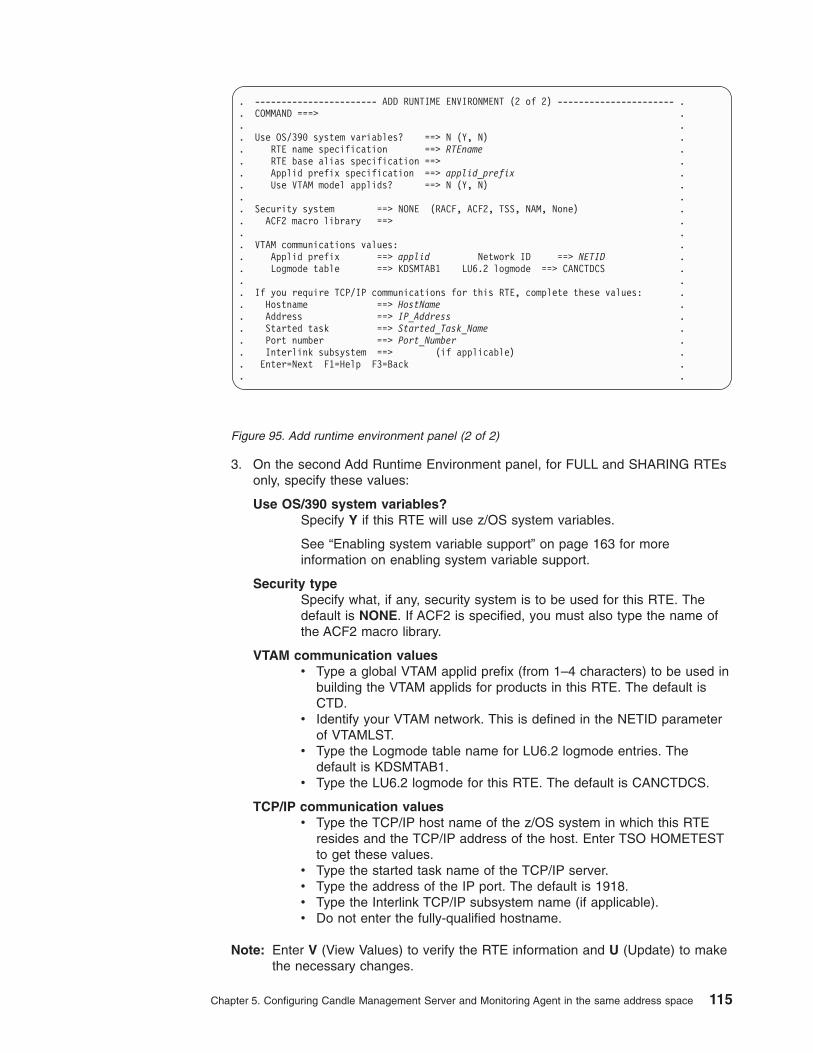
3. On the second Add Runtime Environment panel, for FULL and SHARING RTEs
only, specify these values:
Use OS/390 system variables?
Specify Y if this RTE will use z/OS system variables.
See “Enabling system variable support” on page 163 for more
information on enabling system variable support.
Security type
Specify what, if any, security system is to be used for this RTE. The
default is NONE. If ACF2 is specified, you must also type the name of
the ACF2 macro library.
VTAM communication values
v Type a global VTAM applid prefix (from 1–4 characters) to be used in
building the VTAM applids for products in this RTE. The default is
CTD.
v Identify your VTAM network. This is defined in the NETID parameter
of VTAMLST.
v Type the Logmode table name for LU6.2 logmode entries. The
default is KDSMTAB1.
v Type the LU6.2 logmode for this RTE. The default is CANCTDCS.
TCP/IP communication values
v Type the TCP/IP host name of the z/OS system in which this RTE
resides and the TCP/IP address of the host. Enter TSO HOMETEST
to get these values.
v Type the started task name of the TCP/IP server.
v Type the address of the IP port. The default is 1918.
v Type the Interlink TCP/IP subsystem name (if applicable).
v Do not enter the fully-qualified hostname.
Note: Enter V (View Values) to verify the RTE information and U (Update) to make
the necessary changes.
. ----------------------- ADD RUNTIME ENVIRONMENT (2 of 2) ---------------------- .
. COMMAND ===> .
. .
. Use OS/390 system variables? ==> N (Y, N) .
. RTE name specification ==> RTEname .
. RTE base alias specification ==> .
. Applid prefix specification ==> applid_prefix .
. Use VTAM model applids? ==> N (Y, N) .
. .
. Security system ==> NONE (RACF, ACF2, TSS, NAM, None) .
. ACF2 macro library ==> .
. .
. VTAM communications values: .
. Applid prefix ==> applid Network ID ==> NETID .
. Logmode table ==> KDSMTAB1 LU6.2 logmode ==> CANCTDCS .
. .
. If you require TCP/IP communications for this RTE, complete these values: .
. Hostname ==> HostName .
. Address ==> IP_Address .
. Started task ==> Started_Task_Name .
. Port number ==> Port_Number .
. Interlink subsystem ==> (if applicable) .
. Enter=Next F1=Help F3=Back .
. .
Figure 95. Add runtime environment panel (2 of 2)
Chapter 5. Configuring Candle Management Server and Monitoring Agent in the same address space 115
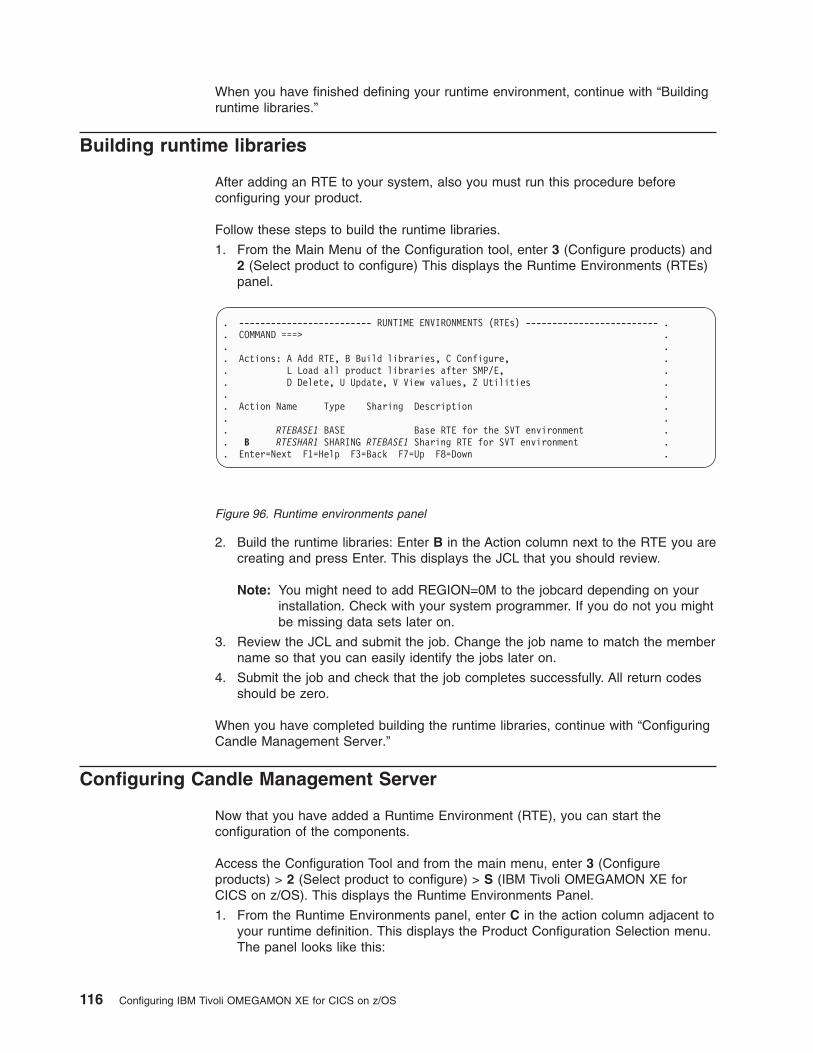
When you have finished defining your runtime environment, continue with “Building
runtime libraries.”
Building runtime libraries
After adding an RTE to your system, also you must run this procedure before
configuring your product.
Follow these steps to build the runtime libraries.
1. From the Main Menu of the Configuration tool, enter 3 (Configure products) and
2 (Select product to configure) This displays the Runtime Environments (RTEs)
panel.
2. Build the runtime libraries: Enter B in the Action column next to the RTE you are
creating and press Enter. This displays the JCL that you should review.
Note: You might need to add REGION=0M to the jobcard depending on your
installation. Check with your system programmer. If you do not you might
be missing data sets later on.
3. Review the JCL and submit the job. Change the job name to match the member
name so that you can easily identify the jobs later on.
4. Submit the job and check that the job completes successfully. All return codes
should be zero.
When you have completed building the runtime libraries, continue with “Configuring
Candle Management Server.”
Configuring Candle Management Server
Now that you have added a Runtime Environment (RTE), you can start the
configuration of the components.
Access the Configuration Tool and from the main menu, enter 3 (Configure
products) > 2 (Select product to configure) > S (IBM Tivoli OMEGAMON XE for
CICS on z/OS). This displays the Runtime Environments Panel.
1. From the Runtime Environments panel, enter C in the action column adjacent to
your runtime definition. This displays the Product Configuration Selection menu.
The panel looks like this:
. ------------------------- RUNTIME ENVIRONMENTS (RTEs) ------------------------- .
. COMMAND ===> .
. .
. Actions: A Add RTE, B Build libraries, C Configure, .
. L Load all product libraries after SMP/E, .
. D Delete, U Update, V View values, Z Utilities .
. .
. Action Name Type Sharing Description .
. .
. RTEBASE1 BASE Base RTE for the SVT environment .
. B RTESHAR1 SHARING RTEBASE1 Sharing RTE for SVT environment .
. Enter=Next F1=Help F3=Back F7=Up F8=Down .
Figure 96. Runtime environments panel
116 Configuring IBM Tivoli OMEGAMON XE for CICS on z/OS
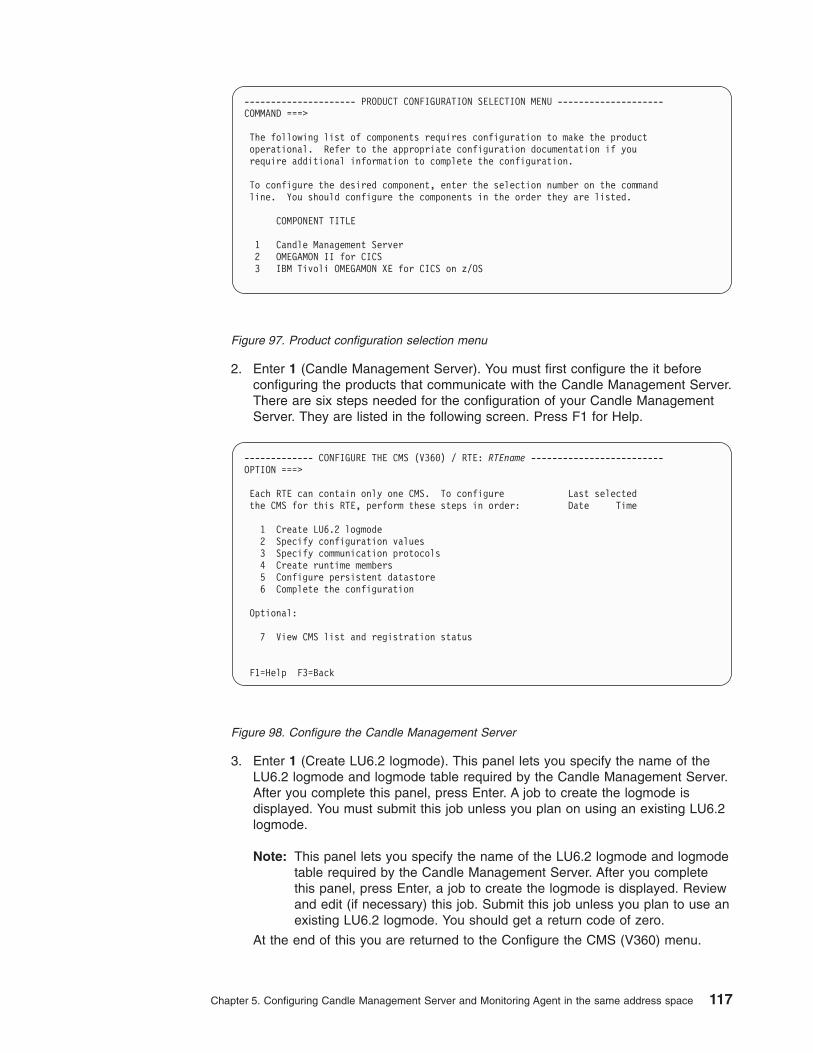
2. Enter 1 (Candle Management Server). You must first configure the it before
configuring the products that communicate with the Candle Management Server.
There are six steps needed for the configuration of your Candle Management
Server. They are listed in the following screen. Press F1 for Help.
3. Enter 1 (Create LU6.2 logmode). This panel lets you specify the name of the
LU6.2 logmode and logmode table required by the Candle Management Server.
After you complete this panel, press Enter. A job to create the logmode is
displayed. You must submit this job unless you plan on using an existing LU6.2
logmode.
Note: This panel lets you specify the name of the LU6.2 logmode and logmode
table required by the Candle Management Server. After you complete
this panel, press Enter, a job to create the logmode is displayed. Review
and edit (if necessary) this job. Submit this job unless you plan to use an
existing LU6.2 logmode. You should get a return code of zero.
At the end of this you are returned to the Configure the CMS (V360) menu.
--------------------- PRODUCT CONFIGURATION SELECTION MENU --------------------
COMMAND ===>
The following list of components requires configuration to make the product
operational. Refer to the appropriate configuration documentation if you
require additional information to complete the configuration.
To configure the desired component, enter the selection number on the command
line. You should configure the components in the order they are listed.
COMPONENT TITLE
1 Candle Management Server
2 OMEGAMON II for CICS
3 IBM Tivoli OMEGAMON XE for CICS on z/OS
Figure 97. Product configuration selection menu
------------- CONFIGURE THE CMS (V360) / RTE: RTEname -------------------------
OPTION ===>
Each RTE can contain only one CMS. To configure Last selected
the CMS for this RTE, perform these steps in order: Date Time
1 Create LU6.2 logmode
2 Specify configuration values
3 Specify communication protocols
4 Create runtime members
5 Configure persistent datastore
6 Complete the configuration
Optional:
7 View CMS list and registration status
F1=Help F3=Back
Figure 98. Configure the Candle Management Server
Chapter 5. Configuring Candle Management Server and Monitoring Agent in the same address space 117

Note: This screen shows the defaults. These are only suggestions. Follow the
guidelines for your site. Press F1 for further information.
LU6.2 logmode
This is the name LU6.2 logmode.
Logmode table name
This is the name of the logmode table that contains the LU6.2 logmode.
This is required even if you do not submit the job.
VTAMLIB load library
This is the name of the system library that is used to contain VTAM
logmode tables. This is usually SYS1.VTAMLIB. You can specify any
load library if you do not want to update your VTAMLIB directly.
VTAM macro library
This is the name of the system library that contains the VTAM macros.
This library is usually SYS1.SISTMAC.
4. Enter 2 (Specify Configuration values). This is the critical step where you
declare if this is either a hub or remote Candle Management Server.
For this configuration where there is only one Candle Management Server you
should specify Hub.
CMS Started Task
This is the name of the started task for the Candle Management Server.
This started task must be copied to your system procedure library. The
default is CANSDSST.
----------------------------- CREATE LU6.2 LOGMODE ----------------------------
COMMAND ===>
The CMS requires an LU6.2 logmode. Complete the items on this panel and
press ENTER to create a job that will assemble and link the required logmode.
LU6.2 logmode ==> CANCTDCS
Logmode table name ==> KDSMTAB1
VTAMLIB load library ==> SYS1.VTAMLIB
VTAM macro library ==> SYS1.SISTMAC1
Figure 99. Create LU6.2 logmode panel
------------------------- SPECIFY CONFIGURATION VALUES -----------------------
COMMAND ===>
To configure a CMS for your site, complete the items on this panel.
CMS started task ==> CMS_started_task_name
Hub or Remote? ==> HUB
Security validation? ==> N (Y, N)
Enter=Next F1=Help F3=Back F5=Advanced
Figure 100. Specify configuration values panel
118 Configuring IBM Tivoli OMEGAMON XE for CICS on z/OS
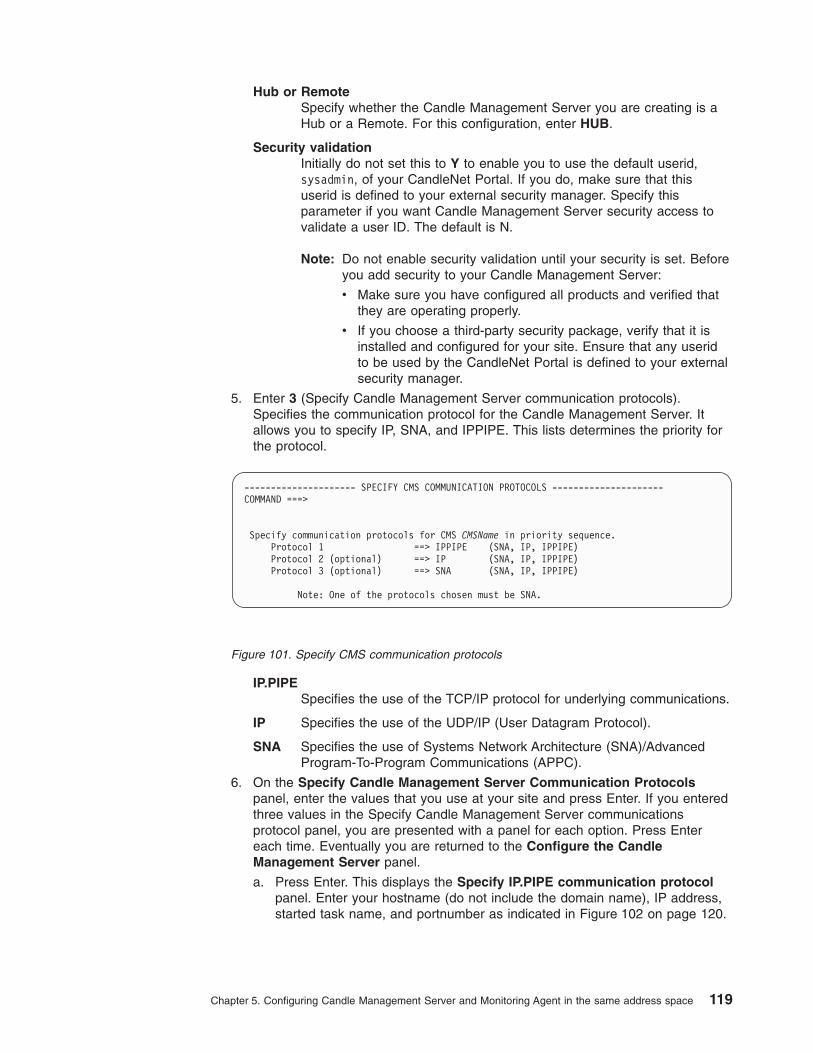
Hub or Remote
Specify whether the Candle Management Server you are creating is a
Hub or a Remote. For this configuration, enter HUB.
Security validation
Initially do not set this to Y to enable you to use the default userid,
sysadmin, of your CandleNet Portal. If you do, make sure that this
userid is defined to your external security manager. Specify this
parameter if you want Candle Management Server security access to
validate a user ID. The default is N.
Note: Do not enable security validation until your security is set. Before
you add security to your Candle Management Server:
v Make sure you have configured all products and verified that
they are operating properly.
v If you choose a third-party security package, verify that it is
installed and configured for your site. Ensure that any userid
to be used by the CandleNet Portal is defined to your external
security manager.
5. Enter 3 (Specify Candle Management Server communication protocols).
Specifies the communication protocol for the Candle Management Server. It
allows you to specify IP, SNA, and IPPIPE. This lists determines the priority for
the protocol.
IP.PIPE
Specifies the use of the TCP/IP protocol for underlying communications.
IP Specifies the use of the UDP/IP (User Datagram Protocol).
SNA Specifies the use of Systems Network Architecture (SNA)/Advanced
Program-To-Program Communications (APPC).
6. On the Specify Candle Management Server Communication Protocols
panel, enter the values that you use at your site and press Enter. If you entered
three values in the Specify Candle Management Server communications
protocol panel, you are presented with a panel for each option. Press Enter
each time. Eventually you are returned to the Configure the Candle
Management Server panel.
a. Press Enter. This displays the Specify IP.PIPE communication protocol
panel. Enter your hostname (do not include the domain name), IP address,
started task name, and portnumber as indicated in Figure 102 on page 120.
--------------------- SPECIFY CMS COMMUNICATION PROTOCOLS ---------------------
COMMAND ===>
Specify communication protocols for CMS CMSName in priority sequence.
Protocol 1 ==> IPPIPE (SNA, IP, IPPIPE)
Protocol 2 (optional) ==> IP (SNA, IP, IPPIPE)
Protocol 3 (optional) ==> SNA (SNA, IP, IPPIPE)
Note: One of the protocols chosen must be SNA.
Figure 101. Specify CMS communication protocols
Chapter 5. Configuring Candle Management Server and Monitoring Agent in the same address space 119

Hostname
Specify the TCP ID of the MVS mainframe to which you will
connect. To get this value, issue the TSO HOMETEST command
and use the first qualifier of the TCP hostname.
Address
Specify the TCP address of the MVS mainframe to which you will
connect. To get this value, issue the TSO HOMETEST command.
Started task
Specify the started task name of TCP which is running on the MVS
mainframe host.
Network interface card (NIC)
Specify the network interface card (NIC) that you prefer for the IBM
application to use. During configuration, the Configuration tool adds
the KDCB0_HOSTNAME= parameter in the KDSENV member of
the high.level.qualifier.RTEname.RKANPAR library.
Port number
Specify the port number you want to use. If you are not using the
default port number 1918, enter the port number you plan to use.
This value is used in the KDC_FAMILIES environment variable in
the KDSENV member in RKANPAR.
Note: If you are defining a remote Candle Management Server,
then this port number must match the port number of the Hub
that this remote Candle Management Server reports to.
There should only be one remote Candle Management
Server in a given MVS image that reports to the same Hub
Candle Management Server.
Address translation
Specify Y to configure IP.PIPE support for communication across
firewalls using address translation.
-------------------- SPECIFY IP.PIPE COMMUNICATION PROTOCOL ------------------
COMMAND ===>
Specify the TCP communication values for this CMS.
Hostname ==> hostname
Address ==> IP_address
Started task ==> TCPIP
If applicable
Network interface card (NIC) ==>
Interlink subsystem ==>
IUCV interface in use? ==> N (Y, N)
Specify IP.PIPE configuration
Port number ==> portnumber
Address translation ==> N (Y, N)
Partition name ==>
Enter=Next F1=Help F3=Back
Figure 102. Specify IP.PIPE communication protocol
120 Configuring IBM Tivoli OMEGAMON XE for CICS on z/OS
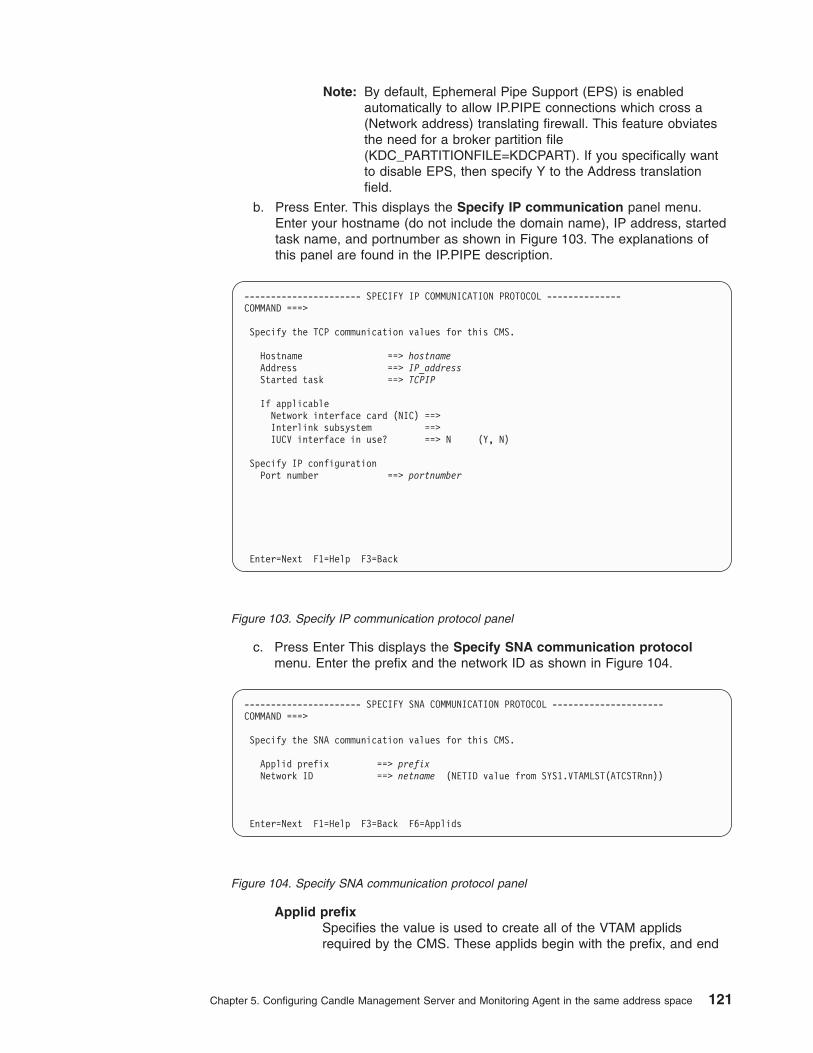
Note: By default, Ephemeral Pipe Support (EPS) is enabled
automatically to allow IP.PIPE connections which cross a
(Network address) translating firewall. This feature obviates
the need for a broker partition file
(KDC_PARTITIONFILE=KDCPART). If you specifically want
to disable EPS, then specify Y to the Address translation
field.
b. Press Enter. This displays the Specify IP communication panel menu.
Enter your hostname (do not include the domain name), IP address, started
task name, and portnumber as shown in Figure 103. The explanations of
this panel are found in the IP.PIPE description.
c. Press Enter This displays the Specify SNA communication protocol
menu. Enter the prefix and the network ID as shown in Figure 104.
Applid prefix
Specifies the value is used to create all of the VTAM applids
required by the CMS. These applids begin with the prefix, and end
---------------------- SPECIFY IP COMMUNICATION PROTOCOL --------------
COMMAND ===>
Specify the TCP communication values for this CMS.
Hostname ==> hostname
Address ==> IP_address
Started task ==> TCPIP
If applicable
Network interface card (NIC) ==>
Interlink subsystem ==>
IUCV interface in use? ==> N (Y, N)
Specify IP configuration
Port number ==> portnumber
Enter=Next F1=Help F3=Back
Figure 103. Specify IP communication protocol panel
---------------------- SPECIFY SNA COMMUNICATION PROTOCOL ---------------------
COMMAND ===>
Specify the SNA communication values for this CMS.
Applid prefix ==> prefix
Network ID ==> netname (NETID value from SYS1.VTAMLST(ATCSTRnn))
Enter=Next F1=Help F3=Back F6=Applids
Figure 104. Specify SNA communication protocol panel
Chapter 5. Configuring Candle Management Server and Monitoring Agent in the same address space 121
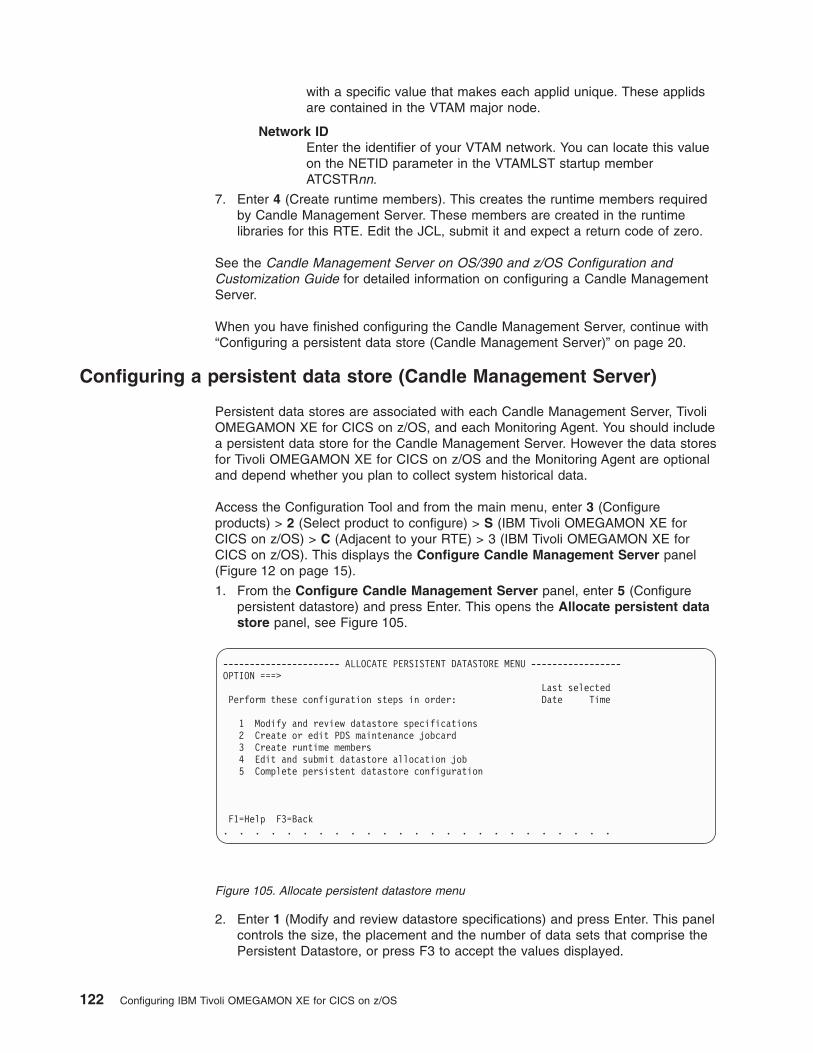
with a specific value that makes each applid unique. These applids
are contained in the VTAM major node.
Network ID
Enter the identifier of your VTAM network. You can locate this value
on the NETID parameter in the VTAMLST startup member
ATCSTRnn.
7. Enter 4 (Create runtime members). This creates the runtime members required
by Candle Management Server. These members are created in the runtime
libraries for this RTE. Edit the JCL, submit it and expect a return code of zero.
See the Candle Management Server on OS/390 and z/OS Configuration and
Customization Guide for detailed information on configuring a Candle Management
Server.
When you have finished configuring the Candle Management Server, continue with
“Configuring a persistent data store (Candle Management Server)” on page 20.
Configuring a persistent data store (Candle Management Server)
Persistent data stores are associated with each Candle Management Server, Tivoli
OMEGAMON XE for CICS on z/OS, and each Monitoring Agent. You should include
a persistent data store for the Candle Management Server. However the data stores
for Tivoli OMEGAMON XE for CICS on z/OS and the Monitoring Agent are optional
and depend whether you plan to collect system historical data.
Access the Configuration Tool and from the main menu, enter 3 (Configure
products) > 2 (Select product to configure) > S (IBM Tivoli OMEGAMON XE for
CICS on z/OS) > C (Adjacent to your RTE) > 3 (IBM Tivoli OMEGAMON XE for
CICS on z/OS). This displays the Configure Candle Management Server panel
(Figure 12 on page 15).
1. From the Configure Candle Management Server panel, enter 5 (Configure
persistent datastore) and press Enter. This opens the Allocate persistent data
store panel, see Figure 105.
2. Enter 1 (Modify and review datastore specifications) and press Enter. This panel
controls the size, the placement and the number of data sets that comprise the
Persistent Datastore, or press F3 to accept the values displayed.
---------------------- ALLOCATE PERSISTENT DATASTORE MENU -----------------
OPTION ===>
Last selected
Perform these configuration steps in order: Date Time
1 Modify and review datastore specifications
2 Create or edit PDS maintenance jobcard
3 Create runtime members
4 Edit and submit datastore allocation job
5 Complete persistent datastore configuration
F1=Help F3=Back
. . . . . . . . . . . . . . . . . . . . . . . . .
Figure 105. Allocate persistent datastore menu
122 Configuring IBM Tivoli OMEGAMON XE for CICS on z/OS
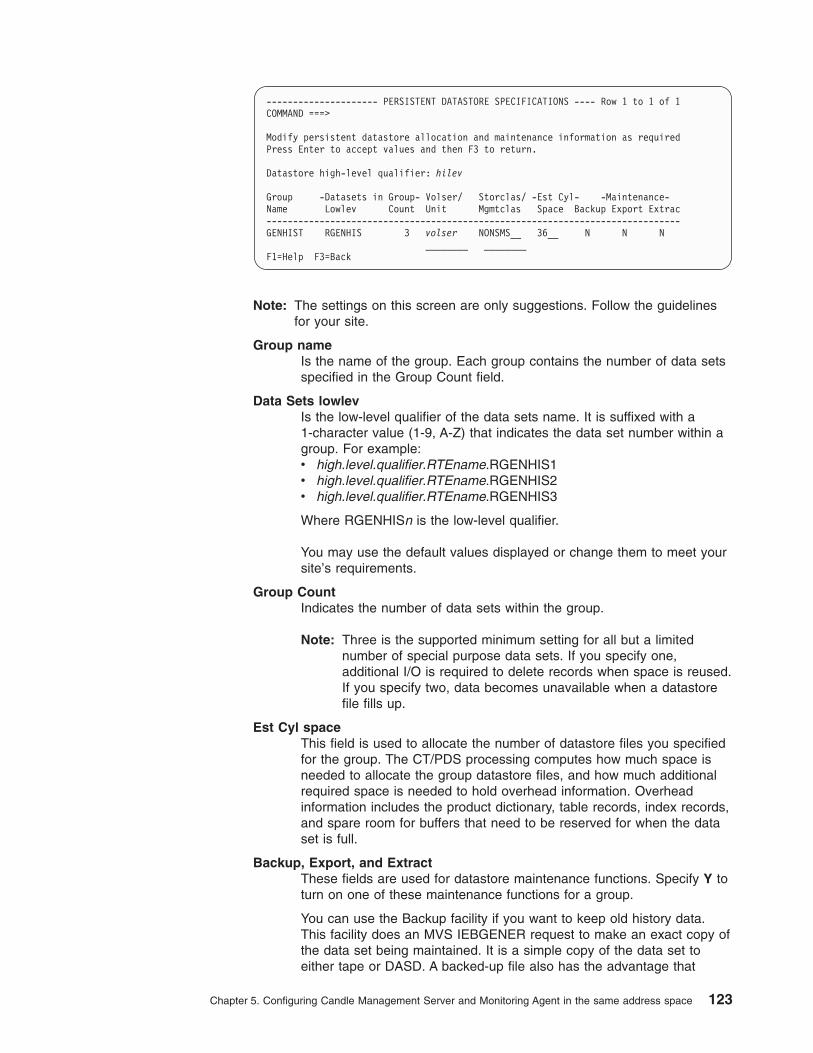
--------------------- PERSISTENT DATASTORE SPECIFICATIONS ---- Row 1 to 1 of 1
COMMAND ===>
Modify persistent datastore allocation and maintenance information as required
Press Enter to accept values and then F3 to return.
Datastore high-level qualifier: hilev
Group -Datasets in Group- Volser/ Storclas/ -Est Cyl- -Maintenance-
Name Lowlev Count Unit Mgmtclas Space Backup Export Extrac
------------------------------------------------------------------------------
GENHIST RGENHIS 3 volser NONSMS__ 36__ N N N
________ ________
F1=Help F3=Back
Note: The settings on this screen are only suggestions. Follow the guidelines
for your site.
Group name
Is the name of the group. Each group contains the number of data sets
specified in the Group Count field.
Data Sets lowlev
Is the low-level qualifier of the data sets name. It is suffixed with a
1-character value (1-9, A-Z) that indicates the data set number within a
group. For example:
v high.level.qualifier.RTEname.RGENHIS1
v high.level.qualifier.RTEname.RGENHIS2
v high.level.qualifier.RTEname.RGENHIS3
Where RGENHISn is the low-level qualifier.
You may use the default values displayed or change them to meet your
site’s requirements.
Group Count
Indicates the number of data sets within the group.
Note: Three is the supported minimum setting for all but a limited
number of special purpose data sets. If you specify one,
additional I/O is required to delete records when space is reused.
If you specify two, data becomes unavailable when a datastore
file fills up.
Est Cyl space
This field is used to allocate the number of datastore files you specified
for the group. The CT/PDS processing computes how much space is
needed to allocate the group datastore files, and how much additional
required space is needed to hold overhead information. Overhead
information includes the product dictionary, table records, index records,
and spare room for buffers that need to be reserved for when the data
set is full.
Backup, Export, and Extract
These fields are used for datastore maintenance functions. Specify Y to
turn on one of these maintenance functions for a group.
You can use the Backup facility if you want to keep old history data.
This facility does an MVS IEBGENER request to make an exact copy of
the data set being maintained. It is a simple copy of the data set to
either tape or DASD. A backed-up file also has the advantage that
Chapter 5. Configuring Candle Management Server and Monitoring Agent in the same address space 123
nothing has to be done to the file to dynamically make the data
available to the Persistent Datastore again.
Each group contains the number of data sets specified in the Group Count field.
The Datasets Lowlev is suffixed with a 1-character value (1-9, A-Z) that
indicates the dataset number within a group. As an example, if these are the
values referenced on the Persistent Datastore Specifications panel, the
PD#Psuffix job creates the Persistent Datastore members that make reference
to these datastore files
3. Enter 2 (Create or edit PDS maintenance jobcard). Edit the job card and press
Enter. This specifies the job card to be used for the Persistent Datastore (PDS)
KPDPROC1, KPDPROCC and KPDPROC2 maintenance jobs. The job card
member (KPDJOBC) is created in the high.level.qualifier.RTEname..RKANSAM
library.
4. Enter 3 (Create runtime members). This opens JCL that you can edit and
submit. You should expect a return code of zero. This job creates the persistent
datastore members.
5. Enter 4 (Edit and submit datastore allocation job). This opens JCL that you can
edit and submit. You should expect a return code of zero. This job allocates and
initializes all data sets required for this product’s persistent datastore
Note: This job is applicable to define a brand new PDS configuration. If the
PDS data sets already exist, then delete or rename this product’s
persistent datastore files if you want the configuration tool to re-allocate
and re-initialize the datasets for this product’s persistent datastore.
6. Enter 5 (Complete persistent datastore configuration). This describes the steps
that you need to take to copy the procedures that you have created to your
procedures libraries. This step will be deferred until the completion of the
configuration of Tivoli OMEGAMON XE for CICS on z/OS, see “Completing the
configuration” on page 36.
See the Candle Management Server on OS/390 and z/OS Configuration and
Customization Guide for detailed information on configuring a Candle Management
Server.
When you have finished configuring the Candle Management Server, continue with
“Configuring a OMEGAMON II for CICS.”
Configuring a OMEGAMON II for CICS
So far you have created a Runtime Environment and configured a Candle
Management Server on your system. This procedure configures OMEGAMON II for
CICS.
Access the Configuration Tool and from the main menu, enter 3 (Configure
products) > 2 (Select product to configure) > S IBM Tivoli OMEGAMON XE for
CICS on z/OS. This displays the Runtime Environments Panel.
1. From the Runtime Environments panel, enter C in the action column adjacent
to the runtime definition. This displays the Product Configuration Selection
menu. The panel looks like this:
124 Configuring IBM Tivoli OMEGAMON XE for CICS on z/OS

--------------------- PRODUCT CONFIGURATION SELECTION MENU --------------------
COMMAND ===>
The following list of components requires configuration to make the product
operational. Refer to the appropriate configuration documentation if you
require additional information to complete the configuration.
To configure the desired component, enter the selection number on the command
line. You should configure the components in the order they are listed.
COMPONENT TITLE
1 Candle Management Server
2 OMEGAMON II for CICS
3 IBM Tivoli OMEGAMON XE for CICS on z/OS
2. From the Product Configuration Selection menu, enter 2 (OMEGAMON II for
CICS). The configuration panel looks like this:
---------------- CONFIGURE OMEGAMON II FOR CICS / RTE: RTEname ----------------
OPTION ===>
Last selected
Perform these configuration steps in order: Date Time
1 Specify configuration values
2 Allocate additional runtime datasets
3 Create runtime members
4 Complete the configuration
Optional:
5 Allocate/initialize task history datasets
6 Install/update CICS global data area modules
7 Modify menu system command security
8 Install Candle Subsystem
9 Run migration utility
F1=Help F3=Back
. . . . . . . . . . . . . . . . . . . . . . . . . . .
3. From the Configure OMEGAMON II for CICS panel, enter 1 (Specify
configuration values). The configuration values are displayed. Check that the
name of the started task for End-to-End (ETE) is correct and is unique for this
RTE. Press Enter when complete.
Chapter 5. Configuring Candle Management Server and Monitoring Agent in the same address space 125

---------- OMEGAMON II FOR CICS CONFIGURATION VALUES / RTE: RTEname -----------
OPTION ===>
VTAM information:
Maximum number of CUA users ==> 99 (10-256)
Enable ACF/VTAM authorized path ==> N (Y, N)
CUA security options:
Specify security ==> NONE (RACF, ACF2, TSS,
NAM, None)
Function level security resource class ==> (ACF2 max is 3 char)
Started task:
End-to-End (ETE) ==> started_task_name
Advanced options:
Maximum number of KOCCI users (UMAX) ==> 99 (1-99)
Copies of OMEGAMON II address spaces ==> 1 (1-16)
Fold CUA output to upper case ==> N (Y, N)
Enable CUA simplified signon under MVS/ESA ==> Y (Y, N)
Enable CUA WTO messages ==> N (Y, N)
Enter=Next F1=Help F3=Back
. . . . . . . . . . . . . . . . . . . . . . . . . . .
a. Edit the parameters to meet your site’s requirements.
---------- OMEGAMON II FOR CICS CONFIGURATION VALUES / RTE: RTEname Row 17 from 64
COMMAND ===>
Modify the parameters below to suit your site’s requirements.
-- Menu System -- -------- CUA Interface ---------- Major Default
ID STC Name Applid STC Name Applid Operator Prefix Node CICS Rgn
-- -------- -------- -------- -------- -------- ------ -------- --------
00 OMEGOCA_ IYK2OC0A OMEGC2A_ IYK2C20A IYK2C2A_ IYK2CA IYK2C2AN *_______
Enter=Next F1=Help F3=Back F7=Up F8=Down
Note: The screen shows some typical examples.
4. From the Configure OMEGAMON II for CICS panel, enter 2 (Allocate
additional runtime datasets). There is nothing to do in this step.
5. From the Configure OMEGAMON II for CICS panel, enter 3 (Create runtime
members). This creates JCL that you should review, edit and submit. You should
expect return code of zero. Change the job name to, for example, the name of
the member of the PDS.
6. Copy procedures to PROCLIB. This describes a series of steps that copy
procedures from the Configuration Tool to your PROCLIB and VTAM definitions
to your VTAMLST. This step will be deferred until the completion of the
configuration of Tivoli OMEGAMON XE for CICS on z/OS, see “Completing the
configuration” on page 129.
When you have finished configuring the OMEGAMON II for CICS, continue with or
“Configuring a monitoring agent for a Candle Management Server in the same
address space.”
Configuring a monitoring agent for a Candle Management Server in the
same address space
This topic describes the procedures that are necessary to create a Monitoring Agent
and link it to the Candle Management Server that is in the same address space.
126 Configuring IBM Tivoli OMEGAMON XE for CICS on z/OS

See the IBM Tivoli OMEGAMON Platform: Configuring Candle Management Server
on z/OS for detailed information on configuring a Candle Management Server.
Access the Configuration Tool and from the main menu, enter 3 (Configure
products) > 2 (Select product to configure) > S (IBM Tivoli OMEGAMON XE for
CICS on z/OS). This displays the Runtime Environments Panel.
1. From the Runtime Environments panel, enter C in the action column adjacent to
the runtime definition. This displays the Product Configuration Selection menu.
The panel looks like this:
2. Enter 3 (IBM Tivoli OMEGAMON XE for CICS on z/OS). To configure the
products you have installed, follow the instructions on each Configuration tool
panel. Help is available for each panel by pressing F1.
When you finish configuring one product, press F3 to return to the Product
Component Selection Menu. Repeat this process to configure all of your
products. The panel looks like this:
----------------------- PRODUCT COMPONENT SELECTION MENU ----------------------
COMMAND ===>
The following list of components requires configuration to make the product
operational. Refer to the appropriate configuration documentation if you
require additional information to complete the configuration.
To configure the desired component, enter the selection number on the command
line. You should configure the components in the order they are listed.
COMPONENT TITLE
1 Candle Management Server
2 OMEGAMON II for CICS
3 IBM Tivoli OMEGAMON XE for CICS on z/OS
Figure 106. Product component selection menu
Chapter 5. Configuring Candle Management Server and Monitoring Agent in the same address space 127
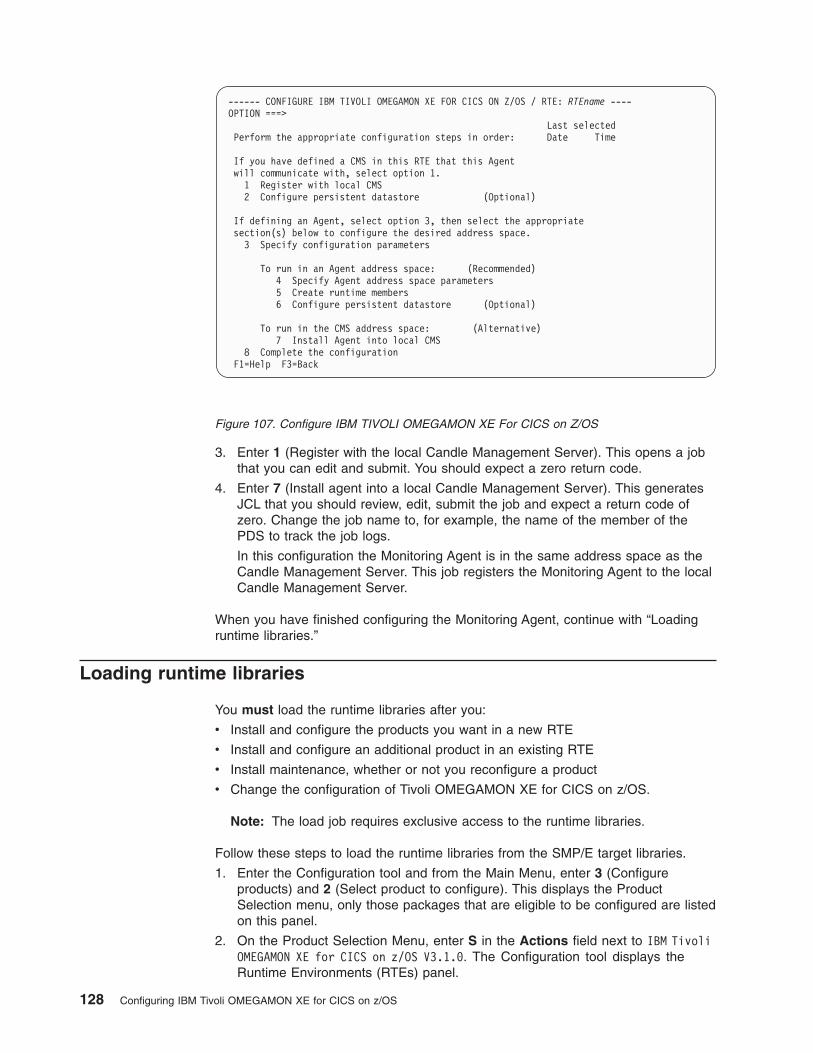
3. Enter 1 (Register with the local Candle Management Server). This opens a job
that you can edit and submit. You should expect a zero return code.
4. Enter 7 (Install agent into a local Candle Management Server). This generates
JCL that you should review, edit, submit the job and expect a return code of
zero. Change the job name to, for example, the name of the member of the
PDS to track the job logs.
In this configuration the Monitoring Agent is in the same address space as the
Candle Management Server. This job registers the Monitoring Agent to the local
Candle Management Server.
When you have finished configuring the Monitoring Agent, continue with “Loading
runtime libraries.”
Loading runtime libraries
You must load the runtime libraries after you:
v Install and configure the products you want in a new RTE
v Install and configure an additional product in an existing RTE
v Install maintenance, whether or not you reconfigure a product
v Change the configuration of Tivoli OMEGAMON XE for CICS on z/OS.
Note: The load job requires exclusive access to the runtime libraries.
Follow these steps to load the runtime libraries from the SMP/E target libraries.
1. Enter the Configuration tool and from the Main Menu, enter 3 (Configure
products) and 2 (Select product to configure). This displays the Product
Selection menu, only those packages that are eligible to be configured are listed
on this panel.
2. On the Product Selection Menu, enter S in the Actions field next to IBM Tivoli
OMEGAMON XE for CICS on z/OS V3.1.0. The Configuration tool displays the
Runtime Environments (RTEs) panel.
------ CONFIGURE IBM TIVOLI OMEGAMON XE FOR CICS ON Z/OS / RTE: RTEname ----
OPTION ===>
Last selected
Perform the appropriate configuration steps in order: Date Time
If you have defined a CMS in this RTE that this Agent
will communicate with, select option 1.
1 Register with local CMS
2 Configure persistent datastore (Optional)
If defining an Agent, select option 3, then select the appropriate
section(s) below to configure the desired address space.
3 Specify configuration parameters
To run in an Agent address space: (Recommended)
4 Specify Agent address space parameters
5 Create runtime members
6 Configure persistent datastore (Optional)
To run in the CMS address space: (Alternative)
7 Install Agent into local CMS
8 Complete the configuration
F1=Help F3=Back
Figure 107. Configure IBM TIVOLI OMEGAMON XE For CICS on Z/OS
128 Configuring IBM Tivoli OMEGAMON XE for CICS on z/OS
3. Type L next to the RTE for which you want to load the runtime libraries and
press Enter.
Note: If you are sharing RTEs, both the master RTE and the sharing RTE must
be loaded.Review the JCL and submit the job. Verify that the job completes successfully
and that the return code is 04 or less.
4. When you are finished loading the runtime libraries, press F3 to return to the
Main Menu.
Now continue with “Completing the configuration.”
Completing the configuration
The Configuration Tool created started task procedures in the data set
high.level.qualifier.RKANSAM . These must be copied to your procedure library. In
addition the VTAM definitions that have been created must be copied to your
SYS1.VTAMLST
From the Runtime environments panel, enter 8 (Complete the configuration) next to
your runtime definition. This describes the steps that you have to follow to ensure
that you have the definitions that have been created in the configuration in your
runtime environment.
Using the Configuration Tool Utilities to update your started task library, use the
following steps:
1. From the Runtime environments panel, Enter Z (Utilities) next to your runtime
definition. Copy the agent started task from RKANSAM to PROCLIB.
2. From the Utilities panel, Enter 8 (Create the Copy JCL). On the next panel enter
the name of your procedure library, for example, USER.PROCLIB. Press Enter.
Edit the JCL, submit the job. You should expect a return code of zero. This
generates some JCL to create a member called KCISYPJB in
high.level.qualifier.rtename.RKANSAM.
3. Edit KCISYPJB and submit the job. This job copies all the required started tasks
from your RKANSAM library to the specified procedure library. You should
expect a return code of zero. Looking through the code you will see the names
of the started tasks that have been created during the configuration. There are
started tasks for:
v Candle Management Server
v OMEGAMON II for CICS
v Tivoli OMEGAMON XE for CICS on z/OS
v End-to-End (ETE).
4. From the Utilities panel, Enter 9 (Create the VTAM definitions). Enter the name
of your VTAM node, press Enter. This sample system copy JCL copies the
VTAM definitions to VTAMLST. The Configuration tool created VTAM definitions
in RKANSAM. You should copy the VTAM major node from RKANSAM to your
system VTAMLST. This generates JCL to create a member called KCISYNJB in
high.level.qualifier.rtename.RKANSAM.
5. Edit KCISYNJB and submit the job. This job copies all the required VTAM
definitions from your RKANSAM library to the specified VTAMLST. You should
expect a return code of zero.
6. All runtime libraries concatenated in the STEPLIB DDNAME must be
APF-authorized.
Chapter 5. Configuring Candle Management Server and Monitoring Agent in the same address space 129

7. Vary VTAM major node active. Vary the VTAM major node active, for example,
V NET,ACT,ID=OMEGAAN
8. Edit the started task for your Monitoring Agent. Add the following statement the
end of job: // RKCPXMnn DD DUMMY Where nn is a two digit value between 01-15
and is unique for your monitoring agent. This corresponds to the statement that
you add to the CICS started job.
9. Contact you local security administrator to grant the appropriate authorizations.
Now, you can verify your installation and configuration, continue with “Modifying the
CICS started task” and “Verifying the configuration” on page 131.
If you are migrating data from previous releases or from OMEGAMON II to
OMEGAMON XE, see Chapter 9, “Migrating,” on page 155.
Continue with “Modifying the CICS started task.”
Modifying the CICS started task
You can access the information from the Configure OMEGAMON II for CICS
panel, enter 4 (Complete the configuration). This provides information that you have
to add to your the JCL for your CICS regions. It is summarized in the following
points.
1. Add //KC2GLBnn DD DUMMY to your CICS started task. If you want to use the
monitoring options in a suffixed global data area (GDA), you must add this DD
statement to the CICS region JCL to identify the global.
2. Add //RKC2XMnn DD DUMMY to your CICS started task. If you want to use other
than the default OMEGAMON II address space pair (the defaults here are
CANSOC0 and CANSC20 as set on Configure OMEGAMON II for CICS option
1) to monitor a CICS region, you must add this DD statement to the CICS
region JCL to identify the address space pair.
3. Add //RKCPXMnn DD DUMMY to your CICS started task.
4. Add the program KOCOME00. Program KOCOME00 is the only program loaded
from your CICS startup JCL’s DFHRPL concatenation. You can copy this
program to a separate DFHRPL to reduce PDS directory search times. If you
include program KOCOME00 in your PLTPI, you can ensure that the
OMEGAMON II address space is active before your CICS region completes
initializing. To do this, add the following DD statement to the CICS startup JCL:
//OCCIREQnn DD DUMMY
After you add the DD statement, program KOCOME00 checks the
cross-memory interface task (XMIT) is running as a subtask of the menu
system. If the subtask is active, initialization continues. If the subtask is not
active, the following WTOR message appears:
OC0806: XMCR OCCIREQ SPECIFIED IN THE STARTUP JCL BUT RKC2XMnn NOT ACTIVE.
REPLY ABEND, IGNORE,OR RETRY.
Where nn is the suffix specified in the //RKC2XMnn DD DUMMY statement in the
CICS startup JCL or, if no suffix was specified, by the default (00).
5. Add a DD statement for RKANMOD and concatenate the OMEGAMON II load
library to your DFHRPL DD statement. Here is an example of the additional
statements:
//DFHRPL......
// ...
130 Configuring IBM Tivoli OMEGAMON XE for CICS on z/OS
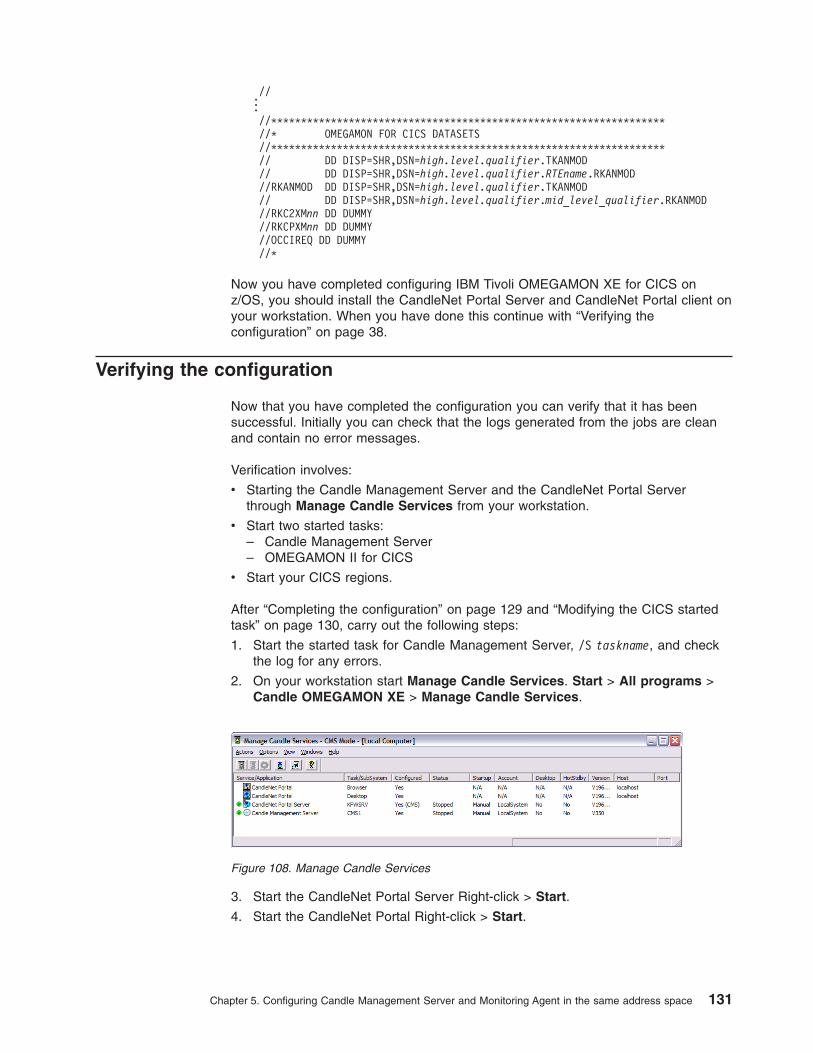
// ... //******************************************************************
//* OMEGAMON FOR CICS DATASETS
//******************************************************************
// DD DISP=SHR,DSN=high.level.qualifier.TKANMOD
// DD DISP=SHR,DSN=high.level.qualifier.RTEname.RKANMOD
//RKANMOD DD DISP=SHR,DSN=high.level.qualifier.TKANMOD
// DD DISP=SHR,DSN=high.level.qualifier.mid_level_qualifier.RKANMOD
//RKC2XMnn DD DUMMY
//RKCPXMnn DD DUMMY
//OCCIREQ DD DUMMY
//*
Now you have completed configuring IBM Tivoli OMEGAMON XE for CICS on
z/OS, you should install the CandleNet Portal Server and CandleNet Portal client on
your workstation. When you have done this continue with “Verifying the
configuration” on page 38.
Verifying the configuration
Now that you have completed the configuration you can verify that it has been
successful. Initially you can check that the logs generated from the jobs are clean
and contain no error messages.
Verification involves:
v Starting the Candle Management Server and the CandleNet Portal Server
through Manage Candle Services from your workstation.
v Start two started tasks:
– Candle Management Server
– OMEGAMON II for CICS
v Start your CICS regions.
After “Completing the configuration” on page 129 and “Modifying the CICS started
task” on page 130, carry out the following steps:
1. Start the started task for Candle Management Server, /S taskname, and check
the log for any errors.
2. On your workstation start Manage Candle Services. Start > All programs >
Candle OMEGAMON XE > Manage Candle Services.
3. Start the CandleNet Portal Server Right-click > Start.
4. Start the CandleNet Portal Right-click > Start.
Figure 108. Manage Candle Services
Chapter 5. Configuring Candle Management Server and Monitoring Agent in the same address space 131

When CandleNet Portal opens you will see the list of CICS regions that are
associated with the agent in Navigator pane at the top left hand side of the
workspace.
132 Configuring IBM Tivoli OMEGAMON XE for CICS on z/OS
Chapter 6. Installing CandleNet Portal server and client on
Windows XP
In the package that you received with this product there are three CDs. They are:
IBM Tivoli Data File files for z/OS.
This contains the data files necessary for z/OS seeding.
IBM Tivoli OMEGAMON platform
This contains:
v Candle Management Server.
v Candle Management Agent
v CandleNet Portal Server, including CandleNet Portal Web browser client
enablement (Windows only)
v CandleNet Portal Desktop Client (Windows only)
v Candle Management Workstation (Windows only)
IBM DB2 Universal Database Workgroup Server Edition Version 8.1
A full list of all the materials that you receive with this product can be found in IBM
Tivoli OMEGAMON XE for CICS on z/OS: Getting Started.
Note: A complete account of these processes is found in the Installing Candle
Products on Windows.
If you plan to install the Candle Management Server on a UNIX platform, see
IBM Tivoli OMEGAMON Platform: Installing and Setting up OMEGAMON
Platform and CandleNet Portal on Windows and UNIX.
Other platforms that you can install a Candle Management Server on include
AIX, Solaris and HP/UX.
Note:
This section describes the background, and procedures that you should adopt when
Installing and configuring:
v CandleNet Portal Server.
v CandleNet Portal desktop client.
If you plan to install Candle Management Server on Windows, see the procedure
described in “Installing Candle Management Server on Windows XP” on page 42.
The installation and configuration processes described in this information are limited
to Windows XP Professional Edition with Support pack 1.
Deploying CandleNet Portal
To deploy CandleNet Portal at your site:
v Install at least one CandleNet Portal Server for each hub Candle Management
Server. You can have more than one CandleNet Portal Server connected to the
same hub Candle Management Server, for example, to provide a test
environment and a production environment.
Note: It is recommended that you install the CandleNet Portal Server on the
same machine as the Warehouse Proxy, if possible, for ease of
© Copyright IBM Corp. 2005 133
administration. The CandleNet Portal Server requires its own “Data
Warehouse data” source if it is not installed on the same machine as the
Warehouse Proxy.
Prerequisites
Note: For full details of the hardware and software, see IBM Tivoli OMEGAMON
XE for CICS on z/OS: Getting Started. A summary of the main recommended
hardware and software configurations are as follows:
These are:
Hardware
The recommended hardware for adequate Candle Management Server
performance in an average monitoring environment is:
v Processor speed: 1 GHz CPU
v RAM: 1 GB RAM (although 512MB would be sufficient for smaller
systems)
Software
You may install a Candle Management Server on an Intel-based (x86) CPU
or compatible CPU running Windows XP Professional Edition, Windows
2000, or Windows 2003 Server. The CMS is not supported on DEC Alpha
machines.
Installing DB2 UDB
The OMEGAMON XE installation package comes with DB2 Universal Database
Workgroup Server Edition. Install DB2 UDB on the machine where you will be
installing a CandleNet Portal Server.
If you only intend to install a CandleNet Portal client, you can omit this step.
Note: If you already have a DB2 UDB (version 7 or 8) installation, you need not
install the DB2 UDB (version 8.1) included in your Candle package unless
you want to upgrade to version 8.1.
Upgrading from a version that used MSDE or Microsoft SQL Server
If you are upgrading the CandleNet Portal Server from an earlier version
that used MSDE for the CandleNet Portal Server database, the migration to
DB2 UDB is done by the OMEGAMON installer. If Microsoft SQL Server
(version 7.0) was used for the CandleNet Portal Server database, the
OMEGAMON installer gives you the choice of moving it to DB2 UDB or
keeping the database on Microsoft SQL Server.
1. On the machine where the CandleNet Portal Server will be installed, log on to
Windows with a local ID that has Administrator authority. The DB2 UDB
installation will add a local db2admin user account to Windows, which it cannot
do if your local ID does not have Administrator authority. Without the db2admin
ID, DB2 UDB is unable to create the CandleNet Portal Server database and the
CandleNet Portal Server will not start.
2. Insert the DB2 Universal Database Workgroup Server Edition CD to start the
install wizard.
3. Select “Install Products” and proceed through the license agreement and other
screens.
134 Configuring IBM Tivoli OMEGAMON XE for CICS on z/OS
4. Select the installation type Accept the defaults. Do not select Data
warehousing. This is unrelated to the Candle data warehouse, which is
configured separately.
5. Select the “installation” folder: Change the installation drive if necessary.
6. Set user information for the DB2 Administration Server:
a. You can either accept the user name of “db2admin” or you can use a
different name (up to eight letters and numbers).
b. Enter a password.
c. Do not enter a domain name in the drop-down list.
Note: Follow the guidelines for your site.
DB2 UDB requires the user name and password for all administrative tasks,
particularly when you create the CandleNet Portal Server database. If the
Windows Local Security Settings on this machine enables complex or long
passwords, use whatever password fits the requirements. This Windows setting
also affects CandleNet Portal Server installation.
If you change your DB2 password after you install CandleNet Portal and set up
the DB2 database associated with CandleNet Portal Server, then CandleNet
Portal Server might not initialize correctly the next time it is started. However,
the Manage Candle Services window could indicate that CandleNet Portal
Server status as Started, but a user logging on to CandleNet Portal will not be
able to connect. Check for SQL exceptions in the CandleNet Portal Server log.
The installation of OMEGAMON XE may fail during the start of DB2 if the
DB2ADMIN user ID and password combination is incorrect. If you have changed
the password for DB2ADMIN since DB2 was installed and then try to install
OMEGAMON XE, you will receive error messages.
7. On the remaining screens, select the defaults.
8. Click Install to start copying the files. After the installation is complete, restart
Windows before installing the CandleNet Portal. (Restart Windows even if the
DB2 UDB installer does not ask you.)
Note: If the Windows Local Security Policy on this machine is set to require
complex passwords, you must create a new Windows user named CNPS
before the Candle installer can configure the CandleNet Portal Server.
Installing and configuring OMEGAMON platform
It is assumed that you have already installed a database package.
Installation and configuration is a two stage process:
1. You install the base OMEGAMON platform. This is described in the following
procedure.
2. You install a specific product, in our case, Tivoli OMEGAMON XE for CICS on
z/OS. You can also add other OMEGAMON products depending on the what
you plan to monitor. This installation relates only to Tivoli OMEGAMON XE for
CICS on z/OS. See “Installing and configuring Tivoli OMEGAMON XE for CICS
on z/OS” on page 139
Note: If you are upgrading from a previous release of OMEGAMON XE, the
software is loaded to your existing Candle directory. Do not create a new
directory.
Chapter 6. Installing CandleNet Portal server and client on Windows XP 135
Follow these steps:
1. Log onto Windows using an ID with Administrator authority and close any
running applications.
2. Insert the IBM Tivoli OMEGAMON Platform CD into your CD ROM drive.
Installation begins automatically.
If the installer does not start, go to the Windows directory on your CD ROM
drive and run setup.exe.
If setup.exe initialization fails, you may not have enough free disk space to
decompress the setup files.
3. From the Welcome to IBM Tivoli OMEGAMON Platform panel click Next.
The Software License Agreement is displayed, read the software license
agreement.
4. From the Software License panel, click Accept The Choose Destination
Location dialog is displayed. The default is c:\Candle.
5. Either accept the default (recommended) or define your own path and click
Next. The Select features panel is displayed. This is the point where your
selection depends on the configuration that you want to deploy. The five
choices are:
v Agent Support
v Candle Management Server
v CandleNet Portal Server
v Candle Portal Desktop Client
v Candle Management Workstation
As we are concerned with just installing the CandleNet Portal Server and
CandleNet Portal Desktop Client, we can ignore the other options for the
moment. Obviously, if you wanted to deploy the Candle Management Server
on your workstation instead of z/OS you would need to select this as well. See
“Installing Candle Management Server on Windows XP” on page 42.
6. From the Select Features panel, click both CandleNet Portal Server and
CandleNet Portal Desktop Client and click Next.
136 Configuring IBM Tivoli OMEGAMON XE for CICS on z/OS

7. From the Select Program folder accept the defaults and click Next.
8. From the Start Copying Files click Next. At the end of this process the Setup
Type panel is displayed.
9. Deselect the Launch Manage Candle Services.... and select Configure
CandleNet Portal and click Next. The other option Configure CandleNet
Portal is mandatory.
Figure 109. Select Features window, CandleNet Portal
Figure 110. Setup Type window, CandleNet Portal
Chapter 6. Installing CandleNet Portal server and client on Windows XP 137

10. On the Define CandleNet Portal Host Information panel, check that the name
is the name of your host machine where you are installing CandleNet Portal
Server and click Next. This should not include a domain name, such
asibm.com
A pop-up window is displayed, CNPS Data Source Configuration.
11. Enter your DB2 password and a password for the CNPS database user. Click
OK. It is a good idea to keep these the same (for your own sanity). This step
takes a few moments to complete while it populates the database.
12. On the Success panel click OK. The CandleNet Portal Server Configuration
panel appears. If you are just installing a CandleNet Portal, go to 15 on page
139
13. For this simple configuration just click Protocol 1 and select TCP/IP. Click OK.
The CandleNet Portal Server Configuration panel is displayed.
Figure 111. CNPS Data Source Config Parameters dialog
Figure 112. CNP Server Configuration dialog
138 Configuring IBM Tivoli OMEGAMON XE for CICS on z/OS
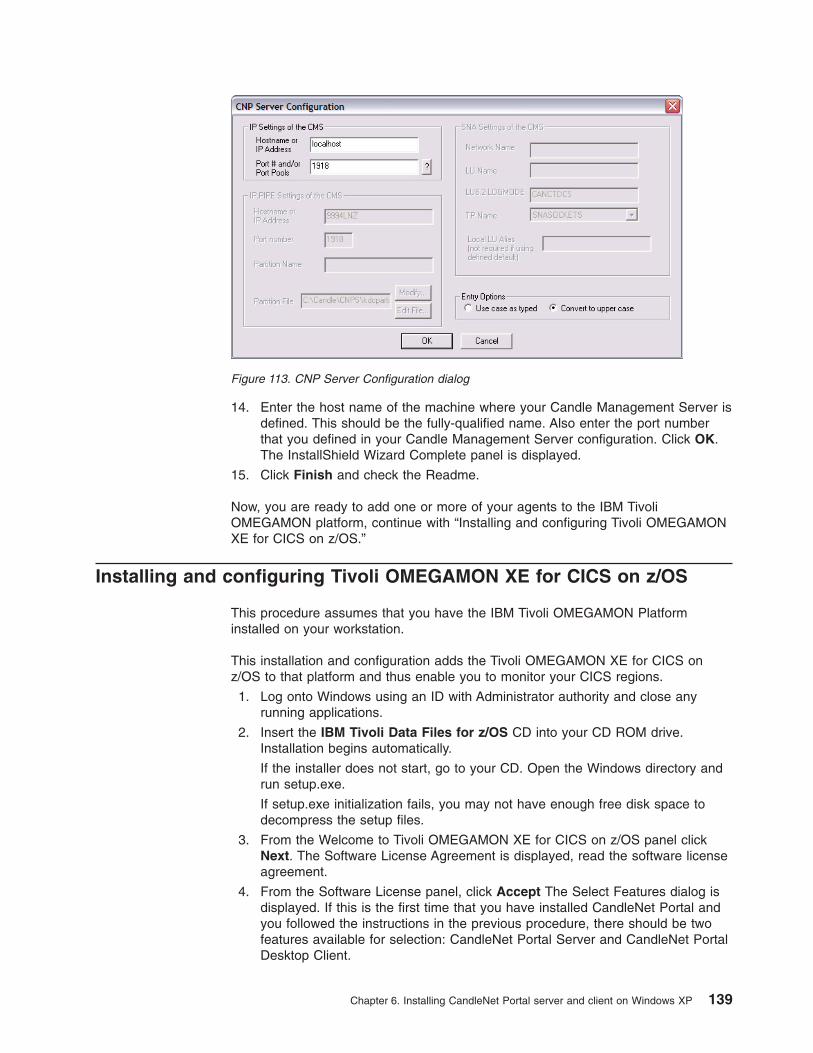
14. Enter the host name of the machine where your Candle Management Server is
defined. This should be the fully-qualified name. Also enter the port number
that you defined in your Candle Management Server configuration. Click OK.
The InstallShield Wizard Complete panel is displayed.
15. Click Finish and check the Readme.
Now, you are ready to add one or more of your agents to the IBM Tivoli
OMEGAMON platform, continue with “Installing and configuring Tivoli OMEGAMON
XE for CICS on z/OS.”
Installing and configuring Tivoli OMEGAMON XE for CICS on z/OS
This procedure assumes that you have the IBM Tivoli OMEGAMON Platform
installed on your workstation.
This installation and configuration adds the Tivoli OMEGAMON XE for CICS on
z/OS to that platform and thus enable you to monitor your CICS regions.
1. Log onto Windows using an ID with Administrator authority and close any
running applications.
2. Insert the IBM Tivoli Data Files for z/OS CD into your CD ROM drive.
Installation begins automatically.
If the installer does not start, go to your CD. Open the Windows directory and
run setup.exe.
If setup.exe initialization fails, you may not have enough free disk space to
decompress the setup files.
3. From the Welcome to Tivoli OMEGAMON XE for CICS on z/OS panel click
Next. The Software License Agreement is displayed, read the software license
agreement.
4. From the Software License panel, click Accept The Select Features dialog is
displayed. If this is the first time that you have installed CandleNet Portal and
you followed the instructions in the previous procedure, there should be two
features available for selection: CandleNet Portal Server and CandleNet Portal
Desktop Client.
Figure 113. CNP Server Configuration dialog
Chapter 6. Installing CandleNet Portal server and client on Windows XP 139

5. Select both CandleNet Portal Server and CandleNet Portal Desktop Client.
Click Next. This displays the Select Program folder panel.
6. From the Select Program folder panel, click Next. This displays the Start
Copying files panel.
7. From the Start Copying files panel, click Next. This displays the Setup Type
panel.
8. Select the Launch Manage Candle Services.... and Configure CandleNet
Portal and click Next. The other option Configure CandleNet Portal is
mandatory.
Figure 114. Install Shield wizard - Select features
140 Configuring IBM Tivoli OMEGAMON XE for CICS on z/OS

This displays the Define CandleNet Portal Host Information panel
Note: You should not include the domain name of your host machine.
Figure 115. Install Shield wizard- Setup Type
Figure 116. Install Shield wizard- Define CNP Host information
Chapter 6. Installing CandleNet Portal server and client on Windows XP 141
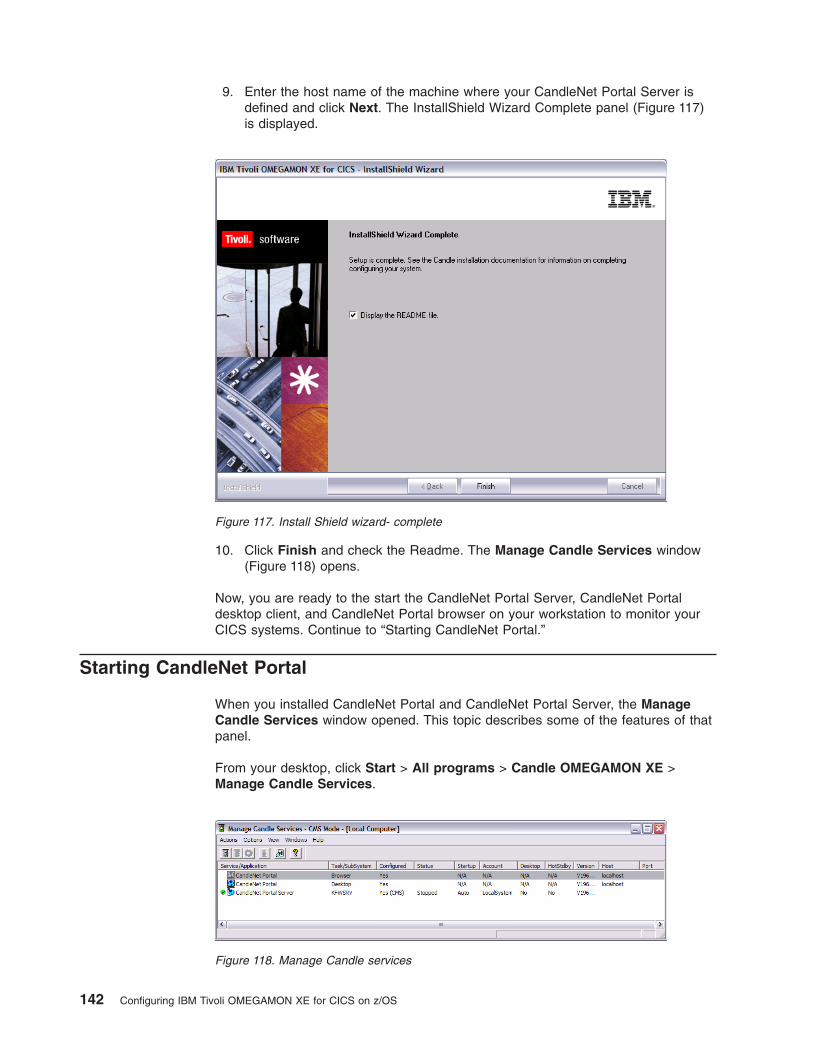
9. Enter the host name of the machine where your CandleNet Portal Server is
defined and click Next. The InstallShield Wizard Complete panel (Figure 117)
is displayed.
10. Click Finish and check the Readme. The Manage Candle Services window
(Figure 118) opens.
Now, you are ready to the start the CandleNet Portal Server, CandleNet Portal
desktop client, and CandleNet Portal browser on your workstation to monitor your
CICS systems. Continue to “Starting CandleNet Portal.”
Starting CandleNet Portal
When you installed CandleNet Portal and CandleNet Portal Server, the Manage
Candle Services window opened. This topic describes some of the features of that
panel.
From your desktop, click Start > All programs > Candle OMEGAMON XE >
Manage Candle Services.
Figure 117. Install Shield wizard- complete
Figure 118. Manage Candle services
142 Configuring IBM Tivoli OMEGAMON XE for CICS on z/OS
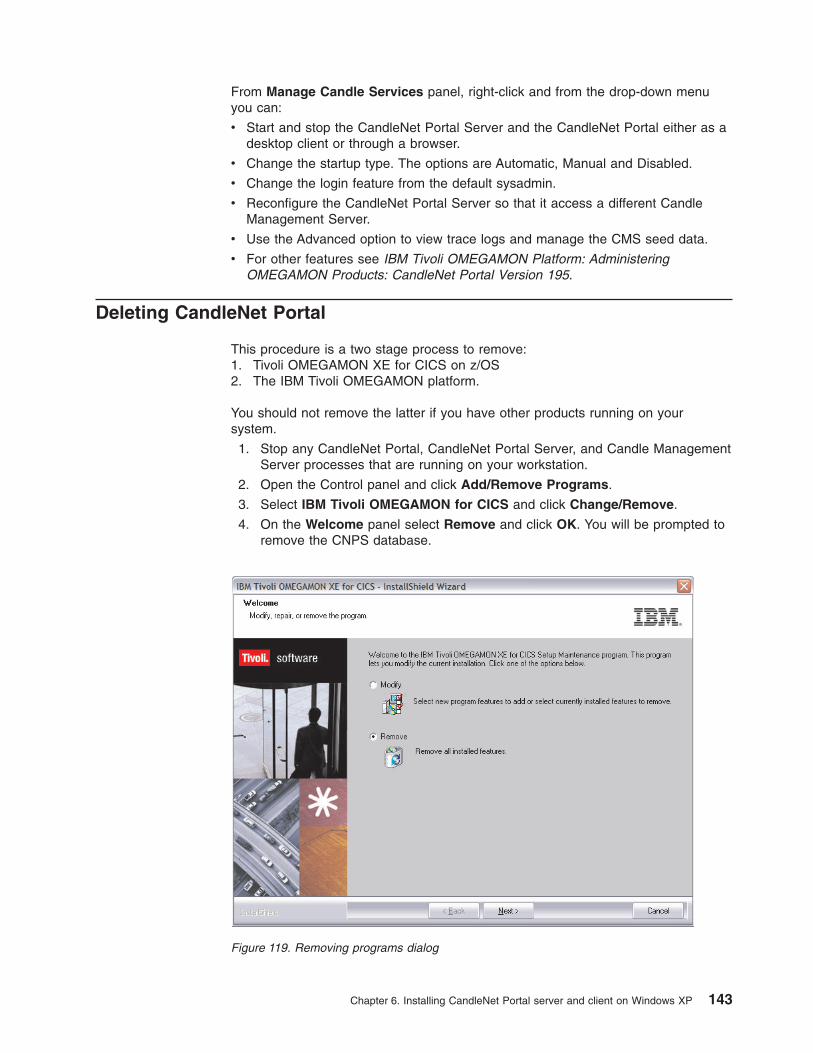
From Manage Candle Services panel, right-click and from the drop-down menu
you can:
v Start and stop the CandleNet Portal Server and the CandleNet Portal either as a
desktop client or through a browser.
v Change the startup type. The options are Automatic, Manual and Disabled.
v Change the login feature from the default sysadmin.
v Reconfigure the CandleNet Portal Server so that it access a different Candle
Management Server.
v Use the Advanced option to view trace logs and manage the CMS seed data.
v For other features see IBM Tivoli OMEGAMON Platform: Administering
OMEGAMON Products: CandleNet Portal Version 195.
Deleting CandleNet Portal
This procedure is a two stage process to remove:
1. Tivoli OMEGAMON XE for CICS on z/OS
2. The IBM Tivoli OMEGAMON platform.
You should not remove the latter if you have other products running on your
system.
1. Stop any CandleNet Portal, CandleNet Portal Server, and Candle Management
Server processes that are running on your workstation.
2. Open the Control panel and click Add/Remove Programs.
3. Select IBM Tivoli OMEGAMON for CICS and click Change/Remove.
4. On the Welcome panel select Remove and click OK. You will be prompted to
remove the CNPS database.
Figure 119. Removing programs dialog
Chapter 6. Installing CandleNet Portal server and client on Windows XP 143
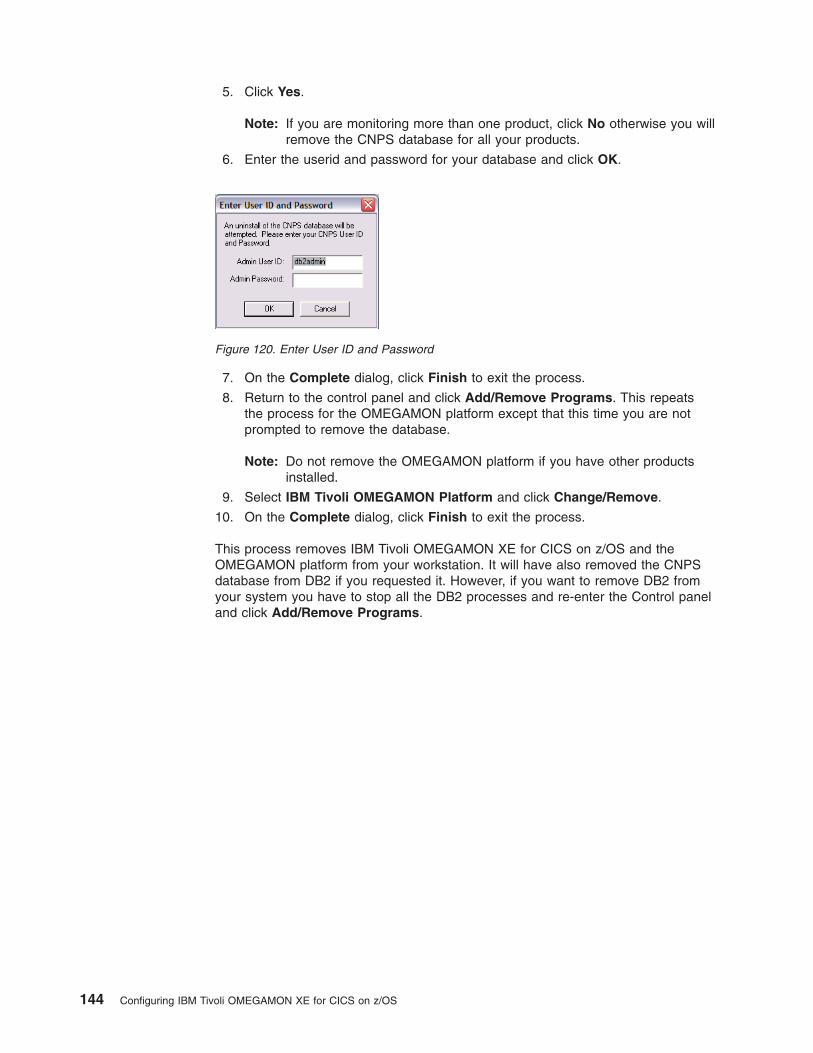
5. Click Yes.
Note: If you are monitoring more than one product, click No otherwise you will
remove the CNPS database for all your products.
6. Enter the userid and password for your database and click OK.
7. On the Complete dialog, click Finish to exit the process.
8. Return to the control panel and click Add/Remove Programs. This repeats
the process for the OMEGAMON platform except that this time you are not
prompted to remove the database.
Note: Do not remove the OMEGAMON platform if you have other products
installed.
9. Select IBM Tivoli OMEGAMON Platform and click Change/Remove.
10. On the Complete dialog, click Finish to exit the process.
This process removes IBM Tivoli OMEGAMON XE for CICS on z/OS and the
OMEGAMON platform from your workstation. It will have also removed the CNPS
database from DB2 if you requested it. However, if you want to remove DB2 from
your system you have to stop all the DB2 processes and re-enter the Control panel
and click Add/Remove Programs.
Figure 120. Enter User ID and Password
144 Configuring IBM Tivoli OMEGAMON XE for CICS on z/OS
Chapter 7. Updating and deleting runtime environments
Here are two procedures to update and delete runtime environments:
v “Updating a runtime environment.”
v “Deleting a runtime environment.”
Updating a runtime environment
With this topic you can change the configuration of your existing runtime
environment, change the configuration of Tivoli OMEGAMON XE for CICS on z/OS
or add new products to an existing runtime environment.
This procedure describes how to update the runtime environment:
1. Using the configuration tool, make the changes you want to the configuration.
2. On the Runtime Environments (RTEs) panel, use the U (Update). This displays
current runtime environment values and indicates those you can change.
3. If the changes are to values that require manual steps outside of the
Configuration tool to complete the configuration, perform the appropriate steps.
For example, if you are using the persistent data store and you change the
prefix for the procedure using the Configuration tool, you must also copy the
renamed procedure to your PROCLIB.
Note: Following any changes you must Build, Configure and Load any of the
affected products.
Deleting a runtime environment
If you no longer need a particular runtime environment, including the runtime
libraries and the configuration values set for the RTE, you can delete it. Make sure
you really do not need the RTE before proceeding. If you delete a runtime
environment, any other RTE that shares libraries with it becomes inoperable.
Be aware that the delete job deletes all libraries that match the pattern:
rhilev.RTEname.*
If you have allocated libraries for this RTE with a different high-level prefix, then you
will have to manually delete those libraries. Also make sure that any libraries that
match the pattern rhilev.RTEname.* (that may not be part of the RTE) are renamed
if you do not want to delete those libraries.
As a precaution, you should back up the entire SMP/E and RTE environment,
including the INSTLIB, INSTDATA, and INSTJOBS libraries. This allows the RTE
and INSTLIB to be restored as needed. Restoring only the RTE is not sufficient
since the RTE information is deleted from the INSTLIB.
Follow these steps to delete a runtime environment.
1. Enter the Configuration tool and from the Main Menu, enter 3 (Configure
products) and 2 (Select product to configure). This displays the Product
Selection menu, only those packages that are eligible to be configured are listed
on this panel.
© Copyright IBM Corp. 2005 145
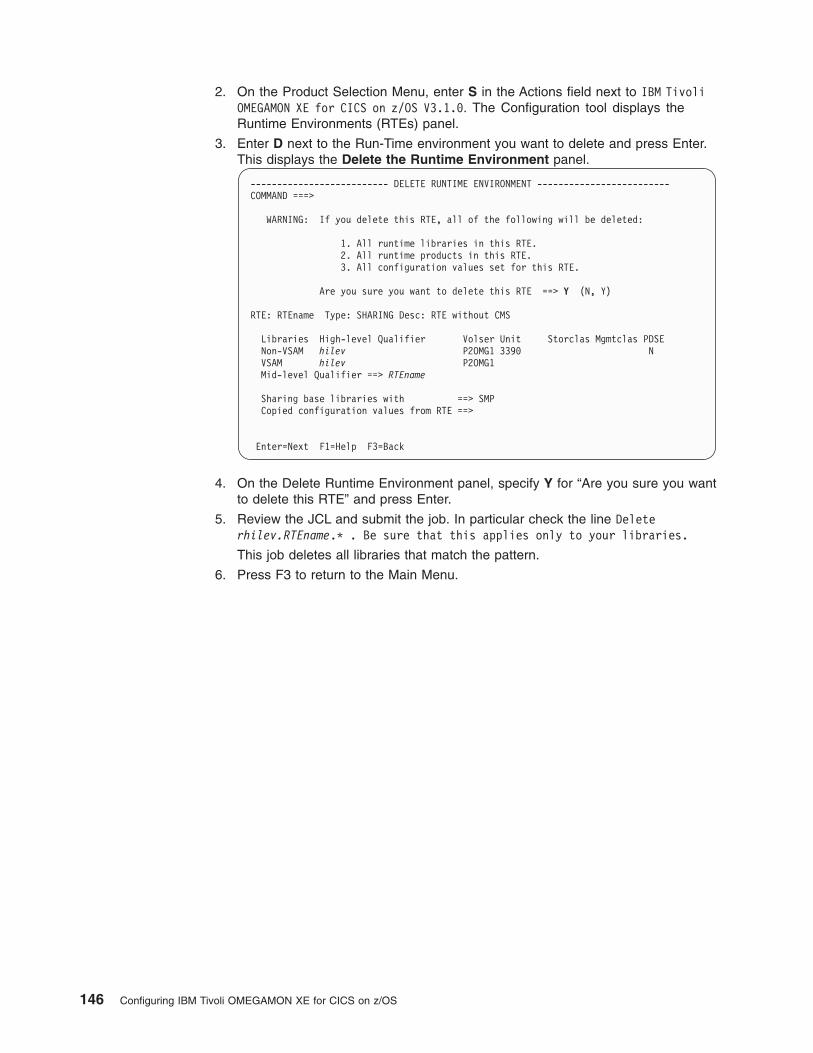
2. On the Product Selection Menu, enter S in the Actions field next to IBM Tivoli
OMEGAMON XE for CICS on z/OS V3.1.0. The Configuration tool displays the
Runtime Environments (RTEs) panel.
3. Enter D next to the Run-Time environment you want to delete and press Enter.
This displays the Delete the Runtime Environment panel.
-------------------------- DELETE RUNTIME ENVIRONMENT -------------------------
COMMAND ===>
WARNING: If you delete this RTE, all of the following will be deleted:
1. All runtime libraries in this RTE.
2. All runtime products in this RTE.
3. All configuration values set for this RTE.
Are you sure you want to delete this RTE ==> Y (N, Y)
RTE: RTEname Type: SHARING Desc: RTE without CMS
Libraries High-level Qualifier Volser Unit Storclas Mgmtclas PDSE
Non-VSAM hilev P2OMG1 3390 N
VSAM hilev P2OMG1
Mid-level Qualifier ==> RTEname
Sharing base libraries with ==> SMP
Copied configuration values from RTE ==>
Enter=Next F1=Help F3=Back
4. On the Delete Runtime Environment panel, specify Y for “Are you sure you want
to delete this RTE” and press Enter.
5. Review the JCL and submit the job. In particular check the line Delete
rhilev.RTEname.* . Be sure that this applies only to your libraries.
This job deletes all libraries that match the pattern.
6. Press F3 to return to the Main Menu.
146 Configuring IBM Tivoli OMEGAMON XE for CICS on z/OS
Chapter 8. Collecting and storing historical data
With Tivoli OMEGAMON XE for CICS on z/OS you can collect both:
v Task history data
v System history data.
This topic provides a summary of the differences between the two. Task history data
is collected through OMEGAMON II for CICS and involves the allocation and
initialization of data sets. The collection of system data involves the configuration of
persistent datastores associated with the Candle Management Server,Tivoli
OMEGAMON XE for CICS on z/OS, and the Monitoring Agent.
You can customize Tivoli OMEGAMON XE for CICS on z/OS to collect and store
historical data. You can then use CandleNet Portal to display short term history.
Tivoli OMEGAMON XE for CICS on z/OS writes its data to a persistent data store
that belongs to the same z/OS image as the Candle Management Server.
For more information about the CT/PDS facility, see the IBM Tivoli OMEGAMON
Platform: Historical Data Collection Guide for OMEGAMON XE Products, Versions
360 and 195.
Task history data
When you configure OMEGAMON II for CICS, you have the option of allocating a
task history data set to store task data for specific CICS regions. This process is
described in “Allocating task history data sets” on page 25. When you configure the
persistent datastores the following partition data sets are created:
v high.level.qualifier.RTEname.RKC2HISn
Where RGENHISn is the low-level qualifier.
Note: Three is the supported minimum setting for all but a limited number of
special purpose data sets. If you specify one, additional I/O is required to
delete records when space is reused. If you specify two, data becomes
unavailable when a datastore file fills up.
Once these datasets are set up you can use the features of CandleNet Portal to
collect and store the data.
System history data
During the configuration of Tivoli OMEGAMON XE for CICS on z/OS you may have
set up three persistent datastores associated with:
1. Candle Management Server
2. Tivoli OMEGAMON XE for CICS on z/OS (optional)
3. Monitoring Agent (optional)
Each of these are involved with the collection of system data. If you are using data
warehousing, you must configure a persistent datastore associated with the Candle
Management Server, otherwise the remaining two persistent datastores are
optional. When you configure the persistent datastores the following partition data
sets are created:
Candle Management Server
© Copyright IBM Corp. 2005 147

v high.level.qualifier.RTEname.RGENHISn
Where RGENHISn is the low-level qualifier.
Note: Three is the supported minimum setting for all but a limited number
of special purpose data sets. If you specify one, additional I/O is
required to delete records when space is reused. If you specify two,
data becomes unavailable when a datastore file fills up.Tivoli OMEGAMON XE for CICS on z/OS
v high.level.qualifier.RTEname.RKCPHISn
Where RGENHISn is the low-level qualifier.
Monitoring Agent
v high.level.qualifier.RTEname.RKC5HISn
Where RGENHISn is the low-level qualifier.
Both the datastores associated with Tivoli OMEGAMON XE for CICS on z/OS and
Monitoring Agent pass the system data to the Candle Management Server that they
are linked to. This could be either a hub or remote Candle Management Server.
Related tasks
“Configuring a persistent data store (Candle Management Server)” on page 20
“Allocating task history data sets” on page 25
“Configuring a persistent data store (Tivoli OMEGAMON XE for CICS on z/OS)”
on page 29
“Configuring a persistent data store Monitoring Agent” on page 33
Collecting task history data
This topic describes the process of configuring CandleNet Portal to collect and filter
historical data. By using CandleNet Portal to control the collection of historical data,
it allows the data to be collected at either the agent or the Candle Management
Server, and provides the additional option of data warehousing.
To configure history data collection in the CandleNet Portal do the following:
1. From the toolbar of CandleNet Portal, click
. This opens the History
Collection Configuration dialog to define and start historical collection for the
specified Monitoring Agents and attribute groups.
Figure 121 on page 149 shows the status panel shows:
Status
You can select a specific Candle Management Server to view the data.
Select a product
If you are monitoring more than one product, select the product.
Collection status
Shows the list of attribute groups for your system. In addition it shows:
v The time interval in minutes
v The location where the data is collected. In this case either the
Candle Management Server or the Monitoring Agent.
v The warehouse interval status. This shows whether you are using
data warehousing or not. In this example it shows that it is turned off.
v Short term history indicates the length of time that history data is
retained.
v File name is the name of the files where the history data is stored.
You can take the following actions from this panel.
148 Configuring IBM Tivoli OMEGAMON XE for CICS on z/OS

v Refresh the status
v Start history data collection.
v Stop history data collection.
2. From the History collection configuration window, click Configuration. In this
window you can control each product and attribute group that you want to
collect data. From Figure 122 on page 150 you can:
Select the product
If you are monitoring more than one product you can select specific
products.
Select product groups
Select an attribute group or groups
Configuration Control
Collection interval
Select the collection interval.
Figure 121. History collection configuration showing the status selected
Chapter 8. Collecting and storing historical data 149
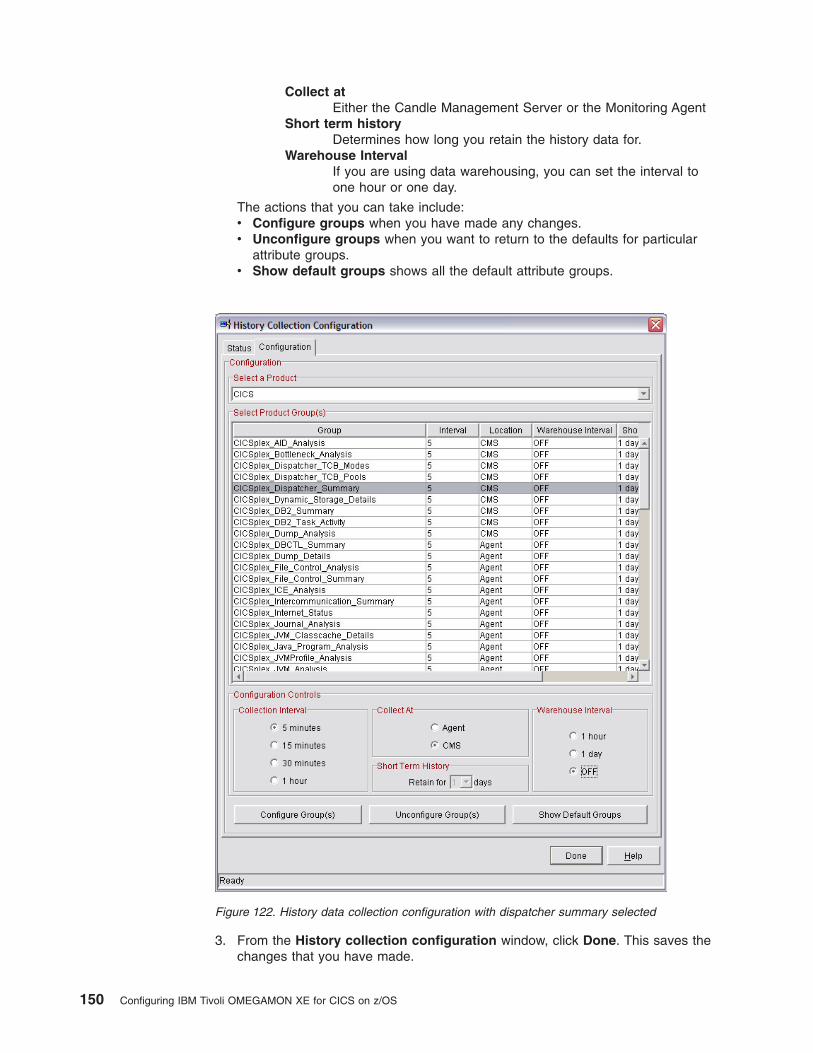
Collect at
Either the Candle Management Server or the Monitoring Agent
Short term history
Determines how long you retain the history data for.
Warehouse Interval
If you are using data warehousing, you can set the interval to
one hour or one day.
The actions that you can take include:
v Configure groups when you have made any changes.
v Unconfigure groups when you want to return to the defaults for particular
attribute groups.
v Show default groups shows all the default attribute groups.
3. From the History collection configuration window, click Done. This saves the
changes that you have made.
Figure 122. History data collection configuration with dispatcher summary selected
150 Configuring IBM Tivoli OMEGAMON XE for CICS on z/OS
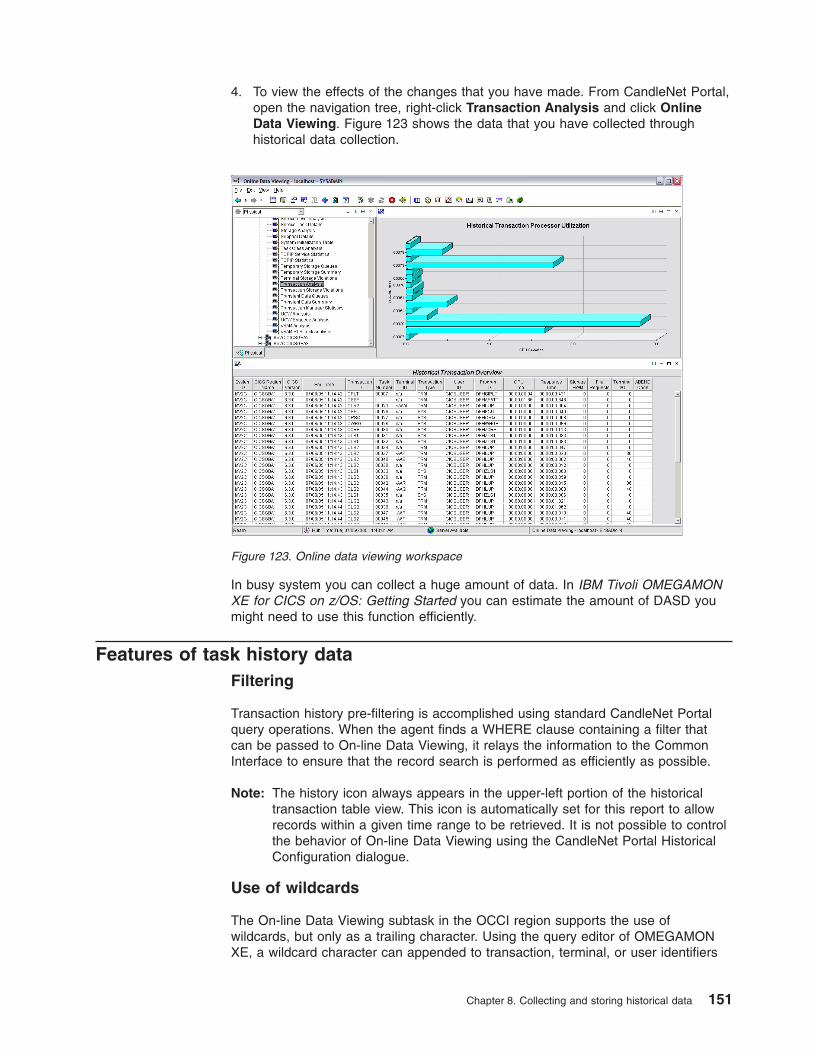
4. To view the effects of the changes that you have made. From CandleNet Portal,
open the navigation tree, right-click Transaction Analysis and click Online
Data Viewing. Figure 123 shows the data that you have collected through
historical data collection.
In busy system you can collect a huge amount of data. In IBM Tivoli OMEGAMON
XE for CICS on z/OS: Getting Started you can estimate the amount of DASD you
might need to use this function efficiently.
Features of task history data
Filtering
Transaction history pre-filtering is accomplished using standard CandleNet Portal
query operations. When the agent finds a WHERE clause containing a filter that
can be passed to On-line Data Viewing, it relays the information to the Common
Interface to ensure that the record search is performed as efficiently as possible.
Note: The history icon always appears in the upper-left portion of the historical
transaction table view. This icon is automatically set for this report to allow
records within a given time range to be retrieved. It is not possible to control
the behavior of On-line Data Viewing using the CandleNet Portal Historical
Configuration dialogue.
Use of wildcards
The On-line Data Viewing subtask in the OCCI region supports the use of
wildcards, but only as a trailing character. Using the query editor of OMEGAMON
XE, a wildcard character can appended to transaction, terminal, or user identifiers
Figure 123. Online data viewing workspace
Chapter 8. Collecting and storing historical data 151
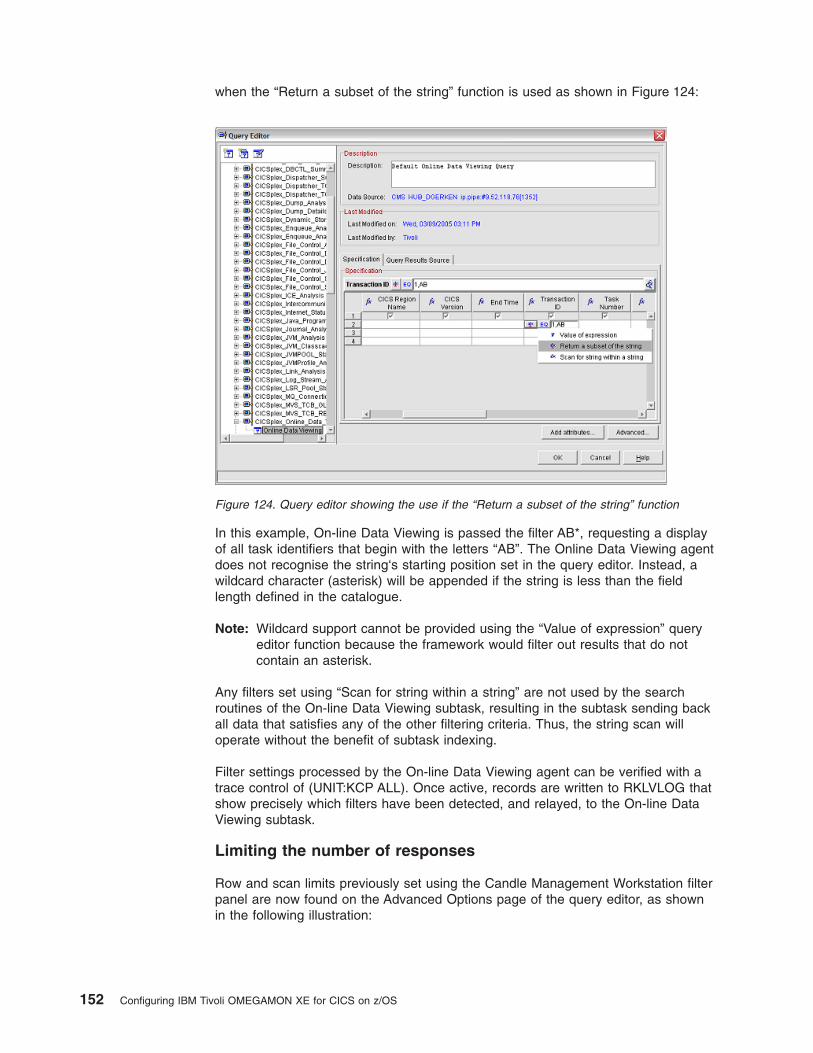
when the “Return a subset of the string” function is used as shown in Figure 124:
In this example, On-line Data Viewing is passed the filter AB*, requesting a display
of all task identifiers that begin with the letters “AB”. The Online Data Viewing agent
does not recognise the string‘s starting position set in the query editor. Instead, a
wildcard character (asterisk) will be appended if the string is less than the field
length defined in the catalogue.
Note: Wildcard support cannot be provided using the “Value of expression” query
editor function because the framework would filter out results that do not
contain an asterisk.
Any filters set using “Scan for string within a string” are not used by the search
routines of the On-line Data Viewing subtask, resulting in the subtask sending back
all data that satisfies any of the other filtering criteria. Thus, the string scan will
operate without the benefit of subtask indexing.
Filter settings processed by the On-line Data Viewing agent can be verified with a
trace control of (UNIT:KCP ALL). Once active, records are written to RKLVLOG that
show precisely which filters have been detected, and relayed, to the On-line Data
Viewing subtask.
Limiting the number of responses
Row and scan limits previously set using the Candle Management Workstation filter
panel are now found on the Advanced Options page of the query editor, as shown
in the following illustration:
Figure 124. Query editor showing the use if the “Return a subset of the string” function
152 Configuring IBM Tivoli OMEGAMON XE for CICS on z/OS
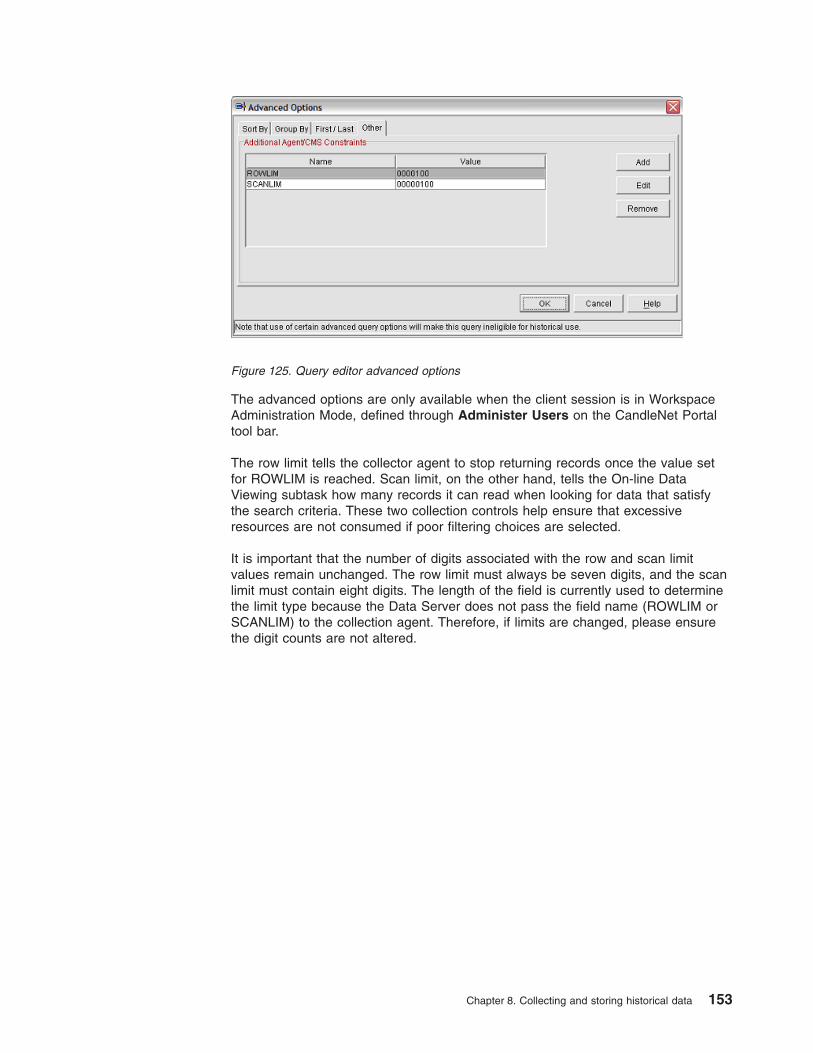
The advanced options are only available when the client session is in Workspace
Administration Mode, defined through Administer Users on the CandleNet Portal
tool bar.
The row limit tells the collector agent to stop returning records once the value set
for ROWLIM is reached. Scan limit, on the other hand, tells the On-line Data
Viewing subtask how many records it can read when looking for data that satisfy
the search criteria. These two collection controls help ensure that excessive
resources are not consumed if poor filtering choices are selected.
It is important that the number of digits associated with the row and scan limit
values remain unchanged. The row limit must always be seven digits, and the scan
limit must contain eight digits. The length of the field is currently used to determine
the limit type because the Data Server does not pass the field name (ROWLIM or
SCANLIM) to the collection agent. Therefore, if limits are changed, please ensure
the digit counts are not altered.
Figure 125. Query editor advanced options
Chapter 8. Collecting and storing historical data 153

154 Configuring IBM Tivoli OMEGAMON XE for CICS on z/OS
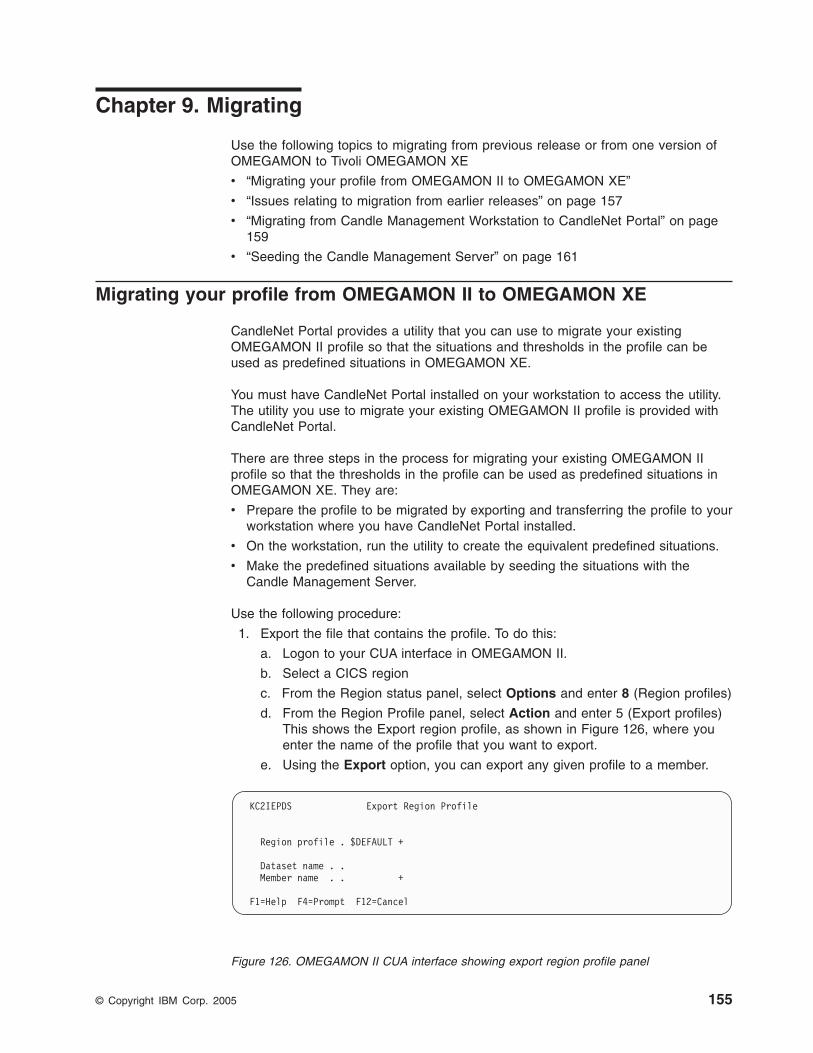
Chapter 9. Migrating
Use the following topics to migrating from previous release or from one version of
OMEGAMON to Tivoli OMEGAMON XE
v “Migrating your profile from OMEGAMON II to OMEGAMON XE”
v “Issues relating to migration from earlier releases” on page 157
v “Migrating from Candle Management Workstation to CandleNet Portal” on page
159
v “Seeding the Candle Management Server” on page 161
Migrating your profile from OMEGAMON II to OMEGAMON XE
CandleNet Portal provides a utility that you can use to migrate your existing
OMEGAMON II profile so that the situations and thresholds in the profile can be
used as predefined situations in OMEGAMON XE.
You must have CandleNet Portal installed on your workstation to access the utility.
The utility you use to migrate your existing OMEGAMON II profile is provided with
CandleNet Portal.
There are three steps in the process for migrating your existing OMEGAMON II
profile so that the thresholds in the profile can be used as predefined situations in
OMEGAMON XE. They are:
v Prepare the profile to be migrated by exporting and transferring the profile to your
workstation where you have CandleNet Portal installed.
v On the workstation, run the utility to create the equivalent predefined situations.
v Make the predefined situations available by seeding the situations with the
Candle Management Server.
Use the following procedure:
1. Export the file that contains the profile. To do this:
a. Logon to your CUA interface in OMEGAMON II.
b. Select a CICS region
c. From the Region status panel, select Options and enter 8 (Region profiles)
d. From the Region Profile panel, select Action and enter 5 (Export profiles)
This shows the Export region profile, as shown in Figure 126, where you
enter the name of the profile that you want to export.
e. Using the Export option, you can export any given profile to a member.
KC2IEPDS Export Region Profile
Region profile . $DEFAULT +
Dataset name . .
Member name . . +
F1=Help F4=Prompt F12=Cancel
Figure 126. OMEGAMON II CUA interface showing export region profile panel
© Copyright IBM Corp. 2005 155
2. FTP the file that contains the profile to the workstation where CandleNet Portal
is installed.
3. On the workstation, copy the file to drive:\Candle\CNPS. For example, if you
have installed CandleNet Portal on your c: drive, you would copy the file to the
c:\Candle\CNPS directory.
4. Open a DOS session and change directory to drive:\Candle\CNPS.
5. At the prompt, enter the following command.KXEMIGR options profile pp
outfile ctl Result: The utility creates the file that contains the migrated profile,
the control file, and the log (if any).
profile
Specifies the name of the file that you exported that contains the
profile. This is required.
pp Specifies the product code. This is required
outfile Specifies the name of the file that will contain the migrated profile. The
default is Kpp_UPD.SQL (where pp is the 2 character product code).
ctl Specifies the name of the product control file. The default is
KppPROD.txt (where pp is the 2 character product code).
options
Specifies the following options:
-v Displays diagnostic messages for the utility.
-? Display help
-nw Migrate predefined situations with the status of critical and
excludes the migration of situations with a status of warning
6. When KXEMIGR is run, it places a member called KCP_UPD.SQL in the
CNPS\SQLLIB directory.
Note: The utility may put your file in c:\candle\cnps rather than
c:\candle\cnps\sql. You should move it to the sql directory if this is the
case.
7. From your desktop, click Start > All programs > Candle OMEGAMON XE >
Manage Candle Services. This displays the Manage Candle Services dialog.
8. From the Actions menu in the Manage Candle Services window, click
Advanced.
9. On the Advanced menu, click Seed Candle Management Server.
The program displays the Seed Candle Management Server dialog.
10. On the Seed Candle Management Server dialog, specify the options you want.
For a Candle Management Server on your workstation, click On this
computer.
11. For a Candle Management Server installed on a different computer, click On a
different computer. On the Non-resident Candle Management Server
Connection dialog(s), specify the appropriate values and click OK. The
program displays the Select Product to Seed Candle Management Server
dialog.
156 Configuring IBM Tivoli OMEGAMON XE for CICS on z/OS
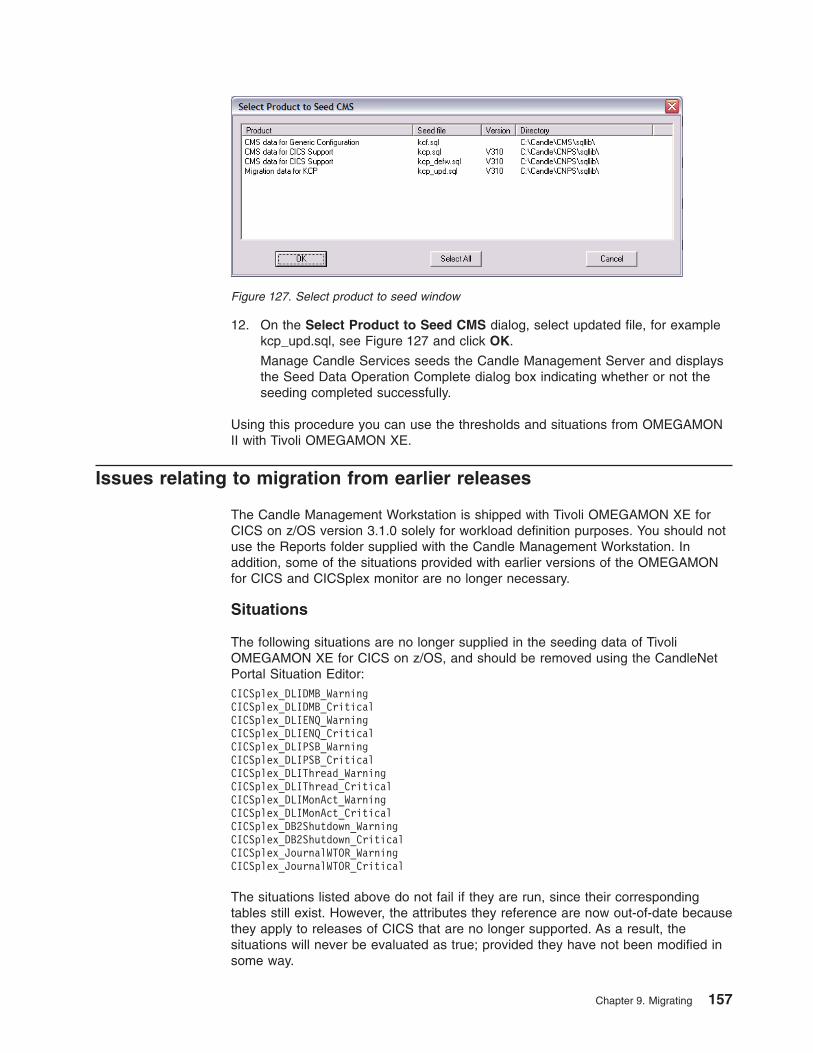
12. On the Select Product to Seed CMS dialog, select updated file, for example
kcp_upd.sql, see Figure 127 and click OK.
Manage Candle Services seeds the Candle Management Server and displays
the Seed Data Operation Complete dialog box indicating whether or not the
seeding completed successfully.
Using this procedure you can use the thresholds and situations from OMEGAMON
II with Tivoli OMEGAMON XE.
Issues relating to migration from earlier releases
The Candle Management Workstation is shipped with Tivoli OMEGAMON XE for
CICS on z/OS version 3.1.0 solely for workload definition purposes. You should not
use the Reports folder supplied with the Candle Management Workstation. In
addition, some of the situations provided with earlier versions of the OMEGAMON
for CICS and CICSplex monitor are no longer necessary.
Situations
The following situations are no longer supplied in the seeding data of Tivoli
OMEGAMON XE for CICS on z/OS, and should be removed using the CandleNet
Portal Situation Editor:
CICSplex_DLIDMB_Warning
CICSplex_DLIDMB_Critical
CICSplex_DLIENQ_Warning
CICSplex_DLIENQ_Critical
CICSplex_DLIPSB_Warning
CICSplex_DLIPSB_Critical
CICSplex_DLIThread_Warning
CICSplex_DLIThread_Critical
CICSplex_DLIMonAct_Warning
CICSplex_DLIMonAct_Critical
CICSplex_DB2Shutdown_Warning
CICSplex_DB2Shutdown_Critical
CICSplex_JournalWTOR_Warning
CICSplex_JournalWTOR_Critical
The situations listed above do not fail if they are run, since their corresponding
tables still exist. However, the attributes they reference are now out-of-date because
they apply to releases of CICS that are no longer supported. As a result, the
situations will never be evaluated as true; provided they have not been modified in
some way.
Figure 127. Select product to seed window
Chapter 9. Migrating 157

History situations from previous releases
Two history situations were used as an historical control mechanism and have been
replaced by the CandleNet Portal History Configuration dialogue:
CICSplex_Hist_Workload_Control
CICSplex_Hist_Region_Control
Each of the historical situations references a table that is no longer supplied in the
Tivoli OMEGAMON XE for CICS on z/OS catalogue. Consequently, the situations
fail, and produce a corresponding error indication in the CandleNet Portal:
A blue “X” mark in the status field of the Enterprise Message Log indicates that the
situation is invalid. You should remove these two situations if you have them
installed in the Candle Management Server.
CICSplex_Hist_Region_Control references an obsolete table called Region
Analysis. All of the attributes that appeared in Region Analysis have since been
moved to other tables located on the CandleNet Portal navigation tree. Hence, if
historical recording of the transferred attributes is desired, standard CandleNet
Portal historical recording techniques should be employed, see “Collecting task
history data” on page 148.
CICSplex_Hist_Workload_Control offered a means of moving Service Level
Analysis history data from workload buffers into the Persistent Data Store (PDS).
The function carried out by this situation is now performed by the CandleNet Portal
History Collection Configuration panel, see “Collecting task history data” on page
148.
It is better to use CandleNet Portal to retrieve history from the workload collector
subtask at a rate that exceeds the interval specified in the Candle Management
Workstation Interval Editor Window. In this way, records are be lost when the
subtask interval expires. The subtask takes measures to ensure that duplicate
history records are never written to the specified data store; irrespective of how low
the CandleNet Portal collection interval is set.
158 Configuring IBM Tivoli OMEGAMON XE for CICS on z/OS
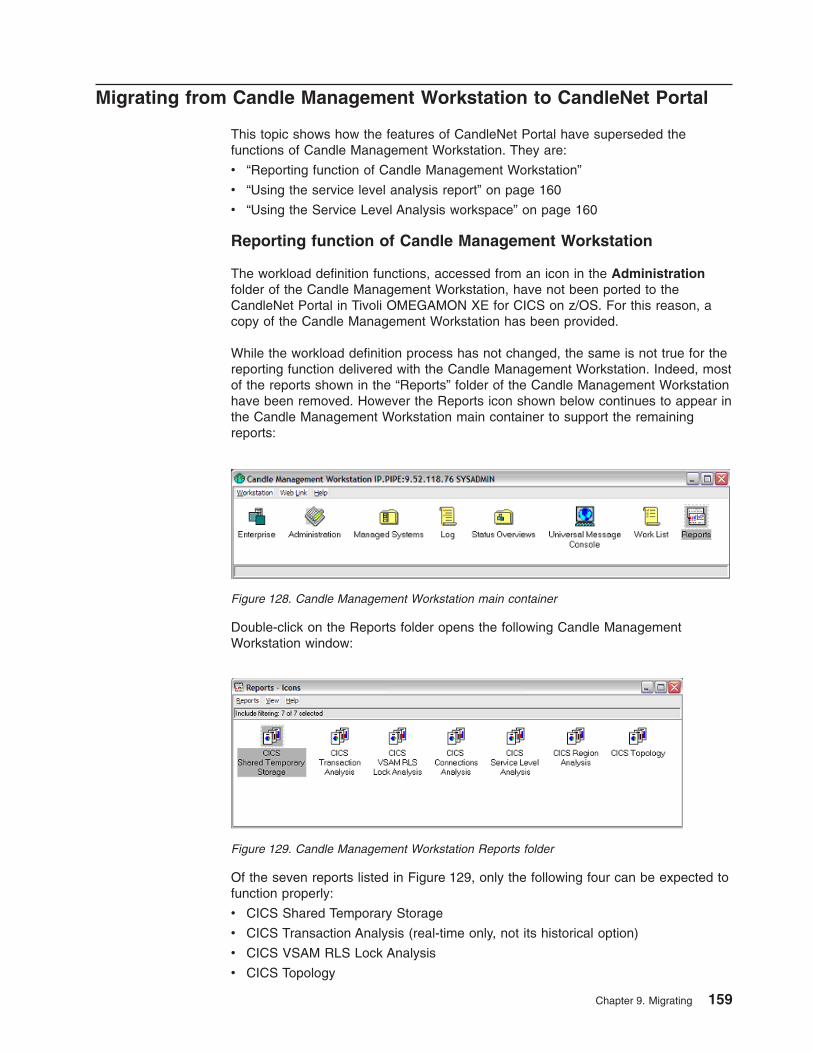
Migrating from Candle Management Workstation to CandleNet Portal
This topic shows how the features of CandleNet Portal have superseded the
functions of Candle Management Workstation. They are:
v “Reporting function of Candle Management Workstation”
v “Using the service level analysis report” on page 160
v “Using the Service Level Analysis workspace” on page 160
Reporting function of Candle Management Workstation
The workload definition functions, accessed from an icon in the Administration
folder of the Candle Management Workstation, have not been ported to the
CandleNet Portal in Tivoli OMEGAMON XE for CICS on z/OS. For this reason, a
copy of the Candle Management Workstation has been provided.
While the workload definition process has not changed, the same is not true for the
reporting function delivered with the Candle Management Workstation. Indeed, most
of the reports shown in the “Reports” folder of the Candle Management Workstation
have been removed. However the Reports icon shown below continues to appear in
the Candle Management Workstation main container to support the remaining
reports:
Double-click on the Reports folder opens the following Candle Management
Workstation window:
Of the seven reports listed in Figure 129, only the following four can be expected to
function properly:
v CICS Shared Temporary Storage
v CICS Transaction Analysis (real-time only, not its historical option)
v CICS VSAM RLS Lock Analysis
v CICS Topology
Figure 128. Candle Management Workstation main container
Figure 129. Candle Management Workstation Reports folder
Chapter 9. Migrating 159

Task history, collected by ONDV workspace in the Common Interface of Candle
Management Workstation, is now available through the CandleNet Portal as Online
Data Viewing link workspace accessed as a link from the Transaction Analysis
workspace. An example of the report is shown below:
Using the service level analysis report
The Candle Management Workstation CICS Region Analysis report generated a
database I/O error, making it and all of its subordinate reports unavailable on the
CMW. Specifically, the Storage Summary, VSAM Analysis, and MQ reports that
used to be accessed via right-click on a row of Region Analysis output can no
longer be obtained in the Candle Management Workstation since their parent report
is no longer supported. One other casualty of the Region Analysis failure is the
CICS Connections Analysis report that attempts to read the Region Analysis table
prior to driving the Connections Analysis agent.
While the Candle Management Workstation CICS Service Level Analysis report
does not generate an error message, the absence of a node on its SQL means that
it will never return any rows of data. Instead, you should use the Service Level
Analysis node found on the CandleNet Portal navigation tree.
Using the Service Level Analysis workspace
With Tivoli OMEGAMON XE for CICS on z/OS, the Origin Node is in the Service
Class table, manages the situation status. Figure 131 on page 161 shows
CandleNet Portal Service Class situation behavior:
Figure 130. Online Data Viewing workspace
160 Configuring IBM Tivoli OMEGAMON XE for CICS on z/OS

When a situation is written against the Service Level Analysis table, the Monitoring
Agent collects service class data and returns an identical row set for each CICS
node to which the situation has been distributed. This ensures that all of the correct
nodes on the CandleNet Portal navigation tree are set with an appropriate status
light.
With the new implementation of Service Level Analysis, some thought should be
given to assigning Service Level Analysis situations to a minimum number of nodes
on a given LPAR. If the situation is distributed to all nodes, then the number of
returned rows will be the product of the service class row set times the number of
subnodes in the distribution list. The only advantages to assigning a Service Level
Analysis situation to more than one node in a given MVS image are:
1. It allows status lights to be set for each selected node
2. It helps ensure that an alert is raised if one CICS has gone offline in an LPAR,
while another CICS is still active and being monitored.
By standardizing the use of the Origin Node field in service class reports, the
Candle Management Workstation no longer recognizes a tripped SLA situation. For
this reason, you should abandon using the Candle Management Workstation for
status purposes, and employ its services strictly for the Workload Definition function
it offers Tivoli OMEGAMON XE for CICS on z/OS.
Seeding the Candle Management Server
When you seed the Candle Management Server, you provide the Candle
Management Server with product-specific information that the Candle Management
Server uses for product-provided solutions for example, predefined situations and
policies.
Before seeding the Candle Management Server, verify that:
v The z/OS products are installed and available with CandleNet Portal.
Figure 131. Service level analysis workspace
Chapter 9. Migrating 161
v The same versions of the z/OS products are installed and available with
CandleNet Portal.
Also verify that the image you used to install CandleNet Portal is compatible with
the products you installed and configured.
For example, if you received a product package containing tapes and a CD image,
verify that an older or newer CD image of CandleNet Portal has not been installed
on the workstation you will be using to seed the Candle Management Server. If you
have any question about whether or not they are compatible, contact IBM Software
Support.
The guidelines you follow to seed the Candle Management Server depend on the
platform for the product. These platforms include:
v Distributed platforms (such as UNIX and Windows)
v z/OS
The guidelines for seeding the Candle Management Server for products on z/OS
vary depending on the product.
Note: When you select the Complete the Configuration step from the Main
Menu, the Configuration tool dynamically displays the Candle Management
Server seeding requirements. The requirements that display depend upon
how a particular product seeds its Candle Management Server.
Follow these steps to seed the Candle Management Server:
1. On the workstation where you installed the CandleNet Portal Server, click Start
> Programs > Candle OMEGAMON XE for CICS > Manage Candle Services.
The program displays the Manage Candle Services dialog.
2. From the Actions menu in the Manage Candle Services window, select
Advanced.
3. On the Advanced menu, select Seed Candle Management Server. This
displays the Seed Candle Management Server dialog.
4. On the Seed Candle Management Server dialog, specify the options you want.
For a Candle Management Server on your workstation, click On this computer.
For a Candle Management Server installed on a different computer, click On a
different computer.
On the Non-resident Candle Management Server Connection dialog, specify the
appropriate values and click OK.
The program displays the Select Product to Seed Candle Management
Server dialog.
5. On the Select Product to Seed Candle Management Server dialog, select the
products you have installed and click OK.
Manage Candle Services seeds the Candle Management Server and displays the
Seed Data Operation Complete dialog box indicating whether or not the seeding
completed successfully.
162 Configuring IBM Tivoli OMEGAMON XE for CICS on z/OS
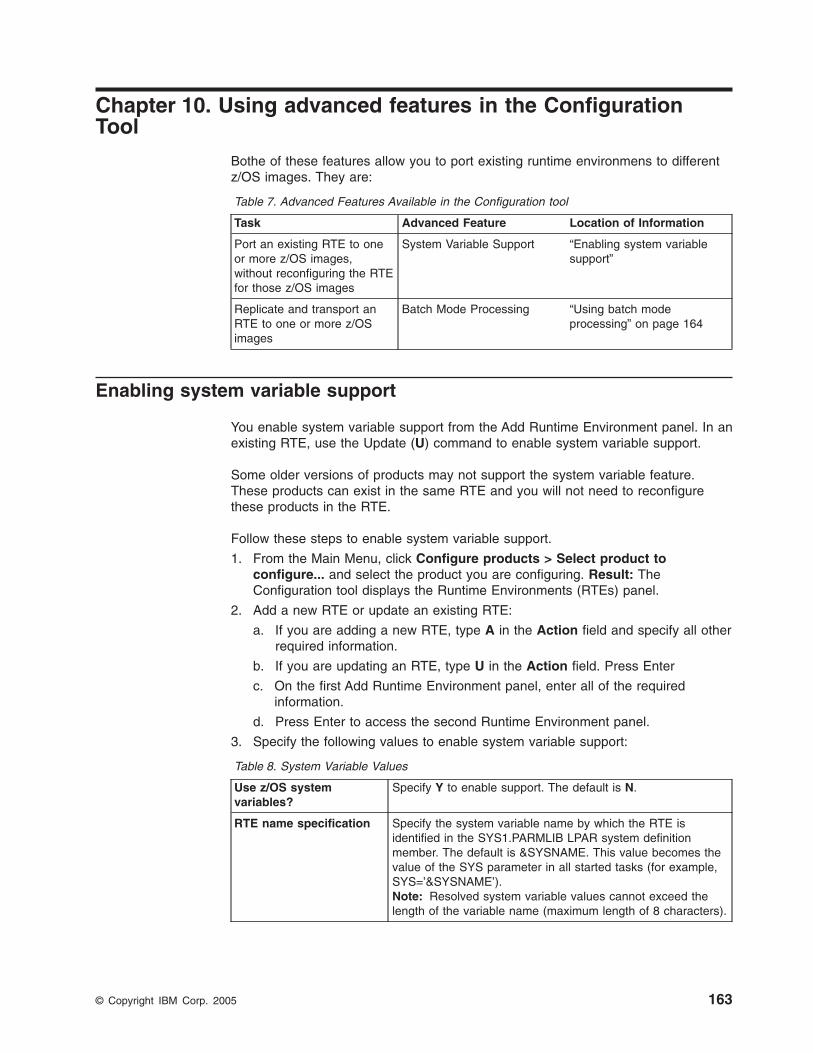
Chapter 10. Using advanced features in the Configuration
Tool
Bothe of these features allow you to port existing runtime environmens to different
z/OS images. They are:
Table 7. Advanced Features Available in the Configuration tool
Task Advanced Feature Location of Information
Port an existing RTE to one
or more z/OS images,
without reconfiguring the RTE
for those z/OS images
System Variable Support “Enabling system variable
support”
Replicate and transport an
RTE to one or more z/OS
images
Batch Mode Processing “Using batch mode
processing” on page 164
Enabling system variable support
You enable system variable support from the Add Runtime Environment panel. In an
existing RTE, use the Update (U) command to enable system variable support.
Some older versions of products may not support the system variable feature.
These products can exist in the same RTE and you will not need to reconfigure
these products in the RTE.
Follow these steps to enable system variable support.
1. From the Main Menu, click Configure products > Select product to
configure... and select the product you are configuring. Result: The
Configuration tool displays the Runtime Environments (RTEs) panel.
2. Add a new RTE or update an existing RTE:
a. If you are adding a new RTE, type A in the Action field and specify all other
required information.
b. If you are updating an RTE, type U in the Action field. Press Enter
c. On the first Add Runtime Environment panel, enter all of the required
information.
d. Press Enter to access the second Runtime Environment panel.
3. Specify the following values to enable system variable support:
Table 8. System Variable Values
Use z/OS system
variables?
Specify Y to enable support. The default is N.
RTE name specification Specify the system variable name by which the RTE is
identified in the SYS1.PARMLIB LPAR system definition
member. The default is &SYSNAME. This value becomes the
value of the SYS parameter in all started tasks (for example,
SYS=’&SYSNAME’).
Note: Resolved system variable values cannot exceed the
length of the variable name (maximum length of 8 characters).
© Copyright IBM Corp. 2005 163
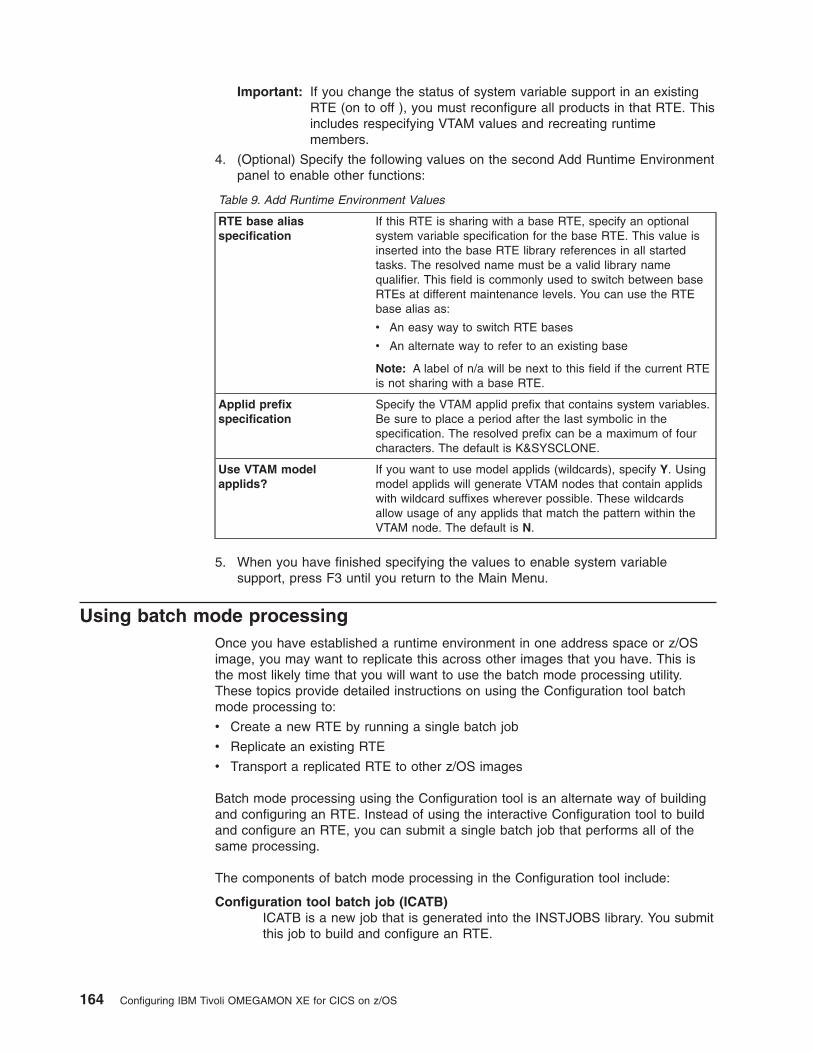
Important: If you change the status of system variable support in an existing
RTE (on to off ), you must reconfigure all products in that RTE. This
includes respecifying VTAM values and recreating runtime
members.
4. (Optional) Specify the following values on the second Add Runtime Environment
panel to enable other functions:
Table 9. Add Runtime Environment Values
RTE base alias
specification
If this RTE is sharing with a base RTE, specify an optional
system variable specification for the base RTE. This value is
inserted into the base RTE library references in all started
tasks. The resolved name must be a valid library name
qualifier. This field is commonly used to switch between base
RTEs at different maintenance levels. You can use the RTE
base alias as:
v An easy way to switch RTE bases
v An alternate way to refer to an existing base
Note: A label of n/a will be next to this field if the current RTE
is not sharing with a base RTE.
Applid prefix
specification
Specify the VTAM applid prefix that contains system variables.
Be sure to place a period after the last symbolic in the
specification. The resolved prefix can be a maximum of four
characters. The default is K&SYSCLONE.
Use VTAM model
applids?
If you want to use model applids (wildcards), specify Y. Using
model applids will generate VTAM nodes that contain applids
with wildcard suffixes wherever possible. These wildcards
allow usage of any applids that match the pattern within the
VTAM node. The default is N.
5. When you have finished specifying the values to enable system variable
support, press F3 until you return to the Main Menu.
Using batch mode processing
Once you have established a runtime environment in one address space or z/OS
image, you may want to replicate this across other images that you have. This is
the most likely time that you will want to use the batch mode processing utility.
These topics provide detailed instructions on using the Configuration tool batch
mode processing to:
v Create a new RTE by running a single batch job
v Replicate an existing RTE
v Transport a replicated RTE to other z/OS images
Batch mode processing using the Configuration tool is an alternate way of building
and configuring an RTE. Instead of using the interactive Configuration tool to build
and configure an RTE, you can submit a single batch job that performs all of the
same processing.
The components of batch mode processing in the Configuration tool include:
Configuration tool batch job (ICATB)
ICATB is a new job that is generated into the INSTJOBS library. You submit
this job to build and configure an RTE.
164 Configuring IBM Tivoli OMEGAMON XE for CICS on z/OS
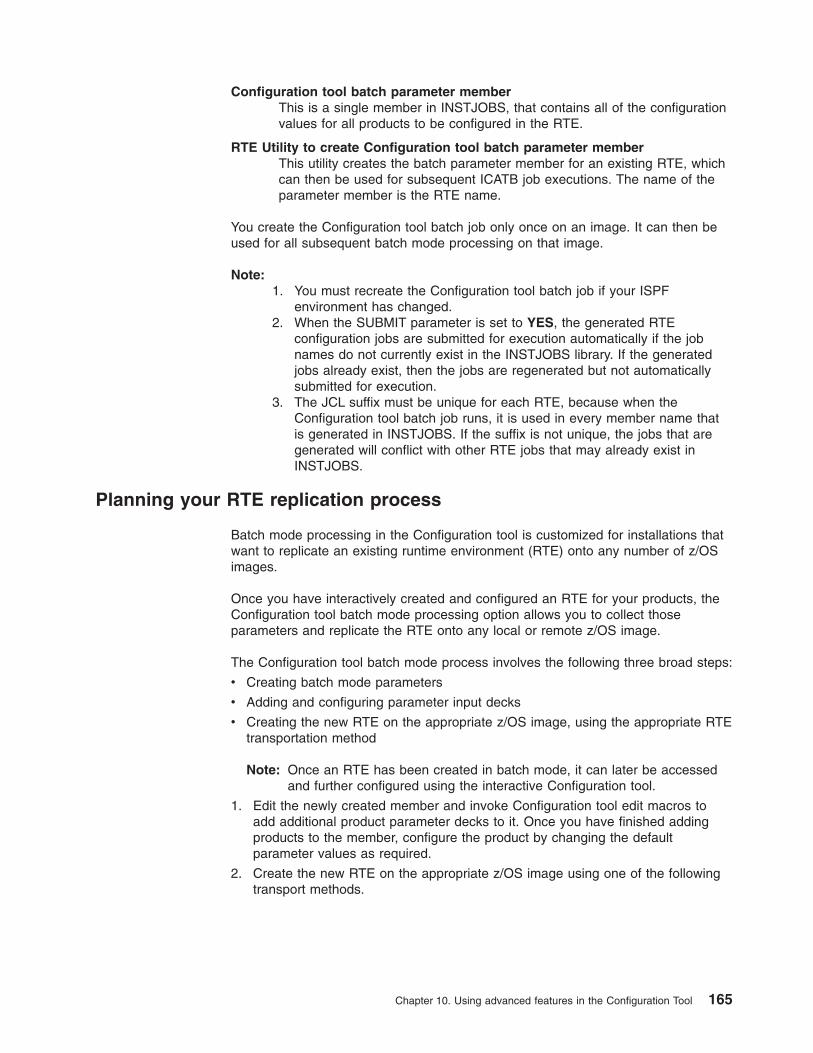
Configuration tool batch parameter member
This is a single member in INSTJOBS, that contains all of the configuration
values for all products to be configured in the RTE.
RTE Utility to create Configuration tool batch parameter member
This utility creates the batch parameter member for an existing RTE, which
can then be used for subsequent ICATB job executions. The name of the
parameter member is the RTE name.
You create the Configuration tool batch job only once on an image. It can then be
used for all subsequent batch mode processing on that image.
Note:
1. You must recreate the Configuration tool batch job if your ISPF
environment has changed.
2. When the SUBMIT parameter is set to YES, the generated RTE
configuration jobs are submitted for execution automatically if the job
names do not currently exist in the INSTJOBS library. If the generated
jobs already exist, then the jobs are regenerated but not automatically
submitted for execution.
3. The JCL suffix must be unique for each RTE, because when the
Configuration tool batch job runs, it is used in every member name that
is generated in INSTJOBS. If the suffix is not unique, the jobs that are
generated will conflict with other RTE jobs that may already exist in
INSTJOBS.
Planning your RTE replication process
Batch mode processing in the Configuration tool is customized for installations that
want to replicate an existing runtime environment (RTE) onto any number of z/OS
images.
Once you have interactively created and configured an RTE for your products, the
Configuration tool batch mode processing option allows you to collect those
parameters and replicate the RTE onto any local or remote z/OS image.
The Configuration tool batch mode process involves the following three broad steps:
v Creating batch mode parameters
v Adding and configuring parameter input decks
v Creating the new RTE on the appropriate z/OS image, using the appropriate RTE
transportation method
Note: Once an RTE has been created in batch mode, it can later be accessed
and further configured using the interactive Configuration tool.
1. Edit the newly created member and invoke Configuration tool edit macros to
add additional product parameter decks to it. Once you have finished adding
products to the member, configure the product by changing the default
parameter values as required.
2. Create the new RTE on the appropriate z/OS image using one of the following
transport methods.
Chapter 10. Using advanced features in the Configuration Tool 165
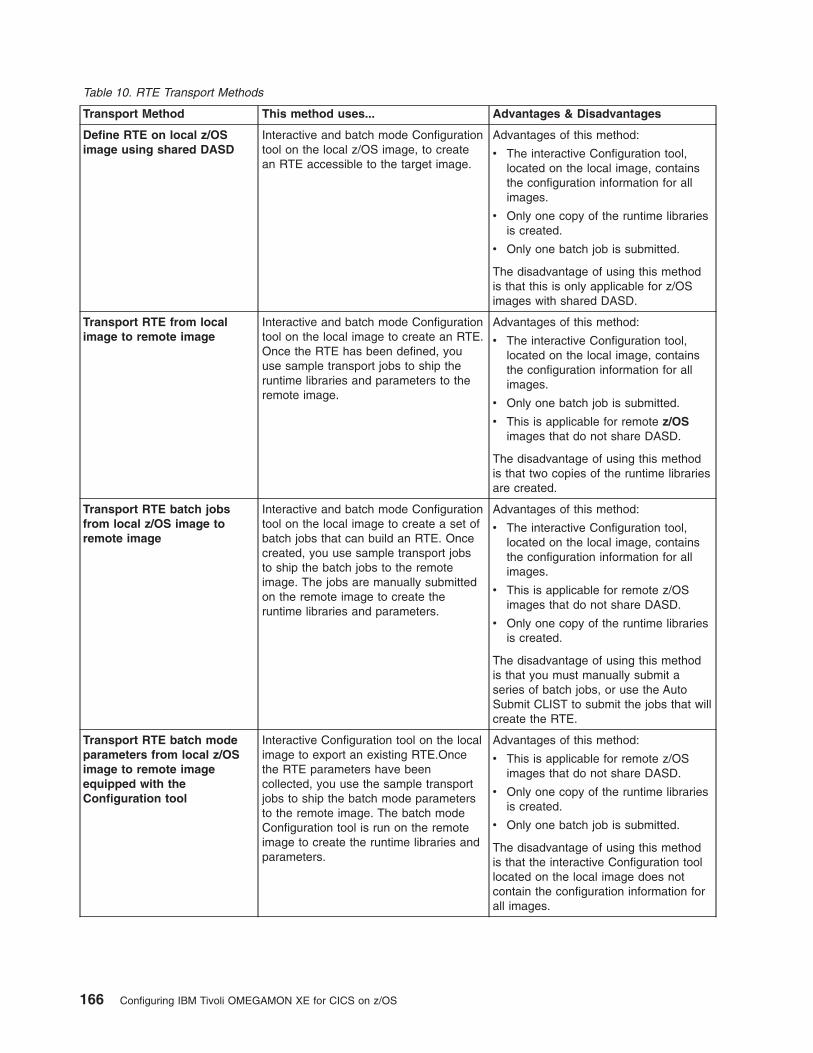
Table 10. RTE Transport Methods
Transport Method This method uses... Advantages & Disadvantages
Define RTE on local z/OS
image using shared DASD
Interactive and batch mode Configuration
tool on the local z/OS image, to create
an RTE accessible to the target image.
Advantages of this method:
v The interactive Configuration tool,
located on the local image, contains
the configuration information for all
images.
v Only one copy of the runtime libraries
is created.
v Only one batch job is submitted.
The disadvantage of using this method
is that this is only applicable for z/OS
images with shared DASD.
Transport RTE from local
image to remote image
Interactive and batch mode Configuration
tool on the local image to create an RTE.
Once the RTE has been defined, you
use sample transport jobs to ship the
runtime libraries and parameters to the
remote image.
Advantages of this method:
v The interactive Configuration tool,
located on the local image, contains
the configuration information for all
images.
v Only one batch job is submitted.
v This is applicable for remote z/OS
images that do not share DASD.
The disadvantage of using this method
is that two copies of the runtime libraries
are created.
Transport RTE batch jobs
from local z/OS image to
remote image
Interactive and batch mode Configuration
tool on the local image to create a set of
batch jobs that can build an RTE. Once
created, you use sample transport jobs
to ship the batch jobs to the remote
image. The jobs are manually submitted
on the remote image to create the
runtime libraries and parameters.
Advantages of this method:
v The interactive Configuration tool,
located on the local image, contains
the configuration information for all
images.
v This is applicable for remote z/OS
images that do not share DASD.
v Only one copy of the runtime libraries
is created.
The disadvantage of using this method
is that you must manually submit a
series of batch jobs, or use the Auto
Submit CLIST to submit the jobs that will
create the RTE.
Transport RTE batch mode
parameters from local z/OS
image to remote image
equipped with the
Configuration tool
Interactive Configuration tool on the local
image to export an existing RTE.Once
the RTE parameters have been
collected, you use the sample transport
jobs to ship the batch mode parameters
to the remote image. The batch mode
Configuration tool is run on the remote
image to create the runtime libraries and
parameters.
Advantages of this method:
v This is applicable for remote z/OS
images that do not share DASD.
v Only one copy of the runtime libraries
is created.
v Only one batch job is submitted.
The disadvantage of using this method
is that the interactive Configuration tool
located on the local image does not
contain the configuration information for
all images.
166 Configuring IBM Tivoli OMEGAMON XE for CICS on z/OS

Creating batch mode parameters
Use the Create batch mode parameters processing option to export an existing
RTE’s parameters into a library member.
You then copy the member and change the image-specific parameters, as
necessary, to configure the RTE for its new environment.
You can generate parameter decks for all products within an existing RTE, and then
copy the information into a new library member to be used during batch mode
processing.
Follow these steps to generate the RTE parameters and copy the information into a
new library member.
1. Enter the Configuration tool and from the Main Menu, enter 3 (Configure
products) and 2 (Select product to configure). This displays the Product
Selection menu, only those packages that are eligible to be configured are listed
on this panel.
2. On the Product Selection Menu, enter S in the Actions field next to IBM Tivoli
OMEGAMON XE for CICS on z/OS V3.1.0. The Configuration tool displays the
Runtime Environments (RTEs) panel.
3. Create the new library member:
a. Type Z next to the RTE you want to replicate and press Enter.
b. From the RTE Utility Menu, click Create batch mode parameters and
press Enter.
c. Specify the library that will receive the batch parameter member generated
by the Configuration tool. The INSTJOBS library is specified by default, and
the member name will be the same as that of the current RTE.
d. Press Enter.
4. Exit the Configuration tool.
5. Edit the INSTJOBS library and copy the exported library member to a new
member name. This new member name is also used as the name of the new
RTE.
6. Using ISPF Option 2, edit the new library member to reflect the settings specific
to the z/OS image where the new RTE will exist.
Adding and configuring product parameter decks (optional)
You can add parameter decks for additional products to the newly created library
member.
Follow these steps to add and configure parameter decks for additional products.
1. Enter the Configuration tool and from the Main Menu, enter 3 (Configure
products) and ? (Services and Utilities) and . This displays the Product
Selection menu, only those packages that are eligible to be configured are listed
on this panel.
2. On the Product Selection Menu, enter S in the Actions field next to IBM Tivoli
OMEGAMON XE for CICS on z/OS V3.1.0. The Configuration tool displays the
Runtime Environments (RTEs) panel.
3. Starting from the Main Menu, click Configure Products > Services and
utilities > Create batch mode job and press Enter.
Chapter 10. Using advanced features in the Configuration Tool 167

Note: KCISETUP needs to be created once on an image and can be used for
all subsequent parameter deck processing on that image. KCISETUP
must be recreated if your ISPF environment has changed, or you
subsequently split your INSTLIB.
4. Exit the Configuration tool.
5. Set the environmental variables required to run the Configuration tool edit
macros:
a. Log onto a TSO session, invoke ISPF, and then go to TSO command mode
(Option 6 in ISPF).
b. Enter the following command: EX ’shilev.INSTLIB(KCISETUP)’ where shilev
is the high-level qualifier.
6. Using ISPF Option 2, edit the library member that was created using “Creating
batch mode parameters” on page 167, entering the following on the command
line: For SMP/E installs, enter:
KCICPGEN Kppvvv
where pp is the two-letter component code for the product you are configuring,
and vvv represents the version of that product.
Note: Only supply the component code and version that identifies the package
you purchased. Underlying components that make up the package will be
included.
7. Repeat the above command until a parameter deck is generated for all the
products you want to add. For a Quick Install, enter:
KCICPGEN QI
The KCICPGEN command invokes the Configuration tool edit macro, which
uses the Kppvvv or QI parameter within the command string to locate the
correct product information (PI) member within INSTDATA. Once it finds the PI
member, the edit macro scans the file and builds a list of all components and
parameters required for the specified product. A product that already exists
within the library member is not replaced.
8. Change the product parameter values within the library member as required.
The values displayed represent default settings.
9. Once you have finished editing the library member, save your changes. The
library member is now ready for batch processing.
Transporting the RTE
Use any of the following the transport methods to create the new RTE on the
appropriate z/OS image.
v “Define an RTE on a local z/OS image using shared DASD” on page 169
v “Transport RTE from a local z/OS image to a remote image” on page 169
v “Transport RTE batch jobs from a local z/OS image to a remote image equipped
with the Configuration tool” on page 170
v “Transport RTE batch mode parameters from a local z/OS image to a remote
image” on page 171
Before using the transport methods within this section, make sure that sufficient
space and library security authorizations exist.
For a list of the advantages and disadvantages for each transport method see
Table 10 on page 166.
168 Configuring IBM Tivoli OMEGAMON XE for CICS on z/OS
Define an RTE on a local z/OS image using shared DASD
Follow these steps to define an RTE on a local z/OS image using shared DASD.
1. Start the Configuration tool on your local image.
2. Create the Configuration tool batch mode job: Starting from the Main Menu,
click Configure products > Services and utilities > Create batch mode job.
Press Enter.
3. Exit the Configuration tool.
4. Perform a scan on your RTE parameters:
a. Edit ICATB, updating the BATCHLIB and BATCHMEM parameters as
necessary, and setting the SUBMIT parameter to SCAN.
b. Submit the ICATB job to scan your RTE parameters.
c. Verify that the job completes successfully; review the parameter report;
correct any errors in the parameter member; repeat the scan until a clean
report is generated.
5. Create a new RTE that is accessible to the target image:
a. Edit ICATB again, setting the SUBMIT parameter to YES. This submits the
RTE configuration jobs that allocate and populate runtime libraries.
b. Submit the ICATB job to create the RTE.
c. Verify that the job completes successfully.
Perform any manual configuration steps on the target image, such as:
v Copying procedures to PROCLIB
v Copying VTAM definitions to VTAMLST
v APF-authorizing libraries
Transport RTE from a local z/OS image to a remote image
Follow these steps to transport an RTE from a local z/OS image to a remote image:
1. Start the Configuration tool on your local image.
2. Starting from the Main Menu, click Configure products > Services and
utilities > Create batch mode job. Press Enter.
3. Exit the Configuration tool.
4. Perform a scan on your RTE parameters:
a. Edit ICATB, updating the BATCHLIB and BATCHMEM parameters as
necessary, and setting the SUBMIT parameter to SCAN.
b. Submit the ICATB job to scan your RTE parameters.
c. Verify that the job completes successfully; review the parameter report;
correct any errors in the parameter member; repeat the scan until a clean
report is generated.
5. Create a new RTE that is accessible to the target image RTE:
a. Edit ICATB again, setting the SUBMIT parameter to YES. This submits the
RTE configuration jobs that allocate and populate runtime libraries.
b. Submit the ICATB job to create the RTE.
c. Verify that the job completes successfully.
6. Start the Configuration tool again.
7. Select the RTE you want to transport:
Chapter 10. Using advanced features in the Configuration Tool 169

a. Access the Runtime Environments (RTEs) panel. (From the Main Menu,
click Configure products > Select product to configure, and then select a
product.)
b. Type Z next to the RTE you want to transport and press Enter.
8. On the RTE Utility Menu, click Generate sample transport JCL and press
Enter. This action will cause several sample transport jobs to be generated
within the RKANSAM library. Member $XPRTNDX provides a description of all
generated members.
For example, to use DFDSS to transport the runtime libraries to the target
image, use sample job
v XDFDMP01 on the master image to dump the runtime libraries
v XDFRST01 on the target image to restore the runtime libraries
You have now successfully transported a new RTE to the target image.
Perform any manual configuration steps on the target image, such as:
v Copying procedures to PROCLIB
v Copying VTAM definitions to VTAMLST
v APF-authorizing libraries
Transport RTE batch jobs from a local z/OS image to a remote
image equipped with the Configuration tool
Follow these steps to transport RTE batch jobs from a local z/OS image to a
remote image that is equipped with the Configuration tool.
1. Start the Configuration Tool on your local image.
2. Create the Configuration Tool batch mode job:
a. Starting from the Main Menu, click Configure products > Services and
utilities > Create batch mode job.
b. Press Enter.
3. Exit the Configuration tool.
4. Perform a scan on your RTE parameters:
a. Edit ICATB, updating the BATCHLIB and BATCHMEM parameters as
necessary, and setting the SUBMIT parameter to SCAN.
b. Submit the ICATB job to scan your RTE parameters.
c. Verify that the job completes successfully; review the parameter report;
correct any errors in the parameter member; repeat the scan until a clean
report is generated.
5. Create the RTE generation jobs:
a. Edit ICATB again, setting the SUBMIT parameter to NO. This creates the
RTE configuration jobs that allocate and populate runtime libraries.
b. Submit the ICATB job to create the RTE generation jobs.
c. Verify that the job completes successfully.
You have now successfully created a set of RTE configuration batch jobs that
must be transported to the target image.
6. Start the Configuration tool again.
7. Select the RTE you want to transport:
a. Access the Runtime Environments (RTEs) panel. (From the Main Menu,
click Configure products > Select product to configure, and then select
a product.)
170 Configuring IBM Tivoli OMEGAMON XE for CICS on z/OS
b. Type Z next to the RTE you want to transport and press Enter.
8. On the RTE Utility Menu, click Generate sample transport JCL and press
Enter. This will cause several sample transport jobs to be generated within the
RKANSAM library. Member $XPRTNDX provides a description of all generated
members.
For example, to use DFDSS to transport the targets, INSTLIB, INSTDATA, and
INSTJOBS to the remote image, use sample job
v XDFDMP03 on the master image to dump the batch jobs
v XDFRST03 on the target image to restore the batch jobs
9. ubmit the batch jobs on the target image in the order listed in the Jobs Sorted
By Generation Sequence section of the the Configuration tool Batch Mode
job report. You can submit each job manually or use the Auto Submit CLIST to
automatically submit the Configuration tool jobs on the target image. To use
the Auto Submit CLIST:
a. Verify that the SMP/E target libraries are available on this image upon
which the CLIST will be executed.
b. Edit the member named SUB#jclsuffix in INSTJOBS, where jclsuffix
identifies the JCL suffix for the new RTE.
c. Execute the CLIST to submit the Configuration tool jobs that will create the
RTE.
You have successfully created a new RTE on the target image.
10. Perform any manual configuration steps on the target image, such as:
v Copying procedures to PROCLIB
v Copying VTAM definitions to VTAMLST
v APF-authorizing libraries
Transport RTE batch mode parameters from a local z/OS image
to a remote image
Follow these steps to transport RTE batch mode parameters from a local z/OS
image to a remote image.
1. Start the Configuration tool on your local image.
2. Select the RTE you want to transport:
a. Access the Runtime Environments (RTEs) panel. (From the Main Menu,
click Configure products > Select product to configure, and then select a
product.)
b. Type Z next to the RTE you want to transport and press Enter.
3. On the RTE Utility Menu, click Generate sample transport JCL and press
Enter. This will cause several sample transport jobs to be generated within the
RKANSAM library. Member $XPRTNDX provides a description of all generated
members.
For example, to use DFDSS to transport the targets, INSTLIB, INSTDATA, and
INSTJOBS to the remote image, use sample job
v XDFDMP03 on the master image to dump the batch jobs
v XDFRST03 on the target image to restore the batch jobs
You have successfully transported the batch mode parameters to the target
image.
4. Create the Configuration toolbatch mode job:
a. Starting from the Main Menu, click Configure products > Services and
utilities > Create batch mode job.
Chapter 10. Using advanced features in the Configuration Tool 171

b. Press Enter.
5. Exit the Configuration tool.
6. Perform a scan on your RTE parameters:
a. Edit ICATB, updating the BATCHLIB and BATCHMEM parameters as
necessary, and setting the SUBMIT parameter to SCAN.
b. Submit the ICATB job to scan your RTE parameters.
c. Verify that the job completes successfully; review the parameter report;
correct any errors in the parameter member; repeat the scan until a clean
report is generated.
7. Create the RTE on the target image:
a. Edit ICATB again, setting the SUBMIT parameter to YES. This submits the
RTE configuration jobs that allocate and populate runtime libraries.
b. Submit the ICATB job to create the RTE.
c. Verify that the job completes successfully.
8. Perform any manual configuration steps on the target image, such as
v Copying procedures to PROCLIB
v Copying VTAM definitions to VTAMLST
v APF-authorizing libraries
172 Configuring IBM Tivoli OMEGAMON XE for CICS on z/OS

Index
AACF2 11, 57, 85, 112
addingan RTE 8, 55, 80, 110
advanced featuresbatch mode processing 163
system variable support 163
allocatingrun-time libraries 14, 82, 88, 116
runtime libraries 61
task history data sets 25
allocating task history data sets 64
applid prefix, global 11, 57, 85, 112
audienceexpertise xiii
responsibilities xiii
Bbatch mode
parameter decks 167
Batch Modeoverview 165
parameter decks 165
RTE parameter export 167
RTE transportation 165, 168
batch mode processing 163
bookssee publications xvi, xix
buildingRTE libraries 8, 55, 80, 110
runtime libraries 14, 61, 82, 88, 116
CCandle
names xiii
terminology xiii
transition to IBM xiii
Candle Management Serverconfiguring 43
deployment 42
installation 42
CandleNet Portaldeleting 143
deployment 133
installation 43, 49, 133, 135
v195 xiii
v196 xiii
CandleNet Portal Serverconfiguring 49
installation 43
CICS started taskmodifying 76, 105, 130
CICS startup JCLmodifying 37
CMSname of the Candle Management Server 57
name of the CandleNet Management Server 11, 85,
112
seeding for migrated profiles 155
seeding using Manage Candle Services 161
collecting historical data 147
collecting task history data 148
completing the configuration 36, 75
configuration toolsetting up 2
starting 2
Configuration toolbatch components 164
batch mode 165
batch mode processing 164
configuringCandle Management Server 14, 43, 88
CandleNet Portal server 49
distributed system 41
hub Candle Management Server 14, 88
migrating your profile 155
multiple z/OS images 79
OMEGAMON XE for CICS 66
persistent data store 20, 33, 71, 94, 100, 103, 122
persistent data stores 14
persistent datastores 88, 116
products in an RTEconfiguring products 8, 55, 80, 110
runtime environments 28, 31, 66, 99, 101, 116, 126
single z/OS images 109
Tivoli OMEGAMON XE for CICS on z/OS 28, 31,
99, 101, 126
Configuring Tivoli OMEGAMON II for CICS 61
conventionstypeface xx
creatinga new RTE 8, 55, 80, 110
DDB2
installation 134
deletingan RTE 145
CandleNet Portal 143
deployingCandle Management Server 42
CandleNet Portal 133
directory names, notation xx
distributed systemconfiguring 41
Eeducation
see Tivoli technical training xx
© Copyright IBM Corp. 2005 173
enabling system variable support 163
environment variables, notation xx
Gglobal applid prefix 11, 57, 85, 112
global started task prefix 11, 57, 85, 112
Hhigh-level qualifiers
non-VSAM libraries 11, 57, 85, 112
VSAM libraries 11, 57, 85, 112
historical datacollecting and storing 147
Iinitializing task history data sets 64
installingCandle Management Server 42
CandleNet Portal 43, 49, 133, 135
CandleNet Portal Server 43
DB2 134
KKXEMIGR command and parameters 155
Lloading
RTE libraries 8, 55, 80, 110
runtime libraries 35, 74, 104, 128
Mmanuals
see publications xvi, xix
migrating 155
from Candle Management workstation 155, 159
from OMEGAMON II 155
to CandleNet Portal 155, 159
migration 155
modifying CICS started task 76, 105, 130
modifying CICS startup JCL 37
multiple z/OS imagesconfiguring 79
NNational Language Support (NLS)
installing NLS components 57
notationenvironment variables xx
path names xx
typeface xx
OOMEGAMON
classic xiv
OMEGAMON DE xiv
OMEGAMON II xiv
OMEGAMON II for CICSlibrary xvii
OMEGAMON platformlibrary xviii
OMEGAMON XE xiv
OMEGAMON XE for Mainframe Networklibrary xvi
online publicationsaccessing xix
ordering publications xix
Ppath names, notation xx
persistent data storesconfiguration 14
persistent datastoresconfiguration 88, 116
predefined situationsmigrating existing profiles 155
prefixapplid 11, 57, 85, 112
started task 11, 57, 85, 112
product-specific configuration 14, 28, 31, 66, 88, 99,
101, 116, 126
profile migration 155
publications xvi
accessing online xix
ordering xix
Rreplicating an RTE 165
RTEreplication process 165
security 11, 57, 85, 112
transportation methods 165
run time environmentdeleting 145
runtime environmentadding 8, 55, 83, 110
runtime environment 8, 55, 83, 110
building libraries 14, 82, 88, 116
updating 145
runtime environment (RTE)adding 8, 55, 80, 110
copying values 11, 85, 112
loading libraries 55
Runtime Environment (RTE)building libraries 8, 55, 61, 80, 110
copying values 57
exporting parameters 165
loading libraries 8, 80, 110
174 Configuring IBM Tivoli OMEGAMON XE for CICS on z/OS
Ssecurity 11, 57, 85, 112
seeding the Candle Management Server 161
background 161
guidelines for products on z/OS 161
prerequisites for seeding products on z/OS 161
setting up the configuration toolchecklist 1
setting up, configuration tool 2
single z/OS imageconfiguring 109
specifyingRTE values 11, 57, 85, 112
started task prefix 11, 57, 85, 112
starting configuration tool 2
storing historical data 147
system history data 147
system variable support 163
existing RTEs 163
new run-time environment 163
Ttask history data 147
collecting 148
task history data setsallocating 64
allocation 25
initializing 64
Tivoli OMEGAMON II for CICSconfiguring 61
Tivoli OMEGAMON XE for CICS on z/OSconfiguration 28, 31, 66, 99, 101, 126
Tivoli software information center xix
Tivoli technical training xx
training, Tivoli technical xx
turning on system variable support 163
typeface conventions xx
Uupdating
runtime environment 145
Vvariables, notation for xx
verifying your configuration 38
Index 175

176 Configuring IBM Tivoli OMEGAMON XE for CICS on z/OS
Notices
This information was developed for products and services offered in the U.S.A. IBM
may not offer the products, services, or features discussed in this document in other
countries. Consult your local IBM representative for information on the products and
services currently available in your area. Any reference to an IBM product, program,
or service is not intended to state or imply that only that IBM product, program, or
service may be used. Any functionally equivalent product, program, or service that
does not infringe any IBM intellectual property right may be used instead. However,
it is the user’s responsibility to evaluate and verify the operation of any non-IBM
product, program, or service.
IBM may have patents or pending patent applications covering subject matter
described in this document. The furnishing of this document does not give you any
license to these patents. You can send license inquiries, in writing, to:
IBM Director of Licensing
IBM Corporation
North Castle Drive
Armonk, NY 10504-1785
U.S.A.
For license inquiries regarding double-byte (DBCS) information, contact the IBM
Intellectual Property Department in your country or send inquiries, in writing, to:
IBM World Trade Asia Corporation
Licensing
2-31 Roppongi 3-chome, Minato-ku
Tokyo 106, Japan
The following paragraph does not apply in the United Kingdom or any other
country where such provisions are inconsistent with local law:
INTERNATIONAL BUSINESS MACHINES CORPORATION PROVIDES THIS
PUBLICATION “AS IS” WITHOUT WARRANTY OF ANY KIND, EITHER EXPRESS
OR IMPLIED, INCLUDING, BUT NOT LIMITED TO, THE IMPLIED WARRANTIES
OF NON-INFRINGEMENT, MERCHANTABILITY, OR FITNESS FOR A
PARTICULAR PURPOSE. Some states do not allow disclaimer of express or
implied warranties in certain transactions, therefore this statement may not apply to
you.
This publication could include technical inaccuracies or typographical errors.
Changes are periodically made to the information herein; these changes will be
incorporated in new editions of the publication. IBM may make improvements and/or
changes in the product(s) and/or the program(s) described in this publication at any
time without notice.
Licensees of this program who wish to have information about it for the purpose of
enabling: (i) the exchange of information between independently created programs
and other programs (including this one) and (ii) the mutual use of the information
which has been exchanged, should contact IBM United Kingdom Laboratories,
MP151, Hursley Park, Winchester, Hampshire, England, SO21 2JN. Such
information may be available, subject to appropriate terms and conditions, including
in some cases, payment of a fee.
© Copyright IBM Corp. 2005 177
The licensed program described in this document and all licensed material available
for it are provided by IBM under terms of the IBM Customer Agreement, IBM
International Programming License Agreement, or any equivalent agreement
between us.
Trademarks
The following terms are trademarks of International Business Machines Corporation
in the United States, or other countries, or both:
Table 11. Trademarks
AF/OPERATOR ETE OMEGAMON II
Candle IBM RMF
Candle Command Center IBMLink SP
Candle Management Server IMS Tivoli
CandleNet Command Center MQSeries VTAM
CandleNet Portal MVS WebSphere
CICS MVS/ESA z/OS
CICS/ESA MVS/XA zSeries
CICS/MVS OMEGACENTER
DB2 OMEGAMON
Java and all Java-based trademarks and logos are trademarks of Sun
Microsystems, Inc. in the United States, other countries, or both.
UNIX is a registered trademark of The Open Group in the United States and other
countries.
Windows is a registered trademark of Microsoft Corporation.
Other company, product, and service names may be trademarks or service marks
of others.
178 Configuring IBM Tivoli OMEGAMON XE for CICS on z/OS
Sending your comments to IBM
If you especially like or dislike anything about this book, please use one of the
methods listed below to send your comments to IBM.
Feel free to comment on what you regard as specific errors or omissions, and on
the accuracy, organization, subject matter, or completeness of this book.
Please limit your comments to the information in this book and the way in which the
information is presented.
To ask questions, make comments about the functions of IBM products or systems,
or to request additional publications, contact your IBM representative or your IBM
authorized remarketer.
When you send comments to IBM, you grant IBM a nonexclusive right to use or
distribute your comments in any way it believes appropriate, without incurring any
obligation to you.
You can send your comments to IBM in any of the following ways:
v By mail, to this address:
User Technologies Department (MP095)
IBM United Kingdom Laboratories
Hursley Park
WINCHESTER,
Hampshire
SO21 2JN
United Kingdom
v By fax:
– From outside the U.K., after your international access code use
44–1962–816151
– From within the U.K., use 01962–816151
v Electronically, use the appropriate network ID:
– IBM Mail Exchange: GBIBM2Q9 at IBMMAIL
– IBMLink™™
: HURSLEY(IDRCF)
– Internet: [email protected]
Whichever you use, ensure that you include:
v The publication title and order number
v The topic to which your comment applies
v Your name and address/telephone number/fax number/network ID.
© Copyright IBM Corp. 2005 179

���
Program Number: 5698-A58
SC32-9424-00
Related Documents