Configure grid and complete installation (Ubuntu or Debian) StorageGRID NetApp June 10, 2022 This PDF was generated from https://docs.netapp.com/us-en/storagegrid-116/ubuntu/navigating-to-grid- manager.html on June 10, 2022. Always check docs.netapp.com for the latest.

Welcome message from author
This document is posted to help you gain knowledge. Please leave a comment to let me know what you think about it! Share it to your friends and learn new things together.
Transcript
Configure grid and complete installation(Ubuntu or Debian)StorageGRIDNetAppJune 10, 2022
This PDF was generated from https://docs.netapp.com/us-en/storagegrid-116/ubuntu/navigating-to-grid-manager.html on June 10, 2022. Always check docs.netapp.com for the latest.

Table of Contents
Configure grid and complete installation (Ubuntu or Debian) . . . . . . . . . . . . . . . . . . . . . . . . . . . . . . . . . . . . . . . 1
Navigate to the Grid Manager . . . . . . . . . . . . . . . . . . . . . . . . . . . . . . . . . . . . . . . . . . . . . . . . . . . . . . . . . . . . . 1
Specify the StorageGRID license information . . . . . . . . . . . . . . . . . . . . . . . . . . . . . . . . . . . . . . . . . . . . . . . . . 2
Add sites. . . . . . . . . . . . . . . . . . . . . . . . . . . . . . . . . . . . . . . . . . . . . . . . . . . . . . . . . . . . . . . . . . . . . . . . . . . . . . 2
Specify Grid Network subnets . . . . . . . . . . . . . . . . . . . . . . . . . . . . . . . . . . . . . . . . . . . . . . . . . . . . . . . . . . . . . 3
Approve pending grid nodes . . . . . . . . . . . . . . . . . . . . . . . . . . . . . . . . . . . . . . . . . . . . . . . . . . . . . . . . . . . . . . 4
Specify Network Time Protocol server information . . . . . . . . . . . . . . . . . . . . . . . . . . . . . . . . . . . . . . . . . . . . . 9
Specify Domain Name System server information. . . . . . . . . . . . . . . . . . . . . . . . . . . . . . . . . . . . . . . . . . . . . 10
Specify the StorageGRID system passwords . . . . . . . . . . . . . . . . . . . . . . . . . . . . . . . . . . . . . . . . . . . . . . . . 11
Review your configuration and complete installation . . . . . . . . . . . . . . . . . . . . . . . . . . . . . . . . . . . . . . . . . . . 13
Post-installation guidelines. . . . . . . . . . . . . . . . . . . . . . . . . . . . . . . . . . . . . . . . . . . . . . . . . . . . . . . . . . . . . . . 15

Configure grid and complete installation (Ubuntuor Debian)
Navigate to the Grid Manager
You use the Grid Manager to define all of the information required to configure your
StorageGRID system.
What you’ll need
The primary Admin Node must be deployed and have completed the initial startup sequence.
Steps
1. Open your web browser and navigate to one of the following addresses:
https://primary_admin_node_ip
client_network_ip
Alternatively, you can access the Grid Manager on port 8443:
https://primary_admin_node_ip:8443
You can use the IP address for the primary Admin Node IP on the Grid Network or on the Admin
Network, as appropriate for your network configuration.
1. Click Install a StorageGRID system.
The page used to configure a StorageGRID grid appears.
1
Specify the StorageGRID license information
You must specify the name for your StorageGRID system and upload the license file
provided by NetApp.
Steps
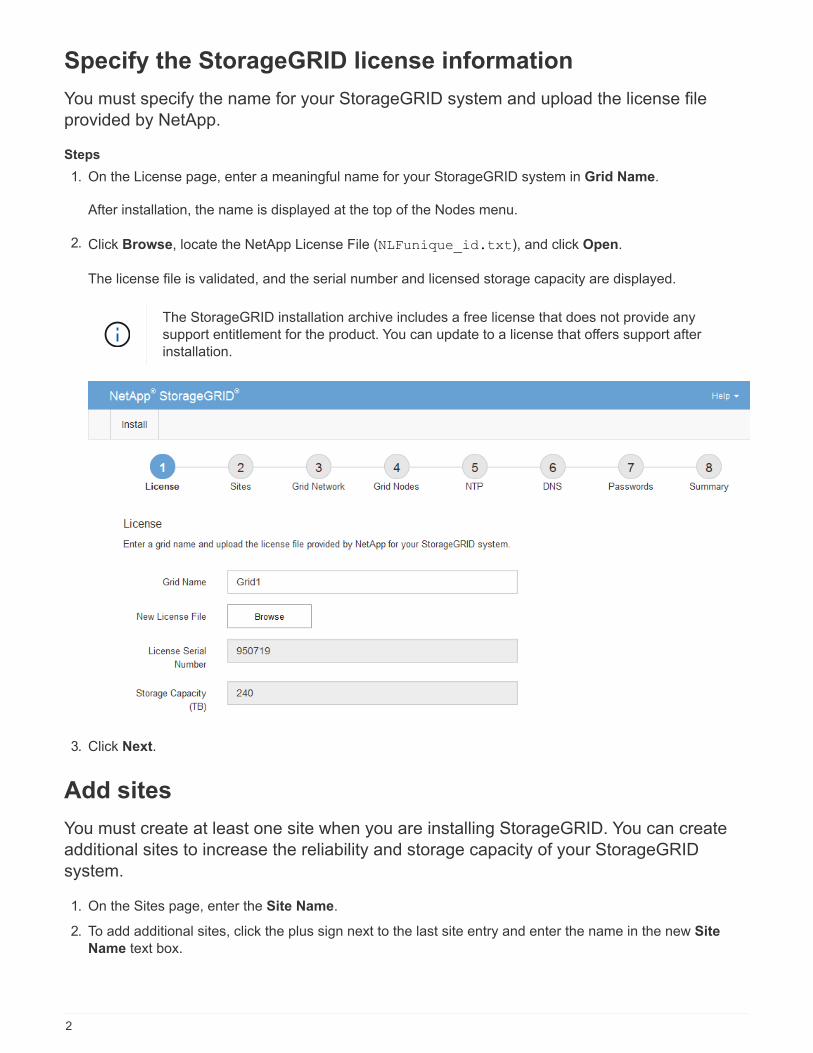
1. On the License page, enter a meaningful name for your StorageGRID system in Grid Name.
After installation, the name is displayed at the top of the Nodes menu.
2. Click Browse, locate the NetApp License File (NLFunique_id.txt), and click Open.
The license file is validated, and the serial number and licensed storage capacity are displayed.
The StorageGRID installation archive includes a free license that does not provide any
support entitlement for the product. You can update to a license that offers support after
installation.
3. Click Next.
Add sites
You must create at least one site when you are installing StorageGRID. You can create
additional sites to increase the reliability and storage capacity of your StorageGRID
system.
1. On the Sites page, enter the Site Name.
2. To add additional sites, click the plus sign next to the last site entry and enter the name in the new Site
Name text box.
2
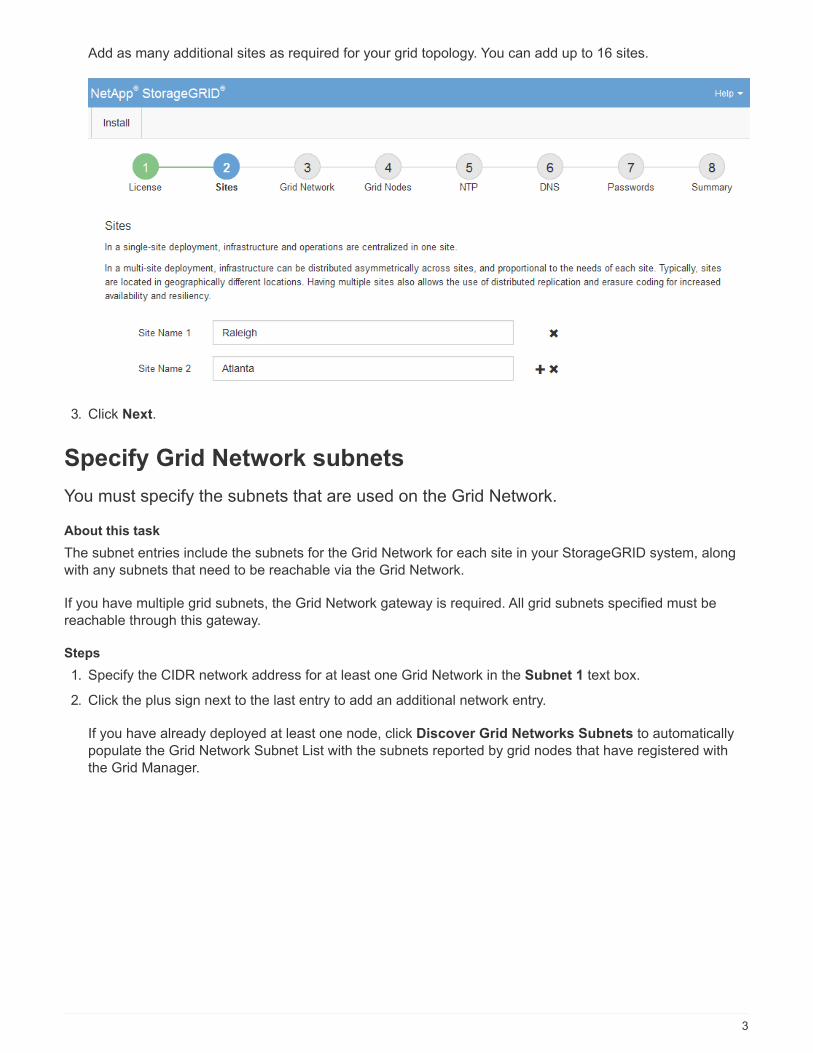
Add as many additional sites as required for your grid topology. You can add up to 16 sites.
3. Click Next.
Specify Grid Network subnets
You must specify the subnets that are used on the Grid Network.
About this task
The subnet entries include the subnets for the Grid Network for each site in your StorageGRID system, along
with any subnets that need to be reachable via the Grid Network.
If you have multiple grid subnets, the Grid Network gateway is required. All grid subnets specified must be
reachable through this gateway.
Steps
1. Specify the CIDR network address for at least one Grid Network in the Subnet 1 text box.
2. Click the plus sign next to the last entry to add an additional network entry.
If you have already deployed at least one node, click Discover Grid Networks Subnets to automatically
populate the Grid Network Subnet List with the subnets reported by grid nodes that have registered with
the Grid Manager.
3
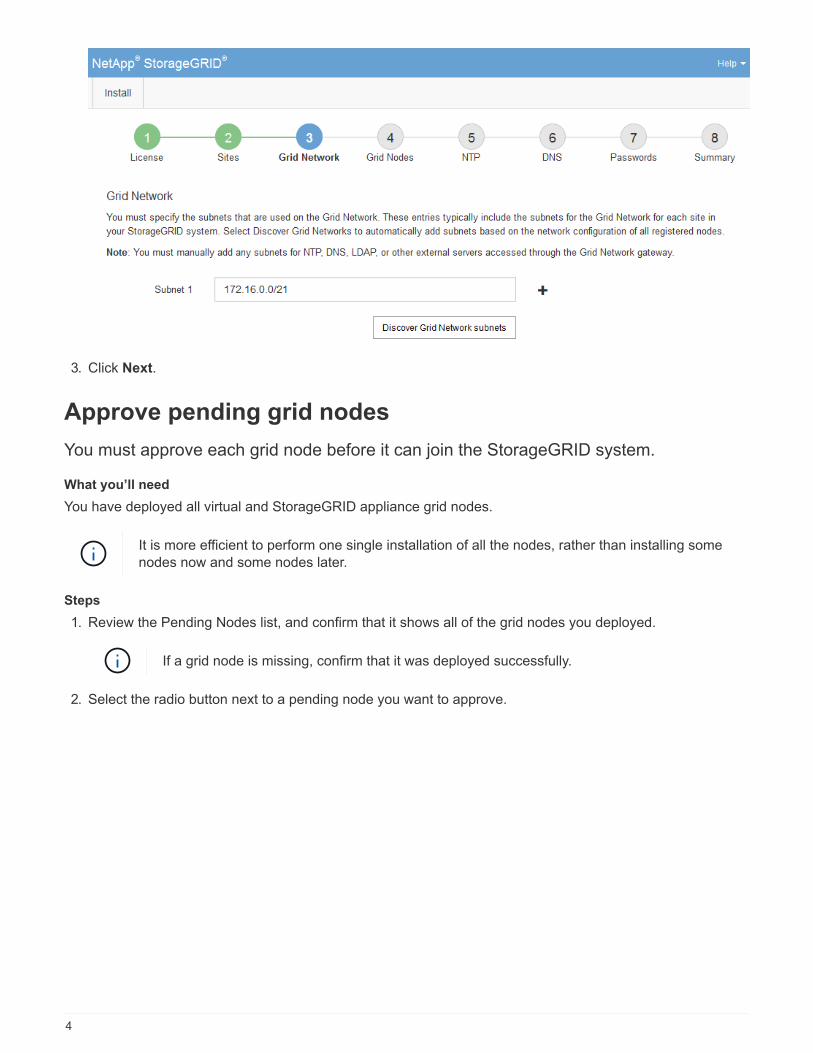
3. Click Next.
Approve pending grid nodes
You must approve each grid node before it can join the StorageGRID system.
What you’ll need
You have deployed all virtual and StorageGRID appliance grid nodes.
It is more efficient to perform one single installation of all the nodes, rather than installing some
nodes now and some nodes later.
Steps
1. Review the Pending Nodes list, and confirm that it shows all of the grid nodes you deployed.
If a grid node is missing, confirm that it was deployed successfully.
2. Select the radio button next to a pending node you want to approve.
4
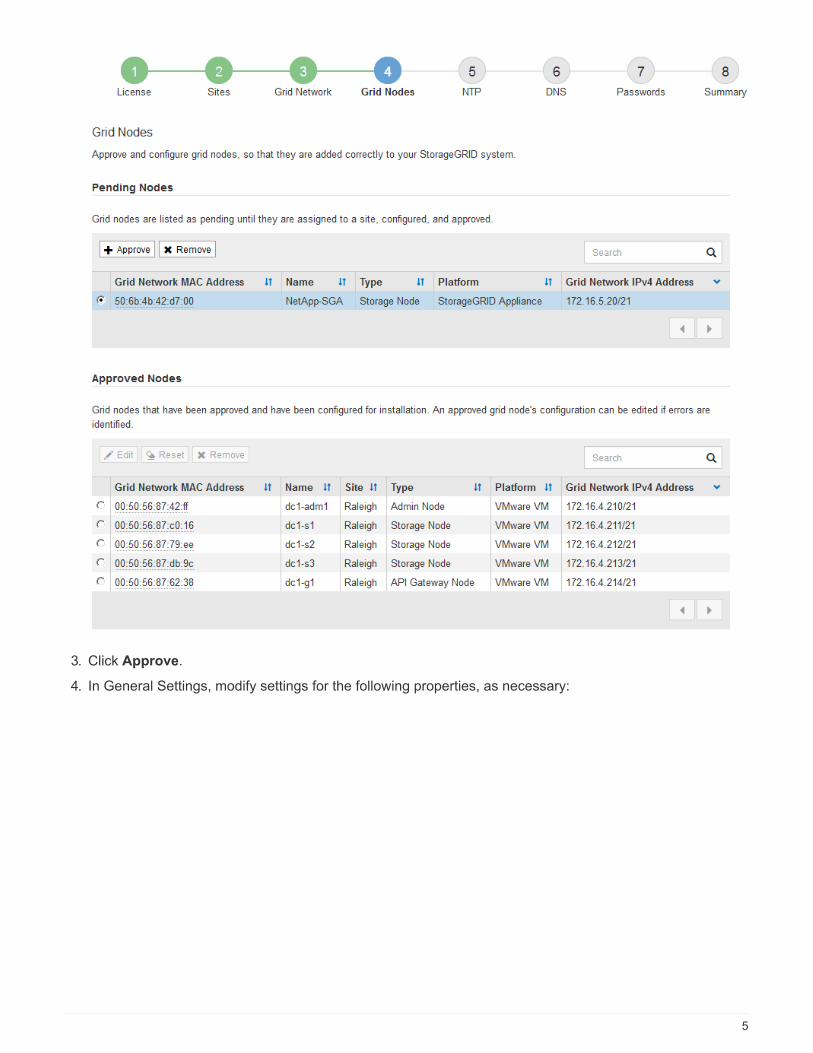
3. Click Approve.
4. In General Settings, modify settings for the following properties, as necessary:
5

◦ Site: The name of the site with which this grid node will be associated.
◦ Name: The name that will be assigned to the node, and the name that will be displayed in the Grid
Manager. The name defaults to the name you specified when you configured the node. During this step
of the installation process, you can change the name as required.
After you complete the installation, you cannot change the name of the node.
For a VMware node, you can change the name here, but this action will not change the
name of the virtual machine in vSphere.
6
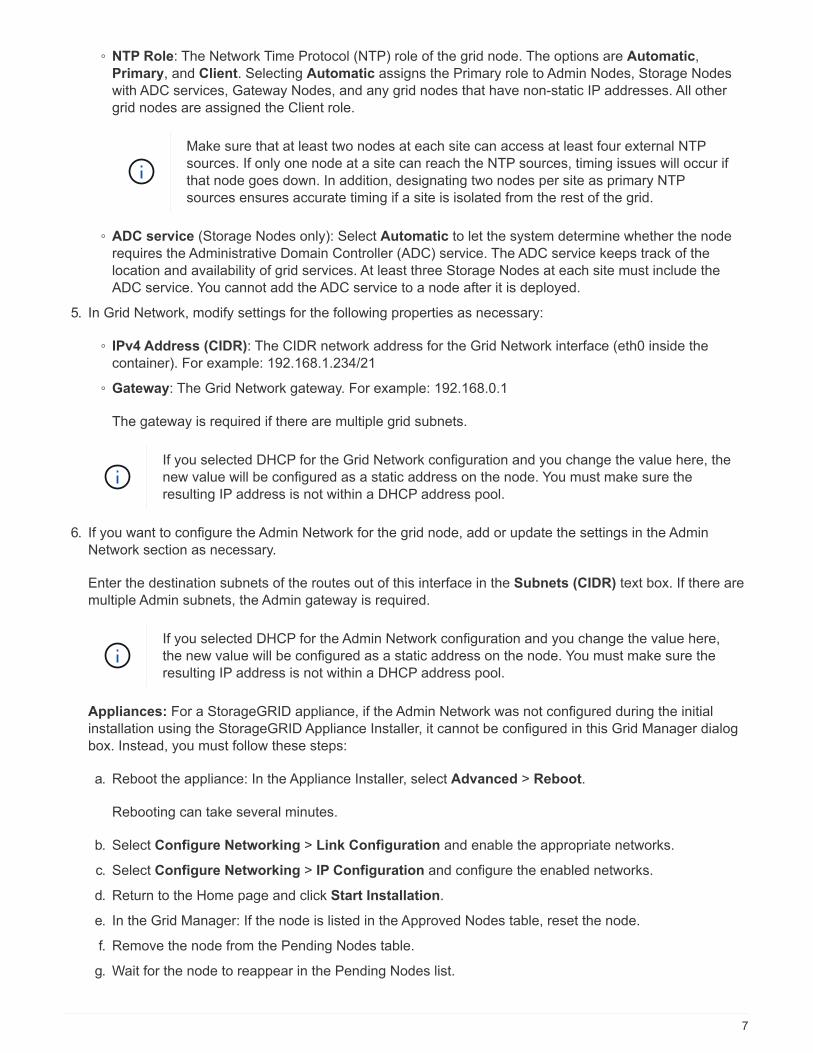
◦ NTP Role: The Network Time Protocol (NTP) role of the grid node. The options are Automatic,
Primary, and Client. Selecting Automatic assigns the Primary role to Admin Nodes, Storage Nodes
with ADC services, Gateway Nodes, and any grid nodes that have non-static IP addresses. All other
grid nodes are assigned the Client role.
Make sure that at least two nodes at each site can access at least four external NTP
sources. If only one node at a site can reach the NTP sources, timing issues will occur if
that node goes down. In addition, designating two nodes per site as primary NTP
sources ensures accurate timing if a site is isolated from the rest of the grid.
◦ ADC service (Storage Nodes only): Select Automatic to let the system determine whether the node
requires the Administrative Domain Controller (ADC) service. The ADC service keeps track of the
location and availability of grid services. At least three Storage Nodes at each site must include the
ADC service. You cannot add the ADC service to a node after it is deployed.
5. In Grid Network, modify settings for the following properties as necessary:
◦ IPv4 Address (CIDR): The CIDR network address for the Grid Network interface (eth0 inside the
container). For example: 192.168.1.234/21
◦ Gateway: The Grid Network gateway. For example: 192.168.0.1
The gateway is required if there are multiple grid subnets.
If you selected DHCP for the Grid Network configuration and you change the value here, the
new value will be configured as a static address on the node. You must make sure the
resulting IP address is not within a DHCP address pool.
6. If you want to configure the Admin Network for the grid node, add or update the settings in the Admin
Network section as necessary.
Enter the destination subnets of the routes out of this interface in the Subnets (CIDR) text box. If there are
multiple Admin subnets, the Admin gateway is required.
If you selected DHCP for the Admin Network configuration and you change the value here,
the new value will be configured as a static address on the node. You must make sure the
resulting IP address is not within a DHCP address pool.
Appliances: For a StorageGRID appliance, if the Admin Network was not configured during the initial
installation using the StorageGRID Appliance Installer, it cannot be configured in this Grid Manager dialog
box. Instead, you must follow these steps:
a. Reboot the appliance: In the Appliance Installer, select Advanced > Reboot.
Rebooting can take several minutes.
b. Select Configure Networking > Link Configuration and enable the appropriate networks.
c. Select Configure Networking > IP Configuration and configure the enabled networks.
d. Return to the Home page and click Start Installation.
e. In the Grid Manager: If the node is listed in the Approved Nodes table, reset the node.
f. Remove the node from the Pending Nodes table.
g. Wait for the node to reappear in the Pending Nodes list.
7
h. Confirm that you can configure the appropriate networks. They should already be populated with the
information you provided on the IP Configuration page.
For additional information, see the installation and maintenance instructions for your appliance model.
7. If you want to configure the Client Network for the grid node, add or update the settings in the Client
Network section as necessary. If the Client Network is configured, the gateway is required, and it becomes
the default gateway for the node after installation.
If you selected DHCP for the Client Network configuration and you change the value here,
the new value will be configured as a static address on the node. You must make sure the
resulting IP address is not within a DHCP address pool.
Appliances: For a StorageGRID appliance, if the Client Network was not configured during the initial
installation using the StorageGRID Appliance Installer, it cannot be configured in this Grid Manager dialog
box. Instead, you must follow these steps:
a. Reboot the appliance: In the Appliance Installer, select Advanced > Reboot.
Rebooting can take several minutes.
b. Select Configure Networking > Link Configuration and enable the appropriate networks.
c. Select Configure Networking > IP Configuration and configure the enabled networks.
d. Return to the Home page and click Start Installation.
e. In the Grid Manager: If the node is listed in the Approved Nodes table, reset the node.
f. Remove the node from the Pending Nodes table.
g. Wait for the node to reappear in the Pending Nodes list.
h. Confirm that you can configure the appropriate networks. They should already be populated with the
information you provided on the IP Configuration page.
For additional information, see the installation and maintenance instructions for your appliance.
8. Click Save.
The grid node entry moves to the Approved Nodes list.
8
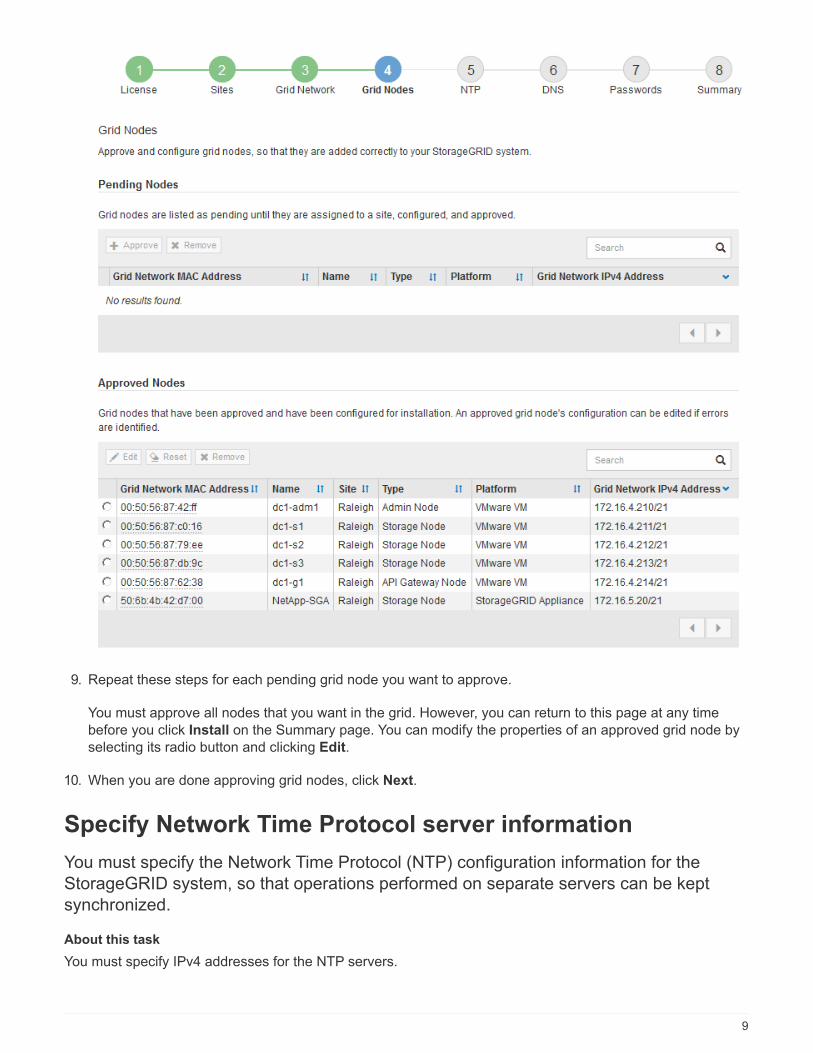
9. Repeat these steps for each pending grid node you want to approve.
You must approve all nodes that you want in the grid. However, you can return to this page at any time
before you click Install on the Summary page. You can modify the properties of an approved grid node by
selecting its radio button and clicking Edit.
10. When you are done approving grid nodes, click Next.
Specify Network Time Protocol server information
You must specify the Network Time Protocol (NTP) configuration information for the
StorageGRID system, so that operations performed on separate servers can be kept
synchronized.
About this task
You must specify IPv4 addresses for the NTP servers.
9

You must specify external NTP servers. The specified NTP servers must use the NTP protocol.
You must specify four NTP server references of Stratum 3 or better to prevent issues with time drift.
When specifying the external NTP source for a production-level StorageGRID installation, do not
use the Windows Time (W32Time) service on a version of Windows earlier than Windows
Server 2016. The time service on earlier versions of Windows is not sufficiently accurate and is
not supported by Microsoft for use in high-accuracy environments, such as StorageGRID.
Support boundary to configure the Windows Time service for high-accuracy environments
The external NTP servers are used by the nodes to which you previously assigned Primary NTP roles.
Make sure that at least two nodes at each site can access at least four external NTP sources. If
only one node at a site can reach the NTP sources, timing issues will occur if that node goes
down. In addition, designating two nodes per site as primary NTP sources ensures accurate
timing if a site is isolated from the rest of the grid.
Steps
1. Specify the IPv4 addresses for at least four NTP servers in the Server 1 to Server 4 text boxes.
2. If necessary, select the plus sign next to the last entry to add additional server entries.
3. Select Next.
Related information
Networking guidelines
Specify Domain Name System server information
You must specify Domain Name System (DNS) information for your StorageGRID
system, so that you can access external servers using hostnames instead of IP
addresses.
10
About this task
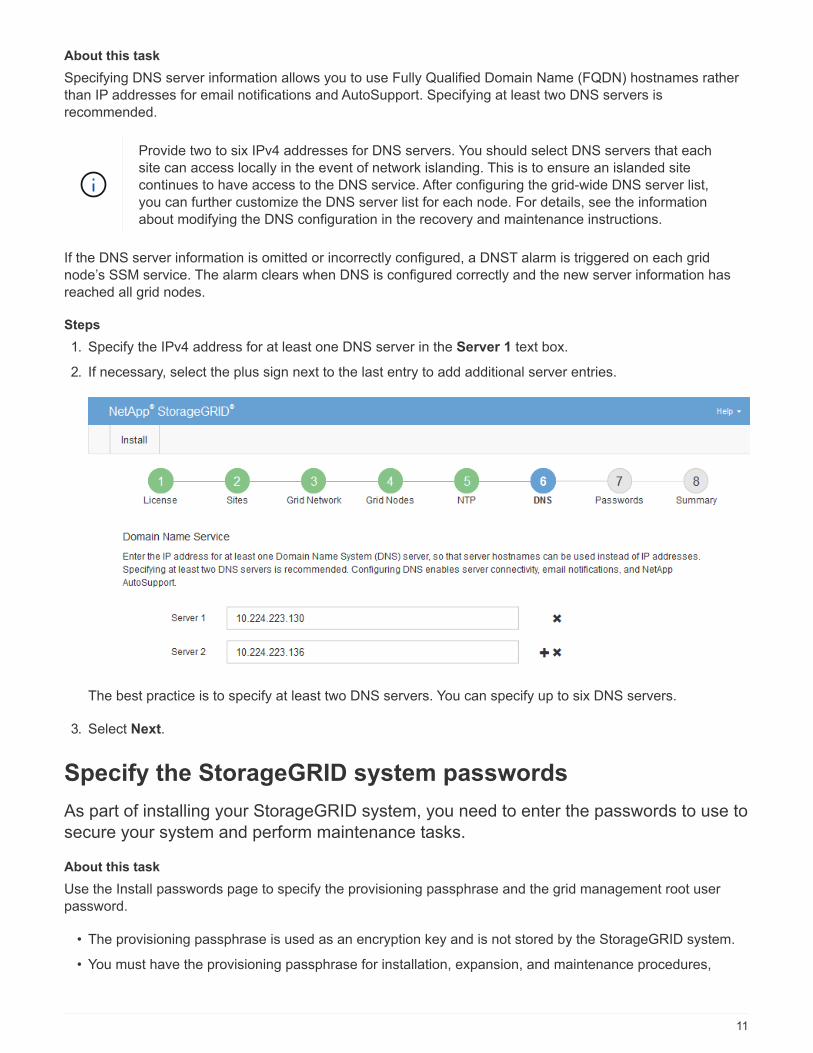
Specifying DNS server information allows you to use Fully Qualified Domain Name (FQDN) hostnames rather
than IP addresses for email notifications and AutoSupport. Specifying at least two DNS servers is
recommended.
Provide two to six IPv4 addresses for DNS servers. You should select DNS servers that each
site can access locally in the event of network islanding. This is to ensure an islanded site
continues to have access to the DNS service. After configuring the grid-wide DNS server list,
you can further customize the DNS server list for each node. For details, see the information
about modifying the DNS configuration in the recovery and maintenance instructions.
If the DNS server information is omitted or incorrectly configured, a DNST alarm is triggered on each grid
node’s SSM service. The alarm clears when DNS is configured correctly and the new server information has
reached all grid nodes.
Steps
1. Specify the IPv4 address for at least one DNS server in the Server 1 text box.
2. If necessary, select the plus sign next to the last entry to add additional server entries.
The best practice is to specify at least two DNS servers. You can specify up to six DNS servers.
3. Select Next.
Specify the StorageGRID system passwords
As part of installing your StorageGRID system, you need to enter the passwords to use to
secure your system and perform maintenance tasks.
About this task
Use the Install passwords page to specify the provisioning passphrase and the grid management root user
password.
• The provisioning passphrase is used as an encryption key and is not stored by the StorageGRID system.
• You must have the provisioning passphrase for installation, expansion, and maintenance procedures,
11

including downloading the Recovery Package. Therefore, it is important that you store the provisioning
passphrase in a secure location.
• You can change the provisioning passphrase from the Grid Manager if you have the current one.
• The grid management root user password may be changed using the Grid Manager.
• Randomly generated command line console and SSH passwords are stored in the Passwords.txt file in the
Recovery Package.
Steps
1. In Provisioning Passphrase, enter the provisioning passphase that will be required to make changes to
the grid topology of your StorageGRID system.
Store the provisioning passphrase in a secure place.
If after the installation completes and you want to change the provisioning passphrase later,
you can use the Grid Manager. Select CONFIGURATION > Access control> Grid
passwords.
2. In Confirm Provisioning Passphrase, reenter the provisioning passphrase to confirm it.
3. In Grid Management Root User Password, enter the password to use to access the Grid Manager as the
“root” user.
Store the password in a secure place.
4. In Confirm Root User Password, reenter the Grid Manager password to confirm it.
5. If you are installing a grid for proof of concept or demo purposes, optionally deselect the Create random
command line passwords check box.
12

For production deployments, random passwords should always be used for security reasons. Deselect
Create random command line passwords only for demo grids if you want to use default passwords to
access grid nodes from the command line using the “root” or “admin” account.
You are prompted to download the Recovery Package file (sgws-recovery-package-
id-revision.zip) after you click Install on the Summary page. You must download this
file to complete the installation. The passwords required to access the system are stored in
the Passwords.txt file, contained in the Recovery Package file.
6. Click Next.
Review your configuration and complete installation
You must carefully review the configuration information you have entered to ensure that
the installation completes successfully.
Steps
1. View the Summary page.
2. Verify that all of the grid configuration information is correct. Use the Modify links on the Summary page to
go back and correct any errors.
3. Click Install.
13

If a node is configured to use the Client Network, the default gateway for that node switches
from the Grid Network to the Client Network when you click Install. If you lose connectivity,
you must ensure that you are accessing the primary Admin Node through an accessible
subnet. See Networking guidelines for details.
4. Click Download Recovery Package.
When the installation progresses to the point where the grid topology is defined, you are prompted to
download the Recovery Package file (.zip), and confirm that you can successfully access the contents of
this file. You must download the Recovery Package file so that you can recover the StorageGRID system if
one or more grid nodes fail. The installation continues in the background, but you cannot complete the
installation and access the StorageGRID system until you download and verify this file.
5. Verify that you can extract the contents of the .zip file, and then save it in two safe, secure, and separate
locations.
The Recovery Package file must be secured because it contains encryption keys and
passwords that can be used to obtain data from the StorageGRID system.
6. Select the I have successfully downloaded and verified the Recovery Package file check box, and
click Next.
If the installation is still in progress, the status page appears. This page indicates the progress of the
installation for each grid node.
14

When the Complete stage is reached for all grid nodes, the sign-in page for the Grid Manager appears.
7. Sign in to the Grid Manager using the "root" user and the password you specified during the installation.
Post-installation guidelines
After completing grid node deployment and configuration, follow these guidelines for
DHCP addressing and network configuration changes.
• If DHCP was used to assign IP addresses, configure a DHCP reservation for each IP address on the
networks being used.
You can only set up DHCP during the deployment phase. You cannot set up DHCP during configuration.
Nodes reboot when their IP addresses change, which can cause outages if a DHCP address
change affects multiple nodes at the same time.
• You must use the Change IP procedures if you want to change IP addresses, subnet masks, and default
gateways for a grid node. See Configure IP addresses.
• If you make networking configuration changes, including routing and gateway changes, client connectivity
to the primary Admin Node and other grid nodes might be lost. Depending on the networking changes
applied, you might need to re-establish these connections.
15

Copyright Information
Copyright © 2022 NetApp, Inc. All rights reserved. Printed in the U.S. No part of this document covered by
copyright may be reproduced in any form or by any means-graphic, electronic, or mechanical, including
photocopying, recording, taping, or storage in an electronic retrieval system- without prior written permission of
the copyright owner.
Software derived from copyrighted NetApp material is subject to the following license and disclaimer:
THIS SOFTWARE IS PROVIDED BY NETAPP “AS IS” AND WITHOUT ANY EXPRESS OR IMPLIED
WARRANTIES, INCLUDING, BUT NOT LIMITED TO, THE IMPLIED WARRANTIES OF MERCHANTABILITY
AND FITNESS FOR A PARTICULAR PURPOSE, WHICH ARE HEREBY DISCLAIMED. IN NO EVENT SHALL
NETAPP BE LIABLE FOR ANY DIRECT, INDIRECT, INCIDENTAL, SPECIAL, EXEMPLARY, OR
CONSEQUENTIAL DAMAGES (INCLUDING, BUT NOT LIMITED TO, PROCUREMENT OF SUBSTITUTE
GOODS OR SERVICES; LOSS OF USE, DATA, OR PROFITS; OR BUSINESS INTERRUPTION) HOWEVER
CAUSED AND ON ANY THEORY OF LIABILITY, WHETHER IN CONTRACT, STRICT LIABILITY, OR TORT
(INCLUDING NEGLIGENCE OR OTHERWISE) ARISING IN ANY WAY OUT OF THE USE OF THIS
SOFTWARE, EVEN IF ADVISED OF THE POSSIBILITY OF SUCH DAMAGE.
NetApp reserves the right to change any products described herein at any time, and without notice. NetApp
assumes no responsibility or liability arising from the use of products described herein, except as expressly
agreed to in writing by NetApp. The use or purchase of this product does not convey a license under any
patent rights, trademark rights, or any other intellectual property rights of NetApp.
The product described in this manual may be protected by one or more U.S. patents, foreign patents, or
pending applications.
RESTRICTED RIGHTS LEGEND: Use, duplication, or disclosure by the government is subject to restrictions
as set forth in subparagraph (c)(1)(ii) of the Rights in Technical Data and Computer Software clause at DFARS
252.277-7103 (October 1988) and FAR 52-227-19 (June 1987).
Trademark Information
NETAPP, the NETAPP logo, and the marks listed at http://www.netapp.com/TM are trademarks of NetApp, Inc.
Other company and product names may be trademarks of their respective owners.
16
Related Documents

![[GUIDE] Ubuntu Debian CentO...](https://static.cupdf.com/doc/110x72/55340b6c4a795936578b49ce/guide-ubuntu-debian-cento.jpg)