Configuration Manager Current Branch 1610 – Cloud Management Gateway Configuration Manager 1610 introduced a new feature to manage clients on the internet - the Cloud Management Gateway. The Cloud Management Gateway service is deployed to Microsoft Azure (an Azure subscription is required), and connects to your Configuration Manager site via the Cloud Management Gateway connection point – a new site system role also introduced in 1610. This allows Configuration Manager clients to access your Configuration Manager site system roles even if they are not on the intranet. Like internet based client management, for clients to access site system roles using the Cloud Management Gateway, SSL certificates are required to authenticate computers and encrypt communications between the different layers of the service. To encrypt traffic between Configuration Manager clients and the site system server hosting the Cloud Management Gateway connector, Software Update Point, and Management point roles, you will also need to create a custom SSL certificate on the CA for the site system. An Azure management certificate is required to deploy the Cloud Management Gateway as well as the Cloud Distribution Point. In the 1610 release, the Cloud Management Gateway only supports the management point and software update point roles. If you will be deploying anything other than software updates to clients managed via the Cloud Management Gateway, you will also need to configure a Cloud Distribution Point for clients to download content from. The guide below covers the full process of creating the required certificates on the Issuing CA server, creating the Cloud Management Gateway and Cloud Management Gateway connection point, uploading management certificates to Azure, configuring the site system roles to accept cloud management gateway traffic, and verifying that clients on the internet can connect to the cloud management gateway. The last section also covers creating the Cloud Distribution Point. More information on the Cloud Management Gateway, including prerequisites, can be found here https://docs.microsoft.com/en-us/sccm/core/clients/manage/plan-cloud-management-gateway The process for deploying Cloud Management Gateway includes the following steps: 1. Create and issue a custom SSL certificate for the Cloud Management Gateway (and optionally, the Cloud Distribution Point). 2. Create a client authentication certificate 3. Export the client certificate's root 4. Verify a unique Azure cloud service URL 5. Request the Cloud Management Gateway certificate from the Certification Authority 6. Upload the Cloud Management Gateway (and optionally, the Cloud Distribution Point) management certificate to Azure.

Welcome message from author
This document is posted to help you gain knowledge. Please leave a comment to let me know what you think about it! Share it to your friends and learn new things together.
Transcript

Configuration Manager Current Branch 1610 – Cloud Management Gateway Configuration Manager 1610 introduced a new feature to manage clients on the internet - the Cloud
Management Gateway. The Cloud Management Gateway service is deployed to Microsoft Azure (an
Azure subscription is required), and connects to your Configuration Manager site via the Cloud
Management Gateway connection point – a new site system role also introduced in 1610. This allows
Configuration Manager clients to access your Configuration Manager site system roles even if they are
not on the intranet.
Like internet based client management, for clients to access site system roles using the Cloud
Management Gateway, SSL certificates are required to authenticate computers and encrypt
communications between the different layers of the service. To encrypt traffic between Configuration
Manager clients and the site system server hosting the Cloud Management Gateway connector,
Software Update Point, and Management point roles, you will also need to create a custom SSL
certificate on the CA for the site system. An Azure management certificate is required to deploy the
Cloud Management Gateway as well as the Cloud Distribution Point.
In the 1610 release, the Cloud Management Gateway only supports the management point and
software update point roles. If you will be deploying anything other than software updates to clients
managed via the Cloud Management Gateway, you will also need to configure a Cloud Distribution Point
for clients to download content from.
The guide below covers the full process of creating the required certificates on the Issuing CA server,
creating the Cloud Management Gateway and Cloud Management Gateway connection point, uploading
management certificates to Azure, configuring the site system roles to accept cloud management
gateway traffic, and verifying that clients on the internet can connect to the cloud management
gateway. The last section also covers creating the Cloud Distribution Point.
More information on the Cloud Management Gateway, including prerequisites, can be found here
https://docs.microsoft.com/en-us/sccm/core/clients/manage/plan-cloud-management-gateway
The process for deploying Cloud Management Gateway includes the following steps:
1. Create and issue a custom SSL certificate for the Cloud Management Gateway (and optionally, the Cloud Distribution Point).
2. Create a client authentication certificate
3. Export the client certificate's root
4. Verify a unique Azure cloud service URL
5. Request the Cloud Management Gateway certificate from the Certification Authority
6. Upload the Cloud Management Gateway (and optionally, the Cloud Distribution Point) management certificate to Azure.

7. Create the Cloud Management Gateway in the Configuration Manager console
8. Install the Cloud Management Gateway connection point in the Configuration Manager console
9. Configure Site System Roles to accept cloud management gateway traffic
10. Verify Client Communication with the Cloud Management Gateway
11. Configure a Cloud Distribution Point (optional)

The first step is to Create and issue a custom SSL Certificate
The certificate created in the following steps can be used for both the Cloud Management Gateway and
Cloud Distribution Point(optional).
To start, create a security group in Active Directory named Configuration Manager Site Servers – this
group will hold the Configuration Manager primary site server(s) and the server that will host the Cloud
Management Gateway connection point role.
Next, on your Issuing CA server, open the Certification Authority console, expand the server name, right
click Certificate Templates – Manage
Right click the Web Server template & choose Duplicate Templates.

In the Duplicate Template dialog box, ensure that Windows 2003 Server, Enterprise Edition is selected, and then click OK.
On the General tab, enter a template name for the cloud management gateway certificate, such as ConfigMgr Cloud Management Gateway Cert
The validity period for the certificate can be extended as needed for your organization.

On the Request Handling tab, choose allow private key to be exported (don’t forget this step!).

On the Security tab, remove Enroll permissions from Enterprise Admins.
Add Read and Enroll permissions for the security group that holds your Configuration Manager site servers (the server that will be used for the Configuration Manager Cloud Management Gateway connection point should be in this group).
Click OK and close Certificate Templates Console.
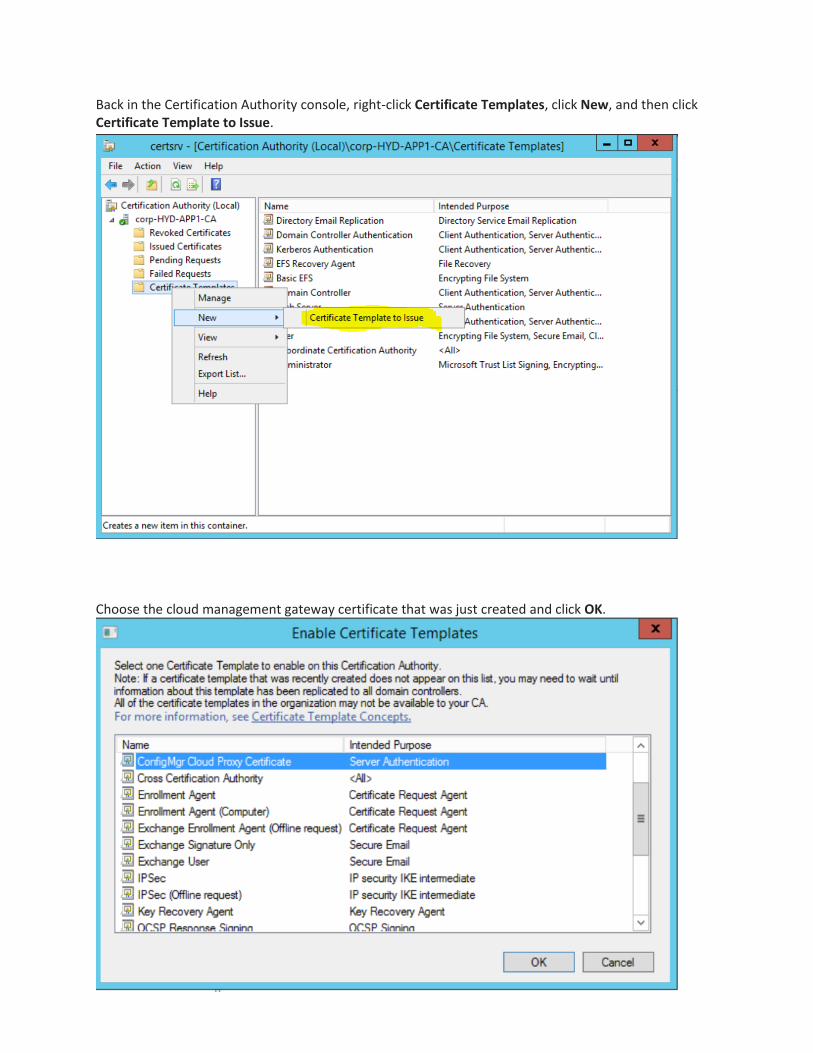
Back in the Certification Authority console, right-click Certificate Templates, click New, and then click Certificate Template to Issue.
Choose the cloud management gateway certificate that was just created and click OK.

Note: If you also plan to use a Cloud Distribution Point, follow the steps above again, but name the certificate template something like ‘ConfigMgr Cloud Distribution Point’.

The next step is to Create the client authentication certificate
Note: A client certificate is required on any computer which will be managed via the Cloud Management Gateway. It is also required on the server that will host the Cloud Management Gateway connection point.
The fastest way to deploy the client certificate to all your machines is through an autoenrollment GPO. The process on how to create the autoenrollment GPO as well as how to import this certificate manually can be found here under the Deploy the Client Certificate for Windows Computers section.
If you do not already have a client certificate template, follow the steps below.
On your Issuing CA server, open the Certification Authority console, expand the server name, right click
Certificate Templates – Manage

Right click the Workstation Authentication template & choose Duplicate Template.
In the Duplicate Template dialog box, ensure that Windows 2003 Server, Enterprise Edition is selected, and then click OK.
On the General tab, enter a name that will be used for the client certificates, such as ConfigMgr Client Certificate.

You can also increase the validity period of the certificate as necessary. (this one has been increased to 20 yrs).

On the Security tab, add Read, Autoenroll and Enroll permissions to the Domain Computers group.
Click OK and close Certificate Templates console.
Back in the Certification Authority console, right click on Certificate Templates – New
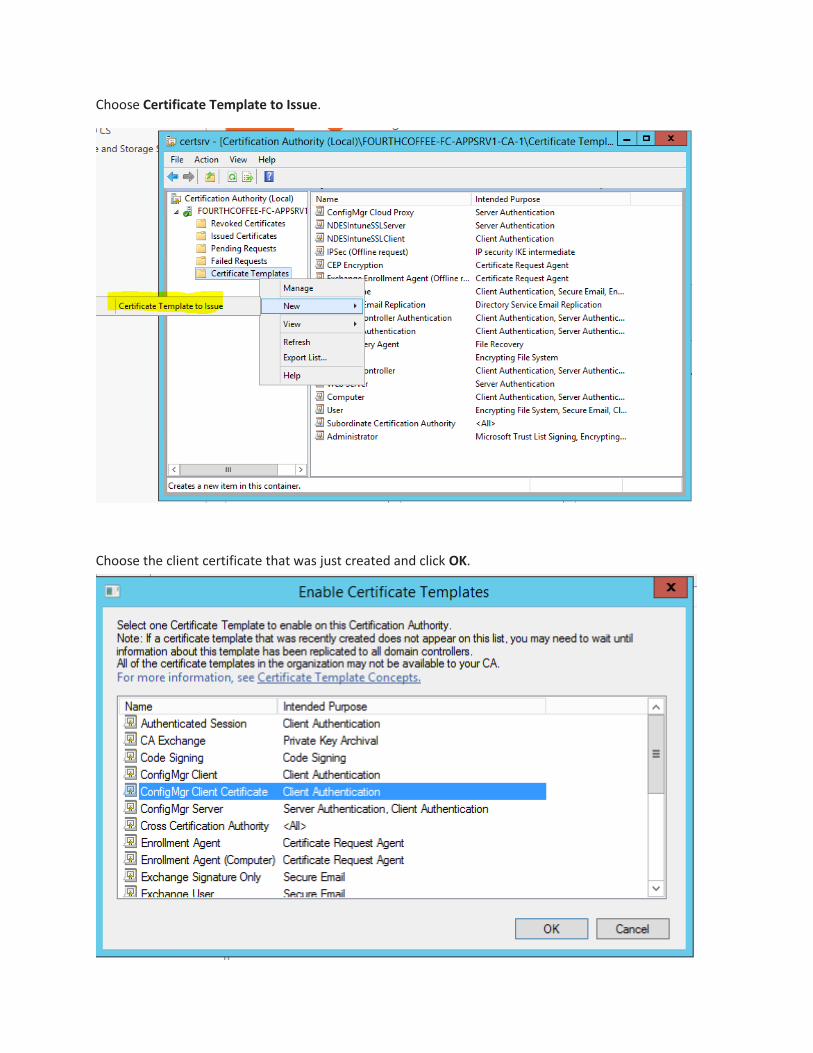
Choose Certificate Template to Issue.
Choose the client certificate that was just created and click OK.

After importing the certificate on a domain machine, Export the Client
Certificate’s Root
Find the certificate root by logging on to a domain joined machine which already has a client cert (as
created in the previous section). Right click on the Start Menu – Run and type certlm.msc
Expand the Personal – Certificates node.

Double click the certificate which shows the intended purpose as Client Authentication & click the
Certificate Path tab. Double click the root authority

Click the Details tab and click Copy to File…
This will open the Certificate Export Wizard
Choose the default values presented in the wizard and save the .cer to a location which can later be accessed to configure the Cloud Management Gateway.


Before uploading the management certificate to Azure, Verify a unique Azure
cloud service URL.
Note: Do not actually create the cloud service when verifying the Azure cloud service URL. The Cloud
Management Gateway setup will do this for us.
Logon to the Azure portal at portal.azure.com
The cloud service name will route to <CloudServiceName>.cloudapp.net; since this is an Azure based
service, it needs to be a unique name and therefore it is best to verify the name before adding this info
to Configuration Manager.
In the Azure Portal, you will see a Cloud Services node on the left. Choose to create a new cloud service.

If you attempt to use a DNS name which is already in use, you will see the message below.
Note down the unique DNS name(s) that will be used for the Cloud Management as you will add this
information to Configuration Manager.

The next step is to Request the Cloud Management Gateway
certificate from the Certification Authority
When requesting the custom web server certificate, provide an FQDN for the certificate's common
name that ends in cloudapp.net for using cloud management gateway on Azure public cloud or
usgovcloudapp.net for the Azure government cloud.
Logon to the server which will serve as your Cloud Management Gateway connection point.
Right click on the Start Menu – Run and type certlm.msc
Expand the Personal – Certificates node.

Expand Personal & right click on Certificates – Request New Certificate
On the Certificate Enrollment page, you should see the cloud management gateway certificate which
was created earlier

Click on the blue link ‘more information is required to enroll….’
In the Certificate Properties, on the General tab, enter the full name of what you will use for the cloud
management gateway service.

Under the Subject Name section, change Type to Common Name and enter the name of the cloud
management gateway service.
Click Add.

Click OK to close out of Certificate Properties.
Enroll in the certificate.
You will see your certificate in the list

Right click on the certificate – All Tasks – Export
Choose Yes, Export the private key
Keep the default PFX format

Secure the certificate with a password & note down this password as we will need it in the next steps

Save the resulting certificate as a .pfx file.
Run through the certificate export wizard again, and this time choose ‘No, do not export the private
key.’
Save the resulting certificate as a .cer file.
At the end of this process, you should have two certificates saved.

(Optional) The next step is to Request the Configuration Manager Cloud
Distribution Point Certificate
If you are also setting up a Cloud Distribution Point, follow these steps to request the web server
certificate.
Logon to your Configuration Manager site server (or another site system server).
Right click on the Start Menu – Run and type certlm.msc
Expand the Personal – Certificates node.

Expand Personal & right click on Certificates – Request New Certificate
On the Certificate Enrollment page, you should see the clouds distribution point certificate which was
created earlier

Click on the blue link ‘more information is required to enroll….’
In the Certificate Properties, on the General tab, change the type dropdown to Common Name and
enter the full name for what you will use for the cloud distribution point.
Note: Specify your choice of service name and your domain name by using an FQDN format. For
example: clouddp1.contoso.com. It does not matter what service name you specify, as long as it is
unique in your namespace. You will use DNS to create an alias (CNAME record) to map this service name
to an automatically generated identifier (GUID) and an IP address from Windows Azure. That process is
described here under the ‘Configure name resolution for cloud-based distribution points’ section.
Click Add.

Click OK to close out of Certificate Properties.
Enroll in the certificate.
You will see your certificate in the list

Right click on the certificate – All Tasks – Export
Choose Yes, Export the private key
Keep the default PFX format

Secure the certificate with a password & note down this password as we will need it in the next steps.

Save the resulting certificate as a .pfx file.
Run through the certificate export wizard again, and this time choose ‘No, do not export the private
key.’
Save the resulting certificate as a .cer file.
At the end of this process, you should have two certificates saved.

The next step is to Upload the management certificate to Azure
(Cloud Management Gateway and Cloud Distribution Point)
For Configuration Manager to access the Azure API and Cloud Management Gateway and/or Cloud
Distribution Point service, we need to upload an Azure Management Certificate to the portal.
Login to the Azure classic portal at https://manage.windowsazure.com
Choose the correct subscription to associate the certificate with. If the subscription needs to be
changed, press the Subscriptions text at the top right of the portal.
Select the Settings node on the left side of the portal, and choose the Management Certificates tab.
Note down your Subscription ID as we will need this when creating both the Cloud Management
Gateway and Cloud Distribution Point in Configuration Manager.
Requirements for an Azure Management Certificate can be found here under the Create a New Self
Signed Certificate section.
Click Upload.

Browse to the .cer file that was created in the previous steps and click the checkbox to complete the
upload process. Upload the certificates for both the Cloud Management Gateway and optionally, the
Cloud Distribution Point.
Cloud Management Gateway
Cloud Distribution Point

After uploading the management certificate(s) to Azure, Create the Cloud
Management Gateway in Configuration Manager
In the Configuration Manager console, navigate to Administration – Cloud Service – Cloud
Management Gateway
Choose Create Cloud Management Gateway
On the General page, enter your Azure Subscription ID and browse to the .pfx certificate that was saved
in the earlier steps.
You will be prompted to enter the password for the .pfx certificate


On the Settings page, enter the following
Service name: the cloud service name which was verified in the earlier steps (example: tejucloudproxy).
Configuration Manager will populate this value after uploading the certificate
Description: add a description for the Cloud Management Gateway; this will later show up in the Azure
portal
Region: Geographical region based on your organization
Instance number: Specify the number of instances you want to run
Certificate file: select the pfx certificate created for the Cloud Management Gateway
Service FQDN: specify the same FQDN service name that was created when the certificate was
requested
Root Certificate file: this is the client root cert which was exported in the earlier steps
Uncheck the box to Verify Client Certificate Revocation (unless you are publicly publishing CRL info)

In the 1610 release, if the certificate does not specify a ‘.cloudapp.net’ name, you will see the message
below
On the Alerts page, make any modifications for alerts on outbound data transfer
Click Next to complete the wizard.


There are a few different methods that we can use to verify that the Cloud Management Gateway was
created successfully.
In the Configuration Manager console, you should see a new entry under Service Name, with the Status
Description showing Provisioning completed.
In the Azure portal, you should see the Cloud Service created and running

The Configuration Manager site server CloudMgr.log, located at <ConfigMgr Install Dir\Logs>, will also
have information on the cloud management gateway provisioning status.
You will see an entry in the log stating ‘Deployment instance status for service <service name> is
ReadyRole’

The next step is to Install the Cloud Management Gateway
Connection Point
In the Configuration Manager console, navigate to Administration – Site Configuration – Servers and
Site System Roles
If you have already added the server which will serve as your cloud management gateway connection
point, right click on that server. if not, right click on Servers and Site System roles, and choose Create
Site System Server.
On the System Role Selection page, choose the Cloud management gateway connection point site
system role.

On the Cloud management gateway connection page, verify that the Cloud Management Gateway
service name matches the information from the Cloud Management Gateway created in the earlier
steps.

Click Next to complete the wizard.

SMS_CLOUD_PROXYCONNECTOR.LOG

Parking connection 2b172de3-6cd3-4fba-9f0c-282023199d33 to Proxy server
TEJUCLOUDPROXY.CLOUDAPP.NET:10140... SMS_CLOUD_PROXYCONNECTOR
11/13/2016 8:19:23 PM 2888 (0x0B48)
Connection 2b172de3-6cd3-4fba-9f0c-282023199d33 finished initialization and
started SMS_CLOUD_PROXYCONNECTOR 11/13/2016 8:19:23 PM 2888
(0x0B48)
ReportOnlineConnections - state message to send: <Connections
ServerName="HYD-APP1.CORP.CONTOSO.COM"><Connection ID="2b172de3-6cd3-4fba-
9f0c-282023199d33" ConnectedInstances="1"/></Connections>
SMS_CLOUD_PROXYCONNECTOR 11/13/2016 8:19:23 PM 2888 (0x0B48)

The last server side configuration is to Configure Site System Roles to Accept
Cloud Management Gateway Traffic
The last thing to configure on the site are the additional site system roles we want to use for the cloud
management gateway service. In this example, this server will also host as a Management Point and
Software Update Point. For each one of these site system roles, ensure that you choose an HTTPS
connection and ‘Allow Configuration Manager Cloud Management Gateway traffic.’
The site server will also need to be configured to Use PKI client certificate (client authentication
capability) when available.
Software Update Point:

Management Point:
Since the Management Point will need to support HTTPS connections from internet clients, the HTTPS
binding in IIS will require an SSL Certificate. The certificate template which was created for the Cloud
Management Gateway can be used for IIS.
Logon to the server which will serve as your Cloud Management Gateway connection
point/Management Point.

Right click on the Start Menu – Run and type certlm.msc
Expand the Personal – Certificates node.

Expand Personal & right click on Certificates – Request New Certificate
On the Certificate Enrollment page, you should see the cloud management gateway certificate which
was created earlier

Click on the blue link ‘more information is required to enroll….’
Keep the Full DN value under Subject name blank.
Under Alternative Name – DNS, enter the FQDN of the management point server.
Click Add.

Click on the General tab and enter a friendly name for the certificate (this will make the cert easier to
identify in IIS).
Click OK to close out of Certificate Properties.

Enroll in the certificate.
Open IIS Manager.
Expand Sites – Default Web Site.
Right click on Default Web Site – Edit Bindings.

Click Add to create an HTTPS binding (443). If there is already an entry for HTTPS, click Edit.
Under the SSL Certificate dropdown, choose the SSL certificate from the previous steps.
Click OK.

In the properties of the site, under Administration – Site Configuration – Sites, right click on your
primary site and choose the Client Computer Communication tab.
Check the box for ‘Use PKI client certificate (client authentication capability) when available’
Uncheck the box for ‘Client check the certificate revocation list (CRL) for site systems’
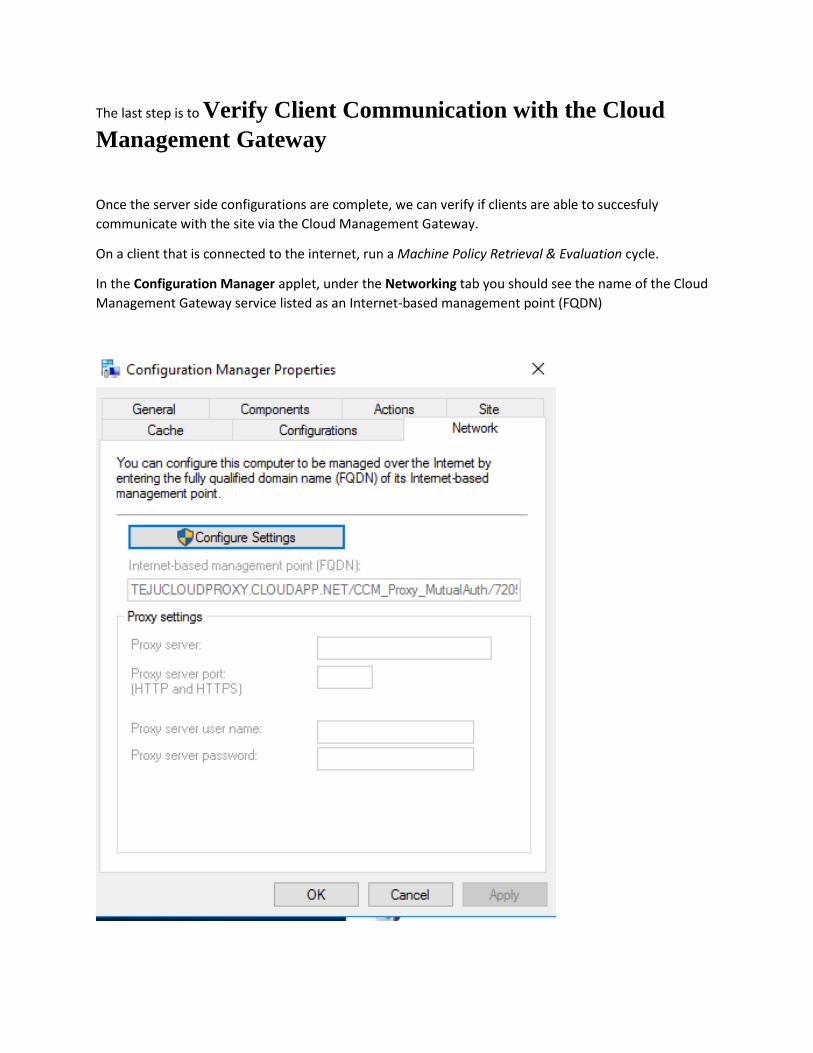
The last step is to Verify Client Communication with the Cloud
Management Gateway
Once the server side configurations are complete, we can verify if clients are able to succesfuly
communicate with the site via the Cloud Management Gateway.
On a client that is connected to the internet, run a Machine Policy Retrieval & Evaluation cycle.
In the Configuration Manager applet, under the Networking tab you should see the name of the Cloud
Management Gateway service listed as an Internet-based management point (FQDN)

The ClientLocation.log should will indicate that the machine is using the internet management point
Rotating internet management point, new management point [1] is:
TEJUSCCMGATEWAY.CLOUDAPP.NET/CCM_Proxy_MutualAuth/72057594037988005
(0) with capabilities: <Capabilities SchemaVersion ="1.0"><Property
Name="SSL" Version="1" /></Capabilities> ClientLocation 12/12/2016
2:41:05 PM 4168 (0x1048)
Rotating assigned management point, new management point [1] is: FC-
APPSRV1.FOURTHCOFFEE.LOCAL (8458) with capabilities: <Capabilities
SchemaVersion="1.0"><Property Name="SSL" Version="1"/><Property
Name="SSLState" Value="63"/></Capabilities> ClientLocation 12/12/2016
2:41:05 PM 4168 (0x1048)
Assigned MP changed from <FC-CM01.FOURTHCOFFEE.LOCAL> to <FC-
APPSRV1.FOURTHCOFFEE.LOCAL>. ClientLocation 12/12/2016 2:41:06 PM
4168 (0x1048)
You can also verify that clients can contact the Cloud Management Gateway service via the following
PowerShell command:

Create Cloud Distribution Point (optional)
An optional step is to create a Cloud Distribution Point in Configuration Manager. The Cloud Distribution
Point can be used to host applications/packages. Note that a Cloud Distribution Point is not required to
host Microsoft software updates as clients will download software updates directly from Microsoft
update.
In earlier steps, we had already configured the Cloud Distribution Point certificate and uploaded that
certificate to the Azure Portal.
In the Configuration Manager console, find Administration – Cloud Services – Cloud Distribution Point
Right click on Cloud Distribution Point and choose Create Cloud Distribution Point
The Cloud Distribution Point setup wizard will open.
On the General page, enter your Azure Subscription ID & upload the Management Certificate (pfx
format) for the Cloud Distribution Point which was created earlier

Click Next.
On the Settings page, enter the following information
Service name: this will populate based on the certificate that was added in the previous step
Description: add a description for the Cloud Distribution Point
Region: specify a region for the cloud service to be hosted in

Primary Site: in the dropdown, choose the site server that will distribute content to the Cloud
Distribution Point
Certificate file: enter the management certificate (pfx format) again
Service FDQN: this will populate based on the certificate common name
Click Next.
On the Alerts page, you can define a storage alert threshold and monthly transfer alter threshold. This
will allow you to monitor the data deployed to the cloud distribution point as well as transfer of content
from the cloud distribution point to clients.

Click Next to see a Summary of all the settings for the Cloud Distribution Point.
Click Next through the rest of the wizard to initiate the Cloud Distribution Point installation.
The SMS_CLOUD_SERVICES_MANAGER component will initiate a connection to Azure to create a
Storage Account. You will see the Storage Account in Azure after Configuration Manager has initiated
the deployment. The name of the Storage Account will match the Service Name value on the General
page of the Create Cloud Distribution Point wizard.

In the Configuration Manager console, you will see the Cloud Distribution Point in a provisioning status
The CloudMgr.log on the site server will also have some status information on the storage account
deployment.
TaskManager: Task [CreateDeployment for service 09193e0871424e41a6a7b74c]
status is RanToCompletion SMS_CLOUD_SERVICES_MANAGER 12/7/2016 1:00:13
AM 5876 (0x16F4)
TaskManager: Removing task [CreateDeployment for service
09193e0871424e41a6a7b74c] from running tasks. SMS_CLOUD_SERVICES_MANAGER
12/7/2016 1:00:13 AM 5876 (0x16F4)
TaskWorker: Starting task: [Upload MP Certificates for service
09193e0871424e41a6a7b74c] SMS_CLOUD_SERVICES_MANAGER 12/7/2016 1:00:13
AM 6072 (0x17B8)
Upload mp certs starting for service 09193e0871424e41a6a7b74c...
SMS_CLOUD_SERVICES_MANAGER 12/7/2016 1:00:13 AM 7460 (0x1D24)
Storage service already exists 09193e0871424e41a6a7b74c
SMS_CLOUD_SERVICES_MANAGER 12/7/2016 1:00:14 AM 7460 (0x1D24)
Uploading certificate for server fc-cm01.fourthcoffee.local to publickeystore
for service 09193e0871424e41a6a7b74c. SMS_CLOUD_SERVICES_MANAGER
12/7/2016 1:00:15 AM 7460 (0x1D24)
Uploading bytearray to container publickeystore with blob name fc-
cm01.fourthcoffee.local.pubkey using storage account 09193e0871424e41a6a7b74c
SMS_CLOUD_SERVICES_MANAGER 12/7/2016 1:00:15 AM 7460 (0x1D24)
UpdateServiceInfo: Service 16777220 to ServiceState 0 ServiceInfoStateDetail
1. SMS_CLOUD_SERVICES_MANAGER 12/7/2016 1:00:15 AM 7460 (0x1D24)
SetTaskState: Task 16777247 State Completed. SMS_CLOUD_SERVICES_MANAGER
12/7/2016 1:00:15 AM 7460 (0x1D24)
Once the deployment is complete, the Cloud Distribution Point will show as Ready in the Configuration
Manager console.

Before clients can access the cloud-based distribution point, they must be able to resolve the name of the cloud-based distribution point to an IP address that Microsoft Azure manages. Clients do this in two stages:
1. They map the service name that you provided with the Configuration Manager cloud-based distribution point service certificate to your Microsoft Azure service FQDN. This FQDN contains a GUID and the DNS suffix of cloudapp.net. The GUID is automatically generated after you install the cloud-based distribution point. You can see the full FQDN in the Microsoft Azure Management Portal, by referencing the SITE URL in the dashboard of the cloud service. An example site URL is http://d1594d4527614a09b934d470.cloudapp.net.
2. They resolve the Microsoft Azure service FQDN to the IP address that Microsoft Azure allocates. This IP address can also be identified in the dashboard for the cloud service in the Microsoft Azure portal, and is named PUBLIC VIRTUAL IP ADDRESS (VIP).
Login to http://manage.windowsazure.com. Click on Cloud Services on the left, and find the cloud
service associated with your Cloud Distribution Point.
Find the Site URL.
On your DNS server, Open DNS Manager – Forward Lookup Zones
Right click on your domain and choose New Alias (CNAME)

To create a new host record, add the following information:
Name
FQDN (add the Site URL from Azure)
The Cloud Distribution Point setup is now complete, and you can start to distribute content to the Cloud
Distribution Point. After distributing content to the Cloud Distribution Point (you can follow the same
process as you would with distributing content to any other distribution point), verify these entries in
the distmgr.log.

Successfully updated the package server status for
["Display=\\fchclouddp.fourthcoffee.local\"]MSWNET:["SMS_SITE=CM1"]\\f
chclouddp.fourthcoffee.local\ for package CM10001E, Status 0
You should also see in the Configuration Manager console that the content was distributed successfully
You can also verify content has distributed successfully using Microsoft Azure Storage Explorer, which is
available here.
Login to your Azure account & under Storage Account, find the account associated with the Cloud
Distribution Point. Under Blog Containers, you should see a content node which will display the content
that has been distributed to the Cloud Distribution Point via Configuration Manager.


Additional References
Use a cloud-based distribution point with System Center Configuration Manager
Install cloud-based distribution points in Microsoft Azure for System Center Configuration Manager
Deploying the Service Certificate for Cloud Based Distribution Points
Plan for cloud management gateway in Configuration Manager
Setup Cloud Management Gateway
Monitor Cloud Management Gateway in Configuration Manager
Related Documents