Computers in Seafood Businesses: A Primer On Using Computers in Your Business James E. Kirkley Sayra G. Thacker College of William and Mary Virginia Institute of Marine Science School of Marine Science Gloucester Point, VA 23062 This project was funded by the United States Department of Commerce, National Oceanic Atmospheric Administration, National Marine Fisheries Service, Northeast Regional Office, Gloucester, Massachusetts under NOAA AWARD NO. NA265K0397- 01. Additional support was provided by the Virginia Sea Grant Marine Advisory Service Program, Virginia Institute of Marine Science, College of William and Mary.

Welcome message from author
This document is posted to help you gain knowledge. Please leave a comment to let me know what you think about it! Share it to your friends and learn new things together.
Transcript

Computers in Seafood Businesses: A Primer
On Using Computers in Your Business
James E. KirkleySayra G. Thacker
College of William and MaryVirginia Institute of Marine Science
School of Marine ScienceGloucester Point, VA 23062
This project was funded by the United States Department of Commerce, NationalOceanic Atmospheric Administration, National Marine Fisheries Service, NortheastRegional Office, Gloucester, Massachusetts under NOAA AWARD NO. NA265K0397-01. Additional support was provided by the Virginia Sea Grant Marine AdvisoryService Program, Virginia Institute of Marine Science, College of William and Mary.

Table of Contents
SECTION PAGE
List of Examples
PREFACE
INTRODUCTION
Knowing Your Computer
The central processing unit (CPU) 2Random access memory (RAM) 3Hard disk drive 4Floppy disk drive 4The Keyboard 5The monitor and cursor 6Disk operating system (DOS) 7W i n d o w s 7Files 8The computer library 8
GETTING STARTED
The Basics 9Formatting 10Important Basic DOS Commands 11Some Additional Basics 15Working Through an Example 18
BUSINESS AND APPLICATION PROGRAMS
Programs and Software 21What is Word Processing? 23The Spreadsheet Packages 24Relational Databases 25
III
iv
1
2
9
21
i

SECTION
SOME APPLICATIONS
Word Processing
Correspondence/LetterDaily logHAACP flow chart
Spreadsheets
Vessel settlement 57Saving time with your spreadsheet 70Monitoring with spreadsheets 72
Relational Databases
A FINAL NOTE
PAGE
27
27
28345 0
53
77
86
ii

LIST OF EXAMPLES
EXAMPLE
Letter in Courier 10 point
Letter in Courier 12 Characters Per Inch ltalica
Daily Fishing Log--Word Processing
HAACP Flow Chart
Vessel Settlement
Generalized Vessel Settlement
Structure of Relational Database
Daily Fishing Log--Relational Database
Summary of Daily Fishing Log
PAGE
31
33
41
52
69
71
80
82
84
iii
PREFACE
It has only been in the past ten years that the American seafood industry
has begun to utilize computers. Until recently, in fact, computer usage was
restricted primarily to processors and fish brokers and dealers. A survey
conducted for this project indicated that captains and crew of scallop vessels
operating in the Mid-Atlantic had little or no familiarity with computers. Moreover,
vessel captains and crew indicated they believed they have no need to use
computers in their fishing operations. Many captains and crew, however, indicated
they would like to know more about computers for use at-home.
This project, funded by the National Marine Fisheries Service, NOAA
AWARD NO. NA265K0397-01, sought to overcome industry’s perception of the
need for computers and to educate members of the sea scallop fishery about
using computers. Mandatory data reporting required by Amendment #4 of the
Fishery Management Plan for Atlantic sea scallops was perhaps the biggest
impetus for industry becoming interested in computers. Once vessel captains
became aware of how personal computers could be used to not only help captains
comply with mandatory data reporting but also help in everyday decisions,
captains and crew became very interested in using personal computers for storing
information and making decisions.
This manual provides an introduction to using computers and specific
application programs for which industry has indicated an interest. Although all
training and instruction are specific to the International Business Machine (IBM) or
iv

compatible personal computer, neither the National Marine Fisheries Service nor
the College of William and Mary, Virginia Institute of Marine Science endorse the
use of IBM or compatible machines or of any of the software described in this
manual. The manual, while allowing self-instruction, is really intended for training
in an instructor-student setting.
The manual provides training in four basic areas: (1) computer and
operating system basics, (2) word processing, (3) spreadsheets, and (4) relational
database systems. Specific programs or examples discussed in the manual
include preparing correspondence, creating a daily log, vessel settlement and
financial summary routines, HACCP flow chart, and a mandatory reporting log.
A major result of this project has been the creation of a formal or structured
industry assistance program within the Virginia Sea Grant Marine Advisory Service
Program. This particular program primarily provides assistance on using personal
computers. Clients include several processors, fish wholesalers, and vessel
owners and captains. Services provided include instruction in using personal
computers and application programs, assistance in acquiring hardware and
software, and preparation of custom programs for industry. Another major result
of this project was inclusion of 14 vessels in the full-time scallop fishery. NMFS
had no history or only a limited history of the 14 vessels operating in the fishery;
the project provided assistance to the vessel owners in preparing vessel histories
which allowed the vessels to remain in the fishery as full-time vessels.

Introduction:
Come on, admit it! For a long time, you have wanted to learn how to use
a computer. You suspected it would be very beneficial to your business. It might
help you catch more fish, receive a higher price per pound, pay your crew faster,
or manage your inventory. You just did not know how to use the computer, how
to buy a computer, or the advantages and disadvantages of having a computer.
You are not alone in your feelings.
Currently, only one-third of the ninety-six million U.S. households are taking
advantage of the technology advances in personal computers (Vivian Marino,
March 27, The Associated Press). Many people are simply scared of using a
computer. What is “DOS”, a “mouse,” a keyboard, or a modem? What if I push
the wrong button? If you are a boat captain, you might be interested in knowing
that you operate equipment that is much more sophisticated than a personal
computer. In fact, many of your on-board electronics are actually computers
dedicated to performing certain tasks.
This manual provides an introduction to using personal computers (PC) in
the fishing industry. Specifically, this manual discusses what computers can do
for your business, what factors are important in purchasing a computer, operation
of a computer, basic terminology, and some basic business programs. Although
there are several types of personal computers, this manual provides instructions
only for IBM (International
is not an endorsement of
Business Machines) or IBM compatible (“clones”). This
IBM or IBM compatible machines over Macintosh-type

machines. instead, the emphasis on IBM or IBM compatible machines reflects the
author’s familiarity with these types of machines.
Knowing Your Computer
The Central Processing Unit(CPU)
There are many important
components or parts of your
computer. All are important, but
the central processing unit (CPU) is
the brains of your computer. The
CPU is also known as the microprocessor and is the major factor which
determines how fast your computer runs programs. There are a variety of IBM-
type processors which are manufactured by several companies (e.g., Intel,
Advanced Micro Devices, and IBM). The older or initial personal computers (PC)
used an 8088 processor or chip; an 8087 chip was a math coprocessor which
enhanced speed and precision of operations. A chip can be made at different
clock speeds measured in megahertz--millions of ticks per second. For example,
a 50 MHz chip will typically operate twice as fast as a 25 MHz chip.
Currently, most new IBM compatible personal computers (PC) use a 486
processor. The 486SX is probably the least processor that can be purchased in
a new personal computer (PC). Many individuals and businesses, however, are
2

purchasing a 486DX2 and even a 486DX4 processor. The DX2 typically operates
at 66 MHz and the DX4 operates at 75 MHz. There is also a Pentium chip, you
might think of this as a 686, which is the most expensive and fastest PC chip
today. In essence, the various processors control clock speed or how fast your
PC operates programs.
What type of processor should you buy? This is a personal decision but
should depend upon what you want your computer to do or the types of programs
you will run. Most experts -agree that you should have at least a 386 processor
with a minimum of 25 MHz. Given the prices and availability of computers,
however, it is suggested that you obtain at least a 486SX PC for a home computer.
For standard business use, you should probably obtain a 486DX2 PC. If your
company is large and you believe you will have many applications, you should
investigate acquiring a 486DX4 or Pentium PC. You should also be aware that
whatever you purchase will probably be superseded by a faster chip in a relatively
short amount of time (for example, a few months).
Random Access Memory (RAM)
Random access memory (RAM) is where the computer stores programs
and files in use. Note the key words “programs and files in use.” Megabytes is
a measure of storage capacity of RAM--one megabyte (MB) is able to store one
million characters. Memory can be easily added or increased by adding single in-
line memory modules or SIMMS, that plug into the computer. The larger the
random access memory, the more data that can be processed at one time and the
3

faster the computer. Current recommendations for new computers is a minimum
of 4 megabyte (MB) of RAM.
Hard Disk Drive
Another important part of your computer is the hard disk drive. A hard disk
drive is like the chart room in the pilot or wheel house. Programs and information
are stored on the hard disk drive even when the personal computer (PC) is turned
off. A hard disk is located inside of a PC. There are no absolute rules on the size
of a hard disk but a minimum of 105 megabytes (105,000,000 characters) of
storage appears to be the recommended minimum size. Somewhere between 200
and 300 megabytes (MB) appear to be the current average size of hard disks.
Floppy Disk Drive
A floppy disk drive is similar to
the hard disk drive. It allows information to be read from
or stored to a floppy disk. The floppy disk is a circular
piece of plastic protected by a square jacket. The disk has
a magnetic surface which stores information or data. The 3.5-inch floppy
floppy disk is inserted into the floppy disk drive.I c
The floppy disk can be easily transported and stored.
00Most computer experts recommend that in addition
to the hard disk drive, personal computers (PCs) have two _o
floppy disk drives. The preferred configuration is one 5.25-5.25inch floppy
4

inch floppy drive and one 3.5-inch floppy drive. If finances become a concern,
then it is probably better to purchase a PC with the smaller 3.5-inch floppy drive
since the smaller unit appears to have become the standard.
The Keyboard
Like your boat without a prop, you are not going anywhere with your
computer unless you have a keyboard. The keyboard resembles a typewriter with
alphabetical and numerical characters. In addition, the keyboard has function (f)
keys). If you know how to type, you already know the arrangement of the letters
and numbers on the computer keyboard. The keyboard is hardwired to the
computer and allows you to communicate with the computer to tell it what to do.
Like a typewriter, the keyboard allows for uppercase or capital letters (e.g., A) and
lowercase or small letters (e.g., a).
m-=m\t I
Keyboard
5

In addition to the standard or familiar alphabetical and numerical characters,
the keyboard has other keys. It has function and arrow keys. Function keys
perform specific functions with different applications; a further discussion of
function keys will be offered later in this manual. Arrow keys also operate
depending upon the program or application a user is using. There are also some
other keys on the keyboard: control, alternate, delete, and insert. These keys also
imply certain functions related to specific programs. However, the simultaneous
pressing of the control (Ctrl), alternate (Alt), and delete (Del) keys will restart your
computer, if power is on, regardless of the application or program you are running.
The Monitor and the Cursor
The monitor is like a television screen and allows the computer user to
visually observe what is being typed into the computer and usually the output or
product of a specific program application. The monitor may be color or
monochrome (black and white or yellow and black). A monitor is also available in
different sizes (for example, 12-inch or 14-inch diagonal). Most monitors allow 25
lines of text to appear on the screen at one time; many new monitors, however,
allow for even more lines of text.
When the computer and monitor are turned on, you will observe a blinking
bar. This lighted or blinking bar is called the cursor. The cursor is a pointer. As
you type characters, the cursor will move one space ahead and mark where you
are on the screen. Depending on what program or application you are running,
the cursor will respond to the arrow keys, space bar, or backspace key.
6

Disk Operating System (DOS)
While the central processing unit (CPU) is the brains of a personal computer
(PC), the disk operating system (DOS) is the manager. The operating system
tends to all the details of the tasks the user asks the computer to perform. DOS
manages devices connected or attached to the computer and assists other
programs in running. Without DOS, the computer is dead. The PC needs DOS
to start up and operate. As a computer user, you need not know all there is to
know about DOS but the more you know the better you can use your computer.
Over the years, there have been many versions of DOS. First, there was
DOS 1 .O for the initial personal computers. Today, users are using DOS 6.0 or a
higher version. Moreover, many users are also using Microsoft Windows as an
extension of the DOS operating system. Windows allows the user to more
efficiently perform various tasks on their computer. Moreover, Windows allows the
user to work with several programs at once. To a large extent, Windows reduces
the burden of learning extensive details about DOS.
Windows
Microsoft Windows is a registered product and is an extension of the disk
operating system. Numerous software applications or programs are being
designed to operate with Windows. With Windows, many applications can be
accomplished with simple keystrokes on the keyboard or clicks of a mouse. A
mouse is a small device that is hard wired to the computer and is about 2.5-inches
7

by 4-inches in size. A mouse contains two buttons which when pushed allow
many operations of programs specifically written to be used with Windows.
Why the name windows? With Windows, the user is offered a visual way
of working by organizing work in windows or rectangular areas on the screen
which can be used for applications. Windows offers drop-down menus, icons--
pictorial representations, and the option of using a keyboard, mouse, or both.
Windows offers many other advantages for computer usage; in this manual,
however, the use of Windows for program applications is not further discussed.
If you are interested in learning more about Windows, you can purchase several
excellent texts at computer shops or related bookstores. It is quite likely that if you
purchase a new computer, Windows will already be installed on the system.
Files
Like a storage file, a computer file is a collection of related information. All
programs, text, and data are stored as a file. One of the most difficult things about
files is naming them. If the user is not careful, they can easily destroy a file if they
try to use the same name for two files.
The Computer Library
The owner or operator of a personal computer should try to build a library
of texts on computers. Excellent introductory texts include “The Little PC Book
and the “Dummies” series. When you purchase your computer or software, you
should receive texts on DOS, your computer and monitor, and your software.
8

Getting Started
The Basics
We assume that you are operating with a current computer system (for
example, a 386 or 486 machine) in which DOS has been installed on the hard disk.
The first thing you do is turn on the monitor and computer; it does not matter
which order as long as both are turned on. The computer will come on with the
cursor light blinking. Your screen may look like this: C:\>. This indicates that
your default drive is the hard disk (C:), your root or default directory is \, and your
computer is ready for use. Your floppy drives will usually be designated A or B
drive; A will usually be the top or left drive and B will usually be the bottom or right
drive (this depends on your system design).
Now what do you do? Your system is on, the cursor is blinking, and there
is some text on your screen. First, we should probably learn some basics about
the disk operating system (DOS). When working with DOS, particularly when you
are a new user, you should have your DOS manual available. The DOS manual
you will usually want will be the “Users Guide” or “Users Reference Manual.” In
addition, most DOS User Guides have a tutorial on how to use DOS. It is a good
ideal to work through the tutorial lessons. Remember you are just starting to work
with a PC; you are not going to blow up the machine because you pushed the
wrong key. Only after you have installed your application programs and data are
there dangers. Even then, you will not blow up your machine. In some instances,

however, pushing a wrong key during program execution can wipe out your
program or information installed on your computer.
Formatting
Lets start with formatting a new floppy disk. We only need to format a disk
once. Formatting is necessary before you can store information or programs on
a floppy disk. In addition, formatting analyzes the disk for defects on the disk.
You need to make sure that the floppy disk you are going to format is the
appropriate size for your floppy drive units. Most new machines have high density
floppy drives and will use the 1.2 MB or 2.0 MB floppy disks.
If you are going to format in the A drive, type “format a:” (the quotes should
not be included in what you type--these quotation marks are used to indicate to
you the characters which should be typed) and press the enter key (located on
right side of keyboard). Depending upon your PC and DOS, the computer system
will print on the screen “insert new diskette in drive A: (or drive B: if you used drive
B:) and strike any key when ready.” Insert the blank disk into drive A:, make sure
the drive door is closed (if 5.25-inch floppy, there will be a lever that you turn
down; if 3.5 inch floppy, you will not have to close a door), and press the enter
key.
When the process is complete, you will usually see the message
“Formatting...Format complete” which will be followed by xxxxxx bytes total disk
space and xxxxxx bytes available on disk. On some machines, you also may see
the message “Checking existing disk format” “Saving UNFORMAT information.”
10

You also may be prompted for a response to “Volume label (11 characters, ENTER
for none)?” If you observe the volume message, simply press the enter key. Last,
you will be asked whether or not you want to format another disk (“Format another
(Y/N)“). If you want to format another disk, type Y; if not, press N and then enter.
Important Basic DOS Commands
There are a lot of basic DOS commands that will be important for you to
install and operate your application programs. One DOS routine that may be
important, but which is not discussed in this manual, is the EDIT or EDLIN routine.
These routines allow you to create files or lines of text and numbers. These
routines are usually not essential to installing and operating your application
programs. Moreover, the availability of EDIT or EDLIN will depend upon which
version of DOS you are using (e.g., EDLIN was the routine prior to version 6.0 of
DOS; EDIT is the routine available on version 6.0 or more recent). Your user guide
manual will usually include an extensive tutorial on EDIT or EDLIN.
Basic DOS commands that you will want to know, however, are the
following: (1) dir, (2) cd, (3) md or mkdir, (4) rd or rmd, (5) change drives, (6)
copy, (7) ren, and (6) del. (Although commands are in quotes, you should not
include the quotes when you use the DOS commands on the personal computer;
these quotes simply indicate the characters you should type). All of the following
commands are executed from the DOS default, root directory, or monitor
mode; you cannot execute these commands
can, however, execute these commands when
11
within another program. You
you are in other directories or

subdirectories. The root directory is the starting point from which all other
directories commence. It does not have a name or it is designed \; it is the
directory you are in when you start your computer unless you have some specific
configuration. Some programs, however, will allow you to switch between an
existing program and DOS.
“dir"-
“cd”__
In your default drive, the command “dir” will list all files on your default driveand directory. For example, the command dir c: will provide you a list of allfiles and directories noted on drive C: which is usually the hard disk drive.
If you type dir a:, you get a list of all files contained on the floppy diskinserted in drive a.
Now is the time we should learn about directories. A directory is a partitionthat enables you to group files in convenient categories. For example, youmight have a directory called settlement or settle where copies of all yourvessel settlements and a settlement program are stored. You might havea directory where you store all your logbook information (e.g., this directorymight be named logbook).
The DOS command cd informs the computer to change from the currentdirectory to another directory. However, you will have to add abackslash \ and inform the system of the directory you want to change to.For example, assume you were already in the default directory (the directorywhen you start up your computer) and you wanted to be in the settledirectory, you would type cd\settle. This should put you into the settledirectory.
How do we make a directory. You should know that many programinstallations automatically create a directory as well as subdirectories. Foryou to create a directory, you only need to type “md” (remember do not addthe quotes) and the name what you want to call your directory.
Example (creating the settle directory): md\settle or mkdir\settle.
This is all you need to type from a monitor mode.
You can also create subdirectories (for example, settle\boatl where boat1might be the name of one of your vessels). To do this, you simply type“md\settle\boat1 ” Now, your settle directory has a boat1 subdirectory.Also, many installation programs for software create subdirectories.
12

" r d ” - This command allows you to remove a directory. For example, if you typed“rd settle” from your default directory, you would erase (eliminate) the settledirectory. Before you use this command, be sure you want to eliminateyour directory or subdirectory.
change-Change is not a command. You can, however, change drives by simplytyping the drive you want to go to. For example, assume you are in thedefault drive C: and you want to go to the A: disk drive, you only have totype A: (B: if you want to go to the B: drive). To return to the default C:drive and directory, type C: (this will return you to the hard disk drive andthe directory you were in before you went to the A or B drive).
"copy"-The copy command will allow you to copy files between drives,directories,and subdirectories. You may discover that you will often wantto make copies of files from your hard disk to a floppy disk to use as abackup in case your computer has problems.
For example, assume you have just settled a vessel (boat1) and thesettlement is called boat15 for boat #1 and the 5th trip of the year. Youwould probably want to copy file (boat15) to a floppy disk for backup. Youwould type copy boat15 a: if you have your floppy disk inserted in drive a:.
What if you wanted to copy a file (say boat15) from the A: drive to the C:drive and directory settle. You would type copy a:boat15 c:\settle. You canalso copy files and give the copied files new names. For example, youcould copy boat15 to vess15 or settle or any name you wanted. To do this,you simply type copy boat15 settle.
A cautionary note: you must always type the exact name of the fileyou are copying from which includes all extensions. For example, if youwanted to copy a file called boat15.dat located on the C:drive and directorysettle to a floppy disk on the A: drive, you must type "copy boat15.dat a:”If you were in another directory (say vessels) and you wanted to copy thefile boat15.dat located in the settle directory to a floppy disk in drive A, youwould have to type copy \settle\boat15.dat a:
"ren”- The “ren” or “rename” command renames all files you specify. For example,you want to rename the file boat15.dat and not make another file. You onlyhave to type ren [drive]:[path] filename1 filename2. Filename1 is the nameof the file you are renaming and filename2 is the name of the new file. Inthis case, you would type ren c: boat15.dat vess15.dat where boat15.datis the old file name and vess15.dat is the new file name. Unlike the copycommand, you will now only have the file vess15.dat; you will no longerhave the file boat15.dat.
13

"del"- “del” is used to delete files. If you wanted to delete the file boat15.dat andyou were in the settle directory, you would type del boat15.dat and the filewould be deleted. You can also delete files in other directories or fromother directories. Suppose you were in the directory mydir and you wantedto delete the boat15.dat file in the settle directory, you would type del\settle\boat15.dat.
There are a lot of other commands for DOS and you should review the DOS
manual to learn these commands. Although not a DOS command, wildcarding is
another important part of DOS commands. Wildcards allow you to carry out tasks
for groups of files. There are two basic types of wildcards--the asterisk * and the
question mark ?. How can we use wildcards to our advantage. Assume you are
in the directory settle and you are interested in the file for a particular boat and trip
but you do not remember the file name pertaining to the boat and trip. You would
only have to type dir boat*.* and the system would list all files beginning with the
name boat.
Alternatively, your might discover that one of your application programs
automatically creates backup files with the extension .bas. In this case, precious
hard disk memory will be utilized to store these backup files. You might decide to
copy all the backup files to a floppy disk and then delete all the backup files on the
hard disk. To copy all the backup files to floppy disk on drive a, type copy *.bas
a: Now to delete all the backup files with the extension .bas, type del *.bas, and
this will remove all the files with the extension .bas from your hard disk. Then if
you type dir, you should observe that you now have more storage space on your
hard disk.
You can use the asterisks wildcards several other ways: *.dat, boat.*, and
14

b*.*.. Assume you want to obtain lists of files with the extension .dat, begin with
boat, or begin with the letter b. Typing dir *.dat would give you a list of all files
containing the extension .dat; typing dir boat.* would give a list of all files named
boat with any extension; typing dir b*.* would give you a list of all files beginning
with the letter b and having any extension or no extension. If you type dir *.*, you
will obtain a list of all files stored in the directory you are in.
Now consider the question mark (?). What if you forgot the name of a file
but knew it had a four character name with or without extensions. If you typed dir
????.*, you would obtain a listing of all files that have four letter names with any
or no extension. For example, you might obtain the lists
brig.bas, and boys.txt if these files existed in your directory.
boat.dat, babe.dat,
Some Additional Basics
It is important that you carefully name files and directories. Whether you
create files in EDIT or EDLIN or your application creates files, you must be careful
to avoid redundancy and misnaming files. All files, all directories, and all
subdirectories must have a name. Names of files and directories can be up to
eight characters long (for example, xxxxxxxx where xxxxxxxx is the first eight
characters used to name the file) and have extensions up to 3 additional
characters (for example, .yyy). You might call your file name computer.txt and
your directory “computer.” (remember the quotes are not included in the name).
Also, except for some applications, names are not case sensitive; that is, it does
not matter whether you use upper or lowercase letters when you name your files
15

or directories. A file name can only be made up of the characters a through z, 0
through 9, and the following special characters: underscore (_),, dollar sign ($),
tilde (~), exclamation point (!), number sign (#), percent sign (%), ampersand (&),
at sign (@), apostrophe (‘), single quotation mark (‘), braces ({ }), parentheses (),
hyphen (-), and caret (^). Other characters are not acceptable (for example, the
plus + sign).
Although the special characters are allowed, it is a good ideal not to use
these characters when naming files or directories, These characters may have
specific meanings for some application programs. A file or directory name also
should not contain spaces, backslashes, commas, or periods (a period is used to
indicate the extension). Also, a file or directory name cannot be identical to the
name of another file or subdirectory in the same directory.
Let us consider a summary of the structure of the location of a file. We will
call this file GUMBALL.DAT. The file GUMBALL.DAT is located in the subdirectory
SWEETS which is located in a directory called JUNKFOOD. This is all stored on
the harddisk C:. Consider the structure: C:\JUNKFOOD\SWEETS\GUMBALL.dat.
C: is the drive; the first backslash--\--is the root directory; JUNKFOOD is a
directory; SWEETS is the subdirectory; GUMBALL.dat is the file name.
If we are in the root directory \ and we wanted to see if GUMBALL.dat was
in the JUNKFOOD directory and SWEETS subdirectory, we could type dir
\JUNKFOOD\SWEETS\GUMBALL.dat or GUM*.*. If we wanted to go to the file,
we would type cd\JUNKFOOD\SWEETS and we would be in the subdirectory
SWEETS. If the GUMBALL.dat file was readable (many files created by programs
1 6

can only be read during the use of that specific program), we could type “type”
GUMBALL.dat and we would see the contents of the file.
What if we wanted a hard copy; a copy of the file on paper. Assuming we
have a printer, we could use several methods to obtain a hard copy of the file
GUMBALL.dat. Provided we are not in the application program, we could press
the control (Ctrl) key and the letter p. This would cause the printer to print
everything on the monitor and the contents of the file we are interested in. For
example, we press the control key and the letter p first, and then we type “type”
GUMBALL.dat. Our printer would print type GUMBALL.dat and the contents of the
file is the file was readable. Some application programs also allow you to obtain
hard copy by pressing the control key and the letter p; some programs have
special codes or instructions they require to obtain hard copy. One last way to
obtain hard copy is to press the Print Scrn key. This will give you a hard copy of
what is on the monitor or computer screen.
A final word on the basics. As long as you do not do something ridiculous
like pour soda or water inside your computer, there is little that you can do to
damage your computer system or information. If you pay attention to backing up
information on floppy disks and sensibly storing those disks, you should always
be able to recover information accidentally lost or suddenly inaccessible.
Remember, computers, like fishing boats, are machines and they do break down.
You should always be prepared for the possible loss of information.

Working Through an Example
Although it is not the intention of this manual to provide instruction on using
EDLIN or EDIT, we will use EDIT to create some files and learn some of the basic
DOS commands. We are using DOS 6.0; your own system may have slightly
different responses. You must remember that all commands must be followed by
pressing the enter or return key. First, we will format a 3.5-inch floppy disk in the
small door drive unit on the computer. We assume the small door unit is the A
drive (it may be the B drive on your personal computer). Type format a: and press
the enter or return key. This is the key on the right side of your keyboard, and
you may have two enter keys; you can press either key). The monitor will display
text asking you to insert a disk and hit any key or return when you are ready.
When you are asked to provide a volume label, just press the enter key. Last, you
will be asked whether or not you want to format another disk; press the N key (you
can use an uppercase N or a lowercase n). You should see on your monitor C:\
which means you are in the root directory and your system is awaiting your
commands.
With this accomplished, type md\settle. This creates a directory called
settle. Now type cd\settle; this puts you into the directory called settle. Now type
cd\; this returns you to the root directory. We want to create a file called
boat15.dat. Type edit boat1 5.dat; at the top left hand corner of the monitor, you
will see File Edit Search Options. We are not going to access these
subroutines but we will eventually use File. Note that the cursor is located at the
18

upper left hand corner of what appears to be a rectangular box. Type boat
number is 15 and press return. This is the first line of a file you are creating. The
cursor should now be at the second line. If it is not, you can use the arrow keys
to move the cursor. Now type trip 15 and 30,000 (we will assume the 30,000 is
the gross stock of trip 15). Now press the alternate Alt key and note that the word
file is highlighted in the upper left hand corner; press return and use the down
arrow key until save as is highlighted. Press the return key. You have now
created a file called boat15.dat. Again press the Alt key and note that file is
highlighted; this time move the cursor using the down arrow key to exit. Press
return and you are back in the monitor mode.
Make sure your formatted floppy disk is in the A: drive. Type “copy
boat15.dat a:" and press return. The file boat15.dat will be copied to your floppy
disk in drive A:. You will receive a message on your screen indicating that the file
has been copied: the message usually reads 1 file(s) copied. To make sure you
copied the file to the floppy disk, type dir a:boat15.dat or a:boat15*.*. You should
obtain a list of the file on the screen and the date the file was last used or the date
it was created.
Now type cd\settle which puts you into the settle directory. Lets copy the
file boat15.dat on floppy disk to the hard disk and settle directory. All we have to
do is make sure our floppy disk is in drive A and type copy a:boat15.dat. This will
automatically copy the file boat15.dat to the settle directory and hard disk. We
could, however, have copied the file from the root directory. Type cd\ and return
to the root directory. In the root directory (C:\), type copy a:boat15.dat
1 9

\settle\boat15.dat. Type dir \settle\boat*.* and note that the file has been copied
to the directory settle. Now type del \settle\boat15.dat; this deletes the file
boat15.dat stored in the settle directory. Go back to the root directory (type cd\
and press return).
Using your DOS tutorial or Users Reference Guide, you should practice
working with DOS. Remember, the more you know about DOS, the better you will
be able to operate your system and application programs.
20

Business and Application Programs
Programs and Software
There are a variety of programs, software packages, or applications that
may be very useful for your everyday business. There are accounting programs
for balancing your books; unless you have bookkeeping experience, however, it
is not advisable that you maintain your accounts. There are programs for writing
your payroll checks. There are even programs for answering your telephone. The
programs or applications you will find useful obviously depend upon your type of
business (for example, wholesaler, vessel owner, fish retailer, importer/exporter,
or vessel captain), the size of your business, the number of employees, and the
types of information you will want to process.
You should be aware that in the past few years there has been a
proliferation of software or application programs written especially for the fishing
industry. If you decide you are interested in acquiring a particular package, make
sure you find out what the program will and will not do and whether or not your
computer system is compatible with the software. Remember that old adage, if it
looks too good to be true, it probably is not. Also, do not get caught up in
purchasing power programs or software with a lot of bells and whistles you really
do not need.
After about 8 years experience with computers in the fish business, I have
found that there are many special application needs. That is, the fish business
21

appears to need programs that are not readily available from a computer dealer
or substantial modification of existing programs. lt often is the case that the
business needs a custom program; a program prepared especially for a particular
application and business. However, if you can develop some basic skills of
working with software packages (programs), you, yourself, may be able to prepare
the programs necessary to perform the operation you want. It is not as hard as
it sounds. Today, many packages have application programs and even
instructions on how to prepare your own computer routine or set of operations.
What types of programs might be appropriate for your business. Today
when you buy a computer system, the seller often includes several programs
which you can use. Moreover, these programs are usually installed on your new
computer by the company selling you the computer. These types of programs,
ones which you may find useful, usually include word processing (kind of like an
electronic typewriter which stores your letters and memos) and spreadsheet
routines. For the vessel owner or owner/operator, word processing and
spreadsheet programs will usually be sufficient for many of your needs. For larger
companies having bookkeepers or accountants, obviously accounting packages
are desired. A third type of software that I have found useful for both small and
large companies is a database management program. Specifically, a relational
database manager program appears to be quite useful for small and large
companies.
22

What is Word Processing?
Like many other application programs, television sets, or cellular telephones,
there are a lot of word processing packages available on the market. This manual
has been prepared using WordPerfect; this, however, is not an endorsement of
WordPerfect. In fact, you may not need to have a full blown word processing
package. You may easily get by with less elaborate word processing packages.
Word processing used to be viewed simply as a way to create documents
(for example, letters, memos, short stories, and book chapters). Today, the
primary objective of word processing is still to allow you to create documents, but
there are many other things you can do. For example, you can maintain a
telephone list or addresses of people you do business with. You can sort by
name, telephone, zip code, or some other variable. You can create mailing labels
in many word processing packages. Some word processing packages will allow
you to perform basic mathematical operations (e.g., add, subtract, multiply, and
divide). With these types of options, you could create a routine to do your vessel
settlement or bill your customers. You could even create a reporting format for
your vessel log or to comply with fisheries management regulations or HACCP
regulations about reporting. Unless your business is relatively small or the number
of transactions you conduct in a month are few, however, it is not a good idea to
use a word processing package for billing, accounting activities, or regulatory
reporting requirements.
23

The Spreadsheet Packages
Spreadsheet packages have become extremely popular for business use.
These packages allow you to store and manipulate information or data in a tabular
format similar to a crossword puzzle. You typically have rows and columns of your
information. You can perform extensive mathematical calculations with a
spreadsheet package. Most of the spreadsheet packages, however, often require
a substantial investment of your time to properly use. It is not likely that you will
turn on your computer, change to a directory having your spreadsheet package,
and instantly create spreadsheets. You will have to spend some time learning the
particular spreadsheet package you are using before you can create spreadsheets.
What can you do with your spreadsheet package. Well, you could prepare
a basic vessel settlement application which would allow you to determine owner,
captain, and crew shares by individual person. The information could be stored
and used at the end of the year for preparing 1099s. Alternatively, you could
create basic accounting applications. The more popular spreadsheet packages
allow you to perform statistical calculations, prepare graphs, and solve for optimum
production and inventory strategies. You could also use your spreadsheet
package to create your mandatory reporting logs, manage inventory, and schedule
vessel and plant maintenance.
How do I decide if I need a spreadsheet package? Obviously if you have
been successfully operating your vessel, business, and personal affairs without a
spreadsheet package, you will continue to do so. There is however an increasing
24

urgency to manage a paper trail on all business transactions. Moreover, there is
an increasing need to be able to quickly respond to new information or study past
information. A common request by vessel captains is “Is it possible to have a
program that would tell me if I ever fished this area and what was my daily
production?” Once the captain finds out that “yes it is possible,” they become
quite interested in obtaining a package like a spreadsheet package.
Spreadsheet packages cost between $40.00 and almost $500.00. For the
individual vessel owner or captain, the less expensive packages will usually satisfy
their needs. For example, the vessel owner or captain can prepare settlements
and regulatory reports, prepare checks, print end of year 1099 statements, and
manage inventory. Alternatively, many spreadsheet packages have a “What if?”
menu which allows you to conduct sensitivity analyses. An owner or captain might
want to assess the relationship between expected owner, captain, crew shares,
days at sea, and crew size in order to determine an optimum production strategy.
Relational Databases
Relational database packages are most often used by the experienced
computer user or computer professional. However, the more recent database
packages allow even the inexperienced computer user to create data bases and
actually write programs for manipulating data or information. Moreover, programs
can be written by professionals, for a relatively nominal fee, to perform applications
consistent with the manner in which you have traditionally operated your business.
It may be useful for you to at least be familiar with the concept of a relational
2 5

database.
What is a relational database? A relational database is a collection of data
and information organized by records and fields or variables which permitting
sorting and grouping of data. A primary benefit of a relational database is that
multiple files can be maintained in which subsequent groupings of data can be
pooled together at one time using a common variable or field of the various files.
For example, suppose you had one file with social security numbers and
addresses of your crew and another file with social security numbers and crew
earnings per individual. In a relational database manager, you could open the two
files and obtain information necessary for preparing and printing 1099 statements.
A relational database manager also allows tremendous flexibility in designing
information systems useful to your vessel and plant operations. In such a system,
you could easily create a daily log and mandatory reporting system for fishing
operations. Besides complying with a mandatory reporting system, you could
obtain information on fishing operations from previous tows, months, and years.
For example in some database programs, you might type find month = january
and year = 87 and obtain information for all tows during January 1987. You could
then use this information to make current decisions about fishing.
Relational database systems, however, are expensive (typically between
$200.00 and $500.00) and require some time to learn to use them. The tutorial
packages that come with the database programs, fortunately, are usually quite
good, and within a matter of a few days, you will be amazed with what you can
accomplish with a database system.
26

Some Applications
Word Processing
In this section, we will use WordPerfect to prepare a business letter and a
daily log form. The use of WordPerfect is not an endorsement of the product.
There are many other word processing packages available (for example, Xywrite,
Volkswriter, WordMarc, Word, and WordStar). WordPerfect, however, appears to
be one of the most widely used word processing packages and is widely taught
at universities, two year colleges, and secretarial schools. We commence our
example from the assumption that WordPerfect is already installed on the hard disk
in a directory called WP51; we also assume that you are not working with the
Windows version of WordPerfect and you have WordPerfect 5.1.
Now go to the WP51 directory by typing cd\wp51 and press enter. If your
WordPerfect directory has another name, type the other name rather than wp51
after cd\. The cd\wp51 command takes you from the root directory or other
directory you are in and puts you in the WordPerfect directory. You are not in,
however, the WordPerfect program. To use the word processing package, type
wp and press enter. You are now in the WordPerfect package and are probably
staring at a blank screen that has a blue background. At the lower right-hand
corner of your screen, you should read Doc 1 Pg 1 Ln 1” Pos 1”. This is
document 1, first page, line 1 (top to bottom) of the text, and 1 inch from the left
margin or the location of your cursor. Now what do you do?
27

Correspondence/Letter
You are ready to compose your letter, but first, let us set the format of the
letter. The format specifies how you want your margins, line spacings,
arrangement of text, and numerous other aspects of your letter. Press the shift
and F8 keys. You will observe the four broad categories: 1 - Line, 2 - Page, 3 -
Document, and 4 - Other. If you press the respective number (1,2,3, or 4) you will
then see options available relative the grouping you selected (for example, press
1 and you will see 9 categories starting with 1 - Hyphenation and ending with 9 -
Window/Orphan Protection. If you pressed the shift and F8 keys and want to exit
the menu, press the enter key or the F7 key which is the exit key.
For our letter, we want to press 1 - Line and then press 3 (full justification).
Now type 4 for Full justification. This will give your document the appearance of
this manual (all text is up against the left and right margins). Since this is your
letter, you can change the appearance. Rather than using full justification, you
may want your letter to have a ragged right edge:
Left Justified: This is what left justified looks like. If you prefer this appearance,then rather than selecting #4 (full justification), select #l for left justified. Thetext of your letter will not be flush against the right-hand margin. Instead, thetext will appear ragged on the right-hand side of your letter.
Without leaving the 1 - Line menu, type 6 for line space. Now type in 1 or 2 or the
number of line spacings you want your letter to have. For example, for 1, 1.5, or
double spacing, your text will have the following appearance (we continue to use
full justified):
28

single line spacing: Today, our vessel, the Spirit, harvested 2,000 pounds of seascallops. Unfortunately, we only received $4.75 per pound and the price of fuelwas $0.91 per gallon. On the plus side, though, we also landed 700 pounds offlounder.
1.5 line spacing: Today, our vessel, the Spirit, harvested 2,000 pounds of sea
scallops. Unfortunately, we only received $4.75 per pound and the price of fuel
was $0.91 per gallon. On the plus side, though, we also landed 700 pounds of
flounder.
double line spacing: Today, our vessel, the Spirit, harvested 2,000 pounds of sea
scallops. Unfortunately, we only received $4.75 per pound and the price of fuel
was $0.91 per gallon. On the plus side, though, we also landed 700 pounds of
flounder.
While still in 1 - Line, let us set the left and right margins. WordPerfect will default
or automatically give you l-inch left and right margins. Let us reset the margins
to 1.25-inches. Press the number 7 and type 1.25 for L and press return; now
type 1.25 for R and press return. You have reset the left and right margins to 1.25-
inches. Now press enter, escape (the esc key), or the F7 key. You should be
back to a blank page. If you want other settings, you can again press the shift
and F8 keys at the same type, make your choices, and follow the procedures
listed on the screen
Let us prepare our letter. Press enter as many times as it is necessary for
you to reach Ln 2” (look at the bottom right hand corner). Type your date; for
example, June 1, 1994 and press return. Let us address our letter to Mr. John R.
29

Fish. Simple type the letters Mr. John R. Fish using upper and lower case letters
(e.g., press shift and M for a capital M; just press r for a lowercase r). When you
finish typing the name press enter. You should be on the next line. Type the
address 100 Atlantic Drive and press enter. Type Atlantic Ocean, USA. From the
2-inch line in the left corner, you should have four lines which read as follows:
June 1, 1994Mr. John R. Fish100 Atlantic DriveAtlantic Ocean, USA
Now using appropriate line spacing, please finish the letter as follows:
Dear Mr. Fish,
We recently purchased 10,000 pounds of your deluxe frozen, breaded fillets (four-ounce servings). Unfortunately when the product was delivered to our plant, theproduct had thawed and we refused shipment. Since we had prepaid for theproduct, we would like to be reimbursed for our cost. We also would like tocontinue our business with your company but cannot do so until we are assuredthat this problem will not again happen.
Sincerely,
Richard B. Scallop
When you are finished, your letter should look as appears on the next page.
30

June 1, 1994Mr. John R. Fish100 Atlantic DriveAtlantic Ocean, USA
Dear Mr. Fish,
We recently purchased 10,000 pounds of your deluxe frozen,breaded fillets (four-ounce servings). Unfortunately when theproduct was delivered to our plant, the product had thawed andwe refused shipment. Since we had prepaid for the product, wewould like to be reimbursed for our cost. We also would liketo continue our business with your company but cannot do sountil we are assured that this problem will not again happen.
Sincerely,
Richard B. Scallop
31

There are several options for changing the appearance of your letter. You
can center the letter from top to bottom as well as left to right. You can change
the type of print; your letter is in courier 10 pt or ten characters to the inch. You
can if you desire make some words in boldface or very dark so they stand out or
you can underline some words. Almost all word processing packages have
options to change the type and appearance of documents. Let us just center the
letter and change the print.
First, press the home key twice and then the up arrow key. This puts you
to the top of the letter. We next change the print by pressing the Ctrl and F8 keys.
We next type the character 4 for basefont. Now using the arrow keys, we move
the cursor to the type of print we want; we will use courier 12 cpi Italica. Once the
cursor is on this print, simply press the enter key. This will change our print for
our letter. Now to center our letter, simply press the shift and F8 keys, then type
the number 2. Then respond by typing the number 1 which corresponds to center
this page. Now respond y or yes to the question Center This Page? No (yes).
Press the enter key twice and you will return to your letter. Last, to see what your
letter will look like when it is printed, type the shift and F7 keys and then enter the
number 6 for view document. Your document should look like the letter on the
next page. To return to the default mode for WordPerfect, press the F7 key.
32

June 1, 1994Mr. John R. Fish100 Atlantic DriveAtlantic Ocean, USA
Dear Mr. Fish,
We recently purchased 10,000 pounds of your deluxe frozen, breaded fillets(four-ounce servings). Unfortunately when the product was delivered toour plant, the product had thawed and we refused shipment. Since we hadprepaid for the product, we would like to be reimbursed for our cost. Wealso would like to continue our business with your company but cannot doso until we are assured that this problem will not again happen.
Sincerely,
Richard B. Scallop
33

Daily Log
There are several ways in WordPerfect to create a daily log form. First,
however, we must decide what information we want to include on the log form.
We should have the vessel name, possibly the vessel characteristics, the date of
departure, the dates of return and settlement, crew size, total landings of targeted
and incidental species, prices or gross stock by species, and discards. In order
to comply with the mandatory reporting requirement, we also need to add average
tow times, areas fished, water or bottom depth, gear fished, mesh or ring size,
number and size of gear, latitude and longitude, number of hauls, dealer name,
date product sold, port and state landed, and time landed. We also will need to
create a summary form “Fishing Vessel Trip Report” consistent with the mandatory
data reporting requirement.
One way to create a daily log is to design the form and type in all lines to
generate a tabular format. An alternative and much easier way, one that is also
permissible with many other word processing packages, is to use the
math/columns/tables command which creates a table for you. We will adopt the
latter strategy.
In order to design our daily log form, we need to determine about how
many tows we normally make on a trip. Most vessels make less than 500 or fewer
tows per trip. We will use an upper limit of 265 tows. This is enough tows to
illustrate how to create a daily log form and you can always make copies of parts
of a document or log sheet and extend the number of tows.
34

Now creating this daily log is going to seem difficult, and at first, it will be. Once
you create the first page, however, of the log, the rest will seem easy. The first
thing you need to do is design your log sheet relative to number of rows, columns,
and information you desire. I have decided that fifteen columns are necessary.
The number of rows will depend upon how we arrange our page and the size of
the print we select. I will use a landscape orientation rather than a portrait
orientation. Therefore, the left to right size of the paper will be 11 inches and the
top to bottom size of the paper will be 8.5 inches. Iwill use letter gothic 18.75
characters per inch style print; the style print, however, depends upon the printer
you have available. You may not be able to use 18.75 characters per inch, but
you probably have a comparable size and style for your printer. Initially, I will set
the number of rows to 35. Now, we have 15 columns and 35 rows as the initial
size of our daily log.
We still need to structure our daily log sheet before we can create it. Since
we are going to use landscape, we need to reset our margins and inform the
system that we will use the landscape orientation. We also need to provide
instructions about what type of print to use. To reset the margins, we only need
to remember to press the shift and F8 key. Then, we enter the number 1 for tine
and then the number 7 for left and right margins. Now type 1 for the left margin
and press enter; type .25 for the right margin and enter. Press enter again. Now
enter the number 2 for page and type 5 for top and bottom margin. Now enter 1
for top margin and press enter and .5 for bottom margin and press enter. Now
enter the number 7 for paper size and move the arrow until you have selected
35

standard wide 1 1” by 8.5” landscape and press enter. Now continue to press
enter until you exit the settings mode; you should see a blank screen. Last, set
the print size by pressing the Ctrl and F8 keys; enter the number 4 for base font
and move the cursor until you have the print you want. Then, press the enter key.
Remember, you will have to use small print (many characters per inch or a low
point size) in order to be able to name all of your columns.
How do we create our log sheet? First, press the Alt and F7 keys. The
system responds by asking you whether or not you want (1) columns, (2) tables,
or (3) math. You respond by pressing the number 2 for tables. Now you will be
asked whether or not you want to (1) create or (2) edit a table; you respond by
pressing the number 1 key. Now you will be asked the number of columns and
you will respond by enter the number 15 and pressing the enter key. The system
will now ask you how many rows you want; you respond by entering the number
35 (the 3 key and then the 5 key) and pressing enter. You should now have
something that resembles a crossword puzzle on your screen. The cursor should
be in the upper left hand corner of your table and the upper left-hand corner box
should have a large red line through it. Press the F7 (which is the exit key) key
and you be in the data entry or text-write mode (you can type in text).
Using the down arrow, come down to row 10 and column 1. We are going
to label our columns. Columns 1 to 15 are to be labeled as follows: (1) Date, (2),
Tow #, (3) Gear in Water, (4) Gear out hauled, (5) Average depth fathoms, (6)
Chart area fished, (7) Scallops retained # baskets, (8) scallops discarded #
baskets, (9) Fish retained 1) , (10) Fish discarded 1) 11) Fish retained
36

2) 12) Fish discarded 2), 13) Fish retained 3) 14) Fish discarded
3) 15) Comments. The numbers 1), 2), and 3) will be used to indicate the
catch and discards of up to 3 species. The comment space can be used to make
comments.
You are now ready to type in your column headings; we will follow the
example on the following pages. You will notice that as you type in the characters,
you will run out of space for some words. Another line will automatically be
inserted into your box. You will also discover that some editing will be necessary.
At row 10 and column 1, type the first heading Date. Use the position arrows to
move across and up and down the table. After typing Data, use the right arrow
until you are at the second box (row 10, column 2)) and type Tow #. For Gear in
water and Gear out hauled, you will have to use the enter key to obtain your lines.
Move to row 10, column 3 using the arrow keys and type Gear and hit return, type
in and hit return, and type hauled. If you press the right arrow key now, you will
be at the top of the next box (row 10, column 4). Continue enter the column
names until you have finished the Comments column.
We will now edit our columns for appearance and space needs. Press the
Alt and F7 key and respond 2 for tables and 2 for edit. Using the arrow keys, go
to the gear in water heading. Press the Ctrl and left arrow key until the right-hand
line or margin for this column is flush with the r in water. If you go too far, you will
add another line. To correct this, press the Ctrl and right arrow key. You will need
to also do this for the Gear out hauled and Average depth fathoms boxes.
We now have to create our upper boxes. In these boxes, we need to be
37

able to enter information about the vessel name, USCG DOC or State Reg. No #,
vessel permit number, number of crew, number of tows for this trip, captain’s
name, type of gear, size of gear, mesh/ring size, operator’s permit number-if
required, date sailed, date landed, date settled, port and state landed, dealer
permit number, dealer name. In order to create the upper portion of our cover
sheet, we will have to go back and edit our table.
Press the Alt and F7 key and respond 2 for table and 2 for edit. We use the
Alt and F4 keys to mark boxes we want to change (for example, join and split).
Make sure the cursor is in the upper left hand corner of the table; press the Alt
and F4 keys. Using the arrow keys (right arrow) and move it five columns to the
right. Now respond by pressing the number 7 for join. You can continue
changing the appearance of your table until the top portion looks like that table on
the following pages. Once you have finished designing your sheet, you can press
the F7 key to exit the table edit mode. You should type in your headings. If you
want to center any of your headings, simply move the cursor to the heading and
press the shift and F6 keys; this will automatically center your heading.
Unfortunately, we have only prepared the cover sheet for the daily log.
Don’t worry, we are not going to create new tables again and again. Instead, we
will copy the cover sheet or front page of our daily log and edit it so that it looks
like the second page of the example in the manual. Press the key which
allows you to see hidden codes. Using the arrow keys, move the cursor to the far
left and make sure it is left of all commands about the structure of your table (for
example, margins, landscape, 11 by 8.5 inch paper, small print, and table). Press
38
the Alt and F4 keys; now move the cursor until you are at the end of the table (you
can press the home key twice and the down arrow key once to go to the end of
the table). Now press the Ctrl and F4 keys (together) and the 1 for block and 2
for copy. Move the cursor to the top of a page or at least until it is below your
table and press the enter key. You will now have a copy of the front page of your
log sheet. If it is not on a new page, go to the beginning section of the table but not
inside the table and press enter until you have placed your table on a new page.
We now need to go back and edit our table to remove the other headings
on the second page. You may, however, want to retain the original headings for
every page to ensure you never mix up your log sheets. We know we want to
retain the column headings Date through Comments. To eliminate the top
headings, we repeat our editing process: (1) press the Alt and F7 keys together,
(2) respond by enter 2 for tables and 2 for edit. Press the Alt and F4 keys
together and use the arrow keys to mark the boxes we want to delete. With this
accomplished, press the del key and upper boxes and titles will be deleted.
We will want to add ten rows back to our table. Move the cursor to the box
just below the Date box (now row 2 column 1). Press the insert key and respond
1 for rows and then 5 for the number of rows. This will allow you 30 tows per
page. Now press the F7 key to exit from the table edit mode. Last, move the
cursor until you get the first tow number on your second page; it should read 1.
Press the Ins key until the lower left corner of your screen reads Typeover. Using
the arrows move the cursor to each entry and retype the numbers until the last
entry reads number 55.

Using the Alt and F4 keys and Ctrl and F4 keys, you can make as many
copies of the second sheet as you like. You can then type the likely number of
tows you will make per trip. You now have a daily log sheet that you can use to
comply with mandatory data reporting requirements as well as allow you to analyze
information from different tows and trips.
While creating a letter and a daily log sheet served to introduce you to word
processing packages (particularly WordPerfect), you may decide you want word
processing package other than WordPerfect. If you purchase a different package,
you will already know the basics for creating documents. The commands and
function keys, however, are likely to be different. In this case, you will need to
spend some time with the tutorial of your word processing package.
We close the lesson on creating a daily log by demonstrating how some
packages allow calculations. Go to the last page of your table and move the
cursor to the column on number of baskets of scallops retained. Enter numbers
arbitrarily in each row under this column using the arrow keys. Leave the last row
blank. This should be cell G31 and the first entry you made should have been cell
G2. With your cursor at cell G31 press the Alt and F7 keys and respond 2 for
tables and 2 for edit; you may not have to enter 2 for tables and 2 for edit because
you may be directly in the table edit mode. Enter 5 for math and respond by enter
a plus sign (shift and = key or uppercase =). You will immediately obtain a total
for the number of baskets of scallops retained for all data entered on this page.
If you elect to regularly use the math routine of your word processing package,
you should spend considerable time with the tutorial lessons for your package.
40

II Vessel Name:
I
U S C G D O C # or State Reg. No.#
I
Vessel Permit Number
I
Number of Crew
I
Number o f Tows f o r This Trip
II
C a p t a in ’s Name:I
Type o f G e a rI
Size o f GearI
Mesh/Ring SizeI
O p e r a t or ’s Permit Number-If requiredII
Date Sailed Date Landed Date Settled P o r t a n d S t a te Landed Dealer Permit Number Dealer Name
Date Tow # Gear G e a r Av er ag e Chart Scal lops Scallops F ish F ish Fish Fish Fish F i s hIn out Depth area retained discarded retained discarded retained retained discarded Commentswater hau led fathoms fished # baskets # baskets 1) 1) 2 ) 3) 3)
1
2
3
4
5
6
7
8
9
10
11
12
13
14
15
16
17
18
19
20
21
22
23
24I

q
---z
q42


Date
87
88
89I I 90 I I I I I I I I I I I I I I
91
9293
94
959 6
97
98
PP 100
101
102
103I 104 I I I I I I I I I I I I I I
106
107
108
109I 110 I I I I I I I I I I I I I I
111
112
113
114

q-'TTTl-TTTTT=
q
q=
=
q
q
1
q
:.
.
45

Date TOW # Gear Gear Average Chart Scallops Scallops Fish Fish Fish Fish Fish Fishin out Depth area retained discarded retained di scarded retained di scarded retained discarded Commentswater hauled fathoms fished # baskets # baskets 1) 1) 2 ) 2) 3) 3)
146
147
148
149
150
151
152
153
154
155
156
157
156
159
160
161
162
163
164
165
166
167
166
169
170
171
172
173
174
175

C h a rtareafished
F i s h F i s h Fish Fishretained discarded retained discarded Comments2) 2) 3 ) 3)
I I I I
188
189
190
191

Tow # G e a r G e a r Average Chart scal lops Scal lops Fish Fish Flrh Fish Fish FishIn out Depth area retained discarded retained discarded retained retained discarded Commentswater hauled fathoms fished # baskets # baskets 1 ) 1 ) 2) 3 ) 3)
206
207
208
209
210
211
212
213
214
215
216
217
216
219
220
221
222
223
224
225
227
232
234 1 I I I I I I I II I I II

q
q
qh
C
cI
q
49
-.II
.
q

HACCP Flow Chart
If you own or manage a processing plant, you might also be interested in
creating a HACCP (Hazard Analysis and Critical Control Point) check list with your
word processing package. You can create a check list for your monitoring
activities and a record keeping system to make sure you have adequate records.
Each plant or product may have different HACCP needs; thus, we cannot create
a generalized monitoring and record keeping system. Any form you create,
however, must recognize all critical control points and allow for evaluation and
assessment of all monitoring procedures (e.g., temperature or time to thaw).
Additional information on HACCP is available in Price, Tom, and Stevenson
“Ensuring Food Safety...The HACCP Way: An Introduction to HACCP & A
Resource Guide for Retail Deli Managers” Extension Service, U.S. Department of
Agriculture, National Sea Grant College Program, National Oceanic and
Atmospheric Administration, U.S. Department of Commerce (1993).
A major part of using your computer to aid you in your HACCP activities is
to create a flow chart depicting the stages of food preparation or processing. Our
example on the next page is not intended to use as an actual monitoring chart for
a HACCP program. The plant owner, manager, or technical consultant will have
to determine the HACCP plan and the critical control points. Once the critical
control points (CCPs) are determined, however, you can prepare a check off chart.
We have used temperature as one monitoring measure for critical control points;
your operation may have several points.
5 0

To create our chart, we simply press the Aft and F9 keys together and
respond 1 for figure box and 1 for create a box. These responses put you into the
menu for creating a figure box. We enter 6 for horizontal position and then press
the key (the number 3) for center; entering the number 3 centers the box. Now
press key #7 for size; then respond with 3 for set both. Set the width for 4 inches
(enter 4 and press enter) and the height to 1.25 inches (enter 1.25 and press
enter). Last, we enter 9 for edit which allows us to enter our text. To leave the
edit box mode, press the key F7 and you are now back to the default mode. You
can similarly create the other boxes.
This last example concludes our
are, of course, many things you can
l introduction to word processing. There
do with word processing to help your
business. The limits are imposed by the software and your willingness to learn.
You should also be aware, however, that there are many packages that are
designed to do some of the things available to you in word processing packages.
For example, daily log sheets could be created in a relational data base package
that has programming capability or in a spreadsheet package. The flow diagram
could be created in specific business or graphics packages. if you have a small
company, it is unlikely that you can be an expert in all software packages. You
may want to opt for a comprehensive word processing package that will allow you
to do many of the things you want to do.
51

Potential Flow Chart for Creating HACCP Monitoring/Checklist
Stage l-Acquisition of Raw Material From Vessel
Temperature C or F
Move Raw. Material to Shucking/Cutting Facility
Temperature C or F
Process and Freeze Product (5 pound boxes)
Temperature C or F
IDeliver to Purchaser of Frozen Product
Temperature C or F
52

Spreadsheets
Spreadsheets are calculating tools. When you think of them as ledgers with
built in calculators, then it is easy to understand how they can be useful for
financial planning, budgeting, and record keeping. Like traditional ledgers the
basic layout of a spreadsheet is rows and columns. Unlike traditional printed
ledgers the user determines the format of these rows and columns allowing them
to customize the report to suit their needs. A vessel owner or captain may wish
to write a spreadsheet program that will create vessel settlements or track
important variables (days at sea, harvest, fuel use, etc.). Attached are two print-
outs from a spreadsheet which does both of these activities. This spreadsheet is
written in Microsoft Works for Windows.
Microsoft Works was chosen for a number of reasons the first is cost.
There are many spreadsheet programs available on the market today with prices
ranging from $44 to $344. The concepts and many basic commands are similar
for all spreadsheets, however there are differences in levels of compatibility with
other software and advanced features. We recommend that you shop around
before purchasing a spreadsheet program. Many new computers come with
Microsoft Works and Windows already installed. Works is an integrated software
package that includes word processing, database, and spreadsheet applications.
Although the spreadsheet application in works is not as sophisticated as some
others it is adequate for many small business needs. So remember you don’t
need to spend large amounts of money to get the results you need. Another
53

reason for choosing Microsoft Works is that it provides an introduction to
Windows. If your computer is an older model with a 286 processor or less it will
not support windows so you will need to use a DOS compatible spreadsheet
application. Frequently the commands are slightly different between applications,
so the transition from one to another is slightly frustrating. Similar to changing
from a manual, stick shift, to an automatic transmission automobile.
Spreadsheet tutorial
Do you have Windows?
Yes . . . . continue
No...stop
Do you have the application Works?
Yes . ..continue
No . . . stop
The following is a quasi “step by step” list of instructions that will allow you to
recreate the works print outs.
Turn on Computer.
What is on the screen?
If you have a message screen showing
“Microsoft Windows version x.x”
then you are ready to go.
54
If you have the C prompt
“C:>”type
win
then the message screen showing “Microsoft Windows version x.x" should appear.
If the message
“Bad command or file name”
appears then Windows is not installed on your computer.
stop
If this is your first time using Windows take a few minutes to play around.
Pressing either “ALT” and “f4” simultaneously (the exit command) or the escape
key will get you out of almost any situation. Use of your mouse is a very important
part of Windows. Although almost everything can be done with the proper
combination of key strokes it is frequently easier to “point and click” Your
computer may have a preinstalled tutorial or you may want to practice this with
one of the preinstalled games. After this you are about ready to begin but first
some more general advice. If by some circumstance you get really stuck
remember there are always solutions. The following is a list of those we have
found most useful: 1) ask for help, don’t forget the kids (computers are very similar
to VCRs and medicine bottles); 2) read the manual; press “Alt”, “Ctrl” and “Del”
simultaneously then follow the instructions (this is the restart command, you will
lose any unsaved work); turn the computer off and stomp around shouting
55

expletives, activities can be performed in any order. The last alternative is not
generally recommended by computer professionals because you will lose any
unsaved work and it causes excessive wear on your equipment. The mental
health benefits of such action are unconfirmed, but we believe them to be
substantial. Now you are ready to begin.
The Window “Program Manager” should be open with several small window
icons (boxes) inside. Using the mouse, move the pointer to the icon labeled
“Microsoft SolutionSeries” and double click. This will open the window. Another
way to open the window is to strike “Alt”, this will highlight the menu bar. Using
the arrow keys highlight “window”, then use the down arrow. This will drop-down
the menu and allow you to view options. Using the vertical arrows select
“Microsoft SolutionSeries”, strike the “enter” key and this will open the window.
The next step is start “Microsoft Works”. You may either point at the icon and
double click or use the arrow key to highlight the icon; then use “Alt“ to highlight
“file”; then arrow down to highlight “open” and hit “enter”. The microsoft works
package includes all of the types of applications discussed in this manual; word
processing, spreadsheet, and database. Select spreadsheet either with the mouse
or by simultaneously depressing “Alt” and “s”. Notice that the "s” is underlined, this
indicates that the character can be used in conjunction with “Alt” to invoke the
command.
You are now in a new (blank) spreadsheet. Notice that the title is sheet1.
Go ahead and save/name your spreadsheet. Go to the menu file then save. The
next thing you will see on the screen is a box. The file name sheet1 should be
56

highlighted on the left side. Check on the right side to see where the file will be
saved. The default location is “C:\msworks”.
Type “setlmnt” and enter return
The computer will automatically add the file extension "WKS” and return you to the
spreadsheet. You may use another name for the file so long as it is less than 8
letters. Note the new name at the top of the window.
Update changes periodically using the command CTRL-S.
Vessel Settlement
Spreadsheet data and information are contained in cells. Each cell is identified by
its location in the column and row matrix. Columns are designated by letters and
rows by number. The first entry in a spreadsheet is usually a descriptive title.
Go to Cell A1
type “Vessel Settlement and Summary” and enter return
The text will appear in a box just under the title as you type it. The following
page is a list of cell addresses and their contents. Look at the vessel settlement
spreadsheet. The information is arranged in 4 blocks. Important identifying and
record keeping information is at the top. The left side contains harvest information,
shares, and crew expenses while the right side contains information on vessel
owner revenues and expenses. The bottom of the settlement is crew payroll
information.
57

Title
Al Vessel Settlement and Summary
Important information
A3
A4
A6
G3
G4
G5
G6
J6
Vessel
Captain
Crew size
Date
Trip
Sailed
Returned
Days at sea
C4
C5
H3
H4
H6
L6
C3 Boat name “Sweet Pea”
Captains name “Popeye”
Crew size “I0”
Date of report “l/31 /94”
Trip number “1”
H5 Date sailed “1/8/94”
Date returned “1 /30/94”
= H6-H5
By using a formula in cell L6 the computer will calculate days at sea for the
user by subtracting departure date (H5) from return date (H6). This is an
especially useful feature since trips frequently extend into the following month. This
area of information is set apart by a line. To add the line to your spreadsheet
highlight cells A6 to L6. This is done by moving the pointer to cell A6 then holding
down the left mouse key as you move the pointer to L6. After you have
highlighted the area go to the Format menu and select Border check bottom by
clicking the mouse in the box to the left. This will replace the grey shading with
an X. Strike return or click on OK and the computer will add the line and return
you to the spreadsheet.
58

Harvest Information, Shares and Crew Expenses
A8 Gross Stock E8 (B11*C11)+(B12*C12) +(B13*C13)
B10 Pounds Cl0 Price
A11 1 B11 10000 C11 $/lb value of grade1 “5.00”
A12 2 B12 1000 Cl2 $/lb value of grade2 “4.00”
A13 3 B13 0 Cl3 $/lb value of grade3 “0.00
A14 tot B14 =sum(B1 1:B13)
The command sum tells the computer to add the numbers within the
parentheses. The " = " preceding the command allows the computer to distinguish
this mathematical formula from text. The colon designates a series, B1 1 through
B13. The computer calculates the dollar value of all scallop landings in cell E8.
A16 Owner’s portion C16 Percent
A17 Crew’s portion C17 Percent
“40%” E16 = E8*B16
“60%” E17 =E8*B17
The revenue that owners and crew receive is usually based upon scallop harvest
revenues, Gross Stock. What percentage goes to each may vary. Take care in
adjusting percentages that the total does not exceed 100%.
A19 Shack C19 Dollar value “$300”
A20 Owner’s portion C20 Percent “0%” E20 =c2o*c19
A21 Crew’s portion C21 Percent “100%” E21 =c21*cl9
Shack are fish and shellfish, that are caught incidentally while harvesting scallops.
A23 Crew Expenses
59

A27
A28
A30
A31
A32
Insurance C24 $/man ‘90"
Electronics
Food
cigarettes
Ice
Settlement
Fuel C30 gallons
Other1
Other2
D24 per man E24 = B24*C6
E25 Dollar value “300”
E26 Dollar value “1100”
E27 Dollar value “0”
E28 Dollar value “1500"
E29 Dollar value “50"
D30 $/gallon E30 = B3O*C30
E31 Dollar value "0”
E32 Dollar value ‘0’
A34 Captain’s bonus C34 percentage “5%” D34 “of gross” E34 =E8*C34
A35 Mate’s Bonus E35Dollar value “250”
A40 Total Crew Expensees (ctrl-B = bold type) E40 =sum(E24:E28)
Insurance is usually charged per man so the cost of insurance (D24) equals
the per man rate (B24) multiplied by crew size (C6). The labels “gallons” and
“price” are currently entered in cells B30 and C30. The user should overwrite
these labels with actual quantities and price data. This allow for tracking of fuel
use in gallons. This list includes some of the most common elements of crew
expenses. The “Other” categories add flexability to the system, allowing other
recurring expense items to be added. Categories “Miscellaneous1" and
“Miscellaneous2” can be used for unusual expenses. Beyond an organized
appearance the value of keeping dollar values in one column is that it simplifies
writing formulas. Total Expenses are the sum of the expenses itemized in cells
60

E24 through 28.
A42 Net Crew Share E42 =E17+E21-E40
Net crew is total revenues (Crew portion of Gross stock revenues + Crew portion
of Shack revenues) less Total Crew expenses. Net to crew is the money available
for paying crew member wages. Crew wages are generally an equal share of net
to crew.
A vertical line is drawn to separate harvest, share, and crew information
from boat revenues and expenses. This is similar to the horizontal line created
earlier. Highlight cells F7 through F42, then go to the Format menu and select
“Border”. Check the box next to “right” using the mouse and press “Return”.
Boat Revenues and Expenses
Revenue
G8 Owners Share (owner’s portion)
G10 Electronics
G1 1 Insurance
J8 =E16
J10 = E25
J11 =E24
G12 Shack
G13 Other
G15 Misc
G19 Subtotal
J12 = E20
J13 Dollar Value “0”
J15 Dollar Value “0”
J19 =sum(J8:J15)
This is a summary of boat owners revenue, naturally the owners share of
61

the catch and shack is included. Other sources of revenue include the rent paid
by the crew for electronic equipment such as need a short list here. The crew also
reimburses the owner for part of the insurance expenses. What else might be
revenue to the owner?
Expenses
G24
G25
G26
G27
G28
G29
G30
G31
G40
J40
Fuel and Lube
Scallop Inc
Other1
Other2
Other3
Other4
Other5
Other6
Total Boat Expenses
=sum(J25:J31) “3721.00”
J24 Dollar amount 550.00"
J25 Dollar amount “386.00”
J26 Dollar amount “842.00”
J27 Dollar amount “1943.00”
J28 Dollar amount “0.00”
J29 Dollar amount “0.00”
J30 Dollar amount “0.00”
J31 Dollar amount “0.00”
As with crew expenses the category other is used to increase flexibility. For
record keeping and tracking expenses, you will want to change this label to a
category such as welding services, or insurance or use the payees name. Listing
expenses by the contractor or suppliers name still allows you to track the
expenses and may facilitate balancing your check-book or filing taxes.
62

G42 Net to Owner G42 = J19-J40
Net returns, net, are what is left of revenue after expenses are paid.
Although in this example boat expenses were substantially less than revenue,
major repairs, large insurance premium and/or costly maintenance can result in
a negative Net to owner for the trip. In other words the owner spent more that
was earned during that time period. In general a negative net to owner is not
considered a problem unless it happens frequently or the shortfall is quite large.
A large shortfall may be signs of poor cash flow management. An example is
scheduling a large insurance premium and loan payment during periods of
traditionally low harvest. In addition to low revenues during this period, it is likely
to be time for scheduling maintenance activities and expenses.
Crew Information
Crew members names are entered in column A and share of revenue is
calculated in column B. Crew member share’s equal “Net to crew” (E42) divided
by “crew size” (C6). Included in this calculation is the command ROUND.
= ROUND(E42/C6,2)
This command rounds each crew share to the second decimal (penny). The
decimal level where rounding should occur is denoted by the number after the
comma. If you wanted to round to the nearest whole dollar then you would enter
a zero (0) in place of the 2. It may be necessary to adjust one crew members
63

share by a few cents to balance total crew shares with net to crew. If the error
check value at the bottom of the statement is zero (0) then no correction is
needed. Take care that crew size is entered accurately and includes the captain.
The error check will also alert you if the number of crew receiving shares at the
bottom of the statement does not agree with the number of crew entered earlier.
The error check value is calculated by subtracting “Net to Crew” (E42) from
the crew shares column total (C57). The error check value is equal to the needed
correction. So that if the error check value is -0.05, the appropriate action is to
enter a number that is 0.05 less than the average for one crew member.
Typically the only crew members who receive a bonus are the captain and
the mate. The values of these bonuses were calculated or input earlier in the
settlement spreadsheet. In the crew information section the spreadsheet
references these numbers by using their address.
Cell D45 contains =E34 and
Cell D46 contains = E35
The value of this is that you do not have to reenter information and risk
transposing numbers.
The column categories may be changed to suit individual preferences
however when calculating an individuals net income only the first two columns,
share and bonus, are expected to be income the other columns are for
deductions. If for some reason you wish to have income in one of these columns
enter the value as a negative. For example if crewman5 is fined $180 for being
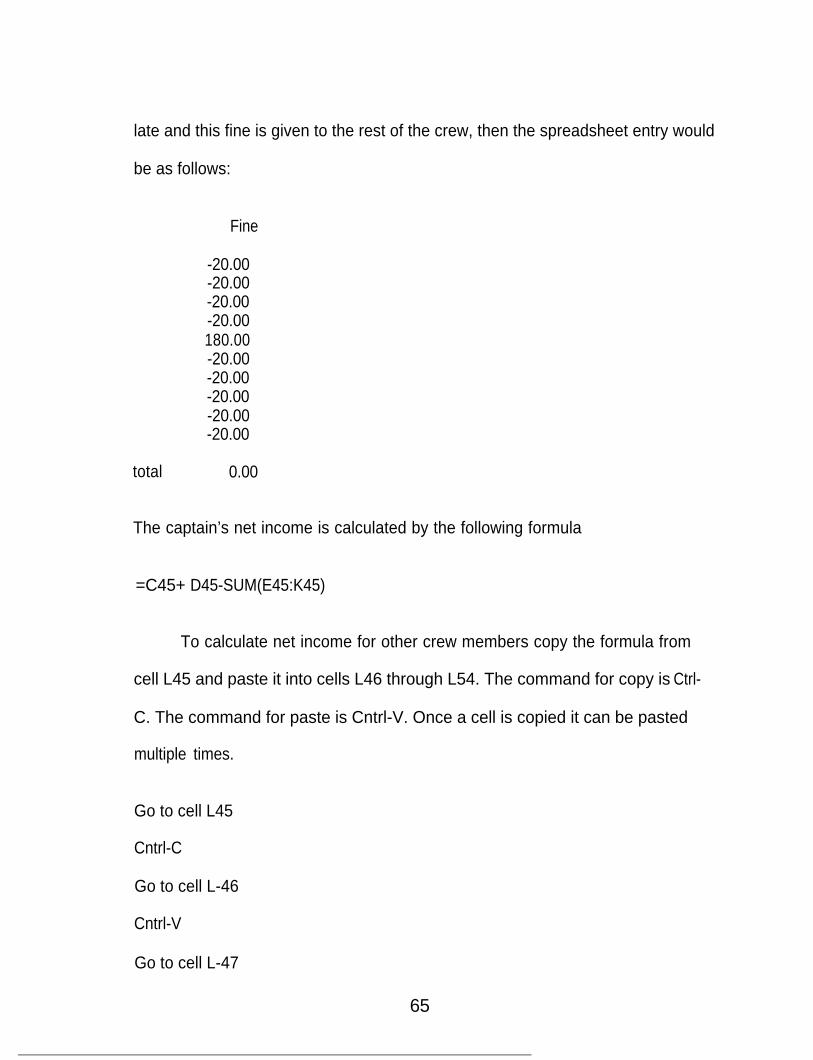
late and this fine is given to the rest of the crew, then the spreadsheet entry would
be as follows:
Fine
-20.00-20.00-20.00-20.00180.00-20.00-20.00-20.00-20.00-20.00
total 0.00
The captain’s net income is calculated by the following formula
=C45+ D45-SUM(E45:K45)
To calculate net income for other crew members copy the formula from
cell L45 and paste it into cells L46 through L54. The command for copy is Ctrl-
C. The command for paste is Cntrl-V. Once a cell is copied it can be pasted
multiple times.
Go to cell L45
Cntrl-C
Go to cell L-46
Cntrl-V
Go to cell L-47
65

Cntrl-V
Go to cell L-55
Cntrl-V
This net to crew member is the amount that was actually paid at the end of the
trip.
The total for crew shares (C57) is calculated using the formula
= SUM (C45:C55)
the totals for other categories can be calculated by copying and pasting this
formula into cells D57 through L57
Although it is wonderful to have all this information readily accessible by
computer, you may still need printed copies of vessel settlements. The next
thing you want to do with your spreadsheet is adjust column widths and
spacing so that everything is neat and well organized when printed. To change
column widths do the following:
Go to any cell within the column;
Alt (highlights menu bar)
Go to Format Menu
Go down to Column Width
Return
Enter a number in the box for column width.
66

Return
The following are the widths for each of the columns:
A 3
B 13
c 9
D 8
E 10
F 8
G 8
H 7
I 7
J 10
K 7
L 10
If you start designing a spreadsheet from scratch, this is likely to be an
iterative process. You will try something, check it out, change it, check it out, try
something else...... until you get the look you want. We have already done the
arranging, including moving, part of formatting for this spreadsheet. However,
the commands you use for moving information are cut, Cntrl-X, and paste,
Cntrl-V.
67

To print this spreadsheet use the following commands:
Set Print AreaHighlight the block A3 through L57Start at A3 push and hold the left mouse button, while moving the mouseto cell L59. Release the left mouse button.ALT Takes you to File menuArrow down to highlight “Set Print area”Return Takes you to a question box“Set print area to current selection?”The default answer is “OK” so you may either point on the box OK with themouse and click the left mouse button or simply strike return.
Printer Setup
ALT Takes you to the File MenuArrow down or use the mouse to highlight “Printer Setup...”
Page Set up
ALT Takes you to the File menuArrow down to highlight “Page Set Up”The values should be set as follows
Top marginBottom marginLeft marginRight marginHeader marginFooter marginPage lengthPage width
0.75”0.75”0.75”0.75”0.50”0.75”
11 .OO”8.50”
You are also given the option of changing the first page number if you want
something other than 1. You may also print row and column headings, and
gridlines if you choose. Note: Printing row and column headings reduces the
space available for other spreadsheet information.
68

Vessel Settlement for Scallop Inc.
VesselCaptain
Crew size
Gross Stock
Sweat PeaPopeye
10
54000.00
Pounds Price1 10000.00 5.002 1000.00 4.003 0.00 0.00To 11000
Owner's Portion 40%Crew’s Portion 60%
Shack 300.00Owner's portion 0%Crew's portion 100%
Crew ExpensesInsurance 90.00 per manElectronicsFoodCigarettesIceSettlementFuel gallons priceOther 1Other2
21600.0032400.00
900.00300.00
1100.000.00
1500.0050.00
0.00
Captain’s BonusMate’s Bonus
5% of gross 2700.00250.00
Miscellaneous 1Miscellaneous 2
Total Crew Expenses
Net to Crew
6800.00
25900.00
Crew Share Bonus Fine
Date l *****
Trip 1Sailed l * * * * *Returned l ***** Days at Sea 22
Owners Share 21600.00
ElectronicsInsuranceShackOther
300.00900.00
0.000.00
0.00
Subtotal 22800.00
0300
Boat ExpensesFuel and LubeScallop IncOther1Other2Other3Other4Other5Other8
550.00386.00842.00
1943.000.000.000.000.00
0.000.00
Total Boat Expenses 3721.00
19079.00
Advnc Loan Net
Net to Owner
C. Port S.lnc. Supply CigCaptain 2590.00 l ******Mate 2590.00 250.00TBN 2590.00 0.00TBN 2590.00 0.00TBN 2590.00 0.00TBN 2590.00 0.00TBN 2590.00 0.00TBN 2590.00 0.00TBN 2590.00 0.00TBN 2590.00 0.00TBN 0.00
0.00 0.00 0.00 0.00 0.000.00 0.00 0.00 0.00 0.000.00 0.00 0.00 0.00 0.000.00 0.00 0.00 0.00 0.000.00 0.00 0.00 0.00 0.000.00 0.00 0.00 0.00 0.000.00 0.00 0.00 0.00 0.000.00 0.00 0.00 0.00 0.000.00 0.00 0.00 0.00 0.000.00 0.00 0.00 0.00 0.00
0.00 0.00 0.00 0.00
0.00 0.000.00 0.000.00 0.000.00 0.000.00 0.000.00 0.000.00 0.000.00 0.000.00 0.000.00 0.000.00 0.00
5290284025902590259025902590259025902590
0
Total ******** ******* 0.00 0.00 0.00 0.00 0.00 0.00 0.00 28850.00
69

Saving Time with your spreadsheet
It probably took you more time to set-up and print the preceding vessel
settlement than it would for you to fill out a form using a pencil and calculator.
You don’t want to do this every time the boat comes into port. The solution:
copy the spreadsheet. Go back and set inputs, NOT FORMULAS, to zero.
Insert a page break at row 60.
ALT-E
Insert Page Break
row
OK
Now duplicate the spreadsheet.
Using the mouse highlight all cells Al through L60
CTRL-C (copy)
Go to A61
CTRL-V (paste)
Go to A119
CTRL-V
Continue adding settlement routines to the spreadsheet until you have enough?
How many is enough? What is the maximum number of trips you expect a
boat to make in a year?
70

Captain
Crew size
Gross Stock
Pounds
Some BoatJohn Smith
10
Price1 16783.002 70.003
4.053.90
68244.15
InsuranceShackOtherMisc
Days at Sea 15
********
300.00
Owner’s PortionCrew's Portion
ShackOwner's portionCrew’s portion
Crew ExpensesInsuranceElectronicsFoodCigarettesIceSettlementFuelOther 1Other2
Captain’s BonusMate’s Bonus
Miscellaneous 1Miscellaneous 2
40%60%
0.000%
100%
90.00 per man
8281 .OO $0.75
5% gross
Scallop IncSplices
27297.6640946.49
Subtotal
0
0
900.00300.00
2214.76
1330.0050.00
6210.75
3412.21840.00
1547.7570.00
Boat ExpensesFuel and LubeScallop IncOther1Other2Other3Other4Other5
8751 .OO6973.232659.33
124.963417.50
156.00250.00
Total Crew Expenses 16875.47 Total Boat Expenses l *******
Net Crew Share 24071.02 Net Owner Share 6165.64
John SmithMateJim FisherJoe FisherTom Fisher56789l *
Share Bonus Fine c. Port S.lnc. Supply Cig A d v n c Loan Net2407.10 l *****= -22.24 14.00 285.00 26.19 253 -560 5823.3582407.10 840.00 -22.22 300.09 20.50 26.19 30 2892.632407.10 -22.22 73.75 26.19 30 20 2279.382407.10 -22.22 l *tt** 30 2285.572407.10 -22.22 44.50 26.19 30 540 1788.632407.10 200.00 250.00 47.50 26.19 30 1853.412407.10 -22.22 78.75 17.46 30 2303.112407.10 -22.22 89.75 25.14 30 2284.432407.10 -22.22 81.00 26.19 30 2292.132407.10 -22.22 22.00 ****** 30 2153.53
0
Total l ******* l ****** 0.00 36.00 835.00 ****** ****** 199.74 0.00 25956.18

Monitoring with spreadsheets
There is wealth of information in the spreadsheets but even if they are in one
place - a computer file - it can be difficult or at least time consuming to
understand all of it. The second spreadsheet is the vessel summary. This is
contained in cells N4 through W42.
N4 Vessel Summary
N6 Year 06 94
N7 Vessel 07 Sweet Pea
N8 Primary Captain 08 Popeye
N10 Number of trips 010 =MAX(H4,H62,H120...H1164)
1 Days @ sea 011 =SUM(L6,L64,L122...L1166)
N12 Average crew size 012 =SUM(C6,C64,C122...C1 166)/O10
T4 Harvest V4 Pounds W4 Value
T6 Scallops
T7 Total Catch V7 =SUM(B14,B72,B130...B1116)
W7 = SUM(B8,B66,B124...B1110)
T8 Avg Catch/Trip V8 =V7/O10
W8 = W7/O10
T9 Avg Catch/Day @ Sea V9 =V7/011
W9 = W7/O11
T12 Shack
T13 Total Catch V13 NA
72
W13=SUM(C19,C77,C135...C1122)

T14 Avg Catch/Trip V14 NA
T15 Avg Catch/Day @ Sea V15 NA
N18 Crew revenues and expenses
019 Total P19 Avg/trip
N20 Revenues
W14 =W13/O10
W15=W13/011
Q19 Avg/day
N21 Stock 021 =SUM(E17,E75,E133...E1119)Q21 = 021/0$11
N22 Shack 022 =SUM(E21 ,E79,E137...E1123)Q22 = 022/0$11
N24 Expenses
N25Q25
N26Q26
N27Q27
N28Q28
N29Q29
N30Q30
N31Q31
N32Q32
Insurance 025 =SUM(E24,E82,E140...E1126)= 025/0$11
Electronics 026 =SUM(E25,E83,E141...E1127)= 026/0$11
Food 027 =SUM(E26,E84,E142...E1128)= 027/0$11
Cigarettes 028 =SUM(E27,E85,E143...E1129)= 028/0$11
Ice 029 =SUM(E28,E86,E144...E1130)= 029/0$11
Settlement 030 =SUM(E29,E87,E145...E1131)= 030/0$11
Fuel 031 =SUM(E30,E88,E146...E1132)= 031/0$11
Capt. Bonus 032 =SUM(E34,E92,E150...E1136)= 032/0$11
P21 =021/0$10
P22 = 022/0$10
P25
P26
P27
P28
P29
P30
P31
P32
=025/0$10
= 026/0$10
=027/0$10
=028/0$10
=029/0$10
=030/0$10
=031/0$10
=032/0$10
73

N33 Mate Bonus 033 =SUM(E35,E93,E151...E1137) P33 =033/0$10Q33 = 033/0$11
N34 Total 034 =SUM(E40,E98,E156...E1142) P34 =034/0$10Q34 = 034/0$11
N36 Net 0 3 6 =SUM(E42,E100,E158...E1146) P36 =036/0$10Q36 = 036/0$11
Rather than keying in all the formulas by hand it is possible to copy them.Using row 25 as the model
copy 0 through Q then go to cells 026 through 033 and paste.
N40 Total fuel (gal) 040 =SUM(C30,C88,C146...C1132)
T18 Boat revenues and expenses
U19 Total V19 Avg/trip WI 9 Avg/day
T20
T21W21
T22 Shack U22 =SUM(J12,J70,J128...J1114)W22 = U22/0$11
T23 Electronics U23 =SUM(J10,J68,J126...J1112)W23 = U23/0$11
T24 Insurance U24 =SUM(J11,J69,J127...J1113)W24 = U24/0$11
T25 Other U25 =SUM(J13,J71 ,J129...J1115)W25 = U25/0$11
T26W26
T28 Total U28 =SUM(J18,J76,J134...J1120)W28 = U28/0$11
Revenues
Stock U21 =SUM(J8,J66,J124...J1110)= U21/0$11
Misc U26 =SUM(J15,J73,J131...J1117)= U26/0$11
V21 = U21 /O$l0
V22 = U22/0$10
V23 = U23/0$10
V24 = U24/0$10
V25 = U25/0$10
V26 = U26/0$10
V28 = U28/0$10
7 4

T30
T31W31
T32 Scallop IncW32 = U32/0$11
W33
T34 Other 2W34 = U34/0$11
T35 Other 3W355 = U35/0$11
T36 Other4W36 = U36/0$11
T37 Other5W37 = U37/0$11
T38 Other6W38 = U38/0$11
Expenses
Fuel and Lube= U31/0$11
Other1= U33/0$11
U31 =SUM(J24,J82,J14O...J1126)V31 =U31/0$10
U32 =SUM(J25,J83,J141...J1127)V32 =U32/0$10
U33 =SUM(J26,J84,J142...J1128)V33 =U33/0$10
U34 =SUM(J27,J85,J143...J1129)V34 =U34/0$10
U35 =SUM(J28,J86,J144...J113O)V35 =U35/0$10
U36 =SUM(J29,J87,J145...J1131)V36 =U36/0$10
U37 =SUM(J30,J88,J146...J1132)V37 =U37/0$10
U38 =SUM(J31,J89,J147...J1133)V38 =U38/O$lO
T40 Total U40 =SUM(J40,J98,J156...J1142) V40 = U40/0$10W400 = U40/0$11
T42 Net U42 =SUM(J42,J100,J158...J1144) V42 =U41/0$10W42 = U42/0$11
As with the crew revenue and expense section effort and potential errors can be
reduced by copying and pasting formulas. This is particularly useful for the
expense section.
To print this section of the spreadsheet you will need to reset the print
area, change printer set-up to landscape and page set to length 8.5 inches and
width 11 inches.
--
At this point you have invested quite a bit of tedious effort into this
75

project and may be wondering how this is ever supposed to save you time.
The goal is to only assemble this spreadsheet once. Now save your work and
create a back-up. You want to keep on back-up clean, without any data
entered. This is the template you will open and rename for vessel and year.
76

Relational Database Packages
A relational database package is likely to pose some of the more
cumbersome learning challenges. Unless you spend time working through the
tutorials, it is not advised that you maintain your business’s accounts or financial
statements on a relational database package. If you work through the tutorials,
however, you can easily master a variety of applications. Alternatively, you can
go to your software or computer store and have programs custom prepared for
your business or fishing vessel. We have prepared programs for vessel
settlements, inventory control, preparation of 1099s, and tracking and
monitoring workmens’ or personal injury claims. If you wanted, you could
create a program and database structure that would allow you to tabulate and
submit your mandatory log information. You could also use a relational
database program to maintain your HACCP records and information. Last, you
could create an entire accounting package in a relational database program;
you could, however, likely do better by purchasing an accounting package.
Why might you want to use a relational database? There are several
reasons. First, a relational database has tremendous computing capability.
You can easily create data files and routines for fast easy summary of
information. Most relational database programs, in fact, have built in routines
that allow you to easily summarize information. You can easily sort data and
prepare company reports or trip log summaries. For example, what if you
wanted a summary of catch per tow and total landings and revenues for all trips
77

conducted during January between 1980 and 1993. If you had the necessary
database, you could call up a summary routine, sort the data, and have your
information printed on the printer in a relatively short amount of time (e.g., less
than three minutes).
In this section, we will explore the dBase Ill Plus relational database
program. Paradox and FoxPro are two other current relational database
programs. All three programs are similar in capabilities and approaches to use.
Learning one package will go a long way towards learning another package.
Like changing cars, however, if you learn one system and later change, you will
have to spend the time learning the new package; each package has its own
peculiarities.
Since we have been working with daily log and trip information, we will
create a relational database that can be used to store and analyze tow-by-tow
information. Rather than create a full blown database, we will create just
enough variables and observations to learn the basics of a relational data base.
We will consider the following variables: (1) date, (2) month, (3) day, (4) year,
(5) tow number, (6) starting tow time, (7) ending tow time, (8) beginning loran
X, (9) beginning loran Y, (10) ending loran X, (11) ending loran Y, (12) chart
area fished, (13) towing speed per tow, (14) bottom depth in fathoms, (15)
number of baskets of scallops caught and retained per tow, (16) number of
baskets of scallops caught and discarded per tow, (17) pounds of flounder
caught and retained per tow, (18) pounds of flounder caught and discarded per
tow, (19) pounds of monkfish caught and retained per tow, (20) pounds of
78

monkfish caught and discarded per tow, (21) pounds of sea bass caught and
retained per tow, (22) pounds of sea bass caught and discarded per tow, (23)
pounds of other fish caught and retained per tow, and (24) pounds of other fish
caught and discarded per tow.
How do we create our data base? dBase is already installed on your
system so you only have to type in cd\dbase and press the enter key. If you
are working with another database system, you will have to follow the tutorial
contained in that system’s manual. Now type dbase, press enter, and then
press either the escape or enter key, and you will see a dBase menu on your
screen. This is actually an assist routine available in dBase. Using the arrows,
move the cursor (highlighted block) to create and press return. Now move the
cursor to database file and press return. Move the cursor to C: and press
return. You will be asked to provide the name of your data base: type daily
which will be the name you give your data base.
You are ready to name your 24 variables. On your screen, you will see
field name, type, width, and decimal. You must fill in these blanks. For type of
variable, you have several choices: date, numeric, and character. We will use
four variables for date: (1) date, (2) month, (3) day, and (4) year. Under the
field heading, type data for field name, date for type, and 8 for width. The next
variable will be month; so type month under field name. Now use numeric for
type and type 2 for field width. Hit return for decimals (dec) or type 0 and
return. You follow these procedures until you have entered all 24 variables.
Field names, data types, and field widths should be as follows:
79
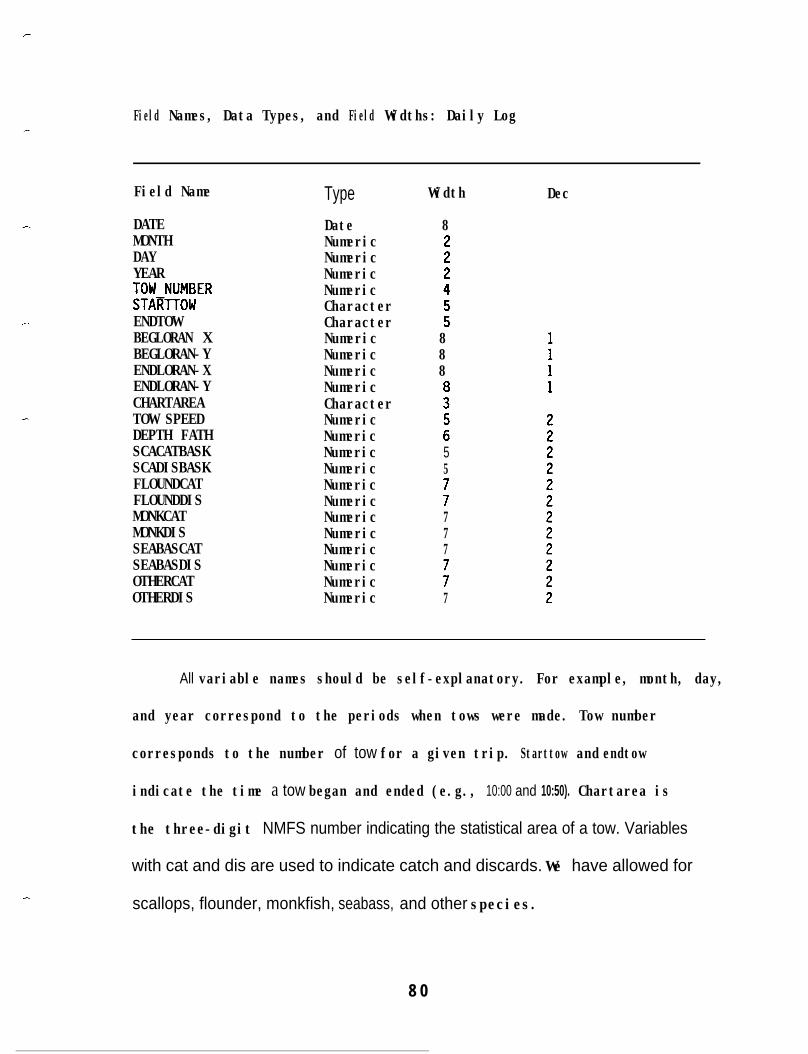
Field Names, Data Types, and Field Widths: Daily Log
Field Name
DATEMONTHDAYYEAR:;;R;;;ER
ENDTOWBEGLORAN XBEGLORAN-YENDLORAN-XENDLORAN-YCHARTAREATOW SPEEDDEPTH FATHSCACATBASKSCADISBASKFLOUNDCATFLOUNDDISMONKCATMONKDISSEABASCATSEABASDISOTHERCATOTHERDIS
TypeDate 8 NumericNumericNumericNumericCharacterCharacterNumeric 8Numeric 8 Numeric 8NumericCharacterNumericNumericNumericNumericNumericNumericNumericNumericNumericNumericNumericNumeric
Width
5:
55
:777
:7
Dec
All variable names should be self-explanatory. For example, month, day,
and year correspond to the periods when tows were made. Tow number
corresponds to the number of tow for a given trip. Starttow and endtow
indicate the time a tow began and ended (e.g., 10:00 and 10:50). Chartarea is
the three-digit NMFS number indicating the statistical area of a tow. Variables
with cat and dis are used to indicate catch and discards. We have allowed for
scallops, flounder, monkfish, seabass, and other species.
8 0

Now that you have created your data file, you are ready to save the file
and enter your data. Press the Ctrl and End keys to indicate you want to save
the file. The system will ask you whether or not you want to input your data
now; type yes. You will now see the names of your 24 variables and blank
boxes beside each variable on your screen. You enter your data by typing in
the values for each variable and pressing return as you finish entering the value
of each variable. In the case where you enter the exact same number of values
as your field width, the system automatically goes to the next variable or field
and awaits your input. We will use the 10 observations contained in the table
on the next page for our data. Continue to enter the data until you have
entered the tenth observation (values for all 24 fields and the last observation).
Now press the Ctrl and end keys to make sure you have saved your data.
Now you have a dBase data base. So what! What are you going to do
with it. We will learn some of the routines available in dBase as well as other
relational database programs. With dBase, we can easily summarize
information by field. One type of information that fishermen are often interested
in is their catch during other months or for certain areas. We will create some
simple summary programs in dbase to examine landings by month and chart
area.
81

Data Set for Daily Log Example:Dbase
Scallop and other species catch and discards measured in terms of baskets; all other catch and discards are measured in terms of pounds.
82

How do we create these programs. In dBase, we type assist. We then
move to arrow or cursor until create is highlighted. We press return and move
the cursor to report. We press return at C: and type month. We are going to
summarize landings by month. Using the arrow, we go from options to groups.
We are now asked how we want to group data. We respond by indicating we
want to group our information by month (type month and press return). We
now indicate that we only want a summary report; we do this by moving the
cursor (using the arrows) to summary report and press return which changes
“no” to “yes”. We now press the right arrow until we are at the item called
columns. We press enter and look for a triangle on the line for field name.
Since we want to summarize catch of all our five species/groups, we type each
species one at a time as follows: (1) scacatbask and press return and move the
arrow to total this column and press return until we have the response yes: (2)
using the page down (Pg Dn) key to allow us to enter another species--press
return and type floundcat and again indicate we want to total; (3) we do this for
the other three species.
After we have finished
move to exit and we indicate
creating our program, we use the arrow key to
(by using the arrow keys) we want to save our
program. We simply press return. Now we are ready to use our program. We
type assist and move the cursor until we have the word retrieve highlighted at
the top of the screen. Moving the arrow until report is highlighted. Moving the
arrow, select month--the program we just created--and press return. The
dBase program will respond by asking you whether or not you want to select
83

data by certain characteristics. We do not and simply press return given that
execute the command is highlighted. We then will be asked whether or not we
want our report printed on the printer or on the screen; we will indicate printer.
For our limited data set, we will obtain four rows of information which
summarize landings of the five species over each month (5, 10, 3, and 6). We
will have a subtotal and a grand total. Our printout will look as follows:
** 5** Subtotal **17.75 29.00 20.00 0.00 44.00
** 10** Subtotal **
4.00 13.00 20.00 0.00 10.00** 3** Subtotal **
7.25 50.00 40.00 0.00 38.00
** 6** Subtotal **11.50 3.00 35.00 0.00 9.00
*** Total ***40.50 95.00 115.00 0.00 101 .00
We could also run our monthly program and select chart areas. Type
assist and use the arrow key until retrieve is highlighted. Using the arrow key,
select report and press return. Press return for C: and move the arrow until
you select month.frm (this is your program for monthly summaries). Press
return and you will be asked whether or not you want to execute or use search
conditions. Indicate that you want to use the search condition: move arrow
until search condition is highlighted and press return. Move arrow until
84

Chartarea is highlighted and press return. Respond by entering the three-digit
area code in which you are interested (e.g., 614). Press return and indicate no
more conditions. Now execute the program and you will have a monthly
summary of landings of each species for area 614 or other area you selected.
As you can tell from the simple example you just completed, relational
database programs are quite powerful. They can manipulate and organize data
in a variety of ways. You can easily create programs to generate reports or
summarize data. If you write a program and it does not work, you will not hurt
anything and you can easily write a program that will work. When you started
fishing, you probably were not the best fishermen or captain. It took time for
you to learn. The same applies to learning how to use relational database
programs.
85

A Final Note
This manual provided an introduction to using personal computers and
common types of software. Besides learning about the Disk Operating System
(DOS), you also learned about word processing, spreadsheet packages, and
relational database programs. You should now have enough familiarity with
computers and software packages to learn other packages and aspects of
computers. Whether or not you computerize your business practices is your
business, but if you do, you will likely have an edge over your competitors. You
will access to more information in a shorter amount of time. Many tasks that
you do with paper and pencil can be done by computer.
You learned that you do not need to be a rocket scientist to operate a
computer. In fact, if you are a captain, the equipment you regularly operate
requires more skills than those required to operate a personal computer. As
you might expect, there are many other types of software with possible
application to your job available in the market. You only need to stop by a local
computer store and inform their sales staff about the types of applications for
which you might be interested. Last, it is hoped that you will continue to learn
about computers and use them in your business.
86
Related Documents