LAB EXPERIMENT 2: Task 2.1 Run the code. Code: #include <iostream> #ifdef __APPLE__ # include <GLUT/glut.h> #else # include <GL/glut.h> #endif using namespace std; // Drawing (display) routine. void drawScene(void) { // Clear screen to background color. glClear(GL_COLOR_BUFFER_BIT); // Set foreground (or drawing) color. glColor3f(0.0, 0.0, 0.0); // Draw a polygon with specified vertices. glBegin(GL_POLYGON); glVertex3f(20.0, 20.0, 0.0); glVertex3f(80.0, 20.0, 0.0); glVertex3f(80.0, 80.0, 0.0);

Welcome message from author
This document is posted to help you gain knowledge. Please leave a comment to let me know what you think about it! Share it to your friends and learn new things together.
Transcript

LAB EXPERIMENT 2:
Task 2.1 Run the code.
Code: #include <iostream>
#ifdef __APPLE__
# include <GLUT/glut.h>
#else
# include <GL/glut.h>
#endif
using namespace std;
// Drawing (display) routine.
void drawScene(void)
{
// Clear screen to background color.
glClear(GL_COLOR_BUFFER_BIT);
// Set foreground (or drawing) color.
glColor3f(0.0, 0.0, 0.0);
// Draw a polygon with specified vertices.
glBegin(GL_POLYGON);
glVertex3f(20.0, 20.0, 0.0);
glVertex3f(80.0, 20.0, 0.0);
glVertex3f(80.0, 80.0, 0.0);

glVertex3f(20.0, 80.0, 0.0);
glEnd();
// Flush created objects to the screen, i.e., force rendering.
glFlush();
}
// Initialization routine.
void setup(void)
{
// Set background (or clearing) color.
glClearColor(1.0, 1.0, 1.0, 0.0);
}
// OpenGL window reshape routine.
void resize(int w, int h)
{
// Set viewport size to be entire OpenGL window.
glViewport(0, 0, (GLsizei)w, (GLsizei)h);
// Set matrix mode to projection.
glMatrixMode(GL_PROJECTION);
// Clear current projection matrix to identity.
glLoadIdentity();
// Specify the orthographic (or perpendicular) projection,
// i.e., define the viewing box.
glOrtho(0.0, 100.0, 0.0, 100.0, -1.0, 1.0);
// Set matrix mode to modelview.
glMatrixMode(GL_MODELVIEW);

// Clear current modelview matrix to identity.
glLoadIdentity();
}
// Keyboard input processing routine.
void keyInput(unsigned char key, int x, int y)
{
switch(key)
{
// Press escape to exit.
case 27:
exit(0);
break;
default:
break;
}
}
// Main routine: defines window properties, creates window,
// registers callback routines and begins processing.
int main(int argc, char **argv)
{
// Initialize GLUT.
glutInit(&argc, argv);
// Set display mode as single-buffered and RGB color.
glutInitDisplayMode(GLUT_SINGLE | GLUT_RGB);

// Set OpenGL window size.
glutInitWindowSize(500, 500);
// Set position of OpenGL window upper-left corner.
glutInitWindowPosition(100, 100);
// Create OpenGL window with title.
glutCreateWindow("square.cpp");
// Initialize.
setup();
// Register display routine.
glutDisplayFunc(drawScene);
// Register reshape routine.
glutReshapeFunc(resize);
// Register keyboard routine.
glutKeyboardFunc(keyInput);
// Begin processing.
glutMainLoop();
return 0;
}

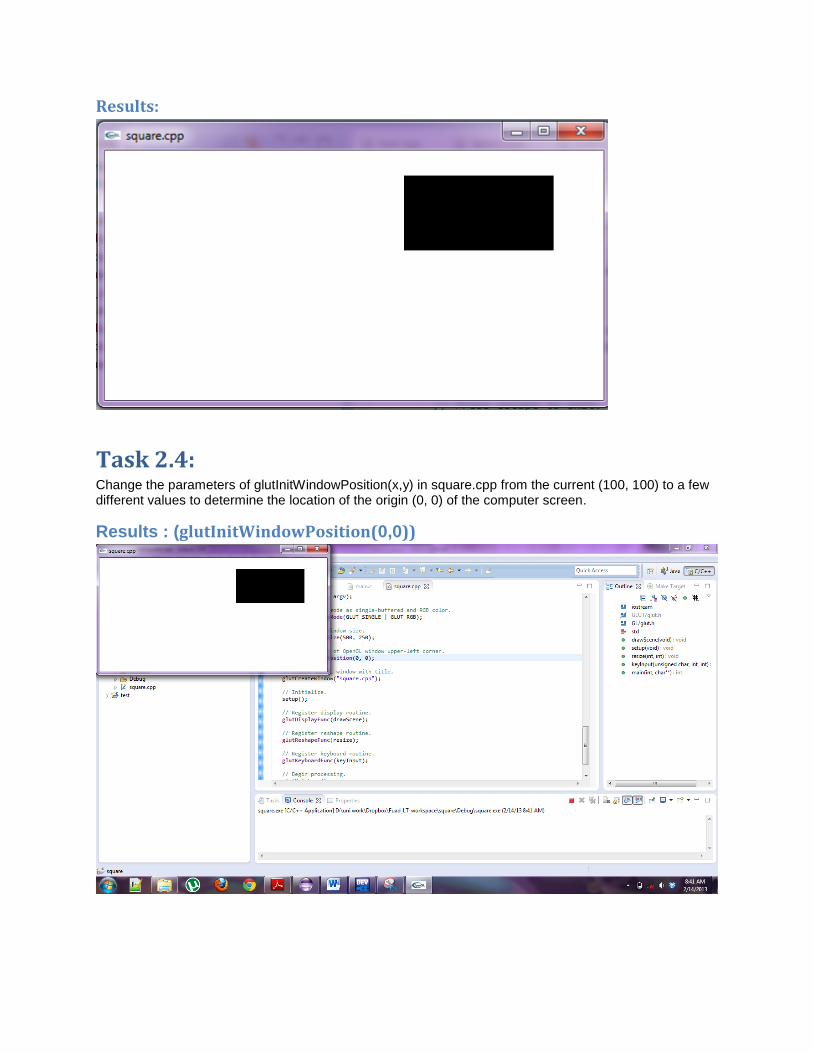
Result:
Task 2.2: Change the glutInitWindowSize() parameter values of square.cpp to glutInitWindowSize(300, 300) and then glutInitWindowSize(500, 250).

Results: (glutInitWindowSize(300, 300))
(glutInitWindowSize(500, 250))
Task 2.3: Change only the viewing box of square.cpp by replacing glOrtho(0.0, 100.0, 0.0, 100.0, -1.0, 1.0) with glOrtho(-100,100.0, -100.0, 100.0, -1.0, 1.0).
Results:
Task 2.4: Change the parameters of glutInitWindowPosition(x,y) in square.cpp from the current (100, 100) to a few different values to determine the location of the origin (0, 0) of the computer screen.
Results : (glutInitWindowPosition(0,0))

(glutInitWindowPosition(0,100))
(glutInitWindowPosition(0,518))
Task 2.5: Add another square by inserting the following right after the code for the original square in square.cpp:
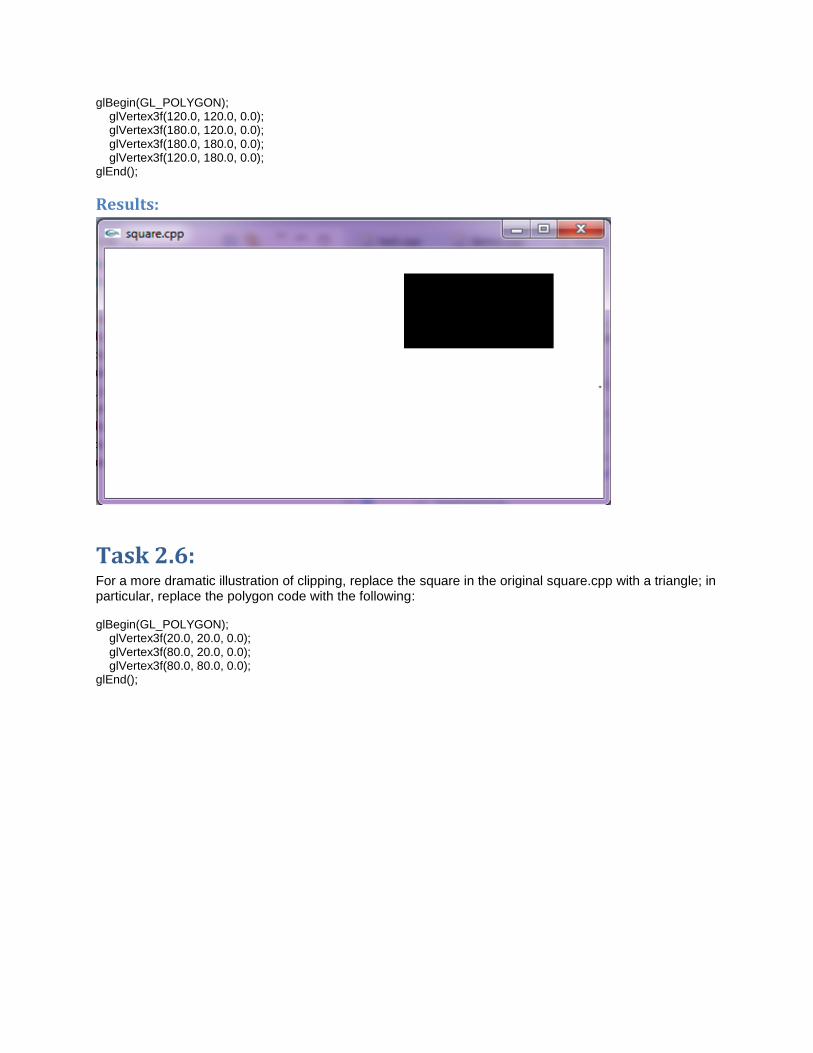
glBegin(GL_POLYGON); glVertex3f(120.0, 120.0, 0.0); glVertex3f(180.0, 120.0, 0.0); glVertex3f(180.0, 180.0, 0.0); glVertex3f(120.0, 180.0, 0.0); glEnd();
Results:
Task 2.6: For a more dramatic illustration of clipping, replace the square in the original square.cpp with a triangle; in particular, replace the polygon code with the following: glBegin(GL_POLYGON); glVertex3f(20.0, 20.0, 0.0); glVertex3f(80.0, 20.0, 0.0); glVertex3f(80.0, 80.0, 0.0); glEnd();

Results:
Next, lift the vertex up the z-axis by changing it to glVertex3f(20.0,20.0, 0.5); lift it further by changing its z-value to 1.5 (Figure 2.12 is a screenshot), then 2.5 and, finally, 10.0
Results: glVertex3f(20.0,20.0, 0.5)

glVertex3f(20.0,20.0, 1.5)
glVertex3f(20.0,20.0, 10.0)
Task 2.7: The color of the square in square.cpp is specified by the three parameters of the glColor3f(0.0, 0.0, 0.0) statement in the drawScene() routine, each of which gives the value of one of the three primary components, blue, green and red.

Results : (glColor3f(1.0, 0.0, 0.0) -> Red)
(glColor3f(0.0, 1.0, 0.0) -> Green)

(glColor3f(0.0, 0.0, 1.0) -> Blue)
(glColor3f(1.0, 1.0, 1.0) -> white)
Task 2.8: Add the additional color declaration statement glColor3f(1.0, 0.0, 0.0) just after the existing one glColor3f(0.0, 0.0,0.0) in the drawing routine of square.cpp so that the foreground color block becomes // Set foreground (or drawing) color. glColor3f(0.0, 0.0, 0.0); glColor3f(1.0, 0.0, 0.0);

Results:
Task 2.9: Replace the polygon declaration part of square.cpp with the following to draw two squares : glColor3f(1.0, 0.0, 0.0); glBegin(GL_POLYGON); glVertex3f(20.0, 20.0, 0.0); glVertex3f(80.0, 20.0, 0.0); glVertex3f(80.0, 80.0, 0.0); glVertex3f(20.0, 80.0, 0.0); glEnd(); glColor3f(0.0, 1.0, 0.0); glBegin(GL_POLYGON); glVertex3f(40.0, 40.0, 0.0); glVertex3f(60.0, 40.0, 0.0); glVertex3f(60.0, 60.0, 0.0); glVertex3f(40.0, 60.0, 0.0); glEnd();

Results:
Flip the order in which the two squares appear in the code by cutting the seven statements that specify the red square and pasting them after those to do with the green one.
Results:
Task 2.10: Replace the polygon declaration part of square.cpp with: glBegin(GL_POLYGON); glColor3f(1.0, 0.0, 0.0); glVertex3f(20.0, 20.0, 0.0); glColor3f(0.0, 1.0, 0.0); glVertex3f(80.0, 20.0, 0.0);

glColor3f(0.0, 0.0, 1.0); glVertex3f(80.0, 80.0, 0.0); glColor3f(1.0, 1.0, 0.0); glVertex3f(20.0, 80.0, 0.0); glEnd();
Results:
Task 2.11: Replace glBegin(GL_POLYGON) with glBegin(GL -POINTS) in square.cpp and make the point size bigger with a call to glPointSize(5.0), so that the part drawing the polygon is now glPointSize(5.0); // Set point size. glBegin(GL_POINTS); glVertex3f(20.0, 20.0, 0.0); glVertex3f(80.0, 20.0, 0.0); glVertex3f(80.0, 80.0, 0.0); glVertex3f(20.0, 80.0, 0.0); glEnd();

Results:
Task 2.12: Continue, replacing GL_POINTS with GL_LINES, GL_LINE_STRIP and, finally, GL_LINE_LOOP.
Results: (GL_LINES):

Results: (GL_LINE_STRIP):
Results: (GL_LINE_LOOP):
Task 2.13: Replace the polygon declaration part of square.cpp with: glBegin(GL_TRAINGLES); glVertex3f(10.0, 90.0, 0.0); glVertex3f(10.0, 10.0, 0.0); glVertex3f(35.0, 75.0, 0.0); glVertex3f(30.0, 20.0, 0.0); glVertex3f(90.0, 90.0, 0.0); glVertex3f(80.0, 40.0, 0.0); glEnd();

Results:
Task 2.14: In fact, it's often easier to decipher a 2D primitive by viewing it in outline. Accordingly, continue the preceding experiment by inserting the call glPolygonMode(GL_FRONT_AND_BACK, GL_LINE) in the drawing routine and, further, replacing GL_TRAINGLES with GL_TRAINGLE_STRIP. The relevant part of the display routine then is as below: // Set polygon mode. glPolygonMode(GL_FRONT_AND_BACK, GL_LINE); // Draw a triangle strip. glBegin(GL_TRAINGLE_STRIP); glVertex3f(10.0, 90.0, 0.0); glVertex3f(10.0, 10.0, 0.0); glVertex3f(35.0, 75.0, 0.0); glVertex3f(30.0, 20.0, 0.0); glVertex3f(90.0, 90.0, 0.0); glVertex3f(80.0, 40.0, 0.0); glEnd();
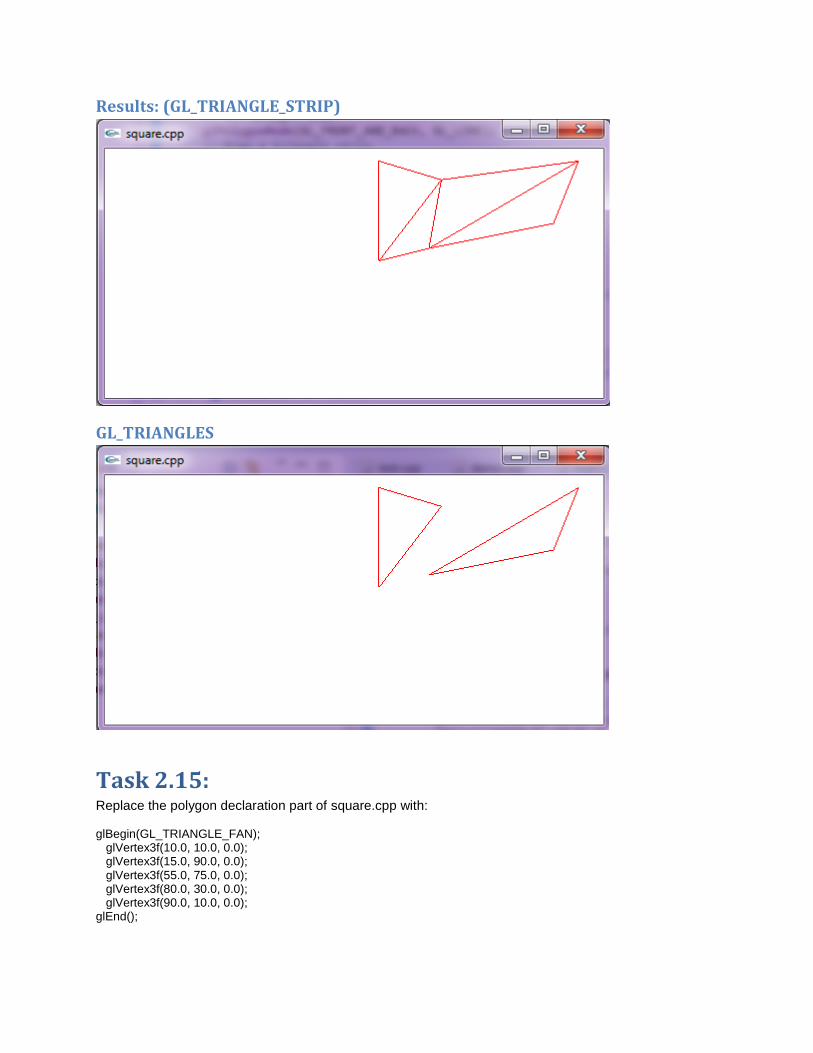
Results: (GL_TRIANGLE_STRIP)
GL_TRIANGLES
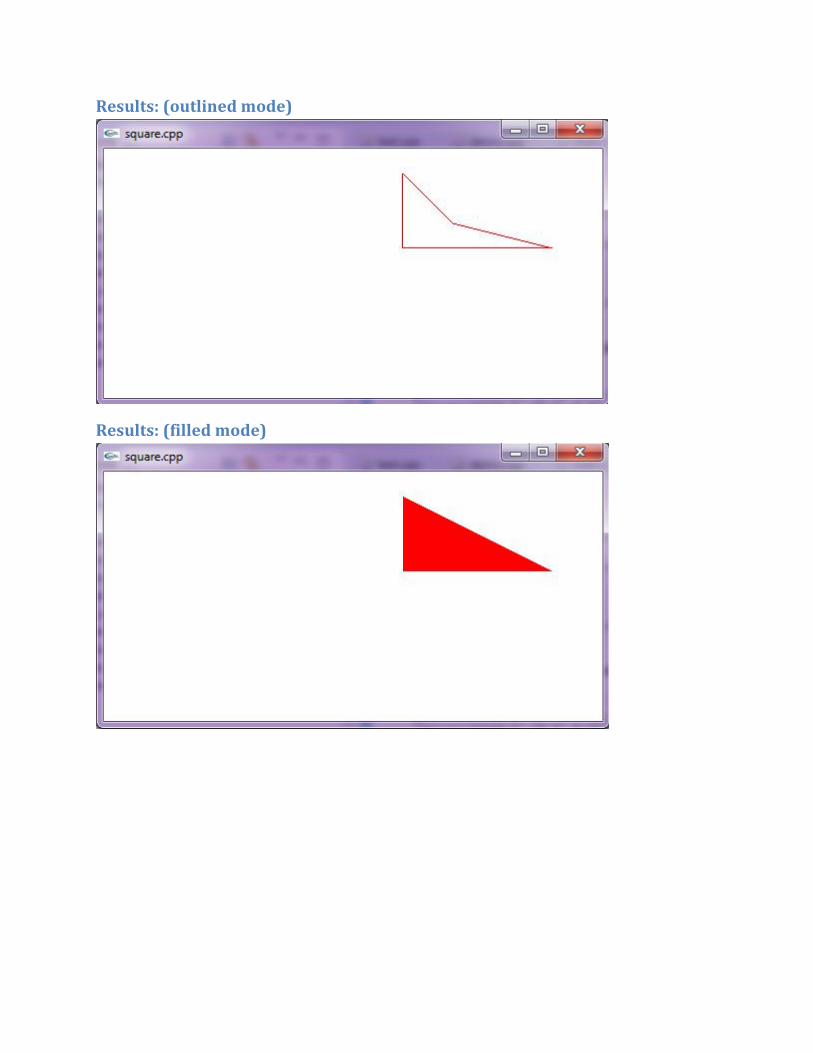
Task 2.15: Replace the polygon declaration part of square.cpp with: glBegin(GL_TRIANGLE_FAN); glVertex3f(10.0, 10.0, 0.0); glVertex3f(15.0, 90.0, 0.0); glVertex3f(55.0, 75.0, 0.0); glVertex3f(80.0, 30.0, 0.0); glVertex3f(90.0, 10.0, 0.0); glEnd();
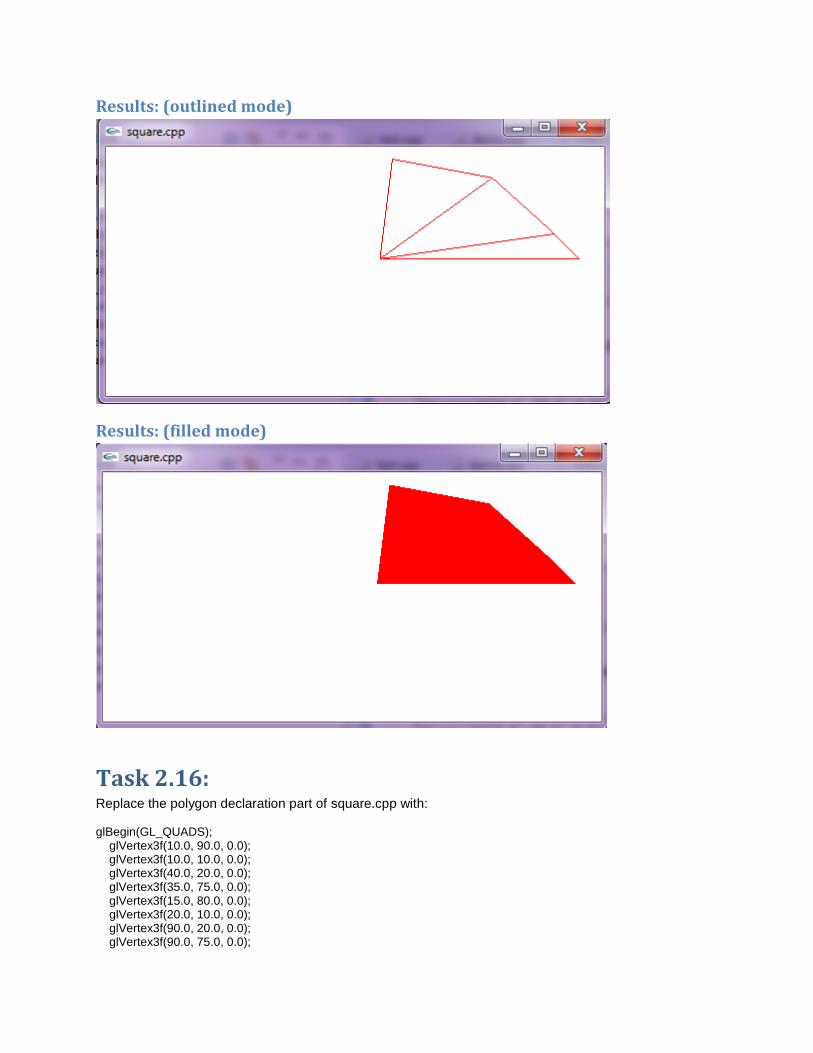
Results: (outlined mode)
Results: (filled mode)
Task 2.16: Replace the polygon declaration part of square.cpp with: glBegin(GL_QUADS); glVertex3f(10.0, 90.0, 0.0); glVertex3f(10.0, 10.0, 0.0); glVertex3f(40.0, 20.0, 0.0); glVertex3f(35.0, 75.0, 0.0); glVertex3f(15.0, 80.0, 0.0); glVertex3f(20.0, 10.0, 0.0); glVertex3f(90.0, 20.0, 0.0); glVertex3f(90.0, 75.0, 0.0);
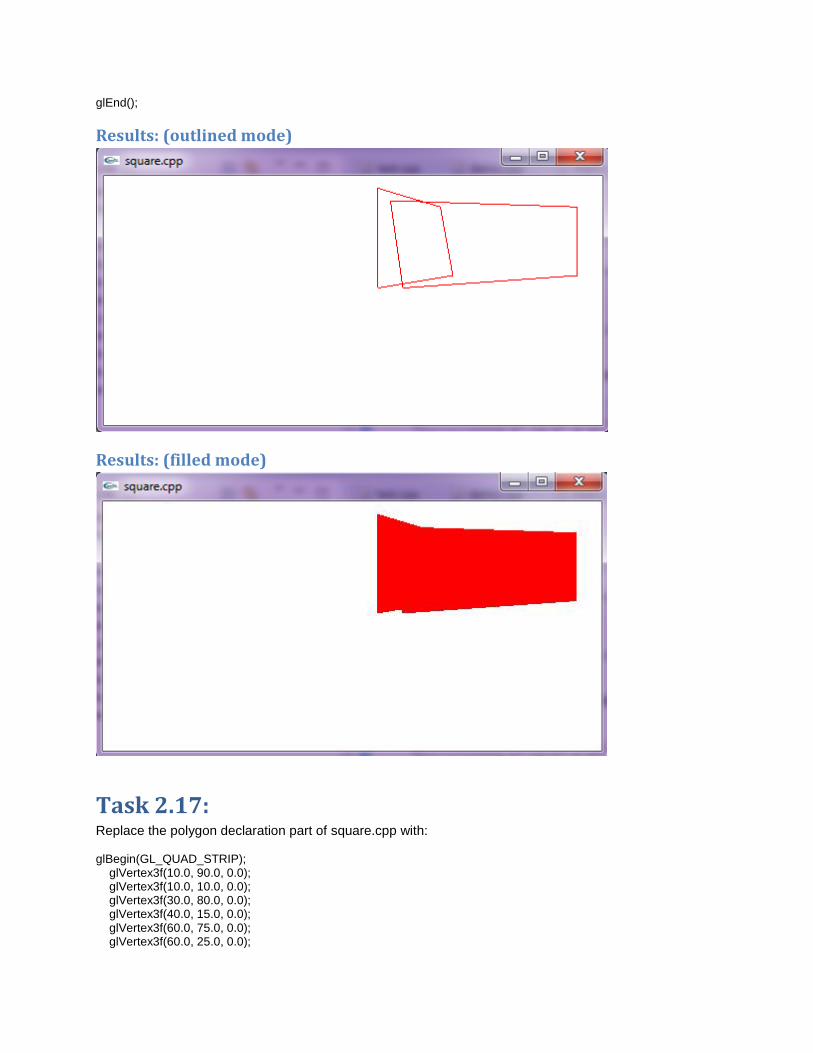
glEnd();
Results: (outlined mode)
Results: (filled mode)
Task 2.17: Replace the polygon declaration part of square.cpp with: glBegin(GL_QUAD_STRIP); glVertex3f(10.0, 90.0, 0.0); glVertex3f(10.0, 10.0, 0.0); glVertex3f(30.0, 80.0, 0.0); glVertex3f(40.0, 15.0, 0.0); glVertex3f(60.0, 75.0, 0.0); glVertex3f(60.0, 25.0, 0.0);

glVertex3f(90.0, 90.0, 0.0); glVertex3f(85.0, 20.0, 0.0); glEnd();
Apply both the filled and outlined drawing modes.
Results: (outlined mode)
Results: (filled mode)
Task 2.18: Replace the polygon declaration of square.cpp with: glBegin(GL_POLYGON); glVertex3f(20.0, 20.0, 0.0);

glVertex3f(50.0, 20.0, 0.0); glVertex3f(80.0, 50.0, 0.0); glVertex3f(80.0, 80.0, 0.0); glVertex3f(20.0, 80.0, 0.0); glEnd();
Results:
Task 2.19: Replace the polygon declaration of square.cpp with: glBegin(GL_POLYGON); glVertex3f(20.0, 20.0, 0.0); glVertex3f(80.0, 20.0, 0.0); glVertex3f(40.0, 40.0, 0.0); glVertex3f(20.0, 80.0, 0.0); glEnd();

Results: (outlined mode)
Results: (filled mode)
Next, keeping the same cycle of vertices as above, list them starting with glVertex3f(80.0, 20.0, 0.0)): glBegin(GL_POLYGON); glVertex3f(80.0, 20.0, 0.0); glVertex3f(40.0, 40.0, 0.0); glVertex3f(20.0, 80.0, 0.0); glVertex3f(20.0, 20.0, 0.0); glEnd();
Make sure to display it both filled and outlined.
Results: (outlined mode)
Results: (filled mode)
Related Documents