K-501USB Read Before Use COMPACT HI-FI COMPONENT SYSTEM Read the opposite side for the "Operating Procedures". B60-5655-00 00 MA (E,X) BT 0607

Welcome message from author
This document is posted to help you gain knowledge. Please leave a comment to let me know what you think about it! Share it to your friends and learn new things together.
Transcript

K-501USBRead Before Use
COMPACT HI-FI COMPONENT SYSTEM
Read the opposite side for the "Operating Procedures".
B60-5655-00 00 MA (E,X) BT 0607

Before applying power
Safety precautions
WARNING : TO PREVENT FIRE OR ELECTRIC SHOCK, DO NOT EXPOSE THIS APPLIANCE TO RAIN OR MOISTURE.
The marking of products using lasers
The marking this product has been classified as Class 1. It means that there is no danger of hazard-ous radiation outside the product.Location: Back panel
CLASS 1LASER PRODUCT
IMPORTANT SAFETY INSTRUCTIONS
Caution : Read this page carefully to ensure safe operation.
Read Instructions – All the safety and operating instructions should be read before the product is operated.Retain Instructions – The safety and operating instructions should be retained for future reference.Heed Warnings – All warnings on the product and in the operating instructions should be adhered to.Follow Instructions – All operating and use instructions should be followed.
1. Cleaning – Unplug this product from the wall outlet before cleaning. Do not use liquid cleaners or aerosol cleaners. Use a damp cloth for cleaning.
2. Attachments – Do not use attachments not recommended by the product manufacturer as they may cause hazards.
3. Water and Moisture – This product shall not be exposed to dripping and splashing – for example, near a bath tub, wash bowl, kitchen sink, or laundry tub; in a wet basement; or near a swimming pool; and the like. Do not place an object containing liquid, such as a flower vase, on the appliance.
4. Accessories – Do not place this product on an unstable cart, stand, tripod, bracket, or table. The product may fall, causing serious injury to a child or adult, and serious damage to the product. Use only with a cart, stand, tripod, bracket, or table recommended by the manufacturer. Any mounting of the product should follow the manufacturer’s instructions, and should use a mounting accessory recommended by the manufacturer.A product and car t combination should be moved with care. Quick stops, excessive force, and uneven surfaces may cause the product and cart combination to overturn.
5. Ventilation – Slots and openings in the cabinet are provided for ventilation and to ensure reliable operation of the product and to protect it from overheating, and these openings must not be blocked or covered. The openings should never be blocked by placing the product on a bed, sofa, rug, or other similar surface. This product should not be placed in a built-in installation such as a bookcase or rack unless proper ventilation is provided or the manufacturer’s instructions have been adhered to.
CAUTIONRISK OF ELECTRIC SHOCK
DO NOT OPEN
CAUTION: TO REDUCE THE RISK OF ELECTRIC SHOCK, DO NOT REMOVE COVER (OR BACK). NO USER-SERVICEABLE PARTS INSIDE. REFER SERVICING TO QUALIFIED SERVICE PERSONNEL.
THE LIGHTNING FLASH WITH ARROWHEAD SYMBOL, WITHIN AN EQUILATERAL TRI-ANGLE, IS INTENDED TO ALERT THE USER TO THE PRESENCE OF UNINSULATED “DAN-GEROUS VOLTAGE” WITHIN THE PRODUCT’S ENCLOSURE THAT MAY BE OF SUFFICIENT MAGNITUDE TO CONSTITUTE A RISK OF ELECTRIC SHOCK TO PERSONS.
THE EXCLAMATION POINT WITHIN AN EQUI-LATERAL TRIANGLE IS INTENDED TO ALERT THE USER TO THE PRESENCE OF IMPORTANT OPERATING AND MAINTENANCE (SERVIC-ING) INSTRUCTIONS IN THE LITERATURE AC-COMPANYING THE APPLIANCE.
Caution : Read this page carefully to ensure safe operation.
Units are designed for operation as follows.
Australia ........................................................... AC 240 V only Europe .............................................................. AC 230 V only

6. Power Sources – This product should be operated only from the type of power source indicated on the product. If you are not sure of the type of power supply to your home, consult your product dealer or local power company.
7. CAUTION – Polarization – This product may be equipped with a polarized alternating-current line plug (a plug having one blade wider than the other). This plug will fit into the power outlet only one way. This is a safety feature. If you are unable to insert the plug fully into the outlet, try reversing the plug. If the plug should still fail to fit, contact your electrician to replace your obsolete outlet. Do not defeat the safety purpose of the polarized plug.
8. Power Cord Protection – Power-supply cords should be routed so that they are not likely to be walked on or pinched by items placed upon or against them, paying particular attention to cords at plugs, convenience receptacles, and the point where they exit from the product.
9. Lightning – For added protection for this product during a lightning storm, or when it is left unattended and unused for long periods of time, unplug it from the wall outlet and disconnect the antenna or cable system. This will prevent damage to the product due to lightning and power-line surges.
10. Overloading – Do not overload wall outlets, extension cords, or integral convenience receptacles as this can result in a risk of fire or electric shock.
11. Object and Liquid Entry – Never push objects of any kind into this product through openings as they may touch dangerous voltage points or short-out parts that could result in a fire or electric shock. Never spill liquid of any kind on the product.
12. Servicing – Do not attempt to service this product yourself as opening or removing covers may expose you to dangerous voltage or other hazards. Refer all servicing to qualified service personnel.
13. Damage Requiring Service – Unplug this product from the wall outlet and refer servicing to qualified service personnel under the following conditions:
a) When the power-supply cord or plug is damaged,b) If liquid has been spilled, or objects have fallen
into the product,c) If the product has been exposed to rain or water,d) If the product does not operate normally by
following the operating instructions.e) If the product has been dropped or damaged in
any way, andf) When the product exhibits a distinct change in
performance – this indicates a need for service.g) If an abnormal smell or smoke is detected.
14. Replacement Parts – When replacement parts are required, be sure the service technician has used replacement parts specified by the manufacturer or have the same characteristics as the original part. Unauthorized substitutions may result in fire, electric shock, or other hazards.
15. Safety Check – Upon completion of any service or repairs to this product, ask the service technician to perform safety checks to determine that the product is in proper operating condition.
16. Wall or Ceiling Mounting – This product should be mounted to a wall or ceiling only as recommended by the manufacturer.
17. Heat – This product should be situated away from heat sources such as radiators, heat registers, stoves, or other products that produce heat. Do not place a flaming object, such as a candle or lantern, or near the product.
18. Power Lines – An outside antenna system should not be located in the vicinity of overhead power lines or other electric light or power circuits, or where it can fall into such power lines or circuits. When installing an outside antenna system, extreme care should be taken to keep from touching such power lines or circuits as contact with them might be fatal.
19. Outdoor Antenna Grounding – If an outside antenna or cable system is connected to the product, be sure the antenna or cable system is grounded so as to provide some protection against voltage surges and built-up static charges. Article 810 of the National Electrical Code, ANSI/NFPA 70, provides information with regard to proper grounding of the mast and supporting structure, grounding of the lead-in wire to an antenna discharge unit, size of grounding conductors, location of antenna-discharge unit, connection to grounding electrodes, and requirements for the grounding electrode.
I
EXAMPLE OF ANTENNA GROUNDING AS PER NATIONAL ELECTRICAL CODE
POWER SERVICE GROUNDING ELECTRODE SYSTEM (NEC ART 250, PART H)NEC – NATIONAL ELECTRICAL CODE
GROUNDING CONDUCTORS (NEC SECTION 810-21)
ANTENNA LEAD IN WIRE
ANTENNA DISCHARGE UNIT (NEC SECTION 810-20)
GROUND CLAMP
ELECTRIC SERVICE EQUIPMENT
GROUND CLAMPS
Notes:1. Item 7 is not required except for grounded or
polarized equipment.2. Item 19 complies with UL in the U.S.A.

Information on Disposal of Old Electrical and Electronic Equipment (applicable for EU countries that have adopted separate waste collection systems)Products with the symbol (crossed-out wheeled bin) cannot be disposed as household waste.Old electrical and electronic equipment should be
recycled at a facility capable of handling these items and their waste byproducts.Contact your local authority for details in locating a recycle facility nearest to you.Proper recycling and waste disposal will help conserve resources whilst preventing
detrimental effects on our health and the environment.

Contents (For "Read Before Use")
IMPORTANT SAFETY INSTRUCTIONS ...................2
Accessories/Associated Products .................................................................6Installation ............................................................................................................7Connections .........................................................................................................8Controls, Connectors and Indicators ........................................................ 12Additional Information .................................................................................. 16Before Recording ............................................................................................. 19Folders and Music Files ................................................................................. 20How to Use This Volume "Operating Procedures" ............................... 22Basic Operation ................................................................................................ 24Care and Storage ............................................................................................. 26Specifications .................................................................................................... 27
Before applying power ...............................................................................2
To ensure safety, read the items carrying this marking carefully.

6 English
Accessories/Associated Products
KenwoodDigital HDDAudio Player
Memory Card(SD Card)
KenwoodDigital Memory
Audio Player
M1GC7 HD20GA7
Connect to USB connector for recording and playback
Connect to D.AUDIO INconnector for playback.
Insert into the memory card slot for recording music.
AM loop antenna(x 1)
FM indoor antenna(x 1)
Remote control unit(RC-F0508E x 1)
Remote control batteries(R03 x 2)
Associated Products
Check that all accessories are present in the package.
Speaker cords(2 m x 2)
Packaged together with speakers
If any accessories are missing, or if the unit is damaged or fails to operate, notify your dealer immediately. If the unit was shipped to you directly, notify your shipper immediately. Kenwood recommends that you retain the original carton and packing materials in case you need to move or ship the unit in the future.Keep this manual handy for future reference.
as of Sep. 2006

7
Installation
Installation Method
Place the left and right speakers correctly. If they are placed in wrong locations, the left and right audio cannot be reproduced correctly.
Place the main unit by leaving a space of at least 1 cm from each speaker.
Always install the system on a level, stable surface. If the system is installed on a bench or desktop, be sure to check its strength before installation.
CAUTION
Obser ve the following cautions when installing the system. Insufficient heat radiation may build up internal heat and cause a malfunction or fire hazard.
Install the system so that the power outlet is easily accessible from the user, and unplug the power cord from the power outlet immediately in case of a trouble.Note that the power supply to the system is not shut down completely by simply setting the power key to OFF.To shut down the power supply completely, it is required to unplug the power cord.
The magnetism from the speakers may cause color irregularities on a nearby TV or PC screen. Always install the speakers at a distance from a TV or PC.
The audio is variable depending on how the speakers are installed. Ensure the following points to enjoy music with higher quality.
Make the environments around the left and right speakers as equal as possible. Also reduce the sound reflections in these environments as low as possible.(For example, install the left and right speakers at distances from the walls and hang a thick curtain on glass windows.)
Place the left and right speakers at a large distance between each other.
Place the left and right speakers on the same height as the ears of the listener.
Do not place an object that may hinder heat radiation on the system.
Leave the spaces specified below around the cabinets of the main unit.
Install this system as shown below.
To improve the audio effects
Top panel: 50 cm or moreBack panel: 10 cm or more
Left speaker Right speaker
Main unit
8 English
Connections
1
2
3
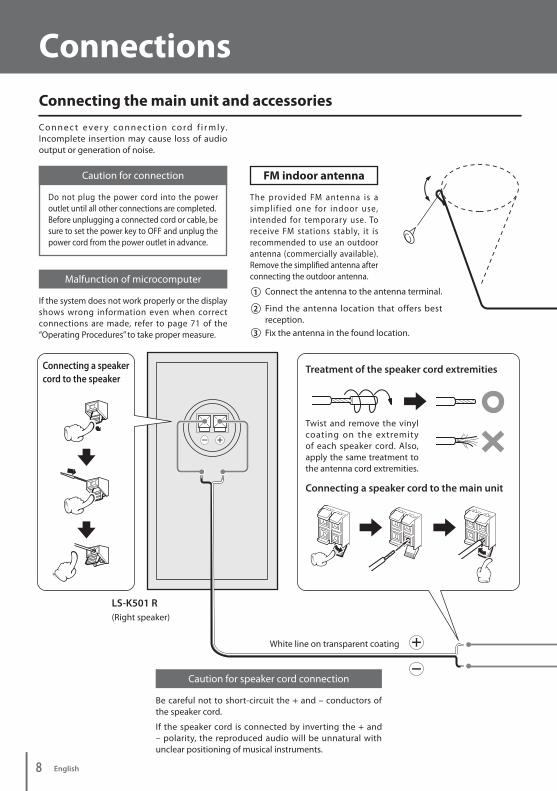
Co n n e c t e ve r y c o n n e c t i o n c o rd f i r m l y.Incomplete insertion may cause loss of audio output or generation of noise.
FM indoor antenna
The provided FM antenna is a s implif ied one for indoor use, intended for temporary use. To receive FM stations stably, it is recommended to use an outdoor antenna (commercially available).Remove the simplified antenna after connecting the outdoor antenna.Malfunction of microcomputer
If the system does not work properly or the display shows wrong information even when correct connections are made, refer to page 71 of the “Operating Procedures” to take proper measure.
Connect the antenna to the antenna terminal.
Find the antenna location that offers best reception.Fix the antenna in the found location.
Caution for speaker cord connection
If the speaker cord is connected by inverting the + and – polarity, the reproduced audio will be unnatural with unclear positioning of musical instruments.
Be careful not to short-circuit the + and – conductors of the speaker cord.
Caution for connection
Do not plug the power cord into the power outlet until all other connections are completed.Before unplugging a connected cord or cable, be sure to set the power key to OFF and unplug the power cord from the power outlet in advance.
Connecting the main unit and accessories
LS-K501 R
Twist and remove the vinyl coating on the extremity of each speaker cord. Also, apply the same treatment to the antenna cord extremities.
(Right speaker)
Treatment of the speaker cord extremities
Connecting a speaker cord to the main unit
White line on transparent coating
Connecting a speaker cord to the speaker
9
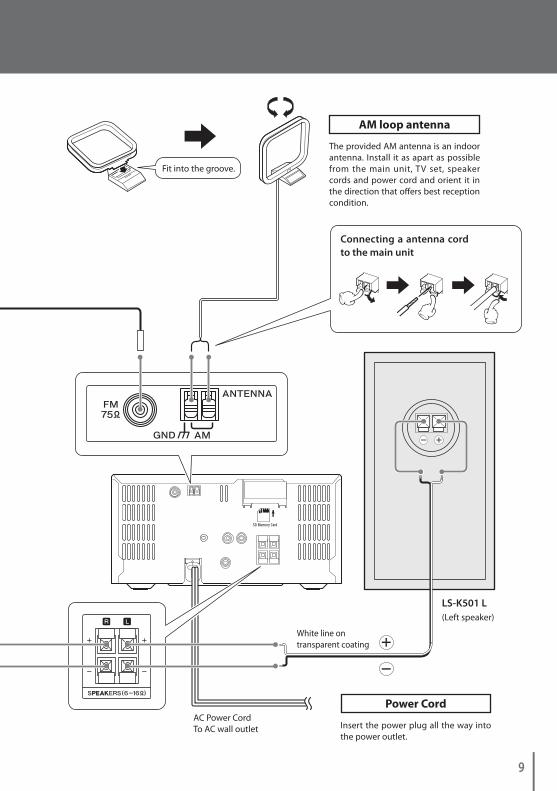
AM loop antenna
The provided AM antenna is an indoor antenna. Install it as apart as possible from the main unit, TV set, speaker cords and power cord and orient it in the direction that offers best reception condition.
Power Cord
Insert the power plug all the way into the power outlet.
AC Power CordTo AC wall outlet
LS-K501 L(Left speaker)
Connecting a antenna cord to the main unit
Fit into the groove.
White line on transparent coating
10 English
Connections
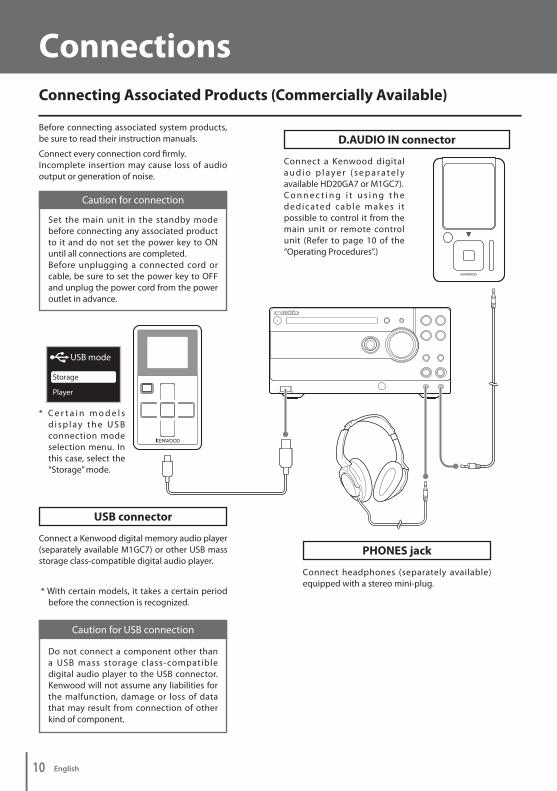
USB connector
Connect a Kenwood digital memory audio player (separately available M1GC7) or other USB mass storage class-compatible digital audio player.
PHONES jack
Connect headphones (separately available) equipped with a stereo mini-plug.
Before connecting associated system products, be sure to read their instruction manuals.
Caution for connection
Set the main unit in the standby mode before connecting any associated product to it and do not set the power key to ON until all connections are completed.Before unplugging a connected cord or cable, be sure to set the power key to OFF and unplug the power cord from the power outlet in advance.
Connect every connection cord firmly.Incomplete insertion may cause loss of audio output or generation of noise.
D.AUDIO IN connector
Caution for USB connection
Do not connect a component other than a USB mass storage class-compatible digital audio player to the USB connector.Kenwood will not assume any liabilities for the malfunction, damage or loss of data that may result from connection of other kind of component.
* With certain models, it takes a certain period before the connection is recognized.
* C e r t a i n m o d e l s d i s p l a y t h e U S B connection mode selection menu. In this case, select the “Storage” mode.
Connect a Kenwood digital a u d i o p l a y e r ( s e p a r a t e l y available HD20GA7 or M1GC7).C o n n e c t i n g i t u s i n g t h e de di cate d ca bl e m ak es i t possible to control it from the main unit or remote control unit (Refer to page 10 of the “Operating Procedures”.)
Connecting Associated Products (Commercially Available)
USB mode
Storage
Player

11
FM outdoor antenna
Use a 75-Ω coaxial cable, lead it indoors and connect to the FM 75 Ω terminal. Remove the simplified FM indoor antenna after connecting the outdoor antenna.
AUX IN jacks
Connect to audio autput of an auxiliary component such as a VCR or a turntable incorporating an RIAA equalizer amplifier (separately available P-110).
D.AUDIO OUT (ANALOG) jack SUB WOOFER PRE OUT jack
Connect the powered subwoofer (separately available SW-40HT, etc.).
Caution for outdoor antenna installation
Memory card slot
Inser t a memor y card (separately available).(Refer to page 53 of the “Operating Procedures”.)
R
L
Since antenna installation necessitates skill and experience, always consult your dealer before installation. The antenna should be placed at a distance from the power distribution wires. Otherwise, an electric shock accident may occur if the antenna falls down.
Connect a digital audio player with direct encoding capability using a commercially cord with stereo mini plugs. Note that the D.AUDIO OUT jack outputs an analog signal.

12 English
Controls, Connectors and Indicators
1
2
3
4
5
6
7
8
11
13
14
15
16
9
10
12
18
19
17
20
The display design mentioned in the following text may differ from the actual design
Demonstration function
This system incorporates a demonstration function (display only). In the demonstration mode, the lighting operation indicators vary in sequence but this variation is accompanied with no change in played audio.
Press during demonstration.
To cancel (switching demonstration off)
Press and hold for more than 2 seconds while the system power is ON.
To start (switching demonstration on)
* The demonstration is switched on automatically when a power failure occurs or the power cord is unplugged or plugged in again while the system power is ON.
Display
Character information display
Available operation key indicatorsThe indicators light to indicate the MULTI CONTROL keys that can currently be pressed for editing or selection operation.
Timer indicator (Refer to page 46 of the “Operating Procedures”.)The indicator lights up when the timer is activated.
D.AUDIO indicatorThe indicator lights when a Kenwood digital audio player is connected through the dedicated cable.
Sound setup indicator (Refer to page 18 of the “Operating Procedures”.)The indicator lights when the sound setup is enabled.
Music file type indicatorsAn indicator l ights up according to the type (compression format) of the music file being played.
Source operation indicatorsThe indicators for the connected (inserted) audio input source or recording condition light or blink.
REC REMAIN indicator (Refer to page 54 of the “Operating Procedures”.)The indicator l ights when the remaining recording time is being displayed.
Tuner and time-related indicators (Refer to pages 20 and 54 of the “Operating Procedures”.)
O.T.E. (One-Touch Edit) recording indicator (Refer to pages 26 to 29 of the “Operating Procedures”.)The indicator lights during O.T.E. recording.
Mode-related indicators (Refer to pages 6 to 15 of the “Operating Procedures”.)One of the indicators light according to the selected mode.
: Repeat play mode
A.P.S. (Auto Power Save) indicator (Refer to page 68 of the “Operating Procedures”.)
: Random play mode: Folder mode: Program mode
Recording progress indicatorThe indicator segments show the progress of recording.
Record mode-related indicators (Refer to page 56 of the “Operating Procedures”.)The indicators l ight to indicate the modes of recording in the USB audio player and memory card.
MUTE indicator (See page 24.)The indicator lights during audio muting.
Play/record/pause indicators
Record setup indicators (Refer to page 57 of the “Operating Procedures”.)The indicators light according to the recording speed and input settings.
Selection cursorsEither cursor l ights to indicate the character information being selected.
: Lights in SETUP or TOOL operation.
: Lights when a folder in a USB audio player or memory card is selected.
: Lights when a music file in a USB audio player or memory card is selected
RDS-related indicators (See page 24, 25.)
3
56
7
891011121314
1516
17
18
19
20
4
1 2
SETUP/DEMO
SETUP/DEMO

13
1
2
3
4
5
16
5
6
7
8
9
10
11
12
13
14
15
Standby mode
When the standby/timer indicator is lit, a small amount of power is supplied to the system to back up the memory. This status is referred to as the standby mode. During this mode, the system can be switched OFF from the remote control unit.
One-touch operation function
Main unit
Power key (See page 25.)Press to switch the power of the system ON/OFF (standby mode).Standby/timer indicatorThe indicator lights when the system power is set to the standby mode. Red lighting: Ordinary standby mode Amber lighting: Timer standby mode
CD tray (See page 25.)Place a CD on the tray.
CD open/close key (See page 25.)Press to open or close the CD tray.
SET UP/DEMO keyPress to set up the system of this unit. (Refer to page 42 of the “Operating Procedures”.)Press or hold to switch demonstration on/off. (See page 12.)
Play/pause keys (Refer to pages 6~ of the “Operating Procedures”.)Press to start or let pause the playback of each audio input source.
STOP [AUTO/MONO] keyPress to stop playback or recording. (Refer to page 6~ the “Operating Procedures”.)Press during a setup to stop it in the middle.When the tuner source is selected, press to select the auto or manual tuning. (Refer to page 21 of the “Operating Procedures”.)Press in the standby mode to display the current time for 5 seconds. (Refer to page 69 of the “Operating Procedures”.)
CD USB O.T.E. key(Refer to page 26 of the “Operating Procedures”.)Press to start O.T.E. recording of a CD.
CD MEMORY O.T.E. key(Refer to page 28 of the “Operating Procedures”.)Press to start O.T.E. recording of a CD.
Headphones jack (See page 10.)Connect headphones (separately available) equipped with a stereo mini-plug.
VOLUME control knob (See page 28.)Press to adjust the listening volume. Turning the knob clockwise increase the volume and turning it counterclockwise decreases the volume.
Remote control sensor (See page 15.)
INPUT SELECTOR key(Refer to pages 9 to 11 of the “Operating Procedures”.)Press to select the source for D.AUDIO or AUX.
USB connector (See page 10.)Connect a USB audio player.
MULTI CONTROL knobPress to select music, music file or broadcasting station.Use during playback to fast forward or fast reverse it.Use during setting to select and enter an item.
TUNER/BAND key (Refer to page 20 of the “Operating Procedures”.)Press to select the tuner source.Also, press to select the radio-broadcasting band
D.AUDIO IN connector (Refer to page 10 of the “Operating Procedures”.)Connect a Kenwood digital audio player using the dedicated cable.
The system incorporates the convenient one-touch operation function. When the system is in standby mode, pressing one of the keys switches the system ON. If a disc is loaded in the selected audio input source, its playback also starts at the same time.
SETUP/DEMO
MULTI CONTOROL
VOLUME
PHONE
MEMORY
CD
USB
INPUTSELECTOR
TUNER/BAND
CD MEMORYO.T.E.
CD USBO.T.E.
STOP[AUTO/MONO]
IN
3 5
7
6
8
9
101112131415
4
16
1 2

14 English
Controls, Connectors and Indicators
1
2
3
4
5
6
7
8
9
10
11
12
13
14
The keys having the same names as the keys on the main unit function in the same way as the main unit keys with the same times.
1
4
6
7
8
9
10
11
12
13
14
15
1617
21
22
23
24
25
26
27
29
28
30
31
20
1918
5
3
2
Remote Control unit
Power key (See page 25.)
DISPLAY/CHARAC. key (Refer to pages 38 and 54 of the “Operating Procedures”.)
TIME DISP. key (Refer to pages 54 of the “Operating Procedures”.)
CLEAR key (Refer to pages 25, 39 and 57 of the “Operating Procedures”.)
FLAT key (Refer to page 19 of the “Operating Procedures”.)
Tone setting keys (Refer to page 18 of the “Operating Procedures”.)
SET UP key (Refer to page 42~ of the “Operating Procedures”.)
VOLUME keys (See page 24.)
MUTE key (See page 24.)
STOP [AUTO/MONO] key
TUNING key (Refer to page 7 to 21 of the “Operating Procedures”)
D.AUDIO play/pause keyPress to start or let pause the playback of the Kenwood digital audio player connected to the D.AUDIO IN connector using the dedicated cable. (Refer to page 10 of the “Operating Procedures”.)
Press to fast forward or fast reverse music. When the tuner source is selected, press to select a broadcasting station.
Press to stop playback or recording. (Refer to page 6~ of the “Operating Procedures”.) Press during a setup to stop it in the middle. When the tuner source is selected, press to select the auto or manual tuning. (Refer to page 21 of the “Operating Procedures”.)Press in the standby mode to display the current time for 5 seconds.(Refer to page 69 of the “Operating Procedures”.)
Press to mute the audio temporarily.
Press to adjust the listening volume. Pressing the upper key increases the volume and pressing the lower key decreases the volume.
Press to set up the system of this unit.
Press to switch the TONE, D-BASS, MANUAL EQ or SPRM setup.
Press to cancel temporarily the TONE, D-BASS and MANUAL EQ setups.
Press to clear a track during program play mode. Also, press to clear a preset station. Press during character input to clear a character.
Press to switch the time display information.
Press to display a title, broadcasting station name or time.Press during character input to switch the character group.
Press to switch the power of the system ON/OFF (standby mode).
DIMMER key (Refer to page 66 of the “Operating Procedures”.)Press to adjust the display brightness
PTY key (Refer to page 25 of the “Operating Procedures”.)Press to enter PTY mode.

15
29
30
15
16
17
18
19
20
21
22
23
24
25
26
27
31
28
1
2
3
Operation
Plug the power cord of the system to a power outlet and press the power key on the remote control unit to turn the system ON.After the system is switched ON, press the desired operation key.
Loading batteries in the remote control unit
When the remote control batteries are exhausted, replace them with a pair of new R03 batteries.
The system may malfunction if the remote control sensor is exposed to direct sunlight or the light of a fluorescent lamp with high-frequency lighting system (inverter system, etc.).In this case, change the system installation to prevent malfunction.
Remove the battery cover
Replace the batteries with new R03 batteries
Close the battery cover
* Insert batteries with correct polarity.
The provided batteries are intended for use in checking operations and their life may be shorter than usual.
O.T.E. key (Refer to page 26 to 29 of the “Operating Procedures”.)
TIMER key (Refer to page 46 of the “Operating Procedures”.)
INTRO SCAN key (Refer to page 16 of the “Operating Procedures”.)
REPEAT key (Refer to page 13 of the “Operating Procedures”.)
RANDOM key (Refer to page 12 of the “Operating Procedures”.)
AUX key (Refer to page 9 of the “Operating Procedures”.)
P.CALL key (Refer to page 7 to 20 of the “Operating Procedures”.)
Play/pause key (Refer to page 6~ of the “Operating Procedures”.)
RETURN key
MULTI CONTROL keys
TUNER [FM/AM] key (Refer to page 20 of the “Operating Procedures”.)
P.MODE key (Refer to pages 6, 14 and 16 of the “Operating Procedures”.)
TOOL key
MEMORY USB key(Refer to page 30 of the “Operating Procedures”.)
MEMORY REC key
Numeric keys/character input keysPress to select a title. (Refer to page 7~ of the “Operating Procedures”.)Press to input a title. (Refer to page 38 of the “Operating Procedures”.)
Press to start recording on the memory card.(Refer to page 32 to 35 of the “Operating Procedures”.)
Press to start transfer of music files from the memory card to the USB audio player.
Press during editing.
Press to select the play mode (all-track play mode, folder play mode or program play mode).
Press to select FM or AM.
Press to select music, music file or broadcasting station.Use during playback to fast forward or fast reverse it.Use during setting to select and enter an item.
Press during setting or editing to return to the previous item or previous display page.
Press to start or let pause the playback of each audio input source.
Press to skip music. When the tuner source is selected, press to select a broadcasting station.
Press to select AUX.
Press to start random playback.
Press to start repeat playback.
Press to start the Intro Scan of all music files or the files in the selected folder.
Press to activate or deactivate the timer.
Press to start O.T.E. recording of a CD.
SLEEP key(Refer to page 47 of the “Operating Procedures”.)Press to set the sleep timer.
30° 30°
Approx.6m

16 English
Additional Information
NoteMedium Icon on this system
A memory card of 32 MB to 2 GB can be used. It is recommended to use a memory card with 5 MB/S or more transfer speed.A SDHC card (4 GB or more) cannot be used.A multimedia card (MMC) cannot be used.
Playback of a disc not compliant with the CD standard, such as a copy controlled CD, is not guaranteed.A CD-R or CD-RW that has been recorded in the CD-DA format and finalized after recording can be played back.Certain CD-R and CD-RW discs may not be playable on this system depending on the equipment used for recording, the recording condition or the type of disc.
Media Usable With This System
A special adapter is required for using a miniSDTM card.
SD logo is a trademark.
miniSD is a trademark of the SD Association.TM
Memory Card
SD memory card
miniSDTM card
CD
Commercially available music CD
A CD-R or CD-RW that has been recorded in the CD-DA format
Kenwood DigitalAudio Player
USB mass storage class-compatible
digital audio player
Do not connect a component other than a USB mass storage class-compatible digital audio player to the USB connector. Kenwood will not assume any liabilities for the malfunction, damage or loss of data that may result from connection of other kind of component. USB
17
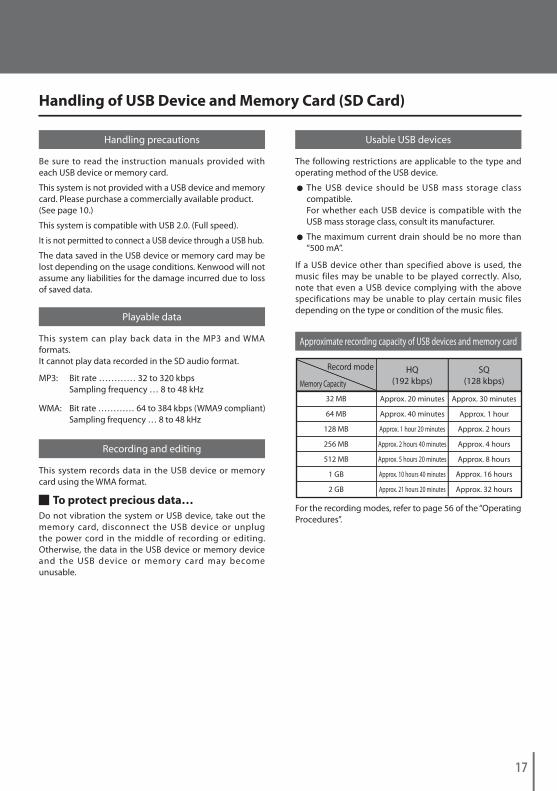
Playable data
This system can play back data in the MP3 and WMA formats.It cannot play data recorded in the SD audio format.
Recording and editing
This system records data in the USB device or memory card using the WMA format.
To protect precious data…Do not vibration the system or USB device, take out the memory card, disconnect the USB device or unplug the power cord in the middle of recording or editing. Otherwise, the data in the USB device or memory device and the USB device or memory card may become unusable.
Usable USB devices
Approximate recording capacity of USB devices and memory card
Handling precautions
Be sure to read the instruction manuals provided with each USB device or memory card.
The USB device should be USB mass storage class compatible.For whether each USB device is compatible with the USB mass storage class, consult its manufacturer.
The maximum current drain should be no more than “500 mA”.
If a USB device other than specified above is used, the music files may be unable to be played correctly. Also, note that even a USB device complying with the above specifications may be unable to play certain music files depending on the type or condition of the music files.
This system is not provided with a USB device and memory card. Please purchase a commercially available product.(See page 10.)
This system is compatible with USB 2.0. (Full speed).
It is not permitted to connect a USB device through a USB hub.
The data saved in the USB device or memory card may be lost depending on the usage conditions. Kenwood will not assume any liabilities for the damage incurred due to loss of saved data.
Handling of USB Device and Memory Card (SD Card)
MP3: Bit rate ………… 32 to 320 kbpsSampling frequency … 8 to 48 kHz
WMA: Bit rate ………… 64 to 384 kbps (WMA9 compliant)Sampling frequency … 8 to 48 kHz
The following restrictions are applicable to the type and operating method of the USB device.
Memory Capacity
HQ(192 kbps)
32 MB Approx. 20 minutes
64 MB Approx. 40 minutes
128 MB Approx. 1 hour 20 minutes
256 MB Approx. 2 hours 40 minutes
512 MB Approx. 5 hours 20 minutes
1 GB Approx. 10 hours 40 minutes
2 GB Approx. 21 hours 20 minutes
SQ(128 kbps)
Approx. 30 minutes
Approx. 1 hour
Approx. 2 hours
Approx. 4 hours
Approx. 8 hours
Approx. 16 hours
Approx. 32 hours
For the recording modes, refer to page 56 of the “Operating Procedures”.
Record mode

18 English
Additional Information
1
2
3
4
Before transporting or moving the system, prepare it as described below.
Disconnect the USB audio player and take out the memory card and CD.
Press the play/pause keys for the memory card and CD and confirm that message “NO CARD” or “NO DISC” is displayed
Wait a while, and then turn the system OFF.
If an external component is connected, confirm that it is turned OFF and then unplug the connection cable.
Caution for Transport or Movement
Cautions on CD discs
Always use a disc carrying the marking.
A disc without this marking may be unable to be played back correctly.
Handling precautions
Hold a CD taking care not to touch the played surface.
Discs playable on the system
This system can play back a CD (12 cm, 8 cm), CD-R, CD-RW or the audio part of a CD-EXTRA disc. The disc rotates at a high speed during playback. Never
use a cracked, chipped or greatly warped disc. Otherwise, damage or malfunction of the player may result.Also, do not use a disc with a non-circular shape as this may result in malfunction.
Notes on CD-R/CD-RW discs
If the CD-R or CD-RW disc in use has a printable label surface, the disc may be unable to be taken out of the system due to sticking of the label surface. To prevent malfunction of the system, do not use such a disc.
Handling of CD
The setups in the system are backed up for about a day even after the power cord has been unplugged from the power outlet. The backed-up setups are as follows.
Input selectionVolume settingBalance settingInput level settingD-BASS, MANUAL EQ and SPRM function settingsTimer settingsDIMMER settingA.P.S. (Auto Power Save) setting
Preset stationsTuning mode(Auto/manual)Receiving bandReceiving frequency
Memory Backup
Record modeRecording speedAuto marking settingTEXT COPY settingRecording level settingTrack mark setting
Tuner setups Recording setups

19
Before Recording
×
×
×
×
Folders and music files
Every time recording of music files is started, a new folder is created automatically in the KWD folder and the music files are stored in the new folder. The created folder and files are numbered automatically.See page 20 for details.
The maximum number of folder is 200.
The maximum number of music files is 1000 within the recording capacity.
A USB audio player or memory card cannot record more than 200 folders.
Number of folders and music files that can be handled with the system
A USB audio player or memory card cannot record more than 1000 music files even when there is remaining recording capacity in it.
Recordable and Non-Recordable Sources
Recording in USB Audio Player or Memory Card
The materials you record cannot be used without permission of their copyright owners except for personal use.
Materials recorded from broadcasting, discs or other recorded materials (music tapes, karaoke tapes, etc.) are protected by the copy right just like the verses and melodies of songs.
The copyright law prescribes that the permission from the copyright owners is required to sell, distribute, transfer or lend the materials recorded from the above recorded materials or to use them on a commercial basis (including background music in shops, etc.).
Copyright Information
: Digital recording possible : Analog recording in normal recording speed only × : Not possible recording
: Recording of music from the memory card to the USB audio player has the same effect as moving the music files from the former to the latter.
*1
*1
USB audio player
Memory Card
CD
Kenwood digital audio player connected to D.AUDIO IN
Radio
External component (connected to AUX)
USB audio player Memory cardDigital audio player connected to D.AUDIO OUT jack
Recording Source
Recording Destination
20 English
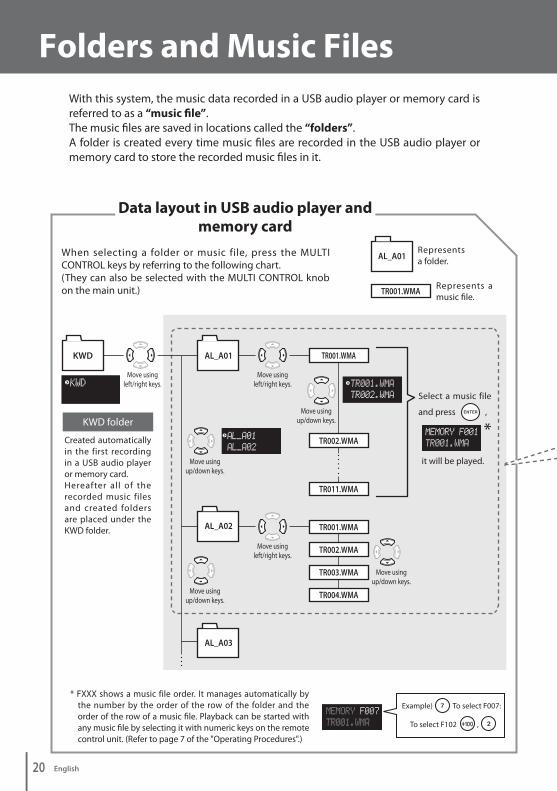
Folders and Music Files
When selecting a folder or music file, press the MULTI CONTROL keys by referring to the following chart.(They can also be selected with the MULTI CONTROL knob on the main unit.)
Select a music file
and press ,
Data layout in USB audio player and memory card
AL_A01
AL_A02
AL_A03
TR001.WMA
TR002.WMA
TR011.WMA
TR001.WMA
TR002.WMA
TR003.WMA
TR004.WMA
it will be played.
KWD
AL_A01
TR001.WMARepresents a music file.
Represents a folder.
With this system, the music data recorded in a USB audio player or memory card is referred to as a “music file”.The music files are saved in locations called the “folders”.A folder is created every time music files are recorded in the USB audio player or memory card to store the recorded music files in it.
* FXXX shows a music file order. It manages automatically by the number by the order of the row of the folder and the order of the row of a music file. Playback can be started with any music file by selecting it with numeric keys on the remote control unit. (Refer to page 7 of the "Operating Procedures".)
Example) To select F007:
To select F102 ,
*Created automatically in the first recording in a USB audio player or memory card. Hereafter all of the recorded music files and created folders are placed under the KWD folder.
Move using left/right keys.
Move using up/down keys.KWD folder
Move using left/right keys.
Move using up/down keys.
Move using up/down keys.
Move using left/right keys.
Move using up/down keys.

21
When a CD is recorded:
When tracks selected from another CD is recorded in the same memory card:
When music is recorded from this system to USB audio player or memory card
Example:
M a x i m u m n u m b e r s o f folders and music f i les handled by the KWD folder
Folder …………… 200
Music files ……… 1000
For the maximum numbers of folders and music files handled by the KWD folder, refer to page 51 of the “Operating Procedures”.
AL_A01KWD
TR001.WMA
TR002.WMA
TR011.WMA
Track 1
Track 2
Track 11
Data layout in USB audio player and memory card
AL_A01KWD
TR001.WMA
TR002.WMA
TR003.WMA
TR004.WMA
Track 3
Track 5
Track 8
Track 9
Data layout in USB audio player and memory card
AL_A02
AL_A01 folder is automatically created.
AL_A02 folder is newly created.
AL_A01 folder created in previous recording.
The recorded music files and folders accommodating them are numbered automatically. These number can later be modified.
Numbers assigned to folders: AL_A01…AL_A99… …AL_Z99
Numbers assigned to music files: TR001.WMA, TR002.WMA……
This system records data in the USB device or memory card using the WMA format.
22 English
How to Use This Volume “Operating Procedures”
32 33
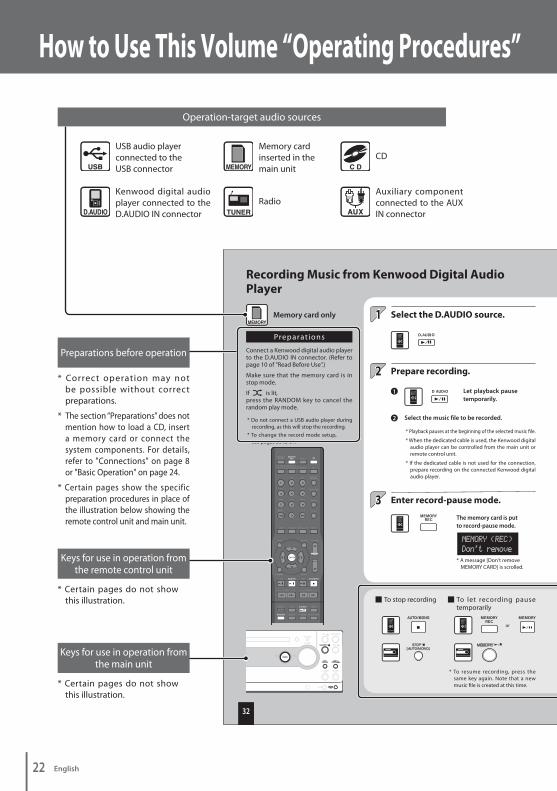
Recording Music from Kenwood Digital Audio Player
1
2
3
4
1
2
5
Record
Select the D.AUDIO source.
Prepare recording.
Recording Music from
Kenwood D
igital Audio Player
Preparat ions
Connect a Kenwood digital audio player to the D.AUDIO IN connector. (Refer to page 10 of "Read Before Use".)
Make sure that the memory card is in stop mode.
If is lit,press the RANDOM key to cancel the random play mode.
Memory card only
To stop recording
Enter record-pause mode.
Select the music fi le to be recorded.
Let playback pause temporarily.
Start recording.
Press the MEMORY REC key again to enter record mode.
If the memory card contains a folder named AL_Z90 or higher, a message [CHECK REFRESH] is displayed and recording cannot be started. In this case, it is required to rearrange the folders by means of refreshing. (See page 52.)
To let recording pause temporarily
* When the dedicated cable is used, the Kenwood digital audio player can be controlled from the main unit or remote control unit.
* Playback pauses at the beginning of the selected music fi le.
* If the dedicated cable is not used for the connection, prepare recording on the connected Kenwood digital audio player.
Dividing music during recording
During recording from the TUNER, AUX or D.AUDIO source to a memory card, the recorded music file can be divided into multiple music files by manually entering a track mark (music division mark). Each press of the key or knob creates a new music fi le from that point.
Press at the point you want to divide the music.
* The track marks can also be entered automatically. (See page 59.)
* To resume recording, press the same key again. Note that a new music fi le is created at this time.
or
* Do not connect a USB audio player during recording, as this will stop the recording.
* To change the record mode setup, see pages 56 to 61.
A message [STOP REC No Capacity] is displayed. Erase the unnecessary music fi les before retrying recording from the beginning. (See page 36.)
* Do not switch the system OFF or apply shock or vibration to it while [DATA WRITING] is displayed.
The memory card stops and a message [DATA WRITING] is displayed.
* If the power to the system is shut off before [DATA WRITING] disappears, the recorded data will be lost.
When the memory card becomes full before completion of recording:
When recording completes:
* A message [Don't remove MEMORY CARD] is scrolled.
* If the dedicated cable is not used for the connection, start playback on the connected Kenwood digital audio player.
If the audio recorded is distorted or too low
Adjust the recording level. (See page 58.)
The memory card is put to record-pause mode.
Start playback of the Kenwood digital audio player.
* A message [Don't remove MEMORY CARD] is scrolled.
Hint
* Correct operation may not be possible without correct preparations.
USB audio player connected to the USB connector
* The section “Preparations” does not mention how to load a CD, insert a memory card or connect the system components. For details, refer to "Connections" on page 8 or "Basic Operation" on page 24.
* Certain pages show the specific preparation procedures in place of the illustration below showing the remote control unit and main unit.
Operation-target audio sources
Keys for use in operation from the main unit
Keys for use in operation from the remote control unit
Preparations before operation
CD
Radio
Memory card inserted in the main unit
Auxiliary component connected to the AUX IN connector
Kenwood digital audio player connected to the D.AUDIO IN connector
* Certain pages do not show this illustration.
* Certain pages do not show this illustration.

23
32 33
Recording Music from Kenwood Digital Audio Player
1
2
3
4
1
2
5
Record
Select the D.AUDIO source.
Prepare recording.
Recording Music from
Kenwood D
igital Audio Player
Preparat ions
Connect a Kenwood digital audio player to the D.AUDIO IN connector. (Refer to page 10 of "Read Before Use".)
Make sure that the memory card is in stop mode.
If is lit,press the RANDOM key to cancel the random play mode.
Memory card only
To stop recording
Enter record-pause mode.
Select the music fi le to be recorded.
Let playback pause temporarily.
Start recording.
Press the MEMORY REC key again to enter record mode.
If the memory card contains a folder named AL_Z90 or higher, a message [CHECK REFRESH] is displayed and recording cannot be started. In this case, it is required to rearrange the folders by means of refreshing. (See page 52.)
To let recording pause temporarily
* When the dedicated cable is used, the Kenwood digital audio player can be controlled from the main unit or remote control unit.
* Playback pauses at the beginning of the selected music fi le.
* If the dedicated cable is not used for the connection, prepare recording on the connected Kenwood digital audio player.
Dividing music during recording
During recording from the TUNER, AUX or D.AUDIO source to a memory card, the recorded music file can be divided into multiple music files by manually entering a track mark (music division mark). Each press of the key or knob creates a new music fi le from that point.
Press at the point you want to divide the music.
* The track marks can also be entered automatically. (See page 59.)
* To resume recording, press the same key again. Note that a new music fi le is created at this time.
or
* Do not connect a USB audio player during recording, as this will stop the recording.
* To change the record mode setup, see pages 56 to 61.
A message [STOP REC No Capacity] is displayed. Erase the unnecessary music fi les before retrying recording from the beginning. (See page 36.)
* Do not switch the system OFF or apply shock or vibration to it while [DATA WRITING] is displayed.
The memory card stops and a message [DATA WRITING] is displayed.
* If the power to the system is shut off before [DATA WRITING] disappears, the recorded data will be lost.
When the memory card becomes full before completion of recording:
When recording completes:
* A message [Don't remove MEMORY CARD] is scrolled.
* If the dedicated cable is not used for the connection, start playback on the connected Kenwood digital audio player.
If the audio recorded is distorted or too low
Adjust the recording level. (See page 58.)
The memory card is put to record-pause mode.
Start playback of the Kenwood digital audio player.
* A message [Don't remove MEMORY CARD] is scrolled.
Hint
The text represents the characters displayed as the character information on the display by enclosing them in [ ].
Example: Select [INTRO SCAN].
* Steps with which both and are shown can be performed
using either the remote control unit or main unit.
* The display illustrations in this manual have been drawn exclusively for use in explanation. They may differ from the actual views of the display.
Items and operations related to the above operation
Supplementary tips on operations
Display during or after each operation
These are the operating procedures.
Indicates a step using the main unit. Press the main unit keys to perform this operation.
Indicates a step using the remote control unit. Press the remote control unit keys to perform this operation.

24 English
Basic Operation
Increases volume
Decreases volume
1 2
3
3
Press the MUTE key again(to return to the previous volume level).
Preparations
Install the system in a proper location.(See page 7.)
Prepare the remote control unit.(See page 15.)
Adjusting the volume
Decreasesvolume
Increasesvolume
Adjust in the range from 0 to 40 (max.).* Turning the knob quickly (on the main unit) or
holding a key depressed (on the remote control unit) accelerates the volume variation speed.
Muting the audio temporarily
To cancel muting
Adjust the volume.
Inserting a memory cardPress the bottom edge of the memory card slot to open the cover.
1
Insert a memory card.2
Close the memory card slot cover.
3
* Be sure to set the system to the standby mode in advance. For details, refer to page 53 of the “Operating Procedures”.
Be careful of orientation!Hold and insert the card so that the labeled side faces down and the cut corner comes on the left.
Check the connections.(See pages 8 to 11.)

25
2
3
1
Open the tray.
Place a CD with label side up.
* For details, refer to the description on playback of each audio source in the “Operating Procedures”.
Press the play/pause key of the desired audio source.
* Pressing the play/pause key of the desired audio input source also turns the system ON (One-touch operation function). (See page 13.)
Press the CD open/close key.
Load a disc.
Play music.
Turn the system ON (OFF).
1
Place a CD on the tray.2
Close the tray.3
* Pressing the power key while the system is ON switches it OFF (standby mode).
USB

26 English
Care and StorageCare and storage of main unit
Do not place in the following locations.
Place exposed to direct sunlight.
Place subjected to excessive humidity or dirt.
Place exposed to direct heat from heating equipment.
Be careful against condensation
When the difference in temperatures between the main unit and the environmental air is large, dew may be condensed inside the main unit and may cause malfunction of the main unit. If this happens, leave the main unit for a few hours until its internal mechanisms are dried up.Take special care against condensation when the main unit is moved between places with a large temperature difference or into a room with high humidity.
Care and storage of CD
Before storing the CD
When a CD becomes dirty
When the main unit is not to be used for a long period, take out the CD and store in the case.
Other cautions
Care and storage of SD card
Before storing the SD card
When a SD card becomes dirty
Other cautions
Caution for disposal/transfer of memory card
“Initialization” or “deletion” of the card using this system or a PC simply modifies the file management information and does not erase the data in the memory card completely. Before disposal or transfer of a memory card, it is recommended to destroy the memory card physically or to destroy the data in it completely by using commercially available PC data destruction software.The data in the memory card should be managed on the user’s own responsibility.
When a main unit becomes dirty
When the front panel or case gets dirty, wipe with a soft dry cloth. Do not use lacquer thinner, benzine, alcohol or contact revitalizer for these chemicals will cause discoloration or deformation.
When a disc is contaminated with fingerprints or other stains, wipe gently in the radial direction using a soft dry cloth.
Do not write letters on a CD using a pencil or ballpoint pen.
Do not stick a sheet of paper, sticker or label on a CD.
Do not use an analog disk cleaner, lacquer thinner, benzine or alcohol.
Do not use a CD if the sticker or label on it is peeled off or bond is overflowed around the sticker or label.
Do not use a disc accessory (stabilizer, protective sheet, protective ring, etc.) or lens cleaner.
Do not attempt to open or modify a card.
Do not peel off the label from the card.
Do not attach a label or sticker on the card.
Do not touch the metallic terminals on the back side with a hand or metallic object.
Always store the SD card in its case.
Avoid locations with a very high temperature (such as a place exposed to direct sunlight) or high humidity.
Wipe gently with a soft, dry cloth.
Do not use lacquer thinner, benzine or alcohol.
Care and storage of USB device
Be sure to read the instruction manuals provided with each USB device.

27
Specifications
Design and specifications are subject to change without notice.Full performance is not guaranteed in extremely cold environments (under water-freezing temperatures).
For your recordsRecord the serial number, found on the back of the unit, in the spaces designated on the warranty card, and in the space provided below. Refer to the model and serial numbers whenever you call upon your dealer for information or service on this product.
Model
Serial Number
Effective output power during STEREO operation (1 kHz, 10%, T.H.D., at 6 Ω)..................................................................................20 W + 20 W (RMS)Total harmonic distortion .....................................................0.025%
(1 kHz, 10 W, 6 Ω, 30 kHz LPF)D-BASS (+10) ...............................................+9.0 dB (60 Hz, Vol. 30)Input (Sensitivity/impedance) LINE (AUX) ....................... 350 mV / 22 kΩ (Max INPUT LEVEL) LINE (D. AUDIO) ............ 350 mV / 10 kΩ (Max INPUT LEVEL)Output (Level/Impedance) PRE OUT (D. AUDIO) ...................................900 mV/10 kΩ (HIGH)..............................................................................550 mV/10 kΩ (LOW) SUB WOOFER PREOUT ...................................................1.6 V/10 kΩ
Main unit (RD-K501USB)[Amplifier block]
FM tuner Tuning frequency range ...........................87.5 MHz~108 MHzAM tuner Tuning frequency range ........................... 531 kHz~1,602 kHz
[Tuner block]
Usable memory card .............. SD memory card, miniSDTM cardUsable memory card capacity ...................................32 MB~2 GBFile system ..................................................................... FAT 12/16/32Recording format WMA SQ ......................................128 kbps/44.1 kHz STEREO HQ .....................................192 kbps/44.1 kHz STEREOPlaying format MP3 Sampling frequency ..................................... 8~48 kHz Bit rate (CBR/VBR *) ................................ 32~320 kbps WMA (WMA9 compliant, DRM non-correspondence) Sampling frequency ..................................... 8~48 kHz Bit rate (CBR/VBR *) ................................ 64~384 kbpsID3 tag ..............................................................Non-correspondenceMaximum numbers of folders ....................................................200Maximum folder hierarchical number ....................................... 10Maximum numbers of files ....................................................... 1000
[Memory card block]
Laser ................................................................... Semiconductor laserD/A converter ..................................................................................1 bitOversampling .............................................................8 fs (352.8 kHz)Frequency response .................................................. 20 Hz~20 kHzWow & flutter ............................................Below measurable limit
[CD player block]
Power consumption .....................................................................73 WStandby power consumption ....................................0.4 W or lessDimensions ............................................... Width 240 mm (9-7/16") Height 121.5 mm (4-13/16") Depth 361 mm (14-3/16")Weight (net) .................................................................5.3 kg (11.7 lb)
[Power supply and other blocks]
Enclosure ............................................................. Bass-Refrex systemSpeaker unit configuration Woofer ............................................................. 100 mm cone type Tweeter ......................................... 25 mm balanced dome typeImpedance ..........................................................................................6 ΩPower handling capacity ............................................................20 WDimensions ................................................. Width 140 mm (5-1/2") Height 260 mm (10-1/4") Depth 209 mm (8-1/4")Weight (net) .....................................................2.2 kg (4.9 lb) (1 pcs)
Speakers (LS-K501)
Usable USB device ......................................USB Mass strage classInterface ...................... USB 2.0 (Full speed) USB 1.1 compatibleFile system ..................................................................... FAT 12/16/32Recording format WMA SQ ......................................128 kbps/44.1 kHz STEREO HQ .....................................192 kbps/44.1 kHz STEREOPlaying format MP3 Sampling frequency ..................................... 8~48 kHz Bit rate (CBR/VBR *) ................................ 32~320 kbps WMA (WMA9 compliant, DRM non-correspondence) Sampling frequency ..................................... 8~48 kHz Bit rate (CBR/VBR *) ................................ 64~384 kbpsID3 tag ..............................................................Non-correspondenceMaximum numbers of folders ....................................................200Maximum folder hierarchical number ....................................... 10Maximum numbers of files ....................................................... 1000Maximum current drain ........................................................500 mA
[USB block]
* The audio data of VBR may become beyond the limits of the bit rate the above-mentioned, and may not be playable on this system.

28 English
Related Documents


