CoffeeScript Application Development Cookbook Mike Hatfield Quick answers to common problems Over 90 hands-on recipes to help you develop engaging applications using CoffeeScript Free Sample

CoffeeScript Application Development Cookbook - Sample Chapter
Dec 22, 2015
Chapter No. 5 Going Native with Cordova
Over 90 hands-on recipes to help you develop engaging applications using CoffeeScript
For more information: http://bit.ly/1CrEZRM
Over 90 hands-on recipes to help you develop engaging applications using CoffeeScript
For more information: http://bit.ly/1CrEZRM
Welcome message from author
This document is posted to help you gain knowledge. Please leave a comment to let me know what you think about it! Share it to your friends and learn new things together.
Transcript

CoffeeScript Application Development Cookbook
Mike Hatfi eld
CoffeeScript Application Development Cookbook
What this book will do for you...
Create user interfaces with jQuery, Backbone, AngularJS, and Kendo.UI
Develop RESTful services using Node and Express
Read and write data using SQLite, Redis, MongoDB, CouchDB, and Microsoft SQL Server
Interface with external services to send e-mails, SMS text messages, and use cloud storage services such as DropBox and S3
Test your code using Jasmine, QUnit, Zombie, Persona, and Mocha with Chai
Work with a variety of hosts such as Heroku, Azure, and Amazon Web Services
Use CoffeeScript for DevOps tasks such as managing fi les and directories, and parsing CSV and fi xed-width fi les
$ 49.99 US£ 32.99 UK
Prices do not include local sales tax or VAT where applicable
Inside the Cookbook... A straightforward and easy-to-follow format
A selection of the most important tasks and problems
Carefully organized instructions for solving the problem effi ciently
Clear explanations of what you did
Apply the solution to other situations
Quick answers to common problems
CoffeeScript is a JavaScript compiler. CoffeeScript brings many things to the table that are lacking in JavaScript itself. This includes a class and module system, a syntax that is cleaner, less terse, and well structured, and list comprehensions that make working with collections of data more enjoyable. CoffeeScript can be used as not only a tool for the Web, but also as a tool for day-to-day DevOps type tasks (for example, fi le processing, working with databases, and more).
This practical guide contains a wide range of recipes demonstrating how CoffeeScript can be used while developing the entire stack of an application. With recipes that range from easy and intermediate to advanced, there is something here for anyone looking to escape the common pitfalls of JavaScript and develop in a clean and expressive language.
Mike H
atfi eldC
offeeScript Application D
evelopment C
ookbook
Over 90 hands-on recipes to help you develop engaging applications using CoffeeScript
P U B L I S H I N GP U B L I S H I N G
community experience dist i l ledP
UB
LIS
HIN
GP
UB
LIS
HIN
G
Visit www.PacktPub.com for books, eBooks, code, downloads, and PacktLib.
Free Sample

In this package, you will find: • The author biography • A preview chapter from the book, Chapter 5 'Going Native with Cordova' • A synopsis of the book’s content • More information on CoffeeScript Application Development Cookbook
About the Author Mike Hatfield has over 25 years of experience in developing custom business solutions for a variety of clients and industries. With a focus on the ever-expanding Web, Mike has crafted hundreds of web-based applications while spending the last couple of years developing business solutions for the mobile web.
He is the chief technology officer at Nicom IT Solutions Inc., a large independent IT consulting firm based in Halifax, Canada. As the CTO, Mike remains on the lookout for emerging trends in the development industry to identify new opportunities for his clients.
With his wife, Tracy, and their three children, Chris, Jason, and Jennifer, he lives a quiet suburban life while continually learning new technologies and satisfying his love of horror movies.

CoffeeScript Application Development Cookbook In my nearly 20 years of developing custom software solutions, nothing has had as great an impact on our industry or society as the Internet. Today, it would be difficult to imagine a world without HTML, CSS, and JavaScript. When I developed my first web-based application using JavaScript with Netscape Navigator in the mid 1990s, little did I know that we were in the early days of a software revolution.
Skip ahead nearly two decades and JavaScript has become one of the most widely supported programming languages in the world. Unfortunately, little has changed with JavaScript in this time and it is plagued with gotchas that can make developing a pure JavaScript system challenging. Enter CoffeeScript.
CoffeeScript provides us with a better approach to develop our applications that not only helps us to avoid these pitfalls, but also allows us to be more productive while still being able to take advantage of the large JavaScript ecosystem.
This book is a practical guide, filled with many step-by-step examples of using CoffeeScript for all aspects of building our software.
We will begin by looking at the fundamentals and getting our tools ready to be productive CoffeeScript developers. Next, we will use CoffeeScript to create our application layers, including the user interface, database, and backend services layer. After that, we will investigate various options to test and host our applications. Finally, we will look at ways CoffeeScript can be used by the DevOps to help automate their day-to-day tasks.

What This Book Covers Chapter 1, Getting Ready, introduces CoffeeScript and lays the foundation to use CoffeeScript to develop all aspects of modern cloud-based applications.
Chapter 2, Starting with the Basics, covers using CoffeeScript with strings, numbers, dates, arrays, and classes.
Chapter 3, Creating Client Applications, demonstrates using CoffeeScript with various UI libraries and frameworks, including jQuery, Backbone, Angular, and Socket.IO.
Chapter 4, Using Kendo UI for Desktop and Mobile Applications, demonstrates how to use CoffeeScript with Telerik's open source Kendo UI Core framework to create both desktop and mobile applications.
Chapter 5, Going Native with Cordova, demonstrates how to use Apache Cordova with CoffeeScript to create native applications that can access native device features such as camera, geolocation, and contacts and be deployed to physical hardware.
Chapter 6, Working with Databases, covers various database technologies, including SQLite, Redis, MongoDB, and CouchDB, and how CoffeeScript can be used with each technology to perform create, read, update, and delete operations.
Chapter 7, Building Application Services, dives into the aspects of building the backend services needed by our application with a look at building RESTful services, working with Base64 encoding, and using domain name services to do DNS and reverse DNS lookups.
Chapter 8, Using External Services, examines ways to use existing services to send text messages and e-mails, use the Amazon cloud storage, and transfer fi les via FTP.
Chapter 9, Testing Our Applications, is dedicated to using CoffeeScript to test our applications using test frameworks such as Jasmine, Mocha, and Zombie as well as creating mocks using Persona.
Chapter 10, Hosting Our Web Applications, explains how to prepare your application for deployment using Grunt, and how to deploy to popular cloud hosting solutions such as Heroku and Windows Azure.
Chapter 11, Scripting for DevOps, examines ways that CoffeeScript can be used to help with day-to-day operation tasks such as working with fi les and directories, CSV and fixed-width data files, generating PDF files, and formatting data for output.
5Going Native with
Cordova
In this chapter, we will cover the following recipe:
Creating a basic Cordova application
Using the camera
Using geolocation
Using contacts
Getting device information
IntroductionCordova is a framework from the Apache foundation that allows you to wrap your web applications inside a native wrapper that can be packaged and made available via the various app marketplaces.
Cordova currently supports iOS, Android, Blackberry, Windows Phone, and FireFoxOS.
Cordova is not only a native wrapper, but it also provides a JavaScript interface, allowing it to provide access to native hardware and services such as:
Access to a camera to take photos and/or videos
Access to geolocation information
Access to contacts
Access to device information
You can fi nd out more about Apache Cordova from the offi cial project website at http://cordova.apache.org.

Going Native with Cordova
146
Creating a basic Cordova applicationIn this recipe, we will run through the steps to create a basic Cordova application.
Getting readyBefore getting started with Cordova, we must install the Cordova library. Cordova can be installed as a Node package.
Open a terminal window and install the Node package with the following code:
npm install -g cordova
This will install the Cordova package into Node's global space and allows us to use the Cordova command-line utilities to create and manage our mobile application.
How to do it...Once Cordova has been installed, we can use the cordova command-line tool to create a mobile application.
At a terminal window, perform the following steps:
1. Execute the cordova create command:
cordova create HelloWorld com.csbook.helloworld
2. Switch to the HelloWorld directory:
cd HelloWorld
3. Add a target platform using the cordova platform add command:
cordova platform add android
How it works...Issuing the cordova create command will create a simple folder structure and Cordova libraries, most notably a folder called www. This is where we build our web-based mobile applications.
Adding a platform will create a folder for each platform added. For example, adding the Android platform created a /platforms/android directory that has all of the necessary fi les needed to provide support for the Android platform.
You will see a www folder inside the /platforms/android folder. This is automatically built based on the contents of the /www folder. Do not make changes to the platform's www fi les as your changes will be overwritten when the application is rebuilt.

Chapter 5
147
Using the cameraCordova provides access to the hardware camera via the org.apache.cordova.camera plugin.
Getting readyPlugins are added to our application via the cordova plugin add command.
To add the camera plugin, enter the following command in a terminal window at the root directory of our application:
cordova plugin add org.apache.cordova.camera
Once installed, the camera methods are made available via the navigator.camera object.
Our example will use the Kendo UI mobile framework. To get set up, follow these steps:
1. Copy the Kendo UI kendo directory into the www directory of our Cordova application.
2. Replace the contents of index.html with the following code:
<!DOCTYPE html><html>
<head> <meta charset="utf-8" /> <meta name="format-detection" content="telephone=no" /> <meta name="msapplication-tap-highlight" content="no" /> <link rel="stylesheet" href="kendo/styles/kendo.mobile.all.min.css"> <title>CoffeeScript - Cordova</title></head>
<body> <!-- add your html here -->
<script src="cordova.js"></script> <script src="kendo/js/jquery.min.js"></script> <script src="kendo/js/kendo.ui.core.min.js"></script> <script src="coffee/app.coffee" type="text/coffeescript"></script>
<!-- add your CoffeeScript files here -->

Going Native with Cordova
148
<script type="text/coffeescript"> app.init() </script>
<script src="js/vendor/coffee-script.js"></script></body>
</html>
3. Create a directory named coffee for our CoffeeScript fi les.
4. Create a fi le named coffee/app.coffee with the following code:
init = (element) -> application = new kendo.mobile.Application(element)
window.app = init: init demos: {}
How to do it...The camera plugin provides a getPicture() method that takes success and failure callbacks as well as optional confi guration objects:
1. Add the following HTML to index.html:
<div data-role="view" id="app-camera" data-title="Camera" data-layout="layout"> <h3>Camera</h3> <p> <a data-role="button" data-click="app.demos.camera.onTakePhoto"> Take Photo</a> </p> <ul data-role="listview" data-style="inset"></ul> <div id="photo-view" data-role="scroller"> <div data-role="page"> <img id="photo" src="" /> </div> </div></div>
Chapter 5
149
2. Create a fi le named coffee/camera.coffee with the following code:
displayPhoto = (img) -> photo = (document.getElementById 'photo') photo.src = 'data:image/jpeg;base64,' + img
onTakePhoto = -> success = (img) -> displayPhoto img
fail = (msg) -> alert 'Camera failed: ' + msg
options = quality: 50 destinationType: Camera.DestinationType.DATA_URL
navigator.camera.getPicture success, fail, options
3. Add a reference to our coffee/camera.coffee fi le:
<script type="text/coffeescript" src="coffee/camera.coffee"></script>
How it works...Our index.html fi le sets up a Kendo mobile view with a button with a data-click attribute set to call app.demos.camera.onTakePhoto.
Our onTakePhoto() method defi nes a success() and a fail() callback function. It then prepares a confi guration option object that sets the image quality to be 50 percent and desintationType to be a data URL.
When navigator.camera.getPicture() is called, the camera is displayed and the user can use the device's native camera options to adjust the camera settings and take a photo. If successful, the success() callback is called with the image's data URL as a parameter.
Going Native with Cordova
150
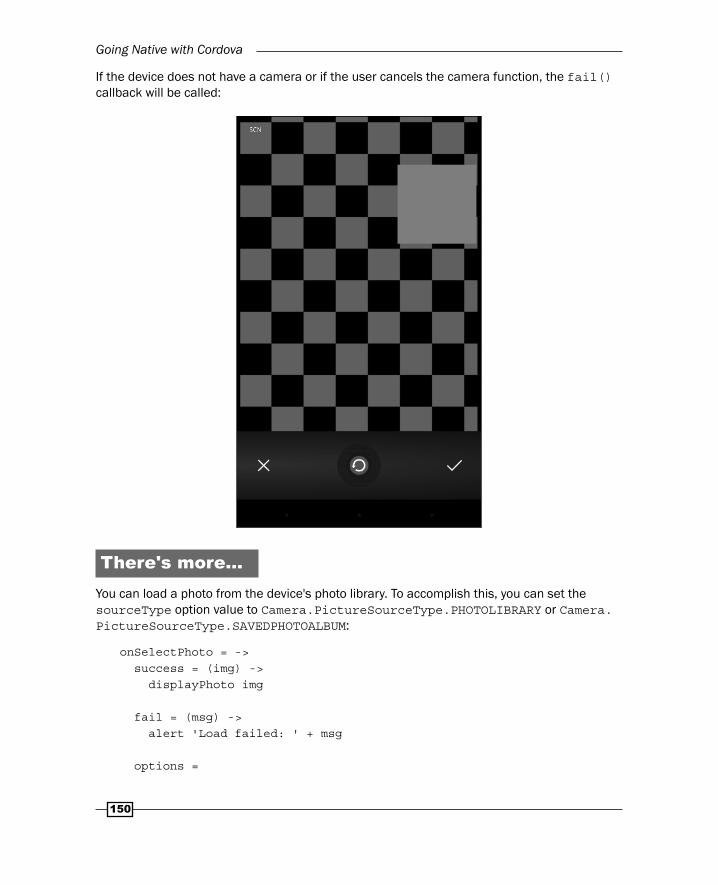
If the device does not have a camera or if the user cancels the camera function, the fail() callback will be called:
There's more...You can load a photo from the device's photo library. To accomplish this, you can set the sourceType option value to Camera.PictureSourceType.PHOTOLIBRARY or Camera.PictureSourceType.SAVEDPHOTOALBUM:
onSelectPhoto = -> success = (img) -> displayPhoto img
fail = (msg) -> alert 'Load failed: ' + msg
options =

Chapter 5
151
destinationType: Camera.DestinationType.DATA_URL sourceType: Camera.PictureSourceType.PHOTOLIBRARY
navigator.camera.getPicture success, fail, options
When getPicture() is called with sourceType set to PHOTOLIBRARY or SAVEDPHOTOALBUM, the device's photo library is displayed, allowing the user to select a photo from the library.
Using geolocationWe can use Cordova's org.apache.cordova.geolocation plugin to access the hardware's geolocation services.
Getting readyBegin by installing the geolocation plugin using the following command:
cordova plugin add org.apache.cordova.geolocation
Once installed, we can use Cordova's navigator.geolocation object to access the hardware's geolocation services.
How to do it...To access the device's geolocation information, we use the getCurrentPosition() method:
1. Add the following HTML to index.html:
<div data-role="view" id="app-location" data-title="Location" data-layout="layout"> <h3>Location</h3> <p> <a data-role="button" data-click="app.demos.location.onFetchLocation"> Fetch Location</a> </p> <p id="location-status" style="display: none;"> <i>Fetching position...</i> </p> <p id="location-error" style="display: none;"></p> <ul id="location-info" data-role="listview" data-style="inset" style="display: none;"> </ul></div>
Going Native with Cordova
152
2. Create a fi le named coffee/location.coffee with the following code:
$locationStatus = $ '#location-status'$locationError = $ '#location-error'$locationInfo = $ '#location-info'
onFetchLocation = -> onSuccess = (pos) -> $locationInfo.empty() $locationStatus.hide()
$locationInfo.append \ "<li>Latitude: #{pos.coords.latitude}</li>" $locationInfo.append \ "<li>Longitude: #{pos.coords.longitude}</li>" $locationInfo.append \ "<li>Altitude: #{pos.coords.altitude}</li>" $locationInfo.append \ "<li>Accuracy: #{pos.coords.accuracy}</li>" $locationInfo.append \ "<li>Heading: #{pos.coords.heading}</li>" $locationInfo.append \ "<li>Speed: #{pos.coords.speed}</li>" $locationInfo.append \ "<li>Timestamp: #{pos.timestamp}</li>"
$locationInfo.show()
onError = (err) -> $locationStatus.hide()
errorMessage = "<h4>Error: #{err.code}</h4><p>#{err.message}</p>" $locationError.html errorMessage $locationError.show()
$locationStatus.show()
navigator.geolocation.getCurrentPosition \ onSuccess, \ onError, \ { timeout: 30000, enableHighAccuracy: true }
app.demos.location = onFetchLocation: onFetchLocation
3. Add a reference to coffee/location.coffee to our index.html fi le.

Chapter 5
153
How it works...In our HTML page, we create a Kendo mobile view with a button to fetch the user's current position via the button's data-click attribute. Clicking on the button will call the app.demos.locaiton.onFetchLocation() method.
In our code fi le, we create an event handler for the location fetch event.
The heart of this module is the call to navigator.geolocation.getCurrentPosition(). To this method, we pass a success and fail callback function.
If successful, the success callback is passed a position object. The position has a coords object and a timestamp property. In our example, we display the latitude, longitude, altitude, accuracy, heading, and speed properties of coords. We also display the position's timestamp. This can be seen in the following fi gure:

Going Native with Cordova
154
There's more...The geolocation object provides geolocation.watchPosition() and geolocation.clearWatch() to set up an event listener that will be called if the position changes and clears/cancels the listener:
onWatch = -> positionChanged = (pos) -> $locationInfo.empty() $locationInfo.append \ "<li>Latitude: #{pos.coords.latitude}</li>" $locationInfo.append \ "<li>Longitude: #{pos.coords.longitude}</li>" $locationInfo.append \ "<li>Timestamp: #{pos.timestamp}</li>"
onError = (err) -> $locationStatus.hide()
errorMessage = "<h4>Error: #{err.code}</h4><p>#{err.message}</p>" $locationError.html errorMessage $locationError.show()
watchHandle = navigator.geolocation.watchPosition \ positionChanged, onError
onWatchCancelled = -> if watchHandle navigator.geolocation.clearWatch watchHandle watchHandle = null
In our code, we call navigator.geolocation.watchPosition() and save the handle so we can cancel it at a later time. Each time a position change is detected, our positionChanged() function will be called with the position object.
When we want to cancel our watchPosition handler, we can call the navigator.geolocation.clearWatch() method by passing our handle to it.

Chapter 5
155
Using contactsCordova provides access to the contacts on the user's device through the org.apache.cordova.contacts plugin.
Getting readyInstall the contacts plugin using the following command:
cordova plugin add org.apache.cordova.contacts
Once installed, a contacts object will be added to the navigator, which provides the contacts.create() and contacts.find() methods.
How to do it...To create a contact, we use the navigator.contacts.create() method. It returns a contact object that can be used by your application. You can pass an object literal to this create() method, which will initialize the various contact properties:
1. Add the following HTML to index.html:
<div data-role="view" id="app-contact" data-title="Contacts" data-layout="layout"> <h3>Contacts</h3> <p> <a data-role="button" data-click="app.demos.contacts.onAddContact"> Add Contact</a> <a data-role="button" data-click="app.demos.contacts.onFetchContacts"> Fetch Contacts</a> </p> <p id="contact-status" style="display: none;"> <i>Fetching contacts...</i> </p> <p id="contact-error" style="display: none;"></p> <ul id="contact-info" data-role="listview" data-style="inset" style="display: none;"> </ul></div>
Going Native with Cordova
156
2. Create a fi le named coffee/contact.coffee with the following code:
$contactStatus = ($ '#contact-status')$contactError = ($ '#contact-error')$contactInfo = ($ '#contact-info')
onFetchContacts = -> addContact = (contact) -> if contact.displayName $contactInfo.append "<li>#{contact.displayName}</li>"
onSuccess = (contacts) -> $contactStatus.hide() $contactInfo.empty() (addContact item) for item in contacts $contactInfo.show()
onError = (err) -> $contactStatus.hide()
errorMessage = "<h4>Error: #{err.code}</h4> <p>#{err.message}</p>" $contactError.html errorMessage $contactError.show()
$contactStatus.show() fields = ['displayName'] findOptions = filter: '' multiple: true
navigator.contacts.find fields, \ onSuccess, \ onError, \ findOptions
3. Add a reference to coffee/contact.coffee to our index.html fi le:
<script type="text/coffeescript" src="coffee/contact.coffee"></script>
How it works...Our Kendo mobile view has two buttons. The fi rst button defi nes a data-click attribute that will call our app.demos.contacts.onAddContact() method. The second button defi nes a data-click attribute that will call our app.demos.contacts.onFetchContacts() method.
Chapter 5
157
In our contacts code, we defi ne our onAddContact() method. This method calls the navigator.contacts.create() method, passing an object literal that provides displayName, nickname, and name, which is itself an object literal with the givenName and familyName properties.
When we create a contact, it does not save the contact to the contact list on the device. This allows you to add or modify additional properties before persisting the contact. To persist the contact, we call the object's save() method.
There's more...Along with creating contacts, we can also fi nd an existing contact or all contacts in the user's contact list; we can use Cordova's navigator.contacts.find() method for this:
onFetchContacts = -> addContact = (contact) -> if contact.displayName $contactInfo.append "<li>#{contact.displayName}</li>"
onSuccess = (contacts) -> $contactStatus.hide() $contactInfo.empty() (addContact item) for item in contacts $contactInfo.show()
onError = (err) -> $contactStatus.hide()
errorMessage = "<h4>Error: #{err.code}</h4><p>#{err.message}</p>" $contactError.html errorMessage $contactError.show()
$contactStatus.show() fields = ['displayName'] findOptions = filter: '' multiple: true
navigator.contacts.find \ fields, onSuccess, onError, findOptions
Our onFetchContacts() method fi rst defi nes an array of contact fi elds we are interested in. This must have at least one element. In our example, we are only interested in accessing the contact's displayName value.

Going Native with Cordova
158
We then defi ne a searchOptions object literal that has two properties: filter and multiple.
The filter property defi nes an object literal representing our search criteria. For example, findOptions.filter = 'Mike' will fi nd all contacts where the contact's displayName contains Mike. The filter property is '' (an empty string) by default. This will match all records.
By default, our search option's multiple property is false. We set it to true so we get more than one result.
Lastly, we call Cordova's navigator.contacts.find() method, passing our search fi elds (required), our success and fail callbacks (both required), and our fi nd options (optional).
If successful, our success callback is passed an array of matching contact objects. Our onSuccess() method iterates through the results and adds them to the contact-info list-view control seen in the following fi gure:
Chapter 5
159
Getting device informationIt is sometimes helpful to have specifi c information about the user's device. Cordova provides a device object that provides such information.
Getting readyTo retrieve device information, we must install the device plugin with the following command:
cordova plugin add org.apache.cordova.device
How to do it...To get device information, follow these steps:
1. Add the following HTML to index.html:
<div data-role="view" id="app-device" data-title="Contacts" data-layout="layout"> <h3>Device Information</h3> <p> <a data-role="button" data-click="app.demos.device.onFetchInfo"> Fetch Device Info</a> </p> <ul id="device-info" data-role="listview" data-style="inset" style="display: none;"> </ul></div>
2. Create a fi le named coffee/device.coffee with the following code:
$deviceInfo = $('#device-info')
onFetchInfo = -> $deviceInfo.empty() $deviceInfo.append "<li>Name: #{device.name}</li>" $deviceInfo.append "<li>Cordova: #{device.cordova}</li>" $deviceInfo.append "<li>Model: #{device.model}</li>" $deviceInfo.append "<li>Platform: #{device.platform}</li>" $deviceInfo.append "<li>UUID: #{device.uuid}</li>" $deviceInfo.append "<li>Version: #{device.version}</li>" $deviceInfo.show()
app.demos.device = onFetchInfo: onFetchInfo
Going Native with Cordova
160
3. Add a reference to coffee/device.coffee to our index.html fi le:
<script type="text/coffeescript" src="coffee/device.coffee"></script>
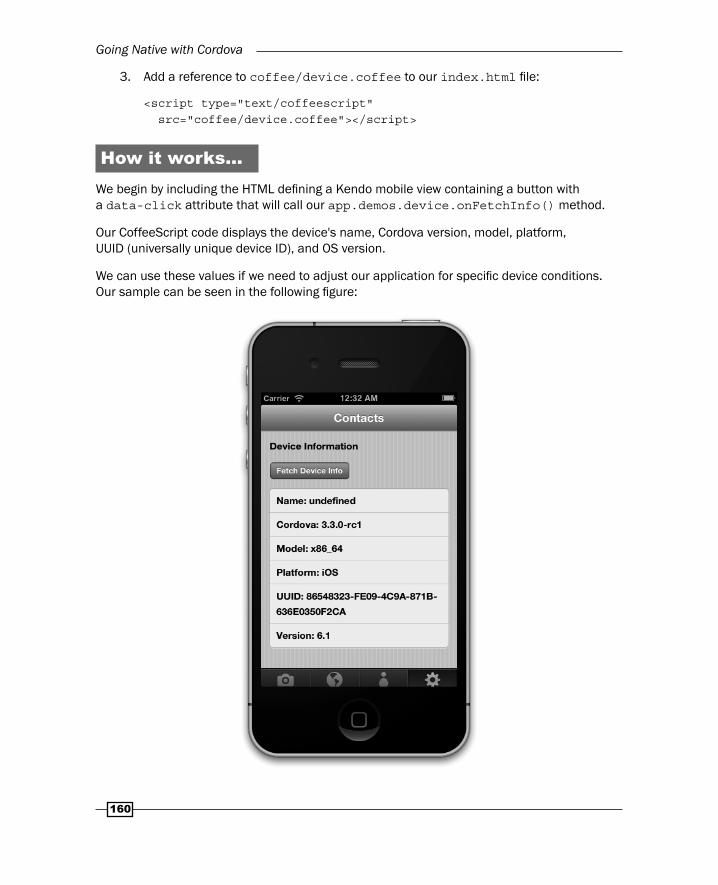
How it works...We begin by including the HTML defi ning a Kendo mobile view containing a button with a data-click attribute that will call our app.demos.device.onFetchInfo() method.
Our CoffeeScript code displays the device's name, Cordova version, model, platform, UUID (universally unique device ID), and OS version.
We can use these values if we need to adjust our application for specifi c device conditions. Our sample can be seen in the following fi gure:

Where to buy this book You can buy CoffeeScript Application Development Cookbook from the Packt Publishing website. Alternatively, you can buy the book from Amazon, BN.com, Computer Manuals and most internet book retailers.
Click here for ordering and shipping details.
www.PacktPub.com
Stay Connected:
Get more information CoffeeScript Application Development Cookbook
Related Documents


