cobas b 101 system Version 1.0 Operator’s Manual (Canada) 07735219018 (01) 2015-11 EN-CA

Welcome message from author
This document is posted to help you gain knowledge. Please leave a comment to let me know what you think about it! Share it to your friends and learn new things together.
Transcript

cobas b 101 systemVersion 1.0
Operator’s Manual (Canada)
07735219018 (01) 2015-11 EN-CA

Roche Diagnostics
2 Operator’s Manual · Version 1.0
cobas b 101 system

Roche Diagnostics
Operator’s Manual · Version 1.0 3
cobas b 101 system
Document information
Revision history
Edition notice The contents of this document, including all graphics, are the property of Roche. Information in this document is subject to change without notice. Roche shall not be liable for technical or editorial errors or omissions contained herein. No part of this document may be reproduced or transmitted in any form or by any means, electronic or mechanical, for any purpose, without the express written permission of Roche.
Please send questions or comments about this manual to your local Roche representative.
Copyright © 2012-2015, Roche Diagnostics GmbH. All rights reserved.
Trademarks The following trademarks are acknowledged:
COBAS, COBAS B, ACCU-CHEK, and LIFE NEEDS ANSWERS are trademarks of Roche.
All other trademarks are the property of their respective owners.
Contact address
Manual Version Software Version Revision date Changes
1.0 1.0 November 2015 Canadian version.
First publication.
Roche Diagnostics GmbH
Sandhofer Strasse 116
68305 Mannheim
Germany
Roche Diagnostics
4 Operator’s Manual · Version 1.0
cobas b 101 system
Symbols On the packaging and on the identification plate of the instrument you may encounter the following symbols, shown here with their meaning:
Screen content All depictions of screen content are for illustration purposes only, and the content does not necessarily represent realistic values.
Symbol Used for
Caution, consult accompanying documents. Refer to safety-related
notes in the instructions for use accompanying this product.
Consult instructions for use
Temperature limitation (Store at)
Humidity limitation (Store at)
Power supply connection
Use by
Manufacturer
Batch code / Lot number
Catalog number
In vitro diagnostic medical device
This product fulfills the requirements of the European Directives 98/
79/EC on in vitro diagnostic medical devices
The system fulfills the Canadian and U.S. safety requirements (UL
LISTED, in accordance with UL 61010A-1:02 and CAN/CSA-C22.2
No.61010-1-04)
Table 1 Symbols on the packaging and on the identification plate of the instrument
LOT
IVD

Roche Diagnostics
Operator’s Manual · Version 1.0 5
cobas b 101 system
Abbreviations The following abbreviations are used:
Abbreviation Meaning
BUH Base Unit Hub
CHOL Total cholesterol
DMS Data management system
eAG Estimated average glucose
ff And the following
Hb Hemoglobin
HbA1c Glycosylated hemoglobin type A1c
HDL High density lipoprotein
IFCC International Federation of Clinical Chemistry
LAN Local area network
LDL Low density lipoprotein
NGSP National Glycohemoglobin Standardization Program
QC Quality control
STAT Short turn around test
TG Triglyceride
Table 2 Abbreviations used in this documentation

Roche Diagnostics
6 Operator’s Manual · Version 1.0
cobas b 101 system
Roche Diagnostics
Operator’s Manual · Version 1.0 7
cobas b 101 system
Table of contents
1 Introduction................................................................................................111.1 Before you start .......................................................................................................111.1.1 Intended use .......................................................................................................111.1.2 Important information regarding use .............................................................111.1.3 If you need help ..................................................................................................111.1.4 What can the instrument do for you? .............................................................111.1.5 Test principles ....................................................................................................121.2 Safety classification.................................................................................................141.3 Safety Information..................................................................................................141.3.1 Instrument approvals ........................................................................................151.3.2 Disposal of the instrument ...............................................................................151.3.3 General care ........................................................................................................151.3.4 Touch screen ......................................................................................................161.3.5 Operating conditions ........................................................................................161.3.6 Quality control ...................................................................................................16
2 The cobas b 101 system...............................................................................172.1 Overview of the instrument elements .................................................................172.2 Buttons and icons overview ..................................................................................202.3 Icons on information screens ...............................................................................222.4 Icons on error messages ........................................................................................222.5 Symbols on the instrument case...........................................................................23
3 Putting the instrument into operation ......................................................253.1 Installation...............................................................................................................253.1.1 Unpacking the instrument ...............................................................................253.1.2 Placing the instrument ......................................................................................253.1.3 Power supply ......................................................................................................263.1.4 Starting the instrument .....................................................................................263.1.5 Switching off the instrument ............................................................................29
4 Setting up the instrument...........................................................................314.1 Using setup screens ................................................................................................314.1.1 Using the virtual keyboard ...............................................................................324.2 Settings summary ...................................................................................................334.2.1 Options setup .....................................................................................................334.2.2 ID Setup ..............................................................................................................354.2.3 Control Settings ......................................................................................364.2.4 Screen setup .......................................................................................................374.3 Options setup ..........................................................................................................384.3.1 Sort Results .........................................................................................................394.3.2 Comments ..........................................................................................................394.3.3 Dual Test .............................................................................................................424.3.4 Parameter ............................................................................................................434.3.5 Result Units ........................................................................................................444.3.6 Custom Normal Ranges ....................................................................................444.3.7 Alarm ...................................................................................................................464.3.8 Key Click .............................................................................................................464.3.9 Auto Off ..............................................................................................................474.3.10 Computer ............................................................................................................484.3.11 Service ..................................................................................................................48

Roche Diagnostics
8 Operator’s Manual · Version 1.0
cobas b 101 system
4.4 ID setup....................................................................................................................564.4.1 Operator ID ........................................................................................................564.4.2 ID Entry ..............................................................................................................584.4.3 ID Validation ......................................................................................................614.4.4 Password Entry ..................................................................................................624.4.5 Password Expiry .................................................................................................624.4.6 Administrator .....................................................................................................634.4.7 Edit Operator List ..............................................................................................644.4.8 Change Password ...............................................................................................674.5 Patient ID setup ......................................................................................................694.5.1 ID Entry ..............................................................................................................714.5.2 Name Entry .........................................................................................................734.5.3 Date of Birth Entry ............................................................................................744.5.4 ID Validation ......................................................................................................744.5.5 Edit Patient List ..................................................................................................754.6 Control Settings ......................................................................................................794.6.1 Operator Lockout ..............................................................................................804.6.2 QC Lockout ........................................................................................................814.6.3 Optical Check Lockout .....................................................................................824.6.4 STAT Test ...........................................................................................................834.6.5 QC Result Format ..............................................................................................844.6.6 QC Range ............................................................................................................854.7 Screen setup.............................................................................................................874.7.1 Adjusting the screen contrast ...........................................................................874.7.2 Choosing the language ......................................................................................884.7.3 Setting the date ...................................................................................................884.7.4 Setting the time ..................................................................................................894.7.5 Writing facility information .............................................................................904.7.6 Calibrating the touch screen ............................................................................91
5 Testing samples...........................................................................................935.1 What you need........................................................................................................935.2 Important notes regarding blood testing ............................................................935.2.1 Always … ............................................................................................................935.2.2 Never … ..............................................................................................................945.3 Preparing the instrument ......................................................................................945.3.1 Starting the instrument .....................................................................................945.3.2 User identification .............................................................................................955.4 Preparing the sample .............................................................................................965.4.1 Getting a good capillary blood sample ...........................................................965.4.2 Getting a good result from venous blood or plasma samples .....................965.5 Performing patient tests ........................................................................................975.5.1 Short guide ..........................................................................................................975.5.2 Single testing vs. dual testing .........................................................................1025.5.3 Using operator information ...........................................................................1025.5.4 Using patient information ..............................................................................1065.5.5 If the control results are no longer valid .......................................................1095.5.6 Preparing a disc ................................................................................................1095.5.7 Using a fingerstick ...........................................................................................1115.5.8 Applying sample to a disc ...............................................................................1135.5.9 Performing a test (no operator and patient information, single testing) 1165.5.10 Performing the tests (with operator and patient information,
dual testing) ......................................................................................................1185.5.11 Adding comments to results ..........................................................................1205.5.12 Adding patient information ...........................................................................1225.5.13 Printing results .................................................................................................123

Roche Diagnostics
Operator’s Manual · Version 1.0 9
cobas b 101 system
5.6 Performing STAT tests ........................................................................................1245.7 Aborting a test.......................................................................................................125
6 Performing control tests...........................................................................1276.1 Liquid QC tests .....................................................................................................1276.1.1 Performing a liquid QC test ...........................................................................1296.2 Optical check.........................................................................................................1336.2.1 Performing an optical check ..........................................................................1346.3 Proficiency test......................................................................................................1346.3.1 Performing a proficiency test .........................................................................135
7 Reviewing results ......................................................................................1377.1 Reviewing patient results.....................................................................................1387.1.1 Finding the results of a patient ......................................................................1397.1.2 Adding and changing comments ..................................................................1407.1.3 Adding patient information to results ..........................................................1427.1.4 Searching for results of a certain patient ......................................................1437.2 Reviewing control results ....................................................................................145
8 Printing results .........................................................................................147
9 Cleaning and disinfecting of the cobas b 101 system...............................1499.1 Guide to cleaning and disinfecting the cobas b 101 system...........................1499.2 Cleaning and disinfecting the screen and outside of the instrument............1519.3 Cleaning and disinfecting the inside of the instrument..................................1529.4 Cleaning and disinfecting the barcode scanner ...............................................154
10 Troubleshooting .......................................................................................15510.1 Exceptional situations not indicated on screen................................................15510.2 Exceptional situations indicated on screen.......................................................15610.2.1 Operator and QC lockout (the control results are no longer valid) .........15610.2.2 Barcode cannot be read ...................................................................................15810.2.3 Printing is not working ...................................................................................15910.3 Error messages ......................................................................................................159
11 General product specifications.................................................................16711.1 Technical data .......................................................................................................16711.1.1 Measuring ranges .............................................................................................16811.2 Sample materials...................................................................................................16811.3 Further Information.............................................................................................16911.3.1 Materials supplied by Roche ..........................................................................16911.3.2 Other materials ................................................................................................16911.3.3 Accessories ........................................................................................................16911.3.4 Product limitations ..........................................................................................16911.3.5 Barcodes ............................................................................................................17011.4 Warranty................................................................................................................17111.5 Contact information for Roche ..........................................................................172
12 Index..........................................................................................................173

Roche Diagnostics
10 Operator’s Manual · Version 1.0
cobas b 101 system

Roche Diagnostics
Operator’s Manual · Version 1.0 11
cobas b 101 system
1 Introduction
1.1 Before you start
1.1.1 Intended use
The cobas b 101 system is intended for professional use in a clinical laboratory setting or point-of-care (PoC) locations.
1.1.2 Important information regarding use
Read this operator's manual, as well as the package inserts for all relevant consumables, before using the instrument for the first test.
You must configure the cobas b 101 system according to your needs before initial use. You can configure the instrument either directly or by using a suitable data management system. Refer to Setting up the instrument on page 31.
Be sure to read the Safety Information on page 14 ff before operating the instrument.
1.1.3 If you need help
Information about using the instrument, the screen menus, and on performing tests can be found in this operator's manual.
Error messages that appear on-screen include information or instructions on how to correct the error.
For all questions about the cobas b 101 system that are not answered in this manual, contact your Roche representative (see Contact information for Roche on page 172). In order to expedite troubleshooting, please have ready your instrument, its serial number, this manual, and all related consumables when you call. If you suspect a communication error beyond the instrument, also have your Base Unit Hub serial number ready to help assist our customer care group in troubleshooting.
1.1.4 What can the instrument do for you?
The cobas b 101 system has the following functions and properties:
o Perform patient tests for HbA1c, Lipid Panel, and control tests using QC solutions for HbA1c and Lipid Panel.
o Automatically record all relevant data for the tests, including:
O Time and date of test
O IDs for operators and patients
O Information about QC solutions, optical check disc, and tests
O Test results and comments
o For purposes of quality assurance, information on the following areas can be collected, stored, and transferred:
O Instrument
O Test discs
O QC solutions
O Optical check disc
O Test results
Roche Diagnostics
12 Operator’s Manual · Version 1.0
cobas b 101 system
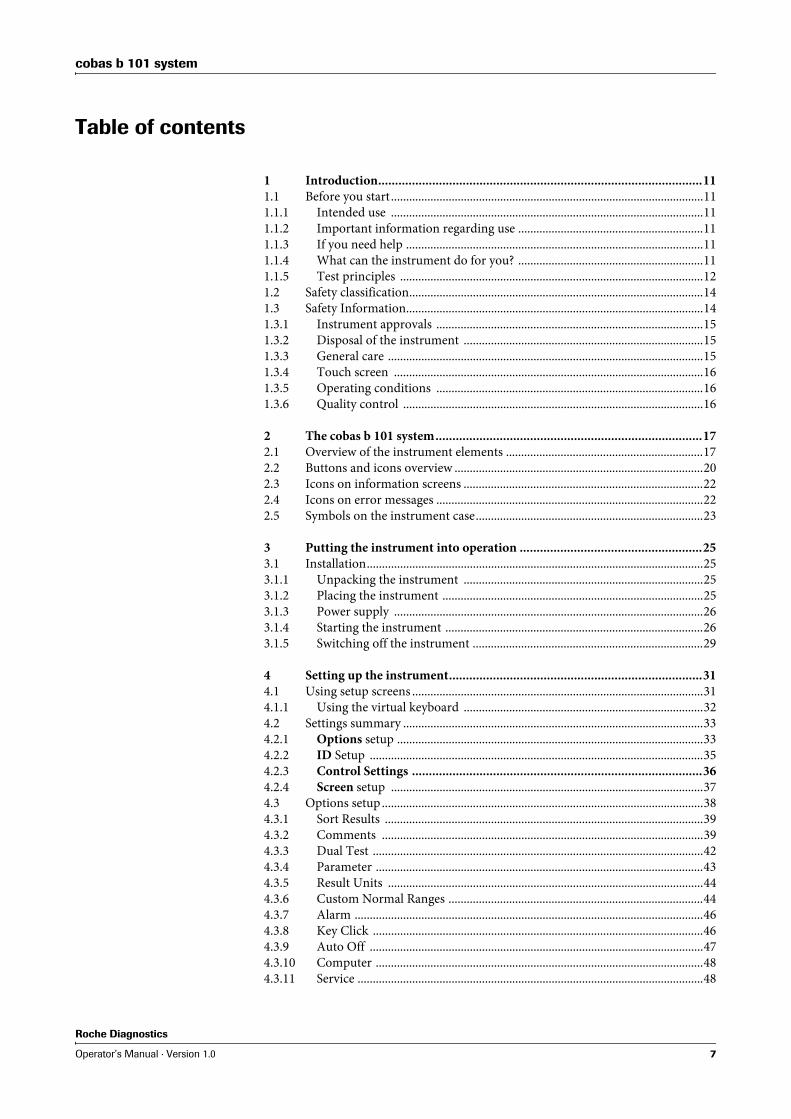
1.1.5 Test principles
All auxiliary materials such as diluents and enzymes that are required to perform the tests are contained in the test discs.
The following sections explain the main steps required for the two test types HbA1c and the Lipid Panel.
HbA1c
The blood sample is diluted and mixed with TRIS buffer to release hemoglobin from the erythrocytes. The hemoglobin precipitates. A fraction of the sample is conveyed into a reaction chamber where it is mixed with sodium lauryl sulfate (SLS). SLS is used to oxidize the hemoglobin forming the complex, sodium lauryl sulfate, chromophore. Since the extent of color development at 525 nm is proportional to the concentration of total hemoglobin in the sample, this can be determined from the transmissivity of the sample. The other fraction of the diluted hemoglobin is denaturated in a first step. An agglutinator (synthetic protein containing multiple copies of the immunoreactive portion of HbA1c) causes agglutination of latex coated with HbA1c specific monoclonal antibodies. This agglutination reaction causes increased scattering of light, which is measured as an increase in absorbance at 531 nm. HbA1c in whole blood specimens competes for the limited number of antibody-latex binding sites causing an inhibition of agglutination and a decreased scattering of light. The decreased scattering is measured as a decrease in absorbance at 625 nm.
Figure 1 HbA1c test principles
Roche Diagnostics
Operator’s Manual · Version 1.0 13
cobas b 101 system
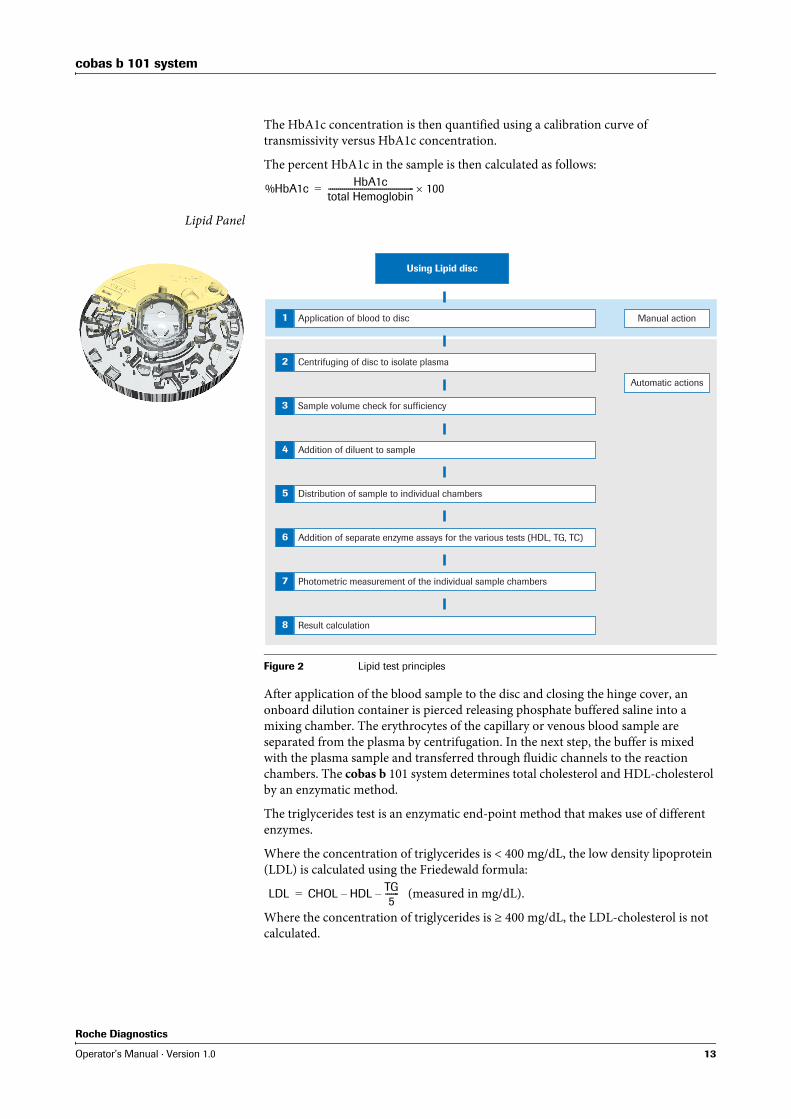
The HbA1c concentration is then quantified using a calibration curve of transmissivity versus HbA1c concentration.
The percent HbA1c in the sample is then calculated as follows:
Lipid Panel
After application of the blood sample to the disc and closing the hinge cover, an onboard dilution container is pierced releasing phosphate buffered saline into a mixing chamber. The erythrocytes of the capillary or venous blood sample are separated from the plasma by centrifugation. In the next step, the buffer is mixed with the plasma sample and transferred through fluidic channels to the reaction chambers. The cobas b 101 system determines total cholesterol and HDL-cholesterol by an enzymatic method.
The triglycerides test is an enzymatic end-point method that makes use of different enzymes.
Where the concentration of triglycerides is < 400 mg/dL, the low density lipoprotein (LDL) is calculated using the Friedewald formula:
(measured in mg/dL).
Where the concentration of triglycerides is ≥ 400 mg/dL, the LDL-cholesterol is not calculated.
%HbA1c HbA1ctotal Hemoglobin------------------------------------------- 100=
Figure 2 Lipid test principles
LDL CHOL HDL TG5
-------––=

Roche Diagnostics
14 Operator’s Manual · Version 1.0
cobas b 101 system
1.2 Safety classification
This section explains how precautionary information is presented in this manual.
The safety precautions and important user notes are classified according to the ANSI Z535.6 Standard. Familiarize yourself with the following meanings and icons:
These symbols and signal words are used for specific hazards:
Important information that is not safety relevant is indicated by the following icon:
1.3 Safety Information
The safety alert symbol by itself (without a signal word) is used to promote awareness to hazards which are generic or to direct the reader to related safety information.
WARNING
Indicates a hazardous situation which, if not avoided, could result in death or serious injury.
CAUTION
Indicates a hazardous situation which, if not avoided, could result in minor or moderate injury.
NOTICE Indicates a hazardous situation which, if not avoided, may result in damage to the instru-ment.
Indicates additional information on correct use or useful tips.
Operator qualification
Only healthcare professionals may operate the cobas b 101 system.
WARNING
Protection against infection
There is a potential risk of infection. Operators of the cobas b 101 system must be aware that any object coming into contact with human blood is a potential source of infection.
o Use gloves.
o Use single-use only disposable blood lancets.
o Dispose of used lancets in a sturdy sharps container with lid.
o Dispose of used test discs according to your facility’s infection control policy.
o Follow all health and safety regulations in force locally.
CAUTION
Protection against injury
If the equipment is used in a manner not specified by the manufacturer, the protection provided by the equipment may be impaired.
o Only use the instrument in the manner specified by the manufacturer.
Roche Diagnostics
Operator’s Manual · Version 1.0 15
cobas b 101 system
1.3.1 Instrument approvals
This equipment complies with the emission and immunity requirements described in IEC 61326-2-6.
o The electromagnetic environment should be evaluated prior to operation of the device.
o Do not use this device in close proximity to sources of strong electromagnetic radiation (e.g. unshielded intentional RF sources), as these may interfere with the proper operation.
Class B FCC rule compliance: This equipment has been tested and found to comply with the limits for Class B digital device, pursuant to part 15 of the FCC Rules. These limits are designed to provide reasonable protection against harmful interferences when the equipment is operated in a residential area. However, this equipment generates, uses, and can radiate radio frequency energy and, if not installed and used in accordance with the present manual, may cause harmful interference to radio communications.
1.3.2 Disposal of the instrument
1.3.3 General care
NOTICE Malfunction of instrument and incorrect results due to interfering electromagnetic fields
Strong electromagnetic fields may interfere with the proper function of the instrument.
o Do not use this device in close proximity to sources of strong electromagnetic irradia-tion (e.g. unshielded intentional RF sources).
WARNING
Infection by a potentially biohazardous instrument
The cobas b 101 system or its components must be treated as potentially biohazardous waste. Decontamination (i.e., a combination of processes including cleaning, disinfection and/or sterilization) is required before reuse, recycling, or disposal.
o Dispose of the instrument or its components according to the appropriate local regula-tions.
NOTICE Malfunction and instrument failure due to improper handling
Using unsuitable solutions may result in incorrect operation and possible instrument fail-ure.
o Clean the instrument only with recommended solutions.
o Do not let cleaning solution enter the instrument.
o Make sure that the items are thoroughly dried after cleaning or disinfecting.
o Do not perform any maintenance actions or repairs other than those described in this manual.

Roche Diagnostics
16 Operator’s Manual · Version 1.0
cobas b 101 system
1.3.4 Touch screen
1.3.5 Operating conditions
To ensure that the instrument functions properly, please observe the following guidelines:
o Only use the instrument at an ambient temperature between +15 °C and +32 °C (59 °F and 90 °F).
o Only use the instrument at a relative humidity between 10% and 85%, non-condensing.
o Only use a voltage of 100 V to 240 V AC (+/-10%), 50/60 Hz.
o When performing tests, place the instrument on a level (within 3 degrees), vibration-free surface.
o Only use the instrument in appropriate light conditions:
O Below 20 kLux. (Do not expose the instrument to bright light such as sunlight or spotlight.)
O Sufficiently bright to see clearly what you are doing, for example when applying blood.
1.3.6 Quality control
The instrument has the following built-in quality control functions:
o A self-test of the electronic and mechanical components and functions is performed every time the instrument is powered on.
o The test disc temperature is checked while a test is in progress.
o The expiry date and lot information of the test disc are checked.
Roche offers liquid controls and an optical check as well as the option for proficiency testing. These controls are provided to assist with meeting locally applicable regulatory compliance requirements.
NOTICE Impaired usability of screen due to improper use
Using pointed or sharp-edged objects can damage the touch screen.
Direct sunlight may reduce the life expectancy and functionality of the display.
o Use only your finger (even when wearing gloves) or special pens designed for use with touch screens to touch the screen elements.
o Avoid prolonged exposure to direct sunlight.

Roche Diagnostics
Operator’s Manual · Version 1.0 17
cobas b 101 system
2 The cobas b 101 system
2.1 Overview of the instrument elements
A Lid. Use the Open button on the screen
e.g. to insert a test disc for measurement.
Keep this lid closed during measurement.
B Touch screen. Shows buttons, icons,
information, and test results.
To use a function, tap the button on the
screen lightly.
C Power on/off switch.
D Lid button. Use this button to open the lid
when the instrument is switched off.
E DC IN 12 V terminal. Connect the power
cable from the power adapter to supply
12 V DC power to the instrument.
F BUH terminal. Connection to a network
through a Base Unit Hub.
G USB 1 terminal. Connection to a personal
computer.
H Barcode scanner terminal.
I USB 2 terminal. Connection to USB
memory stick or a printer.
Figure 3 Main hardware elements of the instrument
A
B
C D E F G H
I
J Temperature sensor
K Upper heater
L Barcode sensor
M Turntable. Holds and rotates the disc during
processing.
N Lower heater
Figure 4 Main hardware elements inside the instrument
LJ
M
K
N

Roche Diagnostics
18 Operator’s Manual · Version 1.0
cobas b 101 system
CAUTION
Injury to skin due to prolonged exposure to heated surface
Exposing skin to the heat of the upper heater (K) and lower (N) heater for a long period of time may cause low-temperature burns.
o Do not expose the skin to the upper heater (K) or lower heater (N) for a long period of time when the power is turned on.
NOTICE Damage to the instrument by incorrect power supply
Only use the power supply equipment delivered with the instrument.
e See General product specifications on page 167.
o In areas with weak or unstable power supply, Roche recommends the use of an unin-terruptible power supply unit.
NOTICE Damage to the instrument by inappropriate handling
o Do not forcefully open the lid. Choose Open on the screen when the instrument is switched on, use the button at the back of the instrument when it is switched off. If the lid cannot be opened using Open, e.g. because the disc was not inserted correctly, switch off the instrument and press firmly the button at the back of the instrument.
o Do not move or lift the instrument by its lid.
o Do not forcefully push the lid in its open position.
o Do not forcefully close the lid.
o Do not place objects on top of the instrument.
NOTICE Malfunction due to using multiport USB hub
o Do not use a multiport hub.
NOTICE Malfunction due to connecting unsuitable devices
o Do not connect unsuitable devices such as phones to the RS422 (BUH) terminal.
o Make sure to connect the devices to the appropriate connectors.
NOTICE Damage to the instrument by short circuiting
o Make sure no foreign substances such as liquids reach the sockets and plugs.

Roche Diagnostics
Operator’s Manual · Version 1.0 19
cobas b 101 system
e For details on using test discs, see Preparing a disc on page 109.
A Test type indication
B Use the underside of the hinge cover for
writing information, e.g. the patient ID
C Open the disc on this side
D Suction point (at the underside of the disc)
Figure 5 Test disc, example for lipid test panel
C
B
D
A
o There are various optical surfaces on the disc. Therefore, when handling a disc make sure to hold it by its hinge cover and side only, do not touch the transparent surfaces.
o When writing on the disc, e.g. the patient name, make sure only to use the dedicated area. Do not affix labels to the disc.
o The imprinted side must face up when inserting the disc.
Figure 6 Inserting a test disc

Roche Diagnostics
20 Operator’s Manual · Version 1.0
cobas b 101 system
2.2 Buttons and icons overview
The buttons and icons that are displayed during normal operation are shown here, along with their respective meanings.
Button/Icon Meaning
OK.
Save setting.
Cancel.
Discard setting.
Return (to previous menu).
Delete last character in data entry box.
Reduce/increase the value displayed.
Move screen contents.
Patient Test menu.
Control Test menu.
Review Results menu.
Setup menu.
Log off.
Go to Main Menu.
Print results.
List the results for a specific patient.
Enter patient information.
Enter a comment.
Edit patient information.
Enter information using the barcode scanner.
Enter information using the keyboard.
Table 1 Buttons and icons used on-screen

Roche Diagnostics
Operator’s Manual · Version 1.0 21
cobas b 101 system
Add an item to the list.
Delete the selected list item.
Edit the selected list item.
Move the selected list item up.
Move the selected list item down.
[Hi] The result in the chosen measuring unit is above the accepted range.
[Lo] The result in the chosen measuring unit is below the accepted range.
The result in the chosen measuring unit is above the user specified
range.
The result in the chosen measuring unit is below the user specified
range.
NGSP The HbA1c results were calculated using the NGSP reference method.
IFCC The HbA1c results were calculated using the IFCC reference method.
There is a comment for this result.
The instrument is connected to a printer.
The instrument is connected to a scanner.
The instrument is connected to a USB stick.
The instrument is connected to an external computer.
Wait until the action is complete.
Button/Icon Meaning
Table 1 Buttons and icons used on-screen (Continued)

Roche Diagnostics
22 Operator’s Manual · Version 1.0
cobas b 101 system
2.3 Icons on information screens
2.4 Icons on error messages
Button/Icon Category Meaning
Notice Notification for information purposes only.
Operation may proceed after confirming the notification.
Decision Notification as a decision point.
A choice is provided as to how to proceed.
Mandatory Notification of mandatory steps.
If you accept, the mentioned actions must be performed.
Table 2 Icons used on information screens
Button/Icon Category Meaning
Error o Hardware problem codes. Operation has stopped.
o Software problem codes. Operation has stopped.
Warning Application problem codes. The operator may need to
repeat the test with a new panel.
Information User handling codes. Suggests an alternate workflow.
Operation can continue.
Table 3 Severity icons used on error message screens
Button/Icon Subject the message is related to
Space for patient data, administrator data, operator data, event records
Test result space
QC result space
Temperature
Control lot expiry
Disc lot expiry
Operator or patient information
Measurement (range, failure)
Table 4 Subject icons used on error message screens

Roche Diagnostics
Operator’s Manual · Version 1.0 23
cobas b 101 system
2.5 Symbols on the instrument case
Date
Disc status
Disc error
Disc presence
Printer connection
USB stick connection
Scanner connection
Tilted instrument
Shock to instrument
Button/Icon Subject the message is related to
Table 4 Subject icons used on error message screens (Continued)
Button/Icon Meaning
DC IN 12 V terminal
BUH Base Unit Hub terminal
USB 1 terminal. Connection to a personal computer
USB 2 terminal. Connection to USB memory stick or a printer
Barcode scanner terminal
Table 5 Symbols on the instrument case
DC IN 12V
1
2

Roche Diagnostics
24 Operator’s Manual · Version 1.0
cobas b 101 system

Roche Diagnostics
Operator’s Manual · Version 1.0 25
cobas b 101 system
3 Putting the instrument into operation
3.1 Installation
3.1.1 Unpacking the instrument
a To unpack the instrument
1 Open the box using a pair of scissors or a knife to cut the tape.
2 Remove and unpack all the items.
3 Check the delivered items against the following list.
4 Check the items for damage.
5 If items are missing or damaged, report the missing and damaged items to your local supplier.
3.1.2 Placing the instrument
a To place the instrument
1 Observe the required ambient conditions.
e See General product specifications on page 167.
2 Place the instrument on a level (maximum 3 degrees incline), stable surface (table).
3 Make sure there is sufficient space around the instrument so that the ventilation openings at the front and back are not obstructed and that there is sufficient space for connecting devices such as a USB stick to the back of the instrument.
Please keep the shipping box for reuse if you plan to transport the instrument and supplies to other sites.
Be careful not to damage the contents when using a cutting instrument.
m cobas b 101 system
m Power adapter
m Power cable
m Optical check disc
Consumables are not supplied with the instrument.
e See Materials supplied by Roche on page 169.

Roche Diagnostics
26 Operator’s Manual · Version 1.0
cobas b 101 system
3.1.3 Power supply
a To connect the instrument to the mains power
1 Make sure the instrument is switched off.
When the power switch is in off position, the green background color of the power switch is not visible.
2 Connect the adapter cable to the DC IN 12 V terminal on the instrument.
3 Connect the power cables to the adapter and to the mains supply.
3.1.4 Starting the instrument
a To start the instrument for the first time
1 Switch on the instrument.
When the self-tests and warm-up have successfully been completed, the Touch Screen Calibration screen is displayed.
NOTICE Damage to the instrument by incorrect power supply
Only use the power supply equipment delivered with the instrument.
e See General product specifications on page 167.
If at the moment you are not sure about the following settings just accept the default val-ues, you can change them later.

Roche Diagnostics
Operator’s Manual · Version 1.0 27
cobas b 101 system
2 Perform the touch screen calibration. Follow the instructions on screen.
e For details see Calibrating the touch screen on page 91.
When you have confirmed the settings, the Language screen is displayed.
3 Define which language you want to work in.
e For details see Choosing the language on page 88.
When you have confirmed the settings, the Date Format screen is displayed.
4 Define how you want the date to be displayed on screen.
e For details see Setting the date on page 88.
When you have confirmed the settings, the Date screen is displayed.
5 Define the current date.
e For details see Setting the date on page 88.
When you have confirmed the settings, the Time Format screen is displayed.
6 Define how you want the time to be displayed on screen.
e For details see Setting the time on page 89.
When you have confirmed the settings, the Time screen is displayed.
7 Define the current time.
e For details see Setting the time on page 89.
When you have confirmed the settings, the HbA1c screen is displayed.
8 Define which units should be used for HbA1c results.
e For details see Result Units on page 44.
When you have confirmed the settings, the eAG screen is displayed.
9 Define which units should be used for eAG reporting.
e For details see Result Units on page 44.
When you have confirmed the settings, the Lipid screen is displayed.
10 Define which units should be used for Lipid results.
e For details see Result Units on page 44.
After 3 -5 minutes, the Main Menu is displayed.

Roche Diagnostics
28 Operator’s Manual · Version 1.0
cobas b 101 system
a To start the instrument for routine testing
1 Switch on the instrument.
Several screens are displayed, informing you of the startup actions that are being performed.
When the self-tests and warm-up have successfully been completed, the Main Menu is displayed.
Depending on whether you work with operator information, functions may not be available and you may have to log on first.
e For information on on-screen messages, see Error messages on page 159.

Roche Diagnostics
Operator’s Manual · Version 1.0 29
cobas b 101 system
3.1.5 Switching off the instrument
a To switch off the instrument
1 Make sure the instrument is not processing.
2 If you logged on at the beginning of the session, choose to log off.
It is safe to switch off when the Main Menu is displayed and there are no flashing status icons (A), when the screen-saver screen is displayed, and when you are asked on screen to switch off.
3 Switch off the instrument using the power switch.
CAUTION
Loss of sample due to inappropriate switching off
Switching off the instrument results in immediate processing stop and you need to repeat the test that was being processed when you switched off the instrument, requiring new sample and disc.
o Do not switch off the instrument while it is processing.
You can define automatic logoff after a certain period of inactivity. See To define that automatic logoff should be used on page 60.
A

Roche Diagnostics
30 Operator’s Manual · Version 1.0
cobas b 101 system

Roche Diagnostics
Operator’s Manual · Version 1.0 31
cobas b 101 system
4 Setting up the instrument
e For information on the meaning of the button symbols and the associated functions, see
Table 1 on page 20.
4.1 Using setup screens
All setup screens have the same basic structure and use the same buttons.
The available choices are represented by buttons (A), whose text describes the underlying function.
Selected choices are displayed blue (C). Choose a button to either select it or make it inactive.
Buttons with blue edge and gray content indicate choices or functions that are not available because a condition is not met that requires user input, for example an ID must be supplied.
Presentation of screen elements in this manual
o Buttons are screen prompts that cause something to happen when chosen. The names of buttons are either highlighted like this or the button icon is shown (for example
for OK).
o Names of screens, tabs, and parts of screens, and headings of tables and lists are shown highlighted like this.
o Values you need to choose or enter are highlighted like this.
Using buttons
o The term choose means that you should lightly tap the screen where for example a button is displayed.
o In some instances, for example when changing a value using , keeping your finger on the button results in repeated change of the value.
Figure 7 Typical setup screens
A
C
B
D
Patient Test
No
Setup

Roche Diagnostics
32 Operator’s Manual · Version 1.0
cobas b 101 system
Buttons in gray indicate choices or functions that are not available due to the current instrument setup.
Use this button to display the options that are not visible at the moment (D). This function is available if there are more list items (choices) further up in the list.
Use this button also to increase a value (B).
Use this button to display the options that are not visible at the moment (D). This function is available if there are more list items (choices) further down in the list.
Use this button also to decrease a value (B).
Use this button to display the screen that was previously displayed.
Use this button to return to the Main Menu.
Use this button to cancel the changes and definitions you have just made and close the screen without saving them.
Use this button to save the changes and definitions you have just made and close the screen.
Use this button to delete the last character in a data entry box.
4.1.1 Using the virtual keyboard
Use the virtual keyboard to enter text.
Use to delete the current text.
Use to display the numeric keyboard and to display the alphabetic keyboard.
Choose to save the text.
Choose to cancel the entries you have just made and close the screen without saving them.
Choose to insert a space between characters.
Figure 8 Using the virtual keyboard

Roche Diagnostics
Operator’s Manual · Version 1.0 33
cobas b 101 system
4.2 Settings summary
h Main Menu > Setup
The following tables list the available screen items and give the possible values that can be selected or entered for them.
4.2.1 Options setup
h Main Menu > Setup > Options
Figure 9 Setup screen
Setup item Navigation Possible values Default value
Sort Results o Date/Time
o Patient ID
o Patient Name
Date/Time
Comments Setting Patient o No
o Optional
o Required
o Required (Out of
Range)
Optional
Control o No
o Optional
o Required
o Required (Out of
Range)
Optional
Edit Patient o Up to 10 comments
o Up to 20 characters per
comment
"" (blank)
Control o Up to 10 comments
o Up to 20 characters per
comment
"" (blank)
Sequence Patient o NA NA
Control o NA NA
Dual Test o Disabled
o EnabledDisabled
Table 6 Options settings

Roche Diagnostics
34 Operator’s Manual · Version 1.0
cobas b 101 system
Parameter HbA1c o HbA1c
o eAGHbA1c
Lipid o CHOL
o TG
o HDL
o LDL
CHOL
TG
HDL
LDL
o Non-HDL
o CHOL/HDL
Non-HDL
CHOL/HDL
Result Unit HbA1c o NGSP
o IFCC
NGSP
IFCC
eAG o mg/dL
o mmol/Lmg/dL
Lipid o mg/dL
o mmol/Lmg/dL
Custom Normal Ranges
DisabledDisabled
Enabled
HbA1c NGSP o Min: 4.0-14.0% 4.0
o Max: 4.0-14.0% 14.0
IFCC o Min: 20-130 mmol/mol 20
o Max: 20-130 mmol/mol 130
eAG o Min: 95-299 mg/dl
(5.28-16.57 mmol/L)95 (5.28)
o Max: 95-299 mg/dl
(5.28-16.57 mmol/L)299 (16.57)
Lipid CHOL o Min: 50-500 mg/dl
(1.28-12.95 mmol/L)50 (1.28)
o Max: 50-500 mg/dl
(1.28-12.95 mmol/L)500 (12.95)
TG o Min: 45-650 mg/dl
(0.50-7.35 mmol/L)45 (0.50)
o Max: 45-650 mg/dl
(0.50-7.35 mmol/L)650 (7.35)
HDL o Min: 15-100 mg/dl
(0.38-2.60 mmol/L)15 (0.38)
o Max: 15-100 mg/dl
(0.38-2.60 mmol/L)100 (2.60)
LDL o Min: 1-477 mg/dl
(0.01-12.34 mmol/L)1 (0.01)
o Max: 1-477 mg/dl
(0.01-12.34 mmol/L)477 (12.34)
Non-HDL o Min: 1-486 mg/dl
(0.01-12.57 mmol/L)1 (0.01)
o Max: 1-486 mg/dl
(0.01-12.57 mmol/L)486 (12.57)
CHOL/HDL o Min: 1.0-34.5 1.0
o Max: 1.0-34.5 34.5
Alarm o 0-4 2
Setup item Navigation Possible values Default value
Table 6 Options settings (Continued)

Roche Diagnostics
Operator’s Manual · Version 1.0 35
cobas b 101 system
4.2.2 ID Setup
h Main Menu > Setup > ID Setup
Key Click o 0-4 2
Auto Off o Disabled
Disabledo Enabled
(1-999 min)
Computer o Disabled
o USB
o BUH
Disabled
Service Information
No values to be defined
Data Handling Anonymize Patient Info.
Audit Trail Log File
Error Log File
Import Configuration
Export Configuration
Initialize Configuration
Error History
Software Update
Language Update
Setup item Navigation Possible values Default value
Table 6 Options settings (Continued)
Setup item Navigation Possible values Default values
Operator ID ID Entry NoNo
Required ID Entry Mode o KeyboardKeyboard
Barcodeo Barcode
o List
Length o Min: 1-20 1
o Max: 1-20 20
Auto Logoff
Time
o Enabled
1-60 min Enabled
20o Disabled
ID Validation o No
Noo Length
o List
Password Entry o DisabledDisabled
o Enabled
Password Expiry DisabledDisabled
Enabled o 1-365 days 90
Administrator o DisabledDisabled
o Enabled
Edit Operator
List
One set of operator
information per
operator
Change Password NA NA
Table 7 ID Setup settings

Roche Diagnostics
36 Operator’s Manual · Version 1.0
cobas b 101 system
4.2.3 Control Settings
h Main Menu > Setup > Control Settings
Patient ID ID Entry NoNo
Optional ID Entry Mode o KeyboardKeyboard
Barcodeo Barcode
o List
Length o Min: 1-20 1
o Max: 1-20 20
Required ID Entry Mode o KeyboardKeyboard
Barcodeo Barcode
o List
Length o Min: 1-20 1
o Max: 1-20 20
Name Entry o DisabledDisabled
o Enabled
Date of Birth
Entry
o DisabledDisabled
o Enabled
ID Validation o No
Noo Name
o Date of Birth
Edit Patient List One set of patient
information per
patient
Setup item Navigation Possible values Default values
Table 7 ID Setup settings (Continued)
Setup item Navigation Possible values Default values
Operator Lockout o No
No
o Weekly
o Monthly
o Every X
Months
(Range 1-12)
3
QC Lockout Interval o No
No
o Daily
o Weekly
o Monthly
o Every X Days
(Range 1-60)14
New Lot HbA1c o DisabledDisabled
o Enabled
Lipid o DisabledDisabled
o Enabled
Table 8 Control settings

Roche Diagnostics
Operator’s Manual · Version 1.0 37
cobas b 101 system
4.2.4 Screen setup
h Main Menu > Setup > Screen
Optical Check Lockout
o No
No
o Daily
o Weekly
o Monthly
o Every X
Months
(Range 1-12)
3
STAT Test o Disabled
Enabledo Enabled
(1-9 tests)5
QC Result Format o Physical Value
Physical
and Target
Value
o Physical and
Target Value
o Target Value
Deviation
QC Range HbA1c Default Range NGSP NGSP
IFCC Default
Range
IFCC
Custom Range NGSP 0-±21% ±21%
IFCC 0-±34% ±34%
Lipid Default Range
Default
Range
Custom Range CHOL 0-±18% ±18%
TG 0-±24% ±24%
HDL 0-±22% ±22%
Setup item Navigation Possible values Default values
Table 8 Control settings (Continued)
Setup item Navigation Possible values Default value
Contrast o 1-5 3
Language List of available languages English
Date/Time Date Format o DD.MM.YYYY
o MM/DD/YYYY
o YYYY-MM-DD
DD.MM.YYYY
Date o 01.01.2012 - 31.12.2050 NA
Time Format o 12 h
o 24 h24 h
Time o 0:00-23:59
(12:00AM-11:59PM)NA
Facility Information o 0-60 characters "" (blank)
Touch Screen Calibration
NA NA
Table 9 Screen settings

Roche Diagnostics
38 Operator’s Manual · Version 1.0
cobas b 101 system
4.3 Options setup
Use these functions to define how you want to use the instrument.
h Main Menu > Setup > Options.
The following buttons are available:
o Use Sort Results to define the order in which result information is displayed in the result screens.
o Use Comments to define whether and in which situations predefined comments should be added to results, and to write and change such comments.
o Use Dual Test to define whether HbA1c and Lipid Panel tests are performed separately or immediately following each other without displaying the results of the first test.
o Use Parameter to define which parameters will be reported.
o Use Result Units to set the units in which results will be reported.
o Use Custom Normal Ranges to customize the normal ranges for each test.
o Use Alarm to adjust the acoustic signal that is generated in certain critical situations, for example when a measurement is complete or when an exceptional situation was registered by the instrument.
o Use Key Click to adjust the acoustic signal that is generated when you choose a button on the screen.
o Use Auto Off to save energy by reducing the back lighting of the LCD display and switching off the heater after a certain time of inactivity.
When the system goes into this off mode, the screen saver screen is displayed. By touching the screen, the system is activated again.
o Use Computer to define how the instrument is connected to an external computer or a network.
o Use Service to perform service related activities.
Figure 10 Screen Setup screen

Roche Diagnostics
Operator’s Manual · Version 1.0 39
cobas b 101 system
4.3.1 Sort Results
Use this function to define the order in which result information is displayed in the result review screens.
a To define how results are sorted
1 Choose Setup > Options > Sort Results.
Use Date/Time if you want the results sorted by date and time when they were created.
Use Patient ID if you want the results to be sorted by their associated patient IDs.
Use Patient Name if you want the results to be sorted by their associated patient names. (This button is active if name entry is enabled. See To define how operator related information should be handled on page 58.)
2 Choose one of the buttons.
3 Choose to save the settings and to close the screen.
4.3.2 Comments
Use the comments functions to define whether and in which situations predefined comments should be added to results, and to write and change such comments.
You can define up to 10 patient and up to 10 control result comments, each containing up to 20 characters.
a To display the basic comments options
1 Choose Setup > Options > Comments.
The Comments screen is displayed.

Roche Diagnostics
40 Operator’s Manual · Version 1.0
cobas b 101 system
2 Choose a button.
o Choose Setting to define whether comments are required for each result.
e See To choose whether a comment should be displayed with results on page 40.
o Choose Edit to edit existing comments or to add a new comment.
e See To write (predefine) a result comment or change it on page 41.
o Choose Sequence to change the order in which the comments are displayed in the Comments list that is for example displayed when you add a comment to a result.
e See To define the sequence in which patient result comments are listed in the
comments list on page 42.
a To choose whether a comment should be displayed with results
1 Choose Setup > Options > Comments > Setting > Patient or Control.
The Patient or Control screen is displayed.
2 Choose a button.
o Choose No if you do not want to use comments.
o Choose Optional if adding a comment should be optional.
o Choose Required if a comment must be added to all results.
o Choose Required (Out of Range) if a comment must be added to results that are outside predefined ranges.
3 Choose to save the choices and to close the screen.
The procedure is the same for defining patient and control result comments.

Roche Diagnostics
Operator’s Manual · Version 1.0 41
cobas b 101 system
a To write (predefine) a result comment or change it
1 Choose Setup > Options > Comments > Edit > Patient or Control.
The Edit Patient Comments or Edit Control Comments screen is displayed.
Existing comments are displayed in the buttons.
2 Choose a button.
o To edit an existing comment, choose its button.
o To add a new comment, choose a blank button.
If you cannot see a blank button, choose repeatedly until you see one, then choose it.
The Edit screen is displayed.
3 Use the keyboard to enter the information. Use the button to switch to the numeric keyboard for entering numbers. Use the button to return to the alphabetic keyboard. Use to delete the last character in the data entry box.
You can enter up to 20 characters.
4 Choose to save the information and to close the screen.
a To delete a result comment
1 Choose Setup > Options > Comments > Edit > Patient or Control.
The Edit Patient or Edit Control screen is displayed.
Existing comments are displayed in the buttons.
2 Choose the button of the comment that you want to delete.
The Edit screen is displayed.
3 Use to delete all characters in the data entry box.
4 Choose to save the information and to close the screen.
The comment is no longer contained in the Edit Patient Comment or Edit Control Comment list.
The procedure is the same for defining patient and control result comments.
The procedure is the same for deleting patient and control result comments.

Roche Diagnostics
42 Operator’s Manual · Version 1.0
cobas b 101 system
a To define the sequence in which patient result comments are listed in the comments list
1 Choose Setup > Options > Comments > Sequence > Patient or Control.
The Patient Sequence or Control Sequence screen is displayed.
2 Choose a comment button.
3 Move the button up or down in the list.
o Choose to move the button up by one position in the list. Choose it again to move it up another position.
o Choose to move the button down by one position in the list. Choose it again to move it down another position.
4 Choose to save the settings and to close the screen.
4.3.3 Dual Test
Use this function to define whether HbA1c and Lipid Panel tests can be performed immediately following each other without displaying the results of the first test.
a To define whether dual testing will be used
1 Choose Setup > Options > Dual Test.
The Dual Test screen is displayed.
2 Choose one of the buttons.
Choose Disabled to prevent dual testing from being used.
Choose Enabled if you want to be able to use dual testing.
3 Choose to save the settings and to close the screen.
The procedure for defining the sequence is the same for both the patient and control result comments.

Roche Diagnostics
Operator’s Manual · Version 1.0 43
cobas b 101 system
4.3.4 Parameter
Use this screen to define which parameters are reported.
a To choose which HbA1c parameters are reported
1 Choose Setup > Options > Parameter > HbA1c.
2 Choose one or both buttons.
o Choose HbA1c if you want the results to be reported as HbA1c values.
o Choose eAG if you want the results to be reported as estimated average glucose values (eAG).
3 Choose to save the settings and to close the screen.
a To choose which parameters are reported
1 Choose Setup > Options > Parameter > Lipid.
The following parameters are available:
o CHOL
o TG
o HDL
o LDL
o Non-HDL
o CHOL/HDL
2 Choose the buttons of all parameters for which you want to display the results.
3 Choose to save the settings and to close the screen.

Roche Diagnostics
44 Operator’s Manual · Version 1.0
cobas b 101 system
4.3.5 Result Units
Use this screen to choose the units in which results are reported.
HbA1c
a To set the units for the HbA1c tests
1 Choose Setup > Options > Result Units.
2 Choose HbA1c.
A screen for selecting the units is displayed.
3 Choose up to three units you want to use.
4 Choose to save the settings and to close the screen.
eAG
a To set the units for eAG reporting
1 Choose Setup > Options > Result Units.
2 Choose eAG.
A screen for selecting the unit is displayed.
3 Choose either mg/dL or mmol/L.
4 Choose to save the settings and to close the screen.
Lipid
a To set the units for the Lipid Panel
1 Choose Setup > Options > Result Units.
2 Choose Lipid.
A screen for selecting the unit is displayed.
3 Choose either mg/dL or mmol/L.
4 Choose to save the settings and to close the screen.
4.3.6 Custom Normal Ranges
Use this function to customize the normal ranges for each test. Make sure your values comply with the legal requirements that apply to your facility.
You need to enable a parameter before you can define its units. See Parameter on page 43.
o You need to enable tests before you can customize their ranges. See Parameter on page 43.
o The normal ranges are described in Table 6 on page 33 ff.

Roche Diagnostics
Operator’s Manual · Version 1.0 45
cobas b 101 system
a To disable the use of customized ranges
1 Choose Setup > Options > Custom Normal Ranges.
The Custom Normal Ranges screen is displayed.
2 Choose Disabled to define that customized normal ranges will not be used. In this case the default values apply.
3 Choose to save the settings and to close the screen.
a To define normal ranges
1 Choose Setup > Options > Custom Normal Ranges.
The Custom Normal Ranges screen is displayed.
2 Choose Enabled.
3 Choose .
4 Choose one of the parameters.
5 If you choose HbA1c or Lipid you need to choose one of the reference methods.
If you choose eAG the screen for defining the values is displayed directly.

Roche Diagnostics
46 Operator’s Manual · Version 1.0
cobas b 101 system
6 Define the minimum and maximum values.
Use and to increase and decrease the values.
7 Choose to save the settings and to close the screen.
4.3.7 Alarm
Use this function to adjust the acoustic signal that is generated in certain situations, for example when a measurement is complete or when an exceptional situation was registered by the instrument.
a To adjust the acoustic signal
1 Choose Setup > Options > Alarm.
2 Use and to increase or decrease the value.
You can choose a value between 0 and 4. Choosing the value 0 (zero) turns off the acoustic signal.
3 Choose to save the settings and to close the screen.
4.3.8 Key Click
Use this function to adjust the acoustic signal that is generated when you choose a button on the screen.
a To adjust the acoustic signal
1 Choose Setup > Options > Key Click.
Roche recommends not to turn off the acoustic signal.

Roche Diagnostics
Operator’s Manual · Version 1.0 47
cobas b 101 system
2 Use and to increase or decrease the value.
You can choose a value between 0 and 4. Choosing the value 0 (zero) turns off the acoustic signal.
3 Choose to save the settings and to close the screen.
4.3.9 Auto Off
Use this function to save energy by reducing the back lighting of the LCD display and switching off the heater after a certain time of inactivity.
a To turn off the energy saving function
1 Choose Setup > Options > Auto Off.
The Auto Off screen is displayed.
2 Choose Disabled.
3 Choose to save the settings and to close the screen.
a To define the time after which the energy saving function sets in
1 Choose Setup > Options > Auto Off.
The Auto Off screen is displayed.
2 Choose Enabled.
3 Choose .
4 Use and to increase and decrease the value.
You can set a time between 1 to 999 minutes.
5 Choose to save the settings and to close the screen.
o When the system goes into Auto Off mode the screen saver screen is displayed. By touching the screen, the system is activated again.
o If you work with automatic logoff (see To define that automatic logoff should be used on page 60) you are automatically logged off when the system goes into Auto Off mode.

Roche Diagnostics
48 Operator’s Manual · Version 1.0
cobas b 101 system
4.3.10 Computer
Use this function to define how the instrument is connected to an external computer or a network.
a To define the data connection
1 Choose Setup > Options > Computer.
2 Choose one of the buttons.
Use Disabled if you do not intend to connect the instrument to an external computer or a Base Unit Hub.
Use USB if you want to use the USB port to connect an external computer.
Use BUH (Base Unit Hub) if you want to use the BUH port to connect the instrument to a network or a data management system.
3 Choose to save the settings and to close the screen.
4.3.11 Service
Use these functions to perform service related activities.
h Setup > Options > Service
o Use Information to display status information on the instrument.
e See Information on page 50.
o Connect the data management system according to standard POCT1-A.
o For details on how to set up such connections see the user documentation for the respective hardware and software products and contact your Roche representative.
Figure 11 Service screen

Roche Diagnostics
Operator’s Manual · Version 1.0 49
cobas b 101 system
o Use Data Handling to perform the following tasks:
O Deleting the patient information (Anonymize Patient Info).
Use this function to delete the patient names and dates of birth in all results. Results then are identified by an ID only. You would typically use this function if the instrument needs to be returned to your Roche representative for troubleshooting purposes.
e See Anonymize Patient Info on page 51.
O Exporting the audit trail log file.
Use this function when required for regulatory reasons or to provide your Roche representative with the necessary information to perform effective troubleshooting. It generates a historic record of events and actions performed on the instrument.
e See Audit Trail Log File on page 51.
O Exporting the error log file.
Use this function to provide your Roche representative with the necessary information to perform effective troubleshooting. It generates a record of the error messages generated by the instrument.
e See Error Log File on page 52.
O Importing configuration settings.
Use this function when for example setting up a further or a replacement instrument. (To be able to import a configuration, it must previously have been exported from a cobas b 101 system instrument that runs the same software as the current instrument.)
e See Import Configuration on page 53.
O Exporting the configuration settings.
Use this function to create a copy of your setup. You can use this file for setting up a further or a replacement instrument.
e See Import Configuration on page 53.
O Initializing the configuration.
Use this function to set all setup information back to their factory values.
e See Initialize Configuration on page 54.
o Use Error History to display a chronological list of messages that were generated, together with their code.
e See Error History on page 54.
o Use Software Update to install a new software version of the system software.
e See Software Update on page 54.
o Use Language Update to load additional user interface languages.
The instrument is delivered with a set of languages, and you can work with any of these. Additional languages may be available from Roche, you can use these after you have installed them on the instrument using the Language Update function.
e See Language Update on page 55.

Roche Diagnostics
50 Operator’s Manual · Version 1.0
cobas b 101 system
File names The file names for the various import and export functions have predefined formats:
o For software and language update files the format is as follows:
o For files that were generated by the instrument the format is as follows:
Information Use this function to check the current status of the instrument.
a To display the current instrument status information
1 Choose Setup > Options > Service > Information.
2 Choose to close the screen.
Con
ten
t ty
pe
S =
Sys
tem
sof
twar
e
L =
Lan
guag
e so
ftw
are
Maj
or v
ersi
on
Min
or v
ersi
on
Rev
isio
n
Bui
ld (
year
)
Bui
ld (
num
ber)
Ext
ensi
on
Example: L 1 1 3 12 01 bin
Table 10 File name example for language update file: L1131201.bin
Con
ten
t ty
pe
A=
Aud
it t
rail
file
E =
Err
or lo
g fi
le
B =
Bac
kup
of s
yste
m
sett
ings
Yea
r (Y
Y)
Mon
th (
MM
)
Day
(D
D)
Inde
x (t
o di
stin
guis
h
betw
een
file
s th
at w
ere
gen
erat
ed o
n t
he
sam
e da
y)
Ext
ensi
on
Example: E 12 12 01 A csv
Table 11 File name example for error log file: E121201A.csv
The Total Test Count refers to patient tests, it does not include control tests.

Roche Diagnostics
Operator’s Manual · Version 1.0 51
cobas b 101 system
Anonymize Patient Info Use this function to delete the patient names and dates of birth in all results. Results then are identified by an ID only. You would typically use this function if the instrument needs to be returned to your Roche representative for troubleshooting purposes.
a To delete patient information
1 Choose Setup > Options > Service > Data Handling > Anonymize Patient Info.
2 Choose .
3 A screen is displayed for confirming the deletion.
4 Choose .
The patient names and dates of birth for all results are deleted.
5 When a message is displayed confirming the successful deletion, choose to close the screen.
Audit Trail Log File This function generates a historic record of up to 1000 events and actions performed on the instrument. Use this function to back up event data, which may be required for regulatory reasons or by your Roche representative to perform effective troubleshooting.
a To export the audit trail log file
1 Choose Setup > Options > Service > Data Handling > Audit Trail Log File.
You are asked to insert a USB stick.
2 Insert a USB stick in the USB port at the back of the instrument.
e See Figure 4 on page 17.
3 Choose .
4 Wait until a message informs you that the export of the audit trail log file is complete.
5 Choose to close the screen.
When the log file is full (1000 events) the oldest entries are replaced with the new ones. Therefore, you need to periodically export the audit trail log file.

Roche Diagnostics
52 Operator’s Manual · Version 1.0
cobas b 101 system
Error Log File This file can contain up to 100 error records. Use this function to back up the error records, which may be required by your Roche representative to perform effective troubleshooting.
a To export the error log file
1 Choose Setup > Options > Service > Data Handling > Error Log File.
You are asked to insert a USB stick.
2 Insert a USB stick in the USB port at the back of the instrument.
e See Figure 4 on page 17.
3 Choose .
4 Wait until a message informs you that the export of the error log file is complete.
5 Choose to close the screen.
Export Configuration You typically use this function if you need to replace the current instrument or to create a backup before you retire the current instrument.
The following information is exported:
o Setup parameters
o Operator list
o Comment list
o Patient list
o Patient results
o Control results
o QC Info Disc information
a To export the current configuration settings
1 Choose Setup > Options > Service > Data Handling > Export Configuration.
You are asked to insert a USB stick.
2 Insert a USB stick in the USB port at the back of the instrument.
e See Figure 4 on page 17.
3 Choose .
4 Wait until a message informs you that the export is complete.
5 Choose to close the screen.
When the log file is full (100 error records) the oldest entries are replaced with the new ones. Therefore, you need to periodically export the error log file.

Roche Diagnostics
Operator’s Manual · Version 1.0 53
cobas b 101 system
Import Configuration You typically use this function if you need to replace the current instrument or to access results that were generated on a retired instrument.
a To import configuration settings
1 Choose Setup > Options > Service > Data Handling > Import Configuration.
You are asked to insert a USB stick.
2 Insert a USB stick in the USB port at the back of the instrument.
e See Figure 4 on page 17.
3 Choose .
You are asked to confirm the import.
4 Choose to confirm.
5 Wait until a message informs you that the import is complete.
6 Choose to close the screen.
a To access results that were generated on a different (retired) instrument
1 Export the data of the current instrument.
e See To export the current configuration settings on page 52.
2 Import the data that were generated on the retired instrument.
e See To import configuration settings on page 53.
All existing results are overwritten!
3 Find the required data and print them if required.
4 Import the data that were generated in step 1.
e See To import configuration settings on page 53.
a To install the configuration data of a different (retired) instrument
1 Export the data of the instrument you are going to retire.
e See To export the current configuration settings on page 52.
2 Install the new instrument and import the data that were generated in step 1.
e See To import configuration settings on page 53.
Existing results are deleted
When importing configuration data, existing patient and control results are deleted and replaced.
To be able to import a configuration, it must previously have been exported from a cobas b 101 systeminstrument that runs the same software as the current instrument. See To export the current configuration settings on page 52.

Roche Diagnostics
54 Operator’s Manual · Version 1.0
cobas b 101 system
Initialize Configuration Use this function to set all setup information back to their factory values. This does not affect the language, date, and time settings.
a To initialize the configuration settings
1 Choose Setup > Options > Service > Data Handling > Initialize Configuration.
2 Choose .
You are asked to confirm the initialization.
3 Choose .
4 Wait until a message informs you that the initialization is complete.
5 Choose to close the screen.
Error History Use this function to check for messages that were generated by the instrument. The list is chronologically sorted.
a To check for messages
1 Choose Setup > Options > Service > Error History.
A list is displayed that contains the most recent messages that were generated by the instrument.
Use and to display items that are currently not displayed.
2 Note the error code and refer to Table 18 on page 160 for details.
3 Choose to close the screen.
Software Update Use this function for installing a new version of the system software.
This task takes about 5 minutes.
a To update the system software
1 Choose Setup > Options > Service > Software Update.
You are asked to insert a USB stick.
2 Insert a USB stick in the USB port at the back of the instrument.
e See Figure 4 on page 17.
You are asked to confirm the update.
3 Choose .
The instrument performs checks and then installs the software.
4 Wait until a message informs you that the update is complete.
5 Switch off the instrument.
Only install original Roche software.
Do not remove the USB stick or switch off the instrument during the installation proce-dure.

Roche Diagnostics
Operator’s Manual · Version 1.0 55
cobas b 101 system
6 Remove the USB stick.
7 Switch on the instrument.
Language Update The instrument is delivered with a set of languages, and you can work with any of these. Additional languages may be available from Roche, you can use these after you have installed them on the instrument using the Language Update function. You can install up to 18 languages.
This task takes about 5 minutes.
a To add a new user interface language
1 Choose Setup > Options > Service > Language Update.
You are asked to insert a USB stick.
2 Insert a USB stick in the USB port at the back of the instrument.
e See Figure 4 on page 17.
3 Choose .
4 Wait until a message informs you that the installation is complete.
5 Switch off the instrument.
6 Remove the USB stick.
7 Switch on the instrument.
Do not remove the USB stick or switch off the instrument during the installation proce-dure.

Roche Diagnostics
56 Operator’s Manual · Version 1.0
cobas b 101 system
4.4 ID setup
Use the ID Setup functions to define how operator and patient related information is handled.
h Main Menu > Setup > ID Setup.
Use the Operator ID functions to define and organize operator access to the various functions of the instrument.
e See Operator ID on page 56.
Use the Patient ID functions to define whether you want to work with demographic patient data, and if you do so, to define such data.
e See Patient ID setup on page 69.
4.4.1 Operator ID
Use the Operator ID functions to define and organize operator access to the various functions of the instrument. If you choose to work without operator information, anyone can use the instrument and perform all possible functions; by using operator information, you can limit access to the instrument to specific persons, and you can assign them to the Operator or Administrator user group. Members of the Operator group can perform all functions required to perform day-to-day testing, members of the Administrator group can additionally use the functions required for managing the instrument.
The following illustration shows the logical relations between the various definitions and settings.
Figure 12 ID Setup screen
You can operate the instrument without using operator and patient data.

Roche Diagnostics
Operator’s Manual · Version 1.0 57
cobas b 101 system
Figure 13 Logical overview of using the Operator ID functions
4 Work with operator roles?
Setup > ID Setup > Operator ID
Ready for processing
ID Entry
ID Validation
Password Entry
ID Entry Mode
Auto Logoff Time
Length
ID Entry
Password Entry
Required
Barcode
Enabled
List
List
Keyboard
Disabled
LengthEnter Nr. of characters
Enter minutes
No
ID Validation No
Disabled
Disabled
Enabled
EnabledPassword Entry
Administrator
Edit Operator List
Administrator
Enter ID
Operator ID
Enter name
Operator Name
Enter password
Password Entry
Authority Level
Administrator
Operator
No
No
No
No
Yes
Yes
Yes
Yes
3 Work with passwords?
1 Work with operator IDs?
2 Validate operator IDs?
5
Password Expiry
Password Expiry Disabled
Enabled
Enter days
Yes
Yes

Roche Diagnostics
58 Operator’s Manual · Version 1.0
cobas b 101 system
a To define how operator related information should be handled
1 Choose Setup > ID Setup > Operator ID.
o Use ID Entry to define whether and how the IDs should be entered, how long they should be and whether a user should be logged off automatically after a certain period of inactivity.
e See ID Entry on page 58.
o Use ID Validation to define whether the IDs should be validated and against which values (length, information defined in the Edit Operator List).
e See ID Validation on page 61.
o Use Password Entry to define whether users must enter passwords.
e See Password Entry on page 62.
o Use Password Expiry to define whether a password should expire and if so after how many days.
e See Password Expiry on page 62.
o Use Administrator to define whether the instrument should be managed by a dedicated administrator.
e See Administrator on page 63.
o Use Edit Operator List to define and change user information such as ID, name, password, and user rights (Administrator, Operator, Training Mode).
e See Edit Operator List on page 64.
o Use Change Password to change your current password. This function is available if you work with password identification (Password Entry).
e See Change Password on page 67.
2 Choose one of the buttons.
4.4.2 ID Entry
Use this function to define whether and how the IDs should be entered, how long they should be and whether users should be logged off automatically after a certain period of inactivity.
a To define that operator IDs should not be used
1 Choose Setup > ID Setup > Operator ID > ID Entry.
The Operator ID Entry screen is displayed.
Roche Diagnostics
Operator’s Manual · Version 1.0 59
cobas b 101 system
2 Choose No.
3 Choose to save the settings and to close the screen.
a To define how the operator IDs should be entered and used
1 Choose Setup > ID Setup > Operator ID > ID Entry.
The Operator ID Entry screen is displayed.
2 Choose Required to define that users should identify themselves before they can use the instrument.
3 Choose .
A list is displayed.
4 Choose ID Entry Mode.
A list is displayed to select how IDs can be entered.
5 Choose a button.
o Choose Keyboard to allow the users to type their ID using the on-screen keyboard.
o Choose Barcode to allow the users to use the handheld barcode scanner to enter their user ID.
o Choose List to allow the user to select their ID from the Edit Operator List list.
6 Choose to save the settings and to close the screen.
The Operator ID Entry screen is displayed again.
a To define how long IDs should be
1 Choose Setup > ID Setup > Operator ID > ID Entry.
The Operator ID Entry screen is displayed.
2 Choose Required.
3 Choose .
A list is displayed.
4 Choose Length.
The Operator ID Length screen is displayed.
Working without operator IDs has the following major consequences:
o Everyone can use the instrument and perform tests.
o There is no record of who has performed a certain test.
o If you select Keyboard you can additionally select Barcode and vice versa.
o If you select List more than one operator must be defined in the Edit Operator List. See Edit Operator List on page 64.

Roche Diagnostics
60 Operator’s Manual · Version 1.0
cobas b 101 system
5 Define the minimum and maximum length.
Use and to increase and decrease the values.
6 Choose to save the settings and to close the screen.
The Operator ID Entry screen is displayed again.
a To define that automatic logoff should be used
1 Choose Setup > ID Setup > Operator ID > ID Entry.
The Operator ID Entry screen is displayed.
2 Choose Required.
3 Choose .
A list is displayed.
4 Choose Auto Logoff Time.
The Auto Logoff Time screen is displayed.
5 Choose Enabled.
6 Choose .
A screen is displayed for defining the period of inactivity after which the user should be logged off automatically.
7 Define a value between 1 and 60 minutes. Use and to increase and decrease the values.
8 Choose to save the settings and to close the screen.
The Operator ID Entry screen is displayed again.
When the user is logged off, the screen saver screen is displayed. By touching the screen, the system is activated again.

Roche Diagnostics
Operator’s Manual · Version 1.0 61
cobas b 101 system
a To define that automatic logoff should not be used
1 Choose Setup > ID Setup > Operator ID > ID Entry.
The Operator ID Entry screen is displayed.
2 Choose Required to define that users should identify themselves before they can use the instrument.
3 Choose .
A list is displayed.
4 Choose Auto Logoff Time.
5 Choose Disabled.
6 Choose to save the settings and to close the screen.
The Operator ID Entry screen is displayed again.
4.4.3 ID Validation
Use this function to define whether the IDs should be validated and if so against which of the values defined in the Edit Operator List.
a To define whether IDs should be validated, and if so against which values
1 Choose Setup > ID Setup > Operator ID > ID Validation.
2 Choose one of the following buttons:
o Choose No to define that IDs should not be validated.
o Choose Length if you want the IDs checked against the permissible length.
o Choose List if you want the IDs checked against the IDs defined in the Edit Operator List.
e See Edit Operator List on page 64.
3 Choose to save the settings and to close the screen.
The Operator ID screen is displayed again.

Roche Diagnostics
62 Operator’s Manual · Version 1.0
cobas b 101 system
4.4.4 Password Entry
Use this function to define whether users must enter passwords.
a To define whether passwords must be entered
1 Choose Setup > ID Setup > Operator ID > Password Entry.
The Operator Password Entry screen is displayed.
2 Choose one of the buttons:
o Choose Disabled if users should not require password identification.
o Choose Enabled if users should identify themselves with their password when they start up the instrument or when the user had or was logged off.
3 Choose to save the settings and to close the screen.
The Operator ID screen is displayed again.
4.4.5 Password Expiry
Use this function to define whether a password should expire and if so after how many days.
a To define that passwords should not expire
1 Choose Setup > ID Setup > Operator ID > Password Expiry.
The Password Expiry screen is displayed.
2 Choose Disabled.
3 Choose to save the settings and to close the screen.
The Operator ID screen is displayed again.
a To define the password expiry period
1 Choose Setup > ID Setup > Operator ID > Password Expiry.
The Password Expiry screen is displayed.
2 Choose Enabled.
3 Choose .
4 Define a value between 1 and 365 days. Use and to increase and decrease the value.

Roche Diagnostics
Operator’s Manual · Version 1.0 63
cobas b 101 system
5 Choose to save the settings and to close the screen.
The Operator ID screen is displayed again.
4.4.6 Administrator
Use this function to define whether the instrument is managed by one or several dedicated administrators. If you choose to work with the Administrator role, the administrator can perform all functions on the instrument, but users with the Operator role assigned to them can only perform the functions for routine testing and maintenance. If you work without the Administrator role, all users can perform all functions.
Users with the Operator role assigned to them can perform the following functions, in addition to performing patient and control tests:
o Enable/disable dual testing
o Define how results are sorted (date/time, patient ID, patient name)
o Add new patients to the patient list
o Adjust the loudness of the acoustic alarm
o Adjust the loudness of key click sound
o Adjust the touch screen contrast
o Calibrate the touch screen
o Change the screen language
o Change their own password
o Enable/disable USB and BUH connections
o View the system information
o View the error history
a To define whether there are dedicated users for managing the instrument
1 Choose Setup > ID Setup > Operator ID > Administrator.
The Administrator screen is displayed.
2 Choose one of the buttons.
o Use Disabled if all users should be able to perform all functions.
o Use Enabled if the instrument management should be performed by dedicated users.
3 Choose to save the settings and to close the screen.
The Operator ID Entry screen is displayed again.
If administrators have forgotten their password, they can contact their Roche representa-tive and request a password of the day. If you work with operator information but not with the Administrator role, all users can request such a password.

Roche Diagnostics
64 Operator’s Manual · Version 1.0
cobas b 101 system
4.4.7 Edit Operator List
Use this function to define and change user information such as ID, name, role (Administrator, Operator, Training Mode), and password. You can define up to 50 sets of user information, five of them can be administrators.
e For preconditions, see Figure 16 on page 79.
a To define a new user
1 Choose Setup > ID Setup > Operator ID > Edit Operator List.
2 Choose .
3 Do one of the following:
4 Enter the operator name using the keyboard.
5 Choose .
The Authority Level screen is displayed.
If … Do this
You want to enter the ID
manually
1. Enter the operator ID using the keyboard.
2. Choose .
The Operator Name screen is displayed.
You want to use the barcode
scanner
1. Choose .
A screen is displayed, asking you to scan the barcode.
2. Scan the barcode.
A screen is displayed for checking the ID.
3. Choose to confirm.
(If the information is not correct, choose . A screen
is then displayed, asking you to scan the barcode again.
Scan the barcode again.)
The Operator Name screen is displayed.

Roche Diagnostics
Operator’s Manual · Version 1.0 65
cobas b 101 system
6 Choose one of the buttons.
o Choose Operator if the user should be able to perform only the functions required for performing routine testing.
o Choose Administrator if the user should be able to perform all functions.
o Choose Training Mode if the user should be able to perform control tests as part of the instrument setup.
The Add New Operator screen is displayed, which allows you to review the information you entered.
7 Choose if you need to change the information. Otherwise proceed with step 8.
After choosing the Operator ID screen is displayed again. Make the required changes as described in the previous steps.
8 Choose .
The definitions are displayed.
9 If you work with passwords, you are asked to define the password.
o Choose and define the password.
o Choose and enter the identical password again.
The password can contain up to 20 alphanumeric characters.
10 Choose to save the settings and to close the screen.
The Edit Operator List screen is displayed again.
a To change user information
1 Choose Setup > ID Setup > Operator ID > Edit Operator List.
2 Choose an operator from the list.

Roche Diagnostics
66 Operator’s Manual · Version 1.0
cobas b 101 system
3 Choose .
4 Use to delete the characters in the entry box and enter the new information.
5 Choose .
The Operator Name screen is displayed.
6 Use to delete the characters in the entry box.
7 Enter the new information.
8 Choose .
The Authority Level screen is displayed.
9 Choose one of the buttons.
o Choose Operator if the user should be able to perform only the functions required for performing routine testing.
o Choose Administrator if the user should be able to perform all functions.
o Choose Training Mode if the user should be able to perform control tests as part of the instrument setup.
The Change Operator screen is displayed, which allows you to review the information you entered.
10 Choose if you need to change the information. Otherwise proceed with step 11.
After choosing the Operator ID screen is displayed again. Make the required changes as described in the previous steps.
11 Choose to save the settings and to close the screen.
The Edit Operator List screen is displayed again.
If you want to use the barcode scanner to define the ID, choose and read the bar-code.

Roche Diagnostics
Operator’s Manual · Version 1.0 67
cobas b 101 system
a To delete a user
1 Choose Setup > ID Setup > Operator ID > Edit Operator List.
2 Choose the button of the user whose information you want to delete.
3 Choose .
A screen is displayed for confirming the deletion.
4 Choose to delete this set of user information.
The Edit Operator List screen is displayed again.
4.4.8 Change Password
All users can change their own password, users who are members of the Administrator role can also change (reset) the password of other users. The Change Password function is available if you work with password identification. See Password Entry on page 62.
a To change your password
1 Choose Setup > ID Setup > Operator ID > Change Password.
2 Enter the existing password and choose .
3 Enter the new password and choose .
4 Enter the new password again and choose .
Password expiry If you work with password expiry (see Password Expiry on page 62) you must change the password when it has expired.

Roche Diagnostics
68 Operator’s Manual · Version 1.0
cobas b 101 system
a To change your password when it has expired
1 If you log on after your password has expired a screen is displayed to inform you of this fact.
2 Choose .
3 Enter the new password and choose .
4 Enter the new password again and choose .
a To reset a password
1 Choose Setup > ID Setup > Operator ID > Edit Operator List.
2 Choose the user’s button and choose .
3 Choose to confirm the operator ID.
4 Choose to confirm the operator name.
5 Choose to confirm the authority level.
6 Choose to confirm the operator information.
7 Choose to confirm that you want to change the password.
8 Enter the new password and choose .
9 Enter the new password again and choose .

Roche Diagnostics
Operator’s Manual · Version 1.0 69
cobas b 101 system
4.5 Patient ID setup
Use the Patient ID functions to define whether you want to work with demographic patient data, and if so to define such data.
If you choose to work with patient information, a patient ID must be assigned to every result. (Note that if you choose to work without patient information, the instrument still automatically assigns an ID to each result, but no demographic patient data will be associated with it.) Working with patient information enables you to list all results of a certain patient. You can define up to 500 sets of patient information.
The following illustration shows the logical relations between the various definitions and settings.
Figure 14 Patient information in result display

Roche Diagnostics
70 Operator’s Manual · Version 1.0
cobas b 101 system
Figure 15 Logical overview of using the Patient ID functions
Setup > ID Setup > Patient ID
Ready for processing
ID Entry
ID Entry Mode
Length
ID Entry
Barcode
List
Keyboard
Enter no. of characters
No
Option
Required
No
5 Validate
ID Validation
Name
Date of Birth
NoID ValidationNo
Yes
Yes
Yes
4 Work with dates
Enabled
Disabled
Password Entry
Date of Birth Entry
Date of Birth Entry
No
Yes
Name Entry
Name Entry Enabled
DisabledNo
Yes
3 Work with
1Work with patient
No
Edit Patient List6information
2Work with demographic
Enter patient ID
Enter patient name
Enter date of birth

Roche Diagnostics
Operator’s Manual · Version 1.0 71
cobas b 101 system
a To define how patient information should be handled
1 Choose Setup > ID Setup > Patient ID.
o Use ID Entry to define whether and how the IDs should be entered.
e See ID Entry on page 71.
o Use Name Entry to define whether you want to work with patient names. If you don’t, tests and results will be anonymous on the instrument.
e See Name Entry on page 73.
o Use Date of Birth Entry to define whether the date of birth should be added to the patient ID.
e See Date of Birth Entry on page 74.
o Use ID Validation to define whether the IDs should be validated and if so against which values (patient name, date of birth).
e See ID Validation on page 74.
o Use Edit Patient List to define and change patient information such as ID, name, and date of birth.
e See Edit Patient List on page 75.
2 Choose one of the buttons.
4.5.1 ID Entry
Use this function to define whether and how the IDs should be entered.
Each result has a patient ID assigned to it, even if you work without patient information. If you work with patient information, results for the same patient have the same patient ID; if you work without patient information, each result, regardless of whether there are several for the same patient, has its unique ID assigned to it.
a To define that you want to work without patient information
1 Choose Setup > ID Setup > Patient ID > ID Entry.
The ID Entry screen is displayed.
2 Choose No.
3 Choose to save the settings and to close the screen.
o If you choose No, the instrument will automatically assign an ID (running number) to each result.
o The lifespan of the instrument is limited to 12240 patient or control tests. Messages will warn you in time when this limit is approached.

Roche Diagnostics
72 Operator’s Manual · Version 1.0
cobas b 101 system
a To define that you want to work with mandatory patient information
1 Choose Setup > ID Setup > Patient ID > ID Entry.
The ID Entry screen is displayed.
2 Choose Required.
3 Proceed with step 3 in To determine how to define patient information on page 72.
a To define that you want to optionally work with patient information
1 Choose Setup > ID Setup > Patient ID > ID Entry.
The ID Entry screen is displayed.
2 Choose Optional to define that you can define patient information for a test.
3 Proceed with step 3 in To determine how to define patient information on page 72.
a To determine how to define patient information
1 Choose Setup > ID Setup > Patient ID > ID Entry.
The ID Entry screen is displayed.
2 Choose Optional or Required.
3 Choose .
4 Choose ID Entry Mode.
A list is displayed where you can select how patient information can be entered.
5 Choose one of the buttons.
o Choose Keyboard to allow the users to type the patient information using the on-screen keyboard.
o Choose Barcode to allow the users to use the handheld barcode scanner to enter patient IDs.
o Choose List to allow the users to select patient information from the Edit Patient List.
e See Edit Patient List on page 75.
6 Choose to save the settings and to close the screen.
The ID Entry screen is displayed again.
If you choose Keyboard you can additionally select Barcode and vice versa.

Roche Diagnostics
Operator’s Manual · Version 1.0 73
cobas b 101 system
7 Choose Length to define how long a patient ID should be.
8 Use and to increase and decrease the values.
9 Choose to save the settings and to close the screen.
The ID Entry screen is displayed again.
4.5.2 Name Entry
Use this function to define whether you want to work with patient names. If you don’t, tests and results will be anonymous on the instrument, identified by their patient ID only.
a To define that you want to work with patient names
1 Choose Setup > ID Setup > Patient ID > Name Entry.
The Name Entry screen is displayed.
2 Choose Enabled.
3 Choose .
A screen is displayed, informing you that using this function means that the patient data will not be anonymous.
4 Choose to save the settings and to close the screen.
The Patient ID screen is displayed again.
a To define that you do not want to work with patient names
1 Choose Setup > ID Setup > Patient ID > Name Entry.
The Name Entry screen is displayed.
2 Choose Disabled.
3 Choose to save the settings and to close the screen.
The Patient ID screen is displayed again.

Roche Diagnostics
74 Operator’s Manual · Version 1.0
cobas b 101 system
4.5.3 Date of Birth Entry
Use this function to define whether the date of birth should be added to the patient information. (The date of birth is contained in the result printout but not displayed with on-screen results. You can, however, view the full set of patient results from the results display.)
a To define whether to include the date of birth with the patient information
1 Choose Setup > ID Setup > Patient ID > Date of Birth Entry.
The Date of Birth Entry screen is displayed.
2 Choose one of the buttons.
o Choose Disabled if you want to work without date of birth information.
o Choose Enabled if you want to work with date of birth information.
3 Choose to save the settings and to close the screen.
The Patient ID screen is displayed again.
4.5.4 ID Validation
Use this function to define whether patient information should be validated and if so against which of the values defined in the Edit Patient List (patient name, date of birth).
a To define whether patient ID validation should be used
1 Choose Setup > ID Setup > Patient ID > ID Validation.
The ID Validation screen is displayed.
2 Choose one of the buttons.
o Choose No if you want to work without ID validation.
o Choose Name if the patient name should be validated against the name defined in the Edit Patient List.
e See Edit Patient List on page 75.
o Choose Date of Birth if the patient’s date of birth should be validated against the date of birth defined in the Edit Patient List.
e See Edit Patient List on page 75.
3 Choose to save the settings and to close the screen.
The Patient ID screen is displayed again.
If you choose Name you can additionally select Date of Birth and vice versa.

Roche Diagnostics
Operator’s Manual · Version 1.0 75
cobas b 101 system
4.5.5 Edit Patient List
Use this function to define and change patient information such as ID, name, and date of birth. You can define up to 500 sets of patient information.
a To define a new patient
1 Choose Setup > ID Setup > Patient ID > Edit Patient List.
The Edit Patient List screen is displayed. Each currently defined patient is represented by a button.
2 Choose .
3 To define the patient ID, do one of the following:
The following procedures are based on a setup that works with patient ID, patient name, and date of birth information. If you do not work with names or dates of birth, the corre-sponding functions are not available and the screens are not displayed.
Whether the following functions are available depends on how the ID Entry Mode is defined. See To define how patient information should be handled on page 71.
If … Do this
You want to enter the ID
manually
1. Enter the patient ID using the keyboard.
2. Choose .
The Patient Name screen is displayed.

Roche Diagnostics
76 Operator’s Manual · Version 1.0
cobas b 101 system
4 Enter the patient name using the keyboard.
5 Choose .
6 Define the date of birth. Use and to increase and decrease the values.
7 Choose .
8 Review the information.
Choose if you need to change the information. Otherwise proceed with step 9.
When choosing the Patient ID screen is displayed again. Make the required changes as described in the previous steps.
9 Choose to save the settings and to close the screen.
The Edit Patient List screen is displayed again.
You want to use the barcode
scanner
1. Choose .
A screen is displayed, asking you to scan the barcode.
2. Scan the barcode.
A screen is displayed for checking the ID.
3. Choose .
(If the information is not correct, choose . A screen
is then displayed, asking you to scan the barcode again.
Scan the barcode again.)
The Patient Name screen is displayed.
If … Do this

Roche Diagnostics
Operator’s Manual · Version 1.0 77
cobas b 101 system
a To change patient information
1 Choose Setup > ID Setup > Patient ID > Edit Patient List.
2 Choose one of the patient buttons.
3 Choose .
4 To change the patient ID, do one of the following:
5 Enter the patient name using the keyboard.
If … Do this
You want to change the ID
manually
1. Use to delete the current text. Enter the patient ID
using the keyboard.
2. Choose .
The Patient Name screen is displayed.
You want to use the barcode
scanner
1. Choose .
A screen is displayed, asking you to scan the barcode.
2. Scan the barcode.
A screen is displayed for checking the ID.
3. Choose .
(If the information is not correct, choose . A screen
is then displayed, asking you to scan the barcode again.
Scan the barcode again.)
The Patient Name screen is displayed.

Roche Diagnostics
78 Operator’s Manual · Version 1.0
cobas b 101 system
6 Choose .
7 Define the date of birth. Use and to increase and decrease the values.
The Change Patient screen is displayed, which allows you to review the information you entered.
8 Choose if you need to change the information. Otherwise proceed with step 9.
When choosing the Patient ID screen is displayed again. Make the required changes as described in the previous steps.
9 Choose to save the settings and to close the screen.
The Edit Patient List screen is displayed again.
a To delete patient information
1 Choose Setup > ID Setup > Patient ID > Edit Patient List.
2 Choose the button.
3 Choose .
A screen is displayed for confirming the deletion.
4 Choose to delete this set of patient information.
The Edit Patient List screen is displayed again.

Roche Diagnostics
Operator’s Manual · Version 1.0 79
cobas b 101 system
4.6 Control Settings
h Main Menu > Setup > Control Settings.
Use the Control Settings functions to define how control results are displayed and what effect results have that are outside the predefined ranges. You can also define your own result ranges.
Separate QC solutions are used for HbA1c tests and the Lipid Panel, and for each two levels are available (Level 1 and Level 2). You can either test both levels in one procedure or test one of the levels at a later stage.
An optical check disc is used to check the functioning of the optical unit.
Use the Lockout functions to define how frequently control measurements should be performed. If the results are out of date or outside the defined ranges either the current user or the complete instrument is blocked from performing patient tests until a valid control result is available.
o Use the Operator Lockout function to define after what period of time new QC tests must be performed by a specific operator to be able to perform routine patient tests.
e See Operator Lockout on page 80.
o Use the QC Lockout functions to define after what period of time control results are no longer valid and whether QC tests must be performed when you use a test disc of a new lot. If one of the latest control results is no longer valid, patient test processing is blocked on the instrument until the respective QC test has been performed successfully.
e See QC Lockout on page 81.
o Use the Optical Check Lockout functions to define whether you want the instru-ment to check the expiry of optical check control results and if so how frequently.
e See Optical Check Lockout on page 82.
o Use the STAT Test function to define whether you want to work with STAT tests and if so how many of them can be performed. (You typically use this function when testing is blocked due to no longer valid control results and there is no time to first perform the necessary control tests.)
e See STAT Test on page 83.
o Use the QC Result Format functions to define how the control results are displayed (result values, target value deviation) and whether the target value should be displayed with the results.
e See QC Result Format on page 84.
Figure 16 Control Settings screen
If a control test failed, no patient tests can be performed until the control test is suc-cessfully completed.

Roche Diagnostics
80 Operator’s Manual · Version 1.0
cobas b 101 system
o Use the QC Range function to define whether you want to work with the result ranges as defined by the manufacturer of the controls or whether you want to define your own ranges, if the latter is the case you can also define these ranges here.
e See QC Range on page 85.
4.6.1 Operator Lockout
Use this function to define after what period of time new QC tests must be performed by a specific operator to be able to perform routine patient tests.
a To define how often an operator must perform QC tests
1 Choose Setup > Control Settings > Operator Lockout.
2 Choose one of the buttons.
o Choose No if you do not want the instrument to check the expiry of control results.
o Choose Weekly if you want the control results to be valid for one week.
o Choose Monthly if you want the control results to be valid for one month.
o Choose Every X Months if you want the control results to be valid for a specific number of months.
If you choose this option choose and a screen for entering the number of months is displayed.
Define an interval between 1 and 12 months. Use and to increase and decrease the values.
3 Choose to save the settings and to close the screen.
The Control Settings screen is displayed again.

Roche Diagnostics
Operator’s Manual · Version 1.0 81
cobas b 101 system
4.6.2 QC Lockout
Use this function to define after what period of time control results are no longer valid and whether QC tests must be performed when you use a test disc of a new lot. If one of the latest control results is no longer valid, patient test processing is blocked on the instrument until the respective QC test has been performed successfully.
a To define how often QC tests should be performed
1 Choose Setup > Control Settings > QC Lockout.
The QC Lockout screen is displayed.
2 Choose Interval.
A screen is displayed for defining the period of time after which new QC tests should be performed.
3 Choose one of the buttons.
o Choose No if you do not want the instrument to check the expiry of control results.
o Choose Daily if you want the control results to be valid for one day.
o Choose Weekly if you want the control results to be valid for one week.
o Choose Monthly if you want the control results to be valid for one month.
o Choose Every X days if you want the control results to be valid for a specific number of days.
If you choose this option choose and a screen for entering the number of days is displayed.
Define an interval between 1 and 60 days. Use and to increase and decrease the values.
4 Choose to save the settings and to close the screen.
The Control Settings screen is displayed again.
a To define whether QC tests should be performed when using a test disc of a new lot
1 Choose Setup > Control Settings > QC Lockout.
The QC Lockout screen is displayed.
2 Choose New Lot.
The QC Lockout New Lot screen is displayed.
3 Choose either HbA1c or Lipid.

Roche Diagnostics
82 Operator’s Manual · Version 1.0
cobas b 101 system
4 Choose one of the buttons.
Choose Disabled if you do not want that a QC test must be performed when using a disc of a new lot.
Choose Enabled if you want that a QC test must be performed when using a disc of a new lot.
5 Choose to save the settings and to close the screen.
The QC Lockout New Lot screen is displayed again.
4.6.3 Optical Check Lockout
Use this function to define whether you want the instrument to check the expiry of optical check results and if so how frequently.
a To define how to use optical check control results
1 Choose Setup > Control Settings > Optical Check Lockout.
2 Choose one of the buttons.
o Choose No if you do not want the instrument to check the expiry of optical check results.
o Choose Daily if you want the optical check results to be valid for one day.
o Choose Weekly if you want the optical check results to be valid for one week.
o Choose Monthly if you want the optical check results to be valid for one month.
o Choose Every X Months if you want the optical check results to be valid for a specific number of months.
If you choose this option choose and a screen for entering the number of months is displayed.
Define an interval between 1 and 12 months. Use and to increase and decrease the values.

Roche Diagnostics
Operator’s Manual · Version 1.0 83
cobas b 101 system
3 Choose to save the settings and to close the screen.
The Control Settings screen is displayed again.
4.6.4 STAT Test
STAT (short turn around time) tests are tests that are performed in situations of operator or QC lockout, i.e. when QC results are not or no longer valid and there is no time to perform the necessary control tests first.
Use this function to define whether you want to work with STAT tests and if so how many of them can be performed.
a To define how to use STAT tests
1 Choose Setup > Control Settings > STAT Test.
2 Choose one of the buttons.
o Choose Disabled if you do not want to use STAT tests.
o Choose Enabled if you want to allow STAT tests.
If you choose this option choose and a screen is displayed for entering the number of STAT tests you want to be able to perform, even if patient testing is blocked.
Define a value between 1 and 9. Use and to increase and decrease the values.
WARNING
Incorrect results due to expired quality control results
Quality control measures are performed to ensure that the instrument and your technique used in testing give accurate results of patient tests.
Performing patient tests when the current control test results are not or no longer valid may lead to incorrect patient results.
o Do not perform patient tests with invalid quality control except in emergencies.
o Always perform control tests as soon as they are due.
In the following situations STAT tests are not available:
o When the optical check test has failed neither HbA1c nor lipid patient tests are available.
o When the HbA1c QC test has failed, HbA1c STAT tests are not available.
o When the Lipid QC test has failed, lipid STAT tests are not available.
With each test that is performed, the counter is decreased by one, regardless who is logged on as operator.

Roche Diagnostics
84 Operator’s Manual · Version 1.0
cobas b 101 system
3 Choose to save the settings and to close the screen.
The Control Settings screen is displayed again.
4.6.5 QC Result Format
Use this function to define how the control results are displayed (result values, target value deviation) and whether the target values should be displayed with the results.
a To define how control results should be displayed
1 Choose Setup > Control Settings > QC Result Format.
2 Choose a button from the list.
o Choose Physical Value if you want the results to show the actually measured value and the defined range.
o Choose Physical and Target Value if you want the results to include the actually measured value, the target value, and the defined range.
o Choose Target Value Deviation if you want the results to show the deviation (percentage) from the target values and the allowed range (percentage).
3 Choose to save the settings and to close the screen.
The QC Result Format screen is displayed again.
The Pass or Fail information is always displayed, even if you do not choose any of the buttons.

Roche Diagnostics
Operator’s Manual · Version 1.0 85
cobas b 101 system
4.6.6 QC Range
Use this function to define whether you want to work with the result ranges as defined by the manufacturer of the controls (Default Range) or whether you want to define your own ranges (Custom Range), if the latter is the case you can also define these ranges here.
a To define the range for HbA1c tests
1 Choose Setup > Control Settings > QC Range.
A screen is displayed for choosing the test type.
2 Choose HbA1c.
3 Define whether to work with the manufacturer’s ranges or with your own.
o If you want to work with the result ranges as defined by the manufacturer of the controls, chose Default Range and then .
A screen for selecting the test is displayed.
Choose a test and continue with step 4.
or
o If you want to adjust the ranges, chose Custom Range and then .
A screen for selecting a test is displayed.
Choose a test and then .
Define the deviation using and to increase and decrease the percentage.
4 Choose to save the settings and to close the screen.
The QC Range screen is displayed again.
You can only change the ranges within the limits defined in the respective QC info disc.

Roche Diagnostics
86 Operator’s Manual · Version 1.0
cobas b 101 system
a To define the range for lipid tests
1 Choose Setup > Control Settings > QC Range.
A screen is displayed for choosing the test type.
2 Choose Lipid.
3 Define whether to work with the manufacturer’s ranges or with your own.
o Choose Default Range to define that you want to work with the result ranges as defined by the manufacturer of the controls.
Continue with step 4.
or
o Choose Custom Range to adjust the ranges.
Choose .
Adjust the deviations using and to increase and decrease the percentages.
4 Choose to save the settings and to close the screen.
The QC Range screen is displayed again.

Roche Diagnostics
Operator’s Manual · Version 1.0 87
cobas b 101 system
4.7 Screen setup
h Main Menu > Setup > Screen.
Use and to display buttons that cannot currently be seen.
The following buttons are available:
o Use Contrast to adjust the display to your ambient light condition to make it easier to read.
o Use Language to set of language you want to work in.
o Use Date/Time to define the formats in which date and time are displayed and to set the current date and time.
o Use Facility Information to record any information about your institution (practice, laboratory etc.) that you want to be displayed with the result printouts.
o Use Touch Screen Calibration to make sure that choosing a button on screen actually initiates the function associated with this button.
4.7.1 Adjusting the screen contrast
Use this function to adjust the display to your ambient light conditions to make it easier to read.
a To adjust the contrast
1 Choose Setup > Screen > Contrast.
2 Use and to increase and decrease the contrast respectively. There are five levels available.
3 Choose to confirm the change and to close the screen.
Figure 17 Screen Setup screen

Roche Diagnostics
88 Operator’s Manual · Version 1.0
cobas b 101 system
4.7.2 Choosing the language
The instrument is delivered with a set of languages, you can work with any of these. Additional languages may be available from Roche, you can use these as soon as you have installed them on the instrument. (See Language Update on page 55.)
a To choose the language
1 Choose Setup > Screen > Language.
The Language screen is displayed.
The language name is displayed in its native spelling.
2 Choose the button that displays the language you want to use.
Use and to display buttons that cannot currently be seen.
3 Choose to confirm the change and to close the screen.
4.7.3 Setting the date
To set the current date you first choose the format in which the date should be displayed, then you set the date.
a To select the date format
1 Choose Setup > Screen > Date/Time > Date Format.
The Date Format screen is displayed.
Example for the DD.MM.YYYY format: 01.12.2012 (1 December 2012).
Example for the MM/DD/YYYY format: 12/01/2012 (1 December 2012).
Example for the YYYY-MM-DD format: 2012-12-01 (1 December 2012).
When you switch on the instrument for the first time, the screens for defining the date format and the date itself are automatically displayed. You need to define both.
You can change these settings later.

Roche Diagnostics
Operator’s Manual · Version 1.0 89
cobas b 101 system
2 Choose the format you want to use.
3 Choose to confirm the change and to close the screen.
a To define the date
1 Choose Setup > Screen > Date/Time > Date.
2 Use and to increase and decrease the values.
3 Choose to confirm the change and to close the screen.
4.7.4 Setting the time
To set the current time you first choose the format in which the time should be displayed, then you set the time.
a To select the time format
1 Choose Setup > Screen > Date/Time > Time Format.
Example for the 12h format: 01:30 pm.
Example for the 24h format: 13:30.
2 Choose the format you want to use.
3 Choose to confirm the change and to close the screen.
When you switch on the instrument for the first time, the screens for defining the time format and the time itself are automatically displayed. You need to define both.
You can change these settings later.

Roche Diagnostics
90 Operator’s Manual · Version 1.0
cobas b 101 system
a To define the time
1 Choose Setup > Screen > Date/Time > Time.
2 Use and to increase and decrease the values. For the 12 hour format, make sure to choose AM or PM correctly.
3 Choose to confirm the change and to close the screen.
4.7.5 Writing facility information
Use this function to record any information about your facility (practice, laboratory etc.) that you want to have displayed with the result printouts. You can enter up to 60 characters.
a To enter facility information
1 Choose Setup > Screen > Facility Information.
2 Use the keyboard to enter the information. Use the button to switch to the numeric keyboard for entering numbers. Use the button to return to the alphabetic keyboard. Use to delete the last character in the data entry box.
3 Choose to save the text and to close the screen.

Roche Diagnostics
Operator’s Manual · Version 1.0 91
cobas b 101 system
4.7.6 Calibrating the touch screen
Use this function to make sure that choosing a button on screen actually initiates the function associated with this button.
a To calibrate the touch screen
1 Choose Setup > Screen > Touch Screen Calibration.
The first screen of the calibration wizard is displayed.
2 Follow the instructions on screen.
You are asked to confirm completion of the calibration.
3 Choose to confirm completion, save the settings, and to close the screen.
When you switch on the instrument for the first time, the screens for calibrating the touch screen are automatically displayed.
When touching the point, make sure to touch it exactly in the center of the target sym-bol.

Roche Diagnostics
92 Operator’s Manual · Version 1.0
cobas b 101 system

Roche Diagnostics
Operator’s Manual · Version 1.0 93
cobas b 101 system
5 Testing samples
5.1 What you need
m cobas b 101 system.
m cobas HbA1c Test or cobas Lipid Panel disc.
m Single-use only disposable blood lancets, e.g. Accu-Chek Safe-T-Pro Plus.
m Pipette or capillary tube with plunger if you take sample from a blood collection tube.
For HbA1c tests use pipettes with a pipetting volume of at least 2.0 μL, for lipid tests with a volume of at least 19.0 μL.
m External printer (if you want to print the results).
m Handheld barcode scanner (if you want to read operator or patient information from barcodes).
m Powder-free gloves.
m Cotton balls and alcohol wipes.
5.2 Important notes regarding blood testing
5.2.1 Always …
Make sure the following conditions are met before and during performing tests:
o The ambient temperature must be between +15ºC and +32ºC (59 to 90ºF).
Do not operate an air conditioning system near the instrument.
Do not place the instrument near another heat emitting device.
o The ambient relative humidity must be between 10% and 85% non condensing.
Do not operate a humidifier or dehumidifier near the instrument.
o The ambient environment must not contain high levels of dust.
o The instrument must be placed on a level (maximum 3 degrees incline), stable surface (table).
o Do not knock or move the instrument during processing.
o For correct handling of test discs, follow the information contained in the package insert.
WARNING
Protection against infection
There is a potential risk of infection. Operators of the cobas b 101 system must be aware that any object coming into contact with human blood is a potential source of infection.
o Use gloves.
o Use single-use only disposable blood lancets.
o Dispose of used lancets in a sturdy sharps container with lid.
o Dispose of used test discs according to your facility’s infection control policy.
o Follow all health and safety regulations in force locally.

Roche Diagnostics
94 Operator’s Manual · Version 1.0
cobas b 101 system
o If the test discs are stored in a refrigerator, they must be kept—in their sealed foil pouch—at an ambient temperature between +15 °C and +32 °C (59 °F and 90 °F)) for at least 20 minutes before being used for performing tests.
o Apply blood to the disc immediately after lancing.
o Use a disc within 20 minutes of opening its pouch.
o The turntable, its surroundings, and the touch screen must be clean.
5.2.2 Never …
Observe the following precautions:
o Do not disconnect the power supply or switch off the instrument while the instrument is processing.
o Do not disconnect the printer, computer, or BUH while the instrument is processing a test or performing other activities such as printing or transferring data.
o Do not take blood from a patient who has wet hands (residues of water, sweat, hand cream, alcohol).
5.3 Preparing the instrument
5.3.1 Starting the instrument
a To start the instrument
1 Switch on the instrument.
The instrument automatically performs self-tests and warm-up.
When they are successfully completed the Main Menu is displayed.
CAUTION
Accuracy and precision of measured results
Failure to comply with the above precautions may lead to inaccurate results, which in turn may influence the result interpretation by the health care professional.
If an error message is displayed, note its ID and refer to section Error messages on page 159.

Roche Diagnostics
Operator’s Manual · Version 1.0 95
cobas b 101 system
5.3.2 User identification
The instrument can be set up so that users must log on (enter identification information) before they can use the instrument. This is done to restrict access to the instrument.
The following identification functions are available:
o Operator ID
e See Edit Operator List on page 64.
o Operator name
e See Edit Operator List on page 64.
o User role (authority)
e See Edit Operator List on page 64.
o Password
e See Password Entry on page 62 and Password Expiry on page 62.
a To log on
1 You are automatically presented with the appropriate logon screens as soon as you choose one of the buttons. Which ones they are and which information you need to supply depends on the instrument setup.
2 Enter the logon information as requested.
Which screen is displayed now depends on which button you chose at the beginning.

Roche Diagnostics
96 Operator’s Manual · Version 1.0
cobas b 101 system
5.4 Preparing the sample
5.4.1 Getting a good capillary blood sample
To get a suitable drop of blood:
o Use single-use only disposable blood lancets.
o Warm the hand. Have the patient hold it under his or her arm or use a hand warmer.
o Wash your hands with soap to remove fatty substances. Warm water helps to stimulate the blood flow. Rinse the fingers extensively to remove all traces of soap. Dry your hands.
(Hand cream and soap might contain substances such as glycerides, glycerol and ethylene glycol, which can result in false high triglyceride results.)
o Have the patient let that arm hang down by his or her side before lancing a finger.
o Choose an area on the side of the middle or ring finger of either hand and disinfect it with an alcohol wipe (i.e. 70% Isopropanol or Ethanol, emollient free!) and dry with a clean swab or paper tissue.
o Immediately after lancing, skim the finger smoothly from the palm's end towards 1 cm before the puncture site several times to obtain a good drop of blood. Wipe off this first drop of blood, as it may contain tissue fluid, then obtain another drop of blood in the same way.
o Immediately apply the drop of blood directly to the suction point of the test disc.
o Wipe the puncture site with a clean swab or paper tissue. If bleeding continues, slightly press on the puncture site and cover it with a protective plaster.
e For details on obtaining a blood sample, see To use a fingerstick on page 111.
e For an overview of performing a test, see Short guide on page 97.
5.4.2 Getting a good result from venous blood or plasma samples
Instead of performing a test with capillary blood you can use venous whole blood or plasma sample.
CAUTION
When washing or disinfecting the patient's finger, allow it to dry thoroughly. Residues of water or disinfectant on the skin can dilute the drop of blood and so produce false results. Residues of hand cream on skin influence the triglyceride results.
Always use venous blood and plasma with anticoagulant as stated in the respective method sheet of the test.
CAUTION
Incorrect results due to using inappropriate anticoagulants
Using inappropriate anticoagulants may interfere with the reagents and lead to incorrect results.
o Only use anticoagulants or other additives that are stated in the method sheet of the respective test.

Roche Diagnostics
Operator’s Manual · Version 1.0 97
cobas b 101 system
5.5 Performing patient tests
The following procedures depend on whether you work with or without operator IDs.
e For information on the effect of the various operator ID definitions, see Figure 13 on
page 57.
e For information on the effect of the various patient ID definitions, see Figure 15 on
page 70.
e For a detailed procedure when working without operator and patient information, see
Performing a test (no operator and patient information, single testing) on page 116.
e For a detailed procedure when working with operator and patient information, see
Performing the tests (with operator and patient information, dual testing) on page 118.
5.5.1 Short guide
The following table provides an overview of how to perform a single mode patient test with capillary blood.
e For details on individual steps, see the subsequent sections.
CAUTION
Keep the lid closed and in place while the instrument is operating.
Only open the lid when instructed to do so or when the instrument is switched off.
CAUTION
Incorrect results due to wrong liquid
Make sure you use patient sample and not control solution.
NOTICE Wear powder-free gloves while operating the cobas b 101 system instrument. (Powder may adversely affect the optical unit in the instrument or the disc.)
Due to the possible difference between the internal clock and local time (time zones), the actual disc expiry dates can vary to beyond the date printed on the pouch.
Step Task Procedure, comment
1 Precondition the discs. 1. Discs must have a temperature between
+15 °C and +32 °C (59 °F and 90 °F) when
being used. If you store them in a
refrigerator, remove them from the
refrigerator at least 20 minutes before you
want to use them.
Table 12 Short guide for performing a single mode patient test (capillary blood)
15 to 32ºC
(59 to 90ºF)
20 min

Roche Diagnostics
98 Operator’s Manual · Version 1.0
cobas b 101 system
2 Start the test on the
instrument.
1. Choose Main Menu > Patient Test.
2. If you are asked to provide an operator ID
and possibly a password, enter them.
3. If you are asked to provide patient
information (e.g. a patient ID), enter it.
When the instrument is ready to perform
the test you are asked to prepare the disc
and to open the lid.
e For details on using operator
information, see Using operator
information on page 102.
For details on using patient information,
see Using patient information on
page 106.
3 Prepare the disc. 1. Tear open the pouch at the notch on the
edge of the foil pouch. Make sure to open
the whole length of the pouch so the disc
can easily be removed.
4 Remove the disc from the
pouch and open it.
1. Remove the disc from its pouch and place
it on a clean surface.
Make sure not to touch the suction point
and the transparent surfaces.
Step Task Procedure, comment
Table 12 Short guide for performing a single mode patient test (capillary blood) (Continued)

Roche Diagnostics
Operator’s Manual · Version 1.0 99
cobas b 101 system
5 Apply a fingerstick and
transfer the capillary blood to
the disc
1. Wash the hands with soap. Rinse the
fingers extensively, then dry them
thoroughly.
2. Choose an area on the side of the middle
or ring finger of either hand
3. Clean the chosen area with an alcohol
wipe (i.e. 70% Isopropanol or Ethanol,
emollient free!), then dry it with a clean
swab or paper tissue.
4. Firmly prick the chosen area with a
lancet.
5. Skim the finger smoothly from the palm's
end up to 1 cm before the puncture site
several times to obtain a large drop of
blood. Wipe off this first drop of blood, as
it may contain tissue fluid. Squeeze the
finger gently again until a second large
drop of blood forms.
6. With the imprinted side of the disc facing
upwards, position the disc’s suction point
above the drop of blood.
7. Apply blood and observe that it has filled
the marked area. Check the sample
volume: turn the disc on its backside. The
area marked in blue has to be filled
completely with blood.
8. Press the hinge cover down firmly to
close the disc.
9. Ensure that the disc is free from blood
outside the sample application zone and
the hinge cover.
10. Wipe the puncture site with a clean swab
or paper tissue. If bleeding continues,
slightly press on the puncture site and
cover it with a protective plaster.
6 Insert the disc in the
instrument
1. Open the lid of the instrument.
2. Place the disc on the turntable.
Make sure to have the imprinted side up
and not to touch the transparent surfaces.
3. Close the lid.
The instrument automatically starts
processing the test.
Step Task Procedure, comment
Table 12 Short guide for performing a single mode patient test (capillary blood) (Continued)

Roche Diagnostics
100 Operator’s Manual · Version 1.0
cobas b 101 system
7 Review the results When the test is complete, the results are
displayed on screen.
The possible actions that follow depend on
the instrument setup.
e For details on reviewing patient results,
see Reviewing patient results on page 138.
Enter a comment
1. Choose .
2. Choose one of the predefined comment
buttons or define a new one.
3. Choose to accept the comment.
e For details on defining comments, see
Adding comments to results on page 120
4. Choose to accept the result.
Exceptional situations If the result is outside a range a message is
displayed.
When you confirm this message, the result
screen is displayed.
[Hi] The result in the chosen measuring unit is
above the accepted range.
[Lo] The result in the chosen measuring unit is
below the accepted range.
The result is above the user defined range.
The result is below the user defined range.
8 Print the results If your instrument is connected to an external
printer you can now print the results.
1. Choose .
The result is printed using a predefined
layout. You cannot alter this.
Step Task Procedure, comment
Table 12 Short guide for performing a single mode patient test (capillary blood) (Continued)

Roche Diagnostics
Operator’s Manual · Version 1.0 101
cobas b 101 system
9 Remove the disc from the
instrument and dispose of it
1. Choose Open.
2. Remove the disc and dispose of it in
accordance with the regulations that
apply to your facility.
3. Close the lid.
Step Task Procedure, comment
Table 12 Short guide for performing a single mode patient test (capillary blood) (Continued)

Roche Diagnostics
102 Operator’s Manual · Version 1.0
cobas b 101 system
5.5.2 Single testing vs. dual testing
The instrument offers two testing modes: single and dual testing. Single testing allows measuring one disc at a time, either the HbA1c or the Lipid disc. Dual testing allows measuring an HbA1c and a Lipid disc immediately following each other with all results displaying after the second test.
e For details on setting up the test mode, see Dual Test on page 42.
5.5.3 Using operator information
Test procedures depend on whether your instrument is configured to work with or without operator and patient information, and also on the test mode (single or dual testing).
e For details on defining operator information, see ID setup on page 56 ff.
Working with operator information has the following purpose:
o Each test result is identified by the ID and name of the operator who has performed the test. This may be a legal requirement for result archiving purposes.
o You can limit instrument access to specifically trained persons.
o You can specify certain users for setup and maintenance of the instrument.
For the operator, the main consequence of working with user information is the fact that they have to identify themselves (enter the operator ID and possibly password) before they can use the instrument.
The instrument offers several ways of entering your operator information:
o You can use the on-screen keyboard for entering all information (ID, password).
e See To enter your operator information using the barcode scanner on page 104.
Single testing Dual testing
1 Prepare the disc.
2 Apply a fingerstick.
3 o Transfer the sample to the disc. o Transfer the sample first to the Lipid
then to the HbA1c disc.
o Insert the disc in the instrument and
close the lid.
o Insert the HbA1c disc in the
instrument immediately after applying
sample and close the lid.
The instrument starts testing
automatically.
o When the test is complete, remove the
HbA1c disc and insert the Lipid disc.
The instrument starts testing
automatically.
The instrument starts testing
automatically.
4 Review and print the results.
5 Remove the disc.
Table 13 Single vs. dual testing
o Testing of discs must start immediately after applying the sample.
o In the case of dual testing, testing of the Lipid disc must start as soon as the HbA1c test is complete.

Roche Diagnostics
Operator’s Manual · Version 1.0 103
cobas b 101 system
o You can use the handheld barcode scanner to enter your operator ID.
This function speeds up information entry and prevents input errors. It is particularly suitable for environments where barcodes are generally used, e.g. on patient records.
e See To enter your operator information using either the keyboard or the scanner on
page 105.
o You can use a list of predefined users (Edit Operator List) to enter your operator ID and name.
This function is designed to make the ID entry easy.
e See To enter your operator information using the operator list on page 105.
a To enter your operator information using the keyboard
1 On the Main Menu, choose any button.
A screen for entering your operator ID is displayed.
2 Enter your operator ID.
Use to display the numeric keyboard and to display the alphabetic keyboard.
3 Choose .
A screen is displayed for entering your password.
4 Enter your password.
Choose .
Which screen is displayed now depends on the button you chose in step 1.
5 You can now proceed to work with the instrument.
For security reasons, passwords can only be entered using the keyboard.
The following procedure is based on the assumption that you work with operator IDs and passwords. If you do not work with passwords, the respective screens are not displayed.

Roche Diagnostics
104 Operator’s Manual · Version 1.0
cobas b 101 system
a To enter your operator information using the barcode scanner
1 On the Main Menu, choose any button.
A screen for entering your operator ID is displayed.
2 Scan your operator ID.
A screen is displayed that shows the ID.
3 Check the ID and choose .
If the information is not correct, choose , and you can scan it again. If the information is still not correct, see Troubleshooting on page 155.
A screen for entering your password is displayed.
4 Enter your password.
Choose .
Which screen is displayed now depends on the button you chose in step 1.
5 You can now proceed to work with the instrument.
The following procedure is based on the assumption that you work with operator IDs and passwords. If you do not work with passwords, the respective screens would not be dis-played.

Roche Diagnostics
Operator’s Manual · Version 1.0 105
cobas b 101 system
a To enter your operator information using either the keyboard or the scanner
1 On the Main Menu, choose any button.
A screen is displayed asking you to scan the barcode.
2 Do one of the following:
o Scan the barcode using the handheld barcode scanner.
e See To enter your operator information using the barcode scanner on page 104.
o Choose and enter the ID using the keyboard.
e See To enter your operator information using the keyboard on page 103.
a To enter your operator information using the operator list
1 On the Main Menu, choose any button.
A list is displayed for selecting your operator ID.
Use and to display your button if you cannot see it.
2 Choose the button that contains your operator ID.
A screen is displayed for entering your password.
3 Enter your password.
Choose .
Which screen is displayed now depends on the button you chose in step 1.
4 You can now proceed to work with the instrument.
The following procedure is based on the assumption that you work with operator IDs and passwords and that a barcode scanner is connected the instrument. If you do not work with passwords, the respective screens are not displayed.
o The following procedure is based on the assumption that you work with operator IDs and passwords. If you do not work with passwords, the respective screens are not dis-played.
o To be able to use the operator list at least one operator must be defined.
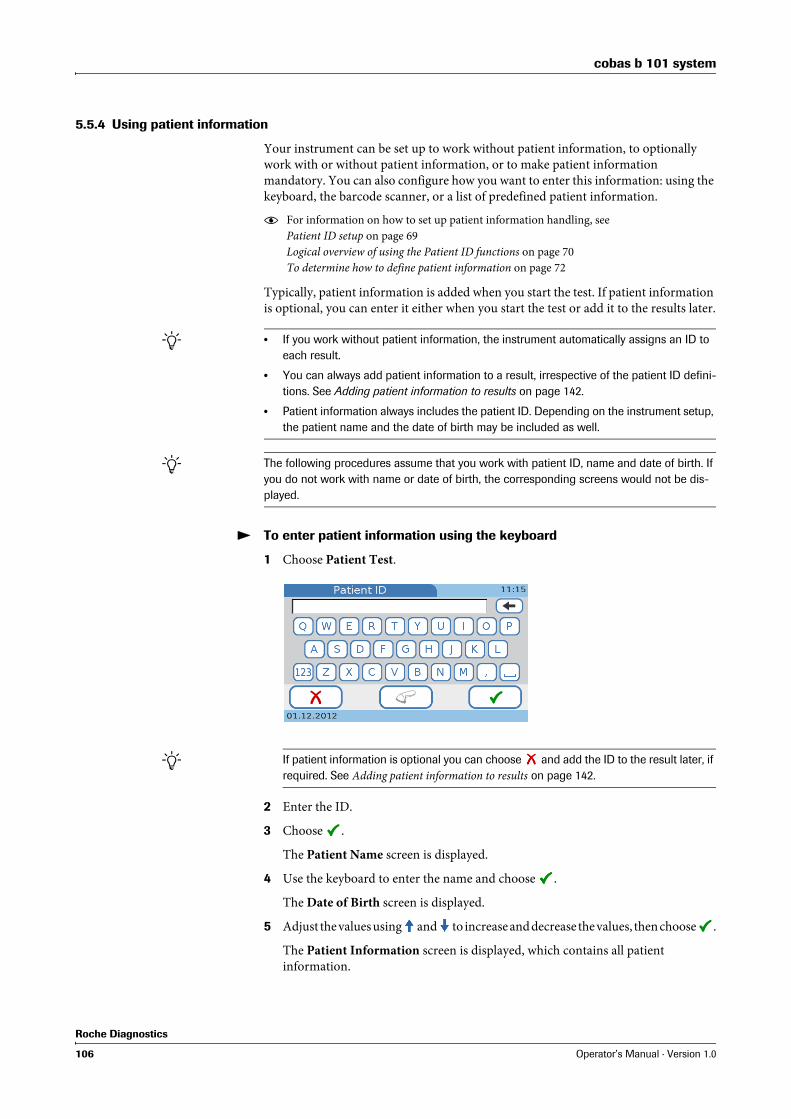
Roche Diagnostics
106 Operator’s Manual · Version 1.0
cobas b 101 system
5.5.4 Using patient information
Your instrument can be set up to work without patient information, to optionally work with or without patient information, or to make patient information mandatory. You can also configure how you want to enter this information: using the keyboard, the barcode scanner, or a list of predefined patient information.
e For information on how to set up patient information handling, see
Patient ID setup on page 69
Logical overview of using the Patient ID functions on page 70
To determine how to define patient information on page 72
Typically, patient information is added when you start the test. If patient information is optional, you can enter it either when you start the test or add it to the results later.
a To enter patient information using the keyboard
1 Choose Patient Test.
2 Enter the ID.
3 Choose .
The Patient Name screen is displayed.
4 Use the keyboard to enter the name and choose .
The Date of Birth screen is displayed.
5 Adjust the values using and to increase and decrease the values, then choose .
The Patient Information screen is displayed, which contains all patient information.
o If you work without patient information, the instrument automatically assigns an ID to each result.
o You can always add patient information to a result, irrespective of the patient ID defini-tions. See Adding patient information to results on page 142.
o Patient information always includes the patient ID. Depending on the instrument setup, the patient name and the date of birth may be included as well.
The following procedures assume that you work with patient ID, name and date of birth. If you do not work with name or date of birth, the corresponding screens would not be dis-played.
If patient information is optional you can choose and add the ID to the result later, if required. See Adding patient information to results on page 142.

Roche Diagnostics
Operator’s Manual · Version 1.0 107
cobas b 101 system
6 Choose if you need to change the information. Otherwise proceed with the next step.
When choosing the Patient ID screen is displayed again. Make the required changes as described in the previous steps.
7 Choose to save the settings and to close the screen.
The patient information will be contained in result screen.
8 Continue with the test.
a To enter patient information using the barcode scanner
1 Choose Patient Test.
2 Scan the patient barcode.
The Patient Name screen is displayed.
3 Use the keyboard to enter the name.
4 Choose .
The Date of Birth screen is displayed.
5 Adjust the values using and to increase and decrease the values.
6 Choose .
The Patient Information screen is displayed, which contains all patient information.
7 Choose if you need to change the information. Otherwise proceed with the next step.
When choosing the Patient ID screen is displayed again. Choose , scan the patient barcode and make the required changes as described in the previous steps.
8 Choose to save the settings and to close the screen.
The patient information will be contained in result screen.
9 Continue with the test.
If patient information is optional you can choose and add it to the result later, if required. See Adding patient information to results on page 142.
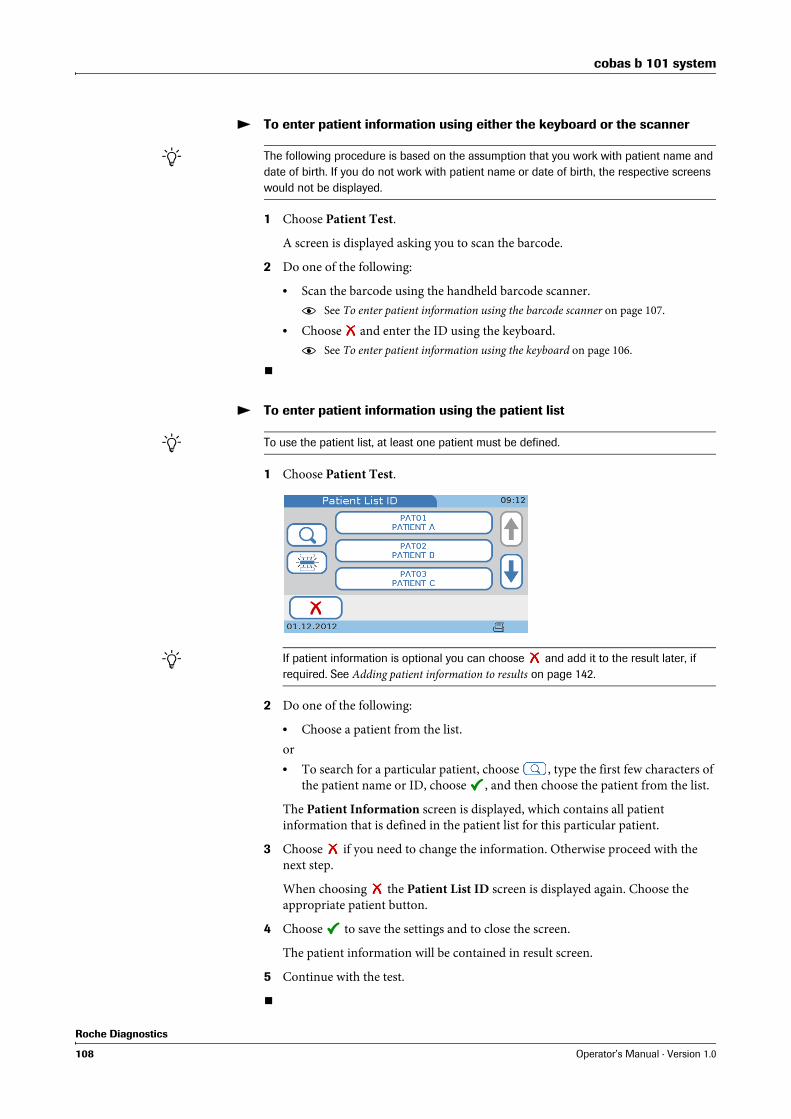
Roche Diagnostics
108 Operator’s Manual · Version 1.0
cobas b 101 system
a To enter patient information using either the keyboard or the scanner
1 Choose Patient Test.
A screen is displayed asking you to scan the barcode.
2 Do one of the following:
o Scan the barcode using the handheld barcode scanner.
e See To enter patient information using the barcode scanner on page 107.
o Choose and enter the ID using the keyboard.
e See To enter patient information using the keyboard on page 106.
a To enter patient information using the patient list
1 Choose Patient Test.
2 Do one of the following:
o Choose a patient from the list.
or
o To search for a particular patient, choose , type the first few characters of the patient name or ID, choose , and then choose the patient from the list.
The Patient Information screen is displayed, which contains all patient information that is defined in the patient list for this particular patient.
3 Choose if you need to change the information. Otherwise proceed with the next step.
When choosing the Patient List ID screen is displayed again. Choose the appropriate patient button.
4 Choose to save the settings and to close the screen.
The patient information will be contained in result screen.
5 Continue with the test.
The following procedure is based on the assumption that you work with patient name and date of birth. If you do not work with patient name or date of birth, the respective screens would not be displayed.
To use the patient list, at least one patient must be defined.
If patient information is optional you can choose and add it to the result later, if required. See Adding patient information to results on page 142.

Roche Diagnostics
Operator’s Manual · Version 1.0 109
cobas b 101 system
5.5.5 If the control results are no longer valid
If your instrument is configured to check the validity of control results (see Operator Lockout on page 80 and QC Lockout on page 81) you may not be able to perform patient tests.
You can see this on the Main Menu:
If you choose Patient Test, a message will inform you that you cannot proceed.
e See Operator and QC lockout (the control results are no longer valid) on page 156.
5.5.6 Preparing a disc
a To prepare a disc
1 Take a disc that has been stored at an ambient temperature between +15 °C and +32 °C (59 °F and 90 °F) for at least 20 minutes.
The type of disc (HbA1c, Lipid) is indicated on the foil (A).
Figure 18 Main Menu with locked Patient Test function
o If the test discs are stored in a refrigerator, they must be kept—in their sealed foil pouch—at an ambient temperature between +15 °C and +32 °C (59 °F and 90 °F) for at least 20 minutes before being used for performing tests.
o Do not open the foil pouch during this warming up period.
o Do not affix any labels to the disc, this may interfere with testing mechanisms.
o Do not try to disassemble the disc.
A
B

Roche Diagnostics
110 Operator’s Manual · Version 1.0
cobas b 101 system
2 Inspect the unopened foil pouch for tears and punctures.
3 Tear open the pouch at the notch on the edge of the foil pouch (B).
4 Remove the test disc from the pouch holding the hinge cover of the disc with thumb and forefinger or thumb and middle finger.
5 Open the hinge cover.
Hold the hinge cover with two fingers at the position of the arrow (A) and open the hinge cover to the maximum opening angle. You experience a click when it is properly opened.
Do not use a disc from a damaged pouch.
o Make sure not to touch the transparent surfaces of the test disc. Roche recom-mends to always place the disc in a pouch when it is not currently being used, even for small periods of time and also after it has been used.
o Make sure to place the disc on a clean surface only.
o If you drop the unpacked disc, do not use it, dispose of it and use a new disc.
o Do not place the disc in direct sunlight. For details, see its package insert.
o You must use the disc within 20 minutes after opening the pouch. For details, see its package insert.
A
C
B

Roche Diagnostics
Operator’s Manual · Version 1.0 111
cobas b 101 system
5.5.7 Using a fingerstick
This task is only required if you test capillary blood.
a To use a fingerstick
1 Warm the hand. Have the patient hold it under his or her arm or use a hand warmer.
2 Wash the hand with soap to remove fatty substances. Warm water helps to stimulate the blood flow. Rinse the fingers extensively to remove all traces of soap. Dry the hand.
(Hand cream and soap might contain substances such as glycerides, glycerol and ethylene glycol, which can result in false high triglyceride results.)
3 Choose an area on the side of the middle or ring finger of either hand.
Generally, the middle or ring finger are chosen because they tend to bleed the best and are less sensitive to pain than other fingers. The index finger may have increased sensitivity to pain. Therefore, avoid using it when possible.
o Do not open the hinge cover to more than the maximum opening angle by applying excess force, and do not grip the hinge cover too tightly with your two fingers (C); the hinge cover may come off.
o Do not close the hinge cover before applying blood sample. Once the hinge cover has been closed it cannot be opened again. Do not use force to open it again.
o Do not contaminate the suction point (B).
Do not refrigerate a test disc once its pouch has been opened.
CAUTION
Use single-use only disposable blood lancets. Follow the manufacturer’s instructions for the device.
Do not use a finger that is swollen or edematous. Avoid recent incision sites and open cuts on the fingers.

Roche Diagnostics
112 Operator’s Manual · Version 1.0
cobas b 101 system
4 Disinfect the area with an alcohol wipe (i.e. 70% Isopropanol or Ethanol, emollient free!) and dry with a clean swab or paper tissue.
5 Firmly prick the chosen area with a lancet.
6 Immediately after lancing, skim the finger smoothly from the palm's end towards 1 cm before the puncture site several times to obtain a good drop of blood. Wipe off this first drop of blood, as it may contain tissue fluid, then obtain another drop of blood i the same way.
7 Immediately apply the drop of blood directly to the suction point of the test disc.
It is important to thoroughly dry off the alcohol because it may cause hemolysis of the sample.
For details on using the lancet, see its package inset.
Do not squeeze or milk the area around the puncture, the sample may become hemo-lytic or contain tissue fluid, which potentially affects sample results.

Roche Diagnostics
Operator’s Manual · Version 1.0 113
cobas b 101 system
8 Wipe the puncture site with a clean swab or paper tissue. If bleeding continues, slightly press on the puncture site and cover it with a protective plaster.
5.5.8 Applying sample to a disc
The procedure depends on whether you use capillary blood or venous blood from a blood collection tube.
a To apply capillary blood sample
1 Immediately after pricking the finger, apply the drop of blood directly to the suction point of the test disc.
2 With the imprinted side of the disc facing upwards, position the disc’s suction point above the blood drop. Apply blood and check that it has filled the marked area.
CAUTION
Incorrect results due to soiled disc
Sample or any other liquid that is spilled on the disc casing may lead to incorrect results.
o Do not use discs that had any liquid spilled on their casing. Dispose of them and start with a new disc.
CAUTION
Incorrect results due to deteriorated sample or wrong sample temperature
Sample whose temperature is too high or that was stored in inappropriate conditions may deteriorate.
Testing sample that had been frozen and not brought up to a temperature between +15 °C and +32 °C (59 °F and 90 °F) before application may lead to incorrect results.
o Make sure the sample is fresh and has the correct temperature.
o Roche recommends not to use previously frozen sample for Lipid Panel tests. When using previously frozen blood for HbA1c testing, make sure the blood temperature has reached room temperature before application.
CAUTION
Incorrect results due to inappropriate sample handling
Air bubbles in the sample may adversely affect capillary forces and lead to low fill volume.
o Make sure the sample is free of air bubbles.
o Apply the blood immediately after lancing to prevent clotting.
o Do not apply blood to a disc directly from a syringe with needle.
o The sample must be tested within the time limits defined in the respective package insert.

Roche Diagnostics
114 Operator’s Manual · Version 1.0
cobas b 101 system
Turn the disc on its back. The area marked in blue has to be filled completely with blood (A: HbA1c disc, B: Lipid disc), and also make sure not to overdose (> 20 μL for HbA1c disc, > 40 μL for Lipid disc).
If there is insufficient blood, do not use a second fingerstick and apply the blood to the same disc; this may lead to clotting. Instead, continue with the procedure and if an error message points to underdosing obtain a new blood sample and apply it to a new disc.
3 Press the hinge cover down firmly to close the disc.
Once closed correctly the hinge cover cannot be opened again.
BA
Do not use a disc for testing whose hinge cover has been forcibly removed. Dispose of such a disc and prepare a new disc.

Roche Diagnostics
Operator’s Manual · Version 1.0 115
cobas b 101 system
4 Wipe the puncture site with a clean swab or paper tissue. If bleeding continues, slightly press on the puncture site and cover it with a protective plaster.
5 If you want to write information such as a patient name on the disc, use a felt pen and write it on the underside of the hinge cover.
a To apply venous sample from a blood collection tube
1 Mix the blood well before applying it to the disc.
2 Collect the blood from a vial by using a pipette, capillary tube or similar.
3 With the imprinted side of the disc facing downwards, apply the blood sample to the suction point.
4 Check the sample volume: The area marked in blue has to be filled completely with blood (A: HbA1c disc, B: Lipid disc), and also make sure not to overdose (> 20 μL for HbA1c disc, > 40 μL for Lipid disc).
The sample must be tested within the time limits defined in the respective disc package insert.
CAUTION
Incorrect results due to insufficient mixing of the anticoagulated whole blood or plasma
Insufficient mixing of the anticoagulated whole blood or plasma prior to applying it may lead to incorrect results.
o Always mix the anticoagulated whole blood or plasma well before applying it.
BA

Roche Diagnostics
116 Operator’s Manual · Version 1.0
cobas b 101 system
5 Press the hinge cover down firmly to close the disc.
Once closed correctly the hinge cover cannot be opened again.
6 If you want to write information such as a patient name on the disc, use a felt pen and write it on the underside of the hinge cover.
5.5.9 Performing a test (no operator and patient information, single testing)
a To perform a test
1 On the Main Menu, choose Patient Test.
An instruction screen is displayed.
2 Choose Open.
The lid opens automatically.
A screen is displayed, asking you to place the disc and to close the lid.
The sample must be tested within the time limits defined in the respective disc package insert.
Test procedures depend on whether your instrument is configured to work with or without operator and patient information, and also on the test mode (single or dual testing).
The following procedure is based on the following configuration:
o You work without operator information and without patient information. (Note that the instrument automatically assigns an ID to each test.)
o You work in single test mode.

Roche Diagnostics
Operator’s Manual · Version 1.0 117
cobas b 101 system
3 Place the disc on the turn-table.
4 Make sure that the imprinted side is facing up.
5 Close the lid slowly, you can feel it click when it is closed.
The measuring process starts automatically.
Messages are displayed to inform you about the progress. When the test is complete, the results are displayed.
6 If the instrument is configured to allow comment entry, you may now add a comment to the result by choosing and then selecting a predefined comment or writing a new one.
e For details on writing and adding comments, see Adding comments to results on
page 120.
e For details on reviewing results, see Reviewing patient results on page 138.
7 Choose .
A screen is displayed, asking you to open the lid.
8 Choose Open.
A screen is displayed, asking you to remove the disc and close the lid.
Do not insert a disc whose hinge cover has been forcibly removed. Dispose of such a disc and prepare a new disc.

Roche Diagnostics
118 Operator’s Manual · Version 1.0
cobas b 101 system
9 Remove the disc, store it in its pouch, and dispose of it according to the rules for handling biohazardous waste that apply to your facility.
The results are now available on the Review Results screens.
10 Close the lid.
The Main Menu is displayed again.
5.5.10 Performing the tests (with operator and patient information, dual testing)
a To perform a test
1 On the Main Menu, choose Patient Test.
If you have just started the instrument or this is your first action of a work session, a screen for entering your operator ID is displayed.
2 Enter the operator ID.
e For the different methods of entering information, see Using operator information on
page 102.
3 Choose .
A screen for entering your password is displayed.
4 Enter your password.
5 Choose .
A screen for entering the patient ID is displayed.
6 Enter the patient information
e For details on entering patient information, see Using patient information on
page 106.
A screen is displayed for selecting single or dual testing.
7 Choose Dual Testing.
An instruction screen is displayed.
Test procedures depend on whether your instrument is configured to work with or without operator and patient information, and also on the test mode (single or dual testing).
The following procedure is based on the following configuration:
o You work with operator information and patient information.
o You work with patient name information.
o You work with password identification.
o You work in dual test mode.
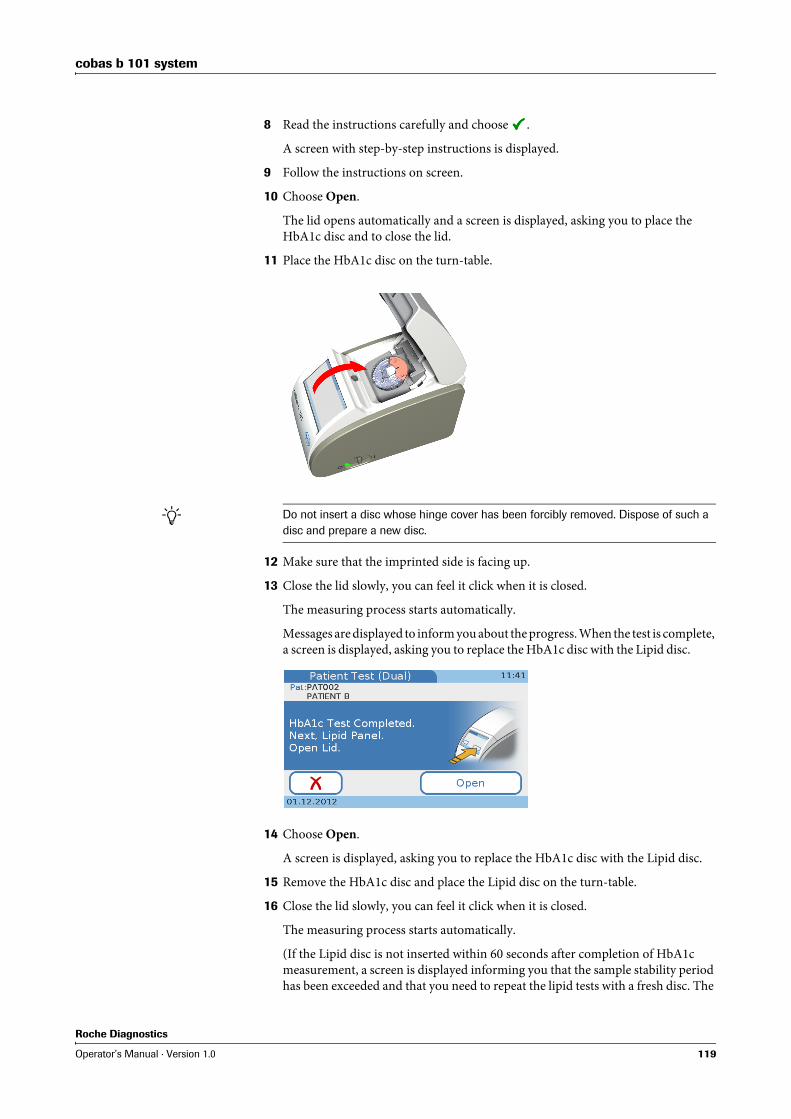
Roche Diagnostics
Operator’s Manual · Version 1.0 119
cobas b 101 system
8 Read the instructions carefully and choose .
A screen with step-by-step instructions is displayed.
9 Follow the instructions on screen.
10 Choose Open.
The lid opens automatically and a screen is displayed, asking you to place the HbA1c disc and to close the lid.
11 Place the HbA1c disc on the turn-table.
12 Make sure that the imprinted side is facing up.
13 Close the lid slowly, you can feel it click when it is closed.
The measuring process starts automatically.
Messages are displayed to inform you about the progress. When the test is complete, a screen is displayed, asking you to replace the HbA1c disc with the Lipid disc.
14 Choose Open.
A screen is displayed, asking you to replace the HbA1c disc with the Lipid disc.
15 Remove the HbA1c disc and place the Lipid disc on the turn-table.
16 Close the lid slowly, you can feel it click when it is closed.
The measuring process starts automatically.
(If the Lipid disc is not inserted within 60 seconds after completion of HbA1c measurement, a screen is displayed informing you that the sample stability period has been exceeded and that you need to repeat the lipid tests with a fresh disc. The
Do not insert a disc whose hinge cover has been forcibly removed. Dispose of such a disc and prepare a new disc.

Roche Diagnostics
120 Operator’s Manual · Version 1.0
cobas b 101 system
test is aborted, confirm the message, remove the disc, obtain a fresh sample and Lipid disc, then perform a single lipid test.)
Messages are displayed to inform you about the progress. When the test is complete, the results are displayed.
17 If the instrument is configured to allow comment entry, you may now add a comment to the result by choosing and then selecting a predefined comment or entering a new one.
Note that comments are entered separately for both the HbA1c and Lipid results.
e For details on writing and adding comments, see Adding comments to results on
page 120.
18 Choose .
A screen is displayed, asking you to open the lid.
19 Choose Open.
A screen is displayed, asking you to remove the disc and close the lid.
20 Remove the disc, store it in its pouch, and dispose of it according to the rules for handling biohazardous waste that apply to your facility.
The results are now available on the Review Results screens.
21 Close the lid.
The Main Menu is displayed again.
5.5.11 Adding comments to results
Typically, you would add a comment as part of reviewing the result. Whether you can or even must add a comment to the results depends on how your instrument is configured.
e For information on defining predefined comments, see To write (predefine) a result
comment or change it on page 41.
For information on configuring the commenting functions, see Comments on page 39.
If you work with dual testing, comments are added to both results separately.

Roche Diagnostics
Operator’s Manual · Version 1.0 121
cobas b 101 system
a To add a comment to a result while performing a test
1 Perform a test.
e See Performing a test (no operator and patient information, single testing) on page 116
e See Performing the tests (with operator and patient information, dual testing) on
page 118
When the test is complete, the results are displayed.
2 Choose .
The Comments list is displayed, which contains all predefined comments.
3 Do one of the following:
If your instrument is configured to always require comments and you do not enter a comment at this stage, a message is displayed, reminding you that you need to add a comment.
If … Do this
You want to add a
predefined comment
o Choose one of the comment buttons and choose .

Roche Diagnostics
122 Operator’s Manual · Version 1.0
cobas b 101 system
The Patient Result screen is displayed again, containing the comment.
4 Choose to continue with the task.
a To add a comment to a result as part of separate result validation
1 See Adding and changing comments on page 140.
5.5.12 Adding patient information
Typically, patient information is added when you start the test.
e See Using patient information on page 106.
If patient information is optional, you can enter it either when you start the test or add it to the results later.
e See Adding patient information to results on page 142.
You want to change and
add a predefined comment
1. Choose one of the comment buttons and choose .
2. Change the comment.
Use to delete the current text.
Use the keyboard to enter the new text.
Use to display the numeric keyboard and to
display the alphabetic keyboard.
3. Choose .
You want to add a new
comment
1. Choose ,
2. Enter the comment.
Use to display the numeric keyboard and to
display the alphabetic keyboard.
3. Choose .
If … Do this

Roche Diagnostics
Operator’s Manual · Version 1.0 123
cobas b 101 system
5.5.13 Printing results
What exactly is included in the result printout depends on the instrument configuration. Basically, what is displayed is printed. With dual testing, the results for both the HbA1c and the Lipid Panel tests are printed.
a To print a result
1 Display the result.
If you are in the process of performing a test, the results will be displayed automatically.
2 Choose .
The results are printed.
o To be able to print results your instrument must be connected to an external printer.
o Only connect the instrument to one of the recommended printers. See Accessories on page 169.
o Do not disconnect the printer from the instrument while printing is in progress.
A Patient ID
B Patient name
C Patient date of birth
D Operator ID
E Operator name
F Test name
G Disc lot number
H Date and time when result was generated
I Results
J Comment
K Date and time when result was printed
L Facility information
B
C
D
E
FG
H
I
J
K
L
A
The instrument displays a message if printing was not successful.

Roche Diagnostics
124 Operator’s Manual · Version 1.0
cobas b 101 system
5.6 Performing STAT tests
STAT tests are tests that are performed in situations of operator or QC lockout, i.e. when QC results are not or no longer valid and there is no time to perform the necessary control tests first.
e For information on setting up STAT testing, see STAT Test on page 83.
a To perform a STAT test
1 On the Main Menu, choose Patient Test.
The button is marked as blocked.
2 A screen is displayed, asking you whether you want to perform a STAT test.
3 Choose .
4 Continue the test as a normal patient test.
NOTICE Unreadable results due to fading
Results printed with a thermal printer can fade over time and become unreadable.
o Do not use old discolored thermal printer paper and only use the paper specified for your printer.
o If you need to archive printed results make sure to store the paper in a dark place away from direct light.
In the following situations STAT tests are not available:
o When the optical check test has failed neither HbA1c nor lipid patient tests are available.
o When the HbA1c QC test has failed, HbA1c STAT tests are not available.
o When the Lipid QC test has failed, Lipid STAT tests are not available.
o When All testing function lockout is enabled in the data management system.

Roche Diagnostics
Operator’s Manual · Version 1.0 125
cobas b 101 system
Results for STAT tests are specially marked.
5.7 Aborting a test
Aborting a test means to interrupt the measurement process. The process is the same for the various kinds of test.
a To abort a test
1 On the progress screen, choose .
2 A screen is displayed asking you whether you really want to abort the test.
3 Choose to confirm.
4 Choose to close the screen.
A screen is displayed, asking you to open the lid.
5 Choose Open.
6 Open the lid and remove the disc.
7 Close the lid.
You cannot reuse a disc that was used for an aborted test.

Roche Diagnostics
126 Operator’s Manual · Version 1.0
cobas b 101 system

Roche Diagnostics
Operator’s Manual · Version 1.0 127
cobas b 101 system
6 Performing control tests
The instrument can be set up to be used with or without control testing.
e See Operator Lockout on page 80
See QC Lockout on page 81
See Optical Check Lockout on page 82
The following sections describe working with control testing.
The following types of control test are available:
o Liquid QC tests
o Optical check test
o Proficiency test
6.1 Liquid QC tests
Observe the applicable regulations and directives of the relevant regulatory agencies when performing liquid QC tests. Accurately testing known levels of the QC solution ensures that the instrument and your technique used in testing give accurate results of patient tests. QC solutions have defined (known) values. The results for these solutions must fall within certain acceptable ranges in order to allow valid patient testing. The instrument may be configured to require control testing before patient testing is allowed. This is called QC Lockout. In this case, the instrument prevents patient and proficiency testing if the control results are not within the acceptable ranges.
Intervals Intervals between running liquid QC tests are determined by your facility. These intervals are typically entered when the instrument is configured.
e See QC Lockout on page 81.
CAUTION
Incorrect patient results due to invalid quality control results
Quality control (QC) measurements are performed to ensure that the instrument and your technique used in testing give accurate results of patient tests.
Performing patient tests when the current control test results are not or no longer valid may lead to incorrect patient results.
o Always perform quality control measurements as soon as they are due.
o Use control tests in a manner that ensures compliance with the regulatory require-ments that apply to you facility.

Roche Diagnostics
128 Operator’s Manual · Version 1.0
cobas b 101 system
When to run liquid QC tests Liquid QC tests should be run in the following circumstances:
o Before using the instrument for patient testing the first time
o According to the liquid quality control intervals established by your facility
o When the quality control interval has been exceeded
o When using a new QC solution vial for the first time
o When using the first disc of a new lot
o If questionable test results are displayed repeatedly
o If you wish to test the performance of the instrument
o If a previous control test is out of range
o
You will be informed by messages on screen if a liquid QC test is required.
e See Operator and QC lockout (the control results are no longer valid) on page 156.
Available QC solutions For liquid QC tests, the following QC solutions are available:
o cobas HbA1c Control
O Level 1: test results within normal range
O Level 2: test results in pathological range
o cobas Lipid Panel Control (CHOL,TG, HDL)
O Level 1: low values in test results
O Level 2: high values in test results
Information stored with controlresults
The following information is stored for every liquid QC test:
o Liquid QC test result
o Lot number of the QC solution
o Operator ID (if configured)
o Level of control solution (Level 1 or Level 2)
o Lot number of the test disc
o Time and date of test
o Comments (if entered)
o Out of range measurements
QC info disc The QC info disc is supplied with each new lot of QC solution and contains the following QC information:
o Control lot number
o Expiry date of QC lot
o Parameter (HbA1c, Lipid)
o Target values for each control
o Acceptable ranges for each control
If you work with QC lockout and a control test failed, no patient tests can be performed (not even STAT tests) until a valid QC result can be produced.

Roche Diagnostics
Operator’s Manual · Version 1.0 129
cobas b 101 system
6.1.1 Performing a liquid QC test
Liquid QC tests are performed in the same manner as patient tests.
e For information on performing a test, see Testing samples on page 93.
e For information on what to do when control measurements are due, see Operator and QC
lockout (the control results are no longer valid) on page 156.
What you need o cobas HbA1c Control (Level 1 and 2 bottles)
o cobas Lipid Panel Control (Level 1 and 2 bottles)
o Pipette or capillary tube with plunger
o cobas HbA1c QC Info Disc
o cobas Lipid QC Info Disc
o cobas HbA1c Test disc
o cobas Lipid Panel disc
o External printer if you want to print the results
o Barcode scanner if you want to read information from barcodes
o Powder-free gloves
Unpacking the test disc The disc is handled in the same way as for single-use patient testing.
e See Preparing a disc on page 109.
Applying QC solution Test solution is applied using either the dropper included in control kit for HbA1c or an eyedropper for the lipid QC solutions.
e See To apply venous sample from a blood collection tube on page 115.
The following table shows the possible effects on the results and the locking state.
o Verify that the QC solution has not expired.
o Verify that the QC solution lot number matches the lot number displayed on screen.
o Make sure to use the correct parameter.
o Make sure to use the correct level.
Check the sample volume: turn the disc on its back. The area marked in blue has to be filled completely with blood, and also make sure not to overdose (> 20 μL for HbA1c disc, > 40 μL for Lipid disc).
You can either test both levels in one procedure or test one of the levels at a later stage.
Testing of discs must start immediately after applying the solution.

Roche Diagnostics
130 Operator’s Manual · Version 1.0
cobas b 101 system
a To perform a liquid QC test of a new lot
1 Choose Control Test > QC Test.
A screen for choosing the control lot is displayed.
When performing a QC test for the first time, only the New QC Lot button is available.
2 Choose New QC Lot.
A screen is displayed asking you to insert the QC info disc.
First test Second test Overall QC result status
Locking status
Pass Not performed
(user chose not to
perform second test)
Pass Unlock
Pass Pass Pass Unlock
Pass Fail Fail Lock
Pass Aborted by user
during testing
Aborted No change
Pass Error Aborted No change
Fail Not performed
(skipped by
instrument)
Fail Lock
Error Not performed
(skipped by
instrument)
Aborted No change
Aborted by user Not performed
(skipped by
instrument)
Aborted No change
Table 14 Possible effects on the results and the locking state if testing both or just one QC
level
Make sure to use the QC info disc that is contained with the control kit you are going to use.

Roche Diagnostics
Operator’s Manual · Version 1.0 131
cobas b 101 system
3 Choose Open, open the lid and load the QC info disc, then close the lid.
The test information is read into the instrument and displayed as illustrated in the following example of a Lipid QC test.
4 Compare the control lot number on the bottle with that of your QC info disc, they must be identical.
5 Choose .
A screen is displayed for choosing a control level.
6 Choose a level and then .
A screen with instructions is displayed.
7 Prepare the disc.
e See Preparing a disc on page 109.
8 Apply the solution.
e See To apply venous sample from a blood collection tube on page 115.
9 Choose Open, open the lid and load the disc, then close the lid.
A screen is displayed asking you to check the loaded solution.
10 Check the information displayed on screen and confirm by choosing .
(If it is not correct, you can abort the test by choosing and confirming the abortion. The results are then displayed as Aborted.)
The test is performed. When it is complete, a screen is displayed asking you whether you want to proceed with the QC solution of the other level.
11 Choose to confirm that you want to test the other level as well.
A screen with instructions is displayed.
A Control lot number
B Parameters for the QC solution
C Target value for each control
D Acceptable range for each control
B C DA
CAUTION
Incorrect results due to wrong liquid
o Make sure you use control solution and not patient sample.
o Make sure that the level you just selected and that of the solution in the disc are the same.
You can perform the test with the other level at a later stage and abort QC testing by choosing . Choose to confirm. The results are displayed. Continue with step 16. For details on the effect on the lockout status, see Table 14 on page 130.

Roche Diagnostics
132 Operator’s Manual · Version 1.0
cobas b 101 system
12 Prepare the second disc.
e See Preparing a disc on page 109.
13 Apply the solution of the other level.
e See To apply venous sample from a blood collection tube on page 115.
14 Choose Open and replace the disc with the one containing the QC solution of the other level, then close the lid.
A screen is displayed asking you to check the loaded solution.
15 Check the information displayed on screen and confirm by choosing .
(If it is not correct, you can abort the test by choosing and confirming the abortion. The results are then displayed as Aborted.)
The test is performed. When it is complete, the results are displayed.
How the results are displayed depends on how the control result format is defined on the instrument. See QC Result Format on page 84.
16 If you want to add a comment choose .
Whether you can or need to add a comment depends on how commenting is set up for control results.
e For details on setting up commenting, see Comments on page 39.For details on adding comments, see Adding comments to results on page 120.
17 Choose .
A screen is displayed asking you to open the lid.
18 Choose Open, open the lid and remove the disc, then close the lid.
The Main Menu is displayed.
a To perform a liquid QC test of an existing lot
1 Choose Control Test > QC Test.
A screen for choosing the control lot is displayed.
Make sure that the level you just selected and that of the solution in the disc are the same.
o The Pass or Fail information is always displayed.
o If a control test persistently fails contact your Roche representative.

Roche Diagnostics
Operator’s Manual · Version 1.0 133
cobas b 101 system
2 Choose a button of an existing lot.
o Choose the HbA1c button to perform an HbA1c QC test.
o Choose the Lipid button to perform a Lipid QC test.
A screen is displayed with the defined target values and acceptable ranges.
3 Choose .
A screen is displayed for choosing a control level.
4 Continue with step 6 on page 131.
6.2 Optical check
Observe the applicable regulations and directives of the relevant regulatory agencies when performing an optical check test. The optical check is designed to check the optical function and accuracy of the entire instrument. For the test, an optical check disc is used, which is supplied with the instrument. If the test passes successfully, the optical functions of the instrument can be considered to work normally.
When to run the optical check The optical check should be performed in the following circumstances:
o Before the instrument is used for patient testing for the first time.
o When the test interval has been exceeded. The intervals are determined by the rules that apply to your facility.
o If a message for optical check lockout is displayed. (The instrument can be configured to block patient testing if there is no valid result for the optical check. See Optical Check Lockout on page 82.)
o If an error message concerning the optical system is displayed.
o If you want to check the optical function of the instrument.
o After impact on the instrument (e.g. after accidentally knocking the instrument).
Optical check disc The optical check disc is a special disc that is supplied with the instrument. It is designed for testing the optical unit of the instrument.
CAUTION
o Take care not to soil the optical areas of the optical check disc.
o Store the optical check disc in the conditions described in its package insert. Do not store it in a refrigerator.
o Keep the disc at an ambient temperature between +15 °C and +32 °C (59 °F and 90 °F) for at least 20 minutes before using it.
o Take care not to drop the optical check.
o Do not disassemble the optical check disc.
o Do not store the optical check disc at a place subjected to direct sunlight.

Roche Diagnostics
134 Operator’s Manual · Version 1.0
cobas b 101 system
6.2.1 Performing an optical check
a To perform an optical check test
1 Choose Control Test > Optical Check.
A screen is displayed asking you to open the lid.
2 Choose Open, open the lid and load the optical check disc, then close the lid.
The test is performed. When it is complete, a screen is displayed, informing you whether the test has passed or failed.
3 If you want to add a comment choose .
Whether you can or need to add a comment depends on how commenting is set up for control results. See Adding comments to results on page 120.
4 Choose .
A screen is displayed asking you to open the lid.
5 Choose Open, open the lid, remove the optical check disc and store it in its proper case.
6 Close the lid.
The Main Menu is displayed.
6.3 Proficiency test
When to run a proficiency test Proficiency tests are run on samples whose values are unknown to the operator performing the test. These samples are provided by an outside source, and the results should be forwarded to the appropriate source after completing the test. The supplied samples are treated in the same manner as regular patient samples.
Proficiency testing provides another means to verify that your technique, reagents, system, and testing performance are as they should be. Some regulatory agencies require that these proficiency samples be tested as part of an institution's quality assurance program before certification of the institution is granted.
Proficiency tests are performed for each of the patient tests you use on the cobas b 101 system.
The following information is stored for every proficiency test:
o Test name
o Test results
o Proficiency test ID
o Lot number of the test disc
Test cannot be performed due to improper disc placement
If the disc or the turntable are soiled, the disc may not rest flat on the turntable. This may prevent the instrument from performing the test properly.
o Make sure the disc is free of soil and rests flat on the turntable.
Observe the applicable regulations and directives of the responsible regulatory agencies when performing proficiency tests.

Roche Diagnostics
Operator’s Manual · Version 1.0 135
cobas b 101 system
o Time and date of test
o Comments (if entered)
o Operator ID (if configured)
What you need o HbA1c proficiency test sample (vial containing venous blood)
o Lipid proficiency test sample (vial containing venous blood)
o Pipette, capillary tube or similar
o cobas HbA1c Test disc
o cobas Lipid Panel disc
o Handheld barcode scanner if you want to input information from barcodes
o External printer if you want to print the results
6.3.1 Performing a proficiency test
a To perform a proficiency test
1 Choose Control Test > Proficiency Test.
A screen is displayed asking you to open the lid.
2 Apply the sample to the suction point of the disc and then close it.
e See Preparing the sample on page 96 and To apply venous sample from a blood
collection tube on page 115.
3 Choose Open, open the lid, insert the disc, and close the lid.
The test is performed. When it is complete, the test results are displayed.
Note that with these results there is no pass or fail indication
4 If you want to add a comment choose .
You can use the comment function to add information on the sample if required.
Whether you can or need to add a comment depends on how commenting is set up for control results.
e For details on adding comments, see Comments on page 39.
For details on adding comments, see Adding and changing comments on page 140.
5 Choose .
6 Choose if you want to print the results.
7 Choose .
A screen is displayed asking you to open the lid.
8 Choose Open, open the lid, remove the proficiency test disc, then close the lid.
The Main Menu is displayed.
9 Forward the results to the appropriate source.

Roche Diagnostics
136 Operator’s Manual · Version 1.0
cobas b 101 system

Roche Diagnostics
Operator’s Manual · Version 1.0 137
cobas b 101 system
7 Reviewing results
The cobas b 101 system can store the results of up to 5000 patient and 500 control tests, as well as up to 500 sets of patient information and 50 sets of operator information. If the remaining memory capacity for results reaches 50 tests (for either patients or controls), a message is displayed, informing you of this fact. You can save the data to an external data medium.
You can review results either as a part of running the test or at a later stage. You can also print results using a dedicated external printer.
The way results are presented and how to review them depends on which units were defined to be used and how commenting is set up; with control results it also depends on how the result format was defined.
e For details on defining the result units, see Result Units on page 44.
e For details on configuring the commenting functions, see Comments on page 39.
e For details on defining how control results are displayed, see QC Result Format on
page 84.
h Main Menu > Review Results > Patient Results or Control Results
Figure 19 Displaying results

Roche Diagnostics
138 Operator’s Manual · Version 1.0
cobas b 101 system
7.1 Reviewing patient results
[Hi], [Lo] If a result is outside the permissible ranges, a message is displayed, indicating the range and whether the result is above [Hi] or below [Lo] the range. On the result screen, [Hi] and [Lo] respectively are displayed instead of the result value (Q).
a To review patient results
1 Choose Main Menu > Review Results > Patient Results.
The Patient Results screen is displayed.
2 Choose one of the buttons:
o Choose All to list all patient results.
o Choose HbA1c to list all results of HbA1c tests.
o Choose Lipid to list all results of lipid tests.
A list is displayed with a button for each result.
A Patient ID
B Patient name
C Operator ID
D Operator name
E Test parameters
F Comment
G Current date
H Back to Main MenuI Print the result
J Display or add patient information
K Add comment
L Current time
M Test type
N Lot number
O Date and time when the result was
generated
P Results
Q Results are out of range
Figure 20 Overview on patient result screen
A
CD
E
F
L
N
O
P
MB
G
H I J K
Q

Roche Diagnostics
Operator’s Manual · Version 1.0 139
cobas b 101 system
3 Choose one of the result buttons.
(If you work with patient information, you can choose to find all results of a particular patient. See Finding the results of a patient on page 139.)
The results are displayed.
4 Do one or several of the following:
(Which of the following tasks are available to you depends on how the instrument is set up, and your facility’s work procedures define which to perform.)
o Use to add or change a comment.
e See Adding and changing comments on page 140.
o Use to add or change patient information.
e See Adding patient information to results on page 142.
o Use to print the results.
e See Printing results on page 147.
7.1.1 Finding the results of a patient
a To find the results of a certain patient
1 Display a result list.
(Main Menu > Review Results > Patient Results > All or HbA1c or Lipid.)
This function is available if you work with patient information.
e See Patient ID setup on page 69.

Roche Diagnostics
140 Operator’s Manual · Version 1.0
cobas b 101 system
2 Choose .
3 Enter part of or the complete patient ID or name.
4 Choose .
5 If more than one patient ID or name match the characters you just entered, a list is displayed containing all the matching patients. Choose one of the patient buttons, and a list is displayed containing all the results for this patient.
If only one patient ID matches the characters you just entered, a list is displayed containing all the results for this patient.
6 Choose one of the result buttons.
The results are displayed.
7.1.2 Adding and changing comments
Whether this function is available and how comments are added depends on how commenting is set up on your instrument.
e For information on setting up the commenting functions, see Comments on page 39.
e For information on writing comments, see To write (predefine) a result comment or change
it on page 41.
If you use the barcode scanner for entering patient information, you can choose and then scan the patient information. A list is displayed containing all the results for this patient. Choose one of the result buttons to display the result.

Roche Diagnostics
Operator’s Manual · Version 1.0 141
cobas b 101 system
a To add a comment to a result or change an existing comment
1 Display a result.
2 On the result screen, choose .
The Comments list is displayed, which contains all predefined comments.
A
With dual testing, comments are entered separately for both the HbA1c and Lipid results. (You can use and (A) to switch between the two result sets.)

Roche Diagnostics
142 Operator’s Manual · Version 1.0
cobas b 101 system
3 Do one of the following:
7.1.3 Adding patient information to results
You can add patient information to results if your instrument is set up to optionally work with or without patient information. You can always change patient information that was entered previously. Your instrument setup also determines the way in which this information is entered (keyboard, scanner, from a list of predefined patients). Note that if you work with operator information and the Administrator role, you must have Administrator authority to be able to add patient information to results.
e For information on how to set up patient information handling, see
Patient ID setup on page 69
Logical overview of using the Patient ID functions on page 70
To determine how to define patient information on page 72
Possible patient information items are the ID, name, and the date of birth. Patient information always includes the patient ID. Depending on the instrument setup, the patient name and the date of birth may be included as well.
If … Do this
You want to add a
predefined comment
o Choose one of the comment buttons and choose .
You want to change and
add a predefined comment
1. Choose one of the comment buttons, then choose .
2. Change the comment.
Use to delete the current text.
Use the keyboard to enter the new text.
3. Choose .
You want to add a new
comment
1. Choose .
2. Enter the comment.
3. Choose .
The same patient information always applies to all results of a patient.

Roche Diagnostics
Operator’s Manual · Version 1.0 143
cobas b 101 system
7.1.4 Searching for results of a certain patient
a To find all results of a certain patient
1 In the result list, choose .
The Search by Patient screen is displayed.
2 Enter part of or the complete patient ID.
3 Choose .
A list is displayed with all patients whose ID or name contains the characters you just entered.
4 Choose a patient name button.
A list is displayed with all the tests that were performed for this patient.
5 Choose one of the buttons from the list.
The results are displayed.
a To add patient information to a result
1 Display a result.
2 Choose .
A screen is displayed that lists all the results of the patient with the current patient ID.
3 Choose .
A screen is displayed, asking you whether you want to add patient information.
4 Choose to confirm.
If you use the keyboard or the scanner for entering patient information, the Patient ID screen is displayed.
If you use the patient list for entering patient information, the patient list is displayed.
This function is available if you work with patient information.
e See Patient ID setup on page 69
If you use the barcode scanner for entering patient information, you can choose and then scan patient ID.

Roche Diagnostics
144 Operator’s Manual · Version 1.0
cobas b 101 system
5 Enter the information.
o Enter the information using the keyboard.
e See To enter patient information using the keyboard on page 106.
o Enter the information using the barcode scanner.
e See To enter patient information using the barcode scanner on page 107.
o Enter the information using the patient list.
e See To enter patient information using the patient list on page 108.
a To change patient information
1 Display a result.
2 Choose .
A screen is displayed that lists all the results of the patient.
3 Choose .
A screen is displayed, showing the current patient information.
4 Choose .
If you use the keyboard or the scanner for entering patient information, the Patient ID screen is displayed.
If you use the patient list for entering patient information, the patient list is displayed.
5 Enter the information.
o Enter the information using the keyboard.
e See To enter patient information using the keyboard on page 106.
o Enter the information using the barcode scanner.
e See To enter patient information using the barcode scanner on page 107.
o Enter the information using the patient list.
e See To enter patient information using the patient list on page 108.
A confirmation screen is displayed that shows the changed information.
6 Choose to save the new information.
The ID that was assigned by the instrument is replaced by the one you just entered.

Roche Diagnostics
Operator’s Manual · Version 1.0 145
cobas b 101 system
7.2 Reviewing control results
How the results are displayed depends on how the control result format is defined on the instrument. You cannot change the result format for the Optical Check and Proficiency control tests.
e For details on defining how control results are displayed, see QC Result Format on
page 84.
[Hi], [Lo] If a QC result is outside the permissible ranges, a message is displayed, indicating the range and whether the result is above [Hi] or below [Lo] the range. On the result screen, [Hi] and [Lo] respectively are displayed instead of the result value.
If a QC result is outside the defined ranges the result is flagged with an arrow.
a To review control results
1 Choose Main Menu > Review Results > Control Results.
The Control Results screen is displayed.
2 Choose one of the buttons:
o Choose QC Test to view all liquid QC results.
o Choose Optical Check to view all optical check results.
o Choose Proficiency Test to view all proficiency test results.
3 Display an individual result.
With the exception of the proficiency test results, the Pass or Fail information is always displayed.
A Lot ID and level of the QC solution
B Operator ID
C Operator name
D Pass or fail indication
E Test parameters
F Results
G Comment
H Current date
I Back to Main MenuJ Print the result
K Target value
L Add comment
M Acceptable range
N Current time
O Test type
P Lot ID of disc
Q Date and time when the result was
generated
R Button for displaying the results of the other
level
Figure 21 Overview of the QC result screen
A
C
D
E
G
N
P
Q
R
OB
HI J L
F
K M

Roche Diagnostics
146 Operator’s Manual · Version 1.0
cobas b 101 system
4 Which of the following tasks are available to you depends on how the instrument is set up, and your facility’s work procedures define which to perform.
o Use to add a comment.
e See Adding and changing comments on page 140.
o Use to print the results.
e See Printing results on page 147.

Roche Diagnostics
Operator’s Manual · Version 1.0 147
cobas b 101 system
8 Printing results
What exactly is included in the result printout depends on the instrument configuration. Basically what is displayed is printed. With dual testing, the results for both the HbA1c and the Lipid Panel tests are printed.
a To print a patient result
1 Display the result.
2 Choose .
The result is printed.
Your instrument must be connected to an external printer to be able to print results.
The instrument displays a message if printing was not successful.
NOTICE Printed results can fade over time and become unreadable.
o If you need to archive printed results make sure to store the paper in a dark place away from direct light.
o Only use paper of the quality recommended by the manufacturer of your printer.

Roche Diagnostics
148 Operator’s Manual · Version 1.0
cobas b 101 system

Roche Diagnostics
Operator’s Manual · Version 1.0 149
cobas b 101 system
9 Cleaning and disinfecting of the cobas b 101 system
Cleaning and disinfecting the instrument is, at minimum, recommended daily. Follow recommendations from the FDA, CDC, and CMC and your facility’s policies and procedures for infection control.(1) (2) (3)
9.1 Guide to cleaning and disinfecting the cobas b 101 system
Prior to cleaning and disinfecting the instrument:
o Follow the infection control procedures of your institution when handling the instrument.
o Wear gloves.
o The gloves worn during cleaning and disinfecting should be removed and hands washed thoroughly with soap and water.
Cleaning and disinfecting theinstrument
o Clean the instrument to remove visible soil and organic material prior to disinfecting.(3)
o Disinfect the instrument to destroy pathogenic and other types of microorganisms. Disinfection destroys most recognized pathogenic microorganisms but not necessarily all microbial forms (e.g., bacterial spores).(3)
When to clean and disinfect theinstrument
o Clean the instrument when there are visible signs of soil or per your facility’s guidelines.
o Clean and disinfect the instrument daily or per your facility’s guidelines. The instrument should be cleaned prior to disinfection.
Acceptable cleaning anddisinfecting agents
To purchase approved disinfecting products, please refer to your facility’s guidelines, which may include instructions on direct purchase from the manufacturer or through an approved distributor.
Acceptable active ingredients and products for cleaning and disinfecting are:
o Sani-Cloth Plus Germicidal Disposable Wipes
(EPA registration number 9840-6)
Pre-moistened disinfecting cloths (active ingredient: n-alkyl dimethyl ethylbenzyl ammonium chlorides 0.125%; n-alkyl dimethyl benzyl ammonium chlorides 0.125% and isopropyl alcohol 14.85%)
(1) FDA Public Health Notification: Use of Fingerstick Devices on More than One Person Poses Risk for
Transmitting Bloodborne Pathogens: Initial Communication, (2010).
http://www.fda.gov/MedicalDevices/Safety/AlertsandNotices/ucm224025.htm
(2) CDC Clinical Reminder: Use of Fingerstick Devices on More than One Person Poses Risk for
Transmitting Bloodborne Pathogens, (2010).
http://www.cdc.gov/injectionsafety/Fingerstick-DevicesBGM.html
(3) Healthcare Infection Control Practices Advisory Committee (HICPAC), William A. Rutala, Ph.D.,
M.P.H., and David J. Weber, M.D., M.P.H. Centers for Disease Control and Prevention, 2008.
Guideline for Disinfection and Sterilization in Healthcare Facilities. Atlanta, Ga.
Obtain and dispose of acceptable cleaning and disinfection solutions per facility guide-lines.

Roche Diagnostics
150 Operator’s Manual · Version 1.0
cobas b 101 system
What to clean and disinfect The following parts of the instrument may be cleaned and disinfected:
o Outside of the instrument
o Screen
o Inside of the instrument
o Barcode scanner
Technical assistance If you notice any signs of deterioration after cleaning and disinfecting of your instrument, stop using the instrument and contact Roche Technical Service for assistance. See Contact information for Roche on page 172.
It is important to follow the procedure as described in this section. Failure to follow these procedures may cause malfunction of the instrument.
WARNING
Protection against infection
There is a potential risk of infection. Healthcare professionals using the cobas b 101 sys-tem must be aware that any object coming into contact with human blood is a potential source of infection.
o Use gloves.
o Use recommended cleaning and disinfecting materials only.
o Dispose of used cleaning and disinfecting material according to your facility’s infection control policy.
o After cleaning and disinfecting the instrument, remove the gloves and wash your hands.
o Follow all health and safety regulations in force locally.
NOTICE Damage to the instrument by using unsuitable cleaning materials
Using unsuitable solutions may result in incorrect operation and possible failure of the sys-tem.
o Clean and disinfect the instrument with recommended materials only. Make sure that the instrument is thoroughly dried after cleaning and disinfecting.
o Do not use any abrasive cleaning and disinfecting substances or pointed implements for cleaning and disinfecting the instrument.
Always use Sani-Cloth Plus Germicidal Disposable Wipes. Do not use any other cleaning or disinfecting solutions. Using solutions other than the Sani-Cloth Plus could result in dam-age to the system components.
NOTICE Damage to the instrument by liquids reaching critical parts
Liquids reaching electrical parts such as sockets and plugs may lead to short-circuiting. Liquids entering internal parts may lead to their disfunctioning.
o Make sure no foreign substances such as liquids reach the sockets and plugs.
o Make sure no liquid enters internal components.
o Do not use spray of any sort.
o Ensure the swab or cloth is only damp, not wet.
o Remove excessive moisture, if necessary.
o Do not allow pooling of liquid on touch screen. Remove immediately with dry lint-free cloth.

Roche Diagnostics
Operator’s Manual · Version 1.0 151
cobas b 101 system
9.2 Cleaning and disinfecting the screen and outside of the instrument
Immediately clean and disinfect the screen and outside of the instrument whenever it is visibly soiled or whenever a spillage occurs.
Clean and disinfect at least once a day.
a To clean the screen and outside of the instrument
1 Switch off the instrument (A). Disconnect the power cable from the instrument (B).
When using a Sani-Cloth Plus Germicidal Disposable Wipe, squeeze off excess cleaning and disinfecting solution or blot dry on a paper towel to remove any excess cleaning solution before cleaning the surface of the instrument.
2 To clean, use a Sani-Cloth Plus Germicidal Disposable Wipe to gently wipe the screen and the outside of the instrument. Dry the screen and the outside of the instrument thoroughly with a dry cloth or gauze.
3 To disinfect, use a fresh Sani-Cloth Plus Germicidal Disposable Wipe by gently wiping the screen and the outside of the instrument. Allow the screen and the outside of the instrument to remain damp with the recommended cleaning and disinfecting solution for a contact time of greater than 3 minutes.
4 Dry the screen and the outside of the instrument thoroughly with a dry cloth or gauze. Visually verify that no solution is seen anywhere on the instrument at the completion of cleaning and disinfecting. Ensure that the instrument is thoroughly dried after cleaning and disinfecting (see safety message Damage to the screen by using unsuitable materials in this section).
5 Reconnect the power cable.
NOTICE The inside and outside of the instrument must be kept clean at all times. If there is a spill-age, clean and disinfect immediately using a Sani-Cloth Plus Germicidal Disposable Wipe. Dispose of the wipe according to your facility’s infection control policy.
B
A
The instrument should be cleaned prior to each disinfection step.
The screen and the outside of the instrument should stay moist for the entire contact time.

Roche Diagnostics
152 Operator’s Manual · Version 1.0
cobas b 101 system
6 Switch on the instrument and check that the startup procedure works without an error message.
9.3 Cleaning and disinfecting the inside of the instrument
Immediately clean and disinfect the inside of the instrument whenever it is visibly soiled or whenever a spillage occurs.
Clean and disinfect at least once a day.
a To clean and disinfect the inside of the instrument
1 Switch off the instrument (B). Disconnect the power cable from the instrument (C).
When using a Sani-Cloth Plus Germicidal Disposable Wipe, squeeze off excess cleaning and disinfecting solution or blot dry on a paper towel to remove any excess cleaning solution before cleaning the surface of the instrument.
2 Press the lid button (A) at the rear of the instrument and open the lid.
3 To clean, use a Sani-Cloth Plus Germicidal Disposable Wipe to gently wipe the inside of the instrument and disc insertion area (D). Dry the inside of the instrument and disc insertion area thoroughly with a dry cloth or gauze.
Pay particular attention to the temperature sensor window (E).
NOTICE Damage to the screen by using unsuitable materials
Using unsuitable materials may damage the surface of the screen.
o Do not use any abrasive cleaning substances or pointed implements for cleaning the screen.
NOTICE Damage to the instrument due to short-circuiting
Liquids reaching electrical parts such as sockets and plugs may lead to short-circuit-ing.
o Make sure no foreign substances such as liquids reach the sockets and plugs.
B
A
C
D
The instrument should be cleaned prior to each disinfection step.

Roche Diagnostics
Operator’s Manual · Version 1.0 153
cobas b 101 system
4 To disinfect, use a fresh Sani-Cloth Plus Germicidal Disposable Wipe by gently wiping the inside of the instrument and disc insertion area. Allow the inside of the instrument and disc insertion area to remain damp with the recommended cleaning and disinfecting solution for a contact time of greater than 3 minutes.
5 Dry the inside of the instrument and disc insertion area thoroughly with a dry cloth or gauze. Visually verify that no solution is seen anywhere on the instrument at the completion of cleaning and disinfecting. Ensure that the instrument is thoroughly dried after cleaning and disinfecting (see safety message Damage to the instrument due to liquid entering internal components in this section).
6 Close the lid.
7 Reconnect the power cable.
8 Switch on the instrument and check that the startup procedure works without an error message.
E
CAUTION
Incorrect results due to soiled temperature sensor
A soiled temperature sensor may lead to malfunction and incorrect results.
o Do not touch the temperature sensor with your fingers.
The inside of the instrument and disc insertion area should stay moist for the entire contact time.
Damage to the instrument due to liquid entering internal components
Liquids entering internal components may damage them and lead to their disfunctioning.
o Make sure no liquid enters internal components.
o Do not immerse in liquid the instrument or any parts of it.
Roche Diagnostics
154 Operator’s Manual · Version 1.0
cobas b 101 system
9.4 Cleaning and disinfecting the barcode scanner
The internal barcode scanner is used for reading the disc barcodes.
Immediately clean and disinfect the barcode scanner of the instrument whenever it is visibly soiled or whenever a spillage occurs.
Clean and disinfect at least once a day.
a To clean and disinfect the barcode scannere See safety message Damage to the sensor surface by using unsuitable materials in this
section.
When using a Sani-Cloth Plus Germicidal Disposable Wipe, squeeze off excess cleaning and disinfecting solution or blot dry on a paper towel to remove any excess cleaning solution before cleaning the barcode scanner.
1 To clean, use a Sani-Cloth Plus Germicidal Disposable. Wipe to gently wipe the barcode scanner.
2 To disinfect, use a fresh Sani-Cloth Plus Germicidal Disposable Wipe by gently wiping the barcode scanner. Allow the barcode scanner to remain damp with the recommended cleaning and disinfecting solution for a contact time of greater than 3 minutes.
3 Dry the barcode scanner thoroughly with a dry cloth or gauze. Visually verify that no solution is seen anywhere on the barcode scanner at the completion of cleaning and disinfecting. Ensure that the barcode scanner is thoroughly dried after cleaning and disinfecting.
The instrument should be cleaned prior to each disinfection step.
The barcode scanner should stay moist for the entire contact time.
NOTICE Damage to the sensor surface by using unsuitable materials
Using unsuitable materials may damage the surface of the sensor.
o Do not use any abrasive cleaning and disinfecting substances or pointed imple-ments for cleaning or disinfecting the sensor surface.

Roche Diagnostics
Operator’s Manual · Version 1.0 155
cobas b 101 system
10 Troubleshooting
10.1 Exceptional situations not indicated on screen
The following sections describe how to deal with some exceptional situations that are not indicated on screen.
The instrument display does notcome on
Perform the following checks and actions:
o Switch off the instrument, wait 10 seconds and switch on the instrument again.
o Check whether the power on/off switch is damaged and you can slide it to the On and Off positions.
o Check whether the power cable are properly connected.
o Check whether the correct power adapter is used.
o Check whether the power LED on the adapter lights up and the power adapter is working.
o Check the voltage at your mains power outlet.
The touch screen backlight doesnot function properly
Perform the following checks and actions:
o Check whether any display elements are visible on the screen.
o Check whether the instrument is positioned in an exceptionally bright environment, e.g. in direct sunlight or near strong fluorescent lighting.
o Check whether the display is improved by changing the contrast setting in the setup.
The instrument's touch screendoes not work properly
Perform the following checks and actions:
o Check for any signs of damage on the screen such as splotches, punctures, cracks, or ink marks.
o Check whether the instrument has been exposed to extreme temperatures.
o Check whether all the segments are visible and the contrast adjustment works properly.
o When entering characters using the keyboard, check whether anything different than the characters are displayed.
The screen saver (moving whitecobas logo on black screen) is
displayed
Perform the following checks and actions:
o Check whether Auto Off or Auto Logout are active.
e See Auto Off on page 47 and To define that automatic logoff should be used on page 60.
o Check that touching the screen results in the work screen being displayed.
The instrument does notgenerate an acoustic signal when
buttons are touched
Perform the following checks and actions:
o Check whether the volume level for Key Click is set to zero.
e See Key Click on page 46.
The instrument does notgenerate an acoustic signal whena measurement is complete and
or an error occurs
Perform the following checks and actions:
o Check whether the volume level for Alarm is set to zero.
e See Alarm on page 46.
If a problem persists, contact your Roche service representative.

Roche Diagnostics
156 Operator’s Manual · Version 1.0
cobas b 101 system
The instrument displaysinformation in the wrong
language
Perform the following checks and actions:
o Check whether the setup for Language is set to your language.
e See Choosing the language on page 88.
10.2 Exceptional situations indicated on screen
10.2.1 Operator and QC lockout (the control results are no longer valid)
If your instrument is configured to check the validity of control results (see Operator Lockout on page 80 and QC Lockout on page 81) you may not be able to perform patient tests.
For emergency situations, you can define that a certain number of so-called STAT (short turn around time) tests can be performed even if testing is blocked. See STAT Test on page 83.
Note that in the following situations STAT tests cannot be performed either:
o When the optical check test has failed neither HbA1c nor lipid patient tests are available
o When the HbA1c QC test has failed, HbA1c STAT tests are not available
o When the Lipid QC test has failed, lipid STAT tests are not available
o When All testing function lockout is enabled in the data management system
Locked testing is indicated on the Main Menu:
If you attempt to perform a test you will be informed by messages on screen about the reason why the test cannot currently be performed.
The following table lists examples of screen information related to lockout situations and provides some further explanations.
Figure 22 Main Menu with locked Patient Test function

Roche Diagnostics
Operator’s Manual · Version 1.0 157
cobas b 101 system
The following table lists error messages related to lockout situations and provides some further explanations.
Message Comment
You can still perform lipid patient tests, but
you need to perform a HbA1c QC test before
you can perform another HbA1c patient test.
You can perform lipid patient tests as normal
but HbA1c testing is blocked. Because you
work with STAT testing you can perform - in
this example - one more HbA1c test.
e See To perform a STAT test on page 124.
You can still perform HbA1c patient tests,
but you need to perform a Lipid QC test
before you can perform another lipid patient
test.
Because you work with STAT testing you can
perform the HbA1c test as a STAT test, even
though the disc is of a new lot and you work
with New Lot Lockout.
See To perform a STAT test on page 124.
Table 15 Lockout situations
ID Message text Comment
I-226 Operator Lockout
Run QC Test to Proceed
You cannot perform any tests before you have
successfully completed the QC test.
You work with operator lockout and the
logged-in operator has not performed the QC
test within the given interval and the number
of allowed STAT tests is zero.
I-227 QC Lockout
Run QC Test to Proceed
You cannot perform any tests before you have
successfully completed the QC test.
You work with QC lockout and the QC test has
not been performed within the given interval,
and the number of allowed STAT tests is zero.
I-228 Failed QC Lockout
Run QC Test to Proceed
You cannot perform any tests before you have
successfully completed QC test.
The results of the last QC test are not valid
(Fail).
Table 16 Messages related to lockout situations

Roche Diagnostics
158 Operator’s Manual · Version 1.0
cobas b 101 system
10.2.2 Barcode cannot be read
a To deal with a barcode reading problem
1 If a barcode cannot be read properly, a message is displayed. Follow the instructions in the message.
2 If the problem persists, perform an optical check test.
e See Performing an optical check on page 134.
3 If the problem persists clean the barcode scanner sensor surface.
e See Cleaning and disinfecting of the cobas b 101 system on page 149.
4 If the problem persists, check that a supported barcode type is used.
e See Barcodes on page 170.
5 If the problem still persists, contact your Roche service representative.
I-229 Optical Check Lockout
Run Optical Check to Proceed
You cannot perform any tests before you have
successfully completed an Optical Check test.
I-230 QC Lockout Contact System Administrator
I-233 New Lot Lockout
Test Control Level 1 and 2 With
This Disc Lot to Proceed
You cannot perform any tests before you have
successfully completed the QC test.
You work with New Lot Lockout and you
inserted a disc of a new lot, and the number of
allowed STAT tests is zero.
I-234 Failed Optical Check Lockout
Run Optical Check to Proceed
You cannot perform any tests before you have
successfully completed an Optical Check test.
The results of the last Optical Check test are
not valid (Fail).
I-405 Wrong Disc (Lipid) Inserted and
New Lot Lockout
Test Control Level 1 and 2 With This Disc Lot
to Proceed.
Repeat Dual Test
ID Message text Comment
Table 16 Messages related to lockout situations (Continued)

Roche Diagnostics
Operator’s Manual · Version 1.0 159
cobas b 101 system
10.2.3 Printing is not working
a To check the printing
1 Check the connection between the instrument and the printer. ( )
2 Follow the instructions in the printer documentation.
3 If the problem persists contact your Roche service representative.
.
10.3 Error messages
In exceptional situations error messages are displayed. These messages have a distinct structure: The following is an example of a warning message.
Use the various information items as follows:
A Icon indicates the severity of the issue
B Message ID
C Subject icon
D Description of issue
E Proposed action to resolve the issue
Figure 23 Example of an error message
A B C
E
D

Roche Diagnostics
160 Operator’s Manual · Version 1.0
cobas b 101 system
o The icon (A) indicates the severity of the issue, i.e. whether you need to intervene.
o Use the message ID (B) to locate the message text in Table 18 on page 160 and quote it when contacting your Roche service representative.
o Use the subject icons (C) to get a rough idea of what the message refers to.
e For details, see Table 4 on page 22.
o Read the description (D) carefully to understand the issue.
o Follow the instructions given in the proposed solution (E).
Error messages The following table list the error messages, sorted according to their message ID
Button/Icon Category Meaning
Error o Hardware problem codes. Operation has
stopped.
o Software problem codes. Operation has stopped.
Warning Application problem codes. The operator needs to
repeat the test with a new disc.
Information User handling codes. Suggests an alternate workflow.
Operation can continue.
Table 17 Icons used on error message screens
ID Message text Comment
E-001 Software Failed Execute Software Update
E-002 Instrument Error! (Internal) Re-Start System or Contact Technical Service
E-003 Battery Down Contact Technical Service
E-004 Battery Down Contact Technical Service
E-005 Internal Memory Error (Patient
Results)
Contact Technical Service
E-006 Internal Memory Error (QC
Results)
Contact Technical Service
E-007 Internal Memory Error (Settings) Contact Technical Service
E-008 Software Update Failed Retry Software Update
E-009 Language Update Failed Retry Language Update
E-100 Unexpected Software Error Re-Start System or Contact Technical Service
E-101 Unexpected Software Error Re-Start System or Contact Technical Service
E-102 Data Writing Failed Format USB Memory Stick and Retry
E-209 Instrument Error! (Internal) Re-Start System or Contact Technical Service
E-210 Instrument Error!
(Temp.Control)
Re-Start System or Contact Technical Service
E-211 Instrument Error! (Optics) Re-Start System or Contact Technical Service
E-212 Instrument Error! (Lid) Re-Start System or Contact Technical Service
E-216 Shock During Measurement Repeat Test with New Disc
E-217 Liquid Detection! Contact Technical Service
I-200 Ambient Temperature Too High
or Low
Turn Off Instrument. Make Sure that the
Ambient Temperature Falls Within Specified
Limits.
I-201 Disc Temperature Too High or
Low
Use New Disc Within Specified Temperature
Limits
Table 18 Error messages

Roche Diagnostics
Operator’s Manual · Version 1.0 161
cobas b 101 system
I-202 Disc Present Remove Disc
I-203 Disc Present Remove Disc
I-204 Barcode Scanner Not Connected Connect Barcode Scanner
I-205 USB Memory Stick Not
Connected
Connect USB Memory Stick
I-206 Printer Not Connected Connect Printer.
I-207 Printer Out Of Paper Check Printer Paper
I-208 Invalid Installation Condition
(Tilt)
Turn Off Instrument and Set Instrument on
Plane Surface
I-218 Invalid Barcode Scanner
Connected
Connect Recommended Barcode Scanner or
Contact Technical Service
I-219 Invalid Operator Barcode Scan Valid Operator Barcode or Contact
System Administrator
I-220 Invalid Patient Barcode Scan Valid Patient Barcode or Contact System
Administrator
I-221 Invalid USB Memory Stick Connect Valid USB Memory Stick or Contact
System Administrator
I-222 USB Memory Stick Disconnected
During Processing
Connect USB Memory Stick and Retry
Procedure
I-223 Printer Error Contact Technical Service
I-224 Invalid Printer Connected Connect Recommended Printer or Contact
Technical Service
I-225 All Parameters Disabled Enable Parameters Before Test
I-226 Operator Lockout Run QC Test to Proceed
I-227 QC Lockout Run QC Test to Proceed
I-228 Failed QC Lockout Run QC Test to Proceed
I-229 Optical Check Lockout Run Optical Check to Proceed
I-230 QC Lockout Contact System Administrator
I-232 Comment Required for this
Result
Enter Comment
I-233 New Lot Lockout Test Control Level 1 and 2 With This Disc Lot
to Proceed
I-234 Failed Optical Check Lockout Run Optical Check to Proceed
I-235 Disc Rotation Error! Remove Disc in Instrument if Disc Exists
I-236 Disc Rotation Error! Close Disc Hinge Cover and Re-Insert Disc or
Contact System Administrator
I-237 Barcode Sensor Window Dirty Clean Window
I-300 Invalid Disc Inserted (Hinge
Cover Open)
Close Hinge Cover and Insert Disc Again
I-301 Used Disc Inserted Replace Disc
I-302 Invalid Disc Inserted Replace Disc
I-303 Disc Lot Expired Use Non-Expired Disc
I-304 Control Lot Expired Use Non-Expired Control Lot
I-305 Wrong Disc (HbA1c) Inserted! Inserted Disc is Not Corresponding to QC Info
Disc. Retry QC Test with Correct Lot
I-313 Optical Check Disc Expired Use Non-Expired Optical Check Disc
ID Message text Comment
Table 18 Error messages (Continued)

Roche Diagnostics
162 Operator’s Manual · Version 1.0
cobas b 101 system
I-314 Wrong Disc (Lipid) Inserted! Inserted Disc is Not Corresponding to QC Info
Disc. Retry QC Test with Correct Lot
I-400 Wrong Disc (Lipid) Inserted! Repeat HbA1c Test with New Disc
I-401 Wrong Disc (HbA1c) Inserted! Remove HbA1c Disc and Insert Lipid Disc
Immediately
I-404 Wrong Disc (Lipid) Inserted and
Disc Lot Expired.
Repeat Dual Test with Non-Expired Disc
I-405 Wrong Disc (Lipid) Inserted and
New Lot Lockout
Test Control Level 1 and 2 With This Disc Lot
to Proceed.
Repeat Dual Test
I-500 Invalid Date Re-Enter Date
I-501 Operator ID Not Found Contact System Administrator
I-502 Invalid Operator ID Length Re-Enter Operator ID
I-503 Invalid Password Re-Enter Password or Contact System
Administrator
I-504 Password Confirmation Failed Re-Enter Password
I-505 Entered Password Expired Enter New Password
I-506 Invalid Patient ID Length Re-Enter Patient ID
I-507 Invalid Patient ID Re-Enter Patient ID
I-508 Entered Patient Name is Not in
List
Re-Enter Patient Name
I-509 Entered Date of Birth is Not in
List
Re-Enter Date of Birth
I-510 Invalid Software Update File Connect USB Memory Stick with Valid
Software Update File
I-511 Invalid Range Re-Enter Range: Max. Must Be Greater Than
Min.
I-513 Operator ID Already Defined Re-Enter Operator ID
I-514 Do Not Delete Own Operator ID -
I-515 No Patient Name in List Register Patient Name or Contact System
Administrator
I-516 No Date of Birth in List Register Date of Birth or Contact System
Administrator
I-518 Patient ID Already Defined Re-Enter Patient ID
I-519 Software Update Version Invalid Connect USB Memory Stick with Valid
Software Update File
I-520 Language File Invalid Connect USB Memory Stick with Valid
Language File
I-521 Database Full (Audit Trail) Oldest Entries Will be Overwritten.
Save Audit Trail Log File to USB Memory Stick
or DMS.
I-523 Database Full (Operator) Contact System Administrator
I-524 Database Full (Administrator) Contact System Administrator
I-525 Database Full (Patient) Contact System Administrator
I-526 Invalid Password Re-Enter Password
ID Message text Comment
Table 18 Error messages (Continued)
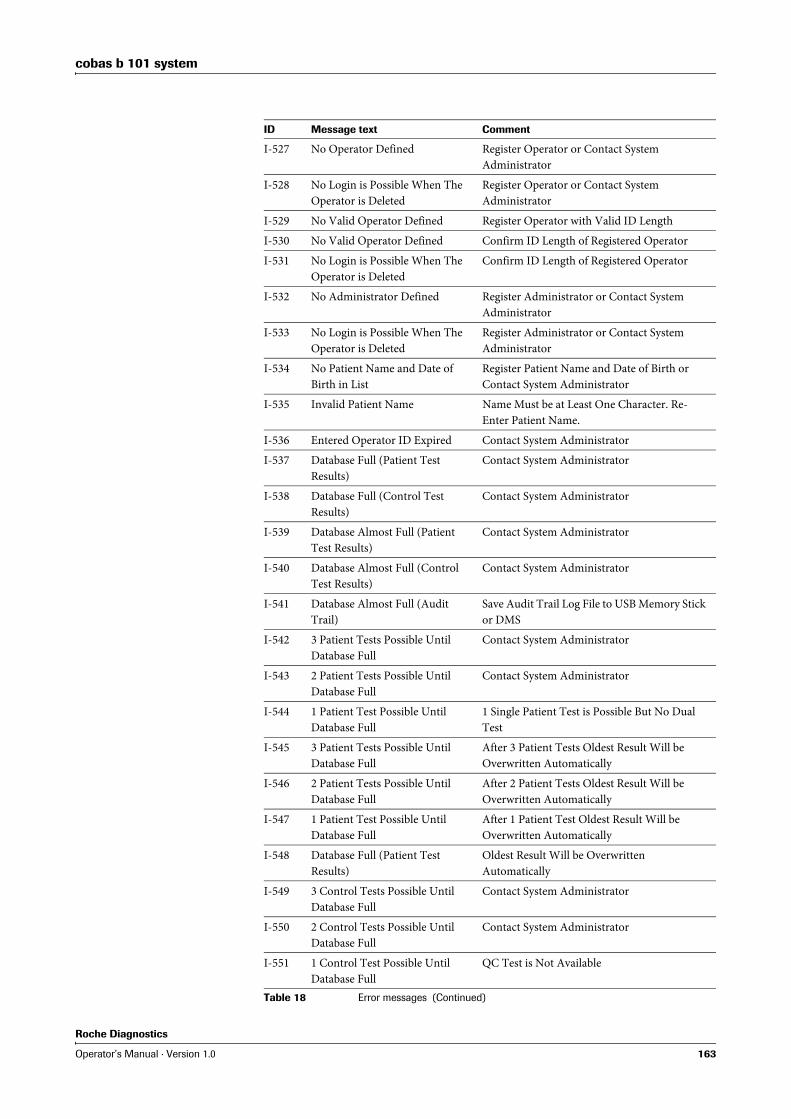
Roche Diagnostics
Operator’s Manual · Version 1.0 163
cobas b 101 system
I-527 No Operator Defined Register Operator or Contact System
Administrator
I-528 No Login is Possible When The
Operator is Deleted
Register Operator or Contact System
Administrator
I-529 No Valid Operator Defined Register Operator with Valid ID Length
I-530 No Valid Operator Defined Confirm ID Length of Registered Operator
I-531 No Login is Possible When The
Operator is Deleted
Confirm ID Length of Registered Operator
I-532 No Administrator Defined Register Administrator or Contact System
Administrator
I-533 No Login is Possible When The
Operator is Deleted
Register Administrator or Contact System
Administrator
I-534 No Patient Name and Date of
Birth in List
Register Patient Name and Date of Birth or
Contact System Administrator
I-535 Invalid Patient Name Name Must be at Least One Character. Re-
Enter Patient Name.
I-536 Entered Operator ID Expired Contact System Administrator
I-537 Database Full (Patient Test
Results)
Contact System Administrator
I-538 Database Full (Control Test
Results)
Contact System Administrator
I-539 Database Almost Full (Patient
Test Results)
Contact System Administrator
I-540 Database Almost Full (Control
Test Results)
Contact System Administrator
I-541 Database Almost Full (Audit
Trail)
Save Audit Trail Log File to USB Memory Stick
or DMS
I-542 3 Patient Tests Possible Until
Database Full
Contact System Administrator
I-543 2 Patient Tests Possible Until
Database Full
Contact System Administrator
I-544 1 Patient Test Possible Until
Database Full
1 Single Patient Test is Possible But No Dual
Test
I-545 3 Patient Tests Possible Until
Database Full
After 3 Patient Tests Oldest Result Will be
Overwritten Automatically
I-546 2 Patient Tests Possible Until
Database Full
After 2 Patient Tests Oldest Result Will be
Overwritten Automatically
I-547 1 Patient Test Possible Until
Database Full
After 1 Patient Test Oldest Result Will be
Overwritten Automatically
I-548 Database Full (Patient Test
Results)
Oldest Result Will be Overwritten
Automatically
I-549 3 Control Tests Possible Until
Database Full
Contact System Administrator
I-550 2 Control Tests Possible Until
Database Full
Contact System Administrator
I-551 1 Control Test Possible Until
Database Full
QC Test is Not Available
ID Message text Comment
Table 18 Error messages (Continued)

Roche Diagnostics
164 Operator’s Manual · Version 1.0
cobas b 101 system
I-552 3 Control Tests Possible Until
Database Full
After 3 Control Tests Oldest Result Will be
Overwritten Automatically
I-553 2 Control Tests Possible Until
Database Full
After 2 Control Tests Oldest Result Will be
Overwritten Automatically
I-554 1 Control Test Possible Until
Database Full
After 1 Control Test Oldest Result Will be
Overwritten Automatically
I-555 Database Full (Control Test
Results)
Oldest Result Will be Overwritten
Automatically
I-556 Invalid Backup File Connect USB Memory Stick with Valid Backup
File
I-557 No Patient Test Possible in
Training Mode
Contact System Administrator
I-559 Test Count Limit: Max.1250
Remaining Tests.
Contact Technical Service
I-560 Test Count Limit: Max.750
Remaining Tests
Contact Technical Service
I-561 Test Count Limit: Max.250
Remaining Tests.
Contact Technical Service
I-562 Test Count Limit: Max.50
Remaining Tests.
Contact Technical Service
I-563 Test Count Limit: 2 Tests Possible
Until Count Limit.
Contact Technical Service
I-564 Test Count Limit: 1 Test Possible
Until Count Limit.
Contact Technical Service
I-565 End of Test Count. Thank You
for Using cobas b101.
Contact Technical Service
I-566 No Valid Administrator Defined Modify ID Length of Registered Administrator
W-306 Disc Error! (Barcode Failure) Repeat Test with New Disc
W-308 Out Of Measuring Range (Lipid):
Above (Hi) or Below (Lo)
[display of range]
W-309 Out Of Measuring Range
(HbA1c): Above (Hi) or Below
(Lo)
[display of range]
W-310 Interference in Sample [display of detected interference]
W-315 Dust Detected Repeat Optical Check with New Optical Check
Disc
W-316 Disc Error! (Reaction Failure) Repeat Test with New Disc
W-317 Disc Error! (Reaction Failure:
HbA1c)
Repeat Test with New Disc
W-318 Sample Stability Time Exceeded
or No Sample in Disc
Repeat Test with New Disc
W-319 Abnormally High Hemoglobin —
W-320 Abnormally Low Hemoglobin —
W-321 Disc Error! (Reaction Failure:
Lipid)
Repeat Test with New Disc
ID Message text Comment
Table 18 Error messages (Continued)

Roche Diagnostics
Operator’s Manual · Version 1.0 165
cobas b 101 system
W-322 Large Sample Volume Repeat Test with New Disc
W-323 Insufficient Sample Volume Repeat Test with New Disc
W-403 Sample Stability Time Is
Exceeded
Repeat Lipid Panel with New Disc
ID Message text Comment
Table 18 Error messages (Continued)

Roche Diagnostics
166 Operator’s Manual · Version 1.0
cobas b 101 system

Roche Diagnostics
Operator’s Manual · Version 1.0 167
cobas b 101 system
11 General product specifications
11.1 Technical data
Operating temperature range foroperation
+15ºC to +32ºC (59ºF to 90ºF), indoor use
Temperature range for storageand transport
-25ºC to +60ºC (-13ºF to +140ºF)
Relative humidity for operation 10-85%, (non condensing)
Relative humidity for storageand transport
10-90%, (non condensing)
Maximum altitude foroperation
3,000m (9,843 feet)
Position Place the analyzer on a level, vibration-free surface
Memory o 5,000 patient test results
o 500 control test results
o 500 sets of patient information
o 50 sets of operator information, including 5 for administrators
Interface o USB interface for PC
o USB interface for barcode scanner
o USB interface for printer or USB stick
o RS422 interface for Base Unit Hub
Printer Optional (via USB)
e See Accessories on page 169.
Barcode scanner Optional (via USB)
e See Accessories on page 169.
Base Unit Hub (BUH) Optional (via RS422)
e See Accessories on page 169.
Power connection Overvoltage Category II
Pollution Degree 2 IEC/UL 61010-1
Power supply adapter: Input 100 ~ 240 V AC; 50/60 Hz; Output 12V DC.
Power consumption: Max. 60 VA
Noise emission Max. 65 dB (A)
User interface Touch screen and barcode scanner

Roche Diagnostics
168 Operator’s Manual · Version 1.0
cobas b 101 system
Dimensions Width: 135 mm (5.31 in)
Height: 184 mm (7.24 in)
Depth: 234 mm (9.21 in)
Weight 2.0 kg (without power supply adapter)
11.1.1 Measuring ranges
The measuring ranges depend on the test parameters.
HbA1c
eAG Calculated.
Lipid
11.2 Sample materials
HbA1c test
Lipid test
Parameter Range
NGSP 4.0-14.0%
IFCC 20-130 mmol/mol
Table 19 Measuring ranges for HbA1c tests
Parameter Range mmol/L Range mg/dl
CHOL 1.28-12.95 50-500
TG 0.50-7.35 45-650
HDL 0.38-2.60 15-100
LDL Calculated
Non-HDL Calculated
CHOL/HDL Calculated
Table 20 Measuring ranges for lipid tests
Sample type Capillary whole blood, venous whole blood with
anticoagulant (EDTA or heparin)
Sample size At least 2 μL
Interferences Refer to the HbA1c disc package insert
Table 21 Sample materials for HbA1c tests
CAUTION
Incorrect results due to using inappropriate anticoagulants
Using inappropriate anticoagulants may interfere with the reagents and lead to incorrect results.
o Do not use inappropriate anticoagulants.
Sample type Capillary whole blood, venous whole blood with
anticoagulant (EDTA), plasma with anticoagulant (EDTA)
Sample size At least 19 μL
Interferences Refer to the Lipid disc package insert
Table 22 Sample materials for lipid tests

Roche Diagnostics
Operator’s Manual · Version 1.0 169
cobas b 101 system
11.3 Further Information
11.3.1 Materials supplied by Roche
The following materials are available through Roche. For details contact your local Roche representative.
o cobas HbA1c Test
o cobas Lipid Panel
o cobas HbA1c Control
o cobas Lipid Control
11.3.2 Other materials
o Accu-Chek Safe-T-Pro Plus (single-use disposable lancets)
o Sani-Cloth Plus Germicidal Disposable Wipes
o Powder free gloves
o Cotton swabs
o Lint-free cloths
11.3.3 Accessories
11.3.4 Product limitations
For details on product data and limitations, refer to the information in the package insert supplied with each test disc.
Item Comment
External printer o TPL2824 (Zebra)
o CT-S281L (Citizen Systems)
o Printer paper and labels
Barcode scanner MS180-1UVG (Unitech corporation)
The barcode scanner must be able to read at least one of the following
barcode formats:
o Code 128 (ISO/IEC15417, JIS-X-0504)
o Code 93 (USS-CODE93)
o Code 39 (ISO/IEC16388, JIS-X-0503)
o Interleaved 2 of 5 (ISO/IEC16390,JIS-X-0505)
o codabar [NW-7] (ANSI/AIM BC3-1995, JIS-X-0506)
Make sure you use one of the above barcode formats for your
barcodes.
Base Unit Hub Required for stand-alone network connection.
Optical Check Disc Replacement disc if damaged or lost.
Table 23 Accessories

Roche Diagnostics
170 Operator’s Manual · Version 1.0
cobas b 101 system
11.3.5 Barcodes
Operator and patient IDbarcode masks
Acceptable characters You can use all characters from the on-screen keyboard, with the exception of characters with diacritic marks, for example: Á, Ç, É, Í, Ñ, Ó, Ú, Ü.
Effective scanning size 80 mm
Samples of recommendedbarcodes
Barcode mask character Definition
A-Z, 0-9 If not preceded by the Caret (“^”), the scan data character
must be the same as the mask character. This character is not
saved as part of the ID. If the characters are not the same, the
scan data is not a valid ID.
Dollar (“$”) The scan data character in this position is kept as part of the
ID.
Asterisk (“*“) The scan data character in this position is not kept as part of
the ID.
Tilde (“~”) The scan data character in this position must be a number, 0-
9, and it is not kept as part of the ID. If the scan data character
is not a number, the scan data is not a valid ID.
Plus (“+”) The scan data character in this position must be an alphabetic
character, A – Z, and it is not kept as part of the ID. If the scan
data character is not an alphabetic character, the scan data is
not a valid ID.
Caret (“^”) This mask character denotes that the scan data character
must be equal to the next character in the barcode mask after
the “^”, and that the scan data character is kept as part of the
ID. If the scan data character is not equal to the mask
character following the “^”, the barcode reading is invalid as
an ID.
Table 24 Barcode masks
Barcode Description
Codabar
(ANSI/AIM BC3-1995, JIS-X-0506)
Code 39
(ISO/IEC16388,JIS-X-0503)
Code 93
(USS-CODE93)
Table 25 Sample barcodes

Roche Diagnostics
Operator’s Manual · Version 1.0 171
cobas b 101 system
11.4 Warranty
The statutory guarantee provisions on rights in consumer goods sales in the country of purchase shall apply.
Code 128
(ISO/IEC15417,JIS-X-0504)
Interleaved 2 of 5
(ISO/IEC16390,JIS-X-0505)
Barcode Description
Table 25 Sample barcodes (Continued)

Roche Diagnostics
172 Operator’s Manual · Version 1.0
cobas b 101 system
11.5 Contact information for Roche
For all questions about the cobas b 101 system that are not answered in this operator’s manual, contact your Roche representative.
a To find your Roche contact details
1 Visit our website at www.roche.com.
2 Choose Roche Worldwide at the top of the page.
3 Choose your country to find the appropriate local office contact information.
The cobas b 101 system is manufactured for and distributed by:
In Canada:
Roche Diagnostics201 Boul. Armand-FrappierLaval, Québec (Canada) H7V 4A2Telephone (region of Montréal): (450) 686-7050Technical Support: Roche Care Center (toll free)1-877-273-3433www.rochediagnostics.ca
In the United States:
Roche Diagnostics9115 Hague RoadIndianapolis, IN 46256
In Australia:
Roche Diagnostics Australia Pty Limited
ABN 29 003 001 20531 Victoria AvenueCastle Hill, NSW, 2154

Roche Diagnostics
Operator’s Manual · Version 1.0 173
cobas b 101 system
12 Index
A
Abbreviations, 4Aborting a test, 125Acoustic signal– alarm, 46– key click, 46Adding– comments, 120– patient information, 106, 142Administrator, 63Alarm, 46Alarm signal, 46Altitude, maximum, 167Audit trail log, 51Auto Off, 47
B
backup data, 53Barcode scanner– cleaning, 154– operator information, 104– patient information, 107– recommended, 169Base unit hub, 48, 169Blood testing, general notes, 93BUH (base unit hub), 48Buttons, 20
C
Calibrating touch screen, 91Changing– comments, 41– normal ranges, 44– passwords, 67– patient information, 77Checking results– See Reviewing resultsCleaning– barcode scanner, 154– inside of instrument, 152– outside of instrument, 151Commenting, setup, 39Comments– adding to patient results, 120, 140– changing, 41– deleting, 41– sequence, 42– writing, 41Computers, connecting to, 48Conditions of operation, 16
Configuration– exporting, 52– importing, 53– initializing, 54– instrument, 31Configuring– See, DefiningConnecting the instrument, 26Connecting to external computer, 48Contacting Roche, 171Contrast, 87Control liquids, 128Control results– format, 84– not valid, 109, 156– reviewing, 145Control tests– liquid, 127– optical check, 134– performing, 127– performing (liquid), 129– performing (optical check), 134– when to perform, 128Customizing normal ranges, 44
D
Data interface, 167Data management system (DMS), 48Data of retired system, 53Date, 89Date format, 88Date of birth, 74Date, defining, 88Defining– administrators, 63– commenting, 39– comments, 41– date, 88– dual testing, 42– patient information, 72, 75– reporting parameters, 43– use of operator information., 58– users, 64Deleting– comments, 41– patient information, 78– users, 67Dimensions of instrument, 168Discs– applying sample, 113– overview, 19– preparing, 109

Roche Diagnostics
174 Operator’s Manual · Version 1.0
cobas b 101 system
Displaying results for a patient, 139Disposal of instrument, 15DMS (data management system), 48Dual testing, 102– defining, 42
E
Elements of instrument, 17Energy saving, 47Entering passwords, 62Error history, 54Error log, 52Expiry of passwords, 62Exporting– audit trail, 51– configuration, 52– error log, 52External printer, 169
F
Facility information, 90File names, formats, 50Finding results of patient, 139, 143Fingerstick, using, 111Formats– control results, 84– date, 88– file names, 50– time, 89
H
History, of generated messages, 54
I
Icons, 20– error messages, 22ID Entry, 58, 71IDs– operators, 56, 95Importing– configuration, 53– languages, 55– software, 54Information– facility, 90– operators, 102– patients, 51– system, 50Initializing configuration, 54Installation, 25Instrument– cleaning inside, 152
– cleaning outside, 151– configuring, 31– connecting, 26– dimensions, 168– elements, 17– overview, 17– setting up, 31– starting, 26– switching off, 29– unpacking, 25– weight, 168Intended use, 11
K
Key click, 46Keyboard, 32
L
Laboratory information– see Facility informationLanguages– choosing, 88– updating, 55Liquid control tests, 127– performing, 129Lockout– instrument, 81– operator, 80– optical check, 82logging on, 95Loudness of alarms, 46
M
Memory capacity, 167Messages– chronological list, 54– icons, 22
N
Normal ranges, changing, 44
O
Operating conditions, 16Operator IDs, 56– screen overview, 56Operator information– overview, 102– use, 58– using the barcode scanner, 104– using the operator list, 105– validating, 61

Roche Diagnostics
Operator’s Manual · Version 1.0 175
cobas b 101 system
Operator list, 64, 105Operator lockout, 80Optical check disc, 169Optical check lockout, 82Optical check, performing, 134Overview– disc, 19– instrument, 17– instrument setup, 33– operator information, 102– performing tests, 97
P
Parameters– defining, 43Passwords– changing, 67– entering, 62– expiry, 62Patient date of birth, working with or
without, 74Patient IDs, 69Patient information– adding, 106, 142– changing, 77– defining, 72, 75– deleting, 51, 78– using barcode scanner, 107– validation, 74– working with or without, 71Patient list, 75Patient names, working with or
without, 73Patient results– adding comments, 140– finding, 139, 143– printing, 123– reviewing, 138Patient tests– performing, 97, 116, 118– prerequisites, 93Performing– control tests, 127– liquid control tests, 129– optical control tests, 134– patient tests, 97, 116, 118Performing tests, overview, 97Placing the instrument, 25Power connections, 167Practice information– see Facility informationPreparing– discs, 109– instrument for testing, 94– samples, 96
Prerequisites for patient testing, 93Principles, 12Printer, 169Printing results, 123Proficiency test, 134
Q
QC– See also Control ...QC information discs, 128QC lockout, 81QC range, 85QC, built-in functions, 16
R
Ranges of controls, 85Relative humidity, 167Results– adding comments, 140– backup, 53– defining how they are reported, 43– finding for a patient, 139, 143– printing, 123– reviewing, 137– sorting, 39– units, 44Reviewing– control results, 145– patient results, 138– results, 137Roche, contacting, 171
S
Samples– applying to disc, 113– preparing, 96Screens– adjusting contrast, 87– configuration, 31– contrast, 87– setup, 31Sequence, comments, 42Setting up– See, DefiningSetup– instrument, 31– overview, 33– screens, 31Signals, alarm, 46Single testing, 102Software, updating, 54Sorting results, 39Specifications, 167

Roche Diagnostics
176 Operator’s Manual · Version 1.0
cobas b 101 system
Starting the instrument, 26STAT tests, working with or without,
83Switching off, 29Symbols used, 4System information, 50
T
Technical specifications, 167Test principles, 12Testing patient samples, 97Tests– aborting, 125– performing, 97Time, 90Time format, 89Touch screen– calibration, 91
U
Units used for results, 44Unpacking, 25Updating– languages, 55– software, 54Use of instrument, 11User identification, 95Users– defining, 64– deleting, 67Using fingerstick, 111
V
Validating– operator information, 61– patient information, 74Virtual keyboard, 32
W
Warranty, 173Weight of instrument, 168Writing comments, 41
Related Documents