CALCLOCK EXTREME Calcaneal Fracture Fixation System SURGICAL TECHNIQUE CLX Calcaneal Plate ™

Welcome message from author
This document is posted to help you gain knowledge. Please leave a comment to let me know what you think about it! Share it to your friends and learn new things together.
Transcript

CALCLOCK EXTREME
Calcaneal Fracture Fixation SystemSURGIC AL TECHNIQUE
CLX Calcaneal Plate
™
Table of Contents
Indications for Use 3
Key Design Features 3
Contraindications 3
Preoperative Planning 3
Surgical Technique 4
Implants and Instruments 10
Contents
Proper surgical procedures and techniques are the responsibility of the medical professional. The following guidelines are furnished for information purposes only. Each surgeon must evaluate the appropriateness of the procedures based on his or her personal medical training and experience. Prior to use of the system, the surgeon should refer to the product package insert for complete warnings, precautions, indications, contraindications and adverse effects. Package inserts are also available by contacting Wright Medical Technology, Inc.
2
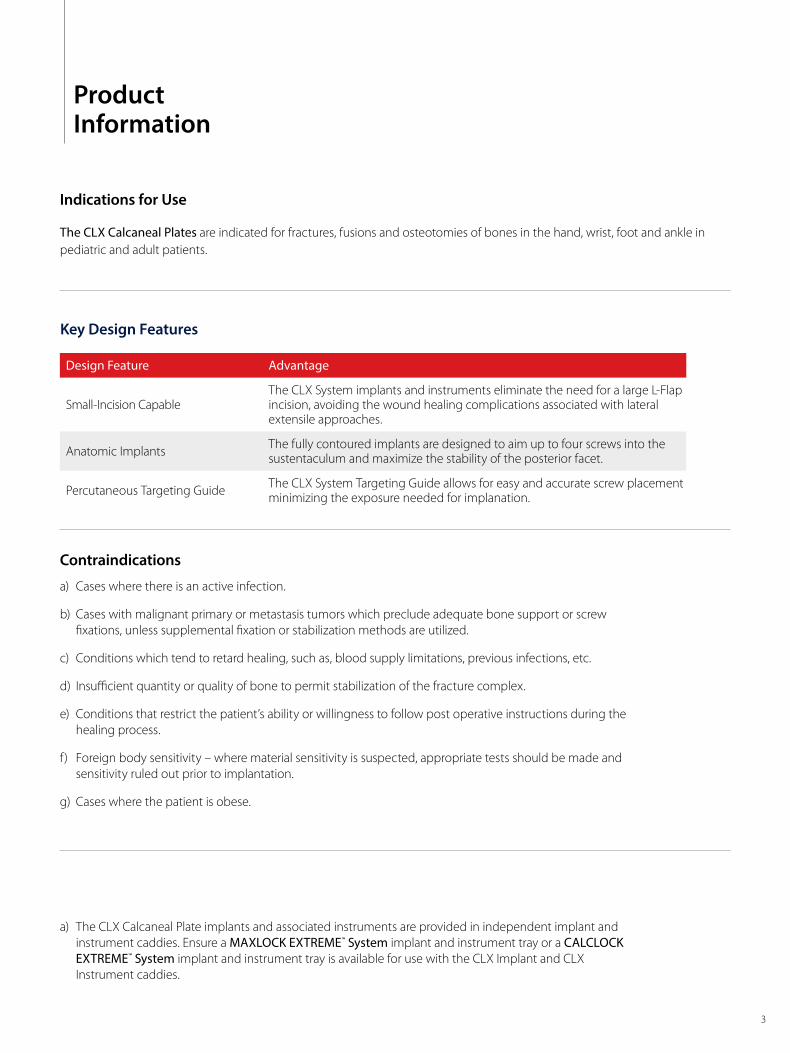
Indications for Use
The CLX Calcaneal Plates are indicated for fractures, fusions and osteotomies of bones in the hand, wrist, foot and ankle in pediatric and adult patients.
Contraindications
a) Cases where there is an active infection.
b) Cases with malignant primary or metastasis tumors which preclude adequate bone support or screw fixations, unless supplemental fixation or stabilization methods are utilized.
c) Conditions which tend to retard healing, such as, blood supply limitations, previous infections, etc.
d) Insufficient quantity or quality of bone to permit stabilization of the fracture complex.
e) Conditions that restrict the patient’s ability or willingness to follow post operative instructions during the healing process.
f) Foreign body sensitivity – where material sensitivity is suspected, appropriate tests should be made and sensitivity ruled out prior to implantation.
g) Cases where the patient is obese.
a) The CLX Calcaneal Plate implants and associated instruments are provided in independent implant and instrument caddies. Ensure a MAXLOCK EXTREME™ System implant and instrument tray or a CALCLOCK EXTREME™ System implant and instrument tray is available for use with the CLX Implant and CLX Instrument caddies.
Design Feature Advantage
Small-Incision CapableThe CLX System implants and instruments eliminate the need for a large L-Flap incision, avoiding the wound healing complications associated with lateral extensile approaches.
Anatomic Implants The fully contoured implants are designed to aim up to four screws into the sustentaculum and maximize the stability of the posterior facet.
Percutaneous Targeting Guide The CLX System Targeting Guide allows for easy and accurate screw placement minimizing the exposure needed for implanation.
Key Design Features
3
ProductInformation
4
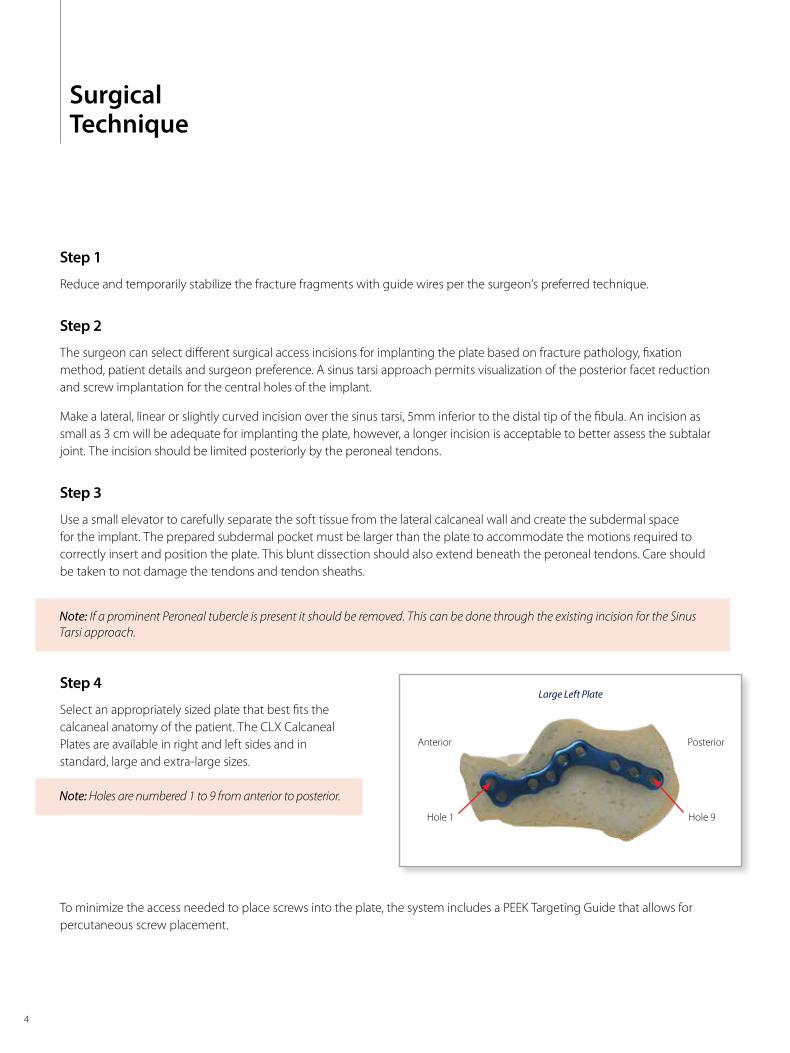
Step 4
Select an appropriately sized plate that best fits the calcaneal anatomy of the patient. The CLX Calcaneal Plates are available in right and left sides and in standard, large and extra-large sizes.
Note: If a prominent Peroneal tubercle is present it should be removed. This can be done through the existing incision for the Sinus Tarsi approach.
Note: Holes are numbered 1 to 9 from anterior to posterior.
Large Left Plate
Anterior Posterior
Hole 1 Hole 9
To minimize the access needed to place screws into the plate, the system includes a PEEK Targeting Guide that allows for percutaneous screw placement.
Step 1
Reduce and temporarily stabilize the fracture fragments with guide wires per the surgeon’s preferred technique.
Step 2
The surgeon can select different surgical access incisions for implanting the plate based on fracture pathology, fixation method, patient details and surgeon preference. A sinus tarsi approach permits visualization of the posterior facet reduction and screw implantation for the central holes of the implant.
Make a lateral, linear or slightly curved incision over the sinus tarsi, 5mm inferior to the distal tip of the fibula. An incision as small as 3 cm will be adequate for implanting the plate, however, a longer incision is acceptable to better assess the subtalar joint. The incision should be limited posteriorly by the peroneal tendons.
Step 3
Use a small elevator to carefully separate the soft tissue from the lateral calcaneal wall and create the subdermal space for the implant. The prepared subdermal pocket must be larger than the plate to accommodate the motions required to correctly insert and position the plate. This blunt dissection should also extend beneath the peroneal tendons. Care should be taken to not damage the tendons and tendon sheaths.
SurgicalTechnique
5
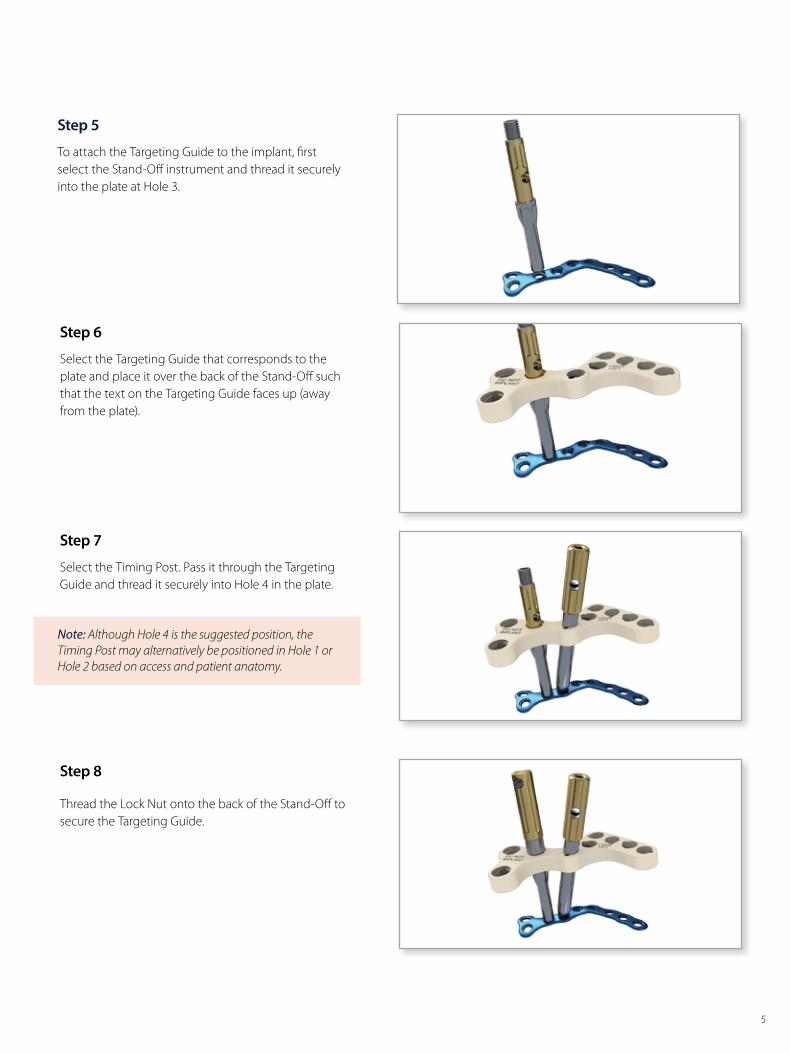
Step 6
Select the Targeting Guide that corresponds to the plate and place it over the back of the Stand-Off such that the text on the Targeting Guide faces up (away from the plate).
Step 7
Select the Timing Post. Pass it through the Targeting Guide and thread it securely into Hole 4 in the plate.
Step 8
Thread the Lock Nut onto the back of the Stand-Off to secure the Targeting Guide.
Note: Although Hole 4 is the suggested position, the Timing Post may alternatively be positioned in Hole 1 or Hole 2 based on access and patient anatomy.
Step 5
To attach the Targeting Guide to the implant, first select the Stand-Off instrument and thread it securely into the plate at Hole 3.
6
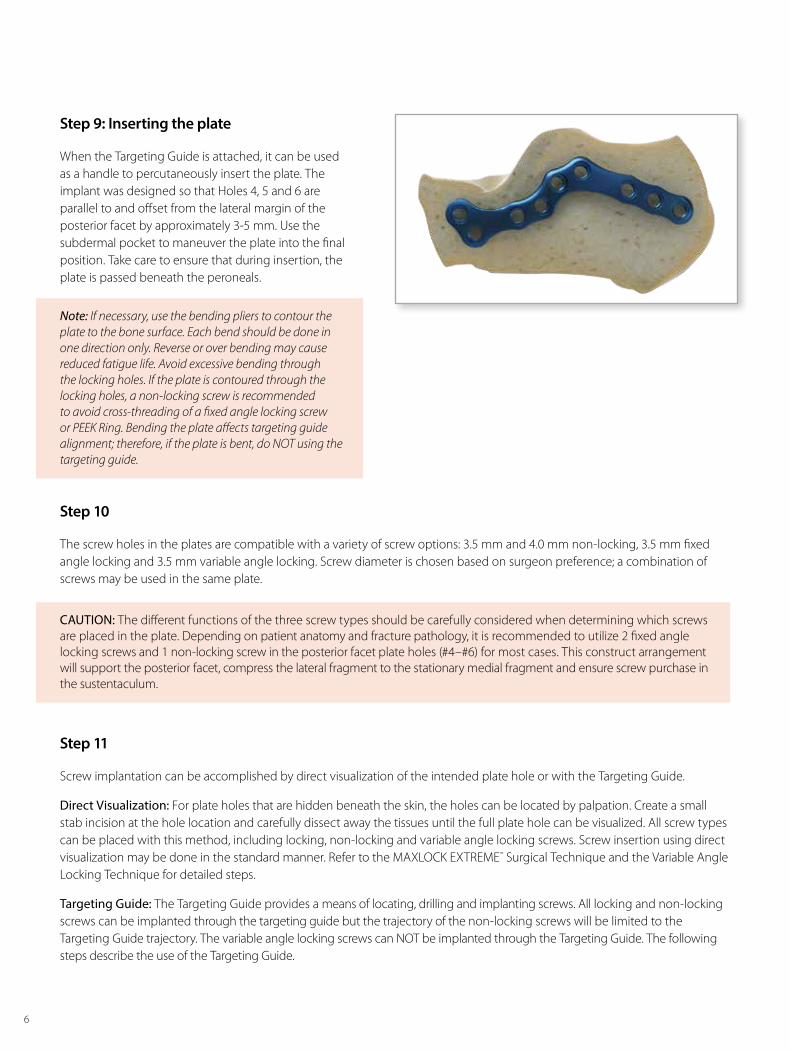
Step 9: Inserting the plate
When the Targeting Guide is attached, it can be used as a handle to percutaneously insert the plate. The implant was designed so that Holes 4, 5 and 6 are parallel to and offset from the lateral margin of the posterior facet by approximately 3-5 mm. Use the subdermal pocket to maneuver the plate into the final position. Take care to ensure that during insertion, the plate is passed beneath the peroneals.
Note: If necessary, use the bending pliers to contour the plate to the bone surface. Each bend should be done in one direction only. Reverse or over bending may cause reduced fatigue life. Avoid excessive bending through the locking holes. If the plate is contoured through the locking holes, a non-locking screw is recommended to avoid cross-threading of a fixed angle locking screw or PEEK Ring. Bending the plate affects targeting guide alignment; therefore, if the plate is bent, do NOT using the targeting guide.
CAUTION: The different functions of the three screw types should be carefully considered when determining which screws are placed in the plate. Depending on patient anatomy and fracture pathology, it is recommended to utilize 2 fixed angle locking screws and 1 non-locking screw in the posterior facet plate holes (#4–#6) for most cases. This construct arrangement will support the posterior facet, compress the lateral fragment to the stationary medial fragment and ensure screw purchase in the sustentaculum.
Step 10
The screw holes in the plates are compatible with a variety of screw options: 3.5 mm and 4.0 mm non-locking, 3.5 mm fixed angle locking and 3.5 mm variable angle locking. Screw diameter is chosen based on surgeon preference; a combination of screws may be used in the same plate.
Step 11
Screw implantation can be accomplished by direct visualization of the intended plate hole or with the Targeting Guide.
Direct Visualization: For plate holes that are hidden beneath the skin, the holes can be located by palpation. Create a small stab incision at the hole location and carefully dissect away the tissues until the full plate hole can be visualized. All screw types can be placed with this method, including locking, non-locking and variable angle locking screws. Screw insertion using direct visualization may be done in the standard manner. Refer to the MAXLOCK EXTREME™ Surgical Technique and the Variable Angle Locking Technique for detailed steps.
Targeting Guide: The Targeting Guide provides a means of locating, drilling and implanting screws. All locking and non-locking screws can be implanted through the targeting guide but the trajectory of the non-locking screws will be limited to the Targeting Guide trajectory. The variable angle locking screws can NOT be implanted through the Targeting Guide. The following steps describe the use of the Targeting Guide.
7
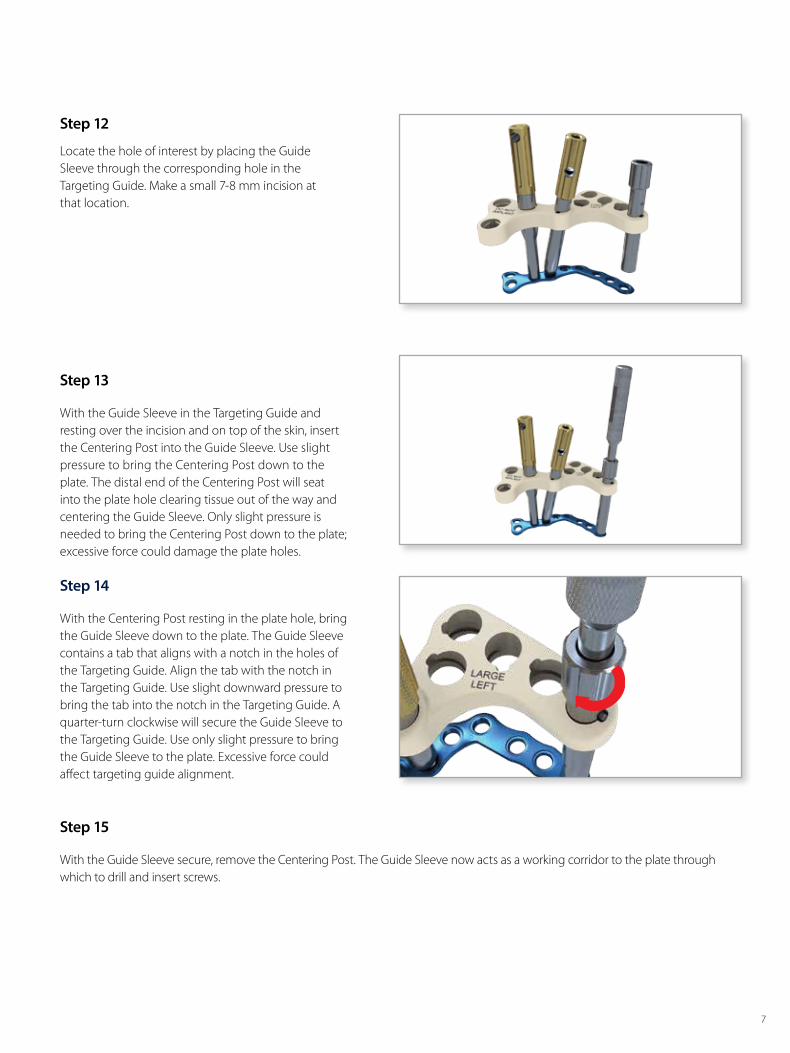
Step 12
Locate the hole of interest by placing the Guide Sleeve through the corresponding hole in the Targeting Guide. Make a small 7-8 mm incision at that location.
Step 13
With the Guide Sleeve in the Targeting Guide and resting over the incision and on top of the skin, insert the Centering Post into the Guide Sleeve. Use slight pressure to bring the Centering Post down to the plate. The distal end of the Centering Post will seat into the plate hole clearing tissue out of the way and centering the Guide Sleeve. Only slight pressure is needed to bring the Centering Post down to the plate; excessive force could damage the plate holes.
Step 14
With the Centering Post resting in the plate hole, bring the Guide Sleeve down to the plate. The Guide Sleeve contains a tab that aligns with a notch in the holes of the Targeting Guide. Align the tab with the notch in the Targeting Guide. Use slight downward pressure to bring the tab into the notch in the Targeting Guide. A quarter-turn clockwise will secure the Guide Sleeve to the Targeting Guide. Use only slight pressure to bring the Guide Sleeve to the plate. Excessive force could affect targeting guide alignment.
Step 15
With the Guide Sleeve secure, remove the Centering Post. The Guide Sleeve now acts as a working corridor to the plate through which to drill and insert screws.

8
Step 16
Insert the CLX Drill Guide through the Guide Sleeve and thread into the plate hole.
Step 17
Use the CLX 2.4 mm Drill Bit (magenta) or CLX 2.7 mm Drill Bit (aqua color) to drill for the desired screw. The 2.4mm Drill Bit is intended for use with 3.5 mm diameter locking or non-locking screws (magenta). The 2.7 mm Drill Bit is intended for use with the 4.0 mm non-locking screws (aqua).
Note: Take care not to drill excessively past the distal cortex as the posterior tibial nerve could be injured.
Step 18
Screw length can be determined from the measurement scale on the drill bit. Alternatively, use the CLX Depth Gauge through the Drill Guide to determine screw length. Screw length measurements are read from the top face of the CLX Drill Guide.
Step 19
Remove the Drill Guide.
9
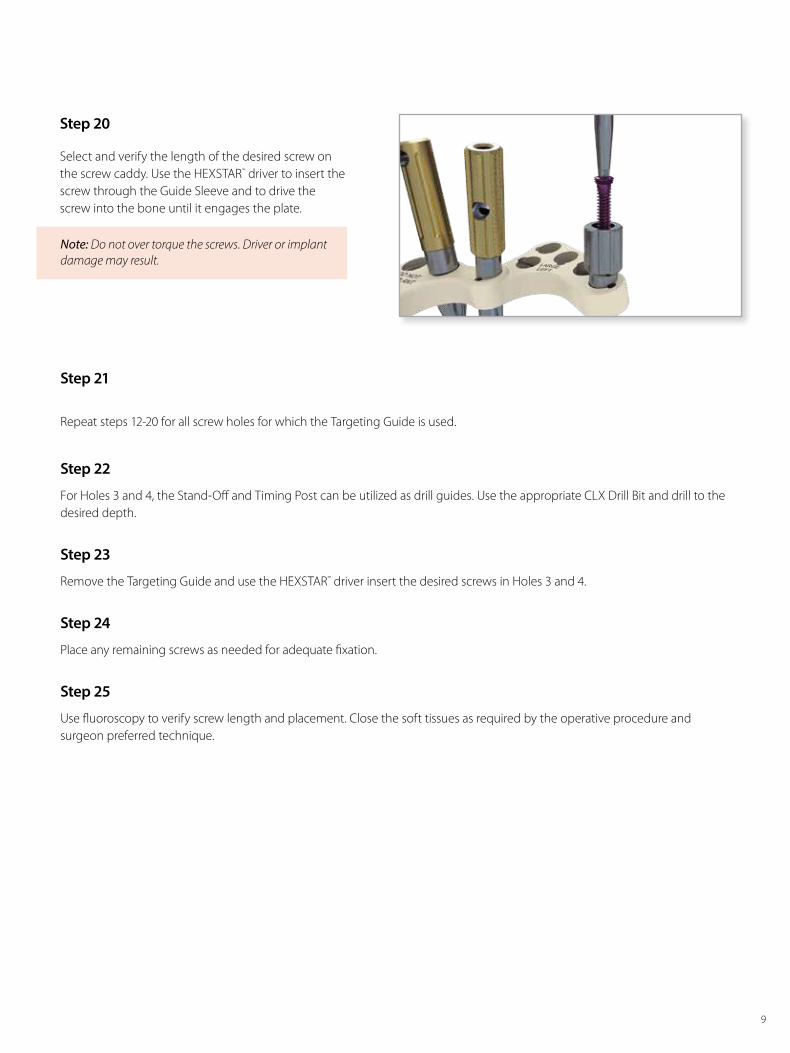
Step 20
Select and verify the length of the desired screw on the screw caddy. Use the HEXSTAR™ driver to insert the screw through the Guide Sleeve and to drive the screw into the bone until it engages the plate.
Note: Do not over torque the screws. Driver or implant damage may result.
Step 21
Repeat steps 12-20 for all screw holes for which the Targeting Guide is used.
Step 22
For Holes 3 and 4, the Stand-Off and Timing Post can be utilized as drill guides. Use the appropriate CLX Drill Bit and drill to the desired depth.
Step 23
Remove the Targeting Guide and use the HEXSTAR™ driver insert the desired screws in Holes 3 and 4.
Step 24
Place any remaining screws as needed for adequate fixation.
Step 25
Use fluoroscopy to verify screw length and placement. Close the soft tissues as required by the operative procedure and surgeon preferred technique.
10
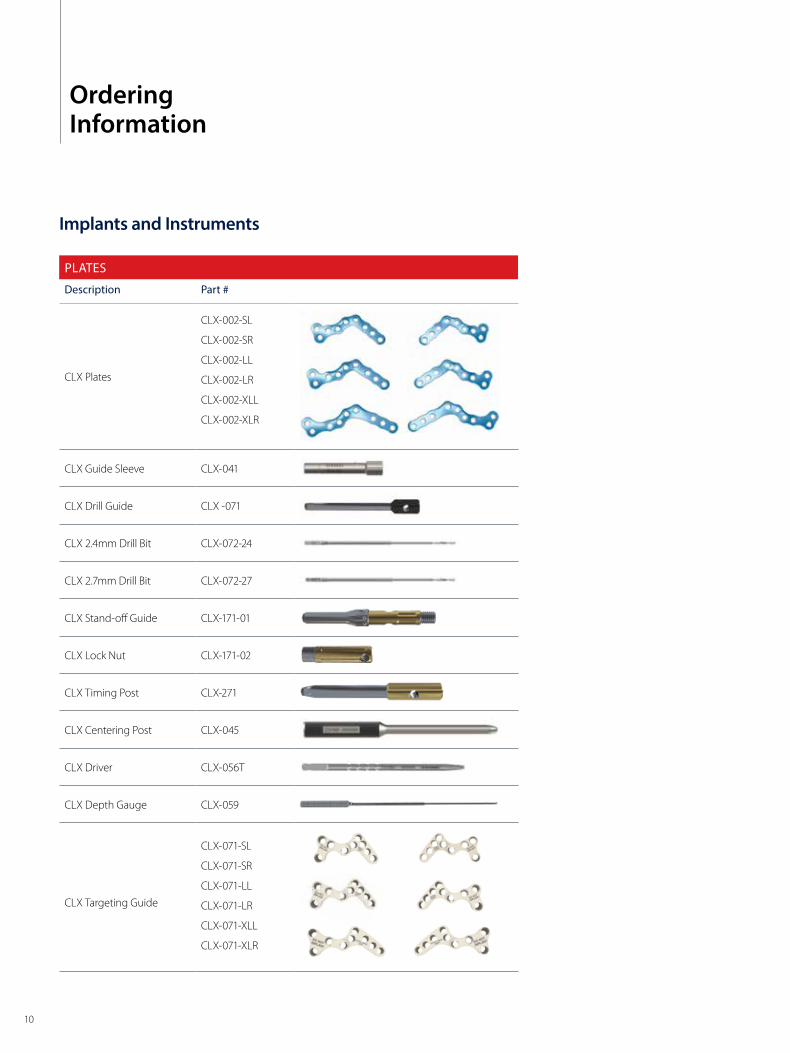
Implants and Instruments
PLATES
Description Part #
CLX Plates
CLX-002-SL
CLX-002-SR
CLX-002-LL
CLX-002-LR
CLX-002-XLL
CLX-002-XLR
CLX Guide Sleeve CLX-041
CLX Drill Guide CLX -071
CLX 2.4mm Drill Bit CLX-072-24
CLX 2.7mm Drill Bit CLX-072-27
CLX Stand-off Guide CLX-171-01
CLX Lock Nut CLX-171-02
CLX Timing Post CLX-271
CLX Centering Post CLX-045
CLX Driver CLX-056T
CLX Depth Gauge CLX-059
CLX Targeting Guide
CLX-071-SL
CLX-071-SR
CLX-071-LL
CLX-071-LR
CLX-071-XLL
CLX-071-XLR
OrderingInformation

11
Notes

CALCLOCK™, EXTREME™, HEXSTAR™ and MAXLOCK™, are trademarks or registered trademarks of Orthohelix Surgical Designs Inc. in the U. S. and other countries. ™Trademarks and ®Registered marks of Wright Medical Technology, Inc.©2016 Wright Medical Technology, Inc. All Rights Reserved. CLX-801-001 Rev A ECN 160155 11-Jan-2016
1023 Cherry RoadMemphis, TN 38117800 238 7117901 867 9971www.wright.com
10801 Nesbitt Avenue SouthBloomington, MN 55437888 867 6437952 426 7600www.tornier-us.com
Related Documents