CloverETL Server Reference Manual

Welcome message from author
This document is posted to help you gain knowledge. Please leave a comment to let me know what you think about it! Share it to your friends and learn new things together.
Transcript
CloverETL ServerReference Manual
CloverETL Server: Reference ManualThis Reference Manual refers to CloverETL Server 4.8.x release.
Copyright © 2018 Javlin, a.s. All rights reserved.
Javlin
www.cloveretl.com
www.javlininc.com
Feedback welcome:
If you have any comments or suggestions for this documentation, please send them by e-mail [email protected].
Consider How to speed up communication with CloverCARE support before contacting the support.
iii
Table of ContentsI. CloverETL Server ...................................................................................................................... 1
1. What is CloverETL Server? ................................................................................................ 2II. Installation Instructions .............................................................................................................. 4
2. System Requirements for CloverETL Server .......................................................................... 53. Installing .......................................................................................................................... 8
Evaluation Server ........................................................................................................ 10Installation ......................................................................................................... 10
Production Server ........................................................................................................ 13Apache Tomcat ................................................................................................... 14Jetty .................................................................................................................. 20IBM WebSphere ................................................................................................. 24GlassFish / Sun Java System Application Server ....................................................... 28JBoss Application Server ...................................................................................... 31JBoss Enterprise Application Platform .................................................................... 36Oracle WebLogic Server ...................................................................................... 42
CloverETL Server Activation ........................................................................................ 46CloverETL Server Activation Alternatives ............................................................... 48
IBM InfoSphere MDM Plugin Installation ....................................................................... 49Installation into Server ......................................................................................... 49
Possible Issues during Installation .................................................................................. 514. Postinstallation Configuration ............................................................................................ 56
Memory Settings ......................................................................................................... 56Maximum Number of Open Files ................................................................................... 58Firewall Exceptions ..................................................................................................... 58
5. Upgrading Server to Newer Version ................................................................................... 59III. Configuration ........................................................................................................................ 61
6. Configuration Sources and Their Priorities ........................................................................... 62Configuration Sources .................................................................................................. 62
Environment Variables ......................................................................................... 62System Properties ................................................................................................ 62Properties File on Default Location ........................................................................ 62Properties File on Specified Location ...................................................................... 62Modification of Context Parameters in web.xml ........................................................ 62Context Parameters (Available on Apache Tomcat) ................................................... 63
Priorities of Configuration Sources ................................................................................. 637. Setup ............................................................................................................................. 64
Using Setup ............................................................................................................... 64Setup Tabs ......................................................................................................... 66
8. Examples of DB Connection Configuration .......................................................................... 72Embedded Apache Derby ............................................................................................. 73MySQL ..................................................................................................................... 74
Creating database ................................................................................................ 74CloverETL setup ................................................................................................. 74
DB2 .......................................................................................................................... 75Creating database ................................................................................................ 75DB2 on Linux/Windows ....................................................................................... 75DB2 on AS/400 .................................................................................................. 77
Oracle ....................................................................................................................... 78Creating database ................................................................................................ 78CloverETL setup ................................................................................................. 78
Microsoft SQL Server .................................................................................................. 79Creating database ................................................................................................ 79CloverETL setup ................................................................................................. 79
Postgre SQL ............................................................................................................... 81Creating database ................................................................................................ 81
CloverETL Server
iv
CloverETL setup ................................................................................................. 81JNDI DB DataSource ................................................................................................... 82Encrypted JNDI .......................................................................................................... 84
9. List of Properties ............................................................................................................. 9010. Secure Configuration Properties ........................................................................................ 9711. Logging ...................................................................................................................... 101
IV. Administration ..................................................................................................................... 10312. Temp Space Management .............................................................................................. 104
Overview ................................................................................................................. 104Management ............................................................................................................. 105
13. Secure Parameters ........................................................................................................ 11014. Users and Groups ......................................................................................................... 114
LDAP Authentication ................................................................................................. 115Users ....................................................................................................................... 118Groups ..................................................................................................................... 121User Lockout ............................................................................................................ 132
15. Server Side Job Files - Sandboxes ................................................................................... 135Referencing Files from the ETL Graph or Jobflow .......................................................... 137Sandbox Content Security and Permissions .................................................................... 138Sandbox Content ....................................................................................................... 139
Download sandbox as ZIP ................................................................................... 139Upload ZIP to sandbox ....................................................................................... 140
Job Config Properties ................................................................................................. 143WebDAV Access to Sandboxes ................................................................................... 146
WebDAV Clients .............................................................................................. 146WebDAV Authentication/Authorization ................................................................. 146
16. CloverETL Server Monitoring ....................................................................................... 148Standalone Server Detail ............................................................................................. 148Cluster Overview ....................................................................................................... 153Node Detail .............................................................................................................. 154Server Logs .............................................................................................................. 155
17. Server Configuration Migration ....................................................................................... 156Server Configuration Export ........................................................................................ 157Server Configuration Import ........................................................................................ 158
18. Diagnostics ................................................................................................................. 162V. Using Graphs ....................................................................................................................... 163
19. Graph/Jobflow Parameters ............................................................................................. 164Parameters by Execution Type ..................................................................................... 165
Executed from Web GUI .................................................................................... 165Executed by Launch Service Invocation ................................................................. 165Executed by HTTP API Run Graph Operation Invocation ......................................... 165Executed by RunGraph Component ...................................................................... 165Executed by WS API Method executeGraph Invocation ............................................ 165Executed by Task "graph execution" by Scheduler ................................................... 165Executed from JMS Listener ............................................................................... 165Executed by Task "Start a graph" by Graph/Jobflow Event Listener ............................ 165Executed by Task "graph execution" by File Event Listener ....................................... 166
Adding Another Graph Parameters ............................................................................... 167Additional "Graph Config Parameters" .................................................................. 167Task "execute_graph" Parameters ......................................................................... 167
20. Tasks ......................................................................................................................... 168Send an Email .......................................................................................................... 169
Placeholders ...................................................................................................... 170Execute Shell Command ............................................................................................. 173Start a Graph ............................................................................................................ 176Start a Jobflow .......................................................................................................... 178Start a Profiler Job ..................................................................................................... 179Abort job ................................................................................................................. 180

CloverETL Server
v
Archive Records ........................................................................................................ 181Send a JMS Message ................................................................................................. 183Execute Groovy Code ................................................................................................ 186
21. Manual Task Execution ................................................................................................. 18822. Scheduling .................................................................................................................. 189
Timetable Setting ...................................................................................................... 190Allocations of Scheduled Task on Nodes ....................................................................... 195Scheduling the Tasks - Examples ................................................................................. 196
Start a graph at specific time ............................................................................... 196Start a Jobflow once an hour ............................................................................... 196Complex Scheduling .......................................................................................... 196
23. Viewing Job Runs - Executions History ........................................................................... 197Filtering and ordering ................................................................................................. 197
24. Listeners ..................................................................................................................... 200Graph Event Listeners ................................................................................................ 202
Graph Events .................................................................................................... 202Listener ............................................................................................................ 203Tasks ............................................................................................................... 204Use Cases ........................................................................................................ 204
Jobflow Event Listeners .............................................................................................. 209Jobflow Events .................................................................................................. 209Listener ............................................................................................................ 210Tasks ............................................................................................................... 210
JMS Messages Listeners ............................................................................................. 212Universal Event Listeners ........................................................................................... 217
Evaluation Criteria ............................................................................................. 217File Event Listeners (remote and local) ......................................................................... 219
Cluster environment ........................................................................................... 220Supported filesystems and protocols ...................................................................... 221Observed file .................................................................................................... 222File Events ....................................................................................................... 223Check Interval, Task and Use Cases ..................................................................... 223Howtos ............................................................................................................ 224
Task Failure Listeners ................................................................................................ 226Task Choice ..................................................................................................... 226Task Failed E-mail Template ............................................................................... 227
25. Recommendations for Transformations Developers ............................................................. 22826. Extensibility - CloverETL Engine Plugins ......................................................................... 22927. Troubleshooting ........................................................................................................... 230
VI. API .................................................................................................................................... 23128. Simple HTTP API ........................................................................................................ 23229. JMX mBean ................................................................................................................ 243
JMX Configuration .................................................................................................... 243Operations ................................................................................................................ 245
30. SOAP WebService API ................................................................................................. 246SOAP WS Client ....................................................................................................... 246SOAP WS API Authentication/Authorization .................................................................. 246
31. Launch Services ........................................................................................................... 247Launch Services Authentication ................................................................................... 252Sending the Data to Launch Service ............................................................................. 252Results of the Graph Execution .................................................................................... 252
32. Data Services .............................................................................................................. 254Overview ................................................................................................................. 254User Interface ........................................................................................................... 255
Endpoints ......................................................................................................... 255List of Data Services .......................................................................................... 256Detail .............................................................................................................. 257Testing and Documentation ................................................................................. 258

CloverETL Server
vi
State and History ............................................................................................... 258Alerts and Notification ....................................................................................... 259Configuration .................................................................................................... 261Catalog of Services ............................................................................................ 262Built-in Data Service Examples ............................................................................ 262HTTPS Connectors ............................................................................................ 263
Using Data Services ................................................................................................... 266Deploying Data Service ...................................................................................... 266Publishing and unpublishing Data Service from Sandbox .......................................... 266Publishing Data Service examples ........................................................................ 267Changing Data Service to Anonymous .................................................................. 267Running Data Service on HTTPS ......................................................................... 268Running Data Service on HTTPS on Cluster .......................................................... 269Monitoring the Data Service ................................................................................ 270Testing the Data Service ..................................................................................... 270Performance Tuning ........................................................................................... 272Exporting Data Service configuration .................................................................... 273Importing Data Service configuration .................................................................... 273Avoiding premature marking Data Service as failing ................................................ 273Looking up particular Data Service ....................................................................... 273Reseting state of failing Data Service endpoint ........................................................ 274
Custom HTTP Headers ............................................................................................... 27533. CloverETL Server API Extensibility ................................................................................ 276
Groovy Code API ...................................................................................................... 276Variables Accessible in the Groovy Code .............................................................. 276Code Examples ................................................................................................. 277
VII. Cluster .............................................................................................................................. 27834. Clustering Features ....................................................................................................... 279
High Availability ....................................................................................................... 279Scalability ................................................................................................................ 279
Transformation Requests ..................................................................................... 280Parallel Data Processing ..................................................................................... 280
Graph Allocation Examples ......................................................................................... 286Example of Distributed Execution ................................................................................ 287
Details of the Example Transformation Design ....................................................... 287Scalability of the Example Transformation ............................................................. 290
35. Cluster Configuration .................................................................................................... 292Mandatory Properties ................................................................................................. 293Optional Properties .................................................................................................... 295Example of 2 Node Cluster Configuration ...................................................................... 298
Basic 2-nodes Cluster Configuration ..................................................................... 2982-nodes Cluster with Proxied Access to Database .................................................... 2992-nodes cluster with load balancer ........................................................................ 300
Jobs Load Balancing Properties .................................................................................... 301Running More Clusters ............................................................................................... 302Cluster Reliability in Unreliable Network Environment .................................................... 303
NodeA Cannot Establish HTTP Connection to NodeB .............................................. 303NodeA Cannot Establish TCP Connection (Port 7800 by Default) to NodeB .................. 303NodeB is Killed or It Cannot Connect to the Database .............................................. 304Auto-Resuming in Unreliable Network .................................................................. 304Long-Term Network Malfunction May Cause Jobs to Hang on ................................... 305
36. Recommendations for Cluster Deployment ........................................................................ 30637. Multiple CloverServer Instances on the same Host ............................................................. 307
VIII. Security ............................................................................................................................ 30838. Security Recommendations for CloverETL Server .............................................................. 309

Part I. CloverETL Server
2
Chapter 1. What is CloverETL Server?The CloverETL Server is an enterprise runtime, monitoring, and automation platform for the CloverETL dataintegration suite. It provides the necessary tools to deploy, monitor, schedule, integrate, and automate dataintegration processes in large scale and complex projects.
CloverETL Server's HTTP and SOAP Web Services APIs provide additional automation control for integratingthe CloverETL Server into existing application portfolios and processes.
The CloverETL Server is a Java application built to J2EE standards. We support a wide range of applicationservers including Apache Tomcat, Jetty, IBM WebSphere, Sun Glassfish, JBoss AS, and Oracle WebLogic.
Chapter 1. What isCloverETL Server?
3
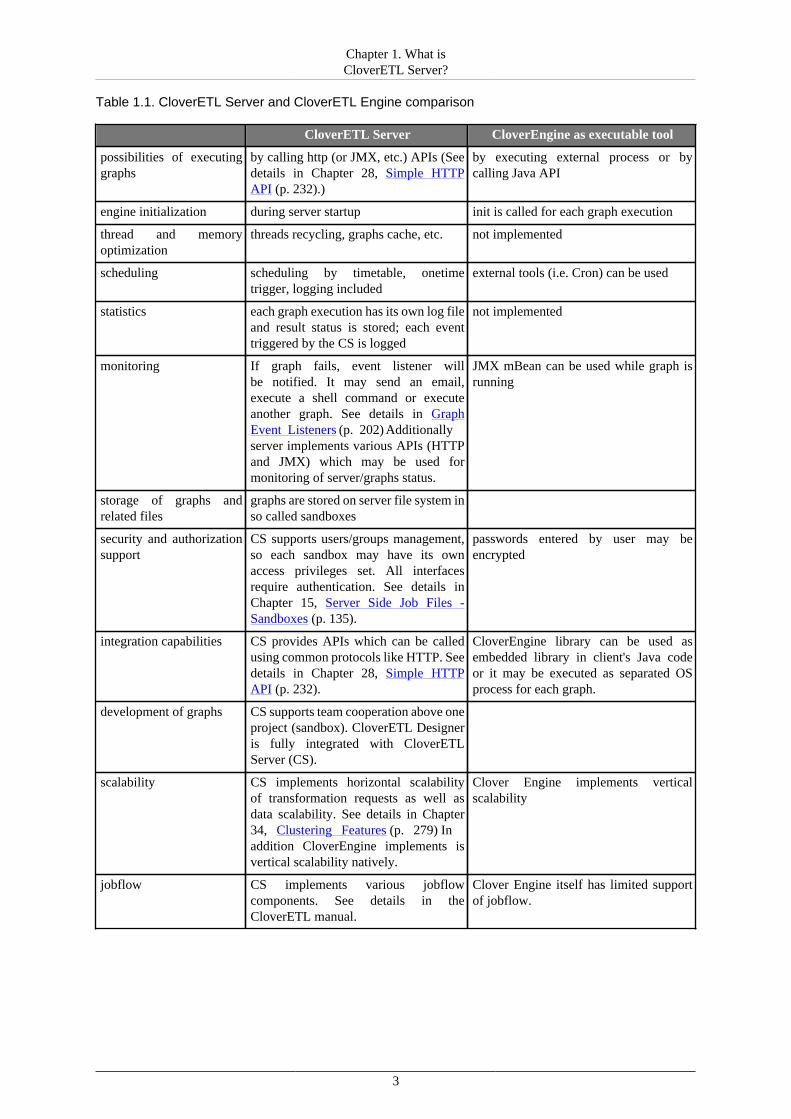
Table 1.1. CloverETL Server and CloverETL Engine comparison
CloverETL Server CloverEngine as executable tool
possibilities of executinggraphs
by calling http (or JMX, etc.) APIs (Seedetails in Chapter 28, Simple HTTPAPI (p. 232).)
by executing external process or bycalling Java API
engine initialization during server startup init is called for each graph execution
thread and memoryoptimization
threads recycling, graphs cache, etc. not implemented
scheduling scheduling by timetable, onetimetrigger, logging included
external tools (i.e. Cron) can be used
statistics each graph execution has its own log fileand result status is stored; each eventtriggered by the CS is logged
not implemented
monitoring If graph fails, event listener willbe notified. It may send an email,execute a shell command or executeanother graph. See details in GraphEvent Listeners (p. 202). Additionallyserver implements various APIs (HTTPand JMX) which may be used formonitoring of server/graphs status.
JMX mBean can be used while graph isrunning
storage of graphs andrelated files
graphs are stored on server file system inso called sandboxes
security and authorizationsupport
CS supports users/groups management,so each sandbox may have its ownaccess privileges set. All interfacesrequire authentication. See details inChapter 15, Server Side Job Files -Sandboxes (p. 135).
passwords entered by user may beencrypted
integration capabilities CS provides APIs which can be calledusing common protocols like HTTP. Seedetails in Chapter 28, Simple HTTPAPI (p. 232).
CloverEngine library can be used asembedded library in client's Java codeor it may be executed as separated OSprocess for each graph.
development of graphs CS supports team cooperation above oneproject (sandbox). CloverETL Designeris fully integrated with CloverETLServer (CS).
scalability CS implements horizontal scalabilityof transformation requests as well asdata scalability. See details in Chapter34, Clustering Features (p. 279) Inaddition CloverEngine implements isvertical scalability natively.
Clover Engine implements verticalscalability
jobflow CS implements various jobflowcomponents. See details in theCloverETL manual.
Clover Engine itself has limited supportof jobflow.

Part II. Installation Instructions
5
Chapter 2. System Requirements for CloverETLServerCloverETL Server is a Java application distributed as a web application archive (.war) for an easy deployment onvarious application servers. It is compatible with Windows and Unix-like systems as well as several other operatingsystems. Since it is a Java application, it requires Java Development Kit (JDK) to run. We do not recommendusing Java Runtime Environment (JRE) only, since compilation of some CloverETL Server's transformationsrequires JDK to function properly.
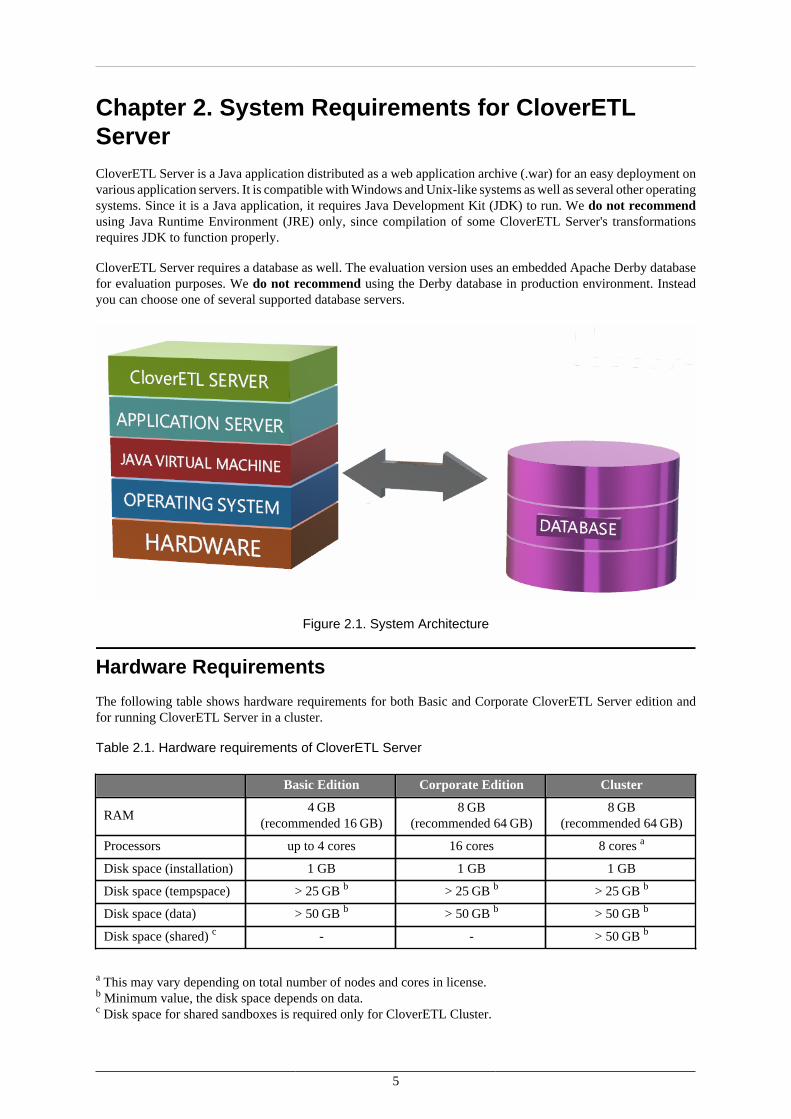
CloverETL Server requires a database as well. The evaluation version uses an embedded Apache Derby databasefor evaluation purposes. We do not recommend using the Derby database in production environment. Insteadyou can choose one of several supported database servers.
Figure 2.1. System Architecture
Hardware Requirements
The following table shows hardware requirements for both Basic and Corporate CloverETL Server edition andfor running CloverETL Server in a cluster.
Table 2.1. Hardware requirements of CloverETL Server
Basic Edition Corporate Edition Cluster
RAM4 GB
(recommended 16 GB)8 GB
(recommended 64 GB)8 GB
(recommended 64 GB)
Processors up to 4 cores 16 cores 8 cores a
Disk space (installation) 1 GB 1 GB 1 GB
Disk space (tempspace) > 25 GB b > 25 GB b > 25 GB b
Disk space (data) > 50 GB b > 50 GB b > 50 GB b
Disk space (shared) c - - > 50 GB b
a This may vary depending on total number of nodes and cores in license.b Minimum value, the disk space depends on data.c Disk space for shared sandboxes is required only for CloverETL Cluster.
Chapter 2. System Requirementsfor CloverETL Server
6
Software Requirements
Operating systemCloverETL server is compatible with Windows and Unix-based systems, as well as with other systems supportingJava (Mac OS X, IBM System, etc.).
Java Virtual Machine
• Oracle JDK 7/8 32/64 bit• IBM SDK 7 (for IBM WebSphere only)
Application Server
• Apache Tomcat 7 or 8 or 9 (p. 14)• Jetty 9.1 (p. 20)• IBM WebSphere 8.5 (p. 24)• Glassfish 3.1 (p. 28)• JBoss 6 or 7 (p. 31)• Oracle WebLogic 11g (10.3.6) or 12c (12.1.2 or 12.1.3) 32/64 bit (p. 42)
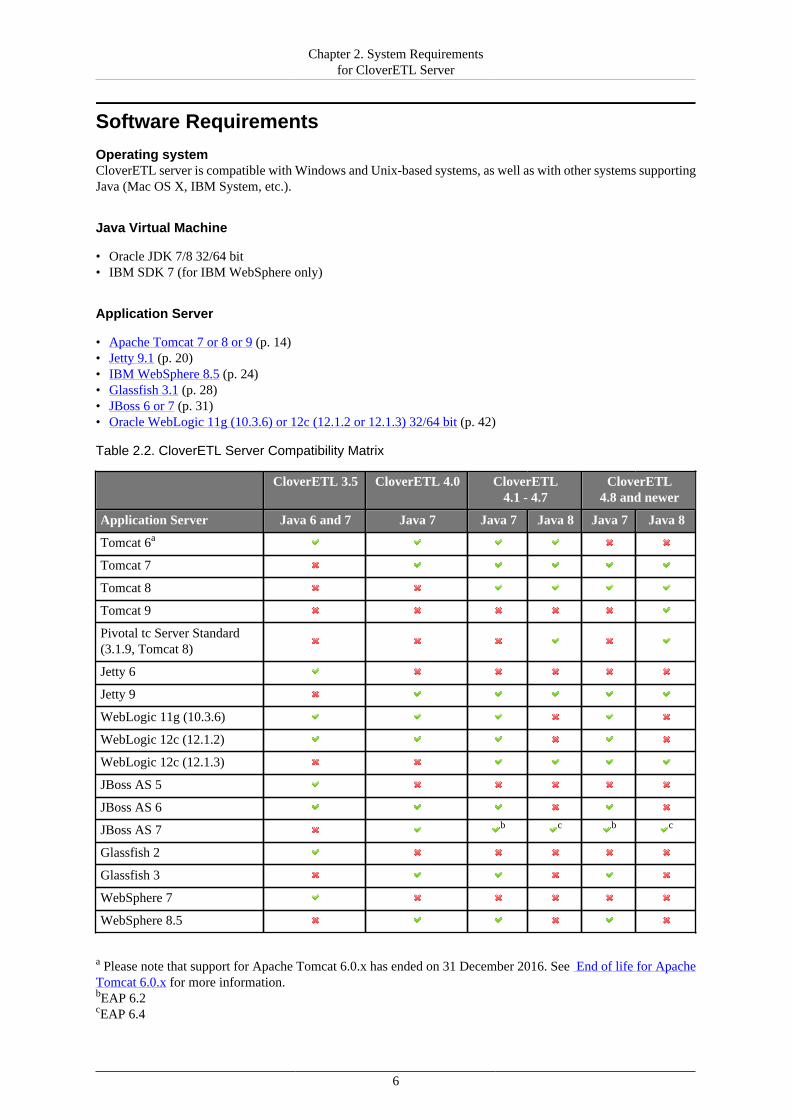
Table 2.2. CloverETL Server Compatibility Matrix
CloverETL 3.5 CloverETL 4.0 CloverETL4.1 - 4.7
CloverETL4.8 and newer
Application Server Java 6 and 7 Java 7 Java 7 Java 8 Java 7 Java 8
Tomcat 6a
Tomcat 7
Tomcat 8
Tomcat 9
Pivotal tc Server Standard(3.1.9, Tomcat 8)
Jetty 6
Jetty 9
WebLogic 11g (10.3.6)
WebLogic 12c (12.1.2)
WebLogic 12c (12.1.3)
JBoss AS 5
JBoss AS 6
JBoss AS 7 b c b c
Glassfish 2
Glassfish 3
WebSphere 7
WebSphere 8.5
a Please note that support for Apache Tomcat 6.0.x has ended on 31 December 2016. See End of life for ApacheTomcat 6.0.x for more information.bEAP 6.2cEAP 6.4

Chapter 2. System Requirementsfor CloverETL Server
7
NoteWe support Java 8 on particular supported application server only if the application server itselfofficially supports Java 8.
Database servers
We support the following database servers. The officially supported versions, we are testing against, are inparentheses.
• MySQL (5.6.12) (p. 74)• DB2 (10.5.1) (p. 75)• Oracle (11.2.0.2.0) (p. 78)• MS SQL Server 2014 (12.0.2000.8) (p. 79)• PostgreSQL (9.2.4) (p. 81)
8
Chapter 3. InstallingThis chapter describes two different server installations - Evaluation Server (p. 10) and ProductionServer (p. 13) - and provide instructions on installing the CloverETL Server License.
Evaluation Server
The Evaluation Server (p. 10) consists of CloverETL Server bundled with the Tomcat application container.The server performs basic configuration during the first startup and requires no additional database server. Thisoption is recommended only for basic evaluation of CloverETL Server's functions.
However with further configuration, it is possible to evaluate other CloverETL Server features and even make theevaluation server ready for production environment. This process requires connection to an external, dedicateddatabase and subsequent configuration of services (e.g. SMTP, LDAP, etc.).
ImportantThe Apache Derby DB, bundled with the evaluation server, is not recommended for productionenvironment. Please use one of the supported external databases.
Production Server
In case of Production Server (p. 13), the CloverETL Server is installed on one of the several compatibleapplication containers. This process requires additional configuration (e.g. memory allocation, databaseconnection, etc.) but allows you to choose an application container and external database according to yourpreference.
Installation and configuration procedure
To create a fully working instance of Production CloverETL Server, you should:
•Install an application server
CloverETL Server is compatible with several application containers. Following subsections offer detailedinstructions on installation of the respective application servers and their subsequent configuration.
•Set up limits on a number of opened files, memory allocation and firewall exceptions
CloverETL Server's graph transformations and evaluations may require more memory than the default limitset in the database as well as higher number of simultaneously opened files. Moreover, some componentsrequire firewall exceptions to be set. These instructions provide recommendation on adjusting both theMemory Settings (p. 56) and the Maximum Number of Open Files (p. 58), as well as FirewallExceptions (p. 58).
•Install CloverETL Server into application server
CloverETL Server is provided as a web archive (.war) file for an easy deployment.•Create a database dedicated to CloverETL server
Unlike the Evaluation server, the Production server requires that you have created a dedicated database forCloverETL Server. In the configuration phase of this manual, you will be guided to Chapter 8, Examples ofDB Connection Configuration (p. 72) with instructions on how to properly configure the properties file ofvarious databases.
•Set up connection to the database
The CloverETL Server Console GUI lets you configure a number of items including database connection,license file, etc. Optionally, you can set up password encryption in configuration files for higher security. Fordetails, see Chapter 7, Setup (p. 64).
•Install a license
To be able to execute graphs, you need to install a valid license. There are three options for CloverETL ServerActivation (p. 46).
Chapter 3. Installing
9
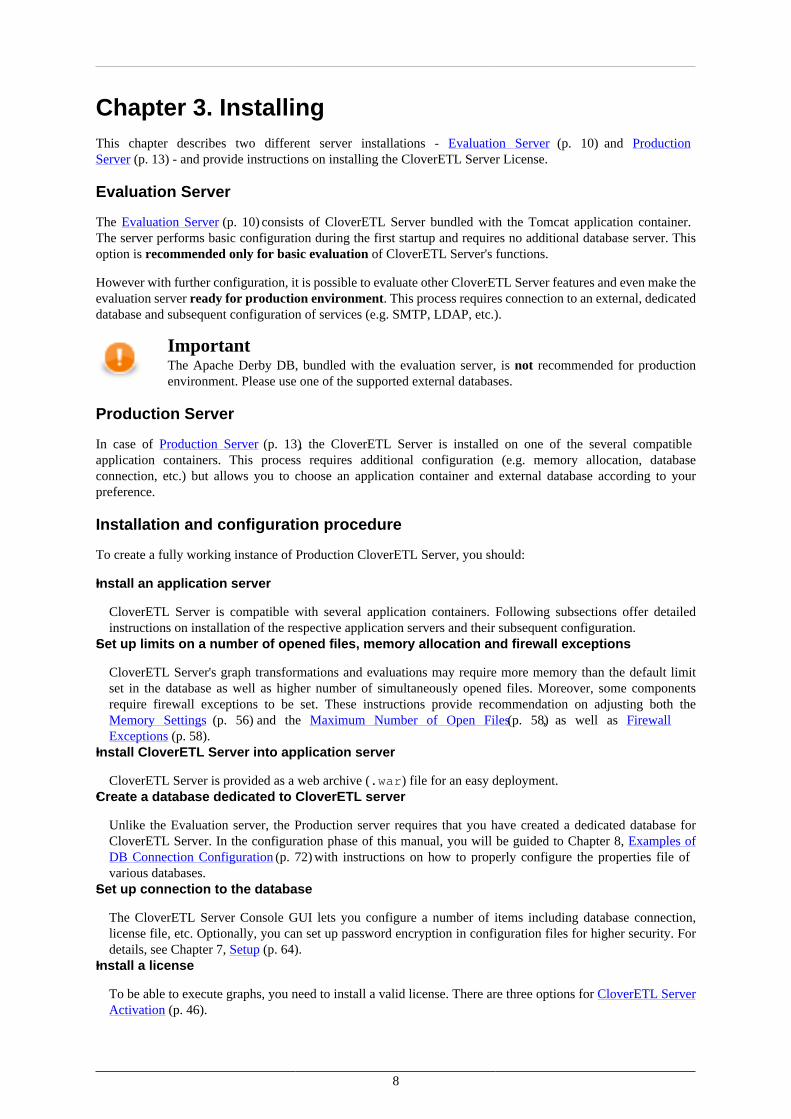
•Perform additional server configuration
•Set up a master password for secure parameters
When handling sensitive information (e.g. passwords), it is advised to define secure graph parameters. Thisaction requires a master password (see Chapter 13, Secure Parameters (p. 110)).
•Set up SMTP server connection
CloverETL Server lets you configure an SMTP connection for reporting events on the server via e-mails.
•Configure temp space
CloverETL Server works with temporary directories and files. To ensure the components work correctly, youshould configure the Temp space location on the file system. For details, see Chapter 12, Temp SpaceManagement (p. 104).
•Configure sandboxes
Lastly, you should set the content security and user's permissions for sandboxes. For details and instructions,see Chapter 15, Server Side Job Files - Sandboxes (p. 135).
Chapter 3. Installing
10
Evaluation Server
The default installation of CloverETL Server uses the embedded Apache Derby DB; therefore, it does not requireany extra database server. Furthermore, it does not require any subsequent configuration, as CloverETL Serverconfigures itself during the first startup. Database tables and some necessary records are automatically created onthe first startup with an empty database.
By performing a subsequent configuration, you can evaluate other CloverETL Server features (e.g. sending e-mails, LDAP authentication, clustering, etc.). This way, you can also prepare the evaluation server for productionenvironment. However, note that the embedded Apache Derby database is not recommended for productionenvironment. Therefore, before the subsequent configuration, choose one of the supported external dedicateddatabase.
If the CloverETL Server must be evaluated on application containers other than Tomcat, or you prefer a differentdatabase, proceed with the common installation of Production Server (p. 13)
NoteDefault login credentials for CloverETL Server Console are:
Username: clover
Password: clover
Installation
1. Make sure you have a compatible Java version:
Important
CloverETL Server 4.1 and higher requires Oracle JDK or JRE v. 1.7.x or higher. We recommendJDK 1.8.x.
• You can check your installed Java version by typing the following command to the command prompt orterminal:
java -version
• Alternatively, for macOS and Windows platforms, see How to find Java version in Windows or Mac.
2. Download and extract the CloverETL Evaluation Server.
• Go to CloverETL User Login Page.
• Using your credentials, log into your account, navigate to the download section and download the CloverETLEvaluation Server Bundle.
• Extract the .zip archive. (For example, the name of an archive containing CloverETLServer v 4.8.0 bundled with Tomcat v 8.0.47 will beCloverETLServer.4.8.0.Tomcat-8.0.47.zip.)
Note
It is recommended to place the extracted content on a path that does not contain space character(s).
C:\Program Files or /home/user/some dir
Chapter 3. Installing
11
C:\Users\Username or /home/user/some_dir
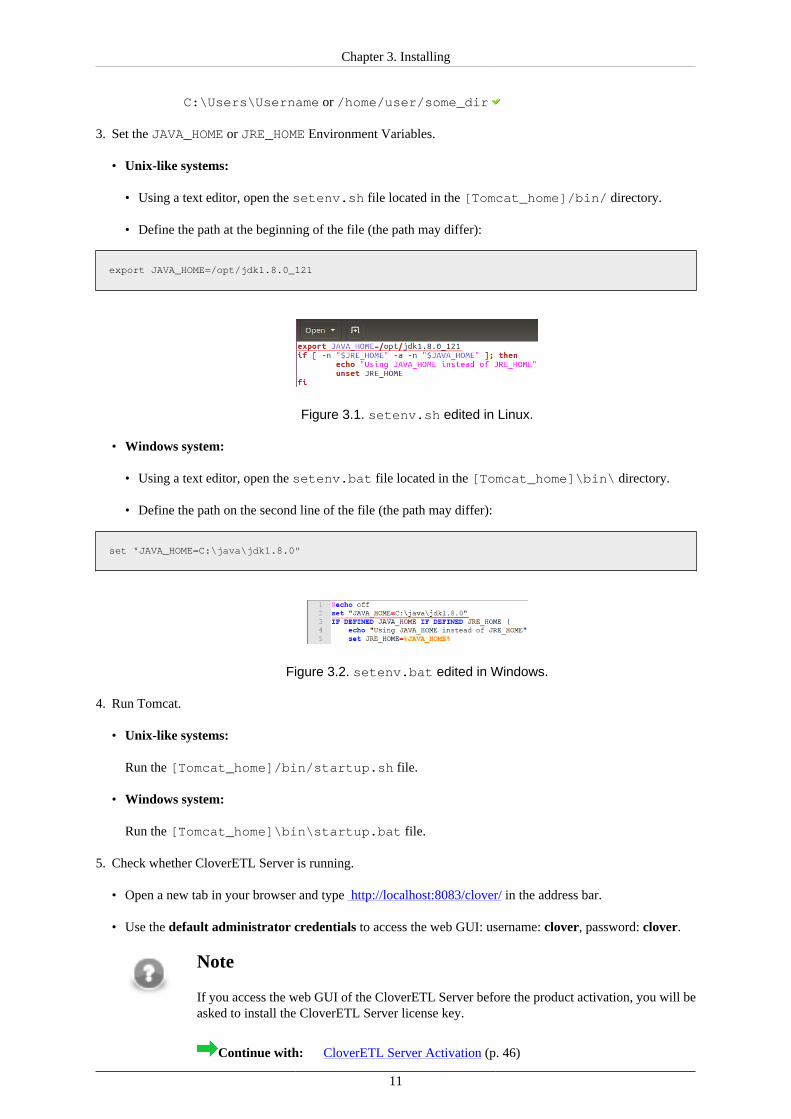
3. Set the JAVA_HOME or JRE_HOME Environment Variables.
• Unix-like systems:
• Using a text editor, open the setenv.sh file located in the [Tomcat_home]/bin/ directory.
• Define the path at the beginning of the file (the path may differ):
export JAVA_HOME=/opt/jdk1.8.0_121
Figure 3.1. setenv.sh edited in Linux.
• Windows system:
• Using a text editor, open the setenv.bat file located in the [Tomcat_home]\bin\ directory.
• Define the path on the second line of the file (the path may differ):
set "JAVA_HOME=C:\java\jdk1.8.0"
Figure 3.2. setenv.bat edited in Windows.
4. Run Tomcat.
• Unix-like systems:
Run the [Tomcat_home]/bin/startup.sh file.
• Windows system:
Run the [Tomcat_home]\bin\startup.bat file.
5. Check whether CloverETL Server is running.
• Open a new tab in your browser and type http://localhost:8083/clover/ in the address bar.
• Use the default administrator credentials to access the web GUI: username: clover, password: clover.
Note
If you access the web GUI of the CloverETL Server before the product activation, you will beasked to install the CloverETL Server license key.
Continue with: CloverETL Server Activation (p. 46)

Chapter 3. Installing
12
Tip
To safely stop the server, run the [Tomcat_home]/bin/shutdown.sh or[Tomcat_home]\bin\shutdown.bat file for Unix-like or Windows systemrespectively.
6. CloverETL Server is now installed and prepared for basic evaluation. There are couple of sandboxes withvarious demo transformations installed.
Chapter 3. Installing
13
Production Server
This section describes in detail the installation of CloverETL Server on various application containers andits subsequent configuration required for production environment. For simple evaluation of CloverETL Serverfeatures use Evaluation server (p. 10) (note that CloverETL Evaluation server can also be configured for productionuse).
CloverETL Server for production environment is shipped as a Web application archive (WAR file), and uses anexternal, dedicated database. Thus, standard methods for deploying a web application on you application servermay be used. However, each application server has specific behavior and features. Detailed information abouttheir installation and configuration can be found in the following chapters.
List of Suitable Containers
• Apache Tomcat (p. 14)• Jetty (p. 20)• IBM WebSphere (p. 24)• GlassFish / Sun Java System Application Server (p. 28)• JBoss Application Server (p. 31)• JBoss Enterprise Application Platform (p. 36)• Oracle WebLogic Server (p. 42)
In case of problems during the installation see Possible Issues during Installation (p. 51).
Important
CloverETL Server 4.1 and higher requires Oracle JDK or JRE v. 1.7.x or higher. We recommendJDK 1.8.x.
Chapter 3. Installing
14
Apache Tomcat
Installation of Apache Tomcat (p. 14)Apache Tomcat as a Windows Service (p. 15)Apache Tomcat on IBM AS/400 (iSeries) (p. 17)Installation of CloverETL Server (p. 17)Configuration of CloverETL Server on Apache Tomcat (p. 18)
Important
See Application Server (p. 6) in system requirements for currently supported Apache Tomcatversions and required Java versions.
If you encounter any problems during the installation, the Possible Issues duringInstallation (p. 51) section may provide a solution.
Please note that since 31 December, 2016, the Apache Tomcat team has ended Apache Tomcat6.0.x support. See End of life for Apache Tomcat 6.0.x for more information.
Installation of Apache Tomcat
1. Download the binary distribution: Tomcat 7, Tomcat 8 or Tomcat 9.
CloverETL Server is developed and tested with the Apache Tomcat 7.0.x, 8.0.x or 9.0.x containers. Runningthe Server with other versions may result in unpredictable behavior.
2. Extract the downloaded archive (zip or tar.gz).
3. Set up JAVA_HOME to point to the correct Java version:
• Unix-like systems:
Setup the path in /etc/profile or /etc/bash.bashrc:
export JAVA_HOME=/path/to/JDK
(for example: export JAVA_HOME=/usr/jdk1.8.0_121)
• Windows system:
Under System Variables in Advanced System Settings, create a new variable named JAVA_HOME. Thevalue should contain the path to the JDK installation directory (e.g. C:\Java\jdk1.8.0_121).
4. Run Tomcat:
• Unix-like systems:
Run the [Tomcat_home]/bin/startup.sh file.
• Windows system:
Run the [Tomcat_home]\bin\startup.bat file.
5. Check whether Tomcat is running.
• Open a new tab in your browser and type http://localhost:8080/ in the address bar.
If the Apache Tomcat Information page appears (see below), the server is successfully installed:

Chapter 3. Installing
15
Figure 3.3. Apache Tomcat welcome page
Tip
For detailed installation instructions, see: Tomcat 7, Tomcat 8 or Tomcat 9 Setup Guide.
Note
For the installation on IBM AS/400, continue with Apache Tomcat on IBM AS/400(iSeries) (p. 17).
Continue with: Installation of CloverETL Server (p. 17).
Apache Tomcat as a Windows Service
1. Download the 32-bit/64-bit Windows Service Installer file in the Binary Distributions section on the Tomcat7, Tomcat 8 or Tomcat 9 download page.
2. Use the standard installation wizard to install Apache Tomcat.
3. Check whether Tomcat is running.
• Type http://localhost:8080/ in your browser's address bar.
• If the Apache Tomcat Information page appears, the server is successfully installed.
4. When Tomcat is installed as a Windows service, CloverETL is configured by one of the following options:
Chapter 3. Installing
16
a.Graphical configuration utility
• Run the [Tomcat_home]\bin\Tomcat8w.exe file.
• In the Apache Tomcat Properties dialog box, select the Java tab and set the initial and maximum heapsize in Initial memory pool and Maximum memory pool fields to 512MB and 1024MB respectively.Other configuration parameters can be defined in Java Options field, being separated by new line.
• Click on Apply and restart the service.
NoteThe Java tab allows you to use alternative Java virtual machine by setup of path to jvm.dllfile.
b.Command Prompt tool
• Run the [Tomcat_home]\bin\Tomcat8.exe file.
• If Tomcat is running, navigate to [Tomcat_home]\bin and stop the service by typing:
.\Tomcat8.exe //SS//Tomcat8
in the Command Prompt. (When using different version of Tomcat, change the number in the commandto reflect the installed version.)
• Configure the service by typing the command:
.\Tomcat8.exe //US//Tomcat8 --JvmMs=512 --JvmMx=1024 --JvmOptions=-Dclover.config.file=C:\path\to\clover-config.properties#-XX:MaxMetaspaceSize=256m
The parameter JvmMs is the initial and JvmMx is the maximum heap size in MB; JvmOptions areseparated by '#' or ';'.
ImportantIf you use Java 7, change -XX:MaxMetaspaceSize to -XX:MaxPermSize.
• Start the service from Windows administration console or by typing the following command in theCommand Prompt:
.\Tomcat8.exe //TS//Tomcat8
Tip
By default, when Apache Tomcat is run as a Windows service, it is not available for Java processmonitoring tools (e.g., JConsole or JVisualVM). However, these tools can still connect to theprocess via JMX. In order to expose Tomcat's Java process via JMX, add the following options tothe service settings:
-Dcom.sun.management.jmxremote.port=3333 -Dcom.sun.management.jmxremote.ssl=false -Dcom.sun.management.jmxremote.authenticate=false
Chapter 3. Installing
17
Once the service is run with these options, you can connect to port 3333 using JMX and monitorthe server.
Note
The instructions can be applied to Tomcat 7 and Tomcat 9, simply replace the number 8 in the filename with the number 7 or 9.
More information about running Java applications as Windows Service can be found at Apache Commons.
Continue with: Installation of CloverETL Server (p. 17).
Apache Tomcat on IBM AS/400 (iSeries)
Additional settings are required to run CloverETL Server on the iSeries platform:
1. Declare you are using Java 7.0 32-bit.
2. Run Java with parameter -Djava.awt.headless=true.
To configure the settings, modify (or create) the [Tomcat_home]/bin/setenv.sh file to contain:
JAVA_HOME=/QOpenSys/QIBM/ProdData/JavaVM/jdk70/32bit
JAVA_OPTS="$JAVA_OPTS -Djava.awt.headless=true"
Continue with: Installation of CloverETL Server (p. 17)
Installation of CloverETL Server
1. Check if you meet the prerequisites:
• Oracle JDK or JRE is installed (See Java Virtual Machine (p. 6) for the required Java version.)
• JAVA_HOME or JRE_HOME environment variable is set (see Setting up JAVA_HOME (p. 14)).
• A supported version (p. 6) of Apache Tomcat is installed.
2. It is strongly recommended to adjust the default limits for Memory allocation (see the MemorySettings (p. 56) section).
You can set the minimum and maximum memory heap size by adjusting the "Xms" and "Xmx" JVMparameters:
Unix-like systems:
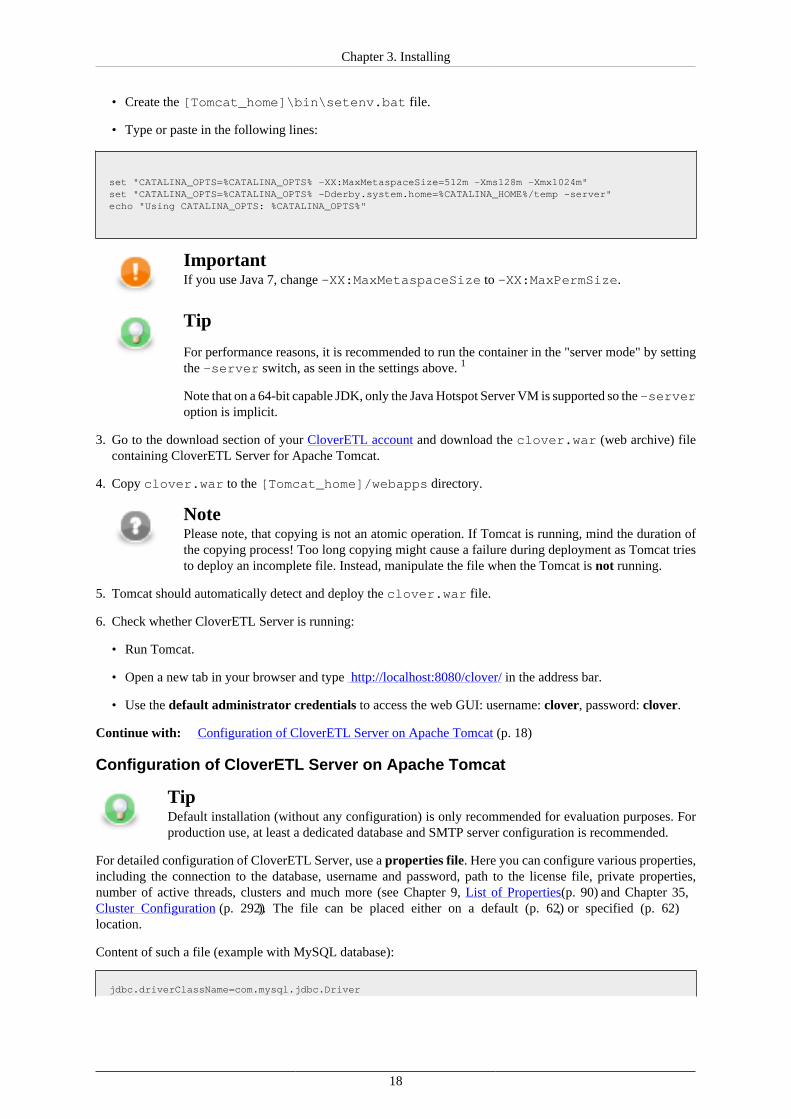
• Create the [Tomcat_home]/bin/setenv.sh file.
• Type or paste in the following lines:
export CATALINA_OPTS="$CATALINA_OPTS -XX:MaxMetaspaceSize=512m -Xms128m -Xmx1024m" export CATALINA_OPTS="$CATALINA_OPTS -Dderby.system.home=$CATALINA_HOME/temp -server"echo "Using CATALINA_OPTS: $CATALINA_OPTS"
Windows systems:
Chapter 3. Installing
18
• Create the [Tomcat_home]\bin\setenv.bat file.
• Type or paste in the following lines:
set "CATALINA_OPTS=%CATALINA_OPTS% -XX:MaxMetaspaceSize=512m -Xms128m -Xmx1024m" set "CATALINA_OPTS=%CATALINA_OPTS% -Dderby.system.home=%CATALINA_HOME%/temp -server"echo "Using CATALINA_OPTS: %CATALINA_OPTS%"
ImportantIf you use Java 7, change -XX:MaxMetaspaceSize to -XX:MaxPermSize.
Tip
For performance reasons, it is recommended to run the container in the "server mode" by settingthe -server switch, as seen in the settings above. 1
Note that on a 64-bit capable JDK, only the Java Hotspot Server VM is supported so the -serveroption is implicit.
3. Go to the download section of your CloverETL account and download the clover.war (web archive) filecontaining CloverETL Server for Apache Tomcat.
4. Copy clover.war to the [Tomcat_home]/webapps directory.
NotePlease note, that copying is not an atomic operation. If Tomcat is running, mind the duration ofthe copying process! Too long copying might cause a failure during deployment as Tomcat triesto deploy an incomplete file. Instead, manipulate the file when the Tomcat is not running.
5. Tomcat should automatically detect and deploy the clover.war file.
6. Check whether CloverETL Server is running:
• Run Tomcat.
• Open a new tab in your browser and type http://localhost:8080/clover/ in the address bar.
• Use the default administrator credentials to access the web GUI: username: clover, password: clover.
Continue with: Configuration of CloverETL Server on Apache Tomcat (p. 18)
Configuration of CloverETL Server on Apache Tomcat
TipDefault installation (without any configuration) is only recommended for evaluation purposes. Forproduction use, at least a dedicated database and SMTP server configuration is recommended.
For detailed configuration of CloverETL Server, use a properties file. Here you can configure various properties,including the connection to the database, username and password, path to the license file, private properties,number of active threads, clusters and much more (see Chapter 9, List of Properties (p. 90) and Chapter 35,Cluster Configuration (p. 292)). The file can be placed either on a default (p. 62), or specified (p. 62)location.
Content of such a file (example with MySQL database):
jdbc.driverClassName=com.mysql.jdbc.Driver
Chapter 3. Installing
19
jdbc.url=jdbc:mysql://127.0.0.1:3306/clover?useUnicode=true&characterEncoding=utf8jdbc.username=yourUsernamejdbc.password=yourPasswordjdbc.dialect=org.hibernate.dialect.MySQLDialect
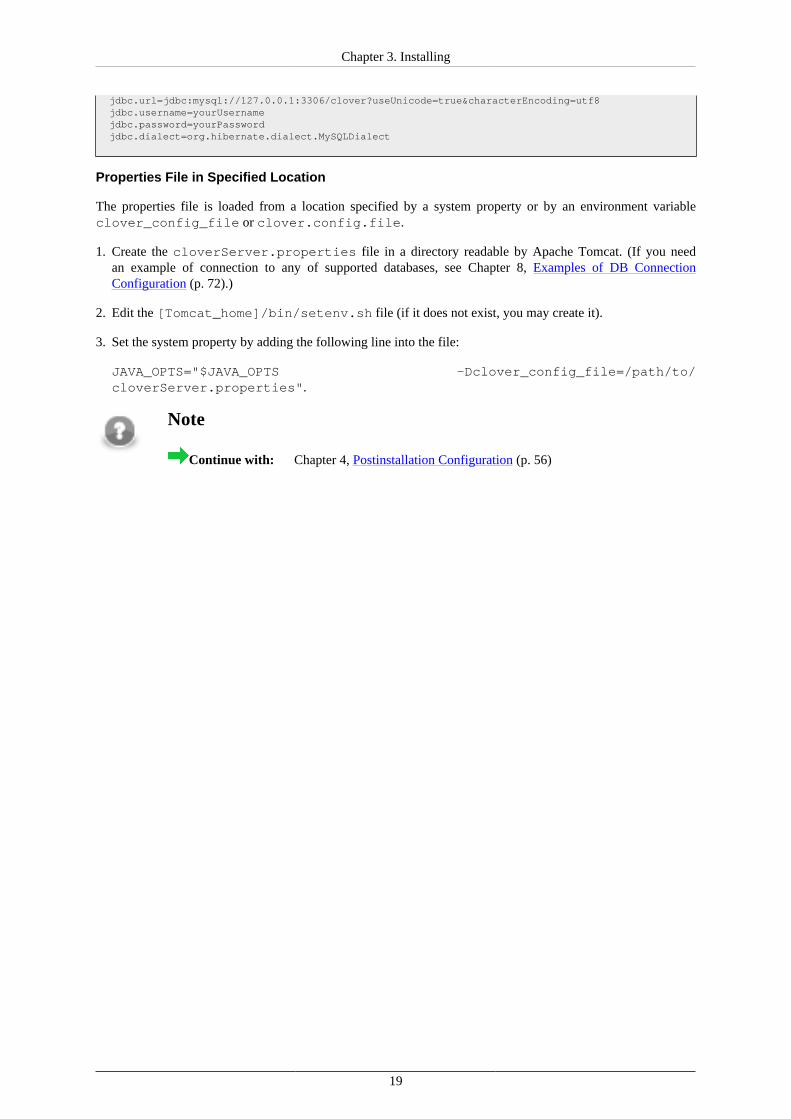
Properties File in Specified Location
The properties file is loaded from a location specified by a system property or by an environment variableclover_config_file or clover.config.file.
1. Create the cloverServer.properties file in a directory readable by Apache Tomcat. (If you needan example of connection to any of supported databases, see Chapter 8, Examples of DB ConnectionConfiguration (p. 72).)
2. Edit the [Tomcat_home]/bin/setenv.sh file (if it does not exist, you may create it).
3. Set the system property by adding the following line into the file:
JAVA_OPTS="$JAVA_OPTS -Dclover_config_file=/path/to/cloverServer.properties".
Note
Continue with: Chapter 4, Postinstallation Configuration (p. 56)

Chapter 3. Installing
20
Jetty
Installation of Jetty (p. 20)Installation of CloverETL Server (p. 21)Configuration of CloverETL Server on Jetty (p. 22)
Important
See Application Server (p. 6) in system requirements for currently supported Jetty versions andrequired Java versions.
If you encounter any problems during the installation, the Possible Issues duringInstallation (p. 51) section may provide a solution.
Installation of Jetty
1. Download the Jetty release from the official download page.
CloverETL Server is currently developed and tested with Jetty 9.2.11 (v20150529) container. SinceCloverETL 4.0, Jetty 6 is no longer supported (latest tested version is 6.1.22). Running the Server with otherversions may result in unpredictable behavior.
2. Extract the downloaded archive (zip or tar.gz).
3. Run Jetty.
• Unix-like systems:
• Run [Jetty_home]/bin/jetty.sh start
• Windows system:
• Run the [Jetty_home]\java -jar start.jar --exec command in Windows commandprompt.
4. Check whether Jetty is running.
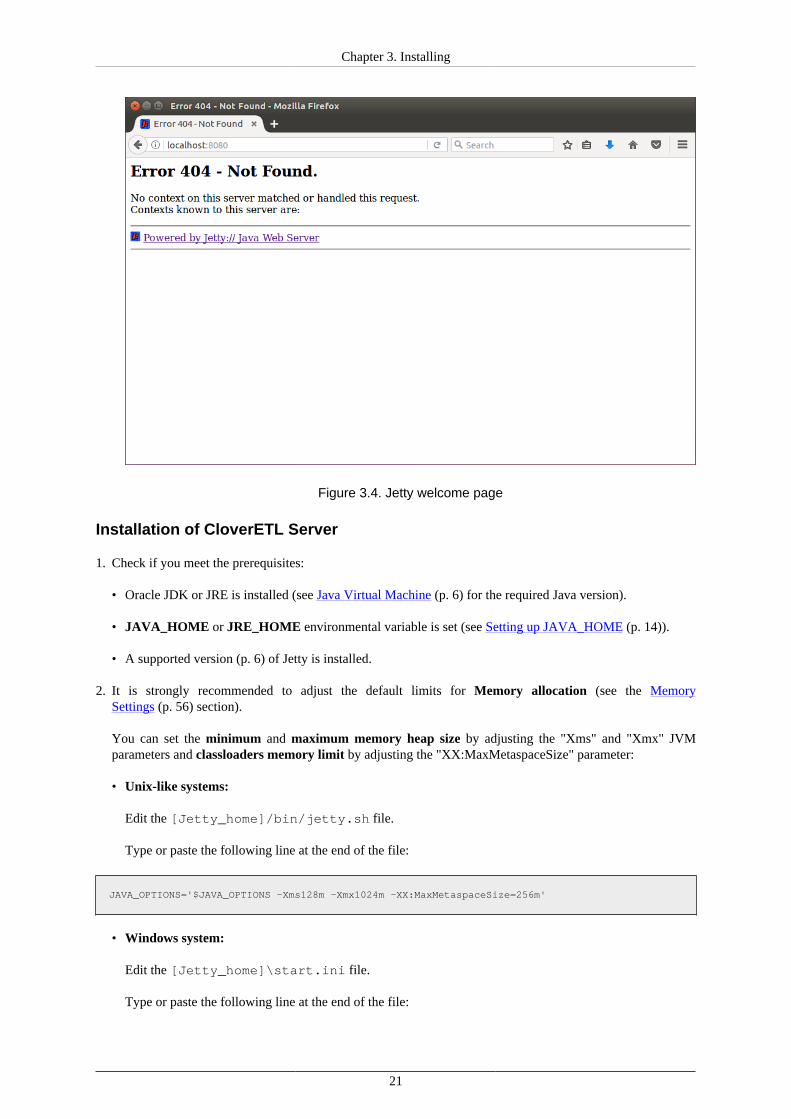
• Open a new tab in your browser and type http://localhost:8080/ in the address bar.
Note
Since the clover.war file is not yet implemented, you may see the Error 404 - Not foundstatus code (see the figure below). However, it means that the server is running.
Chapter 3. Installing
21
Figure 3.4. Jetty welcome page
Installation of CloverETL Server
1. Check if you meet the prerequisites:
• Oracle JDK or JRE is installed (see Java Virtual Machine (p. 6) for the required Java version).
• JAVA_HOME or JRE_HOME environmental variable is set (see Setting up JAVA_HOME (p. 14)).
• A supported version (p. 6) of Jetty is installed.
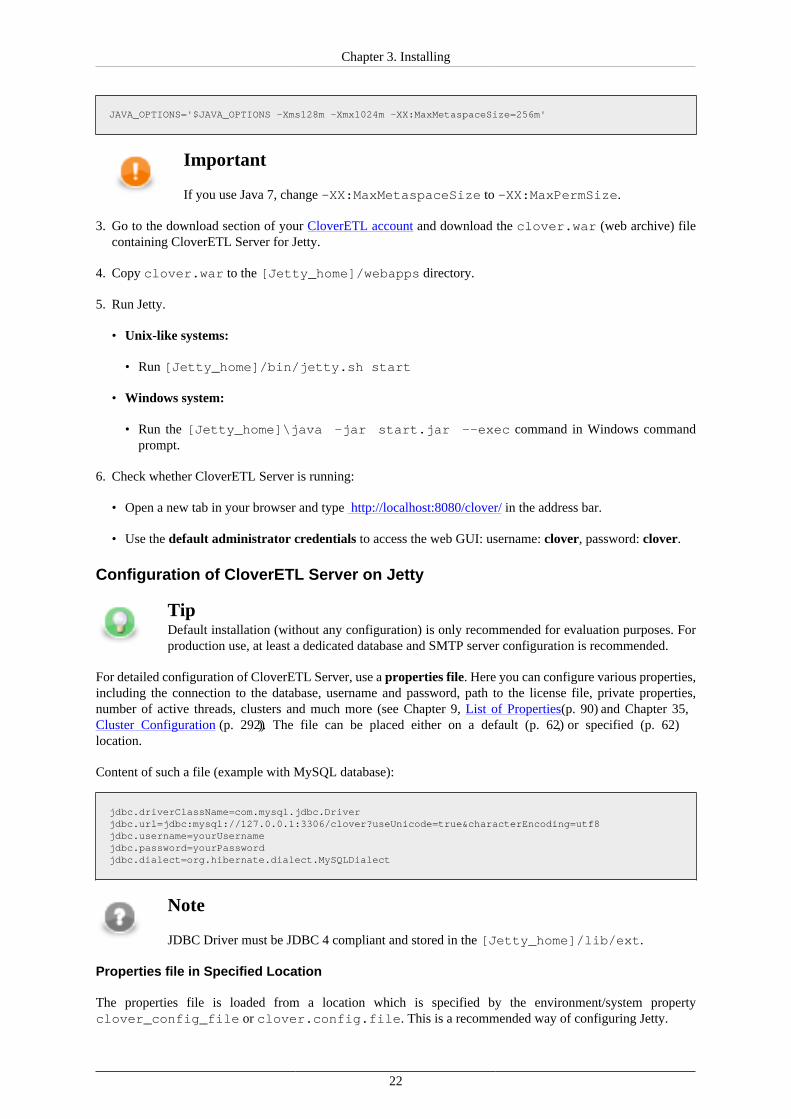
2. It is strongly recommended to adjust the default limits for Memory allocation (see the MemorySettings (p. 56) section).
You can set the minimum and maximum memory heap size by adjusting the "Xms" and "Xmx" JVMparameters and classloaders memory limit by adjusting the "XX:MaxMetaspaceSize" parameter:
• Unix-like systems:
Edit the [Jetty_home]/bin/jetty.sh file.
Type or paste the following line at the end of the file:
JAVA_OPTIONS='$JAVA_OPTIONS -Xms128m -Xmx1024m -XX:MaxMetaspaceSize=256m'
• Windows system:
Edit the [Jetty_home]\start.ini file.
Type or paste the following line at the end of the file:
Chapter 3. Installing
22
JAVA_OPTIONS='$JAVA_OPTIONS -Xms128m -Xmx1024m -XX:MaxMetaspaceSize=256m'
Important
If you use Java 7, change -XX:MaxMetaspaceSize to -XX:MaxPermSize.
3. Go to the download section of your CloverETL account and download the clover.war (web archive) filecontaining CloverETL Server for Jetty.
4. Copy clover.war to the [Jetty_home]/webapps directory.
5. Run Jetty.
• Unix-like systems:
• Run [Jetty_home]/bin/jetty.sh start
• Windows system:
• Run the [Jetty_home]\java -jar start.jar --exec command in Windows commandprompt.
6. Check whether CloverETL Server is running:
• Open a new tab in your browser and type http://localhost:8080/clover/ in the address bar.
• Use the default administrator credentials to access the web GUI: username: clover, password: clover.
Configuration of CloverETL Server on Jetty
TipDefault installation (without any configuration) is only recommended for evaluation purposes. Forproduction use, at least a dedicated database and SMTP server configuration is recommended.
For detailed configuration of CloverETL Server, use a properties file. Here you can configure various properties,including the connection to the database, username and password, path to the license file, private properties,number of active threads, clusters and much more (see Chapter 9, List of Properties (p. 90) and Chapter 35,Cluster Configuration (p. 292)). The file can be placed either on a default (p. 62), or specified (p. 62)location.
Content of such a file (example with MySQL database):
jdbc.driverClassName=com.mysql.jdbc.Driverjdbc.url=jdbc:mysql://127.0.0.1:3306/clover?useUnicode=true&characterEncoding=utf8jdbc.username=yourUsernamejdbc.password=yourPasswordjdbc.dialect=org.hibernate.dialect.MySQLDialect
Note
JDBC Driver must be JDBC 4 compliant and stored in the [Jetty_home]/lib/ext.
Properties file in Specified Location
The properties file is loaded from a location which is specified by the environment/system propertyclover_config_file or clover.config.file. This is a recommended way of configuring Jetty.
Chapter 3. Installing
23
1. Create the cloverServer.properties file in a directory readable by Jetty. (If you need anexample of connection to any of supported databases, see Chapter 8, Examples of DB ConnectionConfiguration (p. 72).)
2. Unix-like systems:
a. Edit the [Jetty_home]/bin/jetty.sh file.
b. Set the system property by adding the following line into the file:
JAVA_OPTIONS="$JAVA_OPTIONS -Dclover_config_file=/path/to/cloverServer.properties"
Windows system:
a. Edit the [Jetty_home]\start.ini file.
b. Set the system property by adding the following line into the file just after the memory settings:
JAVA_OPTIONS="$JAVA_OPTIONS -Dclover_config_file=/path/to/cloverServer.properties"
Note
Continue with: Chapter 4, Postinstallation Configuration (p. 56)
Chapter 3. Installing
24
IBM WebSphere
Installation of IBM Websphere (p. 24)Installation of CloverETL Server (p. 24)Configuration of CloverETL Server on IBM WebSphere (p. 26)
Important
See Application Server (p. 6) in system requirements for currently supported IBM WebSphereversions and required Java versions.
In order to ensure reliable function of CloverETL Server always use the latest version of IBM JavaSDK. At least SDK 7.0 SR6 (package IBM WebSphere SDK Java Technology Edition V7.0.6.1) isrecommended. Using older SDKs may lead to deadlocks during execution of specific ETL graphs.
If you encounter any problems during the installation, the Possible Issues duringInstallation (p. 51) section may provide a solution.
Installation of IBM Websphere
1. Create a My IBM account on https://www.ibm.com
2. Go to IBM Marketplace and download IBM Installation Manager.
3. Follow the instructions to download IBM Websphere.
CloverETL Server is developed and tested with the IBM WebSphere 8.5 container. Running the Server withother versions may result in unpredictable behavior.
4. Create a profile.
• Unix-like systems:
Run the [IBM_home]/WebSphere/AppServer/bin/ProfileManagement/pmt.sh.
• Windows system:
Run the [IBM_home]\WebSphere\AppServer\bin\ProfileManagement\pmt.bat.
ImportantMake sure the profile name does not contain the keyword "clover", otherwise the CloverETLserver won't start properly.
5. Check whether the server is operational.
You will be prompted to run a first-time server management tool that will check whether the installation wassuccessful and the server can be started.
Go to http://localhost:9060/ibm/console/ where you should be able to see the WebSphere login page.
Installation of CloverETL Server
1. Check if you meet the prerequisites:
• IBM Java SDK is installed (see Java Virtual Machine (p. 6) for the required Java version).
• JAVA_HOME or JRE_HOME environmental variable is set (see Setting up JAVA_HOME (p. 14)).
Chapter 3. Installing
25
• A supported version (p. 6) of IBM WebSphere is installed.
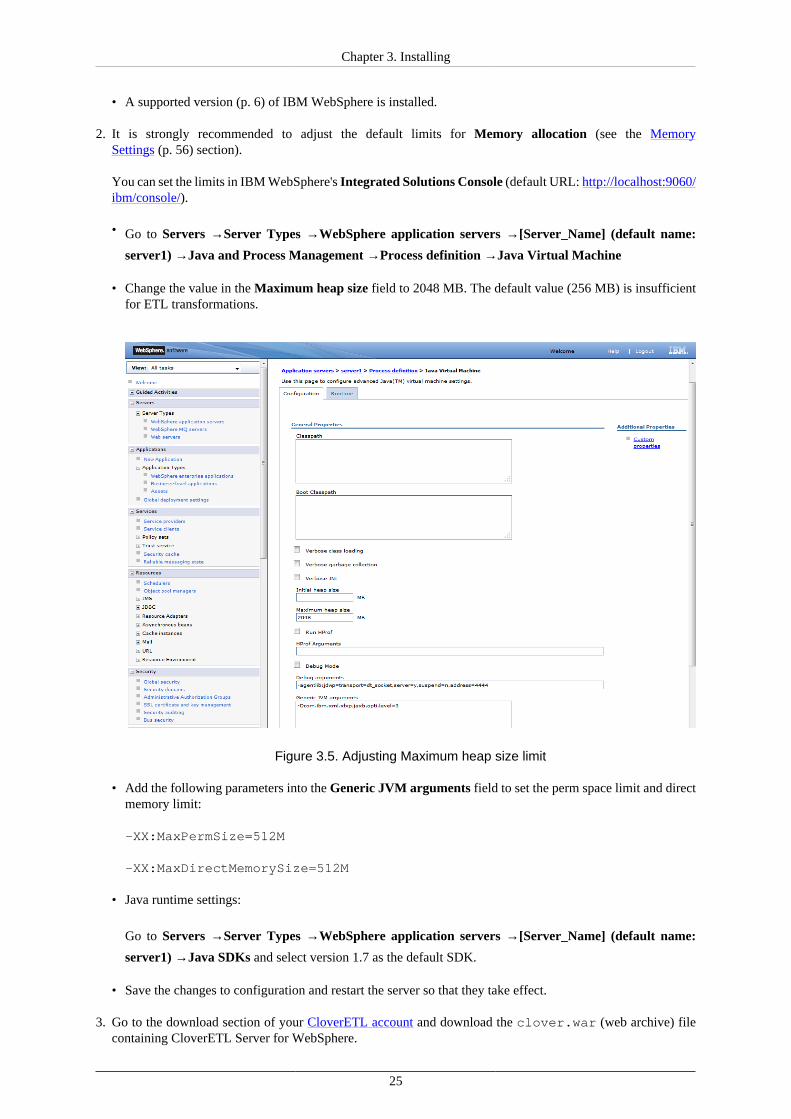
2. It is strongly recommended to adjust the default limits for Memory allocation (see the MemorySettings (p. 56) section).
You can set the limits in IBM WebSphere's Integrated Solutions Console (default URL: http://localhost:9060/ibm/console/).
• Go to Servers →Server Types →WebSphere application servers →[Server_Name] (default name:
server1) →Java and Process Management →Process definition →Java Virtual Machine
• Change the value in the Maximum heap size field to 2048 MB. The default value (256 MB) is insufficientfor ETL transformations.
Figure 3.5. Adjusting Maximum heap size limit
• Add the following parameters into the Generic JVM arguments field to set the perm space limit and directmemory limit:
-XX:MaxPermSize=512M
-XX:MaxDirectMemorySize=512M
• Java runtime settings:
Go to Servers →Server Types →WebSphere application servers →[Server_Name] (default name:
server1) →Java SDKs and select version 1.7 as the default SDK.
• Save the changes to configuration and restart the server so that they take effect.
3. Go to the download section of your CloverETL account and download the clover.war (web archive) filecontaining CloverETL Server for WebSphere.
Chapter 3. Installing
26
4. Deploy the clover.war file.
• Go to Integrated Solutions Console (default URL: http://localhost:9060/ibm/console/).
• Go to Applications →New Application →New Enterprise Application, select the CloverETL ServerWAR archive and deploy it to the application server, but do not start it yet.
5. Configure application class loading.
Go to WebSphere Enterprise Applications →clover_war (or other name of the Clover application)
→Manage Modules →CloverETL and under Class loader order select Classes loaded with local classloader first (parent last).
6. Save the changes to the server configuration and start the clover_war application.
7. Check whether the server is running.
Provided you set clover.war as the application running with "clover" context path, use the following URL(notice the port number has changed):
http://localhost:9080/clover
Note
Please note that some CloverETL features using third party libraries do not work properly on IBMWebSphere.
• Hadoop is guaranteed to run only on Oracle Java 1.6+, but Hadoop developers do make an effortto remove any Oracle/Sun-specific code. See Hadoop Java Versions on Hadoop Wiki.
• AddressDoctor5 on IBM WebSphere requires additional JVM parameter -Xmso2048k toprevent AddressDoctor from crashing JVM. See documentation on AddressDoctor component.
Configuration of CloverETL Server on IBM WebSphere
TipDefault installation (without any configuration) is only recommended for evaluation purposes. Forproduction use, at least a dedicated database and SMTP server configuration is recommended.
For detailed configuration of CloverETL Server, use a properties file. Here you can configure various properties,including the connection to the database, username and password, path to the license file, private properties,number of active threads, clusters and much more (see Chapter 9, List of Properties (p. 90) and Chapter 35,Cluster Configuration (p. 292)). The file can be placed either on a default (p. 62), or specified (p. 62)location.
Content of such a file (example with MySQL database):
jdbc.driverClassName=com.mysql.jdbc.Driverjdbc.url=jdbc:mysql://127.0.0.1:3306/clover?useUnicode=true&characterEncoding=utf8jdbc.username=yourUsernamejdbc.password=yourPasswordjdbc.dialect=org.hibernate.dialect.MySQLDialect
Properties File in Specified Location
The properties file is loaded from a location which is specified by the environment/system propertyclover_config_file or clover.config.file.
1. Create the cloverServer.properties file in a directory readable by IBM WebSphere. (If you needan example of connection to any of supported databases, see Chapter 8, Examples of DB ConnectionConfiguration (p. 72).)
Chapter 3. Installing
27
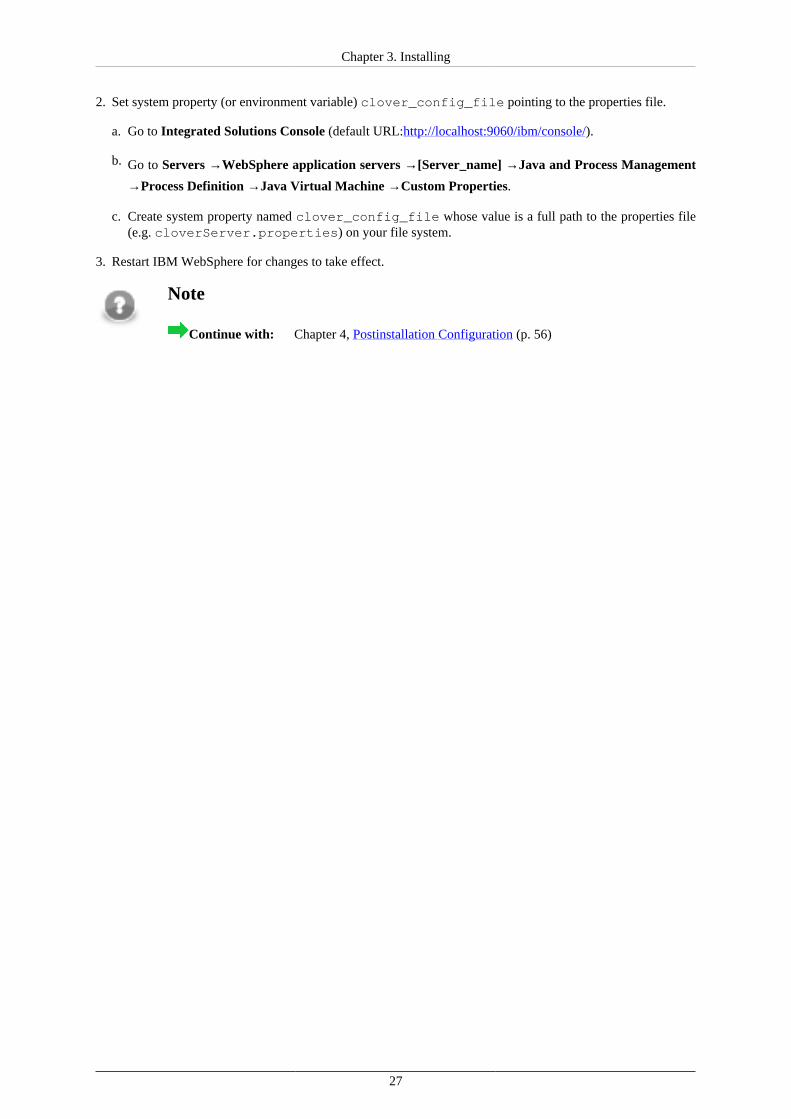
2. Set system property (or environment variable) clover_config_file pointing to the properties file.
a. Go to Integrated Solutions Console (default URL:http://localhost:9060/ibm/console/).
b. Go to Servers →WebSphere application servers →[Server_name] →Java and Process Management
→Process Definition →Java Virtual Machine →Custom Properties.
c. Create system property named clover_config_file whose value is a full path to the properties file(e.g. cloverServer.properties) on your file system.
3. Restart IBM WebSphere for changes to take effect.
Note
Continue with: Chapter 4, Postinstallation Configuration (p. 56)
Chapter 3. Installing
28
GlassFish / Sun Java System Application Server
Installation of GlassFish (p. 28)Installation of CloverETL Server (p. 29)Configuration of CloverETL Server on GlassFish (p. 30)
Important
See Application Server (p. 6) in system requirements for currently supported GlassFish versionsand required Java versions.
GlassFish 3.1.2 contains a bug causing Launch Services to work improperly (see https://java.net/jira/browse/GLASSFISH-18444). We recommend version 3.1.2.2.
If you encounter any problems during the installation, the Possible Issues duringInstallation (p. 51) section may provide a solution.
Installation of GlassFish
1. Choose and download the GlassFish release from the official download page.
CloverETL Server is developed and tested with the GlassFish 3.1.2.2 container. Running the Server with otherversions may result in unpredictable behavior.
2. Extract the downloaded archive, or run the .exe file which will guide you through the setup.
3. Run GlassFish.
• Run [GlassFish_home]/bin/asadmin start-domain and enter a new password foradministrator.
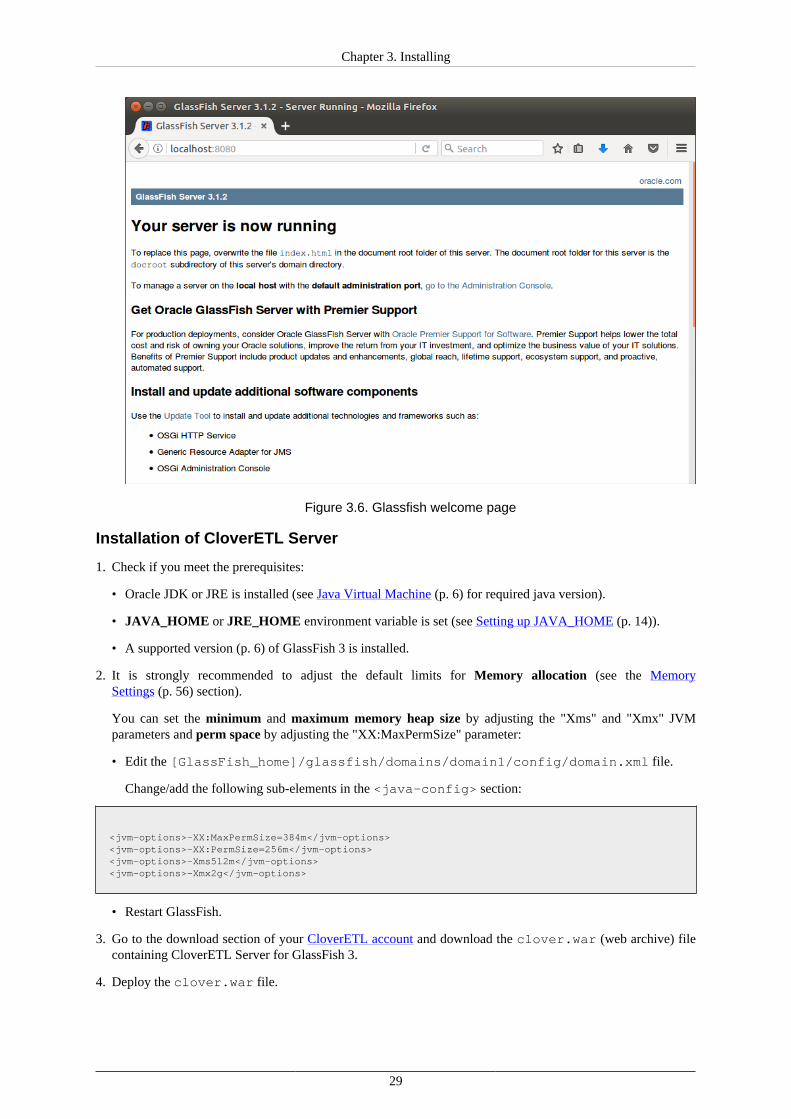
4. Check whether GlassFish is running.
• Open a new tab in your browser and type http://localhost:8080/ in the address bar.
If the GlassFish welcome page appears (see below), the server is successfully installed.
• The Admin Console is, by default, accessible at http://localhost:4848/.
Chapter 3. Installing
29
Figure 3.6. Glassfish welcome page
Installation of CloverETL Server
1. Check if you meet the prerequisites:
• Oracle JDK or JRE is installed (see Java Virtual Machine (p. 6) for required java version).
• JAVA_HOME or JRE_HOME environment variable is set (see Setting up JAVA_HOME (p. 14)).
• A supported version (p. 6) of GlassFish 3 is installed.
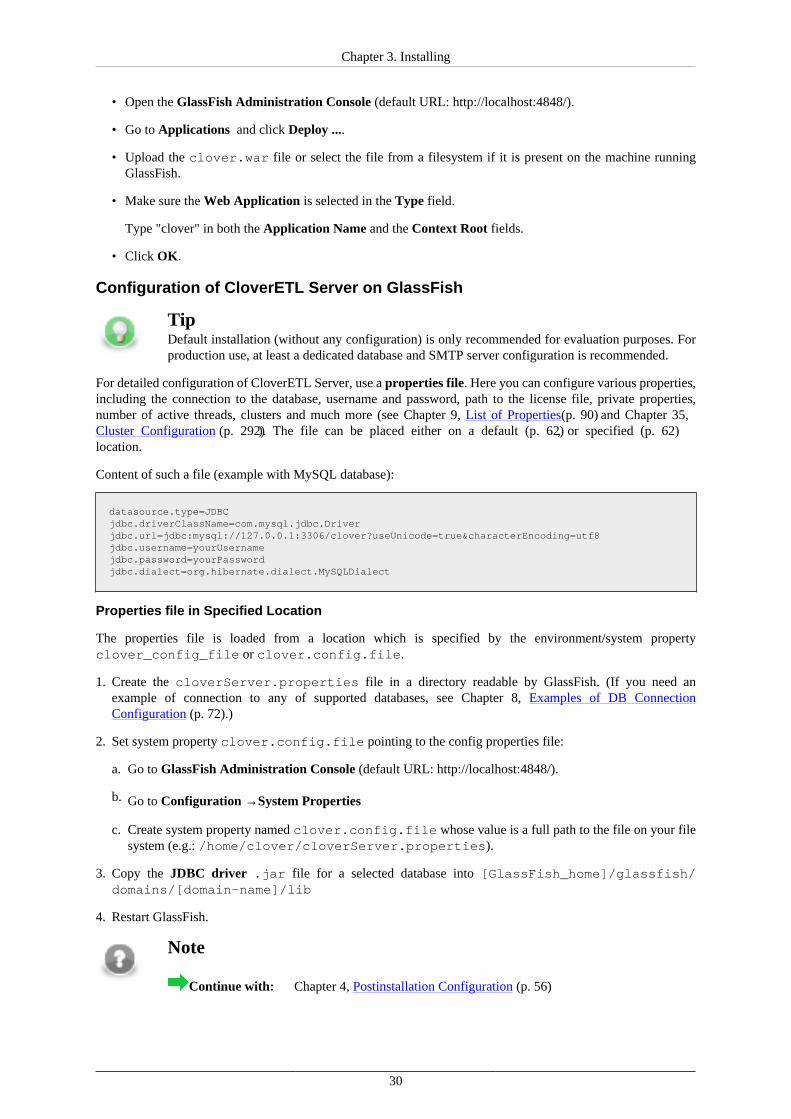
2. It is strongly recommended to adjust the default limits for Memory allocation (see the MemorySettings (p. 56) section).
You can set the minimum and maximum memory heap size by adjusting the "Xms" and "Xmx" JVMparameters and perm space by adjusting the "XX:MaxPermSize" parameter:
• Edit the [GlassFish_home]/glassfish/domains/domain1/config/domain.xml file.
Change/add the following sub-elements in the <java-config> section:
<jvm-options>-XX:MaxPermSize=384m</jvm-options><jvm-options>-XX:PermSize=256m</jvm-options><jvm-options>-Xms512m</jvm-options><jvm-options>-Xmx2g</jvm-options>
• Restart GlassFish.
3. Go to the download section of your CloverETL account and download the clover.war (web archive) filecontaining CloverETL Server for GlassFish 3.
4. Deploy the clover.war file.
Chapter 3. Installing
30
• Open the GlassFish Administration Console (default URL: http://localhost:4848/).
• Go to Applications and click Deploy ....
• Upload the clover.war file or select the file from a filesystem if it is present on the machine runningGlassFish.
• Make sure the Web Application is selected in the Type field.
Type "clover" in both the Application Name and the Context Root fields.
• Click OK.
Configuration of CloverETL Server on GlassFish
TipDefault installation (without any configuration) is only recommended for evaluation purposes. Forproduction use, at least a dedicated database and SMTP server configuration is recommended.
For detailed configuration of CloverETL Server, use a properties file. Here you can configure various properties,including the connection to the database, username and password, path to the license file, private properties,number of active threads, clusters and much more (see Chapter 9, List of Properties (p. 90) and Chapter 35,Cluster Configuration (p. 292)). The file can be placed either on a default (p. 62), or specified (p. 62)location.
Content of such a file (example with MySQL database):
datasource.type=JDBCjdbc.driverClassName=com.mysql.jdbc.Driverjdbc.url=jdbc:mysql://127.0.0.1:3306/clover?useUnicode=true&characterEncoding=utf8jdbc.username=yourUsernamejdbc.password=yourPasswordjdbc.dialect=org.hibernate.dialect.MySQLDialect
Properties file in Specified Location
The properties file is loaded from a location which is specified by the environment/system propertyclover_config_file or clover.config.file.
1. Create the cloverServer.properties file in a directory readable by GlassFish. (If you need anexample of connection to any of supported databases, see Chapter 8, Examples of DB ConnectionConfiguration (p. 72).)
2. Set system property clover.config.file pointing to the config properties file:
a. Go to GlassFish Administration Console (default URL: http://localhost:4848/).
b. Go to Configuration →System Properties
c. Create system property named clover.config.file whose value is a full path to the file on your filesystem (e.g.: /home/clover/cloverServer.properties).
3. Copy the JDBC driver .jar file for a selected database into [GlassFish_home]/glassfish/domains/[domain-name]/lib
4. Restart GlassFish.
Note
Continue with: Chapter 4, Postinstallation Configuration (p. 56)
Chapter 3. Installing
31
JBoss Application Server
Installation of JBoss AS (p. 31)Installation of CloverETL Server (p. 32)Configuration of CloverETL Server on JBoss AS (p. 34)
Important
See Application Server (p. 6) in system requirements for currently supported JBoss AS versions andrequired Java versions.
If you encounter any problems during the installation, the Possible Issues duringInstallation (p. 51) section may provide a solution.
Installation of JBoss AS
1. Download the JBoss AS release from the official download page.
CloverETL Server is developed and tested with the JBoss AS 5, 6 and 7 containers. Running the Server withother versions may result in unpredictable behavior.
2. Extract the downloaded archive (zip or tar.gz).
3. Run JBoss AS.
• Unix-like systems:
• JBoss AS v 6.x.x
Run [JBoss_AS_home]/bin/run.sh.
• JBoss AS v 7.x.x
Run [JBoss_AS_home]/bin/standalone.sh.
• Windows system:
• JBoss AS v 6.x.x
Run [JBoss_AS_home]\bin\run.bat.
• JBoss AS v 7.x.x
Run [JBoss_AS_home]\bin\standalone.bat.
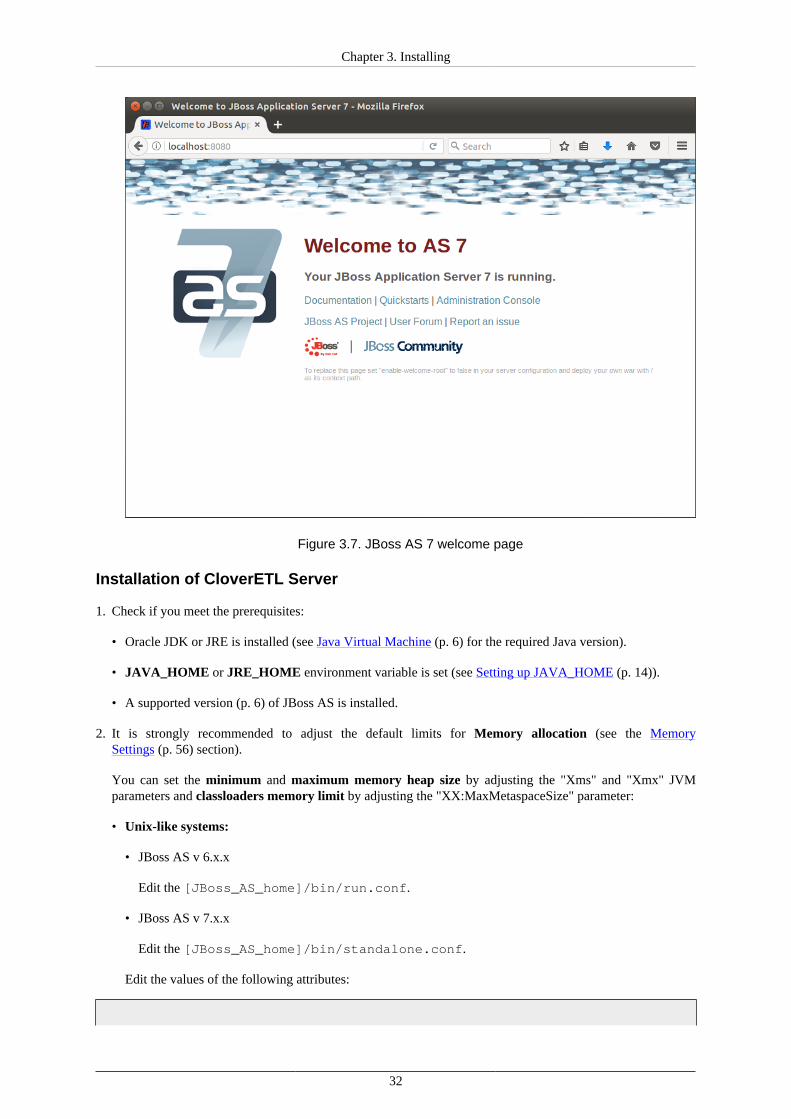
4. Check whether JBoss AS is running.
• Open a new tab in your browser and type http://localhost:8080/ in the address bar.
Chapter 3. Installing
32
Figure 3.7. JBoss AS 7 welcome page
Installation of CloverETL Server
1. Check if you meet the prerequisites:
• Oracle JDK or JRE is installed (see Java Virtual Machine (p. 6) for the required Java version).
• JAVA_HOME or JRE_HOME environment variable is set (see Setting up JAVA_HOME (p. 14)).
• A supported version (p. 6) of JBoss AS is installed.
2. It is strongly recommended to adjust the default limits for Memory allocation (see the MemorySettings (p. 56) section).
You can set the minimum and maximum memory heap size by adjusting the "Xms" and "Xmx" JVMparameters and classloaders memory limit by adjusting the "XX:MaxMetaspaceSize" parameter:
• Unix-like systems:
• JBoss AS v 6.x.x
Edit the [JBoss_AS_home]/bin/run.conf.
• JBoss AS v 7.x.x
Edit the [JBoss_AS_home]/bin/standalone.conf.
Edit the values of the following attributes:
Chapter 3. Installing
33
-XX:MaxMetaspaceSize=512m -Xms128m -Xmx2048m"
• Windows system:
• JBoss AS v 6.x.x
Edit the [JBoss_AS_home]\bin\run.conf.bat.
• JBoss AS v 7.x.x
Edit the [JBoss_AS_home]\bin\standalone.conf.bat.
Edit the values of the following attributes:
-XX:MaxMetaspaceSize=512m -Xms128m -Xmx2048m"
3. Go to the download section of your CloverETL account and download the clover.war (web archive) filecontaining CloverETL Server for JBoss AS.
4. Create a separate JBoss server configuration.It may be useful to use a specific JBoss server configuration, when it is necessary to run CloverETL:
• isolated from other JBoss applications
• with a different set of services
• with different libraries on the classpath than other applications
See the JBoss manual for details about the JBoss server configuration: JBoss Server Configurations , Startthe Server With Alternate Configuration
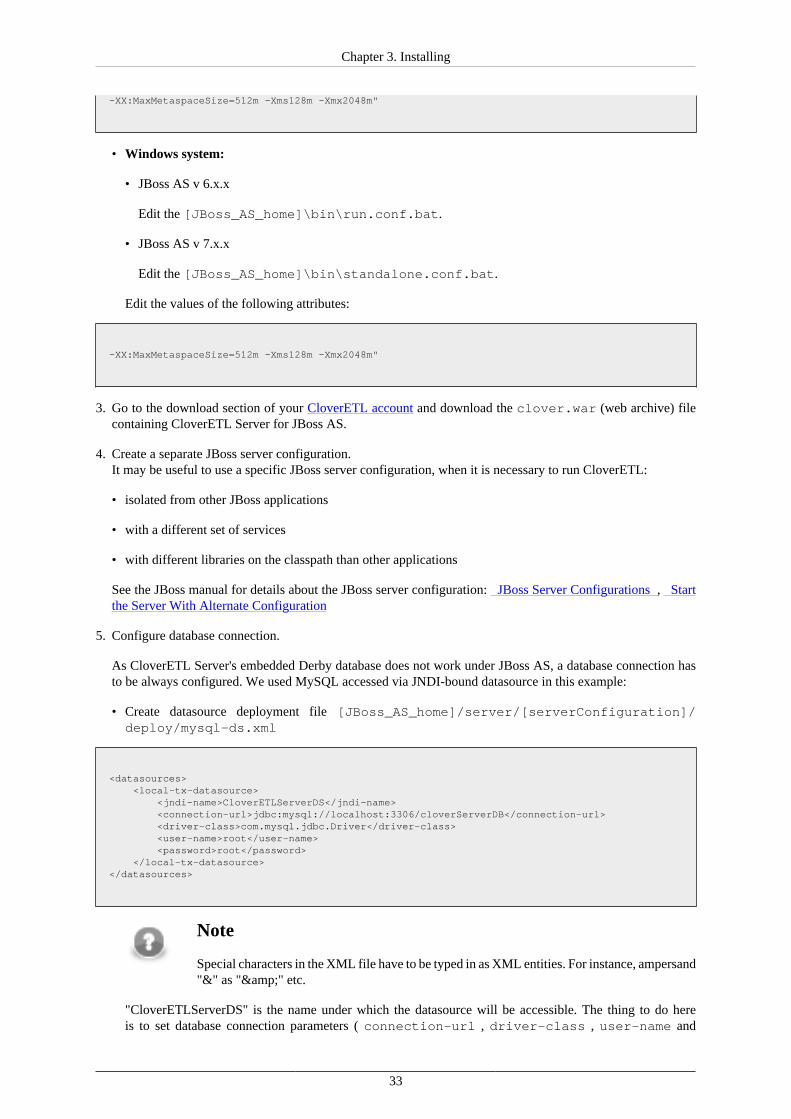
5. Configure database connection.
As CloverETL Server's embedded Derby database does not work under JBoss AS, a database connection hasto be always configured. We used MySQL accessed via JNDI-bound datasource in this example:
• Create datasource deployment file [JBoss_AS_home]/server/[serverConfiguration]/deploy/mysql-ds.xml
<datasources> <local-tx-datasource> <jndi-name>CloverETLServerDS</jndi-name> <connection-url>jdbc:mysql://localhost:3306/cloverServerDB</connection-url> <driver-class>com.mysql.jdbc.Driver</driver-class> <user-name>root</user-name> <password>root</password> </local-tx-datasource> </datasources>
Note
Special characters in the XML file have to be typed in as XML entities. For instance, ampersand"&" as "&" etc.
"CloverETLServerDS" is the name under which the datasource will be accessible. The thing to do hereis to set database connection parameters ( connection-url , driver-class , user-name and
Chapter 3. Installing
34
password ) to the database. The database has to be empty before the first execution, the server createsits tables on its own.
• Put the JDBC driver JAR file for your database to the application server classpath. In this example wecopied the file mysql-connector-java-5.1.5-bin.jar to [JBoss_AS_home]/server/[serverConfiguration]/lib
6. Configure CloverETL Server according to the description in the next section (p. 34).
7. Deploy the WAR file
• JBoss AS 6.x.x
Copy clover.war to [JBoss_AS_home]/server/[serverConfiguration]/deploy
• JBoss AS 7.x.x
Copy clover.war to [JBoss_AS_home]/standalone/deployments
8. • JBoss AS 6.x.x
Start JBoss AS via [JBoss_AS_home]/bin/run.sh (or run.bat on Windows OS).
If you want to run JBoss with a specific server configuration, it has to be specified as a parameter:[JBoss_AS_home]/bin/run.sh -c [serverConfiguration] If the serverConfiguration isn'tspecified, the "default" is used.
• JBoss AS 7.x.x
Start JBoss AS via [JBoss_AS_home]/bin/standalone.sh (or standalone.bat on WindowsOS).
Configuration of CloverETL Server on JBoss AS
NoteDefault installation (without any configuration) does not work under JBoss AS. In order to be ableto use the CloverETL Server, a working database connection is required.
For detailed configuration of CloverETL Server, use a properties file. Here you can configure various properties,including the connection to the database, username and password, path to the license file, private properties,number of active threads, clusters and much more (see Chapter 9, List of Properties (p. 90) and Chapter 35,Cluster Configuration (p. 292)). The file can be placed either on a default (p. 62), or specified (p. 62)location.
Content of such a file (example with MySQL database):
datasource.type=JNDIdatasource.jndiName=java:/CloverETLServerDSjdbc.dialect=org.hibernate.dialect.MySQLDialect
datasource.type Indicates the server will use JNDI-bound datasource created in steps above.
datasource.jndiName Specifies where can the datasource be found in JNDI.
jdbc.dialect Set the dialect according to your database server ( Part III,“Configuration” (p. 61)).
Chapter 3. Installing
35
Properties File in Specified Location
The properties file is loaded from a location which is specified by the environment/system propertyclover_config_file or clover.config.file.
1. Create the cloverServer.properties file in a directory readable by JBoss AS. (If you needan example of connection to any of supported databases, see Chapter 8, Examples of DB ConnectionConfiguration (p. 72).)
2. Set system property (or environment variable) clover.config.file pointing to the config properties file.
It should contain the full path to the cloverServer.properties file created in the previous step.
The simplest way is by setting a Java parameter:
Unix-like systems:
a. Edit the file [JBoss_AS_home]/bin/run.sh (JBoss AS v 6.x.x) or standalone.sh (JBoss ASv 7.x.x).
b. Add the following line:
export JAVA_OPTS="$JAVA_OPTS -Dclover.config.file=/home/clover/config/cloverServer.properties"
Windows system:
a. Edit the file [JBoss_AS_home]\bin\run.conf.bat (JBoss AS v 6.x.x) or\standalone.conf.bat (JBoss AS v 7.x.x).
b. Add the following line to the section where options are passed to the JVM:
set JAVA_OPTS=%JAVA_OPTS% -Dclover.config.file=C:\JBoss6\cloverServer.properties
Important
Do not override other settings in the JAVA_OPTS property - i.e. memory settings described above.
3. Restart JBoss AS so that the changes take effect.
4. Check the CloverETL Server application is running:
Server's console is accessible at http://localhost:8080/clover by default.
Note
Continue with: Chapter 4, Postinstallation Configuration (p. 56)
Chapter 3. Installing
36
JBoss Enterprise Application Platform
Installation of JBoss EAP (p. 36)Installation of CloverETL Server (p. 37)Configuration of CloverETL Server on JBoss EAP (p. 40)
Important
See Application Server (p. 6) in system requirements for currently supported JBoss EAP versionsand required Java versions.
If you encounter any problems during the installation, the Possible Issues duringInstallation (p. 51) section may provide a solution.
Installation of JBoss EAP
1. Using your credentials, log into the customer portal on the official Red Hat page and download a compatibleJBoss EAP version.
2. Extract the downloaded archive (alternatively, you can download and run the installer and follow theinstructions).
3. Run JBoss EAP.
• Unix-like systems:
Run [JBoss_EAP_home]/bin/standalone.sh.
• Windows system:
Run [JBoss_EAP_home]\bin\standalone.bat.
4. Check whether JBoss EAP is running.
• Open a new tab in your browser and type http://localhost:8080/ in the address bar.
You should see the JBoss EAP welcome page (otherwise, please consult the JBoss EAP guide):
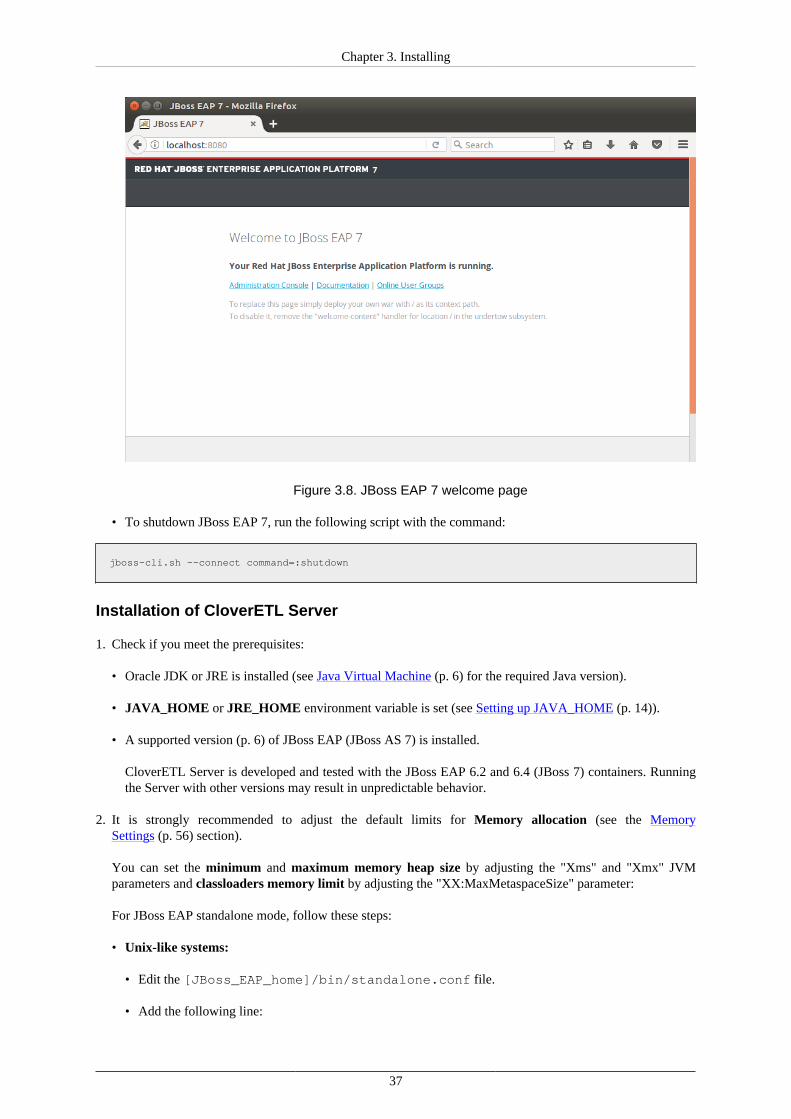
Chapter 3. Installing
37
Figure 3.8. JBoss EAP 7 welcome page
• To shutdown JBoss EAP 7, run the following script with the command:
jboss-cli.sh --connect command=:shutdown
Installation of CloverETL Server
1. Check if you meet the prerequisites:
• Oracle JDK or JRE is installed (see Java Virtual Machine (p. 6) for the required Java version).
• JAVA_HOME or JRE_HOME environment variable is set (see Setting up JAVA_HOME (p. 14)).
• A supported version (p. 6) of JBoss EAP (JBoss AS 7) is installed.
CloverETL Server is developed and tested with the JBoss EAP 6.2 and 6.4 (JBoss 7) containers. Runningthe Server with other versions may result in unpredictable behavior.
2. It is strongly recommended to adjust the default limits for Memory allocation (see the MemorySettings (p. 56) section).
You can set the minimum and maximum memory heap size by adjusting the "Xms" and "Xmx" JVMparameters and classloaders memory limit by adjusting the "XX:MaxMetaspaceSize" parameter:
For JBoss EAP standalone mode, follow these steps:
• Unix-like systems:
• Edit the [JBoss_EAP_home]/bin/standalone.conf file.
• Add the following line:
Chapter 3. Installing
38
JAVA_OPTS="$JAVA_OPTS -XX:MaxMetaspaceSize=512m -Xms128m -Xmx2048m"
• Windows systems:
• Edit the [JBoss_EAP_home]\bin\standalone.conf.bat file.
•
JAVA_OPTS="$JAVA_OPTS -XX:MaxMetaspaceSize=512m -Xms128m -Xmx2048m"
Important
If you use Java 7, change -XX:MaxMetaspaceSize to -XX:MaxPermSize.
3. Go to the download section of your CloverETL account and download the clover.war (web archive) filecontaining CloverETL Server for JBoss EAP.
4. Configure the database connection.
By default, CloverETL Server uses embedded Derby database; however, such setup is not recommended forproduction use.
You can use the database connection provided by JNDI-bound datasource deployed by JBoss EAP. In orderto define the datasource, edit the file:
[JBoss_EAP_home]/standalone/configuration/standalone.xml
and add the definition of the datasourceinto into the section <subsystemxmlns="urn:jboss:domain:datasources:1.1"> under the element <datasources>. Here isan example of datasource connecting to a MySQL database:
<datasource jndi-name="java:jboss/datasources/CloverETLServerDS" pool-name="CloverETLServerDS-Pool" enabled="true"> <connection-url>jdbc:mysql://localhost:3307/cloverServerDB</connection-url> <driver>com.mysql</driver> <transaction-isolation>TRANSACTION_READ_COMMITTED</transaction-isolation> <pool> <min-pool-size>5</min-pool-size> <max-pool-size>50</max-pool-size> <prefill>true</prefill> </pool> <security> <user-name>root</user-name> <password>root</password> </security> <statement> <prepared-statement-cache-size>32</prepared-statement-cache-size> <share-prepared-statements>true</share-prepared-statements> </statement></datasource><drivers> <driver name="com.mysql" module="mysql.driver"> <driver-class>com.mysql.jdbc.Driver</driver-class> </driver></drivers>
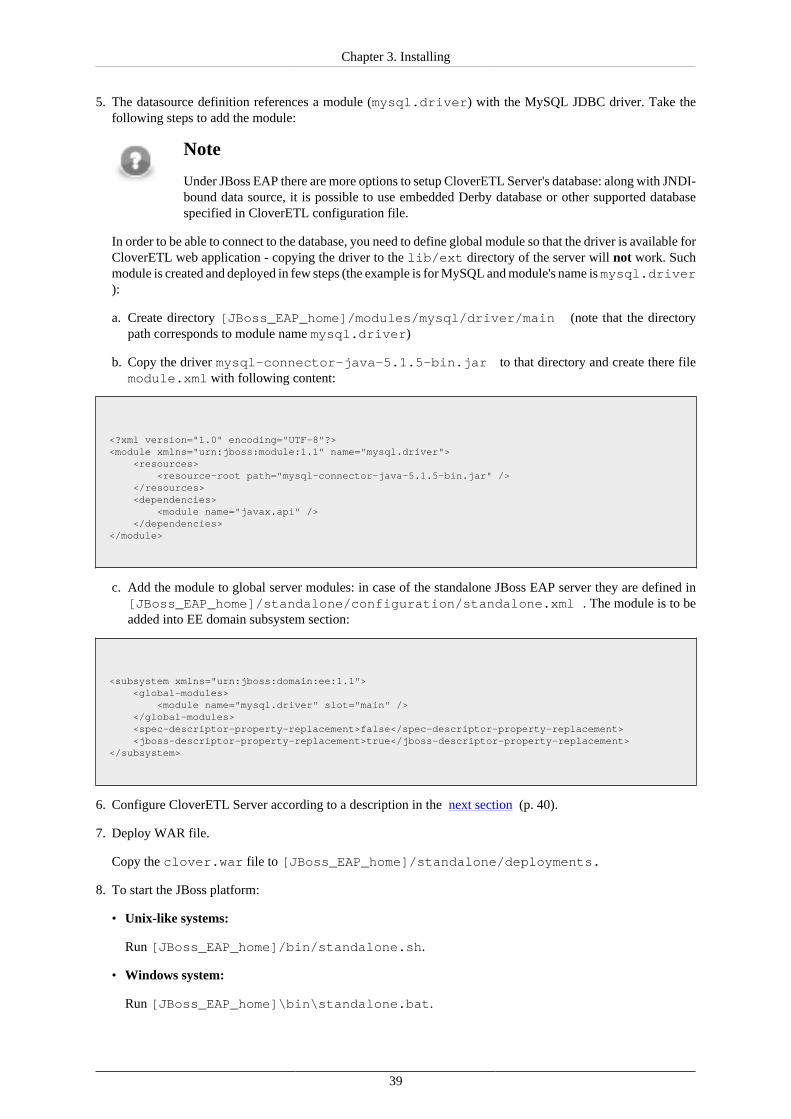
Chapter 3. Installing
39
5. The datasource definition references a module (mysql.driver) with the MySQL JDBC driver. Take thefollowing steps to add the module:
Note
Under JBoss EAP there are more options to setup CloverETL Server's database: along with JNDI-bound data source, it is possible to use embedded Derby database or other supported databasespecified in CloverETL configuration file.
In order to be able to connect to the database, you need to define global module so that the driver is available forCloverETL web application - copying the driver to the lib/ext directory of the server will not work. Suchmodule is created and deployed in few steps (the example is for MySQL and module's name is mysql.driver):
a. Create directory [JBoss_EAP_home]/modules/mysql/driver/main (note that the directorypath corresponds to module name mysql.driver)
b. Copy the driver mysql-connector-java-5.1.5-bin.jar to that directory and create there filemodule.xml with following content:
<?xml version="1.0" encoding="UTF-8"?><module xmlns="urn:jboss:module:1.1" name="mysql.driver"> <resources> <resource-root path="mysql-connector-java-5.1.5-bin.jar" /> </resources> <dependencies> <module name="javax.api" /> </dependencies></module>
c. Add the module to global server modules: in case of the standalone JBoss EAP server they are defined in[JBoss_EAP_home]/standalone/configuration/standalone.xml . The module is to beadded into EE domain subsystem section:
<subsystem xmlns="urn:jboss:domain:ee:1.1"> <global-modules> <module name="mysql.driver" slot="main" /> </global-modules> <spec-descriptor-property-replacement>false</spec-descriptor-property-replacement> <jboss-descriptor-property-replacement>true</jboss-descriptor-property-replacement></subsystem>
6. Configure CloverETL Server according to a description in the next section (p. 40).
7. Deploy WAR file.
Copy the clover.war file to [JBoss_EAP_home]/standalone/deployments.
8. To start the JBoss platform:
• Unix-like systems:
Run [JBoss_EAP_home]/bin/standalone.sh.
• Windows system:
Run [JBoss_EAP_home]\bin\standalone.bat.

Chapter 3. Installing
40
It may take a couple of minutes for all applications to start.
9. Check JBoss response and CloverETL Server response.
• JBoss administration console is accessible at http://localhost:8080/ by default. Default username/passwordis admin/admin
• CloverETL Server is accessible at http://localhost:8080/clover by default.
Configuration of CloverETL Server on JBoss EAP
TipDefault installation (without any configuration) is only recommended for evaluation purposes. Forproduction use, at least a dedicated database and SMTP server configuration is recommended.
For detailed configuration of CloverETL Server, use a properties file. Here you can configure various properties,including the connection to the database, username and password, path to the license file, private properties,number of active threads, clusters and much more (see Chapter 9, List of Properties (p. 90) and Chapter 35,Cluster Configuration (p. 292)). The file can be placed either on a default (p. 62), or specified (p. 62)location.
Properties File in Specified Location
The properties file is loaded from a location which is specified by the environment/system propertyclover_config_file or clover.config.file.
1. • Create the cloverServer.properties file in a directory readable by JBoss EAP. (If you needan example of connection to any of supported databases, see Chapter 8, Examples of DB ConnectionConfiguration (p. 72).):
datasource.type=JNDIdatasource.jndiName=java:jboss/datasources/CloverETLServerDSjdbc.dialect=org.hibernate.dialect.MySQLDialectlicense.file=/home/clover/config/license.dat
Do not forget to set correct JDBC dialect according to your database server (Part III,“Configuration” (p. 61)). You can set the path to the license file, too.
• Alternatively, you can set "JDBC" datasource.type and configure the database connection to bemanaged directly by CloverETL Server (provided that you have deployed proper JDBC driver module tothe server):
datasource.type=JDBCjdbc.url=jdbc:mysql://localhost:3306/cloverServerDBjdbc.dialect=org.hibernate.dialect.MySQLDialectjdbc.driverClassName=com.mysql.jdbc.Driverjdbc.username=rootjdbc.password=rootlicense.file=/home/clover/config/license.dat
2. Set the clover.config.file system property (or environment variable).
It should contain the full path to the cloverServer.properties file created in the previous step.
The simplest way to set the system property is to edit the configuration file [JBoss_EAP_home]/standalone/configuration/standalone.xml, and to add the following snippet just under<extensions> section:
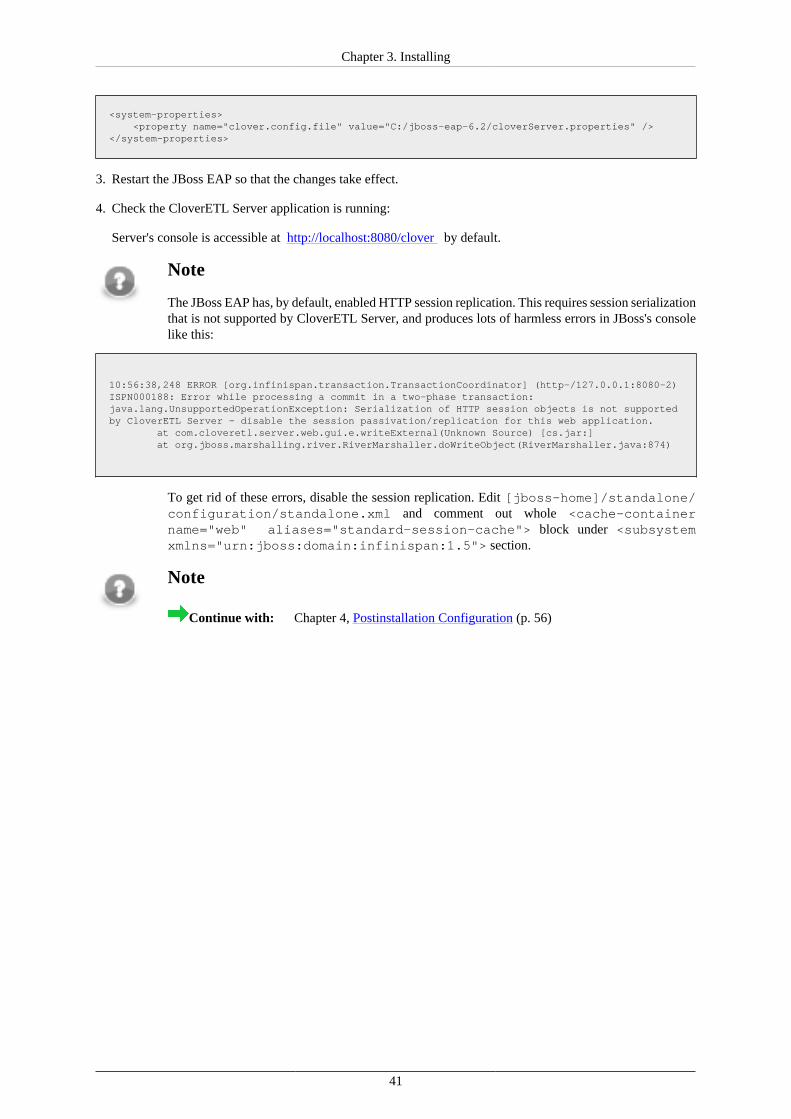
Chapter 3. Installing
41
<system-properties> <property name="clover.config.file" value="C:/jboss-eap-6.2/cloverServer.properties" /></system-properties>
3. Restart the JBoss EAP so that the changes take effect.
4. Check the CloverETL Server application is running:
Server's console is accessible at http://localhost:8080/clover by default.
Note
The JBoss EAP has, by default, enabled HTTP session replication. This requires session serializationthat is not supported by CloverETL Server, and produces lots of harmless errors in JBoss's consolelike this:
10:56:38,248 ERROR [org.infinispan.transaction.TransactionCoordinator] (http-/127.0.0.1:8080-2)ISPN000188: Error while processing a commit in a two-phase transaction:java.lang.UnsupportedOperationException: Serialization of HTTP session objects is not supportedby CloverETL Server - disable the session passivation/replication for this web application. at com.cloveretl.server.web.gui.e.writeExternal(Unknown Source) [cs.jar:] at org.jboss.marshalling.river.RiverMarshaller.doWriteObject(RiverMarshaller.java:874)
To get rid of these errors, disable the session replication. Edit [jboss-home]/standalone/configuration/standalone.xml and comment out whole <cache-containername="web" aliases="standard-session-cache"> block under <subsystemxmlns="urn:jboss:domain:infinispan:1.5"> section.
Note
Continue with: Chapter 4, Postinstallation Configuration (p. 56)
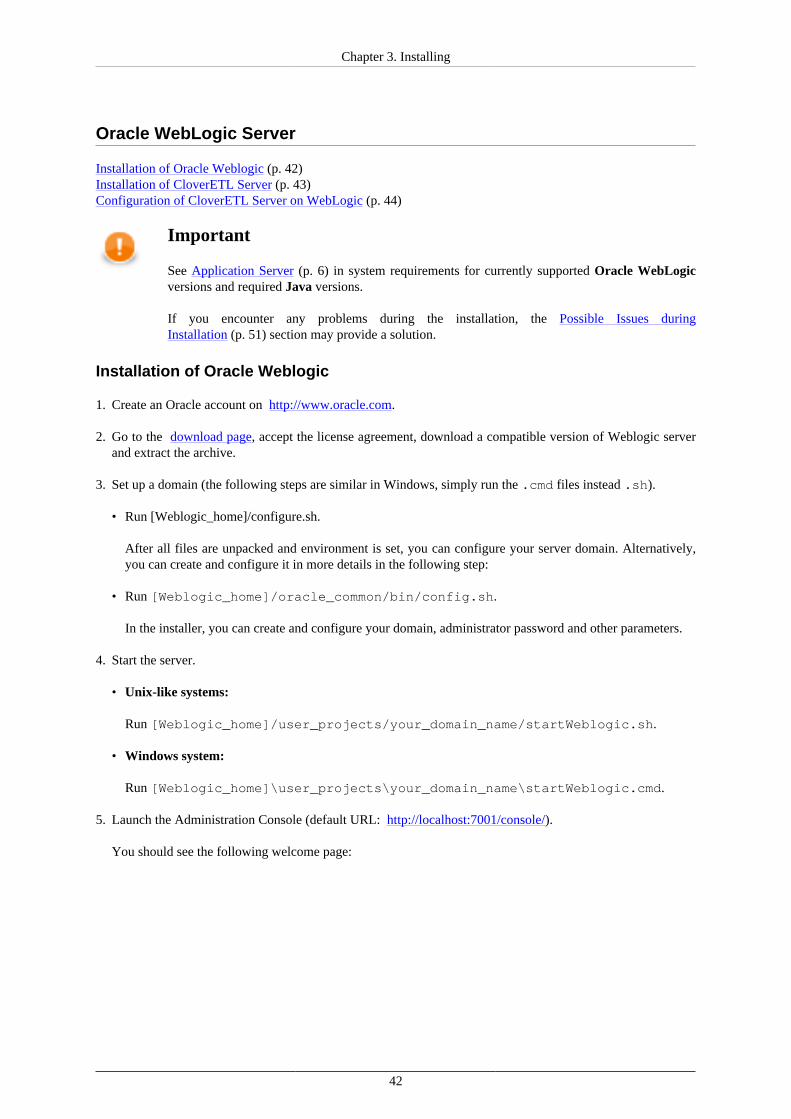
Chapter 3. Installing
42
Oracle WebLogic Server
Installation of Oracle Weblogic (p. 42)Installation of CloverETL Server (p. 43)Configuration of CloverETL Server on WebLogic (p. 44)
Important
See Application Server (p. 6) in system requirements for currently supported Oracle WebLogicversions and required Java versions.
If you encounter any problems during the installation, the Possible Issues duringInstallation (p. 51) section may provide a solution.
Installation of Oracle Weblogic
1. Create an Oracle account on http://www.oracle.com.
2. Go to the download page, accept the license agreement, download a compatible version of Weblogic serverand extract the archive.
3. Set up a domain (the following steps are similar in Windows, simply run the .cmd files instead .sh).
• Run [Weblogic_home]/configure.sh.
After all files are unpacked and environment is set, you can configure your server domain. Alternatively,you can create and configure it in more details in the following step:
• Run [Weblogic_home]/oracle_common/bin/config.sh.
In the installer, you can create and configure your domain, administrator password and other parameters.
4. Start the server.
• Unix-like systems:
Run [Weblogic_home]/user_projects/your_domain_name/startWeblogic.sh.
• Windows system:
Run [Weblogic_home]\user_projects\your_domain_name\startWeblogic.cmd.
5. Launch the Administration Console (default URL: http://localhost:7001/console/).
You should see the following welcome page:
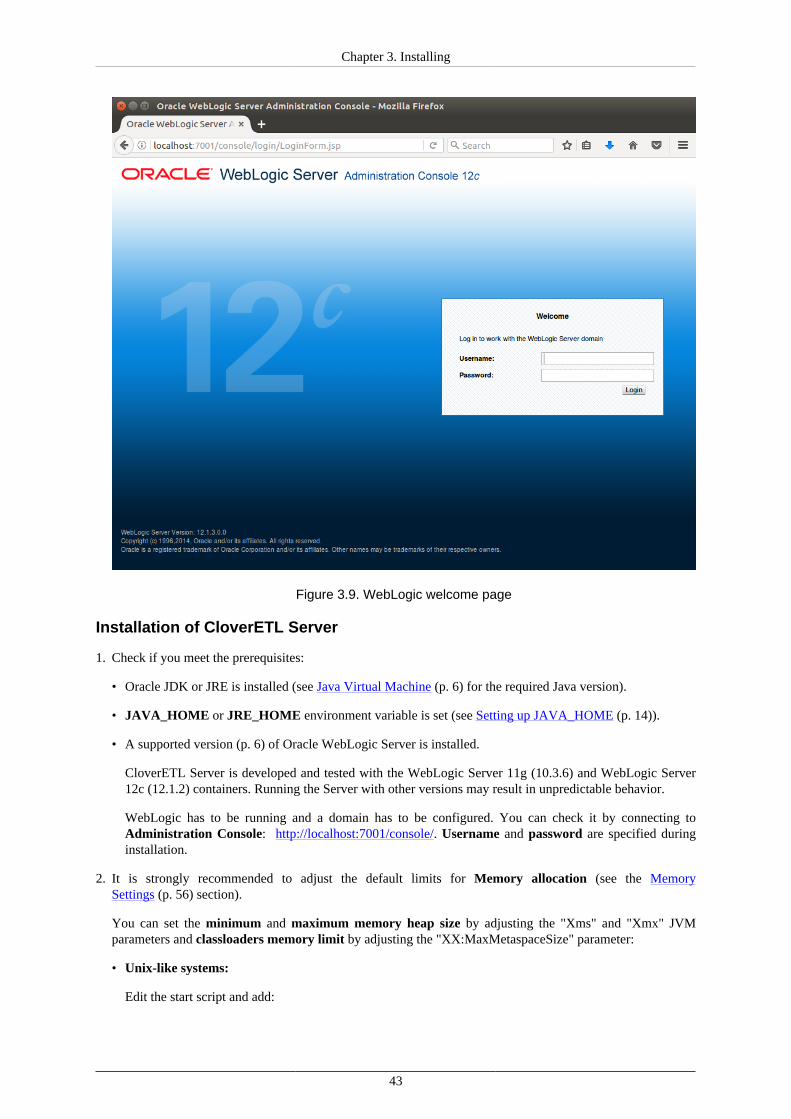
Chapter 3. Installing
43
Figure 3.9. WebLogic welcome page
Installation of CloverETL Server
1. Check if you meet the prerequisites:
• Oracle JDK or JRE is installed (see Java Virtual Machine (p. 6) for the required Java version).
• JAVA_HOME or JRE_HOME environment variable is set (see Setting up JAVA_HOME (p. 14)).
• A supported version (p. 6) of Oracle WebLogic Server is installed.
CloverETL Server is developed and tested with the WebLogic Server 11g (10.3.6) and WebLogic Server12c (12.1.2) containers. Running the Server with other versions may result in unpredictable behavior.
WebLogic has to be running and a domain has to be configured. You can check it by connecting toAdministration Console: http://localhost:7001/console/. Username and password are specified duringinstallation.
2. It is strongly recommended to adjust the default limits for Memory allocation (see the MemorySettings (p. 56) section).
You can set the minimum and maximum memory heap size by adjusting the "Xms" and "Xmx" JVMparameters and classloaders memory limit by adjusting the "XX:MaxMetaspaceSize" parameter:
• Unix-like systems:
Edit the start script and add:
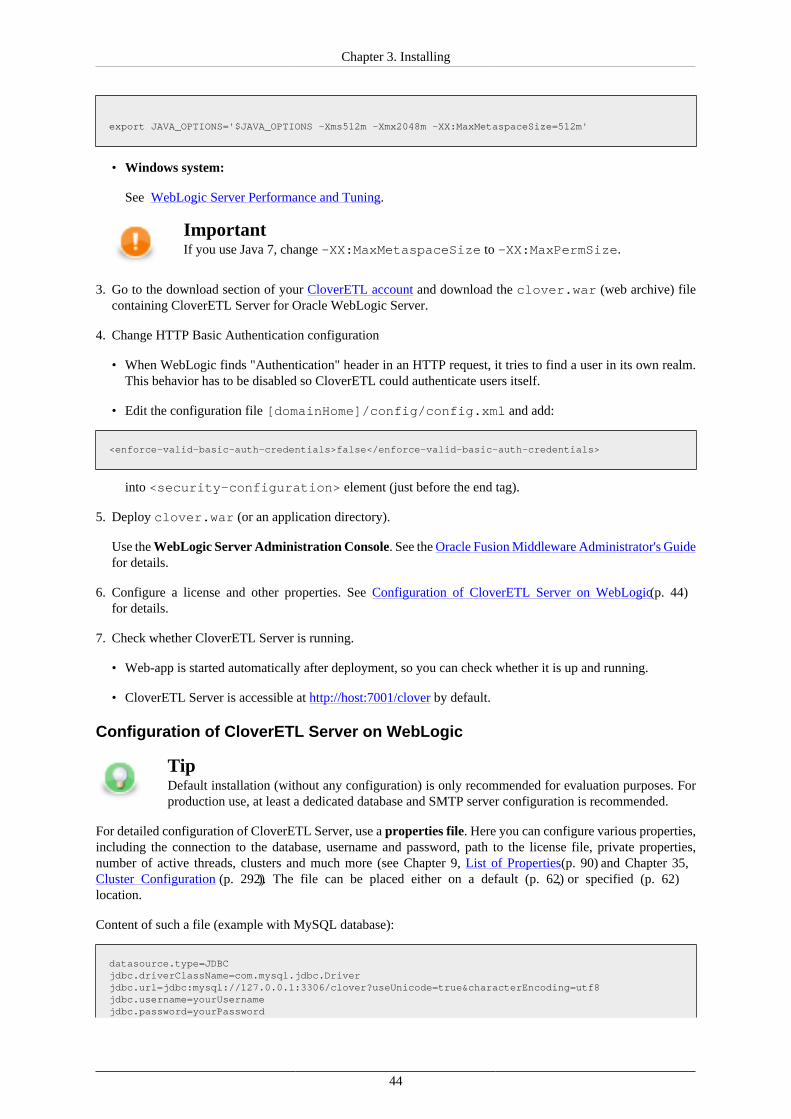
Chapter 3. Installing
44
export JAVA_OPTIONS='$JAVA_OPTIONS -Xms512m -Xmx2048m -XX:MaxMetaspaceSize=512m'
• Windows system:
See WebLogic Server Performance and Tuning.
ImportantIf you use Java 7, change -XX:MaxMetaspaceSize to -XX:MaxPermSize.
3. Go to the download section of your CloverETL account and download the clover.war (web archive) filecontaining CloverETL Server for Oracle WebLogic Server.
4. Change HTTP Basic Authentication configuration
• When WebLogic finds "Authentication" header in an HTTP request, it tries to find a user in its own realm.This behavior has to be disabled so CloverETL could authenticate users itself.
• Edit the configuration file [domainHome]/config/config.xml and add:
<enforce-valid-basic-auth-credentials>false</enforce-valid-basic-auth-credentials>
into <security-configuration> element (just before the end tag).
5. Deploy clover.war (or an application directory).
Use the WebLogic Server Administration Console. See the Oracle Fusion Middleware Administrator's Guidefor details.
6. Configure a license and other properties. See Configuration of CloverETL Server on WebLogic (p. 44)for details.
7. Check whether CloverETL Server is running.
• Web-app is started automatically after deployment, so you can check whether it is up and running.
• CloverETL Server is accessible at http://host:7001/clover by default.
Configuration of CloverETL Server on WebLogic
TipDefault installation (without any configuration) is only recommended for evaluation purposes. Forproduction use, at least a dedicated database and SMTP server configuration is recommended.
For detailed configuration of CloverETL Server, use a properties file. Here you can configure various properties,including the connection to the database, username and password, path to the license file, private properties,number of active threads, clusters and much more (see Chapter 9, List of Properties (p. 90) and Chapter 35,Cluster Configuration (p. 292)). The file can be placed either on a default (p. 62), or specified (p. 62)location.
Content of such a file (example with MySQL database):
datasource.type=JDBCjdbc.driverClassName=com.mysql.jdbc.Driverjdbc.url=jdbc:mysql://127.0.0.1:3306/clover?useUnicode=true&characterEncoding=utf8jdbc.username=yourUsernamejdbc.password=yourPassword
Chapter 3. Installing
45
jdbc.dialect=org.hibernate.dialect.MySQLDialect
Properties File in Specified Location
1. Create the cloverServer.properties file in a directory readable by WebLogic. (If you needan example of connection to any of supported databases, see Chapter 8, Examples of DB ConnectionConfiguration (p. 72).)
The configuration file should contain DB datasource configuration, SMTP connection configuration, etc. SeePart III, “Configuration” (p. 61) for details.
2. Set clover_config_file system property (or environment variable) pointing to the configurationproperties file.
• Set JAVA_OPTIONS variable in the WebLogic domain start script [domainHome]/startWebLogic.sh
JAVA_OPTIONS="${JAVA_OPTIONS} -Dclover_config_file=/path/to/clover-config.properties
3. Restart WebLogic for changes to take effect.
Important
When CloverETL Server is deployed on WebLogic and JNDI Datasource pointing to Oracle DB isused, there must be an extra configuration property in the configuration file:
quartz.driverDelegateClass=org.quartz.impl.jdbcjobstore.oracle.weblogic.WebLogicOracleDelegate
Note
Continue with: Chapter 4, Postinstallation Configuration (p. 56)
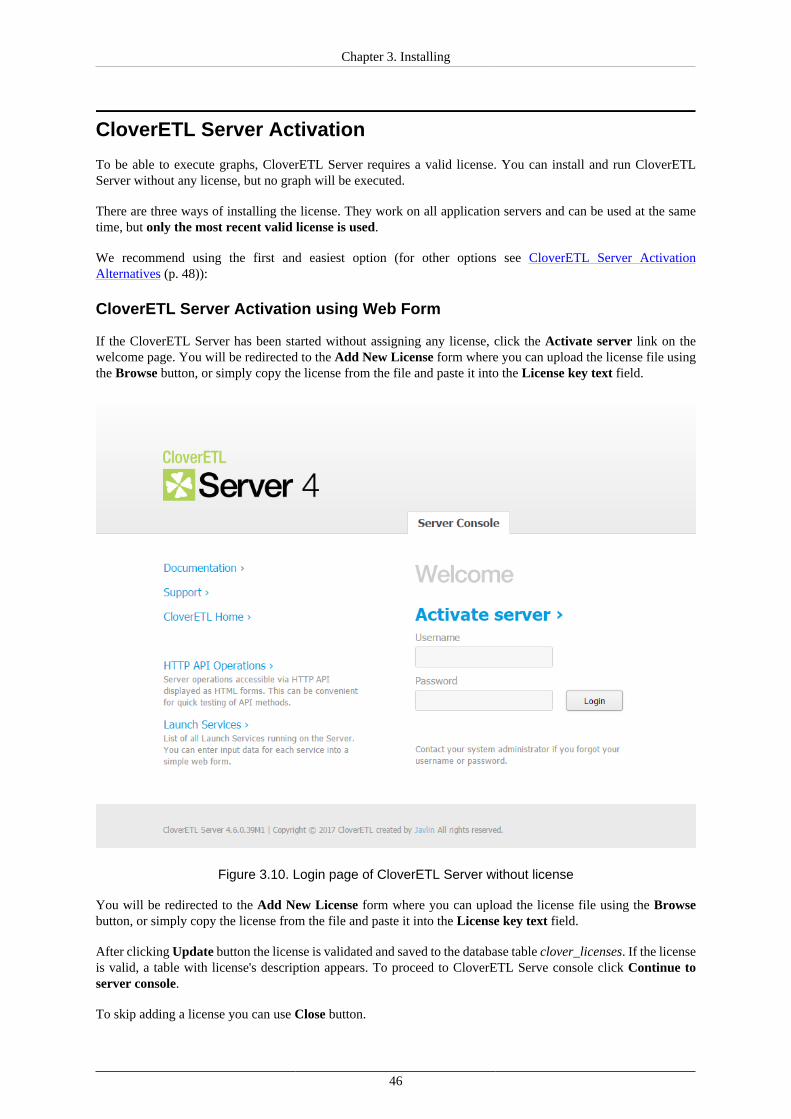
Chapter 3. Installing
46
CloverETL Server Activation
To be able to execute graphs, CloverETL Server requires a valid license. You can install and run CloverETLServer without any license, but no graph will be executed.
There are three ways of installing the license. They work on all application servers and can be used at the sametime, but only the most recent valid license is used.
We recommend using the first and easiest option (for other options see CloverETL Server ActivationAlternatives (p. 48)):
CloverETL Server Activation using Web Form
If the CloverETL Server has been started without assigning any license, click the Activate server link on thewelcome page. You will be redirected to the Add New License form where you can upload the license file usingthe Browse button, or simply copy the license from the file and paste it into the License key text field.
Figure 3.10. Login page of CloverETL Server without license
You will be redirected to the Add New License form where you can upload the license file using the Browsebutton, or simply copy the license from the file and paste it into the License key text field.
After clicking Update button the license is validated and saved to the database table clover_licenses. If the licenseis valid, a table with license's description appears. To proceed to CloverETL Serve console click Continue toserver console.
To skip adding a license you can use Close button.
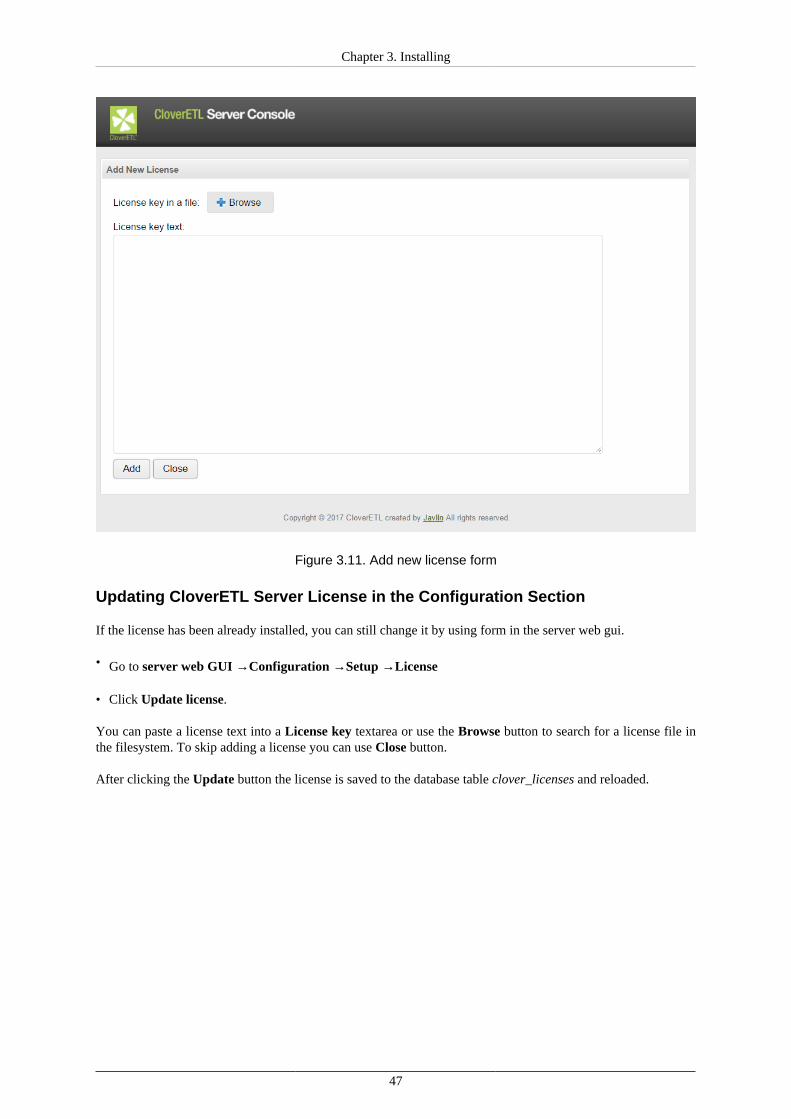
Chapter 3. Installing
47
Figure 3.11. Add new license form
Updating CloverETL Server License in the Configuration Section
If the license has been already installed, you can still change it by using form in the server web gui.
• Go to server web GUI →Configuration →Setup →License
• Click Update license.
You can paste a license text into a License key textarea or use the Browse button to search for a license file inthe filesystem. To skip adding a license you can use Close button.
After clicking the Update button the license is saved to the database table clover_licenses and reloaded.
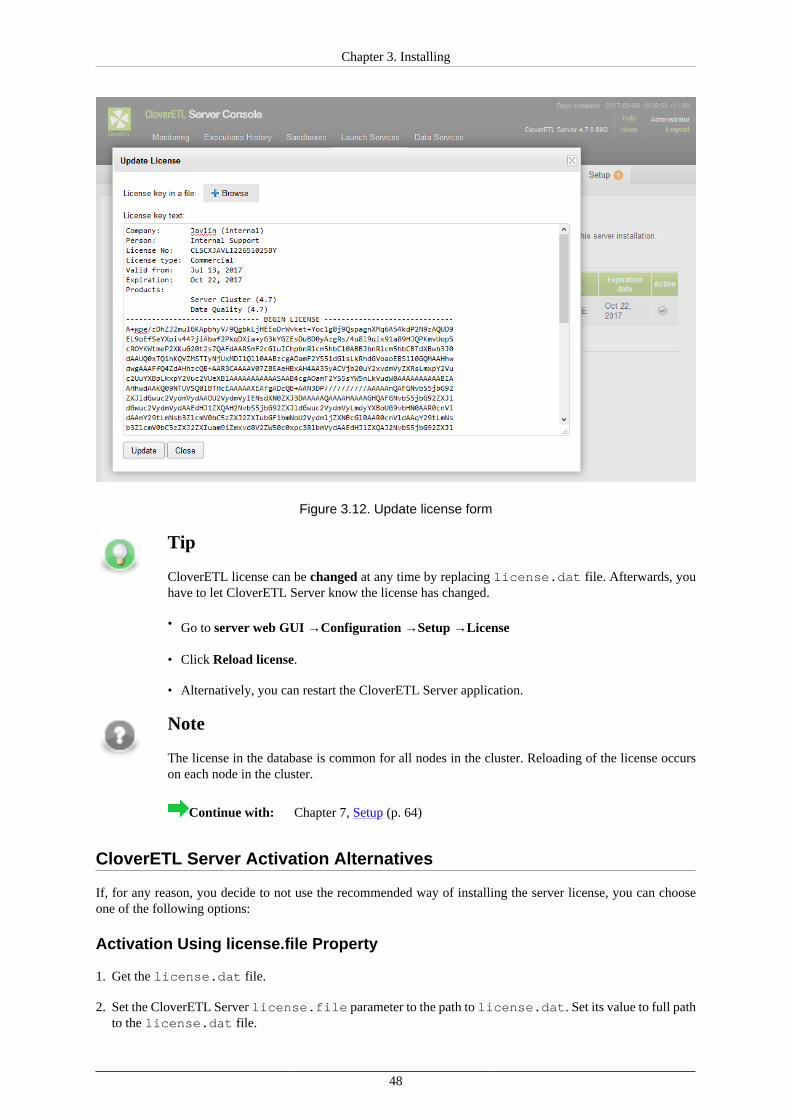
Chapter 3. Installing
48
Figure 3.12. Update license form
Tip
CloverETL license can be changed at any time by replacing license.dat file. Afterwards, youhave to let CloverETL Server know the license has changed.
• Go to server web GUI →Configuration →Setup →License
• Click Reload license.
• Alternatively, you can restart the CloverETL Server application.
Note
The license in the database is common for all nodes in the cluster. Reloading of the license occurson each node in the cluster.
Continue with: Chapter 7, Setup (p. 64)
CloverETL Server Activation Alternatives
If, for any reason, you decide to not use the recommended way of installing the server license, you can chooseone of the following options:
Activation Using license.file Property
1. Get the license.dat file.
2. Set the CloverETL Server license.file parameter to the path to license.dat. Set its value to full pathto the license.dat file.
Chapter 3. Installing
49
See Chapter 9, List of Properties (p. 90) for list of properties.
3. Restart the application server.
Separate License WAR
Simple approach, but it may be used only for standalone server running on Apache Tomcat.
1. Download the clover-license.war web archive file.
2. Copy clover-license.war to the [tomcat_home]/webapps directory.
3. The war file should be detected and deployed automatically without restarting Tomcat.
4. Check whether the license web-app is running on:
http://[host]:[port]/clover-license/ (Note: clover-license contextPath is mandatoryand cannot by changed)
Note
Continue with: Chapter 7, Setup (p. 64)
IBM InfoSphere MDM Plugin Installation
Downloading
IBM InfoSphere MDM Components for CloverETL Server are downloaded as a ZIP file containing theextension. The ZIP file is available for download under your account on www.cloveretl.com in CloverETL Serverdownload area, under the Utilities section as ibm-mdm-connectors.${version}.zip file.
Requirements
Requirements of IBM InfoSphere MDM Components:
• supported OS are Microsoft Windows 32 bit, Microsoft Windows 64 bit, Linux 64 bit, and Mac OS X Cocoa
• at least 512MB of RAM
• installed CloverETL Server
The support for 32 bit Linux was removed in 4.5.0.
Installation into Server
The following steps are needed to install IBM InfoSphere MDM Components into CloverETL Server:
1. Install CloverETL Server, see its documentation for details.
2. Download the ZIP file with IBM InfoSphere MDM Components for Server and store it on the system whereCloverETL Server is installed. See Downloading (p. 49) for instructions for the download.
3. The ZIP file contains a CloverETL plugin. Your Server installation needs to beconfigured to find and load the plugin from the ZIP file. This is done by setting theengine.plugins.additional.src Server configuration property to the absolute path of the ZIP file,
Chapter 3. Installing
50
e.g. engine.plugins.additional.src=c:/Server/ibm-mdm-connectors.4.8.0.zip (incase the Server is configured via a property file).
Details for setting the configuration property depend on your Server installation specifics, application serverused etc. See CloverETL Server documentation for details. Typically the property would be set similarly tohow you set-up the properties for connection to the Server's database. Updating the configuration propertyusually requires restart of the Server.
4. To verify that the plugin was loaded successfully, login to the Server's Reporting Console and lookin the Configuration > CloverETL Info > Plugins page. In the list of plugins you should seecloveretl.engine.initiate.
Troubleshooting
If you get an Unknown component or Unknown connection error when running a graph with IBMInfoSphere MDM components, it means that the IBM InfoSphere MDM Components plugin was not loaded bythe Server successfully. Please check the above steps to install the plugin, especially the path to the ZIP file.
Chapter 3. Installing
51
Possible Issues during Installation
Since CloverETL Server is considered a universal JEE application running on various application servers,databases and jvm implementations, problems may occur during the installation. These can be solved with a properconfiguration of the server environment. This section contains tips for the configuration.
Memory Issues on Derby (p. 51)JAVA_HOME or JRE_HOME Environment Variables Are Not Defined (p. 51)Apache Tomcat Context Parameters Do Not Have Any Effect (p. 52)Tomcat Log File catalina.out Is Missing on Windows (p. 52)Timeouts Waiting for JVM (p. 52)clover.war as Default Context on WebSphere (Windows OS) (p. 53)Tomcat 6.0 on Linux - Default DB (p. 53)Derby.system.home Cannot be Accessed (p. 53)Environment Variables and More than one CloverETL Server Instances Running on Single Machine (p. 54)Special Characters and Slashes in Path (p. 54)File System Permissions (p. 54)JMS API and JMS Third-Party Libraries (p. 54)Using an Unsupported JDBC Connector for MySQL (p. 54)
Memory Issues on Derby
If your server suddenly starts consuming too much resources (CPU, memory) despite having been working wellbefore, it might be because of running the internal Derby DB. Typically, causes are incorrect/incomplete shutdownof Apache Tomcat and parallel (re)start of Apache Tomcat.
Solution: move to a standard (standalone) database.
How to fix this? Redeploy CloverETL Server:
1. Stop Apache Tomcat and verify there are no other instances running. If so, kill them.
2. Backup the configuration file, if you configured any.
3. Delete the webapps/clover directory.
4. Start Apache Tomcat server. It will automatically redeploy CloverETL Server.
5. Verify you can connect from Designer and from web.
6. Shutdown Apache Tomcat.
7. Restore the configuration file and point it to your regular database.
8. Start Apache Tomcat.
JAVA_HOME or JRE_HOME Environment Variables Are Not Defined
If you are getting this error message during an attempt to start your application server (mostly Tomcat), performthe following actions.
Linux:
This command will help you set a path to the variable on the server.[root@server /] export JAVA_HOME=/usr/local/jdk1.x.x
As a final step, restart the application server.
Chapter 3. Installing
52
Windows OS:
Set JAVA_HOME to your JDK installation directory, e.g. C:\Program Files\java\jdk1.8.0.
Important
Some CloverETL functions requires JDK to work correctly, therefore we do not recommend havingonly JRE installed.
Apache Tomcat Context Parameters Do Not Have Any Effect
Tomcat may sometimes ignore some context parameters. It may cause weird CloverETL Server behavior,since it appears as configured, but only partially. Some parameters are accepted, some are ignored. This issueis rare, however it may occur in some environments. Such behavior is consistent, so restart has no effect.It's possibly related to Tomcat issues: https://issues.apache.org/bugzilla/show_bug.cgi?id=47516 and https://issues.apache.org/bugzilla/show_bug.cgi?id=50700 To avoid this, please use a properties file instead of contextparameters to configure CloverETL Server.
Tomcat Log File catalina.out Is Missing on Windows
Tomcat start batch files for Windows aren't configured to create catalina.out file which contains standard outputof the application. The catalina.out file may be vital when Tomcat isn't started in the console and an issueoccurs. Or even when Tomcat is executed in the console, it may be closed automatically just after the error messageappears in it.
Please follow these steps to enable catalina.out creation:
• Modify [Tomcat_home]/bin/catalina.bat. Add parameter "/B" to the lines where the "_EXECJAVA" variableis set. There should be two such lines:
set _EXECJAVA=start /B [the rest of the line]Parameter /B causes, that "start" command doesn't open new console window, but runs the command it's ownconsole window.
• Create a new startup file, e.g. [Tomcat_home]/bin/startupLog.bat, containing a single line:
catalina.bat start > ..\logs\catalina.out 2<&1It executes Tomcat in the usual way, but standard output isn't put to the console, but to the catalina.out file.
Then use the new startup file instead of [Tomcat_home]/bin/startup.bat.
Timeouts Waiting for JVM
If you get the Jetty application server successfully running but cannot start CloverETL Server, it might be becauseof the wrapper waiting for JVM too long (it is considered a low-memory issue). Examine [Jetty_home]\logs\jetty-service.log for a following line:
Startup failed: Timed out waiting for signal from JVM.
If it is there, edit [Jetty_home]\bin\jetty-service.conf and add these lines:
wrapper.startup.timeout=60wrapper.shutdown.timeout=60
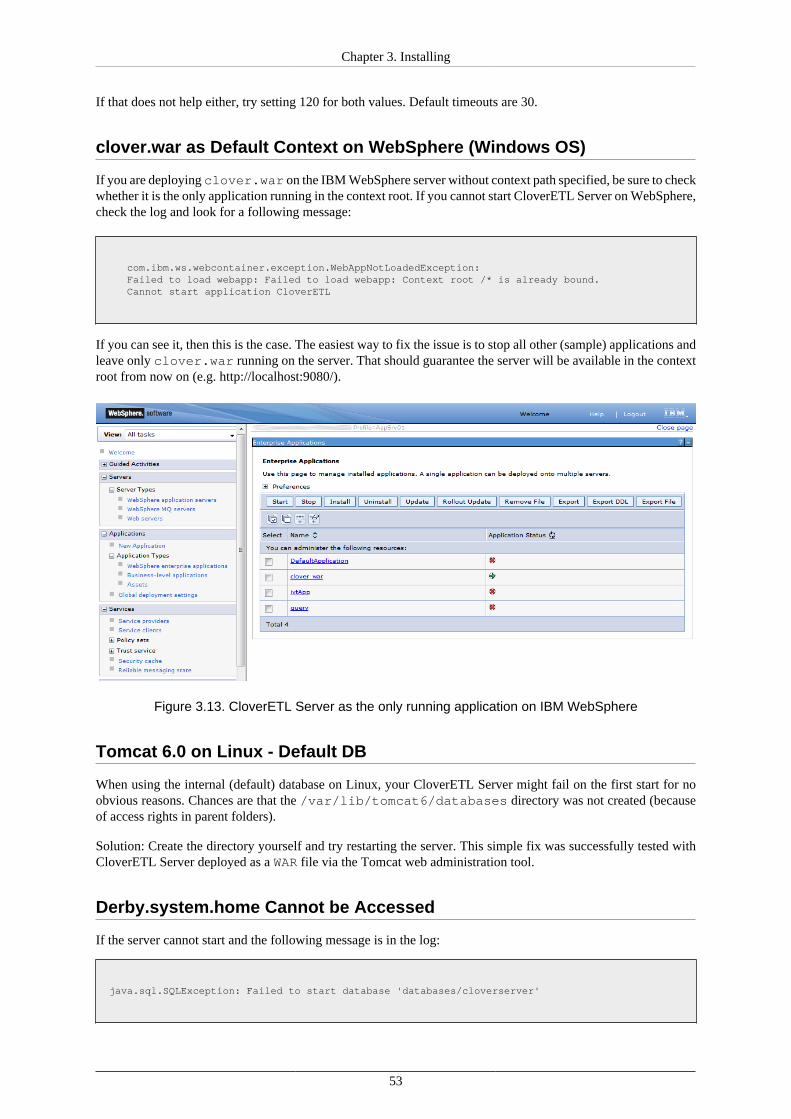
Chapter 3. Installing
53
If that does not help either, try setting 120 for both values. Default timeouts are 30.
clover.war as Default Context on WebSphere (Windows OS)
If you are deploying clover.war on the IBM WebSphere server without context path specified, be sure to checkwhether it is the only application running in the context root. If you cannot start CloverETL Server on WebSphere,check the log and look for a following message:
com.ibm.ws.webcontainer.exception.WebAppNotLoadedException: Failed to load webapp: Failed to load webapp: Context root /* is already bound. Cannot start application CloverETL
If you can see it, then this is the case. The easiest way to fix the issue is to stop all other (sample) applications andleave only clover.war running on the server. That should guarantee the server will be available in the contextroot from now on (e.g. http://localhost:9080/).
Figure 3.13. CloverETL Server as the only running application on IBM WebSphere
Tomcat 6.0 on Linux - Default DB
When using the internal (default) database on Linux, your CloverETL Server might fail on the first start for noobvious reasons. Chances are that the /var/lib/tomcat6/databases directory was not created (becauseof access rights in parent folders).
Solution: Create the directory yourself and try restarting the server. This simple fix was successfully tested withCloverETL Server deployed as a WAR file via the Tomcat web administration tool.
Derby.system.home Cannot be Accessed
If the server cannot start and the following message is in the log:
java.sql.SQLException: Failed to start database 'databases/cloverserver'
Chapter 3. Installing
54
then see the next exception for details. After that, check settings of the derby.system.home system property.It may point to an unaccessible directory, or files may be locked by another process. We suggest you set a specificdirectory as the system property.
Environment Variables and More than one CloverETL Server InstancesRunning on Single Machine
If you are setting environment variables like clover_license_file or clover_config_file,remember you should not be running more than one CloverETL Server. Therefore, if you ever need to run moreinstances at once, use other ways of setting parameters (see Part III, “Configuration” (p. 61) for descriptionof all possibilities). The reason is the environment variables are shared by all applications in use causing them toshare configurations and fail unexpectedly. Instead of the environment variables, you can use system properties(passed to the application container process using parameter with -D prefix: -Dclover_config_file).
Special Characters and Slashes in Path
When working with servers, you ought to stick to folder naming rules more than ever. Do not use any specialcharacters in the server path, e.g. spaces, accents, diacritics are not recommended. It's unfortunately commonnaming strategy on Windows systems. It can produce issues which are hard to find. If you are experiencing weirderrors and cannot trace the source of them, install the application server in a safe destination like:
C:\JBoss6\
Similarly, use slashes but never backslashes in paths inside the *.properties files, e.g. when pointing to theCloverETL Server license file. If you incorrectly use backlash, it will be considered an escape character and theserver may not work properly. This is an example of a correct path:
license.file=C:/CoverETL/Server/license.dat
File System Permissions
Application server must be executed by OS user with proper read/write permissions on file system. Problem mayoccur, if app-server is executed by root user for the first time, so log and other temp files are created by root user.When the same app-server is executed by another user, it will fail because it cannot write to root's files.
JMS API and JMS Third-Party Libraries
Missing JMS libraries do not cause fail of the server startup, but it is an issue of deployment on an applicationserver, thus it is still related to this chapter.
clover.war itself does not contain jms.jar, so it has to be on an application server's classpath. Most of the applicationservers have jms.jar by default, but Tomcat, for example, does not. So if the JMS features are needed, the jms.jarhas to be added explicitly.
If "JMS Task" feature is used, there must be third-party libraries on a server's classpath as well. The same approachis recommended for JMS Reader/Writer components, even if these components allow to specify external libraries.It is due to common memory leak in these libraries which causes "OutOfMemoryError: PermGen space".
Using an Unsupported JDBC Connector for MySQL
CloverETL Server requires MySQL 5 up to version 5.5 included. Using an unsupported JDBC connector forMySQL might cause an exception, for example:
Chapter 3. Installing
55
could not execute queryYou have an error in your SQL syntax; check the manual that corresponds to your MySQL server version for the right syntaxto use near 'OPTION SQL_SELECT_LIMIT=DEFAULT' at line 1
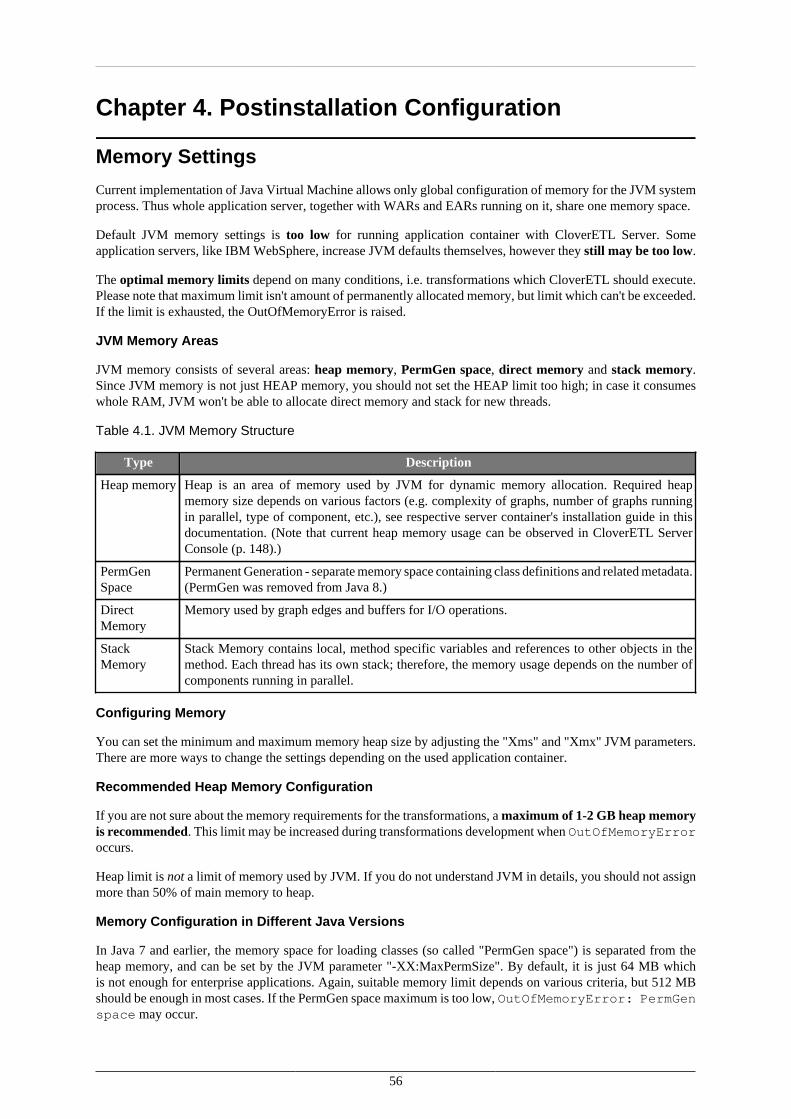
56
Chapter 4. Postinstallation Configuration
Memory Settings
Current implementation of Java Virtual Machine allows only global configuration of memory for the JVM systemprocess. Thus whole application server, together with WARs and EARs running on it, share one memory space.
Default JVM memory settings is too low for running application container with CloverETL Server. Someapplication servers, like IBM WebSphere, increase JVM defaults themselves, however they still may be too low.
The optimal memory limits depend on many conditions, i.e. transformations which CloverETL should execute.Please note that maximum limit isn't amount of permanently allocated memory, but limit which can't be exceeded.If the limit is exhausted, the OutOfMemoryError is raised.
JVM Memory Areas
JVM memory consists of several areas: heap memory, PermGen space, direct memory and stack memory.Since JVM memory is not just HEAP memory, you should not set the HEAP limit too high; in case it consumeswhole RAM, JVM won't be able to allocate direct memory and stack for new threads.
Table 4.1. JVM Memory Structure
Type Description
Heap memory Heap is an area of memory used by JVM for dynamic memory allocation. Required heapmemory size depends on various factors (e.g. complexity of graphs, number of graphs runningin parallel, type of component, etc.), see respective server container's installation guide in thisdocumentation. (Note that current heap memory usage can be observed in CloverETL ServerConsole (p. 148).)
PermGenSpace
Permanent Generation - separate memory space containing class definitions and related metadata.(PermGen was removed from Java 8.)
DirectMemory
Memory used by graph edges and buffers for I/O operations.
StackMemory
Stack Memory contains local, method specific variables and references to other objects in themethod. Each thread has its own stack; therefore, the memory usage depends on the number ofcomponents running in parallel.
Configuring Memory
You can set the minimum and maximum memory heap size by adjusting the "Xms" and "Xmx" JVM parameters.There are more ways to change the settings depending on the used application container.
Recommended Heap Memory Configuration
If you are not sure about the memory requirements for the transformations, a maximum of 1-2 GB heap memoryis recommended. This limit may be increased during transformations development when OutOfMemoryErroroccurs.
Heap limit is not a limit of memory used by JVM. If you do not understand JVM in details, you should not assignmore than 50% of main memory to heap.
Memory Configuration in Different Java Versions
In Java 7 and earlier, the memory space for loading classes (so called "PermGen space") is separated from theheap memory, and can be set by the JVM parameter "-XX:MaxPermSize". By default, it is just 64 MB whichis not enough for enterprise applications. Again, suitable memory limit depends on various criteria, but 512 MBshould be enough in most cases. If the PermGen space maximum is too low, OutOfMemoryError: PermGenspace may occur.

Chapter 4. PostinstallationConfiguration
57
In Java 8, memory space for loading classes (so called "Metaspace") is separated from heap, and can be set by theJVM parameter -XX:MaxMetaspaceSize. The default maximum Metaspace size is unlimited.
Please see the specific container section for details on memory settings.
Codecache Size
Some CloverETL Server installations can occasionally run into performance issue: JVM is running more thanhundred times slower. The issue can be caused by a full code cache (https://docs.oracle.com/javase/8/embedded/develop-apps-platforms/codecache.htm). Reserved code cache size is platform dependent and can be too small forCloverETL Server. It is highly recommended to increase code cache size using the following JVM argument:
-XX:ReservedCodeCacheSize=256m
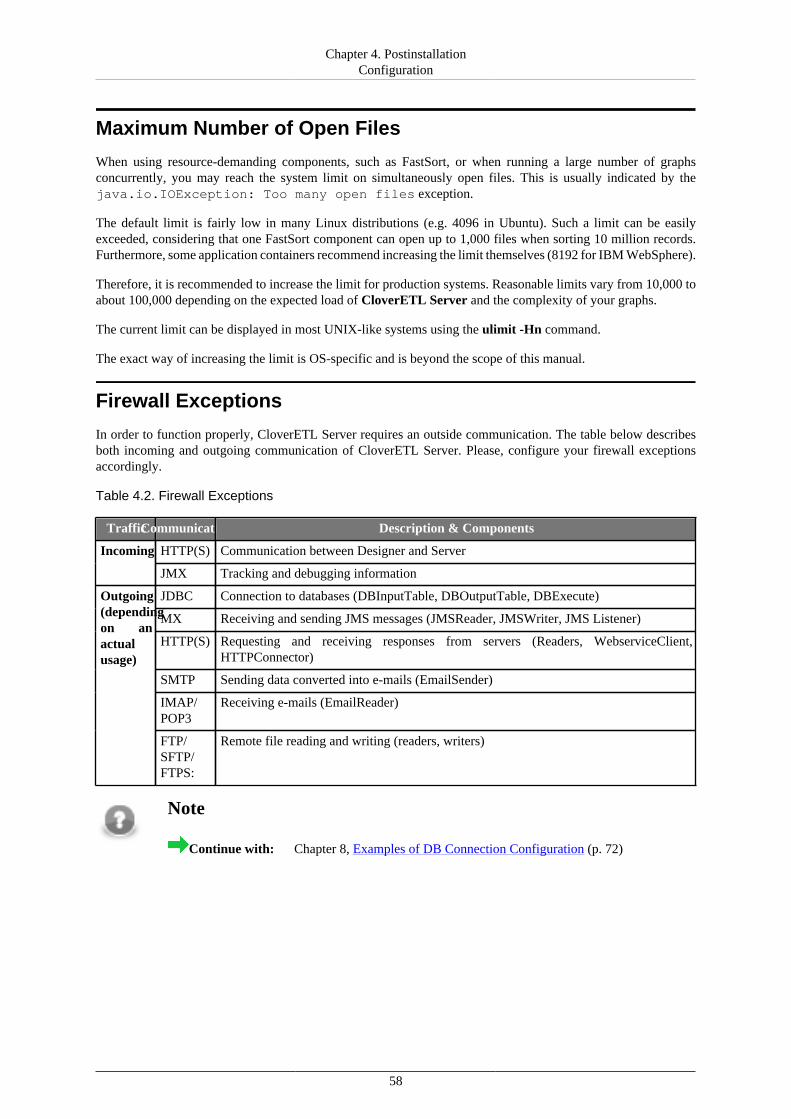
Chapter 4. PostinstallationConfiguration
58
Maximum Number of Open Files
When using resource-demanding components, such as FastSort, or when running a large number of graphsconcurrently, you may reach the system limit on simultaneously open files. This is usually indicated by thejava.io.IOException: Too many open files exception.
The default limit is fairly low in many Linux distributions (e.g. 4096 in Ubuntu). Such a limit can be easilyexceeded, considering that one FastSort component can open up to 1,000 files when sorting 10 million records.Furthermore, some application containers recommend increasing the limit themselves (8192 for IBM WebSphere).
Therefore, it is recommended to increase the limit for production systems. Reasonable limits vary from 10,000 toabout 100,000 depending on the expected load of CloverETL Server and the complexity of your graphs.
The current limit can be displayed in most UNIX-like systems using the ulimit -Hn command.
The exact way of increasing the limit is OS-specific and is beyond the scope of this manual.
Firewall Exceptions
In order to function properly, CloverETL Server requires an outside communication. The table below describesboth incoming and outgoing communication of CloverETL Server. Please, configure your firewall exceptionsaccordingly.
Table 4.2. Firewall Exceptions
TrafficCommunication Description & Components
HTTP(S) Communication between Designer and ServerIncoming
JMX Tracking and debugging information
JDBC Connection to databases (DBInputTable, DBOutputTable, DBExecute)
MX Receiving and sending JMS messages (JMSReader, JMSWriter, JMS Listener)
HTTP(S) Requesting and receiving responses from servers (Readers, WebserviceClient,HTTPConnector)
SMTP Sending data converted into e-mails (EmailSender)
IMAP/POP3
Receiving e-mails (EmailReader)
Outgoing(dependingon anactualusage)
FTP/SFTP/FTPS:
Remote file reading and writing (readers, writers)
Note
Continue with: Chapter 8, Examples of DB Connection Configuration (p. 72)
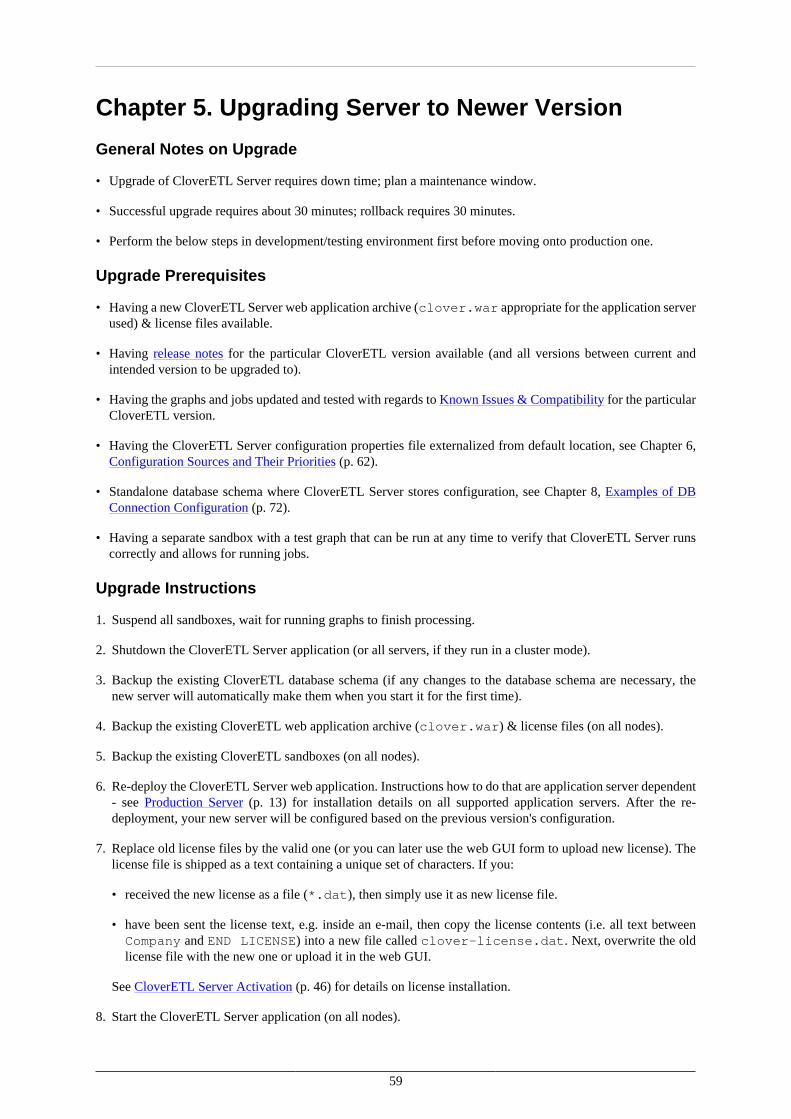
59
Chapter 5. Upgrading Server to Newer Version
General Notes on Upgrade
• Upgrade of CloverETL Server requires down time; plan a maintenance window.
• Successful upgrade requires about 30 minutes; rollback requires 30 minutes.
• Perform the below steps in development/testing environment first before moving onto production one.
Upgrade Prerequisites
• Having a new CloverETL Server web application archive (clover.war appropriate for the application serverused) & license files available.
• Having release notes for the particular CloverETL version available (and all versions between current andintended version to be upgraded to).
• Having the graphs and jobs updated and tested with regards to Known Issues & Compatibility for the particularCloverETL version.
• Having the CloverETL Server configuration properties file externalized from default location, see Chapter 6,Configuration Sources and Their Priorities (p. 62).
• Standalone database schema where CloverETL Server stores configuration, see Chapter 8, Examples of DBConnection Configuration (p. 72).
• Having a separate sandbox with a test graph that can be run at any time to verify that CloverETL Server runscorrectly and allows for running jobs.
Upgrade Instructions
1. Suspend all sandboxes, wait for running graphs to finish processing.
2. Shutdown the CloverETL Server application (or all servers, if they run in a cluster mode).
3. Backup the existing CloverETL database schema (if any changes to the database schema are necessary, thenew server will automatically make them when you start it for the first time).
4. Backup the existing CloverETL web application archive (clover.war) & license files (on all nodes).
5. Backup the existing CloverETL sandboxes (on all nodes).
6. Re-deploy the CloverETL Server web application. Instructions how to do that are application server dependent- see Production Server (p. 13) for installation details on all supported application servers. After the re-deployment, your new server will be configured based on the previous version's configuration.
7. Replace old license files by the valid one (or you can later use the web GUI form to upload new license). Thelicense file is shipped as a text containing a unique set of characters. If you:
• received the new license as a file (*.dat), then simply use it as new license file.
• have been sent the license text, e.g. inside an e-mail, then copy the license contents (i.e. all text betweenCompany and END LICENSE) into a new file called clover-license.dat. Next, overwrite the oldlicense file with the new one or upload it in the web GUI.
See CloverETL Server Activation (p. 46) for details on license installation.
8. Start the CloverETL Server application (on all nodes).
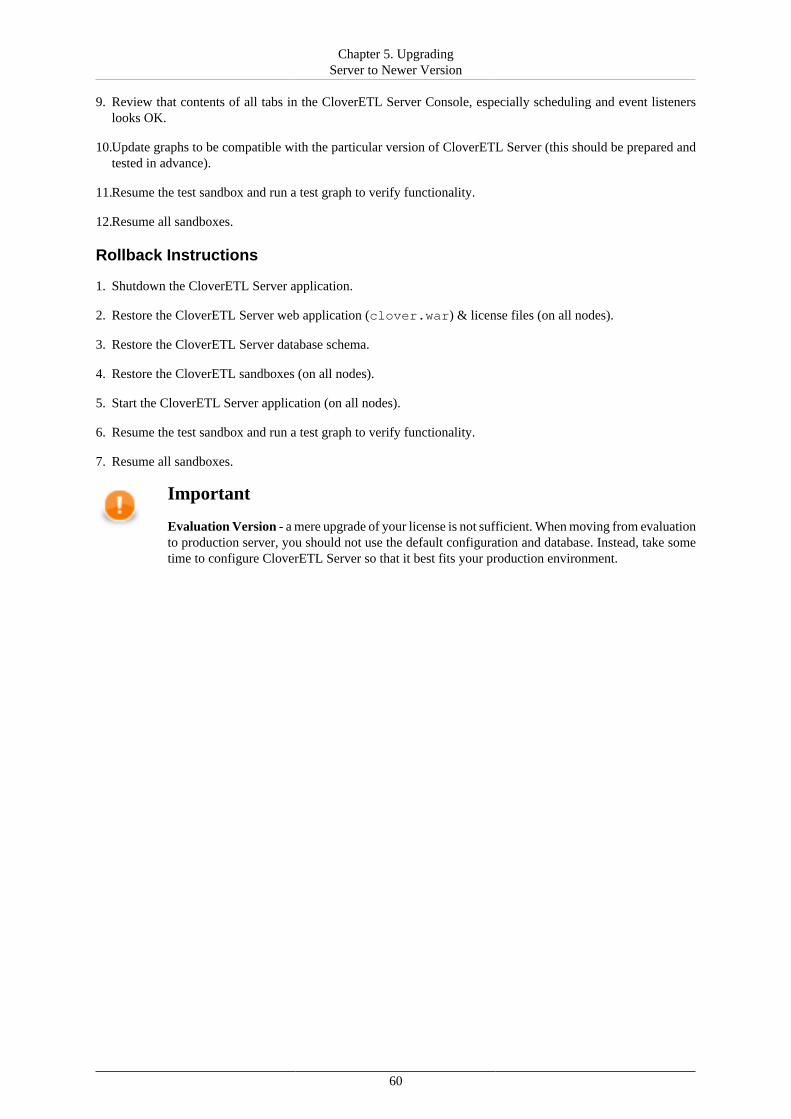
Chapter 5. UpgradingServer to Newer Version
60
9. Review that contents of all tabs in the CloverETL Server Console, especially scheduling and event listenerslooks OK.
10.Update graphs to be compatible with the particular version of CloverETL Server (this should be prepared andtested in advance).
11.Resume the test sandbox and run a test graph to verify functionality.
12.Resume all sandboxes.
Rollback Instructions
1. Shutdown the CloverETL Server application.
2. Restore the CloverETL Server web application (clover.war) & license files (on all nodes).
3. Restore the CloverETL Server database schema.
4. Restore the CloverETL sandboxes (on all nodes).
5. Start the CloverETL Server application (on all nodes).
6. Resume the test sandbox and run a test graph to verify functionality.
7. Resume all sandboxes.
Important
Evaluation Version - a mere upgrade of your license is not sufficient. When moving from evaluationto production server, you should not use the default configuration and database. Instead, take sometime to configure CloverETL Server so that it best fits your production environment.

Part III. ConfigurationThis part describes in detail the configuration options for CloverETL Server used in production. In the followingchapters, you will find information on setting required properties and parameters, description of CloverETLServer's Configuration GUI elements, parameters for specific database configuration, list of properties used ingeneral configuration, instructions on encrypting confidential properties and log files setting.
Note
We recommend the default installation (without any configuration) only for evaluation purposes.For production use, we recommend configuring a dedicated database and properly configuring theSMTP server for sending notifications.
62
Chapter 6. Configuration Sources and TheirPriorities
Configuration SourcesThere are several sources of configuration properties. If a property isn't set, application's default setting is used.
Configuration properties can be encrypted (see details in Chapter 10, Secure Configuration Properties (p. 97)).
Warning: Do not combine sources specified below. Configuration becomes confusing and maintenance will bemuch more difficult.
Environment Variables
Environment variables are variables configured by means of your operating system. E.g. $PATH is an environmentvariable.
Set environment variable with prefix clover. , i.e. (clover.config.file)
Some operating systems may not use dot (.) character, so underlines (_) may be used instead of dots. So theclover_config_file name works as well.
System Properties
System properties are configured by means of JVM, e.g. with -D argument (-Dclover.config.file).
Set system property with clover. prefix, i.e. (clover.config.file)
Underlines (_) may be used instead of dots (.) so the clover_config_file name works as well.
Properties File on Default Location
Source is a common properties file (text file with key-value pairs):
[property-key]=[property-value]
By default, CloverETL tries to find the config file on the [workingDir]/cloverServer.properties path.
Properties File on Specified Location
A file has the same file structure as in the case above, but its location is specified in the clover_config_fileor with a clover.config.file environment variable or system property.
This is the recommended way of configuration if context parameters cannot be set in the application server.
Modification of Context Parameters in web.xml
Unzip clover.war and modify the WEB-INF/web.xml file. Add the following piece of code into the file:
<context-param> <param-name>[property-name]</param-name> <param-value>[property-value]</param-value></context-param>
Chapter 6. ConfigurationSources and Their Priorities
63
This way isn't recommended, but it may be useful when none of the approaches above are possible.
Context Parameters (Available on Apache Tomcat)
Some application servers allow you to set context parameters without modification of the WAR file.
This way of configuration is possible, but it is not recommended, as Apache Tomcat may ignore some contextparameters in some environments. Use of a properties file is almost as convenient and much more reliable way.
Example for Apache Tomcat
On Tomcat, it is possible to specify context parameters in a context configuration file [Tomcat_home]/conf/Catalina/localhost/clover.xml which is created automatically just after deployment of a CloverETLServer web application.
You can specify a property by adding this element:
<Parameter name="[propertyName]" value="[propertyValue]" override="false" />
Priorities of Configuration Sources
Configuration sources have these priorities:
1. context parameters (specified in an application server or directly in a web.xml file);
2. external configuration file; CS tries to find it in this order. Only one of them is loaded:
• path specified with a config.file context parameter;
• path specified with a clover_config_file or clover.config.file system property;
• path specified with a clover_config_file or clover.config.file environment variable;
• default location ([workingDir]/cloverServer.properties);
3. system properties;
4. environment variables;
5. default values.
Note
Continue with: Chapter 8, Examples of DB Connection Configuration (p. 72)
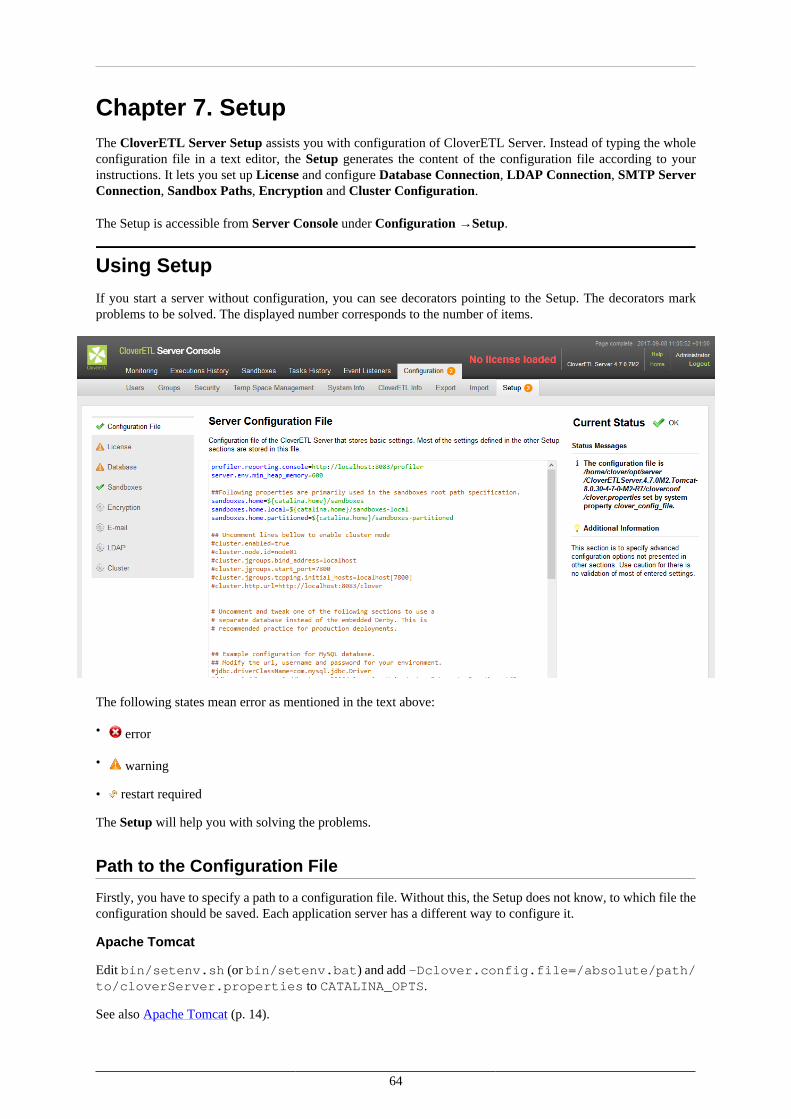
64
Chapter 7. SetupThe CloverETL Server Setup assists you with configuration of CloverETL Server. Instead of typing the wholeconfiguration file in a text editor, the Setup generates the content of the configuration file according to yourinstructions. It lets you set up License and configure Database Connection, LDAP Connection, SMTP ServerConnection, Sandbox Paths, Encryption and Cluster Configuration.
The Setup is accessible from Server Console under Configuration →Setup.
Using Setup
If you start a server without configuration, you can see decorators pointing to the Setup. The decorators markproblems to be solved. The displayed number corresponds to the number of items.
The following states mean error as mentioned in the text above:
• error
• warning
• restart required
The Setup will help you with solving the problems.
Path to the Configuration File
Firstly, you have to specify a path to a configuration file. Without this, the Setup does not know, to which file theconfiguration should be saved. Each application server has a different way to configure it.
Apache Tomcat
Edit bin/setenv.sh (or bin/setenv.bat) and add -Dclover.config.file=/absolute/path/to/cloverServer.properties to CATALINA_OPTS.
See also Apache Tomcat (p. 14).
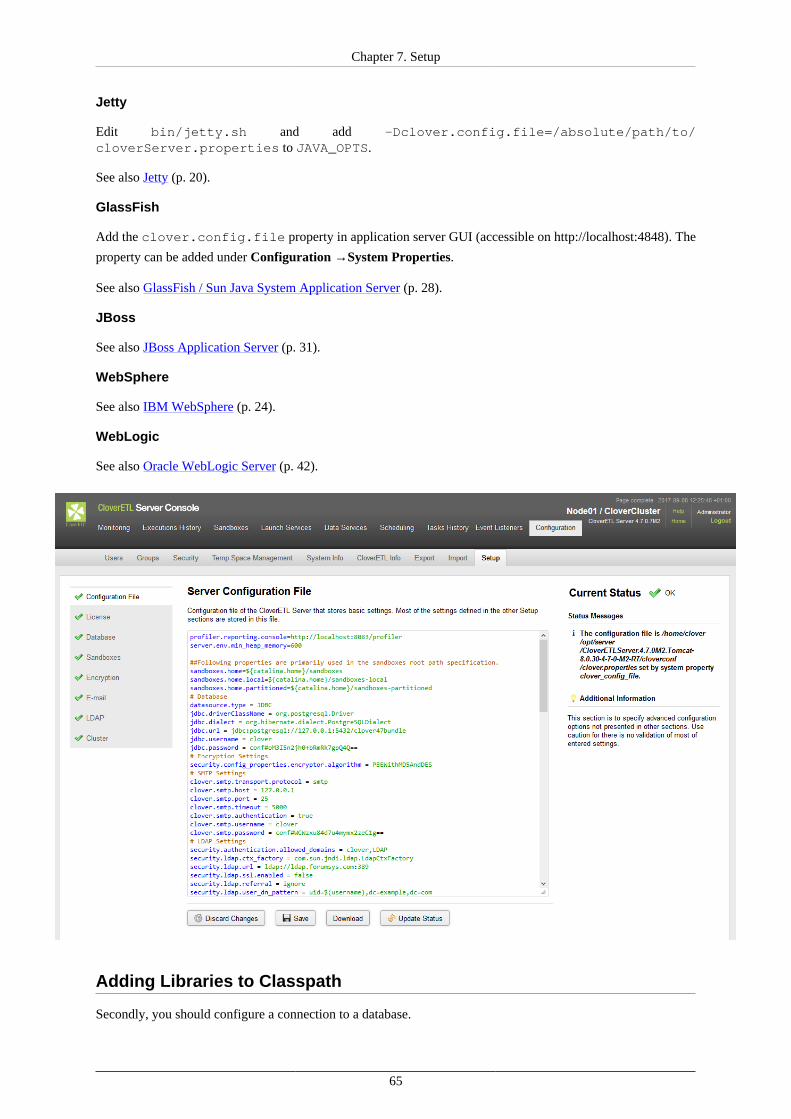
Chapter 7. Setup
65
Jetty
Edit bin/jetty.sh and add -Dclover.config.file=/absolute/path/to/cloverServer.properties to JAVA_OPTS.
See also Jetty (p. 20).
GlassFish
Add the clover.config.file property in application server GUI (accessible on http://localhost:4848). The
property can be added under Configuration →System Properties.
See also GlassFish / Sun Java System Application Server (p. 28).
JBoss
See also JBoss Application Server (p. 31).
WebSphere
See also IBM WebSphere (p. 24).
WebLogic
See also Oracle WebLogic Server (p. 42).
Adding Libraries to Classpath
Secondly, you should configure a connection to a database.
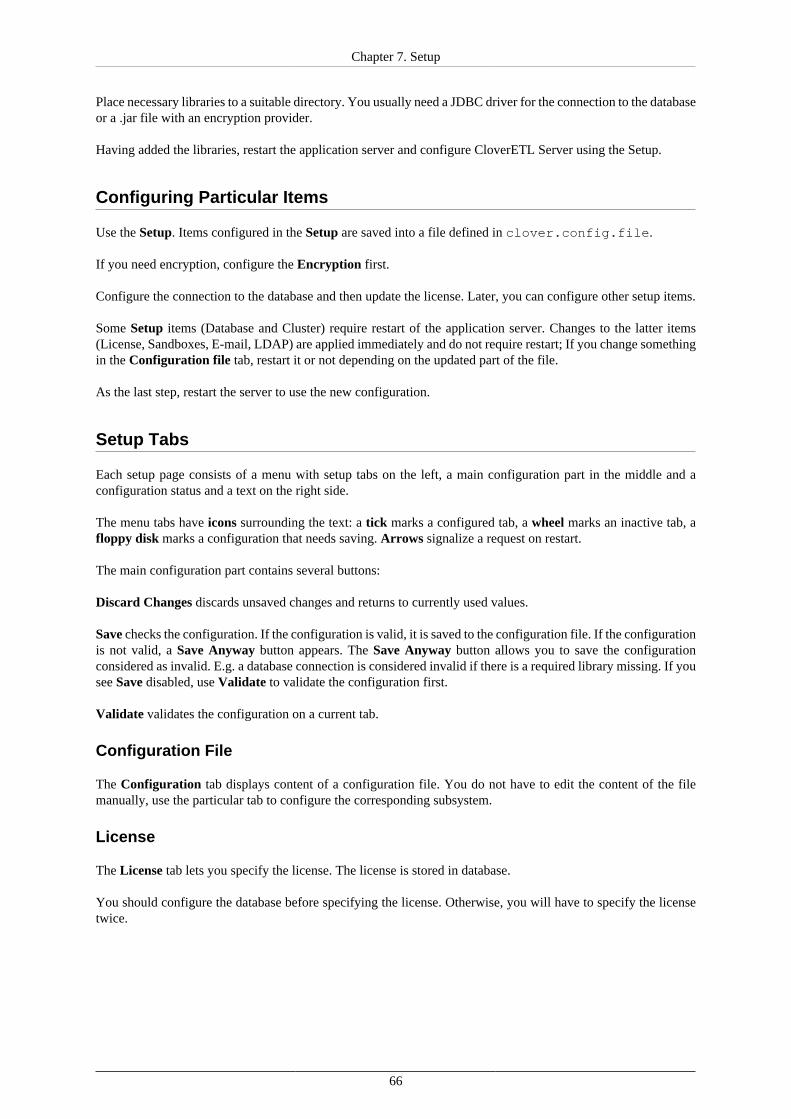
Chapter 7. Setup
66
Place necessary libraries to a suitable directory. You usually need a JDBC driver for the connection to the databaseor a .jar file with an encryption provider.
Having added the libraries, restart the application server and configure CloverETL Server using the Setup.
Configuring Particular Items
Use the Setup. Items configured in the Setup are saved into a file defined in clover.config.file.
If you need encryption, configure the Encryption first.
Configure the connection to the database and then update the license. Later, you can configure other setup items.
Some Setup items (Database and Cluster) require restart of the application server. Changes to the latter items(License, Sandboxes, E-mail, LDAP) are applied immediately and do not require restart; If you change somethingin the Configuration file tab, restart it or not depending on the updated part of the file.
As the last step, restart the server to use the new configuration.
Setup Tabs
Each setup page consists of a menu with setup tabs on the left, a main configuration part in the middle and aconfiguration status and a text on the right side.
The menu tabs have icons surrounding the text: a tick marks a configured tab, a wheel marks an inactive tab, afloppy disk marks a configuration that needs saving. Arrows signalize a request on restart.
The main configuration part contains several buttons:
Discard Changes discards unsaved changes and returns to currently used values.
Save checks the configuration. If the configuration is valid, it is saved to the configuration file. If the configurationis not valid, a Save Anyway button appears. The Save Anyway button allows you to save the configurationconsidered as invalid. E.g. a database connection is considered invalid if there is a required library missing. If yousee Save disabled, use Validate to validate the configuration first.
Validate validates the configuration on a current tab.
Configuration File
The Configuration tab displays content of a configuration file. You do not have to edit the content of the filemanually, use the particular tab to configure the corresponding subsystem.
License
The License tab lets you specify the license. The license is stored in database.
You should configure the database before specifying the license. Otherwise, you will have to specify the licensetwice.
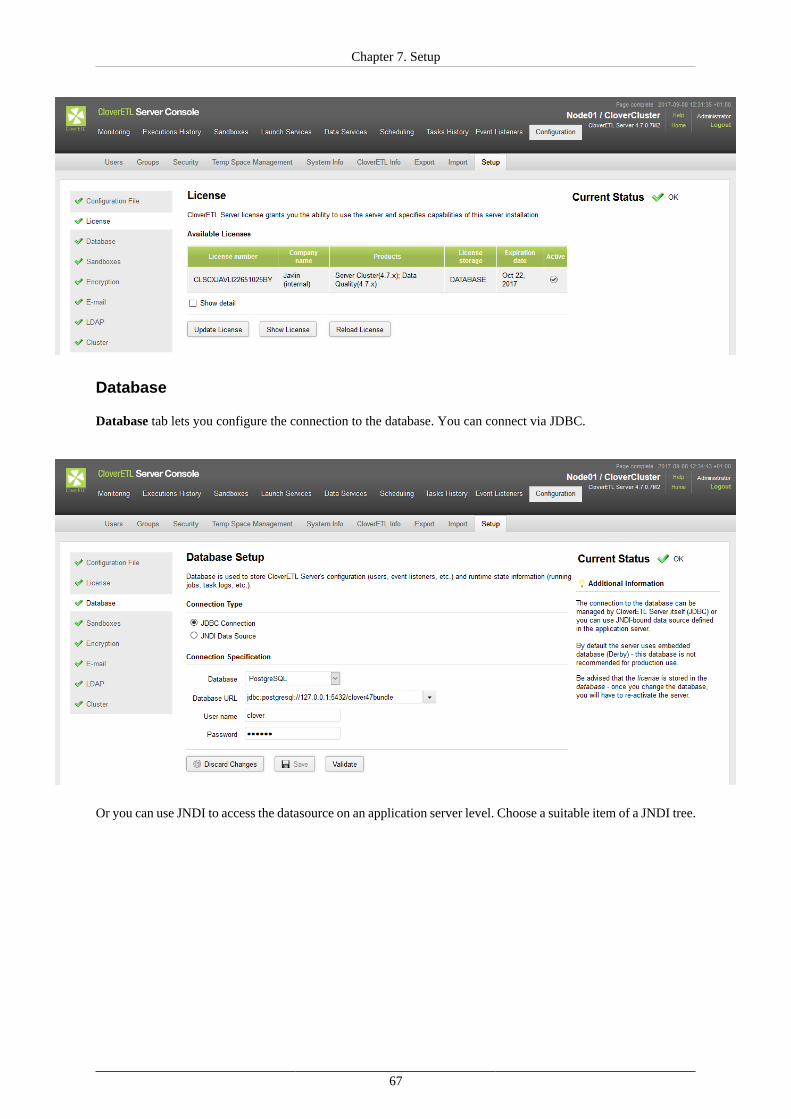
Chapter 7. Setup
67
Database
Database tab lets you configure the connection to the database. You can connect via JDBC.
Or you can use JNDI to access the datasource on an application server level. Choose a suitable item of a JNDI tree.
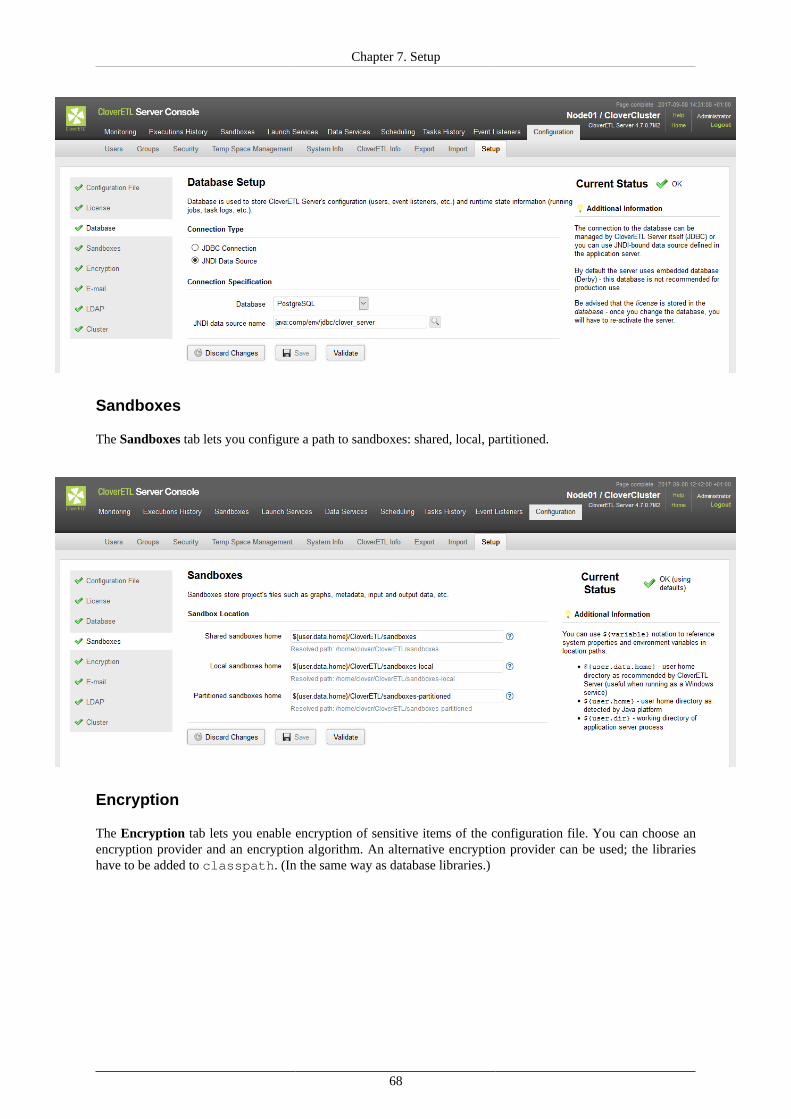
Chapter 7. Setup
68
Sandboxes
The Sandboxes tab lets you configure a path to sandboxes: shared, local, partitioned.
Encryption
The Encryption tab lets you enable encryption of sensitive items of the configuration file. You can choose anencryption provider and an encryption algorithm. An alternative encryption provider can be used; the librarieshave to be added to classpath. (In the same way as database libraries.)
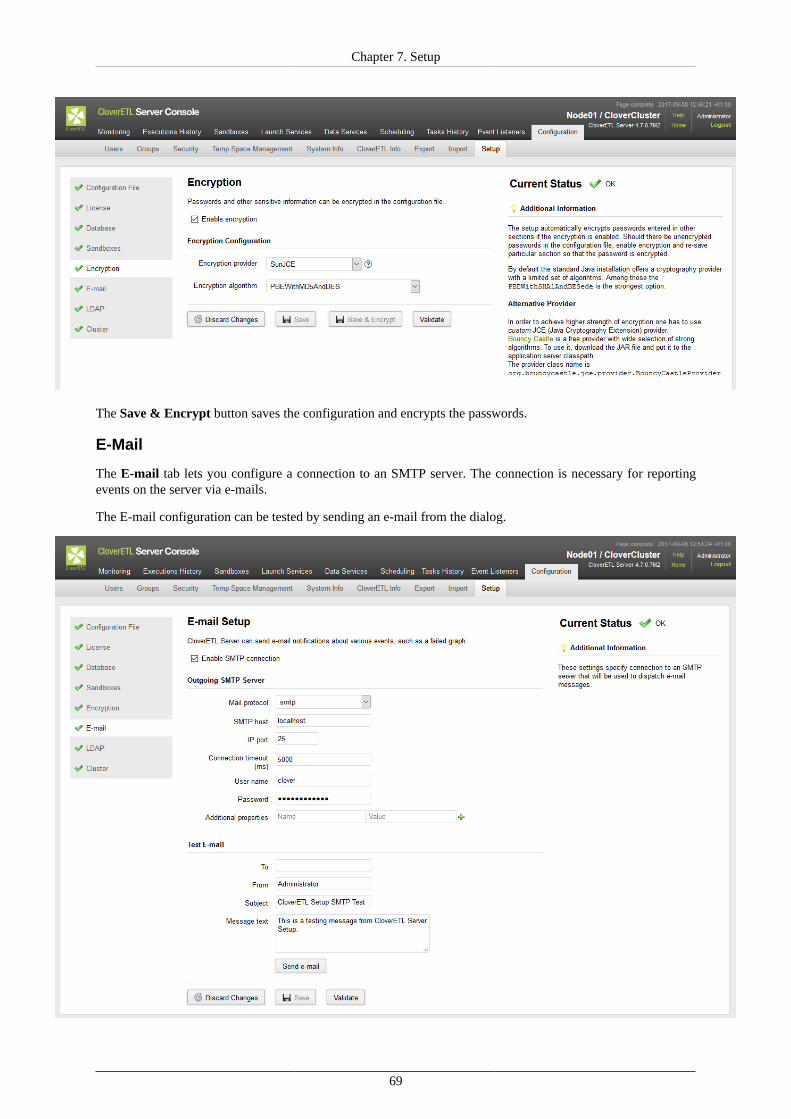
Chapter 7. Setup
69
The Save & Encrypt button saves the configuration and encrypts the passwords.
The E-mail tab lets you configure a connection to an SMTP server. The connection is necessary for reportingevents on the server via e-mails.
The E-mail configuration can be tested by sending an e-mail from the dialog.
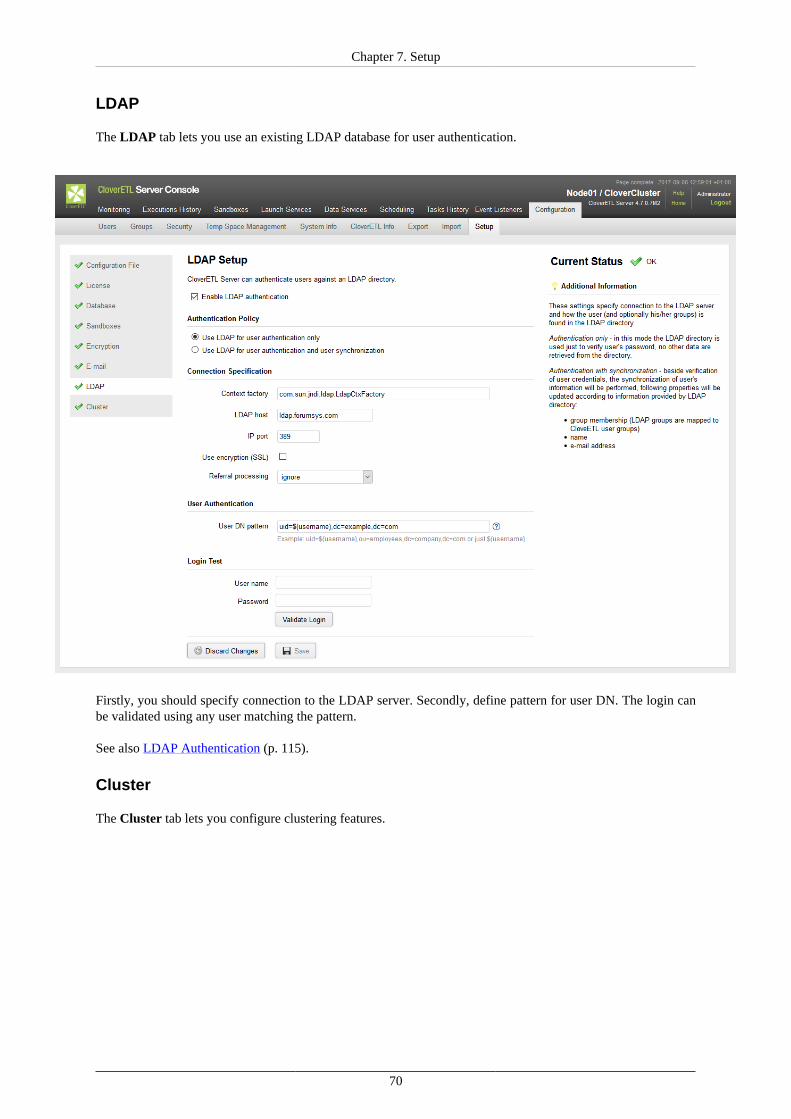
Chapter 7. Setup
70
LDAP
The LDAP tab lets you use an existing LDAP database for user authentication.
Firstly, you should specify connection to the LDAP server. Secondly, define pattern for user DN. The login canbe validated using any user matching the pattern.
See also LDAP Authentication (p. 115).
Cluster
The Cluster tab lets you configure clustering features.
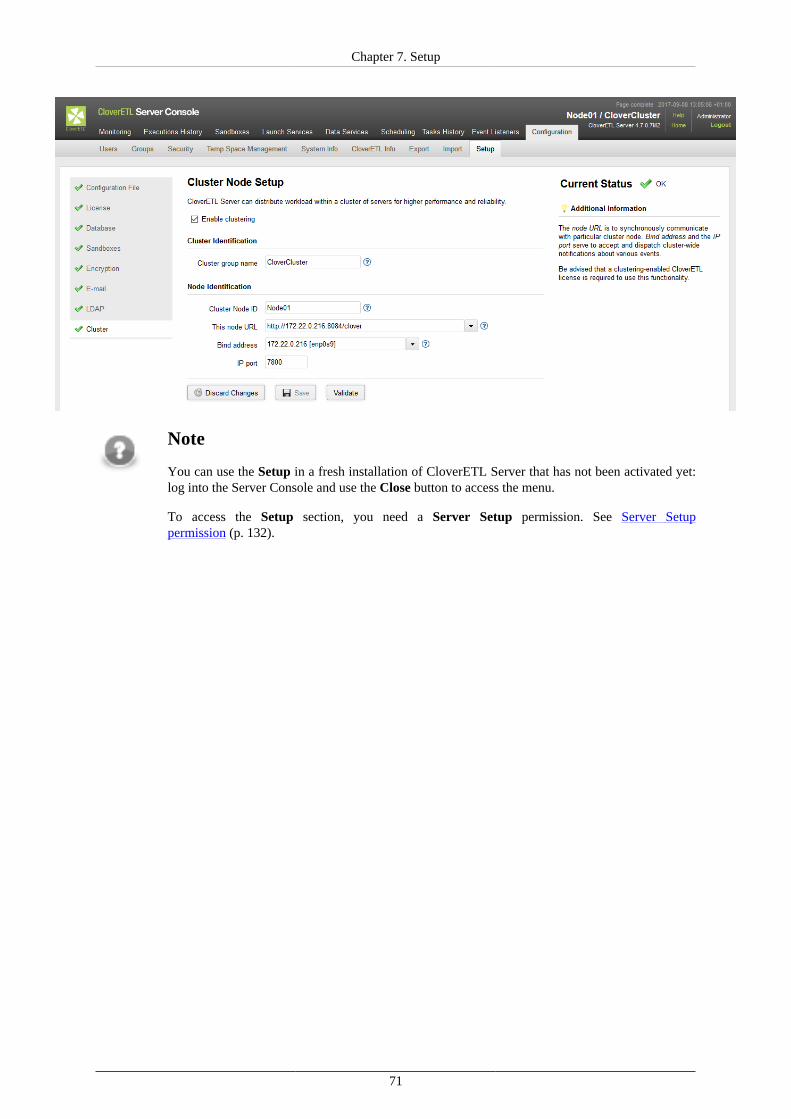
Chapter 7. Setup
71
Note
You can use the Setup in a fresh installation of CloverETL Server that has not been activated yet:log into the Server Console and use the Close button to access the menu.
To access the Setup section, you need a Server Setup permission. See Server Setuppermission (p. 132).

72
Chapter 8. Examples of DB ConnectionConfigurationIn a standalone deployment (non-clustered), a configuration of DB connection is optional, since embedded ApacheDerby DB is used by default and it is sufficient for evaluation. However, configuration of an external DBconnection is strongly recommended for production deployment. It is possible to specify common JDBC DBconnection attributes (URL, username, password) or a JNDI location of DB DataSource.
In a clustered deployment, at least one node in the cluster must have a DB connection configured. Other nodes mayhave their own direct connection (to the same DB), or may use another node as a proxy for persistent operations;however, the scheduler is active only on nodes with a direct connection. See Part VII, “Cluster” (p. 278) fordetails about this feature, this section describes only a direct DB connection configuration.
DB Configurations and their changes may be as follows:
• Embedded Apache Derby (p. 73)• MySQL (p. 74)• DB2 (p. 75)• Oracle (p. 78)• Microsoft SQL Server (p. 79)• Postgre SQL (p. 81)• JNDI DB DataSource (p. 82)
See Database servers (p. 7) for officially supported versions of particular databases.
Chapter 8. Examples of DBConnection Configuration
73
Embedded Apache Derby
The Apache Derby embedded DB is used with a default CloverETL Server installation. It uses the workingdirectory as a storage directory for data persistence by default. This may be a problem on some systems. In caseof any problems with connecting to Derby DB, we recommend you configure a connection to external DB or atleast specify the Derby home directory:
Set the derby.system.home system property to set path which is accessible for application server. You canspecify this system property with this JVM execution parameter:
-Dderby.system.home=[derby_DB_files_root]
If you use a properties file for configuration, specify these parameters: jdbc.driverClassName,jdbc.url, jdbc.username, jdbc.password, jdbc.dialect. For example:
jdbc.driverClassName=org.apache.derby.jdbc.EmbeddedDriverjdbc.url=jdbc:derby:databases/cloverDb;create=truejdbc.username=jdbc.password=jdbc.dialect=com.cloveretl.server.dbschema.DerbyDialect
Take a closer look at the jdbc.url parameter. The databases/cloverDb part means a subdirectory for DBdata. This subdirectory will be created in the directory which is set as derby.system.home (or in the workingdirectory if derby.system.home is not set). You may change the default value databases/cloverDb.
A Derby JDBC 4 compliant driver is bundled with CloverETL Server, thus there is no need to add it on theclasspath.
Note
Continue with: Encrypted JNDI (p. 84) or CloverETL Server Activation (p. 46)
Chapter 8. Examples of DBConnection Configuration
74
MySQL
CloverETL Server supports MySQL 5, up to version 5.5 included.
Creating database
The following steps will create database clover_db and user clover with password clover.
1. Create database clover_db, set charset and collate.
CREATE SCHEMA clover_db CHARACTER SET utf8 COLLATE utf8_unicode_ci;
2. Use clover_db as the current database.
USE clover_db;
3. Create a new user with password and host.
CREATE USER 'clover'@'%' IDENTIFIED BY 'clover';
4. Add all privileges to user 'clover' in DB clover_db.
GRANT ALL ON clover_db.* TO 'clover'@'%';
5. Reload privileges.
FLUSH privileges;
CloverETL setup
If you use a properties file for configuration, specify these parameters: jdbc.driverClassName,jdbc.url, jdbc.username, jdbc.password, jdbc.dialect. For example:
jdbc.driverClassName=com.mysql.jdbc.Driverjdbc.url=jdbc:mysql://127.0.0.1:3306/clover?useUnicode=true&characterEncoding=utf8jdbc.username=rootjdbc.password=jdbc.dialect=org.hibernate.dialect.MySQLDialect
Please don't forget to add a JDBC 4 compliant driver on the classpath. A JDBC Driver which doesn't meet JDBC4 won't work properly.
Note
Continue with: Encrypted JNDI (p. 84) or CloverETL Server Activation (p. 46)
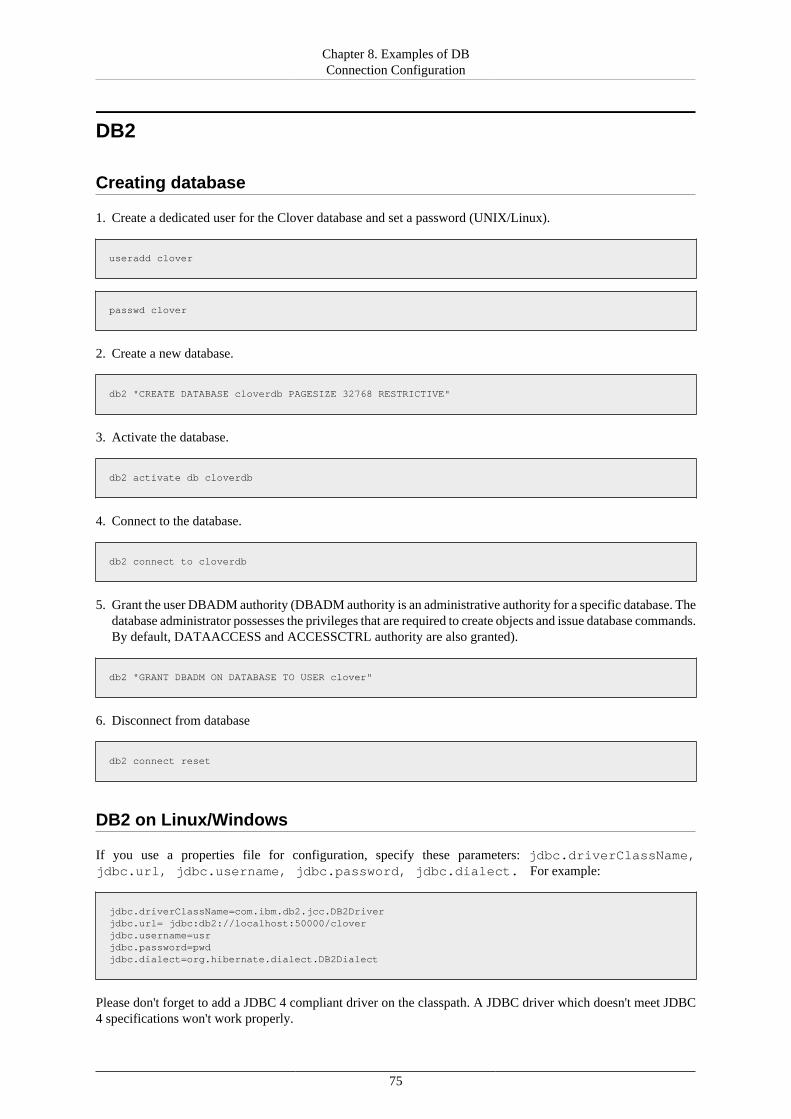
Chapter 8. Examples of DBConnection Configuration
75
DB2
Creating database
1. Create a dedicated user for the Clover database and set a password (UNIX/Linux).
useradd clover
passwd clover
2. Create a new database.
db2 "CREATE DATABASE cloverdb PAGESIZE 32768 RESTRICTIVE"
3. Activate the database.
db2 activate db cloverdb
4. Connect to the database.
db2 connect to cloverdb
5. Grant the user DBADM authority (DBADM authority is an administrative authority for a specific database. Thedatabase administrator possesses the privileges that are required to create objects and issue database commands.By default, DATAACCESS and ACCESSCTRL authority are also granted).
db2 "GRANT DBADM ON DATABASE TO USER clover"
6. Disconnect from database
db2 connect reset
DB2 on Linux/Windows
If you use a properties file for configuration, specify these parameters: jdbc.driverClassName,jdbc.url, jdbc.username, jdbc.password, jdbc.dialect. For example:
jdbc.driverClassName=com.ibm.db2.jcc.DB2Driverjdbc.url= jdbc:db2://localhost:50000/cloverjdbc.username=usrjdbc.password=pwdjdbc.dialect=org.hibernate.dialect.DB2Dialect
Please don't forget to add a JDBC 4 compliant driver on the classpath. A JDBC driver which doesn't meet JDBC4 specifications won't work properly.
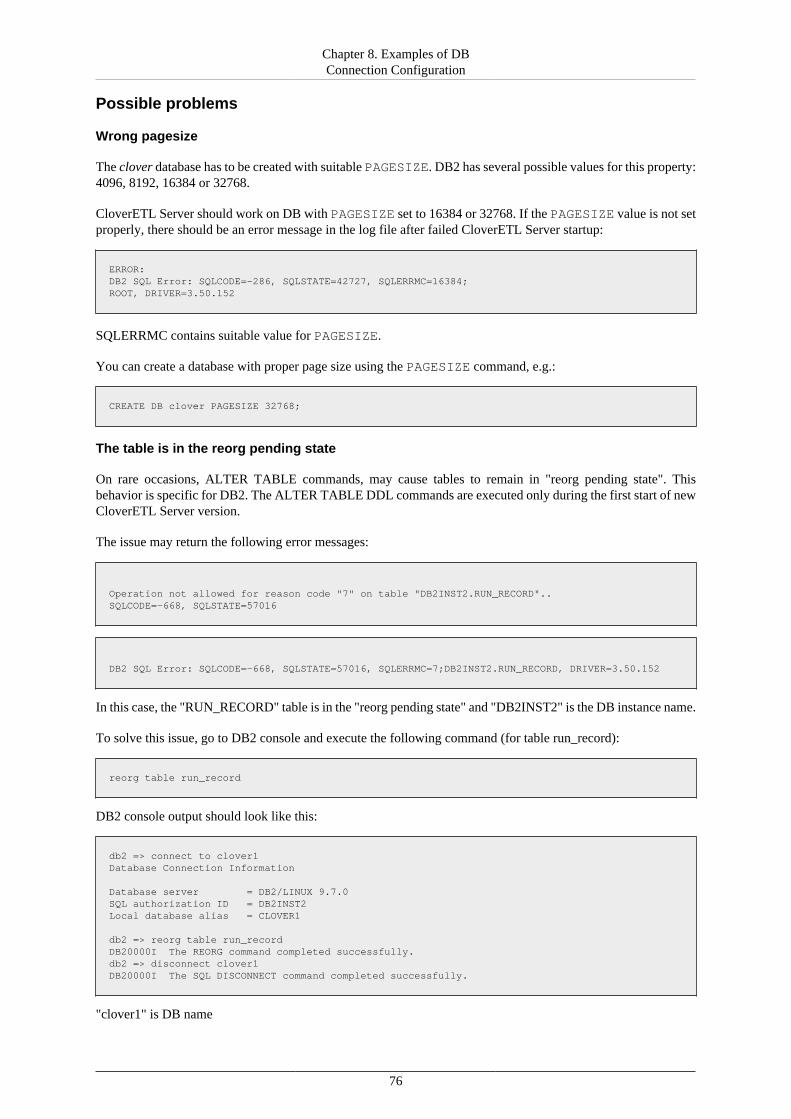
Chapter 8. Examples of DBConnection Configuration
76
Possible problems
Wrong pagesize
The clover database has to be created with suitable PAGESIZE. DB2 has several possible values for this property:4096, 8192, 16384 or 32768.
CloverETL Server should work on DB with PAGESIZE set to 16384 or 32768. If the PAGESIZE value is not setproperly, there should be an error message in the log file after failed CloverETL Server startup:
ERROR:DB2 SQL Error: SQLCODE=-286, SQLSTATE=42727, SQLERRMC=16384; ROOT, DRIVER=3.50.152
SQLERRMC contains suitable value for PAGESIZE.
You can create a database with proper page size using the PAGESIZE command, e.g.:
CREATE DB clover PAGESIZE 32768;
The table is in the reorg pending state
On rare occasions, ALTER TABLE commands, may cause tables to remain in "reorg pending state". Thisbehavior is specific for DB2. The ALTER TABLE DDL commands are executed only during the first start of newCloverETL Server version.
The issue may return the following error messages:
Operation not allowed for reason code "7" on table "DB2INST2.RUN_RECORD".. SQLCODE=-668, SQLSTATE=57016
DB2 SQL Error: SQLCODE=-668, SQLSTATE=57016, SQLERRMC=7;DB2INST2.RUN_RECORD, DRIVER=3.50.152
In this case, the "RUN_RECORD" table is in the "reorg pending state" and "DB2INST2" is the DB instance name.
To solve this issue, go to DB2 console and execute the following command (for table run_record):
reorg table run_record
DB2 console output should look like this:
db2 => connect to clover1Database Connection Information Database server = DB2/LINUX 9.7.0SQL authorization ID = DB2INST2Local database alias = CLOVER1 db2 => reorg table run_recordDB20000I The REORG command completed successfully.db2 => disconnect clover1DB20000I The SQL DISCONNECT command completed successfully.
"clover1" is DB name
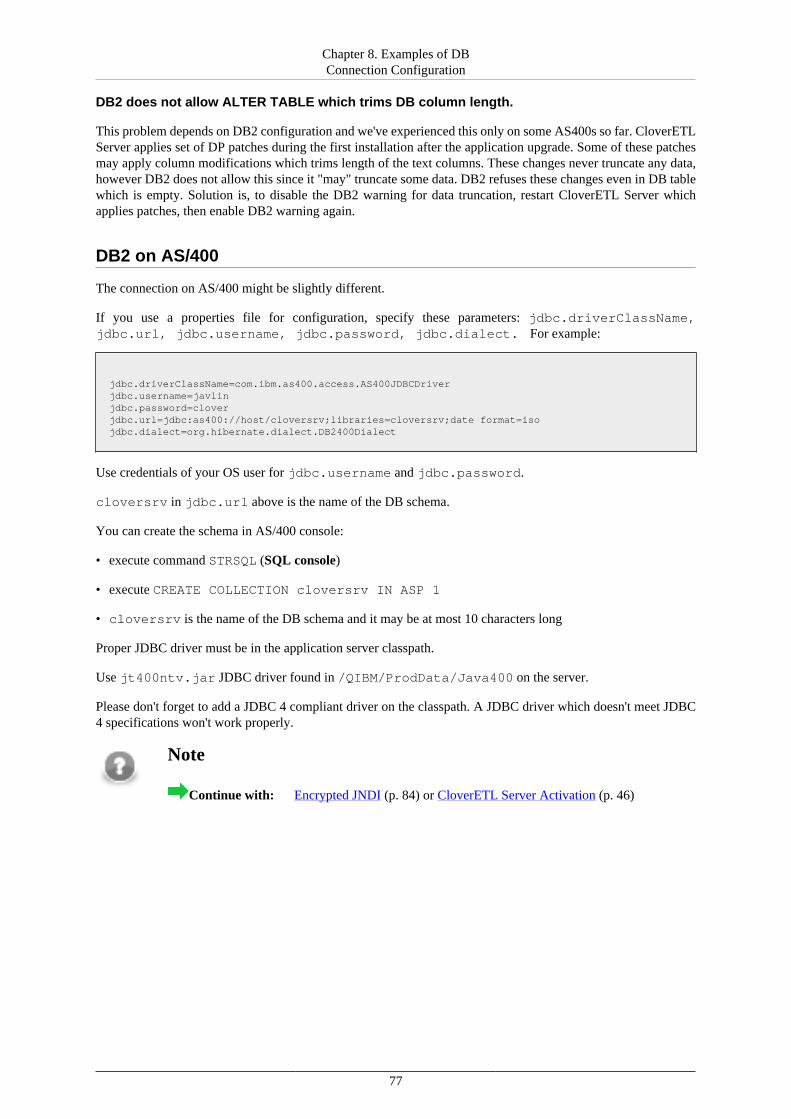
Chapter 8. Examples of DBConnection Configuration
77
DB2 does not allow ALTER TABLE which trims DB column length.
This problem depends on DB2 configuration and we've experienced this only on some AS400s so far. CloverETLServer applies set of DP patches during the first installation after the application upgrade. Some of these patchesmay apply column modifications which trims length of the text columns. These changes never truncate any data,however DB2 does not allow this since it "may" truncate some data. DB2 refuses these changes even in DB tablewhich is empty. Solution is, to disable the DB2 warning for data truncation, restart CloverETL Server whichapplies patches, then enable DB2 warning again.
DB2 on AS/400
The connection on AS/400 might be slightly different.
If you use a properties file for configuration, specify these parameters: jdbc.driverClassName,jdbc.url, jdbc.username, jdbc.password, jdbc.dialect. For example:
jdbc.driverClassName=com.ibm.as400.access.AS400JDBCDriverjdbc.username=javlinjdbc.password=cloverjdbc.url=jdbc:as400://host/cloversrv;libraries=cloversrv;date format=isojdbc.dialect=org.hibernate.dialect.DB2400Dialect
Use credentials of your OS user for jdbc.username and jdbc.password.
cloversrv in jdbc.url above is the name of the DB schema.
You can create the schema in AS/400 console:
• execute command STRSQL (SQL console)
• execute CREATE COLLECTION cloversrv IN ASP 1
• cloversrv is the name of the DB schema and it may be at most 10 characters long
Proper JDBC driver must be in the application server classpath.
Use jt400ntv.jar JDBC driver found in /QIBM/ProdData/Java400 on the server.
Please don't forget to add a JDBC 4 compliant driver on the classpath. A JDBC driver which doesn't meet JDBC4 specifications won't work properly.
Note
Continue with: Encrypted JNDI (p. 84) or CloverETL Server Activation (p. 46)

Chapter 8. Examples of DBConnection Configuration
78
Oracle
Creating database
Run the following script to create a role, a user and a tablespace for CloverETL server.
Role: cloverRole
User: cloverUser
Password: cloverPassword
-- Create a new role and grant it privilegesCREATE ROLE cloverRole NOT IDENTIFIED;
GRANT CREATE SESSION TO cloverRole;GRANT ALTER SESSION TO cloverRole;GRANT CREATE TABLE TO cloverRole;GRANT CREATE SEQUENCE TO cloverRole;GRANT CREATE TRIGGER TO cloverRole;
-- Create a new database user with passwordCREATE USER cloverUser IDENTIFIED BY cloverPassword;
-- Set quota on tablespaceGRANT UNLIMITED TABLESPACE TO cloverUser;
-- Connect a new role to a new userGRANT cloverRole TO cloverUser;
CloverETL setup
If you use a properties file for configuration, specify these parameters: jdbc.driverClassName,jdbc.url, jdbc.username, jdbc.password, jdbc.dialect. For example:
jdbc.driverClassName=oracle.jdbc.OracleDriverjdbc.url=jdbc:oracle:thin:@host:1521:dbjdbc.username=userjdbc.password=passjdbc.dialect=org.hibernate.dialect.Oracle10gDialect
Please don't forget to add a JDBC 4 compliant driver on the classpath. A JDBC driver which doesn't meet theJDBC 4 specifications won't work properly.
These are privileges which have to be granted to schema used by CloverETL Server:
CONNECTCREATE SESSIONCREATE/ALTER/DROP TABLECREATE/ALTER/DROP SEQUENCE
QUOTA UNLIMITED ON <user_tablespace>;QUOTA UNLIMITED ON <temp_tablespace>;
Note
Continue with: Encrypted JNDI (p. 84) or CloverETL Server Activation (p. 46)
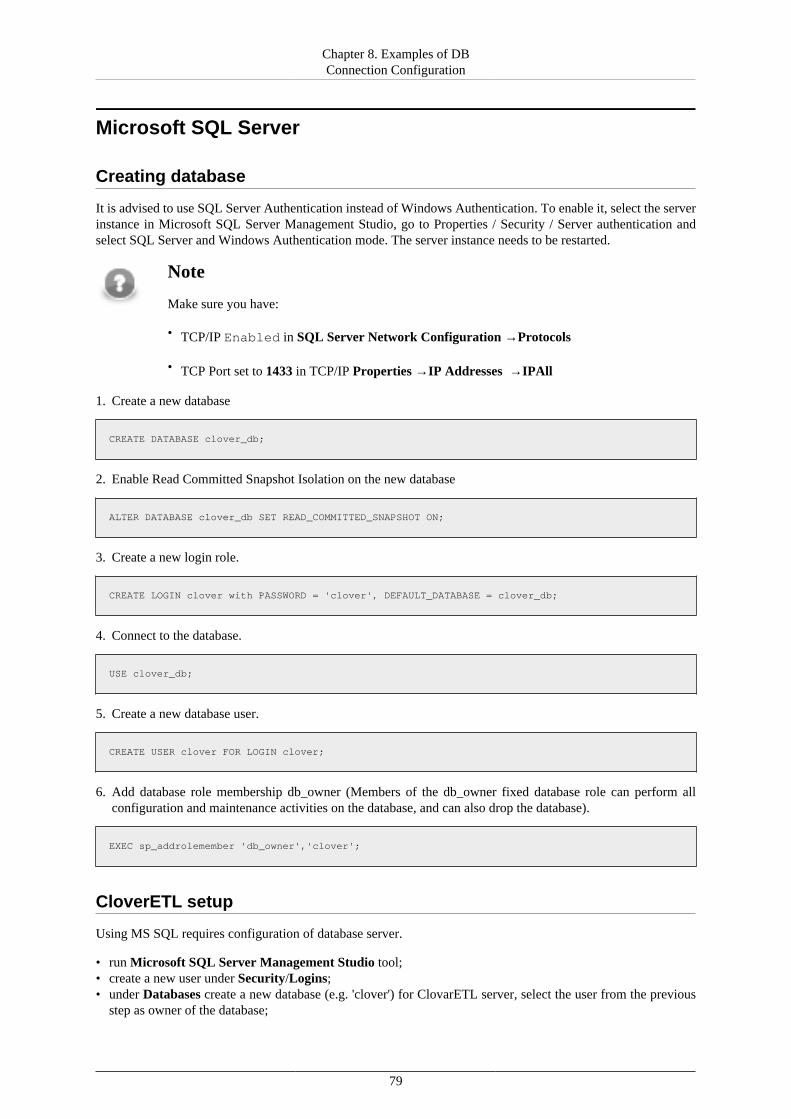
Chapter 8. Examples of DBConnection Configuration
79
Microsoft SQL Server
Creating database
It is advised to use SQL Server Authentication instead of Windows Authentication. To enable it, select the serverinstance in Microsoft SQL Server Management Studio, go to Properties / Security / Server authentication andselect SQL Server and Windows Authentication mode. The server instance needs to be restarted.
Note
Make sure you have:
• TCP/IP Enabled in SQL Server Network Configuration →Protocols
• TCP Port set to 1433 in TCP/IP Properties →IP Addresses →IPAll
1. Create a new database
CREATE DATABASE clover_db;
2. Enable Read Committed Snapshot Isolation on the new database
ALTER DATABASE clover_db SET READ_COMMITTED_SNAPSHOT ON;
3. Create a new login role.
CREATE LOGIN clover with PASSWORD = 'clover', DEFAULT_DATABASE = clover_db;
4. Connect to the database.
USE clover_db;
5. Create a new database user.
CREATE USER clover FOR LOGIN clover;
6. Add database role membership db_owner (Members of the db_owner fixed database role can perform allconfiguration and maintenance activities on the database, and can also drop the database).
EXEC sp_addrolemember 'db_owner','clover';
CloverETL setup
Using MS SQL requires configuration of database server.
• run Microsoft SQL Server Management Studio tool;• create a new user under Security/Logins;• under Databases create a new database (e.g. 'clover') for ClovarETL server, select the user from the previous
step as owner of the database;
Chapter 8. Examples of DBConnection Configuration
80
• under database Options, set the Is Read Committed Snapshot On option to True;
If you use a properties file for configuration, specify these parameters: jdbc.driverClassName,jdbc.url, jdbc.username, jdbc.password, jdbc.dialect. For example:
jdbc.driverClassName=com.microsoft.sqlserver.jdbc.SQLServerDriver
jdbc.url=jdbc:sqlserver://localhost:1433;instance=SQLSERVERINSTANCE;database=clover_dbjdbc.username=userjdbc.password=passjdbc.dialect=org.hibernate.dialect.SQLServerDialect
Please do not forget to add a JDBC 4 compliant driver on the application server classpath. A JDBC driver thatdoes not meet the JDBC 4 specifications will not work properly.
Note
Continue with: Encrypted JNDI (p. 84) or CloverETL Server Activation (p. 46)

Chapter 8. Examples of DBConnection Configuration
81
Postgre SQL
Creating database
Advanced users can create their own table space
We are going to create a database for clover to use a 'user group' role which will own the database and a user rolewhich we will add to the user group. This user role will be then used by the server to access the database.
Database name: clover_db
UserGroup: cloveretl
User: clover
Password: clover
1. Optionally, you can create new tablespace
2. Connect as postgres (default admin) to the default db postgres and execute the following commands:
CREATE ROLE cloveretl NOSUPERUSER NOCREATEDB NOCREATEROLE NOINHERIT NOLOGIN;CREATE ROLE clover NOSUPERUSER NOCREATEDB NOCREATEROLE INHERIT LOGIN ENCRYPTED PASSWORD 'clover';GRANT cloveretl TO clover;CREATE DATABASE clover_db;GRANT ALL ON DATABASE clover_db TO cloveretl;REVOKE ALL ON DATABASE clover_db FROM public;
To separate database into its own tablespace create a tablespace before creating the database:
and use the following command to create the db:
CREATE DATABASE clover_db WITH OWNER cloveretl TABLESPACE tablespace_name;
https://www.postgresql.org/docs/9.2/static/sql-createtablespace.html
CloverETL setup
If you use a properties file for configuration, specify these parameters: jdbc.driverClassName,jdbc.url, jdbc.username, jdbc.password, jdbc.dialect. For example:
jdbc.driverClassName=org.postgresql.Driverjdbc.url=jdbc:postgresql://localhost/clover?charSet=UTF-8jdbc.username=postgresjdbc.password=jdbc.dialect=org.hibernate.dialect.PostgreSQLDialect
Please don't forget to a add JDBC 4 compliant driver on the classpath. A JDBC driver which doesn't meet theJDBC 4 specifications won't work properly.
The JDBC driver for PostgreSQL can be downloaded from: https://jdbc.postgresql.org/download.html. In ApacheTomcat, you would place libraries into $CATALINA_HOME/libs directory.
Note
Continue with: Encrypted JNDI (p. 84) or CloverETL Server Activation (p. 46)
Chapter 8. Examples of DBConnection Configuration
82
JNDI DB DataSource
CloverETL Server can connect to a database using JNDI DataSource, which is configured in an application serveror container. However, there are some CloverETL parameters which must be set, otherwise the behavior maybe unpredictable:
datasource.type=JNDI # type of datasource; must be set, because default value is JDBCdatasource.jndiName=# JNDI location of DB DataSource; default value is java:comp/env/jdbc/clover_server #jdbc.dialect=# Set dialect according to DB which DataSource is connected to. The same dialect as in the sections above. #
The parameters above may be set in the same way as other parameters (in the properties file or Tomcat context file).
Example of DataSource configuration in Apache Tomcat. The following context resource configuration may beadded to the [Tomcat_home]/conf/server.xml file to the <Host> element.
<Context path="/clover" > <Resource name="jdbc/clover_server" auth="Container" type="javax.sql.DataSource" driverClassName="com.mysql.jdbc.Driver" url="jdbc:mysql://127.0.0.1:3306/clover?useUnicode=true&characterEncoding=utf8" username="clover" password="" maxActive="20" maxIdle="10" maxWait="-1"/></Context>
Do not put the code above into <GlobalNamingResources> element, since the resource would not be visibleby the CloverETL webapp.
NoteCloverETL's default Quartz configuration does not work with default JNDI DataSource fromWeblogic. Proceed with one of the following options:
1. Configure the Quartz JDBC delegate manually before the server is started, or
2. disable JDBC type wrapping in the Weblogic's DataSource configuration.
Tip
The resource configuration may also be added to the context file [Tomcat_home]/conf/Catalina/localhost/clover.xml.
Important
• Special characters typed in the context file have to be specified as XML entities, e.g. ampersand"&" as "&" etc.
• The default JNDI pool DBCP in Apache Tomcat does not handle connections in efficient way.With the DBCP JNDI pool, low performance can be seen if DBOutputTable with returningstatement is used.
Use tomcat-jdbc-pool instead. Just addfactory="org.apache.tomcat.jdbc.pool.DataSourceFactory" to thedefinition of the JNDI resource. See https://tomcat.apache.org/tomcat-7.0-doc/jdbc-pool.html
See Chapter 9, List of Properties (p. 90) for list of properties.
Chapter 8. Examples of DBConnection Configuration
83
Note
Continue with: Encrypted JNDI (p. 84) or CloverETL Server Activation (p. 46)
Chapter 8. Examples of DBConnection Configuration
84
Encrypted JNDI
You can store password for database connection in an encrypted format. The configuration differs betweenparticular application servers.
Encrypted JNDI on Tomcat (p. 84)Encrypted JNDI on Jetty 9 (9.2.6) (p. 85)Encrypted JNDI on JBoss 6.0.0 (p. 86)Encrypted JNDI on JBoss 7 (p. 87)Encrypted JNDI on Glassfish 3 (3.1.2.2) (p. 88)Encrypted JNDI on WebSphere 8.5.5.0 (p. 89)Encrypted JNDI on WebLogic (p. 89)
Encrypted JNDI on Tomcat
You need secure-cfg-tool to encrypt the passwords. Use the version of secure-cfg-toolcorresponding to the version of CloverETL Server. Usage of the tool is described in Chapter 10, SecureConfiguration Properties (p. 97).
Use encrypt.sh or encrypt.bat for password encryption. Place the encrypted password into a configurationfile, and put cloveretl-secure-jndi-resource-{version}.jar and jasypt-1.9.0.jar fileson the classpath of the application server. The .jar files can be found in the tomcat-secure-jndi-resource directory packed in secure-cfg-tool.
The tomcat-secure-jndi-resource directory contains a useful README file with further details onencrypted JNDI.
Example of encrypted JNDI connection for PostgreSQL
Encrypt the password:
1. ./encrypt.sh -a PBEWithSHA1AndDESede
2. The configuration is placed in ${CATALINA_HOME}/conf/context.xml. Note that the encryptionalgorithm PBEWithSHA1AndDESede is not default.
<Resource name="jdbc/clover_server" auth="Container" factory="com.cloveretl.secure.tomcatresource.SecureDataSourceFactory" secureAlgorithm="PBEWithSHA1AndDESede" type="javax.sql.DataSource" driverClassName="org.postgresql.Driver" url="jdbc:postgresql://127.0.0.1:5432/clover410m1?charSet=UTF-8" username="conf#rPz5Foo7HPn4dFTRV5Ourg==" password="conf#4KlNp8/FVDR+rTWX0dEqWA==" maxActive="20" maxIdle="10" maxWait="-1"/>
If you use other JCE (e.g. Bouncy Castle), it has to be added to the classpath of the application server(${CATALINA_HOME}/lib). The encrypt command requires the path to directory with JCE, too.
./encrypt.sh -l ~/lib/ -corg.bouncycastle.jce.provider.BouncyCastleProvider -aPBEWITHSHA256AND256BITAES-CBC-BC
<Resource name="jdbc/clover_server" auth="Container"
Chapter 8. Examples of DBConnection Configuration
85
factory="com.cloveretl.secure.tomcatresource.SecureDataSourceFactory" secureProvider="org.bouncycastle.jce.provider.BouncyCastleProvider" secureAlgorithm="PBEWITHSHA256AND256BITAES-CBC-BC" type="javax.sql.DataSource" driverClassName="org.postgresql.Driver" url="jdbc:postgresql://127.0.0.1:5432/clover410m1?charSet=UTF-8" username="conf#Ws9IuHKo9h7hMjPllr31VxdI1A9LKIaYfGEUmLet9rA=" password="conf#Cj1v59Z5nCBHaktn6Ubgst4Iz69JLQ/q6/32Xwr/IEE=" maxActive="20" maxIdle="10" maxWait="-1"/>
Encrypted JNDI on Jetty 9 (9.2.6)
Note
See the Jetty documentation on Secure Password Obfuscation.
Configuration of a JNDI JDBC connection pool is stored in the plain text file, $JETTY_HOME/etc/jetty.xml.
<New id="MysqlDB" class="org.eclipse.jetty.plus.jndi.Resource"> <Arg></Arg> <Arg>jdbc/MysqlDS</Arg> <Arg> <New class="com.mysql.jdbc.jdbc2.optional.MysqlConnectionPoolDataSource"> <Set name="URL">jdbc:mysql://localhost:3306/clover_empty</Set> <Set name="User">user</Set> <Set name="Password">password</Set> </New> </Arg></New>
Obfuscating the Password
Password can be obfuscated using org.eclipse.jetty.util.security.Password class within lib/jetty-util-{VERSION}.jar:
java -cp lib/jetty-util-9.2.6.v20141205.jar org.eclipse.jetty.util.security.Password password
Command returns obfuscated and hashed password. The obfuscated one will be used to replace the plain passwordvalue.
Replacing the Password
Replace the plain text password with the Call element. Its only argument is a string starting with the OBF: prefixreturned by the command mentioned in the previous section.
<New id="MysqlDB" class="org.eclipse.jetty.plus.jndi.Resource"> <Arg></Arg> <Arg>jdbc/MysqlDS</Arg> <Arg> <New class="com.mysql.jdbc.jdbc2.optional.MysqlConnectionPoolDataSource"> <Set name="URL">jdbc:mysql://localhost:3306/clover_empty</Set> <Set name="User">user</Set> <Set name="Password"> <Call class="org.eclipse.jetty.util.security.Password" name="deobfuscate"> <Arg>OBF:1v2j1uum1xtv1zej1zer1xtn1uvk1v1v</Arg> </Call> </Set> </New> </Arg></New>
Chapter 8. Examples of DBConnection Configuration
86
Note
Password in the JMS connection can also be obfuscated.
Encrypted JNDI on JBoss 6.0.0
Note
See the JBoss documentation on Encrypting Data Source Passwords
(In the documentation, client/jboss-logging-spi.jar is used; however in newer version,the client/jboss-logging.jar can be used instead.)
Original datasource with an unencrypted password:
<datasources> <local-tx-datasource> <jndi-name>MysqlDS</jndi-name> <connection-url>jdbc:mysql://127.0.0.1:3306/clover</connection-url> <driver-class>com.mysql.jdbc.Driver</driver-class> <user-name>user</user-name> <password>password</password> </local-tx-datasource> </datasources>
1. Encrypt the data source password:
• Unix-like systems:
java -cp client/jboss-logging.jar:lib/jbosssx.jar org.jboss.resource.security.SecureIdentityLoginModule password
• Windows system:
java -cp client\jboss-logging.jar;lib\jbosssx.jar org.jboss.resource.security.SecureIdentityLoginModule password
The command will return an encrypted password, e.g. 5dfc52b51bd35553df8592078de921bc.
2. Create a new application authentication policy in conf/login-config.xml within currently used server'sprofile directory (e.g. server/default/conf/login-config.xml).
<application-policy name="EncryptDBPassword"> <authentication> <login-module code="org.jboss.resource.security.SecureIdentityLoginModule" flag="required"> <module-option name="username">user</module-option> <module-option name="password">5dfc52b51bd35553df8592078de921bc</module-option> <module-option name="managedConnectionFactoryName">jboss.jca:name=MysqlDS,service=LocalTxCM</module-option> </login-module> </authentication> </application-policy>
3. Replace authentication entries with a reference to the application authentication policy
<security-domain>EncryptDBPassword</security-domain>
The final datasource looks like this:
<datasources>
Chapter 8. Examples of DBConnection Configuration
87
<local-tx-datasource> <jndi-name>MysqlDS</jndi-name> <connection-url>jdbc:mysql://127.0.0.1:3306/clover</connection-url> <driver-class>com.mysql.jdbc.Driver</driver-class> <security-domain>EncryptDBPassword</security-domain> </local-tx-datasource> </datasources>
The same mechanism can be probably used also for JMS.
<tx-connection-factory>...<security-domain-and-application>RealmWithEncryptedPassword</security-domain-and-application>...</tx-connection-factory>
Encrypted JNDI on JBoss 7JBoss 7 - JBoss EAP 6.2.0.GA - AS 7.3.0.Final-redhat-14
Note
See Using Encrypted DataSource Password in JBoss AS7 for details.
Configuration steps are similar to configuring of JBoss 6.
All configuration takes place in the single configuration file, e.g. for standalone profile JBOSS_HOME/standalone/configuration/standalone.xml.
Original datasource:
<datasources> <datasource jndi-name="java:/MysqlDS" pool-name="MySQLPool"> <connection-url>jdbc:mysql://localhost:3306/clover</connection-url> <driver>mysql</driver> <pool> <max-pool-size>30</max-pool-size> </pool> <security> <user-name>user</user-name> <password>password</password> </security> </datasource>
<drivers> <driver name="mysql" module="com.cloveretl.jdbc"> <driver-class>com.mysql.jdbc.Driver</driver-class> </driver> </drivers><datasources>
1. In JBOSS_HOME directory run the cli command:
java -cp modules/system/layers/base/org/picketbox/main/picketbox-4.0.19.SP2-redhat-1.jar:client/jboss-logging.jar org.picketbox.datasource.security.SecureIdentityLoginModule password
The command will return an encrypted password, e.g. 5dfc52b51bd35553df8592078de921bc.
2. Add a new security-domain to security-domains, the password value is a result of the command from theprevious step.
<security-domain name="EncryptDBPassword" cache-type="default"> <authentication>
Chapter 8. Examples of DBConnection Configuration
88
<login-module code="org.picketbox.datasource.security.SecureIdentityLoginModule" flag="required"> <module-option name="username" value="user"/> <module-option name="password" value="5dfc52b51bd35553df8592078de921bc"/> <module-option name="managedConnectionFactoryName" value="jboss.jca:service=LocalTxCM,name=MysqlPool"/> </login-module> </authentication> </security-domain>
3. Replace user and password with a reference to the security domain.
<datasources> <datasource jndi-name="java:/MysqlDS" pool-name="MysqlPool" enabled="true" use-java-context="true"> <connection-url>jdbc:mysql://localhost:3306/clover</connection-url> <driver>mysql</driver> <pool> <max-pool-size>30</max-pool-size> </pool> <security> <security-domain>EncryptDBPassword</security-domain> </security> </datasource> <drivers> <driver name="mysql" module="com.cloveretl.jdbc"> <driver-class>com.mysql.jdbc.Driver</driver-class> </driver> </drivers> </datasources>
It is possible that the same mechanism can also be used for JMS.
Encrypted JNDI on Glassfish 3 (3.1.2.2)
Configuration of JDBC connection pool is stored in the plain text file $DOMAIN/config/domain.xml.
<jdbc-connection-pool driver-classname="com.mysql.jdbc.Driver" datasource-classname="" res-type="java.sql.Driver" description="" name="jdbc/MysqlDS"> <property name="URL" value="jdbc:mysql://localhost:3306/clover_empty"></property> <property name="user" value="user"></property> <property name="password" value="password"></property></jdbc-connection-pool>
Password is unencrypted, but can be replaced with so called password alias:
A password alias stores a password in an encrypted form in the domain keystore, providing a clear-text alias nameto use instead of the password. In password files and the domain configuration file, use the form ${ALIAS=alias-name} to refer to the encrypted password.
Creating a Password Alias
There are two ways to create a password alias: using create-password-alias command in a command-line admin-console utility, or in the web Server Administration Console in the Password Aliases section (Domain->PasswordAliases).
Replacing the Password with the Password Alias
Replace the password (the attribute value) with a ${ALIAS=password_alias_name} string, wherepassword_alias_name is the name of the alias.
<jdbc-connection-pool driver-classname="com.mysql.jdbc.Driver" datasource-classname="" res-type="java.sql.Driver" description="" name="jdbc/MysqlDS"> <property name="URL" value="jdbc:mysql://localhost:3306/clover_empty"></property> <property name="user" value="user"></property> <property name="password" value="${ALIAS=password_alias_name}"></property></jdbc-connection-pool>
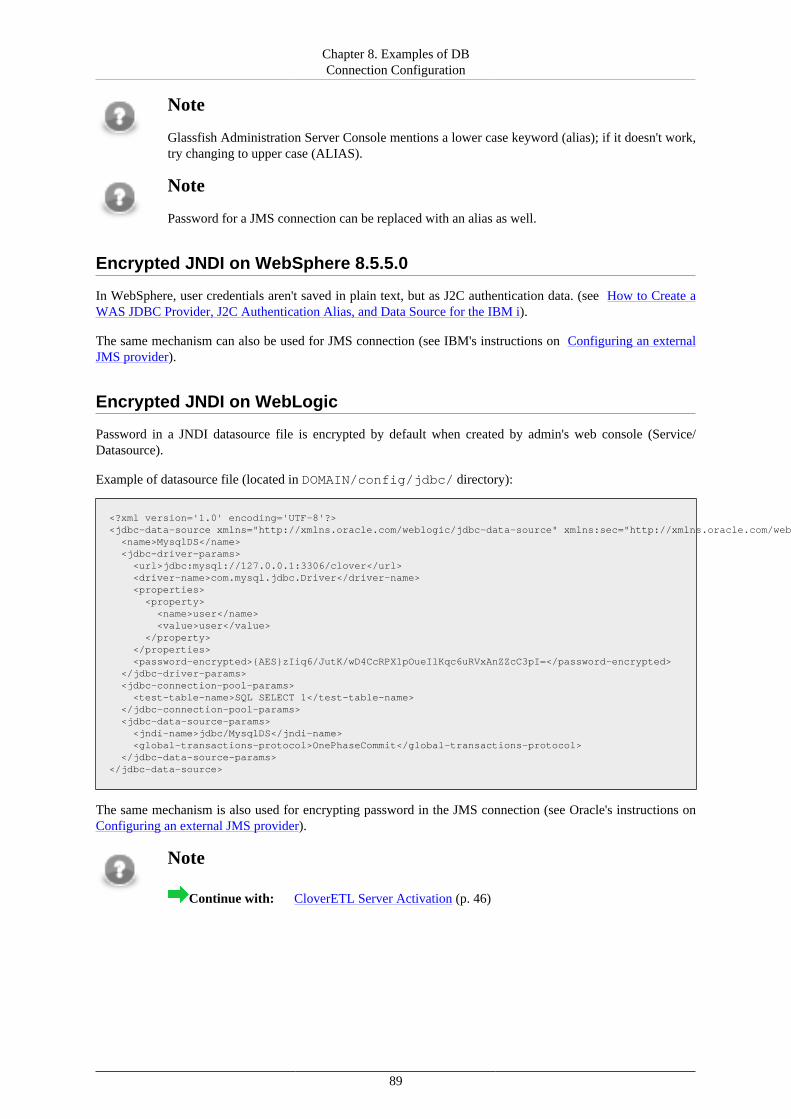
Chapter 8. Examples of DBConnection Configuration
89
Note
Glassfish Administration Server Console mentions a lower case keyword (alias); if it doesn't work,try changing to upper case (ALIAS).
Note
Password for a JMS connection can be replaced with an alias as well.
Encrypted JNDI on WebSphere 8.5.5.0
In WebSphere, user credentials aren't saved in plain text, but as J2C authentication data. (see How to Create aWAS JDBC Provider, J2C Authentication Alias, and Data Source for the IBM i).
The same mechanism can also be used for JMS connection (see IBM's instructions on Configuring an externalJMS provider).
Encrypted JNDI on WebLogic
Password in a JNDI datasource file is encrypted by default when created by admin's web console (Service/Datasource).
Example of datasource file (located in DOMAIN/config/jdbc/ directory):
<?xml version='1.0' encoding='UTF-8'?><jdbc-data-source xmlns="http://xmlns.oracle.com/weblogic/jdbc-data-source" xmlns:sec="http://xmlns.oracle.com/weblogic/security" xmlns:wls="http://xmlns.oracle.com/weblogic/security/wls" xmlns:xsi="http://www.w3.org/2001/XMLSchema-instance" xsi:schemaLocation="http://xmlns.oracle.com/weblogic/jdbc-data-source http://xmlns.oracle.com/weblogic/jdbc-data-source/1.0/jdbc-data-source.xsd"> <name>MysqlDS</name> <jdbc-driver-params> <url>jdbc:mysql://127.0.0.1:3306/clover</url> <driver-name>com.mysql.jdbc.Driver</driver-name> <properties> <property> <name>user</name> <value>user</value> </property> </properties> <password-encrypted>{AES}zIiq6/JutK/wD4CcRPX1pOueIlKqc6uRVxAnZZcC3pI=</password-encrypted> </jdbc-driver-params> <jdbc-connection-pool-params> <test-table-name>SQL SELECT 1</test-table-name> </jdbc-connection-pool-params> <jdbc-data-source-params> <jndi-name>jdbc/MysqlDS</jndi-name> <global-transactions-protocol>OnePhaseCommit</global-transactions-protocol> </jdbc-data-source-params></jdbc-data-source>
The same mechanism is also used for encrypting password in the JMS connection (see Oracle's instructions onConfiguring an external JMS provider).
Note
Continue with: CloverETL Server Activation (p. 46)
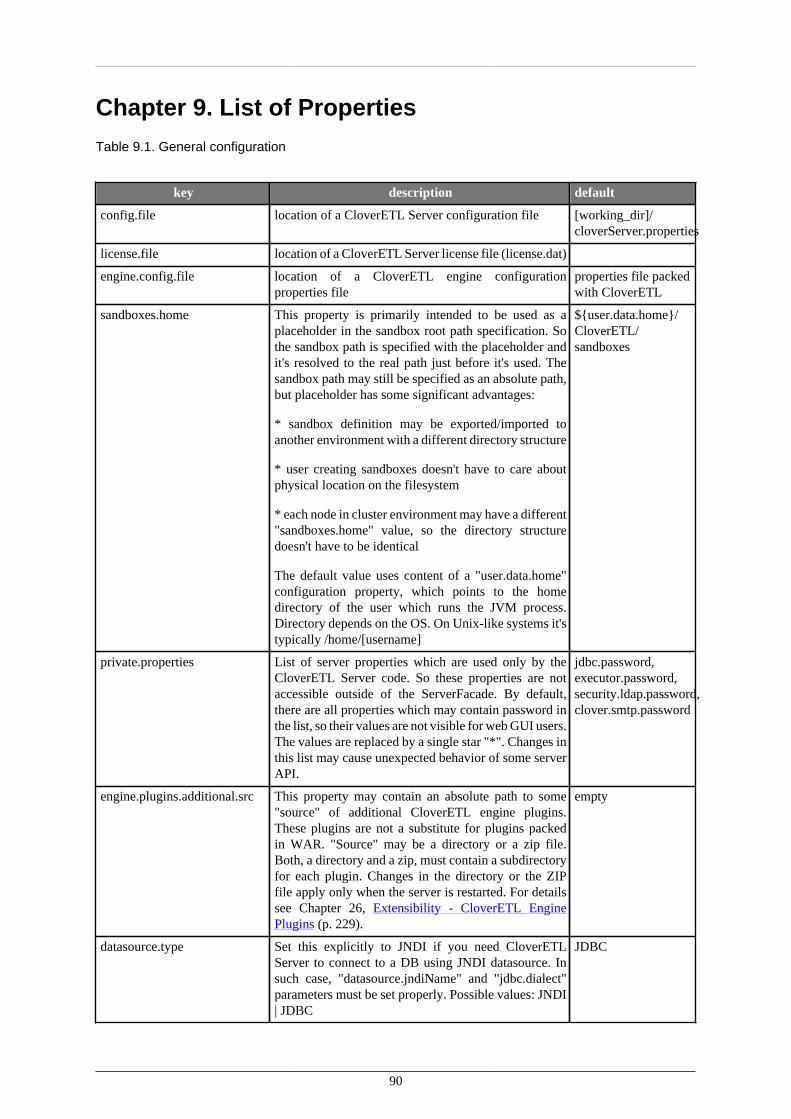
90
Chapter 9. List of PropertiesTable 9.1. General configuration
key description default
config.file location of a CloverETL Server configuration file [working_dir]/cloverServer.properties
license.file location of a CloverETL Server license file (license.dat)
engine.config.file location of a CloverETL engine configurationproperties file
properties file packedwith CloverETL
sandboxes.home This property is primarily intended to be used as aplaceholder in the sandbox root path specification. Sothe sandbox path is specified with the placeholder andit's resolved to the real path just before it's used. Thesandbox path may still be specified as an absolute path,but placeholder has some significant advantages:
* sandbox definition may be exported/imported toanother environment with a different directory structure
* user creating sandboxes doesn't have to care aboutphysical location on the filesystem
* each node in cluster environment may have a different"sandboxes.home" value, so the directory structuredoesn't have to be identical
The default value uses content of a "user.data.home"configuration property, which points to the homedirectory of the user which runs the JVM process.Directory depends on the OS. On Unix-like systems it'stypically /home/[username]
${user.data.home}/CloverETL/sandboxes
private.properties List of server properties which are used only by theCloverETL Server code. So these properties are notaccessible outside of the ServerFacade. By default,there are all properties which may contain password inthe list, so their values are not visible for web GUI users.The values are replaced by a single star "*". Changes inthis list may cause unexpected behavior of some serverAPI.
jdbc.password,executor.password,security.ldap.password,clover.smtp.password
engine.plugins.additional.src This property may contain an absolute path to some"source" of additional CloverETL engine plugins.These plugins are not a substitute for plugins packedin WAR. "Source" may be a directory or a zip file.Both, a directory and a zip, must contain a subdirectoryfor each plugin. Changes in the directory or the ZIPfile apply only when the server is restarted. For detailssee Chapter 26, Extensibility - CloverETL EnginePlugins (p. 229).
empty
datasource.type Set this explicitly to JNDI if you need CloverETLServer to connect to a DB using JNDI datasource. Insuch case, "datasource.jndiName" and "jdbc.dialect"parameters must be set properly. Possible values: JNDI| JDBC
JDBC
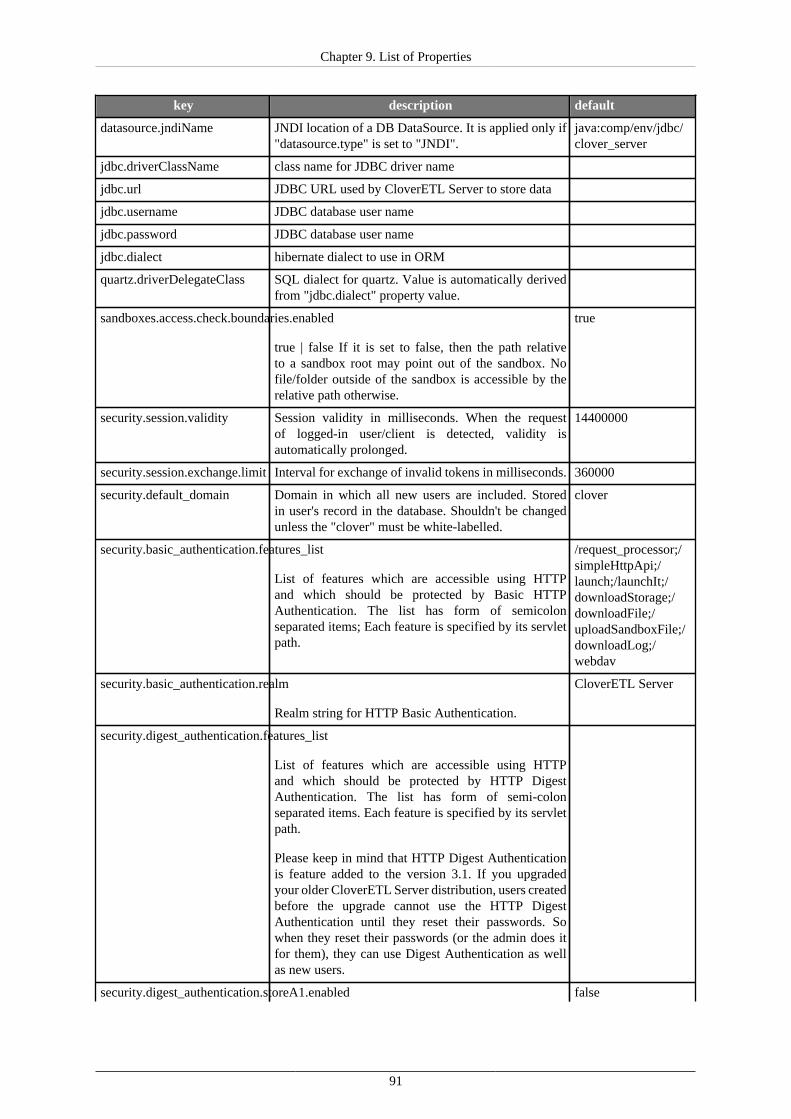
Chapter 9. List of Properties
91
key description default
datasource.jndiName JNDI location of a DB DataSource. It is applied only if"datasource.type" is set to "JNDI".
java:comp/env/jdbc/clover_server
jdbc.driverClassName class name for JDBC driver name
jdbc.url JDBC URL used by CloverETL Server to store data
jdbc.username JDBC database user name
jdbc.password JDBC database user name
jdbc.dialect hibernate dialect to use in ORM
quartz.driverDelegateClass SQL dialect for quartz. Value is automatically derivedfrom "jdbc.dialect" property value.
sandboxes.access.check.boundaries.enabled
true | false If it is set to false, then the path relativeto a sandbox root may point out of the sandbox. Nofile/folder outside of the sandbox is accessible by therelative path otherwise.
true
security.session.validity Session validity in milliseconds. When the requestof logged-in user/client is detected, validity isautomatically prolonged.
14400000
security.session.exchange.limit Interval for exchange of invalid tokens in milliseconds. 360000
security.default_domain Domain in which all new users are included. Storedin user's record in the database. Shouldn't be changedunless the "clover" must be white-labelled.
clover
security.basic_authentication.features_list
List of features which are accessible using HTTPand which should be protected by Basic HTTPAuthentication. The list has form of semicolonseparated items; Each feature is specified by its servletpath.
/request_processor;/simpleHttpApi;/launch;/launchIt;/downloadStorage;/downloadFile;/uploadSandboxFile;/downloadLog;/webdav
security.basic_authentication.realm
Realm string for HTTP Basic Authentication.
CloverETL Server
security.digest_authentication.features_list
List of features which are accessible using HTTPand which should be protected by HTTP DigestAuthentication. The list has form of semi-colonseparated items. Each feature is specified by its servletpath.
Please keep in mind that HTTP Digest Authenticationis feature added to the version 3.1. If you upgradedyour older CloverETL Server distribution, users createdbefore the upgrade cannot use the HTTP DigestAuthentication until they reset their passwords. Sowhen they reset their passwords (or the admin does itfor them), they can use Digest Authentication as wellas new users.
security.digest_authentication.storeA1.enabled false
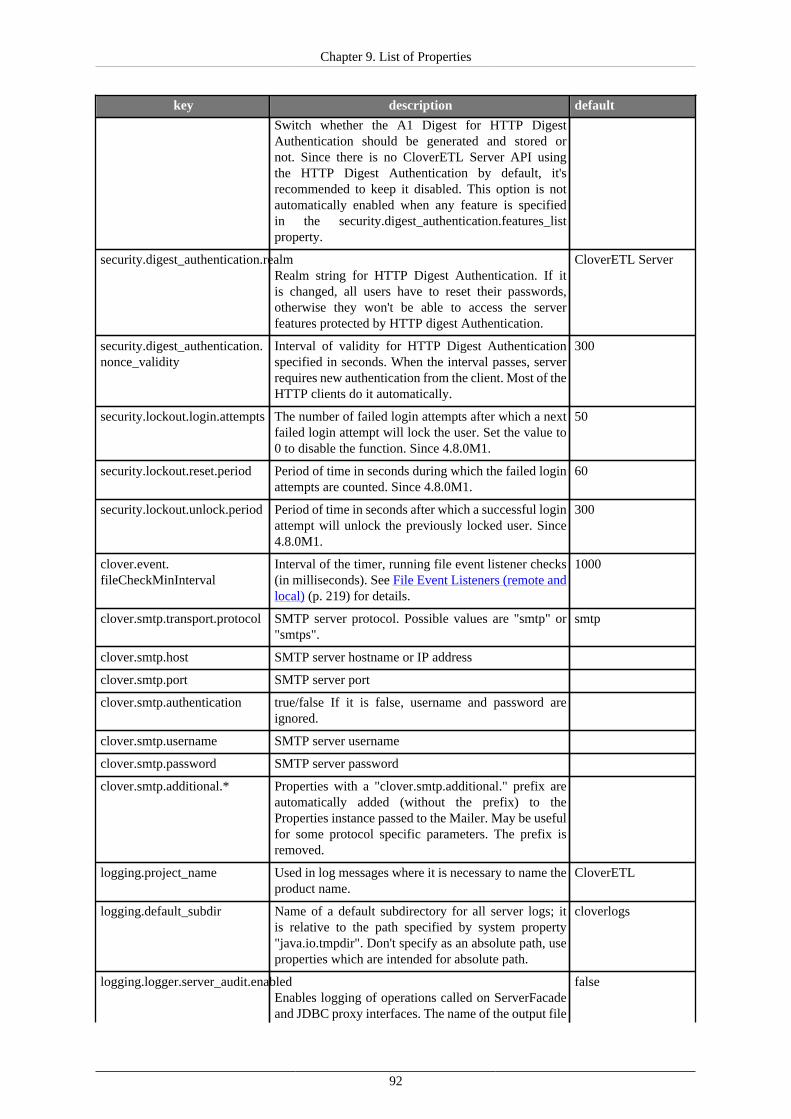
Chapter 9. List of Properties
92
key description default
Switch whether the A1 Digest for HTTP DigestAuthentication should be generated and stored ornot. Since there is no CloverETL Server API usingthe HTTP Digest Authentication by default, it'srecommended to keep it disabled. This option is notautomatically enabled when any feature is specifiedin the security.digest_authentication.features_listproperty.
security.digest_authentication.realmRealm string for HTTP Digest Authentication. If itis changed, all users have to reset their passwords,otherwise they won't be able to access the serverfeatures protected by HTTP digest Authentication.
CloverETL Server
security.digest_authentication.nonce_validity
Interval of validity for HTTP Digest Authenticationspecified in seconds. When the interval passes, serverrequires new authentication from the client. Most of theHTTP clients do it automatically.
300
security.lockout.login.attempts The number of failed login attempts after which a nextfailed login attempt will lock the user. Set the value to0 to disable the function. Since 4.8.0M1.
50
security.lockout.reset.period Period of time in seconds during which the failed loginattempts are counted. Since 4.8.0M1.
60
security.lockout.unlock.period Period of time in seconds after which a successful loginattempt will unlock the previously locked user. Since4.8.0M1.
300
clover.event.fileCheckMinInterval
Interval of the timer, running file event listener checks(in milliseconds). See File Event Listeners (remote andlocal) (p. 219) for details.
1000
clover.smtp.transport.protocol SMTP server protocol. Possible values are "smtp" or"smtps".
smtp
clover.smtp.host SMTP server hostname or IP address
clover.smtp.port SMTP server port
clover.smtp.authentication true/false If it is false, username and password areignored.
clover.smtp.username SMTP server username
clover.smtp.password SMTP server password
clover.smtp.additional.* Properties with a "clover.smtp.additional." prefix areautomatically added (without the prefix) to theProperties instance passed to the Mailer. May be usefulfor some protocol specific parameters. The prefix isremoved.
logging.project_name Used in log messages where it is necessary to name theproduct name.
CloverETL
logging.default_subdir Name of a default subdirectory for all server logs; itis relative to the path specified by system property"java.io.tmpdir". Don't specify as an absolute path, useproperties which are intended for absolute path.
cloverlogs
logging.logger.server_audit.enabledEnables logging of operations called on ServerFacadeand JDBC proxy interfaces. The name of the output file
false
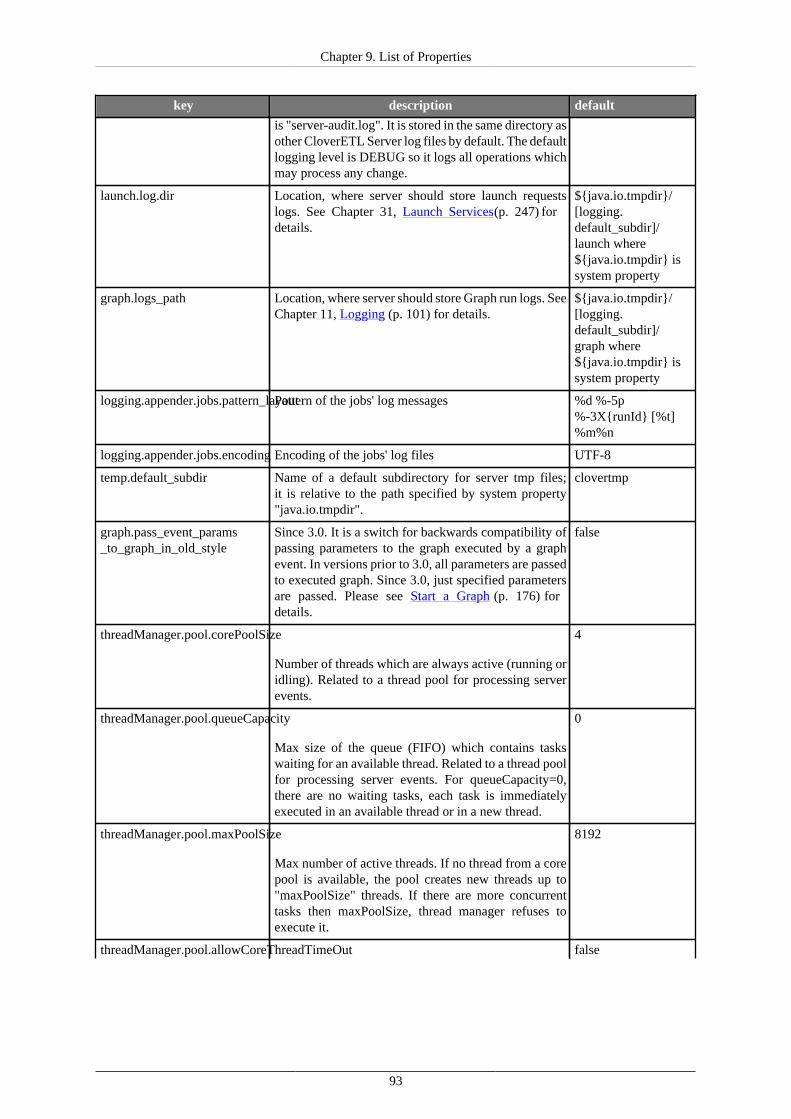
Chapter 9. List of Properties
93
key description default
is "server-audit.log". It is stored in the same directory asother CloverETL Server log files by default. The defaultlogging level is DEBUG so it logs all operations whichmay process any change.
launch.log.dir Location, where server should store launch requestslogs. See Chapter 31, Launch Services (p. 247) fordetails.
${java.io.tmpdir}/[logging.default_subdir]/launch where${java.io.tmpdir} issystem property
graph.logs_path Location, where server should store Graph run logs. SeeChapter 11, Logging (p. 101) for details.
${java.io.tmpdir}/[logging.default_subdir]/graph where${java.io.tmpdir} issystem property
logging.appender.jobs.pattern_layoutPattern of the jobs' log messages %d %-5p%-3X{runId} [%t]%m%n
logging.appender.jobs.encoding Encoding of the jobs' log files UTF-8
temp.default_subdir Name of a default subdirectory for server tmp files;it is relative to the path specified by system property"java.io.tmpdir".
clovertmp
graph.pass_event_params_to_graph_in_old_style
Since 3.0. It is a switch for backwards compatibility ofpassing parameters to the graph executed by a graphevent. In versions prior to 3.0, all parameters are passedto executed graph. Since 3.0, just specified parametersare passed. Please see Start a Graph (p. 176) fordetails.
false
threadManager.pool.corePoolSize
Number of threads which are always active (running oridling). Related to a thread pool for processing serverevents.
4
threadManager.pool.queueCapacity
Max size of the queue (FIFO) which contains taskswaiting for an available thread. Related to a thread poolfor processing server events. For queueCapacity=0,there are no waiting tasks, each task is immediatelyexecuted in an available thread or in a new thread.
0
threadManager.pool.maxPoolSize
Max number of active threads. If no thread from a corepool is available, the pool creates new threads up to"maxPoolSize" threads. If there are more concurrenttasks then maxPoolSize, thread manager refuses toexecute it.
8192
threadManager.pool.allowCoreThreadTimeOut false
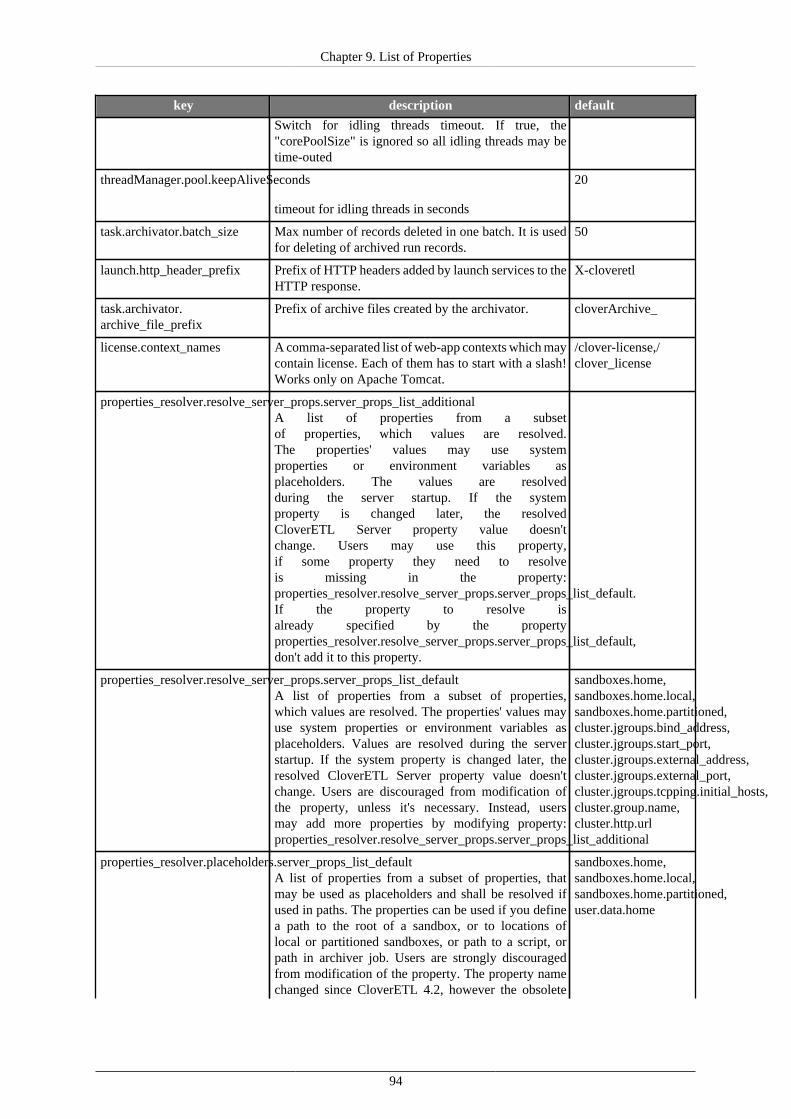
Chapter 9. List of Properties
94
key description default
Switch for idling threads timeout. If true, the"corePoolSize" is ignored so all idling threads may betime-outed
threadManager.pool.keepAliveSeconds
timeout for idling threads in seconds
20
task.archivator.batch_size Max number of records deleted in one batch. It is usedfor deleting of archived run records.
50
launch.http_header_prefix Prefix of HTTP headers added by launch services to theHTTP response.
X-cloveretl
task.archivator.archive_file_prefix
Prefix of archive files created by the archivator. cloverArchive_
license.context_names A comma-separated list of web-app contexts which maycontain license. Each of them has to start with a slash!Works only on Apache Tomcat.
/clover-license,/clover_license
properties_resolver.resolve_server_props.server_props_list_additionalA list of properties from a subsetof properties, which values are resolved.The properties' values may use systemproperties or environment variables asplaceholders. The values are resolvedduring the server startup. If the systemproperty is changed later, the resolvedCloverETL Server property value doesn'tchange. Users may use this property,if some property they need to resolveis missing in the property:properties_resolver.resolve_server_props.server_props_list_default.If the property to resolve isalready specified by the propertyproperties_resolver.resolve_server_props.server_props_list_default,don't add it to this property.
properties_resolver.resolve_server_props.server_props_list_defaultA list of properties from a subset of properties,which values are resolved. The properties' values mayuse system properties or environment variables asplaceholders. Values are resolved during the serverstartup. If the system property is changed later, theresolved CloverETL Server property value doesn'tchange. Users are discouraged from modification ofthe property, unless it's necessary. Instead, usersmay add more properties by modifying property:properties_resolver.resolve_server_props.server_props_list_additional
sandboxes.home,sandboxes.home.local,sandboxes.home.partitioned,cluster.jgroups.bind_address,cluster.jgroups.start_port,cluster.jgroups.external_address,cluster.jgroups.external_port,cluster.jgroups.tcpping.initial_hosts,cluster.group.name,cluster.http.url
properties_resolver.placeholders.server_props_list_defaultA list of properties from a subset of properties, thatmay be used as placeholders and shall be resolved ifused in paths. The properties can be used if you definea path to the root of a sandbox, or to locations oflocal or partitioned sandboxes, or path to a script, orpath in archiver job. Users are strongly discouragedfrom modification of the property. The property namechanged since CloverETL 4.2, however the obsolete
sandboxes.home,sandboxes.home.local,sandboxes.home.partitioned,user.data.home
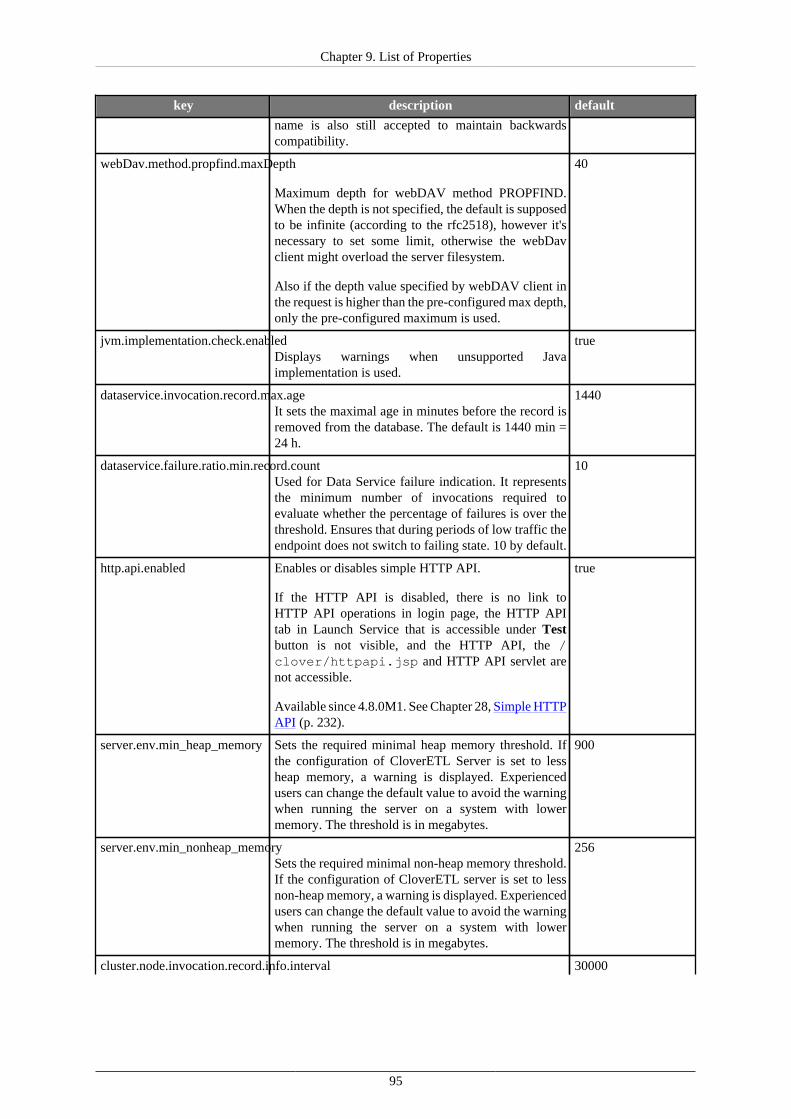
Chapter 9. List of Properties
95
key description default
name is also still accepted to maintain backwardscompatibility.
webDav.method.propfind.maxDepth
Maximum depth for webDAV method PROPFIND.When the depth is not specified, the default is supposedto be infinite (according to the rfc2518), however it'snecessary to set some limit, otherwise the webDavclient might overload the server filesystem.
Also if the depth value specified by webDAV client inthe request is higher than the pre-configured max depth,only the pre-configured maximum is used.
40
jvm.implementation.check.enabledDisplays warnings when unsupported Javaimplementation is used.
true
dataservice.invocation.record.max.ageIt sets the maximal age in minutes before the record isremoved from the database. The default is 1440 min =24 h.
1440
dataservice.failure.ratio.min.record.countUsed for Data Service failure indication. It representsthe minimum number of invocations required toevaluate whether the percentage of failures is over thethreshold. Ensures that during periods of low traffic theendpoint does not switch to failing state. 10 by default.
10
http.api.enabled Enables or disables simple HTTP API.
If the HTTP API is disabled, there is no link toHTTP API operations in login page, the HTTP APItab in Launch Service that is accessible under Testbutton is not visible, and the HTTP API, the /clover/httpapi.jsp and HTTP API servlet arenot accessible.
Available since 4.8.0M1. See Chapter 28, Simple HTTPAPI (p. 232).
true
server.env.min_heap_memory Sets the required minimal heap memory threshold. Ifthe configuration of CloverETL Server is set to lessheap memory, a warning is displayed. Experiencedusers can change the default value to avoid the warningwhen running the server on a system with lowermemory. The threshold is in megabytes.
900
server.env.min_nonheap_memorySets the required minimal non-heap memory threshold.If the configuration of CloverETL server is set to lessnon-heap memory, a warning is displayed. Experiencedusers can change the default value to avoid the warningwhen running the server on a system with lowermemory. The threshold is in megabytes.
256
cluster.node.invocation.record.info.interval 30000
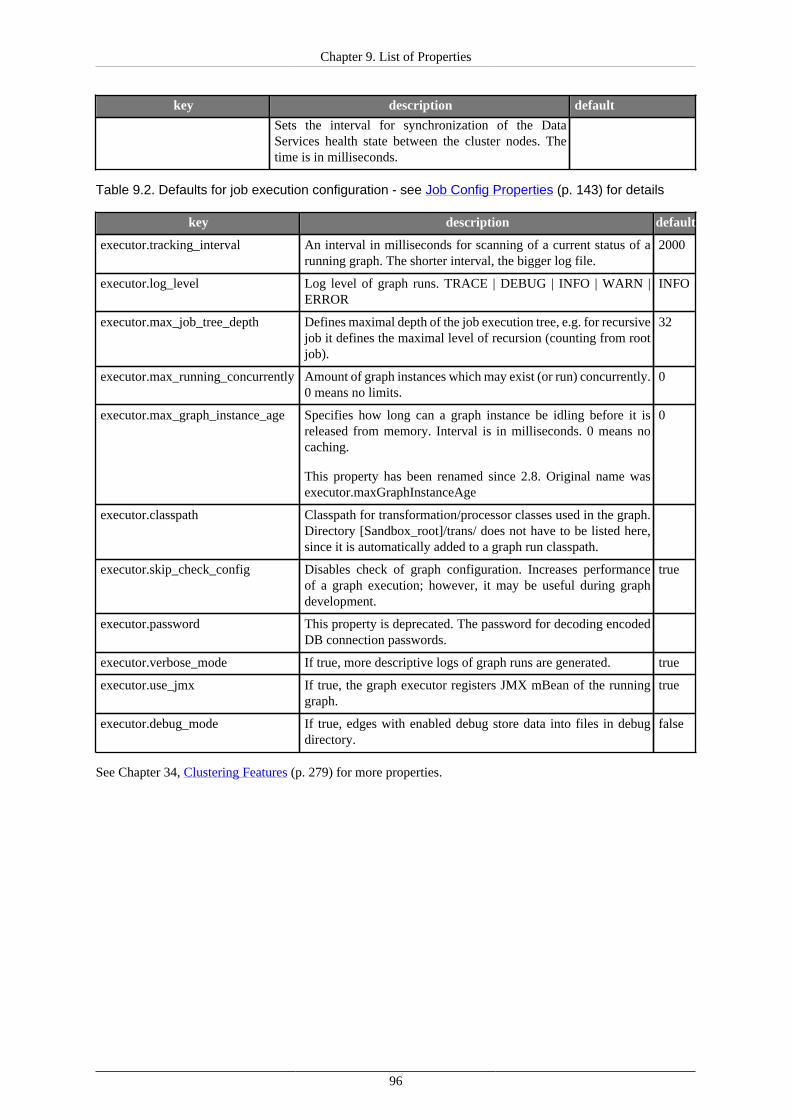
Chapter 9. List of Properties
96
key description default
Sets the interval for synchronization of the DataServices health state between the cluster nodes. Thetime is in milliseconds.
Table 9.2. Defaults for job execution configuration - see Job Config Properties (p. 143) for details
key description default
executor.tracking_interval An interval in milliseconds for scanning of a current status of arunning graph. The shorter interval, the bigger log file.
2000
executor.log_level Log level of graph runs. TRACE | DEBUG | INFO | WARN |ERROR
INFO
executor.max_job_tree_depth Defines maximal depth of the job execution tree, e.g. for recursivejob it defines the maximal level of recursion (counting from rootjob).
32
executor.max_running_concurrently Amount of graph instances which may exist (or run) concurrently.0 means no limits.
0
executor.max_graph_instance_age Specifies how long can a graph instance be idling before it isreleased from memory. Interval is in milliseconds. 0 means nocaching.
This property has been renamed since 2.8. Original name wasexecutor.maxGraphInstanceAge
0
executor.classpath Classpath for transformation/processor classes used in the graph.Directory [Sandbox_root]/trans/ does not have to be listed here,since it is automatically added to a graph run classpath.
executor.skip_check_config Disables check of graph configuration. Increases performanceof a graph execution; however, it may be useful during graphdevelopment.
true
executor.password This property is deprecated. The password for decoding encodedDB connection passwords.
executor.verbose_mode If true, more descriptive logs of graph runs are generated. true
executor.use_jmx If true, the graph executor registers JMX mBean of the runninggraph.
true
executor.debug_mode If true, edges with enabled debug store data into files in debugdirectory.
false
See Chapter 34, Clustering Features (p. 279) for more properties.
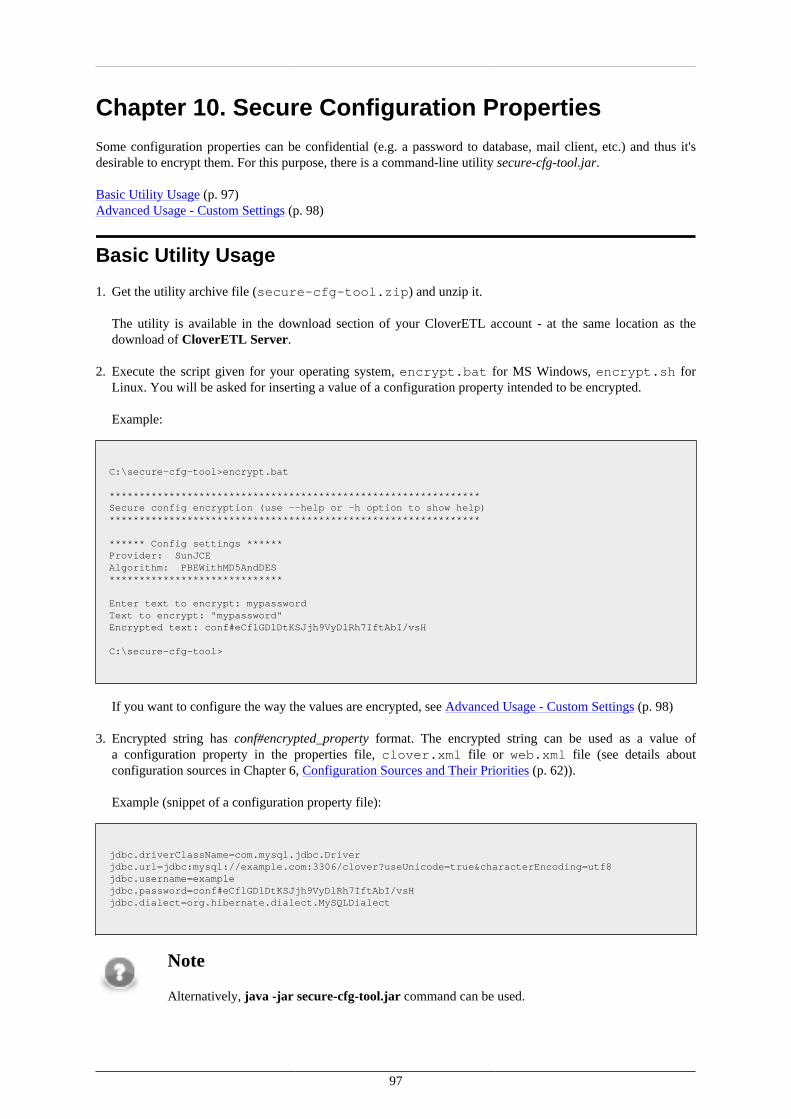
97
Chapter 10. Secure Configuration PropertiesSome configuration properties can be confidential (e.g. a password to database, mail client, etc.) and thus it'sdesirable to encrypt them. For this purpose, there is a command-line utility secure-cfg-tool.jar.
Basic Utility Usage (p. 97)Advanced Usage - Custom Settings (p. 98)
Basic Utility Usage
1. Get the utility archive file (secure-cfg-tool.zip) and unzip it.
The utility is available in the download section of your CloverETL account - at the same location as thedownload of CloverETL Server.
2. Execute the script given for your operating system, encrypt.bat for MS Windows, encrypt.sh forLinux. You will be asked for inserting a value of a configuration property intended to be encrypted.
Example:
C:\secure-cfg-tool>encrypt.bat
**************************************************************Secure config encryption (use --help or -h option to show help)**************************************************************
****** Config settings ******Provider: SunJCEAlgorithm: PBEWithMD5AndDES*****************************
Enter text to encrypt: mypasswordText to encrypt: "mypassword"Encrypted text: conf#eCflGDlDtKSJjh9VyDlRh7IftAbI/vsH
C:\secure-cfg-tool>
If you want to configure the way the values are encrypted, see Advanced Usage - Custom Settings (p. 98)
3. Encrypted string has conf#encrypted_property format. The encrypted string can be used as a value ofa configuration property in the properties file, clover.xml file or web.xml file (see details aboutconfiguration sources in Chapter 6, Configuration Sources and Their Priorities (p. 62)).
Example (snippet of a configuration property file):
jdbc.driverClassName=com.mysql.jdbc.Driverjdbc.url=jdbc:mysql://example.com:3306/clover?useUnicode=true&characterEncoding=utf8jdbc.username=examplejdbc.password=conf#eCflGDlDtKSJjh9VyDlRh7IftAbI/vsHjdbc.dialect=org.hibernate.dialect.MySQLDialect
Note
Alternatively, java -jar secure-cfg-tool.jar command can be used.
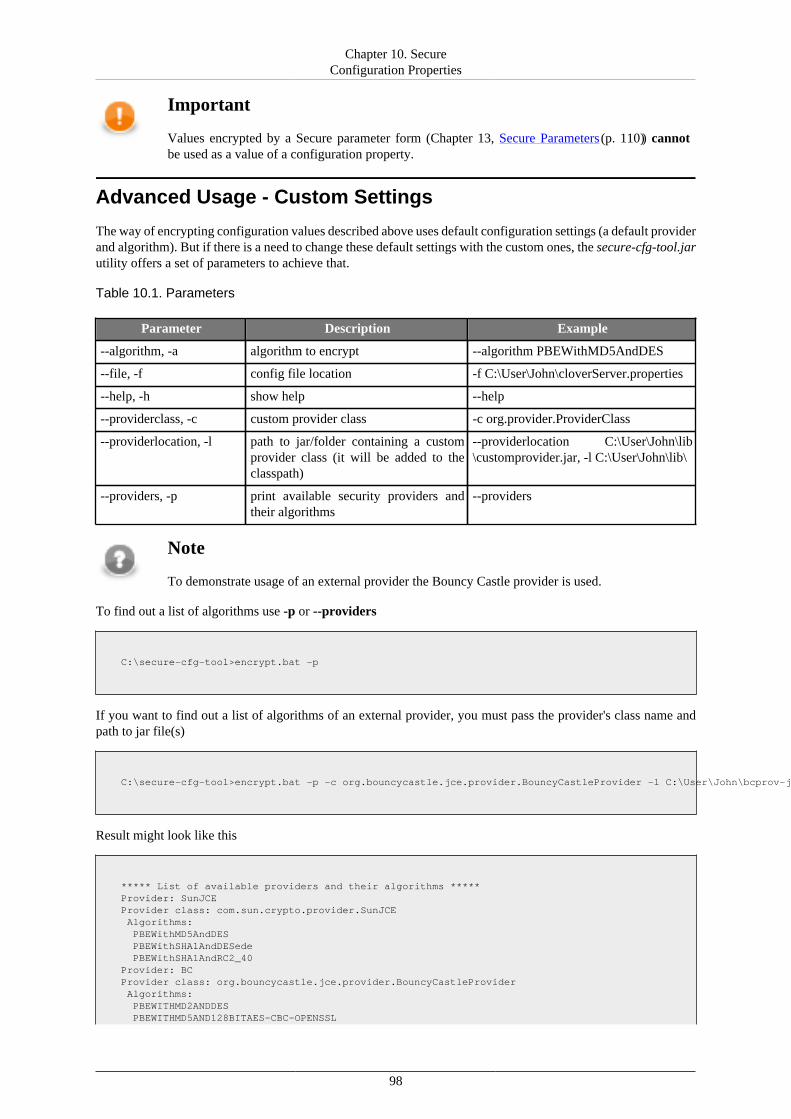
Chapter 10. SecureConfiguration Properties
98
Important
Values encrypted by a Secure parameter form (Chapter 13, Secure Parameters (p. 110)) cannotbe used as a value of a configuration property.
Advanced Usage - Custom Settings
The way of encrypting configuration values described above uses default configuration settings (a default providerand algorithm). But if there is a need to change these default settings with the custom ones, the secure-cfg-tool.jarutility offers a set of parameters to achieve that.
Table 10.1. Parameters
Parameter Description Example
--algorithm, -a algorithm to encrypt --algorithm PBEWithMD5AndDES
--file, -f config file location -f C:\User\John\cloverServer.properties
--help, -h show help --help
--providerclass, -c custom provider class -c org.provider.ProviderClass
--providerlocation, -l path to jar/folder containing a customprovider class (it will be added to theclasspath)
--providerlocation C:\User\John\lib\customprovider.jar, -l C:\User\John\lib\
--providers, -p print available security providers andtheir algorithms
--providers
Note
To demonstrate usage of an external provider the Bouncy Castle provider is used.
To find out a list of algorithms use -p or --providers
C:\secure-cfg-tool>encrypt.bat -p
If you want to find out a list of algorithms of an external provider, you must pass the provider's class name andpath to jar file(s)
C:\secure-cfg-tool>encrypt.bat -p -c org.bouncycastle.jce.provider.BouncyCastleProvider -l C:\User\John\bcprov-jdk15on-152.jar
Result might look like this
***** List of available providers and their algorithms ***** Provider: SunJCE Provider class: com.sun.crypto.provider.SunJCE Algorithms: PBEWithMD5AndDES PBEWithSHA1AndDESede PBEWithSHA1AndRC2_40 Provider: BC Provider class: org.bouncycastle.jce.provider.BouncyCastleProvider Algorithms: PBEWITHMD2ANDDES PBEWITHMD5AND128BITAES-CBC-OPENSSL
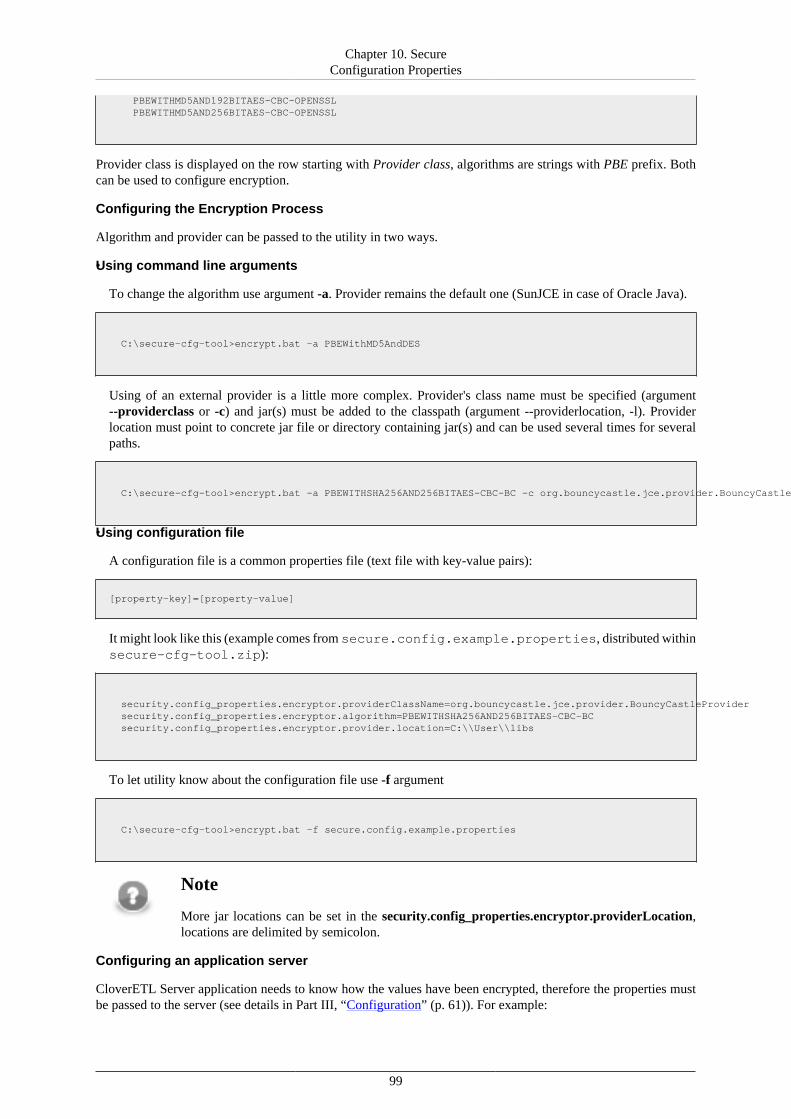
Chapter 10. SecureConfiguration Properties
99
PBEWITHMD5AND192BITAES-CBC-OPENSSL PBEWITHMD5AND256BITAES-CBC-OPENSSL
Provider class is displayed on the row starting with Provider class, algorithms are strings with PBE prefix. Bothcan be used to configure encryption.
Configuring the Encryption Process
Algorithm and provider can be passed to the utility in two ways.
•Using command line arguments
To change the algorithm use argument -a. Provider remains the default one (SunJCE in case of Oracle Java).
C:\secure-cfg-tool>encrypt.bat -a PBEWithMD5AndDES
Using of an external provider is a little more complex. Provider's class name must be specified (argument--providerclass or -c) and jar(s) must be added to the classpath (argument --providerlocation, -l). Providerlocation must point to concrete jar file or directory containing jar(s) and can be used several times for severalpaths.
C:\secure-cfg-tool>encrypt.bat -a PBEWITHSHA256AND256BITAES-CBC-BC -c org.bouncycastle.jce.provider.BouncyCastleProvider -l C:\User\John\bcprov-jdk15on-152.jar
•Using configuration file
A configuration file is a common properties file (text file with key-value pairs):
[property-key]=[property-value]
It might look like this (example comes from secure.config.example.properties, distributed withinsecure-cfg-tool.zip):
security.config_properties.encryptor.providerClassName=org.bouncycastle.jce.provider.BouncyCastleProvider security.config_properties.encryptor.algorithm=PBEWITHSHA256AND256BITAES-CBC-BC security.config_properties.encryptor.provider.location=C:\\User\\libs
To let utility know about the configuration file use -f argument
C:\secure-cfg-tool>encrypt.bat -f secure.config.example.properties
Note
More jar locations can be set in the security.config_properties.encryptor.providerLocation,locations are delimited by semicolon.
Configuring an application server
CloverETL Server application needs to know how the values have been encrypted, therefore the properties mustbe passed to the server (see details in Part III, “Configuration” (p. 61)). For example:
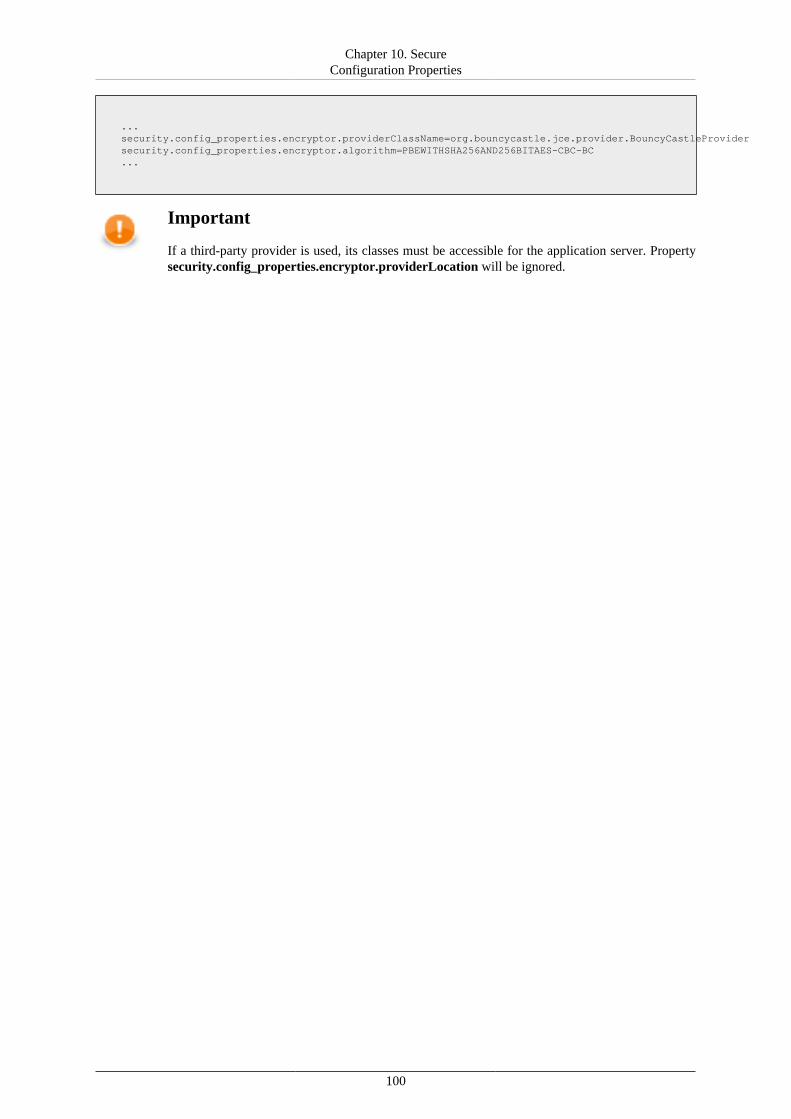
Chapter 10. SecureConfiguration Properties
100
... security.config_properties.encryptor.providerClassName=org.bouncycastle.jce.provider.BouncyCastleProvider security.config_properties.encryptor.algorithm=PBEWITHSHA256AND256BITAES-CBC-BC ...
Important
If a third-party provider is used, its classes must be accessible for the application server. Propertysecurity.config_properties.encryptor.providerLocation will be ignored.
101
Chapter 11. LoggingMain Logs (p. 101)Another Useful Logging Settings (p. 101)Access Log in Apache Tomcat (p. 102)Graph Run Logs (p. 102)Server Audit Logs (p. 102)
Main Logs
The CloverETL Server uses the log4j library for logging. The WAR file contains the default log4j configuration.The log4j configuration file log4j.xml is placed in WEB-INF/classes directory.
By default, log files are produced in the directory specified by system property "java.io.tmpdir" in thecloverlogs subdirectory.
"java.io.tmpdir" usually contains common system temp dir i.e. /tmp. On Tomcat, it is usually $TOMCAT_HOME/temp
The default logging configuration (log4j.xml bundled in the clover.war) may be changed to another log4jconfiguration file using system property log4j.configuration. If you override the configuration, only theproperties from the new file are used.
The log4j.configuration should contain the URL of the a new log4j configuration file. It's not just filesystem path, it must be URL, so it may look like this:
log4j.configuration=file:/home/clover/config/log4j.xml
It is better to copy the original file and modify the copy, than to create a new one.
Please note, that "log4j.configuration" is not a CloverETL Server configuration property, but system property,thus it must be set on the JVM command line by -Dlog4j.configuration or in other way suitable for the applicationcontainer. Best possibility how to set a system property for each application container is described in the"Installation" chapter.
Since such a configuration overrides the default configuration, it may have influence over Graph run logs. So yourown log configuration has to contain following fragment to preserve Graph run logs
<logger name="Tracking" additivity="false"> <level value="debug"/></logger>
Another Useful Logging Settings
These system properties allow for logging of HTTP requests/responses to stdout:
Client side:
com.sun.xml.ws.transport.http.client.HttpTransportPipe.dump=true (for moreinformation consult CloverETL Designer Users's Guide - chapter Integrating CloverETL Designer withCloverETL Server)
Server side:
com.sun.xml.ws.transport.http.HttpAdapter.dump=true

Chapter 11. Logging
102
Access Log in Apache Tomcat
If you need to log all requests processed by server, add the following code to $CATALINA_HOME/conf/server.xml.
<Valve className="org.apache.catalina.valves.AccessLogValve" directory="logs" prefix="localhost_access_log." suffix=".txt" pattern="%h %l %u %t %D %r %s %b" />
The format defined above has following meaning
[IP address] [date-time] [processing duration in milliseconds] [method] [URL] [protocol+version] [response code] [response size]
The log will look like the next line
172.17.30.243 - - [13/Nov/2014:12:53:03 +0000] 2 "POST /clover/sDispatcher/clusterNodeApi HTTP/1.1" 200 1435"
Graph Run Logs
Each graph or jobflow run has its own log file – for example, in the Server Console, section "Executions History".
By default, these log files are saved in the subdirectory cloverLogs/graph in the directory specified by"java.io.tmpdir" system property.
It’s possible to specify a different location for these logs with the CloverETL "graph.logs_path" property. Thisproperty does not influence main Server logs.
Server Audit Logs
Server Audit Log logs operations called on ServerFacade and JDBC proxy interfaces.
Audit logging can be enabled by setting (adding) the value of CloverETL propertylogging.logger.server_audit.enabled to true. In server GUI, you can change the property value in
Configuration →Setup →Configuration File. Audit logging is disabled by default.
The name of output file is server-audit.log. The file is in the same directory as main server log files.Default log level is DEBUG, so all operations which may do any change or another important operations (e.g.login or openJdbcConnection) are logged. To enable logging of all operations, change log level to TRACE in thelog4j configuration.
Each logged operation is logged by two messages: entering method and exiting method (if the exception is raised,it's logged instead of output parameters)
• Entering method (marked as "inputParams"). All method's parameters (except for passwords) are printed.• Exiting method (marked as "outputParams"). Method's return value is printed.• Exception in method (marked as "EXCEPTION"). Exception's stacktrace is printed.
Message also contains:
• username, if the user is known• client IP address, if it's known• cluster node ID• Interface name and the operation name
Values of transient and lazy initialized (in entity classes) fields and fields with binary content are not printed.

Part IV. Administration
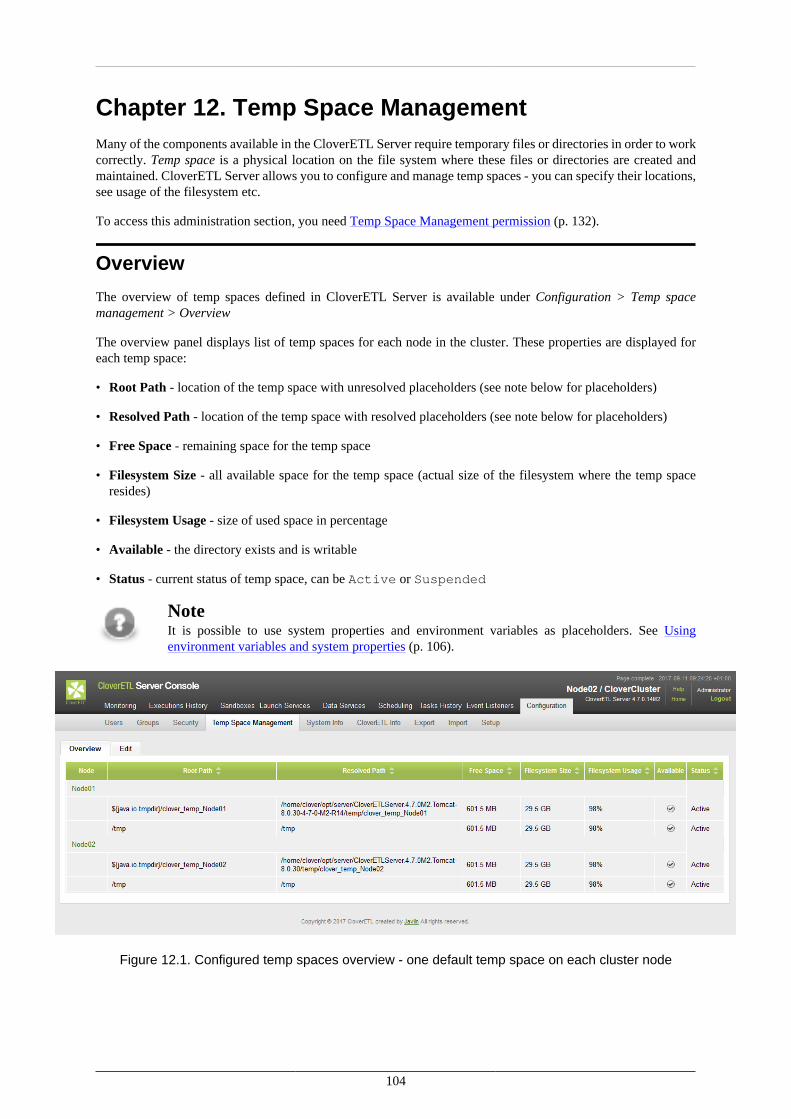
104
Chapter 12. Temp Space ManagementMany of the components available in the CloverETL Server require temporary files or directories in order to workcorrectly. Temp space is a physical location on the file system where these files or directories are created andmaintained. CloverETL Server allows you to configure and manage temp spaces - you can specify their locations,see usage of the filesystem etc.
To access this administration section, you need Temp Space Management permission (p. 132).
Overview
The overview of temp spaces defined in CloverETL Server is available under Configuration > Temp spacemanagement > Overview
The overview panel displays list of temp spaces for each node in the cluster. These properties are displayed foreach temp space:
• Root Path - location of the temp space with unresolved placeholders (see note below for placeholders)
• Resolved Path - location of the temp space with resolved placeholders (see note below for placeholders)
• Free Space - remaining space for the temp space
• Filesystem Size - all available space for the temp space (actual size of the filesystem where the temp spaceresides)
• Filesystem Usage - size of used space in percentage
• Available - the directory exists and is writable
• Status - current status of temp space, can be Active or Suspended
NoteIt is possible to use system properties and environment variables as placeholders. See Usingenvironment variables and system properties (p. 106).
Figure 12.1. Configured temp spaces overview - one default temp space on each cluster node
Chapter 12. TempSpace Management
105
Management
Temp space management offers an interface to add, disable, enable and delete a temp space. It is accessible underConfiguration > Temp space management > Edit.
The screen is divided in two drop-down areas: Global Configuration and Per Node Configuration. The Globalconfiguration manages temp spaces of standalone server or in case of a server cluster temp spaces on all its nodes.The Per Node Configuration allows to maintain temp spaces on each particular node.
Initialization (p. 105)Adding Temp Space (p. 105)Using environment variables and system properties (p. 106)Disabling Temp Space (p. 107)Enabling Temp Space (p. 108)Removing Temp Space (p. 108)
Initialization
When CloverETL Server is starting the system checks temp space configuration: in case no temp space isconfigured a new default temp space is created in the directory where java.io.tmpdir system property points.The directory is named as follows:
• ${java.io.tmpdir}/clover_temp in case of a standalone server
• ${java.io.tmpdir}/clover_temp_<node_id> in case of server cluster
Adding Temp Space
In order to define new temp space enter its path into text field under last row in the table and click the Add link.If the directory entered does not exist, it will be created.
TipThe main point of adding additional temp spaces is to enable higher system throughput - therefore thepaths entered should point to directories residing on different physical devices to achieve maximalI/O performance.
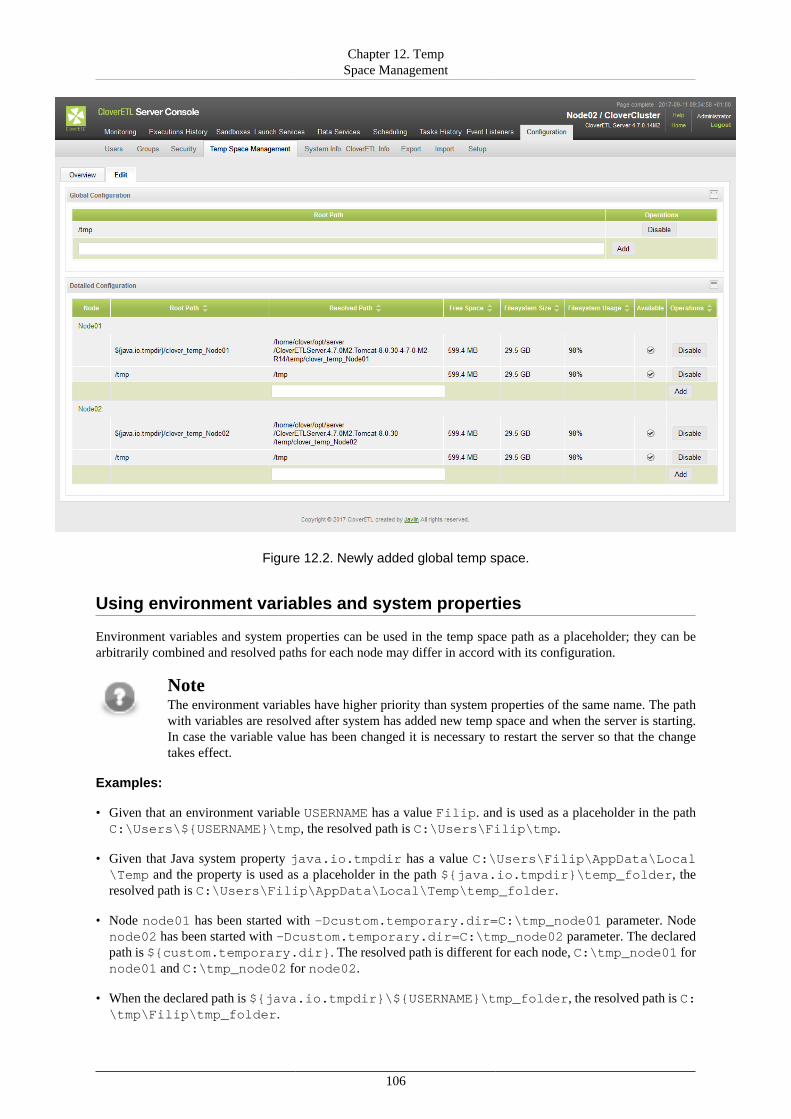
Chapter 12. TempSpace Management
106
Figure 12.2. Newly added global temp space.
Using environment variables and system properties
Environment variables and system properties can be used in the temp space path as a placeholder; they can bearbitrarily combined and resolved paths for each node may differ in accord with its configuration.
NoteThe environment variables have higher priority than system properties of the same name. The pathwith variables are resolved after system has added new temp space and when the server is starting.In case the variable value has been changed it is necessary to restart the server so that the changetakes effect.
Examples:
• Given that an environment variable USERNAME has a value Filip. and is used as a placeholder in the pathC:\Users\${USERNAME}\tmp, the resolved path is C:\Users\Filip\tmp.
• Given that Java system property java.io.tmpdir has a value C:\Users\Filip\AppData\Local\Temp and the property is used as a placeholder in the path ${java.io.tmpdir}\temp_folder, theresolved path is C:\Users\Filip\AppData\Local\Temp\temp_folder.
• Node node01 has been started with -Dcustom.temporary.dir=C:\tmp_node01 parameter. Nodenode02 has been started with -Dcustom.temporary.dir=C:\tmp_node02 parameter. The declaredpath is ${custom.temporary.dir}. The resolved path is different for each node, C:\tmp_node01 fornode01 and C:\tmp_node02 for node02.
• When the declared path is ${java.io.tmpdir}\${USERNAME}\tmp_folder, the resolved path is C:\tmp\Filip\tmp_folder.
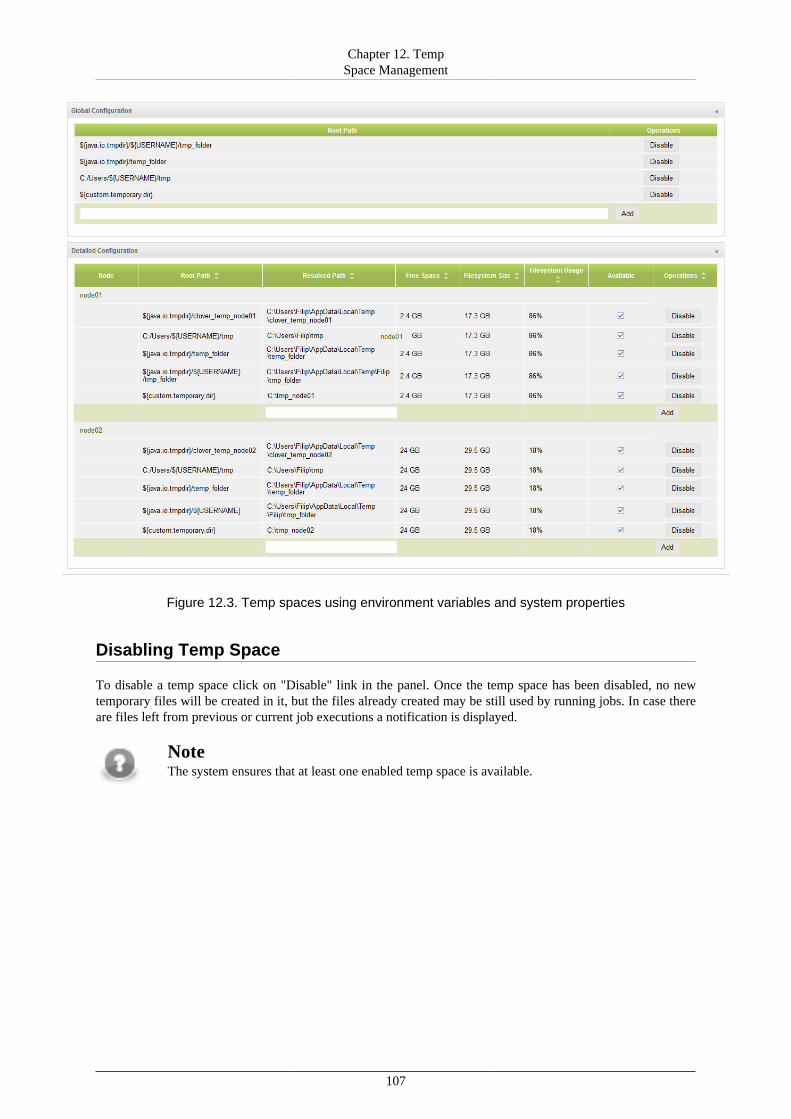
Chapter 12. TempSpace Management
107
Figure 12.3. Temp spaces using environment variables and system properties
Disabling Temp Space
To disable a temp space click on "Disable" link in the panel. Once the temp space has been disabled, no newtemporary files will be created in it, but the files already created may be still used by running jobs. In case thereare files left from previous or current job executions a notification is displayed.
NoteThe system ensures that at least one enabled temp space is available.
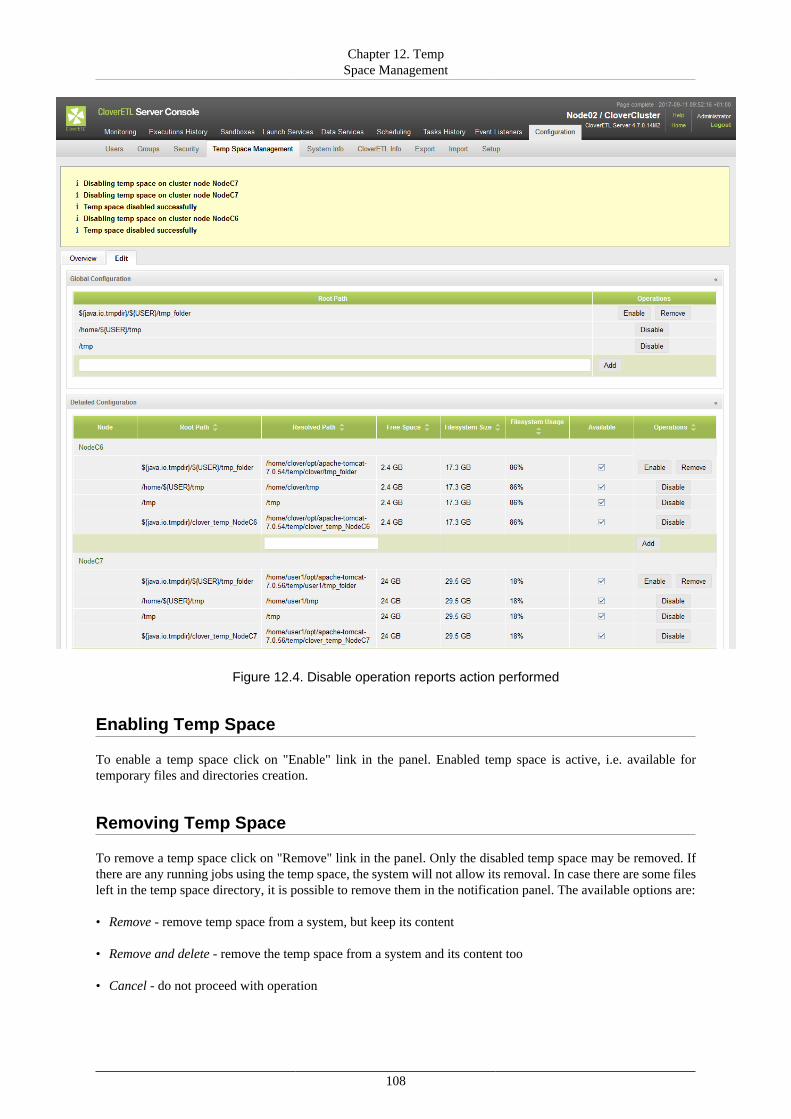
Chapter 12. TempSpace Management
108
Figure 12.4. Disable operation reports action performed
Enabling Temp Space
To enable a temp space click on "Enable" link in the panel. Enabled temp space is active, i.e. available fortemporary files and directories creation.
Removing Temp Space
To remove a temp space click on "Remove" link in the panel. Only the disabled temp space may be removed. Ifthere are any running jobs using the temp space, the system will not allow its removal. In case there are some filesleft in the temp space directory, it is possible to remove them in the notification panel. The available options are:
• Remove - remove temp space from a system, but keep its content
• Remove and delete - remove the temp space from a system and its content too
• Cancel - do not proceed with operation
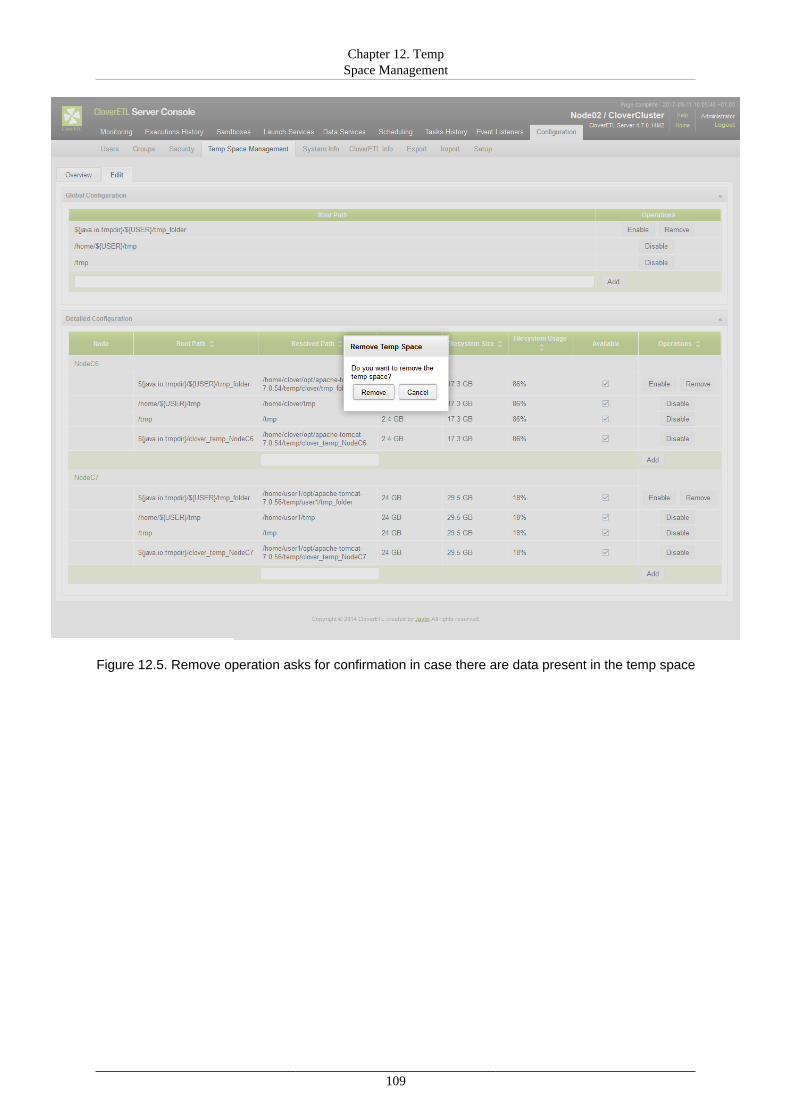
Chapter 12. TempSpace Management
109
Figure 12.5. Remove operation asks for confirmation in case there are data present in the temp space
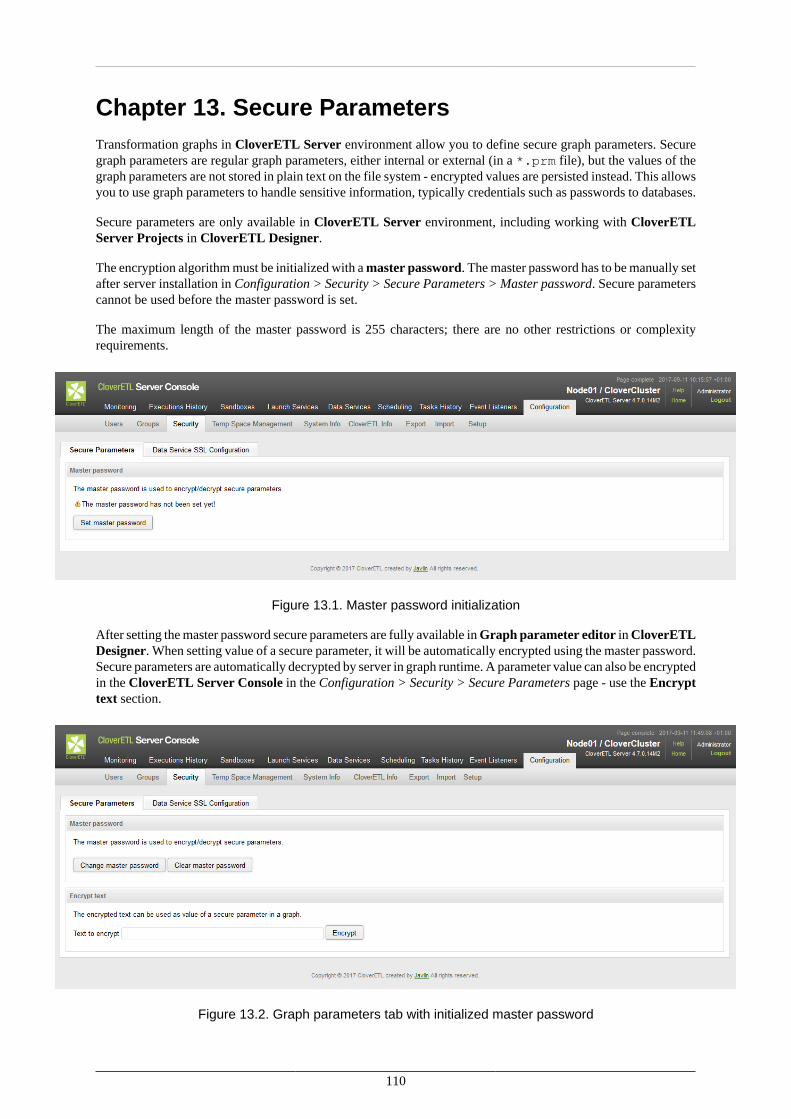
110
Chapter 13. Secure ParametersTransformation graphs in CloverETL Server environment allow you to define secure graph parameters. Securegraph parameters are regular graph parameters, either internal or external (in a *.prm file), but the values of thegraph parameters are not stored in plain text on the file system - encrypted values are persisted instead. This allowsyou to use graph parameters to handle sensitive information, typically credentials such as passwords to databases.
Secure parameters are only available in CloverETL Server environment, including working with CloverETLServer Projects in CloverETL Designer.
The encryption algorithm must be initialized with a master password. The master password has to be manually setafter server installation in Configuration > Security > Secure Parameters > Master password. Secure parameterscannot be used before the master password is set.
The maximum length of the master password is 255 characters; there are no other restrictions or complexityrequirements.
Figure 13.1. Master password initialization
After setting the master password secure parameters are fully available in Graph parameter editor in CloverETLDesigner. When setting value of a secure parameter, it will be automatically encrypted using the master password.Secure parameters are automatically decrypted by server in graph runtime. A parameter value can also be encryptedin the CloverETL Server Console in the Configuration > Security > Secure Parameters page - use the Encrypttext section.
Figure 13.2. Graph parameters tab with initialized master password

Chapter 13. Secure Parameters
111
If you change the master password, the secure parameters encrypted using the old master password cannot bedecrypted correctly anymore. In that case existing secure parameters need to be encrypted again with the newmaster password. That can be accomplished simply by setting their value (non-encrypted) again in the Graphparameter editor. Similar master password inconsistency issue can occur if you move a transformation graphwith some secure parameters to another server with a different master password. So it is highly recommended touse the identical master password for all your CloverETL Server installations.
See documentation of secure parameters in CloverETL Designer manual for further details.
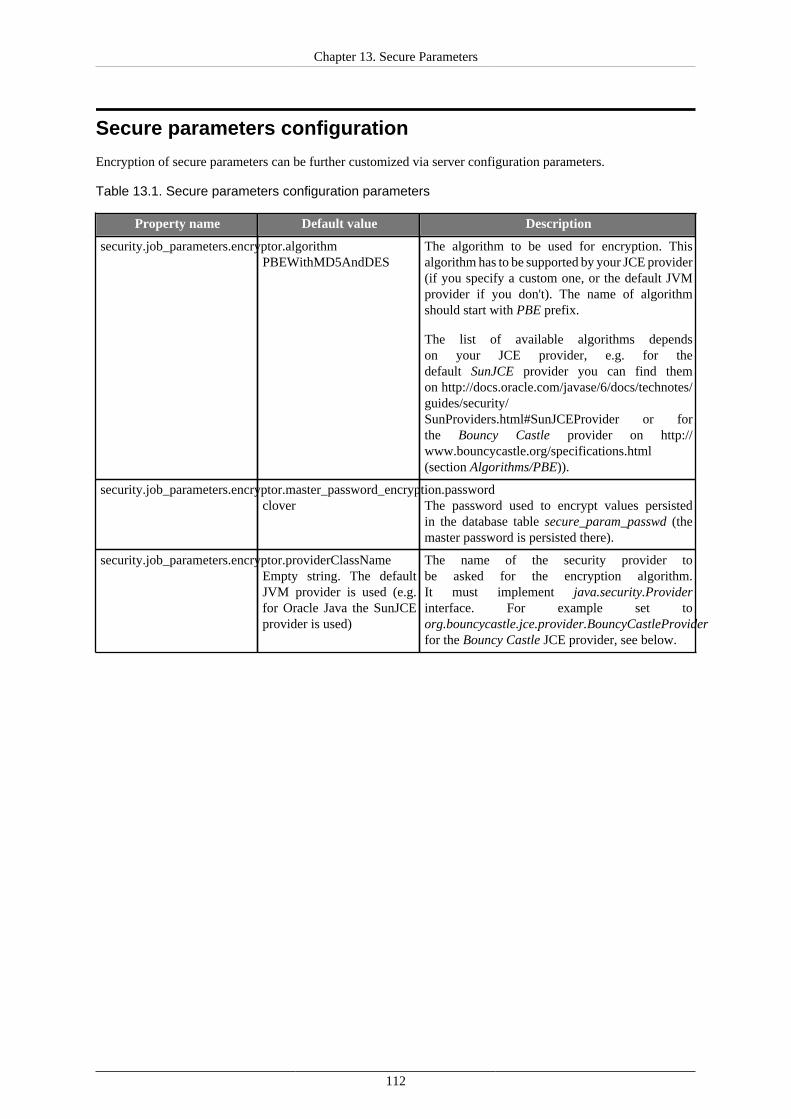
Chapter 13. Secure Parameters
112
Secure parameters configuration
Encryption of secure parameters can be further customized via server configuration parameters.
Table 13.1. Secure parameters configuration parameters
Property name Default value Description
security.job_parameters.encryptor.algorithmPBEWithMD5AndDES
The algorithm to be used for encryption. Thisalgorithm has to be supported by your JCE provider(if you specify a custom one, or the default JVMprovider if you don't). The name of algorithmshould start with PBE prefix.
The list of available algorithms dependson your JCE provider, e.g. for thedefault SunJCE provider you can find themon http://docs.oracle.com/javase/6/docs/technotes/guides/security/SunProviders.html#SunJCEProvider or forthe Bouncy Castle provider on http://www.bouncycastle.org/specifications.html(section Algorithms/PBE)).
security.job_parameters.encryptor.master_password_encryption.passwordclover The password used to encrypt values persisted
in the database table secure_param_passwd (themaster password is persisted there).
security.job_parameters.encryptor.providerClassNameEmpty string. The defaultJVM provider is used (e.g.for Oracle Java the SunJCEprovider is used)
The name of the security provider tobe asked for the encryption algorithm.It must implement java.security.Providerinterface. For example set toorg.bouncycastle.jce.provider.BouncyCastleProviderfor the Bouncy Castle JCE provider, see below.
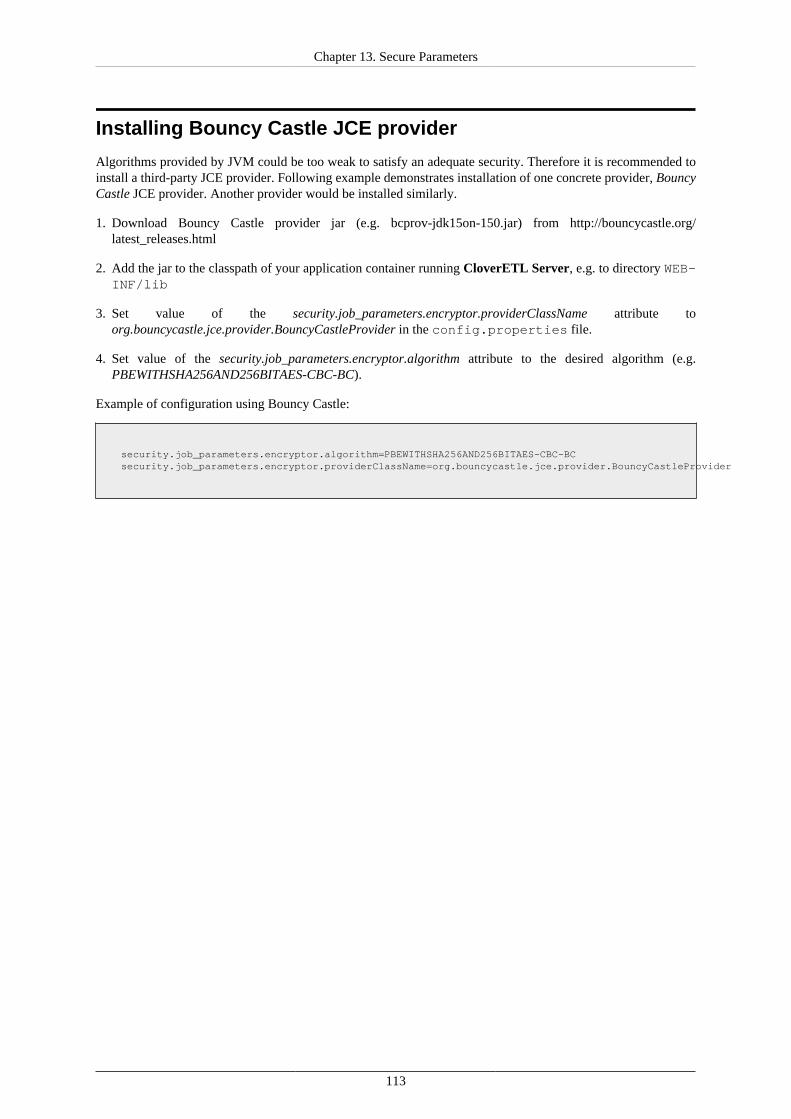
Chapter 13. Secure Parameters
113
Installing Bouncy Castle JCE provider
Algorithms provided by JVM could be too weak to satisfy an adequate security. Therefore it is recommended toinstall a third-party JCE provider. Following example demonstrates installation of one concrete provider, BouncyCastle JCE provider. Another provider would be installed similarly.
1. Download Bouncy Castle provider jar (e.g. bcprov-jdk15on-150.jar) from http://bouncycastle.org/latest_releases.html
2. Add the jar to the classpath of your application container running CloverETL Server, e.g. to directory WEB-INF/lib
3. Set value of the security.job_parameters.encryptor.providerClassName attribute toorg.bouncycastle.jce.provider.BouncyCastleProvider in the config.properties file.
4. Set value of the security.job_parameters.encryptor.algorithm attribute to the desired algorithm (e.g.PBEWITHSHA256AND256BITAES-CBC-BC).
Example of configuration using Bouncy Castle:
security.job_parameters.encryptor.algorithm=PBEWITHSHA256AND256BITAES-CBC-BC security.job_parameters.encryptor.providerClassName=org.bouncycastle.jce.provider.BouncyCastleProvider

114
Chapter 14. Users and GroupsThe CloverETL Server has a built-in security module that manages users and groups. User groups control accesspermissions to sandboxes and operations the users can perform on the Server, including authenticated calls toServer API functions. A single user can belong to multiple groups.
LDAP or Active Directory can be configured with the Server to authenticate users and optionally assign theireffective groups (and permissions) from a global directory.
You can manage users and user groups in Configuration/Users and Groups. Please note that you need a “Listusers” (“List groups” respectively) permission for that.
Chapter 14. Users and Groups
115
LDAP Authentication
Since 3.2 it's possible to configure CloverETL Server to use LDAP server for users authentication. So thecredentials of users registered in LDAP may be used for authentication to any CloverETL Server interface (APIor web console).
However authorization (access levels to sandboxes content and privileges for operations) is still handled by Cloversecurity module. Each user, event though logged-in using LDAP authentication, must have his own "user" record(with related groups) in the CloverETL security module. So there must be the user with the same username anddomain set to "LDAP". Such record has to be created by a Server administrator before the the user can log in.
What does the CloverETL do to authenticate an LDAP user?
1. User specifies the LDAP credentials in a login form to the Server web console
2. CloverETL Server looks up a user record and checks whether has "LDAP" domain set
3. If the system is configured to use LDAP for authentication only, it attempts to connect to LDAP server usinguser's credentials. If it succeeds, the user is logged in.
4. In case the system is configured for user group synchronization the procedure is as follows:
5. CloverETL Server connects to the LDAP server and checks whether the user exists (it uses specified searchto lookup in LDAP).
6. If the user exists in LDAP, CloverETL Server performs authentication.
7. If succeeded, CloverETL Server searches LDAP for user's groups.
8. Clover user is assigned to the Clover groups according to his current assignation to the LDAP groups.
9. User is logged-in.
Note
Switching domains:
• If a user was created as LDAP and then switched to clover domain, you have to set a passwordfor him in Change password tab.
• If a user was created as clover and then switched to LDAP domain, he has a password in cloverdomain, but it is overridden by the LDAP password. After switching back to clover domain,the original password is re-used. It can be reset in the Change password tab if needed (e.g.forgotten).
Configuration
By default CloverETL Server allows only its own internal mechanism for authentication. To enable authenticationwith LDAP, set the configuration property "security.authentication.allowed_domains" properly. It is a list of userdomains that are used for authentication.
Currently there are 2 authentication mechanism implemented: "LDAP" and "clover" ("clover" is an identifier ofCloverETL internal authentication and may be changed by security.default_domain property, but only for white-labeling purposes). To enable LDAP authentication, set value to "LDAP" (only LDAP) or "clover,LDAP". Usersfrom both domain may login. It's recommended to allow both mechanisms together, until the LDAP is properlyconfigured. So the admin user can still login to web GUI although the LDAP connection isn't properly configured.
You can use Setup to configure LDAP authentication. See the section called “LDAP” (p. 70) in Chapter 7,Setup (p. 64).
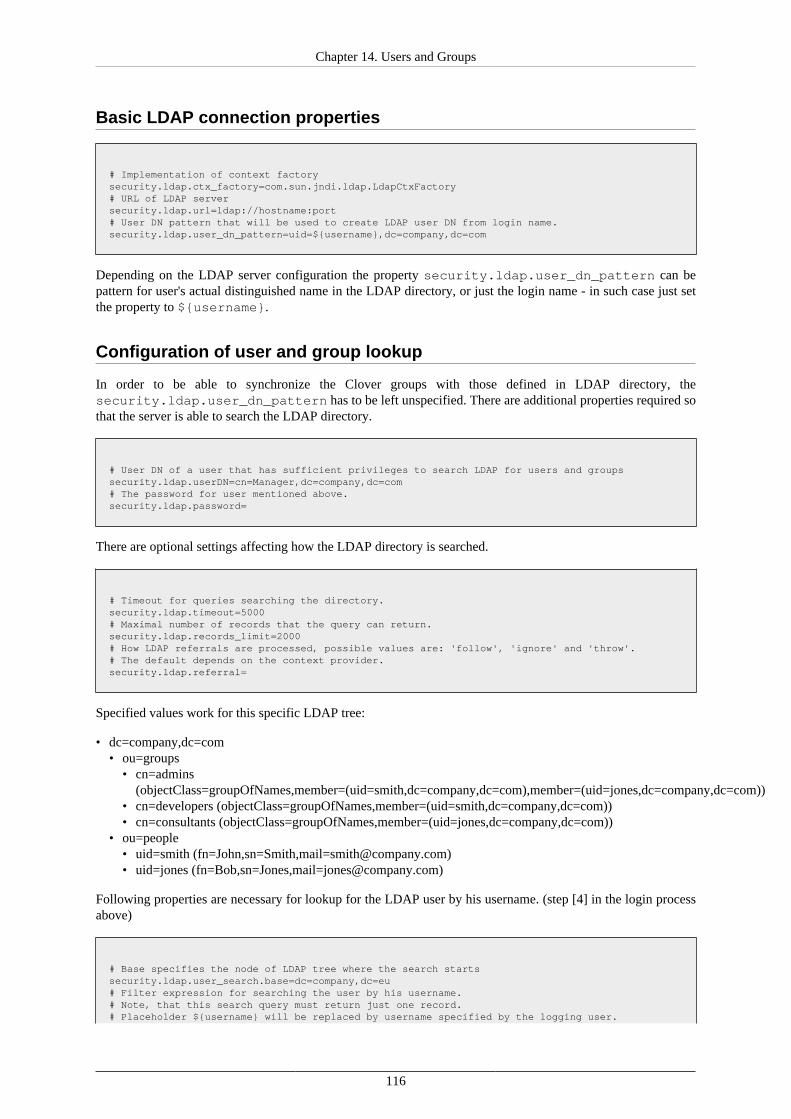
Chapter 14. Users and Groups
116
Basic LDAP connection properties
# Implementation of context factorysecurity.ldap.ctx_factory=com.sun.jndi.ldap.LdapCtxFactory# URL of LDAP serversecurity.ldap.url=ldap://hostname:port# User DN pattern that will be used to create LDAP user DN from login name. security.ldap.user_dn_pattern=uid=${username},dc=company,dc=com
Depending on the LDAP server configuration the property security.ldap.user_dn_pattern can bepattern for user's actual distinguished name in the LDAP directory, or just the login name - in such case just setthe property to ${username}.
Configuration of user and group lookup
In order to be able to synchronize the Clover groups with those defined in LDAP directory, thesecurity.ldap.user_dn_pattern has to be left unspecified. There are additional properties required sothat the server is able to search the LDAP directory.
# User DN of a user that has sufficient privileges to search LDAP for users and groupssecurity.ldap.userDN=cn=Manager,dc=company,dc=com# The password for user mentioned above.security.ldap.password=
There are optional settings affecting how the LDAP directory is searched.
# Timeout for queries searching the directory.security.ldap.timeout=5000# Maximal number of records that the query can return.security.ldap.records_limit=2000# How LDAP referrals are processed, possible values are: 'follow', 'ignore' and 'throw'.# The default depends on the context provider. security.ldap.referral=
Specified values work for this specific LDAP tree:
• dc=company,dc=com• ou=groups
• cn=admins(objectClass=groupOfNames,member=(uid=smith,dc=company,dc=com),member=(uid=jones,dc=company,dc=com))
• cn=developers (objectClass=groupOfNames,member=(uid=smith,dc=company,dc=com))• cn=consultants (objectClass=groupOfNames,member=(uid=jones,dc=company,dc=com))
• ou=people• uid=smith (fn=John,sn=Smith,[email protected])• uid=jones (fn=Bob,sn=Jones,[email protected])
Following properties are necessary for lookup for the LDAP user by his username. (step [4] in the login processabove)
# Base specifies the node of LDAP tree where the search startssecurity.ldap.user_search.base=dc=company,dc=eu# Filter expression for searching the user by his username. # Note, that this search query must return just one record.# Placeholder ${username} will be replaced by username specified by the logging user.
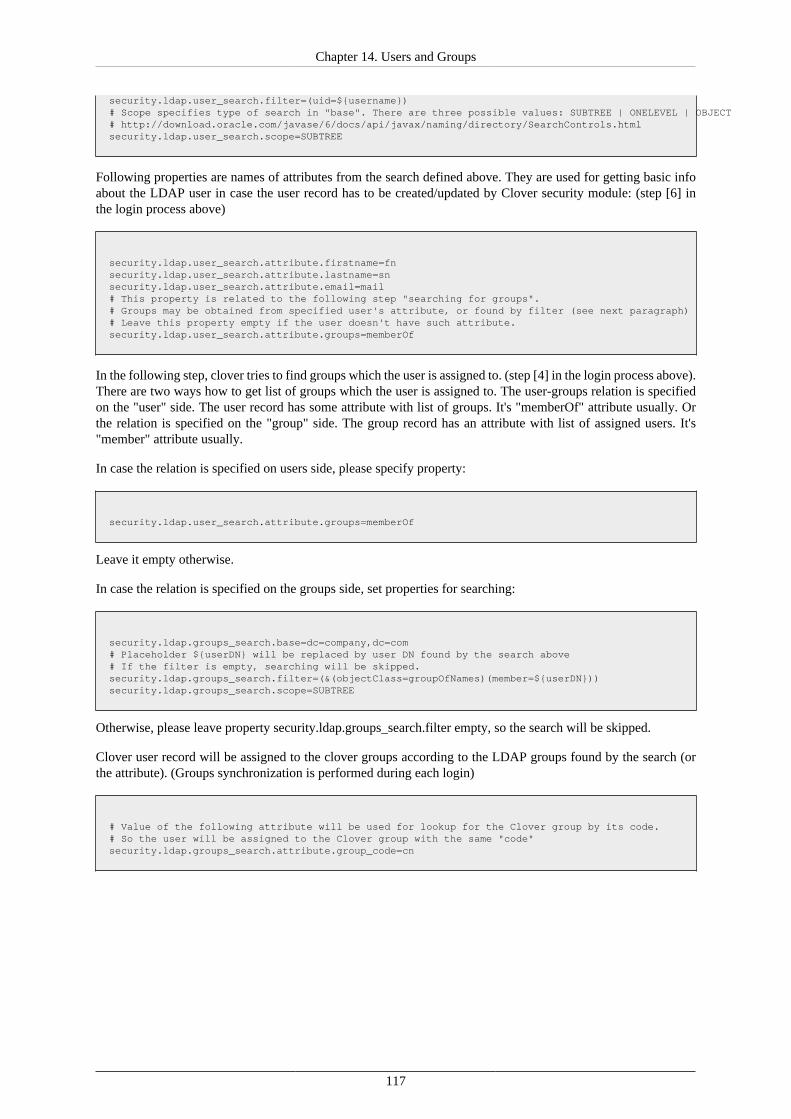
Chapter 14. Users and Groups
117
security.ldap.user_search.filter=(uid=${username})# Scope specifies type of search in "base". There are three possible values: SUBTREE | ONELEVEL | OBJECT # http://download.oracle.com/javase/6/docs/api/javax/naming/directory/SearchControls.htmlsecurity.ldap.user_search.scope=SUBTREE
Following properties are names of attributes from the search defined above. They are used for getting basic infoabout the LDAP user in case the user record has to be created/updated by Clover security module: (step [6] inthe login process above)
security.ldap.user_search.attribute.firstname=fnsecurity.ldap.user_search.attribute.lastname=snsecurity.ldap.user_search.attribute.email=mail# This property is related to the following step "searching for groups". # Groups may be obtained from specified user's attribute, or found by filter (see next paragraph)# Leave this property empty if the user doesn't have such attribute.security.ldap.user_search.attribute.groups=memberOf
In the following step, clover tries to find groups which the user is assigned to. (step [4] in the login process above).There are two ways how to get list of groups which the user is assigned to. The user-groups relation is specifiedon the "user" side. The user record has some attribute with list of groups. It's "memberOf" attribute usually. Orthe relation is specified on the "group" side. The group record has an attribute with list of assigned users. It's"member" attribute usually.
In case the relation is specified on users side, please specify property:
security.ldap.user_search.attribute.groups=memberOf
Leave it empty otherwise.
In case the relation is specified on the groups side, set properties for searching:
security.ldap.groups_search.base=dc=company,dc=com# Placeholder ${userDN} will be replaced by user DN found by the search above# If the filter is empty, searching will be skipped.security.ldap.groups_search.filter=(&(objectClass=groupOfNames)(member=${userDN}))security.ldap.groups_search.scope=SUBTREE
Otherwise, please leave property security.ldap.groups_search.filter empty, so the search will be skipped.
Clover user record will be assigned to the clover groups according to the LDAP groups found by the search (orthe attribute). (Groups synchronization is performed during each login)
# Value of the following attribute will be used for lookup for the Clover group by its code.# So the user will be assigned to the Clover group with the same "code"security.ldap.groups_search.attribute.group_code=cn
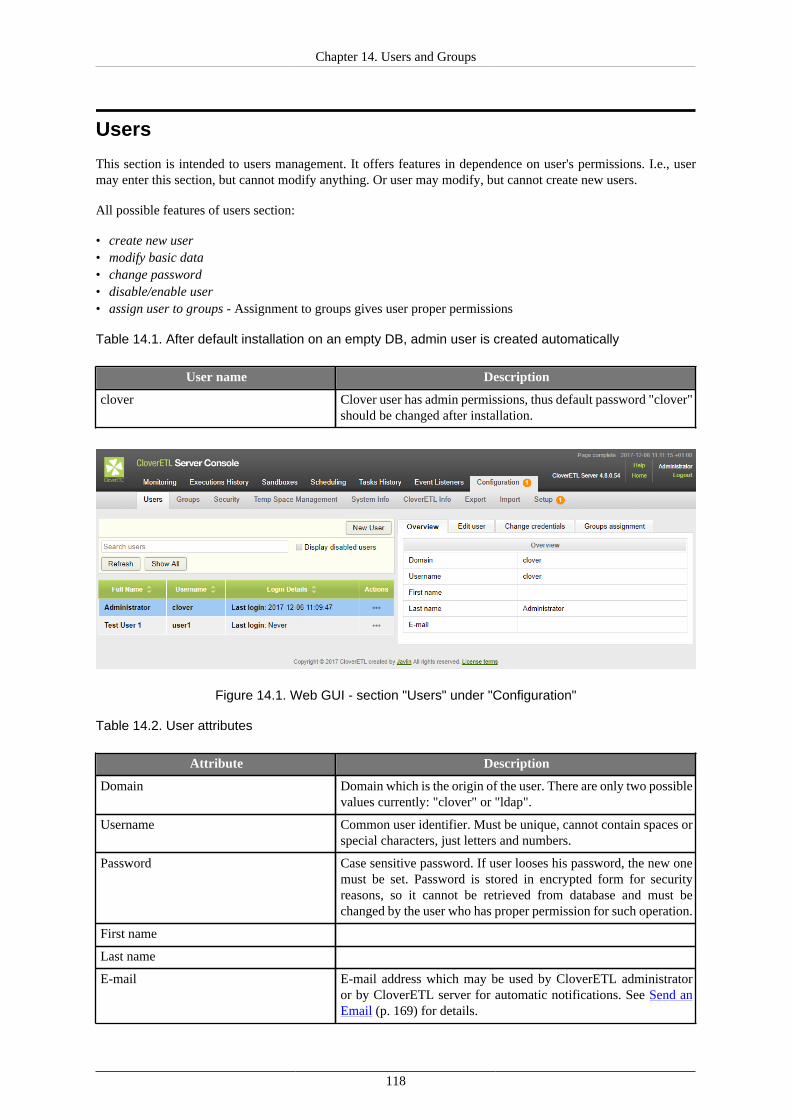
Chapter 14. Users and Groups
118
Users
This section is intended to users management. It offers features in dependence on user's permissions. I.e., usermay enter this section, but cannot modify anything. Or user may modify, but cannot create new users.
All possible features of users section:
• create new user• modify basic data• change password• disable/enable user• assign user to groups - Assignment to groups gives user proper permissions
Table 14.1. After default installation on an empty DB, admin user is created automatically
User name Description
clover Clover user has admin permissions, thus default password "clover"should be changed after installation.
Figure 14.1. Web GUI - section "Users" under "Configuration"
Table 14.2. User attributes
Attribute Description
Domain Domain which is the origin of the user. There are only two possiblevalues currently: "clover" or "ldap".
Username Common user identifier. Must be unique, cannot contain spaces orspecial characters, just letters and numbers.
Password Case sensitive password. If user looses his password, the new onemust be set. Password is stored in encrypted form for securityreasons, so it cannot be retrieved from database and must bechanged by the user who has proper permission for such operation.
First name
Last name
E-mail E-mail address which may be used by CloverETL administratoror by CloverETL server for automatic notifications. See Send anEmail (p. 169) for details.
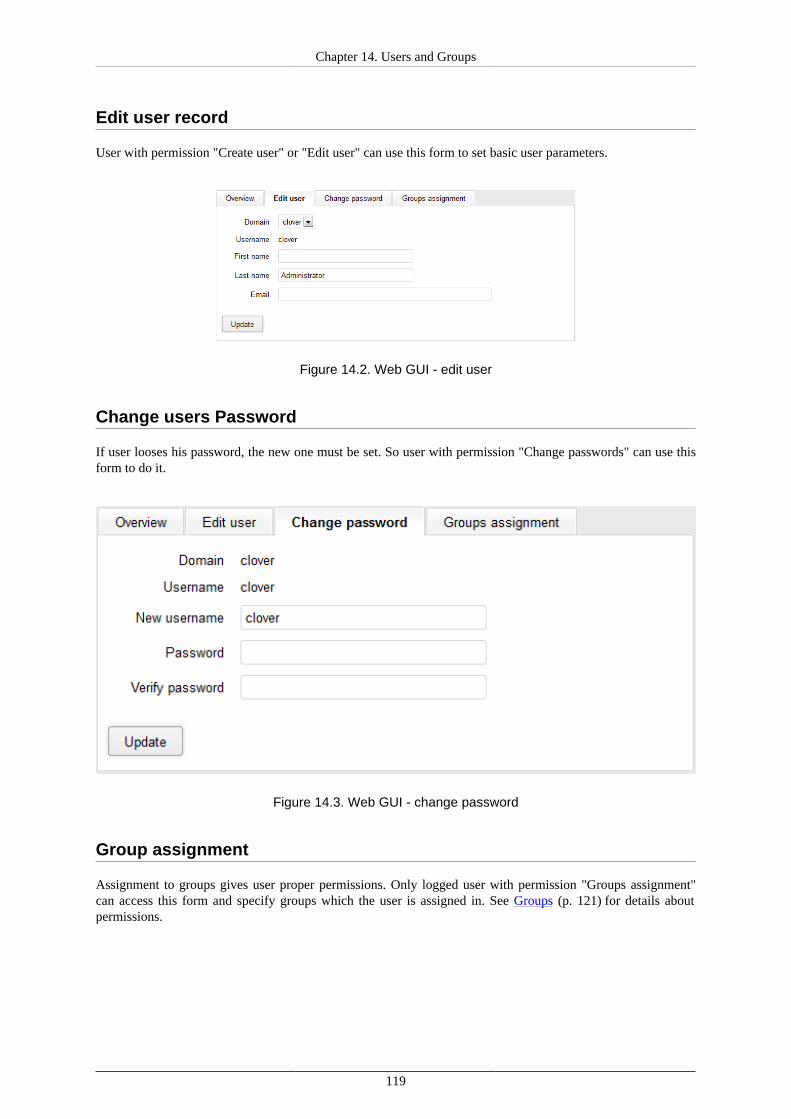
Chapter 14. Users and Groups
119
Edit user record
User with permission "Create user" or "Edit user" can use this form to set basic user parameters.
Figure 14.2. Web GUI - edit user
Change users Password
If user looses his password, the new one must be set. So user with permission "Change passwords" can use thisform to do it.
Figure 14.3. Web GUI - change password
Group assignment
Assignment to groups gives user proper permissions. Only logged user with permission "Groups assignment"can access this form and specify groups which the user is assigned in. See Groups (p. 121) for details aboutpermissions.

Chapter 14. Users and Groups
120
Figure 14.4. Web GUI - groups assignment
Disabling / enabling users
Since user record has various relations to the logs and history records, it can't be deleted. So it's disabled instead.It basically means, that the record doesn't display in the list and the user can't login.
However disabled user may be enabled again. Please note, that disabled user is removed from its groups, so groupsshould be assigned properly after re-enabling.
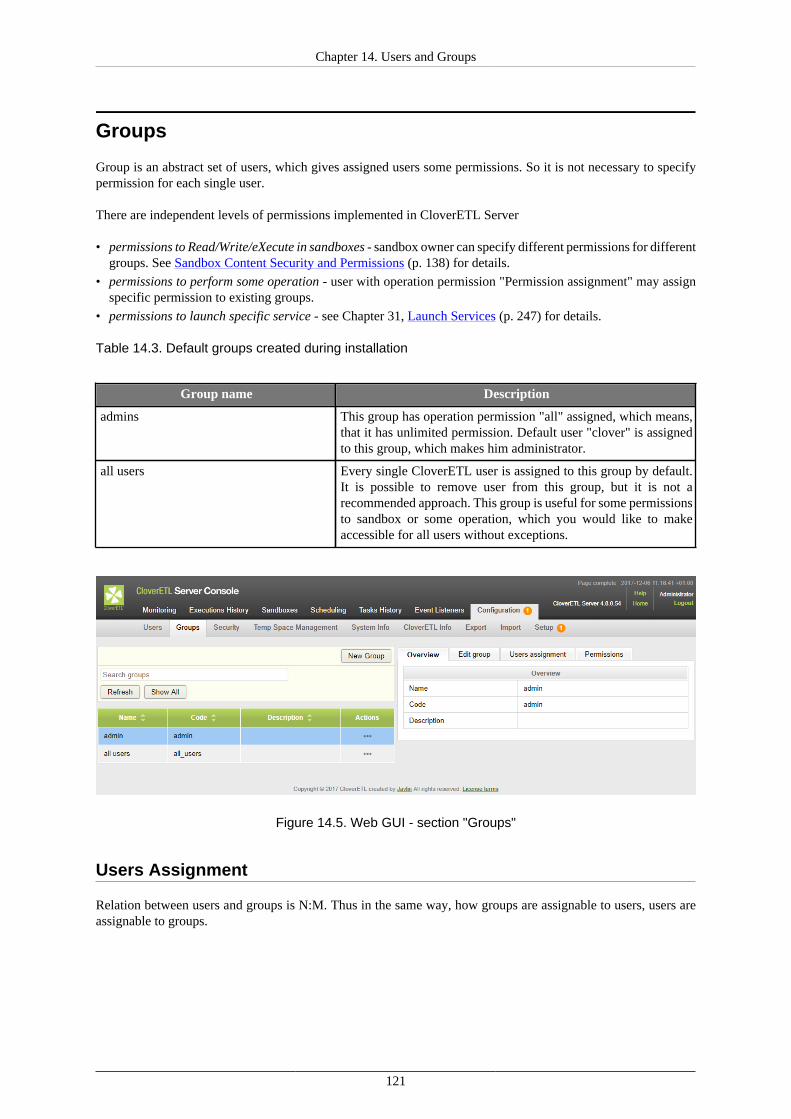
Chapter 14. Users and Groups
121
Groups
Group is an abstract set of users, which gives assigned users some permissions. So it is not necessary to specifypermission for each single user.
There are independent levels of permissions implemented in CloverETL Server
• permissions to Read/Write/eXecute in sandboxes - sandbox owner can specify different permissions for differentgroups. See Sandbox Content Security and Permissions (p. 138) for details.
• permissions to perform some operation - user with operation permission "Permission assignment" may assignspecific permission to existing groups.
• permissions to launch specific service - see Chapter 31, Launch Services (p. 247) for details.
Table 14.3. Default groups created during installation
Group name Description
admins This group has operation permission "all" assigned, which means,that it has unlimited permission. Default user "clover" is assignedto this group, which makes him administrator.
all users Every single CloverETL user is assigned to this group by default.It is possible to remove user from this group, but it is not arecommended approach. This group is useful for some permissionsto sandbox or some operation, which you would like to makeaccessible for all users without exceptions.
Figure 14.5. Web GUI - section "Groups"
Users Assignment
Relation between users and groups is N:M. Thus in the same way, how groups are assignable to users, users areassignable to groups.
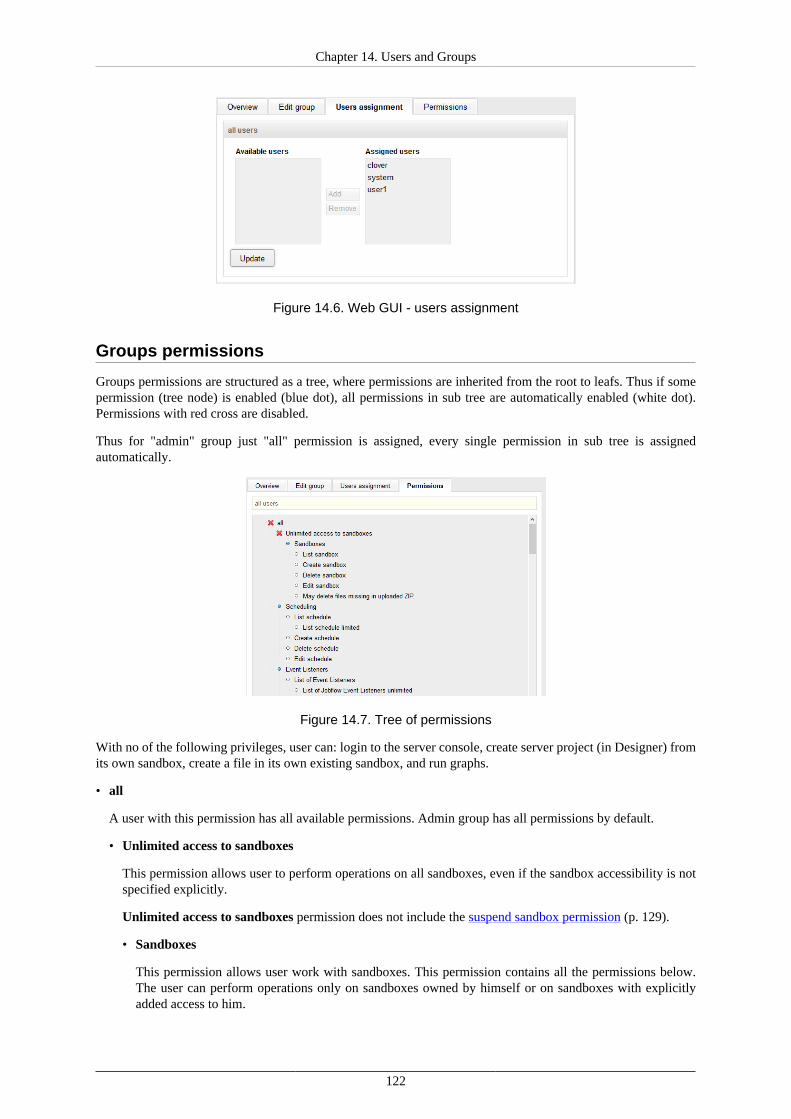
Chapter 14. Users and Groups
122
Figure 14.6. Web GUI - users assignment
Groups permissions
Groups permissions are structured as a tree, where permissions are inherited from the root to leafs. Thus if somepermission (tree node) is enabled (blue dot), all permissions in sub tree are automatically enabled (white dot).Permissions with red cross are disabled.
Thus for "admin" group just "all" permission is assigned, every single permission in sub tree is assignedautomatically.
Figure 14.7. Tree of permissions
With no of the following privileges, user can: login to the server console, create server project (in Designer) fromits own sandbox, create a file in its own existing sandbox, and run graphs.
• all
A user with this permission has all available permissions. Admin group has all permissions by default.
• Unlimited access to sandboxes
This permission allows user to perform operations on all sandboxes, even if the sandbox accessibility is notspecified explicitly.
Unlimited access to sandboxes permission does not include the suspend sandbox permission (p. 129).
• Sandboxes
This permission allows user work with sandboxes. This permission contains all the permissions below.The user can perform operations only on sandboxes owned by himself or on sandboxes with explicitlyadded access to him.
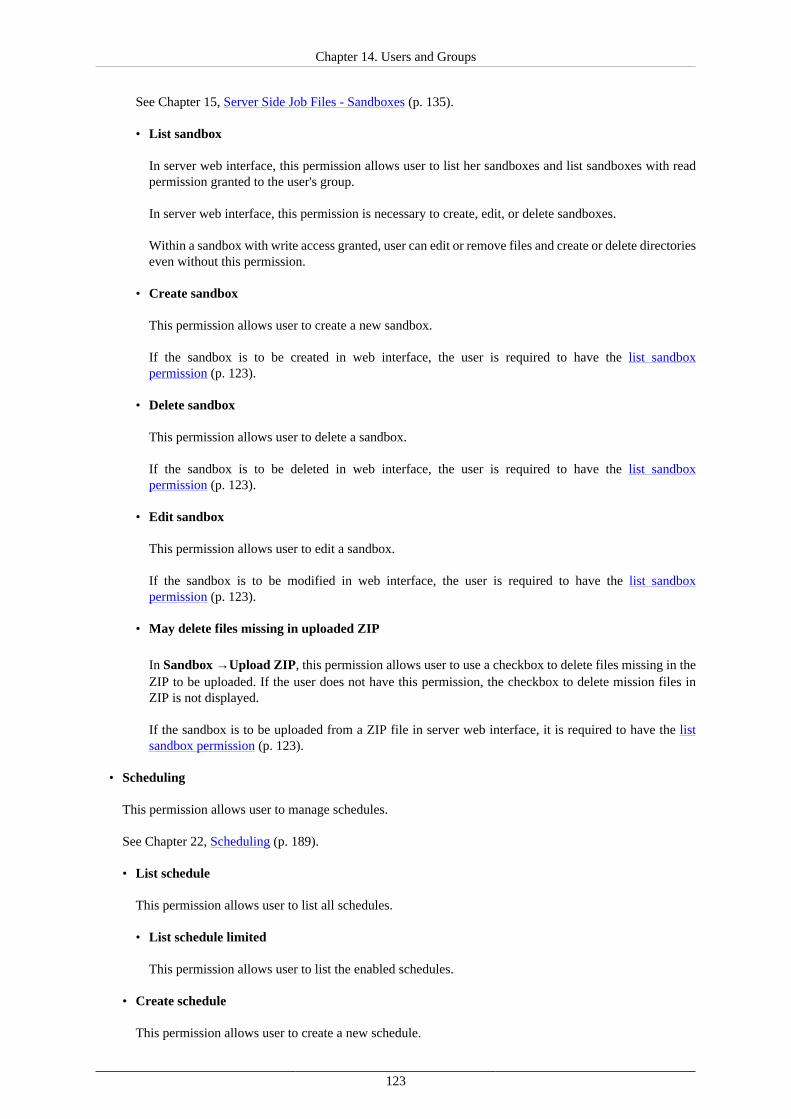
Chapter 14. Users and Groups
123
See Chapter 15, Server Side Job Files - Sandboxes (p. 135).
• List sandbox
In server web interface, this permission allows user to list her sandboxes and list sandboxes with readpermission granted to the user's group.
In server web interface, this permission is necessary to create, edit, or delete sandboxes.
Within a sandbox with write access granted, user can edit or remove files and create or delete directorieseven without this permission.
• Create sandbox
This permission allows user to create a new sandbox.
If the sandbox is to be created in web interface, the user is required to have the list sandboxpermission (p. 123).
• Delete sandbox
This permission allows user to delete a sandbox.
If the sandbox is to be deleted in web interface, the user is required to have the list sandboxpermission (p. 123).
• Edit sandbox
This permission allows user to edit a sandbox.
If the sandbox is to be modified in web interface, the user is required to have the list sandboxpermission (p. 123).
• May delete files missing in uploaded ZIP
In Sandbox →Upload ZIP, this permission allows user to use a checkbox to delete files missing in theZIP to be uploaded. If the user does not have this permission, the checkbox to delete mission files inZIP is not displayed.
If the sandbox is to be uploaded from a ZIP file in server web interface, it is required to have the listsandbox permission (p. 123).
• Scheduling
This permission allows user to manage schedules.
See Chapter 22, Scheduling (p. 189).
• List schedule
This permission allows user to list all schedules.
• List schedule limited
This permission allows user to list the enabled schedules.
• Create schedule
This permission allows user to create a new schedule.
Chapter 14. Users and Groups
124
The user needs the list schedule limited permission (p. 123) to access the scheduling section to createa new schedule.
• Delete schedule
This permission allows user to delete the schedule.
User needs list schedule limited permission (p. 123) or list schedule permission (p. 123) to accessthe scheduling section to delete the schedule.
• Edit schedule
This permission allows user to edit the schedule.
User needs list schedule limited permission (p. 123) or list schedule permission (p. 123) to accessthe scheduling section to edit the schedule.
• Event listeners
This permission allows user to manage event listeners.
See Chapter 24, Listeners (p. 200).
• List of Event Listeners
This permission allows user to list all event listeners.
• List of Jobflow Event Listeners unlimited
This permission allows user to list jobflow event listeners.
See Jobflow Event Listeners (p. 209)
• List of Jobflow Event Listeners limited
This permission allows user to list jobflow event listeners of sandboxes the user can read from.
• List of Graph Event Listeners unlimited
This permission allows user to list all graph event listeners.
See Graph Event Listeners (p. 202).
• List of Graph Event Listeners limited
This permission allows user to list graph event listeners from sandboxes the user can read from.
• List of File Event Listeners unlimited
This permission allows user to list all file event listeners.
See File Event Listeners (remote and local) (p. 219).
• List of File Event Listeners limited
This permission allows user to list all file event listeners.
• List of JMS Event Listeners unlimited
This permission allows user to list all JMS listeners.
See JMS Messages Listeners (p. 212).
Chapter 14. Users and Groups
125
• List of JMS Event Listeners limited
This permission allows user to list all JMS listeners.
• List of Universal Event Listeners unlimited
This permission allows user to list all universal event listeners.
See Universal Event Listeners (p. 217).
• List of Universal Event Listeners limited
This permission allows user to list all universal event listeners.
See Universal Event Listeners (p. 217).
• Create Event Listener
This permission allows user to create event listeners.
If the event listener is to be created in server web interface, the user needs to have permission to list theevent listeners of the particular type.
• Create Jobflow Event Listener
This permission allows user to create a new Jobflow Event listener.
If the jobflow event listener is to be created in server web interface, the user needs to have the list ofjobflow event listeners limited permission (p. 124).
See Jobflow Event Listeners (p. 209).
• Create Graph Event Listener
This permission allows user to create a graph event listener.
If the graph event listener is to be created in server web interface, the user needs to have the list of graphevent listeners limited permission (p. 124).
See Graph Event Listeners (p. 202).
• Create File Event Listener
This permission allows user to create a graph event listener.
If the file event listener is to be created in server web interface, the user needs to have the list of fileevent listeners limited permission (p. 124).
See File Event Listeners (remote and local) (p. 219).
• Create JMS Listener
This permission allows user to create a JMS event listener.
If the JMS event listener is to be created in server web interface, the user needs to have the list of JMSevent listeners limited permission (p. 125).
See JMS Messages Listeners (p. 212).
• Create Universal Event Listener
Chapter 14. Users and Groups
126
This permission allows user to create a universal event listener.
If the universal event listener is to be created in server web interface, the user needs to have the list ofuniversal event listeners limited permission (p. 125).
See Universal Event Listeners (p. 217).
• Edit Event Listener
This permission allow user to edit an event listener.
If the event listener is to be created in server web interface, the user needs to have permission to list eventlistener of the particular type.
• Edit Jobflow Event Listener
This permission allows user to edit a jobflow event listener.
If the jobflow event listener is to be edited in server web interface, the user needs to have the list ofjobflow event listeners limited permission (p. 124).
See Jobflow Event Listeners (p. 209).
• Edit Graph Event Listener
This permission allows user to edit a graph event listener.
If the graph event listener is to be edited in server web interface, the user needs to have the list of graphevent listeners limited permission (p. 124).
See Graph Event Listeners (p. 202).
• Edit File Event Listener
This permission allows user to edit a file event listener.
If the file event listener is to be edited in server web interface, the user needs to have the list of file eventlisteners limited permission (p. 124).
See File Event Listeners (remote and local) (p. 219).
• Edit JMS Event Listener
This permission allows user to edit a JMS event listener.
If the JMS event listener is to be edited in server web interface, the user needs to have the list of JMSevent listeners limited permission (p. 125).
• Edit Universal Event Listener
This permission allows user to edit a universal event listener.
If the universal event listener is to be edited in server web interface, user needs to have permission listof universal event listeners limited permission (p. 125).
See Universal Event Listeners (p. 217).
• Delete Event ListenerThis permission allows user to delete event listeners.
Chapter 14. Users and Groups
127
• Delete Jobflow Event Listener
This permission allows user to delete a jobflow event listener.
User needs to have the delete graph event listener permission (p. 127) to delete a jobflow eventlistener.
It the jobflow event listener is to be deleted in server web interface, the user needs to have the list ofjobflow event listeners limited permission (p. 124)
• Delete Graph Event Listener
This permission allows user to delete a graph event listener.
If the graph event listener is to be deleted in server web interface, the user needs to have the list of graphevent listeners limited permission (p. 124).
See Graph Event Listeners (p. 202).
• Delete File Event Listener
This permission allows user to delete a file event listener.
The user needs to have the delete graph event listener permission (p. 127) to delete a file event listener.
If the file event listener is to be deleted in server web interface, the user needs to have the list of fileevent listeners limited permission (p. 124).
See File Event Listeners (remote and local) (p. 219).
• Delete JMS Event Listener
This permission allows user to delete a JMS Event Listener.
The user needs to have the delete graph event listener permission (p. 127) to delete a JMS eventlistener.
If the graph event listener is to be deleted in server web interface, the user needs to have the list of JMSevent listeners limited permission (p. 125).
• Delete Universal Event Listener
This permission allows user to delete a universal event listener.
The user needs to have the delete graph event listener permission (p. 127) to delete universal eventlistener.
If the universal event listener is to be deleted in server web interface, the user needs to have the list ofuniversal event listeners limited permission (p. 125).
See Universal Event Listeners (p. 217).
• Manual task Execution
This permission allows user to manually execute a task (send an email, execute a script, etc.) with animmediate effect.
See Chapter 21, Manual Task Execution (p. 188).
• Unlimited access to execution history
Chapter 14. Users and Groups
128
This permission allows user to perform the same operations as unlimited access to execution history listpermission (p. 128).
• Unlimited access to execution history list
This permission allows user to view execution history of all jobs.
• Limited access to execution history list
This permission allows user to view execution history of jobs from sandboxes the user can read from.In Designer, this permission is required to be able to view Execution log in Designer's console andexecution history in Execution tab.
• Launch Services
This permission allows user to list, create, edit, and delete launch services.
See Chapter 31, Launch Services (p. 247).
• List Launch Services unlimited
This permission allows user to list all launch services.
• List Launch Services Limited
This permission allows user to list launch services from sandboxes the user can read from.
• Create Launch service
This permission allows user to create a new launch service.
User has to have the create graph event listener permission (p. 125) to bind the launch service with agraph.
If the launch service is to be created in server web interface, the user has to have the list launch serviceslimited permission (p. 128) (or the list launch services unlimited permission (p. 128)) to access thesection with launch services.
• Delete Launch Service
This permission allows user to delete a launch service.
User has to have delete graph event listener permission (p. 127) to delete a launch service.
If the launch service is to be deleted in server web interface, the user needs to have the list launch serviceslimited permission (p. 128) to access the section with launch services.
• Edit Launch Service
This permission allows user to edit a launch services.
User has to have edit graph event listener (p. 126) to edit the launch service.
If the launch service is to be edited in server web interface, the user needs to have the list launch serviceslimited permission (p. 128) to choose the launch service in the server interface.
• Tasks history
This permission allows user to access Tasks history section.
See Chapter 20, Tasks (p. 168).
Chapter 14. Users and Groups
129
• Monitoring
Monitoring permission grants user all its subpermissions.
• Monitoring section
This permission allows user to access the monitoring section.
See Chapter 16, CloverETL Server Monitoring (p. 148).
• Suspend
This permission allows user to suspend the server, a cluster node, or a sandbox.
The user needs to have the monitoring section permission (p. 129) to access the Monitoring section.
• Suspend server
This permission allows user to suspend or resume the server.
The user needs to have the monitoring section permission (p. 129) to access the monitoring section.
• Suspend cluster node
This permission allows user to suspend or resume a cluster node.
The user needs to have the monitoring section permission (p. 129) to access the monitoring section.
• Suspend sandbox
This permission allows user to suspend a sandbox. The user needs to have list sandboxpermission (p. 123) to view the sandboxes to suspend them.
See also Chapter 15, Server Side Job Files - Sandboxes (p. 135).
• Reset caches
Deprecated.
• Running jobs unlimited
If the graph is to be run from server web interface, the user needs to have the list sandboxpermission (p. 123) to list the graphs.
• Running jobs limited
If the graph is to be run from server web interface, the user needs to have the list sandboxpermission (p. 123) to list the graphs.
• Configuration
This permission allows user to access the configuration section.
• Users
This permission allow user to access the Users section and configure user accounts.
• List user
This permission allows user to list users and access to the Users administration section (Configuration
→Users)

Chapter 14. Users and Groups
130
• Change passwords
This permission allows user to change his password and to change password of another user.
To see list of users, the user needs the list user permission (p. 129).
• Edit user
This permission allows user to change group assignment.
To see the list of users, the user needs to have the list user permission (p. 129).
• Edit own profile and password
This permission allows user to change his profile (first name, last name, email, and password).
The user can access her profile in main web console view under username, in upper right corner of thepage.
• Delete user
This permission allows user to disable a user.
The user needs to have the list user permission (p. 129) to list available users.
• Create user
This permission allows user to create a new user.
If the user is to be created in server web interface, the creating user needs to have the list userpermission (p. 129) to list users to access this option.
• Groups assignment
This permission allows user to assign users to groups.
The user needs to have the edit user permission (p. 130) to successfully finish the assignment of usersto groups.
If the user is to be created in server web interface, the creating user needs to have the list userpermission (p. 129) to list users to access this option.
• Groups
This permission allows user to manage groups: user can list groups, create groups, delete groups, edit thegroup, assign users to the group, and change permissions of the group.
• List groups
This permission allows user to list groups. This permission is necessary for use of other options from theGroups group.
• Create group
This permission allows user to create a new user group.
If the user group is to be created in server web interface, the user needs to have the list groupspermission (p. 130) to view a list of groups and to access this option.
• Delete group

Chapter 14. Users and Groups
131
This permission allows user to delete a user group.
Only empty groups can be deleted. You need to have the list groups permission (p. 130) to view listof groups and to access this option.
• Edit group
This permission allow user to edit user groups.
This permission does not include User assignment and Permission assignment.
If the user group is to be edited from server web interface, the user needs to have the list groupspermission (p. 130).
• Users assignment
This permission allows user to assign users to groups.
The user needs Edit group permission (p. 131) to commit the changes in the assignment.
If the assignment is to be edited in server web interface, the user needs to have the list groupspermission (p. 130) to list the groups.
• Permission assignment
This permission allows user to configure group Permissions.
The user needs have the Edit group permission (p. 131) to commit the changes.
If the permissions are to be edited in server web interface, the user needs to have the list groupspermission (p. 130) to list the groups.
• Secure parameters administration
• Secure params
This permission allows user to change the value of a secure parameter.
The user can use secure parameters in graphs even without this permission.
• CloverETL/System info sections
This permission allows user to view System Info and CloverETL Info sections.
• CloverETL Server properties
This permission allows user to view Server Properties tab and Data Profiler properties tab in CloverETLInfo section.
The user needs to have the CloverETL/System info sections permission (p. 131) to access CloverETLInfo section.
• Reload license
This permission allows user to reload and view the server license.
The user needs to have the CloverETL/System info sections permission (p. 131) to access theConfiguration section.
• Upload license
Chapter 14. Users and Groups
132
This permission allows user to update the server license.
The user needs to have the CloverETL/System info sections permission (p. 131) to access theConfiguration section.
See CloverETL Server Activation (p. 46).
• Server Configuration Management
This permission allows user to import and export the server configuration.
See Chapter 17, Server Configuration Migration (p. 156).
• Export Server Configuration
This permission allows user to export the server configuration.
See Server Configuration Export (p. 157).
• Import Server Configuration
This permission allows user to import the server configuration.
See Server Configuration Import (p. 158).
• Temp Space Management
This permission allows user to access Temp Space Management section.
See Chapter 12, Temp Space Management (p. 104).
• Server Setup
This permission allows user to access the server setup.
See Chapter 7, Setup (p. 64).
• Heap Memory Dump
This permission allows user to create a Thread dump and a Heap Memory Dump.
See Chapter 18, Diagnostics (p. 162).
• Groovy Code API
This permission allows user to run Groovy scripts.
See Groovy Code API (p. 276).
• Open Profiler Reporting Console
This permission allows user to login to the Profiler reporting console.
The permission is necessary to view the results of Clover Profiling Jobs in Designer.
Even without this permission, a user can create and run .cpj jobs from Designer.
User Lockout
CloverETL can lock a user access after a set number of unsuccessful login attempts as a way of protecting againstbrute force attacks on users' credentials.

Chapter 14. Users and Groups
133
The lockout occurs only in CloverETL. For example, it will not affect LDAP in the case of LDAP userauthentication. By default, the feature is disabled.
Information regarding user lockout is stored in the USER_ACTION server log. Notifications can be sent viaemail; however, it is necessary to set up a connection to an SMTP server in the E-mail (p. 69) tab of the Setup GUI.
The feature has several parameters which can be set by modifying the following lines in the configuration file;either directly or in the Configuration File tab of the Setup GUI (p. 64):
security.lockout.login.attemptsLimits the number of login attempts of the user. The next failed loginattempt will lock the user's access.
When setting the value, keep in mind that CloverETL Designer withseveral server projects can attempt to log in multiple times.
The recommended value is 50. Change the value to 0 to disable the feature.
security.lockout.reset.periodRepresents the period (in seconds) during which failed login attempts arecounted. If no such attempt occurs during this period, the counter of failedlogin attempts is reset to 0. This way, the user does not have to worry aboutaccidentally locking himself out of the system after a certain number offailed login attempts over an extended period of time.
The default value is 60 (1 minute). Change the value to 0 to set the periodto infinity.
security.lockout.unlock.periodRepresents the period (in seconds) after which a successful login attemptwill unlock the previously locked user. After this period, the user is ableto login using his credentials again without the need to have his accountunlocked by the administrator.
The parameter protects the system against denial of service (DoS) attacksand should be set to a reasonable value so you are not locked out of thesystem for too long in case the administrator's account is affected by theattack.
The default value is 300 (5 minutes). Change the value to 0 to set the periodto infinity.
security.lockout.notification.emailThe parameter represents a comma separated list of emails of persons whoshould be notified when a user lockout occurs.
Note that the locked out user receives the notification email automatically(if the server's SMTP is configured and they have provided their emailaddress). This parameter should therefore be set, for example, to anadministrators' mail group so they are aware of the situation.
The recommended, default values are set in such a way as to efficiently protect the system against brute forceattacks, prevent complete lockout of the administrator access and not limit users in standard usage of CloverETLServer.
The properties can be set in the following section of the properties file:
## Uncomment lines bellow to enable user lockout after number of failed logins## Number of failed login attempts after which a next failed login attempt will lock the user## 0 means feature is switched off## default suggested value is 50 #security.lockout.login.attempts=50## Periods are specified in seconds## Period of time during which the failed login attempts are counted## Default is 60s (1 min)
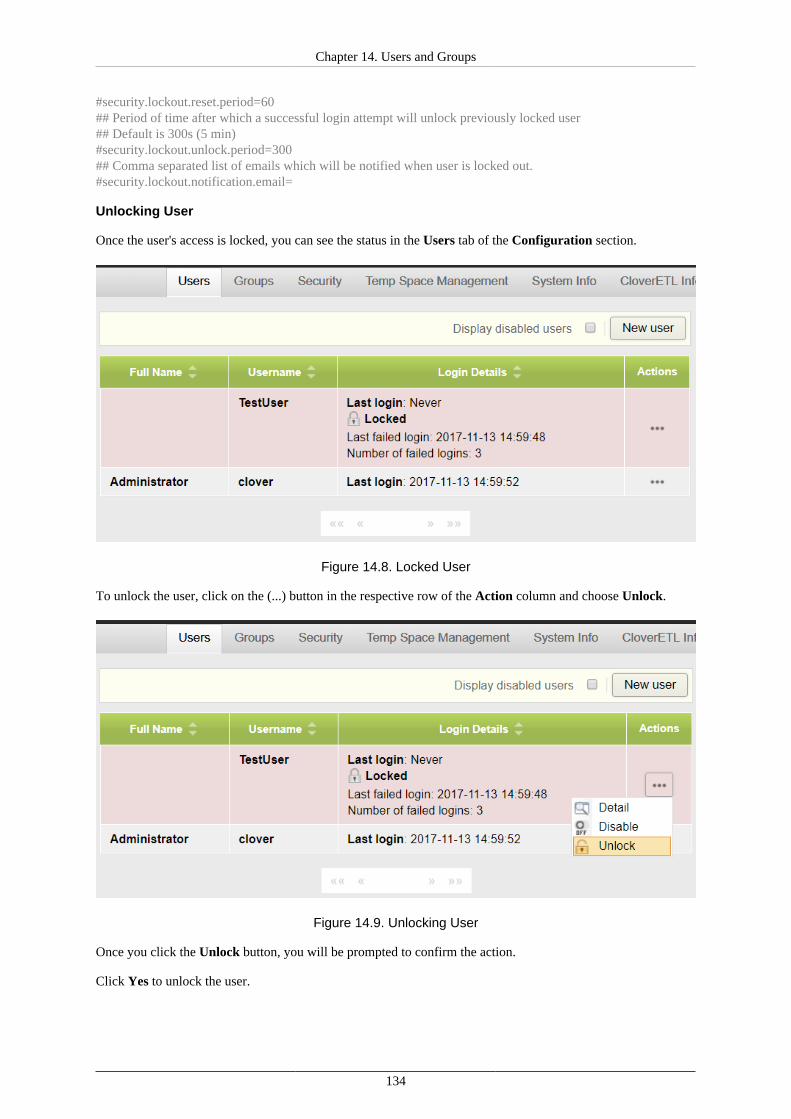
Chapter 14. Users and Groups
134
#security.lockout.reset.period=60## Period of time after which a successful login attempt will unlock previously locked user## Default is 300s (5 min)#security.lockout.unlock.period=300## Comma separated list of emails which will be notified when user is locked out. #security.lockout.notification.email=
Unlocking User
Once the user's access is locked, you can see the status in the Users tab of the Configuration section.
Figure 14.8. Locked User
To unlock the user, click on the (...) button in the respective row of the Action column and choose Unlock.
Figure 14.9. Unlocking User
Once you click the Unlock button, you will be prompted to confirm the action.
Click Yes to unlock the user.
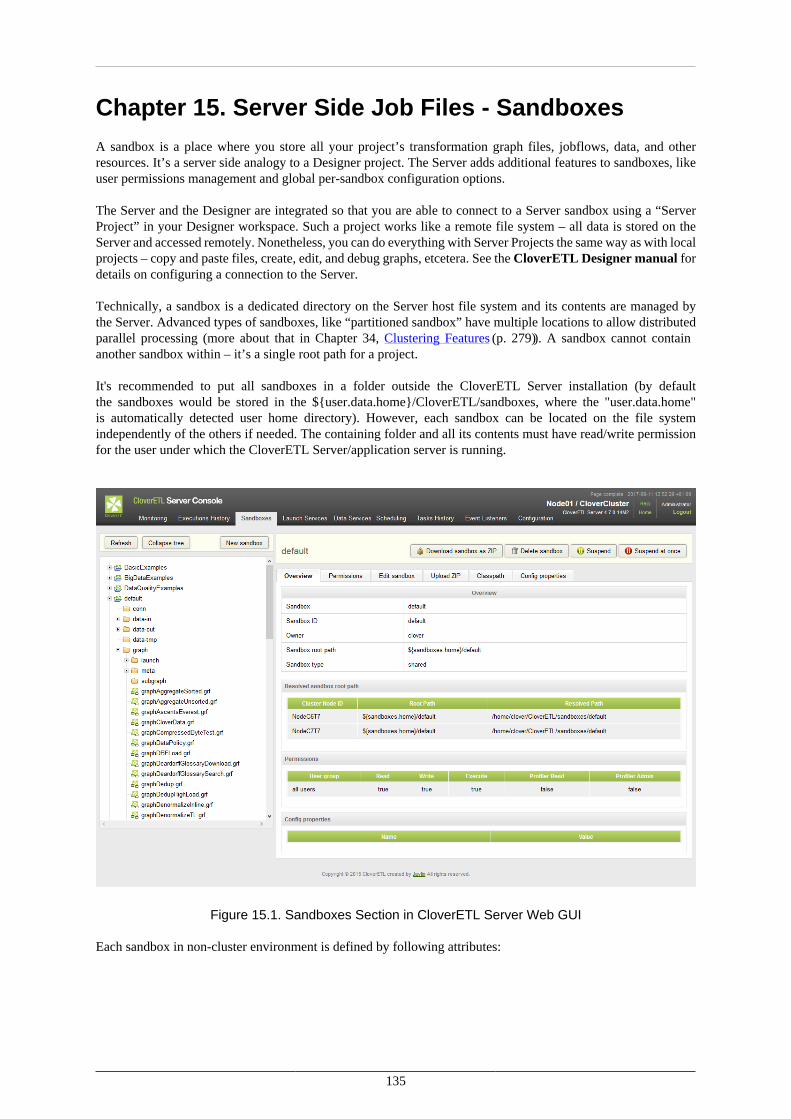
135
Chapter 15. Server Side Job Files - SandboxesA sandbox is a place where you store all your project’s transformation graph files, jobflows, data, and otherresources. It’s a server side analogy to a Designer project. The Server adds additional features to sandboxes, likeuser permissions management and global per-sandbox configuration options.
The Server and the Designer are integrated so that you are able to connect to a Server sandbox using a “ServerProject” in your Designer workspace. Such a project works like a remote file system – all data is stored on theServer and accessed remotely. Nonetheless, you can do everything with Server Projects the same way as with localprojects – copy and paste files, create, edit, and debug graphs, etcetera. See the CloverETL Designer manual fordetails on configuring a connection to the Server.
Technically, a sandbox is a dedicated directory on the Server host file system and its contents are managed bythe Server. Advanced types of sandboxes, like “partitioned sandbox” have multiple locations to allow distributedparallel processing (more about that in Chapter 34, Clustering Features (p. 279)). A sandbox cannot containanother sandbox within – it’s a single root path for a project.
It's recommended to put all sandboxes in a folder outside the CloverETL Server installation (by defaultthe sandboxes would be stored in the ${user.data.home}/CloverETL/sandboxes, where the "user.data.home"is automatically detected user home directory). However, each sandbox can be located on the file systemindependently of the others if needed. The containing folder and all its contents must have read/write permissionfor the user under which the CloverETL Server/application server is running.
Figure 15.1. Sandboxes Section in CloverETL Server Web GUI
Each sandbox in non-cluster environment is defined by following attributes:
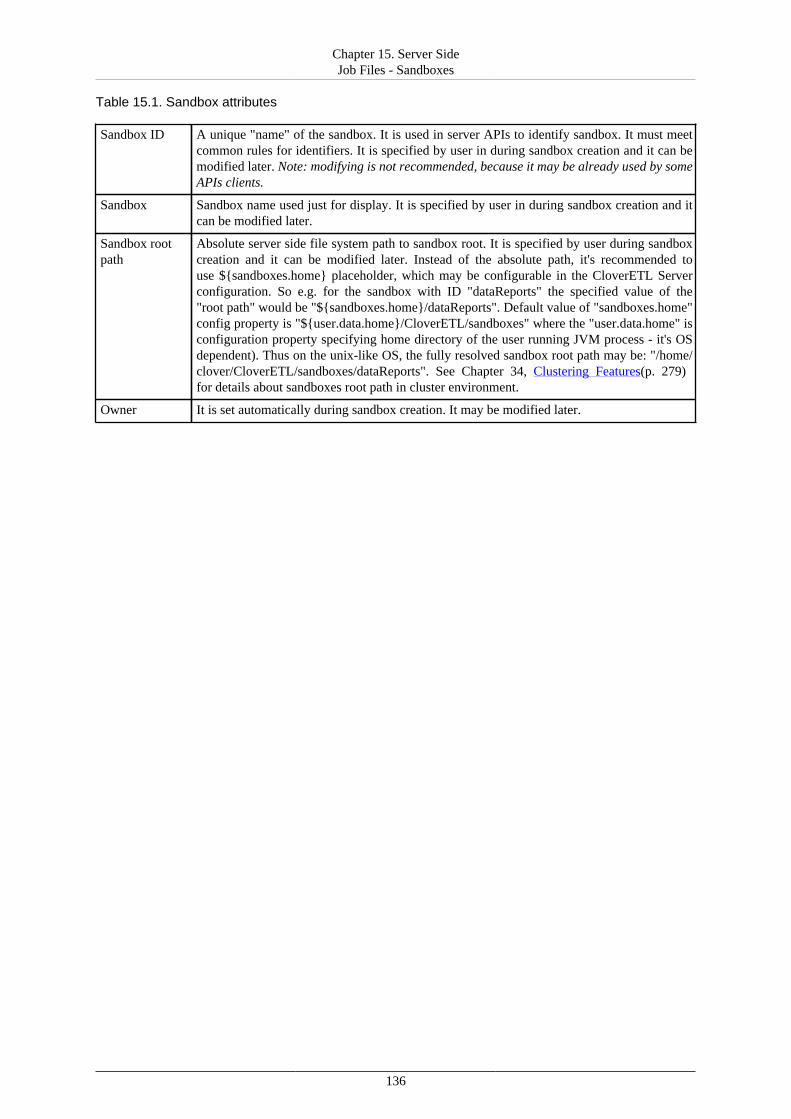
Chapter 15. Server SideJob Files - Sandboxes
136
Table 15.1. Sandbox attributes
Sandbox ID A unique "name" of the sandbox. It is used in server APIs to identify sandbox. It must meetcommon rules for identifiers. It is specified by user in during sandbox creation and it can bemodified later. Note: modifying is not recommended, because it may be already used by someAPIs clients.
Sandbox Sandbox name used just for display. It is specified by user in during sandbox creation and itcan be modified later.
Sandbox rootpath
Absolute server side file system path to sandbox root. It is specified by user during sandboxcreation and it can be modified later. Instead of the absolute path, it's recommended touse ${sandboxes.home} placeholder, which may be configurable in the CloverETL Serverconfiguration. So e.g. for the sandbox with ID "dataReports" the specified value of the"root path" would be "${sandboxes.home}/dataReports". Default value of "sandboxes.home"config property is "${user.data.home}/CloverETL/sandboxes" where the "user.data.home" isconfiguration property specifying home directory of the user running JVM process - it's OSdependent). Thus on the unix-like OS, the fully resolved sandbox root path may be: "/home/clover/CloverETL/sandboxes/dataReports". See Chapter 34, Clustering Features (p. 279)for details about sandboxes root path in cluster environment.
Owner It is set automatically during sandbox creation. It may be modified later.
Chapter 15. Server SideJob Files - Sandboxes
137
Referencing Files from the ETL Graph or Jobflow
In some components you can specify file URL attribute as a reference to some resource on the file system. Alsoexternal metadata, lookup or DB connection definition is specified as reference to some file on the filesystem.With CloverETL Server there are more ways how to specify this relation.
• Relative path
All relative paths in your graphs are considered as relative paths to the root of the same sandbox which containsjob file (ETL graph or Jobflow).
• sandbox:// URLs
Sandbox URL allows user to reference the resource from different sandboxes with standalone CloverETL Serveror the cluster. In cluster environment, CloverETL Server transparently manages remote streaming if the resourceis accessible only on some specific cluster node.
See Using a Sandbox Resource as a Component Data Source (p. 284) for details about the sandbox URLs.
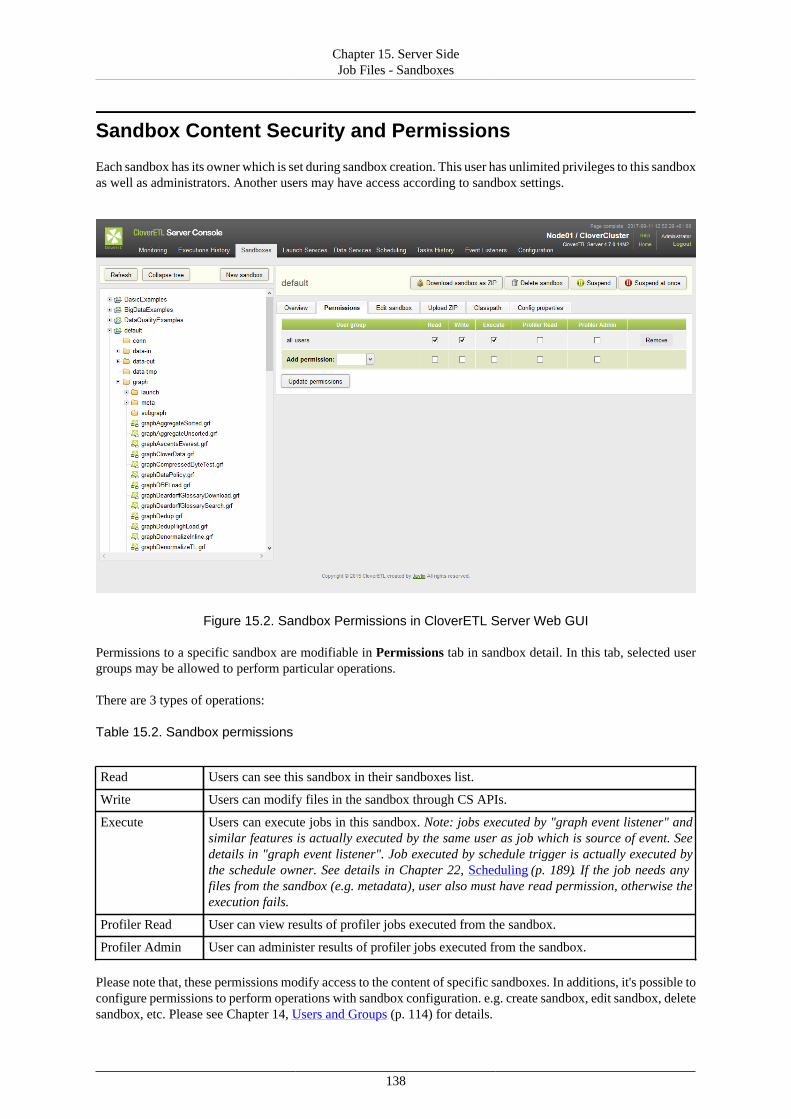
Chapter 15. Server SideJob Files - Sandboxes
138
Sandbox Content Security and Permissions
Each sandbox has its owner which is set during sandbox creation. This user has unlimited privileges to this sandboxas well as administrators. Another users may have access according to sandbox settings.
Figure 15.2. Sandbox Permissions in CloverETL Server Web GUI
Permissions to a specific sandbox are modifiable in Permissions tab in sandbox detail. In this tab, selected usergroups may be allowed to perform particular operations.
There are 3 types of operations:
Table 15.2. Sandbox permissions
Read Users can see this sandbox in their sandboxes list.
Write Users can modify files in the sandbox through CS APIs.
Execute Users can execute jobs in this sandbox. Note: jobs executed by "graph event listener" andsimilar features is actually executed by the same user as job which is source of event. Seedetails in "graph event listener". Job executed by schedule trigger is actually executed bythe schedule owner. See details in Chapter 22, Scheduling (p. 189). If the job needs anyfiles from the sandbox (e.g. metadata), user also must have read permission, otherwise theexecution fails.
Profiler Read User can view results of profiler jobs executed from the sandbox.
Profiler Admin User can administer results of profiler jobs executed from the sandbox.
Please note that, these permissions modify access to the content of specific sandboxes. In additions, it's possible toconfigure permissions to perform operations with sandbox configuration. e.g. create sandbox, edit sandbox, deletesandbox, etc. Please see Chapter 14, Users and Groups (p. 114) for details.
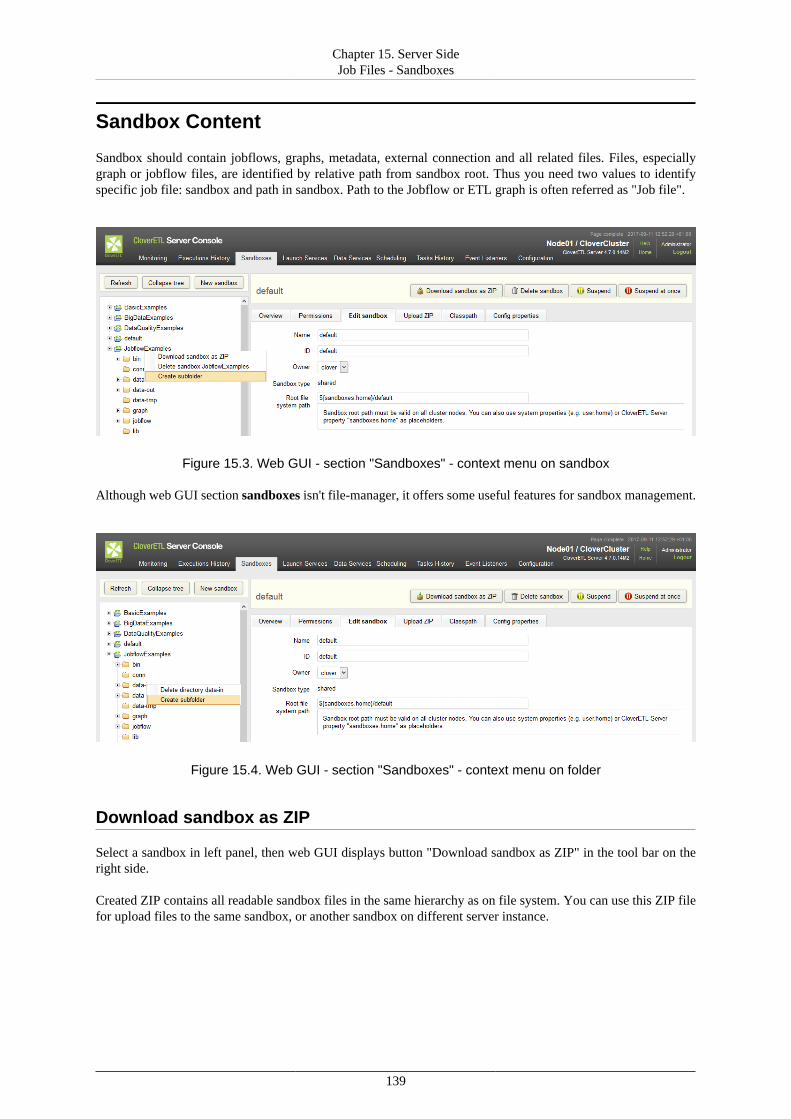
Chapter 15. Server SideJob Files - Sandboxes
139
Sandbox Content
Sandbox should contain jobflows, graphs, metadata, external connection and all related files. Files, especiallygraph or jobflow files, are identified by relative path from sandbox root. Thus you need two values to identifyspecific job file: sandbox and path in sandbox. Path to the Jobflow or ETL graph is often referred as "Job file".
Figure 15.3. Web GUI - section "Sandboxes" - context menu on sandbox
Although web GUI section sandboxes isn't file-manager, it offers some useful features for sandbox management.
Figure 15.4. Web GUI - section "Sandboxes" - context menu on folder
Download sandbox as ZIP
Select a sandbox in left panel, then web GUI displays button "Download sandbox as ZIP" in the tool bar on theright side.
Created ZIP contains all readable sandbox files in the same hierarchy as on file system. You can use this ZIP filefor upload files to the same sandbox, or another sandbox on different server instance.
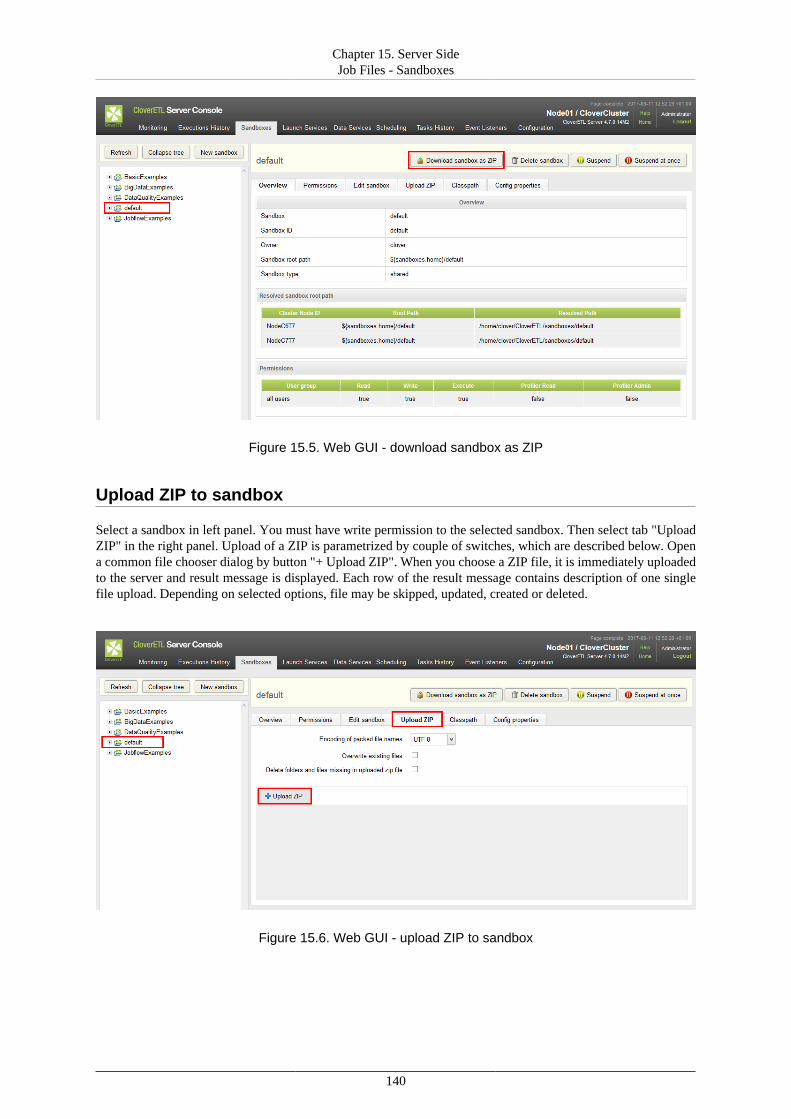
Chapter 15. Server SideJob Files - Sandboxes
140
Figure 15.5. Web GUI - download sandbox as ZIP
Upload ZIP to sandbox
Select a sandbox in left panel. You must have write permission to the selected sandbox. Then select tab "UploadZIP" in the right panel. Upload of a ZIP is parametrized by couple of switches, which are described below. Opena common file chooser dialog by button "+ Upload ZIP". When you choose a ZIP file, it is immediately uploadedto the server and result message is displayed. Each row of the result message contains description of one singlefile upload. Depending on selected options, file may be skipped, updated, created or deleted.
Figure 15.6. Web GUI - upload ZIP to sandbox
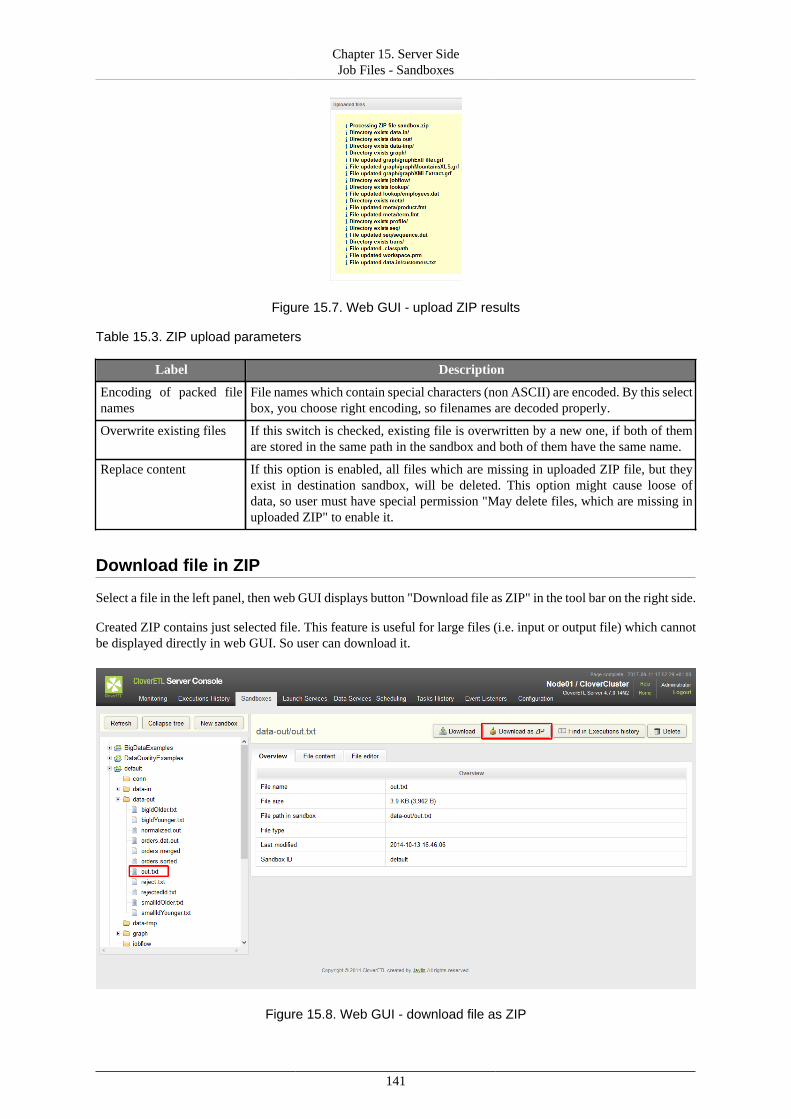
Chapter 15. Server SideJob Files - Sandboxes
141
Figure 15.7. Web GUI - upload ZIP results
Table 15.3. ZIP upload parameters
Label Description
Encoding of packed filenames
File names which contain special characters (non ASCII) are encoded. By this selectbox, you choose right encoding, so filenames are decoded properly.
Overwrite existing files If this switch is checked, existing file is overwritten by a new one, if both of themare stored in the same path in the sandbox and both of them have the same name.
Replace content If this option is enabled, all files which are missing in uploaded ZIP file, but theyexist in destination sandbox, will be deleted. This option might cause loose ofdata, so user must have special permission "May delete files, which are missing inuploaded ZIP" to enable it.
Download file in ZIP
Select a file in the left panel, then web GUI displays button "Download file as ZIP" in the tool bar on the right side.
Created ZIP contains just selected file. This feature is useful for large files (i.e. input or output file) which cannotbe displayed directly in web GUI. So user can download it.
Figure 15.8. Web GUI - download file as ZIP
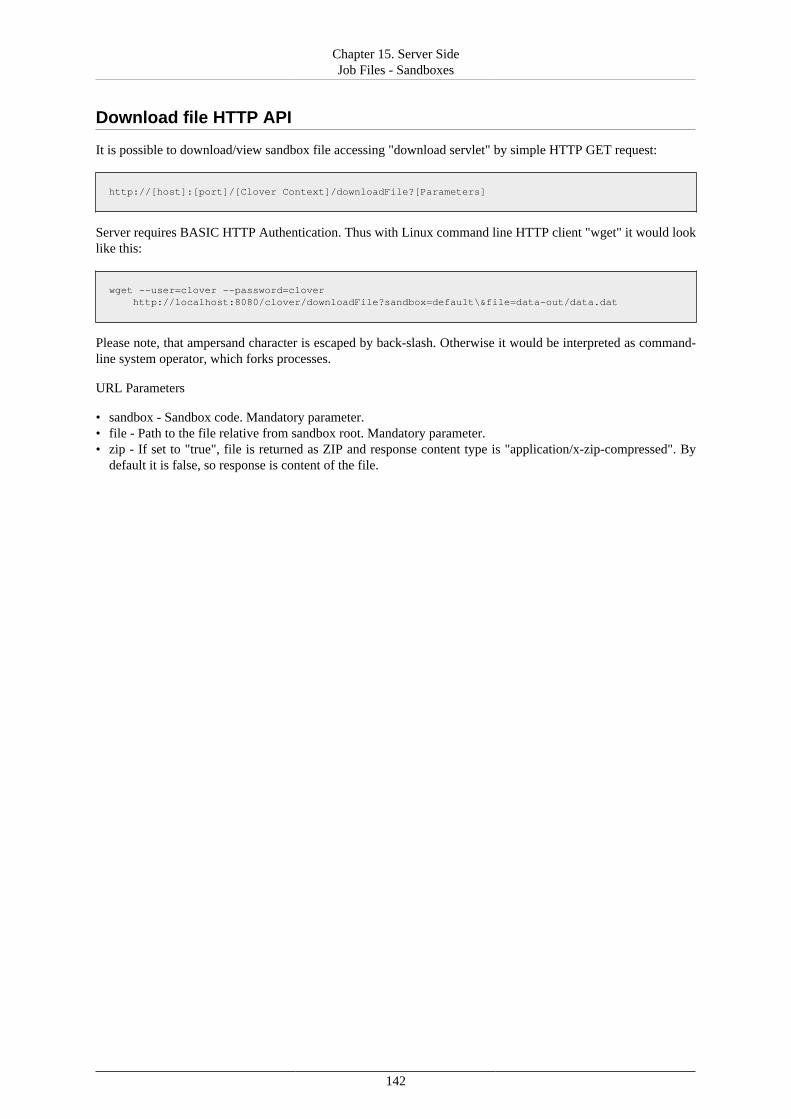
Chapter 15. Server SideJob Files - Sandboxes
142
Download file HTTP API
It is possible to download/view sandbox file accessing "download servlet" by simple HTTP GET request:
http://[host]:[port]/[Clover Context]/downloadFile?[Parameters]
Server requires BASIC HTTP Authentication. Thus with Linux command line HTTP client "wget" it would looklike this:
wget --user=clover --password=clover http://localhost:8080/clover/downloadFile?sandbox=default\&file=data-out/data.dat
Please note, that ampersand character is escaped by back-slash. Otherwise it would be interpreted as command-line system operator, which forks processes.
URL Parameters
• sandbox - Sandbox code. Mandatory parameter.• file - Path to the file relative from sandbox root. Mandatory parameter.• zip - If set to "true", file is returned as ZIP and response content type is "application/x-zip-compressed". By
default it is false, so response is content of the file.
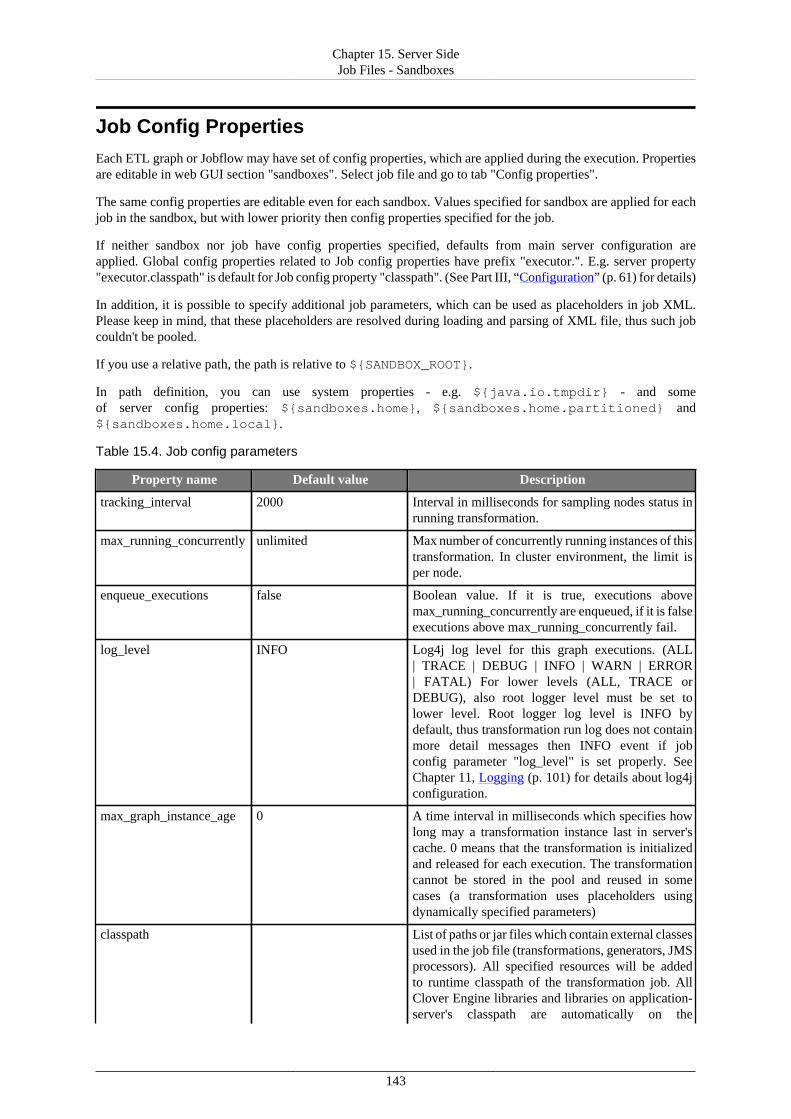
Chapter 15. Server SideJob Files - Sandboxes
143
Job Config PropertiesEach ETL graph or Jobflow may have set of config properties, which are applied during the execution. Propertiesare editable in web GUI section "sandboxes". Select job file and go to tab "Config properties".
The same config properties are editable even for each sandbox. Values specified for sandbox are applied for eachjob in the sandbox, but with lower priority then config properties specified for the job.
If neither sandbox nor job have config properties specified, defaults from main server configuration areapplied. Global config properties related to Job config properties have prefix "executor.". E.g. server property"executor.classpath" is default for Job config property "classpath". (See Part III, “Configuration” (p. 61) for details)
In addition, it is possible to specify additional job parameters, which can be used as placeholders in job XML.Please keep in mind, that these placeholders are resolved during loading and parsing of XML file, thus such jobcouldn't be pooled.
If you use a relative path, the path is relative to ${SANDBOX_ROOT}.
In path definition, you can use system properties - e.g. ${java.io.tmpdir} - and someof server config properties: ${sandboxes.home}, ${sandboxes.home.partitioned} and${sandboxes.home.local}.
Table 15.4. Job config parameters
Property name Default value Description
tracking_interval 2000 Interval in milliseconds for sampling nodes status inrunning transformation.
max_running_concurrently unlimited Max number of concurrently running instances of thistransformation. In cluster environment, the limit isper node.
enqueue_executions false Boolean value. If it is true, executions abovemax_running_concurrently are enqueued, if it is falseexecutions above max_running_concurrently fail.
log_level INFO Log4j log level for this graph executions. (ALL| TRACE | DEBUG | INFO | WARN | ERROR| FATAL) For lower levels (ALL, TRACE orDEBUG), also root logger level must be set tolower level. Root logger log level is INFO bydefault, thus transformation run log does not containmore detail messages then INFO event if jobconfig parameter "log_level" is set properly. SeeChapter 11, Logging (p. 101) for details about log4jconfiguration.
max_graph_instance_age 0 A time interval in milliseconds which specifies howlong may a transformation instance last in server'scache. 0 means that the transformation is initializedand released for each execution. The transformationcannot be stored in the pool and reused in somecases (a transformation uses placeholders usingdynamically specified parameters)
classpath List of paths or jar files which contain external classesused in the job file (transformations, generators, JMSprocessors). All specified resources will be addedto runtime classpath of the transformation job. AllClover Engine libraries and libraries on application-server's classpath are automatically on the
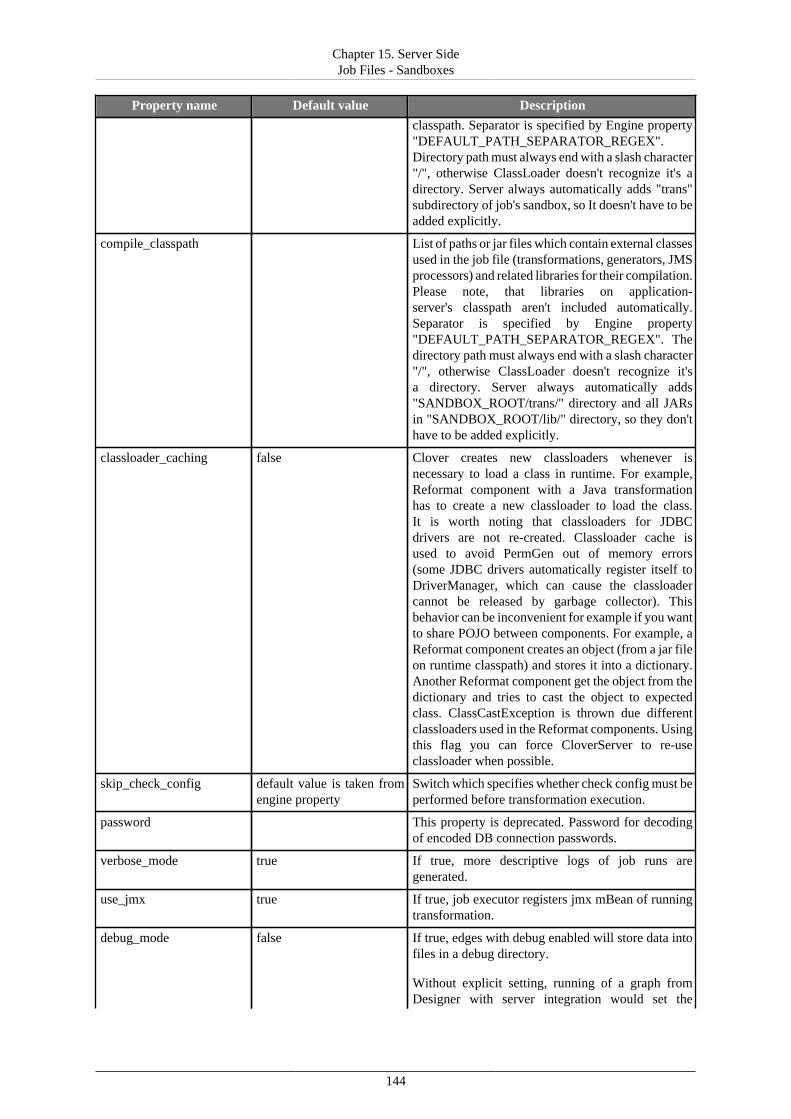
Chapter 15. Server SideJob Files - Sandboxes
144
Property name Default value Description
classpath. Separator is specified by Engine property"DEFAULT_PATH_SEPARATOR_REGEX".Directory path must always end with a slash character"/", otherwise ClassLoader doesn't recognize it's adirectory. Server always automatically adds "trans"subdirectory of job's sandbox, so It doesn't have to beadded explicitly.
compile_classpath List of paths or jar files which contain external classesused in the job file (transformations, generators, JMSprocessors) and related libraries for their compilation.Please note, that libraries on application-server's classpath aren't included automatically.Separator is specified by Engine property"DEFAULT_PATH_SEPARATOR_REGEX". Thedirectory path must always end with a slash character"/", otherwise ClassLoader doesn't recognize it'sa directory. Server always automatically adds"SANDBOX_ROOT/trans/" directory and all JARsin "SANDBOX_ROOT/lib/" directory, so they don'thave to be added explicitly.
classloader_caching false Clover creates new classloaders whenever isnecessary to load a class in runtime. For example,Reformat component with a Java transformationhas to create a new classloader to load the class.It is worth noting that classloaders for JDBCdrivers are not re-created. Classloader cache isused to avoid PermGen out of memory errors(some JDBC drivers automatically register itself toDriverManager, which can cause the classloadercannot be released by garbage collector). Thisbehavior can be inconvenient for example if you wantto share POJO between components. For example, aReformat component creates an object (from a jar fileon runtime classpath) and stores it into a dictionary.Another Reformat component get the object from thedictionary and tries to cast the object to expectedclass. ClassCastException is thrown due differentclassloaders used in the Reformat components. Usingthis flag you can force CloverServer to re-useclassloader when possible.
skip_check_config default value is taken fromengine property
Switch which specifies whether check config must beperformed before transformation execution.
password This property is deprecated. Password for decodingof encoded DB connection passwords.
verbose_mode true If true, more descriptive logs of job runs aregenerated.
use_jmx true If true, job executor registers jmx mBean of runningtransformation.
debug_mode false If true, edges with debug enabled will store data intofiles in a debug directory.
Without explicit setting, running of a graph fromDesigner with server integration would set the
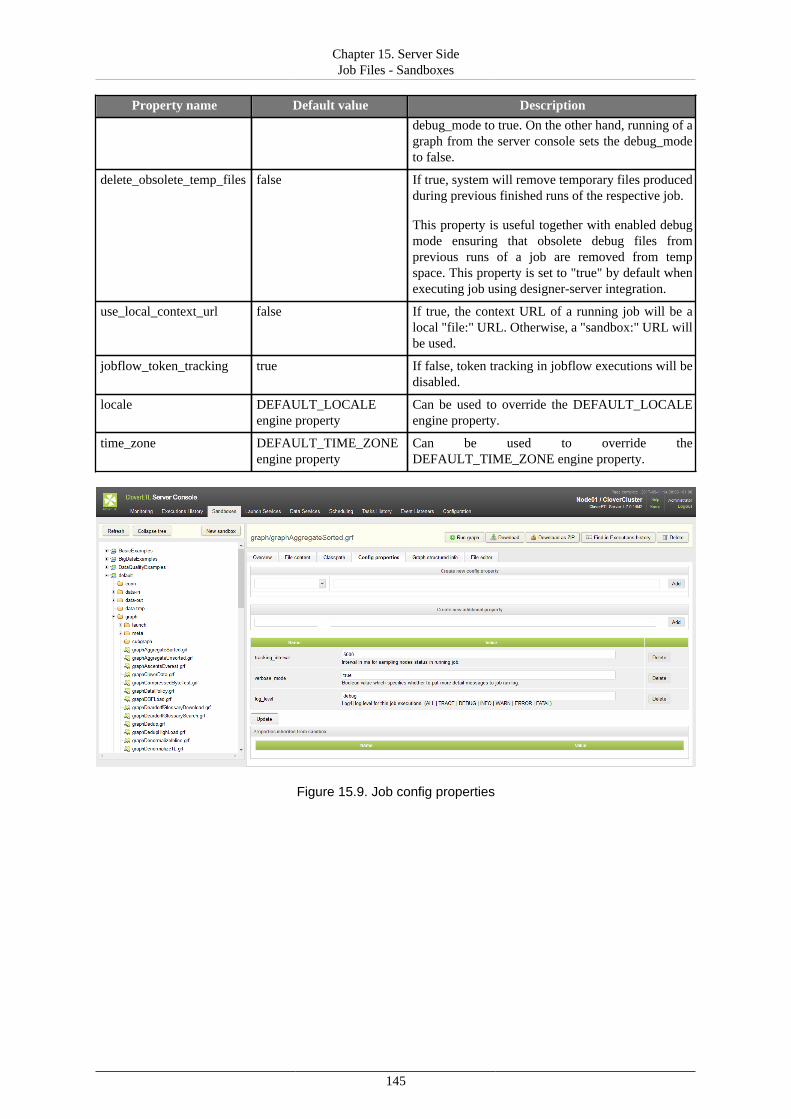
Chapter 15. Server SideJob Files - Sandboxes
145
Property name Default value Description
debug_mode to true. On the other hand, running of agraph from the server console sets the debug_modeto false.
delete_obsolete_temp_files false If true, system will remove temporary files producedduring previous finished runs of the respective job.
This property is useful together with enabled debugmode ensuring that obsolete debug files fromprevious runs of a job are removed from tempspace. This property is set to "true" by default whenexecuting job using designer-server integration.
use_local_context_url false If true, the context URL of a running job will be alocal "file:" URL. Otherwise, a "sandbox:" URL willbe used.
jobflow_token_tracking true If false, token tracking in jobflow executions will bedisabled.
locale DEFAULT_LOCALEengine property
Can be used to override the DEFAULT_LOCALEengine property.
time_zone DEFAULT_TIME_ZONEengine property
Can be used to override theDEFAULT_TIME_ZONE engine property.
Figure 15.9. Job config properties
Chapter 15. Server SideJob Files - Sandboxes
146
WebDAV Access to Sandboxes
Since 3.1
WebDAV API allows you to access and manage sandbox content using a standard WebDAV specification.
Specifically, it allows for:
• Browsing a directory structure• Editing files• Removing files/folders• Renaming files/folders• Creating files/folders• Copying files• Moving files
The WebDAV interface is accessible from the URL: "http://[host]:[port]/clover/webdav".
Note: Although common browsers will open this URL, most of them are not rich WebDAV clients. Thus, you willonly see a list of items, but you cannot browse the directory structure.
WebDAV Clients
There are many WebDAV clients for various operating systems, some OS support WebDAV natively.
Linux like OS
Great WebDAV client working on Linux systems is Konqueror. Please use different protocol in the URL:webdav://[host]:[port]/clover/webdav
Another WebDAV client is Nautilus. Use different protocol in the URL dav://[host]:[port]/clover/webdav.
MS windows
Last distributions of MS Windows (Win XP and later) have native support for WebDAV. Unfortunately, it is moreor less unreliable, so it is recommended to use some free or commercial WebDAV client.
• The best WebDAV client we've tested is BitKinex: http://www.bitkinex.com/webdavclient
• Another option is to use Total Commander (http://www.ghisler.com/index.htm) with WebDAV plugin: http://www.ghisler.com/plugins.htm#filesys
Mac OS
Mac OS supports WebDAV natively and in this case it should be without any problems. You can use "finder"application, select "Connect to the server ..." menu item and use URL with HTTP protocol: "http://[host]:[port]/clover/webdav".
WebDAV Authentication/Authorization
CloverETL Server WebDAV API uses the HTTP Basic Authentication by default. However it may be reconfiguredto use HTTP Digest Authentication. Please see Part III, “Configuration” (p. 61) for details.
Digest Authentication may be useful, since some WebDAV clients can't work with HTTP Basic Authentication,only with Digest Authentication.

Chapter 15. Server SideJob Files - Sandboxes
147
HTTP Digest Authentication is feature added to the version 3.1. If you upgraded your older CloverETL Serverdistribution, users created before the upgrade cannot use the HTTP Digest Authentication until they reset theirpasswords. So when they reset their passwords (or the admin does it for them), they can use Digest Authenticationas well as new users.
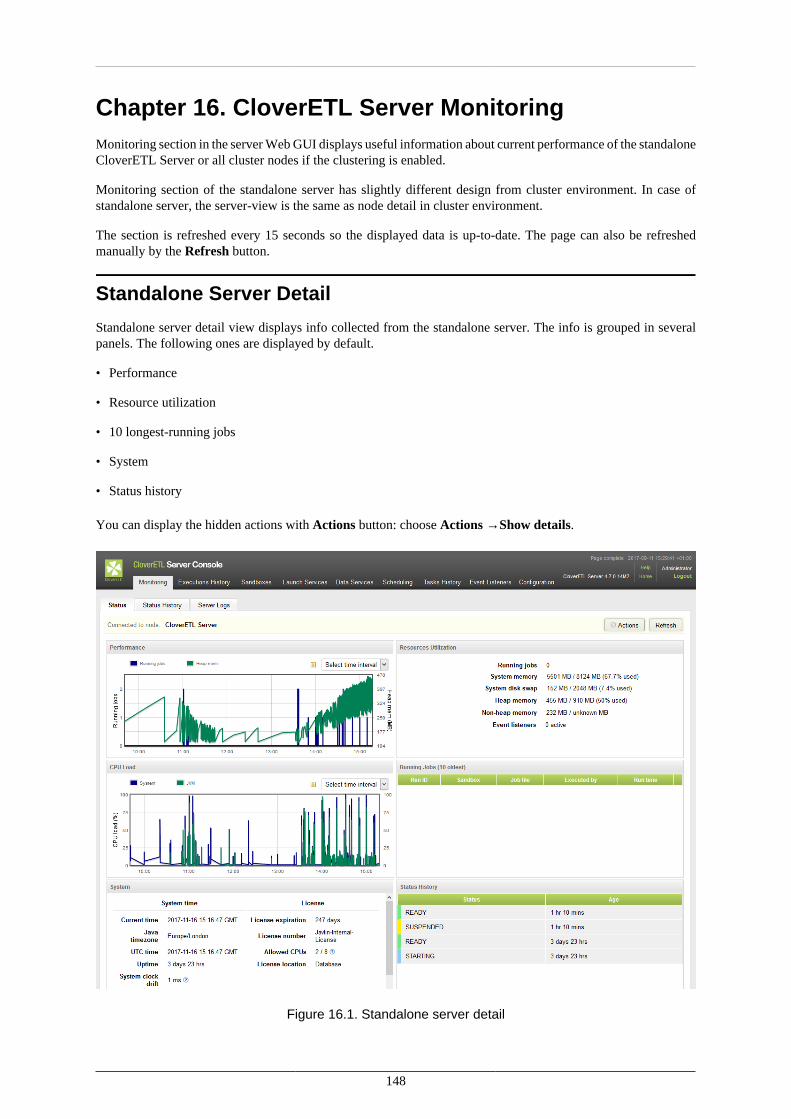
148
Chapter 16. CloverETL Server MonitoringMonitoring section in the server Web GUI displays useful information about current performance of the standaloneCloverETL Server or all cluster nodes if the clustering is enabled.
Monitoring section of the standalone server has slightly different design from cluster environment. In case ofstandalone server, the server-view is the same as node detail in cluster environment.
The section is refreshed every 15 seconds so the displayed data is up-to-date. The page can also be refreshedmanually by the Refresh button.
Standalone Server Detail
Standalone server detail view displays info collected from the standalone server. The info is grouped in severalpanels. The following ones are displayed by default.
• Performance
• Resource utilization
• 10 longest-running jobs
• System
• Status history
You can display the hidden actions with Actions button: choose Actions →Show details.
Figure 16.1. Standalone server detail
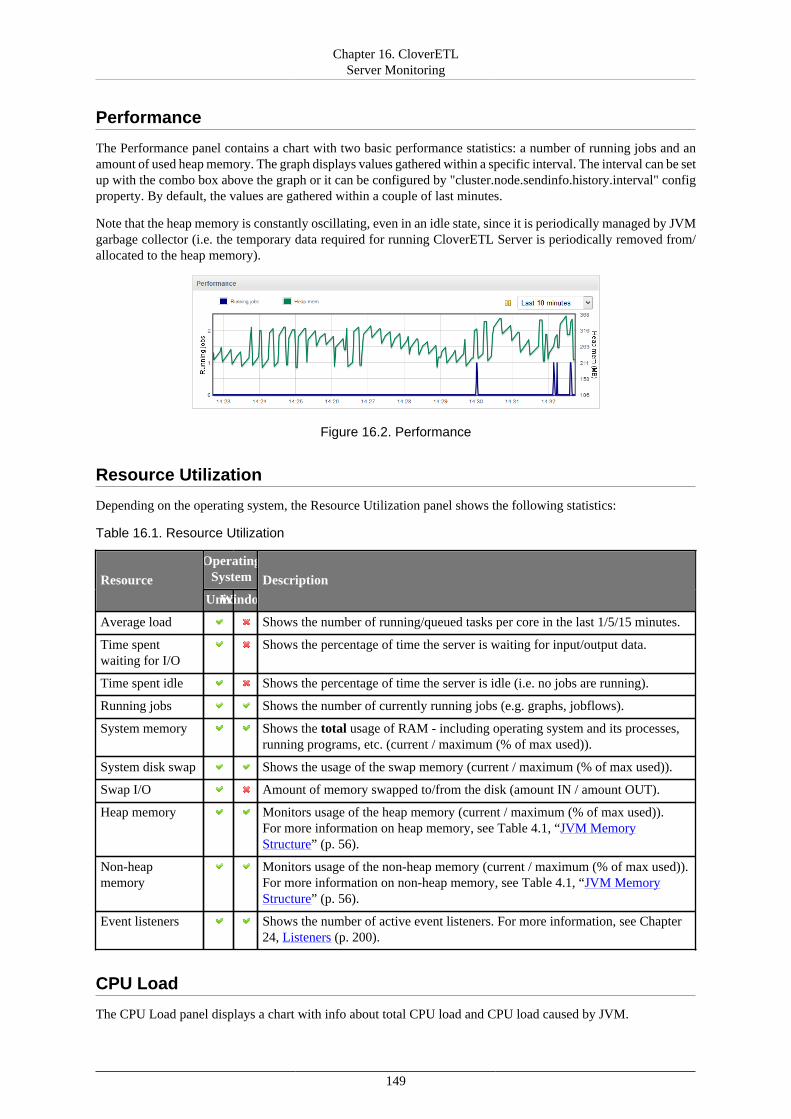
Chapter 16. CloverETLServer Monitoring
149
Performance
The Performance panel contains a chart with two basic performance statistics: a number of running jobs and anamount of used heap memory. The graph displays values gathered within a specific interval. The interval can be setup with the combo box above the graph or it can be configured by "cluster.node.sendinfo.history.interval" configproperty. By default, the values are gathered within a couple of last minutes.
Note that the heap memory is constantly oscillating, even in an idle state, since it is periodically managed by JVMgarbage collector (i.e. the temporary data required for running CloverETL Server is periodically removed from/allocated to the heap memory).
Figure 16.2. Performance
Resource Utilization
Depending on the operating system, the Resource Utilization panel shows the following statistics:
Table 16.1. Resource Utilization
OperatingSystemResource
UnixWindows
Description
Average load Shows the number of running/queued tasks per core in the last 1/5/15 minutes.
Time spentwaiting for I/O
Shows the percentage of time the server is waiting for input/output data.
Time spent idle Shows the percentage of time the server is idle (i.e. no jobs are running).
Running jobs Shows the number of currently running jobs (e.g. graphs, jobflows).
System memory Shows the total usage of RAM - including operating system and its processes,running programs, etc. (current / maximum (% of max used)).
System disk swap Shows the usage of the swap memory (current / maximum (% of max used)).
Swap I/O Amount of memory swapped to/from the disk (amount IN / amount OUT).
Heap memory Monitors usage of the heap memory (current / maximum (% of max used)).For more information on heap memory, see Table 4.1, “JVM MemoryStructure” (p. 56).
Non-heapmemory
Monitors usage of the non-heap memory (current / maximum (% of max used)).For more information on non-heap memory, see Table 4.1, “JVM MemoryStructure” (p. 56).
Event listeners Shows the number of active event listeners. For more information, see Chapter24, Listeners (p. 200).
CPU Load
The CPU Load panel displays a chart with info about total CPU load and CPU load caused by JVM.
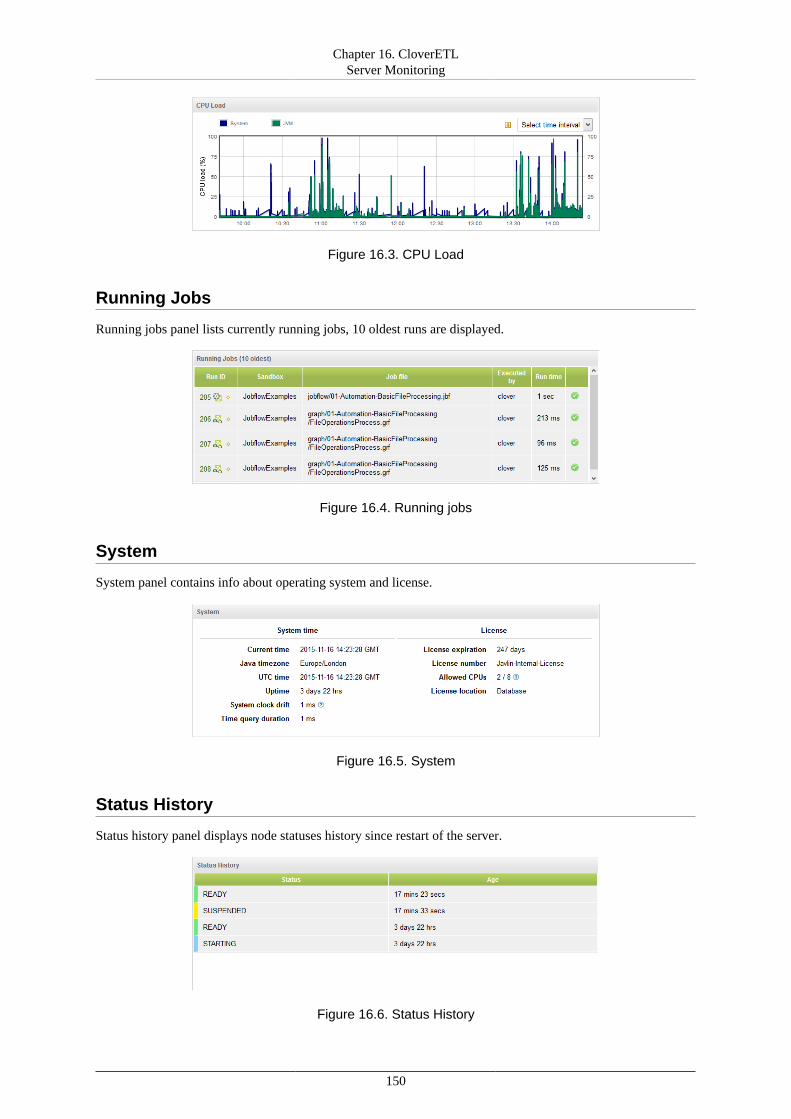
Chapter 16. CloverETLServer Monitoring
150
Figure 16.3. CPU Load
Running Jobs
Running jobs panel lists currently running jobs, 10 oldest runs are displayed.
Figure 16.4. Running jobs
System
System panel contains info about operating system and license.
Figure 16.5. System
Status History
Status history panel displays node statuses history since restart of the server.
Figure 16.6. Status History
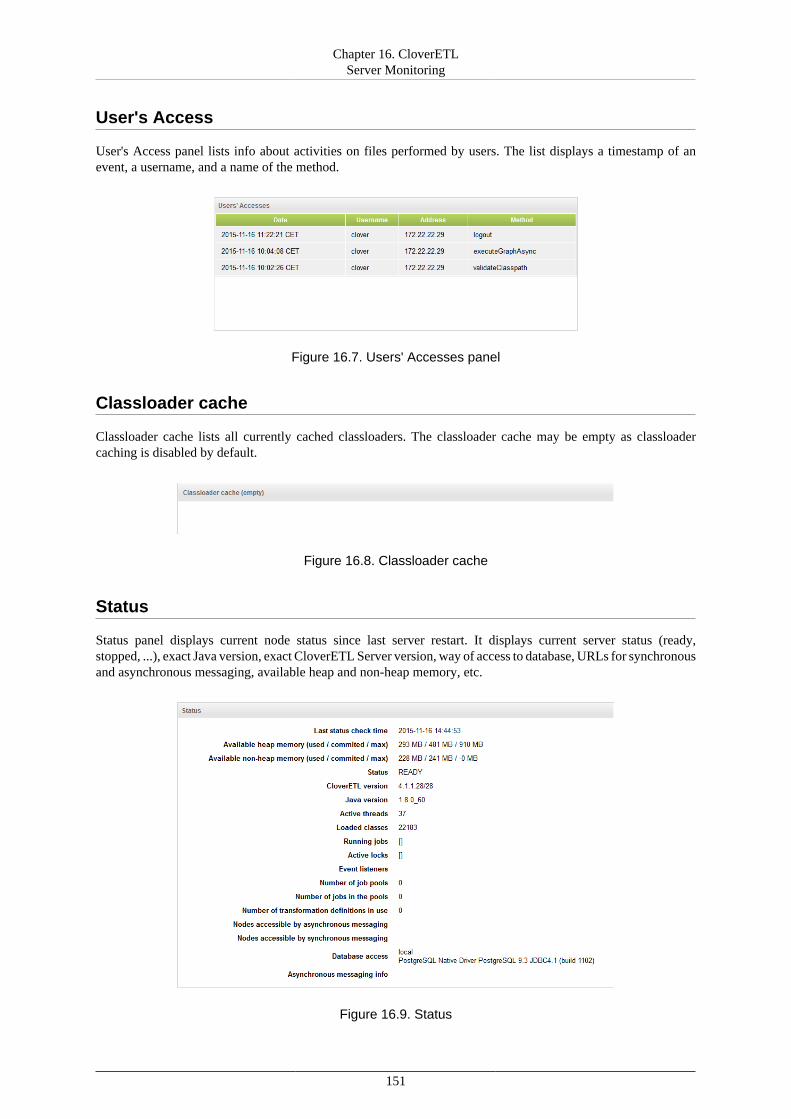
Chapter 16. CloverETLServer Monitoring
151
User's Access
User's Access panel lists info about activities on files performed by users. The list displays a timestamp of anevent, a username, and a name of the method.
Figure 16.7. Users' Accesses panel
Classloader cache
Classloader cache lists all currently cached classloaders. The classloader cache may be empty as classloadercaching is disabled by default.
Figure 16.8. Classloader cache
Status
Status panel displays current node status since last server restart. It displays current server status (ready,stopped, ...), exact Java version, exact CloverETL Server version, way of access to database, URLs for synchronousand asynchronous messaging, available heap and non-heap memory, etc.
Figure 16.9. Status
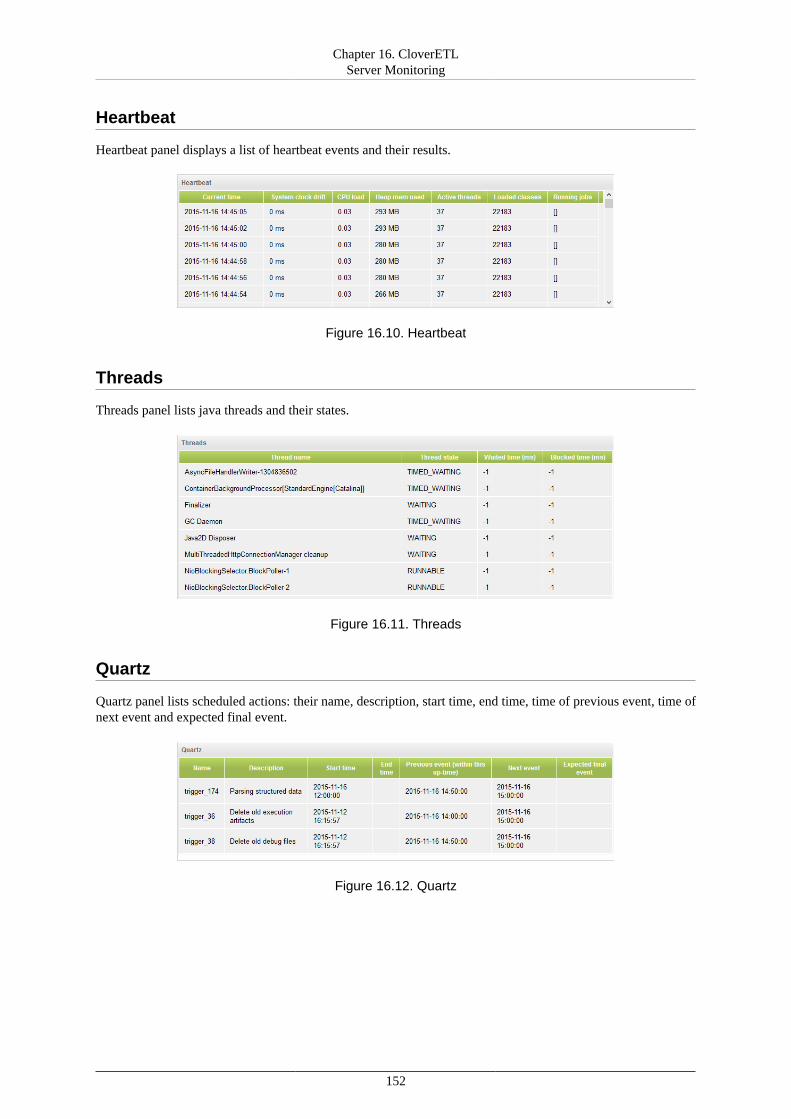
Chapter 16. CloverETLServer Monitoring
152
Heartbeat
Heartbeat panel displays a list of heartbeat events and their results.
Figure 16.10. Heartbeat
Threads
Threads panel lists java threads and their states.
Figure 16.11. Threads
Quartz
Quartz panel lists scheduled actions: their name, description, start time, end time, time of previous event, time ofnext event and expected final event.
Figure 16.12. Quartz
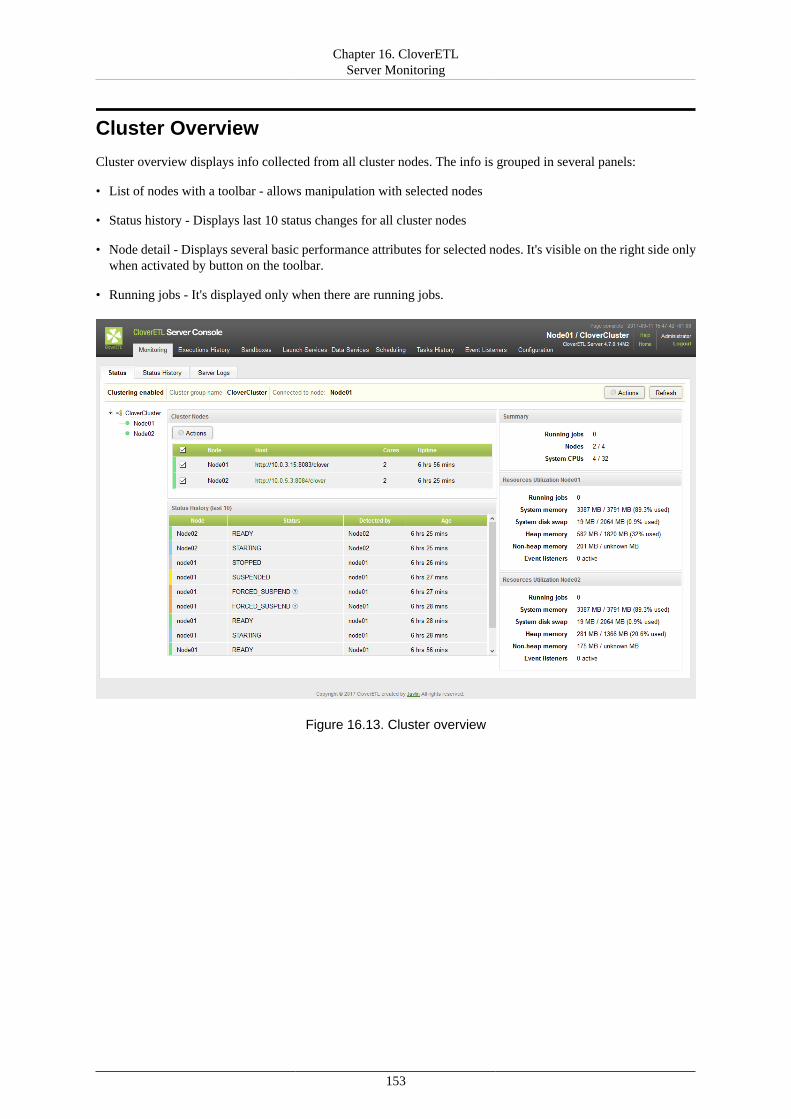
Chapter 16. CloverETLServer Monitoring
153
Cluster Overview
Cluster overview displays info collected from all cluster nodes. The info is grouped in several panels:
• List of nodes with a toolbar - allows manipulation with selected nodes
• Status history - Displays last 10 status changes for all cluster nodes
• Node detail - Displays several basic performance attributes for selected nodes. It's visible on the right side onlywhen activated by button on the toolbar.
• Running jobs - It's displayed only when there are running jobs.
Figure 16.13. Cluster overview
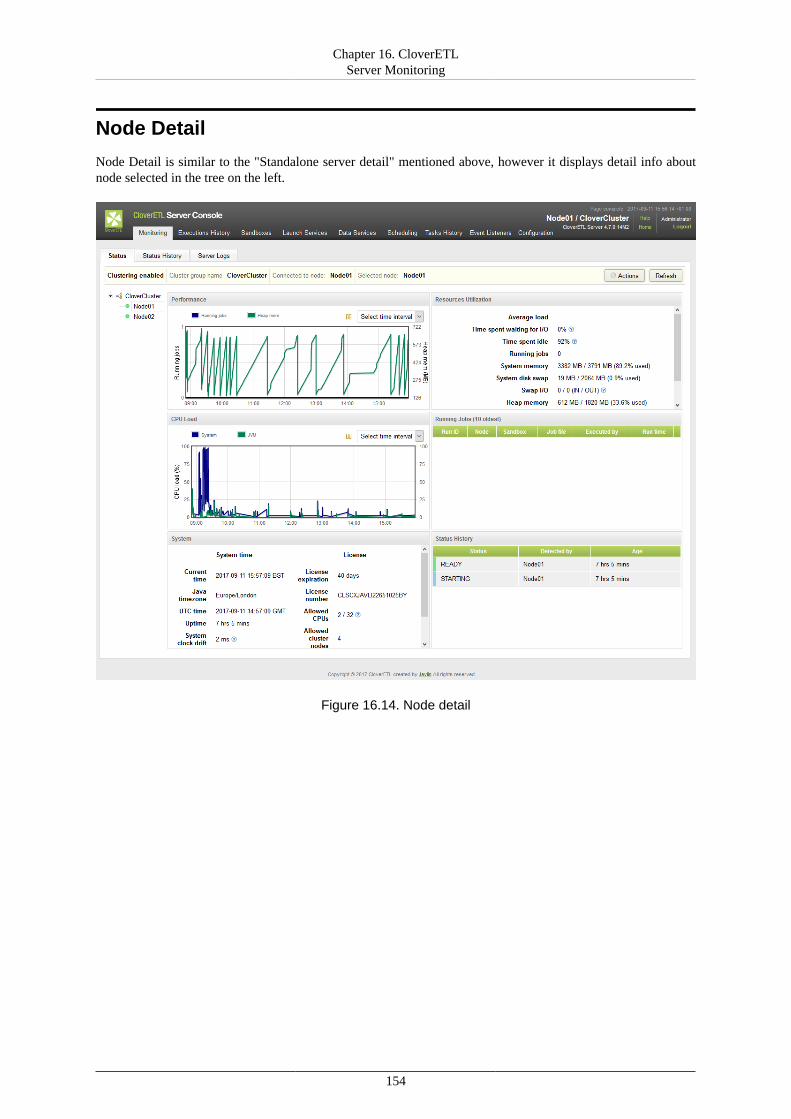
Chapter 16. CloverETLServer Monitoring
154
Node Detail
Node Detail is similar to the "Standalone server detail" mentioned above, however it displays detail info aboutnode selected in the tree on the left.
Figure 16.14. Node detail
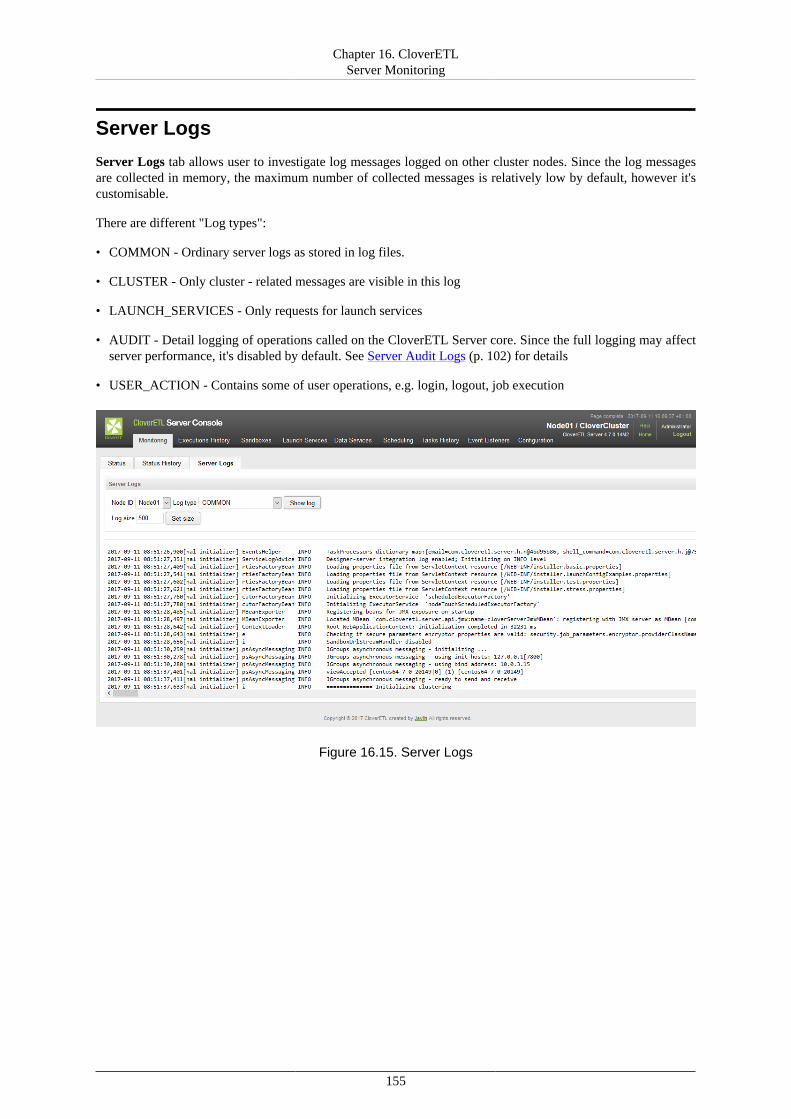
Chapter 16. CloverETLServer Monitoring
155
Server Logs
Server Logs tab allows user to investigate log messages logged on other cluster nodes. Since the log messagesare collected in memory, the maximum number of collected messages is relatively low by default, however it'scustomisable.
There are different "Log types":
• COMMON - Ordinary server logs as stored in log files.
• CLUSTER - Only cluster - related messages are visible in this log
• LAUNCH_SERVICES - Only requests for launch services
• AUDIT - Detail logging of operations called on the CloverETL Server core. Since the full logging may affectserver performance, it's disabled by default. See Server Audit Logs (p. 102) for details
• USER_ACTION - Contains some of user operations, e.g. login, logout, job execution
Figure 16.15. Server Logs
156
Chapter 17. Server Configuration MigrationCloverETL Server provides means to migrate its configuration (e.g. event listeners, schedules etc.) or parts of theconfiguration between separate instances of the server. A typical use case is deployment from test environmentto production - this involves not only deployment of CloverETL graphs, but also copying parts of configurationsuch as file event listeners etc.
Configuration migration is performed in 2 steps - export of the configuration from the source server, followedby import of the configuration at the destination server. After exporting, the configuration is stored as an XMLfile. The file can be modified manually before import, for example to migrate only parts of the configuration.Additionally, the configuration file can be stored in a versioning system (such as Subversion or Git) for versioningof the CloverETL Server configuration.
It is recommended to perform import of configuration on a suspended CloverETL Server and to plan formaintenance. Additionally, it is recommended to backup the CloverETL Server configuration database before theimport.
The following items are parts of the Server Configuration and can be migrated between servers:
• Users & Groups (see Chapter 14, Users and Groups (p. 114))
• Sandboxes (see Chapter 15, Server Side Job Files - Sandboxes (p. 135))
• Job Parameters (see Chapter 19, Graph/Jobflow Parameters (p. 164))
• Schedules (see Chapter 22, Scheduling (p. 189))
• Event Listeners (see Graph Event Listeners (p. 202), Jobflow Event Listeners (p. 209), JMS MessagesListeners (p. 212), File Event Listeners (remote and local) (p. 219))
• Launch Services (see Chapter 31, Launch Services (p. 247))
• Temp Spaces (see Chapter 12, Temp Space Management (p. 104))
Permissions for Configuration Migration
Whether a user is entitled to perform configuration migration is determined by having Server ConfigurationManagement permission; this permission has two sub-permissions: Export Server Configuration and Import ServerConfiguration (see Groups permissions (p. 122) for further information on permissions). These permissions areof higher priority than permissions related to a particular migrated item type - so even if the user does not havea permission e.g. to list server's schedules, with Export Server Configuration he will be allowed to export allof defined schedules. The same is true for adding and changing items with the Import Server Configurationpermission.
See Server Configuration permission (p. 132).
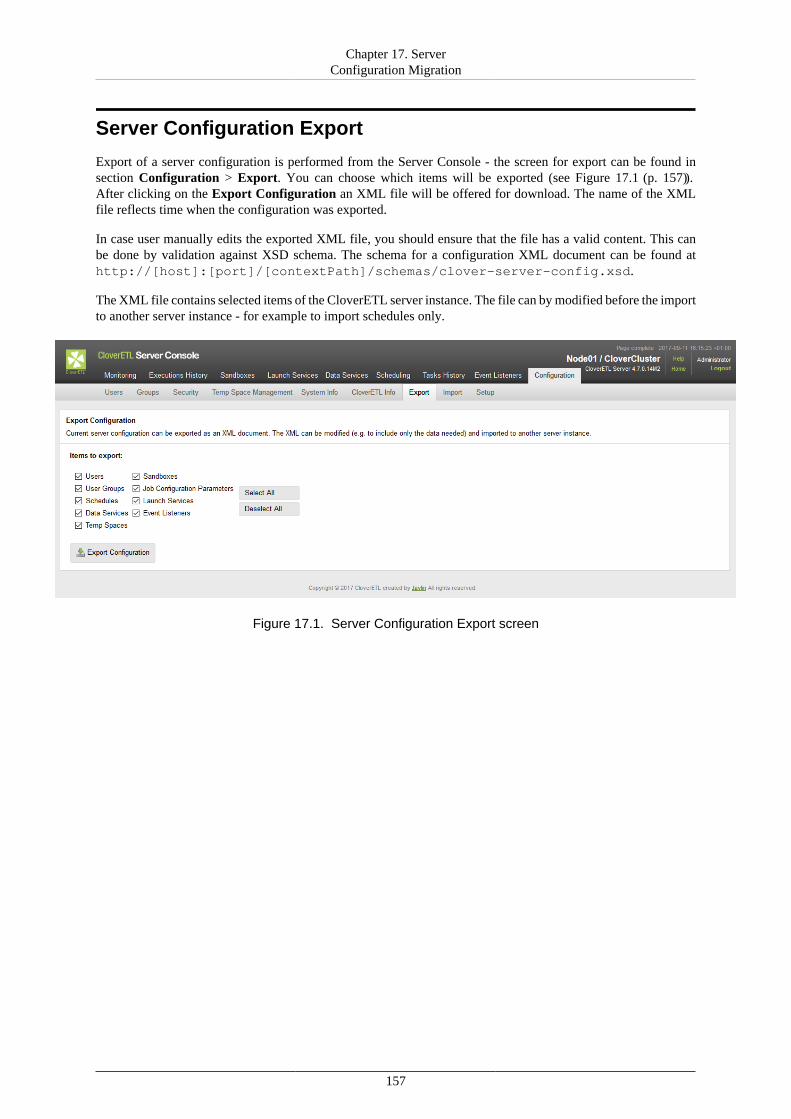
Chapter 17. ServerConfiguration Migration
157
Server Configuration Export
Export of a server configuration is performed from the Server Console - the screen for export can be found insection Configuration > Export. You can choose which items will be exported (see Figure 17.1 (p. 157)).After clicking on the Export Configuration an XML file will be offered for download. The name of the XMLfile reflects time when the configuration was exported.
In case user manually edits the exported XML file, you should ensure that the file has a valid content. This canbe done by validation against XSD schema. The schema for a configuration XML document can be found athttp://[host]:[port]/[contextPath]/schemas/clover-server-config.xsd.
The XML file contains selected items of the CloverETL server instance. The file can by modified before the importto another server instance - for example to import schedules only.
Figure 17.1. Server Configuration Export screen
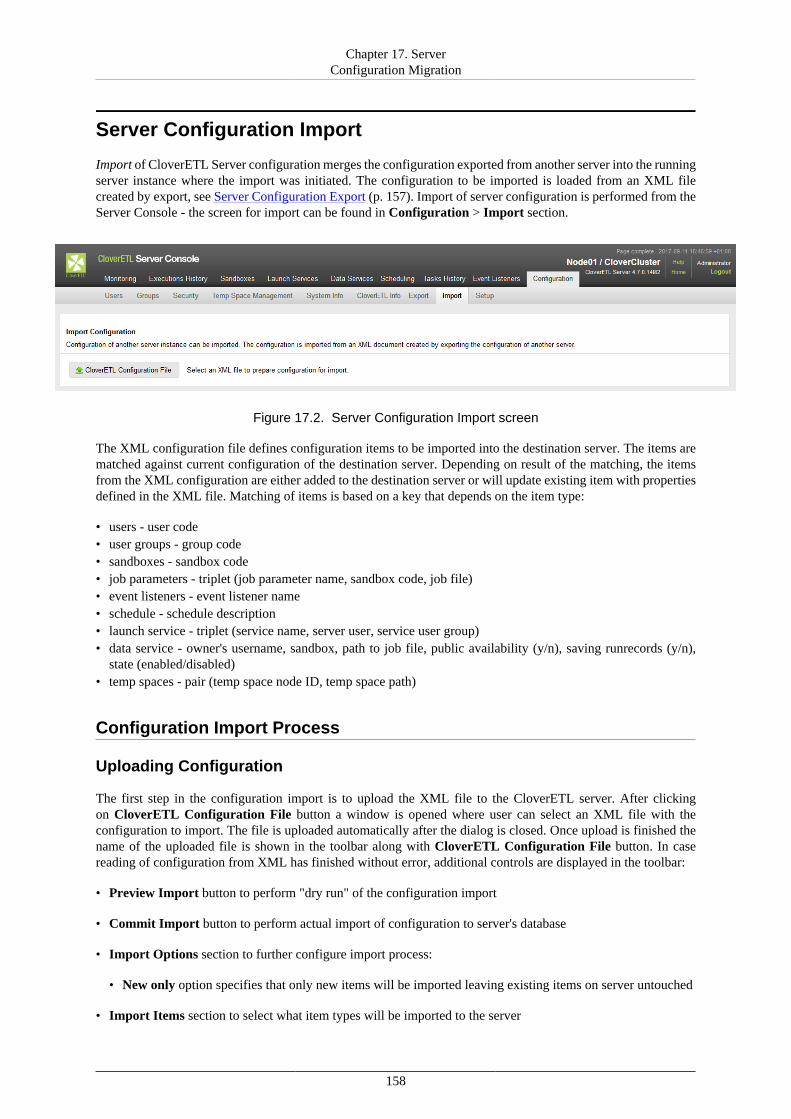
Chapter 17. ServerConfiguration Migration
158
Server Configuration Import
Import of CloverETL Server configuration merges the configuration exported from another server into the runningserver instance where the import was initiated. The configuration to be imported is loaded from an XML filecreated by export, see Server Configuration Export (p. 157). Import of server configuration is performed from theServer Console - the screen for import can be found in Configuration > Import section.
Figure 17.2. Server Configuration Import screen
The XML configuration file defines configuration items to be imported into the destination server. The items arematched against current configuration of the destination server. Depending on result of the matching, the itemsfrom the XML configuration are either added to the destination server or will update existing item with propertiesdefined in the XML file. Matching of items is based on a key that depends on the item type:
• users - user code• user groups - group code• sandboxes - sandbox code• job parameters - triplet (job parameter name, sandbox code, job file)• event listeners - event listener name• schedule - schedule description• launch service - triplet (service name, server user, service user group)• data service - owner's username, sandbox, path to job file, public availability (y/n), saving runrecords (y/n),
state (enabled/disabled)• temp spaces - pair (temp space node ID, temp space path)
Configuration Import Process
Uploading Configuration
The first step in the configuration import is to upload the XML file to the CloverETL server. After clickingon CloverETL Configuration File button a window is opened where user can select an XML file with theconfiguration to import. The file is uploaded automatically after the dialog is closed. Once upload is finished thename of the uploaded file is shown in the toolbar along with CloverETL Configuration File button. In casereading of configuration from XML has finished without error, additional controls are displayed in the toolbar:
• Preview Import button to perform "dry run" of the configuration import
• Commit Import button to perform actual import of configuration to server's database
• Import Options section to further configure import process:
• New only option specifies that only new items will be imported leaving existing items on server untouched
• Import Items section to select what item types will be imported to the server

Chapter 17. ServerConfiguration Migration
159
Figure 17.3. Server Configuration uploaded
NoteWhen transferring configuration from one server instance to another, it is important that theseinstances are of compatible, preferably the same, version. The user is notified when the source andtarget differ at at least minor version number (e.g. 3.4.1 and 3.5.0). It is also recommended not totransfer configuration between clustered and non-clustered server instances.
Verifying Configuration
Once the configuration is uploaded, the system executes "dry run" of the configuration import automatically. Thedry run performs configuration import, but no data is actually written do the server's database. The outcome ofthe operation is Import Log with messages related either to the configuration as a whole or to particular importeditems (see Figure 17.4 (p. 160)). There is also another view of Imported Items to list all added/updated itemsgrouped into tables according to their types. Each item has an icon indicating result of the item import operation:
• - the item has been added as a new one
• - the item has been updated
• - the item has been updated, but none of its properties has changed
• - the item has been removed
For the updated items, the state of the item before update is shown in the lower of the rows with less contrast textcolor, the new values of item's properties are shown in upper of the rows with regular text color. Actual changesare highlighted by background color change on respective property and also on both rows. The Imported Itemsview can be filtered using radio buttons above it:
• Changes only button will display only items that have been either added or actually changed by update
• All updates button will display all of imported items, event those identical to already present ones
Example 17.1. Example of simple configuration defining one new server user.
<?xml version="1.0" encoding="UTF-8" standalone="yes"?><cloverServerConfiguration xmlns="http://cloveretl.com/server/data" timeZone="Europe/Berlin"> <usersList> <user disabled="false"> <username>johnsmith</username> <firstName>John</firstName> <lastName>Smith</lastName> <email>[email protected]</email> <domain>clover</domain> <password>SITx8e1pjoo4em17As3LNw==</password> <passwordA1Digest>70151bae7488da4159ac5ccec97d0995</passwordA1Digest> <userGroups> <groupCode>all_users</groupCode>
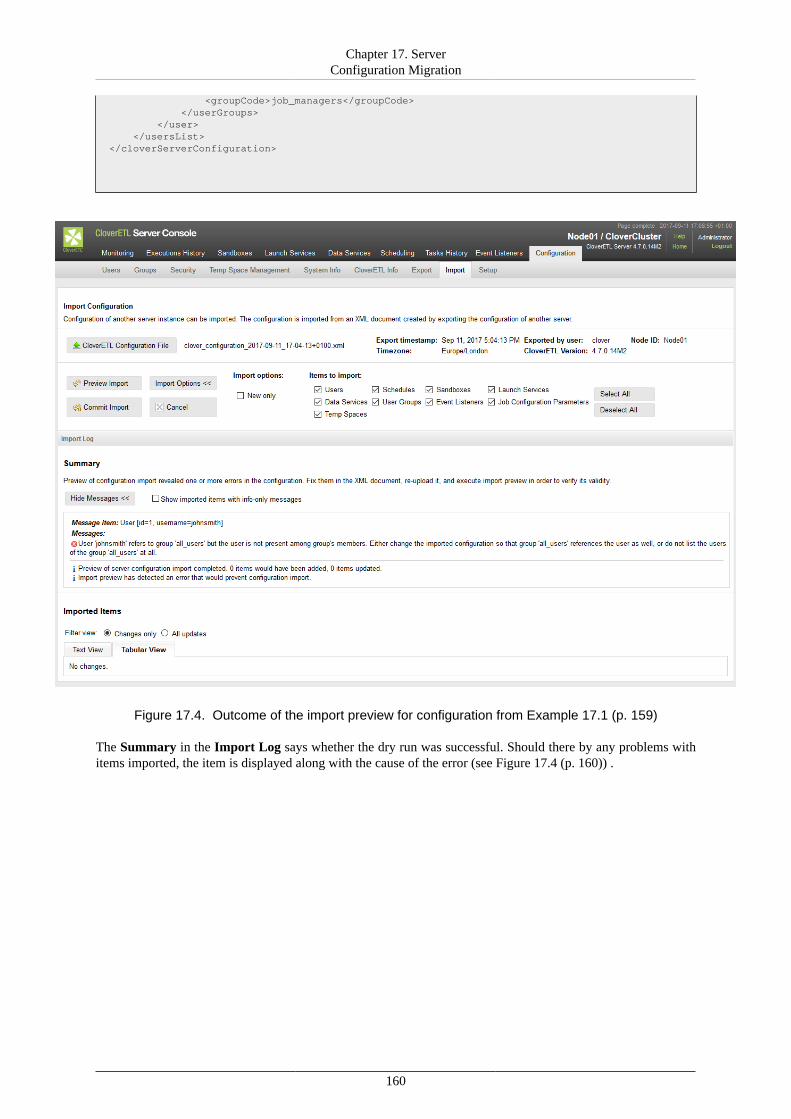
Chapter 17. ServerConfiguration Migration
160
<groupCode>job_managers</groupCode> </userGroups> </user> </usersList></cloverServerConfiguration>
Figure 17.4. Outcome of the import preview for configuration from Example 17.1 (p. 159)
The Summary in the Import Log says whether the dry run was successful. Should there by any problems withitems imported, the item is displayed along with the cause of the error (see Figure 17.4 (p. 160)) .
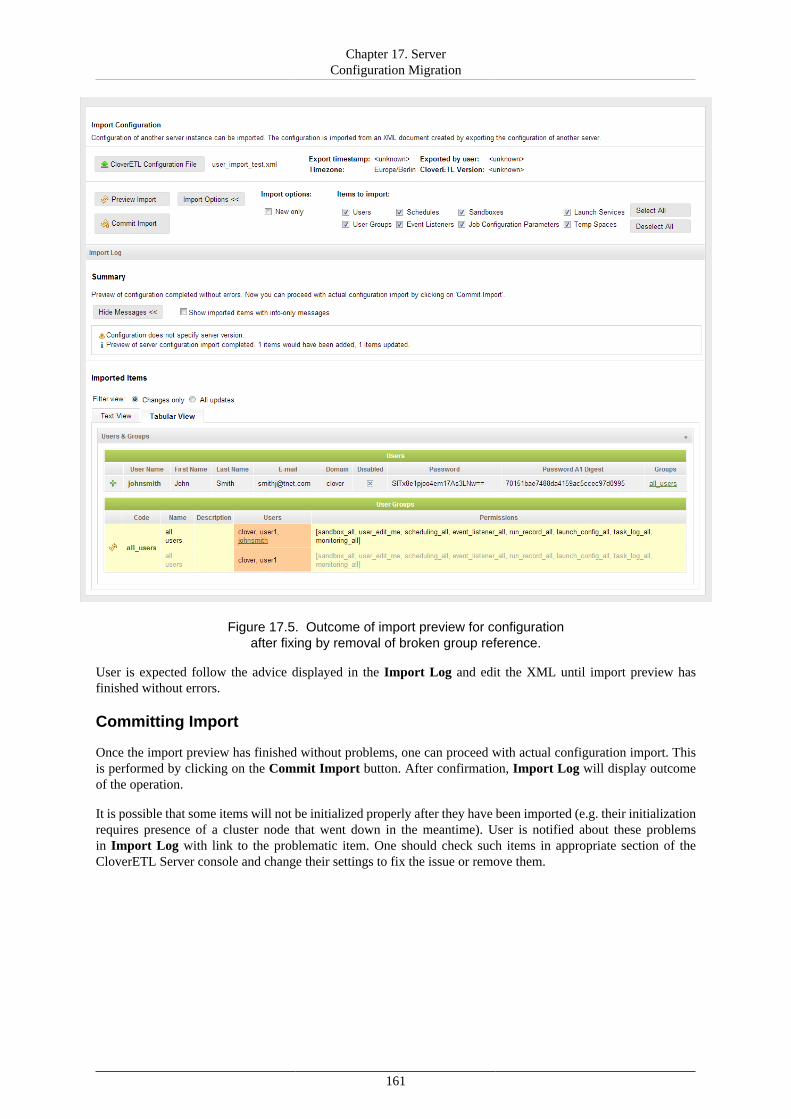
Chapter 17. ServerConfiguration Migration
161
Figure 17.5. Outcome of import preview for configurationafter fixing by removal of broken group reference.
User is expected follow the advice displayed in the Import Log and edit the XML until import preview hasfinished without errors.
Committing Import
Once the import preview has finished without problems, one can proceed with actual configuration import. Thisis performed by clicking on the Commit Import button. After confirmation, Import Log will display outcomeof the operation.
It is possible that some items will not be initialized properly after they have been imported (e.g. their initializationrequires presence of a cluster node that went down in the meantime). User is notified about these problemsin Import Log with link to the problematic item. One should check such items in appropriate section of theCloverETL Server console and change their settings to fix the issue or remove them.

162
Chapter 18. DiagnosticsCloverETL Server allows you to create a thread dump or a heap dump. The thread and heap dumps are useful forinvestigation of performance and memory issues.
In server GUI, go to Configuration →System Info →Diagnostics.
Heap Dump
Heap Dump is content of a JVM process memory stored in a binary file.
To download the Heap Dump, click Download button under Heap Dump section. The download of Heap Dumpmay take some time.
The Dump live objects only checkbox allows you to avoid dumping of objects awaiting garbage collection
You can use jvisualvm or jhat to view and analyze the heap dump.
Important
Heap Dump does not work on WebSphere. On WebSphere, you can create heap dumps usingadministration console. See IBM Knowledge Center for the instructions.
Thread Dump
Thread Dump is a list of existing JVM threads with their callstacks and held locking objects (if supported). Itcan be viewed in a text editor.
To download the thread dump, click Download button under Thread Dump section.
Required Permissions
To create Thread Dump or Heap Dump, following permissions are required:
• Configuration →Heap Memory Dump
See also Heap Memory Dump permission (p. 132).

Part V. Using Graphs
164
Chapter 19. Graph/Jobflow ParametersThe CloverETL Server passes a set of parameters to each graph or jobflow execution.
Keep in mind that ${paramName} placeholders (parameters) are resolved only during the initialization (loadingof XML definition file), so if you need the parameters to be resolved for each job execution, you cannot set thejob to be pooled. However, current parameter values are always accessible by inline Java code like this:
String runId = getGraph().getGraphProperties().getProperty("RUN_ID");
Properties may be added or replaced like this:
getGraph().getGraphProperties().setProperty("new_property", value );
This is set of parameters which are always set by CloverETL Server:
Table 19.1. Defaults for graph execution configuration - see section Graph config properties for details
key description
SANDBOX_CODE An identifier of a sandbox which contains executedgraph.
JOB_FILE A path to the file (graph, subgraph, jobflow). The pathrelative to sandbox root path.
SANDBOX_ROOT An absolute path sandbox root.
RUN_ID ID of the graph execution. In standalone mode or incluster mode, it is always unique. It may be lower then 0value, if the run record isn't persistent. See Chapter 31,Launch Services (p. 247) for details.
PARENT_RUN_ID Run ID of the graph execution which is a parent to thecurrent one. Useful when the execution is subgraph,child-job of some jobflow or worker for distributedtransformation in cluster. When the execution doesn'thave a parent, the PARENT_RUN_ID is the same asRUN_ID.
ROOT_RUN_ID Run ID of the graph execution which is root executionto the current one (the one which doesn't have parent).Useful when the execution is a subgraph, child-job ofsome jobflow or worker for distributed transformationin cluster. When the execution doesn't have a parent, theROOT_RUN_ID is the same as RUN_ID.
CLOVER_USERNAME Username of user who launched the graph or jobflow.
NODE_ID Id of node running the graph or jobflow.
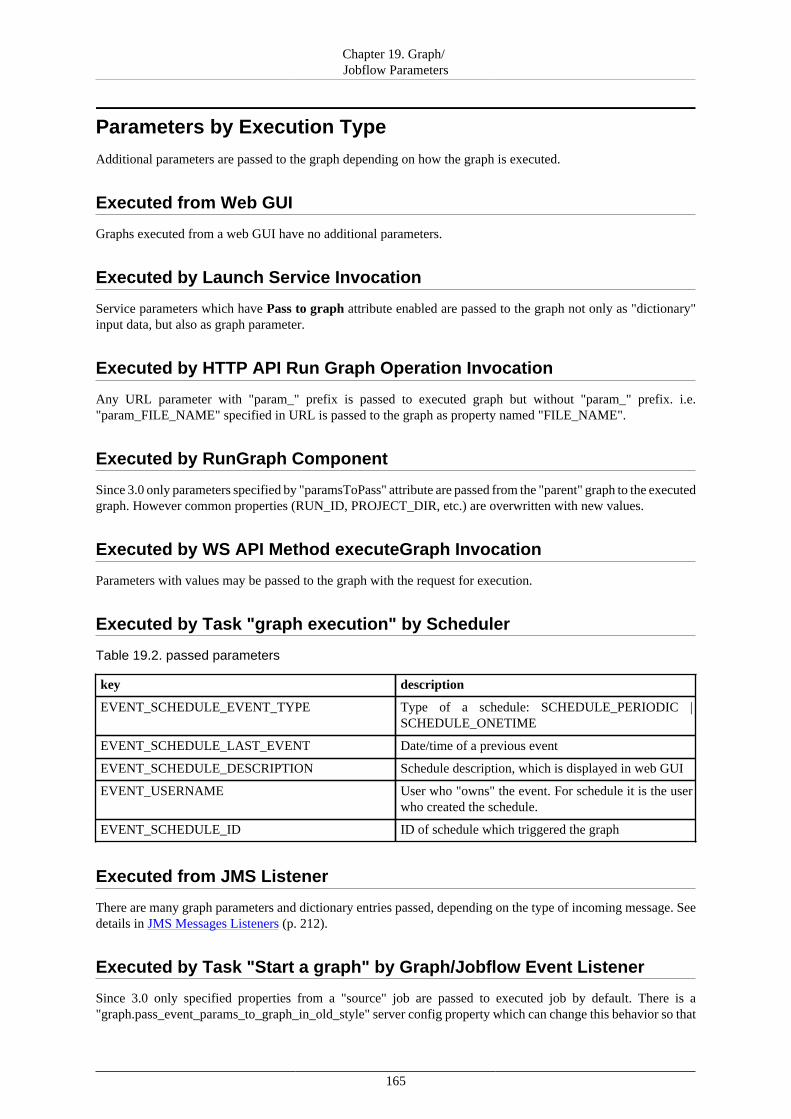
Chapter 19. Graph/Jobflow Parameters
165
Parameters by Execution Type
Additional parameters are passed to the graph depending on how the graph is executed.
Executed from Web GUI
Graphs executed from a web GUI have no additional parameters.
Executed by Launch Service Invocation
Service parameters which have Pass to graph attribute enabled are passed to the graph not only as "dictionary"input data, but also as graph parameter.
Executed by HTTP API Run Graph Operation Invocation
Any URL parameter with "param_" prefix is passed to executed graph but without "param_" prefix. i.e."param_FILE_NAME" specified in URL is passed to the graph as property named "FILE_NAME".
Executed by RunGraph Component
Since 3.0 only parameters specified by "paramsToPass" attribute are passed from the "parent" graph to the executedgraph. However common properties (RUN_ID, PROJECT_DIR, etc.) are overwritten with new values.
Executed by WS API Method executeGraph Invocation
Parameters with values may be passed to the graph with the request for execution.
Executed by Task "graph execution" by Scheduler
Table 19.2. passed parameters
key description
EVENT_SCHEDULE_EVENT_TYPE Type of a schedule: SCHEDULE_PERIODIC |SCHEDULE_ONETIME
EVENT_SCHEDULE_LAST_EVENT Date/time of a previous event
EVENT_SCHEDULE_DESCRIPTION Schedule description, which is displayed in web GUI
EVENT_USERNAME User who "owns" the event. For schedule it is the userwho created the schedule.
EVENT_SCHEDULE_ID ID of schedule which triggered the graph
Executed from JMS Listener
There are many graph parameters and dictionary entries passed, depending on the type of incoming message. Seedetails in JMS Messages Listeners (p. 212).
Executed by Task "Start a graph" by Graph/Jobflow Event Listener
Since 3.0 only specified properties from a "source" job are passed to executed job by default. There is a"graph.pass_event_params_to_graph_in_old_style" server config property which can change this behavior so that
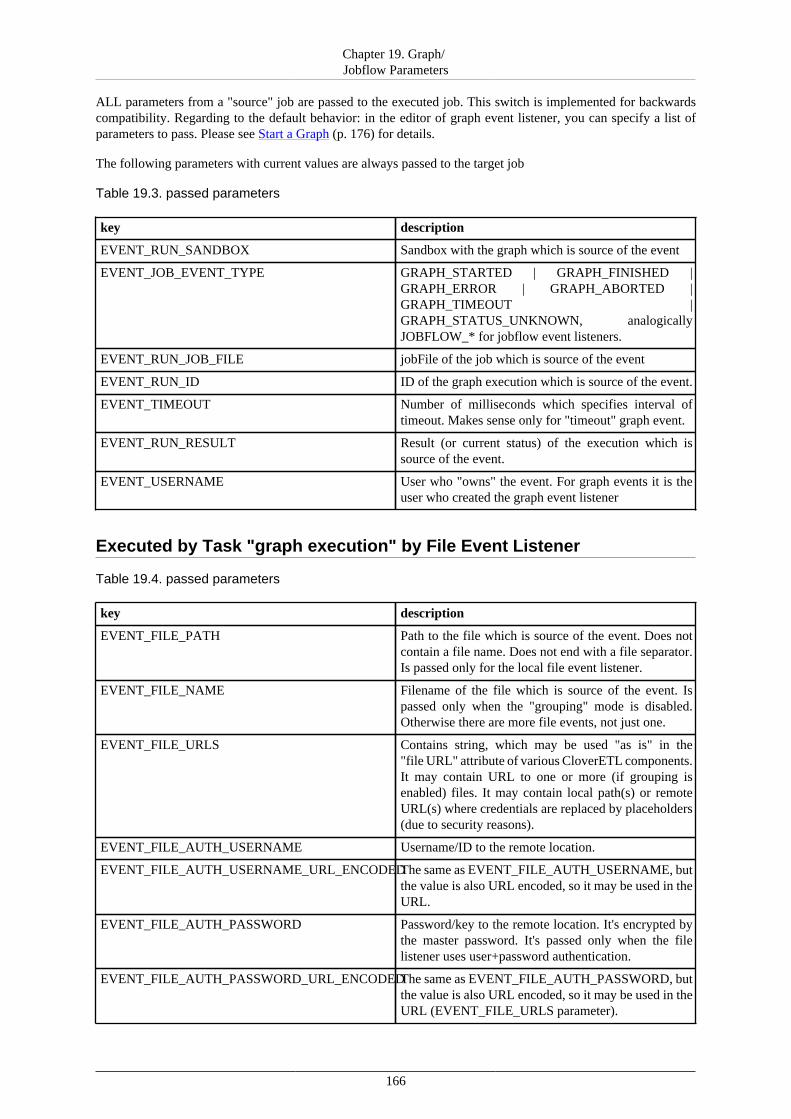
Chapter 19. Graph/Jobflow Parameters
166
ALL parameters from a "source" job are passed to the executed job. This switch is implemented for backwardscompatibility. Regarding to the default behavior: in the editor of graph event listener, you can specify a list ofparameters to pass. Please see Start a Graph (p. 176) for details.
The following parameters with current values are always passed to the target job
Table 19.3. passed parameters
key description
EVENT_RUN_SANDBOX Sandbox with the graph which is source of the event
EVENT_JOB_EVENT_TYPE GRAPH_STARTED | GRAPH_FINISHED |GRAPH_ERROR | GRAPH_ABORTED |GRAPH_TIMEOUT |GRAPH_STATUS_UNKNOWN, analogicallyJOBFLOW_* for jobflow event listeners.
EVENT_RUN_JOB_FILE jobFile of the job which is source of the event
EVENT_RUN_ID ID of the graph execution which is source of the event.
EVENT_TIMEOUT Number of milliseconds which specifies interval oftimeout. Makes sense only for "timeout" graph event.
EVENT_RUN_RESULT Result (or current status) of the execution which issource of the event.
EVENT_USERNAME User who "owns" the event. For graph events it is theuser who created the graph event listener
Executed by Task "graph execution" by File Event Listener
Table 19.4. passed parameters
key description
EVENT_FILE_PATH Path to the file which is source of the event. Does notcontain a file name. Does not end with a file separator.Is passed only for the local file event listener.
EVENT_FILE_NAME Filename of the file which is source of the event. Ispassed only when the "grouping" mode is disabled.Otherwise there are more file events, not just one.
EVENT_FILE_URLS Contains string, which may be used "as is" in the"file URL" attribute of various CloverETL components.It may contain URL to one or more (if grouping isenabled) files. It may contain local path(s) or remoteURL(s) where credentials are replaced by placeholders(due to security reasons).
EVENT_FILE_AUTH_USERNAME Username/ID to the remote location.
EVENT_FILE_AUTH_USERNAME_URL_ENCODEDThe same as EVENT_FILE_AUTH_USERNAME, butthe value is also URL encoded, so it may be used in theURL.
EVENT_FILE_AUTH_PASSWORD Password/key to the remote location. It's encrypted bythe master password. It's passed only when the filelistener uses user+password authentication.
EVENT_FILE_AUTH_PASSWORD_URL_ENCODEDThe same as EVENT_FILE_AUTH_PASSWORD, butthe value is also URL encoded, so it may be used in theURL (EVENT_FILE_URLS parameter).

Chapter 19. Graph/Jobflow Parameters
167
key description
EVENT_FILE_EVENT_TYPE SIZE | CHANGE_TIME | APPEARANCE |DISAPPEARANCE
EVENT_FILE_PATTERN Pattern specified in a file event listener
EVENT_FILE_LISTENER_ID
EVENT_USERNAME User who "owns" the event. For file events, it is the userwho created the file event listener.
Adding Another Graph Parameters
Additional "Graph Config Parameters"
It is possible to add so-called additional parameters in Web GUI - section Sandboxes for the selected graph or forall graphs in the selected sandbox. See details in Job Config Properties (p. 143).
Task "execute_graph" Parameters
The "execute graph" task may be triggered by schedule, graph event listener, or file event listener. Task editorallows you to specify key=value pairs which are passed to executed graph.
168
Chapter 20. TasksTask is a graph, jobflow, Groovy script, etc. that can be started manually, started on scheduled time, or triggeredby some event. Task basically specifies WHAT to do.
There are several tasks implemented for schedule and for graph event listener as follows:
• Start a Graph (p. 176)• Start a Jobflow (p. 178)• Abort job (p. 180)• Execute Shell Command (p. 173)• Send an Email (p. 169)• Execute Groovy Code (p. 186)• Archive Records (p. 181)
Tasks in Cluster Environment
In the Cluster environment, you can specify node where the task runs. The task can run on Any node or on oneof selected nodes. If there is no node ID specified, task may be processed on any cluster node, so in most cases itwill be processed on the same node where the event was triggered. If there are some nodeIDs specified, task willbe processed on the first node in the list which is connected in cluster and ready.
Tasks are used in
Chapter 22, Scheduling (p. 189)Chapter 24, Listeners (p. 200)Chapter 21, Manual Task Execution (p. 188)
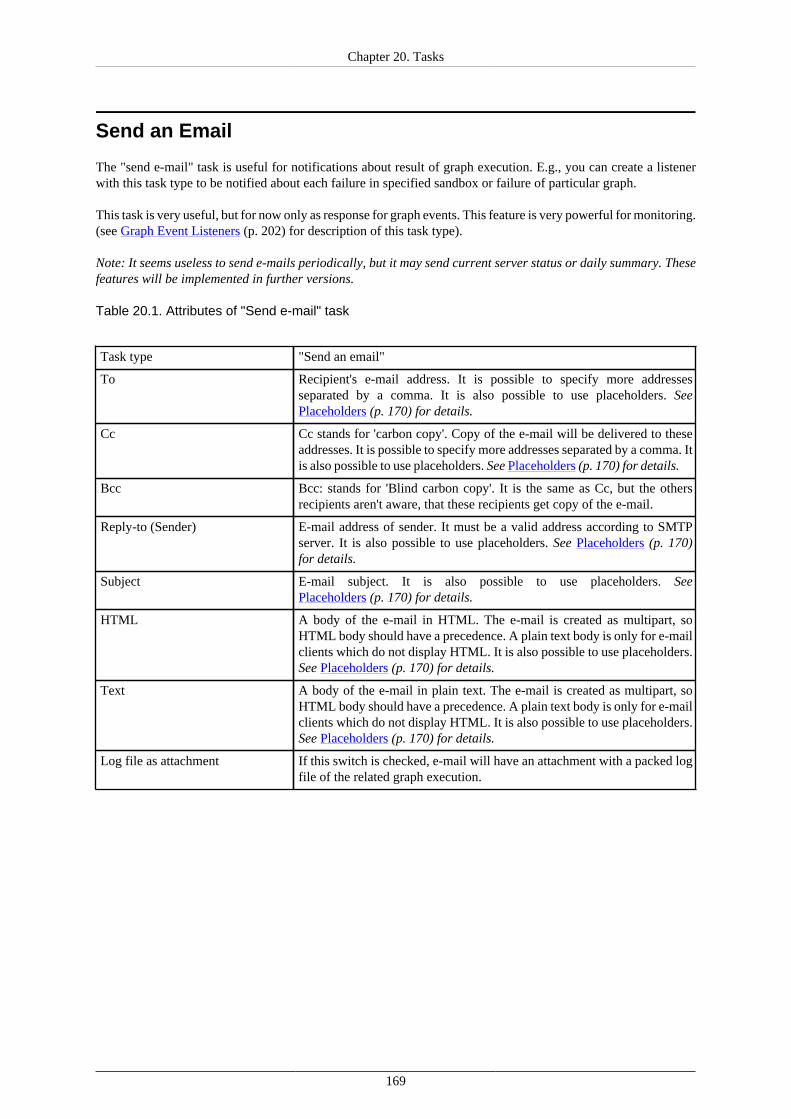
Chapter 20. Tasks
169
Send an Email
The "send e-mail" task is useful for notifications about result of graph execution. E.g., you can create a listenerwith this task type to be notified about each failure in specified sandbox or failure of particular graph.
This task is very useful, but for now only as response for graph events. This feature is very powerful for monitoring.(see Graph Event Listeners (p. 202) for description of this task type).
Note: It seems useless to send e-mails periodically, but it may send current server status or daily summary. Thesefeatures will be implemented in further versions.
Table 20.1. Attributes of "Send e-mail" task
Task type "Send an email"
To Recipient's e-mail address. It is possible to specify more addressesseparated by a comma. It is also possible to use placeholders. SeePlaceholders (p. 170) for details.
Cc Cc stands for 'carbon copy'. Copy of the e-mail will be delivered to theseaddresses. It is possible to specify more addresses separated by a comma. Itis also possible to use placeholders. See Placeholders (p. 170) for details.
Bcc Bcc: stands for 'Blind carbon copy'. It is the same as Cc, but the othersrecipients aren't aware, that these recipients get copy of the e-mail.
Reply-to (Sender) E-mail address of sender. It must be a valid address according to SMTPserver. It is also possible to use placeholders. See Placeholders (p. 170)for details.
Subject E-mail subject. It is also possible to use placeholders. SeePlaceholders (p. 170) for details.
HTML A body of the e-mail in HTML. The e-mail is created as multipart, soHTML body should have a precedence. A plain text body is only for e-mailclients which do not display HTML. It is also possible to use placeholders.See Placeholders (p. 170) for details.
Text A body of the e-mail in plain text. The e-mail is created as multipart, soHTML body should have a precedence. A plain text body is only for e-mailclients which do not display HTML. It is also possible to use placeholders.See Placeholders (p. 170) for details.
Log file as attachment If this switch is checked, e-mail will have an attachment with a packed logfile of the related graph execution.

Chapter 20. Tasks
170
Figure 20.1. Web GUI - send e-mail
Note: Do not forget to configure connection to SMTP server (See Part III, “Configuration” (p. 61) for details).
Placeholders
Placeholder may be used in some fields of tasks. They are especially useful for e-mail tasks, where you can generatecontent of e-mail according to context variables.
Note: In most cases, you can avoid this by using e-mail templates (See E-mail task for details)
These fields are preprocessed by Apache Velocity templating engine. See Velocity project URL for syntaxdescription http://velocity.apache.org/
There are several context variables, which you can use in placeholders and even for creating loops and conditions.
• event• now• user• run• sandbox

Chapter 20. Tasks
171
Some of them may be empty depending on type of event. E.g., if task is processed because of graph event, thenrun and sandbox variables contain related data, otherwise they are empty.

Chapter 20. Tasks
172
Table 20.2. Placeholders useful in e-mail templatesVariable name Contains
now Current date-time
user User, who caused this event. It may be an owner of a schedule, or someone whoexecuted a graph. It contains sub-properties, which are accessible using dot notation(i.e. ${user.email}) e-mail:
• user.email• user.username• user.firstName• user.lastName• user.groups (list of values)
run Data structure describing one single graph execution. It contains sub-properties,which are accessible using dot notation (i.e. ${run.jobFile})
• job.jobFile• job.status• job.startTime• job.stopTime• job.errNode• job.errMessage• job.errException• job.logLocation
tracking A data structure describing status of components in graph execution. It contains sub-properties, which are accessible using Velocity syntax for loops and conditions.
#if (${tracking})<table border="1" cellpadding="2" cellspacing="0">#foreach ($phase in $tracking.trackingPhases)<tr><td>phase: ${phase.phaseNum}</td> <td>${phase.executionTime} ms</td> <td></td><td></td><td></td></tr> #foreach ($node in $phase.trackingNodes) <tr><td>${node.nodeName}</td> <td>${node.result}</td> <td></td><td></td><td></td></tr> #foreach ($port in $node.trackingPorts) <tr><td></td><td></td> <td>${port.type}:${port.index}</td> <td>${port.totalBytes} B</td> <td>${port.totalRows} rows</td></tr> #end #end#end</table>#end}
sandbox Data structure describing a sandbox containing the executed graph. It contains sub-properties, which are accessible using dot notation (i.e. ${sandbox.name})
• sandbox.name• sandbox.code• sandbox.rootPath
schedule Data structure describing schedule which triggered this task. It contains sub-properties, which are accessible using dot notation (i.e. ${schedule.description})
• schedule.description• schedule.startTime• schedule.endTime• schedule.lastEvent• schedule.nextEvent• schedule.fireMisfired
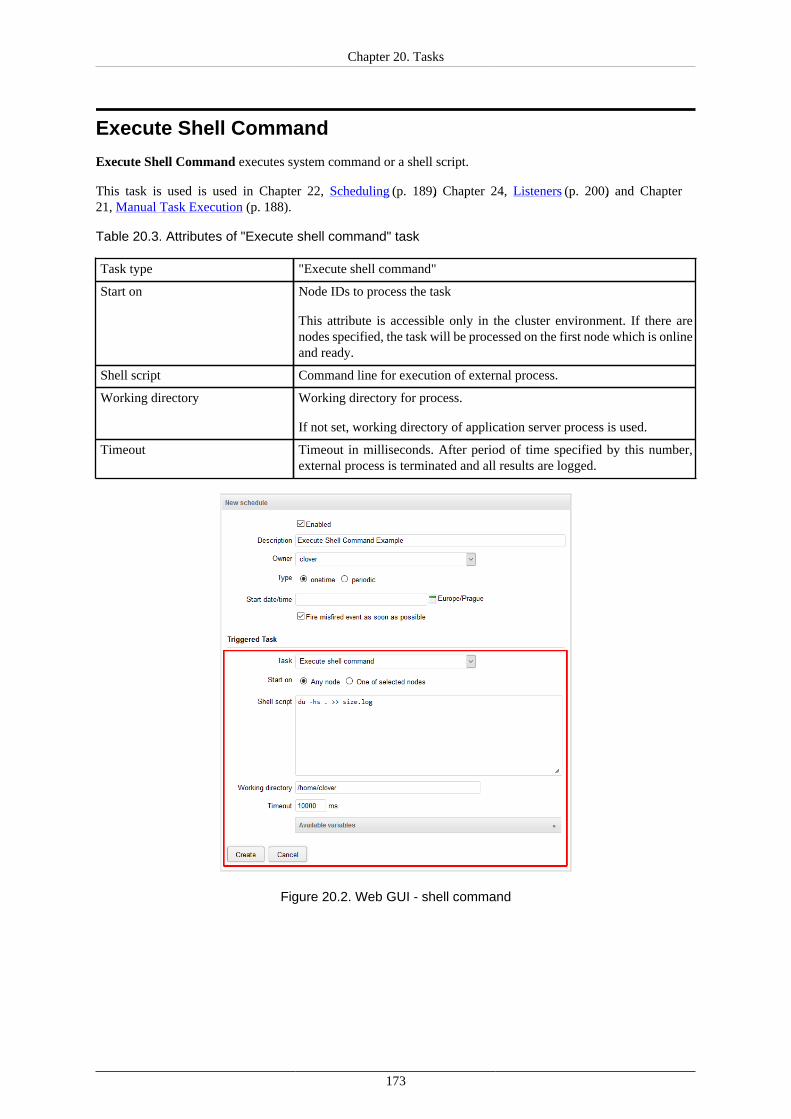
Chapter 20. Tasks
173
Execute Shell Command
Execute Shell Command executes system command or a shell script.
This task is used is used in Chapter 22, Scheduling (p. 189), Chapter 24, Listeners (p. 200), and Chapter21, Manual Task Execution (p. 188).
Table 20.3. Attributes of "Execute shell command" task
Task type "Execute shell command"
Start on Node IDs to process the task
This attribute is accessible only in the cluster environment. If there arenodes specified, the task will be processed on the first node which is onlineand ready.
Shell script Command line for execution of external process.
Working directory Working directory for process.
If not set, working directory of application server process is used.
Timeout Timeout in milliseconds. After period of time specified by this number,external process is terminated and all results are logged.
Figure 20.2. Web GUI - shell command
Chapter 20. Tasks
174
Execute Shell Command Parameters
Some parameters are available only in particular context: scheduling, event listeners, or manual task execution.
Table 20.4. Parameters of "Execute shell command" task
event Event that has triggered the task
now Current date-time
task The triggered task
user Object representing user who executed the graph/jobflow. It contains sub-properties that are accessible using dot notation (i.e. ${user.email})
• user.email• user.username• user.firstName• user.lastName• user.groups (list of values)
Table 20.5. Parameters of "Execute shell command" task - available in scheduling
schedule Object representing the schedule that triggered this task. Itcontains sub-properties that are accessible using dot notation (i.e.${schedule.description})
• schedule.description• schedule.startTime• schedule.endTime• schedule.lastEvent• schedule.nextEvent• schedule.fireMisfired
EVENT_USERNAME Username of the user who caused the event.
EVENT_USER_ID Numeric ID of the user who caused the event.
EVENT_SCHEDULE_DESCRIPTION Description of the schedule.
EVENT_SCHEDULE_EVENT_TYPE Type of the schedule - SCHEDULE_ONETIME orSCHEDULE_PERIODIC.
EVENT_SCHEDULE_ID Numeric ID of the schedule
EVENT_SCHEDULE_LAST_EVENT Date-time of the latest schedule triggering (injava.util.Date.toString() format).
Table 20.6. Parameters of "Execute shell command" task - available in listeners
run Object representing single graph/jobflow execution. It contains sub-propertiesthat are accessible using dot notation (i.e. ${run.jobFile}).
• run.jobFile• run.status• run.startTime• run.stopTime• run.errNode• run.errMessage• run.errException
Chapter 20. Tasks
175
sandbox Object representing a sandbox containing the executed graph/jobflow.It contains sub-properties that are accessible using dot notation (i.e.${sandbox.name})
• sandbox.name• sandbox.code• sandbox.rootPath
tracking Object represeting status of components in a graph execution. It contains sub-properties that are accessible using Velocity syntax for loops and conditions.
EVENT_USERNAME Username of the user who caused the event.
EVENT_USER_ID Numeric ID of the user who caused the event.
EVENT_RUN_SANDBOX Code of the sandbox containing the graph/jobflow.
EVENT_RUN_JOB_FILE Sandbox-relative path to the graph/jobflow file.
EVENT_RUN_RESULT Current status of the graph/jobflow execution
• N_A• READY• RUNNING• WAITING• FINISHED_OK• ERROR• ABORTED• TIMEOUT• UNKNOWN
EVENT_RUN_ID Numeric ID of the run record representing graph/jobflow execution
EVENT_TIMEOUT Specified timeout (in milliseconds) for the TIMEOUT event to occur.
EVENT_JOB_EVENT_TYPE Graph event that triggered the task
• GRAPH_STARTED• GRAPH_PHASE_FINISHED• GRAPH_FINISHED• GRAPH_ERROR• GRAPH_ABORTED• GRAPH_TIMEOUT• GRAPH_STATUS_UNKNOWN
Table 20.7. Parameters of "Execute shell command" task - available in manual task execution
parameters Task parameters - container for String-String key-value pairs passed to thistask.
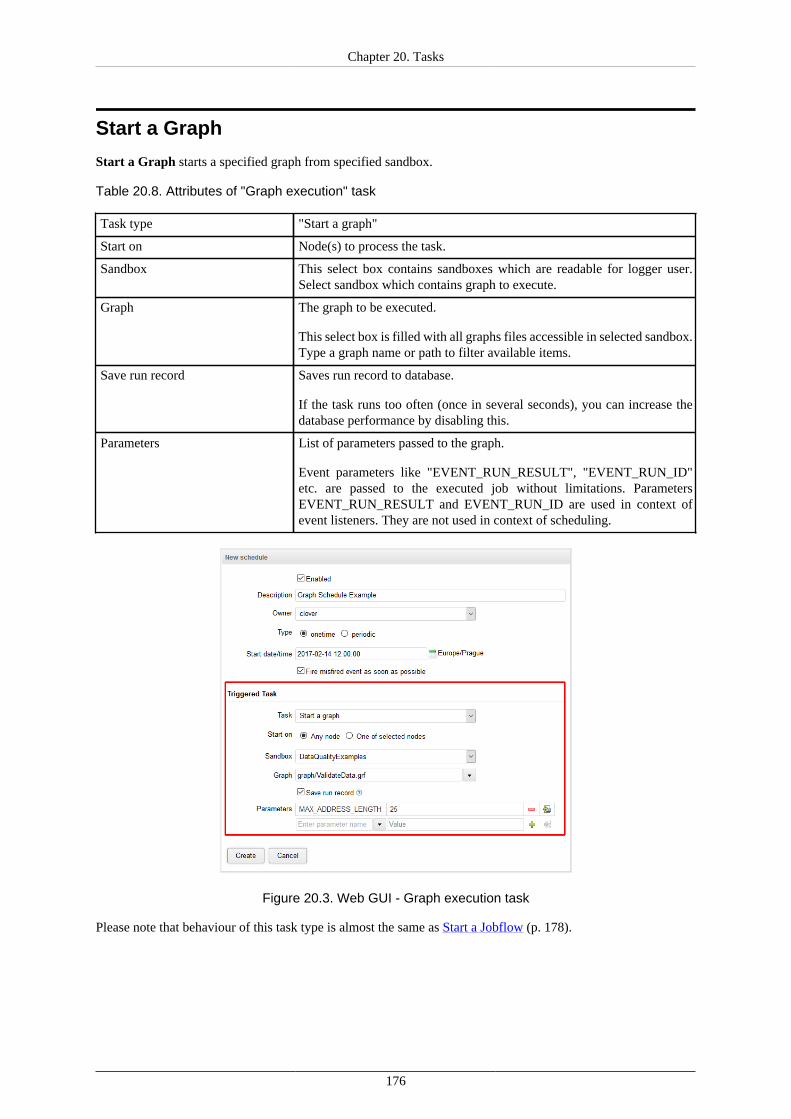
Chapter 20. Tasks
176
Start a Graph
Start a Graph starts a specified graph from specified sandbox.
Table 20.8. Attributes of "Graph execution" task
Task type "Start a graph"
Start on Node(s) to process the task.
Sandbox This select box contains sandboxes which are readable for logger user.Select sandbox which contains graph to execute.
Graph The graph to be executed.
This select box is filled with all graphs files accessible in selected sandbox.Type a graph name or path to filter available items.
Save run record Saves run record to database.
If the task runs too often (once in several seconds), you can increase thedatabase performance by disabling this.
Parameters List of parameters passed to the graph.
Event parameters like "EVENT_RUN_RESULT", "EVENT_RUN_ID"etc. are passed to the executed job without limitations. ParametersEVENT_RUN_RESULT and EVENT_RUN_ID are used in context ofevent listeners. They are not used in context of scheduling.
Figure 20.3. Web GUI - Graph execution task
Please note that behaviour of this task type is almost the same as Start a Jobflow (p. 178).

Chapter 20. Tasks
177
Parameters
You can start a graph with parameters.
To start a graph with parameter choose an existing parameter from a list, set its value, and click the plus signbutton at the end of line.
Figure 20.4. Web GUI - Graph execution task
If the graph is started by event listener, it receives some additional parameters from the triggering job.
Parameters passed to graph by Event Listeners
Table 20.9. Additional parameters available in Event Listeners
EVENT_USERNAME Username of the user who caused the event
EVENT_USER_ID Numeric ID of the user who caused the event.
EVENT_RUN_SANDBOX Code of the sandbox containing the graph/jobflow
EVENT_RUN_JOB_FILE Sandbox-relative path to the graph/jobflow file.
EVENT_RUN_RESULT Current status of the graph/jobflow execution (N_A, READY,RUNNING, WAITING, FINISHED_OK, ERROR, ABORTED, TIMEOUTor UNKNOWN).
EVENT_RUN_ID Numeric ID of the run record representing graph/jobflow execution.
EVENT_JOB_EVENT_TYPE Graph/Jobflow event type that triggered the task.
EVENT_TIMEOUT Specified timeout (in milliseconds) for the TIMEOUT event to occur
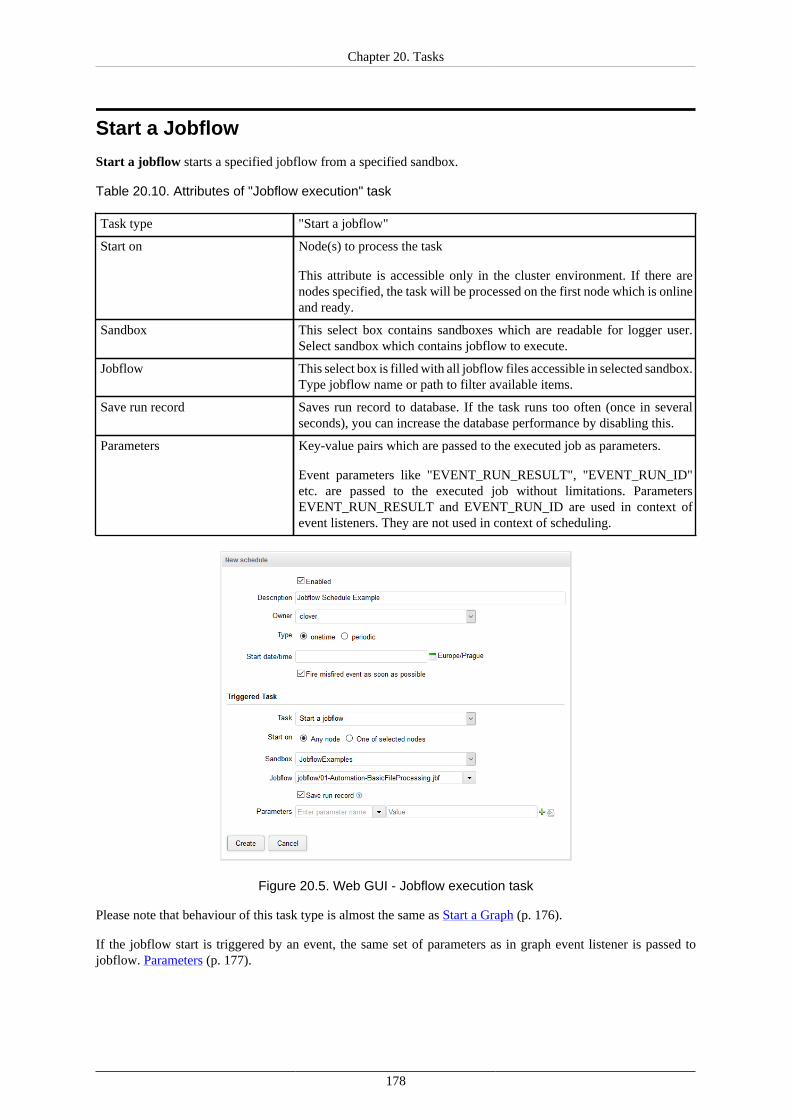
Chapter 20. Tasks
178
Start a Jobflow
Start a jobflow starts a specified jobflow from a specified sandbox.
Table 20.10. Attributes of "Jobflow execution" task
Task type "Start a jobflow"
Start on Node(s) to process the task
This attribute is accessible only in the cluster environment. If there arenodes specified, the task will be processed on the first node which is onlineand ready.
Sandbox This select box contains sandboxes which are readable for logger user.Select sandbox which contains jobflow to execute.
Jobflow This select box is filled with all jobflow files accessible in selected sandbox.Type jobflow name or path to filter available items.
Save run record Saves run record to database. If the task runs too often (once in severalseconds), you can increase the database performance by disabling this.
Parameters Key-value pairs which are passed to the executed job as parameters.
Event parameters like "EVENT_RUN_RESULT", "EVENT_RUN_ID"etc. are passed to the executed job without limitations. ParametersEVENT_RUN_RESULT and EVENT_RUN_ID are used in context ofevent listeners. They are not used in context of scheduling.
Figure 20.5. Web GUI - Jobflow execution task
Please note that behaviour of this task type is almost the same as Start a Graph (p. 176).
If the jobflow start is triggered by an event, the same set of parameters as in graph event listener is passed tojobflow. Parameters (p. 177).

Chapter 20. Tasks
179
Start a Profiler Job
Start a profiler job starts a specified profiler job from a specified directory.
You can pass parameters to the profiler job in the same way as in case you Start a Graph (p. 176) or Start aJobflow (p. 178).
In case of triggering the profiler job by event listener, the same set of additional parameters, as in case of executionof graph, is passed to the profiler job. See Parameters passed to graph by Event Listeners (p. 177).
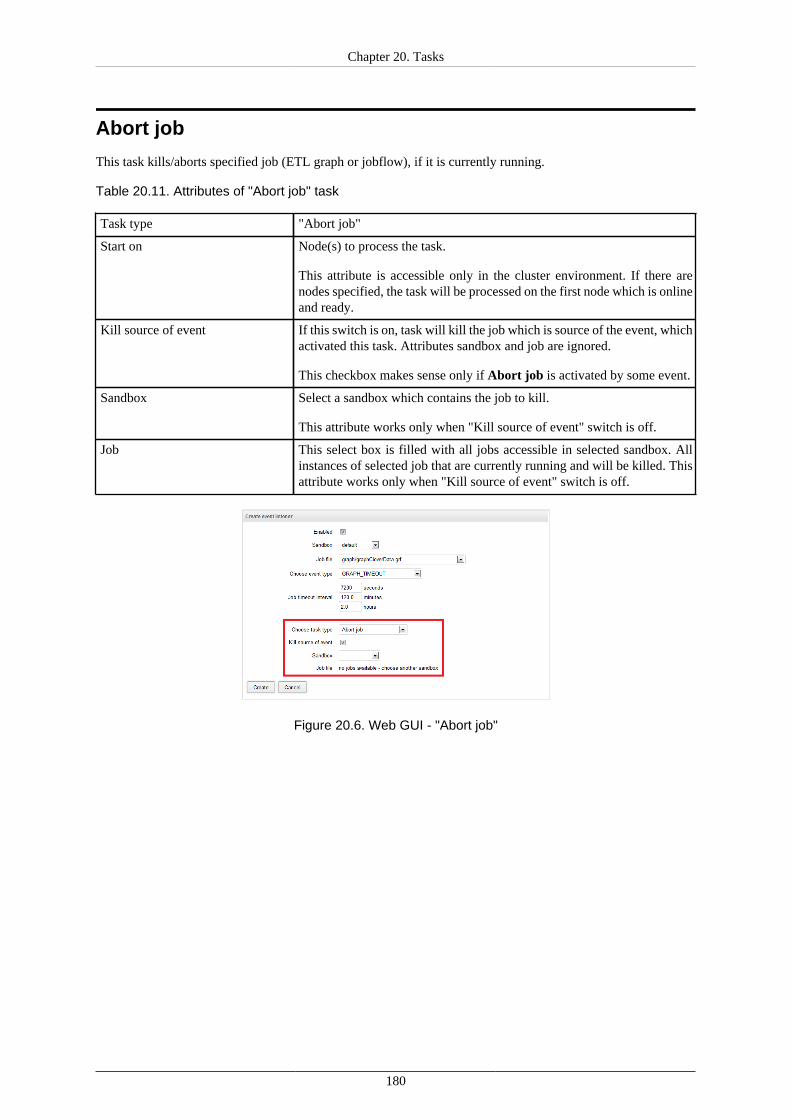
Chapter 20. Tasks
180
Abort job
This task kills/aborts specified job (ETL graph or jobflow), if it is currently running.
Table 20.11. Attributes of "Abort job" task
Task type "Abort job"
Start on Node(s) to process the task.
This attribute is accessible only in the cluster environment. If there arenodes specified, the task will be processed on the first node which is onlineand ready.
Kill source of event If this switch is on, task will kill the job which is source of the event, whichactivated this task. Attributes sandbox and job are ignored.
This checkbox makes sense only if Abort job is activated by some event.
Sandbox Select a sandbox which contains the job to kill.
This attribute works only when "Kill source of event" switch is off.
Job This select box is filled with all jobs accessible in selected sandbox. Allinstances of selected job that are currently running and will be killed. Thisattribute works only when "Kill source of event" switch is off.
Figure 20.6. Web GUI - "Abort job"

Chapter 20. Tasks
181
Archive Records
This task can archive (or delete) obsolete records from DB.
Table 20.12. Attributes of "Archivator" task
Task type "Archivator"
Start on This attribute specifies cluster node on which may process the task.
This attribute is accessible only in the cluster environment.
If it's empty, it may be any node, if there are nodes specified, the task willbe processed on the first node which is online and ready.
Archivator type There are two possible values: "archive" or "delete".
Delete option removes records without any possibility of UNDO operation.
Archive option removes records from DB, but creates a ZIP package withCSV files containing deleted data.
Older then Time period (in minutes) - it specifies which records are evaluated asobsolete. Records older then the specified interval are stored in archives.
Output path for archives This attribute makes sense only for "archive" type.
Include executions history
Include temp files If checked, archivator removes all graph temporary files older than thegiven timestamp defined in "Older than" attribute. The temporary files arefiles with graph debug data, dictionary files and files created by graphcomponents.
Include tasks history If checked, archivator will include run records. Log files of graph runs areincluded as well.
Include profiler runs If checked, archivator will include profiler job results.
Include server instance history
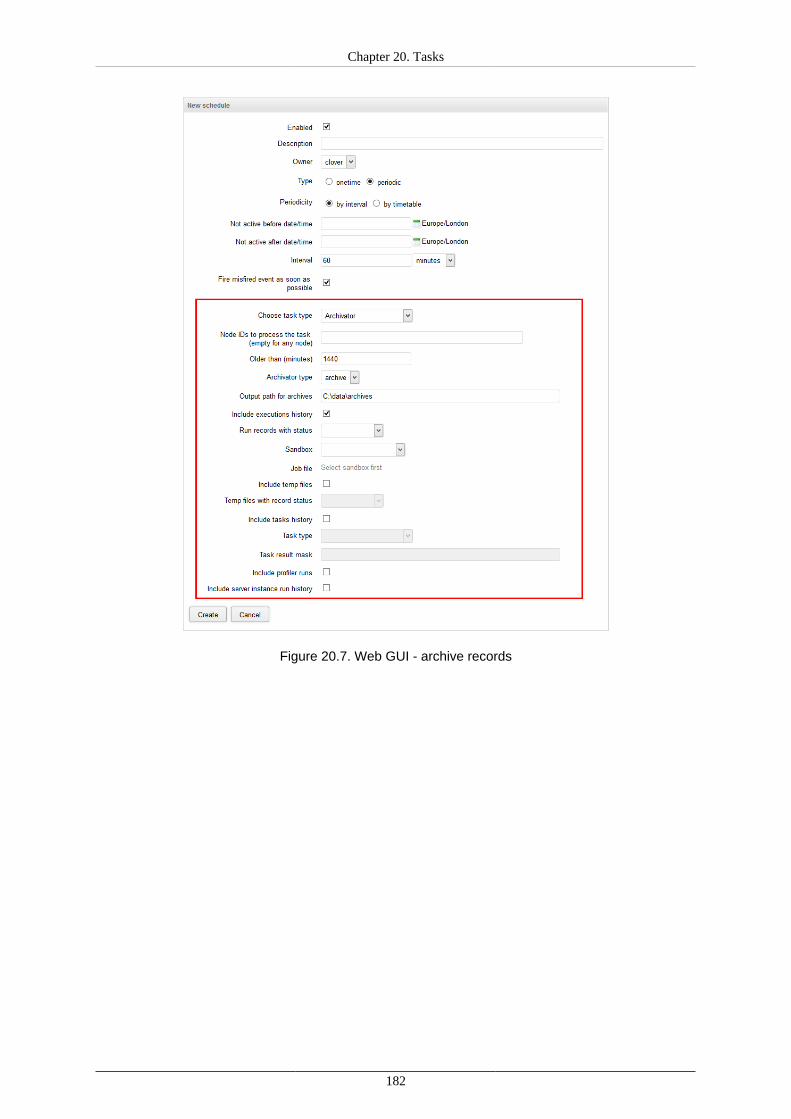
Chapter 20. Tasks
182
Figure 20.7. Web GUI - archive records
Chapter 20. Tasks
183
Send a JMS Message
This type of task is useful for notifications about result of graph execution. E.g. you can create a graph eventlistener with this task type to be notified about each failure in a specific sandbox or failure of a particular graph.
JMS messaging requires JMS API (jms.jar) and third-party libraries. All these libraries must be available onapplication server classpath. Some application servers contain these libraries by default, some do not, thus thelibraries must be added explicitly.
Table 20.13. Attributes of JMS message task
Task type "JMS message"
Initial context Choose between default and custom initial context.
Initial context class name A full class name of javax.naming.InitialContext implementation. EachJMS provider has its own implementation. E.g., for Apache MQ it is"org.apache.activemq.jndi.ActiveMQInitialContextFactory". If it is empty,server uses the default initial context.
Broker URL
Connection factory JNDI name A JNDI name of a connection factory. It depends on a JMS provider.
Destination JNDI name JNDI name of a message queue/topic on the server
Username Username for connection to a JMS message broker
Password Password for connection to a JMS message broker
URL URL of a JMS message broker
JMS pattern This select box is available only when user is creating a new record. Itcontains all predefined JMS message patterns. If user chooses any of them,text field below is automatically filled with value from pattern.
Text Body of a JMS message. It is also possible to use placeholders. SeePlaceholders (p. 170) of send e-mail task for details.
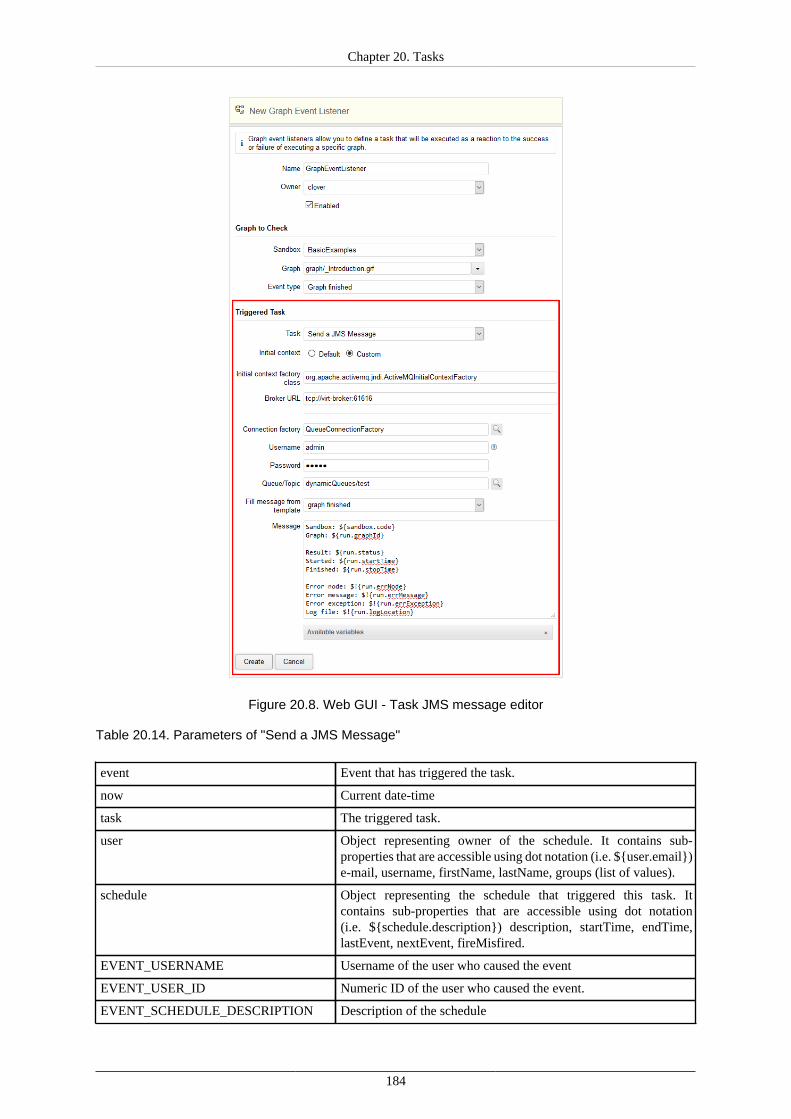
Chapter 20. Tasks
184
Figure 20.8. Web GUI - Task JMS message editor
Table 20.14. Parameters of "Send a JMS Message"
event Event that has triggered the task.
now Current date-time
task The triggered task.
user Object representing owner of the schedule. It contains sub-properties that are accessible using dot notation (i.e. ${user.email})e-mail, username, firstName, lastName, groups (list of values).
schedule Object representing the schedule that triggered this task. Itcontains sub-properties that are accessible using dot notation(i.e. ${schedule.description}) description, startTime, endTime,lastEvent, nextEvent, fireMisfired.
EVENT_USERNAME Username of the user who caused the event
EVENT_USER_ID Numeric ID of the user who caused the event.
EVENT_SCHEDULE_DESCRIPTION Description of the schedule

Chapter 20. Tasks
185
EVENT_SCHEDULE_EVENT_TYPE Type of the schedule - SCHEDULE_ONETIME orSCHEDULE_PERIODIC.
EVENT_SCHEDULE_ID Numeric ID of the schedule.
EVENT_SCHEDULE_LAST_EVENT Date-time of the latest schedule triggering (injava.util.Date.toString() format).
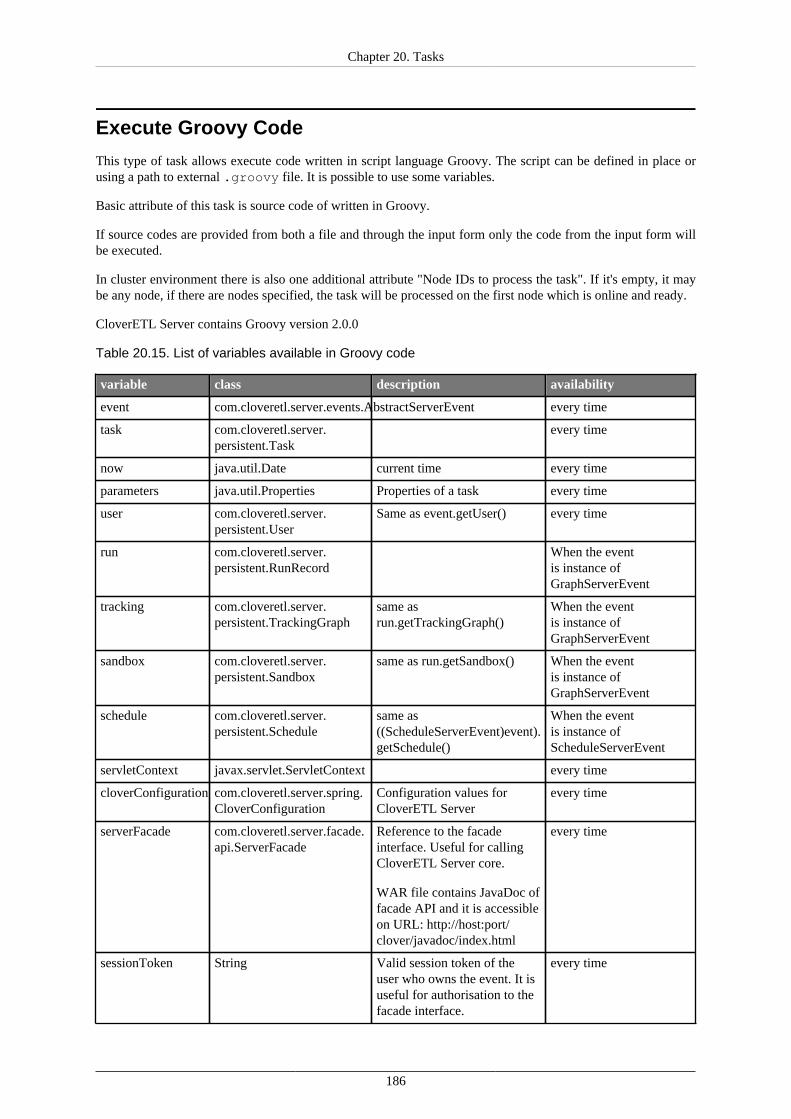
Chapter 20. Tasks
186
Execute Groovy Code
This type of task allows execute code written in script language Groovy. The script can be defined in place orusing a path to external .groovy file. It is possible to use some variables.
Basic attribute of this task is source code of written in Groovy.
If source codes are provided from both a file and through the input form only the code from the input form willbe executed.
In cluster environment there is also one additional attribute "Node IDs to process the task". If it's empty, it maybe any node, if there are nodes specified, the task will be processed on the first node which is online and ready.
CloverETL Server contains Groovy version 2.0.0
Table 20.15. List of variables available in Groovy code
variable class description availability
event com.cloveretl.server.events.AbstractServerEvent every time
task com.cloveretl.server.persistent.Task
every time
now java.util.Date current time every time
parameters java.util.Properties Properties of a task every time
user com.cloveretl.server.persistent.User
Same as event.getUser() every time
run com.cloveretl.server.persistent.RunRecord
When the eventis instance ofGraphServerEvent
tracking com.cloveretl.server.persistent.TrackingGraph
same asrun.getTrackingGraph()
When the eventis instance ofGraphServerEvent
sandbox com.cloveretl.server.persistent.Sandbox
same as run.getSandbox() When the eventis instance ofGraphServerEvent
schedule com.cloveretl.server.persistent.Schedule
same as((ScheduleServerEvent)event).getSchedule()
When the eventis instance ofScheduleServerEvent
servletContext javax.servlet.ServletContext every time
cloverConfiguration com.cloveretl.server.spring.CloverConfiguration
Configuration values forCloverETL Server
every time
serverFacade com.cloveretl.server.facade.api.ServerFacade
Reference to the facadeinterface. Useful for callingCloverETL Server core.
WAR file contains JavaDoc offacade API and it is accessibleon URL: http://host:port/clover/javadoc/index.html
every time
sessionToken String Valid session token of theuser who owns the event. It isuseful for authorisation to thefacade interface.
every time
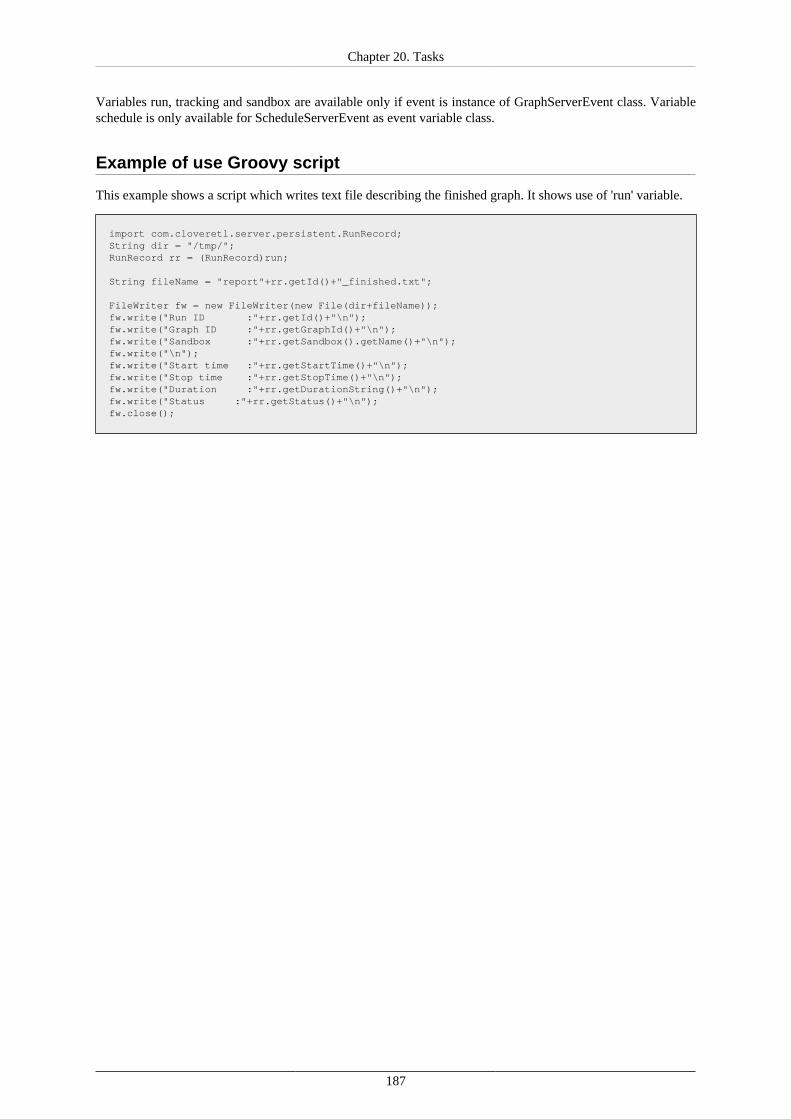
Chapter 20. Tasks
187
Variables run, tracking and sandbox are available only if event is instance of GraphServerEvent class. Variableschedule is only available for ScheduleServerEvent as event variable class.
Example of use Groovy script
This example shows a script which writes text file describing the finished graph. It shows use of 'run' variable.
import com.cloveretl.server.persistent.RunRecord;String dir = "/tmp/";RunRecord rr = (RunRecord)run;
String fileName = "report"+rr.getId()+"_finished.txt";
FileWriter fw = new FileWriter(new File(dir+fileName));fw.write("Run ID :"+rr.getId()+"\n");fw.write("Graph ID :"+rr.getGraphId()+"\n");fw.write("Sandbox :"+rr.getSandbox().getName()+"\n");fw.write("\n");fw.write("Start time :"+rr.getStartTime()+"\n");fw.write("Stop time :"+rr.getStopTime()+"\n");fw.write("Duration :"+rr.getDurationString()+"\n");fw.write("Status :"+rr.getStatus()+"\n");fw.close();
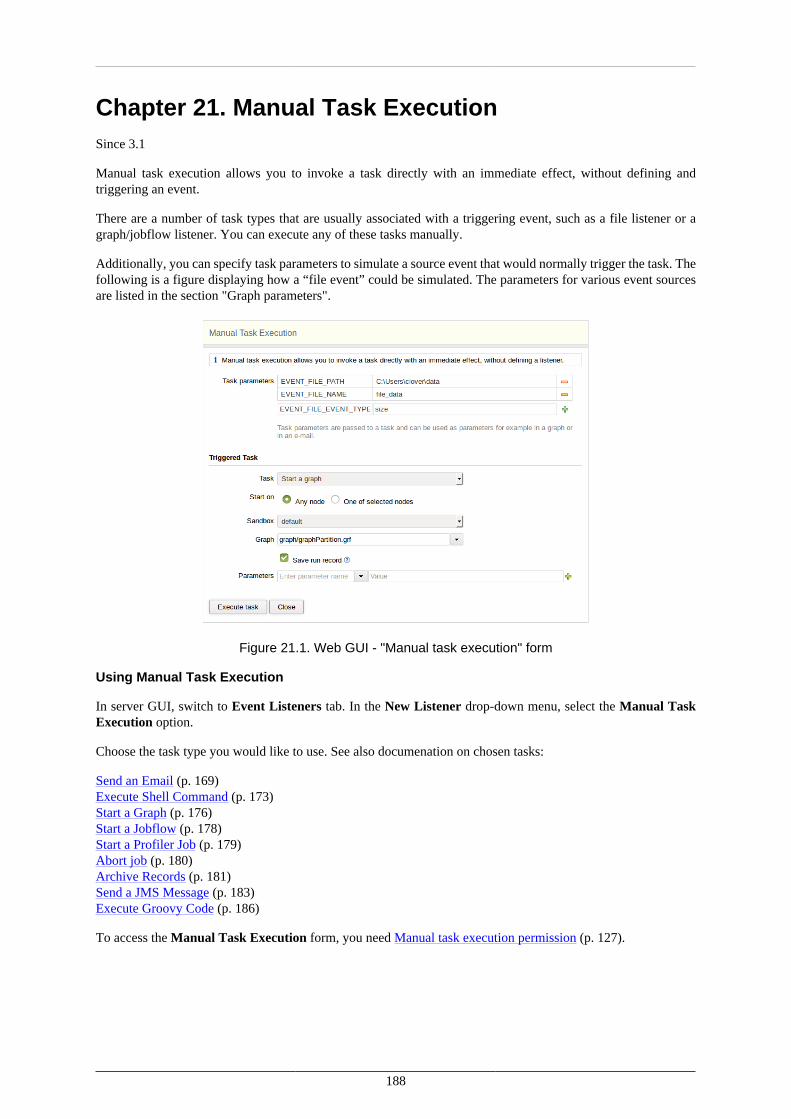
188
Chapter 21. Manual Task ExecutionSince 3.1
Manual task execution allows you to invoke a task directly with an immediate effect, without defining andtriggering an event.
There are a number of task types that are usually associated with a triggering event, such as a file listener or agraph/jobflow listener. You can execute any of these tasks manually.
Additionally, you can specify task parameters to simulate a source event that would normally trigger the task. Thefollowing is a figure displaying how a “file event” could be simulated. The parameters for various event sourcesare listed in the section "Graph parameters".
Figure 21.1. Web GUI - "Manual task execution" form
Using Manual Task Execution
In server GUI, switch to Event Listeners tab. In the New Listener drop-down menu, select the Manual TaskExecution option.
Choose the task type you would like to use. See also documenation on chosen tasks:
Send an Email (p. 169)Execute Shell Command (p. 173)Start a Graph (p. 176)Start a Jobflow (p. 178)Start a Profiler Job (p. 179)Abort job (p. 180)Archive Records (p. 181)Send a JMS Message (p. 183)Execute Groovy Code (p. 186)
To access the Manual Task Execution form, you need Manual task execution permission (p. 127).
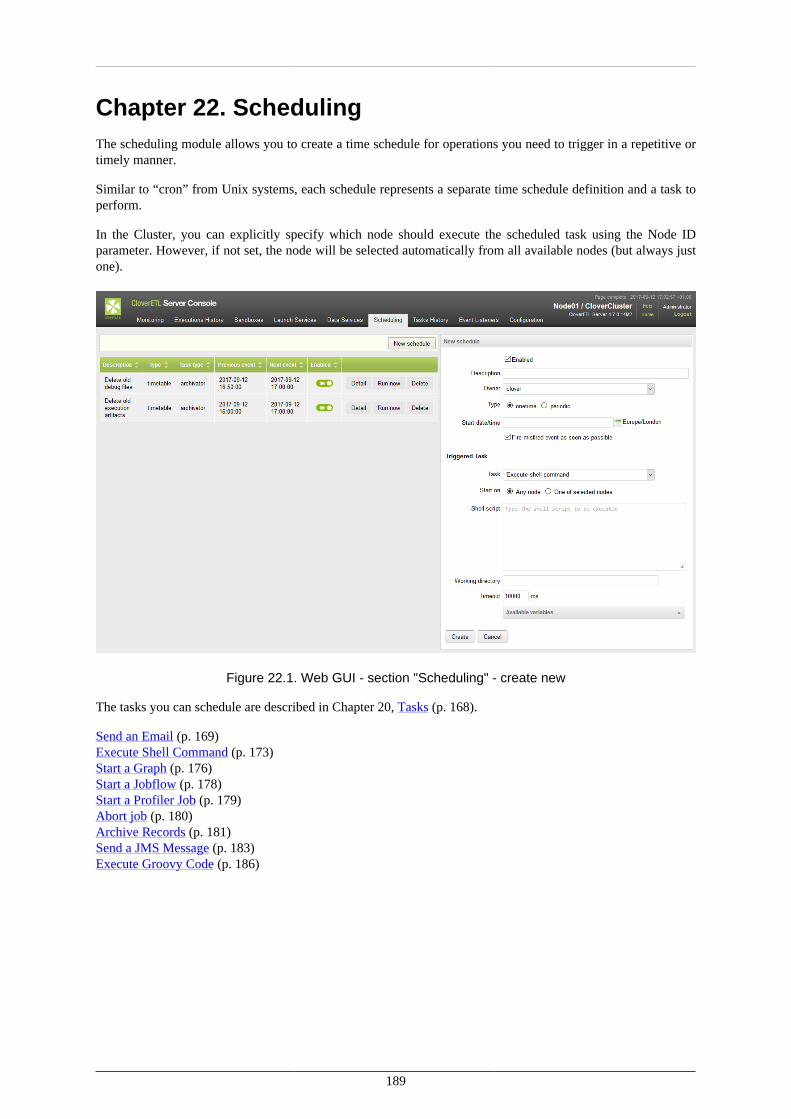
189
Chapter 22. SchedulingThe scheduling module allows you to create a time schedule for operations you need to trigger in a repetitive ortimely manner.
Similar to “cron” from Unix systems, each schedule represents a separate time schedule definition and a task toperform.
In the Cluster, you can explicitly specify which node should execute the scheduled task using the Node IDparameter. However, if not set, the node will be selected automatically from all available nodes (but always justone).
Figure 22.1. Web GUI - section "Scheduling" - create new
The tasks you can schedule are described in Chapter 20, Tasks (p. 168).
Send an Email (p. 169)Execute Shell Command (p. 173)Start a Graph (p. 176)Start a Jobflow (p. 178)Start a Profiler Job (p. 179)Abort job (p. 180)Archive Records (p. 181)Send a JMS Message (p. 183)Execute Groovy Code (p. 186)
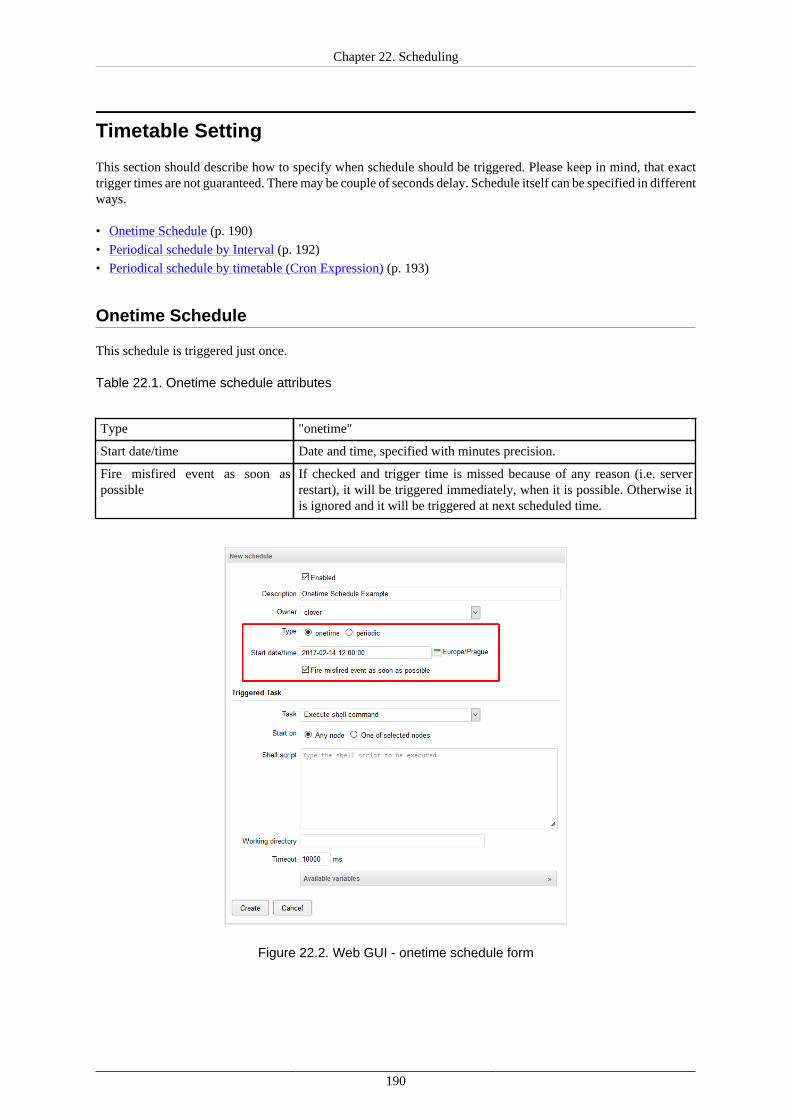
Chapter 22. Scheduling
190
Timetable Setting
This section should describe how to specify when schedule should be triggered. Please keep in mind, that exacttrigger times are not guaranteed. There may be couple of seconds delay. Schedule itself can be specified in differentways.
• Onetime Schedule (p. 190)
• Periodical schedule by Interval (p. 192)
• Periodical schedule by timetable (Cron Expression) (p. 193)
Onetime Schedule
This schedule is triggered just once.
Table 22.1. Onetime schedule attributes
Type "onetime"
Start date/time Date and time, specified with minutes precision.
Fire misfired event as soon aspossible
If checked and trigger time is missed because of any reason (i.e. serverrestart), it will be triggered immediately, when it is possible. Otherwise itis ignored and it will be triggered at next scheduled time.
Figure 22.2. Web GUI - onetime schedule form

Chapter 22. Scheduling
191
Figure 22.3. Web GUI - schedule form - calendar
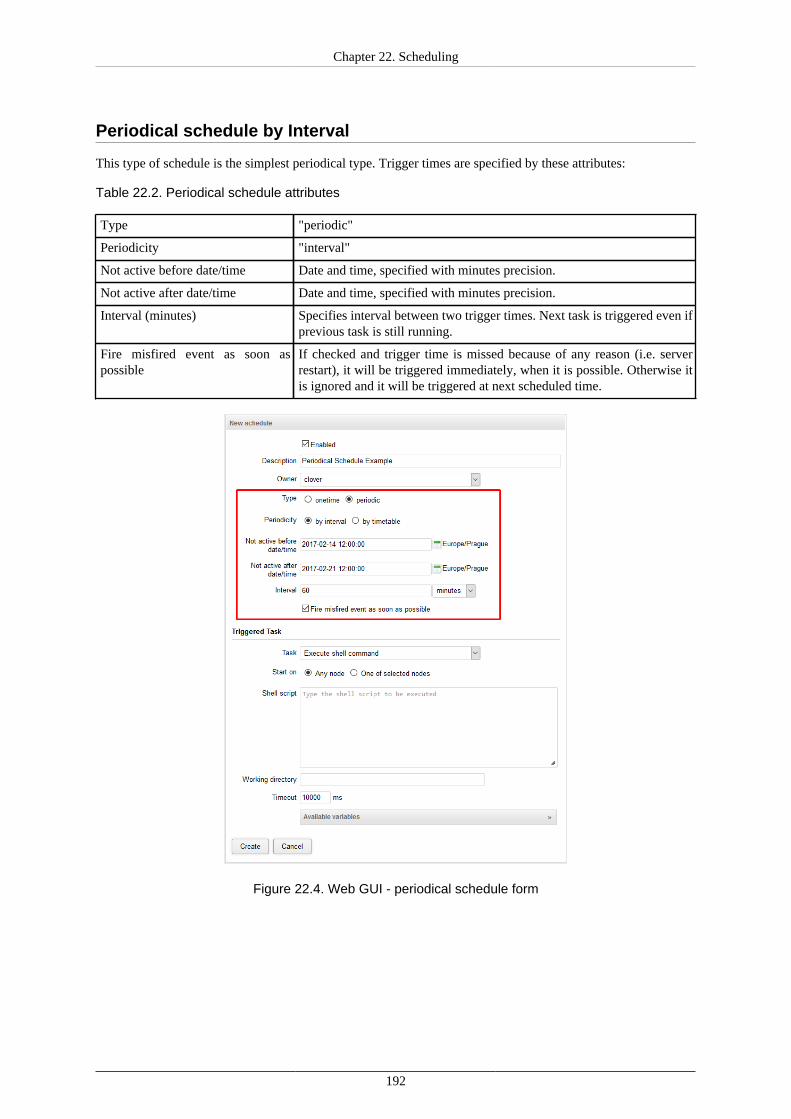
Chapter 22. Scheduling
192
Periodical schedule by Interval
This type of schedule is the simplest periodical type. Trigger times are specified by these attributes:
Table 22.2. Periodical schedule attributes
Type "periodic"
Periodicity "interval"
Not active before date/time Date and time, specified with minutes precision.
Not active after date/time Date and time, specified with minutes precision.
Interval (minutes) Specifies interval between two trigger times. Next task is triggered even ifprevious task is still running.
Fire misfired event as soon aspossible
If checked and trigger time is missed because of any reason (i.e. serverrestart), it will be triggered immediately, when it is possible. Otherwise itis ignored and it will be triggered at next scheduled time.
Figure 22.4. Web GUI - periodical schedule form
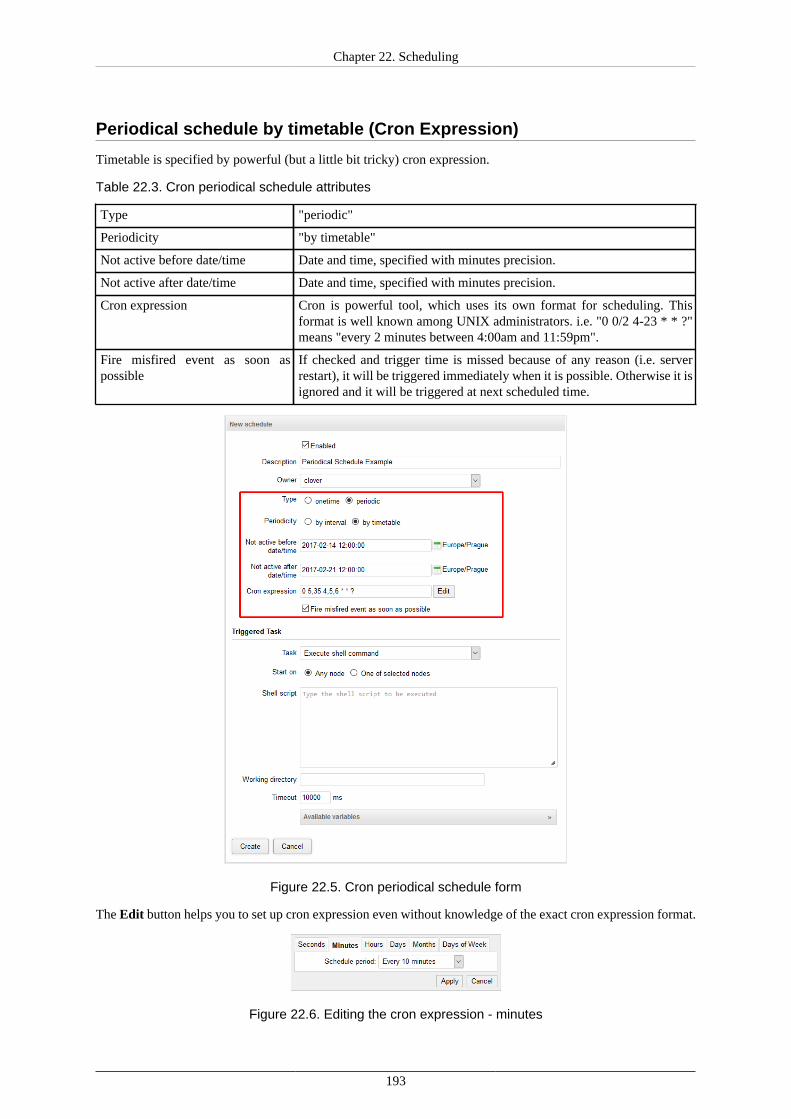
Chapter 22. Scheduling
193
Periodical schedule by timetable (Cron Expression)
Timetable is specified by powerful (but a little bit tricky) cron expression.
Table 22.3. Cron periodical schedule attributes
Type "periodic"
Periodicity "by timetable"
Not active before date/time Date and time, specified with minutes precision.
Not active after date/time Date and time, specified with minutes precision.
Cron expression Cron is powerful tool, which uses its own format for scheduling. Thisformat is well known among UNIX administrators. i.e. "0 0/2 4-23 * * ?"means "every 2 minutes between 4:00am and 11:59pm".
Fire misfired event as soon aspossible
If checked and trigger time is missed because of any reason (i.e. serverrestart), it will be triggered immediately when it is possible. Otherwise it isignored and it will be triggered at next scheduled time.
Figure 22.5. Cron periodical schedule form
The Edit button helps you to set up cron expression even without knowledge of the exact cron expression format.
Figure 22.6. Editing the cron expression - minutes
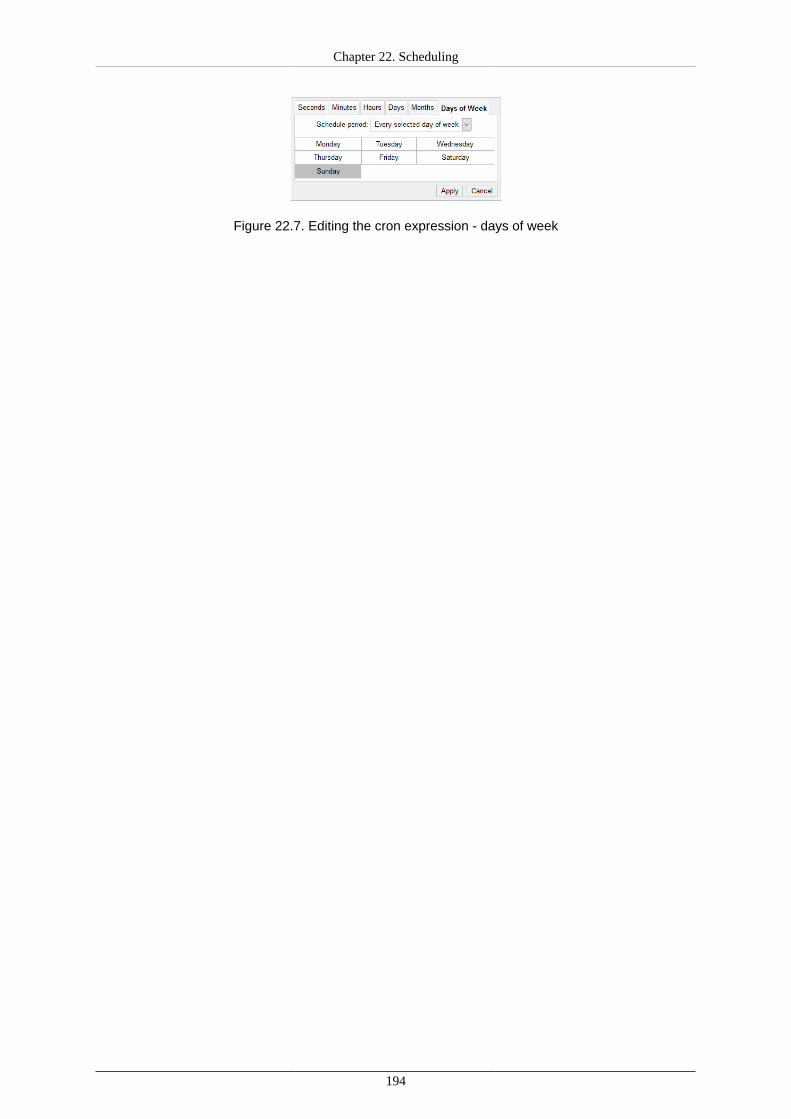
Chapter 22. Scheduling
194
Figure 22.7. Editing the cron expression - days of week
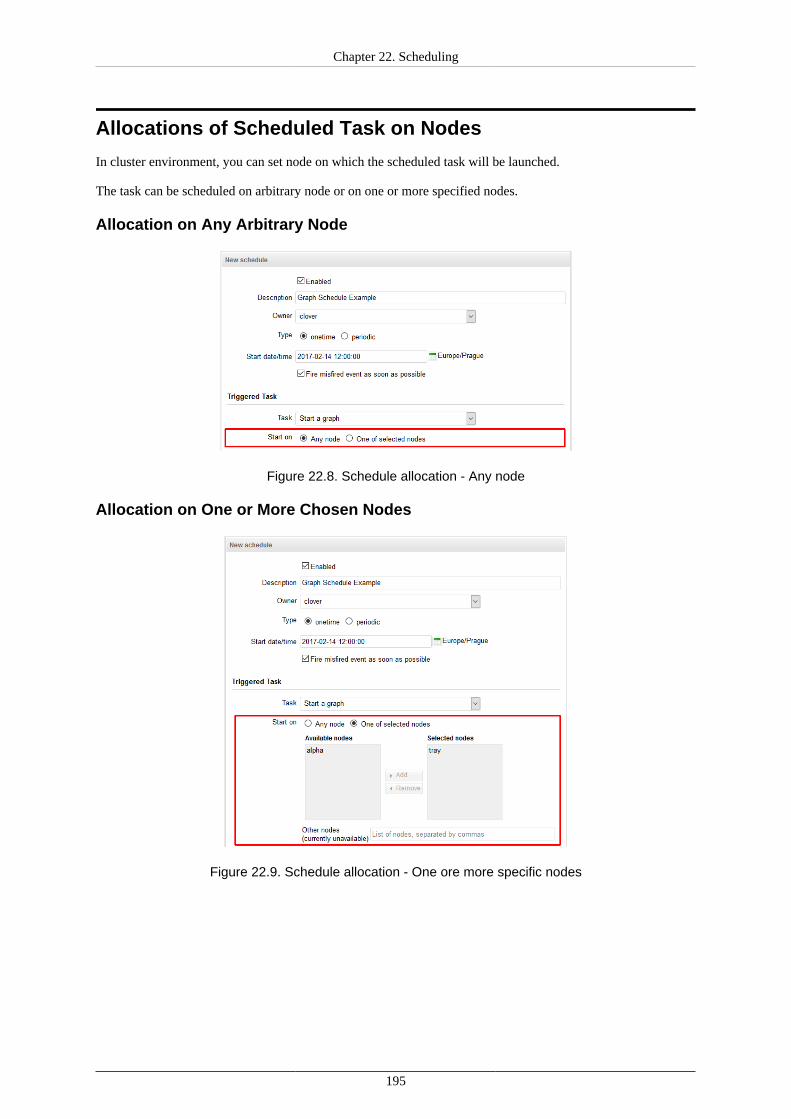
Chapter 22. Scheduling
195
Allocations of Scheduled Task on Nodes
In cluster environment, you can set node on which the scheduled task will be launched.
The task can be scheduled on arbitrary node or on one or more specified nodes.
Allocation on Any Arbitrary Node
Figure 22.8. Schedule allocation - Any node
Allocation on One or More Chosen Nodes
Figure 22.9. Schedule allocation - One ore more specific nodes

Chapter 22. Scheduling
196
Scheduling the Tasks - Examples
Start a graph at specific time
This example shows scheduling the start of a graph at the specific time.
1. In server GUI, in Scheluling section, click New schedule.
2. Enter the description that allows you to successfully identify the task between other existing tasks, e.g. Myone-time processing example.
3. Choose onetime to start the graph just once.
4. Enter start date and time. The calendar accessible under calendar icon might help you to enter the required dateand time in correct format.
5. Choose Task Start a graph.
6. Select the sandbox and graph within the sandbox.
Start a Jobflow once an hour
This example show scheduling the repetitive run.
Create a new schedule that runs UserStats.jbf jobflow from reports sandbox once an hour.
1. Enter description, e.g. Hourly user stats.
2. Choose periodic type and periodicity by interval.
3. The task will be started once an hour within some time period. Enter the beginning of this period (not activebefore) and end of the period (not active after).
4. Enter interval between two jobflow starts.
5. Select the sandbox and graph within the sandbox.
Complex Scheduling
This example shows complex scheduling using cron expression.
Start a graph WeekendGraph.grf every Saturday and Sunday at 22:15.
1. Enter the description of the schedule, e.g. The Weekend Graph
2. Select periodic type and periodicity by timetable.
3. Click Edit on line starting with Cron expression.
On Minutes tab, select Every selected minute and select 15.
On Hours tab, select Every selected hour and select 22.
On Days of Week tab, select Every selected day of week and click Saturday and Sunday.
4. The Task is Start a graph
5. Select the sandbox and graph.
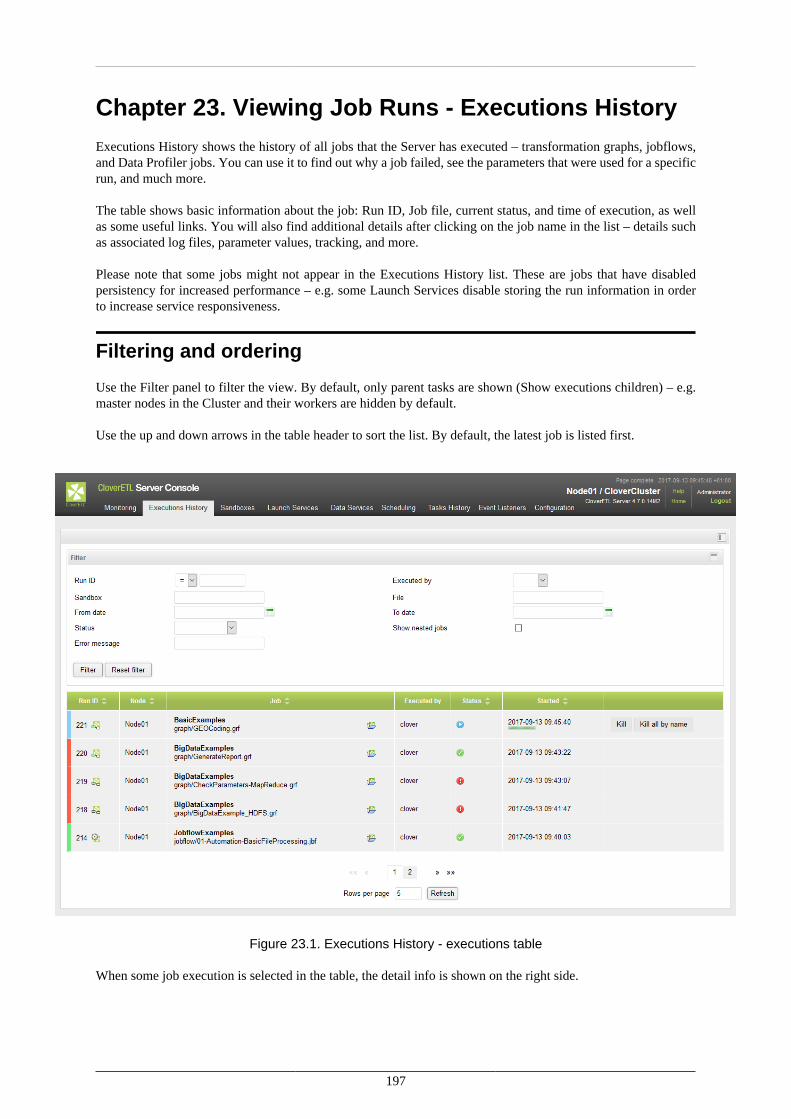
197
Chapter 23. Viewing Job Runs - Executions HistoryExecutions History shows the history of all jobs that the Server has executed – transformation graphs, jobflows,and Data Profiler jobs. You can use it to find out why a job failed, see the parameters that were used for a specificrun, and much more.
The table shows basic information about the job: Run ID, Job file, current status, and time of execution, as wellas some useful links. You will also find additional details after clicking on the job name in the list – details suchas associated log files, parameter values, tracking, and more.
Please note that some jobs might not appear in the Executions History list. These are jobs that have disabledpersistency for increased performance – e.g. some Launch Services disable storing the run information in orderto increase service responsiveness.
Filtering and ordering
Use the Filter panel to filter the view. By default, only parent tasks are shown (Show executions children) – e.g.master nodes in the Cluster and their workers are hidden by default.
Use the up and down arrows in the table header to sort the list. By default, the latest job is listed first.
Figure 23.1. Executions History - executions table
When some job execution is selected in the table, the detail info is shown on the right side.
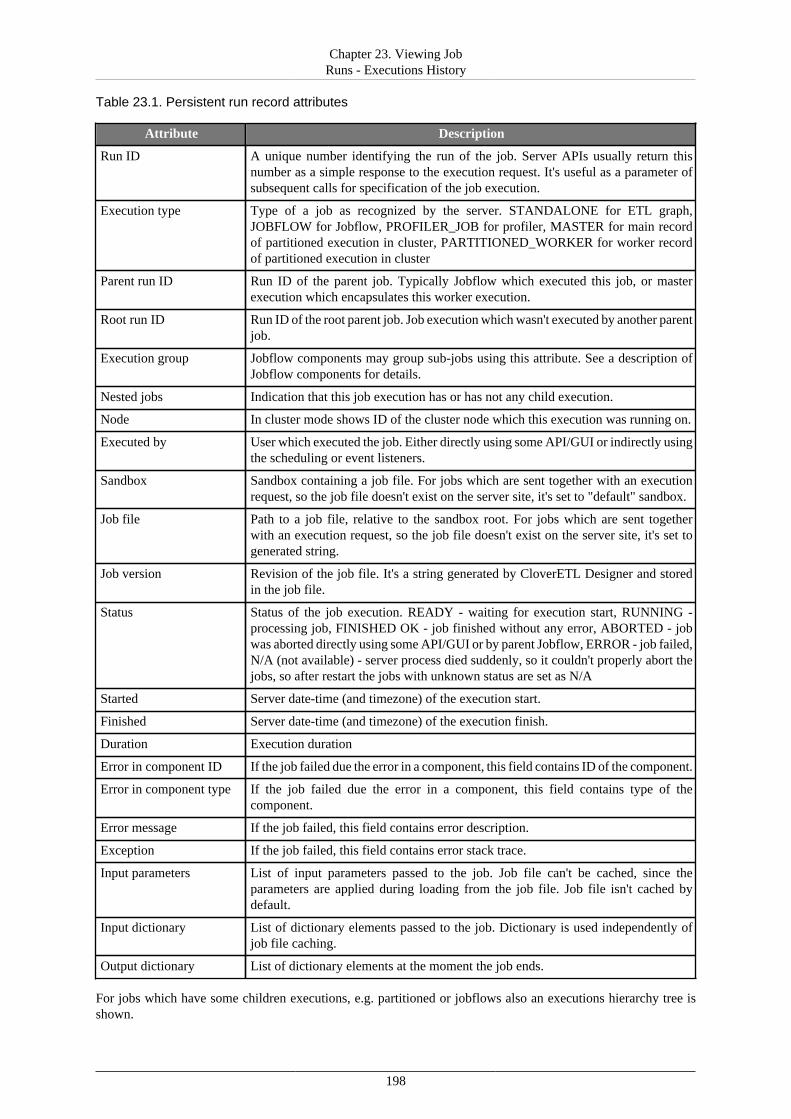
Chapter 23. Viewing JobRuns - Executions History
198
Table 23.1. Persistent run record attributes
Attribute Description
Run ID A unique number identifying the run of the job. Server APIs usually return thisnumber as a simple response to the execution request. It's useful as a parameter ofsubsequent calls for specification of the job execution.
Execution type Type of a job as recognized by the server. STANDALONE for ETL graph,JOBFLOW for Jobflow, PROFILER_JOB for profiler, MASTER for main recordof partitioned execution in cluster, PARTITIONED_WORKER for worker recordof partitioned execution in cluster
Parent run ID Run ID of the parent job. Typically Jobflow which executed this job, or masterexecution which encapsulates this worker execution.
Root run ID Run ID of the root parent job. Job execution which wasn't executed by another parentjob.
Execution group Jobflow components may group sub-jobs using this attribute. See a description ofJobflow components for details.
Nested jobs Indication that this job execution has or has not any child execution.
Node In cluster mode shows ID of the cluster node which this execution was running on.
Executed by User which executed the job. Either directly using some API/GUI or indirectly usingthe scheduling or event listeners.
Sandbox Sandbox containing a job file. For jobs which are sent together with an executionrequest, so the job file doesn't exist on the server site, it's set to "default" sandbox.
Job file Path to a job file, relative to the sandbox root. For jobs which are sent togetherwith an execution request, so the job file doesn't exist on the server site, it's set togenerated string.
Job version Revision of the job file. It's a string generated by CloverETL Designer and storedin the job file.
Status Status of the job execution. READY - waiting for execution start, RUNNING -processing job, FINISHED OK - job finished without any error, ABORTED - jobwas aborted directly using some API/GUI or by parent Jobflow, ERROR - job failed,N/A (not available) - server process died suddenly, so it couldn't properly abort thejobs, so after restart the jobs with unknown status are set as N/A
Started Server date-time (and timezone) of the execution start.
Finished Server date-time (and timezone) of the execution finish.
Duration Execution duration
Error in component ID If the job failed due the error in a component, this field contains ID of the component.
Error in component type If the job failed due the error in a component, this field contains type of thecomponent.
Error message If the job failed, this field contains error description.
Exception If the job failed, this field contains error stack trace.
Input parameters List of input parameters passed to the job. Job file can't be cached, since theparameters are applied during loading from the job file. Job file isn't cached bydefault.
Input dictionary List of dictionary elements passed to the job. Dictionary is used independently ofjob file caching.
Output dictionary List of dictionary elements at the moment the job ends.
For jobs which have some children executions, e.g. partitioned or jobflows also an executions hierarchy tree isshown.
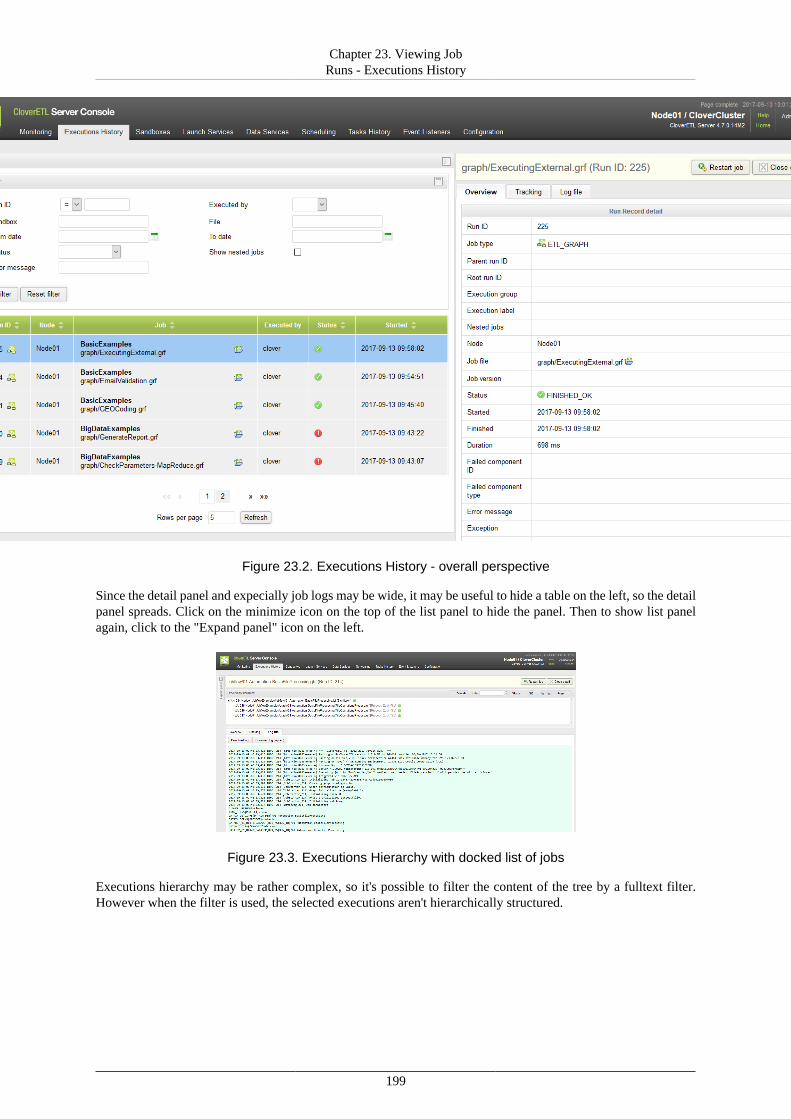
Chapter 23. Viewing JobRuns - Executions History
199
Figure 23.2. Executions History - overall perspective
Since the detail panel and expecially job logs may be wide, it may be useful to hide a table on the left, so the detailpanel spreads. Click on the minimize icon on the top of the list panel to hide the panel. Then to show list panelagain, click to the "Expand panel" icon on the left.
Figure 23.3. Executions Hierarchy with docked list of jobs
Executions hierarchy may be rather complex, so it's possible to filter the content of the tree by a fulltext filter.However when the filter is used, the selected executions aren't hierarchically structured.
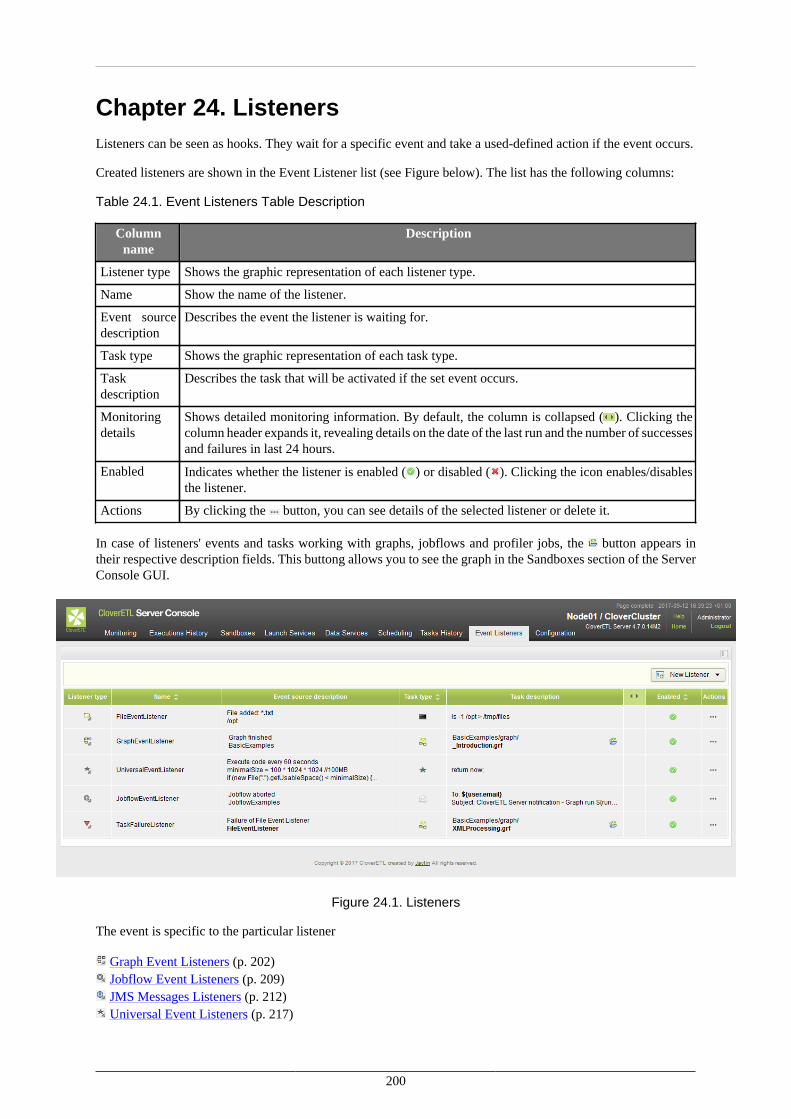
200
Chapter 24. ListenersListeners can be seen as hooks. They wait for a specific event and take a used-defined action if the event occurs.
Created listeners are shown in the Event Listener list (see Figure below). The list has the following columns:
Table 24.1. Event Listeners Table Description
Columnname
Description
Listener type Shows the graphic representation of each listener type.
Name Show the name of the listener.
Event sourcedescription
Describes the event the listener is waiting for.
Task type Shows the graphic representation of each task type.
Taskdescription
Describes the task that will be activated if the set event occurs.
Monitoringdetails
Shows detailed monitoring information. By default, the column is collapsed ( ). Clicking thecolumn header expands it, revealing details on the date of the last run and the number of successesand failures in last 24 hours.
Enabled Indicates whether the listener is enabled ( ) or disabled ( ). Clicking the icon enables/disablesthe listener.
Actions By clicking the button, you can see details of the selected listener or delete it.
In case of listeners' events and tasks working with graphs, jobflows and profiler jobs, the button appears intheir respective description fields. This buttong allows you to see the graph in the Sandboxes section of the ServerConsole GUI.
Figure 24.1. Listeners
The event is specific to the particular listener
Graph Event Listeners (p. 202) Jobflow Event Listeners (p. 209) JMS Messages Listeners (p. 212) Universal Event Listeners (p. 217)

Chapter 24. Listeners
201
File Event Listeners (remote and local) (p. 219) Task Failure Listeners (p. 226)
The available actions taken by the listeners are common for all listeners. The actions, that can be taken are:
• Send an e-mail - see Send an Email (p. 169)• Execute a shell command - see Execute Shell Command (p. 173)• Start a graph - see Start a Graph (p. 176)• Start a jobflow - see Start a Jobflow (p. 178)• Start a profiler job• Abort a job - see Abort job (p. 180)• Archivator - see Archive Records (p. 181)• Send a JMS Message - see Send a JMS Message (p. 183)• Execute a Groovy code - see Execute Groovy Code (p. 186)
Chapter 24. Listeners
202
Graph Event Listeners
Graph Event Listeners allow you to define a task that the Server will execute as a reaction to the success, failureor other event of a specific job (a transformation graph).
Each listener is bound to a specific graph and is evaluated no matter whether the graph was executed manually,scheduled, or via an API call, etc.
You can use listeners to chain multiple jobs (creating a success listener that starts the next job in a row). However,we recommend using Jobflows to automate complex processes because of its better development and monitoringcapabilities.
Graph Event Listeners are similar to Jobflow Event Listeners (Jobflow Event Listeners (p. 209)) – forCloverETL Server both are simply “jobs”.
In the Cluster, the event and the associated task are executed on the same node the job was executed on by default.If the graph is distributed, the task will be executed on the master worker node. However, you can override wherethe task will be executed by explicitly specifying a Node IDs in the task definition.
Graph Events
Each event carries properties of a graph, which is source of the event. If there is an event listener specified,task may use these properties. E.g. next graphs in the chain may use "EVENT_FILE_NAME" placeholder whichwas activated by the first graph in the chain. Graph properties, which are set specifically for each graph run (i.e.RUN_ID), are overridden by the last graph.
Types of graph events
• Graph started (p. 202)
• Graph phase finished (p. 202)
• Graph finished (p. 202)
• Graph error (p. 202)
• Graph aborted (p. 203)
• Graph timeout (p. 203)
• Graph unknown status (p. 203)
Graph started
Graph started event is created, when ETL graph execution successfully started.
Graph phase finished
Graph phase finished event is created, everytime when graph phase is finished and all its nodes are finished withstatus FINISHED_OK.
Graph finished
Graph finished event is created, when all phases and nodes of graph are finished with FINISHED_OK status.
Graph error
Graph error event is created, when graph cannot be executed for any reason, or when any node of graph fails.
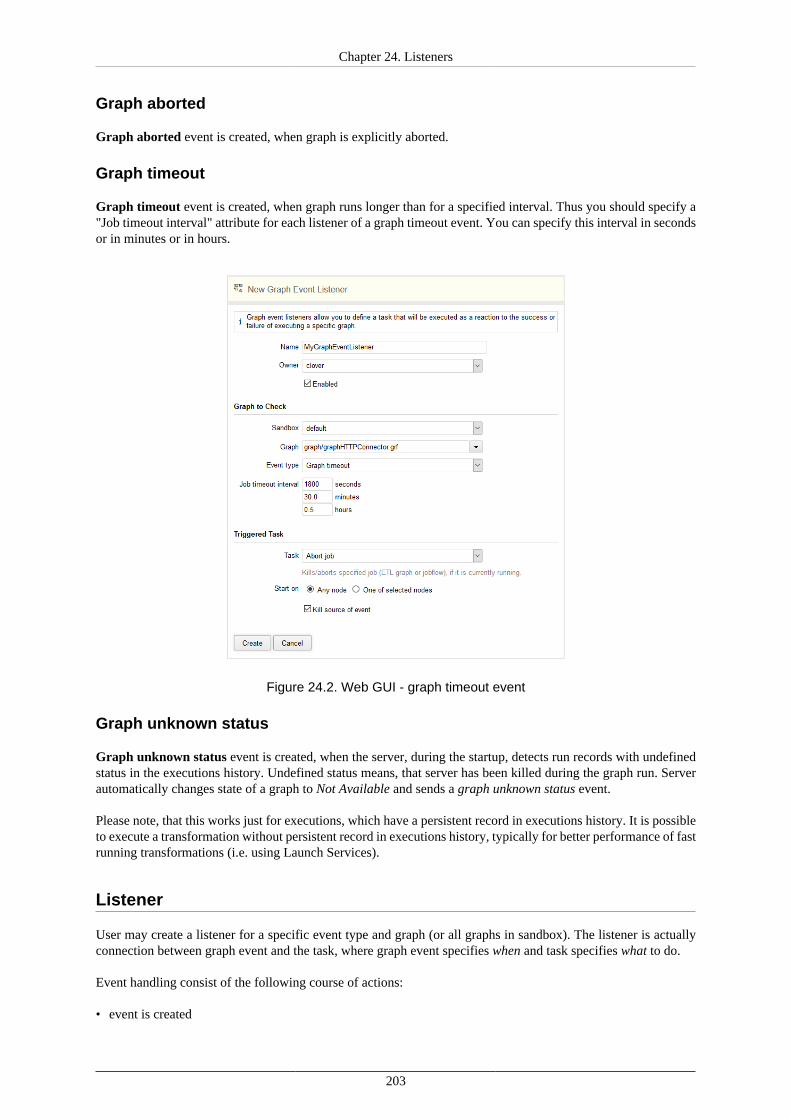
Chapter 24. Listeners
203
Graph aborted
Graph aborted event is created, when graph is explicitly aborted.
Graph timeout
Graph timeout event is created, when graph runs longer than for a specified interval. Thus you should specify a"Job timeout interval" attribute for each listener of a graph timeout event. You can specify this interval in secondsor in minutes or in hours.
Figure 24.2. Web GUI - graph timeout event
Graph unknown status
Graph unknown status event is created, when the server, during the startup, detects run records with undefinedstatus in the executions history. Undefined status means, that server has been killed during the graph run. Serverautomatically changes state of a graph to Not Available and sends a graph unknown status event.
Please note, that this works just for executions, which have a persistent record in executions history. It is possibleto execute a transformation without persistent record in executions history, typically for better performance of fastrunning transformations (i.e. using Launch Services).
Listener
User may create a listener for a specific event type and graph (or all graphs in sandbox). The listener is actuallyconnection between graph event and the task, where graph event specifies when and task specifies what to do.
Event handling consist of the following course of actions:
• event is created
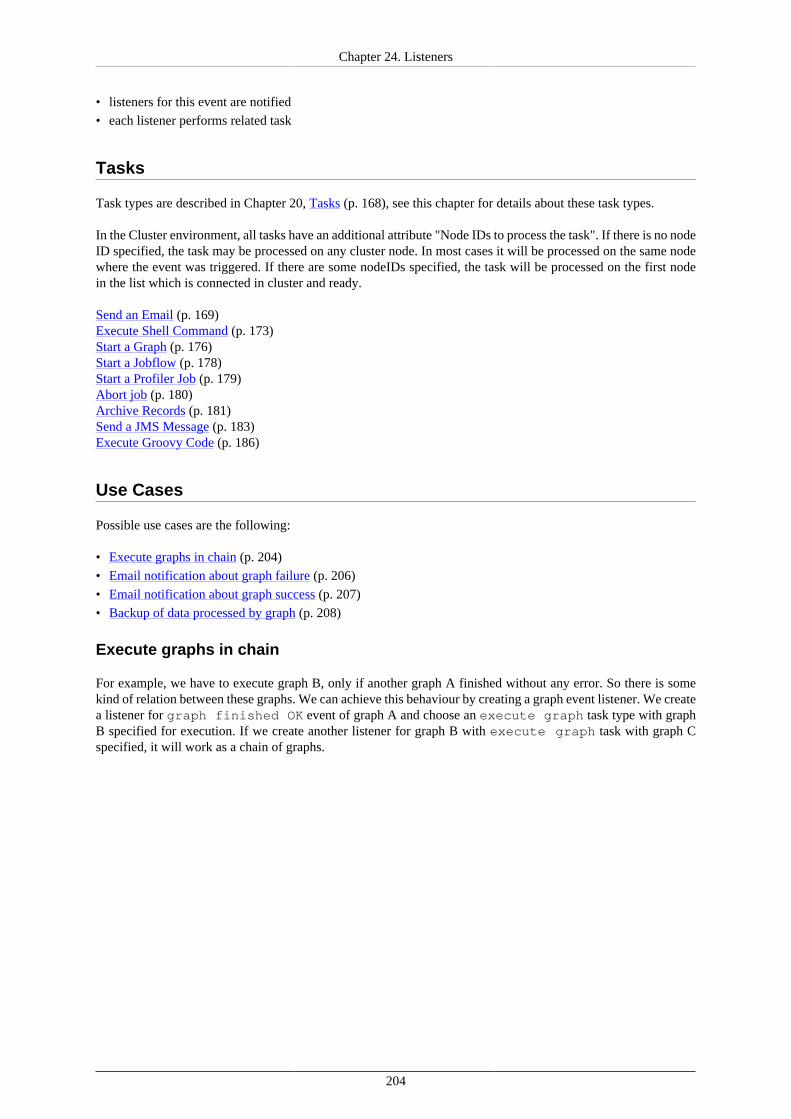
Chapter 24. Listeners
204
• listeners for this event are notified
• each listener performs related task
Tasks
Task types are described in Chapter 20, Tasks (p. 168), see this chapter for details about these task types.
In the Cluster environment, all tasks have an additional attribute "Node IDs to process the task". If there is no nodeID specified, the task may be processed on any cluster node. In most cases it will be processed on the same nodewhere the event was triggered. If there are some nodeIDs specified, the task will be processed on the first nodein the list which is connected in cluster and ready.
Send an Email (p. 169)Execute Shell Command (p. 173)Start a Graph (p. 176)Start a Jobflow (p. 178)Start a Profiler Job (p. 179)Abort job (p. 180)Archive Records (p. 181)Send a JMS Message (p. 183)Execute Groovy Code (p. 186)
Use Cases
Possible use cases are the following:
• Execute graphs in chain (p. 204)
• Email notification about graph failure (p. 206)
• Email notification about graph success (p. 207)
• Backup of data processed by graph (p. 208)
Execute graphs in chain
For example, we have to execute graph B, only if another graph A finished without any error. So there is somekind of relation between these graphs. We can achieve this behaviour by creating a graph event listener. We createa listener for graph finished OK event of graph A and choose an execute graph task type with graphB specified for execution. If we create another listener for graph B with execute graph task with graph Cspecified, it will work as a chain of graphs.
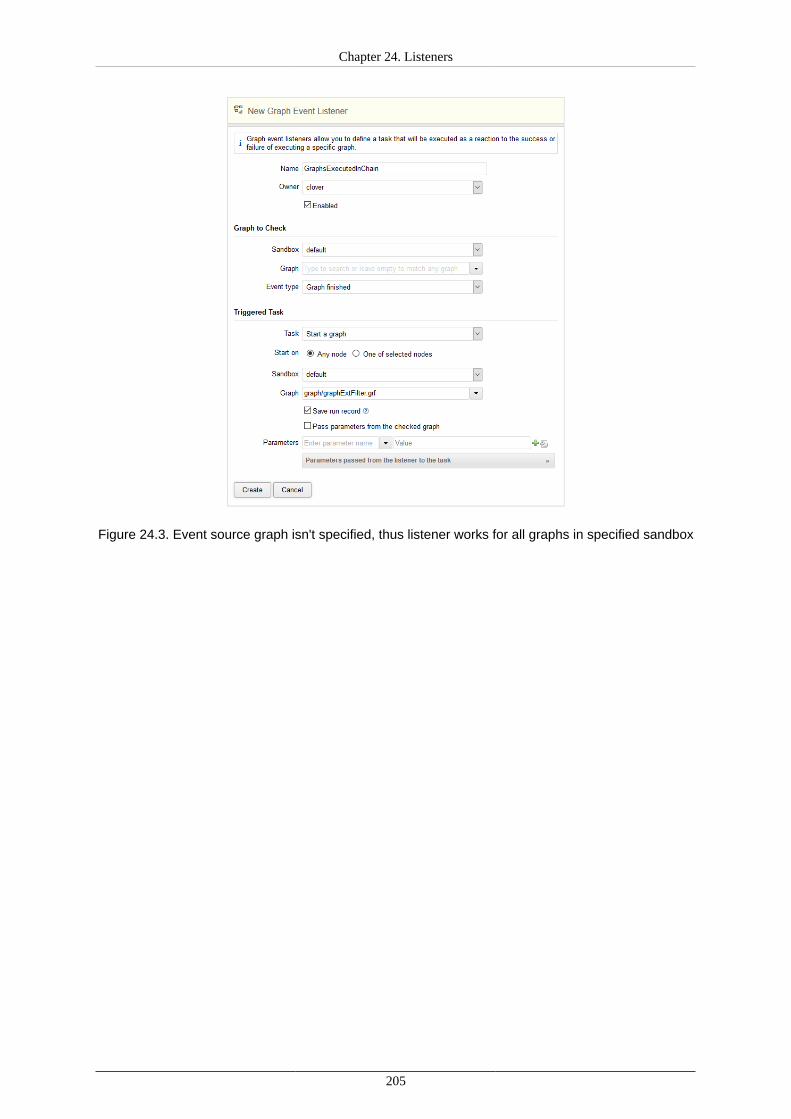
Chapter 24. Listeners
205
Figure 24.3. Event source graph isn't specified, thus listener works for all graphs in specified sandbox
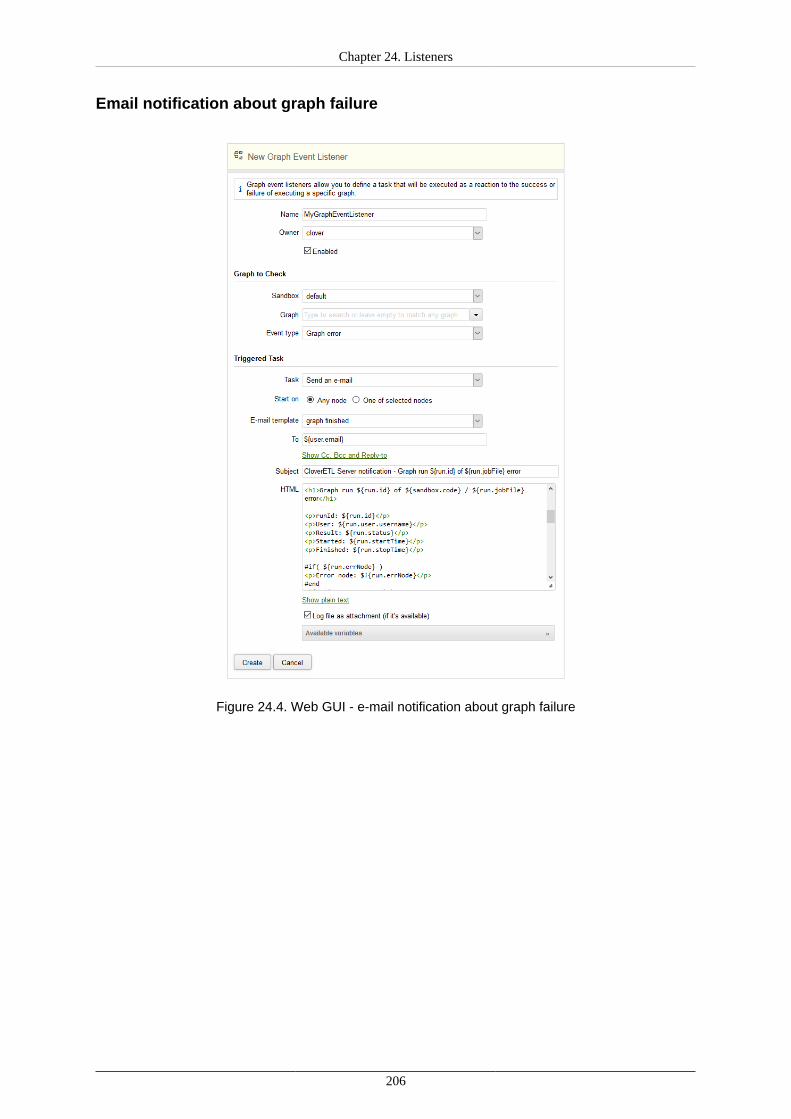
Chapter 24. Listeners
206
Email notification about graph failure
Figure 24.4. Web GUI - e-mail notification about graph failure
Chapter 24. Listeners
207
Email notification about graph success
Figure 24.5. Web GUI - email notification about graph success
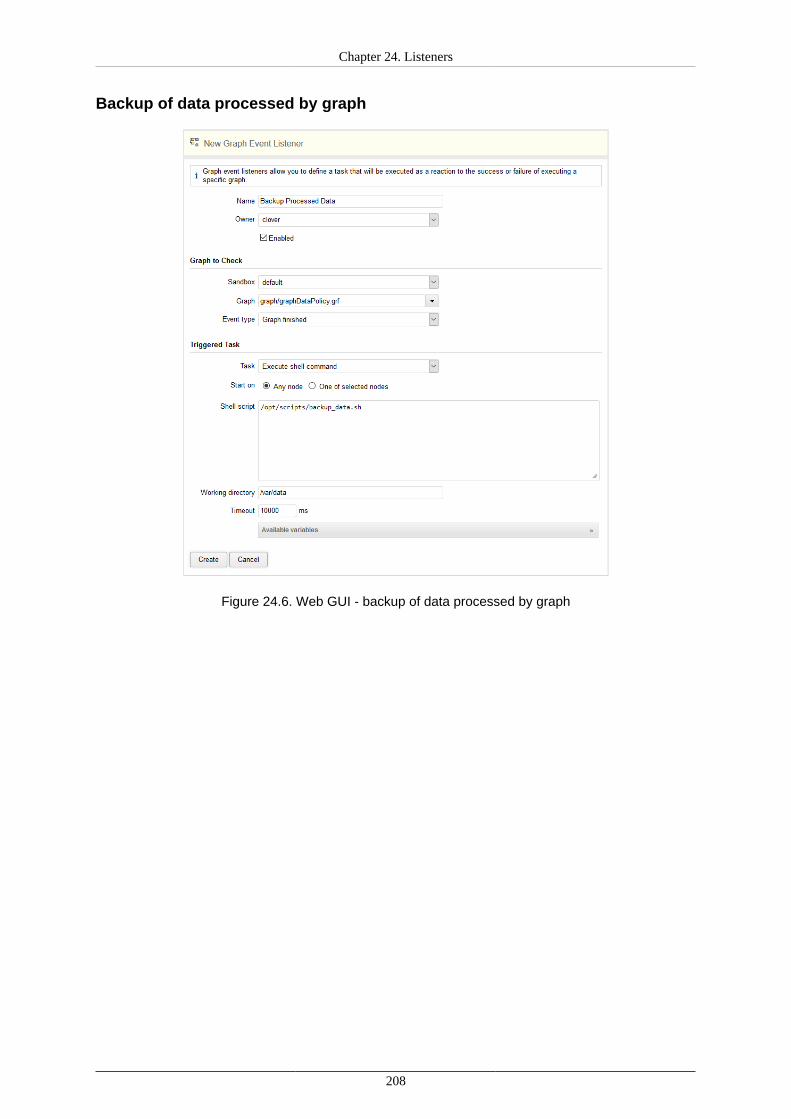
Chapter 24. Listeners
208
Backup of data processed by graph
Figure 24.6. Web GUI - backup of data processed by graph
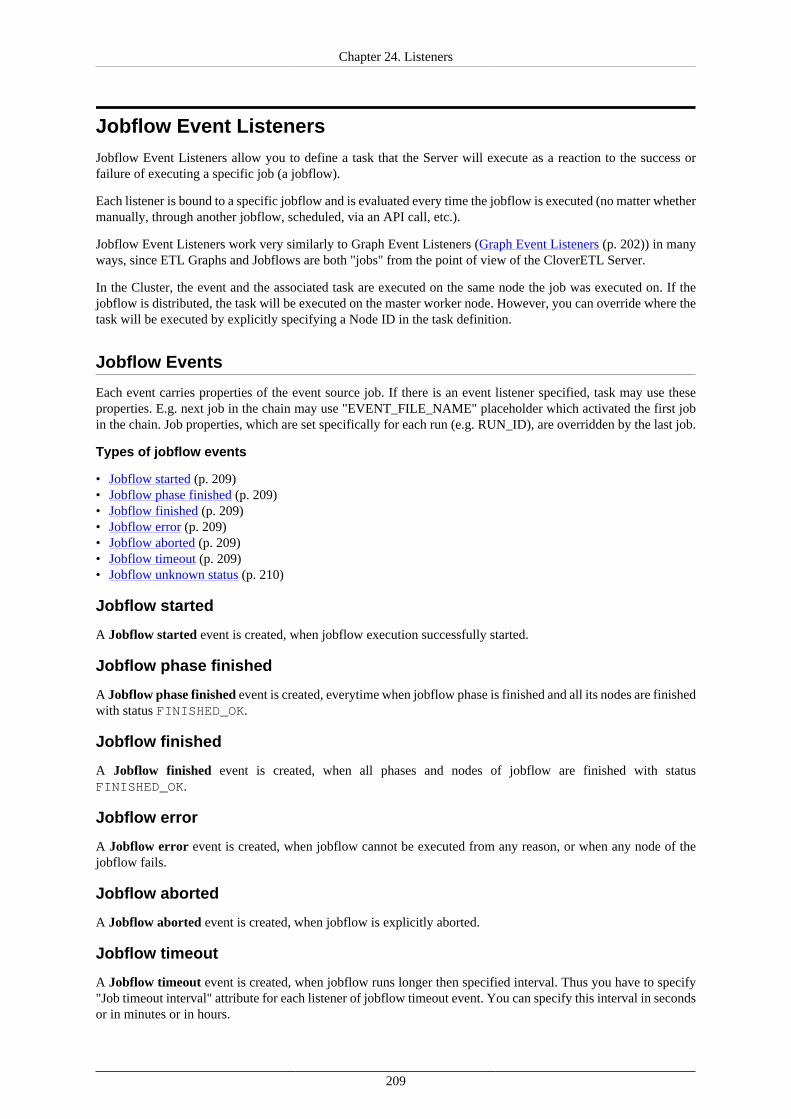
Chapter 24. Listeners
209
Jobflow Event ListenersJobflow Event Listeners allow you to define a task that the Server will execute as a reaction to the success orfailure of executing a specific job (a jobflow).
Each listener is bound to a specific jobflow and is evaluated every time the jobflow is executed (no matter whethermanually, through another jobflow, scheduled, via an API call, etc.).
Jobflow Event Listeners work very similarly to Graph Event Listeners (Graph Event Listeners (p. 202)) in manyways, since ETL Graphs and Jobflows are both "jobs" from the point of view of the CloverETL Server.
In the Cluster, the event and the associated task are executed on the same node the job was executed on. If thejobflow is distributed, the task will be executed on the master worker node. However, you can override where thetask will be executed by explicitly specifying a Node ID in the task definition.
Jobflow Events
Each event carries properties of the event source job. If there is an event listener specified, task may use theseproperties. E.g. next job in the chain may use "EVENT_FILE_NAME" placeholder which activated the first jobin the chain. Job properties, which are set specifically for each run (e.g. RUN_ID), are overridden by the last job.
Types of jobflow events
• Jobflow started (p. 209)• Jobflow phase finished (p. 209)• Jobflow finished (p. 209)• Jobflow error (p. 209)• Jobflow aborted (p. 209)• Jobflow timeout (p. 209)• Jobflow unknown status (p. 210)
Jobflow started
A Jobflow started event is created, when jobflow execution successfully started.
Jobflow phase finished
A Jobflow phase finished event is created, everytime when jobflow phase is finished and all its nodes are finishedwith status FINISHED_OK.
Jobflow finished
A Jobflow finished event is created, when all phases and nodes of jobflow are finished with statusFINISHED_OK.
Jobflow error
A Jobflow error event is created, when jobflow cannot be executed from any reason, or when any node of thejobflow fails.
Jobflow aborted
A Jobflow aborted event is created, when jobflow is explicitly aborted.
Jobflow timeout
A Jobflow timeout event is created, when jobflow runs longer then specified interval. Thus you have to specify"Job timeout interval" attribute for each listener of jobflow timeout event. You can specify this interval in secondsor in minutes or in hours.
Chapter 24. Listeners
210
Figure 24.7. Web GUI - jobflow timeout event
Jobflow unknown status
A Jobflow unknown status event is created, when the server, during the startup, detects run records withundefined status in the executions history. Undefined status means, that server has been killed during jobflow run.Server automatically changes state of jobflow to Not Available and sends jobflow status unknown event.
Please note, that this works just for executions, which have persistent record in executions history. It is possibleto execute transformation without persistent record in executions history, typically for better performance of fastrunning transformations (e.g. using Launch Services).
Listener
User may create a listener for the specified event type and jobflow (or all jobflows in sandbox). The listener isactually connection between jobflow event and task, where jobflow event specifies when and task specifies whatto do.
Event handling consist of the following course of actions:
• event is created• listeners for this event are notified• each listener performs the related task
Tasks
Task specifies operation which should be performed as the reaction to the triggered event.
Task types are described in Chapter 20, Tasks (p. 168).
Note: You can use a task of any type for a jobflow event listener. Description of task types is divided into twosections just to show the most obvious use cases.

Chapter 24. Listeners
211
Send an Email (p. 169)Execute Shell Command (p. 173)Start a Graph (p. 176)Start a Jobflow (p. 178)Start a Profiler Job (p. 179)Abort job (p. 180)Archive Records (p. 181)Send a JMS Message (p. 183)Execute Groovy Code (p. 186)
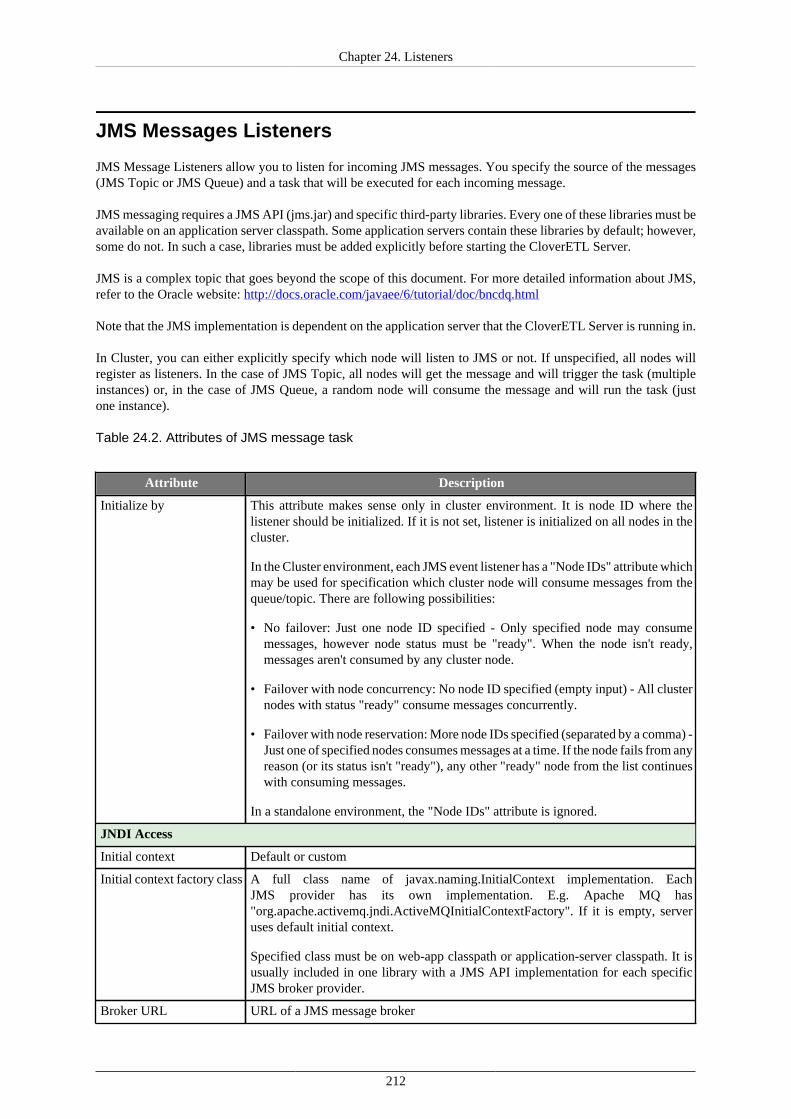
Chapter 24. Listeners
212
JMS Messages Listeners
JMS Message Listeners allow you to listen for incoming JMS messages. You specify the source of the messages(JMS Topic or JMS Queue) and a task that will be executed for each incoming message.
JMS messaging requires a JMS API (jms.jar) and specific third-party libraries. Every one of these libraries must beavailable on an application server classpath. Some application servers contain these libraries by default; however,some do not. In such a case, libraries must be added explicitly before starting the CloverETL Server.
JMS is a complex topic that goes beyond the scope of this document. For more detailed information about JMS,refer to the Oracle website: http://docs.oracle.com/javaee/6/tutorial/doc/bncdq.html
Note that the JMS implementation is dependent on the application server that the CloverETL Server is running in.
In Cluster, you can either explicitly specify which node will listen to JMS or not. If unspecified, all nodes willregister as listeners. In the case of JMS Topic, all nodes will get the message and will trigger the task (multipleinstances) or, in the case of JMS Queue, a random node will consume the message and will run the task (justone instance).
Table 24.2. Attributes of JMS message task
Attribute Description
Initialize by This attribute makes sense only in cluster environment. It is node ID where thelistener should be initialized. If it is not set, listener is initialized on all nodes in thecluster.
In the Cluster environment, each JMS event listener has a "Node IDs" attribute whichmay be used for specification which cluster node will consume messages from thequeue/topic. There are following possibilities:
• No failover: Just one node ID specified - Only specified node may consumemessages, however node status must be "ready". When the node isn't ready,messages aren't consumed by any cluster node.
• Failover with node concurrency: No node ID specified (empty input) - All clusternodes with status "ready" consume messages concurrently.
• Failover with node reservation: More node IDs specified (separated by a comma) -Just one of specified nodes consumes messages at a time. If the node fails from anyreason (or its status isn't "ready"), any other "ready" node from the list continueswith consuming messages.
In a standalone environment, the "Node IDs" attribute is ignored.
JNDI Access
Initial context Default or custom
Initial context factory class A full class name of javax.naming.InitialContext implementation. EachJMS provider has its own implementation. E.g. Apache MQ has"org.apache.activemq.jndi.ActiveMQInitialContextFactory". If it is empty, serveruses default initial context.
Specified class must be on web-app classpath or application-server classpath. It isusually included in one library with a JMS API implementation for each specificJMS broker provider.
Broker URL URL of a JMS message broker
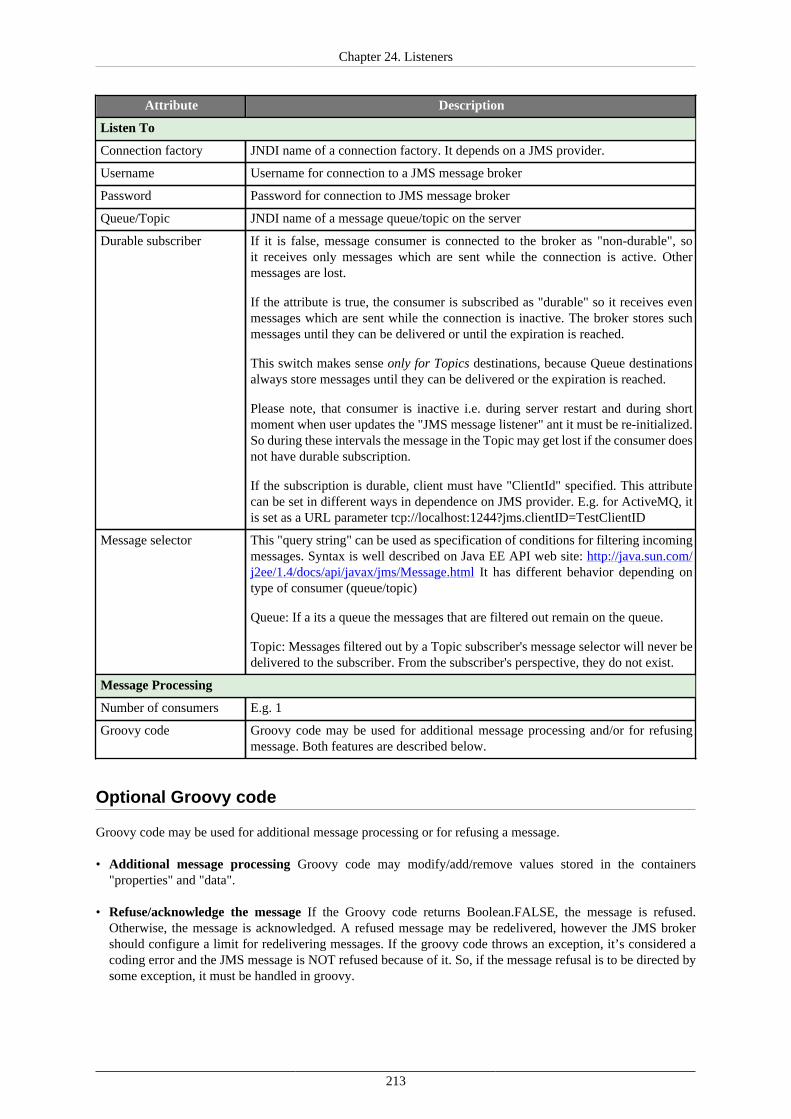
Chapter 24. Listeners
213
Attribute Description
Listen To
Connection factory JNDI name of a connection factory. It depends on a JMS provider.
Username Username for connection to a JMS message broker
Password Password for connection to JMS message broker
Queue/Topic JNDI name of a message queue/topic on the server
Durable subscriber If it is false, message consumer is connected to the broker as "non-durable", soit receives only messages which are sent while the connection is active. Othermessages are lost.
If the attribute is true, the consumer is subscribed as "durable" so it receives evenmessages which are sent while the connection is inactive. The broker stores suchmessages until they can be delivered or until the expiration is reached.
This switch makes sense only for Topics destinations, because Queue destinationsalways store messages until they can be delivered or the expiration is reached.
Please note, that consumer is inactive i.e. during server restart and during shortmoment when user updates the "JMS message listener" ant it must be re-initialized.So during these intervals the message in the Topic may get lost if the consumer doesnot have durable subscription.
If the subscription is durable, client must have "ClientId" specified. This attributecan be set in different ways in dependence on JMS provider. E.g. for ActiveMQ, itis set as a URL parameter tcp://localhost:1244?jms.clientID=TestClientID
Message selector This "query string" can be used as specification of conditions for filtering incomingmessages. Syntax is well described on Java EE API web site: http://java.sun.com/j2ee/1.4/docs/api/javax/jms/Message.html It has different behavior depending ontype of consumer (queue/topic)
Queue: If a its a queue the messages that are filtered out remain on the queue.
Topic: Messages filtered out by a Topic subscriber's message selector will never bedelivered to the subscriber. From the subscriber's perspective, they do not exist.
Message Processing
Number of consumers E.g. 1
Groovy code Groovy code may be used for additional message processing and/or for refusingmessage. Both features are described below.
Optional Groovy code
Groovy code may be used for additional message processing or for refusing a message.
• Additional message processing Groovy code may modify/add/remove values stored in the containers"properties" and "data".
• Refuse/acknowledge the message If the Groovy code returns Boolean.FALSE, the message is refused.Otherwise, the message is acknowledged. A refused message may be redelivered, however the JMS brokershould configure a limit for redelivering messages. If the groovy code throws an exception, it’s considered acoding error and the JMS message is NOT refused because of it. So, if the message refusal is to be directed bysome exception, it must be handled in groovy.

Chapter 24. Listeners
214
Table 24.3. Variables accessible in groovy code
type key description
javax.jms.Message msg instance of a JMS message
java.util.Properties properties See below for details. It contains values (Stringor converted to String) read from a message andit is passed to the task which may use themsomehow. E.g. "execute graph" task passesthese parameters to the executed graph.
java.util.Map<String, Object> data See below for details. Contains values (Object,Stream, ..) read or proxied from the messageinstance and it is passed to the task which mayuse them somehow. E.g. "execute graph" taskpasses it to the executed graph as "dictionaryentries".
javax.servlet.ServletContext servletContext instance of ServletContext
com.cloveretl.server.api.ServerFacade serverFacade instance of serverFacade usable for callingCloverETL Server core features.
java.lang.String sessionToken sessionToken, needed for calling serverFacademethods
Message data available for further processing
A JMS message is processed and the data it contains is stored into two data structures: Properties and Data.
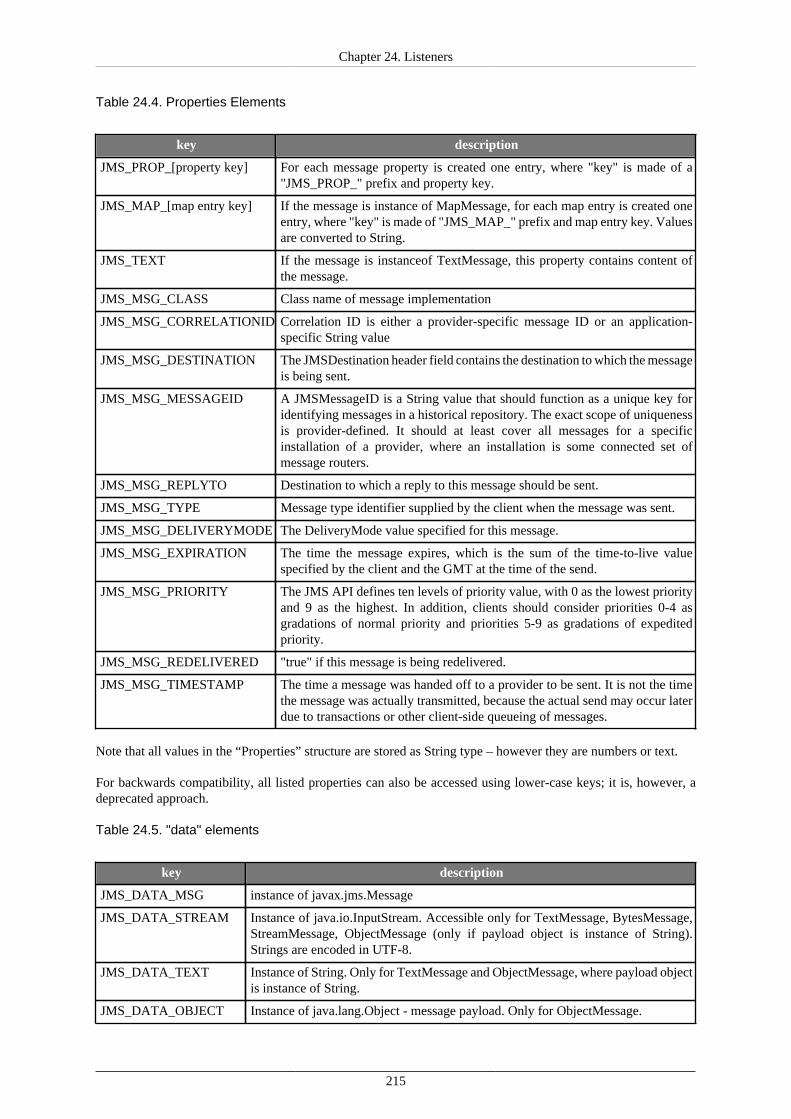
Chapter 24. Listeners
215
Table 24.4. Properties Elements
key description
JMS_PROP_[property key] For each message property is created one entry, where "key" is made of a"JMS_PROP_" prefix and property key.
JMS_MAP_[map entry key] If the message is instance of MapMessage, for each map entry is created oneentry, where "key" is made of "JMS_MAP_" prefix and map entry key. Valuesare converted to String.
JMS_TEXT If the message is instanceof TextMessage, this property contains content ofthe message.
JMS_MSG_CLASS Class name of message implementation
JMS_MSG_CORRELATIONID Correlation ID is either a provider-specific message ID or an application-specific String value
JMS_MSG_DESTINATION The JMSDestination header field contains the destination to which the messageis being sent.
JMS_MSG_MESSAGEID A JMSMessageID is a String value that should function as a unique key foridentifying messages in a historical repository. The exact scope of uniquenessis provider-defined. It should at least cover all messages for a specificinstallation of a provider, where an installation is some connected set ofmessage routers.
JMS_MSG_REPLYTO Destination to which a reply to this message should be sent.
JMS_MSG_TYPE Message type identifier supplied by the client when the message was sent.
JMS_MSG_DELIVERYMODE The DeliveryMode value specified for this message.
JMS_MSG_EXPIRATION The time the message expires, which is the sum of the time-to-live valuespecified by the client and the GMT at the time of the send.
JMS_MSG_PRIORITY The JMS API defines ten levels of priority value, with 0 as the lowest priorityand 9 as the highest. In addition, clients should consider priorities 0-4 asgradations of normal priority and priorities 5-9 as gradations of expeditedpriority.
JMS_MSG_REDELIVERED "true" if this message is being redelivered.
JMS_MSG_TIMESTAMP The time a message was handed off to a provider to be sent. It is not the timethe message was actually transmitted, because the actual send may occur laterdue to transactions or other client-side queueing of messages.
Note that all values in the “Properties” structure are stored as String type – however they are numbers or text.
For backwards compatibility, all listed properties can also be accessed using lower-case keys; it is, however, adeprecated approach.
Table 24.5. "data" elements
key description
JMS_DATA_MSG instance of javax.jms.Message
JMS_DATA_STREAM Instance of java.io.InputStream. Accessible only for TextMessage, BytesMessage,StreamMessage, ObjectMessage (only if payload object is instance of String).Strings are encoded in UTF-8.
JMS_DATA_TEXT Instance of String. Only for TextMessage and ObjectMessage, where payload objectis instance of String.
JMS_DATA_OBJECT Instance of java.lang.Object - message payload. Only for ObjectMessage.

Chapter 24. Listeners
216
The “Data” container is passed to a task that can use it, depending on its implementation. For example, the task"execute graph" passes it to the executed graph as “dictionary entries.”
In the Cluster environment, you can specify explicitly node IDs, which can execute the task. However, if the “data”payload is not serializable and the receiving and executing node differ, an error will be thrown as the Clustercannot pass the “data” to the executing node.
Inside a graph or a jobflow, data passed as dictionary entries can be used in some component attributes. Forexample, a File URL attribute would look like: "dict:JMS_DATA_STREAM:discrete" for reading the data directlyfrom the incoming JMS message using a proxy stream.
For backwards compatibility, all listed dictionary entries can also be accessed using lower-case keys; it is, however,a deprecated approach.
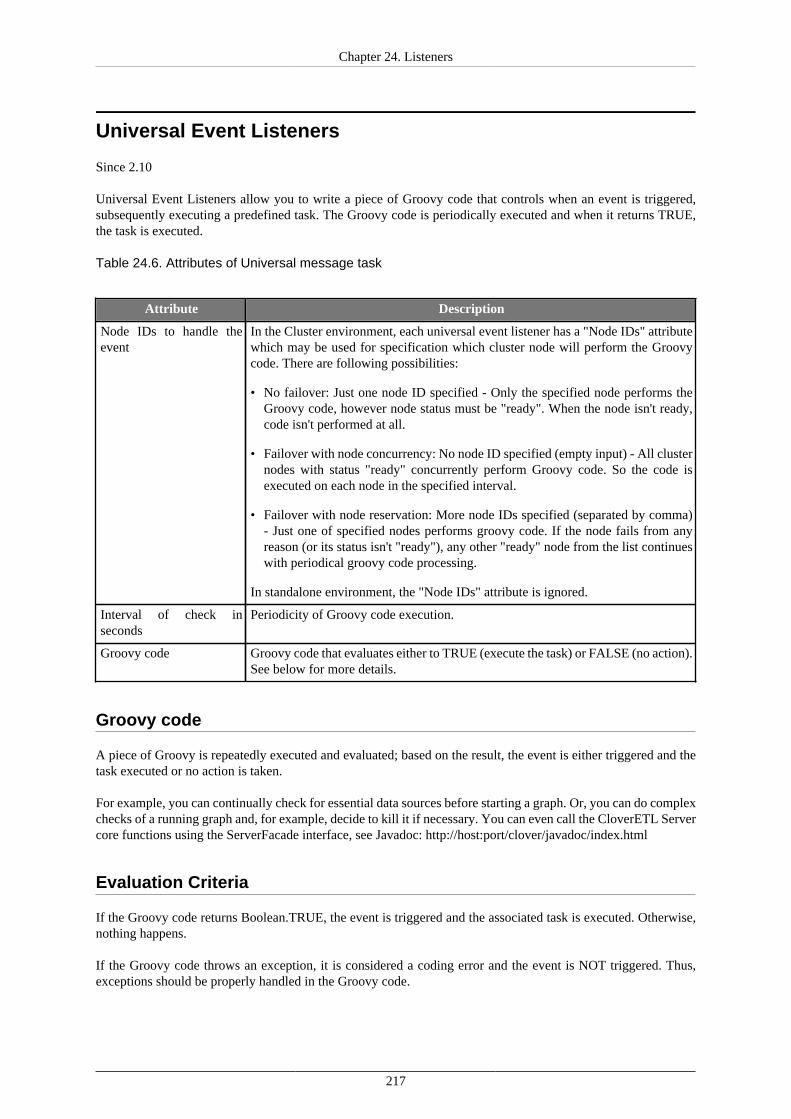
Chapter 24. Listeners
217
Universal Event Listeners
Since 2.10
Universal Event Listeners allow you to write a piece of Groovy code that controls when an event is triggered,subsequently executing a predefined task. The Groovy code is periodically executed and when it returns TRUE,the task is executed.
Table 24.6. Attributes of Universal message task
Attribute Description
Node IDs to handle theevent
In the Cluster environment, each universal event listener has a "Node IDs" attributewhich may be used for specification which cluster node will perform the Groovycode. There are following possibilities:
• No failover: Just one node ID specified - Only the specified node performs theGroovy code, however node status must be "ready". When the node isn't ready,code isn't performed at all.
• Failover with node concurrency: No node ID specified (empty input) - All clusternodes with status "ready" concurrently perform Groovy code. So the code isexecuted on each node in the specified interval.
• Failover with node reservation: More node IDs specified (separated by comma)- Just one of specified nodes performs groovy code. If the node fails from anyreason (or its status isn't "ready"), any other "ready" node from the list continueswith periodical groovy code processing.
In standalone environment, the "Node IDs" attribute is ignored.
Interval of check inseconds
Periodicity of Groovy code execution.
Groovy code Groovy code that evaluates either to TRUE (execute the task) or FALSE (no action).See below for more details.
Groovy code
A piece of Groovy is repeatedly executed and evaluated; based on the result, the event is either triggered and thetask executed or no action is taken.
For example, you can continually check for essential data sources before starting a graph. Or, you can do complexchecks of a running graph and, for example, decide to kill it if necessary. You can even call the CloverETL Servercore functions using the ServerFacade interface, see Javadoc: http://host:port/clover/javadoc/index.html
Evaluation Criteria
If the Groovy code returns Boolean.TRUE, the event is triggered and the associated task is executed. Otherwise,nothing happens.
If the Groovy code throws an exception, it is considered a coding error and the event is NOT triggered. Thus,exceptions should be properly handled in the Groovy code.
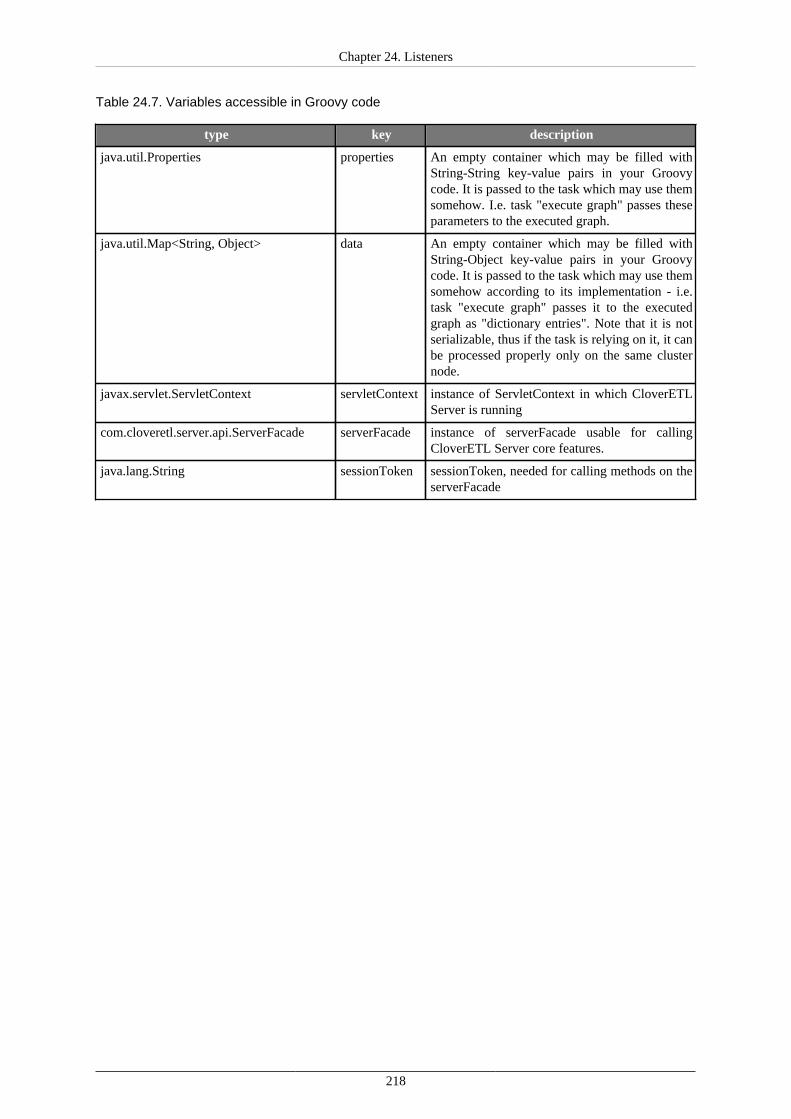
Chapter 24. Listeners
218
Table 24.7. Variables accessible in Groovy code
type key description
java.util.Properties properties An empty container which may be filled withString-String key-value pairs in your Groovycode. It is passed to the task which may use themsomehow. I.e. task "execute graph" passes theseparameters to the executed graph.
java.util.Map<String, Object> data An empty container which may be filled withString-Object key-value pairs in your Groovycode. It is passed to the task which may use themsomehow according to its implementation - i.e.task "execute graph" passes it to the executedgraph as "dictionary entries". Note that it is notserializable, thus if the task is relying on it, it canbe processed properly only on the same clusternode.
javax.servlet.ServletContext servletContext instance of ServletContext in which CloverETLServer is running
com.cloveretl.server.api.ServerFacade serverFacade instance of serverFacade usable for callingCloverETL Server core features.
java.lang.String sessionToken sessionToken, needed for calling methods on theserverFacade
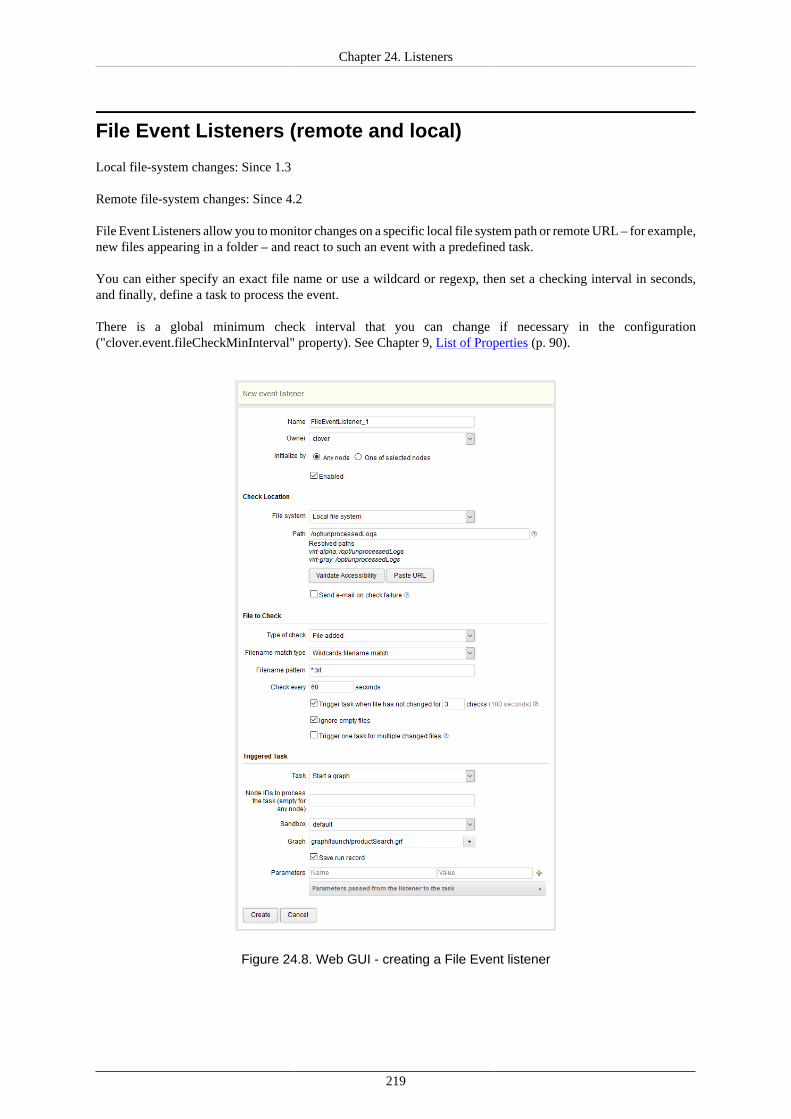
Chapter 24. Listeners
219
File Event Listeners (remote and local)
Local file-system changes: Since 1.3
Remote file-system changes: Since 4.2
File Event Listeners allow you to monitor changes on a specific local file system path or remote URL – for example,new files appearing in a folder – and react to such an event with a predefined task.
You can either specify an exact file name or use a wildcard or regexp, then set a checking interval in seconds,and finally, define a task to process the event.
There is a global minimum check interval that you can change if necessary in the configuration("clover.event.fileCheckMinInterval" property). See Chapter 9, List of Properties (p. 90).
Figure 24.8. Web GUI - creating a File Event listener
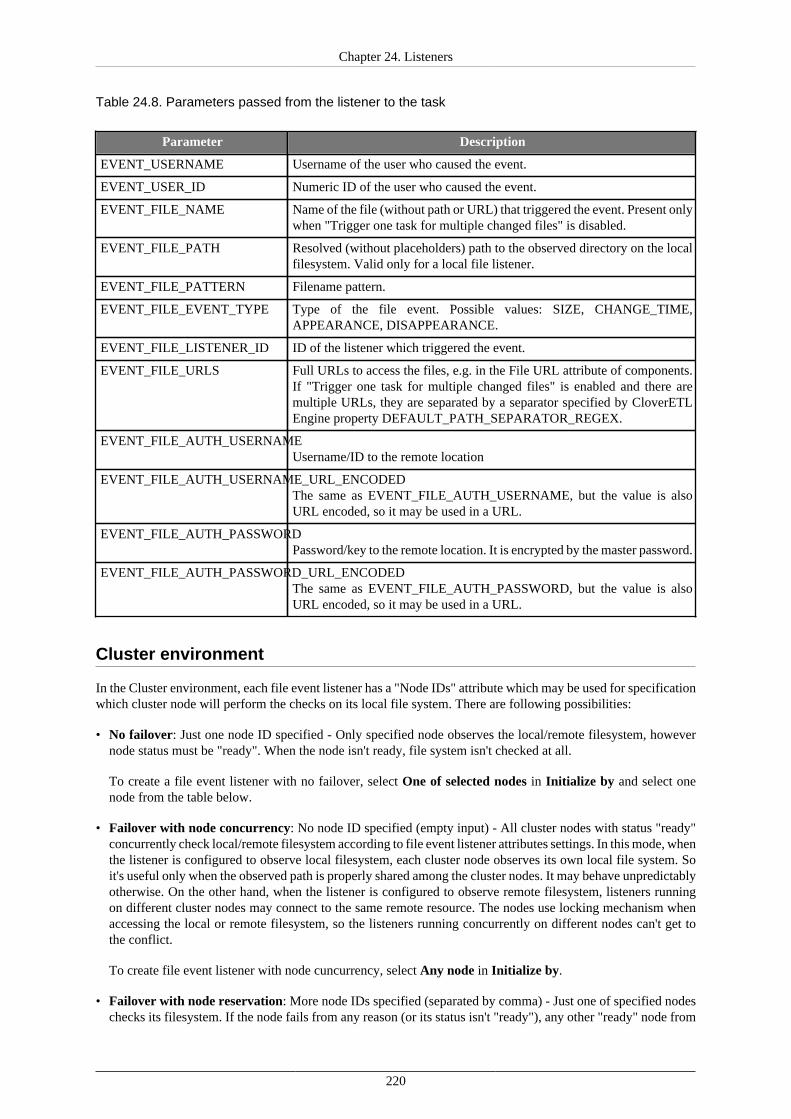
Chapter 24. Listeners
220
Table 24.8. Parameters passed from the listener to the task
Parameter Description
EVENT_USERNAME Username of the user who caused the event.
EVENT_USER_ID Numeric ID of the user who caused the event.
EVENT_FILE_NAME Name of the file (without path or URL) that triggered the event. Present onlywhen "Trigger one task for multiple changed files" is disabled.
EVENT_FILE_PATH Resolved (without placeholders) path to the observed directory on the localfilesystem. Valid only for a local file listener.
EVENT_FILE_PATTERN Filename pattern.
EVENT_FILE_EVENT_TYPE Type of the file event. Possible values: SIZE, CHANGE_TIME,APPEARANCE, DISAPPEARANCE.
EVENT_FILE_LISTENER_ID ID of the listener which triggered the event.
EVENT_FILE_URLS Full URLs to access the files, e.g. in the File URL attribute of components.If "Trigger one task for multiple changed files" is enabled and there aremultiple URLs, they are separated by a separator specified by CloverETLEngine property DEFAULT_PATH_SEPARATOR_REGEX.
EVENT_FILE_AUTH_USERNAMEUsername/ID to the remote location
EVENT_FILE_AUTH_USERNAME_URL_ENCODEDThe same as EVENT_FILE_AUTH_USERNAME, but the value is alsoURL encoded, so it may be used in a URL.
EVENT_FILE_AUTH_PASSWORDPassword/key to the remote location. It is encrypted by the master password.
EVENT_FILE_AUTH_PASSWORD_URL_ENCODEDThe same as EVENT_FILE_AUTH_PASSWORD, but the value is alsoURL encoded, so it may be used in a URL.
Cluster environment
In the Cluster environment, each file event listener has a "Node IDs" attribute which may be used for specificationwhich cluster node will perform the checks on its local file system. There are following possibilities:
• No failover: Just one node ID specified - Only specified node observes the local/remote filesystem, howevernode status must be "ready". When the node isn't ready, file system isn't checked at all.
To create a file event listener with no failover, select One of selected nodes in Initialize by and select onenode from the table below.
• Failover with node concurrency: No node ID specified (empty input) - All cluster nodes with status "ready"concurrently check local/remote filesystem according to file event listener attributes settings. In this mode, whenthe listener is configured to observe local filesystem, each cluster node observes its own local file system. Soit's useful only when the observed path is properly shared among the cluster nodes. It may behave unpredictablyotherwise. On the other hand, when the listener is configured to observe remote filesystem, listeners runningon different cluster nodes may connect to the same remote resource. The nodes use locking mechanism whenaccessing the local or remote filesystem, so the listeners running concurrently on different nodes can't get tothe conflict.
To create file event listener with node cuncurrency, select Any node in Initialize by.
• Failover with node reservation: More node IDs specified (separated by comma) - Just one of specified nodeschecks its filesystem. If the node fails from any reason (or its status isn't "ready"), any other "ready" node from
Chapter 24. Listeners
221
the list continues with checking. Please note, that when file event listener is re-initialized on another clusternode, it compares last directory content detected by the failed node with the current directory content.
To create a file event listener with node reservation, select One of selected nodes in Initialize by and selectmore nodes.
In standalone environment, the "Node IDs" attribute is ignored.
Supported filesystems and protocols
Local filesystem
The user may specify path to the directory which the listener shall observe. The listener doesn't read the directorycontent recursivelly. The directory must exist.
In cluster environment the directory must exist on each cluster node where the listener may run. If the listenercan run concurrently on more nodes, the directory must be shared among all these nodes and the directory mustexist on all these nodes.
It's recommended to use placeholders to unify configuration on all nodes. These are recommended placeholders:CloverETL Server config property ${sandboxes.home} and JVM system property ${java.io.tmpdir}.It's possible to use any JVM system property or Environment variable.
Remote filesystem
The user may specify URL to the directory which the listener shall observe. Currently these protocols aresupported: FTP, S3, SFTP and SMB. Different protocols may use different authentication methods: none,username+password and keystore. The listener doesn't read the directory content recursivelly. The directory mustexist.
Currently the subset of the protocols allowed by file-operations is supported:
• FTP - File Transfer Protocol (no authentication or username+password authentication) URL example:
ftp://host:23/observed/path/
• SFTP (SSH/FTP) - SSH File Transfer Protocol (username+private key authentication) URL example:
sftp://host:23/observed/path/
It's recommended to use placeholders to unify path configuration on all nodes. These are recommendedplaceholders: CloverETL Server config property ${sandboxes.home}, JVM system property${user.home}. It's possible to use any JVM system property or Environment variable.
• S3 - Amazon S3 Storage (AWS Access Key ID + Secret Access Key authentication) URL example:
s3://s3.amazonaws.com/bucketname/path/
Please specify the AWS Access Key ID as username and Secret Access Key as password.
• Microsoft SMB/CIFS Protocol (username+password authentication) URL example:
Chapter 24. Listeners
222
smb://host/path/
• Microsoft SMBv2/v3 Protocol (username+password authentication) URL example:
smb2://host/path/
Observed file
Local observed file is specified by directory path and file name pattern.
Remote observed file is specified by URL, credentials and file name pattern.
User may specify just one exact file name or file name pattern for observing more matching files in specifieddirectory. If there are more changed files matching the pattern, separated event is triggered for each of these files.
There are three ways how to specify file name pattern of observed file(s)
• Exact match (p. 222)• Wildcards (p. 222)• Regular expression (p. 222)
Exact match
You specify the exact name of the observed file.
Wildcards
You can use wildcards common in most operating systems (*, ?, etc.)
• * - Matches zero or more instances of any character• ? - Matches one instance of any character• [...] - Matches any of characters enclosed by the brackets• \ - Escape character
Examples
• *.csv - Matches all CSV files
• input_*.csv - Matches i.e. input_001.csv, input_9.csv
• input_???.csv - Matches i.e. input_001.csv, but does not match input_9.csv
Regular expression
Examples
• (.*?)\.(jpg|jpeg|png|gif)$ - Matches image files
Notes
• It is strongly recommended to use absolute paths with placeholders. It is possible to use relative path, butworking directory depends on an application server.
• Use forward slashes as file separators, even on MS Windows OS. Backslashes might be evaluated as escapesequences.
Chapter 24. Listeners
223
File Events
For each listener you have to specify event type, which you are interested in.
Please note that since CloverETL 4.2, the grouping mode may be enabled for the file listener, so all file changesdetected by single check produce just one "grouped" file event. Otherwise each single file produces its own event.
There are four types of file events:
• File added (p. 223)• File removed (p. 223)• File size changed (p. 223)• File timestamp changed (p. 223)
File added
Event of this type occurs, when the observed file is created or copied from another location between two checks.Please keep in mind, that event of this type occurs immediately when a new file is detected, regardless it is completeor not. Thus task which may need a complete file is executed when file is still incomplete. Recommended approachis to save the file to a different location and when it is complete, rename it or move it to an observed locationwhere CloverETL Server may detect it. File moving/renaming should be atomic operation.
Event of this type does not occur when the file has been updated (change of timestamp or size) between two checks.Appearance means that the file didn't exist during the previous check and it exists now, during the current check.
File removed
Event of this type occurs, when observed file is deleted or moved to another location between two checks.
File size changed
Event of this type occurs when the size of the observed file has changed between two checks. Event of this typeis never produced when file is created or removed. The file must exist during both checks.
File timestamp changed
Event of this type occurs, when change time of the observed file has changed between two checks. Event of thistype is never produced when the file is created or removed. The file must exist during both checks.
Check Interval, Task and Use Cases
• User may specify the minimum time interval between two checks. The interval is specified in seconds. Checkevery
• Each listener defines a task, which will be processed as a reaction for the file event. All task types and theirsattributes are described in Scheduling and GraphEventListeners sections.
• Graph Execution, when a file with input data is accessible
• Graph Execution, when a file with input data is updated
• Graph Execution, when a file with generated data is removed and must be recreated
How to use source of event during task processing
A file(s), which caused event (considered as source of the event) may be used during task processing. CloverETLgraph/jobflow components with "File URL" attribute (e.g. reader or writer components) may directly use event

Chapter 24. Listeners
224
source by parameter placeholder: ${EVENT_FILE_URLS}. Please see Executed by Task "graph execution" byFile Event Listener (p. 166) to see another parameters.
Please note that previous versions used lower-case placeholders. Since version 3.3, placeholders are upper-case,however lower-case still work for backward compatibility.
For "graph execution" task this works only if the graph is not pooled. Thus "keep in pool interval" must be setto 0 (default value).
Delayed triggering for incomplete files
It is possible to delay task execution for incomplete files. This is useful in cases, when the condition to executethe listener's task has been met, but there is still some work that needs to be done on the file, e.g. the whole fileneeds to be uploaded.
Ignore empty files
If the process creating the file creates an empty file and does something else for several minutes or even hours,and finally writes the content, tick Ignore empty files checkbox. The task will be triggered only if a non-emptyfile appears.
Trigger task when file has not changed for n checks
If the file size slowly rises till the file is complete, tick the checkbox Trigger task when file has not changed.Then specify the number of additional file size checks that are to be performed on the file. The listener's task willnot be triggered until the checks are performed and the file's size stays the same between these checks.
Combination
If you use Ignore empty files and Trigger task when file has not changed for n checks together, the first onefilters out empty files and the later one the files that are being changed. The task will be triggered only on filesthat are not empty and that have not changed for the specified number of checks.
Howtos
Create a file event listener listening to changes on local file system (p. 224)Observe file from one cluster node (p. 225)Quickly setup failure notification (p. 225)Quickly enable or disable file event listener (p. 225)
Create a file event listener listening to changes on local file system
This howto shows way to create a new listener checking appearance of a file (new_invoices.txt) onlocal file system (/mnt/sdb2/). The appearance will trigger a graph (graph/checkInvoices.grf) fromInvoicesProcessing sandbox.
In Event Listeners →File Event Listeners, click New Listener.
Enter the Name of the listener, e.g. Invoices.
Enter the Path to the directory where files will appear: /mnt/sdb2. You can check that Clover can access thisdirectory (the directory exists and permissions are set up properly) with Validate Accesibility button.
If the observed directory becomes inaccessible, CloverETL Server can send you an email. To do so, tick Sendemail on check failure and enter recipient(s).
The event should be triggered on file appearance - set Type of check to File added.
Enter the file name new_invoices.txt to Filename pattern.
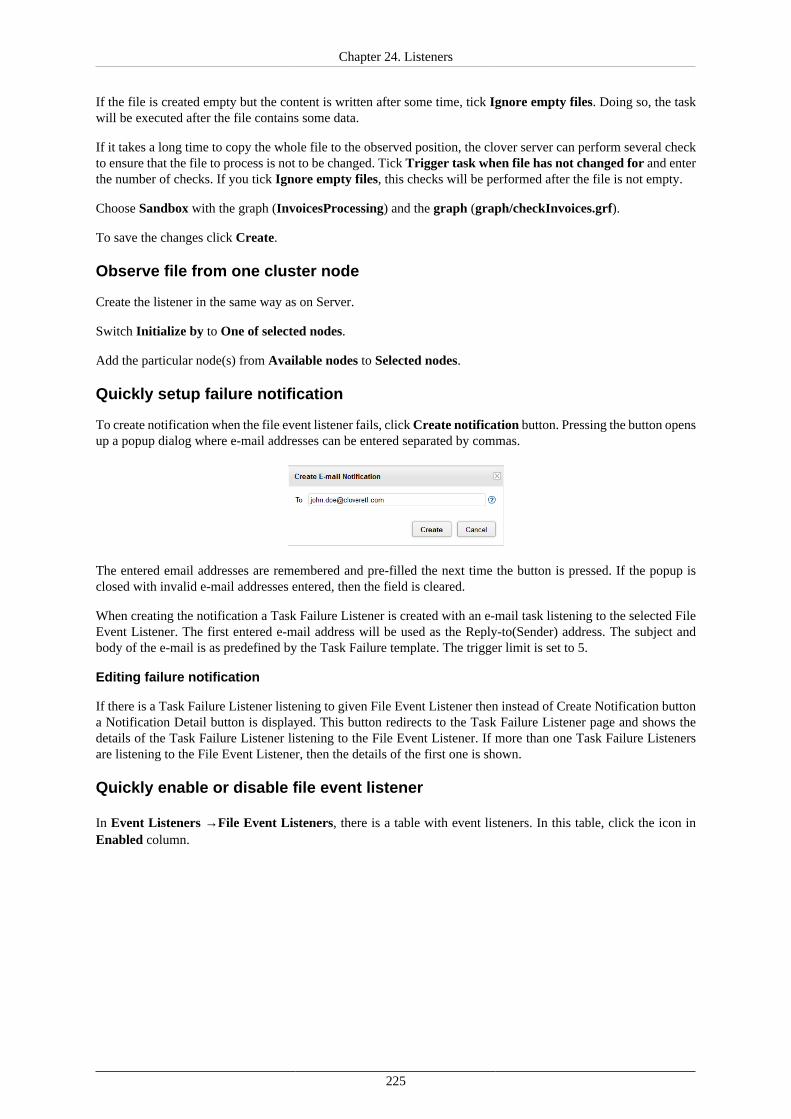
Chapter 24. Listeners
225
If the file is created empty but the content is written after some time, tick Ignore empty files. Doing so, the taskwill be executed after the file contains some data.
If it takes a long time to copy the whole file to the observed position, the clover server can perform several checkto ensure that the file to process is not to be changed. Tick Trigger task when file has not changed for and enterthe number of checks. If you tick Ignore empty files, this checks will be performed after the file is not empty.
Choose Sandbox with the graph (InvoicesProcessing) and the graph (graph/checkInvoices.grf).
To save the changes click Create.
Observe file from one cluster node
Create the listener in the same way as on Server.
Switch Initialize by to One of selected nodes.
Add the particular node(s) from Available nodes to Selected nodes.
Quickly setup failure notification
To create notification when the file event listener fails, click Create notification button. Pressing the button opensup a popup dialog where e-mail addresses can be entered separated by commas.
The entered email addresses are remembered and pre-filled the next time the button is pressed. If the popup isclosed with invalid e-mail addresses entered, then the field is cleared.
When creating the notification a Task Failure Listener is created with an e-mail task listening to the selected FileEvent Listener. The first entered e-mail address will be used as the Reply-to(Sender) address. The subject andbody of the e-mail is as predefined by the Task Failure template. The trigger limit is set to 5.
Editing failure notification
If there is a Task Failure Listener listening to given File Event Listener then instead of Create Notification buttona Notification Detail button is displayed. This button redirects to the Task Failure Listener page and shows thedetails of the Task Failure Listener listening to the File Event Listener. If more than one Task Failure Listenersare listening to the File Event Listener, then the details of the first one is shown.
Quickly enable or disable file event listener
In Event Listeners →File Event Listeners, there is a table with event listeners. In this table, click the icon inEnabled column.

Chapter 24. Listeners
226
Task Failure Listeners
Since 4.4
Task Failure Listeners allow you to detect and react to failures in your server when a task you set up in a listenerfails to execute, e.g. a File Listener is set up to detect changes on an FTP server, but it fails to connect to theFTP server.
Task Failure Listeners do not detect failures of the task itself, e.g. a File Listener is set up to detect changes onan FTP server and send an e-mail if the change is detected. If the File Listener fails to send the e-mail for somereason, the Task Failure Listener won't detect it.
The same tasks to be executed are available as with all the other listeners, with the difference being that whencreating a new Task Failure Listener the pre-selected task is Sending an e-mail if the e-mail service is configuredin Configuration.
Figure 24.9. Web GUI - creating a Task Failure listener
Task Choice
There are three options to choose from: Listening to any task failure, listening to failures from a group (such asFile Event Listeners), or listening to a failure of a chosen listener.
Selecting an option from the 'Listen to type' menu restricts the 'Listen to' combobox to event sources of the chosencategory. If there are no event sources in the category, the Failure Listener still can be created, it will react tofailures of tasks that will be created in that category.
When selecting an event source you can type into the text field to filter the dropdown menu. After selecting anevent source some information is presented about the listener.
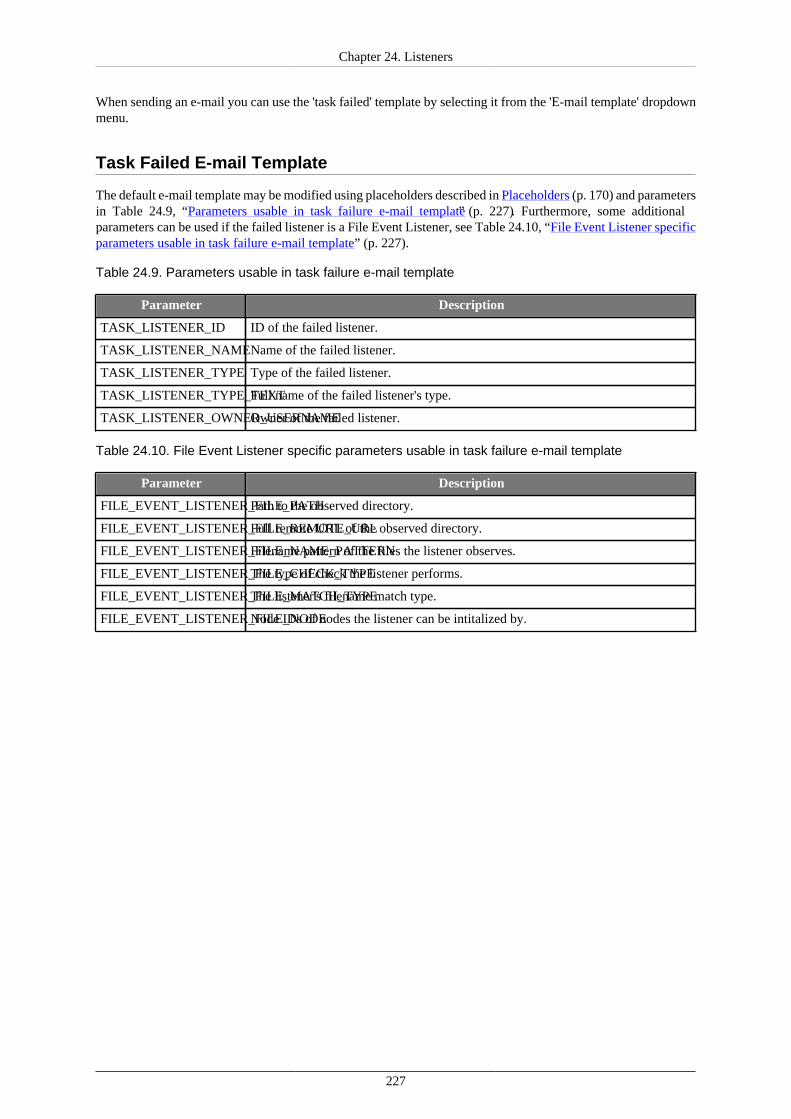
Chapter 24. Listeners
227
When sending an e-mail you can use the 'task failed' template by selecting it from the 'E-mail template' dropdownmenu.
Task Failed E-mail Template
The default e-mail template may be modified using placeholders described in Placeholders (p. 170) and parametersin Table 24.9, “Parameters usable in task failure e-mail template” (p. 227). Furthermore, some additionalparameters can be used if the failed listener is a File Event Listener, see Table 24.10, “File Event Listener specificparameters usable in task failure e-mail template” (p. 227).
Table 24.9. Parameters usable in task failure e-mail template
Parameter Description
TASK_LISTENER_ID ID of the failed listener.
TASK_LISTENER_NAMEName of the failed listener.
TASK_LISTENER_TYPE Type of the failed listener.
TASK_LISTENER_TYPE_TEXTFull name of the failed listener's type.
TASK_LISTENER_OWNER_USERNAMEOwner of the failed listener.
Table 24.10. File Event Listener specific parameters usable in task failure e-mail template
Parameter Description
FILE_EVENT_LISTENER_FILE_PATHPath to the observed directory.
FILE_EVENT_LISTENER_FILE_REMOTE_URLFull remote URL of the observed directory.
FILE_EVENT_LISTENER_FILE_NAME_PATTERNFilename pattern of the files the listener observes.
FILE_EVENT_LISTENER_FILE_CHECK_TYPEThe type of check the listener performs.
FILE_EVENT_LISTENER_FILE_MATCH_TYPEThe listener's filename match type.
FILE_EVENT_LISTENER_FILE_NODENode IDs of nodes the listener can be intitalized by.
228
Chapter 25. Recommendations for TransformationsDevelopers
Add external libraries to app-server classpath
Connections (JDBC/JMS) may require third-party libraries. We strongly recommended adding these libraries tothe app-server classpath.
CloverETL allows you to specify these libraries directly in a graph definition so that CloverETLcan load these libraries dynamically. However, external libraries may cause memory leak, resulting in"java.lang.OutOfMemoryError: PermGen space" in this case.
In addition, app-servers should have the JMS API on their classpath – and the third-party libraries often bundlethis API as well. So it may result in classloading conflicts if these libraries are not loaded by the same classloader.
Another graphs executed by RunGraph component may beexecuted only in the same JVM instance
In the server environment, all graphs are executed in the same VM instance. The attribute "same instance" of theRunGraph component cannot be set to false.
229
Chapter 26. Extensibility - CloverETL Engine PluginsSince 3.1.2
The CloverETL Server can use external engine plugins loaded from a specified source. The source is specified byengine.plugins.additional.src config property.
See details about the possibilities with CloverETL configuration in Part III, “Configuration” (p. 61)
This property must be the absolute path to the directory or zip file with additional CloverETL engine plugins. Boththe directory and zip must contain a subdirectory for each plugin. These plugins are not a substitute for pluginspacked in a WAR file. Changes in the directory or the ZIP file apply only when the server is restarted.
Each plugin has its own class-loader that uses a parent-first strategy by default. The parent of plugins' classloadersis web-app classloader (content of [WAR]/WEB-INF/lib). If the plugin uses any third-party libraries, there maybe some conflict with libraries on parent-classloaders classpath. These are common exceptions/errors suggestingthat there is something wrong with classloading:
• java.lang.ClassCastException• java.lang.ClassNotFoundException• java.lang.NoClassDefFoundError• java.lang.LinkageError
There are a couple of ways you can get rid of such conflicts:
• Remove your conflicting third-party libraries and use libraries on parent classloaders (web-app or app-serverclassloaders)
• Use a different class-loading strategy for your plugin.
• In the plugin descriptor plugin.xml, set attribute greedyClassLoader="true" in the element "plugin"
• It means that the plugin classloader will use a self-first strategy
• Set an inverse class-loading strategy for selected Java packages.
• In the plugin descriptor plugin.xml, set attribute "excludedPackages" in the element "plugin".
• It's a comma-separated list of package prefixes – like this, for example:excludedPackages="some.java.package,some.another.package"
• In the previous example, all classes from "some.java.package", "some.another.package" and all their sub-packages would be loaded with the inverse loading strategy, then the rest of classes on the plugins classpath.
The suggestions above may be combined. It's not easy to find the best solution for these conflicts and it maydepend on the libraries on app-server classpath.
For more convenient debugging, it’s useful to set TRACE log level for related class-loaders.
<logger name="org.jetel.util.classloader.GreedyURLClassLoader"> <level value="trace"/></logger><logger name="org.jetel.plugin.PluginClassLoader"> <level value="trace"/></logger>
See Chapter 11, Logging (p. 101) for details about overriding a server log4j configuration.
230
Chapter 27. Troubleshooting
Graph hangs and is un-killable
Graph can sometimes hang and be un-killable if some network connection in it hangs. This can be improved bysetting a shorter tcp-keepalive so that the connection times out earlier. The default value on Linux is 2 hours (7,200seconds). You can set it to 10 minutes (600 seconds).
See http://tldp.org/HOWTO/TCP-Keepalive-HOWTO/usingkeepalive.html on tcp-timeout in Linux.
The file descriptor can be closed manually using gdb. See http://stackoverflow.com/questions/5987820/how-to-close-file-descriptor-via-linux-shell-command/12058001#12058001.
SSL/TLS Issues
Java 7 and HTTPS
There may be issues when using Java 7 and HTTPS-based communication. There are servers that do notsupport TLS 1.0 (Transport Layer Security) protocol anymore and the Java 7 does not support newer versionsof the TLS by default. To activate newer versions of the TLS protocol, user has to specify the systemproperty https.protocols and set the value to TLSv1,TLSv1.1,TLSv1.2. Consult section on ProductionServer (p. 13) to find out how to set the system property on particular application server.
SSL-related Failures on WebLogic 12
Certain graphs using SSL-encrypted connections may fail on WebLogic 12 due to damaged library distributedwith this application server. The issue can be identified by a SHA-1 digest error in the graph execution stacktrace:
...Caused by: java.io.IOException: Could not convert socket to TLS at com.sun.mail.pop3.Protocol.stls(Protocol.java:659) at com.sun.mail.pop3.POP3Store.getPort(POP3Store.java:269) at com.sun.mail.pop3.POP3Store.protocolConnect(POP3Store.java:207)Caused by: javax.net.ssl.SSLException: java.lang.SecurityException: SHA1 digest error for org/bouncycastle/jce/provider/JCEECPublicKey.class...
To fix the issue, replace the library [MW_HOME]/oracle_common/modules/bcprov-jdk16-1.45.jar with the one downloaded directly from Bouncy Castle home page. Restart of the applicationserver is required to load the new library.

Part VI. API
232
Chapter 28. Simple HTTP APIThe Simple HTTP API is a basic Server automation tool that lets you control the Server from external applicationsusing simple HTTP calls.
Most of operations is accessible using the HTTP GET method and return plain text. Thus, both “request” and“response” can be conveniently sent and parsed using very simple tools (wget, grep, etc.).
If global security is “on” (on by default), Basic HTTP authentication is used. Authenticated operations will requirevalid user credentials with corresponding permissions.
Note that the ETL graph-related operations "graph_run", "graph_status" and "graph_kill" also work for jobflowsand Data Profiler jobs.
The generic pattern for a request URL:
http://[domain]:[port]/[context]/[servlet]/[operation]?[param1]=[value1]&[param2]=[value2]...
example: http://localhost:8080/clover/simpleHttpApi/help
Note
For backward compatibility, you can also use http://localhost:8080/clover/request_processor/help.
For a wget client, you can use the following command line:
wget --user=$USER --password=$PASS -O ./$OUTPUT_FILE $REQUEST_URL
• Operation help (p. 233)• Operation graph_run (p. 233)• Operation graph_status (p. 234)• Operation graph_kill (p. 235)• Operation server_jobs (p. 236)• Operation sandbox_list (p. 236)• Operation sandbox_content (p. 236)• Operation executions_history (p. 236)• Operation suspend (p. 238)• Operation resume (p. 238)• Operation sandbox_create (p. 239)• Operation sandbox_add_location (p. 239)• Operation sandbox_remove_location (p. 239)• Operation download_sandbox_zip (p. 240)• Operation upload_sandbox_zip (p. 240)• Operation cluster_status (p. 241)• Operation export_server_config (p. 241)• Operation import_server_config (p. 242)
The HTTP API is enabled by default. You can disable it with configuration property http.api.enabled. In
server GUI, switch to Configuration →Setup and add line
http.api.enabled=false
to the properties file.
Chapter 28. Simple HTTP API
233
Operation help
parameters
no
returns
list of possible operations and parameters with its descriptions
example
http://localhost:8080/clover/simpleHttpApi/help
Operation graph_run
Call this operation to start execution of the specified job. The operation is called graph_run for backwardcompatibility, however it may execute ETL graph, jobflow or profiler job.
parameters
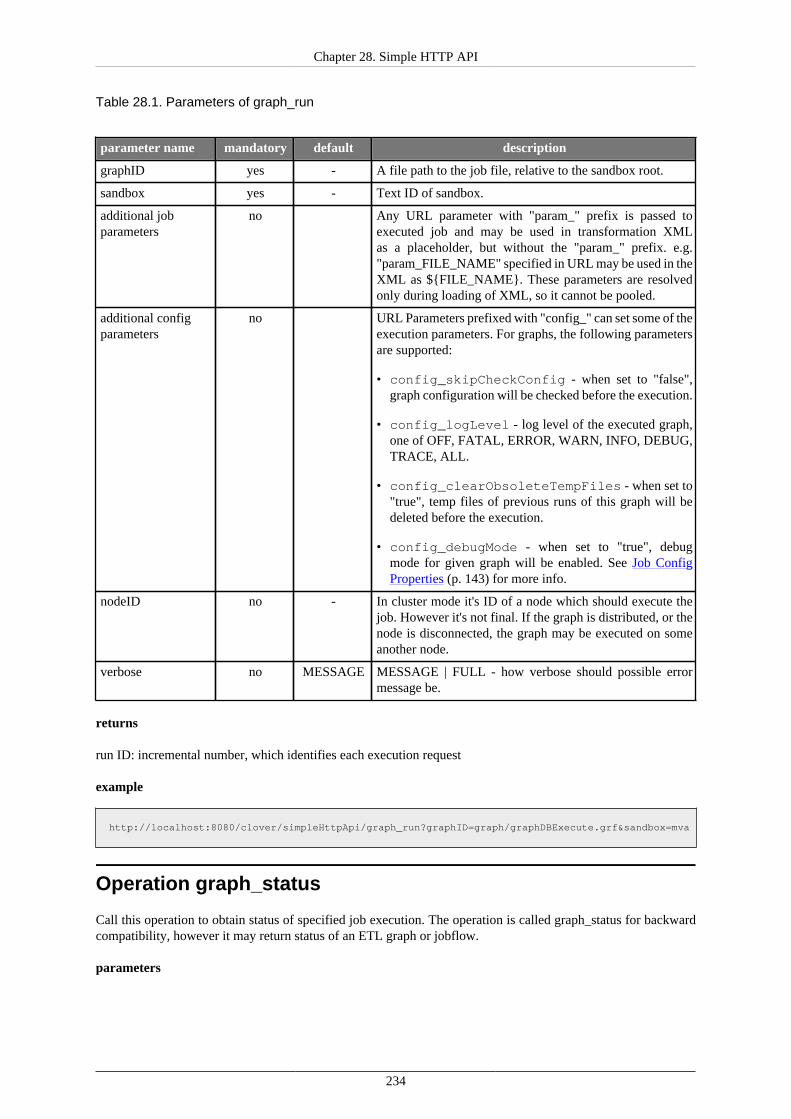
Chapter 28. Simple HTTP API
234
Table 28.1. Parameters of graph_run
parameter name mandatory default description
graphID yes - A file path to the job file, relative to the sandbox root.
sandbox yes - Text ID of sandbox.
additional jobparameters
no Any URL parameter with "param_" prefix is passed toexecuted job and may be used in transformation XMLas a placeholder, but without the "param_" prefix. e.g."param_FILE_NAME" specified in URL may be used in theXML as ${FILE_NAME}. These parameters are resolvedonly during loading of XML, so it cannot be pooled.
additional configparameters
no URL Parameters prefixed with "config_" can set some of theexecution parameters. For graphs, the following parametersare supported:
• config_skipCheckConfig - when set to "false",graph configuration will be checked before the execution.
• config_logLevel - log level of the executed graph,one of OFF, FATAL, ERROR, WARN, INFO, DEBUG,TRACE, ALL.
• config_clearObsoleteTempFiles - when set to"true", temp files of previous runs of this graph will bedeleted before the execution.
• config_debugMode - when set to "true", debugmode for given graph will be enabled. See Job ConfigProperties (p. 143) for more info.
nodeID no - In cluster mode it's ID of a node which should execute thejob. However it's not final. If the graph is distributed, or thenode is disconnected, the graph may be executed on someanother node.
verbose no MESSAGE MESSAGE | FULL - how verbose should possible errormessage be.
returns
run ID: incremental number, which identifies each execution request
example
http://localhost:8080/clover/simpleHttpApi/graph_run?graphID=graph/graphDBExecute.grf&sandbox=mva
Operation graph_status
Call this operation to obtain status of specified job execution. The operation is called graph_status for backwardcompatibility, however it may return status of an ETL graph or jobflow.
parameters
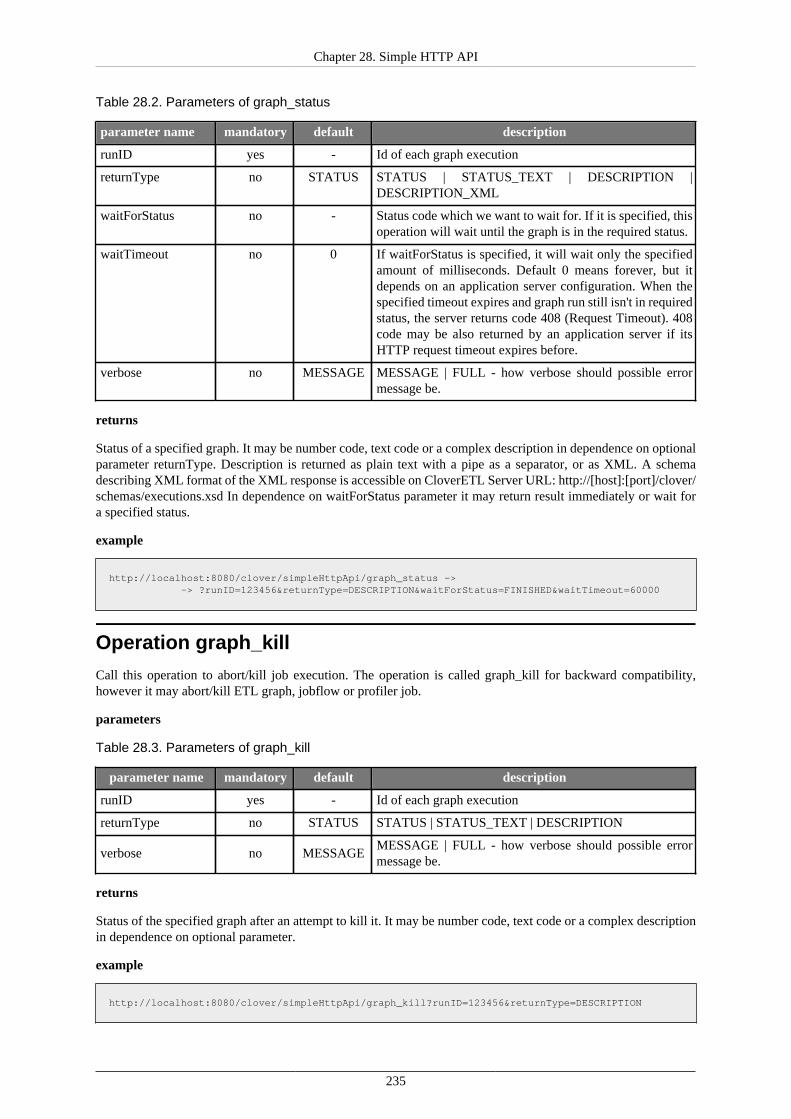
Chapter 28. Simple HTTP API
235
Table 28.2. Parameters of graph_status
parameter name mandatory default description
runID yes - Id of each graph execution
returnType no STATUS STATUS | STATUS_TEXT | DESCRIPTION |DESCRIPTION_XML
waitForStatus no - Status code which we want to wait for. If it is specified, thisoperation will wait until the graph is in the required status.
waitTimeout no 0 If waitForStatus is specified, it will wait only the specifiedamount of milliseconds. Default 0 means forever, but itdepends on an application server configuration. When thespecified timeout expires and graph run still isn't in requiredstatus, the server returns code 408 (Request Timeout). 408code may be also returned by an application server if itsHTTP request timeout expires before.
verbose no MESSAGE MESSAGE | FULL - how verbose should possible errormessage be.
returns
Status of a specified graph. It may be number code, text code or a complex description in dependence on optionalparameter returnType. Description is returned as plain text with a pipe as a separator, or as XML. A schemadescribing XML format of the XML response is accessible on CloverETL Server URL: http://[host]:[port]/clover/schemas/executions.xsd In dependence on waitForStatus parameter it may return result immediately or wait fora specified status.
example
http://localhost:8080/clover/simpleHttpApi/graph_status -> -> ?runID=123456&returnType=DESCRIPTION&waitForStatus=FINISHED&waitTimeout=60000
Operation graph_kill
Call this operation to abort/kill job execution. The operation is called graph_kill for backward compatibility,however it may abort/kill ETL graph, jobflow or profiler job.
parameters
Table 28.3. Parameters of graph_kill
parameter name mandatory default description
runID yes - Id of each graph execution
returnType no STATUS STATUS | STATUS_TEXT | DESCRIPTION
verbose no MESSAGEMESSAGE | FULL - how verbose should possible errormessage be.
returns
Status of the specified graph after an attempt to kill it. It may be number code, text code or a complex descriptionin dependence on optional parameter.
example
http://localhost:8080/clover/simpleHttpApi/graph_kill?runID=123456&returnType=DESCRIPTION
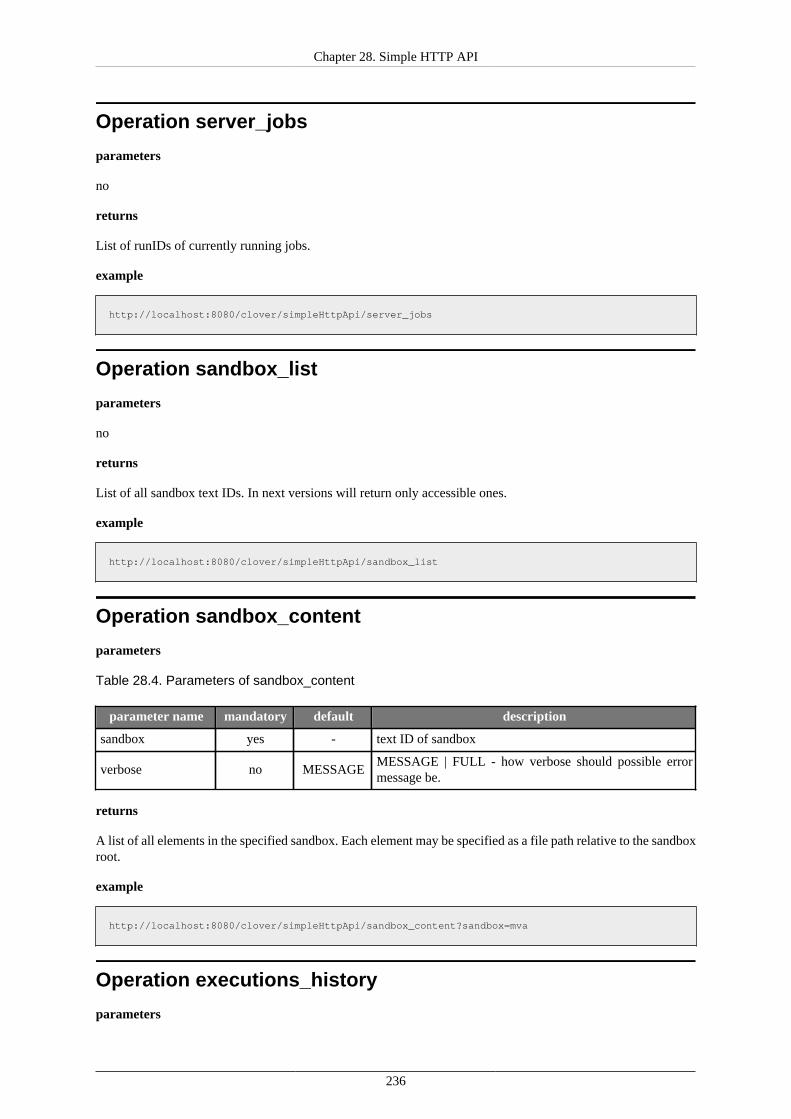
Chapter 28. Simple HTTP API
236
Operation server_jobs
parameters
no
returns
List of runIDs of currently running jobs.
example
http://localhost:8080/clover/simpleHttpApi/server_jobs
Operation sandbox_list
parameters
no
returns
List of all sandbox text IDs. In next versions will return only accessible ones.
example
http://localhost:8080/clover/simpleHttpApi/sandbox_list
Operation sandbox_content
parameters
Table 28.4. Parameters of sandbox_content
parameter name mandatory default description
sandbox yes - text ID of sandbox
verbose no MESSAGEMESSAGE | FULL - how verbose should possible errormessage be.
returns
A list of all elements in the specified sandbox. Each element may be specified as a file path relative to the sandboxroot.
example
http://localhost:8080/clover/simpleHttpApi/sandbox_content?sandbox=mva
Operation executions_history
parameters

Chapter 28. Simple HTTP API
237
Table 28.5. Parameters of executions_history
parameter name mandatory default description
sandbox yes - text ID of sandbox
from no Lower datetime limit of start of execution. The operationwill return only records after (and equal) this datetime.Format: "yyyy-MM-dd HH:mm" (must be URL encoded).
to no Upper datetime limit of start of execution. The operation willreturn only records before (and equal) this datetime. Format:"yyyy-MM-dd HH:mm" (must be URL encoded).
stopFrom no Lower datetime limit of stop of execution. The operationwill return only records after (and equal) this datetime.Format: "yyyy-MM-dd HH:mm" (must be URL encoded).
stopTo no Upper datetime limit of stop of execution. The operation willreturn only records before (and equal) this datetime. Format:"yyyy-MM-dd HH:mm" (must be URL encoded).
status no Current execution status. The operation will return onlyrecords with specified STATUS. Meaningful values areRUNNING | ABORTED | FINISHED_OK | ERROR
sandbox no Sandbox code. The operation will return only records forgraphs from the specified sandbox.
graphId no Text Id, which is unique in a specified sandbox. The file pathis relative to the sandbox root.
orderBy no Attribute for list ordering. Possible values: id | graphId |status | startTime | stopTime. By default, there is no ordering.
orderDescend no true A switch which specifies ascending or descending ordering.If it is true (which is default), ordering is descending.
returnType no IDs Possible values are: IDs | DESCRIPTION |DESCRIPTION_XML
index no 0 Index of the first returned records in whole record set.(starting from
records no infinite Max amount of returned records.
verbose no MESSAGE MESSAGE | FULL - how verbose should possible errormessage be.
returns
List of executions according to filter criteria.
For returnType==IDs returns a simple list of runIDs (with new line delimiter).
For returnType==DESCRIPTION returns complex response which describes current status of selectedexecutions, their phases, nodes and ports.
execution|[runID]|[status]|[username]|[sandbox]|[graphID]|[startedDatetime]|[finishedDatetime]|[clusterNode]|[graphVersion]phase|[index]|[execTimeInMilis]node|[nodeID]|[status]|[totalCpuTime]|[totalUserTime]|[cpuUsage]|[peakCpuUsage]|[userUsage]|[peakUserUsage]port|[portType]|[index]|[avgBytes]|[avgRows]|[peakBytes]|[peakRows]|[totalBytes]|[totalRows]
example of request
http://localhost:8080/clover/simpleHttpApi/executions_history ->
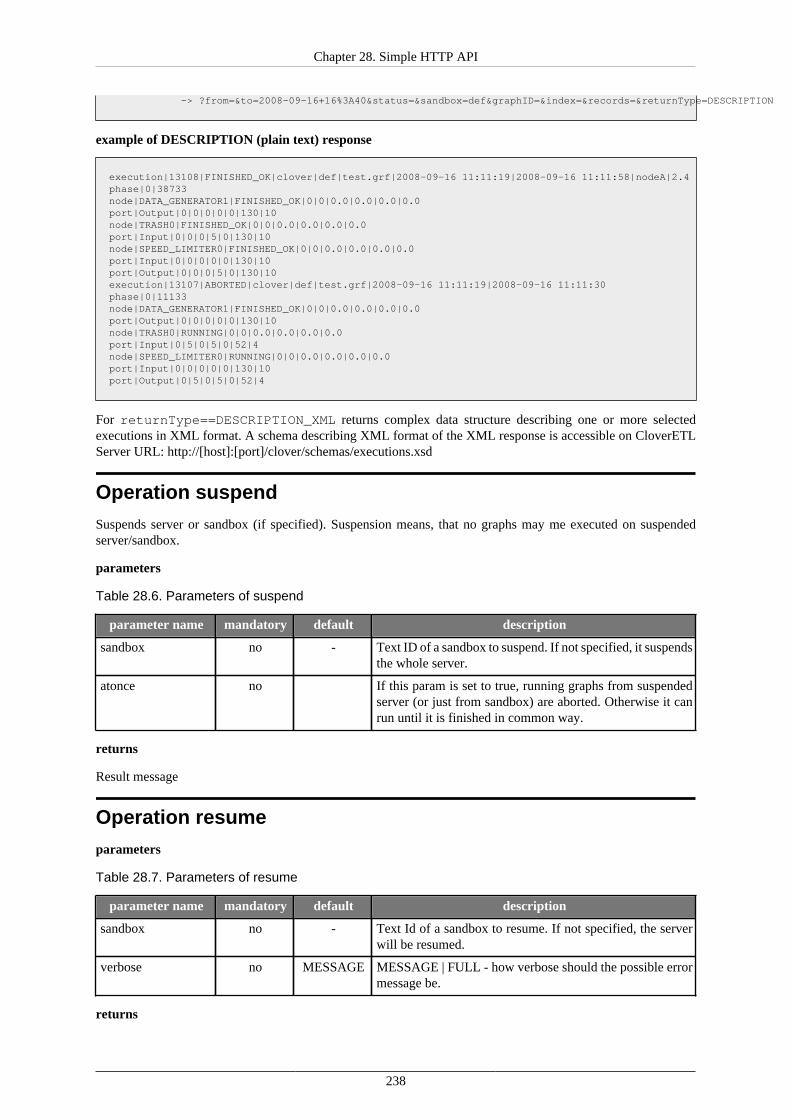
Chapter 28. Simple HTTP API
238
-> ?from=&to=2008-09-16+16%3A40&status=&sandbox=def&graphID=&index=&records=&returnType=DESCRIPTION
example of DESCRIPTION (plain text) response
execution|13108|FINISHED_OK|clover|def|test.grf|2008-09-16 11:11:19|2008-09-16 11:11:58|nodeA|2.4phase|0|38733node|DATA_GENERATOR1|FINISHED_OK|0|0|0.0|0.0|0.0|0.0port|Output|0|0|0|0|0|130|10node|TRASH0|FINISHED_OK|0|0|0.0|0.0|0.0|0.0port|Input|0|0|0|5|0|130|10node|SPEED_LIMITER0|FINISHED_OK|0|0|0.0|0.0|0.0|0.0port|Input|0|0|0|0|0|130|10port|Output|0|0|0|5|0|130|10execution|13107|ABORTED|clover|def|test.grf|2008-09-16 11:11:19|2008-09-16 11:11:30phase|0|11133node|DATA_GENERATOR1|FINISHED_OK|0|0|0.0|0.0|0.0|0.0port|Output|0|0|0|0|0|130|10node|TRASH0|RUNNING|0|0|0.0|0.0|0.0|0.0port|Input|0|5|0|5|0|52|4node|SPEED_LIMITER0|RUNNING|0|0|0.0|0.0|0.0|0.0port|Input|0|0|0|0|0|130|10port|Output|0|5|0|5|0|52|4
For returnType==DESCRIPTION_XML returns complex data structure describing one or more selectedexecutions in XML format. A schema describing XML format of the XML response is accessible on CloverETLServer URL: http://[host]:[port]/clover/schemas/executions.xsd
Operation suspend
Suspends server or sandbox (if specified). Suspension means, that no graphs may me executed on suspendedserver/sandbox.
parameters
Table 28.6. Parameters of suspend
parameter name mandatory default description
sandbox no - Text ID of a sandbox to suspend. If not specified, it suspendsthe whole server.
atonce no If this param is set to true, running graphs from suspendedserver (or just from sandbox) are aborted. Otherwise it canrun until it is finished in common way.
returns
Result message
Operation resume
parameters
Table 28.7. Parameters of resume
parameter name mandatory default description
sandbox no - Text Id of a sandbox to resume. If not specified, the serverwill be resumed.
verbose no MESSAGE MESSAGE | FULL - how verbose should the possible errormessage be.
returns
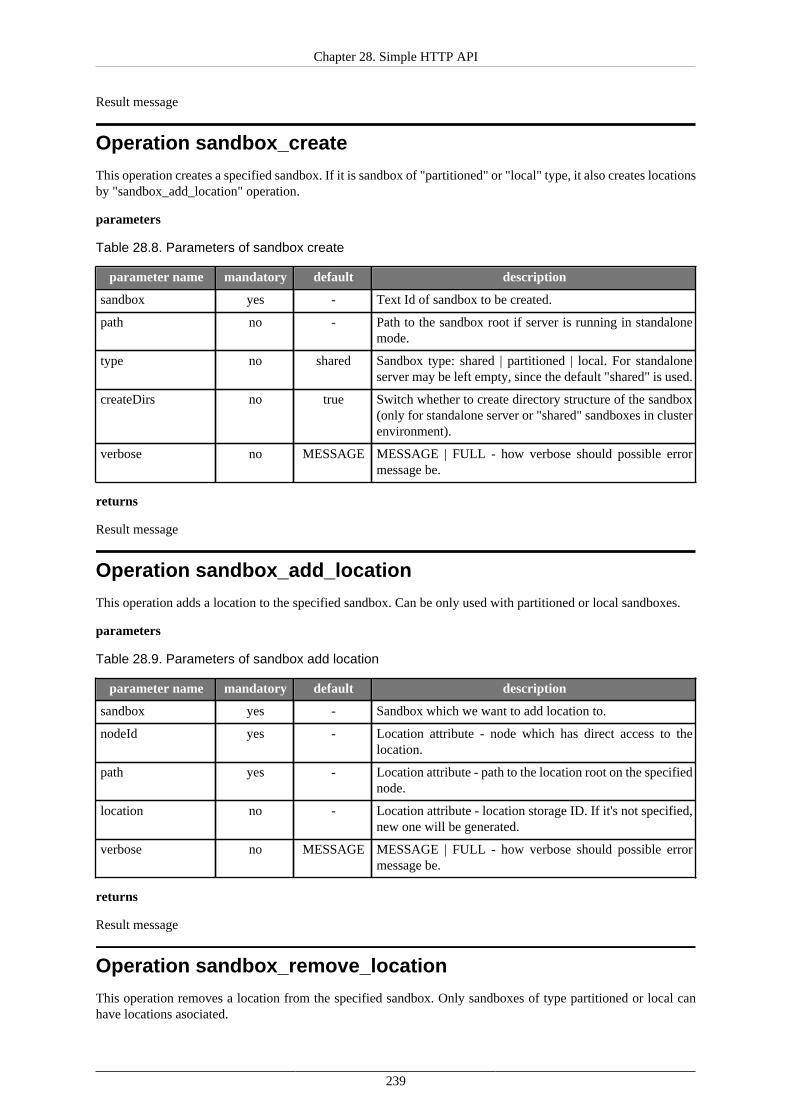
Chapter 28. Simple HTTP API
239
Result message
Operation sandbox_create
This operation creates a specified sandbox. If it is sandbox of "partitioned" or "local" type, it also creates locationsby "sandbox_add_location" operation.
parameters
Table 28.8. Parameters of sandbox create
parameter name mandatory default description
sandbox yes - Text Id of sandbox to be created.
path no - Path to the sandbox root if server is running in standalonemode.
type no shared Sandbox type: shared | partitioned | local. For standaloneserver may be left empty, since the default "shared" is used.
createDirs no true Switch whether to create directory structure of the sandbox(only for standalone server or "shared" sandboxes in clusterenvironment).
verbose no MESSAGE MESSAGE | FULL - how verbose should possible errormessage be.
returns
Result message
Operation sandbox_add_location
This operation adds a location to the specified sandbox. Can be only used with partitioned or local sandboxes.
parameters
Table 28.9. Parameters of sandbox add location
parameter name mandatory default description
sandbox yes - Sandbox which we want to add location to.
nodeId yes - Location attribute - node which has direct access to thelocation.
path yes - Location attribute - path to the location root on the specifiednode.
location no - Location attribute - location storage ID. If it's not specified,new one will be generated.
verbose no MESSAGE MESSAGE | FULL - how verbose should possible errormessage be.
returns
Result message
Operation sandbox_remove_location
This operation removes a location from the specified sandbox. Only sandboxes of type partitioned or local canhave locations asociated.
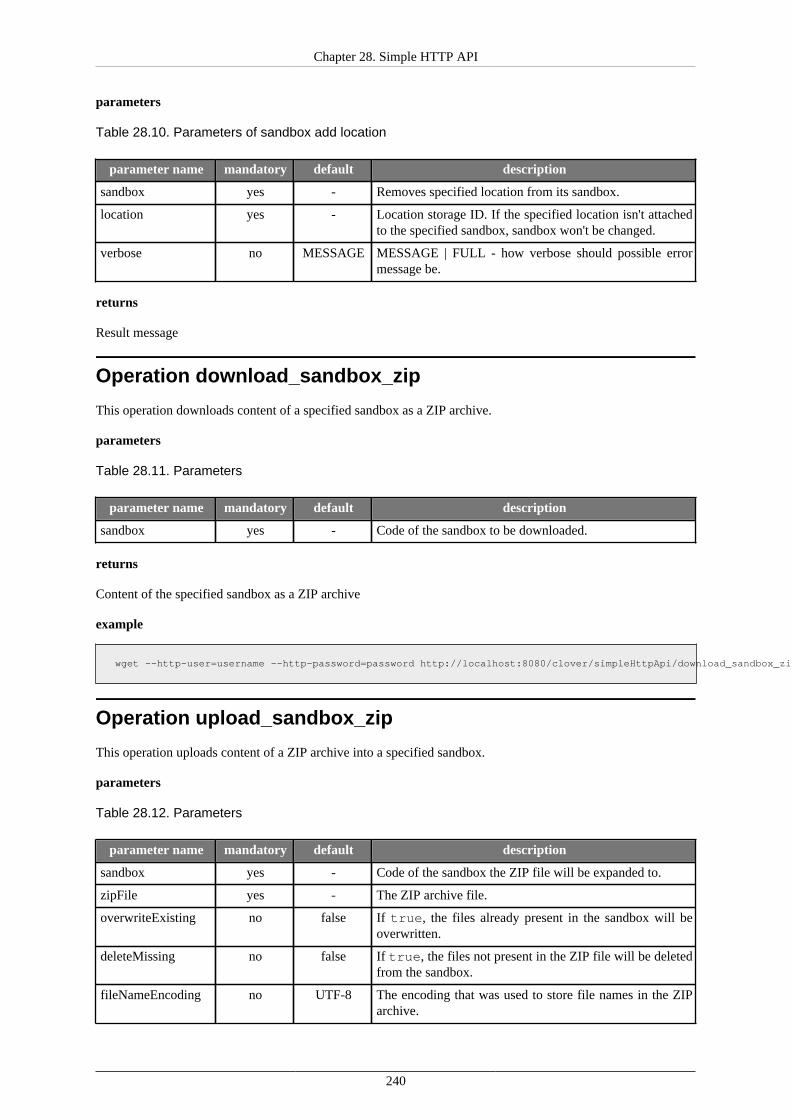
Chapter 28. Simple HTTP API
240
parameters
Table 28.10. Parameters of sandbox add location
parameter name mandatory default description
sandbox yes - Removes specified location from its sandbox.
location yes - Location storage ID. If the specified location isn't attachedto the specified sandbox, sandbox won't be changed.
verbose no MESSAGE MESSAGE | FULL - how verbose should possible errormessage be.
returns
Result message
Operation download_sandbox_zip
This operation downloads content of a specified sandbox as a ZIP archive.
parameters
Table 28.11. Parameters
parameter name mandatory default description
sandbox yes - Code of the sandbox to be downloaded.
returns
Content of the specified sandbox as a ZIP archive
example
wget --http-user=username --http-password=password http://localhost:8080/clover/simpleHttpApi/download_sandbox_zip?sandbox=my-sandbox
Operation upload_sandbox_zip
This operation uploads content of a ZIP archive into a specified sandbox.
parameters
Table 28.12. Parameters
parameter name mandatory default description
sandbox yes - Code of the sandbox the ZIP file will be expanded to.
zipFile yes - The ZIP archive file.
overwriteExisting no false If true, the files already present in the sandbox will beoverwritten.
deleteMissing no false If true, the files not present in the ZIP file will be deletedfrom the sandbox.
fileNameEncoding no UTF-8 The encoding that was used to store file names in the ZIParchive.
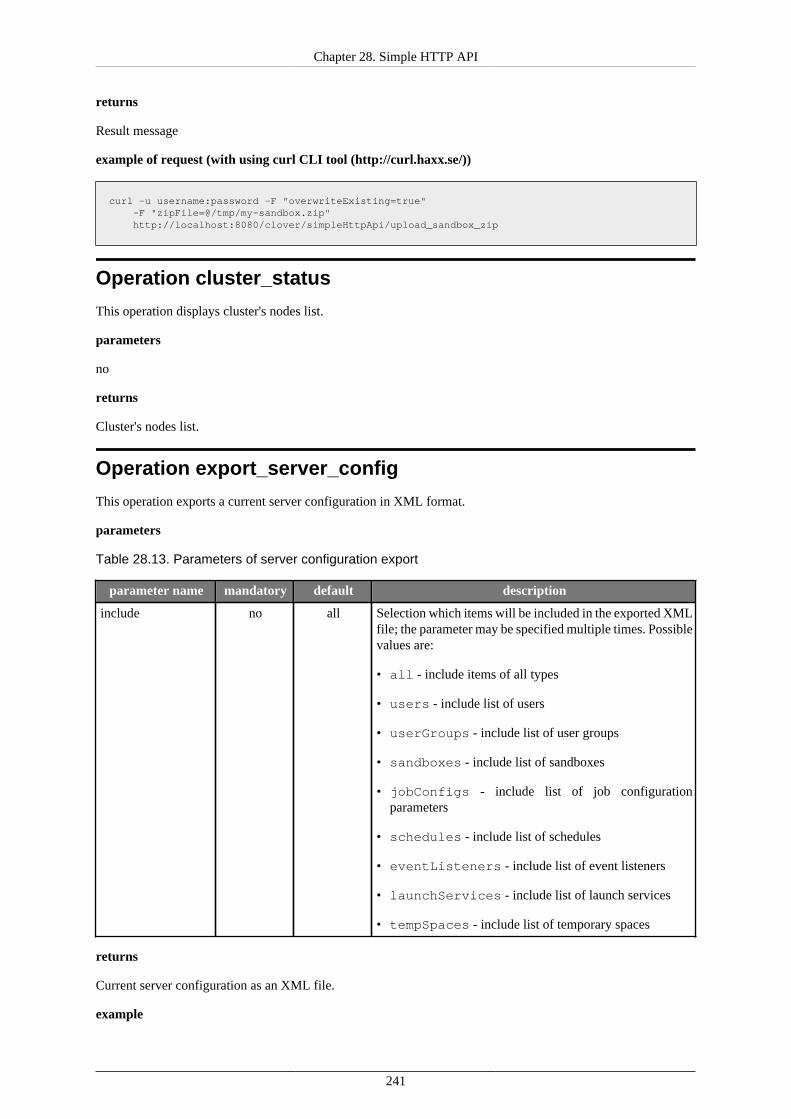
Chapter 28. Simple HTTP API
241
returns
Result message
example of request (with using curl CLI tool (http://curl.haxx.se/))
curl -u username:password -F "overwriteExisting=true" -F "zipFile=@/tmp/my-sandbox.zip" http://localhost:8080/clover/simpleHttpApi/upload_sandbox_zip
Operation cluster_status
This operation displays cluster's nodes list.
parameters
no
returns
Cluster's nodes list.
Operation export_server_config
This operation exports a current server configuration in XML format.
parameters
Table 28.13. Parameters of server configuration export
parameter name mandatory default description
include no all Selection which items will be included in the exported XMLfile; the parameter may be specified multiple times. Possiblevalues are:
• all - include items of all types
• users - include list of users
• userGroups - include list of user groups
• sandboxes - include list of sandboxes
• jobConfigs - include list of job configurationparameters
• schedules - include list of schedules
• eventListeners - include list of event listeners
• launchServices - include list of launch services
• tempSpaces - include list of temporary spaces
returns
Current server configuration as an XML file.
example

Chapter 28. Simple HTTP API
242
wget --http-user=username --http-password=password http://localhost:8080/clover/simpleHttpApi/export_server_config
Operation import_server_config
This operation imports server configuration.
parameters
Table 28.14. Parameters of server configuration import
parameter name mandatory default description
xmlFile yes - An XML file with server's configuration.
dryRun no true If true, a dry run is performed with no actual changeswritten.
verbose no MESSAGE MESSAGE | FULL - how verbose should the response be:MESSAGE for a simple message, FULL for a full XMLreport.
newOnly no false If true only new items will imported to the server; theitems already present on the server will be left untouched.
include no all Selection which items will be imported from the XML; theparameter may be specified multiple times. Possible valuesare:
• all - import items of all types
• users - import users
• userGroups - import user groups
• sandboxes - import sandboxes
• jobConfigs - import job configuration parameters
• schedules - import schedules
• eventListeners - import listeners
• launchServices - import launch services
• tempSpaces - import temporary spaces
returns
Result message or XML report
example of request (with using curl CLI tool (http://curl.haxx.se/))
curl -u username:password -F "dryRun=true" -F "verbose=FULL" -F "xmlFile=@/tmp/clover_configuration_2013-07-10_14-03-23+0200.xml" http://localhost:8080/clover/simpleHttpApi/import_server_config
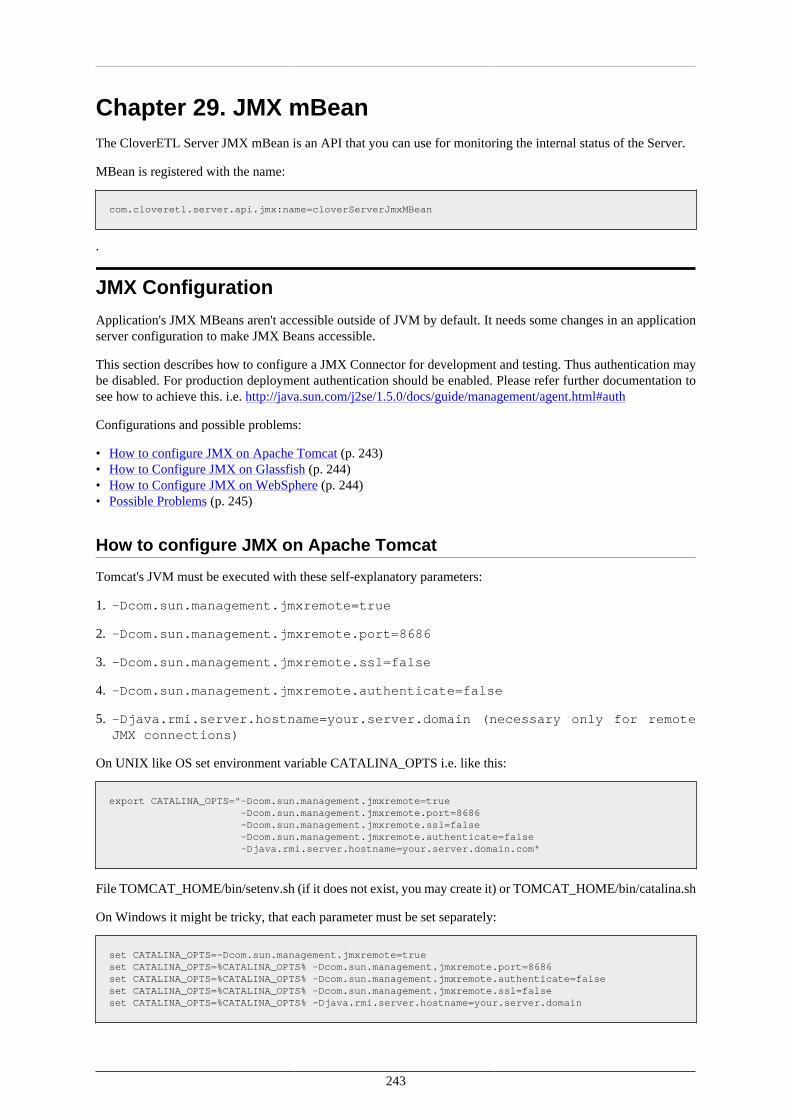
243
Chapter 29. JMX mBeanThe CloverETL Server JMX mBean is an API that you can use for monitoring the internal status of the Server.
MBean is registered with the name:
com.cloveretl.server.api.jmx:name=cloverServerJmxMBean
.
JMX Configuration
Application's JMX MBeans aren't accessible outside of JVM by default. It needs some changes in an applicationserver configuration to make JMX Beans accessible.
This section describes how to configure a JMX Connector for development and testing. Thus authentication maybe disabled. For production deployment authentication should be enabled. Please refer further documentation tosee how to achieve this. i.e. http://java.sun.com/j2se/1.5.0/docs/guide/management/agent.html#auth
Configurations and possible problems:
• How to configure JMX on Apache Tomcat (p. 243)• How to Configure JMX on Glassfish (p. 244)• How to Configure JMX on WebSphere (p. 244)• Possible Problems (p. 245)
How to configure JMX on Apache Tomcat
Tomcat's JVM must be executed with these self-explanatory parameters:
1. -Dcom.sun.management.jmxremote=true
2. -Dcom.sun.management.jmxremote.port=8686
3. -Dcom.sun.management.jmxremote.ssl=false
4. -Dcom.sun.management.jmxremote.authenticate=false
5. -Djava.rmi.server.hostname=your.server.domain (necessary only for remoteJMX connections)
On UNIX like OS set environment variable CATALINA_OPTS i.e. like this:
export CATALINA_OPTS="-Dcom.sun.management.jmxremote=true -Dcom.sun.management.jmxremote.port=8686 -Dcom.sun.management.jmxremote.ssl=false -Dcom.sun.management.jmxremote.authenticate=false -Djava.rmi.server.hostname=your.server.domain.com"
File TOMCAT_HOME/bin/setenv.sh (if it does not exist, you may create it) or TOMCAT_HOME/bin/catalina.sh
On Windows it might be tricky, that each parameter must be set separately:
set CATALINA_OPTS=-Dcom.sun.management.jmxremote=trueset CATALINA_OPTS=%CATALINA_OPTS% -Dcom.sun.management.jmxremote.port=8686set CATALINA_OPTS=%CATALINA_OPTS% -Dcom.sun.management.jmxremote.authenticate=falseset CATALINA_OPTS=%CATALINA_OPTS% -Dcom.sun.management.jmxremote.ssl=falseset CATALINA_OPTS=%CATALINA_OPTS% -Djava.rmi.server.hostname=your.server.domain
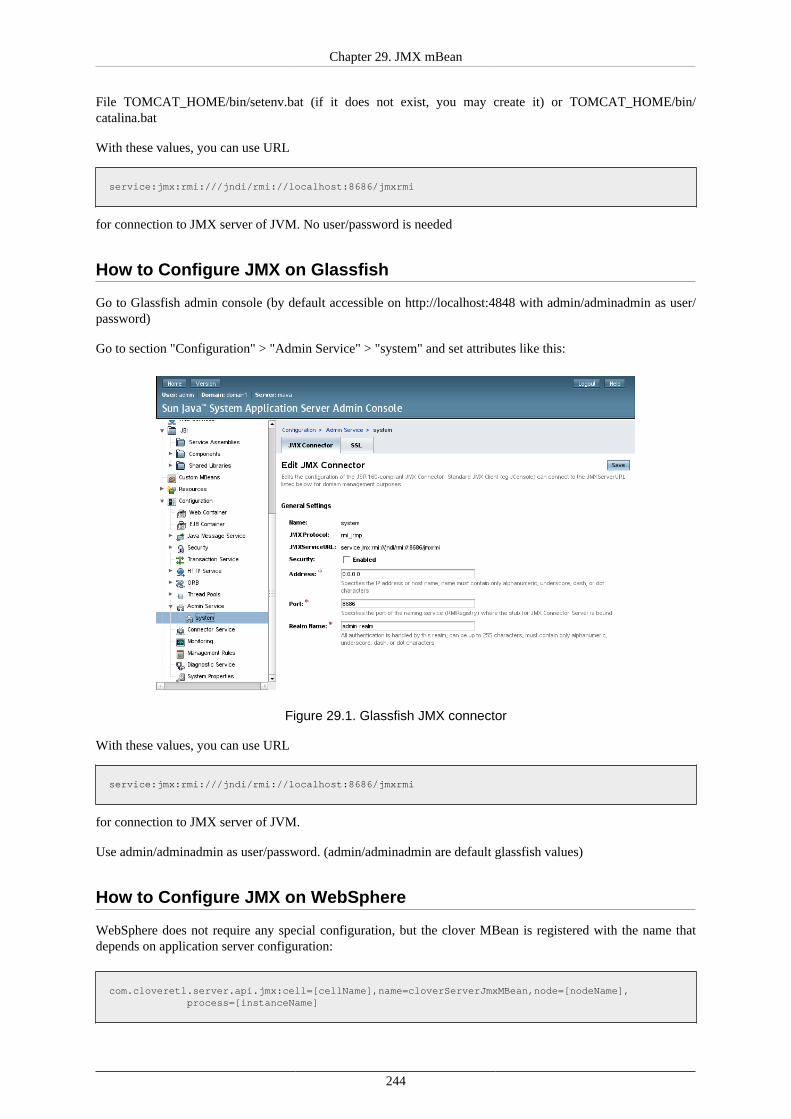
Chapter 29. JMX mBean
244
File TOMCAT_HOME/bin/setenv.bat (if it does not exist, you may create it) or TOMCAT_HOME/bin/catalina.bat
With these values, you can use URL
service:jmx:rmi:///jndi/rmi://localhost:8686/jmxrmi
for connection to JMX server of JVM. No user/password is needed
How to Configure JMX on Glassfish
Go to Glassfish admin console (by default accessible on http://localhost:4848 with admin/adminadmin as user/password)
Go to section "Configuration" > "Admin Service" > "system" and set attributes like this:
Figure 29.1. Glassfish JMX connector
With these values, you can use URL
service:jmx:rmi:///jndi/rmi://localhost:8686/jmxrmi
for connection to JMX server of JVM.
Use admin/adminadmin as user/password. (admin/adminadmin are default glassfish values)
How to Configure JMX on WebSphere
WebSphere does not require any special configuration, but the clover MBean is registered with the name thatdepends on application server configuration:
com.cloveretl.server.api.jmx:cell=[cellName],name=cloverServerJmxMBean,node=[nodeName], process=[instanceName]
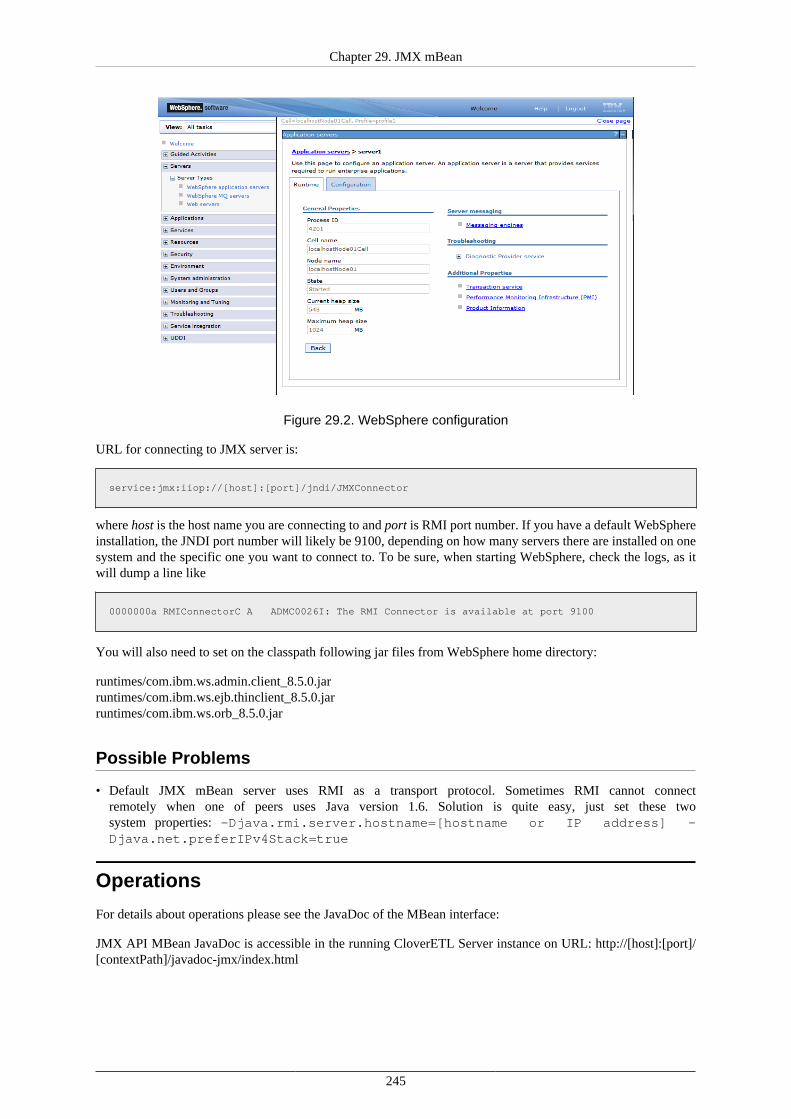
Chapter 29. JMX mBean
245
Figure 29.2. WebSphere configuration
URL for connecting to JMX server is:
service:jmx:iiop://[host]:[port]/jndi/JMXConnector
where host is the host name you are connecting to and port is RMI port number. If you have a default WebSphereinstallation, the JNDI port number will likely be 9100, depending on how many servers there are installed on onesystem and the specific one you want to connect to. To be sure, when starting WebSphere, check the logs, as itwill dump a line like
0000000a RMIConnectorC A ADMC0026I: The RMI Connector is available at port 9100
You will also need to set on the classpath following jar files from WebSphere home directory:
runtimes/com.ibm.ws.admin.client_8.5.0.jarruntimes/com.ibm.ws.ejb.thinclient_8.5.0.jarruntimes/com.ibm.ws.orb_8.5.0.jar
Possible Problems
• Default JMX mBean server uses RMI as a transport protocol. Sometimes RMI cannot connectremotely when one of peers uses Java version 1.6. Solution is quite easy, just set these twosystem properties: -Djava.rmi.server.hostname=[hostname or IP address] -Djava.net.preferIPv4Stack=true
Operations
For details about operations please see the JavaDoc of the MBean interface:
JMX API MBean JavaDoc is accessible in the running CloverETL Server instance on URL: http://[host]:[port]/[contextPath]/javadoc-jmx/index.html
246
Chapter 30. SOAP WebService APIThe CloverETL Server SOAP Web Service is an advanced API that provides an automation alternative to theSimple HTTP API. While most of the HTTP API operations are available in the SOAP interface too (though notall of them), the SOAP API provides additional operations for manipulating sandboxes, monitoring, etc.
The SOAP API service is accessible on the following URL:
http://[host]:[port]/clover/webservice
The SOAP API service descriptor is accessible on URL:
http://[host]:[port]/clover/webservice?wsdl
Protocol HTTP can be changed to secured HTTPS based on the web server configuration.
SOAP WS Client
Exposed service is implemented with the most common binding style "document/literal", which is widelysupported by libraries in various programming languages.
To create client for this API, only WSDL document (see the URL above) is needed together with somedevelopment tools according to your programming language and development environments.
JavaDoc of WebService interface with all related classes is accessible in the running CloverETL Server instanceon URL http://[host]:[port]/[contextPath]/javadoc-ws/index.html
If the web server has HTTPS connector configured, also the client must meet the security requirements accordingto web server configuration. i.e. client trust + key stores configured properly
SOAP WS API Authentication/Authorization
Since exposed service is stateless, authentication "sessionToken" has to be passed as a parameter to each operation.Client can obtain authentication sessionToken by calling "login" operation.
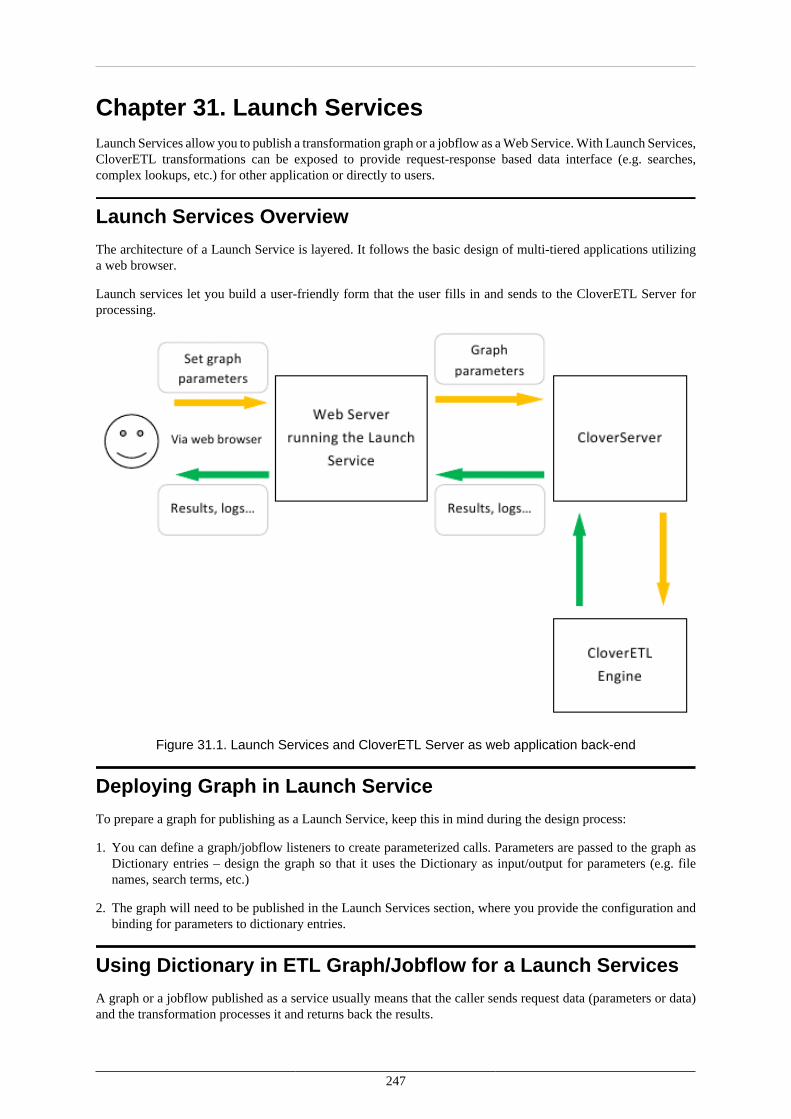
247
Chapter 31. Launch ServicesLaunch Services allow you to publish a transformation graph or a jobflow as a Web Service. With Launch Services,CloverETL transformations can be exposed to provide request-response based data interface (e.g. searches,complex lookups, etc.) for other application or directly to users.
Launch Services Overview
The architecture of a Launch Service is layered. It follows the basic design of multi-tiered applications utilizinga web browser.
Launch services let you build a user-friendly form that the user fills in and sends to the CloverETL Server forprocessing.
Figure 31.1. Launch Services and CloverETL Server as web application back-end
Deploying Graph in Launch Service
To prepare a graph for publishing as a Launch Service, keep this in mind during the design process:
1. You can define a graph/jobflow listeners to create parameterized calls. Parameters are passed to the graph asDictionary entries – design the graph so that it uses the Dictionary as input/output for parameters (e.g. filenames, search terms, etc.)
2. The graph will need to be published in the Launch Services section, where you provide the configuration andbinding for parameters to dictionary entries.
Using Dictionary in ETL Graph/Jobflow for a Launch Services
A graph or a jobflow published as a service usually means that the caller sends request data (parameters or data)and the transformation processes it and returns back the results.
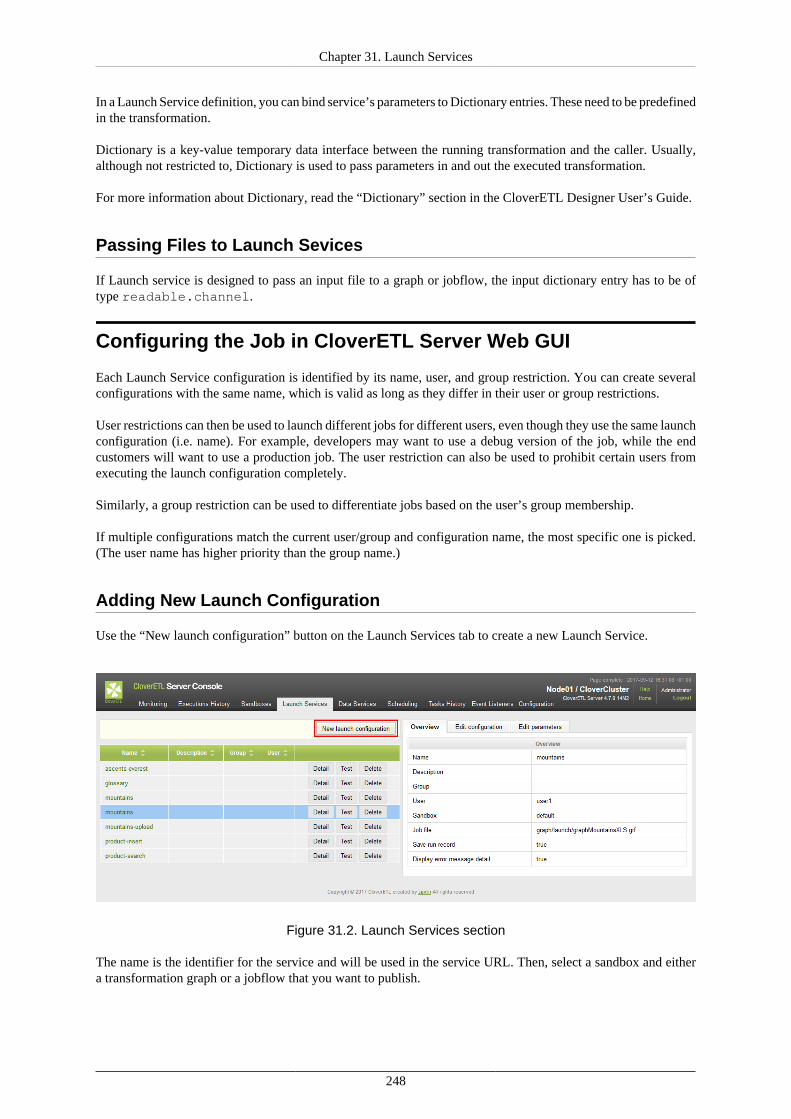
Chapter 31. Launch Services
248
In a Launch Service definition, you can bind service’s parameters to Dictionary entries. These need to be predefinedin the transformation.
Dictionary is a key-value temporary data interface between the running transformation and the caller. Usually,although not restricted to, Dictionary is used to pass parameters in and out the executed transformation.
For more information about Dictionary, read the “Dictionary” section in the CloverETL Designer User’s Guide.
Passing Files to Launch Sevices
If Launch service is designed to pass an input file to a graph or jobflow, the input dictionary entry has to be oftype readable.channel.
Configuring the Job in CloverETL Server Web GUI
Each Launch Service configuration is identified by its name, user, and group restriction. You can create severalconfigurations with the same name, which is valid as long as they differ in their user or group restrictions.
User restrictions can then be used to launch different jobs for different users, even though they use the same launchconfiguration (i.e. name). For example, developers may want to use a debug version of the job, while the endcustomers will want to use a production job. The user restriction can also be used to prohibit certain users fromexecuting the launch configuration completely.
Similarly, a group restriction can be used to differentiate jobs based on the user’s group membership.
If multiple configurations match the current user/group and configuration name, the most specific one is picked.(The user name has higher priority than the group name.)
Adding New Launch Configuration
Use the “New launch configuration” button on the Launch Services tab to create a new Launch Service.
Figure 31.2. Launch Services section
The name is the identifier for the service and will be used in the service URL. Then, select a sandbox and eithera transformation graph or a jobflow that you want to publish.
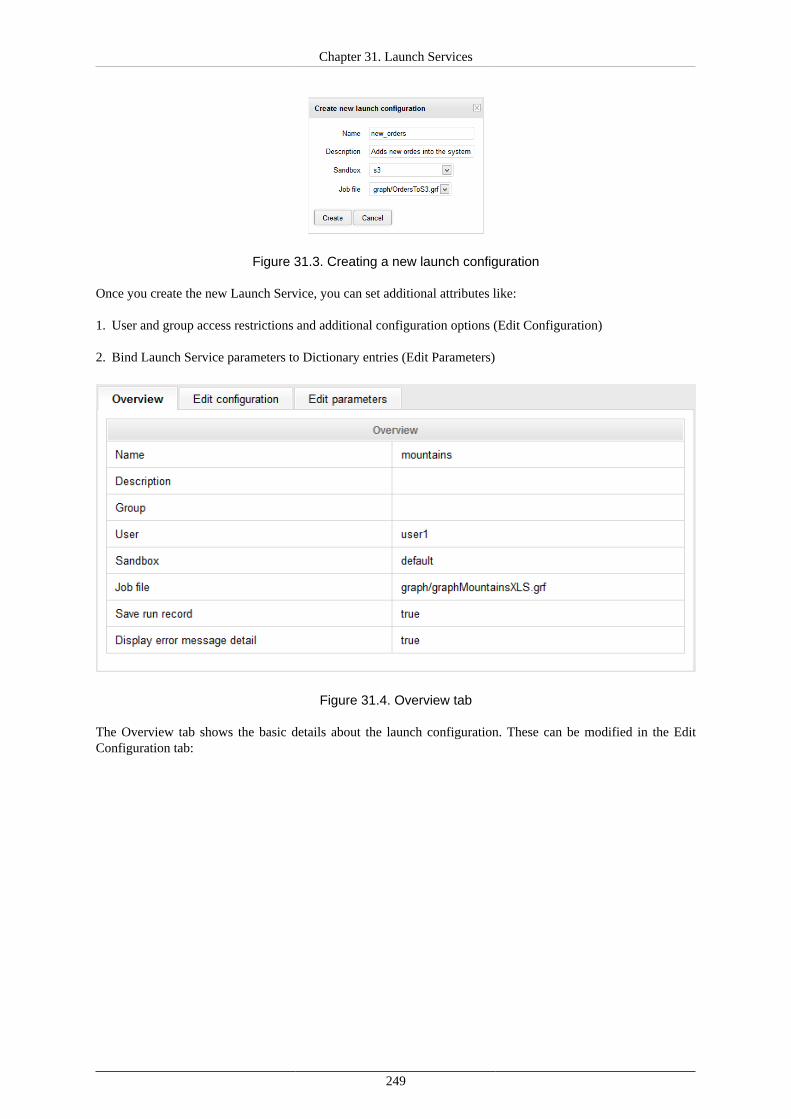
Chapter 31. Launch Services
249
Figure 31.3. Creating a new launch configuration
Once you create the new Launch Service, you can set additional attributes like:
1. User and group access restrictions and additional configuration options (Edit Configuration)
2. Bind Launch Service parameters to Dictionary entries (Edit Parameters)
Figure 31.4. Overview tab
The Overview tab shows the basic details about the launch configuration. These can be modified in the EditConfiguration tab:
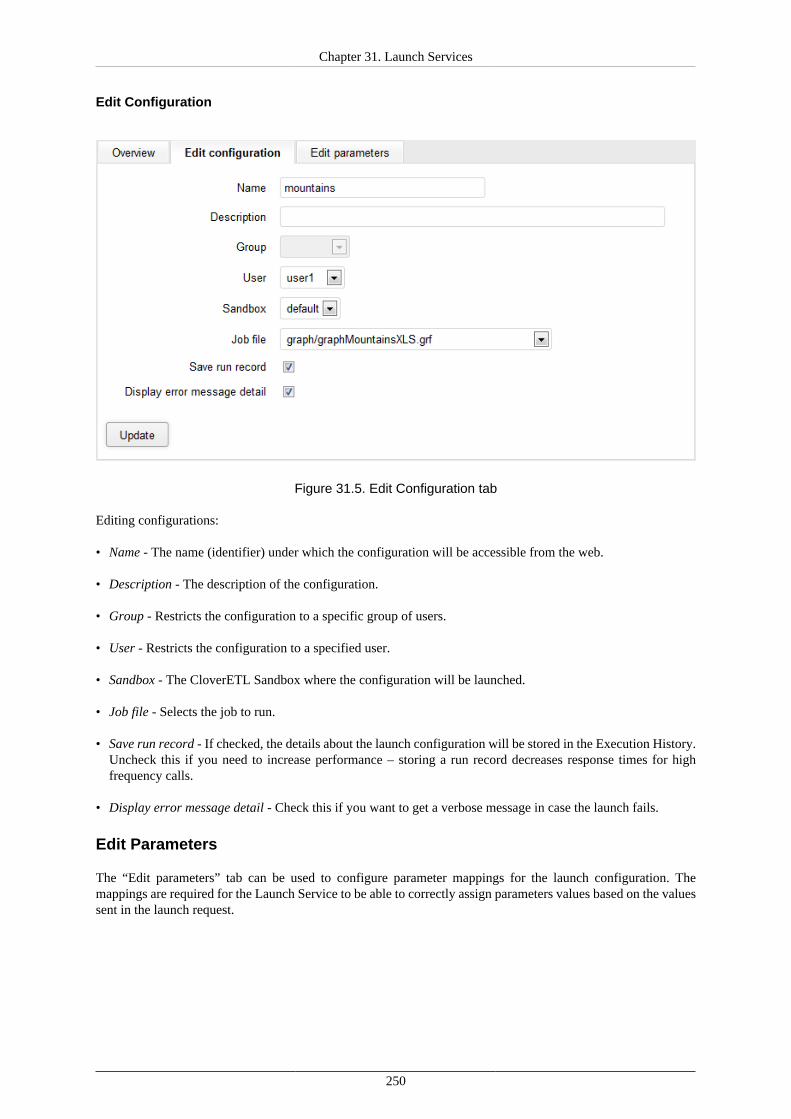
Chapter 31. Launch Services
250
Edit Configuration
Figure 31.5. Edit Configuration tab
Editing configurations:
• Name - The name (identifier) under which the configuration will be accessible from the web.
• Description - The description of the configuration.
• Group - Restricts the configuration to a specific group of users.
• User - Restricts the configuration to a specified user.
• Sandbox - The CloverETL Sandbox where the configuration will be launched.
• Job file - Selects the job to run.
• Save run record - If checked, the details about the launch configuration will be stored in the Execution History.Uncheck this if you need to increase performance – storing a run record decreases response times for highfrequency calls.
• Display error message detail - Check this if you want to get a verbose message in case the launch fails.
Edit Parameters
The “Edit parameters” tab can be used to configure parameter mappings for the launch configuration. Themappings are required for the Launch Service to be able to correctly assign parameters values based on the valuessent in the launch request.
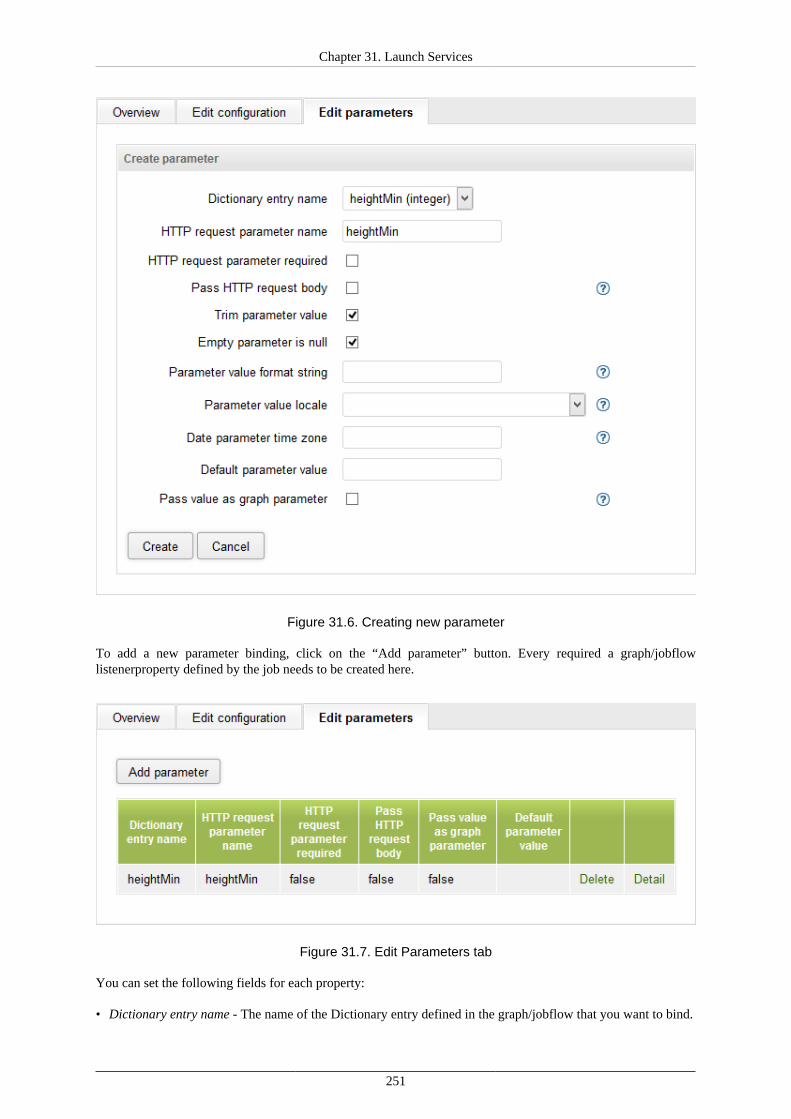
Chapter 31. Launch Services
251
Figure 31.6. Creating new parameter
To add a new parameter binding, click on the “Add parameter” button. Every required a graph/jobflowlistenerproperty defined by the job needs to be created here.
Figure 31.7. Edit Parameters tab
You can set the following fields for each property:
• Dictionary entry name - The name of the Dictionary entry defined in the graph/jobflow that you want to bind.
Chapter 31. Launch Services
252
• HTTP request parameter name - The name of this property as it will be visible in the published service. Thisname can be different from Name.
• HTTP request parameter required - If checked, the parameter is mandatory and an error will be reported ifit’s omitted.
• Pass HTTP request body - If checked, the request body is set to dictionary entry as readable channel.
• Pass value as graph parameter - If checked, the property value will be passed to the job also as a parameter(${ParameterName}, where ParameterName is equal to Name). This lets you use the parameter anywherein the job definition (not just places that support Dictionary). However, parameters are evaluated during jobinitialization. Thus, such a job cannot be pooled which decreases performance for high frequency repetitivecalls to the service. In this case, consider redesigning the transformation to use Dictionary instead, allowingfor pooling.
• Default parameter value - The default value applied in case the parameter is omitted in the launch request.
Launch Services Authentication
If you are using launch services, you have two ways how to be logged in: using form-based authentication ofServer console or HTTP basic authentication of Launch services.
The form-based authentication of Server console enables user to create or modify Launch services. If you arelogged in this way, you act as an administrator of Launch services.
To insert data into the Launch service form you should be logged in using HTTP basic authentication. Follow thelink to the Launch service form and web browser will request your credentials. If you are logged in using HTTP-basic authentication you act as an user of Launch services forms.
Sending the Data to Launch Service
A launch request can be sent via HTTP GET or POST methods. A launch request is simply a URL which containsthe values of all parameters that should be passed to the job. The request URL is composed of several parts:
(You can use a Launch Services test page, accessible from the login screen, to test drive Launch Services.)
[Clover Context]/launch/[Configuration name]?[Parameters]
• [Clover Context] is the URL to the context in which the CloverETL Server is running. Usually this isthe full URL to the CloverETL Server (for example, for CloverETL Demo Server this would be http://server-demo.cloveretl.com:8080/clover).
• [Configuration name] is the name of the launch configuration specified when the configuration wascreated. In our example, this would be set to “mountains” (case-sensitive).
• [Parameters] is the list of parameters the configuration requires as a query string. It’s a URL-encoded [RFC1738] list of name=value pairs separated by the "&" character.
Based on the above, the full URL of a launch request for our example with mountains may look like this: http://server-demo.cloveretl.com:8080/clover/launch/NewMountains?heightMin=4000. In the request above, the valueof heightMin property is set to 4000.
Results of the Graph Execution
After the job terminates, the results are sent back to the HTTP client as content of an HTTP response.
Output parameters are defined in the job’s Dictionary. Every Dictionary entry marked as “Output” is sent backas a part of the response.

Chapter 31. Launch Services
253
Depending on the number of output parameters, the following output is sent to the HTTP client:
• No output parameters - Only a summary page is returned. The page contains: when the job was started, whenit finished, the user name, and so on. The format of the summary page cannot be customized.
• One output parameter - In this case, the output is sent to the client as in the body of the HTTP response withits MIME content type defined by the property type in Dictionary.
• Multiple output parameters - In this case, each output parameter is sent to the HTTP client as part of themultipart HTTP response. The content type of the response is either multipart/related or multipart/x-mixed-replace, depending on the HTTP client (the client detection is fully automatic). The multipart/related type isused for browsers based on Microsoft Internet Explorer and the multipart/x-mixed-replace is sent to browsersbased on Gecko or Webkit.
Launch requests are recorded in the log files in the directory specified by the launch.log.dir propertyin the CloverETL Server configuration. For each launch configuration, one log file named [Configurationname]#[Launch ID].log is created. For each launch request, this file will contain only one line with following tab-delimited fields:
(If the property launch.log.dir is not specified, log files are created in the temp directory[java.io.tmpdir]/cloverlog/launch where "java.io.tmpdir" is system property)
• Launch start time
• Launch end time
• Logged-in user name
• Run ID
• Execution status FINISHED_OK, ERROR or ABORTED
• IP Address of the client
• User agent of the HTTP client
• Query string passed to the Launch Service (full list of parameters of the current launch)
In the case that the configuration is not valid, the same launch details are saved into the_no_launch_config.log file in the same directory. All unauthenticated requests are saved to the same fileas well.
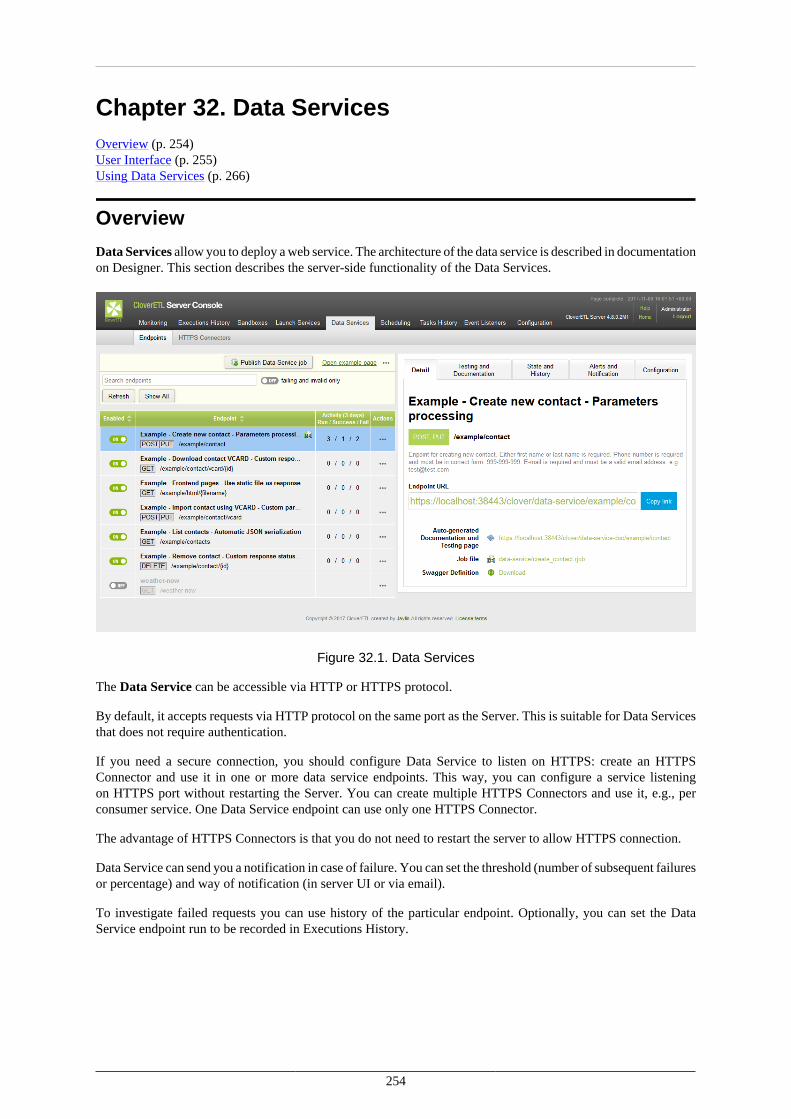
254
Chapter 32. Data ServicesOverview (p. 254)User Interface (p. 255)Using Data Services (p. 266)
Overview
Data Services allow you to deploy a web service. The architecture of the data service is described in documentationon Designer. This section describes the server-side functionality of the Data Services.
Figure 32.1. Data Services
The Data Service can be accessible via HTTP or HTTPS protocol.
By default, it accepts requests via HTTP protocol on the same port as the Server. This is suitable for Data Servicesthat does not require authentication.
If you need a secure connection, you should configure Data Service to listen on HTTPS: create an HTTPSConnector and use it in one or more data service endpoints. This way, you can configure a service listeningon HTTPS port without restarting the Server. You can create multiple HTTPS Connectors and use it, e.g., perconsumer service. One Data Service endpoint can use only one HTTPS Connector.
The advantage of HTTPS Connectors is that you do not need to restart the server to allow HTTPS connection.
Data Service can send you a notification in case of failure. You can set the threshold (number of subsequent failuresor percentage) and way of notification (in server UI or via email).
To investigate failed requests you can use history of the particular endpoint. Optionally, you can set the DataService endpoint run to be recorded in Executions History.
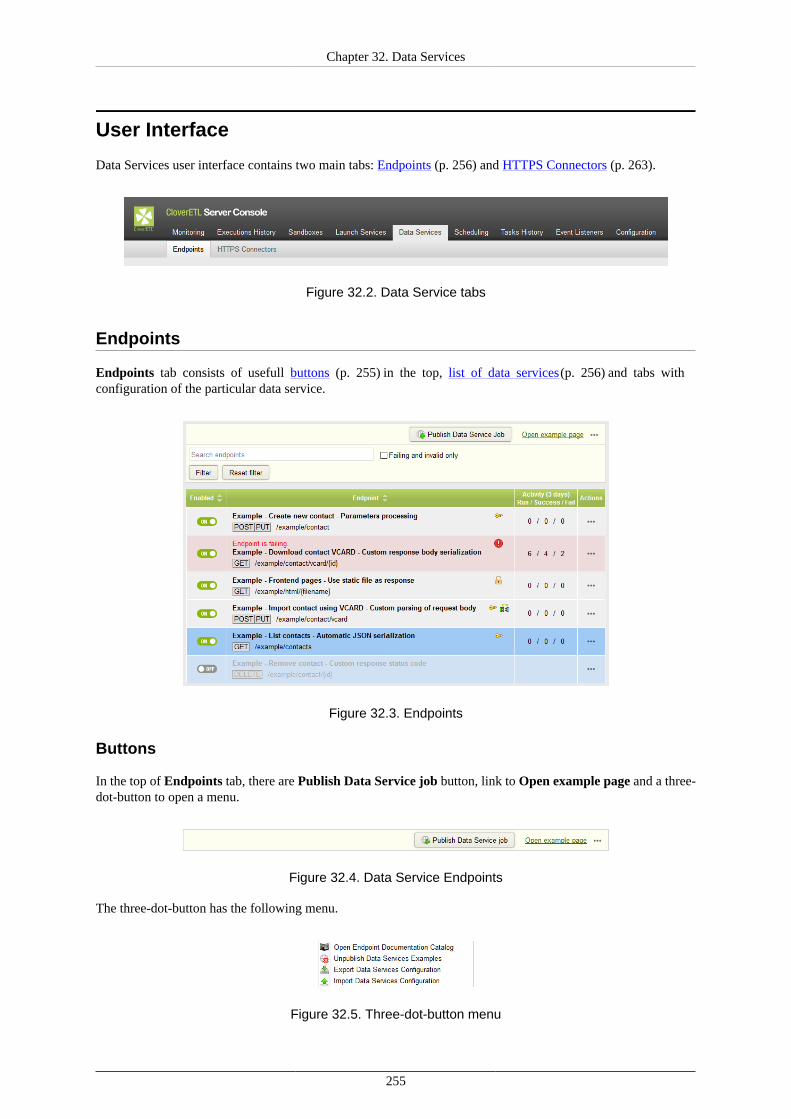
Chapter 32. Data Services
255
User Interface
Data Services user interface contains two main tabs: Endpoints (p. 256) and HTTPS Connectors (p. 263).
Figure 32.2. Data Service tabs
Endpoints
Endpoints tab consists of usefull buttons (p. 255) in the top, list of data services (p. 256) and tabs withconfiguration of the particular data service.
Figure 32.3. Endpoints
Buttons
In the top of Endpoints tab, there are Publish Data Service job button, link to Open example page and a three-dot-button to open a menu.
Figure 32.4. Data Service Endpoints
The three-dot-button has the following menu.
Figure 32.5. Three-dot-button menu
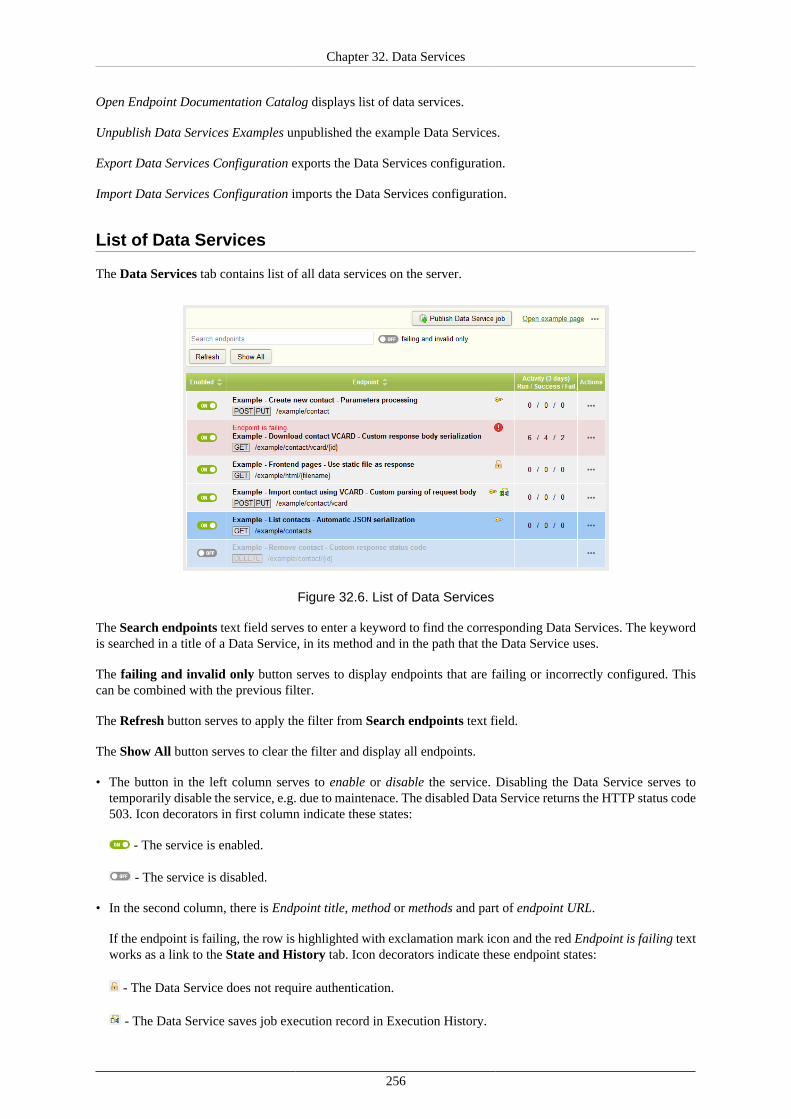
Chapter 32. Data Services
256
Open Endpoint Documentation Catalog displays list of data services.
Unpublish Data Services Examples unpublished the example Data Services.
Export Data Services Configuration exports the Data Services configuration.
Import Data Services Configuration imports the Data Services configuration.
List of Data Services
The Data Services tab contains list of all data services on the server.
Figure 32.6. List of Data Services
The Search endpoints text field serves to enter a keyword to find the corresponding Data Services. The keywordis searched in a title of a Data Service, in its method and in the path that the Data Service uses.
The failing and invalid only button serves to display endpoints that are failing or incorrectly configured. Thiscan be combined with the previous filter.
The Refresh button serves to apply the filter from Search endpoints text field.
The Show All button serves to clear the filter and display all endpoints.
• The button in the left column serves to enable or disable the service. Disabling the Data Service serves totemporarily disable the service, e.g. due to maintenace. The disabled Data Service returns the HTTP status code503. Icon decorators in first column indicate these states:
- The service is enabled.
- The service is disabled.
• In the second column, there is Endpoint title, method or methods and part of endpoint URL.
If the endpoint is failing, the row is highlighted with exclamation mark icon and the red Endpoint is failing textworks as a link to the State and History tab. Icon decorators indicate these endpoint states:
- The Data Service does not require authentication.
- The Data Service saves job execution record in Execution History.
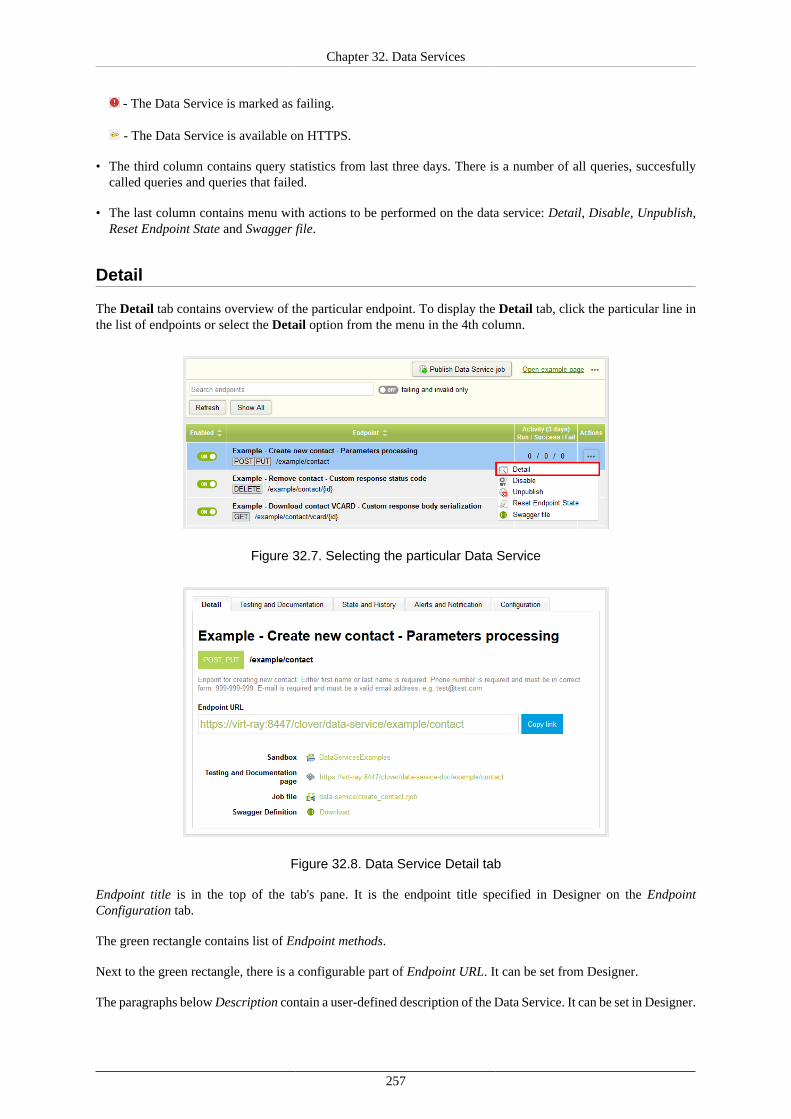
Chapter 32. Data Services
257
- The Data Service is marked as failing.
- The Data Service is available on HTTPS.
• The third column contains query statistics from last three days. There is a number of all queries, succesfullycalled queries and queries that failed.
• The last column contains menu with actions to be performed on the data service: Detail, Disable, Unpublish,Reset Endpoint State and Swagger file.
Detail
The Detail tab contains overview of the particular endpoint. To display the Detail tab, click the particular line inthe list of endpoints or select the Detail option from the menu in the 4th column.
Figure 32.7. Selecting the particular Data Service
Figure 32.8. Data Service Detail tab
Endpoint title is in the top of the tab's pane. It is the endpoint title specified in Designer on the EndpointConfiguration tab.
The green rectangle contains list of Endpoint methods.
Next to the green rectangle, there is a configurable part of Endpoint URL. It can be set from Designer.
The paragraphs below Description contain a user-defined description of the Data Service. It can be set in Designer.
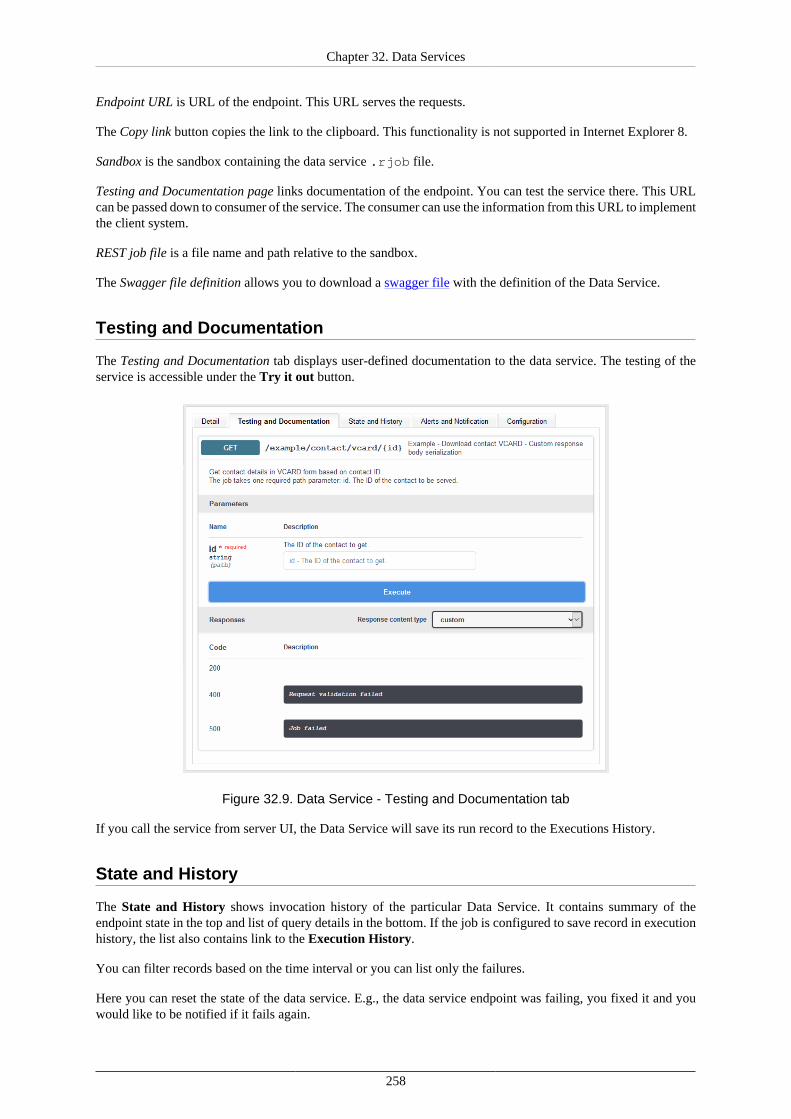
Chapter 32. Data Services
258
Endpoint URL is URL of the endpoint. This URL serves the requests.
The Copy link button copies the link to the clipboard. This functionality is not supported in Internet Explorer 8.
Sandbox is the sandbox containing the data service .rjob file.
Testing and Documentation page links documentation of the endpoint. You can test the service there. This URLcan be passed down to consumer of the service. The consumer can use the information from this URL to implementthe client system.
REST job file is a file name and path relative to the sandbox.
The Swagger file definition allows you to download a swagger file with the definition of the Data Service.
Testing and Documentation
The Testing and Documentation tab displays user-defined documentation to the data service. The testing of theservice is accessible under the Try it out button.
Figure 32.9. Data Service - Testing and Documentation tab
If you call the service from server UI, the Data Service will save its run record to the Executions History.
State and History
The State and History shows invocation history of the particular Data Service. It contains summary of theendpoint state in the top and list of query details in the bottom. If the job is configured to save record in executionhistory, the list also contains link to the Execution History.
You can filter records based on the time interval or you can list only the failures.
Here you can reset the state of the data service. E.g., the data service endpoint was failing, you fixed it and youwould like to be notified if it fails again.
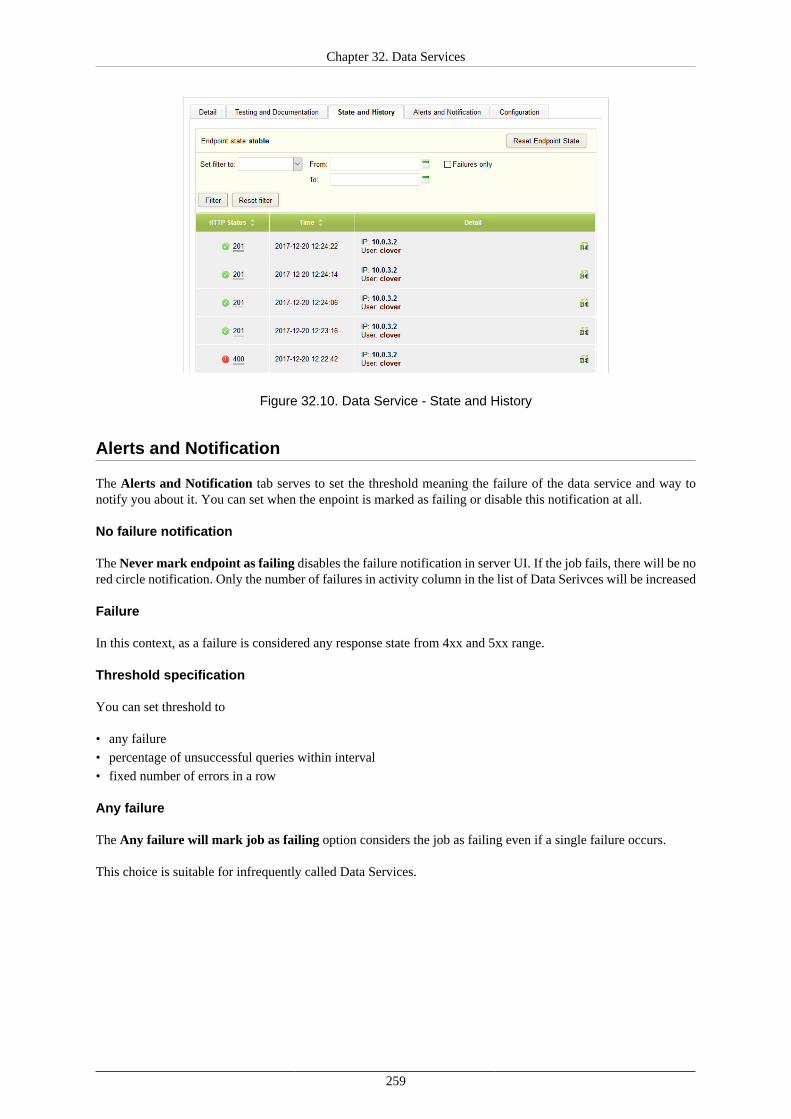
Chapter 32. Data Services
259
Figure 32.10. Data Service - State and History
Alerts and Notification
The Alerts and Notification tab serves to set the threshold meaning the failure of the data service and way tonotify you about it. You can set when the enpoint is marked as failing or disable this notification at all.
No failure notification
The Never mark endpoint as failing disables the failure notification in server UI. If the job fails, there will be nored circle notification. Only the number of failures in activity column in the list of Data Serivces will be increased
Failure
In this context, as a failure is considered any response state from 4xx and 5xx range.
Threshold specification
You can set threshold to
• any failure
• percentage of unsuccessful queries within interval
• fixed number of errors in a row
Any failure
The Any failure will mark job as failing option considers the job as failing even if a single failure occurs.
This choice is suitable for infrequently called Data Services.
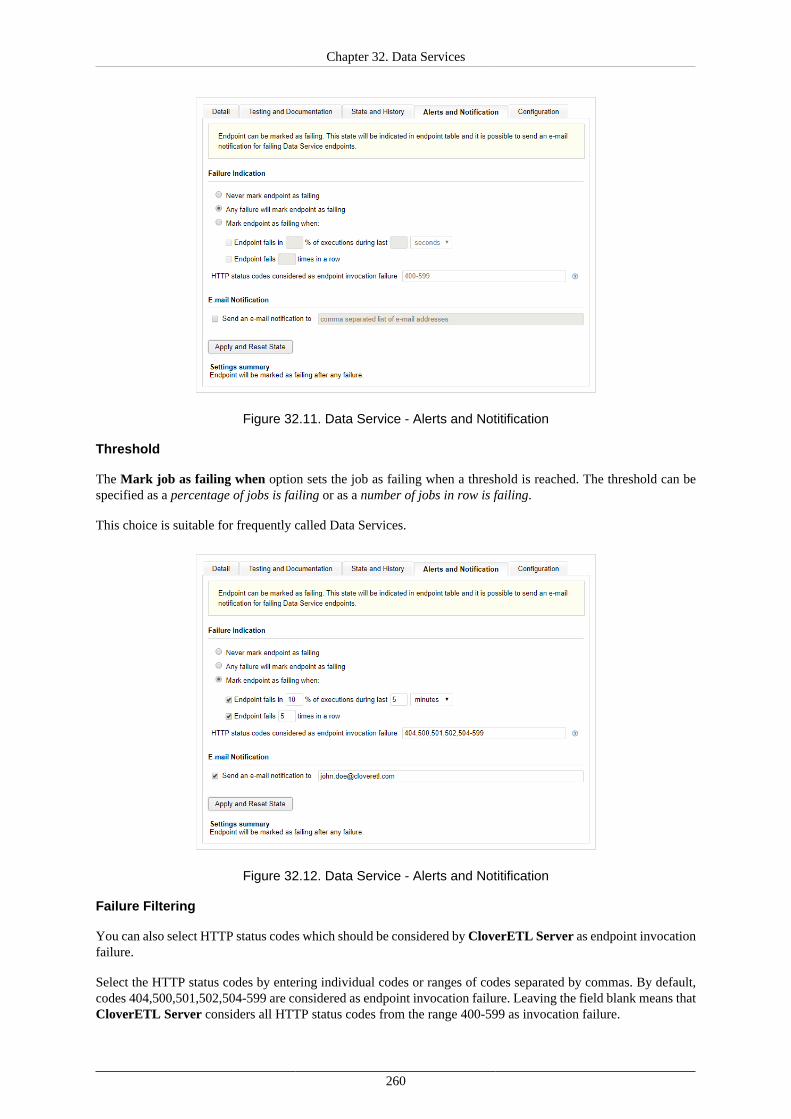
Chapter 32. Data Services
260
Figure 32.11. Data Service - Alerts and Notitification
Threshold
The Mark job as failing when option sets the job as failing when a threshold is reached. The threshold can bespecified as a percentage of jobs is failing or as a number of jobs in row is failing.
This choice is suitable for frequently called Data Services.
Figure 32.12. Data Service - Alerts and Notitification
Failure Filtering
You can also select HTTP status codes which should be considered by CloverETL Server as endpoint invocationfailure.
Select the HTTP status codes by entering individual codes or ranges of codes separated by commas. By default,codes 404,500,501,502,504-599 are considered as endpoint invocation failure. Leaving the field blank means thatCloverETL Server considers all HTTP status codes from the range 400-599 as invocation failure.
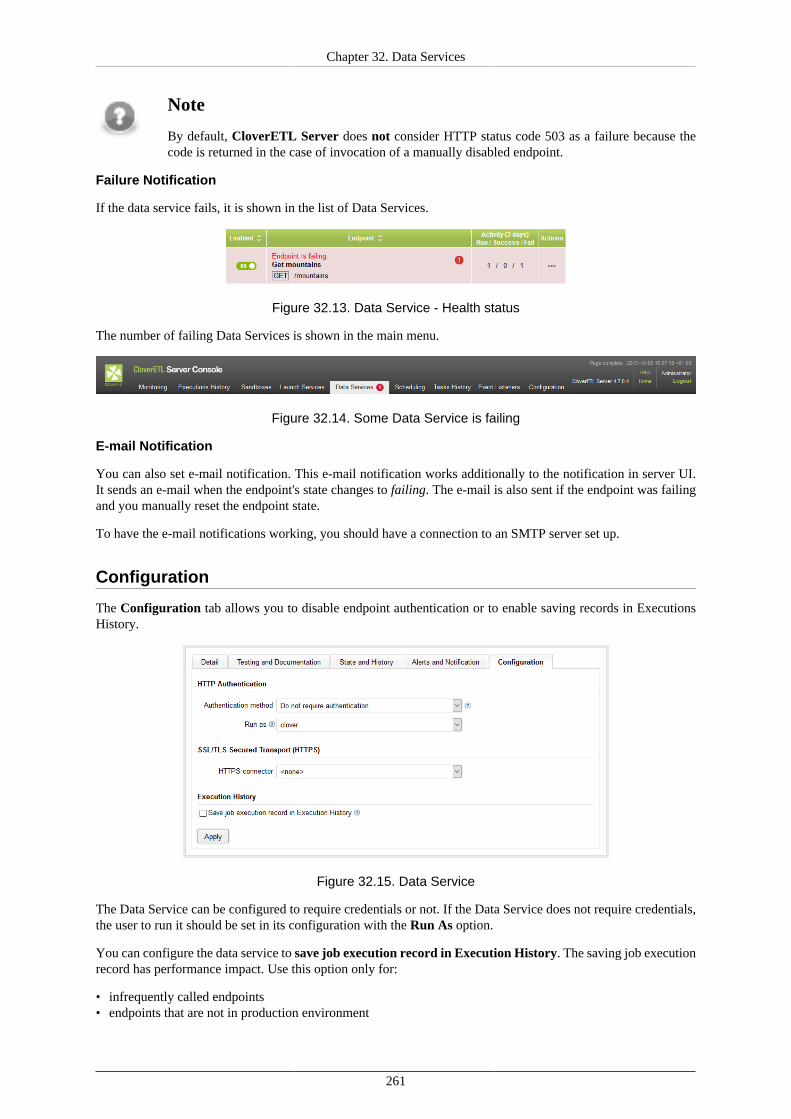
Chapter 32. Data Services
261
Note
By default, CloverETL Server does not consider HTTP status code 503 as a failure because thecode is returned in the case of invocation of a manually disabled endpoint.
Failure Notification
If the data service fails, it is shown in the list of Data Services.
Figure 32.13. Data Service - Health status
The number of failing Data Services is shown in the main menu.
Figure 32.14. Some Data Service is failing
E-mail Notification
You can also set e-mail notification. This e-mail notification works additionally to the notification in server UI.It sends an e-mail when the endpoint's state changes to failing. The e-mail is also sent if the endpoint was failingand you manually reset the endpoint state.
To have the e-mail notifications working, you should have a connection to an SMTP server set up.
Configuration
The Configuration tab allows you to disable endpoint authentication or to enable saving records in ExecutionsHistory.
Figure 32.15. Data Service
The Data Service can be configured to require credentials or not. If the Data Service does not require credentials,the user to run it should be set in its configuration with the Run As option.
You can configure the data service to save job execution record in Execution History. The saving job executionrecord has performance impact. Use this option only for:
• infrequently called endpoints• endpoints that are not in production environment
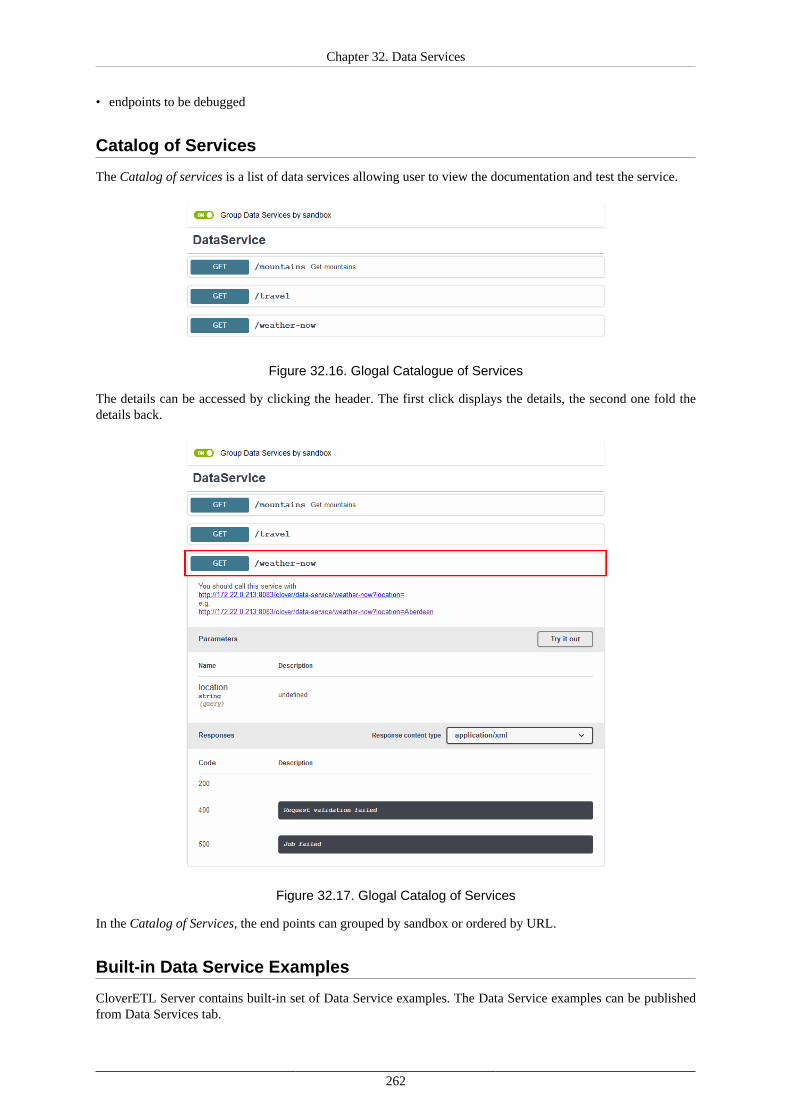
Chapter 32. Data Services
262
• endpoints to be debugged
Catalog of Services
The Catalog of services is a list of data services allowing user to view the documentation and test the service.
Figure 32.16. Glogal Catalogue of Services
The details can be accessed by clicking the header. The first click displays the details, the second one fold thedetails back.
Figure 32.17. Glogal Catalog of Services
In the Catalog of Services, the end points can grouped by sandbox or ordered by URL.
Built-in Data Service Examples
CloverETL Server contains built-in set of Data Service examples. The Data Service examples can be publishedfrom Data Services tab.
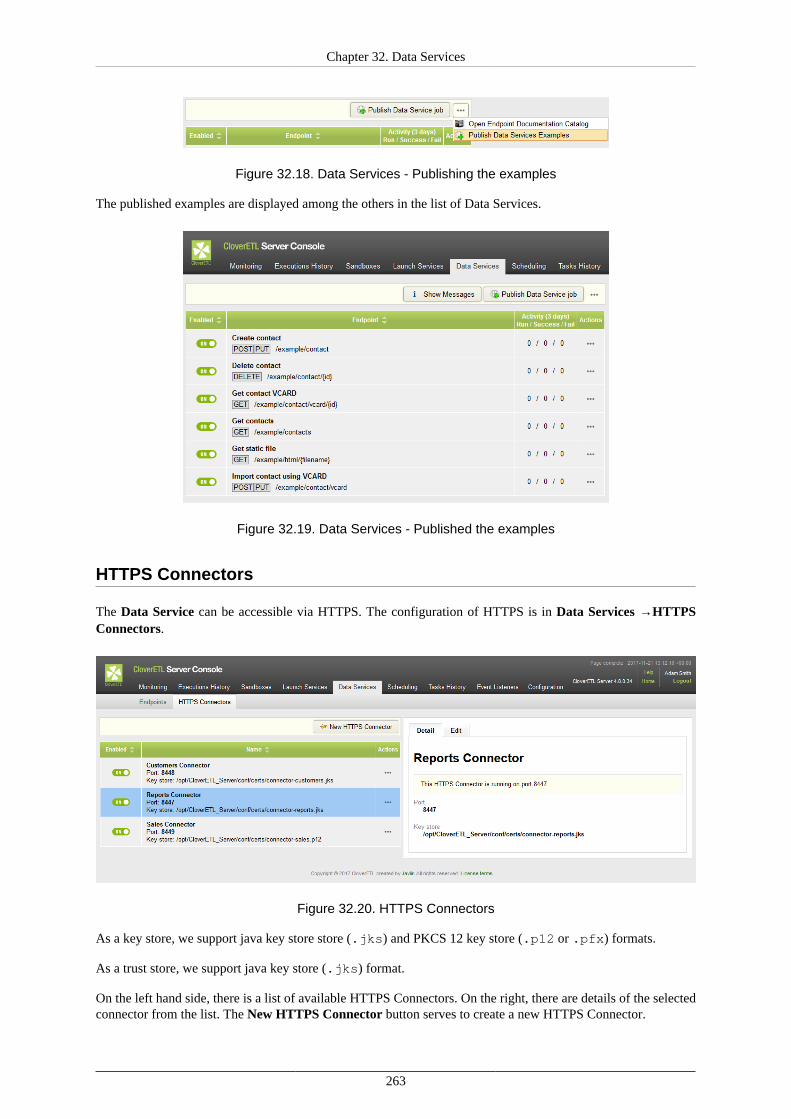
Chapter 32. Data Services
263
Figure 32.18. Data Services - Publishing the examples
The published examples are displayed among the others in the list of Data Services.
Figure 32.19. Data Services - Published the examples
HTTPS Connectors
The Data Service can be accessible via HTTPS. The configuration of HTTPS is in Data Services →HTTPSConnectors.
Figure 32.20. HTTPS Connectors
As a key store, we support java key store store (.jks) and PKCS 12 key store (.p12 or .pfx) formats.
As a trust store, we support java key store (.jks) format.
On the left hand side, there is a list of available HTTPS Connectors. On the right, there are details of the selectedconnector from the list. The New HTTPS Connector button serves to create a new HTTPS Connector.
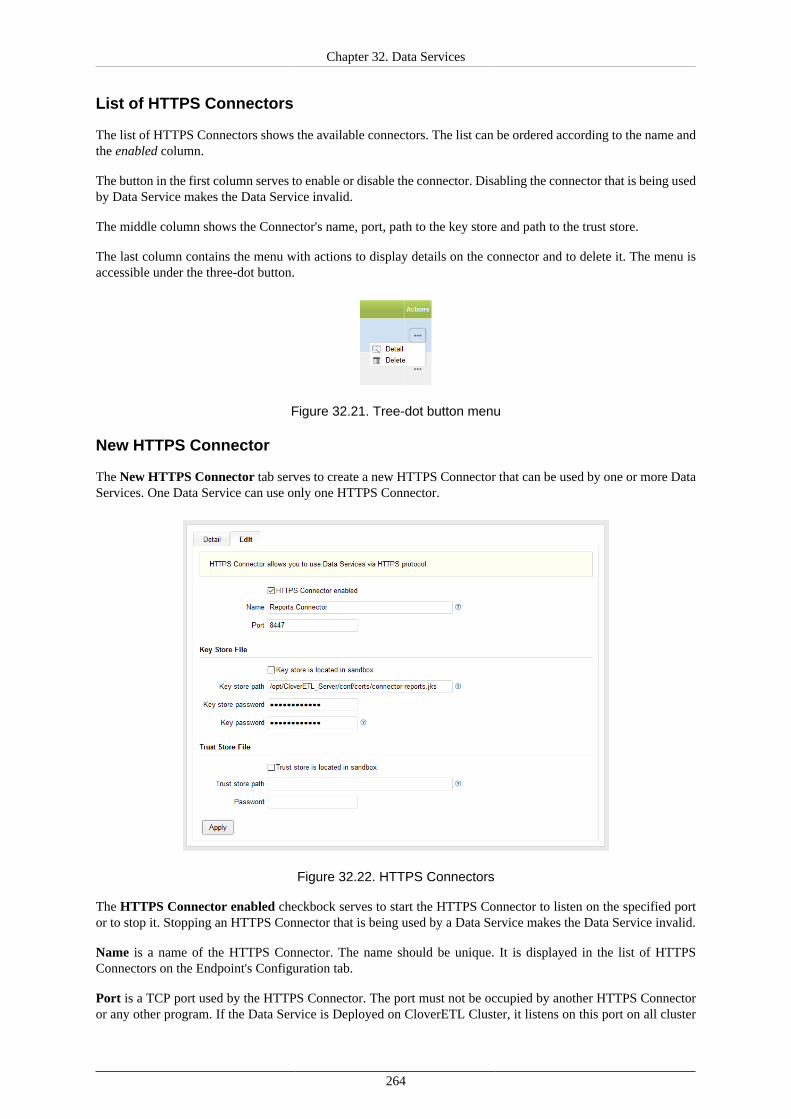
Chapter 32. Data Services
264
List of HTTPS Connectors
The list of HTTPS Connectors shows the available connectors. The list can be ordered according to the name andthe enabled column.
The button in the first column serves to enable or disable the connector. Disabling the connector that is being usedby Data Service makes the Data Service invalid.
The middle column shows the Connector's name, port, path to the key store and path to the trust store.
The last column contains the menu with actions to display details on the connector and to delete it. The menu isaccessible under the three-dot button.
Figure 32.21. Tree-dot button menu
New HTTPS Connector
The New HTTPS Connector tab serves to create a new HTTPS Connector that can be used by one or more DataServices. One Data Service can use only one HTTPS Connector.
Figure 32.22. HTTPS Connectors
The HTTPS Connector enabled checkbock serves to start the HTTPS Connector to listen on the specified portor to stop it. Stopping an HTTPS Connector that is being used by a Data Service makes the Data Service invalid.
Name is a name of the HTTPS Connector. The name should be unique. It is displayed in the list of HTTPSConnectors on the Endpoint's Configuration tab.
Port is a TCP port used by the HTTPS Connector. The port must not be occupied by another HTTPS Connectoror any other program. If the Data Service is Deployed on CloverETL Cluster, it listens on this port on all cluster

Chapter 32. Data Services
265
nodes. If you use firewall, set it to allow incomming connections to this port. If you use SELinux, it must beconfigured to allow CloverETL Server to use this tcp port.
Key store is located in sandbox checkbox switches between absolute paths to key store and paths relative toserver sandbox. If you tick this option, Sandbox and Key store items are displayed. Otherwise, you will see Keystore path. The recommended way is to store the key stores out of the sandbox.
Sandbox is the sandbox with the key store.
Key store is the key store within the sandbox.
Key store path is the absolute path to the java key store. You can use environment variables, systemproperties of JVM and configuration parameters of the server as a part of the path. Usually, you will use${sandboxes.home} here.
Key store password is the password to the java key store.
Key password is the password to the key in the key store.
Trust store is located in sandbox checkbox switches between absolute paths to trust store and paths relative toserver sandbox. If enabled, you can enter Sandbox and Trust store options. Otherwise you will see Trust storepath.
Sandbox is the sandbox containing the trust store.
Trust store is the trust store within the sandbox.
Trust store path the absolute path to the trust store. You can use environment variables, system properties of JVMand configuration parameters of the server as a part of the path. Ususally, you will use ${sandboxes.home}here.
Password is the password to the trust store.
To create a data service listening on HTTPS you need a keystore with a server certificate. You can create onewith the following command.
keytool -keystore service.jks -genkey -keyalg rsa -keysize 3072 -alias serverName
As a key store, we support java key store (.jks) and PKCS 12 key store (.p12 or .pfx) formats.
As a trust store, we support java key store (.jks) format.
For security reasons, we recommend you to put the keystore outside the server sandbox.
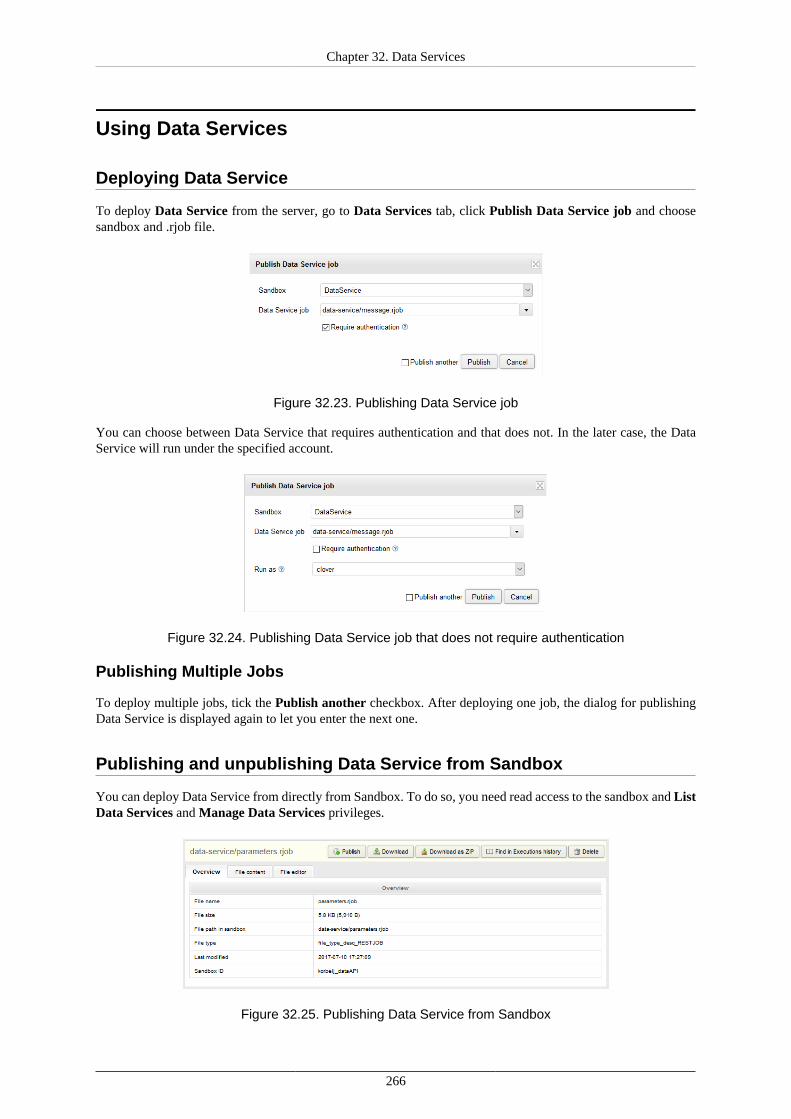
Chapter 32. Data Services
266
Using Data Services
Deploying Data Service
To deploy Data Service from the server, go to Data Services tab, click Publish Data Service job and choosesandbox and .rjob file.
Figure 32.23. Publishing Data Service job
You can choose between Data Service that requires authentication and that does not. In the later case, the DataService will run under the specified account.
Figure 32.24. Publishing Data Service job that does not require authentication
Publishing Multiple Jobs
To deploy multiple jobs, tick the Publish another checkbox. After deploying one job, the dialog for publishingData Service is displayed again to let you enter the next one.
Publishing and unpublishing Data Service from Sandbox
You can deploy Data Service from directly from Sandbox. To do so, you need read access to the sandbox and ListData Services and Manage Data Services privileges.
Figure 32.25. Publishing Data Service from Sandbox
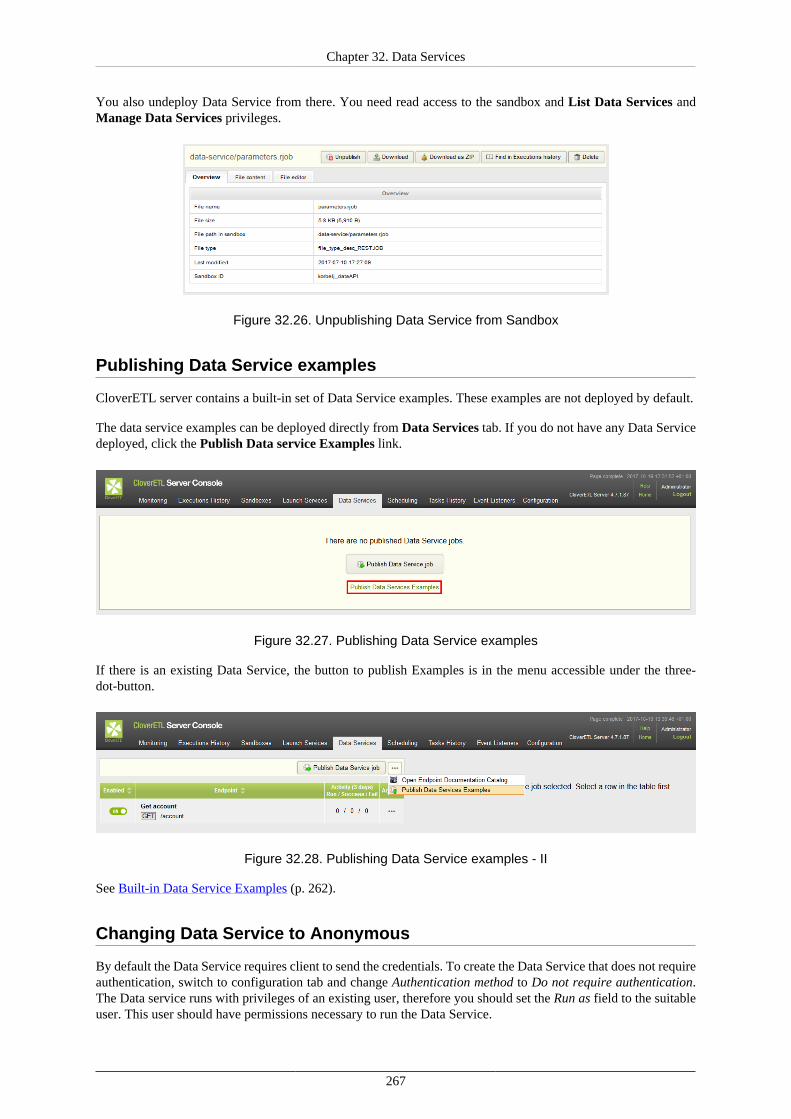
Chapter 32. Data Services
267
You also undeploy Data Service from there. You need read access to the sandbox and List Data Services andManage Data Services privileges.
Figure 32.26. Unpublishing Data Service from Sandbox
Publishing Data Service examples
CloverETL server contains a built-in set of Data Service examples. These examples are not deployed by default.
The data service examples can be deployed directly from Data Services tab. If you do not have any Data Servicedeployed, click the Publish Data service Examples link.
Figure 32.27. Publishing Data Service examples
If there is an existing Data Service, the button to publish Examples is in the menu accessible under the three-dot-button.
Figure 32.28. Publishing Data Service examples - II
See Built-in Data Service Examples (p. 262).
Changing Data Service to Anonymous
By default the Data Service requires client to send the credentials. To create the Data Service that does not requireauthentication, switch to configuration tab and change Authentication method to Do not require authentication.The Data service runs with privileges of an existing user, therefore you should set the Run as field to the suitableuser. This user should have permissions necessary to run the Data Service.
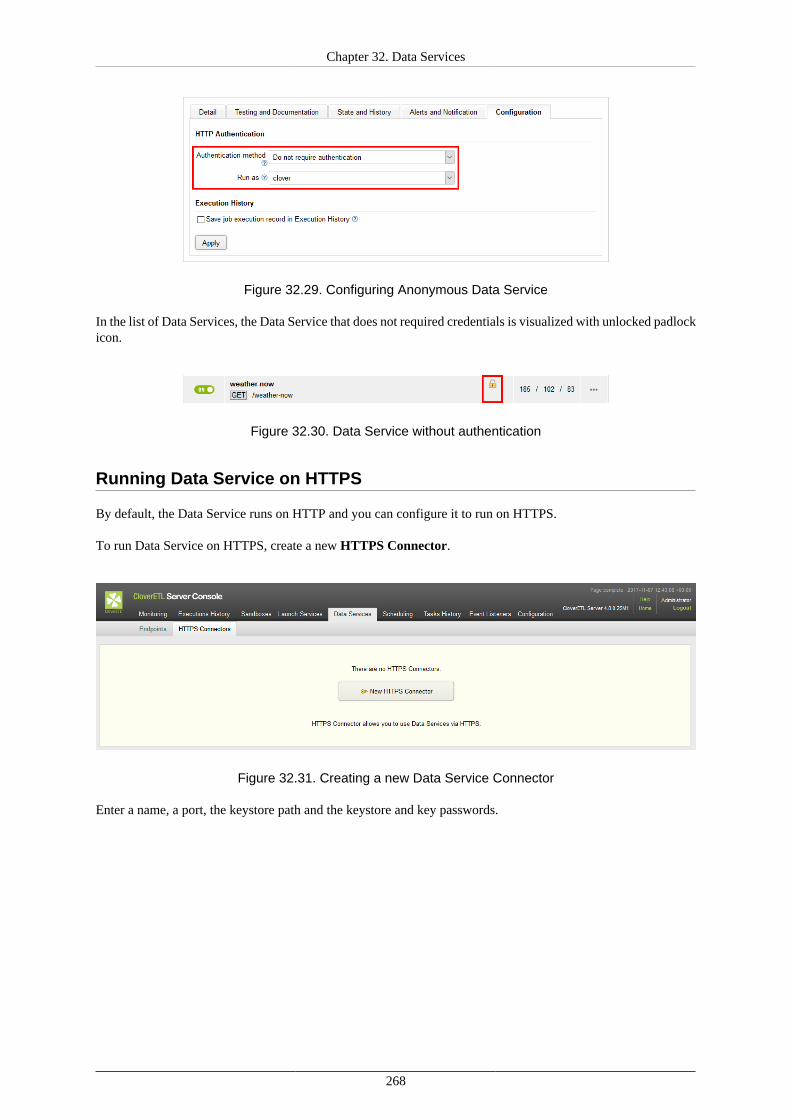
Chapter 32. Data Services
268
Figure 32.29. Configuring Anonymous Data Service
In the list of Data Services, the Data Service that does not required credentials is visualized with unlocked padlockicon.
Figure 32.30. Data Service without authentication
Running Data Service on HTTPS
By default, the Data Service runs on HTTP and you can configure it to run on HTTPS.
To run Data Service on HTTPS, create a new HTTPS Connector.
Figure 32.31. Creating a new Data Service Connector
Enter a name, a port, the keystore path and the keystore and key passwords.
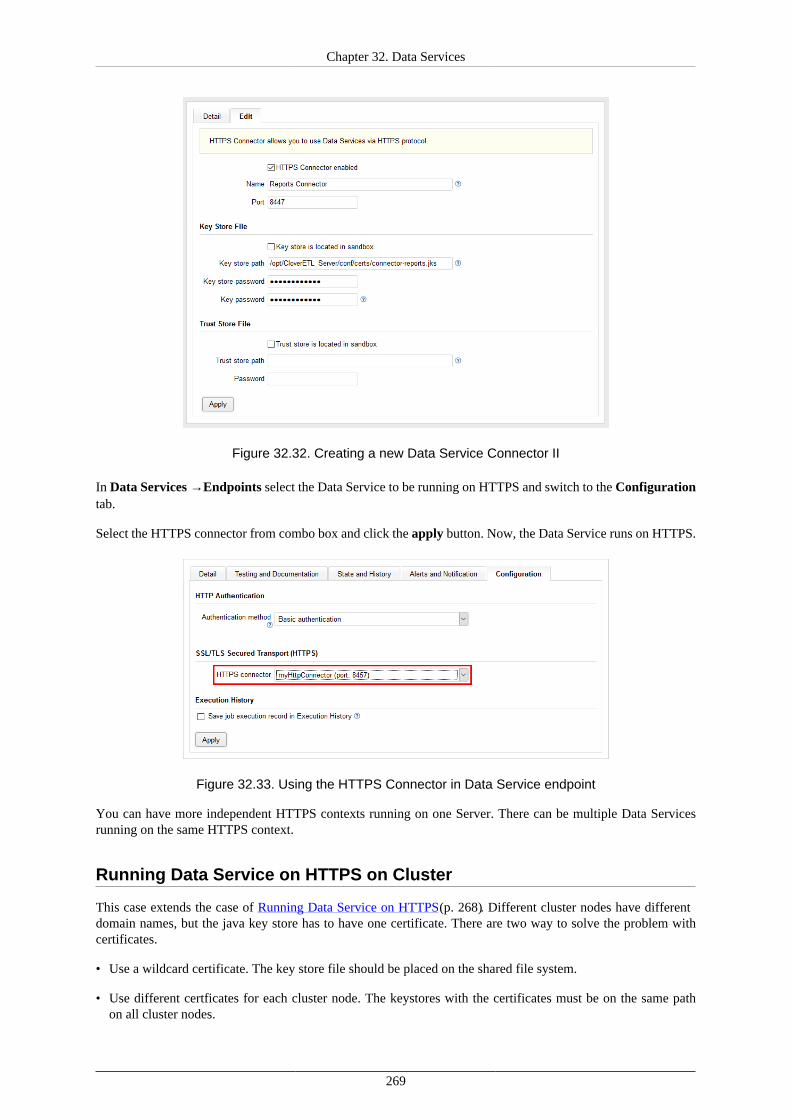
Chapter 32. Data Services
269
Figure 32.32. Creating a new Data Service Connector II
In Data Services →Endpoints select the Data Service to be running on HTTPS and switch to the Configurationtab.
Select the HTTPS connector from combo box and click the apply button. Now, the Data Service runs on HTTPS.
Figure 32.33. Using the HTTPS Connector in Data Service endpoint
You can have more independent HTTPS contexts running on one Server. There can be multiple Data Servicesrunning on the same HTTPS context.
Running Data Service on HTTPS on Cluster
This case extends the case of Running Data Service on HTTPS (p. 268). Different cluster nodes have differentdomain names, but the java key store has to have one certificate. There are two way to solve the problem withcertificates.
• Use a wildcard certificate. The key store file should be placed on the shared file system.
• Use different certficates for each cluster node. The keystores with the certificates must be on the same pathon all cluster nodes.
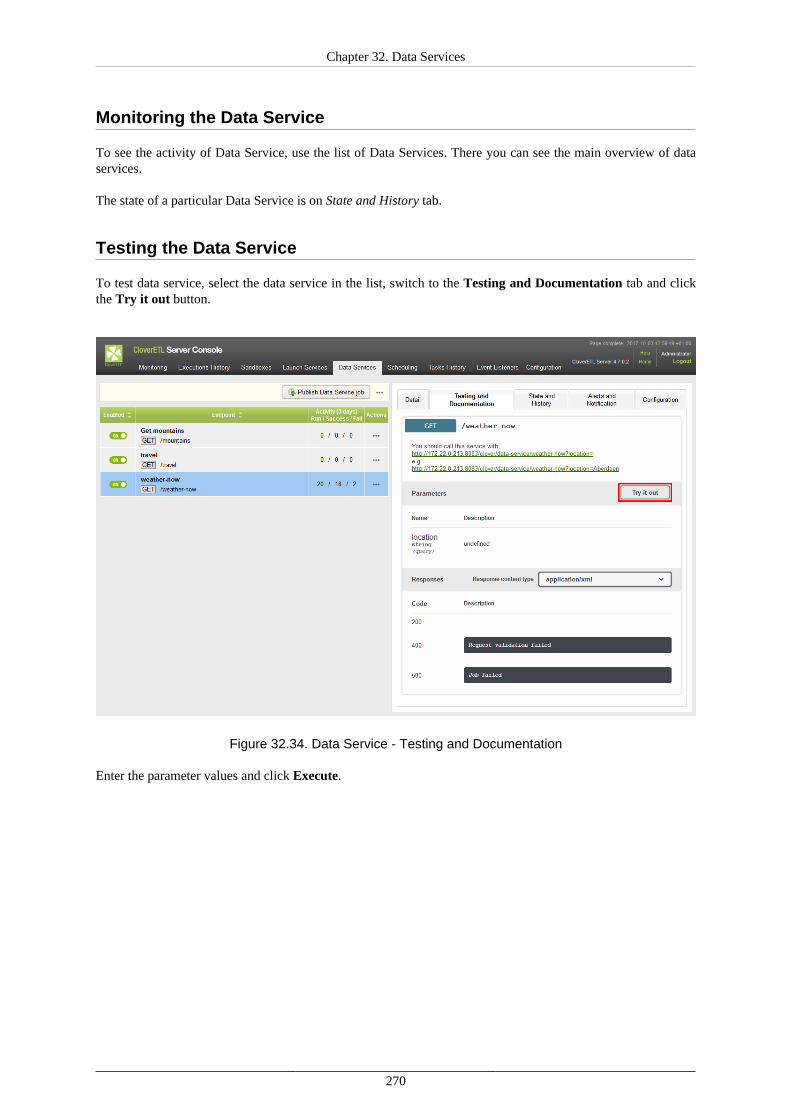
Chapter 32. Data Services
270
Monitoring the Data Service
To see the activity of Data Service, use the list of Data Services. There you can see the main overview of dataservices.
The state of a particular Data Service is on State and History tab.
Testing the Data Service
To test data service, select the data service in the list, switch to the Testing and Documentation tab and clickthe Try it out button.
Figure 32.34. Data Service - Testing and Documentation
Enter the parameter values and click Execute.
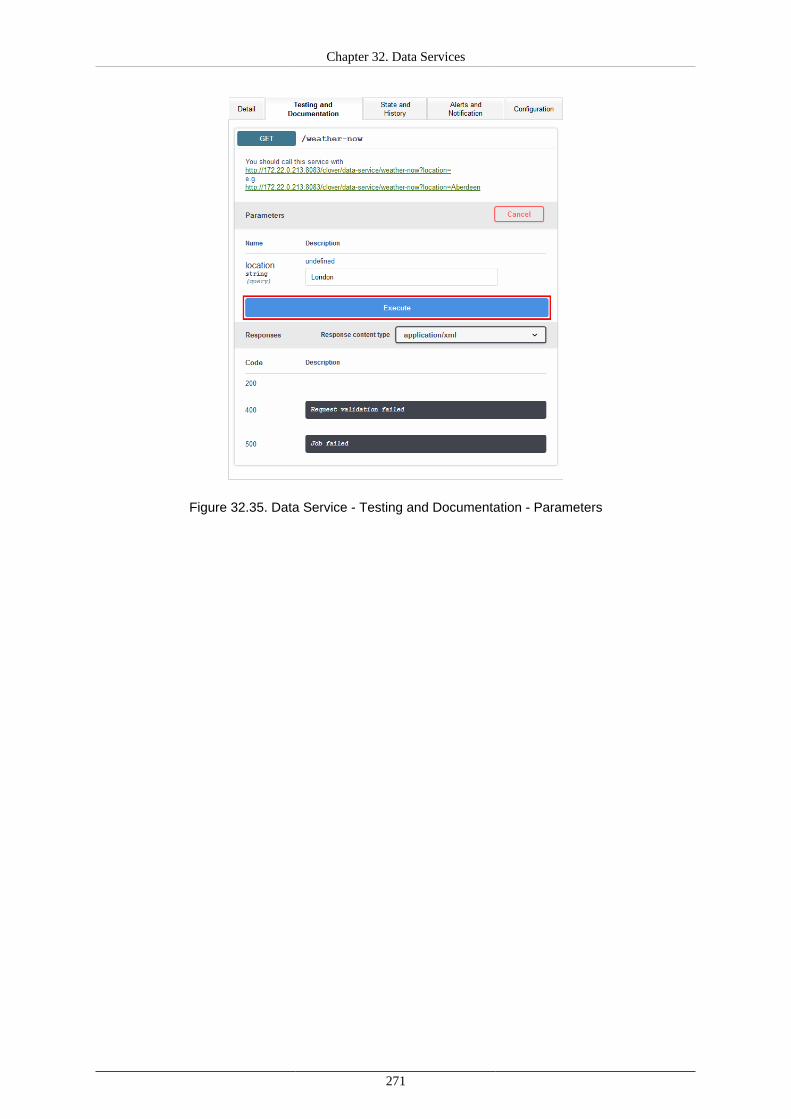
Chapter 32. Data Services
271
Figure 32.35. Data Service - Testing and Documentation - Parameters
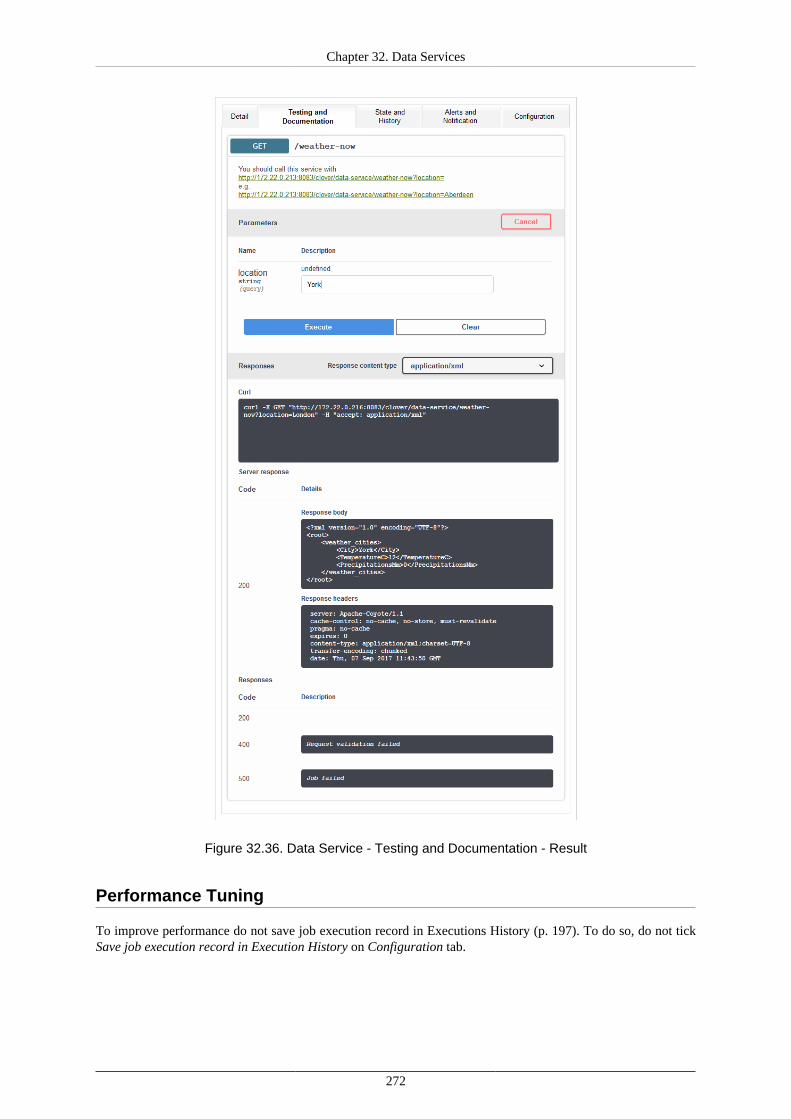
Chapter 32. Data Services
272
Figure 32.36. Data Service - Testing and Documentation - Result
Performance Tuning
To improve performance do not save job execution record in Executions History (p. 197). To do so, do not tickSave job execution record in Execution History on Configuration tab.
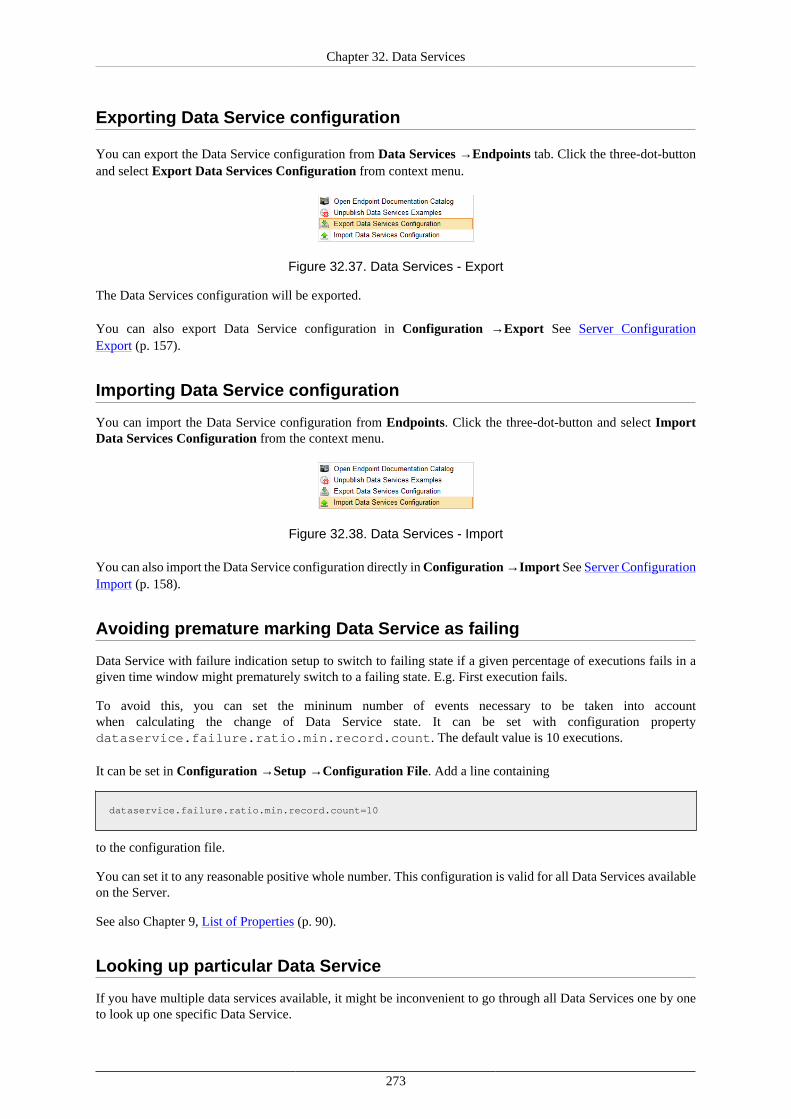
Chapter 32. Data Services
273
Exporting Data Service configuration
You can export the Data Service configuration from Data Services →Endpoints tab. Click the three-dot-buttonand select Export Data Services Configuration from context menu.
Figure 32.37. Data Services - Export
The Data Services configuration will be exported.
You can also export Data Service configuration in Configuration →Export See Server ConfigurationExport (p. 157).
Importing Data Service configuration
You can import the Data Service configuration from Endpoints. Click the three-dot-button and select ImportData Services Configuration from the context menu.
Figure 32.38. Data Services - Import
You can also import the Data Service configuration directly in Configuration →Import See Server ConfigurationImport (p. 158).
Avoiding premature marking Data Service as failing
Data Service with failure indication setup to switch to failing state if a given percentage of executions fails in agiven time window might prematurely switch to a failing state. E.g. First execution fails.
To avoid this, you can set the mininum number of events necessary to be taken into accountwhen calculating the change of Data Service state. It can be set with configuration propertydataservice.failure.ratio.min.record.count. The default value is 10 executions.
It can be set in Configuration →Setup →Configuration File. Add a line containing
dataservice.failure.ratio.min.record.count=10
to the configuration file.
You can set it to any reasonable positive whole number. This configuration is valid for all Data Services availableon the Server.
See also Chapter 9, List of Properties (p. 90).
Looking up particular Data Service
If you have multiple data services available, it might be inconvenient to go through all Data Services one by oneto look up one specific Data Service.

Chapter 32. Data Services
274
If you know the endpoint name, you can look it up. Enter the text into the Search endpoints field and click theRefresh button. The Data Services will be filtered.
The entered text will be searched in the title of the Data Service, in the name of the request method, in the nameof .rjob file and in the path that the Data Service uses.
If you would like to see the invalid endpoints only, click the failing and invalid only icon. The both filters canbe combined.
To switch off the filters, click the Show All button.
Reseting state of failing Data Service endpoint
If the Data Service endpoint is in the failing state and the problem has been fixed, you can reset the endpointstate manually.
To reset the state open the details of the endpoint, switch to the Alerts and Notification tab and click the Applyand Reset State button.
If the the endpoint has e-mail address set, a notification e-mail will be sent to this address.

Chapter 32. Data Services
275
Custom HTTP Headers
Data Services accept a custom HTTP header X-Clover-Save-Run-Record. The possible values of theheader are TRUE and FALSE. CloverETL Server accepts them case insensitively.
This header overrides the endpoint's configuration to save or not to save the run record.
Testing and Documentation page now automatically sends the header with value set to true. This means that allinvocations from Testing and Documentation page are saved to executions history.
Testing Data Service from Designer creates a record in Executions History regardless of it being published or not.
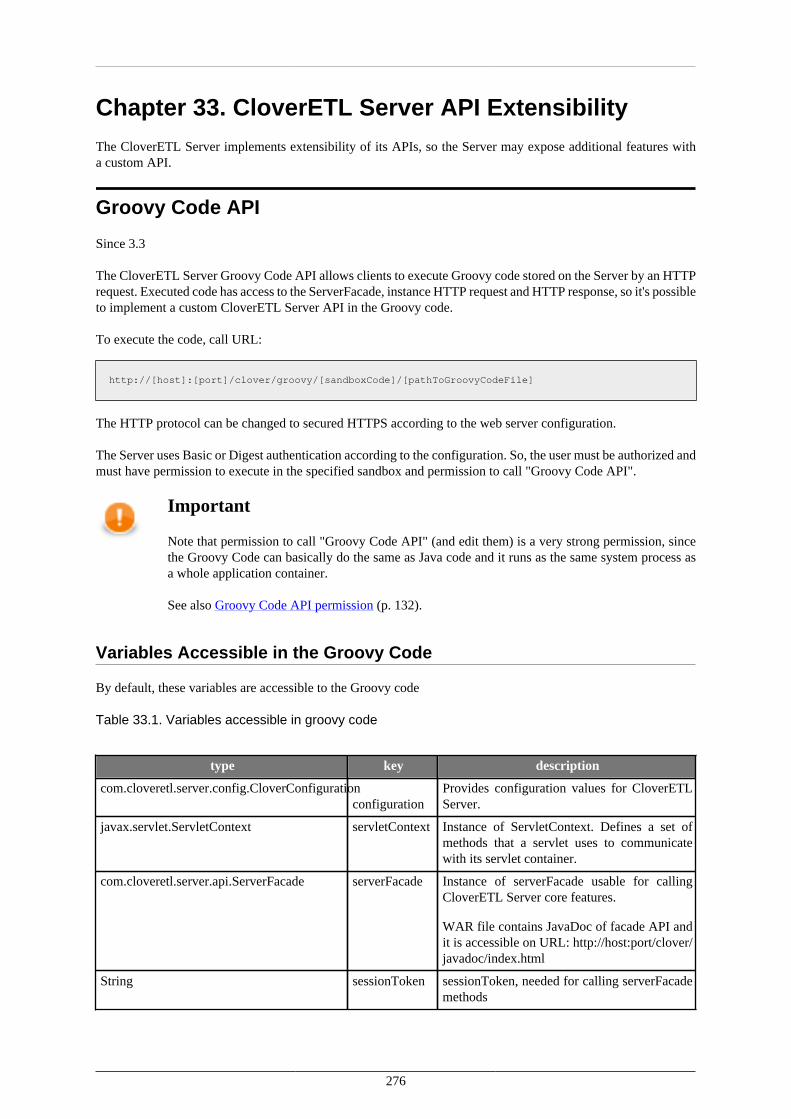
276
Chapter 33. CloverETL Server API ExtensibilityThe CloverETL Server implements extensibility of its APIs, so the Server may expose additional features witha custom API.
Groovy Code API
Since 3.3
The CloverETL Server Groovy Code API allows clients to execute Groovy code stored on the Server by an HTTPrequest. Executed code has access to the ServerFacade, instance HTTP request and HTTP response, so it's possibleto implement a custom CloverETL Server API in the Groovy code.
To execute the code, call URL:
http://[host]:[port]/clover/groovy/[sandboxCode]/[pathToGroovyCodeFile]
The HTTP protocol can be changed to secured HTTPS according to the web server configuration.
The Server uses Basic or Digest authentication according to the configuration. So, the user must be authorized andmust have permission to execute in the specified sandbox and permission to call "Groovy Code API".
Important
Note that permission to call "Groovy Code API" (and edit them) is a very strong permission, sincethe Groovy Code can basically do the same as Java code and it runs as the same system process asa whole application container.
See also Groovy Code API permission (p. 132).
Variables Accessible in the Groovy Code
By default, these variables are accessible to the Groovy code
Table 33.1. Variables accessible in groovy code
type key description
com.cloveretl.server.config.CloverConfigurationconfiguration
Provides configuration values for CloverETLServer.
javax.servlet.ServletContext servletContext Instance of ServletContext. Defines a set ofmethods that a servlet uses to communicatewith its servlet container.
com.cloveretl.server.api.ServerFacade serverFacade Instance of serverFacade usable for callingCloverETL Server core features.
WAR file contains JavaDoc of facade API andit is accessible on URL: http://host:port/clover/javadoc/index.html
String sessionToken sessionToken, needed for calling serverFacademethods
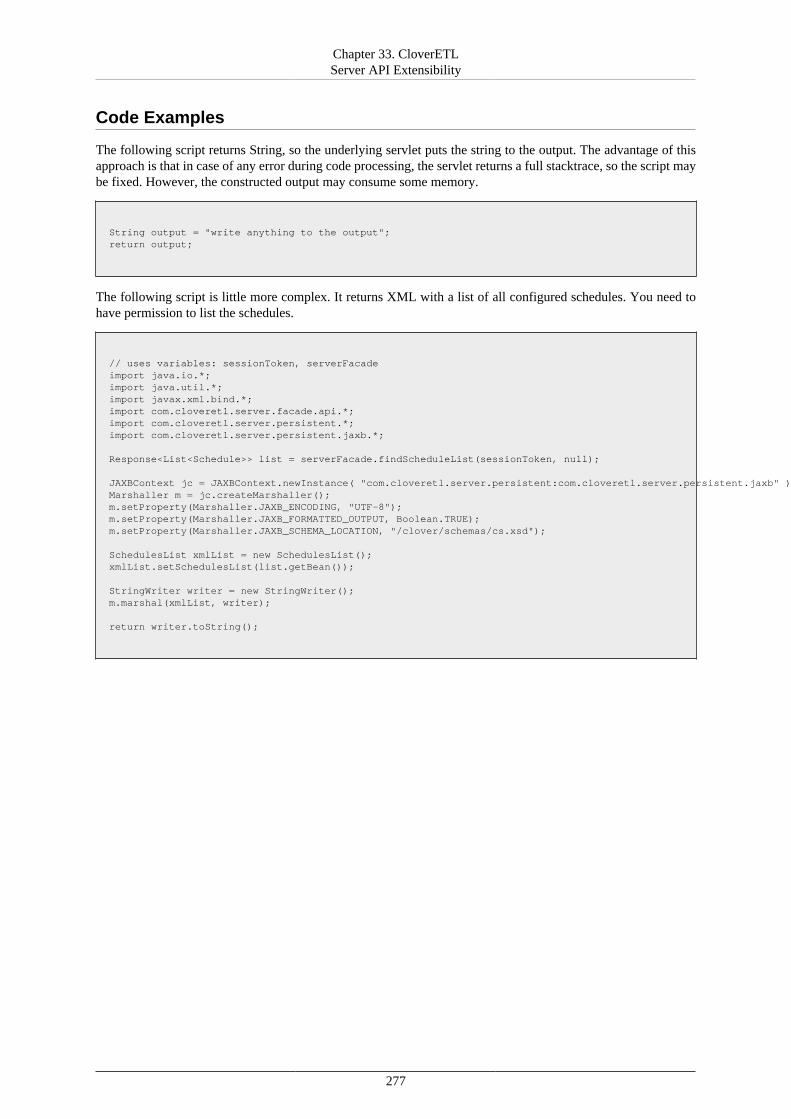
Chapter 33. CloverETLServer API Extensibility
277
Code Examples
The following script returns String, so the underlying servlet puts the string to the output. The advantage of thisapproach is that in case of any error during code processing, the servlet returns a full stacktrace, so the script maybe fixed. However, the constructed output may consume some memory.
String output = "write anything to the output";return output;
The following script is little more complex. It returns XML with a list of all configured schedules. You need tohave permission to list the schedules.
// uses variables: sessionToken, serverFacadeimport java.io.*;import java.util.*;import javax.xml.bind.*;import com.cloveretl.server.facade.api.*;import com.cloveretl.server.persistent.*;import com.cloveretl.server.persistent.jaxb.*;
Response<List<Schedule>> list = serverFacade.findScheduleList(sessionToken, null);
JAXBContext jc = JAXBContext.newInstance( "com.cloveretl.server.persistent:com.cloveretl.server.persistent.jaxb" );Marshaller m = jc.createMarshaller();m.setProperty(Marshaller.JAXB_ENCODING, "UTF-8");m.setProperty(Marshaller.JAXB_FORMATTED_OUTPUT, Boolean.TRUE);m.setProperty(Marshaller.JAXB_SCHEMA_LOCATION, "/clover/schemas/cs.xsd");
SchedulesList xmlList = new SchedulesList();xmlList.setSchedulesList(list.getBean()); StringWriter writer = new StringWriter(); m.marshal(xmlList, writer);
return writer.toString();

Part VII. Cluster
279
Chapter 34. Clustering FeaturesThere are two common Cluster features: high availability and scalability. Both are implemented by the CloverETLServer on different levels. This section should clarify the basics of CloverETL Clustering.
The CloverETL Server only works in the Cluster if your license allows it.
High Availability
CloverETL Server does not recognize any differences between cluster nodes. Thus, there are no "master" or "slave"nodes meaning all nodes can be virtually equal. There is no single point of failure (SPOF) in the CloverETL clusteritself, however SPOFs may be in the input data or some other external element.
Clustering offers high availability (HA) for all features accessible through HTTP, for event listeners andscheduling. Regarding the HTTP accessible features: it includes sandbox browsing, modification of servicesconfiguration (scheduling, launch services, listeners) and primarily job executions. Any cluster node may acceptincoming HTTP requests and process them itself or delegate it to another node.
Since all nodes are typically equal, almost all requests may be processed by any cluster node:
• All job files, metadata files, etc. are located in shared sandboxes. Thus all nodes have access to them. A sharedfilesystem may be a SPOF, thus it is recommended to use a replicated filesystem instead.
• The database is shared by all cluster nodes. Again, a shared DB might be a SPOF, however it may be clusteredas well.
But there is still a possibility, that a node itself cannot process a request. In such cases, it completely andtransparently delegates the request to a node which can process the request.
These are the requests which are limited to one (or more) specific node(s):
• a request for the content of a partitioned or local sandbox. These sandboxes aren't shared among all clusternodes. Please note that this request may come to any cluster node which then delegates it transparently to atarget node, however, this target node must be up and running.
• A job is configured to use a partitioned or local sandbox. These jobs need nodes which have a physical accessto the required sandboxes.
• A job has allocation specified by specific cluster nodes. Concept of "allocation" is described in the followingsections.
Thus an inaccessible cluster node may cause a failure of the request, so if it's possible, it's better to avoid usingspecific cluster nodes or resources accessible only by specific cluster node.
CloverETL itself implements a load balancer for executing jobs. So a job which isn't configured for some specificnode(s) may be executed anywhere in the cluster and the CloverETL load balancer decides, according to therequest and current load, which node will process the job. All this is done transparently for the client side.
To achieve HA, it is recommended to use an independent HTTP load balancer. Independent HTTP load balancersallow transparent fail-overs for HTTP requests. They send requests to the nodes which are running.
Scalability
There are two independent levels of scalability implemented. Scalability of transformation requests (and any HTTPrequests) and data scalability (parallel data processing).
Both of these "scalability levels" are "horizontal". Horizontal scalability means adding nodes to the cluster, whereasvertical scalability means adding resources to a single node. Vertical scalability is supported natively by theCloverETL engine and it is not described here.
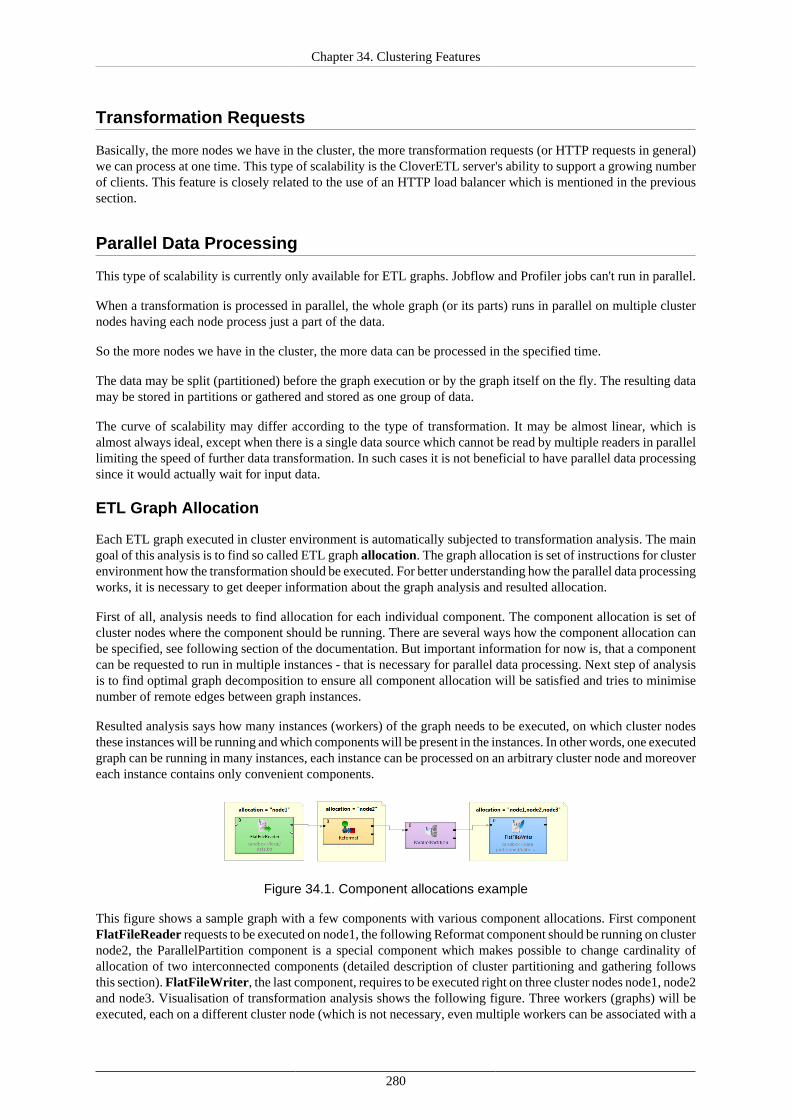
Chapter 34. Clustering Features
280
Transformation Requests
Basically, the more nodes we have in the cluster, the more transformation requests (or HTTP requests in general)we can process at one time. This type of scalability is the CloverETL server's ability to support a growing numberof clients. This feature is closely related to the use of an HTTP load balancer which is mentioned in the previoussection.
Parallel Data Processing
This type of scalability is currently only available for ETL graphs. Jobflow and Profiler jobs can't run in parallel.
When a transformation is processed in parallel, the whole graph (or its parts) runs in parallel on multiple clusternodes having each node process just a part of the data.
So the more nodes we have in the cluster, the more data can be processed in the specified time.
The data may be split (partitioned) before the graph execution or by the graph itself on the fly. The resulting datamay be stored in partitions or gathered and stored as one group of data.
The curve of scalability may differ according to the type of transformation. It may be almost linear, which isalmost always ideal, except when there is a single data source which cannot be read by multiple readers in parallellimiting the speed of further data transformation. In such cases it is not beneficial to have parallel data processingsince it would actually wait for input data.
ETL Graph Allocation
Each ETL graph executed in cluster environment is automatically subjected to transformation analysis. The maingoal of this analysis is to find so called ETL graph allocation. The graph allocation is set of instructions for clusterenvironment how the transformation should be executed. For better understanding how the parallel data processingworks, it is necessary to get deeper information about the graph analysis and resulted allocation.
First of all, analysis needs to find allocation for each individual component. The component allocation is set ofcluster nodes where the component should be running. There are several ways how the component allocation canbe specified, see following section of the documentation. But important information for now is, that a componentcan be requested to run in multiple instances - that is necessary for parallel data processing. Next step of analysisis to find optimal graph decomposition to ensure all component allocation will be satisfied and tries to minimisenumber of remote edges between graph instances.
Resulted analysis says how many instances (workers) of the graph needs to be executed, on which cluster nodesthese instances will be running and which components will be present in the instances. In other words, one executedgraph can be running in many instances, each instance can be processed on an arbitrary cluster node and moreovereach instance contains only convenient components.
Figure 34.1. Component allocations example
This figure shows a sample graph with a few components with various component allocations. First componentFlatFileReader requests to be executed on node1, the following Reformat component should be running on clusternode2, the ParallelPartition component is a special component which makes possible to change cardinality ofallocation of two interconnected components (detailed description of cluster partitioning and gathering followsthis section). FlatFileWriter, the last component, requires to be executed right on three cluster nodes node1, node2and node3. Visualisation of transformation analysis shows the following figure. Three workers (graphs) will beexecuted, each on a different cluster node (which is not necessary, even multiple workers can be associated with a
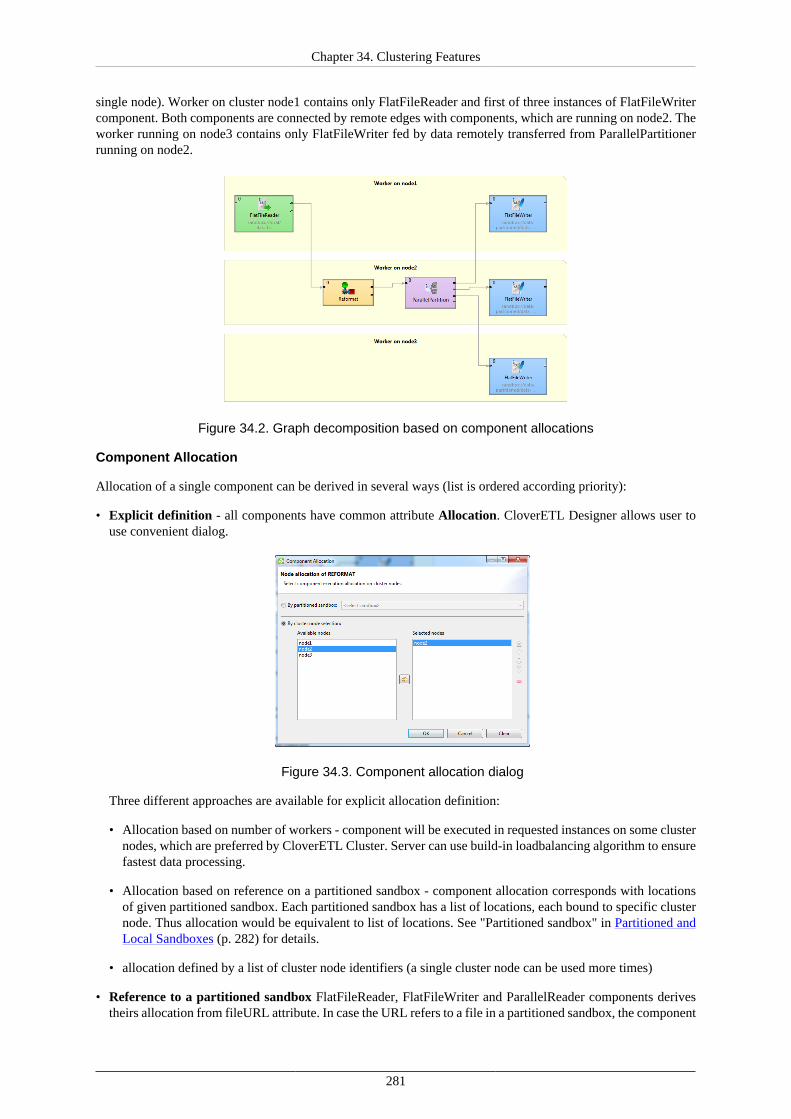
Chapter 34. Clustering Features
281
single node). Worker on cluster node1 contains only FlatFileReader and first of three instances of FlatFileWritercomponent. Both components are connected by remote edges with components, which are running on node2. Theworker running on node3 contains only FlatFileWriter fed by data remotely transferred from ParallelPartitionerrunning on node2.
Figure 34.2. Graph decomposition based on component allocations
Component Allocation
Allocation of a single component can be derived in several ways (list is ordered according priority):
• Explicit definition - all components have common attribute Allocation. CloverETL Designer allows user touse convenient dialog.
Figure 34.3. Component allocation dialog
Three different approaches are available for explicit allocation definition:
• Allocation based on number of workers - component will be executed in requested instances on some clusternodes, which are preferred by CloverETL Cluster. Server can use build-in loadbalancing algorithm to ensurefastest data processing.
• Allocation based on reference on a partitioned sandbox - component allocation corresponds with locationsof given partitioned sandbox. Each partitioned sandbox has a list of locations, each bound to specific clusternode. Thus allocation would be equivalent to list of locations. See "Partitioned sandbox" in Partitioned andLocal Sandboxes (p. 282) for details.
• allocation defined by a list of cluster node identifiers (a single cluster node can be used more times)
• Reference to a partitioned sandbox FlatFileReader, FlatFileWriter and ParallelReader components derivestheirs allocation from fileURL attribute. In case the URL refers to a file in a partitioned sandbox, the component

Chapter 34. Clustering Features
282
allocation is automatically derived from locations of the partitioned sandbox. So in case you manipulate withone of these components with a file in partitioned sandbox suitable allocation is used automatically.
• Adoption from neighbour components By default, allocation is inherited from neighbour components.Components on the left side have higher priority. Cluster partitioners and cluster gathers are nature bounds forrecursive allocation inheritance.
Partitioning/Gathering Data
As mentioned before, data may be partitioned and gathered in multiple ways. It may be prepared before the graphis executed or it may be partitioned on the fly.
Partitioning/gathering "on the fly"
There are six special components to consider: ParallelPartition, ParallelLoadBalancingPartition,ParallelSimpleCopy, ParallelSimpleGather, ParallelMerge and ParallelRepartition. All the components worksimilarly to their non-cluster variation. But their splitting or gathering nature is used to change data flow allocation,so they may be used to change distribution of the data among workers.
ParallelPartition and ParallelLoadBalancingPartition work similar to a common partitioner, they change thedata allocation from 1 to N. Component preceding the ParallelPartitioner run on just one node, whereas componentbehind the ParallelPartitioner run in parallel according to node allocation. ParallelSimpleCopy component can beuse in similar locations. This component does not distribute the data records, but copies them to all output workers.
ParallelGather and ParallelMerge work in the opposite way. They change the data allocation from N to 1.Component preceding the gather/merge run in parallel while component behind the gather run on just one node.
Partitioning/gathering data by external tools
Partitioning data on the fly may in some cases be an unnecessary bottleneck. Splitting data using low-level toolscan be much better for scalability. The optimal case being, that each running worker reads data from an independentdata source. Thus there does not have to be a ParallelPartitioner component and the graph runs in parallel fromthe beginning.
Or the whole graph may run in parallel, however the results would be partitioned.
Node Allocation Limitations
As described above, each component may have its own node allocation specified which may result in someconflicts.
• Node allocation of neighbouring components must have the same cardinality. So it doesn't have to be thesame allocation, but the cardinality must be the same. E.g. There is an ETL graph with 2 components:DataGenerator and Trash. DataGenerator allocated on NodeA sending data to Trash allocated on NodeB worksfine. DataGenerator allocated on NodeA sending data to Trash allocated on NodeA and NodeB fails.
• Node allocation behind the ParallelGather and ParallelMerge must have cardinality 1. So it may be of anyallocation, but the cardinality must be just 1.
• Node allocation of components in front of the ParallelPartition, ParallelLoadBalancingPartition andParallelSimpleCopy must have cardinality 1.
Partitioned and Local Sandboxes
Partitioned and local sandboxes were mentioned in previous sections. These new sandbox types were introducedin version 3.0 and they are vital for parallel data processing.
Together with shared sandboxes, we have three sandbox types in total.
Shared sandbox
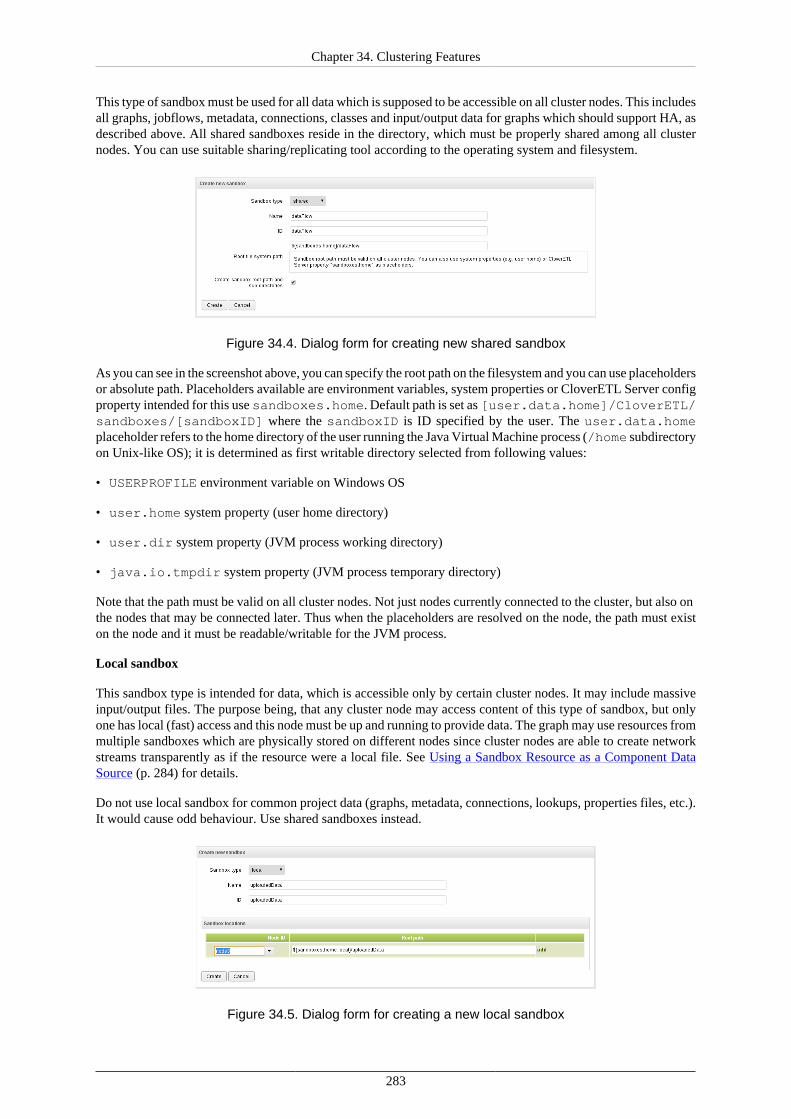
Chapter 34. Clustering Features
283
This type of sandbox must be used for all data which is supposed to be accessible on all cluster nodes. This includesall graphs, jobflows, metadata, connections, classes and input/output data for graphs which should support HA, asdescribed above. All shared sandboxes reside in the directory, which must be properly shared among all clusternodes. You can use suitable sharing/replicating tool according to the operating system and filesystem.
Figure 34.4. Dialog form for creating new shared sandbox
As you can see in the screenshot above, you can specify the root path on the filesystem and you can use placeholdersor absolute path. Placeholders available are environment variables, system properties or CloverETL Server configproperty intended for this use sandboxes.home. Default path is set as [user.data.home]/CloverETL/sandboxes/[sandboxID] where the sandboxID is ID specified by the user. The user.data.homeplaceholder refers to the home directory of the user running the Java Virtual Machine process (/home subdirectoryon Unix-like OS); it is determined as first writable directory selected from following values:
• USERPROFILE environment variable on Windows OS
• user.home system property (user home directory)
• user.dir system property (JVM process working directory)
• java.io.tmpdir system property (JVM process temporary directory)
Note that the path must be valid on all cluster nodes. Not just nodes currently connected to the cluster, but also onthe nodes that may be connected later. Thus when the placeholders are resolved on the node, the path must existon the node and it must be readable/writable for the JVM process.
Local sandbox
This sandbox type is intended for data, which is accessible only by certain cluster nodes. It may include massiveinput/output files. The purpose being, that any cluster node may access content of this type of sandbox, but onlyone has local (fast) access and this node must be up and running to provide data. The graph may use resources frommultiple sandboxes which are physically stored on different nodes since cluster nodes are able to create networkstreams transparently as if the resource were a local file. See Using a Sandbox Resource as a Component DataSource (p. 284) for details.
Do not use local sandbox for common project data (graphs, metadata, connections, lookups, properties files, etc.).It would cause odd behaviour. Use shared sandboxes instead.
Figure 34.5. Dialog form for creating a new local sandbox
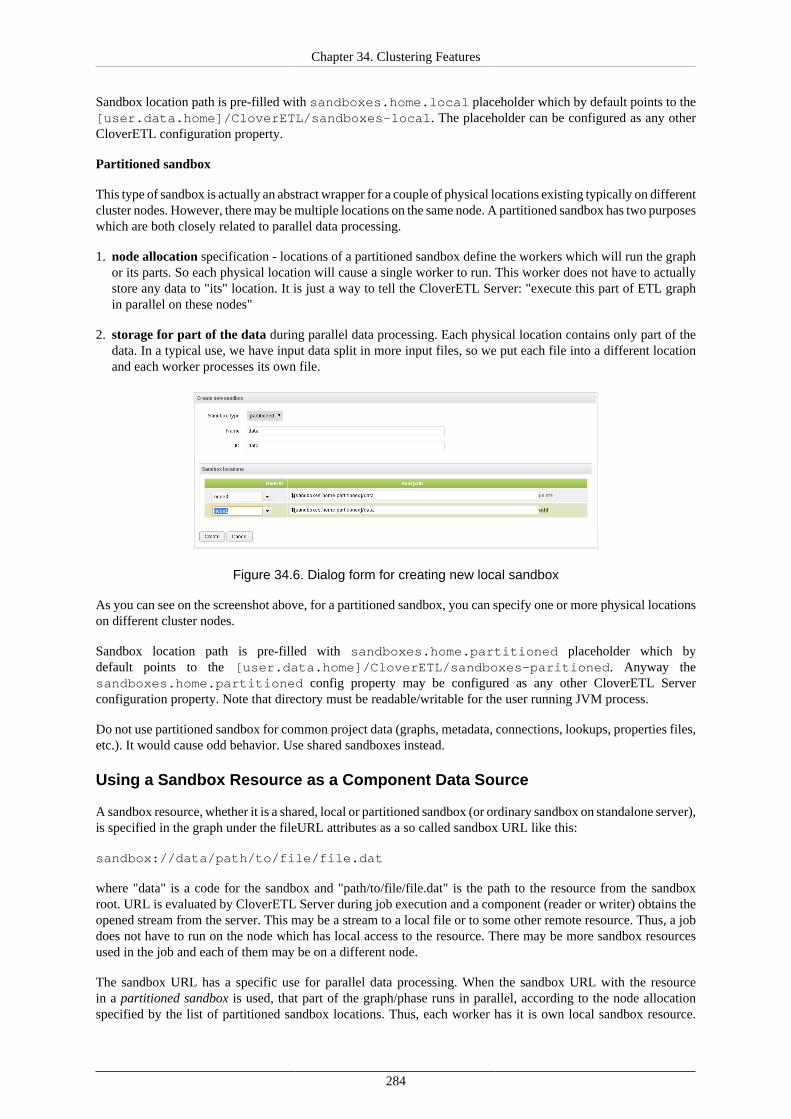
Chapter 34. Clustering Features
284
Sandbox location path is pre-filled with sandboxes.home.local placeholder which by default points to the[user.data.home]/CloverETL/sandboxes-local. The placeholder can be configured as any otherCloverETL configuration property.
Partitioned sandbox
This type of sandbox is actually an abstract wrapper for a couple of physical locations existing typically on differentcluster nodes. However, there may be multiple locations on the same node. A partitioned sandbox has two purposeswhich are both closely related to parallel data processing.
1. node allocation specification - locations of a partitioned sandbox define the workers which will run the graphor its parts. So each physical location will cause a single worker to run. This worker does not have to actuallystore any data to "its" location. It is just a way to tell the CloverETL Server: "execute this part of ETL graphin parallel on these nodes"
2. storage for part of the data during parallel data processing. Each physical location contains only part of thedata. In a typical use, we have input data split in more input files, so we put each file into a different locationand each worker processes its own file.
Figure 34.6. Dialog form for creating new local sandbox
As you can see on the screenshot above, for a partitioned sandbox, you can specify one or more physical locationson different cluster nodes.
Sandbox location path is pre-filled with sandboxes.home.partitioned placeholder which bydefault points to the [user.data.home]/CloverETL/sandboxes-paritioned. Anyway thesandboxes.home.partitioned config property may be configured as any other CloverETL Serverconfiguration property. Note that directory must be readable/writable for the user running JVM process.
Do not use partitioned sandbox for common project data (graphs, metadata, connections, lookups, properties files,etc.). It would cause odd behavior. Use shared sandboxes instead.
Using a Sandbox Resource as a Component Data Source
A sandbox resource, whether it is a shared, local or partitioned sandbox (or ordinary sandbox on standalone server),is specified in the graph under the fileURL attributes as a so called sandbox URL like this:
sandbox://data/path/to/file/file.dat
where "data" is a code for the sandbox and "path/to/file/file.dat" is the path to the resource from the sandboxroot. URL is evaluated by CloverETL Server during job execution and a component (reader or writer) obtains theopened stream from the server. This may be a stream to a local file or to some other remote resource. Thus, a jobdoes not have to run on the node which has local access to the resource. There may be more sandbox resourcesused in the job and each of them may be on a different node.
The sandbox URL has a specific use for parallel data processing. When the sandbox URL with the resourcein a partitioned sandbox is used, that part of the graph/phase runs in parallel, according to the node allocationspecified by the list of partitioned sandbox locations. Thus, each worker has it is own local sandbox resource.

Chapter 34. Clustering Features
285
CloverETL Server evaluates the sandbox URL on each worker and provides an open stream to a local resourceto the component.
The sandbox URL may be used on standalone server as well. It is excellent choice when graph referencessome resources from different sandboxes. It may be metadata, lookup definition or input/output data. Of course,referenced sandbox must be accessible for the user who executes the graph.

Chapter 34. Clustering Features
286
Graph Allocation Examples
Basic component allocation
This example shows two component graph, where allocation ensures that the first component will be executed oncluster node1 and the second component will be executed on cluster node2.
Basic component allocation with remote data transfer
Two components connected with an edge can have different allocation. The first is executed on node1 and thesecond is executed on node2. Cluster environment automatically ensures remote data records transfer.
Multiple execution
Graph with multiple node allocation is executed in parallel. In this example both components have same allocation,so three identical transformation will be executed on cluster node1, node2 and node3.
Cluster data partitioning
Graph with two allocations. First component has a single node allocation, which is not specified and isautomatically derived to ensure minimal number of remote edges. The ParallelPartition component distributerecords for further data processing on cluster node1, node2 and node3.
Cluster data gathering
Graph with two allocations. Resulted data records of parallel data processing in the first component are collectedin the ParallelSimpleGather component and passed to the cluster node4 for further single node processing.
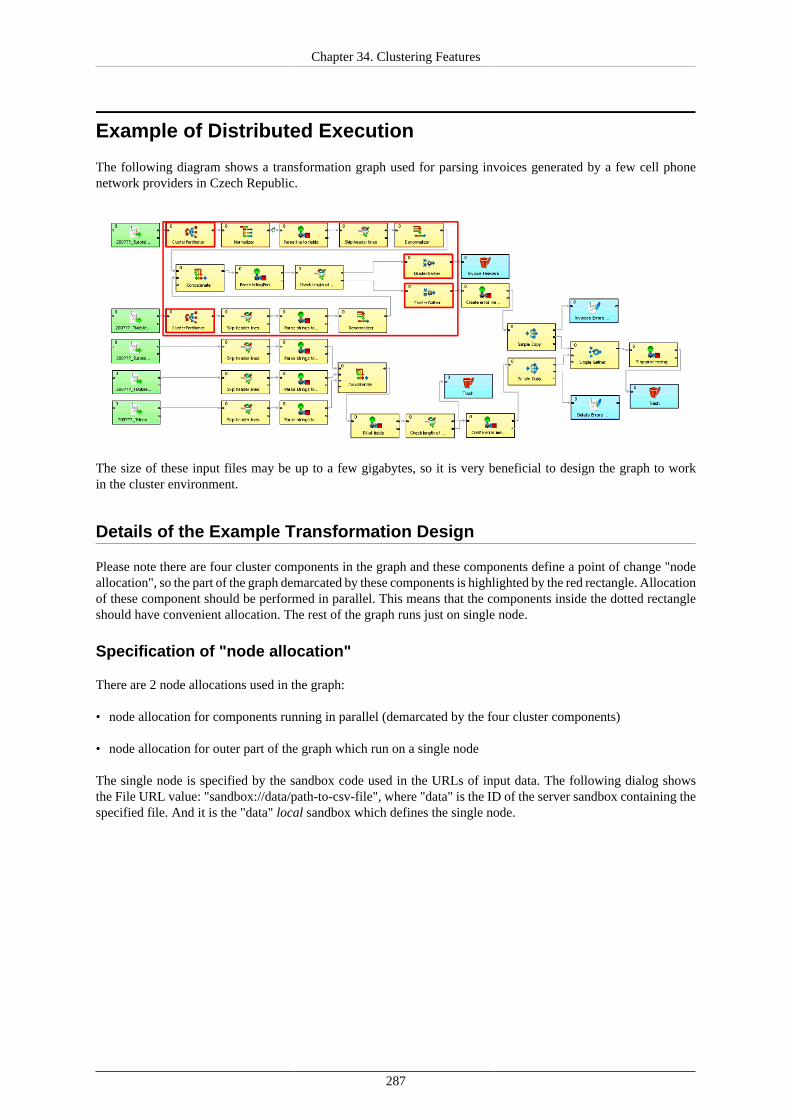
Chapter 34. Clustering Features
287
Example of Distributed Execution
The following diagram shows a transformation graph used for parsing invoices generated by a few cell phonenetwork providers in Czech Republic.
The size of these input files may be up to a few gigabytes, so it is very beneficial to design the graph to workin the cluster environment.
Details of the Example Transformation Design
Please note there are four cluster components in the graph and these components define a point of change "nodeallocation", so the part of the graph demarcated by these components is highlighted by the red rectangle. Allocationof these component should be performed in parallel. This means that the components inside the dotted rectangleshould have convenient allocation. The rest of the graph runs just on single node.
Specification of "node allocation"
There are 2 node allocations used in the graph:
• node allocation for components running in parallel (demarcated by the four cluster components)
• node allocation for outer part of the graph which run on a single node
The single node is specified by the sandbox code used in the URLs of input data. The following dialog showsthe File URL value: "sandbox://data/path-to-csv-file", where "data" is the ID of the server sandbox containing thespecified file. And it is the "data" local sandbox which defines the single node.
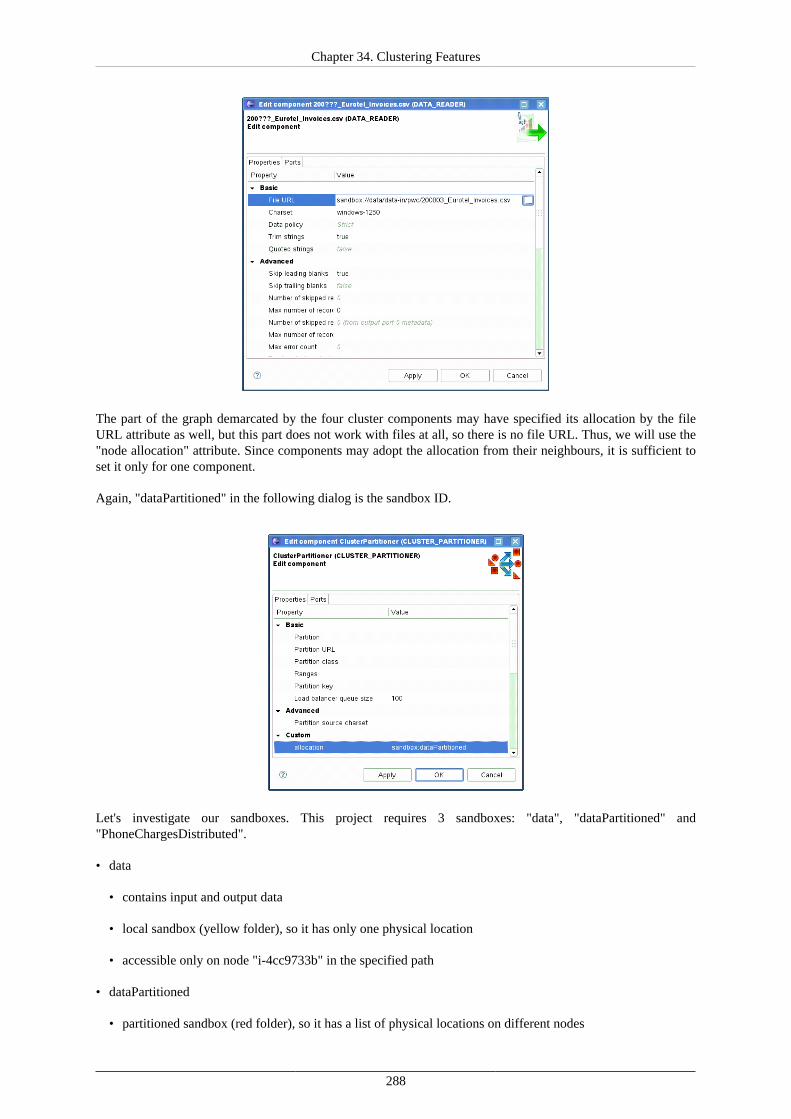
Chapter 34. Clustering Features
288
The part of the graph demarcated by the four cluster components may have specified its allocation by the fileURL attribute as well, but this part does not work with files at all, so there is no file URL. Thus, we will use the"node allocation" attribute. Since components may adopt the allocation from their neighbours, it is sufficient toset it only for one component.
Again, "dataPartitioned" in the following dialog is the sandbox ID.
Let's investigate our sandboxes. This project requires 3 sandboxes: "data", "dataPartitioned" and"PhoneChargesDistributed".
• data
• contains input and output data
• local sandbox (yellow folder), so it has only one physical location
• accessible only on node "i-4cc9733b" in the specified path
• dataPartitioned
• partitioned sandbox (red folder), so it has a list of physical locations on different nodes

Chapter 34. Clustering Features
289
• does not contain any data and since the graph does not read or write to this sandbox, it is used only for thedefinition of "nodes allocation"
• on the following figure, allocation is configured for two cluster nodes
• PhoneChargesDistributed
• common sandbox containing the graph file, metadata, and connections
• shared sandbox (blue folder), so all cluster nodes have access to the same files
If the graph was executed with the sandbox configuration of the previous figure, the node allocation would be:
• components which run only on single node, will run only on the "i-4cc9733b" node according to the "data"sandbox location.
• components with allocation according to the "dataPartitioned" sandbox will run on nodes "i-4cc9733b" and"i-52d05425".
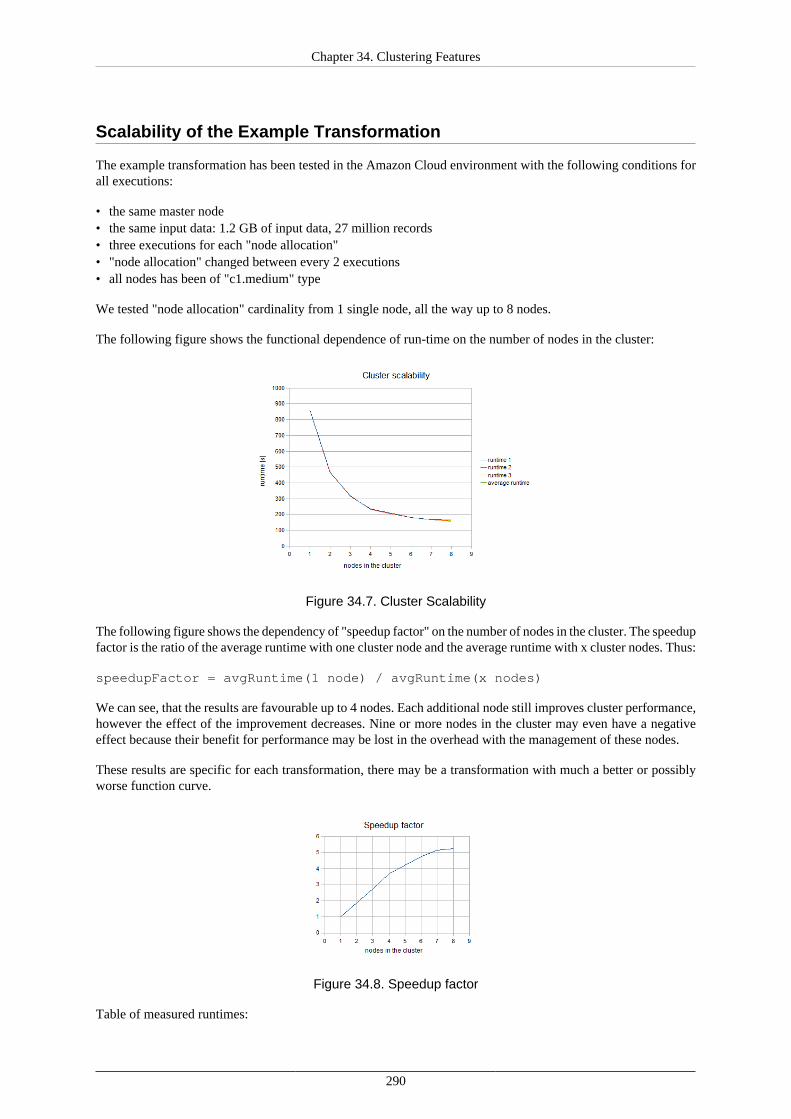
Chapter 34. Clustering Features
290
Scalability of the Example Transformation
The example transformation has been tested in the Amazon Cloud environment with the following conditions forall executions:
• the same master node• the same input data: 1.2 GB of input data, 27 million records• three executions for each "node allocation"• "node allocation" changed between every 2 executions• all nodes has been of "c1.medium" type
We tested "node allocation" cardinality from 1 single node, all the way up to 8 nodes.
The following figure shows the functional dependence of run-time on the number of nodes in the cluster:
Figure 34.7. Cluster Scalability
The following figure shows the dependency of "speedup factor" on the number of nodes in the cluster. The speedupfactor is the ratio of the average runtime with one cluster node and the average runtime with x cluster nodes. Thus:
speedupFactor = avgRuntime(1 node) / avgRuntime(x nodes)
We can see, that the results are favourable up to 4 nodes. Each additional node still improves cluster performance,however the effect of the improvement decreases. Nine or more nodes in the cluster may even have a negativeeffect because their benefit for performance may be lost in the overhead with the management of these nodes.
These results are specific for each transformation, there may be a transformation with much a better or possiblyworse function curve.
Figure 34.8. Speedup factor
Table of measured runtimes:

Chapter 34. Clustering Features
291
nodes runtime 1 [s] runtime 2 [s] runtime 3 [s] averageruntime [s]
speedup factor
1 861 861 861 861 1
2 467 465 466 466 1.85
3 317 319 314 316.67 2.72
4 236 233 233 234 3.68
5 208 204 204 205.33 4.19
6 181 182 182 181.67 4.74
7 168 168 168 168 5.13
8 172 159 162 164.33 5.24
292
Chapter 35. Cluster ConfigurationCluster can work properly only if each node is properly configured. Clustering must be enabled, nodeID mustbe unique on each node, all nodes must have access to shared DB (direct connection or proxied by anothercluster node) and shared sandboxes, and all properties for inter-node cooperation must be set according to networkenvironment.
Properties and possible configuration are the following:
• Mandatory Properties (p. 293)• Optional Properties (p. 295)• Example of 2 Node Cluster Configuration (p. 298)• Jobs Load Balancing Properties (p. 301)
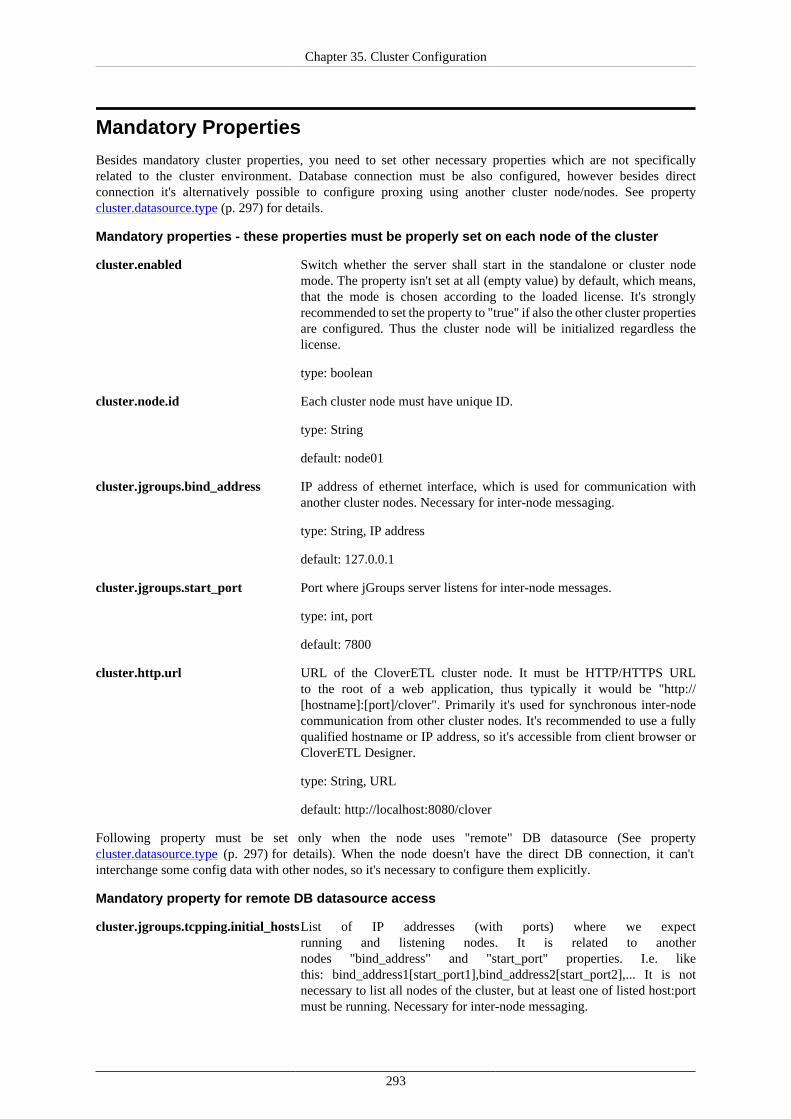
Chapter 35. Cluster Configuration
293
Mandatory Properties
Besides mandatory cluster properties, you need to set other necessary properties which are not specificallyrelated to the cluster environment. Database connection must be also configured, however besides directconnection it's alternatively possible to configure proxing using another cluster node/nodes. See propertycluster.datasource.type (p. 297) for details.
Mandatory properties - these properties must be properly set on each node of the cluster
cluster.enabled Switch whether the server shall start in the standalone or cluster nodemode. The property isn't set at all (empty value) by default, which means,that the mode is chosen according to the loaded license. It's stronglyrecommended to set the property to "true" if also the other cluster propertiesare configured. Thus the cluster node will be initialized regardless thelicense.
type: boolean
cluster.node.id Each cluster node must have unique ID.
type: String
default: node01
cluster.jgroups.bind_address IP address of ethernet interface, which is used for communication withanother cluster nodes. Necessary for inter-node messaging.
type: String, IP address
default: 127.0.0.1
cluster.jgroups.start_port Port where jGroups server listens for inter-node messages.
type: int, port
default: 7800
cluster.http.url URL of the CloverETL cluster node. It must be HTTP/HTTPS URLto the root of a web application, thus typically it would be "http://[hostname]:[port]/clover". Primarily it's used for synchronous inter-nodecommunication from other cluster nodes. It's recommended to use a fullyqualified hostname or IP address, so it's accessible from client browser orCloverETL Designer.
type: String, URL
default: http://localhost:8080/clover
Following property must be set only when the node uses "remote" DB datasource (See propertycluster.datasource.type (p. 297) for details). When the node doesn't have the direct DB connection, it can'tinterchange some config data with other nodes, so it's necessary to configure them explicitly.
Mandatory property for remote DB datasource access
cluster.jgroups.tcpping.initial_hostsList of IP addresses (with ports) where we expectrunning and listening nodes. It is related to anothernodes "bind_address" and "start_port" properties. I.e. likethis: bind_address1[start_port1],bind_address2[start_port2],... It is notnecessary to list all nodes of the cluster, but at least one of listed host:portmust be running. Necessary for inter-node messaging.

Chapter 35. Cluster Configuration
294
type: String, in format: "IPaddress1[port1],IPaddress2[port2]"
default: 127.0.0.1[7800]
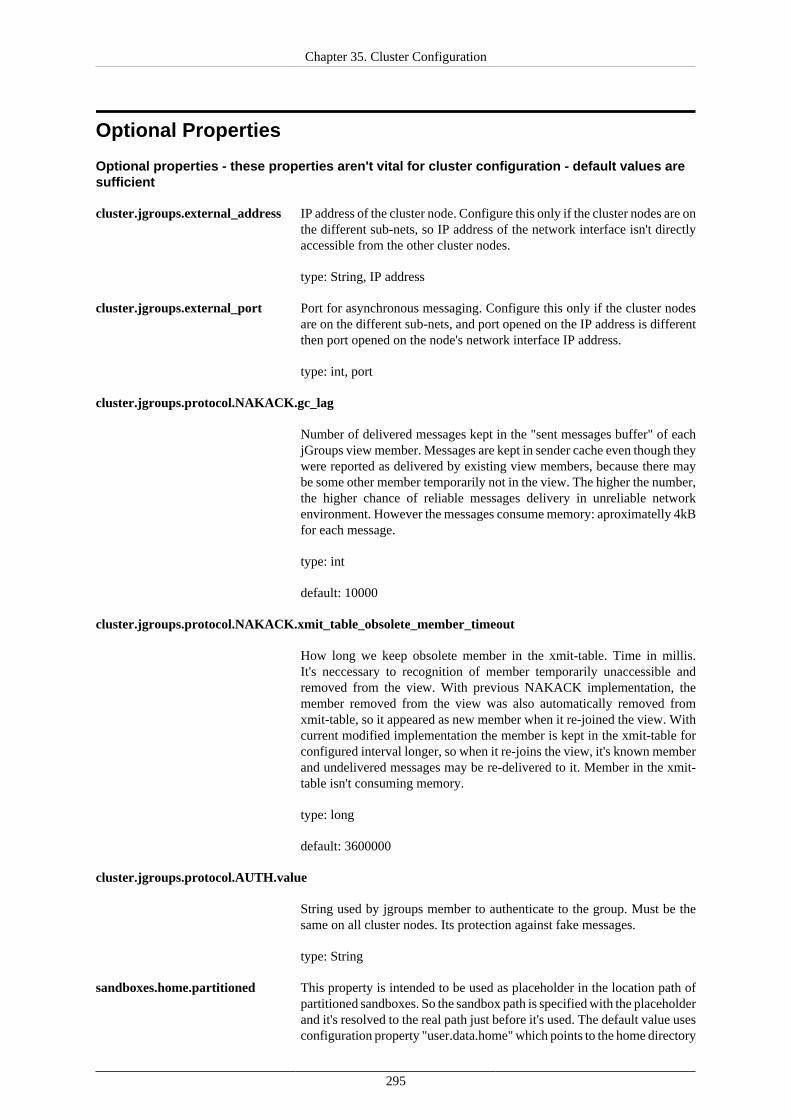
Chapter 35. Cluster Configuration
295
Optional Properties
Optional properties - these properties aren't vital for cluster configuration - default values aresufficient
cluster.jgroups.external_address IP address of the cluster node. Configure this only if the cluster nodes are onthe different sub-nets, so IP address of the network interface isn't directlyaccessible from the other cluster nodes.
type: String, IP address
cluster.jgroups.external_port Port for asynchronous messaging. Configure this only if the cluster nodesare on the different sub-nets, and port opened on the IP address is differentthen port opened on the node's network interface IP address.
type: int, port
cluster.jgroups.protocol.NAKACK.gc_lag
Number of delivered messages kept in the "sent messages buffer" of eachjGroups view member. Messages are kept in sender cache even though theywere reported as delivered by existing view members, because there maybe some other member temporarily not in the view. The higher the number,the higher chance of reliable messages delivery in unreliable networkenvironment. However the messages consume memory: aproximatelly 4kBfor each message.
type: int
default: 10000
cluster.jgroups.protocol.NAKACK.xmit_table_obsolete_member_timeout
How long we keep obsolete member in the xmit-table. Time in millis.It's neccessary to recognition of member temporarily unaccessible andremoved from the view. With previous NAKACK implementation, themember removed from the view was also automatically removed fromxmit-table, so it appeared as new member when it re-joined the view. Withcurrent modified implementation the member is kept in the xmit-table forconfigured interval longer, so when it re-joins the view, it's known memberand undelivered messages may be re-delivered to it. Member in the xmit-table isn't consuming memory.
type: long
default: 3600000
cluster.jgroups.protocol.AUTH.value
String used by jgroups member to authenticate to the group. Must be thesame on all cluster nodes. Its protection against fake messages.
type: String
sandboxes.home.partitioned This property is intended to be used as placeholder in the location path ofpartitioned sandboxes. So the sandbox path is specified with the placeholderand it's resolved to the real path just before it's used. The default value usesconfiguration property "user.data.home" which points to the home directory
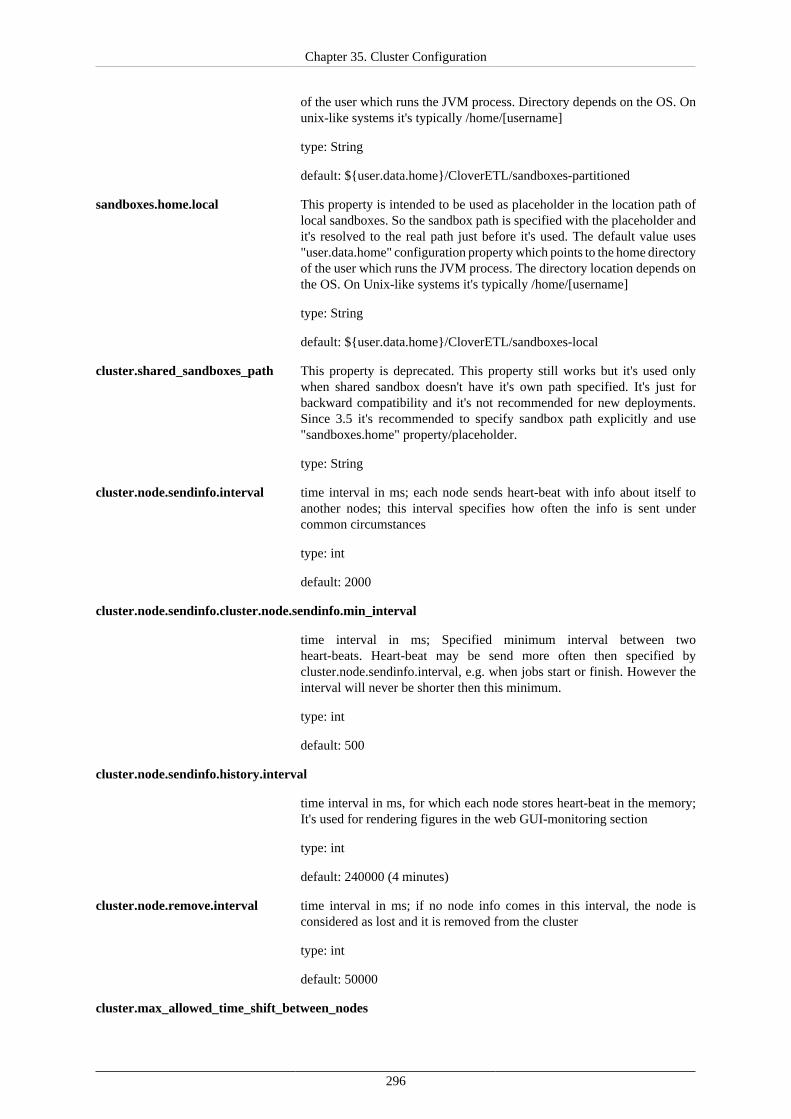
Chapter 35. Cluster Configuration
296
of the user which runs the JVM process. Directory depends on the OS. Onunix-like systems it's typically /home/[username]
type: String
default: ${user.data.home}/CloverETL/sandboxes-partitioned
sandboxes.home.local This property is intended to be used as placeholder in the location path oflocal sandboxes. So the sandbox path is specified with the placeholder andit's resolved to the real path just before it's used. The default value uses"user.data.home" configuration property which points to the home directoryof the user which runs the JVM process. The directory location depends onthe OS. On Unix-like systems it's typically /home/[username]
type: String
default: ${user.data.home}/CloverETL/sandboxes-local
cluster.shared_sandboxes_path This property is deprecated. This property still works but it's used onlywhen shared sandbox doesn't have it's own path specified. It's just forbackward compatibility and it's not recommended for new deployments.Since 3.5 it's recommended to specify sandbox path explicitly and use"sandboxes.home" property/placeholder.
type: String
cluster.node.sendinfo.interval time interval in ms; each node sends heart-beat with info about itself toanother nodes; this interval specifies how often the info is sent undercommon circumstances
type: int
default: 2000
cluster.node.sendinfo.cluster.node.sendinfo.min_interval
time interval in ms; Specified minimum interval between twoheart-beats. Heart-beat may be send more often then specified bycluster.node.sendinfo.interval, e.g. when jobs start or finish. However theinterval will never be shorter then this minimum.
type: int
default: 500
cluster.node.sendinfo.history.interval
time interval in ms, for which each node stores heart-beat in the memory;It's used for rendering figures in the web GUI-monitoring section
type: int
default: 240000 (4 minutes)
cluster.node.remove.interval time interval in ms; if no node info comes in this interval, the node isconsidered as lost and it is removed from the cluster
type: int
default: 50000
cluster.max_allowed_time_shift_between_nodes
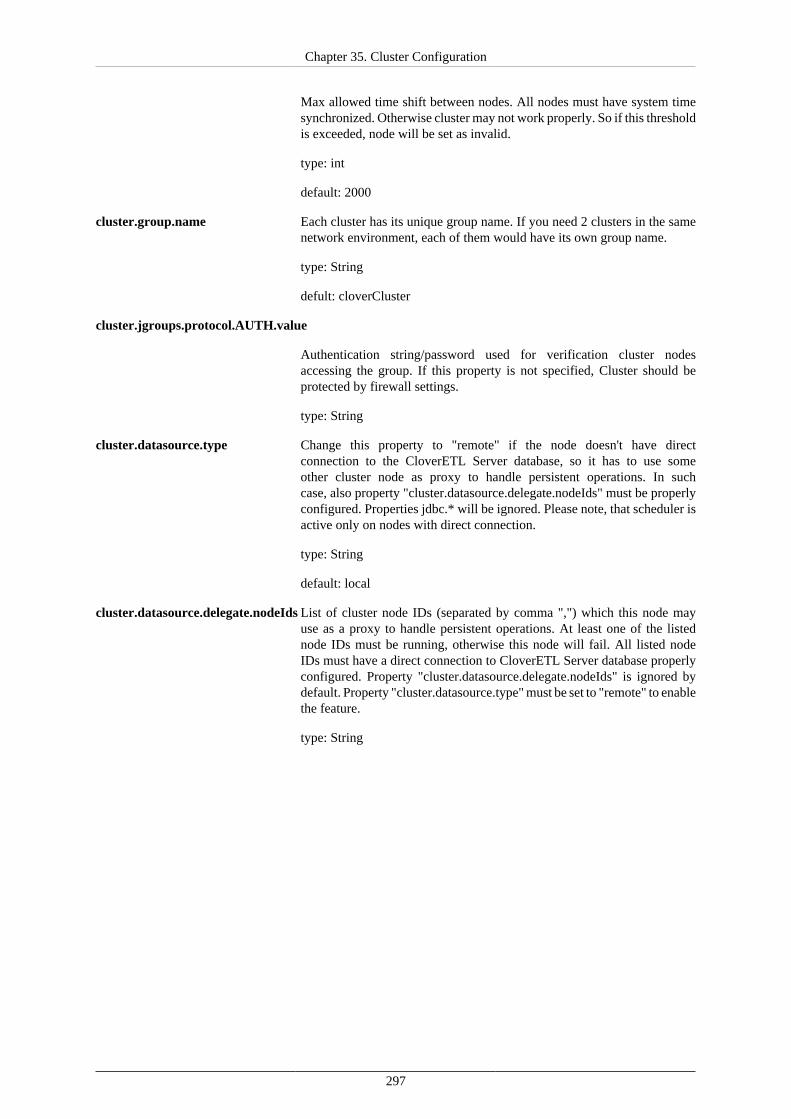
Chapter 35. Cluster Configuration
297
Max allowed time shift between nodes. All nodes must have system timesynchronized. Otherwise cluster may not work properly. So if this thresholdis exceeded, node will be set as invalid.
type: int
default: 2000
cluster.group.name Each cluster has its unique group name. If you need 2 clusters in the samenetwork environment, each of them would have its own group name.
type: String
defult: cloverCluster
cluster.jgroups.protocol.AUTH.value
Authentication string/password used for verification cluster nodesaccessing the group. If this property is not specified, Cluster should beprotected by firewall settings.
type: String
cluster.datasource.type Change this property to "remote" if the node doesn't have directconnection to the CloverETL Server database, so it has to use someother cluster node as proxy to handle persistent operations. In suchcase, also property "cluster.datasource.delegate.nodeIds" must be properlyconfigured. Properties jdbc.* will be ignored. Please note, that scheduler isactive only on nodes with direct connection.
type: String
default: local
cluster.datasource.delegate.nodeIds List of cluster node IDs (separated by comma ",") which this node mayuse as a proxy to handle persistent operations. At least one of the listednode IDs must be running, otherwise this node will fail. All listed nodeIDs must have a direct connection to CloverETL Server database properlyconfigured. Property "cluster.datasource.delegate.nodeIds" is ignored bydefault. Property "cluster.datasource.type" must be set to "remote" to enablethe feature.
type: String
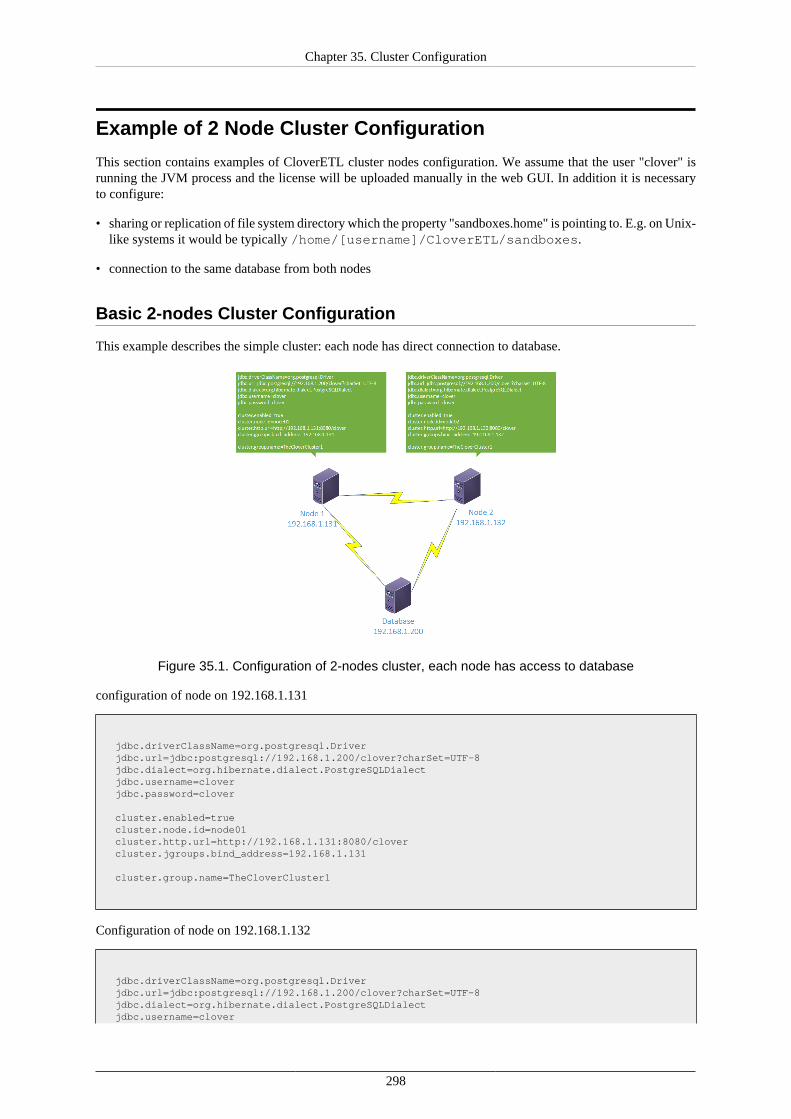
Chapter 35. Cluster Configuration
298
Example of 2 Node Cluster Configuration
This section contains examples of CloverETL cluster nodes configuration. We assume that the user "clover" isrunning the JVM process and the license will be uploaded manually in the web GUI. In addition it is necessaryto configure:
• sharing or replication of file system directory which the property "sandboxes.home" is pointing to. E.g. on Unix-like systems it would be typically /home/[username]/CloverETL/sandboxes.
• connection to the same database from both nodes
Basic 2-nodes Cluster Configuration
This example describes the simple cluster: each node has direct connection to database.
Figure 35.1. Configuration of 2-nodes cluster, each node has access to database
configuration of node on 192.168.1.131
jdbc.driverClassName=org.postgresql.Driver jdbc.url=jdbc:postgresql://192.168.1.200/clover?charSet=UTF-8 jdbc.dialect=org.hibernate.dialect.PostgreSQLDialect jdbc.username=clover jdbc.password=clover
cluster.enabled=true cluster.node.id=node01 cluster.http.url=http://192.168.1.131:8080/clover cluster.jgroups.bind_address=192.168.1.131 cluster.group.name=TheCloverCluster1
Configuration of node on 192.168.1.132
jdbc.driverClassName=org.postgresql.Driver jdbc.url=jdbc:postgresql://192.168.1.200/clover?charSet=UTF-8 jdbc.dialect=org.hibernate.dialect.PostgreSQLDialect jdbc.username=clover
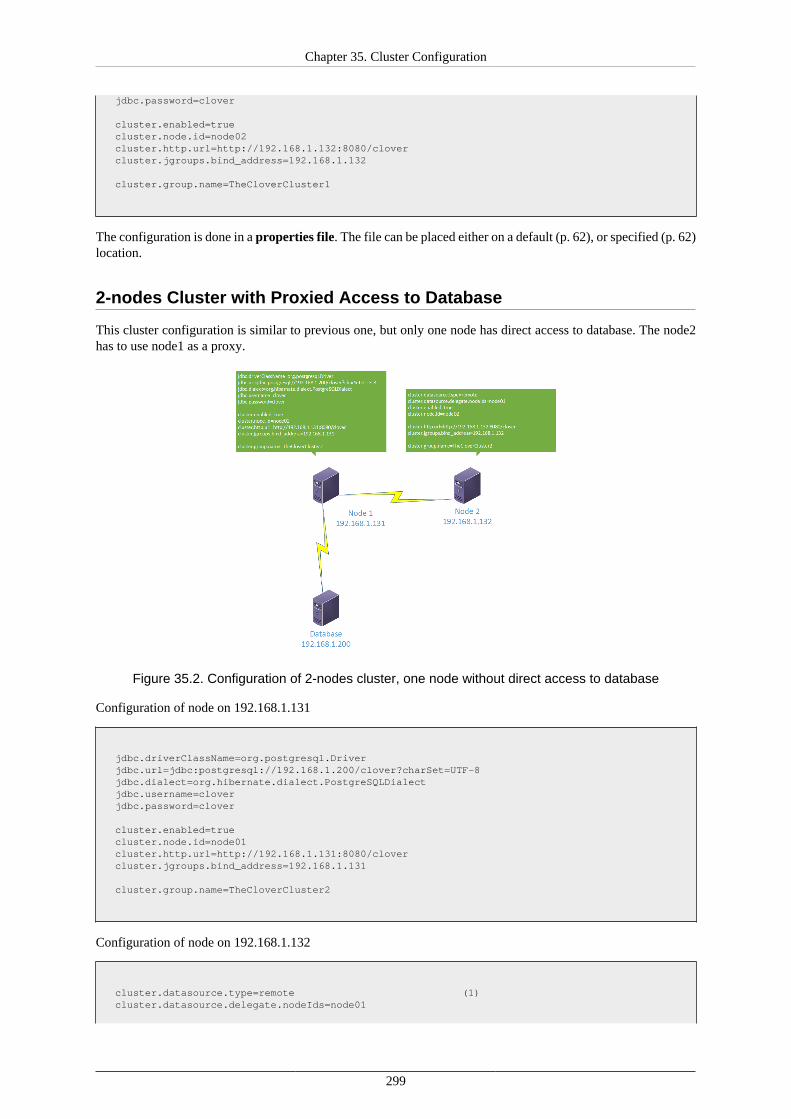
Chapter 35. Cluster Configuration
299
jdbc.password=clover
cluster.enabled=true cluster.node.id=node02 cluster.http.url=http://192.168.1.132:8080/clover cluster.jgroups.bind_address=192.168.1.132 cluster.group.name=TheCloverCluster1
The configuration is done in a properties file. The file can be placed either on a default (p. 62), or specified (p. 62)location.
2-nodes Cluster with Proxied Access to Database
This cluster configuration is similar to previous one, but only one node has direct access to database. The node2has to use node1 as a proxy.
Figure 35.2. Configuration of 2-nodes cluster, one node without direct access to database
Configuration of node on 192.168.1.131
jdbc.driverClassName=org.postgresql.Driver jdbc.url=jdbc:postgresql://192.168.1.200/clover?charSet=UTF-8 jdbc.dialect=org.hibernate.dialect.PostgreSQLDialect jdbc.username=clover jdbc.password=clover
cluster.enabled=true cluster.node.id=node01 cluster.http.url=http://192.168.1.131:8080/clover cluster.jgroups.bind_address=192.168.1.131 cluster.group.name=TheCloverCluster2
Configuration of node on 192.168.1.132
cluster.datasource.type=remote (1) cluster.datasource.delegate.nodeIds=node01
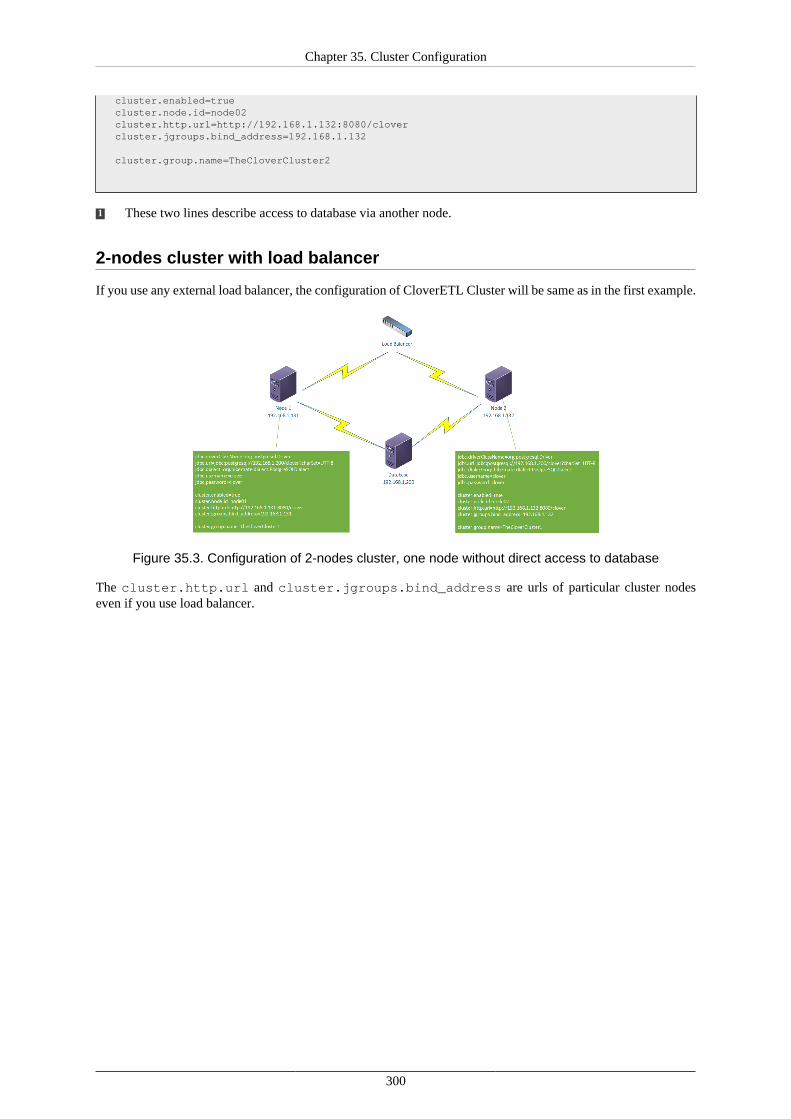
Chapter 35. Cluster Configuration
300
cluster.enabled=true cluster.node.id=node02 cluster.http.url=http://192.168.1.132:8080/clover cluster.jgroups.bind_address=192.168.1.132 cluster.group.name=TheCloverCluster2
1 These two lines describe access to database via another node.
2-nodes cluster with load balancer
If you use any external load balancer, the configuration of CloverETL Cluster will be same as in the first example.
Figure 35.3. Configuration of 2-nodes cluster, one node without direct access to database
The cluster.http.url and cluster.jgroups.bind_address are urls of particular cluster nodeseven if you use load balancer.
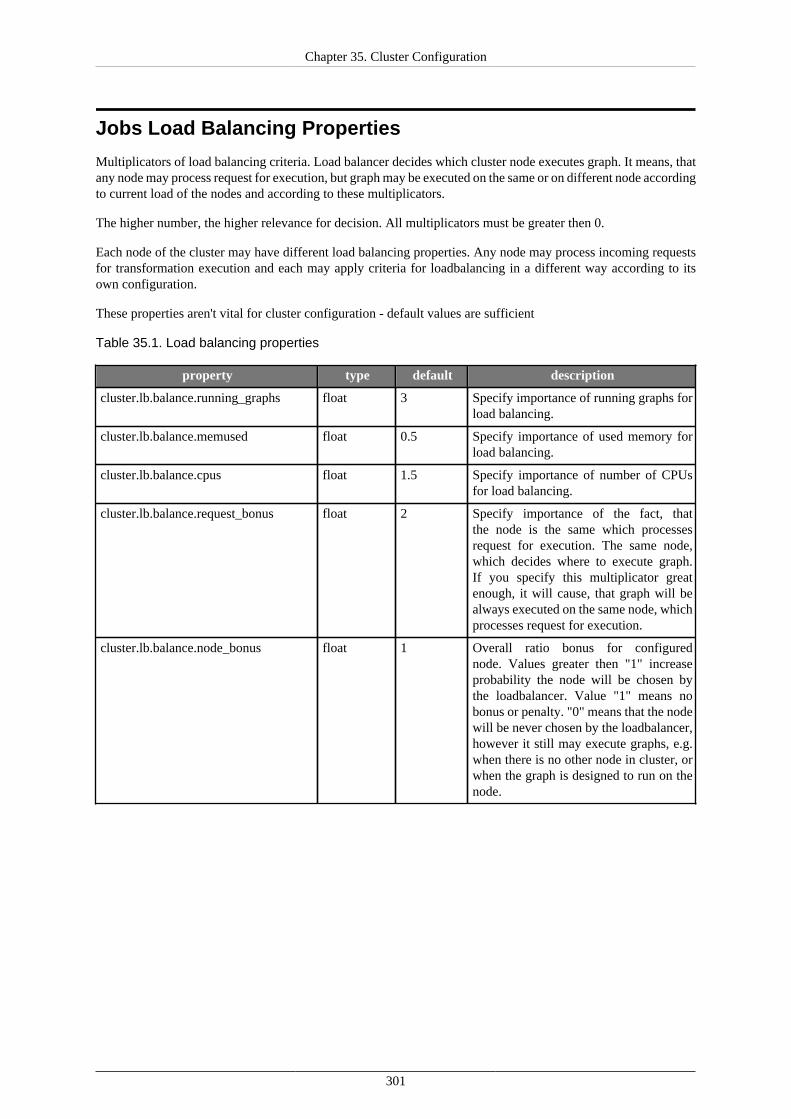
Chapter 35. Cluster Configuration
301
Jobs Load Balancing Properties
Multiplicators of load balancing criteria. Load balancer decides which cluster node executes graph. It means, thatany node may process request for execution, but graph may be executed on the same or on different node accordingto current load of the nodes and according to these multiplicators.
The higher number, the higher relevance for decision. All multiplicators must be greater then 0.
Each node of the cluster may have different load balancing properties. Any node may process incoming requestsfor transformation execution and each may apply criteria for loadbalancing in a different way according to itsown configuration.
These properties aren't vital for cluster configuration - default values are sufficient
Table 35.1. Load balancing properties
property type default description
cluster.lb.balance.running_graphs float 3 Specify importance of running graphs forload balancing.
cluster.lb.balance.memused float 0.5 Specify importance of used memory forload balancing.
cluster.lb.balance.cpus float 1.5 Specify importance of number of CPUsfor load balancing.
cluster.lb.balance.request_bonus float 2 Specify importance of the fact, thatthe node is the same which processesrequest for execution. The same node,which decides where to execute graph.If you specify this multiplicator greatenough, it will cause, that graph will bealways executed on the same node, whichprocesses request for execution.
cluster.lb.balance.node_bonus float 1 Overall ratio bonus for configurednode. Values greater then "1" increaseprobability the node will be chosen bythe loadbalancer. Value "1" means nobonus or penalty. "0" means that the nodewill be never chosen by the loadbalancer,however it still may execute graphs, e.g.when there is no other node in cluster, orwhen the graph is designed to run on thenode.
Chapter 35. Cluster Configuration
302
Running More Clusters
If you run more clusters, each cluster has to have its own unique name. If the name is not unique, the cluster nodesof different clusters may consider foreign cluster nodes as part of the same cluster. The cluster name is configuredusing cluster.group.name option. See Optional Properties (p. 295).
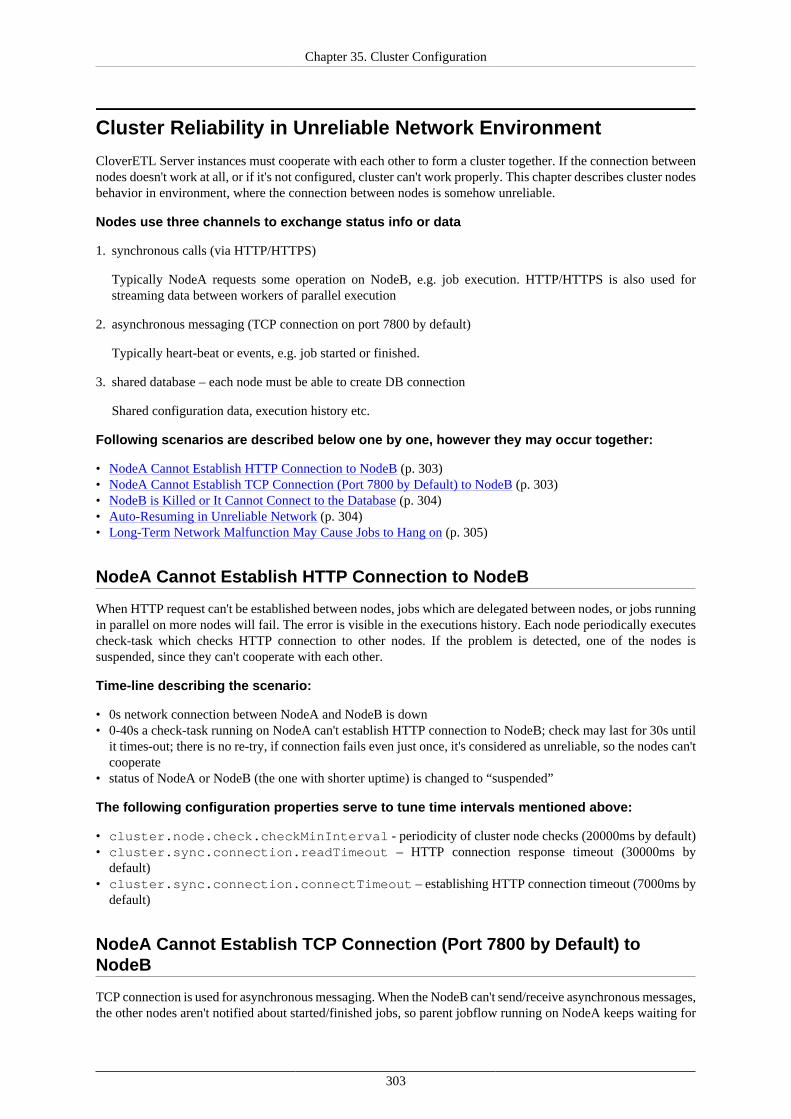
Chapter 35. Cluster Configuration
303
Cluster Reliability in Unreliable Network Environment
CloverETL Server instances must cooperate with each other to form a cluster together. If the connection betweennodes doesn't work at all, or if it's not configured, cluster can't work properly. This chapter describes cluster nodesbehavior in environment, where the connection between nodes is somehow unreliable.
Nodes use three channels to exchange status info or data
1. synchronous calls (via HTTP/HTTPS)
Typically NodeA requests some operation on NodeB, e.g. job execution. HTTP/HTTPS is also used forstreaming data between workers of parallel execution
2. asynchronous messaging (TCP connection on port 7800 by default)
Typically heart-beat or events, e.g. job started or finished.
3. shared database – each node must be able to create DB connection
Shared configuration data, execution history etc.
Following scenarios are described below one by one, however they may occur together:
• NodeA Cannot Establish HTTP Connection to NodeB (p. 303)• NodeA Cannot Establish TCP Connection (Port 7800 by Default) to NodeB (p. 303)• NodeB is Killed or It Cannot Connect to the Database (p. 304)• Auto-Resuming in Unreliable Network (p. 304)• Long-Term Network Malfunction May Cause Jobs to Hang on (p. 305)
NodeA Cannot Establish HTTP Connection to NodeB
When HTTP request can't be established between nodes, jobs which are delegated between nodes, or jobs runningin parallel on more nodes will fail. The error is visible in the executions history. Each node periodically executescheck-task which checks HTTP connection to other nodes. If the problem is detected, one of the nodes issuspended, since they can't cooperate with each other.
Time-line describing the scenario:
• 0s network connection between NodeA and NodeB is down• 0-40s a check-task running on NodeA can't establish HTTP connection to NodeB; check may last for 30s until
it times-out; there is no re-try, if connection fails even just once, it's considered as unreliable, so the nodes can'tcooperate
• status of NodeA or NodeB (the one with shorter uptime) is changed to “suspended”
The following configuration properties serve to tune time intervals mentioned above:
• cluster.node.check.checkMinInterval - periodicity of cluster node checks (20000ms by default)• cluster.sync.connection.readTimeout – HTTP connection response timeout (30000ms by
default)• cluster.sync.connection.connectTimeout – establishing HTTP connection timeout (7000ms by
default)
NodeA Cannot Establish TCP Connection (Port 7800 by Default) toNodeB
TCP connection is used for asynchronous messaging. When the NodeB can't send/receive asynchronous messages,the other nodes aren't notified about started/finished jobs, so parent jobflow running on NodeA keeps waiting for
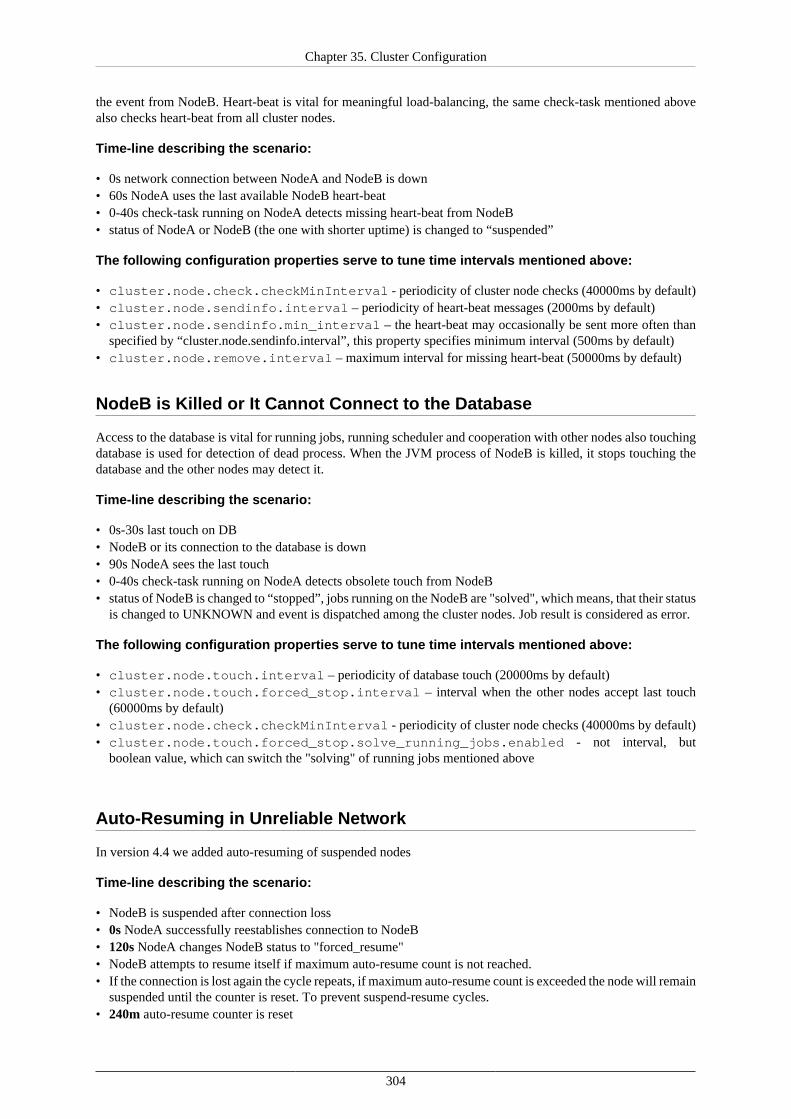
Chapter 35. Cluster Configuration
304
the event from NodeB. Heart-beat is vital for meaningful load-balancing, the same check-task mentioned abovealso checks heart-beat from all cluster nodes.
Time-line describing the scenario:
• 0s network connection between NodeA and NodeB is down• 60s NodeA uses the last available NodeB heart-beat• 0-40s check-task running on NodeA detects missing heart-beat from NodeB• status of NodeA or NodeB (the one with shorter uptime) is changed to “suspended”
The following configuration properties serve to tune time intervals mentioned above:
• cluster.node.check.checkMinInterval - periodicity of cluster node checks (40000ms by default)• cluster.node.sendinfo.interval – periodicity of heart-beat messages (2000ms by default)• cluster.node.sendinfo.min_interval – the heart-beat may occasionally be sent more often than
specified by “cluster.node.sendinfo.interval”, this property specifies minimum interval (500ms by default)• cluster.node.remove.interval – maximum interval for missing heart-beat (50000ms by default)
NodeB is Killed or It Cannot Connect to the Database
Access to the database is vital for running jobs, running scheduler and cooperation with other nodes also touchingdatabase is used for detection of dead process. When the JVM process of NodeB is killed, it stops touching thedatabase and the other nodes may detect it.
Time-line describing the scenario:
• 0s-30s last touch on DB• NodeB or its connection to the database is down• 90s NodeA sees the last touch• 0-40s check-task running on NodeA detects obsolete touch from NodeB• status of NodeB is changed to “stopped”, jobs running on the NodeB are "solved", which means, that their status
is changed to UNKNOWN and event is dispatched among the cluster nodes. Job result is considered as error.
The following configuration properties serve to tune time intervals mentioned above:
• cluster.node.touch.interval – periodicity of database touch (20000ms by default)• cluster.node.touch.forced_stop.interval – interval when the other nodes accept last touch
(60000ms by default)• cluster.node.check.checkMinInterval - periodicity of cluster node checks (40000ms by default)• cluster.node.touch.forced_stop.solve_running_jobs.enabled - not interval, but
boolean value, which can switch the "solving" of running jobs mentioned above
Auto-Resuming in Unreliable Network
In version 4.4 we added auto-resuming of suspended nodes
Time-line describing the scenario:
• NodeB is suspended after connection loss• 0s NodeA successfully reestablishes connection to NodeB• 120s NodeA changes NodeB status to "forced_resume"• NodeB attempts to resume itself if maximum auto-resume count is not reached.• If the connection is lost again the cycle repeats, if maximum auto-resume count is exceeded the node will remain
suspended until the counter is reset. To prevent suspend-resume cycles.• 240m auto-resume counter is reset

Chapter 35. Cluster Configuration
305
The following configuration properties serve to tune time intervals mentioned above:
• cluster.node.check.intervalBeforeAutoresume - time (in ms) the node has to be accessible tobe forcibly resumed (120000 by default)
• cluster.node.check.maxAutoresumeCount - how many times a node may try to auto-resume itself(3 by default)
• cluster.node.check.intervalResetAutoresumeCount=240 - time (in minutes) beforeautoresume counter will be reset
Long-Term Network Malfunction May Cause Jobs to Hang on
Jobflow or master execution executing child jobs on another cluster nodes must be notified about status changesof their child jobs. When the asynchronous messaging doesn't work, events from the child jobs aren't delivered,so parent jobs keep running. When the network works again, the child job events may be re-transmitted, so hungparent job may be finished. However the network malfunction may be so long, that the event can't be re-transmitted.
Please see following time-line to consider proper configuration:
• job A running on NodeA executes job B running on NodeB
• network between NodeA and NodeB is down from some reason
• job B finishes and sends the “finished” event, however it can't be delivered to NodeA – event is stored in the“sent events buffer”
• Since the network is down, also heart-beat can't be delivered and maybe HTTP connections can't be established,the cluster reacts as described in the sections above. Even though the nodes may be suspended, parent job Akeeps waiting for the event from job B
•now, there are 3 possibilities:
a. Network finally starts working and since all undelivered events are in the “sent events buffer”, they are re-transmitted and all of them are finally delivered. Parent job A is notified and proceeds. It may fail later, sincesome cluster nodes may be suspended.
b. Network finally starts working, but number of the events sent during the malfunction exceeded “sent eventsbuffer” limit size. So some messages are lost and won't be re-transmitted. Thus the buffer size limit shouldbe higher in the environment with unreliable network. Default buffer size limit is 10000 events. It shouldbe enough for thousands of simple job executions, basically it depends on number of job phases. Each jobexecution produces at least 3 events (job started, phase finished, job finished). Please note that there arealso some other events fired occasionally (configuration changes, suspending, resuming, cache invalidation).Also messaging layer itself stores own messages to the buffer, but it's just tens messages in a hour. Heart-beat is not stored in the buffer.
There is also inbound events buffer used as temporary storage for events, so the events may be delivered incorrect order when some events can't be delivered at the moment. When the cluster node is inaccessible, theinbound buffer is released after timeout, which is set to 1 hour by default.
c. Node B is restarted, so all undelivered events in the buffer are lost.
The following configuration properties serve to tune time intervals mentioned above:
• cluster.jgroups.protocol.NAKACK.gc_lag – limit size of the sent events buffer; Please note thateach stored message takes 2kB of heap memory (default limit is 10000 events)
• cluster.jgroups.protocol.NAKACK.xmit_table_obsolete_member_timeout – inboundbuffer timeout of unaccessible cluster node

306
Chapter 36. Recommendations for ClusterDeployment1. All nodes in the cluster should have a synchronized system date-time.
2. All nodes share sandboxes stored on a shared or replicated filesystem. The filesystem shared among all nodesis single point of failure. Thus, the use of a replicated filesystem is strongly recommended.
3. All nodes share a DB, thus it must support transactions. I.e. The MySQL table engine, MyISAM, may causestrange behaviour because it is not transactional.
4. All nodes share a DB, which is a single point of failure. Use of a clustered DB is strongly recommended.
5. Configure the license by "license.file" property or upload it in the Web GUI, so it's stored in the database. Donot use clover-license.war.
307
Chapter 37. Multiple CloverServer Instances on thesame HostRunning multiple CloverETL Server instances on the same host is not recommended. If you do so, you shouldensure that the instances do not interfere with each other.
• Each instance must run in a separate application server.
• Each instance must have its own port to listen. Application server can have some additional opened ports,therefore you might change the configuration of the application server as well.
• The instances must have different ${java.io.tmpdir} directory.
• Each instance needs separate ${sandboxes.home} directory.
See the documentation of particular application server for further information on running multiple instances ofthe application server on the same computer.

Part VIII. Security

309
Chapter 38. Security Recommendations forCloverETL ServerTo improve security of CloverETL Server, you should:
• Change the default password for clover user. Without changing the password, everybody would be able to login as clover. See Change users Password (p. 119).
• Create a user different from clover and add it to admin group. If there are more administrators, create a useraccount for each. See Users (p. 118).
• Set the master password. Without the master password, you cannot use secure parameters. See Chapter 13,Secure Parameters (p. 110).
• Run CloverETL Server with privileges of an ordinary user, e.g. create a system account clover used only forrunning CloverETL Server. Do not run CloverETL Server under root account.
• Run CloverETL Server on HTTPS. If you communicate over HTTP, you data is sent unencrypted andeavesdroppers can easily see it.
• Disable the HTTP API if you do not need it. See Chapter 28, Simple HTTP API (p. 232).
• In Data Services, put the keystores outside the sandbox and run the service on HTTPS. If you have keystore insandbox, a user with write permissions could replace it with another key store. HTTPS Connectors (p. 263).
• Enable user lockout after repeated failed login attempts. If you use this feature in Cluster, make sure that allcluster nodes have the same lockout configuration. See User Lockout (p. 132)

310
List of Figures2.1. System Architecture ................................................................................................................ 53.1. setenv.sh edited in Linux. ................................................................................................. 113.2. setenv.bat edited in Windows. ........................................................................................... 113.3. Apache Tomcat welcome page ................................................................................................ 153.4. Jetty welcome page ............................................................................................................... 213.5. Adjusting Maximum heap size limit ......................................................................................... 253.6. Glassfish welcome page ......................................................................................................... 293.7. JBoss AS 7 welcome page ...................................................................................................... 323.8. JBoss EAP 7 welcome page .................................................................................................... 373.9. WebLogic welcome page ........................................................................................................ 433.10. Login page of CloverETL Server without license ...................................................................... 463.11. Add new license form .......................................................................................................... 473.12. Update license form ............................................................................................................. 483.13. CloverETL Server as the only running application on IBM WebSphere .......................................... 5312.1. Configured temp spaces overview - one default temp space on each cluster node ............................ 10412.2. Newly added global temp space. ........................................................................................... 10612.3. Temp spaces using environment variables and system properties ................................................. 10712.4. Disable operation reports action performed ............................................................................. 10812.5. Remove operation asks for confirmation in case there are data present in the temp space .................. 10913.1. Master password initialization .............................................................................................. 11013.2. Graph parameters tab with initialized master password ............................................................. 11014.1. Web GUI - section "Users" under "Configuration" .................................................................. 11814.2. Web GUI - edit user .......................................................................................................... 11914.3. Web GUI - change password ............................................................................................... 11914.4. Web GUI - groups assignment ............................................................................................. 12014.5. Web GUI - section "Groups" ............................................................................................... 12114.6. Web GUI - users assignment ............................................................................................... 12214.7. Tree of permissions ............................................................................................................ 12214.8. Locked User ..................................................................................................................... 13414.9. Unlocking User ................................................................................................................. 13415.1. Sandboxes Section in CloverETL Server Web GUI .................................................................. 13515.2. Sandbox Permissions in CloverETL Server Web GUI ............................................................... 13815.3. Web GUI - section "Sandboxes" - context menu on sandbox ...................................................... 13915.4. Web GUI - section "Sandboxes" - context menu on folder ......................................................... 13915.5. Web GUI - download sandbox as ZIP ................................................................................... 14015.6. Web GUI - upload ZIP to sandbox ....................................................................................... 14015.7. Web GUI - upload ZIP results ............................................................................................. 14115.8. Web GUI - download file as ZIP .......................................................................................... 14115.9. Job config properties .......................................................................................................... 14516.1. Standalone server detail ...................................................................................................... 14816.2. Performance ...................................................................................................................... 14916.3. CPU Load ........................................................................................................................ 15016.4. Running jobs ..................................................................................................................... 15016.5. System ............................................................................................................................. 15016.6. Status History ................................................................................................................... 15016.7. Users' Accesses panel ......................................................................................................... 15116.8. Classloader cache .............................................................................................................. 15116.9. Status .............................................................................................................................. 15116.10. Heartbeat ........................................................................................................................ 15216.11. Threads .......................................................................................................................... 15216.12. Quartz ............................................................................................................................ 15216.13. Cluster overview .............................................................................................................. 15316.14. Node detail ..................................................................................................................... 15416.15. Server Logs ..................................................................................................................... 15517.1. Server Configuration Export screen ...................................................................................... 157
CloverETL Server
311
17.2. Server Configuration Import screen ...................................................................................... 15817.3. Server Configuration uploaded ............................................................................................ 15917.4. Outcome of the import preview for configuration from Example 17.1 ......................................... 16017.5. Outcome of import preview for configuration after fixing by removal of broken group reference. ...... 16120.1. Web GUI - send e-mail ...................................................................................................... 17020.2. Web GUI - shell command .................................................................................................. 17320.3. Web GUI - Graph execution task .......................................................................................... 17620.4. Web GUI - Graph execution task .......................................................................................... 17720.5. Web GUI - Jobflow execution task ....................................................................................... 17820.6. Web GUI - "Abort job" ...................................................................................................... 18020.7. Web GUI - archive records ................................................................................................. 18220.8. Web GUI - Task JMS message editor .................................................................................... 18421.1. Web GUI - "Manual task execution" form .............................................................................. 18822.1. Web GUI - section "Scheduling" - create new ......................................................................... 18922.2. Web GUI - onetime schedule form ....................................................................................... 19022.3. Web GUI - schedule form - calendar ..................................................................................... 19122.4. Web GUI - periodical schedule form ..................................................................................... 19222.5. Cron periodical schedule form ............................................................................................. 19322.6. Editing the cron expression - minutes .................................................................................... 19322.7. Editing the cron expression - days of week ............................................................................. 19422.8. Schedule allocation - Any node ............................................................................................ 19522.9. Schedule allocation - One ore more specific nodes ................................................................... 19523.1. Executions History - executions table .................................................................................... 19723.2. Executions History - overall perspective ................................................................................ 19923.3. Executions Hierarchy with docked list of jobs ........................................................................ 19924.1. Listeners .......................................................................................................................... 20024.2. Web GUI - graph timeout event ........................................................................................... 20324.3. Event source graph isn't specified, thus listener works for all graphs in specified sandbox ................. 20524.4. Web GUI - e-mail notification about graph failure ................................................................... 20624.5. Web GUI - email notification about graph success ................................................................... 20724.6. Web GUI - backup of data processed by graph ....................................................................... 20824.7. Web GUI - jobflow timeout event ........................................................................................ 21024.8. Web GUI - creating a File Event listener ............................................................................... 21924.9. Web GUI - creating a Task Failure listener ............................................................................ 22629.1. Glassfish JMX connector .................................................................................................... 24429.2. WebSphere configuration .................................................................................................... 24531.1. Launch Services and CloverETL Server as web application back-end .......................................... 24731.2. Launch Services section ...................................................................................................... 24831.3. Creating a new launch configuration ..................................................................................... 24931.4. Overview tab .................................................................................................................... 24931.5. Edit Configuration tab ........................................................................................................ 25031.6. Creating new parameter ...................................................................................................... 25131.7. Edit Parameters tab ............................................................................................................ 25132.1. Data Services .................................................................................................................... 25432.2. Data Service tabs ............................................................................................................... 25532.3. Endpoints ......................................................................................................................... 25532.4. Data Service Endpoints ....................................................................................................... 25532.5. Three-dot-button menu ........................................................................................................ 25532.6. List of Data Services .......................................................................................................... 25632.7. Selecting the particular Data Service ..................................................................................... 25732.8. Data Service Detail tab ....................................................................................................... 25732.9. Data Service - Testing and Documentation tab ........................................................................ 25832.10. Data Service - State and History ......................................................................................... 25932.11. Data Service - Alerts and Notitification ................................................................................ 26032.12. Data Service - Alerts and Notitification ................................................................................ 26032.13. Data Service - Health status ............................................................................................... 26132.14. Some Data Service is failing .............................................................................................. 26132.15. Data Service .................................................................................................................... 261
CloverETL Server
312
32.16. Glogal Catalogue of Services ............................................................................................. 26232.17. Glogal Catalog of Services ................................................................................................ 26232.18. Data Services - Publishing the examples .............................................................................. 26332.19. Data Services - Published the examples ................................................................................ 26332.20. HTTPS Connectors ........................................................................................................... 26332.21. Tree-dot button menu ........................................................................................................ 26432.22. HTTPS Connectors ........................................................................................................... 26432.23. Publishing Data Service job ............................................................................................... 26632.24. Publishing Data Service job that does not require authentication ............................................... 26632.25. Publishing Data Service from Sandbox ................................................................................ 26632.26. Unpublishing Data Service from Sandbox ............................................................................. 26732.27. Publishing Data Service examples ....................................................................................... 26732.28. Publishing Data Service examples - II .................................................................................. 26732.29. Configuring Anonymous Data Service ................................................................................. 26832.30. Data Service without authentication ..................................................................................... 26832.31. Creating a new Data Service Connector ............................................................................... 26832.32. Creating a new Data Service Connector II ............................................................................ 26932.33. Using the HTTPS Connector in Data Service endpoint ............................................................ 26932.34. Data Service - Testing and Documentation ........................................................................... 27032.35. Data Service - Testing and Documentation - Parameters .......................................................... 27132.36. Data Service - Testing and Documentation - Result ................................................................ 27232.37. Data Services - Export ...................................................................................................... 27332.38. Data Services - Import ...................................................................................................... 27334.1. Component allocations example ........................................................................................... 28034.2. Graph decomposition based on component allocations .............................................................. 28134.3. Component allocation dialog ................................................................................................ 28134.4. Dialog form for creating new shared sandbox ......................................................................... 28334.5. Dialog form for creating a new local sandbox ......................................................................... 28334.6. Dialog form for creating new local sandbox ........................................................................... 28434.7. Cluster Scalability .............................................................................................................. 29034.8. Speedup factor .................................................................................................................. 29035.1. Configuration of 2-nodes cluster, each node has access to database ............................................. 29835.2. Configuration of 2-nodes cluster, one node without direct access to database ................................. 29935.3. Configuration of 2-nodes cluster, one node without direct access to database ................................. 300
313
List of Tables1.1. CloverETL Server and CloverETL Engine comparison .................................................................. 32.1. Hardware requirements of CloverETL Server .............................................................................. 52.2. CloverETL Server Compatibility Matrix ..................................................................................... 64.1. JVM Memory Structure .......................................................................................................... 564.2. Firewall Exceptions ............................................................................................................... 589.1. General configuration ............................................................................................................ 909.2. Defaults for job execution configuration - see Job Config Properties for details ................................. 9610.1. Parameters .......................................................................................................................... 9813.1. Secure parameters configuration parameters ............................................................................ 11214.1. After default installation on an empty DB, admin user is created automatically .............................. 11814.2. User attributes ................................................................................................................... 11814.3. Default groups created during installation ............................................................................... 12115.1. Sandbox attributes .............................................................................................................. 13615.2. Sandbox permissions .......................................................................................................... 13815.3. ZIP upload parameters ........................................................................................................ 14115.4. Job config parameters ......................................................................................................... 14316.1. Resource Utilization ........................................................................................................... 14919.1. Defaults for graph execution configuration - see section Graph config properties for details .............. 16419.2. passed parameters .............................................................................................................. 16519.3. passed parameters .............................................................................................................. 16619.4. passed parameters .............................................................................................................. 16620.1. Attributes of "Send e-mail" task ........................................................................................... 16920.2. Placeholders useful in e-mail templates .................................................................................. 17220.3. Attributes of "Execute shell command" task ........................................................................... 17320.4. Parameters of "Execute shell command" task .......................................................................... 17420.5. Parameters of "Execute shell command" task - available in scheduling ......................................... 17420.6. Parameters of "Execute shell command" task - available in listeners ............................................ 17420.7. Parameters of "Execute shell command" task - available in manual task execution .......................... 17520.8. Attributes of "Graph execution" task ..................................................................................... 17620.9. Additional parameters available in Event Listeners ................................................................... 17720.10. Attributes of "Jobflow execution" task ................................................................................. 17820.11. Attributes of "Abort job" task ............................................................................................. 18020.12. Attributes of "Archivator" task ........................................................................................... 18120.13. Attributes of JMS message task .......................................................................................... 18320.14. Parameters of "Send a JMS Message" .................................................................................. 18420.15. List of variables available in Groovy code ............................................................................ 18622.1. Onetime schedule attributes ................................................................................................. 19022.2. Periodical schedule attributes ............................................................................................... 19222.3. Cron periodical schedule attributes ........................................................................................ 19323.1. Persistent run record attributes ............................................................................................. 19824.1. Event Listeners Table Description ......................................................................................... 20024.2. Attributes of JMS message task ............................................................................................ 21224.3. Variables accessible in groovy code ...................................................................................... 21424.4. Properties Elements ............................................................................................................ 21524.5. "data" elements ................................................................................................................. 21524.6. Attributes of Universal message task ..................................................................................... 21724.7. Variables accessible in Groovy code ..................................................................................... 21824.8. Parameters passed from the listener to the task ........................................................................ 22024.9. Parameters usable in task failure e-mail template ..................................................................... 22724.10. File Event Listener specific parameters usable in task failure e-mail template ............................... 22728.1. Parameters of graph_run ..................................................................................................... 23428.2. Parameters of graph_status .................................................................................................. 23528.3. Parameters of graph_kill ..................................................................................................... 23528.4. Parameters of sandbox_content ............................................................................................. 23628.5. Parameters of executions_history .......................................................................................... 237

CloverETL Server
314
28.6. Parameters of suspend ........................................................................................................ 23828.7. Parameters of resume ......................................................................................................... 23828.8. Parameters of sandbox create ............................................................................................... 23928.9. Parameters of sandbox add location ...................................................................................... 23928.10. Parameters of sandbox add location ..................................................................................... 24028.11. Parameters ...................................................................................................................... 24028.12. Parameters ...................................................................................................................... 24028.13. Parameters of server configuration export ............................................................................. 24128.14. Parameters of server configuration import ............................................................................. 24233.1. Variables accessible in groovy code ...................................................................................... 27635.1. Load balancing properties .................................................................................................... 301

315
List of Examples17.1. Example of simple configuration defining one new server user. .................................................. 159
Related Documents