CloudConductor Documentation Release v0.1.1 CloudConductor authors Apr 17, 2020

Welcome message from author
This document is posted to help you gain knowledge. Please leave a comment to let me know what you think about it! Share it to your friends and learn new things together.
Transcript

CloudConductor DocumentationRelease v0.1.1
CloudConductor authors
Apr 17, 2020

Getting Started
1 Getting Started 3
2 Installation 5
3 Beginner’s Tutorial 7
4 Understanding CloudConductor 11
5 Creating a workflow 13
6 Defining a resource kit 15
7 Defining the running platform 17
8 Creating a sample sheet 21
9 Pipeline configuration 23
10 Resource kit configuration 25
11 Develop your own module 27
12 Glossary 31
13 Authors 33
i

ii

CloudConductor Documentation, Release v0.1.1
Contents:
Getting Started 1

CloudConductor Documentation, Release v0.1.1
2 Getting Started

CHAPTER 1
Getting Started
Welcome to the CloudConductor documentation portal! Documentation is organized in following sections:
• Installation: Get CloudConductor on local linux running system.
• Beginner Tutorial: Learn to use CloudConductor with a quick and simple tutorial.
If you are Looking for more adavanced information about CloudCondutor, please check out our Advanced Topicssection.
If you are looking forward to develop with and for CloudConductor, refer the How to create a module section.
If you couldn’t find what you were looking for?
• Post an issue on the issue tracker on GitHub
You can contribute to the CloudConductor by forking the Github repo and sending your pull request. We will be veryhappy to merge your changes to the repo.
3

CloudConductor Documentation, Release v0.1.1
4 Chapter 1. Getting Started

CHAPTER 2
Installation
This section helps to get the CloudConductor up and running on your local machine. There are two ways in whichyou can install CloudConductor on your local Linux running system.
• Install from source
• Install from Docker Hub
If you want to run your workflows on Google Cloud Platform, please refer to the section Install Google Cloud platformSDK.
2.1 Install from source
2.1.1 Pre-requisites
• Linux OS
• Python v.2.7.*
• Git
Following tools are required to run your workflows using CloudConductor:
1. Python v2.7.*
You can check your pre-installed Python version by running the following command in your terminal:
$ python -VPython 2.7.10
To install the correct version of Python, visit the official Python website.
2. Python packages: configobj, jsonschema, requests
You will need pip to install the above packages. After installing pip, run the following commands in yourterminal:
5

CloudConductor Documentation, Release v0.1.1
# Upgrade pipsudo pip install -U pip
# Install Python modulessudo pip install -U configobj jsonschema requests
3. Git
Please follow the instructions on official Git website to download and install Git on your local system.
4. Download the CloudConductor repository from the GitHub by executing following command line:
```bash$ git clone https://github.com/labdave/CloudConductor.git```
2.2 Install from Docker Hub
The only pre-requisite here is the Docker client. Please execute the following command line to see if your systemalready have Docker-client installed or not.
$ sudo docker --version
If the Dcoker is not installed on your system, you can get it from the website of Docker-client.
After the Docker set up, please pull the CloudConductor Docker image from the Docker Hub. To do so, please runthe following command line:
$ sudo docker pull davelabhub/cloudconductor
You can run CloudConductor as Docker container as follows:
$ sudo docker run --rm --user root davelabhub/cloudconductor "CloudConductor --help"
2.3 Install Google Cloud Platform SDK
Follow the instructions on the official Google Cloud website.
6 Chapter 2. Installation

CHAPTER 3
Beginner’s Tutorial
3.1 Pre-requisites
Following are the requirments before you can use the CloudConductor. Please make sure your system is properlysetup for CloudConductor.
• Linux OS
• Python v.2.7.*
• CloudConductor
• Google Cloud SDK
If you have any question about the installation of required tools, please refer to our Installation section which helpsyou to set up your system for CloudConductor.
3.2 Running CloudConductor
The CloudConductor requires four types of configuration files as follows:
• Workflow config
• Resource Kit config
• Platform config
• Sample Sheet
3.2.1 Prepare Workflow Config
The workflow configuration exemplifies your data processing steps, where output of one tools becomes input of con-secutive tool. Following is workflow example which takes a raw FASTQ files from RNAseq experiment, perform
7

CloudConductor Documentation, Release v0.1.1
QC, and align to the Human reference genome to produce the aligned reads as BAM file. You can refer to Workflowfundamentals for more details.
[split_samples]module = SampleSplitter
[fastqc]module = FastQCdocker_image = fastqcinput_from = split_samplesfinal_output = R1_fastqc, R2_fastqc
[trimmomatic]module = Trimmomaticdocker_image = trimmomaticinput_from = split_samplesfinal_output = trim_report
[[args]]MINLEN = 25
[star_bam]module = Stardocker_image = starinput_from = trimmomaticfinal_output = bam, transcriptome_mapped_bam, raw_read_counts, final_log
[[args]]ref = star_genome_dir
[star_bam_index]module = Samtoolsdocker_image = samtoolssubmodule = Indexinput_from = star_bamfinal_output = bam_idx
3.2.2 Prepare Resource Kit Config
The resource kit configuration defines the resources needed to run your workflow. The resouces can be path to thereference files, tool executables, docker images, etc. Following is a resource kit example containing all the requiredresource to produce aligned reads from raw FASTQ file for a RNAseq experiment. You can refer to Resouce Kitfundamentals for more details.
[Docker][[fastqc]]
image = quay.io/biocontainers/fastqc:0.11.7--pl5.22.0_2[[[fastqc]]]
resource_type = fastqcpath = fastqc
[[trimmomatic]]image = quay.io/biocontainers/trimmomatic:0.36--5[[[trimmomatic]]]
resource_type = trimmomaticpath = trimmomatic
[[star]]image = quay.io/biocontainers/star:2.6.0b--0[[[star]]]
(continues on next page)
8 Chapter 3. Beginner’s Tutorial

CloudConductor Documentation, Release v0.1.1
(continued from previous page)
resource_type = starpath = STAR
[[samtools]]image = quay.io/biocontainers/samtools:1.8--3[[[samtools]]]
resource_type = samtoolspath = samtools
[Path][[adapters]]
resource_type = adapterspath = gs://davelab_data/tools/Trimmomatic_0.36/adapters/adapters.
→˓fa[[star_genome_dir]]
resource_type = refpath = gs://davelab_data/ref/hg19/RNA/star
[[ref]]resource_type = refpath = gs://davelab_data/ref/hg19/RNA/ensembl.hg19.release84.fa
3.2.3 Prepare Platform Config
The platform configuration defines the runtime platform for the CloudConductor to run your workflow. ThePlatform Config set several things for the runtime platform such as which zone, service account key, max-imun retires for command execution, etc. Following is a example of Platform Config to run on the workflow onGoogle Cloud Platform. You can refer to Platform fundamentals for more details.
zone = us-east1-crandomize_zone = Falseservice_account_key_file = var/GAP_new.jsonreport_topic = pipeline_reports
[task_processor]disk_image = davelab-image-dockermax_reset = 3is_preemptible = Truecmd_retries = 1apt_packages = pigz
3.2.4 Prepare Sample Sheet
The sample sheet provide sample information to the CloudConductor. The sample information such as the type ofthe sample (i.e. tumor, normal), sequencing platform on which the sample were sequenced, path to the sample rawdata, etc. Following is sample sheet example. You can refer to Sample Sheet fundamentals for more details.
{"paired_end": true,"seq_platform": "Illumina","samples": [{
"name": "s1","paths": {
"R1": "gs://your_desired_loc/s1_1_I13_0124.fastq.gz","R2": "gs://your_desired_loc/s1_2_I13_0124.fastq.gz"
(continues on next page)
3.2. Running CloudConductor 9

CloudConductor Documentation, Release v0.1.1
(continued from previous page)
},"is_tumor": false,"lib_name": "LIB_NAME"
},{
"name": "s2","paths": {
"R1": "gs://your_desired_loc/s2_1_I13_0124.fastq.gz","R2": "gs://your_desired_loc/s2_2_I13_0124.fastq.gz"
},"is_tumor": false,"lib_name": "LIB_NAME"
}]
}
Once, you have preapared all the required files you can run the CloudConductor as follows:
$ ./CloudConductor --name cc_run_1 \--input sample_sheet.json \--pipeline_config workflow.config \--res_kit_config res_kit.config \--plat_config gcp_platform.config \--plat_name Google \--output_dir gs://your_desired_loc/cc_run_1/ \-vvv
10 Chapter 3. Beginner’s Tutorial

CHAPTER 4
Understanding CloudConductor
CloudConductor requires four input configuration files:
1. Pipeline graph - defines the analysis pipelines as the correct order of the bioinformatics tools
2. Resource kit - defines the locations of the tools and the required resources
3. Sample Sheet - defines the actual input data that needs to be analyzed
4. Platform - defines the configuration for the processing platform.
Every analysis will be defined by these four configuration files. In the following sections we will explain how togenerate these files.
11

CloudConductor Documentation, Release v0.1.1
12 Chapter 4. Understanding CloudConductor

CHAPTER 5
Creating a workflow
In bioinformatics, a pipeline is defined as a sequence of bioinformatics tools that transform and analyze the input data.A pipeline in CloudConductor is represented as a directed graph of modules, where a module is a bioinformatics tool.Consider Figure 1 as an example of a pipeline.
Before we explain how to define a pipeline, let’s first describe how to define a module in a pipeline.
5.1 Modules
A module is a bioinformatics tool and a submodule is a function that a bioinformatics tool is performing. Somebioinformatics tools have only one function, thus their modules have only one submodule. In Figure 1, Samtoolsis a module with two submodules: Index and Flagstat, while BWA is one module with one submodule with thesame name. Modules and submodules are predefined. Here is a list of currently available modules and submodules.Please read the advanced topics if you would like to define your own modules and submodules
In a pipeline, a pipeline step is defined using the keywords module and submodule as following:
[*unique_name_of_pipeline_step*]module=*name_of_module*submodule=*name_of_submodule_used*
Each submodule is defined by a set of input keys, output keys and a command. The submodule is running the commandon the input keys and generates output as output_keys. In Figure 1, submodule Index from module Samtools hasone input key (“bam” - the input BAM file) and one output key (“bam_idx” - the output BAM index file).
You can specify to keep an output file generated by a module using the keyword final_output in the module definition.For example, if you want to keep the indexed file after running samtools index you would define the module asfollowing:
[bam_indexing]module=Samtoolssubmodule=Indexfinal_output=bam_idx
13

CloudConductor Documentation, Release v0.1.1
Additionally, using the keyword docker_image you are able to specify which Docker image from resource kit youwant CloudConductor to use. If no docker_image is specified, then the tool executable is obtain from the externalresources list from resource kit.
More information about resources and Docker will be presented in the definition of the resource kit.
5.2 Create a pipeline graph
To create a pipeline graph, you need to connect the modules using the keyword input_from. For example, in Figure1, BWA receives the input from Trimmomatic.
The value of an input_from key is a set of defined unique pipeline steps. The pipeline presented in Figure 1 can berepresented as following:
[trim_reads]module=Trimmomaticdocker_image=Trimmomatic_docker
[align_reads]module=BWAinput_from=trim_readsfinal_output=bam
[bam_indexing]module=Samtoolssubmodule=Indexdocker_image=Samtools_dockerinput_from=align_readsfinal_output=bam_idx
[bam_summary]module=Samtoolssubmodule=Flagstatdocker_image=Samtools_dockerinput_from=align_readsfinal_output=flagstat
As you can observe, there is no need to specify the submodules for Trimmomatic or BWA as they have only onesubmodule with the same name. Also, we decided to not keep the output of Trimmomatic, but you can always addfastq as final_output to keep it.
5.3 Available modules
Here is a list of currently implemented modules and their submodules:
14 Chapter 5. Creating a workflow

CHAPTER 6
Defining a resource kit
In CloudConductor, resources are defined by a configuration file named resource kit. This section will explain howto create a resource kit.
Every resource kit is divided in two large sections. The first section is named Docker and defines resources providedthrough Docker. The second section is named PATH and defines resources available on an external storage systemsuch as Google Cloud Storage.
Each resource is defined by a resource type, a path and sometimes a containing directory.
The resource type is represented in the resource kit by the mandatory keyword resource_type. It has the same valueas as the input key of a pipeline module that uses the specific resource. For example, submodule Index from moduleSamtools has one input key, named samtools that defines the required resource type. Consequently, the resource oftype samtools will be connected to the input key samtools from submodule Index.
The executable path is represented in the resource kit by the mandatory keyword path. Its value should be theexecutable path (absolute, relative to the source directory or basename with ‘*’ ) that CloudConductor will execute.
There are many examples of tools for which copying only their executable is not enough, so for these tools the entiredirectory needs to be transfered. The containing directory of an executable is defined in the resource kit as theoptional keyword containing_dir. This keyword should be used when the resource requires an entire directory ofdependencies in order to be functional. When using this keyword, please ensure that the executable path specified bythe keyword path is relative to this directory.
6.1 Docker
As expected, when defining a resource from Docker, you will need the path to the Docker image. Additionally, youwill need to specify what resources are provided in the Docker image. Finally, the template of the Docker section of aresource kit is as follows:
[Docker][[*unique_name_docker_resource*]]
image=*path_docker_image*[[[*name_of_resource*]]]
(continues on next page)
15

CloudConductor Documentation, Release v0.1.1
(continued from previous page)
resource_type=*resource_input_key*path=*executable_path_on_docker*
For instance, the resource kit definition for Trimmomatic and Samtools is:
[Docker][[Trimmomatic_docker]]
image=quay.io/biocontainers/trimmomatic:0.36--5[[[trimmomatic]]]
resource_type=trimmomaticpath=trimmomatic
[[Samtools_docker]]image=quay.io/biocontainers/samtools:1.8--3[[[samtools]]]
resource_type=samtoolspath=samtools
6.2 External Resources
In general, we highly recommend that you use resource through the Docker system as it will ensure the reproducibilityof your pipeline. However, you can also use the resources available on an external storage system, such as GoogleCloud Storage.
The template to define a resource from an external storage system is the following:
[Path][[*name_of_resource*]]
resource_type=*resource_input_key*path=*executable_path*
Here are a few examples of defined resources available only on an external storage systems:
[Path][[gnomAD_exome]]
resource_type=gnomad_refpath=gs://gnomad-public/release/2.0.2/vcf/exomes/gnomad.exomes.r2.0.2.sites.
→˓vcf.bgz[[gnomAD_exome_index]]
resource_type=gnomad_ref_idxpath=gs://gnomad-public/release/2.0.2/vcf/exomes/gnomad.exomes.r2.0.2.sites.
→˓vcf.bgz.tbi[[bwa]]
resource_type=bwapath=bin/bedtoolscontaining_dir=gs://path/to/bedtools/main/directory/
16 Chapter 6. Defining a resource kit

CHAPTER 7
Defining the running platform
Currently, CloudConductor is implemented and tested for Google Cloud Platform, however we are planning to developnew platform systems in the future.
7.1 Google Cloud Platform (GCP)
In order to use Google Cloud as the processing platform, you will need to complete and configure a few steps:
1. Create a Google Cloud Platform account (if you do not have one already)
2. Create a service account key for CloudConductor
3. Identify your resource quota
4. Create a reporting topic on Google Pub/Sub
5. Generate a compute image
6. Configure CloudConductor
7.1.1 Account
If you already have a GCP account and you can access your cloud console, then you can skip this step entirely.
Otherwise, please follow this link to access your cloud console and to start an account. Please ensure that you configureyour billing account as it is a requirement to have access to the cloud services.
7.1.2 Service account key
Now that you have access to the cloud, we should configure your account so that CloudConductor has access as well.You will need to create a service account for CloudConductor. Make sure you keep the generated private key only toyourself as anyone that has access to your private key will be able to access your resources.
17

CloudConductor Documentation, Release v0.1.1
7.1.3 Resource quota
An important step when using CloudConductor is understanding your resource limits. CloudConductor is capable ofrunning thousands of instances and allocating petabytes of storage, but your GCP account might not be able to run atthis scale yet (especially if you just created your account). Also, as expected, the total processing cost will be higherwhen using many resources, but the results will come much faster.
Please follow and read the information in this link.
7.1.4 Reporting topic
When CloudConductor is complete, it generates a final report that is transferred to the final output directory and atopic on Google Pub/Sub. Having all analysis run reports sent to a single Pub/Sub topic will ensure that, at the end ofthe day, all run statistics are centralized into one single location.
Follow this link to read the instructions on how to create your Pub/Sub topic.
7.1.5 Compute image
All instances on Google Cloud require a disk image. Also, CloudConductor requires Docker for the initialization stepof the tools.
7.1.6 Configure CloudConductor
Now that you finally have your Google Cloud account ready to run CloudConductor, you need to configure Cloud-Conductor.
Here is a template of what needs to be completed in a CloudConductor platform configuration file for Google Cloud:
PLAT_MAX_NR_CPUS = integer(min=1,max=300000) # Maximum vCPUs count→˓(for the entire GCP project)PLAT_MAX_MEM = integer(min=1,max=1000000) # Maximum memory RAM in→˓GB (for the entire GCP project)PLAT_MAX_DISK_SPACE = integer(min=1,max=2000000) # Maximum disk space in→˓GB (for the entire GCP project)PROC_MAX_NR_CPUS = integer(min=1,max=64) # Maximum vCPUs count→˓(for one single instance)PROC_MAX_MEM = integer(min=1,max=416) # Maximum memory RAM in→˓GB (for one single instance)PROC_MAX_DISK_SPACE = integer(min=1,max=64000) # Maximum disk space in→˓GB (for one single instance)
report_topic = string # Pub/Sub topic where final reports→˓are sent
service_account_key_file = string # Local path to CloudConductor→˓service account private key
zone = string # The zone where all instances are→˓createdrandomize_zone = boolean # Specify if to randomize the zone
[task_processor]disk_image = string # Disk image
(continues on next page)
18 Chapter 7. Defining the running platform

CloudConductor Documentation, Release v0.1.1
(continued from previous page)
is_preemptible = boolean # Specify if the running instances to→˓be preemptiblemax_reset = integer # Maximum number of preemptions→˓before total stop
cmd_retries = integer # Maximum number of command reruns
An example of a platform configuration file is:
PLAT_MAX_NR_CPUS = 150000PLAT_MAX_MEM = 500000PLAT_MAX_DISK_SPACE = 1000000PROC_MAX_NR_CPUS = 48PROC_MAX_MEM = 312PROC_MAX_DISK_SPACE = 64000
report_topic = pipeline_reports
zone = us-central1-crandomize_zone = True
service_account_key_file = /home/cloudconductor/.priv_key/CC.json
[task_processor]disk_image = CC-image-latest
is_preemptible = Truemax_reset = 5
cmd_retries = 3
7.1. Google Cloud Platform (GCP) 19

CloudConductor Documentation, Release v0.1.1
20 Chapter 7. Defining the running platform

CHAPTER 8
Creating a sample sheet
In CloudConductor, the main input of a pipeline is specified in a sample sheet. Except three mandatory keys (samples,name, paths) any additional input keys specified in the sample sheet are related to the modules used in the pipelinegraph.
The sample sheet is in JSON format and its template is as following:
{"samples":[
{"name": *name_of_sample1*,"paths": {
*input_path_key1*: *path1*,
*input_path_key2*: *path2*,...
}
*sample_specific_input_key1*: *value_key1*,
*sample_specific_input_key2*: *value_key2*,...
},...
],
*general_input_key1*: *value1*,
*general_input_key2*: *value2*,...
}
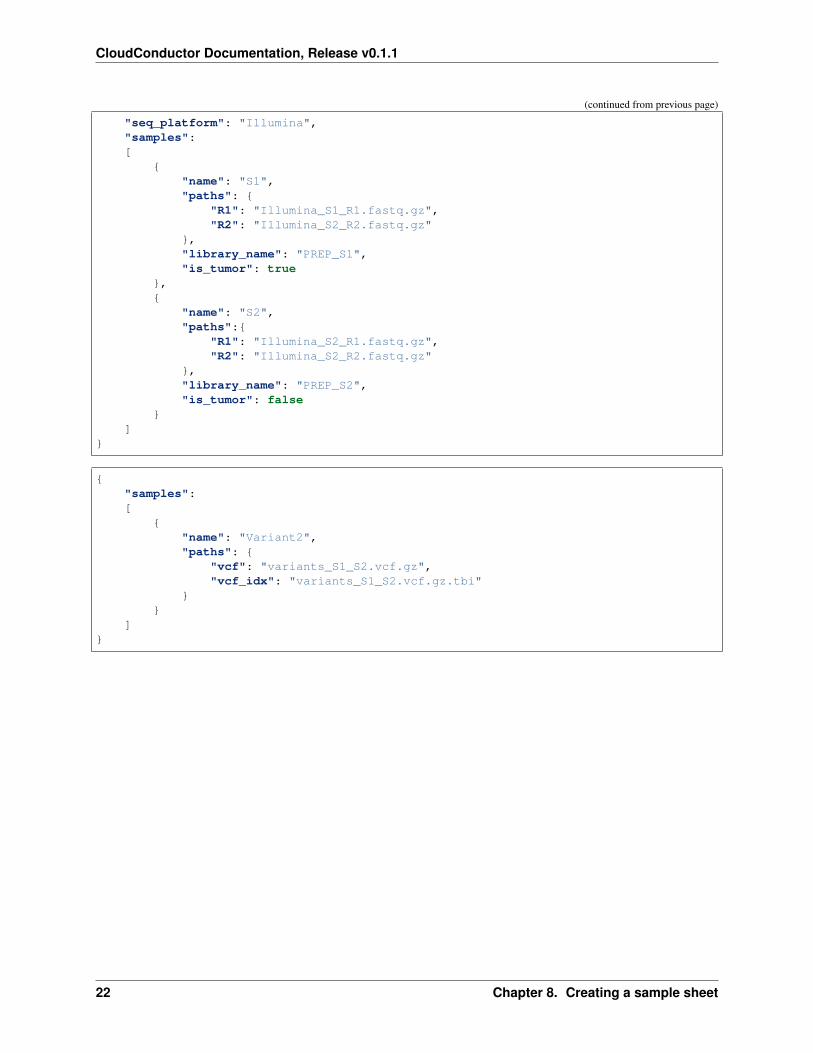
In the above template, the keys samples, name and paths are mandatory as they specify a list of samples, the name ofthe specific sample and the file data paths of the specific sample, respectively. You can specify any additional inputkeys at any level in the sample sheet, however sample-specific information should be specified at the sample level.
Here are two example sample sheets:
{"paired_end": true,
(continues on next page)
21
CloudConductor Documentation, Release v0.1.1
(continued from previous page)
"seq_platform": "Illumina","samples":[
{"name": "S1","paths": {
"R1": "Illumina_S1_R1.fastq.gz","R2": "Illumina_S2_R2.fastq.gz"
},"library_name": "PREP_S1","is_tumor": true
},{
"name": "S2","paths":{
"R1": "Illumina_S2_R1.fastq.gz","R2": "Illumina_S2_R2.fastq.gz"
},"library_name": "PREP_S2","is_tumor": false
}]
}
{"samples":[
{"name": "Variant2","paths": {
"vcf": "variants_S1_S2.vcf.gz","vcf_idx": "variants_S1_S2.vcf.gz.tbi"
}}
]}
22 Chapter 8. Creating a sample sheet

CHAPTER 9
Pipeline configuration
9.1 Splittting and Merging tasks
In CloudConductor, a large task can be processed as multiple smaller tasks using splitters and mergers. In order todefine a splitter and merger, please follow the instructions specified in module creation from developer’s guide.
An example use for splitters and mergers is processing the sequencing reads. The input sequencing reads can bealigned independently, thus the aligning procedure can run in parallel. For example, consider the simple pipelinepresented in Figure 2.
The graph configuration file for the pipeline presented in Figure 2 is:
[align_reads]module=BWAfinal_output=bam
[bam_indexing]module=Samtoolssubmodule=Indexdocker_image=Samtools_dockerinput_from=align_readsfinal_output=bam_idx
However, after implementing a .fastq file splitter and a .bam file merger, the new pipeline can be changed aspresented in Figure 3.
. . . and the final graph configuration file becomes:
[split_reads]module=FastqSplitter
[align_reads]module=BWAinput_from=split_reads
(continues on next page)
23

CloudConductor Documentation, Release v0.1.1
(continued from previous page)
[merge_align]module=MergeBamsinput_from=align_readsfinal_output=bam
[bam_indexing]module=Samtoolssubmodule=Indexdocker_image=Samtools_dockerinput_from=align_readsfinal_output=bam_idx
As you can observe, in the pipeline definition the new splitter and merger have been added as simple modules. Animportant thing to notice is that the final_output has been moved from align_reads to merge_align. If the final_outputwas declared at the level of align_reads, a set of all splitted alignments (not the final merged result) will be consideredas final alignment result.
9.2 Additional configurationg for a pipeline
There are cases when in a specific pipeline run the user wants to override a setting (most times a constant) in a tool.You can do that as well in the pipeline graph using the args subsection. For example, let’s say we would like tooverride the default value of the constants MINLEN and SLIDINGWINDOW_SIZE from Trimmomatic. In thiscase, the pipeline graph looks as following:
[trim_reads]module=Trimmomaticdocker_image=Trimmomatic_docker[[args]]
MINLEN=20SLIDINGWINDOW_SIZE=5
These changes will affect only the CloudConductor runs that use the above pipeline graph.
24 Chapter 9. Pipeline configuration

CHAPTER 10
Resource kit configuration
10.1 Multi-tools Dockers
There are (not recommended) situations when a Docker contains two separate tools as a command requires pipingfrom one command to another. You can solve this problem by simply defining additional resources in a Docker image.
For example, the aligning output of BWA is in SAM format, so to convert it to a more efficient format, BAM, we arepiping the output from BWA to Samtools to convert the output format. Thus, we are required to have a Docker imagethat has both tools. Here is how you define this situation in a resource kit:
[Docker][[bwa]]
image = thd7/bwasam:v.20180522[[[bwa]]]
resource_type = bwapath = bwa
[[[samtools]]]resource_type = samtoolspath = samtools
10.2 Multiple resources of same type
There are situations in which the user can have different definitions of the same resource type in the resource kit. Forinstance, the analysis pipeline requires two different versions of the same tool. This resource kit implementation willraise an error as CloudConductor cannot decide which resource definition of the same resource type to choose from.Consequently, the user has to specify in the pipeline graph the exact resource name that they require.
Consider this part of a resource kit implementation as an example:
[Path]...
(continues on next page)
25

CloudConductor Documentation, Release v0.1.1
(continued from previous page)
[[samtools_0.19]]resource_type=samtoolspath=samtoolscontaining_dir=gs://path/to/samtools_0.19
[[samtools_1.3]]resource_type=samtoolspath=samtoolscontaining_dir=gs://path/to/samtools_1.3
...
. . . and the implementation of the pipeline graph using the above resource kit:
...[align_reads]
module=BWAfinal_output=bam
[bam_indexing]module=Samtoolssubmodule=Indexinput_from=align_readsfinal_output=bam_idx[[args]]
samtools=samtools_0.19
[bam_summary]module=Samtoolssubmodule=Flagstatinput_from=align_readsfinal_output=flagstat[[args]]
samtools=samtools_1.3...
26 Chapter 10. Resource kit configuration

CHAPTER 11
Develop your own module
There are three types of modules that can be developed in CloudConductor:
• Tool - represents a tool that can have one or multiple functions, represented as submodules
• Splitter - represents a tool that splits one input data entity into multiple chunks of data of the same type
• Merger - represents a tool that merges chunks of data of the same type, into one output data entity
11.1 Tool
To develop a new Tool, you will need to create a new actual Python module in the CloudConductor’s directoryModules/Tools with the name you are interested to develop. Then, for each task that the new tool performs,create a class that extends Modules/Module.
Let’s name our new tool as NewTool and its subcommand/task as Subcommand. In this case, the Python moduleModules/Tools/NewTool.py should look as following:
from Modules import Module
class Subcommand(Module):
def __init__(self, module_id, is_docker=False):"""Initialize the new Subcommand class.
Args:module_id (string) - the unique ID generated by CloudConductor for this
→˓objectis_docker (boolean) - the current module should return a docker specific
→˓command"""super(Subcommand, self).__init__(module_id, is_docker)
(continues on next page)
27

CloudConductor Documentation, Release v0.1.1
(continued from previous page)
# Define list of output_keys the command will generate data forself.output_keys = ["output_key1", "output_key2", "output_key3"]
def define_input(self):"""Define the input of the subcommand"""pass
def define_output(self):"""Define the output of the subcommand"""pass
def define_command(self):"""Generate the actual command"""pass
In the new Subcommand class constructor, you should extend the base class Module and specify what are the outputkeys that the subcommand is generating.
In the define_input() method you should use the inherited method self.add_argument() to define anyinput key. An input key has three properties that can be set with the self.add_argument() method:
• is_required - sets if the input_key is mandatory (False by default)
• is_resource - sets if the input_key represents a resource to be searched in resource kit (False by default)
• default_value - a default value for the input_key, in case it never gets set (None by default)
For example:
def define_input(self):self.add_argument("R1", is_required=True)self.add_argument("R2")self.add_argument("bwa", is_required=True, is_resource=True)self.add_argument("samtools", is_required=True, is_resource=True)
In the define_output() method you should use the inherited method self.add_output() to define anyoutput_key. You can use self.get_argument() method to obtain any of the arguments value. An output key hastwo properties that can be set with the self.add_output() method:
• value - represents the actual value of the output key. If file, you can use the inherited method self.generate_unique_file_name() to obtain a unique file name for a generated output file
• is_path - sets if the value is a path (i.e. file or directory).
For example:
def define_output(self):bam_output = self.generate_unique_file_name(extension=".bam")self.add_output("bam", bam_output)
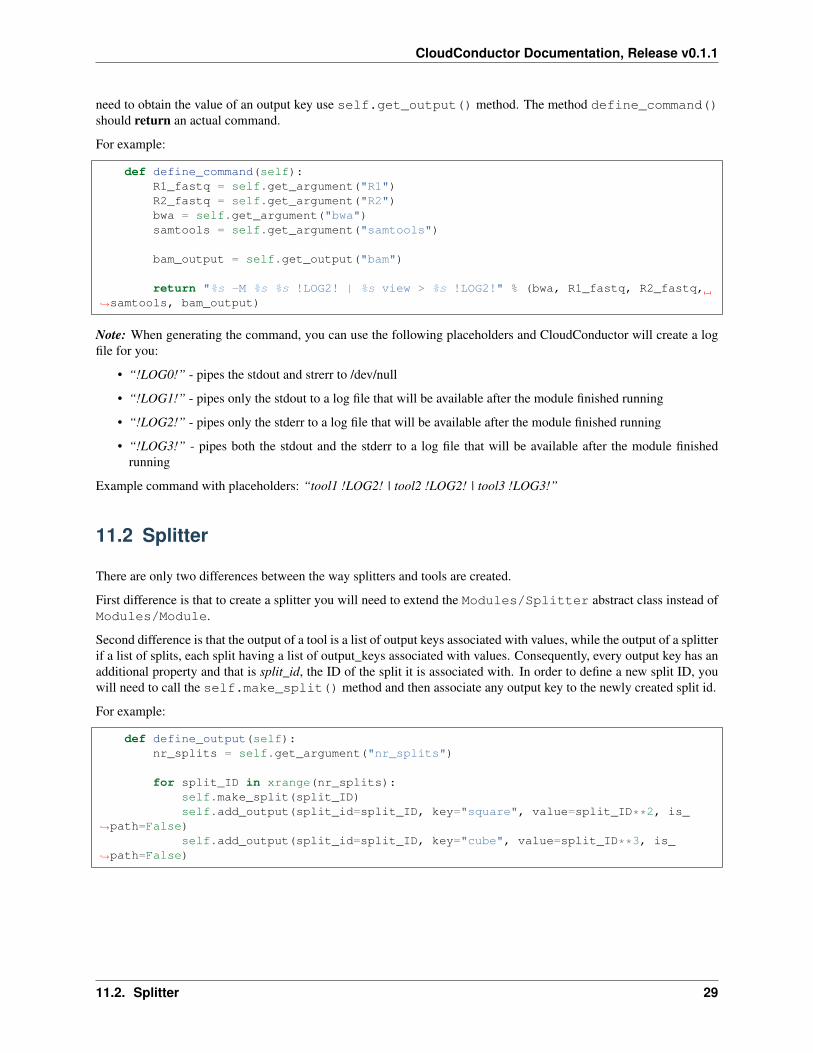
In the define_command() method you should expect that both the input and output keys are already associatedwith the correct values. If you need to obtain the value of an input key use self.get_argument() method. If you
28 Chapter 11. Develop your own module
CloudConductor Documentation, Release v0.1.1
need to obtain the value of an output key use self.get_output() method. The method define_command()should return an actual command.
For example:
def define_command(self):R1_fastq = self.get_argument("R1")R2_fastq = self.get_argument("R2")bwa = self.get_argument("bwa")samtools = self.get_argument("samtools")
bam_output = self.get_output("bam")
return "%s -M %s %s !LOG2! | %s view > %s !LOG2!" % (bwa, R1_fastq, R2_fastq,→˓samtools, bam_output)
Note: When generating the command, you can use the following placeholders and CloudConductor will create a logfile for you:
• “!LOG0!” - pipes the stdout and strerr to /dev/null
• “!LOG1!” - pipes only the stdout to a log file that will be available after the module finished running
• “!LOG2!” - pipes only the stderr to a log file that will be available after the module finished running
• “!LOG3!” - pipes both the stdout and the stderr to a log file that will be available after the module finishedrunning
Example command with placeholders: “tool1 !LOG2! | tool2 !LOG2! | tool3 !LOG3!”
11.2 Splitter
There are only two differences between the way splitters and tools are created.
First difference is that to create a splitter you will need to extend the Modules/Splitter abstract class instead ofModules/Module.
Second difference is that the output of a tool is a list of output keys associated with values, while the output of a splitterif a list of splits, each split having a list of output_keys associated with values. Consequently, every output key has anadditional property and that is split_id, the ID of the split it is associated with. In order to define a new split ID, youwill need to call the self.make_split() method and then associate any output key to the newly created split id.
For example:
def define_output(self):nr_splits = self.get_argument("nr_splits")
for split_ID in xrange(nr_splits):self.make_split(split_ID)self.add_output(split_id=split_ID, key="square", value=split_ID**2, is_
→˓path=False)self.add_output(split_id=split_ID, key="cube", value=split_ID**3, is_
→˓path=False)
11.2. Splitter 29

CloudConductor Documentation, Release v0.1.1
11.3 Merger
There is only one difference between the way mergers and tools are created. The difference being, you will needto extend the Module/Merger abstract class instead of Modules/Module. Other than that, the whole logic issimilar.
30 Chapter 11. Develop your own module

CHAPTER 12
Glossary
31

CloudConductor Documentation, Release v0.1.1
32 Chapter 12. Glossary

CHAPTER 13
Authors
13.1 Razvan Panea
13.2 Alex Waldrop
13.3 Tushar Dave
33
Related Documents