Oracle® Enterprise Manager Cloud Control Advanced Installation and Configuration Guide 13c Release 5 F37162-08 July 2022

Welcome message from author
This document is posted to help you gain knowledge. Please leave a comment to let me know what you think about it! Share it to your friends and learn new things together.
Transcript

Oracle® Enterprise ManagerCloud Control Advanced Installation andConfiguration Guide
13c Release 5F37162-08July 2022

Oracle Enterprise Manager Cloud Control Advanced Installation and Configuration Guide, 13c Release 5
F37162-08
Copyright © 2014, 2022, Oracle and/or its affiliates.
Primary Author: Oracle Corporation
Contributors: Enterprise Manager Cloud Control Development Teams, Quality Assurance Teams, CustomerSupport Teams, and Product Management Teams.
This software and related documentation are provided under a license agreement containing restrictions onuse and disclosure and are protected by intellectual property laws. Except as expressly permitted in yourlicense agreement or allowed by law, you may not use, copy, reproduce, translate, broadcast, modify, license,transmit, distribute, exhibit, perform, publish, or display any part, in any form, or by any means. Reverseengineering, disassembly, or decompilation of this software, unless required by law for interoperability, isprohibited.
The information contained herein is subject to change without notice and is not warranted to be error-free. Ifyou find any errors, please report them to us in writing.
If this is software or related documentation that is delivered to the U.S. Government or anyone licensing it onbehalf of the U.S. Government, then the following notice is applicable:
U.S. GOVERNMENT END USERS: Oracle programs (including any operating system, integrated software,any programs embedded, installed or activated on delivered hardware, and modifications of such programs)and Oracle computer documentation or other Oracle data delivered to or accessed by U.S. Government endusers are "commercial computer software" or "commercial computer software documentation" pursuant to theapplicable Federal Acquisition Regulation and agency-specific supplemental regulations. As such, the use,reproduction, duplication, release, display, disclosure, modification, preparation of derivative works, and/oradaptation of i) Oracle programs (including any operating system, integrated software, any programsembedded, installed or activated on delivered hardware, and modifications of such programs), ii) Oraclecomputer documentation and/or iii) other Oracle data, is subject to the rights and limitations specified in thelicense contained in the applicable contract. The terms governing the U.S. Government’s use of Oracle cloudservices are defined by the applicable contract for such services. No other rights are granted to the U.S.Government.
This software or hardware is developed for general use in a variety of information management applications.It is not developed or intended for use in any inherently dangerous applications, including applications thatmay create a risk of personal injury. If you use this software or hardware in dangerous applications, then youshall be responsible to take all appropriate fail-safe, backup, redundancy, and other measures to ensure itssafe use. Oracle Corporation and its affiliates disclaim any liability for any damages caused by use of thissoftware or hardware in dangerous applications.
Oracle, Java, and MySQL are registered trademarks of Oracle and/or its affiliates. Other names may betrademarks of their respective owners.
Intel and Intel Inside are trademarks or registered trademarks of Intel Corporation. All SPARC trademarks areused under license and are trademarks or registered trademarks of SPARC International, Inc. AMD, Epyc,and the AMD logo are trademarks or registered trademarks of Advanced Micro Devices. UNIX is a registeredtrademark of The Open Group.
This software or hardware and documentation may provide access to or information about content, products,and services from third parties. Oracle Corporation and its affiliates are not responsible for and expresslydisclaim all warranties of any kind with respect to third-party content, products, and services unless otherwiseset forth in an applicable agreement between you and Oracle. Oracle Corporation and its affiliates will not beresponsible for any loss, costs, or damages incurred due to your access to or use of third-party content,products, or services, except as set forth in an applicable agreement between you and Oracle.

Contents
Preface
Audience xix
Documentation Accessibility xix
Related Resources xix
Conventions xx
Part I Getting Started
1 Procuring the Software
Releases Available for Enterprise Manager Cloud Control 1-1
Procuring the Enterprise Manager Cloud Control Software 1-2
How Do You Access the Enterprise Manager Cloud Control Software from a DVD? 1-2
Accessing the Software from a DVD 1-2
Setting Mount Points for a DVD 1-2
How Do You Procure the Enterprise Manager Cloud Control Software from Oracle? 1-3
Downloading the Enterprise Manager Cloud Control Software 1-4
Verifying the File Size of Enterprise Manager Zip Files 1-5
Procuring the Oracle Management Agent Software 1-5
2 Understanding the Basics
Understanding the Basics of Enterprise Manager Cloud Control Installation 2-1
What are the Different Installation Modes Offered by Enterprise Manager CloudControl? 2-2
What Is an Enterprise Manager Cloud Control Installation Wizard? 2-2
What Installation Types Are Offered by the Enterprise Manager Cloud ControlInstallation Wizard? 2-3
Create a New Enterprise Manager System 2-3
Upgrade an Existing Enterprise Manager System 2-4
Install Only the Software 2-4
Install Only the Software With Plug-ins 2-4
What Is Oracle Configuration Manager? 2-4
iii

What Are the Enterprise Manager Cloud Control Software Updates? 2-5
What Is a Software Update? 2-6
How Does the Software Update Feature Work? 2-6
What Types of Software Updates Are Downloaded and Applied? 2-6
Are the Software Updates Applied Automatically Even for Databases That HaveOracle Management Repository Preconfigured? 2-7
How Can You Download the Software Updates? 2-7
Can I Download and Apply These Patches After Installation or Upgrade? 2-9
How Can You Identify What Patches Have Been Applied? 2-9
What is a Deployment Size for Enterprise Manager Cloud Control in an AdvancedConfiguration? 2-10
What Is an Agent Gold Image? 2-11
What Is an Agent Gold Image Console? 2-11
What Is an Add Host Target Wizard? 2-11
What Is a Plug-in? 2-14
What Is an Add Management Service Deployment Procedure? 2-14
What Ports Are Used for Installation? 2-15
What Default Ports Are Used for Enterprise Manager Cloud Control Installation? 2-16
How Can You Check Whether a Port Is Free? 2-17
How Can You Customize the Ports During and After Installing Enterprise ManagerCloud Control? 2-17
What Precautions You Must Take While Customizing the Enterprise ManagerCloud Control Ports? 2-20
What Data Files Are Created While Configuring Oracle Management Repository? 2-20
How Do You Delete the Data Files Created While Configuring Oracle ManagementRepository? 2-21
Globalization Support for Enterprise Manager 2-22
Understanding the Oracle WebLogic Server Requirement for an Enterprise ManagerInstallation 2-22
When and Why Do You Need the Oracle WebLogic Server Credentials? 2-23
When and Why Do You Need the Node Manager Credentials? 2-23
How Do You Find Admin Server Port After Installing Enterprise Manager? 2-24
How Do You Verify Whether Admin Server Is Running? 2-24
How Do You Start the Admin Server? 2-24
Understanding the Installation Directories 2-24
What Is an Oracle Inventory Directory? 2-25
What Is an Oracle Middleware Home or Oracle home? 2-26
What Is an Oracle Management Service Instance Base Location? 2-27
What Is an Agent Base Directory? 2-27
What Is an Agent Home? 2-27
What Is an Agent Instance Directory? 2-28
What Is a Plug-in Home? 2-28
What Is a /TMP or C:\Temp Directory Used For? 2-28
iv

Understanding the Configuration Assistants 2-29
What Are Configuration Assistants? 2-29
What Configuration Assistants Are Run by the Installation Wizard? 2-29
Configuration Assistants Run While Installing a New Enterprise Manager 2-29
Configuration Assistants Run While Upgrading an Existing Enterprise Manager 2-30
Configuration Assistants Run While Upgrading an Additional Oracle ManagementService 2-30
What Do You Do When Configuration Assistants Fail? 2-31
Understanding the Prerequisite Checks before Installing Enterprise Manager Cloud Control 2-31
What Prerequisite Checks Are Run by Default? 2-31
How Do You Run the Prerequisite Checks in a Standalone Mode? 2-32
Understanding the Limitations of Enterprise Manager Cloud Control 2-33
Can You Access Unlicensed Components? 2-33
What Are the Limitations with DHCP-Enabled Machines? 2-33
Understanding the Startup Scripts 2-33
Where is the Startup Script Stored? 2-34
What does the Startup Script Invoke? 2-34
How Do I Stop the Startup Script from Starting the OMS or the Management Agent? 2-34
Can the Startup Script Start an OMS or a Management Agent on a Remote Host? 2-34
How Do I Change the Management Agent Service Priority Level that the Startup ScriptFollows While Starting Up or Shutting Down the Management Agent? 2-34
Understanding Other Miscellaneous Concepts 2-35
What Is a Host List File? 2-35
What Scripts Are Run During the Installation Process? 2-36
Part II Installing Enterprise Manager System
3 Installing Enterprise Manager in Silent Mode
Introduction to Installing Enterprise Manager in Silent Mode 3-1
Before You Begin Installing Enterprise Manager in Silent Mode 3-2
Prerequisites for Installing Enterprise Manager in Silent Mode 3-2
Installing Enterprise Manager in Silent Mode 3-2
Installing Enterprise Manager in Silent Mode 3-2
Advanced Installer Options Supported for Installing an Enterprise Manager System inSilent Mode 3-5
Limitations with the Advanced Options Supported for Installing an Enterprise ManagerSystem in Silent Mode 3-6
Editing the new_install.rsp Response File for Installing an Enterprise Manager in SilentMode 3-6
v

Performing Postinstallation Tasks After Installing an Enterprise Manager System in SilentMode 3-15
4 Installing Enterprise Manager Using the Software Only with Plug-insMethod
Introduction to Installing Enterprise Manager Using the Software Only with Plug-ins Method 4-2
Before You Begin Installing Enterprise Manager Using the Software Only with Plug-insMethod 4-4
Prerequisites for Installing Enterprise Manager Using the Software Only with Plug-insMethod 4-4
Installing the Enterprise Manager Using the Software Only with Plug-ins Method 4-4
Install Software Only With Plug-ins and Configure Later in Graphical Mode 4-5
Installing the Enterprise Manager Cloud Control Software Only With Plug-ins inGraphical Mode 4-6
Running the Root Script 4-16
Configuring the Enterprise Manager Cloud Control Software Only in GraphicalMode 4-16
Apply Release Update 4-27
Performing Postconfiguration Tasks After Configuring the Enterprise ManagerCloud Control Software Only in Graphical Mode 4-30
Install Software Only With Plug-ins and Configure Later in Silent Mode 4-30
Installing the Enterprise Manager Cloud Control Software Only with Plug-ins inSilent Mode 4-31
Running the Root Script 4-35
Configuring the Enterprise Manager Cloud Control Software Only in Silent Mode 4-36
Performing Postconfiguration Tasks After Configuring the Enterprise ManagerCloud Control Software Only in Silent Mode 4-49
Part III Installing Additional Oracle Management Services
5 Installing Additional Oracle Management Services in Silent Mode
About Installing Additional Oracle Management Services in Silent Mode 5-1
Installing Additional Oracle Management Services in Silent Mode 5-1
Part IV Installing Oracle Management Agent
6 Installing Oracle Management Agent in Silent Mode
Overview of Installing a Management Agent in Silent Mode 6-1
Before You Begin Installing a Management Agent in Silent Mode 6-3
vi

Prerequisites for Installing a Management Agent in Silent Mode 6-4
Installing a Management Agent in Silent Mode 6-8
Installing a Management Agent Using the AgentPull Script 6-9
Acquiring the Management Agent Software 6-9
Installing a Management Agent Using the AgentPull Script 6-10
Installing a Management Agent Using an Agent Gold Image, Using the AgentPull Script 6-11
Meeting the Prerequisites for Installing a Management Agent Using an Agent GoldImage, Using the AgentPull Script 6-11
Installing a Management Agent Using an Agent Gold Image, Using the AgentPullScript 6-11
Installing a Management Agent Using the agentDeploy Script 6-13
Using EM CLI from the Remote Destination Host 6-13
Using EM CLI from the OMS Host 6-17
Installing a Management Agent Using the RPM File 6-19
Acquiring the Management Agent Software and Downloading the RPM File ontothe OMS Host 6-19
Transferring the RPM File to the Destination Host 6-21
Installing the Management Agent Using the RPM File 6-21
Installing a Management Agent on a Virtual Host 6-22
Response File Parameters for Installing a Management Agent in Silent Mode Using theAgentPull Script 6-23
Response File Parameters for Installing a Management Agent in Silent Mode Using theagentDeploy Script 6-25
Response File Parameters for Installing a Management Agent in Silent Mode Using anRPM File 6-27
Options Supported by the AgentPull Script 6-28
Options Supported by the agentDeploy Script 6-29
Contents of the Downloaded Management Agent Software 6-30
Contents of the Management Agent RPM File 6-31
After Installing a Management Agent in Silent Mode 6-31
7 Cloning Oracle Management Agents
Overview of Cloning Management Agents 7-1
Before You Begin Cloning a Management Agent 7-2
Prerequisites for Cloning a Management Agent 7-6
Cloning a Management Agent 7-15
Cloning a Management Agent in Graphical Mode 7-15
Cloning a Management Agent Using Add Host Targets Wizard 7-15
Format of Host List File 7-20
Additional Parameters Supported for Cloning a Management Agent in GraphicalMode 7-20
Cloning a Management Agent in Silent Mode 7-22
vii

After Cloning a Management Agent 7-24
8 Installing Shared Agents
Overview of Installing Shared Agents 8-1
Before You Begin Installing Shared Agents 8-2
Prerequisites for Installing Shared Agents 8-5
Installing Shared Agents 8-12
Installing Shared Agents Using Add Host Targets Wizard 8-13
Additional Parameters Supported for Installing Shared Agents Using Add Host TargetsWizard 8-17
Installing Shared Agents in Silent Mode 8-17
Response File Parameters for Installing Shared Agents in Silent Mode 8-19
After Installing Shared Agents 8-20
9 Converting Shared Agents to Standalone Agents
Converting NFS or Shared Agents to Standalone Agents 9-1
10
Installing the Oracle Management Agent Software Now and ConfiguringIt Later
Overview of Installing a Management Agent and Configuring It Later 10-1
Before You Begin Installing a Management Agent 10-2
Prerequisites for Installing a Management Agent 10-2
Installing Only the Management Agent Software Binaries 10-2
Configuring the Management Agent Software Binaries 10-3
After Installing a Management Agent 10-3
Part V Advanced Installation and Configuration
11
Managing the Lifecycle of Agent Gold Images
Agent Gold Image Terminology 11-1
Operations You Can Perform Using an Agent Gold Image 11-2
Understanding the Agent Gold Image Console 11-3
Understanding the Management Agent Base Directory Structure 11-5
Agent Base Directory Structure After a Management Agent Is Provisioned Using aGold Image 11-5
Agent Base Directory Structure After Upgrade or Update to 13c Using a Gold Image 11-6
Managing the Lifecycle of an Agent Gold Image 11-6
viii

Creating an Agent Gold Image 11-7
Creating an Agent Gold Image Using the Gold Agent Images Home Page 11-7
Creating an Agent Gold Image Using EM CLI 11-7
Editing an Agent Gold Image 11-8
Deleting an Agent Gold Image 11-8
Creating an Agent Gold Image Version 11-8
Creating an Agent Gold Image Version Using the Gold Agent Images Home Page 11-8
Creating an Agent Gold Image Version Using EM CLI 11-10
Deleting an Agent Gold Image Version 11-12
Deleting an Agent Gold Image Version Using Gold Agent Images Home Page 11-12
Deleting an Agent Gold Image Version Using EM CLI 11-12
Staging an Agent Gold Image Version 11-13
Staging an Agent Gold Image Version Using Gold Agent Images Home Page 11-13
Staging an Agent Gold Image Version Using EM CLI 11-13
Setting a Particular Agent Gold Image Version as the Current Version 11-14
Setting a Particular Agent Gold Image Version as the Current Version Using GoldAgent Images Home Page 11-15
Setting a Particular Agent Gold Image Version as the Current Version Using EMCLI 11-15
Setting a Particular Agent Gold Image Version as the Restricted Version 11-15
Setting a Particular Agent Gold Image Version as the Restricted Version UsingGold Agent Images Home Page 11-16
Setting a Particular Agent Gold Image Version as the Restricted Version Using EMCLI 11-16
Subscribing Management Agents to an Agent Gold Image 11-16
Subscribing Management Agents to an Agent Gold Image Using Gold AgentImages Home Page 11-17
Subscribing Management Agents to an Agent Gold Image Using EM CLI 11-18
Unsubscribing Management Agents from an Agent Gold Image 11-19
Unsubscribing Management Agents to an Agent Gold Image Using Gold AgentImages Home Page 11-19
Unsubscribing Management Agents to an Agent Gold Image Using EM CLI 11-19
Provisioning Management Agents Using an Agent Gold Image 11-21
Updating Management Agents Using an Agent Gold Image Version 11-21
Updating Management Agents with an Agent Gold Image 11-22
Updating Management Agents Using Agent Gold Image Version Using EM CLI 11-24
Viewing Agent Gold Image Activity Details 11-32
Viewing Agent Gold Image Activity Details Using Gold Agent Image Home Page 11-32
Viewing Agent Gold Image Activity Details Using EM CLI 11-32
Checking the Agent Gold Image Compliance Level 11-34
Viewing Details about the Agent Gold Images 11-34
Viewing Details about the Agent Gold Images and Gold Image Versions Using the GoldAgent Images Home Page 11-34
ix

Viewing Details about the Agent Gold Images Using EM CLI 11-35
Viewing Notifications Related to Agent Gold Images 11-39
Viewing Agent Gold Images with Pending Updates 11-39
Viewing the Last Agent Gold Image That Was Changed 11-39
Viewing the Log Files Related to Agent Gold Image 11-39
Viewing the Status of Unsubscribed Operations Using EM CLI 11-39
Viewing a List of Management Agents Subscribed to a Given Agent Gold Image Using EMCLI 11-41
Creating an Agent Gold Image Update Policy and Defining the Default Values To Be Set forManagement Agent Upgrade 11-42
Creating an Agent Gold Image Update Policy and Defining the Default Values to be Setfor Management Agent Update Using the Gold Agent Images Home Page 11-42
Creating an Agent Gold Image Update Policy and Defining the Default Values To BeSet for Management Agent Upgrade Using EM CLI 11-42
12
Configuring Enterprise Manager for Firewalls
Planning to Configure a Firewall for the Enterprise Manager System 12-1
Typical Firewall Configurations for the Enterprise Manager System 12-2
Configuring a Firewall Between the Web Browser and the Enterprise Manager System 12-4
Configuring an OMS on a Host Protected by a Firewall 12-4
Configuring the OMS to Use a Proxy Server to Communicate with Management Agents 12-5
Configuring a Management Agent on a Host Protected by a Firewall 12-6
Configuring a Management Agent to Use a Proxy Server 12-7
Configuring Firewalls Between the OMS and the Management Repository 12-8
Configuring Firewalls Between the Enterprise Manager Cloud Control Console and aManaged Database Target 12-8
Configuring Firewalls for Multiple OMS Instances 12-8
Enabling the OMS to Access My Oracle Support 12-9
Configuring the dontProxyfor Property 12-9
Configuring Firewalls to Allow ICMP and UDP Traffic for Oracle Beacons 12-10
Enabling ICMP Echo Requests on Firewalls 12-10
13
Sizing Your Enterprise Manager Deployment
Enterprise Manager Cloud Control Sizing 13-1
Overview of Sizing Guidelines 13-2
Hardware Information 13-2
Sizing Specifications 13-2
Sizing for Upgraded Installs 13-3
Minimum Hardware Requirements 13-3
Network Topology Considerations 13-3
Software Configurations 13-4
x

Eval Configuration 13-4
Small Configuration 13-4
Medium Configuration 13-5
Large Configuration 13-6
Extra Large Configuration 13-6
Repository Tablespace Sizing 13-7
Additional Configurations 13-8
Large Concurrent UI Load 13-8
Large Job System Load 13-9
Changing OMS Properties 13-10
Modifying Database Settings 13-15
Enterprise Manager Cloud Control Performance Methodology 13-15
Step 1: Choosing a Starting Platform Cloud Control Deployment 13-16
Step 2: Periodically Evaluating the Vital Signs of Your Site 13-16
Step 3: Using DBA and Enterprise Manager Tasks To Eliminate Bottlenecks 13-18
Offline Monthly Tasks 13-18
Step 4: Eliminating Bottlenecks Through Tuning 13-18
High CPU Utilization 13-19
Loader Vital Signs 13-20
Rollup Vital Signs 13-20
Rollup Process 13-21
Job, Notification, and Alert Vital Signs 13-22
Config Metric Post Load Callbacks 13-24
I/O Vital Signs 13-25
About the Oracle Enterprise Manager Performance Page 13-26
Determining the Optimum Number of Middle Tier OMS Servers 13-27
Step 5: Extrapolating Linearly Into the Future for Sizing Requirements 13-27
Using Returning Query Safeguards to Improve Performance 13-28
Overview of Sizing Requirements for Fusion Middleware Monitoring 13-28
14
Configuring Proxies for OMS and Management Agent Communication
About Using Proxies for OMS and Management Agent Communication 14-1
Configuring Proxies for OMS-to-Management Agent Communication 14-3
Configuring Proxies for Management Agent-to-OMS Communication After theManagement Agent Is Deployed 14-5
Configuring Proxies for Management Agent-to-OMS Communication While Deploying theManagement Agent 14-6
Configuring Proxies for OMS-to-My Oracle Support Communication 14-7
Updating Proxies Configured for OMS-to-Management Agent Communication 14-7
Associating Additional Management Agents to an Existing Proxy to Communicate with theOMS 14-8
xi

Excluding Management Agents from Using Proxies to Communicate with the OMS 14-9
Viewing a List of Proxies by Proxy Names or Management Agents 14-10
Monitoring Proxies Configured for OMS-to-Management Agent Communication 14-10
Removing Proxies Configured for OMS-to-Management Agent Communication 14-11
EM CLI Verbs for Configuring Proxies for OMS and Management Agent Communication 14-11
15
Installing JVMD Agents with Advanced Install Options
Overview of JVMD Architecture 15-1
Before you Begin Installing JVMD Agent 15-3
Prerequisites for Installing JVMD Agent 15-3
Deploying JVMD Agents Using Advanced Installation Options 15-3
Deploying JVMD Agents Manually by Downloading and Deploying jamagent.war 15-4
Deploying JVMD Agents Manually Using deploy_jvmdagent.pl 15-8
Deploying JVMD Agents for High Availability 15-9
After Installing JVMD Agents 15-10
16
Configuring Enterprise Manager Federation
17
Using Oracle Analytics Server with Enterprise Manager
18
Configuring Oracle Enterprise Manager App for Grafana
19
Running the OMS in Console-Only Mode
About Running the OMS in Console-Only Mode 19-1
Running the OMS in Console-Only Mode 19-2
20
Support for Customization of Enterprise Manager Login Page
Logo on Enterprise Manager Login Page 20-1
Setup Weblogic Server to Host Images 20-2
Run EMCTL Command to set the Logo Image 20-4
Access EM Login Page to see the Logo 20-5
License Agreement Popup 20-6
Informational Text on Enterprise Manager Login Page 20-8
xii

21
Installing Oracle Enterprise Manager Cloud Control and Configuring theAgent on Oracle Directory Server Enterprise Edition (ODSEE)
Installing Oracle Enterprise Manager Cloud Control 13.5 21-1
Login to Oracle Enterprise Manager Cloud Control (OEMCC) 21-4
Configuring Oracle Directory Server Enterprise Edition (ODSEE) as a Middleware Target 21-5
Part VI Configuring Enterprise Manager for High Availability
22
High Availability Solutions
Latest High Availability Information 22-1
Defining High Availability 22-2
Levels of High Availability 22-2
Comparing Availability Levels 22-3
Implementing High Availability Levels 22-4
23
Enterprise Manager High Availability
Agent High Availability 23-1
Configuring the Management Agent to Automatically Start on Boot and Restart onFailure 23-1
Configuring Restart for the Management Agent 23-1
Installing the Management Agent Software on Redundant Storage 23-2
Repository High Availability 23-2
General Best Practice for Repository High Availability 23-2
Configuring RAC for the Management Repository 23-2
Oracle Management Service High Availability 23-3
Best Practices for Configuring the Cloud Control OMS to be Compatible with DisasterRecovery using Alias Host Names and Storage Replication 23-4
Overview and Requirements 23-4
Create an OMS installation base directory under ORACLE_BASE 23-4
Configure an Alias Host Name 23-5
Configure an Oracle Inventory located under OMS installation base directory 23-5
Configure a Software Owner and Group that can be configured identically on allnodes 23-6
Select a time zone that can be configured identically on all nodes 23-6
Installation and Configuration 23-6
Configuring the Cloud Control OMS in an Active/Passive Environment for HA FailoverUsing Virtual Host Names 23-7
Overview and Requirements 23-7
Installation and Configuration 23-8
xiii

Setting Up the Virtual Host Name/Virtual IP Address 23-8
Setting Up Shared Storage 23-8
Setting Up the Environment 23-9
Synchronizing Operating System IDs 23-9
Setting Up Shared Inventory 23-9
Installing the Software 23-10
Starting Up Services 23-10
Installing Additional Management Services 23-10
Configuring Multiple Management Services Behind a Server Load Balancer (SLB) 23-10
Configuring the Software Library 23-11
Configuring a Load Balancer 23-11
24
Enterprise Manager Disaster Recovery
Disaster Recovery Overview and Topology 24-1
Design Considerations 24-3
Network Considerations 24-3
Planning Host Names 24-3
Load Balancers Consideration 24-6
Application Virtual Host Name Consideration 24-6
Storage Considerations 24-6
Database Considerations 24-7
Connect Descriptor Considerations 24-8
Starting Points 24-9
The primary site is already created, standby site is being planned 24-9
The primary site is already created, standby site is already created using thedeprecated "Standby WLS Domain" method. 24-10
No installation exists, both primary and standby sites are being planned 24-10
Setting Up Management Repository Disaster Recovery 24-10
Configuring a Standby Database for the Management Repository 24-11
Setting Up the OMS and Software Library Disaster Recovery 24-12
Management Service Disaster Recovery 24-12
Monitoring Standby OMS Hosts 24-14
Software Library Disaster Recovery 24-16
Migrating an Existing Site to Shared Storage 24-16
Performing Switchover and Failover Operations 24-17
Switchover Procedure 24-18
Failover Procedure 24-20
Keeping the Standby Site in Sync with the Primary 24-22
xiv

25
Backing Up and Recovering Enterprise Manager
Backing Up Your Deployment 25-1
Software Library Backup 25-1
Management Repository Backup 25-2
Oracle Management Service Backup 25-2
Management Agent Backup 25-4
Recovery of Failed Enterprise Manager Components 25-4
Repository Recovery 25-4
Recovery Scenarios 25-5
Full Recovery on the Same Host 25-6
Incomplete Recovery on the Same Host 25-6
Full Recovery on a Different Host 25-6
Incomplete Recovery on a Different Host 25-7
Recovering the OMS 25-8
Recovering the Software Homes 25-8
Recreating the OMS 25-9
OMS Recovery Scenarios 25-9
Single OMS, No Server Load Balancer (SLB), OMS Restored on the same Host 25-10
Single OMS, No SLB, OMS Restored on a Different Host 25-11
Single OMS, No SLB, OMS Restored on a Different Host using the OriginalHostname 25-13
Multiple OMS, Server Load Balancer, Primary OMS Recovered on the Same Host 25-14
Multiple OMS, Server Load Balancer Configured, Primary OMS Recovered on aDifferent Host 25-15
Multiple OMS, SLB configured, additional OMS recovered on same or different host 25-17
Recovering the Software Library 25-18
Recovering Management Agents 25-18
Management Agent Recovery Scenarios 25-19
Management Agent Reinstall Using the Same Port 25-19
Management Agent Restore from Filesystem Backup 25-20
Recovering from a Simultaneous OMS-Management Repository Failure 25-20
Collapsed Configuration: Incomplete Management Repository Recovery, Primary OMSon the Same Host 25-21
Distributed Configuration: Incomplete Management Repository Recovery, PrimaryOMS and additional OMS on Different Hosts, SLB Configured 25-21
Part VII Deinstallation
xv

26
Deinstalling Enterprise Manager (Single and Multi-OMS Environments)
Deinstallation Scope 26-1
Deinstalling the Enterprise Manager System 26-2
Deinstalling or Undeploying Only Plug-ins from the OMS 26-3
Deleting OMS Entries from the Management Repository 26-3
27
Decommissioning and Deinstalling Oracle Management Agents
Decommissioning Oracle Management Agents 27-1
Decommissioning Management Agents Using Enterprise Manager Console 27-1
Decommissioning Management Agents Using emcli 27-2
Deinstalling Oracle Management Agents 27-4
Deinstalling Standalone Management Agents 27-5
Deinstalling Standalone Management Agents Using the AgentDeinstall.pl Script 27-5
Deinstalling Shared Agents 27-6
Deinstalling Standalone Management Agents Installed Using an RPM File 27-6
After Deinstalling Standalone Management Agents 27-6
Deinstalling or Undeploying Only Plug-ins from the Oracle Management Agent 27-7
28
Deinstalling JVMD Agents
Deinstalling JVMD Agents 28-1
Removing JVMD Agents Using Engines And Agents Page 28-1
Removing JVMD Agents Manually 28-2
29
Removing Standby Oracle Management Services
Removing Additional Standby OMS Instances 29-1
Removing the First Standby OMS 29-4
Part VIII Appendixes
A Overview of the Installation and Configuration Log Files
Enterprise Manager Cloud Control Installation Logs A-1
Installation Logs A-1
Configuration Logs A-1
General Configuration Logs A-2
Repository Configuration Logs A-2
Secure Logs A-5
xvi

Oracle Management Service Logs A-5
Add Host Log Files A-5
Initialization Logs A-6
Application Prerequisite Logs A-6
System Prerequisite Logs A-6
Agent Installation Logs A-7
Other Add Host Logs A-7
Manual Management Agent Installation Logs A-8
Agent Gold Image Log Files A-8
Additional OMS Installation Logs A-9
B Redirecting Oracle Management Agent to Another Oracle ManagementService
Prerequisites for Redirecting a Management Agent to Another OMS B-1
Redirecting a Management Agent to Another OMS B-2
C Applying Patches to Oracle Management Agents While Deploying orUpgrading Them
Saving Management Agent Patches to an OMS Host C-1
Verifying Patch Application After Management Agent Deployment or Upgrade C-3
D Using the RepManager Utility
Overview of the RepManager Utility D-1
Actions and Commands Supported by the RepManager Utility D-1
E Collecting OCM Data Using Oracle Harvester
Oracle Harvester E-1
Highlights of Oracle Harvester E-2
Oracle Harvester and OCM E-2
Support For Enterprise Manager E-3
Viewing CSIs in Enterprise Manager E-4
Harvester Target Lifecycle Properties from Enterprise Manager E-4
Harvester Job Status Metric E-5
Supported Targets in Oracle Harvester E-5
Configuration Data Not Available in My Oracle Support E-6
Leveraging the Enterprise Manager Infrastructure E-7
Configuring Enterprise Manager to Upload Configuration Data to Oracle E-7
Oracle Configuration Manager E-7
xvii

Additional Information About MOS and OCM E-8
Troubleshooting Configuration Data Collection Tools E-8
Oracle Harvester Collection Fails If the state/upload/external Directory Is Missing E-9
Oracle Configuration Manager Is Not Running E-9
Configuration Data Not Available in My Oracle Support E-9
Only a Subset of the Targets Is Collected by the Oracle Harvester E-10
F Enabling the Enterprise Manager Accessibility Features
Enabling Screen Reader Mode F-1
Enabling Screen Reader Mode for UIX Pages F-1
Enabling Text Descriptions for Charts for UIX Pages F-2
Verifying Screen Reader Support Is Enabled F-3
Enterprise Manager Cloud Control Keyboard Navigation F-4
Keyboard Shortcuts F-5
Keyboard Shortcuts for Oracle Application Development Framework Components F-5
Keyboard Shortcuts for Oracle JavaScript Extension Toolkit (JET) Components F-6
G Configuring Targets for Failover in Active/Passive Environments
Target Relocation in Active/Passive Environments G-1
Installation and Configuration G-2
Prerequisites G-2
Configuration Steps G-2
Discovering Targets G-2
Deploying Plug-ins G-3
Failover Procedure G-3
Failback Procedure G-4
EM CLI relocate_targets Parameters G-4
Relocation Script G-5
Relocation Script Example G-5
H Updating Demonstration Keystores to Reflect Alias Hostnames
I Postinstalltion Task to Configure TLS for Oracle Management RepositoryDatabase
Index
xviii

Preface
Oracle Enterprise Manager Cloud Control Advanced Installation and Configuration Guide isan extension to Oracle Enterprise Manager Cloud Control Basic Installation Guide.
While the Oracle Enterprise Manager Cloud Control Basic Installation Guide covers basicinstallation procedures that help you get started with Enterprise Manager Cloud Control, theOracle Enterprise Manager Cloud Control Advanced Installation and Configuration Guidecovers advanced installation procedures that help you install and configure the EnterpriseManager Cloud Control components in more complex environments.
This preface contains the following topics:
• Audience
• Documentation Accessibility
• Related Resources
• Conventions
AudienceOracle Enterprise Manager Cloud Control Advanced Installation and Configuration Guide isintended for systems administrators who want to install Enterprise Manager Cloud Controlcomponents in complex environments.
Documentation AccessibilityFor information about Oracle's commitment to accessibility, visit the Oracle AccessibilityProgram website at http://www.oracle.com/pls/topic/lookup?ctx=acc&id=docacc.
Access to Oracle Support
Oracle customers that have purchased support have access to electronic support through MyOracle Support. For information, visit http://www.oracle.com/pls/topic/lookup?ctx=acc&id=info or visit http://www.oracle.com/pls/topic/lookup?ctx=acc&id=trs if youare hearing impaired.
Related ResourcesFor more information about Enterprise Manager Cloud Control documentation, see thefollowing books:
• Oracle Enterprise Manager Cloud Control Basic Installation Guide
• Oracle Enterprise Manager Cloud Control Upgrade Guide
xix

For the latest releases of these and other Oracle documentation, check the OracleHelp Center at the following URL:
http://docs.oracle.com/en/enterprise-manager/
ConventionsThe following text conventions are used in this document:
Convention Meaning
boldface Boldface type indicates graphical user interface elements associatedwith an action, or terms defined in text or the glossary.
italic Italic type indicates book titles, emphasis, or placeholder variables forwhich you supply particular values.
monospace Monospace type indicates commands within a paragraph, URLs, codein examples, text that appears on the screen, or text that you enter.
Preface
xx

Part IGetting Started
This part describes how you can procure the Enterprise Manager Cloud Control software andthe Oracle Management Agent software, and explains some key concepts you must knowbefore you start using Enterprise Manager Cloud Control. In particular, this part contains thefollowing chapters:
• Procuring the Software
• Understanding the Basics

1Procuring the Software
This chapter describes how you can procure the Enterprise Manager Cloud Control softwareand the Oracle Management Agent software. In particular, this chapter covers the following:
• Releases Available for Enterprise Manager Cloud Control
• Procuring the Enterprise Manager Cloud Control Software
• Procuring the Oracle Management Agent Software
Releases Available for Enterprise Manager Cloud ControlTable 1-1 describes the releases Enterprise Manager Cloud Control has had so far.
Table 1-1 Enterprise Manager Cloud Control Releases
Release Numbers Release Type ReleaseDate
Implementation Method Description
Oracle EnterpriseManager CloudControl 13cRelease 5
Major Release March2021
• New installation of13c Release 5
• Upgrade from 13cRelease 4, 13cRelease 3
The fifth 13c release.
Oracle EnterpriseManager CloudControl 13cRelease 4
Major Release January2020
• New installation of13c Release 4
• Upgrade from 13cRelease 3, 13cRelease 2
The forth 13c release.
Oracle EnterpriseManager CloudControl 13cRelease 3
Major Release May 2018 • New installation of13c Release 3
• Upgrade from 13cRelease 2, 12cRelease 5 (12.1.0.5,12)c Release 4(12.1.0.4)
The third 13c release.
Oracle EnterpriseManager CloudControl 13cRelease 2
Major Release June 2016 • New installation of13c Release 2
• Upgrade from 13cRelease 1, 12cRelease 5 (12.1.0.5,12)c Release 4(12.1.0.4)
The second 13c release.
Oracle EnterpriseManager CloudControl 13cRelease 1
Base Release December2015
• New installation of13c Release 1
• Upgrade from 12cRelease 5 (12.1.0.5),12c Release 4(12.1.0.4), 12cRelease 3 (12.1.0.3)
First ever 13c release.
1-1

Note:
For more information on these releases and the platforms they support,access the Enterprise Manager Cloud Control Certification Matrix. Forinstructions to access this matrix, refer to the Oracle Enterprise ManagerCloud Control Basic Installation Guide.
Procuring the Enterprise Manager Cloud Control SoftwareYou can procure the Enterprise Manager Cloud Control software from either theproduct DVD or Oracle Software Downloads site. This section describes these sourcesand covers the following:
• How Do You Access the Enterprise Manager Cloud Control Software from a DVD?
• How Do You Procure the Enterprise Manager Cloud Control Software fromOracle?
How Do You Access the Enterprise Manager Cloud Control Softwarefrom a DVD?
You can obtain the Enterprise Manager Cloud Control software from the product DVDthat is available through Oracle Service Delivery Managers or Oracle SalesRepresentatives. The software may be available either on a single DVD or on multipleDVDs depending on the operating system.
This section covers the following:
• Accessing the Software from a DVD
• Setting Mount Points for a DVD
Accessing the Software from a DVDIf the software is available on a single DVD, then insert the DVD into the DVD drive,and run the .bin file.
If the software is available on multiple DVDs, then copy the archived software fromeach of the DVDs to a location on your local disk. Then, run the .bin file. No need toextract the archived (ZIP) files. Retain them as .bin and .zip files.
Setting Mount Points for a DVDIf you want to access the DVD from a shared DVD drive, then set a mount point for theDVD drive.
On most Linux operating systems, the disk mounts automatically when you insert theDVD into the DVD drive. However, for some Linux operating systems, you might haveto manually mount the disk. To verify whether the disk mounts automatically and tomanually mount the disk if it does not mount itself automatically, follow these steps:
1. Insert the DVD into the disk drive.
Chapter 1Procuring the Enterprise Manager Cloud Control Software
1-2

2. To verify if the disk is automatically mounted, run the following command:
• On Red Hat Enterprise Linux:
# ls /mnt/cdrom• On SUSE Linux Enterprise Server:
# ls /media/cdrom3. If the command in Step (2) fails to display the contents of the disk, then run the following
command:
• On Red Hat Enterprise Linux:
# mount -t nfs <host name>:/mnt/<full path to the dvdrom>• On SUSE Linux Enterprise Server:
# mount -t nfs <host name>:/media/<full path to the dvdrom>On most AIX operating systems, the disk mounts automatically when you insert the DVD intothe DVD drive. However, for some AIX operating systems, you might have to manually mountthe disk. To manually mount the disk if it does not mount itself automatically, follow thesesteps:
1. Switch the user to root user by running the following command:
$ su -root2. Insert the disk into the drive.
Note:
If required, enter the following command to eject the currently mounted disk andto remove it from the drive:
# /usr/sbin/umount /<SD_DVD>
3. Enter the following command:
# /usr/sbin/mount -rv cdrfs /dev/cd0 /SD_DVDIn this example command, /SD_DVD is the disk mount point directory and /dev/cd0 is thedevice name for the disk device.
4. If you are prompted to specify the disk location, then specify the disk mount pointdirectory path. For example, /SD_DVD
How Do You Procure the Enterprise Manager Cloud Control Software fromOracle?
You can procure the Enterprise Manager Cloud Control software from Oracle SoftwareDownloads site. The software available is archived using Info-ZIP's highly portable ZIP utility.The software is available in ZIP files. After downloading the software, you will need theUNZIP utility to extract the files.
This section covers the following:
• Downloading the Enterprise Manager Cloud Control Software
Chapter 1Procuring the Enterprise Manager Cloud Control Software
1-3

• Verifying the File Size of Enterprise Manager Zip Files
Downloading the Enterprise Manager Cloud Control SoftwareTo download the Enterprise Manager Cloud Control software, follow these steps:
1. As the install user who will be installing the product, create a directory where youcan download and store the Enterprise Manager Cloud Control software files.
2. Access Enterprise Manager Download from Oracle Software Downloads site.
3. Download the following files:
• For UNIX platforms:
– em13500_<platform>.bin– em13500_<platform>-2.zip– em13500_<platform>-3.zip– em13500_<platform>-4.zip– em13500_<platform>-5.zip
• For Microsoft Windows platforms:
– setup_em13500_win64.exe– setup_em13500_win64-2.zip– setup_em13500_win64-3.zip– setup_em13500_win64-4.zip– setup_em13500_win64-5.zip
WARNING:
Do not extract the contents of the downloaded archived (ZIP) files likeyou did for the previous releases of Enterprise Manager Cloud Control.Retain them as .bin and .zip files.
4. As the install user who will be installing the product, set the execute permission forthe .bin or the .exe file.
For example, on UNIX platforms, set the execute permission for theem13500_linux64.bin file.
chmod +x em13500_linux64.bin5. Verify that the execute permission has been correctly set for the .bin or the .exe
file.
For example, on UNIX platforms, run the following command:
ls -ltrYou should see a similar output that lists the file permissions:
-r-xr-xr-x 1 user1 group1 2032373759 Jul 14 03:57 em13500_linux64.bin-r--r--r-- 1 user1 group1 2022925751 Jul 14 03:57 em13500_linux64-2.zip-r--r--r-- 1 user1 group1 2046336073 Jul 14 03:57 em13500_linux64-3.zip
Chapter 1Procuring the Enterprise Manager Cloud Control Software
1-4

-r--r--r-- 1 user1 group1 653990632 Jul 14 03:57 em13500_linux64-4.zip-r--r--r-- 1 user1 group1 653990632 Jul 14 03:57 em13500_linux64-5.zip
Verifying the File Size of Enterprise Manager Zip FilesAfter downloading the ZIP files, run the cksum command against the ZIP files and check if thefile checksum of the downloaded software is the same as the file checksum displayed onOracle Software Downloads site.
The following is the format of the ZIP files released for 13c Release 5 for UNIX platforms.Here, <platform> refers to the operating system and N refers to the ZIP file number. Forexample, em13500_linux64-2.zip, em13500_linux64-3.zip, em13500_linux64-4.zip andem13500_linux64-5.zip.
em13500_<platform>-N.zip (<value> bytes) (cksum - <value>)
Similarly, the following is the format of the ZIP files released for 13c Release 5 for MicrosoftWindows platforms. Here, N refers to the ZIP file number. For example,setup_em13500_win64-2.zip, setup_em13500_win64-3.zip, setup_em13500_win64-4.zipand setup_em13500_win64-5.zip.setup_em13500_win64-N.zip (<value> bytes) (cksum - <value>)
The value (cksum - <value>) is the file checksum that you need to check. To check the filechecksum of the first ZIP file, run the following command:
$ cksum em13500_<platform>-N.zipFor example,
$ cksum em13500_linux64-2.zip
Procuring the Oracle Management Agent SoftwareOracle Management Agent (Management Agent) is one of the core components of EnterpriseManager Cloud Control, and therefore, its software is part of the Enterprise Manager CloudControl software. When you install Enterprise Manager Cloud Control, the installation wizardautomatically installs a Management Agent.
You can install additional Management Agents using the Add Host Targets Wizard built intothe Enterprise Manager Cloud Control console (Cloud Control console). The wizard uses theManagement Agent software that is already present in the OMS home.
However, note that the Management Agent software present in the OMS home is always forthe version and platform on which that OMS is running. For example, if the OMS is OracleManagement Service 13c Release 2 and it is running on Linux platform, then theManagement Agent software available there is also for that release and for that platform.
If you want to install a Management Agent for a platform that is different from the one onwhich the OMS is running, then ensure that you download that software using the SelfUpdate Console, which is built into the Enterprise Manager Cloud Control Console.
For information on Self Update, see Oracle Enterprise Manager Cloud Control Administrator'sGuide. For instructions to download the software, see the chapter on updating Cloud Controlin the Oracle Enterprise Manager Cloud Control Basic Installation Guide.
Chapter 1Procuring the Oracle Management Agent Software
1-5

2Understanding the Basics
This chapter introduces you to some key concepts of Enterprise Manager Cloud Control, anddescribes some important aspects of installation that you must know before you proceed anyfurther.
In particular, this chapter covers the following:
• Understanding the Basics of Enterprise Manager Cloud Control Installation
• Understanding the Oracle WebLogic Server Requirement for an Enterprise ManagerInstallation
• Understanding the Installation Directories
• Understanding the Configuration Assistants
• Understanding the Prerequisite Checks before Installing Enterprise Manager CloudControl
• Understanding the Limitations of Enterprise Manager Cloud Control
• Understanding the Startup Scripts
• Understanding Other Miscellaneous Concepts
Understanding the Basics of Enterprise Manager Cloud ControlInstallation
This section describes the fundamental aspects of the installation process. In particular, thissection covers the following:
• What are the Different Installation Modes Offered by Enterprise Manager Cloud Control?
• What Is an Enterprise Manager Cloud Control Installation Wizard?
• What Installation Types Are Offered by the Enterprise Manager Cloud Control InstallationWizard?
• What Is Oracle Configuration Manager?
• What Are the Enterprise Manager Cloud Control Software Updates?
• What is a Deployment Size for Enterprise Manager Cloud Control in an AdvancedConfiguration?
• What Is an Agent Gold Image?
• What Is an Agent Gold Image Console?
• What Is an Add Host Target Wizard?
• What Is a Plug-in?
• What Is an Add Management Service Deployment Procedure?
• What Ports Are Used for Installation?
2-1

• What Data Files Are Created While Configuring Oracle Management Repository?
• How Do You Delete the Data Files Created While Configuring Oracle ManagementRepository?
• Globalization Support for Enterprise Manager
What are the Different Installation Modes Offered by EnterpriseManager Cloud Control?
You can install Enterprise Manager Cloud Control or any of its core components eitherin an interactive, graphical mode or in a silent mode.
Installation Modes Description
Graphical Mode Graphical mode is the Graphical User Interface (GUI) method thatinvolves usage of a Java-based installation wizard or a browser-basedapplication that is built into and accessed from the Enterprise ManagerCloud Control console. This method is best suited for first-timeinstallations because you are guided through the entire installationprocess and your installation details are captured using the interviewscreens.
Silent Mode Silent method involves usage of Oracle-supplied response files orscripts that capture all the information required for installation. Thismethod is simpler and faster, but requires you to have some knowledgeon the installation process so that you can provide your installationdetails in the response files without having to see the interview screensof the installation wizard.
In both these modes, you can perform a software-only installation. A Software-Onlyinstallation is an approach that enables you to install only the software binaries ofEnterprise Manager Cloud Control or a Management Agent, that is, without anyconfiguration to the installation. This is best suited when you want to install thesoftware at one point and configure it later.
What Is an Enterprise Manager Cloud Control Installation Wizard?Enterprise Manager Cloud Control Installation Wizard is a Java-based wizard thathelps you install or upgrade to Enterprise Manager Cloud Control in graphical mode. Ifyou are installing Enterprise Manager Cloud Control or any of its core components forthe first time, then Oracle strongly recommends you to use this installation wizard.
Note:
To invoke the installation wizard on UNIX platforms, runem13500_<platform>.bin. To invoke on Microsoft Windows platforms, runsetup_em13500_win64.exe.
Figure 2-1 describes the key elements of the installation wizard.
Chapter 2Understanding the Basics of Enterprise Manager Cloud Control Installation
2-2

Figure 2-1 Enterprise Manager Cloud Control Installation Wizard
What Installation Types Are Offered by the Enterprise Manager CloudControl Installation Wizard?
The Enterprise Manager Cloud Control Installation Wizard offers the following installationtypes:
• Create a New Enterprise Manager System
• Upgrade an Existing Enterprise Manager System
• Install Only the Software
• Install Only the Software With Plug-ins
Create a New Enterprise Manager SystemThis installation type enables you to install a new Enterprise Manager Cloud Control systemwith either simple or advanced configuration settings. For information about simple andadvanced installation types, refer to the Oracle Enterprise Manager Basic Installation Guide.
For information about what is installed for both simple and advanced installation types, referto the Oracle Enterprise Manager Basic Installation Guide.
Chapter 2Understanding the Basics of Enterprise Manager Cloud Control Installation
2-3

Note:
If you want to install Enterprise Manager Cloud Control for evaluation ordemo purposes, then use the Simple installation type.
Upgrade an Existing Enterprise Manager SystemThis installation type enables you to upgrade the following to Enterprise ManagerCloud Control 13c Release 5:
• Enterprise Manager Cloud Control 13c Release 4
• Enterprise Manager Cloud Control 13c Release 3
Both are the only upgrade paths supported.
For upgrade, you can select Upgrade End-to-End or Upgrade software only with plug-ins and Configure Later. The upgrade process enables you to upgrade on the samehost where your earlier release of Enterprise Manager is running. It also upgrades theManagement Repository in the existing database. Since the upgrade happens on thesame host, there is a reasonable downtime involved.
Install Only the SoftwareThis installation type enables you to install only the software binaries of EnterpriseManager Cloud Control at one point, and configure it at a later point.
This approach helps you divide the installation process into two phases, mainly theinstallation phase and the configuration phase. Understandably, the installation phasetakes less time compared to the configuration phase because the installation phaseinvolves only copying of binaries.
For information about what is installed during the installation phase and what isconfigured during the configuration phase, refer to Introduction to Installing EnterpriseManager Using the Software Only with Plug-ins Method.
Install Only the Software With Plug-insThis installation type enables you to install the software binaries of Enterprise ManagerCloud Control with plug-ins at one point, and configure it at a later point.
This approach helps you divide the installation process into two phases, mainly theinstallation phase and the configuration phase. Understandably, the installation phasetakes less time compared to the configuration phase because the installation phaseinvolves only copying of software binaries.
For information about what is installed during the installation phase and what isconfigured during the configuration phase, refer to Introduction to Installing EnterpriseManager Using the Software Only with Plug-ins Method.
What Is Oracle Configuration Manager?While installing Enterprise Manager Cloud Control, you can choose to enable OracleConfiguration Manager.
Chapter 2Understanding the Basics of Enterprise Manager Cloud Control Installation
2-4

Oracle Configuration Manager automatically collects configuration information from yourenvironment at regular intervals and uploads it to Oracle repository. This helps Oraclemaintain up-to-date information about your environment, identify security vulnerabilities,quickly diagnose support issues, and offer better solutions consistently.
In addition, Oracle Configuration Manager enables the Harvester feature, which automaticallycollects configuration information about the targets monitored by Enterprise Manager CloudControl and uploads it to Oracle repository at regular Intervals. This eliminates the need toinstall and configure Oracle Configuration Manager collector in each and every Oracle homeof the targets that are managed by Enterprise Manager Cloud Control. For more informationabout Oracle Configuration Manager and the Harvester feature, see the Oracle ConfigurationManager Installation and Configuration Guide..
However, no business or personal information is collected and uploaded, except forlocal contact name in the event of transmission problems. Oracle guarantees that allthe information collected will be kept strictly confidential and under no circumstanceswill this information be shared with any other party.
Oracle recommends that the host from where you are running the installation wizard have aconnection to the Internet so that the configuration information can be automatically collectedand uploaded to My Oracle Support.
If the host from where you are running the installation wizard has an Internet connection, thenon the My Oracle Support Details screen of the installation wizard, enter the My OracleSupport user name (or e-mail address) and password.
If the host from where you are running the installation wizard does not have an Internetconnection, then enter only the e-mail address and leave the other fields blank. After youcomplete the installation, at a later point when you are ready to configure OracleConfiguration Manager, run the following command from the Oracle home of the OMS host:
On UNIX Platforms:
$<OMS_HOME>/oracle_common/ccr/bin/configCCROn Microsoft Windows Platforms:
$<OMS_HOME>\oracle_common\ccr\bin\configCCR.exe
What Are the Enterprise Manager Cloud Control Software Updates?This section describes the following:
• What Is a Software Update?
• How Does the Software Update Feature Work?
• What Types of Software Updates Are Downloaded and Applied?
• Are the Software Updates Applied Automatically Even for Databases That Have OracleManagement Repository Preconfigured?
• How Can You Download the Software Updates?
• Can I Download and Apply These Patches After Installation or Upgrade?
• How Can You Identify What Patches Have Been Applied?
Chapter 2Understanding the Basics of Enterprise Manager Cloud Control Installation
2-5

What Is a Software Update?Software Update is a feature built in to the Enterprise Manager Cloud ControlInstallation Wizard. The feature appears as the Software Updates screen in theinstaller, and enables you to automatically download and deploy the latestrecommended patches while installing or upgrading Enterprise Manager CloudControl.
This way, you do not have to keep a manual check on the patches released by Oracle.All patches required by the installer for successful installation and upgrade areautomatically detected and downloaded from My Oracle Support, and applied duringthe installation or upgrade, thus reducing the known issues and potential failures.
Note:
The patches available via the Software Updates screen must be downloadedonly via the Software Updates screen, and not from My Oracle Support.
How Does the Software Update Feature Work?The Software Update feature connects to My Oracle Support and first downloads apatch, that consists of a file called patch.xml. The installer parses the patch.xmlfile, and creates a directory titled updates to download all the required updates. Theupdates directory has the following subdirectories:
• updates/agentContains patches related only to the central agent (Management Agent installedwith the OMS).
• updates/omsContains patches related to the OMS.
• updates/metadataContains a subdirectory, inside which you will find the patch.xml that determineswhat all updates must be downloaded and on which Oracle home they must beapplied.
Note:
All software updates must be downloaded and applied only via the SoftwareUpdates screen in the Installer, and not from My Oracle Support.
What Types of Software Updates Are Downloaded and Applied?The following are the different types of updates that can be applied using this feature:
• OUI/Opatch Updates
Chapter 2Understanding the Basics of Enterprise Manager Cloud Control Installation
2-6

Includes the latest OUI/Opatch versions or their updates. If a new version of the installeris downloaded, then OUI is restarted and launched from the location where the latestversion is downloaded.
• Prerequisite Updates
Includes new prerequisite check-related updates released in response to issues reportedafter a release of Enterprise Manager Cloud Control. This enables OUI to always run thelatest set of prerequisite checks, thus resulting in a smoother installation or upgradeexperience.
• EM installer Updates
Includes updates that fix OUI issues—essentially, Java code changes that most likelyresults in automatic restart of OUI after their application.
• Interim Patch Updates
Includes patches such as DST patches, performance-related patches, and so on. Theyare automatically detected, downloaded, and applied.
• Patch Set Updates
Includes multiple patch updates that fix bugs, enhance existing features, and alsosometimes introduce new features.
Are the Software Updates Applied Automatically Even for Databases That HaveOracle Management Repository Preconfigured?
During installation, you are prompted for the details of a database where Oracle ManagementRepository can be configured. If you plan to provide the details of a database that alreadyhas an Oracle Management Repository preconfigured using the database templates offeredby Oracle, then the selected software updates are not automatically applied. In such a case,you must manually download and apply the software updates on the database after theinstallation.
How Can You Download the Software Updates?You can download the software updates in one of the following ways:
• Download by User (Offline Mode): Use this option when you do not have Internetconnectivity on the host where you are installing Enterprise Manager, to connect to MyOracle Support.
To download the software updates, follow these steps:
Caution:
Make sure you download and apply the software updates only using theinstaller. DO NOT directly download them from My Oracle Support.
1. On a host that has Internet connectivity, invoke the Enterprise Manager CloudControl Installation Wizard with the DOWNLOAD_UPDATES=true argument in thefollowing way. This argument ensures that the installation wizard is invoked only fordownloading the software updates. Make sure you run this command only from
Chapter 2Understanding the Basics of Enterprise Manager Cloud Control Installation
2-7

the downloaded Enterprise Manager Cloud Control 13c Release 5software location, and NOT from the existing OMS home or databasehome.
<Software_Extracted_Location>./em13500_<platform>.binDOWNLOAD_UPDATES=true
Note:
– On Microsoft Windows, run setup_em13500_win64.exeDOWNLOAD_UPDATES=true
– Make sure you download these updates on another host (withInternet connectivity) that runs on the same operating system asthe host on which you want to invoke the installer and install theproduct. For example, if you want to install on Linux, them makesure the host with Internet connectivity on which you aredownloading these updates also runs on Linux. Similarly, if youwant to install on Microsoft Windows, make sure you downloadthe patches on another host that runs on Microsoft Windows.
2. On the Software Updates screen, enter the My Oracle Support account username and password, and click Search for Updates. The installation wizarddisplays the Downloading Updates dialog, and downloads the softwareupdates to /OraInstall<timestamp>/updates. Click Next.
After the download is complete, close the Software Updates screen.
3. Copy the entire updates directory to the host where you want to install theOMS.
Note:
Make sure the host from where you are copying the directory and thehost on which you are copying the directory run on the sameoperating system. For example, if you downloaded the updates tothe directory on Linux host, then make sure you copy it to anotherLinux host where want to install the product. Copying the directoryacross operating systems is not recommended for the installation.
4. On the host where you want to install the OMS, invoke the installation wizard.
– In Graphical Mode: On the Software Updates screen of the installationwizard, select Search for Updates, and then, select Local Directory.Enter the location where you copied the updates, and click Search forUpdates. To search the computer and select the location, click Browse.
For example, if you copied the entire updates directory to /u01/home/em/,then select or enter /u01/home/em/updates.Once the search results appear with patch numbers and their details, clickthe patch number to view the ReadMe associated with that patch.Otherwise, click Next. The installer automatically applies all the patcheswhile installing or upgrading the Enterprise Manager system.
Chapter 2Understanding the Basics of Enterprise Manager Cloud Control Installation
2-8

– In Silent Mode: Invoke the installer passing the response file with theINSTALL_UPDATES_SELECTION parameter set to "staged", and theSTAGE_LOCATION parameter set to the absolute path of the location where theupdates are available.
Note:
If you have a proxy server set up, then invoke the installation wizardpassing the SHOW_PROXY=true argument. For example, if you are invoking ingraphical mode, then invoke in the following way:
<Software_Location>/em13500_<platform>.bin SHOW_PROXY=true
• Automatic Download by Installation Wizard (Online Mode): Use this option when youhave Internet connectivity to connect to My Oracle Support automatically using theEnterprise Manager Cloud Control Installation Wizard.
On a host that has Internet connectivity, invoke the Enterprise Manager Cloud ControlInstallation Wizard.
– In Graphical Mode: On the Software Updates screen of the installation wizard,select Search for Updates, then select My Oracle Support. Enter the My OracleSupport account user name and password, and click Search for Updates.
Once the search results appear with patch numbers and their details, click the patchnumber to view the ReadMe associated with that patch. Otherwise, click Next. Theinstaller automatically applies all the patches while installing or upgrading theEnterprise Manager system.
– In Silent Mode: Invoke the installer passing the response file with theINSTALL_UPDATES_SELECTION parameter set to "download", and theMYORACLESUPPORT_USERNAME_FOR_SOFTWAREUPDATES and theMYORACLESUPPORT_PASSWORD_FOR_SOFTWAREUPDATES parameters set to your MyOracle Support credentials.
Can I Download and Apply These Patches After Installation or Upgrade?Ideally, you must download and apply the software updates only at the time of installing orupgrading the Enterprise Manager system. The software updates fix issues with theinstallation or upgrade process, and therefore, they are necessary at the time of installing orupgrading the Enterprise Manager system.
The only exception is when you provide the details of a database that already has an OracleManagement Repository preconfiguring using the database templates offered by Oracle. Insuch a case, you must manually download and apply the updates on the database after theinstallation.
How Can You Identify What Patches Have Been Applied?To identify what patches have been applied, run the following command from the OMS homeor the Management Agent home. The output of this command lists all the applied patches.
<ORACLE_HOME>/OPatch/opatch lsinventory
Chapter 2Understanding the Basics of Enterprise Manager Cloud Control Installation
2-9

What is a Deployment Size for Enterprise Manager Cloud Control inan Advanced Configuration?
When you install Enterprise Manager Cloud Control with advanced configurationsettings (Advanced installation type), you have an option of selecting the deploymentsize of your choice. This option is available in both graphical mode (EnterpriseManager Cloud Control Installation Wizard) and silent mode (response file).
The deployment size essentially indicates the number of targets you plan to monitor,the number of Management Agents you plan to have, and the number of concurrentuser sessions you plan to have.
Table 2-1 describes each deployment size.
Table 2-1 Deployment Size
Deployment Size Targets Count Management AgentsCount
Concurrent UserSession Count
Small Up to 999 Up to 99 Up to 10
Medium Between 1000 and9999
Between 100 and 999 Between 10 and 24
Large 10,000 or more 1000 or more Between 25 and 50
Note:
If the database you are connecting to is a database instance created with apreconfigured Management Repository using the database templates offeredby Oracle, then make sure the deployment size you select on this screenmatches with the deployment size for which you ran the SQL script asdescribed in Oracle Enterprise Manager Basic Installation Guide. Otherwise,you will see errors.
If you want to select a deployment size different from the deployment size forwhich you ran the SQL script earlier, then do one of the following:
• Minimize the installer, run the SQL script intended for the deploymentsize you want to select, then return to this screen and select the desireddeployment size. To understand the SQL script to be run for eachdeployment size, see Oracle Enterprise Manager Basic InstallationGuide.
• Select the deployment size of your choice on this screen, and click Next.When you see errors, manually fix the parameters in the database, thenreturn to this screen to continue with the installation.
The prerequisite checks are run regardless of the selection you make, but the valuesto be set for the various parameters checked depend on the selection you make. Formore information about these deployment sizes, and the database parameters set foreach of them, refer to Sizing Your Enterprise Manager Deployment .
Chapter 2Understanding the Basics of Enterprise Manager Cloud Control Installation
2-10

After installing Enterprise Manager Cloud Control with a particular deployment size, you canchoose to increase or decrease the count of targets, Management Agents, or concurrent usersessions. However, if you do increase the count to a level that is not appropriate for theselected deployment size, then the performance might suffer. Under such circumstances,Oracle recommends you to modify the database parameters according to the desireddeployment size, as described in Sizing Your Enterprise Manager Deployment .
What Is an Agent Gold Image?In the past, Enterprise Manager Cloud Control has offered several approaches for installingManagement Agents, including the Add Host Targets Wizard, EM CLI, and response files tosilently perform the installation. Starting with 13c Release 1, Enterprise Manager CloudControl offers Agent Gold Images that can be used for mass-deployment and upgrade ofManagement Agents in your environment.
An Agent Gold Image represents the ideal state of a Management Agent in a data centermanaged by Enterprise Manager, having a customized configuration of the desired versionsof the Management Agent software, the desired versions of the monitoring plug-ins, and thedesired patches.
An Agent Gold Image version is created by an Enterprise Manager user, using a livereference Management Agent that is thoroughly tested and tuned. An Agent Gold Imageversion can be used to provision new Management Agents or update existing ManagementAgents on a large number of hosts.
For more information on Agent Gold Images, see Managing the Lifecycle of Agent GoldImages .
What Is an Agent Gold Image Console?The Agent Gold Image Console is a GUI-rich application accessible from within theEnterprise Manager Cloud Control Console, and used for managing the lifecycle of AgentGold Images. For information about Agent Gold Image, see What Is an Agent Gold Image?.
Using the Agent Gold Image Console, you can create or delete a gold image; you can create,delete, or stage a gold image version; you can set a gold image version as current orrestricted version; you can subscribe or unsubscribe Management Agents to a gold image;and most importantly, you can provision new Management Agents or upgrade existing ones.
For more information on the Agent Gold Image Console, see Understanding the Agent GoldImage Console.
What Is an Add Host Target Wizard?The Add Host Targets Wizard (Figure 2-2) is a GUI-rich application accessible from within theEnterprise Manager Cloud Control Console, and used for installing Management Agents onunmanaged hosts and converting them to managed hosts in the Enterprise Manager system.
Chapter 2Understanding the Basics of Enterprise Manager Cloud Control Installation
2-11

Figure 2-2 Add Host Target Wizard
To access the Add Host Targets Wizard, do one of the following:
• From the Setup menu, select Add Target, then select Add Targets Manually. Onthe Add Targets Manually page, click Install Agent on Host.
• From the Setup menu, select Add Target, then select Auto Discovery Results.On the Auto Discovery Results page, under the Servers, Storage and Network tab,select a host that you want to monitor from the displayed list, then click Promote.
The wizard enables you to do the following on multiple hosts across platforms withoptions to run preinstall and postinstall scripts:
• Deploy a fresh Management Agent
• Clone an existing well-tested and patched Management Agent
Chapter 2Understanding the Basics of Enterprise Manager Cloud Control Installation
2-12

• Install a Management Agent (called Shared Agent) using an existing, centrally sharedManagement Agent (called Master Agent)
Although the Add Host Targets Wizard can be used for remotely installing one ManagementAgent, the wizard is best suited for mass-deployment of Management Agents, particularlywhile mass-deploying Management Agents of different releases on hosts of differentplatforms. The wizard gives you the flexibility to select hosts on which you want to install aManagement Agent. This helps you when you want to install the Management Agent onseveral hosts, in one attempt.
Chapter 2Understanding the Basics of Enterprise Manager Cloud Control Installation
2-13

What Is a Plug-in?Plug-ins are modules that can be plugged into an existing Enterprise Manager CloudControl deployment to extend target management or other vertical functionality inEnterprise Manager.
At a high level, plug-ins contain archives for monitoring and discovering OMSinstances and Management Agents. The archives contain Java and SQL codes, andmetadata.
For more information, see Enterprise Manager Cloud Control Administrator’s Guide.
What Is an Add Management Service Deployment Procedure?A deployment procedure is a procedure that contains a hierarchal sequence ofprovisioning or patching steps, where each step may contain a sequence of othersteps. In other words, the workflow of all tasks that need to be performed for aparticular life cycle management activity is encapsulated in a deployment procedure.
Enterprise Manager Cloud Control offers deployment procedures, and all of these canbe accessed from within the Cloud Control console. One of the deploymentprocedures that falls within the context of Enterprise Manager Cloud Controlinstallation is the Add Management Service deployment procedure.
The Add Management Service deployment procedure (Figure 2-3) helps you meethigh-availability requirements by enabling you to install an additional OMS using anexisting OMS that is running on an Admin Server host.
Chapter 2Understanding the Basics of Enterprise Manager Cloud Control Installation
2-14

Figure 2-3 Add Management Service Deployment Procedure
In simple words, the Add Management Service deployment procedure enables you to installadditional OMS instances in your environment. The deployment procedure clones an existingOMS and replicates its configuration to the destination host.
The earlier releases of Enterprise Manager offered this installation type from the EnterpriseManager Installation Wizard. However, for the Enterprise Manager Cloud Control release, thisinstallation type is offered as a deployment procedure.
For more information about the deployment procedure, see the chapter on adding additionalmanagement service in the Oracle Enterprise Manager Basic Installation Guide.
What Ports Are Used for Installation?This section describes the default ports that are honored while installing Enterprise ManagerCloud Control. In particular, this section covers the following:
• What Default Ports Are Used for Enterprise Manager Cloud Control Installation?
• How Can You Check Whether a Port Is Free?
• How Can You Customize the Ports During and After Installing Enterprise Manager CloudControl?
Chapter 2Understanding the Basics of Enterprise Manager Cloud Control Installation
2-15

• What Precautions You Must Take While Customizing the Enterprise ManagerCloud Control Ports?
What Default Ports Are Used for Enterprise Manager Cloud ControlInstallation?
The following are the default ports used for installation:
• Enterprise Manager Cloud Control
Table 2-2 Default Port for Enterprise Manager Grid Control
- Upload Port Console Port
HTTP Port The first available free port from therange 4889 to 4898 is selected.
The first available free port fromthe range 7788 - 7798 isselected.
HTTPS Port 1159
If 1159 is not available, then the firstavailable free port from the range4899 to 4908 is selected.
The first available free port fromthe range 7799 - 7809 isselected.
• Oracle Management Agent
The default upload port for Management Agent is 3872. The same port is used forboth HTTP and HTTPS. If 3872 is not available, then the first available free portfrom the range 1830 to 1849 is selected.
• Administration Server
The default HTTPS port for Admin Server is 7101. If 7101 is not available, then thefirst available free port from the range 7101 to 7200 is selected.
• Node Manager
The default HTTPS port is the first available free port from the range 7401 to 7500is selected.
• Managed Server
The default HTTP port is the first available free port from the range 7201 to 7300 isselected.
The default HTTPS port is the first available free port from the range 7301 to 7400is selected.
• JVM Diagnostics Managed Server
If SLB is not configured, then the aforementioned HTTP and HTTPS upload portsof Enterprise Manager Cloud Control are used. If SLB is configured, then the portsconfigured for JVM Diagnostics on the SLB are used. Alternatively, in addition tothe SLB configuration, if the HTTP upload port is enabled for Enterprise ManagerCloud Control, then the HTTP upload port also can be used by the JVMDiagnostics Agents for communicating with the JVM Diagnostics Engine.
• Oracle HTTP Server
The default HTTP port for Oracle HTTP Server is 9788. If 9788 is not available,then the first available free port from the range 9751 to 9800 is selected.
Chapter 2Understanding the Basics of Enterprise Manager Cloud Control Installation
2-16

The default HTTPS port for Oracle HTTP Server is 9899. If 9899 is not available, then thefirst available free port from the range 9851 to 9900 is selected.
• Java Object Cache (JOC)
The default JOC port is 23456. If 23456 is not available, no alternate port is used, soensure that port 23456 is free.
How Can You Check Whether a Port Is Free?To check whether a port is free, run the following command:
• On Unix:
netstat -an | grep <port no>• On Microsoft Windows:
netstat -an|findstr <port_no>
How Can You Customize the Ports During and After Installing Enterprise ManagerCloud Control?
Enterprise Manager Cloud Control offers you the flexibility to use custom ports instead ofdefault ports.
Customizing the Ports While Installing Enterprise Manager Cloud Control
For information on how to start a Oracle HTTP server instances, see Starting Oracle HTTPServer Instances on a Privileged Port (UNIX Only) in the Oracle® Fusion MiddlewareAdministering Oracle HTTP Server.
• If you are installing Enterprise Manager Cloud Control (advanced installation) in graphicalmode, that is, using the Enterprise Manager Cloud Control Installation Wizard, then youcan use the Port Configuration Details screen to enter custom ports. You can also importa staticports.ini file that already captures the custom ports.
• If you are installing Enterprise Manager Cloud Control in silent mode, that is, using theinstallation procedures described in Installing Enterprise Manager System, then updatethe staticports.ini file with suitable custom ports.
The staticports.ini file is available at the following location of the software kit (DVD,downloaded software, and so on):
<software_kit>/response/staticports.iniCustomizing the HTTP/HTTPS Console and the Upload Ports After Installing EnterpriseManager Cloud Control
For information on how to start a Oracle HTTP server instances, see Starting Oracle HTTPServer Instances on a Privileged Port (UNIX Only) in the Oracle® Fusion MiddlewareAdministering Oracle HTTP Server.
If you want to change the HTTP/HTTPS console ports and upload ports after installingEnterprise Manager Cloud Control, then follow these steps:
1. Stop the OMS. To do so, run the following command from the Oracle home of the OMShost.
$<ORACLE_HOME>/bin/emctl stop oms -all
Chapter 2Understanding the Basics of Enterprise Manager Cloud Control Installation
2-17

2. Update the emoms properties with HTTP and HTTPS ports as described in Table 2-3. Specify the values for parameters <http_upload_new>,<https_upload_new>, <http_console_new>, and <https_console_new>):
Table 2-3 Updating EMOMS Properties with HTTP and HTTPS Ports
Port/Property Type Command to Run
HTTP Upload Port <ORACLE_HOME>/bin/emctl set property -nameoracle.sysman.emSDK.svlt.ConsoleServerPort -value <http_upload_new>
HTTPS Upload Port <ORACLE_HOME>/bin/emctl set property -nameoracle.sysman.emSDK.svlt.ConsoleServerHTTPSPort-value <https_upload_new>
HTTP Console Port <ORACLE_HOME>/bin/emctl set property -nameoracle.sysman.emSDK.svlt.EMConsoleServerPort -value <http_console_new>
HTTPS Console Port <ORACLE_HOME>/bin/emctl set property -nameoracle.sysman.emSDK.svlt.EMConsoleServerHTTPSPort -value <https_console_new>
3. Back up the following file that is present in the OMS instance base directory(typically, gc_inst).
$<OMS_INSTANCE_HOME>/emgc.propertiesAfter backing up the file, open the original emgc.properties file, and specify thenew port numbers for the following parameters:
EM_UPLOAD_HTTP_PORT=<http_upload_new>EM_UPLOAD_HTTPS_PORT=<https_upload_new>EM_CONSOLE_HTTP_PORT=<http_console_new>EM_CONSOLE_HTTPS_PORT=<https_console_new>
4. Back up the files httpd.conf, ssl.conf, and httpd_em.conf from the followinglocation:
$<WEBTIER_INSTANCE_HOME>/config/OHS/ohs#/After backing up the files, open the original files, and specify the new portnumbers:
• In httpd.conf file, in the Listen directive section, replace<http_console_orig> with <http_console_new>.
• In ssl.conf file, in the Listen and Virtual Host directive sections, replace<https_console_orig> with <https_console_new>.
• In httpd_em.conf file, in the Listen and VirtualHost directive section, replace<http_upload_orig> with <http_upload_new>, and <https_upload_orig>with <https_upload_new>, respectively.
5. Start the OMS, and verify its status. To do so, run the following command from theOracle home of the OMS host.
$<ORACLE_HOME>/bin/emctl start oms$<ORACLE_HOME>/bin/emctl status oms -details
Chapter 2Understanding the Basics of Enterprise Manager Cloud Control Installation
2-18

6. If the OMS is configured with any Server Load Balance (SLB), then update the ports inthe SLB pools, monitors, and so on.
7. If the OMS is configured for SSO or OAM, then re-run the SSO or OAM configuration.
8. Back up the following file that is present in the agent instance home (typically,agent_inst).
$<AGENT_INSTANCE_HOME>/sysman/config/emd.properties
Note:
Back up the emd.properties file from all Management Agents that arecommunicating with the OMS.
After backing up the file, open the original emd.properties file, and verify the URLmentioned in REPOSITORY_URL. If the URL is an HTTPS URL, then change the portnumber to <https_upload_new>. If the URL is an HTTP URL, then change the portnumber to <http_upload_new>.
9. If there are any EM CLI instances set up on the ports you have changed, then set upthose instances again. To do so, from each EM CLI instance, run the command emclisetup or emcli status, and note the EM URL that appears.
If you have changed that port number, run the following command:
emcli setup -url=http(s)://<host>:<new_port#>/em -dir=<dir>....10. After changing the console port, you must update the URL for the EM Console Service
with the new port number. However, you can skip this step if the URL is that of an SLBand not of an OMS.
a. From the Targets menu, select All Targets.
b. In the Search Target Name text box, enter EM Console Service, and click thesearch icon.
c. In the search results table, click EM Console Service.
d. On the EM Console Service page, from the EM Service menu, selectAdministration, then select Service Tests and Beacons.
e. On the Service Tests and Beacons page, in the Service Tests table, select EMConsole Service Test, and click Edit.
f. On the Edit Service Test: EM Console Service Test page, in the Transaction section,in the Steps table, select Access Login Page.
g. On the Edit Step: Access Login page, in the Request section, in the URL text box,change the port in the URL.
h. Click Continue.
i. Click OK.
j. On the Security Configuration page, click Yes.
Chapter 2Understanding the Basics of Enterprise Manager Cloud Control Installation
2-19

What Precautions You Must Take While Customizing the Enterprise ManagerCloud Control Ports?
While updating the staticports.ini file, you must be extremely careful because anerror in the file can cause the installation wizard to use default ports without displayingany warning. Therefore, before updating the staticports.ini file, check for thesepoints:
• Do NOT set any port to a value lower than or equal to 1024. Ports up to 1024 aretypically reserved for root users (super users). Therefore, make sure the port youcustomize is always set to a value greater than 1024.
• If a port is already being used by a component or any other application, do notenter that port (used port) in the staticports.ini file. If you do, then the relatedconfiguration assistant also fails.
• If you have entered the same port for more than one component, then theinstallation displays an error after the prerequisite checks phase. You must rectifythis error before proceeding with the installation.
• If you have syntax errors in the staticports.ini file (for example, if you omittedthe equal (=) character for a line), then the installation wizard ignores the line. Forthe components specified on such lines, the installation wizard assigns the defaultports. The installation wizard does not display a warning for lines with syntaxerrors.
• If you misspell a component name, then the installation wizard assigns the defaultport for the component. Names of components in the file are case-sensitive. Theinstallation wizard does not display a warning for lines with unrecognized names.
• If you enter a nonnumeric value for the port number, then the installation wizardignores the line and assigns the default port number for the component. It doesthis without displaying any warning.
• If you misspell the parameter on the command line, then the installation wizarddoes not display a warning. It continues and assigns default ports to allcomponents.
• If you enter a relative path to the staticports.ini file (for example, ./staticports.ini) in the command line, then the installation wizard does not findthe file. It continues without displaying a warning and it assigns default ports to allcomponents. You must enter a full path to the staticports.ini file.
What Data Files Are Created While Configuring Oracle ManagementRepository?
The following are the data files created while configuring Oracle ManagementRepository:
Table 2-4 Data Files Created While Configuring Oracle Management Repository
Data Files Description
mgmt.dbf Stores information about the monitored targets, their metrics,and so on.
Chapter 2Understanding the Basics of Enterprise Manager Cloud Control Installation
2-20

Table 2-4 (Cont.) Data Files Created While Configuring Oracle ManagementRepository
Data Files Description
mgmt_ecm_depot1.dbf Stores configuration information collected from the monitoredtargets.
mgmt_deepdive.dbf Stores monitoring data related to JVM Diagnostics andApplication Dependency Performance (ADP).
How Do You Delete the Data Files Created While Configuring OracleManagement Repository?
To delete the data files, you must drop the SYSMAN/MDS schema. To do so, run thefollowing command from the Oracle home of the OMS host.
$<ORACLE_HOME>/sysman/admin/emdrep/bin/RepManager <repository_database_host><repository_database_port> <repository_database_sid> -action drop -dbUser<repository_database_user> -dbPassword <repository_database_password> -dbRole<repository_database_user_role> -mwHome <middleware_home> -mwOraHome<middleware_home> -oracleHome <middleware_home>
Note:
For Microsoft Windows, invoke RepManager.bat.
After dropping the schema, manually delete the database files mgmt.dbf andmgmt_ecm_depot1.dbf.
You can find these files by running the following command as SYS:
SELECT FILE_NAME FROM DBA_DATA_FILES WHERE UPPER (TABLESPACE_NAME) LIKE 'MGMT%';Table 2-5 describes the -action options that are supported by the different versions ofRepManager.
Table 2-5 RepManager Support for -action dropall and -action drop Commands
RepManager Version Command Supported
13c Release 5 -action dropThe command drops SYSMAN, SYSMAN_MDS,SYSMAN122140_OPSS, and SYSMAN_RO.
13c Release 4 -action dropThe command drops SYSMAN, SYSMAN_MDS,SYSMAN122130_OPSS, SYSMAN_RO, andSYSMAN_BIPLATFORM.
Starting with 13c Release 4, SYSMAN_OPSS user no longer exists. Ithas been changed to SYSMAN122130_OPSS user for this release.
Chapter 2Understanding the Basics of Enterprise Manager Cloud Control Installation
2-21

Table 2-5 (Cont.) RepManager Support for -action dropall and -action dropCommands
RepManager Version Command Supported
13c Release 1, 13c Release 2,13c Release 3
-action dropThe command drops SYSMAN, SYSMAN_MDS, SYSMAN_OPSS,SYSMAN_RO, and SYSMAN_BIPLATFORM.
12c Release 5 (12.1.0.5), 12cRelease 4 (12.1.0.4)
-action dropThe command drops SYSMAN, SYSMAN_MDS, SYSMAN_APM,SYSMAN_OPSS, SYSMAN_RO, and SYSMAN_BIPLATFORM.
12c Release 1 (12.1.0.1), 12cRelease 2 (12.1.0.2), and 12cRelease 3 (12.1.0.3)
• -action dropall• -action dropThe commands drop SYSMAN, SYSMAN_MDS, SYSMAN_APM,SYSMAN_OPSS, and SYSMAN_RO.
11g Release 1 (11.1.0.1) • -action dropallThe command drops only SYSMAN and SYSMAN_MDS.
• -action dropThe command drops only SYSMAN.
10g Release 5 (10.2.0.5) -action dropThe command drops only SYSMAN.
Globalization Support for Enterprise ManagerEnterprise Manager Cloud Control is translated to the following languages:
• Brazilian Portuguese
• Chinese (Simplified and Traditional)
• French
• German
• Italian
• Japanese
• Korean
• Spanish
The preferred language set in your Web browser is the language that is used in theEnterprise Manager Cloud Control Console.
The language or the locale set on the operating system is the language used in theEnterprise Manager Cloud Control Installation Wizard.
Understanding the Oracle WebLogic Server Requirement foran Enterprise Manager Installation
Enterprise Manager Cloud Control 13c requires Oracle WebLogic Server 12c Release2 (12.2.1.4.0) and Java Development Kit 1.8.0_261. The Enterprise Manager Cloud
Chapter 2Understanding the Oracle WebLogic Server Requirement for an Enterprise Manager Installation
2-22

Control installation wizard automatically installs them for you while installing a new EnterpriseManager system.
Note:
Enterprise Manager Cloud Control 13c does not support preinstalled OracleWebLogic Server and Java Development Kit. Therefore, allow the installationwizard to install them for you.
This section describes some important aspects related to Oracle WebLogic Server that youmust know before you install Enterprise Manager Cloud Control.
In particular, this section covers the following:
• When and Why Do You Need the Oracle WebLogic Server Credentials?
• When and Why Do You Need the Node Manager Credentials?
• How Do You Find Admin Server Port After Installing Enterprise Manager?
• How Do You Verify Whether Admin Server Is Running?
• How Do You Start the Admin Server?
When and Why Do You Need the Oracle WebLogic Server Credentials?While installing or upgrading to Enterprise Manager Cloud Control, you are prompted to enterthe Oracle WebLogic Server credentials (user name and password). The credentials are usedfor creating the WebLogic domain and other associated components such as the AdminServer, the managed server, and the node manager.
The WebLogic user name is the default user name that will be used as the administrativeuser for the WebLogic Domain. By default, the user name is weblogic. And the WebLogicpassword is the password for this default administrative user account.
When and Why Do You Need the Node Manager Credentials?While installing or upgrading to Enterprise Manager Cloud Control, you are prompted to enterthe Node Manager password for the default Node Manager user account, which isnodemanager. The password is used for configuring the Node Manager. A Node Managerenables you to start, shut down, or restart an Oracle WebLogic Server instance remotely, andis recommended for applications with high availability requirements.
Note:
On Microsoft Windows, a Node Manager service is NOT created. This is anexpected behavior.
Chapter 2Understanding the Oracle WebLogic Server Requirement for an Enterprise Manager Installation
2-23

How Do You Find Admin Server Port After Installing EnterpriseManager?
To find the Admin Server port, view the value set for the AS_HTTPS_PORT parameter inthe emgc.properties file. This file is available in the Oracle Management ServiceInstance Base location.
For example,
/u01/oracle/gc_inst/em/EMGC_OMS1/emgc.properties
How Do You Verify Whether Admin Server Is Running?To install an additional OMS, the Admin Server that is used by the first OMS must beup and running. To verify whether the Admin Server is running, access the AdminServer console using the following URL:
https://host:port/consoleHere, host and port are values specified in the EM_INSTANCE_HOST and AS_HTTPS_PORTparameters, respectively, in the emgc.properties file. This properties file is availablein the Oracle Management Service Instance Base location of the first OMS.
For example,
/u01/oracle/gc_inst/em/EMGC_OMS1/emgc.properties
How Do You Start the Admin Server?You can start the Admin Server by running the following command. Although thecommand is used essentially to start the OMS, the command in turn starts the AdminServer on which that OMS is running. So run this command even if you know that theOMS is already running.
emctl start oms -admin_only
Understanding the Installation DirectoriesThis section describes the installation directories that need to be entered whileinstalling Enterprise Manager Cloud Control or any of its core components. Inparticular, this section covers the following:
• What Is an Oracle Inventory Directory?
• What Is an Oracle Middleware Home or Oracle home?
• What Is an Oracle Management Service Instance Base Location?
• What Is an Agent Home?
• What Is an Agent Base Directory?
• What Is an Agent Instance Directory?
• What Is a /TMP or C:\Temp Directory Used For?
Chapter 2Understanding the Installation Directories
2-24

What Is an Oracle Inventory Directory?If Enterprise Manager Cloud Control is the first Oracle product that you are installing, then theEnterprise Manager Cloud Control Installation Wizard prompts you to enter an inventorydirectory (also called the oraInventory directory).
This inventory directory is used by the installation wizard to place all the installer files anddirectories on the host. The installation wizard automatically sets up subdirectories for eachOracle product to contain the inventory data.
You can enter the oraInventory directory in two ways:
• While installing Enterprise Manager Cloud Control using the installation wizard, you canenter the oraInventory directory in the Oracle Inventory screen. When you enter it in thisscreen, you must also select the appropriate operating system group name that will ownthe oraInventory directories. The group you select must have write permission on theoraInventory directories.
• While installing Enterprise Manager Cloud Control in silent mode, that is, without usingthe installation wizard, you can enter the oraInventory directory using the -invPtrLocparameter. This parameter considers the path to a location where the inventory pointerfile (oraInst.loc) is available. However, this parameter is supported only on UNIXplatforms, and not on Microsoft Windows platforms.
For example
./em13500_<platform>.bin -invPtrLoc /scratch/OracleHomes/oraInst.loc
Note:
• For a typical non-HA environment, the Central Inventory (oraInventory) can bein a shared or non-shared location. If you use a shared location, then ensurethat only one shared location is maintained per host, and no two hosts updatethe same shared location. One inventory file is meant only for one host, so itmust not be shared and edited by other hosts. When you use the /etc/oraInst.loc file, ensure that the inventory location specified there is not pointingto such a location. If you have configured a shared location that is common fortwo or more hosts, then switch over to a non-shared location.
• For a typical HA environment with primary and standby disaster recovery sitesusing storage replication and virtual host names, the Central Inventory(oraInventory) for software installed on the shared storage using the virtual hostname should be located in a shared location that is common between the OMShost in the primary site and the OMS host in the standby site. This sharedlocation should be located on the replicated storage so that the oraInventorycan be accessed from the active site for software maintenance activities.
If you already have an Oracle product installed on the host, then the installation wizard usesthe existing oraInventory directory that was created while installing that Oracle product.Ensure that you have write permission on that directory. To do so, run the installer as thesame operating system user as the one who installed the other Oracle product.
Chapter 2Understanding the Installation Directories
2-25

Note:
The oraInventory directory is different from Installation Directory. Forinformation about Installation Directory, see What Is an Oracle MiddlewareHome or Oracle home?.
What Is an Oracle Middleware Home or Oracle home?While installing or upgrading to Enterprise Manager Cloud Control, you are required toenter the Oracle Middleware home.
Oracle Middleware home or Oracle home (Middleware home or Oracle home) is theparent directory that has the Oracle WebLogic Server home, the Java DevelopmentKit, the OMS, the Web tier instance files, and other relevant directories and files. Thisis where the OMS and the plug-ins are deployed.
For example,
/u01/software/em13c/oraclehome
Caution:
In 12c Release 5 (12.1.0.5) or earlier, there were two distinct directories,mainly the Middleware home and the OMS home. While the Middlewarehome was the parent directory that contained the Oracle WebLogic Serverhome, the Java Development Kit, the Web tier instance files, and otherrelevant directories and files, the OMS home was a subdirectory within theMiddleware home where the OMS was installed and from where severalcommands were run.
However, in 13c Release 1 or later, the Middleware home and the OMShome are not viewed as separate homes; instead they are referred to asone, single home called the Oracle home. The directory contents of the OMShome have been moved to the Middleware home. Therefore, in 13c Release1 or later, Oracle home (or OMS home) refers to the Middleware home. Allcommands that had to be run from the OMS home earlier should now be runfrom the Middleware home directly.
By default, the installation wizard installs Java Development Kit (JDK) 1.8.0_261 andOracle WebLogic Server 12c Release 2 (12.2.1.4.0) in the Middleware home youspecify. Therefore, enter the absolute path to a new middleware home directory whereyou want to have them installed.
Ensure that the path you enter does not exceed 70 characters for Unix platforms and25 characters for Microsoft Windows platforms. Also ensure that the directory youenter has write permission, and does not contain any files or subdirectories. Even inthe case of two system upgrade, enter a new middleware home location, and not theold middleware home directory that you used for the earlier release of the EnterpriseManager system.
Chapter 2Understanding the Installation Directories
2-26
For example, the middleware home path C:\sw\em13c\oraclehome containing only 22characters is acceptable. However,C:\OracleSoftware\OracleMiddleware\OracleEnterpriseManager\OMS\newrelease\omscontaining more than 25 characters is not acceptable for Microsoft Windows platforms.
What Is an Oracle Management Service Instance Base Location?While installing Enterprise Manager Cloud Control, you are required to enter the OracleManagement Service Instance Base Location.
Oracle Management Service Instance Base Location is a directory outside the Middlewarehome where the configuration files of the OMS are stored. By default, gc_inst is the OracleManagement Service Base Location. However, you can choose to use a custom name if youwant.
The installation wizard uses its built-in algorithm to identify this location, and displays it foryou to validate. If the Middleware home is /u01/software/em13c/oraclehome, then bydefault, the following is the Oracle Management Service Instance Base Location:
/u01/software/em13c/gc_instYou can either accept the default location or specify another location that has writepermission.
Note:
For information about Oracle Middleware home, see What Is an Oracle MiddlewareHome or Oracle home?.
What Is an Agent Base Directory?While installing Enterprise Manager Cloud Control and a standalone Management Agent, youare required to enter an installation base directory, which is essentially the agent basedirectory.
Agent Base Directory is a directory outside the Oracle Middleware home (or Oracle home),where the Management Agent home is created.
For example,
/u01/software/em13c/agentbasedirEnsure that the number of characters in the agent base directory path does not exceed 25characters for Microsoft Windows platforms. For example, the agent base directory pathC:\sw\em13c\agntbsedir containing only 22 characters is acceptable. However,C:\Oracle\ManagementAgent\12c\new containing more than 25 characters is not acceptable.
What Is an Agent Home?Agent Home is the subdirectory within the Agent Base Directory where the ManagementAgent installed.
For example, if the agent base directory is /u01/software/em13c/agentbasedir, then bydefault, the following is the agent home:
Chapter 2Understanding the Installation Directories
2-27

/u01/software/em13c/agentbasedir/agent_13.5.0.0.0
What Is an Agent Instance Directory?Agent Instance Directory is a subdirectory (agent_inst) within the Agent BaseDirectory that is created for storing all Management Agent-related configuration files.
For example, if the agent base directory is /u01/software/em13c/agentbasedir, then bydefault, the following is the agent instance directory:
/u01/software/em13c/agentbasedir/agent_inst
What Is a Plug-in Home?Plug-in home is a subdirectory either within the Middleware home or within the AgentBase Directory where the plug-ins related to the OMS and the Management Agent aredeployed, respectively.
Table 2-6 lists the default Plug-ins homes are created.
Table 2-6 Plug-in Homes
Component Default Oracle Home Sample Location
Plug-In (OMS-specificplug-ins)
$<ORACLE_HOME>/plugins/<pluginID_Version>
/u01/software/em13c/oraclehome/plugins/oracle.sysman.db.agent.plugin_13.5.0.0.0
Plug-In (agent-specificplug-ins)
$<AGENT_BASE_DIR>/plugins /u01/software/em13c/agentbasedir/plugins
What Is a /TMP or C:\Temp Directory Used For?When you invoke the Enterprise Manager Cloud Control Installation Wizard, itautomatically copies some executable files and link files to a temporary directory onthe host.
For example, the default /tmp directory on UNIX hosts, and C:\Temp on MicrosoftWindows hosts.
If the host is set to run cron jobs along with many other processes that may be runningperiodically, then these jobs attempt to clean up the default temporary directory,thereby deleting some files and causing the installation wizard to fail.
If there are any cron jobs or processes that are automatically run on the hosts to cleanup the temporary directories, then ensure that you set the TMP or TEMP environmentvariable to a location that is different from the default location. Ensure that the non-default location you set is secure on the hard drive, that is, the non-default location is alocation where cleanup jobs are not run. Also ensure that you have write permissionson this alternative directory.
This must be done before you run the installer to invoke the Enterprise Manager CloudControl Installation Wizard. (For UNIX operating systems, you invokeem13500_<platform>.bin, and for Microsoft Windows, you invokesetup_em13500_win64.exe).
Chapter 2Understanding the Installation Directories
2-28

Note:
Specifying an alternative temporary directory location is not mandatory, and isrequired only if any cron jobs are set on the computers to clean up the /tmpdirectory.
Understanding the Configuration AssistantsThis section describes the postinstallation activities that are performed by the installationwizard. In particular, this section covers the following:
• What Are Configuration Assistants?
• What Configuration Assistants Are Run by the Installation Wizard?
• What Do You Do When Configuration Assistants Fail?
What Are Configuration Assistants?While installing or upgrading to Enterprise Manager Cloud Control in either GUI mode (usingthe installation wizard) or silent mode (using a response file), a set of configuration assistantsare run at the end of the installation process to configure the installed or upgradedcomponents. Your installation or upgrade process is complete only after all the componentsare configured using these configuration assistants.
Note:
Even when you perform a software-only installation of Enterprise Manager, whenyou run the ConfigureGC.sh script to configure the installation, the configurationassistants are internally run. (On Microsoft Windows, run the ConfigureGC.batscript.)
What Configuration Assistants Are Run by the Installation Wizard?This section lists the configuration assistants run by the installation wizard for the differentinstallation types.
• Configuration Assistants Run While Installing a New Enterprise Manager
• Configuration Assistants Run While Upgrading an Existing Enterprise Manager
• Configuration Assistants Run While Upgrading an Additional Oracle Management Service
Configuration Assistants Run While Installing a New Enterprise ManagerThe following are the configuration assistants that are run while installing a new OMS:
• Plug-ins Prerequisites Check
• Repository Configuration
Chapter 2Understanding the Configuration Assistants
2-29

Note:
If you use a database instance that was created with a preconfiguredManagement Repository using the database templates offered byOracle, then Repository Out-of-Box Configuration is run instead ofRepository Configuration.
• MDS Schema Configuration
Note:
If you use a database instance that was created with a preconfiguredManagement Repository using the database templates offered byOracle, then MDS Schema Configuration is not run.
• OMS Configuration
• Plug-ins Deployment and Configuration
• Start Oracle Management Service
• Agent Configuration Assistant
Configuration Assistants Run While Upgrading an Existing Enterprise ManagerThe following are the configuration assistants that are run while upgrading an OMS:
• Stopping APM Engines
• Upgrade Prerequisite
• Plug-ins Prerequisites
• Repository Upgrade
• MDS Schema Configuration
• OMS Configuration
• Plug-ins Deployment and Configuration
• Start Oracle Management Service
Note:
Agent Configuration Assistant is not run because the Management Agent isupgraded using the Agent Upgrade Console.
Configuration Assistants Run While Upgrading an Additional OracleManagement Service
The following are the configuration assistants that are run while upgrading anadditional OMS.
Chapter 2Understanding the Configuration Assistants
2-30

• Stopping APM Engines
• Upgrade Prerequisite
• Plug-ins Prerequisites
• OMS Configuration
• Plug-ins Deployment and Configuration
• Start Oracle Management Service
Note:
The Agent Configuration Assistant is not run because the Management Agent isupgraded using the Agent Upgrade Console.
What Do You Do When Configuration Assistants Fail?If an optional configuration assistant fails, then the installation wizard ignores the failure andruns to the next configuration assistant automatically. However, if a mandatory configurationassistant fails, then the installation wizard stops the installation process. In this case, you areexpected to resolve the issue and rerun the configuration assistant.
Understanding the Prerequisite Checks before InstallingEnterprise Manager Cloud Control
Every time you install Enterprise Manager Cloud Control using the installation wizard, a set of prerequisite checks are run to verify if the environment meets the minimum requirements fora successful installation. The installation wizard checks for a variety of things includingrequired operating system patches, operating system packages, kernel parameters, and soon.
The following sections describe these prerequisite checks. In particular, this section coversthe following:
• What Prerequisite Checks Are Run by Default?
• How Do You Run the Prerequisite Checks in a Standalone Mode?
What Prerequisite Checks Are Run by Default?The following are the default prerequisite checks that are run for different installation types—Creating a New Enterprise Manager System and Upgrading an Existing Enterprise ManagerSystem:
• Prerequisite check for verifying whether the /bin/bash file exists with write permission.
• Prerequisite check for verifying that the environment variable EMCLI_STATE_DIR is not set.
• Prerequisite check for verifying whether the installation is being done on a certifiedoperating system.
• Prerequisite check for verifying whether all the certified packages and libraries have beeninstalled.
Chapter 2Understanding the Prerequisite Checks before Installing Enterprise Manager Cloud Control
2-31

• Prerequisite check for verifying whether the glibc package has been installed.
• Prerequisite check for verifying whether there is sufficient disk space in the tempdirectory.
• Prerequisite check for verifying whether there is sufficient disk space in theinventory directory.
• Prerequisite check for verifying whether there is write permission in the inventorydirectory.
• Prerequisite check for verifying whether the software is compatible with the currentoperating system.
• Prerequisite check for verifying whether there is sufficient physical memory.
• Prerequisite check for verifying the required ulimit value.
• Prerequisite check for verifying the host name.
• Prerequisite check for verifying whether the LD_ASSUME_KERNEL environmentvariable is set.
• Prerequisite check for verifying whether proper timezone is set.
• Prerequisite check for verifying whether there is 4 GB of swap space.
• Prerequisite check for verifying whether the http_proxy environment variable isset. Ideally, it must not be set.
How Do You Run the Prerequisite Checks in a Standalone Mode?You can run the prerequisite checks in standalone mode before invoking theinstallation wizard. This helps you identify and resolve issues that might otherwisecause the installation to fail.
WARNING:
When you run the prerequisite checks in standalone mode on a host wherethere are no Oracle products installed, the prerequisite check that checks forthe central inventory hard disk space fails. This failure is expected becausethere are no Oracle products installed on the host. You can safely ignore thisfailure, and proceed with the actual installation.
Table 2-7 shows the commands you need to run to run the prerequisite checks instandalone mode:
Table 2-7 Running Prerequisite Checks in Standalone Mode
Installation Type Command
• Create a New Enterprise ManagerSystem
• Upgrade an Existing EnterpriseManager System
• Install Software Only
<Software_Location>/em13500_<platform>.bin -prereqchecker -entryPoint "oracle.sysman.top.oms_Core"-silent
Chapter 2Understanding the Prerequisite Checks before Installing Enterprise Manager Cloud Control
2-32

Note:
On Microsoft Windows, run setup_em13500_win64.exe. Also,<Software_Location> mentioned in the commands in Table 2-7 refer to the locationwhere the Enterprise Manager software is available. For example, DVD. If you havedownloaded the software from Oracle Software Downloads site, then enter theabsolute path to that downloaded location.
Understanding the Limitations of Enterprise Manager CloudControl
This section describes the limitations you might face while using Enterprise Manager CloudControl. In particular, this section covers the following:
• Can You Access Unlicensed Components?
• What Are the Limitations with DHCP-Enabled Machines?
Can You Access Unlicensed Components?Although the installation media in your media pack contain many Oracle components, you arepermitted to use only those components for which you have purchased licenses. OracleSupport Service does not provide support for components for which licenses have not beenpurchased.
For more information, access the Enterprise Manager documentation library at the followingURL and view the Oracle Enterprise Manager Licensing Information Guide:
http://www.oracle.com/technetwork/indexes/documentation/index.html
What Are the Limitations with DHCP-Enabled Machines?Do NOT run the OMS on a computer that is DHCP enabled. Oracle strongly suggests thatyou use a static host name or IP address assigned on the network for Enterprise ManagerCloud Control components to function properly.
For more information, refer to My Oracle Support Note 428665.1 at:
https://support.oracle.com/
Understanding the Startup ScriptsBy default, Enterprise Manager Cloud Control offers a startup script called gcstartup withevery installation of OMS and Management Agent. The startup script ensures that the OMSand the Management Agent are started automatically every time their hosts are rebooted,thereby relieving you of the manual effort.
Chapter 2Understanding the Limitations of Enterprise Manager Cloud Control
2-33

Where is the Startup Script Stored?The startup script is present in the following location of the OMS host and theManagement Agent host:
/etc/init.d/gcstartup
What does the Startup Script Invoke?On the OMS host, the startup script invokes the following file to start up the OMS whenits host is rebooted:
$<ORACLE_HOME>/install/unix/scripts/omsstupSimilarly, on the Management Agent host, the startup script invokes the following file tostart up the Management Agent when its host is rebooted:
$<AGENT_HOME>/install/unix/scripts/agentstup
How Do I Stop the Startup Script from Starting the OMS or theManagement Agent?
If you do not want the startup script to start the OMS and the Management Agentwhen their hosts are rebooted, then remove the omsstup file and the agentstup filefrom the respective hosts.
Alternatively, you can rename the file /etc/oragchomelist to /etc/oragchomelist_bak.
Can the Startup Script Start an OMS or a Management Agent on aRemote Host?
The startup script is specific to the host on which an OMS or a Management Agent isinstalled. Therefore, the startup script cannot start an OMS or a Management Agent ona remote host.
How Do I Change the Management Agent Service Priority Level thatthe Startup Script Follows While Starting Up or Shutting Down theManagement Agent?
You can change the Management Agent service priority level either while installing theManagement Agent, or after installing the Management Agent.
To change the Management Agent service priority level while installing ManagementAgents using the Add Host Targets Wizard, use the START_PRIORITY_LEVEL andSHUT_PRIORITY_LEVEL additional parameters that are described in the OracleEnterprise Manager Basic Installation Guide. To change the Management Agentservice priority level while installing a Management Agent using the agentDeployscript, use the START_PRIORITY_LEVEL and SHUT_PRIORITY_LEVEL response fileparameters that are described in Table 6-4.
Chapter 2Understanding the Startup Scripts
2-34

To change the Management Agent service priority level after installing the ManagementAgent, follow these steps:
1. Navigate to the /etc/rc.d directory. If the rc.d directory is not present within /etc,navigate to /sbin/rc.d.
2. Delete all the gcstartup files present in the /etc/rc.d or /sbin/rc.d directory. Tosearch for these files, run the following command:
find . -name "*gcstartup"3. Edit the START_PRIORITY_LEVEL and SHUT_PRIORITY_LEVEL parameters in
the $<AGENT_HOME>/install/unix/scripts/gcroot.sh file.
For more information about these parameters, see Table 6-4.
4. Run the root.sh script from the Management Agent home:
$<AGENT_HOME>/root.shFor example, the output of the find . -name "*gcstartup" command that you run afternavigating to /etc/rc.d may be the following:
./rc5.d/K19gcstartup
./rc5.d/S98gcstartup
./rc5.d/S98lockgcstartup
./rc5.d/K19unlockgcstartup
./rc3.d/K19gcstartup
./rc3.d/S98gcstartup
./rc3.d/S98lockgcstartup
./rc3.d/K19unlockgcstartup
./rc2.d/K19gcstartup
./rc2.d/S98gcstartup
./rc2.d/S98lockgcstartup
./rc2.d/K19unlockgcstartup
./init.d/unlockgcstartup
./init.d/gcstartup
./init.d/lockgcstartup
If this is the output, delete all the gcstartup files present in the ./rc5.d, ./rc3.d, ./rc2.dand ./init.d directories, edit the START_PRIORITY_LEVEL and SHUT_PRIORITY_LEVELparameters in the <AGENT_HOME>/install/unix/scripts/gcroot.sh file, and then runroot.sh.
Understanding Other Miscellaneous ConceptsThis section covers miscellaneous concepts related to the installation of Enterprise ManagerCloud Control. In particular, this section covers the following:
• What Is a Host List File?
• What Scripts Are Run During the Installation Process?
What Is a Host List File?While using the Add Host Targets Wizard, you can enter the hosts on which you want toinstall Oracle Management Agent, in two ways — you can either enter the host name or theIP address, or select an external file that contains a list of hosts mentioned.
Chapter 2Understanding Other Miscellaneous Concepts
2-35

If you choose to select an external file, then ensure that the file contains only the hostname or the host name followed by the platform name.
The following is an example of the external file with only the host names.
host1.example.comhost2.example.com
The following is an example of the external file with the host names and the platformnames.
host1.example.com linuxhost2.example.com aix
What Scripts Are Run During the Installation Process?At least once during or after the installation of Enterprise Manager Cloud Control orManagement Agent, you are prompted to log in as a root user and runoraInstRoot.sh, allroot.sh, or root.sh. You must log in as a root user because thescripts edit files in the /etc directory and create files in the local bin directory (/usr/local/bin, by default).
After every installation, a check is performed to identify the Central Inventory(oraInventory) directory. The Central Inventory directory is a directory that isautomatically created by the installation wizard when an Oracle product is installed ona host for the very first time.
Note:
• For a typical non-HA environment, the Central Inventory (oraInventory)can be in a shared or non-shared location. If you use a shared location,then ensure that only one shared location is maintained per host, and notwo hosts update the same shared location. One inventory file is meantonly for one host, so it must not be shared and edited by other hosts.When you use the /etc/oraInst.loc file, ensure that the inventory locationspecified there is not pointing to such a location. If you have configured ashared location that is common for two or more hosts, then switch overto a non-shared location.
• For a typical HA environment with primary and standby disaster recoverysites using storage replication and virtual host names, the CentralInventory (oraInventory) for software installed on the shared storageusing the virtual host name should be located in a shared location that iscommon between the OMS host in the primary site and the OMS host inthe standby site. This shared location should be located on the replicatedstorage so that the oraInventory can be accessed from the active site forsoftware maintenance activities.
• If you have NOT installed an Oracle product before on the host, then run theoraInstRoot.sh script from the Central Inventory:
$Home/oraInventory/oraInstRoot.sh
Chapter 2Understanding Other Miscellaneous Concepts
2-36

The oraInstRoot.sh script is run to create the oraInst.loc file. The oraInst.loc filecontains the Central Inventory location.
• However, if you already have an Oracle product on the host, then run allroot.sh scriptfrom the Oracle home of the OMS host:
<ORACLE_HOME>/allroot.sh
Chapter 2Understanding Other Miscellaneous Concepts
2-37

Part IIInstalling Enterprise Manager System
This part describes the different ways of installing Enterprise Manager Cloud Control. Inparticular, this part contains the following chapters:
• Installing Enterprise Manager in Silent Mode
• Installing Enterprise Manager Using the Software Only with Plug-ins Method

3Installing Enterprise Manager in Silent Mode
This chapter describes how you can install Enterprise Manager Cloud Control while utilizingan existing, certified Oracle Database, in silent mode. In particular, this section covers thefollowing:
• Introduction to Installing Enterprise Manager in Silent Mode
• Before You Begin Installing Enterprise Manager in Silent Mode
• Prerequisites for Installing Enterprise Manager in Silent Mode
• Installing Enterprise Manager in Silent Mode
• Performing Postinstallation Tasks After Installing an Enterprise Manager System in SilentMode
Note:
All general purpose file systems, including OCFS2, are acceptable for storingEnterprise Manager Cloud Control 13c software binaries and OMS instance homefiles (configuration files in gc_inst). However, OCFS is not considered a generalpurpose file system, and therefore is not considered acceptable for this use.
WARNING:
Do not install Enterprise Manager Cloud Control 13c on servers of SPARC series:T1000, T2000, T5xx0, and T3-*. For more information, see My Oracle Support note1590556.1.
Introduction to Installing Enterprise Manager in Silent ModeIf you are familiar with the way Enterprise Manager is installed, and if you want to install itwithout facing any interview screens of the installation wizard, then the best option is to installit in silent mode.
In silent mode, you use a response file that captures all the information you need tosuccessfully complete an installation. This saves time and effort in one way because theinstallation details are captured just once, and in a single file that can be circulated andreused for installation on other hosts.
However, whether you install Enterprise Manager in graphical mode or silent mode, theinstallation process, the installed components, and the configuration process remain thesame. Therefore, silent mode of installing Enterprise Manager is only an option offered toyou.
3-1

To understand what components are installed, what configuration assistants are run,and how the directory structure will look after installation, see the chapter on installingEnterprise Manager system in the Oracle Enterprise Manager Cloud Control BasicInstallation Guide.
Before You Begin Installing Enterprise Manager in SilentMode
Before you begin installing an Enterprise Manager system in silent mode, familiarizeyourself with the key aspects of installation described in the Oracle EnterpriseManager Cloud Control Basic Installation Guide.
Prerequisites for Installing Enterprise Manager in SilentMode
Meet the prerequisites described in the chapter on installing Enterprise Managersystem that is available in the Oracle Enterprise Manager Cloud Control BasicInstallation Guide.
Installing Enterprise Manager in Silent ModeThis section covers the following:
• Installing Enterprise Manager in Silent Mode
• Advanced Installer Options Supported for Installing an Enterprise Manager Systemin Silent Mode
• Limitations with the Advanced Options Supported for Installing an EnterpriseManager System in Silent Mode
• Editing the new_install.rsp Response File for Installing an Enterprise Manager inSilent Mode
Installing Enterprise Manager in Silent ModeTo install a complete Enterprise Manager system in silent mode, follow these steps:
Chapter 3Before You Begin Installing Enterprise Manager in Silent Mode
3-2

Note:
Oracle recommends you to run the EM Prerequisite Kit before invoking the installerto ensure that you meet all the repository requirements beforehand. Even if you donot run it manually, the installer anyway runs it in the background while installing theproduct. However, running it manually beforehand sets up your ManagementRepository even before you can start the installation or upgrade process. Forinformation on the kit, to understand how to run it, and to know about theprerequisite checks it runs, see Oracle Enterprise Manager Cloud Control BasicInstallation Guide.
However, if you plan to use a database instance that was created with apreconfigured Management Repository using the database templates offeredby Oracle, then make sure you pass the following parameter while invokingthe EM Prerequisite Kit.
-componentVariables repository:EXECUTE_CHECKS_NOSEED_DB_FOUND:false
1. Invoke the installer and generate the response file you need to use for performing a silentinstallation.
./em13500_<platform>.bin -getResponseFileTemplates -outputLoc<absolute_path_to_a_directory_to_store_the_generated_response_file>
Note:
The command generates multiple response files. You must use only thenew_install.rsp file for this silent installation.
2. Edit the new_install.rsp file and enter appropriate values for the parameters describedin Table 3-2.
3. Invoke the installer in silent mode and pass the updated response file.
(On Unix, make sure you invoke the installer as a user who belongs to the oinstallgroup you created. For information about creating operating system groups and users,see the Oracle Enterprise Manager Cloud Control Basic Installation Guide.)
• If this is the first Oracle product you are installing on the host, then run the followingcommand:
./em13500_<platform>.bin -silent -responseFile<absolute_path_to_the_directory_where_the_generated_and_updated_response_file_is_stored>/new_install.rsp [-invPtrLoc<absolute_path_to_oraInst.loc>]
• Otherwise, run the following command:
./em13500_<platform>.bin -silent -responseFile<absolute_path_to_the_directory_where_the_generated_and_updated_response_file_is_stored>/new_install.rsp
Chapter 3Installing Enterprise Manager in Silent Mode
3-3

Note:
• To invoke the installation wizard on UNIX platforms, runem13500_<platform>.bin. To invoke on Microsoft Windowsplatforms, run setup_em13500_win64.exe.
• The installer requires about 14 GB of hard disk space in thetemporary directory. If your temporary directory does not have thisspace, then pass the -J-Djava.io.tmpdir parameter and provide analternative directory where there is 14 GB of space.
The directory specified by this parameter will also be used as thelocation for the Provisioning Advisor Framework (PAF) stagingdirectory, which is used for copying the Software Library entitiesrelated to the deployment procedures. The PAF staging directory isused only for provisioning activities — entities are copied for adeployment procedure, and then, deleted once the deploymentprocedure ends.
For example,
./em13500_linux64.bin -J-Djava.io.tmpdir=/u01/software/em13c/stage/
• Ensure that there are no white spaces in the name of the directorywhere you download and run the Enterprise Manager Cloud Controlsoftware from. For example, do not download and run the softwarefrom a directory titled EM Software because there is a white spacebetween the two words of the directory name.
• If you connect to a database instance that was created using the database template offered by Oracle, then you will be prompted thatthe database parameters need to be modified to suit the deploymentsize you selected. This is because the templates are essentiallydesigned for simple installation, and the database parameters areset as required for simple installation. Since it is used for advancedinstallation, the parameters must be set to different values. You canconfirm the message to proceed further. The installation wizard willautomatically set the parameters to the required values.
• For information about the additional, advanced options you can passwhile invoking the installer, refer to Advanced Installer OptionsSupported for Installing an Enterprise Manager System in SilentMode.
Chapter 3Installing Enterprise Manager in Silent Mode
3-4

Note:
If a Server Load Balancer (SLB) is configured in your environment, and theupload port is locked, then configure the SLB for JVMD Engines, and thensecure the OMS.
If an SLB is configured in your environment, but the upload port is unlocked,then decide whether you want to route the JVMD traffic through the SLB. If youdo, then configure the SLB for JVMD Engines, and then secure the OMS.
To secure the OMS, run the following command from the Oracle home of theOMS host:
<ORACLE_HOME>/bin/emctl secure oms -host <SLB host>-slb_jvmd_http_port <JVMD_SLB_HTTP_Port> -slb_jvmd_https_port<JVMD_SLB_HTTPS_Port> -sysman_pwd <system_password> -reg_pwd<agent_registration_password>
Advanced Installer Options Supported for Installing an Enterprise ManagerSystem in Silent Mode
The following are some additional, advanced options you can pass while invoking theinstaller:
• By default, a Provisioning Advisor Framework (PAF) staging directory is created forcopying the Software Library entities related to the deployment procedures. By default,this location is the scratch path location (/tmp). The location is used only for provisioningactivities—entities are copied for a deployment procedure, and then, deleted once thedeployment procedure ends.
If you want to override this location with a custom location, then invoke the installer withthe -J-Djava.io.tmpdir option, and enter a unique custom location.
For example,
./em13500_linux64.bin -J-Djava.io.tmpdir=/u00/install/em/STAGE/ -silent -responseFile /u01/software/em/response/new_install.rsp
• After the installation ends successfully, the OMS and the Management Agent startautomatically. If you do not want them to start automatically, then invoke the installer withSTART_OMS and START_AGENT options, and set them to true or false depending on whatyou want to control.
For example, if you do not want the Management Agent to start automatically, then runthe following command:
./em13500_<platform>.bin START_OMS=true START_AGENT=false -silent -responseFile <absolute_path>/new_install.rspTo understand the limitations involved with this advanced option, see Limitations with theAdvanced Options Supported for Installing an Enterprise Manager System in SilentMode.
Chapter 3Installing Enterprise Manager in Silent Mode
3-5

Limitations with the Advanced Options Supported for Installing anEnterprise Manager System in Silent Mode
When you use START_OMS and START_AGENT as advanced options to control the waythe OMS and the Management Agent start up automatically, sometimes theManagement Agent and the host on which it was installed do not appear as targets inthe Cloud Control console.
Table 3-1 lists the different combinations of these advanced options, and describes theworkaround to be followed for each combination:
Table 3-1 Advanced Options and Workarounds
Advanced Option Workaround
START_OMS=falseSTART_AGENT=false
1. Start the OMS:
$<ORACLE_HOME>/bin/emctl start oms2. Secure the Management Agent:
$<AGENT_HOME>/bin/emctl secure agent3. Start the Management Agent:
$<AGENT_HOME>/bin/emctl start agent4. Add the targets:
$<AGENT_HOME>/bin/emctl config agentaddinternaltargets
5. Upload the targets:
$<AGENT_HOME>/bin/emctl upload agentSTART_OMS=trueSTART_AGENT=false
Start the Management Agent:
$<AGENT_HOME>/bin/emctl start agentSTART_OMS=falseSTART_AGENT=true
1. Start the OMS:
$<ORACLE_HOME>/bin/emctl start oms2. Secure the Management Agent:
$<AGENT_HOME>/bin/emctl secure agent3. Add the targets:
$<AGENT_HOME>/bin/emctl config agentaddinternaltargets
4. Upload the targets:
$<AGENT_HOME>/bin/emctl upload agent
Editing the new_install.rsp Response File for Installing an EnterpriseManager in Silent Mode
Table 3-2 describes what variables you must edit and how you must edit them in the new_install.rsp response file for installing Enterprise Manager Cloud Control insilent mode.
Chapter 3Installing Enterprise Manager in Silent Mode
3-6

Table 3-2 Editing the new_install.rsp Response File for Installing Enterprise Manager System inSilent Mode
Parameter Data Type DoubleQuotesRequiredfor Value?
Description
UNIX_GROUP_NAME
String Yes (Required only when central inventory does not exist) Enter the nameof the UNIX group you belong to.
For example, "dba"Note: This parameter is supported only on UNIX platforms, and not onMicrosoft Windows platforms.
INVENTORY_LOCATION
String Yes (Required only when central inventory does not exist) Enter theabsolute path to the Central Inventory. Ensure that you have read,write, and execute permissions on the default inventory directory.
For example, "/scratch/oracle/oraInventory".Note: This parameter is supported only on UNIX platforms, and not onMicrosoft Windows platforms.
INSTALL_UPDATES_SELECTION
String Yes By default, this variable is set to skip indicating that the softwareupdates will not be installed during installation.
Enter skip if you want to skip the software updates.
Enter staged if you have already downloaded the software updatesand you want to install the software updates from a staged location.
STAGE_LOCATION
String Yes (Required only if INSTALL_UPDATES_SELECTION=staged)
Enter the absolute path of the stage location where the softwareupdates are available.
MYORACLESUPPORT_USERNAME_FOR_SOFTWAREUPDATES
String Yes Enter the username of the My Oracle Support account to download theupdates during the installation.
If you want to download the updates during the installation, make sureyou provide MYORACLESUPPORT_USERNAME_FOR_SOFTWAREUPDATESand MYORACLESUPPORT_PASSWORD_FOR_SOFTWAREUPDATES, and setINSTALL_UPDATES_SELECTION="download".
MYORACLESUPPORT_PASSWORD_FOR_SOFTWAREUPDATES
String Yes Enter the password of the My Oracle Support account to download theupdates during the installation.
If you want to download the updates during the installation, make sureyou provide MYORACLESUPPORT_USERNAME_FOR_SOFTWAREUPDATESand MYORACLESUPPORT_PASSWORD_FOR_SOFTWAREUPDATES, and setINSTALL_UPDATES_SELECTION="download".
PROXY_USER
String Yes Enter the user name that can be used to access the proxy server.
Note: Applies only if you have set the INSTALL_UPDATES_SELECTIONvariable to "download", and only if your connection to the Internetrequires you to connect through a proxy.
PROXY_PWD String Yes Enter the password that can be used to access the proxy server.
Note: Applies only if you have set the INSTALL_UPDATES_SELECTIONparameter to "download", and only if your connection to the Internetrequires you to connect through a proxy.
Chapter 3Installing Enterprise Manager in Silent Mode
3-7

Table 3-2 (Cont.) Editing the new_install.rsp Response File for Installing Enterprise ManagerSystem in Silent Mode
Parameter Data Type DoubleQuotesRequiredfor Value?
Description
PROXY_HOST
String Yes Enter the name of the proxy host.
Note: Applies only if you have set the INSTALL_UPDATES_SELECTIONparameter to "download", and only if your connection to the Internetrequires you to connect through a proxy.
PROXY_PORT
String Yes Enter the port used by the proxy server.
Note: Applies only if you have set the INSTALL_UPDATES_SELECTIONparameter to "download", and only if your connection to the Internetrequires you to connect through a proxy.
ORACLE_MIDDLEWARE_HOME_LOCATION
String Yes Enter the location where you want the installer to install OracleWebLogic Server 12c Release 2 (12.2.1.4.0) and Java Development Kit(JDK) 1.8.0_261. Ensure that the middleware location has writepermission. Note that the middleware location is essentially the oneand only Oracle home in 13c release.
For example, "/u01/software/em13c/oraclehome"Note: Ensure that the number of characters in the middleware homepath does not exceed 70 characters for Unix platforms and 25characters for Microsoft Windows platforms.
For example, the middleware home path C:\sw\em13c\oraclehomecontaining only 22 characters is acceptable. However,C:\OracleSoftware\OracleMiddleware\OracleEnterpriseManager\OMS\newrelease\oms containing more than 25 characters is notacceptable for Microsoft Windows platforms.
ORACLE_HOSTNAME
String Yes Enter a fully qualified domain name that is registered in the DNS and isaccessible from other network hosts, or enter an alias host name that isdefined in the /etc/hosts file on all the OMS instances at this site.
The host name must resolve to the local host because the host name isused for the local Oracle WebLogic Server as well as the OracleManagement Service. Do not provide a remote host or a load balancervirtual host in this field. Do not enter an IP address. Do not useunderscores in the name. Short names are allowed, but you will see awarning, so Oracle recommends that you enter a fully qualified domainname instead.
If you do not mention the host name, the installation wizard will proceedfurther, honoring the host name it automatically detects for that host.
Chapter 3Installing Enterprise Manager in Silent Mode
3-8

Table 3-2 (Cont.) Editing the new_install.rsp Response File for Installing Enterprise ManagerSystem in Silent Mode
Parameter Data Type DoubleQuotesRequiredfor Value?
Description
AGENT_BASE_DIR
String Yes Enter the absolute path to the agent base directory, a location outsidethe Oracle Middleware home where the Management Agent can beinstalled.
For example, "/u01/software/em13c/agentbasedir".Ensure that this location is empty and has write permission. Alsoensure that it is always maintained outside the Oracle Middlewarehome.
Note: (Only for Microsoft Windows) Ensure that the number ofcharacters in the agent base directory path does not exceed 25characters. For example, the agent base directory pathC:\sw\em13c\agntbsedir containing only 22 characters isacceptable. However, C:\Oracle\ManagementAgent\13c\newcontaining more than 25 characters is not acceptable.
WLS_ADMIN_SERVER_USERNAME
String Yes By default, weblogic is the name assigned to the default user accountthat is created for the Oracle WebLogic Domain. If you want to acceptthe default name, then skip this variable. However, if you want to have acustom name, then enter the name of your choice.
WLS_ADMIN_SERVER_PASSWORD
String Yes Enter a password for the WebLogic user account.
Ensure that your password contains at least 8 characters without anyspaces, begins with a letter, and includes at least one numeric value.
WLS_ADMIN_SERVER_CONFIRM_PASSWORD
String Yes Confirm the password for the WebLogic user account.
NODE_MANAGER_PASSWORD
String Yes By default, nodemanager is the name assigned to the default useraccount that is created for the node manager. Enter a password for thisnode manager user account.
Ensure that your password contains at least 8 characters without anyspaces, begins with a letter, and includes at least one numeric value.
NODE_MANAGER_CONFIRM_PASSWORD
String Yes Confirm the password for the node manager user account.
ORACLE_INSTANCE_HOME_LOCATION
String Yes By default, gc_inst is considered as the OMS Instance Base directoryfor storing all OMS-related configuration files. Enter the absolute pathto a location outside the middleware home leading up to the directoryname.
For more information about this location, see What Is an OracleManagement Service Instance Base Location?.
Note: If you are installing on an NFS-mounted drive and creating theOMS instance base directory (gc_inst) on that NFS-mounted drive,then after you install, move the lock files from the NFS-mounted driveto a local file system location. For instructions, refer to PerformingPostinstallation Tasks After Installing an Enterprise Manager System inSilent Mode.
Chapter 3Installing Enterprise Manager in Silent Mode
3-9

Table 3-2 (Cont.) Editing the new_install.rsp Response File for Installing Enterprise ManagerSystem in Silent Mode
Parameter Data Type DoubleQuotesRequiredfor Value?
Description
CONFIGURE_ORACLE_SOFTWARE_LIBRARY
Boolean No If you want to configure the Software Library at the time of installation,set this parameter to TRUE. Otherwise, set it to FALSE.
Even if you do not configure it at the time of installation, yourinstallation will succeed, and you can always configure it later from theEnterprise Manager Cloud Control Console.
Oracle recommends toconfigure it at the time of installation thereforeit's automatically configured by the installer which saves time and effort.
For example, CONFIGURE_ORACLE_SOFTWARE_LIBRARY=trueSOFTWARE_LIBRARY_LOCATION
String Yes Required if you set CONFIGURE_ORACLE_SOFTWARE_LIBRARY=trueIf you have set CONFIGURE_ORACLE_SOFTWARE_LIBRARY to TRUE,then enter the absolute path leading up to a unique directory name onthe OMS host where the Software Library can be configured.
Ensure that the location you enter is a shared location on the OMShost. This helps when you install additional OMS instances that canuse the same shared Software Library location.
DATABASE_HOSTNAME
String Yes Enter the fully qualified name of the host where the existing databaseresides. Ensure that the host name does not have underscores.
For example, "example.com".
If you have already created a database instance with a preconfiguredManagement Repository using the database templates offered byOracle, then provide details about that database instance.
If you are connecting to an Oracle RAC Database, and if the nodeshave virtual host names, then enter the virtual host name of one of itsnodes.
The connection to the database is established with a connect stringthat is formed using only this virtual host name, and the installationends successfully.
However, if you want to update the connect string with other nodes ofthe cluster, then after the installation, run the following command:
$<ORACLE_HOME>/bin/emctl config oms -store_repos_details -repos_conndesc "(DESCRIPTION=(ADDRESS_LIST=(FAILOVER=ON) (ADDRESS=(PROTOCOL=TCP)(HOST=node1-vip.example.com)(PORT=1521))(ADDRESS=(PROTOCOL=TCP)(HOST=node2-vip.example.com)(PORT=1521))) (CONNECT_DATA=(SERVICE_NAME=EMREP)))" -repos_user sysmanIf your Oracle RAC database is configured with Single Client AccessName (SCAN) listener, then you can enter a connection string usingthe SCAN listener.
Note: If you connect to a database instance that was created using the database template offered by Oracle, then note that the passwordassigned to the user accounts SYSMAN_MDS, SYSMAN_APM, andSYSMAN122140_OPSS, which were created while preconfiguring theManagement Repository, are automatically reset with the SYSMANpassword you enter for the SYSMAN_PASSWORD parameter.
Chapter 3Installing Enterprise Manager in Silent Mode
3-10

Table 3-2 (Cont.) Editing the new_install.rsp Response File for Installing Enterprise ManagerSystem in Silent Mode
Parameter Data Type DoubleQuotesRequiredfor Value?
Description
LISTENER_PORT
String Yes Enter the listener port to connect to the existing database.
For example, "1521".SERVICENAME_OR_SID
String Yes Enter the service name or the system ID (SID) of the existing database.
For example, "orcl".If you are providing the details of a pluggable database (PDB), thenuse the full service name instead of the alias. For example,pdb.example.com. If you are providing the details of a lone-pluggabledatabase (Lone-PDB), then use the full service name. For example,pdb.example.com. If you are providing the details of a non-containerdatabase (Non-CDB), then use the SID.
SYS_PASSWORD
String Yes Enter the SYS user account's password.
SYSMAN_PASSWORD
String Yes Enter a password for creating a SYSMAN user account. This passwordis used to create the SYSMAN user, which is the primary owner of theManagement Repository schema.
The SYSMAN account password must begin with a letter, and can onlycontain uppercase or lowercase letters, numbers and the followingcharacters: $, # , _
Examples of invalid passwords: Welcome!, 123oracle, #Oracle
If you connect to a database instance that was created using the database template offered by Oracle, then note that the passwordassigned to the user accounts SYSMAN_MDS, SYSMAN_APM, andSYSMAN122140_OPSS, which were created while preconfiguring theManagement Repository, are automatically reset with the SYSMANpassword you enter for this parameter.
SYSMAN_CONFIRM_PASSWORD
String Yes Confirm the SYSMAN user account's password.
Chapter 3Installing Enterprise Manager in Silent Mode
3-11

Table 3-2 (Cont.) Editing the new_install.rsp Response File for Installing Enterprise ManagerSystem in Silent Mode
Parameter Data Type DoubleQuotesRequiredfor Value?
Description
DEPLOYMENT_SIZE
String Yes Set one of the following values to indicate the number of targets youplan to monitor, the number of Management Agents you plan to have,and the number of concurrent user sessions you plan to have.
• SMALL, to monitor up to 999 targets, with up to 99 ManagementAgents and up to 10 concurrent user sessions
• MEDIUM, to monitor about 1000 to 9999 targets, with about 100 to999 Management Agents and about 10 to 24 concurrent usersessions
• LARGE, to monitor 10,000 or more targets, with 1000 or moreManagement Agents, and with about 25 to 50 concurrent usersessions
For example, "MEDIUM".The prerequisite checks are run regardless of the selection you make,but the values to be set for the various parameters checked depend onthe selection you make.
You can also modify the deployment size after the installation. For moreinformation on deployment sizes, the prerequisite checks that are run,the database parameters that are set, and how you can modify thedeployment size after installation, refer to What is a Deployment Sizefor Enterprise Manager Cloud Control in an Advanced Configuration?.
Note:If the database you are connecting to is a database instance createdwith a preconfigured Management Repository using the databasetemplates offered by Oracle, then make sure the deployment size youset here matches with the deployment size you selected on theDatabase Templates screen of Oracle Database ConfigurationAssistant (DBCA) while creating the database instance.
If you want to select a deployment size different from the deploymentsize you had selected while creating the database instance usingDBCA, then do one of the following:
• Create another database instance with a template for the desireddeployment size, then return to this response file and set the samedeployment size to this parameter. For instructions to create adatabase instance with an Oracle-supplied template, see OracleEnterprise Manager Cloud Control Basic Installation Guide.
• In the database instance you have created, fix the parameters tosupport the deployment size you want to set here in the responsefile. To automatically fix the database parameters using Oracle-supplied SQL scripts, see Oracle Enterprise Manager CloudControl Basic Installation Guide.
KEYSTORE_LOCATION
String Yes Enter the location of the keystore (location where the SSL key will getstored).
KEYSTORE_PASSWORD
String Yes Enter the password of the keystore.
Chapter 3Installing Enterprise Manager in Silent Mode
3-12

Table 3-2 (Cont.) Editing the new_install.rsp Response File for Installing Enterprise ManagerSystem in Silent Mode
Parameter Data Type DoubleQuotesRequiredfor Value?
Description
MANAGEMENT_TABLESPACE_LOCATION
String Yes Enter the absolute path to the location where the data file (mgmt.dbf)for management tablespace can be stored. Ensure that the specifiedpath leads up to the file name.
For example:
• If the database is on a file system, then the path must look like"/u01/oracle/prod/oradata/mgmt.dbf".
• If the database is on Automatic Storage Management (ASM), thenthe path must look like "+DATA/oemrsp01d/datafile/mgmt.dbf", where disk_group1 is a diskgroup created on ASMand prod is the Service ID (SID).
• If the database is on a raw device, then the path must look like"</dev/raw1>/prod/oradata/mgmt.dbf", where /dev/raw1 isthe raw device and prod is the SID.
Enterprise Manager Cloud Control requires this data file to storeinformation about the monitored targets, their metrics, and so on.Essentially, everything else other than configuration data, softwarelibrary data, and audit data.
CONFIGURATION_DATA_TABLESPACE_LOCATION
String Yes Enter the absolute path to the location where the data file(mgmt_ecm_depot1.dbf) for configuration data tablespace can bestored. Ensure that the specified path leads up to the file name.
For example, "/home/john/oradata/mgmt_ecm_depot1.dbf".Enterprise Manager Cloud Control requires this data file to storeconfiguration information collected from the monitored targets.
JVM_DIAGNOSTICS_TABLESPACE_LOCATION
String Yes Enter the absolute path to a location where the data file(mgmt_deepdive.dbf) for JVM Diagnostics data tablespace can bestored. Ensure that the specified path leads up to the file name.
For example, "/home/john/oradata/mgmt_deepdive.dbf".Enterprise Manager Cloud Control requires this data file to storemonitoring data related to JVM Diagnostics and ApplicationDependency Performance (ADP).
EMPREREQ_AUTO_CORRECTION=false
Boolean No It specifies whether prereqs can be auto corrected.
AGENT_REGISTRATION_PASSWORD
String Yes Enter a password to secure the communication between the OMS andthe Management Agents. Note that you have to provide the sameregistration password for securing your Management Agents.
AGENT_REGISTRATION_CONFIRM_PASSWORD
String Yes Confirm the agent registration password.
Chapter 3Installing Enterprise Manager in Silent Mode
3-13

Table 3-2 (Cont.) Editing the new_install.rsp Response File for Installing Enterprise ManagerSystem in Silent Mode
Parameter Data Type DoubleQuotesRequiredfor Value?
Description
STATIC_PORTS_FILE
String Yes By default, ports described in What Ports Are Used for Installation? arehonored. If you want to accept the default ports, then leave this fieldblank.
If you want to use custom ports, then enter the absolute path to thestaticports.ini file that lists the custom ports to be used for theinstallation.
PLUGIN_SELECTION
String List Yes
(A comma-separatedlist of plug-innames,where theplug-innames mustbe in doublequotes)
By default, mandatory plug-ins such as Oracle Database Plug-in,Oracle Fusion Middleware Plug-in, and Oracle Exadata Plug-in, OracleCloud Framework Plug-in, and Oracle System Infrastructure Plug-in areautomatically installed with the Enterprise Manager system.
In addition to the default ones, if you want to deploy any addition plug-in, then list those plug-in names in a comma-separated list. Ensure thatthe plug-in names are in double quotes.
If you want to deploy a deprecated plug-in that is supported only in thecurrent release, but not in any of the future releases, then evaluate yourselection and decide whether or not you want to proceed with thedeployment of such plug-ins.
For example,
PLUGIN_SELECTION={"oracle.sysman.empa","oracle.sysman.vt"}If you want to install some plug-ins that are not in the software kit (DVD,downloaded software), then do the following:
1. Manually download the required plug-ins from Plug-in Update.
Plug-ins produced by partners and customers are available fordownload from the Entreprise Manager Extensibility Exchange.
2. Invoke the installer with the following option and pass the locationwhere the additional plug-ins have been downloaded:
./em13500_<platform>.binPLUGIN_LOCATION=<absolute_path_to_plugin_software_location>
b_upgrade Boolean No For this case, set it to b_upgrade=falseEM_INSTALL_TYPE
String No For this case, set it to EM_INSTALL_TYPE=NOSEED
CONFIGURATION_TYPE
String No For this case, set it to ADVANCEDCONFIGURATION_TYPE=ADVANCED
Chapter 3Installing Enterprise Manager in Silent Mode
3-14

Performing Postinstallation Tasks After Installing an EnterpriseManager System in Silent Mode
Perform the post-install steps as described in the chapter on installing Enterprise Managersystem that is available in the Oracle Enterprise Manager Cloud Control Basic InstallationGuide.
Chapter 3Performing Postinstallation Tasks After Installing an Enterprise Manager System in Silent Mode
3-15

4Installing Enterprise Manager Using theSoftware Only with Plug-ins Method
This chapter explains how you can install only the software binaries of Enterprise ManagerCloud Control at one point, and configure the installation at a later point. In particular, thischapter covers the following:
• Introduction to Installing Enterprise Manager Using the Software Only with Plug-insMethod
• Before You Begin Installing Enterprise Manager Using the Software Only with Plug-insMethod
• Prerequisites for Installing Enterprise Manager Using the Software Only with Plug-insMethod
• Installing the Enterprise Manager Using the Software Only with Plug-ins Method
Note:
• To install Enterprise Manager Cloud Control in a production environment, usethe Advanced Install or Install software only with plug-ins installation type. Theinstall software only with plug-ins installation type offers custom and advancedconfiguration options that enable you to customize your installation to suit yourneeds.
• SSL Support: Starting with Enterprise Manager 13c Release 5 Update 8(13.5.0.8) or above, SSL configuration is supported. If the repository databaseis configured with one-way or two-way SSL authentication, you can configurethe Enterprise Manager against the SSL-enabled repository database whenconfiguring the Enterprise Manager Cloud Control software only in graphical orsilent mode. PKCS12 is the wallet file format supported for SSL configuration.
• All general purpose file systems, including OCFS2, are acceptable for storingEnterprise Manager Cloud Control 13c software binaries and OMS instancehome files (configuration files in gc_inst). However, OCFS is not considered ageneral purpose file system, and therefore is not considered acceptable for thisuse.
WARNING:
Do not install Enterprise Manager Cloud Control 13c on servers of SPARC series:T1000, T2000, T5xx0, and T3-*. For more information, see My Oracle Support note1590556.1.
4-1

Introduction to Installing Enterprise Manager Using theSoftware Only with Plug-ins Method
You can choose to install only the software binaries of Enterprise Manager CloudControl at one point and configure it at a later point in time to work with an existing,certified Oracle Database. This approach enables you to divide the installation processinto two phases, mainly the installation phase and the configuration phase.Understandably, the installation phase takes less time compared to the configurationphase because the installation phase involves only copying of binaries. This approachhelps you plan your installation according to the time and priorities you have.
During the installation phase, you invoke the installer to create Oracle homes andinstall the following:
• Installs Oracle WebLogic Server 12c Release 2 (12.2.1.4.0).
• Installs Java Development Kit (JDK) 1.8.0_261.
• Installs Oracle Management Service 13c Release 5.
• Installs Oracle Management Agent 13c Release 5 in the agent base directory youspecify (outside the middleware home).
• Installs Oracle JRF 12c Release 2 (12.2.1.4.0).
• Installs Oracle Web Tier 12c Release 2 (12.2.1.4.0).
During the configuration phase, you invoke a configuration script to do the following:
• Create an Oracle WebLogic domain called GCDomain. For this WebLogic Domain,a default user account, weblogic, is used as the administrative user. You canchoose to change this, if you want, in the installer.
• Create a Node Manager user account called nodemanager. A Node Managerenables you to start, shut down, or restart an Oracle WebLogic Server instanceremotely, and is recommended for applications with high availability requirements.
Note:
On Microsoft Windows, a Node Manager service is NOT created. This isan expected behavior.
• Configure an Oracle Management Service Instance Base location (gc_inst)outside the Middleware home, for storing all configuration details related to OracleManagement Service 13c.
For example, if the Middleware home is /u01/software/em13c/oraclehome, thenthe instance base location is /u01/software/em13c/gc_inst.
• Configures Oracle Management Repository in the existing, certified OracleDatabase. If the database instance is created using the database template offeredby Oracle, then this step is skipped.
Chapter 4Introduction to Installing Enterprise Manager Using the Software Only with Plug-ins Method
4-2

Note:
Starting with Enterprise Manager 13c Release 5 Update 8 (13.5.0.8) or above,SSL configuration is supported. If the repository database is configured withone-way or two-way SSL authentication, you can configure the EnterpriseManager against the SSL-enabled repository database when configuring theEnterprise Manager Cloud Control software only in graphical or silent mode.PKCS12 is the wallet file format supported for SSL configuration.
• Creates a plug-in directory and installs the following default plug-ins.
– Oracle Database Plug-in
– Oracle Fusion Middleware Plug-in
Note:
Starting with 13c Release 1, as part of the Oracle Fusion Middleware Plug-in deployment, one Java Virtual Machine Diagnostics (JVMD) Engine isinstalled by default on the OMS. For every additional OMS you deploy, youreceive one JVMD Engine by default with that OMS.
JVMD enables administrators to diagnose performance problems in Javaapplications in the production environment. By eliminating the need toreproduce problems, it reduces the time required to resolve theseproblems, thus improving application availability and performance.
While JVMD Engine is installed by default on the OMS host, you will stillneed JVMD Agents to be manually deployed on the targeted JVMs. Forinstructions to deploy the JVMD Agent, see Installing JVMD Agents withAdvanced Install Options for installing with advanced install options.
– Oracle Exadata Plug-in
– Oracle Cloud Framework Plug-in
– Oracle System Infrastructure Plug-in
– Any other additional plug-ins you choose to deploy
• Runs the following configuration assistants to configure the installed components forsimple as well as advanced installation:
– Plug-ins Prerequisites Check
– Repository Configuration
Note:
If you use a database instance that was created with a preconfiguredManagement Repository using the database templates offered by Oracle,then Repository Out-of-Box Configuration is run instead of RepositoryConfiguration.
– MDS Schema Configuration
Chapter 4Introduction to Installing Enterprise Manager Using the Software Only with Plug-ins Method
4-3

Note:
If you use a database instance that was created with a preconfiguredManagement Repository using the database templates offered byOracle, then MDS Schema Configuration is not run.
– OMS Configuration
– Plug-ins Deployment and Configuration
– Start Oracle Management Service
– Agent Configuration Assistant
Before You Begin Installing Enterprise Manager Using theSoftware Only with Plug-ins Method
Before you begin installing an Enterprise Manager system using software only mode,familiarize yourself with the key aspects of installation described in the EnterpriseManager Basic Installation Guide.
Prerequisites for Installing Enterprise Manager Using theSoftware Only with Plug-ins Method
Meet the prerequisites described under the Prerequisites for Installing an EnterpriseManager System in the Enterprise Manager Basic Installation Guide.
Installing the Enterprise Manager Using the Software Onlywith Plug-ins Method
This section describes the following:
• Install Software Only With Plug-ins and Configure Later in Graphical Mode
• Install Software Only With Plug-ins and Configure Later in Silent Mode
Chapter 4Before You Begin Installing Enterprise Manager Using the Software Only with Plug-ins Method
4-4

Note:
• The above software only methods are only applicable for a new freshinstallation of Enterprise Manager. Do not use if you are doing an EnterpriseManager upgrade using the software only method.
• Starting with Enterprise Manager 13c Release 5 Update 8 (13.5.0.8) or above,SSL configuration is supported. If the repository database is configured withone-way or two-way SSL authentication, you can configure the EnterpriseManager against the SSL-enabled repository database when configuring theEnterprise Manager Cloud Control software only in graphical or silent mode.PKCS12 is the wallet file format supported for SSL configuration.
Install Software Only With Plug-ins and Configure Later in Graphical ModeThis section explains how you can install only the software binaries of Enterprise ManagerCloud Control with plug-ins at one point and configure the installation at a later point all ingraphical mode.
This installation type provides the following benefits:
• Deploys the mandatory plug-ins such as Oracle Database plug-in, Oracle FusionMiddleware plug-in, Oracle Exadata plug-in, Oracle Cloud Framework plug-in, and OracleSystem Infrastructure plug-in. In addition, enables you to select and deploy other optionalplug-ins of your choice. This installation type allows you to install software only OMS bits,along with selected plug-ins.
Note:
You may choose to manually download the required plug-ins from Plug-inUpdate.
In addition, plug-ins produced by partners or customers are available fordownload from the Enterprise Manager Extensibility Exchange.
• You may choose to apply release update patches available post-release, once you havecompleted installing the Enterprise Manager System Using Software Only Install WithPlug-ins and Configuring Later in Graphical Mode option.
• Offers an option to select the deployment size (small, medium, or large) of your choice,and depending on the deployment size you select, configures with the required memory.The deployment size essentially indicates the number of targets you plan to monitor, thenumber of Management Agents you plan to have, and the number of concurrent usersessions you plan to have.
• Allows you to use a database where the Management Repository is preconfigured usingthe database templates offered by Oracle.
• Allows you to change the name of the default Weblogic user account for the WebLogicdomain GCDomain.
• Prompts for separate, distinct passwords for WebLogic Server administration, NodeManager, SYSMAN user account, and Management Agent registration.
Chapter 4Installing the Enterprise Manager Using the Software Only with Plug-ins Method
4-5

• Allows you to change the name of the default OMS instance base directory(gc_inst) to a name of your choice, and creates that directory outside theMiddleware home.
• Allows you to change the locations of the tablespaces for management,configuration data, and JVM diagnostics data.
• Allows you to customize the ports according to your environment.
• SSL Support: Starting with Enterprise Manager 13c Release 5 Update 8(13.5.0.8) or above, you can enable one-way or two-way Secure Sockets Layer(SSL) mode during the Configuring the Enterprise Manager Cloud ControlSoftware Only in Graphical Mode step when running the ConfigureGC script.
Note:
PKCS12 is the wallet file format supported for SSL configuration.
This section covers the following:
• Installing the Enterprise Manager Cloud Control Software Only With Plug-ins inGraphical Mode
• Running the Root Script
• Configuring the Enterprise Manager Cloud Control Software Only in GraphicalMode
• Apply Release Update
• Performing Postconfiguration Tasks After Configuring the Enterprise ManagerCloud Control Software Only in Graphical Mode
Installing the Enterprise Manager Cloud Control Software Only With Plug-ins inGraphical Mode
This section explains how you can install only the software binaries of EnterpriseManager Cloud Control with Plug-ins at one point in graphical mode, and configure theinstallation at a later point.
To install Enterprise Manager Cloud Control for a production site, follow these steps:
Chapter 4Installing the Enterprise Manager Using the Software Only with Plug-ins Method
4-6

Note:
Oracle recommends you to run the EM Prerequisite Kit before invoking the installerto ensure that you meet all the repository requirements beforehand. Even if you donot run it manually, the installer anyway runs it in the background while installing theproduct. However, running it manually beforehand sets up your ManagementRepository even before you can start the installation or upgrade process. Forinformation on the kit, to understand how to run it, and to know about theprerequisite checks it runs, see Overview of the EM Prerequisite Kit in the OracleEnterprise Manager Cloud Control Basic Installation Guide.
However, if you plan to use a database instance that was created with apreconfigured Management Repository using the database templates offeredby Oracle, then make sure you pass the following parameter while invokingthe EM Prerequisite Kit.
-componentVariables repository:EXECUTE_CHECKS_NOSEED_DB_FOUND:false
1. Invoke the Enterprise Manager Cloud Control Installation Wizard.
Invoke the installation wizard as a user who belongs to the oinstall group you createdfollowing the instructions in Creating Operating System Groups and Users for EnterpriseManager Cloud Control in the Oracle Enterprise Manager Cloud Control Basic InstallationGuide.
./em13500_<platform>.bin [-invPtrLoc <absolute_path_to_oraInst.loc>]For example, for Linux platform, run /u1/software/em/em13500_linux64.bin [-invPtrLoc <absolute_path_to_oraInst.loc>]
Chapter 4Installing the Enterprise Manager Using the Software Only with Plug-ins Method
4-7

Note:
• To invoke the installation wizard on UNIX platforms, runem13500_<platform>.bin. To invoke on Microsoft Windowsplatforms, run setup_em13500_win64.exe.
• The installer requires about 14 GB of hard disk space in thetemporary directory. If your temporary directory does not have thisspace, then pass the -J-Djava.io.tmpdir parameter and provide analternative directory where there is 14 GB of space.
The directory specified by this parameter will also be used as thelocation for the Provisioning Advisor Framework (PAF) stagingdirectory, which is used for copying the Software Library entitiesrelated to the deployment procedures. The PAF staging directory isused only for provisioning activities — entities are copied for adeployment procedure, and then, deleted once the deploymentprocedure ends.
For example,
./em13500_linux64.bin -J-Djava.io.tmpdir=/u01/software/em13c/stage/
• Ensure that there are no white spaces in the name of the directorywhere you download and run the Enterprise Manager Cloud Controlsoftware from. For example, do not download and run the softwarefrom a directory titled EM Software because there is a white spacebetween the two words of the directory name.
• The INSTALL_SWONLY_WITH_PLUGINS parameter is not supportedstarting with Enterprise Manager 13c Release 5. If you executethe ./em13500_<platform>.bin script using theINSTALL_SWONLY_WITH_PLUGINS parameter, you will receive aninvalid parameter error message since the parameter is no longersupported.
2. Click Next.
3. Select Installation Type.
On the Installation Types screen, select Create a new Enterprise Managersystem, then select Install software only with plug-ins
Chapter 4Installing the Enterprise Manager Using the Software Only with Plug-ins Method
4-8

4. Click Next.
5. (Recommended) Install Software Updates.
On the Software Updates screen, select Search for Updates, and then select one of thefollowing options to apply the latest software updates:
• Local Directory, if you do not have Internet connectivity on your host, and want todownload the updates in offline mode and apply them while performing theinstallation.
• My Oracle Support, if you have Internet connectivity on your host, and want toconnect to My Oracle Support directly via the installer to download the updates inonline mode and apply them while performing the installation.
For more information on these options, and for instructions to download and apply the software updates using these options, see the Enterprise Manager Advanced Installationand Configuration Guide.
Note:
The Software Updates screen uses the built-in feature Auto Update toautomatically download and deploy the latest recommended patches whileinstalling or upgrading Enterprise Manager Cloud Control. This way, you do nothave to keep a manual check on the patches released by Oracle. All patchesrequired by the installer for successful installation and upgrade areautomatically detected and downloaded from My Oracle Support, and appliedduring the installation or upgrade, thus reducing the known issues and potentialfailures. Oracle strongly recommends using this feature, and applying thesoftware updates while the installation is in progress.
Chapter 4Installing the Enterprise Manager Using the Software Only with Plug-ins Method
4-9

Note:
During installation, you will be prompted for the details of a databasewhere Oracle Management Repository can be configured. If you plan toprovide the details of a database that already has an OracleManagement Repository preconfigured using the database templatesoffered by Oracle, then the software updates selected on this screencannot be automatically applied. In such a case, you must manuallydownload and apply these software updates after the installation.
Note:
Despite providing the My Oracle Support credentials, if you are unable todownload the software updates, then exit the installer, and invoke theinstaller again passing the -showProxy parameter in the following way:
<Software_Location>/em13500_<platform>.bin SHOW_PROXY=true
6. Click Next.
If Enterprise Manager Cloud Control is the first Oracle product you are installing onthe host that is running on UNIX operating system, then the Oracle Inventoryscreen appears. For details, see step (6). Otherwise, the Check Prerequisitesscreen appears. For details, see step (8).
If Enterprise Manager Cloud Control is the first Oracle product you are installing onthe host that is running on Microsoft Windows operating system, then the OracleInventory screen does not appear. On Microsoft Windows, the following is thedefault inventory directory:
<system drive>\Program Files\Oracle\Inventory7. Enter Oracle Inventory Details.
On the Oracle Inventory screen, do the following. You will see this screen only ifthis turns out to be your first ever installation of an Oracle product on the host.
a. Enter the full path to a directory where the inventory files and directories canbe placed.
Chapter 4Installing the Enterprise Manager Using the Software Only with Plug-ins Method
4-10

Note:
• If this is the first Oracle product on the host, then the default centralinventory location is <home directory>/oraInventory. However, if youalready have some Oracle products on the host, then the centralinventory location can be found in the oraInst.loc file. TheoraInst.loc file is located in the /etc directory for Linux and AIX, andin the /var/opt/oracle directory for Solaris, HP-UX, and Tru64.
• Ensure that you have read, write, and execute permissions on thedefault inventory directory. If you do not have the required permissions,then exit the installer, invoke the installer again with theINVENTORY_LOCATION parameter, and pass the absolute path to thealternative inventory location.
For example,
<Software_Location>/em13500_<platform>.binINVENTORY_LOCATION=<absolute_path_to_inventory_directory>Alternatively, invoke the installer with the -invPtrLoc parameter, andpass the absolute path to the oraInst.loc file that contains thealternative inventory location.
For example,
<Software_Location>/em13500_<platform>.bin -invPtrLoc<absolute_path_to_oraInst.loc>However, note that these parameters are supported only on UNIXplatforms, and not on Microsoft Windows platforms.
b. Select the appropriate operating system group name that will own the Oracleinventory directories. The group that you select must have write permissions on theOracle Inventory directories.
8. Click Next.
9. Check Prerequisites.
On the Prerequisite Checks screen, check the status of the prerequisite checks run bythe installation wizard, and verify whether your environment meets all the minimumrequirements for a successful installation.
The installation wizard runs the prerequisite checks automatically when you come to thisscreen. For example, it checks for the required operating system patches and operatingsystem packages.
The status of the prerequisite check can be either Warning, Failed, Succeeded, NotExecuted, In Progress, or Pending.
If some checks result in Warning or Failed status, then investigate and correct theproblems before you proceed with the installation. The screen provides details on whythe prerequisites failed and how you can resolve them. After you correct the problems,return to this screen and click Rerun to check the prerequisites again.
Chapter 4Installing the Enterprise Manager Using the Software Only with Plug-ins Method
4-11

Note:
You can choose to ignore the checks with Warning status by clickingIgnore. However, all package requirements must be met or fixed beforeproceeding any further.
10. Click Next.
Note:
If a prerequisite check fails reporting a missing package, then make sureyou install the required package, and click Rerun. The installation wizardvalidates the package name as well as the version, so make sure youinstall the packages of the minimum versions, see PackageRequirements for Enterprise Manager Cloud Controlin the OracleEnterprise Manager Cloud Control Basic Installation Guide.
11. Enter Installation Details.
On the Installation Details screen, do the following:
a. Enter the Middleware home where you want to install the OMS and other corecomponents. This is essentially the Oracle home.
Note:
• The Enterprise Manager Cloud Control Installation Wizardinstalls Oracle WebLogic Server 12c Release 2 (12.2.1.4.0) andJDK 1.8.0_261 by default in this middleware home directory youenter here. A preinstalled JDK or Oracle WebLogic Server is notsupported from 13c Release 1 onwards.
• Ensure that the number of characters in the middleware homepath does not exceed 70 characters for Unix platforms and 25characters for Microsoft Windows platforms.
For example, the middleware home path C:\Oracle\MW\EMcontaining only 15 characters is acceptable. However,C:\OracleSoftware\OracleMiddleware\OracleEnterpriseManager\OMS\newrelease\oms containing more than 25 characters isnot acceptable for Microsoft Windows platforms.
b. Enter the absolute path to the agent base directory, a location outside themiddleware home where the Management Agent can be installed. Forexample, if the middleware home is /u01/software/em13c/oraclehome, thenyou can specify the agent base directory as /u01/software/em13c/agentbasedir.Ensure that this location is empty and has write permission. Also ensure that itis always maintained outside the Oracle Middleware home.
Chapter 4Installing the Enterprise Manager Using the Software Only with Plug-ins Method
4-12

Note:
Ensure that the number of characters in the middleware home path doesnot exceed 70 characters for Unix platforms and 25 characters for MicrosoftWindows platforms.
For example, the middleware home path C:\Oracle\MW\EM containing only15 characters is acceptable. However,C:\OracleSoftware\OracleMiddleware\OracleEnterpriseManager\OMS\newrelease\oms containing more than 25 characters is not acceptable forMicrosoft Windows platforms.
c. Validate the name of the host where you want to configure the OMS.
The host name appears as a fully qualified name, or as a virtual host name if yourhost is configured with virtual machine. If the installation wizard was invoked with avalue for ORACLE_HOSTNAME, then this field is prepopulated with that name.
Accept the default host name, or enter a fully qualified domain name that isregistered in the DNS and is accessible from other network hosts, or enter an aliashost name that is defined in the /etc/hosts file on all the OMS instances at this site.
Note:
The host name must resolve to the local host or virtual host because thehost name is used for the local Oracle WebLogic Server as well as theOracle Management Service. Do not provide a remote host or a loadbalancer virtual host in this field. Do not enter an IP address. Do not useunderscores in the name. Short names are allowed, but you will see awarning, so Oracle recommends that you enter a fully qualified domainname instead.
12. Click Next.
13. Select Plug-Ins.
On the Select Plug-Ins screen, select the optional plug-ins you want to install from thesoftware kit (DVD, downloaded software) while installing the Enterprise Manager system.
Plug-Ins are pluggable entities that offer special management capabilities customized tosuit specific target types or solution areas.
The pre-selected rows are mandatory plug-ins that will be installed by default. Select theoptional ones you want to install.
Note:
If you select a deprecated plug-in that is supported only in the current release,but not in any of the future releases, then you are prompted to evaluate yourselection and decide whether or not you want to proceed with the deploymentof such plug-ins.
Chapter 4Installing the Enterprise Manager Using the Software Only with Plug-ins Method
4-13

Note:
During installation, if you want to install a plug-in that is not available inthe software kit, then refer to the point about installing additional plug-insin Section 4.4.1.1.1.
For details, see Using Advanced Script Options While Configuring theEnterprise Manager Software Using the Install Software Only Method inGraphical Mode.
14. Click Next.
Note:
• If you are connecting to an Oracle RAC database, and if you havespecified the virtual IP address of one of its nodes, then theinstallation wizard prompts you with a Connection String dialog andrequests you to update the connection string with information aboutthe other nodes that are part of the cluster. Update the connectionstring and click OK. If you want to test the connection, click TestConnection.
• If your Oracle RAC database is configured with Single Client AccessName (SCAN) listener, then you can enter a connection string usingthe SCAN listener.
• If you are connecting to an Oracle Database that is configured withCDB or PDB, then make sure you open the PDB before you providethe PDB details on this screen.
• If you see an error stating that the connection to the database failedwith ORA-01017 invalid user name/password, then follow thesesteps to resolve the issue:
(1) Verify that SYS password provided is valid.
(2) Verify that the database initialization parameterREMOTE_LOGIN_PASSWORDFILE is set to Shared or Exclusive.
(3) Verify that password file with the file name orapw<SID> exists inthe <ORACLE_HOME>/dbs directory of the database home. If it doesnot, create a password file using the ORAPWD command.
• For information on all the database initialization parameters that areset, and all the prerequisite checks that are run, and for instructionsto run the prerequisite checks manually if they fail, see InstallingOracle Enterprise Manager Cloud Control in the Oracle EnterpriseManager Cloud Control Basic Installation Guide.
15. Review and Install.
On the Review screen, review the details you provided for the selected installationtype.
• If you want to change the details, click Back repeatedly until you reach thescreen where you want to make the changes.
Chapter 4Installing the Enterprise Manager Using the Software Only with Plug-ins Method
4-14

• After you verify the details, if you are satisfied, click Install to begin the software onlyinstallation process.
16. Track the Progress.
On the Install Progress Details screen, view the overall progress (in percentage) of theinstallation.
17. End the Installation.
On the Finish screen, you should see information pertaining to the installation ofEnterprise Manager. Review the information and click Close to exit the installationwizard.
18. Run Scripts.
Once the software binaries are copied, you are prompted to run the allroot.sh script,and the oraInstRoot.sh script if this is the first Oracle product installation on the host.Open another window, log in as root, and manually run the scripts.
If you are installing on Microsoft Windows operating system, then you will NOT beprompted to run this script.
The install software only with plug-ins has been completed. Now you can proceed withthe next step, the configuration process.
Using Advanced Installer Options While Installing the Enterprise Manager Software Using theSoftware-Only Method in Graphical Mode
The following are some additional advanced options you can pass while invoking the installer:
• For Oracle Enterprise Manager Cloud Control 13c and later, GCDomain is the onlysupported domain name for creating the WebLogic domain. Customized WebLogicdomain names are not supported.
• If you want to set the Central Inventory, then pass the -invPtrLoc parameter. Thisparameter considers the path to a location where the inventory pointer file (oraInst.loc)is available. However, this parameter is supported only on UNIX platforms, and not onMicrosoft Windows platforms.
For example,
./em13500_<platform>.bin -invPtrLoc /scratch/OracleHomes/oraInst.loc• After you install the software binaries, you will configure the binaries. And after the
configuration ends successfully, by default, the OMS and the Management Agent startautomatically. If you do not want them to start automatically, then invoke the installationwizard with START_OMS and START_AGENT options, and set them to true or falsedepending on what you want to control.
Note:
Ensure that the START_OMS and START_AGENT options are used even when theConfigureGC.sh is invoked to configure the software binaries as described in Configuring the Enterprise Manager Cloud Control Software Only in GraphicalMode.
Chapter 4Installing the Enterprise Manager Using the Software Only with Plug-ins Method
4-15

Running the Root Script(For UNIX Only) After you install the software binaries of Enterprise Manager CloudControl, log in as a root user in a new terminal and run the following scripts:
• If this is the first Oracle product you just installed on the host, then run the oraInstroot.sh script from the inventory location specified in the oraInst.loc filethat is available in the Management Agent home.
For example, if the inventory location specified in the oraInst.loc file is $HOME/oraInventory, then run the following command:
$HOME/oraInventory/oraInstRoot.sh
Note:
If you are not a root user, then use SUDO to change to a root user. Forexample, run the following command:
/usr/local/bin/sudo $HOME/oraInventory/oraInstRoot.sh
• Run the allroot.sh script from the Oracle home of the OMS host:
$<ORACLE_HOME>/allroot.sh
Note:
If you are not a root user, then use SUDO to change to a root user. Forexample, run the following command:
/usr/local/bin/sudo $<ORACLE_HOME>/allroot.sh
Configuring the Enterprise Manager Cloud Control Software Only in GraphicalMode
To configure Enterprise Manager Cloud Control, follow these steps:
1. Invoke the Enterprise Manager Cloud Control Installation Wizard
Invoke the installation wizard in graphical mode. (On Unix, make sure you invokethe installation wizard as a user who belongs to the oinstall group you created.For information about creating operating system groups and users see, CreatingOperating System Groups and Users for Enterprise Manager Cloud Control in theOracle Enterprise Manager Cloud Control Basic Installation Guide.
$<ORACLE_HOME>/sysman/install/ConfigureGC.sh [-invPtrLoc<absolute_path_to_oraInst.loc>][ENABLE_SSL=true]For Microsoft Windows platforms, invoke ConfigureGC.bat script.
Optional Parameters:
• The -invPtrLoc parameter is supported only on UNIX platforms. Do not use iton Microsoft Windows platforms.
Chapter 4Installing the Enterprise Manager Using the Software Only with Plug-ins Method
4-16

• The ENABLE_SSL parameter is required if the repository database is configured withSSL authentication method and you want to configure the Enterprise Manageragainst it for secure communication. For example:$<ORACLE_HOME>/sysman/install/ConfigureGC.sh ENABLE_SSL=true
For more information about the SSL configuration and additional advanced options youcan pass while invoking the ConfigureGC script, see Using Advanced Script OptionsWhile Configuring the Enterprise Manager Software Using the Install Software OnlyMethod in Graphical Mode.
Note:
• While installing the software binaries as described in Installing theEnterprise Manager Cloud Control Software Only With Plug-ins in GraphicalMode, if you had passed the argument -invPtrLoc, then you need to passthe same argument in this step as well.
• The only way to configure the software only installation is to run theConfigureGC.sh (or ConfigureGC.bat on Microsoft Windows) script. DONOT run the individual configuration assistants to configure a software onlyinstallation. If you want to run the individual configuration assistants toconfigure the installation for some reason, then contact Oracle Support.
• If you have already configured a software only installation (the Oraclehome) using the ConfigureGC.sh script (or ConfigureGC.bat on MicrosoftWindows, then DO NOT try to reconfigure it—either using the script orusing the individual configuration assistants.
• If you accidentally exit the installer before clicking Retry, then do NOTrestart the installer to reach the same screen; instead, invoke therunConfig.pl script from the Oracle home to rerun the ConfigurationAssistant in silent mode. For Microsoft Windows platforms, invokerunConfig.pl script.
$<ORACLE_HOME>/oui/bin/runConfig.pl<absolute_path_to_Middleware_home>If the runConfig.pl script fails, then clean up your environment and redothe installation.
2. Select Installation Type
On the Installation Types screen, select Create a new Enterprise Manager system.
Chapter 4Installing the Enterprise Manager Using the Software Only with Plug-ins Method
4-17

3. Click Next.
4. Enter WebLogic Server Configuration Details
On the WebLogic Server Configuration Details screen, enter the credentials for theWebLogic Server user account and the Node Manager user account, and validatethe path to the Oracle Management Service instance base location. Ensure thatthe Oracle Management Service instance base location is outside the middlewarehome
Note:
Ensure that your password contains at least 8 characters without anyspaces, begins with a letter, and includes at least one numeric value.
Note:
Ensure that the Oracle Management Service instance base location isoutside the middleware home.
By default, the WebLogic Domain name is GCDomain, and the Node Manager nameis nodemanager. These are non-editable fields. The installer uses this informationfor creating Oracle WebLogic Domain and other associated components such asthe admin server, the managed server, and the node manager.
Chapter 4Installing the Enterprise Manager Using the Software Only with Plug-ins Method
4-18

A Node Manager enables you to start, shut down, or restart an Oracle WebLogic Serverinstance remotely, and is recommended for applications with high availabilityrequirements.
Note:
On Microsoft Windows, a Node Manager service is NOT created. This is anexpected behavior.
By default, the Oracle Management Service instance base location is gc_inst, which iscreated outside the Middleware home for storing all configuration details related to theOMS.
5. Click Next.
6. Enter Database Connection Details
On the Database Connection Details screen, do the following:
a. Provide the details of the existing certified database where the ManagementRepository needs to be created: database host name, database listener port,database service id (SID) and the password of the SYS database user.
If you have already created a database instance with a preconfigured ManagementRepository using the database templates offered by Oracle, then provide detailsabout that database instance.
The installer uses this information to connect to the existing database for creating theSYSMAN schema and plug-in schemas. If you provide details of a database that
Chapter 4Installing the Enterprise Manager Using the Software Only with Plug-ins Method
4-19

already has a preconfigured Management Repository, then the installer onlycreates plug-in schemas.
Note:
• For information about creating a database instance with apreconfigured Management Repository using the databasetemplates offered by Oracle, refer to Enterprise Manager BasicInstallation Guide.
• If you connect to a database instance that was created using the database template offered by Oracle, then note that thepassword assigned to the user accounts SYSMAN_MDS, SYSMAN_APM, and SYSMAN122140_OPSS, which werecreated while preconfiguring the Management Repository, areautomatically reset with the SYSMAN password you enter on theRepository Configuration Details screen).
• The PDB name will always be empdbrepos irrespective of theCDB name if the PDB is created with the above listed templates.However, if the CDB is created with <domain name> then thePDB will be empdbrepos.<domain name>. For more informationsee, Creating a Database Instance with PreconfiguredRepository Using Database Templates in the Oracle EnterpriseManager Cloud Control Basic Installation Guide.
• If you are providing the details of a pluggable database (PDB),then use the full service name instead of the alias. For example,pdb.example.com. If you are providing the details of a lone-pluggable database (Lone-PDB), then use the full service name.For example, pdb.example.com. If you are providing the detailsof a non-container database (Non-CDB), then use the SID.
• To identify whether your database is a certified database listed inthe certification matrix, access the certification matrix asdescribed in Accessing the Enterprise Manager CertificationMatrix in the Oracle Enterprise Manager Cloud Control BasicInstallation Guide.
• For information on all the database initialization parameters thatare set, and all the prerequisite checks that are run, and forinstructions to run the prerequisite checks manually if they fail,see Overview of the EM Prerequisite Kit in the Oracle EnterpriseManager Cloud Control Basic Installation Guide.
b. Select the deployment size from the Deployment Size list to indicate thenumber of targets you plan to monitor, the number of Management Agents youplan to have, and the number of concurrent user sessions you plan to have.
The prerequisite checks are run regardless of the selection you make, but thevalues to be set for the various parameters checked depend on the selectionyou make.
For more information on deployment sizes, the prerequisite checks that arerun, the database parameters that are set, and how you can modify the
Chapter 4Installing the Enterprise Manager Using the Software Only with Plug-ins Method
4-20

deployment size after installation, refer to What is a Deployment Size for EnterpriseManager Cloud Control in an Advanced Configuration?.
Table 4-1 describes each deployment size.
Table 4-1 Deployment Size
Deployment Size Targets Count Management AgentsCount
Concurrent User SessionCount
Small Up to 999 Up to 99 Up to 10
Medium Between 1000 and 9999 Between 100 and 999 Between 10 and 24
Large 10,000 or more 1000 or more Between 25 and 50
c. (Optional) This checkbox is only available if the parameter: ENABLE_SSL=true is usedwhen invoking the ConfigureGC script.
Check the Select to provide Truststore Details checkbox if SSL is configured.
Provide the database truststore file and the database truststore password for one-way or two-way SSL configuration.
d. (Optional) This checkbox is only available if the parameter: ENABLE_SSL=true is usedwhen invoking the ConfigureGC script.
Check the Select to provide Keystore Details checkbox if SSL is configured.
Provide the database keystore file and the database keystore password for two-waySSL configuration.
PKCS12 wallet file format is supported.
7. Click Next.
Note:
If the database you are connecting to is a database instance created with apreconfigured Management Repository using the database templates offered byOracle, then make sure the deployment size you select on this screen matcheswith the deployment size you selected in the Oracle Database ConfigurationAssistant (DBCA) while creating the database instance.
If you want to select a deployment size different from the deployment size youhad selected while creating the database instance using DBCA, then do one ofthe following:
• Select the deployment size of your choice on this screen, and click Next.When you see errors, fix the parameters in the database, then return to thisscreen to continue with the installation. To automatically fix the parametersusing Oracle-supplied SQL scripts, see the Enterprise Manager BasicInstallation Guide.
• Minimize the installer, create another database instance with a template forthe desired deployment size, then return to this screen and select thematching deployment size. For instructions, see the Enterprise ManagerBasic Installation Guide.
8. Check the Database Prerequisites.
Chapter 4Installing the Enterprise Manager Using the Software Only with Plug-ins Method
4-21

On the Database Prerequisite Checks screen, check the status of the databaseprerequisites performed by the installation wizard, and verify whether yourenvironment meets all the minimum requirements for a successful installation.Then click Next.
The installation wizard runs the database prerequisite checks automatically whenyou come to this screen. The status of the prerequisite check can be eitherWarning, Failed or Succeeded.
If some checks result in Warning or Failed status, then investigate and correct theproblems before you proceed with the installation. The screen provides details onwhy the prerequisites failed and how you can resolve them. After you correct theproblems, return to this screen and click Check Again to check the databaseprerequisites again.
• If the Auto Fixable column is Yes, you can click on Auto Fix and the installerwill fix the issue automatically.
• If the recommendation indicates that the Correction Type is Manual, you needto fix the issue manually.
After you complete reviewing and fixing the prerequisites results, click Next.
The Information pop-up window is displayed.
Review the important information provided and then click OK.
9. Click Next.
10. Enter Enterprise Manager Configuration Details
On the Repository Configuration Details screen, do the following:
a. For SYSMAN Password, enter and confirm a password for creating theSYSMAN user account.
The SYSMAN user account is used for creating the SYSMAN schema, whichholds most of the relational data used in managing Enterprise Manager CloudControl. SYSMAN is also the super administrator for Enterprise ManagerCloud Control.
Note:
• Ensure that your password contains at least 8 characters withoutany spaces, begins with a letter, and includes at least onenumeric value.
• If you connect to a database instance that was created using the database template offered by Oracle, then note that thepassword assigned to the user accounts SYSMAN_MDS,SYSMAN_APM, and SYSMAN122140_OPSS, which werecreated while preconfiguring the Management Repository, areautomatically reset with the SYSMAN password you enter onthis screen.
b. For Agent Registration Password, enter and confirm a password forregistering the new Management Agents that join the Enterprise Managersystem.
Chapter 4Installing the Enterprise Manager Using the Software Only with Plug-ins Method
4-22

Note:
Ensure that your password contains at least 8 characters without anyspaces, begins with a letter, and includes at least one numeric value.
c. For Management Tablespace, enter the absolute path to the location where the datafile for management tablespace (mgmt.dbf) can be stored. The installer uses thisinformation for storing data about the monitored targets, their metrics, and so on.Ensure that the specified path leads up to the file name.
For example, /u01/oracle/prod/oradata/mgmt.dbfIf the database is on Oracle Automatic Storage Management (Oracle ASM), then thepath must look like: +<disk_group>/<sid>/<subdir_path_if_any>/<datafilename>.dbfFor example, +DATA/oemrsp01d/datafile/mgmt.dbf
d. For Configuration Data Tablespace, enter the absolute path to the location wherethe data file for configuration data tablespace (mgmt_ecm_depot1.dbf) can be stored.This is required for storing configuration information collected from the monitoredtargets. Ensure that the specified path leads up to the file name.
For example, /u01/oracle/prod/oradata/mgmt_ecm_depot1.dbfIf the database is on Oracle Automatic Storage Management (Oracle ASM), then thepath must look like: +<disk_group>/<sid>/<subdir_path_if_any>/<datafilename>.dbfFor example, +DATA/oemrsp01d/datafile/mgmt_ecm_depot1.dbf
e. For JVM Diagnostics Data Tablespace, enter the absolute path to a location wherethe data file for JVM Diagnostics data tablespace (mgmt_deepdive.dbf) can bestored. Ensure that the specified path leads up to the file name. Enterprise ManagerCloud Control requires this data file to store monitoring data related to JVMDiagnostics and Application Dependency Performance (ADP).
For example, /u01/oracle/prod/oradata/mgmt_deepdive.dbfIf the database is on Oracle Automatic Storage Management (Oracle ASM), then thepath must look like: +<disk_group>/<sid>/<subdir_path_if_any>/<datafilename>.dbfFor example, +DATA/oemrsp01d/datafile/mgmt_deepdive.dbf
11. Click Next.
12. Configure Shared Locations.
On the Enterprise Manager Shared Location Details screen, do the following:
a. Configure Oracle Software Library. Oracle Software Library (Software Library) is afeature within Enterprise Manager Cloud Control that acts as a repository to storesoftware entities such as software patches, virtual appliance images, reference goldimages, application software, and their associated directive scripts. You require theSoftware Library for operations such as provisioning and patching.
When checking Configure Oracle Software Library check box, enter the absolutepath leading up to a unique directory name. By default, the storage location that isconfigured is the OMS Shared File System location, Oracle strongly recommendsthat the location you enter is a mounted location on the OMS host. This helps when
Chapter 4Installing the Enterprise Manager Using the Software Only with Plug-ins Method
4-23

you install additional OMS instances that can use the same mounted SoftwareLibrary location.
Note:
Software Library supports two types of storage locations, mainlyOMS Shared File System location and OMS Agent File Systemlocation. To understand these storage locations, see Upload FileLocations in the Oracle Enterprise Manager Cloud ControlAdministrator's Guide..
For some reason, if you are unable to configure an OMS Shared FileSystem location, then configure an OMS Agent Storage location. Forinstructions, see Configuring an OMS Agent File system Location inthe Oracle Enterprise Manager Cloud Control Administrator's Guide.
Note:
• Configuring the Software Library at the time of installation isoptional. Even if you do not select this option and configure itnow, your installation will succeed. You always have the optionof configuring the Software Library later using the Initial SetupConsole or the Software Library Administration Console(available within the Enterprise Manager Cloud ControlConsole). However, Oracle strongly recommends that you selectthis option and configure it at the time of installation so that theinstaller can automatically configure it for you. This saves timeand effort, and enables you to install an additional OMS,immediately after the first OMS, and configure it to use the sameSoftware Library location.
• Once the Software Library is configured, you can view thelocation details in the Software Library Administration Console.To access this console, from the Setup menu, selectProvisioning and Patching, then select Software Library.
13. Click Next.
14. Review Port Configuration Details
On the Port Configuration Details screen, customize the ports to be used forvarious components.
You can enter an available custom port that is either within or outside the portrange recommended by Oracle.
To verify if a port is free, run the following command:
• On Unix:
netstat -anp | grep <port no>• On Microsoft Windows:
netstat -an|findstr <port_no>
Chapter 4Installing the Enterprise Manager Using the Software Only with Plug-ins Method
4-24

However, the custom port must be greater than 1024 and lesser than 65535.Alternatively, if you already have the ports predefined in a staticports.ini file and if youwant to use those ports, then click Import staticports.ini file and select the file.
Note:
If the staticports.ini file is passed during installation, then by default, theports defined in the staticports.ini file are displayed. Otherwise, the firstavailable port from the recommended range is displayed.
The staticports.ini file is available in the following location:
<Software_Extracted_Location>/response
15. Click Next.
16. Review and Configure
On the Review screen, review the details you provided for the selected installation type.
• If you want to change the details, click Back repeatedly until you reach the screenwhere you want to make the changes.
• After you verify the details, click Configure to begin the configuration process.
17. Track the Configuration Progress
On the Configuration Details screen, view the overall progress (in percentage) of theconfiguration.
Note:
• If a configuration assistant fails, the installer stops and none of thesubsequent configuration assistants are run. Resolve the issue and retrythe configuration assistant.
• If you accidentally exit the installer before clicking Retry, then do NOTrestart the installer to reach the same screen; instead, invoke therunConfig.pl script from the Oracle home of the OMS host to rerun theconfiguration assistant in silent mode. For Microsoft Windows platforms,invoke the runConfig.pl script.
$<ORACLE_HOME>/oui/bin/runConfig.pl<absolute_path_to_Middleware_home>If the runConfig.pl script fails, then clean up your environment and redothe installation.
18. End the Installation
On the Finish screen, you should see information pertaining to the configuration of theEnterprise Manager. Review the information and click Close to exit the installationwizard.
Chapter 4Installing the Enterprise Manager Using the Software Only with Plug-ins Method
4-25

Note:
If a Server Load Balancer (SLB) is configured in your environment, andthe upload port is locked, then configure the SLB for JVMD Engines, andthen secure the OMS.
If an SLB is configured in your environment, but the upload port isunlocked, then decide whether you want to route the JVMD trafficthrough the SLB. If you do, then configure the SLB for JVMD Engines,and then secure the OMS.
To secure the OMS, run the following command from the bin directory ofthe Oracle home of the OMS host:
<ORACLE_HOME>/bin/emctl secure oms -host <SLB host>-slb_jvmd_http_port <JVMD_SLB_HTTP_Port> -slb_jvmd_https_port<JVMD_SLB_HTTPS_Port> -sysman_pwd <system_password> -reg_pwd<agent_registration_password>
Apply Release Update
If there's a Release Update available and you want to apply the Release Update ontop of the 13c Enterprise Manager main release, you can do it at this point of theinstallation process. For details, see Apply Release Update.
Using Advanced Script Options While Configuring the Enterprise Manager Software Usingthe Install Software Only Method in Graphical Mode
The following are some additional advanced options you can pass while invoking theConfigureGC script (ConfigureGC.sh on UNIX/Linux or ConfigureGC.bat on MicrosoftWindows):
• For Oracle Enterprise Manager Cloud Control 13c and later, GCDomain is the onlysupported domain name for creating the WebLogic domain. Customized WebLogicdomain names are not supported.
• SSL configuration support:Starting with Enterprise Manager 13c Release 5 Update 8 (13.5.0.8) or above,SSL configuration is supported.
If the repository database is configured with one-way or two-way SSLauthentication, you can configure the Enterprise Manager against the SSL-enabled repository database when configuring the Enterprise Manager CloudControl software only in graphical or silent mode.
Note:
PKCS12 is the wallet file format supported for SSL configuration.
To enable SSL configuration authentication in Enterprise Manager usingconfiguring the Enterprise Manager Cloud Control software only in graphicalmode, run the ConfigureGC script using the ENABLE_SSL=true option.
Chapter 4Installing the Enterprise Manager Using the Software Only with Plug-ins Method
4-26

– For Linux:
ConfigureGC.sh ENABLE_SSL=true
– For Windows:
ConfigureGC.bat ENABLE_SSL=true
The graphical configuration installer has multiple steps. During the DatabaseConnection Details step, enter the SSL information applicable to your environment. Forone-way SSL configuration, you only need to provide the Truststore location andpassword information. For details, see Configuring the Enterprise Manager Cloud ControlSoftware Only in Graphical Mode.
• After the configuration ends successfully, the OMS and the Management Agent startautomatically. If you do not want them to start automatically, then invoke the script withSTART_OMS and START_AGENT options, and set them to true or false depending on whatyou want to control.
Note:
Ensure that the START_OMS and START_AGENT options are used even when theinstallation wizard was invoked to install the software binaries as described in Install Software Only With Plug-ins and Configure Later in Graphical Mode.
For example, if you do not want the Management Agent to start automatically, then runthe following command:
$<ORACLE_HOME>/sysman/install/ConfigureGC.sh START_OMS=trueSTART_AGENT=falseTo understand the limitations involved with this advanced option, see Limitations with theAdvanced Options Supported for Installing an Enterprise Manager System in SilentMode.
Apply Release Update(Recommended) If you want to apply a Release Update, previously known as Bundle Patch,that is available on top of Enterprise Manager 13c Release 5 main release on an OracleHome, you need to use the command:
omspatcher apply -bitonly.
Use the latest version of the omspatcher as suggested in the Release Update Readme file,and keep a backup of the previous omspatcher.
Perform the following steps:
Note:
Since omspatcher is located in ‘$ORACLE_HOME/OMSPatcher’, ensure that thedirectory is included in the path before running the commands.
Chapter 4Installing the Enterprise Manager Using the Software Only with Plug-ins Method
4-27

1. Execute omspatcher in bitonly mode for the Release Update.
For example,
$ORACLE_HOME/OMSPatcher/omspatcher apply -bitonlyOMSPatcher Automation ToolCopyright (c) 2017, Oracle Corporation. All rights reserved.
OMSPatcher version : 13.9.4.4.0OUI version : 13.9.4.0.0Running from : $ORACLE_HOMELog file location : $ORACLE_HOME/cfgtoollogs/omspatcher/opatch<timestamp>_1.log
OMSPatcher log file: $ORACLE_HOME/cfgtoollogs/omspatcher/1111141/omspatcher_<timestamp>_deploy.log
WARNING: OMSPatcher has been invoked with 'bitonly' option but the System patch provided has deployment metadata. Invocation in 'bitonly' mode will prevent OMSPatcher from deploying artifacts. Do you want to proceed? [y|n]yUser Responded with: Y
Running apply prerequisite checks for sub-patch(es) "1111141" and Oracle Home "$ORACLE_HOME"...Sub-patch(es) "1111141" are successfully analyzed for Oracle Home "$ORACLE_HOME"To continue, OMSPatcher will do the following:[Patch and deploy artifacts] : Do you want to proceed? [y|n]yUser Responded with: YApplying sub-patch(es) "1111141"Please monitor log file: $ORACLE_HOME/cfgtoollogs/opatch/opatch<timestamp>_1.log
Complete Summary================All log file names referenced below can be accessed from the directory "$ORACLE_HOME/cfgtoollogs/omspatcher/<timestamp>_SystemPatch_1111141_1"Patching summary:-----------------Binaries of the following sub-patch(es) have been applied successfully:Featureset Sub-patches Log file ---------- ----------- -------- oracle.sysman.top.oms_13.5.0.0.0 1111141 1111141_opatch<timestamp>_1.log--------------------------------------------------------------------------------The following warnings have occurred during OPatch execution:
Chapter 4Installing the Enterprise Manager Using the Software Only with Plug-ins Method
4-28

1) OMSPatcher has been invoked with 'bitonly' option but the System patch provided has deployment metadata.Invocation in 'bitonly' mode will prevent OMSPatcher from deploying artifacts.--------------------------------------------------------------------------------OMSPatcher Session completed with warnings.Log file location:$ORACLE_HOME/cfgtoollogs/omspatcher/1111141/omspatcher_<timestamp>_deploy.logOMSPatcher completed with warnings.
2. Run omspatcher lspatches command to list all the sub-patches applied in Step 1.
Syntax: omspatcher lspatches | grep "<RU Number / Id >"
For example,
************omspatcher Trace for reference$omspatcher lspatches | grep 30684860oracle.help.ohw.rcf/12.2.1.3.0 Core N/A 30684860 ADF BUNDLE PATCH 12.2.1.3.0(ID:191219.0902.S)oracle.jrf.adfrt.javatools/12.2.1.3.0 Core N/A 30684860 ADF BUNDLE PATCH 12.2.1.3.0(ID:191219.0902.S)oracle.jrf.adfrt/12.2.1.3.0 Core N/A 30684860 ADF BUNDLE PATCH 12.2.1.3.0(ID:191219.0902.S)oracle.help.ohw.share/12.2.1.3.0 Core N/A 30684860 ADF BUNDLE PATCH 12.2.1.3.0(ID:191219.0902.S)oracle.jrf.adfrt.help/12.2.1.3.0 Core N/A 30684860 ADF BUNDLE PATCH 12.2.1.3.0(ID:191219.0902.S)
Note:
The last column lists all the sub-patches applied with the Bundle Patch.
3. Run omspatcher commit command with any one applied sub-patch-id.
Note:
The output of Step 2 lists all the applied sub-patches. You can pick any sub-patch id and run omspatcher commit command.
Syntax: omspatcher commit -id <subpatch_id>
For example,
OMSPatcher/omspatcher commit -id 30684860
Chapter 4Installing the Enterprise Manager Using the Software Only with Plug-ins Method
4-29

OMSPatcher Automation ToolCopyright (c) 2017, Oracle Corporation. All rights reserved.
OMSPatcher version : 13.9.4.4.0OUI version : 13.9.4.0.0Running from : /u01/XXXLog file location : /u01/XXX/cfgtoollogs/omspatcher/opatch<timestamp>_1.log
OMSPatcher will now mark the patch "30684860" as auto-executed.Log file location: /u01/XXX/cfgtoollogs/omspatcher/opatch<timestamp>_1.logOMSPatcher succeeded.
Performing Postconfiguration Tasks After Configuring the Enterprise ManagerCloud Control Software Only in Graphical Mode
Perform the post-install steps as described in Performing Postinstallation Tasks AfterInstalling an Enterprise Manager System chapter from the Enterprise Manager BasicInstallation Guide.
Install Software Only With Plug-ins and Configure Later in Silent ModeThis section explains how you can install only the software binaries of EnterpriseManager Cloud Control at one point in silent mode, and configure the EnterpriseManager installation at a later point.
SSL Support: Starting with Enterprise Manager 13c Release 5 Update 8 (13.5.0.8) orabove, you can enable one-way or two-way Secure Sockets Layer (SSL) mode duringthe Configuring the Enterprise Manager Cloud Control Software Only in Silent Modestep when running the ConfigureGC script.
Note:
PKCS12 wallet file format is supported.
This section covers the following:
• Installing the Enterprise Manager Cloud Control Software Only with Plug-ins inSilent Mode
• Running the Root Script
• Configuring the Enterprise Manager Cloud Control Software Only in Silent Mode
• Performing Postconfiguration Tasks After Configuring the Enterprise ManagerCloud Control Software Only in Silent Mode
Chapter 4Installing the Enterprise Manager Using the Software Only with Plug-ins Method
4-30

Installing the Enterprise Manager Cloud Control Software Only with Plug-ins in SilentMode
To install only the software binaries of Enterprise Manager Cloud Control in silent mode,follow these steps:
Note:
Oracle recommends you to run the EM Prerequisite Kit before invoking the installerto ensure that you meet all the repository requirements beforehand. Even if you donot run it manually, the installer anyway runs it in the background while installing theproduct. However, running it manually beforehand sets up your ManagementRepository even before you can start the installation or upgrade process. Forinformation on the kit, to understand how to run it, and to know about theprerequisite checks it runs, see the Enterprise Manager Basic Installation Guide.
However, if you plan to use a database instance that was created with apreconfigured Management Repository using the database templates offeredby Oracle, then make sure you pass the following parameter while invokingthe EM Prerequisite Kit.
-componentVariables repository:EXECUTE_CHECKS_NOSEED_DB_FOUND:false
1. Invoke the installer and generate the response file you need to use for performing a silentsoftware-only installation.
./em13500_<platform>.bin -getResponseFileTemplates -outputLoc<absolute_path_to_a_directory_to_store_the_generated_response_file>
Note:
The command generates multiple response files. You must use only thesoftwareOnlyWithPlugins_install.rsp file for this silent software-onlyinstallation.
2. Edit the softwareOnlyWithPlugins_install.rsp file and enter appropriate values for thevariables described in Table 4-2.
3. Invoke the installer in silent mode and pass the updated response file.
(On Unix, make sure you invoke the installer as a user who belongs to the oinstallgroup you created. For information about creating operating system groups and users,see the Enterprise Manager Basic Installation Guide.)
• If this is the first Oracle product you are installing on the host, then run the followingcommand:
./em13500_<platform>.bin -silent -responseFile<absolute_path_to_the_directory_where_the_generated_and_updated_response_file_is_stored>/softwareOnlyWithPlugins_install.rsp [-invPtrLoc<absolute_path_to_oraInst.loc>]
Chapter 4Installing the Enterprise Manager Using the Software Only with Plug-ins Method
4-31

• Otherwise, run the following command:
./em13500_<platform>.bin -silent -responseFile<absolute_path_to_the_directory_where_the_generated_and_updated_response_file_is_stored>/softwareOnlyWithPlugins_install.rsp
Note:
• To invoke the installation wizard on UNIX platforms, runem13500_<platform>.bin. To invoke on Microsoft Windowsplatforms, run setup_em13500_win64.exe.
• The installer requires about 14 GB of hard disk space in thetemporary directory. If your temporary directory does not have thisspace, then pass the -J-Djava.io.tmpdir parameter and provide analternative directory where there is 14 GB of space.
The directory specified by this parameter will also be used as thelocation for the Provisioning Advisor Framework (PAF) stagingdirectory, which is used for copying the Software Library entitiesrelated to the deployment procedures. The PAF staging directory isused only for provisioning activities — entities are copied for adeployment procedure, and then, deleted once the deploymentprocedure ends.
For example,
./em13500_linux64.bin -J-Djava.io.tmpdir=/u01/software/em13c/stage/
• For information about the additional, advanced options you can passwhile invoking the installer, refer to Advanced Installer OptionsSupported for Installing an Enterprise Manager System in SilentMode.
Editing the softwareOnlyWithPlugins_install.rsp Response File for Installing the EnterpriseManager Using the Software Only Method in Silent Mode
Table 4-2 describes what variables you must edit and how you must edit them in thesoftwareOnlyWithPlugins_install.rsp response file for installing the softwarebinaries.
Chapter 4Installing the Enterprise Manager Using the Software Only with Plug-ins Method
4-32

Table 4-2 Editing the softwareOnlyWithPlugins_install.rsp Response File forInstalling the Enterprise Manager Software Using the Software Only Method in SilentMode
Parameter Data Type DoubleQuoteRequired forValues?
Description
UNIX_GROUP_NAME
String Yes (Required only when central inventory does notexist) Enter the name of the UNIX group you belongto.
For example, "dba".Note: This parameter is supported only on UNIXplatforms, and not on Microsoft Windows platforms.
INSTALL_UPDATES_SELECTION
String No By default, this variable is set to skip indicating thatthe software updates will not be installed duringinstallation.
Enter skip if you want to skip the software updates.
Enter staged if you have already downloaded thesoftware updates and you want to install thesoftware updates from a staged location.
For example,INSTALL_UPDATES_SELECTION=skip
STAGE_LOCATION
String Yes (Required only ifINSTALL_UPDATES_SELECTION=staged)
Enter the absolute path of the stage location for thesoftware updates.
MYORACLESUPPORT_USERNAME_FOR_SOFTWAREUPDATES
String Yes (Required only ifINSTALL_UPDATES_SELECTION=download)
Enter the username of the My Oracle Supportaccount to download the updates during theinstallation.
If you want to download the updates during theinstallation, make sure you provideMYORACLESUPPORT_USERNAME_FOR_SOFTWAREUPDATES andMYORACLESUPPORT_PASSWORD_FOR_SOFTWAREUPDATES and setINSTALL_UPDATES_SELECTION="download".
MYORACLESUPPORT_PASSWORD_FOR_SOFTWAREUPDATES
String Yes (Required only ifINSTALL_UPDATES_SELECTION=download)
Enter the password of the My Oracle Support useraccount to download the updates during theinstallation.
If you want to download the updates during theinstallation, make sure you provideMYORACLESUPPORT_USERNAME_FOR_SOFTWAREUPDATES andMYORACLESUPPORT_PASSWORD_FOR_SOFTWAREUPDATES and setINSTALL_UPDATES_SELECTION="download".
Chapter 4Installing the Enterprise Manager Using the Software Only with Plug-ins Method
4-33

Table 4-2 (Cont.) Editing the softwareOnlyWithPlugins_install.rsp Response File forInstalling the Enterprise Manager Software Using the Software Only Method in SilentMode
Parameter Data Type DoubleQuoteRequired forValues?
Description
INVENTORY_LOCATION
String Yes (Required only when central inventory does notexist) Enter the absolute path to the CentralInventory. Ensure that you have read, write, andexecute permissions on the default inventorydirectory.
For example, "/u01/oracle/oraInventory".Note: This parameter is supported only on UNIXplatforms, and not on Microsoft Windows platforms.
ORACLE_MIDDLEWARE_HOME_LOCATION
String Yes Enter the location where you want the installer toinstall Oracle WebLogic Server and JavaDevelopment Kit (JDK). Ensure that the middlewarelocation has write permission.
For example, "/u01/software/em13c/oraclehome".
Note: Ensure that the number of characters in themiddleware home path does not exceed 70characters for Unix platforms and 25 characters forMicrosoft Windows platforms.
For example, the middleware home pathC:\sw\em13c\oraclehome containing only 22characters is acceptable. However,C:\OracleSoftware\OracleMiddleware\OracleEnterpriseManager\OMS\newrelease\omscontaining more than 25 characters is notacceptable for Microsoft Windows platforms.
AGENT_BASE_DIR
String Yes Enter the absolute path to the agent base directory,a location outside the Oracle Middleware homewhere the Management Agent can be installed.
For example, "/u01/software/em13c/agentbasedir".Ensure that this location is empty and has writepermission. Also ensure that it is always maintainedoutside the Oracle Middleware home.
Note: (Only for Microsoft Windows) Ensure that thenumber of characters in the agent base directorypath does not exceed 25 characters. For example,the agent base directory pathC:\sw\em13c\agntbsedir containing only 22characters is acceptable. However,C:\Oracle\ManagementAgent\12c\newcontaining more than 25 characters is notacceptable.
Chapter 4Installing the Enterprise Manager Using the Software Only with Plug-ins Method
4-34

Table 4-2 (Cont.) Editing the softwareOnlyWithPlugins_install.rsp Response File forInstalling the Enterprise Manager Software Using the Software Only Method in SilentMode
Parameter Data Type DoubleQuoteRequired forValues?
Description
ORACLE_HOSTNAME
String Yes Enter a fully qualified domain name that isregistered in the DNS and is accessible from othernetwork hosts, or enter an alias host name that isdefined in the /etc/hosts file on all the OMSinstances at this site.
The host name must resolve to the local hostbecause the host name is used for the local OracleWebLogic Server as well as the OracleManagement Service. Do not provide a remote hostor a load balancer virtual host in this field. Do notenter an IP address. Do not use underscores in thename. Short names are allowed, but you will see awarning, so Oracle recommends that you enter afully qualified domain name instead.
If you do not mention the host name, the installationwizard will proceed further, honoring the host nameit automatically detects for that host.
PLUGIN_SELECTION={}
String List Yes Enter the list of new plug-ins to be deployed duringinstallation.
It contains a list of strings and each string is thePLUGIN_ID of that plugin.
For example,PLUGIN_SELECTION={'oracle.sysman.empa','oracle.sysman.vt'}
b_upgrade Boolean No For install software only, set it to falseb_upgrade=false
EM_INSTALL_TYPE
String No For install software only, set it to NOSEEDEM_INSTALL_TYPE=NOSEED
CONFIGURATION_TYPE
String No For install software only, set it to LATERCONFIGURATION_TYPE=LATER
Running the Root Script(For UNIX Only) After you install the software binaries of Enterprise Manager Cloud Control,log in as a root user in a new terminal and run the following scripts:
• If this is the first Oracle product you just installed on the host, then run the oraInstroot.sh script from the inventory location specified in the oraInst.loc file that isavailable in the Management Agent home.
For example, if the inventory location specified in the oraInst.loc file is $HOME/oraInventory, then run the following command:
$HOME/oraInventory/oraInstRoot.sh
Chapter 4Installing the Enterprise Manager Using the Software Only with Plug-ins Method
4-35

Note:
If you are not a root user, then use SUDO to change to a root user. Forexample, run the following command:
/usr/local/bin/sudo $HOME/oraInventory/oraInstRoot.sh
• Run the allroot.sh script from the OMS home:
$<ORACLE_HOME>/allroot.sh
Note:
If you are not a root user, then use SUDO to change to a root user. Forexample, run the following command:
/usr/local/bin/sudo $<ORACLE_HOME>/allroot.sh
Configuring the Enterprise Manager Cloud Control Software Only in SilentMode
To configure only the software binaries of Enterprise Manager Cloud Control, followthese steps:
1. Access the new_install.rsp file that you generated in Step (1) of Installing theEnterprise Manager Cloud Control Software Only with Plug-ins in Silent Mode. Editthat file and enter appropriate values for the variables described in Table 4-3.
2. Configure the software binaries by invoking the ConfigureGC.sh script (orConfigureGC.bat on Microsoft Windows) passing the response file you edited inthe previous step:
$<ORACLE_HOME>/sysman/install/ConfigureGC.sh -silent -responseFile<absolute_path_to_the_directory_where_the_generated_and_updated_response_file_is_stored>/new_install.rsp [-invPtrLoc<absolute_path_to_oraInst.loc>] [ENABLE_SSL=true]Optional Parameters:
• The -invPtrLoc parameter is supported only on UNIX platforms, and not onMicrosoft Windows platforms.
• The ENABLE_SSL parameter is required if the repository database is configuredwith SSL authentication and you want to configure the Enterprise Manageragainst it for secure communication. For example:
$<ORACLE_HOME>/sysman/install/ConfigureGC.sh -silent -responseFile <absolute_path_to_the_directory_where_the_generated_and_updated_response_file_is_stored>/new_install.rsp ENABLE_SSL=true
Before running the ConfigureGC.sh script, ensure the response file has beenupdated with the SSL parameters and values applicable to your environment.
Chapter 4Installing the Enterprise Manager Using the Software Only with Plug-ins Method
4-36

For information about response file parameters, see Editing the new_install.rspResponse File for Configuring the Enterprise Manager Software Using the SoftwareOnly Method in Silent Mode.
For more information about SSL configuration and additional advanced options youcan pass while invoking the ConfigureGC.sh script, see Using Advanced ScriptOptions While Configuring the Enterprise Manager Software Using the InstallSoftware Only Method in Silent Mode.
Note:
• While installing the software binaries as described in Installing theEnterprise Manager Cloud Control Software Only with Plug-ins in SilentMode, if you had passed the argument -invPtrLoc, then pass the sameargument here as well.
• The only way to configure a software only installation is to run theConfigureGC.sh script (or ConfigureGC.bat on Microsoft Windows). DONOT run the individual configuration assistants to configure a software onlyinstallation. If you want to run the individual configuration assistants toconfigure the installation for some reason, then contact Oracle Support.
• If you have already configured a software only installation (the Oraclehome) using the ConfigureGC.sh script (or ConfigureGC.bat on MicrosoftWindows), then DO NOT try to reconfigure it—either using the script orusing the individual configuration assistants.
• If you connect to a database instance that was created using the databasetemplate offered by Oracle, then you will be prompted that the databaseparameters need to be modified to suit the deployment size you selected.This is because the templates are essentially designed for simpleinstallation, and the database parameters are set as required for simpleinstallation. Since it is used for advanced installation, the parameters mustbe set to different values. You can confirm the message to proceed further.The installation wizard will automatically set the parameters to the requiredvalues.
Server Load Balancer Considerations:
If a Server Load Balancer (SLB) is configured in your environment, and the upload port islocked, then configure the SLB for JVMD Engines, and then secure the OMS.
If an SLB is configured in your environment, but the upload port is unlocked, then decidewhether you want to route the JVMD traffic through the SLB. If you do, then configure theSLB for JVMD Engines, and then secure the OMS.
To secure the OMS, run the following command from the bin directory of the Oracle home ofthe OMS host:
<ORACLE_HOME>/bin/emctl secure oms -host <SLB host>-slb_jvmd_http_port <JVMD_SLB_HTTP_Port> -slb_jvmd_https_port <JVMD_SLB_HTTPS_Port> -sysman_pwd <system_password> -reg_pwd <agent_registration_password>
Chapter 4Installing the Enterprise Manager Using the Software Only with Plug-ins Method
4-37

<ORACLE_HOME>/bin/emctl secure oms -host <SLB host>-slb_jvmd_http_port<JVMD_SLB_HTTP_Port> -slb_jvmd_https_port <JVMD_SLB_HTTPS_Port> -sysman_pwd <system_password> -reg_pwd <agent_registration_password>
Other Considerations:
• If a prerequisite check fails reporting a missing package, then make sure youinstall the required package, and retry the installation. The installer validates thepackage name as well as the version, so make sure you install the minimumversion of the packages mentioned in the Enterprise Manager Basic InstallationGuide. To understand the logic the installer uses to verify these packages, see theEnterprise Manager Basic Installation Guide.
• If any repository-related prerequisite check fails, then run the check manually. Forinstructions, see the appendix on EM Prerequisite Kit in the Enterprise ManagerBasic Installation Guide.
• If a configuration assistant fails, the installer stops and none of the subsequentconfiguration assistants are run. Resolve the issue and rerun the configurationassistant.
Editing the new_install.rsp Response File for Configuring the Enterprise Manager SoftwareUsing the Software Only Method in Silent Mode
Table 4-3 describes what variables you must edit and how you must edit them in thenew_install.rsp file for configuring the software binaries.
Table 4-3 Editing the new_install.rsp Response File for Configuring the Enterprise ManagerSoftware Using the Software Only Method in Silent Mode
Parameter Data Type Double QuotesRequired forValue?
Description
UNIX_GROUP_NAME
String Yes (Required only when central inventory does not exist) Enter thename of the UNIX group you belong to.
For example, "dba"Note: This parameter is supported only on UNIX platforms,and not on Microsoft Windows platforms.
INVENTORY_LOCATION
String Yes (Required only when central inventory does not exist) Enter theabsolute path to the Central Inventory. Ensure that you haveread, write, and execute permissions on the default inventorydirectory.
For example, "/scratch/oracle/oraInventory".Note: This parameter is supported only on UNIX platforms,and not on Microsoft Windows platforms.
INSTALL_UPDATES_SELECTION
String Yes By default, this variable is set to skip indicating that thesoftware updates will not be installed during installation.
Enter skip if you want to skip the software updates.
Enter staged if you have already downloaded the softwareupdates and you want to install the software updates from astaged location.
Chapter 4Installing the Enterprise Manager Using the Software Only with Plug-ins Method
4-38

Table 4-3 (Cont.) Editing the new_install.rsp Response File for Configuring the EnterpriseManager Software Using the Software Only Method in Silent Mode
Parameter Data Type Double QuotesRequired forValue?
Description
STAGE_LOCATION
String Yes (Required only if INSTALL_UPDATES_SELECTION=staged)
Enter the absolute path of the stage location for the softwareupdates.
MYORACLESUPPORT_USERNAME_FOR_SOFTWAREUPDATES
String Yes (Required only ifINSTALL_UPDATES_SELECTION="download")
Enter the username of the My Oracle Support user account todownload the updates during the installation.
If you want to download the updates during the installation,make sure you provideMYORACLESUPPORT_USERNAME_FOR_SOFTWAREUPDATES andMYORACLESUPPORT_PASSWORD_FOR_SOFTWAREUPDATES, andset INSTALL_UPDATES_SELECTION="download".
MYORACLESUPPORT_PASSWORD_FOR_SOFTWAREUPDATES
String Yes (Required only ifINSTALL_UPDATES_SELECTION="download")
Enter the password of the My Oracle Support user account todownload the updates during the installation.
If you want to download the updates during the installation,make sure you provideMYORACLESUPPORT_USERNAME_FOR_SOFTWAREUPDATES andMYORACLESUPPORT_PASSWORD_FOR_SOFTWAREUPDATES, andset INSTALL_UPDATES_SELECTION="download".
PROXY_USER String Yes Enter the user name that can be used to access the proxyserver.
PROXY_PWD String Yes Enter the password that can be used to access the proxyserver.
PROXY_HOST String Yes Enter the name of the proxy host.
PROXY_PORT String Yes Enter the port used by the proxy server.
ORACLE_MIDDLEWARE_HOME_LOCATION
String Yes Enter the location where you want the installer to install OracleWebLogic Server 12c Release 2 (12.2.1.4.0) and JavaDevelopment Kit (JDK) 1.8.0_261. Ensure that the middlewarelocation has write permission. Note that the middlewarelocation is essentially the one and only Oracle home in 13crelease.
For example, "/u01/software/em13c/oraclehome"Note: Ensure that the number of characters in the middlewarehome path does not exceed 70 characters for Unix platformsand 25 characters for Microsoft Windows platforms.
For example, the middleware home pathC:\sw\em13c\oraclehome containing only 22 characters isacceptable. However,C:\OracleSoftware\OracleMiddleware\OracleEnterpriseManager\OMS\newrelease\oms containing more than 25characters is not acceptable for Microsoft Windows platforms.
Chapter 4Installing the Enterprise Manager Using the Software Only with Plug-ins Method
4-39

Table 4-3 (Cont.) Editing the new_install.rsp Response File for Configuring the EnterpriseManager Software Using the Software Only Method in Silent Mode
Parameter Data Type Double QuotesRequired forValue?
Description
ORACLE_HOSTNAME
String Yes Enter a fully qualified domain name that is registered in theDNS and is accessible from other network hosts, or enter analias host name that is defined in the /etc/hosts file on allthe OMS instances at this site.
The host name must resolve to the local host because the hostname is used for the local Oracle WebLogic Server as well asthe Oracle Management Service. Do not provide a remote hostor a load balancer virtual host in this field. Do not enter an IPaddress. Do not use underscores in the name. Short namesare allowed, but you will see a warning, so Oracle recommendsthat you enter a fully qualified domain name instead.
If you do not mention the host name, the installation wizard willproceed further, honoring the host name it automaticallydetects for that host.
AGENT_BASE_DIR
String Yes Enter the absolute path to the agent base directory, a locationoutside the Oracle Middleware home where the ManagementAgent can be installed.
For example, "/u01/software/em13c/agentbasedir".Ensure that this location is empty and has write permission.Also ensure that it is always maintained outside the OracleMiddleware home.
Note: (Only for Microsoft Windows) Ensure that the number ofcharacters in the agent base directory path does not exceed 25characters. For example, the agent base directory pathC:\sw\em13c\agntbsedir containing only 22 characters isacceptable. However,C:\Oracle\ManagementAgent\13c\new containing morethan 25 characters is not acceptable.
WLS_ADMIN_SERVER_USERNAME
String Yes By default, weblogic is the name assigned to the default useraccount that is created for the Oracle WebLogic Domain. If youwant to accept the default name, then leave the field blank.However, if you want to have a custom name, then enter thename of your choice.
WLS_ADMIN_SERVER_PASSWORD
String Yes Enter a password for the WebLogic user account.
Ensure that your password contains at least 8 characterswithout any spaces, begins with a letter, and includes at leastone numeric value.
WLS_ADMIN_SERVER_CONFIRM_PASSWORD
String Yes Confirm the password for the WebLogic user account.
NODE_MANAGER_PASSWORD
String Yes By default, nodemanager is the name assigned to the defaultuser account that is created for the node manager. Enter apassword for this node manager user account.
Ensure that your password contains at least 8 characterswithout any spaces, begins with a letter, and includes at leastone numeric value.
Chapter 4Installing the Enterprise Manager Using the Software Only with Plug-ins Method
4-40

Table 4-3 (Cont.) Editing the new_install.rsp Response File for Configuring the EnterpriseManager Software Using the Software Only Method in Silent Mode
Parameter Data Type Double QuotesRequired forValue?
Description
NODE_MANAGER_CONFIRM_PASSWORD
String Yes Confirm the password for the node manager user account.
ORACLE_INSTANCE_HOME_LOCATION
String Yes By default, gc_inst is considered as the OMS Instance Basedirectory for storing all OMS-related configuration files. Enterthe absolute path to a location outside the middleware homeleading up to the directory name.
For more information about this location, see What Is anOracle Management Service Instance Base Location?.
Note: If you are installing on an NFS-mounted drive andcreating the OMS instance base directory (gc_inst) on thatNFS-mounted drive, then after you install, move the lock filesfrom the NFS-mounted drive to a local file system location. Forinstructions, refer to Performing Postconfiguration Tasks AfterConfiguring the Enterprise Manager Cloud Control SoftwareOnly in Silent Mode.
CONFIGURE_ORACLE_SOFTWARE_LIBRARY
Boolean No If you want to configure the Software Library at the time ofinstallation, set this parameter to TRUE. Otherwise, set it toFALSE.Even if you do not configure it at the time of installation, yourinstallation will succeed, and you can always configure it laterfrom the Enterprise Manager Cloud Control Console. However,Oracle recommends that you configure it at the time ofinstallation so that it is automatically configured by the installer,thus saving your time and effort.
SOFTWARE_LIBRARY_LOCATION
String Yes (Required only ifCONFIGURE_ORACLE_SOFTWARE_LIBRARY=TRUE)
Enter the absolute path leading up to a unique directory nameon the OMS host where the Software Library can beconfigured. Ensure that the location you enter is a mountedlocation on the OMS host, and is placed outside theMiddleware Home. Also ensure that the OMS process ownerhas read/write access to that location. Configuring on amounted location helps when you install additional OMSinstances as they will require read/write access to the sameOMS Shared File System storage location.
Chapter 4Installing the Enterprise Manager Using the Software Only with Plug-ins Method
4-41

Table 4-3 (Cont.) Editing the new_install.rsp Response File for Configuring the EnterpriseManager Software Using the Software Only Method in Silent Mode
Parameter Data Type Double QuotesRequired forValue?
Description
DATABASE_HOSTNAME
String Yes Enter the fully qualified name of the host where the existingdatabase resides. Ensure that the host name does not haveunderscores.
For example, "example.com".If you have already created a database instance with apreconfigured Management Repository using the databasetemplates offered by Oracle, then provide details about thatdatabase instance.
If you are connecting to an Oracle RAC Database, and if thenodes have virtual host names, then enter the virtual hostname of one of its nodes.
The connection to the database is established with a connectstring that is formed using only this virtual host name, and theinstallation ends successfully.
However, if you want to update the connect string with othernodes of the cluster, then after the installation, run the followingcommand:
$<ORACLE_HOME>/bin/emctl config oms -store_repos_details -repos_conndesc"(DESCRIPTION= (ADDRESS_LIST=(FAILOVER=ON)(ADDRESS=(PROTOCOL=TCP)(HOST=node1-vip.example.com)(PORT=1521))(ADDRESS=(PROTOCOL=TCP)(HOST=node2-vip.example.com)(PORT=1521)))(CONNECT_DATA=(SERVICE_NAME=EMREP)))" -repos_user sysmanIf your Oracle RAC database is configured with Single ClientAccess Name (SCAN) listener, then you can enter aconnection string using the SCAN listener.
Note: If you connect to a database instance that was createdusing the database template offered by Oracle, then note thatthe password assigned to the user accounts SYSMAN_MDS,SYSMAN_APM, and SYSMAN122140_OPSS, which werecreated while preconfiguring the Management Repository, areautomatically reset with the SYSMAN password you enter forthe SYSMAN_PASSWORD parameter.
LISTENER_PORT
String Yes Enter the listener port to connect to the existing database.
For example, "1521".
Chapter 4Installing the Enterprise Manager Using the Software Only with Plug-ins Method
4-42

Table 4-3 (Cont.) Editing the new_install.rsp Response File for Configuring the EnterpriseManager Software Using the Software Only Method in Silent Mode
Parameter Data Type Double QuotesRequired forValue?
Description
SERVICENAME_OR_SID
String Yes Enter the service name or the system ID (SID) of the existingdatabase.
For example, "orcl".If you are providing the details of a pluggable database (PDB),then use the full service name instead of the alias. Forexample, pdb.example.com. If you are providing the details of alone-pluggable database (Lone-PDB), then use the full servicename. For example, pdb.example.com. If you are providing thedetails of a non-container database (Non-CDB), then use theSID.
SYS_PASSWORD
String Yes Enter the SYS user account's password.
SYSMAN_PASSWORD
String Yes Enter a password for creating a SYSMAN user account. Thispassword is used to create the SYSMAN user, which is theprimary owner of the Management Repository schema.
Ensure that your password contains at least 8 characterswithout any spaces, begins with a letter, and includes at leastone numeric value.
Note: If you connect to a database instance that was createdusing the database template offered by Oracle, then note thatthe password assigned to the user accounts SYSMAN_MDS,SYSMAN_APM, and SYSMAN122140_OPSS, which werecreated while preconfiguring the Management Repository, areautomatically reset with the SYSMAN password you enter forthis parameter.
SYSMAN_CONFIRM_PASSWORD
String Yes Confirm the SYSMAN user account's password.
Chapter 4Installing the Enterprise Manager Using the Software Only with Plug-ins Method
4-43

Table 4-3 (Cont.) Editing the new_install.rsp Response File for Configuring the EnterpriseManager Software Using the Software Only Method in Silent Mode
Parameter Data Type Double QuotesRequired forValue?
Description
DEPLOYMENT_SIZE
String Yes Set one of the following values to indicate the number oftargets you plan to monitor, the number of Management Agentsyou plan to have, and the number of concurrent user sessionsyou plan to have.
• SMALL, to monitor up to 999 targets, with up to 99Management Agents and up to 10 concurrent usersessions
• MEDIUM, to monitor about 1000 to 9999 targets, withabout 100 to 999 Management Agents and about 10 to 24concurrent user sessions
• LARGE, to monitor 10,000 or more targets, with 1000 ormore Management Agents, and with about 25 to 50concurrent user sessions.
For example, "MEDIUM".If the database you are connecting to is a database instancecreated with a preconfigured Management Repository usingthe database templates offered by Oracle, then make sure thedeployment size you set here matches with the samedeployment size you selected on the Database Templatesscreen of Oracle Database Configuration Assistant (DBCA)while creating the database instance.
If you want to select a deployment size different from thedeployment size you had selected while creating the databaseinstance using DBCA, then do one of the following:
• Create another database instance with a template for thedesired deployment size, then return to this response fileand set the same deployment size to this parameter. Forinstructions to create a database instance with an Oracle-supplied template, see Oracle Enterprise Manager CloudControl Basic Installation Guide.
• In the database instance you have created, fix theparameters to support the deployment size you want to sethere in the response file. To automatically fix the databaseparameters using Oracle-supplied SQL scripts, see OracleEnterprise Manager Cloud Control Basic Installation GuideEnterprise Manager Basic Installation Guide.
Chapter 4Installing the Enterprise Manager Using the Software Only with Plug-ins Method
4-44

Table 4-3 (Cont.) Editing the new_install.rsp Response File for Configuring the EnterpriseManager Software Using the Software Only Method in Silent Mode
Parameter Data Type Double QuotesRequired forValue?
Description
MANAGEMENT_TABLESPACE_LOCATION
String Yes Enter the absolute path to the location where the data file formanagement tablespace (mgmt.dbf) can be stored. Ensurethat the specified path leads up to the file name.
For example:
• If the database is on a file system, then the path must looklike "/u01/oracle/prod/oradata/mgmt.dbf".
• If the database is on Automatic Storage Management(ASM), then the path must look like "+<disk_group1>/prod/oradata/mgmt.dbf", where disk_group1 is adiskgroup created on ASM and prod is the Service ID(SID).
• If the database is on a raw device, then the path must looklike "</dev/raw1>/prod/oradata/mgmt.dbf",where /dev/raw1 is the raw device and prod is the SID.
Enterprise Manager Cloud Control requires this data file tostore information about the monitored targets, their metrics,and so on. Essentially, everything else other than configurationdata, software library data, and audit data.
CONFIGURATION_DATA_TABLESPACE_LOCATION
String Yes Enter the absolute path to the location where the data file forconfiguration data tablespace (mgmt_ecm_depot1.dbf) canbe stored. Ensure that the specified path leads up to the filename.
For example, "/home/john/oradata/mgmt_ecm_depot1.dbf".Enterprise Manager Cloud Control requires this data file tostore configuration information collected from the monitoredtargets.
JVM_DIAGNOSTICS_TABLESPACE_LOCATION
String Yes Enter the absolute path to a location where the data file forJVM Diagnostics data tablespace (mgmt_deepdive.dbf) canbe stored. Ensure that the specified path leads up to the filename.
For example, "/home/john/oradata/mgmt_deepdive.dbf".Enterprise Manager Cloud Control requires this data file tostore monitoring data related to JVM Diagnostics andApplication Dependency Performance (ADP).
EMPREREQ_AUTO_CORRECTION=false
Boolean No It specifies whether prereqs can be auto corrected.
Is_oneWaySSL String No Set it to true if the repository database is configured with one-way SSL.Example: Is_oneWaySSL=trueIf Is_oneWaySSL=true is set, TRUSTSTORE_LOCATION andTRUSTSTORE_PASSWORD parameters are required.
Chapter 4Installing the Enterprise Manager Using the Software Only with Plug-ins Method
4-45

Table 4-3 (Cont.) Editing the new_install.rsp Response File for Configuring the EnterpriseManager Software Using the Software Only Method in Silent Mode
Parameter Data Type Double QuotesRequired forValue?
Description
TRUSTSTORE_LOCATION
String Yes (Required only if Is_oneWaySSL=true orIs_twoWaySSL=true)
It specifies the absolute location of the Truststore Wallet file.
TRUSTSTORE_PASSWORD
String Yes (Required only if Is_oneWaySSL=true orIs_twoWaySSL=true)
It specifies the password of the Truststore Wallet.
Is_twoWaySSL String No Set it to true if the repository database is configured with two-way SSL.Example: Is_twoWaySSL=trueIf Is_twoWaySSL=true is set, TRUSTSTORE_LOCATION,TRUSTSTORE_PASSWORD, KEYSTORE_LOCATION andKEYSTORE_PASSWORD parameters are required.
KEYSTORE_LOCATION
String Yes (Required only if Is_twoWaySSL=true)
It specifies the location of the keystore (location where the SSLkey will get stored).
KEYSTORE_PASSWORD
String Yes (Required only if Is_twoWaySSL=true)
It specifies the password of the keystore.
AGENT_REGISTRATION_PASSWORD
String Yes Enter a password to secure the communication between theOMS and the Management Agents. Note that you have toprovide the same registration password for securing yourManagement Agents.
AGENT_REGISTRATION_CONFIRM_PASSWORD
String Yes Confirm the agent registration password.
STATIC_PORTS_FILE
String Yes By default, ports described in What Ports Are Used forInstallation? are honored. If you want to accept the defaultports, then leave this field blank.
If you want to use custom ports, then enter the absolute path tothe staticports.ini file that lists the custom ports to beused for the installation.
Chapter 4Installing the Enterprise Manager Using the Software Only with Plug-ins Method
4-46

Table 4-3 (Cont.) Editing the new_install.rsp Response File for Configuring the EnterpriseManager Software Using the Software Only Method in Silent Mode
Parameter Data Type Double QuotesRequired forValue?
Description
PLUGIN_SELECTION
By default, mandatory plug-ins such as Oracle Database Plug-in, Oracle Fusion Middleware Plug-in, and Oracle ExadataPlug-in, Oracle Cloud Framework Plug-in, and Oracle SystemInfrastructure Plug-in are automatically installed with theEnterprise Manager system.
In addition to the default ones, if you want to deploy anyaddition plug-in, then list those plug-in names in a comma-separated list. Ensure that the plug-in names are in doublequotes.
If you want to deploy a deprecated plug-in that is supportedonly in the current release, but it's not in any of the futurereleases, then evaluate your selection and decide whether ornot you want to proceed with the deployment of such plug-ins.
For example,
PLUGIN_SELECTION={"oracle.sysman.empa","oracle.sysman.vt"}If you want to install some plug-ins that are not in the softwarekit (DVD, downloaded software), then do the following:
1. Manually download the required plug-ins from Plug-inUpdate.
In addition, plug-ins produced by partners or customersare available on the Enterprise ManagerExtensibility Exchange.
2. Invoke the installer with the following option and pass thelocation where the additional plug-ins have beendownloaded:
./em13500_<platform>.binPLUGIN_LOCATION=<absolute_path_to_plugin_software_location>
b_upgrade Boolean No For this case, set it to falseb_upgrade=false
EM_INSTALL_TYPE
String No For this case, set it to NOSEEDEM_INSTALL_TYPE=NOSEED
CONFIGURATION_TYPE
String No For this case, set it to ADVANCEDCONFIGURATION_TYPE=ADVANCED
Using Advanced Script Options While Configuring the Enterprise Manager Software Using theInstall Software Only Method in Silent Mode
The following are some additional advanced options you can pass while invoking theConfigureGC script (ConfigureGC.sh on UNIX/Linux or ConfigureGC.bat on MicrosoftWindows):
Chapter 4Installing the Enterprise Manager Using the Software Only with Plug-ins Method
4-47

• For Oracle Enterprise Manager Cloud Control 13c and later, GCDomain is the onlysupported domain name for creating the WebLogic domain. Customized WebLogicdomain names are not supported.
• SSL configuration support:Starting with Enterprise Manager 13c Release 5 Update 8 (13.5.0.8) or above,SSL configuration is supported.
If the repository database is configured with one-way or two-way SSLauthentication, you can configure the Enterprise Manager against the SSL-enabled repository database when configuring the Enterprise Manager CloudControl software only in graphical or silent mode.
Note:
PKCS12 is the wallet file format supported for SSL configuration.
To enable SSL configuration in Enterprise Manager using configuring theEnterprise Manager Cloud Control software only in silent mode, run theConfigureGC script using a response file and the ENABLE_SSL=true option.
1. Update the new_install.rsp response file with the SSL information.
Review the SSL configuration, edit the new_install.rsp response file andupdate the appropriate SSL parameters and values applicable to yourenvironment.
The SSL parameters available are:
– Is_oneWaySSL– Is_twoWaySSL– TRUSTSTORE_LOCATION– TRUSTSTORE_PASSWORD– KEYSTORE_LOCATION– KEYSTORE_PASSWORDFor more details about the SSL parameters from the response file, see Editingthe new_install.rsp Response File for Configuring the Enterprise ManagerSoftware Using the Software Only Method in Silent Mode
2. Execute the ConfigureGC script using ENABLE_SSL=true option.
– For Linux:
ConfigureGC.sh -silent -responseFile <absolute_path_to_the_directory_where_the_generated_and_updated_response_file_is_stored>/new_install.rsp ENABLE_SSL=true
– For Windows:
ConfigureGC.bat -silent -responseFile <absolute_path_to_the_directory_where_the_generated_and_updated_response_file_is_stored>/new_install.rsp ENABLE_SSL=true
Chapter 4Installing the Enterprise Manager Using the Software Only with Plug-ins Method
4-48

The ConfigureGC script gets executed in silent mode enabling SSL configuration andusing the SSL parameters provided in the response file.
• After the configuration ends successfully, the OMS and the Management Agent startautomatically. If you do not want them to start automatically, then invoke the script withSTART_OMS and START_AGENT options, and set them to true or false depending on whatyou want to control.
Note:
Ensure that the START_OMS and START_AGENT options are used even when theinstallation wizard was invoked to install the software binaries as describedinInstall Software Only With Plug-ins and Configure Later in Graphical Mode.
For example, if you do not want the Management Agent to start automatically, then runthe following command:
$<ORACLE_HOME>/sysman/install/ConfigureGC.sh START_OMS=trueSTART_AGENT=falseTo understand the limitations involved with this advanced option, see Limitations with theAdvanced Options Supported for Installing an Enterprise Manager System in SilentMode.
Performing Postconfiguration Tasks After Configuring the Enterprise Manager CloudControl Software Only in Silent Mode
Perform the post-install steps as described in Performing Postinstallation Tasks AfterInstalling an Enterprise Manager System section that is available in the Enterprise ManagerBasic Installation Guide.
Chapter 4Installing the Enterprise Manager Using the Software Only with Plug-ins Method
4-49

Part IIIInstalling Additional Oracle ManagementServices
This part contains the following chapters:
• Installing Additional Oracle Management Services in Silent Mode

5Installing Additional Oracle ManagementServices in Silent Mode
Oracle recommends that you install additional Oracle Management Services (OMS) in yourenvironment to ensure high availability of your Enterprise Manager system. This chapterdescribes how you can install an additional OMS in silent mode. In particular, this chaptercovers the following:
• About Installing Additional Oracle Management Services in Silent Mode
• Installing Additional Oracle Management Services in Silent Mode
About Installing Additional Oracle Management Services inSilent Mode
Oracle recommends that you install additional OMS instances in your environment to ensurehigh availability of your Enterprise Manager system. To install an additional OMS, you canuse the Add Management Service deployment procedure. The Add Management Servicedeployment procedure offers a GUI-rich, interactive way of installing an additional OMS. Forinstructions, see Adding Additional Oracle Management Services in the Oracle EnterpriseManager Cloud Control Basic Installation Guide.
However, if you have any security restrictions or audit demands in your environment, or if youare not permitted to use Oracle credentials to log in over the network for installation, then youcan install in silent, non-interactive mode. Before you start the silent installation, meet all theprerequisites listed in Adding Additional Oracle Management Services in the OracleEnterprise Manager Cloud Control Basic Installation Guide.
WARNING:
Do not install Enterprise Manager Cloud Control 13c on servers of SPARC series:T1000, T2000, T5xx0, and T3-*. For more information, see My Oracle Support note1590556.1.
Installing Additional Oracle Management Services in SilentMode
To install an additional OMS in silent mode, follow these steps:
1. If Oracle Software Library (Software Library) is configured on the main OMS, whichcomes with Enterprise Manager Cloud Control, then do the following:
• On Unix Platforms:
5-1

– Ensure that the Software Library is read-write accessible from the remotehost where you plan to install the additional OMS.
• On Microsoft Windows Platforms: If you do not have an option to share ormount the Software Library, then copy the Software library from the main,source OMS host to the destination host where you plan to install theadditional OMS.
In this procedure, for easy understanding, the OMS that comes with EnterpriseManager Cloud Control is referred to as the first OMS, and the additional OMS youinstall is referred to as the additional OMS.
2. On the remote host, perform a software only installation of the additional OMS asdescribed in Install Software Only With Plug-ins and Configure Later in GraphicalMode
Install Software Only With Plug-ins and Configure Later in Graphical Mode.
Note:
• Ensure that you install the software binaries as the same user as theone used for installing the first OMS. You must be able to access theSoftware Library files.
• Ensure that you install the software binaries in the same middlewarelocation as that of the first OMS.
• At the end of the software only installation, do NOT run theConfigureGC.sh (for Unix platforms) or ConfigureGC.bat script (forMicrosoft Windows) as prompted by the installer. That file must berun only when you are performing a fresh installation.
3. Deploy the plug-ins.
To deploy the plug-ins, refer to Install Software Only With Plug-ins and ConfigureLater in Silent Mode.
4. On the additional OMS, apply all the patches you applied on the first OMS so thatboth OMS instances are identical and are in sync. Patches include patches thatmodified the Enterprise Manager system, the Software Library, the OMS files, theManagement Repository, and so on.
To identify the patches you applied on the first OMS, run the following commandsfrom the platform home:
mw_home/OMSPatcher/omspatcher lspatchesThis command displays the installed patches and Oracle home relationships. Mapthe installed patches to the patch .zip files on My Oracle Support site (https://support.oracle.com/). Download the files and unzip the archives on theadditional OMSs. If patches are already available in the file system or a sharedarea, reuse those patches to apply it on other OMSs.
Chapter 5Installing Additional Oracle Management Services in Silent Mode
5-2

Note:
For more details on installed patches in the platform, and Plug-in homes, runthe command $ORACLE_HOME/OPatch/opatch lsinventory -details -oh<desired home path>.
To apply the patches, run the following commands:
• For each system patch:
Platform Home/MSPatcher/omspatcher apply <patch location> -oh <PlatformHome> -invPtrLoc <Platform Home>/oraInst.loc<Platform Home>/OPatch/opatchauto commit -id 17513525 -oh <Platform Home>-invPtrLoc <Platform Home>/oraInst.loc
Note:
A patch is a system patch if it has a <system patch location>/bundle.xmlfile. The system patch ID is the top level directory patch ID number. This IDis also available in the <System patch location>/bundle.xml file. Forexample, <system_patch_bundle_xml type_version="2.0"bundle_type="ENGSYSTEM" patch_abstract="sample System Patchdescription" patch_id="1111115"> clearly indicates the patch ID as1111115.
• For each one-off patch specifically for the platform homes:
<Platform Home>/OPatch/opatch napply <one-off location> -oh <PlatformHome> -invPtrLoc <Platform Home>/oraInst.loc
5. Export the configuration details from the first OMS. To do so, run the following commandfrom the Oracle home of the first OMS host, and pass the location where theconfiguration details can be exported as a file.
$<ORACLE_HOME>/bin/emctl exportconfig oms -dir <absolute_path_to_directory>6. Copy the exported configuration details file from the first OMS host to the additional OMS
host.
7. If the additional OMS is being installed using an alias host name, then set theORACLE_HOSTNAME environment variable to the alias host name.
8. Recover the configuration details onto the additional OMS. To do so, run the followingcommand from the Oracle home of the additional OMS host:
$<ORACLE_HOME>/bin/omsca recover -ms -backup_file<absolute_path_to_the_file_copied_in_step4> [-AS_HTTPS_PORT <port> -MSPORT<port> -MS_HTTPS_PORT <port> -EM_NODEMGR_PORT <port> -EM_UPLOAD_PORT <port>-EM_UPLOAD_HTTPS_PORT <port> -EM_CONSOLE_PORT <port> -EM_CONSOLE_HTTPS_PORT<port> -config_home <absolute_path_to_instance_dir> -EM_INSTANCE_HOST<second_oms_host_name>]For example,
/u01/software/em13c/oraclehome2/bin/omsca recover -ms -backup_file /opt/oracle/product/backup/opf_ADMIN_20120504_031016.bka -AS_HTTPS_PORT 7101 -
Chapter 5Installing Additional Oracle Management Services in Silent Mode
5-3

MSPORT 7202 -MS_HTTPS_PORT 7301 -EM_NODEMGR_PORT 7403 -EM_UPLOAD_PORT4889 -EM_UPLOAD_HTTPS_PORT 4900 -EM_CONSOLE_PORT 7788 -EM_CONSOLE_HTTPS_PORT 7799 -config_home /opt/oracle/product/omsmdw/gc_inst -EM_INSTANCE_HOST example.com
Note:
If the additional OMS is being installed using an alias host name, thenset the EM_INSTANCE_HOST parameter to the alias host name that isdefined in the /etc/hosts file on all the OMS instances at this site.
9. (Applicable only if you do not already have a Management Agent on the host)Configure the Management Agent on the additional OMS host by running thefollowing command from the agent home:
$<AGENT_HOME>/sysman/install/agentDeploy.shAGENT_BASE_DIR=<agent_base_dir> OMS_HOST=<oms_host_name>EM_UPLOAD_PORT=<oms_port> AGENT_REGISTRATION_PASSWORD=<password> -configOnly
Note:
• If you have a Server Load Balancer (SLB) configured, then directlyenter the host name and the port number of the SLB for theOMS_HOST and EM_UPLOAD_PORT parameters. If an SLB is notconfigured, then enter the host name and the secure upload port ofthe first OMS for the OMS_HOST and EM_UPLOAD_PORT parameters.
• If the additional OMS is being installed using an alias host name,then add the ORACLE_HOSTNAME=<alias host name> parameter to thecommand and set the parameter to the alias host name that isdefined in the /etc/hosts file on all the OMS instances at this site.
10. Deploy the required plug-ins on the Management Agent.
For information about deploying plug-ins, see Managing Plug-Ins in the OracleEnterprise Manager Cloud Control Administrator's Guide.
11. Import the trusted certificate on the additional OMS host, where you configured theManagement Agent as described in Step (9). When prompted for a password,enter welcome.
$<AGENT_HOME>/bin/emctl secure add_trust_cert_to_jks12. Review and perform the applicable postinstallation steps. See Performing
Postinstallation Tasks After Adding an Additional Oracle Management Service inthe Oracle Enterprise Manager Cloud Control Basic Installation Guide.
13. Manually discover the Oracle WebLogic Server target.
a. Ensure that both the first and the additional OMS instances are up andrunning.
b. In the Cloud Control console, from the Targets menu, select All Targets.
Chapter 5Installing Additional Oracle Management Services in Silent Mode
5-4

c. On the All Targets page, search and click /EMGC_GCDomain/GCDomain/.
d. On the EMGC_GCDomain home page, from the WebLogic Domain menu, selectRefresh WebLogic Domain.
e. On the Refresh WebLogic Domain page, click Add / Update Targets, and follow thesteps guided by the wizard.
Enterprise Manager Cloud Control refreshes the WebLogic Domain and discoversthe second managed server on the additional OMS host.
For information about discovering the other targets and adding targets, see Overview ofDiscovering and Adding Targets in the Oracle Enterprise Manager Cloud ControlAdministrator's Guide.
For configuring the shared Oracle Software Library location and the Server LoadBalancer, see Configuring a Software Library in the Oracle Enterprise Manager CloudControl Administrator's Guide.
Chapter 5Installing Additional Oracle Management Services in Silent Mode
5-5

Part IVInstalling Oracle Management Agent
This part describes the different ways of installing Oracle Management Agent. In particular,this part contains the following chapters:
• Installing Oracle Management Agent in Silent Mode
• Cloning Oracle Management Agents
• Installing Shared Agents
• Installing the Oracle Management Agent Software Now and Configuring It Later

6Installing Oracle Management Agent in SilentMode
This chapter describes how you can install Oracle Management Agent (Management Agent)in silent mode. In particular, this chapter covers the following:
• Overview of Installing a Management Agent in Silent Mode
• Before You Begin Installing a Management Agent in Silent Mode
• Prerequisites for Installing a Management Agent in Silent Mode
• Installing a Management Agent in Silent Mode
• After Installing a Management Agent in Silent Mode
Overview of Installing a Management Agent in Silent ModeInstalling a Management Agent in silent mode is only an alternative to installing it using theAdd Host Targets Wizard. While the Add Host Targets Wizard requires you to use its GUI-richinterview screens for providing all installation details, the silent mode requires you to use aresponse file for providing installation details and deployment scripts to install ManagementAgents on hosts.
Installing in silent mode is useful when you want to install an additional Management Agenton a destination host from the destination host itself, without using the Add Host TargetsWizard.
You can install Management Agents in silent mode using the following methods:
Using the AgentPull Script
In this method, you do not have to use EM CLI to download the Management Agent softwareonto the remote destination host before executing the script to install the Management Agent.This method supports only a few additional parameters, and is ideal for a basic ManagementAgent install.
Using the agentDeploy Script
In this method, you must use EM CLI to download the Management Agent software onto theremote destination host before executing the script to install the Management Agent. You caneither choose to use EM CLI from the OMS host, or from the remote destination host. If youchoose to use EM CLI from the OMS host, you must transfer the downloaded ManagementAgent software to the remote destination host before executing the script to install theManagement Agent. This method supports many additional parameters, and is ideal for acustomized Management Agent install.
Using the RPM File
In this method, you obtain the .rpm file using EM CLI on the OMS host, then transfer the fileto the remote destination host before running the file to install the Management Agent. Usingthe .rpm file, you can also choose to install a Management Agent while provisioning anoperating system on a bare metal host. For more information, see the Oracle Enterprise
6-1

Manager Administrator's Guide for Software and Server Provisioning and Patching.This guide is available in the Enterprise Manager documentation library at:
http://www.oracle.com/technetwork/indexes/documentation/index.html
Note:
• The Management Agent .rpm file can be obtained using EM CLI only forLinux x86 and Linux x86-64 platforms.
• For Enterprise Manager 13c (13.5.0.x), installing a Management Agentby downloading the Management Agent .rpm file from Oracle SoftwareDownloads site is not supported.
Once the installation is complete, you will see the following default contents in theagent base directory:
<agent_base_directory> |_____agent_13.5.0.0.0 |_____sbin |_____OPatch |_____agent.rsp |_____bin |_____cfgtoollogs |_____config |_____install |_____instalclient |_____. |_____. |_____. |_____agent_inst |_____agentInstall.rsp |_____agentimage.properties
Note:
• You can repoint your existing Management Agents to a new OracleManagement Service (OMS). For instructions, see Redirecting OracleManagement Agent to Another Oracle Management Service.
When you repoint your existing Management Agents to a new OMS, youcannot move the targets monitored by the Management Agents, thetarget history, and the Management Agent history. The monitored targetsand the history data is lost.
• (For Microsoft Windows hosts) If you upgrade a 13.5.0.x ManagementAgent and you want to install another Management Agent on the samehost, which points to a different OMS, ensure that you specify thes_agentSrvcName parameter while installing the Management Agent, asdescribed in Response File Parameters for Installing a ManagementAgent in Silent Mode Using the agentDeploy Script.
Chapter 6Overview of Installing a Management Agent in Silent Mode
6-2

Before You Begin Installing a Management Agent in Silent ModeBefore you begin installing a Management Agent in silent mode, keep these points in mind:
• You can install a Management Agent on only one host at a time by using the silentmethods. Therefore, use this approach when you want to install a Management Agent ononly a few hosts.
• The Management Agent software for the platform of the host on which you want to installa Management Agent must be downloaded and applied, using Self Update. Only theManagement Agent software for the OMS host platform is downloaded and applied bydefault. The Management Agent software contains the core binaries required forinstallation, the response file to be edited and passed, and the agentDeploy.sh script(agentDeploy.bat for Microsoft Windows).
For information on how to download and apply the Management Agent software for aplatform using Self Update, see Acquiring the Management Agent Software in OnlineMode in the Oracle Enterprise Manager Cloud Control Basic Installation Guide.
• In Enterprise Manager Cloud Control 13c Release 5, you can save the ManagementAgent one-off patches that you want to apply on a particular version of the ManagementAgent software, such that these patches are automatically applied on the softwarewhenever a new Management Agent of the same version is deployed, or an oldManagement Agent is upgraded to that version.
For information on how to do this, see Applying Patches to Oracle Management AgentsWhile Deploying or Upgrading Them.
Also, you can apply one-off patches on a plug-in and create a custom patched plug-in,such that this custom patched plug-in is deployed on all the new Management Agentsthat you deploy, and all the old Management Agents that you upgrade.
For information on how to do this, see Managing Plug-Ins in the Oracle EnterpriseManager Cloud Control Administrator's Guide.
• Starting with Enterprise Manager Cloud Control 13c Release 3, parallel deployment ofManagement Agents using the AgentPull.sh script (AgentPull.bat for MicrosoftWindows) is supported. This enables you to deploy Management Agents on multiplehosts, at the same time (in a parallel manner), using the AgentPull.sh or AgentPull.batscript.
• If you want to install a Management Agent on a Microsoft Windows host in silent mode,ensure that you execute the AgentPull.bat or agentDeploy.bat script from the defaultcommand prompt, which is cmd.exe, and not from any other command prompt.
• You cannot run any preinstallation or postinstallation scripts as part of the installationprocess. You can run them manually before or after the installation.
• By default, installing a Management Agent in silent mode configures only the followingtypes of plug-ins:
– All discovery plug-ins that were configured with the OMS from where theManagement Agent software is being deployed.
– Oracle Home discovery plug-in.
– Oracle Home monitoring plug-in.
Chapter 6Before You Begin Installing a Management Agent in Silent Mode
6-3

Prerequisites for Installing a Management Agent in SilentMode
Before installing a Management Agent in silent mode, ensure that you meet thefollowing prerequisites:
Table 6-1 Prerequisites for Installing Oracle Management Agent in Silent Mode
Requirement Description
Hardware Requirements Ensure that you meet the hard disk space and physical memory requirements. Formore information, see Hardware Requirements for Enterprise Manager CloudControl in the Oracle Enterprise Manager Cloud Control Basic Installation Guide.
Operating SystemRequirements
Ensure that you install the Management Agent only on certified operating systemsas mentioned in the Enterprise Manager certification matrix available on My OracleSupport.
To access the Enterprise Manager certification matrix, follow the steps outlined in Accessing the Enterprise Manager Certification Matrix in the Oracle EnterpriseManager Cloud Control Basic Installation Guide.
File System Requirements Ensure that the file system mounted on the destination host does not permit bufferedwrites.
File DescriptorRequirements
• Ensure that the maximum user process limit is set to 13312 or greater.
To verify the current value set, run the following command:
ulimit -uIf the current value is not 13312 or greater, then contact your systemadministrator to set it to at least 13312.
• Ensure that you set the soft limit of file descriptor to a minimum of 4096 andhard limit less then or equal to 16384.
To verify the current value set, run the following commands:
For Soft Limit:/bin/sh -c "ulimit -n"
For Hard Limit:/bin/sh -c "ulimit -Hn"If the current value is not 4096 or greater, then as a root user, update the /etc/security/limits.conf file with the following entries:
<UID> soft nofile 4096<UID> hard nofile 16384
Package Requirements Ensure that you install all the operating system-specific packages. For moreinformation, see the chapter on package requirements in the Package, KernelParameter, and Library Requirements for Enterprise Manager Cloud Control in theOracle Enterprise Manager Cloud Control Basic Installation Guide.
If you choose to install a Management Agent using a .rpm file, ensure that the rpm-build package is installed on the host. To verify this, run the following command:
rpm -qa | grep rpm-build
Chapter 6Prerequisites for Installing a Management Agent in Silent Mode
6-4

Table 6-1 (Cont.) Prerequisites for Installing Oracle Management Agent in Silent Mode
Requirement Description
CURL Utility Requirements
(For installing using theAgentPull script only)
Ensure that you install the CURL utility on the destination host.
You can download the CURL utility from the following URL:
http://curl.haxx.se/dlwiz/?type=binNote: For destination hosts running on Microsoft Windows, Oracle recommends thatyou install CURL in c:\.
ZIP and UNZIP UtilityRequirements
Ensure that the ZIP and the UNZIP utilities are present on the destination host.
The ZIP utility must be of version 3.0 2008 build or higher.
The UNZIP utility must be of version 6.0 or higher.
User and Operating SystemGroup Requirement
Ensure that the destination host where you want to install the Management Agenthas the appropriate users and operating system groups created.
For more information, see the chapter on creating operating system groups and users in the Creating Operating System Groups and Users for Enterprise ManagerCloud Control in the Oracle Enterprise Manager Cloud Control Basic InstallationGuide.
Note: If your enterprise has a policy against installing Management Agents using theOMS install operating system user account, you can use a different operatingsystem user account to install Management Agents. However, ensure that the useraccount you use and the OMS install user account belong to the same primarygroup.
/etc/hosts File Requirements Ensure that the /etc/hosts file on the host has the IP address, the fully qualifiedname, and the short name in the following format:
172.16.0.0 example.com mypc(Only for Microsoft Windows) Ensure that the entry for local host in the etc/hostsfile is always against 127.0.0.1 and against any other address.
Chapter 6Prerequisites for Installing a Management Agent in Silent Mode
6-5

Table 6-1 (Cont.) Prerequisites for Installing Oracle Management Agent in Silent Mode
Requirement Description
Time Zone Requirements Ensure that the host time zone has been set correctly. To verify the host time zone,run the following command:
echo $TZIf the time zone displayed is incorrect, run the following commands, before runningthe agentDeploy.sh or agentDeploy.bat scripts, to set the correct time zone:
• For Korn shell:
TZ=<value>export TZ
• For Bourne shell or Bash shell:
export TZ=<value>• For C shell:
setenv TZ <value>For example, in the Bash shell, run the following command to set the time zone toAmerica/New_York:
export TZ='America/New_York'To set the time zone on a destination host that runs on Microsoft Windows, from theStart menu, select Control Panel. Click Date and Time, then select the Time Zonetab. Select your time zone from the displayed drop down list.
To view a list of the time zones you can use, access the supportedtzs.lst filepresent in the <AGENT_HOME>/sysman/admin directory of the central agent (that is,the Management Agent installed on the OMS host).
Note: If you had ignored a prerequisite check warning about wrong time zonesettings during the Management Agent install, you must set the correct time zone onthe host after installing the Management Agent. For information on setting timezones post install, refer After Installing a Management Agent in Silent Mode.
PATH Environment VariableRequirements
(For installing using theAgentPull script only)
Ensure that the location of zip and unzip is part of the PATH environment variable.
For example, if zip and unzip are present in /usr/bin, then /usr/bin must bepart of the PATH environment variable.
Path ValidationRequirements
Validate the path to all command locations. For more information, refer to theappendix on validating command locations in the Validating Command Locations inthe Oracle Enterprise Manager Cloud Control Basic Installation Guide.
CLASSPATH EnvironmentVariable Requirements
Unset the CLASSPATH environment variable. You can always reset the variable to theoriginal value after the installation is complete.
Port Requirements Ensure that the default ports described in What Default Ports Are Used forEnterprise Manager Cloud Control Installation? are free.
Temporary Directory SpaceRequirements
Ensure that you allocate 400 MB of space for a temporary directory where theexecutables can be copied.
By default, the temporary directory location set to the environment variable TMP orTEMP is honored. If both are set, then TEMP is honored. If none of them are set,then the following default values are honored: /tmp on UNIX hosts and c:\Temp onMicrosoft Windows hosts.
/var/tmp Requirements
(For installing usingthe .rpm file only)
Ensure that the /var/tmp directory has at least 700 MB of free space.
Chapter 6Prerequisites for Installing a Management Agent in Silent Mode
6-6

Table 6-1 (Cont.) Prerequisites for Installing Oracle Management Agent in Silent Mode
Requirement Description
/usr/lib/oracle Requirements
(For installing usingthe .rpm file only)
Ensure that the /usr/lib/oracle directory exists and has at least 2 GB of freespace. If it does not exist, create it, and ensure that the install user has writepermissions on it.
Agent Base DirectoryRequirements
Ensure the following:
• The agent base directory is empty and has at least 1 GB of free space.• The directory name does not contain any spaces.• The install user owns the agent base directory. The agent base directory and
the parent directories of the agent base directory have read, write, and executepermissions for the install user. Ensure that the install user or the root userowns all the parent directories of the agent base directory, and that the parentdirectories have read and execute permissions for the install user group and allthe other users. Also, ensure that the root user owns the root directory.
For example, if the agent base directory is /scratch/OracleHomes/agent,and oracle is the install user, then the /scratch/OracleHomes/agentdirectory must be owned by oracle, directories scratch and OracleHomesmust be owned by either oracle or the root user, and the root directory (/) mustbe owned by the root user.
• If the agent base directory is mounted, it is mounted with the setuid optionturned on.
Agent Instance HomeRequirements
(For installing using theagentDeploy script only)
Ensure that the agent instance home location you specify in the response file isempty.
Permission Requirements • Ensure that you have write permission in the agent instance home.• Ensure that you have write permission in the temporary directory.
Installing UserRequirements
If the central inventory owner and the user installing the Management Agent aredifferent, then ensure that they are part of the same group, and have read and writepermissions on the inventory directory.
For example, if the inventory owner is abc and the user installing the ManagementAgent is xyz, then ensure that abc and xyz belong to the same group, and they haveread and write access to the inventory.
Central Inventory(oraInventory) Requirements
• Ensure that you allocate 100 MB of space on all destination hosts for theCentral Inventory.
• Ensure that you have read, write, and execute permissions on oraInventoryon all destination hosts.
If you do not have these permissions on the default inventory (typically in thelocation mentioned in the /etc/oraInst.loc file) on any destination host,then ensure that you enter the path to an alternative inventory location using theINVENTORY_LOCATION or -invPtrLoc arguments as described in Table 6-7.Note that these parameters are supported only on UNIX platforms, and not onMicrosoft Windows platforms.
Chapter 6Prerequisites for Installing a Management Agent in Silent Mode
6-7

Table 6-1 (Cont.) Prerequisites for Installing Oracle Management Agent in Silent Mode
Requirement Description
Agent User AccountPermissions and Rights
(For installing using theAgentPull oragentDeploy scripts only)
(For Microsoft Windows) If you are installing the Management Agent on a MicrosoftWindows-based operating system, then ensure that the agent user account haspermissions and rights to perform the following:
• Act as part of the operating system.• Adjust memory quotas for a process.• Replace process level token.• Log on as a batch job.To verify whether the agent user has these rights, follow these steps:
1. Launch the Local Security Policy.
From the Start menu, click Settings and then select Control Panel. From theControl Panel window, select Administrative Tools, and from theAdministrative Tools window, select Local Security Policy.
2. In the Local Security Policy window, from the tree structure, expand LocalPolicies, and then expand User Rights Assignment.
Permissions for cmd.exe
(For installing using theAgentPull oragentDeploy scripts only)
(For Microsoft Windows) If you are installing the Management Agent on a MicrosoftWindows-based operating system, then ensure that you grant the Cmd.exe programRead and Execute permissions for the user account that the batch job runs under.This is a restriction from Microsoft.
For more information on this restriction and to understand how you can grant thesepermissions, access the following URL to Microsoft Web site:
http://support.microsoft.com/kb/867466/en-usRuntime Library FileRequirements
(For Microsoft Windows) If you are installing the Management Agent on a MicrosoftWindows-based operating system, then ensure that the Msvcp71.dll andMsvcr71.dll runtime library files are present in c:\windows\system32.
Installing a Management Agent in Silent ModeThis section describes the actions involved in installing a Management Agent in silentmode. It consists of the following:
• Installing a Management Agent Using the AgentPull Script
• Installing a Management Agent Using the agentDeploy Script
• Installing a Management Agent Using the RPM File
• Installing a Management Agent on a Virtual Host
• Response File Parameters for Installing a Management Agent in Silent ModeUsing the AgentPull Script
• Response File Parameters for Installing a Management Agent in Silent ModeUsing the agentDeploy Script
• Response File Parameters for Installing a Management Agent in Silent ModeUsing an RPM File
• Options Supported by the AgentPull Script
• Options Supported by the agentDeploy Script
• Contents of the Downloaded Management Agent Software
Chapter 6Installing a Management Agent in Silent Mode
6-8

Note:
If the OMS host is running on Microsoft Windows, and the OMS software wasinstalled in a drive other than C:\, then update the SCRATCH_PATH variable inORACLE_HOME\oui\prov\resources\ssPaths_msplats.properties.For example, if the OMS software was installed in D:\, ensure that you update theSCRATCH_PATH variable to D:\tmpada
Installing a Management Agent Using the AgentPull ScriptTo install a Management Agent using the AgentPull script, follow these steps:
1. Acquiring the Management Agent Software
2. Installing a Management Agent Using the AgentPull Script
3. Installing a Management Agent Using an Agent Gold Image, Using the AgentPull Script
Note:
To install a Management Agent using the AgentPull script, you do not need todownload the Management Agent software onto the destination host. TheAgentPull script performs this action automatically.
Acquiring the Management Agent Software1. If the destination host runs on UNIX, access the following URL from the host, and save
the file as AgentPull.sh (AgentPull.bat for Microsoft Windows) to a temporary directory.For example, /tmp (c:\temp for Microsoft Windows).
https://<OMS_HOST>:<OMS_PORT>/em/install/getAgentImageIf the destination host runs on Microsoft Windows, access the following URL from thehost:
https://<OMS_HOST>:<OMS_PORT>/em/install/getAgentImage?script=bat
Note:
You can also use the following command to obtain the AgentPull.sh script:
curl "https://<OMS_HOST>:<OMS_PORT>/em/install/getAgentImage" --insecure -o AgentPull.shTo use this command, ensure that you have the CURL utility installed, asdescribed in Table 6-1.
2. (Only for UNIX Operating Systems) Provide the execute permission to the AgentPull.shscript by running the following command:
chmod +x <absolute_path_to_AgentPull.sh>
Chapter 6Installing a Management Agent in Silent Mode
6-9

For example, run the command chmod +x /tmp/AgentPull.sh.3. Identify the platforms for which the Management Agent software is available on the
OMS host. To do so, run the AgentPull.sh script (AgentPull.bat for MicrosoftWindows) passing the -showPlatforms option.
<absolute_path_to_AgentPull.sh> -showPlatformsThe following is a sample output of the command.
Platforms VersionLinux x86-64 13.5.0.0.0Microsoft Windows x64 (64-bit) 13.5.0.0.0IBM AIX on POWER Systems (64-bit) 13.5.0.0.0
If the output lists the platform on which you want to install the Management Agent,then proceed to Installing a Management Agent Using the AgentPull Script.Otherwise, acquire and apply the Management Agent software for the requiredplatform using Self Update.
For information on how to acquire and apply the Management Agent software for aplatform using Self Update, see Oracle Enterprise Manager Cloud Control BasicInstallation Guide.
Installing a Management Agent Using the AgentPull Script1. If the destination host runs on UNIX, and the OMS host runs on Microsoft
Windows, run the following command:
dos2unix <absolute_path_to_AgentPull.sh>For example, run the command dos2unix /tmp/AgentPull.sh.
2. Create a response file (in any location on the destination host) specifying theparameters described in Table 6-3. Ensure that you do not name the response fileagent.rsp.The following are the contents of a sample response file, agent.properties.LOGIN_USER=sysmanLOGIN_PASSWORD=welcomePLATFORM="Linux x86-64"AGENT_REGISTRATION_PASSWORD=wel246come
If you want the script to ignore a particular response file parameter, specify a '#'before the parameter. For example, #VERSION.
3. Run the AgentPull.sh script for Unix and AgentPull.bat for Microsoft Windowsspecifying the AGENT_BASE_DIR and RSPFILE_LOC parameters:
AgentPull.sh LOGIN_USER=<value> LOGIN_PASSWORD=<value>CURL_PATH=<value> PLATFORM=<value> [VERSION=<value>AGENT_BASE_DIR=<value> RSPFILE_LOC=<value>AGENT_REGISTRATION_PASSWORD=<value> -download_only -showPlatforms -ignoreDiscoveryPlugin]AgentPull.bat AGENT_BASE_DIR=<value> RSPFILE_LOC=<value>CURL_PATH=<value> [AGENT_REGISTRATION_PASSWORD=<value> VERSION=<value>-download_only -showPlatforms -ignoreDiscoveryPlugin -help]For example, run the following command:
Chapter 6Installing a Management Agent in Silent Mode
6-10

/tmp/AgentPull.sh RSPFILE_LOC=/tmp/agent.properties AGENT_BASE_DIR=/scratch/agentThe AgentPull.sh script (and AgentPull.bat) supports certain options, such as -download_only, which downloads the Management Agent software, but does not deploythe Management Agent. These supported options are described in Table 6-6.
If you are installing a Management Agent on a Microsoft Windows host usingAgentPull.bat, ensure that you execute AgentPull.bat from the default commandprompt, which is cmd.exe, and not from any other command prompt.
If the Management Agent install fails, diagnose the problem by viewing the ManagementAgent install logs. For information on the location of these logs, see Manual ManagementAgent Installation Logs.
Installing a Management Agent Using an Agent Gold Image, Using theAgentPull Script
To install a Management Agent using the AgentPull script, follow these steps:
1. Meeting the Prerequisites for Installing a Management Agent Using an Agent GoldImage, Using the AgentPull Script
2. Installing a Management Agent Using an Agent Gold Image, Using the AgentPull Script
Meeting the Prerequisites for Installing a Management Agent Using an Agent GoldImage, Using the AgentPull Script
1. Ensure that there is at least one standalone 13c Management Agent installed in yourenvironment.
2. Create an Agent Gold Image. See Creating an Agent Gold Image.
3. Create an Agent Gold Image version. See Creating an Agent Gold Image Version.
4. Set a particular Agent Gold Image version as the current version that can be used fordeployment. Setting a Particular Agent Gold Image Version as the Current Version.
5. To acquire the Management Agent software, follow the instructions outlined in Acquiringthe Management Agent Software.
Installing a Management Agent Using an Agent Gold Image, Using the AgentPullScript
To install a Management Agent using an Agent Gold Image, using the AgentPull script, followthese steps:
1. If the destination host runs on UNIX, and the OMS host runs on Microsoft Windows, runthe following command:
dos2unix <absolute_path_to_AgentPull.sh>For example, run the command dos2unix /tmp/AgentPull.sh.
2. Create a response file (in any location on the destination host) specifying the parametersdescribed in Table 6-3. Ensure that you do not name the response file agent.rsp.The following are the contents of a sample response file, agent.properties.
Chapter 6Installing a Management Agent in Silent Mode
6-11

LOGIN_USER=sysmanLOGIN_PASSWORD=welcomePLATFORM="Linux x86-64"AGENT_REGISTRATION_PASSWORD=wel246come
If you want the script to ignore a particular response file parameter, specify a '#'before the parameter. For example, #VERSION.
3. Run the AgentPull.sh script (AgentPull.bat for Microsoft Windows) in thefollowing way. Table 6-2 describes the parameters passed to this command.
<absolute_path_to_AgentPull.sh> LOGIN_USER=<username>LOGIN_PASSWORD=<password> CURL_PATH=/usr/curl VERSION_NAME=<value>|IMAGE_NAME=<value> [ AGENT_BASE_DIR=<value> RSPFILE_LOC=<value>AGENT_REGISTRATION_PASSWORD=<password> -download_only -showGoldImages-showGoldImageVersions -ignoreAuthentication]For example, the following command downloads the latest revision of the AgentGold Image available in the production system, and uses it to deploy theManagement Agent:
AgentPull.sh LOGIN_USER=username LOGIN_PASSWORD=passwordCURL_PATH=/usr/curl IMAGE_NAME=DB_MONITORING AGENT_BASE_DIR=/tmp/agentpull
Table 6-2 Parameters Passed to the AgentPull.sh Script While Installing aManagement Agent Using an Agent Gold Image
Parameter Description
LOGIN_USER Enterprise Manager Cloud Control Console login username.
CURL_PATH Absolute path to the curl software.
LOGIN_PASSWORD Enterprise Manager Cloud Control Console loginpassword.
VERSION_NAME Agent Gold Image version name to be used fordeployment.
IMAGE_NAME Agent Gold Image name from which the Agent GoldImage version should be used for deployment.
AGENT_BASE_DIR Directory where the Agent Gold Image should bedownloaded and where the Management Agentshould be installed.
AGENT_REGISTRATION_PASSWORD Agent registration password to secure theManagement Agent.
RSPFILE_LOC Absolute path to the response file location.
-download_only Downloads the Agent Gold Image, but does notdeploy the Management Agent using that image.
-showGoldImages Lists the Agent Gold Images.
-showGoldImageVersionsIMAGE_NAME=<value>
Lists the Agent Gold Image versions available for aparticular Agent Gold Image.
-ignoreAuthentication Bypasses the Enterprise Manager credentials.
Chapter 6Installing a Management Agent in Silent Mode
6-12

If you are installing a Management Agent on a Microsoft Windows host usingAgentPull.bat, ensure that you execute AgentPull.bat from the default commandprompt, which is cmd.exe, and not from any other command prompt.
If the Management Agent install fails, diagnose the problem by viewing the ManagementAgent install logs. For information on the location of these logs, see Manual ManagementAgent Installation Logs.
If the source Management Agent was installed using the Add Host Targets Wizard,ensure that you specify the START_AGENT=true and the b_secureAgent=true parameterswhile invoking the deployment script.
Installing a Management Agent Using the agentDeploy ScriptYou can install a Management Agent using the agentDeploy.sh or agentDeploy.bat script inthe following ways:
• Using EM CLI from the Remote Destination Host
• Using EM CLI from the OMS Host
Using EM CLI from the Remote Destination HostTo install a Management Agent using the agentDeploy script, and EM CLI from thedestination host, follow these steps:
1. Acquiring the Management Agent Software and Downloading it onto theDestination Host Using EM CLI.
a. Set up EM CLI on the destination host.
For information on how to set up EM CLI on a host that is not running the OMS, see EM CLI Overview and Concepts in the Oracle Enterprise Manager Cloud ControlCommand Line Interface Guide.
b. On the destination host, from the EM CLI install location, log in to EM CLI:
<emcli_install_location>/emcli login -username=<username>For example,
<emcli_install_location>/emcli login -username=sysmanSpecify the password when you are prompted for it.
Note:
Ensure that the EM CLI log in user has the ADD_TARGET privilege.
c. Synchronize EM CLI:
<emcli_install_location>/emcli syncd. Identify the platforms for which the Management Agent software is available in
Software Library:
<emcli_install_location>/emcli get_supported_platformsThis command lists all the platforms for which the Management Agent software isavailable in Software Library. The following is the sample output of the command.
Chapter 6Installing a Management Agent in Silent Mode
6-13

---------------------------------------------------Version = 13.5.0.0.0Platform Name = Linux x86-64---------------------------------------------------Version = 13.5.0.0.0Platform Name = Oracle Solaris on x86-64 (64-bit)---------------------------------------------------Version = 13.5.0.0.0Platform Name = HP-UX PA-RISC (64-bit)---------------------------------------------------
If the output lists the platform on which you want to install the ManagementAgent, then proceed to the next step. Otherwise, acquire and apply theManagement Agent software for the required platform using Self Update.
For information on how to acquire and apply the Management Agent softwarefor a platform using Self Update, see Acquiring the Management AgentSoftware in Online Mode in the Oracle Enterprise Manager Cloud ControlBasic Installation Guide.
e. Download the Management Agent software from Software Library to atemporary directory on the destination host. The command downloads thecore Management Agent software to the destination directory you entered. Forexample, for Linux x86-64, you will see the file13.5.0.0.0_AgentCore_226.zip. For information on the contents of this coresoftware, see Contents of the Downloaded Management Agent Software.
<emcli_install_location>/emcli get_agentimage -destination=<download_directory> -platform="<platform>" -version=<version>For example,
./emcli get_agentimage -destination=/tmp/agentImage -platform="Linux x86-64" -version=13.5.0.0.0In the command, note the following:
-destination is a directory on the destination host where you want theManagement Agent software to be downloaded. Ensure that you have writepermission on this location.
-platform is the platform for which you want to download the software; thismust match one of the platforms listed in the previous step for which thesoftware is available in Software Library.
-version is the version of the Management Agent software that you want todownload; this is an optional argument. If you do not pass this argument, thenthe version is defaulted to the OMS version.
Chapter 6Installing a Management Agent in Silent Mode
6-14

Note:
If you use the get_agentimage EM CLI verb to download the ManagementAgent software for a platform different from the destination host platform,then meet the following requirements:
• Ensure the ZIP utility is of version 3.0 2008 build or higher, and theUNZIP utility is of version 6.0 or higher.
• Set the ZIP_LOC environment variable to the subdirectory where the ZIPutility is present. For example, if the ZIP utility is present in /usr/bin/zip, then set ZIP_LOC=usr/bin/zip.
• Set the UNZIP_LOC=usr/bin/unzip environment variable to the parentdirectory of the subdirectory where the UNZIP utility is present. Forexample, if the UNZIP utility is present in the subdirectory /usr/bin/unzip, then set UNZIP_LOC=usr/bin/, where usr/bin is the parentdirectory.
Similarly, if you use the get_agentimage EM CLI verb to download theManagement Agent software for a platform different from the OMS hostplatform, then meet the following requirements:
• Ensure the ZIP utility is of version 3.0 2008 build or higher, and theUNZIP utility is of version 6.0 or higher.
• Set the ZIP_LOC environment variable to $OMS_HOME/bin/zip, that is,the subdirectory where the ZIP utility is present on the OMS host.
• Set the UNZIP_LOC=<ORACLE_HOME>/bin/unzip environment variable to<ORACLE_HOME>/bin/, that is, the parent directory of the subdirectorywhere the UNZIP utility is present in the Oracle home of the OMS host.
2. Installing the Management Agent Using the agentDeploy Script.
a. On the destination host, extract the contents of the ZIP file using the unzip utility:
unzip <software_zip_file_location> -d <software_extract_location>For example,
unzip /tmp/agentImage/13.5.0.0.0_AgentCore_226.zip -d /tmp/agtImgb. Edit the response file agent.rsp as described in Table 6-4.
<software_extract_location>/agent.rspThe following are the contents of a sample response file.
OMS_HOST=example.comEM_UPLOAD_PORT=14511AGENT_REGISTRATION_PASSWORD=abc123AGENT_PORT=1832
If you want the script to ignore a particular response file parameter, specify a '#'before the parameter. For example, #AGENT_PORT.
c. Invoke the deployment script and pass the response file:
Chapter 6Installing a Management Agent in Silent Mode
6-15

<software_extract_location>/agentDeploy.shAGENT_BASE_DIR=<absolute_path_to_agentbasedir>RESPONSE_FILE=<software_extract_location>/agent.rspIf a proxy is set up between the destination host and the OMS host, you mustspecify the REPOSITORY_PROXYHOST and REPOSITORY_PROXYPORT parameters ina properties file, then specify the PROPERTIES_FILE parameter while runningagentDeploy.sh to install a Management Agent on the destination host:
<software_extract_location>/agentDeploy.shAGENT_BASE_DIR=<absolute_path_to_agentbasedir>RESPONSE_FILE=<absolute_path_to_responsefile>PROPERTIES_FILE=<absolute_path_to_properties_file>For example, /tmp/agtImg/agentDeploy.sh AGENT_BASE_DIR=/scratch/agent13c RESPONSE_FILE=/tmp/agtImg/agent.rsp PROPERTIES_FILE=/tmp/agent.propertiesThe properties file you use must have the following format:
REPOSITORY_PROXYHOST=<proxy_host_name>REPOSITORY_PROXYPORT=<proxy_port>
Note:
• Instead of passing a response file, you can choose to passresponse file parameters explicitly while invoking the deploymentscript.
The mandatory response file parameters are OMS_HOST,EM_UPLOAD_PORT and AGENT_REGISTRATION_PASSWORD.
For example,
/tmp/agtImg/agentDeploy.sh AGENT_BASE_DIR=/u01/software/em13c/agentbasedir OMS_HOST=example.comEM_UPLOAD_PORT=14511AGENT_REGISTRATION_PASSWORD=2bornot2b
• When you pass the arguments while invoking the deploymentscript, these values need not be given with double quotes.However, when you provide them in a response file, the valuesneed to be in double quotes (except for the argumentSTART_AGENT).
• In addition to passing the agent base directory and a responsefile (or individual mandatory arguments with installation details),you can also pass other options that are supported by thedeployment script. For more information, see Options Supportedby the agentDeploy Script.
• If you are installing a Management Agent on a MicrosoftWindows host using agentDeploy.bat, ensure that you executeagentDeploy.bat from the default command prompt, which iscmd.exe, and not from any other command prompt.
d. Run the root scripts after the install. For more information, see After Installinga Management Agent in Silent Mode.
Chapter 6Installing a Management Agent in Silent Mode
6-16

If you want to install a Management Agent on a physical host, and install anotherManagement Agent on a virtual host that is installed on the physical host, ensuring that boththe Management Agents use the same port for communication, follow these steps:
1. Install a Management Agent on the physical host. Stop the Management Agent.
2. Install a Management Agent on the virtual host. Stop the Management Agent.
3. Set AgentListenOnAllNICs=false in the $<AGENT_HOME>/sysman/config/emd.properties file. Ensure that you perform this step for both the Management Agents.
4. Start up both the Management Agents.
If the Management Agent install fails, diagnose the problem by viewing the ManagementAgent install logs. For information on the location of these logs, see Manual ManagementAgent Installation Logs.
Using EM CLI from the OMS HostTo install a Management Agent using the agentDeploy script, and EM CLI from the OMShost, follow these steps:
1. Acquiring the Management Agent Software and Downloading it onto the OMS HostUsing EM CLI.
a. On the OMS host, from the Oracle home, log in to EM CLI. EM CLI is available bydefault with every OMS installation, so you need not install the client separately onthe OMS host.
$<ORACLE_HOME>/bin/emcli login -username=<username>For example,
/u01/software/em13c/oraclehome/bin/emcli login -username=sysmanSpecify the password when you are prompted for it.
Note:
• Ensure that the EM CLI log in user has the ADD_TARGET privilege.
• If you have configured a load balancer for a multiple OMS setup,ensure that you run the EM CLI commands on one of the local OMShosts, and not on the load balancer hosts.
• If you have configured a load balancer for a multiple OMS setup, andyou choose to use the EM CLI setup command, ensure that you passthe OMS host and port as parameters, and not the load balancer hostand port.
For example, emcli setup -url=https://<OMS_HOST>:<OMS_PORT>/em-user=sysman -password=sysman
b. Synchronize EM CLI:
$<ORACLE_HOME>/bin/emcli syncc. Identify the platforms for which the Management Agent software is available in
Software Library:
Chapter 6Installing a Management Agent in Silent Mode
6-17

$<ORACLE_HOME>/bin/emcli get_supported_platformsThis command lists all the platforms for which the Management Agentsoftware is available in Software Library. The following shows the sampleoutput of the command.
---------------------------------------------------Version = 13.5.0.0.0Platform Name = Linux x86-64---------------------------------------------------Version = 13.5.0.0.0Platform Name = Oracle Solaris on x86-64 (64-bit)---------------------------------------------------Version = 13.5.0.0.0Platform Name = HP-UX PA-RISC (64-bit)---------------------------------------------------
If the output lists the platform on which you want to install the ManagementAgent, then proceed to the next step. Otherwise, acquire and apply theManagement Agent software for the required platform using Self Update.
For information on how to acquire and apply the Management Agent softwarefor a platform using Self Update, see Acquiring the Management AgentSoftware in Online Mode in the Oracle Enterprise Manager Cloud ControlBasic Installation Guide.
d. Download the Management Agent software from the Software Library to atemporary directory on the OMS host:
$<ORACLE_HOME>/bin/emcli get_agentimage -destination=<download_directory> -platform="<platform>" -version=<version>For example,
./emcli get_agentimage -destination=/tmp -platform="Linux x86-64" -version=13.5.0.0.0
Note:
If you use the get_agentimage EM CLI verb to download theManagement Agent software for a platform different from the OMShost platform, then you must set the ZIP_LOC environment variableto $OMS_HOME/bin/zip, which is the location of the ZIP utility on theOMS host.
If you use the get_agentimage EM CLI verb to download theManagement Agent software for a platform different from thedestination host platform, then you must set the ZIP_LOCenvironment variable to the location of the ZIP utility. For example, ifthe ZIP utility is present in /usr/bin/zip, set ZIP_LOC=usr/bin/zip.Also, ensure that the ZIP utility is of version 3.0 2008 build or higher.
Chapter 6Installing a Management Agent in Silent Mode
6-18

Note:
In the command, note the following:
• -destination is a directory on the OMS host where you want theManagement Agent software to be downloaded. Ensure that you havewrite permission on this location.
If the destination directory is titled with two or more words separated bya space, then enclose the directory name with double quotes.
For example, if the destination directory is titled /tmp/linuxagentimage, then enter the value as -destination="/tmp/linuxagentimage"
• -platform is the platform for which you want to download the software;this must match one of the platforms listed in the previous step forwhich the software is available in Software Library.
• -version is the version of the Management Agent software that youwant to download; this is an optional argument. If you do not pass thisargument, then the version is defaulted to the OMS version.
The command downloads the core Management Agent software to the destinationdirectory you entered. For example, for Linux x86-64, you will see the file13.5.0.0.0_AgentCore_226.zip. For information on the contents of this coresoftware, see Contents of the Downloaded Management Agent Software.
2. Transferring the Management Agent Software to the Destination Host.
Transfer the downloaded ZIP file to a temporary directory (/tmp) on the destination hostwhere you want to install the Management Agent. You can use any file transfer utility totransfer the file.
3. Installing the Management Agent Using the agentDeploy Script.
Follow Step 2 mentioned in Using EM CLI from the Remote Destination Host to install theManagement Agent.
Installing a Management Agent Using the RPM FileTo install a Management Agent using a .rpm file, follow these steps:
1. Acquiring the Management Agent Software and Downloading the RPM File onto the OMSHost.
2. Transferring the RPM File to the Destination Host.
3. Installing the Management Agent Using the RPM File.
Acquiring the Management Agent Software and Downloading the RPM File onto theOMS Host
1. On the OMS host, from the Oracle home, log in to EM CLI. EM CLI is available by defaultwith every OMS installation, so you need not install the client separately on the OMShost.
Chapter 6Installing a Management Agent in Silent Mode
6-19

$<ORACLE_HOME>/bin/emcli login -username=<username>For example,
/u01/software/em13c/oraclehome/bin/emcli login -username=sysmanSpecify the password when you are prompted for it.
Note:
Ensure that the EM CLI log in user has the ADD_TARGET privilege.
2. Synchronize EM CLI:
$<ORACLE_HOME>/bin/emcli sync3. Identify the platforms for which the Management Agent software is available in
Software Library:
$<ORACLE_HOME>/bin/emcli get_supported_platformsThis command lists all the platforms for which the Management Agent software isavailable in Software Library. The following is the sample output of the command.
---------------------------------------------------Version = 13.5.0.0.0Platform Name = Linux x86-64---------------------------------------------------Version = 13.5.0.0.0Platform Name = Oracle Solaris on x86-64 (64-bit)---------------------------------------------------Version = 13.5.0.0.0Platform Name = HP-UX PA-RISC (64-bit)---------------------------------------------------
If the output lists the platform on which you want to install the Management Agent,then proceed to the next step. Otherwise, acquire and apply the ManagementAgent software for the required platform using Self Update.
For information on how to acquire and apply the Management Agent software for aplatform using Self Update, see Acquiring the Management Agent Software inOnline Mode in the Oracle Enterprise Manager Cloud Control Basic InstallationGuide.
4. Download the .rpm file of the Management Agent from Software Library to atemporary directory on the OMS host:
$<ORACLE_HOME>/bin/emcli get_agentimage_rpm -destination=<download_directory> -platform="<platform>" -version=<version>For example,
./emcli get_agentimage_rpm -destination=/tmp/agentRPM -platform="Linuxx86-64" -version=13.5.0.0.0In the command, note the following:
• -destination is a directory on the OMS host where you want the .rpm file tobe downloaded. Ensure that you have write permission on this location.
Chapter 6Installing a Management Agent in Silent Mode
6-20

• -platform is the platform for which you want to download the .rpm file; this mustmatch one of the platforms listed in the previous step for which the software isavailable on the OMS host.
• -version is the version of the Management Agent for which you want to downloadthe .rpm file; this is an optional argument. If you do not pass this argument, then theversion is defaulted to the OMS version.
The command downloads the .rpm file of the core Management Agent to the destinationdirectory you entered. For example, oracle-agt-13.5.0.0.0-1.0.i386.rpmAlso, this command retrieves the Management Agent software, patches, and plug-inspresent in the OMS home. For information on how to save Management Agent patches tothe OMS home such that they are applied whenever a Management Agent is deployed,see Saving Management Agent Patches to an OMS Host.
Note:
Creating an agent rpm file for Linux is not supported when OMS is running onAIX.
Transferring the RPM File to the Destination Host
• Transfer the downloaded .rpm file to a temporary directory (/tmp) on the destination hostwhere you want to install the Management Agent. You can use any file transfer utility totransfer the file.
Installing the Management Agent Using the RPM File1. On the destination host, install the .rpm file as a root user to install the Management
Agent:
rpm -ivh <download_directory>/<rpm_file>For example,
rpm -ivh /tmp/oracle-agt-13.5.0.0.0-1.0.i386.rpm
Note:
The following is the output of the command:
Preparing... ########################################### [100%]Running the prereq1:oracle-agt ########################################### [100%]Follow the below steps to complete the agent rpm installation:1. Edit the properties file: /usr/lib/oracle/agent/agent.properties with the correct values2. Execute the command /etc/init.d/oracle-agt RESPONSE_FILE=<location_to_agent.properties>
Chapter 6Installing a Management Agent in Silent Mode
6-21

When you use a .rpm file to install a Management Agent, the default agent basedirectory location is /usr/lib/oracle/agent. To install the Management Agentusing a custom agent base directory location, run the following command as a rootuser:
rpm -ivh --relocate /usr/lib/oracle/agent=<custom_agent_base_directory_location> <download_directory>/<rpm_file>For example,
rpm -ivh --relocate /usr/lib/oracle/agent=/scratch/aime/agent tmp/agent_rpm/oracle-agt-13.5.0.0.0-1.0.i386.rpmWhen you use a .rpm file to install a Management Agent, the inventory location isalways <agent_base_directory>/oraInventory. As the default agent basedirectory location is /usr/lib/oracle/agent, the default inventory locationis /usr/lib/oracle/agent/oraInventory. If you choose to install theManagement Agent in a custom agent base directory location (using the --relocate option), say in /oem/agent, then the inventory location is /oem/agent/oraInventory.
2. Edit the agent.properties file as described in Table 6-5. The file is available inthe following location:
/usr/lib/oracle/agent/agent.properties3. Run the following command to complete the installation:
/etc/init.d/oracle-agt RESPONSE_FILE=<location_to_agent.properties>If the Management Agent install fails, diagnose the problem by viewing theManagement Agent install logs. For information on the location of these logs, see Manual Management Agent Installation Logs.
Installing a Management Agent on a Virtual HostTo install a Management Agent on a virtual host, follow these steps:
1. Follow the steps described in Using EM CLI from the Remote Destination Host or Using EM CLI from the OMS Host. While invoking the agentDeploy.sh or theagentDeploy.bat script, ensure that you specify the ORACLE_HOSTNAME parameter.
For example, <software_extract_location>/agentDeploy.shAGENT_BASE_DIR=<absolute_path_to_agentbasedir>RESPONSE_FILE=<absolute_path_to_response_file>ORACLE_HOSTNAME=<name_of_virtual_host>For more information about the ORACLE_HOSTNAME parameter, see Table 6-4.
2. If the virtual host is associated with a virtual Network Interface Controller (NIC), setAgentListenOnAllNICs=false in the $<AGENT_HOME>/sysman/config/emd.properties file, then run the following command:
$<AGENT_HOME>/bin/emctl reload
Chapter 6Installing a Management Agent in Silent Mode
6-22

Response File Parameters for Installing a Management Agent in SilentMode Using the AgentPull Script
Table 6-3 describes the mandatory parameters that you must include, and the optionalparameters that you can include in the response file, while installing a Management Agentusing the AgentPull script.
Table 6-3 Creating a Response File for Installing Oracle Management Agent Using AgentPullScript
Parameter Description
LOGIN_USER (Mandatory) Enter the Enterprise Manager console login user name.
For example, LOGIN_USER=sysmanLOGIN_PASSWORD (Mandatory) Enter the Enterprise Manager console login password.
For example, LOGIN_PASSWORD=myuserpasswordPLATFORM (Mandatory) Enter the platform for which you want to download the Management
Agent software.
For example, PLATFORM="Linux x86-64"Note: The value of this parameter must be in " ".
AGENT_REGISTRATION_PASSWORD
(Mandatory) Enter a password for registering new Management Agents that join theEnterprise Manager system.
By default, the communication between the OMS and the Management Agents issecured and locked. Any new Management Agents that join the Enterprise Managersystem must be authenticated before they become part of the system. The passwordyou enter here will be used for authenticating those new Management Agents.
For example, AGENT_REGISTRATION_PASSWORD=Wel456comeVERSION (Optional) Enter the version of the Management Agent software you want to
download.
For example, VERSION=13.5.0.0.0If you do not specify this parameter, it is assigned the OMS version.
CURL_PATH
(For Microsoft Windowshosts only)
(Optional) Enter the absolute path of the installed CURL utility.
For example, CURL_PATH=c:\Program Files\curlIf you do not include this parameter, it is assigned the value c:\.
OMS_HOST (Optional) Enter the OMS host name.
For example, OMS_HOST=example.comEM_UPLOAD_PORT (Optional) Enter the upload port (HTTP or HTTPS) for communicating with the OMS.
For example, EM_UPLOAD_PORT=14511
Chapter 6Installing a Management Agent in Silent Mode
6-23

Table 6-3 (Cont.) Creating a Response File for Installing Oracle Management Agent UsingAgentPull Script
Parameter Description
AGENT_INSTANCE_HOME
(Optional) Enter a directory location on the destination host where all ManagementAgent-related configuration files can be stored. For this parameter, you can do one ofthe following:
• Leave it blank.
In this case, by default, an instance directory titled agent_inst is created in theagent installation base directory.
For example, if the installation base directory is /john/oracle/, then theinstance directory is defaulted to /john/oracle/agent_inst
• Enter the absolute path to a custom directory.
Although you can enter any location as a custom location, Oracle recommendsyou to maintain the instance directory inside the installation base directory.
For example, AGENT_INSTANCE_HOME=/u01/software/em13c/agentbasedir/agent_inst
AGENT_PORT (Optional) Enter a free port on which the Management Agent process should bestarted. The same port is used for both HTTP and HTTPS.
For example, AGENT_PORT=1832If you do not enter any value, then either 3872 or any free port between 1830 and1849 is honored.
START_AGENT (Optional) Enter TRUE if you want the Management Agent to start automatically onceit is installed and configured. Otherwise, enter FALSE.For example, START_AGENT=TRUEIf you do not include this parameter, it defaults to TRUE.
ORACLE_HOSTNAME (Optional) Enter the fully qualified domain name of the host where you want to installthe Management Agent.
For example, ORACLE_HOSTNAME=example.comIf you do not include this parameter, it defaults to the physical host name.
ALLOW_IPADDRESS (Optional) Enter TRUE if you want to specify an IP address for ORACLE_HOSTNAME. IfALLOW_IPADDRESS is set to FALSE, a prerequisite check fails when you specify an IPaddress for ORACLE_HOSTNAME while installing a Management Agent.
For example, ALLOW_IPADDRESS=TRUEIf you do not include this parameter, it defaults to FALSE.
INVENTORY_LOCATION (Optional) Enter the custom inventory location.
Chapter 6Installing a Management Agent in Silent Mode
6-24

Table 6-3 (Cont.) Creating a Response File for Installing Oracle Management Agent UsingAgentPull Script
Parameter Description
PROPERTIES_FILE (Optional) Use this parameter to specify the absolute location of the properties file.
For example, PROPERTIES_FILE=/tmp/agent.propertiesIn the properties file, specify the parameters that you want to use for the ManagementAgent deployment. The list of parameters that you can specify in the properties file ispresent in $<AGENT_INSTANCE_HOME>/sysman/config/emd.properties. In theproperties file, you must specify the parameters in name value pairs, for example:
REPOSITORY_PROXYHOST=abc.example.comREPOSITORY_PROXYPORT=1532The properties file does not support parameter values that have spaces. If the valueof a particular parameter contains a space, then run the following command afterdeploying the Management Agent:
$<AGENT_INSTANCE_HOME>/bin/emctl setproperty agent -name<parameter_name> -value <parameter_value>
s_agentSrvcName
(Only for MicrosoftWindows hosts)
(Optional) Enter the customized Management Agent service name.
For example, s_agentSrvcName=agentsrvc1If you do not include this parameter, it defaults toOracle+<oracle_home_name>+Agent.
Note: (For Microsoft Windows hosts) If you upgrade a 13.5.0.x Management Agentinstalled on a host and you want to install another Management Agent on the samehost, which points to a different OMS, specify the s_agentSrvcName parameter whileinstalling the Management Agent.
Access Permission Add write permission to the agent.rsp file
Response File Parameters for Installing a Management Agent in SilentMode Using the agentDeploy Script
Table 6-4 describes the mandatory parameters that you must include, and the optionalparameters that you can include in the response file, while installing a Management Agentusing the agentDeploy script.
Table 6-4 Creating a Response File for Installing Oracle Management Agent Using agentDeployScript
Parameter Description
OMS_HOST (Mandatory) Enter the OMS host name.
For example, OMS_HOST=example.comEM_UPLOAD_PORT (Mandatory) Enter the upload port (HTTP or HTTPS) for communicating with
the OMS.
For example, EM_UPLOAD_PORT=14511
Chapter 6Installing a Management Agent in Silent Mode
6-25

Table 6-4 (Cont.) Creating a Response File for Installing Oracle Management Agent UsingagentDeploy Script
Parameter Description
AGENT_REGISTRATION_PASSWORD
(Mandatory) Enter a password for registering new Management Agents that jointhe Enterprise Manager system.
By default, the communication between the OMS and the Management Agentsis secured and locked. Any new Management Agents that join the EnterpriseManager system must be authenticated before they become part of the system.The password you enter here will be used for authenticating those newManagement Agents.
For example, AGENT_REGISTRATION_PASSWORD=Wel456comeAGENT_INSTANCE_HOME (Optional) Enter a directory location on the destination host where all
Management Agent-related configuration files can be stored. For thisparameter, you can do one of the following:
• Leave it blank.
In this case, by default, an instance directory titled agent_inst is createdin the agent installation base directory.
For example, if the installation base directory is /john/oracle/, then theinstance directory is defaulted to /john/oracle/agent_inst
• Enter the absolute path to a custom directory.
Although you can enter any location as a custom location, Oraclerecommends you to maintain the instance directory inside the installationbase directory.
For example, AGENT_INSTANCE_HOME=/u01/software/em13c/agentbasedir/agent_inst
AGENT_PORT (Optional) Enter a free port on which the Management Agent process should bestarted. The same port is used for both HTTP and HTTPS.
For example, AGENT_PORT=1832If you do not enter any value, then either 3872 or any free port between 1830and 1849 is honored.
START_AGENT (Optional) Enter TRUE if you want the Management Agent to start automaticallyonce it is installed and configured. Otherwise, enter FALSE.For example, START_AGENT=TRUEIf you do not include this parameter, it defaults to TRUE.
ORACLE_HOSTNAME (Optional) Enter the fully qualified domain name of the host where you want toinstall the Management Agent.
For example, ORACLE_HOSTNAME=example.comIf you do not include this parameter, it defaults to the physical host name.
ALLOW_IPADDRESS (Optional) Enter TRUE if you want to specify an IP address forORACLE_HOSTNAME. If ALLOW_IPADDRESS is set to FALSE, a prerequisitecheck fails when you specify an IP address for ORACLE_HOSTNAME whileinstalling a Management Agent.
For example, ALLOW_IPADDRESS=TRUEIf you do not include this parameter, it defaults to FALSE.
INVENTORY_LOCATION (Optional) Enter the custom inventory location.
Chapter 6Installing a Management Agent in Silent Mode
6-26

Table 6-4 (Cont.) Creating a Response File for Installing Oracle Management Agent UsingagentDeploy Script
Parameter Description
PROPERTIES_FILE (Optional) Use this parameter to specify the absolute location of the propertiesfile.
For example, PROPERTIES_FILE=/tmp/agent.propertiesIn the properties file, specify the parameters that you want to use for theManagement Agent deployment. The list of parameters that you can specify inthe properties file is present in $<AGENT_INSTANCE_HOME>/sysman/config/emd.properties. In the properties file, you must specify the parameters inname value pairs, for example:
REPOSITORY_PROXYHOST=abc.example.comREPOSITORY_PROXYPORT=1532The properties file does not support parameter values that have spaces. If thevalue of a particular parameter contains a space, then run the followingcommand after deploying the Management Agent:
$<AGENT_INSTANCE_HOME>/bin/emctl setproperty agent -name<parameter_name> -value <parameter_value>
s_agentSrvcName
(Only for Microsoft Windowshosts)
(Optional) Enter the customized Management Agent service name.
For example, s_agentSrvcName=agentsrvc1If you do not include this parameter, it defaults toOracle+<oracle_home_name>+Agent.
Note: (For Microsoft Windows hosts) If you upgrade a 13.5.0.x ManagementAgent installed on a host and you want to install another Management Agent onthe same host, which points to a different OMS, specify the s_agentSrvcNameparameter while installing the Management Agent.
Response File Parameters for Installing a Management Agent in SilentMode Using an RPM File
Table 6-5 describes the mandatory parameters that you must include, and the optionalparameters that you can include in the response file, while installing a Management Agentusing a.rpm file.
Table 6-5 Creating a Response File for Installing Oracle Management Agent Using an RPM File
Parameter Description
OMS_HOST (Mandatory) Enter the host name of the OMS to which you want to connect.
For example, OMS_HOST=example.comOMS_PORT (Mandatory) Enter the upload port (HTTP or HTTPS) to communicate with the
OMS.
For example, OMS_PORT=1835
Chapter 6Installing a Management Agent in Silent Mode
6-27

Table 6-5 (Cont.) Creating a Response File for Installing Oracle Management Agent Using anRPM File
Parameter Description
AGENT_REGISTRATION_PASSWORD
(Mandatory) Enter a password for registering new Management Agents that jointhe Enterprise Manager system.
By default, the communication between the OMS and the Management Agentsis secured and locked. Any new Management Agents that join the EnterpriseManager system must be authenticated before they become part of the system.The password you enter here will be used for authenticating those newManagement Agents.
For example, AGENT_REGISTRATION_PASSWORD=Wel456comeAGENT_USERNAME (Mandatory) Enter the user name with which you want to install the
Management Agent.
For example, AGENT_USERNAME=oracleAGENT_GROUP (Mandatory) Enter the group to which the Management Agent user should
belong.
For example, AGENT_GROUP=dbaAGENT_PORT (Optional) Enter the port used for the Management Agent process.
For example, AGENT_PORT=1832If you do not enter any value, then either 3872 or any free port between 1830and 1849 is honored.
ORACLE_HOSTNAME (Only for Virtual Hosts) Enter the virtual host name where you want to install theManagement Agent.
For example, ORACLE_HOSTNAME=example.com
Options Supported by the AgentPull ScriptTable 6-6 lists the options supported by the AgentPull.sh script. On MicrosoftWindows, these options apply to the AgentPull.bat file.
Table 6-6 Understanding the Options Supported by AgentPull.sh/AgentPull.bat
Option Description
-download_only Only downloads the Management Agent software. Does notdeploy the Management Agent.
-showPlatforms Displays the platforms for which the Management Agent softwareis available on the OMS host. Does not install the ManagementAgent.
-help Displays command line help and describes the usage of theAgentPull.sh script.
-ignoreDiscoveryPlugin Ignores all the discovery plug-ins and allows only Oracle homeplug-in.
Chapter 6Installing a Management Agent in Silent Mode
6-28

Table 6-6 (Cont.) Understanding the Options Supported by AgentPull.sh/AgentPull.bat
Option Description
-invPtrLoc Enter the absolute path to the inventory file that has the locationof the Central Inventory (oraInventory).
For example, -invPtrLoc /tmp/oraInst.locImportant:• This option is supported only on Unix platforms, and not on
Microsoft Windows platforms.• You can use this option even when another Oracle product is
already installed on the remote host, and the CentralInventory pointer /var/opt/oracle/oraInst.loc (forSolaris and HP-UX platforms) or /etc/oraInst.loc (forother Unix platforms) exists.
• If you use this option, ensure that you do not use theINVENTORY_LOCATION option.
Options Supported by the agentDeploy ScriptTable 6-7 lists the options supported by the agentDeploy.sh script. On Microsoft Windows,these options apply to the agentDeploy.bat file.
Table 6-7 Understanding the Options Supported by agentDeploy.sh/agentDeploy.bat
Option Description
-prereqOnly Runs only the prerequisite checks. Does NOT actually install the ManagementAgent.
This option is useful when you want to verify whether your environment meetsall the prerequisites for a successful Management Agent installation.
-ignorePrereqs Skips running the prerequisite checks. Use this when you have already used the-prereqOnly option and verified the prerequisites, and only want to install thesoftware binaries.
INVENTORY_LOCATION Enter the absolute path to the Central Inventory (oraInventory).
For example, INVENTORY_LOCATION=$HOME/oraInventoryImportant:• This option is supported only on Unix platforms, and not on Microsoft
Windows platforms.• Ensure that you use this option only when no other Oracle product is
installed on the remote host, and the Central Inventory pointer /var/opt/oracle/oraInst.loc (for Solaris and HP-UX platforms) or /etc/oraInst.loc (for other Unix platforms) does not exist.
• If you use this option, ensure that you do not use the -invPtrLoc option.
Chapter 6Installing a Management Agent in Silent Mode
6-29

Table 6-7 (Cont.) Understanding the Options Supported by agentDeploy.sh/agentDeploy.bat
Option Description
-invPtrLoc Enter the absolute path to the inventory file that has the location of the CentralInventory (oraInventory).
For example, -invPtrLoc /tmp/oraInst.locImportant:• This option is supported only on Unix platforms, and not on Microsoft
Windows platforms.• You can use this option even when another Oracle product is already
installed on the remote host, and the Central Inventory pointer /var/opt/oracle/oraInst.loc (for Solaris and HP-UX platforms) or /etc/oraInst.loc (for other Unix platforms) exists.
• If you use this option, ensure that you do not use theINVENTORY_LOCATION option.
-help Displays command line help and describes the usage of the deployment script.
-debug Logs more debug messages useful for debugging and resolving errors.
-ignoreUnzip Skips extracting the software binaries of the Management Agent software. Usethis when you do not want to copy the binaries again, but only want to configurethe available binaries.
-softwareOnly Installs only the software binaries, and does NOT configure the installation. Usethis when you want to perform a software-only installation of the ManagementAgent. For more information, see Installing the Oracle Management AgentSoftware Now and Configuring It Later.
Note: This option does not apply if you are cloning using a ZIP file.
-configOnly Configures the software binaries, and does not install any software binaries.Use this when you have performed a software-only installation using the -softwareOnly option, so that only the configuration is done to the copiedsoftware binaries. For more information, see Installing the Oracle ManagementAgent Software Now and Configuring It Later.
Note: This option does not apply if you are cloning using a ZIP file.
-forceConfigure Forcefully configures the Management Agent even when the OMS isunreachable. Use this option only when you are installing the ManagementAgent before installing the OMS, and when you know for sure that you willinstall the OMS later on the same host and port mentioned for the parametersOMS_HOST and EM_UPLOAD_PORT, respectively, in the response file you pass.
If you pass this option, then do not pass -configOnly, -softwareOnly, and -prereqOnly.
Note: When you pass this option, the Management Agent is configured to useHTTP (non-secure) communication. To establish a secure HTTPScommunication between the Management Agent and the OMS, you mustmanually secure the Management Agent after the OMS is available.
When you install the agent using the response file and -forceConfigure option,use the option as follows:• b_forceConfigure=true
Contents of the Downloaded Management Agent SoftwareTable 6-8 describes the contents of the core Management Agent software youdownload before installing the Management Agent using the agentDeploy script.
Chapter 6Installing a Management Agent in Silent Mode
6-30

Table 6-8 Contents of the Downloaded Management Agent Software
Files Description
Plugins Plug-in directory containing all the discovering plug-ins, which were installedwith the OMS, Oracle Home discovery plug-in, and Oracle Home monitoringplug-in.
agentcore.bin Binary file containing the core agent bits and agent set-uid binaries.
agentDeploy.sh/agentDeploy.bat Script used for deploying the Management Agent.
unzip Utility used for unarchiving the ZIP files.
agentimage.properties Properties file used for getting the version, platform ID, and so on.
agent.rsp Response file to be edited and passed for installing the Management Agent.
Contents of the Management Agent RPM FileIf you choose to install a Management Agent using the .rpm file, the .rpm file you downloadcontains an agent base directory. Table 6-9 describes the contents of this agent basedirectory:
Table 6-9 Contents of the Agent Base Directory Present in RPM File
Element Description
agent_13.4.0.0.0 Contains the Management Agent software.
plugins.txt Response file specifying the plug-ins deployed on the Management Agent.
plugins Contains the plug-in software.
agentimage.properties Properties file used for getting the version, platform ID, and so on.
agent.properties Response file to be edited and passed for installing the Management Agent.
oracle-agt Management Agent configuration script.
After Installing a Management Agent in Silent ModeAfter you install the Management Agent, follow these steps:
1. (Only for UNIX Operating Systems) Manually run the following scripts as a root user:
• If this is the first Oracle product you just installed on the host, then run theorainstRoot.sh script from the inventory location specified in the oraInst.loc filethat is available in the Management Agent home. This location is also displayedwhen you run the agentDeploy script with the -configOnly option.
For example, if the inventory location specified is $HOME/oraInventory, then run thefollowing command:
$HOME/oraInventory/orainstRoot.sh• Run the root.sh script from the Management Agent home:
$<AGENT_HOME>/root.sh
Chapter 6After Installing a Management Agent in Silent Mode
6-31

Note:
You do not need to run the orainstRoot.sh and root.sh scripts if youare installing a Management Agent using a .rpm file.
2. Verify the installation:
a. Navigate to the Management Agent home and run the following command tosee a message that confirms that the Management Agent is up and running:
$<AGENT_INSTANCE_HOME>/bin/emctl status agentb. Navigate to the Management Agent home and run the following command to
see a message that confirms that EMD upload completed successfully:
$<AGENT_INSTANCE_HOME>/bin/emctl upload agent3. Verify whether all the plug-ins listed in $<AGENT_BASE_DIRECTORY>/plugins.txt
were installed successfully. To do so, run the following command:
$<AGENT_INSTANCE_HOME>/bin/emctl listplugins agent -type all4. If you had ignored a prerequisite check warning about wrong time zone settings,
run the following command and follow the steps it displays:
$<AGENT_INSTANCE_HOME>/bin/emctl resetTZ agent5. By default, the host and the Management Agent get automatically added to the
Enterprise Manager Cloud Control console for monitoring. None of the targetsrunning on that host get automatically discovered and monitored.
To monitor the other targets, you must add them to Enterprise Manager CloudControl either using the Auto Discovery Results page, the Add Targets Manuallypage, or the discovery wizards offered for the targets you want to monitor.
For information about discovering targets and adding targets in EnterpriseManager Cloud Control, see Overview of Discovering and Adding Targets in theOracle Enterprise Manager Cloud Control Administrator's Guide.
Chapter 6After Installing a Management Agent in Silent Mode
6-32

Note:
• To know the location where a Management Agent is deployed on a MicrosoftWindows host, that is, the Management Agent Oracle home, access<INVENTORY_LOCATION>\inventory.xml, then search for HOMENAME="agent13c2". The value of the LOC parameter denotes the ManagementAgent Oracle home.
For example, in the following line of C:\ProgramFiles\Oracle\inventory.xml, D:\agent13cr1\13.5.0.0.0 denotes theManagement Agent Oracle home:
<HOME NAME="agent13c2" LOC="D:\agent13cr1\13.5.0.0.0" TYPE="O"IDX="10">
• You can repoint your existing Management Agents to a new OracleManagement Service (OMS). For information on how to do this, see theRedirecting Oracle Management Agent to Another Oracle Management ServiceAppendix present in Oracle Enterprise Manager Cloud Control AdvancedInstallation Guide.
When you repoint your existing Management Agents to a new OMS, you cannotmove the targets monitored by the Management Agents, the target history, andthe Management Agent history. The monitored targets and the history data islost.
Chapter 6After Installing a Management Agent in Silent Mode
6-33

7Cloning Oracle Management Agents
This chapter explains how you can clone existing Oracle Management Agents (ManagementAgents) using the Cloud Control console, or in silent mode. In particular, this chapter coversthe following:
• Overview of Cloning Management Agents
• Before You Begin Cloning a Management Agent
• Prerequisites for Cloning a Management Agent
• Cloning a Management Agent
• After Cloning a Management Agent
Overview of Cloning Management AgentsOracle Management Agent (Management Agent) is one of the core components of EnterpriseManager Cloud Control that enables you to convert an unmanaged host to a managed host inthe Enterprise Manager system. The Management Agent works in conjunction with the plug-ins to monitor the targets running on that managed host.
Therefore, if you want to monitor a target running on a host, you must first convert thatunmanaged host to a managed host by installing an Oracle Management Agent, and thenmanually discover the targets running on it to start monitoring them.
However, the Management Agent you install using other installation types is always a freshinstallation without any customized configuration that you had done or interim one-off patchesthat you had applied to other running Management Agents.
If you want to install an additional Management Agent that is identical to the existing well-tested, pre-patched, and running Management Agent, then a good option is to clone theexisting instance. This saves time and effort in patching a fresh installation all over again andbringing it to the current state.
You can clone an existing Management Agent in graphical or silent mode.
• In graphical mode, you use the Add Host Targets Wizard that is accessible from withinthe Enterprise Manager Cloud Control console. The wizard enables you to select asource Management Agent, which you want to clone, and identify one or more remotehosts on which you want to clone it.
The wizard first copies the source Management Agent image to the host on which OracleManagement Service (OMS) is running, and then, it transfers that copied image to thedestination hosts. Although the wizard can be used for remotely cloning one, singleManagement Agent, it is best suited for mass-deployment of Management Agents,particularly while mass-deploying Management Agents of different releases on hosts ofdifferent platforms.
• In silent mode, you use a compressed file (ZIP), which you transfer. Understandably, thisis a much easier method because you compress the Oracle home of an existingManagement Agent and transfer it to the destination host without having to specify any
7-1

parameters or values in an interview screen, but still retaining all its configurationsettings and applied one-off patches.
While cloning Management Agents in silent mode, you need to create a differentcompressed file for every platform on which you want to deploy the clonedManagement Agent. Hence, this method is not ideal for the mass deployment ofManagement Agents on hosts of different platforms. This method is a quick and aneffective one for deploying Management Agents on hosts that have the sameplatform.
After installing a Management Agent, to monitor a target, add the target to EnterpriseManager Cloud Control either using the Auto Discovery Results page, the Add TargetsManually page, or the discovery wizards offered for the targets you want to monitor.
For information about discovering targets and adding targets in Enterprise ManagerCloud Control, see Overview of Discovering and Adding Target in the OracleEnterprise Manager Cloud Control Administrator's Guide.
Once the installation is complete, you will see the following default contents in theagent base directory:
<agent_base_directory> |_____agent_13.5.0.0.0 |_____sbin |_____OPatch |_____agent.rsp |_____bin |_____cfgtoollogs |_____config |_____install |_____instalclient |_____. |_____. |_____. |_____agent_inst |_____agentInstall.rsp |_____agentimage.properties
Note:
You can repoint your existing Management Agents to a new OracleManagement Service (OMS). For instructions, see Redirecting OracleManagement Agent to Another Oracle Management Service.
When you repoint your existing Management Agents to a new OMS, youcannot move the targets monitored by the Management Agents, the targethistory, and the Management Agent history. The monitored targets and thehistory data is lost.
Before You Begin Cloning a Management AgentBefore you begin cloning an Oracle Management Agent, keep these points in mind:
• (Only for Graphical Mode) The Add Host Targets Wizard converts an unmanagedhost to a managed host in the Enterprise Manager system by cloning an existingOracle Management Agent.
Chapter 7Before You Begin Cloning a Management Agent
7-2

• For more information on the compatibility between a particular version of OracleManagement Agent 13c and a particular version of Oracle Management Service 13c, see Before You Begin Installing an Enterprise Manager System in the Oracle EnterpriseManager Cloud Control Basic Installation Guide.
• (Only for Graphical Mode) Using the Add Host Targets Wizard, you can clone only whenthe source host (from where you are cloning the Management Agent) and the destinationhost are running on the same operating system. Therefore, if you have hosts running ondifferent platforms, then you must have one deployment session per platform.
• Ensure that you do not use the central agent (that is, the Management Agent installed onthe OMS host) as the source Management Agent.
• While cloning, the source Management Agent is not shut down.
• (Only for Graphical Mode) If you have multiple hosts, sharing a common mounted drive,then install the Management Agents in two different phases:
1. First, clone the Management Agent to the host where the drive is shared by selectingthe deployment type Clone Existing Agent in the Add Host Targets Wizard. Followthe instructions outlined in this chapter.
2. Then, install a Management Agent on all other hosts that access the shared,mounted drive by selecting the deployment type Add Host to Shared Agent in theAdd Host Targets Wizard. (Here, you will select the Management Agent you installedin the previous step.) For more information, follow the instructions outlined in Installing Shared Agents.
• Cloning on shared clusters is NOT supported. If you have an Oracle RAC Cluster withmultiple nodes, then you must clone the Management Agent on each of the nodesseparately. In other words, in the Add Host Targets Wizard, you must add each nodeexplicitly as a destination host.
• (Only for Graphical Mode) The Add Host Targets Wizard uses SSH to establishconnectivity between Oracle Management Service (OMS) and the remote hosts whereyou want to install the Management Agents
• (Only for Graphical Mode) Only SSH1 (SSH version 1) and SSH2 (SSH version 2)protocols offered by OpenSSH are supported for deploying a Management Agent.
• (Only for Graphical Mode) The Add Host Targets Wizard supports Named Credentialsthat enable you to use a set of credentials registered with a particular name specificallyfor this operation, by your administrator. This ensures an additional layer of security foryour passwords because as an operator, you can only select the named credential, whichis saved and stored by an administrator, and not know the actual user name andpassword associated with it.
In case the named credential you select does not have the privileges to clone, then youcan set the named credential to run as another user (locked user account). In this case,the wizard logs in to the hosts using the named credential you select, but clones usingthe locked user account you set.
For example, you can create a named credential titled User_A (the user account that hasremote login access), and set it to run as User_X (the Management Agent install useraccount for which no direct login is set) that has the required privileges. In this case,the wizard logs in to the hosts as User_A, but installs as User_X, using the privilegedelegation setting (sudo or PowerBroker) specified in the named credential.
• (Only for Graphical Mode) Named credentials support SSH public key authentication andpassword based authentication. So you can use an existing SSH public keyauthentication without exposing your passwords.
Chapter 7Before You Begin Cloning a Management Agent
7-3

To set up SSH public key authentication for a named credential, follow thesesteps:
Note:
If you have already set up SSH public key authentication for a namedcredential and the SSH keys are already created, upload the SSH keysto Enterprise Manager, as mentioned in Step 4 of the followingprocedure.
1. Navigate to the following location in the Oracle home of the OMS host:
$<ORACLE_HOME>/oui/prov/resources/scriptsFor example,
/home/software/em/middleware/oms/oui/prov/resources/scripts2. If the OMS host runs on Oracle Solaris, edit the sshUserSetup.sh script to
change the following:
"SunOS") SSH="/usr/local/bin/ssh" SSH_KEYGEN="/usr/local/bin/ssh-keygen"to
"SunOS") SSH="/usr/bin/ssh" SSH_KEYGEN="/usr/bin/ssh-keygen"3. If the OMS host runs on any Unix based operating system, run the
sshUserSetup.sh script on the OMS host as the OMS install user, and passthe Management Agent install user name and the fully qualified name of thetarget hosts:
sshUserSetup.sh -setup -user <agent_install_user_name> -hosts<target_hosts>The following SSH keys are created:
$HOME/.ssh/id_rsa$HOME/.ssh/id_rsa_pub
Here, $HOME refers to the home directory of the OMS install user.
If the OMS host runs on Microsoft Windows, install Cygwin on the OMS host(described in Oracle Enterprise Manager Cloud Control Basic InstallationGuide), then run the following script on the OMS host as the OMS install user,and pass the Management Agent install user name and the fully qualifiedname of the target hosts:
sshUserSetupNT.sh -setup -user <agent_install_user_name> -hosts<target_hosts>
4. Upload the SSH keys to Enterprise Manager.
From the Setup menu, select Security, then select Named Credentials. ClickCreate. For Credential Name, specify the name of the credential, forCredential Type, select SSH Key Credentials, and for Scope, select Global.If you do not select the Global option, you cannot use the SSH namedcredential to install Management Agents using the Add Host Targets Wizard.
Chapter 7Before You Begin Cloning a Management Agent
7-4

To upload one of the private SSH keys created in Step 3, in the Credential Propertiessection, specify the location of the private SSH key as a value for the Upload PrivateKey field. Click Save.
To upload one of the public SSH keys created in Step 3, in the Credential Propertiessection, specify the location of the public SSH key as a value for the Upload PublicKey field. Click Save.
Figure 7-1 describes how to upload SSH keys to Enterprise Manager.
Figure 7-1 Uploading SSH Keys to Enterprise Manager
If you have already set up SSH public key authentication for a named credential, you canuse the named credential while installing Management Agents using the Add HostTargets Wizard.
You can also use the Add host Targets Wizard to set up SSH public key authentication fora named credential.
• By default, the Add Host Targets Wizard configures all the plug-ins that were configuredwith the Management Agent you are cloning.
• You must have read privileges on the Oracle WebLogic Server's alert log directories forthe Support Workbench (Incident) metrics to work properly. You must also ensure that theManagement Agent that is monitoring this Oracle WebLogic Server target is running onthe same host as the Oracle WebLogic Server.
• Upgrading a lower release of Solaris by applying a kernel patch or a patch bundle is notequivalent to installing the actual Solaris 5.10 Update 10+ image. Oracle Management
Chapter 7Before You Begin Cloning a Management Agent
7-5

Agent 13c Release 5 is built, tested, and certified on a minimum update version ofSolaris 5.10 Update 10+, so Oracle recommends that you install OracleManagement Agent only on Solaris 5.10 Update 9, and not on any release thatwas upgraded using patches.
• Changes done to the emd.properties file on the source host before cloning arenot carried over to the destination host after cloning.
Prerequisites for Cloning a Management AgentBefore cloning the Management Agent, ensure that you meet the followingprerequisites.
Table 7-1 Prerequisites for Cloning Oracle Management Agent
Requirement Description
Hardware Requirements Ensure that you meet the hard disk space and physical memory requirements.For more information, see Hardware Requirements for Enterprise ManagerCloud Controlin the Oracle Enterprise Manager Cloud Control Basic InstallationGuide.
Software Requirements
(Only for Graphical Mode)
(For Microsoft Windows) Ensure that you have installed Cygwin 1.7 on thedestination host. For more information, see the chapter on installing Cygwin inthe Installing Cygwin in the Oracle Enterprise Manager Cloud Control BasicInstallation Guide.
Note: While running cygwin.bat in Microsoft Windows Server 2008 andMicrosoft Windows Vista, ensure that you invoke it in administrator mode. To dothis, right-click the cygwin.bat file and select Run as administrator.
Operating System Requirements Ensure that you install the Management Agent only on certified operatingsystems as mentioned in the Enterprise Manager certification matrix availableon My Oracle Support.
To access the Enterprise Manager certification matrix, follow the steps outlinedin Accessing the Enterprise Manager Certification Matrix in the OracleEnterprise Manager Cloud Control Basic Installation Guide.
For information about platforms receiving future support, refer to My OracleSupport note 793512.1.
Note: If you use Oracle Solaris 10, then ensure that you have update 10 orhigher installed. To verify whether it is installed, run the following command:
cat /etc/releaseYou should see the output similar to the following. Here, s10s_u6 indicates thatupdate 6, which is not a supported update level for installation, is installed.
Solaris 10 10/08 s10s_u6wos_07b SPARCFile System Requirements Ensure that the file system mounted on the destination host does not permit
buffered writes.
Chapter 7Prerequisites for Cloning a Management Agent
7-6

Table 7-1 (Cont.) Prerequisites for Cloning Oracle Management Agent
Requirement Description
File Descriptor Requirements • Ensure that the maximum user process limit is set to 13312 or greater.
To verify the current value set, run the following command:
ulimit -uIf the current value is not 13312 or greater, then contact your systemadministrator to set it to at least 13312.
• Ensure that you set the soft limit of file descriptor to a minimum of 4096and hard limit less then or equal to 16384.
To verify the current value set, run the following commands:
For Soft Limit:/bin/sh -c "ulimit -n"
For Hard Limit:/bin/sh -c "ulimit -Hn"If the current value is not 4096 or greater, then as a root user, updatethe /etc/security/limits.conf file with the following entries:
<UID> soft nofile 4096<UID> hard nofile 16384
Package Requirements Ensure that you install all the operating system-specific packages. For moreinformation, see the chapter on package requirements in the Package, KernelParameter, and Library Requirements for Enterprise Manager Cloud Control inthe Oracle Enterprise Manager Cloud Control Basic Installation Guide.
User and Operating System Group Requirement
Ensure that the destination host where you want to install the ManagementAgent has the appropriate users and operating system groups created.
For more information, see the chapter on creating operating system groups andusers in the Creating Operating System Groups and Users for EnterpriseManager Cloud Control in the Oracle Enterprise Manager Cloud Control BasicInstallation Guide.
Note: If your enterprise has a policy against installing Management Agentsusing the OMS install operating system user account, you can use a differentoperating system user account to install Management Agents. However, ensurethat the user account you use and the OMS install user account belong to thesame primary group.
/etc/hosts File Requirements Ensure that the /etc/hosts file on the host has the IP address, the fullyqualified name, and the short name in the following format:
172.16.0.0 example.com mypcDestination Host Requirements Ensure that the destination hosts are accessible from the host where the OMS
is running.
If the destination host and the host on which OMS is running belong to differentnetwork domains, then ensure that you update the /etc/hosts file on thedestination host to add a line with the IP address of that host, the fully qualifiedname of that host, and the short name of the host.
For example, if the fully-qualified host name is example.com and the shortname is mypc, then add the following line in the /etc/hosts file:
172.16.0.0 example.com mypc
Chapter 7Prerequisites for Cloning a Management Agent
7-7

Table 7-1 (Cont.) Prerequisites for Cloning Oracle Management Agent
Requirement Description
Destination Host CredentialRequirements
(Only for Graphical Mode)
Ensure that all the destination hosts running on the same operating systemhave the same set of credentials. For example, all the destination hosts runningon Linux operating system must have the same set of credentials.
The wizard installs the Management Agent using the same user account. If youhave hosts running on the same operating system but with different credentials,then have two different deployment sessions.
Chapter 7Prerequisites for Cloning a Management Agent
7-8

Table 7-1 (Cont.) Prerequisites for Cloning Oracle Management Agent
Requirement Description
Destination Host Time ZoneRequirements
(Only for Graphical Mode)
Ensure that the time zones of the destination hosts have been set correctly. Toverify the time zone of a destination host, log in to the OMS host, and run thefollowing command:
ssh -l <install_user> <destination_host_name> /bin/sh -c'echo $TZ'If the time zone displayed is incorrect, log in to the destination host, and followthese steps:
1. Run the following commands to set the time zone on the destination host:
• For Korn shell:
TZ=<value>export TZ
• For Bourne shell or Bash shell:
export TZ=<value>• For C shell:
setenv TZ <value>For example, in the Bash shell, run the following command to set the timezone to America/New_York:
export TZ='America/New_York'To set the time zone on a destination host that runs on Microsoft Windows,from the Start menu, select Control Panel. Click Date and Time, thenselect the Time Zone tab. Select your time zone from the displayed dropdown list.
To view a list of the time zones you can use, access thesupportedtzs.lst file present in the <AGENT_HOME>/sysman/admindirectory of the central agent (that is, the Management Agent installed onthe OMS host).
2. Restart the SSH daemon.
If the destination host runs on a UNIX based operating system, run thefollowing command:
sudo /etc/init.d/sshd restartIf the destination host runs on a Microsoft Windows operating system, runthe following commands:
cygrunsrv -E sshdcygrunsrv -S sshd
3. Verify whether the SSH server can access the TZ environment variable bylogging in to the OMS host, and running the following command:
ssh -l <install_user> <destination_host_name> /bin/sh -c'echo $TZ'
Note: If you had ignored a prerequisite check warning about wrong time zonesettings during the cloning procedure, you must set the correct time zone on thedestination hosts after cloning the Management Agent. For information onsetting time zones post cloning, see After Cloning a Management Agent.
Chapter 7Prerequisites for Cloning a Management Agent
7-9

Table 7-1 (Cont.) Prerequisites for Cloning Oracle Management Agent
Requirement Description
Time Zone Requirements
(Only for Silent Mode)
Ensure that the host time zone has been set correctly. To verify the host timezone, run the following command:
echo $TZIf the time zone displayed is incorrect, run the following commands, beforerunning the agentDeploy.sh or agentDeploy.bat scripts, to set the correcttime zone:
• For Korn shell:
TZ=<value>export TZ
• For Bourne shell or Bash shell:
export TZ=<value>• For C shell:
setenv TZ <value>For example, in the Bash shell, run the following command to set the time zoneto America/New_York:
export TZ='America/New_York'To set the time zone on a destination host that runs on Microsoft Windows, fromthe Start menu, select Control Panel. Click Date and Time, then select theTime Zone tab. Select your time zone from the displayed drop down list.
To view a list of the time zones you can use, access the supportedtzs.lstfile present in the <AGENT_HOME>/sysman/admin directory of the central agent(that is, the Management Agent installed on the OMS host).
Note:• If you are installing a Management Agent on a host that runs on Microsoft
Windows Server 2003, and you encounter an error when you use the Asia/Kolkata time zone, see the My Oracle Support note 1530571.1.
• If you had ignored a prerequisite check warning about wrong time zonesettings during the cloning procedure, you must set the correct time zoneon the host after cloning the Management Agent. For information on settingtime zones post cloning, see After Cloning a Management Agent.
Note: If you had ignored a prerequisite check warning about wrong time zonesettings during the cloning procedure, you must set the correct time zone on thehost after cloning the Management Agent. For information on setting time zonespost cloning, see After Cloning a Management Agent.
Chapter 7Prerequisites for Cloning a Management Agent
7-10

Table 7-1 (Cont.) Prerequisites for Cloning Oracle Management Agent
Requirement Description
sudo/pbrun/sesu/su SSHRequirements
(Only for Graphical Mode)
(Only for UNIX)
Ensure that you set the oracle.sysman.prov.agentpush.enablePtyproperty to true in the $<ORACLE_HOME>/sysman/prov/agentpush/agentpush.properties file, if the privilege delegation tool you are usingrequires a pseudo terminal for remote command execution via SSH. Mostprivilege delegation tools such as pbrun, sesu, and su require a pseudoterminal for remote command execution, by default.
Note: If you are using sudo as your privilege delegation tool, and you do notwant to set the oracle.sysman.prov.agentpush.enablePty property totrue, do one of the following:
• Include Defaults visiblepw in the /etc/sudoers file, or enter thesudo command with the -S option for Privileged Delegation Setting onthe Installation Details page.
For information on how to access the Installation Details page, see Cloninga Management Agent in Graphical Mode.
• Comment out Defaults requiretty in the /etc/sudoers file.
sudo/pbrun/sesu/suRequirements (for Root User)
(Only for Graphical Mode)
(Only for UNIX)
• Ensure that the installing user has the privileges to invoke the id commandand the agentdeployroot.sh script as root. Grant the privileges in theconfiguration file of your privilege delegation tool.
For example, if you are using sudo as your privilege delegation tool, includethe following in the /etc/sudoers file to grant the required privileges:
<install_user> ALL=(root) /usr/bin/id, <agent_home>/*/agentdeployroot.shFor example, oracle ALL=(root) /usr/bin/id, /home/oracle/agentibd/*/agentdeployroot.shHere, oracle is the installing user, and /home/oracle/agentibd is theManagement Agent home, that is, the agent base directory.
• You do not require the following entry in the /etc/sudoers file forinstalling a Management Agent. However, the entry is required forperforming provisioning and patching operations in Enterprise Manager.Therefore, if you are removing this entry before installing a ManagementAgent, then ensure that you bring back the entry after installing theManagement Agent.
In Enterprise Manager Cloud Control 12c Release 2 (12.1.0.2), Release3 (12.1.0.3), Release 4 (12.1.0.4), Release 5 (12.1.0.5), 13c Release 1,13c Release 2, 13c Release 3 or 13c Release 4:(root) /<AGENT_ORACLE_HOME>/sbin/nmosudoIn Enterprise Manager Cloud Control 12c Release 1 (12.1.0.1) [withBundle Patch 1]:(root) /<AGENT_INSTANCE_DIRECTORY>/bin/nmosudo
Chapter 7Prerequisites for Cloning a Management Agent
7-11

Table 7-1 (Cont.) Prerequisites for Cloning Oracle Management Agent
Requirement Description
sudo/pbrun/sesu/suRequirements (for LockedAccount User)
(Only for Graphical Mode)
(Only for UNIX)
Ensure that the installing user has the privileges to invoke /bin/sh as thelocked account user. Grant the privileges in the configuration file of yourprivilege delegation tool.
For example, if you are using sudo as your privilege delegation tool, include thefollowing in the /etc/sudoers file to grant the required privileges:
login_user1 ALL=(oracle) /bin/shHere, login_user1 is the SSH log in user, and oracle is the locked accountand install user.
If you do not want to grant privileges to the installing user to invoke /bin/sh asthe locked account user, set theoracle.sysman.prov.agentpush.pdpShellOutEnabled property tofalse, and ensure that the installing user has the privileges to invoke id,chmod, cp, mkdir, rm, tar, emctl, agentDeploy.sh,em13400_<platform>.bin, and unzip as the locked account user. Grant theprivileges in the configuration file of your privilege delegation tool.
For example, if you are using sudo as your privilege delegation tool, include thefollowing in the /etc/sudoers file to grant the required privileges:
login_user1 ALL=(oracle) /usr/bin/id, /bin/chmod, /bin/cp, /bin/mkdir, /bin/rm, /bin/tar, /home/oracle/agentibd/agent_inst/bin/emctl, /home/oracle/agentibd/*/agentDeploy.sh, /home/oracle/agentibd/*/prereq_stage/agent_13.4.0.0.0/oui/bin/em13400_<platform>.bin, /home/oracle/agentibd/*/unzip, /home/oracle/agentibd/*/unzipTmp/unzip, /home/oracle/agentibd/*/agentcore.binHere, login_user1 is the SSH log in user, oracle is the locked account andinstall user, and /home/oracle/agentibd is the agent base directory.
Permission Requirements • Ensure that the agent base directory you specify is empty and has writepermission.
• Ensure that the instance directory is empty and has write permission.
PATH Environment VariableRequirements
(Only for Graphical Mode)
On the destination host, ensure the following:
• (For Microsoft Windows) Ensure that the Cygwin software location appearsbefore other software locations in the PATH environment variable. Aftermaking it the first entry, restart the SSH daemon (sshd).
• (For UNIX) On the destination host, ensure that the SCP binaries (forexample, /usr/bin/scp) are in the PATH environment variable:
Path Validation Requirements Validate the path to all command locations. For more information, see theappendix on validating command locations in the Validating CommandLocations in the Oracle Enterprise Manager Cloud Control Basic InstallationGuide.
CLASSPATH EnvironmentVariable Requirements
Unset the CLASSPATH environment variable. You can always reset the variableto the original value after the installation is complete.
Temporary Directory SpaceRequirements
Ensure that you allocate 400 MB of space for a temporary directory where theexecutables can be copied.
By default, the temporary directory location set to the environment variable TMPor TEMP is honored. If both are set, then TEMP is honored. If none of them areset, then the following default values are honored: /tmp on UNIX hosts andc:\Temp on Microsoft Windows hosts.
Chapter 7Prerequisites for Cloning a Management Agent
7-12

Table 7-1 (Cont.) Prerequisites for Cloning Oracle Management Agent
Requirement Description
Agent Base DirectoryRequirements
Ensure that the agent base directory is empty and has at least 1 GB of freespace.
Ensure that the directory name does not contain any spaces.
The install user owns the agent base directory. The agent base directory andthe parent directories of the agent base directory have read, write, and executepermissions for the install user. Ensure that the install user or the root userowns all the parent directories of the agent base directory, and that the parentdirectories have read and execute permissions for the install user group and allthe other users. Also, ensure that the root user owns the root directory.
For example, if the agent base directory is /scratch/OracleHomes/agent,and oracle is the install user, then the /scratch/OracleHomes/agentdirectory must be owned by oracle, directories scratch and OracleHomesmust be owned by either oracle or the root user, and the root directory (/) mustbe owned by the root user.
If the agent base directory is mounted, then ensure that it is mounted with thesetuid turned on.
Default SSH Port Requirements
(Only for Graphical Mode)
Ensure that the SSH daemon is running on the default port (that is, 22) on allthe destination hosts. To verify the SSH port on a Unix host, run the followingcommand:
netstat -anp | grep -i sshdFor example, the output of this command may be the following:
tcp 0 0 0.0.0.0:22 0.0.0.0:* LISTEN 3188/sshdThe above output indicates that the SSH daemon is running on port 22.
Also, on a Unix host, you can run the following command to verify the SSH port:
cat /etc/ssh/sshd_configFor a Microsoft Windows host, the SSH port value is mentioned in theC:\cygwin\etc\sshd_config file.
If the SSH port is a non-default port, that is, any port other than 22, then updatethe SSH_PORT property in the following file:
$<ORACLE_HOME>/oui/prov/resources/Paths.propertiesSoftware AvailabilityRequirements
(Only for Graphical Mode)
For Cloning an Existing Management AgentEnsure that you already have Oracle Management Agent 13c running in yourenvironment. Ensure that the platform on which it is running is the same as theplatform of the destination hosts on which you want to clone.
For Installing a Management Agent Using Shared Oracle HomeEnsure that you already have Oracle Management Agent 13c installed as aMaster Agent in a shared, mounted location.
Installation Base DirectoryRequirements
(Only for Graphical Mode)
Ensure that the agent base directory you specify in the Installation BaseDirectory field is empty and has write permission.
Job System Requirements Ensure that the job system is enabled on the source Management Agent youwant to clone.
Chapter 7Prerequisites for Cloning a Management Agent
7-13

Table 7-1 (Cont.) Prerequisites for Cloning Oracle Management Agent
Requirement Description
Installing User Requirements If the central inventory owner and the user installing the Management Agent aredifferent, then ensure that they are part of the same group.
Also ensure that the inventory owner and the group to which the owner belongshave read and write permissions on the inventory directory.
For example, if the inventory owner is abc and the user installing theManagement Agent is xyz, then ensure that abc and xyz belong to the samegroup, and they have read and write access to the inventory.
Central Inventory (oraInventory)Requirements
• Ensure that you allocate 100 MB of space on all destination hosts for theCentral Inventory.
• Ensure that you have read, write, and execute permissions onoraInventory on all destination hosts. If you do not have thesepermissions on the default inventory (typically at /etc/oraInst.loc) onany destination host, then ensure that you specify the path to an alternativeinventory location by using one of the following options in the AdditionalParameters field of the Add Host Targets Wizard. However, theseparameters are supported only on UNIX platforms, and not on MicrosoftWindows platforms.
INVENTORY_LOCATION=<absolute_path_to_inventory_directory>-invPtrLoc <absolute_path_to_oraInst.loc>
Port Requirements Ensure that the default ports described in What Default Ports Are Used forEnterprise Manager Cloud Control Installation? are free.
Agent User Account Permissionsand Rights
(Only for Microsoft Windows)
(For Microsoft Windows) If you are installing the Management Agent on aMicrosoft Windows-based operating system, then ensure that the agent useraccount has permissions and rights to perform the following:
• Act as part of the operating system.• Adjust memory quotas for a process.• Replace process level token.• Log on as a batch job.To verify whether the agent user has these rights, follow these steps:
1. Launch the Local Security Policy.
From the Start menu, click Settings and then select Control Panel. Fromthe Control Panel window, select Administrative Tools, and from theAdministrative Tools window, select Local Security Policy.
2. In the Local Security Policy window, from the tree structure, expand LocalPolicies, and then expand User Rights Assignment.
Permissions for cmd.exe (For Microsoft Windows) If you are installing the Management Agent on aMicrosoft Windows-based operating system, then ensure that you grant theCmd.exe program Read and Execute permissions for the user account that thebatch job runs under. This is a restriction from Microsoft.
For more information on this restriction and to understand how you can grantthese permissions, access the following URL to Microsoft Web site:
http://support.microsoft.com/kb/867466/en-usRuntime Library FileRequirements
(For Microsoft Windows) If you are installing the Management Agent on aMicrosoft Windows-based operating system, then ensure that the Msvcp71.dlland Msvcr71.dll runtime library files are present in c:\windows\system32.
Chapter 7Prerequisites for Cloning a Management Agent
7-14

Table 7-1 (Cont.) Prerequisites for Cloning Oracle Management Agent
Requirement Description
Preinstallation/PostinstallationScripts Requirements
(Only for Graphical Mode)
Ensure that the preinstallation and postinstallation scripts that you want to runalong with the installation are available either on the OMS host, destinationhosts, or on a shared location accessible to the destination hosts.
Cloning a Management AgentThis section describes the following:
• Cloning a Management Agent in Graphical Mode
• Cloning a Management Agent in Silent Mode
Note:
If the OMS host is running on Microsoft Windows, and the OMS software wasinstalled in a drive other than C:\, then update the SCRATCH_PATH variablein $OMS_HOME\oui\prov\resources\ssPaths_msplats.properties.For example, if the OMS software was installed in D:\, ensure that you update theSCRATCH_PATH variable to D:\tmpada
Cloning a Management Agent in Graphical ModeThis section describes how to clone a Management Agent using the Cloud Control console. Itconsists of the following:
• Cloning a Management Agent Using Add Host Targets Wizard
• Format of Host List File
• Additional Parameters Supported for Cloning a Management Agent in Graphical Mode
Cloning a Management Agent Using Add Host Targets WizardTo clone a Management Agent in graphical mode using Add Host Targets Wizard, followthese steps:
1. In Cloud Control, do one of the following:
• From the Setup menu, select Add Target, and then, click Auto Discovery Results.On the Auto Discovery Results page, select a host you want to monitor in EnterpriseManager Cloud Control, and click Promote.
Enterprise Manager Cloud Control displays the Add Host Wizard, where you canselect the option to clone an existing Management Agent.
• From the Setup menu, select Add Target, and then, click Add Targets Manually.On the Add Targets Manually page, click Install Agent on Host.
Chapter 7Cloning a Management Agent
7-15

Enterprise Manager Cloud Control displays the Add Host Wizard, where youcan select the option to clone an existing Management Agent.
2. On the Host and Platform page, do the following:
a. Accept the default name assigned for this session or enter a unique name ofyour choice. The custom name you enter can be any intuitive name, and neednot necessarily be in the same format as the default name. For example,add_host_operation_1A unique deployment activity name enables you to save the cloning detailsspecified in this deployment session and reuse them in the future withouthaving to enter all the details all over again in the new session.
b. Click Add to enter the fully qualified name and select the platform of the hoston which you want to clone the Management Agent.
Note:
• Oracle recommends you to enter the fully qualified domain nameof the host. For monitoring purpose, Enterprise Manager CloudControl adds that host and the Management Agent with theexact name you enter here.
• You must enter only one host name per row. Entering multiplehost names separated by a comma is not supported.
• You must ensure that the host name you enter does not haveunderscores.
Alternatively, you can click either Load from File to add host names stored ina file, or Add Discovered Hosts to add host names from a list of hostsdiscovered by Enterprise Manager. For information on how the host nameentries must appear in the host file, see Format of Host List File .
Note:
When you click Add Discovered Hosts and add hosts from a list ofdiscovered hosts, the host's platform is automatically detected anddisplayed. The platform name is detected using a combination offactors, including hints received from automated discovery and theplatform of the OMS host. This default platform name is asuggestion, so Oracle strongly recommends you to verify theplatform details before proceeding to the next step.
As you can clone only if the source host and destination host are running onthe same platform, set the platform for the first host in the first row of the tableand from the Platform list, select Same for All Hosts. This will ensure thatthe platform name you selected for the first host is also set for the rest of thehosts in the table.
Chapter 7Cloning a Management Agent
7-16

Note:
If you are cloning a Management Agent on a platform that is different fromthe platform on which the OMS host is running, then ensure that theManagement Agent software for that platform is available in OracleSoftware Library (Software Library). If the Management Agent software forthe required platform is not available in Software Library, acquire and applythe software using the Self Update console.
To access the Self Update Console, from the Setup menu, selectExtensibility, then select Self Update. To acquire the latest ManagementAgent software, click Agent Software, select the required software, thenclick Download.
For more information on how to acquire and apply the Management Agentsoftware for a platform using the Self Update console, see OracleEnterprise Manager Cloud Control Basic Installation Guide.
c. Click Next.
3. On the Installation Details page, do the following:
a. In the Deployment Type section, select Clone Existing Agent. Then, for SelectTarget, click the torch icon and select the Management Agent you want to clone.
Note:
• Ensure that you do not use the central agent (that is, the ManagementAgent installed on the OMS host) as the source Management Agent.
• If you have multiple hosts sharing a common mounted drive, then installthe Management Agents in two different phases:
i. In the Add Host Targets Wizard, select the deployment type CloneExisting Agent, and clone the Management Agent to the hostwhere the drive is shared.
ii. In the Add Host Targets Wizard, select the deployment type AddHost to Shared Agent, and install a Management Agent on allother hosts that access the shared, mounted drive. (Here, you willselect the Management Agent you cloned in the previous step asthe master agent or shared agent.)
b. From the table, select the first row that indicates the hosts grouped by their commonplatform name.
c. In the Installation Details section, provide the installation details common to the hostsselected in Step 3 (b). For Installation Base Directory, enter the absolute path tothe agent base directory where you want the software binaries, security files, andinventory files of the Management Agent to be copied.
For example, /usr/home/software/oracle/agentHomeIf the path you enter does not exist, the application creates a directory at thespecified path, and copies the Management Agent software binaries, security files,and inventory files there.
Chapter 7Cloning a Management Agent
7-17

Note:
The Installation Base Directory is essentially the agent basedirectory. Ensure that the directory you provide is empty. If apreviously run deployment session had failed for some reason, thenyou might see an ADATMP_<timestamp> subdirectory in theinstallation base directory. In this case, either delete the subdirectoryand start a new deployment session, or retry the failed session fromthe Add Host Status page.
d. For Instance Directory, accept the default instance directory location or enterthe absolute path to a directory of your choice where all Management Agent-related configuration files can be stored.
For example, /usr/home/software/oracle/agentHome/agent_instIf you are entering a custom location, then ensure that the directory has writepermission. Oracle recommends you to maintain the instance directory insidethe installation base directory.
If the path you enter does not exist, the application creates a directory at thespecified path, and stores all the Management Agent-related configuration filesthere.
e. From Named Credential list, select an appropriate profile whose credentialscan be used for setting up the SSH connectivity between the OMS and theremote hosts, and for installing a Management Agent on each of the remotehosts.
Note:
• If you do not have a credential profile, or if you have one but donot see it in the Named Credential list, then click the plus iconagainst this list. In the Create New Named Credential window,enter the credentials and store them with an appropriate profilename so that it can be selected and used for installing theManagement Agents. Also set the run privilege if you want toswitch over from the Named Credential you are creating, toanother user who has the privileges to perform the installation.
• If the plus icon is disabled against this list, then you do not havethe privileges to create a profile with credentials. In this case,contact your administrator and either request him/her to grantyou the privileges to create a new profile or request him/her tocreate a profile and grant you the access to view it in the NamedCredential list.
• If you have manually set up SSH public key authenticationbetween the OMS and the remote hosts, then you may not havea password for your user account. In this case, create a namedcredential with a dummy password. Do NOT leave the passwordfield blank.
Chapter 7Cloning a Management Agent
7-18

f. For Privileged Delegation Setting, validate the Privilege Delegation setting to beused for running the root scripts. By default, it is set to the Privilege Delegationsetting configured in Enterprise Manager Cloud Control.
For example, you can specify one of the following for the Privileged DelegationSetting field:
/usr/bin/sudo -u %RUNAS% %COMMAND%/usr/bin/sudo -u -S %RUNAS% %COMMAND% (if a pseudo terminal is required for remote command execution via SSH)/usr/bin/sesu - %RUNAS% -c "%COMMAND%"/usr/bin/pbrun %PROFILE% -u %RUNAS% %COMMAND%/usr/bin/su - %RUNAS% -c "%COMMAND%"
If you leave the Privileged Delegation Setting field blank, the root scripts will not berun by the wizard; you will have to run them manually after the installation. Forinformation about running them manually, see After Cloning a Management Agent.
This setting will also be used for performing the installation as the user set in the RunAs attribute of the selected Named Credential if you had set the user while creatingthat Named Credential.
Note:
In the Privilege Delegation setting, the %RUNAS% is honored as the root userfor running the root scripts and as the user set in the Run As attribute of theNamed Credential for performing the installation.
g. For Port, accept the default port (3872) that is assigned for the Management Agentto communicate, or enter a port of your choice.
The custom port you enter must not be busy. If you are not sure, you can leave thisfield blank. Enterprise Manager Cloud Control automatically assigns the first availablefree port within the range of 1830 - 1849.
h. (Optional) In the Optional Details section, enter the absolute path to an accessiblelocation where the preinstallation and postinstallation scripts you want to run areavailable. Note that only one preinstallation or one postinstallation script can bespecified.
If you want to run the script as root, then select Run as Root. If the script is on thehost where OMS is running and is not on the host where you want to install theManagement Agent, then select Script on OMS. In this case, the script will be copiedfrom the OMS host to the destination hosts, and then run on the destination hosts.
i. (Optional) For Additional Parameters, enter a whitespace-separate list of additionalparameters that you want to pass during the installation. For a complete list ofsupported additional parameters, see Table 7-2.
For example, if you want to provide the inventory pointer location file, then enter -invPtrLoc followed by the absolute path to the file location. Note that this parameteris supported only on UNIX platforms, and not on Microsoft Windows platforms.
j. Repeat Step 3 (b) to Step 3 (i) for every other row you have in the table.
k. Click Next.
4. On the Review page, review the details you have provided and if you are satisfied withthe details, then click Deploy Agent to clone the Management Agent.
Chapter 7Cloning a Management Agent
7-19

If you want to modify the details, then click Back repeatedly to reach the pagewhere you want to make the changes.
When you click Deploy Agent and submit the deployment session, you areautomatically taken to the Add Host Status page that enables you to monitor theprogress of the deployment session.
Note:
On the Add Host Status page, if you see the error message CopyingSource Agent Image Failed, then refer to the following log file in theOracle home of the OMS host:
$<ORACLE_HOME>/sysman/prov/agentpush/<timestampdir>/applogs/deployfwk.logThis error usually occurs when the job system is not enabled on thesource Management Agent you are cloning. Ensure that the job systemis enabled.
Format of Host List FileIn the Add Host Targets Wizard, you can click Load from File to add the hosts listed ina file. However, ensure that the file you select has one of the following formats:
• Only the host name.
For Example,
host1.example.comhost2.example.com
• The host name followed by the platform name.
For Example,
host1.example.com linux_x64host2.example.com aixThe supported platform names are linux_x64, linux, solaris, hpunix, hpi,linux64_zseries, aix, linux_ppc64, windows_x64, solaris_x64, win32.
Additional Parameters Supported for Cloning a Management Agent inGraphical Mode
Table 7-2 lists the additional parameters supported for cloning a Management Agent ingraphical mode.
Chapter 7Cloning a Management Agent
7-20

Table 7-2 Supported Additional Parameters
Parameter Description
INVENTORY_LOCATION Enter the absolute path to the Central Inventory (oraInventory).
For example, INVENTORY_LOCATION=$HOME/oraInventoryImportant:• This parameter is supported only on Unix platforms, and not on Microsoft
Windows platforms.• Ensure that you use this parameter only when no other Oracle product is
installed on the remote host, and the Central Inventory pointer /var/opt/oracle/oraInst.loc (for Solaris and HP-UX platforms) or /etc/oraInst.loc (for other Unix platforms) does not exist.
• If you use this parameter, ensure that you do not use the -invPtrLocparameter.
-invPtrLoc Enter the absolute path to the inventory file that has the location of the CentralInventory (oraInventory).
For example, -invPtrLoc /tmp/oraInst.locImportant:• This parameter is supported only on Unix platforms, and not on Microsoft
Windows platforms.• You can use this parameter even when another Oracle product is already
installed on the remote host, and the Central Inventory pointer /var/opt/oracle/oraInst.loc (for Solaris and HP-UX platforms) or /etc/oraInst.loc (for other Unix platforms) exists.
• If you use this parameter, ensure that you do not use theINVENTORY_LOCATION parameter.
s_agentSrvcName (Only for Microsoft Windows) Enter a custom name for the Management Agentservice.
Every Management Agent appears as a service in Microsoft Windows, andevery Management Agent has a default service name. If you want to assign acustom name to identify it, then use this parameter.
For example, s_agentSrvcName=agentsrvc1Note: If you upgrade a 12c Management Agent installed on a MicrosoftWindows host to 13c, and you want to install another Management Agent on thesame host, reporting to a different OMS, ensure that you specify thes_agentSrvcName parameter.
START_AGENT=false Specify this parameter if you do not want the Management Agent to startautomatically once it is installed and configured.
If you do not specify this parameter, the Management Agent starts automaticallyonce it is installed and configured.
b_secureAgent=false Specify this parameter if you do not want the Management Agent to be securedafter the install.
If you specify this parameter, ensure that you also specify the OMS HTTP port,using the EM_UPLOAD_PORT parameter.
For example, b_secureAgent=false EM_UPLOAD_PORT=4899If you do not specify this parameter, the Management Agent is securedautomatically after the install.
Chapter 7Cloning a Management Agent
7-21

Cloning a Management Agent in Silent ModeTo clone a Management Agent manually, follow these steps:
Note:
Ensure that you do not use the central agent (that is, the Management Agentinstalled on the OMS host) as the source Management Agent.
1. Set the required environment variables as described in Table 7-3.
Table 7-3 Setting Environment Variables for Cloning in Silent Mode
Variable What to Set? How to Set?
AGENT_BASE_DIR Set it to the installation base directory of theManagement Agent you want to clone.
• In bash terminal, run the followingcommand:
exportAGENT_BASE_DIR=<absolute_path_to_agent_install_base_dir>For example,
export AGENT_BASE_DIR=/u01/software/em13c/agentbasedir
• In other terminals, run the followingcommand:
setenv AGENT_BASE_DIR<absolute_path_to_agent_install_base_dir>For example,
setenv AGENT_BASE_DIR /u01/software/em13c/agentbasedir
AGENT_HOME Set it to the Oracle home of the ManagementAgent.
For example,
/u01/software/em13c/agentbasedir/agent_13.5.0.0.0
• In bash terminal, run the followingcommand:
exportAGENT_HOME=<absolute_path_to_agent_home>For example,
export AGENT_HOME=/u01/software/em13c/agentbasedir/agent_13.5.0.0.0
• In other terminals, run the followingcommand:
setenv AGENT_HOME<absolute_path_to_agent_home>For example,
setenv AGENT_HOME /u01/software/em13c/agentbasedir/agent_13.5.0.0.0
Chapter 7Cloning a Management Agent
7-22

Table 7-3 (Cont.) Setting Environment Variables for Cloning in Silent Mode
Variable What to Set? How to Set?
T_WORK Set it to /tmp/clone_work. • In bash terminal, run the followingcommand:
export T_WORK=/tmp/clone_work• In other terminals, run the following
command:
setenv T_WORK /tmp/clone_work2. Navigate to the agent base directory:
cd $AGENT_BASE_DIR3. Run the create_plugin_list.pl script from the Management Agent Oracle home:
$AGENT_HOME/perl/bin/perl <AGENT_HOME>/sysman/install/create_plugin_list.pl-instancehome <AGENT_INSTANCE_HOME>
4. Compress the directories and files present in the agent base directory, and create a ZIPfile in the temporary directory (represented by the environment variable T_WORK):
zip -r $T_WORK/agentcoreimage.zip agent_13.5.0.0.0 plugins.txt5. Navigate to the temporary directory (represented by the environment variable T_WORK):
cd $T_WORK6. Copy the agentDeploy.sh to the temporary directory:
cp $AGENT_HOME/sysman/install/agentDeploy.sh .7. Copy the UNZIP utility to the temporary directory:
cp $AGENT_HOME/bin/unzip .8. Copy the agentimage.properties to the temporary directory:
cp $AGENT_HOME/sysman/agentimage.properties .9. Create the final ZIP file with all the contents to be transferred, in the temporary directory:
zip -r agent.zip $T_WORK/*10. Transfer the ZIP file to the installation base directory of the destination host using a file
transfer utility (for example, FTP).
11. Extract the contents of the ZIP file to a temporary directory on the destination host (thetemporary directory is referred to as <extracted_location> in the steps that follow).
12. Create a response file titled agent.rsp (in the same directory) as described in Table 6-4.
Note:
The response file you create can have any name, and not necessarilyagent.rsp. For easy understanding, this chapter uses the name agent.rsp.Also, instead of creating a response file, you can choose to pass the values inseparate arguments while invoking the deployment script. However, Oraclerecommends that you create a response file and capture the information there.
13. Invoke the deployment script and pass the response file:
Chapter 7Cloning a Management Agent
7-23

<extracted_location>/agentDeploy.shAGENT_BASE_DIR=<absolute_path_to_clone_agentbasedir>RESPONSE_FILE=<absolute_path_to_responsefile> -clone
Note:
• Instead of creating a response file, if you choose to pass the valuesin separate arguments, then invoke the deployment script with somemandatory arguments in the following way:
<extracted_location>/agentDeploy.shAGENT_BASE_DIR=<absolute_path_to_agentbasedir>OMS_HOST=<oms_hostname> EM_UPLOAD_PORT=<em_upload_port>AGENT_REGISTRATION_PASSWORD=<password>
• In addition to passing the agent base directory and a response file(or individual mandatory arguments with installation details), you canalso pass other options that are supported by the deployment script.For more information, see Options Supported by the agentDeployScript.
• If the source Management Agent was installed using the Add HostTargets Wizard, ensure that you specify the START_AGENT=true andthe b_secureAgent=true parameters while invoking the deploymentscript.
After Cloning a Management AgentAfter cloning a Management Agent, follow these steps:
1. (Only for Graphical Mode) Verify the installation on the Add Host Status page.Review the progress made on each of the phases of the deployment operation —Initialization, Remote Prerequisite Check, and Agent Deployment.
Note:
In the Add Host Targets Wizard, after you click Deploy Agent to installone or more Management Agents, you are automatically taken to theAdd Host Status page.
If you want to view the details or track the progress of all the deploymentsessions, then from the Setup menu, select Add Target, and then, clickAdd Targets Manually. On the Add Targets Manually page, click InstallAgent Results.
If a particular phase fails or ends up with a warning, then review the detailsprovided for each phase in the Agent Deployment Details section, and do one ofthe following:
• Ignore the warning or failure, and continue with the session if you prefer.
Chapter 7After Cloning a Management Agent
7-24

– You can choose to proceed with the deployment of Management Agents only onthose remote hosts that have successfully cleared the checks, and you canignore the ones that have Warning or Failed status. To do so, click Continue andselect Continue, Ignoring Failed Hosts.
– You can choose to proceed with the deployment of Management Agents on allthe hosts, including the ones that have Warning or Failed status. To do so, clickContinue and select Continue, All Hosts.
• Fix the problem by reviewing the error description carefully, understanding its cause,and taking action as recommended by Oracle.
– You can choose to retry the deployment of Management Agents with the sameinstallation details. To do so, click Retry and select Retry Using Same Inputs.
– You can retry the deployment of Management Agents with modified installationdetails. To do so, click Retry and select Update Inputs and Retry.
Note:
If you see the error message Copying Source Agent Image Failed, then refer tothe following log file in the Oracle home of the OMS host:
$<ORACLE_HOME>/sysman/prov/agentpush/<timestampdir>/applogs/deployfwk.logThis error usually occurs when the job system is not enabled on the sourceManagement Agent you are cloning. Ensure that the job system is enabled.
2. Perform the post installation steps as described in After Installing a Management Agent inSilent Mode.
Note:
• You can repoint your existing Management Agents to a new OracleManagement Service (OMS). For instructions, see Redirecting OracleManagement Agent to Another Oracle Management Service.
When you repoint your existing Management Agents to a new OMS, you cannotmove the targets monitored by the Management Agents, the target history, andthe Management Agent history. The monitored targets and the history data islost.
Chapter 7After Cloning a Management Agent
7-25

8Installing Shared Agents
This chapter describes how you can install a Shared Agent with the help of a central, sharedOracle home location of an existing Oracle Management Agent (Management Agent) that isinstalled on an NFS-mounted drive.
• Overview of Installing Shared Agents
• Before You Begin Installing Shared Agents
• Prerequisites for Installing Shared Agents
• Installing Shared Agents
• After Installing Shared Agents
Overview of Installing Shared AgentsShared Agent is a Management Agent that is installed on a remote host, using the binaries ofan existing Management Agent. The Management Agent that shares its software binaries, inthis context, is called the Master Agent, and the one that is configured with an instancedirectory on the remote host is called a Shared Agent or an NFS Agent.
This feature facilitates the installation of multiple Management Agents by making use of verylimited resources, and helps you carry out lifecycle operations with ease. For example,patching the Master Agent updates all its Shared Agents.
You can take advantage of this operation by installing additional Management Agents onhosts that share a mounted drive where a Management Agent is already installed. Such anoperation makes use of the software binaries of the shared Oracle home present on themounted drive, and configures the remote hosts such that they are managed by thatManagement Agent, thereby capitalizing on the NFS visibility and saving hard disk space onthe remote hosts.
You can install a Shared Agent in graphical or silent mode. In graphical mode, you use theAdd Host Targets Wizard that is accessible from within the Enterprise Manager Cloud Controlconsole. In silent mode, you use the AgentNFS.pl script.
The wizard and the script use the software binaries from the shared Oracle home andconfigure an instance directory on each of the destination hosts for storing configuration filessuch as emd.properties, targets.xml, log files, and so on.
8-1

Note:
• Shared Agents can be installed on Exalogic systems.
• Installing a Shared Agent on a host running on Microsoft Windows is notsupported.
• Unlike the Add Host Target Wizard, the AgentNFS.pl script must be runonly from a destination host, and at a given time, only one ManagementAgent can be installed. Therefore, if you want to install only a fewManagement Agents, then use the AgentNFS.pl script.
Before You Begin Installing Shared AgentsBefore you begin installing a Shared Agent, keep these points in mind:
• When you install a Shared Agent, you only configure an instance directory on thedestination host to store configuration files; you do not actually install aManagement Agent. However, a Shared Agent installed on a host behaves exactlylike a Management Agent, and has all the features and capabilities of aManagement Agent.
• Only the destination host and the Shared Agent installed on it get automaticallydiscovered and monitored in the Enterprise Manager system. The targets runningon that destination host do not get automatically discovered and added to theEnterprise Manager system.
• The source host (where the Master Agent is running) and the destination hostmust be running on the same operating system.
• The Master Agent and the Shared Agent must be installed with the same useraccount.
• (Only for Graphical Mode) The Add Host Targets Wizard uses SSH to establishconnectivity between Oracle Management Service (OMS) and the remote hostswhere you want to install the Management Agents.
• (Only for Graphical Mode) Only SSH1 (SSH version 1) and SSH2 (SSH version 2)protocols offered by OpenSSH are supported for deploying a Management Agent.
• (Only for Graphical Mode) The Add Host Targets Wizard supports NamedCredentials that enable you to use a set of credentials registered with a particularname specifically for this operation, by your administrator. This ensures anadditional layer of security for your passwords because as an operator, you canonly select the named credential, which is saved and stored by an administrator,and not know the actual user name and password associated with it.
In case the named credential you select does not have the privileges to performthe installation, then you can set the named credential to run as another user(locked user account). In this case, the wizard logs in to the hosts using the namedcredential you select, but performs the installation using the locked user accountyou set.
For example, you can create a named credential titled User_A (the user accountthat has remote login access), and set it to run as User_X (the Management Agentinstall user account for which no direct login is set) that has the required
Chapter 8Before You Begin Installing Shared Agents
8-2

privileges. In this case, the wizard logs in to the hosts as User_A, but installs as User_X,using the privilege delegation setting (sudo or PowerBroker) specified in the namedcredential.
• (Only for Graphical Mode) Named credentials support SSH public key authentication andpassword based authentication. So you can use an existing SSH public keyauthentication without exposing your passwords.
To set up SSH public key authentication for a named credential, follow these steps:
Note:
If you have already set up SSH public key authentication for a named credentialand the SSH keys are already created, upload the SSH keys to EnterpriseManager, as mentioned in Step 3 of the following procedure.
1. Navigate to the following location in the Oracle home of the OMS:
$<ORACLE_HOME>/oui/prov/resources/scriptsFor example,
/u01/software/em13c/oraclehome/oui/prov/resources/scripts2. If the OMS host runs on Oracle Solaris, edit the sshUserSetup.sh script to change
the following:
"SunOS") SSH="/usr/local/bin/ssh" SSH_KEYGEN="/usr/local/bin/ssh-keygen"to
"SunOS") SSH="/usr/bin/ssh" SSH_KEYGEN="/usr/bin/ssh-keygen"3. If the OMS host runs on any Unix based operating system, run the sshUserSetup.sh
script on the OMS host as the OMS install user, and pass the Management Agentinstall user name and the fully qualified name of the target hosts:
sshUserSetup.sh -setup -user <agent_install_user_name> -hosts<target_hosts>The following SSH keys are created:
$HOME/.ssh/id_rsa$HOME/.ssh/id_rsa_pub
Here, $HOME refers to the home directory of the OMS install user.
If the OMS host runs on Microsoft Windows, install Cygwin on the OMS host (see Installing Cygwin in the Oracle Enterprise Manager Cloud Control Basic InstallationGuide), then run the following script on the OMS host as the OMS install user, andpass the Management Agent install user name and the fully qualified name of thetarget hosts:
sshUserSetupNT.sh -setup -user <agent_install_user_name> -hosts<target_hosts>
4. Upload the SSH keys to Enterprise Manager.
From the Setup menu, select Security, then select Named Credentials. ClickCreate. For Credential Name, specify the name of the credential, for CredentialType, select SSH Key Credentials, and for Scope, select Global. If you do not
Chapter 8Before You Begin Installing Shared Agents
8-3

select the Global option, you cannot use the SSH named credential to installManagement Agents using the Add Host Targets Wizard.
To upload one of the private SSH keys created in Step 3, in the CredentialProperties section, specify the location of the private SSH key as a value forthe Upload Private Key field. Click Save.
To upload one of the public SSH keys created in Step 3, in the CredentialProperties section, specify the location of the public SSH key as a value forthe Upload Public Key field. Click Save.
Figure 8-1 describes how to upload SSH keys to Enterprise Manager.
Figure 8-1 Uploading SSH Keys to Enterprise Manager
If you have already set up SSH public key authentication for a named credential,you can use the named credential while installing Management Agents using theAdd Host Targets Wizard.
• By default, the following types of plug-ins are configured on the Shared Agent:
– All discovery plug-ins that were configured with the OMS from where theManagement Agent software is being deployed.
– Oracle Home discovery plug-in
– Oracle Home monitoring plug-in
– All the additional plug-ins deployed on the Master Agent
• Upgrading a lower release of Solaris by applying a kernel patch or a patch bundleis not equivalent to installing the actual Solaris 5.10 Update 10+ image. OracleManagement Agent 13c Release 3 was built, tested, and certified on a minimum
Chapter 8Before You Begin Installing Shared Agents
8-4

update version of Solaris 5.10 Update 10+, so Oracle recommends that you install OracleManagement Agent only on Solaris 5.10 Update 10+, and not on any release that wasupgraded using patches.
Prerequisites for Installing Shared AgentsBefore installing a Shared Agent, ensure that you meet the following prerequisites:
Table 8-1 Prerequisites for Installing Shared Agent
Requirement Description
Hardware Requirements Ensure that you meet the hard disk space and physical memory requirements.For more information, see Hardware Requirements for Enterprise ManagerCloud Control in the Oracle Enterprise Manager Cloud Control Basic InstallationGuide.
Destination Host Disk SpaceRequirements
Ensure that the Master Agent host has a minimum of 1 GB free hard diskspace, and the Shared Agent host has a minimum of 2 MB free hard diskspace.
Operating System Requirements Ensure that you install the Management Agent only on certified operatingsystems as mentioned in the Enterprise Manager certification matrix availableon My Oracle Support.
You cannot install a Shared Agent using a Master Agent that runs on aMicrosoft Windows platform. Shared Agents are not supported on MicrosoftWindows platforms.
To access the Enterprise Manager certification matrix, see Accessing theEnterprise Manager Certification Matrix in the Oracle Enterprise Manager CloudControl Basic Installation Guide.
For information about platforms receiving future support, refer to My OracleSupport note 793512.1.
Note: If you use Oracle Solaris 10, then ensure that you have update 10 orhigher installed. To verify whether it is installed, run the following command:
cat /etc/releaseYou should see the output similar to the following. Here, s10s_u6 indicates thatupdate 6, which is not a supported update level for installation, is installed.
Solaris 10 10/08 s10s_u6wos_07b SPARCFile System Requirements Ensure that the file system mounted on the destination host does not permit
buffered writes.
Chapter 8Prerequisites for Installing Shared Agents
8-5

Table 8-1 (Cont.) Prerequisites for Installing Shared Agent
Requirement Description
File Descriptor Requirements • Ensure that the maximum user process limit is set to 13312 or greater.
To verify the current value set, run the following command:
ulimit -uIf the current value is not 13312 or greater, then contact your systemadministrator to set it to at least 13312.
• Ensure that you set the soft limit of file descriptor to a minimum of 4096and hard limit less then or equal to 16384.
To verify the current value set, run the following commands:
For Soft Limit:/bin/sh -c "ulimit -n"
For Hard Limit:/bin/sh -c "ulimit -Hn"If the current value is not 4096 or greater, then as a root user, updatethe /etc/security/limits.conf file with the following entries:
<UID> soft nofile 4096<UID> hard nofile 16384
Package Requirements Ensure that you install all the operating system-specific packages. For moreinformation, see Package, Kernel Parameter, and Library Requirements forEnterprise Manager Cloud Control in the Oracle Enterprise Manager CloudControl Basic Installation Guide.
User and Operating System Group Requirement
Ensure that the destination host where you want to install the ManagementAgent has the appropriate users and operating system groups created.
For more information, see Creating Operating System Groups and Users forEnterprise Manager Cloud Control in the Oracle Enterprise Manager CloudControl Basic Installation Guide.
Note: If your enterprise has a policy against installing Management Agentsusing the OMS install operating system user account, you can use a differentoperating system user account to install Management Agents. However, ensurethat the user account you use and the OMS install user account belong to thesame primary group.
Software AvailabilityRequirements
Ensure that you already have Oracle Management Agent 13c installed as aMaster Agent in a shared, mounted location.
For information on how to install a Management Agent, see Installing OracleManagement Agents in the Oracle Enterprise Manager Cloud Control BasicInstallation Guide.
Chapter 8Prerequisites for Installing Shared Agents
8-6

Table 8-1 (Cont.) Prerequisites for Installing Shared Agent
Requirement Description
Software Mount Requirements Ensure that at least one Shared Agent host has read write permissions on themount location. To mount the Management Agent software on the Shared Agenthost with read write permissions, run the following command:
mount -t nfs -o rw<master_agent_host_name>:<agent_base_dir_of_master_agent><agent_base_dir_of_shared_agent>For example, run the following command:
mount -t nfs -o rw abc.oracle.com:/scratch/agent /scratch/agentTo mount the Management Agent software on the Shared Agent host with readonly permissions, run the following command:
mount -t nfs -o ro<master_agent_host_name>:<agent_base_dir_of_master_agent><agent_base_dir_of_shared_agent>For example, run the following command:
mount -t nfs -o ro abc.oracle.com:/scratch/agent /scratch/agentNote: Before mounting the Management Agent software on the Shared Agenthost, ensure that you have created the agent base directory on the SharedAgent host, such that the directory has the same path as the agent basedirectory on the Master Agent host.
/etc/hosts File Requirements Ensure that the /etc/hosts file on the host has the IP address, the fullyqualified name, and the short name in the following format:
172.16.0.0 example.com mypcDestination Host AccessRequirements
Ensure that the destination hosts are accessible from the host where the OMSis running.
If the destination host and the host on which OMS is running belong to differentnetwork domains, then ensure that you update the /etc/hosts file on thedestination host to add a line with the IP address of that host, the fully qualifiedname of that host, and the short name of the host.
For example, if the fully-qualified host name is example.com and the shortname is mypc, then add the following line in the /etc/hosts file:
172.16.0.0 example.com mypcDestination Host CredentialRequirements
(Only for Graphical Mode)
Ensure that all the destination hosts running on the same operating systemhave the same set of credentials. For example, all the destination hosts runningon Linux operating system must have the same set of credentials.
The wizard installs the Management Agent using the same user account. If youhave hosts running on the same operating system but with different credentials,then have two different deployment sessions.
Chapter 8Prerequisites for Installing Shared Agents
8-7

Table 8-1 (Cont.) Prerequisites for Installing Shared Agent
Requirement Description
Destination Host Time ZoneRequirements
(Only for Graphical Mode)
Ensure that the time zones of the destination hosts have been set correctly. Toverify the time zone of a destination host, log in to the OMS host, and run thefollowing command:
ssh -l <install_user> <destination_host_name> /bin/sh -c'echo $TZ'If the time zone displayed is incorrect, log in to the destination host, and followthese steps:
1. Run the following commands to set the time zone on the destination host:
• For Korn shell:
TZ=<value>export TZ
• For Bourne shell or Bash shell:
export TZ=<value>• For C shell:
setenv TZ <value>For example, in the Bash shell, run the following command to set the timezone to America/New_York:
export TZ='America/New_York'To view a list of the time zones you can use, access thesupportedtzs.lst file present in the <AGENT_HOME>/sysman/admindirectory of the central agent (that is, the Management Agent installed onthe OMS host).
2. Restart the SSH daemon.
If the destination host runs on a UNIX based operating system, run thefollowing command:
sudo /etc/init.d/sshd restartIf the destination host runs on a Microsoft Windows operating system, runthe following commands:
cygrunsrv -E sshdcygrunsrv -S sshd
3. Verify whether the SSH server can access the TZ environment variable bylogging in to the OMS host, and running the following command:
ssh -l <install_user> <destination_host_name> /bin/sh -c'echo $TZ'
Note: If you had ignored a prerequisite check warning about wrong time zonesettings during the Management Agent install, you must set the correct timezone on the destination hosts after installing the Management Agents. Forinformation on setting time zones post install, refer After Installing SharedAgents.
Chapter 8Prerequisites for Installing Shared Agents
8-8

Table 8-1 (Cont.) Prerequisites for Installing Shared Agent
Requirement Description
Time Zone Requirements
(Only for Silent Mode)
Ensure that the host time zone has been set correctly. To verify the host timezone, run the following command:
echo $TZIf the time zone displayed is incorrect, run the following commands, beforerunning the agentDeploy.sh or agentDeploy.bat scripts, to set the correcttime zone:
• For Korn shell:
TZ=<value>export TZ
• For Bourne shell or Bash shell:
export TZ=<value>• For C shell:
setenv TZ <value>For example, in the Bash shell, run the following command to set the time zoneto America/New_York:
export TZ='America/New_York'To view a list of the time zones you can use, access the supportedtzs.lstfile present in the <AGENT_HOME>/sysman/admin directory of the central agent(that is, the Management Agent installed on the OMS host).
Note: If you had ignored a prerequisite check warning about wrong time zonesettings during the Management Agent install, you must set the correct timezone on the host after installing the Management Agent. For information onsetting time zones post install, refer After Installing Shared Agents.
sudo/pbrun/sesu/su SSHRequirements
(Only for Graphical Mode)
Ensure that you set the oracle.sysman.prov.agentpush.enablePtyproperty to true in the $<ORACLE_HOME>/sysman/prov/agentpush/agentpush.properties file, if the privilege delegation tool you are usingrequires a pseudo terminal for remote command execution via SSH. Mostprivilege delegation tools such as pbrun, sesu, and su require a pseudoterminal for remote command execution, by default.
Note: If you are using sudo as your privilege delegation tool, and you do notwant to set the oracle.sysman.prov.agentpush.enablePty property totrue, do one of the following:
• Include Defaults visiblepw in the /etc/sudoers file, or enter thesudo command with the -S option for Privileged Delegation Setting onthe Installation Details page.
For information on how to access the Installation Details page, see Installing Shared Agents Using Add Host Targets Wizard.
• Comment out Defaults requiretty in the /etc/sudoers file.
Chapter 8Prerequisites for Installing Shared Agents
8-9

Table 8-1 (Cont.) Prerequisites for Installing Shared Agent
Requirement Description
sudo/pbrun/sesu/suRequirements (for Root User)
(Only for Graphical Mode)
• Ensure that the installing user has the privileges to invoke the id commandand the agentdeployroot.sh script as root. Grant the privileges in theconfiguration file of your privilege delegation tool.
For example, if you are using sudo as your privilege delegation tool, includethe following in the /etc/sudoers file to grant the required privileges:
<install_user> ALL=(root) /usr/bin/id, <agent_home>/*/agentdeployroot.shFor example, oracle ALL=(root) /usr/bin/id, /u01/app/oracle/admin/shared/agent_home/*/agentdeployroot.shHere, oracle is the installing user, and /u01/app/oracle/admin/shared/agent_home is the Shared Agent home.
• You do not require the following entry in the /etc/sudoers file forinstalling a Management Agent. However, the entry is required forperforming provisioning and patching operations in Enterprise Manager.Therefore, if you are removing this entry before installing a ManagementAgent, then ensure that you bring back the entry after installing theManagement Agent.
In Enterprise Manager Cloud Control 12c Release 2 (12.1.0.2), Release3 (12.1.0.3), Release 4 (12.1.0.4), Release 5 (12.1.0.5), 13c Release 1,13c Release 2, 13c Release 3, 13c Release 4 and 13c Release 5:(root) /<AGENT_ORACLE_HOME>/sbin/nmosudoIn Enterprise Manager Cloud Control 12c Release 1 (12.1.0.1) [with orwithout Bundle Patch 1]:(root) /<AGENT_ORACLE_HOME>/bin/nmosudo
Chapter 8Prerequisites for Installing Shared Agents
8-10

Table 8-1 (Cont.) Prerequisites for Installing Shared Agent
Requirement Description
sudo/pbrun/sesu/suRequirements (for LockedAccount User)
(Only for Graphical Mode)
Ensure that the installing user has the privileges to invoke /bin/sh as thelocked account user. Grant the privileges in the configuration file of yourprivilege delegation tool.
For example, if you are using sudo as your privilege delegation tool, include thefollowing in the /etc/sudoers file to grant the required privileges:
login_user1 ALL=(oracle) /bin/shHere, login_user1 is the SSH log in user, and oracle is the locked accountand install user.
If you do not want to grant privileges to the installing user to invoke /bin/sh asthe locked account user, set theoracle.sysman.prov.agentpush.pdpShellOutEnabled property tofalse, and ensure that the installing user has the privileges to invoke id,chmod, cp, mkdir, rm, tar, emctl, perl,em13400_<platform>.bin, and unzip as the locked account user. Grant theprivileges in the configuration file of your privilege delegation tool.
For example, if you are using sudo as your privilege delegation tool, include thefollowing in the /etc/sudoers file to grant the required privileges:
login_user1 ALL=(oracle) /usr/bin/id, /bin/chmod, /bin/cp, /bin/mkdir, /bin/rm, /bin/tar, /home/oracle/agentinst/bin/emctl, /home/oracle/agentibd/agent_13.5.0.0.0/perl/bin/perl, /home/oracle/agentibd/agent_13.5.0.0.0/oui/bin/em13400_<platform>.bin, /home/oracle/agentibd/agent_13.5.0.0.0/bin/unzip, /home/oracle/agentibd/*/agentcore.binHere, login_user1 is the SSH log in user, oracle is the locked account andinstall user, /home/oracle/agentinst is the agent instance directory of theShared Agent, and /home/oracle/agentibd/ is the agent base directory.
Temporary Directory SpaceRequirements
Ensure that you allocate 400 MB of space for a temporary directory where theexecutables can be copied.
By default, the temporary directory location set to the environment variable TMPor TEMP is honored. If both are set, then TEMP is honored. If none of them areset, then the following default values are honored: /tmp on UNIX hosts andc:\Temp on Microsoft Windows hosts.
Instance Directory Requirements Ensure that the Shared Agent instance directory (the directory where you wantto save the Shared Agent configuration files) you specify is empty and has writepermissions for the install user. Also, ensure that the parent directory has writepermissions for the install user.
Shared Oracle HomeRequirements
Ensure that the Master Agent home is accessible from the destination hostwhere you want to install the Shared Agent. Ensure that the Master Agent homeis mounted with the setuid turned on.
Path Validation Requirements
(Only for Graphical Mode)
Validate the path to all command locations. For more information, see ValidatingCommand Locations in the Oracle Enterprise Manager Cloud Control BasicInstallation Guide.
CLASSPATH EnvironmentVariable Requirements
If the value assigned to the CLASSPATH environment variable has white spacesin it, then ensure that you unset it. You can always reset the environmentvariable to the original value after the installation is complete.
Chapter 8Prerequisites for Installing Shared Agents
8-11

Table 8-1 (Cont.) Prerequisites for Installing Shared Agent
Requirement Description
Default SSH Port Requirements
(Only for Graphical Mode)
Ensure that the SSH daemon is running on the default port (that is, 22) on allthe destination hosts. To verify the SSH port on a Unix host, run the followingcommand:
netstat -anp | grep -i sshdFor example, the output of this command may be the following:
tcp 0 0 0.0.0.0:22 0.0.0.0:* LISTEN 3188/sshdThe above output indicates that the SSH daemon is running on port 22.
Also, on a Unix host, you can run the following command to verify the SSH port:
cat /etc/ssh/sshd_configFor a Microsoft Windows host, the SSH port value is mentioned in theC:\cygwin\etc\sshd_config file.
If the SSH port is a non-default port, that is, any port other than 22, then updatethe SSH_PORT property in the following file:
$<ORACLE_HOME>/oui/prov/resources/Paths.propertiesPort Requirements Ensure that the default ports described in What Default Ports Are Used for
Enterprise Manager Cloud Control Installation? are free.
Installing User Requirements • The Master Agent and the Shared Agent must be installed with the sameuser account.
• If the central inventory owner and the user installing the ManagementAgent are different, then ensure that they are part of the same group.
• Ensure that the inventory owner and the group to which the owner belongshave read and write permissions on the inventory directory.
For example, if the inventory owner is abc and the user installing theManagement Agent is xyz, then ensure that abc and xyz belong to thesame group, and they have read and write access to the inventory.
Central Inventory (oraInventory)Requirements
• Ensure that you allocate 100 MB of space on all destination hosts for theCentral Inventory.
• The Shared Agent uses the inventory location mentioned in theoraInst.loc file, which is present in the <MASTER_AGENT_BASE DIR>/13.5.0.0.0/ directory. Ensure that the Shared Agent user has read andwrite permissions on this directory.
Preinstallation/PostinstallationScripts Requirements
(Only for Graphical Mode)
Ensure that the preinstallation and postinstallation scripts that you want to runalong with the installation are available either on the OMS host, destinationhosts, or on a shared location accessible to the destination hosts.
Installing Shared AgentsThis section describes how to install Shared Agents using the Add Host TargetsWizard, as well as in silent mode. This section consists of the following:
• Installing Shared Agents Using Add Host Targets Wizard
• Additional Parameters Supported for Installing Shared Agents Using Add HostTargets Wizard
• Installing Shared Agents in Silent Mode
• Response File Parameters for Installing Shared Agents in Silent Mode
Chapter 8Installing Shared Agents
8-12

Note:
If the OMS host is running on Microsoft Windows, and the OMS software wasinstalled in a drive other than C:\, then update the SCRATCH_PATH variablein $OMS_HOME\oui\prov\resources\ssPaths_msplats.properties.For example, if the OMS software was installed in D:\, ensure that you update theSCRATCH_PATH variable to D:\tmpada
Installing Shared Agents Using Add Host Targets WizardTo install a Shared Agent in graphical mode, using Add Host Targets Wizard, follow thesesteps:
1. In Cloud Control, do one of the following:
• From the Setup menu, select Add Targets, and then, click Auto Discovery Results.On the Auto Discovery Results page, select a host you want to monitor in EnterpriseManager Cloud Control, and click Promote.
• From the Setup menu, select Add Target, and then, click Add Targets Manually.On the Add Targets Manually page, click Install Agent on Host.
2. On the Host and Platform page, do the following:
a. Accept the default name assigned for this session or enter a unique name of yourchoice. The custom name you enter can be any intuitive name, and need notnecessarily be in the same format as the default name. For example,add_host_operation_1A unique deployment activity name enables you to save the installation detailsspecified in this deployment session and reuse them in the future without having toenter all the details all over again in the new session.
b. Click Add to enter the fully qualified name and select the platform of the host onwhich you want to install the Management Agent.
Note:
• Oracle recommends you to enter the fully qualified domain name of thehost. For monitoring purpose, Enterprise Manager Cloud Control addsthat host and the Management Agent with the exact name you enterhere.
• You must enter only one host name per row. Entering multiple hostnames separated by a comma is not supported.
• You must ensure that the host name you enter does not haveunderscores.
Alternatively, you can click either Load from File to add host names stored in a file,or Add Discovered Hosts to add host names from a list of hosts discovered by
Chapter 8Installing Shared Agents
8-13

Enterprise Manager. For information on how the host name entries mustappear in the host file, see Format of Host List File
Note:
When you click Add Discovered Hosts and add hosts from a list ofdiscovered hosts, the host's platform is automatically detected anddisplayed. The platform name is detected using a combination offactors, including hints received from automated discovery and theplatform of the OMS host. This default platform name is asuggestion, so Oracle strongly recommends you to verify theplatform details before proceeding to the next step.
As the Shared Agent can be installed only if the source host and thedestination host are running on the same platform, set the platform for the firsthost in the first row of the table and from the Platform list, select Same for AllHosts. This will ensure that the platform name you selected for the first host isalso set for the rest of the hosts in the table.
Note:
If you are installing a Management Agent on a host that is running ona platform different from the OMS host platform, then ensure that theManagement Agent software for that platform is available in OracleSoftware Library (Software Library). If the Management Agentsoftware for the required platform is not available in Software Library,acquire and apply the software using the Self Update console.
To access the Self Update Console, from the Setup menu, selectExtensibility, then select Self Update. To acquire the latestManagement Agent software, click Agent Software, select therequired software, then click Download.
For more information on how to acquire and apply the ManagementAgent software for a platform using the Self Update console, see Oracle Enterprise Manager Cloud Control Basic Installation Guide.
c. Click Next.
3. On the Installation Details page, do the following:
a. In the Deployment Type section, select Add Host to Shared Agent. Then, forSelect Target, click the torch icon and select the Management Agent that isshared and mounted. This location must be visible on all remote hosts.
b. From the table, select the first row that indicates the hosts grouped by theircommon platform name.
c. In the Installation Details section, provide the installation details common tothe hosts selected in Step 3 (b). For Oracle Home, validate or enter thelocation of the shared Management Agent home. Ensure that the ManagementAgent home is on a shared location, and is accessible from all the destinationhosts.
Chapter 8Installing Shared Agents
8-14

d. For Instance Directory, enter the absolute path to a directory, on the Shared Agenthost, where all Management Agent-related configuration files can be stored. Ensurethat the directory has write permission.
For example, /usr/home/software/oracle/agentHome/agent_instIf the path you enter does not exist, the application creates a directory at thespecified path, and stores all the Management Agent-related configuration files there.
e. From Named Credential list, select an appropriate profile whose credentials can beused for setting up the SSH connectivity between the OMS and the remote hosts,and for installing a Management Agent on each of the remote hosts.
Note:
• If you do not have a credential profile, or if you have one but do not seeit in the Named Credential list, then click the plus icon against this list.In the Create New Named Credential window, enter the credentials andstore them with an appropriate profile name so that it can be selectedand used for installing the Management Agents. Also set the runprivilege if you want to switch over from the Named Credential you arecreating, to another user who has the privileges to perform theinstallation.
• If the plus icon is disabled against this list, then you do not have theprivileges to create a profile with credentials. In this case, contact youradministrator and either request him/her to grant you the privileges tocreate a new profile or request him/her to create a profile and grant youthe access to view it in the Named Credential list.
• If you have manually set up SSH public key authentication between theOMS and the remote hosts, then you may not have a password for youruser account. In this case, create a named credential with a dummypassword. Do NOT leave the password field blank.
f. For Privileged Delegation Setting, validate the Privilege Delegation setting to beused for running the root scripts. By default, it is set to the Privilege Delegationsetting configured in Enterprise Manager Cloud Control.
For example, you can specify one of the following for the Privileged DelegationSetting field:
/usr/bin/sudo -u %RUNAS% %COMMAND%/usr/bin/sudo -u -S %RUNAS% %COMMAND% (if a pseudo terminal is required for remote command execution via SSH)/usr/bin/sesu - %RUNAS% -c "%COMMAND%"/usr/bin/pbrun %PROFILE% -u %RUNAS% %COMMAND%/usr/bin/su - %RUNAS% -c "%COMMAND%"
If you leave the Privileged Delegation Setting field blank, the root scripts will not berun by the wizard; you will have to run them manually after the installation. Forinformation about running them manually, see After Installing Shared Agents.
This setting will also be used for performing the installation as the user set in the RunAs attribute of the selected Named Credential if you had set the user while creatingthat Named Credential.
Chapter 8Installing Shared Agents
8-15

Note:
In the Privilege Delegation setting, the %RUNAS% is honored as theroot user for running the root scripts and as the user set in the RunAs attribute of the Named Credential for performing the installation.
g. For Port, accept the default port (3872) that is assigned for the ManagementAgent to communicate, or enter a port of your choice.
The custom port you enter must not be busy. If you are not sure, you canleave it blank. Enterprise Manager Cloud Control automatically assigns thefirst available free port within the range of 1830 - 1849.
h. (Optional) In the Optional Details section, enter the absolute path to anaccessible location where the preinstallation and postinstallation scripts youwant to run are available. Note that only one preinstallation or onepostinstallation script can be specified.
If you want to run the script as root, then select Run as Root. If the script ison the host where OMS is running and is not on the host where you want toinstall the Management Agent, then select Script on OMS. In this case, thescript will be copied from the OMS host to the destination hosts, and then runon the destination hosts.
i. (Optional) For Additional Parameters, enter a whitespace-separate list ofadditional parameters that you want to pass during the installation. For acomplete list of supported additional parameters, see Table 8-2.
For example, if you want to provide the inventory pointer location file, thenenter -invPtrLoc followed by the absolute path to the file location. However,this parameter is supported only on UNIX platforms, and not on MicrosoftWindows platforms.
j. Repeat Step 3 (b) to Step 3 (h) for every other row you have in the table.
k. Click Next.
4. On the Review page, review the details you have provided and if you are satisfiedwith the details, then click Deploy Agent to install the Management Agent.
If you want to modify the details, then click Back repeatedly to reach the pagewhere you want to make the changes.
When you click Deploy Agent and submit the deployment session, you areautomatically taken to the Add Host Status page that enables you to monitor theprogress of the deployment session.
Note:
If you restart the destination host after installing a Shared Agent, and theShared Agent does not start up automatically, restore the mount with theoriginal permissions, then start the Shared Agent manually.
Chapter 8Installing Shared Agents
8-16

Additional Parameters Supported for Installing Shared Agents Using AddHost Targets Wizard
Table 8-2 lists the additional parameters supported for installing a Shared Agent in graphicalmode.
Table 8-2 Supported Additional Parameters
Parameter Description
START_AGENT=false Specify this parameter if you do not want the Management Agent tostart automatically once it is installed and configured.
If you do not specify this parameter, the Management Agent startsautomatically once it is installed and configured.
b_secureAgent=false Specify this parameter if you do not want the Management Agent to besecured after the install.
If you specify this parameter, ensure that you also specify the OMSHTTP port, using the EM_UPLOAD_PORT parameter.
For example, b_secureAgent=false EM_UPLOAD_PORT=4899If you do not specify this parameter, the Management Agent is securedautomatically after the install.
Installing Shared Agents in Silent ModeTo install a Shared Agent in silent mode, follow these steps:
On the Master Agent Host:
1. Run the create_plugin_list.pl script from the Master Agent host:
<AGENT_HOME>/perl/bin/perl <AGENT_HOME>/sysman/install/create_plugin_list.pl-instancehome <AGENT_INSTANCE_HOME>
On the Shared Agent Host:
1. Create a response file titled AgentNFS.rsp as described in Table 8-3.
Note:
The response file you create can have any name, and not necessarilyAgentNFS.rsp. For easy understanding, this chapter uses the nameAgentNFS.rsp. Also, instead of creating a response file, you can choose to passthe arguments explicitly while invoking the script. However, Oracle recommendsthat you create a response file and capture the information there.
2. Invoke the script from the Shared Agent host, and pass the response file.
<AGENT_HOME>/perl/bin/perl <AGENT_HOME>/sysman/install/AgentNFS.pl -responseFile <absolute_path_to_response_file>For example,
Chapter 8Installing Shared Agents
8-17

/shared/app/agentbasedir/agent_13.5.0.0.0/perl/bin/perl /shared/app/agentbasedir/agent_13.5.0.0.0/sysman/install/AgentNFS.pl -responseFile /home/john/AgentNFS.rspEnsure that <AGENT_HOME> is a shared location, and is accessible from all thedestination hosts.
Note:
• Instead of creating a response file, you can choose to pass all thearguments explicitly while invoking the script. In this case, invoke thescript in the following way:
$<AGENT_HOME>/perl/bin/perl <AGENT_HOME>/sysman/install/AgentNFS.plAGENT_INSTANCE_HOME=<absolute_path_to_instance_dir>ORACLE_HOME=<absolute_path_to_master_agent_oracle_home><parameter1>=<value1> <parameter2>=<value2><parameter3>=<value3>...For example,
/shared/app/agentbasedir/agent_13.5.0.0.0/perl/bin/perl /shared/app/agentbasedir/agent_13.5.0.0.0/sysman/install/AgentNFS.pl AGENT_INSTANCE_HOME=/<local_location>/agent_inst ORACLE_HOME=/shared/app/agentbasedir/agent_13.5.0.0.0 AGENT_PORT=1832AGENT_REGISTRATION_PASSWORD=welcome b_secureAgent=TRUESTART_AGENT=TRUEWhile specifying AGENT_INSTANCE_HOME, ensure that the location youspecify is local to the host and is not reused by any other host.
• If the Master Agent was installed using the Add Host Targets Wizard,then ensure that you pass the following arguments with thesevalues:
AGENT_REGISTRATION_PASSWORD=<password>START_AGENT=TRUE
• Do NOT pass the -invPtrLoc argument because, by default, thelocation <AGENT_HOME>/oraInst.loc is honored, where<AGENT_HOME> is the Master Agent. Also ensure that the OracleInventory directory, to which the inventory file points, is not in ashared location.
• If you restart the destination host after installing a Shared Agent, andthe Shared Agent does not start up automatically, restore the mountwith the original permissions, then start the Shared Agent manually.
3. When prompted to run the root.sh script, run it from the instance directory of theShared Agent:
<AGENT_INSTANCE_HOME>/root.shIf you are not a root user, then use SUDO to change to a root user. For example,run the following command:
Chapter 8Installing Shared Agents
8-18

/usr/local/bin/sudo /shared/app/agentbasedir/agent_inst/root.sh4. Repeat Step (2) to Step (4) on the remaining hosts where you want to install the Shared
Agent.
Response File Parameters for Installing Shared Agents in Silent ModeTo install a Shared Agent in silent mode, you must invoke the AgentNFS.pl script and pass aresponse file that captures all the required information. Table 8-3 describes the variousparameters you must include in the response file.
Table 8-3 Creating a Response File for Installing Oracle Management Agent Using theAgentNFS.pl Script
Parameter Description
ORACLE_HOME Specify the absolute path to the Master Agent home, which is shared andvisible on the destination host.
For example, /shared/app/agentbasedir/agent_13.4.0.0.0
AGENT_PORT (Optional) Enter the port on which the Shared Agent process should be started.You can enter any free port between 1830 and 1849. The same port is used forboth HTTP and HTTPS.
For example, 1832AGENT_INSTANCE_HOME Specify the absolute path to a location on the destination host where you want
to store all Management Agent-related configuration files.
For example, /<local_location>/agent_instEnsure that this location is local to the host and is not reused by any other host.
AGENT_REGISTRATION_PASSWORD
Enter a password for registering new Management Agents that join theEnterprise Manager system.
By default, the communication between the OMS and the Management Agentsis secured and locked. Any new Management Agents that join the EnterpriseManager system must be authenticated before they become part of the system.The password you enter here will be used for authenticating those newManagement Agents.
For example, Wel456comeNote: If the Master Agent was installed using the Add Host Targets Wizard,then you must pass this parameter.
b_secureAgent=TRUE Set it to TRUE so that the Shared Agent is secured.
START_AGENT Set it to TRUE so that the Shared Agent is started automatically once it isinstalled and configured.
Note: If the Master Agent was installed using the Add Host Targets Wizard,then you must pass this parameter.
ORACLE_HOSTNAME (Optional) (Only for Installation on Virtual Hosts) Specify the virtual host namewhere you are installing the Shared Agent.
ALLOW_IPADDRESS (Optional) Enter TRUE if you want to specify an IP address forORACLE_HOSTNAME. If ALLOW_IPADDRESS is set to FALSE, a prerequisitecheck fails when you specify an IP address for ORACLE_HOSTNAME whileinstalling a Management Agent.
For example, ALLOW_IPADDRESS=TRUEIf you do not include this parameter, it defaults to FALSE.
Chapter 8Installing Shared Agents
8-19

Table 8-3 (Cont.) Creating a Response File for Installing Oracle Management Agent Using theAgentNFS.pl Script
Parameter Description
START_PRIORITY_LEVEL
(For Unix based hosts only)
(Optional) Use this parameter to specify the priority level of the ManagementAgent service when the host is started. This parameter accepts values between0 and 99. However, Oracle recommends that you provide a value between 91and 99 for this parameter.
For example, START_PRIORITY_LEVEL=95If you do not include this parameter, it defaults to 98.
SHUT_PRIORITY_LEVEL
(For Unix based hosts only)
(Optional) Use this parameter to specify the priority level of the ManagementAgent service when the host is shut down. This parameter accepts valuesbetween 0 and 99.For example, SHUT_PRIORITY_LEVEL=25If you do not include this parameter, it defaults to 19.
PROPERTIES_FILE (Optional) Use this parameter to specify the absolute location of the propertiesfile.
For example, PROPERTIES_FILE=/tmp/agent.propertiesIn the properties file, specify the parameters that you want to use for theManagement Agent deployment. The list of parameters that you can specify inthe properties file is present in $<AGENT_INSTANCE_HOME>/sysman/config/emd.properties. In the properties file, you must specify the parameters inname value pairs, for example:
REPOSITORY_PROXYHOST=abc.example.comREPOSITORY_PROXYPORT=1532The properties file does not support parameter values that have spaces. If thevalue of a particular parameter contains a space, then run the followingcommand after deploying the Management Agent:
$<AGENT_INSTANCE_HOME>/bin/emctl setproperty agent -name<parameter_name> -value <parameter_value>
After Installing Shared AgentsAfter you install a Shared Agent, follow these steps:
1. (Only for Graphical Mode) Verify the installation on the Add Host Status page.Review the progress made on each of the phases of the deployment operation —Initialization, Remote Prerequisite Check, and Agent Deployment.
Note:
In the Add Host Targets Wizard, after you click Deploy Agent to installone or more Management Agents, you are automatically taken to theAdd Host Status page.
If you want to view the details or track the progress of all the deploymentsessions, then from the Setup menu, select Add Target, and then, clickAdd Targets Manually. On the Add Targets Manually page, click InstallAgent Results.
Chapter 8After Installing Shared Agents
8-20

If a particular phase fails or ends up with a warning, then review the details provided foreach phase in the Agent Deployment Details section, and do one of the following:
• Ignore the warning or failure, and continue with the session if you prefer.
– You can choose to proceed with the deployment of Management Agents only onthose remote hosts that have successfully cleared the checks, and you canignore the ones that have Warning or Failed status. To do so, click Continue andselect Continue, Ignoring Failed Hosts.
– You can choose to proceed with the deployment of Management Agents on allthe hosts, including the ones that have Warning or Failed status. To do so, clickContinue and select Continue, All Hosts.
• Fix the problem by reviewing the error description carefully, understanding its cause,and taking action as recommended by Oracle.
– You can choose to retry the deployment of Management Agents with the sameinstallation details. To do so, click Retry and select Retry Using Same Inputs.
– You can retry the deployment of Management Agents with modified installationdetails. To do so, click Retry and select Update Inputs and Retry.
2. Verify the installation:
a. Navigate to the Shared Agent instance home and run the following command to seea message that confirms that the Management Agent is up and running:
$<AGENT_INSTANCE_HOME>/bin/emctl status agentb. Navigate to the Shared Agent home and run the following command to see a
message that confirms that EMD upload completed successfully:
$<AGENT_INSTANCE_HOME>/bin/emctl upload agent3. (Only for Graphical Mode) If you have restrictive Privilege Delegation Provider (PDP)
configuration settings, enter the location of nmosudo in your PDP configuration file.
Enterprise Manager supports PDPs such as SUDO and PowerBroker that enableadministrators to restrict certain users from running certain commands.
In Enterprise Manager Cloud Control 12c Release 2 (12.1.0.2), Release 3 (12.1.0.3),Release 4 (12.1.0.4), Release 5 (12.1.0.5), 13c Release 1, 13c Release 2, 13c Release3, 13c Release 4 and 13c Release 5, nmosudo is located in the sbin directory, which is inthe agent base directory. For example, <AGENT_BASE_DIRECTORY>/sbin/nmosudo. InEnterprise Manager Cloud Control 12c Release 1 (12.1.0.1) [with or without Bundle Patch1], nmosudo is located in the agent instance directory. For example,<AGENT_INSTANCE_DIRECTORY>/bin/nmosudo.Therefore, when you install a 13c Release 5 Management Agent, you must modify yourPDP configuration file to update the new location of nmosudo.For example, if you use SUDO as your PDP, the configuration file for SUDO istypically /etc/sudoers. In this file, update the following entry with the new location tonmosudo.sudouser ALL : oracle /eminstall/basedir/sbin/nmosudo *
4. (Only for UNIX Operating Systems) Manually run the following scripts as a root user:
• If this is the first Oracle product you installed on the host, then run theorainstRoot.sh script from the inventory location specified in the oraInst.loc filethat is available in the Shared Agent home.
Chapter 8After Installing Shared Agents
8-21

For example, if the inventory location specified in the oraInst.loc fileis $HOME/oraInventory, then run the following command:
$HOME/oraInventory/orainstRoot.sh• Run the root.sh script from the Shared Agent home:
$<AGENT_HOME>/root.sh5. If you had ignored a prerequisite check warning about wrong time zone settings,
run the following command and follow the steps it displays:
$<AGENT_INSTANCE_HOME>/bin/emctl resetTZ agent6. By default, the host and the Shared Agent get automatically added to the
Enterprise Manager Cloud Control console for monitoring. None of the targetsrunning on that host get automatically discovered and monitored.
To monitor the other targets, you need to add them to Enterprise Manager CloudControl either using the Auto Discovery Results page, the Add Targets Manuallypage, or the discovery wizards offered for the targets you want to monitor.
To add the host targets and the oracle_emd targets to the Shared Agent, run thefollowing command:
$<SHARED_AGENT_HOME>/bin/emctl config agent addinternaltargetsFor information about discovering targets in Enterprise Manager Cloud Control,see Discovering and Adding Host and Non-Host Targets in the Oracle EnterpriseManager Cloud Control Administrator's Guide
Note:
If Oracle Management Agents 13c (13.4.0.x) hang frequently or do notrespond on Solaris 9ux and 10ux operating systems, then refer to documentID 1427773.1 on My Oracle Support.
Chapter 8After Installing Shared Agents
8-22

9Converting Shared Agents to StandaloneAgents
The Management Agent is an integral software component that enables you to convert anunmanaged host to a managed host in the Enterprise Manager system. The ManagementAgent works in conjunction with the plug-ins to monitor the targets running on that managedhost.
With the first Oracle Management Service (OMS) you install, by default you receive aManagement Agent called the Central Agent. The Central Agent is used for monitoring onlythe first OMS host, the first OMS, and the other targets running on the first OMS host. Tomonitor other hosts and the targets running on those hosts, you must install a separateStandalone Management Agent on each of those hosts.
Shared Agent is a Management Agent that is installed on a remote host, using the binaries ofan existing Management Agent. The Management Agent that shares its software binaries, inthis context, is called the Master Agent, and the one that is configured with an instancedirectory on the remote host is called a Shared Agent or an NFS Agent.
This chapter describes how to convert Shared Agents to Standalone Agents. In particular,this chapter covers the following:
• Converting NFS or Shared Agents to Standalone Agents
Converting NFS or Shared Agents to Standalone Agents
Note:
You must carry out this procedure for every Shared Agent that you want to convertto a standalone Agent.
To convert NFS or Shared Agents to Standalone agents, follow these steps:
1. In the Master Agent host, navigate to the agent base directory and compress thedirectory excluding the following files:
• agent_inst directory
• root owned files in the sbin directory
To do so, execute the following command:
cd <agent base directory>zip -rq agentcoreimage.zip * -x sbin/nmb sbin/nmgsshe sbin/nmhs sbin/nmo sbin/nmopdpx sbin/nmosudo agent_instFor example, cd /u01/app/oracle/agent_nfs/agentbasedirzip -rq agentcoreimage.zip * -x sbin/nmb sbin/nmgsshe sbin/nmhs sbin/nmo sbin/nmopdpx sbin/nmosudo agent_inst
9-1

Perform the following steps in each of the Shared agents.
2. Stop the agent by executing the following command:
<sharedagent_inst>/bin/emctl stop agentFor example,/u01/app/emstate/agent_inst/bin/emctl stop agent
3. Copy the compressed file to a local folder in the Shared Agent host by executingthe following command:
cp <agent base directory>/agentcoreimage.zip <local directory>For example,cp /u01/app/oracle/agent_nfs/agentbasedir/agentcoreimage.zip /u01/stage
4. Unmount the agent base directory by executing the following command:
umount <path to the agent base directory>For example,umount /u01/app/oracle/agent_nfs/agentbasedir
Note:
You cannot run this command if you are not a root user.
5. Extract the compressed file from the local directory in the agent base directory byexecuting the following command:
unzip agentcoreimage.zip -d <agent base directory>For example,unzip /u01/stage/agentcoreimage.zip -d /u01/app/oracle/agent_nfs/agentbasedir
6. Run the <path to the agent home>/root.sh script as a root user.
7. Copy the instance home in the agent base directory and rename it to agent_inst tomatch the structure in the Master Agent, by executing the following command:
cp -r <local instance home> <agent base directory>/For example,cp -r /u01/app/emstate/agent_inst/* /u01/app/oracle/agent_nfs/agentbasedir/agent_inst/
8. Start the Agent from the path <agent base directory>/agent_inst, by executing thefollowing command:
<agent base directory>/agent_inst/bin/emctl start agentFor example,/u01/app/oracle/agent_nfs/agentbasedir/agent_inst/bin/emctl start agent
9. Execute the following command to create an entry in the inventory by executingthe following command:
$ORACLE_HOME/oui/bin/attachHome.sh -silent ORACLE_HOME=<$ORACLE_HOME>-force
10. Refresh the Oracle home collection by executing the following command:
<Agent Instance Home>/bin/emctl control agent runCollection<ORACLEHOME_TARGET_NAME>: oracle_home oracle_home_configFor example,
Chapter 9Converting NFS or Shared Agents to Standalone Agents
9-2

./u01/app/oracle/agent_nfs/agentbasedir/agent_inst/emctl control agentrunCollection example.com:oracle_home oracle_home_config
Note:
<ORACLEHOME_TARGET_NAME> is present in the <Agent Instance Home>/sysman/emd/targets.xml file.
To refresh the Oracle home collection using the graphical interface, follow these steps:
a. On the Home page of the Management Agent, in the Summary section, click OracleHome and Patch Details.
b. On the following page, click Refresh Configuration.
Note:
Perform this step for both Shared and Master Agents.
Chapter 9Converting NFS or Shared Agents to Standalone Agents
9-3

10Installing the Oracle Management AgentSoftware Now and Configuring It Later
This chapter explains how you can install only the software binaries of Oracle ManagementAgent (Management Agent) at one point and configure the installation at a later stage. Inparticular, this chapter covers the following:
• Overview of Installing a Management Agent and Configuring It Later
• Before You Begin Installing a Management Agent
• Prerequisites for Installing a Management Agent
• Installing Only the Management Agent Software Binaries
• Configuring the Management Agent Software Binaries
• After Installing a Management Agent
Overview of Installing a Management Agent and Configuring ItLater
You can choose to install only the software binaries of the Management Agent at one pointand configure it at a later stage to work with the associated Oracle Management Service(OMS). This approach enables you to divide the installation process into two phases, mainlythe installation phase and the configuration phase.
During the installation phase, you invoke the agentDeploy.sh script passing the -softwareOnly argument to copy the software binaries and create an Oracle home for theManagement Agent. During the configuration phase, you invoke the same script passing -configOnly to configure the software binaries.
Understandably, the installation phase takes much lesser time compared to the configurationphase because the installation phase involves only copying of binaries. This helps you planyour installation according to the time and priorities you have.
Note:
This installation type is available only in silent mode.
10-1

Note:
If you want to repoint your existing Management Agents to a new OracleManagement Service (OMS), then you must first deinstall thoseManagement Agents and plug-ins, and then redeploy those ManagementAgents and plug-ins using the new OMS. This is typically done when youwant to move from an Enterprise Manager Cloud Control system in a testenvironment to an Enterprise Manager Cloud Control system in a productionenvironment.
When you repoint your existing Management Agents to a new OMS, youcannot move the targets monitored by the Management Agents, the targethistory, and the Management Agent history. The monitored targets and thehistory data is lost.
Before You Begin Installing a Management AgentBefore you begin installing a Management Agent, review the points outlined in BeforeYou Begin Installing a Management Agent in Silent Mode.
Prerequisites for Installing a Management AgentBefore installing the Management Agent, ensure that you meet the prerequisitesdescribed in Prerequisites for Installing a Management Agent in Silent Mode.
Installing Only the Management Agent Software BinariesTo install only the software binaries of a Management Agent in silent mode, follow oneof the procedures mentioned in Installing a Management Agent Using the agentDeployScript. While invoking the deployment script, ensure that you pass the -softwareOnlyoption:
<Software_Extracted_Location>/agentDeploy.shAGENT_BASE_DIR=<absolute_path_to_agentbasedir>RESPONSE_FILE=<absolute_path_to_responsefile> -softwareOnlyFor example, /tmp/agtImg/agentDeploy.sh AGENT_BASE_DIR=//u01/software/em13c/agentbasedir RESPONSE_FILE=/tmp/agtImg/agent.rsp -softwareOnlyIf the Management Agent is installed successfully, a message mentioning so isdisplayed on the command line.
Note:
Do not pass the option -forceConfigure.
Chapter 10Before You Begin Installing a Management Agent
10-2

Configuring the Management Agent Software BinariesTo configure the software binaries of a Management Agent in silent mode, invoke thedeployment script with the following options from the Management Agent home:
$<AGENT_HOME>/sysman/install/agentDeploy.shAGENT_BASE_DIR=<absolute_path_to_agentbasedir>RESPONSE_FILE=<absolute_path_to_responsefile> -configOnlyFor example, /u01/software/em13c/agentbasedir/agent_13.5.0.0.0/sysman/install/agentDeploy.sh AGENT_BASE_DIR=/u01/software/em13c/agentbasedirRESPONSE_FILE=/tmp/agtImg/agent.rsp -configOnlyIf the Management Agent is installed successfully, a message mentioning so is displayed onthe command line.
Note:
• The response file you pass here is the same response file you passed in Installing Only the Management Agent Software Binaries.
• Do not pass the option -forceConfigure.
After Installing a Management AgentAfter you install the Management Agent, follow the steps outlined in After Installing aManagement Agent in Silent Mode.
Chapter 10Configuring the Management Agent Software Binaries
10-3

Part VAdvanced Installation and Configuration
This part describes the advanced installation and configuration tasks you can perform afteryou have installed Enterprise Manager Cloud Control and have started using the product.
In particular, this part contains the following chapters:
• Managing the Lifecycle of Agent Gold Images
• Configuring Enterprise Manager for Firewalls
• Sizing Your Enterprise Manager Deployment
• Configuring Proxies for OMS and Management Agent Communication
• Installing JVMD Agents with Advanced Install Options
• Configuring Enterprise Manager Federation
• Using Oracle Analytics Server with Enterprise Manager
• Configuring Oracle Enterprise Manager App for Grafana
• Running the OMS in Console-Only Mode
• Support for Customization of Enterprise Manager Login Page

11Managing the Lifecycle of Agent Gold Images
Oracle Management Agent (Management Agent) is one of the core components of EnterpriseManager Cloud Control that enables you to convert an unmanaged host to a managed host inthe Enterprise Manager system. The Management Agent works in conjunction with the plug-ins to monitor the targets running on that managed host. Therefore, at any point in time, if youwant to monitor a target running on a host, you must first convert that unmanaged host to amanaged host by installing a Management Agent.
In the past, Enterprise Manager Cloud Control has offered several approaches for installingManagement Agents, including the Add Host Targets Wizard, EM CLI, and response files tosilently perform the installation. Starting with 13c, Enterprise Manager Cloud Control offersAgent Gold Images that can be used for mass-deployment and upgrade of ManagementAgents in your environment.
An Agent Gold Image represents the ideal state of a Management Agent in a data centermanaged by Enterprise Manager, having a customized configuration of the desired versionsof the Management Agent software, the desired versions of the monitoring plug-ins, and thedesired patches.
An Agent Gold Image version is created by an Enterprise Manager user, using a livereference Management Agent that is thoroughly tested and tuned. An Agent Gold Imageversion can be used to provision new Management Agents or update existing ManagementAgents on a large number of hosts.
This chapter describes how you can manage the lifecycle of an Agent Gold Image. Inparticular, this chapter covers the following:
• Agent Gold Image Terminology
• Operations You Can Perform Using an Agent Gold Image
• Understanding the Agent Gold Image Console
• Understanding the Management Agent Base Directory Structure
• Managing the Lifecycle of an Agent Gold Image
• Viewing Agent Gold Image Activity Details
• Checking the Agent Gold Image Compliance Level
• Viewing Details about the Agent Gold Images
• Viewing Notifications Related to Agent Gold Images
• Viewing Agent Gold Images with Pending Updates
• Viewing the Last Agent Gold Image That Was Changed
• Viewing the Log Files Related to Agent Gold Image
Agent Gold Image TerminologyThe following terminologies are commonly used while discussing Agent Gold Images:
11-1

• Agent Gold Image and Agent Gold Image version: An Agent Gold Imagerepresents the ideal state of a Management Agent in a data center, havingcustomized configurations of the desired versions of the Management Agentsoftware, the desired versions of the monitoring plug-ins, and the desired patches.
An Agent Gold Image is expected to undergo revisions whenever you plan toupgrade your Management Agents, upgrade the plug-ins deployed on yourManagement Agents, deploy new plug-ins on your Management Agents, or deploynew patches on your Management Agents or plug-ins. Each of these sequentialrevisions of an Agent Gold Image is termed as an Agent Gold Image version.
• Updating a Management Agent: This can refer to upgrading a ManagementAgent (that is, upgrading the Management Agent software), deploying new plug-ins on a Management Agent, upgrading the existing plug-ins on a ManagementAgent, applying Management Agent and plug-in patches, and any combination ofthese. You can perform any combination of these tasks using Agent Gold Imageversions.
• Current version of an Agent Gold Image: The up-to-date version of an AgentGold Image that you want to use to standardize the Management Agents in yourenterprise.
• Restricted version of an Agent Gold Image: An Agent Gold Image version thatmust be used only for limited deployment, perhaps for testing purposes, and notfor mass deployment. By default, you can deploy or update a maximum of 10Management Agents using a restricted version of a particular Agent Gold Image. Itis recommended that administrators seek the permission of the superadministrator before using this gold image version to deploy or updateManagement Agents. At any given point, for a Management Agent gold image,you can have only one restricted version.
• Subscribing a Management Agent to an Agent Gold Image: Associating aManagement Agent with a particular Agent Gold Image. This is a prerequisite forupdating Management Agents using a particular Agent Gold Image version.
• Unsubscribing a Management Agent from an Agent Gold Image:Disassociating a Management Agent from the Agent Gold Image that it subscribesto. Perform this task if you do not want to manage the update operations of aparticular Management Agent using an Agent Gold Image anymore.
• Agent Gold Image compliance: Out of all the Management Agents subscribed toa particular gold image, the percentage of Management Agents that are on thecurrent version of the Agent Gold Image.
Operations You Can Perform Using an Agent Gold ImageUsing an Agent Gold Image, you can perform the following tasks:
• Provision new Management Agents.
• Update any existing Management Agents.
– Upgrade your Management Agents (that is, upgrading the Management Agentsoftware).
– Deploy new plug-ins on your Management Agents.
– Upgrade the existing plug-ins that are deployed on your Management Agents.
– Deploy patches on your Management Agents.
Chapter 11Operations You Can Perform Using an Agent Gold Image
11-2

– Deploy patches on the plug-ins that are deployed on your Management Agents.
• Check the Agent Gold Image compliance level to identify what percentage ofManagement Agents in your environment are already associated with an Agent GoldImage, and what percentage are not.
• Track the Agent Gold Image activities, such as the gold image jobs submitted, theirstatus, the start and end time of the activity, and so on.
Note:
You cannot install, update, or upgrade a Shared Agent (NFS Agent) using an AgentGold Image. For information about Shared Agents, see Overview of InstallingShared Agents.
In addition, you cannot use an unsecure Management Agent to create an AgentGold Image version. Therefore, always use only a secure Management Agent asthe source for creating an Agent Gold Image version.
You cannot subscribe the following Management Agents to an Agent Gold Image:
• Central Agent.
• Already subscribed Management Agents.
• Shared Agents (NFS Agents).
• Unsecure Management Agents.
• Management Agents on platforms that are different from the platforms on whichthe Agent Gold Image is available.
The platform is identified by the Oracle home collection, so make sure theOracle home target is discovered and collected. To do so, On the Home page ofthe Management Agent, in the Summary section, click Oracle Home andPatch Details, and on the following page, click Refresh Configuration.
Understanding the Agent Gold Image ConsoleTo access the Agent Gold Image console, from the Setup menu, select Manage CloudControl, then select Gold Agent Images.
Chapter 11Understanding the Agent Gold Image Console
11-3

Table 11-1 describes the various parts of the Gold Agent Image Console.
Table 11-1 Description of the Gold Agent Image Console
Number Description
1 A pictorial representation of the compliance level - out of all the Management Agentsthat are subscribed to an Agent Gold Image, how many are deployed or updatedwith a gold image and how many are yet to be deployed or updated with a goldimage. Hover your mouse over the graph to see the exact number of ManagementAgents.
2 Name of the Agent Gold Image.
To view more details about an Agent Gold Image, click the gold image. On the GoldImage page, view details of the image versions created for that gold image. Also, foreach gold image version, view general details, the associated instance properties,the plug-ins and patches deployed, the activities performed on it, and the stagelocations configured for it.
Note: The Gold Image page lists only those gold image versions that have been setto current (active) or restricted version status. It does not list gold image versions ofany other status. If you want to view all the gold image versions of a particular goldimage, regardless of their status, then on the Agent Gold Images page, clickManage Image Versions and Subscriptions. And on the Manage Image page,click the Versions And Drafts tab.
3 Number of Management Agents associated or subscribed to the Agent Gold Image.This includes the Management Agents that are not only updated with the gold imagebut also the ones that are not updated but subscribed to the gold image.
Subscribing Management Agents to a gold image is a prerequisite for updatingManagement Agents with a particular gold image version.
Chapter 11Understanding the Agent Gold Image Console
11-4

Table 11-1 (Cont.) Description of the Gold Agent Image Console
Number Description
4 Number of Management Agents subscribed to a gold image and also updated withthat gold image.
5 Percentage of Management Agent on the latest gold image version.
6 Number of gold image versions subscribed to by the Management Agents. Thisincludes all gold image versions, including the latest version that ManagementAgents are subscribed to.
7 Platform for which the Agent Gold Image is created.
8 Enables you to manage the Agent Gold Images. You can create, edit, or remove agold image. You can also view details of the gold images created so far.
9 List of the Agent Gold Image activities, such as the jobs submitted to the EnterpriseManager job system, their status, the time at which the activity began, the time atwhich the activity ended, and so on.
10 Name of the Agent Gold Image and the date and time when they were last changed.
11 List of Agent Gold Images that have pending updates.
12 List of notifications related to Agent Gold Images.
Understanding the Management Agent Base Directory StructureThis section illustrates the base directory structure of a Management Agent that isprovisioned, upgraded, or updated using a gold image. It consists of the following:
• Agent Base Directory Structure After a Management Agent Is Provisioned Using a GoldImage
• Agent Base Directory Structure After Upgrade or Update to 13c Using a Gold Image
Agent Base Directory Structure After a Management Agent Is ProvisionedUsing a Gold Image
The following is the agent base directory structure of a Management Agent that is provisionedusing a gold image.
<agent_base_directory> |_____agent_13.5.0.0.0 |_____bin |_____sysman |_____root.sh |_____agent.rsp |_____oraInst.loc |_____plugins |_____OPatch |_____oracle_common |_____cfgtoollogs |_____perl |_____stage |_____ocm |_____lib |_____inventory
Chapter 11Understanding the Management Agent Base Directory Structure
11-5

|_____install |_____config |_____EMStage |_____. |_____. |_____. |_____oraInventory |_____agent_inst |_____sbin |_____plugins.txt |_____plugins.txt.status |_____agentimage.properties
Agent Base Directory Structure After Upgrade or Update to 13c Usinga Gold Image
The following is the agent base directory structure of a Management Agent that isupgraded or updated using a gold image.
<agent_base_directory> |_____GoldImage_<gold_image_name> |_____agentInstall.rsp |_____agent_13.5.0.0.0 |_____agentimage.properties |_____backup_agtup |_____plugins.txt |_____plugins.txt.status |_____agent_inst |_____agentimage.properties |_____core |_____plugins |_____plugins.txt |_____plugins.txt.status |_____sbin |_____cfgtoollogs |_____install |_____inventory |_____oraInst.loc |_____. |_____. |_____.
Managing the Lifecycle of an Agent Gold Image
Note:
To view a visual demonstration on Agent Gold Image console and itsoperations, access the following URL and click Begin Video.
https://apexapps.oracle.com/pls/apex/f?p=44785:24:0:::24:P24_CONTENT_ID,P24_PREV_PAGE:12891,1
You can perform the following lifecycle management operations for an Agent GoldImage:
Chapter 11Managing the Lifecycle of an Agent Gold Image
11-6

• Creating an Agent Gold Image
• Editing an Agent Gold Image
• Deleting an Agent Gold Image
• Creating an Agent Gold Image Version
• Deleting an Agent Gold Image Version
• Staging an Agent Gold Image Version
• Setting a Particular Agent Gold Image Version as the Current Version
• Setting a Particular Agent Gold Image Version as the Restricted Version
• Subscribing Management Agents to an Agent Gold Image
• Unsubscribing Management Agents from an Agent Gold Image
• Provisioning Management Agents Using an Agent Gold Image
• Updating Management Agents Using an Agent Gold Image Version
Creating an Agent Gold ImageTo create an Agent Gold Image, use either of the following methods:
• Creating an Agent Gold Image Using the Gold Agent Images Home Page
• Creating an Agent Gold Image Using EM CLI
Creating an Agent Gold Image Using the Gold Agent Images Home PageTo create an Agent Gold Image, follow these steps:
1. From the Setup menu, select Manage Cloud Control, then select Gold Agent Images.
2. Click Manage All Images.
3. Click Create.
4. Specify the gold image name, a description (optional), and the platform of the sourceManagement Agent that you want to use to create the Agent Gold Image versions.Ensure that you use only a standalone Management Agent as the source, and not acentral agent.
5. Click Submit.
Creating an Agent Gold Image Using EM CLIWhen you create an Agent Gold Image version using EM CLI, the Agent Gold Image getsautomatically created.
To create an Agent Gold Image by creating an Agent Gold Image version using EM CLI, see Creating an Agent Gold Image Version Using EM CLI
Chapter 11Managing the Lifecycle of an Agent Gold Image
11-7

Editing an Agent Gold Image
Note:
You can only edit an Agent Gold Image if you haven't created any AgentGold Image versions.
To edit an Agent Gold Image, follow these steps:
1. From the Setup menu, select Manage Cloud Control, then select Gold AgentImages.
2. Click Manage All Images.
3. Select the gold image that you want to edit, then click Edit.
4. Edit the gold image name, description, and platform details.
5. Click Submit.
Deleting an Agent Gold Image
Note:
You can only delete an Agent Gold Image if you have not created any AgentGold Image versions.
To delete an Agent Gold Image, follow these steps:
1. From the Setup menu, select Manage Cloud Control, then select Gold AgentImages.
2. Click Manage All Images.
3. Select the gold image that you want to delete, then click Remove.
Creating an Agent Gold Image VersionTo create an Agent Gold Image version, use either of the following methods:
• Creating an Agent Gold Image Version Using the Gold Agent Images Home Page
• Creating an Agent Gold Image Version Using EM CLI
Creating an Agent Gold Image Version Using the Gold Agent Images HomePage
To create an Agent Gold Image version, follow these steps:
Chapter 11Managing the Lifecycle of an Agent Gold Image
11-8

Note:
You cannot use unsecure Management Agents to create an Agent Gold Imageversion. Therefore, always use only secure Management Agents. Before creatingan Agent Gold Image version, meet the hardware requirements. SeeHardwareRequirements for Enterprise Manager Cloud Control in the Oracle EnterpriseManager Cloud Control Basic Installation Guide.
If the configuration properties of the source Management Agent were changed forsome reason in the emd.properties file, then before creating an agent gold imageversion using that source Management Agent, reload the configuration properties ofthat Management Agent. To do so, run the following command:
emctl reload agent
1. From the Setup menu, select Manage Cloud Control, then select Gold Agent Images.
2. Click the name of the required Agent Gold Image.
3. Click Manage Image Versions and Subscriptions.
4. Select the Versions and Drafts tab, then from the Actions menu, select Create.
5. Specify an image version name, and a description for the image version, if required.
When you create an image version and update a Management Agent with it, EnterpriseManager Cloud Control uses the image version name you provide here to create asubdirectory in the agent base directory for the Management Agent being updated.
For example, if the agent base directory of the Management Agent being updatedis /u01/software/em13c/agentbasedir, and the agent home is /u01/software/em13c/agentbasedir/agent_13.5.0.0.0, and if you provide OPB_BP1 as the image versionname, then when you update the Management Agent with the image version, a newsubdirectory /u01/software/em13c/agentbasedir/GoldImage_OPB_BP1/agent_13.5.0.0.0 is created. The word limit for the image version name is 20characters.
6. If you want to create the gold image version using a source Management Agent, forCreate image by, select Selecting a source agent, then specify the sourceManagement Agent that you want to use. In this case, you can also specify the following:
• Work Directory: The working directory that must be used to create the Agent GoldImage. The default working directory is $AGENT_INSTANCE_HOME/install. Ensurethat you have minimum 750MB space in this location.
• Configuration Properties: The Management Agent configuration properties separatedby a semicolon (;) that must be captured while creating the Agent Gold Image. Thenames of these properties can be found in the $AGENT_INSTANCE_HOME/sysman/config/emd.properties file.
• Exclude Files: The list of files that you want to exclude from the Agent Base Directoryof the source agent while creating the Agent Gold Image. Ensure that you provide thecomplete file path. If there are two or more files, then separated them by a semicolon(;).
However, if you want to create the gold image version by importing an existing goldimage version, for Create image by, select Importing an image, then specify thelocation of the gold image version that you want to import. In order to be able to import an
Chapter 11Managing the Lifecycle of an Agent Gold Image
11-9

image, the image should already be staged. If you have not already staged theimage for this purpose, then stage it as described in Staging an Agent Gold ImageVersion Using Gold Agent Images Home Page.
7. Click OK.
A job that creates the Agent Gold Image version is submitted to the EnterpriseManager job system. You can view the status of this job on the Gold Agent ImageActivities page, in the Image Activities tab.
Creating an Agent Gold Image Version Using EM CLITo create an Agent Gold Image version using EM CLI, follow these steps:
Note:
You cannot use unsecure Management Agents to create an Agent GoldImage version. Therefore, always use only secure Management Agents.Before creating an Agent Gold Image version, meet the hardwarerequirements. See Hardware Requirements for Enterprise Manager CloudControl in the Oracle Enterprise Manager Cloud Control Basic InstallationGuide.
If the configuration properties of the source Management Agent werechanged for some reason in the emd.properties file, then before creating anagent gold image version using that source Management Agent, reload theconfiguration properties of that Management Agent. To do so, run thefollowing command:
emctl reload agent
1. Log in to EM CLI from the /bin directory present within the OMS home:
$<OMS_HOME>/bin/emcli login -username=<user_name>
Once you run this command, EM CLI will prompt you for a password. Enter thepassword for the user name you specified.
2. Synchronize EM CLI:
$<OMS_HOME>/bin/emcli sync3. Run the create_gold_agent_image verb to create an Agent Gold Image using the
specified source Management Agent or by importing an already created imagefrom another Enterprise Management System:
$<OMS_HOME>/bin/emcli create_gold_agent_image -image_name="gold_image_name" -version_name="gold_image_version_name" -source_agent|-import_location="source_agent|import_location" [-gold_image_description="gold_image_description"] [-working_directory="working_directory_location"] [-config_properties= " agent_configuration_properties"] [-exclude_files= "list_of_files_directories_to_exclude"]
Note that the parameters mentioned in [ ] are optional.
Chapter 11Managing the Lifecycle of an Agent Gold Image
11-10

Table 11-2 lists and describes the parameters supported for creating an Agent GoldImage version using EM CLI.
Table 11-2 Supported Parameters for Creating an Agent Gold Image Version
Parameter Description
-image_name Agent Gold Image name to which the created Agent Gold Image must beadded.
-version_name Version name of the Agent Gold Image.
When you create an image version and update a Management Agent with it,Enterprise Manager Cloud Control uses the image version name you providehere to create a subdirectory in the agent base directory for the ManagementAgent being updated.
For example, if the agent base directory of the Management Agent beingupdated is /u01/software/em13c/agentbasedir, and the agent homeis /u01/software/em13c/agentbasedir/agent_13.5.0.0.0, and if youprovide OPB_BP1 as the image version name, then when you update theManagement Agent with the image version, a new subdirectory /u01/software/em13c/agentbasedir/GoldImage_OPB_BP1/agent_13.5.0.0.0 is created. The word limit for the image version name is 20characters.
-source_agent Management Agent to be used as the source to create the Agent Gold Image.
To view a list of the Management Agents that can be used as a source to createa gold image, run emcli get_targets -target="oracle_emd".
-import_location Location where the Agent Gold Image is staged for creating the gold agentimage version. This location is accessible from all the OMS instances.
-gold_image_description Description of the Agent Gold Image.
-working_directory Working directory to be used to create the Agent Gold Image. The defaultworking directory is $AGENT_INSTANCE_HOME/install. Minimum free spacerequired is 1 GB.
-config_properties Management Agent configuration properties separated by \";\" that must becaptured while creating the Agent Gold Image. For example,MaxThread;GracefulShutdown.
-exclude_files List of files or directories separated by \";\" that must be excluded from the goldagent image version. For example, agent_13.5.0.0.0/cfgtoollogs/agentDeploy;agent_13.5.0.0.0/oui. Ensure that you provide only therelative path to the files and directories and not the absolute path.
Examples:
• The following example creates an Agent Gold Image OPC_AGI_DB_JUL_13, usingexample.com:3872 as the source Management Agent, and adds the gold imageversion to the gold image OPC_DB_MONITORING:
$<OMS_HOME>/bin/emcli create_gold_agent_image -source_agent=example.com:3872 -version_name=OPC_AGI_DB_JUL_13 -image_name=OPC_DB_MONITORING
• The following example creates an Agent Gold Image OPC_AGI_DB_JUL_13, usingexample.com:3872 as the source Management Agent, /tmp as the working directory,and adds the gold image version to the gold image OPC_DB_MONITORING:
$<OMS_HOME>/bin/emcli create_gold_agent_image -source_agent=example.com:3872 -version_name=OPC_AGI_DB_JUL_13 -image_name=OPC_DB_MONITORING -working_directory=/tmp
Chapter 11Managing the Lifecycle of an Agent Gold Image
11-11

• The following example creates an Agent Gold Image OPC_AGI_DB_JUL_13using gold image software staged at import location /abc/stage:$<OMS_HOME>/bin/emcli create_gold_agent_image -import_location=/abc/stage -version_name=OPC_AGI_DB_JUL_13 -image_name=OPC_DB_MONITORING
Deleting an Agent Gold Image VersionTo delete an Agent Gold Image version, use either of the following methods:
• Deleting an Agent Gold Image Version Using Gold Agent Images Home Page
• Deleting an Agent Gold Image Version Using EM CLI
Deleting an Agent Gold Image Version Using Gold Agent Images Home PageTo delete an Agent Gold Image version, follow these steps:
1. From the Setup menu, select Manage Cloud Control, then select Gold AgentImages.
2. Click the name of the required Agent Gold Image.
3. Click Manage Image Versions and Subscriptions.
4. Select the Versions and Drafts tab.
Note:
An active (current) image cannot be deleted.
5. Select the gold image version that you want to delete, then from the Actionsmenu, select Delete.
Deleting an Agent Gold Image Version Using EM CLITo delete an Agent Gold Image version using EM CLI, follow these steps:
1. Log in to EM CLI from the /bin directory present within the OMS home:
$<OMS_HOME>/bin/emcli login -username=<user_name>
Once you run this command, EM CLI will prompt you for a password. Enter thepassword for the user name you specified.
2. Synchronize EM CLI:
$<OMS_HOME>/bin/emcli sync3. Run the delete_gold_agent_image verb:
$<OMS_HOME>/bin/emcli delete_gold_agent_image -version_name="gold_image_version_name_to_delete"
Use the -version_name parameter to specify the Agent Gold Image version thatyou want to delete.
For example, to delete the Agent Gold Image OPC_AGI_DB_JUL_13, run thefollowing:
Chapter 11Managing the Lifecycle of an Agent Gold Image
11-12

$<OMS_HOME>/bin/emcli delete_gold_agent_image -version_name=OPC_AGI_DB_JUL_13
Staging an Agent Gold Image VersionTo stage a functional Agent Gold Image version on a host, use either of the followingmethods:
• Staging an Agent Gold Image Version Using Gold Agent Images Home Page
• Staging an Agent Gold Image Version Using EM CLI
Staging an Agent Gold Image Version Using Gold Agent Images Home PageTo stage an Agent Gold Image version on a host, follow these steps:
Note:
Before staging an Agent Gold Image version, meet the hardware requirements. See Hardware Requirements for Enterprise Manager Cloud Control in the OracleEnterprise Manager Cloud Control Basic Installation Guide.
1. From the Setup menu, select Manage Cloud Control, then select Gold Agent Images.
2. Click the name of the required Agent Gold Image.
3. Click Manage Image Versions and Subscriptions.
4. Select the Versions and Drafts tab. Select the gold image version that you want tostage, then from the Actions menu, select Stage.
5. Specify the host, and the location on the host where you want to stage the Agent GoldImage version. Click OK.
A job that stages the Agent Gold Image version is submitted to the Enterprise Managerjob system. You can view the status of this job on the Gold Agent Image Activities page,in the Image Activities tab.
Staging an Agent Gold Image Version Using EM CLITo stage an Agent Gold Image version using EM CLI, follow these steps:
Note:
Before staging an Agent Gold Image version, meet the hardware requirements. See Hardware Requirements for Enterprise Manager Cloud Control in the OracleEnterprise Manager Cloud Control Basic Installation Guide.
1. Log in to EM CLI from the /bin directory present within the OMS home:
$<OMS_HOME>/bin/emcli login -username=<user_name>
Once you run this command, EM CLI will prompt you for a password. Enter the passwordfor the user name you specified.
Chapter 11Managing the Lifecycle of an Agent Gold Image
11-13

2. Synchronize EM CLI:
$<OMS_HOME>/bin/emcli sync3. Run the stage_gold_agent_image verb to stage an Agent Gold Image on a
destination host:
$<OMS_HOME>/bin/emcli stage_gold_agent_image -version_name="gold_image_version_to_stage" -image_name="gold_image_name" -host_name="staging_destination_host" -stage_location="stage_location_on_destination_host"
Table 11-3 lists and describes the parameters supported for staging an Agent GoldImage version using EM CLI.
Table 11-3 Supported Parameters for Staging an Agent Gold Image Version
Parameter Description
-version_name Agent Gold Image version that should be staged.
-image_name Agent Gold Image that should be staged.
-host_name Destination host where the Agent Gold Image should be staged. As aprerequisite, a Management Agent should be running on this host.
-stage_location Location on the destination host where the Agent Gold Image should be staged.The location should be a shared location and should be accessible by theManagement Agents being updated by that Agent Gold Image. Otherwise, thelocation should be accessible from the OMS that is used to import the AgentGold Image from this location. In addition, the minimum free space required is 1GB.
For example, to stage the Agent Gold Image OPC_AGI_DB_JUL_13 of goldimage OPC_AGI_DB, at the stage location /net/stage/agent on the hostexample.com, run the following:
$<OMS_HOME>/bin/emcli stage_gold_agent_image -version_name=OPC_AGI_DB_JUL_13 -stage_location=/net/stage/agent -host_name=example.com
Setting a Particular Agent Gold Image Version as the Current VersionThe up-to-date version of an Agent Gold Image that you want to use to standardize theManagement Agents in your enterprise is termed as the current version of the AgentGold Image.
When an Agent Gold Image version is created, it is marked as a draft version. Settinga draft version of an Agent Gold Image as the current version indicates that the goldimage version is ready to be used to mass deploy or mass update ManagementAgents. Once an image is set to Active (Current), you cannot revert it to a draft or arestricted version.
To set a draft version of an Agent Gold Image as the current version, use either of thefollowing methods:
• Setting a Particular Agent Gold Image Version as the Current Version Using GoldAgent Images Home Page
• Setting a Particular Agent Gold Image Version as the Current Version Using EMCLI
Chapter 11Managing the Lifecycle of an Agent Gold Image
11-14

Setting a Particular Agent Gold Image Version as the Current Version Using GoldAgent Images Home Page
To set a draft version of an Agent Gold Image as the current version, follow these steps:
1. From the Setup menu, select Manage Cloud Control, then select Gold Agent Images.
2. Click the name of the required Agent Gold Image.
3. Click Manage Image Versions and Subscriptions.
4. Select the Versions and Drafts tab. Select the gold image version that you want to setas the current version, then click Set Current Version.
A job that promotes the Agent Gold Image draft version to the current version issubmitted to the Enterprise Manager job system. You can view the status of this job onthe Gold Agent Image Activities page, in the Image Activities tab.
Setting a Particular Agent Gold Image Version as the Current Version Using EM CLITo set a particular Agent Gold Image version as the current version using EM CLI, followthese steps:
1. Log in to EM CLI from the /bin directory present within the OMS home:
$<OMS_HOME>/bin/emcli login -username=<user_name>
Once you run this command, EM CLI will prompt you for a password. Enter the passwordfor the user name you specified.
2. Synchronize EM CLI:
$<OMS_HOME>/bin/emcli sync3. Run the promote_gold_agent_image verb to promote the Agent Gold Image version to
the Current maturity level:
$<OMS_HOME>/bin/emcli promote_gold_agent_image -version_name="gold_image_version_name" -maturity="Current/Restricted/Draft"
The -version_name parameter defines the Agent Gold Image that you want to promote.
The -maturity parameter defines the gold image maturity level.
For example, to promote the Agent Gold Image OPC_AGI_DB_JUL_13 to the Currentmaturity level, run the following:
$<OMS_HOME>/bin/emcli promote_gold_agent_image -version_name=OPC_AGI_DB_JUL_13 -maturity=Current
Setting a Particular Agent Gold Image Version as the Restricted VersionTo set a draft or active version of an Agent Gold Image as the restricted version, use either ofthe following methods:
• Setting a Particular Agent Gold Image Version as the Restricted Version Using GoldAgent Images Home Page
• Setting a Particular Agent Gold Image Version as the Restricted Version Using EM CLI
Chapter 11Managing the Lifecycle of an Agent Gold Image
11-15

Setting a Particular Agent Gold Image Version as the Restricted Version UsingGold Agent Images Home Page
To set a draft or active version of an Agent Gold Image as the restricted version, followthese steps:
1. From the Setup menu, select Manage Cloud Control, then select Gold AgentImages.
2. Click the name of the required Agent Gold Image.
3. Click Manage Image Versions and Subscriptions.
4. Select the Versions and Drafts tab. Select the gold image version that you wantto set as the restricted version, then click Set Restricted Version.
Setting a Particular Agent Gold Image Version as the Restricted Version UsingEM CLI
To set a draft or active version of an Agent Gold Image version as the restrictedversion using EM CLI, follow these steps:
1. Log in to EM CLI from the /bin directory present within the OMS home:
$<OMS_HOME>/bin/emcli login -username=<user_name>
Once you run this command, EM CLI will prompt you for a password. Enter thepassword for the user name you specified.
2. Synchronize EM CLI:
$<OMS_HOME>/bin/emcli sync3. Run the promote_gold_agent_image verb to promote the Agent Gold Image
version to the Restricted maturity level:
$<OMS_HOME>/bin/emcli promote_gold_agent_image -version_name="gold_image_version_name" -maturity="Current/Restricted/Draft"
The -version_name parameter defines the Agent Gold Image that you want topromote.
The -maturity parameter defines the gold image maturity level.
For example, to promote the Agent Gold Image OPC_AGI_DB_JUL_13 to theRestricted maturity level, run the following:
$<OMS_HOME>/bin/emcli promote_gold_agent_image -version_name=OPC_AGI_DB_JUL_13 -maturity=Restricted
Subscribing Management Agents to an Agent Gold ImageTo subscribe a set of Management Agents to an Agent Gold Image, use either of thefollowing methods:
• Subscribing Management Agents to an Agent Gold Image Using Gold AgentImages Home Page
Chapter 11Managing the Lifecycle of an Agent Gold Image
11-16

• Subscribing Management Agents to an Agent Gold Image Using EM CLI
Subscribing Management Agents to an Agent Gold Image Using Gold Agent ImagesHome Page
Note:
You cannot install, update, or upgrade a Shared Agent (NFS Agent) using an AgentGold Image.
You cannot subscribe the following Management Agents to an Agent Gold Image:
• Central Agent.
• Already subscribed Management Agents.
• Shared Agents (NFS Agents).
• Unsecure Management Agents.
• Management Agents on platforms that are different from the platforms on whichthe Agent Gold Image is available.
The platform is identified by the Oracle home collection, so make sure theOracle home target is discovered and collected. To do so, On the Home page ofthe Management Agent, in the Summary section, click Oracle Home andPatch Details, and on the following page, click Refresh Configuration.
To subscribe a set of Management Agents to an Agent Gold Image, follow these steps:
1. From the Setup menu, select Manage Cloud Control, then select Gold Agent Images.
2. Click the name of the required Agent Gold Image.
3. Click Manage Image Versions and Subscriptions.
4. Select the Subscriptions tab. Click Subscribe.
5. Search for and select the required Management Agents, then click Select.
Chapter 11Managing the Lifecycle of an Agent Gold Image
11-17

Subscribing Management Agents to an Agent Gold Image Using EM CLI
Note:
You cannot install, update, or upgrade a Shared Agent (NFS Agent) using anAgent Gold Image.
You cannot subscribe the following Management Agents to an Agent GoldImage:
• Central Agent.
• Already subscribed Management Agents.
• Shared Agents (NFS Agents).
• Unsecure Management Agents.
• Management Agents on platforms that are different from the platforms onwhich the Agent Gold Image is available.
The platform is identified by the Oracle home collection, so make surethe Oracle home target is discovered and collected. To do so, On theHome page of the Management Agent, in the Summary section, clickOracle Home and Patch Details, and on the following page, clickRefresh Configuration.
To subscribe a Management Agent to an Agent Gold Image using EM CLI, followthese steps:
1. Log in to EM CLI from the /bin directory present within the OMS home:
$<OMS_HOME>/bin/emcli login -username=<user_name>
Once you run this command, EM CLI will prompt you for a password. Enter thepassword for the user name you specified.
2. Synchronize EM CLI:
$<OMS_HOME>/bin/emcli sync3. Run the subscribe_agents verb to subscribe the specified Management Agent to
a specific Agent Gold Image:
$<OMS_HOME>/bin/emcli subscribe_agents -image_name="Image Name" [-agents="agent_name_pattern"] [-groups="group_name"]
Note that the parameters mentioned in [ ] are optional.
The -image_name parameter subscribes the Management Agents to the specifiedAgent Gold Image.
The -agents parameter subscribes only the Management Agents that match thespecified name pattern.
Chapter 11Managing the Lifecycle of an Agent Gold Image
11-18

The -groups parameter subscribes only the Management Agents that belong to thespecified groups.
Examples:
• The following example subscribes the Management Agents that match the namepattern abc% or xyz.example.com:1243 to the Agent Gold ImageOPC_AGT_ADC_POD:
$<OMS_HOME>/bin/emcli subscribe_agents -image_name="OPC_AGT_ADC_POD" -agents="abc%,xyz.example.com:1243"
• The following example subscribes all the Management Agents to the Agent GoldImage OPC_AGT_ADC_POD:
$<OMS_HOME>/bin/emcli subscribe_agents -image_name="OPC_AGT_ADC_POD"• The following example subscribes all the Management Agents that belong to the
group GROUP1 or GRP2 to the Agent Gold Image OPC_AGT_ADC_POD:
$<OMS_HOME>/bin/emcli subscribe_agents -image_name="OPC_AGT_ADC_POD" -groups="GROUP1,GRP2"
Unsubscribing Management Agents from an Agent Gold ImageTo unsubscribe Management Agents from an Agent Gold Image, use either of the followingmethods:
• Unsubscribing Management Agents to an Agent Gold Image Using Gold Agent ImagesHome Page
• Unsubscribing Management Agents to an Agent Gold Image Using EM CLI
Unsubscribing Management Agents to an Agent Gold Image Using Gold AgentImages Home Page
To unsubscribe Management Agents from an Agent Gold Image, follow these steps:
1. From the Setup menu, select Manage Cloud Control, then select Gold Agent Images.
2. Click the name of the required Agent Gold Image.
3. Click Manage Image Versions and Subscriptions.
4. Select the Subscriptions tab. Select the Management Agents that you want tounsubscribe from the Agent Gold Image. Click Unsubscribe. Select OK.
Unsubscribing Management Agents to an Agent Gold Image Using EM CLITo unsubscribe a Management Agent from an Agent Gold Image using EM CLI, follow thesesteps:
1. Log in to EM CLI from the /bin directory present within the OMS home:
$<OMS_HOME>/bin/emcli login -username=<user_name>
Once you run this command, EM CLI will prompt you for a password. Enter the passwordfor the user name you specified.
2. Synchronize EM CLI:
Chapter 11Managing the Lifecycle of an Agent Gold Image
11-19

$<OMS_HOME>/bin/emcli sync3. Run the unsubscribe_agents verb to unsubscribe the specified Management
Agent from a specific Agent Gold Image:
$<OMS_HOME>/bin/emcli unsubscribe_agents -image_name="Image Name" [-agents="Full Agent Name"] [-groups="List of group names"] [-closure_related="true/false"] [-closure_nfs="true/false"]
Note that the parameters mentioned in [ ] are optional.
Table 11-4 lists and describes the supported parameters for unsubscribingManagement Agents from an Agent Gold Image.
Table 11-4 Supported Parameters for Unsubscribing Management Agents
Parameter Description
-image_name Unsubscribes the Management Agents that subscribe to the specified AgentGold Image.
-agents Unsubscribes the Management Agents that match the specified name pattern.
-groups Unsubscribes the Management Agents that belong to the specified groups.
-closure_related Does not unsubscribe the related Management Agents if the value specified forthis parameter is 'false'.
-closure_shared Does not unsubscribe the related shared agents if the value specified for thisparameter is 'false'.
Examples:
• The following example unsubscribes the Management Agents that subscribeto the Agent Gold Image OPC_AGT_ADC_POD, and match the name patternabc% or xyz.example.com:1243:$<OMS_HOME>/bin/emcli unsubscribe_agents -image_name="OPC_AGT_ADC_POD" -agents="abc%,xyz.example.com:1243"
• The following example unsubscribes all the Management Agents thatsubscribe to the Agent Gold Image OPC_AGT_ADC_POD:
$<OMS_HOME>/bin/emcli unsubscribe_agents -image_name="OPC_AGT_ADC_POD"• The following example unsubscribes the Management Agents that subscribe
to the Agent Gold Image OPC_AGT_ADC_POD, and belong to the groupGROUP1 or GRP2:
$<OMS_HOME>/bin/emcli unsubscribe_agents -image_name="OPC_AGT_ADC_POD" -groups="GROUP1,GRP2"
• The following example unsubscribes xyz.example.com:1243 and all its relatedshared agents that subscribe to the Agent Gold Image OPC_AGT_ADC_POD:
$<OMS_HOME>/bin/emcli unsubscribe_agents -image_name="OPC_AGT_ADC_POD" -agents="xyz.example.com:1243" -closure_shared="true"
• The following example unsubscribes xyz.example.com:1243 and all its relatedManagement Agents that subscribe to the Agent Gold ImageOPC_AGT_ADC_POD:
$<OMS_HOME>/bin/emcli unsubscribe_agents -image_name="OPC_AGT_ADC_POD" -agents="xyz.example.com:1243" -closure_related="true"
Chapter 11Managing the Lifecycle of an Agent Gold Image
11-20

Provisioning Management Agents Using an Agent Gold ImageSee Advantages of Provisioning, Upgrading, and Updating Management Agents Using aGold Image Version in the Oracle Enterprise Manager Cloud Control Basic Installation Guide.
Note:
You cannot install, update, or upgrade a Shared Agent (NFS Agent) using an AgentGold Image. For information about Shared Agents, see Overview of InstallingShared Agents.
Updating Management Agents Using an Agent Gold Image VersionTo update a Management Agent using an Agent Gold Image version, follow these steps:
1. Create an Agent Gold Image. To do this, see Creating an Agent Gold Image.
2. Create an Agent Gold Image version. To do this, see Creating an Agent Gold ImageVersion.
3. Set a particular Agent Gold Image version as the current version. To do this, see Settinga Particular Agent Gold Image Version as the Current Version.
4. Subscribe Management Agents to an Agent Gold Image. To do this, see SubscribingManagement Agents to an Agent Gold Image.
5. Update Management Agents. To update your Management Agents using an Agent GoldImage version, use either of the following procedures:
• Updating Management Agents with an Agent Gold Image
• Updating Management Agents Using Agent Gold Image Version Using EM CLI
Note:
Before updating a standalone Management Agent using an Agent Gold Imageversion, meet the hardware requirements. See Hardware Requirements forEnterprise Manager Cloud Control in the Oracle Enterprise Manager CloudControl Basic Installation Guide.
Note:
When you have to update a set of related Management Agents to an AgentGold Image, it is mandatory to update all the related agents. However, there isan option to override this in case if you want to update only a selected fewAgents to the Agent Gold Image. To achieve this, you have to set the parameterclosureRelated to false in the EM_GI_MASTER_INFO table.
Chapter 11Managing the Lifecycle of an Agent Gold Image
11-21

Note:
You cannot install, update, or upgrade a Shared Agent (NFS Agent) using anAgent Gold Image.
Updating Management Agents with an Agent Gold ImageTo update a Management Agent using an Agent Gold Image version, follow thesesteps:
1. From the Setup menu, select Manage Cloud Control, then select Gold AgentImages.
2. Click the name of the required Agent Gold Image.
3. Click Manage Image Versions and Subscriptions.
4. Select the Subscriptions tab. Select the Management Agents that you want toupdate, select Update, then select To Current Version, or To RestrictedVersion.
5. Accept the default job name for the Management Agent update job. You canchange this, if required.
If you have not included certain Management Agents in the previous step andwant to include them in the update operation now, select Add, then specify theadditional Management Agents.
If there is any change to the sbin directory, particularly for a complete agentupgrade or when there is an sbin-specific patch, after updating the ManagementAgent, the preferred privileged credentials of the Management Agent host areused for running the root.sh script on the Management Agent.
If these credentials are not already set, then click Override Preferred Credentialsand enter the credentials you want to use instead.
Click Next.
6. By default, Image Version Pre Staged is not selected, in this case provide a stagelocation that is local to the destination host. However, if you select the Imageversion Pre Staged, provide a shared, NFS-mounted stage location that isaccessible by all the Management Agents.
Also, specify a method for Management Agent deployment. If you select thedefault option Push, the OMS transfers the Management Agent software to all thehosts that are selected for the update operation. However, if you want theManagement Agent present on each destination host to retrieve the ManagementAgent software from the OMS instead, select Pull.
7. In the Additional Inputs section, specify any scripts that you want to run before theupdate operation and after the update operation. Ensure that you select Script onOMS Host if the script exists on the OMS host. Also, specify any additionalparameters that you want to use for the update operation. Table 11-5 provides theadditional parameters that you can use while updating Management Agents.
Chapter 11Managing the Lifecycle of an Agent Gold Image
11-22

Table 11-5 List of Additional Parameters for 13c Management Agent Update
Parameter Description
-ignorePrereqs Skips running the prerequisite checks.
Specify this parameter when you have already verified the prerequisites, andonly want to perform the rest of the upgrade process.
-debug Logs debug messages useful for debugging and resolving errors.
8. In the Schedule section, specify values for the following:
9. • Batch Size: A Management Agent update activity runs in a way that theManagement Agents are updated in batches. The batch size represents the numberof Management Agents present in a batch.
• Job Frequency: The time (in minutes) after which the application checks whetherthe current batch is complete or not.
• Success Rate: The percentage of the total number of Management Agents (that is,the Management Agents that are a part of the current update batch and theManagement Agents that were a part of the previous update batches) that must havebeen updated once a batch is complete, before the next batch is allowed to begin.
For example, if there are 1000 Agents deployed in your enterprise and the batch sizeis set to 100, the batch success rate is set to 90, and the Agents are updated inbatches of 100. In this case, once a batch is complete, the application moves to thenext batch only if 90 per cent of the total number of Management Agents are updatedsuccessfully.
• Start: The time when you want to start the update operation, and the time when youwant the update operation to end. By default, the time set is Immediately. In thiscontext, it is the OMS time that is considered.
• Duration: The duration until which you want the update operation to run.
10. In the Notify section, specify the email addresses to which you want the notificationsabout the update job progress to be sent.
11. In the Shell Profile section, select Update Shell Profile, and specify the location of yourshell profile, if you want your shell profile to be updated with the new Management AgentOracle home location.
By default, this is not selected, and is optional.
12. In the Cleanup options section, select:
• Pre-Cleanup to clean up the old or inactive agent homes prior to updating theManagement Agents.
• Post-Cleanup to clean up the old or inactive agent homes after updating theManagement Agents.
Note:
If the cleanup operation is not performed at this point, it can be done at alater time using the Agent Upgrade Console. For more information, seeOracle Enterprise Manager Cloud Control Upgrade Guide.
Chapter 11Managing the Lifecycle of an Agent Gold Image
11-23

A job that updates the Management Agents is submitted to the EnterpriseManager job system. You can view the status of this job on the Gold Agent ImageActivities page, in the Update Activities tab.
13. Click Update.
A job that updates the Management Agents is submitted to the EnterpriseManager job system. You can view the status of this job on the Gold Agent ImageActivities page, in the Update Activities tab.
Updating Management Agents Using Agent Gold Image Version Using EM CLITo update Management Agents using an Agent Gold Image version, using EM CLI,follow these steps:
Note:
Before updating a standalone Management Agent using an Agent GoldImage version, meet the hardware requirements. See HardwareRequirements for Enterprise Manager Cloud Control in the Oracle EnterpriseManager Cloud Control Basic Installation Guide.
1. Log in to EM CLI from the /bin directory present within the Oracle home of theOMS:
$<ORACLE_HOME>/bin/emcli login -username=<user_name>
Once you run this command, EM CLI will prompt you for a password. Enter thepassword for the user name you specified.
2. Synchronize EM CLI:
$<ORACLE_HOME>/bin/emcli sync3. Run the get_updatable_agents verb to display the Management Agents that can
be updated using a particular Agent Gold Image version or Agent Gold Image:
$<ORACLE_HOME>/bin/emcli get_updatable_agents -version_name | -image_name [-agents="Full Agent Name"] [-versions="List of Versions"] [-groups="List of group names"] [-output_file="Location of the output file"]
Note that the parameters mentioned in [ ] are optional.
Note:
It is mandatory to specify the -version_name parameter or the -image_name parameter. If you specify both, a union of the outputs (wheneach of these parameters is specified individually) is displayed.
Chapter 11Managing the Lifecycle of an Agent Gold Image
11-24

Note:
To view a list of Management Agents that cannot be updated, run theget_not_updatable_agents verb:
emcli get_not_updatable_agents [-version_name | -image_name]
The parameters mentioned in [ ] are optional.
Table 11-6 lists and describes the supporting parameters for displaying the ManagementAgents that can be updated using a particular Management Agent image version.
Table 11-6 Supported Parameters for Displaying Management Agents That Can Be Updated
Parameter Description
-version_name Specify this option to display the Management Agents that can be updatedusing the specified Agent Gold Image version.
-image_name Specify this option to display the Management Agents that can be updatedusing the specified Agent Gold Image.
-versions Specify this option to display the Management Agents that can be updated, andare of the specified versions.
-agents Specify this option to display the Management Agents that can be updated, andwhose name matches the specified name pattern.
-groups Specify this option to display the Management Agents that can be updated, andare a part of those groups whose name matches the specified name pattern.
-output_file Specify this option to add the displayed list of Management Agents that can beupdated to an output file.
Examples:
• The following example lists the Management Agents that can be updated using thelatest Agent Gold Image OPC_AGT_ADC_POD:
<ORACLE_HOME>/bin/emcli get_updatable_agents -image_name="OPC_AGT_ADC_POD"• The following example lists the Management Agents that can be updated using the
Agent Gold Image version OPC_AGT_ADC_POD_JUNE:
<ORACLE_HOME>/bin/emcli get_updatable_agents -version_name="OPC_AGT_ADC_POD_JUNE"
• The following example lists the Management Agents that are of version 12.1.0.1.0 or12.1.0.2.0, and can be updated using the Agent Gold Image versionOPC_AGT_ADC_POD_JUNE:
<ORACLE_HOME>/bin/emcli get_updatable_agents -version_name="OPC_AGT_ADC_POD_JUNE" -versions="12.1.0.1.0,12.1.0.2.0"
• The following example lists the Management Agents that belong to GROUP1 orGRP2, and can be updated using the Agent Gold Image versionOPC_AGT_ADC_POD_JUNE:
<ORACLE_HOME>/bin/emcli get_updatable_agents -version_name="OPC_AGT_ADC_POD_JUNE" -groups="GROUP1,GRP2"
Chapter 11Managing the Lifecycle of an Agent Gold Image
11-25

• The following example lists the Management Agents that can updated usingthe Agent Gold Image OPC_AGT_ADC_POD_JUNE, and adds the list to theoutput file /scratch/agents_file.txt:<ORACLE_HOME>/bin/emcli get_updatable_agents -image_name="OPC_AGT_ADC_POD_JUNE" -output_file="/scratch/agents_file.txt"
4. Run the update_agents verbs to prepare the environment for updating yourManagement Agents and to submit the Management Agent update job:
<ORACLE_HOME>/bin/emcli update_agents -version_name | -image_name -agents="agent_names" | -input_file="agents_file:input_file_location" [-pre_script_loc="location_of_pre_script"] [-pre_script_on_oms] [-post_script_loc="location_of_post_script"] [-post_script_on_oms] [-op_name="custom_operation_name"] [-override_credential="named_credential"] [-additional_parameters] [-stage_location="custom_stage_location"] [-is_staged="true|false"] [-stage_action="push|pull"] [-batch_size] [-start_time] [-end_time] [-frequency]< [-success_rate] [-runPrecleanup] {-runPostcleanup] [-email] [-update_profile] [-profile_path]
Note that the parameters mentioned in [ ] are optional.
Note:
It is mandatory to specify the -version_name parameter or the -image_name parameter. Also, it is mandatory to specify the -agentsparameter or the -input_file parameter. If you specify both -agentsand -input_file, a union of the outputs (when each of theseparameters is specified individually) is displayed.
All parameters can be passed in a response file, using the -input_fileparameter. For example, -input_file="response_file:/scratch/response_file.txt".In the response file, each parameter must be specified on a new line,and in name value pairs. For example, op_name=UPDATE_AGT_121020If the same parameter is passed both on the command line and in theresponse file, the value of the command line parameter is givenprecedence.
Chapter 11Managing the Lifecycle of an Agent Gold Image
11-26

Table 11-7 lists and describes the supporting parameters for updating ManagementAgents using an Agent Gold Image version.
Table 11-7 Supported Parameters for Updating Management Agents Using Agent Gold ImageVersion
Parameter Description
-version_name Agent Gold Image version to which the Management Agents should beupdated.
-image_name Agent Gold Image to which the Management Agents should be updated.
-agents Names of all the Management Agents that should be updated.
-input_file Absolute path to the file that lists the Management Agents to be updated.
-pre_script_loc Absolute path to a script that should be run before updating the ManagementAgents.
-pre_script_on_oms Indicates that the pre-script is present on the OMS host.
-post_script_loc Absolute path to a script that should be run after updating the ManagementAgents.
-post_script_on_oms Indicates that the post-script is present on the OMS host.
-op_name Custom operation name for the Management Agent update.
-override_credential Overrides the preferred credentials with different named credentials. Typically,the preferred credentials of the Oracle home of the Management Agent areused to run root.sh on certain Management Agents after the update. Butpassing this option overrides those preferred credentials.
-additional_parameters Additional parameters to be passed for the Management Agent update.
-stage_location Custom stage location for the Management Agent update. Minimum free spacerequired is 1 GB if image is not already staged. Ensure that this location isaccessible from all the Management Agents being updated if image isprestaged.
-is_staged Set to 'true' if you have already staged the Agent Gold Image.
-stage_action Set to 'pull' if you want the Management Agents to be updated to pull the AgentGold Image. Typically, If the Agent Gold Image has not already been staged, bydefault the Agent Gold Image is pushed to the Management Agents to beupdated. Setting to 'pull' pulls the Agent Gold Image instead.
-batch_size Number of Management Agents present in an update batch. Default value is100.
-start_time Start time for the update job. Specify in \" yyyy-mm-dd hh:mm:ss\" format.
-end_time End time for the update job. Specify in \" yyyy-mm-dd hh:mm:ss\" format.
-frequency Time (in minutes) after which the application should check whether or not thecurrent batch is complete, and should schedule the next batch for update.Default value is.
-success_rate Percentage of the total number of Management Agents that must have beensuccessfully updated in previous batches, before the next batch is allowed tobegin. Default value is 90.
-runPrecleanup Cleans up the old agent homes before updating the Management Agents.
-runPostcleanup Cleans up the old agent homes after updating the Management Agents.
-email Email IDs separated by a comma (,) to which notifications should be sent oncethe batch completes.
Chapter 11Managing the Lifecycle of an Agent Gold Image
11-27

Table 11-7 (Cont.) Supported Parameters for Updating Management Agents Using Agent GoldImage Version
Parameter Description
-update_profile Indicates that a profile is set with agent Oracle home.
-profile_path Absolute path to user profiles separated by a comma (,) if the update profileoption is selected.
Examples:
• The following example updates xyz.example.com:1243 using the latest AgentGold Image in the series OPC_AGT_ADC_POD:
<ORACLE_HOME>/bin/emcli update_agents -gold_image_series="OPC_AGT_ADC_POD" -agents="xyz.example.com:1243"
• The following example updates xyz.example.com:1243 using the Agent GoldImage OPC_AGT_ADC_POD_JUNE:
<ORACLE_HOME>/bin/emcli update_agents -gold_image_name="OPC_AGT_ADC_POD_JUNE" -agents="xyz.example.com:1243"
• The following example updates all the Management Agents present in theinput file /scratch/agents_file.txt using the Agent Gold ImageOPC_AGT_ADC_POD_JUNE:
<ORACLE_HOME>/bin/emcli update_agents -gold_image_name="OPC_AGT_ADC_POD_JUNE" -input_file="agents_file:/scratch/agents_file.txt"
• The following example runs /scratch/pre_script, then updatesxyz.example.com:1243 using the Agent Gold ImageOPC_AGT_ADC_POD_JUNE:
<ORACLE_HOME>/bin/emcli update_agents -gold_image_name="OPC_AGT_ADC_POD_JUNE" -agents="xyz.example.com:1243" -pre_script_loc="/scratch/pre_script"
• The following example updates xyz.example.com:1243 using the Agent GoldImage OPC_AGT_ADC_POD_JUNE, then runs /scratch/post_script:
<ORACLE_HOME>/bin/emcli update_agents -gold_image_name="OPC_AGT_ADC_POD_JUNE" -agents="xyz.example.com:1243" -post_script_loc="/scratch/post_script"
• The following example updates xyz.example.com:1243 (creates an update jobUPDATE_JOB123) using the Agent Gold ImageOPC_AGT_ADC_POD_JUNE:
<ORACLE_HOME>/bin/emcli update_agents -gold_image_name="OPC_AGT_ADC_POD_JUNE" -agents="xyz.example.com:1243" -op_name="UPDATE_JOB123"
• The following example updates xyz.example.com:1243 using the Agent GoldImage OPC_AGT_ADC_POD_JUNE, and uses NAMED_CRED123 to run root.shafter the update:
<ORACLE_HOME>/bin/emcli update_agents -gold_image_name="OPC_AGT_ADC_POD_JUNE" -agents="xyz.example.com:1243" -override_credential="NAMED_CRED123"
Chapter 11Managing the Lifecycle of an Agent Gold Image
11-28

• The following example updates xyz.example.com:1243 using the Agent Gold ImageOPC_AGT_ADC_POD_JUNE, passing two additional parameters:
<ORACLE_HOME>/bin/emcli update_agents -gold_image_name="OPC_AGT_ADC_POD_JUNE" -agents="xyz.example.com:1243" -additional_parameters="-ignorePrereqs -newParameter"
• The following example updates xyz.example.com:1243 using the latest Agent GoldImage in the series OPC_AGT_ADC_POD, passing two additional parameters:
<ORACLE_HOME>/bin/emcli update_agents -gold_image_series="OPC_AGT_ADC_POD" -agents="xyz.example.com:1243" -additional_parameters="-ignorePrereqs -newParameter"
• The following example updates xyz.example.com:1243 using the latest Agent GoldImage in the series OPC_AGT_ADC_POD, without staging the gold image:
<ORACLE_HOME>/bin/emcli update_agents -gold_image_series="OPC_AGT_ADC_POD" -agents="xyz.example.com:1243" -is_staged="true"
• The following example updates xyz.example.com:1243 using the latest Agent GoldImage in the series OPC_AGT_ADC_POD, and the gold image is pulled byxyz.example.com:1243:<ORACLE_HOME>/bin/emcli update_agents -gold_image_series="OPC_AGT_ADC_POD" -agents="xyz.example.com:1243" -stage_action="pull"
• The following example runs the Management Agent update with maximum of 150Management Agents getting updated in each batch:
<ORACLE_HOME>/bin/emcli update_agents -image_name="OPC_AGT_ADC_POD" -agents="xyz.example.com:1243" -batch_size=150
• The following example runs the Management Agent update with maximum of 150Management Agents getting updated in each batch:
Note:
The next batch gets scheduled only if 80% of the Management Agents aresuccessfully updated in the previous batches.
<ORACLE_HOME>/bin/emcli update_agents -image_name="OPC_AGT_ADC_POD" -agents="xyz.example.com:1243" -batch_size=150 success_rate=80
• The following example schedules the agent update job starting at May 7, 10:00:00AM and ending at May 8, 10:00:00 AM:
<ORACLE_HOME>/bin/emcli update_agents -image_name="OPC_AGT_ADC_POD" -agents="xyz.example.com:1243" -start_time="2019-05-07 10:00:00" -end_time="2019-05-08 10:00:00"
5. Run the get_agent_update_status verb to displays the update results of theManagement Agent:
<ORACLE_HOME>/bin/emcli get_agent_update_status -version_name | -op_name [-agent="agent_name_pattern"] [-severity="ERROR|WARNING"] [-severity_id="severity_id"] [-status="PendingUpdateInprogress|Updatable|NotUpdatable|NotExecuted|Success|Inprogress|Failed"]
Chapter 11Managing the Lifecycle of an Agent Gold Image
11-29

Note that the parameters mentioned in [ ] are optional.
Note:
It is mandatory to specify the -op_name parameter or the -version_nameparameter. If you have specified -severity or -severity_id, ensurethat you do not specify -version_name or -status.
Table 11-8 lists and describes the supporting parameters for displaying the updatestatus of the Management Agent.
Table 11-8 Supported Parameters for Displaying Update Status of the Management Agent
Parameter Description
-version_name Displays the details of the update operation submitted for the specified AgentGold Image version name.
-op_name Displays the details of the specified update operation.
-agent Displays the details of the operations submitted for Management Agents thathave the specified name pattern.
-status Displays the details of the update operations that have the specified status.
-severity Displays the details of the update operations that have the specified severitylevel.
-severity_id Displays the details of the update operations that have the specified severity ID
Examples:
• The following example displays the details of the update operations submittedfor the Agent Gold Image version OPC_AGT_ADC_POD_JUNE:
<ORACLE_HOME>/bin/emcli get_agent_update_status -version_name="OPC_AGT_ADC_POD_JUNE"
• The following example displays the details of the update operations submittedfor the Agent Gold Image OPC_AGT_ADC_POD_JUNE, for the ManagementAgent xyz.example.com:1243:<ORACLE_HOME>/bin/emcli get_agent_update_status -version_name="OPC_AGT_ADC_POD_JUNE" -agent="xyz.example.com:1243"
• The following example displays the details of the update operations submittedfor the Agent Gold Image OPC_AGT_ADC_POD_JUNE, for the ManagementAgent xyz.example.com:1243, that have their status as Failed:<ORACLE_HOME>/bin/emcli get_agent_update_status -version_name="OPC_AGT_ADC_POD_JUNE" -agent="xyz.example.com:1243" -status="Failed"
• The following example displays the details of the update operationUPDATE_JOB123:<ORACLE_HOME>/bin/emcli get_agent_update_status -op_name="UPDATE_JOB123"
• The following example displays the details of the update operationUPDATE_JOB123, for the Management Agent xyz.example.com:1243:
Chapter 11Managing the Lifecycle of an Agent Gold Image
11-30

<ORACLE_HOME>/bin/emcli get_agent_update_status -op_name="UPDATE_JOB123" -agent="xyz.example.com:1243"
• The following example displays the details of the update operation UPDATE_JOB123,for Management Agents having the status Failed:<ORACLE_HOME>/bin/emcli get_agent_update_status -op_name="UPDATE_JOB123" -status="Failed"
• The following example displays the details of the update operation UPDATE_JOB123 forthe Management Agent xyz.example.com:1243, having the status Failed:<ORACLE_HOME>/bin/emcli get_agent_update_status -op_name="UPDATE_JOB123" -status="Failed" -agent="xyz.example.com:1243"
• The following example displays the Management Agents of the update operationUPDATE_JOB123, for which severity is ERROR:<ORACLE_HOME>/bin/emcli get_agent_update_status -op_name="UPDATE_JOB123" -severity="ERROR"
• The following example displays the Management Agents of the update operationUPDATE_JOB123, for which severity is WARNING, and severity ID is ROOT_RUN_CHECK:<ORACLE_HOME>/bin/emcli get_agent_update_status -op_name="UPDATE_JOB123" -severity="WARNING" -severity_id="ROOT_RUN_CHECK"
• The following example displays the Management Agents of the update operationUPDATE_JOB123, for which severity ID is ROOT_RUN_CHECK:<ORACLE_HOME>/bin/emcli get_agent_update_status -op_name="UPDATE_JOB123" -severity_id="ROOT_RUN_CHECK"
• The following example displays the details of the update operation UPDATE_JOB123 forthe Management Agent xyz.example.com:1243, with severity as ERROR:<ORACLE_HOME>/bin/emcli get_agent_update_status -op_name="UPDATE_JOB123" -severity="ERROR" -agent="xyz.example.com:1243"
• The following example displays the details of the update operation UPDATE_JOB123for the Management Agent xyz.example.com:1243, with severity ID asROOT_RUN_CHECK:<ORACLE_HOME>/bin/emcli get_agent_update_status -op_name="UPDATE_JOB123" -severity_id="ROOT_RUN_CHECK" -agent="xyz.example.com:1243"
• The following example displays the details of the update operation UPDATE_JOB123 forthe Management Agent xyz.example.com:1243, with severity as WARNING andseverity ID as ROOT_RUN_CHECK:<ORACLE_HOME>/bin/emcli get_agent_update_status -op_name="UPDATE_JOB123" -severity="WARNING" -severity_id="ROOT_RUN_CHECK" -agent="xyz.example.com:1243"
• The following example displays the Management Agents of the update operationUPDATE_JOB123, for which severity is ERROR:<ORACLE_HOME>/bin/emcli get_agent_update_status -op_name="UPDATE_JOB123" -severity="ERROR"
Chapter 11Managing the Lifecycle of an Agent Gold Image
11-31

Viewing Agent Gold Image Activity DetailsTo view a list of the Agent Gold Image activities (that is, the jobs that are submitted tothe Enterprise Manager job system) and details such as their status, the time at whichthe activity begun, the time at which the activity ended, and so on, use either of thefollowing methods:
• Viewing Agent Gold Image Activity Details Using Gold Agent Image Home Page
• Viewing Agent Gold Image Activity Details Using EM CLI
Viewing Agent Gold Image Activity Details Using Gold Agent ImageHome Page
To view a list of the Agent Gold Image activities, follow these steps:
1. From the Setup menu, select Manage Cloud Control, then select Gold AgentImages.
2. In the Activities section, click Show all activities.
3. To view the status details of Agent Gold Image activities, Management Agentupdate activities, or Management Agent unsubscribe activities, select the ImageActivities, Update Activities, or Unsubscribe Activities tab, respectively.
4. To view the execution details of a particular Agent Gold Image activity,Management Agent update activity, or Management Agent unsubscribe activity,click the job name.
Viewing Agent Gold Image Activity Details Using EM CLITo view the activity details of an Agent Gold Image using EM CLI, follow these steps:
1. Log in to EM CLI from the /bin directory present within the OMS home:
$<OMS_HOME>/bin/emcli login -username=<user_name>
Once you run this command, EM CLI will prompt you for a password. Enter thepassword for the user name you specified.
2. Synchronize EM CLI:
$<OMS_HOME>/bin/emcli sync3. Run the list_gold_agent_image_activities verb to list the activities that the
specified Agent Gold Image is a part of:
$<OMS_HOME>/bin/emcli list_gold_agent_image_activities -version_name="gold_image_version_name" [-noheader] [-script | -format= [name:<pretty|script|csv>]; [column_separator:"column_sep_string"]; [row_separator:"row_sep_string"]; ]
Note that the parameters mentioned in [ ] are optional.
Table 11-9 lists and describes the supported parameters for viewing details aboutthe Agent Gold Image.
Chapter 11Viewing Agent Gold Image Activity Details
11-32
Table 11-9 Supported Parameters for Viewing Details about the Agent Gold Image
Parameter Description
-version_name Agent Gold Image version whose activities you want to view.
-no_header Displays a tabular form of the output without column headers.
-script This parameter is equivalent to -format="name:script".-format This parameter defines the type of the output format. The default value of this
parameter is -format="name:pretty".-format="name:pretty" displays the output table in a readable format thatcannot be parsed by scripts.
-format="name:script" sets the default column separator to a tab characterand the default row separator to a newline character. You can specify thecolumn_separator and row_separator strings to change these defaultcharacters.
-format="name:csv" sets the column separator to a comma and the rowseparator to a newline character.
For example, to view activity details for the Agent Gold Image OPC_AGI_DB_JUL_13,run the following command:
$<OMS_HOME>/bin/emcli list_gold_agent_image_activities -version_name=OPC_AGI_DB_JUL_13
4. You can also run the get_gold_agent_image_activity_status to check the activitystatus of the Agent Gold Image:
$<OMS_HOME>/bin/emcli get_gold_agent_image_activity_status -operation_name="gold_image_operation_name" [-noheader] [-script | -format= [name:<pretty|script|csv>]; [column_separator:"column_sep_string"]; [row_separator:"row_sep_string"]; ]
Table 11-10 lists and describes the supported parameters for viewing the activity status ofthe Agent Gold Image.
Table 11-10 Supported Parameters for Viewing Activity Status of the Agent Gold Image
Parameter Description
-operation_name Displays the status of a particular Agent Gold Image activity.
-no_header Displays a tabular form of the output without column headers.
-script This parameter is equivalent to -format="name:script".
Chapter 11Viewing Agent Gold Image Activity Details
11-33

Table 11-10 (Cont.) Supported Parameters for Viewing Activity Status of the Agent Gold Image
Parameter Description
-format This parameter defines the type of the output format. The default value of thisparameter is -format="name:pretty".-format="name:pretty" displays the output table in a readable format thatcannot be parsed by scripts.
-format="name:script" sets the default column separator to a tab characterand the default row separator to a newline character. You can specify thecolumn_separator and the row_separator strings to change these defaultcharacters.
-format="name:csv" sets the column separator to a comma and the rowseparator to a newline character.
For example, to display the activity status of the Agent Gold Image operationGOLDAGENTIMAGE_CREATE_2019_12_22_12_12_52_535, run the followingcommand:
$<OMS_HOME>/bin/emcli get_gold_agent_image_activity_status -operation_name=GOLDAGENTIMAGE_CREATE_2019_12_22_12_12_52_535
Checking the Agent Gold Image Compliance LevelTo check the compliance level for all the Agent Gold Images, from the Setup menu,select Manage Cloud Control, then select Gold Agent Images.
You can view a pictorial representation (a vertical bar graph) of the number ofManagement Agents that are on gold image and not on gold image. Hover your mouseover the vertical bars to see the exact number of Management Agents that are inquestion.
In the table below the vertical bar graph, you can view details about the gold imagescreated so far. To check the compliance level, see the Compliance column.
Viewing Details about the Agent Gold ImagesYou can view details about the Agent Gold Images, using either of the followingmethods:
• Viewing Details about the Agent Gold Images and Gold Image Versions Using theGold Agent Images Home Page
• Viewing Details about the Agent Gold Images Using EM CLI
Viewing Details about the Agent Gold Images and Gold ImageVersions Using the Gold Agent Images Home Page
To view details about the Agent Gold Images and gold image versions using the GoldAgent Images Home page, from the Setup menu, select Manage Cloud Control, thenselect Gold Agent Images.
You can view a pictorial representation (a vertical bar graph) of the number ofManagement Agents that are on gold image and not on gold image. Hover your mouse
Chapter 11Checking the Agent Gold Image Compliance Level
11-34

over the vertical bars to see the exact number of Management Agents that are in question.
In the table below the vertical bar graph, you can view details about the gold images createdso far. Table 11-11 describes these details.
Table 11-11 Gold Agent Image Details
Column Name Description
Gold Image Name Name of the Agent Gold Image.
To view more details about an Agent Gold Image and its versions, click the goldimage. On the Gold Agent Images page, view details about the deploymentsand the image versions created for that gold image. Also, for each gold imageversion, view general details, the associated instance properties, the plug-insand patches deployed, the activities performed on it, and the stage locationsconfigured for it.
Note: The Gold Image page lists only those gold image versions that have beenset to current (active) or restricted version status. It does not list gold imageversions of any other status. If you want to view all the gold image versions of aparticular gold image, regardless of their status, then on the Agent Gold Imagespage, click Manage Image Versions and Subscriptions. And on the ManageImage page, click the Versions And Drafts tab.
Subscribed Agents Number of Management Agents associated or subscribed to the Agent GoldImage. This includes the Management Agents that are not only updated withthe gold image but also the ones that are not updated but subscribed to thegold image.
Subscribing Management Agents to a gold image is a prerequisite for updatingManagement Agents with a particular gold image version.
Agents on Gold Image Number of Management Agents subscribed to a gold image and also updatedwith that gold image.
Compliance Percentage of Management Agent on the latest gold image version.
Number of Deployed Gold ImageVersions
Number of gold image versions subscribed to by the Management Agents. Thisincludes all gold image versions, including the latest version that ManagementAgents are subscribed to.
Platform Name Platform for which the Agent Gold Image is created.
Viewing Details about the Agent Gold Images Using EM CLITo view details about an Agent Gold Image using EM CLI, follow these steps:
1. Log in to EM CLI from the /bin directory present within the OMS home:
$<OMS_HOME>/bin/emcli login -username=<user_name>
Once you run this command, EM CLI will prompt you for a password. Enter the passwordfor the user name you specified.
2. Synchronize EM CLI:
$<OMS_HOME>/bin/emcli sync3. Run the list_gold_agent_images verb to list the various Agent Gold Images that have
been created.:
$<OMS_HOME>/bin/emcli list_gold_agent_images[-noheader]
Chapter 11Viewing Details about the Agent Gold Images
11-35
[-script | -format= [name:<pretty|script|csv>];[column_separator:"column_sep_string"];[row_separator:"row_sep_string"];]
Note that the parameters mentioned in [ ] are optional.
Table 11-12 lists and describes the supported parameters for displaying the list ofAgent Gold Images.
Table 11-12 Supported Parameters for Displaying the List of Agent Gold Images
Parameter Description
-no_header Displays a tabular form of the output without column headers.
-script This parameter is equivalent to -format="name:script".-format This parameter defines the type of the output format. The default value of this
parameter is -format="name:pretty".-format="name:pretty" displays the output table in a readable format thatcannot be parsed by scripts.
-format="name:script" sets the default column separator to a tab characterand the default row separator to a newline character. You can specify thecolumn_separator and row_separator strings to change these defaultcharacters.
-format="name:csv" sets the column separator to a comma and the rowseparator to a newline character.
4. Run the list_gold_agent_imageversions verb to list the Agent Gold Imageversions:
$<OMS_HOME>/bin/emcli list_gold_agent_imageversions[-image_name="gold_image_name"] [-all][-noheader] [-script | -format= [name:<pretty|script|csv>]; [column_separator:"column_sep_string"]; [row_separator:"row_sep_string"]; ]
Note that the parameters mentioned in [ ] are optional.
Table 11-13 lists and describes the supported parameters for displaying the list ofAgent Gold Image versions.
Table 11-13 Supported Parameters for Displaying the List of Agent Gold Image Versions
Parameter Description
-image_name A parameter to view the Agent Gold Image versions that are part of a particularAgent Gold Image.
-all A parameter to view all the Agent Gold Images.
Chapter 11Viewing Details about the Agent Gold Images
11-36

Table 11-13 (Cont.) Supported Parameters for Displaying the List of Agent Gold Image Versions
Parameter Description
-no_header A parameter to display a tabular form of the output without column headers.
-script This parameter is equivalent to -format="name:script".-format This parameter defines the type of the output format. The default value of this
parameter is -format="name:pretty".-format="name:pretty" displays the output table in a readable format thatcannot be parsed by scripts.
-format="name:script" sets the default column separator to a tab characterand the default row separator to a newline character. You can specify thecolumn_separator and the row_separator strings to change these defaultcharacters.
-format="name:csv" sets the column separator to a comma and the rowseparator to a newline character.
For example, to display the Agent Gold Image versions that are promoted to Current, runthe following command:
$<OMS_HOME>/bin/emcli list_gold_agent_imageversionsTo display the Agent Gold Image versions that are part of the OPC_DB_MONITORINGand promoted to Current, run the following command:
$<OMS_HOME>/bin/emcli list_gold_agent_imageversions -image_name=OPC_DB_MONITORING
5. Run the get_gold_agent_image_details verb to display a list of the platform, plug-in,patch, configuration properties, and Management Agent details of an Agent Gold Image:
$<OMS_HOME>/bin/emcli get_gold_agent_image_details-version_name="gold_image_version_name" [-platform][-plugin] [-patch][-config_properties][-agent][-noheader][-script | -format= [name:<pretty|script|csv>]; [column_separator:"column_sep_string"]; [row_separator:"row_sep_string"]; ]
Note that the parameters mentioned in [ ] are optional.
Table 11-14 lists and describes the supported parameters for displaying the platform,plug-in, patch, configuration properties, and Management Agent details of the Agent GoldImage.
Table 11-14 Supported Parameters for Displaying the Details of the Agent Gold Image
Parameter Description
-version_name The name of the Agent Gold Image version whose details you want to view.
Chapter 11Viewing Details about the Agent Gold Images
11-37

Table 11-14 (Cont.) Supported Parameters for Displaying the Details of the Agent Gold Image
Parameter Description
-platform The platform details of the Agent Gold Image.
-plugin The plug-in details of the Agent Gold Image.
-patch The patch details of the Agent Gold Image.
-config_properties The configuration properties of the Agent Gold Image.
-agent The Management Agent details of the Agent Gold Image.
-no_header A tabular form of the output without column headers.
-script This parameter is equivalent to -format="name:script".-format This parameter defines the type of the output format. The default value of this
parameter is -format="name:pretty".-format="name:pretty" displays the output table in a readable format thatcannot be parsed by scripts.
-format="name:script" sets the default column separator to a tab characterand the default row separator to a newline character. You can specify thecolumn_separator and row_separator strings to change these defaultcharacters.
-format="name:csv" sets the column separator to a comma and the rowseparator to a newline character.
For example, to display the platform, plug-in, and patch details of the Agent GoldImage OPC_AGI_DB_JUL_13, run the following command:
$<OMS_HOME>/bin/emcli get_gold_agent_image_details -version_name=OPC_AGI_DB_JUL_13
6. You can also run the list_agents_on_gold_image verb to list the ManagementAgents that were deployed or updated using a particular Agent Gold Imageversion or overall agent deployment report for Agent Gold Image:
$<OMS_HOME>/bin/emcli list_agents_on_gold_image -version_name|-image_name="gold_image_version_name|gold_image_name" [-agent_name="agent_name_pattern"]
Note that the parameters mentioned in [ ] are optional.
Specify the -version_name parameter to view the Management Agents that weredeployed or updated using a particular Agent Gold Image version.
Specify the -image_name parameter to view the number of Management Agentsdeployed for given Agent Gold Image.
Specify the -agent_name parameter to view only the Management Agents thatmatch the specified name pattern.
For example, to display the Management Agents that were deployed or updatedusing the Agent Gold Image OPC_AGI_DB_JUL_13, run the following command:
$<OMS_HOME>/bin/emcli list_agents_on_gold_image -version_name=OPC_AGI_DB_JUL_13
To display the number of Management Agents that were deployed or updatedusing any of the Agent Gold Image versions that are part of the gold imageOPC_DB_MONITORING, run the following command:
Chapter 11Viewing Details about the Agent Gold Images
11-38

$<OMS_HOME>/bin/emcli list_agents_on_gold_image -image_name=OPC_DB_MONITORING
Viewing Notifications Related to Agent Gold ImagesTo view notifications related to Agent Gold Images, follow these steps:
1. From the Setup menu, select Manage Cloud Control, then select Gold Agent Images.
2. On the Gold Agent Images page, in the Notifications section that is on the right, view thenotifications pertaining to gold images.
Viewing Agent Gold Images with Pending UpdatesTo view the Agent Gold Images with pending updates, follow these steps:
1. From the Setup menu, select Manage Cloud Control, then select Gold Agent Images.
2. On the Gold Agent Images page, in the Actions Required section that is on the right, viewthe pending updates against the gold images.
3. To drill down further and update the Management Agents with the latest gold imageversion, click the gold image name.
Viewing the Last Agent Gold Image That Was ChangedTo view the last Agent Gold Image that was changed, follow these steps:
1. From the Setup menu, select Manage Cloud Control, then select Gold Agent Images.
2. On the Gold Agent Images page, in the Last Image Change section that is on the right,view the date and time stamp of the gold image that was last changed.
Viewing the Log Files Related to Agent Gold ImageTo view the log files related to Agent Gold Image, see Overview of the Installation andConfiguration Log Files .
Viewing the Status of Unsubscribed Operations Using EM CLITo view the status of unsubscribed operations, follow these steps:
1. Log in to EM CLI from the /bin directory present within the Oracle home:
$<ORACLE_HOME>/bin/emcli login -username=<user_name>
Once you run this command, EM CLI will prompt you for a password. Enter the passwordfor the user name you specified.
2. Synchronize EM CLI:
$<ORACLE_HOME>/bin/emcli sync3. Run the emcli get_agent_unsubscribe_status verb to view the status of unsubscribed
operations:
<ORACLE_HOME>/bin/emcli get_agent_unsubscribe_status -version_name | -op_name
Chapter 11Viewing Notifications Related to Agent Gold Images
11-39

[-agent="agent_name_pattern"] [-severity="ERROR|WARNING"] [-severity_id="severity_id"][-status="PendingUpdateInprogress|Updatable|NotUpdatable|NotExecuted|Success|Inprogress|Failed"]
Note the parameters mentioned in [ ] are optional.
Table 11-15 lists and describes the parameters supported for viewing the status ofunsubscribed operations using EM CLI.
Note:
It is mandatory to specify the -op_name parameter or the -version_nameparameter. If you have specified -severity or -severity_id, then ensurethat you do not specify -version_name or -status.
Table 11-15 Supported Parameters for Viewing the Status of Unsubscribed Operations
Parameters Description
-version_name Version name of the unsubscribed Agent Gold Image.
--op_name Operation name of the unsubscribed Agent Gold Image.
-agent Agent name of the unsubscribed Agent Gold Image.
-severity Severity status of the Agent Gold Image.
-severity_id Severity ID of the Agent Gold Image.
-status Status of the unsubscribed Agent Gold Image.
Examples:
• The following example displays the details of the unsubscribe operationssubmitted for the Agent Gold Image version 'OPC_AGT_ADC_POD_JUNE':
emcli get_agent_unsubscribe_status -version_name="OPC_AGT_ADC_POD_JUNE"• The following example displays the details of the unsubscribe operations
submitted for the Agent Gold Image 'OPC_AGT_ADC_POD_JUNE', for theManagement Agent xyz.example.com:1243:
emcli get_agent_unsubscribe_status -version_name="OPC_AGT_ADC_POD_JUNE" -agent="xyz.example.com:1243"
• The following example displays the details of the unsubscribe operationssubmitted for the Agent Gold Image 'OPC_AGT_ADC_POD_JUNE', for theManagement Agent xyz.example.com:1243, that have their status as 'Failed':
emcli get_agent_unsubscribe_status -version_name="OPC_AGT_ADC_POD_JUNE" -agent="xyz.example.com:1243" -status="Failed"
• The following example displays the details of the unsubscribe operation'UNSUBSCRIBE_JOB123':
emcli get_agent_unsubscribe_status -op_name="UNSUBSCRIBE_JOB123"• The following example displays the details of the unsubscribe operation
'UNSUBSCRIBE_JOB123' for the Management Agent xyz.example.com:1243,having the status 'Failed':
Chapter 11Viewing the Status of Unsubscribed Operations Using EM CLI
11-40

emcli get_agent_unsubscribe_status -op_name="UNSUBSCRIBE_JOB123" -status="Failed" -agent="xyz.example.com:1243"
Viewing a List of Management Agents Subscribed to a GivenAgent Gold Image Using EM CLI
To view a list of Management Agents subscribed to a given Agent Gold Image, follow thesesteps:
1. Log in to EM CLI from the /bin directory present within the Oracle home:
$<ORACLE_HOME>/bin/emcli login -username=<user_name>
Once you run this command, EM CLI will prompt you for a password. Enter the passwordfor the user name you specified.
2. Synchronize EM CLI:
$<ORACLE_HOME>/bin/emcli sync3. Run the emcli list_gold_image_subscribed_agent verb to view the status of unsubscribed
operations:
<ORACLE_HOME>/bin/emcli list_gold_image_subscribed_agent -image_name="gold_image_name" [-noheader] [-script | -format= [name:<pretty|script|csv>]; [column_separator:"column_sep_string"]; [row_separator:"row_sep_string"];]
Note the parameters mentioned in [ ] are optional.
Table 11-16 lists and describes the parameters supported to view the list of all agentssubscribed to a given Management Gold image.
Table 11-16 Supported Parameters for Viewing the List of Management Agents Subscribed to aGiven Agent Gold Image
Parameters Description
-image_name Image name of a particular Management Agent that is subscribed to an AgentGold Image.
-noheader A tabular form of the output without column headers.
-script This is equivalent to -format="name:script".
-format Defines the format of a particular Management Agent that is subscribed to anAgent Gold Image.
Example:
The following example displays all the agents subscribed to OPC_DB_MONITORINGimage:
emcli list_gold_image_subscribed_agent -image_name=OPC_DB_MONITORING
Chapter 11Viewing a List of Management Agents Subscribed to a Given Agent Gold Image Using EM CLI
11-41

Creating an Agent Gold Image Update Policy and Definingthe Default Values To Be Set for Management AgentUpgrade
To create an Agent Gold Image Update Policy and to define default values forManagement Agent Upgrade, use either of the following methods:
• Creating an Agent Gold Image Update Policy and Defining the Default Values tobe Set for Management Agent Update Using the Gold Agent Images Home Page
• Creating an Agent Gold Image Update Policy and Defining the Default Values ToBe Set for Management Agent Upgrade Using EM CLI
Creating an Agent Gold Image Update Policy and Defining the DefaultValues to be Set for Management Agent Update Using the Gold AgentImages Home Page
To create an Agent gold image update policy and define the default values for agentupdate, follow these steps:
1. From the Setup menu , select Manage Cloud Control, then select Gold AgentImages.
2. On the Gold Agent Images page, in the Policy Settings section that is on the right,click the Policy Setting icon.
3. In the Property Description table, select a row, then click Edit and set the value.
Creating an Agent Gold Image Update Policy and Defining the DefaultValues To Be Set for Management Agent Upgrade Using EM CLI
To create an Agent Gold Image Update Policy and to define default values forManagement Agent Upgrade using EM CLI, follow these steps:
1. Log in to EM CLI from the /bin directory present within the Oracle home:
$<ORACLE_HOME>/bin/emcli login -username=<user_name>
Once you run this command, EM CLI will prompt you for a password. Enter thepassword for the user name you specified.
2. Synchronize EM CLI:
$<ORACLE_HOME>/bin/emcli sync3. Run the emcli set_gold_agent_update_policy verb to define default values for
Management Agent Upgrade:
<ORACLE_HOME>/bin/emcli set_gold_agent_update_policy [-additional_parameters="Additional_parameters seperated by space"] [-pre_script_loc="Absolute path of Prescript location"] [-post_script_loc="Absolute path of Postscript location"] [-is_pre_script_on_oms="true/false"]
Chapter 11Creating an Agent Gold Image Update Policy and Defining the Default Values To Be Set for Management Agent Upgrade
11-42

[-is_post_script_on_oms="true/false"] [-stage_location="Absolute path of stage location] [-is_staged="true/false"] [-stage_action="Stage action] [-batch_size="Batch size"] [-frequency="Frequency"] [-success_rate="Success rate"] [-update_profile="true/false"] [-profile_path="Profile path"] [-email="Email IDs separated by comma"] [-run_preCleanup="true/false"] [-run_postCleanup="true/false"]
Note the parameters mentioned in [ ] are optional.
Table 11-17 lists and describes the parameters supported to upgrade and define defaultvalues for Management Agents.
Table 11-17 Supported Parameters for Upgrading Agents and Defining Default Values
Parameters Description
-additional_parameters Additional parameters set in the repository to create an Agent Gold ImagePolicy.
-pre_script_loc Prescript location set in the repository to create an Agent Gold Image Policy.
-post_script_loc Postscript location set in the repository to create an Agent Gold Image Policy.
-is_pre_script_on_oms Value set in the repository for this parameter to create an Agent Gold ImagePolicy.
-is_post_script_on_oms Value set in the repository for this parameter to create an Agent Gold ImagePolicy.
-stage_location Stage location value set in the repository to create an Agent Gold Image Policy.
-is_staged Value set for this parameter in the repository to create an Agent Gold ImagePolicy.
-stage_action Value set for stage action in the repository to create an Agent Gold ImagePolicy.
-batch_size Value set for batch size in the repository to create an Agent Gold Image Policy.
-frequency Value set for frequency in the repository to create an Agent Gold Image Policy.
-success_rate Value set for success rate in the repository to create an Agent Gold ImagePolicy.
-update_profile Value set for update profile in the repository to create an Agent Gold ImagePolicy.
-profile_path Value set for profile path in the repository to create an Agent Gold Image Policy.
-email Email set in the repository to create an Agent Gold Image Policy.
-run_preCleanup Value set for this parameter to create an Agent Gold Image Policy.
-run_postCleanup Value set for this parameter to create an Agent Gold Image Policy.
Examples:
• The following example sets additional parameters in the repository:
emcli set_gold_agent_update_policy -additional_parameters=-ignorePrereqs• The following example sets prescript location in the repository:
Chapter 11Creating an Agent Gold Image Update Policy and Defining the Default Values To Be Set for Management Agent Upgrade
11-43

emcli set_gold_agent_update_policy -pre_script_loc=/home/john/pretscript• The following example sets stage location in the repository:
emcli set_gold_agent_update_policy -stage_location=/scratch/tmp• The following example sets batch size in the repository:
emcli set_gold_agent_update_policy -batch_size=100• The following example sets the success rate in the repository:
emcli set_gold_agent_update_policy -success_rate=90
Chapter 11Creating an Agent Gold Image Update Policy and Defining the Default Values To Be Set for Management Agent Upgrade
11-44

12Configuring Enterprise Manager for Firewalls
Firewalls protect a company's Information Technology (IT) infrastructure by providing theability to restrict network traffic by examining each network packet and determining theappropriate course of action.
Firewall configuration typically involves restricting the ports that are available to one side ofthe firewall, for example the Internet. It can also be set up to restrict the type of traffic that canpass through a particular port such as HTTP. If a client attempts to connect to a restricted port(a port not covered by a security "rule") or uses a protocol that is incorrect, then the client willbe disconnected immediately by the firewall. Firewalls can also be used within a companyIntranet to restrict user access to specific servers.
You can deploy the components of Enterprise Manager Cloud Control on different hoststhroughout your enterprise. These hosts can be separated by firewalls. This chapterdescribes how firewalls can be configured to allow communication between variousEnterprise Manager components.
This chapter contains the following sections:
• Planning to Configure a Firewall for the Enterprise Manager System
• Typical Firewall Configurations for the Enterprise Manager System
• Configuring a Firewall Between the Web Browser and the Enterprise Manager System
• Configuring an OMS on a Host Protected by a Firewall
• Configuring a Management Agent on a Host Protected by a Firewall
• Configuring Firewalls Between the OMS and the Management Repository
• Configuring Firewalls Between the Enterprise Manager Cloud Control Console and aManaged Database Target
• Configuring Firewalls for Multiple OMS Instances
• Enabling the OMS to Access My Oracle Support
• Configuring the dontProxyfor Property
• Configuring Firewalls to Allow ICMP and UDP Traffic for Oracle Beacons
• Enabling ICMP Echo Requests on Firewalls
Planning to Configure a Firewall for the Enterprise ManagerSystem
Firewall configuration should be the last phase of Enterprise Manager deployment. Beforeyou configure your firewalls, verify that you are able to log in to the Enterprise Managerconsole and that your Oracle Management Agents (Management Agent) are up and aremonitoring targets. After you verify, configure the firewall for the default ports described in What Ports Are Used for Installation?. The default ports are typically assigned while installingthe Enterprise Manager system. However, while installing the Enterprise Manager system, if
12-1

you had used any custom ports instead of the default ones, then make sure youconfigure the firewall for the custom ports.
If you are deploying the Enterprise Manager system in an environment where firewallsare already available, then make sure you open the default ports, or the custom portsthat you want to use, until you have completed the installation and configurationprocesses and are certain that you are able to log in to Enterprise Manager and thatyour Management Agents are up and monitoring targets.
If you are enabling Enterprise Manager Framework Security for the OracleManagement Service (OMS), the final step in that configuration process is to restrictuploads from the Management Agents to secure channels only. Before completing thatstep, configure your firewalls to allow both HTTP and HTTPS traffic between theManagement Agent and Management Repository and test to be sure that you can login to Enterprise Manager and that data is being uploaded to the ManagementRepository. After you have confirmed that the OMS and Management Agents cancommunicate with both protocols enabled, complete the transition to secure mode andchange your firewall configuration as necessary. If you incrementally configure yourfirewalls, it will be easier to troubleshoot any configuration problems.
Typical Firewall Configurations for the Enterprise ManagerSystem
Your main task in enabling Enterprise Manager to work in a firewall-protectedenvironment is to take advantage of proxy servers whenever possible, to make sureonly the necessary ports are open for secure communications, and to make sure thatonly data necessary for running your business is allowed to pass through the firewall.
Figure 12-1 provides a topology of an Enterprise Manager environment that is using afirewall, and also illustrates the default ports that can be used.
Chapter 12Typical Firewall Configurations for the Enterprise Manager System
12-2

Figure 12-1 Firewall Port Requirements (Default)
The conventions used in the preceding illustration are as follows:
Table 12-1 Conventions Used In Illustration
Convention Description
C Is the entity that is making the call.
* Enterprise Manager will default to the first available port within anEnterprise Manager set range.
** Enterprise Manager will default to the first available port.
*** Database listener ports.
Chapter 12Typical Firewall Configurations for the Enterprise Manager System
12-3

Note:
• Port 1159, 4898-4989 indicates that 1159 is the default. If this port is notavailable, the Oracle Management Service will search in the specifiedrange (4889 - 4897).
• To clone between two target hosts separated by a firewall, the agents willneed to communicate to each other on the agent ports. The initiatingManagement Agent will make the call.
• Allow ICMP (0) Echo Reply and ICMP (8) Echo Request in the firewall.
Configuring a Firewall Between the Web Browser and theEnterprise Manager System
Connections from your web browser to the Enterprise Manager system are performedover the default port used for the Oracle HTTP Server.
The default, non-secure port for the Oracle HTTP Server is 7788. If 7788 is notavailable, then the first available free port from the range 7788 - 7798 is selected. Ifyou are accessing the Enterprise Manager Cloud Control Console using the followingURL and port, then you must configure the firewall to allow the Enterprise ManagerCloud Control Console to receive HTTP traffic over port 7788:
http://omshost.example.com:7788/emIf you have enabled security for your Oracle HTTP Server, then the secure port for theOracle HTTP Server is 7799. If 7799 is not available, then the first available free portfrom the range 7799 - 7809 is selected. If you are accessing the Enterprise ManagerCloud Control Console using the following URL and port, then you must configure thefirewall to allow the Enterprise Manager Cloud Control Console to receive HTTPStraffic over port 7799:
https://omshost.example.com:7799/em
Configuring an OMS on a Host Protected by a FirewallIf your OMS is installed on a host that is protected by a firewall and the ManagementAgents that provide management data are on the other side of the firewall, you mustperform the following tasks:
• Configure the OMS to use a proxy server for its communication with theManagement Agents, as described in Configuring the OMS to Use a Proxy Serverto Communicate with Management Agents.
• Configure the firewall to allow incoming HTTP and HTTPS traffic from theManagement Agents on the Management Repository upload port.
The default, non-secure upload port is 4889. If 4889 is not available, then the firstavailable port in the range 4889 - 4897 is selected.
If you have enabled Enterprise Manager Framework Security, then the secureupload port is 1159. If 1159 is not available, then the first available free port fromthe range 4899 to 4908 is selected.
Chapter 12Configuring a Firewall Between the Web Browser and the Enterprise Manager System
12-4

Figure 12-2 illustrates the connections the Management Agent must make when it isprotected by a firewall.
Figure 12-2 Configuration Tasks When the Management Service Is Behind a Firewall
Configuring the OMS to Use a Proxy Server to Communicate withManagement Agents
This section describes how to configure the OMS to use a proxy server for its communicationwith Management Agents outside the firewall.
Note:
You can also configure the OMS to use multiple proxies for its communication withManagement Agents. For information about configuring OMS and ManagementAgent, see Configuring Proxies for OMS and Management Agent Communication .
Chapter 12Configuring an OMS on a Host Protected by a Firewall
12-5

To configure the OMS to use a proxy server, do the following:
1. From the Setup menu, select Proxy Settings, then select Agents.
Note:
The Proxy Settings for Agents page enables you to configure a proxyserver that can be used for communication only from the OMS to theManagement Agent, and not from the Management Agent to the OMS.Any proxy server you configure will be used for the communicationbetween the OMS and all the Management Agents.
2. Select Manual proxy configuration.
3. Specify values for Protocol, Proxy Server Host, Port, and No Proxy for. If thespecified proxy server has been configured using a security realm, logincredentials, or both, then specify values for Realm, User Name, and Password.
4. Under the Test URL section, specify a Management Agent URL for URL, then clickTest to test if the OMS can communicate with the specified Management Agentusing the specified proxy server.
5. If the connection is successful, click Apply to save the proxy settings to therepository.
6. Restart the OMS. If you are using a multi-OMS setup, restart all the OMSes.
To restart an OMS that runs on a Unix based platform, run the followingcommands:
<ORACLE_HOME>/bin/emctl stop oms<ORACLE_HOME>/bin/emctl start oms
To restart an OMS that runs on a Microsoft Windows platform, follow these steps:
a. Right-click My Computer, then select Manage.
b. In the Computer Management window, in the left pane, expand Services andApplications, then select Services.
c. Select the OracleManagementServer_EMGC_OMS* service, then click the restartbutton.
Configuring a Management Agent on a Host Protected by aFirewall
If a Management Agent is installed on a host that is protected by a firewall and theOMS is on the other side of the firewall, you must perform the following tasks:
• Configure the Management Agent to use a proxy server for its uploads to theOMS, as described in Configuring a Management Agent to Use a Proxy Server.
• Configure the firewall to allow incoming HTTP and HTTPS traffic from the OMS onthe Management Agent port.
The default upload port for Management Agent is 3872. The same port is used forboth HTTP and HTTPS. If 3872 is not available, then the first available free portfrom the range 1830 to 1849 is selected.
Chapter 12Configuring a Management Agent on a Host Protected by a Firewall
12-6

Figure 12-3 illustrates the connections the Management Agent must make when it isprotected by a firewall.
Figure 12-3 Configuration Tasks When the Management Agent Is Behind a Firewall
Configuring a Management Agent to Use a Proxy ServerYou can configure a Management Agent to use a proxy server for its communications with anOMS outside the firewall, or to manage a target outside the firewall. To do so, follow thesesteps:
1. From the Setup menu, select Agents.
2. Click the Agent you want to configure in the Name column in the Management Agentstable. The target home page for the Management Agent opens.
3. Select Properties from the Agent menu.
4. Select Advanced Properties from the pull down menu.
5. Supply the correct values for the REPOSITORY_PROXYHOST and REPOSITORY_PROXYPORTproperties.
6. Click Apply to save your changes, which will be saved to the AGENT_HOME/sysman/config/emd.properties file.
Note:
The proxy password will be obfuscated when you restart the Management Agent.
Chapter 12Configuring a Management Agent on a Host Protected by a Firewall
12-7

Configuring Firewalls Between the OMS and theManagement Repository
Secure connections between the OMS and the Management Repository areperformed using features of Oracle Advanced Security. As a result, if the OMS and theManagement Repository are separated by a firewall, you must configure the OracleNet firewall proxy to allow the OMS to access the repository. Also, if you haveconfigured a timeout for this firewall, ensure that you tune the SQLNET.EXPIRE_TIMEparameter for Dead Connection Detection (DCD) at the database side, and set thisparameter (in $ORACLE_HOME/network/admin/sqlnet.ora) to a value smaller than thevalue of the timeout configured for the firewall.
Configuring Firewalls Between the Enterprise ManagerCloud Control Console and a Managed Database Target
When you are using the Enterprise Manager Cloud Control Console to manage adatabase, you must log in to the database from the Enterprise Manager console inorder to perform certain monitoring and administration tasks. If you are logging in to adatabase on the other side of a firewall, you will need to configure the firewall to allowOracle Net firewall proxy access.
Specifically, to perform any administrative activities on the managed database, youmust be sure that the firewall is configured to allow the OMS to communicate with thedatabase through the Oracle Listener port.
You can obtain the Listener port by reviewing the Listener home page in the EnterpriseManager console.
Configuring Firewalls for Multiple OMS InstancesEnterprise Manager supports the use of multiple OMS instances that communicatewith a common Management Repository. For example, using more than one OMS canbe helpful for load balancing as you expand your central management capabilitiesacross a growing e-business enterprise.
When you deploy multiple OMS instances in an environment protected by firewalls, besure to consider the following:
• Each Management Agent is configured to upload data to one OMS. As a result, ifthere is a firewall between the Management Agent and its OMS, you mustconfigure the firewall to allow the Management Agent to upload data to the OMSusing the upload URL.
See Also:
Configuring a Management Agent on a Host Protected by a Firewall
Configuring an OMS on a Host Protected by a Firewall
Chapter 12Configuring Firewalls Between the OMS and the Management Repository
12-8

• In addition, each OMS must be able to contact any Management Agent in your enterpriseso it can check for the availability of the Management Agent. As a result, you must besure that your firewall is configured so that each OMS you deploy can communicate overHTTP or HTTPS with any Management Agent in your enterprise.
Otherwise, an OMS without access to a particular Management Agent may reportincorrect information about whether or not the Management Agent is up and running.
Enabling the OMS to Access My Oracle SupportUnless online access to the Internet is strictly forbidden in your environment, OMS should beenabled to access My Oracle Support. This access is necessary to enable updates andpatches to be downloaded, for example.
At minimum, the following URLs should be made available through the firewall:
• aru-akam.oracle.com• ccr.oracle.com• login.oracle.com• support.oracle.com• updates.oracle.com• oauth-e.oracle.comEnsure that the default ports, that is, port 80 for HTTP connectivity and port 443 for HTTPSconnectivity, are used to connect to the mentioned URLs.
Configuring the dontProxyfor PropertyWhen you configure the OMS or a Management Agent to use a proxy server, it is important tounderstand the purpose of the dontProxyFor property, which identifies specific URL domainsfor which the proxy will not be used.
For example, suppose the following were true:
• You have installed the OMS and several Management Agents on hosts that are inside thecompany firewall. These hosts are in the internal .example.com and .example.us.comdomains.
• You have installed several additional Management Agents on hosts that are outside thefirewall. These hosts are installed in the .example.uk domain.
• You have configured Enterprise Manager to automatically check for critical softwarepatches on My Oracle Support.
In this scenario, you want the OMS to connect directly to the Management Agents inside thefirewall without using the proxy server. On the other hand, you want the OMS to use theproxy server to contact the Management Agents outside the firewall, as well as the My OracleSupport site, which resides at the following URL:
http://support.oracle.com
The following properties will prevent the OMS from using the proxy server for connections tothe Management Agents inside the firewall. Connections to My Oracle Support and toManagement Agents outside the firewall will be routed through the proxy server:
Chapter 12Enabling the OMS to Access My Oracle Support
12-9

proxyHost=proxy42.example.comproxyHost=80dontProxyFor=.example.com, .example.us.com
Configuring Firewalls to Allow ICMP and UDP Traffic forOracle Beacons
Oracle Beacons provide application performance availability and performancemonitoring. They are part of the features of Enterprise Manager.
See Also:
"About " in the Enterprise Manager Online Help
Enterprise Manager uses the industry-standard Internet Control Message Protocol(ICMP) and User Datagram Protocol (UDP) to transfer data between Oracle Beaconsand the network components you are monitoring. There may be situations where yourWeb application components and the Beacons you use to monitor those componentsare separated by a firewall. In those cases, you must configure your firewall to allowICMP, UDP and HTTP traffic.
Enabling ICMP Echo Requests on FirewallsOMS uses the Internet Control Message Protocol (ICMP) Echo Request to check thestatus target host machines. If the ICMP Echo Request is blocked by the firewall, ahost machine will appear to be down.
To determine the status of any machine in the environment, ICMP Echo Requestsmust be enabled on the firewall. If the ICMP Echo Request is enabled, the pingcommand can be issued by the OMS to check the status of the machine.
Ensure that you allow ICMP (0) Echo Reply and ICMP (8) Echo Request in thefirewall.
Chapter 12Configuring Firewalls to Allow ICMP and UDP Traffic for Oracle Beacons
12-10

13Sizing Your Enterprise Manager Deployment
This section describes techniques for achieving optimal performance using the OracleEnterprise Manager application. It can also help you with capacity planning, sizing andmaximizing Enterprise Manager performance in a large scale environment.Oracle Enterprise Manager Cloud Control has the ability to scale for hundreds of users andthousands of systems and services on a single Enterprise Manager implementation.
By maintaining routine housekeeping and monitoring performance regularly, you insure thatyou will have the required data to make accurate forecasts of future sizing requirements.Receiving good baseline values for the Enterprise Manager Cloud Control vital signs andsetting reasonable warning and critical thresholds on baselines allows Enterprise Manager tomonitor itself for you.
Sizing is a critical factor in Enterprise Manager performance. Inadequately-sized EnterpriseManager deployments may result in the overall benefits of Enterprise Manager beingcompromised. The resources required for the Enterprise Manager Oracle Management(OMS) Service and Management Repository tiers will vary significantly based on the numberof monitored targets. While there are many additional aspects to be considered when sizingEnterprise Manager infrastructure, these guidelines provide a simple methodology that canbe followed to determine the minimum required hardware resources and initial configurationsettings for the OMS and Management Repository tiers.
This chapter contains the following sections:
• Enterprise Manager Cloud Control Sizing
• Enterprise Manager Cloud Control Performance Methodology
• Overview of Sizing Requirements for Fusion Middleware Monitoring
Enterprise Manager Cloud Control SizingOracle Enterprise Manager provides a highly available and scalable deployment topology.This chapter lays out the basic minimum sizing and tuning recommendations for initialcapacity planning for your Oracle Enterprise Manager deployment. This chapter assumes abasic understanding of Oracle Enterprise Manager components and systems. A completedescription of Oracle Enterprise Manager can be obtained from Enterprise Manager CloudControl Introduction . This information is a starting point for site sizing. Every site has its owncharacteristics and should be monitored and tuned as needed.
Sizing is a critical factor for Enterprise Manager performance. Inadequately sized EnterpriseManager deployments will result in frustrated users and the overall benefits of EnterpriseManager may be compromised. The resources required for Enterprise Manager OMS andRepository tiers will vary significantly based on the number of monitored targets. While thereare many additional aspects to be considered when sizing Enterprise Manager infrastructure,the following guidelines provide a simple methodology that can be followed to determine theminimum required hardware resources and initial configuration settings for the OMS andRepository tiers.
13-1

Overview of Sizing GuidelinesThe following sections provide an overview of the sizing guidelines.
Hardware InformationThe sizing guidelines outlined in this chapter were obtained by running a virtualenvironment on the following hardware and operating system combination.
• Hardware -- Oracle X4-2
• Hypervisor -- 64 bit Linux Oracle Virtual Server
• Operating System of Virtual Machines -- 64 bit Oracle Linux
The virtual environment setup had a one to one mapping of CPUs between the OracleVirtual Server (OVS) host and the virtual machines running on it. The OVS servers hadenough RAM to support all virtual machines without memory swapping.
This information is based on a 64-bit Oracle Linux environment. If you are running onother platforms, you will need to convert the sizing information based on similarhardware performance. This conversion should be based on single-threadperformance. Running on a machine with 24 slow cores is not equivalent to running ona machine with 12 fast cores even though the total machine performance might be thesame on a throughput benchmark. Single thread performance is critical for goodEnterprises Manager user interface response times.
Sizing SpecificationsThe sizing guidelines for Oracle Enterprise Manager are divided into four sizes: Eval,Small, Medium and Large. The definitions of each size are shown in Table 13-1.
Table 13-1 Oracle Enterprise Manager Site Sizes
Size Agent Count Target Count Concurrent UserSessions
Eval < 10 < 100 <3
Small < 100 < 1000 <10
Medium >= 100, < 1000 >= 1000, < 10,000 >= 10, < 25
Large >= 1000 >= 10,000 >= 25, <= 50*
Extra Large >= 5000 >=50,000 >=50, <=100
For larger user loads see Large Concurrent UI Load.
The Eval configuration is not meant for production environments. It is only to be usedfor trial and testing environments.
Extra Large is not an option while installing Enterprise Manager. You can configureyour environment with the Extra Large settings if it matches the sizing criteria.
Chapter 13Enterprise Manager Cloud Control Sizing
13-2

Sizing for Upgraded InstallsIf upgrading from a previous release of Enterprise Manager to Enterprise Manager 13c, thefollowing queries can be run as the sysman user to obtain the Management Agent and targetcounts for use in Table 1.
• Agent count - select count (*) from mgmt_targets where target_type = ‘oracle_emd'
• Target count – select count (*) from mgmt_targets where target_type = ‘oracle_emd'
Minimum Hardware RequirementsTable 13-2 lists the minimum hardware requirements for the four configurations.
Table 13-2 Oracle Enterprise Manager Minimum Hardware Requirements
Size OMSMachineCount*
Cores perOMS
Memory perOMS (GB)
Storage perOMS (GB)
DatabaseMachineCount*
Cores perDatabaseMachine
Memory perDatabaseMachine(GB)
Eval 1 2 10 24 - - -
Small 1 4 10 24 1 4 7
Medium 2 6 12 24 2 (OracleRAC)
6 10
Large 2
4
12
6
24
12
24
24
2 (OracleRAC)
2 (OracleRAC)
12
12
18
18
ExtraLarge
4 24 32 24 2 (OracleRAC)
48 96
Table 13-3 Oracle Enterprise Manager Minimum Storage Requirements
Size MGMT_TABLESPACE (GB)
MGMT_AD4J_TS(GB)
MGMT_ECM_DEPOT_TS (GB)
TEMP ARCHIVE LOGAREA (GB
Eval 15 3 1 3 Archive log off
Small 100 10 1 12 25
Medium 300 30 4 20 100
Large 400 50 8 40 150
ExtraLarge
600 80 16 80 250
Network Topology ConsiderationsA critical consideration when deploying Enterprise Manager Cloud Control is networkperformance between tiers. Enterprise Manager Cloud Control ensures tolerance of networkglitches, failures, and outages between application tiers through error tolerance and recovery.The Management Agent in particular is able to handle a less performant or reliable networklink to the Management Service without severe impact to the performance of Enterprise
Chapter 13Enterprise Manager Cloud Control Sizing
13-3

Manager as a whole. The scope of the impact, as far as a single Management Agent'sdata being delayed due to network issues, is not likely to be noticed at the EnterpriseManager Cloud Control system wide level.
The impact of slightly higher network latencies between the Management Service andManagement Repository will be substantial, however. Implementations of EnterpriseManager Cloud Control have experienced significant performance issues when thenetwork link between the Management Service and Management Repository is not ofsufficient quality.
The Management Service host and Repository host should be located in closeproximity to each other. Ideally, the round trip network latency between the two shouldbe less than 1 millisecond.
Software ConfigurationsThe following sections provide information about Eval, small, medium and largeconfigurations.
Eval ConfigurationThe Eval configuration must be installed by selecting the Simple installation option.The installation then must be configured with the appropriate values.
Minimum OMS Settings
The Oracle Management Service (OMS) heap size should be set to 1 GB.
Minimum Repository Database Settings
Table 13-4 below lists the minimum repository database settings that arerecommended for an Eval configuration.
Table 13-4 Eval Configuration Minimum Database Settings
Parameter Minimum Value
Processes 300
memory_target 1000 MB
redo log file size 50 MB
shared_pool_size 450 MB
session_cached_cursors remove
Small ConfigurationThe Small configuration is based on the minimum requirements that are required bythe Oracle Enterprise Manager installer.
Minimum OMS Settings
No additional settings are required.
Minimum Database Settings
Table 13-5 lists the minimum recommended database settings.
Chapter 13Enterprise Manager Cloud Control Sizing
13-4

Table 13-5 Small Site Minimum Database Settings
Parameter Minimum Value
processes 300
pga_aggregate_target* 1024 MB
sga_target* 3 GB
redo log file size 300 MB
shared_pool_size 600 MB
optimizer_adaptive_features false
Note:
*memory_target of 4 GB can be used in place of sga_target andpga_aggregate_target
Medium ConfigurationThe Medium configuration modifies several out-of-box Oracle Enterprise Manager settings.
Minimum OMS Settings
The Oracle Management Service (OMS) heap size should be set to 4096 MB.
Minimum Repository Database Settings
Table 13-6 lists the minimum repository database settings that are recommended for aMedium configuration.
Table 13-6 Medium Site Minimum Database Settings
Parameter Minimum Value
processes 600
pga_aggregate_target* 1280 MB
sga_target* 5 GB
redo log file size 600 MB
shared_pool_size 600 MB
optimizer_adaptive_features false
Note:
*memory_target of 6.25 GB can be used in place of sga_target andpga_aggregate_target
Chapter 13Enterprise Manager Cloud Control Sizing
13-5

Note:
Processes count should be adjusted based on OMS nodes *300.
Large ConfigurationThe Large configuration modifies several out-of-box Oracle Enterprise Managersettings.
Minimum OMS Settings
Table 13-7 lists the minimum OMS settings that are recommended for Largeconfigurations.
Table 13-7 Large Site Minimum OMS Settings
OMS Count Heap Size Minimum Value
2 8192 MB
4 4096 MB
Minimum Repository Database Settings
Table 13-8 lists the minimum repository database settings that are recommended for aLarge configuration.
Table 13-8 Large Site Minimum Database Settings
Parameter Minimum Value
processes 1000
pga_aggregate_target* 1536 MB
sga_target* 8 GB
redo log file size 1000 MB
shared_pool_size 600 MB
optimizer_adaptive_features false
Note:
*memory_target of 9.5 GB can be used in place of sga_target andpga_aggregate_target
Extra Large ConfigurationThe Extra Large configuration requires the following settings:
Minimum OMS Settings
Chapter 13Enterprise Manager Cloud Control Sizing
13-6

Table 13-9 lists the minimum OMS settings that are recommended for Extra Largeconfigurations.
Table 13-9 Extra Large Site Minimum OMS Settings
OMS Count Heap Size Minimum Value
4 16384 MB
Minimum Repository Database Settings
Table 13-10 lists the minimum repository database settings that are recommended for a ExtraLarge configuration.
Table 13-10 Extra Large Site Minimum Database Settings
Parameter Minimum Value
processes 2000
pga_aggregate_target* 6 GB
sga_target* 40 GB
redo log file size 2 GB
shared_pool_size 600 MB
optimizer_adaptive_features false
Note:
It is recommended to set RAC services for ping alerts, jobs, rollup, events, andConfig Metric Post Load Callbacks. For more information, see Step 4: EliminatingBottlenecks Through Tuning.
Repository Tablespace SizingTable 13-11 lists the required minimum storage requirements for the Management Repository.
Table 13-11 Total Management Repository Storage
- Minimum Tablespace Sizes*
DevelopmentSize
SYSTEM** MGMT_TABLESPACE
MGMT_ECM_DEPOT_TS
MGMT_AD4J_TS
TEMP
Small 600 MB 100 GB 1 GB 10 GB 12 GB
Medium 600 MB 300 GB 4 GB 30 GB 20 GB
Large 600 MB 400 GB Greater than 8GB
50 GB 40 GB
Extra Large 600 MB 600 GB 16 GB 80 GB 80 GB
Chapter 13Enterprise Manager Cloud Control Sizing
13-7

Additional ConfigurationsSome Enterprise Manager installations may need additional tuning settings based onlarger individual system loads. Additional settings are listed below.
Large Concurrent UI LoadIf more than 50 concurrent users are expected per OMS, the following settings shouldbe altered as seen in Table 13-12.
Table 13-12 Large Concurrent UI Load Additional Settings
Process Parameter Value Where To Set
OMS -Djbo.recyclethreshold Number of concurrent users /number of OMS
Per OMS
OMS -Djbo.ampool.maxavailablesize
Number of concurrent users /number of OMS
Per OMS
OMS Heap Size Additional 4GB for everyincrement of 50 users
Per OMS
Database sga_target Additional 1GB for everyincrement of 50 users
Per Instance
Higher user loads will require more hardware capacity. An additional 2 cores for boththe database and OMS hosts for every 50 concurrent users.
Example: A site with 1500 agents and 15,000 targets with 150 concurrent users wouldrequire at a minimum the setting modifications listed in Table 13-13 (based on aLARGE 2 OMS configuration).
Table 13-13 Large Concurrent UI Load Additional Settings Example for 2 OMS Configurations
Process Parameter Value Calculation
OMS -Djbo.recyclethreshold 75 (set on each OMS) 150 users / 2 OMS
OMS -Djbo.ampool.maxavailablesize
75 (set on each OMS) 150 users / 2 OMS
OMS Heap Size 12 GB (set on each OMS) 8GB (standard large setting)+ ((150 users – 50 defaultlarge user load) / 2 OMS)*(4GB / 50 users)
Database sga_target 10 GB 8GB (standard large setting)+ (150 users - 50 defaultlarge user load) * (1GB / 50users)
Minimum Additional Hardware required is listed in Table 13-14.
Chapter 13Enterprise Manager Cloud Control Sizing
13-8

Table 13-14 Large Concurrent UI Load Minimum Additional Hardware Example For 2 OMSConfiguration
Tier Parameter Value Calculation
OMS CPU cores 32 (total between all OMShosts)
12 cores * 2 OMS (defaultlarge core count) + (150users - 50 default large userload) *(2 cores * 2 OMS)/ 50users)
Database CPU cores 32 (total between allDatabase hosts)
12 cores * 2 OMS (defaultlarge core count) + (150users - 50 default large userload) *(2 cores * 2 OMS / 50users)
The physical memory of each machine would have to be increased to support running thisconfiguration as well.
You can alter the value of the following parameters: -Djbo.recyclethreshold, -Djbo.ampool.maxavailablesize, and Heap Size. By default these values are set as follows:
• Djbo.recyclethreshold is set to 50
• Djbo.ampool.maxavailablesize is set to 50
• Heap Size is set to -Xms1024m -Xmx1740m
You can set the values for these memory parameters by making changes in thestartEMServer.sh file, which can be found in the following location:
gc_inst/user_projects/domains/GCDomain/bin
For details about changing Changing Djbo.ampool.maxavailablesize andDjbo.recyclethreshold (JAVA_EM_ARGS), see Changing OMS Properties.
In the same file, you may change the heap size settings for the following section:
USER_MEM_ARGS="-Xms1024m -Xmx1740m -XX:MaxPermSize=1024M -XX:-DoEscapeAnalysis -XX:+UseCodeCacheFlushing -XX:CompileThreshold=8000 -XX:PermSize=128m"
Note:
Oracle does not recommend changing the Xms value.
Large Job System LoadIf the jobs system has a backlog for long periods of time or if you would like the backlogprocessed faster, set the following parameters with the emctl set property command.
Table 13-15 Large Job System Backlog Settings
Parameter Value
oracle.sysman.core.jobs.shortPoolSize 50
Chapter 13Enterprise Manager Cloud Control Sizing
13-9

Table 13-15 (Cont.) Large Job System Backlog Settings
Parameter Value
oracle.sysman.core.jobs.longPoolSize 24
oracle.sysman.core.jobs.longSystemPoolSize 20
oracle.sysman.core.jobs.systemPoolSize 50
oracle.sysman.core.conn.maxConnForJobWorkers 144*
Note:
*This setting may require an increase in the processes setting in thedatabase of 144 number of OMS servers.
These settings assume that there are sufficient database resources available tosupport more load. These parameters are likely to be required in a Large configurationwith 2 OMS nodes.
Changing OMS PropertiesThe following section provides examples of changing the OMS settings recommendedin this chapter. You may need to change OMS property settings, for example, whenincreasing the Job Backlog. The values in the examples should be substituted with theappropriate value for your configuration. Use the following instructions to change OMSproperties.
Changing the Heap Size
Values of the following property names for Memory Args can be set in order to overridetheir default values:
OMS_HEAP_MINOMS_HEAP_MAXOMS_PERMGEN_MINOMS_PERMGEN_MAX
The following table describes the above parameters and provides a description,default values, recommendations for their use, and any notes, warnings or issues ofwhich to be aware.
Chapter 13Enterprise Manager Cloud Control Sizing
13-10

Name Description Default Recommendation Notes, Warnings orIssues
OMS_HEAP_MIN(-Xms)
Change of –Xms is notreally required. Shouldmaintain post-installation default value.If a large setup becomesa ‘very large setup' overa period of time, thenuser/sysadmin maychoose to increase thevalue at the time ofincreasing the value of –Xmx.
32/64 bit -
Small: 256M
Medium: 256M
Large: 256M
For IBM JVM,irrespective of the appsize, use the followingsettings:
32-bit: 1024M
64-bit: 1740M
Same as mentioned inthe Default section.
These are postinstallation defaults, thusthe recommendedsetup.
N/A
OMS_HEAP_MAX(-Xmx)
As targets are addedafter the initialinstallation/setup ofEnterprise Manager,increasing the HEAPsize is recommended toavoid any unforeseenOut Of Memory Error ofTenured/Old Gen.
32 bit –
Small/Medium/Large:1524M
64 bit -
Small: 1740M
Medium: 4096M
Large: 8192M
For IBM JVM,irrespective of the appsize, there are no limitson the heap size.
Same as mentioned inthe Default section.
These are postinstallation defaults, thusthe recommendedsetup.
All these parametersshould be changed,once users experience alower throughput over aperiod of time, due toconsistently highmemory usage. Theperson (preferablysysadmin) manipulatingthe parameters must beaware of the limits/warnings.
OMS_PERMGEN_MIN (-XX:PermSize)
Change of –XX:PermSize is notrequired. Shouldmaintain post-installation default value.
32/64 bit -
Small: 128M
Medium: 128M
Large: 128M
For IBM JVM,irrespective of the appsize, use the followingsettings:
32-bit: 128M
64-bit: 128M
Same as mentioned inthe Default section.
These are postinstallation defaults, thusthe recommendedsetup.
N/A
OMS_PERMGEN_MAX (-XX:MaxPermSize)
In Large configurations,where too manyactivities in the OMScontainer result in alarge number ofclassloaders and ‘Class'objects being created,the perm gen maybecome full, resulting inan Out Of Memory Error.
32 bit –
Small/Medium/Large:612M
64 bit -
Small: 612M
Medium: 768M
Large: 768M
For IBM JVM,irrespective of the appsize, use the followingsettings:
32-bit: 612M
64-bit: 612M
Same as mentioned inthe Default section.
These are postinstallation defaults, thusthe recommendedsetup.
N/A
You can use either of the following two commands to set the value for any of the aboveproperties:
Chapter 13Enterprise Manager Cloud Control Sizing
13-11

emctl set property –name EM_JAVA_MEM_ARGS –value <complete memoryparameter>
Or you can use:
emctl set property –name <property_name> -value <number_followed_by_G_or_M>
For example:
emctl set property –name OMS_PERMGEN_MAX –value 1024MUse the following command to get the property name:
emctl get property –name <property_name>
Values of the following property names for JBO Args can be set in order to overridetheir default values:
• JBO_MIN_POOL_SIZE - After this limit is exceeded, the application pool will timeout application modules inactive longer than jbo.ampool.maxinactiveage. Thedefault value is 1.
• JBO_POOL_TTL - Defines the application module pool time to live for applicationmodule instances. The default value is -1.
• JBO_LAZY_LOAD - Determines whether to load components lazily. The defaultvalue is TRUE.
• JBO_MAX_CURSORS - The maximum number of cursors the businesscomponents may have open. The framework will clean up free JDBC statementsas the number of cursors approaches this number. The default value is 5.
• JBO_RECYC_THRESHOLD - The recycle threshold, used in application modulepooling. The default value is 50.
• JBO_MAX_POOL_SIZE - After this limit is exceeded, the application pool will timeout application modules inactive for the longest time, even if that is less time thanthe jbo.ampool.maxinactiveage. The default value is 50.
Use either of the following commands to set the value for any of the above properties:
emctl set property –name EM_JAVA_MEM_ARGS –value <complete memoryparameter>
Or you can use:
emctl set property –name <property_name> -value <property_value>
For example:
emctl set property –name JBO_MAX_POOL_SIZE –value 5Use the following command to get the property name:
emctl get property –name <property_name>
An OMS restart using the below commands is required on each OMS after changingthe property value:
emctl stop oms -allemctl start oms
Changing shortPoolSize
Chapter 13Enterprise Manager Cloud Control Sizing
13-12

To change the OMS property, oracle.sysman.core.jobs.shortPoolSize, follow theserecommendations:
To set the property, enter the following command:
$ emctl set property -name oracle.sysman.core.jobs.shortPoolSize -value 200To get the property (after changing from the default), enter the following command:
$ emctl get property -name “oracle.sysman.core.jobs.shortPoolSize"To delete the property (revert to original setting), enter the following command:
$ emctl delete property -name “oracle.sysman.core.jobs.shortPoolSize"An OMS and Node Manager restart using ‘emctl stop oms -all; emctl start oms' is required oneach OMS after changing the property value. The default value is 25.
Changing longPoolSize
To change the OMS property, oracle.sysman.core.jobs.longPoolSize, follow theserecommendations:
To set the property, enter the following command:
$ emctl set property -name oracle.sysman.core.jobs.longPoolSize -value 200To get the property (after changing from the default), enter the following command:
$ emctl get property -name “oracle.sysman.core.jobs.longPoolSize"To delete the property (revert to original setting), enter the following command:
$ emctl delete property -name “oracle.sysman.core.jobs.longPoolSize"An OMS restart using ‘emctl stop oms; emctl start oms' is required on each OMS afterchanging the property value. The default value is 12.
Changing longSystemPoolSize
To change the OMS property, oracle.sysman.core.jobs.longSystemPoolSize, follow theserecommendations:
To set the property, enter the following command:
$ emctl set property -name oracle.sysman.core.jobs.longSystemPoolSize -value 200To get the property (after changing from the default), enter the following command:
$ emctl get property -name “oracle.sysman.core.jobs.longSystemPoolSize"To delete the property (revert to original setting), enter the following command:
$ emctl delete property -name “oracle.sysman.core.jobs.longSystemPoolSize"An OMS restart using ‘emctl stop oms; emctl start oms' is required on each OMS afterchanging the property value. The default value is 10.
Changing systemPoolSize
To change the OMS property, oracle.sysman.core.jobs.systemPoolSize, follow theserecommendations:
To set the property, enter the following command:
Chapter 13Enterprise Manager Cloud Control Sizing
13-13

$ emctl set property -name oracle.sysman.core.jobs.systemPoolSize -value200To get the property (after changing from the default), enter the following command:
$ emctl get property -name “oracle.sysman.core.jobs.systemPoolSize"To delete the property (revert to original setting), enter the following command:
$ emctl delete property -name “oracle.sysman.core.jobs.systemPoolSize"An OMS restart using ‘emctl stop oms; emctl start oms' is required on each OMS afterchanging the property value. The default value is 25.
Changing maxConnForJobWorkers
To change the OMS property, oracle.sysman.core.conn.maxConnForJobWorkers,follow these recommendations:
To set the property, enter the following command:
$ emctl set property -name oracle.sysman.core.conn.maxConnForJobWorkers -value 200To get the property (after changing from the default), enter the following command:
$ emctl get property -name “oracle.sysman.core.conn.maxConnForJobWorkers"To delete the property (revert to original setting), enter the following command:
$ emctl delete property -name“oracle.sysman.core.conn.maxConnForJobWorkers"An OMS restart using ‘emctl stop oms; emctl start oms' is required on each OMS afterchanging the property value. The default value is 25.
Changing Djbo.ampool.maxavailablesize and Djbo.recyclethreshold(JAVA_EM_ARGS)
To change the OMS properties, Djbo.ampool.maxavailablesize andDjbo.recyclethreshold, follow these recommendations:
To set the properties, enter the following command:
$ emctl set property -name JAVA_EM_ARGS -value "-Djbo.ampool.maxavailablesize=500 -Djbo.recyclethreshold=500"To get the properties (after changing from the default), enter the following command:
$ emctl get property -name "JAVA_EM_ARGS"To delete the properties (revert to original setting), enter the following command:
$ emctl delete property -name "JAVA_EM_ARGS"An OMS restart using ‘emctl stop oms -all; emctl start oms' is required on each OMSafter changing the property value.
Changing omsAgentComm.ping.heartbeatPingRecorderThreads
To change the OMS property,oracle.sysman.core.omsAgentComm.ping.heartbeatPingRecorderThreads, followthese recommendations:
Chapter 13Enterprise Manager Cloud Control Sizing
13-14

To set the property, enter the following command:
emctl set property -nameoracle.sysman.core.omsAgentComm.ping.heartbeatPingRecorderThreads -value 5To get the property (after changing from the default), enter the following command:
emctl get property -nameoracle.sysman.core.omsAgentComm.ping.heartbeatPingRecorderThreadsTo delete the properties (revert to original setting), enter the following command:
emctl delete property -nameoracle.sysman.core.omsAgentComm.ping.heartbeatPingRecorderThreadsAn OMS restart using ‘emctl stop oms; emctl start oms' is required on each OMS afterchanging the property value.
Modifying Database SettingsIf you have downloaded the Database Templates for a Preconfigured Repository, you can runthe appropriate SQL script to adjust the database parameters to the recommended settings.The scripts that you should run are listed in the following table:
Table 13-16 Scripts for Deployment Sizes for DB 19c
Size Script
Small <DB_HOME>/assistance/dbca/templates/set_repo_param_<DatabaseVersion>_Database_SQL_for_<EM Version>_Small_deployment.sql
Medium <DB_HOME>/assistance/dbca/templates/set_repo_param_<DatabaseVersion>_Database_SQL_for_<EM Version>_Medium_deployment.sql
Large <DB_HOME>/assistance/dbca/templates/set_repo_param_<DatabaseVersion>_Database_SQL_for_<EM Version>_Large_deployment.sql
Note:
The above scripts do not adjust MEMORY_TARGET/ SGA_TARGET/PGA_AGGREGATE_TARGET so these parameters must be modified manually.
Enterprise Manager Cloud Control Performance MethodologyAn accurate predictor of capacity at scale is the actual metric trend information from eachindividual Enterprise Manager Cloud Control deployment. This information, combined with anestablished, rough, starting host system size and iterative tuning and maintenance, producesthe most effective means of predicting capacity for your Enterprise Manager Cloud Controldeployment. It also assists in keeping your deployment performing at an optimal level.
Here are the steps to follow to enact the Enterprise Manager Cloud Control sizingmethodology:
1. If you have not already installed Enterprise Manager Cloud Control, choose a roughstarting host configuration as listed in Table 13-1.
Chapter 13Enterprise Manager Cloud Control Performance Methodology
13-15

2. Periodically evaluate your site's vital signs (detailed later).
3. Eliminate bottlenecks using routine DBA/Enterprise Manager administrationhousekeeping.
4. Eliminate bottlenecks using tuning.
5. Extrapolate linearly into the future to plan for future sizing requirements.
Step one need only be done once for a given deployment. Steps two, three, and fourmust be done, regardless of whether you plan to grow your Enterprise Manager CloudControl site, for the life of the deployment on a regular basis. These steps areessential to an efficient Enterprise Manager Cloud Control site regardless of its size orworkload. You must complete steps two, three, and four before you continue on to stepfive. This is critical. Step five is only required if you intend to grow the deployment sizein terms of monitored targets. However, evaluating these trends regularly can behelpful in evaluating any other changes to the deployment.
Step 1: Choosing a Starting Platform Cloud Control DeploymentFor information about choosing a starting platform Cloud Control deployment, see Overview of Sizing Guidelines.
Step 2: Periodically Evaluating the Vital Signs of Your SiteThis is the most important step of the five. Without some degree of monitoring andunderstanding of trends or dramatic changes in the vital signs of your EnterpriseManager Cloud Control site, you are placing site performance at serious risk. Everymonitored target sends data to the Management Repository for loading andaggregation through its associated Management Agent. This adds up to aconsiderable volume of activity that requires the same level of management andmaintenance as any other enterprise application.
Enterprise Manager has "vital signs" that reflect its health. These vital signs should bemonitored for trends over time as well as against established baseline thresholds. Youmust establish realistic baselines for the vital signs when performance is acceptable.Once baselines are established, you can use built-in Oracle Enterprise Manager CloudControl functionality to set baseline warning and critical thresholds. This allows you tobe notified automatically when something significant changes on your EnterpriseManager site. The following table is a point-in-time snapshot of the EnterpriseManager Cloud Control vital signs for two sites:
Module Metrics EM Site 1 EM Site 2
Site - emsite1 emsite2
Target Counts Database Targets 192 (45 not up) 1218 (634 not up)
- Host Targets 833 (12 not up) 1042 (236 not up)
- Total Targets 2580 (306 not up) 12293 (6668 not up)
Overall Status Overall Backoff Requests in theLast 10 Mins
0 500
Job Statistics Estimated time for clearingcurrent Job steps backlogJob
0.1 7804
Event Statistics Pending Events Count 2 4000
Chapter 13Enterprise Manager Cloud Control Performance Methodology
13-16

Module Metrics EM Site 1 EM Site 2
Management Service HostStatistics
Average % CPU (Host 1) 9 (emhost01) 13 (emhost01)
- Average % CPU (Host 2) 6 (emhost02) 17 (emhost02)
- Average % CPU (Host 3) N/A 38 (em6003)
- Average % CPU (Host 4) N/A 12 (em6004)
- Number of cores per host 2 X 2.8 (Xeon) 4 X 2.4 (Xeon)
- Memory per Host (GB) 8 8
Management RepositoryHost Statistics
Average % CPU (Host 1) 12 (db01rac) 64 (em6001rac)
- Average % CPU (Host 2) 14 (db02rac) 78 (em6002rac)
- Number of CPU cores per host 4 8
- Memory target (GB) 5.25 7.5
- Memory per Host (GB) 8 16
- Total Management RepositorySize (GB)
56 98
- Oracle RAC Interconnect Traffic(MB/s)
1 4
- Management Server Traffic(MB/s)
4 4
- Total Management Repository I/O(MB/s)
6 27
Enterprise Manager UIPage Response/Sec
Home Page 3 6
- All Host Page 3 30+
- All Database Page 6 30+
- Database Home Page 2 2
- Host Home Page 2 2
The two Enterprise Manager sites are at the opposite ends of the scale for performance.
EM Site 1 is performing very well with very few backoff requests. It also has a very low joband event backlogs. The CPU utilization on both the OMS and Management RepositoryServer hosts are low. Most importantly, the UI Page Response times are excellent. Tosummarize, Site 1 is doing substantial work with minimal effort. This is how a well configured,tuned and maintained Oracle Enterprise Manager Cloud Control site should look.
Conversely, EM Site 2 is having difficulty. The site has substantial amounts of backoffs andsizable job and event backlogs. Worst of all are the user interface page response times.There is clearly a bottleneck on Site 2, possibly more than one.
These vital signs are all available from within the Enterprise Manager interface. Most valuescan be found on the All Metrics page for each host, or the All Metrics page for the OMS.Keeping an eye on the trends over time for these vital signs, in addition to assigningthresholds for warning and critical alerts, allows you to maintain good performance andanticipate future resource needs. You should plan to monitor these vital signs as follows:
Chapter 13Enterprise Manager Cloud Control Performance Methodology
13-17

• Take a baseline measurement of the vital sign values seen in the previous tablewhen the Enterprise Manager Cloud Control site is running well.
• Set reasonable thresholds and notifications based on these baseline values soyou can be notified automatically if they deviate substantially. This may requiresome iteration to fine-tune the thresholds for your site. Receiving too manynotifications is not useful.
• On a daily (or weekly at a minimum) basis, watch for trends in the 7-day graphs forthese values. This will not only help you spot impending trouble, but it will alsoallow you to plan for future resource needs.
Another crucial vital sign to monitor on the Enterprise Manager console is the self-monitoring Managing the Manager Repository pages which provide visibility into theinflow of metrics and events. Fine tuning incoming metric and events data is crucial formaintaining overall Enterprise Manager health and performance.
The next step provides guidance of what to do when the vital sign values are not withinestablished baseline thresholds, though the inflow trend of Metrics and Events data inthe self-monitoring pages does not show any abnormality. Also, it explains how tomaintain your site's performance through routine housekeeping.
Step 3: Using DBA and Enterprise Manager Tasks To EliminateBottlenecks
It is critical to note that routine housekeeping helps keep your Enterprise ManagerCloud Control site running well. The following are lists of housekeeping tasks and theinterval on which they should be done.
Offline Monthly TasksEnterprise Manager Administrators should monitor the database built-in SegmentAdvisor for recommendations on Enterprise Manager Repository segment health. TheSegment Advisor advises administrators which segments need to be rebuilt/reorganized and provides the commands to do so.
For more information about Segment Advisor and issues related to system health,refer to notes 242736.1 and 314112.1 in the My Oracle Support Knowledge Base.
Step 4: Eliminating Bottlenecks Through TuningThe most common causes of performance bottlenecks in the Enterprise ManagerCloud Control application are listed below (in order of most to least common):
1. Housekeeping that is not being done (far and away the biggest source ofperformance problems)
2. Hardware or software that is incorrectly configured
3. Hardware resource exhaustion
When the vital signs are routinely outside of an established threshold, or are trendingthat way over time, you must address two areas. First, you must ensure that allpreviously listed housekeeping is up to date. Secondly, you must address resourceutilization of the Enterprise Manager Cloud Control application. The vital signs listed inthe previous table reflect key points of resource utilization and throughput in EnterpriseManager Cloud Control. The following sections cover some of the key vital signs along
Chapter 13Enterprise Manager Cloud Control Performance Methodology
13-18

with possible options for dealing with vital signs that have crossed thresholds establishedfrom baseline values.
High CPU UtilizationWhen you are asked to evaluate a site for performance and notice high CPU utilization, thereare a few common steps you should follow to determine what resources are being used andwhere.
1. Use the Processes display on the Enterprise Manager Host home page to determinewhich processes are consuming the most CPU on any Management Service orManagement Repository host that has crossed a CPU threshold.
2. Once you have established that Enterprise Manager is consuming the most CPU, useEnterprise Manager to identify what activity is the highest CPU consumer. Typically thismanifests itself on a Management Repository host where most of the ManagementService's work is performed. Here are a few typical spots to investigate when the Management Repository appears to be using too many resources.
a. Check out Top Wait Events metrics for the Enterprise Manager Repository.
b. Click the CPU Used database resource listed on the Management Repository'sDatabase Performance page to examine the SQL that is using the most CPU at theManagement Repository.
c. Check the Database Locks on the Management Repository's Database Performancepage looking for any contention issues.
d. Check the SQL Monitoring on the Management Repository's Database for anyresource intensive SQL.
High CPU utilization is probably the most common symptom of any performance bottleneck.Typically, the Management Repository is the biggest consumer of CPU, which is where youshould focus. A properly configured and maintained Management Repository host systemthat is not otherwise hardware resource constrained should average roughly 40 percent orless total CPU utilization. An OMS host system should average roughly 20 percent or lesstotal CPU utilization. These relatively low average values should allow sufficient headroom forspikes in activity. Allowing for activity spikes helps keep your page performance moreconsistent over time. If your Enterprise Manager Cloud Control site interface pages happen tobe responding well (approximately 3 seconds) while there are no significant backlogs, and itis using more CPU than recommended, you may not have to address it unless you areconcerned it is part of a larger upward trend.
The recommended path for tracking down the root cause of high Management RepositoryCPU utilization is captured under steps 3.a, 3b, 3c, and 3.d listed above. CPU should bealways be the topmost wait event. Log File Sync wait event indicating slow I/O performanceshould not appear in the top 5 waits ideally. To identify the root cause, start at theManagement Repository Performance page and work your way down to the SQL that isconsuming the most CPU in its processing. Correlate your findings with the AWR report. Thisapproach has been used very successfully on several real world sites.
If you are running Enterprise Manager on Intel based hosts, the Enterprise Manager CloudControl Management Service and Management Repository will both benefit from Hyper-Threading (HT) being enabled on the host or hosts on which they are deployed. HT is afunction of certain late models of Intel processors, which allows the execution of someamount of CPU instructions in parallel. This gives the appearance of double the number ofCPUs physically available on the system. Testing has proven that HT provides approximately1.5 times the CPU processing power as the same system without HT enabled. This cansignificantly improve system performance. The Management Service and Management
Chapter 13Enterprise Manager Cloud Control Performance Methodology
13-19

Repository both frequently have more than one process executing simultaneously, sothey can benefit greatly from HT.
Loader Vital SignsThe vital signs for the loader indicate exactly how much data is continuously cominginto the system from all the Enterprise Manager Agents. The most important item hereis the “Number of Agents Sent Back in the Last Hour" metric. The metric can be foundin the All Metrics page of each management service. This is the number of agentsinstructed to defer loading of data in the last hour. Ideally no agent should beinstructed to defer loading, but some level of deferred loading is normal. If this value isabove 2 percent of your deployed agent count and it is growing continuously, thenaction should be taken.
Ensure that back-off requests are spread uniformly across OMS in a multi-OMSenvironment. If the back-off requests pertain to a specific OMS and does not showuniform trend across OMS, verify that the load-balancing algorithm set at Server LoadBalancer is round-robin. Add loader threads only if there are backoffs on importantchannels in the range of hundreds an hour consistently and there are sufficient freeresources on the database.
The number of Loader Threads is always set to 20 per OMS by default. Adding loaderthreads to an OMS increases the overall host CPU utilization. Customers can changethis value as their site requires.
There are diminishing returns when adding loader threads if your repository does nothave sufficient resources available. If you have available repository resources, as youadd loader threads, you should see the “Number of Agents Sent Back in the LastHour" metric decrease. If you are not seeing improvement you should explore othertuning or housekeeping opportunities.
To add more loader threads, you can change the following configuration parameter:
oracle.sysman.core.gcloader.max_recv_thread
The default value is 20. This is a per OMS setting.
Rollup Vital SignsThe rollup process is the aggregation mechanism for Enterprise Manager CloudControl. The two vital signs for the rollup are the rows/second and % of hour run. Dueto the large volume of data rows processed by the rollup, it tends to be the largestconsumer of Management Repository buffer cache space. Because of this, the rollupvital signs can be great indicators of the benefit of increasing buffer cache size.
Rollup rows/second shows exactly how many rows are being processed, oraggregated and stored, every second. This value is usually around 2,000 (+/- 500)rows per second on a site with a decent size buffer cache and reasonable speedy I/O.A downward trend over time for this value may indicate a future problem, but as longas % of hour run is under 100 your site is probably fine.
If rollup % of hour run is trending up (or is higher than your baseline), and you havenot yet set the Management Repository buffer cache to its maximum, it may beadvantageous to increase the buffer cache setting. Usually, if there is going to be abenefit from increasing buffer cache, you will see an overall improvement in resourceutilization and throughput on the Management Repository host. The loader statisticswill appear a little better. CPU utilization on the host will be reduced and I/O will
Chapter 13Enterprise Manager Cloud Control Performance Methodology
13-20

decrease. The most telling improvement will be in the rollup statistics. There should be anoticeable improvement in both rollup rows/second and % of hour run. If you do not see anyimprovement in any of these vital signs, you can revert the buffer cache to its previous size.The old Buffer Cache Hit Ratio metric can be misleading. It has been observed in testing thatBuffer Cache Hit Ratio will appear high when the buffer cache is significantly undersized andEnterprise Manager Cloud Control performance is struggling because of it. There will betimes when increasing buffer cache will not help improve performance for Cloud Control. Thisis typically due to resource constraints or contention elsewhere in the application. Considerusing the steps listed in the High CPU Utilization section to identify the point of contention.Cloud Control also provides advice on buffer cache sizing from the database itself. This isavailable on the database Memory Parameters page.
One important thing to note when considering increasing buffer cache is that there may beoperating system mechanisms that can help improve Enterprise Manager Cloud Controlperformance. One example of this is the "large memory" option available on Red Hat Linux.The Linux OS Red Hat Advanced Server™ 2.1 (RHAS) has a feature called big pages. InRHAS 2.1, bigpages is a boot up parameter that can be used to pre-allocate large sharedmemory segments. Use of this feature, in conjunction with a large Management RepositorySGA, can significantly improve overall Cloud Control application performance. Starting in RedHat Enterprise Linux™ 3, big pages functionality is replaced with a new feature called hugepages, which no longer requires a boot-up parameter.
Rollup ProcessIf rollup % of hour run is trending up (or is higher than your baseline) and buffer cache isalready set to optimal but there is still many cluster Wait events reported in the AWR report,configure the Rollup database service and set affinity to run the Rollup Service only on asingle-instance RAC node. Ensure that single-instance RAC node is sized to handle large I/Ovolume.
Use the following configuration steps for Rollup database service:
1. Create database service "rollup" and set one of the RAC instances as the primaryinstance in "-r".
• srvctl add service -d <dbname>-s rollup -r <primary instance> -a <the otherinstances> -y automatic
• srvctl start service -d <dbname>-s rollup
srvctl status service -d <dbname>
2. As sys user, execute DBMS_SCHEDULER.create_job_class( job_class_name =>'ROLLUP', service => 'rollup')
3. GRANT EXECUTE ON sys.ROLLUP TO sysman;
4. As sysman user, execute DBMS_SCHEDULER.SET_ATTRIBUTE ( name =>'EM_ROLLUP_SCHED_JOB', attribute => 'job_class', value => 'ROLLUP')
5. As sysman user, executeGC_SCHED_JOB_REGISTRAR.SET_JOB_CLASS('EM_ROLLUP_SCHED_JOB','ROLLUP')
In addition to configuration of Rollup database service, add Rollup worker threads if thedatabase can handle the increased load from these threads. Configure additional rollupworker threads using configure option in Metric Rollup Performance Chart available in self-monitoring "Managing the Manager" Repository page.
Chapter 13Enterprise Manager Cloud Control Performance Methodology
13-21

Job, Notification, and Alert Vital SignsJobs, notifications, and alerts are indicators of the processing efficiency of theManagement Service(s) on your Enterprise Manager Cloud Control site.
Jobs
A growing backlog in Jobs Steps Scheduled at the repository indicates there are notenough resources available at the repository. High Job Dispatcher processing time (%)indicates a repository bottleneck. Low throughput with High Job Dispatcher processingtime (%) indicates a processing bottleneck. The Jobs subsystem uses the locks tomaintain sequence internally, so you can see application locks wait events, andtransaction locking wait events in the AWR report in repository. It is normal to observethe Job system consuming 5-8% of waiting time, but if that value crosses 20-30%, it isquite abnormal and should be triaged. If there are significant amounts of cluster waitsfor Job SQLs in AWR, you could potentially optimize the Job system by introducingRAC services. Create a database service for Jobs and then set affinity to run on a two-node RAC instance for better optimal performance.
Use the following configuration steps to set up the Rollup database service:
1. Create the database service emjob and set two of the RAC instances as primaryinstance in "-r".
srvctl add service -d <dbname> -s emjob -r <primary instances> -a <theother instances> -y automaticAfter creating the database service, you need to restart the service using thesrvctl start service command.
2. Execute the following DBMS_SCHEDULER jobs:
• As a sys user, executeDBMS_SCHEDULER.create_job_class( job_class_name => 'EMJOB', service=> 'emjob ')
• GRANT EXECUTE ON sys.EMJOB TO sysman;
• As a sysman user, execute DBMS_SCHEDULER.SET_ATTRIBUTE (name =>' EM_JOBS_STEP_SCHED ', attribute => 'job_class', value => 'EMJOB')
• As a sysman user, execute DBMS_SCHEDULER.SET_ATTRIBUTE (name =>' EM_JOB_PURGE_POLICIES ', attribute => 'job_class', value => 'EMJOB')
• As a sysman user, executeGC_SCHED_JOB_REGISTRAR.SET_JOB_CLASS('EM_JOBS_STEP_SCHED', 'EMJOB')
• As a sysman user, runGC_SCHED_JOB_REGISTRAR.SET_JOB_CLASS('EM_JOB_PURGE_POLICIES', 'EMJOB')
• INSERT INTO MGMT_PARAMETERS(parameter_name, parameter_value)VALUES ('EM_jobs_step_sched_job_class', 'EMJOB')
3. Set the connect string with ping service name to the emctl property
oracle.sysman.core.omsAgentComm.ping.connectionService.connectDescriptor
• Sample: emctl set property -name"company.sysman.core.jobs.conn.service" -value "\(DESCRIPTION=\
Chapter 13Enterprise Manager Cloud Control Performance Methodology
13-22

(ADDRESS_LIST=\(ADDRESS=\(PROTOCOL=TCP\)\(HOST=xxx.example.com\)\(PORT=1521\)\)\)\(CONNECT_DATA=\(SERVICE_NAME=emjob\)\)\)"
Events and Notifications
If the vital sign has crossed the baseline threshold, look for vital signs in self-monitoringManaging the Manager pages. Monitor charts for consistent drastic increase in Metric alertsbacklog, Metric Collection errors backlog, and Notification backlog. Key Metrics to checkevent backlogs are Total Events Pending and Total Events Processed (Last Hour). If TotalEvents Pending remains high but Total Events Processed (Last Hour) is making goodprogress, it could be a temporary spike which can be ignored, but if there is a consistentincrease in both metrics, the Events subsystem will benefit by introducing a database serviceand setting affinity to only run on a single-instance RAC node.
Use these configuration steps for an Events database service:
1. Create a database service event and set one of the RAC instances as the primaryinstance in "-r"
srvctl add service -d <dbname>-s event -r <primary instance> -a <the theother instances> -y automatic
2. Set the connect string with the 'ping' service name to the emctl propertyoracle.sysman.core.events.connectDescriptor
Sample emctl set property -name"oracle.sysman.core.events.connectDescriptor" -value "\(DESCRIPTION=\(ADDRESS_LIST=\(ADDRESS=\(PROTOCOL=TCP\)\(HOST=xxx.example.com\)\(PORT=1521\)\)\)\(CONNECT_DATA=\(SERVICE_NAME=event\)\)\)"
Ping Alerts
Ping Alerts performance is crucial for determining target availability. If the vital signs havecrossed a baseline threshold and there are many cluster waits in the AWR report, there is ameasurable benefit by introducing a database service for Ping and setting affinity to run onlyon a single instance RAC node.
Use these configuration steps for defining a Pings database service:
1. Create database service ping and set one of RAC instance as primary instance in "-r"
srvctl add service -d <dbname>-s ping -r <primary instance> -a <the theother instances> -y automatic
2. Execute the following DBMS_SCHEDULER jobs
• As a sys user, execute DBMS_SCHEDULER.create_job_class( job_class_name =>'PING', service => 'ping')
• GRANT EXECUTE ON sys.PING TO sysman;
• As a sysman user, execute DBMS_SCHEDULER.SET_ATTRIBUTE ( name =>'EM_PING_MARK_NODE_STATUS', attribute => 'job_class', value => 'PING')
• As a sysman user, execute DBMS_SCHEDULER.SET_ATTRIBUTE ( name =>'EM_REPOS_SEV_EVAL', attribute => 'job_class', value => 'PING')
• As a sysman user, executeGC_SCHED_JOB_REGISTRAR.SET_JOB_CLASS('EM_REPOS_SEV_EVAL','PING')
Chapter 13Enterprise Manager Cloud Control Performance Methodology
13-23

• As a sysman user, executeGC_SCHED_JOB_REGISTRAR.SET_JOB_CLASS('EM_PING_MARK_NODE_STATUS', 'PING')
3. Set the connect string with ping service name to emctl propertyoracle.sysman.core.omsAgentComm.ping.connectionService.connectDescriptor
Sample
emctl set property -nameoracle.sysman.core.omsAgentComm.ping.connectionService.connectDescriptor" -value "\(DESCRIPTION=\(ADDRESS_LIST=\(ADDRESS=\(PROTOCOL=TCP\)\(HOST=xxx.example.com\)\(PORT=1521\)\)\)\(CONNECT_DATA=\(SERVICE_NAME=ping\)\)\)
Config Metric Post Load CallbacksThe Config Metrics upload to OMS from Agents is a two step process:
1. Agents upload the Config Metric collections to OMS, OMS registers the upload inthe Enterprise Manager Repository, generates a snapshot and then, feeds theuploaded payload (or data) into a queue, called as the Loader-Job Queue, forprocessing later. This allows the Loader module at OMS off-load the additionalprocessing required with Config Metric Upload, and free up resources to processmore uploads from Agents.
2. There is a separate module responsible for pulling the entries out of this queue,and then calling the callbacks responsible to work on the data and then assimilatethe data in the repository in order of their insertion into the Loader-Job Queue.This module is referred to as the Config Metric Post Upload Callback Executor (orloader-job) module. This module allows the end user to configure the number ofthreads that will process the data, number of SQL connections to the EnterpriseManager Repository that these threads have access to, and whether to use adedicated DB service pinned on one of the RAC nodes which hosts the EnterpriseManager Repository.
The default values of the settings on Eval, Small, and Medium Enterprise Manager sitesizes works fine. You might need to override the default values for Large and ExtraLarge configurations.
To configure a DB Service and pin it to a Repository node
srvctl add service -d <dbname>-s loaderjob -r <primary instance> -a <the the otherinstances> -y automatic
To configure a DB service as the connection source
emctl set property -name "oracle.sysman.core.pbs.gcloader.connectDescriptor" -value "\(DESCRIPTION=\(ADDRESS_LIST=\(ADDRESS=\(PROTOCOL=TCP\)\(HOST=xxx.example.com\)\(PORT=1521\)\)\)\(CONNECT_DATA=\(SERVICE_NAME=loaderjob\)\)\)"
Large
To configure the number of threads to be created for this module
emctl set property -name "oracle.sysman.core.pbs.gcloader.numThreads" -value 5
To configure the number of SQL connection available to the threads of this module
Chapter 13Enterprise Manager Cloud Control Performance Methodology
13-24

emctl set property -name "oracle.sysman.core.gcloader.loaderjob.maxConnections" -value 5
Extra Large
To configure the number of threads to be created for this module
emctl set property -name "oracle.sysman.core.pbs.gcloader.numThreads" -value 10
To configure the number of SQL connection available to the threads of this module
emctl set property -name "oracle.sysman.core.gcloader.loaderjob.maxConnections" -value 10
I/O Vital SignsMonitoring the I/O throughput of the different channels in your Enterprise Manager CloudControl deployment is essential to ensuring good performance. At minimum, there are threedifferent I/O channels on which you should have a baseline and alert thresholds defined:
• Disk I/O from the Management Repository instance to its data files
• Network I/O between the OMS and Management Repository
• Oracle RAC interconnect (network) I/O (on Oracle RAC systems only)
You should understand the potential peak and sustained throughput I/O capabilities for eachof these channels. Based on these and the baseline values you establish, you can derivereasonable thresholds for warning and critical alerts on them in Cloud Control. You will thenbe notified automatically if you approach these thresholds on your site. Some Cloud Controlsite administrators can be unaware or mistaken about what these I/O channels can handle ontheir sites. This can lead to Enterprise Manager Cloud Control saturating these channels,which in turn cripples performance on the site. In such an unfortunate situation, you wouldsee that many vital signs would be impacted negatively.
To discover whether the Management Repository is involved, you can use Cloud Control tocheck the Database Performance page. On the Performance page for the ManagementRepository, click the wait graph showing the largest amount of time spent. From this you cancontinue to drill down into the actual SQL code or sessions that are waiting. This should helpyou to understand where the bottleneck is originating.
Another area to check is unexpected I/O load from non-Enterprise Manager Cloud Controlsources like backups, another application, or a possible data-mining co-worker who engagesin complex SQL queries, multiple Cartesian products, and so on.
Total Repository I/O trouble can be caused by two factors. The first is a lack of regularhousekeeping. Some of the Cloud Control segments can be very badly fragmented causing asevere I/O drain. Second, there can be some poorly tuned SQL statements consuming muchof the site I/O bandwidth. These two main contributors can cause most of the Cloud Controlvital signs to plummet. In addition, the lax housekeeping can cause the ManagementRepository's allocated size to increase dramatically.
One important feature of which to take advantage is asynchronous I/O. Enablingasynchronous I/O can dramatically improve overall performance of the Cloud Controlapplication. The Sun Solaris™ and Linux operating systems have this capability, but may bedisabled by default. The Microsoft Windows™ operating system uses asynchronous I/O bydefault. Oracle strongly recommends enabling of this operating system feature on theManagement Repository hosts and on Management Service hosts as well.
Chapter 13Enterprise Manager Cloud Control Performance Methodology
13-25

Automatic Storage Management (ASM) is recommended for Enterprise ManagerCloud Control repository database storage.
About the Oracle Enterprise Manager Performance PageThere may be occasions when Enterprise Manager user interface pages are slow inthe absence of any other performance degradation. The typical cause for these slowdowns will be an area of Enterprise Manager housekeeping that has been overlooked.The first line of monitoring for Enterprise Manger page performance is the use of Enterprise Manager beacons. These functionalities are also useful for webapplications other than Enterprise Manager.
Beacons are designed to be lightweight page performance monitoring targets. Afterdefining a beacon target on an Management Agent, you can then define UIperformance transactions using the beacon. These transactions are a series of UIpage hits that you will manually walk through once. Thereafter, the beacon willautomatically repeat your UI transaction on a specified interval. Each time the beacontransaction is run, Enterprise Manager will calculate its performance and store it forhistorical purposes. In addition, alerts can be generated when page performancedegrades below thresholds you specify.
When you configure the Enterprise Manager beacon, you begin with a singlepredefined transaction that monitors the home page you specify during this process.You can then add as many transactions as are appropriate. You can also set upadditional beacons from different points on your network against the same webapplication to measure the impact of WAN latency on application performance. Thissame functionality is available for all Web applications monitored by EnterpriseManager Cloud Control.
After you are alerted to a UI page that is performing poorly, you can then use thesecond line of page performance monitoring in Enterprise Manager Cloud Control.This end-to-end (or E2E) monitoring functionality in Cloud Control is designed to allowyou to break down processing time of a page into its basic parts. This will allow you topinpoint when maintenance may be required to enhance page performance. E2Emonitoring in Cloud Control lets you break down both the client side processing andthe server side processing of a single page hit.
The next page down in the Middle Tier Performance section will break out theprocessing time by tier for the page. By clicking the largest slice of the ProcessingTime Breakdown pie chart, which is JDBC time above, you can get the SQL details. Byclicking the SQL statement, you break out the performance of its execution over time.
The JDBC page displays the SQL calls the system is spending most of its page timeexecuting. This SQL call could be an individual DML statement or a PL/SQL procedurecall. In the case of an individual SQL statement, you should examine the segments(tables and their indexes) accessed by the statement to determine their housekeeping(rebuild and reorganization) needs. The PL/SQL procedure case is slightly moreinvolved because you must look at the procedure's source code in the ManagementRepository to identify the tables and associated indexes accessed by the call.
Once you have identified the segments, you can then run the necessary rebuild andreorganization statements for them with the OMS down. This should dramaticallyimprove page performance. There are cases where page performance will not behelped by rebuild and reorganization alone, such as when excessive numbers of openalerts, system errors, and metric errors exist. The only way to improve these calls is toaddress (for example, clean up or remove) the numbers of these issues. After thesenumbers are reduced, then the segment rebuild and reorganization should be
Chapter 13Enterprise Manager Cloud Control Performance Methodology
13-26

completed to optimize performance. These scenarios are covered in Step 3: Using DBA andEnterprise Manager Tasks To Eliminate Bottlenecks. If you stay current, you should not needto analyze UI page performance as often, if at all.
For more information about new features for monitoring the performance of SQL proceduresfrom the Enterprise Manager console, see the chapter, "Maintaining Enterprise Manager" inthe Enterprise Manager Administration book.
Determining the Optimum Number of Middle Tier OMS ServersDetermining the optimum number of middle tier OMS servers is not a trivial task. A number ofdata points must be considered for an informed, justified and acceptable decision forintroducing additional OMS instances. The number of monitored targets is one of the firstconsiderations, but its weight in decision making is normally not substantial.
The following items should be considered and examined as part of this exercise:
• The volume of job automation and scheduling used
• The number of administrators working simultaneously in the console
• Network bandwidth and data channel robustness from agents to the OMS servers
• Number of triggered violations and notifications
• Speed and stability of the IO system the OMS servers use
Careful investigation of each category is essential to making an informed decision. In somecases, just adding an OMS server or providing more CPU or memory to the same host maynot make any difference in performance enhancement. You can use the current running OMSinstances to collect accurate statistics on current OMS performance to calculate the numberof required OMS servers for current or future deployments. Enterprise Manager has vitalsigns that reflect its health. These vital signs should be monitored for trends over time as wellas against established baseline thresholds.
Step 5: Extrapolating Linearly Into the Future for Sizing RequirementsDetermining future storage requirements is an excellent example of effectively using vital signtrends. You can use two built-in Cloud Control charts to forecast this: the total number oftargets over time and the Management Repository size over time.
Both of the graphs are available on the All Metrics page for the Management Service. Itshould be obvious that there is a correlation between the two graphs. A straight line appliedto both curves would reveal a fairly similar growth rate. After a target is added to EnterpriseManager Cloud Control for monitoring, there is a 31-day period where ManagementRepository growth will be seen because most of the data that will consume ManagementRepository space for a target requires approximately 31 days to be fully represented in theManagement Repository. A small amount of growth will continue for that target for the nextyear because that is the longest default data retention time at the highest level of dataaggregation. This should be negligible compared with the growth over the first 31 days.
When you stop adding targets, the graphs will level off in about 31 days. When the graphslevel off, you should see a correlation between the number of targets added and the amountof additional space used in the Management Repository. Tracking these values from early onin your Enterprise Manager Cloud Control deployment process helps you to manage yoursite's storage capacity pro-actively. This history is an invaluable tool.
The same type of correlation can be made between CPU utilization and total targets todetermine those requirements. There is a more immediate leveling off of CPU utilization as
Chapter 13Enterprise Manager Cloud Control Performance Methodology
13-27

targets are added. There should be no significant increase in CPU cost over time afteradding the targets beyond the relatively immediate increase. Introducing newmonitoring to existing targets, whether new metrics or increased collections, wouldmost likely lead to increased CPU utilization.
Using Returning Query Safeguards to Improve PerformanceOn the All Targets page, Enterprise Manager uses a safeguard that prevents a flood ofdata from slowing performance and consuming excessive resources within the OMSby limiting the number of rows that can be returned from a query. By default, the limit isset to 2000, but an Enterprise Manager administrator can modify the limit with thefollowing command:
emctl set property -name oracle.sysman.core.uifwk.maxRows -value 2000Providing a value equal to 0 will turn off the safeguard and fetch all rows. The newvalue takes immediate effect; no OMS restart is required. If the value is less than 0,the default value (2000) will be used instead. The only way to indicate that no limitingshould be performed is to set the value to exactly 0.
When there are too many results returned from a query and this limit comes into effect,the following message appears under the results table:
"This table of search results is limited to 2000 targets. Narrow the results by usingRefine Search or Search Target Name. See the tuning guide for how to modify thislimit."
Similar behaviors (and messages) are applied to other large tables throughoutEnterprise Manager. The same OMS property (oracle.sysman.core.uifwk.maxRows)controls the maximum limit for all of them together. This matches the behavior (andreuses the existing property) from previous Enterprise Manager releases.
Overview of Sizing Requirements for Fusion MiddlewareMonitoring
A Fusion Middleware target is like any other Enterprise Manager target. Therefore anyrepository or sizing guideline that is applicable for an Enterprise Manager target wouldbe applicable on a Fusion Middleware target.
One major concern in the case of Fusion Middleware discovery is that too manytargets may be discovered, created and monitored. This adds additional load on theOMS instance, repository and agent. In the case of very large number of targets, aftertarget discovery Oracle recommends that users should review all the targets and theirrespective metrics.
Based on requirements, users should finalize which targets and metrics should bemonitored and the required frequency those targets should be monitored.
After discovery, Oracle recommends you allow Fusion Middleware/ADP/JVMDmonitoring to run for some duration (a few days to possibly a few weeks) andcontinuously monitor the database size and Operating System file system growth (inthe case of ADP; ADP Manager requires a minimum of 10GB of disk space) until itbecomes constant. You can then fine tune various parameters associated with thesedifferent features.
Chapter 13Overview of Sizing Requirements for Fusion Middleware Monitoring
13-28

In version 12c of Enterprise Manager, both ADP and JVMD use the Enterprise Managerrepository as their repository. Their data are stored in the MGMT_AD4J_TS tablespace.
Chapter 13Overview of Sizing Requirements for Fusion Middleware Monitoring
13-29

14Configuring Proxies for OMS andManagement Agent Communication
Oracle Management Service (OMS) and Oracle Management Agent (Management Agent)are core components of Enterprise Manager Cloud Control. While the Management Agentsdiscover and monitor targets in your environment, the OMS orchestrates with theManagement Agents to manage the discovered targets and to store the collected informationin a repository for future reference and analysis.
For this purpose, OMS and Management Agents constantly communicate with each other. Tomanage the HTTP and HTTPS requests more efficiently and to add an additional layer ofsecurity, you can choose to secure this communication by configuring an HTTP or HTTPS-based proxy between the OMS and the Management Agents.
This chapter describes how you can configure an HTTP proxy to secure the communicationbetween the OMS and the Management Agents. In particular, this chapter covers thefollowing:
• About Using Proxies for OMS and Management Agent Communication
• Configuring Proxies for OMS-to-Management Agent Communication
• Configuring Proxies for Management Agent-to-OMS Communication After theManagement Agent Is Deployed
• Configuring Proxies for Management Agent-to-OMS Communication While Deploying theManagement Agent
• Configuring Proxies for OMS-to-My Oracle Support Communication
• Updating Proxies Configured for OMS-to-Management Agent Communication
• Associating Additional Management Agents to an Existing Proxy to Communicate withthe OMS
• Excluding Management Agents from Using Proxies to Communicate with the OMS
• Viewing a List of Proxies by Proxy Names or Management Agents
• Monitoring Proxies Configured for OMS-to-Management Agent Communication
• Removing Proxies Configured for OMS-to-Management Agent Communication
• EM CLI Verbs for Configuring Proxies for OMS and Management Agent Communication
About Using Proxies for OMS and Management AgentCommunication
Oracle Management Service (OMS) and Oracle Management Agent (Management Agent)are core components of Enterprise Manager Cloud Control. While the Management Agentsdiscover and monitor targets in your environment, the OMS orchestrates with theManagement Agents to manage the discovered targets and store the collected information ina repository for future reference and analysis. For this purpose, OMS and Management
14-1

Agents constantly communicate with each other. To manage the HTTP and HTTPSrequests more efficiently and to add an additional layer of security, you can choose tosecure this communication by configuring an HTTP or HTTPS-based proxy betweenthe OMS and the Management Agents.
A proxy is an application external to Enterprise Manager Cloud Control that acts as anintermediary for managing HTTP as well as HTTPS requests across networkboundaries or firewalls. By using a proxy, you can expose only certain ports forcommunication between two or more components, thus making the communicationmore secure and reliable.
In the earlier releases of Enterprise Manager Cloud Control, you had the option ofconfiguring only one proxy for an OMS to communicate with its Management Agents.However, from 13c Release 1 onwards, you have the following proxy configurationoptions:
• No proxy at all.
• One proxy for all the Management Agents.
• One proxy for a few Management Agents and no proxy for the rest.
• Different proxies for the same group of Management Agents (redundant proxies).
• Different proxies for different groups of Management Agents.
A proxy is modeled and added as a manageable entity in Enterprise Manager CloudControl, and is monitored much like other target type for its availability. Therefore, evena non-administrator can view the details of a proxy in Enterprise Manager CloudControl. However, only administrators with full privileges on targets are permitted tomodify the proxy configuration settings.
However, the proxies configured for Management Agent-to-OMS communication andfor OMS-to-My Oracle Support communication are not modeled as target types andare not monitored in Enterprise Manager Cloud Control. Also, you cannot configureredundant proxies for them in any way.
In addition, from 13c Release 1 onwards, you can configure multiple proxies for thesame group of Management Agents, as redundant proxies, to support high availabilityof the proxies configured for the OMS. In this case, since the OMS has multipleproxies configured to communicate with its Management Agents, the proxy that is upand running is selected for communication, regardless of the status of the otherproxies.
Note:
• NTLM-based Microsoft proxies are not supported. To enable accessthrough such proxies, add all the available agent hosts to theUnauthenticated Sites Properties of the NTLM-based Microsoft proxy.
• Local addresses of each OMS automatically bypass the proxy.
Chapter 14About Using Proxies for OMS and Management Agent Communication
14-2

Configuring Proxies for OMS-to-Management AgentCommunication
You can secure the communication between Oracle Management Service (OMS) and OracleManagement Agents (Management Agents) by configuring a proxy. A proxy is an applicationexternal to Enterprise Manager Cloud Control that acts as an intermediary for managingHTTP as well as HTTPS requests across network boundaries or firewalls. By using a proxy,you can expose only certain ports for communication, and thereby have a more secure andreliable communication between the OMS and the Management Agents.
You can configure one proxy for all Management Agents, one proxy for a set of ManagementAgents and none for the rest, or different proxies for different sets of Management Agents.
In addition, you can configure two or more proxies as redundant proxies to support highavailability of the proxies configured for OMS and Management Agent communication. Undersuch circumstances, by default, the proxy that is up and running is selected forcommunication, regardless of the status of the other proxies. Before starting to communicateif a proxy is found to be inactive or down, then an alternate proxy configured for thatManagement Agent is selected. However, note that after the communication begins through aparticular proxy, if that proxy turns inactive or shuts down, then no fallback mechanism iscurrently available to select an alternate proxy that is up and running.
Note:
• NTLM-based Microsoft proxies are not supported. To enable access throughsuch proxies, add all the available agent hosts to the Unauthenticated SitesProperties of the NTLM-based Microsoft proxy.
• Local addresses of each OMS automatically bypass the proxy.
To configure proxies for OMS and Management Agent communication, follow these steps:
1. From the Setup menu, select Proxy Settings, then select Agents.
2. On the Proxy page, click Create.
3. On the Create a Proxy page, do the following:
a. In the Name field, enter a unique name for the proxy you are configuring. This is thename with which the proxy is modeled as a target type and monitored in EnterpriseManager Cloud Control. For example, oms-agent_proxy1.
b. In the Host field, enter the name of the host on which the proxy resides. Forexample, www-proxy.example.com.
c. In the Port field, enter the port used by the proxy.
d. From the Protocol options, select an appropriate protocol, either HTTP or HTTPS.
e. To verify if the OMS is able to successfully connect to the proxy you have specified,click Test Proxy.
Chapter 14Configuring Proxies for OMS-to-Management Agent Communication
14-3
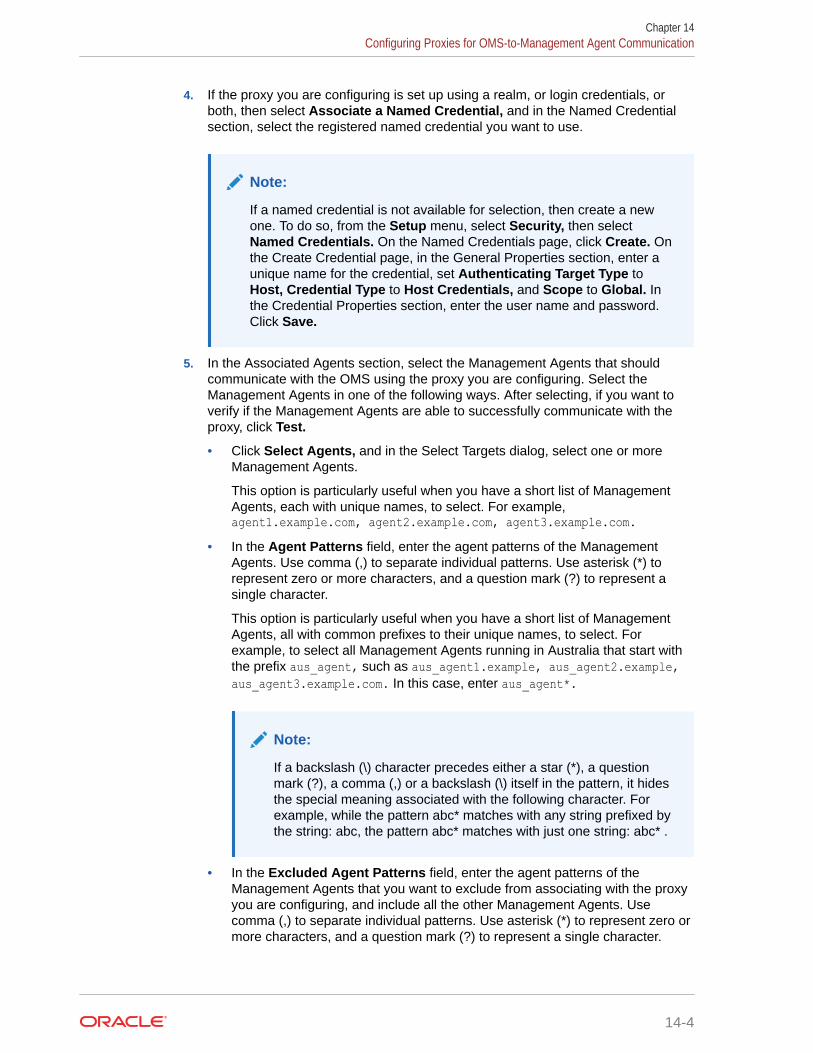
4. If the proxy you are configuring is set up using a realm, or login credentials, orboth, then select Associate a Named Credential, and in the Named Credentialsection, select the registered named credential you want to use.
Note:
If a named credential is not available for selection, then create a newone. To do so, from the Setup menu, select Security, then selectNamed Credentials. On the Named Credentials page, click Create. Onthe Create Credential page, in the General Properties section, enter aunique name for the credential, set Authenticating Target Type toHost, Credential Type to Host Credentials, and Scope to Global. Inthe Credential Properties section, enter the user name and password.Click Save.
5. In the Associated Agents section, select the Management Agents that shouldcommunicate with the OMS using the proxy you are configuring. Select theManagement Agents in one of the following ways. After selecting, if you want toverify if the Management Agents are able to successfully communicate with theproxy, click Test.
• Click Select Agents, and in the Select Targets dialog, select one or moreManagement Agents.
This option is particularly useful when you have a short list of ManagementAgents, each with unique names, to select. For example,agent1.example.com, agent2.example.com, agent3.example.com.
• In the Agent Patterns field, enter the agent patterns of the ManagementAgents. Use comma (,) to separate individual patterns. Use asterisk (*) torepresent zero or more characters, and a question mark (?) to represent asingle character.
This option is particularly useful when you have a short list of ManagementAgents, all with common prefixes to their unique names, to select. Forexample, to select all Management Agents running in Australia that start withthe prefix aus_agent, such as aus_agent1.example, aus_agent2.example,aus_agent3.example.com. In this case, enter aus_agent*.
Note:
If a backslash (\) character precedes either a star (*), a questionmark (?), a comma (,) or a backslash (\) itself in the pattern, it hidesthe special meaning associated with the following character. Forexample, while the pattern abc* matches with any string prefixed bythe string: abc, the pattern abc* matches with just one string: abc* .
• In the Excluded Agent Patterns field, enter the agent patterns of theManagement Agents that you want to exclude from associating with the proxyyou are configuring, and include all the other Management Agents. Usecomma (,) to separate individual patterns. Use asterisk (*) to represent zero ormore characters, and a question mark (?) to represent a single character.
Chapter 14Configuring Proxies for OMS-to-Management Agent Communication
14-4

This option is particularly useful when you have a long list of Management Agentsyou want to exclude, each with either fully unique names or with common prefixes totheir unique names. For example, to exclude all the Management Agents running inHong Kong that start with the prefix hkg_agent, such as hkg_agent1.example.com,hkg_agent2.example.com, hkg_agent3.example.com.
Note:
Excluded Agent Patterns do not exclude the Management Agents from thelist of Management Agents selected by their names. They exclude onlythose Management Agents that are derived from the agent patterns youhave entered in the Agent Patterns field.
6. Click Submit.
Configuring Proxies for Management Agent-to-OMSCommunication After the Management Agent Is Deployed
You can secure the communication between the Management Agents and the OMS byconfiguring a proxy. A proxy is an application external to Enterprise Manager Cloud Controlthat acts as an intermediary for managing HTTP as well as HTTPS requests across networkboundaries or firewalls. By using a proxy, you can expose only certain ports forcommunication, and thereby have a more secure and reliable communication between theManagement Agents and the OMS.
You can configure a proxy between the Management Agent and the OMS, after deploying theManagement Agent, either using the Enterprise Manager Cloud Control Console or using thecommand-line interface (EMCTL commands).
To configure a proxy between the Management Agent and the OMS, after deploying theManagement Agent, using the Enterprise Manager Cloud Control Console, follow thesesteps:
1. From the Targets menu, select All Targets.
2. On the All Targets page, in the Refine Search pane, under the heading Target Type,scroll down and expand the subheading Internal. Then click Agent.
3. From the list of Management Agents, click the Management Agent for which you want toconfigure the proxy.
4. On the Agent Home page, from the Agent menu, select Properties.
5. On the Properties page, from the Show drop down list, select Advanced Properties.
6. Expand Runtime Settings.
7. Set the following properties:
REPOSITORY_PROXYHOSTREPOSITORY_PROXYPORTREPOSITORY_PROXYPWDREPOSITORY_PROXYREALMREPOSITORY_PROXYUSER
Chapter 14Configuring Proxies for Management Agent-to-OMS Communication After the Management Agent Is Deployed
14-5

8. Click Apply.
To configure a proxy between the Management Agent and the OMS, after deployingthe Management Agent, using the command-line interface (EMCTL), follow thesesteps:
1. Set the proxy properties in the <AGENT_HOME>/sysman/config/emd.propertiesfile. To do so, run the following EMCTL commands from the Management Agenthome:
emctl setproperty agent -name REPOSITORY_PROXYHOST -value <proxy_host>emctl setproperty agent -name REPOSITORY_PROXYPORT -value <proxy_port>emctl setproperty agent -name REPOSITORY_PROXYREALM –value<proxy_realm>emctl setproperty agent -name REPOSITORY_PROXYUSER –value <proxy_user>emctl setproperty agent -name REPOSITORY_PROXYPWD –value<proxy_password>For example,
emctl setproperty agent -name REPOSITORY_PROXYHOST -value www-proxy.example.comemctl setproperty agent -name REPOSITORY_PROXYPORT -value 80emctl setproperty agent -name REPOSITORY_PROXYREALM –value realm1emctl setproperty agent -name REPOSITORY_PROXYUSER –value u01emctl setproperty agent -name REPOSITORY_PROXYPWD –value password
2. Restart the Management Agent.
Configuring Proxies for Management Agent-to-OMSCommunication While Deploying the Management Agent
You can secure the communication between the Management Agents and the OMS byconfiguring a proxy. A proxy is an application external to Enterprise Manager CloudControl that acts as an intermediary for managing HTTP as well as HTTPS requestsacross network boundaries or firewalls. By using a proxy, you can expose only certainports for communication, and thereby have a more secure and reliable communicationbetween the Management Agents and the OMS.
To configure a proxy between the Management Agent and the OMS while deployingthe Management Agent, follow the steps outlined in Installing Management AgentsUsing an Agent Gold Image Using Add Host Targets Wizard or ProvisioningManagement Agents Using An Agent Gold Image, and deploy the Management Agent.While providing the details for Management Agent deployment, on the InstallationDetails page of the Add Target Wizard, expand the Optional Details section, and in theAdditional Parameters field, enter the following parameters with the appropriateproxy settings. Separate the parameters with a comma (,).
REPORSITORY_PROXYHOST=<proxy_host_name>,REPORSITORY_PROXYPORT=<proxy_host_port>For example,
REPORSITORY_PROXYHOST=www-proxy.example.com, REPORSITORY_PROXYPORT=1523
Chapter 14Configuring Proxies for Management Agent-to-OMS Communication While Deploying the Management Agent
14-6

Configuring Proxies for OMS-to-My Oracle SupportCommunication
Oracle Management Service (OMS) uses the Internet connectivity on its host to connect toMy Oracle Support periodically to download patches, patch sets, patch recommendations,and Automated Release Updates (ARU) seed data. To secure this communication, you canadd a proxy between the OMS and My Oracle Support.
To configure a proxy between the OMS and My Oracle Support, follow these steps:
1. From the Setup menu, select Proxy Settings, then select My Oracle Support.
2. On the Proxy Settings for My Oracle Support page, select Manual Proxy Configuration.
3. In the HTTPS field, enter the name of the host where the proxy resides. For example,www-proxy.example.com.
4. In the Port field, enter the port used by the proxy.
5. If the specified proxy is configured using a security realm, login credentials, or both, thenselect Password/Advanced Setup and enter the realm and the credentials.
6. To verify if the OMS can successfully connect to My Oracle Support using the specifiedproxy details, click Test.
7. If the connection is successful, click Apply.
Note:
• The proxy you configure applies to all OMS instances in a multi-OMSenvironment.
• If you are using a proxy in your setup, ensure that it allows connectivity to aru-akam.oracle.com, ccr.oracle.com, login.oracle.com,support.oracle.com, and updates.oracle.com.NTLM or NT LAN Manager-based Microsoft proxies are not supported. If youare using an NTLM-based Microsoft proxy to enable access to theaforementioned sites, then add the aforementioned URLs to theUnauthenticated Sites Properties of the proxy.
Updating Proxies Configured for OMS-to-Management AgentCommunication
You can modify the proxy you have configured for secure communication between OracleManagement Service (OMS) and Oracle Management Agents (Management Agent). Youmight want to modify the proxy port, the protocol, the credentials, or a more commonrequirement—you might want to add more or remove some Management Agents that areassociated with the proxy.
Chapter 14Configuring Proxies for OMS-to-My Oracle Support Communication
14-7

Note:
You cannot modify the proxy name with which the proxy is monitored inEnterprise Manager Cloud Control, and you cannot map a different proxy tothe proxy name.
To update or modify the proxy configured for OMS and Management Agentcommunication, follow these steps:
1. From the Setup menu, select Proxy Settings, then select Agents.
2. On the Proxy page, select the proxy (the row in the table) you want to update, andclick Modify.
3. On the Modify a Proxy page, edit the port, the protocol, the named credentials, orthe Management Agents associated with the proxy.
For instructions to update the port, the protocol, and the proxy credentials, see Configuring Proxies for OMS-to-Management Agent Communication.
For instructions to associate additional Management Agents to an existing proxy,see Associating Additional Management Agents to an Existing Proxy toCommunicate with the OMS. For instructions to exclude Management Agents fromusing an existing proxy, see Excluding Management Agents from Using Proxies toCommunicate with the OMS.
Associating Additional Management Agents to an ExistingProxy to Communicate with the OMS
You can secure the communication between Oracle Management Service (OMS) andOracle Management Agents (Management Agent) by configuring a proxy andassociating a set of Management Agents to communicate with the OMS only throughthat proxy. Under certain circumstances, after configuring a proxy, you might have tomodify the proxy to include additional Management Agents to communicate using thatproxy.
To associate additional Management Agents to an existing proxy, follow these steps:
1. From the Setup menu, select Proxy Settings, then select Agents.
2. On the Proxy page, select the proxy (the row in the table) you want to modify toexclude the Management Agents, and click Modify.
3. On the Modify Proxy page, do one of the following:
• In the Associated Agents section, click Select Agents, and in the SelectTargets dialog, select one or more Management Agents.
This option is particularly useful when you have a short list of ManagementAgents, each with unique names, to select. For example,agent1.example.com, agent2.example.com, agent3.example.com.
• In the Associated Agents section, in the Agent Patterns field, enter the agentpatterns of the Management Agents. Use comma (,) to separate individualpatterns. Use asterisk (*) to represent zero or more characters, and a questionmark (?) to represent a single character.
Chapter 14Associating Additional Management Agents to an Existing Proxy to Communicate with the OMS
14-8

This option is particularly useful when you have a short list of Management Agents,all with common prefixes to their unique names, to select. For example, to select allManagement Agents running in Australia that start with the prefix aus_agent, suchas aus_agent1.example, aus_agent2.example, aus_agent3.example.com. In thiscase, enter aus_agent*.
Note:
If a backslash (\) character precedes either a star (*), a question mark (?), acomma (,) or a backslash (\) itself in the pattern, it hides the specialmeaning associated with the following character. For example, while thepattern abc* matches with any string prefixed by the string: abc, the patternabc* matches with just one string: abc* .
You can also use the Agent Patterns field in combination with the Excluded AgentPatterns field to add any additional Management Agents to the list. For example, ifyou have 100 Management Agents in Australia that start with the prefix aus_agent,and if you want to exclude aus_agent98.example, aus_agent99.example.com, andaus_agent100.example.com, then you can enter aus_agent* in the Agent Patternsfield, and enter aus_agent98.example, aus_agent99.example.com, andaus_agent100.example.com in the Excluded Agent Patterns field.
Excluding Management Agents from Using Proxies toCommunicate with the OMS
You can secure the communication between Oracle Management Service (OMS) and OracleManagement Agents (Management Agent) by configuring a proxy and associating a set ofManagement Agents to communicate with the OMS only through that proxy. However, undercertain circumstances, after configuring a proxy, you might have to modify it to exclude someManagement Agents from using that proxy, and have only the remaining Management Agentsuse that proxy.
To exclude Management Agents from using a proxy to communicate with the OMS, followthese steps:
1. From the Setup menu, select Proxy Settings, then select Agents.
2. On the Proxy page, select the proxy (the row in the table) you want to modify to excludethe Management Agents, and click Modify.
3. On the Modify Proxy page, do one of the following:
• In the Associated Agents section, select the Management Agents you want toexclude, and click Remove Agents.
• In the Associated Agents section, in the Excluded Agent Patterns field, enter theagent patterns of the Management Agents that you want to exclude. Use comma (,)to separate individual patterns. Use asterisk (*) to represent zero or more characters,and a question mark (?) to represent a single character.
This option is particularly useful when you have a long list of Management Agentsyou want to exclude, each with either fully unique names or with common prefixes totheir unique names. For example, to exclude all the Management Agents running in
Chapter 14Excluding Management Agents from Using Proxies to Communicate with the OMS
14-9

Hong Kong that start with the prefix hkg_agent, such ashkg_agent1.example.com, hkg_agent2.example.com,hkg_agent3.example.com, enter hkg_agent* in the Excluded Agent Patternsfield.
Note:
Excluded Agent Patterns do not exclude the Management Agents fromthe list of Management Agents selected by their names. They excludeonly those Management Agents that are derived from the agent patternsyou have entered in the Agent Patterns field.
Viewing a List of Proxies by Proxy Names or ManagementAgents
To view a list of proxies configured for OMS and Management Agent communication,from the Setup menu, select Proxy Settings, then select Agents.
By default, the proxies are sorted by proxy names.
• To search for a particular proxy, in the Search Proxy section, enter the proxyname and click the search icon. You can enter the full proxy name, a fewcharacters of the proxy name, or the percentage (%) wildcard character. The tablefilters itself to list the proxy you searched for.
• To drill down and view more details about a proxy, in the Proxy Name column,click the proxy name.
• To view a list of Management Agents that are associated with a proxy, select aproxy name row in the table and view the details in the Associated Agents table.
• To drill down further and view more details about a Management Agent that isassociated with a particular proxy, in the Agent Name column of the AssociatedAgents section, click the Management Agent name.
To sort the proxies by Management Agent names, from the View by options, selectAgents.
• To drill down and view more details about the Management Agent, in the AgentName column, click the Management Agent name.
• To drill down and view more details about the proxy, in the Associated ProxyTargets column, click the proxy name.
Monitoring Proxies Configured for OMS-to-ManagementAgent Communication
All proxies configured for OMS to Management Agent communication are modeled astargets in Enterprise Manager Cloud Control. To monitor a proxy, you must access itsHome page from either the Proxy page or from the All Targets page.
To access the Home page of a particular proxy from the Proxy page, follow thesesteps:
Chapter 14Viewing a List of Proxies by Proxy Names or Management Agents
14-10

1. From the Setup menu, select Proxy Settings, then select Agents.
2. On the Proxy page, in the Proxy Name column, click the proxy name.
To access the Home page of a particular proxy from the All Targets page, follow these steps:
1. From the Targets menu, select All Targets.
2. On the All Targets page, in the Refine Search pane, expand Others, then click Proxy.The resultant table lists all the proxies configured. Click the proxy name to access itsHome page.
3. On the Proxy Home page, click Help for more information.
Removing Proxies Configured for OMS-to-Management AgentCommunication
To remove a proxy that is configured for OMS and Management Agent communication, followthese steps:
1. From the Setup menu, select Proxy Settings, then select Agents.
2. On the Proxy page, in the Proxy Name column, select the proxy you want to remove,and click Remove.
EM CLI Verbs for Configuring Proxies for OMS andManagement Agent Communication
Table 14-1 lists the EM CLI verbs for configuring proxies for OMS and Management Agentcommunication. For more information about these verbs, see the Oracle Enterprise ManagerCloud Control Command Line Interface Guide.
Table 14-1 EM CLI Verbs for Configuring Proxies for OMS and Management AgentCommunication
EM CLI Verb Description
add_proxy Adds a proxy that mediates the HTTP or HTTPS traffic from the OMSto the Management Agent. This proxy is modeled asoracle_em_proxy target type in Enterprise Manager Cloud Control.
delete_proxy Deletes an HTTP or HTTPS proxy that is configured for the OMS andManagement Agent communication.
list_proxies Lists all HTTP and HTTPS proxies that are configured for the OMSand Management Agent communication. By default, the output is intabular format, listing the proxy name, the protocol, the host name(with its port), and the status.
modify_proxy Modifies an HTTP or HTTPS proxy that is configured for the OMS andManagement Agent communication.
show_proxy Shows the details of an HTTP or HTTPS proxy that is configured forthe OMS and Management Agent communication.
test_proxy Tests whether or not an HTTP or HTTPS proxy, which is configured forthe OMS and Management Agent communication, is reachable.
Chapter 14Removing Proxies Configured for OMS-to-Management Agent Communication
14-11

15Installing JVMD Agents with Advanced InstallOptions
This chapter describes how you can install JVM Diagnostics (JVMD) Agents manually in theEnterprise Manager Cloud Control environment.
In particular, this chapter covers the following:
• Overview of JVMD Architecture
• Before you Begin Installing JVMD Agent
• Prerequisites for Installing JVMD Agent
• Deploying JVMD Agents Using Advanced Installation Options
• After Installing JVMD Agents
Overview of JVMD ArchitectureJVM Diagnostics is integrated with Oracle Enterprise Manager Cloud Control. It primarilyenables administrators to diagnose performance problems in Java applications in theproduction environment. By eliminating the need to reproduce problems, it reduces the timerequired to resolve these problems, thus improving application availability and performance.Using JVMD, administrators can identify the root cause of performance problems in theproduction environment, without having to reproduce them in the test or developmentenvironment.
The following diagram shows the JVMD Architecture:
15-1

Figure 15-1 JVMD Architecture
JVMD Engine is the core analytical engine of the JVMD monitoring system. Startingwith Enterprise Manager 13c, JVMD Engine is deployed as an Enterprise ApplicationDeployment (ear file) on the EMGC domain out-of-the-box. JVMD Engine runs as anEnterprise JavaBeans (EJB) technology in the OMS server. JVMD Engine collectsruntime data from JVMD Agents on request from the OMS, and stores the data in therepository. Multiple JVMD Engines can be configured.
JVMD Agents are the data collectors of the target JVM. JVMD Agents are deployed tomanaged application servers to collect JVM monitoring data related to JVM threads,stacks, heap and CPU usage, and so on, in real-time, while introducing minimaloverhead.
The JVMD Agent is deployed on the targeted JVM (the one running a productionWebLogic Server). It collects real-time data and transmits it to the JVM DiagnosticsEngine. This data is stored in the Management Repository, and the collectedinformation is displayed on the Enterprise Manager Cloud Control console formonitoring purposes. The communication between JVMD Engine and JVMD Agentcan be secure (SSL), or non-secure.
JVMD communication between clients (also known as agents) and server (also knownas manager servers or engines) is HTTPS based. The JVMD manager server hostsand ports can be found on the Engines and Agents page, under the MiddlewareManagement option of the Enterprise Manager Setup menu. Please refer the SLB user
Chapter 15Overview of JVMD Architecture
15-2

guide to set up a pool for the corresponding JVMD manager hosts and ports. The JVMDagent deployment and download should specify the SLB host and port to achieve HA.
Most SLBs ensure source address (that is, client host) based affinity. JVMD communicationinserts header field FROM-AGENT-ID, which can be used for this purpose. Please refer the SLBuser guide for configuration instructions.
In 13.2GC, if the load balancer is configured to terminate at the OMS managed servers andyou have defined the custom certificates, then ensure the following:
• Custom certificates file(s) are placed in <EMAS plugin home>/archives/jvmd/certificates directory
• Custom certificates file(s) have a .crt extension
• Custom certificates file(s) do not have a WLSDemo_ prefix
• Custom certificates file(s) are provided in above location on each OMS
Note:
A README.txt file is available at <EMAS plugin home>/archives/jvmd/certificates directory.
Before you Begin Installing JVMD AgentBefore installing a JVMD Agent, review the points outlined in Oracle Enterprise ManagerCloud Control Basic Installation Guide.
Prerequisites for Installing JVMD AgentBefore installing a JVMD Agent, ensure that you meet the prerequisites described in OracleEnterprise Manager Cloud Control Basic Installation Guide.
Deploying JVMD Agents Using Advanced Installation OptionsThis section describes how to deploy JVMD Agents manually.
Note:
If you have removed an agent and you want to deploy it again, you must restartJVM before deploying it.
This section consists of the following:
• Deploying JVMD Agents Manually by Downloading and Deploying jamagent.war
• Deploying JVMD Agents Manually Using deploy_jvmdagent.pl
• Deploying JVMD Agents for High Availability
Chapter 15Before you Begin Installing JVMD Agent
15-3

Deploying JVMD Agents Manually by Downloading and Deployingjamagent.war
To deploy JVMD Agents manually, follow these steps:
Note:
• The preferred method of manual deployment of JVMD Agents is usingstep 1. Download jamagent.war.
• Step 2. Deploy JVMD Agent manually section is applicable only if theDownload jamagent.war fails.
1. Download jamagent.war.
To download jamagent.war using Cloud Control, follow these steps:
a. In Cloud Control, from the Setup menu, select Middleware Management,then select Engines And Agents.
b. On the Engines And Agents page, click Download JVMD Agent. TheDownload JVM Diagnostics Components dialog box is displayed.
c. From the JVMD Component menu, select JVMD Agent to downloadjamagent.war and then click OK. The JVM Diagnostics Agent web.xmlParameters dialog box is displayed.
d. From the Available Engines menu, select an option from the list:
Select the HTTP URL if you want the JVMD Agent to connect to the JVMDEngine using a non-secure connection.
Select the HTTPS URL if you want the JVMD Agent to connect to the JVMDEngine using a secure connection.
Select Custom if you want the JVMD Agent to connect to a JVMD Enginethrough a Load Balancer or a firewall. Specify the host name and the port thatthe JVMD Agent must connect to.
For example:
HTTP: http://sl1.us.example.com:3800HTTPS: https://sl1.us.example.com:3801 (secure communication)
Chapter 15Deploying JVMD Agents Using Advanced Installation Options
15-4

e. Select Enable Monitoring to deploy an agent in monitoring disabled mode, uncheckthe checkbox. You can enable or disable the monitoring using Configure JVM Targetbutton on JVM Target home page.
Library Location: Default location where jvmd agent library would be copied duringdeployment.
f. Click Download to download jamagent.war.
2. Deploy JVMD Agent manually.
Deploying JVMD Agent on WebLogic Server: using the WebLogic ServerAdministration Console
To deploy JVMD Agent on a WebLogic Managed Server manually, follow these steps:
a. Login to the WebLogic Server Administration console.
Chapter 15Deploying JVMD Agents Using Advanced Installation Options
15-5

b. In the Change Center, click Lock & Edit if that button is enabled.
c. Under Domain Structure, select Deployments.
d. On the Deployments page, click Install.
e. Click Install.
f. Delete old javadiagnosticagent.ear or jamagent.war if there are any.
g. Follow wizard instruction to install the agent as an application , target it to all orsome of the servers in the domain, leave all other options in their defaultsetting.
h. Start jamagent app if not started already.
Server restart is not required (unless it is an agent upgrade).
i. Go to EM CC and verify if ServerName_jvm target is created.
Deploying JVMD Agent on WebLogic Server
To deploy JVMD Agent on a WebLogic Managed Server manually, follow thesesteps:
a. Make a copy of the deployment profile sample_jvmdagent_deploy.propertiesavailable in the jvmd.zip file. Update the location of thejavadiagnosticagent.ear file, the name of the WebLogic domain, and theserver information. Save the profile as jvmdagent_deploy.properties.For more information about the parameters, view the README.txt file presentin the customprov folder of the jvmd.zip file.
b. Run the following perl script available in the customprov folder of the jvmd.zipfile to deploy JVMD Agent on all the specified servers.
perl deploy_jvmdagent.pl
Note:
Ensure that the deployment profile jvmdagent_deploy.propertiesand the perl scripts are available in the same folder.
Deploying JVMD Agent on GlassFish
To deploy JVMD Agent on a GlassFish server manually, follow these steps:
a. Log in to the Glassfish Administration console.
b. In the Common Tasks section, click Applications.
c. In the Deployed Applications section, click Deploy.
d. For Location, select Packaged File to Be Uploaded to the Server, thenspecify the location on your local host where jamagent.war is present.
e. For Selected Targets, add the server on which you want to deployjamagent.war.
f. Click OK.
Deploying JVMD Agent on JBoss
Chapter 15Deploying JVMD Agents Using Advanced Installation Options
15-6

To deploy JVMD Agent on JBoss manually, follow these steps:
a. Log in to the JBoss Administration console.
b. Under Applications, click Web Application (WAR)s.
c. Click Add a new resource.
d. Enter the absolute path to jamagent.war present on your local host.
e. For both Deploy Exploded and Deploy Farmed, select No.
f. Click Continue.
To deploy JVMD Agent on JBoss manually, you can also do the following:
a. Transfer jamagent.war to the following location:
<JBOSS_HOME>/server/all/deployb. Restart the application server.
Deploying JVMD Agent on Tomcat
To deploy JVMD Agent on Tomcat manually, follow these steps:
a. Transfer jamagent.war to the following location:
$CATALINA_BASE/webappsb. Restart the application server.
For the latest versions of Tomcat, if the autoDeploy flag is set to truein $CATALINA_BASE/conf/server.xml, you do not need to restart the applicationserver. Tomcat will pick up jamagent.war at runtime.
Deploying JVMD Agent on Websphere
To deploy JVMD Agent on Websphere manually, follow these steps:
a. Log in to the Websphere Administration console.
b. Expand Applications, then click New Application.
c. Click New Enterprise Application.
d. For Path to the new application, select Local file system, then specify the locationon your local host where jamagent.war is present.
e. Provide the context root for jamagent.war.f. Save the configuration.
g. Start the application.
Deploying JVMD Agent on OC4J
To deploy JVMD Agent on OC4J manually, follow these steps:
a. Log in to the OC4J Administration console.
b. Click Applications.
c. Click Deploy.
d. Select Archive is present on local host. For Archive Location, specify the locationon your local host where jamagent.war is present. Click Next.
Chapter 15Deploying JVMD Agents Using Advanced Installation Options
15-7

e. For Application Name, enter jamagent. For Context Root, enter /jamagent.f. Click Deploy.
Deploying JVMD Agent on a Standalone JVM
A JVMD Agent can be deployed on a standalone JVM such that the inputs areread from web.xml, or such that you specify the inputs on the command line.
To deploy a JVMD Agent on a standalone JVM such that all the inputs are readfrom web.xml, run the following command from the command line:
java -cp <absolute_path_to_jamagent.war> jamagent.jamrun<java_class_with_a_main_method>To deploy a JVMD Agent on a standalone JVM by specifying all the inputs on thecommand line, run the following command from the command line:
java -cp <absolute_path_to_jamagent.war> jamagent.jamrun<java_class_with_a_main_method> jamconshost=<jvmd_engine_host>jamconsport=<jvmd_engine_listen_port>jamjvmid=<unique_jvmd_identifier>jamtimeout=<timeout_period_in_seconds>jamloglevel=<jvmd_agent_log_level>
Note:
When jamagent.war is run using an IBM Java Development Kit (JDK),you may see the following warning in the logs:
******can_tag_objects capability is not set.Copy library libjamcapability to another directory and restart Java with argument "-agentpath:<absolute_path_to_libjamcapability.so>" ******
To troubleshoot this warning, include the libjamcapability.so libraryand restart the IBM JVM:
/scratch/IBM/WebSphere/AppServer/java/bin/java -agentpath:/scratch/libjamcapability.so -cp /scratch/jamagent.warjamagent.jamrun MyFirstProgram
Deploying JVMD Agents Manually Using deploy_jvmdagent.plYou can deploy JVMD Agents manually, using the deploy_jvmdagent.pl script. Youcan run this script only in silent mode, that is, you must specify all the input detailsusing a properties file.
To deploy JVMD Agents manually using deploy_jvmdagent.pl, follow these steps:
1. Ensure that the latest version of jamagent.war has been downloaded.
For information on how to download jamagent.war, see Step 1 in DeployingJVMD Agents Manually by Downloading and Deploying jamagent.war.
2. Navigate to the following location on the OMS host:
$<MIDDLEWARE_HOME>/plugins/oracle.sysman.emas.oms.plugin_13.4.0.0.0/archives/jvmd/deployment_Scripts/agent/jvmd/
Chapter 15Deploying JVMD Agents Using Advanced Installation Options
15-8

3. View the README.txt file for information on how to use the deploy_jvmdagent.pl script.
4. Specify all the inputs in a properties file, then use the following command:
perl deploy_jvmdagent.pl [-appserver <server_type>] [-file<name_of_properties_file>]For example, perl deploy_jvmdagent.pl -appserver WLS -filewls_deploy.properties.Deploying JVMD Agents using deploy_jvmdagent.pl is supported only on WebLogicServer and GlassFish, and not on other application servers. The -appserver parameterdefines the application server on which you want to deploy a JVMD Agent. If you aredeploying a JVMD Agent on a WebLogic Managed Server, specify WLS for -appserver. Ifyou are deploying a JVMD Agent on a GlassFish server, specify GF for -appserver. Ifyou do not specify the -appserver parameter, it is assigned the value WLS by default.
The -file parameter defines the name of the properties file containing the deploymentinputs. If you do not specify this parameter, and have specified WLS for -appserver,deploy_jvmdagent.pl searches for a properties file namedweblogic_deploy.properties in the folder containing the script. If you do not specify the-file parameter, and have specified GF for -appserver, deploy_jvmdagent.pl looks fora properties file named glassfish_deploy.properties in the folder containing the script.To learn how to specify the input details in a properties file, view the sample propertiesfiles sample_weblogic_deploy.properties or sample_glassfish_deploy.properties.
Deploying JVMD Agents for High AvailabilityIf you have multiple JVMD Engines in your setup, and have configured a load balancer forthem, you can deploy JVMD Agents such that they connect to the load balancer, and not toany of the individual JVMD Engines. This increases the availability of the JVMD Agents, andcreates a failover mechanism, that is, even if a particular JVMD Engine goes down, theJVMD Agents remain active. For more information on configuring multiple OMS HighAvailability behind a SLB, see Enterprise Manager 13c Cloud Control: Configuring OMSHigh Availability with F5 BIG-IP Local Traffic Manager technical whitepaper.
You can deploy JVMD Agents for high availability using the Engines And Agents page, ormanually.
Deploying JVMD Agents for High Availability Using the Engines And Agents Page
To deploy JVMD Agents for high availability using the Engines And Agents page, follow thesesteps:
1. Follow the steps mentioned in Oracle Enterprise Manager Cloud Control BasicInstallation Guide to deploy a JVMD Agent.
Note:
By default, the JVMD Agent connects to the load balancer using HTTPS.
2. On the JVMD Agents Configurations page, for Available JVMD Engines, select Other.Provide the load balancer host name and port.
Click Next.
3. On the Review page, review all the information, then click Deploy.
Chapter 15Deploying JVMD Agents Using Advanced Installation Options
15-9

Deploying JVMD Agents for High Availability Manually
To deploy JVMD Agents for high availability manually, follow these steps:
1. Follow the steps mentioned in Step 1 of Deploying JVMD Agents Manually byDownloading and Deploying jamagent.war to download jamagent.war.
2. When the JVM Diagnostics Agent web.xml Parameters dialog box is displayed,from the Available Engines menu, select Custom. Provide the load balancer hostname and port.
Click Download.
3. Deploy the JVMD Agent as mentioned in Step 2 of Deploying JVMD AgentsManually by Downloading and Deploying jamagent.war.
After Installing JVMD AgentsAfter installing a JVMD Agent, follow the steps outlined in Oracle Enterprise ManagerCloud Control Basic Installation Guide.
Chapter 15After Installing JVMD Agents
15-10

16Configuring Enterprise Manager Federation
Enterprise Manager Federation allows customers to have a consolidated view of allEnterprise Manager sites providing a summary of all Enterprise Manager sites deployedacross the enterprise.
This chapter contains the following sections:
• Overview
• Enterprise Manager Federation Dashboard
• Enterprise Manager Federation Set Up and Configuration
• Enterprise Manager Federation Post Configuration Tasks
Overview
Enterprise Manager Federation allows customers to have a consolidated view of allEnterprise Manager sites providing a summary of all Enterprise Manager sites deployedacross the enterprise.
The Enterprise Manager Federation user interface offers federated summary and also, linksto specific Enterprise Manager sites summary pages for in depth analysis. The FederationOverview page offers federated summary for the following areas: Targets summary, Incidentssummary, Problems summary and Jobs summary.
The Enterprise Manager Federation supports the use of cURL commands and REST API.
Enterprise Manager Federation Dashboard
The federated Enterprise Manager sites data is accessible from a single interface. TheEnterprise Manager Federation Dashboard summarizes:
• Targets
• Incidents
• Problems
• Jobs
You can also drill down from any of the summary options described above. For example, youcan drill down into an individual Enterprise Manager's All Targets page, Job activity page orIncident overview page for details.
16-1

Enterprise Manager Federation Set Up and Configuration
The following steps are required to be executed only once by any EM SuperAdministrator user to set up the Enterprise Manager Federation:
Step 1: Set Up the Primary Enterprise Manager Site
Step 2: Add list of Enterprise Manager sites to be federated
Step 3: Import Certificates
Step 1: Set Up the Primary Enterprise Manager Site
The Enterprise Manager administrator needs to select a Primary Enterprise Managersite from the entire enterprise. It can be any Enterprise Manager site runningEnterprise Manager 13c Release 4 Update 5 (13.4.0.5) or higher version.
To set up the Primary Enterprise Manager site, you need to use emctl utility and runthe following:
emctl set property -name "oracle.sysman.federation.masterEM" -value "true"
Step 2: Add list of Enterprise Manager sites to be federated
The Enterprise Manager administrator needs to add a list of the Enterprise Managersites that will be part of the federation and their respective URLs to the PrimaryEnterprise Manager site using cURL command line tool. Any Enterprise Manager 13cRelease 4 Update 4 (13.4.0.4) or higher can be a federated site.
To add a list of Enterprise Manager sites, you can use cURL command line tool and runthe following:
curl -X POST <Primary_EM_host_URL>:<Primary_EM_host_port>/em/websvcs/restful/fed/emSites -u '<EM_user_from_Primary_EM_host>' -H 'content-
Chapter 16
16-2

type: application/json' -d '{"siteURL":"<EM_site1_URL>:EM_site1_port>", "name": "host"}'
Example using cURL
curl -X POST https://primary_em.sample.com:5416/em/websvcs/restful/fed/emSites -u 'user1' -H 'content-type: application/json' -d '{"siteURL":"https://em_site1.sample.com:5416", "name": "host"}'
Response
The response from this command returns the following:
• Successful operation: It returns the newly generated EM Site GUID for a successfulresponse. This value will be used in the following step. For example, it will return"422cf85c13354336874a1971c1d57a70" as the EM Site GUID for em_site1.sample.comsite.
• Invalid input: It returns an error code and a message for a failed response.
The cURL command supports one Enterprise Manager site at a time. Repeat this step to addmore Enterprise Manager sites as federated sites. The maximum number of federatedEnterprise Manager sites supported is 10.
Step 3: Import Certificates into Primary Enterprise Manager site's trust store
To allow https connectivity to other Enterprise Manager sites, the Enterprise Manageradministrator imports the federated Enterprise Manager sites certificates into the PrimaryEnterprise Manager site's trust store.
The administrator needs to ensure the certificates provided are PEM encoded (DER encodedcertificates are not supported).
The customer will provide other Enterprise Manager's certificate by using cURL command linetool
curl -X POST <Primary_EM_host_URL>:<Primary_EM_host_port>/em/websvcs/restful/fed/emSites/<EM Site GUID>/certificates -u '<EM_user_from_Primary_EM_host>' -H 'content-type: multipart/form-data' -F file=@<certificate file>
Example using cURL
curl -X POST https://primary_em.sample.com:5416/em/websvcs/restful/fed/emSites/422cf85c13354336874a1971c1d57a70/certificates -u 'user1' -H 'content-type: multipart/form-data' -F file=@em_site1.pem
Response
The response from this command returns the following:
• Successful operation: It returns the Certificate GUID and the PEM content of the fileuploaded for a successful response.
• Invalid input: It returns an error code and a message for a failed response.
Chapter 16
16-3

The certificate is stored in Enterprise Manager credential framework.
Enterprise Manager Federation Post Configuration Tasks
The following post configuration tasks are required to be performed by any individualuser who wants to have access to the Enterprise Manager Federation Dashboardwhich resides in the Primary Enterprise Manager site. Users will need to createcredentials and link it to the federated Enterprise Manager site. The credentials areprivate to that user and not shared.
1. Create credentials for the user
To connect to a federated Enterprise Manager site, you need to create credentialsfor the user in the Primary Enterprise Manager site.
A credential includes user name, password and an optional credential name. It'sprivate and not shared with others.
curl -X POST <Primary_EM_host_URL>:<Primary_EM_host_port>/em/websvcs/restful/fed/credentials -u '<EM_user_from_Primary_EM_host>' -H 'content-type: application/json' -d '{"userName": "<user_name>", "password": "<password>", "name": "<optional_credential_name>"}'
Example using cURL
curl -X POST https://primary_em.sample.com:5416/em/websvcs/restful/fed/credentials -u 'user1' -H 'content-type: application/json' -d '{"userName": "emuser", "password": "oracle", "name": "default"}'
Response
The response from this command returns the following:
• Successful operation: The newly created Credential GUID is returned for asuccessful response. For example, "3f1e2492016740f9aae9d2647d09efb0".This value will be used in the following step.
• Invalid input: The error code and message are returned for a failed response
Note:
If there's a credentials change in any Enterprise Manager site, the newcredentials also must be updated in the Primary Enterprise Manager site(Enterprise Manager Federation) using the following command:
curl -X PUT <Primary_EM_host_URL>:<Primary_EM_host_port>/em/websvcs/restful/fed/credentials -u '<EM_user_from_Primary_EM_host>' -H 'content-type: application/json' -d '{"userName": "<user_name>", "password": "<password>", "name": "<optional_credential_name>"}'
2. Link the user credentials to federated Enterprise Manager site
Chapter 16
16-4

After the credentials are created, you need to link the user credentials to the federatedEnterprise Manager site.
The Enterprise Manager Federation dashboard uses the user credentials to retrieve datafrom the federated Enterprise Manager site using the value of the EM Site GUID.
curl -X POST <Primary_EM_host_URL>:<Primary_EM_host_port>/em/websvcs/restful/fed/emSites/<EM Site GUID>/credential -u '<EM_user_from_Primary_EM_host>' -H 'content-type: application/json' -d '{"id": "<Credential GUID>"}'
Example using cURL
curl -X POST https://primary_em.sample.com:5416/em/websvcs/restful/fed/emSites/422cf85c13354336874a1971c1d57a70/credential -u 'user1' -H 'content-type: application/json' -d '{"id":"3f1e2492016740f9aae9d2647d09efb0"}'
• Successful operation: A string is returned for a successful response.
• Invalid input: The error code and message are returned for a failed response.
3. (Optional) Configure groups to view federated Enterprise Manager sites by groups
Starting with Enterprise Manager 13 Release 5 Update 1 (13.5.0.0.1), group basedfiltering is supported by configuring groups to view information specific to selectedgroup(s) across federated Enterprise Manager sites.
Groups are used to logically organize, manage and monitor the targets in individualEnterprise Manager sites or federated Enterprise Manger sites. Creating a federationgroup in the primary Enterprise Manager enables the federation dashboard to get dataspecific to the configured groups from the federated Enterprise Manager sites. Forexample, the super administrator can create groups for specific applications or businessunits: One group for Customer Service applications and other group for Financeapplications. The groups created by the super administrator user are available to allusers.
Requirement:
• The Primary Enterprise Manager site must have installed Enterprise Manager 13cRelease 5 Update 1 (13.5.0.0.1) or higher.
• The federated Enterprise Manager sites must have installed Enterprise Manager 13cRelease 4 Update 9 (13.4.0.0.9) or higher.
To add a group, you can use the following cURL command:
curl -X POST https://<Primary_EM_host_name>.<Primary_EM_host_domain>/em/websvcs/restful/fed/composites -u '<EM_user_from_Primary_EM_host>' -H 'content-type: application/json' -d '{ "targetName":"<Group_Name>", "targetType":"composite"}'
For example, to add a group called "Finance DB", use the following command:
curl -X POST https://primary_em.sample.com/em/websvcs/restful/fed/composites -u 'superadmin' -H 'content-type: application/json' -d '{ "targetName":"Finance DB", "targetType":"composite"}'
Chapter 16
16-5

After the groups are configured, Enterprise Manager Federation will have twodashboard types available:
• By Sites
It allows filtering down data to specific federated group across all federatedEnterprise Manager.
• By Groups
It consolidates data for all federated groups across all federated EnterpriseManager sites. This dashboard is useful for users interested to see data onlyrelated to the federated groups, and not the whole enterprise.
Chapter 16
16-6

17Using Oracle Analytics Server with EnterpriseManager
Beginning with Enterprise Manager Cloud Control 13c Release 5 (13.5.0.0.0), OracleAnalytics Publisher (formerly BI Publisher) must be accessed from a standalone OracleAnalytics Server. If you want to use reporting functionality, you will need to install or access astandalone instance of Oracle Analytics Server (OAS), previously called Enterprise Edition(OBIEE). Similarly, BI Publisher, which is part of OBIEE, has been renamed Oracle AnalyticsPublisher (OAP). See Standalone Oracle Analytics Service for more information.
17-1

18Configuring Oracle Enterprise Manager Appfor Grafana
The Oracle Enterprise Manager App for Grafana allows you to integrate and display EMMetrics data in Grafana. EM collects extensive metric data from various managed targets,and this app allows you to leverage this data for your use cases. You can create custom EM-based Grafana dashboards by browsing and selecting the EM metrics of interest, or foradvanced use cases running SQL queries against the EM Repository’s SDK views or TargetDatabases. The App is an extension to EM’s data visualization capabilities for addeddashboard customization supported by Grafana.
Starting with Enterprise Manager 13c Release 4 Update 3 (13.4.0.3) or higher, the OracleEnterprise Manager App for Grafana is available for download. For more information aboutinstalling, enabling and using this app, see Oracle Enterprise Manager App for GrafanaUser's Guide.
18-1

19Running the OMS in Console-Only Mode
Oracle Management Service (OMS) is designed to run two types of services, mainly the console services and the background services. This chapter describes how you can run theOMS in console-only mode. In particular, this chapter covers the following:
• About Running the OMS in Console-Only Mode
• Running the OMS in Console-Only Mode
About Running the OMS in Console-Only ModeOracle Management Service (OMS) is designed to run two types of services, mainly the console services and the background services. While the console services are required torender a GUI-rich console for Enterprise Manager, the background services are required torun critical jobs, upload operations, business logics, and so on.
Figure 19-1 illustrates the functioning of an OMS where both console services andbackground services are running.
Figure 19-1 Functioning of OMS with Active Console and Background Services
19-1

In a multi-OMS environment, if you want to have a dedicated OMS for User Interface(UI) operations or if you do not want to run background services in SSA OMS(external-facing OMS in a private or public cloud environment), then you can choose toshut down the background services and run only the UI services, thus turning the OMSinto a pure, console-only mode. In such a case, the Management Agents upload datato other OMS instances where both background services and UI services are running.However, note that you cannot shut down the background services and run only the UIservices of an OMS that is deployed in a remote location.
Note:
• Only the additional OMS instances can be run in console-only mode,while the OMS instance that shares the host with the AdministrationServer cannot.
• Only the additional OMS instances of the same location can be run inconsole-only mode, while the additional OMS in a remote locationcannot. For example, if you have four OMS instances in the US and onein Australia, then the OMS in Australia cannot be run in console-onlymode.
Running the OMS in Console-Only ModeTo run the OMS in console-only mode, follow these steps:
1. Stop the OMS using the following command.
$<ORACLE_HOME>/bin/emctl stop oms2. Set the start up mode to console-only, using the following command.
$<ORACLE_HOME>/bin/emctl config oms -set_startup_mode console_only3. Start the OMS using the following command.
$<ORACLE_HOME>/bin/emctl start omsTo revert the OMS instances to Normal mode, run the following command, and restartthe OMS.
$<ORACLE_HOME>/bin/emctl config oms -set_startup_mode normal
Chapter 19Running the OMS in Console-Only Mode
19-2

20Support for Customization of EnterpriseManager Login Page
Enterprise Manager allows customization of the EM login page in order to accommodatecorporate policies and standards.
This chapter covers the following topics:
• Logo on Enterprise Manager Login Page
• License Agreement Popup
• Informational Text on Enterprise Manager Login Page
Logo on Enterprise Manager Login PageStarting with EM 13c Release 3, a logo can be placed on the upper left corner of theEnterprise Manager login page. The supported image formats are jpeg, jpg, png, and gif. Thelogo ratio of the image file is adjusted according to the allocated space. The current size ofthe space provided is “width:200px;height:70px”. It is recommended to modify the logo imageso that it fits into the space provided.
Figure 20-1 Modify the logo image to accommodate the allocated space
20-1

The image file can be hosted on any web server including Weblogic server. For anexample on how to set it up on Weblogic server, see Setup Weblogic Server to HostImages.
Setup Weblogic Server to Host ImagesIn order to load a custom logo image file on the Enterprise Manager login page, a webapplication containing the static image file needs to be deployed to the Weblogicdomain on the Admin Server. For instructions on how to install a Web application, see https://docs.oracle.com/middleware/1213/wls/WLACH/taskhelp/web_applications/InstallWebApplications.html
To deploy the custom logo image file, perform the following steps:
1. On the OMS host, create a directory to store the logo image file to be used on theEM login page. For example, /u01/oracle/gc_inst/em/EMGC_OMS1/temp
2. Copy the logo image file to the newly created directory. For example, /u01/oracle/gc_inst/em/EMGC_OMS1/temp/custom_logo.png
3. In the newly created directory, create a WEB-INF directory. For example, /u01/oracle/gc_inst/em/EMGC_OMS1/temp/WEB-INF
4. In the WEB-INF directory create a file called web.xml with the following content:
<?xml version="1.0" encoding="UTF-8"?><!DOCTYPE web-app PUBLIC"-//Sun Microsystems, Inc.//DTD Web Application 2.3//EN""http://java.sun.com/j2ee/dtds/web-app_2_3.dtd"><web-app></web-app>
5. Login to the Weblogic console. Username by default is weblogic and password isthe sysman password.
URL: https://hostname:port/consoleExample: https://<fully_qualified_host_name>:7102/console
Note:
The Weblogic console URL (Admin Server URL) is not the same URL asthe Enterprise Manager console. The host and the port are valuesspecified in the AS_HOST and AS_HTTPS_PORT parameters,respectively, in the emgc.properties file. This properties file is available inthe Oracle Management Service Instance Base location of the first OMS.For example, /u01/oracle/gc_inst/em/EMGC_OMS1/emgc.properties.The Admin Server URL can also be found in the <EM Home Dir>/install/setupinfo.txt file.
6. Enable ‘http’ port for the Admin Server. This can be done from the Admin Serversettings.
a. From the tree view, expand Environment and then select Servers. Find andclick EMGC_ADMINSERVER (admin) in the table.
Chapter 20Logo on Enterprise Manager Login Page
20-2

Note:
For multi-OMS deployments, the custom logo image can be hosted on eachOMS server. In case an OMS server is not available due to patching orupgrade, the running OMS server can still access the logo image hosted byits own OMS tier. To configure the logo image in this method, deploy theimage to each OMS tier, for example, EMGC_OMS1, EMGC_OMS2,EMGC_OMS3 and so on, instead of EMGC_ADMINSERVER.
b. Settings for EMGC_ADMINSERVER page opens. Go to the General Tab, if notopened already. Select the Listen Port Enabled check box.
c. Edit the port number as required. The default port number is 7001. The value ofListen Port will be the http port which will be used later to run the emctlcommand to set the image file.
d. Click Save. The following message appears at the top of the screen:
All changes have been activated. No restarts are necessary.
Settings updated successfully.
Figure 20-2 Setting http listen port on the Weblogic Server AdministrationConsole
7. Click Deployments menu at the left. The Install button is disabled by default.
8. Click Lock & Edit to enable the Install button.
9. In the Deployments screen, click the Install button.
10. Set the path to the directory created from Step 1 ( /u01/oracle/gc_inst/em/EMGC_OMS1/temp).
11. Click Next.
12. In the next screen, accept the default values for the selected options. By default Installthis deployment as an application option will be selected.
13. Click Next.
14. In the next screen, select EMGC_ADMINSERVER as the target.
Chapter 20Logo on Enterprise Manager Login Page
20-3

15. Click Next.
16. In the next screen, accept the default values.
17. Click Finish.
If the application is successfully deployed, the following message appears:
All changes have been activated. No restarts are necessary.
The deployment has been successfully installed.
18. Ensure that the status of the web application 'temp' deployed above is in 'Active'state. If not, click Activate Changes on the upper left corner to activate.
19. If the status of ‘temp’ appears as Prepared even after Step 18, select ‘temp’ fromthe table and click Start.
Note:
Ensure that the status of ‘temp’ appears ‘Active’ in the Deploymentstable.
Figure 20-3 Deploying a Web Application on the Weblogic ServerAdministration Console
20. Access the file path to ensure the image appears on the browser screen.
URL: http://hostname:port/console/<newly created directory>/<logoimage filename>Example: http://<fully_qualified_host_name>:7001/temp/custom_logo.pngBoth http and https based image location are supported.
Run EMCTL Command to set the Logo ImageThe login page logo can be set by using EMCTL commands. For more information,see Executing EMCTL Commands. OMS restart is not required to reflect the newproperty value.
The EMCTL command to set the logo image is:
Chapter 20Logo on Enterprise Manager Login Page
20-4

emctl set property -name oracle.sysman.core.uifwk.loginPageLogo –value '<HTTP URL to the image file>' -sysman_pwd <sysman password>
For example,
emctl set property -name oracle.sysman.core.uifwk.loginPageLogo –value ‘http://page.example.com:7001/temp/custom_logo.png’ -sysman_pwd password
Below is a sample output after running the EMCTL command to set the logo image:
bash-4.2$ ./emctl set property -name oracle.sysman.core.uifwk.loginPageLogo –value ‘http://page.example.com:7001/temp/custom_logo.png’ -sysman_pwd password
Oracle Enterprise Manager Cloud Control 13c Release 4Copyright (c) 1996, 2019 Oracle Corporation. All rights reserved.Property oracle.sysman.core.uifwk.loginPageLogo has been set to value http://page.example.com:7001/temp/custom_logo.png for all Management ServersOMS restart is not required to reflect the new property value
The EMCTL command to unset the logo image is:
emctl set property -name oracle.sysman.core.uifwk.loginPageLogo -value null -sysman_pwd <sysman password>
For example,
emctl set property -name oracle.sysman.core.uifwk.loginPageLogo -value null -sysman_pwd password
Access EM Login Page to see the LogoFrom the browser, go to https://<hostname>:<port>/em/faces/logon/core-uifwk-console-login
Note:
You must clear the browser cache if you do not see the custom logo on theEnterprise Manager login page.
Chapter 20Logo on Enterprise Manager Login Page
20-5

Figure 20-4 Enterprise Manager Login Page with Custom Logo
License Agreement PopupA License Agreement popup can be configured to appear after the user clicks on theLogin button from the Enterprise Manager login page. On pressing Login, a LicenseAgreement popup message appears confirming the user whether they ‘Agree’ or‘Disagree’. On pressing Agree the user will be able to successfully login. On pressingDisagree or Close, the user will stay in the login page. By default, the popup title isTerms of Service Agreement and the button labels are Agree and Disagree. TheLicense Agreement popup title, message, and the button labels are customizableusing EMCTL commands. OMS restart is not required to reflect the new propertyvalue.
The EMCTL command to set the License Agreement popup title is:
emctl set property -name oracle.sysman.core.uifwk.licenseAgreementMessagePopupTitle -value ‘<popup title>' -sysman_pwd <sysman password>
For example,
emctl set property -name oracle.sysman.core.uifwk.licenseAgreementMessagePopupTitle -value ‘ABC Company License Agreement’ -sysman_pwd password
The EMCTL command to set the License Agreement popup message is:
emctl set property -name oracle.sysman.core.uifwk.licenseAgreementMessage -value ‘<popup message>’ -sysman_pwd <sysman password>
For example,
emctl set property -name oracle.sysman.core.uifwk.licenseAgreementMessage -value ‘Do you agree to the License Agreement?’ -sysman_pwd password
The popup message supports HTML tags. For a list of supported HTML tags, see https://docs.oracle.com/html/E12419_09/tagdoc/af_outputFormatted.html
Chapter 20License Agreement Popup
20-6

For example,
emctl set property -name oracle.sysman.core.uifwk.licenseAgreementMessage -value '<H2 align=center>ABC Company </H2>Warning: You are accessing a system operated by ABC Company. Unauthorized access or use of this system is prohibited and may constitute an offense under the Computer Misuse Act 1990. </b> <br><br> ABC Company will take appropriate actions if information is disclosed without prior authorization. This may include legal proceedings, prosecution and disciplinary action up to and including dismissal.<br><br> <b>Click "Agree" if you are authorized to access this application and agree to the stated Terms of Service Agreement. </b>' -sysman_pwd password
The EMCTL command to unset the License Agreement popup message is:
emctl set property -name oracle.sysman.core.uifwk.licenseAgreementMessage -value null -sysman_pwd <sysman password>
For example,
emctl set property -name oracle.sysman.core.uifwk.licenseAgreementMessage -value null -sysman_pwd password
The EMCTL command to set the License Agreement popup’s agree button label is:
emctl set property -name oracle.sysman.core.uifwk.licenseAgreementMessageAgreeButton -value ‘<Agree button label>’ -sysman_pwd <sysman password>
For example,
emctl set property -name oracle.sysman.core.uifwk.licenseAgreementMessageAgreeButton -value ‘Yes’ -sysman_pwd password
The EMCTL command to set the License Agreement popup’s disagree button label is:
emctl set property -name oracle.sysman.core.uifwk.licenseAgreementMessageDisagreeButton -value '<Disagree button label>' -sysman_pwd <sysman password>
For example,
emctl set property -name oracle.sysman.core.uifwk.licenseAgreementMessageDisagreeButton -value ‘No’ -sysman_pwd password
Chapter 20License Agreement Popup
20-7

Figure 20-5 Enterprise Manager License Agreement Popup
Informational Text on Enterprise Manager Login PageAn informational text can be placed to the left of the Enterprise Manager login fields.The Informational text can be used to provide contextual help with using the site.Some examples of usage include instructions to apply for access, password resetpolicy, and instructions for assistance. Similar to the License Agreement popupmessage, informational text also supports HTML tags. OMS restart is not required toreflect the new property value.
The EMCTL command to set the informational text is:
emctl set property -name oracle.sysman.core.uifwk.loginPageInformationText -value ‘<informational text>’ -sysman_pwd <sysman password>
For example,
emctl set property -name oracle.sysman.core.uifwk.loginPageInformationText -value ‘<b> Please use your IUSER credentials to log into OEM </b> <br><br> For lost/forgotten passwords, please use the reset facility: http://page.example.com <br><br> To apply for access please complete this application form: http://page.example.com <br>' -sysman_pwd password
The EMCTL command to unset the informational text is:
emctl set property -name oracle.sysman.core.uifwk.loginPageInformationText -value null -sysman_pwd <sysman password>
For example,
emctl set property -name oracle.sysman.core.uifwk.loginPageInformationText -value null -sysman_pwd password
Chapter 20Informational Text on Enterprise Manager Login Page
20-8

Figure 20-6 Enterprise Manager Login Page Informational Text
Chapter 20Informational Text on Enterprise Manager Login Page
20-9

21Installing Oracle Enterprise Manager CloudControl and Configuring the Agent on OracleDirectory Server Enterprise Edition (ODSEE)
This chapter describes how you can install Oracle Enterprise Manager Cloud Control(OEMCC) 13c and configure the Agent on Oracle Directory Server Enterprise Edition(ODSEE) 11g for Monitoring.
In particular, this chapter covers the following:
• Installing Oracle Enterprise Manager Cloud Control (OEMCC) 13.4
• Login to Oracle Enterprise Manager Cloud Control (OEMCC)
• Configuring ODSEE as a Middleware Target
Installing Oracle Enterprise Manager Cloud Control 13.5This section shows an example of installing Oracle Enterprise Manager Cloud Control 13.5 tomonitor Oracle Directory Server Enterprise Edition (ODSEE) 11.1.1.7.181016. Agentinstallation already exists for ODSEE since ODSEE is on the same host as OEMCC.
Before you start installing Enterprise Manager Cloud Control 13.5, refer to the following forfurther information:
• Oracle Enterprise Manager Cloud Control Online Documentation Library
• Enterprise Manager Cloud Contronl Basic Installation Guide
• Oracle Enterprise Manager Downloads
• Oracle Enterprise Manager Deployment Prerequisites
• Before You Begin Installing an Enterprise Manager System
• Prerequisites for Installing an Enterprise Manager System
• Overview of the EM Prerequisite Kit
The installation example below follows the Simple Configuration steps as available in Installing an Enterprise Manager System for a Demonstration Site (Simple Configuration).
Note:
You can also follow the Advanced Configuration step as available in Installing anEnterprise Manager System for a Production Site (Advanced Configuration).
1. Run em13500_linux64.bin.
a. Download the following files for OEMCC 13.5 and save in the same directory:
21-1

• em13500_linux64-2.zip em13500_linux64-3.zipem13500_linux64-4.zip em13500_linux64-5.zipem13500_linux64-6.zip
• em13500_linux64-7.zip em13500_linux64-8.zipem13500_linux64.json em13500_linux64.bin
b. Run the .bin file chmod +x em13500_linux64.bin.
c. Run ./em13500_linux64.bin.
Note:
If the /tmp directory does not have enough space , thenem13500_linux64.bin can not be run to install OEMCC. Run ./em13500_linux64.bin -J-Djava.io.tmpdir=/refresh/EM13.5/tmpto specify a tmp directory that has greater than 14 GB of space.
2. Enter My Oracle Support Details..
3. Click Next.
4. Install the software updates.
5. Check the prerequisites.
6. Click Next.
7. Select the Installation Types (Simple or Advanced).
8. In the Installation Details dialog box, specify the Middleware Home, Agent Basedirectory, and Host Name.
9. Click Next.
10. Enter the Configuration Details.
Chapter 21Installing Oracle Enterprise Manager Cloud Control 13.5
21-2

11. Click Next.
12. Configure Shared Locations.
13. Click Next.
14. Review and Install.
Chapter 21Installing Oracle Enterprise Manager Cloud Control 13.5
21-3

15. Track the Progress.
Note:
This stage of installation alerts you of any database repositoryprerequisite issues.
16. Run the allroot.sh script as root.
17. Click Finish to end the installation.
For more information on installing, see Performing Postinstallation Tasks AfterInstalling an Enterprise Manager System
Login to Oracle Enterprise Manager Cloud Control(OEMCC)
After you are done with OEMCC installation, you can login to the Enterprise Managerconsole.
1. Enter the Enterprise Manager Cloud Control url obtained at the last step ofinstallation in your browser.
The OEMCC 13c Login page appears.
2. Login as a SYSMAN using the administrator password specified duringinstallation.
3. Accept the License Agreement.
The OEMCC 13c home page appears.
Chapter 21Login to Oracle Enterprise Manager Cloud Control (OEMCC)
21-4

Configuring Oracle Directory Server Enterprise Edition (ODSEE)as a Middleware Target
The Middleware Target configuration uses the Directory Service Control Center (DSCC) tomonitor each ODSEE instance. This means that each ODSEE instance that is intended to bemonitored by OEMCC has to be registered in the DSCC.
1. Login into OEMCC as SYSMAN and then, click Targets and select Middleware.
2. Click Add and select Oracle Directory Server Enterprise Edition.
3. Enter the ODSEE Registry Host (where the DSCC resides), the ODSEE Registry Port(the DSCC port number, by default 3998), the Directory Server Username (by default,cn=admin,cn=administrators,cn=dscc), the Directory Server User Password, and theODSEE Install Home (where DSCC was installed from). Retain the default value forUnique Deployment Identifier field. Click Continue.
Chapter 21Configuring Oracle Directory Server Enterprise Edition (ODSEE) as a Middleware Target
21-5

Figure 21-1 Oracle Directory Server Enterprise Edition
4. The existing Targets are displayed, which will be the DSCC and any ODSEEinstances registered to that DSCC. Click Continue.
The DSCC and its registered instances are displayed in OEMCC.
Figure 21-2 Middleware Targets
5. Click the DSCC link to display the ODSEE instances registered to that DSCC.
6. Click the ODSEE link to display the information on the LDAP Service tab.
7. Run the Directory Server Resource Kit (DSRK) searchrate against the instance toshow the metric changes.
Figure 21-3 Metrics
Chapter 21Configuring Oracle Directory Server Enterprise Edition (ODSEE) as a Middleware Target
21-6

A graph of CPU utilization is also displayed, from where you can monitor the Load andResponse and System Resources.
Figure 21-4 CPU Utilization Graph
8. Click the Resources tab to display the cache metrics and the suffix/backend information.
9. Click the suffixes and backends link to display the cache information for backend files,system resources, and suffix-backend entry.
Chapter 21Configuring Oracle Directory Server Enterprise Edition (ODSEE) as a Middleware Target
21-7

Part VIConfiguring Enterprise Manager for HighAvailability
This section covers Enterprise Manager high availability best practices and strategies thatallow you to safeguard your Oracle Enterprise Manager installation.
• High Availability Solutions
• Enterprise Manager High Availability
• Enterprise Manager Disaster Recovery
• Backing Up and Recovering Enterprise Manager

22High Availability Solutions
Highly Available systems are critical to the success of virtually every business today. It isequally important that the management infrastructure monitoring these mission-criticalsystems are highly available. The Enterprise Manager Cloud Control architecture isengineered to be scalable and available from the ground up. It is designed to ensure that youconcentrate on managing the assets that support your business, while it takes care ofmeeting your business Service Level Agreements.
When you configure Cloud Control for high availability, your aim is to protect each componentof the system, as well as the flow of management data in case of performance or availabilityproblems, such as a failure of a host or a Management Service.
Maximum Availability Architecture (MAA) provides a highly available Enterprise Managerimplementation by guarding against failure at each component of Enterprise Manager.
The impacts of failure of the different Enterprise Manager components are:
• Management Agent failure or failure in the communication between Management Agentsand Management Service
Results in targets monitored by the agent no longer being monitored by EnterpriseManager.
• Management Service failure
Results in downtime for Enterprise Manager.
• Management Repository failure
Results in downtime for Enterprise Manager.
• Software Library Failure
Results in a sub-set of Enterprise Manager operations being unavailable. Theseoperations include self-update and provisioning and patching operations including Agentdeployment.
Overall, failure in any component of Enterprise Manager can result in substantial servicedisruption. Therefore it is essential that each component be hardened using a highly availablearchitecture.
Latest High Availability InformationBecause of rapidly changing technology, and the fact that high availability implementationsextend beyond the realm of Oracle Enterprise Manager, the following resources should bechecked regularly for the latest information on third-party integration with Oracle's highavailability solutions (F5 or third-party cluster ware, for example).
• Oracle Maximum Availability Architecture Web site
HTTP://www.oracle.com/goto/maa
• Enterprise Manager 13c Framework and Infrastructure Web site
HTTP://www.oracle.com/technetwork/oem/frmwrk-infra-496656.html
22-1

Defining High AvailabilityOracle Enterprise Manager's flexible, distributed architecture permits a wide range ofdeployment configurations, allowing it to meet the monitoring and management needsof your business, as well as allowing for expansion as business needs dictate.
For this reason, high availability for Enterprise Manager cannot be narrowly defined asa singular implementation, but rather a range of protection levels based on youravailable resources, Oracle technology and best practices that safeguard theinvestment in your IT infrastructure. Depending on your Enterprise Managerdeployment and business needs, you can implement the level of high availabilitynecessary to sustain your business. High availably for Enterprise Manager can becategorized into four levels, each level building on the previous and increasing inimplementation cost and complexity, but also incrementally increasing the level ofavailability.
Levels of High AvailabilityEach high availability solution level is driven by your business requirements andavailable IT resources. However, it is important to note that the levels represent asubset of possible deployments that are useful in presenting the various optionsavailable. Your IT organization will likely deploy its own configuration which need notexactly match one of the levels.
The following table summarizes four example high availability levels for OracleEnterprise Manager installations as well as general resource requirements.
Table 22-1 Enterprise Manager High Availability Levels
Level Description MinimumNumber ofNodes
RecommendedNumber ofNodes
Load BalancerRequirements
Level 1 OMS and repository database.Each resides on their own host withno failover.
1 2 None
Level 2 OMS installed on shared storagewith a VIP based failover. Databaseis using Local Data Guard.
2 4 None
Level 3 OMS in Active/Active configuration.The database is using RAC + LocalData Guard
3 5 Local Load Balancer
Chapter 22Defining High Availability
22-2

Table 22-1 (Cont.) Enterprise Manager High Availability Levels
Level Description MinimumNumber ofNodes
RecommendedNumber ofNodes
Load BalancerRequirements
Level 4 OMS on the primary site in Active/Active Configuration. Repositorydeployed using Oracle RAC.
Duplicate hardware deployed at thestandby site.
DR for OMS and Software Libraryusing Storage Replication betweenprimary and standby sites.
Database DR using Oracle DataGuard.
Note: Level 4 is a MAA BestPractice, achieving highestavailability in the most costeffective, simple architecture.
4 8 Required: LocalLoad Balancer foreach site.
Optional: GlobalLoad Balancer
Comparing Availability LevelsThe following tables compare the protection levels and recovery times for the various HAlevels.
Table 22-2 High Availability Levels of Protection
Level OMS HostFailure
OMS StorageFailure
Database HostFailure
DatabaseStorage Failure
Site Failure/DisasterRecovery
Level 1 No No No No No
Level 2 Yes No Yes Yes No
Level 3 Yes Yes Yes Yes No
Level 4 Yes Yes Yes Yes Yes
Table 22-3 High Availability Level Recovery Times
Level Node Failure Local Storage Failure Site Failure Cost
Level 1 Hours-Days Hours-Days Hours-Days $
Level 2 Minutes Hours-Days Hours-Days $$
Level 3 No Outage Minutes Hours-Days $$$
Level 4 No Outage Minutes Minutes $$$$
One measure that is not represented in the tables is that of scalability. Levels three and fourprovide the ability to scale the Enterprise Manager installation as business needs grow. Therepository, running as a RAC database, can easily be scaled upwards by adding new nodesto the RAC cluster and it is possible to scale the Management Service tier by simply addingmore OMS servers.
Chapter 22Comparing Availability Levels
22-3

If you need equalized performance in the event of failover to a standby deployment,whether that is a local standby database or a Level four standby site including astandby RAC database and standby OMS servers, it is essential to ensure that thedeployments on both sites are symmetrically scaled. This is particularly true if youwant to run through planned failover routines where you actively run on the primary orsecondary site for extended periods of time. For example, some finance institutionsmandate this as part of operating procedures.
If you need survivability in the event of a primary site loss you need to go with a Levelfour architecture.
Implementing High Availability LevelsOnce you have determined the high availability requirements for your enterprise, youare ready to begin implementing one of the high availability levels that is suitable foryour environment. Use the following information roadmap to find implementationinstructions for each level.
Level Where to find information
Level 1 Oracle Enterprise Manager Basic Installation Guide and the Oracle EnterpriseManager Advanced Installation and Configuration Guide
Level 2 Oracle Enterprise Manager Basic Installation Guide and the Oracle EnterpriseManager Advanced Installation and Configuration Guide
PLUS
• Configuring the Cloud Control OMS in an Active/Passive Environment forHA Failover Using Virtual Host Names
• Configuring a Standby Database for the Management Repository
Level 3 Oracle Enterprise Manager Basic Installation Guide and the Oracle EnterpriseManager Advanced Installation and Configuration Guide
PLUS
• Oracle Management Service High Availability• Configuring a Load Balancer• Configuring the Software Library• Installing Additional Management Services• Configuring a Standby Database for the Management Repository
Level 4 Oracle Enterprise Manager Basic Installation Guide and the Oracle EnterpriseManager Advanced Installation and Configuration Guide
PLUS
• Configuring a Standby Database for the Management Repository• Management Service Disaster Recovery
Chapter 22Implementing High Availability Levels
22-4

23Enterprise Manager High Availability
This chapter discusses best practices for installation and configuration of each Cloud Controlcomponent and covers the following topics:
• Agent High Availability
• Repository High Availability
• Oracle Management Service High Availability
Agent High AvailabilityThe following sections discuss best practices for installation and configuration of theManagement Agent.
Configuring the Management Agent to Automatically Start on Boot andRestart on Failure
The Management Agent is started manually. It is important that the Management Agent beautomatically started when the host is booted to insure monitoring of critical resources on theadministered host. To that end, use any and all operating system mechanisms toautomatically start the Management Agent. For example, on UNIX systems this is done byplacing an entry in the UNIX /etc/init.d that calls the Management Agent on boot or bysetting the Windows service to start automatically.
Configuring Restart for the Management AgentOnce the Management Agent is started, the watchdog process monitors the ManagementAgent and attempts to restart it in the event of a failure. The behavior of the watchdog iscontrolled by environment variables set before the Management Agent process starts. Theenvironment variables that control this behavior follow. All testing discussed here was donewith the default settings.
• EM_MAX_RETRIES – This is the maximum number of times the watchdog will attempt torestart the Management Agent within the EM_RETRY_WINDOW. The default is toattempt restart of the Management Agent three times.
• EM_RETRY_WINDOW - This is the time interval in seconds that is used together withthe EM_MAX_RETRIES environmental variable to determine whether the ManagementAgent is to be restarted. The default is 600 seconds.
The watchdog will not restart the Management Agent if the watchdog detects that theManagement Agent has required restart more than EM_MAX_RETRIES within theEM_RETRY_WINDOW time period.
23-1

Installing the Management Agent Software on Redundant StorageThe Management Agent persists its configuration, intermediate state and collectedinformation using local files in the Agent State Directory.
In the event that these files are lost or corrupted before being uploaded to theManagement Repository, a loss of monitoring data and any pending alerts not yetuploaded to the Management Repository occurs.
To protect from such losses, configure the Agent State Directory on redundant storage.The Agent State Directory can be determined by entering the command'$AGENT_HOME/agent_inst/bin/emctl getemhome', or from the Agent Homepage inthe Cloud Control console.
Repository High AvailabilityThe following sections document best practices for repository configuration.
General Best Practice for Repository High AvailabilityBefore installing Enterprise Manager, you should prepare the database, which will beused for setting up Management Repository. Install the database using DatabaseConfiguration Assistant (DBCA) to make sure that you inherit all Oracle install bestpractices.
• Choose Automatic Storage Management (ASM) as the underlying storagetechnology.
• Enable ARCHIVELOG Mode
• Enable Block Checksums
• Configure the Size of Redo Log Files and Groups Appropriately
• Use a Flash Recovery Area
• Enable Flashback Database
• Use Fast-Start Fault Recovery to Control Instance Recovery Time
• Enable Database Block Checking
• Set DISK_ASYNCH_IO
Use the MAA Advisor for additional high availability recommendations that should beapplied to the Management Repository. MAA Advisor can be accessed by selectingAvailability > MAA Advisor from the Homepage of the Repository Database.
See Overview of High Availability for more information on these and other bestpractices to ensure the database that hosts the Management Repository is configuredto provide required availability.
Configuring RAC for the Management RepositoryIf the Management Repository is a Real Application Cluster (RAC) database, theManagement Services should be configured with the appropriate connect strings.SCAN connect strings are recommended to avoid reconfiguration of the Repository
Chapter 23Repository High Availability
23-2

connect descriptor following addition or removal of nodes in the Repository tier.SERVICE_NAME should always be used in connect strings instead of SID_NAME
Refer to the Oracle Database Net Services Administrator's Guide for details.
The following example shows a connect string for Repository
(DESCRIPTION=(ADDRESS=(PROTOCOL=TCP)(HOST=primary-cluster-scan.example.com)(PORT=1521))(CONNECT_DATA=(SERVER=DEDICATED)(SERVICE_NAME=PDB.example.com)))
The Repository connect descriptor is configured by running the emctl command fromManagement Service. If you have multiple Management Services configured, this commandmust be run on each Management Service.
emctl config oms -store_repos_details -repos_conndesc '(DESCRIPTION= (ADDRESS_LIST=(FAILOVER=ON) (ADDRESS=(PROTOCOL=TCP)(HOST=node1-vip.example.com)(PORT=1521)) (ADDRESS=(PROTOCOL=TCP)(HOST=node2-vip.example.com)(PORT=1521))) (CONNECT_DATA=(SERVICE_NAME=EMREP)))' -repos_user sysman
After updating the Repository connect descriptor, run the following command from any oneOMS to make the same change to the monitoring configuration used for the ManagementServices and Repository target:
emctl config emrep -conn_desc <repository_connect descriptor as above>
Oracle Management Service High AvailabilityThe following sections document configuring the OMS for high availability.
OMS high availability begins with ensuring there is at least one OMS available at any giventime. Depending upon your Recovery Time Objective (RTO), this can be accomplishedwithout downtime from loss of a node in an active/active configuration by adding at least oneadditional OMS, or with limited downtime from loss of a node in an active/passiveconfiguration by ensuring that the OMS can be run with the same address on a differentserver if the primary server fails. See High Availability Solutions for more details onarchitectural options for achieving high availability.
Regardless of the manner selected to provide high availability, and the level of availabilityselected for initial installation, there are a number of steps that can be taken to best preparethe environment for a future move to higher levels of availability including disaster recovery.See "Best Practices for Configuring the Cloud Control OMS to be Compatible with DisasterRecovery using Alias Host Names and Storage Replication" for details on these steps.
To ensure OMS high availability, there also must be a sufficient number of OMSs to supportthe size and scope of the environment managed by Enterprise Manager as well as the scaleand complexity of the usage of Enterprise Manager including the number of administratorsand the breadth of capability employed.
Once an environment requires more than one active OMS, whether to ensure sufficientcapacity for the environment or to prevent the downtime associated with failover to a passiveOMS, a Server Load Balancer (SLB) is required. A SLB provides a single address forManagement Agents and administrators to communicate with the set of OMS servers,monitors the OMSs to know which OMSs are available, and routes the communication to anavailable OMS.
It can be expensive to implement a SLB. If the environment does not need more than oneOMS to handle the processing requirements, and if the minutes of downtime associated withan active/passive failover of the OMS meets RTO requirements, a SLB is not required to
Chapter 23Oracle Management Service High Availability
23-3

provide high availability. The instructions in "Configuring the Cloud Control OMS in anActive/Passive Environment for HA Failover Using Virtual Host Names" provide anexample of how to configure for high availability using a virtual IP address and sharedstorage.
If you need to add one or more additional OMSs to support your RTO and/or theprocessing needs of the environment, see "Installing Additional ManagementServices". Once you've added additional OMS(s), see "Configuring MultipleManagement Services Behind a Server Load Balancer (SLB) " for information on howto configure multiple OMSs behind a SLB.
Best Practices for Configuring the Cloud Control OMS to beCompatible with Disaster Recovery using Alias Host Names andStorage Replication
This section provides best practices for Cloud Control administrators who want toinstall the Cloud Control OMS in a manner that will ensure compatibility with DisasterRecovery using Alias Host Names and Storage Replication. This will reduce the stepsrequired to implement a Disaster Recovery configuration should it be required at afuture date. These best practices are applicable for every MAA high availability levelinstallation. Installing even a standalone OMS in a manner that considers the needs ofthe highest MAA high availability level will provide the greatest flexibility and easiestmigration to higher MAA high availability levels in the future.
Overview and RequirementsThe following installation conditions must be met in order for a Cloud Control OMSinstallation to support Disaster Recovery using alias host names and storagereplication:
• The Middleware Home, OMS Instance Base, Agent Base, and Oracle Inventorydirectories must be installed on storage that can be replicated to the standby site.
• The installation of the OMS must be performed in a manner that maintains anAlias Host Name that is the same for the primary and standby site hosts for theOMS. This Alias Host Name allows the software to be configured such that thesame binaries and configuration can be used either on the OMS host at theprimary or standby site without changes.
• The Middleware Home, OMS Instance Base, and Agent Base must be installedusing the Oracle Inventory location on the storage that can be replicated to thestandby site.
• The software owner and time zone parameters must be the same on all nodes thatwill host this Oracle Management Service (OMS).
• The path to the Middleware, Instance, OMS Agent, and Oracle Inventorydirectories must be the same on all nodes that will host this OMS.
Create an OMS installation base directory under ORACLE_BASETo support disaster recovery, the Middleware Home, OMS Instance Base, Agent Base,and Oracle Inventory directories must be installed on storage that can be replicated tothe standby site. Each of these directories is traditionally located directly underneathORACLE_BASE. Once an OMS is installed, its directory path cannot be changed.
Chapter 23Oracle Management Service High Availability
23-4

Transitioning an installation with each of these directories located directly underneathORACLE_BASE to replicated storage later can add complications such as requiring theORACLE_BASE to be relocated to replicated storage to maintain the original directory pathsfor the installed software, which would require any locally installed software under that path tobe uninstalled and reinstalled in an alternate local storage directory.
To provide the greatest flexibility for future storage migrations, create a directory underORACLE_BASE that will be the base directory for all OMS software, including theMiddleware Home, OMS Instance Base, Agent Base, and Oracle Inventory directories. Forexample, if the ORACLE_BASE is /u01/app/oracle, create a new OMS installation basedirectory, such as /u01/app/oracle/OMS. This directory will serve as the mount point for thereplicated storage. If the software is installed locally under this directory, this directory canbecome a single mount point to the replicated storage enabling a simple migration. Whenproviding and reviewing directory locations while installing the OMS, ensure the MiddlewareHome, OMS Instance Base, Agent Base, and Oracle Inventory are installed under thisdirectory.
Configure an Alias Host NameTo support disaster recovery, a host at the primary site and a host at the standby site must becapable of running with the same host name used in the OMS installation. This can beaccomplished using an alias host name.
Configure an alias host name to use in the installation using the guidance in "Planning HostNames." Option 2: Alias host names on both sites in this section provides the greatestflexibility and is recommended as a best practice for new installations.
To implement Option 2, specify the alias host name when installing the OMS, either by usingthe ORACLE_HOSTNAME=<ALIAS_HOST_NAME> parameter or by specifying the aliashost name in the Host Name field in the OUI installation. For example, include the followingparameter on the installation wizard command line:
ORACLE_HOSTNAME=oms1.example.com
Configure an Oracle Inventory located under OMS installation base directoryTo support disaster recovery, a single OMS installation is shared by a host at the primary siteand a host at the standby site using replicated storage. Only the active OMS mounts thereplicated storage. Software maintenance activities may need to be performed when eitherthe primary or standby site is the active site. As such, it is important to ensure that the OracleInventory containing the details of the installation is available from either location.
To prevent the need to perform manual migration activities to move the OMS installation froma local Oracle Inventory to a replicated storage Oracle Inventory, create the Oracle Inventoryunder the OMS installation base directory.
Use the following steps to prepare the installer to set up an inventory located under the OMSinstallation base directory:
1. Create the OMS installation base directory.
2. Create the Oracle Inventory directory under the new OMS installation base directory:
$ cd <OMS installation base directory>$ mkdir oraInventory
3. Create the oraInst.loc file. This file contains the Oracle Inventory directory pathinformation needed by the Universal Installer.
Chapter 23Oracle Management Service High Availability
23-5

$ cd oraInventory$ vi oraInst.locEnter the path information to the Oracle Inventory directory and specify the groupof the software owner as the oinstall user. For example:
inventory_loc=/u01/app/oracle/OMS/oraInventoryinst_group=oinstall
Specify the Oracle Inventory under the OMS installation base directory when installingthe OMS by providing the -invPtrloc <oraInst.loc file with path> parameter on theinstallation wizard command line, for example:
-invPtrloc /u01/app/oracle/OMS/oraInventory/oraInst.locThe installer will create the inventory in the specified location. Use this inventory for allinstallation, patching, and upgrade activities for this OMS and OMS agent.
Configure a Software Owner and Group that can be configured identically on allnodes
Just as the OMSs at the primary site are installed using the same software owner andgroup, to support disaster recovery, the software owner and group need to beconfigured identically on the standby site OMS hosts. Ensure that both the ownername and ID and the group name and ID selected for use at the primary site will alsobe available for use at the standby site.
Verification that the user and group of the software owner are configured identically onall OMS nodes can be performed using the 'id' command as in the example below:
$ id -auid=550(oracle) gid=50(oinstall) groups=501(dba)
Select a time zone that can be configured identically on all nodesJust as the OMSs at the primary site are installed using the same time zone, tosupport disaster recovery, the time zone should be configured identically on thestandby site OMS hosts. Select a time zone that can be used at both sites and ensurethat the time zone is the same on all OMS hosts.
Installation and ConfigurationThe following are high level installation steps that reinforce the best practices listed inthis section. Reference the detailed instructions in the Enterprise Manager BasicInstallation Guide for details on the installation steps, including required pre-requisitesand additional post installation operations.
If you are using an NFS mounted volume for the installation, please ensure that youspecify rsize and wsize in your mount command to prevent running into I/O issues.
For example:
nas.example.com:/export/share1 /u01/app/oracle/OMS nfsrw,bg,rsize=32768,wsize=32768,hard,nointr,tcp,noacl,vers=3,timeo=600 0 0
Chapter 23Oracle Management Service High Availability
23-6

Note:
Review the NFS Mount Point Location Requirements for additional important NFS-related requirements. See Prerequisites for Installing an Enterprise ManagerSystem in the Oracle Enterprise Manager Cloud Control Basic Installation Guide.
Refer to the following steps when installing the software:
1. Create an OMS installation base directory under ORACLE_BASE. If installing onreplicated storage now, ensure that the replicated storage is mounted to this directory.
2. Configure the Alias Host Names for all OMSs being installed on each of the OMS hosts.
3. Configure a Software Owner and Group that will be consistently defined on all OMShosts.
4. Configure the time zone that will be consistently set on all OMS hosts.
5. Follow the detailed preparation and installation instructions in "Installing OracleEnterprise Manager Cloud Control 13c Release" in the Enterprise Manager BasicInstallation Guide, specifying the following information as part of the installation process:
a. Ensure that the Middleware Home, OMS Instance Base, and Agent Base are locatedunder the OMS installation base directory.
b. Specify the inventory location file and the Alias Host Name of the OMS. These canbe specified on the command line as in the following example:
$ <Software_Location>/em_<platform>.bin -invPtrloc /u01/app/oracle/OMS/oraInventory/oraInst.loc ORACLE_HOSTNAME=oms1.example.comYou can also provide the ORACLE_HOSTNAME when prompted for this informationfrom within the Enterprise Manager installation wizard UI.
6. Continue the remainder of the installation.
Configuring the Cloud Control OMS in an Active/Passive Environment forHA Failover Using Virtual Host Names
This section provides a general reference for Cloud Control administrators who want toconfigure Enterprise Manager Cloud Control in Cold Failover Cluster (CFC) environments.
Overview and RequirementsThe following conditions must be met for Cloud Control to fail over to a different host:
• The installation must be done using a Virtual Host Name and an associated unique IPaddress.
• Install on a shared disk/volume which holds the binaries and the gc_inst directory.
• The Inventory location must failover to the surviving node.
• The software owner and time zone parameters must be the same on all cluster membernodes that will host this Oracle Management Service (OMS).
Chapter 23Oracle Management Service High Availability
23-7

Installation and ConfigurationTo override the physical host name of the cluster member with a virtual host name,software must be installed using the parameter ORACLE_HOSTNAME.
The software must be installed using the command line parameter -invPtrLoc to pointto the shared inventory location file, which includes the path to the shared inventorylocation.
If you are using an NFS mounted volume for the installation, please ensure that youspecify rsize and wsize in your mount command to prevent running into I/O issues.
For example:
nas.example.com:/export/share1 /u01/app/share1 nfs rw,bg,rsize=32768,wsize=32768,hard,nointr,tcp,noac,vers=3,timeo=600 0 0
Note:
Any reference to shared failover volumes could also be true for non-sharedfailover volumes which can be mounted on active hosts after failover.
Setting Up the Virtual Host Name/Virtual IP AddressYou can set up the virtual host name and virtual IP address by either allowing theclusterware to set it up, or manually setting it up yourself before installation and startupof Oracle services. The virtual host name must be static and resolvable consistently onthe network. All nodes participating in the setup must resolve the virtual IP address tothe same host name. Standard TCP tools such as nslookup and traceroute can beused to verify the host name. Validate using the following commands:
nslookup <virtual hostname>This command returns the virtual IP address and full qualified host name.
nslookup <virtual IP>This command returns the virtual IP address and fully qualified host name.
Be sure to try these commands on every node of the cluster and verify that the correctinformation is returned.
Setting Up Shared StorageStorage can be managed by the clusterware that is in use or you can use any sharedfile system (FS) volume, such as NFS, as long as it is not an unsupported type, suchas OCFS V1.
Chapter 23Oracle Management Service High Availability
23-8

Note:
Only OCFS V1 is not supported. All other versions of OCFS are supported.
If the OHS directory is on a shared storage, the LockFile directive in the httpd.conf file shouldbe modified to point to a local disk, otherwise there is a potential for locking issues.
Setting Up the EnvironmentSome operating system versions require specific operating system patches be applied priorto installing 13c. The user installing and using the 13c software must also have sufficientkernel resources available. Refer to the operating system's installation guide for more details.Before you launch the installer, certain environment variables need to be verified. Each ofthese variables must be identically set for the account installing the software on ALLmachines participating in the cluster:
• OS variable TZ
Time zone setting. You should unset this variable prior to installation.
• PERL variables
Variables such as PERL5LIB should also be unset to avoid association to the incorrectset of PERL libraries
Synchronizing Operating System IDsThe user and group of the software owner should be defined identically on all nodes of thecluster. This can be verified using the 'id' command:
$ id -auid=550(oracle) gid=50(oinstall) groups=501(dba)
Setting Up Shared InventoryUse the following steps to set up shared inventory:
1. Create your new ORACLE_HOME directory.
2. Create the Oracle Inventory directory under the new ORACLE_HOME:
$ cd <shared oracle home>$ mkdir oraInventory
3. Create the oraInst.loc file. This file contains the Oracle Inventory directory pathinformation needed by the Universal Installer.
vi oraInst.locEnter the path information to the Oracle Inventory directory and specify the group of thesoftware owner as the oinstall user. For example:
inventory_loc=/app/oracle/share1/oraInventoryinst_group=oinstall
Chapter 23Oracle Management Service High Availability
23-9

Installing the SoftwareRefer to the following steps when installing the software:
1. Create the shared disk location on both the nodes for the software binaries.
2. Point to the inventory location file oraInst.loc (under the ORACLE_BASE in thiscase), as well as specifying the host name of the virtual group. For example:
$ <Software_Location>/em_<platform>.bin -invPtrLoc /app/oracle/share1/oraInst.loc ORACLE_HOSTNAME=lxdb.example.com -debugYou can also provide the ORACLE_HOSTNAME when prompted for thisinformation from in Enterprise Manager installation wizard UI.
3. Install Oracle Management Services on cluster member Host1.
4. Continue the remainder of the installation normally.
5. Once completed, copy the files oraInst.loc and oratab to /etc on all cluster memberhosts (Host2, Host3, ...)
Starting Up ServicesEnsure that you start your services in the proper order. Use the order listed below:
1. Establish the IP address on the active node.
2. Start the TNS listener (if it is part of the same failover group).
3. Start the database (if it is part of the same failover group).
4. Start Cloud Control using emctl start oms5. Test functionality.
In case of failover, refer to "Performing Switchover and Failover Operations".
Installing Additional Management ServicesThere are two ways to install additional Management Services:
• Using the "Add Oracle Management Service" Deployment Procedure (preferredmethod). For more information about using this Deployment Procedure, see Adding Additional Oracle Management Services in the Oracle Enterprise ManagerCloud Control Basic Installation Guide.
• Installing Additional Oracle Management Service in Silent Mode (alternativemethod). For more information about silent mode installation, see the chapter onInstalling Additional OMSs in Silent Mode in the Oracle Enterprise Manager CloudControl Advanced Installation and Configuration Guide.
Configuring Multiple Management Services Behind a Server LoadBalancer (SLB)
The following sections discuss how to configure the OMS for high availability in anActive/Active configuration using a Server Load Balancer.
Chapter 23Oracle Management Service High Availability
23-10

Configuring the Software LibraryThe Software Library location must be accessible by all active Management Services. If theSoftware Library is not configured during installation, it needs to be configured post-installusing the Enterprise Manager console:
1. On the Enterprise Manager home page, from the Setup menu, select Provisioning andPatching, and then select Software Library.
2. On the Software Library: Administration page, select OMS Shared File system.
3. To add a new OMS Shared File System, click +Add.
4. In the Add OMS Shared File System location dialog box, provide a unique name for thelocation and set the location to the shared storage that can be accessed by anyManagement Service hosts.
Configuring a Load BalancerThis section describes the guidelines for setting up a Server Load Balancer (SLB) todistribute the Agent and Browser traffic to available Management Services.
Server Load Balancer Requirements
In order to configure your OMS's in an active/active configuration behind an SLB, your SLBmust meet the following requirements:
• The SLB must have configured public-facing ports that provide access to the variousservices provided by the OMS’s that are part of the SLB load balancer configuration.
Depending on your configuration, you may require up to 4 ports on the SLB (SecureUpload, Agent Registration, Secure Console, Unsecure Console)
• Support for persistence.
HTTP and HTTPS traffic between the user-interactive browser and the OMS requirespersistence settings to ensure that navigation between OMS pages occur to the samepool member throughout the interactive session.
• Support for application monitoring.
The SLB must be capable of monitoring the health of the OMSs and detecting failures, sothat requests will not be routed to OMSs that are not available.
• Understand the SSL configuration for your SLB environment.The following are the SSL configurations available:
– Layer 3 Load Balancing: The load balancer tunnels incoming SSL connections toyour OMS servers on the back end. This SSL configuration is also known as SSLTunneling.
– SSL Proxy: The load balancer terminates the client SSL connection and acts as aproxy to initiate an SSL connection to the backend OMS servers. This permits theLoad Balancer to utilize Layer 7 inspection which enables modifications to thesession, such as applying rules, perform virtual server authentication, or cookie/session persistence. This SSL configuration is also known as SSL End-To-End.
– SSL Termination: The client browser session to the Load Balancer is encryptedusing SSL, decrypted at the Load Balancer, then the traffic is sent unencrypted to theback end OMS. This SSL configuration is not supported for OMS.
Chapter 23Oracle Management Service High Availability
23-11

SLB configuration is a two-step process:
1. Configure the SLB.
2. Make requisite changes on the Management Services.
SLB Side SetupUse the following table as reference for setting up the SLB with Cloud ControlManagement Services.
Various configuration items listed in the below table will be described in subsequentsections of this document.
Table 23-1 Management Service Ports
Cloud Control Service OMSTCP Port
MonitorName
TCPProfileName
PersistenceProfile
PoolName
VirtualServerName
SLBVirtualServerPort
Secure Console 7799 mon_ccsc tcp_ccsc sourceip_ccsc
pool_ccsc vs_ccsc443
443
Unsecure Console 7788 mon_ccuc tcp_ccuc sourceip_ccuc
pool_ccuc vs_ccuc80
80
Secure Upload 4900 mon_ccsu tcp_ccsu None pool_ccsu vs_ccsu4900
4900
Agent Registration 4889 mon_ccar tcp_ccar cookie_ccar
pool_ccar vs_ccar4889
4889
Always-On Monitoring SecureUpload
8081 mon_ccaom
tcp_ccaom
None pool_ccaom
vs_ccaom8081
8081
Secure JVMD 7301 mon_ccsjvmd
tcp_ccsjvmd
sourceip_ccsjvmd
pool_ccsjvmd
vs_ccsjvmd7301
7301
Unsecure JVMD 7202 mon_ccujvmd
tcp_ccujvmd
sourceip_ccujvmd
pool_ccujvmd
vs_ccujvmd7202
7202
Cipher profiles are used to define the security, compatibility and speed of the HTTPStraffic. Ciphers are supported by Enterprise Manager and they are used by the SLBadministrator to determine which ciphers may be used or which must be excluded toconnect to the Enterprise Manager.
Note:
If the Always-On Monitoring service is installed on a host other than the OMShost in the HA configuration, you need to specify the host on which theAlways-On Monitoring service is installed instead of the OMS host
Use the administration tools that are packaged with your SLB. A sample configurationfollows. This example assumes that you have two Management Services running onhost A and host B using the default ports as listed in Table 33–1.
1. Create Monitors
Chapter 23Oracle Management Service High Availability
23-12
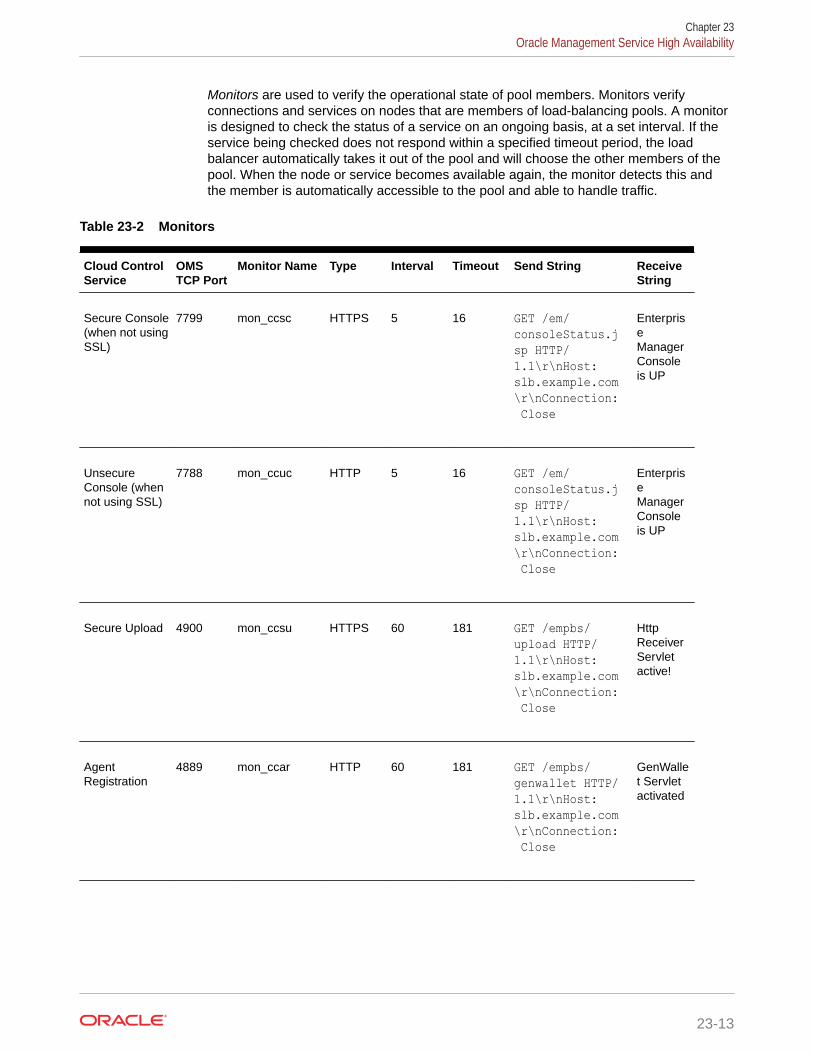
Monitors are used to verify the operational state of pool members. Monitors verifyconnections and services on nodes that are members of load-balancing pools. A monitoris designed to check the status of a service on an ongoing basis, at a set interval. If theservice being checked does not respond within a specified timeout period, the loadbalancer automatically takes it out of the pool and will choose the other members of thepool. When the node or service becomes available again, the monitor detects this andthe member is automatically accessible to the pool and able to handle traffic.
Table 23-2 Monitors
Cloud ControlService
OMSTCP Port
Monitor Name Type Interval Timeout Send String ReceiveString
Secure Console(when not usingSSL)
7799 mon_ccsc HTTPS 5 16 GET /em/consoleStatus.jsp HTTP/1.1\r\nHost: slb.example.com\r\nConnection: Close
EnterpriseManagerConsoleis UP
UnsecureConsole (whennot using SSL)
7788 mon_ccuc HTTP 5 16 GET /em/consoleStatus.jsp HTTP/1.1\r\nHost: slb.example.com\r\nConnection: Close
EnterpriseManagerConsoleis UP
Secure Upload 4900 mon_ccsu HTTPS 60 181 GET /empbs/upload HTTP/1.1\r\nHost: slb.example.com\r\nConnection: Close
HttpReceiverServletactive!
AgentRegistration
4889 mon_ccar HTTP 60 181 GET /empbs/genwallet HTTP/1.1\r\nHost: slb.example.com\r\nConnection: Close
GenWallet Servletactivated
Chapter 23Oracle Management Service High Availability
23-13

Table 23-2 (Cont.) Monitors
Cloud ControlService
OMSTCP Port
Monitor Name Type Interval Timeout Send String ReceiveString
Always-OnMonitoringSecure Upload
8081 mon_ccaom HTTPS 60 181 GET /upload HTTP/1.1\r\nHost: slb.example.com\r\nConnection: Close
AlwaysOnMonitoring is active
Secure JVMD 7301 mon_ccsjvmd HTTPS 60 181 GET /jamservlet/comm HTTP/1.1\r\nHost: slb.example.com\r\nConnection: Close
Reply to empty request
UnsecureJVMD
7202 mon_ccujvmd HTTPS 60 181 GET /jamservlet/comm HTTP/1.1\r\nHost: slb.example.com\r\nConnection: Close
Reply to empty request
Note:
Some Load Balancers require <CR><LF> characters to be addedexplicitly to the Send String using literal "\r\n". This is vendor-specific.Refer to your SLB documentation for details.
2. Create Pools
A pool is a set of servers configured behind the Load Balancer and groupedtogether to receive traffic over a specific TCP port for each OMS service.
Load balancing methods vary depending on the SLB vendor; with several of mostcommon methods being round-robin, least connection, and source-IP hashing.Refer to your specific SLB documentation for available methods and to determinethe most suitable for your SLB and operating environment.
Each pool can have its own unique characteristic for a persistence definition andthe load-balancing algorithm used.
Chapter 23Oracle Management Service High Availability
23-14

Table 23-3 Pools
Cloud ControlServices
Pool Name AssociatedHealthMonitor
Load Balancing OMS Host:OMSService Port
Secure Console pool_ccsc mon_ccsc Least Connections(member)
OMS Host A:7799
OMS Host B:7799
UnsecureConsole
pool_ccuc mon_ccuc Least Connections(member)
OMS Host A:7788
OMS Host B:7788
Secure Upload pool_ccsu mon_ccsu Least Connections(member)
OMS Host A:4900
OMS Host B:4900
AgentRegistration
pool_ccar mon_ccar Least Connections(member)
OMS Host A:4889
OMS Host B:4889
Always-OnMonitoringSecure Upload
pool_ccaom mon_ccaom Least Connections(member)
OMS Host A:8081
OMS Host B:8081
Secure JVMD pool_ccsjvmd mon_ccsjvmd Least Connections(member)
OMS Host A:7301
OMS Host B:7301
Unsecure JVMD pool_ccujvmd mon_ccujvmd Least Connections(member)
OMS Host A:7202
OMS Host B:7202
3. Create TCP Profiles
TCP profiles are collections of TCP settings that are configurable settings for controllingthe behavior of a particular type (e.g. TCP, HTTP) of network traffic. These profilesenhance control over network traffic and allow the user to control different characteristicsfor specific clients or applications (e.g. differing browsers).
Separate TCP profiles can then be associated with different services or virtual servers asrequired for your operating environment.
TCP profile values can have serious impacts on the network performance and should beused carefully and with careful consideration of your network and operationalrequirements.
TCP profile settings are site and SLB-specific therefore there are no specific OMSrequirements for TCP profile settings. Refer to your SLB documentation and networkadministrator for required TCP profile configuration settings.
Table 23-4 TCP Profiles
CLOUD CONTROL SERVICE TCP PROFILE NAME
Secure Console tcp_ccsc
Unsecure Console tcp_ccuc
Secure Upload tcp_ccsu
Agent Registration tcp_ccar
Always-On Monitoring SecureUpload
tcp_ccaom
Secure JVMD tcp_ccsjvmd
Unsecure JVMD tcp_ccujvmd
Chapter 23Oracle Management Service High Availability
23-15

4. Create Persistence Profiles
Certain types of applications may require the same client returning to the samepool member, this is called persistence or “stickiness". It can be configured using apersistence profile, and applied to the virtual server. For Oracle Cloud Controlservices, persistence needs to be configured for every service, except for theSecure Upload service.
Some products offer session persistence support without cookies. These productsdepend on the IP address of the incoming request. In some circumstances, theoriginating IP address can change, resulting in session persistence being lost orthe request redirected to the wrong backend server. If these cases occur, theservice would be better defined to use cookies for persistence instead of sourceaddress affinity. Cookie persistence is only applicable when implementing SSLproxying architecture. For Layer 3 Load Balancing (formerly known as SSLTunneling) the only Persistence Type alternative is Source Address Affinity.
Table 23-5 Persistence Profiles
CLOUD CONTROLSERVICE
PERSISTENCEPROFILE NAME
Type Timeout Expiration
Secure Console sourceip_ccsc Source AddressAffinity or Cookie
3600 Not Applicable
Unsecure Console sourceip_ccuc Source AddressAffinity or Cookie
3600 Not Applicable
Agent Registration cookie_ccar Cookie Not Applicable 3600
Secure JVMD sourceip_ccsjvmd Source AddressAffinity
3600 Not Applicable
Unsecure JVMD sourceip_ccujvmd Source AddressAffinity or Cookie
3600 Not Applicable
5. Create Rules
Rules are scripts that run against network traffic passing through your loadbalancer device. Rules give you the ability to influence network traffic in a varietyof ways according to your functional needs.
Some of the following are types of rules that may be configured, depending onyour local Load Balancer:
• Access control rules which provide access to application resources basedupon the source of the request.
• Access method rules which specify the permitted HTTP methods.
• URL redirect rules which route incoming HTTP requests to a differentdestination URL.
• Request and response header rules which add, alter or remove HTTP requestor response headers.
• HTTP header rules which specify the size of the HTTP header and whetherperiod and underscore characters are permitted within the headers.
Rule capabilities and rule definition syntax vary according to your Load Balancervendor. Refer to the vendor documentation for information about these capabilitiesand syntactic guidance.
Chapter 23Oracle Management Service High Availability
23-16

In the examples provided within this document, our virtual servers for Unsecure Consoleand Unsecure BI Publisher use notional rules for the purpose of redirecting requests tothe Unsecure Console service (port 80) and Unsecure BI Publisher (port 8080) andsending them to the secure Console Service (port 443) and Secure BI Publisher (Port5443) on the Load Balancer.
6. Create Virtual Servers
A virtual server, with its virtual IP Address and port number, is the client- addressablehostname or IP address through which members of a load balancing pool are madeavailable to a client. After a virtual server receives a request, it directs the request to amember of the pool based on a chosen load balancing method.
Table 23-6 Required Virtual Servers
CloudControlService
Virtual ServerName
Virtual IP andPort
ProtocolProfile(Client)
Rule Name Defaut Pool DefaultPersistenceProfile
SecureConsole
vs_ccsc443 VIP:443 tcp_ccsc None pool_ccsc sourceip_ccsc
UnsecureConsole *
vs_ccuc80 VIP:80 tcp_ccuc ccuc_httptohttps
pool_ccuc sourceip_ccuc
Secure Upload vs_ccsu4900 VIP:4900 tcp_ccsu None pool_ccsu None
AgentRegistration
vs_ccar4889 VIP:4889 tcp_ccar None pool_ccar cookie_ccar
Always-OnMonitoringSecure Upload
vs_ccaom8081
VIP:8081 tcp_ccaom None pool_ccaom sourceip_aom
Secure JVMD vs_ccsjvmd7301
VIP:7301 tcp_ccsjvmd None pool_ccsjvmd sourceip_ccsjvmd
UnsecureJVMD
vs_ccujvmd7202
VIP:7202 tcp_ccujvmd None pool_ccujvmd sourceip_ccujvmd
* These entries are not considered best practice and are not recommended as theyprovide unsecured and unencrypted access to Enterprise Manager.
Enterprise Manager Side Setup
Perform the following steps:
1. Resecure the Oracle Management Service
By default, the service name on the Management Service-side certificate uses the nameof the Management Service host. Management Agents do not accept this certificate whenthey communicate with the Oracle Management Service through a load balancer. Youmust run the following command to regenerate the certificate on each ManagementService:
emctl secure oms -host slb.example.com -secure_port 4900 -slb_port 4900 -slb_console_port 443 -slb_jvmd_https_port 7301 -lock_consle
Chapter 23Oracle Management Service High Availability
23-17

-lock_upload Oracle Enterprise Manager Cloud Control 13c Release 5 Copyright (c) 1996, 2020 Oracle Corporation. All rights reserved. Securing OMS... Started Enter Enterprise Manager Root (SYSMAN) Password : Enter Agent Registration Password : (c) 1996, 2019 Oracle Corporation. All rights reserved. Securing OMS... Started. Securing OMS... Successful Restart OMS
The slb_console_port corresponds to the Virtual Server port that is used to accessEnterprise Manager. This is defined above (in the Virtual Server Name -vs_gcsc443) with a Virtual Server Port of 443.
Restart the OMS after resecuring the Oracle Management Service. Repeat thisstep for each OMS supported by the Load Balancer.
2. Resecure all Management Agents
Management Agents that were installed prior to SLB setup, including theManagement Agent that comes with the Management Service install, would beuploading directly to the Management Service. These Management Agents will notbe able to upload after SLB is setup. Resecure these Management Agents toupload to the SLB by running the following command on each Management Agent:
emctl secure agent –emdWalletSrcUrl https://slb.example.com:<upload port>/em3. Configure Always-On Monitoring
Refer to the chapter “Alway-On Monitoring” in the Enterprise Manager CloudControl Administrator's Guide for details on configuring the Always-on Monitoringapplication using the emsca utility.
The following command must be run only once against any specific OMS after it issecured.
emctl set property -name "oracle.sysman.core.events.emsURL" -value "https://slb.example.com:8081/upload"
Enter Enterprise Manager Root (SYSMAN) Password :
Oracle Enterprise Manager Cloud Control 13c Release 5
Copyright (c) 1996, 2020 Oracle Corporation. All rights reserved. Property oracle.sysman.core.events.emsURL has been set to value
https://slb.example.com:8081/upload for all Management Servers
OMS restart is not required to reflect the new property value
No Enterprise Manager components must be restarted for this command to takeeffect.
Adding a Second/Subsequent Always-On Monitoring Instance
Download the latest Always-On Monitoring (AOM) release from Self-Update. Copythe ems.zip file to a location where you want AOM to be installed and unzip thefile.
The emsca tool can be rerun to add additional Always-On Monitoring instances tothe same/different host as shown in the following example:
Chapter 23Oracle Management Service High Availability
23-18

cd ems/scripts
./emsca add_emsOracle Enterprise Manager Cloud Control 13c Release 5 Copyright (c) 1996, 2020 Oracle Corporation. All rights reserved. --------------------------------------------------------------- Event Monitoring Service Repository Connection String : emshost:25059:emssidEvent Monitoring Service Repository Username : emsEvent Monitoring Service Repository Password :Enterprise Manager Repository Connection String : emhost:25059:emsidEnterprise Manager Repository Username : sysmanEnterprise Manager Repository Password :Enter Enterprise Manager Middleware Home : /mylocation/omsOracleHomeConnecting to EMS repository.Registering EMS instanceEvent Monitoring Service Upload URL: https://myemshost:1830/uploadOracle PKI Tool : Version 12.1.3.0.0Copyright (c) 2004, 2019, Oracle and/or its affiliates. All rights reserved.Certificate was added to keystore
4. Configure EMCLI
Configure the EMCLI client installations to use the SLB hostname and port for the EMconsole. This reconfiguration can be expected to run for approximately 15-20 minutes.
emcli setup -url=”https://slb.example.com:443/em” -username=sysman -trustall
Configuring SSL on Enterprise Manager and the SLB (Release 12.1.0.2 and later)
If the SLB is configured to use Third-Party/Custom SSL certificates, you must ensure that theCA certificates are properly configured in order for the trust relationship to be maintainedbetween the Agent, SLB, and the OMS. Specifically, the following must be carried out:
• Import the CA certificates of the SLB into the OMS trust store.
• Copy the Enterprise Manager CA certificates to the trust store of the SLB
Enterprise Manager uses the default Enterprise Manager certificates and not the Customcertificates. In order for Agents to upload information successfully to the OMS through theSLB, these custom trusted certificates need to be copied/imported to the trust store of theOMS and AgentsThe following procedures illustrate the process used to secure the 12c OMSand Agent when an SLB is configured with Third Party/Custom SSL certificates.
Verifying the SSL Certificate used at the SLB
Perform the following steps to determine whether the SLB is using different certificates thanthe OMS:
1. To check the certificate chain used by any URL, run the following command:
<OMS_HOME>/bin/emctl secdiag openurl -url <HTTPS URL>To check the certificates used by the SLB URL, run the following command:
<OMS_HOME>/bin/emctl secdiag openurl -url https://<SLB Hostname>:<HTTPSUpload port>/empbs/uploadTo check the certificates used by the OMS URL, run the following command:
Chapter 23Oracle Management Service High Availability
23-19

<OMS_HOME>/bin/emctl secdiag openurl -url https://<OMSHostname>:<HTTPS Upload port>/empbs/upload
2. If the default Enterprise Manager self-signed certificates are used in the SLB, theoutput of both the commands will appear as follows:
Issuer : CN=<OMS Hostname>, C=US, ST=CA, L=EnterpriseManager on<OMS Hostname>, OU=EnterpriseManager on <OMS Hostname>,O=EnterpriseManager on <OMS Hostname>
3. If a custom or self-signed SSL certificate is used in the SLB, then output of thecommand executed with the SLB Name will provide details shown here:
Issuer : CN=Entrust Certification Authority - L1C, OU="(c) 2014 Entrust,Inc.", OU=www.entrust.net/rpa is incorporated by reference, O="Entrust,Inc.", C=US
In this example, the SLB is using the custom certificate (CN=Entrust CertificationAuthority - L1C, OU="(c) 2014 Entrust, Inc."), which needs to be imported astrusted certificate into the OMS.
4. If OpenSSL is available on the OS, you can also check the value of CN by runningthe following command:
$openssl s_client -connect <HOSTNAME>:<PORT>Importing the SSL Certificate of the SLB to the Trust Store of the OMS and Agent
1. Export the SLB certificate in base64 format to a text file named: customca.txt.
2. Secure the OMS:
cd <OMS_HOME>/bin>./emctl secure oms -host <SLB Host name> -secure_port <HTTPS UploadPort> -slb_port <SLB upload Port> -slb_console_port <SLB Console port>-console -trust_certs_loc <path to customca.txt>
Note:
All the OMS's behind the SLB need to be secured using the emctl secureoms command.
The CA certificate of the OMS is present in the <EM_INSTANCE_HOME>/em/EMGC_OMS1/sysman/config/b64LocalCertificate.txt file and needs tobe copied to the SSL trust store of the SLB.
3. Restart all the OMS:
cd <OMS_HOME>/binemctl stop oms -allemctl start oms
4. Secure all the Agents pointing to this Enterprise Manager setup:
cd <AGENT_HOME>/bin./emctl secure agent –emdWalletSrcUrl <SLB Upload URL>
Chapter 23Oracle Management Service High Availability
23-20

For more information on configuring multiple OMS High Availability behind a SLB, see Enterprise Manager 13c Cloud Control: Configuring OMS High Availability with F5BIG-IP Local Traffic Manager technical whitepaper.
Chapter 23Oracle Management Service High Availability
23-21

24Enterprise Manager Disaster Recovery
While the high availability solutions described in the previous chapter typically protect againstcomponent failure or system-level problems, in many enterprises it is also necessary toprotect Enterprise Manager against larger outages such as catastrophic data center failuredue to natural disasters, fire, electrical failure, evacuation, or pervasive sabotage.
Maximum Availability Architecture for Enterprise Manager involves deploying a remotefailover architecture that allows a secondary data center to take over the managementinfrastructure in the event that disaster strikes the primary management infrastructure.
Note:
Enterprise Manager 13c supports a single approach to OMS Disaster Recovery.
The Standby OMSs using Standby WebLogic Domain approach that was previouslydeprecated as of Cloud Control 12.1.0.3 is now de-supported. Standby OMSs usingStorage Replication is the supported approach and is discussed in this chapter.
Standby OMSs using Storage Replication is the disaster recovery approach in Cloud Control13c. Advantages of Standby OMSs using Storage Replication are:
• OMS patching and upgrade only needs to be performed at one site.
• Plug-ins only need to be managed at one site.
This chapter covers the following topics:
• Disaster Recovery Overview and Topology
• Design Considerations
• Setting Up Management Repository Disaster Recovery
• Setting Up the OMS and Software Library Disaster Recovery
• Performing Switchover and Failover Operations
• Keeping the Standby Site in Sync with the Primary
Disaster Recovery Overview and TopologyThe Disaster Recovery solution for a Cloud Control deployment involves replication of theOMS, Software Library and Repository components at a standby site. This solution can becombined with the high availability solution described in the previous chapter to ensure thatfailures ranging from component failure to a complete site outage can be recovered from withminimal disruption to the availability of Cloud Control.
A complete implementation of the Enterprise Manager Cloud Control combining the HighAvailability design from the previous chapter with the Disaster Recovery described in thischapter solution is shown in the following figure.
24-1

Figure 24-1 High Availability with Disaster Recovery Topology
Key aspects of the DR solution shown in the figure are:
• The solution has two sites. The Primary Site is running and active, while theStandby Site is in passive mode.
• The traffic from the Enterprise Manager users and Agents is directed to thePrimary Site by a Global Load Balancer or a DNS entry that resolves to an IPaddress hosted at the Primary Site.
• The Standby Site is similar to the Primary Site in terms of hardware and networkresources which ensures there will be no loss of performance when failoverhappens.
• It is not necessary to perform an OMS installation at the Standby Site. OracleInventory, OMS Software, Agent and Software Library and all located on replicatedstorage. When the Production Site storage is replicated at the Standby Site theequivalent data are written to the Standby Site
• The OMS hostnames must resolve to the IP addresses of the Primary OMSs whenqueried from the Primary Site and to the IP addresses of the correspondingstandby hosts when queried from the Standby Site.
• OMS software, Oracle Inventory, Software Library and Agent binaries andconfiguration files for all OMS(s) are on replicated storage.
Chapter 24Disaster Recovery Overview and Topology
24-2

• OMS hosts on each site access the replicated storage using the same mount points
• Replication between the sites takes place should take place at regular scheduledintervals and following configuration changes.
• Oracle Data Guard Physical Standby is used to replicate the Repository database at thestandby site.
• There must be sufficient network bandwidth between the primary and standby sites tohandle peak redo data generation.
• When there is a failure or planned outage of the Primary Site, you perform the followingsteps to enable the Standby Site to assume the Primary role in the topology:
– Stop OMSs at the primary site
– Perform on-demand replication of storage (if primary site is available)
– Failover/switchover of the database to the standby site
– Reverse storage replication and activate replicated storage read/write at standby site
– Start OMSs at standby site
– Update DNS or global load balancer to re-route user requests to the standby site. Atthis point, the standby site has assumed the production role.
Design ConsiderationsThis section discusses design considerations for a Cloud Control Disaster Recovery solutionfor an enterprise deployment.
The following topics are covered:
• Network Considerations
• Storage Considerations
• Database Considerations
• Starting Points
Network ConsiderationsThe following sections discuss network considerations that must be taken into account whenimplementing standby Management Services using storage replication
Planning Host NamesIn a Disaster Recovery topology, the production site host names must be resolvable to the IPaddresses of the corresponding peer systems at the standby site. Therefore, it is important toplan the host names for the production site and standby site. After switchover or failover froma primary site to a standby site, it should be possible to start applications on the standbyhosts without requiring you to change the hostname for hosts on the standby site.
This can be achieved in either of the following ways:
• Option 1: Physical host names on primary site and alias on standby site: OMSs at theprimary site are configured using physical host names and aliases for these host namesare configured on the corresponding hosts at the standby site.
Chapter 24Design Considerations
24-3

• Option 2: Alias host names on both sites: OMSs at the primary site are configuredusing an alias host name that can be configured at both the primary and standbysites.
The choice between these options would depend on your network infrastructure andcorporate policies. From a setup procedure perspective, Option 1 is easier toimplement if you have an existing single site Cloud Control installation which uses thephysical host names as it does not require any transformation of your existing site tosetup DR. Option 2 is easier to implement if you are setting up a new Cloud Controlinstallation and start with alias host names or you have an existing Cloud Controlinstallation using alias host names.
Note:
If using Option 2, you should set ORACLE_HOSTNAME as the Alias hostname when invoking the installer. For example:
$ runInstaller em_<platform>.bin ORACLE_HOSTNAME=oms1.example.comYou can also provide the ORACLE_HOSTNAME when prompted for thisinformation from in Enterprise Manager runInstaller UI.
Host name resolution at each site can be done using either local resolution (/etc/hosts)or DNS based resolution or a combination of both. The following examples use thesephysical host names and IP addresses:
HOSTNAME IP ADDRESS DESCRIPTIONoms1-p.example.com 123.1.2.111 Physical host for OMS1 on Primary siteoms2-p.example.com 123.1.2.112 Physical host for OMS2 on Primary siteoms1-s.example.com 123.2.2.111 Physical host for OMS1 on Standby siteoms2-s.example.com 123.2.2.112 Physical host for OMS2 on Standby site
Note:
If using local resolution for either Option 1 or Option 2, ensure that the /etc/hosts file on each OMS at a site where alias host names are being usedcontains the physical and alias host names for all OMSs at the site asdepicted in the examples below.
Example for Option 1: /etc/hosts configurations when OMSs are installed at primarysite using primary site physical host names (oms1-p.example.com and oms2-p.example.com):
Primary Site 127.0.0.1 localhost.localdomain localhost123.1.2.111 oms1-p.example.com oms1-p #OMS1123.1.2.112 oms2-p.example.com oms2-p #OMS2 Standby Site 127.0.0.1 localhost.localdomain localhost
Chapter 24Design Considerations
24-4

123.2.2.111 oms1-s.example.com oms1-s oms1-p.example.com #OMS1123.2.2.112 oms2-s.example.com oms2-s oms2-p.example.com #OMS2
If the network has been configured correctly, a ping of the OMS host name from the primarysite should result in a reply from the primary host, and a ping of the OMS host name from thestandby site should result in a reply from the standby host.
Ping results from primary site (reply from primary site):
[oracle@oms1-p ~]$ ping oms1-p.example.comPING oms1-p.example.com (123.1.2.111) 56(84) bytes of data.64 bytes from oms1-p.example.com (123.1.2.111): icmp_seq=1 ttl=64 time=0.018 ms64 bytes from oms1-p.example.com (123.1.2.111): icmp_seq=2 ttl=64 time=0.020 ms64 bytes from oms1-p.example.com (123.1.2.111): icmp_seq=3 ttl=64 time=0.022 ms
Ping results from standby site (reply from standby site)
[oracle@oms1-s ~]$ ping oms1-p.example.comPING oms1-s.example.com (123.2.2.111) 56(84) bytes of data.64 bytes from oms1-s.example.com (123.2.2.111): icmp_seq=1 ttl=64 time=0.018 ms64 bytes from oms1-s.example.com (123.2.2.111): icmp_seq=2 ttl=64 time=0.020 ms64 bytes from oms1-s.example.com (123.2.2.111): icmp_seq=3 ttl=64 time=0.022 ms
Example for Option 2: /etc/hosts configuration when OMSs are installed using alias hostnames (oms1.example.com and oms2.example.com):
Primary Site 127.0.0.1 localhost.localdomain localhost123.1.2.111 oms1-p.example.com oms1-p oms1.example.com #OMS1123.1.2.112 oms2-p.example.com oms2-p oms2.example.com #OMS2 Standby Site 127.0.0.1 localhost.localdomain localhost123.2.2.111 oms1-s.example.com oms1-s oms1.example.com #OMS1123.2.2.112 oms2-s.example.com oms2-s oms2.example.com #OMS2
If the network has been configured correctly, a ping of the OMS host name from the primarysite should result in a reply from the primary host, and a ping of the OMS host name from thestandby site should result in a reply from the standby host.
Example:
Ping results from primary site (reply from primary site):
[oracle@oms1-p ~]$ ping oms1.example.comPING oms1-p.example.com (123.1.2.111) 56(84) bytes of data.64 bytes from oms1-p.example.com (123.1.2.111): icmp_seq=1 ttl=64 time=0.018 ms64 bytes from oms1-p.example.com (123.1.2.111): icmp_seq=2 ttl=64 time=0.020 ms64 bytes from oms1-p.example.com (123.1.2.111): icmp_seq=3 ttl=64 time=0.022 ms
Ping results from standby site (reply from standby site)
[oracle@oms1-s ~]$ ping oms1.example.comPING oms1-s.example.com (123.2.2.111) 56(84) bytes of data.64 bytes from oms1-s.example.com (123.2.2.111): icmp_seq=1 ttl=64 time=0.018 ms64 bytes from oms1-s.example.com (123.2.2.111): icmp_seq=2 ttl=64 time=0.020 ms64 bytes from oms1-s.example.com (123.2.2.111): icmp_seq=3 ttl=64 time=0.022 ms
Chapter 24Design Considerations
24-5

Load Balancers ConsiderationIf there is more than one OMS at each site, both Primary and Standby Sites requiretheir own server load balancer. See "Configuring a Load Balancer". The SLB pools oneach site will reference the IP addresses of the respective OMS hosts.
Application Virtual Host Name ConsiderationA hostname through which the Cloud Control clients (agents and users) should accessCloud Control is required. When the primary site is active, this hostname should beconfigured in DNS to resolve to the IP address hosted by the primary site SLB. Whenthe standby site is activated, the DNS entry should be updated so that the hostnameresolves to the IP address hosted by the standby site SLB.
A sample DNS configuration for the Cloud Control application hostname when usingmultiple OMSs with an SLB at each site is shown in the table below:
Table 24-1 DNS Configuration
DNS NAME DNS RECORD TYPE VALUE COMMENTS
em.example.com CNAME slb_primary.example.com
Virtual Hostname used by CloudControl clients to communicatewith Management Service. Shouldpoint to the currently active site.
slb_primary.example.com
A 123.1.2.110 Primary Site SLB address
slb_standby.example.com
A 123.2.2.110 Standby Site SLB address
The DNS switchover can be accomplished by either using a global load balancer ormanually changing DNS names.
• A global load balancer can provide authoritative DNS name server equivalentcapabilities. One advantage of using a global load balancer is that the time for anew name-to-IP mapping to take effect can be almost immediate. The downside isthat an additional investment must be made for the global load balancer
• Manually changing the DNS names. To ensure that DNS records cached by theCloud Control clients are updated in a timely fashion after an update, it isrecommended to set the TTL for the em.example.com CNAME to a low value suchas 60 seconds. This will ensure that DNS changes will quickly propagate to allclients. However due to the shortened caching period, an increase in DNSrequests can be observed.
Storage ConsiderationsThe Disaster Recovery solution for a Cloud Control deployment involves installing theSoftware Library, OMS installation, Agent installation and Oracle inventory onreplicated storage.
Storage Replication Requirements
Your chosen method of storage replication should support the following:
Chapter 24Design Considerations
24-6

• Snapshots and consistent filesystem copies
• Ability to perform scheduled and on-demand replication between sites
The following section details the storage structure recommended by Oracle.
• Create one volume per OMS host.
• Mount the above volumes to each OMS host using the same mount point e.g. /u01/app/oracle/OMS. On each host, this volume would contain the OMS installation, Agentinstallation and Oracle inventory.
• Create a consistency group for the above volumes so that consistent replication can bedone for all the volumes.
• Create one volume for the software library. This volume must be mounted simultaneouslyto all the OMS hosts using the same mount point. For example, /swlib.
• Decide on appropriate replication frequency for the OMS file systems and software librarybased on your infrastructure. Oracle recommends a minimum frequency of 24 hours forthe OMS file system and continuous or hourly replication for the software library.
Once these volumes are mounted, ensure that the mounted directories are owned by theOracle Software Owner User (typically, oracle) and the Oracle Inventory Group (typically,oinstall), and that the Oracle Software Owner User has read and write access to thedirectories.
Example: The following table shows an example configuration.
Table 24-2 Storage Configuration
Volume Mounted on Host Mount Point Comments
VOLOMS1 oms1-p.example.com(Host 1)
/u01/app/oracle/OMS Installation of EnterpriseManager on Primary Site OMS1
VOLOMS2 oms2-p.example.com(Host 2)
/u01/app/oracle/OMS Installation of EnterpriseManager on Primary Site OMS2
VOLSWLIB oms1-p.example.com andoms2-p.example.com(Host 1 + Host 2)
/swlib Software library on Primary SiteOMS1 and OMS2
VOLAOM1 aom1.example.com / AOM(Host 3)
/u01/app/oracle /AOM Always-On Monitoring installedon Host 3.
VOLAOM2 aom2.example.com / AOM(Host 4)
/u01/app/oracle/AOM Always-On Monitoring installedon Host 4.
Database ConsiderationsThis section provides the recommendations and considerations for setting up Repositorydatabases for Disaster Recovery.
• Oracle recommends creating Real Application Cluster databases on both the productionsite and standby site.
• Logical standby Management Repository databases are not supported for disasterrecovery.
• The Oracle Data Guard configuration used should be decided based on the data lossrequirements of the database as well as the network considerations such as the available
Chapter 24Design Considerations
24-7

bandwidth and latency when compared to the redo generation. Make sure that thisis determined correctly before setting up the Oracle Data Guard configuration.
• To enable Data Guard to restart instances during the course of broker operations,a service with a specific name must be statically registered with the local listenerof each instance.
• To enable the most effective use of dgmgrl for Repository database switchoverand failover operations, the TNS aliases for all primary and standby Repositorydatabases must be added to the tnsnames.ora file under the ORACLE_HOME ofeach database instance.
• It is strongly recommended to force Data Guard to perform manual databasesynchronization whenever middle tier synchronization is performed. This isespecially true for components that store configuration data in the metadatarepositories.
• Once the connect descriptor is selected based on the recommendations discussedin Connect Descriptor Considerations, run the following command on each OMS atthe primary site to configure the connect descriptor.
emctl config oms -store_repos_details -repos_conndesc <connect descriptor> -repos_user <username>
The following usage example follows the connect descriptor recommendationdiscussed in Connect Descriptor Considerations.
emctl config oms -store_repos_details -repos_conndesc "(DESCRIPTION_LIST=(LOAD_BALANCE=off)(FAILOVER=on)(DESCRIPTION=(CONNECT_TIMEOUT=5)(TRANSPORT_CONNECT_TIMEOUT=3)(RETRY_COUNT=3)(ADDRESS_LIST=(LOAD_BALANCE=on)(ADDRESS=(PROTOCOL=TCP)(HOST=primary_cluster_scan.example.com)(PORT=1521)))(CONNECT_DATA=(SERVICE_NAME=haemrep.example.com)))(DESCRIPTION=(CONNECT_TIMEOUT=5)(TRANSPORT_CONNECT_TIMEOUT=3)(RETRY_COUNT=3)(ADDRESS_LIST=(LOAD_BALANCE=on)(ADDRESS=(PROTOCOL=TCP)(HOST=standby_cluster_scan.example.com)(PORT=1521)))(CONNECT_DATA=(SERVICE_NAME=haemrep.example.com))))" -repos_user SYSMAN
Connect Descriptor ConsiderationsTwo technologies that together dramatically improve the simplicity of connection stringmanagement for Repository databases for Disaster Recovery are Single Client AccessName (SCAN) addresses and role-based database services.
SCAN addresses provide a single address for a RAC cluster, eliminating the need tospecify multiple VIP addresses in the connection string. For more information onSCAN addresses, see Oracle Clusterware Administration and Deployment.
Role-based database services allow the creation of a database service that will run ona RAC cluster based on the role of the database without requiring the administrator tocreate and maintain database triggers to manage the database service. With a role-based database service, Oracle Clusterware will automatically start and stop thedatabase service based upon the specified role (Primary or Standby). For moreinformation on role-based database services, see the Oracle Real Application ClustersAdministration and Deployment Guide and the Client Failover Best Practices forHighly Available Oracle Databases: Oracle Database 12c technical whitepaper.
Combining these two technologies allows the creation of a Repository connectionstring that contains a single entry for the primary database and a single entry for thestandby database. This connection string can be used from both the primary and
Chapter 24Design Considerations
24-8

standby sites, which removes the need to manually change the connection string duringswitchover or failover operations.
To create a role-based database service for use in connecting to the repository in a Level 4MAA configuration, perform commands similar to the following to create the database serviceon both primary and standby clusters.
Primary cluster:
srvctl add service -d emrepa -s haemrep.example.com -l PRIMARY -remrepa1,emrepa2Standby cluster:
srvctl add service -d emreps -s haemrep.example.com -l PRIMARY -remreps1,emreps2Perform the following on a node of the primary cluster to start the service initially.
srvctl start service -d emrepa -s haemrep.example.comThe role-based database service is now active and will run on whichever cluster hosts theactive database.
Oracle recommends the use of a connection string similar to the following in an environmentusing Oracle Database 12, Data Guard, and RAC, replacing the names of the scanaddresses for each cluster and the role-based database service name with the appropriatevalues in your environment:
(DESCRIPTION_LIST=(LOAD_BALANCE=off)(FAILOVER=on)(DESCRIPTION=(CONNECT_TIMEOUT=5)(TRANSPORT_CONNECT_TIMEOUT=3)(RETRY_COUNT=3)(ADDRESS_LIST=(LOAD_BALANCE=on)(ADDRESS=(PROTOCOL=TCP)(HOST=primary-cluster-scan.example.com)(PORT=1521)))(CONNECT_DATA=(SERVICE_NAME=haemrep.example.com)))(DESCRIPTION=(CONNECT_TIMEOUT=5)(TRANSPORT_CONNECT_TIMEOUT=3)(RETRY_COUNT=3)(ADDRESS_LIST=(LOAD_BALANCE=on)(ADDRESS=(PROTOCOL=TCP)(HOST=standby-cluster-scan.example.com)(PORT=1521)))(CONNECT_DATA=(SERVICE_NAME=haemrep.example.com))))
Starting PointsBefore setting up the standby site, the administrator must evaluate the starting point of theproject. The starting point for designing an Enterprise Manager Cloud Control DisasterRecovery topology is usually one of the following:
• The primary site is already created, standby site is being planned
• The primary site is already created, standby site is already created using the deprecated"Standby WLS Domain" method
• No installation exists, both primary and standby sites are being planned
The primary site is already created, standby site is being plannedWhen the starting point is an existing primary site, the OMS installation for the primary sitealready exist on the file system. Also, the host names, ports, and user accounts are alreadydefined. The following procedure must be used to transform the site and prepare it forDisaster Recovery topology.
1. Review the Network Considerations and plan your host names
Chapter 24Design Considerations
24-9

If using option 1, no host name changes are required on the primary site. Prepareyour standby site hosts by adding appropriate alias host names.
If using option 2, change the OMS host name to move your existing OMSinstallation to use alias host names. Prepare your standby site hosts by adding theappropriate alias host names.
2. Review the Storage Considerations and move your OMS installation to sharedstorage
Migrate the primary site to shared storage. See Migrating an Existing Site toShared Storage.
3. Review the Database considerations and plan your repository host names andconnect descriptors
To achieve seemless failover/switchover consider if you want to use hostnamealias for the repository database. If so, migrate your repository database to usealias hostname.
4. Now that your primary site is ready, use the procedures in Setting Up ManagementRepository Disaster Recovery and Setting Up the OMS and Software LibraryDisaster Recovery to complete the DR setup.
The primary site is already created, standby site is already created using thedeprecated "Standby WLS Domain" method.
1. Use the deleting standby OMS procedure to delete the Standby OMS. See Removing Additional Standby OMS Instances.
2. Use the procedure documented in The primary site is already created, standby siteis being planned.
No installation exists, both primary and standby sites are being plannedWhen you are designing a new primary site (not using a pre-existing primary site), itseasier as the site planning can be done before starting the installation of software.
1. Review the Network Considerations and plan your host names.
2. Review the Storage Considerations and prepare your storage volumes.
3. Review the Database Considerations and prepare your repository host names.
4. Perform your primary site installation using the procedures in Enterprise ManagerHigh Availability , taking care to use the correct host names and installing on theshared storage.
5. Now that your primary site is ready, see the following sections for procedures tocomplete the DR setup.
• Setting Up Management Repository Disaster Recovery
• Setting Up the OMS and Software Library Disaster Recovery
Setting Up Management Repository Disaster RecoveryThe Management Repository should use Data Guard as a Disaster Recovery solution.
Chapter 24Setting Up Management Repository Disaster Recovery
24-10

Configuring a Standby Database for the Management RepositoryThe following steps describe the procedure for setting up a standby Management Repositorydatabase.
1. Prepare Standby Management Repository hosts for Data Guard.
Install a Management Agent on each of the standby Management Repository hosts.Configure the Management Agents to upload by the SLB on the primary site. Install Gridinfrastructure and RAC Database software on the standby Management Repositoryhosts. The version used must be the same as that on the primary site.
2. Prepare the primary Management Repository database for Data Guard.
If the primary Management Repository database is not already configured, enablearchive log mode, setup flash recovery area and enable flashback database on theprimary Management Repository database.
Note:
Ensure that the database is put into FORCE LOGGING mode to preventstandby database corruption during upgrades.
When the primary Management Repository database is in FORCE LOGGINGmode, all database changes are logged except for those in temporarytablespaces and temporary segments. FORCE LOGGING mode ensures thatthe standby database remains consistent with the primary ManagementRepository database.
3. Create the Physical Standby Database.
Use the Enterprise Manager console to set up a physical standby database in thestandby environment. The Standby Management Repository database must be aPhysical Standby. Logical standby Management Repository databases are not supported.
The Enterprise Manager console does not support creating a standby RAC database. Ifthe standby database has to be RAC, configure the standby database using a singleinstance and then use the 'Convert to RAC' option from the Enterprise Manager Consoleto convert the single instance standby database to RAC.
4. Add Static Service to the Listener.
To enable Data Guard to restart instances during the course of broker operations, aservice with a specific name must be statically registered with the local listener of eachinstance. The value for the GLOBAL_DBNAME attribute must be set to a concatenationof <db_unique_name>_DGMGRL.<db_domain>. For example, in the LISTENER.ORAfile:
SID_LIST_LISTENER=(SID_LIST=(SID_DESC=(SID_NAME=sid_name)(GLOBAL_DBNAME=db_unique_name_DGMGRL.db_domain)(ORACLE_HOME=oracle_home)))
5. Enable Flashback Database on the Standby Database.
To allow re-instate of an old primary database as a standby database after a failover,flashback database must be enabled. Hence do so for both the primary and the standbydatabases.
Chapter 24Setting Up Management Repository Disaster Recovery
24-11

6. To allow Enterprise Manager to monitor a Physical Standby database (which istypically in a mounted state), specify sysdba monitoring privileges. This can bespecified either during the Standby creation wizard itself or post creation bymodifying the Monitoring Configuration for the standby database target.
7. Verify the Physical Standby
Verify the Physical Standby database through the Enterprise Manager Console.Click the Log Switch button on the Data Guard page to switch log and verify that itis received and applied to the standby database.
Setting Up the OMS and Software Library DisasterRecovery
The Disaster Recovery solution for a Cloud Control deployment involves installing theSoftware Library, OMS installation, Agent installation and Oracle inventory onreplicated filesystem.
The recommended method for creating Standby OMSs is to use storage replication asdocumented in this chapter.
Note:
Enterprise Manager 13c supports a single approach to OMS DisasterRecovery.The Standby OMSs using Standby WebLogic Domain approach that waspreviously deprecated as of Cloud Control 12.1.0.3 is now de-supported.Standby OMSs using Storage Replication is the supported approach and isdiscussed in this chapter.
Storage Replication Requirements
Your chosen method of storage replication should support the following:
• Snapshots and consistent filesystem copies
• Ability to perform an on-demand replication between sites
Management Service Disaster Recovery1. Ensure that the primary OMS host names are resolvable to the IP addresses of
the corresponding standby hosts at the standby site. This can be achieved ineither of the following ways:
• By installing OMSs at the primary site using physical host names andconfiguring aliases for these host names on the corresponding hosts at thestandby site.
• By installing each OMS using an alias host name that can be configured atboth the primary and standby sites.
Host name resolution at each site can be done using either local resolution (/etc/hosts) or DNS based resolution or a combination of both.
Chapter 24Setting Up the OMS and Software Library Disaster Recovery
24-12

Example /etc/hosts configurations when OMSs are installed at primary site using primarysite physical host names (oms1-p.example.com and oms2-p.example.com):
Primary Site
127.0.0.1 localhost.localdomain123.1.2.111 oms1-p.example.com oms1-p #OMS1123.1.2.112 oms2-p.example.com oms2-p #
Standby Site
127.0.0.1 localhost.localdomain123.2.2.111 oms1-s.example.com oms1-s oms1-p.example.com #OMS1123.2.2.112 oms2-s.example.com oms2-s oms2-p.example.com #OMS2
Example /etc/hosts configuration when OMSs are installed using alias host names(oms1.example.com and oms2.example.com):
Primary Site
127.0.0.1 localhost.localdomain123.1.2.111 oms1-p.example.com oms1-p oms1.example.com #OMS1123.1.2.112 oms2-p.example.com oms2-p oms2.example.com #OMS2
Standby Site
127.0.0.1 localhost.localdomain123.2.2.111 oms1-s.example.com oms1-s oms1.example.com #OMS1123.2.2.112 oms2-s.example.com oms2-s oms2.example.com #OMS2
If the network has been configured correctly, a ping of the OMS host name from theprimary site should result in a reply from the primary host, and a ping of the OMS hostname from the standby site should result in a reply from the standby host.
Example
Ping results from primary site (reply from primary site):
[oracle@oms1-p ~]$ ping oms1-p.example.comPING oms1-p.example.com (123.1.2.111) 56(84) bytes of data.64 bytes from oms1-p.example.com (123.1.2.111): icmp_seq=1 ttl=64 time=0.018 ms64 bytes from oms1-p.example.com (123.1.2.111): icmp_seq=2 ttl=64 time=0.020 ms64 bytes from oms1-p.example.com (123.1.2.111): icmp_seq=3 ttl=64 time=0.022 ms
Ping results from standby site (reply from standby site)
[oracle@oms1-s ~]$ ping oms1-p.example.comPING oms1-s.example.com (123.2.2.111) 56(84) bytes of data.64 bytes from oms1-s.example.com (123.2.2.111): icmp_seq=1 ttl=64 time=0.018 ms64 bytes from oms1-s.example.com (123.2.2.111): icmp_seq=2 ttl=64 time=0.020 ms64 bytes from oms1-s.example.com (123.2.2.111): icmp_seq=3 ttl=64 time=0.022 ms
2. Ensure that the OMS installation, Agent Installation and Oracle Inventory for each OMSat the primary site is placed on replicated storage. This can either be done by specifyingreplicated storage during OMS installation or by moving these components ontoreplicated storage after installation.
Chapter 24Setting Up the OMS and Software Library Disaster Recovery
24-13

Note:
If the components are moved to shared storage after installation theymust retain their original pathnames.
3. Configure an application virtual host name in DNS to point to Primary site.
• If there is a single OMS at the primary site the DNS entry for the applicationvirtual host name should point to this OMS.
• If there are multiple OMSs at the primary site the DNS entry for the applicationvirtual host name should point to the SLB.
• This host name should be configured with a short TTL value (30-60 seconds)so that it will not be cached by clients for extended periods.
4. Configure SLB at the standby site (only required if multiple OMSs are required atthe standby site). See Configuring a Load Balancer for more information. The SLBpools on the standby site will reference the IP addresses of the standby OMShosts.
5. Resecure all Agents and OMSs using application virtual host name.
Examples
For OMS
emctl secure oms -sysman_pwd <sysman_pwd> -reg_pwd <agent_reg_password> -host em.example.com -secure_port 4900 -slb_port 4900 -slb_console_port 443 -console -lock_upload -lock_console
For Agent
emctl secure agent -emdWalletSrcUrl https://em.example.com:4901/em6. Configure the storage replication schedule for as frequently as the network
infrastructure will allow (minimum every 24 hours).
Note:
Refer to your storage/network documentation to determine a replicationschedule that maximizes the resource utilization performance of yournetwork infrastructure.
7. Move HTTP Lock files to local filesystem. See the Enterprise Manager CloudControl Advanced Installation and Configuration Guide for more information.
Monitoring Standby OMS HostsMonitoring the availability of the standby OMS hosts is necessary to ensure that theyare ready for switchover/failover operations. In order to monitor these hosts, Agentsshould be deployed to local file systems on each standby OMS host.To avoid conflicts
Chapter 24Setting Up the OMS and Software Library Disaster Recovery
24-14

with the components that will be started on the standby site after a switchover/failover, whendeploying Agents on the standby OMS hosts the following points should be considered:
• The Agents deployed to the standby OMS hosts should not use the replicated OracleInventory. They should be installed using a local inventory that does not include thereplicated OMS and Agent installs.
• The Agents deployed to the standby OMS hosts should be deployed on a different port tothat used by the replicated Agents. This will avoid port conflicts when the replicated OMSand Agent are started on the standby OMS host.
• Regardless of which network topology is used (aliases at both sites or aliases only at thestandby site), these Agents should be deployed using the physical hostnames of thestandby OMS hosts.
• These Agents should be deployed into a separate inventory so that they are kept apartfrom the inventory used for the OMS installation.
• After deploying Agents to the standby OMS hosts, confirm that all OMS Agents (thoseinstalled with alias host names on replicated storage and those installed with physicalhost names on local storage) are configured consistently with the same time zone. Seethe chapter on EMCTL Commands for Management Agent in the Enterprise ManagerCloud Control Administrator’s Guide for details on changing the agent time zone.
To specify an inventory location for Agent installation, an inventory pointer file can be createdand the -invPtrLoc flag can be used during installation.
The following example shows an inventory pointer file that defines the inventory locationas /u01/oraInventory_standby
more /u01/oraInst_standby.loc
inventory_loc=/u01/oraInventory_standbyinst_group=dba
The -invPtrLoc flag can then be passed during Agent installation.
Chapter 24Setting Up the OMS and Software Library Disaster Recovery
24-15

Software Library Disaster Recovery1. The Software Library should be located on a file system that is replicated using
storage replication. If the Software Library is currently located on another filesystem it can be migrated using the 'Migrate and Remove' option in the SoftwareLibrary Administration page.
See the chapter on Configuring a Software Library in the Enterprise ManagerCloud Control Administrator's Guide for more information.
2. Configure the storage replication schedule for as frequently as the networkinfrastructure as the network infrastructure will allow. Oracle recommendscontinuous replication to occur every 2 hours (minimum).
Migrating an Existing Site to Shared Storage
Note:
You can migrate from your existing site to a shared storage file system evenif you want to use Level 4 of the high-availability solution for your existingenvironment.
• Use file system backups to move existing OMS and agent installations to sharedstorage.
• Use the following guidelines to migrate from local file system to shared storage
Chapter 24Setting Up the OMS and Software Library Disaster Recovery
24-16

– All backups must be offline backups, i.e. OMS and agent processes on a host mustbe shut down completed before backing up and restoring.
– The backups must be performed as root user and permissions must be preserved.
– The directory paths for Middleware Home and Instance Home must not change.
– The migration can be done in a rolling fashion to avoid complete downtime of CloudControl.
• Use the process documented in the Enterprise Manager Cloud Control Administrator’sGuide to move the software library to shared storage.
Performing Switchover and Failover OperationsActivating the standby site can take place either by using a switchover or a failover. Theseare used in different situations as described below:
• Switchover - A pre-planned role reversal of the primary and standby sites. In aswitchover, functionality is transferred from the primary site to a standby site in an orderly,coordinated operation. As such, both sites must be available for a switchover tocomplete. Switchover is usually performed for testing and validation of Disaster Recovery(DR) scenarios and for planned maintenance activities on the primary infrastructure. Aswitchover is the preferred method of activating the standby site as the primary.
• Failover - Activation of the standby site as the primary site when the original primary sitebecomes unavailable.
Note:
If BI Publisher is configured in your environment, and if your disaster recoveryapproach uses Standby OMSs using Storage Replication as discussed in thischapter, BI Publisher will be functional on the standby site when switchover/failoveroccurs.
Note:
If an error is encountered unmounting the OMS filesystem as part of a switchover orfailover operation, it may be because Oracle Configuration Manager (OCM) isconfigured and running from the OMS home. If OCM is running, it should bestopped before unmounting the OMS filesystem. To check OCM status, run thefollowing command:
<OMS_HOME>/ccr/bin/emCCR status.
To stop OCM, run the following command:
<OMS_HOME>/ccr/bin/emCCR stop.
To start OCM after a switchover or failover, run the following command:
<OMS_HOME>/ccr/bin/emCCR start.
Chapter 24Performing Switchover and Failover Operations
24-17

Switchover ProcedureThis section describes the steps to switchover to the standby site. The sameprocedure is applied to switchover in either direction.
1. Shut down all OMS components at the primary site.
2. Shut down all virtual Management Agents at the primary site.
3. Shut down the Always-On Monitoring service for each of the OMSs:
<AOM location>/scripts/emsctl stop4. Unmount the OMS filesystem and the software library filesystems from OMS hosts
at the primary site.
If configured, unmount the BIP shared storage and AOM storage filesystems.
5. Perform on-demand replication of OMS and software library filesystems.
Note:
Refer to your storage documentation for steps required to perform an on-demand replication.
6. Update DNS entry for the application virtual hostname.
7. Switchover Oracle Database using Data Guard switchover.
Use DGMGRL to perform a switchover to the standby database. The commandcan be run on the primary site or the standby site. The switchover commandverifies the states of the primary database and the standby database, affectsswitchover of roles, restarts the old primary database, and sets it up as the newstandby database.
SWITCHOVER TO <standby database name>;Verify the post switchover states. To monitor a standby database completely, theuser monitoring the database must have SYSDBA privileges. This privilege isrequired because the standby database is in a mounted-only state. A best practiceis to ensure that the users monitoring the primary and standby databases haveSYSDBA privileges for both databases.
SHOW CONFIGURATION;SHOW DATABASE <primary database name>;SHOW DATABASE <standby database name>;
8. Perform role reversal of the Software Library and OMS storage (refer to yourstorage documentation for instructions).
9. Re-enable replication schedules for SWLIB and OMS storage.
If AOM hase been configured, re-enable replication schedules for the AOMstorage location.
10. Mount OMS, AOM (if configured), and Software Library filesystems on OMS hostsat Standby site.
11. Start the first OMS Admin Server at the standby site.
Chapter 24Performing Switchover and Failover Operations
24-18

Note:
This step is not required if using a connection string that works from bothprimary and standby sites, such as by using SCAN addresses and Role-BasedDatabase Services as described in Database Considerations.
12. Point the OMS to the new Primary Repository Database using the following command:
emctl config oms -store_repos_details -repos_conndesc <connect descriptor> -repos_user <username>
Example
emctl config oms -store_repos_details -repos_conndesc '(DESCRIPTION=(ADDRESS_LIST=(ADDRESS=(PROTOCOL=TCP)(HOST=newscan.domain)(PORT=1521)))(CONNECT_DATA=(SERVICE_NAME=emreps.domain)))' -repos_user SYSMAN
Note:
This step is not required if using a connection string that works from bothprimary and standby sites, such as by using SCAN addresses and Role-BasedDatabase Services as described in Database Considerations.
This step should be repeated on each OMS.
13. Point AOM to the new Primary Repository Database using the following command:
emsctl set_ems_repos_conn -username=<repository username> -password=<repository password> -connect_string=<repository connect descriptor>
Note: Changing the AOM connect information applies only to the local AOMinstance.This command must be executed on each AOM instance in order for it to takeaffect.
14. Start the OMSs and AOMs (if configured) at the standby site.
15. Start the Management Agents at the standby site using the following command:
emctl start agent16. Relocate Management Services and Repository target using the following command:
emctl config emrep -agent <agent name> -conn_desc <repository connection>
The Management Services and Management Repository target is monitored by aManagement Agent on one of the Management Services on the primary site. To ensurethat the target is monitored after switchover/failover, relocate the target to a ManagementAgent on the standby site by running the following command on one of the ManagementService standby sites.
Chapter 24Performing Switchover and Failover Operations
24-19

Note:
This step is not required if the following two conditions are met:
• Using a Repository Connect Descriptor that works from both primaryand standby sites, such as by using SCAN addresses and Role-Based Database Services. Under this condition, the connectiondescriptor does not need to be updated in order to monitor theManagement Services and Management Repository target.
• Management Services and Management Repository target ismonitored by a Management Agent installed on replicated storageusing an Alias Host Name. Under this condition, the same agent willnow be running on the standby site; therefore a different Agent doesnot need to be configured.
17. Update the URI for the WebLogic Admin Console from within Cloud Control.
Navigate to the target homepage for GCDomain. From the WebLogic Domainmenu, select Target Setup, and then Monitoring Configuration.
Failover ProcedureThis section describes the steps to failover to the standby site, recover the EnterpriseManager application state by resynchronizing the Management Repository databasewith all Management Agents, and finally enabling the original primary database
1. Shut down all OMS components at the primary site if running.
2. Shut down all virtual agents at primary site if running.
3. Shut down all AOM instances (if configured).
4. Unmount OMS and Software Library filesystems from OMS hosts at primary site.
If BI Publisher has been configured, umount the BI Publisher shared storagefilesystem from OMS hosts at the primary site.
If AOM has been configured, unmount the AOM storage filesystem.
5. Perform on-demand replication of the OMS and Software Library file systems.(Depending on the type of failure encountered this may not be possible.) If BIPublisher has been configured, perform an on-demand replication of the BIPublisher shared storage filesystem. If AOM has been configured, perform an on-demand replication of the AOM storage filesystem.
Note:
Refer to your storage documentation for steps required to perform an on-demand replication.
6. Update the DNS entry for the application virtual hostname.
7. Failover Oracle Database using Data Guard failover.
8. Perform role reversal of Software Library and OMS storage.
Chapter 24Performing Switchover and Failover Operations
24-20

9. Re-enable replication schedules for SWLIB and OMS storage
10. Mount the OMS and Software Library filesystems on OMS hosts at the standby site
11. Start the first OMS Admin Server.
Note:
This step is not required if the following two conditions are met:
a. Using a Repository Connect Descriptor that works from both primary andstandby sites, such as by using SCAN addresses and Role-BasedDatabase Services.
b. Running in Data Guard Maximum Protection or Maximum Availability levelas there is no data loss on failover.
12. Modify the OMS connect descriptor to point to the new Primary Repository Database.
emctl config oms -store_repos_details -repos_conndesc <connect descriptor> -repos_user <username>
Example
emctl config oms -store_repos_details -repos_conndesc '(DESCRIPTION=(ADDRESS_LIST=(ADDRESS=(PROTOCOL=TCP)(HOST=newscan.domain)(PORT=1521)))(CONNECT_DATA=(SERVICE_NAME=emreps.domain)))' -repos_user SYSMAN
Note:
This step is not required if using a Repository Connect Descriptor that worksfrom both primary and standby sites, such as by using SCAN addresses andRole-Based Database Services.
This step should be repeated on each OMS.
13. Modify the AOM connect descriptor to point to the new Primary Repository Database:
emsctl set_ems_repos_conn -username=<repository username> -password=<repository password> -connect_string=<repository connect descriptor>
Changing the AOM connect information applies only to the local AOM instance
This command must be executed on each AOM instance in order for it to take affect.
14. Perform a Repository Resynchronization to resync the Agents with the new Primarydatabase.
Skip this step if you are running in Data Guard Maximum Protection or MaximumAvailability level as there is no data loss on failover. However, if there is data loss,synchronize the new primary database with all Management Agents.
On any one Management Service on the standby site, run the following command:
emctl resync repos -full -name "<name for recovery action>"This command submits a resync job that is executed on each Management Agent whenthe Management Services on the standby site are brought up.
Chapter 24Performing Switchover and Failover Operations
24-21

15. Start the Agents at the standby site.
16. Start the OMSs at the standby site.
17. Start the AOM instances at the standby site.
18. Modify Management Services and Repository target connect descriptor.
From the Setup menu, select Manage Cloud Control and then Health Overview.The Management Services and Repository page displays. From the OMS andRepository menu, select Target Setup and then Monitoring Configuration.
The Repository Connect Descriptor should be modified to connect to the databasethat is currently active.
Note:
This step is not required if using a Repository Connect Descriptor thatworks from both primary and standby sites, such as by using SCANaddresses and Role-Based Database Services
19. Update the URI for the WebLogic Admin Console from within Cloud Control.
Navigate to the target homepage for GCDomain. From the WebLogic Domainmenu, select Target Setup, and then Monitoring Configuration.
Keeping the Standby Site in Sync with the PrimaryThe standby site will be kept in sync with the primary automatically through thecombination of Data Guard and storage replication.
The administrator should ensure that an on-demand replication to the standby sitetakes place before and after the following operations on the OMS or the agent:
• Plug-in deployment/undeployment, or existing plug-in upgrade
• Upgrade
• Patch
• emctl commands (other than lifecycle verbs (start/stop/status oms))
• Configuration of ADP/JVMD
Note:
Refer to your storage documentation for steps required to perform an on-demand replication.
Chapter 24Keeping the Standby Site in Sync with the Primary
24-22

25Backing Up and Recovering EnterpriseManager
As the monitoring and management framework for your ecosystem, an important part of yourhigh availability strategy is to ensure Enterprise Manager is regularly backed up so that it canbe restored in the event of failure.
This chapter covers the following topics:
• Backing Up Your Deployment
• Software Library Backup
• Management Repository Backup
• Oracle Management Service Backup
• Management Agent Backup
• Recovery of Failed Enterprise Manager Components
• Recovering from a Simultaneous OMS-Management Repository Failure
Backing Up Your DeploymentAlthough Enterprise Manager functions as a single entity, technically, it is built on adistributed, multi-tier software architecture composed of the following software components:
• Oracle Management Services (OMS)
• Management Agent
• Management Repository
• Software Library
Each component, being uniquely different in composition and function, requires differentapproaches to backup and recovery. For this reason, the backup strategies are discussed ona per-tier basis in this chapter. For an overview of Enterprise Manager architecture, seeInstallation of Enterprise Manager Cloud Control in the Oracle Enterprise Manager CloudControl Basic Installation Guide.
Software Library BackupThe software library is a centralized media storage for Enterprise Manager software entitiessuch as software patches, virtual appliance images, reference gold images, applicationsoftware, and their associated directive scripts. The software library is an essential part ofEnterprise Manager framework and is required by many Enterprise Manager features in orderto function properly. The software library storage locations should be backed up periodicallyusing file system backup. Oracle recommends the backup be performed at a frequency of 1to 24 hours.
25-1

Management Repository BackupThe Management Repository is the storage location where all the information collectedby the Management Agent gets stored. It consists of objects such as database jobs,packages, procedures, views, and tablespaces. Because it is configured in an OracleDatabase, the backup and recovery strategies for the Management Repository areessentially the same as those for the Oracle Database. Backup procedures for thedatabase are well established standards and can be implemented using the RMANbackup utility, which can be accessed via the Cloud Control console.
Management Repository Backup
Oracle recommends using High Availability Best Practices for protecting theManagement Repository database against unplanned outages. As such, use thefollowing standard database backup strategies.
• Database should be in archivelog mode. Not running the repository database inarchivelog mode leaves the database vulnerable to being in an unrecoverablecondition after a media failure.
• Perform regular hot backups with RMAN using the Recommended BackupStrategy option via the Cloud Control console. Other utilities such as DataGuardand RAC can also be used as part of a comprehensive HA and data protectionstrategy typically implemented with HA levels 3 and 4. For more information aboutthe various HA levels, see Implementing High Availability Levels.
Adhering to these strategies will create a full backup and then create incrementalbackups on each subsequent run. The incremental changes will then be rolled up intothe baseline, creating a new full backup baseline.
Using the Recommended Backup Strategy also takes advantage of the capabilities ofEnterprise Manager to execute the backups: Jobs will be automatically scheduledthrough the Job sub-system of Enterprise Manager. The history of the backups willthen be available for review and the status of the backup will be displayed on therepository database target home page. This backup job along with archiving andflashback technologies will provide a restore point in the event of the loss of any partof the repository. This type of backup, along with archive and online logs, allows therepository to be recovered to the last completed transaction.
You can view when the last repository backup occurred on the Management Servicesand Repository Overview page under the Repository details section.
For a thorough summary of how to configure backups using Enterprise Manager, see Configuring Your Database for Basic Backup and Recovery in the Oracle Database 2Day DBA. For additional information on Database high availability, see Overview ofHigh Availability.
Oracle Management Service BackupThe Oracle Management Service (OMS) orchestrates with Management Agents todiscover targets, monitor and manage them, and store the collected information in arepository for future reference and analysis. The OMS also renders the Web interfacefor the Enterprise Manager console.
Chapter 25Management Repository Backup
25-2

Backing Up the OMS
The OMS is generally stateless. Some configuration data is stored on the OMS file system.
A snapshot of OMS configuration can be taken using the emctl exportconfig omscommand.
$ <OMS_HOME>/bin/emctl exportconfig oms [-sysman_pwd <sysman password>][-dir <backup dir>] Specify directory to store backup file[-keep_host] Specify this parameter if the OMS was installed using a virtual hostname (usingORACLE_HOSTNAME=<virtual_hostname>)
Running exportconfig captures a snapshot of the OMS at a given point in time, thus allowingyou to back up the most recent OMS configuration on a regular basis. exportconfig shouldalways be run on the OMS running the WebLogic Admin Server. If required, the most recentsnapshot can then be restored on a fresh OMS installation on the same or different host.
Backup strategies for the OMS components are as follows:
• Software Homes
Composed of Fusion Middleware Home, the OMS Oracle Home and the WebTier (OHS)Oracle Home and multiple Management Plug-in Oracle Homes.
Software Homes changes when patches or patchsets are applied or updates are appliedthrough the new Self Update feature. For this reason, filesystem-level backups should betaken after each patch/patchset application or application of updates through SelfUpdate. You should back up the Oracle inventory files along with the Software Homesand save the output of opatch lsinventory –detail to make it easy to determine whichpatches are applied to the backed up Oracle Homes.
Note:
If you do not have filesystem-level backups, you can also reinstall the softwarehomes using the “Installing Software Only" install method.
Important: The location of the OMS Oracle Home must be the same for allOMS instances in your Cloud Control deployment.
• Instance Home
The gc_inst directory, composed of WebLogic Server, OMS and web tier configurationfiles.
The Instance Home can be backed up using the emctl exportconfig oms command.
• Administration Server
The Administration Server operates as the central control entity for the configuration ofthe entire OMS instance domain. The Administration Server is an integral part of the firstOMS installed in your Cloud Control deployment and shares the Software Homes andInstance Home.
The Administration Server is backed up at the same time as the Instance Home, theemctl exportconfig oms command (only run on the first OMS with the AdministrationServer).
Chapter 25Oracle Management Service Backup
25-3

Management Agent BackupThe Management Agent is an integral software component that is deployed on eachmonitored host. It is responsible for monitoring all the targets running on those hosts,communicating that information to the middle-tier OMS and managing and maintainingthe hosts and its targets.
Backing Up Management Agents
There are no special considerations for backing up Management Agents. As a bestpractice, reference Management Agent installs should be maintained for differentplatforms and kept up-to-date in terms of customizations in the emd.properties file andpatches applied. Use Deployment options from the Cloud Control console to installand maintain reference Agent installs.
If a Management Agent is lost, it should be reinstalled by cloning from a referenceinstall.
Recovery of Failed Enterprise Manager ComponentsRecovering Enterprise Manager means restoring any of the three fundamentalcomponents of the Enterprise Manager architecture.
• Management Repository
• Management Service
• Management Agent
• Software Library
Repository RecoveryRecovery of the Repository database must be performed using RMAN since CloudControl will not be available when the repository database is down. There are tworecovery cases to consider:
• Full Recovery: No special consideration is required for Enterprise Manager.
• Point-in-Time/Incomplete Recovery: Recovered repository may be out of syncwith Agents because of lost transactions. In this situation, some metrics may showup incorrectly in the Cloud Control console unless the repository is synchronizedwith the latest state available on the Agents.
A repository resync feature allows you to automate the process of synchronizing theEnterprise Manager repository with the latest state available on the ManagementAgents.
To resynchronize the repository with the Management Agents, you use EnterpriseManager command-line utility (emctl) resync repos command:
emctl resync repos -full -name "<descriptive name for the operation>"
You must run this command from the OMS Oracle Home AFTER restoring theManagement Repository, but BEFORE starting the OMS. After submitting thecommand, start up all OMS instances and monitor the progress of repository
Chapter 25Management Agent Backup
25-4

resychronization from the Enterprise Manager console's Repository Resynchronization page,as shown in the following figure.
Figure 25-1 Repository Synchronization Page
Management Repository recovery is complete when the resynchronization jobs complete onall Management Agents.
Oracle strongly recommends that the Management Repository database be run in archivelogmode so that in case of failure, the database can be recovered to the latest transaction. If thedatabase cannot be recovered to the last transaction, Repository Synchronization can beused to restore monitoring capabilities for targets that existed when the last backup wastaken. Actions taken after the backup will not be recovered automatically. Some examples ofactions that will not be recovered automatically by Repository Synchronization are:
• Incident Rules
• Preferred Credentials
• Groups, Services, Systems
• Jobs/Deployment Procedures
• Custom Reports
• New Agents
Recovery ScenariosA prerequisite for repository (or any database) recovery is to have a valid, consistent backupof the repository. Using Enterprise Manager to automate the backup process ensures regular,up-to-date backups are always available if repository recovery is ever required. RecoveryManager (RMAN) is a utility that backs up, restores, and recovers Oracle Databases. TheRMAN recovery job syntax should be saved to a safe location. This allows you to perform acomplete recovery of the Enterprise Manager repository database. In its simplest form, thesyntax appears as follows:
run {restore database;recover database;}
Chapter 25Recovery of Failed Enterprise Manager Components
25-5

Actual syntax will vary in length and complexity depending on your environment. Formore information on extracting syntax from an RMAN backup and recovery job, orusing RMAN in general, see the Oracle Database Backup and Recovery AdvancedUser's Guide.
The following scenarios illustrate various repository recovery situations along with therecovery steps.
Full Recovery on the Same HostRepository database is running in archivelog mode. Recent backup, archive log filesand redo logs are available. The repository database disk crashes. All datafiles andcontrol files are lost.
Resolution:
1. Stop all OMS instances using emctl stop oms -all.
2. Recover the database using RMAN
3. Bring the site up using the command emctl start oms on all OMS instances.
4. Verify that the site is fully operational.
Incomplete Recovery on the Same HostRepository database is running in noarchivelog mode. Full offline backup is available.The repository database disk crashes. All datafiles and control files are lost.
Resolution:
1. Stop the OMS instances using emctl stop oms -all.
2. Recover the database using RMAN.
3. Initiate Repository Resync using emctl resync repos -full -name "<resyncname>" from one of the OMS Oracle Home.
4. Start the OMS instances using emctl start oms.
5. Log in to Cloud Control. From the Setup menu, select Manage Cloud Control, andthen Health Overview. The Management Services and Repository page displays.
6. From the OMS and Repository menu, select Repository Synchronization.
7. Verify that the site is fully operational.
Full Recovery on a Different HostThe Management Repository database is running on host "A" in archivelog mode.Recent backup, archive log files and redo logs are available. The repository databasecrashes. All datafiles and control files are lost.
Resolution:
1. Stop the OMS instances using the command emctl stop oms.
2. Recover the database using RMAN on a different host (host "B").
3. Correct the connect descriptor for the repository by running the followingcommand on each OMS.
Chapter 25Recovery of Failed Enterprise Manager Components
25-6

$emctl config oms –store_repos_details -repos_conndesc <connect descriptor> -repos_user sysman
4. Stop the OMS using the following command:
emctl stop oms -all5. Start the OMS instances using the command
emctl start oms.
6. Relocate the Management Repository database target to the Agent running on host "B"by running the following command from the OMS:
$emctl config repos -host <hostB> -oh <OH of repository on hostB> -conn_desc "<TNS connect descriptor>"
Note:
This command can only be used to relocate the repository database under thefollowing conditions:
• An Agent is already running on this machine.
• No database on host "B" has been discovered.
7. Change the monitoring configuration for the OMS and Repository target: by running thefollowing command from the OMS:
$emctl config emrep -conn_desc "<TNS connect descriptor>"8. Verify that the site is fully operational.
Incomplete Recovery on a Different HostThe Management Repository database is running on host "A" in noarchivelog mode. Fulloffline backup is available. Host "A" is lost due to hardware failure. All datafiles and controlfiles are lost.
Resolution:
1. Stop the OMS instances using emctl stop oms.
2. Recover the database using RMAN on a different host (host "B").
3. Correct the connect descriptor for the repository in credential store.
$emctl config oms –store_repos_details -repos_conndesc <connect descriptor> -repos_user sysman
This commands will prompt you to stop and start the oms.
4. Initiate Repository Resync:
$emctl resync repos -full -name "<resync name>"
from one of the OMS Oracle Homes.
5. Start the OMS using the command emctl start oms.6. Run the command to relocate the repository database target to the Management Agent
running on host "B":
Chapter 25Recovery of Failed Enterprise Manager Components
25-7

$emctl config repos -agent <agent on host B> -host <hostB> -oh <OH ofrepository on hostB> -conn_desc "<TNS connect descriptor>"
7. Run the command to change monitoring configuration for the OMS and Repositorytarget:
emctl config emrep -conn_desc "<TNS connect descriptor>"8. Log in to Cloud Control. From the Setup menu, select Manage Cloud Control, and
then select Health Overview.
9. From the OMS and Repository menu, select Repository Synchronization.Monitor the status of resync jobs. Resubmit failed jobs, if any, after fixing the errormentioned.
10. Verify that the site is fully operational.
Recovering the OMSIf an Oracle Management Service instance is lost, recovering it essentially consists ofthree steps: Recovering the Software Homes, configuring the Instance Home andrecovering the Software Library if configured on same host as Enterprise Manager.
Recovering the Software HomesWhen restoring on the same host, the software homes can be restored from filesystembackup. In case a backup does not exist, or if installing to a different host, the SoftwareHomes can be reconstructed using the “Install Software Only" option from the CloudControl software distribution. Care should be taken to select and install ALLManagement Plug-ins that existed in your environment prior to crash.
1. Connect to the Management Repository as SYSMAN and run the following SQLquery to retrieve a list of installed plug-ins:
SELECT epv.display_name, epv.plugin_id, epv.version, epv.rev_version,decode(su.aru_file, null, 'Media/External', 'https://updates.oracle.com/Orion/Services/download/'||aru_file||'?aru='||aru_id||chr(38)||'patch_file='||aru_file) URLFROM em_plugin_version epv, em_current_deployed_plugin ecp, em_su_entities suWHERE epv.plugin_type NOT IN ('BUILT_IN_TARGET_TYPE', 'INSTALL_HOME')AND ecp.dest_type='2'AND epv.plugin_version_id = ecp.plugin_version_idAND su.entity_id = epv.su_entity_id;
The above query returns the list of plug-ins along with the URLs to download themif they were downloaded through self update. If plug-ins are present in the installmedia or are third party plug-ins not available through Self Update, the URLs aremarked as "Media/Unknown".
2. Download the additional plug-ins, if any, from the URLs in the list returned by thequery in step 1 and place them in a single directory. Change the filenameextension from .zip to .opar.
3. Invoke the installer and select the Software-Only option to install the Middlewareand OMS Oracle Home.
4. To install the required plug-ins, you must then run the PluginInstall.sh script(OMS_HOME/sysman/install/PluginInstall.sh) with thePLUGIN_LOCATION=<absolute path to plugin dir> specifying the path to the
Chapter 25Recovery of Failed Enterprise Manager Components
25-8

directory where downloaded plugins are kept. When asked to select plugins, make sureyou select the same plugins as were listed in the SQL query.
Note:
Recovery will fail if all required plug-ins have not been installed.
After the software-only mode, all patches that were installed prior to the crash must be re-applied. Assuming the Management Repository is intact, the post-scripts that run SQLagainst the repository can be skipped as the repository already has those patches applied.
To apply the patches in bitonly mode, use the following command:
• $omspatcher apply -analyze -bitonly• $omspatcher apply -bitonlyAs stated earlier, the location of the OMS Oracle Home is fixed and cannot be changed.Hence, ensure that the OMS Oracle Home is restored in the same location that was usedpreviously.
Recreating the OMSOnce the Software Homes are recovered, the instance home can be reconstructed using theomsca command in recovery mode:
omsca recover –as –ms -nostart –backup_file <exportconfig file>Use the export file generated by the emctl exportconfig command shown in the previoussection.
OMS Recovery ScenariosThe following scenarios illustrate various OMS recovery situations along with the recoverysteps.
Note:
A prerequisite for OMS recovery is to have recent, valid OMS configuration backupsavailable. Oracle recommends that you back up the OMS using the emctlexportconfig oms command whenever an OMS configuration change is made.This command must be run on the primary OMS running the WebLogicAdminServer.
Alternatively, you can run this command on a regular basis using the EnterpriseManager Job system.
Each of the following scenarios cover the recovery of the Software homes usingeither a filesystem backup (when available and only when recovering to the samehost) or using the Software only option from the installer. In either case, the bestpractice is to recover the instance home (gc_inst) using the omsca recovercommand, rather than from a filesystem backup. This guarantees that the instancehome is valid and up to date.
Chapter 25Recovery of Failed Enterprise Manager Components
25-9

Single OMS, No Server Load Balancer (SLB), OMS Restored on the sameHost
Site hosts a single OMS. No SLB is present. The OMS configuration was backed upusing the emctl exportconfig oms command on the primary OMS running theAdminServer. The OMS Oracle Home is lost.
Resolution:
1. Perform cleanup on failed OMS host.
Make sure there are no processes still running from the Middleware home using acommand similar to the following:
ps -ef | grep -i -P "(Middleware|gc_inst)" | grep -v grep | awk '{print $2}' | xargs kill -9
Note:
Change Middleware|gc_inst to strings that match your own middlewareand instance homes.
If recovering the software homes using the software only install method, first de-install the existing Oracle Homes using the Cloud Control software distributioninstaller. This is required even if the software homes are no longer available as it isnecessary to remove any record of the lost Oracle Homes from the Oracleinventory.
If they exist, remove the ‘Middleware' and ‘gc_inst' directories.
2. Ensure that software library locations are still accessible and valid. If a Softwarelibrary is accessible but corrupt, it will affect OMSCA recovery.
3. Restore the Software Homes. See Recovering the Software Homes for moreinformation.
If restoring from a filesystem backup, delete the following file:
OMS_HOME/sysman/config/emInstanceMapping.propertiesIn addition, delete any gc_inst directories that may have been restored, if theyexist.
4. Run omsca in recovery mode specifying the export file taken earlier to configurethe OMS:
<OMS_HOME>/bin/omsca recover –as –ms –nostart –backup_file <exportconfig file>
Note:
The -backup_file to be passed must be the latest file generated fromemctl exportconfig oms command.
5. Start the OMS.
Chapter 25Recovery of Failed Enterprise Manager Components
25-10

OMS_HOME/bin/emctl start oms6. Recover the Agent (if necessary).
If the Management Agent Software Home was recovered along with the OMS SoftwareHomes, the Management Agent instance directory should be recreated to ensureconsistency between the Management Agent and OMS.
a. Remove the agent_inst directory if it was restored from backup.
b. Use agentDeploy.sh to configure the agent:
<AGENT_BASE_DIR>/core/13.5.0.0.0/sysman/install/agentDeploy.sh AGENT_BASE_DIR=<AGENT_BASE_DIR> AGENT_INSTANCE_HOME=<AGENT_INSTANCE_HOME> ORACLE_HOSTNAME=<AGENT_HOSTNAME> AGENT_PORT=<AGENT_PORT> -configOnly OMS_HOST=<oms host> EM_UPLOAD_PORT=<OMS_UPLOAD_PORT> AGENT_REGISTRATION_PASSWORD=<REG_PASSWORD>
If the Management Agent configuration fails, see <AGENT_HOME>/cfgtoollogs/cfgfw/oracle.sysman.top.agent_<time_stamp>.log
c. The OMS may block the Management Agent. Synchronize the agent with repositoryusing the following command:
<OMS_HOME>/bin/emcli resyncAgent -agent=<agent target namemyhost.example.com:3872>
If the Management Agent software home was not recovered along with the OMS but theAgent still needs to be recovered, follow the instructions in section Agent Reinstall Usingthe Same Port.
Note:
This is only likely to be needed in the case where a filesystem recovery hasbeen performed that did not include a backup of the Agent software homes. Ifthe OMS software homes were recovered using the Software only installmethod, this step will not be required because a Software only install installs anAgent software home under the Middleware home.
7. Verify that the site is fully operational.
Single OMS, No SLB, OMS Restored on a Different HostSite hosts a single OMS. The OMS is running on host "A." No SLB is present. The OMSconfiguration was backed up using the emctl exportconfig oms command. Host "A" is lost.
Resolution:
1. Ensure that software library locations are accessible from “Host B".
Note: If configured, all BIP shared locations (sharedLoc) should also accessible.
2. Restore the software homes on “Host B". See Recovering the Software Homes for moreinformation.
3. Run omsca in recovery mode specifying the export file taken earlier to configure theOMS:
<OMS_HOME>/bin/omsca recover –as –ms –nostart –backup_file <exportconfig file>
Chapter 25Recovery of Failed Enterprise Manager Components
25-11

Note:
The -backup_file to be passed must be the latest file generated fromemctl exportconfig oms command.
4. Start the OMS.
<OMS_HOME>/bin/emctl start oms
An agent is installed as part of the Software only install and needs to beconfigured using the agentDeploy.sh command:
5. Configure the Agent.
<AGENT_BASE_DIR>/agent_13.5.0.0.0/sysman/install/agentDeploy.sh AGENT_BASE_DIR=<AGENT_BASE_DIR> AGENT_INSTANCE_HOME=<AGENT_INSTANCE_HOME> ORACLE_HOSTNAME=<AGENT_HOSTNAME> AGENT_PORT=<AGENT_PORT> -configOnly OMS_HOST=<oms host> EM_UPLOAD_PORT=<OMS_UPLOAD_PORT> AGENT_REGISTRATION_PASSWORD=<REG_PASSWORD>
If the Management Agent configuration fails, see <AGENT_HOME>/cfgtoollogs/cfgfw/oracle.sysman.top.agent_<time_stamp>.log
6. Relocate the oracle_emrep target to the Management Agent of the new OMS hostusing the following commands:
<OMS_HOME>/bin/emcli login –username=sysman<OMS_HOME>/bin/emcli sync<OMS_HOME>/bin/emctl config emrep -agent <agent on host "B", e.g myNewOMSHost.example.com:3872>
Note:
If you run emctl config emrep -agent and set the flag -ignore_timeskew, there may a loss of monitoring data as the availabilityof monitored targets may be affected when the Management Servicesand Repository target is moved to the new Agent.
7. In the Cloud Control console, locate the 'WebLogic Domain' target for the CloudControl Domain. Go to 'Monitoring Credentials' and update the adminserver hostto host B. Then do a Refresh Weblogic Domain to reconfigure the domain withnew hosts.
8. Locate duplicate targets from the Management Services and Repository Overviewpage of the Enterprise Manager console. Click the Duplicate Targets link to accessthe Duplicate Targets page. To resolve duplicate target errors, the duplicate targetmust be renamed on the conflicting Agent. Relocate duplicate targets from Agent"A" to Agent "B".
9. Change the OMS to which all Management Agents point and then resecure allAgents.
Because the new machine is using a different hostname from the one originallyhosting the OMS, all Agents in your monitored environment must be told where tofind the new OMS. On each Management Agent, run the following command:
Chapter 25Recovery of Failed Enterprise Manager Components
25-12

<AGENT_INST_DIR>/bin/emctl secure agent -emdWalletSrcUrl "http://hostB:<http_port>/em"
10. Assuming the original OMS host is no longer in use, remove the Host target (including allremaining monitored targets) from Cloud Control by selecting the host on the Targets >Hosts page and clicking ‘Remove'. You will be presented with an error that informs you toremove all monitored targets first. Remove those targets then repeat the step to removethe Host target successfully.
11. Verify that the site is fully operational.
Single OMS, No SLB, OMS Restored on a Different Host using the OriginalHostname
Site hosts a single OMS. The OMS is running on Host "A." No SLB is present. The OMSconfiguration was backed up using the emctl exportconfig oms command. Host "A" is lost.Recovery is to be performed on “Host B" but retaining the use of “Hostname A".
Resolution:
1. Ensure that the software library location is accessible from Host "B".
2. Restore the software homes on Host B. See Recovering the Software Homes for moreinformation.
3. Modify the network configuration such that “Host B" also responds to hostname of “HostA". Specific instructions on how to configure this are beyond the scope of this document.However, some general configuration suggestions are:
Modify your DNS server such that both “Hostname B" and “Hostname A" networkaddresses resolve to the physical IP of “Host B".
Multi-home “Host B". Configure an additional IP on “Host B" for the IP address that“Hostname A" resolves to. For example, on “Host B" run the following commands:
ifconfig eth0:1 <IP assigned to “Hostname A"> netmask <netmask>/sbin/arping -q -U -c 3 -I eth0 <IP of HostA>
4. Run omsca in recovery mode specifying the export file taken earlier to configure theOMS:
<OMS_HOME>/bin/omsca recover –as –ms –nostart –backup_file <exportconfig file> -AS_HOST <hostA> -EM_INSTANCE_HOST <hostA>
Note:
The -backup_file to be passed must be the latest file generated from emctlexportconfig oms command.
5. Start the OMS.
<OMS_HOME>/bin/emctl start oms6. Configure the agent.
An agent is installed as part of the Software only install and needs to be configured usingthe agentDeploy.sh command:
<AGENT_HOME>/core/13.4.0.0.0/sysman/install/agentDeploy.sh AGENT_BASE_DIR=<AGENT_BASE_DIR> AGENT_INSTANCE_HOME=<AGENT_INSTANCE_HOME>
Chapter 25Recovery of Failed Enterprise Manager Components
25-13

ORACLE_HOSTNAME=<AGENT_HOSTNAME> AGENT_PORT=<AGENT_PORT> -configOnly OMS_HOST=<oms host> EM_UPLOAD_PORT=<OMS_UPLOAD_PORT> AGENT_REGISTRATION_PASSWORD=<REG_PASSWORD>
The OMS may block the Management Agent. Synchronize the Agent withrepository using the following command:
<OMS_HOME>/bin/emcli resyncAgent -agent=<agent target namemyhost.example.com:3872>
7. Verify that the site is fully operational.
Multiple OMS, Server Load Balancer, Primary OMS Recovered on the SameHost
Site hosts multiple OMS instances. All OMS instances are fronted by a Server LoadBalancer. OMS configuration backed up using the emctl exportconfig omscommand on the primary OMS running the WebLogic AdminServer. The primary OMSis lost.
Resolution:
1. Perform a cleanup on the failed OMS host.
Make sure there are no processes still running from the Middleware home using acommand similar to the following:
ps -ef | grep -i -P "(Middleware|gc_inst)" | grep -v grep | awk '{print $2}' | xargs kill -9
Note:
Change Middleware|gc_inst to strings that match your own middlewareand instance homes.
If recovering the software homes using the software only install method, first de-install the existing Oracle Homes using the Cloud Control software distributioninstaller. This is required even if the software homes are no longer available as it isnecessary to remove any record of the lost Oracle Homes from the Oracleinventory.
If they exist, remove the ‘Middleware' and ‘gc_inst' directories.
2. Ensure that software library locations are still accessible.
3. Restore the software homes. See Recovering the Software Homes for moreinformation.
If restoring from a filesystem backup, delete the following file:
<OMS_HOME>/sysman/config/emInstanceMapping.properties
4. Run omsca in recovery mode specifying the export file taken earlier to configurethe OMS:
<OMS_HOME>/bin/omsca recover –as –ms –nostart –backup_file <exportconfig file>
Chapter 25Recovery of Failed Enterprise Manager Components
25-14

Note:
The -backup_file to be passed must be the latest file generated from emctlexportconfig oms command.
5. Start the OMS.
<OMS_HOME>/bin/emctl start oms6. Recover the Management Agent.
If the Management Agent software home was recovered along with the OMS softwarehomes (as is likely in a Primary OMS install recovery where the agent and agent_instdirectories are commonly under the Middleware home), the Management Agent instancedirectory should be recreated to ensure consistency between the Management Agent andOMS.
a. Remove the agent_inst directory if it was restored from backup.
b. Use agentDeploy.sh to configure the Management Agent:
<AGENT_HOME>/core/13.5.0.0.0/sysman/install/agentDeploy.sh AGENT_BASE_DIR=<AGENT_BASE_DIR> AGENT_INSTANCE_HOME=<AGENT_INSTANCE_HOME> ORACLE_HOSTNAME=<AGENT_HOSTNAME> AGENT_PORT=<AGENT_PORT> -configOnly OMS_HOST=<oms host> EM_UPLOAD_PORT=<OMS_UPLOAD_PORT> AGENT_REGISTRATION_PASSWORD=<REG_PASSWORD>
c. The OMS may block the Management Agent. Synchronize the Agent with therepository using the following command:
<OMS_HOME>/bin/emcli resyncAgent -agent=<agent target name e.g.myhost.example.com:3872>
If the Management Agent software home was not recovered along with the OMS but theManagement Agent still needs to be recovered, follow the instructions in section AgentReinstall Using the Same Port.
Note:
This is only likely to be needed in the case where a filesystem recovery hasbeen performed that did not include a backup of the Management Agentsoftware homes. If the OMS software homes were recovered using theSoftware only install method, this step will not be required because a Softwareonly install installs an Management Agent software home under the Middlewarehome.
7. Verify that the site is fully operational.
Multiple OMS, Server Load Balancer Configured, Primary OMS Recovered on aDifferent Host
Site hosts multiple OMS instances. OMS instances fronted by a Server Load Balancer. OMSConfiguration backed up using emctl exportconfig oms command. Primary OMS on host "A"is lost and needs to be recovered on Host "B".
1. If necessary, perform cleanup on failed OMS host.
Chapter 25Recovery of Failed Enterprise Manager Components
25-15

Make sure there are no processes still running from the Middleware home using acommand similar to the following:
ps -ef | grep -i -P "(Middleware|gc_inst)" | grep -v grep | awk '{print $2}' | xargs kill -9
2. Ensure that software library locations are accessible from “Host B".
3. Restore the software homes on “Host B". See Recovering the Software Homes formore information.
4. Run omsca in recovery mode specifying the export file taken earlier to configurethe OMS:
<OMS_HOME>/bin/omsca recover –as –ms –nostart –backup_file <exportconfig file>
Note:
The -backup_file to be passed must be the latest file generated fromemctl exportconfig oms command.
5. Start the OMS.
<OMS_HOME>/bin/emctl start oms6. Configure the Management Agent.
An Agent is installed as part of the Software only install and needs to beconfigured using the agentDeploy.sh command:
<AGENT_BASE_DIR>/agent_13.5.0.0.0/sysman/install/agentDeploy.sh AGENT_BASE_DIR=<AGENT_BASE_DIR> AGENT_INSTANCE_HOME=<AGENT_INSTANCE_HOME> ORACLE_HOSTNAME=<AGENT_HOSTNAME> AGENT_PORT=<AGENT_PORT> -configOnly OMS_HOST=<oms host> EM_UPLOAD_PORT=<OMS_UPLOAD_PORT> AGENT_REGISTRATION_PASSWORD=<REG_PASSWORD>
If any non-default plug-ins were previously deployed on the failed agent, they mustbe re-deployed after recovery of the Agent. Note that this pertains to plug-ins thatexisted on the recovering Agent before it failed (that are not related to the OMS/Repository target), and any plug-ins for additional targets the OMS Agenthappened to be also monitoring. To re-deploy the plug-ins , run the followingcommand (not as part of config emrep, or manually):
emcli relocate_targets7. Additional Management Services, if any, must be re-enrolled with the Admin
Server that is now running on host B. To re-enroll the Management Services, runthe following command on each additional OMS:
<OMS-HOME>/bin/emctl enroll oms -as_host <new Admin Server host, i.e.host B> -as_port <admin server port>
8. Add the new OMS to the SLB virtual server pools and remove the old OMS.
9. Relocate the oracle_emrep target to the Management Agent of the new OMS hostusing the following commands:
<OMS_HOME>/bin/emcli sync<OMS_HOME>/bin/emctl config emrep -agent <agent on host "B", e.g myNewOMSHost.example.com:3872>
Chapter 25Recovery of Failed Enterprise Manager Components
25-16

Note:
If you run emctl config emrep -agent and set the flag -ignore_timeskew,there may a loss of monitoring data as the availability of monitored targets maybe affected when the Management Services and Repository target is moved tothe new Agent.
10. In the Cloud Control console, locate the 'WebLogic Domain' target for the Cloud ControlDomain. Go to 'Monitoring Credentials' and update the adminserver host to host B. Thendo a Refresh Weblogic Domain to reconfigure the domain with new hosts.
11. Locate duplicate targets from the Management Services and Repository Overview pageof the Enterprise Manager console. Click the Duplicate Targets link to access theDuplicate Targets page. To resolve duplicate target errors, the duplicate target must berenamed on the conflicting Management Agent. Relocate duplicate targets fromManagement Agent "A" to Management Agent "B".
12. Assuming the original OMS host is no longer in use, remove the Host target (including allremaining monitored targets) from Cloud Control by selecting the host on the Targets >Hosts page and clicking ‘Remove'. You will be presented with an error that informs you toremove all monitored targets first. Remove those targets then repeat the step to removethe Host target successfully.
13. All other OMSs in the system must re-enroll with the newly recovered OMS using thefollowing command:
emctl enroll oms -as_host <new OMS host> -as_port <port #, default 7101> 14. Verify that the site is fully operational.
Multiple OMS, SLB configured, additional OMS recovered on same or different hostMultiple OMS site where the OMS instances are fronted by an SLB. OMS configurationbacked up using the emctl exportconfig oms command on the first OMS. Additional OMS islost and needs to be recovered on the same or a different host.
1. If recovering to the same host, ensure cleanup of the failed OMS has been performed:
Make sure there are no processes still running from the Middleware home using acommand similar to the following:
ps -ef | grep -i -P "(Middleware|gc_inst)" | grep -v grep | awk '{print $2}' | xargs kill -9
First de-install the existing Oracle Homes using the Cloud Control software distributioninstaller. This is required even if the software homes are no longer available as it isnecessary to remove any record of the lost Oracle Homes from the Oracle inventory.
If they exist, remove the Middleware and gc_inst directories.
2. Ensure that shared software library locations are accessible.
3. Install an Management Agent on the required host (same or different as the case maybe).
4. For procedures on installing additional Oracle Management Services, see InstallingAdditional Oracle Management Services in Silent Mode.
5. Verify that the site is fully operational.
Chapter 25Recovery of Failed Enterprise Manager Components
25-17

Recovering the Software LibraryIf the software library is lost, it should be restored from the last available backup. Afterrestoring the backup, the following commands must be run to verify and re-importmissing entities:
1. emcli verify_swlib - This command verifies the accessibility of the softwarelibrary storage locations and reports if entities are missing any files on the filesystem.
2. emcli reimport_swlib_metadata - This command re-imports all Oracle-suppliedentities that are shipped along with the product. If you have a recent backup, thisshould not be required. Run emcli reimport_swlib_metadata if the emcliverify_swlib command reports Oracle-owned entities with files missing from thefilesystem.
3. emcli verify_updates - This command verifies whether entities downloaded bySelf Update are missing from the software library. For each missing entity, thecommand also displays the instructions to re-import the entitiy into the softwarelibrary.
Recovering Management AgentsIf a Management Agent is lost, it should be reinstalled by cloning from a referenceinstall. Cloning from a reference install is often the fastest way to recover aManagement Agent install because it is not necessary to track and reapplycustomizations and patches. Care should be taken to reinstall the Management Agentusing the same port. Using the Enterprise Manager's Management AgentResynchronization feature, a reinstalled Management Agent can be reconfigured usingtarget information present in the Management Repository.
If agent is not reinstalled by using clone option, patches should be reapplied after newagent is installed.
Note:
Management Agent resynchronization can only be performed by EnterpriseManager Super Administrators.
When the Management Agent is reinstalled using the same port, the OMS detects thatit has been re-installed and blocks it temporarily to prevent the auto-discovered targetsin the re-installed Management Agent from overwriting previous customizations.
Chapter 25Recovery of Failed Enterprise Manager Components
25-18

Note:
This is a condition in which the OMS rejects all heartbeat or upload requests fromthe blocked Management Agent. Hence, a blocked Agent will not be able to uploadany alerts or metric data to the OMS. However, blocked Management Agentscontinue to collect monitoring data.
An Agent can be blocked due to one of several conditions. They are:
• Enterprise Manager has detected that the Agent has been restored from abackup.
• Plug-ins on the Agent do not match the records in the Management Repository.
• The user has manually blocked the Agent.
For the first two conditions, an Agent resynchronization is required to unblock theagent by clearing the states on the Agent and pushing plug-ins from theManagement Repository.
The Management Agent can be resynchronized and unblocked from the Management Agenthomepage by using the emcli resyncAgent <agent target name> command.Resynchronization pushes all targets from the Management Repository to the ManagementAgent and then unblocks the Agent.
Management Agent Recovery ScenariosThe following scenarios illustrate various Management Agent recovery situations along withthe recovery steps. The Management Agent resynchronization feature requires that areinstalled Management Agent use the same port and location as the previous ManagementAgent that crashed.
Note:
Management Agent resynchronization can only be performed by EnterpriseManager Super Administrators.
Management Agent Reinstall Using the Same PortA Management Agent is monitoring multiple targets. The Agent installation is lost.
1. De-install the Agent Oracle Home using the Oracle Universal Installer.
Note:
This step is necessary in order to clean up the inventory.
2. Install a new Management Agent or use the Management Agent clone option to reinstallthe Management Agent though Enterprise Manager. Specify the same port that was usedby the crashed Agent. The location of the install must be same as the previous install.
Chapter 25Recovery of Failed Enterprise Manager Components
25-19

The OMS detects that the Management Agent has been re-installed and blocksthe Management Agent.
3. Initiate Management Agent Resynchronization using the following command:
emcli resyncAgent -agent="Agent Host:Port"All targets in the Management Repository are pushed to the new ManagementAgent. The Agent is instructed to clear backlogged files and then do a clearstate.The Agent is then unblocked.
4. Reconfigure User-defined Metrics if the location of User-defined Metric scriptshave changed.
5. Verify that the Management Agent is operational and all target configurations havebeen restored using the following emctl commands:
emctl status agent emctl upload agent
There should be no errors and no XML files in the backlog.
Management Agent Restore from Filesystem BackupA single Management Agent is monitoring multiple targets. File system backup for theAgent Oracle Home exists. The Agent install is lost.
1. Restore the Management Agent from the filesystem backup then start theManagement Agent.
The OMS detects that the Management Agent has been restored from backup andblocks the Management Agent.
2. Initiate Management Agent Resynchronization using the following command:
emcli resyncAgent -agent="Agent Host:Port"All targets in the Management Repository are pushed to the new ManagementAgent. The Agent is instructed to clear backlogged files and performs a clearstate.The Management Agent is unblocked.
3. Verify that the Management Agent is functional and all target configurations havebeen restored using the following emctl commands:
emctl status agentemctl upload agent
There should be no errors and no XML files in the backlog.
Recovering from a Simultaneous OMS-ManagementRepository Failure
When both OMS and Management Repository fail simultaneously, the recoverysituation becomes more complex depending upon factors such as whether the OMSand Management Repository recovery has to be performed on the same or differenthost, or whether there are multiple OMS instances fronted by an SLB. In general, theorder of recovery for this type of compound failure should be Management Repositoryfirst, followed by OMS instances following the steps outlined in the appropriaterecovery scenarios discussed earlier. The following scenarios illustrate two OMS-Management Repository failures and the requisite recovery steps.
Chapter 25Recovering from a Simultaneous OMS-Management Repository Failure
25-20

Collapsed Configuration: Incomplete Management Repository Recovery,Primary OMS on the Same Host
Management Repository and the primary OMS are installed on same host (host "A"). TheManagement Repository database is running in noarchivelog mode. Full cold backup isavailable. A recent OMS backup file exists ( emctl exportconfig oms). The ManagementRepository, OMS and the Management Agent crash.
1. Follow the Management Repository recovery procedure shown in Incomplete Recoveryon the Same Host with the following exception:
Since the OMS OracleHome is not available and Management Repositoryresynchronization has to be initiated before starting an OMS against the restoredManagement Repository, submit "resync" via the following PL/SQL block. Log into theManagement Repository as SYSMAN using SQLplus and run:
begin emd_maintenance.full_repository_resync('<resync name>'); end;2. Follow the OMS recovery procedure shown in Single OMS, No Server Load Balancer
(SLB), OMS Restored on the same Host.
3. Verify that the site is fully operational.
Distributed Configuration: Incomplete Management Repository Recovery,Primary OMS and additional OMS on Different Hosts, SLB Configured
The Management Repository, primary OMS, and additional OMS all reside on the differenthosts. The Management Repository database was running in noarchivelog mode. OMSbackup file from a recent backup exists (emctl exportconfig oms). Full cold backup of thedatabase exists. All three hosts are lost.
1. Follow the Management Repository recovery procedure shown in Incomplete Recoveryon the Same Host. with the following exception:
Since OMS Oracle Home is not yet available and Management Repository resync has tobe initiated before starting an OMS against the restored Management Repository, submitresync via the following PL/SQL block. Log into the Management Repository as SYSMANusing SQLplus and run the following:
begin emd_maintenance.full_repository_resync('resync name'); end;2. Follow the OMS recovery procedure shown in Multiple OMS, Server Load Balancer
Configured, Primary OMS Recovered on a Different Host with the following exception:
Override the Management Repository connect description present in the backup file bypassing the additional omsca parameter:
-REPOS_CONN_STR <restored repos descriptor>
This needs to be added along with other parameters listed in Multiple OMS, Server LoadBalancer Configured, Primary OMS Recovered on a Different Host.
3. Follow the OMS recovery procedure shown in Multiple OMS, SLB configured, additionalOMS recovered on same or different host.
4. Verify that the site is fully operational.
Chapter 25Recovering from a Simultaneous OMS-Management Repository Failure
25-21

Part VIIDeinstallation
In particular, this part contains the following chapters:
• Deinstalling Enterprise Manager (Single and Multi-OMS Environments)
• Decommissioning and Deinstalling Oracle Management Agents
• Deinstalling JVMD Agents
• Removing Standby Oracle Management Services

26Deinstalling Enterprise Manager (Single andMulti-OMS Environments)
This chapter describes how you can deinstall an entire Enterprise Manager system, and alsohow you can remove the entries of an Oracle Management Service (OMS) from the OracleManagement Repository (Management Repository) in case you lost the host where the OMSwas running.
In particular, this chapter covers the following:
• Deinstallation Scope
• Deinstalling the Enterprise Manager System
• Deinstalling or Undeploying Only Plug-ins from the OMS
• Deleting OMS Entries from the Management Repository
Deinstallation ScopeThe following describes the scope of deinstalling the components of an Enterprise Managersystem.
Table 26-1 Deinstallation Scope
EnvironmentType
OMS Type InstallationType
Components Deinstalled Components NotDeinstalled
Single OMS,Multi-OMS
First OMS FreshInstallation
• First OMS (including theinstance home)
• Central Agent• Management Repository
Not Applicable
Single OMS,Multi-OMS
First OMS Upgrade • First OMS (including theinstance home)
• Management Repository
Central Agent.
To deinstall the central agent,see Decommissioning andDeinstalling OracleManagement Agents.
Multi-OMS Additional OMS FreshInstallation
Additional OMS • Management Repository• Standalone Management
Agent running on theadditional OMS host.
To deinstall the centralagent, see Decommissioning andDeinstalling OracleManagement Agents.
26-1

Table 26-1 (Cont.) Deinstallation Scope
EnvironmentType
OMS Type InstallationType
Components Deinstalled Components NotDeinstalled
Multi-OMS Additional OMS Upgrade Additional OMS • Management Repository• Standalone Management
Agent running on theadditional OMS host.
To deinstall the centralagent, see Decommissioning andDeinstalling OracleManagement Agents.
Deinstalling the Enterprise Manager SystemTo deinstall an Enterprise Manager system in a single OMS environment or multi-OMSenvironment, follow these steps:
Note:
• Before you begin, understand the scope of deinstallation as described in Deinstallation Scope.
• For a multi-OMS environment, first deinstall the additional OMSinstances, and then deinstall the first OMS.
• The steps outlined in this section not only deinstall the OMS instancesbut also deinstall the Management Repository.
• Once the Management Repository is deinstalled from the database, youcan reuse the empty database for any other purpose. Only theEnterprise Manager schema is removed from the database, but thephysical files or the software binaries of the database software willcontinue to remain on the host.
• The steps outlined in this section do not deinstall, remove, or roll backany of the patches applied on the database.
• For a fresh OMS installation, either the first OMS or an additional OMS,the steps outlined in this section automatically remove the middleware,the OMS, the OMS instance home, and the Management Agentdirectories.
• For an upgraded OMS, either the first OMS or an additional OMS, thesteps outlined in this section automatically remove the middleware, theOMS, and the OMS instance home directories, but not the ManagementAgent directory. You must deinstall the Management Agent as describedin Decommissioning and Deinstalling Oracle Management Agents.
1. Copy the deinstallation script from the Oracle home of the OMS host to atemporary or stage location.
Chapter 26Deinstalling the Enterprise Manager System
26-2

cp <ORACLE_HOME>/sysman/install/EMDeinstall.pl <temporary_location>For example,
cp /u01/software/em13c/oraclehome/sysman/install/EMDeinstall.pl /u01/tmp_deinstall
2. Deinstall the OMS.
<ORACLE_HOME>/perl/bin/perl <temporary_location>/EMDeinstall.pl -mwHome<ORACLE_HOME> -stageLoc <temporary_location>You will be prompted for database credentials (SYS and SYSMAN) and the WebLogicDomain credentials. Enter the credentials and proceed with the deinstallation.
For example,
/u01/software/em13c/oraclehome/perl/bin/perl /u01/tmp_deinstall/EMDeinstall.pl -mwHome /u01/software/em13c/oraclehome -stageLoc /u01/tmp_deinstall
Note:
The deinstallation process removes the entry of the S98gcstartup script, an auto-start script, from the /etc/oragchomelist file, but does not remove the script itself.You can leave this script and the symlinks associated with it because when youinstall Enterprise Manager again on the same host, the installer automaticallyoverwrites the script and re-create the symlinks.
However, if you want to clear the host of any Oracle products, then Oraclerecommends that you manually delete this script and the symlinks associated withit. To do so, navigate to the /etc/rc.d/ directory, and search for the scriptS98gcstartup. This script is usually present in a subdirectory within the /etc/rc.d/directory. Navigate to the subdirectory where the script is found and delete thescript. For example, /etc/rc.d/rc3.d/S98gcstartup or /etc/rc.d/init.d/gcstartup/S98gcstartup.
Deinstalling or Undeploying Only Plug-ins from the OMSIf you want to deinstall or undeploy only the plug-ins from the OMS, and not the entireEnterprise Manager system, then use the Plug-ins page within the Enterprise Manager CloudControl Console. For instructions, see the Oracle Enterprise Manager Cloud ControlAdministrator's Guide. Do NOT use this chapter to undeploy only the plug-ins.
Deleting OMS Entries from the Management RepositoryIf you lose the host where an additional OMS is running, then make sure you manually deletethe entry for that OMS from the Management Repository. To do so, follow these steps:
1. Run the following command to deconfigure Oracle WebLogic Server, applications, and soon from the WebLogic Domain; remove all OMS-related entries from the ManagementRepository; and delete these targets of the OMS: oracle_oms, oracle_oms_pbs,oracle_oms_console.
$ORACLE_HOME/bin/omsca delete
Chapter 26Deinstalling or Undeploying Only Plug-ins from the OMS
26-3

2. Manually delete the following WebLogic targets of the OMS.
• /EMGC_GCDomain/GCDomain/EMGC_OMS2 (weblogic_j2eeserver)
• /EMGC_GCDomain/instance2/ohs2 (oracle_apache)
Now Enterprise Manager will not have any reference of the deleted additional OMS. Ifyou want to delete the OMS, follow the instructions outlined in Deinstalling theEnterprise Manager System.
Chapter 26Deleting OMS Entries from the Management Repository
26-4

27Decommissioning and Deinstalling OracleManagement Agents
This chapter describes how to decommission and deinstall standalone Oracle ManagementAgents (Management Agent). In particular, this chapter covers the following:
• Decommissioning Oracle Management Agents
• Deinstalling Oracle Management Agents
• Deinstalling or Undeploying Only Plug-ins from the Oracle Management Agent
Decommissioning Oracle Management AgentsThis section describes the various ways of decommissioning Oracle Management Agents. Inparticular, this section covers using the Agent Decommission feature from the EnterpriseManager Cloud Control console user interface and from command line using emclicommands. They both allow to decommission a single or multiple agents at the same time.
• Decommissioning Management Agents Using Enterprise Manager Console
• Decommissioning Management Agents Using emcli
Decommissioning Management Agents Using Enterprise Manager ConsoleTo decommission Management Agents using the Enterprise Manager Cloud Control console,you can use the Agent Decommission button under Setup > Manage CloudControl>Agents page.
If you want to decommission a single agent, you can also use the Agent Decommissionoption from Agent Home page by going to Targets> Select Agent > Agent > Target Setup >Agent Decommission.
The Agent Decommission provides the following two options:
• Remove Agent from Repository: It removes the agent(s) selected and its targets fromthe repository. It doesn't require agent host credentials. Only super user credentials aresufficient.
• Remove Agent from Host and Repository: It removes the agent(s) selected and itstargets from the repository. It also performs an agent software deinstallation from the hostand it requires agent install user host credentials. If you select this option, there's noneed to cleanup any directories or to do any agent deinstallation manually afterward.
After you select the desired option, the Agent Decommission confirmation window will bedisplayed:
27-1

Check "I understand that agent deletion will delete all the monitored targets" checkbox.Then, select your option and press OK.
After confirmation, the Enterprise Manager Jobs page will open. You need to enter therequired details information and click Submit. The Successful Job Submissionwindow will be displayed with the link to the Agent Decommission job. In some cases,user may not see the complete job details since the targets and agents are alreadyremoved from repository.
Decommissioning Management Agents Using emcliTo decommission Management Agents using emcli commands, you can use thecommand line to create scripts and manage the agent decommission process byrunning the scripts manually.
Decommissioning agents using emcli provides the following two options:
• Remove Agent from Repository: It removes the desired agent(s) and its targetsfrom the repository. This option doesn't require agent host credentials. Only superuser credentials are sufficient. This option type is called "Multiple AgentsDecommission".
• Remove Agent from Host and Repository: It removes the desired agent(s) andits targets from the repository. It also performs an agent software deinstallationfrom the host and it requires agent install user host credentials. There's no need tocleanup any directories or to do any agent deinstallation manually afterward. Thisoption type is called "Multiple Agents Cleanup".
Chapter 27Decommissioning Oracle Management Agents
27-2

Follow the instructions below:
1. Create an input property file using a text editor with the following required parameters:
name is any job name you would like to use.
type is the agent decommission option type name. It can be type=Multiple AgentsDecommission or type=Multiple Agents Cleanup.
target_list specifies the list of targets using the fully qualified host name and portnumber. For example, target_list=host1.example.com:1834:oracle_emd.
schedule.frequency specifies the frequency. The supported value is IMMEDIATE.
cred.agent_creds.<all_targets>:oracle_emd specifies the agent credentials. This is amandatory parameter only when using type=Multiple Agents Cleanup. Forexample, cred.agent_creds.<all_targets>:oracle_emd=NAMED:agentinst• Sample input property file for type=Multiple Agents Cleanup
name=Multi Agent Full Cleanup Jobtype=Multiple Agents Cleanuptarget_list=<FQDN_Host_Name1>:<port>:oracle_emdtarget_list=<FQDN_Host_Name2>:<port>:oracle_emdtarget_list=<FQDN_Host_Name3>:<port>:oracle_emdschedule.frequency=IMMEDIATEcred.agent_creds.<all_targets>:oracle_emd=NAMED:<Agent_Install_User>
If type=Multiple Agents Cleanup, all agents targets should have beeninstalled with the same agent credentials. If there are agents targets installed withdifferent credentials, the input property file with different credentials should becreated.
• Sample input property file for type=Multiple Agents Decommission
name=Multi Agent Decommission Repo onlytype=Multiple Agents Decommissiontarget_list=<FQDN_Host_Name1>:<port>:oracle_emdtarget_list=<FQDN_Host_Name2>:<port>:oracle_emdtarget_list=<FQDN_Host_Name3>:<port>:oracle_emdschedule.frequency=IMMEDIATE
After creating the appropriate input property file, it can be saved as a text file. Forexample, it can be named "decom_agent_multi.txt".
2. Run emcli command to create the job using the text file created in Step 1.
./emcli create_job -input_file=property_file:"decom_agent_multi.txt"Creation of job "MULTI AGENT FULL CLEANUP JOB" was successful.
3. Check status of the agent decommission job.
./emcli get_jobs -name="MULTI AGENT FULL CLEANUP JOB"Name TypeJob ID Execution ID ScheduledCompleted TZ Offset Status Status ID Owner Target Type
Chapter 27Decommissioning Oracle Management Agents
27-3

Target NameMULTI AGENT FULL CLEANUP JOB Multiple Agents Decommission90AF4B4FBAD35BAEE053BD70F00A8249 90AF4B4FBADC5BAEE053BD70F00A8249 2019-08-21 22:52:25none GMT-07:00 Running 2 SYSMAN oracle_emd <Host_Name1>:<port>MULTI AGENT FULL CLEANUP JOB Multiple Agents Decommission90AF4B4FBAD35BAEE053BD70F00A8249 90AF4B4FBAD55BAEE053BD70F00A8249 2019-08-21 22:52:25none GMT-07:00 Running 2 SYSMAN oracle_emd <Host_Name2>:<port>MULTI AGENT FULL CLEANUP JOB Multiple Agents Decommission90AF4B4FBAD35BAEE053BD70F00A8249 90AF4B4FBAD95BAEE053BD70F00A8249 2019-08-21 22:52:25none GMT-07:00 Running 2 SYSMAN oracle_emd <Host_Name3>:<port>
Deinstalling Oracle Management AgentsThis section lists the deinstallation prerequisites and describes the various ways ofdeinstalling a standalone Oracle Management Agent. In particular, this section coversthe following:
• Deinstalling Standalone Management Agents
• After Deinstalling Standalone Management Agents
Note:
On a cluster, ensure that you deinstall the Management Agents from all thenodes one by one. To do so, follow the instructions outlined in this chapter.
Note:
When you deinstall an old standalone Management Agent and install a newstandalone Management Agent on the same host, you will lose all historicaltarget information from the Management Repository.
To avoid losing all historical target information, first install the new standaloneManagement Agent, then run the emcli relocate_targets command tohand over the targets from the old standalone Management Agent to the newstandalone Management Agent, and then deinstall the old standaloneManagement Agent.
For information about the emcli relocate_targets command, see relocate_targets in the Oracle Enterprise Manager Cloud Control CommandLine Interface Guide.
Chapter 27Deinstalling Oracle Management Agents
27-4

Deinstalling Standalone Management AgentsThis section describes the following:
• Deinstalling Standalone Management Agents Using the AgentDeinstall.pl Script
• Deinstalling Shared Agents
• Deinstalling Standalone Management Agents Installed Using an RPM File
Deinstalling Standalone Management Agents Using the AgentDeinstall.pl ScriptTo deinstall a standalone Management Agent using the AgentDeinstall.pl script, followthese steps:
1. Invoke the AgentDeinstall.pl script to delete the standalone Management Agent andalso remove the agent base directory.
$<AGENT_HOME>/perl/bin/perl <AGENT_HOME>/sysman/install/AgentDeinstall.pl -agentHome <AGENT_HOME>For example,
/u01/software/em13c/agentbasedir/agent_13.5.0.0.0/perl/bin/perl /u01/software/em13c/agentbasedir/agent_13.5.0.0.0/sysman/install/AgentDeinstall.pl -agentHome /u01/software/em13c/agentbasedir/agent_13.5.0.0.0
2. Manually remove the targets, which were being monitored by the standaloneManagement Agent you deinstalled, from the Enterprise Manager Cloud Control Console.To do so, run the following EM CTL command from any host where EM CLI is installed.
emcli delete_target-name="<host_name>:<agent_port>"-type="oracle_emd"-delete_monitored_targetsFor example,
emcli delete_target-name="example.com:1836"-type="oracle_emd"-delete_monitored_targets
3. Manually delete the agent base directory. For information on agent base directory, see What Is an Agent Base Directory?.
For UNIX platforms:
rm -rf <absolute_path_to_install_base_dir>For Microsoft Windows platforms:
rmdir /s /q <absolute_path_to_install_base_dir>
Chapter 27Deinstalling Oracle Management Agents
27-5

Note:
While deinstalling the standalone Management Agent, the ManagementAgent service is removed automatically. If the service is not removedautomatically, you can remove it manually after the deinstall, by running thefollowing command:
sc delete <service_name>
Deinstalling Shared AgentsTo deinstall a Shared Agent, run the following command from the Master Agent homethat is visible on the host where your Shared Agent is installed:
$<AGENT_HOME>/perl/bin/perl <AGENT_HOME>/sysman/install/NFSAgentDeInstall.plAGENT_INSTANCE_HOME=<absolute_path_to_agent_instance_home>ORACLE_HOME=<absolute_path_to_agent_home>For example,
/shared/app/agentbasedir/agent_13.5.0.0.0/perl/bin/perl /shared/app/agentbasedir/agent_13.5.0.0.0/sysman/install/NFSAgentDeInstall.plAGENT_INSTANCE_HOME=/shared/app/agentbasedir/agent_inst ORACLE_HOME=/shared/app/agentbasedir/agent_13.5.0.0.0
Deinstalling Standalone Management Agents Installed Using an RPM FileTo deinstall a standalone Management Agent that was installed using a .rpm file,ensure that you have Resource Package Manager (RPM) installed on theManagement Agent host, then follow these steps:
1. Run the following command on the Management Agent host to obtain the RPMname:
rpm -qa | grep oracle-agt2. Run the following command as a root user to deinstall the Management Agent:
rpm -e <rpm_name>Here, <rpm_name> is the RPM name that is displayed in the output of the commandyou ran in Step 1.
After Deinstalling Standalone Management AgentsAfter you deinstall a standalone Management Agent, follow these steps:
1. Verify that the Oracle homes you deinstalled are deregistered from the centralinventory. However, some files might still remain in these Oracle homes. If they do,you can manually delete them.
You must also manually delete the auto-startup script called gcstartup that will bepresent under /etc/init.d directory.
Chapter 27Deinstalling Oracle Management Agents
27-6

Note:
These auto-start scripts are not available on Microsoft Windows.
2. If you deinstalled on a Microsoft Windows platform, then follow these steps to remove theentries from the Microsoft Windows registry. Ensure that you are logged in as a user withAdministrator privileges on that host.
a. Expand HKEY_LOCAL_MACHINE, SOFTWARE, Oracle, and then Sysman. Underthe Sysman directory, delete the Management Agent service. For example,Oracleagent13cAgent.
b. Close the registry editor.
Deinstalling or Undeploying Only Plug-ins from the OracleManagement Agent
If you want to deinstall or undeploy only the plug-ins from the Management Agent, and not todeinstall the Management Agent itself, then use the Plug-ins page within the EnterpriseManager Cloud Control Console. For instructions, see Undeploying Plug-Ins from OracleManagement Agent in the Oracle Enterprise Manager Cloud Control Administrator'sGuide.Do NOT use the installer to undeploy only the plug-ins.
Chapter 27Deinstalling or Undeploying Only Plug-ins from the Oracle Management Agent
27-7

28Deinstalling JVMD Agents
This chapter describes how you can deinstall Java Virtual Machine Diagnostics (JVMD)Agents in the Enterprise Manager Cloud Control environment.
Deinstalling JVMD AgentsThis section describes the methods to remove JVMD Agents. It consists of the following:
• Removing JVMD Agents Using Engines And Agents Page
• Removing JVMD Agents Manually
Removing JVMD Agents Using Engines And Agents PageTo remove the JVMD Agents (that are deployed on monitored WebLogic domains) using theEngines And Agents page, perform the following steps:
1. From the Setup menu, select Middleware Management, then select Engines AndAgents.
2. On the Engines And Agents page, click Manage JVMD Agents.
Note:
If no active JVMD Engines are present and no JVMD Agents are deployed, theManage JVMD Agents button is disabled.
3. For Operation, select Remove.
If you select Expand All from the View menu, you can view the target name, target type,target host, target status, and so on of all the Managed Servers on which JVMD Agentsare deployed.
Select the JVMD Agents you want to remove. Click Next.
4. On the Target Credentials page, for each WebLogic domain, specify a value for OracleEMAgent Target Host Credentials and Oracle WebLogic Domain Credentials(corresponding to the Admin server target), and then click Apply.
Note:
In case host and domain preferred credentials are already set for the Adminserver target, they are automatically applied to the domain, and it is notrequired to click Apply.
28-1

Oracle EMAgent Target Host Credentials are the login credentials for the host onwhich the Management Agent, that is used to discover the WebLogic domain'sAdmin Server, is running. Oracle WebLogic Domain Credentials are thecredentials for the Administration Server of the selected WebLogic domain.
To set the preferred credentials for a WebLogic domain's Admin server (that is, thepreferred EMAgent target host credentials and the preferred Oracle WebLogicDomain credentials), from the Setup menu, select Security, then select PreferredCredentials. Select the Oracle Admin Server target type, then click ManagePreferred Credentials. In the Target Preferred Credentials section, set thepreferred host credentials and the preferred WebLogic administrator credentialsfor the required WebLogic Admin server.
Click Next.
5. On the JVMD Agents Configurations page, specify values for the WebLogicHome and Middleware Home fields.
These fields are displayed only if their values could not be obtained internally.Also, if the WebLogic Administration Server is behind a firewall or on a virtual host,the application may not be able to connect to it using the default information. Inthis case, you may need to provide additional information in the Advanced DomainConfiguration section. For example, if the WebLogic Administration Server is on avirtual host, and the application cannot connect to it using the default host value,you must provide the virtual host IP address for Administration server host.
Click Next.
6. On the Review page, review all the information, and then click Remove.
Note:
To deploy an agent after you have removed it, you must restart JVM beforedeploying the agent.
Removing JVMD Agents ManuallyTo manually remove the JVMD Agent deployed to a target, perform the followingsteps:
1. Log in to the Administration Console of the target server.
2. On the Home Page, click Deployments.
3. Select the relevant JVMD Agent application (javadiagnosticagent).
Note:
The JVMD agent can be deployed in 2 ways:
• Using bulk deployment job on Weblogic domain manager servers. Inthis case, the application is referred as javadiagnosticagent.
• Manually downloading agent and deploying to a server. In this case,the application is referred as jamagent.
Chapter 28Deinstalling JVMD Agents
28-2

4. From the Stop menu, select Force Stop Now.
5. After the applications are stopped, select the same applications, then click Delete.
6. Log in to Enterprise Manager Cloud Control.
7. In Cloud Control, from the Targets menu, select Middleware.
8. On the Middleware page, in the Search table, search for targets of type Java VirtualMachine, select the target corresponding to the server, then click Remove.
Note:
To deploy an agent after you have removed it, you must restart JVM beforedeploying the agent.
Chapter 28Deinstalling JVMD Agents
28-3

29Removing Standby Oracle ManagementServices
This chapter describes how to remove standby Oracle Management Services (OMS) from aLevel 4 High Availability (HA) configuration. The following OMS removal scenarios arecovered:
• Removing Additional Standby OMS Instances
• Removing the First Standby OMS
Removing Additional Standby OMS InstancesTo remove an additional standby OMS instance, follow these steps:
1. Deconfigure and delete an additional standby OMS instance by running the followingcommand from the OMS home:
$<OMS_HOME>/bin/omsca delete -OMSNAME <oms_name>When prompted, enter the repository login credentials.
Note:
Run this command on each of the additional standby OMS instances.
2. From the Enterprise Manager console, refresh the Weblogic domain.
a. From the Targets menu, select Middleware.
29-1

Figure 29-1 Middleware Menu
b. Click the WebLogic Domain you want to refresh. The domain home pagedisplays.
Figure 29-2 Domain Home Page
c. From either the Farm or WebLogic Domain menu, select Refresh WebLogicDomain.
Chapter 29Removing Additional Standby OMS Instances
29-2

Figure 29-3 Refresh WebLogic Domain
Enterprise Manager displays available Refresh WebLogic Domain options.
Figure 29-4 Refresh WebLogic Domain
d. Click Add/Update Targets on the Refresh Weblogic Domain page. TheManagement Agent refreshes by connecting to the Administration Server. TheAdministration Server must be up for the refresh to occur.
Click Close on the Confirmation page. Cloud Control will search the domain for newand modified targets.
3. Delete the OMS target associated with the OMS.
a. From the Target Navigation area, click the target associated with the additionalstandby OMS you deconfigured earlier.
b. From the WebLogic menu, select Target Setup and then Remove Target.Enterprise Manager displays a Warning dialog asking if you wish to continue. ClickYes.
Chapter 29Removing Additional Standby OMS Instances
29-3

4. Repeat this deinstallation procedure for all remaining additional standby OMSs.
Removing the First Standby OMSTo remove the first standby OMS, follow these steps:
Note:
DO NOT attempt to deinstall the first standby OMS if there are any remainingadditional standby OMSs within your environment. See "Removing AdditionalStandby OMS Instances" for instructions on removing additional standbyOMSs.
1. Deconfigure and delete the first standby OMS instance by running the followingcommand from the OMS home:
$<OMS_HOME>/bin/omsca delete -full
Note:
You are prompted to confirm your action, and furnish the AdminServercredentials and the repository database details such as the databasehost name, listener port, SID, and password. Once you provide therequired details, the command automatically stops the OMS, OracleWebLogic Server, and also Oracle WebTier.
2. Delete the OMS target associated with the OMS.
a. From the Target Navigation area, click the target associated with the firststandby OMS you deconfigured earlier.
b. From the WebLogic menu, select Target Setup and then Remove Target.Enterprise Manager displays a Warning dialog asking if you wish to continue.Click Yes.
Chapter 29Removing the First Standby OMS
29-4

Part VIIIAppendixes
This part contains the following appendixes:
• Overview of the Installation and Configuration Log Files
• Redirecting Oracle Management Agent to Another Oracle Management Service
• Applying Patches to Oracle Management Agents While Deploying or Upgrading Them
• Using the RepManager Utility
• Collecting OCM Data Using Oracle Harvester
• Enabling the Enterprise Manager Accessibility Features
• Configuring Targets for Failover in Active/Passive Environments
• Updating Demonstration Keystores to Reflect Alias Hostnames

AOverview of the Installation and ConfigurationLog Files
This appendix lists the locations of the various log files that are created during theprerequisites check, installation, and configuration phases of Enterprise Manager CloudControl components.
In particular, this appendix covers the following:
• Enterprise Manager Cloud Control Installation Logs
• Add Host Log Files
• Manual Management Agent Installation Logs
• Agent Gold Image Log Files
• Additional OMS Installation Logs
Enterprise Manager Cloud Control Installation LogsThis section describes the following log files that are created while installing EnterpriseManager Cloud Control:
• Installation Logs
• Configuration Logs
Installation LogsThe following are the installation logs, which provide complete information on the installationstatus:
• <ORACLE_INVENTORY_HOME>/logs/install<timestamp>.log• <ORACLE_HOME>/cfgtoollogs/oui/install<timestamp>.log
Note:
The install log file is located in the <ORACLE_INVENTORY_HOME> directory bydefault. This log file will be copied on to the above-mentioned Oracle homelocation after the installation is complete.
Configuration LogsThis section describes the following configuration logs:
• General Configuration Logs
A-1

• Repository Configuration Logs
• Secure Logs
General Configuration LogsThe Oracle Management Service (OMS) configuration logs are located in the followinglocation of the Oracle home of the OMS.
<ORACLE_HOME>/cfgtoollogs/omscaTable A-1 lists the configuration logs for different installation types.
Table A-1 General Configuration Logs
Installation Type Location
Install a new or Upgrade Enterprise Managersystem
• <ORACLE_HOME>/cfgtoollogs/cfgfw/CfmLogger<timestamp>.log
• <ORACLE_HOME>/cfgtoollogs/cfgfw/oracle.sysman.top.oms.<timestamp>.log
Note: <ORACLE_HOME> refers to the Oracle home of the OMS.
Add an additional Management Service • <ORACLE_HOME>/cfgtoollogs/omsca/logs/omsca<timestamp.log>
• <ORACLE_HOME>/cfgtoollogs/cfgfw/oracle.sysman.top.oms.<timestamp>.log
Note: <ORACLE_HOME> refers to the Oracle home of the OMS.
Install Oracle Management Agent • <ORACLE_HOME>/cfgtoollogs/cfgfw/CfmLogger• <ORACLE_HOME>/cfgtoollogs/cfgfw/
oracle.sysman.top.agent.<timestamp>.logNote: <ORACLE_HOME> refers to the Oracle home of theManagement Agent.
Repository Configuration LogsThis section describes the following repository configuration logs:
• SYSMAN Schema Operation Logs
• MDS Schema Operation Logs
SYSMAN Schema Operation Logs
The SYSMAN schema operation logs are available in the following location of theOracle home of the OMS. Listed in this directory is an overall log file, emschema.log,which logs all the actions performed by all the instances of RepManager run.
$<ORACLE_HOME>/sysman/log/schemanager/In this location, for each run of RepManager, a new subdirectory is created based onthe time at which the RepManager was run.
For example, if the RepManager was run and an instance was created at 09/29/201912:50PM, then the following subdirectory is created.
Appendix AEnterprise Manager Cloud Control Installation Logs
A-2

$<ORACLE_HOME>/sysman/log/schemananager/m_092919_1250_PM/An instance of RepManager (or equivalently RepManager) can have schema actions, mainlyCREATE, DROP, UPGRADE, TRANSX, and RESUME_RETRY. For each action, asubdirectory is created.
For example, if a CREATE action is performed by a RepManager instance at 09/29/201912:51PM, then the following subdirectory is created. Listed under this subdirectory are RCU-related log files and emschema.log.CREATE log file that logs the CREATE action-specificmessages.
$<ORACLE_HOME>/sysman/log/schemananager/m_092919_1250_PM/m_092919_1251PM.CREATE/In general, in $<ORACLE_HOME>/sysman/log/schemananager/m_<time-stamp>/m_<time-stamp>.<schema-action>, the following files are created:
• RCU per component (i.e. init, common, modify, drop, config, outofbox, preupgrade log
• RCU log
• Schema action-specific RCU logs
• TransX action-specific log (emrep_config.log)
If the any of the schema operations (CREATE/UPGRADE/PREUPGRADE/DROP) fail in SQLexecution, and if you retry the operation by clicking Retry, then a separate subdirectory titledm_<time-stamp>.RESUME_RETRY is created.
The following shows the overall directory structure of repository operation logs for differentschema actions:
$<ORACLE_HOME>/sysman/log/schemamanager emschema.log m_030219_0349_AM m_030219_0325_AM.TRANSX emrep_config.log emschema.log.TRANSX m_030219_0438_AM m_030219_0438_AM.DROP (Same structure for Drop and Dropall actions) rcu.log emschema.log.DROP em_repos_drop.log m_030219_0450_AM m_030219_0450_AM.CREATE custom_comp_create_tbs.log em_repos_common.log em_repos_init.log emrep_config.log.3 emrep_config.log.2 emrep_config.log.1 emrep_config.log emschema.log rcu.log emschema.log.CREATE em_repos_config.log m_030219_1006_PM m_030219_1006_PM.RESUME_RETRY emrep_config.log.3 emrep_config.log.2 emrep_config.log.1 emrep_config.log emschema.log
Appendix AEnterprise Manager Cloud Control Installation Logs
A-3

rcu.log emschema.log.RESUME_RETRY em_repos_modify.log m_030219_1021_PM m_030219_1021_PM.UPGRADE em_repos_init.log emrep_config.log.3 emrep_config.log.2 emrep_config.log.1 emrep_config.log emschema.log rcu.log emschema.log.UPGRADE em_repos_modify.log m_030219_1100_PM m_030219_1100_PM.PREUPGRADE em_repos_preupgrade.log emschema.log.PREUPGRADE rcu.log em_repos_init.log emrep_config.log.3 emrep_config.log.2 emrep_config.log.1 emrep_config.log em_repos_common.log m_030219_1125_PM m_030219_1125_PM.MY_ORACLE_SUPPORT emschema.log.MY_ORACLE_SUPPORTm_030219_1135_PM m_030219_1135_PM.PLUGINPURGE emschema.log.PLUGINPURGEem_repos_pluginpurge.logrcu.log
EMPrereqKit Logs
For EMPrereqKit, the logs are available at the <oraInventoryLoc>/logs/ location.
The details of execution of the prerequisites per prerequisite component location isavailable at:
<oraInventoryLoc>/logs/emdbprereqs/LATEST/componentLog/<log_filename>For example,
<oraInventoryLoc>/logs/emdbprereqs/LATEST/componentLog/repository.logThe details of execution of the EMPrereqkit is available at:
<oraInventoryLoc>/logs/emdbprereqs/LATEST/emprereqkit.logThe errors are located at:
<oraInventoryLoc>/logs/emdbprereqs/LATEST/emprereqkit.err
MDS Schema Operation Logs
MDS Schema Creation Log
For MDS schema creation operation, the following log is available in the Oracle homeof the OMS:
$<ORACLE_HOME>/cfgtoollogs/cfgfw/emmdscreate_<timestamp>.log
Appendix AEnterprise Manager Cloud Control Installation Logs
A-4

For more information, review the following logs from the Oracle home of the OMS:
$<ORACLE_HOME>/sysman/log/schemamanager/m_<timestamp>/m_<timestamp>.CREATE/mds.log$<ORACLE_HOME>/sysman/log/schemamanager/m_<timestamp>/m_<timestamp>.CREATE/rcu.logMDS Schema Drop Logs
For MDS schema drop operation, the following logs are available in the location you specifiedby using the -logDir argument while invoking the MDS schema drop command:
$<user_specified_location>/mds.log$<user_specified_location>/emmdsdrop_<timestamp>.logHowever, if you did not specify any custom location while invoking the MDS schema dropcommand, then the logs are created in the Oracle home of the OMS. For example, /scratch/OracleHomes/oms13c/mds.log and /scratch/OracleHomes/oms13c/emmdsdrop_<timestamp>.log.
Secure LogsFor OMS, the following secure log is available in the OMS Instance Base location. Here,<oms_name>, for example, can be EMGC_OMS1.
<OMS_INSTANCE_HOME>/em/<oms_name>/sysman/log/secure.logFor Management Agents, the following secure log is available in the Oracle home of theManagement Agent.
<Agent_Instance_Home/sysman/log/secure.log
Oracle Management Service LogsThe following log files that provide information about the running OMS are available in theOMS Instance Base location. Here, <oms_name>, for example, can be EMGC_OMS1.
<OMS_INSTANCE_HOME>/em/<oms_name>/sysman/log/emoms.trc<OMS_INSTANCE_HOME>/em/<oms_name>/sysman/log/emoms.log
Add Host Log FilesThis section describes the locations for the following Add Host log files:
• Initialization Logs
• Application Prerequisite Logs
• System Prerequisite Logs
• Agent Installation Logs
• Other Add Host Logs
Appendix AAdd Host Log Files
A-5

Initialization LogsTable A-2 lists the initialization logs of the remote host and their locations. Note that<OMS_INSTANCE_HOME> mentioned in this table refers to the OMS instance basedirectory (by default, it is gc_inst/em/EMGC_OMS1,which is present in the parentdirectory of the middleware home, by default).
Table A-2 Initialization Logs
Log File Location
<hostname>_deploy.log <OMS_INSTANCE_HOME>/sysman/agentpush/<time-stamp>/applogs
Application Prerequisite LogsTable A-3 lists the application prerequisite logs and their locations. Note that<OMS_INSTANCE_HOME> mentioned in this table refers to the OMS instance basedirectory (by default, it is gc_inst/em/EMGC_OMS1,which is present in the parentdirectory of the middleware home, by default), and <install_type> mentioned in thistable refer to one of the installation types mentioned in Table A-4.
Table A-3 Prerequisite Logs
Log File Location
prereq<time_stamp>.log <OMS_INSTANCE_HOME>/sysman/agentpush/<time-stamp>/prereqlogs/<install_type>_logs/<hostname>/
prereq<time_stamp>.out <OMS_INSTANCE_HOME>/sysman/agentpush/<time-stamp>/prereqlogs/<install_type>_logs/<hostname>/
prereq<time_stamp>.err <OMS_INSTANCE_HOME>/sysman/agentpush/<time-stamp>/prereqlogs/<install_type>_logs/<hostname>/
Table A-4 Install Types
Install Type Description Target Operating System Type
emagent_install New Agent Installation UNIX
emagent_clone Agent Cloning UNIX
nfs_install Shared Agent Installation UNIX
System Prerequisite LogsTable A-5 lists the system prerequisite logs and their locations. Note that<OMS_INSTANCE_HOME> mentioned in this table refers to the OMS instance basedirectory (by default, it is gc_inst/em/EMGC_OMS1,which is present in the parentdirectory of the middleware home, by default).
Appendix AAdd Host Log Files
A-6

Table A-5 System Prerequisite Logs
Log File Location
prereqchecker<time_stamp>.log
<OMS_INSTANCE_HOME>/sysman/agentpush/<time-stamp>/prereqlogs/productprereq_logs/<hostname>/
launcher<time_stamp>.log <OMS_INSTANCE_HOME>/sysman/agentpush/<time-stamp>/prereqlogs/productprereq_logs/<hostname>/
oraInstall<time_stamp>.out
<OMS_INSTANCE_HOME>/sysman/agentpush/<time-stamp>/prereqlogs/productprereq_logs/<hostname>/
oraInstall<time_stamp>.err
<OMS_INSTANCE_HOME>/sysman/agentpush/<time-stamp>/prereqlogs/productprereq_logs/<hostname>/
Agent Installation LogsTable A-6 lists the agent installation logs and their locations. Note that <OMS_INSTANCE_HOME>mentioned in this table refers to the OMS instance base directory (by default, it isgc_inst/em/EMGC_OMS1,which is present in the parent directory of the middleware home, bydefault).
Table A-6 Agent Installation Logs
Log File Location Description
install.log/.err <OMS_INSTANCE_HOME>/sysman/agentpush/<time-stamp>/logs/<hostname>
Fresh and Cloned Agent installlogs
nfs_install.log/.err <OMS_INSTANCE_HOME>/sysman/agentpush/<time-stamp>/logs/<hostname>
Shared Agent installation logs
cfgfw/*.log <OMS_INSTANCE_HOME>/sysman/agentpush/<time-stamp>/cfgtoollogs/<hostname>
Agent Configuration logs
Other Add Host LogsTable A-7 lists all the other installation logs that are created during an agent installation usingthe Add Host wizard. Note that <OMS_INSTANCE_HOME> mentioned in this table refers to theOMS instance base directory (by default, it is gc_inst/em/EMGC_OMS1,which is present in theparent directory of the middleware home, by default).
Table A-7 Other Add Host Logs
Logs Location Description
EMAgentPushLogger<TIMESTAMP>.log.0
<OMS_INSTANCE_HOME>/sysman/agentpush/logs/
Agent Deploy application logs.
remoteInterfaces<TIMESTAMP>.log
<OMS_INSTANCE_HOME>/sysman/agentpush/logs/
Logs of the remote interfaceslayer.
Appendix AAdd Host Log Files
A-7

Table A-7 (Cont.) Other Add Host Logs
Logs Location Description
deployfwk.log <OMS_INSTANCE_HOME>/sysman/agentpush/<time-stamp>/applogs/
Add Host DeploymentFramework logs
ui.log <OMS_INSTANCE_HOME>/sysman/agentpush/<time-stamp>/applogs/
Add Host User Interface logs.
Manual Management Agent Installation LogsTable A-8 lists the installation logs that are created when a Management Agent isinstalled manually, that is, in silent mode. Note that <ORACLE_HOME> mentioned in thistable refers to the target Management Agent Oracle Home, that is, <AGENT_BASE_DIR>/13.3.0.0.0/.
Table A-8 Manual Management Agent Installation Logs
Logs Location Description
agentDeploy<TIMESTAMP>.log
<ORACLE_HOME>/cfgtoollogs/agentDeploy/
Installation logs
prereq<TIMESTAMP>.log <ORACLE_HOME>/cfgtoollogs/agentDeploy/
Installation prerequisite logs
CfmLogger<TIMESTAMP>.log <ORACLE_HOME>/cfgtoollogs/cfgfw/ Configuration logs
AttachHome<TIMESTAMP>.log <ORACLE_HOME>/cfgtoollogs/agentDeploy/
Attach home logs
UpdateHomeDeps<TIMESTAMP>.log
<ORACLE_HOME>/cfgtoollogs/agentDeploy/
Update home logs
cloneActions<TIMESTAMP>.log
<ORACLE_HOME>/cfgtoollogs/agentDeploy/
Clone action logs
Agent Gold Image Log FilesTable A-9 lists the log files that need to be scrutinised for a failure of Gold Imagecreation process.
Table A-9 Agent Gold Image Creation Failure Logs
Logs Location Description
Output log. From the Enterprise Manger Cloud Control home pageclick Setup and select Manage Cloud Control and thenclick Agent Gold Images.
On the Agent Gold Images page click on Show allactivities link to see all the jobs. Click on the job nameto see the job result and the output logs.
Output logs for the agent goldimage job run.
Appendix AManual Management Agent Installation Logs
A-8

Table A-9 (Cont.) Agent Gold Image Creation Failure Logs
Logs Location Description
GoldAgentImageLogger<timestamp>.log
<OMS_INSTANCE_HOME>/EMGC_OMS1/sysman/goldagentimage/logs/
OMS side logs.
goldimagecreate<timestamp>.log
<AGENT_INSTANCE_HOME>/install/<TIMESTAMP>/ Agent side logs.
Table A-10 lists the log files that need to be scrutinised for Agent update failure.
Table A-10 Agent Update Failure Logs
Logs Location Description
agentDeploy<timestamp>.log
<New oracle home>/cfgtoollogs/agentDeploy/Note: If the <New oracle home>/cfgtoollogs/agentDeploy/ location is not editable, the logs arecreated in <AGENT_INSTANCE_HOME>/install/logs/folder.
Agent deploy logs.
All log files. <AGENT_INSTANCE_HOME>/sysman/logs Additional informationlogs.
All log files. <OMS_INSTANCE_HOME>/EMGC_OMS1/sysman/logs OMS side exceptionlogs.
All log files. user_projects/domains/EMGC_DOMAIN/servers/EMGC_OMS1/logs/
Server side logs.
Additional OMS Installation LogsTable A-11 lists the installation logs that you can view when adding an OMS fails:
Note:
• ORACLE_HOME refers to the home for the new additional OMS. However, forAdmin logs, ORACLE_HOME refers to the home for the primary OMS.
• INSTANCE_HOME refers to the OMS instance directory (that is, gc_inst,which ispresent in the parent directory of the middleware home, by default).
Table A-11 Additional OMS Installation Logs
Logs Location
omsca failure $ORACLE_HOME/cfgtoollogs/omscaPlug-in failure $ORACLE_HOME/cfgtoollogs/pluginca
Appendix AAdditional OMS Installation Logs
A-9

Table A-11 (Cont.) Additional OMS Installation Logs
Logs Location
Managed server logs
• emLogs (emoms logs)• msLogs (Managed server logs, if server
fails to start)• nmLogs
$ORACLE_HOME/cfgtoollogs/omsca/log_<timestamp>/
Admin logs $INSTANCE_HOME/user_projects/domains/GCDomain/servers/EMGC_ADMINSERVER/logs(If out of memory error or space issue occurs, this logs on theprimary OMS)
Deployment procedure output Deployment procedure screenshots
Clone logs $ORACLE_HOME/cfgtoollogs/clone
Appendix AAdditional OMS Installation Logs
A-10

BRedirecting Oracle Management Agent toAnother Oracle Management Service
This appendix explains how to redirect or repoint your Oracle Management Agent(Management Agent), which is already communicating with an Oracle Management Service(OMS), to communicate and upload data to a different OMS that is part of a differentEnterprise Manager Cloud Control (Cloud Control) deployment.
Note:
• Redirecting Management Agents to a different OMS that is part of a differentCloud Control deployment is supported only for Management Agents that weredeployed afresh, and were not upgraded from an earlier version. You cannotredirect a Management Agent that was upgraded from an earlier version.
• When you redirect a Management Agent to a different OMS that is part of adifferent Cloud Control deployment, you lose all the changes made to the agentinstance home, such as user defined metric collections, changes made to theemd.properties file, and so on.
In particular, this appendix covers the following:
• Prerequisites for Redirecting a Management Agent to Another OMS
• Redirecting a Management Agent to Another OMS
Prerequisites for Redirecting a Management Agent to AnotherOMS
Before redirecting or repointing a Management Agent, ensure that you meet the followingprerequisites:
• Ensure that the new OMS that you want to point the Management Agent to is of the sameversion as the Management Agent, or of a higher version.
To view the version of the Management Agent you want to repoint, from the Setup menu,select Manage Cloud Control, then select Agents. Click the name of the ManagementAgent. The Management Agent version is displayed in the Summary section.
To view the version of the new OMS, from the Setup menu, select Manage CloudControl, then select Management Services. Click the name of the new OMS. The OMSversion is displayed in the Summary section.
You can repoint the Management Agent only if the new OMS is compatible with theManagement Agent. Using the Enterprise Manager certification matrix, you can view thecompatibility between an OMS version and a Management Agent version. For information
B-1

on accessing this matrix, refer Accessing the Enterprise Manager CertificationMatrix in the Oracle Enterprise Manager Cloud Control Basic Installation Guide.
• Ensure that the previous OMS that the Management Agent was pointing to, andthe new OMS that you want to point the Management Agent to have the same setof plug-ins deployed on them, and that all the plug-ins configured on theManagement Agent are deployed on the new OMS. Also, ensure that all theseplug-ins deployed on the new OMS are of the same version, (that is, the versionconfigured on the Management Agent or the previous OMS) or a higher version.
To view the list of plug-ins deployed on a particular OMS, log in to the EnterpriseManager system, from the Setup menu, select Extensibility, then select Plug-ins.
To view the list of plug-ins configured on a particular Management Agent, run thefollowing command:
$<AGENT_INSTANCE_HOME>/bin/emctl listplugins agent -type all• Ensure that the Management Agent that you want to redirect is up and running,
then run the following command to re-create the plugins.txt file:
$<AGENT_HOME>/perl/bin/perl $<AGENT_HOME>/sysman/install/create_plugin_list.pl -instancehome <AGENT_INSTANCE_HOME>
Note:
By default, the Perl install location is specified as /usr/local/bin increate_plugin_list.pl. If Perl is installed on the Management Agenthost in a different location, ensure that you edit the first line ofcreate_plugin_list.pl, and specify the location where Perl isinstalled.
• Ensure that all the patches applied on the Management Agent that change thetarget type or collection metadata are also applied on the new OMS that you wantto point the Management Agent to.
To view all the patches applied on the Management Agent, from the Targetsmenu, select All Targets. Click the name of the Management Agent Oracle Hometarget. All the patches applied on the Management Agent are displayed in theApplied Patches section.
From the displayed list of patches, apply the required patches (the patches thatchange the target type or collection metadata) on the new OMS. For informationon how to apply a patch on an OMS, seePatching Oracle Management Serviceand the Repository in the Oracle Enterprise Manager Cloud ControlAdministrator's Guide.
• If you have applied any one-off patches on the Management Agent you want torepoint, ensure that you apply the fix for Bug 15904425 on the Management Agentand the new OMS.
Redirecting a Management Agent to Another OMSTo redirect or repoint a Management Agent, follow these steps:
1. Stop the Management Agent:
Appendix BRedirecting a Management Agent to Another OMS
B-2

$<AGENT_INSTANCE_HOME>/bin/emctl stop agent2. Delete the Management Agent target on the old OMS:
$<ORACLE_HOME>/bin/emcli delete_target -delete_monitored_targets -name=<name_of_agent_target> -type="oracle_emd"For more information about the delete_target EMCLI command, see delete_target inthe Oracle Enterprise Manager Cloud Control Command Line Interface Guide.
3. Remove the Management Agent instance home:
rm -rf <absolute_path_to_agent_instance_home>If the agent base directory and the agent instance home point to the same physicallocation, do not run this command. Instead, remove the <AGENT_INSTANCE_HOME>/bin,<AGENT_INSTANCE_HOME>/sysman, <AGENT_INSTANCE_HOME>/diag, and<AGENT_INSTANCE_HOME>/install directories.
4. Create a new instance home for the Management Agent and redirect it to the new OMS.To do so, run the agentDeploy.sh script(agentDeploy.bat for Microsoft Windows hosts)with the -configOnly option:
$<AGENT_BASE_DIR>/agent_13.5.0.0.0/sysman/install/agentDeploy.shAGENT_BASE_DIR=<absolute_path_to_agent_base_dir>AGENT_INSTANCE_HOME=<absolute_path_to_agent_base_dir>/agent_instAGENT_PORT=<port_for_agent_process> OMS_HOST=<new_oms_host_name>EM_UPLOAD_PORT=<upload_port>AGENT_REGISTRATION_PASSWORD=<agent_reg_password> -configOnlyFor example,
/scratch/emga/agt4agi/agent_13.5.0.0.0/sysman/install/agentDeploy.shAGENT_BASE_DIR=/u01/software/em13c/agentbasedir AGENT_INSTANCE_HOME=/u01/software/em13c/agentbasedir/agent_inst AGENT_PORT=3880OMS_HOST=newoms.example.com EM_UPLOAD_PORT=4900AGENT_REGISTRATION_PASSWORD=<password> -configOnlyFor more information about the parameters you can specify while runningagentDeploy.sh or agentDeploy.bat, refer Table 6-4. For more information about the -configOnly option, refer Table 6-7.
Note:
The specified agent base directory location and the new agent instance homelocation map to locations on the same host, where the Management Agent wasalready configured. The OMS host name, of course, maps to the other hostwhere the new OMS is configured, that is, the OMS with which you want theManagement Agent to communicate now.
Appendix BRedirecting a Management Agent to Another OMS
B-3

CApplying Patches to Oracle ManagementAgents While Deploying or Upgrading Them
Starting with Enterprise Manager Cloud Control 13c Release 3, you can combineManagement Agent binaries with Management Agent patches and plug-in patches, so thatyou do not have to apply these patches every time you deploy or upgrade a ManagementAgent. You can save the Management Agent one-off patches that you want to apply on aparticular version of the Management Agent software, such that these patches areautomatically applied on the software whenever a new Management Agent of the sameversion is deployed, or an old Management Agent is upgraded to that version. This is a one-time operation, that is, you do not have to perform this action every time you deploy orupgrade a Management Agent.
If you save the Management Agent one-off patches on the OMS host as described in thisappendix, any Management Agent deployment or upgrade activity will automatically pick upthese patches for the respective Management Agent versions and platforms. Hence, thisfeature saves you a considerable amount of time and effort.
For information on applying patches on a plug-in and ensuring that the patched plug-in isdeployed on all the new Management Agents that you deploy, and all the old ManagementAgents that you upgrade, see Oracle Enterprise Manager Cloud Control AdministrationGuide.
Ensure that you follow the steps mentioned in this appendix and the section referenced in theprevious para before scheduling a Management Agent deployment or upgrade session, sothat the patches that you want to apply on the Management Agent and plug-ins are appliedautomatically after the Management Agent deployment or upgrade.
This appendix contains the following sections:
• Saving Management Agent Patches to an OMS Host
• Verifying Patch Application After Management Agent Deployment or Upgrade
Saving Management Agent Patches to an OMS HostTo save Management Agent one-off patches to your OMS host, such that they are appliedwhenever a new Management Agent is deployed, or a Management Agent is upgraded,follow these steps:
1. Download the required Management Agent one-off patches from My Oracle Support,available at the following URL:
https://support.oracle.com/Ensure that the size of the patch zip file you downloaded is the same as what isdisplayed on the My Oracle Support page.
For information on how to download a patch from My Oracle Support, see OracleEnterprise Manager Lifecycle Management Administrator's Guide.
C-1

2. Create the following directory on the OMS host, and transfer all the genericManagement Agent one-off patches to it:
$<ORACLE_HOME>/install/oneoffs/<agent_version>/Generic/Here, <agent_version> is the version of the Management Agent that the patch isfor. Ensure that you use the five-digit Management Agent version while creatingthis directory.
For example, if you want to apply Patch 11180406, a generic Management Agentone-off patch for a 13c Release 3 Management Agent, whenever a 13c Release 3Management Agent is deployed, or an old Management Agent is upgraded to 13cRelease 3, download this patch from My Oracle Support, create the followingdirectory, then transfer the patch to it:
/u01/software/em13c/oraclehome/install/oneoffs/13.3.0.0.0/Generic/3. Create the following directories on the OMS host, and transfer all the platform-
specific Management Agent one-off patches to them:
$<ORACLE_HOME>/install/oneoffs/<agent_version>/<platform>/Here, <agent_version> is the version of the Management Agent that the patch isfor. Ensure that you use the five-digit Management Agent version while creatingthese directories.
<platform> is the platform directory name, which is different for different patchplatforms. Table C-1 lists the platform directories that you must create for variouspatch platforms.
Table C-1 Platform Directory Names for Transferring Platform-Specific Management AgentPatches
Patch Platform Platform Directory Name
Linux x86 linux
Linux x86-64 linux_x64
Oracle Solaris on SPARC (64-bit) solaris
Oracle Solaris on x86-64 (64-bit) solaris_x64
HP-UX PA-RISC (64-bit) hpunix
HP-UX Itanium hpi
IBM S/390 Based Linux (31-bit) linux_zseries64
IBM AIX on POWER Systems (64-bit) aix
IBM: Linux on POWER Systems linux_ppc64
Microsoft Windows x64 (64-bit) windows_x64
Microsoft Windows (32-bit) win32
Note:
If you have a multi-OMS environment, ensure that you perform thesesteps on all the OMS hosts. Ensure that you download and transfer thesame patches to the same directories on all the OMS hosts. Failing to doso may result in inconsistency and unexpected errors.
Appendix CSaving Management Agent Patches to an OMS Host
C-2

For example, if you want to apply Patch 11878907 (which is for a 13c Release 3 Linuxx86-64 Management Agent), and Patch 11993577 (which is for a 13c Release 3 MicrosoftWindows x64 Management Agent), whenever these Management Agents are deployed,or older versions of these Management Agents are upgraded to 13c Release 3, downloadthese patches from My Oracle Support, create the following directories, then transfer thepatches to them:
For Patch 11878907:
/u01/software/em13c/oraclehome/install/oneoffs/13.3.0.0.0/linux_x64/For Patch 11993577:
/u01/software/em13c/oraclehome/install/oneoffs/13.3.0.0.0/windows_x64/
Verifying Patch Application After Management AgentDeployment or Upgrade
You can use these methods to verify whether the Management Agent one-off patches thatyou saved to your OMS host (described in Saving Management Agent Patches to an OMSHost) have been applied on a Management Agent that you deployed or upgraded:
• Run the following command from the Management Agent home:
$<AGENT_HOME>/OPatch/opatch lsinventory -oh <AGENT_HOME> -invPtrLoc<AGENT_HOME>/oraInst.locThis command displays all the patches applied on the Management Agent.
• In the Cloud Control console, from the Setup menu, select Manage Cloud Control, thenselect Agents. Click the name of the required Management Agent to navigate to its homepage. In the Configuration section, click Oracle Home and Patch Details. The patchesapplied on the Management Agent are displayed in the Patches Applied section.
Appendix CVerifying Patch Application After Management Agent Deployment or Upgrade
C-3

DUsing the RepManager Utility
This appendix describes the RepManager utility. In particular, this appendix covers thefollowing:
• Overview of the RepManager Utility
• Actions and Commands Supported by the RepManager Utility
Overview of the RepManager UtilityRepManager is a utility that enables you to upgrade and drop Oracle ManagementRepository (Management Repository), selectively purge plug-ins, and load dlf messages toOracle Management Repository. This utility is available in the Oracle home of the OracleManagement Service (OMS) host.
For UNIX operating systems:
$<ORACLE_HOME>/sysman/admin/emdrep/bin/RepManagerFor Microsoft Windows operating systems:
$<ORACLE_HOME>/sysman/admin/emdrep/bin/RepManager.batThis utility is invoked by Repository Configuration Assistant while installing a completeEnterprise Manager system, and by Repository Upgrade Configuration Assistant whileupgrading to Enterprise Manager Cloud Control.
Note:
If you want to drop the Enterprise Manager schema completely, then use theRepManager available in the Oracle home of the OMS host. Do not use the one inthe database home because it cannot remove the Enterprise Manager schemacompletely.
Actions and Commands Supported by the RepManager UtilityTable D-1 shows the list of actions and their associated commands supported by theRepManager utility.
WARNING:
The RepManager in drop mode puts the database in quiesce mode by "ALTERSYSTEM QUIESCE RESTRICTED;" command.
D-1

Table D-1 Actions and Commands Supported by RepManager
Action Command Description Example
preupgrade
$<ORACLE_HOME>/sysman/admin/emdrep/bin/RepManager -actionpreupgrade<repository_database_host><repository_database_port><repository_database_sid> -dbUser sys-dbPassword <syspassword> -dbRolesysdba -reposNamesysman [-mwHome<Middleware home>]-pluginDepList"<pluginid1>=<pluginid1home>,<pluginid2>=<pluginid2 home>" -runAsReposUser<TRUE/FALSE> -dlfSources "<omshome>,<plugin1home>,<plugin2home>"
Use this action with the followingparameters to perform the preupgradesteps before upgrading a ManagementRepository.
• Specify the host, port, and SID toconnect to the database where theManagement Repository has to beupgraded.
• Specify the database user (SYS) andpassword, the database role(SYSDBA), the repository name(SYSMAN) and password, and theMiddleware home to upgrade theManagement Repository. Here,Middleware home is the Oracle homewhere the WebLogic Server, OMS,and other components are configured.
• Specify a comma-separated list ofplug-ins to be deployed according tothe dependency. You can pass a filewith this option, the contents being acomma-separated list of plug-in IDs. Ifthe -pluginDepList parameter is notset, or is left with an empty list (forexample, "{}"), then the following isread, by default, to retrieve the plug-independency list:
$<ORACLE_HOME>/sysman/admin/emdrep/plugininfo/pluginDepList
• Depending on how the plug-ins can bedeployed, specify whether they mustbe deployed as SYS or SYSMAN, whichis the repository user. To deploy themas SYSMAN, set the -runAsReposUser parameter to TRUE.If you do not pass this parameter, bydefault, the plug-ins will be deployedas SYS user.
• Specify a comma-separated locationsfor DLF files from platform/plug-ins.You can pass a file with this option, thecontents being comma-separatedlocations for DLF files from platform/plug-ins. If the -dlfSourcesparameter is not set, or is left with anempty list (for example, "{}"), then thefollowing is read, by default, to retrievethe dlf resource locations:
$<ORACLE_HOME>/sysman/admin/emdrep/plugininfo/dlfSourcesIf this option is missing and defaultdlfSources file is not present, only dlf
$<ORACLE_HOME>/sysman/admin/emdrep/bin/RepManager-actionpreupgradeexample.com1521 db3 -dbUser sys-dbRolesysdba -reposNamesysman -mwHome /scratch/weblogic/middleware-pluginDepList<pluginid1>=<pluginid1home>,<pluginid2>=<pluginid2home>
Appendix DActions and Commands Supported by the RepManager Utility
D-2

Table D-1 (Cont.) Actions and Commands Supported by RepManager
Action Command Description Example
files for platform will be picked. If this ispresent, only the DLFs under thesesources will be picked up.
Appendix DActions and Commands Supported by the RepManager Utility
D-3

Table D-1 (Cont.) Actions and Commands Supported by RepManager
Action Command Description Example
upgrade
$<ORACLE_HOME>/sysman/admin/emdrep/bin/RepManager -actionupgrade<repository_database_host><repository_database_port><repository_database_sid> -dbUser sys-dbPassword <syspassword> -dbRolesysdba -reposNamesysman [-mwHome<Middleware home>]-pluginDepList"<pluginid1>=<pluginid1home>,<pluginid2>=<pluginid2 home>" -runAsReposUser<TRUE/FALSE> -dlfSources "<omshome>,<plugin1home>,<plugin2home>"Note: Run preupgradebefore performingupgrade action.
Use this action with the followingparameters to upgrade a ManagementRepository.
• Specify the host, port, and SID toconnect to the database where theManagement Repository has to beupgraded.
• Specify the database user (SYS) andpassword, the database role(SYSDBA), the repository name(SYSMAN) and password, and theMiddleware home to upgrade theManagement Repository. Here,Middleware home is the Oracle homewhere the WebLogic Server, OMS,and other components are configured.
• Specify a comma-separated list ofplug-ins to be deployed according tothe dependency. You can pass a filewith this option, the contents being acomma-separated list of plug-in IDs. Ifthe -pluginDepList parameter is notset, or is left with an empty list (forexample, "{}"), then the following isread, by default, to retrieve the plug-independency list:
$<ORACLE_HOME>/sysman/admin/emdrep/plugininfo/pluginDepList
• Depending on how the plug-ins can bedeployed, specify whether they mustbe deployed as SYS or SYSMAN, whichis the repository user. To deploy themas SYSMAN, set the -runAsReposUser parameter to TRUE.If you do not pass this parameter, bydefault, the plug-ins will be deployedas SYS user
• Specify a comma-separated locationsfor DLF files from platform/plug-ins.You can pass a file with this option, thecontents being comma-separatedlocations for DLF files from platform/plug-ins. If the -dlfSourcesparameter is not set, or is left with anempty list (for example, "{}"), then thefollowing is read, by default, to retrievethe dlf resource locations:
$<ORACLE_HOME>/sysman/admin/emdrep/plugininfo/dlfSourcesIf this option is missing and defaultdlfSources file is not present, only dlffiles for platform will be picked. If this is
$<RACLE_HOME>/sysman/admin/emdrep/bin/RepManager-actionupgradeexample.com1521 db3 -dbUser sys-dbRolesysdba -reposNamesysman -mwHome /scratch/weblogic/middleware-pluginDepList<pluginid1>=<pluginid1home>,<pluginid2>=<pluginid2home>
Appendix DActions and Commands Supported by the RepManager Utility
D-4

Table D-1 (Cont.) Actions and Commands Supported by RepManager
Action Command Description Example
present, only the DLFs under thesesources will be picked up.
transX $<ORACLE_HOME>/sysman/admin/emdrep/bin/RepManager -actiontransx<repository_database_host><repository_database_port><repository_database_sid> -reposNamesysman [-mwHome<Middleware home>]-dlfSources "<omshome>,<plugin1home>,<plugin2home>"Note: You can also run -doTransX. By default, itis set to true. If you setthe value to false, notranslation bundles areloaded. This is applicablefor -dlfSources forpreupgrade and upgradeactions.
Use this action with the followingparameters to load the translationresources to the Management Repository.
• Specify the host, port, and SID toconnect to the database and load thetranslation resources to theManagement Repository.
• Specify the repository name(SYSMAN) and password, and theMiddleware home to load translationresources to Oracle ManagementRepository. Here, Middleware home isthe Oracle home where the WebLogicServer, OMS, and other componentsare configured.
• Specify a comma-separated locationsfor DLF files from platform/plug-ins.You can pass a file with this option, thecontents being comma-separatedlocations for DLF files from platform/plug-ins. If the -dlfSourcesparameter is not set, or is left with anempty list (for example, "{}"), then thefollowing is read, by default, to retrievethe dlf resource locations:
$<ORACLE_HOME>/sysman/admin/emdrep/plugininfo/dlfSourcesIf this option is missing and defaultdlfSources file is not present, only dlffiles for platform will be picked. If this ispresent, only the DLFs under thesesources will be picked up.
$<ORACLE_HOME>/sysman/admin/emdrep/bin/RepManager-actiontransxexample.com1521 db3 -reposNamesysman -mwHome /scratch/WLS/middleware
Appendix DActions and Commands Supported by the RepManager Utility
D-5

Table D-1 (Cont.) Actions and Commands Supported by RepManager
Action Command Description Example
resume $<ORACLE_HOME>/sysman/admin/emdrep/bin/RepManager -resumeretry<repository_database_host><repository_database_port><repository_database_sid> -dbUser sys-dbPassword <syspassword> -dbRolesysdba -reposNamesysman [-mwHome<Middleware home>]-checkpointLocation<directory whereschemamanagerstores checkpoints>
Use this action with the followingparameters to resume the last failed action,for example, the upgrade action.
• Specify the host, port, and SID toconnect to the database where theaction has to be resumed.
• Specify the database user (SYS) andpassword, the database role(SYSDBA), the repository name(SYSMAN) and password for theSYSMAN user, and the Middlewarehome where the action has to beresumed. Here, Middleware home isthe Oracle home where the WebLogicServer, OMS, and other componentsare configured.
• Specify the location at which toresume the step. The checkpointlocation is $<ORACLE_HOME>/sysman/log/schemamanager.
$<ORACLE_HOME>/sysman/admin/emdrep/bin/RepManagerexample.com1521 db3 -dbUser sys-dbRolesysdba -reposNamesysman -resumeretry -checkpointLocation /scratch/weblogic/middleware/oms/sysman/log/schemamanager -mwHome /scratch/weblogic/middleware
Appendix DActions and Commands Supported by the RepManager Utility
D-6

Table D-1 (Cont.) Actions and Commands Supported by RepManager
Action Command Description Example
drop $<ORACLE_HOME>/sysman/admin/emdrep/bin/RepManager -actiondrop<repository_database_host><repository_database_port><repository_database_sid> -dbUser sys-dbPassword <syspassword> -dbRolesysdba -reposNamesysman [-mwHome<Middleware home>][-mwOraHome <OracleHome>]OR
$<ORACLE_HOME>/sysman/admin/emdrep/bin/RepManager -actiondrop<repository_database_host><repository_database_port><repository_database_sid> -dbUser sys-dbPassword <syspassword> -dbRolesysdba -reposNamesysman [-mwHome<Middleware home>][-mwOraHome <OracleHome>]Ensure that there are noactive sessions,scheduler jobs, anddbms_jobs running forSYSMAN,SYSMAN_MDSSYSMAN122130_OPSS,and SYSMAN_APM.Ensure that none ofthese users are loggedin. To ensure this, stopthe OMS using thecommand emctl stop
Use this action with the followingparameters to remove all the EnterpriseManager repository schemas.
• Specify the host, port, and SID toconnect to the database in which allthe schemas have to be dropped.
• Specify the database user (SYS) andpassword, the database role(SYSDBA), the repository name(SYSMAN) and password, and theMiddleware home. Here, Middlewarehome is the Oracle home where theWebLogic Server, OMS, and othercomponents are configured.
At the end, a confirmation messageappears to confirm the status of thisoperation. If all the schemas weresuccessfully dropped, then a messageconfirming the same appears. Otherwise, amessage providing details on each of theschemas appears.
For example,
SYSMAN_OPSS schema is not cleaned. EM_X synonyms are not dropped.
$<ORACLE_HOME>/sysman/admin/emdrep/bin/RepManagerexample.com1521 db3 -dbUser sys-dbRolesysdba -reposNamesysman -action drop-mwHome /scratch/weblogic/middlewareOR
$<ORACLE_HOME>/sysman/admin/emdrep/bin/RepManagerexample.com1521 db3 -dbUser sys-dbRolesysdba -reposNamesysman -action drop-mwHome /scratch/weblogic/middleware-mwOraHome /scratch/weblogic/middleware
Appendix DActions and Commands Supported by the RepManager Utility
D-7

Table D-1 (Cont.) Actions and Commands Supported by RepManager
Action Command Description Example
oms -all on all OMSinstances.
pluginpurge
$<ORACLE_HOME>/sysman/admin/emdrep/bin/RepManager -actionpluginpurge<repository_database_host><repository_database_port><repository_database_sid> -dbUser sys-dbPassword <syspassword> -dbRolesysdba -reposNamesysman -pluginPurgeList"<plugin_name>=<plugin_location>" [-mwHome <Middlewarehome>] -mwOraHome<Oracle Home>Note: To purge multipleplug-ins, for the -pluginPurgeListargument, enter the plug-ins separated by acommand. For example,<pluginid1>=<pluginid1 home>,<pluginid2>=<pluginid2 home>
Use this action with the followingparameters to deinstall a plug-in from theManagement Repository.
• Specify the host, port, and SID toconnect to the database from whichthe plug-in has to be deinstalled.
• Specify the database user (SYS) andpassword, the database role(SYSDBA), the repository name(SYSMAN) and password, and theMiddleware home. Here, Middlewarehome is the Oracle home where theWebLogic Server, OMS, and othercomponents are configured
• Specify a comma-separated list ofplug-ins to be purged from EnterpriseManager Repository with EM-EXTmodel.
$<ORACLE_HOME>/sysman/admin/emdrep/bin/RepManagerexample.com1521 db3 -dbUser sys-dbRolesysdba -reposNamesysman -actionpluginpurge-pluginPurgeList"oracle.sysman.myyempwpax.oms.plugin_13.4.0.0.0=/scratch/weblogic/middleware/plugins/oracle.sysman.myyempwpax.oms.plugin_13.4.0.0.0" -mwHome /scratch/weblogic/middleware
Note:
For information on the support for -action drop and -action dropallcommands, see Table 2-5.
Appendix DActions and Commands Supported by the RepManager Utility
D-8

Note:
If you do not specify passwords during RepManager actions, you will be promptedto do so.
Appendix DActions and Commands Supported by the RepManager Utility
D-9

ECollecting OCM Data Using Oracle Harvester
This appendix provides information for using the Oracle Harvester to collect OracleConfiguration Manager (OCM) data for submission to My Oracle Support (MOS).My Oracle Support provides a key set of features and functionality that greatly enhance thecustomer's interaction with Oracle Support. My Oracle Support streamlines the ServiceRequest submission process by providing in-context information specific to a customer'sconfigurations, as well as proactive support. To enable these features within My OracleSupport, the customer's configuration information must be uploaded to Oracle. When theconfiguration data is uploaded on a regular basis, customer support representatives cananalyze this data and provide better service to customers.
The following mechanisms are provided to customers for collecting and uploadingconfiguration data to Oracle.
• Oracle Enterprise Manager Harvester (Oracle Harvester)
• Oracle Configuration Manager (OCM)
In particular:
• Oracle Configuration Manager is installed and configured automatically when you installan Oracle product.
When installing any product, the first screen asks for My Oracle Support credentials.THIS IS A PIVOTAL SCREEN in the installation. The user name and password that youprovide are the credentials against which the configuration data is uploaded to Oracle.
• Configuration collections run and the configuration data is uploaded to Oracle every 24hours.
• Once the data is uploaded, it can be viewed by logging into My Oracle Support (https://support.oracle.com) using the same credentials supplied during product installation.
Note: If you use Enterprise Manager to manage your applications, we recommend that youuse Oracle Harvester to upload your configurations to Oracle. Otherwise, use OCM.
The sections below provide information on the following topics:
• Oracle Harvester
• Oracle Configuration Manager
• Additional Information About MOS and OCM
• Troubleshooting Configuration Data Collection Tools
Oracle HarvesterOracle Harvester only harvests data for targets that are managed by Enterprise Manager.Because Oracle Harvester has the same OCM dependencies, Oracle Harvester enables thegathering of target configuration data by leveraging Enterprise Manager collection methodsthus precluding the need to install OCM on target homes managed by Oracle Harvester. Thefollowing topics are presented:
E-1

• Highlights of Oracle Harvester
• Oracle Harvester and OCM
• Support For Enterprise Manager
• Viewing CSIs in Enterprise Manager
• Harvester Target Lifecycle Properties from Enterprise Manager
• Harvester Job Status Metric
• Supported Targets in Oracle Harvester
• Configuration Data Not Available in My Oracle Support
Highlights of Oracle HarvesterThe following are highlights of Oracle Harvester:
• Data is uploaded by default for all targets against the same credentials with whichOCM in the Oracle Management Service (OMS) home is configured. FromEnterprise Manager Cloud Control, you can change this default value for a targetby assigning a CSI from the CSI Assignment page. Click Setup, then My OracleSupport to get started.
• Requires OCM to be configured and running in the OMS home for EnterpriseManager.
• Gathers target configuration data from the Management Repository
• Automatically runs periodically so no user intervention is required
Oracle Harvester and OCMWhen you install Enterprise Manager, Oracle Harvester and Oracle ConfigurationManager (OCM) are automatically installed as are all the necessary subcomponents.The Oracle Harvester will run as long as the OCM in the OMS home is configured andrunning.
OCM must be enabled in the Oracle Home of the OMS and configured (and running inconnected mode) in the Instance Home of the OMS. The reason is that the OracleOMS target will not be discovered by the OCM collector if ORACLE_CONFIG_HOME is notset.
Perform the following steps to ensure the Oracle OMS target is discovered:
1. Locate the OMS instance home.
• For Oracle Enterprise Manager Cloud Control 13c and later, OCM is located inthe following directory:
OMS_HOME/oracle_common• For Oracle Enterprise Manager Cloud Control 12c and earlier:
In the $ORACLE_HOME/sysman/config/emInstanceMapping.properties file(where ORACLE_HOME is the Oracle Home of the OMS), there is an entryreferencing a file called emgc.properties.
The directory in which the emgc.properties file is located is the "instancehome" of the OMS. In the following example, /u01/app/oracle/product/gc_inst/em/EMGC_OMS1 is the instance home of the OMS:
Appendix EOracle Harvester
E-2

EMGC_OMS1=/u01/app/oracle/product/gc_inst/em/EMGC_OMS1/emgc.properties
Set the environment variable ORACLE_CONFIG_HOME to the directory of thisemgc.properties file. (Note: this setting is not required for Cloud Control 13c.)
For example:
$export ORACLE_CONFIG_HOME=/u01/app/oracle/product/gc_inst/em/EMGC_OMS12. If My Oracle Support credentials were not provided during the Enterprise Manager
installation, run the following command to set them:
setupCCR
Provide the My Oracle Support credentials when prompted.
For more information about the Oracle Configuration Manager (OCM), see the OracleConfiguration Manager Installation and Administration Guide.
Or visit the OCM documentation library:
http://docs.oracle.com/cd/E49269_01/index.htm
Support For Enterprise ManagerBy default, all targets are uploaded using the credentials used to register OracleConfiguration Manager in the OMS Home. In Enterprise Manager, you have the option ofassigning a Customer Support Identifier (CSI) to each target home.
The Oracle Harvester supports uploading configuration data to different CSIs for eachdifferent Oracle Home.
The steps include:
1. Ensuring that the Oracle Harvester has run. This job runs automatically. The status of therun can be monitored from the Support Identifier Assignment page. To access this pagefrom the Enterprise Manager home page, select Setup, then select My Oracle Support.From the menu, select Support Identifier Assignment.
2. Setting My Oracle Support preferred credentials. From the Enterprise Manager homepage, select Setup, then select My Oracle Support. From the menu, select Setcredentials and supply any valid My Oracle Support credentials.
3. Assigning the Support Identifier.
a. From the Enterprise Manager home page, select Setup, then select My OracleSupport. Select Support Identifier Assignment and provide the correct user nameand password. Select Set credentials.
b. Select Home. Click Assign button. Select CSI and click OK.
4. Ensuring the message displays indicating the assignment was successful. The messagereads:
Support Identifier has been assigned for 1 Oracle homes. The changes in the Customer Support Identifiers will be reflected in My Oracle Support after the next Harvester run.
Appendix EOracle Harvester
E-3

Viewing CSIs in Enterprise ManagerYou can see the CSI associated with a target by viewing the target property or bydoing a configuration search with CSI set as the search criteria. Any user with operatorprivilege on all targets for a given Oracle Home can assign a CSI for that OracleHome.
Note:
A Super Administrator can assign a CSI for any Oracle Home. Administratorscan assign CSIs to Oracle Homes for which they have operator privilege onall the targets.
Refer to the help in the Enterprise Manager interface on how to access thisinformation.
There are a number of areas in the Enterprise Manager UI where you can view CSIs.
• Oracle Home target home page.
1. From the Enterprise Manager home page, select Targets, then select a target.
2. In the Refine Search area, select Other, then select the Oracle Home ofchoice.
3. On the Oracle Home target page, select Target Information in the target's dropdown menu.
• Another way is by adding a CSI to a search.
1. From the Enterprise Manager home page, select Targets, then select Add CSIto Configuration Search criteria; Add Properties
Harvester Target Lifecycle Properties from Enterprise ManagerOracle Harvester provides the target lifecycle property to enable you to identify thepurpose of a target, for example, development, testing, and so on.
Once defined, the Oracle Harvester collects the target lifecycle property for all thetargets and uploads the property to Oracle Configuration Manager server.
You can assign target lifecycle property to any target from either the EnterpriseManager UI or the My Oracle Support UI.
The possible values of a target's lifecycle property are:
• Mission Critical
• Production
• Stage
• Test
• Development
Appendix EOracle Harvester
E-4

Harvester Job Status MetricStarting from Enterprise Manager Cloud Control 12c Release 12.1.0.3 and OCM 10.3.8.1.0, aHarvester Job Status metric has been added to the OMS and Repository target. This metricwill provide information related to the Harvester Job. The following information is collected aspart of this metric:
• Harvester Status: Provides the status of the last harvester job run. Possible valuesinclude:
– SUCCESS: indicates the job ran successfully.
– ERROR: returned if job failed.
– NOT CONFIGURED: indicates that OCM is not configured.
– NOT AUTHENTICATE: shows that OCM is configured, but it is not in Authenticatedmode.
• Harvester Error: Shows an error message in case the harvester job fails to run.
• Last Harvester Job Run: Shows the time the last harvester job ran.
• Next Harvester Job Run: Shows the time of the next harvester job run.
• Total Targets Processed: Shows the number of targets processed by the harvester jobduring its last run.
• Total Targets Successful: Total number of targets successfully uploaded to MOS fromTotal Targets Processed.
• Total Targets Failed: Shows the total number of target that failed to upload to MOS outof the Total Targets Processed in the Last Harvester Job Run.
• OCM Version: Shows the version of OCM configured with Enterprise Manager.
The Harvester Job Status metric data is available from the OMS and Repository targetmetrics page. An ERROR threshold has been defined for the Harvester Status field. If thevalue of this field shows ERROR, then an incident will be created, which will appear on boththe OMS and Repository home page and the Incident Manager Page.
Supported Targets in Oracle HarvesterDepending on the release of Enterprise Manager that Oracle Harvester is running on, Oraclecollects the configuration data from a different set of target types. Only configuration datafrom the target types shown in Table E-1 are collected by Oracle Harvester.
Table E-1 Supported Targets in Enterprise Manager 12.1 Releases
Target Plug-in Release Enterprise Manager Release
12.1.0.1 12.1.0.2 12.1.0.3
BI 12.1.0.3 No Yes Yes
Host not applicable Yes Yes Yes
Management Agent not applicable Yes Yes Yes
ManagementRepository
not applicable Yes Yes Yes
Appendix EOracle Harvester
E-5

Table E-1 (Cont.) Supported Targets in Enterprise Manager 12.1 Releases
Target Plug-in Release Enterprise Manager Release
12.1.0.1 12.1.0.2 12.1.0.3
Oracle ApplicationServer
all versions Yes Yes Yes
Oracle Database all versions Yes Yes Yes
Oracle DatabaseMachine
all versions Yes Yes Yes
Oracle ExadataStorage Server
all versions Yes Yes Yes
Oracle Exalogic 12.1.0.2
12.1.0.3
No
No
Yes
No
Yes
Yes
Oracle FusionApplications
all versions Yes Yes Yes
Oracle FusionMiddleware
all versions Yes Yes Yes
Oracle Home not applicable Yes Yes Yes
Oracle IdentityManager forconfigurations: OIF,OID, OVD and DIP
No Yes Yes
Oracle IdentityManager forconfigurations: OIM,OAM and OAAM
all versions Yes Yes Yes
Oracle ManagementService
not applicable Yes Yes Yes
Oracle SOA Suite all versions Yes Yes Yes
Oracle VirtualManager
all versions Yes Yes Yes
Oracle WebLogicServer
all versions Yes Yes Yes
Siebel 12.1.0.3 No No Yes
Configuration Data Not Available in My Oracle SupportIn previous versions of Enterprise Manager, Oracle Harvester configuration data wasonly uploaded to My Oracle Support when 30 days had passed since the last upload ofdata by a standalone OCM Collector if such data already existed in My OracleSupport.
This restriction has been lifted beginning with Enterprise Manager 12c. Configurationdata for targets collected from Oracle Harvester running in Enterprise Manager release12c and later displays in My Oracle Support immediately, regardless of how recentlydata was uploaded by a standalone OCM Collector.
Appendix EOracle Harvester
E-6

Leveraging the Enterprise Manager InfrastructureA full deployment of Enterprise Manager includes the following components:
1. One or more Oracle Management Service (OMS) instances
2. An Oracle database used as the Management Repository
3. Management Agents deployed onto each host containing targets to be managed byEnterprise Manager
On a regular basis, configuration data is collected by Management Agents for targetsmanaged by Enterprise Manager and uploaded to the OMS; the data is stored in theEnterprise Manager Repository.
Enterprise Manager extracts, or harvests, the collected configuration data from the EnterpriseManager repository for the purpose of conveying that data to Oracle. Once harvested, theconfiguration data is automatically uploaded to My Oracle Support by way a recurringEnterprise Manager job, generating system configuration information in My Oracle Supportjust as if it were uploaded from OCM instances.
Note that this also carries the advantage of simpler software deployment. The pure OCMmodel requires one instance of the OCM software in every Oracle Home. The EnterpriseManager infrastructure, on the other hand, requires one Management Agent on each host,thus potentially requiring many fewer deployments.
Configuring Enterprise Manager to Upload Configuration Data to OracleThe only prerequisites for using Enterprise Manager to collect and upload configuration datato Oracle Support are that the Enterprise Manager OMS must be at least version 10.2.0.5,and there must be an OCM instance configured (and running in connected mode) in theOracle Home of the OMS.
If multiple OMS instances are used for the Enterprise Manager infrastructure, then each OMSmust have OCM configured and running. OCM is easily set up as part of the 10.2.0.5patchset installation; alternatively OCM can be configured later from the command line. Formore information, see the Oracle Configuration Manager Installation and AdministrationGuide. Once OCM is configured in the OMS home, Enterprise Manager-collectedconfiguration upload to Oracle is enabled.
Note:
The Oracle Home of the OMS is the only place in which an OCM instance isneeded (not on any managed targets).
Oracle Configuration ManagerOracle Configuration Manager is installed and configured automatically when you install anOracle product. It is installed in the product Home and collects configuration data for alltargets installed in that Home.
The OCM setup requires specifying the My Oracle Support account and password, or MyOracle Support account and Customer Support Identifier (CSI). Configuration data will be
Appendix EOracle Configuration Manager
E-7

uploaded using this information and can be viewed by logging in to My Oracle Supportusing the same credentials.
OCM must be installed in every Oracle Home from which you want to uploadconfiguration data to Oracle. In addition to being part of the product installation, OCMcan also be downloaded from My Oracle Support. The Mass Deployment tool isavailable to help with deploying OCM across data centers. The OCM kit is availablefrom the Collector tab on My Oracle Support.
Once OCM is installed, no additional work is required. By default, automatic updatesare enabled and you are encouraged to use this feature to ensure you are alwaysrunning the latest version of OCM. This feature can be disabled if required, forexample, for security reasons. If you disable the feature, you can turn it on byexecuting the following command:
<ocm_install_root>/ccr/bin/emCCR automatic_update on
Note: If you use Enterprise Manager or Ops Center to manage your applications, werecommend that you use Oracle Harvester or Ops Center Harvester respectively toupload your configurations to Oracle. Otherwise, use OCM.
Additional Information About MOS and OCMTo find additional information about My Oracle Support, see:
https://support.oracle.comTo find more information about OCM, perform the following steps:
1. Log into My Oracle Support at https://support.oracle.com2. To access the Collector tab, click More and select Collector from the drop-down
menu. The Collector page contains useful information.
Troubleshooting Configuration Data Collection ToolsIn Enterprise Manager Release 12.1.0.2, ensure that collection data is uploaded toOracle by using the emccr status command. Look at the last uploaded date and time.
Note: This emccr status command shows that collected data was uploaded, but doesnot ensure the Oracle Harvester collections were successful and uploaded.
Location of error logs:
• Oracle Harvester error logs:
– For Harvester Job errors, look at:
INSTANCE_HOME/sysman/log/emoms_pbs.trc– UI errors, for example CSI Assignment errors, look at:
INSTANCE_HOME/sysman/log/emoms.trc
For example:
/gc_inst/user_projects/domains/GCDomain/servers/EMGC_OMS1/sysman/log/emoms.trc
• Ops Center Harvester error log is located at:
Appendix EAdditional Information About MOS and OCM
E-8

/var/opt/sun/xvm/logs/ocharvester.log• Oracle Configuration Manager log is located at:
ccr/hosts/<hostname>/log/collector.logThe following sections describe how to resolve issues with the configuration data collections:
• Oracle Harvester Collection Fails If the state/upload/external Directory Is Missing
• Oracle Configuration Manager Is Not Running
• Configuration Data Not Available in My Oracle Support
• Only a Subset of the Targets Is Collected by the Oracle Harvester
Oracle Harvester Collection Fails If the state/upload/external Directory IsMissing
If the Oracle Harvester collection fails with the following error, the required directory namedexternal is missing.
[JobWorker 75210:Thread-61] ERROR gcharvester.GcCollectionMgr initOcm.? - GC OCMHarvester: Caught GC Harvester exception from GCInit.init(): The installed versionof Oracle Configuration Manager in the ORACLE_HOME(/scratch/aime/work/midlwre8937/oms11g) is prior to 10.3.1. The Grid ControlConfiguration harvesting requires at a minimum, 10.3.1
To resolve this issue, create the external directory:
$ORACLE_INSTANCE_HOME/ccr/state/upload/external(Bug 12795503)
Oracle Configuration Manager Is Not RunningWhen OCM is not running, you may see the following error:
2012-08-29 16:34:20,709 [JobWorker 97285:Thread-60] WARNgcharvester.HarvesterJobUtils performOCMCollections.? - GC OCM Harvester: OCM wasstopped and is not running
To resolve this issue, verify that the OCM was installed and configured in the appropriatedirectories (execute emCCR status).
In particular, OCM must be installed in the OMS Oracle Home and configured (and running inconnected mode) in the OMS Instance Home.
Configuration Data Not Available in My Oracle SupportWhen you look at My Oracle Support and do not find configuration data, it could be that theOracle Harvester collection did not run.
To resolve this issue, verify that the OCM was installed and configured in the appropriatedirectories (execute emCCR status). In particular, OCM must be installed in the OMS OracleHome and configured (and running in connected mode) in the OMS Instance Home.
To verify that OCM is running, perform the following steps:
1. Set ORACLE_CONFIG_HOME to the INSTANCE HOME
Appendix ETroubleshooting Configuration Data Collection Tools
E-9

2. Execute $ORACLE_HOME/ccr/bin/emCCR status
Only a Subset of the Targets Is Collected by the Oracle HarvesterIf many targets are uploaded to the Management Repository but only a subset of thetargets is collected by the Oracle Harvester, it could be because the same error wasencountered 10 times during a collection, causing the Oracle Harvester to stopcollecting. Look at the appropriate log file to verify that this error has occurred.
Resolve the issue by running the following SQL script against the ManagementRepository. This script forces the Oracle Harvester to ignore this collection error andcontinue collecting the remaining target information.
sql> insert into mgmt_ocm_upl_props (name,str_value) values('ignore_errors','true');sql> commit;
Bounce the OMS after executing the SQL script.
(Bug 11734389)
Appendix ETroubleshooting Configuration Data Collection Tools
E-10

FEnabling the Enterprise Manager AccessibilityFeatures
As part of the effort to make Oracle products, services, and supporting documentationaccessible and usable to the disabled community, Enterprise Manager offers several featuresthat make management data available to users of assistive technology and individuals withdisabilities in general.
Enterprise Manager provides support for Screen Reader. Also, you can navigate through theEnterprise Manager Cloud Control console with a keyboard alone – using common keyboardcommands.
This appendix covers the following topics:
• Enabling Screen Reader Mode
• Verifying Screen Reader Support Is Enabled
• Enterprise Manager Cloud Control Keyboard Navigation
Note:
If Screen Reader support is enabled, then all pages related to Refresh ProcessStatus are not refreshed automatically because Partial Page Rendering (PPR) isturned off. This is an expected behavior.
Enabling Screen Reader ModeThere are numerous pages of monitoring and management data in the Enterprise ManagerCloud Control console. Different technologies are used for implementing these pages – forexample, many pages rely upon Oracle Application Development Framework (ADF), whileothers depend upon User Interface XML (UIX). These underlying technologies requiredifferent setup for enabling screen reader mode. Pages implemented with ADF work inscreen reader by default. No further action is required. However, pages implemented withUIX require additional steps to be screen reader enabled.
Enabling Screen Reader Mode for UIX PagesUI implemented in UIX needs additional manual configuration for screen reader mode.
To enable screen reader mode for UIX pages, do the following:
1. Locate the uix-config.xml configuration file.
To locate the uix-config.xml file in a Cloud Control installation, change directory to thefollowing location in the Oracle Management Service home:
F-1

./oms/sysman/archives/emgc/deployments/EMGC_DOMAIN/emgc.ear/em.war/WEB-INF/uix-config.xml
Note:
If you have multiple OMS, you need to perform the steps individually foreach OMS.
2. Open the uix-config.xml file using a text editor and set the following entry:
<!-- An alternate configuration that disables accessibility features --><default-configuration><accessibility-mode>screenReader</accessibility-mode></default-configuration>
Note:
<accessibility-mode>- The accessibility-mode element defines what levelof accessibility support should be generated. Acceptable values aredefault and inaccessible, which turns off accessibility features. Thisimproves the page size and screenReader, which enhances theaccessibility to optimize usability with screen readers, but might degradethe appearance in standard browsers.
3. Save and close the file.
4. Restart the Oracle Management Service.
Note:
UIX accessibility mode is a product-wide setting. You will have to restart theEnterprise Manager Management Service for this setting to take effect.
Note:
In the uix-config.xml file, enable-auto-table-ctrl-labels is set to true.This enables tool tip boxes containing labels to appear when you hover yourcursor over UI elements such as checkboxes and radio buttons in tables. Todisable this function, change the setting to false.
Enabling Text Descriptions for Charts for UIX PagesThroughout the Enterprise Manager Cloud Control console, charts are used to displayperformance data. For most users, these charts provide a valuable graphical view ofthe data that can reveal trends and help identify minimum and maximum values forperformance metrics. However, charts do not convey information in a manner that canbe read by a screen reader. To remedy this problem, you can configure EnterpriseManager to provide a complete textual representation of each performance chart. By
Appendix FEnabling Screen Reader Mode
F-2

default, support for the textual representation of charts is disabled. When textual descriptionfor charts is enabled, Enterprise Manager displays a small icon for each chart that can beused as a drill-down link to the textual representation.
To configure web.xml file, follow these steps:
1. Locate the web.xml configuration file.
To locate the web.xml file in a Cloud Control installation, change directory to the followinglocation in the Oracle Management Service home:
./oms/sysman/archives/emgc/deployments/EMGC_DOMAIN/emgc.ear/em.war/WEB-INF/web.xml
Note:
If you have multiple OMS, you need to perform the steps individually for eachOMS.
2. Open the web.xml file with your favorite text editor and locate the following six lines of thefile:
<!-- Uncomment this to enable textual chart descriptions<context-param><param-name>enableChartDescription</param-name><param-value>true</param-value></context-param>-->
3. Remove comments from this section by deleting the first line and the last line of thissection so that the section consists of only these 4 lines:
<context-param><param-name>enableChartDescription</param-name><param-value>true</param-value></context-param>
4. Save and exit the file.
5. Restart the Oracle Management Service.
Verifying Screen Reader Support Is EnabledTo verify if the Screen Reader support is enabled for ADF pages, follow these steps:
1. On the Cloud Control home page, from the <user_name> menu, select AboutEnterprise Manager.
2. In the About Enterprise Manager dialog box, ensure that Accessibility Preference -Screen Reader Support is set to Enabled.
3. If Accessibility Preference - Screen Reader Support is set to Disabled, follow thesteps listed in Enabling the Enterprise Manager Accessibility Features.
To verify whether Screen Reader support has been enabled for UIX pages, follow thesesteps:
• On the Cloud Control home page, from the Setup menu, select Add Target and thenselect Groups.
The Add Target page is displayed.
Appendix FVerifying Screen Reader Support Is Enabled
F-3

Enterprise Manager Cloud Control Keyboard NavigationYou can navigate the Enterprise Manager Cloud Control console without a mouse andaccess all relevant functionality using only the keyboard. You don't need screen readermode or any other assistive technology to use keyboard-only navigation, which isavailable to all users.
Generally, you use the following keys to navigate:
• Tab key: Move to the next control, such as a dynamic target menu, navigation tree,content pane, or tab in a page. Tab traverses the page left to right, top to bottom.Use Shift +Tab to move to the previous control.
• Up and Down Arrow keys: Move to the previous or next item in the navigation tree,menu, or table. Down Arrow also opens a menu.
• Left and Right Arrow keys: Collapse and expand an item in the navigation tree or asubmenu.
• Esc: Close a menu.
• Spacebar: Activate a control. For example, in a check box, spacebar toggles thestate, checking or unchecking the box. On a link, spacebar navigates to the targetof the link.
• Enter: Activate a button.
Table F-1 shows some common tasks and the keyboard navigation used.
Table F-1 Keyboard Navigation for Common Tasks
Task Navigation
Move to next control, such as navigation treeor menu
Tab
Move to previous control, such as navigationtree or menu
Shift+Tab
Move to navigation pane Tab until navigation tree has input focus
Move down the navigation tree Down Arrow
Move up the navigation tree Up Arrow
Expand a folder Right Arrow
Collapse a folder Left Arrow
Appendix FEnterprise Manager Cloud Control Keyboard Navigation
F-4

Table F-1 (Cont.) Keyboard Navigation for Common Tasks
Task Navigation
Open a menu Down Arrow
Move to the next item in a menu Down Arrow
Move to the previous item in a menu Up Arrow
Select a menu item Enter
Open a submenu Right Arrow
Close a submenu Left Arrow
Move out of a menu Esc
Activate a button Enter
Open a tab in a content pane Tab to the content pane, Tab to the tab to getinput focus, then Enter to select the tab
Select an item, such as Message type in LogMessages screen
Spacebar
Select a row in a table Tab to the header of the table, then DownArrow to move to a row
Select a cell in a table Tab to the header of the table, then Tab untilyou reach the cell you want to select, thenEnter
Keyboard ShortcutsKeyboard shortcuts enable you to perform user interface actions without using a mouse.Keyboard shortcuts for specific UI elements come from the Oracle Application DevelopmentFramework components that they are based on. You might also find keyboard shortcuts thatare specific to a particular feature or product.
Keyboard Shortcuts for Oracle Application Development Framework ComponentsEnterprise Manager is based on some Oracle Application Development Framework (ADF)components which come with standard keyboard shortcuts. In some cases, you might finddifferent keyboard shortcuts specific to the page, feature or product that you are using. OracleADF keyboard shortcuts are described in the Oracle Fusion Middleware Developing WebUser Interfaces with Oracle Application Development Framework Faces.
Default Mode
• Refer to the following sections in the guide for the corresponding keyboard shortcuts.
See: Keyboard Shortcuts
– Shortcut Keys for Common Components
– Shortcut Keys for Widgets
– Shortcut Keys for Rich Text Editor Component
– Shortcut Keys for Table, Tree, and Tree Table Components
– Shortcut Keys for ADF Data Visualization Components
Appendix FEnterprise Manager Cloud Control Keyboard Navigation
F-5

– Shortcut Keys for Calendar Component
Screen Reader Mode
The keyboard shortcuts for some components in screen reader mode are differentfrom the shortcuts in default mode.
• Refer to the following sections in the guide for the corresponding keyboardshortcuts.
See: Keyboard Shortcuts
– Shortcut Keys for Table, Tree, and Tree Table Components in Screen ReaderMode
– Shortcut Keys for ADF Data Visualization Components in Screen ReaderMode
– Shortcut Keys for Calendar Component in Screen Reader Mode
Keyboard Shortcuts for Oracle JavaScript Extension Toolkit (JET) ComponentsEnterprise Manager is based on some Oracle Java Script Extension Toolkit (JET)components which come with standard keyboard shortcuts. Oracle JET keyboardshortcuts are described in the Oracle JavaScript Extension Toolkit (JET) Keyboard andTouch Reference.
Enterprise Manager Performance Hub uses the following Oracle JET components:
• oj-accordion
• oj-button
• oj-buttonset-many
• oj-buttonset-one
• oj-chart
• oj-checkboxset
• oj-collapsible
• oj-data-grid
• oj-diagram
• oj-dialog
• oj-input-date
• oj-input-date-time
• oj-input-number
• oj-input-text
• oj-input-time
• oj-label
• oj-legend
• oj-list-view
• oj-masonry-layout
• oj-menu
Appendix FEnterprise Manager Cloud Control Keyboard Navigation
F-6

• oj-menu-button
• oj-navigation-list
• oj-paging-control
• oj-popup
• oj-progress
• oj-radioset
• oj-row-expander
• oj-slider
• oj-status-meter-gauge
• oj-tab-bar
• oj-table
• oj-text-area
• oj-toolbar
• oj-treemap
Appendix FEnterprise Manager Cloud Control Keyboard Navigation
F-7

GConfiguring Targets for Failover in Active/Passive Environments
This section provides a general reference for Cloud Control administrators who want torelocate Cold Failover Cluster (CFC) targets from one existing Management Agent toanother. Although the targets are capable of running on multiple nodes, these targets run onlyon the active node in a CFC environment.
CFC environments commonly use a combination of cluster software to provide a virtual hostname and IP address along with interconnected host and storage systems to shareinformation and provide high availability (HA) for applications. Automating failover of thevirtual host name and IP, in combination with relocating the Enterprise Manager targets andrestarting the applications on the passive node, requires the use of the Oracle EnterpriseManager command-line interface (EM CLI) and Oracle or third-party cluster software. SeveralOracle partner vendors offer clusterware solutions in this area.
This chapter covers the following topics:
• Target Relocation in Active/Passive Environments
• Installation and Configuration
• Failover Procedure
• Failback Procedure
• EM CLI relocate_targets Parameters
• Relocation Script
Target Relocation in Active/Passive EnvironmentsWith Oracle Enterprise Manager 13c, a single Oracle Management Agent running on eachnode in the cluster can monitor targets configured for active/passive high availability. Onlyone Management Agent is required on each of the physical nodes of the CFC clusterbecause, in case of a failover to the passive node, Enterprise Manager can move the HAmonitored targets from the Management Agent on the failed node to another ManagementAgent on the newly activated node using a series of EMCLI commands. See the Oracle®Enterprise Manager Command Line Interface Guide manual for more information.
If your application is running in an active/passive environment, the clusterware brings up theapplications on the passive node in the event that the active node fails. For EnterpriseManager to continue monitoring the targets in this type of configuration, the existingManagement Agent needs additional configuration.
The following sections describe how to prepare the environment to automate and restarttargets on the new active node. Failover and failback procedures are also provided.
G-1

Installation and ConfigurationThe following sections describe how to configure Enterprise Manager to support aCFC configuration using the existing Management Agents communicating with theOracle Management Service processes:
• Prerequisites
• Configuration Steps
PrerequisitesThe following steps assume that the monitored targets have already been installedand configured for failover in a CFC.
Prepare the Active/Passive environments as follows:
• Ensure the operating system clock is synchronized across all nodes of the cluster.(Consider using Network Time Protocol (NTP) or another network synchronizationmethod.)
• Install management agents on each node in the cluster using the physicalhostname. Install the Management Agent on a local disk volume on each node inthe cluster. Once installed, the Management Agents are visible in the CloudControl console.
• Install and configure EMCLI on each node in the CFC cluster. See the Oracle®Enterprise Manager Command Line Interface Guide for more information.
• When a target is being relocated, ensure that the plug-in version and plug-inrevision are the same on both the Management Agent of the failed node and theManagement Agent of the newly activated node.
Configuration StepsThe following steps show how to configure Enterprise Manager to support a CFCconfiguration using the existing Management Agents that are communicating with theOMS processes. The example that follows is based on a configuration with a two-nodecluster that has one failover group.
Configuration involves two steps:
• Discovering Targets
• Deploying Plug-ins
Discovering TargetsAfter the Active / Passive targets have been configured, use the Add Targets Manuallyscreens in the Cloud Control console to add the targets (such as database, listener,application server, and so on). This screen can be accessed by navigating to Setup |Add Target | Add Targets Manually. You should perform this step specifying the activenode (the node that is currently hosting the target to be added).
Appendix GInstallation and Configuration
G-2

Deploying Plug-insAfter the target has been added determine which plug-ins have been deployed on the agentfor the active host. This can be found by navigating to the agent homepage and viewing theplug-ins tab in the Configuration region.
Figure G-1 Agent Home Page
Make a note of the Plug-ins that do not have the Only Discovery Contents box checked.These plug-ins need to be deployed on the agent of the passive node.
After determining which plug-ins are missing by looking at the Agent homepage of thepassive node, deploy any missing plug-ins by navigating to Setup | Extensibility | Plug-ins,selecting the relevant plug-in and using the Deploy on Management Agent menu to deploythe plug-in.
Failover ProcedureTo speed relocation of targets after a node failover, configure the following steps using ascript that contains the commands necessary to automatically initiate a failover of a target.Typically, the clusterware software has a mechanism with which you can automaticallyexecute the script to relocate the targets in Enterprise Manager. Also, see "Relocation Script"for a sample script.
1. Shut down the target services on the failed active node.
On the active node where the targets are running, shut down the target services runningon the virtual IP.
2. If required, disconnect the storage for this target on the active node.
Shut down all the applications running on the virtual IP and shared storage.
3. Enable the target's IP address on the new active node.
Appendix GFailover Procedure
G-3

4. If required, connect storage for the target on the currently active node.
5. Relocate the targets in Cloud Control using EM CLI.
To relocate the targets to the Management Agent on the new active node, run theEM CLI relocate_targets verb for each target type (such as a listener or applicationservers) that you must relocate after the failover operation.
Example:
emcli relocate_targets-src_agent=<node 1>:3872 -dest_agent=<node 2>:3872-target_name=<database_name> -target_type=oracle_database-copy_from_src -force=yes
In this example, port 3872 is the default port for the Management Agent. To findthe appropriate port number for your configuration, use the value for the AgentURL parameter. You can determine this parameter by running the followingcommand for the Management Agent:
emctl status agent
Note:
In case of a failover event, the source Agent may not be running.However, there is no need to have the source Management Agentrunning to accomplish the relocate operation. EM CLI is an OMS clientthat performs its relocate operations directly against the ManagementRepository.
6. Bring up all targets on the new active node.
7. From the Enterprise Manager console, ensure all relocated targets are up andrunning .
Failback ProcedureTo return the HA targets to the original active node, or to any other cluster membernode:
1. Repeat the steps in "Failover Procedure" to return the HA targets to the activenode.
2. Verify the target status in the Enterprise Manager console.
EM CLI relocate_targets ParametersAs shown in Failover Procedure, you run the EM CLI relocate_targets verb for eachtarget type that will be failed over to (or be switched over) during relocation operations. Table G-1 documents the verb parameters associated with this EM CLI verb.
Appendix GFailback Procedure
G-4

Table G-1 relocate_targets Verb Parameters
EM CLI Parameter Description
-src_agent Management Agent on which the target was running before the failoveroccurred.
-dest_agent Management Agent that will be monitoring the target after the failover.
-target_name Name of the target to be failed over.
-target_type Type of target to be failed over (internal Enterprise Manager target type). Forexample, the Oracle database (for a standalone database or an Oracle RACinstance), the Oracle listener for a database listener, and so on.
-copy_from_src Use the same type of properties from the source Management Agent to identifythe target. This is a MANDATORY parameter. Not supplying this parameter mayresult in the corruption of the target definition.
-force Force dependencies (if needed) to failover as well.
Relocation ScriptThe following example shows a relocation script that can executed from a clusterwareconfiguration when a failover operation occurs.
Before running the script:
• Set up the Default Normal Host Credential with Normal Host Credential.
• Set up the Target Preferred Credential of the database instance with the NormalDatabase Credential, SYSDBA Database Credential, and Database Host Credential.
Relocation Script Example#! /bin/ksh#get the status of the targets emcli get_targets -targets="db1:oracle_database;listener_db1:oracle_listener" -noheader if [[ $? != 0 ]]; then exit 1; fi # blackout the targets to stop false errors. This blackout is set to expire in 30 minutes. emcli create_blackout -name="relocating active passive test targets" -add_targets="db1:oracle_database;listener_db1:oracle_listener" -reason="testing failover" -schedule="frequency:once;duration:0:30" if [[ $? != 0 ]]; then exit 1; fi # relocate the targets to the new host emcli relocate_targets -src_agent=host1.example.com:3872 -dest_agent=host2.example.com:3872
Appendix GRelocation Script
G-5

-target_name=db1 -target_type=oracle_database -copy_from_src -force=yes if [[ $? != 0 ]]; then exit 1; fi emcli relocate_targets -src_agent=host1.example.com:3872 -dest_agent=host2.example.com:3872 -target_name=listener_db1 -target_type=oracle_listener -copy_from_src -force=yes if [[ $? != 0 ]]; then exit 1; fi # End the blackout and let the targets become visible emcli stop_blackout -name="relocating active passive test targets" if [[ $? != 0 ]]; then exit 1; fi # Recheck the status of the targets emcli get_targets -targets="db1:oracle_database;listener_db1:oracle_listener" -noheader if [[ $? != 0 ]]; then exit 1; fi
Appendix GRelocation Script
G-6

HUpdating Demonstration Keystores to ReflectAlias Hostnames
If you are using demonstration WebLogic certificates, and if you have implemented aliashostnames as part of preparation for implementing Standby OMSs using the StorageReplication DR architecture, the demonstration identity certificates configured for WebLogicServer need to be recreated on each OMS to have the alias hostname for the OMS, insteadof the physical hostname of the server. These steps need to be implemented afterinstallations and upgrades. These steps involve downtime as the OMS must be restarted. Tomaintain availability, these steps should be performed serially, first on OMS1 and then one byone on additional OMSs so that other OMSs remain online while only one OMS is beingupdated at a time.
Perform the following steps serially, first on OMS1 and then on each additional OMS:
1. Backup existing DemoIdentity.jks file.
cp -p <NEW_INSTANCE_BASE>/user_projects/domains/GCDomain/security/DemoIdentity.jks <NEW_INSTANCE_BASE>/user_projects/domains/GCDomain/security/DemoIdentity.jks.before_regen_YYYYMMDD
For example:
cp -p /u01/app/oracle/OMS/gc_inst/user_projects/domains/GCDomain/security/DemoIdentity.jks /u01/app/oracle/OMS/gc_inst/user_projects/domains/GCDomain/security/DemoIdentity.jks.before_regen_20160402
2. Backup existing DemoTrust.jks file.
cp -p <NEW_MIDDLEWARE_HOME>/wlserver/server/lib/DemoTrust.jks<NEW_MIDDLEWARE_HOME>/wlserver/server/lib/DemoTrust.jks.before_regen_YYYYMMDD
For example:
cp -p /u01/app/oracle/OMS/MWare13c/wlserver/server/lib/DemoTrust.jks /u01/app/oracle/OMS/MWare13c/wlserver/server/lib/DemoTrust.jks.before_regen_20160402
3. Run the following commands in a separate session to prevent the environment variablesettings required to run these steps from affecting other commands. These environmentvariable settings can cause issues to the standard OMS operations and the otherinstructions in this upgrade and transition process.
a. Open a new shell session as the Oracle Software Owner User.
b. Set the necessary environment variables.
i. Change directory to the bin directory for the domain.
cd <NEW_INSTANCE_BASE>/user_projects/domains/GCDomain/binFor example:
cd /u01/app/oracle/OMS/gc_inst/user_projects/domains/GCDomain/bin
H-1

ii. Source the script to set environment variables. Make sure you source thecontents of the script using the exact syntax below including the leadingdot and space. . ./setDomainEnv.sh
c. Create a new keystores directory to use while generating these files.
mkdir -p <NEW_MIDDLEWARE_HOME>/keystoresFor example:
mkdir -p /u01/app/oracle/OMS/MWare13c/keystoresd. Change directory to the new keystores directory.
cd <NEW_MIDDLEWARE_HOME>/keystoresFor example:
cd /u01/app/oracle/OMS/MWare13c/keystorese. Generate the new certificate with the alias hostname for the OMS server. In
the following command, replace <OMS_ALIAS_HOSTNAME_FQDN> with the valuefor <OMS1_ALIAS_HOSTNAME_FQDN> when running these commands on OMS1and with the value for <OMS<#>_ALIAS_HOSTNAME_FQDN> when running thesecommands on OMS<#>.
java utils.CertGen -cn <OMS_ALIAS_HOSTNAME_FQDN> -keyfilepassDemoIdentityPassPhrase -certfile democert -keyfile demokeyFor example:
java utils.CertGen -cn emoms1.example.com -keyfilepassDemoIdentityPassPhrase -certfile democert -keyfile demokey
f. Import the new certificate into a new DemoIdentity.jks file.
java utils.ImportPrivateKey -keystore DemoIdentity.jks -storepassDemoIdentityKeyStorePassPhrase -keyfilepass DemoIdentityPassPhrase-certfile democert.pem -keyfile demokey.pem -alias demoidentity
g. Confirm that the newly generated certificate in the keystore references thealias hostname FQDN of the OMS. When prompted for a password, hit enteras a password is not required to view contents of the keystore. Examine thevalue after CN= on the line that starts Owner: keytool -list -v -keystoreDemoIdentity.jks
h. Delete the four interim files that are no longer needed, leaving just the newDemoIdentity.jks file in the current directory:
rm democert.*rm demokey.*
i. Exit the separate shell session that was started to execute these commands.
4. Stop the OMS.
<NEW_MIDDLEWARE_HOME>/bin/emctl stop oms -allFor example:
/u01/app/oracle/OMS/MWare13c/bin/emctl stop oms -all5. Change directory to the new keystores directory.
cd <NEW_MIDDLEWARE_HOME>/keystoresFor example:
Appendix H
H-2

cd /u01/app/oracle/OMS/MWare13c/keystores6. Replace the old DemoIdentity.jks file with the newly generated file. Note that we are
explicitly NOT passing the -p parameter to cp here so that the target file retains itsoriginal permissions. Specifying -p here will cause the wrong permissions to be set on thetarget file.
cp DemoIdentity.jks <NEW_INSTANCE_BASE>/user_projects/domains/GCDomain/security/For example:
cp DemoIdentity.jks /u01/app/oracle/OMS/gc_inst/user_projects/domains/GCDomain/security/
7. Confirm that the DemoIdentity.jks file has been copied successfully.
ls -alF <NEW_INSTANCE_BASE>/user_projects/domains/GCDomain/security/Demo*For example:
ls -alF /u01/app/oracle/OMS/gc_inst/user_projects/domains/GCDomain/security/Demo*
8. Start the OMS.
<NEW_MIDDLEWARE_HOME>/bin/emctl start omsFor example:
/u01/app/oracle/OMS/MWare13c/bin/emctl start oms9. Run the following commands in a separate session to prevent the environment variable
settings required to run these steps from affecting other commands. These environmentvariable settings can cause issues to the standard OMS operations and the otherinstructions in this upgrade and transition process.
a. Open a new shell session as the Oracle Software Owner User.
b. Set necessary environment variables
i. Change directory to the bin directory for WebLogic Home.
cd <NEW_MIDDLEWARE_HOME>/wlserver/server/binFor example:
cd /u01/app/oracle/OMS/MWare13c/wlserver/server/binii. Source script to set the environment needed to run wlst. Make sure you source
the contents of the script using the exact syntax below including the leading dotand space.
. ./setWLSEnv.shc. Change directory to prepare to run wlst.
cd <NEW_MIDDLEWARE_HOME>/oracle_common/common/binFor example:
cd /u01/app/oracle/OMS/MWare13c/oracle_common/common/bind. Launch wlst.
java -Dweblogic.security.TrustKeyStore=DemoTrust -Dweblogic.security.SSL.minimumProtocolVersion=TLSv1 weblogic.WLST
Appendix H
H-3

e. At this point you should be able to successfully connect to this OMS server viawlst specifying the alias hostname for this OMS server, and if you havealready completed these steps on the other OMS server(s) you should also beable to connect to the other OMS server(s).
f. Attempt to connect to the Admin server:
connect('<ADMIN_SERVER_USER>','<ADMIN_SERVER_PASSWORD>','t3s://<OMS1_ALIAS_HOSTNAME_FQDN>:<ADMIN_SERVER_HTTPS_PORT>')For example:
connect('weblogic','myadminpassword','t3s://emoms1.example.com:7101')
g. Attempt to connect to the OMS1 Managed Server.
connect('<ADMIN_SERVER_USER>','<ADMIN_SERVER_PASSWORD>','t3s://<OMS1_ALIAS_HOSTNAME_FQDN>:<OMS_SERVER_HTTPS_PORT>')For example:
connect('weblogic','myadminpassword','t3s://emoms1.example.com:7301')
h. Attempt to connect to the OMS<#> Managed Server (will fail until these stepsare completed on OMS<#>. These connection tests can be repeated againonce the process is complete on all OMS servers.
connect('<ADMIN_SERVER_USER>','<ADMIN_SERVER_PASSWORD>','t3s://<OMS<#>_ALIAS_HOSTNAME_FQDN>:<OMS_SERVER_HTTPS_PORT>')For example:
connect('weblogic','myadminpassword','t3s://emoms2.example.com:7301')
i. Exit wlst.
exit()j. Exit the separate shell session that was started to execute these commands.
Appendix H
H-4

IPostinstalltion Task to Configure TLS forOracle Management Repository Database
To configure Oracle Management Repository (OMR) Database in Transport Layer Securitythat is, TLS 1.2, follow the steps in Configuring TLSv1.2 for Communication with theEnterprise Manager Repository in the Enterprise Manager Cloud Control Security Guide.
I-1

Index
Symbols-invPtrLoc parameter, 2-25(agentDeploy.bat script, B-3/etc/hosts file, 6-5
AAccess Enterprise Manager Login Page, 20-5accessibility, F-1
configuring web.xml file, F-2screen reader mode for UIX pages, F-1screen reader support, F-3web.xml File, F-2
add host log files, A-5Add Host Status page, 7-20Add Host Target Wizard
overview, 2-11Add Host Targets Wizard, 1-5
best practice, 2-13Add Management Service deployment
procedure, 2-14additional OMS
installation, 5-1Additional Standby OMS, removing, 29-1ADP Manager, 13-28agent base directory, 2-27
requirements, 6-7, 7-13agent installation logs, A-7agent instance directory, 2-28agent instance home
permissions, 6-7requirements, 6-7
agent plug-in home, 2-28AgentDeinstall.pl script, 27-1, 27-2, 27-5agentDeploy.sh script, B-3
limitation, 6-3location, 6-3purpose, 6-1software-only install, 10-1
agentDeploy.sh script supported options, 6-29AgentNFS.pl script
purpose, 8-1response file, 8-17
AgentPull.sh script, 6-1response file, 6-23
AgentPull.sh script supported options, 6-28alerts, 13-22, 13-26allroot.sh script, 4-16, 4-36Application Performance Management, 12-10application prerequisite logs, A-6Application Service Level Management, 12-10assistive technologies, F-1asynchronous I/O, 13-25
Bbackground services, 19-1baselines, 13-16beacon
configuring, 13-26beacons, 13-26BI Publisher, 17-1bottlenecks
eliminating, 13-18tuning, 13-18
buffer cache, 13-20buffer cache sizing, 13-21
Ccapacity
predicting, 13-15central inventory, 2-25, 6-7cksum command, 1-5Cloud Control
deployment, 13-16evaluating, 13-16sizing, 13-15sizing methodology, 13-15starting platform, 13-16vital signs, 13-17, 13-22
Cold Failover Cluster configuration, G-1Cold Failover Cluster, HA, G-1commands
deleting data files, 2-21verifying file size, 1-5
Config MetricPost Load Callbacks, 13-24
Index-1

configuration assistantsfor additional OMS upgrade, 2-30for fresh installation, 2-29for upgrade, 2-30overview, 2-29resolving failures, 2-31run by default, 2-29running
for new Enterprise Manager install, 4-3configuration data tablespace, 4-5, 4-6configuration information, 2-5configuration logs, A-1
general, A-2repository, A-2sysman schema operation logs, A-2
console port, 2-16console services, 19-1console-only mode, 19-1, 19-2CPU
utilization, 13-19utilization analysis, 13-19
CPU threshold, 13-19
Ddata files, 2-20, 3-13
deleting, 2-21for Oracle Management Repository, 2-20overview, 2-20
databasemodifying parameters, 13-15
Database Locks, 13-19database templates
handling errors, 3-4, 4-37providing details in installer, 4-19providing details in response file, 3-10resetting user account passwords, 3-10,
3-11, 4-20, 4-22, 4-42, 4-43databases
data files for Enterprise Manager, 2-20deinstallation
deinstalling in GUI modedeinstalling management agent, 27-1deinstalling management agent installed
with RPM file, 27-6deinstalling OMS, 26-1
deinstalling in silent modedeinstalling management agent using
AgentDeinstall.pl script, 27-1,27-2, 27-5
deinstalling management agent usingRPM file, 27-6
deinstalling shared agent, 27-6deinstalling shared agents, 27-6
deinstallation (continued)deleting OMS entries from the repository,
26-3undeploying plug-ins from Oracle
Management Agents, 27-7undeploying plug-ins from the OMS, 26-3
Deinstalling JVMDagents, 28-1
deployment procedure, 2-14, 5-1deployment size
changing deployment size, 2-11handling errors, 3-4running prerequisite checks, 2-10selecting in installer, 4-20small, medium, large, 2-10, 4-21target count, agent count, session count,
2-10, 4-21deployment sizes, 4-5, 4-6
large, 3-6medium, 3-6overview, 2-10setting, 3-12small, 3-6SQL scripts, 2-10target count, agent count, concurrent user
session count, 2-10target count, agent count, session count, 4-5,
4-6DHCP, 2-33disabled communities, F-1Disaster Recover, 24-1dontProxyFor property, 12-9
EE2E monitoring, 13-26EM Cloud Control Key Navigation, F-4, F-5EM Cloud Control Key Shortcuts, F-5, F-6EMCLI, 6-13, 6-17, 6-20Enabling screen reader mode, F-1end-to-end monitoring, 13-26Enterprise Manager Cloud Control
basic concepts, 2-1configuration assistants, 2-29deinstallation
overview, 26-1deleting data files, 2-21globalization support, 2-22installation
advanced, 4-5, 4-6advanced configuration, 4-5, 4-6deploying plug-ins, 4-13overview, 2-3prerequisite checks, 4-11selecting installation types, 4-8, 4-17
Index
Index-2

Enterprise Manager Cloud Control (continued)installation (continued)software-only installation, 2-4
installation modes, 2-2installation types, 2-3installation wizard, 2-2ports
console port, 2-16customizing ports, 2-17, 2-20default ports, 2-16HTTP port, 2-16HTTPS port, 2-16overview, 2-15upload port, 2-16
prerequisite checks, 2-31procuring from Oracle
verifying file size, 1-5releases, 1-1silent installation
advanced installer options, 3-5postinstall steps, 3-15prerequisites, 3-2
softwaredownload, 1-1
software-only installationconfiguration phase, 4-2facts, 4-4installation phase, 4-2overview, 4-2prerequisites, 4-4silent mode, 4-30
upgradeoverview, 2-4
Enterprise Manager Components, recovering,25-4
Enterprise Manager Framework Security, 12-4in a firewall environment, 12-2
Enterprise Manager Prerequisite Kit, A-4
Ffailover, 24-20Failover, active/passive environment, G-1Failover, Enterprise Manager, G-3Failover, relocate_targets verb, G-4firewall configuration, 12-1
allowing ICMP and UDP traffic, 12-10between browser and Cloud Control console,
12-4between Cloud Control and a managed
database target, 12-8between the OMS and the repository, 12-8enabling ICMP echo requests, 12-10port requirements, 12-2
firewalls, 12-1, 16-1between browser and Cloud Control, 12-4between Cloud Control and a managed
database target, 12-8between Management Service and
Management Repository, 12-8configuration considerations, 12-1configurations for Enterprise Manager
components, 12-2configuring for ICMP traffic, 12-10configuring for UDP traffic, 12-10configuring the OMS on a host protected by a
firewall, 12-4enabling ICMP echo requests, 12-10for multiple Management Services, 12-8for multiple OMS instances, 12-8
First Standby OMS, removing, 29-4Fusion Middleware, 13-28
discovery, 13-28monitoring, 13-28
Gglobalization support, 2-22Grafana, 18-1graphical mode, 2-2
Hhardware requirements, 13-3heap size, 13-9
changing, 13-10high availability, 22-1High Availability, agent, 23-1high availability, levels, 22-2High Availability, OMS, 23-3High Availability, repository, 23-2Highly Available systems, 22-1host list file, 2-35HTTP port, 2-16HTTPS port, 2-16Hyper-Threading, 13-19
II/O Channels
monitoring, 13-25I/O throughput
monitoring, 13-25ICMP, 12-10Informational Text on Enterprise Manager Login
Page, 20-8initialization logs, A-6
Index
Index-3

install logsinstall, A-1
installationadvanced, 4-5, 4-6deploying plug-ins, 4-13installing in silent mode
additional OMS installation, 5-1editing the response file, 3-6installing multi-OMS, 3-1, 3-2installing single OMS, 3-1, 3-2
Management Agents, 11-1production sites, 4-5, 4-6selecting installation types, 4-8, 4-17software-only installation, 4-2
installation base directorypermission, 7-12
installation modes, 2-2installation types, 2-3installation wizard, 2-2installation wizards
invokingone Microsoft Windows, 4-8one Unix, 4-8
installer, 2-2installing JVMD, 15-1instance directory
permission, 7-12requirements, 8-11
Internet Control Message Protocol, 12-10
JJava Development Kit
supported version, 2-22jobs, 13-22
backlog, 13-9JVM Agents
post install tasks, 15-10JVM Diagnostics
architecture, 15-1install prerequisites, 15-3installing JVMD Agents manually, 15-4installing JVMD Agents manually using
scripts, 15-8JVMD Agents overview, 15-2post install tasks, 15-10removing JVMD Agents, 28-1things to know before installing, 15-3
JVM diagnostics data tablespace, 4-5, 4-6JVMD, 13-28JVMD Agents
install prerequisites, 15-3installing for high availability, 15-9installing manually, 15-4installing manually using scripts, 15-8
JVMD Agents (continued)installing on a standalone JVM, 15-4installing on GlassFish, 15-4, 15-9installing on JBoss, 15-4installing on OC4J, 15-4installing on Tomcat, 15-4installing on WebLogic Server, 15-4, 15-9installing on Websphere, 15-4overview, 15-2removing, 28-1things to know before installing, 15-3
JVMD architecture, 15-1
Llicenses, 2-33Load Balancers, 24-6loader, 13-20loader threads, 13-20
default value, 13-20locked user account, 7-3Logo on Enterprise Manager Login Page, 20-1,
20-6logs
add host logs, A-7additional OMS installation logs, A-9agent gold image log files, A-8agent installation logs, A-7application prerequisite logs, A-6cfgfw/*.log, A-7configuration logs, A-1, A-2EMPrereqKit logs, A-4general configuration logs, A-2initialization logs, A-6installation logs, A-1manual agent installation logs, A-8MDS schema operation logs, A-4nfs_install.log/.err, A-7Oracle Management Service log files, A-5Oracle Management Service logs, A-5repository configuration logs, A-2secure logs, A-5sysman schema operation logs, A-2system prerequisite logs, A-6ui.log, A-8
longPoolSizechanging, 13-13
longSystemPoolSizechanging, 13-13
Mmanagement agent
deinstallation in GUI modeoverview, 27-1
Index
Index-4

management agent (continued)deinstallation in GUI mode (continued)postdeinstall tasks, 27-6
installationverifying, 6-32, 8-21
installation using response filecreating response file, 6-23, 6-25, 6-27prerequisites, 6-4
Management Agent, 13-3, 13-16configuring on a host protected by a firewall,
12-6configuring to use a proxy server, 12-7
Management Agent Backup, 25-4Management Agent patching
saving patches, C-1verifying patch application, C-3
Management Repository, 13-19, 13-27Management Repository Backup, 25-2Management Service, 13-3Management Services, additional, 23-10management tablespaces, 4-5, 4-6master agents, 8-1, 8-2maxConnForJobWorkers
changing, 13-14MDS schema, 2-21MDS schema creation log, A-4MDS schema drop logs, A-5mgmt_ecm_depot1.dbf data file, 2-21middleware homes, 2-26
NNamed Credentials, 7-3network
latencies, 13-4topology considerations, 13-3
new_install.rsp response file, 3-6node manager, 2-23node manager credentials, 2-23notifications, 13-22
OOMS backup, 25-2OMS instance base location, 2-27OMS plug-in home, 2-28OMS properties
changing, 13-10, 13-14OMS servers, 13-27
middle tier, 13-27optimum number, 13-27
OMS, behind a load balancer, 23-10OpenSSH, 7-3, 8-2operating system groups, 6-5, 7-7, 8-6operating system requirements, 8-5
operating system users, 6-5, 7-7, 8-6operating systems supported, 6-4Oracle Advanced Security, 12-8Oracle Business Intelligence, 17-1Oracle Configuration Manager
overview, 2-4Oracle Enterprise Manager
rollup process, 13-20Oracle Enterprise Manger
tuning, 13-18Oracle home, 2-27Oracle Inventory, 4-10Oracle Inventory Directory, 2-25Oracle Management Agent
cloningfacts, 7-2in graphical mode, 7-15in silent mode, 7-22overview, 7-1postclone steps, 7-24prerequisites, 7-6supported additional parameters, 7-20,
8-17deinstallation
overview, 27-1installation
cloning, 2-12fresh installation, 2-12NFS installation, 2-13packages, 6-4silent, 6-1, 6-3, 6-4, 6-8, 6-31
installing shared agentsfacts, 8-2in graphical mode, 8-13in silent mode, 8-17postinstall steps, 8-20prerequisites, 8-5
ports, 2-16software, 1-5software-only installation
configuring, 10-3facts, 10-2installing, 10-2overview, 10-1postinstall steps, 10-3prerequisites, 10-2
Oracle Management Repository Database, I-1Oracle Management Service, A-2
configuring for use with a proxy server, 12-5configuring when protected by a firewall, 12-4console-only mode, 19-1, 19-2enabling My Oracle Support access, 12-9
Oracle Middleware home, 2-26Oracle Net firewall proxy access, 12-8Oracle RAC SCAN, 4-14
Index
Index-5

Oracle WebLogic Server, 2-22admin server
admin server port, 2-24starting admin server, 2-24verifying admin server, 2-24
credentials, 2-23node manager, 2-23
oraInst.loc file, 4-16, 4-35oraInstroot.sh script, 4-16, 4-35oraInventory, 2-25other installation logs, A-7
Ppackages, 6-4, 8-6page performance, 13-26patching Management Agents
saving patches, C-1verifying patch application, C-3
permissions, 6-7, 6-8Planning Host Names, 24-3plug-ins, 2-14
downloading plug-ins, 3-14, 4-47selecting plug-ins, 4-13verifying installation, 6-32
plugins.txt file, B-2ports, 2-15, 4-24
admin server port, 2-24Admin Server port, 2-16, 2-24console ports, 2-16custom EM ports, 2-17customizing ports, 2-17customizing ports after installation, 2-17default ports, 2-16HTTP port, 2-16HTTPS port, 2-16managed server port, 2-16node manager port, 2-16Oracle BI Publisher, 2-16upload ports, 2-16verifying free ports, 2-17
postinstallation scripts, 7-15, 8-12Postinstalltion Task to Configure TLS, I-1preinstallation scripts, 7-15, 8-12prerequisite checks
default checks, 2-31entering details, 4-11overview, 2-31run by default, 2-31run in standalone mode, 2-32running in standalone mode, 2-32status, 4-11
privileged delegation setting, 7-6, 7-15, 8-5, 8-13production sites, 4-5, 4-6
propertiessetting, 13-11
proxy serverconfiguring Management Agent for, 12-7configuring the Management Service for,
12-5defining exceptions, 12-9
Qquiesce mode, D-1
Rrecovery, Enterprise Manager, 25-4redirecting Management Agents
prerequisites, B-1procedure, B-2
registration passwords, 4-5, 4-6releases, 1-1RepManager, 2-22, D-1
overview, D-1supported actions and commands, D-1
RepManager utility, D-1RepManager Utility
supported actions, D-1drop, D-7pluginpurge, D-8preupgrade, D-2resume, D-6transX, D-5upgrade, D-4
repositoryside availability, 13-9
Repository High Availability, best practices, 23-2response file, 3-1reusing Management Agent binaries
prerequisites, B-1procedure, B-2
rollup process, 13-20, 13-21rollup statistics, 13-21Run EMCTL Command, 20-4
Ssafeguards, 13-28
improving performance, 13-28screen readers, F-1scripts, 2-36Segment Advisor, 13-18segments
maintaining health, 13-18self update console, 1-5Setup Weblogic Server to host images, 20-2
Index
Index-6

shared agentsauto-discovery of targets, 8-2configuring instance directory, 8-2overview, 8-1
shared oracle home, 8-11shortPoolSize
changing, 13-12silent mode, 2-2sizing, 13-1
benefits, 13-1extrapolating forward, 13-27guidelines, 13-1, 13-2hardware information, 13-2repository tablespace, 13-6, 13-7requirements, 13-27, 13-28software configurations, 13-4specifications, 13-2upgraded installations, 13-3
softwaredownloading Enterprise Manager software,
1-2downloading from Oracle, 1-3DVD, 1-2Enterprise Manager Cloud Control, 1-2Oracle Management Agent, 1-5setting mount points, 1-2
software configurationseval, 13-4extra large, 13-6large, 13-6medium, 13-5small, 13-4
Software Library Backup, 25-1software updates
applying after installation or upgrade, 2-9download automatically, 2-7download by user, 2-7downloading, 2-7identifying applied patches, 2-9installing from local directory, 4-5, 4-6installing from My Oracle Support, 4-5, 4-6offline, 4-5, 4-6offline mode, 2-7online, 4-5, 4-6online mode, 2-7overview, 2-5, 2-6, 4-9types, 2-6
software-only installation, 2-4overview, 4-2
sotwareverifying file size, 1-5
SSH, 7-3, 7-13, 8-2, 8-12SSH public key Authentication, 7-3, 8-3SSH1, 7-3, 8-2SSH2, 7-3, 8-2standby site, sync, 24-22startup scripts
overview, 2-33staticports.ini file, 2-17, 2-20SUDO, 7-11, 7-12, 8-10, 8-11switchover, 24-18SYSMAN passwords, 4-5, 4-6SYSMAN schema, 2-21SYSMAN_APM, 4-20SYSMAN_MDS, 4-20SYSMAN_OPSS, 4-20system prerequisite logs, A-6systemPoolSize
changing, 13-13
TTarget Relocation,active/passive, G-1temporary directory
permissions, 6-7space, 6-6, 7-12, 8-11
thresholds, 13-16, 13-18translated languages, 2-22
UUDP, 12-10unlicensed components, 2-33upload port, 2-16User Datagram Protocol, 12-10user interface
performance, 13-26users
concurrent, 13-8
Vvital signs, 13-27
I/O, 13-25
Index
Index-7
Related Documents