CLAY BASED TECHNOLOGIES CLAY BASED TECHNOLOGIES Practical Action Sudan in association with the Al Fashir and Gemayer Associations for Earthenware Manufacturing Practical Answers Sudan The Technical Enquiries Services This manufacturing manual has step by step instructions, photos and technical drawings for the manufacture of: * The Clay Refrigerator * The Improved Clay Stove * The Mubkhar Stove * The Kisra Clay Stove * The Zeer Water Cooler

Welcome message from author
This document is posted to help you gain knowledge. Please leave a comment to let me know what you think about it! Share it to your friends and learn new things together.
Transcript

�C L AY B A S E DTECHNOLOGIES
CLAY BASEDTECHNOLOGIES
Practical Action Sudan in association with the Al Fashir and Gemayer Associations for Earthenware Manufacturing
Practical Answers SudanThe Technical Enquiries Services
This manufacturing manual has step by step instructions, photos and technical drawings for the manufacture of:
* The Clay Refrigerator* The Improved Clay Stove* The Mubkhar Stove* The Kisra Clay Stove* The Zeer Water Cooler

� C L AY B A S E DTECHNOLOGIES
Extended thanks are given to the Al Fashir Womens Association for Earthenware Manufacturing in North Darfur, especially Fatima Bakheet Diko the leader of the association who appears in a large number of the instruction pictures. The contribution of the Practical Action project manager Awad Allah Hamed Mohammed who coordinated with the potteries association has been invaluable in preparing this guide. Thanks should also go to Howida Mohammed the Practical Answers team officer in North Darfur who helped with translation and research.
With regards to the research carried out at Gemayer in Omdurman thanks is given to the Earthenware Manufacturing Associations and notably the potter John Aguer But who coordinated the visit, as well as Practical Answers Manager Shadia Abdul Moneim and the trainee Walaa Isam Elboushi who participated in the gathering of research. Finally appreciation is extended to Kemal Khalifa for the technical drawings for each of the five technologies.
Acknowledgements
�C L AY B A S E DTECHNOLOGIES
1. Introduction………………………………………………………. 5
2. Testing, improving the quality and manufacturing clay……… 6
3. Clay Preparation…………………………………………….…… 8
4. The Zeer Water Cooler……………………………………..……. 10
5. The Clay Refrigerator………………………………………........ 15
6. The Improved Clay Stove………………………………………... 20
7. The Mubkhar Stove (Charcoal burning stove)………..……….. 23
8. The Kisra Clay Stove………………….…………………….…… 27
9. Further Development of Clay based Technologies……..…….. 30
10. Contacts…………………………………………………………. 31
Contents

� C L AY B A S E DTECHNOLOGIES

�C L AY B A S E DTECHNOLOGIES
As part of the Practical Action technical enquiries service, known as Practical Answers, we wish to give knowledge and information to the people that need it most and the organisations and institutions that support them. With that in mind the purpose of this manual is to give step by step instructions on how to manufacture five technologies made from clay. Most of these technologies have been specifically promoted by Practical Action, although the Zeer cooling pot is a ubiquitous site in Sudan that dates back many centuries. This manual is ideal for an established potteries association or for one that is planned for the future. The five technologies explained in this manual are shown in pictures 1- 5.
It is suggested that for new pottery associations this step by step guide with photos is used alongside a professional trainer with the guide acting as a useful resource to the participants once the training has been completed. However, for a well established
earthenware manufacturing association it is hoped that the guide itself will be enough for the association members to produce the technologies.
In compiling this booklet we worked with both the Al Fashir Womens Pottery Association and a number of Mens Pottery Associations in Gemayer, Omdurman. The guide starts by explaining a couple of clay quality tests and preparation methods before detailing each technology. This detail includes a brief background on the origins and purpose of the technology followed by a step by step guide on how to make it. Finally, the technical drawings are given as guidance for size although it should be remembered that these technologies can vary greatly in size depending on their need. For any questions or support please refer to the Practical Answers contact list at the back of this booklet. A copy of this booklet will be made available in Arabic.
Pic 4. The Mubkhar Stove.Pic 3. The Kisra Clay Stove.
Pic 2. The Clay Refrigerator.
Pic 1. The Improved Clay Stove.
Pic 5. The Zeer Water Cooler.
Introduction�

� C L AY B A S E DTECHNOLOGIES
One of the most important tasks for those wishing to make technologies from clay is to find out the quality of the clay in the area. There are a number of indigenous ways of doing this which do not require excessive amounts of measuring equipment, three of these are outlined below. However if you desire more accurate ways of determining the quality of clay, please contact the Practical Answers Team.
�.�. Shrink Test a) Choose a small amount of soil that is to be tested
and mix it into a dough like mixture. Put the mixture on a plastic sheet and beat it to remove air and produce a good consistent mixture.
b) Following this the mixture should be rolled between your hands until it is long and thin, measuring 10 cm in length and then left to dry for 24 hours. Using the rule it should be measured again to see how much the clay has shrunk. Ideally for good quality clay it should not have shrunk more than 10% of its length. Therefore, in this example it should still be at least 90 mm.
�.�. Inspection using the sensesFirstly it is possible to get an indicator of the amount of clay contained in the soil be simply looking at the surface of the earth. If large cracks are found on the surface there is a good chance that there is clay present. You can also test the quality of the clay through touch. If the soil is clayey you will find it difficult to crumble it in your fingers. Furthermore, when you mix the clay with a little water if the soil is clayey it will stick to your hand and leave a stain.
�.�. Improving the quality of clayIn order to improve the quality of clay it is good to introduce additives. These additives fall into 3 categories: other clays, organic materials and sands. The potteries association in Gemayer uses a red clay additive which they bring from a nearby hill. The additive most used by the potteries association in Al Fashir is donkey dung, although millet and sorghum chaff as well as sawdust are also used. They are believed to control shrinkage and cracking during the drying process and of course these materials are cheap. The higher the shrinkage rate the more organic material is needed. However, it is important to note
Pic 6. The mud should be mixed with water to form a sticky substance.
Testing, improving the quality and
manufacturing clay
�

�C L AY B A S E DTECHNOLOGIES
that some believe that dung is not a good additive,
Our experience in Kenya and Sudan has shown that dungs (particularly donkey dung) have a strong negative effect on the strength of the clay bodies. Dung is highly fibrous and limits the ability of the clay to bond. 1
Sand can also be used to reduce shrinkage, produce more even drying and improve workability by reducing stickiness. It is important when mixing the clay to get the right consistency. It should be kneaded and beaten until all stones are removed, there are no air pockets and the mixture is of a workable consistency. Knowing how tacky and sticky the mixture should be will come with experience. The aim is to produce a mixture which can easily be formed and has good binding qualities, reducing the likelihood of cracking.
�.� Manufacturing by hand or machineThe two associations use different methods to
manufacture the technologies; in Al Fashir the ladies make everything by hand using moulds. These moulds are also made from clay usually with a higher concentration of dung although other objects such as saucepans can be used as moulds, as is the case with the improved clays stoves, see picture 9. At Geyamer they use a Potters Wheel as shown in pictures 10 and 11.
The associations in Geyamer are responding to high demand and the use of the potter s wheel is an efficient way of responding to this demand. Therefore if the ladies association continues to expand they may wish to use this equipment in the future. The potter s wheel works simply by the potter turning the large wooden wheel with his foot at a constant speed. They then mould the clay on the wheel bat (the metal circle at the top). See chapter 4 for photos of the potter s wheel being used.
Pic 7. Wet clay rolled into a sausage shape 100 mm in length.
Pic 8. In this example the clay had shrunk to 93 mm a shrinkage rate of
7% which is acceptable.
Pic 9. Ladies using the saucepan as a mould for the improved clay stove.
1) Allen, Hugh. (2005) The Kenya Ceramic Jiko. Intermediate Technology Publications p35- 40
Pic 11. The potter s wheel set up in a factory (The wheel bat at the top).
Pic 10. The potter s wheel being set up for training purposes.

� C L AY B A S E DTECHNOLOGIES
�.� Al Fashir Association for Earthenware Manufacturing
Clay Preparation�
Pic 15. Enough water is added to form a sticky consistency.
Pic 14. Soil is added to the dung approximately at a ratio of 3:2 (3 buckets of soil for every 2 buckets of dung)
Pic 13.The donkey dung is pounded with sticks.
Pic 12. The donkey dung is emptied onto a plastic bag.
Pic 16. The mixture is mixed by hand.

�C L AY B A S E DTECHNOLOGIES
Pic 17. A completed pile of clay ready for use.
�.� Factories in Gemayer, OmdurmanThe large factories have a standard way of preparing the clay. They mix the materials including additives in a hole with water. They then filter the mixture through a filter bucket into an adjacent hole. The factory in picture 18 only has these two holes where as the factory in pictures 19 – 21 have three holes in total; two holes for filtered clay (one on either side of the ingredients mixing hole):
Pic 18.The filtered hole on the left (full) and the mixing hole on the right (empty).
Pic 19. The filter bucket has lots of little holes in the bottom for drainage.
Pic 20. The mixture is transferred by hand through the filter to get rid of the impurities into the filtered hole.
Pic 21. The filtered clay hole is then drained of water which goes back into the mixing hole leaving behind good
quality clay ready for use.
Filtered Hole
Mixing Hole
Clay Preparation Holes (Factory A) Picture 18
Clay Preparation Holes (Factory B) Pictures 19- 21
Filtered Hole
Mixing Hole
Filtered Hole
Filter bucket
Diagram 1. Clay Preparation Holes
The water that has accumulated in the filtered hole is then drained back into the empty mixing hole, leaving behind good quality clay. This drainage is achieved by opening up a small hole in the dividing wall between the filtered and mixing holes which is normally blocked. The clay is then removed and is ready to use.
�0 C L AY B A S E DTECHNOLOGIES
The Zeer Water Cooler
�
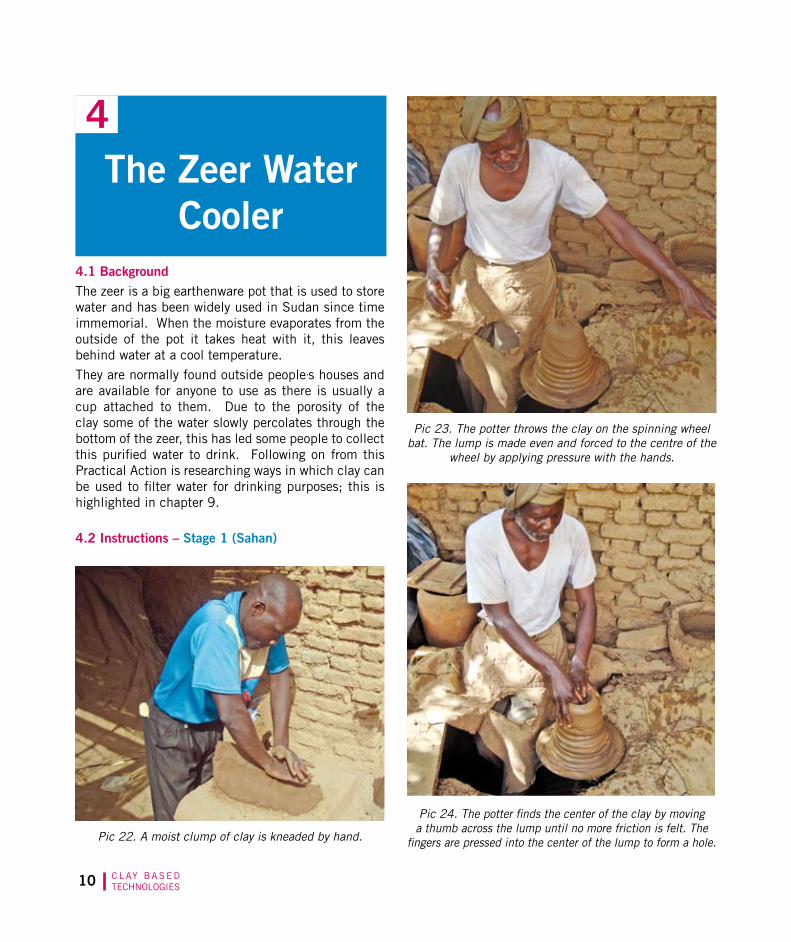
�.� BackgroundThe zeer is a big earthenware pot that is used to store water and has been widely used in Sudan since time immemorial. When the moisture evaporates from the outside of the pot it takes heat with it, this leaves behind water at a cool temperature.
They are normally found outside people,s houses and are available for anyone to use as there is usually a cup attached to them. Due to the porosity of the clay some of the water slowly percolates through the bottom of the zeer, this has led some people to collect this purified water to drink. Following on from this Practical Action is researching ways in which clay can be used to filter water for drinking purposes; this is highlighted in chapter 9.
�.� Instructions – Stage � (Sahan)
Pic 22. A moist clump of clay is kneaded by hand.
Pic 23. The potter throws the clay on the spinning wheel bat. The lump is made even and forced to the centre of the
wheel by applying pressure with the hands.
Pic 24. The potter finds the center of the clay by moving a thumb across the lump until no more friction is felt. The
fingers are pressed into the center of the lump to form a hole.

��C L AY B A S E DTECHNOLOGIES
Pic 25. The hole is then widened. The sides thus defined are pulled up and made thinner by pressure between the
hands.
Pic 26. The vessel is shaped and the surface is smoothed.
Pic 27. The vessel is removed from the wheel bat by hand or by using a knife. It is then left in the sun to dry a little, normally between 1/ 2 hour and an hour depending on the
weather.
Stage � (Fatela �)
Pic 31.The pots at the fatela 1 stage are left to dry in the sun for 1/ 2 an hour to an hour and this happens after each stage.
Pic 28. The vessel is placed in the former (this piece of equipment is secured to the wheel bat and holds the
vessel) and a new piece of material is prepared.
Pic 29. The new piece of clay is added around the top of the vessel and tape is tied around the (sahan) and the new
material, see picture 32.
Pic 30. The new material is blended in and the size of the pot is increased.

�� C L AY B A S E DTECHNOLOGIES
Stage � (Fatela �) Stage � Qufeeh
Pic 32. Further clay is added and tape is wrapped around the fatela 1 and the new material. This happens at each stage.
Pic 33.The fatela 2 is lifted from the former and taken to be dried.
Pic 34. Further clay is added to increase the size of the vessel (The same process as shown in pictures 28 - 31).
Pic 35. Further clay is added to increase the size of the vessel (The same process as shown in pictures 28 – 31).
Stage � Khitam

��C L AY B A S E DTECHNOLOGIES
Stage � Rigab
Pic 36. Further clay is added to increase the size of the vessel and the rim is formed.
Pic 37. The completed zeer pots are stored indoors for one day to dry slowly to prevent shrinkage after that they are
left in the sun for a further day.
Pic 38. The zeers are assembled in the kiln ready for burning. The kiln fuel is wood which is lit under the zeers,
see picture 39 for kiln.
Pic 39. The burnt zeers are complete; the kiln can be seen in the background.

�� C L AY B A S E DTECHNOLOGIES
The Zeer Water Cooler

��C L AY B A S E DTECHNOLOGIES
�.� BackgroundFood preservation is an important issue in the harsh climate of North Darfur in Sudan. The heat and dust take their toll on precious crops. When you have a good harvest it is vital to keep produce in a market saleable condition. The clay refrigerator2
project was first initiated by Practical Action in 2001 following research conducted by Practical Action Country Director Mohammed Majzoub who had heard about the idea being promoted by a teacher named Mohammed Bah Abba in Nigeria. Following the successful experiments conducted by Practical Action and Al Fashir University to measure the clay refrigerators value in maintaining nutrients and extending the shelf life of vegetables, training was given to 21 ladies from the Al Fashir Association for Earthenware Manufacturing on how to make the cooler.
A lidded earthenware pot is fitted inside a larger pot with an insulating layer of sand in between. This sand layer can be kept cool by adding water at regular intervals (generally twice a day), thus providing a refrigerated storage space at minimal cost.
As water in the sand evaporates through the surface of the outer pot, it carries heat, drawing it away from the inner core, thus cooling the inside of the inner pot.
Most people living in rural areas and many living in urban areas for that matter cannot afford to buy an electric refrigerator and an alternative method such as the clay refrigerator can act as an appropriate substitute. The potteries association in Al Fashir made and sold over 50 ceramic refrigerators in 2007 which cost $20 to buy. The ceramic refrigerator has proved very successful and it has been tested with a number of
different vegetables. For example tests have shown that these foods can be kept fresh for the following amount of time:
1. Tomatoes – 3 weeks
2. Bamiah - 2 weeks
3. Okra – 2 weeks
4. Rocket - 5 days
�.� Instructions1. The first task that needs to be performed is the
making of the moulds. To do this make a small
�The Clay
Refrigerator
Pic 40. Practical Action Project Manager Awad
Allah demonstrates the clay refrigerator.
Pic 41. Ladies gather around the clay
refrigerator during their training course.
2) There are a number of names in circulation for this technology including the zeer pots and pot in pot.
Pic 42. A stone is used to shape the inside of the mould into a bowl shape.
�� C L AY B A S E DTECHNOLOGIES
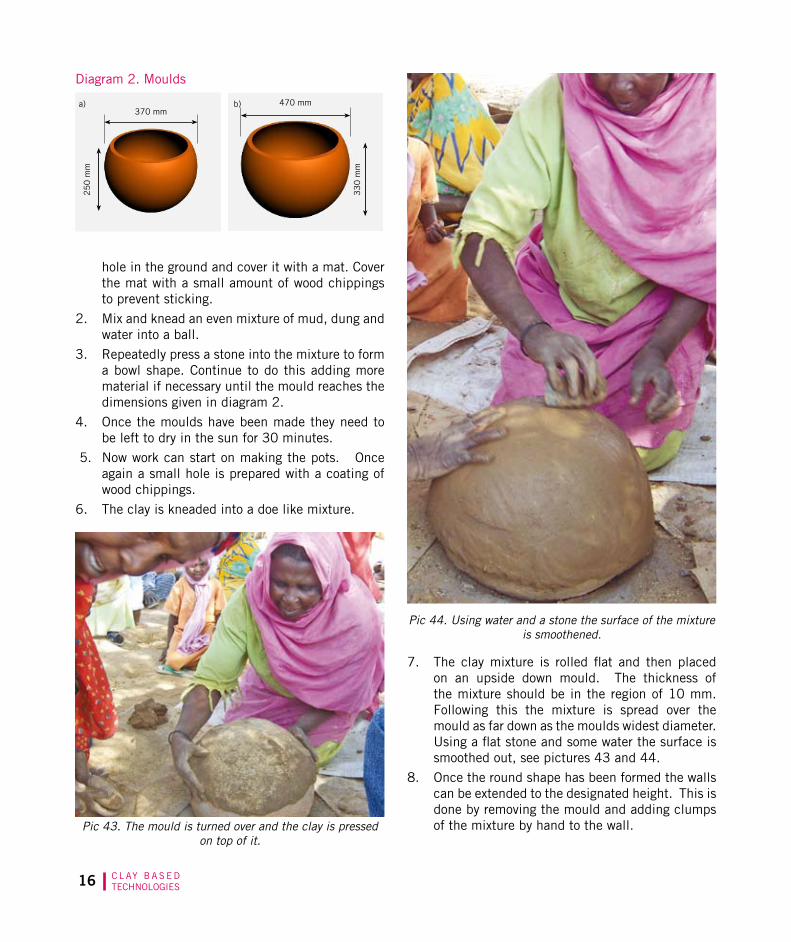
hole in the ground and cover it with a mat. Cover the mat with a small amount of wood chippings to prevent sticking.
2. Mix and knead an even mixture of mud, dung and water into a ball.
3. Repeatedly press a stone into the mixture to form a bowl shape. Continue to do this adding more material if necessary until the mould reaches the dimensions given in diagram 2.
4. Once the moulds have been made they need to be left to dry in the sun for 30 minutes.
5. Now work can start on making the pots. Once again a small hole is prepared with a coating of wood chippings.
6. The clay is kneaded into a doe like mixture.
Pic 43. The mould is turned over and the clay is pressed on top of it.
7. The clay mixture is rolled flat and then placed on an upside down mould. The thickness of the mixture should be in the region of 10 mm. Following this the mixture is spread over the mould as far down as the moulds widest diameter.Using a flat stone and some water the surface is smoothed out, see pictures 43 and 44.
8. Once the round shape has been formed the walls can be extended to the designated height. This is done by removing the mould and adding clumps of the mixture by hand to the wall.
Pic 44. Using water and a stone the surface of the mixture is smoothened.
Diagram 2. Moulds
a)370 mm
470 mm
33
0 m
m
25
0 m
m
b)
��C L AY B A S E DTECHNOLOGIES
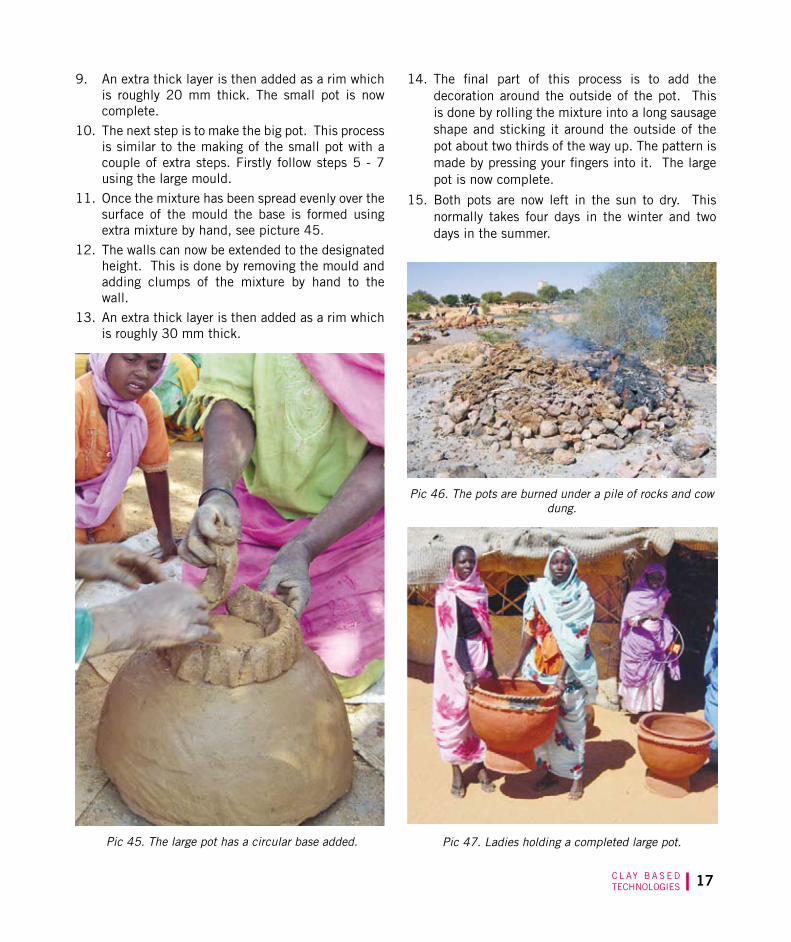
14. The final part of this process is to add the decoration around the outside of the pot. This is done by rolling the mixture into a long sausage shape and sticking it around the outside of the pot about two thirds of the way up. The pattern is made by pressing your fingers into it. The large pot is now complete.
15. Both pots are now left in the sun to dry. This normally takes four days in the winter and two days in the summer.
Pic 45. The large pot has a circular base added. Pic 47. Ladies holding a completed large pot.
Pic 46. The pots are burned under a pile of rocks and cow dung.
9. An extra thick layer is then added as a rim which is roughly 20 mm thick. The small pot is now complete.
10. The next step is to make the big pot. This process is similar to the making of the small pot with a couple of extra steps. Firstly follow steps 5 - 7 using the large mould.
11. Once the mixture has been spread evenly over the surface of the mould the base is formed using extra mixture by hand, see picture 45.
12. The walls can now be extended to the designated height. This is done by removing the mould and adding clumps of the mixture by hand to the wall.
13. An extra thick layer is then added as a rim which is roughly 30 mm thick.

�� C L AY B A S E DTECHNOLOGIES
Pic 48. When the refrigerator is assembled water is poured on the sand.
Pic 49. An assembled refrigerator using wood chippings for insulation.
Pic 50. An assembled refrigerator using sand for insulation.
16. The next process is for the pots to be burned. To make this process more efficient it is better to burn as many pots as possible at once. Firstly an area is cleared and a circle is made with rocks. The ground is then covered with cow dung.
17. The clay pots are then piled in the middle and completely covered with sticks and more dung. The fire is then lit and left to burn for 24 hours, see picture 46.
18. Once the clay pots have been burnt the clay refrigerator can be assembled. Firstly sand should be placed in to the bottom of the large pot forming a layer approximately 5 cm in depth. At this point the small pot should be placed inside the big pot on top of the sand. This should mean that the tops of each pot are now level. Sand can now be put around the outside of the big pot until it is flush with the surface.
19. Ideally the clay refrigerator should be held in a stand to allow airflow underneath to help with the cooling process.
20. A damp cloth should be placed on top of the inner storage pot to prevent hot air entering.

��C L AY B A S E DTECHNOLOGIES
The Clay Refrigerator

�0 C L AY B A S E DTECHNOLOGIES
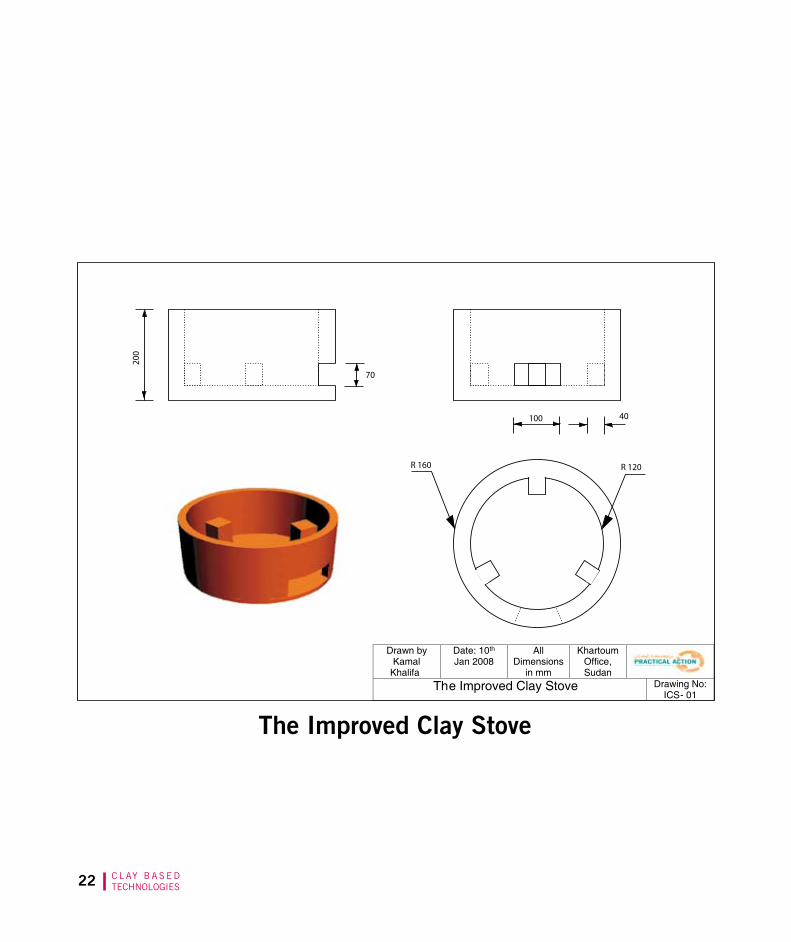
�.� BackgroundThe improved clay stove project started in 2000, in rural Al Fashir. This stove was seen as an appropriate technology and an alternative to the traditional 3 brick stove. This traditional stove was very inefficient and comparative tests that have been performed have highlighted this difference with the improved clay stove being 55 - 60 % more efficient. It is also seen as the most appropriate solution in terms of affordability and ease of dissemination through the training of trainers.
In 2003 the size of the project was increased due to huge displacement caused by the Darfur conflict. This led to greater pressure on the environment and severe risks for IDPs (normally women) when collecting the ever decreasing supply of wood. By 2007 Practical Action had trained more than 3000 women in villages and IDP camps in the manufacture of the Improved Clay Stove.
�.� Instructions
The Improved Clay Stove
�
Pic 51. The bricks and clay are gathered.
Pic 52. The clay is kneaded on a plastic bag.
Pic 53. The red bricks are marked with a knife and cut into thirds using a small axe.
Pic 54. A line is drawn around the outside of the saucepan most frequently used in the kitchen to determine the size
of the stove.

��C L AY B A S E DTECHNOLOGIES
Pic 55. Three brick segments with clay stuck underneath them are placed an equal distance apart inside the edge of
the circle drawn in the sand.
Pic 56. The whole circle is filled with clay to a depth of about 4cm.
Pic 57. The walls are then built up outside the bricks although a small part of the bricks are embedded in the
wall. The walls are roughly 4cm thick. The wall is built up until it is flush with the top of the bricks.
Pic 58. The pan is then placed on top of the bricks and the walls are built up until they are just under the top of the pan.
Their should be a finger size gap between the pan and the wall.
Pic 59. The pot is removed and using a scraper the surface of the stove is made smooth and left for about 1 /2 hour
in the sun before an exhaust hole is cut in the side with a sharp knife.
Pic 60. This exhaust hole increases the stove efficiency by increasing the air flow. It also allows wood to be added without the need to move the saucepan. The stove should
be left to dry naturally, it does not require burning.
�� C L AY B A S E DTECHNOLOGIES
Khartoum Office , Sudan
All Dimensions
in mm
Date : 10 th Jan 2008
Drawn by Kamal
Khalifa Drawing No :
ICS - 01 The Improved Clay Stove
The Improved Clay Stove

��C L AY B A S E DTECHNOLOGIES
�.� BackgroundThe name Mubkhar comes from the word that describes a type of essence burner as this stove is very similar in style. This type of stove differs from the improved clay stove as it requires a mould to help form it. It is very efficient and it uses charcoal for cooking instead of wood. The charcoal rests on a grill at the top allowing for the ash to fall down into the bottom of the stove where it can be removed.
It will heat the pan quickly as you can put the pan on the fire directly. It also allows for greater ventilation. It is affordable as charcoal is not expensive, 4lbs = 1 SDG which will normally last for 2 or 3 days or several meals. Charcoal is also widely available in Al Fashir. A further advantage is that it stays hot even after the charcoal has been used as the clay is a great insulator.
�.� Instructions1. The first task that needs to be performed is the
making of the mould. To do this make a small hole in the ground and cover it with a mat. Cover the mat with a small amount of wood chippings to prevent sticking.
2. Mix and knead an even mixture of mud, dung and water into a ball
3. Repeatedly press a stone into the mixture to form a bowl shape, see picture 61. Continue to do this adding more material if necessary until the mould reaches the dimensions in Diagram 3.
4. Once the mould has been made it needs to be left to dry in the sun for 30 minutes. When you
The Mubkhar Stove
(Charcoal Burning Stove)
�are ready to start work on the stove it should be placed upside-down next to where you are working.
Diagram �. Mould
Pic 61. A stone is used to shape the inside of the mould into a bowl shape.
5 Prepare the surface for rolling the clay using a sack covered with fine sand.
6. Mix the mud, donkey dung and water to form the clay mixture. Roll it into a long sausage shape, see picture 62.
7. Collect a piece of gauze metal and cut it into a square approximately 5cm by 5cm. It should then be placed on top of the mould (The gauze material can be seen in pictures 63 and 65).
8. The clay sausage should be made into a circle and placed directly on top of the gauze. It should be pushed onto the gauze so the gauze gets stuck in the mixture, see picture 63.
9. The mixture is then patted down so that it covers
200 mm
13
0 m
m
c)

�� C L AY B A S E DTECHNOLOGIES
Pic 62. The lady rolls the clay mixture into a sausage shape.
Pic 63. The mixture is formed into a circle and pressed on to the grill.
Pic 64. The mixture is flattened out and a small rim is made at the top.
between a third and a half of the mould. A small rim should then be made at the top, see picture 64.
10. The next stage is the making of the ash chamber where the ash will fall down from the coal. This requires another sausage shape length of mixture which is then wrapped around the rim that was formed in the previous step. Additional material can be added at this stage to increase the length of the chamber. It is recommended to be 10 – 20 cm, see picture 65.
11. Once the depth of the chamber has been reached a final thin layer of mixture needs to be added; this will secure the base. Also the surface of the stove can be smoothed using a scraper with water, see picture 66.
Pic 65. Layers of clay are used to build up the stove walls.

��C L AY B A S E DTECHNOLOGIES
12. Following this the base needs to be made which is done separately. Again gather a suitable clump of clay and flatten it into a circle, see picture 67.
13. Before putting the base in position put some small sticks across the hole to support the base, see picture 68.
14. Put the base over the hole and blend the edges together so that there is a strong bond between them, see picture 69.
15. The final stage is to cut a hole out of the side of the stove for improved air flow and to allow for the removal of ash that has fallen down into the base. Picture 70 shows a completed stove that has been painted.
Pic 67. A flat circle of clay is formed which will be the base of the stove.
Pic 68. Before securing the base small twigs can be used for support.
Pic 70. A completed mubkhar stove which has been painted.
Pic 69. The base is secured and blended in with the rest of the stove.
Pic 66. The chamber walls are finished and the surface is smoothened.

�� C L AY B A S E DTECHNOLOGIES
The Mubkhar Stove (Charcoal Burning Stove)
��C L AY B A S E DTECHNOLOGIES
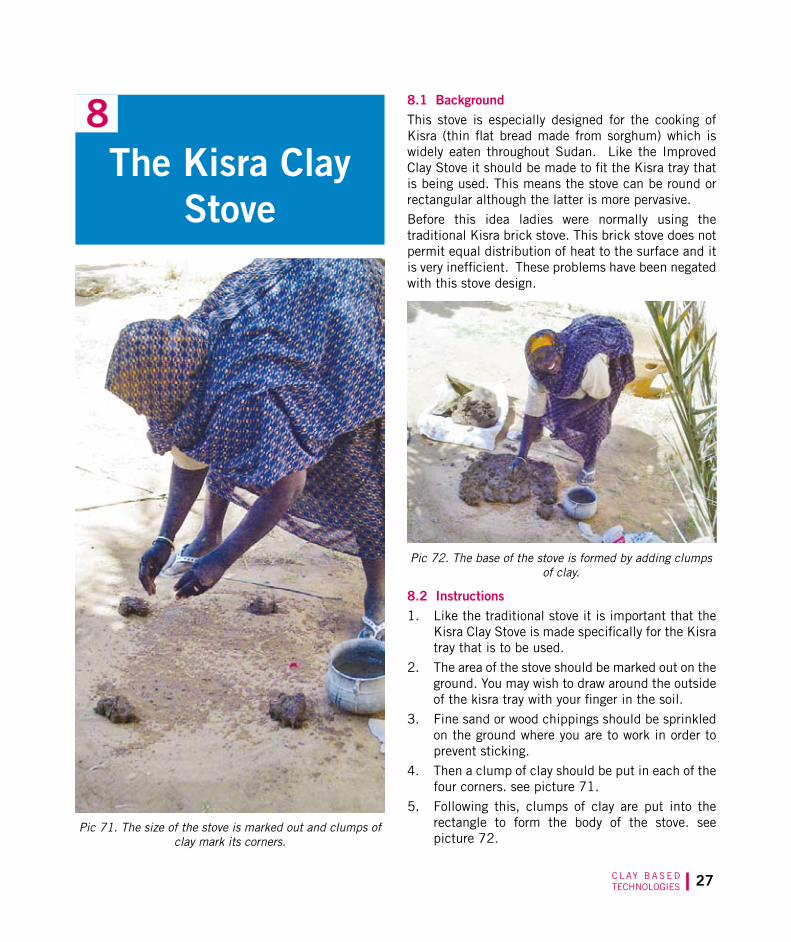
�.� BackgroundThis stove is especially designed for the cooking of Kisra (thin flat bread made from sorghum) which is widely eaten throughout Sudan. Like the Improved Clay Stove it should be made to fit the Kisra tray that is being used. This means the stove can be round or rectangular although the latter is more pervasive.
Before this idea ladies were normally using the traditional Kisra brick stove. This brick stove does not permit equal distribution of heat to the surface and it is very inefficient. These problems have been negated with this stove design.
The Kisra Clay Stove
�
Pic 71. The size of the stove is marked out and clumps of clay mark its corners.
Pic 72. The base of the stove is formed by adding clumps of clay.
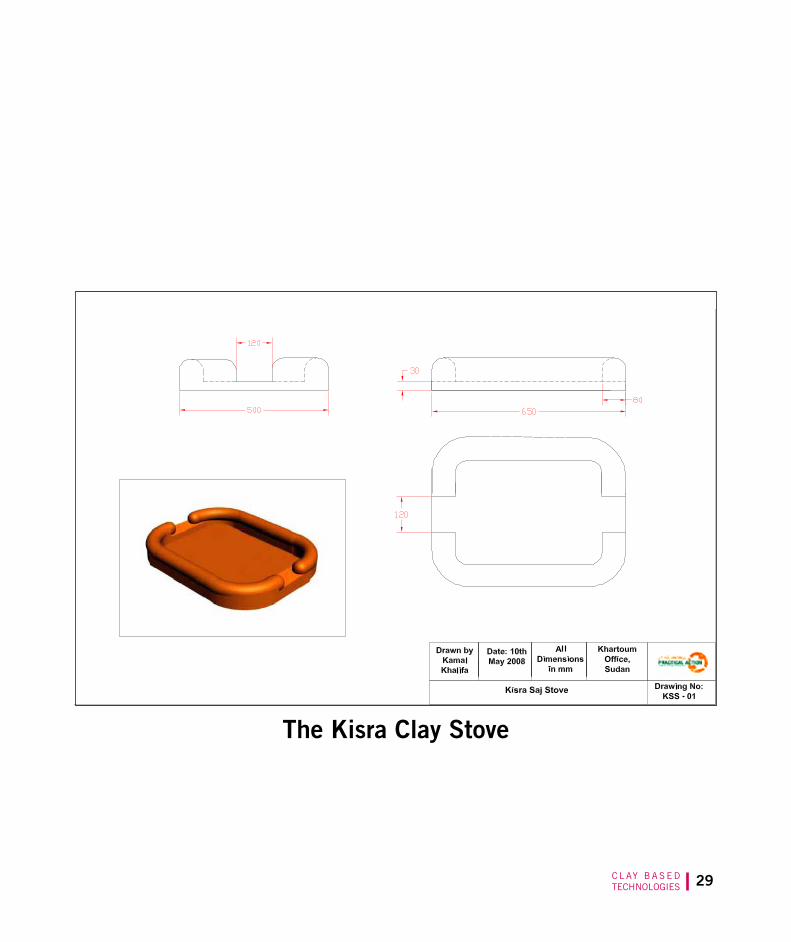
�.� Instructions1. Like the traditional stove it is important that the
Kisra Clay Stove is made specifically for the Kisra tray that is to be used.
2. The area of the stove should be marked out on the ground. You may wish to draw around the outside of the kisra tray with your finger in the soil.
3. Fine sand or wood chippings should be sprinkled on the ground where you are to work in order to prevent sticking.
4. Then a clump of clay should be put in each of the four corners. see picture 71.
5. Following this, clumps of clay are put into the rectangle to form the body of the stove. see picture 72.

�� C L AY B A S E DTECHNOLOGIES
Pic 75. A completed Kisra Stove that is ready to be dried.
Pic 74. The surface of the stove is smoothened.Pic 73. The exhaust hole is cut out of the end of the stove.
6. The clumps of mud are patted so that a flat rectangular base is formed.
7. The next stage is to build up the walls leaving a gap in the wall at either end; this is to allow for airing. see picture 73.
8. Now the body of the stove is complete all that is required is to smooth the surface using something rigid. The stove should be left to dry naturally, it does not require burning, see pictures 74 and 75.
��C L AY B A S E DTECHNOLOGIES
The Kisra Clay Stove

�0 C L AY B A S E DTECHNOLOGIES
Further development of clay based technologies
�
At the time of writing (August 2008) Practical Action is attempting to develop a means of filtration for the standard zeer (chapter 3). Despite the zeers immense popularity it does have some drawbacks in relation to the purity of the water. The water may become contaminated from dust in the air or when people put their hands in the water in order to fill up their cup.
In response to this Practical Action is looking at developing a filter for the zeer. Initial tests are being carried using two zeers (see picture 76) where one zeer acts as a filter. The porous clay material allows the water to percolate through the bottom of the zeer. Normally this clean water is wasted although some people collect it in a small container which they place under the zeer. This idea is still in its experimental stages.
If you are interested in this idea or anything else highlighted in this booklet or need help with any other technical enquiry you may have please contact the Practical Answers team at Practical Action Sudan through one of the contacts on the following page.
Pic 76. Testing the Zeer in Zeer Filter.

��C L AY B A S E DTECHNOLOGIES
We recommend you call the office nearest to your location.
Practical Action Sudan - Khartoum Office
Postal address: PO Box 4172, Khartoum 1114.
Street address: #4 street 49 off Pio Yokwan Road - Khartoum W - Adjacent to and North of Khartoum 3 Sports Club
Telephones : +249- 1- 83 - 578821/ 578827/ 578828 /460419.
Fax: +249- 1- 83 - 472002 .
Shadia Abdul Moneim - Practical Answers Manager
Tel: 0129133804
Email: [email protected]
Liam Morgan – Technology Promotion and Development Manager
Tel: 0918279293
E-Mail: [email protected] or [email protected]
For any Technical Enquiry please contact the Practical Answers team at one of the following offices:
�0
Sudan University for Science and Technology
The Practical Answers Office
Institute for Family and Community Development
Nour Adeen Mahmoud – Practical Answers Officer
Tel: 0129536435
Practical Action Sudan - Kassala Office
Telephones: 0411822103 / 822699-
Fax: 0411827553-
Rifat Bashir – Project Manager
Tel: 091246168
Practical Action Sudan – North Darfur Office
Telephones: 0731848812 / 843809-
Fax: 0731843809-
Howida Mohammed – Practical Answers Officer
Awad Allah Hamid – Project Manager
Tel: 0121215225
Practical Action – Damazene
Telephones: 0157845180

Practical Action - Sudan
Postal address: P.O Box 4172, Khartoum 1114Street address: 4 street 49 off Pio Yokwan Road - Khartoum W - Adjacent to and North of
Khartoum 3 Sports Club Telephones: +249-1-83- 578821/578827/578828/460419Fax: +249-1-83-472002E-Mail: [email protected]: www.practicalaction.org
c August �00�
Related Documents


