It is a violation of Copyright law to make and distribute copies of software or artwork. Software is licensed to the original purchaser for use at one location. ©2012 OESD, LLC. All rights reserved. Note: Some designs in this collection may have been created using unique special stitches and/or techniques. To preserve design integrity when rescaling or rotating designs in your software, always rescale or rotate designs using the handles directly on-screen. Classic Cutwork en Broderie II #12413 / 20 Designs 12413-01 Cutwork Leaves 3 3.58 X 4.80 in. 90.93 X 121.92 mm 6,281 St. 12413-02 Cutwork Leaves 4 4.59 X 5.87 in. 116.59 X 149.10 mm 11,693 St. L 12413-03 Cutwork Piece 1 3.35 X 4.54 in. 85.09 X 115.32 mm 7,366 St. 12413-04 Cutwork Piece 2 3.44 X 4.28 in. 87.38 X 108.71 mm 7,052 St. 12413-05 Cutwork Piece 3 3.42 X 3.27 in. 86.87 X 83.06 mm 5,935 St. 12413-06 Cutwork Scalloped Border 1.46 X 7.00 in. 37.08 X 177.80 mm 3,139 St. L S 12413-07 Cutwork Appliqué Thin Border 2.28 X 8.52 in. 57.91 X 216.41 mm 13,419 St. L 12413-08 Cutwork Appliqué Thin Corner 3.04 X 7.62 in. 77.22 X 193.55 mm 13,584 St. L 12413-09 Cutwork Appliqué Border Piece 3.13 X 4.19 in. 79.50 X 106.43 mm 6,357 St. 12413-10 Cutwork Appliqué Corner 4.45 X 6.56 in. 113.03 X 166.62 mm 17,678 St. L 12413-11 Cutwork Appliqué Border 1 3.25 X 7.18 in. 82.55 X 182.37 mm 21,794 St. L 12413-12 Cutwork Appliqué Border 2 3.95 X 8.24 in. 100.33 X 209.30 mm 26,458 St. L

Welcome message from author
This document is posted to help you gain knowledge. Please leave a comment to let me know what you think about it! Share it to your friends and learn new things together.
Transcript

It is a violation of Copyright law to make and distribute copies of software or artwork. Software is licensed to the original purchaser for use at one location. ©2012 OESD, LLC. All rights reserved.
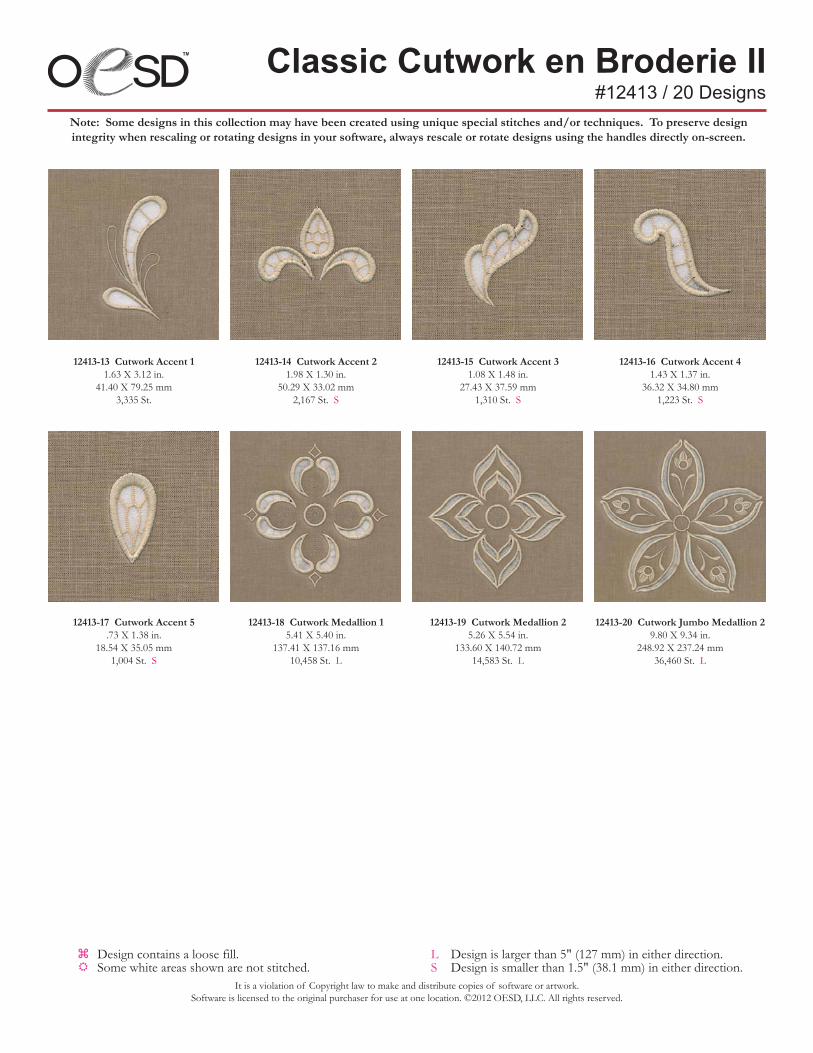
Note: Some designs in this collection may have been created using unique special stitches and/or techniques. To preserve design integrity when rescaling or rotating designs in your software, always rescale or rotate designs using the handles directly on-screen.
Classic Cutwork en Broderie II#12413 / 20 Designs
12413-01 Cutwork Leaves 33.58 X 4.80 in.
90.93 X 121.92 mm6,281 St.
12413-02 Cutwork Leaves 44.59 X 5.87 in.
116.59 X 149.10 mm11,693 St. L
12413-03 Cutwork Piece 13.35 X 4.54 in.
85.09 X 115.32 mm7,366 St.
12413-04 Cutwork Piece 23.44 X 4.28 in.
87.38 X 108.71 mm7,052 St.
12413-05 Cutwork Piece 33.42 X 3.27 in.
86.87 X 83.06 mm5,935 St.
12413-06 Cutwork Scalloped Border1.46 X 7.00 in.
37.08 X 177.80 mm3,139 St. L S
12413-07 Cutwork Appliqué Thin Border
2.28 X 8.52 in.57.91 X 216.41 mm
13,419 St. L
12413-08 Cutwork Appliqué Thin Corner
3.04 X 7.62 in.77.22 X 193.55 mm
13,584 St. L
12413-09 Cutwork Appliqué Border Piece
3.13 X 4.19 in.79.50 X 106.43 mm
6,357 St.
12413-10 Cutwork Appliqué Corner4.45 X 6.56 in.
113.03 X 166.62 mm17,678 St. L
12413-11 Cutwork Appliqué Border 13.25 X 7.18 in.
82.55 X 182.37 mm21,794 St. L
12413-12 Cutwork Appliqué Border 23.95 X 8.24 in.
100.33 X 209.30 mm26,458 St. L
It is a violation of Copyright law to make and distribute copies of software or artwork. Software is licensed to the original purchaser for use at one location. ©2012 OESD, LLC. All rights reserved.
Note: Some designs in this collection may have been created using unique special stitches and/or techniques. To preserve design integrity when rescaling or rotating designs in your software, always rescale or rotate designs using the handles directly on-screen.
Classic Cutwork en Broderie II#12413 / 20 Designs
12413-13 Cutwork Accent 11.63 X 3.12 in.
41.40 X 79.25 mm3,335 St.
12413-14 Cutwork Accent 21.98 X 1.30 in.
50.29 X 33.02 mm2,167 St. S
12413-15 Cutwork Accent 31.08 X 1.48 in.
27.43 X 37.59 mm1,310 St. S
12413-16 Cutwork Accent 41.43 X 1.37 in.
36.32 X 34.80 mm1,223 St. S
12413-17 Cutwork Accent 5.73 X 1.38 in.
18.54 X 35.05 mm1,004 St. S
12413-18 Cutwork Medallion 15.41 X 5.40 in.
137.41 X 137.16 mm10,458 St. L
12413-19 Cutwork Medallion 25.26 X 5.54 in.
133.60 X 140.72 mm14,583 St. L
12413-20 Cutwork Jumbo Medallion 29.80 X 9.34 in.
248.92 X 237.24 mm36,460 St. L
It is a violation of Copyright law to make and distribute copies of software or artwork. Software is licensed to the original purchaser for use at one location. ©2012 OESD, LLC. All rights reserved.
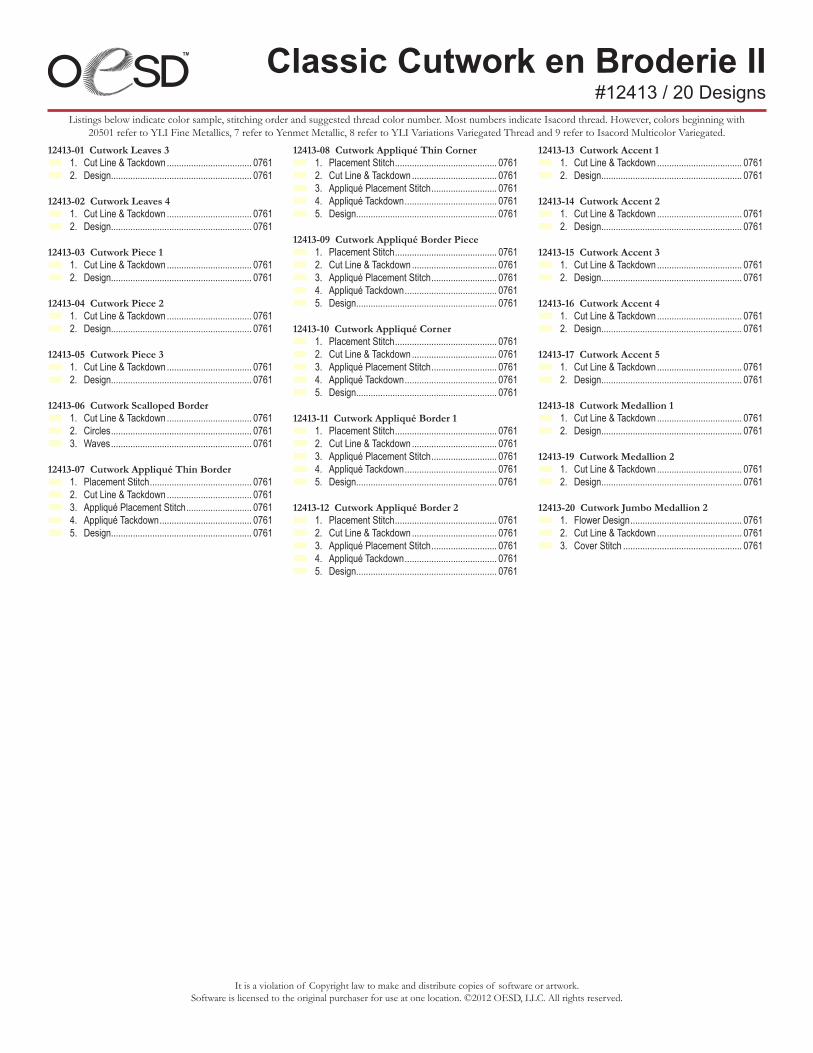
Listings below indicate color sample, stitching order and suggested thread color number. Most numbers indicate Isacord thread. However, colors beginning with 20501 refer to YLI Fine Metallics, 7 refer to Yenmet Metallic, 8 refer to YLI Variations Variegated Thread and 9 refer to Isacord Multicolor Variegated.
Classic Cutwork en Broderie II#12413 / 20 Designs
12413-01 Cutwork Leaves 3n 1. Cut Line & Tackdown ................................... 0761n 2. Design .......................................................... 0761
12413-02 Cutwork Leaves 4n 1. Cut Line & Tackdown ................................... 0761n 2. Design .......................................................... 0761
12413-03 Cutwork Piece 1n 1. Cut Line & Tackdown ................................... 0761n 2. Design .......................................................... 0761
12413-04 Cutwork Piece 2n 1. Cut Line & Tackdown ................................... 0761n 2. Design .......................................................... 0761
12413-05 Cutwork Piece 3n 1. Cut Line & Tackdown ................................... 0761n 2. Design .......................................................... 0761
12413-06 Cutwork Scalloped Bordern 1. Cut Line & Tackdown ................................... 0761n 2. Circles .......................................................... 0761n 3. Waves .......................................................... 0761
12413-07 Cutwork Appliqué Thin Bordern 1. Placement Stitch .......................................... 0761n 2. Cut Line & Tackdown ................................... 0761n 3. Appliqué Placement Stitch ........................... 0761n 4. Appliqué Tackdown ...................................... 0761n 5. Design .......................................................... 0761
12413-08 Cutwork Appliqué Thin Cornern 1. Placement Stitch .......................................... 0761n 2. Cut Line & Tackdown ................................... 0761n 3. Appliqué Placement Stitch ........................... 0761n 4. Appliqué Tackdown ...................................... 0761n 5. Design .......................................................... 0761
12413-09 Cutwork Appliqué Border Piecen 1. Placement Stitch .......................................... 0761n 2. Cut Line & Tackdown ................................... 0761n 3. Appliqué Placement Stitch ........................... 0761n 4. Appliqué Tackdown ...................................... 0761n 5. Design .......................................................... 0761
12413-10 Cutwork Appliqué Cornern 1. Placement Stitch .......................................... 0761n 2. Cut Line & Tackdown ................................... 0761n 3. Appliqué Placement Stitch ........................... 0761n 4. Appliqué Tackdown ...................................... 0761n 5. Design .......................................................... 0761
12413-11 Cutwork Appliqué Border 1n 1. Placement Stitch .......................................... 0761n 2. Cut Line & Tackdown ................................... 0761n 3. Appliqué Placement Stitch ........................... 0761n 4. Appliqué Tackdown ...................................... 0761n 5. Design .......................................................... 0761
12413-12 Cutwork Appliqué Border 2n 1. Placement Stitch .......................................... 0761n 2. Cut Line & Tackdown ................................... 0761n 3. Appliqué Placement Stitch ........................... 0761n 4. Appliqué Tackdown ...................................... 0761n 5. Design .......................................................... 0761
12413-13 Cutwork Accent 1n 1. Cut Line & Tackdown ................................... 0761n 2. Design .......................................................... 0761
12413-14 Cutwork Accent 2n 1. Cut Line & Tackdown ................................... 0761n 2. Design .......................................................... 0761
12413-15 Cutwork Accent 3n 1. Cut Line & Tackdown ................................... 0761n 2. Design .......................................................... 0761
12413-16 Cutwork Accent 4n 1. Cut Line & Tackdown ................................... 0761n 2. Design .......................................................... 0761
12413-17 Cutwork Accent 5n 1. Cut Line & Tackdown ................................... 0761n 2. Design .......................................................... 0761
12413-18 Cutwork Medallion 1n 1. Cut Line & Tackdown ................................... 0761n 2. Design .......................................................... 0761
12413-19 Cutwork Medallion 2n 1. Cut Line & Tackdown ................................... 0761n 2. Design .......................................................... 0761
12413-20 Cutwork Jumbo Medallion 2n 1. Flower Design .............................................. 0761n 2. Cut Line & Tackdown ................................... 0761n 3. Cover Stitch ................................................. 0761
It is a violation of Copyright law to make and distribute copies of software or artwork. Software is licensed to the original purchaser for use at one location. ©2012 OESD, LLC. All rights reserved.
Classic Cutwork en Broderie IIFreestanding Lace Edging and Corners Instructions
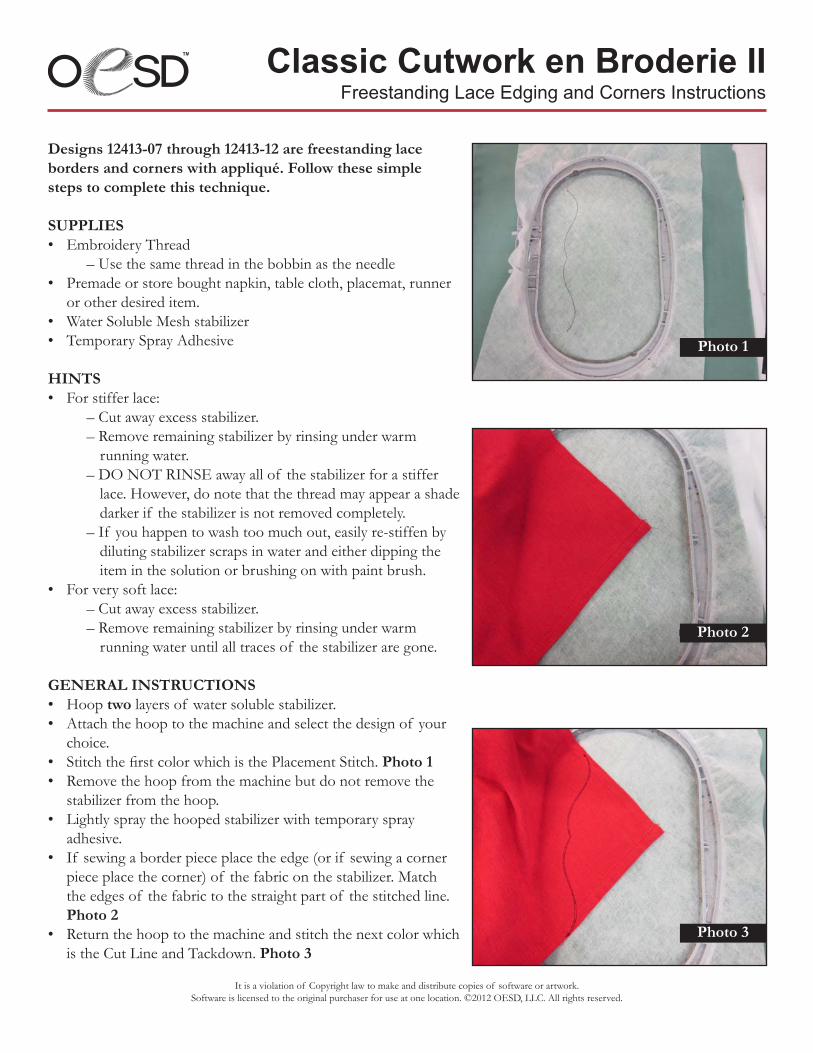
Designs 12413-07 through 12413-12 are freestanding lace borders and corners with appliqué. Follow these simple steps to complete this technique.
SUPPLIES• EmbroideryThread – Use the same thread in the bobbin as the needle• Premadeorstoreboughtnapkin,tablecloth,placemat,runner
or other desired item.• WaterSolubleMeshstabilizer• TemporarySprayAdhesive
HINTS• Forstifferlace: –Cutawayexcessstabilizer. –Removeremainingstabilizerbyrinsingunderwarm running water. –DONOTRINSEawayallof thestabilizerforastiffer lace. However, do note that the thread may appear a shade darkerif thestabilizerisnotremovedcompletely. – If you happen to wash too much out, easily re-stiffen by dilutingstabilizerscrapsinwaterandeitherdippingthe item in the solution or brushing on with paint brush.• Forverysoftlace: –Cutawayexcessstabilizer. –Removeremainingstabilizerbyrinsingunderwarm runningwateruntilalltracesof thestabilizeraregone.
GENERAL INSTRUCTIONS• Hooptwolayersof watersolublestabilizer.• Attachthehooptothemachineandselectthedesignof your
choice.• StitchthefirstcolorwhichisthePlacementStitch.Photo 1• Removethehoopfromthemachinebutdonotremovethestabilizerfromthehoop.
• Lightlyspraythehoopedstabilizerwithtemporarysprayadhesive.
• If sewingaborderpieceplacetheedge(orif sewingacornerpieceplacethecorner)of thefabriconthestabilizer.Matchthe edges of the fabric to the straight part of the stitched line. Photo 2
• Returnthehooptothemachineandstitchthenextcolorwhichis the Cut Line and Tackdown. Photo 3
Photo 1
Photo 2
Photo 3

It is a violation of Copyright law to make and distribute copies of software or artwork. Software is licensed to the original purchaser for use at one location. ©2012 OESD, LLC. All rights reserved.
Classic Cutwork en Broderie IIFreestanding Lace Edging and Corners Instructions
• Again,removethehoopfromthemachinebutdonotremovethestabilizerfromthehoop.
• TrimthefabricrightuptothestitchedCutLineandTackdown. Photo 4
• Returnthehooptothemachineandstitchthethirdcolor,whichwillbetheAppliquéPlacementStitch.
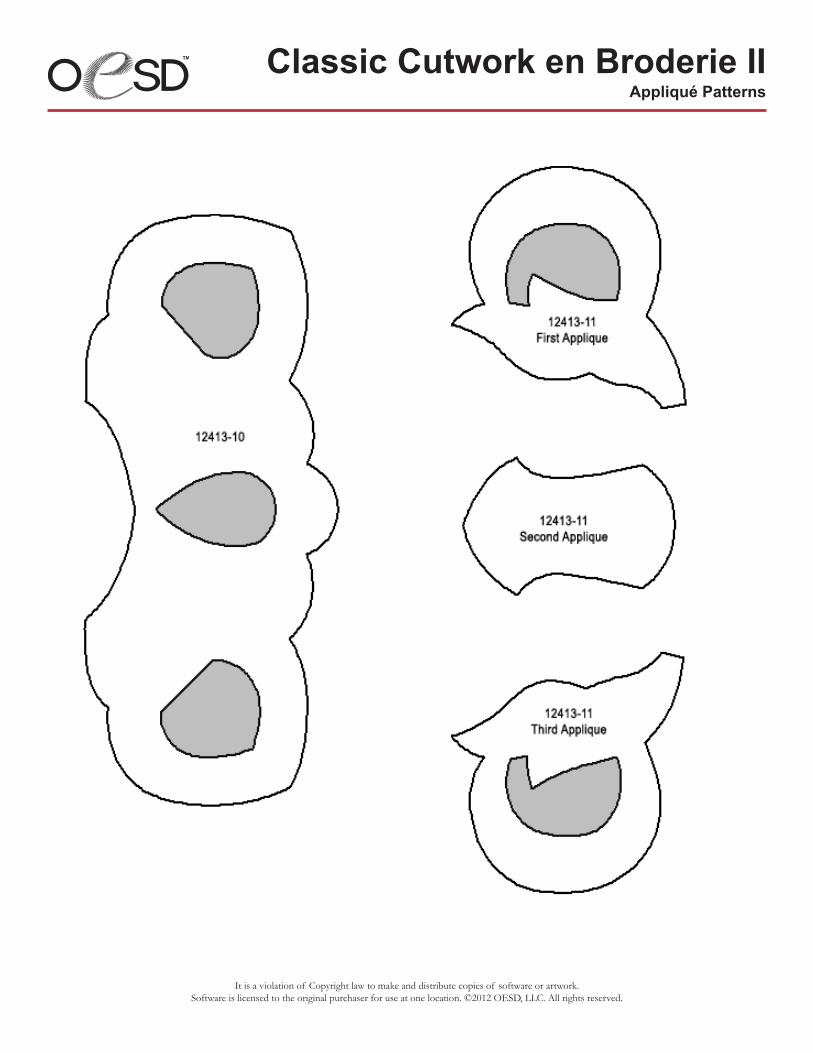
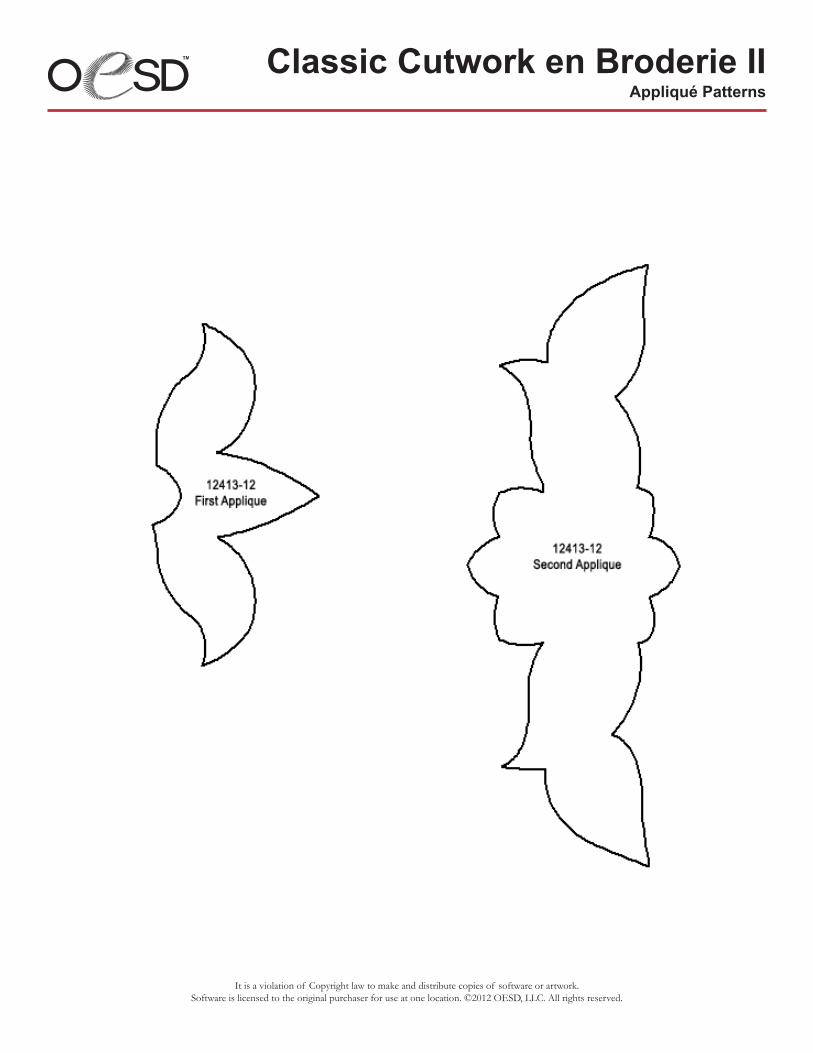
• Usetheincludedappliquépatternstocutouttherequiredpiece(s)foryourselecteddesign.Photo 5
• Lightlyspraythewrongsideof thepre-cutappliquépieceswith temporary spray adhesive and place in required position onhoopedstabilizer.Photo 6
• Continuestitchingtheremainderof thedesign. Photo 7• Cutawayexcessstabilizerandremoveremainingstabilizerby
rinsing under warm water. Refer to hints above for stiff or soft lace.
• Allowtoairdrybylayingthepieceflatwithrightsidedowntoprevent curling.
• If youneedtopressyouritempressitfromthewrongsideusing a pressing cloth.
Photo 4
Photo 5
Photo 6
Photo 7
It is a violation of Copyright law to make and distribute copies of software or artwork. Software is licensed to the original purchaser for use at one location. ©2012 OESD, LLC. All rights reserved.
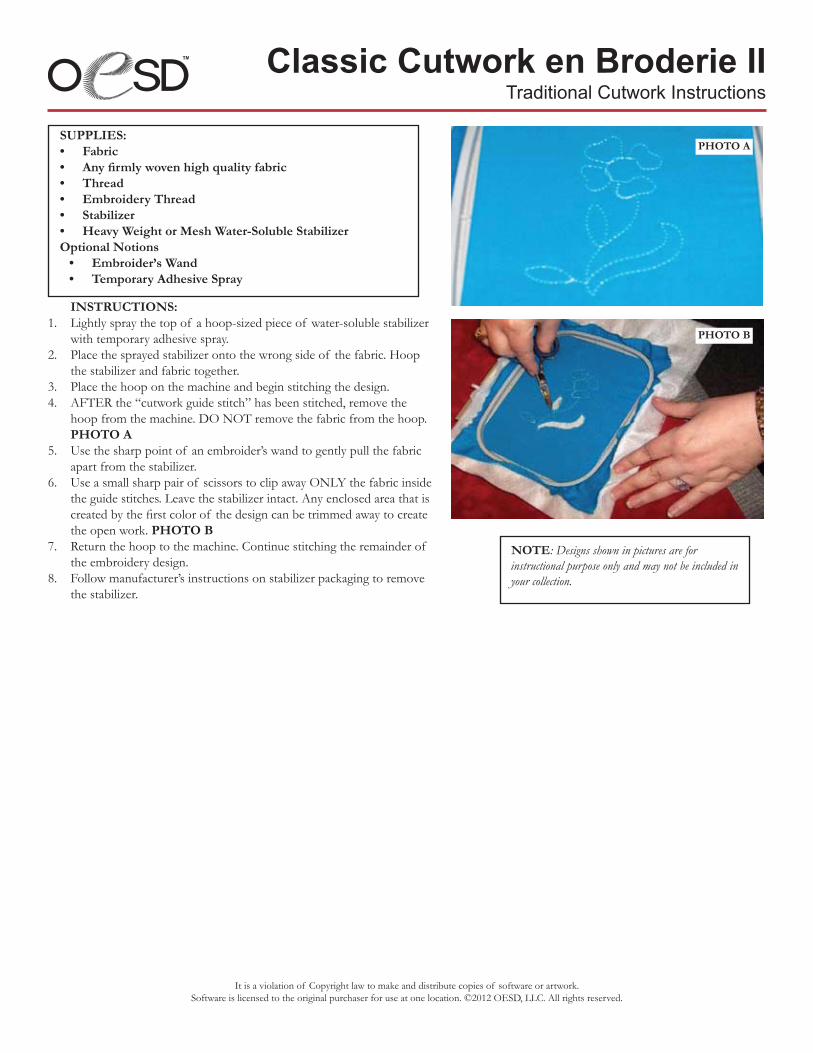
INSTRUCTIONS:1. Lightlyspraythetopof ahoop-sizedpieceof water-solublestabilizer
with temporary adhesive spray.2. Placethesprayedstabilizerontothewrongsideof thefabric.Hoop
thestabilizerandfabrictogether.3. Placethehooponthemachineandbeginstitchingthedesign.4. AFTER the “cutwork guide stitch” has been stitched, remove the
hoop from the machine. DO NOT remove the fabric from the hoop. PHOTO A
5. Use the sharp point of an embroider’s wand to gently pull the fabric apartfromthestabilizer.
6. Use a small sharp pair of scissors to clip away ONLY the fabric inside theguidestitches.Leavethestabilizerintact.Anyenclosedareathatiscreatedbythefirstcolorof thedesigncanbetrimmedawaytocreatethe open work. PHOTO B
7. Return the hoop to the machine. Continue stitching the remainder of the embroidery design.
8. Followmanufacturer’sinstructionsonstabilizerpackagingtoremovethestabilizer.
SUPPLIES:• Fabric• Anyfirmlywovenhighqualityfabric• Thread• Embroidery Thread• Stabilizer• Heavy Weight or Mesh Water-Soluble StabilizerOptional Notions• Embroider’s Wand• Temporary Adhesive Spray
NOTE: Designs shown in pictures are for instructional purpose only and may not be included in your collection.
PHOTO B
Classic Cutwork en Broderie IITraditional Cutwork Instructions
PHOTO A
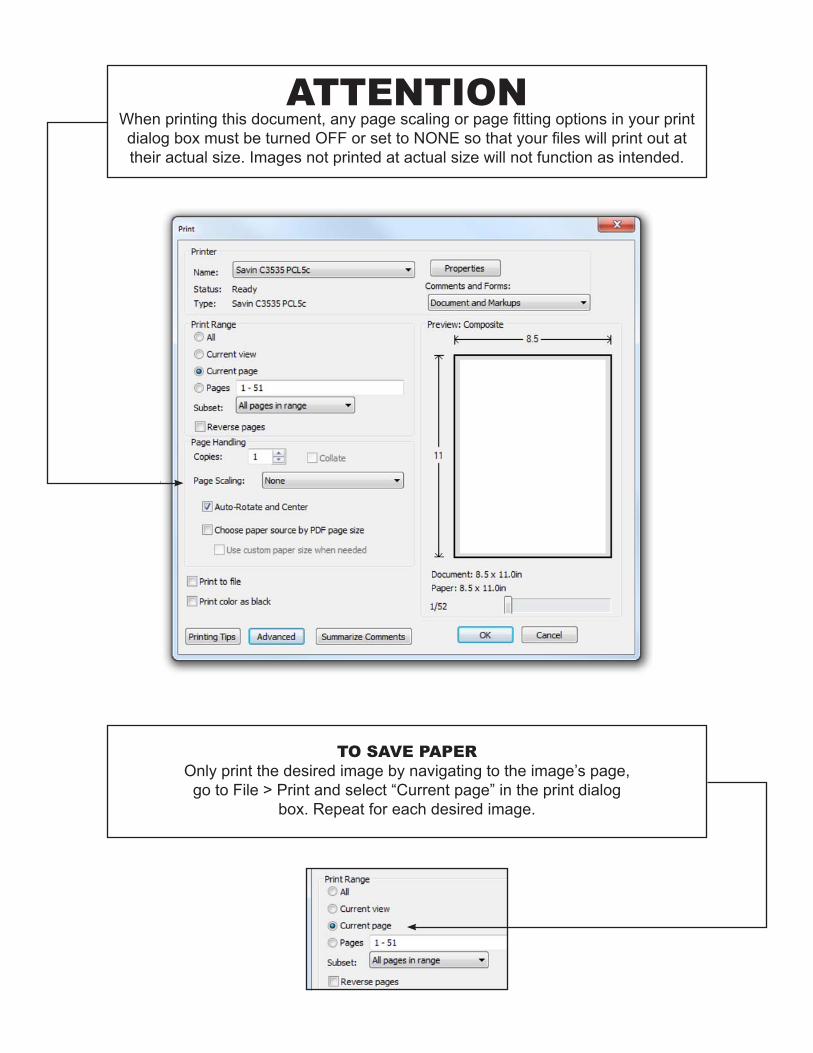
ATTENTIONWhen printing this document, any page scaling or page fitting options in your print dialog box must be turned OFF or set to NONE so that your files will print out at their actual size. Images not printed at actual size will not function as intended.
TO SAVE PAPEROnly print the desired image by navigating to the image’s page,
go to File > Print and select “Current page” in the print dialog box. Repeat for each desired image.

It is a violation of Copyright law to make and distribute copies of software or artwork. Software is licensed to the original purchaser for use at one location. ©2012 OESD, LLC. All rights reserved.
Classic Cutwork en Broderie IIAppliqué Patterns
07
It is a violation of Copyright law to make and distribute copies of software or artwork. Software is licensed to the original purchaser for use at one location. ©2012 OESD, LLC. All rights reserved.
Classic Cutwork en Broderie IIAppliqué Patterns
It is a violation of Copyright law to make and distribute copies of software or artwork. Software is licensed to the original purchaser for use at one location. ©2012 OESD, LLC. All rights reserved.
Classic Cutwork en Broderie IIAppliqué Patterns
It is a violation of Copyright law to make and distribute copies of software or artwork. Software is licensed to the original purchaser for use at one location. ©2012 OESD, LLC. All rights reserved.
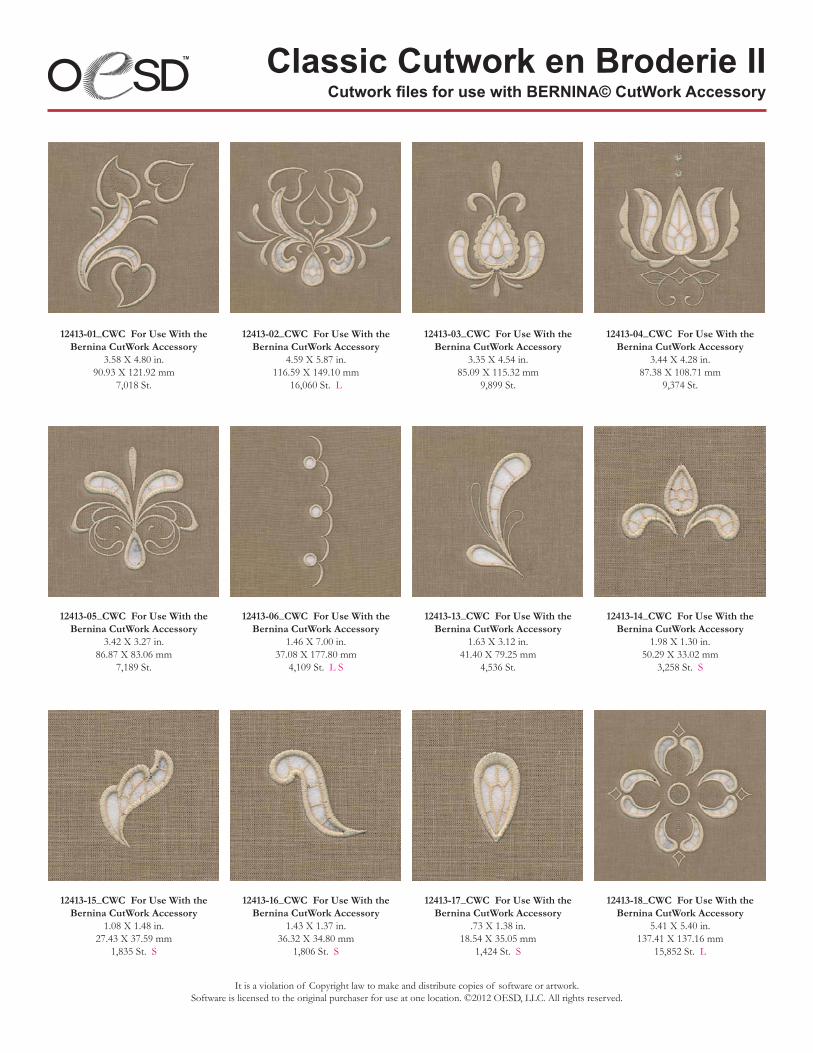
12413-01_CWC For Use With the Bernina CutWork Accessory
3.58 X 4.80 in.90.93 X 121.92 mm
7,018 St.
12413-05_CWC For Use With the Bernina CutWork Accessory
3.42 X 3.27 in.86.87 X 83.06 mm
7,189 St.
12413-15_CWC For Use With the Bernina CutWork Accessory
1.08 X 1.48 in.27.43 X 37.59 mm
1,835 St. S
12413-02_CWC For Use With the Bernina CutWork Accessory
4.59 X 5.87 in.116.59 X 149.10 mm
16,060 St. L
12413-06_CWC For Use With the Bernina CutWork Accessory
1.46 X 7.00 in.37.08 X 177.80 mm
4,109 St. L S
12413-16_CWC For Use With the Bernina CutWork Accessory
1.43 X 1.37 in.36.32 X 34.80 mm
1,806 St. S
12413-03_CWC For Use With the Bernina CutWork Accessory
3.35 X 4.54 in.85.09 X 115.32 mm
9,899 St.
12413-13_CWC For Use With the Bernina CutWork Accessory
1.63 X 3.12 in.41.40 X 79.25 mm
4,536 St.
12413-17_CWC For Use With the Bernina CutWork Accessory
.73 X 1.38 in.18.54 X 35.05 mm
1,424 St. S
12413-04_CWC For Use With the Bernina CutWork Accessory
3.44 X 4.28 in.87.38 X 108.71 mm
9,374 St.
12413-14_CWC For Use With the Bernina CutWork Accessory
1.98 X 1.30 in.50.29 X 33.02 mm
3,258 St. S
12413-18_CWC For Use With the Bernina CutWork Accessory
5.41 X 5.40 in.137.41 X 137.16 mm
15,852 St. L
Cutwork files for use with BERNINA© CutWork AccessoryClassic Cutwork en Broderie II

It is a violation of Copyright law to make and distribute copies of software or artwork. Software is licensed to the original purchaser for use at one location. ©2012 OESD, LLC. All rights reserved.
12413-19_CWC For Use With the Bernina CutWork Accessory
5.26 X 5.54 in.133.60 X 140.72 mm
22,253 St. L
12413-20_CWC For Use With the Bernina CutWork Accessory
9.80 X 9.34 in.248.92 X 237.24 mm
55,673 St. L
Cutwork files for use with BERNINA© CutWork AccessoryClassic Cutwork en Broderie II
It is a violation of Copyright law to make and distribute copies of software or artwork. Software is licensed to the original purchaser for use at one location. ©2012 OESD, LLC. All rights reserved.
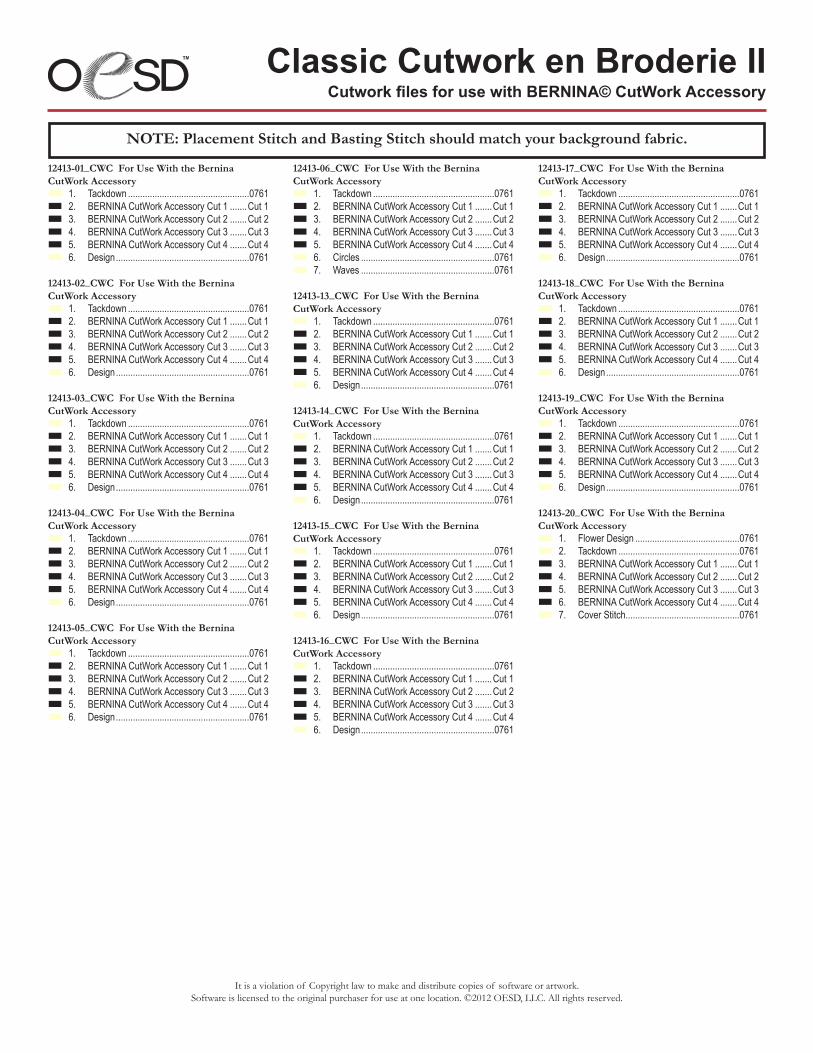
12413-01_CWC For Use With the Bernina CutWork Accessoryn 1. Tackdown ..................................................0761n 2. BERNINA CutWork Accessory Cut 1 .......Cut 1n 3. BERNINA CutWork Accessory Cut 2 .......Cut 2n 4. BERNINA CutWork Accessory Cut 3 .......Cut 3n 5. BERNINA CutWork Accessory Cut 4 .......Cut 4n 6. Design .......................................................0761
12413-02_CWC For Use With the Bernina CutWork Accessoryn 1. Tackdown ..................................................0761n 2. BERNINA CutWork Accessory Cut 1 .......Cut 1n 3. BERNINA CutWork Accessory Cut 2 .......Cut 2n 4. BERNINA CutWork Accessory Cut 3 .......Cut 3n 5. BERNINA CutWork Accessory Cut 4 .......Cut 4n 6. Design .......................................................0761
12413-03_CWC For Use With the Bernina CutWork Accessoryn 1. Tackdown ..................................................0761n 2. BERNINA CutWork Accessory Cut 1 .......Cut 1n 3. BERNINA CutWork Accessory Cut 2 .......Cut 2n 4. BERNINA CutWork Accessory Cut 3 .......Cut 3n 5. BERNINA CutWork Accessory Cut 4 .......Cut 4n 6. Design .......................................................0761
12413-04_CWC For Use With the Bernina CutWork Accessoryn 1. Tackdown ..................................................0761n 2. BERNINA CutWork Accessory Cut 1 .......Cut 1n 3. BERNINA CutWork Accessory Cut 2 .......Cut 2n 4. BERNINA CutWork Accessory Cut 3 .......Cut 3n 5. BERNINA CutWork Accessory Cut 4 .......Cut 4n 6. Design .......................................................0761
12413-05_CWC For Use With the Bernina CutWork Accessoryn 1. Tackdown ..................................................0761n 2. BERNINA CutWork Accessory Cut 1 .......Cut 1n 3. BERNINA CutWork Accessory Cut 2 .......Cut 2n 4. BERNINA CutWork Accessory Cut 3 .......Cut 3n 5. BERNINA CutWork Accessory Cut 4 .......Cut 4n 6. Design .......................................................0761
12413-06_CWC For Use With the Bernina CutWork Accessoryn 1. Tackdown ..................................................0761n 2. BERNINA CutWork Accessory Cut 1 .......Cut 1n 3. BERNINA CutWork Accessory Cut 2 .......Cut 2n 4. BERNINA CutWork Accessory Cut 3 .......Cut 3n 5. BERNINA CutWork Accessory Cut 4 .......Cut 4n 6. Circles .......................................................0761n 7. Waves .......................................................0761
12413-13_CWC For Use With the Bernina CutWork Accessoryn 1. Tackdown ..................................................0761n 2. BERNINA CutWork Accessory Cut 1 .......Cut 1n 3. BERNINA CutWork Accessory Cut 2 .......Cut 2n 4. BERNINA CutWork Accessory Cut 3 .......Cut 3n 5. BERNINA CutWork Accessory Cut 4 .......Cut 4n 6. Design .......................................................0761
12413-14_CWC For Use With the Bernina CutWork Accessoryn 1. Tackdown ..................................................0761n 2. BERNINA CutWork Accessory Cut 1 .......Cut 1n 3. BERNINA CutWork Accessory Cut 2 .......Cut 2n 4. BERNINA CutWork Accessory Cut 3 .......Cut 3n 5. BERNINA CutWork Accessory Cut 4 .......Cut 4n 6. Design .......................................................0761
12413-15_CWC For Use With the Bernina CutWork Accessoryn 1. Tackdown ..................................................0761n 2. BERNINA CutWork Accessory Cut 1 .......Cut 1n 3. BERNINA CutWork Accessory Cut 2 .......Cut 2n 4. BERNINA CutWork Accessory Cut 3 .......Cut 3n 5. BERNINA CutWork Accessory Cut 4 .......Cut 4n 6. Design .......................................................0761
12413-16_CWC For Use With the Bernina CutWork Accessoryn 1. Tackdown ..................................................0761n 2. BERNINA CutWork Accessory Cut 1 .......Cut 1n 3. BERNINA CutWork Accessory Cut 2 .......Cut 2n 4. BERNINA CutWork Accessory Cut 3 .......Cut 3n 5. BERNINA CutWork Accessory Cut 4 .......Cut 4n 6. Design .......................................................0761
12413-17_CWC For Use With the Bernina CutWork Accessoryn 1. Tackdown ..................................................0761n 2. BERNINA CutWork Accessory Cut 1 .......Cut 1n 3. BERNINA CutWork Accessory Cut 2 .......Cut 2n 4. BERNINA CutWork Accessory Cut 3 .......Cut 3n 5. BERNINA CutWork Accessory Cut 4 .......Cut 4n 6. Design .......................................................0761
12413-18_CWC For Use With the Bernina CutWork Accessoryn 1. Tackdown ..................................................0761n 2. BERNINA CutWork Accessory Cut 1 .......Cut 1n 3. BERNINA CutWork Accessory Cut 2 .......Cut 2n 4. BERNINA CutWork Accessory Cut 3 .......Cut 3n 5. BERNINA CutWork Accessory Cut 4 .......Cut 4n 6. Design .......................................................0761
12413-19_CWC For Use With the Bernina CutWork Accessoryn 1. Tackdown ..................................................0761n 2. BERNINA CutWork Accessory Cut 1 .......Cut 1n 3. BERNINA CutWork Accessory Cut 2 .......Cut 2n 4. BERNINA CutWork Accessory Cut 3 .......Cut 3n 5. BERNINA CutWork Accessory Cut 4 .......Cut 4n 6. Design .......................................................0761
12413-20_CWC For Use With the Bernina CutWork Accessoryn 1. Flower Design ...........................................0761n 2. Tackdown ..................................................0761n 3. BERNINA CutWork Accessory Cut 1 .......Cut 1n 4. BERNINA CutWork Accessory Cut 2 .......Cut 2n 5. BERNINA CutWork Accessory Cut 3 .......Cut 3n 6. BERNINA CutWork Accessory Cut 4 .......Cut 4n 7. Cover Stitch...............................................0761
NOTE: Placement Stitch and Basting Stitch should match your background fabric.
Cutwork files for use with BERNINA© CutWork AccessoryClassic Cutwork en Broderie II
It is a violation of Copyright law to make and distribute copies of software or artwork. Software is licensed to the original purchaser for use at one location. ©2012 OESD, LLC. All rights reserved.
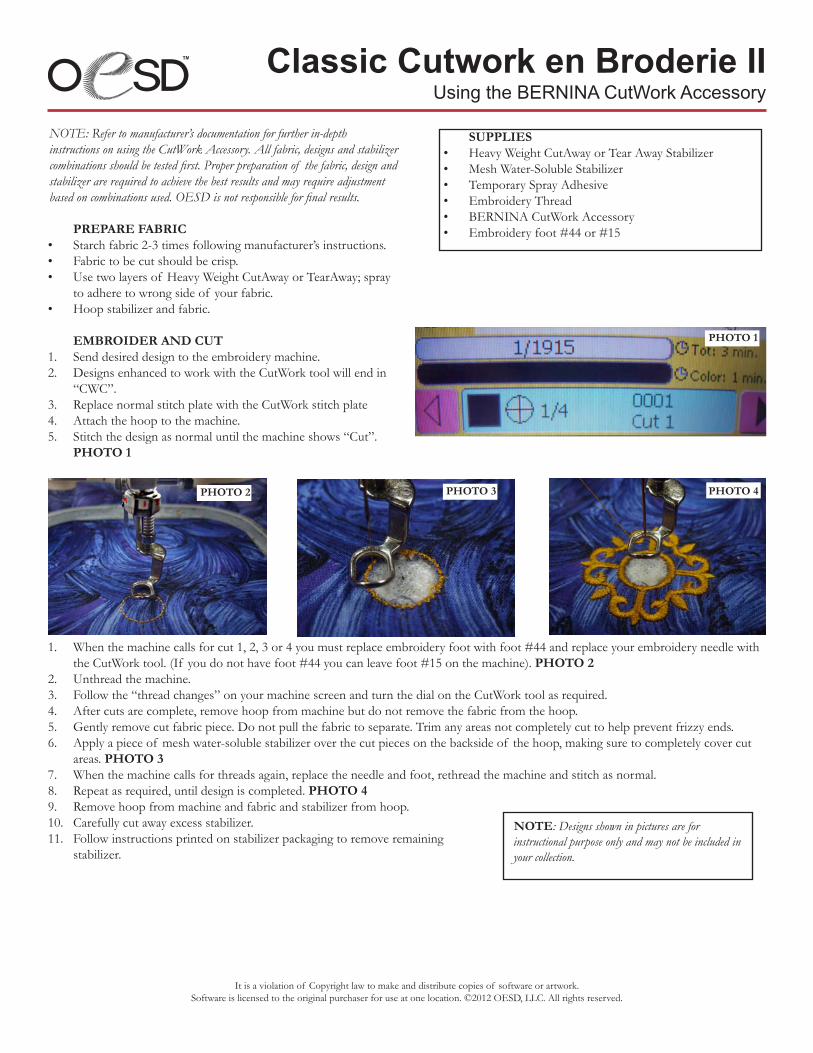
SUPPLIES• HeavyWeightCutAwayorTearAwayStabilizer• MeshWater-SolubleStabilizer• Temporary Spray Adhesive• Embroidery Thread• BERNINACutWorkAccessory• Embroidery foot #44 or #15
NOTE: Refer to manufacturer’s documentation for further in-depth instructions on using the CutWork Accessory. All fabric, designs and stabilizer combinations should be tested first. Proper preparation of the fabric, design and stabilizer are required to achieve the best results and may require adjustment based on combinations used. OESD is not responsible for final results. PREPARE FABRIC• Starch fabric 2-3 times following manufacturer’s instructions.• Fabric to be cut should be crisp.• Usetwolayersof HeavyWeightCutAwayorTearAway;spray
to adhere to wrong side of your fabric.• Hoopstabilizerandfabric. EMBROIDER AND CUT1. Send desired design to the embroidery machine.2. DesignsenhancedtoworkwiththeCutWorktoolwillendin
“CWC”.3. ReplacenormalstitchplatewiththeCutWorkstitchplate4. Attach the hoop to the machine.5. Stitch the design as normal until the machine shows “Cut”.
PHOTO 1
PHOTO 1
1. Whenthemachinecallsforcut1,2,3or4youmustreplaceembroideryfootwithfoot#44andreplaceyourembroideryneedlewiththeCutWorktool.(If youdonothavefoot#44youcanleavefoot#15onthemachine).PHOTO 2
2. Unthread the machine.3. Followthe“threadchanges”onyourmachinescreenandturnthedialontheCutWorktoolasrequired.4. After cuts are complete, remove hoop from machine but do not remove the fabric from the hoop.5. Gentlyremovecutfabricpiece.Donotpullthefabrictoseparate.Trimanyareasnotcompletelycuttohelppreventfrizzyends.6. Applyapieceof meshwater-solublestabilizeroverthecutpiecesonthebacksideof thehoop,makingsuretocompletelycovercut
areas. PHOTO 37. Whenthemachinecallsforthreadsagain,replacetheneedleandfoot,rethreadthemachineandstitchasnormal.8. Repeat as required, until design is completed. PHOTO 49. Removehoopfrommachineandfabricandstabilizerfromhoop.10. Carefullycutawayexcessstabilizer.11. Followinstructionsprintedonstabilizerpackagingtoremoveremaining
stabilizer.
PHOTO 2 PHOTO 3 PHOTO 4
NOTE: Designs shown in pictures are for instructional purpose only and may not be included in your collection.
Classic Cutwork en Broderie IIUsing the BERNINA CutWork Accessory
Related Documents