Civica CMS/Website Training Basics Responsible Design Version DRAFT Version: 6/3/2015 4:13 PM

Welcome message from author
This document is posted to help you gain knowledge. Please leave a comment to let me know what you think about it! Share it to your friends and learn new things together.
Transcript

Civica CMS/Website Training Basics
Responsible Design Version
DRAFT
Version: 6/3/2015 4:13 PM

City Website / Civica Training Basics
2
Table of Contents
Some helpful tidbits about the Civica system ................................................ 5
Active Flag ............................................................................................................................................. 5
Prompt Help .......................................................................................................................................... 5
Browsers ............................................................................................................................................... 6
Civica / City Website – Browser Tips ........................................................................................... 6
Internet Explorer ............................................................................................................................ 6
Chrome ............................................................................................................................................. 7
Firefox .............................................................................................................................................. 7
Admin – Logging in ........................................................................................ 8
NavBuilder ................................................................................................... 12
Create Folders, Pages, Structure ........................................................................................................ 12
Parent vs. Child (top level vs sub level) .................................................................................... 12
Folder and Page (folder has pages) .................................................................................................... 13
Create/Modify .................................................................................................................................... 14
Layouts ........................................................................................................................................... 14
Preview & Edit .................................................................................................................................... 19
Before leaving NavBuilder .................................................................................................................. 23
Move ................................................................................................................................................... 24
Move Out ............................................................................................................................................ 26
Duplicate ............................................................................................................................................. 28
Name and filename ............................................................................................................................ 28
URL ...................................................................................................................................................... 29
Refresh ................................................................................................................................................ 30
Pages/HTML Editor ...................................................................................... 33
Edit ...................................................................................................................................................... 33
HTML Editor ........................................................................................................................................ 33
HTML Editor / WYSIWYG Editor.......................................................................................................... 34
Some General Information ................................................................................................................. 37
Titles and Headers .............................................................................................................................. 40
Paragraph Style ................................................................................................................................... 40
Editing your content ........................................................................................................................... 42
Images ................................................................................................................................................. 48

City Website / Civica Training Basics
3
Insert External Video .......................................................................................................................... 59
Document Manager ............................................................................................................................ 59
Hyperlink Manager ............................................................................................................................. 60
Remove Link ........................................................................................................................................ 62
Word Processing icons ........................................................................................................................ 63
Tables .................................................................................................................................................. 64
Code Snippets ..................................................................................................................................... 65
Special Symbols .................................................................................................................................. 66
Real Font Size ...................................................................................................................................... 67
Format Stripper .................................................................................................................................. 67
Apply CSS dropdown .......................................................................................................................... 69
Foreground Color ................................................................................................................................ 70
Background Color ............................................................................................................................... 73
Print .................................................................................................................................................... 74
New Paragraph ................................................................................................................................... 75
Horizontal Rule ................................................................................................................................... 75
Insert Date .......................................................................................................................................... 76
Insert Time .......................................................................................................................................... 76
About RadEditor ................................................................................................................................. 76
Civica Function for Filebank ................................................................................................................ 79
Load Page History ............................................................................................................................... 82
HTML Code ......................................................................................................................................... 84
Adding Links ........................................................................................................................................ 85
Linking to the Filebank ........................................................................................................................ 88
Image Handling ................................................................................................................................... 90
Image folders and files ................................................................................................................ 95
Uploading a new image - Image selected via the +Upload Tab ........................................... 96
Selecting an Existing Image ....................................................................................................... 99
Images that are too large ......................................................................................................... 100
Resize the Image ........................................................................................................................ 101
Editing the properties of the image ......................................................................................... 104
Tables ................................................................................................................................................ 107
Microsoft Word ................................................................................................................................ 107
Apply CSS Class ................................................................................................................................. 108
History ............................................................................................................................................... 110
WARNING ......................................................................................................................................... 110

City Website / Civica Training Basics
4
Hyperlinks .................................................................................................. 111
FileBank ..................................................................................................... 116
Calendars ................................................................................................... 122
News .......................................................................................................... 130
Press Release ............................................................................................. 131
System Constants ...................................................................................... 132
End of Document Placeholder ................................................................... 132
Appendix A – Page Layouts ........................................................................ 133
Revisions .................................................................................................... 136

City Website / Civica Training Basics
5
Some helpful tidbits about the Civica system The Civica system is a Content Management System (CMS) meaning it is a way to manage our website. It is made up of various modules as well as additional functions in order to create and maintain webpage content. Below are some things that will be helpful to know about the system.
Active Flag
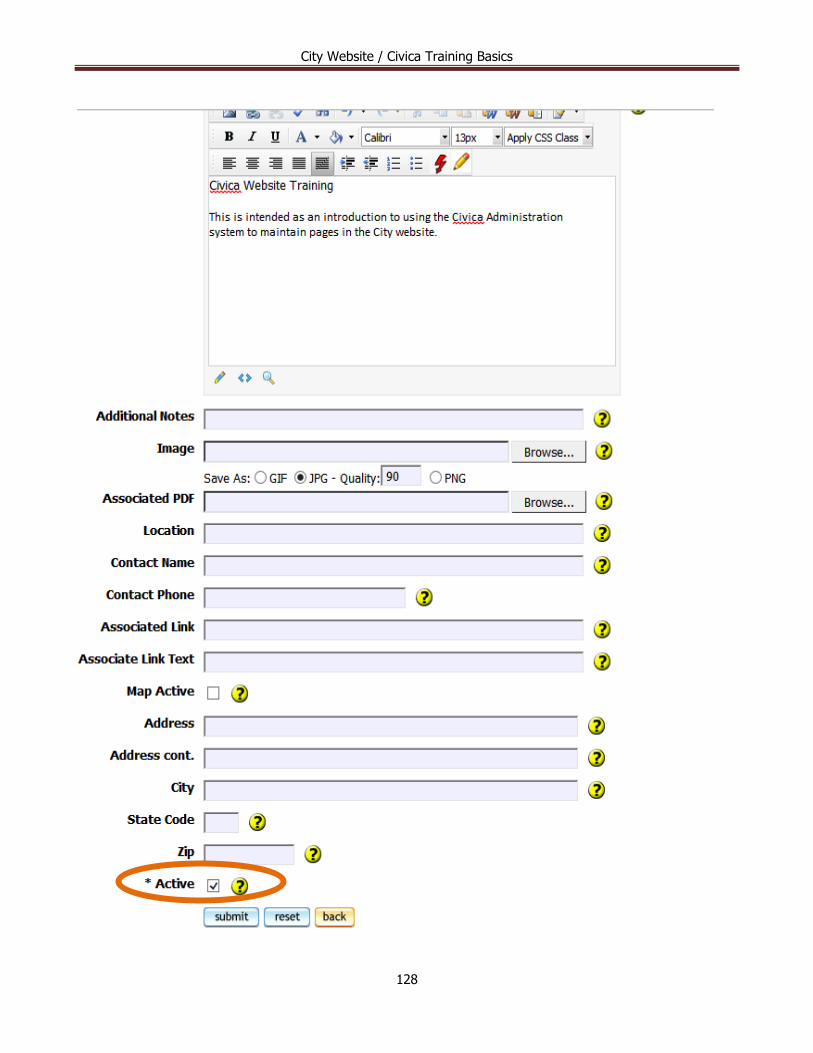
Be sure it is set or the item will not appear on the website.
The Active Flag is commonly used throughout the system to determine whether or not something should be displayed.
Prompt Help Hover mouse over question mark icon to get a help popup:

City Website / Civica Training Basics
6
Browsers Any browser can be used to access the Admin portion of Civica, and from anywhere. However, all browsers do not function alike so there are some idiosyncrasies to understand.
Civica / City Website – Browser Tips Although any browser should work for the Civica Admin, there are quirks we have run into, and below are some tips to try. We’ll deal with the 3 most commonly used browsers: Internet Explorer, Chrome and Firefox First of all, you should have Internet Explorer, Chrome and Firefox installed. In almost all cases one of these will work should another fail. Safari, Opera, etc. should work as well. Second, if you do not have Chrome or Firefox, you can install these yourself: https://www.google.com/chrome/browser/ http://www.mozilla.org/en-US/firefox/new/ As to which browser to use, it has primarily become one of personal preference, though currently (1-8-2015) we are finding there might be issues with Chrome and NavBuilder. Should you run into any problems with any of the browsers, here are some things to try which might rectify the problem: Clear the cache. There are often left over files from previous sessions so clearing them out could resolve the issue so the browser will pick up the most current files. This is especially true for Internet Explorer. Internet Explorer The first and simplest “trick” to try is hold down the CTRL button then click the R. Refresh the page and see if that rectified things. IF so, you are all set! And if not: Go to Tools, Internet Options. If you don’t see your Menu bar, press and release the ALT key. On the General Tab (which should be the first one you see), Click the Delete Button under Browsing History.

City Website / Civica Training Basics
7
Notice all the checkboxes. The key ones are the first two. Depending upon sites you visit, especially those that are restricted and require you to login, you might wish to simply check “Preserve favorities” and “Temporary Internet files” as those are the main culprits for problems and the Civica system. After checking the boxes and possibly unchecking others, click Delete and the system will delete those files. After you have exited out, refresh/reload and try again to see if the problem has been alleviated. If the issue is that you received a Compatibility Error and the following screen, then follow the below instructions: Make sure all instances of the website were closed. Clear cache (as previously instructed above) Go to Tools, Compatibility View Settings. If sanleandro.org is in the window, click on it to highlight it, then click the Remove button and then OK and exit. Close the browser. Open IE once again. Contact the Helpdesk if the issue persists.
Chrome If you need to install Chrome: https://www.google.com/chrome/browser/ Click the menu, which is located in the upper right, just below the “X” and is depicted by 3 horizontal lines, down and select Settings. At the very bottom of the page (you might need to scroll) you will find “Show Advanced Settings”. Select that. Firefox If you need to install Firefox: http://www.mozilla.org/en-US/firefox/new/ Click on Tools, Options. Click the Advanced tab at the top, then the Network tab below. Just above center right is the Clear Now button for Cached Web Content. Click Clear Now. If it does not show the currently using as 0, then click the Clear Now button once more.

City Website / Civica Training Basics
8
Click OK, refresh/reload your browser page and you are finished.
Admin – Logging in
Login in using this website address:
https://www.sanleandro.org/civica/admin This is an internet address and as such is outside the City’s network and thus accessible from anywhere. The https is important as this is the secure side of the website. The https is only needed while working on the website. Http must be used in any links that are for the public side of the website. If Https is used for links to the public side, the viewer will NOT be able to access the link as it expects it to be secure and that only occurs when one is logged into the Admin area. If you get an email that a link is not accessible, suspect it was https instead of http.

City Website / Civica Training Basics
9
The modules you have access to will show with color. All others will be grayed out: If only provided the CRM module:

City Website / Civica Training Basics
10
Shown below are all the current modules with icons:

City Website / Civica Training Basics
11
Another way to access the modules is via the Modules Tab:
Note too whether you get the scrollbar in order to see more. You should only get a list of those modules you can access. Same modules – just another way to access via a dropdown instead of an icon. Back to Contents

City Website / Civica Training Basics
12
NavBuilder
It is essentially the heart of the system. Here is where webpage structures are created. Without it there would be no webpages. Some of the features include:
Create Folders, Pages, Structure
Parent vs. Child (top level vs sub level)
At a folder level, you can create a Child Page under a Child Folder:
In the above, the Parent folder is “Testing” while a Child would be “PWS”. Any pages under the Testing folder, such as “default”, “Search Function”, etc. are Child pages to “Testing”.

City Website / Civica Training Basics
13
At a child folder level one can create any file or folder:
Folder and Page (folder has pages) A website is similar to a file/folder structure in that one could have only pages (files) all by themselves, or folders which contain pages (files). Consider a file cabinet, each drawer could be a parent folder. In that drawer, or parent folder, there are child folders, and in each of those child folders would be child pages. In some way each file or folder relates to the parent. The website is structured in a similar way. The file cabinet itself is the website. Each drawer (and we need some imagination here as we will have many drawers!), is a section of the website, set up for a specific purpose. At the very root, or top level, we have folders for “About the City”, “What’s New”, “How Do I”, “Departments”, “Things to Do” and “Contact Us”. (Inside the NavBuilder there are even some root level pages yet these are usually used as shortcuts to somewhere else in the website).

City Website / Civica Training Basics
14
A great example then of a Parent, or cabinet drawer, would be “Departments”. Under that parent are many Child folders, for each Department as well as some for topic areas a viewer of the website might think of when thinking of a Department and is there for ease of discovery. Then within each actual Department there are Child folders for various aspects of that Department. Looking at any such Child folder one will often discover further Child folders under a Child folder as well as Child pages. A page is a specific piece of information about a topic area. Pages should not be overwhelmed with information as that makes finding specific information difficult and/or reading of the page difficult. Keep the page easy to view and read by using “white space” (blank space), images, small paragraphs, etc. to make the page more pleasing to the eye. If you find you just have too much information to convey, create multiple pages for content areas and simply use an initial page to link to those subject areas. Better to have more pages with less content per page than overwhelm a reader with too much! Take a few minutes to click pages at random on the City website and see how they affect you as you see how it is laid out, the amount of content, etc. and see if you feel overwhelmed. Chances are that if you feel overwhelmed, so will a constituent who views the page.
Create/Modify Create/Modify allows you to actually create the webpage in the system. This is a required step, else you will not have a webpage. During this step you must decide what type of page you desire. You will be able to determine this based on the various page layouts provided. Although you choose this at the time you create a webpage, the page layout can be modified later if needed or desired. The database appears to store the original parameters selected should you desire to revert back to a former page layout. Layouts Page layouts determine what the content will be. Content can be of many types: text, images, Iframe (which will display information that is outside the website as it it were part of the website), calendar items, etc. Click here for a list of all page layouts

City Website / Civica Training Basics
15
The above is simply a sample of what is available (note the vertical scrollbar). Even choosing a particular page layout could have it’s options. Here we will see what happens when I choose HTML,
Above we have selected a page layout in which we can apply some content via the HTML Editor (HTML) and pull in information from the Calendar module (Calendar Events (Below)). The “Preview” button might or might not provide a true preview of the content. It is based on a “canned” image from Civica. If you really want a “preview” you will need to make your selections, click Submit and view the result.

City Website / Civica Training Basics
16
Before choosing a Layout Style, we will move to the right of the Page Layout box to “Post Data”. This determines the calendar to be read for data. We can make our selection(s) via the “pick” link on the right:
First, note there is a vertical scroll bar on the right to provide additional selection choices. Simply click in the box for a desired calendar. Note that in the very first tow you can choose Subs (sub calendars such as those under “Mayor & City Council”, “Commissions and Committees”) and “Show All”. One word of warning. Once you click “Show All”, all the checkboxes will be checked. If you change your mind on that, easiest to click “Cancel” and begin again else you will need to uncheck those that don’t apply.

City Website / Civica Training Basics
17
For this example, we’ll choose “Show All” just to get as many events as possible to display. Under “Layout Style” is “Number”. This represents the number of events to display based on what is choosen in “Layout Style”. For example, if “Number” is set as 20, and “Layout Style” is “caEventListTarget”, we will get the next 20 events, regardless if there are multiple events on one day. It is based on event. However, if “Number” is set as 20, and “Layout Style” is “caMutliDayListTarget”, we will get the next 20 event days and therefore if there are multiple events on a day this will result in showing more than 20 events. After finishing my selections in the Page Layout screen, I will click Submit to get a resulting page. (Options for “Layout Style”):
“Layout” provides various types of page layouts based on the above, usually having to do with format and content. This will be provided in a simple dropdown:
In this case we have 6 options to choose from. Some Page Layout styles have 20-30 or more. With the lack of a real preview, all one can do is make a selection, save and review the

City Website / Civica Training Basics
18
resulting page. In this case, ‘2” has a very good layout with content so we will use that. Try the others at your leisure. Another parameter of note is “Skip”, which is meant to skip days if no events occur that day. This provides the ability to therefore say, in our current example if nothing was scheduled for the next 20 days, to choose only those days with events. One other parameter that could be useful is “Start Date”. If I were to set a start date of 4/1/2015, my calendar items would start listing from that date:
Depending upon the Page Layout selected you will usually receive other parameters used to further refine your page. Back to Contents

City Website / Civica Training Basics
19
Preview & Edit The Preview button, located center, right, will allow you to preview the page you have created. It will also allow you to access the HTML Editor and begin with content. Caution: If you do this, be sure to finish up in NavBuilder or later you will have issues! Therefore, if you click Preview, a new tab will open in your browser. Keep it there and available until you finish with NavBuilder – then to that tab and edit your page. Now that we’ve reviewed some of the features in NavBuilder, let’s get into specifics:

City Website / Civica Training Basics
20
Items to understand, going left to right, then down: There is a folder icon with a green lock. The Change button next to this will change this to a page. Clicking Change again changes it back to a folder. Folders are assumed to have the file name default.asp assigned to them. Folders are designed to hold files. The green lock is simply alerting you this is Checked Out and you can therefore modify it. You can almost always disregard the Layout and Show Help on the ride side of this line. Name. When you create a folder or page in NavBuilder, you must click Create/Modify. The first time this will request you to name the file or folder. If a folder, you will see it create a URL that has that name you entered then /default.asp. Folders always have at least one file. Next to Name is File Name. The difference between the two is that Name is what you will see in the menu, whereas File Name would be the name of the file stored in the folder. When you have a Name that is lengthy, use File Name to shorten it! For example:
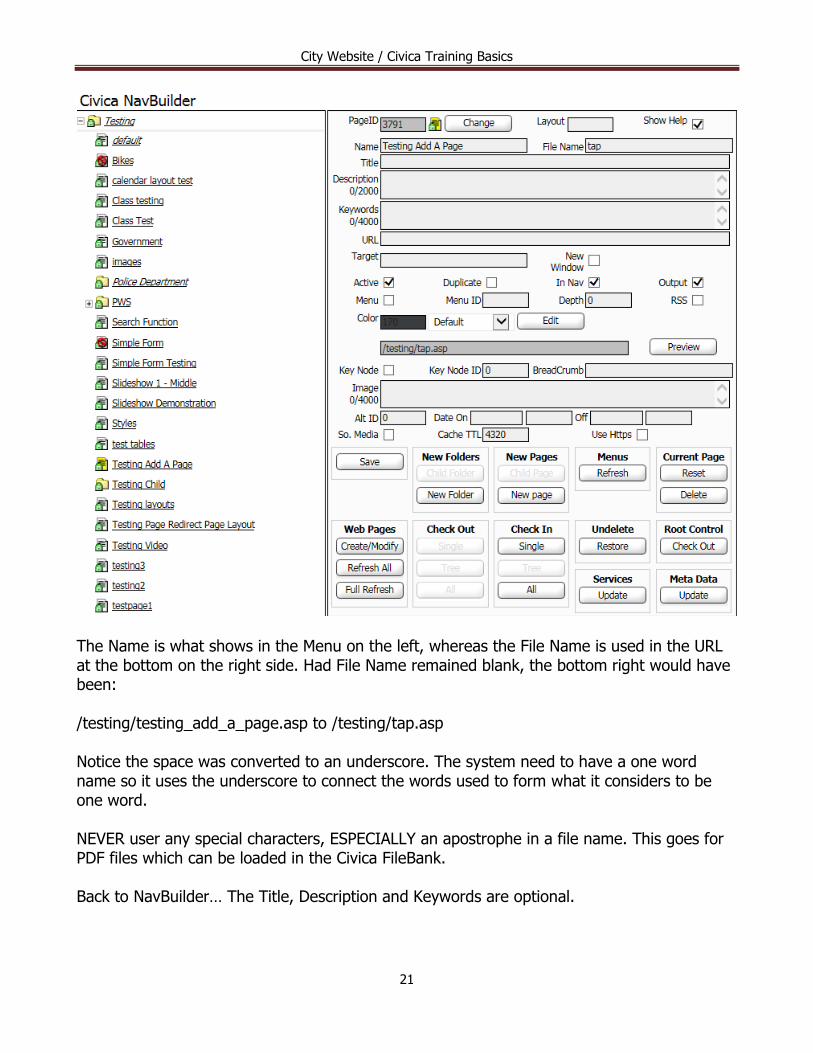
City Website / Civica Training Basics
21
The Name is what shows in the Menu on the left, whereas the File Name is used in the URL at the bottom on the right side. Had File Name remained blank, the bottom right would have been: /testing/testing_add_a_page.asp to /testing/tap.asp Notice the space was converted to an underscore. The system need to have a one word name so it uses the underscore to connect the words used to form what it considers to be one word. NEVER user any special characters, ESPECIALLY an apostrophe in a file name. This goes for PDF files which can be loaded in the Civica FileBank. Back to NavBuilder… The Title, Description and Keywords are optional.

City Website / Civica Training Basics
22
URL is a special case and is used to automatically redirect to a different location/file. For example:
Notice this shows as San Leandro YouTube Channel in the menu yet its actual location, and
thus target, is http://www.youtube.com/user/cityofsanleandro . This link is outside our City
Website, we you will see the New Window box checked (below the URL). This will allow one
to go to this page but the browser will open a new tab or window so they don’t lose their
place in our website.
Whenever you enter a URL in the URL line, it will supersede the one in the line next to the Preview button, which is normally automatically created for you by NavBuilder. This method allows you to redirect one to another page.

City Website / Civica Training Basics
23
Before leaving NavBuilder:
‘Save’, ‘Refresh Menu’, ‘Refresh All’
Check Out/In – Single and Tree (multiple pages and/or folders)
Moving – within (Move) and around (Move Out)
City Website / Civica Training Basics
24
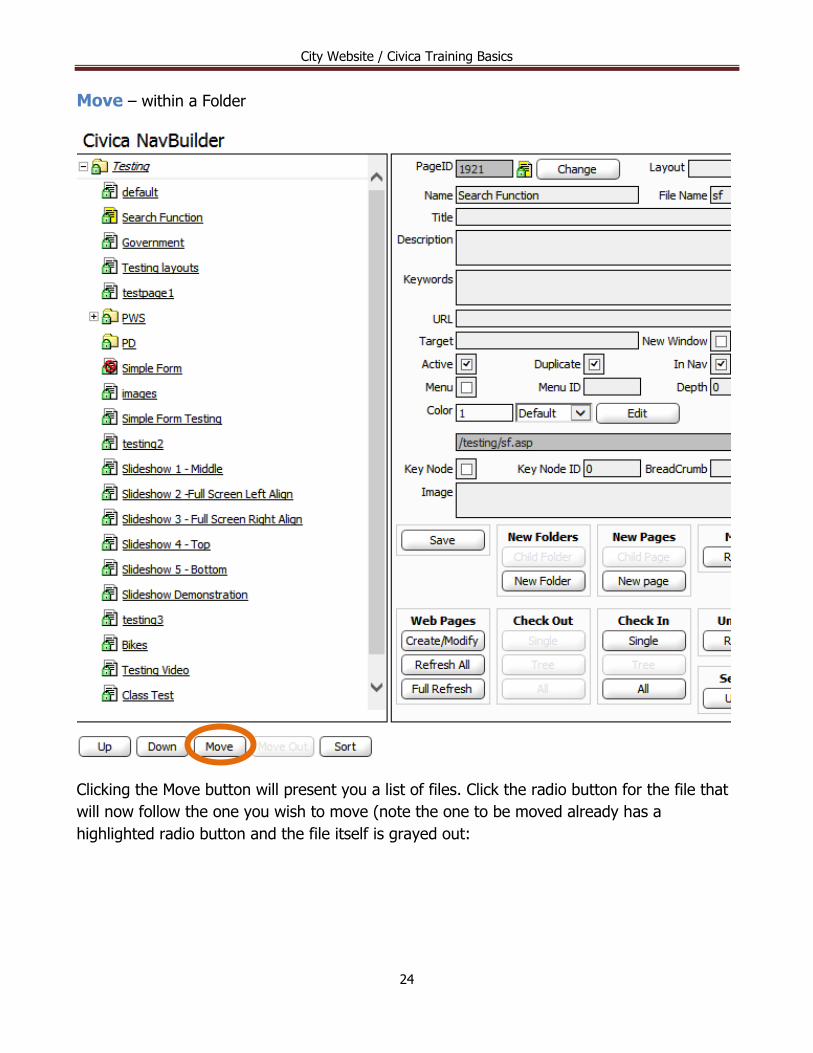
Move – within a Folder
Clicking the Move button will present you a list of files. Click the radio button for the file that
will now follow the one you wish to move (note the one to be moved already has a
highlighted radio button and the file itself is grayed out:

City Website / Civica Training Basics
25
After clicking the radio button for the file you wish to precede, click the Move button (next to the Cancel button) to complete the move.

City Website / Civica Training Basics
26
Move Out From one Folder to another, possibly under a new top level Folder. Make the desired file or folder the currently chosen one. Move next to the page or folder to be moved in the left navigation, yet to its right then right click. If you get the green highlight, then at the bottom the Move Out button will be lit.

City Website / Civica Training Basics
27
Click the Move Out button:
You now get a listing to the right for choosing where to move the file or folder. Only those that have a round ‘radio’ button are available targets.

City Website / Civica Training Basics
28
Duplicate
Name and filename
(Name = Navigation Name. Filename = file name):

City Website / Civica Training Basics
29
URL allows redirection.
Check In and Close window otherwise it remains locked!

City Website / Civica Training Basics
30
Refresh With finishing NavBuilder, ALWAYS think:
Save (the changes)
Menus/Refresh (Refreshes the menu to the left which displays on the page)
Web Pages/ Refresh All (to assure webpages have the latest content and links)
Doing these three after making changes in NavBuilder will help prevent many issues.

City Website / Civica Training Basics
31
Hints:
Green lock – able to edit and/or move Red – deactivated – no one can reach until
set to Active. Folders – hold pages. Also where banners
can be set (banners CANNOT be set for individual pages).
Folders should always have the page
default.asp. Pages hold information. Root folders are top level and would be, for
example:
o Sanleandro.org/depts o o Sanleandro.org/howdoi o o Sanleandro.org/about o
Some custom ones:
o Sanleandro.org/pt o o Sanleandro.org/climate o o Sanleandro.org/testing o o Sanleandro.org/broadband o
The custom ones do Not show in any navigation.
To move a file or folder to be under a different folder, that folder must be “Checked Out” (check out tree assures you can move the item to the tree, yet might interfere with someone else currently working in that tree).
City Website / Civica Training Basics
32
When someone is editing a file or folder, it
is locked. Exiting NavBuilder via Checking in all folders and files should unlock the files and/or folders.
Back to Contents

City Website / Civica Training Basics
33
Pages/HTML Editor
With the exception of the Home page, all page content can be edited and manipulated via the HTML Editor. The Home page is set up differently and controlled differently.
Edit
Note the Edit icon . If you are logged into the Civica Admin area, then go to the website and look at a page (using https, not http), you will find the edit icon IF you are granted access to modify that page.
HTML Editor Hovering over the edit icon will result in the dropdown. The first four, HTML Editor, Layout, NavBuilder and Add Page will be the primary only ones you will use. (“Add Page” is new).
We will cover each of the four in the following sections, beginning with the HTML Editor.

City Website / Civica Training Basics
34
HTML Editor / WYSIWYG Editor (For example purposes, this area uses https://www.sanleandro.org/testing/testing_add_a_page.asp) Although it is a WYSIWYG (What You See Is What You Get) editor, what you see won’t be exactly what you get. Expect lots of trial and error. For example, here is what you will see on the editor:

City Website / Civica Training Basics
35
However, this is what you will see in the webpage:
So you must approximate in the Editor, save then check the webpage and modify as needed.

City Website / Civica Training Basics
36
When you click on the edit icon or HTML Editor, for a new page, you will get a “clean slate” to work in:
Where it says “Enter Page Title”, simply replace that with the title you wish to be shown on the webpage. I am going to call mine “Class Example”. Be careful you don’t leave it blank or you will not a title for your webpage. Fortunately you can update this at any time.

City Website / Civica Training Basics
37
Some General Information Once in the Editor you can right click to get some options to paste content:
Note how Cut and Copy are grayed out. If you highlight some content, then right click, these will be activated.
City Website / Civica Training Basics
38
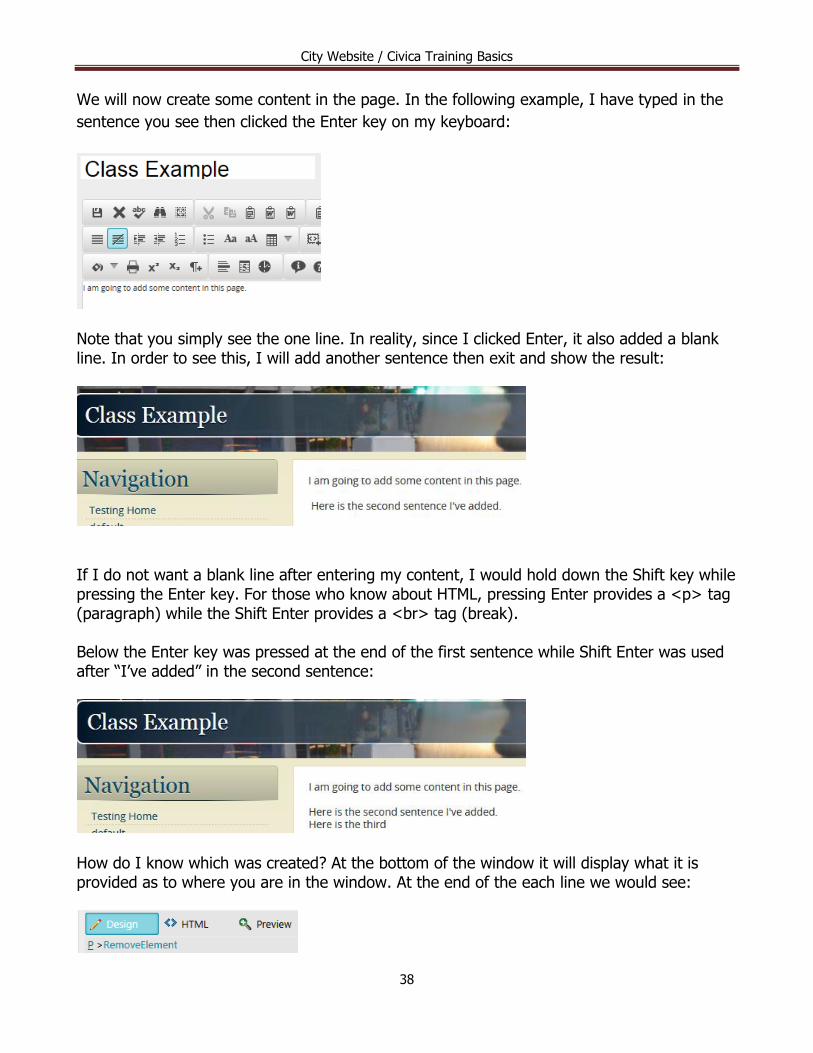
We will now create some content in the page. In the following example, I have typed in the
sentence you see then clicked the Enter key on my keyboard:
Note that you simply see the one line. In reality, since I clicked Enter, it also added a blank line. In order to see this, I will add another sentence then exit and show the result:
If I do not want a blank line after entering my content, I would hold down the Shift key while pressing the Enter key. For those who know about HTML, pressing Enter provides a <p> tag (paragraph) while the Shift Enter provides a <br> tag (break). Below the Enter key was pressed at the end of the first sentence while Shift Enter was used after “I’ve added” in the second sentence:
How do I know which was created? At the bottom of the window it will display what it is provided as to where you are in the window. At the end of the each line we would see:

City Website / Civica Training Basics
39
The Editor is informing us we are at the “P” (<P>) tag. If we click RemoveElement, it will delete the “P” tag. Why did we see this for every line? When we pressed the Enter key to created the first line, the Editor automatically encased the other two lines within the “P” tag as well. This is the default within the editor for both font type and size, as well as formatting. If we were to have exited the editor after the initial Enter, we would have seen:
If you have created a table, and you right click over the table, you get table options:
Back to Contents

City Website / Civica Training Basics
40
Titles and Headers
Paragraph Style We can specify titles and headers in the content section of a webpage in the HTML Editor by
using predefined tags in the center dropdown:
The choices are limited to Normal, Heading 1-4 (H1, H2, H3, H4), which provides simplicity
and consistency within the website:
The Normal is also the “P” tag previously described. In this version of the HTML Editor you
will probably have little need to actually enter it as it is the default and will be assigned by
the Editor.
H1, or Heading 1, is for Titles you want in the page itself. So, in our page I will add “Civica
Class Examples” as my title. First I will position myself at the very beginning of the content
then press the Enter key then reposition myself to the very beginning and type Civica Class

City Website / Civica Training Basics
41
Examples. At first it looks just like the rest of the page so we’ll highlight it, then in the
dropdown mentioned above we will select Heading 1:
Using other functions provided in the Editor toolbar I could do things such as center it on the
page, and/or indent or outdent, etc. For now, we will leave as it is above.
Now let’s add a header. We will position ourselves where we desire to be, then press Enter if
need be to provide space. Then I’ll simply enter the header name, highlight it, then select
Heading 2 from that dropdown. After I had applied Heading 2 I found I had an extra blank
line so I simply deleted that, then saved my work so I could see how the webpage appears:
Notice how the title is a bit larger than the heading. Through these options, or tags, you can
set up a title (or possibly titles) and various headings on your page.
Back to Contents

City Website / Civica Training Basics
42
Editing your content Once your content exists (based on what was entered thus far), you might desire to change
how items are set. The editor will help to show you what tags have been set for it. For
example, if I click on the end of the heading (“My First Heading:”), the Editor will display at
the bottom of the window what has been set:
It will show us the H2 tag was used to define how this heading would display. To change
this, simply click on RemoveElement and it will remove the H2 setting and your display will
show “My First Heading” as plain text. We could, for example, highlight that text once more
then click on the dropdown and select Heading 3 and it will provide the H3 tag for that
heading:
Comparing the prior examples, you will notice a difference in font size between the H2 and
the H3 headers. Use what best fits your content. And as for the title being H1, you might use
H2, then set your headers as H3. Try it and see how it looks – you can always use the
RemoveElement to reset and try again.
Now, let’s review the HTML Editor Toolbar:
The upper left begins with what appears to be a floppy disk icon and this is your SAVE icon.
This should be used periodically to save your work. Although it will take you out of the Editor,
there are two advantages to that.
1. You can see how your page is progressing and how it will look

City Website / Civica Training Basics
43
2. Should something happen (and it occasionally does), your work will be saved and you
can simply begin where you left off. It has happened that one is logged into the Civica
Admin, hits its set time limit and logs one off without notice. So please be sure to
periodically save your work so you do not need to reenter everything!
The second icon is the “Cancel” button and allows you to remove any changes you’ve made,
exit the page and begin anew or leave as is.
The third is the AJAX Spellchecker. When I ran this on my sample page above, it did not find
“Civica” but gave me the option to replace it, ignore it, change manually or add to dictionary.
The fourth, the binoculars, allow you to Find and Replace. Although this works, it does not
highlight what it finds in the Design window, only in the HTML window. It did a nice job for
Replace which can be helpful. If you happen to be in the HTML version of the window, this is
the only function that will work – all others are grayed out.
Next is Select All, which does highlight everything in your editing window. Be careful not to
accidentally remove all your content unless of course you are copying in a new version.
Following there are two more icons, Cut and Copy.
The next icon begins a series of important Paste functions.
The first Paste icon is for things that not copied from Microsoft Office. Microsoft carries with
it a lot of code that creates problems if pasted directly.
The second Paste icon is Paste from Word and the third is Paste from Word, strip font.

City Website / Civica Training Basics
44
Here is line 2 as entered using Calibri Font, 10pt in Word and just pasting it into the page:
The Editor does catch that this is coming from Word and automatically cleans it. Here is the
result:
Notice how much smaller the font is as it is keeping the font information from Word, even
though it was allowed to “clean” it.

City Website / Civica Training Basics
45
Here is the same, using the Paste From Word icon:
Pasting directly from Word and using the icon “Paste from Word” provided the same results.
Now, pasting with the “Paste from Word, strip font” icon:
Notice the font is identical to the original content added to this page. So please use the
“Paste from Word, strip font” icon when pasting from Word! However, if you find you did not,
you can fix the issue.

City Website / Civica Training Basics
46
Position yourself at the end of the line you need to fix (as it carried over the font information
from Word). Notice at the bottom of the Editor window it shows the element information:
Click on RemoveElement, which will remove the FONT information it picked up from Word.
Now when I look at my page I see that line as it should be:
This is simple remedy should you forget to paste properly from Word.
Additional icons exist to
- Paste Plain Text
-
- Paste as HTML
-
- Paste HTML.
-
Pasting Plain Text, like Paste from Word, strip font will assure your information is pasted as
desired and that it picks up the correct font and “P” tags.
Using the Paste as HTML will paste HTML code without rendering it so you will see the actual
code:

City Website / Civica Training Basics
47
<font size="2"><p><BR> Removing Prior Session: <BR>"</p></font>
However, using the Paste HTML icon will render the above code as:
Removing Prior Session:
Here is how it looks in our webpage:
The next icons in the toolbar are the Undo and Redo. These are the same as CTRL Z, CTRL
Y. These should be self explanatory to help you remove changes or put changes back.
However, if you Undo, then enter something new, it will change what is saved in its buffer.
For example, if you type “See the brown dog” it will work as Word does and remove “chunks” of data and not just each individual letter. So be careful in using these. Back to Contents
City Website / Civica Training Basics
48
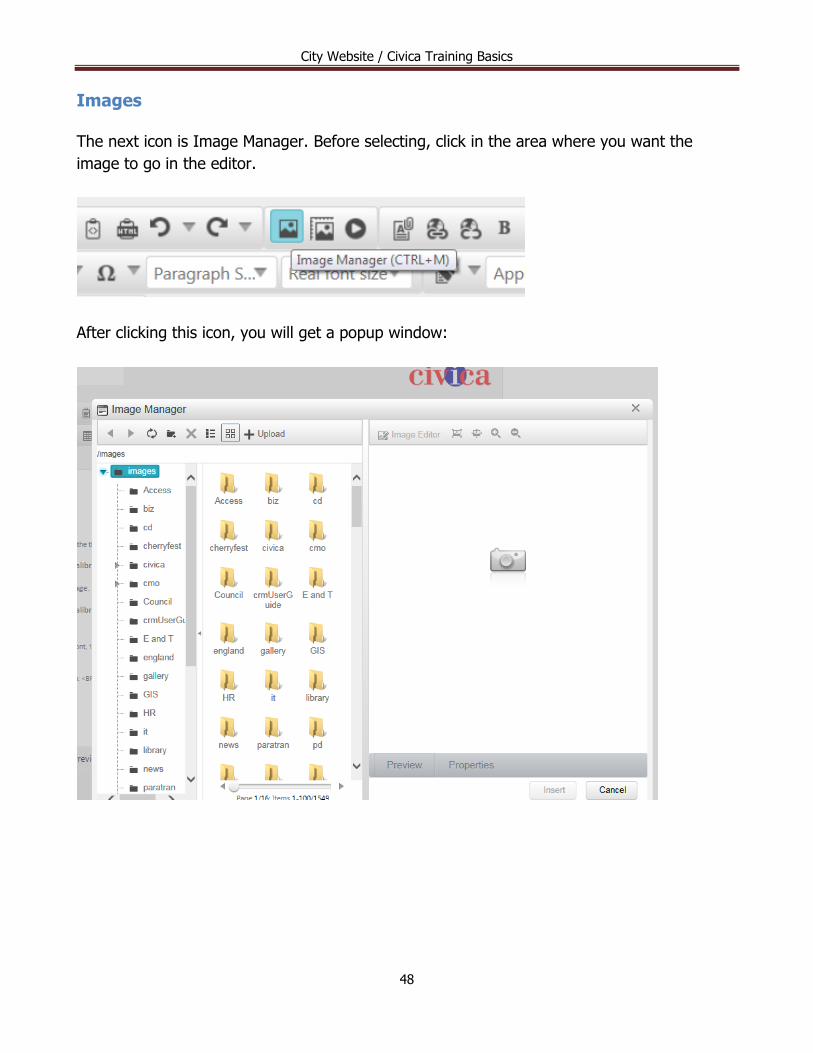
Images The next icon is Image Manager. Before selecting, click in the area where you want the
image to go in the editor.
After clicking this icon, you will get a popup window:

City Website / Civica Training Basics
49
First, select the folder for your image on the left (I have select IT):
This will shift the middle window to the IT folder and display all the images stored there.
This provides you the ability to find an existing image and use it, or you can upload a new
one and it will be stored in this folder.

City Website / Civica Training Basics
50
We will go through an example of uploading a new image:
This will pop up a small window that will initially allow you to upload 3 images. If you need to
upload more, click the Add button to be provided more selections.

City Website / Civica Training Basics
51
Once you have made your selection(s), click the Upload button IF these are indeed new
images. If not, then you have a decision to make.
Notice under the Upload button is the checkbox for “Overwrite if the file exists?”. If checked,
any image with the same file name as one existing in the folder you had selected will be
overwritten. Please be sure you have checked that image file does not exist in that image
window provided. If it does and you want to keep it, then first rename the file you plan to
upload with a new name before uploading.
Once the file has successfully uploaded, it will display in the right side of the window:

City Website / Civica Training Basics
52
You can set the properties for this image prior to adding it to your page by selecting the
“Properties” tab under the displayed image:
In the properties window you can resize the image (after a while you will get a feel for what
the width and height should be. Suffice it to say, in the above example, this is WAY too big
so we will change those values to be a more acceptable range.
With responsible design, you can set the width to (for example) 50%, it will then allow the
photo to resize well on a mobile device. Note that you will want the height to change via the
same ratio, which should be 29% though the Image Manager should determine this value
automatically for you.
We can set other properties such as Alt Text (setting to “Badge”) which will display when one
hovers over the image, Long Description (“Seen on the Memorial Wall outside the Police
Department.”) used for ADA compliance (Americans with Disabilities Act).
We can also align the image so it can be on the left with text printing to the right, or right
with text printing left, etc. via the Image Alignment dropdown. I will select the center.

City Website / Civica Training Basics
53
One can place a border around the image if desired and set the width of the border as well
as color. (Most images on the City website do NOT have borders).
You can resize the images using the buttons around the image. Usually you will want to
resize it diagonally, keeping the height and width ratios the same as they were (only two of
the eight are circled below):

City Website / Civica Training Basics
54
A VERY important note about images:
Trim their size BEFORE loading them into the system!
Remember the initial image loaded? It is 2,675,450 bytes (2612 KB) or nearly 2.7 MB in size.
A decent size for even a large image (one that covers the content area) should be less than
.5 MB maximum (500,000 bytes or 488 KB). This image, which is half the width and less that
30% the height is obviously was too large.
The reason the size is an issue has to do with time to load images. Some pages might have a
number of images (the basic City Website page all by itself is made up of a number of
images). So if some images are really large in size these could significantly slow the loading
of the page.
How to resize an image? You can use various tools already on your computer that Microsoft
supplies, or you could use GIMP (shortcut can be found at H:\GIMP-2.0). This topic is also
discussed under Images. A simple tool is Microsoft Office Tools, Picture Manager. Here you
can choose the image you want, then export it and have it resized in the process:

City Website / Civica Training Basics
55
Note to use the “Export using this size” and select one of the Web sizes:
You can rename it so you don’t affect your original:

City Website / Civica Training Basics
56
To find out the size of an uploaded image, change the second column’s display:
From:

City Website / Civica Training Basics
57
To:

City Website / Civica Training Basics
58
Here is this particular image that was resized then uploaded:
You will notice two things. First, the filename has an “a” before the .jpg extension. This was
done to keep the modified file different from the origin, thus preserving the original.
Second, the file size is now .33 MB, or 334,598 bytes as compared to the original 2,675,450
bytes. The file was reduced to approximately 1/8 it’s original size yet kept its image quality.
Back to Contents
City Website / Civica Training Basics
59
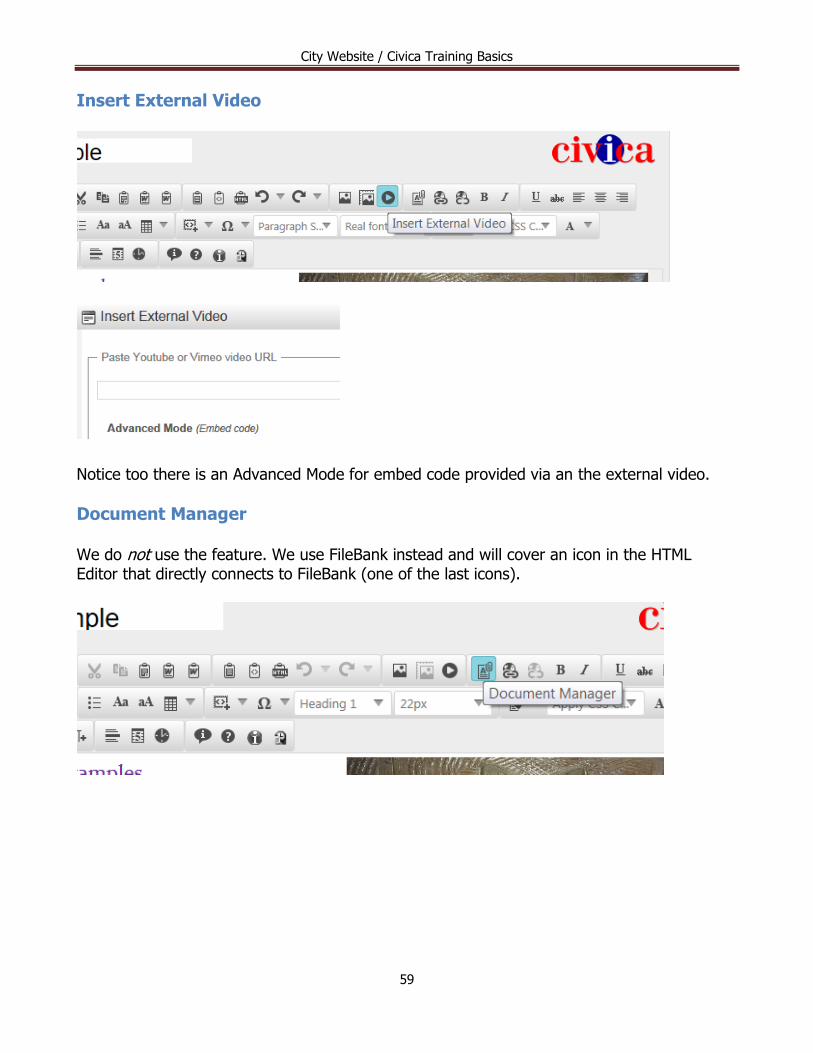
Insert External Video
Notice too there is an Advanced Mode for embed code provided via an the external video.
Document Manager We do not use the feature. We use FileBank instead and will cover an icon in the HTML Editor that directly connects to FileBank (one of the last icons).

City Website / Civica Training Basics
60
Hyperlink Manager
The Hyperlink Manager is used frequently. There are two ways to use this feature. In both cases be sure to have clicked in the content area where you want the link before accessing the Hyperlink Manager. In the first instance, you can open the Hyperlink Manager and create your link completely from within:
In the above, you can define your link (URL), enter the text that will show in your document (Link Text), determine how the link opens (Target) and add text for ADA compliance to describe the link should Link Text be nondescript, such as “click here” (Tooltip). So, if we define a hyperlink as follows, we will then show it as it displays in the second image below:

City Website / Civica Training Basics
61
Note no tag was chosen to show this as a title or header so we get the default font size. Since we did not select a Target, this link will transfer us from the current page to the linked page when clicked. Clicking the link while in the Editor will open the following to present the link information below:
This provides information at a glance on a link. You can change the Target as well as Tooltop (Title) here. You can also open the Hyperlink Manager via the icon that is there as well.

City Website / Civica Training Basics
62
The second instance is to work with existing text and make it into a link. If I take the text
from the prior link and simply enter that text on a line, I can highlight it then select the
Hyperlink Manager and that text will automatically fill the Link Text field:
It might be obvious but using the Hyperlink Manager to create the hyperlink can be more
efficient than the second method, however both will work just fine.
Remove Link Notice in the toolbar that the icon next to the Hyperlink Manager is grayed out:
This is the Remove Link feature. It is off by default as one must be working with a link in
order to need it. If I click on my link in the content section, this icon will become active (after
all, one can’t remove a link if it doesn’t have a target link to remove):

City Website / Civica Training Basics
63
If I then click the icon itself, it will remove the hyperlink itself but leave the text. If you did
this by mistake or change your mind right away, click the Undo icon.
Word Processing icons The next 7 icons on the first row of the toolbar are standard word processing icons so we
won’t cover those here, as is the first icon on the second row:
The next icon though might not exist in word processors we I’ll mention it here:
In order to demonstrate, I copied text to my content area from a random webpage then set
it as Justify format. I then changed the Zoom level of this page to 50% in order for you to
see that it is indeed justified.

City Website / Civica Training Basics
64
After clicking the Remove alignment:
Although this example doesn’t have a great deal of difference, you can see the first two lines
had been padded in the first example and not in the second so they no longer align with the
third.
The next 6 icons again are standard word processing icons:
so we will move onto the next one.
Tables Although tables are standard to have in a word processor we will deal with them here under
the Tables section further in this document.

City Website / Civica Training Basics
65
If you have created a table, and you right click over the table, you get table options:
Suffice it to say here this is a nicely enhanced area and works much more like the Table
functionality of a word processor!
Code Snippets At this point I’ll call Code Snippets an interesting feature which will mainly allow you to set up
some preset table displays which can then be manipulated as needed.
City Website / Civica Training Basics
66
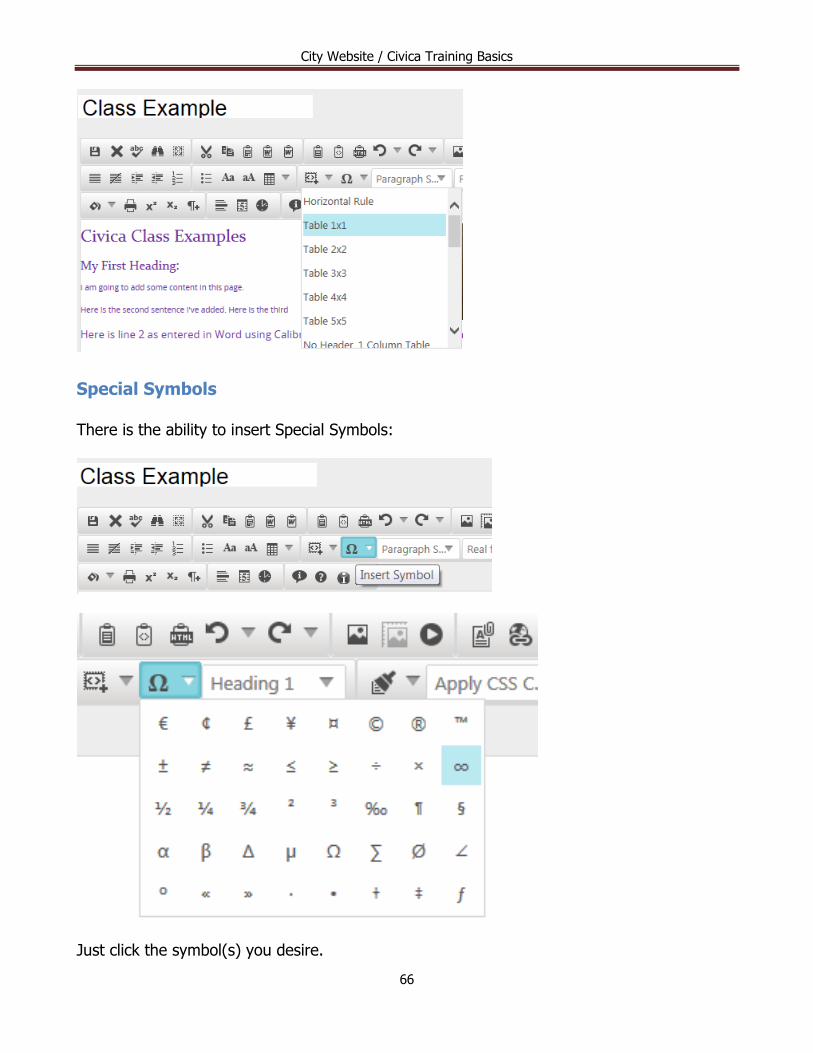
Special Symbols There is the ability to insert Special Symbols:
Just click the symbol(s) you desire.

City Website / Civica Training Basics
67
The next icon (Paragraph Style) we have already covered so we now move to the Format Stripper icon.
Real Font Size
Format Stripper
These are very powerful tools to revise your content.

City Website / Civica Training Basics
68
Strip All Formatting:
As you can see, it definitely strips out everything, including our image! Not sure why this would be useful unless dealing with a small amount of information that needed to be set up “from scratch”. Use the Undo or CTRL Z to put things back as they were. Strip All CSS Formatting

City Website / Civica Training Basics
69
Immediately we see the image has taken over the space. The image was set to be a 50% width, within a “style” statement which is CSS. When CSS was removed, it reverted to its full size. Actual purpose for stripping out CSS? Not really sure unless one wants to “start from scratch” or to do some coding. Use the Undo or CTRL Z to put things back as they were.
Strip Font Elements Can remove the elements set such as size, font type, font weight, etc. Can be done using the tool at the bottom of the screen as well. Strip Span Elements Spans are often set up in the code to do some special task, such as setting the font color. So stripping it out would make the font color revert back to the default. Strip Word Formatting Should work similarly to Paste From Word, Strip Font described previously.
Apply CSS dropdown
City Website / Civica Training Basics
70
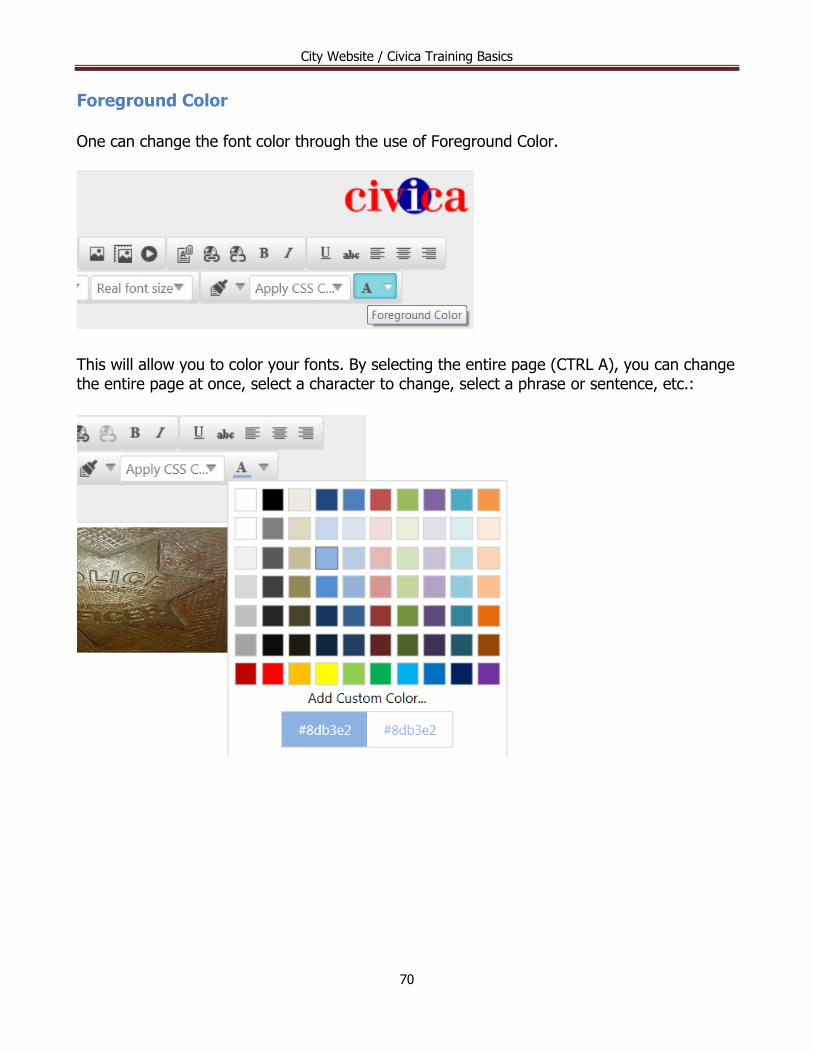
Foreground Color One can change the font color through the use of Foreground Color.
This will allow you to color your fonts. By selecting the entire page (CTRL A), you can change the entire page at once, select a character to change, select a phrase or sentence, etc.:

City Website / Civica Training Basics
71

City Website / Civica Training Basics
72
Keep in mind you can use the Undo function to revert back to the previous color (or use
CTRL Z):
We will revert it back from yellow so it is much easier on the eye.

City Website / Civica Training Basics
73
Background Color
Using the previous line where the font had been changed to yellow, we will instead change its background to yellow:
When hovering over a color, in the bottom rectangles one can find the hexadecimal value for the color being used (good for those coding in HTML).

City Website / Civica Training Basics
74

City Website / Civica Training Basics
75
Above is an example of what you will see in your Print result. The next two icons, Superscript and Subscript are standard word processing functions.
New Paragraph
If I position my cursor in from the the “P” in Please (pretty close to dead center in the following paragraph), then click the New Paragraph icon, it will split this paragraph at that point:
Horizontal Rule
Position yourself where you would like a horizontal rule, or line, in your page then click this icon:

City Website / Civica Training Basics
76
Insert Date
One can easily insert today’s date into the page.
Insert Time
One can easily insert today’s time into the page.
About RadEditor

City Website / Civica Training Basics
77
Similar to all other “About” selections:
Help (F1)
Creates two help windows if in Internet Explorer. One is for Internet Explorer while the other is for the RadEditor:

City Website / Civica Training Basics
78

City Website / Civica Training Basics
79
Provides a quick one line description of the icon. Please note a number of the icons listed above are not in the HTML Editor toolbar.
Civica Function for Filebank
One of the most useful functions in the Editor. Allows the user to set up the text for a link to a Filebank entry and easily attach that link:

City Website / Civica Training Basics
80
In the right pane of the window is the Preview button, used to see the selected file from Filebank so you can assure you have selected the right one. Using Link Only: Navigate on the left side to the file you want to link, then click on that file to hightlight it. Notice data for that file will show in the right side of the window:
At this point you can simply click the Insert button, Save and see your link on your page:
In the above, I hovered over the link, thus displaying it in the Status Bar on the browser (if your Status Bar is turned on).
City Website / Civica Training Basics
81
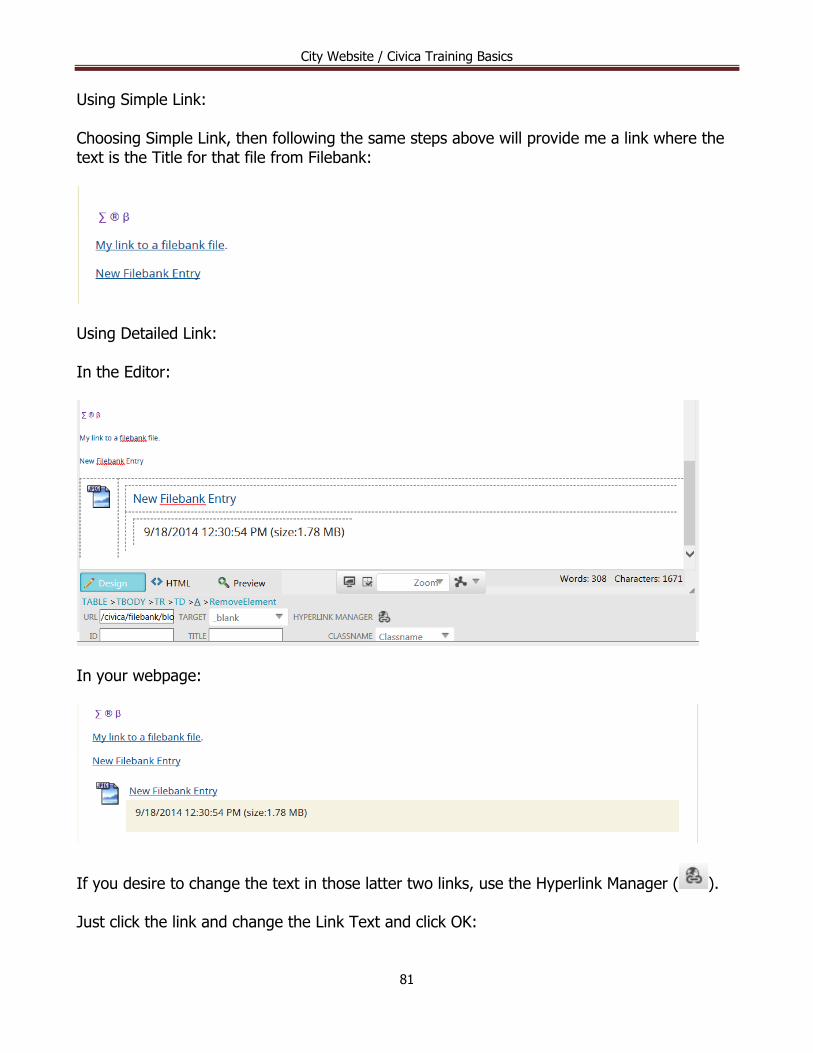
Using Simple Link: Choosing Simple Link, then following the same steps above will provide me a link where the text is the Title for that file from Filebank:
Using Detailed Link: In the Editor:
In your webpage:
If you desire to change the text in those latter two links, use the Hyperlink Manager ( ). Just click the link and change the Link Text and click OK:

City Website / Civica Training Basics
82
Load Page History
The Load Page History allow you to revert back to an older version of the page (50 revisions are kept):

City Website / Civica Training Basics
83
Other features to note:
ZOOM
There are various Zoom levels to choose from:
When you select a Zoom level, it will reflect in your Editor screen:
Note when changed to 100%:
Back to Contents

City Website / Civica Training Basics
84
HTML Code At the bottom, the first is the WYSIWYG, yet if you know HTML, you can use the HTML button to see and edit the code, or copy the code to another editor and paste it back in.
You MUST go back to WYSIWYG in order to save and/or exit:
This is not a class on HTML so this is just FYI. Back to Contents

City Website / Civica Training Basics
85
Adding Links Links allow one to navigate, either within a page or outside to another page or even website. Entering a link to another page, you would first select your text then use the Hyperlink Manager:
I want to navigate to the http://www.sanleandro.org/testing/default.asp.

City Website / Civica Training Basics
86
We would enter http://www.sanleandro.org/testing/default.asp for URL. If the line was highlighted, as ours was, the Link Text will display that text. Target allows you to simply go to the linked page, or open a new window for that page. If the page is within our website, leave the Target as is. If the link goes to an external site, set this as New Window. This will preserve the current page while allowing the user to see the linked page. You would enter the description you want to show, then set the hyperlink for that target location: Enter the text, highlight it:
Then click the hyperlink manager icon ( ) found above in the upper right.

City Website / Civica Training Basics
87
Here are the relevant areas to be filled in: The first line, URL, is the actual link. If this were a link to another website, we would need to enter what is called the “absolute” link and it would appear as: http://www.sanleandro.org/testing/testing_add_a_page.asp However, as this page is within our website, we would enter the “relative” link: /testing/testing_add_a_page.asp Note the beginning portion of the URL is removed as it would actually go out to our website and open a page within a page. The Link Text is what the description of the link will be. Target is important. If the link is to a page or section within the City’s website, this can be left as is. However, if the link is to something external to the City website, change this (via the dropdown) to “new window”. This will open a new tab or window, leaving the City website accessible. Tool Tip can be the same as the Link Text and is for ADA purposes (Americans with Disabilities Act). Back to Contents

City Website / Civica Training Basics
88
Linking to the Filebank A lot of links in the website reference documents in the FileBank. The link reference, or URL
can be attained while in the FileBank, yet can also be found via the HTML Editor via the button (next to last in the toolbar). Here is a new line to reference a document in the FileBank:
Highlight it, then click on the :
Click on the folder, then subfolder (if necessary) to navigate to the document desired, click to highlight the document then simply click Insert!

City Website / Civica Training Basics
89
Back to Contents

City Website / Civica Training Basics
90
Image Handling
Images are any graphic image or photo. When using the WYSIWYG editor, you can resize an image, and as a result the stored image file is resized as well. This is a good feature as some photos are large files that can be rendered in a more appropriate size for a webpage. The quality of the image needed on a webpage is considerably different than one needed for printing. If you use a freeware image manipulating program such as GIMP (shortcut can be found at H:\GIMP 2.8), then you can set a web image at 72 or 96 dpi (dots per inch) and have a good looking image on the screen. GIMP is good for cropping photos/images as well so you can really display just what you desire.

City Website / Civica Training Basics
91
Select Image, Scale Image:
To change the size of the image, change either the width or the height. Changing one will automatically change the other, keeping the proper perspective. If we want this as a reasonable size for the webpage, we might want to try setting it for a width of 300, then click Scale:

City Website / Civica Training Basics
92
At the top of Gimp you will find information about the image, including the current width and
height:
You will then want to save this as a modified version of the original (be careful not to replace
your original!). Click on File, Export As, then change the name of the image, in this case by
simply adding “_new” to it:

City Website / Civica Training Basics
93
Now click Export. Also, be sure to take note of the location where this image will be stored. If desired, change the location to one in which you will be able to more easily find it later

City Website / Civica Training Basics
94
You are provided a default quality level which should be sufficient for the image (provided it is 90% or above). Then click Export to save this image file.
Back in Civica, you will then use the Image Manager to get this into your page:
Back to Contents

City Website / Civica Training Basics
95
Image folders and files
After clicking the Image Manager icon, you will get the root directory shown below. There are many images stored in the root directory, however it is best you double click the folder for your Department and store yours there. You can even create subfolders for better organization.

City Website / Civica Training Basics
96
Uploading a new image - Image selected via the +Upload Tab Click +Upload to upload a new image to the Image Manager:

City Website / Civica Training Basics
97
You will receive a new popup window which allows you to find your image file (Select button) and then Upload it to the Image Manager.
Initially you are provided the ability to upload 3 image files. The “Add” Button will add one more image file upload ability each time it is clicked (though it does not need to be used). Note under the Add button the checkbox for Overwrite if file exists?. If you are replacing an existing file in the Image Manager, this MUST be clicked or you will not be able to upload. MAKE SURE you want to replace the existing file! It is possible for two images to end up with the same named file and replacing an existing one might not be desired! When in doubt, rename the new incoming file before attempting to upload. Click Select, then navigate to the location of your image file and select it:
City Website / Civica Training Basics
98
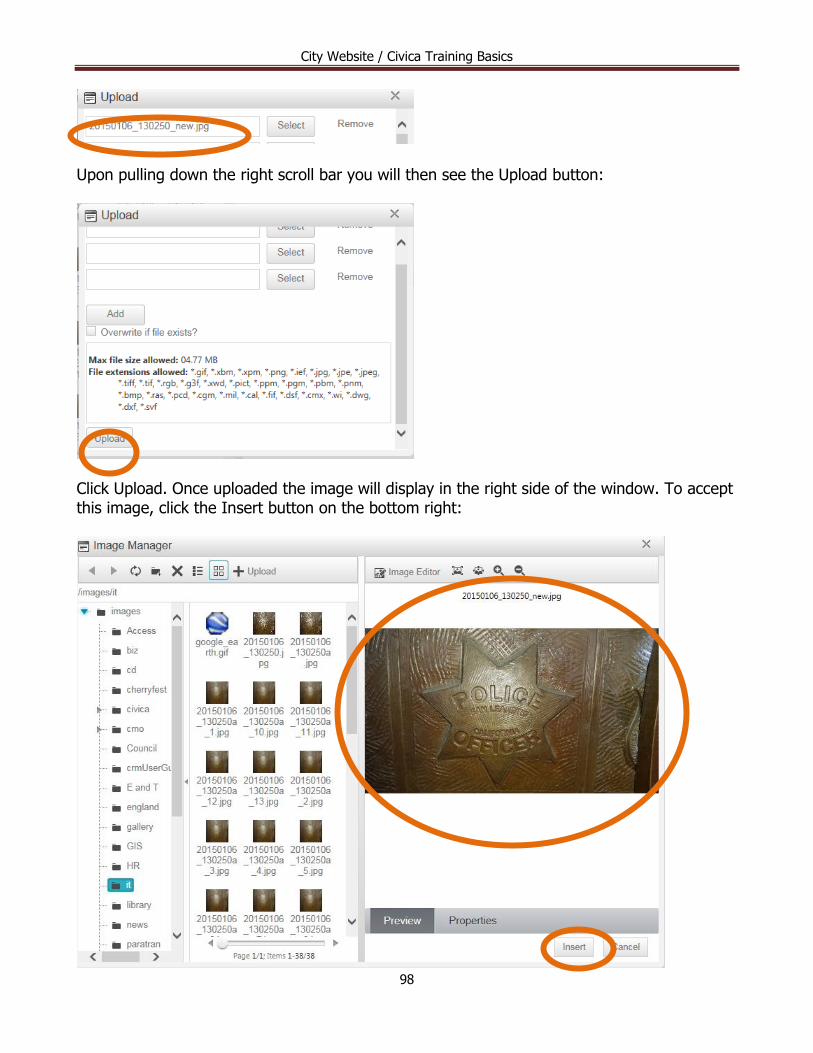
Upon pulling down the right scroll bar you will then see the Upload button:
Click Upload. Once uploaded the image will display in the right side of the window. To accept this image, click the Insert button on the bottom right:

City Website / Civica Training Basics
99
Your image will be inserted into your document at the point where your cursor had been.
Selecting an Existing Image Clicking an image file will allow it to be previewed in the screen to the right. If you happen to find the right image you want, you can then simply click the Insert button to put it in the webpage.
Set the proper folder (see prior images) then browse for an image.

City Website / Civica Training Basics
100
Images that are too large Here is how an oversized image looks in the browser:
Notice how this overruns the right side of the page? One of three things can be done:
1. Resize this image to a smaller size Or
2. Change the page layout to remove the left navigation Or
3. Simply don’t use this image.
Back to Contents

City Website / Civica Training Basics
101
Resize the Image
Click on the photo in the editor. You will find a small box in the upper left. Click and drag it diagonally down and to the right:
City Website / Civica Training Basics
102
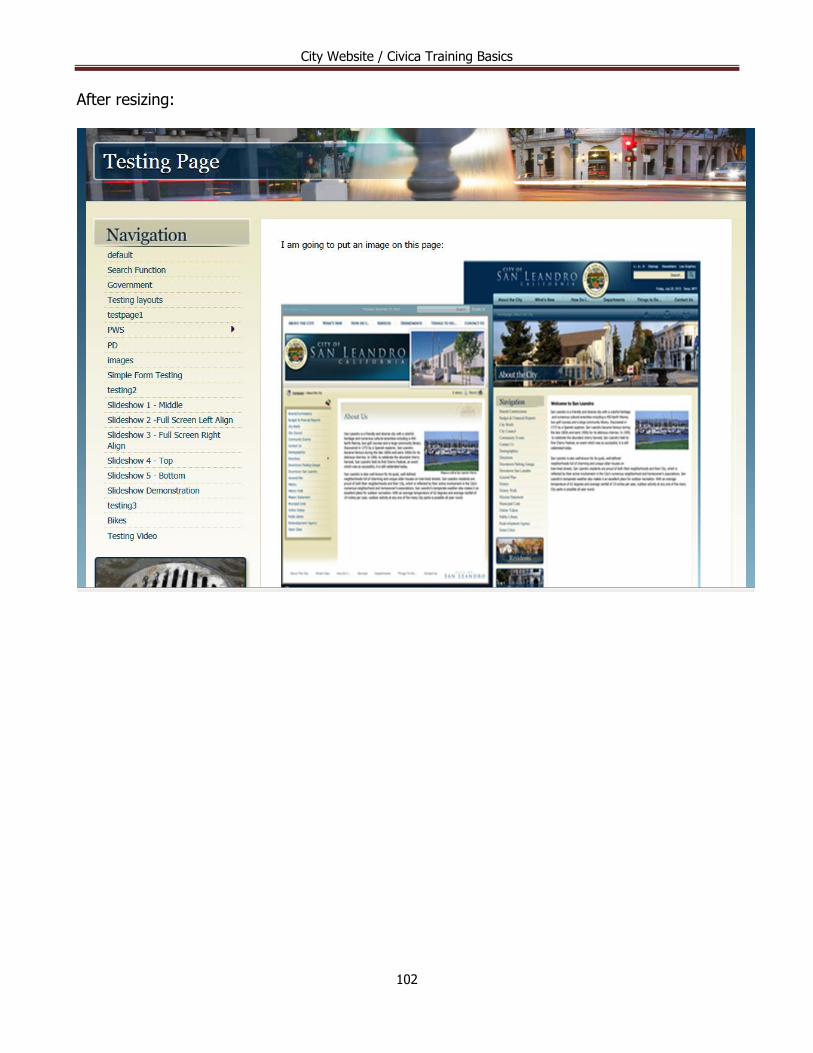
After resizing:

City Website / Civica Training Basics
103

City Website / Civica Training Basics
104
Editing the properties of the image
Often you want to position the image on your webpage, put a border around it (or remove a border), etc. After an image has been placed on the page, click once on it so it is selected, then right click and choose Set Image Properties:

City Website / Civica Training Basics
105
If you do NOT want a border, be sure to enter a 0 (zero) in the Border Width box. If you do have a Border, you can set it’s color via the Border Color. (We tend to not have borders). You can set or change the ALT text (displays when one hovers over the image).

City Website / Civica Training Basics
106
In order to position the image on the page, use the Image Alignment to position the image:
Note there are some other properties you can set as well. Back to Contents
City Website / Civica Training Basics
107
Tables
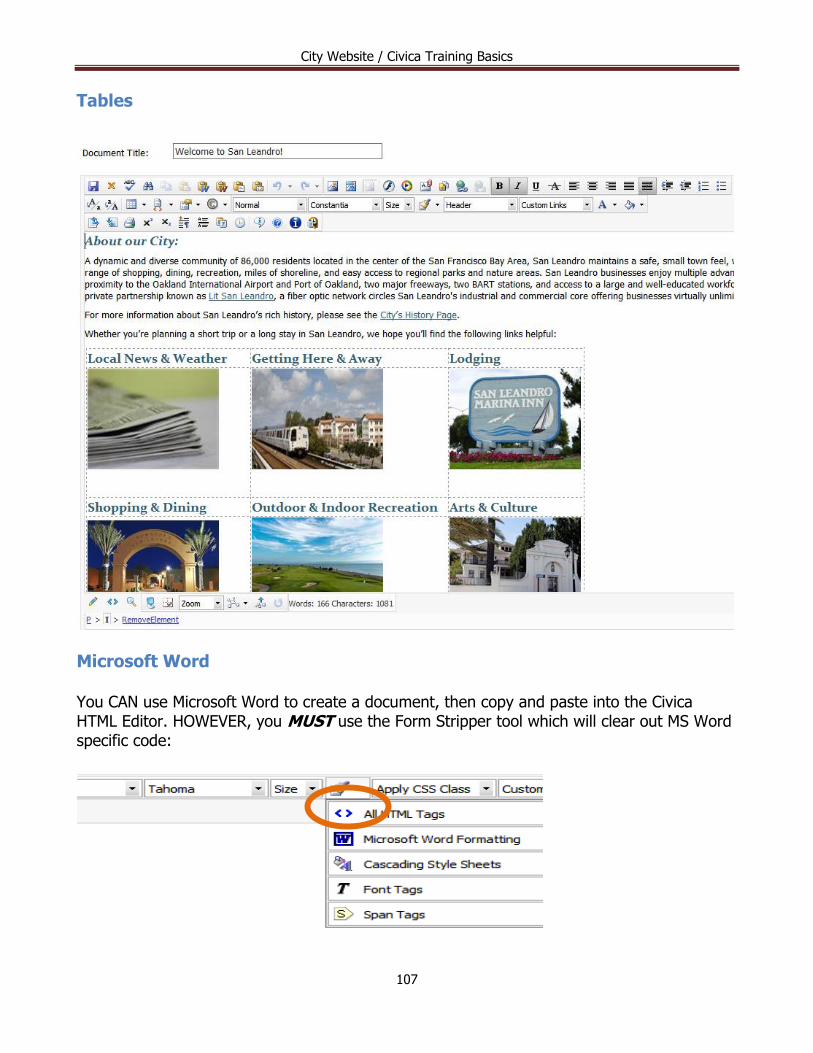
Microsoft Word You CAN use Microsoft Word to create a document, then copy and paste into the Civica HTML Editor. HOWEVER, you MUST use the Form Stripper tool which will clear out MS Word specific code:
City Website / Civica Training Basics
108
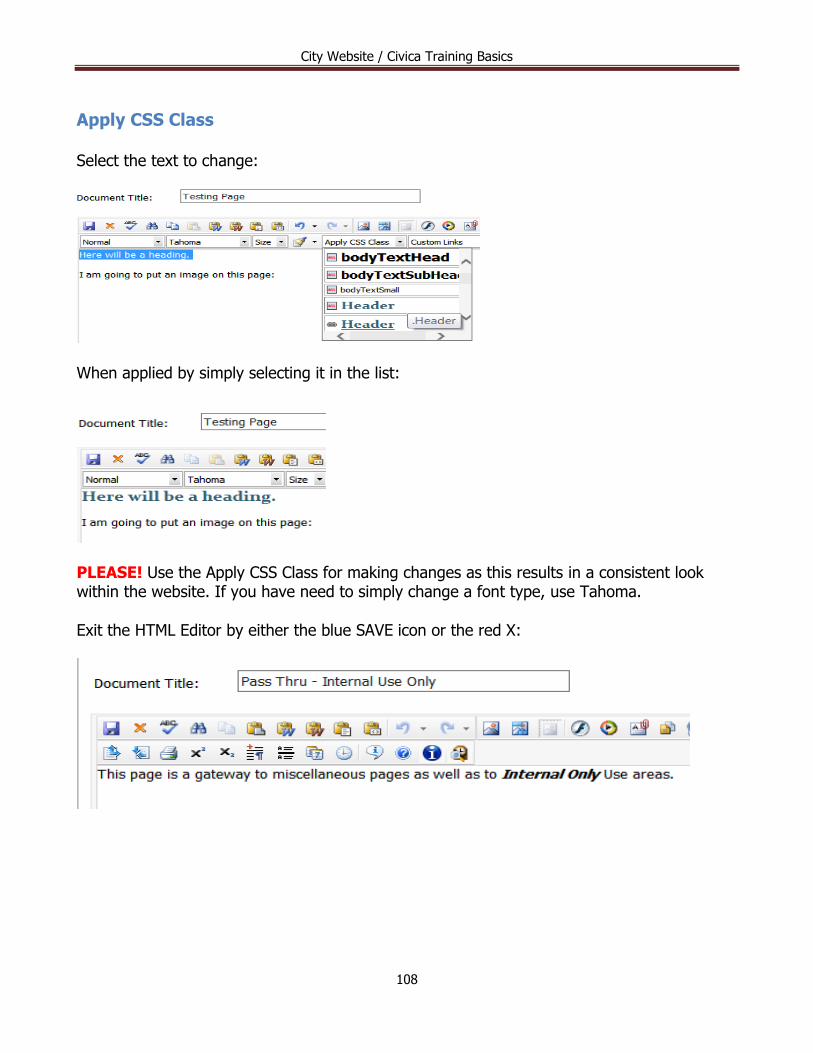
Apply CSS Class Select the text to change:
When applied by simply selecting it in the list:
PLEASE! Use the Apply CSS Class for making changes as this results in a consistent look within the website. If you have need to simply change a font type, use Tahoma. Exit the HTML Editor by either the blue SAVE icon or the red X:

City Website / Civica Training Basics
109
Important Tip: In order to see the toolbar, you MUST be at a zoom level 100%:
At 100%, you will see the toolbar:

City Website / Civica Training Basics
110
History Retrieve a prior version. The last icon:
Select and view. If you believe you found the one you want, then you can save it as the current one. Up to 50 past versions are archived.
WARNING Regarding the HTML Editor… There are times when you get bad code in your page and no amount of attempting to make changes via the HTML Editor will work. Call/email me as to the page and I can get in and clean up the code (which usually doesn’t require too much work). There are times bad code gets into the Civica HTML Editor and there is nothing you can do to fix the issue, unless you know how to read HTML code. Back to Contents

City Website / Civica Training Basics
111
Hyperlinks
First, what is a hyperlink: It is an electronic link to some other document, or place within a document. In other words, it is “active” – clicking a hyperlink will do something. Clicking a hyperlink for an image will display that image. Clicking to move you to an article on another website will move you to that website’s article. Again, “active”. If you hover over a link you can see the target for that link in your Status bar:

City Website / Civica Training Basics
112
However, this happens to be a bad link. When clicked, we will see the following page:
In this particular case we will discover the link is set in the page layout:

City Website / Civica Training Basics
113
How do we know to look here? First, try NavBuilder:
Here we see the page as get_connected.asp, which is simply an innocent webpage. So we should then check its page layout via the Create/Modify found under Web Pages:

City Website / Civica Training Basics
114
You will see the file layout is Page Redirect, and then you will see the target URL. It is this target URL that is the problem as the page was apparently moved. Using the original page previously shown, with the “Sorry this page has moved” message, we can click the “here” link to find the correct URL and can copy it by right clicking the address and then Copy. We can then paste this into our Page Layout from above. As the page resides in our website, we need only paste the “relative” link, /depts/cd/bizdev/san_leandro_videos/city.asp. (If we post the “absolute” link, we will have a full page nested into a full page. Using the absolute link in NavBuilder will result in:

City Website / Civica Training Basics
115
Always be sure when using a hyperlink to remove the “absolute” portion of the link, https://www.sanleandro.org (or http://www.sanleandro.org) as they are not needed or desired. Note that you will remove everything up to the / that follows the .org. This is only with regards to links targeting a page within http://www.sanleandro.org. Back to Contents

City Website / Civica Training Basics
116
FileBank
FileBank is the Civica document Repository, where document can be virtually any type of file, however the vast majority are PDF files. FileBank is made up of folders to hold these documents. A “plus” sign next to a folder indicates it has sub folders:
City Website / Civica Training Basics
117
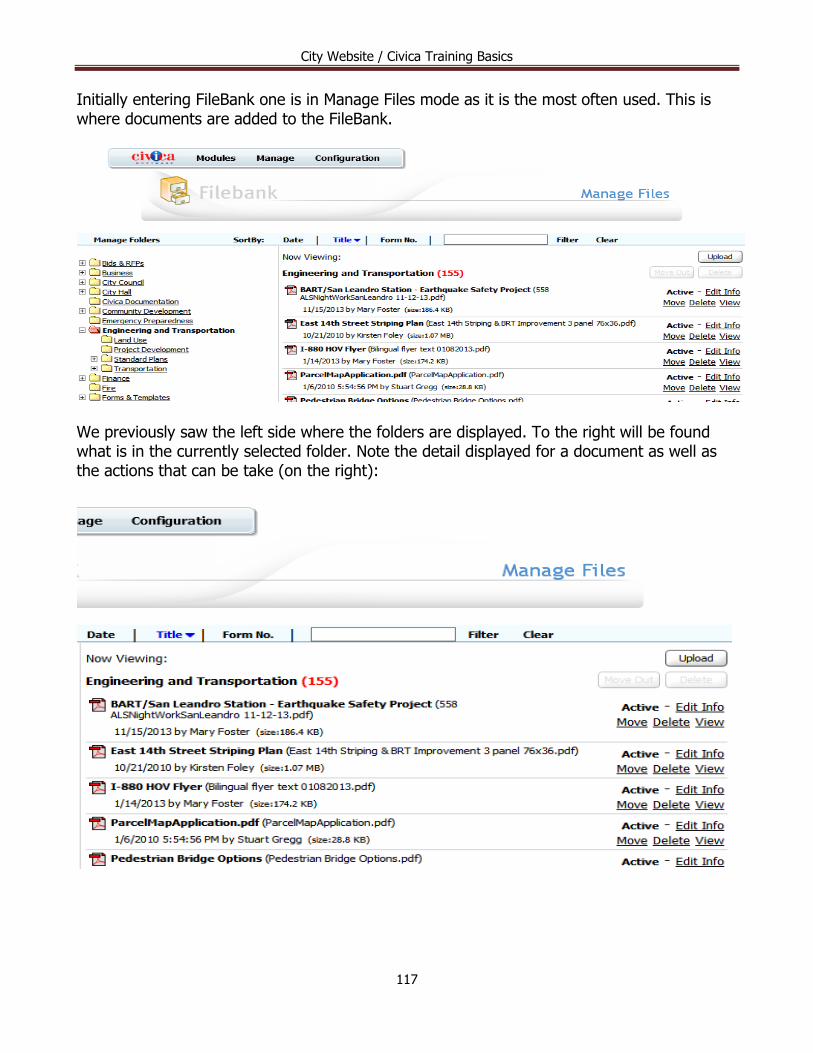
Initially entering FileBank one is in Manage Files mode as it is the most often used. This is where documents are added to the FileBank.
We previously saw the left side where the folders are displayed. To the right will be found what is in the currently selected folder. Note the detail displayed for a document as well as the actions that can be take (on the right):
City Website / Civica Training Basics
118
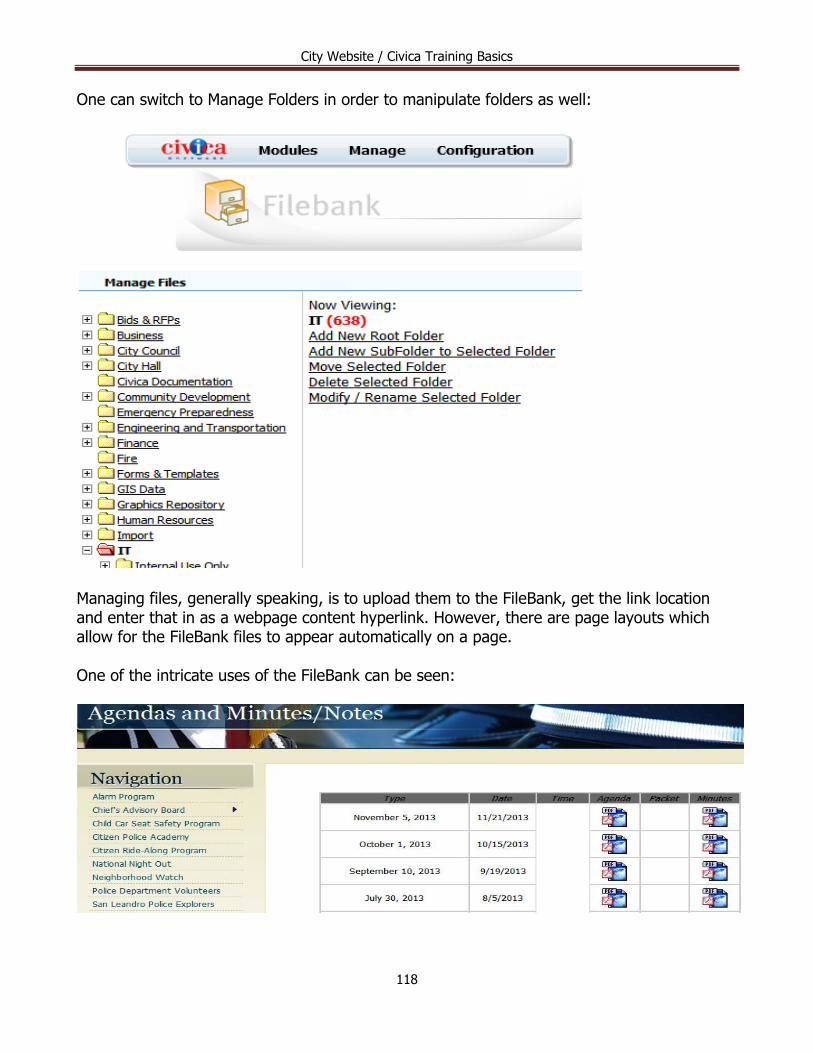
One can switch to Manage Folders in order to manipulate folders as well:
Managing files, generally speaking, is to upload them to the FileBank, get the link location and enter that in as a webpage content hyperlink. However, there are page layouts which allow for the FileBank files to appear automatically on a page. One of the intricate uses of the FileBank can be seen:

City Website / Civica Training Basics
119
The Agenda, and the accompanying minutes are pulled directly and automatically from the FileBank. Links to documents in the filebank are by the “blobid” number. To get the link while in FileBank, one can: Hover over the View button, then write down the link from the status bar (not recommended)
But the easy way is to right click on the View button, then click on Copy Shortcut. This can then be pasted to any text document (Word, WordPad, Notepad, Civica HTML Editor, etc.)

City Website / Civica Training Basics
120
This is a simple method to add the hyperlink to a webpage. Another simple method can be found under the HTML Editor topic. On the Engineering Current Projects page, a number of documents are referred to from FileBank. In the example below the two maps both hyperlink to documents stored in the FileBank:
https://www.sanleandro.org/civica/filebank/blobdload.asp?BlobID=14171

City Website / Civica Training Basics
121
https://www.sanleandro.org/civica/filebank/blobdload.asp?BlobID=14172
I got the above links by hovering over a map, then did the Copy Shortcut and pasted it here.
Back to Contents
City Website / Civica Training Basics
122
Calendars
Calendar items are set up within the Calendar module Quick Tips: Calendar Events and Upcoming Events are the same thing! Calendar Item Listings
1. Go to address field in Internet Explorer
2.
3. Enter this website address: https://www.sanleandro.org/civica/admin
4.
5. Go to Admin page
6.
7. Select “Calendar”
8.
9. Within calendar, arrow to the month of your event
10.
11. Click on date of your event
12.
13. Click on button that says “Add New Entry”
14.
15. Enter all required fields marked with an asterisk
16.
17. After entering all data, then make sure you checkmark box “Active”
18.
19. SUBMIT
20.
There is a City wide calendar on the home page, yet too Departments can have their own calendar.

City Website / Civica Training Basics
123
The Library (https://www.sanleandro.org/depts/library/default.asp) also has one on their home page and selected a different view, as well as one for Purchasing (https://www.sanleandro.org/depts/finance/purchasing/default.asp):

City Website / Civica Training Basics
124
City Website / Civica Training Basics
125
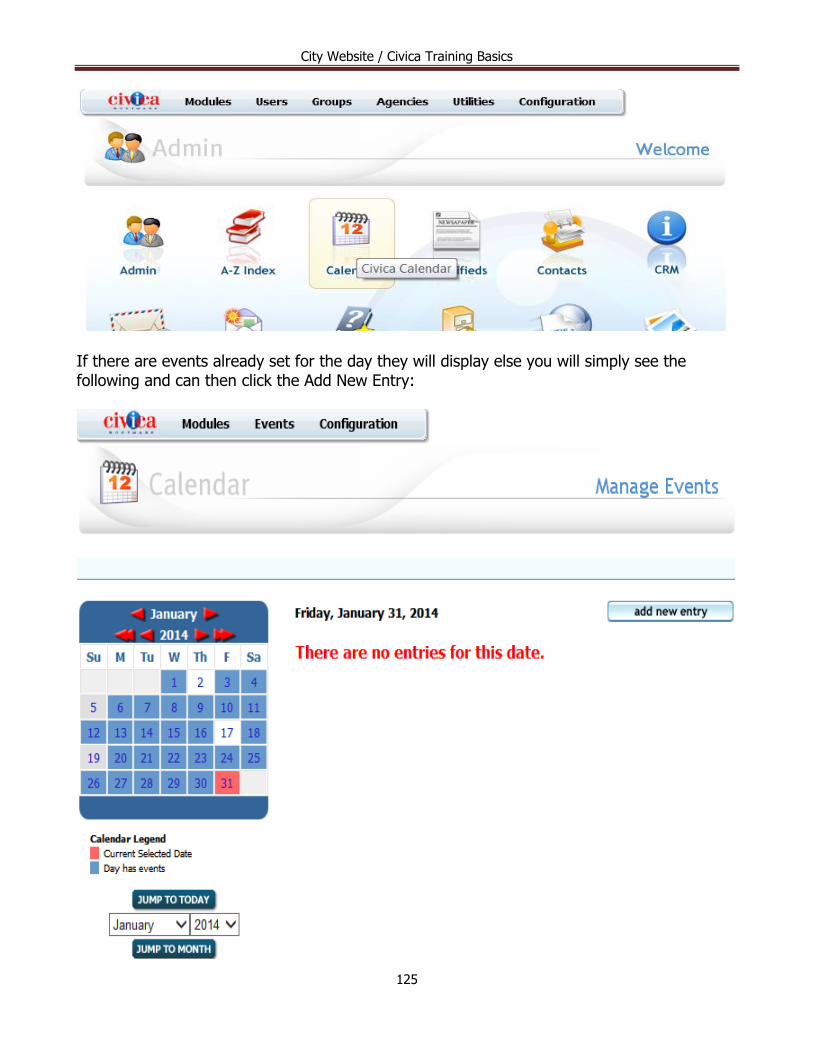
If there are events already set for the day they will display else you will simply see the following and can then click the Add New Entry:

City Website / Civica Training Basics
126
Fill out the New Event form, making sure all required (*) items are entered:

City Website / Civica Training Basics
127
Notice how the Divisions determine the calendar for display. In this case it’s for the Testing Calendar:
City Website / Civica Training Basics
128

City Website / Civica Training Basics
129
After Submit:
Back to Contents

City Website / Civica Training Basics
130
News
TBD Back to Contents

City Website / Civica Training Basics
131
Press Release
TBD Back to Contents

City Website / Civica Training Basics
132
System Constants
HTML Editor: Shift Enter – one blank line (<br> tag. Line Break Enter – Two lines (<p> tag. Paragraph Break RemoveElement – to clear the elements assigned to an item. --- Chrome and NavBuilder – Use your right mouse button to select and expand folders Compatibility Errors with IE – See End of Document Placeholder Back to Contents
City Website / Civica Training Basics
133
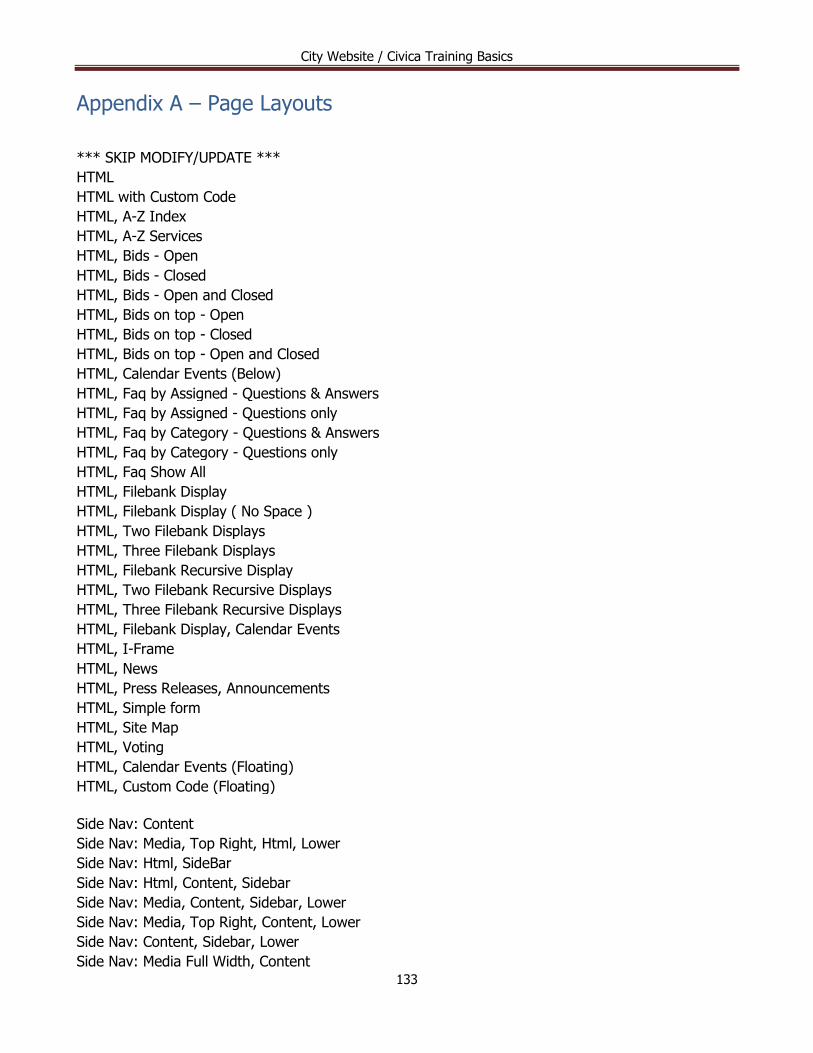
Appendix A – Page Layouts
*** SKIP MODIFY/UPDATE ***
HTML
HTML with Custom Code
HTML, A-Z Index
HTML, A-Z Services
HTML, Bids - Open
HTML, Bids - Closed
HTML, Bids - Open and Closed
HTML, Bids on top - Open
HTML, Bids on top - Closed
HTML, Bids on top - Open and Closed
HTML, Calendar Events (Below)
HTML, Faq by Assigned - Questions & Answers
HTML, Faq by Assigned - Questions only
HTML, Faq by Category - Questions & Answers
HTML, Faq by Category - Questions only
HTML, Faq Show All
HTML, Filebank Display
HTML, Filebank Display ( No Space )
HTML, Two Filebank Displays
HTML, Three Filebank Displays
HTML, Filebank Recursive Display
HTML, Two Filebank Recursive Displays
HTML, Three Filebank Recursive Displays
HTML, Filebank Display, Calendar Events
HTML, I-Frame
HTML, News
HTML, Press Releases, Announcements
HTML, Simple form
HTML, Site Map
HTML, Voting
HTML, Calendar Events (Floating)
HTML, Custom Code (Floating)
Side Nav: Content
Side Nav: Media, Top Right, Html, Lower
Side Nav: Html, SideBar
Side Nav: Html, Content, Sidebar
Side Nav: Media, Content, Sidebar, Lower
Side Nav: Media, Top Right, Content, Lower
Side Nav: Content, Sidebar, Lower
Side Nav: Media Full Width, Content

City Website / Civica Training Basics
134
Side Nav: Top Full Width, Content, Sidebar, Lower
Side Nav: Media Full Width, Content, Sidebar, Lower
Content
Media, News, Sidebar
Media, Nav, Html, Sidebar
Media, Top Right, Nav, Html, Sidebar
Media, Top Right, Nav, Html
Media, Top Right, Nav, Html, Lower
Media, Top Right, Html
Media, Top Right, Html, Lower
Html, SideBar
Calendar Search, Sidebar
Filebank Display (Single folder only)
Filebank Dual Recursive Displays
Filebank Recursive Display
News
News Extra
News Archive
News Archive Extra
News Details
News Display
Calendar - Full Screen
Calendar - Full Screen with HTML header
Calendar - Fixed Width
Calendar - Fixed Width with HTML header
Calendar Events
Full Screen HTML
Full Screen HTML for Home Pages
Full Screen HTML with Custom Code
Full Screen HTML with Custom Code for Home pages
Full Screen HTML, I-Frame
Full Screen Custom Code with Title
Full Screen Custom Code Only
Full Screen Custom Code with Title for Home pages
Full Screen Custom Code Only for Home pages
Full Screen I-Frame
Bid / RFP
Custom Code with Title
Custom Code Only
Faq Show All
City Website / Civica Training Basics
135
Faq by Assigned - Questions only
Faq by Category - Questions & Answers
Show Folder Contents
Press Releases
AZ Index
File Bank search page
Info Guide
Jobs by Type
Jobs by Type ( HTML below )
Jobs all Types
Jobs all Types ( HTML below )
Jobs by Division
Jobs by Division ( HTML below )
Jobs all Divisons
Jobs all Divisons ( HTML below )
Job Classifications
E-Zine / E-Notify
Secure Email Form.
Secure Email Form Processor.
Secure Email Form with Custom Code.
Secure Email Form Processor with Custom Code.
Image Gallery
Movie
Custom 404 page
Page Redirect
Back to Contents

City Website / Civica Training Basics
136
Revisions
Revised 6-3-2105 R. Lynch (Replaced the Page Layout list)
Revised 4-27-2015 R. Lynch (Moved NavBuilder section before the Editor section as one needs a page created before it can be edited. Added Revisions as a separate chapter for the Table of Contents. Removed some blank
pages). Revised: 3-09-2015 R. Lynch (restructured HTML Editor Table of Contents Section); Added initial content with
additional TOC topics. Revised: 2-28-2015 R. Lynch
Revised: 7-29-2014 R. Lynch
Related Documents