pg. 1 Citrix XenApp END User Guide Document Reference Citrix XenApp user Guide Status Author’s Name Mahammad Kubaib For circulation to KPC Citrix Users Issue Date 12/07/2015 Reviewed & Approved by Version control record Version Date Author Comments Draft 12/07/2015 Mahammad Kubaib Citrix XenApp User guide Kuwait Petroleum Corporation (KPC) - Internal

Welcome message from author
This document is posted to help you gain knowledge. Please leave a comment to let me know what you think about it! Share it to your friends and learn new things together.
Transcript

pg. 1
Citrix XenApp END User Guide
Document Reference Citrix XenApp user Guide
Status
Author’s Name Mahammad Kubaib
For circulation to KPC Citrix Users
Issue Date 12/07/2015
Reviewed & Approved by
Version control record
Version Date Author Comments
Draft 12/07/2015 Mahammad Kubaib Citrix XenApp User guide
Kuwait Petroleum Corporation (KPC) - Internal

pg. 2
TABLE OF CONTENTS
1. Introduction……………………………………………………………………………………………………………………………3
2. Prerequisites............................................................................................................................3
3. Installation of Citrix receiver for windows……………………………………………………………………………...5
4. Accessing KPC Citrix portal………………………………………………………………………………………………………8
4.1 Accessing Citrix portal from KPC Internal Network..............................................................8
4.1.1 Logging through web browser……………………………………………………………………………………8
4.1.2 Logging through Citrix Receiver…………………………………………………………………………………9
4.2 Accessing from outside KPC network...................................................................................10
4.2.1 Logging through web browser………………………………………………………………………………….11
4.2.2 Logging through Citrix Receiver……………………………………………………………………………….18
5. Citrix Toolbar.............................................................................................................................20
5.1 Toolbar Settings..................................................................................................................21
5.2 Preferences.........................................................................................................................21
6. Troubleshooting.........................................................................................................................24

pg. 3
1. Introduction.
Citrix Receiver allows you to connect to KPC Apps and VDI virtual desktops provided by the KPC IT Team.
The Apps and virtual desktops are web-based Windows virtual PCs equipped with Microsoft Office,
Outlook email and other standard KPC applications. You can access your Apps and virtual desktop via
Access Portal (https://remote.kpc.com.kw) using an internet browser on a Windows, Macintosh or mobile
device that has the Citrix Receiver installed. With this Access Portal, you can now use one single URL
(https://remote.kpc.com.kw) to access your virtual desktop regardless of whether you are within KPC
network or from outside Internet. This document will guide you to configure Citrix Receiver on your device
to access KPC Portal.
2. Prerequisites.
2.1 Computer System Requirements – Below are the computer configurations recommended by KPC IT
Team. Older software and operating systems are not supported and may not function for remote access:
Administrator Rights: To install applications such as Citrix receiver, administrator level
User names and passwords are required (Ignore this part if you are using personal device).
Windows Devices: Windows OS of XP w/SP3 or higher (Win7 / Win 8 / Vista)
DSL/Cable Connection for best performance.
2.2 Active Directory (AD) Account – Remote access requires an AD account for login and Authentication
purposes. If you need an AD account please note the following:
You are required to submit IT Service Request. If you have any questions regarding this,
please contact KPC IT Service Desk.
2.3 Citrix Receiver - In order to access Citrix applications remotely, you will first need to ensure you have
the Citrix Receiver application on any desktop, laptop you plan on using. To verify if you already have this
application installed complete the following actions:
On a Windows client, click on your start button and type in Citrix Receiver in the search
field. If you have this installed, you’ll see “Citrix Receiver” appear under program files.

pg. 4
2.4 Any of the following browsers:
Microsoft Internet Explorer (version 7, 8, 9, 10 or 11)
Mozilla Firefox (version 9.0.1)
Google Chrome (version 17)
NOTE: If you encounter a known issue in which “Google Chrome does not open
launch.ica files”. Please refer to the Citrix knowledge base article at
http://support.citrix.com/article/CTX136578.
Apple Safari (version 5.1.2)

pg. 5
3. Installing Citrix Receiver for Windows
To access KPC resources we need to download and install Citrix Receiver on computer.
Open up Internet Explorer and type the following address: https://remote.kpc.com.kw
It will automatically detect the receiver and prompt to download/install the receiver if it is not present in the system.
Select the check box and begin the installation by clicking Install.

pg. 6
Installation will begin, click finish when installation is done.

pg. 7

pg. 8
4. Accessing KPC Citrix portal To connect to KPC resources, just go to https://remote.kpc.com.kw . It will detect whether you are from
inside KPC network or from outside, and will direct you to Internal or External Access Portal respectively.
4.1 Accessing Citrix portal inside KPC internal network
4.1.1 Logging through web browser.
Open Internet Explorer and type https://remote.kpc.com.kw ,you will be presented with
a list of the Applications that are available to you. To view the list of Desktops, select Desktops at the top of the page.
Click on the application or desktop that you want, and then it will be launched. Depending
on your web browser settings, you may be prompted that the Citrix Receiver plugin is
disabled or blocked, often with an option to allow it to run. Please click allow/trust as
appropriate to start the application.
When you have finished, click your name and then Log Off from the top right hand corner.

pg. 9
4.1.2 Logging through Citrix Receiver.
Right-click the Receiver icon in the notification area. The following menu options are displayed.
When you click on Open, it will prompt for credential, please enter your domain username and password and click on Logon.

pg. 10
After successful login, you will be presented with a list of the Applications that are
available to you. To view the list of Desktops, select Desktops at the top of the page.
Click on the application or desktop that you want, and then it will be launched.
When you have finished, click your name and then Log Off from the top right hand corner.

pg. 11
4.2 Accessing Citrix portal from outside the KPC network.
4.2.1 Logging through web browser.
Open Internet Explorer and type https://remote.kpc.com.kw ,you will be presented with a logon page, enter the username and password and press logon when finished.
You should now presented with the Duo-security Two-factor Authentication window. Duo prompts you to enroll when you log into a protected VPN, server, or web application.
Click Start Setup to get started.
Choose Your Authenticator: We recommend using a smartphone for the best
experience.

pg. 12
Type Your Phone Number: Select your country and type your phone number. Use the
number of your smartphone, landline, or cell phone that you'll have with you when you're
logging in. You can enter an extension if you chose "Landline" in the previous step. Then
double-check that you entered it correctly, check the box, and click Continue.
Choose Platform: Choose your device's operating system.

pg. 13
Install Duo Mobile: Duo Mobile is an application that runs on your phone and helps you
authenticate. Without it you'll still be able to log in using a phone call or text message,
but Duo strongly recommends that you use Duo Mobile to authenticate quickly and easily.
Follow the platform-specific instructions on the screen to install Duo Mobile.
Activate Duo Mobile: Activating the application will link it to your account so you can
use it for authentication. On iPhone, Android, Windows Phone, and BlackBerry 10,

pg. 14
activate Duo Mobile by scanning the barcode with the app's built-in barcode scanner.
Choose your platform for specific instructions:
The "Continue" button is clickable after you scan the barcode. Can’t scan the
barcode? Click the link and then follow the instructions.
Enrollment Complete!

pg. 15
Click Enroll another device to add another device (backup phone, etc.), or click I'm
done enrolling devices to continue to the authentication prompt. If enabled by your
administrator, you can manage your devices in the future via the authentication
prompt. Otherwise, contact your administrator if you ever need to change your phone
number, re-activate Duo Mobile, or add a second phone.
Authentication: After successfully adding the device you will be presented with authentication page.
Select Duo Push as it is the easiest and quickest way of authenticating. You'll get a login request sent to your phone — just press Approve to authenticate.

pg. 16
If you are running Android 4.1 or later, you can approve the request right from the notification.
If you get a login request that you weren't expecting, press Deny to reject the request.
You’ll be given the ability to report it as fraudulent, or you can tap It was a mistake to
deny the request without reporting it.

pg. 17
After approving the login request on mobile device, you will be presented with a list of
the Applications that are available to you. To view the list of Desktops, select Desktops
at the top of the page.
Click on the application or desktop that you want, and then it will be launched.
When you have finished, click your name and then Log Off from the top right hand
corner.

pg. 18
4.2.2 Logging through Citrix Receiver.
Right-click the Receiver icon in the notification area. The following menu options are displayed.
When you click on Open, it will prompt for your email address. Please enter the details and press Add.
pg. 19
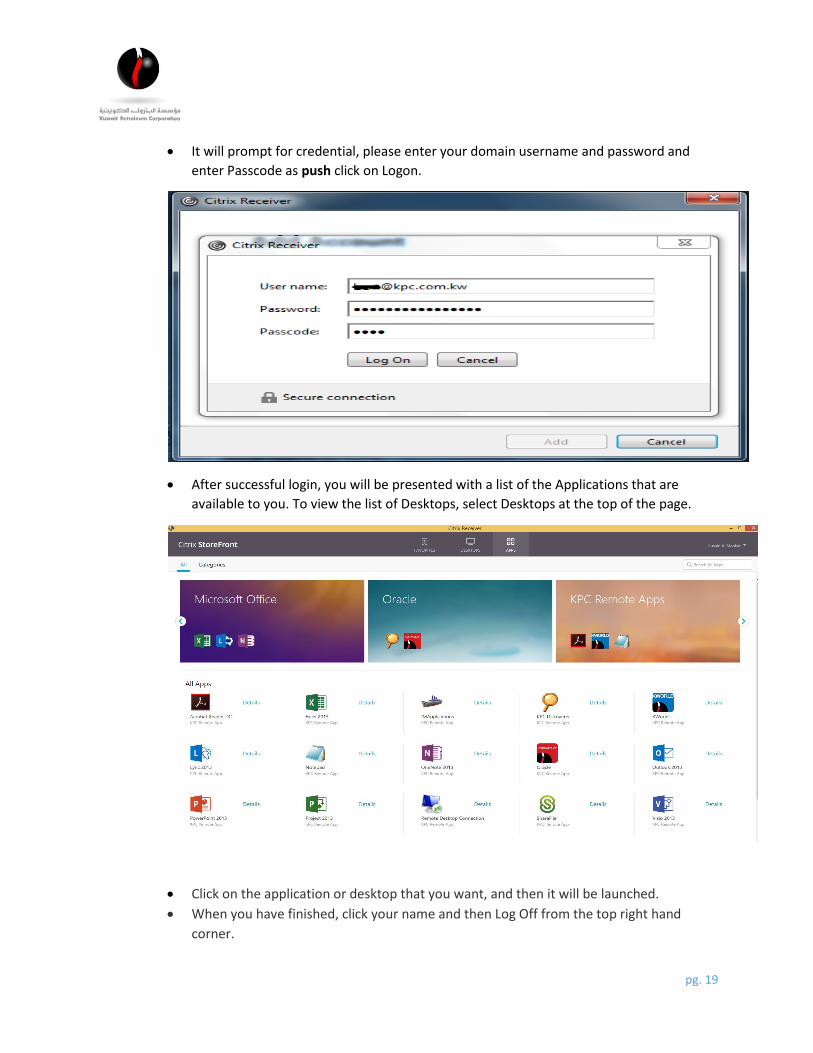
It will prompt for credential, please enter your domain username and password and
enter Passcode as push click on Logon.
After successful login, you will be presented with a list of the Applications that are
available to you. To view the list of Desktops, select Desktops at the top of the page.
Click on the application or desktop that you want, and then it will be launched.
When you have finished, click your name and then Log Off from the top right hand
corner.

pg. 20
5. Citrix Toolbar
At the top of the session window you will see a toolbar. You can show/hide this toolbar
by clicking on the small bar with the arrow:
Hide Toolbar

pg. 21
5.1 Toolbar setting
5.2 Preferences
If you select the Preferences menu, you can do multiple settings to fit your needs. The
screenshots below show the recommended settings, but you are free to set different
ones.

pg. 22

pg. 23

pg. 24
6. Troubleshooting
This section lists potential problems and solutions to assist users in resolving common Citrix
related problems that may occur. Please ensure that you have reviewed the following topics
before contacting KPC IT Help Desk.
1. When I try to install the Citrix Receiver my computer says that I do not have the correct
permissions.
a. To install Citrix Receiver you must have administrator rights on your computer.
2. I do not have Citrix Receiver
a. Browse to http://receiver.citrix.com
3. I already have Citrix Receiver installed on my computer but I keep being asked to install it.
a. Click “Skip to Log on” to skip the auto-detect and install process and go directly to the
Citrix login screen.
4. The auto-detect did not work and I still do not have Citrix Receiver.
a.Go to http://www.citrix.com/downloads/citrix-receiver.html to locate your Operating
System from the list and manually install Citrix Receiver to your computer.
5. I’m being asked to open, run or save a launch.ica file.
a. If you already have the Citrix receiver installed, find the launch.ica file, right click on it
and select “Open file with…” or “Always open file with…” and locate the Citrix Receiver
application. You may need to browse for this file under Applications (Mac OS) or under
C:\Program Files (x86)\Citrix\Receiver (Windows). In future the Citrix Receiver should
automatically open this file.
b. Add https://remote.kpc.com.kw as a Trusted Site within IE.
For Further information, please contact:
Helpdesk Ext 3456, [email protected]
Related Documents