© 1999-2017 Citrix Systems, Inc. All rights reserved. p.1 https://docs.citrix.com Citrix SCOM Management Pack for XenServer May 21, 2017 Citrix SCOM Management Pack 2.25 for XenServer Citrix SCOM Management Pack 2.24 for XenServer Citrix SCOM Management Pack 2.23 for XenServer Citrix SCOM Management Pack 2.22 for XenServer Citrix SCOM Management Pack 2.21 for XenServer

Welcome message from author
This document is posted to help you gain knowledge. Please leave a comment to let me know what you think about it! Share it to your friends and learn new things together.
Transcript

© 1999-2017 Citrix Systems, Inc. All rights reserved. p.1https://docs.citrix.com
Citrix SCOM Management Pack for XenServer
May 21, 2017
Citrix SCOM Management Pack 2.25 for XenServer
Citrix SCOM Management Pack 2.24 for XenServer
Citrix SCOM Management Pack 2.23 for XenServer
Citrix SCOM Management Pack 2.22 for XenServer
Citrix SCOM Management Pack 2.21 for XenServer

© 1999-2017 Citrix Systems, Inc. All rights reserved. p.2https://docs.citrix.com
Citrix SCOM Management Pack 2.25 for XenServer
May 21, 2017
Citrix SCOM Management Pack for XenServer is an availability and performance management solution that extends end-
to-end service monitoring capabilities of Microsoft System Center Operations Manager (SCOM) to include the Citrix
XenServer (XenServer) infrastructure. It fully integrates topology, health, and performance data into SCOM and provides
centralized monitoring.
It covers the following key scenarios:
Are all XenServer instances running?
Are all virtual machines powered on?
Are there any events that indicate a problem with XenServer or a particular virtual machine?
Have any performance thresholds been violated?
Citrix SCOM Management Pack for XenServer components can help you detect and respond to critical events in your
XenServer virtual infrastructure. Frequently, timely alerts help prevent XenServer outages and assure high availability of the
XenServer virtual infrastructure.
Citrix SCOM Management Pack for XenServer provides a large number of performance collection rules which collect vital
XenServer metrics to the SCOM data warehouse. Predefined reports allow you to use this data to review and analyze
performance history and to predict trends.
Architecture
The following diagram shows how Citrix SCOM Management Pack for XenServer connects to the SCOM management
platform and the XenServer enterprise infrastructure.

© 1999-2017 Citrix Systems, Inc. All rights reserved. p.3https://docs.citrix.com

© 1999-2017 Citrix Systems, Inc. All rights reserved. p.4https://docs.citrix.com
What's new
Aug 14 , 2017
Citrix SCOM Management Pack 2.25 for XenServer introduces the following features:
Support for Citrix XenServer. Citrix SCOM Management Pack for XenServer now supports XenServer versions 7.2 and
7.1 CU1
FIPS Compliance. Citrix SCOM Management Pack for XenServer uses FIPS (Federal Information Processing Standards)
compliant algorithms and can monitor FIPS-compliant systems.
Known issues
None
Fixed issues
The following issues are fixed in this product version.
Issue ID: SCOM-1151
Symptom: The Citrix SCOM Management Pack for XenServer Agent might not get upgraded. The upgrade process
initially removes the Citrix MPXS Agent service. However, the previously installed agent package is not replaced and the
earlier program version remains registered with the operating system.
Upgrading
Note: Product versions earlier than 2.21 were released under the name Comtrade Management Pack for Citrix XenServer.
Upgrade is possible for the versions 2.20 and later.
In-place upgrade is not supported in the Citrix SCOM Management Pack for XenServer. Instead to do an upgrade, follow
the steps as below:
1. Uninstall the current version of the management pack following the uninstallation instructions as per the documentation
of your current version.
2. Install the new version of the Citrix SCOM Management Pack for XenServer following the instructions in Install and
Configure. Your management pack customization is preserved.
3. This step is valid only if you are upgrading from version 2.20 . To migrate your management pack customization, on each
XenServer Management Pack proxy node, move the xsmp_config.dat f ile from
the %ProgramFiles%\ComTrade\XenServer MP Agent folder to the %ProgramFiles%\Citrix\XenServer MP Agent folder.

© 1999-2017 Citrix Systems, Inc. All rights reserved. p.5https://docs.citrix.com
System requirements
May 21, 2017
Before installing Citrix SCOM Management Pack for XenServer, make sure that your environment meets the requirements
listed in this section.
Storage requirements
The Operations Manager data warehouse server must have enough free storage space for the performance data that is
collected. Citrix SCOM Management Pack for XenServer daily stores approximately the following amounts of data into the
data warehouse database (OperationsManagerDW):
48 KB per virtual machine
72 KB per physical XenServer host
Software requirements
Citrix SCOM Management Pack for XenServer requires a supported version of the following products that it integrates
with:
Citrix XenServer
Microsoft System Center Operations Manager
Supported versions of Citrix XenServer
Citrix SCOM Management Pack for XenServer is compatible with the following Citrix XenServer versions:
Product version Supported
Citrix XenServer 7.2 ✔
Citrix XenServer 7.1 ✔
Citrix XenServer 7.0 ✔
Citrix XenServer 6.5 ✔
Citrix XenServer 6.2 ✔
Citrix XenServer 6.1 ✔
Citrix XenServer 6.0.2 ✔
Citrix XenServer 6.0 ✔
1

© 1999-2017 Citrix Systems, Inc. All rights reserved. p.6https://docs.citrix.com
This entry covers the RTM version, the RTM version updated with Service Pack 1.
Supported versions of SCOM
Citrix SCOM Management Pack for XenServer is compatible with the following SCOM versions:
Microsoft System Center Operations Manager version Supported
Microsoft System Center Operations Manager 2016 ✔
Microsoft System Center Operations Manager 2012 R2 ✔
Microsoft System Center Operations Manager 2012 R2 ✔
This entry covers both the RTM version and the RTM version updated with Service Pack 1 (SP1).
Supported operating systems
Citrix SCOM Management Pack for XenServer Agent is compatible with the following operating systems:
Operating system Supported
Microsoft Windows Server 2016 ✔
Microsoft Windows Server 2012 R2 ✔
Microsoft Windows Server 2008 R2 ✔
Language support
The product can be deployed and operates correctly in environments where regional settings are configured to use any of
the following languages:
Language Language code Supported
English en ✔
1
2
2

© 1999-2017 Citrix Systems, Inc. All rights reserved. p.7https://docs.citrix.com
Spanish es ✔

© 1999-2017 Citrix Systems, Inc. All rights reserved. p.8https://docs.citrix.com
Install and configure
May 21, 2017
This chapter contains instructions that you must follow to install and configure the Citrix SCOM Management Pack for
XenServer. Perform all procedures in the documented order of precedence.
Preparing for the installation
Before installing the Citrix SCOM Management Pack for XenServer, make sure the following prerequisites are fulfilled:
Your environment meets the hardware and software requirements. See System Requirements. A computer is chosen on which a SCOM management server resides and where the server side of Citrix SCOM
Management Pack for XenServer will be installed. This computer is referred to as SCOM management server.
One or more computers are chosen where Citrix SCOM Management Pack for XenServer Agent instances will be
installed that will remotely collect XenServer data. These computers are referred to as Citrix SCOM Management Pack
for XenServer proxy nodes (proxy nodes). The proxy nodes must be running a supported Microsoft Windows operating
system.
Important: The terms proxy node and proxy agent do not mean the same thing. The former refers to a role in the Citrix
SCOM Management Pack for XenServer deployment, whereas the latter refers to a special configuration of SCOM agent.
The choice about proxy nodes depends on the size and complexity of your XenServer environment. Citrix recommends that
you use one proxy node for monitoring one or two small XenServer pools, but designate multiple proxy nodes in case you
have a larger XenServer environment.
Important: While one proxy node can monitor multiple XenServer pools, proxy nodes should be designated and configured
such that each pool is monitored from a single node.
For a sample hardware specification for proxy nodes, see Optimize, section Adjusting SCOM configuration for management
of large environments.
SCOM agent is installed on all the proxy nodes. Proxy nodes are configured as agent-managed computers in the SCOM
management group.
Installing the product on the SCOM managementserver
The server-side part of the Citrix SCOM Management Pack for XenServer must be installed on the SCOM management
server.
To install the product on the SCOM management server, do the following:
1. Log on to the management server. Use a user account that has local administrative privileges and SCOM administrative
privileges.
2. In Windows Explorer, locate the Citrix_SCOM_Management_Pack_for_XenServer_<Version>.exe f ile (where <Version> is

© 1999-2017 Citrix Systems, Inc. All rights reserved. p.9https://docs.citrix.com
the current software version), and double-click it to invoke the installation process. Wait for the Setup Wizard to appear.
3. In the Welcome page of the Setup Wizard, click Next.
4. In the View Relevant Product Configuration page, click Next.
5. In the License Agreement page of the Setup Wizard, read the end user license agreement carefully. If you accept the
terms of the agreement, click Next.
6. In the Destination Folder page, define the Citrix SCOM Management Pack for XenServer installation folder. Citrix
recommends that you install Citrix SCOM Management Pack for XenServer to the default folder. Proceed as follows:
To install the product to the default folder listed in the Setup Wizard, no special actions are required.
To install the product to a different folder, follow the sub-steps:
Click Change.
In the Browse For Folder dialog box, browse to a desired installation folder, select it, and click OK.
Click Next.
7. In the Configure Post-Install Actions page of the Setup Wizard, decide whether the Setup Wizard should automatically
import the included management packs into SCOM.
To let the Setup Wizard import the management packs, select the Automatically import the ManagementPack option. Citrix recommends this choice.
To import the management packs into SCOM manually at a later time, leave the Automatically import theManagement Pack option unselected. For instructions about how to import or reimport the management packs, see
Manually importing included management packs into SCOM.
8. Click Install. The Setup Wizard displays the Installing the product page and starts copying the installation f iles.
9. After the installation completes, the installation completion page is displayed.
If you let the Setup Wizard to automatically import the management packs, click Next. Else, click Finish to close the
Setup Wizard.
If you let the Setup Wizard to automatically import the management packs, it displays the Executing post-install
actions page. Attend the import process.
10. In the post-installation completion page, review the management packs import log, and click Finish to close the Setup
Wizard.
Verifying the installation on the management server
To verify that the Citrix SCOM Management Pack for XenServer installation on the management server is correct, do the
following:
1. Log on to the management server.
2. Go to Start > Control Panel and click Programs and Features (actions of this step may differ on operating systems
earlier than Windows Server 2016).
3. Check for the presence of the following entry in the Name column:
Citrix SCOM Management Pack for XenServer
4. Launch the SCOM Operations console.
5. In the Monitoring view, expand the items in the left pane until they match the following figure.

© 1999-2017 Citrix Systems, Inc. All rights reserved. p.10https://docs.citrix.com
6. In the Administration view, expand Administration > Management Packs and click Installed Management Packs (the
navigation pane structure may differ in SCOM versions earlier than 2016).
7. Verify the following management pack versions are listed in the middle pane:
Citrix Management Pack for XenServer 2.25.20.0
Citrix Management Pack for XenServer Reports 2.25.20.0
Citrix Management Pack Library 1.0.32.0
Configuring SCOM agent to act as proxy on proxynodes
SCOM agent on each computer where Citrix SCOM Management Pack for XenServer Agent will be installed (Citrix SCOM
Management Pack for XenServer proxy node) must be configured to act as a proxy agent. This configuration enables the
agent to relay or forward information from or about other computes and network devices to the SCOM management
server.
To configure the SCOM agent instances to act as proxy agents, do the following:
1. Launch the SCOM Operations console and connect to the management server.
2. In the Administration view, in the left pane, expand Device Management, and then click Agent Managed.

© 1999-2017 Citrix Systems, Inc. All rights reserved. p.11https://docs.citrix.com
3. For each planned proxy node, follow the steps:
a. Right-click the host name, and select Properties.
b. Click the Security tab.
c. Select the Allow this agent to act as proxy and discover managed objects on other computers option.
d. Click OK.
Installing the product on the proxy nodes
On the designated Citrix SCOM Management Pack for XenServer proxy nodes, only the Citrix SCOM Management Pack for
XenServer Agent must be installed.
To install Citrix SCOM Management Pack for XenServer Agent on a proxy node, do the following:
1. Log on to the proxy node. Use a user account that has local administrative privileges.
2. Copy the MPXSAgent.exe f ile from the %ProgramData%\Citrix\CitrixMPShare\XenServer MP folder on the management
server to a location on the proxy node.
3. In Windows Explorer, locate the MPXSAgent.exe f ile, and double-click it to invoke the installation process. Wait for the
Setup Wizard to appear.
4. In the Welcome page of the Setup Wizard, click Next.
5. In the License Agreement page of the Setup Wizard, read the end user license agreement carefully. If you accept the
terms of the agreement, click Install.6. After the installation completes, the completion page is displayed. Click Finish to close the Setup Wizard.
Verifying the installation on the proxy nodes
To verify that the Citrix SCOM Management Pack for XenServer installation on a proxy node is correct, do the following:
1. Log on to the proxy node.
2. Go to Start > Control Panel and click Programs and Features (actions of this step may differ on operating systems
earlier than Windows Server 2016).
3. Check for the presence of the following entry in the Name column:
Citrix SCOM Management Pack Agent for XenServer4. Go to Start > Administrative Tools and double-click Services.5. In the Name column of the Services window, locate the Citrix MPXS Agent service, and make sure that its status is to
Started.
Configuring Citrix SCOM Management Pack forXenServer
Configuration of Citrix SCOM Management Pack for XenServer requires providing data about XenServer pool masters to
the Citrix SCOM Management Pack for XenServer Agent on each proxy node.
To configure the Citrix SCOM Management Pack for XenServer on a proxy node, do the following:

© 1999-2017 Citrix Systems, Inc. All rights reserved. p.12https://docs.citrix.com
1. Log on to the proxy node. Use a user account that has local administrative privileges.
2. Go to Start > All Programs > Citrix > XenServer Management Pack.
3. Follow the step:
If User Account Control (UAC) is disabled in the operating system, click XenServer MP Configuration.
If UAC is enabled, right-click XenServer MP Configuration, and select Run as administrator.
4. In the Citrix Management Pack Configuration window, click Add.
5. In the Add a new pool master connection dialog box, enter the following data related to a XenServer pool:
Fully qualif ied domain name of the pool master
Port number that the pool master uses for connections
User name and password that are used as connection credentials
6. Optionally, click Test to verify the connection to the pool master. In the Test result dialog box, check the verification
result, and click OK.
7. Click OK to close the dialog box.
8. Repeat the steps 4 to 7 for each additional XenServer pool you want monitor from this proxy node.
9. Click OK to apply the configuration changes and close the window.
Uninstallation
This chapter contains instructions that you must follow to effectively uninstall the Citrix SCOM Management Pack for
XenServer. Perform all procedures in the documented order of precedence.

© 1999-2017 Citrix Systems, Inc. All rights reserved. p.13https://docs.citrix.com
To uninstall Citrix SCOM Management Pack for XenServer Agent from a computer that is a Citrix SCOM Management Pack
for XenServer proxy node, do the following:
1. Log on to the proxy node. Use a user account that has local administrative privileges.
2. Make sure no product folders or f iles are in use by any user.
3. Go to Start > Control Panel and click Programs and Features (actions of this step may differ on operating systems
earlier than Windows Server 2016).
4. Right-click Citrix SCOM Management Pack Agent for XenServer and select Uninstall. Wait for the Setup Wizard to
appear.
5. In the Welcome page of the Setup Wizard, click Uninstall.6. In the Uninstalling the product page, the Setup Wizard reports the uninstallation progress.
7. In the Completion page of the Setup Wizard, click Finish.
Important: Perform this procedure only if you have customized the management packs included in the product.
To remove the customizations that you made to the management packs included in Citrix SCOM Management Pack for
XenServer, do the following:
1. Launch the SCOM Operations console and connect to the management server.
2. In the Administration view, expand Administration > Management Packs and click Installed Management Packs (the
navigation pane structure may differ in SCOM versions earlier than 2016).
3. In the results pane, locate the management packs that depend on the management packs included in Citrix SCOM
Management Pack for XenServer.
4. For each such dependent management pack, follow the steps:
a. Right-click it and then click Delete.
b. On the message stating that deleting the management pack might affect the scoping of some user roles, click Yes.
To remove the management packs included in Citrix SCOM Management Pack for XenServer, do the following:
1. Launch the SCOM Operations console and connect to the management server.
2. In the Administration view, expand Administration > Management Packs and click Installed Management Packs (the
navigation pane structure may differ in SCOM versions earlier than 2016).
3. In the results pane, right-click Citrix Management Pack for XenServer Reports, and then select Delete.
4. On the message stating that deleting the management pack might affect the scoping of some user roles, click Yes.
5. Repeat steps 3 and 4 with Citrix Management Pack for XenServer.
6. Check if other Citrix SCOM Management Pack products are installed on the management server. If none of them is
installed, repeat steps 3 and 4 with Citrix Management Pack Library.
To uninstall the Citrix SCOM Management Pack for XenServer from the SCOM management server, do the following:
1. Log on to the management server. Use a user account that has local administrative privileges and SCOM administrative
privileges.
2. Make sure no product folders or f iles are in use by any user.
3. Go to Start > Control Panel and click Programs and Features (actions of this step may differ on operating systems

© 1999-2017 Citrix Systems, Inc. All rights reserved. p.14https://docs.citrix.com
earlier than Windows Server 2016).
4. Right-click Citrix SCOM Management Pack for XenServer and select Uninstall. Wait for the Setup Wizard to appear.
5. In the Welcome page of the Setup Wizard, click Uninstall.6. In the Uninstalling the product page, the Setup Wizard reports the uninstallation progress.
7. In the Completion page of the Setup Wizard, click Finish.

© 1999-2017 Citrix Systems, Inc. All rights reserved. p.15https://docs.citrix.com
Optimize
May 21, 2017
Optional configuration
Some monitors and rules have default thresholds that might need additional tuning to suit your environment. You should
evaluate monitors and rules to determine whether the default thresholds are appropriate for your environment. If a default
threshold is not appropriate for your environment, you should baseline the relevant performance counters, and then adjust
the threshold by overriding them.
For a complete list of monitors and rules available in Citrix SCOM Management Pack for XenServer see the Reference
Guide.
For general information about discovering objects in SCOM, see the "Object Discoveries" section of the What Is in an
Operations Manager Management Pack? webpage on the Microsoft TechNet website.
The following table lists the object types that Citrix SCOM Management Pack for XenServer discovers in the monitored
environment.
Object type DescriptionAutomaticdiscovery
XenServer CPU A CPU core installed in a XenServer host computer; it is
available to virtual machines.
Yes ✔
XenServer Local Storage A local storage configured for XenServer host computers. Yes ✔
XenServer MP Proxy A proxy for monitoring XenServer pools. Yes ✔
XenServer MP Proxy Computer
Role
A XenServer Management Pack proxy computer role. Yes ✔
XenServer Network A network interface installed in a XenServer host
computer.
Yes ✔
XenServer Network Card A network interface installed in a XenServer host
computer.
Yes ✔
XenServer Pool A XenServer pool. Yes ✔

© 1999-2017 Citrix Systems, Inc. All rights reserved. p.16https://docs.citrix.com
XenServer Server A XenServer host computer. Yes ✔
XenServer Shared Storage A shared storage configured for XenServer host
computers.
Yes ✔
XenServer Unused VM An unused (powered off, suspended) virtual machine. Yes ✔
XenServer VM A virtual machine hosted by XenServer. Yes ✔
XenServer VM CPU A virtual CPU (vCPU). No ✕
XenServer VM Network Card A virtual machine network interface. Yes ✔
Important: It may take up to 4 hours for objects to be discovered for the first time.
To check whether any XenServer objects are discovered in your SCOM, do the following:
1. Log on to the management server.
2. Launch the SCOM Operations console.
3. In the Monitoring view, type XenServer in the Search text box and then click Search.
4. In the Search Window dialog box, browse through the objects listed in the object groups.
Adjusting SCOM configuration for management oflarge environments
A single Citrix SCOM Management Pack for XenServer proxy node can manage up to five XenServer pools, each containing
16 servers with eight running virtual machines (640 virtual machines in total).
To manage a larger XenServer environment, you must make adjustments to the typical SCOM installation. Do the following:
1. On the proxy nodes, increase the size of the SCOM agent queue and the size of the version store.
2. On the SCOM management server, raise the threshold of memory utilization monitor for two crucial agent processes.
After the adjustments, a single proxy node with the following configuration can manage up to 15 pools, each containing 16
servers with 12 running virtual machines (2,880 virtual machines in total):
Intel Core 2 Quad Processor Q9400
8 GB of physical RAM
Windows Server 2008 R2
Note: Performance tests were conducted in a SCOM environment where all the rules and monitors enabled by Citrix SCOM
Management Pack for XenServer by default were running.
To manage even larger environments, use proxy nodes with a better hardware configuration.
© 1999-2017 Citrix Systems, Inc. All rights reserved. p.17https://docs.citrix.com
Increasing the size of the SCOM agent queue
SCOM agent uses a queue to store data that needs to be sent to the management server. Typically, the queue prevents
the loss of data when the management server is not available or the agent is not able to communicate with other available
management servers. When the queue is full, the agent starts dropping the oldest data. If one proxy node is planned to
manage a large XenServer environment, the default agent queue size of 15,360 KB (15 MB) is not enough to accommodate
the high workflow amount. This results in an erroneous management of the XenServer environment.
To increase the queue size, do the following:
1. In the Start menu, type regedit in the Search text box, and then click the Search icon.
2. In the results list, click regedit or regedit.exe.
3. In the User Account Control dialog box, click Yes.
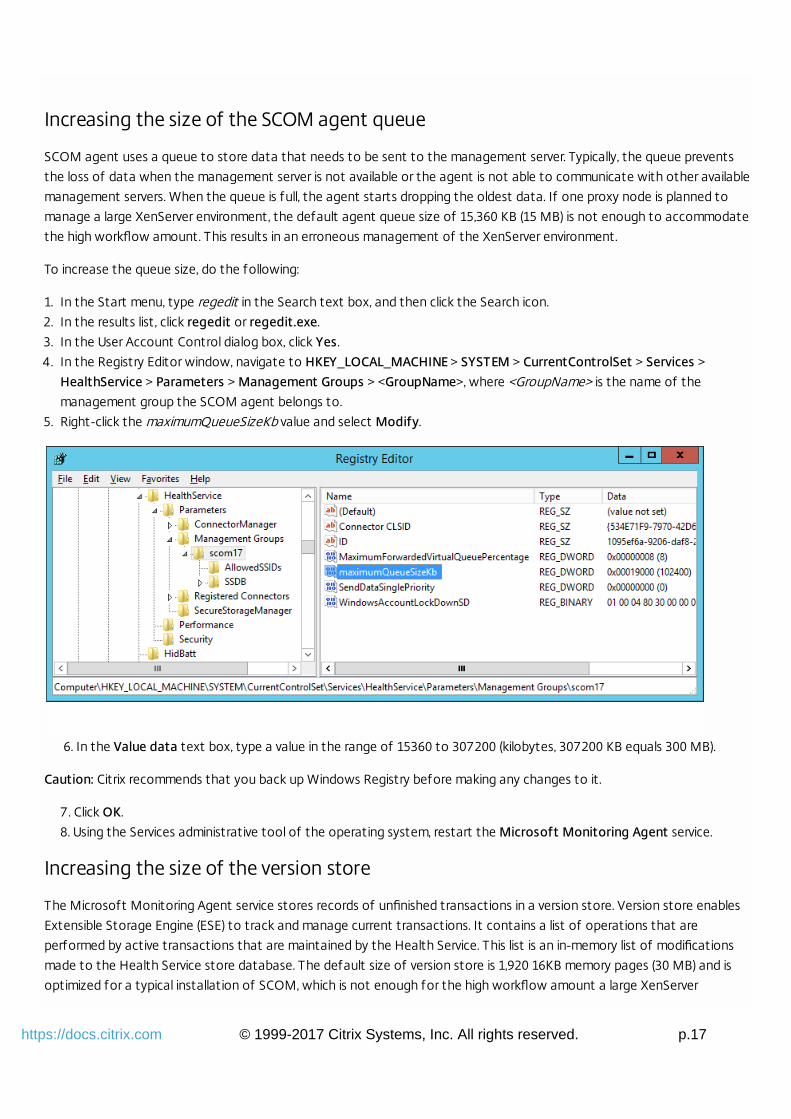
4. In the Registry Editor window, navigate to HKEY_LOCAL_MACHINE > SYSTEM > CurrentControlSet > Services >HealthService > Parameters > Management Groups > <GroupName>, where <GroupName> is the name of the
management group the SCOM agent belongs to.
5. Right-click the maximumQueueSizeKb value and select Modify.
6. In the Value data text box, type a value in the range of 15360 to 307200 (kilobytes, 307200 KB equals 300 MB).
Caution: Citrix recommends that you back up Windows Registry before making any changes to it.
7. Click OK.
8. Using the Services administrative tool of the operating system, restart the Microsoft Monitoring Agent service.
Increasing the size of the version store
The Microsoft Monitoring Agent service stores records of unfinished transactions in a version store. Version store enables
Extensible Storage Engine (ESE) to track and manage current transactions. It contains a list of operations that are
performed by active transactions that are maintained by the Health Service. This list is an in-memory list of modifications
made to the Health Service store database. The default size of version store is 1,920 16KB memory pages (30 MB) and is
optimized for a typical installation of SCOM, which is not enough for the high workflow amount a large XenServer

© 1999-2017 Citrix Systems, Inc. All rights reserved. p.18https://docs.citrix.com
environment may generate.
To increase the queue size, do the following:
1. In the Start menu, type regedit in the Search text box, and then click the Search icon.
2. In the results list, click regedit or regedit.exe.
3. In the User Account Control dialog box, click Yes.
4. In the Registry Editor window, navigate to HKEY_LOCAL_MACHINE > SYSTEM > CurrentControlSet > Services >HealthService > Parameters.
5. Right-click the Persistence Version Store Maximum value and select Modify.
6. In the Value data text box, type a value in the range of 1,920 to 19,200 (16-KB blocks, 19,200 16-KB blocks equals 300
MB).
Caution: Citrix recommends that you back up Windows Registry before making any changes to it.
7. Click OK.
8. Using the Services administrative tool of the operating system, restart the Microsoft Monitoring Agent service.
Raising the memory utilization monitor threshold
SCOM constantly monitors memory utilization of two crucial agent processes: System Center Management Service Host
Process and the Microsoft Monitoring Agent service. When this metric crosses the 300 MB boundary, the recovery action is
to restart these two processes. For a proxy agent computer, the threshold must be raised to 800 MB.
To set the monitor threshold, do the following:
1. Log on to the management server.
2. Launch the SCOM Operations console.
3. In the Monitoring view, expand Operations Manager > Agent Details and click Agents By Version.
4. In the results pane, in the Name column, right-click in the line of the proxy computer, and select Open > Health Explorerfor <ProxyNodeFQDN> .
5. In the Health Explorer for <ProxyNodeFQDN> window, disable any f ilter that might be set.

© 1999-2017 Citrix Systems, Inc. All rights reserved. p.19https://docs.citrix.com
6. Expand Entity Health > Performance > System Center Management Health Service Performance > System CenterManagement Health Service Memory Utilization.
7. Right-click Health Service Private Bytes Threshold and select Monitor Properties.
8. In the Health Service Private Bytes Threshold Properties window, in the Overrides tab, click Override and select Forthe object: <ProxyNodeFQDN> .
9. In the Override Properties window, in the Parameter Name column, locate the Agent Performance Monitor Type(Consecutive Samples) - Threshold line.
10. In the same line, in the Override column, select the check box.
11. In the Override Value column, type 83886088 (bytes; this amount equals 800 MB).
12. From the Select destination management pack drop-down list, select the management pack that you want to save
the customization into. Click New to create a new management pack if needed.
13. Click OK to close the Override Properties window.
14. Click Close to close the Health Service Private Bytes Threshold Properties window.
15. In the left pane, right-click Monitor Host Private Bytes Threshold and select Monitor Properties.
© 1999-2017 Citrix Systems, Inc. All rights reserved. p.20https://docs.citrix.com
16. In the Monitor Host Private Bytes Threshold Properties window, in the Overrides tab, click Override and select Forthe object: <ProxyNodeFQDN> .
17. In the Override Properties window, in the Parameter Name column, locate the Agent Performance Monitor Type(Consecutive Samples) - Threshold line.
18. In the same line, in the Override column, select the check box.
19. In the Override Value column, type 83886088 (bytes; this amount equals 800 MB).
20. From the Select destination management pack drop-down list, select the management pack that you want to save
the customization into. Click New to create a new management pack if needed.
21. Click OK to close the Override Properties window.
22. Click Close to close the Monitor Host Private Bytes Threshold Properties window.
Manually importing included management packs intoSCOM
For general instructions about how to import management packs into SCOM, see the How to Import an Operations
Manager Management Pack webpage on the Microsoft TechNet website.
To import the sealed management packs for XenServer manually, do the following:
1. Log on to the management server.
2. Launch the SCOM Operations console.
3. In the Administration view, click Management Packs.
4. Make sure all required default management packs are present in the list in the results pane. For a list of requirements, see
"Preparing for the installation."
5. In the Tasks pane, expand Actions, and then click Import Management Packs.
6. In the Import Management Packs dialog box, click Add, and then select Add from disk.
7. In the Online Catalog Connection, click No.
8. In the Select Management Packs to import dialog box, browse to the folder that contains the following management
pack f iles, select those f iles, and then click Open.
Comtrade.Citrix.Library.mpComtrade.Citrix.XenServer.mpComtrade.Citrix.XenServer.Reports.mp
9. Click Install.
Customizing sealed management packs
Customization of the sealed management packs that Citrix SCOM Management Pack for XenServer provides is similar to
the default SCOM management pack customization. For details, see the Microsoft TechNet website:
For general information about customization of management packs, see the Customizing Management Packs webpage.
For instructions on how to customize a management pack, see the Create a New Management Pack for Customizations
webpage.

© 1999-2017 Citrix Systems, Inc. All rights reserved. p.21https://docs.citrix.com

© 1999-2017 Citrix Systems, Inc. All rights reserved. p.22https://docs.citrix.com
Citrix SCOM Management Pack 2.24 for XenServer
May 21, 2017
Citrix SCOM Management Pack for XenServer is an availability and performance management solution that extends end-
to-end service monitoring capabilities of Microsoft System Center Operations Manager (SCOM) to include the Citrix
XenServer (XenServer) infrastructure. It fully integrates topology, health, and performance data into SCOM and provides
centralized monitoring.
It covers the following key scenarios:
Are all XenServer instances running?
Are all virtual machines powered on?
Are there any events that indicate a problem with XenServer or a particular virtual machine?
Have any performance thresholds been violated?
Citrix SCOM Management Pack for XenServer components can help you detect and respond to critical events in your
XenServer virtual infrastructure. Frequently, timely alerts help prevent XenServer outages and assure high availability of the
XenServer virtual infrastructure.
Citrix SCOM Management Pack for XenServer provides a large number of performance collection rules which collect vital
XenServer metrics to the SCOM data warehouse. Predefined reports allow you to use this data to review and analyze
performance history and to predict trends.
Architecture
The following diagram shows how Citrix SCOM Management Pack for XenServer connects to the SCOM management
platform and the XenServer enterprise infrastructure.

© 1999-2017 Citrix Systems, Inc. All rights reserved. p.23https://docs.citrix.com

© 1999-2017 Citrix Systems, Inc. All rights reserved. p.24https://docs.citrix.com
What's new
May 21, 2017
Citrix SCOM Management Pack 2.24 for XenServer introduces the following features:
Documentation in HTML format. The documentation for the Citrix SCOM Management Pack 2.24 for XenServer is
available in HTML format. To access the documentation of earlier versions, see Citrix SCOM Management Pack for
XenServer.
Support for Citrix XenServer 7.1. Citrix SCOM Management Pack for XenServer supports XenServer version 7.1.
Known issues
The following is a list of known issues in this product version.
Issue ID: SCOM-1151
Symptom: The Citrix SCOM Management Pack for XenServer Agent might not get upgraded. The upgrade process
initially removes the Citrix MPXS Agent service. However, the previously installed agent package is not replaced and the
earlier program version remains registered with the operating system.
Action: Repeat the upgrade procedure.
Fixed issues
None
Upgrading
Note: Product versions earlier than 2.21 were released under the name Comtrade Management Pack for Citrix XenServer.
Upgrade is possible for the versions 2.20 and later.
In-place upgrade is not supported in the Citrix SCOM Management Pack for XenServer. Instead to do an upgrade, follow
the steps as below:
1. Uninstall the current version of the management pack following the uninstallation instructions as per the documentation
of your current version.
2. Install the new version of the Citrix SCOM Management Pack for XenServer following the instructions in Install and
Configure. Your management pack customization is preserved.
3. This step is valid only if you are upgrading from version 2.20 . To migrate your management pack customization, on each
XenServer Management Pack proxy node, move the xsmp_config.dat f ile from
the %ProgramFiles%\ComTrade\XenServer MP Agent folder to the %ProgramFiles%\Citrix\XenServer MP Agent folder.

© 1999-2017 Citrix Systems, Inc. All rights reserved. p.25https://docs.citrix.com
System requirements
May 21, 2017
Before installing Citrix SCOM Management Pack for XenServer, make sure that your environment meets the requirements
listed in this section.
Storage requirements
The Operations Manager data warehouse server must have enough free storage space for the performance data that is
collected. Citrix SCOM Management Pack for XenServer daily stores approximately the following amounts of data into the
data warehouse database (OperationsManagerDW):
48 KB per virtual machine
72 KB per physical XenServer host
Software requirements
Citrix SCOM Management Pack for XenServer requires a supported version of the following products that it integrates
with:
Citrix XenServer
Microsoft System Center Operations Manager
Supported versions of Citrix XenServer
Citrix SCOM Management Pack for XenServer is compatible with the following Citrix XenServer versions:
Product version Supported
Citrix XenServer 7.1 ✔
Citrix XenServer 7.0 ✔
Citrix XenServer 6.5 ✔
Citrix XenServer 6.2 ✔
Citrix XenServer 6.1 ✔
Citrix XenServer 6.0.2 ✔
Citrix XenServer 6.0 ✔
1
1

© 1999-2017 Citrix Systems, Inc. All rights reserved. p.26https://docs.citrix.com
This entry covers the RTM version, the RTM version updated with Service Pack 1.
Supported versions of SCOM
Citrix SCOM Management Pack for XenServer is compatible with the following SCOM versions:
Microsoft System Center Operations Manager version Supported
Microsoft System Center Operations Manager 2016 ✔
Microsoft System Center Operations Manager 2012 R2 ✔
Microsoft System Center Operations Manager 2012 R2 ✔
This entry covers both the RTM version and the RTM version updated with Service Pack 1 (SP1).
Supported operating systems
Citrix SCOM Management Pack for XenServer Agent is compatible with the following operating systems:
Operating system Supported
Microsoft Windows Server 2016 ✔
Microsoft Windows Server 2012 R2 ✔
Microsoft Windows Server 2008 R2 ✔
Language support
The product can be deployed and operates correctly in environments where regional settings are configured to use any of
the following languages:
Language Language code Supported
English en ✔
Spanish es ✔
1
2
2

© 1999-2017 Citrix Systems, Inc. All rights reserved. p.27https://docs.citrix.com
Install and configure
May 21, 2017
This chapter contains instructions that you must follow to install and configure the Citrix SCOM Management Pack for
XenServer. Perform all procedures in the documented order of precedence.
Preparing for the installation
Before installing the Citrix SCOM Management Pack for XenServer, make sure the following prerequisites are fulfilled:
Your environment meets the hardware and software requirements. See System Requirements. A computer is chosen on which a SCOM management server resides and where the server side of Citrix SCOM
Management Pack for XenServer will be installed. This computer is referred to as SCOM management server.
One or more computers are chosen where Citrix SCOM Management Pack for XenServer Agent instances will be
installed that will remotely collect XenServer data. These computers are referred to as Citrix SCOM Management Pack
for XenServer proxy nodes (proxy nodes). The proxy nodes must be running a supported Microsoft Windows operating
system.
Important: The terms proxy node and proxy agent do not mean the same thing. The former refers to a role in the Citrix
SCOM Management Pack for XenServer deployment, whereas the latter refers to a special configuration of SCOM agent.
The choice about proxy nodes depends on the size and complexity of your XenServer environment. Citrix recommends that
you use one proxy node for monitoring one or two small XenServer pools, but designate multiple proxy nodes in case you
have a larger XenServer environment.
Important: While one proxy node can monitor multiple XenServer pools, proxy nodes should be designated and configured
such that each pool is monitored from a single node.
For a sample hardware specification for proxy nodes, see Optimize, section Adjusting SCOM configuration for management
of large environments.
SCOM agent is installed on all the proxy nodes. Proxy nodes are configured as agent-managed computers in the SCOM
management group.
Installing the product on the SCOM managementserver
The server-side part of the Citrix SCOM Management Pack for XenServer must be installed on the SCOM management
server.
To install the product on the SCOM management server, do the following:
1. Log on to the management server. Use a user account that has local administrative privileges and SCOM administrative
privileges.
2. In Windows Explorer, locate the Citrix_SCOM_Management_Pack_for_XenServer_<Version>.exe f ile (where <Version> is

© 1999-2017 Citrix Systems, Inc. All rights reserved. p.28https://docs.citrix.com
the current software version), and double-click it to invoke the installation process. Wait for the Setup Wizard to appear.
3. In the Welcome page of the Setup Wizard, click Next.
4. In the View Relevant Product Configuration page, click Next.
5. In the License Agreement page of the Setup Wizard, read the end user license agreement carefully. If you accept the
terms of the agreement, click Next.
6. In the Destination Folder page, define the Citrix SCOM Management Pack for XenServer installation folder. Citrix
recommends that you install Citrix SCOM Management Pack for XenServer to the default folder. Proceed as follows:
To install the product to the default folder listed in the Setup Wizard, no special actions are required.
To install the product to a different folder, follow the sub-steps:
Click Change.
In the Browse For Folder dialog box, browse to a desired installation folder, select it, and click OK.
Click Next.
7. In the Configure Post-Install Actions page of the Setup Wizard, decide whether the Setup Wizard should automatically
import the included management packs into SCOM.
To let the Setup Wizard import the management packs, select the Automatically import the ManagementPack option. Citrix recommends this choice.
To import the management packs into SCOM manually at a later time, leave the Automatically import theManagement Pack option unselected. For instructions about how to import or reimport the management packs, see
Manually importing included management packs into SCOM.
8. Click Install. The Setup Wizard displays the Installing the product page and starts copying the installation f iles.
9. After the installation completes, the installation completion page is displayed.
If you let the Setup Wizard to automatically import the management packs, click Next. Else, click Finish to close the
Setup Wizard.
If you let the Setup Wizard to automatically import the management packs, it displays the Executing post-install
actions page. Attend the import process.
10. In the post-installation completion page, review the management packs import log, and click Finish to close the Setup
Wizard.
Verifying the installation on the management server
To verify that the Citrix SCOM Management Pack for XenServer installation on the management server is correct, do the
following:
1. Log on to the management server.
2. Go to Start > Control Panel and click Programs and Features (actions of this step may differ on operating systems
earlier than Windows Server 2016).
3. Check for the presence of the following entry in the Name column:
Citrix SCOM Management Pack for XenServer
4. Launch the SCOM Operations console.
5. In the Monitoring view, expand the items in the left pane until they match the following figure.

© 1999-2017 Citrix Systems, Inc. All rights reserved. p.29https://docs.citrix.com
6. In the Administration view, expand Administration > Management Packs and click Installed Management Packs (the
navigation pane structure may differ in SCOM versions earlier than 2016).
7. Verify the following management pack versions are listed in the middle pane:
Citrix Management Pack for XenServer 2.24.13.0
Citrix Management Pack for XenServer Reports 2.24.13.0
Citrix Management Pack Library 1.0.18.0
Configuring SCOM agent to act as proxy on proxynodes
SCOM agent on each computer where Citrix SCOM Management Pack for XenServer Agent will be installed (Citrix SCOM
Management Pack for XenServer proxy node) must be configured to act as a proxy agent. This configuration enables the
agent to relay or forward information from or about other computes and network devices to the SCOM management
server.
To configure the SCOM agent instances to act as proxy agents, do the following:
1. Launch the SCOM Operations console and connect to the management server.
2. In the Administration view, in the left pane, expand Device Management, and then click Agent Managed.
3. For each planned proxy node, follow the steps:

© 1999-2017 Citrix Systems, Inc. All rights reserved. p.30https://docs.citrix.com
a. Right-click the host name, and select Properties.
b. Click the Security tab.
c. Select the Allow this agent to act as proxy and discover managed objects on other computers option.
d. Click OK.
Installing the product on the proxy nodes
On the designated Citrix SCOM Management Pack for XenServer proxy nodes, only the Citrix SCOM Management Pack for
XenServer Agent must be installed.
To install Citrix SCOM Management Pack for XenServer Agent on a proxy node, do the following:
1. Log on to the proxy node. Use a user account that has local administrative privileges.
2. Copy the MPXSAgent.exe f ile from the %ProgramData%\Citrix\CitrixMPShare\XenServer MP folder on the management
server to a location on the proxy node.
3. In Windows Explorer, locate the MPXSAgent.exe f ile, and double-click it to invoke the installation process. Wait for the
Setup Wizard to appear.
4. In the Welcome page of the Setup Wizard, click Next.
5. In the License Agreement page of the Setup Wizard, read the end user license agreement carefully. If you accept the
terms of the agreement, click Install.6. After the installation completes, the completion page is displayed. Click Finish to close the Setup Wizard.
Verifying the installation on the proxy nodes
To verify that the Citrix SCOM Management Pack for XenServer installation on a proxy node is correct, do the following:
1. Log on to the proxy node.
2. Go to Start > Control Panel and click Programs and Features (actions of this step may differ on operating systems
earlier than Windows Server 2016).
3. Check for the presence of the following entry in the Name column:
Citrix SCOM Management Pack Agent for XenServer4. Go to Start > Administrative Tools and double-click Services.5. In the Name column of the Services window, locate the Citrix MPXS Agent service, and make sure that its status is to
Started.
Configuring Citrix SCOM Management Pack forXenServer
Configuration of Citrix SCOM Management Pack for XenServer requires providing data about XenServer pool masters to
the Citrix SCOM Management Pack for XenServer Agent on each proxy node.
To configure the Citrix SCOM Management Pack for XenServer on a proxy node, do the following:
1. Log on to the proxy node. Use a user account that has local administrative privileges.

© 1999-2017 Citrix Systems, Inc. All rights reserved. p.31https://docs.citrix.com
2. Go to Start > All Programs > Citrix > XenServer Management Pack.
3. Follow the step:
If User Account Control (UAC) is disabled in the operating system, click XenServer MP Configuration.
If UAC is enabled, right-click XenServer MP Configuration, and select Run as administrator.
4. In the Citrix Management Pack Configuration window, click Add.
5. In the Add a new pool master connection dialog box, enter the following data related to a XenServer pool:
Fully qualif ied domain name of the pool master
Port number that the pool master uses for connections
User name and password that are used as connection credentials
6. Optionally, click Test to verify the connection to the pool master. In the Test result dialog box, check the verification
result, and click OK.
7. Click OK to close the dialog box.
8. Repeat the steps 4 to 7 for each additional XenServer pool you want monitor from this proxy node.
9. Click OK to apply the configuration changes and close the window.
Uninstallation
This chapter contains instructions that you must follow to effectively uninstall the Citrix SCOM Management Pack for
XenServer. Perform all procedures in the documented order of precedence.
To uninstall Citrix SCOM Management Pack for XenServer Agent from a computer that is a Citrix SCOM Management Pack

© 1999-2017 Citrix Systems, Inc. All rights reserved. p.32https://docs.citrix.com
for XenServer proxy node, do the following:
1. Log on to the proxy node. Use a user account that has local administrative privileges.
2. Make sure no product folders or f iles are in use by any user.
3. Go to Start > Control Panel and click Programs and Features (actions of this step may differ on operating systems
earlier than Windows Server 2016).
4. Right-click Citrix SCOM Management Pack Agent for XenServer and select Uninstall. Wait for the Setup Wizard to
appear.
5. In the Welcome page of the Setup Wizard, click Uninstall.6. In the Uninstalling the product page, the Setup Wizard reports the uninstallation progress.
7. In the Completion page of the Setup Wizard, click Finish.
Important: Perform this procedure only if you have customized the management packs included in the product.
To remove the customizations that you made to the management packs included in Citrix SCOM Management Pack for
XenServer, do the following:
1. Launch the SCOM Operations console and connect to the management server.
2. In the Administration view, expand Administration > Management Packs and click Installed Management Packs (the
navigation pane structure may differ in SCOM versions earlier than 2016).
3. In the results pane, locate the management packs that depend on the management packs included in Citrix SCOM
Management Pack for XenServer.
4. For each such dependent management pack, follow the steps:
a. Right-click it and then click Delete.
b. On the message stating that deleting the management pack might affect the scoping of some user roles, click Yes.
To remove the management packs included in Citrix SCOM Management Pack for XenServer, do the following:
1. Launch the SCOM Operations console and connect to the management server.
2. In the Administration view, expand Administration > Management Packs and click Installed Management Packs (the
navigation pane structure may differ in SCOM versions earlier than 2016).
3. In the results pane, right-click Citrix Management Pack for XenServer Reports, and then select Delete.
4. On the message stating that deleting the management pack might affect the scoping of some user roles, click Yes.
5. Repeat steps 3 and 4 with Citrix Management Pack for XenServer.
6. Check if other Citrix SCOM Management Pack products are installed on the management server. If none of them is
installed, repeat steps 3 and 4 with Citrix Management Pack Library.
To uninstall the Citrix SCOM Management Pack for XenServer from the SCOM management server, do the following:
1. Log on to the management server. Use a user account that has local administrative privileges and SCOM administrative
privileges.
2. Make sure no product folders or f iles are in use by any user.
3. Go to Start > Control Panel and click Programs and Features (actions of this step may differ on operating systems
earlier than Windows Server 2016).

© 1999-2017 Citrix Systems, Inc. All rights reserved. p.33https://docs.citrix.com
4. Right-click Citrix SCOM Management Pack for XenServer and select Uninstall. Wait for the Setup Wizard to appear.
5. In the Welcome page of the Setup Wizard, click Uninstall.6. In the Uninstalling the product page, the Setup Wizard reports the uninstallation progress.
7. In the Completion page of the Setup Wizard, click Finish.

© 1999-2017 Citrix Systems, Inc. All rights reserved. p.34https://docs.citrix.com
A complete list of monitors and rules available in Citrix SCOM Management Pack for XenServer.
Optimize
May 21, 2017
Optional configuration
Some monitors and rules have default thresholds that might need additional tuning to suit your environment. You should
evaluate monitors and rules to determine whether the default thresholds are appropriate for your environment. If a default
threshold is not appropriate for your environment, you should baseline the relevant performance counters, and then adjust
the threshold by overriding them.
For general information about discovering objects in SCOM, see the "Object Discoveries" section of the What Is in an
Operations Manager Management Pack? webpage on the Microsoft TechNet website.
The following table lists the object types that Citrix SCOM Management Pack for XenServer discovers in the monitored
environment.
Object type DescriptionAutomaticdiscovery
XenServer CPU A CPU core installed in a XenServer host computer; it is
available to virtual machines.
Yes ✔
XenServer Local Storage A local storage configured for XenServer host computers. Yes ✔
XenServer MP Proxy A proxy for monitoring XenServer pools. Yes ✔
XenServer MP Proxy Computer
Role
A XenServer Management Pack proxy computer role. Yes ✔
XenServer Network A network interface installed in a XenServer host
computer.
Yes ✔
XenServer Network Card A network interface installed in a XenServer host
computer.
Yes ✔
XenServer Pool A XenServer pool. Yes ✔
Citrix SCOM Management Pack for XenServer Reference Guide

© 1999-2017 Citrix Systems, Inc. All rights reserved. p.35https://docs.citrix.com
XenServer Server A XenServer host computer. Yes ✔
XenServer Shared Storage A shared storage configured for XenServer host
computers.
Yes ✔
XenServer Unused VM An unused (powered off, suspended) virtual machine. Yes ✔
XenServer VM A virtual machine hosted by XenServer. Yes ✔
XenServer VM CPU A virtual CPU (vCPU). No ✕
XenServer VM Network Card A virtual machine network interface. Yes ✔
Important: It may take up to 4 hours for objects to be discovered for the first time.
To check whether any XenServer objects are discovered in your SCOM, do the following:
1. Log on to the management server.
2. Launch the SCOM Operations console.
3. In the Monitoring view, type XenServer in the Search text box and then click Search.
4. In the Search Window dialog box, browse through the objects listed in the object groups.
Adjusting SCOM configuration for management oflarge environments
A single Citrix SCOM Management Pack for XenServer proxy node can manage up to five XenServer pools, each containing
16 servers with eight running virtual machines (640 virtual machines in total).
To manage a larger XenServer environment, you must make adjustments to the typical SCOM installation. Do the following:
1. On the proxy nodes, increase the size of the SCOM agent queue and the size of the version store.
2. On the SCOM management server, raise the threshold of memory utilization monitor for two crucial agent processes.
After the adjustments, a single proxy node with the following configuration can manage up to 15 pools, each containing 16
servers with 12 running virtual machines (2,880 virtual machines in total):
Intel Core 2 Quad Processor Q9400
8 GB of physical RAM
Windows Server 2008 R2
Note: Performance tests were conducted in a SCOM environment where all the rules and monitors enabled by Citrix SCOM
Management Pack for XenServer by default were running.
To manage even larger environments, use proxy nodes with a better hardware configuration.

© 1999-2017 Citrix Systems, Inc. All rights reserved. p.36https://docs.citrix.com
Increasing the size of the SCOM agent queue
SCOM agent uses a queue to store data that needs to be sent to the management server. Typically, the queue prevents
the loss of data when the management server is not available or the agent is not able to communicate with other available
management servers. When the queue is full, the agent starts dropping the oldest data. If one proxy node is planned to
manage a large XenServer environment, the default agent queue size of 15,360 KB (15 MB) is not enough to accommodate
the high workflow amount. This results in an erroneous management of the XenServer environment.
To increase the queue size, do the following:
1. In the Start menu, type regedit in the Search text box, and then click the Search icon.
2. In the results list, click regedit or regedit.exe.
3. In the User Account Control dialog box, click Yes.
4. In the Registry Editor window, navigate to HKEY_LOCAL_MACHINE > SYSTEM > CurrentControlSet > Services >HealthService > Parameters > Management Groups > <GroupName>, where <GroupName> is the name of the
management group the SCOM agent belongs to.
5. Right-click the maximumQueueSizeKb value and select Modify.
6. In the Value data text box, type a value in the range of 15360 to 307200 (kilobytes, 307200 KB equals 300 MB).
Caution: Citrix recommends that you back up Windows Registry before making any changes to it.
7. Click OK.
8. Using the Services administrative tool of the operating system, restart the Microsoft Monitoring Agent service.
Increasing the size of the version store
The Microsoft Monitoring Agent service stores records of unfinished transactions in a version store. Version store enables
Extensible Storage Engine (ESE) to track and manage current transactions. It contains a list of operations that are
performed by active transactions that are maintained by the Health Service. This list is an in-memory list of modifications
made to the Health Service store database. The default size of version store is 1,920 16KB memory pages (30 MB) and is
optimized for a typical installation of SCOM, which is not enough for the high workflow amount a large XenServer

© 1999-2017 Citrix Systems, Inc. All rights reserved. p.37https://docs.citrix.com
environment may generate.
To increase the queue size, do the following:
1. In the Start menu, type regedit in the Search text box, and then click the Search icon.
2. In the results list, click regedit or regedit.exe.
3. In the User Account Control dialog box, click Yes.
4. In the Registry Editor window, navigate to HKEY_LOCAL_MACHINE > SYSTEM > CurrentControlSet > Services >HealthService > Parameters.
5. Right-click the Persistence Version Store Maximum value and select Modify.
6. In the Value data text box, type a value in the range of 1,920 to 19,200 (16-KB blocks, 19,200 16-KB blocks equals 300
MB).
Caution: Citrix recommends that you back up Windows Registry before making any changes to it.
7. Click OK.
8. Using the Services administrative tool of the operating system, restart the Microsoft Monitoring Agent service.
Raising the memory utilization monitor threshold
SCOM constantly monitors memory utilization of two crucial agent processes: System Center Management Service Host
Process and the Microsoft Monitoring Agent service. When this metric crosses the 300 MB boundary, the recovery action is
to restart these two processes. For a proxy agent computer, the threshold must be raised to 800 MB.
To set the monitor threshold, do the following:
1. Log on to the management server.
2. Launch the SCOM Operations console.
3. In the Monitoring view, expand Operations Manager > Agent Details and click Agents By Version.
4. In the results pane, in the Name column, right-click in the line of the proxy computer, and select Open > Health Explorerfor <ProxyNodeFQDN> .
5. In the Health Explorer for <ProxyNodeFQDN> window, disable any f ilter that might be set.

© 1999-2017 Citrix Systems, Inc. All rights reserved. p.38https://docs.citrix.com
6. Expand Entity Health > Performance > System Center Management Health Service Performance > System CenterManagement Health Service Memory Utilization.
7. Right-click Health Service Private Bytes Threshold and select Monitor Properties.
8. In the Health Service Private Bytes Threshold Properties window, in the Overrides tab, click Override and select Forthe object: <ProxyNodeFQDN> .
9. In the Override Properties window, in the Parameter Name column, locate the Agent Performance Monitor Type(Consecutive Samples) - Threshold line.
10. In the same line, in the Override column, select the check box.
11. In the Override Value column, type 83886088 (bytes; this amount equals 800 MB).
12. From the Select destination management pack drop-down list, select the management pack that you want to save
the customization into. Click New to create a new management pack if needed.
13. Click OK to close the Override Properties window.
14. Click Close to close the Health Service Private Bytes Threshold Properties window.
15. In the left pane, right-click Monitor Host Private Bytes Threshold and select Monitor Properties.

© 1999-2017 Citrix Systems, Inc. All rights reserved. p.39https://docs.citrix.com
16. In the Monitor Host Private Bytes Threshold Properties window, in the Overrides tab, click Override and select Forthe object: <ProxyNodeFQDN> .
17. In the Override Properties window, in the Parameter Name column, locate the Agent Performance Monitor Type(Consecutive Samples) - Threshold line.
18. In the same line, in the Override column, select the check box.
19. In the Override Value column, type 83886088 (bytes; this amount equals 800 MB).
20. From the Select destination management pack drop-down list, select the management pack that you want to save
the customization into. Click New to create a new management pack if needed.
21. Click OK to close the Override Properties window.
22. Click Close to close the Monitor Host Private Bytes Threshold Properties window.
Manually importing included management packs intoSCOM
For general instructions about how to import management packs into SCOM, see the How to Import an Operations
Manager Management Pack webpage on the Microsoft TechNet website.
To import the sealed management packs for XenServer manually, do the following:
1. Log on to the management server.
2. Launch the SCOM Operations console.
3. In the Administration view, click Management Packs.
4. Make sure all required default management packs are present in the list in the results pane. For a list of requirements, see
"Preparing for the installation."
5. In the Tasks pane, expand Actions, and then click Import Management Packs.
6. In the Import Management Packs dialog box, click Add, and then select Add from disk.
7. In the Online Catalog Connection, click No.
8. In the Select Management Packs to import dialog box, browse to the folder that contains the following management
pack f iles, select those f iles, and then click Open.
Comtrade.Citrix.Library.mpComtrade.Citrix.XenServer.mpComtrade.Citrix.XenServer.Reports.mp
9. Click Install.
Customizing sealed management packs
Customization of the sealed management packs that Citrix SCOM Management Pack for XenServer provides is similar to
the default SCOM management pack customization. For details, see the Microsoft TechNet website:
For general information about customization of management packs, see the Customizing Management Packs webpage.
For instructions on how to customize a management pack, see the Create a New Management Pack for Customizations
webpage.

© 1999-2017 Citrix Systems, Inc. All rights reserved. p.40https://docs.citrix.com
Related Documents