© 1999-2017 Citrix Systems, Inc. All rights reserved. p.1 https://docs.citrix.com Citrix SCOM Management Pack 1.13 for StoreFront Nov 27, 2017 Citrix SCOM Management Pack for StoreFront is an availability and performance management solution that extends end- to-end service monitoring capabilities of Microsoft System Center Operations Manager (SCOM SCOM ) to include the Citrix StoreFront (StoreFront StoreFront ) infrastructure. With the Citrix SCOM Management Pack for StoreFront, you can improve the StoreFront infrastructure availability and health. If any important part of Citrix environment that StoreFront relies on is not available, the user will not be able to use its resources at all or will be using them with a degraded performance. The Citrix SCOM Management Pack for StoreFront actively monitors the availability of StoreFront and its core components. The Citrix SCOM Management Pack for StoreFront fully integrates topology, health, and performance data into SCOM, providing an end-to-end operations overview across the entire StoreFront estate, and enabling delivery of effective business service management. The Citrix SCOM Management Pack for StoreFront covers the following key scenarios: StoreFront environment discovery and its presentation in a topology view StoreFront Services probing for each discovered store and measuring response times Web page availability and load time monitoring Controller connection probing StoreFront Services monitoring Architecture The following diagram shows how StoreFront Management Pack connects to the SCOM management platform and the StoreFront estate.

Welcome message from author
This document is posted to help you gain knowledge. Please leave a comment to let me know what you think about it! Share it to your friends and learn new things together.
Transcript

© 1999-2017 Citrix Systems, Inc. All rights reserved. p.1https://docs.citrix.com
Citrix SCOM Management Pack 1.13 for StoreFront
Nov 27, 2017
Citrix SCOM Management Pack for StoreFront is an availability and performance management solution that extends end-
to-end service monitoring capabilities of Microsoft System Center Operations Manager (SCOMSCOM ) to include the Citrix
StoreFront (St oreFrontSt oreFront ) infrastructure.
With the Citrix SCOM Management Pack for StoreFront, you can improve the StoreFront infrastructure availability and
health. If any important part of Citrix environment that StoreFront relies on is not available, the user will not be able to use
its resources at all or will be using them with a degraded performance. The Citrix SCOM Management Pack for
StoreFront actively monitors the availability of StoreFront and its core components.
The Citrix SCOM Management Pack for StoreFront fully integrates topology, health, and performance data into SCOM,
providing an end-to-end operations overview across the entire StoreFront estate, and enabling delivery of effective
business service management.
The Citrix SCOM Management Pack for StoreFront covers the following key scenarios:
StoreFront environment discovery and its presentation in a topology view
StoreFront Services probing for each discovered store and measuring response times
Web page availability and load time monitoring
Controller connection probing
StoreFront Services monitoring
Architecture
The following diagram shows how StoreFront Management Pack connects to the SCOM management platform and the
StoreFront estate.
© 1999-2017 Citrix Systems, Inc. All rights reserved. p.2https://docs.citrix.com
© 1999-2017 Citrix Systems, Inc. All rights reserved. p.3https://docs.citrix.com
What's new
Nov 27, 2017
Citrix SCOM Management Pack 1.13 for StoreFront introduces the following new or enhanced features:
Support f or Cit rix St oreFront versions. Support f or Cit rix St oreFront versions. Citrix SCOM Management Pack for StoreFront now supports StoreFront
Versions 3.13.
New St oreFront SSL Cert if icat e Expirat ion Monit or. New St oreFront SSL Cert if icat e Expirat ion Monit or. Monitors the validity of the certif icate used for SSL
connections to StoreFront. The monitor periodically queries the SSL bindings on Microsoft Internet Information Services
(IIS) running StoreFront and checks the corresponding certif icate expiration dates.
Probing St oreFront user conf igurat ion check. Probing St oreFront user conf igurat ion check. The StoreFront probing user must be correctly configured in the
Citrix Management Pack Configuration tool to enable probing of the StoreFront store services availability and the
response time. The Check Requirements task of the Citrix SCOM Management Pack for StoreFront is now extended to
check whether the probing user is configured correctly. This check helps administrators identify StoreFront probing user
configuration issues easily.
Known issues
The following is a list of known issues in this product version:
Issue IDIssue ID : SCOM-1200
Sympt omSympt om: After installing the Citrix SCOM Management Pack for StoreFront, the states of correctly operating
StoreFront computers are shown as Healthy only after the second discovery interval; until then the states are shown as
Not monitored. After the second discovery interval, all objects get discovered. Restarting the SCOM agent does not
resolve the issue.
Act ionAct ion: None. There is no workaround available.
Issue IDIssue ID : n/a
Sympt omSympt om: For a monitored Citrix StoreFront server where StoreFront software version 2.0 or 2.1 is installed, the
following notif ication is sent:
The "StoreFront MP" service on computer '' status is not operational. Agent Error: 'Workflow ID: agent-service-info-discovery Status: successful Error Message: Workflow ID: server-discovery Status: failed Error Message: The PS object does not have an 'IsAnonymous' property'.Operations Manager Health Explorer shows a healthy state for this server. If you run the Check Requirement s andCheck Requirement s and
Conf igurat ionConf igurat ion task for the server, it completes without errors.
Act ionAct ion: Upgrade your Citrix StoreFront software to version 2.5 or later.
Issue IDIssue ID : SCOM-217 (4285)
Sympt omSympt om: Store service probe fails and reports the No request token choices available or There is no ExplicitFormsprotocol in request token choices or the location is not provided error.
© 1999-2017 Citrix Systems, Inc. All rights reserved. p.4https://docs.citrix.com
This product version supports only the explicit method (user name and password) of the store service authentication.
Act ionAct ion: Enable the explicit authentication method for the authentication service. For this purpose, create a new user
account that has logon permission on the store. The user account does not need administrative privileges. Enter
credentials of the user account using the Citrix Management Pack Configuration tool of Citrix SCOM Management Pack
for StoreFront. For instructions, see Setting up probing user accounts for StoreFront availability in Install and Configure.
Issue IDIssue ID : SCOM-2284
Sympt omSympt om: If you override the Agent Inst allat ionSourceAgent Inst allat ionSource parameter with a different source in the Inst all Cit rix MPSFInst all Cit rix MPSF
Agent Agent or the Check Inst allat ion Prerequisit es f or Cit rix MPSF Agent Check Inst allat ion Prerequisit es f or Cit rix MPSF Agent , the task might fail with a "Management
server not found" error message. This error might occur if the PowerShell version is version 2 or earlier.
WorkaroundWorkaround: Install Citrix Management Pack for StoreFront Agent manually on the StoreFront server instead of using
the tasks, or upgrade PowerShell to version 3 or later.
Fixed issues
None
Upgrading
Not e:Not e: Product versions earlier than 1.5 were released under the name Comtrade Management Pack for Citrix StoreFront.
Upgrade is available only from versions 1.4 and later. During the upgrade process, the included management packs of the
earlier product version are automatically upgraded; their prior removal is not required. Your management pack customization
is preserved.
For upgrade instructions, see Upgrading in Install and Configure.
© 1999-2017 Citrix Systems, Inc. All rights reserved. p.5https://docs.citrix.com
System requirements
Nov 27, 2017
Before installing the Citrix SCOM Management Pack for StoreFront, make sure that your environment meets the
requirements listed in this section.
Sof t ware requirement sSof t ware requirement s
The Citrix SCOM Management Pack for StoreFront requires a supported version of the following products that it
integrates with:
Citrix StoreFront
Microsoft System Center Operations Manager
Not e: Not e: Make sure that Microsoft .NET Framework 4.5.2 or later is available on the StoreFront computer.
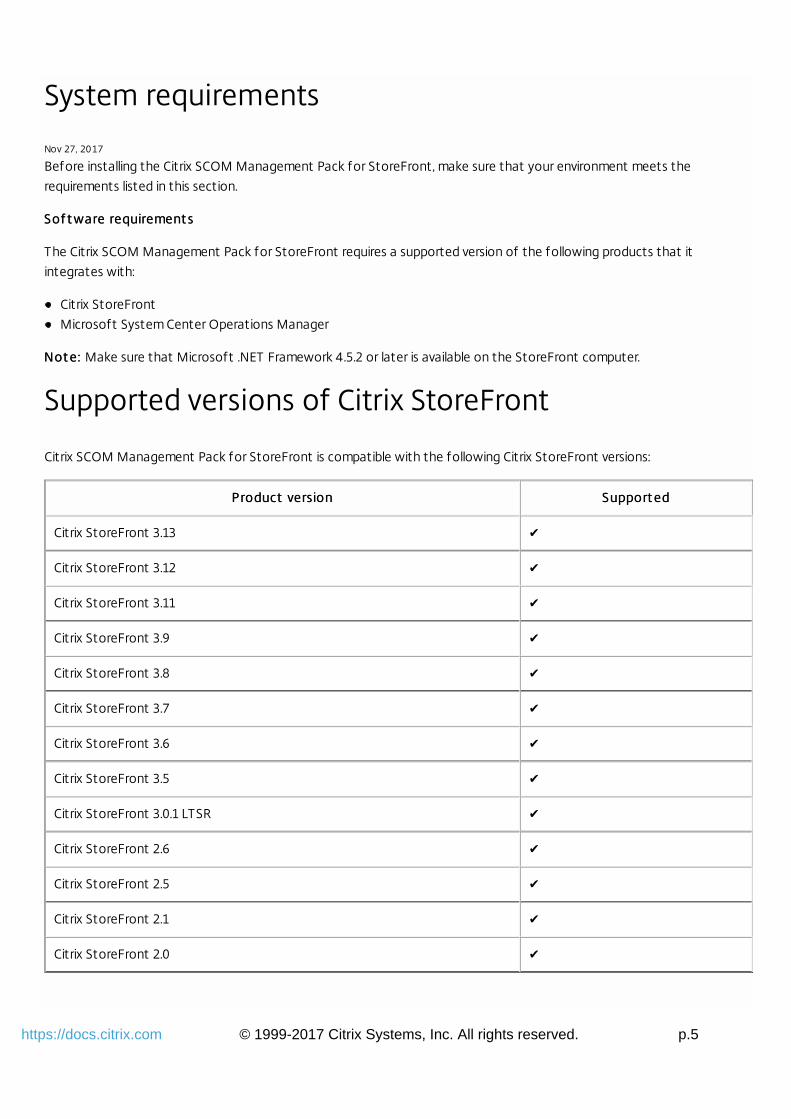
Supported versions of Citrix StoreFront
Citrix SCOM Management Pack for StoreFront is compatible with the following Citrix StoreFront versions:
Product versionProduct version Support edSupport ed
Citrix StoreFront 3.13 ✔
Citrix StoreFront 3.12 ✔
Citrix StoreFront 3.11 ✔
Citrix StoreFront 3.9 ✔
Citrix StoreFront 3.8 ✔
Citrix StoreFront 3.7 ✔
Citrix StoreFront 3.6 ✔
Citrix StoreFront 3.5 ✔
Citrix StoreFront 3.0.1 LTSR ✔
Citrix StoreFront 2.6 ✔
Citrix StoreFront 2.5 ✔
Citrix StoreFront 2.1 ✔
Citrix StoreFront 2.0 ✔

© 1999-2017 Citrix Systems, Inc. All rights reserved. p.6https://docs.citrix.com
Supported versions of SCOM
The product is compatible with the following SCOM versions:
Microsof t Syst em Cent er Operat ions Manager versionMicrosof t Syst em Cent er Operat ions Manager version Support edSupport ed
Microsoft System Center Operations Manager 2016 ✔
Microsoft System Center Operations Manager 2012 R2 ✔
Microsoft System Center Operations Manager 2012 ✔
This entry covers the following configurations: base release, base release + SP1 (Service Pack 1).
Language support
The product can be deployed and operates correctly in environments where regional settings are configured to use any of
the following languages:
LanguageLanguage Language codeLanguage code Support edSupport ed
English en ✔
Spanish es ✔
1
1

© 1999-2017 Citrix Systems, Inc. All rights reserved. p.7https://docs.citrix.com
Performance overview
Nov 27, 2017
Generally speaking, Citrix SCOM Management Pack for StoreFront consists of two parts:
The part installed on the SCOM management server
Citrix SCOM Management Pack for StoreFront Agent
T he SCOM management server-side partT he SCOM management server-side part
This part is a collection of management packs that include discoveries, monitors, rules, and tasks. From the compute and
memory perspective, this part does not significantly add to the basic resource requirements of SCOM management server
itself. It is also not resource-intensive in terms of storage requirements of the SCOM reporting data warehouse database.
For these reasons, there are no special considerations related to the SCOM management-server part when monitoring
larger Citrix StoreFront (St oreFrontSt oreFront ) environments.
Cit rix SCOM Management Pack f or St oreFront AgentCit rix SCOM Management Pack f or St oreFront Agent
Performance and resource consumption of Citrix SCOM Management Pack for StoreFront Agent primarily depends on the
size of your StoreFront environment, specifically on the number of configured stores. In contrast, they are not influenced
by the number of configured StoreFront servers.
Configuration specifications
All figures in this document are valid for environments that:
Are monitored with the specif ied product version of Citrix SCOM Management Pack for StoreFront
Match the documented configuration specif ications for StoreFront and SCOM
Use the default configuration of management packs in terms of which rules and monitors are enabled (this applies to
management packs included in the Citrix SCOM Management Pack for StoreFront and management packs bundled with
SCOM)
Use the default configuration of SCOM management server and SCOM agents, without f ine-tuning or any special
adjustments.
Not eNot e : Factors such as different hardware specif ications and condition of your environment may cause divergence of yourobserved values from the documented values. Validat ed Cit rix SCOM Management Pack f or St oreFront versionValidat ed Cit rix SCOM Management Pack f or St oreFront version Validation of the product was performed with the product version listed in the following table.
Product versionProduct version
Citrix SCOM Management Pack for StoreFront 1.7
Cit rix St oreFront configurat ionCit rix St oreFront configurat ion
The lab set-up in which the Citrix SCOM Management Pack for StoreFront was validated consisted of two StoreFront

© 1999-2017 Citrix Systems, Inc. All rights reserved. p.8https://docs.citrix.com
servers with identical configuration specifications.
Computer: St oreFront serverSt oreFront server
Specif icat ion it emSpecif icat ion it em ValueValue
Compute four virtual CPUs; CPU clock speed of 2.67 GHz
Memory 8 GB of RAM
Software version Citrix StoreFront 3.6
Cit rix XenApp and XenDeskt op configurat ionCit rix XenApp and XenDeskt op configurat ion
The lab set-up used for validation initially comprised thee Citrix XenApp and XenDesktop Delivery Controllers (with identical
configuration specifications) assigned to each store. Measurements were repeated in an environment with three Delivery
Controllers assigned to each store.
Microsof t Syst em Cent er Operat ions Manager configurat ion specificat ionMicrosof t Syst em Cent er Operat ions Manager configurat ion specificat ion
With this configuration, the SCOM database and data warehouse server is deployed outside the SCOM management
server.
Computer: SCOM management serverSCOM management server
Specif icat ion it emSpecif icat ion it em ValueValue
Compute four virtual CPUs; CPU clock speed of 2.67 GHz
Memory 8 GB of RAM
Software version Microsoft System Center Operations Manager 2012 R2
Computer: SCOM dat abase and dat a warehouse serverSCOM dat abase and dat a warehouse server
Specif icat ion it emSpecif icat ion it em ValueValue
Compute four virtual CPUs; CPU clock speed of 2.67 GHz
Memory 16 GB of RAM
Software version Microsoft SQL Server 2014
Monitoring ability
The following table does not list the extreme limits; it lists the lab set-up in which Citrix SCOM Management Pack for
StoreFront was successfully validated with the specified StoreFront, XenApp and XenDesktop, and SCOM configurations.
© 1999-2017 Citrix Systems, Inc. All rights reserved. p.9https://docs.citrix.com
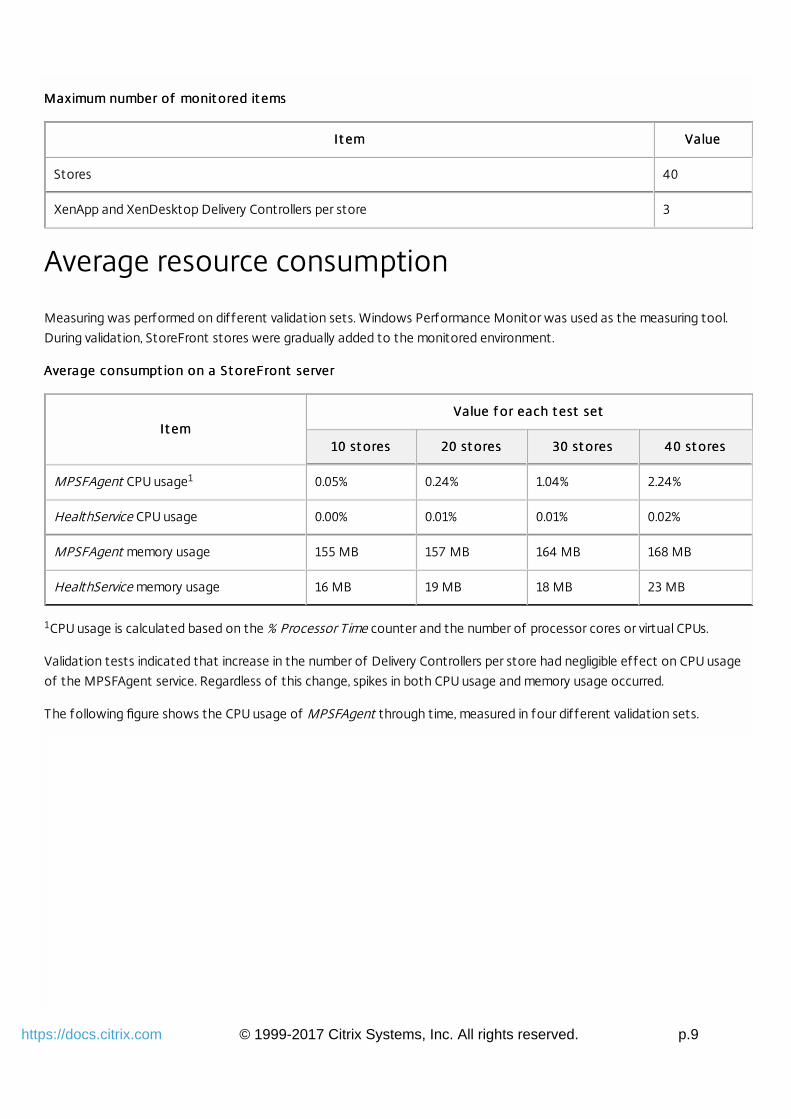
Maximum number of monit ored it emsMaximum number of monit ored it ems
It emIt em ValueValue
Stores 40
XenApp and XenDesktop Delivery Controllers per store 3
Average resource consumption
Measuring was performed on different validation sets. Windows Performance Monitor was used as the measuring tool.
During validation, StoreFront stores were gradually added to the monitored environment.
Average consumpt ion on a St oreFront serverAverage consumpt ion on a St oreFront server
It emIt emValue f or each t est setValue f or each t est set
10 st ores10 st ores 20 st ores20 st ores 30 st ores30 st ores 4 0 st ores4 0 st ores
MPSFAgent CPU usage 0.05% 0.24% 1.04% 2.24%
HealthService CPU usage 0.00% 0.01% 0.01% 0.02%
MPSFAgent memory usage 155 MB 157 MB 164 MB 168 MB
HealthService memory usage 16 MB 19 MB 18 MB 23 MB
CPU usage is calculated based on the % Processor T ime counter and the number of processor cores or virtual CPUs.
Validation tests indicated that increase in the number of Delivery Controllers per store had negligible effect on CPU usage
of the MPSFAgent service. Regardless of this change, spikes in both CPU usage and memory usage occurred.
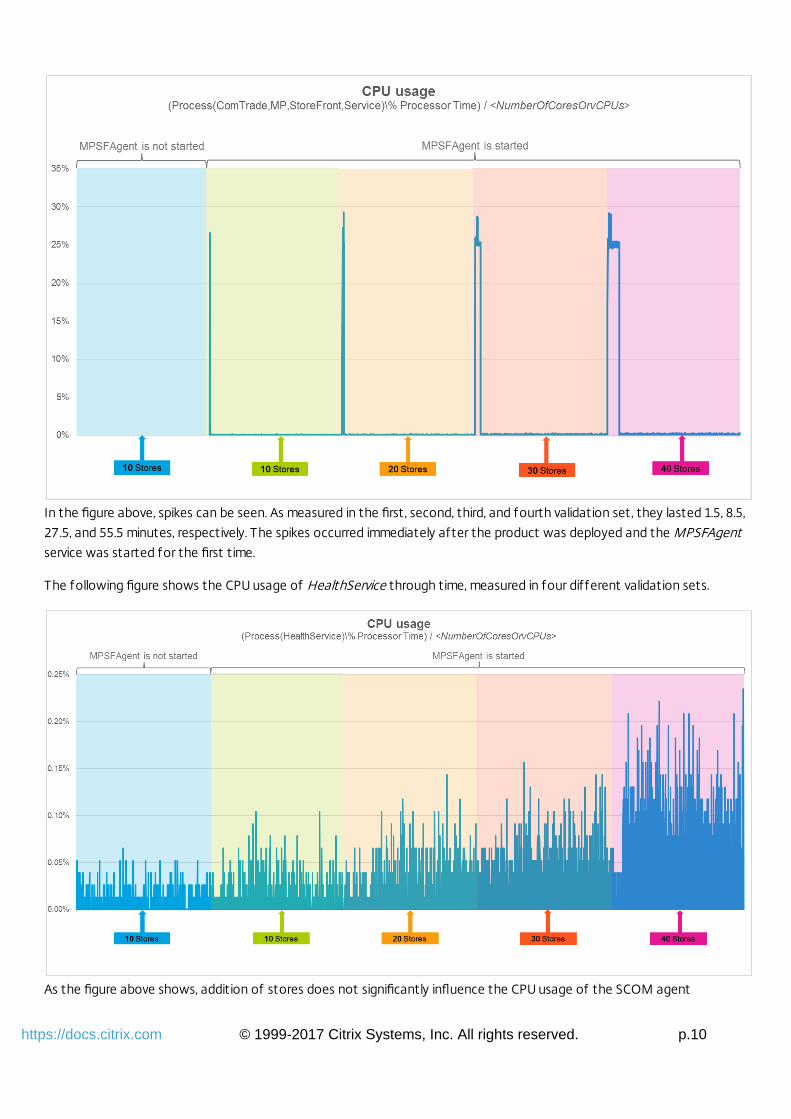
The following figure shows the CPU usage of MPSFAgent through time, measured in four different validation sets.
1
1
© 1999-2017 Citrix Systems, Inc. All rights reserved. p.10https://docs.citrix.com
In the figure above, spikes can be seen. As measured in the first, second, third, and fourth validation set, they lasted 1.5, 8.5,
27.5, and 55.5 minutes, respectively. The spikes occurred immediately after the product was deployed and the MPSFAgentservice was started for the first time.
The following figure shows the CPU usage of HealthService through time, measured in four different validation sets.
As the figure above shows, addition of stores does not significantly influence the CPU usage of the SCOM agent

© 1999-2017 Citrix Systems, Inc. All rights reserved. p.11https://docs.citrix.com
(Operations Manager Agent, Microsoft Monitoring Agent).
The following figure shows the memory usage of MPSFAgent through time, measured in four different validation sets.
As the figure above shows, on the StoreFront server there should be approximately 200 MB of physical memory available
for the needs of the MPSFAgent service.
The following figure depicts the memory usage of HealthService through time, measured in four different validation sets.

© 1999-2017 Citrix Systems, Inc. All rights reserved. p.12https://docs.citrix.com
As the figure above shows, on the StoreFront server, there should be approximately 35 MB of physical memory available for
the needs of the HealthService service.
Detailed analysis of the sampled data reveals that the Citrix SCOM Management Pack for StoreFront has no significant
impact on the compute and memory requirements for the StoreFront server. It also confirms that adding stores to the
environment does not degrade the performance of Citrix SCOM Management Pack for StoreFront. There are prolonged
periods of high CPU usage in environments with 30 or 40 configured stores. However, such spikes occur only once after the
first start of Citrix SCOM Management Pack for StoreFront Agent.

© 1999-2017 Citrix Systems, Inc. All rights reserved. p.13https://docs.citrix.com
Install and configure
Nov 27, 2017
This chapter contains instructions that you must follow to install and configure Citrix SCOM Management Pack for
StoreFront. Perform all procedures in the documented order of precedence.
Not eNot e : Citrix recommends that you use the same versions of the Citrix SCOM Management Pack and of the Citrix SCOM
Management Pack Agent to ensure that all features work correctly.
Before installing the Citrix SCOM Management Pack for StoreFront, make sure the following prerequisites are fulfilled:
Your environment meets the software requirements. For software requirements, see System Requirements.
A computer is chosen on which a SCOM management server resides and where the server side of the Citrix SCOM
Management Pack for StoreFront will be installed. This computer is referred to as SCOM management serverSCOM management server.
SCOM agent is installed on all the computers that host StoreFront, and these computers are configured as agent -agent -
managed comput ersmanaged comput ers in the SCOM management group.
A probing user account for actively monitoring the StoreFront computers is chosen. This must be a domain user account.
With stores configured to allow access by authenticated users only, the Username and password method is configured
as the authentication method (the authentication service uses explicit authentication). For more information, see the
Create and configure the authentication service webpage.
The server-side part of the Citrix SCOM Management Pack for StoreFront must be installed on the SCOM management
server.
To install the Citrix SCOM Management Pack for StoreFront on the SCOM management server, do the following:
1. Log on to the management server. Use a user account that has local administrative privileges and SCOM administrative
privileges.
2. In Windows Explorer, locate the Citrix_SCOM_Management_Pack_for_StoreFront_<Version>.exe f ile (where <Version>is the current software version), and double-click it to invoke the installation process. Wait for the Setup Wizard to
appear.
3. In the Welcome page of the Setup Wizard, click NextNext .
4. In the View Relevant Product Configuration page, click NextNext .
5. In the License Agreement page of the Setup Wizard, read the end user license agreement carefully. If you accept the
terms of the agreement, click NextNext .
6. In the Destination Folder page, define the Citrix SCOM Management Pack for StoreFront installation folder. Citrix
recommends that you install Citrix SCOM Management Pack for StoreFront to the default folder.
Proceed as follows:
To install the product to the default folder listed in the Setup Wizard, no special actions are required.
To install the product to a different folder, follow the sub-steps:
1. Click ChangeChange.
2. In the Browse For Folder dialog box, browse to a desired installation folder, select it, and click OKOK .
7. In the Configure Post-Install Actions page of the Setup Wizard, decide whether the Setup Wizard should automatically
import the included management packs into SCOM.
© 1999-2017 Citrix Systems, Inc. All rights reserved. p.14https://docs.citrix.com
To let the Setup Wizard import the management packs, select the Aut omat ically import t he Management PackAut omat ically import t he Management Pack
option. Citrix recommends this choice.
To import the management packs into SCOM manually at a later time, leave the Aut omat ically import t heAut omat ically import t he
Management PackManagement Pack option unselected. For instructions about how to import or reimport the management packs, see
Manually importing included management packs into SCOM.
8. Click Inst allInst all. The Setup Wizard displays the Installing the product page and starts copying the installation f iles.
9. After the installation completes, the installation completion page is displayed.
If you let the Setup Wizard to automatically import the management packs, click NextNext . Else, click F inishFinish to close the
Setup Wizard.
10. If you let the Setup Wizard to automatically import the management packs, it displays the Executing post-install actions
page. Attend the import process.
11. In the post-installation completion page, review the management packs import log, and click F inishFinish to close the Setup
Wizard.
Not e:Not e: Steps of this procedure must be followed only once on a SCOM management server. In case you previously installed
and configured any of the following Citrix Management Pack products on the same computer, you may not need to repeat
the steps:
Citrix SCOM Management Pack for Provisioning Services
Citrix SCOM Management Pack for ShareFile
Citrix SCOM Management Pack for Web Interface
Citrix SCOM Management Pack for XenApp and XenDesktop
Citrix SCOM Management Pack for XenApp
Citrix SCOM Management Pack for XenMobile
To configure access to the shared folder for agent installation, do the following:1. Log on to the SCOM management server. Use a user account that has local administrative privileges.
2. Choose a local user account (local to the computer with the shared folder) or a domain user account that will have
access to the shared folder, for the purpose of agent deployment and configuration.
Import ant :Import ant : Citrix recommends creating a new, dedicated user account that you will use only for deployment of the
Citrix SCOM Management Pack for StoreFront Agent to managed computers.
3. Using an operating system administrative tool, add the user account to the local CitrixMPShareUsers user group.
4. Launch the SCOM Operations console.
5. In the Administration view, in the left pane, expand Run As Conf igurat ionRun As Conf igurat ion, and then click Account sAccount s .
6. In the Tasks pane, expand Act ionsAct ions, and then click Creat e Run As AccountCreat e Run As Account .
7. In the Create Run As Account Wizard window, click NextNext .
8. In the Run As account t ypeRun As account t ype drop-down menu, leave the default selection (Windows).
9. In the Display nameDisplay name text box, type a name that the SCOM Operations console will use to refer to the newly created
SCOM user account. Click NextNext .
10. In the User nameUser name text box, type the user name of the operating system user account that you chose in step 2.
11. In the PasswordPassword and Conf irm passwordConf irm password text boxes, type the valid password of the operating system user account.
12. In the DomainDomain text box, update the value if needed. Click NextNext .
13. Depending on the effective security policy in your SCOM environment, select either the Less secureLess secure or More secureMore secure
option.
Not e:Not e: Selecting More secureMore secure requires manual steps to be performed in SCOM for each newly added managed
computer.
© 1999-2017 Citrix Systems, Inc. All rights reserved. p.15https://docs.citrix.com
14. Click Creat eCreat e .
15. After the message about successful account creation appears, click CloseClose .
16. In the left pane, under Run As Configuration, click Prof ilesProf iles .
17. In the Profiles list, double-click Cit rix Management Pack Net work Share AccountCit rix Management Pack Net work Share Account .
18. In the Run As Profile Wizard window, in the Introductory page, click NextNext . In the General Properties page, click NextNext .
19. In the Run As Accounts page, click AddAdd.
20. In the Add a Run As Account dialog box, in the Run as account list, select the newly created SCOM user account.
21. Select the A select ed class, group, or object A select ed class, group, or object option.
22. Click SelectSelect and then select ClassClass .
23. In the Class Search dialog box, in the F ilt er by (opt ional)F ilt er by (opt ional) text box, type Windows Computers.
24. Click SearchSearch.
25. In the Available items list, select All Windows Comput ersAll Windows Comput ers .
26. Click OKOK to close the Class Search dialog box.
27. Click OKOK to close the Add a Run As Account dialog box.
28. Click SaveSave to update the profile. This may take a while.
29. Click CloseClose to close the Run As Profile Wizard window.
To verify that the Citrix SCOM Management Pack for StoreFront installation on the management server is correct, do the
following:
1. Log on to the management server.
2. Go to St artSt art > Cont rol PanelCont rol Panel and click Programs and Feat uresPrograms and Feat ures (actions of this step may differ on operating systems
earlier than Windows Server 2016).
3. Check for the presence of the following entry in the Name column:
Citrix SCOM Management Pack for StoreFront4. To check if the CitrixMPShare shared folder is correctly configured, open a Command Prompt window and run the
following commands in sequence (their outputs in case of success are also shown):
net share | findstr -i CitrixMPShare
CitrixMPShare %ProgramData%\Citrix\CitrixMPShare
© 1999-2017 Citrix Systems, Inc. All rights reserved. p.16https://docs.citrix.com
net use \\<ManagementServerHostName>\CitrixMPShare /USER: <DomainName>\<UserName>
The command completed successfully
dir \\<ManagementServerHostName>\CitrixMPShare
<FolderContents>
In these instances, %ProgramData% refers to the actual value of this operating system variable.
<ManagementServerHostName> is the name of the SCOM management server. <DomainName> is the domain or
computer name and <UserName> is the name of the user account that you chose in step 2 of the procedure documented
in Configuring access to the shared folder for agent installation. <FolderContents> is the list of the contents of the
CitrixMPShare folder.
Not eNot e The shared folder is vital for installation of the Citrix SCOM Management Pack for StoreFront Agent and
deployment of its configuration to the managed computers.
5. Launch the SCOM Operations console.
6. In the Monit oringMonit oring view, expand the items in the left pane until they match the following figure.
© 1999-2017 Citrix Systems, Inc. All rights reserved. p.17https://docs.citrix.com
7. In the Administ rat ionAdminist rat ion view, expand Administ rat ionAdminist rat ion > Management PacksManagement Packs and click Inst alled Managementnst alled Management
PacksPacks (the navigation pane structure may differ in SCOM versions earlier than 2016).
8. Verify the following management pack versions are listed in the results pane:
Citrix Management Pack for StoreFront 1.13.141.0
Citrix Management Pack Library 1.0.51.0
SCOM agent on each computer where StoreFront is installed must be configured to act as a proxy agent. This
configuration enables the agent to relay or forward information from or about other computes and network devices to
the SCOM management server.
To configure the SCOM agent instances to act as proxy agents, do the following:
1. Launch the SCOM Operations console and connect to the management server.
2. In the Administ rat ionAdminist rat ion view, expand Device ManagementDevice Management , and then click Agent ManagedAgent Managed.
3. For each StoreFront computer, follow the steps:
1. Right-click the host name, and select Propert iesPropert ies .
2. Click the Securit ySecurit y tab.
3. Select the Allow t his agent t o act as proxy and discover managed object s on ot her comput ersAllow t his agent t o act as proxy and discover managed object s on ot her comput ers option.
4. Click OKOK .
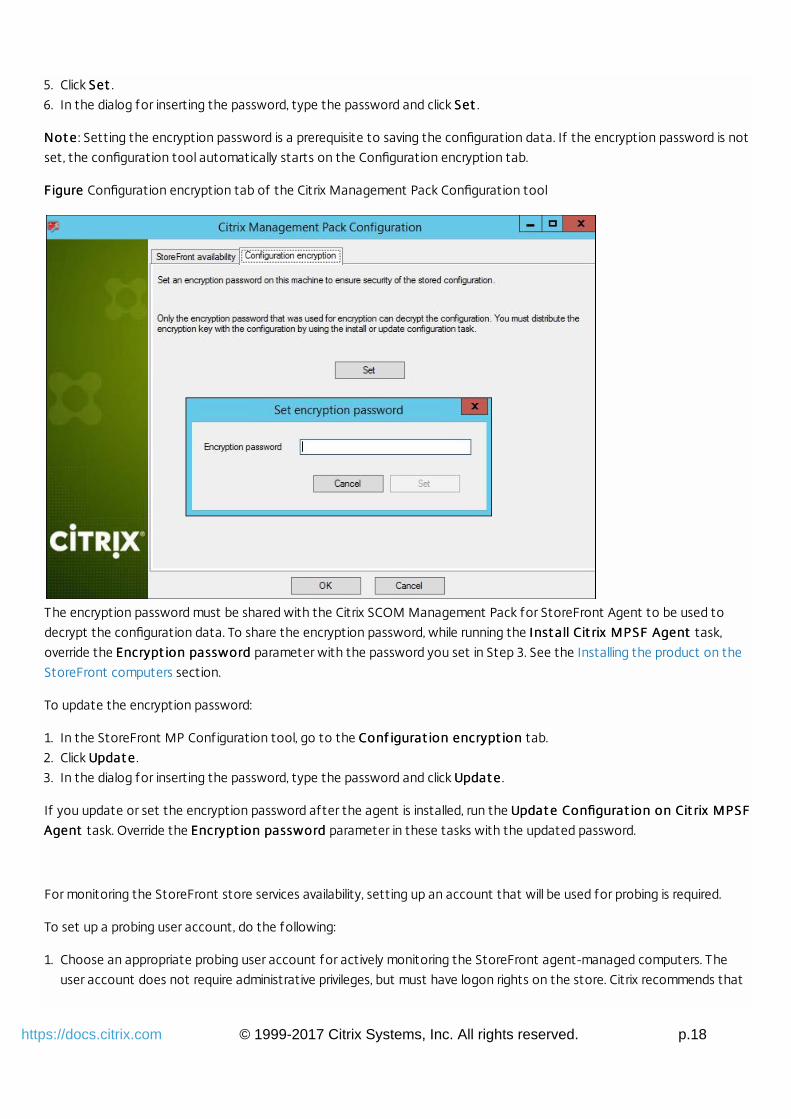
The encryption password is required to generate a key that is used to encrypt the configuration data. Set the encryption
password on the first run of the St oreFront MP Configurat ion St oreFront MP Configurat ion tool..
To set the encryption password:
1. Log on to the management server. Use a user account that has local administrative privileges.
2. Go to St artSt art > All appsAll apps > Cit rixCit rix (actions of this step may differ on operating systems earlier than Windows Server 2016).
3. Select St oreFront MP Conf igurat ion.St oreFront MP Conf igurat ion.
4. Go to the Conf igurat ion encrypt ionConf igurat ion encrypt ion tab.
© 1999-2017 Citrix Systems, Inc. All rights reserved. p.18https://docs.citrix.com
5. Click SetSet .
6. In the dialog for inserting the password, type the password and click SetSet .
Not eNot e : Setting the encryption password is a prerequisite to saving the configuration data. If the encryption password is not
set, the configuration tool automatically starts on the Configuration encryption tab.
F igureFigure Configuration encryption tab of the Citrix Management Pack Configuration tool
The encryption password must be shared with the Citrix SCOM Management Pack for StoreFront Agent to be used to
decrypt the configuration data. To share the encryption password, while running the Inst all Cit rix MPSF AgentInst all Cit rix MPSF Agent task,
override the Encrypt ion passwordEncrypt ion password parameter with the password you set in Step 3. See the Installing the product on the
StoreFront computers section.
To update the encryption password:
1. In the StoreFront MP Configuration tool, go to the Conf igurat ion encrypt ionConf igurat ion encrypt ion tab.
2. Click Updat eUpdat e .
3. In the dialog for inserting the password, type the password and click Updat eUpdat e .
If you update or set the encryption password after the agent is installed, run the Updat e Configurat ion on Cit rix MPSFUpdat e Configurat ion on Cit rix MPSF
AgentAgent task. Override the Encrypt ion passwordEncrypt ion password parameter in these tasks with the updated password.
For monitoring the StoreFront store services availability, setting up an account that will be used for probing is required.
To set up a probing user account, do the following:
1. Choose an appropriate probing user account for actively monitoring the StoreFront agent-managed computers. The
user account does not require administrative privileges, but must have logon rights on the store. Citrix recommends that

© 1999-2017 Citrix Systems, Inc. All rights reserved. p.19https://docs.citrix.com
you use a dedicated user account.
2. Log on to the management server. Use a user account that has local administrative privileges.
3. Go to St artSt art > All appsAll apps > Cit rixCit rix (actions of this step may differ on operating systems earlier than Windows Server 2016).
4. Click St oreFront MP Conf igurat ionSt oreFront MP Conf igurat ion.
5. In the Citrix Management Pack Configuration window, in the StoreFront availability tab, click AddAdd.
6. In the Add StoreFront store services probe user account dialog box, type the following data in the respective text boxes:
Properties of the probing user account:
User name
Password
7. Click OKOK .
8. Optional. To modify the user name or password for a probing user account configuration, click Modify. In the Modify
StoreFront store services probe user account dialog box, modify the data as required, and then click OKOK .
9. Optional. To remove a probing user account configuration, click RemoveRemove and then click YesYes.
10. Click OKOK to apply the configuration changes and close the window.
Not e:Not e: If you modify user name or password for a probing user account configuration when the Citrix SCOM Management
Pack for StoreFront Agent is already installed on the StoreFront computes, run the Update Configuration on Citrix MPSFAgent task from the SCOM Operations console to refresh the local configuration data.
On the StoreFront computers, only the Citrix SCOM Management Pack for StoreFront Agent must be installed.
To install the Management Pack agent on a StoreFront computer, do the following:
1. Launch the SCOM Operations console and connect to the management server.
2. In the Monit oringMonit oring view, in the left pane, expand Cit rix LibraryCit rix Library , and then click St oreFront Comput ersSt oreFront Comput ers .

© 1999-2017 Citrix Systems, Inc. All rights reserved. p.20https://docs.citrix.com
3. In the StoreFront Computers pane, select a StoreFront computer from the StoreFront Computers list.
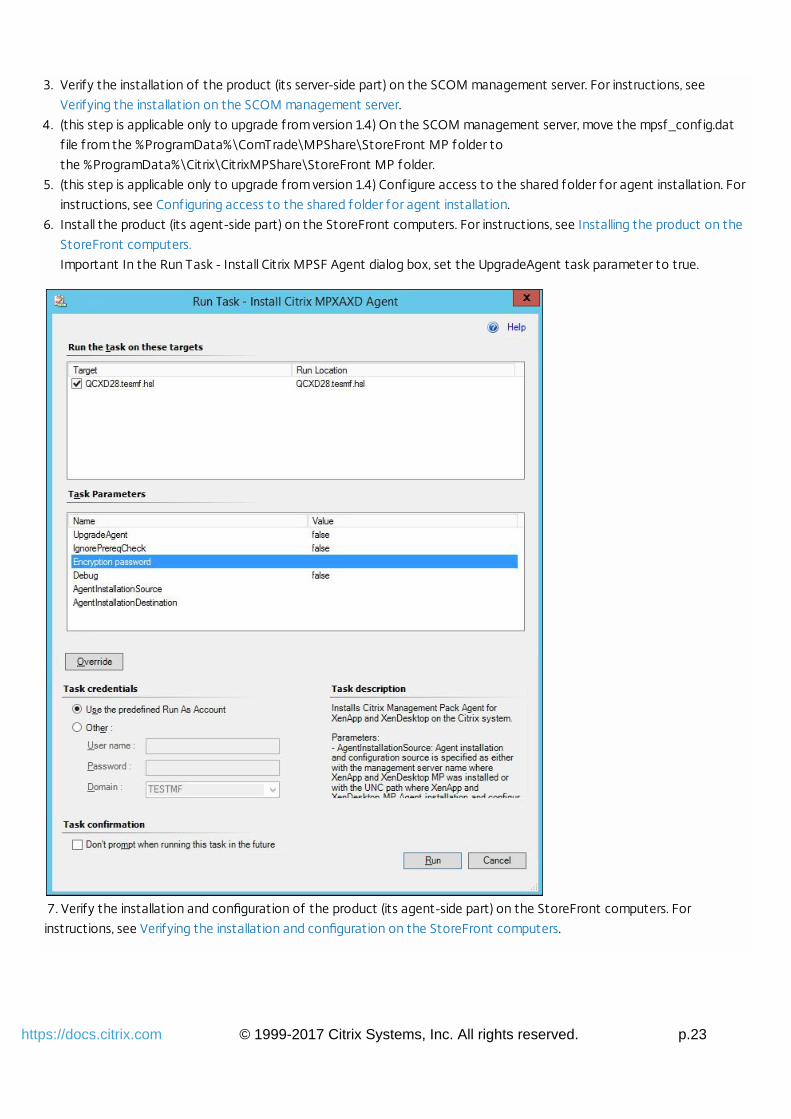
4. In the Tasks pane, expand St oreFront Comput er Role T asksSt oreFront Comput er Role T asks , and then click Inst all Cit rix MPSF AgentInst all Cit rix MPSF Agent .
5. In the Run Task - Install Citrix MPSF Agent dialog box, adjust the task parameters as follows:
UpgradeAgentUpgradeAgent : This option, when set to true, causes uninstallation of the existing Citrix SCOM Management Pack
for StoreFront Agent from the agent-managed computer before the current version is installed. Before such
uninstallation, SCOM agent must be put into maintenance mode.
Default value: false
IgnorePrereqCheckIgnorePrereqCheck: You may not alter this option.
Default value: false
Encrypt ion password:Encrypt ion password: Override this parameter with the encryption password you set in Step 3 of the Configuring
encryption password section.
Default value: (empty)
Agent Inst allat ionSourceAgent Inst allat ionSource : This option defines location of the Management Pack agent installation package and its
configuration f iles. Specify the value according to relationship between the agent-managed computer and the SCOM
management server:
If SCOM agent on the agent-managed computer reports only to the management server where the Citrix SCOM
Management Pack for XenApp and XenDesktop is installed, leave the value empty. The location is automatically
determined based on data retrieved from the agent-managed computer. In most cases, the retrieved location host
name matches the host name of the management server where the installation task is invoked.
If the agent-managed computer is managed by some other management server or the computer hosts a multi-
homed SCOM agent instance, specify the host name of the management server where the Citrix SCOM
Management Pack for XenApp and XenDesktop is installed.
If the agent-managed computer does not have access to the CitrixMPShare shared folder on the management
server, specify the alternative location of the Management Pack agent installation package and its agent
configuration f iles in the UNC format. A prerequisite is that these f iles are copied from the CitrixMPShare shared
folder to a location the agent-managed computer has access to.
Agent Inst allat ionDest inat ionAgent Inst allat ionDest inat ion: This option defines the Management Pack agent's program installation folder on
the agent-managed computer. If no value is specif ied, the Management Pack agent is installed to the
%ProgramFiles%\Citrix\StoreFront MP Agent folder.
Default value: (empty)
6. Click RunRun to invoke the installation process.
7. Observe the output the task generates. If the task reports no errors, the installation on the StoreFront computer is
correct.
T ip:T ip: The task initially performs a prerequisite check. If any of the installation prerequisites are not fulf illed, the process is
interrupted before the actual installation begins. In this case, invoke the Check Installation Prerequisites for Citrix MPSFAgent task to pinpoint the problematic prerequisite.
T ip:T ip: The Agent installation task can be run for multiple selected StoreFront computers.
To verify that the Management Pack agent installation and configuration on a StoreFront computer are correct, do the
following:
1. Launch the SCOM Operations console and connect to the management server.
2. In the Monit oringMonit oring view, in the left pane, expand Cit rix LibraryCit rix Library , and click St oreFront Comput ersSt oreFront Comput ers .
3. In the StoreFront Computers pane, select the StoreFront computer (on which StoreFront Management Pack Agent was
just installed) from the StoreFront Computers list.

© 1999-2017 Citrix Systems, Inc. All rights reserved. p.21https://docs.citrix.com
4. In the Tasks pane, expand Act ionsAct ions, and then click Check Requirement s and Conf igurat ion f or Cit rix MPSF AgentCheck Requirement s and Conf igurat ion f or Cit rix MPSF Agent .
5. Observe the output the task generates. If all checks are denoted successful, the installation and configuration on the
StoreFront computer are correct.
Uninstallation
This chapter contains instructions that you must follow to effectively uninstall Citrix SCOM Management Pack for
StoreFront. Perform all procedures in the documented order of precedence.
To uninstall Citrix SCOM Management Pack for StoreFront Agent from a StoreFront computer, do the following:
1. Launch the SCOM Operations console and connect to the management server.
2. In the Monit oringMonit oring view, expand Cit rix LibraryCit rix Library , and then click St oreFront Comput ersSt oreFront Comput ers .
3. In the StoreFront Computers pane, select a StoreFront computer from the StoreFront Computers list.
4. In the Tasks pane, expand Act ionsAct ions, and then click Uninst all Cit rix MPSF AgentUninst all Cit rix MPSF Agent .
5. In the Run Task - Uninstall Citrix MPSF Agent dialog box, click RunRun to invoke the uninstallation process.
6. Repeat steps 3 to 5 for each additional StoreFront computer.
T ipT ip: The Agent uninstallation task can be run for multiple selected StoreFront computers.
Import antImport ant : Perform this procedure only if you have customized the management packs included in the product.
To remove the customizations that you made to the management packs included in the Citrix SCOM Management Pack
for StoreFront, do the following:
1. Launch the SCOM Operations console and connect to the management server.
2. In the Administ rat ionAdminist rat ion view, expand Administ rat ionAdminist rat ion > Management PacksManagement Packs and click Inst alled Management PacksInst alled Management Packs
(the navigation pane structure may differ in SCOM versions earlier than 2016).
3. In the results pane, locate the management packs that depend on the management packs included in StoreFront
Management Pack.
4. For each such dependent management pack (except for Microsoft.SystemCenter.SecureReferenceOverride), follow the
steps:
1. Right-click it and then click Delet eDelet e .
2. On the message stating that deleting the management pack might affect the scoping of some user roles, click YesYes.
To remove the management packs included in Citrix SCOM Management Pack for StoreFront, do the following:
1. Launch the SCOM Operations console and connect to the management server.
2. In the Administ rat ionAdminist rat ion view, expand Administ rat ionAdminist rat ion > Management Packs Management Packs and click Inst alled Management PacksInst alled Management Packs
(the navigation pane structure may differ in SCOM versions earlier than 2016).
3. Remove references to the included management packs from the Microsoft.SystemCenter.SecureReferenceOverridemanagement pack. To do this perform the following steps:
1. Identify which included management packs are referenced. In the Administ rat ionAdminist rat ion > Management PacksManagement Packs context

© 1999-2017 Citrix Systems, Inc. All rights reserved. p.22https://docs.citrix.com
of the SCOM Operations console, right-click Microsof t .Syst emCent er.SecureRef erenceOverrideMicrosof t .Syst emCent er.SecureRef erenceOverride and select
Propert iesPropert ies . In the dialog box, click the DependenciesDependencies tab.
2. For each such referenced management pack, f ind out its ID. Right-click the referenced management pack. In the
dialog box, take note of the value in the ID text box on the GeneralGeneral tab.
3. Export the Microsoft.SystemCenter.SecureReferenceOverride management pack.
4. Make a copy of the f ile you exported the management pack to.
5. Edit the originally exported f ile: use the IDs to f ind and remove all dependencies to the management packs from the
Manif estManif est > Ref erencesRef erences context (the Ref erenceRef erence elements) and the Monit oringMonit oring > OverridesOverrides context (the
SecureRef erenceOverrideSecureRef erenceOverride elements), and then save the changes.
T ipT ip: For better tracking, increase the management pack version by adjusting the value of the Version element within
the Identity element.
6. Import back the altered Microsoft.SystemCenter.SecureReferenceOverride management pack from the modif ied f ile.
4. In the results pane, right-click Cit rix Management Pack f or St oreFrontCit rix Management Pack f or St oreFront , and then select Delet eDelet e .
5. On the message stating that deleting the management pack might affect the scoping of some user roles, click YesYes.
6. Check if other Citrix SCOM Management Pack products are installed on the management server. If none of them is
installed, repeat steps 4 and 5 with Cit rix Management Pack LibraryCit rix Management Pack Library .
To uninstall Citrix SCOM Management Pack for StoreFront from the SCOM management server, do the following:
1. Log on to the management server. Use a user account that has local administrative privileges and SCOM administrative
privileges.
2. Make sure no product folders or f iles are in use by any user.
3. Go to St artSt art > Cont rol PanelCont rol Panel and click Programs and Feat uresPrograms and Feat ures (actions of this step may differ on operating systems
earlier than Windows Server 2016).
4. Right-click Cit rix SCOM Management Pack f or St oreFrontCit rix SCOM Management Pack f or St oreFront and select Uninst allUninst all. Wait for the Setup Wizard to
appear.
5. In the Welcome page of the Setup Wizard, click Uninst allUninst all.
6. In the Uninstalling the product page, the Setup Wizard reports the uninstallation progress.
7. In the Completion page of the Setup Wizard, click F inishFinish.
8. Delete the %ProgramData%\Citrix\CitrixMPShare\StoreFront MP folder.
Caut ionCaut ion: This action permanently deletes the Agent configuration data. You will be unable to reuse it at a later time.
9. Check if other Citrix SCOM Management Pack products are installed on the management server. If none of them is
installed, follow the steps:
1. Stop sharing the CitrixMPShare shared folder.
2. Delete the %ProgramData%\Citrix\CitrixMPShare folder.
3. Using an operating system administrative tool, delete the local CitrixMPShareUsers user group.
Upgrading
To upgrade Citrix SCOM Management Pack for StoreFront from an earlier version, do the following:
1. Prepare your environment for installation of the new product version. For information, see Preparing for the installation.
2. Install the product (its server-side part) on the SCOM management server. For instructions, see Installing the product on
the SCOM management server.
Note: Installation process upgrades the product while preserving local configuration data.
© 1999-2017 Citrix Systems, Inc. All rights reserved. p.23https://docs.citrix.com
3. Verify the installation of the product (its server-side part) on the SCOM management server. For instructions, see
Verifying the installation on the SCOM management server.
4. (this step is applicable only to upgrade from version 1.4) On the SCOM management server, move the mpsf_config.dat
file from the %ProgramData%\ComTrade\MPShare\StoreFront MP folder to
the %ProgramData%\Citrix\CitrixMPShare\StoreFront MP folder.
5. (this step is applicable only to upgrade from version 1.4) Configure access to the shared folder for agent installation. For
instructions, see Configuring access to the shared folder for agent installation.
6. Install the product (its agent-side part) on the StoreFront computers. For instructions, see Installing the product on the
StoreFront computers.
Important In the Run Task - Install Citrix MPSF Agent dialog box, set the UpgradeAgent task parameter to true.
7. Verify the installation and configuration of the product (its agent-side part) on the StoreFront computers. For
instructions, see Verifying the installation and configuration on the StoreFront computers.
© 1999-2017 Citrix Systems, Inc. All rights reserved. p.24https://docs.citrix.com
Optimize
Nov 27, 2017
For a complete list of the monitors and rules available in Citrix SCOM Management Pack for StoreFront, see the Reference
Guide.
For general instructions about how to import management packs into SCOM, see the How to Import an Operations
Manager Management Pack webpage on the Microsoft TechNet website.
To import the sealed management packs for StoreFront manually, do the following:
1. Log on to the management server.
2. Launch the SCOM Operations console.
3. In the Administration view, click Management PacksManagement Packs.
4. In the Tasks pane, expand Act ionsAct ions, and then click Import Management Packs Import Management Packs.
5. In the Import Management Packs dialog box, click AddAdd, and then select Add f rom diskAdd f rom disk.
6. In the Online Catalog Connection dialog box, click NoNo.
7. In the Select Management Packs to import dialog box, browse to the folder that contains the following management
pack f iles, select those f iles, and then click OpenOpen.
Comtrade.Citrix.Library.mpComtrade.Citrix.StoreFront.mp
8. Click Inst allInst all.
Customization of the sealed management packs that StoreFront Management Pack provides is similar to the default
SCOM management pack customization.
For details, see the Microsoft TechNet website:
For general information about customization of management packs, see the Customizing Management Packs webpage.
For instructions on how to customize a management pack, see the Create a New Management Pack for
Customizations webpage
Related Documents


![StoreFront 3 - Citrix Docs...The StoreFront management console might crash if you customize the Receiver for Web style.css file. [#652230] When using StoreFront with XenApp or XenDesktop](https://static.cupdf.com/doc/110x72/5f6886da21e44e601d50b9c6/storefront-3-citrix-docs-the-storefront-management-console-might-crash-if.jpg)