Americas Headquarters Cisco Systems, Inc. 170 West Tasman Drive San Jose, CA 95134-1706 USA http://www.cisco.com Tel: 408 526-4000 800 553-NETS (6387) Fax: 408 527-0883 Cisco Prime Performance Manager 1.0 User Guide June, 2011 Text Part Number: OL-24597-01

Welcome message from author
This document is posted to help you gain knowledge. Please leave a comment to let me know what you think about it! Share it to your friends and learn new things together.
Transcript

Cisco Prime Performance Manager 1.0 User Guide June, 2011
Americas HeadquartersCisco Systems, Inc.170 West Tasman DriveSan Jose, CA 95134-1706 USAhttp://www.cisco.comTel: 408 526-4000
800 553-NETS (6387)Fax: 408 527-0883
Text Part Number: OL-24597-01

THE SPECIFICATIONS AND INFORMATION REGARDING THE PRODUCTS IN THIS MANUAL ARE SUBJECT TO CHANGE WITHOUT NOTICE. ALL STATEMENTS, INFORMATION, AND RECOMMENDATIONS IN THIS MANUAL ARE BELIEVED TO BE ACCURATE BUT ARE PRESENTED WITHOUT WARRANTY OF ANY KIND, EXPRESS OR IMPLIED. USERS MUST TAKE FULL RESPONSIBILITY FOR THEIR APPLICATION OF ANY PRODUCTS.
THE SOFTWARE LICENSE AND LIMITED WARRANTY FOR THE ACCOMPANYING PRODUCT ARE SET FORTH IN THE INFORMATION PACKET THAT SHIPPED WITH THE PRODUCT AND ARE INCORPORATED HEREIN BY THIS REFERENCE. IF YOU ARE UNABLE TO LOCATE THE SOFTWARE LICENSE OR LIMITED WARRANTY, CONTACT YOUR CISCO REPRESENTATIVE FOR A COPY.
The Cisco implementation of TCP header compression is an adaptation of a program developed by the University of California, Berkeley (UCB) as part of UCB’s public domain version of the UNIX operating system. All rights reserved. Copyright © 1981, Regents of the University of California.
NOTWITHSTANDING ANY OTHER WARRANTY HEREIN, ALL DOCUMENT FILES AND SOFTWARE OF THESE SUPPLIERS ARE PROVIDED “AS IS” WITH ALL FAULTS. CISCO AND THE ABOVE-NAMED SUPPLIERS DISCLAIM ALL WARRANTIES, EXPRESSED OR IMPLIED, INCLUDING, WITHOUT LIMITATION, THOSE OF MERCHANTABILITY, FITNESS FOR A PARTICULAR PURPOSE AND NONINFRINGEMENT OR ARISING FROM A COURSE OF DEALING, USAGE, OR TRADE PRACTICE.
IN NO EVENT SHALL CISCO OR ITS SUPPLIERS BE LIABLE FOR ANY INDIRECT, SPECIAL, CONSEQUENTIAL, OR INCIDENTAL DAMAGES, INCLUDING, WITHOUT LIMITATION, LOST PROFITS OR LOSS OR DAMAGE TO DATA ARISING OUT OF THE USE OR INABILITY TO USE THIS MANUAL, EVEN IF CISCO OR ITS SUPPLIERS HAVE BEEN ADVISED OF THE POSSIBILITY OF SUCH DAMAGES.
Cisco and the Cisco Logo are trademarks of Cisco Systems, Inc. and/or its affiliates in the U.S. and other countries. A listing of Cisco's trademarks can be found at www.cisco.com/go/trademarks. Third party trademarks mentioned are the property of their respective owners. The use of the word partner does not imply a partnership relationship between Cisco and any other company. (1005R)
Any Internet Protocol (IP) addresses and phone numbers used in this document are not intended to be actual addresses and phone numbers. Any examples, command display output, network topology diagrams, and other figures included in the document are shown for illustrative purposes only. Any use of actual IP addresses or phone numbers in illustrative content is unintentional and coincidental.
Cisco Prime Performance Manager 1.0 User Guide © 2011 Cisco Systems, Inc. All rights reserved.
OL-24597-01
C O N T E N T S
Preface xi
C H A P T E R 1 Overview 1-1
What Is Prime Performance Manager 1-1
Server and Network Features 1-1
Graphical User Interface Web Features 1-2
Performance Features 1-2
Security Features 1-2
Integration Features 1-2
What Is Prime Performance Manager Architecture? 1-2
C H A P T E R 2 Getting Started 2-1
Starting Prime Performance Manager Server 2-1
Becoming the Root User 2-2
Supported Devices 2-2
Prime Network Integration 2-3
Prime Network Inventory Import Feature 2-4
Discovering Your Network 2-4
Discovery Overview 2-4
Discovered Nodes 2-5
Verifying Discovery 2-6
C H A P T E R 3 Configuring Security 3-1
Configuring User Access 3-1
Implementing Secure User Access 3-2
Security Authentication 3-2
Configuring User Levels 3-4
Configuring User Passwords 3-4
Enabling Secure User Access 3-5
Creating Secure Passwords 3-6
Configuring Prime Performance Manager User Account Levels 3-6
Basic User (Level 1) Access 3-7
Network Operator (Level 3) Access 3-7
System Administrator (Level 5) Access 3-7
iiiCisco Prime Performance Manager 1.0 User Guide
Contents
Custom User Level 1 (Level 11) and Custom User Level 2 (Level 12) Access 3-7
Automatically Disabling Users and Passwords 3-7
Manually Disabling Users and Passwords 3-10
Enabling and Changing Users and Passwords 3-11
Displaying a Message of the Day 3-12
Listing All Currently Defined Users 3-13
Displaying the Contents of the System Security Log 3-14
Disabling Prime Performance Manager User-Based Access 3-14
Enabling SSL Support on Gateway in Prime Performance Manager 3-15
Exporting an SSL Certificate 3-17
Viewing Detailed Information About an SSL Certificate 3-17
Managing SSL Support in Prime Performance Manager 3-17
Disabling SSL Support in Prime Performance Manager 3-18
Limiting Prime Performance Manager Client Access to Prime Performance Manager Server 3-19
Backing Up or Restoring Prime Performance Manager Files 3-20
Backing Up Prime Performance Manager Data Files 3-21
Changing the Backup Directory 3-22
Setting the Number of Backup Days 3-22
Restoring Prime Performance Manager Data Files 3-23
C H A P T E R 4 Setting Up Your Server 4-1
Changing Prime Performance Manager Server Poller Settings 4-1
Changing the Message Display 4-2
Changing the Location of Prime Performance Manager Message Log Files 4-2
Changing the Size of Prime Performance Manager Message Log Files 4-2
Changing the Time Mode for Dates in Log Files 4-2
Changing the Age of Prime Performance Manager Message Log Files 4-3
Changing Web Preference Settings 4-3
C H A P T E R 5 Accessing Data from the Web Interface 5-1
Supported Browsers 5-1
Checking Your Browser 5-1
Accessing Prime Performance Manager Web Interface 5-2
Overview of Prime Performance Manager Web Interface 5-2
Prime Performance Manager Web Interface Navigation Tree 5-3
Prime Performance Manager Web Interface Content Area 5-4
Customizing Date and Time Ranges 5-4
Using the Toolbar 5-5
ivCisco Prime Performance Manager 1.0 User Guide
OL-24597-01
Contents
Navigating Table Columns 5-9
Displaying the Home Page 5-10
Displaying Active Alarms and Event History 5-11
Toolbar Buttons 5-15
Managing Filters for Alarms and Events 5-17
Setting Alarm or Event Filter 5-17
Alarm and Event Filter Buttons 5-18
Alarm and Event Filter Pane 5-18
Viewing Properties for Alarms and Events 5-20
Attaching Notes to Alarms or Events 5-22
Displaying Summary Lists 5-23
Nodes Table 5-23
Node Distributions By Type 5-25
Alarms Summary 5-26
Viewing Average Poll Response 5-27
Uptime for Managed Nodes 5-27
SNMP Timeout Alarms 5-28
Displaying Software Versions 5-28
Viewing Gateway/Units 5-29
Viewing Reports 5-30
Viewing Historical Statistics Report Settings 5-31
C H A P T E R 6 Viewing Administrative Information from the Web Interface 6-1
Viewing General Tab Details 6-1
Viewing System Messages 6-3
Viewing Info Messages 6-3
Viewing Error Messages 6-4
Viewing Prime Performance Manager User Action Messages 6-4
Viewing All Archived Prime Performance Manager Messages 6-5
Viewing Console Log Archived Messages 6-6
Viewing System Status Information 6-7
Viewing System Status 6-7
Viewing System Versions 6-7
Viewing System Check 6-7
Viewing Connected Clients 6-7
Viewing System Logs 6-8
Viewing the Install Log 6-8
Viewing the Console Log 6-8
Viewing the Backup Log 6-8
vCisco Prime Performance Manager 1.0 User Guide
OL-24597-01
Contents
Viewing the Command Log 6-9
Viewing the Event Automation Log 6-9
Viewing the Security Log 6-9
Viewing the Web Access Logs 6-10
Viewing the Web Error Logs 6-10
Viewing Properties 6-11
Viewing System Properties 6-11
Viewing Server Properties 6-12
Viewing Web Configuration Properties 6-12
Viewing System Reports Property 6-14
Viewing SNMP Tab Details 6-14
SNMP Editor Buttons 6-14
Add SNMP Entry 6-16
SNMP Editor Table 6-16
Viewing Unit Editor Tab 6-17
Adding a Unit Entry 6-18
Viewing Discovery Tab Details 6-18
Viewing Prime Network Tab Details 6-18
Discover Network Buttons 6-20
Load File DialogWindow 6-21
Save File Dialog Window 6-22
Discovery Seeds Pane 6-23
Seed Nodes File: No File Panel 6-23
Seed Details Panel 6-23
Viewing User Management Tab Details 6-24
User Management Buttons 6-24
Add New User 6-26
Add New User 6-26
User Management Table 6-27
Update User Window 6-28
C H A P T E R 7 Managing Reports 7-1
Viewing Report Status Table 7-2
Viewing Network Level Reports 7-2
Viewing Node Level Reports 7-3
Enabling Reports Using the CLI 7-3
Viewing Reports 7-4
Viewing Details Tab 7-6
viCisco Prime Performance Manager 1.0 User Guide
OL-24597-01
Contents
Enabling and Disabling Reports 7-9
Viewing Graph Series Editor Details 7-9
A P P E N D I X A Command Reference A-1
General Commands A-1
Prime Performance Manager A-5
ppm addsnmpcomm A-5
ppm addunitconf A-5
ppm adduser A-6
ppm authtype A-6
ppm backup A-7
ppm backupdays A-8
ppm backupdir A-9
ppm backuplog A-9
ppm backupstats A-10
ppm badloginalarm A-10
ppm badlogindisable A-10
ppm certtool A-11
ppm crosslaunch A-12
ppm changes A-12
ppm checksystem A-12
ppm clitimeout A-12
ppm cmdlog A-13
ppm compilemibs A-13
ppm console A-14
ppm consolelogsize A-14
ppm countnodes A-14
ppm datadir A-14
ppm delete A-15
ppm deletesnmpcomm A-15
ppm deluser A-16
ppm deleteunitconf A-16
ppm disablepass A-16
ppm disableuser A-17
ppm discover A-17
ppm diskmonitor A-17
ppm enableuser A-18
ppm eventautolog A-18
ppm eventconfig A-19
viiCisco Prime Performance Manager 1.0 User Guide
OL-24597-01

Contents
ppm eventeditor A-19
ppm eventtool A-19
ppm evilstop A-21
ppm export A-21
ppm exportcustnames A-21
ppm export cw A-22
ppm export cwv3 A-22
ppm exportusers A-22
ppm help A-22
ppm importcustnames A-23
ppm importcw A-23
ppm inactiveuserdays A-23
ppm installlog A-24
ppm inventoryimport A-24
ppm iosreport A-24
ppm ipaccess A-25
ppm jspport A-25
ppm keytool A-26
ppm listusers A-27
ppm logger A-27
ppm logsize A-27
ppm logtimemode A-29
ppm maxhtmlrows A-29
ppm mldebug A-29
ppm modifysnmpcomm A-30
ppm modifyunitconf A-31
ppm motd A-31
ppm msglog A-31
ppm msglogage A-32
ppm msglogdir A-32
ppm netlog A-33
ppm netlogger A-33
ppm newlevel A-33
ppm osinfo A-34
ppm passwordage A-34
ppm patchlog A-35
ppm poll A-35
ppm print A-35
ppm props A-36
ppm purgedb A-36
viiiCisco Prime Performance Manager 1.0 User Guide
OL-24597-01
Contents
ppm readme A-36
ppm reboot A-36
ppm reloadmibs A-37
ppm repdir A-37
ppm rephelp A-37
ppm restart A-37
ppm restore A-38
ppm restore all A-38
ppm restoreprops A-39
ppm rootvars A-39
ppm sechelp A-39
ppm seclog A-39
ppm serverlist delete A-40
ppm serverlist list A-40
ppm servername A-41
ppm setpath A-41
ppm showsnmpcomm A-42
ppm showunitconf A-42
ppm singlesess A-42
ppm snmpcomm A-43
ppm snmpconf A-43
ppm snmpget A-43
ppm snmphelp A-45
ppm snmpmaxrows A-46
ppm snmpnext A-46
ppm snmpsetup A-48
ppm snmpwalk A-49
ppm ssl A-51
ppm sslstatus A-51
ppm start A-52
ppm start jsp A-52
ppm start pm A-52
ppm start web A-52
ppm statreps A-53
ppm syncunits A-54
ppm status A-54
ppm stop A-54
ppm stop jsp A-55
ppm stop pm A-55
ppm stop web A-55
ixCisco Prime Performance Manager 1.0 User Guide
OL-24597-01
Contents
ppm tac A-55
ppm trapratelimit abate A-56
ppm trapratelimit major A-56
ppm trapratelimit interval A-56
ppm trapratelimit minor A-57
ppm uninstall A-57
ppm unknownage A-57
ppm updateuser A-58
ppm useraccess A-59
ppm userpass A-59
ppm version A-60
ppm webport A-60
ppm who A-60
A P P E N D I X B FAQs B-1
General FAQs B-1
Installation Questions B-1
Server Questions B-2
Browser Questions B-4
Polling Questions B-5
MIB Questions B-5
Miscellaneous Questions B-6
A P P E N D I X C Troubleshooting Prime Performance Manager and the Network C-1
Investigating Data Problems C-1
Checking Prime Performance Manager Server Start Processes C-1
Viewing Prime Performance Manager Data on the Web C-2
A P P E N D I X D MIB Reference D-1
MIBs D-1
A P P E N D I X E Configuring Prime Performance Manager to Run with Various Networking Options E-1
How Does RMI Work? E-2
Firewall Communication E-3
Configuring Port Numbers and Parameters E-3
Configuring Firewalls E-3
G L O S S A R Y
I N D E X
xCisco Prime Performance Manager 1.0 User Guide
OL-24597-01

Preface
This guide describes the architecture, supporting hardware and software, and management procedures for Prime Performance Manager. The information in this guide, helps you to complete the tasks that are necessary to use Prime Performance Manager to monitor the performance of your network.
The Cisco Prime Performance Manager is a performance software product that provides key performance indicators and summarized historical statistics for managed network elements. Its core design points are ease of use, extensibility, and scalability.
This section describes the audience, organization, and conventions of the Cisco Prime Performance Manager 1.0 User Guide. It refers you to related publications and describes online sources of technical information.
For a more detailed description of Prime Performance Manager, see Chapter 1, “Overview.” For the lat-
est Prime Performance Manager information and software updates, go to http://www.cisco.com/go/per-
formance.
This preface includes:
• Audience, page xi
• Organization, page xii
• Conventions, page xii
• Product Documentation, page xiii
• Obtaining Documentation and Submitting a Service Request, page xiii
AudienceThis guide is for system administrators, network operators and basic users who use Prime Performance Manager for reporting on the managed network. They should have:
• Basic network management skills
• Basic Solaris system administrator skills
• Basic Linux system administrator skills
xiCisco Prime Performance Manager 1.0 User Guide
OL-24597-01

Preface
OrganizationThis guide contains the following chapters and appendixes:
• “Overview” provides brief descriptions of Prime Performance Manager architecture, and an overview of how to use Prime Performance Manager to monitor your network performance.
• “Configuring Security” provides information about configuring Prime Performance Manager security and limiting access to Prime Performance Manager.
• “Setting Up Your Server” provides procedures to set up your Prime Performance Manager server.
• “Getting Started” provides basic information and procedures for using Prime Performance Manager.
• “Accessing Data from the Web Interface” describes how to access Prime Performance Manager data from the web interface.
• “Command Reference” describes the commands used to set up and operate Prime Performance Manager.
• “FAQs” provides a list of frequently asked questions and troubleshooting tips for Prime Performance Manager.
• Troubleshooting Prime Performance Manager and the Network provides information for troubleshooting basic Prime Performance Manager and network problems.
• “MIB Reference” lists the MIBs used by Prime Performance Manager.
ConventionsThis document uses the following conventions:
Item Convention
Commands and keywords boldface font
Variables for which you supply values italic font
Displayed session and system information screen font
Information you enter boldface screen font
Variables you enter italic screen font
Menu items and button names boldface font
Selecting a menu item in paragraphs Option > Network Preferences
Selecting a menu item in tables Option > Network Preferences
xiiCisco Prime Performance Manager 1.0 User Guide
OL-24597-01
Preface
Note Means reader take note. Notes contain helpful suggestions or references to material not covered in the publication.
Caution Means reader be careful. In this situation, you might do something that could result in equipment damage or loss of data.
Tip Means the following is a useful tip.
Product DocumentationYou can access the following additional Cisco Prime Performance Manager guides on the Cisco Prime Performance Manager page on Cisco.com:
• Cisco Prime Performance Manager 1.0 User Guide (this guide)
• Cisco Prime Performance Manager 1.0 Release Notes
• Open Source Used in Cisco Prime Performance Manager 1.0
• Cisco Prime Performance Manager 1.0 Documentation Overview
• Cisco Prime Performance Manager 1.0 Quick Start Guide
Cisco License Manager data sheet can be found at http://www.cisco.com/go/performance
Obtaining Documentation and Submitting a Service RequestFor information on obtaining documentation, submitting a service request, and gathering additional information, see the monthly What's New in Cisco Product Documentation, which also lists all new and revised Cisco technical documentation, at:
http://www.cisco.com/en/US/docs/general/whatsnew/whatsnew.html
Subscribe to the What's New in Cisco Product Documentation as a Really Simple Syndication (RSS) feed and set content to be delivered directly to your desktop using a reader application. The RSS feeds are a free service and Cisco currently supports RSS Version 2.0.
xiiiCisco Prime Performance Manager 1.0 User Guide
OL-24597-01

Preface
xivCisco Prime Performance Manager 1.0 User Guide
OL-24597-01

OL-24597-01
C H A P T E R1
OverviewThis chapter describes the Cisco Prime Performance Manager and contains:
• What Is Prime Performance Manager, page 1-1
• What Is Prime Performance Manager Architecture?, page 1-2
What Is Prime Performance ManagerUsing Prime Performance Manager, you generate statistics reports, key performance indicators for managed network elements. Prime Performance Manager provides:
• Server and Network Features, page 1-1
• Graphical User Interface Web Features, page 1-2
• Performance Features, page 1-2
• Security Features, page 1-2
• Integration Features, page 1-2
Server and Network FeaturesPrime Performance Manager:
• Provides administrative and reporting functions through a web browser.
• Supports large networks as described in the Server System Requirements in README in the User Documentation section from the Home page.
• Allows you to increase the scope of monitoring and reporting capacity by adding Units. See What Is Prime Performance Manager Architecture?, page 1-2 section for more information.
• Provides a command-line interface (CLI).
• Allows units to connect to a gateway through the IP network and through a Secure Sockets Layer (SSL) Connection, across a Virtual Private Network (VPN) connection, through a firewall. This VPN supports units connecting to a gateway through a Secure Sockets Layer (SSL) Connection and through a firewall.
1-1Cisco Prime Performance Manager 1.0 User Guide
Chapter 1 Overview What Is Prime Performance Manager Architecture?
Graphical User Interface Web FeaturesPrime Performance Manager provides an extensive Web 2.0 user interface on the Gateway that is used for viewing reports and performing administrative tasks. Prime Performance Manager v1.0 is supported on Internet Explorer 8.0 and Firefox 3.6.x.
Performance FeaturesPrime Performance Manager:
• Provides a large set of built-in reports.
• Enables you to define new reports or extend built-in reports through XML.
• Supports options to configure collection intervals, record aging and statistics export, using comma-separated values (CSV) format files.
• Supports third-party devices.
Security FeaturesPrime Performance Manager provides:
• HTTPS web access and SSL-enabled Gateway-Unit communication options
• Role-based password-protected access for multiple users
• Multiple user authentication methods (PAM-based and standalone)
• Web based and CLI based user management
• Password enforcement policies (aging, minimum length, and lockouts)
• Audit trails of all user actions and all access through the web interface
• Security logs
Integration FeaturesPrime Performance Manager:
• Integrates with Active Network Abstraction (ANA) for device inventory sharing and cross launching of Prime Performance Manager reports from ANA Network Vision.
• Provides Prime Performance Manager events and alarms to northbound management systems.
What Is Prime Performance Manager Architecture?Prime Performance Manager architecture is designed to be a highly scalable collector of performance statistics, from SNMP-enabled devices. The software and functions are distributed across a single Gateway and a single or multiple Unit servers. Both the Gateway and Unit servers consist of multiple components.
The Gateway server is the single point of interface for administrators, users, and northbound systems. The Gateway server is also responsible for synchronizing administrative data to the Unit servers.
1-2Cisco Prime Performance Manager 1.0 User Guide
OL-24597-01

Chapter 1 Overview What Is Prime Performance Manager Architecture?
The Unit servers are a set of distributed servers that collect statistics for a subset of the devices that are managed by a Prime Performance Manager. Unit servers are instantiated, as needed, to address performance and scaling problems.
A single Unit process can coexist with a Gateway process on the same server and a Unit process can also be instantiated on a separate server. A unit server can be instantiated to address memory, CPU, and disk storage issues and it can monitor many devices.
Devices to be monitored, are distributed to or across a single or multiple Units, as directed by the Gateway server. For detailed information on Cisco Prime Performance Manager, see http://www.cisco.com/go/performance
1-3Cisco Prime Performance Manager 1.0 User Guide
OL-24597-01

Chapter 1 Overview What Is Prime Performance Manager Architecture?
1-4Cisco Prime Performance Manager 1.0 User Guide
OL-24597-01

OL-24597-01
C H A P T E R 2
Getting StartedThis chapter gives an overview of how to use Prime Performance Manager to monitor the performance of network elements. It also provides details on starting and stopping the Cisco Prime Performance Manager.
This chapter contains:
• Starting Prime Performance Manager Server, page 2-1
• Discovering Your Network, page 2-4
For detailed information about Prime Performance Manager hardware and software requirements, see http://www.cisco.com/go/performance
Note The default directory for installing Prime Performance Manager is /opt. In commands that call for the default directory, if you installed Prime Performance Manager in a different directory, you must specify that directory instead of /opt.
Starting Prime Performance Manager ServerBefore starting an Prime Performance Manager server, verify that:
• Prime Performance Manager server has IP connectivity to each node
• SNMP is enabled on each node
A node in Prime Performance Manager can be of IOX image.
Because Prime Performance Manager application comprises a gateway component and a unit component, you must start both components to run the application.
You must be logged in as the root user or your login must have administrator privileges. To log in as the root user, see the Becoming the Root User, page 2-2.
Note For details on setting up administrator privileges, see Enabling SSL Support on Gateway in Prime Performance Manager, page 3-15.
2-1Cisco Prime Performance Manager 1.0 User Guide
Chapter 2 Getting Started Supported Devices
To start Prime Performance Manager server on a Solaris or Linux system, enter:
# cd /opt/CSCOppm-gw/bin
or
cd /opt/CSCOppm-unit/bin
# ./ppm start
Note If the database has an exception during start up, the server will fail to start.
Becoming the Root UserSome Prime Performance Manager procedures require that you log in as the root user.
Caution As the root user, you can adversely affect your operating environment if you are unaware of the effects of the commands that you use. If you are a relatively inexperienced UNIX user, limit your activities as the root user to the tasks that are described in this manual.
If you are not logged in, log in as the root user:
> login: root> Password: root-password
If you are already logged in, but not as the root user, use the su command to change your login to root:
# su# Password: root-password
Supported DevicesYou can access the list of supported devices for Prime Performance Manager from Cisco.com:
http://www.cisco.com/en/US/products/ps11715/products_device_support_tables_list.html
The supported device types and the IOS software versions are listed in the Devices Readme page (Home > Managed Platform Documentation > Devices README).
Prime Performance Manager supports pre-defined system reports. These reports are listed in the Report XML Definitions page (Home > Reports Documentation) page. The XML and the property files describe the MIB tables and the fields that are polled for data from the device. It also describes the fields that are mapped to the report columns.
To generate new reports for the devices, refer to the pre-defined system reports as examples, and add new report XML files to the etc/pollers/user directory in the Prime Performance Manager Gateway installation directory, by default it is /opt/CSCOppm-gw.
The new user-defined report XML files must have a unique filename from the pre-defined system report files. For additional details on how to define new reports, contact the Cisco support team.
2-2Cisco Prime Performance Manager 1.0 User Guide
OL-24597-01

Chapter 2 Getting Started Prime Network Integration
Prime Network IntegrationThe Prime Performance Manager web interface allows you to manage devices through Prime Network and Discovery tab.
Using the Prime Network (ANA) tab:
Step 1 Enter the Prime Network (ANA) Inventory (IP Address, Port, User Name and Password) details. The user must have either ANA Administrator or ANA Configurator user privilege.
The default ANA web services port is 6081. The Port field accepts values from 1 to 65535.
Step 2 Select Strict Sync to discover only Prime Network type of devices.
Strict Synchronization allows you to discover only Prime Network type of devices. In Loose Synchronization mode, the Strict Sync check box is unchecked and Cisco Prime Performance Manager continues to manage devices that are not in Prime Network (ANA) inventory.
To log into ANA from Prime Performance Manager, the user must have either ANA Administrator or ANA Configurator user privilege and the device scope must be set to all network elements.
Step 3 Select Install Cross Launch to pass the Prime Network (ANA) device through Prime Performance Manager.
Prime Performance Manager installs the cross launch menu on ANA. This enables you to open the device's performance report page from ANA Client.
Step 4 Click the Import Inventory icon for Prime Performance Manager to detect Prime Network (ANA) device only.
Note Prime Network (ANA) cross launch synchronization feature is used only with the Inventory Import function. This is to make sure that Prime Performance Manager recognizes Prime Network (ANA) devices.
You can use the Discover tab to discover the devices in Prime Performance Manager independently of Prime Network (ANA).
This section contains:
• Prime Network Inventory Import Feature, page 2-4
• Discovering Your Network, page 2-4
2-3Cisco Prime Performance Manager 1.0 User Guide
OL-24597-01
Chapter 2 Getting Started Prime Network Integration
Prime Network Inventory Import FeatureThis section the details the Prime Network (ANA) Inventory import feature in Strict Synchronization and Loose Synchronization modes:
Note SNMP v3, Cloud, and Icmp devices are not imported from ANA. The ANA business tags of stopped VNEs are also not imported.
Strict Synchronization:
• Prime Performance Manager does not manage devices that are not in the Prime Network (ANA) inventory.
• Deleted Prime Network (ANA) devices become unmanaged in the Prime Network inventory, but their statistics data are not removed.
• The following functions are not available after Strict Synchronization:
– Device discovery
– Edit SNMP credentials
– Edit node name
Loose Synchronization:
• Prime Performance Manager manages devices that are not in the Prime Network (ANA) inventory.
• Deleted Prime Network (ANA) devices are managed by Prime Performance Manager.
• The following functions are available after Loose Synchronization:
– Device discovery
– Edit SNMP credentials
– Edit node name
– Edit node SNMP IP address
– Unmanage node
Discovering Your NetworkThis section provides details on using Prime Performance Manager to discover your networks. It includes:
• Discovery Overview, page 2-4
• Verifying Discovery, page 2-6
Discovery Overview
Prime Performance Manager uses a Discovery process to populate Prime Performance Manager database and discover the objects in your network.
You can run Discovery if Prime Performance Manager User-Based Access is disabled. If you are a System Administrator, you can run it if it is enabled. For more information about user authorization levels in Prime Performance Manager, see Configuring Prime Performance Manager User Account Levels, page 3-6.)
2-4Cisco Prime Performance Manager 1.0 User Guide
OL-24597-01
Chapter 2 Getting Started Prime Network Integration
To discover your network:
Step 1 Start Prime Performance Manager.
If you want to change SNMP settings, do so before running Discovery.
Step 2 Select the Administrative node in the Prime Performance Manager left tree.
Step 3 Select the Discovery tab.
You use the Discovery tab to discover the objects in your network.
Step 4 Enter a seed node IP address or name in the IP Address, Address range, Subnet, CIDR, or DNS Hostname field, and click the Add button.
Prime Performance Manager automatically adds the seed node in the Seed Details table
Step 5 Click the Discover Network button.
A message appears, Discovery Is Running and the nodes are discovered. See Discovered Nodes, page 2-5 for more information.
Step 6 Examine the discovered nodes by clicking on the Summary Lists item in the tree.
If you suspect that Prime Performance Manager did not discover all of the nodes, see Verifying Discovery, page 2-6 for troubleshooting information. You might need to add more seed nodes and run Discovery again.
Step 7 After you ensure that Prime Performance Manager discovered all of the nodes in the network, save the list of seed nodes in a seed file.
Related Topics
• Backing Up or Restoring Prime Performance Manager Files, page 3-20
• Discovered Nodes, page 2-5
Discovered Nodes
To view the list of discovered nodes from the navigation tree select Summary List > Nodes. By default, this table is sorted by alarm severity.
• To see a tooltip for each column in the table, place the cursor over a column heading.
• If a cell is too small to show all of its data, place the cursor over the cell to see the full text in a tooltip.
You can resize each column, or sort the table based on the information in any of the columns. By default, Prime Performance Manager displays all columns in the Discovered Nodes section except Internal ID, Uptime, Reboot Reason, Process Traps, and Last Status Change.
• To display hidden columns, right-click in the table heading and select the check boxes for the columns that you want to display.
• To hide columns, right-click in the table heading and uncheck the check boxes for the columns that you want to hide.
For detailed information on working in tables, see Nodes Table, page 5-23. This table gives descriptions of the columns and check boxes of the discovered nodes table
2-5Cisco Prime Performance Manager 1.0 User Guide
OL-24597-01
Chapter 2 Getting Started Prime Network Integration
Verifying DiscoveryAfter you discover the network (see Discovery Overview, page 2-4), click on the Nodes Summary Table to verify that Prime Performance Manager discovered all of the nodes in the network. If you suspect that Prime Performance Manager did not discover all of the nodes, verify that:
• Prime Performance Manager server can ping the nodes.
• SNMP is enabled on the nodes.
• Prime Performance Manager is configured with the correct SNMP community name.
If you suspect that Prime Performance Manager did not discover all of the nodes, run the Discovery again. See Discovery Overview, page 2-4 for more details.
2-6Cisco Prime Performance Manager 1.0 User Guide
OL-24597-01
OL-24597-01
C H A P T E R3
Configuring SecurityBefore you set up your server for discovering, monitoring, and configuring your Cisco network, you need to make some decisions about the level of security you need in your network monitoring.
With Cisco Prime Performance Manager, you can determine how you want users to authenticate encrypted data between the application unit and the gateway, and to limit client access to specific IP addresses.
This chapter provides information about configuring Prime Performance Manager security and limiting access to Prime Performance Manager. This chapter contains:
• Configuring User Access, page 3-1
• Enabling SSL Support on Gateway in Prime Performance Manager, page 3-15
• Limiting Prime Performance Manager Client Access to Prime Performance Manager Server, page 3-19
• Backing Up or Restoring Prime Performance Manager Files, page 3-20
Configuring User AccessYou can use user-based access to control the levels of access that users can have to the various functions in Prime Performance Manager. This is in addition to specifying root and non-root users.
User-based access provides multilevel, password-protected access to Prime Performance Manager features. Each user can have a unique username and password. There are five levels of access and you can assign these levels to users to allow or restrict their access to the features in Prime Performance Manager.
To configure Prime Performance Manager user access, perform the tasks in the following sections.
Required:
• Implementing Secure User Access, page 3-2
• Creating Secure Passwords, page 3-6
• Configuring Prime Performance Manager User Account Levels, page 3-6
Optional:
• Automatically Disabling Users and Passwords, page 3-7
• Manually Disabling Users and Passwords, page 3-10
• Enabling and Changing Users and Passwords, page 3-11
3-1Cisco Prime Performance Manager 1.0 User Guide
Chapter 3 Configuring Security Configuring User Access
• Displaying a Message of the Day, page 3-12
• Listing All Currently Defined Users, page 3-13
• Listing All Currently Defined Users, page 3-13
• Displaying the Contents of the System Security Log, page 3-14
• Disabling Prime Performance Manager User-Based Access, page 3-14
• Enabling SSL Support on Gateway in Prime Performance Manager, page 3-15
Implementing Secure User AccessBefore you can access the full suite of security commands in Prime Performance Manager, you must enable Prime Performance Manager user access, configure the type of security authentication you want, and add users to your user lists.
After you implement user access for Prime Performance Manager, users must log in to the system to access the:
• Prime Performance Manager web interface
• Event Editor
See Security Authentication, page 3-2 for further details.
Related Topic:
Add New User, page 6-26 - with Local Authentication enabled
Add New User, page 6-26 - with Solaris / Linux Authentication enabled
Security Authentication
Two types of security authentication are possible:
• Local authentication:
You can create user accounts and passwords that are local to Prime Performance Manager system. With this method, you can use Prime Performance Manager user access commands to manage usernames, passwords, and access levels.
• Solaris/Linux authentication:
Uses standard Solaris- or Linux-based user accounts and passwords, as specified in the /etc/nsswitch.conf file.
You can provide authentication using the local /etc/passwd file; a distributed Network Information Services (NIS) system. You can use all Prime Performance Manager user access commands except:
– /opt/CSCOppm-gw/bin/ppm disablepass
– /opt/CSCOppm-gw/bin/ppm passwordage
– /opt/CSCOppm-gw/bin/ppm userpass
3-2Cisco Prime Performance Manager 1.0 User Guide
OL-24597-01

Chapter 3 Configuring Security Configuring User Access
PAM Setup to Check Library Version and JVM Versions
Prime Performance Manager 1.0 supports:
• Pluggable Authentication Modules (PAM) for Remote Authentication Dial in User Service (RADIUS)
• Terminal Access Controller Access-Control System (TACACS+)
• Lightweight Directory Access Protocol (LDAP) authentication.
Instructions for configuring these authentication modules are provided on the Gateway install directory, /opt/CSCOppm-gw/install, and on the install directory of the Prime Performance Manager installation image as INSTALL.pam_radius.txt, INSTALL.pam_tacplus.txt, and INSTALL.pam_ldap.txt
• To ensure Java Virtual Machine (JVM) version and available Pluggable Authentication Modules (PAM) library matches, note the following:
– If your Operating System only has 32-bit version of the PAM library, then you need to use 32-bit JVM.
– If your Operating System only has 64-bit version of the PAM library, then you need to use 64-bit JVM.
– If your Operating System has both 32-bit and 64-bit versions of PAM libraries, then you can use either 32-bit or 64-bit JVM.
• To check the available PAM authentication module versions based on:
– /opt/CSCOppm-gw/install/INSTALL.pam_radius.txt, supported only in 32-bit, no 64-bit library support provided for RADIUS on Solaris, enter:
file /usr/lib/security/pam_radius_auth.so
– /opt/CSCOppm-gw/install/INSTALL.pam_radius.txt, supported in 32-bit and 64-bit library support provided for RADIUS on Linux, enter:
/lib/security/pam_radius_auth.so/lib64/security/pam_radius_auth.so
– Based on /opt/CSCOppm-gw/install/INSTALL.pam_tacplus.txt:
TACACS+ on Linux, enter:
file /lib/security/pam_tacplus_auth.sofile /lib64/security/pam_tacplus_auth.so
TACACS+ on Solaris, enter:
file /usr/lib/security/pam_tacplus_auth.sofile /usr/lib/security/sparcv9/pam_tacplus_auth.so
– Based on /opt/CSCOppm-gw/install/INSTALL.pam_ldap.txt:
LDAP on Linux, enter:
file /lib/security/pam_ldap.sofile /lib64/security/pam_ldap.so
LDAP on Solaris, enter:
file /usr/lib/security/pam_ldap.sofile /usr/lib/security/sparcv9/pam_ldap.so
• To check JVM versions, go to:
/opt/CSCOppm-gw/j2re/jre/bin/java -version
3-3Cisco Prime Performance Manager 1.0 User Guide
OL-24597-01
Chapter 3 Configuring Security Configuring User Access
• To change the JVM version on Solaris:
On Solaris, Prime Performance Manager has both 32-bit and 64-bit JVM versions. By default, Prime Performance Manager 1.0 and above enables 64-bit JVM on Solaris. To change JVM to 32-bit version, enter the following commands:
% cd /opt/CSCOppm-gw/j2re/jre/bin% mv java.sgm java.64% mv java.32 java.sgm% /opt/CSCOppm-gw/bin/ppm restart
To check if the JVM version is changed successfully, go to:
/opt/CSCOppm-gw/j2re/jre/bin/java -version
• To check the JVM version on Linux:
For Linux, you cannot change JVM versions. Prime Performance Manager installation program installs 64-bit JVM if the Linux runs 64-bit kernel. Prime Performance Manager installation program installs 32-bit JVM if the Linux runs 32-bit kernel.
You need to ensure that proper version of PAM library is available on Linux that matches the kernel version.
Note Check the install subdirectory in /opt/CSCOppm-gw of Prime Performance Manager installation CD image for the notes - INSTALL.pam_radius.txt (for PAM RADIUS module) or INSTALL.pam_tacplus.txt (for TACPLUS module) and INSTALL.pam_ldap.txt (for LDAP module).
Configuring User LevelsYou can configure one of four account levels for each user. Valid levels are:
1. Basic User (Level 1) Access
2. Network Operator (Level 3) Access
3. System Administrator (Level 5) Access
4. Custom User Level 1 (Level 11) and Custom User Level 2 (Level 12) Access
For more information about account levels, see Configuring Prime Performance Manager User Account Levels, page 3-6.
Configuring User Passwords
The method that you use for setting user passwords depends on the type of authentication that you configure on Prime Performance Manager system (local or Solaris/Linux).
Local Authentication
If the ppm authtype command is set to local, Prime Performance Manager prompts you to:
• Enter the user password. When setting the password, follow the rules and considerations in Creating Secure Passwords, page 3-6.
• Force the user to change the password at the next login. The default is to not force the user to change the password.
If the user needs to change a password, Prime Performance Manager displays an appropriate message, and prompts for the username and new password.
3-4Cisco Prime Performance Manager 1.0 User Guide
OL-24597-01
Chapter 3 Configuring Security Configuring User Access
Solaris/Linux Authentication
If the ppm authtype command is set to Solaris or Linux, users cannot change their passwords by using Prime Performance Manager client. Instead, they must manage their passwords on the external authentication servers by using Solaris or Linux commands, such as passwd.
All new passwords take effect the next time Prime Performance Manager automatically synchronizes local Prime Performance Manager passwords with Solaris or Linux commands.
Enabling Secure User Access
To enable secure user access for Prime Performance Manager:
Step 1 Log into Prime Performance Manager server as the root user (see Starting Prime Performance Manager Server, page 2-1.
Step 2 To enable Prime Performance Manager security, the following prerequisites must be met:
• User access must be enabled.
• The authentication type must be set.
• Users must be added.
The ppm useraccess enable command takes you through all three stages, checking the status of:
1. ppm useraccess—Enabled or disabled.
2. ppm authtype—If you have not already set Prime Performance Manager authentication type, you must do so now.
3. ppm adduser—If you have already assigned users, Prime Performance Manager prompts you to either use the same user database, or create a new one. If you have not assigned users, you must do so now.
Tip For details on ppm useraccess, ppm authtype, and ppm adduser commands, see Appendix A, “Command Reference”.
Run Prime Performance Manager useraccess enable command:
cd /opt/CSCOppm-gw/bin./ppm useraccess enable~text elided~
To activate your security changes on Prime Performance Manager client, restart Prime Performance Manager server using the /opt/CSCOppm-gw/bin/ppm restart command (see ppm restart, page A-37).
To activate your security changes on Prime Performance Manager web interface, clear the browser cache and restart the browser.
See Creating Secure Passwords, page 3-6 to further customize your Prime Performance Manager security system
3-5Cisco Prime Performance Manager 1.0 User Guide
OL-24597-01
Chapter 3 Configuring Security Configuring User Access
Creating Secure PasswordsWhen setting passwords in Prime Performance Manager, the:
• Password must be at least 6 characters, and a maximum of 15 characters.
• Password cannot be identical to the username.
• New password cannot be the same as the old password.
• Prime Performance Manager does not allow users to switch back and forth between two passwords.
• Password cannot be a commonly used word. Prime Performance Manager server uses the system dictionary at /usr/share/lib/dict/words (Solaris) or /usr/share/dict/words (Linux) to determine whether a word is a commonly used word.
To use your own dictionary, add a line to the System.properties file:
– To disable Prime Performance Manager dictionary and allow common words, add:
DICT_FILE=/dev/null
– To use a custom dictionary, add:
DICT_FILE=/new-dictionary
where new-dictionary is the path and filename of the custom dictionary file, such as /users/usr11/words. Each line in the custom dictionary must contain a single word, with no leading or trailing spaces.
Configuring Prime Performance Manager User Account LevelsThis section describes the user account levels, and Prime Performance Manager client and web interface actions that are available at each level:
• Basic User (Level 1) Access, page 3-7
• Network Operator (Level 3) Access, page 3-7
• System Administrator (Level 5) Access, page 3-7
• Custom User Level 1 (Level 11) and Custom User Level 2 (Level 12) Access, page 3-7
The account level that includes an action is the lowest level with access to that action. The action is also available to all higher account levels. For example, a System Administrator also has access to all Network Operator actions.
Account levels are based on the action to be performed, not on the target network element. Therefore, if a user can perform an action on one Prime Performance Manager network element (such as deleting a node), the user can perform the same action on all similar Prime Performance Manager network elements.
Note Access to Prime Performance Manager information and downloads on Cisco.com is already protected by Cisco.com, and is not protected by Prime Performance Manager.
To configure the account level for a user, use the ppm adduser command, as described in Implementing Secure User Access, page 3-2, or ppm updateuser or ppm newlevel commands, as described in Enabling and Changing Users and Passwords, page 3-11.
3-6Cisco Prime Performance Manager 1.0 User Guide
OL-24597-01

Chapter 3 Configuring Security Configuring User Access
Basic User (Level 1) Access
Basic users can view Prime Performance Manager data, load Prime Performance Manager files, and use Prime Performance Manager drill-down menus.
The following Prime Performance Manager actions in the web interfaces are available to basic users:
• View Prime Performance Manager web interface homepage
• View Reports
Network Operator (Level 3) Access
The following Prime Performance Manager actions in the web interfaces are available to network operators:
• Access all basic (Level 1) user actions
• Can view Active Alarms, Event History, Summary List
• Can access only Normal Poll node and Edit Properties option in the Actions menu
System Administrator (Level 5) Access
The following Prime Performance Manager actions in the client and web interfaces are available to system administrators:
• Accessing all basic (Level 1) user, network operator (Level 3) user access.
• Enabling and disabling reports
• Accessing all options from the Actions menu.
• Disabling, enabling and assigning temporary passwords to different user administrations.
Custom User Level 1 (Level 11) and Custom User Level 2 (Level 12) Access
The Custom User Level 1 Access and Custom User Level 2 Access by default does not have authorizations but can be customized and set permissions of all basic (Level 1) user, network operator (Level 3) and system administrator (Level 5) access.
To customize, these access levels, the user needs to edit the roles.conf file in the /opt/CSCOppm-gw/etc path in the gateway.
Automatically Disabling Users and PasswordsAfter you have implemented the basic Prime Performance Manager security system, you can customize the system to automatically disable users and passwords when certain conditions are met. For example, a series of unsuccessful login attempts or a specified period of inactivity).
Tip To view a list of current users and the status of user accounts, use ppm listusers command (see ppm listusers).
3-7Cisco Prime Performance Manager 1.0 User Guide
OL-24597-01
Chapter 3 Configuring Security Configuring User Access
To automatically disable users and passwords:
Step 1 Log into Prime Performance Manager server as the root:
For details about the root user, see Becoming the Root User, page 2-2
Step 2 Enter the following command:
cd /opt/CSCOppm-gw/bin
Step 3 (Optional) To configure Prime Performance Manager to generate an alarm after a specified number of unsuccessful login attempts by a user, enter:
#./ppm badloginalarm number-of-attempts
where number-of-attempts is the number of unsuccessful login attempts allowed before Prime Performance Manager generates an alarm.The number of login attempts are recorded in the security log file.
Prime Performance Manager records alarms in the system security log file. The default path and filename for the system security log file is /opt/CSCOppm-gw/logs/sgmSecurityLog.txt. If you installed Prime Performance Manager in a directory other than /opt, then the system security log file resides in that directory.
By default, there can be five unsuccessful attempts before the system generates an error.
To disable this action (that is, to prevent Prime Performance Manager from automatically generating an alarm after unsuccessful login attempts), enter:
#./ppm badloginalarm clear
Step 4 (Optional) To configure Prime Performance Manager to disable a user’s account automatically after a specified number of unsuccessful login attempts, enter:
#ppm badlogindisable number-of-attempts
where number-of-attempts is the number of unsuccessful login attempts allowed before Prime Performance Manager disables the user’s account. Prime Performance Manager does not delete the user from the user list, Prime Performance Manager only disables the user’s account.
By default, there can be 10 unsuccessful attempts before the system generates an error.
To re-enable the user’s account, use ppm enableuser command.
To disable this action (that is, to prevent Prime Performance Manager from automatically disabling a user’s account after unsuccessful login attempts), enter:
# ./ppm badlogindisable clear
Step 5 (Optional) Prime Performance Manager keeps track of the date and time each user last logged in. To configure Prime Performance Manager to disable a user’s log in automatically after a specified number of days of inactivity, enter:
# ./ppm inactiveuserdays number-of-days
where number-of-days is the number of days that a user can be inactive before Prime Performance Manager disables the user’s account. Prime Performance Manager does not delete the user from the user list, Prime Performance Manager only disables the user’s account.
The valid range is one day to an unlimited number of days. There is no default setting.
To re-enable the user’s account, use Prime Performance Manager enableuser command.
3-8Cisco Prime Performance Manager 1.0 User Guide
OL-24597-01
Chapter 3 Configuring Security Configuring User Access
This action is disabled by default. If you do not specify the ppm inactiveuserdays command, user accounts are never disabled as a result of inactivity.
If you have enabled this action and you want to disable it (that is, to prevent Prime Performance Manager from automatically disabling user accounts as a result of inactivity), enter:
# ./ppm inactiveuserdays clear
Step 6 (Optional) If ppm authtype is set to local, you can configure Prime Performance Manager to force users to change their passwords after a specified number of days.
To configure Prime Performance Manager to force users to change their passwords after a specified number of days, enter:
# ./ppm passwordage number-of-days
where number-of-days is the number of days allowed before users must change their passwords.
Note You must have changed your password at least once for the ppm passwordage command to properly age the password.
The valid range is one day to an unlimited number of days. There is no default setting.
Prime Performance Manager starts password aging at midnight on the day that you set the value. For example, if you use the ppm passwordage command to set the password age to one day (24 hours), the password begins to age at midnight and expires 24 hours later.
This action is disabled by default. If you do not specify the ppm passwordage command, users never need to change their passwords.
If you have enabled this action and you want to disable it (that is, prevent Prime Performance Manager from forcing users to change passwords), enter:
# ./ppm passwordage clear
Note If ppm authtype is set to Solaris or Linux, you cannot use the ppm passwordage command. Instead, you must manage passwords on the external authentication servers.
Step 7 (Optional) To configure Prime Performance Manager to automatically disconnect a web interface after a specified number of minutes of inactivity, enter:
# ./ppm clitimeout number-of-minutes
where number-of-minutes is the number of minutes a client can be inactive before Prime Performance Manager disconnects the client.
The valid range is one minute to an unlimited number of minutes. There is no default value.
This action is disabled by default. If you do not specify the ppm clitimeout command, clients are never disconnected as a result of inactivity.
If you have enabled this action and you want to disable it (that is, never disconnect a client as a result of inactivity), enter the following command:
# ./ppm clitimeout clear
3-9Cisco Prime Performance Manager 1.0 User Guide
OL-24597-01
Chapter 3 Configuring Security Configuring User Access
Manually Disabling Users and PasswordsAs described in the Automatically Disabling Users and Passwords, page 3-7, you can customize Prime Performance Manager to automatically disable users and passwords when certain conditions are met. However, you can also manually disable Prime Performance Manager users and passwords whenever you suspect that a security breech has occurred.
Note You can add new user and password from Prime Performance Manager web interface, see Add New User, page 6-26 for more details.
To disable Prime Performance Manager users and passwords:
Step 1 Log into Prime Performance Manager server as the root:
For details about the root user, see Becoming the Root User, page 2-2
Step 2 Enter:
# cd /opt/CSCOppm-gw/bin
Step 3 (Optional) To delete a user entirely from Prime Performance Manager user access account list, enter:
# ./ppm deluser username
where username is the name of the user.
If you later decide to add the user back to the account list, you must use ppm adduser command.
Step 4 (Optional) If ppm authtype is set to local, you can disable a user’s password. To disable a user’s password, enter:
# ./ppm disablepass username
where username is the name of the user. Prime Performance Manager does not delete the user from the account list, Prime Performance Manager only disables the user’s password.
Note If ppm authtype is set to Solaris or Linux, you cannot use the ppm disablepass command. Instead, you must manage passwords on the external authentication servers.
The user must change the password the next time they log in.
You can also re-enable the user’s account with the same password, or with a new password:
• To re-enable the user’s account with the same password as before, use the ppm enableuser command.
• To re-enable the user’s account with a new password, use the ppm userpass command.
Step 5 (Optional) To disable a user’s account, but not the user’s password, enter:
# ./ppm disableuser username
where username is the name of the user.
Note If ppm authtype is set to Solaris or Linux, you must be logged in as the root user, to enter this command.
3-10Cisco Prime Performance Manager 1.0 User Guide
OL-24597-01
Chapter 3 Configuring Security Configuring User Access
Prime Performance Manager does not delete the user from the account list; Prime Performance Manager only disables the user’s account. The user cannot log in until you re-enable the user’s account:
• To re-enable the user’s account with the same password as before, use the ppm enableuser command.
• To re-enable the user’s account with a new password, use the ppm userpass command.
Enabling and Changing Users and PasswordsPrime Performance Manager also enables you to re-enable users and passwords, and change user accounts.
To enable and change users and passwords:
Step 1 Log into Prime Performance Manager server as the root:
For details about the root user, see Becoming the Root User, page 2-2
Step 2 Enter the following command:
# cd /opt/CSCOppm-gw/bin
Step 3 (Optional) To re-enable a user’s account, which had been disabled either automatically by Prime Performance Manager, enter the following command:
# ./ppm enableuser username
where username is the name of the user. Prime Performance Manager re-enables the user’s account with the same password as before.
Note If ppm authtype is set to Solaris or Linux, you must be logged in as the root user, to enter this command.
Step 4 (Optional) If ppm authtype is set to local, you can change a user’s password, or re-enable the user’s account with a new password, if the user’s account had been disabled automatically by Prime Performance Manager. To change a password or to re-enable a user’s account with a new password, enter:
# ./ppm userpass username
where username is the name of the user.
Prime Performance Manager prompts you for the new password. When setting the password, follow the rules and considerations in the Creating Secure Passwords, page 3-6.
If the user’s account has also been disabled, Prime Performance Manager re-enables the user’s account with the new password.
Note If ppm authtype is set to Solaris or Linux, you cannot use the ppm userpass command. Instead, you must manage passwords on the external authentication servers.
3-11Cisco Prime Performance Manager 1.0 User Guide
OL-24597-01

Chapter 3 Configuring Security Configuring User Access
Step 5 (Optional) To change a user’s account level and password, enter the following command:
# ppm updateuser username
where username is the name of the user.
Note If ppm authtype is set to Solaris or Linux, you must be logged in as the root user, to enter this command.
Prime Performance Manager prompts you for the new account level.
If ppm authtype is set to local, Prime Performance Manager also prompts you for the user’s new password. When setting the password, follow the rules and considerations in Creating Secure Passwords, page 3-6.
Step 6 (Optional) To change a user’s account level, but not the user’s password, enter the following command:
# ./ppm newlevel username
where username is the name of the user.
Prime Performance Manager prompts you for the new account level.
Displaying a Message of the DayYou can use Prime Performance Manager to display a user-specified Prime Performance Manager system notice called the Message of the Day. You can use the Message of the Day to inform users of important changes or events in Prime Performance Manager system.
If you enable the Message of the Day, it appears whenever a user attempts to launch a client.
The Message of the Day also allows you to exit Prime Performance Manager Web User Interface before starting it in certain scenarios. If the user accepts the message, the client launches. If the user declines the message, the client does not launch.
To display the Message of the Day dialog box:
• Launch a web interface. If there is a message, the Message of the Day dialog box appears.
To configure Prime Performance Manager to display the Message of the Day:
Step 1 Log into Prime Performance Manager server as the root:
For details about the root user, see Becoming the Root User, page 2-2
Step 2 Enter the following commands:
cd /opt/CSCOppm-gw/bin./ppm motd enable
Prime Performance Manager displays:
Enter location of the message of the day file: [/opt/CSCOppm-gw/etc/motd]
Step 3 Press Enter to accept the default value; or type a different location and press Enter.
when a user login to Prime Performance Manager web interface, Prime Performance Manager displays:
Last Updated: MM:DD:YYYY Hrs:Sec AMMessage of the day
3-12Cisco Prime Performance Manager 1.0 User Guide
OL-24597-01
Chapter 3 Configuring Security Configuring User Access
Step 4 Accept or Decline the Message of the day. If you accept the message, you are logged into Prime Performance Manager Web Interface.
To create the message text (the first time) or edit the existing text, enter:
./ppm motd edit
To display the contents of the Message of the Day file, enter:
./ppm motd cat
To disable the Message of the Day file, enter:
./ppm motd disable
Listing All Currently Defined UsersTo list all currently defined users in Prime Performance Manager User-Based Access account list:
Note You can also view user account information on Prime Performance Manager User Accounts web page, refer User Management Table, page 6-27 for more details.
Step 1 Log into Prime Performance Manager server as the root:
For details about the root user, see Becoming the Root User, page 2-2
Step 2 Change to the /bin directory:
cd /opt/CSCOppm-gw/bin
Step 3 List all users:
./ppm listusers
Prime Performance Manager displays the following information for each user:
• Username
• Last time the user logged in
• User’s account access level
• User’s current account status, such as Account Enabled or Password Disabled
To list information for a specific user, enter:
./ppm listusers username
where username is the name of the user.
3-13Cisco Prime Performance Manager 1.0 User Guide
OL-24597-01

Chapter 3 Configuring Security Configuring User Access
Displaying the Contents of the System Security LogTo display the contents of the system security log with PAGER:
Step 1 Log into Prime Performance Manager server as the root:
For details about the root user, see Becoming the Root User, page 2-2
Step 2 Change to the /bin directory:
cd /opt/CSCOppm-gw/bin
Step 3 Display the security log contents:
./ppm seclog
The following security events are recorded in the log:
• All changes to system security, including adding users
• Login attempts, whether successful or unsuccessful, and logoffs
• Attempts to switch to another user's account, whether successful or unsuccessful
• Attempts to access files or resources of higher account level
• Access to all privileged files and processes
• Operating system configuration changes and program changes, at the Solaris level
• Prime Performance Manager restarts
• Failures of computers, programs, communications, and operations, at the Solaris level
Step 4 Clear the log, by entering:
/opt/CSCOppm-gw/bin/ppm seclog clear
The default path and filename for the system security log file is /opt/CSCOppm-gw/logs/sgmSecurityLog.txt. If you installed Prime Performance Manager in a directory other than /opt, then the system security log file is located in that directory.
Note You can also view the system security log on Prime Performance Manager System Security Log web page. For more information, see Viewing the Security Log, page 6-9.
Disabling Prime Performance Manager User-Based AccessTo completely disable Prime Performance Manager User-Based Access:
Step 1 Log into Prime Performance Manager server as the root:
For details about the root user, see Becoming the Root User, page 2-2
Step 2 Change to the /bin directory:
cd /opt/CSCOppm-gw/bin
3-14Cisco Prime Performance Manager 1.0 User Guide
OL-24597-01

Chapter 3 Configuring Security Enabling SSL Support on Gateway in Prime Performance Manager
Step 3 Disable user-based access:
./ppm useraccess disable
Prime Performance Manager user access is disabled the next time you restart Prime Performance Manager server (using the ppm restart command).
Enabling SSL Support on Gateway in Prime Performance Manager
Secure Socket Layer (SSL) support is enabled in both Gateway and Unit on Prime Performance Manager. The Unit establishes a connection with the Gateway as a client and after establishing a connection, the Gateway connects to the Unit as a client.
To stop both the gateway and local unit processes run the ppm stop command.
If any remote units are installed, run the ppm stop command to stop the remote units.
To enable SSL support in Prime Performance Manager:
Step 1 Use one of the following command to install an SSL key/certificate pair in Prime Performance Manager
/opt/CSCOppm-gw/bin/ppm keytool genkey
The following prompts appear:
• Country Name (2 letter code) []:
• State or Province Name (full name) []:
• Locality Name (eg, city) []:
• Organization Name (eg, company) []:
• Organizational Unit Name (eg, section) []:
• Common Name (your hostname) []:
• Email Address []:
• Certificate Validity (number of days)? [min: 30, default: 365]
Step 2 Enter these details
Prime Performance Manager generates the following files on the Prime Performance Gateway:
• /opt/CSCOppm-gw/etc/ssl/server.key is Prime Performance Manager gateway's private key. Ensure that unauthorized personnel cannot access this key.
• /opt/CSCOppm-gw/etc/ssl/server.crt is the self-signed SSL certificate.
• /opt/CSCOppm-gw/etc/ssl/server.csr is a certificate signing request (CSR). It is not used if you are using a self-signed SSL certificate.
3-15Cisco Prime Performance Manager 1.0 User Guide
OL-24597-01
Chapter 3 Configuring Security Enabling SSL Support on Gateway in Prime Performance Manager
To install a new SSL key and a self-signed certificate on the Prime Performance units
Step 1 Run the following command
/opt/CSCOppm-unit/bin/ppm keytool genkey
This command must be run on all units that will be connecting to the SSL-enabled Gateway.
The following prompts appear:
• Country Name (2 letter code) []:
• State or Province Name (full name) []:
• Locality Name (eg, city) []:
• Organization Name (eg, company) []:
• Organizational Unit Name (eg, section) []:
• Common Name (your hostname) []:
• Email Address []:
• Certificate Validity (number of days)? [min: 30, default: 365]
Step 2 Enter these details
Prime Performance Manager generates the following files on the Prime Performance Unit:
• /opt/CSCOppm-unit/etc/ssl/server.key is Prime Performance Manager unit’s private key. Ensure that unauthorized personnel cannot access this key.
• /opt/CSCOppm-unit/etc/ssl/server.crt is the self-signed SSL certificate.
• /opt/CSCOppm-unit/etc/ssl/server.csr is a certificate signing request (CSR). It is not used if you are using a self-signed SSL certificate.
Step 3 Import the SSL certificates on the Gateway and Units:
• To import the unit certificate on the gateway, copy the /opt/CSCOppm-unit/etc/ssl/server.crt to a temporary location on the gateway machine, i.e. /tmp/server.crt. Then import the unit certificate by running the following command:
/opt/CSCOppm-gw/bin/ppm certtool import alias - file filename
Where alias is a string alias for the certificate file and filename is the full pathname for the certificate file, i.e. /tmp/server.crt. Each imported certificate must have a unique alias when imported.
• To import the gateway certificate on the unit, copy the /opt/CSCOppm-gw/etc/ssl/server.crt to a temporary location on the unit machine, that is, /tmp/server.crt. Then import the gateway certificate by running the following command:
/opt/CSCOppm-unit/bin/ppm certtool import alias -file filename
Where alias is a string that is an alias for the certificate file and filename is the full pathname for the certificate file, i.e. /tmp/server.crt.
Note The gateway imports the certificate file for each unit that connects to it. Each unit then imports the gateway certificate file for the gateway that it connect to.
Step 4 After importing, run /opt/CSCOppm-gw/bin/ppm ssl enable if its on the gateway and run /opt/CSCOppm-unit/bin/ppm ssl enable if its on the units.
Step 5 Restart the Prime Performance Manager gateway and the Prime Performance Manager units.
3-16Cisco Prime Performance Manager 1.0 User Guide
OL-24597-01
Chapter 3 Configuring Security Exporting an SSL Certificate
Note User should re-install the cross-launch in Prime Network (ANA) after enabling/disabling SSL. This ensures the cross launch links to be updated (example, change “https://” from or to “http://”). Refer Viewing Prime Network Tab Details, page 6-18
Related Topic:
Exporting an SSL Certificate, page 3-17
Viewing Detailed Information About an SSL Certificate, page 3-17
Managing SSL Support in Prime Performance Manager, page 3-17
Disabling SSL Support in Prime Performance Manager, page 3-18
Exporting an SSL CertificateIf you have implemented Secure Sockets Layer (SSL) support in your Prime Performance Manager system, you can export SSL certificates that have been imported to Prime Performance Manager Gateway or Unit.
To export a SSL certificate, run the following command:
/opt/CSCOppm-gw/bin/ppm certtool export alias -file filename
where alias is the alias used when the certificate was imported and filename is the output file for the certificate.
Viewing Detailed Information About an SSL CertificateIf you implemented Secure Sockets Layer (SSL) support in your Prime Performance Manager system, you can view detailed information about SSL certificates that were imported to Prime Performance Manager Gateway or Unit.
To view detailed information about an SSL certificate, click the locked padlock icon in the lower-left corner of any Prime Performance Manager web interface window.
Managing SSL Support in Prime Performance ManagerManaging SSL support in Prime Performance Manager is done by the following set of commands:
• To view the status of SSL support (enabled/disabled) and the list of SSL keys and certificates available in Prime Performance Manager, use the following commands:
Gateway Commands:
/opt/CSCOppm-gw/bin/ppm ssl statusor/opt/CSCOppm-gw/bin/ppm sslstatus
Unit Commands:
/opt/CSCOppm-unit/bin/ppm ssl statusor/opt/CSCOppm-unit/bin/ppm sslstatus
3-17Cisco Prime Performance Manager 1.0 User Guide
OL-24597-01

Chapter 3 Configuring Security Disabling SSL Support in Prime Performance Manager
• To Print Prime Performance Manager server's SSL certificate in X.509 format, use the following command:
Gateway Command:
/opt/CSCOppm-gw/bin/ppm keytool print_crt
Unit Command:
/opt/CSCOppm-unit/bin/ppm keytool print_crt
• To list the SSL key/certificate pair on Prime Performance Manager server, use the following command:
Gateway Command:
/opt/CSCOppm-gw/bin/ppm keytool list
Unit Command:
/opt/CSCOppm-unit/bin/ppm keytool list
Disabling SSL Support in Prime Performance Manager To disable and remove SSL keys and certificates support in Prime Performance Manager gateway and units, use these commands:
Note Before disabling or removing SSL support, stop both the gateway and local unit processes by running the opt/CSCOppm-gw/bin/ppm stop command.
• To disable SSL support in Prime Performance Manager gateway and units, use the following commands:
Gateway Command:
/opt/CSCOppm-gw/bin/ppm ssl disable
Unit Command:
/opt/CSCOppm-unit/bin/ppm ssl disable
• To remove all SSL keys and certificates from Prime Performance Manager gateway and units, use the following commands:
Gateway Command:
/opt/CSCOppm-gw/bin/ppm keytool clear
Unit Command:
/opt/CSCOppm-unit/bin/ppm keytool clear
3-18Cisco Prime Performance Manager 1.0 User Guide
OL-24597-01
Chapter 3 Configuring Security Limiting Prime Performance Manager Client Access to Prime Performance Manager Server
Limiting Prime Performance Manager Client Access to Prime Performance Manager Server
By default, when you first install Prime Performance Manager, all Prime Performance Manager client IP addresses can connect to Prime Performance Manager server. However, you use Prime Performance Manager to limit client access to the server by creating and maintaining the ipaccess.conf file.
You can create the ipaccess.conf file and populate it with a list of Prime Performance Manager client IP addresses that can connect to Prime Performance Manager server. Prime Performance Manager allows connections from only those clients and the local host.
If the file exists but is empty, Prime Performance Manager allows connections only from the local host. (Prime Performance Manager always allows connections from the local host.)
When you first install Prime Performance Manager, the ipaccess.conf file does not exist and Prime Performance Manager allows all client IP addresses to connect to Prime Performance Manager server.
To create the ipaccess.conf file and work with the list of allowed client IP addresses:
Step 1 Log into Prime Performance Manager server as the root:
For details about the root user, see Becoming the Root User, page 2-2
Step 2 Change to the bin directory:
cd /opt/CSCOppm-gw/bin
Step 3 Create the ipaccess.conf file:
• To create the ipaccess.conf file and add a client IP address to the list, enter:
./ppm ipaccess add
• To create the ipaccess.conf file and open the file to edit it directly, enter:
./ppm ipaccess edit
The default directory for the file is located in Prime Performance Manager installation directory:
• If you installed Prime Performance Manager in the default directory, /opt, then the default directory is /opt/CSCOppm-gw/etc.
• If you installed Prime Performance Manager in a different directory, then the default directory is located in that directory.
In the ipaccess.conf file, begin all comment lines with a pound sign (#).
All other lines in the file are Prime Performance Manager client IP addresses, with one address per line.
Wildcards (*) are allowed, as are ranges (for example, 1-100). For example, if you input the address *.*.*.* then all clients can connect to Prime Performance Manager server.
Step 4 After you create the ipaccess.conf file, you can use the full set of Prime Performance Manager ipaccess keywords to work with the file. The keywords are:
• clear—Remove all client IP addresses from the ipaccess.conf file, and allow connections from any Prime Performance Manager client IP address.
• list—List all client IP addresses currently in the ipaccess.conf file. If no client IP addresses are listed (that is, the list is empty), connections from any Prime Performance Manager client IP address are allowed.
3-19Cisco Prime Performance Manager 1.0 User Guide
OL-24597-01

Chapter 3 Configuring Security Backing Up or Restoring Prime Performance Manager Files
• rem—Remove the specified client IP address from the ipaccess.conf file.
• sample—Print out a sample ipaccess.conf file.
For more information, see ppm ipaccess, page A-25.
Any changes you make to the ipaccess.conf file take effect when you restart Prime Performance Manager server.
Backing Up or Restoring Prime Performance Manager FilesBackup and Restore function in Prime Performance Manager allows you to retrieve user accounts and security-related parts of Prime Performance Manager data files from the previous night’s backup.
Backup and Restore should ideally be performed in sets at the same clock time. Sets consists of a Gateway and its units.
Note When Backup is not performed in sets, there is an potential for data not in synchronization between the Gateway and its units.
Below are the backup and restore steps followed on a gateway and a unit:
1. Backup performed on both the gateway and unit at the same time (or nearly so)
2. Backup restored to the gateway first
3. Backup restored to the unit
4. Gateway started
5. Unit started
Below are the backup and restore steps followed on a gateway and multiple units:
1. Backup performed on the gateway and all units at the same time (or nearly so)
2. Backup restored to the gateway first
3. Backup restored to each unit. These restores can be done in parallel.
4. Gateway started
5. Units started. the units can be started serially or in parallel.
Prime Performance Manager v1.0 supports backup and restore on the same machine. For example, taking a backup on unit 1 and restoring to unit 2 is not supported. Taking a backup on a gateway with one IP address and restoring to a gateway with a different IP address is not supported.
System responsiveness may temporarily degrade during backup for very large scale networks.
To restore the security-related Prime Performance Manager data files:
Step 1 Log in as the root user
For details about the root user, see Becoming the Root User, page 2-2
Step 2 Change to the /bin directory:
cd /opt/CSCOppm-gw/bin
3-20Cisco Prime Performance Manager 1.0 User Guide
OL-24597-01
Chapter 3 Configuring Security Backing Up or Restoring Prime Performance Manager Files
Step 3 Restore the security-related data:
./ppm restore
Prime Performance Manager restores the data.
Prime Performance Manager automatically backs up all Prime Performance Manager data files to Prime Performance Manager installation directory daily at same clock time.
To change the time at which Prime Performance Manager automatically backs up files, log in as the root user and change the root crontab file:
• crontab -l lists cron jobs.
• crontab -e opens up an editor so you can make changes and save them.
This section contains these topics:
• Backing Up Prime Performance Manager Data Files, page 3-21
• Changing the Backup Directory, page 3-22
• Setting the Number of Backup Days, page 3-22
• Restoring Prime Performance Manager Data Files, page 3-23
Backing Up Prime Performance Manager Data FilesTo manually back up Prime Performance Manager data files at any time on a Solaris or Linux server:
Step 1 Log in as the root user.
For details about the root user, see Becoming the Root User, page 2-2
Step 2 Change to the bin directory:
cd /opt/CSCOppm-gw/bin
Step 3 Back up Prime Performance Manager files:
./ppm backup
Prime Performance Manager backs up the data files in the installation directory.
If you installed Prime Performance Manager in the default directory, /opt, then the default backup directory is also /opt. If you installed Prime Performance Manager in a different directory, then the default backup directory is that directory.
3-21Cisco Prime Performance Manager 1.0 User Guide
OL-24597-01
Chapter 3 Configuring Security Backing Up or Restoring Prime Performance Manager Files
Changing the Backup DirectoryTo change the directory in which Prime Performance Manager stores its nightly backup files:
Step 1 Log in as the root user.
For details about the root user, see Becoming the Root User, page 2-2
Step 2 Change to the bin directory:
cd /opt/CSCOppm-gw/bin
Step 3 Change the backup directory location:
./ppm backupdir directory
where directory is the new backup directory.
If the new directory does not exist, Prime Performance Manager does not change the directory, but issues an appropriate warning message.
Setting the Number of Backup DaysTo set the number of days that Prime Performance Manager saves backup files:
Step 1 Log in as the root user.
For details about the root user, see Becoming the Root User, page 2-2
Step 2 Change to the bin directory:
cd /opt/CSCOppm-gw/bin
Step 3 Change the number of backup days (default is 1):
./ppm backupdays
Step 4 Enter a value for the number of days from 1 to 30.
Prime Performance Manager will save backup files for the number of days that you entered. In this example, Prime Performance Manager saves backup files for the last five days, and deletes backup files that are older than five days.
3-22Cisco Prime Performance Manager 1.0 User Guide
OL-24597-01
Chapter 3 Configuring Security Backing Up or Restoring Prime Performance Manager Files
Restoring Prime Performance Manager Data FilesPrime Performance Manager supports backup and restore on the same machine. For example, taking a backup on unit 1 and restoring to unit 2 is not supported. Taking a backup on a gateway with one IP address and restoring to a gateway with a different IP address is not supported.
Note Prime Performance Manager data restore can be made on the same server the backup was taken.
To restore Prime Performance Manager data files from a previous backup:
Step 1 Log in as the root user.
For details about the root user, see Becoming the Root User, page 2-2
Step 2 Change to the bin directory:
cd /opt/CSCOppm-gw/bin
Step 3 Restore Prime Performance Manager data files:
./ppm restore
Prime Performance Manager restores the data files.
Note If the number of backup days has been set to more than one day (see Setting the Number of Backup Days, page 3-22), Prime Performance Manager will prompt you for a server backup file restore from as there is no client backups.
Warning Do not interrupt this command. Doing so can corrupt your Prime Performance Manager data files.
ppm restore command provides optional keywords that you use to restore only selected Prime Performance Manager data files, such as log files, report files, or security files. For more information, see Backing Up or Restoring Prime Performance Manager Files, page 3-20.
3-23Cisco Prime Performance Manager 1.0 User Guide
OL-24597-01

Chapter 3 Configuring Security Backing Up or Restoring Prime Performance Manager Files
3-24Cisco Prime Performance Manager 1.0 User Guide
OL-24597-01

OL-24597-01
C H A P T E R4
Setting Up Your ServerThis chapter contains:
• Changing Prime Performance Manager Server Poller Settings, page 4-1
• Changing the Message Display, page 4-2
• Changing Web Preference Settings, page 4-3
Changing Prime Performance Manager Server Poller SettingsPrime Performance Manager provides a status refresh poller for use in Prime Performance Manager web pages.
You can use Prime Performance Manager, to change the settings (such as minimum, maximum, and default) for each poller.
To change server poller settings:
Step 1 Edit the Server.properties file:
• If you installed Prime Performance Manager in the default directory, /opt, then the location of the Server.properties file is /opt/CSCOppm-gw/properties/Server.properties.
• If you installed Prime Performance Manager in a different directory, then the Server.properties file is located in that directory.
To change status refresh poller settings, change one or more of these lines in the file:
# Status refresh default interval in secondsSTATE_REFRESH_DEFAULT = 180
# Status refresh minimum interval in secondsSTATE_REFRESH_MIN = 180
# Status refresh maximum interval in secondsSTATE_REFRESH_MAX = 900
For example, to change the status refresh poller default to 300 seconds, change the STATE_REFRESH_DEFAULT line to:
STATE_REFRESH_DEFAULT = 300
Step 2 Save your changes and restart Prime Performance Manager server.
4-1Cisco Prime Performance Manager 1.0 User Guide

Chapter 4 Setting Up Your Server Changing the Message Display
Any changes you make, take effect when you restart Prime Performance Manager server, and are reflected throughout Prime Performance Manager client GUI and web pages at that time.
For each of these pollers, if you set the:
• Minimum interval for a poller to less than 0 seconds, Prime Performance Manager overrides this setting and resets the minimum interval to 0 seconds.
• Maximum interval for a poller to less than the minimum interval, Prime Performance Manager overrides this setting and resets the maximum interval as equal to the minimum interval.
• Default interval for a poller to less than the minimum interval, Prime Performance Manager overrides this setting and resets the default interval as equal to the minimum interval.
• Default interval for a poller to more than the maximum interval, Prime Performance Manager overrides this setting and resets the default interval as equal to the maximum interval.
Changing the Message DisplayThese sections contain information about changing the way Prime Performance Manager displays and stores messages:
• Changing the Location of Prime Performance Manager Message Log Files, page 4-2
• Changing the Size of Prime Performance Manager Message Log Files, page 4-2
• Changing the Time Mode for Dates in Log Files, page 4-2
• Changing the Age of Prime Performance Manager Message Log Files, page 4-3
Changing the Location of Prime Performance Manager Message Log FilesBy default, all Prime Performance Manager system message log files are located on Prime Performance Manager gateway server at /opt/CSCOppm-gw/logs and unit server at /opt/CSCOppm-unit/logs.
To change the location of the system message log directory, use the ppm msglogdir command. This command execution is specific to the each gateway and unit instance. For more information, see ppm msglogdir, page A-32.
Changing the Size of Prime Performance Manager Message Log FilesTo change the size of the message log files, use the ppm logsize command. This command execution is specific to the each gateway and unit instance. For more information, see ppm logsize, page A-27.
Changing the Time Mode for Dates in Log FilesTo change the time mode for dates in log files, use the ppm logtimemode command. For more information, see ppm logtimemode, page A-29.
4-2Cisco Prime Performance Manager 1.0 User Guide
OL-24597-01
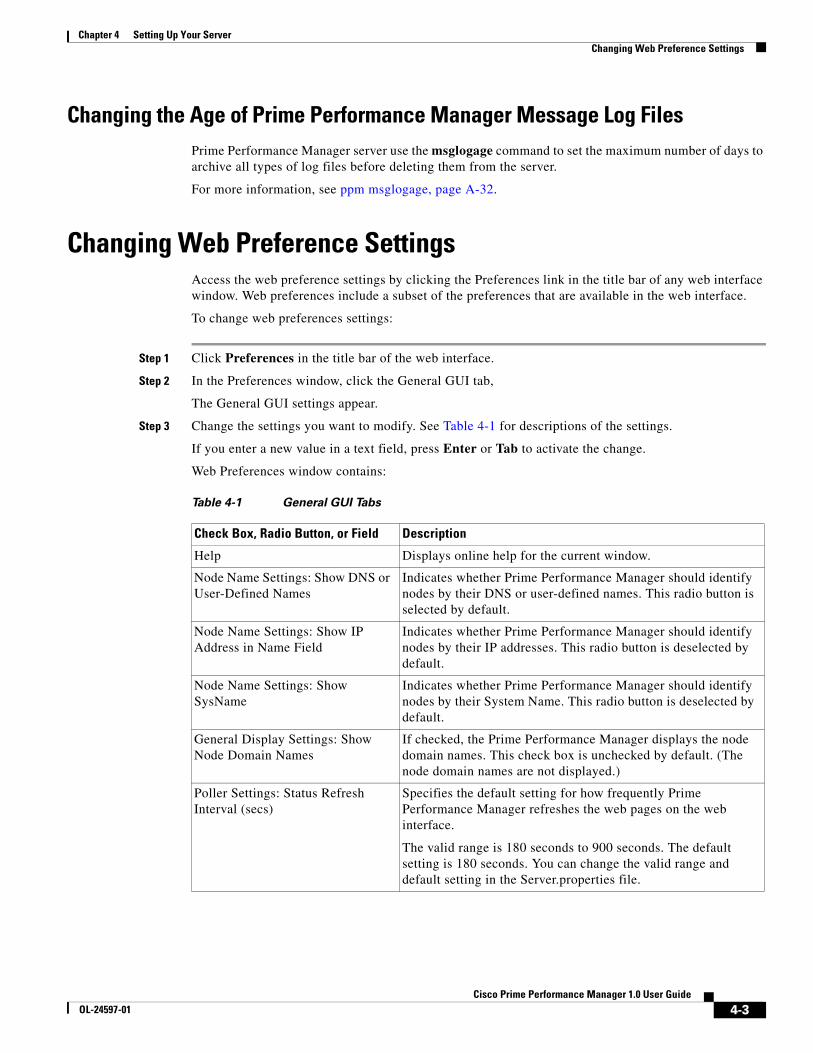
Chapter 4 Setting Up Your Server Changing Web Preference Settings
Changing the Age of Prime Performance Manager Message Log FilesPrime Performance Manager server use the msglogage command to set the maximum number of days to archive all types of log files before deleting them from the server.
For more information, see ppm msglogage, page A-32.
Changing Web Preference SettingsAccess the web preference settings by clicking the Preferences link in the title bar of any web interface window. Web preferences include a subset of the preferences that are available in the web interface.
To change web preferences settings:
Step 1 Click Preferences in the title bar of the web interface.
Step 2 In the Preferences window, click the General GUI tab,
The General GUI settings appear.
Step 3 Change the settings you want to modify. See Table 4-1 for descriptions of the settings.
If you enter a new value in a text field, press Enter or Tab to activate the change.
Web Preferences window contains:
Table 4-1 General GUI Tabs
Check Box, Radio Button, or Field Description
Help Displays online help for the current window.
Node Name Settings: Show DNS or User-Defined Names
Indicates whether Prime Performance Manager should identify nodes by their DNS or user-defined names. This radio button is selected by default.
Node Name Settings: Show IP Address in Name Field
Indicates whether Prime Performance Manager should identify nodes by their IP addresses. This radio button is deselected by default.
Node Name Settings: Show SysName
Indicates whether Prime Performance Manager should identify nodes by their System Name. This radio button is deselected by default.
General Display Settings: Show Node Domain Names
If checked, the Prime Performance Manager displays the node domain names. This check box is unchecked by default. (The node domain names are not displayed.)
Poller Settings: Status Refresh Interval (secs)
Specifies the default setting for how frequently Prime Performance Manager refreshes the web pages on the web interface.
The valid range is 180 seconds to 900 seconds. The default setting is 180 seconds. You can change the valid range and default setting in the Server.properties file.
4-3Cisco Prime Performance Manager 1.0 User Guide
OL-24597-01

Chapter 4 Setting Up Your Server Changing Web Preference Settings
4-4Cisco Prime Performance Manager 1.0 User Guide
OL-24597-01

OL-24597-01
C H A P T E R5
Accessing Data from the Web InterfaceThis chapter provides information about accessing Prime Performance Manager data from Prime Performance Manager web interface.
This chapter contains:
• Supported Browsers, page 5-1
• Accessing Prime Performance Manager Web Interface, page 5-2
• Overview of Prime Performance Manager Web Interface, page 5-2
• Displaying the Home Page, page 5-10
• Displaying Summary Lists, page 5-23
• Viewing Reports, page 5-30
• Viewing Historical Statistics Report Settings, page 5-31
Supported BrowsersPrime Performance Manager web interface is supported on the following browsers:
• Microsoft Windows: Microsoft Internet Explorer version 8.0
• Solaris: Mozilla Firefox 3.6.x
• Red Hat Linux Enterprise 5.3 or 5.5: Mozilla Firefox 3.6.x
Checking Your BrowserTo check your browser and screen settings, from the Prime Performance Manager web interface Home page, select Browser Checker.
Note Opening Prime Performance Manager in an unsupported browser generates a warning. Also, if JavaScript is not enabled, Prime Performance Manager web interface cannot function.
5-1Cisco Prime Performance Manager 1.0 User Guide
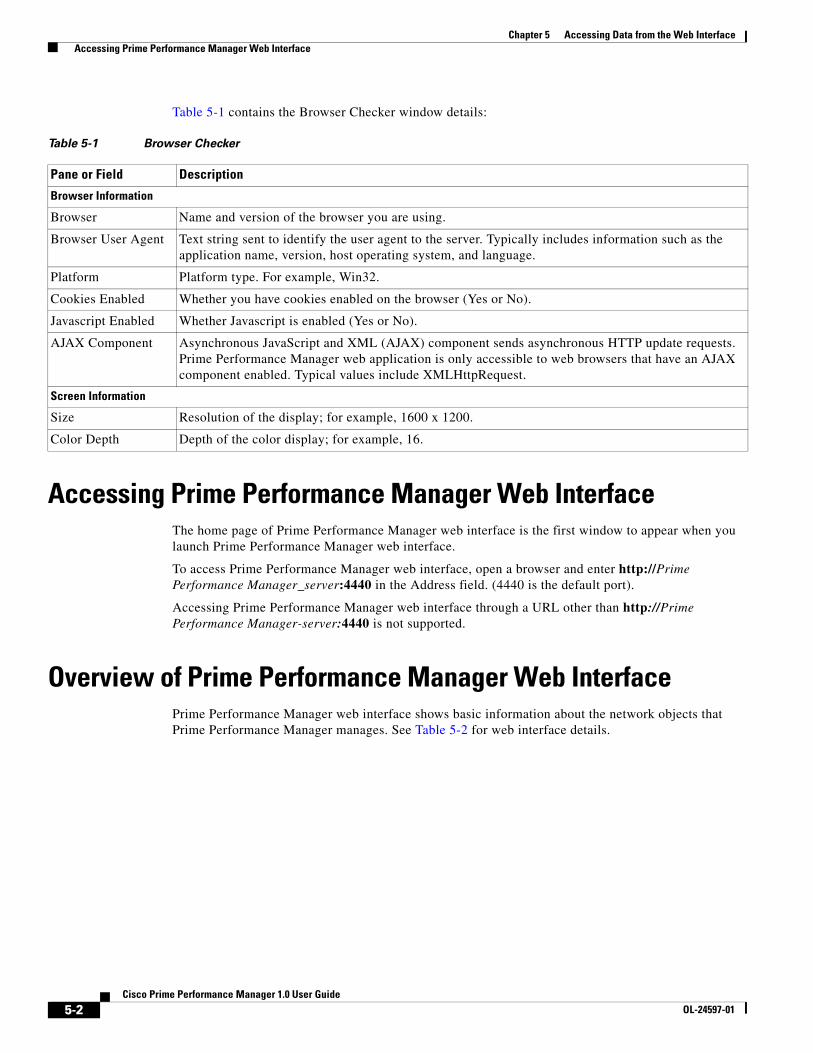
Chapter 5 Accessing Data from the Web Interface Accessing Prime Performance Manager Web Interface
Table 5-1 contains the Browser Checker window details:
Accessing Prime Performance Manager Web InterfaceThe home page of Prime Performance Manager web interface is the first window to appear when you launch Prime Performance Manager web interface.
To access Prime Performance Manager web interface, open a browser and enter http://Prime Performance Manager_server:4440 in the Address field. (4440 is the default port).
Accessing Prime Performance Manager web interface through a URL other than http://Prime Performance Manager-server:4440 is not supported.
Overview of Prime Performance Manager Web InterfacePrime Performance Manager web interface shows basic information about the network objects that Prime Performance Manager manages. See Table 5-2 for web interface details.
Table 5-1 Browser Checker
Pane or Field Description
Browser Information
Browser Name and version of the browser you are using.
Browser User Agent Text string sent to identify the user agent to the server. Typically includes information such as the application name, version, host operating system, and language.
Platform Platform type. For example, Win32.
Cookies Enabled Whether you have cookies enabled on the browser (Yes or No).
Javascript Enabled Whether Javascript is enabled (Yes or No).
AJAX Component Asynchronous JavaScript and XML (AJAX) component sends asynchronous HTTP update requests. Prime Performance Manager web application is only accessible to web browsers that have an AJAX component enabled. Typical values include XMLHttpRequest.
Screen Information
Size Resolution of the display; for example, 1600 x 1200.
Color Depth Depth of the color display; for example, 16.
5-2Cisco Prime Performance Manager 1.0 User Guide
OL-24597-01
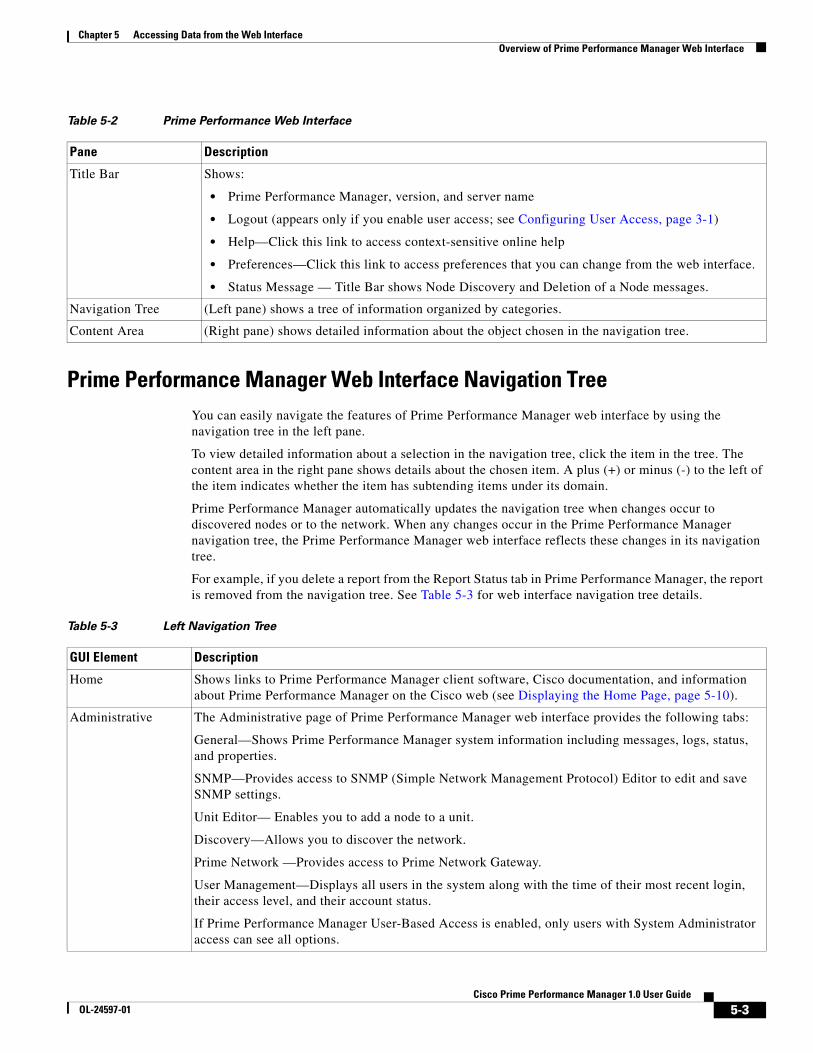
Chapter 5 Accessing Data from the Web Interface Overview of Prime Performance Manager Web Interface
Prime Performance Manager Web Interface Navigation TreeYou can easily navigate the features of Prime Performance Manager web interface by using the navigation tree in the left pane.
To view detailed information about a selection in the navigation tree, click the item in the tree. The content area in the right pane shows details about the chosen item. A plus (+) or minus (-) to the left of the item indicates whether the item has subtending items under its domain.
Prime Performance Manager automatically updates the navigation tree when changes occur to discovered nodes or to the network. When any changes occur in the Prime Performance Manager navigation tree, the Prime Performance Manager web interface reflects these changes in its navigation tree.
For example, if you delete a report from the Report Status tab in Prime Performance Manager, the report is removed from the navigation tree. See Table 5-3 for web interface navigation tree details.
Table 5-2 Prime Performance Web Interface
Pane Description
Title Bar Shows:
• Prime Performance Manager, version, and server name
• Logout (appears only if you enable user access; see Configuring User Access, page 3-1)
• Help—Click this link to access context-sensitive online help
• Preferences—Click this link to access preferences that you can change from the web interface.
• Status Message — Title Bar shows Node Discovery and Deletion of a Node messages.
Navigation Tree (Left pane) shows a tree of information organized by categories.
Content Area (Right pane) shows detailed information about the object chosen in the navigation tree.
Table 5-3 Left Navigation Tree
GUI Element Description
Home Shows links to Prime Performance Manager client software, Cisco documentation, and information about Prime Performance Manager on the Cisco web (see Displaying the Home Page, page 5-10).
Administrative The Administrative page of Prime Performance Manager web interface provides the following tabs:
General—Shows Prime Performance Manager system information including messages, logs, status, and properties.
SNMP—Provides access to SNMP (Simple Network Management Protocol) Editor to edit and save SNMP settings.
Unit Editor— Enables you to add a node to a unit.
Discovery—Allows you to discover the network.
Prime Network —Provides access to Prime Network Gateway.
User Management—Displays all users in the system along with the time of their most recent login, their access level, and their account status.
If Prime Performance Manager User-Based Access is enabled, only users with System Administrator access can see all options.
5-3Cisco Prime Performance Manager 1.0 User Guide
OL-24597-01
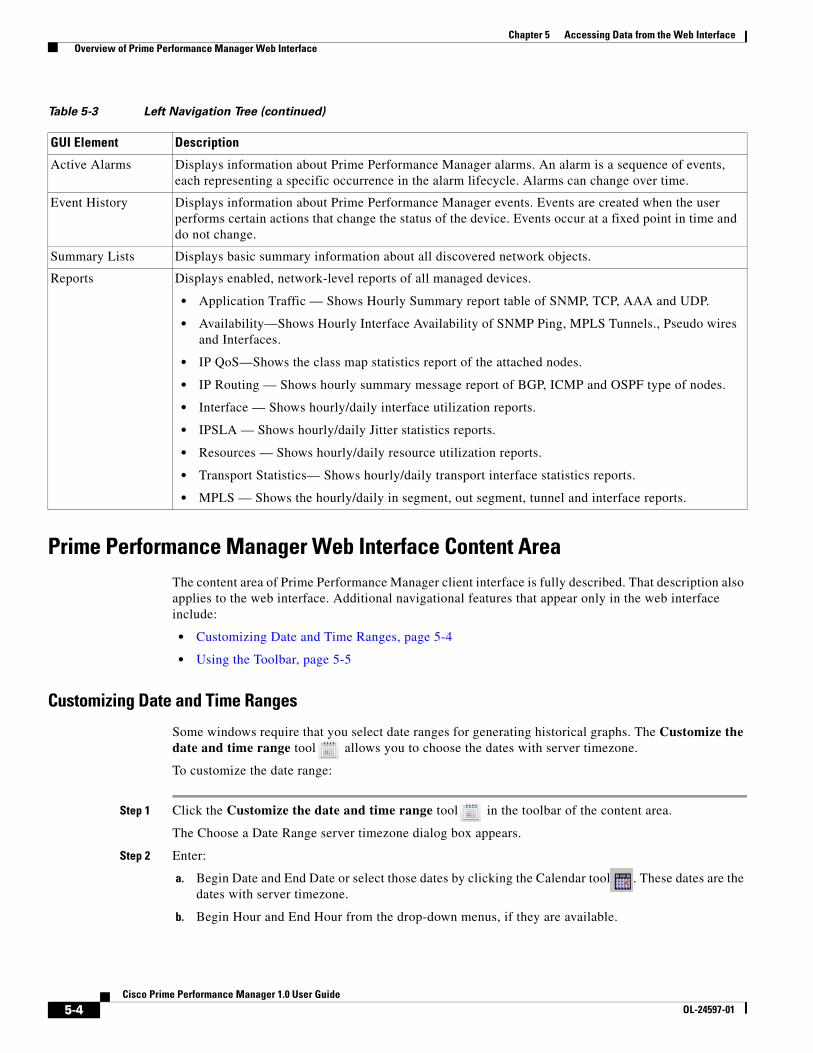
Chapter 5 Accessing Data from the Web Interface Overview of Prime Performance Manager Web Interface
Prime Performance Manager Web Interface Content AreaThe content area of Prime Performance Manager client interface is fully described. That description also applies to the web interface. Additional navigational features that appear only in the web interface include:
• Customizing Date and Time Ranges, page 5-4
• Using the Toolbar, page 5-5
Customizing Date and Time Ranges
Some windows require that you select date ranges for generating historical graphs. The Customize the date and time range tool allows you to choose the dates with server timezone.
To customize the date range:
Step 1 Click the Customize the date and time range tool in the toolbar of the content area.
The Choose a Date Range server timezone dialog box appears.
Step 2 Enter:
a. Begin Date and End Date or select those dates by clicking the Calendar tool . These dates are the dates with server timezone.
b. Begin Hour and End Hour from the drop-down menus, if they are available.
Active Alarms Displays information about Prime Performance Manager alarms. An alarm is a sequence of events, each representing a specific occurrence in the alarm lifecycle. Alarms can change over time.
Event History Displays information about Prime Performance Manager events. Events are created when the user performs certain actions that change the status of the device. Events occur at a fixed point in time and do not change.
Summary Lists Displays basic summary information about all discovered network objects.
Reports Displays enabled, network-level reports of all managed devices.
• Application Traffic — Shows Hourly Summary report table of SNMP, TCP, AAA and UDP.
• Availability—Shows Hourly Interface Availability of SNMP Ping, MPLS Tunnels., Pseudo wires and Interfaces.
• IP QoS—Shows the class map statistics report of the attached nodes.
• IP Routing — Shows hourly summary message report of BGP, ICMP and OSPF type of nodes.
• Interface — Shows hourly/daily interface utilization reports.
• IPSLA — Shows hourly/daily Jitter statistics reports.
• Resources — Shows hourly/daily resource utilization reports.
• Transport Statistics— Shows hourly/daily transport interface statistics reports.
• MPLS — Shows the hourly/daily in segment, out segment, tunnel and interface reports.
Table 5-3 Left Navigation Tree (continued)
GUI Element Description
5-4Cisco Prime Performance Manager 1.0 User Guide
OL-24597-01
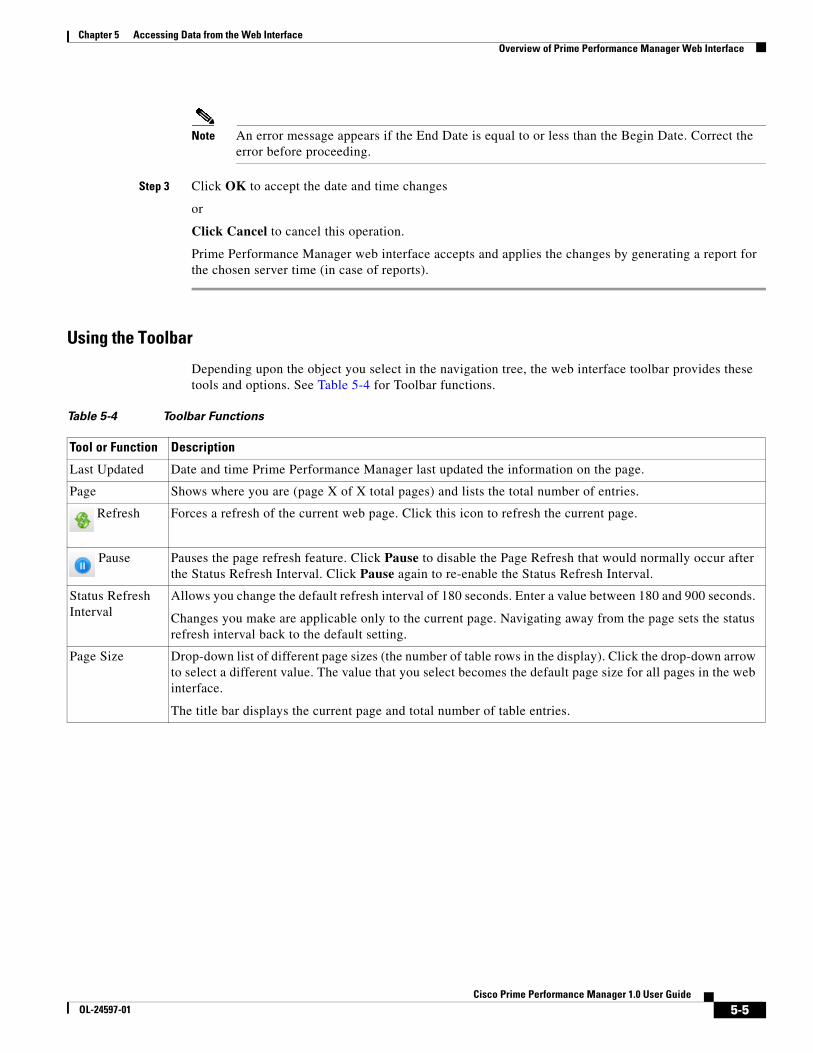
Chapter 5 Accessing Data from the Web Interface Overview of Prime Performance Manager Web Interface
Note An error message appears if the End Date is equal to or less than the Begin Date. Correct the error before proceeding.
Step 3 Click OK to accept the date and time changes
or
Click Cancel to cancel this operation.
Prime Performance Manager web interface accepts and applies the changes by generating a report for the chosen server time (in case of reports).
Using the Toolbar
Depending upon the object you select in the navigation tree, the web interface toolbar provides these tools and options. See Table 5-4 for Toolbar functions.
Table 5-4 Toolbar Functions
Tool or Function Description
Last Updated Date and time Prime Performance Manager last updated the information on the page.
Page Shows where you are (page X of X total pages) and lists the total number of entries.
Refresh Forces a refresh of the current web page. Click this icon to refresh the current page.
Pause Pauses the page refresh feature. Click Pause to disable the Page Refresh that would normally occur after the Status Refresh Interval. Click Pause again to re-enable the Status Refresh Interval.
Status Refresh Interval
Allows you change the default refresh interval of 180 seconds. Enter a value between 180 and 900 seconds.
Changes you make are applicable only to the current page. Navigating away from the page sets the status refresh interval back to the default setting.
Page Size Drop-down list of different page sizes (the number of table rows in the display). Click the drop-down arrow to select a different value. The value that you select becomes the default page size for all pages in the web interface.
The title bar displays the current page and total number of table entries.
5-5Cisco Prime Performance Manager 1.0 User Guide
OL-24597-01
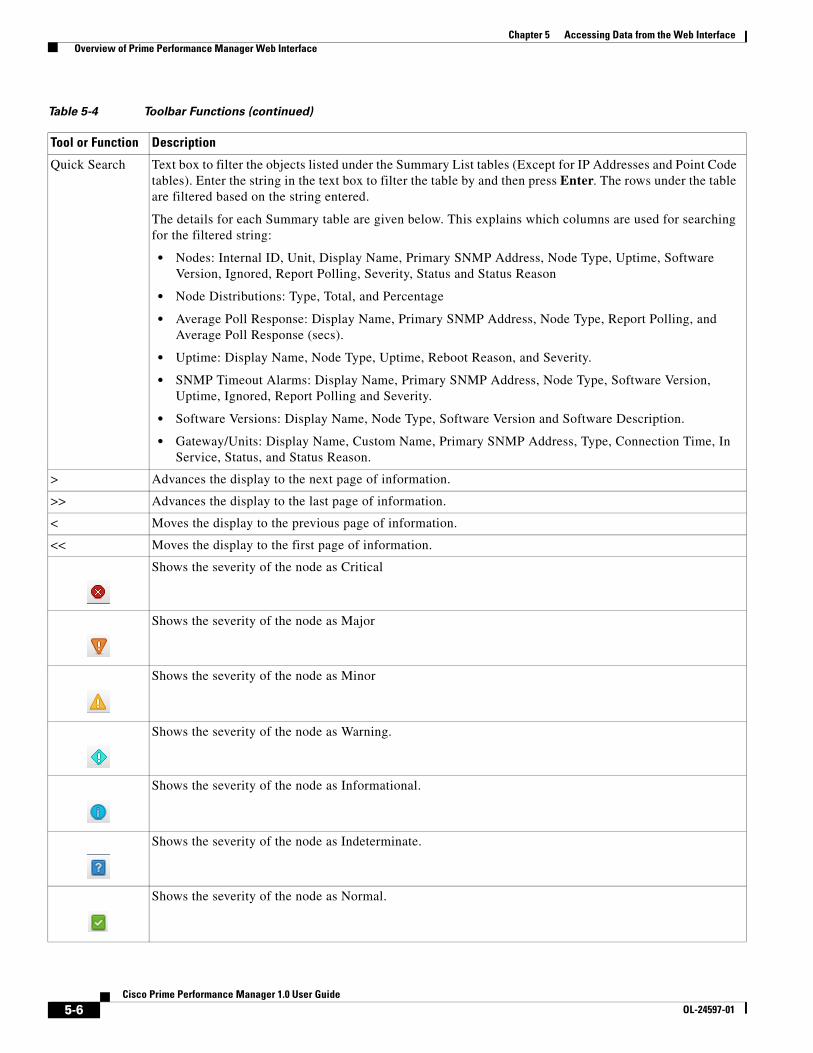
Chapter 5 Accessing Data from the Web Interface Overview of Prime Performance Manager Web Interface
Quick Search Text box to filter the objects listed under the Summary List tables (Except for IP Addresses and Point Code tables). Enter the string in the text box to filter the table by and then press Enter. The rows under the table are filtered based on the string entered.
The details for each Summary table are given below. This explains which columns are used for searching for the filtered string:
• Nodes: Internal ID, Unit, Display Name, Primary SNMP Address, Node Type, Uptime, Software Version, Ignored, Report Polling, Severity, Status and Status Reason
• Node Distributions: Type, Total, and Percentage
• Average Poll Response: Display Name, Primary SNMP Address, Node Type, Report Polling, and Average Poll Response (secs).
• Uptime: Display Name, Node Type, Uptime, Reboot Reason, and Severity.
• SNMP Timeout Alarms: Display Name, Primary SNMP Address, Node Type, Software Version, Uptime, Ignored, Report Polling and Severity.
• Software Versions: Display Name, Node Type, Software Version and Software Description.
• Gateway/Units: Display Name, Custom Name, Primary SNMP Address, Type, Connection Time, In Service, Status, and Status Reason.
> Advances the display to the next page of information.
>> Advances the display to the last page of information.
< Moves the display to the previous page of information.
<< Moves the display to the first page of information.
Shows the severity of the node as Critical
Shows the severity of the node as Major
Shows the severity of the node as Minor
Shows the severity of the node as Warning.
Shows the severity of the node as Informational.
Shows the severity of the node as Indeterminate.
Shows the severity of the node as Normal.
Table 5-4 Toolbar Functions (continued)
Tool or Function Description
5-6Cisco Prime Performance Manager 1.0 User Guide
OL-24597-01
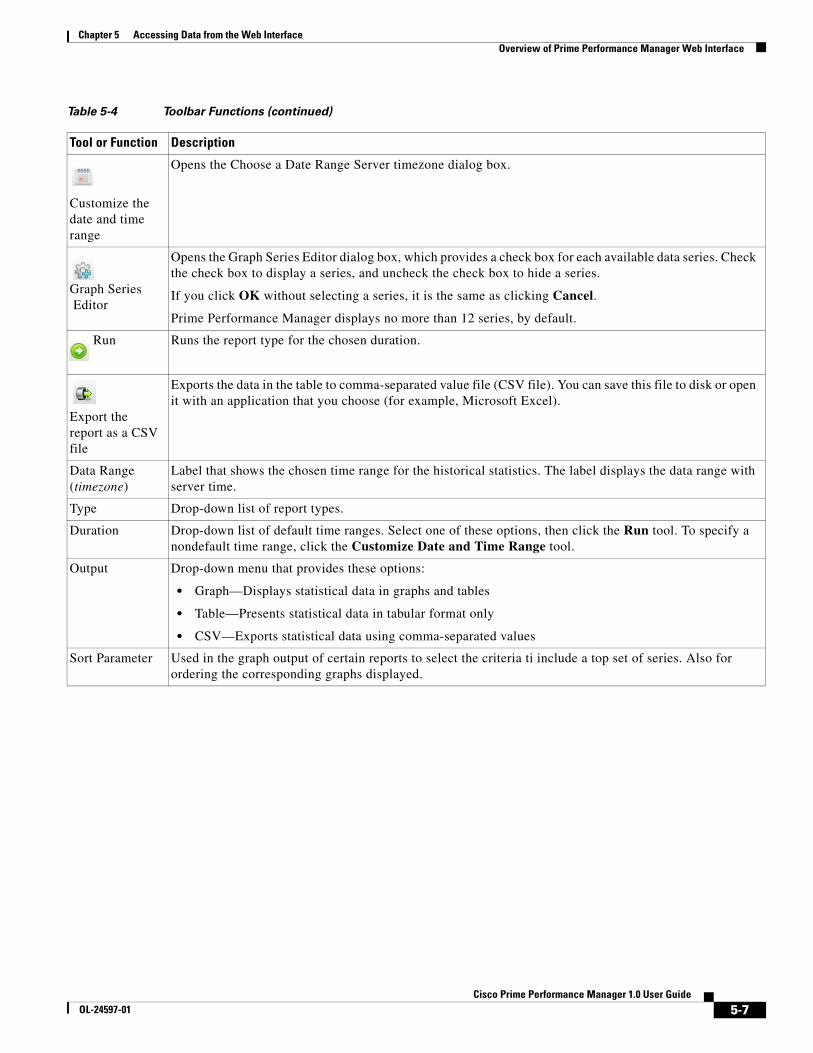
Chapter 5 Accessing Data from the Web Interface Overview of Prime Performance Manager Web Interface
Customize the date and time range
Opens the Choose a Date Range Server timezone dialog box.
Graph Series Editor
Opens the Graph Series Editor dialog box, which provides a check box for each available data series. Check the check box to display a series, and uncheck the check box to hide a series.
If you click OK without selecting a series, it is the same as clicking Cancel.
Prime Performance Manager displays no more than 12 series, by default.
Run Runs the report type for the chosen duration.
Export the report as a CSV file
Exports the data in the table to comma-separated value file (CSV file). You can save this file to disk or open it with an application that you choose (for example, Microsoft Excel).
Data Range (timezone)
Label that shows the chosen time range for the historical statistics. The label displays the data range with server time.
Type Drop-down list of report types.
Duration Drop-down list of default time ranges. Select one of these options, then click the Run tool. To specify a nondefault time range, click the Customize Date and Time Range tool.
Output Drop-down menu that provides these options:
• Graph—Displays statistical data in graphs and tables
• Table—Presents statistical data in tabular format only
• CSV—Exports statistical data using comma-separated values
Sort Parameter Used in the graph output of certain reports to select the criteria ti include a top set of series. Also for ordering the corresponding graphs displayed.
Table 5-4 Toolbar Functions (continued)
Tool or Function Description
5-7Cisco Prime Performance Manager 1.0 User Guide
OL-24597-01
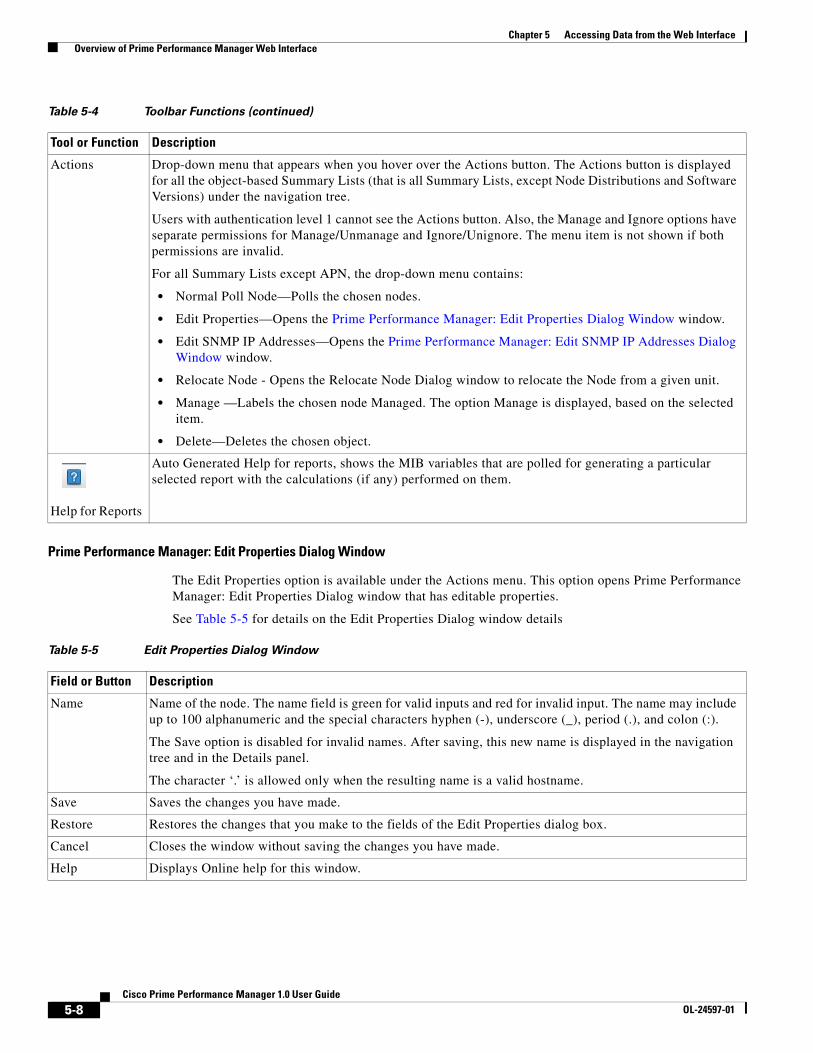
Chapter 5 Accessing Data from the Web Interface Overview of Prime Performance Manager Web Interface
Prime Performance Manager: Edit Properties Dialog Window
The Edit Properties option is available under the Actions menu. This option opens Prime Performance Manager: Edit Properties Dialog window that has editable properties.
See Table 5-5 for details on the Edit Properties Dialog window details
Actions Drop-down menu that appears when you hover over the Actions button. The Actions button is displayed for all the object-based Summary Lists (that is all Summary Lists, except Node Distributions and Software Versions) under the navigation tree.
Users with authentication level 1 cannot see the Actions button. Also, the Manage and Ignore options have separate permissions for Manage/Unmanage and Ignore/Unignore. The menu item is not shown if both permissions are invalid.
For all Summary Lists except APN, the drop-down menu contains:
• Normal Poll Node—Polls the chosen nodes.
• Edit Properties—Opens the Prime Performance Manager: Edit Properties Dialog Window window.
• Edit SNMP IP Addresses—Opens the Prime Performance Manager: Edit SNMP IP Addresses Dialog Window window.
• Relocate Node - Opens the Relocate Node Dialog window to relocate the Node from a given unit.
• Manage —Labels the chosen node Managed. The option Manage is displayed, based on the selected item.
• Delete—Deletes the chosen object.
Help for Reports
Auto Generated Help for reports, shows the MIB variables that are polled for generating a particular selected report with the calculations (if any) performed on them.
Table 5-4 Toolbar Functions (continued)
Tool or Function Description
Table 5-5 Edit Properties Dialog Window
Field or Button Description
Name Name of the node. The name field is green for valid inputs and red for invalid input. The name may include up to 100 alphanumeric and the special characters hyphen (-), underscore (_), period (.), and colon (:).
The Save option is disabled for invalid names. After saving, this new name is displayed in the navigation tree and in the Details panel.
The character ‘.’ is allowed only when the resulting name is a valid hostname.
Save Saves the changes you have made.
Restore Restores the changes that you make to the fields of the Edit Properties dialog box.
Cancel Closes the window without saving the changes you have made.
Help Displays Online help for this window.
5-8Cisco Prime Performance Manager 1.0 User Guide
OL-24597-01
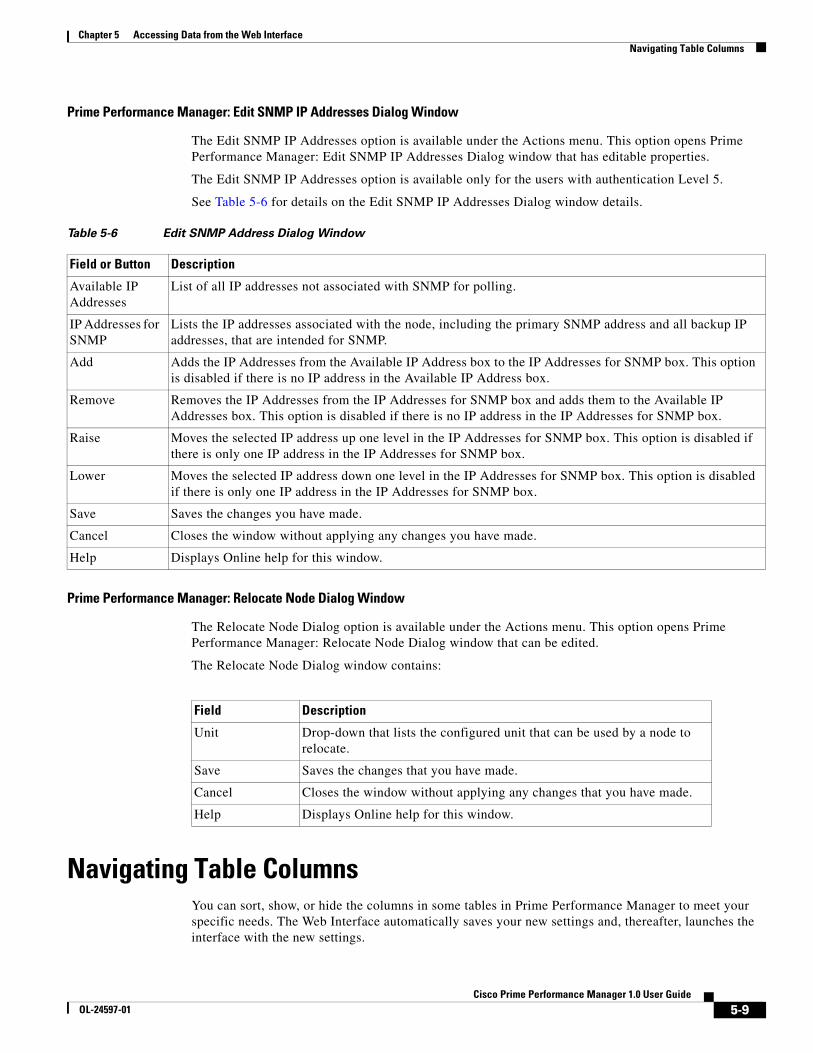
Chapter 5 Accessing Data from the Web Interface Navigating Table Columns
Prime Performance Manager: Edit SNMP IP Addresses Dialog Window
The Edit SNMP IP Addresses option is available under the Actions menu. This option opens Prime Performance Manager: Edit SNMP IP Addresses Dialog window that has editable properties.
The Edit SNMP IP Addresses option is available only for the users with authentication Level 5.
See Table 5-6 for details on the Edit SNMP IP Addresses Dialog window details.
Prime Performance Manager: Relocate Node Dialog Window
The Relocate Node Dialog option is available under the Actions menu. This option opens Prime Performance Manager: Relocate Node Dialog window that can be edited.
The Relocate Node Dialog window contains:
Navigating Table ColumnsYou can sort, show, or hide the columns in some tables in Prime Performance Manager to meet your specific needs. The Web Interface automatically saves your new settings and, thereafter, launches the interface with the new settings.
Table 5-6 Edit SNMP Address Dialog Window
Field or Button Description
Available IP Addresses
List of all IP addresses not associated with SNMP for polling.
IP Addresses for SNMP
Lists the IP addresses associated with the node, including the primary SNMP address and all backup IP addresses, that are intended for SNMP.
Add Adds the IP Addresses from the Available IP Address box to the IP Addresses for SNMP box. This option is disabled if there is no IP address in the Available IP Address box.
Remove Removes the IP Addresses from the IP Addresses for SNMP box and adds them to the Available IP Addresses box. This option is disabled if there is no IP address in the IP Addresses for SNMP box.
Raise Moves the selected IP address up one level in the IP Addresses for SNMP box. This option is disabled if there is only one IP address in the IP Addresses for SNMP box.
Lower Moves the selected IP address down one level in the IP Addresses for SNMP box. This option is disabled if there is only one IP address in the IP Addresses for SNMP box.
Save Saves the changes you have made.
Cancel Closes the window without applying any changes you have made.
Help Displays Online help for this window.
Field Description
Unit Drop-down that lists the configured unit that can be used by a node to relocate.
Save Saves the changes that you have made.
Cancel Closes the window without applying any changes that you have made.
Help Displays Online help for this window.
5-9Cisco Prime Performance Manager 1.0 User Guide
OL-24597-01
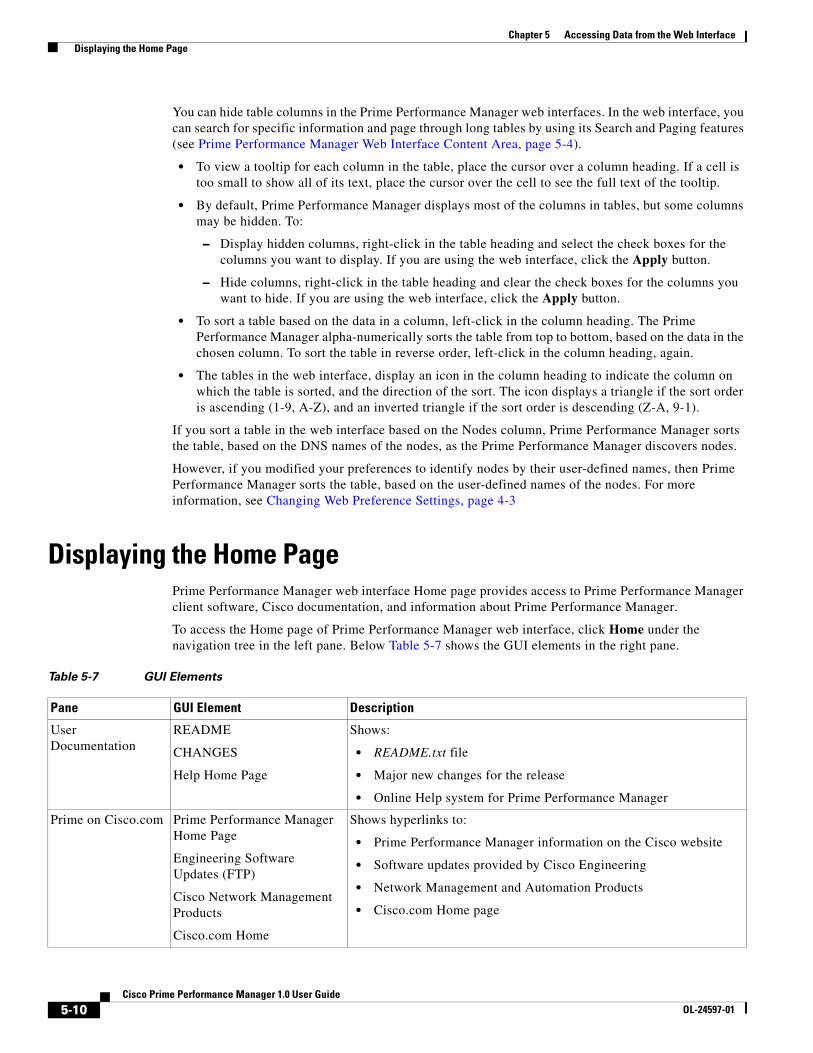
Chapter 5 Accessing Data from the Web Interface Displaying the Home Page
You can hide table columns in the Prime Performance Manager web interfaces. In the web interface, you can search for specific information and page through long tables by using its Search and Paging features (see Prime Performance Manager Web Interface Content Area, page 5-4).
• To view a tooltip for each column in the table, place the cursor over a column heading. If a cell is too small to show all of its text, place the cursor over the cell to see the full text of the tooltip.
• By default, Prime Performance Manager displays most of the columns in tables, but some columns may be hidden. To:
– Display hidden columns, right-click in the table heading and select the check boxes for the columns you want to display. If you are using the web interface, click the Apply button.
– Hide columns, right-click in the table heading and clear the check boxes for the columns you want to hide. If you are using the web interface, click the Apply button.
• To sort a table based on the data in a column, left-click in the column heading. The Prime Performance Manager alpha-numerically sorts the table from top to bottom, based on the data in the chosen column. To sort the table in reverse order, left-click in the column heading, again.
• The tables in the web interface, display an icon in the column heading to indicate the column on which the table is sorted, and the direction of the sort. The icon displays a triangle if the sort order is ascending (1-9, A-Z), and an inverted triangle if the sort order is descending (Z-A, 9-1).
If you sort a table in the web interface based on the Nodes column, Prime Performance Manager sorts the table, based on the DNS names of the nodes, as the Prime Performance Manager discovers nodes.
However, if you modified your preferences to identify nodes by their user-defined names, then Prime Performance Manager sorts the table, based on the user-defined names of the nodes. For more information, see Changing Web Preference Settings, page 4-3
Displaying the Home PagePrime Performance Manager web interface Home page provides access to Prime Performance Manager client software, Cisco documentation, and information about Prime Performance Manager.
To access the Home page of Prime Performance Manager web interface, click Home under the navigation tree in the left pane. Below Table 5-7 shows the GUI elements in the right pane.
Table 5-7 GUI Elements
Pane GUI Element Description
User Documentation
README
CHANGES
Help Home Page
Shows:
• README.txt file
• Major new changes for the release
• Online Help system for Prime Performance Manager
Prime on Cisco.com Prime Performance Manager Home Page
Engineering Software Updates (FTP)
Cisco Network Management Products
Cisco.com Home
Shows hyperlinks to:
• Prime Performance Manager information on the Cisco website
• Software updates provided by Cisco Engineering
• Network Management and Automation Products
• Cisco.com Home page
5-10Cisco Prime Performance Manager 1.0 User Guide
OL-24597-01

Chapter 5 Accessing Data from the Web Interface Displaying Active Alarms and Event History
Displaying Active Alarms and Event HistoryActive Alarms and Event History allows to view a network summary of active alarms and historical events.
The contents of the Active Alarms window and the Event History window are very similar in appearance. However, the Active Alarms table shows fewer entries than the Event History table because multiple events are associated with a single alarm.
Note The appearance and the contents displayed in the Events and Alarms tab are not the same while viewing reports at the node level. For more information see Managing Reports, page 7-1
To see a summary of all active alarms, in the Prime Performance Manager web interface, click Active Alarms in the navigation tree. The Prime Performance Manager shows the Active Alarms window in the right pane.
The Active Alarms window provides basic information about all active alarms. Prime Performance Manager updates the information in the window at least once every minute. For more information about the Active Alarms window, see, Toolbar Buttons, page 5-15
To see a summary of all the recent events, in the Prime Performance Manager web interface, click Event History in the navigation tree. The Prime Performance Manager shows the Event History window in the right pane.
For more information about the Event History window see, Toolbar Buttons, page 5-15
If you select a specific node in the navigation tree and click the Alarms tab or Events tab, the Prime Performance Manager shows information about the alarms or events for only that node.
Managed Platform Documentation
Devices Validated README Prime Performance Manager -Device-IOS-Info
Reports Documentation
• System Reports README - MIBs, Poll Definitions, CSV Formats
• User Reports README - MIBs, Poll Definitions, CSV Formats
• Report XML Definitions
• SNMP MIBs
• System Capability Definitions
• User Capability Definitions
• Cisco Prime Performance Manager README-Reports-system.html
• Cisco Prime Performance Manager README-Reports-user.html
• Cisco Prime Performance Manager Supported SNMP MIBs
• Cisco Prime Performance Manager Report Files
• Cisco Prime Performance Manager /opt/CSCOppm-gw/etc/SystemCapability.xml file
• Cisco Prime Performance Manager /opt/CSCOppm-gw/etc/UserCapability.xml file
Client Software Browser Checker Information about the browser and screen display
System Documentation
Server CLI Help Shows CLI output of Prime Performance Manager help command
Table 5-7 GUI Elements (continued)
Pane GUI Element Description
5-11Cisco Prime Performance Manager 1.0 User Guide
OL-24597-01

Chapter 5 Accessing Data from the Web Interface Displaying Active Alarms and Event History
Note For more information about sorting, displaying, or hiding columns, see Navigating Table Columns, page 5-9.
While using the web interface to select an alarm or event in the table, you check the check box for the row. You can select multiple rows.
To clear the selection, click Clear Selection in the toolbar. In the web interface, use the Shift key to select multiple rows. To clear the selection, left-click anywhere in the table.
See Table 5-8 for the Active Alarms, Alarms tab, Event History, and Events tabs details
Table 5-8 Active Alarms and Event History
Column Description
Internal ID Internal ID of the alarm or event. The internal ID is a unique ID that Prime Performance Manager assigns for its own internal use. This ID can also be useful when the Cisco Technical Assistance Center (TAC) needs to debug problems.
Ack Indicates whether the alarm or event has been acknowledged. To:
• Acknowledge an unacknowledged alarm or event, use the Acknowledge toolbar button.
• Make a previously acknowledged event unacknowledged, use the Unacknowledge toolbar button.
This column is displayed by default.
Name Name of the alarm or event.
This column is displayed by default under Active Alarms and Alarms tab.
Alarm Nature Nature of the alarm. The alarm nature is determined when the alarm is created.
The valid values are:
• ADAC: Automatically detected and automatically cleared
• ADMC: Automatically detected and manually cleared
• Undefined: Undefined
This column is under Active Alarms and Alarms tab.
Alarm Type The type of the alarm. The valid values are:
• Communications
• Processing Error
• Environmental
• QOS
• Equipment
• Undefined
Element Name Network element name associated with the event.
5-12Cisco Prime Performance Manager 1.0 User Guide
OL-24597-01
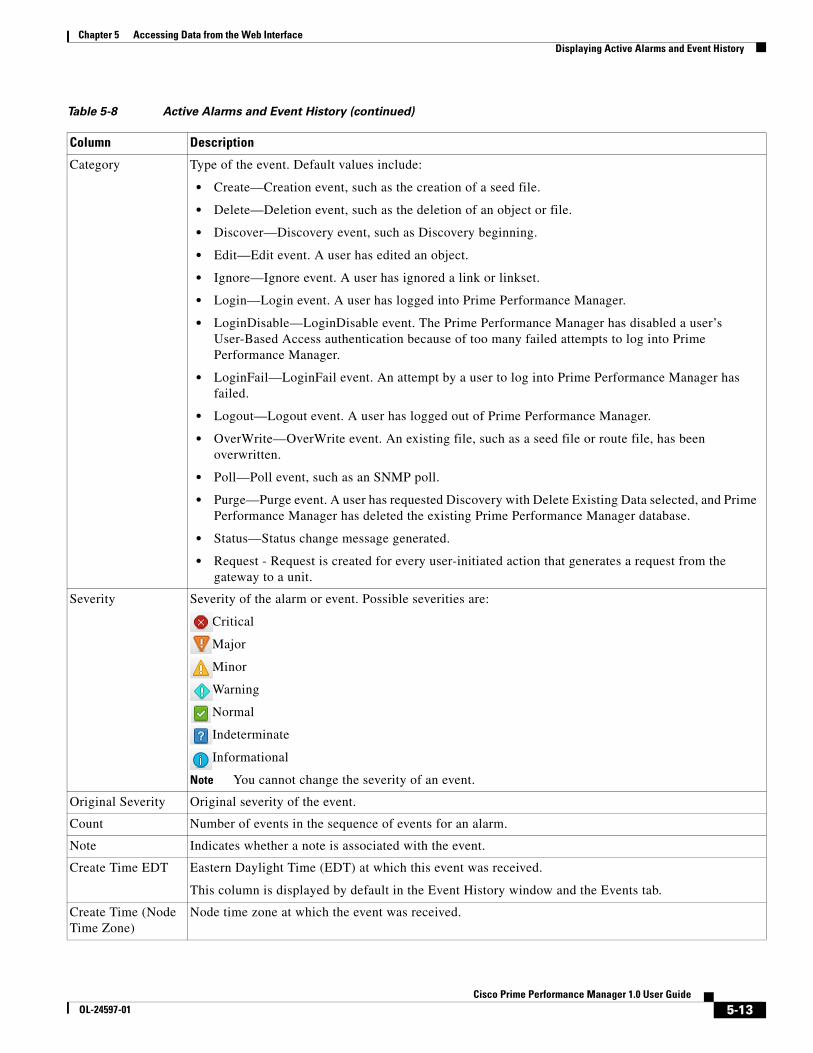
Chapter 5 Accessing Data from the Web Interface Displaying Active Alarms and Event History
Category Type of the event. Default values include:
• Create—Creation event, such as the creation of a seed file.
• Delete—Deletion event, such as the deletion of an object or file.
• Discover—Discovery event, such as Discovery beginning.
• Edit—Edit event. A user has edited an object.
• Ignore—Ignore event. A user has ignored a link or linkset.
• Login—Login event. A user has logged into Prime Performance Manager.
• LoginDisable—LoginDisable event. The Prime Performance Manager has disabled a user’s User-Based Access authentication because of too many failed attempts to log into Prime Performance Manager.
• LoginFail—LoginFail event. An attempt by a user to log into Prime Performance Manager has failed.
• Logout—Logout event. A user has logged out of Prime Performance Manager.
• OverWrite—OverWrite event. An existing file, such as a seed file or route file, has been overwritten.
• Poll—Poll event, such as an SNMP poll.
• Purge—Purge event. A user has requested Discovery with Delete Existing Data selected, and Prime Performance Manager has deleted the existing Prime Performance Manager database.
• Status—Status change message generated.
• Request - Request is created for every user-initiated action that generates a request from the gateway to a unit.
Severity Severity of the alarm or event. Possible severities are:
Critical
Major
Minor
Warning
Normal
Indeterminate
Informational
Note You cannot change the severity of an event.
Original Severity Original severity of the event.
Count Number of events in the sequence of events for an alarm.
Note Indicates whether a note is associated with the event.
Create Time EDT Eastern Daylight Time (EDT) at which this event was received.
This column is displayed by default in the Event History window and the Events tab.
Create Time (Node Time Zone)
Node time zone at which the event was received.
Table 5-8 Active Alarms and Event History (continued)
Column Description
5-13Cisco Prime Performance Manager 1.0 User Guide
OL-24597-01
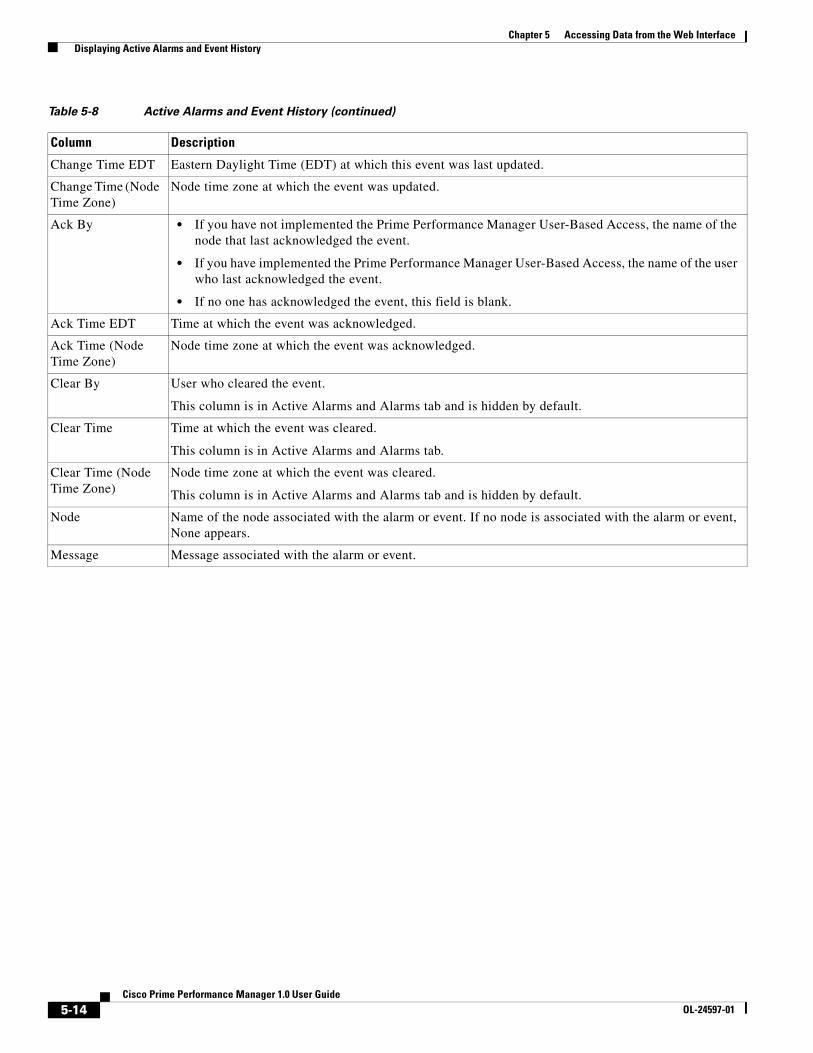
Chapter 5 Accessing Data from the Web Interface Displaying Active Alarms and Event History
Change Time EDT Eastern Daylight Time (EDT) at which this event was last updated.
Change Time (Node Time Zone)
Node time zone at which the event was updated.
Ack By • If you have not implemented the Prime Performance Manager User-Based Access, the name of the node that last acknowledged the event.
• If you have implemented the Prime Performance Manager User-Based Access, the name of the user who last acknowledged the event.
• If no one has acknowledged the event, this field is blank.
Ack Time EDT Time at which the event was acknowledged.
Ack Time (Node Time Zone)
Node time zone at which the event was acknowledged.
Clear By User who cleared the event.
This column is in Active Alarms and Alarms tab and is hidden by default.
Clear Time Time at which the event was cleared.
This column is in Active Alarms and Alarms tab.
Clear Time (Node Time Zone)
Node time zone at which the event was cleared.
This column is in Active Alarms and Alarms tab and is hidden by default.
Node Name of the node associated with the alarm or event. If no node is associated with the alarm or event, None appears.
Message Message associated with the alarm or event.
Table 5-8 Active Alarms and Event History (continued)
Column Description
5-14Cisco Prime Performance Manager 1.0 User Guide
OL-24597-01
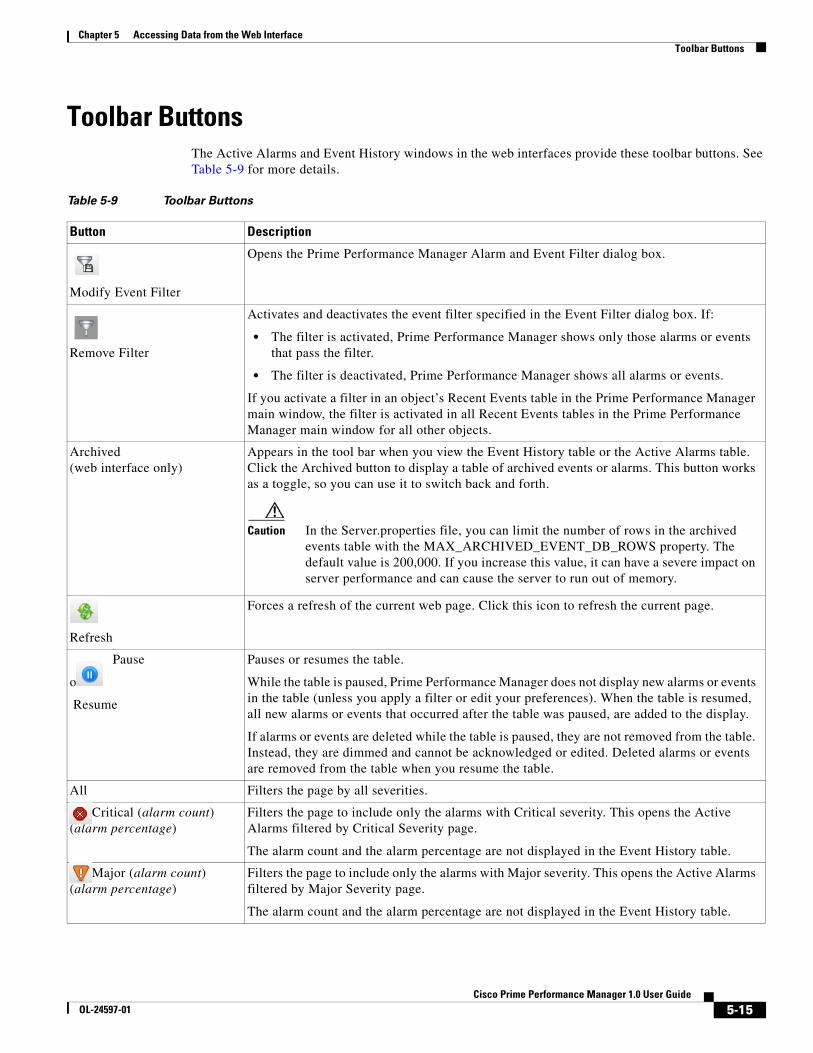
Chapter 5 Accessing Data from the Web Interface Toolbar Buttons
Toolbar ButtonsThe Active Alarms and Event History windows in the web interfaces provide these toolbar buttons. See Table 5-9 for more details.
Table 5-9 Toolbar Buttons
Button Description
Modify Event Filter
Opens the Prime Performance Manager Alarm and Event Filter dialog box.
Remove Filter
Activates and deactivates the event filter specified in the Event Filter dialog box. If:
• The filter is activated, Prime Performance Manager shows only those alarms or events that pass the filter.
• The filter is deactivated, Prime Performance Manager shows all alarms or events.
If you activate a filter in an object’s Recent Events table in the Prime Performance Manager main window, the filter is activated in all Recent Events tables in the Prime Performance Manager main window for all other objects.
Archived (web interface only)
Appears in the tool bar when you view the Event History table or the Active Alarms table. Click the Archived button to display a table of archived events or alarms. This button works as a toggle, so you can use it to switch back and forth.
Caution In the Server.properties file, you can limit the number of rows in the archived events table with the MAX_ARCHIVED_EVENT_DB_ROWS property. The default value is 200,000. If you increase this value, it can have a severe impact on server performance and can cause the server to run out of memory.
Refresh
Forces a refresh of the current web page. Click this icon to refresh the current page.
Pause
or
Resume
Pauses or resumes the table.
While the table is paused, Prime Performance Manager does not display new alarms or events in the table (unless you apply a filter or edit your preferences). When the table is resumed, all new alarms or events that occurred after the table was paused, are added to the display.
If alarms or events are deleted while the table is paused, they are not removed from the table. Instead, they are dimmed and cannot be acknowledged or edited. Deleted alarms or events are removed from the table when you resume the table.
All Filters the page by all severities.
Critical (alarm count) (alarm percentage)
Filters the page to include only the alarms with Critical severity. This opens the Active Alarms filtered by Critical Severity page.
The alarm count and the alarm percentage are not displayed in the Event History table.
Major (alarm count) (alarm percentage)
Filters the page to include only the alarms with Major severity. This opens the Active Alarms filtered by Major Severity page.
The alarm count and the alarm percentage are not displayed in the Event History table.
5-15Cisco Prime Performance Manager 1.0 User Guide
OL-24597-01
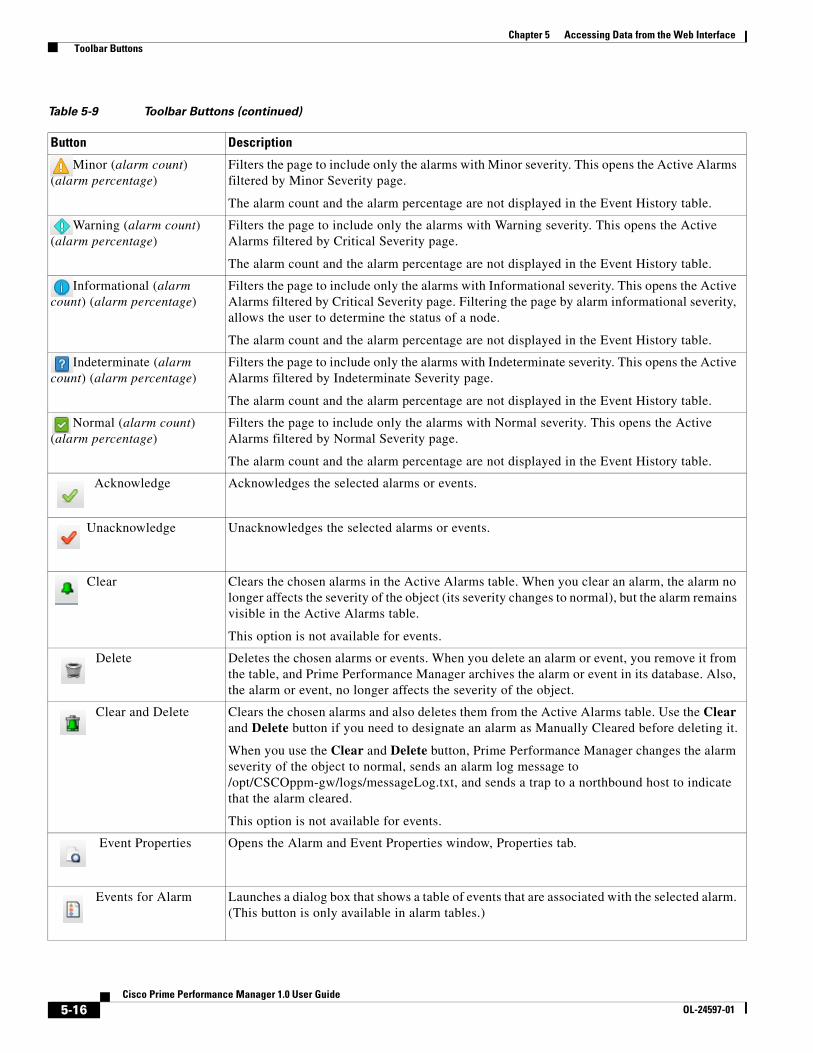
Chapter 5 Accessing Data from the Web Interface Toolbar Buttons
Minor (alarm count) (alarm percentage)
Filters the page to include only the alarms with Minor severity. This opens the Active Alarms filtered by Minor Severity page.
The alarm count and the alarm percentage are not displayed in the Event History table.
Warning (alarm count) (alarm percentage)
Filters the page to include only the alarms with Warning severity. This opens the Active Alarms filtered by Critical Severity page.
The alarm count and the alarm percentage are not displayed in the Event History table.
Informational (alarm count) (alarm percentage)
Filters the page to include only the alarms with Informational severity. This opens the Active Alarms filtered by Critical Severity page. Filtering the page by alarm informational severity, allows the user to determine the status of a node.
The alarm count and the alarm percentage are not displayed in the Event History table.
Indeterminate (alarm count) (alarm percentage)
Filters the page to include only the alarms with Indeterminate severity. This opens the Active Alarms filtered by Indeterminate Severity page.
The alarm count and the alarm percentage are not displayed in the Event History table.
Normal (alarm count) (alarm percentage)
Filters the page to include only the alarms with Normal severity. This opens the Active Alarms filtered by Normal Severity page.
The alarm count and the alarm percentage are not displayed in the Event History table.
Acknowledge Acknowledges the selected alarms or events.
Unacknowledge
Unacknowledges the selected alarms or events.
Clear Clears the chosen alarms in the Active Alarms table. When you clear an alarm, the alarm no longer affects the severity of the object (its severity changes to normal), but the alarm remains visible in the Active Alarms table.
This option is not available for events.
Delete Deletes the chosen alarms or events. When you delete an alarm or event, you remove it from the table, and Prime Performance Manager archives the alarm or event in its database. Also, the alarm or event, no longer affects the severity of the object.
Clear and Delete Clears the chosen alarms and also deletes them from the Active Alarms table. Use the Clear and Delete button if you need to designate an alarm as Manually Cleared before deleting it.
When you use the Clear and Delete button, Prime Performance Manager changes the alarm severity of the object to normal, sends an alarm log message to /opt/CSCOppm-gw/logs/messageLog.txt, and sends a trap to a northbound host to indicate that the alarm cleared.
This option is not available for events.
Event Properties
Opens the Alarm and Event Properties window, Properties tab.
Events for Alarm
Launches a dialog box that shows a table of events that are associated with the selected alarm. (This button is only available in alarm tables.)
Table 5-9 Toolbar Buttons (continued)
Button Description
5-16Cisco Prime Performance Manager 1.0 User Guide
OL-24597-01
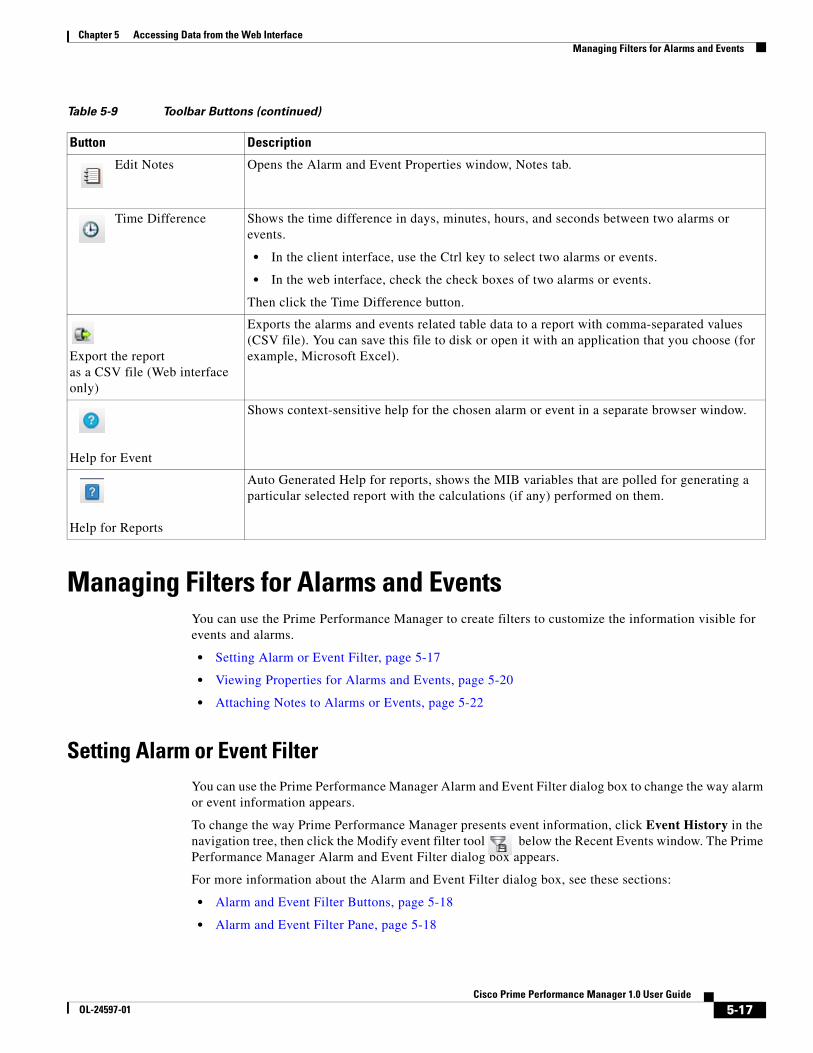
Chapter 5 Accessing Data from the Web Interface Managing Filters for Alarms and Events
Managing Filters for Alarms and EventsYou can use the Prime Performance Manager to create filters to customize the information visible for events and alarms.
• Setting Alarm or Event Filter, page 5-17
• Viewing Properties for Alarms and Events, page 5-20
• Attaching Notes to Alarms or Events, page 5-22
Setting Alarm or Event FilterYou can use the Prime Performance Manager Alarm and Event Filter dialog box to change the way alarm or event information appears.
To change the way Prime Performance Manager presents event information, click Event History in the navigation tree, then click the Modify event filter tool below the Recent Events window. The Prime Performance Manager Alarm and Event Filter dialog box appears.
For more information about the Alarm and Event Filter dialog box, see these sections:
• Alarm and Event Filter Buttons, page 5-18
• Alarm and Event Filter Pane, page 5-18
Edit Notes
Opens the Alarm and Event Properties window, Notes tab.
Time Difference Shows the time difference in days, minutes, hours, and seconds between two alarms or events.
• In the client interface, use the Ctrl key to select two alarms or events.
• In the web interface, check the check boxes of two alarms or events.
Then click the Time Difference button.
Export the report as a CSV file (Web interface only)
Exports the alarms and events related table data to a report with comma-separated values (CSV file). You can save this file to disk or open it with an application that you choose (for example, Microsoft Excel).
Help for Event
Shows context-sensitive help for the chosen alarm or event in a separate browser window.
Help for Reports
Auto Generated Help for reports, shows the MIB variables that are polled for generating a particular selected report with the calculations (if any) performed on them.
Table 5-9 Toolbar Buttons (continued)
Button Description
5-17Cisco Prime Performance Manager 1.0 User Guide
OL-24597-01
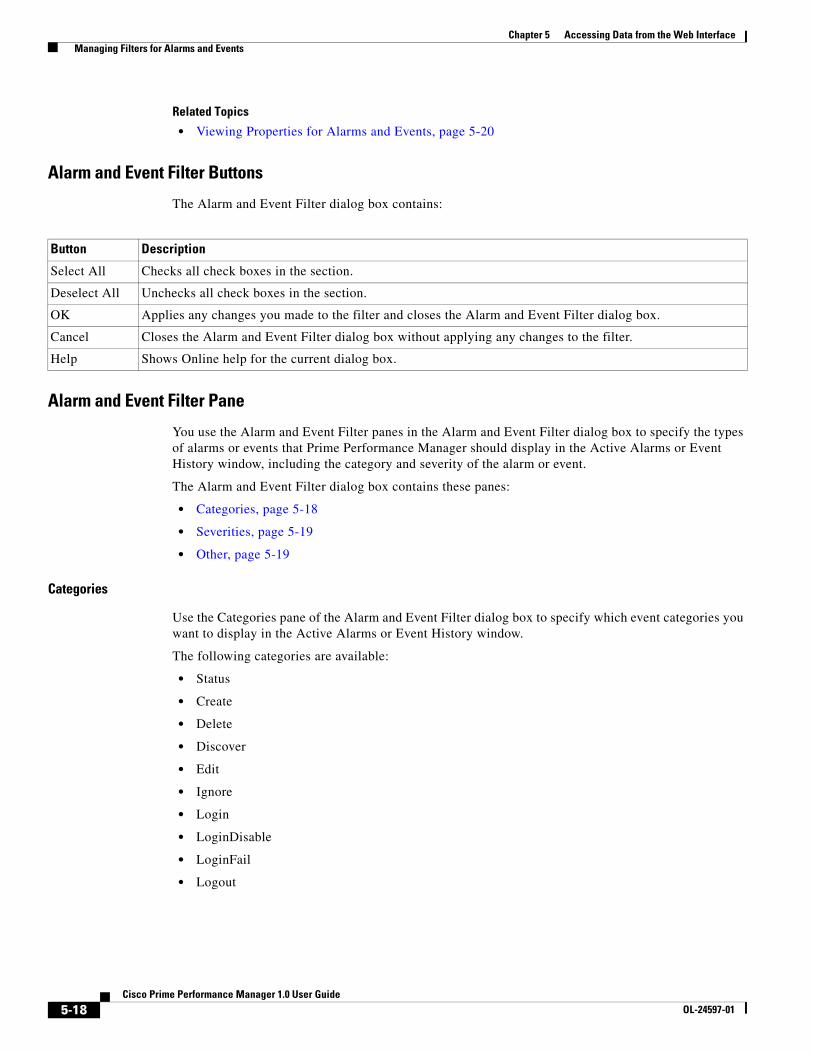
Chapter 5 Accessing Data from the Web Interface Managing Filters for Alarms and Events
Related Topics
• Viewing Properties for Alarms and Events, page 5-20
Alarm and Event Filter Buttons
The Alarm and Event Filter dialog box contains:
Alarm and Event Filter Pane
You use the Alarm and Event Filter panes in the Alarm and Event Filter dialog box to specify the types of alarms or events that Prime Performance Manager should display in the Active Alarms or Event History window, including the category and severity of the alarm or event.
The Alarm and Event Filter dialog box contains these panes:
• Categories, page 5-18
• Severities, page 5-19
• Other, page 5-19
Categories
Use the Categories pane of the Alarm and Event Filter dialog box to specify which event categories you want to display in the Active Alarms or Event History window.
The following categories are available:
• Status
• Create
• Delete
• Discover
• Edit
• Ignore
• Login
• LoginDisable
• LoginFail
• Logout
Button Description
Select All Checks all check boxes in the section.
Deselect All Unchecks all check boxes in the section.
OK Applies any changes you made to the filter and closes the Alarm and Event Filter dialog box.
Cancel Closes the Alarm and Event Filter dialog box without applying any changes to the filter.
Help Shows Online help for the current dialog box.
5-18Cisco Prime Performance Manager 1.0 User Guide
OL-24597-01
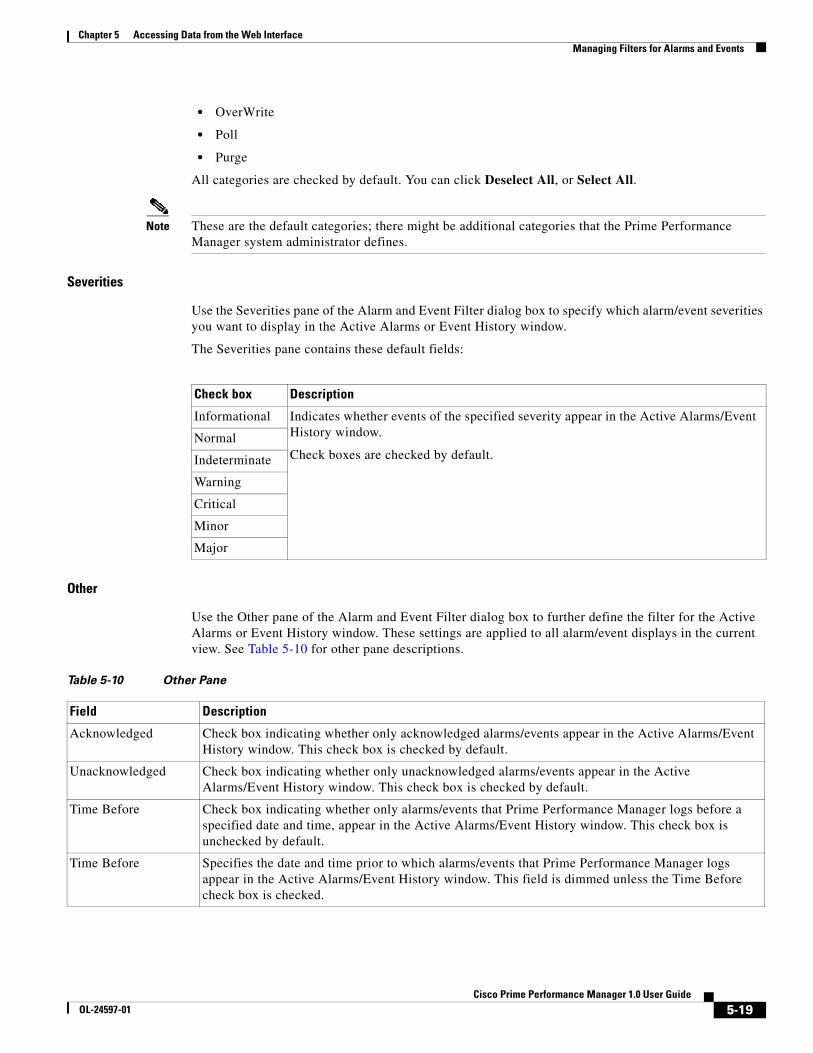
Chapter 5 Accessing Data from the Web Interface Managing Filters for Alarms and Events
• OverWrite
• Poll
• Purge
All categories are checked by default. You can click Deselect All, or Select All.
Note These are the default categories; there might be additional categories that the Prime Performance Manager system administrator defines.
Severities
Use the Severities pane of the Alarm and Event Filter dialog box to specify which alarm/event severities you want to display in the Active Alarms or Event History window.
The Severities pane contains these default fields:
Other
Use the Other pane of the Alarm and Event Filter dialog box to further define the filter for the Active Alarms or Event History window. These settings are applied to all alarm/event displays in the current view. See Table 5-10 for other pane descriptions.
Check box Description
Informational Indicates whether events of the specified severity appear in the Active Alarms/Event History window.
Check boxes are checked by default.Normal
Indeterminate
Warning
Critical
Minor
Major
Table 5-10 Other Pane
Field Description
Acknowledged Check box indicating whether only acknowledged alarms/events appear in the Active Alarms/Event History window. This check box is checked by default.
Unacknowledged Check box indicating whether only unacknowledged alarms/events appear in the Active Alarms/Event History window. This check box is checked by default.
Time Before Check box indicating whether only alarms/events that Prime Performance Manager logs before a specified date and time, appear in the Active Alarms/Event History window. This check box is unchecked by default.
Time Before Specifies the date and time prior to which alarms/events that Prime Performance Manager logs appear in the Active Alarms/Event History window. This field is dimmed unless the Time Before check box is checked.
5-19Cisco Prime Performance Manager 1.0 User Guide
OL-24597-01

Chapter 5 Accessing Data from the Web Interface Managing Filters for Alarms and Events
Viewing Properties for Alarms and EventsYou use the Prime Performance Manager to view detailed information about a chosen alarm or event, including its associated object, status, and other information.
To view detailed information about an alarm or event, in the Web interface, select an alarm or event by checking its check box, then click the Event Properties icon in the toolbar.
The Event Properties dialog box appears. Refer Table 5-11 to see the alarms and event properties description.
Time After Check box indicating whether only alarms/events that Prime Performance Manager logs after a specified date and time, appear in the Active Alarms/Event History window. This check box is unchecked by default.
Time After Specifies the date and time after which alarms/events that Prime Performance Manager logs appear in the Active Alarms/Event History window. This field is dimmed unless the Time After check box is checked.
Name or Message Matches
Check box indicating whether only alarms/events that contain the specified message text appear in the Active Alarms/Event History window. This check box is unchecked by default.
The Name or Message Matches field value is retained after a message filter is set.
Match Case Check box indicating whether only alarms/events that match the case of the text in the Name or Message Matches field should appear in the Active Alarms/Event History window.
This field is dimmed unless the Name or Message Matches check box is checked. The default setting for the Match Case check box is unchecked, if the Name or Message Matches check box is checked. Also, the check box is disabled, if the Match Regex check box is checked.
The Active Alarms/Event History table is filtered properly, based on the text entered in the Name or Message Matches text box (case sensitive), if Match case check box is selected.
The check box Match Case is retained after a message filter is set.
Match Regex Check box indicating whether only alarms/events that match the regular expression of the text in the Name or Message Matches field should appear in the Active Alarms/Event History window.
This field is dimmed unless the Name or Message Matches check box is checked. The default setting for the Match Regex check box is unchecked, if the Name or Message Matches check box is checked. Also, the check box is disabled, if the Match Case check box is checked.
The Active Alarms/Event History table is filtered properly, based on the regular expression entered in the Name or Message Matches text box (case sensitive), if the Match Regex check box is selected.
The check box Match Regex is retained after a message filter is set.
Note If invalid regex is provided, then Active Alarms/Event History table does not contain any rows.
Suppress for unmanaged nodes
Check box to suppress alarms/events for any objects that have been set to the unmanaged state. To suppress alarms/events for unmanaged objects, check the check box. To retain alarms/events for unmanaged objects, uncheck the check box.
Note If you are viewing alarms/events for a specific object in the navigation tree of Prime Performance Manager main window, this button is not available.
Table 5-10 Other Pane (continued)
Field Description
5-20Cisco Prime Performance Manager 1.0 User Guide
OL-24597-01
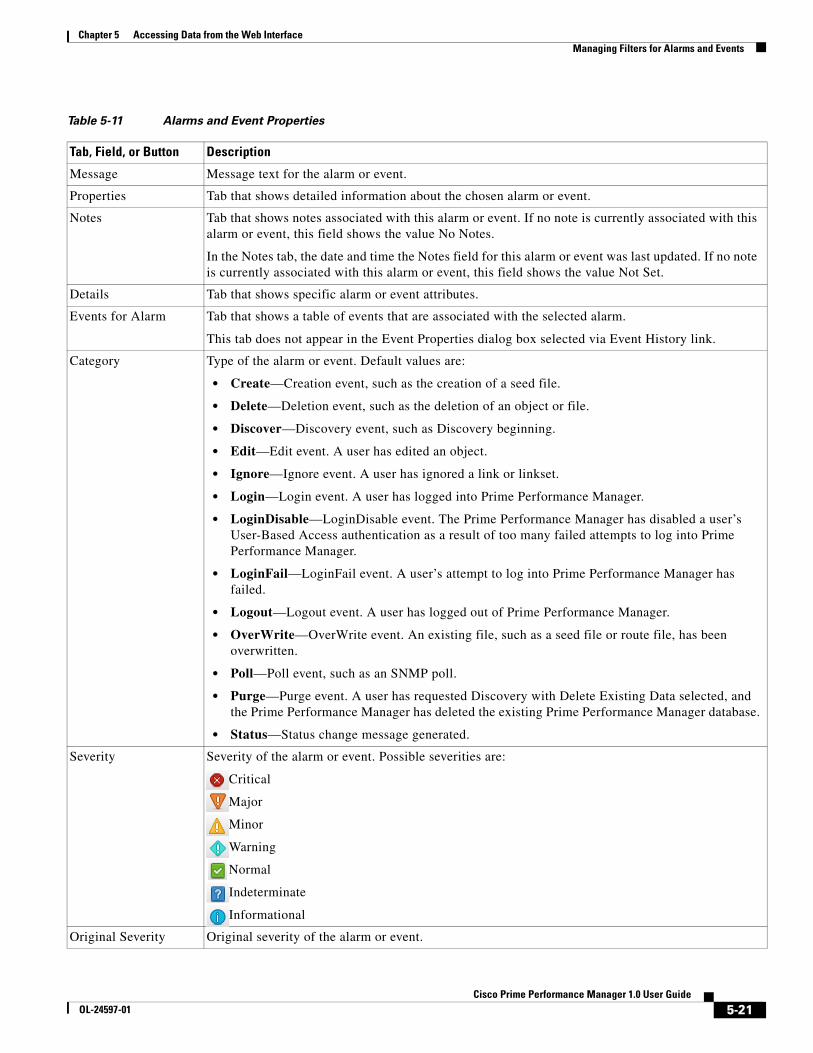
Chapter 5 Accessing Data from the Web Interface Managing Filters for Alarms and Events
Table 5-11 Alarms and Event Properties
Tab, Field, or Button Description
Message Message text for the alarm or event.
Properties Tab that shows detailed information about the chosen alarm or event.
Notes Tab that shows notes associated with this alarm or event. If no note is currently associated with this alarm or event, this field shows the value No Notes.
In the Notes tab, the date and time the Notes field for this alarm or event was last updated. If no note is currently associated with this alarm or event, this field shows the value Not Set.
Details Tab that shows specific alarm or event attributes.
Events for Alarm Tab that shows a table of events that are associated with the selected alarm.
This tab does not appear in the Event Properties dialog box selected via Event History link.
Category Type of the alarm or event. Default values are:
• Create—Creation event, such as the creation of a seed file.
• Delete—Deletion event, such as the deletion of an object or file.
• Discover—Discovery event, such as Discovery beginning.
• Edit—Edit event. A user has edited an object.
• Ignore—Ignore event. A user has ignored a link or linkset.
• Login—Login event. A user has logged into Prime Performance Manager.
• LoginDisable—LoginDisable event. The Prime Performance Manager has disabled a user’s User-Based Access authentication as a result of too many failed attempts to log into Prime Performance Manager.
• LoginFail—LoginFail event. A user’s attempt to log into Prime Performance Manager has failed.
• Logout—Logout event. A user has logged out of Prime Performance Manager.
• OverWrite—OverWrite event. An existing file, such as a seed file or route file, has been overwritten.
• Poll—Poll event, such as an SNMP poll.
• Purge—Purge event. A user has requested Discovery with Delete Existing Data selected, and the Prime Performance Manager has deleted the existing Prime Performance Manager database.
• Status—Status change message generated.
Severity Severity of the alarm or event. Possible severities are:
Critical
Major
Minor
Warning
Normal
Indeterminate
Informational
Original Severity Original severity of the alarm or event.
5-21Cisco Prime Performance Manager 1.0 User Guide
OL-24597-01
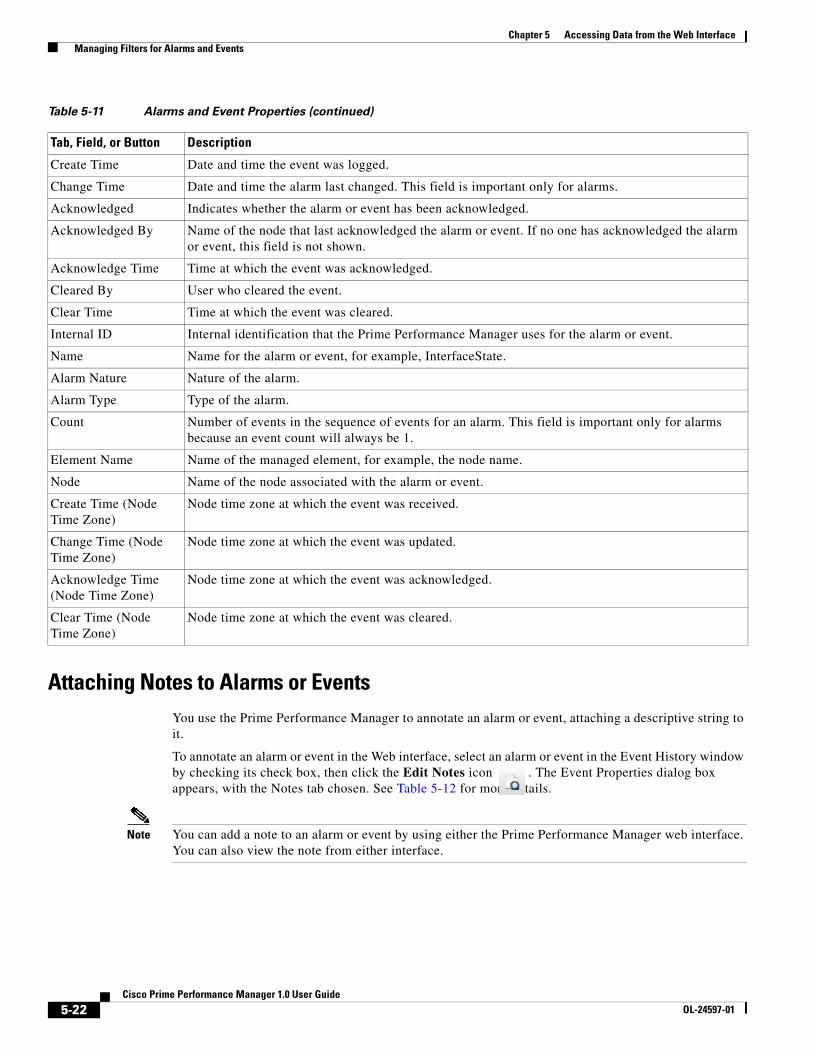
Chapter 5 Accessing Data from the Web Interface Managing Filters for Alarms and Events
Attaching Notes to Alarms or EventsYou use the Prime Performance Manager to annotate an alarm or event, attaching a descriptive string to it.
To annotate an alarm or event in the Web interface, select an alarm or event in the Event History window by checking its check box, then click the Edit Notes icon . The Event Properties dialog box appears, with the Notes tab chosen. See Table 5-12 for more details.
Note You can add a note to an alarm or event by using either the Prime Performance Manager web interface. You can also view the note from either interface.
Create Time Date and time the event was logged.
Change Time Date and time the alarm last changed. This field is important only for alarms.
Acknowledged Indicates whether the alarm or event has been acknowledged.
Acknowledged By Name of the node that last acknowledged the alarm or event. If no one has acknowledged the alarm or event, this field is not shown.
Acknowledge Time Time at which the event was acknowledged.
Cleared By User who cleared the event.
Clear Time Time at which the event was cleared.
Internal ID Internal identification that the Prime Performance Manager uses for the alarm or event.
Name Name for the alarm or event, for example, InterfaceState.
Alarm Nature Nature of the alarm.
Alarm Type Type of the alarm.
Count Number of events in the sequence of events for an alarm. This field is important only for alarms because an event count will always be 1.
Element Name Name of the managed element, for example, the node name.
Node Name of the node associated with the alarm or event.
Create Time (Node Time Zone)
Node time zone at which the event was received.
Change Time (Node Time Zone)
Node time zone at which the event was updated.
Acknowledge Time (Node Time Zone)
Node time zone at which the event was acknowledged.
Clear Time (Node Time Zone)
Node time zone at which the event was cleared.
Table 5-11 Alarms and Event Properties (continued)
Tab, Field, or Button Description
5-22Cisco Prime Performance Manager 1.0 User Guide
OL-24597-01
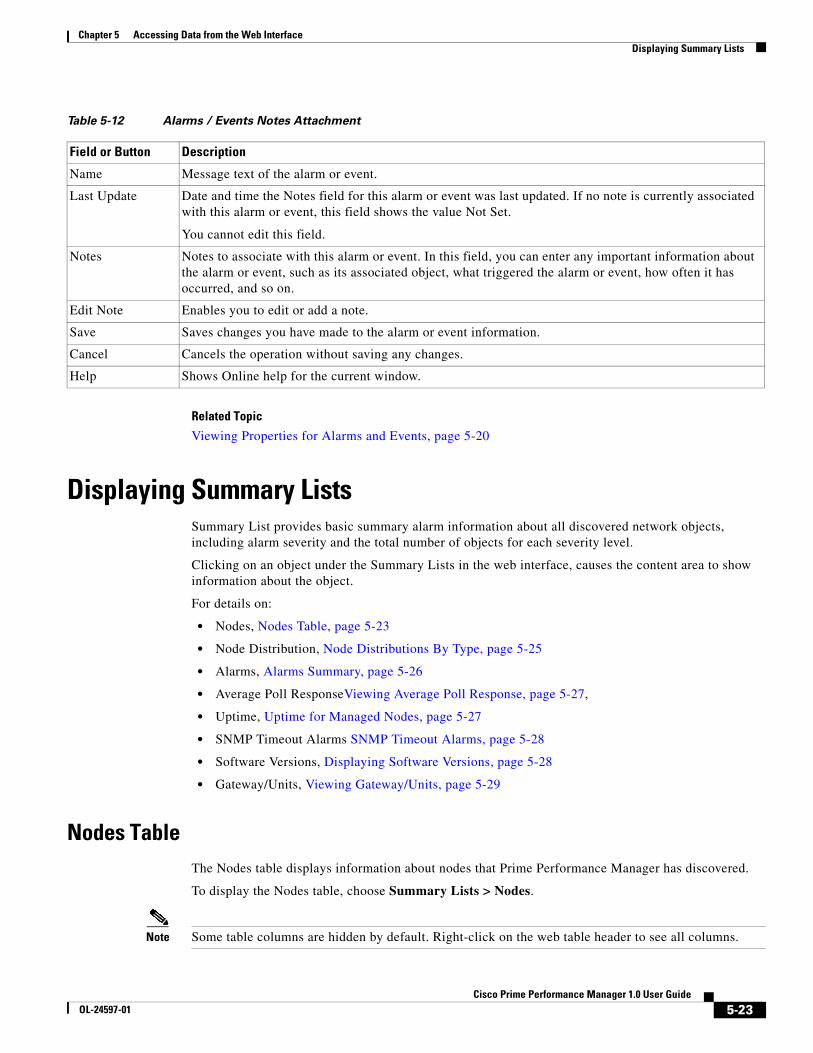
Chapter 5 Accessing Data from the Web Interface Displaying Summary Lists
Related Topic
Viewing Properties for Alarms and Events, page 5-20
Displaying Summary ListsSummary List provides basic summary alarm information about all discovered network objects, including alarm severity and the total number of objects for each severity level.
Clicking on an object under the Summary Lists in the web interface, causes the content area to show information about the object.
For details on:
• Nodes, Nodes Table, page 5-23
• Node Distribution, Node Distributions By Type, page 5-25
• Alarms, Alarms Summary, page 5-26
• Average Poll ResponseViewing Average Poll Response, page 5-27,
• Uptime, Uptime for Managed Nodes, page 5-27
• SNMP Timeout Alarms SNMP Timeout Alarms, page 5-28
• Software Versions, Displaying Software Versions, page 5-28
• Gateway/Units, Viewing Gateway/Units, page 5-29
Nodes TableThe Nodes table displays information about nodes that Prime Performance Manager has discovered.
To display the Nodes table, choose Summary Lists > Nodes.
Note Some table columns are hidden by default. Right-click on the web table header to see all columns.
Table 5-12 Alarms / Events Notes Attachment
Field or Button Description
Name Message text of the alarm or event.
Last Update Date and time the Notes field for this alarm or event was last updated. If no note is currently associated with this alarm or event, this field shows the value Not Set.
You cannot edit this field.
Notes Notes to associate with this alarm or event. In this field, you can enter any important information about the alarm or event, such as its associated object, what triggered the alarm or event, how often it has occurred, and so on.
Edit Note Enables you to edit or add a note.
Save Saves changes you have made to the alarm or event information.
Cancel Cancels the operation without saving any changes.
Help Shows Online help for the current window.
5-23Cisco Prime Performance Manager 1.0 User Guide
OL-24597-01
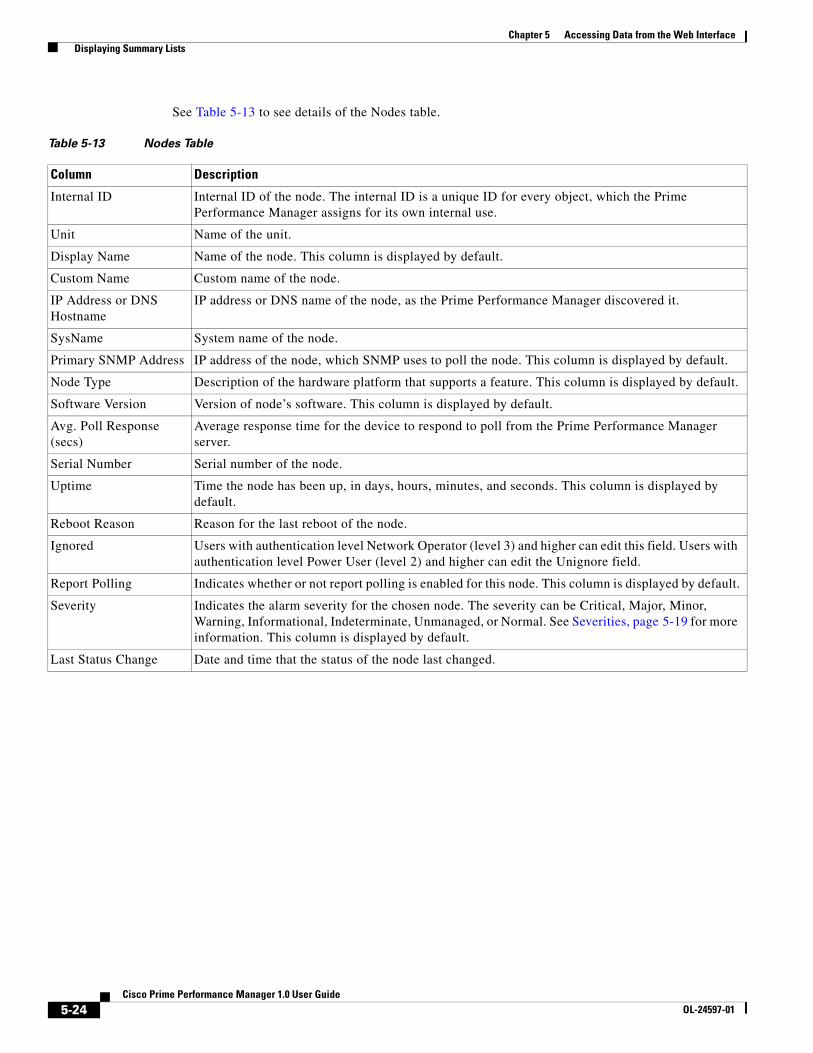
Chapter 5 Accessing Data from the Web Interface Displaying Summary Lists
See Table 5-13 to see details of the Nodes table.
Table 5-13 Nodes Table
Column Description
Internal ID Internal ID of the node. The internal ID is a unique ID for every object, which the Prime Performance Manager assigns for its own internal use.
Unit Name of the unit.
Display Name Name of the node. This column is displayed by default.
Custom Name Custom name of the node.
IP Address or DNS Hostname
IP address or DNS name of the node, as the Prime Performance Manager discovered it.
SysName System name of the node.
Primary SNMP Address IP address of the node, which SNMP uses to poll the node. This column is displayed by default.
Node Type Description of the hardware platform that supports a feature. This column is displayed by default.
Software Version Version of node’s software. This column is displayed by default.
Avg. Poll Response (secs)
Average response time for the device to respond to poll from the Prime Performance Manager server.
Serial Number Serial number of the node.
Uptime Time the node has been up, in days, hours, minutes, and seconds. This column is displayed by default.
Reboot Reason Reason for the last reboot of the node.
Ignored Users with authentication level Network Operator (level 3) and higher can edit this field. Users with authentication level Power User (level 2) and higher can edit the Unignore field.
Report Polling Indicates whether or not report polling is enabled for this node. This column is displayed by default.
Severity Indicates the alarm severity for the chosen node. The severity can be Critical, Major, Minor, Warning, Informational, Indeterminate, Unmanaged, or Normal. See Severities, page 5-19 for more information. This column is displayed by default.
Last Status Change Date and time that the status of the node last changed.
5-24Cisco Prime Performance Manager 1.0 User Guide
OL-24597-01

Chapter 5 Accessing Data from the Web Interface Displaying Summary Lists
Note For toolbar details, see Using the Toolbar, page 5-5.
Node Distributions By TypeThe Node Distributions link displays the percentage distribution summary lists. It displays information about node type, total number of nodes and their percentage distribution. To display the Node Distributions table, choose Summary Lists > Node Distributions.
The Node Distribution by Type table contains:
Note For toolbar details, see Using the Toolbar, page 5-5.
Status Current status of the node. Possible values are:
• Active
• Discovering
• Polling
• Unknown
• Unmanaged
• Waiting
• Warning
This column is displayed by default.
Status Reason Reason for the current status of the node.
For a full list of possible reasons, see the stateReasons.html file.
• If you installed Prime Performance Manager Gateway in the default directory, /opt, then the file is located at /opt/CSCOppm-gw/apache/share/htdocs/eventHelp directory.
• If you installed Prime Performance Manager Unit in the default directory, /opt, then the file is located at /opt/CSCOppm-gw/apache/share/htdocs/eventHelp directory
If the cell is too small to show all of the status reason, place the cursor over the cell to see the full text in a tooltip.
This column is displayed by default.
Table 5-13 Nodes Table (continued)
Column Description
Column Description
Type Description of the hardware platform that supports a feature. See the description of Node Type in Nodes Table, page 5-23 for more information.
Total (total number of nodes)
Total number of nodes of a particular type.
Percentage Percentage of nodes of this type out of all the discovered nodes.
5-25Cisco Prime Performance Manager 1.0 User Guide
OL-24597-01
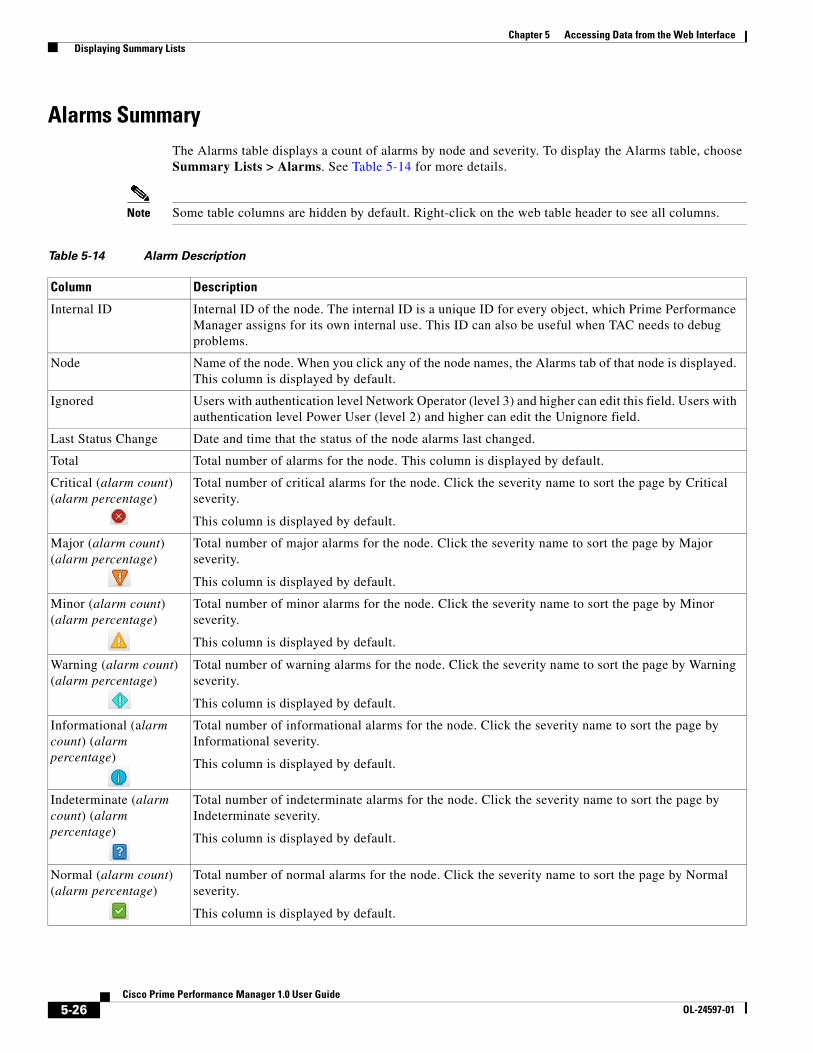
Chapter 5 Accessing Data from the Web Interface Displaying Summary Lists
Alarms SummaryThe Alarms table displays a count of alarms by node and severity. To display the Alarms table, choose Summary Lists > Alarms. See Table 5-14 for more details.
Note Some table columns are hidden by default. Right-click on the web table header to see all columns.
Table 5-14 Alarm Description
Column Description
Internal ID Internal ID of the node. The internal ID is a unique ID for every object, which Prime Performance Manager assigns for its own internal use. This ID can also be useful when TAC needs to debug problems.
Node Name of the node. When you click any of the node names, the Alarms tab of that node is displayed. This column is displayed by default.
Ignored Users with authentication level Network Operator (level 3) and higher can edit this field. Users with authentication level Power User (level 2) and higher can edit the Unignore field.
Last Status Change Date and time that the status of the node alarms last changed.
Total Total number of alarms for the node. This column is displayed by default.
Critical (alarm count) (alarm percentage)
Total number of critical alarms for the node. Click the severity name to sort the page by Critical severity.
This column is displayed by default.
Major (alarm count) (alarm percentage)
Total number of major alarms for the node. Click the severity name to sort the page by Major severity.
This column is displayed by default.
Minor (alarm count) (alarm percentage)
Total number of minor alarms for the node. Click the severity name to sort the page by Minor severity.
This column is displayed by default.
Warning (alarm count) (alarm percentage)
Total number of warning alarms for the node. Click the severity name to sort the page by Warning severity.
This column is displayed by default.
Informational (alarm count) (alarm percentage)
Total number of informational alarms for the node. Click the severity name to sort the page by Informational severity.
This column is displayed by default.
Indeterminate (alarm count) (alarm percentage)
Total number of indeterminate alarms for the node. Click the severity name to sort the page by Indeterminate severity.
This column is displayed by default.
Normal (alarm count) (alarm percentage)
Total number of normal alarms for the node. Click the severity name to sort the page by Normal severity.
This column is displayed by default.
5-26Cisco Prime Performance Manager 1.0 User Guide
OL-24597-01
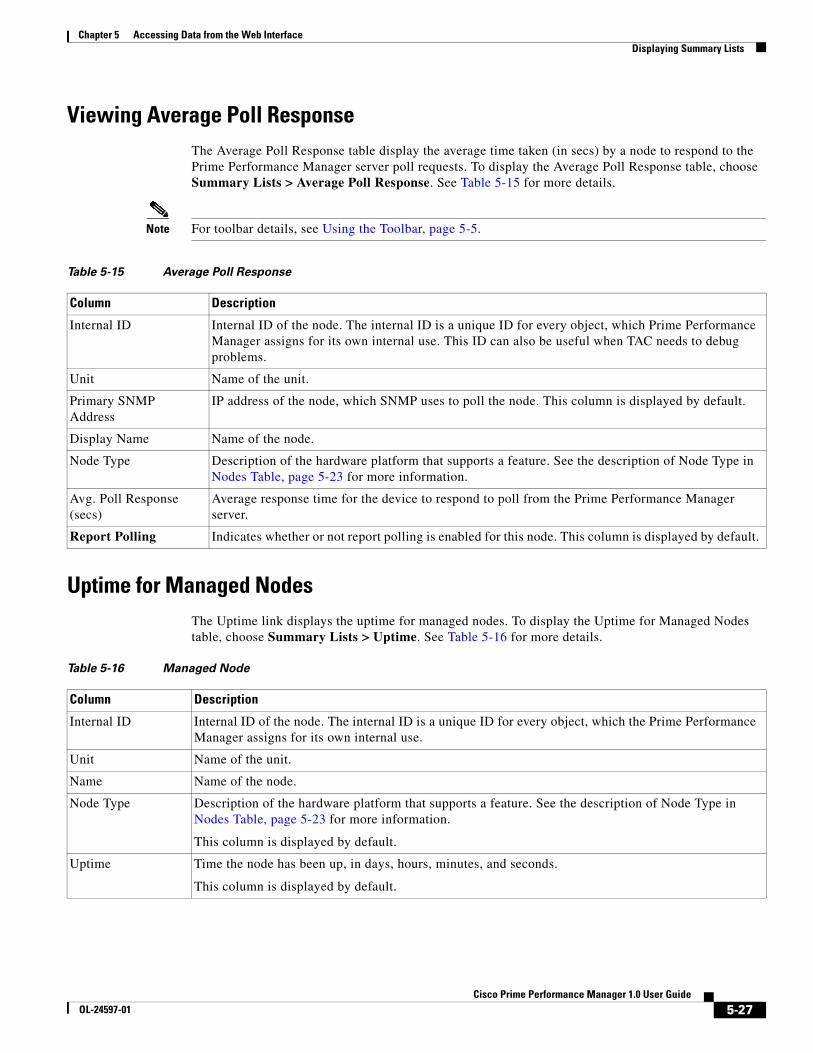
Chapter 5 Accessing Data from the Web Interface Displaying Summary Lists
Viewing Average Poll ResponseThe Average Poll Response table display the average time taken (in secs) by a node to respond to the Prime Performance Manager server poll requests. To display the Average Poll Response table, choose Summary Lists > Average Poll Response. See Table 5-15 for more details.
Note For toolbar details, see Using the Toolbar, page 5-5.
Uptime for Managed NodesThe Uptime link displays the uptime for managed nodes. To display the Uptime for Managed Nodes table, choose Summary Lists > Uptime. See Table 5-16 for more details.
Table 5-15 Average Poll Response
Column Description
Internal ID Internal ID of the node. The internal ID is a unique ID for every object, which Prime Performance Manager assigns for its own internal use. This ID can also be useful when TAC needs to debug problems.
Unit Name of the unit.
Primary SNMP Address
IP address of the node, which SNMP uses to poll the node. This column is displayed by default.
Display Name Name of the node.
Node Type Description of the hardware platform that supports a feature. See the description of Node Type in Nodes Table, page 5-23 for more information.
Avg. Poll Response (secs)
Average response time for the device to respond to poll from the Prime Performance Manager server.
Report Polling Indicates whether or not report polling is enabled for this node. This column is displayed by default.
Table 5-16 Managed Node
Column Description
Internal ID Internal ID of the node. The internal ID is a unique ID for every object, which the Prime Performance Manager assigns for its own internal use.
Unit Name of the unit.
Name Name of the node.
Node Type Description of the hardware platform that supports a feature. See the description of Node Type in Nodes Table, page 5-23 for more information.
This column is displayed by default.
Uptime Time the node has been up, in days, hours, minutes, and seconds.
This column is displayed by default.
5-27Cisco Prime Performance Manager 1.0 User Guide
OL-24597-01
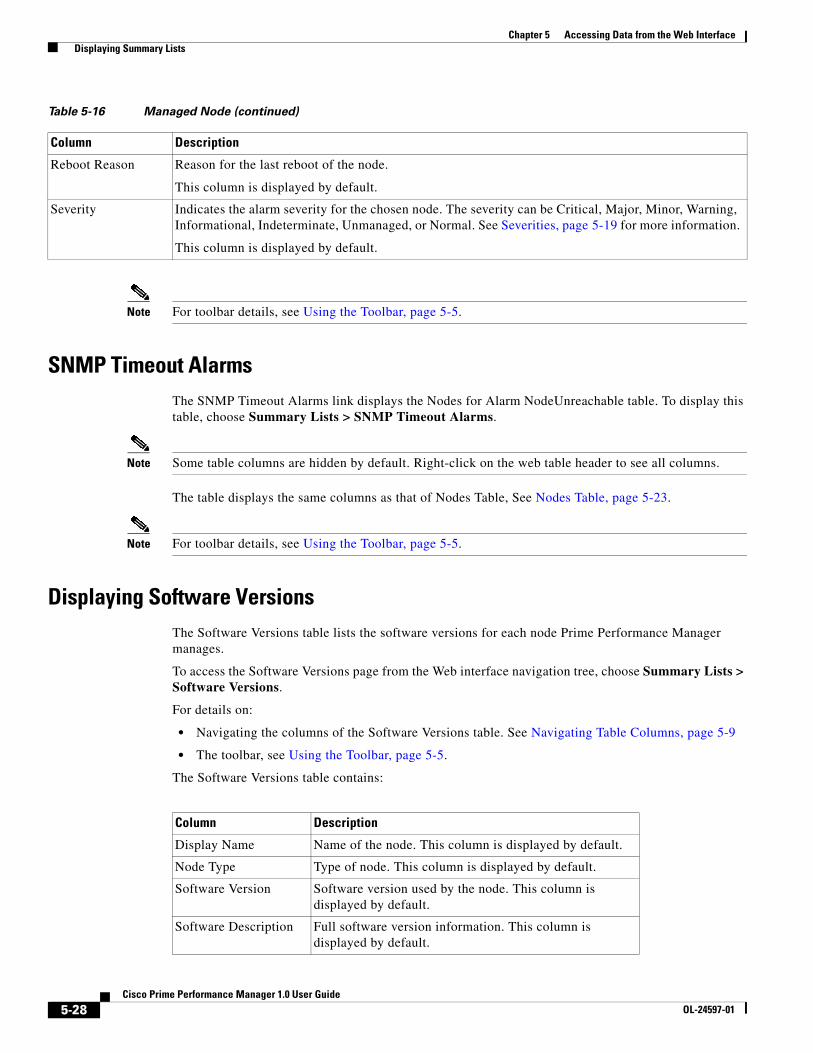
Chapter 5 Accessing Data from the Web Interface Displaying Summary Lists
Note For toolbar details, see Using the Toolbar, page 5-5.
SNMP Timeout AlarmsThe SNMP Timeout Alarms link displays the Nodes for Alarm NodeUnreachable table. To display this table, choose Summary Lists > SNMP Timeout Alarms.
Note Some table columns are hidden by default. Right-click on the web table header to see all columns.
The table displays the same columns as that of Nodes Table, See Nodes Table, page 5-23.
Note For toolbar details, see Using the Toolbar, page 5-5.
Displaying Software VersionsThe Software Versions table lists the software versions for each node Prime Performance Manager manages.
To access the Software Versions page from the Web interface navigation tree, choose Summary Lists > Software Versions.
For details on:
• Navigating the columns of the Software Versions table. See Navigating Table Columns, page 5-9
• The toolbar, see Using the Toolbar, page 5-5.
The Software Versions table contains:
Reboot Reason Reason for the last reboot of the node.
This column is displayed by default.
Severity Indicates the alarm severity for the chosen node. The severity can be Critical, Major, Minor, Warning, Informational, Indeterminate, Unmanaged, or Normal. See Severities, page 5-19 for more information.
This column is displayed by default.
Table 5-16 Managed Node (continued)
Column Description
Column Description
Display Name Name of the node. This column is displayed by default.
Node Type Type of node. This column is displayed by default.
Software Version Software version used by the node. This column is displayed by default.
Software Description Full software version information. This column is displayed by default.
5-28Cisco Prime Performance Manager 1.0 User Guide
OL-24597-01
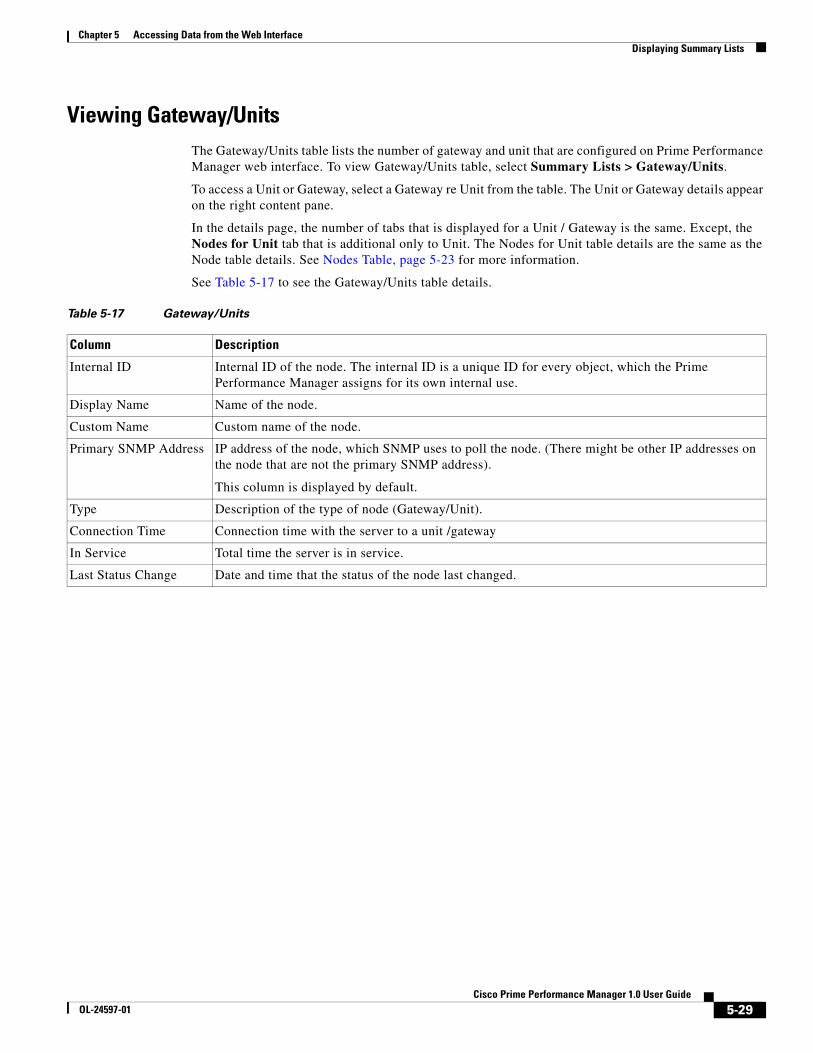
Chapter 5 Accessing Data from the Web Interface Displaying Summary Lists
Viewing Gateway/UnitsThe Gateway/Units table lists the number of gateway and unit that are configured on Prime Performance Manager web interface. To view Gateway/Units table, select Summary Lists > Gateway/Units.
To access a Unit or Gateway, select a Gateway re Unit from the table. The Unit or Gateway details appear on the right content pane.
In the details page, the number of tabs that is displayed for a Unit / Gateway is the same. Except, the Nodes for Unit tab that is additional only to Unit. The Nodes for Unit table details are the same as the Node table details. See Nodes Table, page 5-23 for more information.
See Table 5-17 to see the Gateway/Units table details.
Table 5-17 Gateway/Units
Column Description
Internal ID Internal ID of the node. The internal ID is a unique ID for every object, which the Prime Performance Manager assigns for its own internal use.
Display Name Name of the node.
Custom Name Custom name of the node.
Primary SNMP Address IP address of the node, which SNMP uses to poll the node. (There might be other IP addresses on the node that are not the primary SNMP address).
This column is displayed by default.
Type Description of the type of node (Gateway/Unit).
Connection Time Connection time with the server to a unit /gateway
In Service Total time the server is in service.
Last Status Change Date and time that the status of the node last changed.
5-29Cisco Prime Performance Manager 1.0 User Guide
OL-24597-01
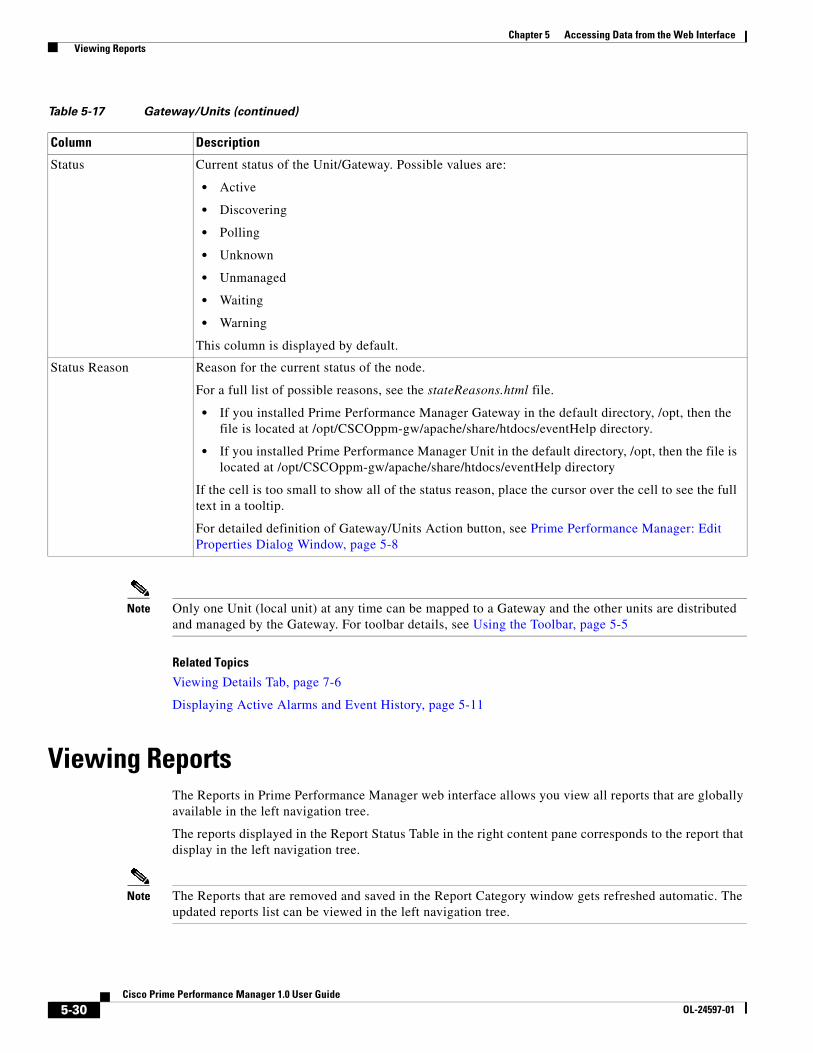
Chapter 5 Accessing Data from the Web Interface Viewing Reports
Note Only one Unit (local unit) at any time can be mapped to a Gateway and the other units are distributed and managed by the Gateway. For toolbar details, see Using the Toolbar, page 5-5
Related Topics
Viewing Details Tab, page 7-6
Displaying Active Alarms and Event History, page 5-11
Viewing ReportsThe Reports in Prime Performance Manager web interface allows you view all reports that are globally available in the left navigation tree.
The reports displayed in the Report Status Table in the right content pane corresponds to the report that display in the left navigation tree.
Note The Reports that are removed and saved in the Report Category window gets refreshed automatic. The updated reports list can be viewed in the left navigation tree.
Status Current status of the Unit/Gateway. Possible values are:
• Active
• Discovering
• Polling
• Unknown
• Unmanaged
• Waiting
• Warning
This column is displayed by default.
Status Reason Reason for the current status of the node.
For a full list of possible reasons, see the stateReasons.html file.
• If you installed Prime Performance Manager Gateway in the default directory, /opt, then the file is located at /opt/CSCOppm-gw/apache/share/htdocs/eventHelp directory.
• If you installed Prime Performance Manager Unit in the default directory, /opt, then the file is located at /opt/CSCOppm-gw/apache/share/htdocs/eventHelp directory
If the cell is too small to show all of the status reason, place the cursor over the cell to see the full text in a tooltip.
For detailed definition of Gateway/Units Action button, see Prime Performance Manager: Edit Properties Dialog Window, page 5-8
Table 5-17 Gateway/Units (continued)
Column Description
5-30Cisco Prime Performance Manager 1.0 User Guide
OL-24597-01
Chapter 5 Accessing Data from the Web Interface Viewing Historical Statistics Report Settings
Viewing Historical Statistics Report Settings
Step 1 In Prime Performance Manager Web interface, in the navigation tree, click Reports.
The Report Status window appears as described in Viewing Reports, page 5-30.
Step 2 Click the Settings tab.
The Historical Stats Report Settings information is displayed.
• Click on Disabled or Enabled to change the state of any of the reports.
Enabling/Disabling reports flag allows to view the reports (5 minute, 15 minute hourly and daily) at different intervals at the node level.
• Click on any field, except for the Reports Directory field, to modify its value.
See Table 5-18 to see the historical statistics report details.
5-31Cisco Prime Performance Manager 1.0 User Guide
OL-24597-01

Chapter 5 Accessing Data from the Web Interface Viewing Historical Statistics Report Settings
Table 5-18 Historical Statistics Report Settings
Field Description
General Settings Reports Directory Specifies the directory in which Prime Performance Manager reports are stored. You must use the CLI to change the directory in which the reports are stored; you cannot click on this field to modify it.
Time Mode Specifies the time mode, either 12-hour or 24-hour, for the reports.
Master Report Flag If this option is enabled, the individual report settings are used. If this is option is disabled, all reports are turned off.
Perform Disk Space Checking
Specifies whether disk space checking is enabled or disabled.
Usage of disk space increases after each report is enabled. The increase in disk space is specific to each report, number of devices and device configuration.
Monitor the usage of disk space and disable the reports for specific nodes or decrease the aging value to delete old reports frequently.
5 Min Report Flag If this option is enabled/flagged, a 5 minute report is generated.To enable a 5-minute report, you should edit the corresponding XML definition of the report.
See Enabling and Disabling Reports, page 7-9 for mode details.
15 Min Report Flag If this option is enabled/flagged, a 15 minute report is generated.
Hourly Report Flag If this option is enabled/flagged, a hourly report is generated.
Daily Report Flag If this option is enabled/flagged, a daily report is generated.
Export CSV Reports Specifies whether to automatically generate reports in CSV format.
5 Min Stats Aging (Days) Specifies the database aging value for 5-minute statistics. When records exceed the specified value, they are aged out of the database.
15 Min Stats Aging (Days) Specifies the database aging value for 15-minute statistics. When records exceed the specified value, they are aged out of the database.
Hourly Stats Aging (Days) Specifies the database aging value for hourly statistics. When records exceed the specified value, they are aged out of the database.
Daily Stats Aging (Days) Specifies the database aging value for daily statistics. When records exceed the specified value, they are aged out of the database.
5 Min CSV Aging (Days) Specifies the database aging value for 5 Minute CSV statistics. When records exceed the specified value, they are aged out of the database.
15 Min CSV Aging (Days) Specifies the database aging value for 15-minute CSV statistics. When records exceed the specified value, they are aged out of the database.
Hourly CSV Aging (Days) Specifies the database aging value for hourly CSV statistics. When records exceed the specified value, they are aged out of the database.
Daily CSV Aging (Days) Specifies the database aging value for daily CSV statistics. When records exceed the specified value, they are aged out of the database.
5-32Cisco Prime Performance Manager 1.0 User Guide
OL-24597-01

OL-24597-01
C H A P T E R6
Viewing Administrative Information from the Web InterfaceTo access the Administrative page of Prime Performance Manager web interface, click Administrative in the navigation tree in the left pane. The tabs on the Administration page appear in the right pane.
This chapter contains descriptions of these tabs and instructions on:
• Viewing General Tab Details, page 6-1
• Viewing SNMP Tab Details, page 6-14
• Viewing Unit Editor Tab, page 6-17
• Viewing Prime Network Tab Details, page 6-18
• Discover Network Buttons, page 6-20
• Viewing User Management Tab Details, page 6-24
Note If Prime Performance Manager User-Based Access is enabled, only users with authentication level 3 (Network Operator) and higher can see all options.
Viewing General Tab DetailsThe Prime Performance Manager web interface General tab provides access to Prime Performance Manager system information, including messages, logs, status, and properties.
To view the General tab information, click Administrative in the navigation tree and then click General tab in the right pane. This tab displays the information indicated in Table 6-1.
6-1Cisco Prime Performance Manager 1.0 User Guide

Chapter 6 Viewing Administrative Information from the Web Interface Viewing General Tab Details
The General tab displays the following:
• Viewing System Messages, page 6-3
• Viewing System Status Information, page 6-7
• Viewing System Logs, page 6-8
• Viewing Properties, page 6-11
Table 6-1 General Tab Details
Pane GUI Elements Description Reference
System Status • System Status
• System Versions
• System Check
• Connected Clients
Displays the output of these system commands:
• ppm status
• ppm version
• ppmCheckSystemLog.txt
• ppm who
For details, see Viewing System Status Information, page 6-7.
System Messages • Info Messages
• Error Messages
• User Actions
• Message Archives
• Console Log Archives
Displays tabular information on system messages.
For details, see Viewing System Messages, page 6-3.
Properties • System
• Server
• WebConfig
• Reports
Displays the contents of these system property files:
• System.properties
• Server.properties
• WebConfig.properties
• Reports.properties
For details, see Viewing System Properties, page 6-11.
System Logs • Install Log
• Console Log
• Backup Log
• Command Log
• Event Automation Log
• Security Log
• Web Access Log
• Web Error Log
Displays the contents of these system logs:
• cisco_primepm_gw_install.log
• sgmConsoleLog.txt
• ppmBackupLog.txt
• Command Log
• eventAutomationLog.txt
• sgmSecurityLog.txt
• Web Access Logs
• Web Error Logs
For details, see Viewing System Logs, page 6-8.
6-2Cisco Prime Performance Manager 1.0 User Guide
OL-24597-01

Chapter 6 Viewing Administrative Information from the Web Interface Viewing General Tab Details
Viewing System MessagesTo view the following Prime Performance Manager system messages from Prime Performance Manager web interface, click Administrative in the navigation tree in the left pane and then click the General tab in the right pane:
Note These messages are related to Prime Performance Manager system itself, not to your network.
• Viewing Info Messages, page 6-3
• Viewing Error Messages, page 6-4
• Viewing Prime Performance Manager User Action Messages, page 6-4
• Viewing All Archived Prime Performance Manager Messages, page 6-5
• Viewing Console Log Archived Messages, page 6-6
Viewing Info Messages
To view information messages, click the Administrative > General tab. In the right pane, select the Info Messages link from System Messages section.
The System Messages: Last number Info Messages page displays informational messages in the Prime Performance Manager system log. These messages help you to diagnose and correct Prime Performance Manager operational problems. See Table 6-2 for more details.
Table 6-2 Info Message
Column Description
Period (in heading)
Collection period of the table, such as Since Server Restart.
Timestamp (in heading)
Date and time that Prime Performance Manager last updated the information on the page.
Row Unique number identifying each entry in the table. You cannot edit this field.
Time Date and time the message was logged.
To sort the messages by time, click the Time heading.
Source Source for the message, with the format process.host.id, where:
• process is the process that logged the message.
• host is the hostname of the process that logged the message.
• id is a Prime Performance Manager ID that uniquely identifies the process that logged the message. This is when two or more clients are running on the same node and are connected to the same Prime Performance Manager server.
Task Task, or thread, that logged the message.
Message Text of the message.
To sort the messages alphabetically by message text, click the Message heading.
6-3Cisco Prime Performance Manager 1.0 User Guide
OL-24597-01
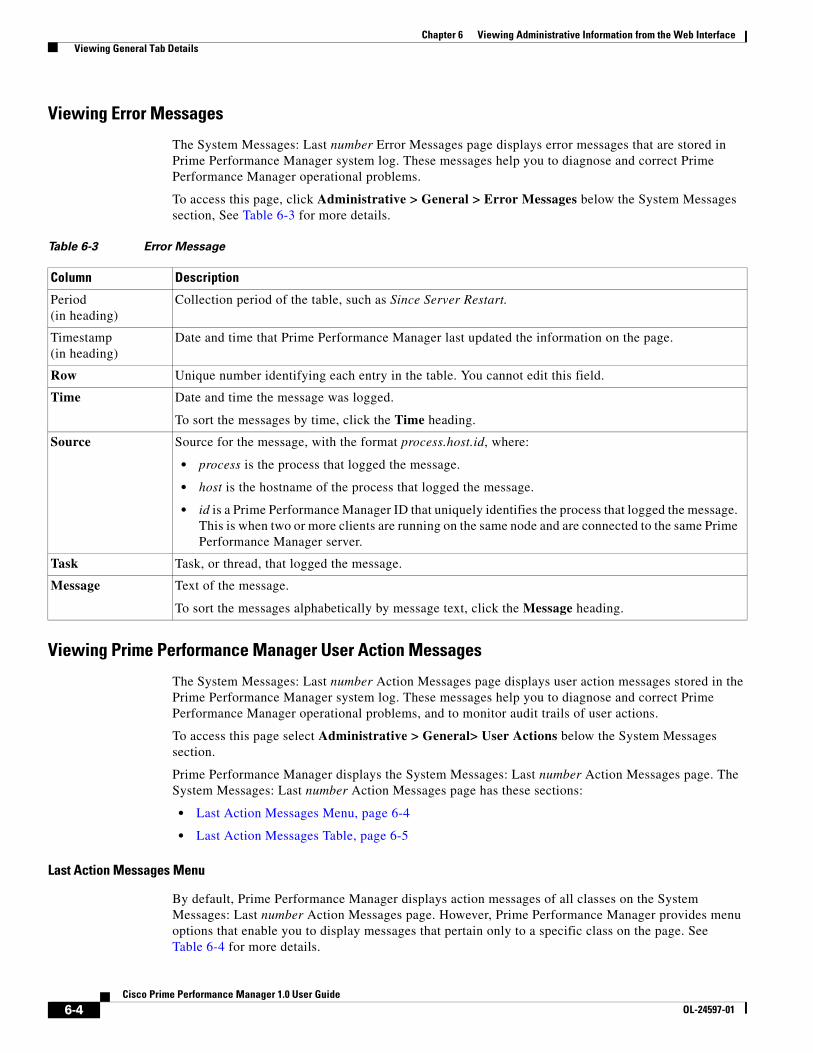
Chapter 6 Viewing Administrative Information from the Web Interface Viewing General Tab Details
Viewing Error Messages
The System Messages: Last number Error Messages page displays error messages that are stored in Prime Performance Manager system log. These messages help you to diagnose and correct Prime Performance Manager operational problems.
To access this page, click Administrative > General > Error Messages below the System Messages section, See Table 6-3 for more details.
Viewing Prime Performance Manager User Action Messages
The System Messages: Last number Action Messages page displays user action messages stored in the Prime Performance Manager system log. These messages help you to diagnose and correct Prime Performance Manager operational problems, and to monitor audit trails of user actions.
To access this page select Administrative > General> User Actions below the System Messages section.
Prime Performance Manager displays the System Messages: Last number Action Messages page. The System Messages: Last number Action Messages page has these sections:
• Last Action Messages Menu, page 6-4
• Last Action Messages Table, page 6-5
Last Action Messages Menu
By default, Prime Performance Manager displays action messages of all classes on the System Messages: Last number Action Messages page. However, Prime Performance Manager provides menu options that enable you to display messages that pertain only to a specific class on the page. See Table 6-4 for more details.
Table 6-3 Error Message
Column Description
Period (in heading)
Collection period of the table, such as Since Server Restart.
Timestamp (in heading)
Date and time that Prime Performance Manager last updated the information on the page.
Row Unique number identifying each entry in the table. You cannot edit this field.
Time Date and time the message was logged.
To sort the messages by time, click the Time heading.
Source Source for the message, with the format process.host.id, where:
• process is the process that logged the message.
• host is the hostname of the process that logged the message.
• id is a Prime Performance Manager ID that uniquely identifies the process that logged the message. This is when two or more clients are running on the same node and are connected to the same Prime Performance Manager server.
Task Task, or thread, that logged the message.
Message Text of the message.
To sort the messages alphabetically by message text, click the Message heading.
6-4Cisco Prime Performance Manager 1.0 User Guide
OL-24597-01
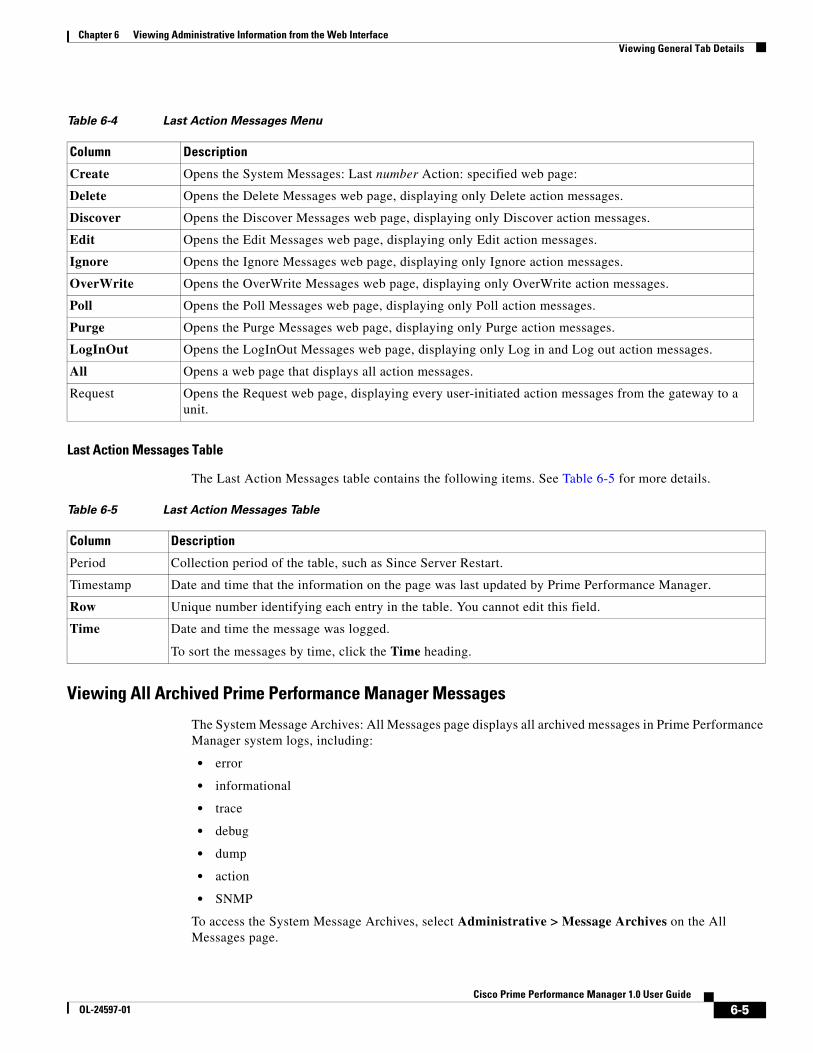
Chapter 6 Viewing Administrative Information from the Web Interface Viewing General Tab Details
Last Action Messages Table
The Last Action Messages table contains the following items. See Table 6-5 for more details.
Viewing All Archived Prime Performance Manager Messages
The System Message Archives: All Messages page displays all archived messages in Prime Performance Manager system logs, including:
• error
• informational
• trace
• debug
• dump
• action
• SNMP
To access the System Message Archives, select Administrative > Message Archives on the All Messages page.
Table 6-4 Last Action Messages Menu
Column Description
Create Opens the System Messages: Last number Action: specified web page:
Delete Opens the Delete Messages web page, displaying only Delete action messages.
Discover Opens the Discover Messages web page, displaying only Discover action messages.
Edit Opens the Edit Messages web page, displaying only Edit action messages.
Ignore Opens the Ignore Messages web page, displaying only Ignore action messages.
OverWrite Opens the OverWrite Messages web page, displaying only OverWrite action messages.
Poll Opens the Poll Messages web page, displaying only Poll action messages.
Purge Opens the Purge Messages web page, displaying only Purge action messages.
LogInOut Opens the LogInOut Messages web page, displaying only Log in and Log out action messages.
All Opens a web page that displays all action messages.
Request Opens the Request web page, displaying every user-initiated action messages from the gateway to a unit.
Table 6-5 Last Action Messages Table
Column Description
Period Collection period of the table, such as Since Server Restart.
Timestamp Date and time that the information on the page was last updated by Prime Performance Manager.
Row Unique number identifying each entry in the table. You cannot edit this field.
Time Date and time the message was logged.
To sort the messages by time, click the Time heading.
6-5Cisco Prime Performance Manager 1.0 User Guide
OL-24597-01
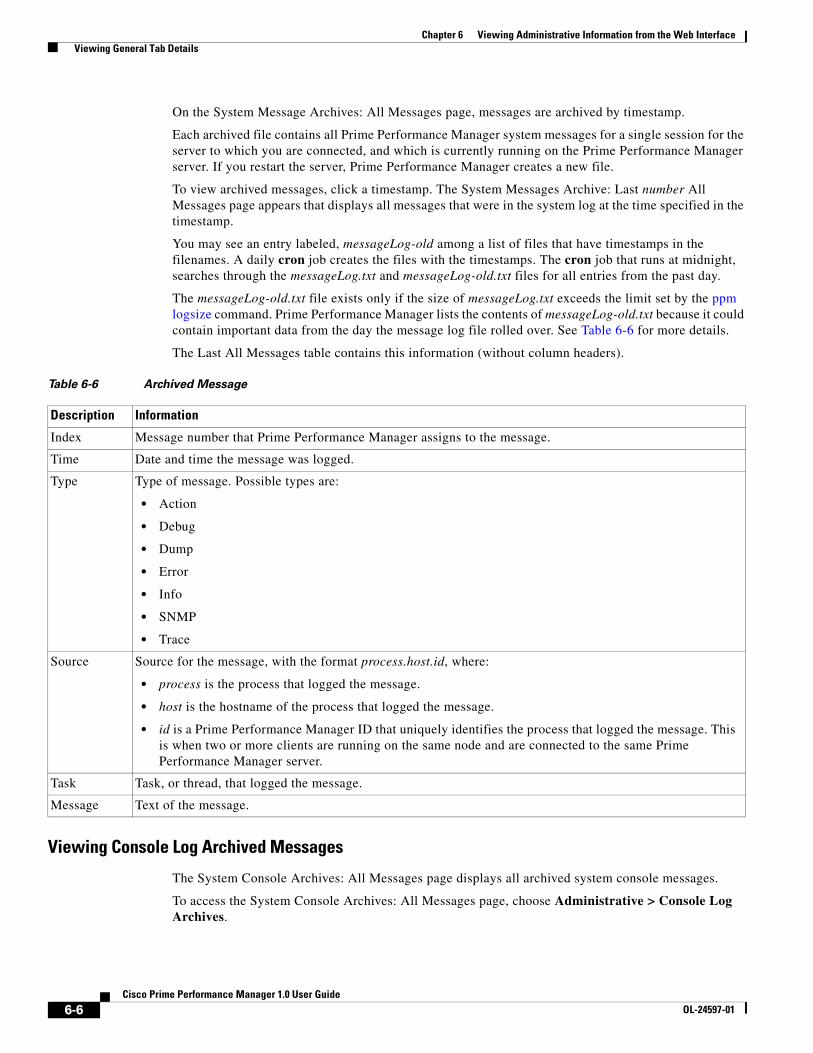
Chapter 6 Viewing Administrative Information from the Web Interface Viewing General Tab Details
On the System Message Archives: All Messages page, messages are archived by timestamp.
Each archived file contains all Prime Performance Manager system messages for a single session for the server to which you are connected, and which is currently running on the Prime Performance Manager server. If you restart the server, Prime Performance Manager creates a new file.
To view archived messages, click a timestamp. The System Messages Archive: Last number All Messages page appears that displays all messages that were in the system log at the time specified in the timestamp.
You may see an entry labeled, messageLog-old among a list of files that have timestamps in the filenames. A daily cron job creates the files with the timestamps. The cron job that runs at midnight, searches through the messageLog.txt and messageLog-old.txt files for all entries from the past day.
The messageLog-old.txt file exists only if the size of messageLog.txt exceeds the limit set by the ppm logsize command. Prime Performance Manager lists the contents of messageLog-old.txt because it could contain important data from the day the message log file rolled over. See Table 6-6 for more details.
The Last All Messages table contains this information (without column headers).
Viewing Console Log Archived Messages
The System Console Archives: All Messages page displays all archived system console messages.
To access the System Console Archives: All Messages page, choose Administrative > Console Log Archives.
Table 6-6 Archived Message
Description Information
Index Message number that Prime Performance Manager assigns to the message.
Time Date and time the message was logged.
Type Type of message. Possible types are:
• Action
• Debug
• Dump
• Error
• Info
• SNMP
• Trace
Source Source for the message, with the format process.host.id, where:
• process is the process that logged the message.
• host is the hostname of the process that logged the message.
• id is a Prime Performance Manager ID that uniquely identifies the process that logged the message. This is when two or more clients are running on the same node and are connected to the same Prime Performance Manager server.
Task Task, or thread, that logged the message.
Message Text of the message.
6-6Cisco Prime Performance Manager 1.0 User Guide
OL-24597-01

Chapter 6 Viewing Administrative Information from the Web Interface Viewing General Tab Details
On the System Console Archives: All Messages page, messages are archived by timestamps. Each archived file contains all Prime Performance Manager system console messages for a single session for the server to which you are connected, and which is currently running on the Prime Performance Manager server. If you restart the server, Prime Performance Manager creates a new file.
To view these archived messages, click a timestamp. The Console Archive: Last number All Messages page appears that displays all console messages that were in the system log at the time specified by the timestamp.
Viewing System Status InformationYou can view Prime Performance Manager system status information from Prime Performance Manager web interface by clicking Administrative in the navigation tree in the left pane and then clicking General tab in the right pane:
• Viewing System Status, page 6-7
• Viewing System Versions, page 6-7
• Viewing System Check, page 6-7
• Viewing Connected Clients, page 6-7
Viewing System Status
To access system status information, choose Administrative > System Status (Prime Performance Manager might take a few seconds to display this page). This page displays the status of all Prime Performance Manager servers, local clients, and processes.
Viewing System Versions
To access version information, choose Administrative > System Versions (Prime Performance Manager might take a few seconds to display this page). This page displays version information for all Prime Performance Manager servers, clients, and processes.
Viewing System Check
To access system information, choose Administrative > System Check. Prime Performance Manager displays the output from the following command:
/opt/CSCOppm-gw/logs/sgmCheckSystemLog.txt
Viewing Connected Clients
To access connected client information, choose Administrative > Connected Clients. This page lists all Prime Performance Manager clients that are currently connected to the Prime Performance Manager server. It also lists all Solaris and Linux users that are logged into the Prime Performance Manager server.
6-7Cisco Prime Performance Manager 1.0 User Guide
OL-24597-01
Chapter 6 Viewing Administrative Information from the Web Interface Viewing General Tab Details
Viewing System LogsYou can view Prime Performance Manager system logs information from Prime Performance Manager web interface by clicking Administrative in the navigation tree in the left pane and then clicking General tab in the right pane:
• Viewing the Install Log, page 6-8
• Viewing the Console Log, page 6-8
• Viewing the Backup Log, page 6-8
• Viewing the Command Log, page 6-9
• Viewing the Event Automation Log, page 6-9
• Viewing the Security Log, page 6-9
• Viewing the Web Access Logs, page 6-10
• Viewing the Web Error Logs, page 6-10
Viewing the Install Log
The Install Log displays the contents of Prime Performance Manager installation log file for the server to which you are connected, and which is currently running Prime Performance Manager.
To access the Install Log, choose Administrative > Install Log. You can also view the Console Log with the ppm installlog command.
Viewing the Console Log
The Console Log displays the contents of Prime Performance Manager system console log file for the server to which you are connected, and which is currently running Prime Performance Manager.
The console log file contains error and warning messages from the Prime Performance Manager server, such as those that might occur if the Prime Performance Manager server cannot start. It also provides a history of start-up messages for server processes and the time each message appeared.
To access the Console Log, choose Administrative > Console Log. You can also view the Console Log with the ppm console command.
Viewing the Backup Log
The Backup Log displays the contents of Prime Performance Manager backup log file for the server to which you are connected, and which is currently running Prime Performance Manager.
The default path and filename for the backup log file is /opt/CSCOppm-gw/logs/ppmBackupLog.txt. If you installed Prime Performance Manager in a directory other than /opt, then the backup log file is in that directory.
To access the Backup Log, choose Administrative > Backup Log. You can also view the Backup Log with the ppm backuplog command.
6-8Cisco Prime Performance Manager 1.0 User Guide
OL-24597-01

Chapter 6 Viewing Administrative Information from the Web Interface Viewing General Tab Details
Viewing the Command Log
The Command Log displays the contents of the Prime Performance Manager system command log file for the server to which you are connected, and which is currently running on the Prime Performance Manager server.
The system command log lists all Prime Performance Manager commands that have been entered for the Prime Performance Manager server, the time each command was entered, and the user who entered the command.
To access the Command Log, choose Administrative > Command Log. You can also view the Command Log with the ppm cmdlog command.
The Prime Performance Manager Command Log page appears. The Command Log table contains:
Viewing the Event Automation Log
The Event Automation Log displays the contents of the system event automation log file for the server to which you are connected, and which is currently running on the Prime Performance Manager server. The system event automation log lists all messages that event automation scripts generate.
The default path and filename for the system event automation log file is /opt/CSCOppm-gw/logs/eventAutomationLog.txt. If you installed Prime Performance Manager in a directory other than /opt, then the system event automation log file is in that directory.
To access the Event Automation Log, choose Administrative > Event Automation Log. You can also view the Event Automation Log with the ppm eventautolog command.
Related Topics
Viewing the Security Log, page 6-9
Viewing the Web Access Logs, page 6-10
Viewing the Web Error Logs, page 6-10
Viewing the Security Log
The Security Log displays the contents of Prime Performance Manager system security log file for the server to which you are connected, and which is currently running Prime Performance Manager server. The system security log lists:
• All security events that have occurred for the Prime Performance Manager server
• The time each event occurred
• The user and command that triggered the event
Column Description
Timestamp Date and time the command was logged.
To sort the messages by time, click the Timestamp heading.
User Name User who entered the command.
To sort the commands by user, click the User heading.
Command Text of the command.
To sort the messages alphabetically by command text, click the Command heading.
6-9Cisco Prime Performance Manager 1.0 User Guide
OL-24597-01

Chapter 6 Viewing Administrative Information from the Web Interface Viewing General Tab Details
• The text of any associated message
The default path and filename for the system security log file is /opt/CSCOppm-gw/logs/sgmSecurityLog.txt. If you installed Prime Performance Manager in a directory other than /opt, then the system security log file is in that directory.
To access the Security Log, choose Administrative > Security Log in the System Logs section. You should be an System Administrator to access Security Log. You can also view the Security Log with the ppm seclog command.
The Last Security Entries table contains these columns:
Viewing the Web Access Logs
The Web Access Logs page displays a list of web access log files for the server to which you are connected, and which is currently running the Prime Performance Manager server.
The web access log lists all system web access messages that have been logged for the Prime Performance Manager server, providing an audit trail of all access to the Prime Performance Manager server through the Prime Performance Manager web interface.
The default path and filename for the web access log file is /opt/CSCOppm-gw/apache/logs/access_log. If you installed Prime Performance Manager in a directory other than /opt, then the web access log file is in that directory.
To access the Web Access Logs page, choose Administrative > Web Access Logs. You can also view the Web Access Logs page using the ppm webport command.
Viewing the Web Error Logs
The Web Error Logs page displays a list of web error log files for the server to which you are connected, and which is currently running on the Prime Performance Manager server. The web server error log lists all system web error messages that have been logged for the Prime Performance Manager web server.
You can use the web error log to troubleshoot the source of problems that users may have encountered while navigating Prime Performance Manager web interface.
The default path and filename for the web error log file is /opt/CSCOppm-gw/apache/logs/error_log. If you installed Prime Performance Manager in a directory other than /opt, then the web error log file is in that directory.
To access the Web Error Logs page, choose Administrative > Web Error Logs. You can also view the Web Error Logs page using the ppm webport command.
Column Description
Timestamp Date and time the security event occurred.
To sort the entries by time, click the Time heading.
User User who triggered the security event.
To sort the entries by user, click the User heading.
Message Text of the security event message.
To sort the entries alphabetically by message text, click the Message heading.
Command Text of the command that triggered the security event.
To sort the entries alphabetically by command text, click the Command heading.
6-10Cisco Prime Performance Manager 1.0 User Guide
OL-24597-01
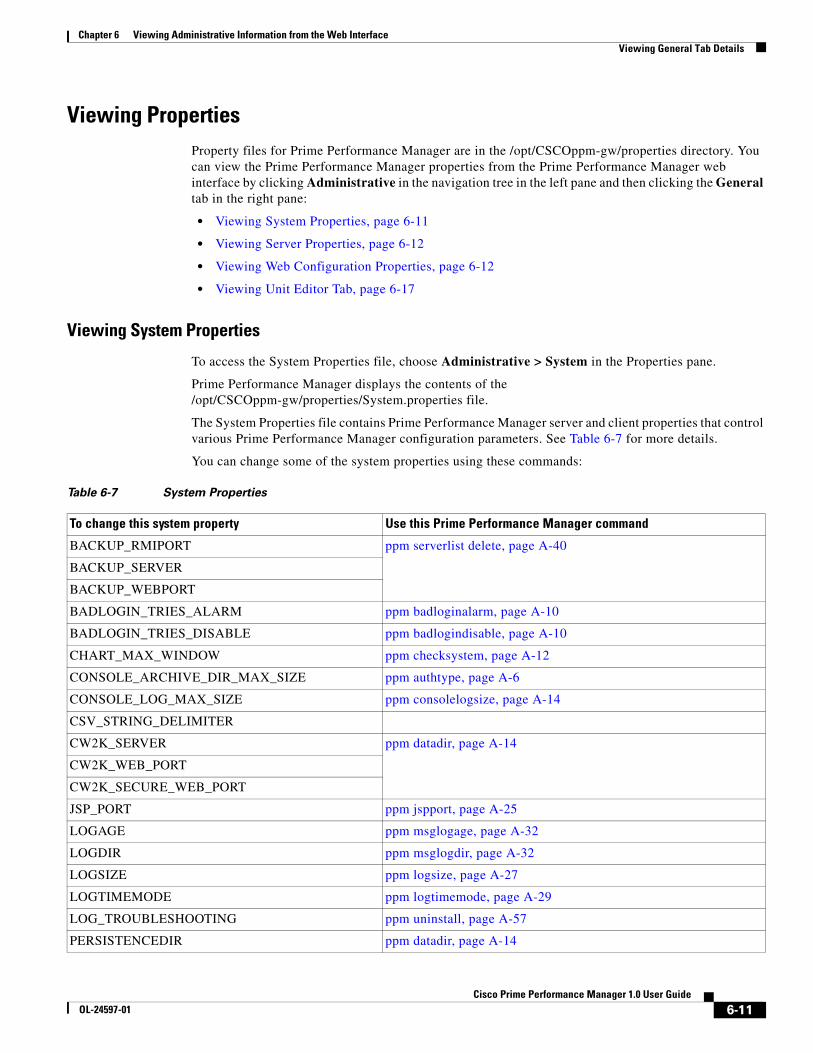
Chapter 6 Viewing Administrative Information from the Web Interface Viewing General Tab Details
Viewing PropertiesProperty files for Prime Performance Manager are in the /opt/CSCOppm-gw/properties directory. You can view the Prime Performance Manager properties from the Prime Performance Manager web interface by clicking Administrative in the navigation tree in the left pane and then clicking the General tab in the right pane:
• Viewing System Properties, page 6-11
• Viewing Server Properties, page 6-12
• Viewing Web Configuration Properties, page 6-12
• Viewing Unit Editor Tab, page 6-17
Viewing System Properties
To access the System Properties file, choose Administrative > System in the Properties pane.
Prime Performance Manager displays the contents of the /opt/CSCOppm-gw/properties/System.properties file.
The System Properties file contains Prime Performance Manager server and client properties that control various Prime Performance Manager configuration parameters. See Table 6-7 for more details.
You can change some of the system properties using these commands:
Table 6-7 System Properties
To change this system property Use this Prime Performance Manager command
BACKUP_RMIPORT ppm serverlist delete, page A-40
BACKUP_SERVER
BACKUP_WEBPORT
BADLOGIN_TRIES_ALARM ppm badloginalarm, page A-10
BADLOGIN_TRIES_DISABLE ppm badlogindisable, page A-10
CHART_MAX_WINDOW ppm checksystem, page A-12
CONSOLE_ARCHIVE_DIR_MAX_SIZE ppm authtype, page A-6
CONSOLE_LOG_MAX_SIZE ppm consolelogsize, page A-14
CSV_STRING_DELIMITER
CW2K_SERVER ppm datadir, page A-14
CW2K_WEB_PORT
CW2K_SECURE_WEB_PORT
JSP_PORT ppm jspport, page A-25
LOGAGE ppm msglogage, page A-32
LOGDIR ppm msglogdir, page A-32
LOGSIZE ppm logsize, page A-27
LOGTIMEMODE ppm logtimemode, page A-29
LOG_TROUBLESHOOTING ppm uninstall, page A-57
PERSISTENCEDIR ppm datadir, page A-14
6-11Cisco Prime Performance Manager 1.0 User Guide
OL-24597-01
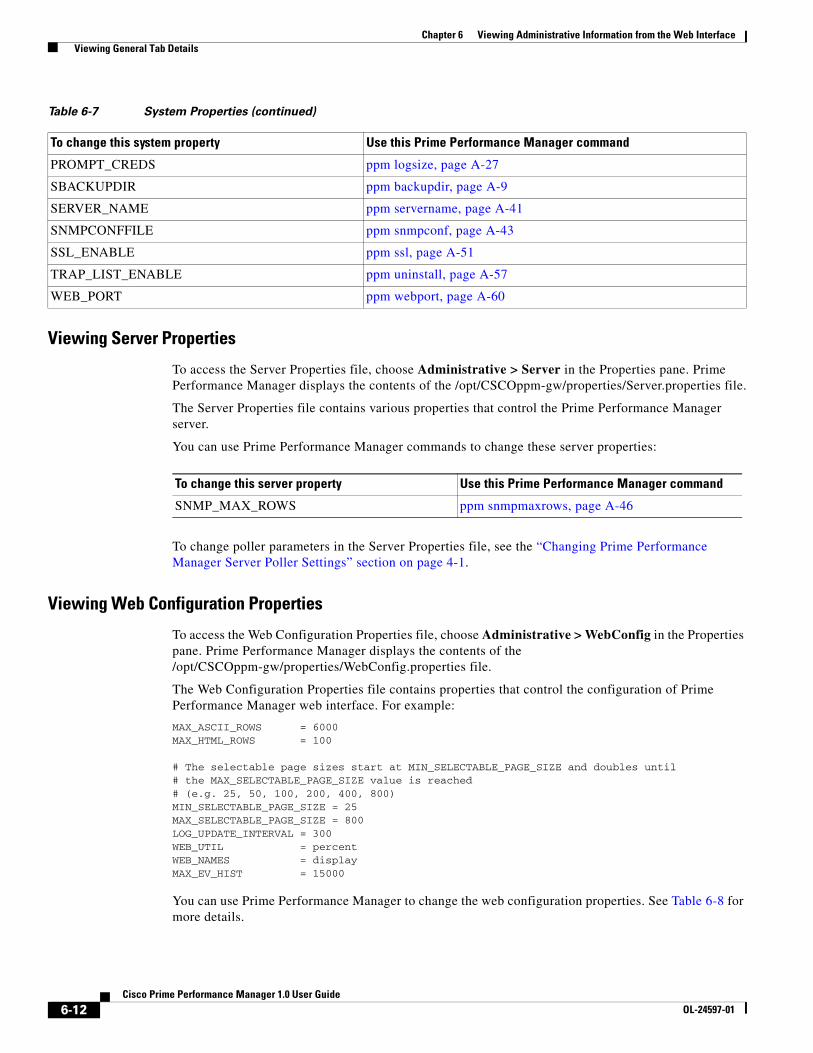
Chapter 6 Viewing Administrative Information from the Web Interface Viewing General Tab Details
Viewing Server Properties
To access the Server Properties file, choose Administrative > Server in the Properties pane. Prime Performance Manager displays the contents of the /opt/CSCOppm-gw/properties/Server.properties file.
The Server Properties file contains various properties that control the Prime Performance Manager server.
You can use Prime Performance Manager commands to change these server properties:
To change poller parameters in the Server Properties file, see the “Changing Prime Performance Manager Server Poller Settings” section on page 4-1.
Viewing Web Configuration Properties
To access the Web Configuration Properties file, choose Administrative > WebConfig in the Properties pane. Prime Performance Manager displays the contents of the /opt/CSCOppm-gw/properties/WebConfig.properties file.
The Web Configuration Properties file contains properties that control the configuration of Prime Performance Manager web interface. For example:
MAX_ASCII_ROWS = 6000MAX_HTML_ROWS = 100
# The selectable page sizes start at MIN_SELECTABLE_PAGE_SIZE and doubles until# the MAX_SELECTABLE_PAGE_SIZE value is reached# (e.g. 25, 50, 100, 200, 400, 800)MIN_SELECTABLE_PAGE_SIZE = 25MAX_SELECTABLE_PAGE_SIZE = 800LOG_UPDATE_INTERVAL = 300WEB_UTIL = percentWEB_NAMES = displayMAX_EV_HIST = 15000
You can use Prime Performance Manager to change the web configuration properties. See Table 6-8 for more details.
PROMPT_CREDS ppm logsize, page A-27
SBACKUPDIR ppm backupdir, page A-9
SERVER_NAME ppm servername, page A-41
SNMPCONFFILE ppm snmpconf, page A-43
SSL_ENABLE ppm ssl, page A-51
TRAP_LIST_ENABLE ppm uninstall, page A-57
WEB_PORT ppm webport, page A-60
Table 6-7 System Properties (continued)
To change this system property Use this Prime Performance Manager command
To change this server property Use this Prime Performance Manager command
SNMP_MAX_ROWS ppm snmpmaxrows, page A-46
6-12Cisco Prime Performance Manager 1.0 User Guide
OL-24597-01

Chapter 6 Viewing Administrative Information from the Web Interface Viewing General Tab Details
Table 6-8 Web Configuration Properties
Web Configuration Property Changing Default Setting
LOG_UPDATE_INTERVAL To control how often, in seconds, Prime Performance Manager updates certain web output, use the ppm webport command.
The valid range is 1 second to an unlimited number of seconds. The default value is 300 seconds (5 minutes).
MAX_EV_HIST To set the maximum number of rows for Prime Performance Manager to search in the event history logs, use the ppm maxhtmlrows command.
The event history logs are the current and archived Prime Performance Manager network status logs for status change and SNMP trap messages.
Prime Performance Manager sends the results of the search to the web browser, where the results are further limited by the setting of ppm maxhtmlrows command.
The valid range is one row to an unlimited number of rows. The default value is 15,000 rows.
MAX_HTML_ROWS To set the maximum number of rows for Prime Performance Manager HTML web output, such as displays of statistics reports, status change messages, or SNMP trap messages, use the ppm maxhtmlrows command.
This lets you select a page size (if you have not explicitly chosen a page size).
After you select a page size from any page, Prime Performance Manager remembers your preference until you delete your browser cookies. The default value is 100 rows.
MIN_SELECTABLE_PAGE_SIZE This setting determines the minimum page size that you can select from the Page Size drop-down menu.
The page size values start with the MIN_SELECTABLE_PAGE_SIZE and double until they reach the MAX_SELECTABLE_PAGE_SIZE.
MAX_SELECTABLE_ PAGE_SIZE
This setting determines the maximum page size that you can select from the Page Size drop-down menu.
The page size values start with the MIN_SELECTABLE_PAGE_SIZE and double until they reach the MAX_SELECTABLE_PAGE_SIZE.
WEB_NAMES To specify whether Prime Performance Manager should show real DNS names or display names in web pages, enter the ppm webport command. To show:
• The real DNS names of nodes, as discovered by Prime Performance Manager, enter Prime Performance Manager webnames real.
• Display names, enter Prime Performance Manager webnames display.
Display names are new names that you specify for nodes. This is the default setting. For more information about display names.
WEB_UTIL To specify whether Prime Performance Manager should display send and receive as percentages or in Erlangs in web pages, enter the ppm who command. To display:
• As a percentage, enter Prime Performance Manager webutil percent. This is the default setting.
• In Erlangs (E), enter Prime Performance Manager webutil erlangs.
6-13Cisco Prime Performance Manager 1.0 User Guide
OL-24597-01
Chapter 6 Viewing Administrative Information from the Web Interface Viewing SNMP Tab Details
Each of the web configuration commands requires you to be logged in as the root user, as described in the “Becoming the Root User” section on page 2-2, as described in the “Enabling SSL Support on Gateway in Prime Performance Manager” section on page 3-15.
Viewing System Reports Property
To access the Report Properties file, choose Administrative > Reports in the Properties pane. Prime Performance Manager displays the contents of the /opt/CSCOppm-gw/properties/Reports.properties file.
The Report Properties file contains various properties that can be enabled/disabled in the Prime Performance Manager server. For example:
STATS_REPORTS = enable
RPT_5MIN_AGE = 3RPT_15MIN_AGE = 3RPT_HOURLY_AGE = 7RPT_DAILY_AGE = 31
RPT_5MIN_CSV_AGE = 3RPT_15MIN_CSV_AGE = 3RPT_HOURLY_CSV_AGE = 7RPT_DAILY_CSV_AGE = 31
RPT_TIMEMODE = 24NODE_NAME_TYPE = dnsname
RPT_5MIN_ENABLED = trueRPT_15MIN_ENABLED = trueRPT_HOURLY_ENABLED = trueRPT_DAILY_ENABLED = true
Viewing SNMP Tab DetailsThe Prime Performance Manager web interface SNMP tab provides access to SNMP (Simple Network Management Protocol) Editor to edit the SNMP settings. To view the SNMP tab information, click Administrative in the navigation tree and then click the SNMP tab in the right pane. The SNMP tab contains:
Note Prime Performance Manager does not support SNMP v3 devices.
• SNMP Editor Buttons, page 6-14
• SNMP Editor Table, page 6-16
SNMP Editor ButtonsThe SNMP tab contains the following buttons. See Table 6-9 for more details.
6-14Cisco Prime Performance Manager 1.0 User Guide
OL-24597-01
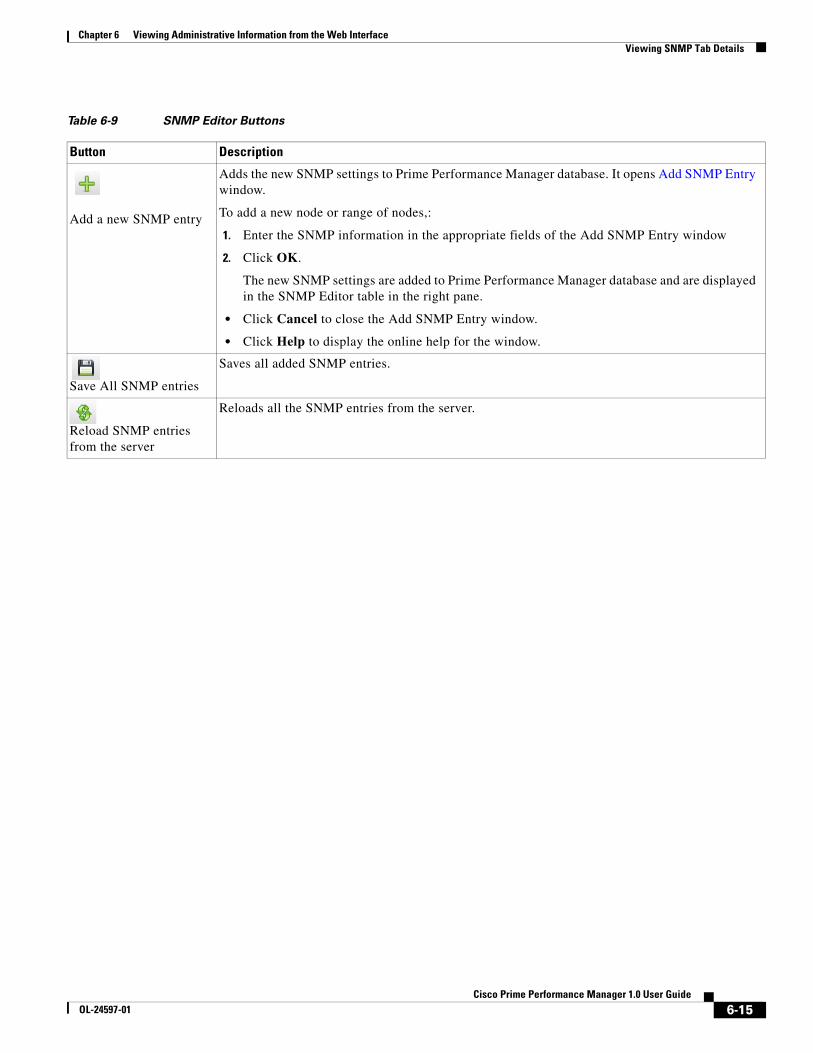
Chapter 6 Viewing Administrative Information from the Web Interface Viewing SNMP Tab Details
Table 6-9 SNMP Editor Buttons
Button Description
Add a new SNMP entry
Adds the new SNMP settings to Prime Performance Manager database. It opens Add SNMP Entry window.
To add a new node or range of nodes,:
1. Enter the SNMP information in the appropriate fields of the Add SNMP Entry window
2. Click OK.
The new SNMP settings are added to Prime Performance Manager database and are displayed in the SNMP Editor table in the right pane.
• Click Cancel to close the Add SNMP Entry window.
• Click Help to display the online help for the window.
Save All SNMP entries
Saves all added SNMP entries.
Reload SNMP entries from the server
Reloads all the SNMP entries from the server.
6-15Cisco Prime Performance Manager 1.0 User Guide
OL-24597-01
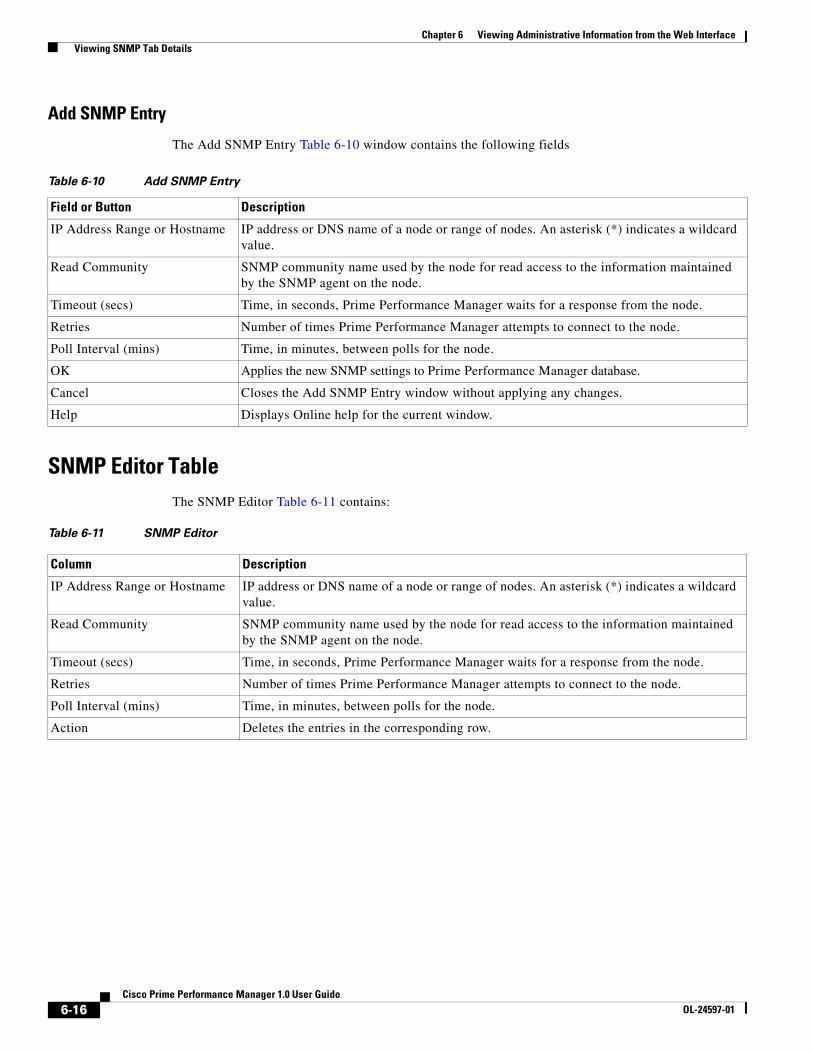
Chapter 6 Viewing Administrative Information from the Web Interface Viewing SNMP Tab Details
Add SNMP Entry
The Add SNMP Entry Table 6-10 window contains the following fields
Table 6-10 Add SNMP Entry
SNMP Editor TableThe SNMP Editor Table 6-11 contains:
Field or Button Description
IP Address Range or Hostname IP address or DNS name of a node or range of nodes. An asterisk (*) indicates a wildcard value.
Read Community SNMP community name used by the node for read access to the information maintained by the SNMP agent on the node.
Timeout (secs) Time, in seconds, Prime Performance Manager waits for a response from the node.
Retries Number of times Prime Performance Manager attempts to connect to the node.
Poll Interval (mins) Time, in minutes, between polls for the node.
OK Applies the new SNMP settings to Prime Performance Manager database.
Cancel Closes the Add SNMP Entry window without applying any changes.
Help Displays Online help for the current window.
Table 6-11 SNMP Editor
Column Description
IP Address Range or Hostname IP address or DNS name of a node or range of nodes. An asterisk (*) indicates a wildcard value.
Read Community SNMP community name used by the node for read access to the information maintained by the SNMP agent on the node.
Timeout (secs) Time, in seconds, Prime Performance Manager waits for a response from the node.
Retries Number of times Prime Performance Manager attempts to connect to the node.
Poll Interval (mins) Time, in minutes, between polls for the node.
Action Deletes the entries in the corresponding row.
6-16Cisco Prime Performance Manager 1.0 User Guide
OL-24597-01
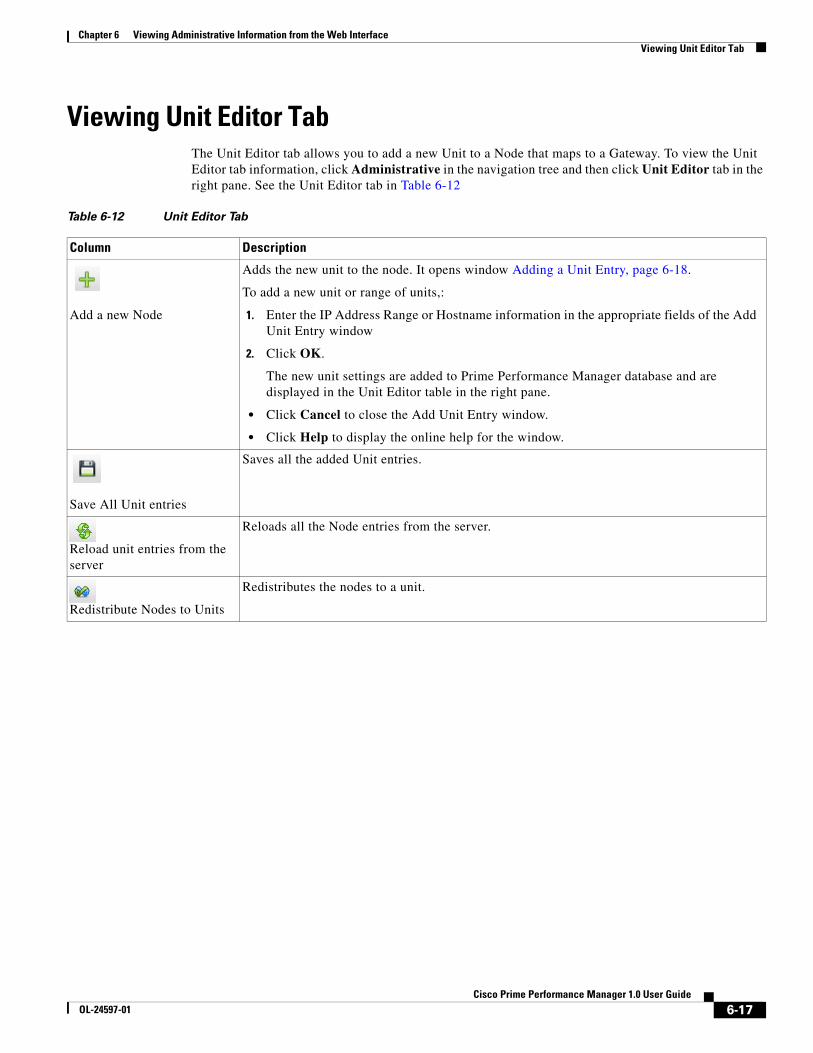
Chapter 6 Viewing Administrative Information from the Web Interface Viewing Unit Editor Tab
Viewing Unit Editor TabThe Unit Editor tab allows you to add a new Unit to a Node that maps to a Gateway. To view the Unit Editor tab information, click Administrative in the navigation tree and then click Unit Editor tab in the right pane. See the Unit Editor tab in Table 6-12
Table 6-12 Unit Editor Tab
Column Description
Add a new Node
Adds the new unit to the node. It opens window Adding a Unit Entry, page 6-18.
To add a new unit or range of units,:
1. Enter the IP Address Range or Hostname information in the appropriate fields of the Add Unit Entry window
2. Click OK.
The new unit settings are added to Prime Performance Manager database and are displayed in the Unit Editor table in the right pane.
• Click Cancel to close the Add Unit Entry window.
• Click Help to display the online help for the window.
Save All Unit entries
Saves all the added Unit entries.
Reload unit entries from the server
Reloads all the Node entries from the server.
Redistribute Nodes to Units
Redistributes the nodes to a unit.
6-17Cisco Prime Performance Manager 1.0 User Guide
OL-24597-01
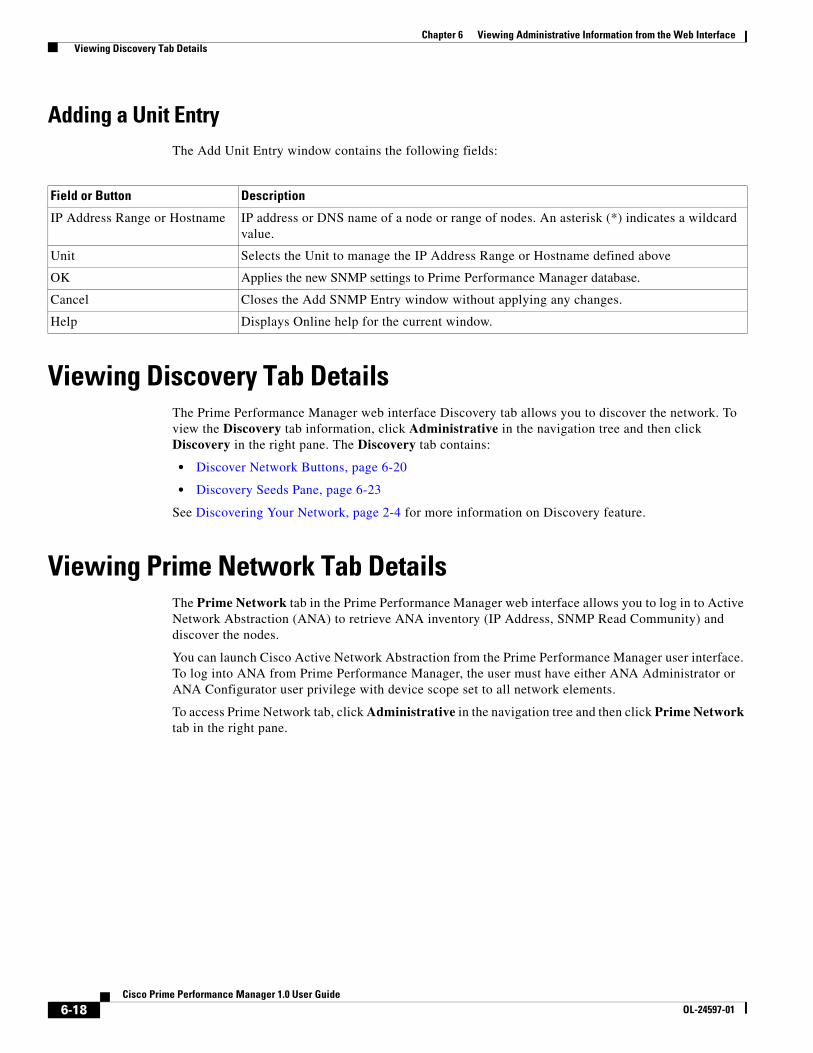
Chapter 6 Viewing Administrative Information from the Web Interface Viewing Discovery Tab Details
Adding a Unit EntryThe Add Unit Entry window contains the following fields:
Viewing Discovery Tab DetailsThe Prime Performance Manager web interface Discovery tab allows you to discover the network. To view the Discovery tab information, click Administrative in the navigation tree and then click Discovery in the right pane. The Discovery tab contains:
• Discover Network Buttons, page 6-20
• Discovery Seeds Pane, page 6-23
See Discovering Your Network, page 2-4 for more information on Discovery feature.
Viewing Prime Network Tab DetailsThe Prime Network tab in the Prime Performance Manager web interface allows you to log in to Active Network Abstraction (ANA) to retrieve ANA inventory (IP Address, SNMP Read Community) and discover the nodes.
You can launch Cisco Active Network Abstraction from the Prime Performance Manager user interface. To log into ANA from Prime Performance Manager, the user must have either ANA Administrator or ANA Configurator user privilege with device scope set to all network elements.
To access Prime Network tab, click Administrative in the navigation tree and then click Prime Network tab in the right pane.
Field or Button Description
IP Address Range or Hostname IP address or DNS name of a node or range of nodes. An asterisk (*) indicates a wildcard value.
Unit Selects the Unit to manage the IP Address Range or Hostname defined above
OK Applies the new SNMP settings to Prime Performance Manager database.
Cancel Closes the Add SNMP Entry window without applying any changes.
Help Displays Online help for the current window.
6-18Cisco Prime Performance Manager 1.0 User Guide
OL-24597-01

Chapter 6 Viewing Administrative Information from the Web Interface Viewing Prime Network Tab Details
The Prime Network Gateway in Table 6-13 contains
Strict Sync allows you to discover only Prime Network Gateway type of devices and not other devices. So in Strict Sync mode there is no SNMP (see Viewing SNMP Tab Details, page 6-14) tab and Discovery (see Discover Network Buttons, page 6-20) tabs available to add a node explicitly.
Note Strict Sync depends on Prime Network Gateway for the source of inventory information.
Table 6-13 Prime Network Tab
Column Description
Host Name or IP Address Allows you to enter the Prime Network (ANA) Host Name or IP Address.
Port Allows you to enter values from 1 to 65535. The default ANA web services port is 6081.
User Name Allows you to enter the username.The user must have either ANA Administrator or ANA Configurator user privilege.
Password Allows you to enter the password
Strict Sync • Check the check box to allow Prime Performance Manager to manage devices that are in the Prime Network (ANA) inventory.
• Uncheck the check box to allow Prime Performance Manager to manage devices that are not in the Prime Network (ANA) inventory.
Import Inventory
Allows Prime Network (ANA) nodes to import and synchronize with Prime Performance Manager.
See Nodes Table, page 5-23 for the list of nodes discovered by Prime Network Gateway.
Cross Launch
Allows to cross launch Prime Network Gateway with Prime Performance Manager.
6-19Cisco Prime Performance Manager 1.0 User Guide
OL-24597-01
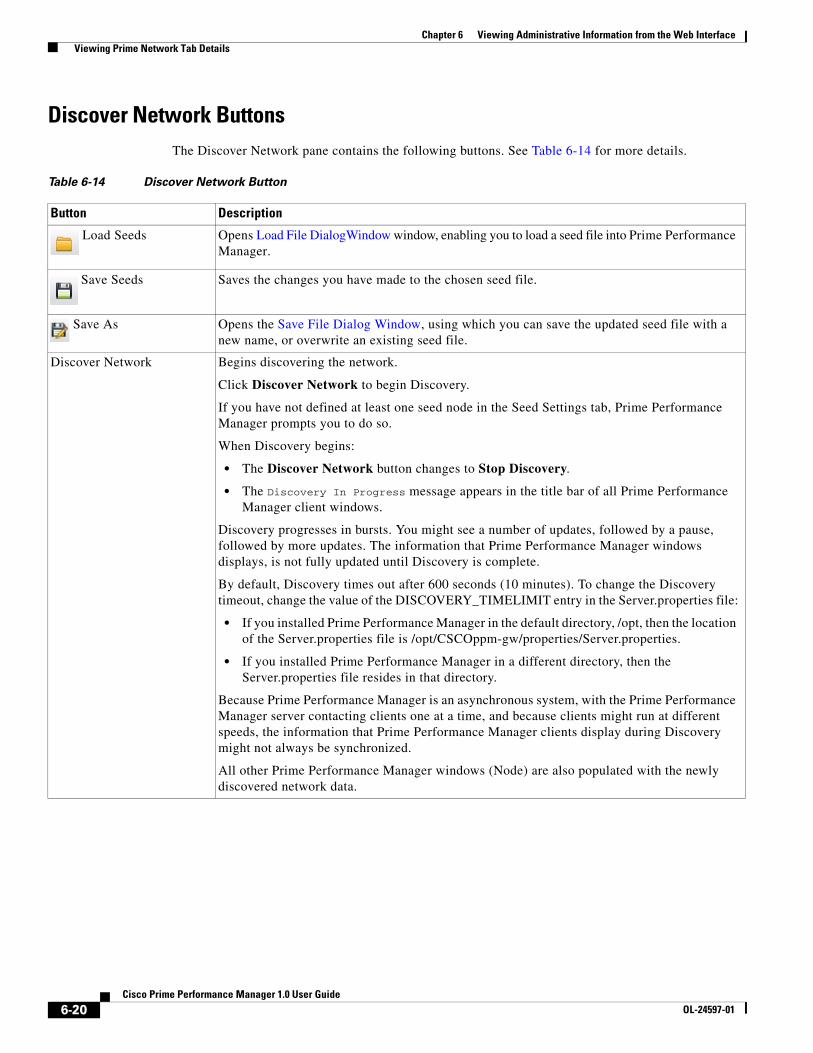
Chapter 6 Viewing Administrative Information from the Web Interface Viewing Prime Network Tab Details
Discover Network ButtonsThe Discover Network pane contains the following buttons. See Table 6-14 for more details.
Table 6-14 Discover Network Button
Button Description
Load Seeds Opens Load File DialogWindow window, enabling you to load a seed file into Prime Performance Manager.
Save Seeds Saves the changes you have made to the chosen seed file.
Save As Opens the Save File Dialog Window, using which you can save the updated seed file with a new name, or overwrite an existing seed file.
Discover Network Begins discovering the network.
Click Discover Network to begin Discovery.
If you have not defined at least one seed node in the Seed Settings tab, Prime Performance Manager prompts you to do so.
When Discovery begins:
• The Discover Network button changes to Stop Discovery.
• The Discovery In Progress message appears in the title bar of all Prime Performance Manager client windows.
Discovery progresses in bursts. You might see a number of updates, followed by a pause, followed by more updates. The information that Prime Performance Manager windows displays, is not fully updated until Discovery is complete.
By default, Discovery times out after 600 seconds (10 minutes). To change the Discovery timeout, change the value of the DISCOVERY_TIMELIMIT entry in the Server.properties file:
• If you installed Prime Performance Manager in the default directory, /opt, then the location of the Server.properties file is /opt/CSCOppm-gw/properties/Server.properties.
• If you installed Prime Performance Manager in a different directory, then the Server.properties file resides in that directory.
Because Prime Performance Manager is an asynchronous system, with the Prime Performance Manager server contacting clients one at a time, and because clients might run at different speeds, the information that Prime Performance Manager clients display during Discovery might not always be synchronized.
All other Prime Performance Manager windows (Node) are also populated with the newly discovered network data.
6-20Cisco Prime Performance Manager 1.0 User Guide
OL-24597-01
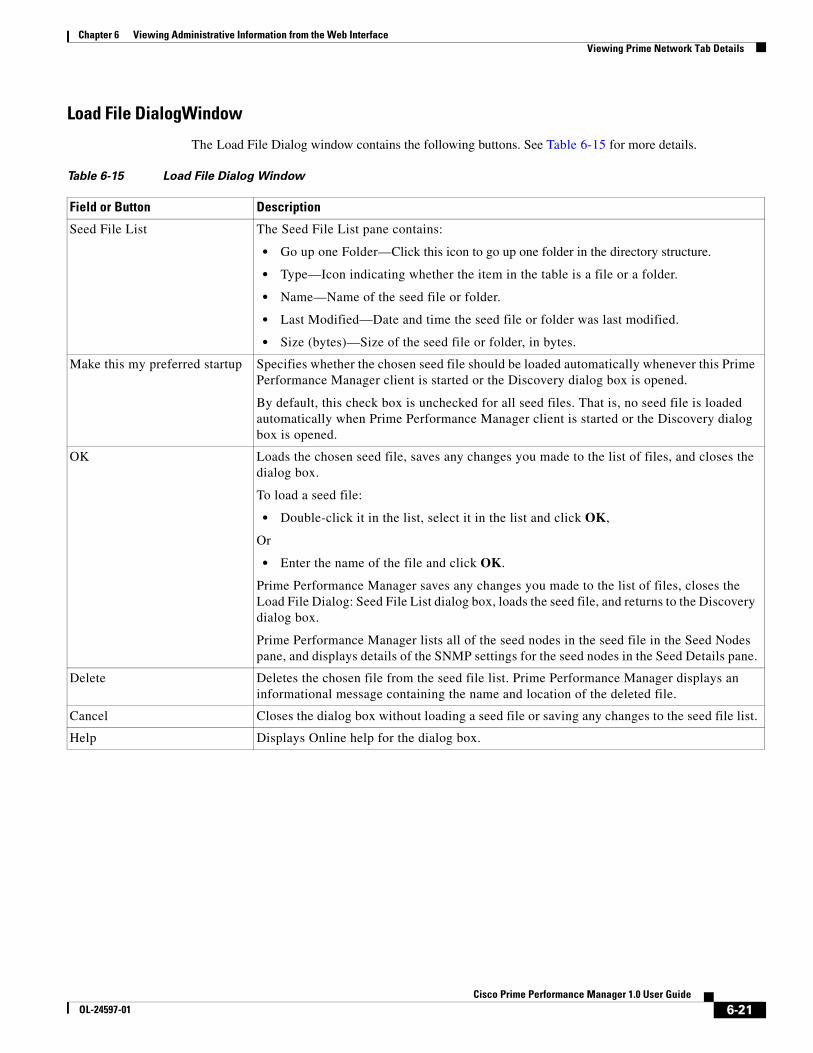
Chapter 6 Viewing Administrative Information from the Web Interface Viewing Prime Network Tab Details
Load File DialogWindow
The Load File Dialog window contains the following buttons. See Table 6-15 for more details.
Table 6-15 Load File Dialog Window
Field or Button Description
Seed File List The Seed File List pane contains:
• Go up one Folder—Click this icon to go up one folder in the directory structure.
• Type—Icon indicating whether the item in the table is a file or a folder.
• Name—Name of the seed file or folder.
• Last Modified—Date and time the seed file or folder was last modified.
• Size (bytes)—Size of the seed file or folder, in bytes.
Make this my preferred startup Specifies whether the chosen seed file should be loaded automatically whenever this Prime Performance Manager client is started or the Discovery dialog box is opened.
By default, this check box is unchecked for all seed files. That is, no seed file is loaded automatically when Prime Performance Manager client is started or the Discovery dialog box is opened.
OK Loads the chosen seed file, saves any changes you made to the list of files, and closes the dialog box.
To load a seed file:
• Double-click it in the list, select it in the list and click OK,
Or
• Enter the name of the file and click OK.
Prime Performance Manager saves any changes you made to the list of files, closes the Load File Dialog: Seed File List dialog box, loads the seed file, and returns to the Discovery dialog box.
Prime Performance Manager lists all of the seed nodes in the seed file in the Seed Nodes pane, and displays details of the SNMP settings for the seed nodes in the Seed Details pane.
Delete Deletes the chosen file from the seed file list. Prime Performance Manager displays an informational message containing the name and location of the deleted file.
Cancel Closes the dialog box without loading a seed file or saving any changes to the seed file list.
Help Displays Online help for the dialog box.
6-21Cisco Prime Performance Manager 1.0 User Guide
OL-24597-01
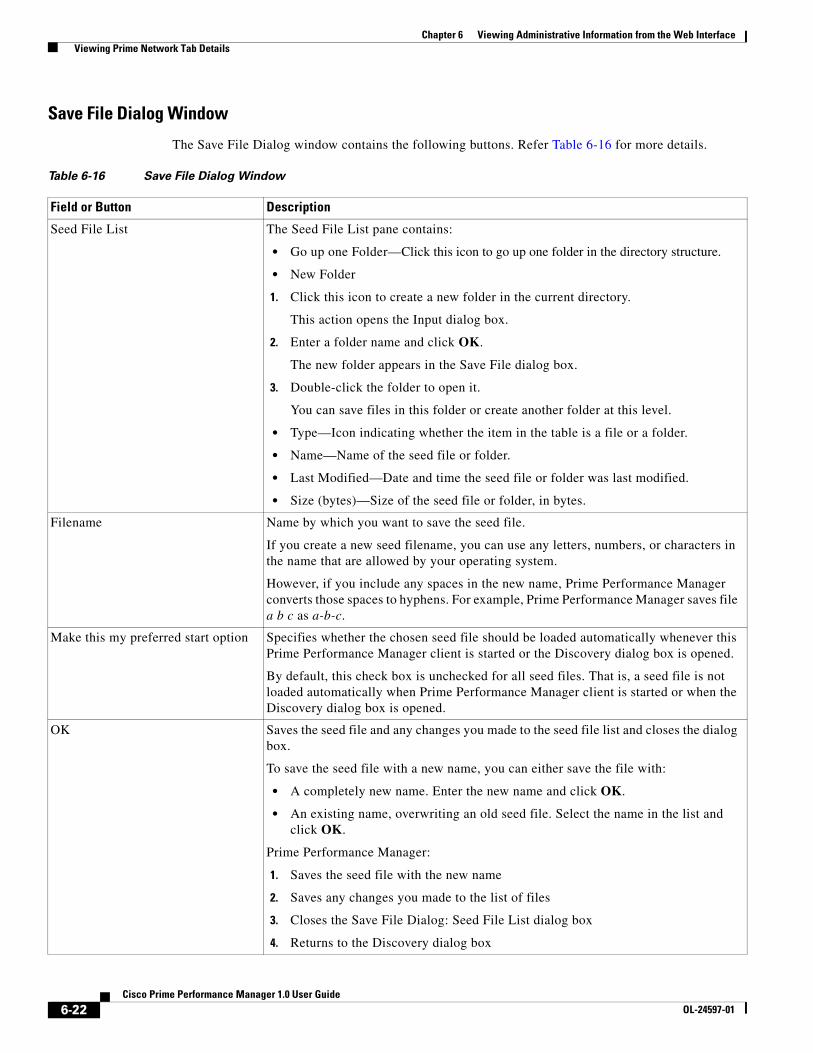
Chapter 6 Viewing Administrative Information from the Web Interface Viewing Prime Network Tab Details
Save File Dialog Window
The Save File Dialog window contains the following buttons. Refer Table 6-16 for more details.
Table 6-16 Save File Dialog Window
Field or Button Description
Seed File List The Seed File List pane contains:
• Go up one Folder—Click this icon to go up one folder in the directory structure.
• New Folder
1. Click this icon to create a new folder in the current directory.
This action opens the Input dialog box.
2. Enter a folder name and click OK.
The new folder appears in the Save File dialog box.
3. Double-click the folder to open it.
You can save files in this folder or create another folder at this level.
• Type—Icon indicating whether the item in the table is a file or a folder.
• Name—Name of the seed file or folder.
• Last Modified—Date and time the seed file or folder was last modified.
• Size (bytes)—Size of the seed file or folder, in bytes.
Filename Name by which you want to save the seed file.
If you create a new seed filename, you can use any letters, numbers, or characters in the name that are allowed by your operating system.
However, if you include any spaces in the new name, Prime Performance Manager converts those spaces to hyphens. For example, Prime Performance Manager saves file a b c as a-b-c.
Make this my preferred start option Specifies whether the chosen seed file should be loaded automatically whenever this Prime Performance Manager client is started or the Discovery dialog box is opened.
By default, this check box is unchecked for all seed files. That is, a seed file is not loaded automatically when Prime Performance Manager client is started or when the Discovery dialog box is opened.
OK Saves the seed file and any changes you made to the seed file list and closes the dialog box.
To save the seed file with a new name, you can either save the file with:
• A completely new name. Enter the new name and click OK.
• An existing name, overwriting an old seed file. Select the name in the list and click OK.
Prime Performance Manager:
1. Saves the seed file with the new name
2. Saves any changes you made to the list of files
3. Closes the Save File Dialog: Seed File List dialog box
4. Returns to the Discovery dialog box
6-22Cisco Prime Performance Manager 1.0 User Guide
OL-24597-01

Chapter 6 Viewing Administrative Information from the Web Interface Viewing Prime Network Tab Details
Discovery Seeds PaneThe Discovery Seeds pane contains:
• Seed Nodes File: No File Panel, page 6-23
• Seed Details Panel, page 6-23
Seed Nodes File: No File Panel
The Seed Nodes File: No File panel contains the following buttons. See Table 6-17 for more details.
Seed Details Panel
The Seed Details panel contains the following buttons. See Table 6-18 for more details.
Delete Deletes the chosen file from the seed file list. Prime Performance Manager displays an informational message containing the name and location of the deleted file.
Cancel Closes the dialog box without saving the seed file or saving any changes to the seed file list.
Help Displays Online help for the dialog box.
Table 6-16 Save File Dialog Window (continued)
Field or Button Description
Table 6-17 Seeds Nodes File
Field or Button Description
IP Address, Address Range, Subnet, CIDR, or DNS Hostname
Address or name of the chosen seed node.
To create a new seed file, enter the name or address of a seed node in this field. Examples of acceptable input include:
• IP Address: 1.2.3.4 (see the guidelines for IP addresses in).
• Address Range: 1.2.3.2-15
• Subnet, CIDR: 1.2.3.0/24, 1.2.3.0/255.255.255.0
• DNS Hostname: Prime Performance Manager.cisco.com
Add Adds a new seed node to Prime Performance Manager.
Delete Deletes the chosen seed node. A confirmation message is displayed before deleting the seed node.
Table 6-18 Seed Details Panel
Field Description
IP Address Range or Hostname IP address or DNS name of a node or range of nodes. An asterisk (*) indicates a wildcard value.
Read Community SNMP community name used by the node for read access to the information maintained by the SNMP agent on the node.
6-23Cisco Prime Performance Manager 1.0 User Guide
OL-24597-01
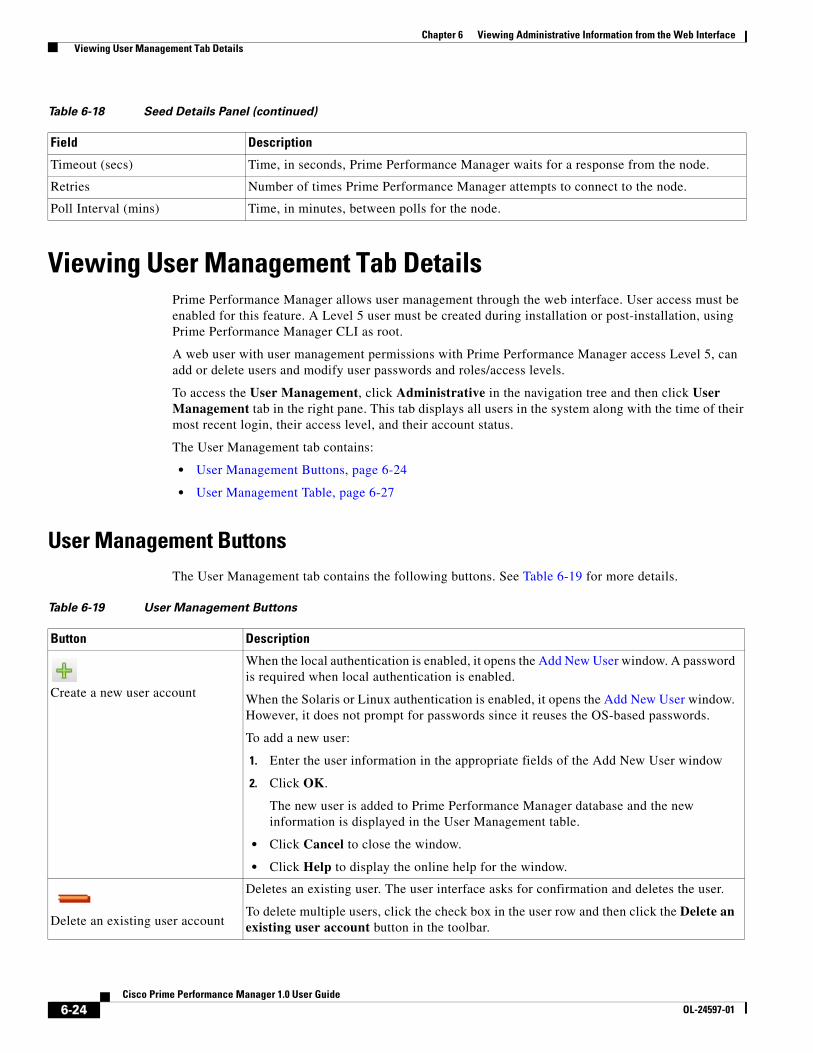
Chapter 6 Viewing Administrative Information from the Web Interface Viewing User Management Tab Details
Viewing User Management Tab DetailsPrime Performance Manager allows user management through the web interface. User access must be enabled for this feature. A Level 5 user must be created during installation or post-installation, using Prime Performance Manager CLI as root.
A web user with user management permissions with Prime Performance Manager access Level 5, can add or delete users and modify user passwords and roles/access levels.
To access the User Management, click Administrative in the navigation tree and then click User Management tab in the right pane. This tab displays all users in the system along with the time of their most recent login, their access level, and their account status.
The User Management tab contains:
• User Management Buttons, page 6-24
• User Management Table, page 6-27
User Management ButtonsThe User Management tab contains the following buttons. See Table 6-19 for more details.
Timeout (secs) Time, in seconds, Prime Performance Manager waits for a response from the node.
Retries Number of times Prime Performance Manager attempts to connect to the node.
Poll Interval (mins) Time, in minutes, between polls for the node.
Table 6-18 Seed Details Panel (continued)
Field Description
Table 6-19 User Management Buttons
Button Description
Create a new user account
When the local authentication is enabled, it opens the Add New User window. A password is required when local authentication is enabled.
When the Solaris or Linux authentication is enabled, it opens the Add New User window. However, it does not prompt for passwords since it reuses the OS-based passwords.
To add a new user:
1. Enter the user information in the appropriate fields of the Add New User window
2. Click OK.
The new user is added to Prime Performance Manager database and the new information is displayed in the User Management table.
• Click Cancel to close the window.
• Click Help to display the online help for the window.
Delete an existing user account
Deletes an existing user. The user interface asks for confirmation and deletes the user.
To delete multiple users, click the check box in the user row and then click the Delete an existing user account button in the toolbar.
6-24Cisco Prime Performance Manager 1.0 User Guide
OL-24597-01

Chapter 6 Viewing Administrative Information from the Web Interface Viewing User Management Tab Details
Users users selected Number of currently selected users.
Clear Selection Deselects the selected list of users.
Table 6-19 User Management Buttons (continued)
Button Description
6-25Cisco Prime Performance Manager 1.0 User Guide
OL-24597-01
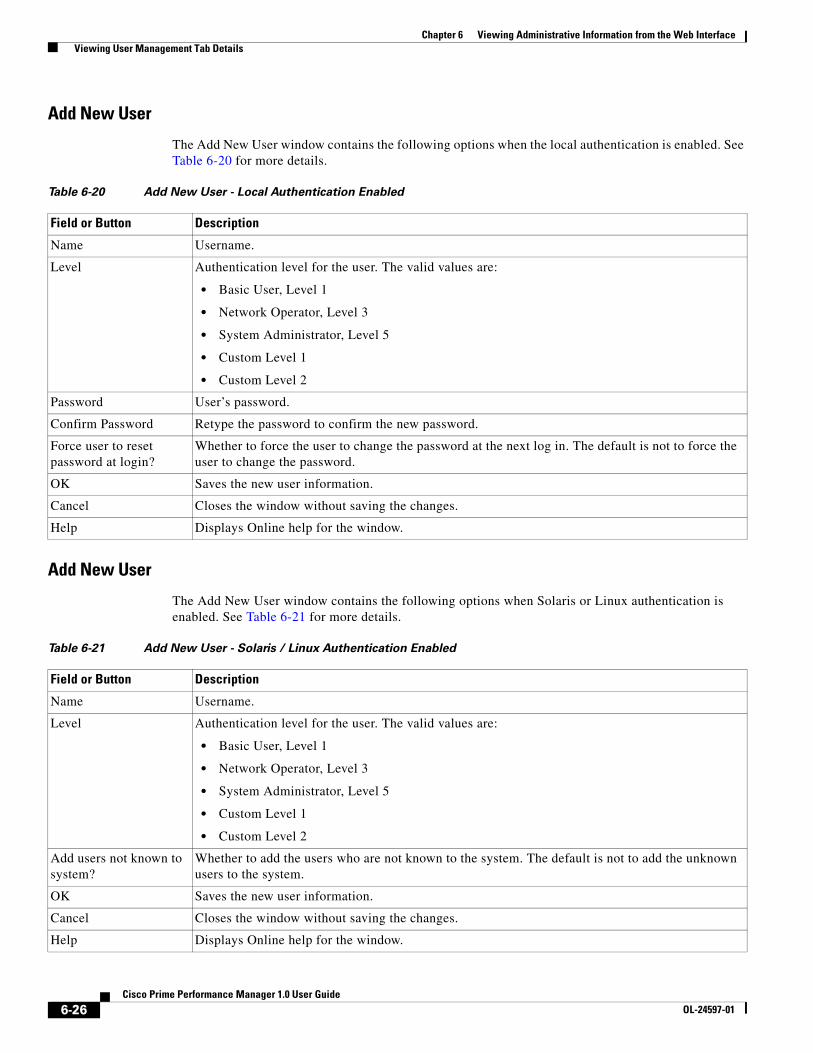
Chapter 6 Viewing Administrative Information from the Web Interface Viewing User Management Tab Details
Add New User
The Add New User window contains the following options when the local authentication is enabled. See Table 6-20 for more details.
Add New User
The Add New User window contains the following options when Solaris or Linux authentication is enabled. See Table 6-21 for more details.
Table 6-20 Add New User - Local Authentication Enabled
Field or Button Description
Name Username.
Level Authentication level for the user. The valid values are:
• Basic User, Level 1
• Network Operator, Level 3
• System Administrator, Level 5
• Custom Level 1
• Custom Level 2
Password User’s password.
Confirm Password Retype the password to confirm the new password.
Force user to reset password at login?
Whether to force the user to change the password at the next log in. The default is not to force the user to change the password.
OK Saves the new user information.
Cancel Closes the window without saving the changes.
Help Displays Online help for the window.
Table 6-21 Add New User - Solaris / Linux Authentication Enabled
Field or Button Description
Name Username.
Level Authentication level for the user. The valid values are:
• Basic User, Level 1
• Network Operator, Level 3
• System Administrator, Level 5
• Custom Level 1
• Custom Level 2
Add users not known to system?
Whether to add the users who are not known to the system. The default is not to add the unknown users to the system.
OK Saves the new user information.
Cancel Closes the window without saving the changes.
Help Displays Online help for the window.
6-26Cisco Prime Performance Manager 1.0 User Guide
OL-24597-01
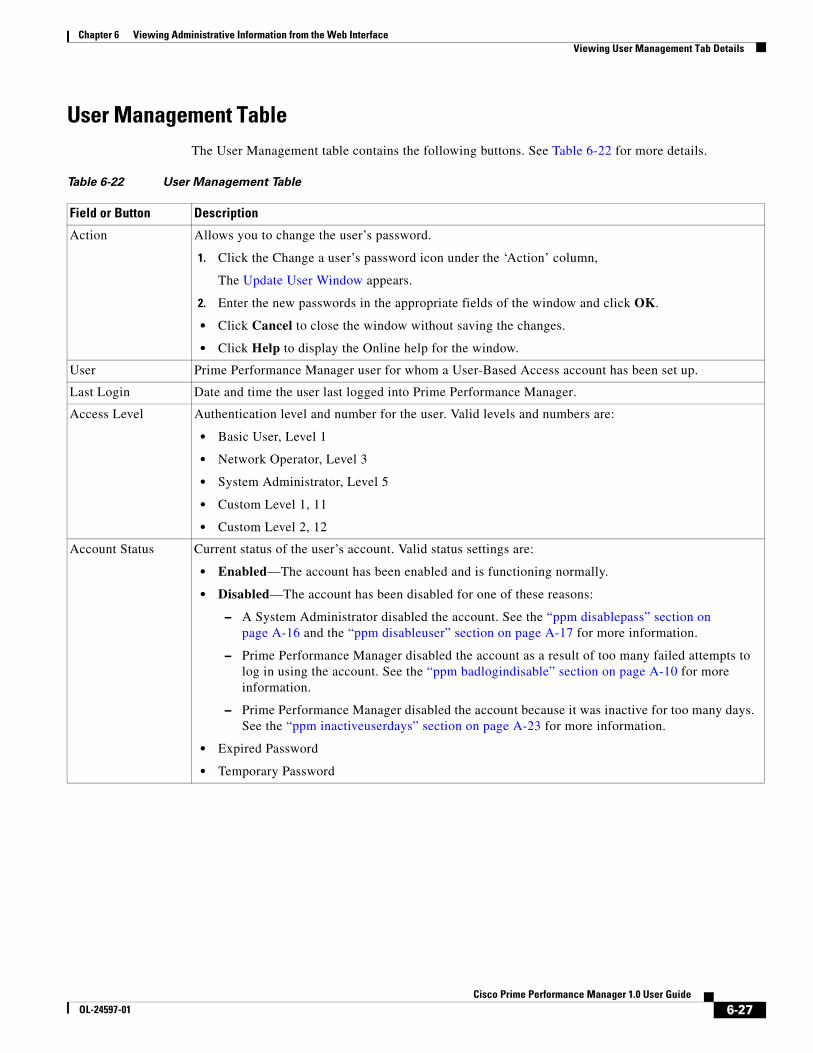
Chapter 6 Viewing Administrative Information from the Web Interface Viewing User Management Tab Details
User Management TableThe User Management table contains the following buttons. See Table 6-22 for more details.
Table 6-22 User Management Table
Field or Button Description
Action Allows you to change the user’s password.
1. Click the Change a user’s password icon under the ‘Action’ column,
The Update User Window appears.
2. Enter the new passwords in the appropriate fields of the window and click OK.
• Click Cancel to close the window without saving the changes.
• Click Help to display the Online help for the window.
User Prime Performance Manager user for whom a User-Based Access account has been set up.
Last Login Date and time the user last logged into Prime Performance Manager.
Access Level Authentication level and number for the user. Valid levels and numbers are:
• Basic User, Level 1
• Network Operator, Level 3
• System Administrator, Level 5
• Custom Level 1, 11
• Custom Level 2, 12
Account Status Current status of the user’s account. Valid status settings are:
• Enabled—The account has been enabled and is functioning normally.
• Disabled—The account has been disabled for one of these reasons:
– A System Administrator disabled the account. See the “ppm disablepass” section on page A-16 and the “ppm disableuser” section on page A-17 for more information.
– Prime Performance Manager disabled the account as a result of too many failed attempts to log in using the account. See the “ppm badlogindisable” section on page A-10 for more information.
– Prime Performance Manager disabled the account because it was inactive for too many days. See the “ppm inactiveuserdays” section on page A-23 for more information.
• Expired Password
• Temporary Password
6-27Cisco Prime Performance Manager 1.0 User Guide
OL-24597-01

Chapter 6 Viewing Administrative Information from the Web Interface Viewing User Management Tab Details
Update User Window
The Update user window contains the following buttons. See Table 6-23 for more details.
Table 6-23 Update User Window
Field or Button Description
Password Enter the password.
Confirm Password Retype the password to confirm the new password.
Force user to reset password at login?
Whether to force the user to change the password at the next log in. The default is not to force the user to change the password.
OK Saves the new user information.
Cancel Closes the window without saving the changes.
Help Displays online help for the window.
6-28Cisco Prime Performance Manager 1.0 User Guide
OL-24597-01

OL-24597-01
C H A P T E R7
Managing ReportsAt scheduled intervals, you can configure the Cisco Prime Performance Manager to gather critical information from network objects that it detects.
Prime Performance Manager uses this information to calculate statistics, such as ethernet statistics, peer flap statistics, performance statistics, device availability and so on. It generates reports based on those statistics.
To view all reports:
Step 1 Select Reports in the Web Navigation tree
Step 2 Click the type of report that you want to view in the web navigation tree. For example, if you want to view current TCP reports, select Reports > Application Traffic > TCP.
All TCP reports appear. See Viewing Reports, page 5-30 for more information.
To view the report for a single node of a specified report type, go to:
Step 1 Click a node in the left pane of the Web Navigation tree
Step 2 Click the type of report you want to view.
Reports for the active nodes appear in the right content pane.
Step 3 Select a node.
The reports for that specific node are displayed. See Viewing Node Level Reports, page 7-3 for more information
This chapter contains:
• Viewing Report Status Table, page 7-2
• Enabling Reports Using the CLI, page 7-3
• Viewing Reports, page 7-4
7-1Cisco Prime Performance Manager 1.0 User Guide
Chapter 7 Managing Reports Viewing Report Status Table
Viewing Report Status TableThe Reports Status Table in the Prime Performance Manager web interface content pane allows you to globally enable and disable reports that are displayed in the left navigation tree.
Note Only reports that run on a regularly scheduled interval are displayed in the Hourly and Daily data. Reports that run continuously are not displayed.
To access the main Reports page:
Step 1 In a web browser, launch the Prime Performance Manager web interface (see Accessing Prime Performance Manager Web Interface, page 5-2).
Step 2 In the navigation tree, click Reports.
The Reports Status Table in the content area displays the Report Type and the status (enabled or disabled).
Step 3 Select the report that you wish to disable and click Save.
The reports in the left navigation tree refreshes to display the status of the report disabled.
To enable a report in Prime Performance Manager Web interface, click the check box in the Status column.
Related Topic
Viewing Network Level Reports, page 7-2
Viewing Node Level Reports, page 7-3
Viewing Network Level ReportsThe Network Level Reports display a summary of the top level graph view summary that is available for a particular report, in the left navigation pane. At Network Level, Table/CSV/Graph views are available to all devices in the network. To view a Network Level Report, select Reports > Availability > Interfaces.
The right content pane displays the network level graph view summary of nodes available.
To view the different types of reports in the right content pane, click the Reports drop-down arrow and select the reports you want to view.
Related Topics
Viewing Graph Series Editor Details, page 7-9
Toolbar Buttons, page 5-15
7-2Cisco Prime Performance Manager 1.0 User Guide
OL-24597-01
Chapter 7 Managing Reports Enabling Reports Using the CLI
Viewing Node Level ReportsThe Node Level Reports display details on reports that are available for a particular node. If you select a node from the top level graph view summary in the right content pane (see Viewing Network Level Reports, page 7-2 for details) it displays the reports detail for that node with the node name in the left navigation pane.
See Managing Reports, page 7-1 for more information.
After you select a node, the Report Status tab appears. This tab displays the nodes that are specific to that node. See Viewing Report Status Table, page 7-2 for more information
Related Topics
• Viewing Details Tab, page 7-6
• Displaying Active Alarms and Event History, page 5-11
• Toolbar Buttons, page 5-15
Enabling Reports Using the CLIUsing CLI commands, you can generate reports that can be run at specified intervals. You can enable and disable automatic generation of these reports, using the ppm statreps commands (see ppm statreps, page A-53).
After you enable generation of a report, it will run at the specified intervals until you disable it with the appropriate CLI command.
Enabling reports using the CLI, is the same as enabling and disabling reports from the Reports page. To enable or disable report aging settings, select Report in the left navigation pane and enter the aging value in the Aging Settings.
The database report aging occurs once every day before the backup starts. It is triggered by the cron job ppmCron.sh backup
To enable reports using the CLI:
Step 1 Log in as the root user.
Step 2 Enter:
cd /opt/CSCOppm-gw/bin
Step 3 Enter the following CLI command to enable all report types:
./ppm statreps all
To see a list of all report-related CLI commands, enter the following command:
./ppm rephelp
7-3Cisco Prime Performance Manager 1.0 User Guide
OL-24597-01

Chapter 7 Managing Reports Viewing Reports
Viewing ReportsAfter you generate reports, you can view them using the Prime Performance Manager web interface. You can view historical reports for all objects of a specific type. For example, all link reports for all links.
You can also view reports for a specific object. For example, all link reports for a specific link.
For the reports whose output type is Graph, the Graph Series Editor window is displayed when you click the Custom series icon. See Viewing Graph Series Editor Details, page 7-9 for details.
For these reports, you can use the Sort Parameter option to select the criteria to include a top set of series. You can also use this option to sort the graphs that are displayed.
You can access reports in the Prime Performance Manager web interface through these categories. See Table 7-1 for more details.
Table 7-1 Reports
Category Report Type Related Content
Reports > Application Traffic AAA AAA Reports
SNMP SNMP Reports
TCP TCP Reports
UDP UDP Reports
Reports > Availability Interfaces Interface Reports
MPLS Networks MPLS Networks Reports
PseudoWires PseudoWires Reports
SNMP Ping SNMP Ping Reports
Reports >IP Protocols BGP CAR Reports
ICMP Class Map Reports
OSPF EVC Reports
Reports >IP QoS CAR BGP Reports
Class Map ICMP Reports
EVC OSPF Reports
Reports > IP SLA Ethernet OAM Ethernet OAM Reports
ICMP Jitter ICMP Jitter Reports
RoundTrip Time RoundTrip Time Reports
UDP Jitter UDP Jitter Reports
Reports > Resources Buffers Buffers Reports
CPU CPU Reports
Memory Memory Reports
Reports > Transport Statistics ATM Interface ATM Interface Reports
ATM PVC ATM PVC Reports
EVC Interface EVC Interface Reports
Ethernet Errors Ethernet Errors Reports
Interface Interface Reports
7-4Cisco Prime Performance Manager 1.0 User Guide
OL-24597-01

Chapter 7 Managing Reports Viewing Reports
Note Prime Performance Manager reports are based on the MIBs supported on the devices. Refer MIBs, page D-1 for MIBs supported in Prime Performance Manager.
Yo can view a Web report either for all objects of a specified type or for a single object of a specified type.
To view a Web report for all objects of a specified type:
Step 1 Select Reports in the Prime Performance Manager web navigation tree and click the type of report you want to view
For example, if you want to view hourly TCP Segments report, select Reports > Application Traffic > TCP> TCP Segments > 15 Minutes/Hourly/Daily.
All link reports appear.
Step 2 Click the Reports drop-down arrow and navigate to the type of report you need. (You need to select the various drop-down menus)
Step 3 Select Duration from the drop-down lists. For example, if you wanted to view hourly link reports for the last 12 hours, choose Last 12 Hours from the Duration drop-down.
For most Statistics and Accounting reports, to customize the date, time range, or both, click the Customize the date and time range icon . Note that these dates are the dates with server time zone.
Step 4 Click the Output Mode drop-down to view the corresponding report in Graph / Table / CSV mode.
CSV reports for all nodes are generated in /opt/CSCOppm-gw/reports and prefixed with the report type for additional context.
For example, B20110308.0945-0500-20110308.1000-0500_ppm-xxx-vm38.csv report is prefixed with CPU.B20110308.0945-0500-20110308.1000-0500_ppm-xxx-vm38.csv.
Step 5 Click the green arrow to run the report
To view a Web report for a single object of a specified type:
Step 1 Click a node in the Web navigation tree to select an object in a node.
Step 2 In the content area in the right pane, click the Reports tab.
Reports appear for the active object only.
Reports > Transport Statistics > MPLS In Segment In Segment Reports
LDP LDP Reports
MPLS Interface MPLS Interface Reports
TE Tunnel TE Tunnel Reports
Out Segment Out Segment Reports
Reports > Transport Statistics Pseudowire Pseudowire Reports
Reports > Transport Statistics ATM Interface ATM Interface Reports
Table 7-1 Reports (continued)
Category Report Type Related Content
7-5Cisco Prime Performance Manager 1.0 User Guide
OL-24597-01

Chapter 7 Managing Reports Viewing Details Tab
Step 3 Click the Reports drop-down arrow and navigate to the type of report you need. (You need to select the various drop-down menus)
Step 4 Select Duration from the drop-down lists. For example, if you wanted to view hourly link reports for the last 12 hours, choose Last 12 Hours from the Duration drop-down.
For most Statistics and Accounting reports, to customize the date, time range, or both click the Customize the date and time range icon . Note that these dates are the dates with server time zone.
Step 5 Click the Output Mode drop-down to view the corresponding report in Graph / Table / CSV mode.
CSV reports for all nodes are generated in /opt/CSCOppm-gw/reports and prefixed with the report type for additional context.
For example, B20110308.0945-0500-20110308.1000-0500_ppm-xxx-yy38.csv report is prefixed with CPU.B20110308.0945-0500-20110308.1000-0500_ppm-xxx-yy38.csv. All the CSV reports are available only after they are compressed in .zip format.
Step 6 Click the green arrow to run the report
Tip For details on web toolbars and icons, see Using the Toolbar, page 5-5.
Related Topics
Viewing Node Level Reports, page 7-3
Viewing Graph Series Editor Details, page 7-9
Enabling and Disabling Reports, page 7-9
Enabling Reports Using the CLI, page 7-3
Viewing Details TabThe Details tab displays information such as naming and status details for the chosen Node and Gateway/Units.
To view the Details tab details of a selected node from the report menu:
Step 1 Select a report in the left navigation tree.
Step 2 Select an object from the reports and then click on a node from the top level graph view summary in the right content pane.
Step 3 The Reports, Details, Events, Alarms and Report Status tab display. See Table 7-2 for more details.
7-6Cisco Prime Performance Manager 1.0 User Guide
OL-24597-01
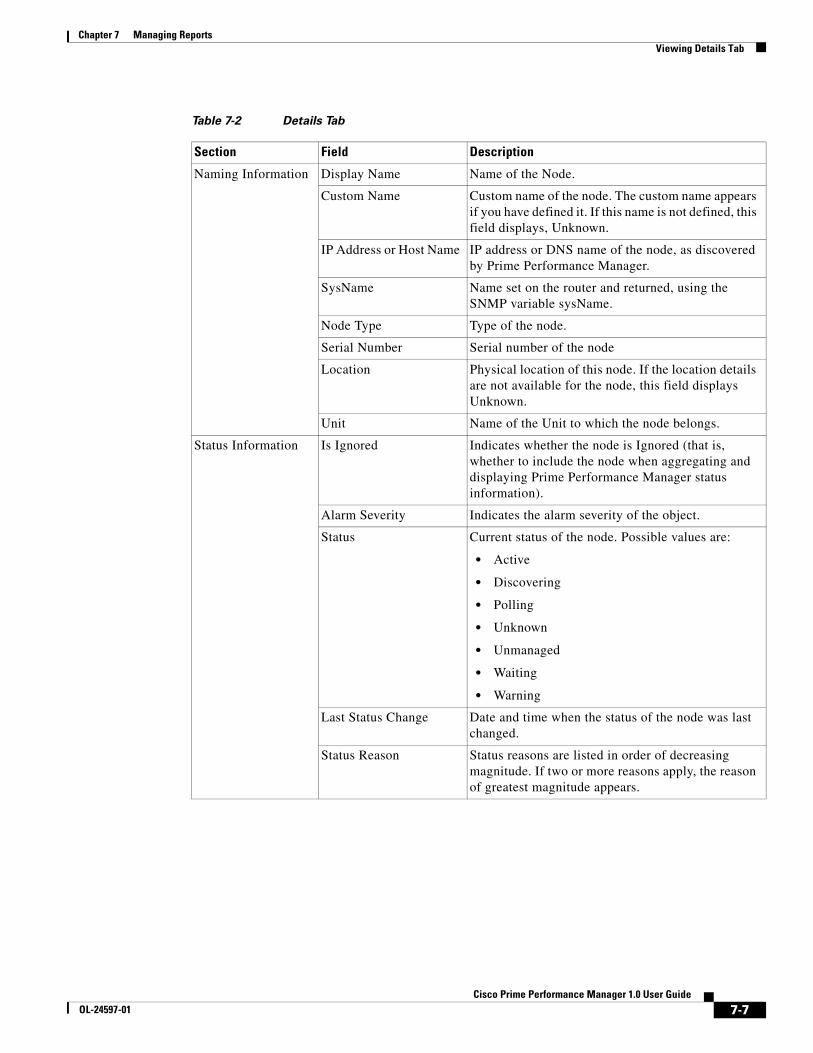
Chapter 7 Managing Reports Viewing Details Tab
Table 7-2 Details Tab
Section Field Description
Naming Information Display Name Name of the Node.
Custom Name Custom name of the node. The custom name appears if you have defined it. If this name is not defined, this field displays, Unknown.
IP Address or Host Name IP address or DNS name of the node, as discovered by Prime Performance Manager.
SysName Name set on the router and returned, using the SNMP variable sysName.
Node Type Type of the node.
Serial Number Serial number of the node
Location Physical location of this node. If the location details are not available for the node, this field displays Unknown.
Unit Name of the Unit to which the node belongs.
Status Information Is Ignored Indicates whether the node is Ignored (that is, whether to include the node when aggregating and displaying Prime Performance Manager status information).
Alarm Severity Indicates the alarm severity of the object.
Status Current status of the node. Possible values are:
• Active
• Discovering
• Polling
• Unknown
• Unmanaged
• Waiting
• Warning
Last Status Change Date and time when the status of the node was last changed.
Status Reason Status reasons are listed in order of decreasing magnitude. If two or more reasons apply, the reason of greatest magnitude appears.
7-7Cisco Prime Performance Manager 1.0 User Guide
OL-24597-01
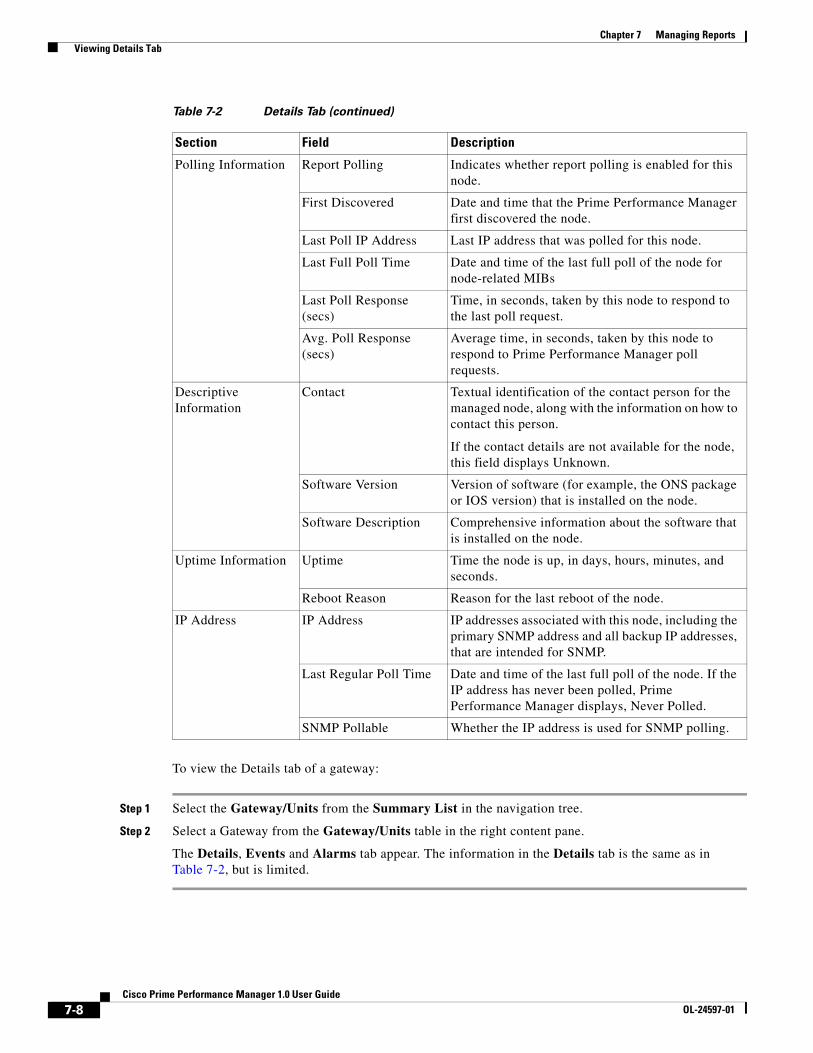
Chapter 7 Managing Reports Viewing Details Tab
To view the Details tab of a gateway:
Step 1 Select the Gateway/Units from the Summary List in the navigation tree.
Step 2 Select a Gateway from the Gateway/Units table in the right content pane.
The Details, Events and Alarms tab appear. The information in the Details tab is the same as in Table 7-2, but is limited.
Polling Information Report Polling Indicates whether report polling is enabled for this node.
First Discovered Date and time that the Prime Performance Manager first discovered the node.
Last Poll IP Address Last IP address that was polled for this node.
Last Full Poll Time Date and time of the last full poll of the node for node-related MIBs
Last Poll Response (secs)
Time, in seconds, taken by this node to respond to the last poll request.
Avg. Poll Response (secs)
Average time, in seconds, taken by this node to respond to Prime Performance Manager poll requests.
Descriptive Information
Contact Textual identification of the contact person for the managed node, along with the information on how to contact this person.
If the contact details are not available for the node, this field displays Unknown.
Software Version Version of software (for example, the ONS package or IOS version) that is installed on the node.
Software Description Comprehensive information about the software that is installed on the node.
Uptime Information Uptime Time the node is up, in days, hours, minutes, and seconds.
Reboot Reason Reason for the last reboot of the node.
IP Address IP Address IP addresses associated with this node, including the primary SNMP address and all backup IP addresses, that are intended for SNMP.
Last Regular Poll Time Date and time of the last full poll of the node. If the IP address has never been polled, Prime Performance Manager displays, Never Polled.
SNMP Pollable Whether the IP address is used for SNMP polling.
Table 7-2 Details Tab (continued)
Section Field Description
7-8Cisco Prime Performance Manager 1.0 User Guide
OL-24597-01

Chapter 7 Managing Reports Enabling and Disabling Reports
To view the Details tab of a unit:
Step 1 Select the Gateway/Units from the Summary List in the navigation tree.
Step 2 Select a Unit from the Gateway/Units table in the right content pane.
The Details, Events, Alarms and Nodes for Unit tab appear. The information in the Details tab is the same as in Table 7-2, but is limited.
Enabling and Disabling ReportsTo enable/disable specific reports, select the Setting tab (see Viewing Historical Statistics Report Settings, page 5-31) in the Reports page. All reports (5 Minute, 15 Minute, Hourly Report, Daily Report) can be enabled or disabled. By default, all the reports are run every15 minutes, hourly and daily.
You can see the node appearing at the bottom on the left navigation tree, after a specific node is selected from the right pane.
To enable a 5-minute report, you should edit the corresponding XML definition of the report.
Note Only a System Administrator has the permission to enable a 5-minute report. The SNMP polling interval for the devices that requires a 5-minute report, are set by System Administrator.
The XML report definition are located on the Gateway in the /opt/CSCOppm-gw/etc/pollers/system or /opt/CSCOppm-gw/etc/pollers/user directories. An System Administrator access is required to edit the report definitions.
Enabling a 5-minute report increases disk space utilization required for the Units and decreases the performance of the Units because of the increase in disk activity.
Viewing Graph Series Editor DetailsThe Graph Series Editor window allows you to show or hide a selected data series.This window appears if you select the report output as Graph. Most network-level reports contain the top 10 series of data.
See Table 7-3 for more details.
Table 7-3 Graph Series Editor
Column or Buttons Descriptions
Selected Series Displays the domain name IDs for the data that is used to create the report.
Available Series Displays the list of available objects for this report.
If there are many objects in the report, the objects in the Available Series column span multiple pages and all objects are not shown on one page.
See Using the Toolbar, page 5-5 for more information on using the paging features. To view all selected objects, sort the table by the Display column.
7-9Cisco Prime Performance Manager 1.0 User Guide
OL-24597-01

Chapter 7 Managing Reports Viewing Graph Series Editor Details
Display
Depending on the report type you select, other columns displayed will differ.
Column of check boxes that allow you to display (by checking) or hide (by unchecking) the data series associated with the chosen backhaul.
The Prime Performance Manager displays only 10 series, by default.
Clear Selection Deselects the selected list of series and the OK button is grayed out. This is a simple way to deselect all the display check boxes.
OK Applies the selections you made. If you deselect all items in the dialog box, the OK and Clear Selection buttons are grayed out.
Cancel Cancels your selections and closes the Graph Series Editor window.
Help Opens the Help for the Graph Series Editor window
Table 7-3 Graph Series Editor (continued)
Column or Buttons Descriptions
7-10Cisco Prime Performance Manager 1.0 User Guide
OL-24597-01
CiscoOL-24597-01
A
P P E N D I X A Command ReferenceThis appendix provides the format and a brief description of these Cisco Prime Performance Manager commands, listed alphabetically. Each command is available on the:
• Server and Solaris or Linux both gateway and unit.
• Server and Solaris or Linux gateway only
• Server and Solaris or Linux unit only
You can run commands from:
• install_directory/bin
where install_directory is the directory where Prime Performance Manager server is installed (by default, /opt/CSCOppm-gw or /opt/CSCOppm-unit)
• Alternatively, if you have the install_directory/bin in your path, you can run commands from your path.
This appendix contains:
• General Commands, page A-1
General CommandsGeneral commands for Prime Performance Manager include:
• Prime Performance Manager, page A-5
• ppm addsnmpcomm, page A-5
• ppm addunitconf, page A-5
• ppm adduser, page A-6
• ppm authtype, page A-6
• ppm backup, page A-7
• ppm backupdays, page A-8
• ppm backupdir, page A-9
• ppm backuplog, page A-9
• ppm backupstats, page A-10
• ppm badloginalarm, page A-10
• ppm badlogindisable, page A-10
A-1 Prime Performance Manager 1.0 User Guide
Appendix A Command Reference General Commands
• ppm certtool, page A-11
• ppm crosslaunch, page A-12
• ppm changes, page A-12
• ppm checksystem, page A-12
• ppm clitimeout, page A-12
• ppm cmdlog, page A-13
• ppm compilemibs, page A-13
• ppm console, page A-14
• ppm consolelogsize, page A-14
• ppm countnodes, page A-14
• ppm datadir, page A-14
• ppm delete, page A-15
• ppm deletesnmpcomm, page A-15
• ppm deluser, page A-16
• ppm deleteunitconf, page A-16
• ppm disablepass, page A-16
• ppm disableuser, page A-17
• ppm discover, page A-17
• ppm diskmonitor, page A-17
• ppm enableuser, page A-18
• ppm eventautolog, page A-18
• ppm eventconfig, page A-19
• ppm eventeditor, page A-19
• ppm eventtool, page A-19
• ppm evilstop, page A-21
• ppm export, page A-21
• ppm exportcustnames, page A-21
• ppm export cw, page A-22
• ppm export cwv3, page A-22
• ppm exportusers, page A-22
• ppm help, page A-22
• ppm importcustnames, page A-23
• ppm importcw, page A-23
• ppm inactiveuserdays, page A-23
• ppm installlog, page A-24
• ppm inventoryimport, page A-24
• ppm iosreport, page A-24
• ppm ipaccess, page A-25
A-2Cisco Prime Performance Manager 1.0 User Guide
OL-24597-01

Appendix A Command Reference General Commands
• ppm jspport, page A-25
• ppm keytool, page A-26
• ppm listusers, page A-27
• ppm logger, page A-27
• ppm logsize, page A-27
• ppm logtimemode, page A-29
• ppm maxhtmlrows, page A-29
• ppm mldebug, page A-29
• ppm modifysnmpcomm, page A-30
• ppm modifyunitconf, page A-31
• ppm motd, page A-31
• ppm msglog, page A-31
• ppm msglogage, page A-32
• ppm msglogdir, page A-32
• ppm netlog, page A-33
• ppm netlogger, page A-33
• ppm newlevel, page A-33
• ppm osinfo, page A-34
• ppm passwordage, page A-34
• ppm patchlog, page A-35
• ppm poll, page A-35
• ppm print, page A-35
• ppm props, page A-36
• ppm purgedb, page A-36
• ppm readme, page A-36
• ppm reboot, page A-36
• ppm reloadmibs, page A-37
• ppm repdir, page A-37
• ppm rephelp, page A-37
• ppm restart, page A-37
• ppm restore, page A-38
• ppm restore all, page A-38
• ppm restoreprops, page A-39
• ppm rootvars, page A-39
• ppm sechelp, page A-39
• ppm seclog, page A-39
• ppm serverlist delete, page A-40
• ppm serverlist list, page A-40
A-3Cisco Prime Performance Manager 1.0 User Guide
OL-24597-01
Appendix A Command Reference General Commands
• ppm servername, page A-41
• ppm setpath, page A-41
• ppm showsnmpcomm, page A-42
• ppm showunitconf, page A-42
• ppm singlesess, page A-42
• ppm snmpcomm, page A-43
• ppm snmpconf, page A-43
• ppm snmpget, page A-43
• ppm snmphelp, page A-45
• ppm snmpmaxrows, page A-46
• ppm snmpnext, page A-46
• ppm snmpsetup, page A-48
• ppm snmpwalk, page A-49
• ppm ssl, page A-51
• ppm sslstatus, page A-51
• ppm start, page A-52
• ppm start jsp, page A-52
• ppm start pm, page A-52
• ppm start web, page A-52
• ppm statreps, page A-53
• ppm syncunits, page A-54
• ppm status, page A-54
• ppm stop, page A-54
• ppm stop jsp, page A-55
• ppm start pm, page A-52
• ppm start web, page A-52
• ppm tac, page A-55
• ppm trapratelimit abate, page A-56
• ppm trapratelimit major, page A-56
• ppm trapratelimit interval, page A-56
• ppm trapratelimit minor, page A-57
• ppm uninstall, page A-57
• ppm unknownage, page A-57
• ppm updateuser, page A-58
• ppm useraccess, page A-59
• ppm userpass, page A-59
• ppm version, page A-60
• ppm webport, page A-60
A-4Cisco Prime Performance Manager 1.0 User Guide
OL-24597-01
Appendix A Command Reference General Commands
• ppm who, page A-60
Prime Performance Manager
Command Description
Displays the command syntax for the Prime Performance Manager command and all of its options. The function of this command is identical to /opt/CSCOppm-gw/bin/ppm help.
Prime Performance Manager help is network specific, so only the commands pertaining to each network type appear. If you set all network types, you can see all the commands.
Related Topic
Chapter 5, “Accessing Prime Performance Manager Web Interface”
ppm addsnmpcomm
Syntax
/opt/CSCOppm-gw/bin/ppm addsnmpcomm -i ipaddress [-r retry | -t timeout | -p poll] -c community
Command Description
Adds an SNMP configuration to Prime Performance Manager server.
• -i ipaddress—The IP address of the device (required)
• -r retry—The number of times to retry connecting to the device (optional)
• -t timeout—The timeout value, in seconds (optional)
• -p poll—The poll interval, in minutes (optional)
• -c community—The read community string of the device (required)
You do not need to restart Prime Performance Manager server.
Related Topic
• ppm deletesnmpcomm, page A-15
• ppm modifysnmpcomm, page A-30
• ppm showsnmpcomm, page A-42
• ppm snmpsetup, page A-48
ppm addunitconf
Syntax
/opt/CSCOppm-gw/bin/ppm addunitconf {-i ipaddress | -u unitname}
Command Description
Command uses the option -i (ipaddress) and -u (unitname) to add a unit configuration.
A-5Cisco Prime Performance Manager 1.0 User Guide
OL-24597-01
Appendix A Command Reference General Commands
ppm adduser
Syntax
/opt/CSCOppm-gw/bin/ppm adduser [username]
Command Description
If you enable Prime Performance Manager User-Based Access, adds the specified user to the authentication list.
When you add a user, Prime Performance Manager prompts you for this information:
• User’s password. When setting the password, follow the rules and considerations in Creating Secure Passwords, page 3-6.
• Whether to force the user to change the password at the next log in. The default is not to force the user to change the password.
• Authentication level for the user. Valid levels are:
– 1—Basic User
– 3—Network Operator
– 5—System Administrator
– 11—Custom Level 1
– 12—Custom Level 2
You must log in as the root user to use this command.
Note If you enable Solaris authentication, you must log in as the root user, to use this command (see Implementing Secure User Access, page 3-2).
Related Topic
• Configuring User Access, page 3-1
• Implementing Secure User Access, page 3-2
ppm authtype
Syntax
/opt/CSCOppm-gw/bin/ppm authtype [local | solaris | linux]
Command Description
Configures Prime Performance Manager security authentication:
• local—Allows you to create user accounts and passwords that are local to the Prime Performance Manager system. When using this method, you manage usernames, passwords, and access levels by using Prime Performance Manager commands.
A-6Cisco Prime Performance Manager 1.0 User Guide
OL-24597-01
Appendix A Command Reference General Commands
• solaris—Uses standard Solaris-based user accounts and passwords, as the /etc/nsswitch.conf file specifies. You can provide authentication with the local /etc/passwd file. You can do this:
– From a distributed Network Information Services (NIS) system
Or
– With any other authentication tool, such as RADIUS or TACACS+.
• linux—Uses standard Linux-based user accounts and passwords, as the /etc/nsswitch.conf file specifies. You can provide authentication with the local /etc/passwd file; from a distributed NIS system; or with any other authentication tool, such as RADIUS or TACACS+.
Note When using the Solaris or Linux options, if you have enabled user access, you must enable SSL (see Enabling SSL Support on Gateway in Prime Performance Manager, page 3-15 to ensure secure passwords between Prime Performance Manager client and server.)
You must log in as the root user to use this command.
Related Topic
• Configuring User Access, page 3-1
• Implementing Secure User Access, page 3-2
ppm backup
Syntax
/opt/CSCOppm-gw/bin/ppm backup
Command Description
Note Since backups can be large, ensure that your file system has enough space to handle them.
Backs up Prime Performance Manager data files to Prime Performance Manager installation directory. Prime Performance Manager automatically backs up all data files nightly at 1:30 AM. However, you can use this command to back up the files at any other time. If you installed Prime Performance Manager in:
• The default directory, /opt, then the locations of the backup files are /ppm10-$SERVERTYPE-$SERVERNAME-backup.tar, where $SERVERTYPE = Gateway or Unit as appropriate and $SERVERNAME = the name of the server as specified during installation.
• A different directory, then the backup files reside in that directory.
To restore Prime Performance Manager data files from the previous night’s backup, use /opt/CSCOppm-gw/bin/ppm restore command. Do not try to extract the backup files manually.
You must log in as the root user to use this command.
Note Prime Performance Manager performs a database integrity check during the backup. If the check fails, the previous backup is not overwritten. Instead, Prime Performance Manager creates a new failed file (for example: ppm10-Gateway-ems-lnx001-backup-failed.tar).
A-7Cisco Prime Performance Manager 1.0 User Guide
OL-24597-01
Appendix A Command Reference General Commands
Related Topics
• ppm backupdays, page A-8
• ppm backupdir, page A-9
• ppm restore, page A-38
ppm backupdays
Syntax
/opt/CSCOppm-gw/bin/ppm backupdays [days]
Command Description
This command sets the number of days to save backup files on Prime Performance Manager server and client. The default value is one day, but you can configure Prime Performance Manager to save multiple days of backup files.
This command accepts values from 1 to 30 days. If you attempt to set a value outside of this range, Prime Performance Manager responds with this message:
Value out of range of 1-30.
Prime Performance Manager stores backup files in the backup directory (see ppm backupdir, page A-9). Prime Performance Manager uses this file naming convention when there are multiple backup files:
ppm releasenumber- [gateway|unit]-backup.tar.[date]
For example:
ppm10-Gateway-ems-lnx001-backup.tar [date]
ppm10-Unit-ems-lnx001-backup.tar [date]
If the number of backup days is more than one, and you run the /opt/CSCOppm-gw/bin/ppm restore command, Prime Performance Manager prompts you for a server or client backup file to restore from. This is because there would be more than one backup file to choose from). See ppm restore, page A-38.
The following is an example of setting the number of backup days to five days:
#./ppm backupdays
Current value is: 1
Enter number of days to save backup files <1-30>: [1] 5
Setting number of days to save backup files to 5 days.
In this example, Prime Performance Manager saves backup files for the last five days. Prime Performance Manager deletes backup files that are older than five days.
Note If you notice multiple backups, ensure that there is enough free space in the backupdir file system (see ppm backupdir, page A-9).
A-8Cisco Prime Performance Manager 1.0 User Guide
OL-24597-01

Appendix A Command Reference General Commands
Related Topic
• Backing Up or Restoring Prime Performance Manager Files, page 3-20
• ppm backupdir, page A-9
ppm backupdir
Syntax
/opt/CSCOppm-gw/bin/ppm backupdir [directory]
Command Description
Note You must stop Prime Performance Manager server before performing this command. You are prompted whether you want to continue.
You can change the directory in which Prime Performance Manager stores its nightly backup files. The default backup directory is the directory in which Prime Performance Manager is installed. If you installed Prime Performance Manager in:
• The default directory, /opt, then the default backup directory is also /opt.
• A different directory, then the default backup directory is that directory.
If you specify a new directory that does not exist, Prime Performance Manager does not change the directory and issues an appropriate message.
You must log in as the root user to use this command.
Related Topic
• ppm backupdays, page A-8
ppm backuplog
Syntax
/opt/CSCOppm-gw/bin/ppm backuplog [clear | -r]
Command Description
Uses PAGER to display the contents of the system backup log.
To clear the log, enter /opt/CSCOppm-gw/bin/ppm backuplog clear.
To display the contents of the log in reverse order, with the most recent commands at the beginning of the log, enter /opt/CSCOppm-gw/bin/ppm backuplog -r.
You must log in as the root user to use this command.
A-9Cisco Prime Performance Manager 1.0 User Guide
OL-24597-01
Appendix A Command Reference General Commands
ppm backupstats
Syntax
/opt/CSCOppm-gw/bin/ppm backupstats
Command Description
This command displays statistics on backup process. You must log in as the root user to use this command.
ppm badloginalarm
Syntax
/opt/CSCOppm-gw/bin/ppm badloginalarm [tries | clear]
Command Description
Number of unsuccessful log-in attempts allowed before Prime Performance Manager generates an alarm.
There can be an unlimited number of unsuccessful attempts. The default value is five unsuccessful attempts.
Prime Performance Manager records alarms in the system security log file. The default path and filename for the system security log file is /opt/CSCOppm-gw/logs/sgmSecurityLog.txt. If you installed Prime Performance Manager in a directory other than /opt, then the system security log file resides in that directory.
To view the system security log file, enter /opt/CSCOppm-gw/bin/ppm seclog. You can also view the system security log on Prime Performance Manager System Security Log web page (see Displaying the Contents of the System Security Log, page 3-14).
To disable this function (that is, to prevent Prime Performance Manager from automatically generating an alarm after unsuccessful log-in attempts), enter /opt/CSCOppm-gw/bin/ppm badloginalarm clear.
You must log in as the root user to use this command.
Related Topic
Automatically Disabling Users and Passwords, page 3-7
ppm badlogindisable
Syntax
/opt/CSCOppm-gw/bin/ppm badlogindisable [tries | clear]
Command Description
Number of unsuccessful log-in attempts by a user allowed before Prime Performance Manager disables the user’s authentication. To re-enable the user’s authentication, use /opt/CSCOppm-gw/bin/ppm enableuser command.
There can be an unlimited number of unsuccessful attempts. The default value is 10 unsuccessful attempts.
A-10Cisco Prime Performance Manager 1.0 User Guide
OL-24597-01
Appendix A Command Reference General Commands
To disable this function (that is, to prevent Prime Performance Manager from automatically disabling a user’s authentication after unsuccessful log-in attempts), enter /opt/CSCOppm-gw/bin/ppm badlogindisable clear.
You must log in as the root user to use this command.
Related Topic
Automatically Disabling Users and Passwords, page 3-7
ppm certtool
Syntax
/opt/CSCOppm-gw/bin/ppm certtool [clear | delete alias | export alias [-file filename] | import alias [-file filename] | list]
Command Description
If you enable the Secure Sockets Layer (SSL) icon your Prime Performance Manager system, you can use this command to manage SSL certificates on Prime Performance Manager web interface from the command line.
Note If you installed Prime Performance Manager server gateway and unit on the same workstation, running this command is not necessary. Instead, when you use the /opt/CSCOppm-gw/bin/ppm keytool command to manage SSL certificates on the server, Prime Performance Manager automatically manages the certificates on the web interface.
Use these keywords and arguments with this command:
• import alias [-file filename]—Imports a signed SSL certificate in X.509 format. This is the most common use for this command.
The alias argument can be any character string; the hostname of the server from which you are importing the certificate is a good choice.
To import the certificate from a file, specify the optional -file keyword and a filename.
• export alias [-file filename]—Exports the specified SSL certificate in X.509 format.
To export the certificate to a file, specify the optional -file keyword and a filename.
• list—Lists all SSL certificates on Prime Performance Manager.
• delete alias—Removes the specified SSL certificate from Prime Performance Manager.
• clear—Removes all SSL certificates from Prime Performance Manager.
Solaris Only: You must log in as the root user to use this command in Solaris.
Related Topic
Exporting an SSL Certificate, page 3-17
A-11Cisco Prime Performance Manager 1.0 User Guide
OL-24597-01

Appendix A Command Reference General Commands
ppm crosslaunch
Syntax
/opt/CSCOppm-gw/bin/ppmcrosslaunch [install | uninstall]
Command Description
Manages the cross launch points for Prime Network (ANA) through Prime Performance Manager.
install—Creates the cross-launch menu items in Prime Network (ANA) Network Vision, so Prime Performance Manager reports can be launched from Prime Network.
uninstall— Removes the cross-launch menu items from Prime Network (ANA) Network Vision.
ppm changes
Command Description
Displays the contents of the Prime Performance Manager CHANGES file. The CHANGES file lists all bugs that have been resolved in Prime Performance Manager, sorted by release. If you installed Prime Performance Manager in:
• The default directory, /opt, then Prime Performance Manager CHANGES file resides in the /opt/CSCOppm-gw/install directory.
• A different directory, then the file resides in that directory.
ppm checksystem
Command Description
Checks the system for a server installation and reviews the:
• System requirements
• TCP/IP address and port usage checks
• Disk space usage check
• Server summary
• Error summary
You must log in as the root user to use all features of this command. The logs/troubleshooting folder has limited permissions to read when the user is not a root user.
ppm clitimeout
Syntax
/opt/CSCOppm-gw/bin/ppm clitimeout [mins | clear]
Command Description
Specifies how long, in minutes, an Prime Performance Manager client can be inactive before Prime Performance Manager automatically disconnects it.
A-12Cisco Prime Performance Manager 1.0 User Guide
OL-24597-01
Appendix A Command Reference General Commands
This function is disabled by default. If you do not specify this command, clients are never disconnected as a result of inactivity.
If you enter /opt/CSCOppm-gw/bin/ppm clitimeout command, the valid range is one minute to an unlimited number of minutes. No default value exists.
If you enable this function and you want to disable it (that is, never disconnect a client as a result of inactivity), enter /opt/CSCOppm-gw/bin/ppm clitimeout clear command.
You must log in as the root user to use this command.
Related Topic
Automatically Disabling Users and Passwords, page 3-7
ppm cmdlog
Syntax
/opt/CSCOppm-gw/bin/ppm cmdlog [clear | -r]
Command Description
Uses PAGER to display the contents of the system command log. The system command log lists:
• All ppm commands that were entered for the Prime Performance Manager server.
• The time each command was entered.
• The user who entered the command.
To clear the log, enter ppm cmdlog clear.
To display the contents of the log in reverse order, with the most recent commands at the beginning of the log, enter ppm cmdlog -r.
You must log in as the root user to use this command.
ppm compilemibsSyntax
/opt/CSCOppm-gw/bin/ppm compilemibs
Command Description
Compiles MIB files in the /opt/CSCOppm-gw/etc/mibs folder and generates a compiled output file. During execution the system reports inconsistencies like duplicate variables names, duplicate OIDs and missing dependant MIBs. After it has completed, you are prompted to reload the compiled output to the Prime Performance Manager server.
This command is available only on the Gateway.
A-13Cisco Prime Performance Manager 1.0 User Guide
OL-24597-01

Appendix A Command Reference General Commands
ppm console
Command Description
Displays the contents of the console log file, sgmConsoleLog.latest.
The console log file contains unexpected error and warning messages from Prime Performance Manager server, such as those that might occur if Prime Performance Manager server cannot start.
You must log in as the root user to use this command.
ppm consolelogsize
Syntax
/opt/CSCOppm-gw/bin/ppm consolelogsize [megs]
Command Description
Sets the maximum size (in megabytes) of the console log file.
To view help for this command, include the following parameter: -h.
ppm countnodes
Command Description
Displays the number of nodes in the current Prime Performance Manager database.
You must log in as the root user to use this command.
ppm datadir
Syntax
/opt/CSCOppm-gw/bin/ppm datadir [directory | nostart]
Command Description
Note You must stop Prime Performance Manager server before performing this command. You are prompted whether to continue.
Sets the directory in which Prime Performance Manager stores data files. Use this command when you want to move the data directory to a larger filing system to accommodate the increasing size of the directory.
The default directory for data files resides in the Prime Performance Manager installation directory. If you installed Prime Performance Manager in:
• The default directory, /opt, then the default directory is /opt/CSCOppm-gw/data.
• A different directory, then the default directory resides in that directory.
Use this command if you want to store data files in a different directory; for example, in a Network File System location on another server.
A-14Cisco Prime Performance Manager 1.0 User Guide
OL-24597-01
Appendix A Command Reference General Commands
After you change the directory, Prime Performance Manager prompts to confirm whether you want to restart Prime Performance Manager server. The new directory takes effect when you restart Prime Performance Manager server.
You must log in as the root user to use this command.
ppm delete
Syntax
/opt/CSCOppm-gw/bin/ppm delete [all | node [all | node [node]...] | sp [all | point-code:net [point-code:net]...] | linkset [all | node/linkset [node/linkset]...]
Command Description
Deletes objects from Prime Performance Manager database.
• all—Deletes all objects from Prime Performance Manager database.
• node all—Deletes all nodes from Prime Performance Manager database.
• node node [node]...—Deletes one or more nodes from Prime Performance Manager database. Use the node arguments to specify one or more nodes.
• sp all—Deletes all nodes from Prime Performance Manager database.
• sp point-code:net [point-code:net]...—Deletes one or more signaling points from Prime Performance Manager database. Use the point-code:net arguments to specify one or more signaling points, which the point code and network name identify; for example, 1.22.0:net0.
• linkset all—Deletes all linksets from Prime Performance Manager database.
• linkset node/linkset [node/linkset]...—Deletes one or more linksets from Prime Performance Manager database. Use the node/linkset arguments to specify one or more linksets associated with specific nodes.
You must log in as the root user to use this command.
ppm deletesnmpcomm/opt/CSCOppm-gw/bin/ppm deletesnmpcomm -i ipaddress
Command Description
Deletes an SNMP configuration from Prime Performance Manager server.
-i ipaddress—The IP address of the device (required)
You do not need to restart Prime Performance Manager server.
Related Topic
• ppm addsnmpcomm, page A-5
• ppm modifysnmpcomm, page A-30
• ppm showsnmpcomm, page A-42
• ppm snmpsetup, page A-48
A-15Cisco Prime Performance Manager 1.0 User Guide
OL-24597-01
Appendix A Command Reference General Commands
ppm deluser
Syntax
/opt/CSCOppm-gw/bin/ppm deluser [username]
Command Description
If you enable Prime Performance Manager user-based access, deletes the specified user from the authentication list. To add the user back to the list, use /opt/CSCOppm-gw/bin/ppm adduser command.
You must log in as the root user to use this command.
Related Topic
Manually Disabling Users and Passwords, page 3-10
ppm deleteunitconf
Syntax
/opt/CSCOppm-gw/bin/ppm deleteunitconf [-i (ipaddress)]
Command Description
This command deletes the existing configuration that specifies the relationship between nodes and their managed units.
ppm disablepass
Syntax
/opt/CSCOppm-gw/bin/ppm disablepass [username]
Command Description
If you enable Prime Performance Manager User-Based Access, and set ppm authtype to local, disables the specified user’s authentication and password. Prime Performance Manager does not delete the user from the authentication list.
Prime Performance Manager only disables the user’s authentication and password. To re-enable the user’s authentication with:
• The same password as before, use /opt/CSCOppm-gw/bin/ppm enableuser command.
• A new password, use /opt/CSCOppm-gw/bin/ppm userpass command.
Note The user can re-enable authentication with a new password by attempting to log in by using the old password; Prime Performance Manager then prompts the user for a new password.
If you set /opt/CSCOppm-gw/bin/ppm authtype to Solaris or Linux, you cannot use this command; instead, you must manage passwords on the external authentication servers.
You must log in as the root user to use this command. You must also set /opt/CSCOppm-gw/bin/ppm authtype to local.
A-16Cisco Prime Performance Manager 1.0 User Guide
OL-24597-01
Appendix A Command Reference General Commands
Related Topic
Manually Disabling Users and Passwords, page 3-10
ppm disableuser
Syntax
/opt/CSCOppm-gw/bin/ppm disableuser [username]
Command Description
If you enable Prime Performance Manager User-Based Access, this disables the specified user’s authentication. Prime Performance Manager does not delete the user from the authentication list, Prime Performance Manager only disables the user’s authentication. To re-enable the user’s authentication with:
• The same password as before, use the /opt/CSCOppm-gw/bin/ppm enableuser command.
• A new password, use the /opt/CSCOppm-gw/bin/ppm userpass command.
You must log in as the root user to use this command.
Related Topic
Manually Disabling Users and Passwords, page 3-10
ppm discover
Syntax
/opt/CSCOppm-gw/bin/ppm discover [seed-node] [seed-node]...
Command Description
You use this command to discover the network from the command line. Use the seed-node arguments to specify the DNS names or IP addresses of one or more seed nodes.
You must log in as the root user to use this command.
Related Topic
Discovering Your Network, page 2-4
ppm diskmonitor
Syntax
/opt/CSCOppm-gw/bin/ppm diskmonitor [enable | disable | status] | warning [megs] | shutdown [megs] | stopscript [path]
Command Description
Monitors the disk space usage of Prime Performance Manager installed directories. When enabled, a script (diskWatcher.sh) runs every hour to check two thresholds:
A-17Cisco Prime Performance Manager 1.0 User Guide
OL-24597-01
Appendix A Command Reference General Commands
• Warning—Warns Prime Performance Manager operator when the disk space usage exceeds the threshold value. Prime Performance Manager logs the warning in the sgmConsoleLog.txt file. For example:
WARNING: The following partition is getting low on free disk space: /opt Space left = 905 MB
• Shutdown—Shuts down Prime Performance Manager server when the disk space usage exceeds the threshold value.
The parameters of Prime Performance Manager diskmonitor command are:
• enable—Enables the hourly check of disk space usage of Prime Performance Manager installed directories.
• disable—Disables the hourly check of disk space usage of Prime Performance Manager installed directories.
• status—Displays the current status of the disk monitor feature (whether enabled or disabled).
• warning [megs]—Sets the warning threshold in MBs. The default setting is 1000 MB.
• shutdown [megs]—Sets the shutdown threshold in MBs. The default setting is 100 MB.
• stopscript [path]—Sets the custom script to call for stop.
You must log in as the root user to use this command.
ppm enableuser
Syntax
/opt/CSCOppm-gw/bin/ppm enableuser [username]
Command Description
If you enable Prime Performance Manager user-based access, re-enables the specified user’s authentication, which had been disabled either automatically by Prime Performance Manager root user.
The user’s authentication is re-enabled with the same password as before.
You must log in as the root user to use this command.
Related Topic
Enabling and Changing Users and Passwords, page 3-11
ppm eventautolog
Syntax
/opt/CSCOppm-gw/bin/ppm eventautolog [clear | -r]
Command Description
Uses PAGER to display the contents of Prime Performance Manager event automation log. The event automation log lists all messages generated by scripts launched by event automation.
To clear the log and restart the server, enter /opt/CSCOppm-gw/bin/ppm eventautolog clear.
A-18Cisco Prime Performance Manager 1.0 User Guide
OL-24597-01
Appendix A Command Reference General Commands
To display the contents of the log in reverse order, with the most recent events at the beginning of the log, enter /opt/CSCOppm-gw/bin/ppm eventautolog -r.
You must log in as the root user to use this command.
ppm eventconfig
Syntax
/opt/CSCOppm-gw/bin/ppm eventconfig [view | edit |restore | master]
Command Description
Allows you to manage the event configuration:
• To view the event configuration file, use the ppm eventconfig view command.
• To edit the event configuration file in your environment with a text editor, use /opt/CSCOppm-gw/bin/ppm eventconfig edit command. (The default text editor is 'vi'.)
• To restore the event configuration file to the last active copy, use the /opt/CSCOppm-gw/bin/ppm eventconfig restore command.
• To restore the event configuration file to the master copy (the default copy shipped with Prime Performance Manager), use the /opt/CSCOppm-gw/bin/ppm eventconfig master command.
You must log in as the root user to use this command.
ppm eventeditor
Syntax
/opt/CSCOppm-gw/bin/ppm eventeditor [hostname]
Command Description
Starts a Prime Performance Manager Event Editor on the specified host. If no hostname is specified, starts an Prime Performance Manager Event Editor on the default host, as specified during installation.
For more information about Prime Performance Manager Event Editor,
If you Telnet into a remote workstation, the DISPLAY variable must be set to your local display, or you cannot use this command. If the DISPLAY variable is not set automatically, you must set it manually.
ppm eventtool
Syntax
/opt/CSCOppm-gw/bin/ppm eventtool {-a actionName} {parameters}
Command Description
Invokes Prime Performance Manager event API operations.
A-19Cisco Prime Performance Manager 1.0 User Guide
OL-24597-01

Appendix A Command Reference General Commands
These action names (and any corresponding required parameters) can be specified with the -a option:
These parameters can be used:
Option Action Names Required Parameters
-a acknowledgeEvents -l or -L
-u
-n
appendNote -e
-n
-u
changeSeverities -s
-l or -L
-u
-n
clearEvents -l or -L
-u
-n
deleteEvents -l or -L
-u
-n
getAllEventsAsTraps -t
getFilteredEventsAsTraps
-t
-f
getNote -e
setNote -e
-n
-u
Parameter Description
-e Specifies an event ID parameter.
-f Specifies a file name for EventFilter, which is an XML element defined in Prime Performance Manager WSDL definitions.
-l Specifies a file name for EventIDList, which is an XML element defined in Prime Performance Manager WSDL definitions.
-n Specifies an event note string.
-s Specifies an event severity.
-t Specifies a file name for TrapTarget, which is an XML element defined in Prime Performance Manager WSDL definitions.
A-20Cisco Prime Performance Manager 1.0 User Guide
OL-24597-01
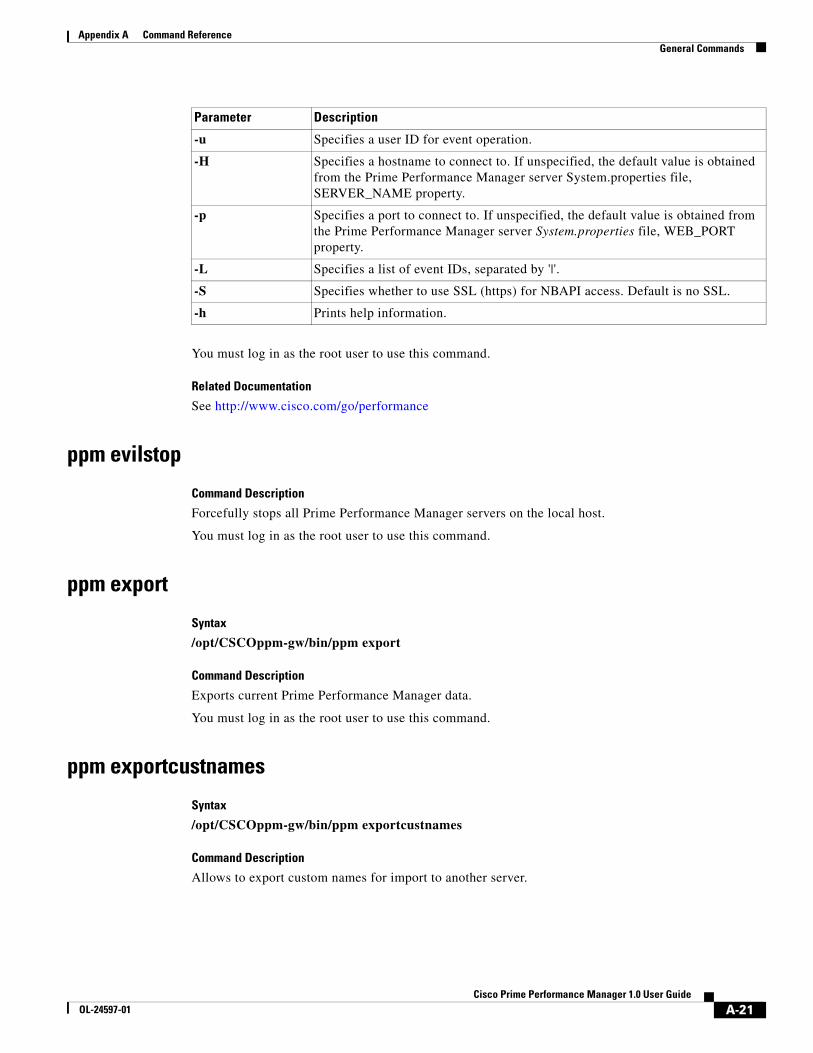
Appendix A Command Reference General Commands
You must log in as the root user to use this command.
Related Documentation
See http://www.cisco.com/go/performance
ppm evilstop
Command Description
Forcefully stops all Prime Performance Manager servers on the local host.
You must log in as the root user to use this command.
ppm export
Syntax
/opt/CSCOppm-gw/bin/ppm export
Command Description
Exports current Prime Performance Manager data.
You must log in as the root user to use this command.
ppm exportcustnames
Syntax
/opt/CSCOppm-gw/bin/ppm exportcustnames
Command Description
Allows to export custom names for import to another server.
-u Specifies a user ID for event operation.
-H Specifies a hostname to connect to. If unspecified, the default value is obtained from the Prime Performance Manager server System.properties file, SERVER_NAME property.
-p Specifies a port to connect to. If unspecified, the default value is obtained from the Prime Performance Manager server System.properties file, WEB_PORT property.
-L Specifies a list of event IDs, separated by '|'.
-S Specifies whether to use SSL (https) for NBAPI access. Default is no SSL.
-h Prints help information.
Parameter Description
A-21Cisco Prime Performance Manager 1.0 User Guide
OL-24597-01

Appendix A Command Reference General Commands
ppm export cw
Syntax
/opt/CSCOppm-gw/bin/ppm export cw
Command Description
Exports current Prime Performance Manager node names, and read and write SNMP community names, in CiscoWorks v2 import format, with fields separated by commas (,). You can export this data to a file, then use the file to import the nodes into the CiscoWorks database.
You must log in as the root user to use this command.
ppm export cwv3
Syntax
/opt/CSCOppm-gw/bin/ppm export cwv3
Command Description
Exports current Prime Performance Manager node names, and read and write SNMP community names, in CiscoWorks v3 import format, with fields separated by commas (,). You can export this data to a file, then use the file to import the nodes into the CiscoWorks database.
You must log in as the root user to use this command.
ppm exportusers
Syntax
/opt/CSCOppm-gw/bin/ppm exportusers
Command Description
Allows to export users for import to another server.
ppm help
Syntax
/opt/CSCOppm-gw/bin/ppm help [keyword]
Command Description
Displays the command syntax for the Prime Performance Manager command and all of its options. The function of this command is identical to Prime Performance Manager.
Prime Performance Manager help is network specific, so only the commands pertaining to each network type appear. If you set all network types, you can see all the commands.
A-22Cisco Prime Performance Manager 1.0 User Guide
OL-24597-01

Appendix A Command Reference General Commands
To see the syntax for a specific command, enter /opt/CSCOppm-gw/bin/ppm help and that command. For example, if you enter /opt/CSCOppm-gw/bin/ppm help restart, Prime Performance Manager displays:
ppm restart - Restarts all ppm Servers on the local host.ppm restart web - Restarts Web servers on the local host.ppm restart jsp - Restarts JSP servers on the local host.ppm restart pm - Restarts Process Manager on the local host.
Related Topic
Chapter 5, “Accessing Data from the Web Interface”
ppm importcustnames
Syntax
/opt/CSCOppm-gw/bin/ppm importcustnames [inputfile]
Command Description
Allows to import custom names from another server.
ppm importcw
Syntax
/opt/CSCOppm-gw/bin/ppm importcw [cwfile]
Command Description
Imports node hostname and read-community strings from the CiscoWorks server to Prime Performance Manager.
cwfile—File name of the CiscoWorks export file (export format must be in CSV file format).
You must log in as the root user to use this command. You do not need to restart the server to activate this command. After running this command, Prime Performance Manager discovers the imported nodes.
ppm inactiveuserdays
Syntax
/opt/CSCOppm-gw/bin/ppm inactiveuserdays [days | clear]
Command Description
If you enable Prime Performance Manager user-based access, number of days a user can be inactive before disabling that user account.
This function is disabled by default. If you do not specify this command, user accounts are never disabled as a result of inactivity.
If you enter the ppm inactiveuserdays command, the valid range is one day to an unlimited number of days. There is no default setting.
A-23Cisco Prime Performance Manager 1.0 User Guide
OL-24597-01
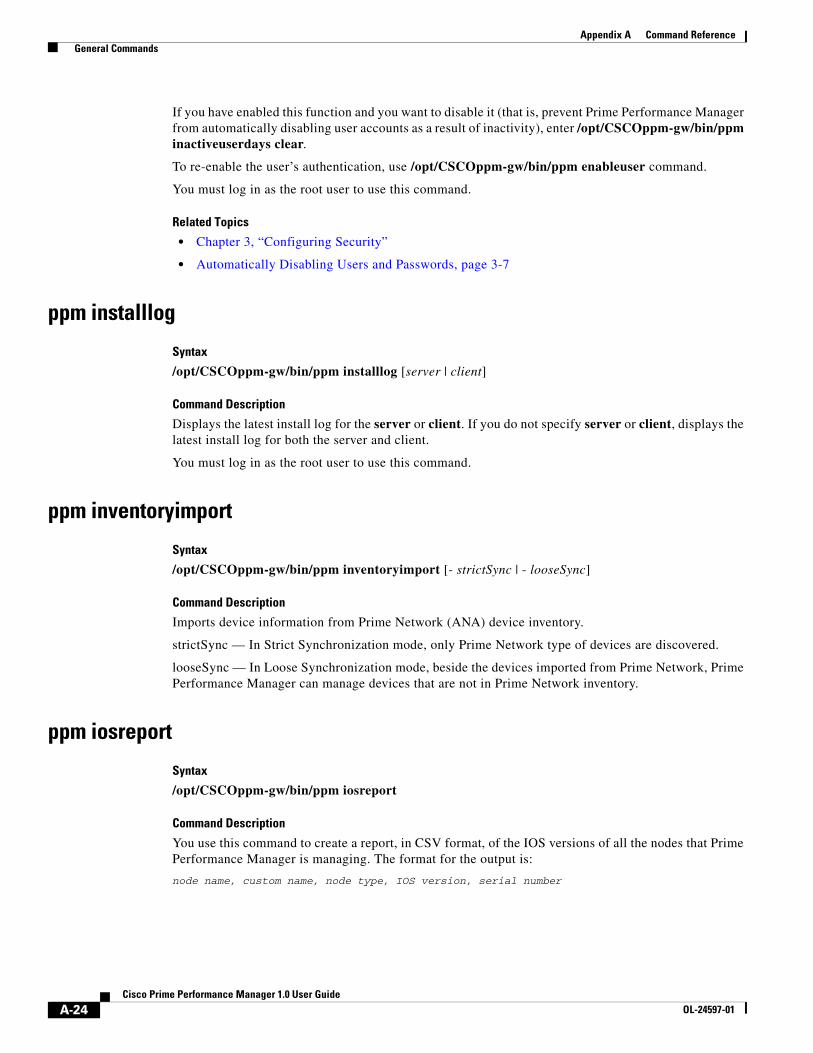
Appendix A Command Reference General Commands
If you have enabled this function and you want to disable it (that is, prevent Prime Performance Manager from automatically disabling user accounts as a result of inactivity), enter /opt/CSCOppm-gw/bin/ppm inactiveuserdays clear.
To re-enable the user’s authentication, use /opt/CSCOppm-gw/bin/ppm enableuser command.
You must log in as the root user to use this command.
Related Topics
• Chapter 3, “Configuring Security”
• Automatically Disabling Users and Passwords, page 3-7
ppm installlog
Syntax
/opt/CSCOppm-gw/bin/ppm installlog [server | client]
Command Description
Displays the latest install log for the server or client. If you do not specify server or client, displays the latest install log for both the server and client.
You must log in as the root user to use this command.
ppm inventoryimport
Syntax
/opt/CSCOppm-gw/bin/ppm inventoryimport [- strictSync | - looseSync]
Command Description
Imports device information from Prime Network (ANA) device inventory.
strictSync — In Strict Synchronization mode, only Prime Network type of devices are discovered.
looseSync — In Loose Synchronization mode, beside the devices imported from Prime Network, Prime Performance Manager can manage devices that are not in Prime Network inventory.
ppm iosreport
Syntax
/opt/CSCOppm-gw/bin/ppm iosreport
Command Description
You use this command to create a report, in CSV format, of the IOS versions of all the nodes that Prime Performance Manager is managing. The format for the output is:
node name, custom name, node type, IOS version, serial number
A-24Cisco Prime Performance Manager 1.0 User Guide
OL-24597-01

Appendix A Command Reference General Commands
For example:
# /opt/CSCOppm-gw/bin/ppm iosreport'NODE NAME','Custom Name','NODE TYPE','IOS VERSION','SERIAL NUMBER','ems15454ec.cisco.com',null,'CiscoONS15454','7.2','SMA08040634','ems1900ke.cisco.com',null,'CiscoMWR-1900','12.4(20070313:074027)','JMX0650L264',
You must log in as the root user to use this command.
ppm ipaccess
Syntax
ppm ipaccess [add [ip-addr] | clear | edit | list | rem [ip-addr] | sample]
Command Description
You use this command to create and manage a list of client IP addresses that can connect to the Prime Performance Manager server.
The list of allowed client IP addresses resides in the ipaccess.conf file. By default, when you first install Prime Performance Manager, the ipaccess.conf file does not exist and all client IP addresses can connect to Prime Performance Manager server.
To create the ipaccess.conf file and specify the list of allowed client IP addresses, use one of these keywords:
• add—Add the specified client IP address to the ipaccess.conf file. If the ipaccess.conf file does not already exist, this command creates a file with the first entry.
• clear—Remove all client IP addresses from the ipaccess.conf file and allow connections from any Prime Performance Manager client IP address.
• edit—Open and edit the ipaccess.conf file directly. If the ipaccess.conf file does not already exist, this command creates an empty file.
• list—List all client IP addresses currently in the ipaccess.conf file. If no client IP addresses appear (that is, the list is empty), connections from any Prime Performance Manager client IP address are allowed.
• rem—Remove the specified client IP address from the ipaccess.conf file.
• sample—Print out a sample ipaccess.conf file.
Any changes you make take effect when you restart Prime Performance Manager server.
See Implementing Secure User Access, page 3-2 for more information about using this command.
You must log in as the root user to use this command.
ppm jspport
Syntax
/opt/CSCOppm-gw/bin/ppm jspport [port-number]
Command Description
Sets a new port number for the JSP server, where port-number is the new, numeric port number. Prime Performance Manager verifies that the new port number is not already in use.
A-25Cisco Prime Performance Manager 1.0 User Guide
OL-24597-01

Appendix A Command Reference General Commands
This command is needed only if you change the port number after you install Prime Performance Manager. This is because another application must use the current port number.
The new port number must contain only numbers. If you enter a port number that contains nonnumeric characters, such as ppm13, an error message appears, and Prime Performance Manager returns to the command prompt without changing the port number.
You must log in as the root user to use this command.
ppm keytool
Syntax
/opt/CSCOppm-gw/bin/ppm keytool [clear | genkey | import_cert cert_filename | import_key key_filename cert_filename | list | print_csr | print_crt]
Command Description
If you implement SSL in your Prime Performance Manager system, manages SSL keys and certificates on Prime Performance Manager server.
Use these keywords and arguments with this command:
• clear—Stops Prime Performance Manager server, if necessary, and removes all SSL keys and certificates from the server. Before restarting the server, you must either generate new SSL keys by using the ppm keytool genkey command; or, you must completely disable SSL by using the ppm ssl disable command.
• genkey—Stops Prime Performance Manager server, if necessary, and generates a new self-signed public or private SSL key pair on Prime Performance Manager server. The new keys take effect when you restart the server.
• import_cert cert_filename—Imports the specified signed SSL certificate in X.509 format.
• import_key key_filename cert_filename—Imports the specified SSL key in OpenSSL format and the specified signed SSL certificate in X.509 format.
• list—Lists all SSL key-certificate pairs on Prime Performance Manager server.
• print_csr—Prints a certificate signing request (CSR) in X.509 format.
• print_crt—Prints Prime Performance Manager server’s SSL certificate in X.509 format.
You must log in as the root user to use this command.
Related Topic
Enabling SSL Support on Gateway in Prime Performance Manager, page 3-15
A-26Cisco Prime Performance Manager 1.0 User Guide
OL-24597-01

Appendix A Command Reference General Commands
ppm listusers
Syntax
/opt/CSCOppm-gw/bin/ppm listusers [username]
Command Description
If you enable Prime Performance Manager User-Based Access, lists all currently defined users in the authentication list, including this information for each user:
• Username.
• Last time the user logged in.
• User’s authentication access level.
• User’s current authentication status, such as Account Enabled or Password Disabled.
To list information for a specific user, use the username argument to specify the user.
You must log in as the root user to use this command.
Related Topic
Listing All Currently Defined Users, page 3-13
ppm logger
Command Description
Displays the system messages messageLog.txt file with tail -f.
To stop the display, press Ctrl-C.
ppm logsize
Syntax
/opt/CSCOppm-gw/bin/ppm logsize [number-of-lines]
Command Description
Sets the maximum size for truncating and rolling log files.
• Message log files are in $LOGDIR/messageLog-archives (typically, /opt/CSCOppm-gw/logs/messageLog-archives).
• Network log files are in $LOGDIR/netStatus/archive
If you enter this command without the number-of-lines argument, Prime Performance Manager displays the current maximum number of lines. You can change this value.
The message and network log process archives the log file when the maximum number of lines is reached. The filename format of archived log files is:
• messageLog.YYYY:MMDD:hhmm:y.txt.Z
or
• networkLog.YYYY:MMDD:hhmm:y.txt.Z
A-27Cisco Prime Performance Manager 1.0 User Guide
OL-24597-01
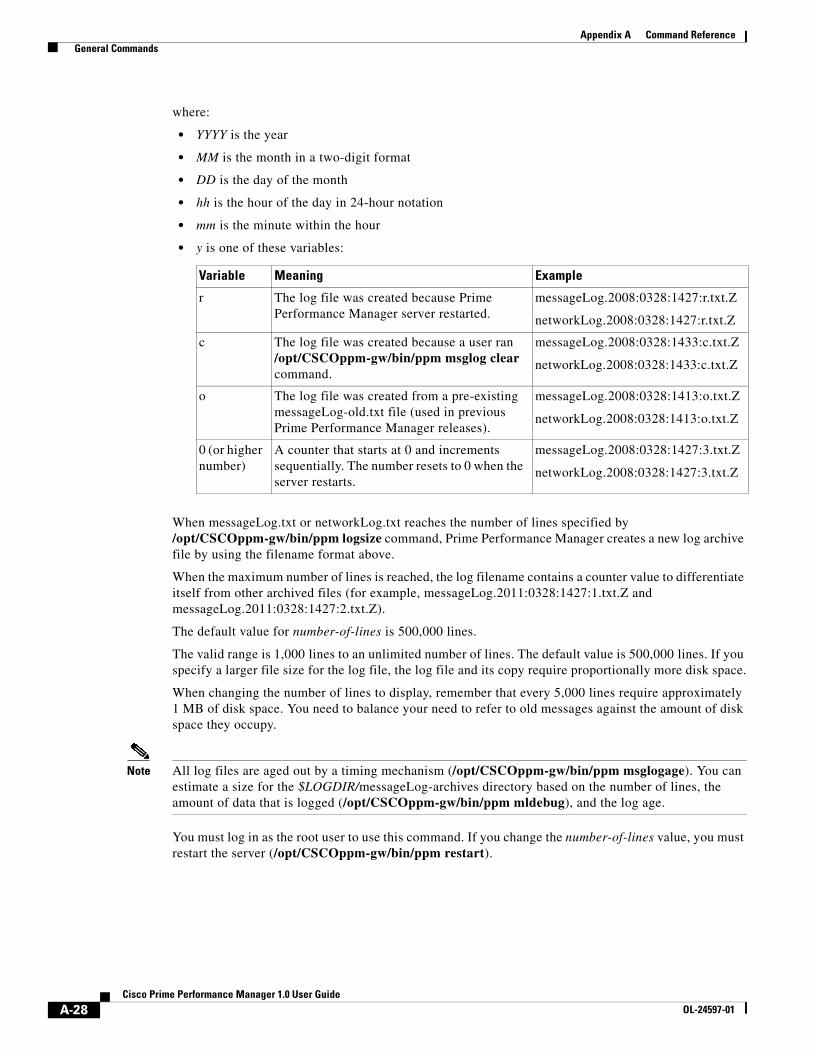
Appendix A Command Reference General Commands
where:
• YYYY is the year
• MM is the month in a two-digit format
• DD is the day of the month
• hh is the hour of the day in 24-hour notation
• mm is the minute within the hour
• y is one of these variables:
When messageLog.txt or networkLog.txt reaches the number of lines specified by /opt/CSCOppm-gw/bin/ppm logsize command, Prime Performance Manager creates a new log archive file by using the filename format above.
When the maximum number of lines is reached, the log filename contains a counter value to differentiate itself from other archived files (for example, messageLog.2011:0328:1427:1.txt.Z and messageLog.2011:0328:1427:2.txt.Z).
The default value for number-of-lines is 500,000 lines.
The valid range is 1,000 lines to an unlimited number of lines. The default value is 500,000 lines. If you specify a larger file size for the log file, the log file and its copy require proportionally more disk space.
When changing the number of lines to display, remember that every 5,000 lines require approximately 1 MB of disk space. You need to balance your need to refer to old messages against the amount of disk space they occupy.
Note All log files are aged out by a timing mechanism (/opt/CSCOppm-gw/bin/ppm msglogage). You can estimate a size for the $LOGDIR/messageLog-archives directory based on the number of lines, the amount of data that is logged (/opt/CSCOppm-gw/bin/ppm mldebug), and the log age.
You must log in as the root user to use this command. If you change the number-of-lines value, you must restart the server (/opt/CSCOppm-gw/bin/ppm restart).
Variable Meaning Example
r The log file was created because Prime Performance Manager server restarted.
messageLog.2008:0328:1427:r.txt.Z
networkLog.2008:0328:1427:r.txt.Z
c The log file was created because a user ran /opt/CSCOppm-gw/bin/ppm msglog clear command.
messageLog.2008:0328:1433:c.txt.Z
networkLog.2008:0328:1433:c.txt.Z
o The log file was created from a pre-existing messageLog-old.txt file (used in previous Prime Performance Manager releases).
messageLog.2008:0328:1413:o.txt.Z
networkLog.2008:0328:1413:o.txt.Z
0 (or higher number)
A counter that starts at 0 and increments sequentially. The number resets to 0 when the server restarts.
messageLog.2008:0328:1427:3.txt.Z
networkLog.2008:0328:1427:3.txt.Z
A-28Cisco Prime Performance Manager 1.0 User Guide
OL-24597-01

Appendix A Command Reference General Commands
ppm logtimemode
Syntax
/opt/CSCOppm-gw/bin/ppm logtimemode [12 | 24]
Command Description
Sets the time mode for dates in log files:
• 12—Use 12-hour time, with AM and PM so that 1:00 in the afternoon is 1:00 PM.
• 24—Use 24-hour time, also called military time so that 1:00 in the afternoon is 13:00. This is the default setting.
You must log in as the root user to use this command.
ppm maxhtmlrows
Syntax
/opt/CSCOppm-gw/bin/ppm maxhtmlrows [number-of-rows]
Command Description
Sets the maximum number of rows for Prime Performance Manager HTML web output; for example, statistics reports, status change messages, or SNMP trap messages.
Note If you have set the Page Size on Prime Performance Manager web interface, this command does not override that setting. When you set the Page Size feature on the Prime Performance Manager web interface, browser cookies store the setting until the cookie expires or Prime Performance Manager deletes it.
If you enter this command without the number-of-rows argument, Prime Performance Manager displays the current maximum number of rows. You can then change that value or leave it. The valid range is one row to an unlimited number of rows. The default value is 100 rows.
You must log in as the root user to use this command.
Related Topic
Chapter 5, “Accessing Data from the Web Interface”
ppm mldebug
Syntax
/opt/CSCOppm-gw/bin/ppm mldebug [mode]
Command Description
Sets the mode for logging Prime Performance Manager debug messages:
• normal—Logs all action, error, and info messages. Use ppm mldebug normal to revert to the default settings if you accidentally enter ppm mldebug command.
• list—Displays the current settings for ppm mldebug command.
A-29Cisco Prime Performance Manager 1.0 User Guide
OL-24597-01
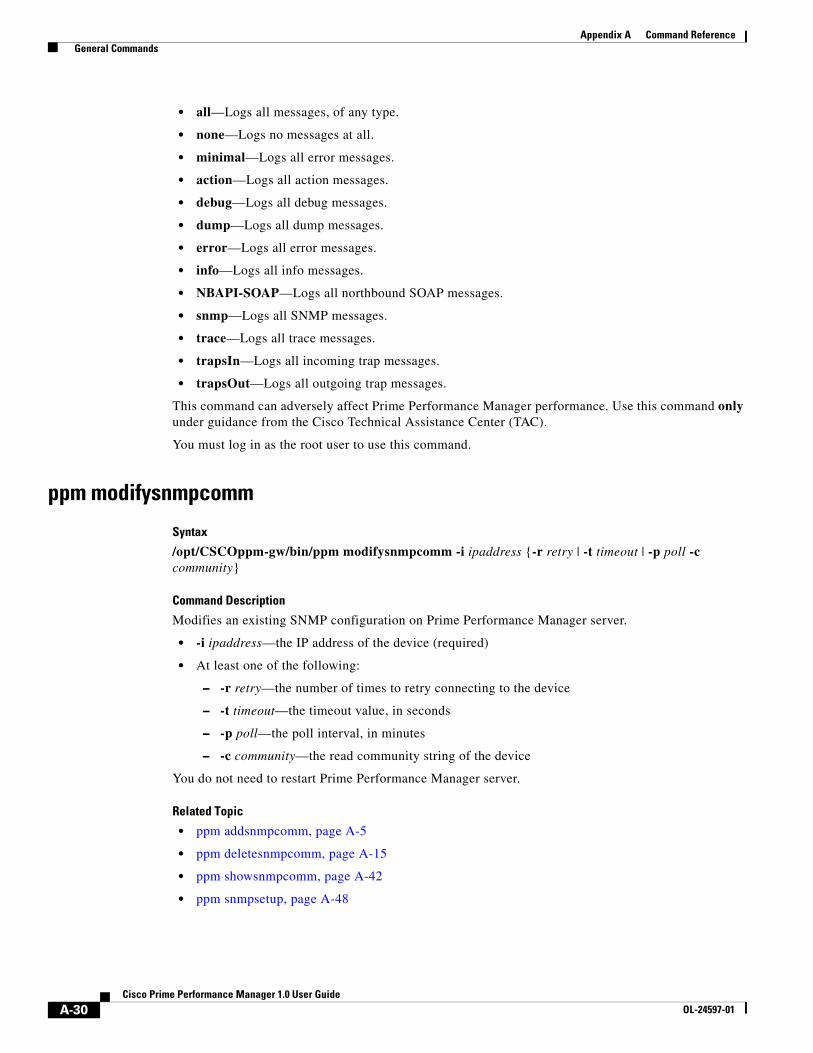
Appendix A Command Reference General Commands
• all—Logs all messages, of any type.
• none—Logs no messages at all.
• minimal—Logs all error messages.
• action—Logs all action messages.
• debug—Logs all debug messages.
• dump—Logs all dump messages.
• error—Logs all error messages.
• info—Logs all info messages.
• NBAPI-SOAP—Logs all northbound SOAP messages.
• snmp—Logs all SNMP messages.
• trace—Logs all trace messages.
• trapsIn—Logs all incoming trap messages.
• trapsOut—Logs all outgoing trap messages.
This command can adversely affect Prime Performance Manager performance. Use this command only under guidance from the Cisco Technical Assistance Center (TAC).
You must log in as the root user to use this command.
ppm modifysnmpcomm
Syntax
/opt/CSCOppm-gw/bin/ppm modifysnmpcomm -i ipaddress {-r retry | -t timeout | -p poll -c community}
Command Description
Modifies an existing SNMP configuration on Prime Performance Manager server.
• -i ipaddress—the IP address of the device (required)
• At least one of the following:
– -r retry—the number of times to retry connecting to the device
– -t timeout—the timeout value, in seconds
– -p poll—the poll interval, in minutes
– -c community—the read community string of the device
You do not need to restart Prime Performance Manager server.
Related Topic
• ppm addsnmpcomm, page A-5
• ppm deletesnmpcomm, page A-15
• ppm showsnmpcomm, page A-42
• ppm snmpsetup, page A-48
A-30Cisco Prime Performance Manager 1.0 User Guide
OL-24597-01
Appendix A Command Reference General Commands
ppm modifyunitconf
Syntax
/opt/CSCOppm-gw/bin/ppm modifyunitconf {-i ipaddress | -u unitname }
Command Description
Command uses the option -i (ipaddress) and -u (unitname) to modify a unit configuration.
ppm motd
Syntax
/opt/CSCOppm-gw/bin/ppm motd [cat | disable | edit | enable]
Command Description
Manages Prime Performance Manager Message of the Day file, which is a user-specified Prime Performance Manager system notice. You can set the Message of the Day to inform users of important changes or events in Prime Performance Manager system.
The Message of the Day also provides users with the chance to exit Prime Performance Manager or GTT client before launching.
If you enable the Message of the Day, it appears whenever a user attempts to launch an Prime Performance Manager or GTT client. If the user:
• Accepts the message, the client launches.
• Declines the message, the client does not launch.
Use these keywords with this command:
• enable—Enables the Message of the Day function. Initially, the message of the day file is blank; use ppm motd edit command to specify the message text.
• edit—Edits the Message of the Day.
• cat—Displays the contents of the Message of the Day file.
• disable—Disables this function (that is, stops displaying the Message of the Day whenever a user attempts to launch an Prime Performance Manager or GTT client).
You must log in as the root user to use this command.
Related Topic
Displaying a Message of the Day, page 3-12
ppm msglog
Syntax
/opt/CSCOppm-gw/bin/ppm msglog [clear | -r]
Command Description
Uses PAGER to display the contents of the system message log.
A-31Cisco Prime Performance Manager 1.0 User Guide
OL-24597-01
Appendix A Command Reference General Commands
To save the current contents of the log, clear the log, and restart the server, enter /opt/CSCOppm-gw/bin/ppm msglog clear.
To display the contents of the log in reverse order, with the most recent messages at the beginning of the log, enter /opt/CSCOppm-gw/bin/ppm msglog -r.
You must log in as the root user to use this command.
ppm msglogage
Syntax
/opt/CSCOppm-gw/bin/ppm msglogage [number-of-days]
Command Description
Sets the maximum number of days to archive all types of log files before deleting them from Prime Performance Manager server.
If you enter this command without the number-of-days argument, Prime Performance Manager displays the current maximum number of days. You can then change that value or leave it. The valid range is one day to an unlimited number of days. The default value is 31 days.
The start date for aging out and deleting files is always yesterday at 12 AM. For example, say that you set the value to one day and you run the ppm msglogage command at 3 PM on January 10th.
To find files that will be deleted by the aging process, count back to 12 AM on January 10th, then add the number of days set in the command. In this example, we added one more day, so any file with an earlier timestamp than January 9th at 12 AM will be removed.
You must log in as the root user to use this command.
ppm msglogdir
Syntax
/opt/CSCOppm-gw/bin/ppm msglogdir [directory]
Command Description
Note You must stop Prime Performance Manager server before performing this command. You are prompted whether to continue.
Changes the default location of all Prime Performance Manager system message log files. By default, the system message log files reside on Prime Performance Manager server at /opt/CSCOppm-xxx/logs. Where xxx denotes Unit or Gateway.
Note Do not set the new directory to any of these: /usr, /var, /opt, or /tmp. Also, do not set the new directory to the same directory in which you are storing GTT files (ppm gttdir), report files (ppm repdir), route table files (ppm routedir), or address table files (ppm atbldir).
After you change the directory, Prime Performance Manager asks if you want to restart Prime Performance Manager server. The new directory takes effect when you restart Prime Performance Manager server.
A-32Cisco Prime Performance Manager 1.0 User Guide
OL-24597-01
Appendix A Command Reference General Commands
You must log in as the root user to use this command. If you change to a default location outside Prime Performance Manager, you must have appropriate permissions for that location.
ppm netlog
Syntax
/opt/CSCOppm-gw/bin/ppm netlog [clear | -r]
Command Description
Uses PAGER to display the contents of the network status log. To:
• Save the current contents of the log, clear the log, and restart the server, enter /opt/CSCOppm-gw/bin/ppm netlog clear.
• Display the contents of the log in reverse order, with the most recent network status messages at the beginning of the log, enter /opt/CSCOppm-gw/bin/ppm netlog -r.
You must log in as the root user to use this command.
ppm netlogger
Server Only
Command Description
Displays the current contents of the network status log file with tail -f command.
To stop the display, enter Ctrl-c.
ppm newlevel
Syntax
/opt/CSCOppm-gw/bin/ppm newlevel [username]
Command Description
If you enable Prime Performance Manager User-Based Access, changes the authentication level for the specified user. Valid levels are:
• 1—Basic User
• 3—Network Operator
• 5—System Administrator
• 11 & 12 — Custom Level
You must log in as the root user to use this command.
Related Topic
Enabling and Changing Users and Passwords, page 3-11
A-33Cisco Prime Performance Manager 1.0 User Guide
OL-24597-01
Appendix A Command Reference General Commands
ppm osinfo
Command Description
Depending on the networks that you have set, displays the operating system versions of software that Prime Performance Manager supports.
ppm passwordage
Note You should have already changed your password at least once for this command to properly age the password.
Syntax
/opt/CSCOppm-gw/bin/ppm passwordage [days | clear]
Command Description
If you enable Prime Performance Manager User-Based Access and you set /opt/CSCOppm-gw/bin/ppm authtype to local, number of days allowed before forcing users to change passwords. The number of days start to accrue beginning yesterday at 12 AM.
Note For more details on how this works, see ppm msglogage, page A-32.
This function is disabled by default. If you do not specify this command, users will never need to change their passwords.
If you enter /opt/CSCOppm-gw/bin/ppm passwordage command, the valid range is one day to an unlimited number of days. No default setting exists.
If you enabled this function and you want to disable it (that is, prevent Prime Performance Manager from forcing users to change passwords), enter /opt/CSCOppm-gw/bin/ppm passwordage clear.
Note If /opt/CSCOppm-gw/bin/ppm authtype is set to solaris, you cannot use this command. Instead, you must manage passwords on the external authentication servers.
You must log in as the root user to use this command.
Related Topic
Automatically Disabling Users and Passwords, page 3-7
A-34Cisco Prime Performance Manager 1.0 User Guide
OL-24597-01

Appendix A Command Reference General Commands
ppm patchlog
Syntax
/opt/CSCOppm-gw/bin/ppm patchlog
Command Description
Uses PAGER to display the contents of the patch log, which lists the patches that you installed on Prime Performance Manager server.
The default path and filename for the patch log file is /opt/CSCOppm-gw/install/sgmPatch.log. If you installed Prime Performance Manager in a directory other than /opt, then the patch log file resides in that directory.
You must log in as the root user to use this command.
ppm poll
Syntax
/opt/CSCOppm-gw/bin/ppm poll [node] [node]...
Command Description
You use this command to poll one or more known nodes from the command line. Use the node arguments to specify the DNS names or IP addresses of one or more known nodes.
You must log in as the root user to use this command.
ppm print
Syntax
/opt/CSCOppm-gw/bin/ppm print {all | device | snmp | task | alarmsummary [severity] [quiet]}
Command Description
Displays information about device versions, SNMP settings, running tasks, summary of alarms, or all of this information.
Use these keywords with this command:
• device—Prints name, state, and system description of all nodes in the network.
• snmp—Prints SNMP information such as read and write community strings.
• task—Prints a list of task IDs and related information.
• alarmsummary—Prints a list of alarms sorted by severity types (critical, major, minor, and so on).
– severity—Prints a list of alarms of a specified severity type. The severity takes one of these values: critical, major, minor, warning, informational, or indeterminate.
– quiet—Use this keyword to print only the alarm counts (without the severity label)
• all—Prints the information available in all of the keywords of this command.
You must log in as the root user to use this command.
A-35Cisco Prime Performance Manager 1.0 User Guide
OL-24597-01

Appendix A Command Reference General Commands
ppm props
Command Description
Displays the contents of the System.properties files for both Prime Performance Manager server and client installs.
You must log in as the root user to use this command.
ppm purgedb
Command Description
Permanently deletes all components in Prime Performance Manager database marked for deletion.
Prime Performance Manager retains information about older objects in its database even after they have been deleted. This is considered a logically deleted state.
Prime Performance Manager retains this information to maintain any user customized data associated with an object (for instance, a customized name) in case the object is rediscovered in the future. Logically deleted data is physically deleted after seven days if it is not reused by then.
You can use the ppm purgedb command to immediately remove this logically deleted data from Prime Performance Manager database.
Unfortunately, this benefit may have a side effect. In certain cases, rediscovery of a deleted object may cause Prime Performance Manager to use obsolete information in the database, rather than the new information. Ultimately, some configuration changes are not detected, and the viewable data from the client application is incorrect.
Note /opt/CSCOppm-gw/bin/ppm purgedb command does not cause the loss of any collected statistical data.
You must log in as the root user to use this command.
ppm readme
Command Description
Displays the contents of the README file for Prime Performance Manager.
Related Topic
Chapter 5, “Accessing Data from the Web Interface”
ppm reboot
Command Description
Reboots the Solaris Prime Performance Manager system.
You must log in as the root user to use this command.
A-36Cisco Prime Performance Manager 1.0 User Guide
OL-24597-01
Appendix A Command Reference General Commands
ppm reloadmibs
Syntax
/opt/CSCOppm-gw/bin/ppmreloadmibs
Command Description
Command to reload the snmpinfo.dat file
ppm repdir
Syntax
/opt/CSCOppm-gw/bin/ppm repdir [dir] [nostart]
Command Description
Command to set directory used for reports. You must log in as the root user to use this command.
ppm rephelp
Command Description
Displays Help for all commands that are related to Prime Performance Manager reports.
You must log in as the root user to use this command.
ppm restart
Syntax
/opt/CSCOppm-gw/bin/ppm restart [jsp | pm | web]
Command Description
Restarts Prime Performance Manager servers on the local host:
• jsp—Restarts Prime Performance Manager JSP Server.
• pm—Restarts Prime Performance Manager Application Server and all managed processes.
• web—Restarts Prime Performance Manager web Server.
If you do not specify a keyword, /opt/CSCOppm-gw/bin/ppm restart restarts all Prime Performance Manager servers.
You must log in as the root user to use this command.
A-37Cisco Prime Performance Manager 1.0 User Guide
OL-24597-01
Appendix A Command Reference General Commands
ppm restore
Syntax
/opt/CSCOppm-gw/bin/ppm restore [logs | reports | security]
Command Description
Restores Prime Performance Manager data files from a previous backup, stored in Prime Performance Manager installation directory. If you installed Prime Performance Manager in:
• The default directory, /opt, then the locations of the backup files are /opt/ ppm10-Unit-ems-lnx001-backup.tar and /opt/ppm10-Gateway-ems-lnx001-backup.tar.
• A different directory, then the backup files reside in that directory.
You can restore data files on the same Solaris or Linux server; or, on a different Solaris or Linux server that is running Prime Performance Manager 1.x.
To restore only specific parts of Prime Performance Manager data files, use these keywords:
• logs—Restores only Prime Performance Manager log files, such as the message log files.
• reports—Restores only Prime Performance Manager report files, such as the statistics report files.
• security—Restores only the security-related parts of Prime Performance Manager data files. This command is useful if you inadvertently delete your user accounts or make other unwanted changes to your Prime Performance Manager security information.
Note If /opt/CSCOppm-gw/bin/ppm backupdays was previously used to set the number of backup days to more than one day, /opt/CSCOppm-gw/bin/ppm restore command prompts you for a server or client backup file to restore from. This is because there would be more than one backup file to choose from).
To change the directory in which Prime Performance Manager stores these backup files, use /opt/CSCOppm-gw/bin/ppm backupdir command.
The server is restarted automatically after running /opt/CSCOppm-gw/bin/ppm restore command.
You must log in as the root user to use this command.
Related Topic
• Backing Up or Restoring Prime Performance Manager Files, page 3-20
• ppm backupdays, page A-8
• ppm backupdir, page A-9
ppm restore all
Syntax
/opt/CSCOppm-gw/bin/ppm restore all [nostart]
Command Description
Restores all system files.
The server is restarted automatically after running /opt/CSCOppm-gw/bin/ppm restore all command.
A-38Cisco Prime Performance Manager 1.0 User Guide
OL-24597-01
Appendix A Command Reference General Commands
The server is not restarted automatically after running /opt/CSCOppm-gw/bin/ppm restore all nostart command.
You must log in as the root user to use this command.
ppm restoreprops
Command Description
Restores Prime Performance Manager server and client System.properties files and other important configuration files to the backup versions of the files.
You must log in as the root user to use this command.
ppm rootvars
Command Description
Displays the contents of the /etc/CSCOppm.sh file, which determines the root location of Prime Performance Manager server and client installation.
ppm sechelp
Command Description
Displays help for all commands that are related to Prime Performance Manager security.
You must log in as the root user to use this command.
Related Topic
Chapter 3, “Configuring Security”
ppm seclog
Syntax
/opt/CSCOppm-gw/bin/ppm seclog [clear | -r]
Command Description
Uses PAGER to display the contents of the system security log.
These security events are recorded in the log:
• All changes to system security, including adding users.
• Log-in attempts, whether successful or unsuccessful, and logoffs.
• Attempts to switch to another user's account, whether successful or unsuccessful.
• Attempts to access files or resources of higher authentication level.
• Access to all privileged files and processes.
• Operating system configuration changes and program changes, at the Solaris level.
A-39Cisco Prime Performance Manager 1.0 User Guide
OL-24597-01
Appendix A Command Reference General Commands
• Prime Performance Manager restarts.
• Failures of computers, programs, communications, and operations, at the Solaris level.
To clear the log, enter /opt/CSCOppm-gw/bin/ppm seclog clear.
To display the contents of the log in reverse order, with the most recent security events at the beginning of the log, enter /opt/CSCOppm-gw/bin/ppm seclog -r.
The default path and filename for the system security log file is /opt/CSCOppm-gw/logs/sgmSecurityLog.txt. If you installed Prime Performance Manager in a directory other than /opt, then the system security log file resides in that directory.
You must log in as the root user to use this command.
Related Topic
Displaying the Contents of the System Security Log, page 3-14
ppm serverlist delete
Syntax
ppm serverlist delete [servername | all ]
Command Description
Deletes Prime Performance Manager server from the list, where servername is the name of the server deleted.
You must log in as the root user to use this command.
ppm serverlist list
Syntax
/opt/CSCOppm-gw/bin/ppm serverlist list
Command Description
Lists all Prime Performance Manager servers configured.
• Add—Adds new Prime Performance Manager server to the list, where servername is the name of the new server added and port number is the port number of the corresponding client.
• Delete—Deletes Prime Performance Manager server from the list, where servername is the name of the server deleted.
You must log in as the root user to use this command.
A-40Cisco Prime Performance Manager 1.0 User Guide
OL-24597-01
Appendix A Command Reference General Commands
ppm servername
Syntax
/opt/CSCOppm-gw/bin/ppm servername [hostname] [nostopstart]
Command Description
Command resets Prime Performance Manager server default hostname, where hostname is the new default hostname.
• Ensure that the new default hostname is valid and defined in your /etc/hosts file. If not, you might not be able to start Prime Performance Manager server.
• User should be logged in as root user to run this command.
• nostopstart - The server is not stopped and started automatically while running this command.
Related Topic
• Appendix B, “FAQs”
• Appendix E, “Configuring Prime Performance Manager to Run with Various Networking Options”
ppm setpath
Syntax
/opt/CSCOppm-gw/bin/ppm setpath [username]
Command Description
Appends binary (bin) directories to the path for a user. Users can then append the proper Prime Performance Manager binary directories to their paths without manually editing the .profile and .cshrc files.
This command appends lines such as these to the user's .profile file:
PATH=$PATH:/opt/CSCOppm-gw/bin:/opt/CSCOppm-gw Client/bin # CiscoPPM
and appends lines such as these to the user's .cshrc file:
set path=($path /opt/CSCOppm-gw/bin /opt/CSCOppm-gw Client/bin) # CiscoPPM
Thereafter, you can enter Prime Performance Manager commands as:
/opt/CSCOppm-gw/bin/ppm help
When entering this command, remember that:
• If you enter this command and you do not specify a username, Prime Performance Manager appends the bin directories to your path (that is, to the path for the user who is currently logged in and entering /opt/CSCOppm-gw/bin/ppm setpath command).
• If you enter this command and you specify a username, Prime Performance Manager appends the bin directories to the path for the specified user. To specify a username, follow these conditions:
– You must log in as the root user.
– The specified username must exist in the local /etc/passwd file.
– You cannot specify a username that is defined in a distributed Network Information Services (NIS) system or in an Network File System-mounted (NFS-mounted) home directory.
A-41Cisco Prime Performance Manager 1.0 User Guide
OL-24597-01
Appendix A Command Reference General Commands
• If you enter this command more than once for the same user, each command overwrites the previous command. Prime Performance Manager does not append multiple bin directories to the same path.
ppm showsnmpcomm
Syntax
/opt/CSCOppm-gw/bin/ppm showsnmpcomm [-i ipaddress]
Command Description
Shows the specified SNMP configuration, or all SNMP configurations, on Prime Performance Manager server.
-i ipaddress—the IP address of the device (optional). If not specified, displays all SNMP configurations on the server.
Related Topic
• ppm addsnmpcomm, page A-5
• ppm deletesnmpcomm, page A-15
• ppm modifysnmpcomm, page A-30
• ppm snmpsetup, page A-48
ppm showunitconf
Syntax
/opt/CSCOppm-gw/bin/ppm showunitconf [-i (ipaddress)]
Command Description
Shows the configuration that specifies the relationship between nodes and their managed units.
-i ipaddress - IP address of the node is optional. If not specified, displays all configured entries on the server.
Note If a node is not specified in the configuration, it means the node will be managed by the default unit. The default unit is the unit which connects to the gateway first.
ppm singlesess
Syntax
/opt/CSCOppm-gw/bin/ppm singlesess [enable | disable | status]
Command Description
This command manages single session per user..
• enable—Enables the single session per user.
Logging into a web interface as a user ends all the existing web interface sessions for that user.
A-42Cisco Prime Performance Manager 1.0 User Guide
OL-24597-01
Appendix A Command Reference General Commands
• disable—Disables the single session per user.
This command allows logging in as the same user from multiple web interfaces.
• status—Shows the status of the single session per user.
You must log in as the root user to use this command.
ppm snmpcomm
Syntax
/opt/CSCOppm-gw/bin/ppm snmpcomm [name]
Command Description
You use this command to set a new default SNMP read community name. Prime Performance Manager automatically updates the name in the SNMP parameters file. The default path and filename for the SNMP parameters file is /opt/CSCOppm-gw/etc/communities.conf.
You must log in as the root user to use this command.
ppm snmpconf
Syntax
/opt/CSCOppm-gw/bin/ppm snmpconf [filename]
Command Description
Sets the file used for SNMP parameters, such as community names, timeouts, and retries.
The default path and filename for the SNMP parameters file is /opt/CSCOppm-gw/etc/communities.conf. If you installed Prime Performance Manager in a directory other than /opt, then the file resides in that directory.
When you specify a new path or filename, Prime Performance Manager restarts the servers.
Note The SNMP parameters file uses the HP OpenView format; therefore, you can set this path and filename to point to the HP OpenView ovsnmp.conf file in an existing OpenView system. For information about exporting SNMP community names from CiscoWorks Resource Manager Essentials (RME).
You must log in as the root user to use this command.
ppm snmpget
Syntax
/opt/CSCOppm-gw/bin/ppm snmpget [-JJVM_ARG1 [-JJVM_ARG2]...] [-v snmp_version] [-c community_string] [-r retry] [-t timeout] [-d output_delimiter] [--header|--no-header] [--raw-octets|--no-raw-octets] [--str-octets|--no-str-octets] [--raw-timeticks|--no-raw-timeticks] [--resolve-integer|--no-resolve-integer] [--resolve-bits|--no-resolve-bits] [--get-sysuptime|--no-get-sysuptime] [--detect-mib-error] [--instance oids] [--int-instance integer] [--str-instance string] [hostname] [oid] [oid]...
A-43Cisco Prime Performance Manager 1.0 User Guide
OL-24597-01
Appendix A Command Reference General Commands
Command Description
Queries the specified hostname by using SNMP GetRequests. Use these optional keywords and arguments with this command:
• -JJVM_ARG1—JVM options. You must specify the -J keyword and arguments before any other keywords and arguments.
For example, by default JVM uses a maximum of 64 MB of memory. However, if you are working in a large table, JVM might require more memory. To enable JVM to use a maximum of 256 MB of memory, use this syntax:
-J-Xmx256m
• -v snmp_version—SNMP protocol version. Valid versions are 1 or 2c. The default version is 2c.
• -c community_string—SNMP community string. You specify the default community string in the SNMP parameters file, communities.conf.
• -r retry—SNMP retry count. You specify the default retry count in the SNMP parameters file, communities.conf.
• -t timeout—SNMP timeout, in seconds. You specify the default timeout in the SNMP parameters file, communities.conf.
• -d output_delimiter—Output delimiter. The default output delimiter is a colon (:).
• --header|--no-header—Specifies whether to display variable names as table headers:
– Specify --header to display variable names as table headers for tabular output, or to display MIB variable OIDs with the value for nontabular output. This is the default setting.
– Specify --no-header if you do not want to display variable names as table headers for tabular output, or MIB variable OIDs with the value for nontabular output.
• --raw-octets|--no-raw-octets—Specifies whether to display octets as raw octets:
– Specify --raw-octets to display raw octets, such as 6c 69 6e 6b, for octet strings.
– Specify --no-raw-octets if you do not want to display raw octets for octet strings. This is the default setting.
The other option for displaying octets is --str-octets|--no-str-octets.
• --str-octets|--no-str-octets—Specifies whether to display octets as strings:
– Specify --str-octets to display octets as strings, such as link. This is the default setting.
– Specify --no-str-octets if you do not want to display octets as strings.
The other option for displaying octets is --raw-octets|--no-raw-octets.
• --raw-timeticks|--no-raw-timeticks—Specifies the time format:
– Specify --raw-timeticks to specify raw timeticks, such as 2313894.
– Specify --no-raw-timeticks to specify formatted timeticks, such as 6 Hours 26 Mins 12 Secs. This is the default setting.
• --resolve-integer|--no-resolve-integer—Specifies the time format. Use:
– --resolve-integer to display integers using the string description in the MIB, such as available or unavailable.
– --no-resolve-integer to display integers as numbers. This is the default setting.
A-44Cisco Prime Performance Manager 1.0 User Guide
OL-24597-01
Appendix A Command Reference General Commands
• --resolve-bits|--no-resolve-bits—Specifies the time format. Use:
– --resolve-bits to display bits using the string description in the MIB, such as continue or ruleset.
– --no-resolve-bits to display bits as numbers, such as 1 or 14. This is the default setting.
• --get-sysuptime|--no-get-sysuptime—Specifies whether to retrieve the sysuptime. Use:
– --get-sysuptime to retrieve the sysuptime in the same packet as each SNMP operation.
– --no-get-sysuptime if you do not want to retrieve the sysuptime in the same packet. This s the default setting.
• --detect-mib-error—Detects errors in returned MIB variables, such as noSuchInstance, noSuchObject, and endOfMibView. If the system detects any such errors, an error message and error code appear.
Sometimes multiple MIB variables are returned at the same time, some of which are in error; others are not. If this occurs and you:
– Specified --detect-mib-error, none of the correct values appear, only the error message, and it returns an error code.
– Did not specify --detect-mib-error, a return code of 0 is returned and all MIB variables appear. (Even noSuchInstance appears as a returned value.) This is the default setting, with --detect-mib-error not specified.
• --instance oids—Appends instance OIDs to each polling MIB variable. For example, these commands perform the same function:
ppm snmpget --instance 172.18.16.10 node_1 ipAdEntIfIndex ipAdEntNetMask
ppm snmpget node_1 ipAdEntIfIndex.172.18.16.10 ipAdEntNetMask.172.18.16.10
• --int-instance integer—Appends the specified integer instance OID to each polling MIB variable.
• --str-instance string—Appends string instance OIDs to each polling MIB variable; for example, these commands perform the same function:
ppm snmpget --str-instance link_1 node_1 cItpSpLinksetState
ppm snmpget node_1 cItpSpLinksetState.6.108.115.110.97.109.101
• hostname—Name of the host to query.
• oid—One or more OIDs or variable names.
The default path for the SNMP parameters file, communities.conf, is /opt/CSCOppm-gw/etc/ communities.conf. If you installed Prime Performance Manager in a directory other than /opt, then the file resides in that directory. You can edit the file manually or using Prime Performance Manager web interface.
You must log in as the root user to use this command.
ppm snmphelp
Command Description
Displays help for all commands that are related to SNMP queries.
You must log in as the root user to use this command.
A-45Cisco Prime Performance Manager 1.0 User Guide
OL-24597-01

Appendix A Command Reference General Commands
ppm snmpmaxrows
Syntax
/opt/CSCOppm-gw/bin/ppm snmpmaxrows [number-of-rows]
Command Description
Sets the value of maximum rows for SNMP walk.
Prime Performance Manager collects network information from device MIBs using SNMP protocol. In certain ITP networks, some MIB tables can be very large (such as GTT tables, MTP3 accounting statistics tables, etc.)
The default value of 100,000 rows is usually sufficient even for large networks. However, for very large networks, if the limit needs to be increased, you can customize the this parameter. It is not recommended to exceed 300,000 rows.
If you enter this command without the number-of-rows argument, Prime Performance Manager displays the current maximum number of rows. You can then change that value or leave it. The valid range is 1 row to an unlimited number of rows. However, it is not recommended to set this number at less than 10,000. The default value is 100,000 rows.
You must log in as the root user to use this command.
ppm snmpnext
Syntax
ppm snmpnext [-JJVM_ARG1 [-JJVM_ARG2]...] [-v snmp_version] [-c community_string] [-r retry] [-t timeout] [-d output_delimiter] [--header|--no-header] [--raw-octets|--no-raw-octets] [--str-octets|--no-str-octets] [--raw-timeticks|--no-raw-timeticks] [--resolve-integer|--no-resolve-integer] [--resolve-bits|--no-resolve-bits] [--get-sysuptime|--no-get-sysuptime] [--detect-mib-error] [--instance oids] [--int-instance integer] [--str-instance string] [hostname] [oid] [oid]...
Command Description
Queries the specified hostname by using SNMP GetNextRequests. Use these optional keywords and arguments with this command:
• -JJVM_ARG1—JVM options. You must specify the -J keyword and arguments before any other keywords and arguments.
For example, by default JVM uses a maximum of 64 MB of memory; however, if you explore a large table, JVM might require more memory. To enable JVM to use a maximum of 256 MB of memory, use this option:
-J-Xmx256m
• -v snmp_version—SNMP protocol version. Valid versions are 1 or 2c. The default version is 2c.
• -c community_string—SNMP community string. You specify the default community string in the SNMP parameters file, communities.conf.
• -r retry—SNMP retry count. You specify the default retry count in the SNMP parameters file, communities.conf.
A-46Cisco Prime Performance Manager 1.0 User Guide
OL-24597-01
Appendix A Command Reference General Commands
• -t timeout—SNMP timeout, in seconds. You specify the default timeout in the SNMP parameters file, communities.conf.
• -d output_delimiter—Output delimiter. The default output delimiter is a colon (:).
• --header|--no-header—Specifies whether to display variable names as table headers:
– Specify --header to display variable names as table headers for tabular output or MIB variable OIDs with the value for nontabular output. This is the default setting.
– Specify --no-header if you do not want to display variable names as table headers for tabular output or MIB variable OIDs with the value for nontabular output.
• --raw-octets|--no-raw-octets—Specifies whether to display octets as raw octets. Use:
– --raw-octets to display raw octets, such as 6c 69 6e 6b, for octet strings.
– --no-raw-octets if you do not want to display raw octets for octet strings. This is the default setting.
The other option for displaying octets is --str-octets|--no-str-octets.
• --str-octets|--no-str-octets—Specifies whether to display octets as strings. Use:
– --str-octets to display octets as strings, such as link. This is the default setting.
– --no-str-octets if you do not want to display octets as strings.
The other option for displaying octets is --raw-octets|--no-raw-octets.
• --raw-timeticks|--no-raw-timeticks—Specifies the time format:
– Specify --raw-timeticks to specify raw timeticks, such as 2313894.
– Specify --no-raw-timeticks to specify formatted timeticks, such as 6 Hours 26 Mins 12 Secs. This is the default setting.
• --resolve-integer|--no-resolve-integer—Specifies the time format. Use:
– --resolve-integer to display integers using the string description in the MIB, such as available or unavailable.
– --no-resolve-integer to display integers as numbers. This is the default setting.
• --resolve-bits|--no-resolve-bits—Specifies the time format:
– Specify --resolve-bits to display bits using the string description in the MIB, such as continue or ruleset.
– Specify --no-resolve-bits to display bits as numbers, such as 1 or 14. This is the default setting.
• --get-sysuptime|--no-get-sysuptime—Specifies whether to retrieve the sysuptime. Use:
– --get-sysuptime to retrieve the sysuptime in the same packet as each SNMP operation.
– --no-get-sysuptime if you do not want to retrieve the sysuptime in the same packet. This is the default setting.
• --detect-mib-error—Detects errors in returned MIB variables, such as noSuchInstance, noSuchObject, and endOfMibView. If the system detects any such errors, an error message appears and an error code is returned.
Sometimes multiple MIB variables are returned at the same time, some of which are in error; others are not. If this occurs and you:
– Specified --detect-mib-error, none of the correct values appear, only the error message and it returns an error code.
A-47Cisco Prime Performance Manager 1.0 User Guide
OL-24597-01
Appendix A Command Reference General Commands
– Did not specify --detect-mib-error, a return code of 0 is returned and all MIB variables appear (even noSuchInstance appears as a returned value). This is the default setting, with --detect-mib-error not specified.
• --instance oids—Appends instance OIDs to each polling MIB variable. For example, these commands perform the same function:
ppm snmpget --instance 172.18.16.10 node_1 ipAdEntIfIndex ipAdEntNetMask
ppm snmpget node_1 ipAdEntIfIndex.172.18.16.10 ipAdEntNetMask.172.18.16.10
• --int-instance integer—Appends the specified integer instance OID to each polling MIB variable.
• --str-instance string—Appends string instance OIDs to each polling MIB variable. For example, these commands perform the same function:
ppm snmpget --str-instance link_1 node_1 cItpSpLinksetState
ppm snmpget node_1 cItpSpLinksetState.6.108.115.110.97.109.101
• hostname—Name of the host to be queried.
• oid—One or more OIDs or variable names.
The default path for the SNMP parameters file, communities.conf, is /opt/CSCOppm-gw/etc/communities.conf. If you installed Prime Performance Manager in a directory other than /opt, then the file resides in that directory. You can edit the file manually or by using Prime Performance Manager client.
You must log in as the root user to use this command.
ppm snmpsetup
Syntax
/opt/CSCOppm-gw/bin/ppm snmpsetup
Command Description
Set SNMP community strings for multiple devices and discover. You do not need to restart the server when using this command.
Related Topic
• ppm addsnmpcomm, page A-5
• ppm deletesnmpcomm, page A-15
• ppm modifysnmpcomm, page A-30
• ppm showsnmpcomm, page A-42
A-48Cisco Prime Performance Manager 1.0 User Guide
OL-24597-01

Appendix A Command Reference General Commands
ppm snmpwalk
Syntax
/opt/CSCOppm-gw/bin/ppm snmpwalk [-JJVM_ARG1 [-JJVM_ARG2]...] [-v snmp_version] [-c community_string] [-r retry] [-t timeout] [-x maximum_rows] [-d output_delimiter] [--tabular|--no-tabular] [--getbulk|--no-getbulk] [--header|--no-header] [--raw-octets|--no-raw-octets] [--str-octets|--no-str-octets] [--raw-timeticks|--no-raw-timeticks] [--resolve-integer|--no-resolve-integer] [--resolve-bits|--no-resolve-bits] [--get-sysuptime|--no-get-sysuptime] [--detect-mib-error] [--instance oids] [--int-instance integer] [--str-instance string] [hostname] [oid] [oid]...
Command Description
Queries the specified hostname by using SNMP GetNextRequests to go through the MIB. Use these optional keywords and arguments with this command:
• -JJVM_ARG1—JVM options. You must specify the -J keyword and arguments before any other keywords and arguments.
For example, by default JVM uses a maximum of 64 MB of memory; however, if you are going through a large table, JVM might require more memory. To enable JVM to use a maximum of 256 MB of memory, use this option:
-J-Xmx256m
• -v snmp_version—SNMP protocol version. Valid versions are 1 or 2c. The default version is 2c.
• -c community_string—SNMP community string. You specify the default community string in the SNMP parameters file, communities.conf.
• -r retry—SNMP retry count. You specify the default retry count in the SNMP parameters file, communities.conf.
• -t timeout—SNMP timeout, in seconds. You specify the default timeout in the SNMP parameters file, communities.conf.
• -x maximum_rows—Maximum number of rows to go through. If a table has more than the maximum number of rows, ppm snmpwalk command fails. You can use the -m keyword and argument to increase the maximum number of rows to go through. The default setting is 10,000 rows.
However, for every 10,000 rows gone through, JVM requires an additional 10 MB of memory. You can use the -J keyword and argument to increase the memory available to JVM.
• -d output_delimiter—Output delimiter. The default output delimiter is a colon (:).
• --tabular|--no-tabular—Specifies whether to print the result of the query in tabular format. Use:
– --tabular to print the result in tabular format. This is the default setting.
– --no-tabular if you do not want to print the result in tabular format.
• --getbulk|--no-getbulk—(SNMP version 2c only) Specifies whether to use the getbulk command to go through the table. Use:
– --getbulk to use the getbulk command. This is the default setting.
– --no-getbulk if you do not want to use the getbulk command.
• --header|--no-header—Specifies whether to display variable names as table headers. Use:
– --header to display variable names as table headers for tabular output or to display MIB variable OIDs with the value for nontabular output. This is the default setting.
A-49Cisco Prime Performance Manager 1.0 User Guide
OL-24597-01
Appendix A Command Reference General Commands
– --no-header if you do not want to display variable names as table headers for tabular output or MIB variable OIDs with the value for nontabular output.
• --raw-octets|--no-raw-octets—Specifies whether to display octets as raw octets. Use:
– --raw-octets to display raw octets, such as 6c 69 6e 6b, for octet strings.
– --no-raw-octets if you do not want to display raw octets for octet strings. This is the default setting.
The other option for displaying octets is --str-octets|--no-str-octets.
• --str-octets|--no-str-octets—Specifies whether to display octets as strings. Use:
– --str-octets to display octets as strings, such as link. This is the default setting.
– --no-str-octets if you do not want to display octets as strings.
The other option for displaying octets is --raw-octets|--no-raw-octets.
• --raw-timeticks|--no-raw-timeticks—Specifies the time format. Use:
– --raw-timeticks to specify raw timeticks, such as 2313894.
– --no-raw-timeticks to specify formatted timeticks, such as 6 Hours 26 Mins 12 Secs. This is the default setting.
• --resolve-integer|--no-resolve-integer—Specifies the time format. Use:
– --resolve-integer to display integers using the string description in the MIB, such as available or unavailable.
– --no-resolve-integer to display integers as numbers. This is the default setting.
• --resolve-bits|--no-resolve-bits—Specifies the time format. Use:
– --resolve-bits to display bits using the string description in the MIB, such as continue or ruleset.
– --no-resolve-bits to display bits as numbers, such as 1 or 14. This is the default setting.
• --get-sysuptime|--no-get-sysuptime—Specifies whether to retrieve the sysuptime. Use:
– --get-sysuptime to retrieve the sysuptime in the same packet as each SNMP operation.
– --no-get-sysuptime if you do not want to retrieve the sysuptime in the same packet. This is the default setting.
• --detect-mib-error—Detects errors in returned MIB variables, such as noSuchInstance, noSuchObject, and endOfMibView. If the system detects any such errors, an error message and error code appear.
Sometimes multiple MIB variables are returned at the same time, some of which are in error; others are not. If this occurs and you:
– Specified --detect-mib-error, none of the correct values appear, only the error message and an error code is returned.
– Did not specify --detect-mib-error, a return code of 0 and all MIB variables appear; even noSuchInstance appears as a returned value. This is the default setting, with --detect-mib-error not specified.
• --instance oids—Appends instance OIDs to each polling MIB variable. For example, these commands perform the same function:
ppm snmpget --instance 172.18.16.10 node_1 ipAdEntIfIndex ipAdEntNetMask
ppm snmpget node_1 ipAdEntIfIndex.172.18.16.10 ipAdEntNetMask.172.18.16.10
A-50Cisco Prime Performance Manager 1.0 User Guide
OL-24597-01
Appendix A Command Reference General Commands
• --int-instance integer—Appends the specified integer instance OID to each polling MIB variable.
• --str-instance string—Appends string instance OIDs to each polling MIB variable. For example, these commands perform the same function:
ppm snmpget --str-instance link_1 node_1 cItpSpLinksetState
ppm snmpget node_1 cItpSpLinksetState.6.108.115.110.97.109.101
• hostname—Name of the host to query.
• oid—One or more OIDs or variable names.
The default path for the SNMP parameters file, communities.conf, is /opt/CSCOppm-gw/etc/communities.conf. If you installed Prime Performance Manager in a directory other than /opt, then the file resides in that directory. You can edit the file manually or using Prime Performance Manager client.
You must log in as the root user to use this command.
ppm ssl
Syntax
/opt/CSCOppm-gw/bin/ppm ssl [enable | disable | status]
Command Description
If you enable the SSL on Prime Performance Manager and you have an SSL key-certificate pair on Prime Performance Manager, you can use this command to manage SSL support in Prime Performance Manager:
• enable—Enables SSL support.
• disable—Disables SSL support.
• status—Displays the current status of SSL support in Prime Performance Manager, including whether you enabled or disabled SSL support, and which SSL keys and certificates exist.
You must log in as the root user to use this command. See Enabling SSL Support on Gateway in Prime Performance Manager, page 3-15 for more information.
ppm sslstatus
Syntax
/opt/CSCOppm-gw/bin/ppm sslstatus
Command Description
Displays the current status for SSL that Prime Performance Manager supports, including whether you enabled or disabled SSL support; and, which SSL keys and certificates exist.
You must log in as the root user to use this command.
Related Topic
Enabling SSL Support on Gateway in Prime Performance Manager, page 3-15
A-51Cisco Prime Performance Manager 1.0 User Guide
OL-24597-01
Appendix A Command Reference General Commands
ppm start
Syntax
/opt/CSCOppm-gw/bin/ppm start
Command Description
Starts all Prime Performance Manager servers on the local host.
You must log in as the root user to use this command.
Note If the database has an exception during start up, the server will fail to start.
Related Topic
Starting Prime Performance Manager Server, page 2-1
ppm start jsp
Syntax
/opt/CSCOppm-gw/bin/ppm startjsp
Command Description
Starts Prime Performance Manager JSP Server on the local host.
You must log in as the root user to use this command.
ppm start pm
Syntax
/opt/CSCOppm-gw/bin/ppm startpm
Command Description
Starts Prime Performance Manager Application Server and all managed processes on the local host.
You must log in as the root user to use this command.
ppm start web
Syntax
/opt/CSCOppm-gw/bin/ppm startweb
Command Description
Starts Prime Performance Manager web server on the local host.
A-52Cisco Prime Performance Manager 1.0 User Guide
OL-24597-01
Appendix A Command Reference General Commands
You must log in as the root user to use this command.
ppm statreps
Full Syntax
/opt/CSCOppm-gw/bin/ppm statreps [none] [default] [all] [enable | disable] [noexport | export] status, [status [node]] status config, status reps, config, reps, [setstatus[category] [enable | disable]], [setstatus[category] [enable | disable] [node]], [5min [enable|disable]], [15min [enable|disable]], [hourly [enable|disable]], [hourly [enable|disable]], [daily [enable |disable]], [5mincsvage [days]], [15mincsvage [days]], [hourlycsvage [days]], [dailycsvage [days]], [5minage [days]], [15minage [days]], [hourlyage [days]], [dailyage [days]], [ nodiskcheck | diskcheck], [timemode [12 | 24]], [csvnames [ppm | 3gpp]], [nametype[dnsname] [customname | sysname]], [csvtype [allnodes | pernodeuniq]], [zipcsvdelay [mins]]
Optionally, you can specify a hostname or IP address to enable or disable the specified report for a specific device. For example the following command enables CPU reports for the device name
ppm statreps cpu <ip address>
If you specify a command in which the hostname or IP address is not applicable, the host parameter is ignored and does not cause an error.
Command Description
[enable | disable] - Enables/Disables master report.
[all] - Enables all report types.
[default] - Enables all default report types.
[none] - Disables all report types.
[noexport | export] - Enables/Disables all csv files.
[nodiskcheck | diskcheck] - Checks for available disk space.
status - Displays network report settings.
status [node] - Displays node report settings.
status config - Displays master report config settings.
status reps - Displays individual report enable status.
config - Displays master report config settings.
reps - Displays individual report enable status.
setstatus [[category] [enable | disable]] - Enables/Disables Network report settings.
setstatus [[category] [enable | disable] [node]] - Enables/Disables Node report settings.
5min [enable | disable] - Enables/Disables 5 minute master report.
15min [enable | disable] - Enables/Disables 15 minute master report.
hourly [enable | disable] - Enables/Disables hourly master report.
daily [enable | disable] - Enables/Disables daily master report.
5mincsvage [days] - Specifies the days to keep 5 min csv files.
15mincsvage [days] - Specifies the days to keep 15 min csv files.
hourlycsvage [days] - Specifies the days to keep hourly csv files.
A-53Cisco Prime Performance Manager 1.0 User Guide
OL-24597-01
Appendix A Command Reference General Commands
dailycsvage [days] - Specifies the days to keep daily csv files.
5minage [days] - Specifies the days to keep 5min data.
15minage [days] - Specifies the days to keep 15min data.
hourlyage [days] - Specifies the days to keep hourly data.
dailyage [days] - Specifies the days to keep daily data.
timemode [12 | 24] - Display in 12 or 24 hour time.
csvnames [ppm | 3gpp] - Specifies the format for csv filenames.
nametype [dnsname | customname | sysname] - Specifies the nodename type for csv files.
csvtype [allnodes | pernodeuniq] - Specifies the combined or pernode csv Files.
zipcsvdelay [mins] - Specifies the minutes to wait before zipping csv Files.
ppm syncunits
Syntax
/opt/CSCOppm-gw/bin/ppm syncunits [enable | disable| status]
Command Description
Command manages file synchronization between Gateway /Units
ppm status
Syntax
/opt/CSCOppm-gw/bin/ppm status
Command Description
Displays the status of all Prime Performance Manager servers on the local host.
Related Topic
Chapter 5, “Accessing Data from the Web Interface”
ppm stop
Syntax
/opt/CSCOppm-gw/bin/ppm stop
Command Description
Stops all Prime Performance Manager servers on the local host.
You must log in as the root user to use this command.
A-54Cisco Prime Performance Manager 1.0 User Guide
OL-24597-01
Appendix A Command Reference General Commands
ppm stop jsp
Syntax
/opt/CSCOppm-gw/bin/ppm stopjsp
Command Description
Stops Prime Performance Manager JSP Server on the local host.
You must log in as the root user to use this command.
ppm stop pm
Syntax
/opt/CSCOppm-gw/bin/ppm stoppm
Command Description
Stops Prime Performance Manager Application Server and all managed processes on the local host.
You must log in as the root user to use this command.
ppm stop web
Syntax
/opt/CSCOppm-gw/bin/ppm stopweb
Command Description
Stops Prime Performance Manager web server on the local host.
You must log in as the root user to use this command.
ppm tac
Syntax
/opt/CSCOppm-gw/bin/ppm tac [short]
Command Description
Collects important troubleshooting information for the Cisco Technical Assistance Center and writes the information to the /opt/CSCOppm-gw/tmp/cisco_ppm_tshoot.log file.
short—Collects the basic information required for diagnosis of the problem.
You must log in as the root user to use this command.
A-55Cisco Prime Performance Manager 1.0 User Guide
OL-24597-01
Appendix A Command Reference General Commands
ppm trapratelimit abate
Syntax
/opt/CSCOppm-gw/bin/ppm trapratelimit abate [offset]
Command Description
This option configures the trap abate offset.
By default, a node generating 2,000 or more traps (major limiting count) in the last 30 minutes (limiting interval) is considered to generate too many traps.
Prime Performance Manager raises a TrapRateStatus major alarm and stops trap processing for this node. If the node no longer experiences a trap storm in the next cycle (limiting interval), Prime Performance Manager will automatically reset the ProcessTrap flag and begin processing traps again.
The abate offset is the offset value from the trap major limit count. The abate threshold limit is the limiting count minus the offset value. By default, the offset value is 200.
For example, if a node generates 2,000 traps (major limiting count) minus 200 traps (the default offset value), which equals 1,800 or more traps, it is considered to be faulty and Prime Performance Manager stops trap processing for this node.
You must log in as the root user to use this command.
ppm trapratelimit major
Syntax
/opt/CSCOppm-gw/bin/ppm trapratelimit major [count]
Command Description
This option configures the trap major limiting count or the major threshold limit.
By default, a node generating 2,000 or more traps (major limiting count) in the last 30 minutes (limiting interval) is considered to generate too many traps.
Prime Performance Manager raises a TrapRateStatus major alarm and stops trap processing for this node. If the node no longer experiences a trap storm in the next cycle (limiting interval), Prime Performance Manager will automatically reset the ProcessTrap flag and begin processing traps again.
You must log in as the root user to use this command.
ppm trapratelimit interval
Syntax
/opt/CSCOppm-gw/bin/ppm trapratelimit interval [min]
Command Description
This option configures the interval at which nodes are checked for a trap storm.
By default, a node generating 2,000 or more traps (major limiting count) in the last 30 minutes (limiting interval) is considered to generate too many traps.
A-56Cisco Prime Performance Manager 1.0 User Guide
OL-24597-01
Appendix A Command Reference General Commands
Prime Performance Manager raises a TrapRateStatus major alarm and stops trap processing for this node. If the node no longer experiences a trap storm in the next cycle (limiting interval), Prime Performance Manager will automatically reset the ProcessTrap flag and begin processing traps again.
You must log in as the root user to use this command.
ppm trapratelimit minor
Syntax
/opt/CSCOppm-gw/bin/ppm trapratelimit minor [count]
Command Description
This option configures the trap minor limiting count or the minor threshold limit.
By default, if a node generates 1,000 or more traps (minor limiting count) in the last 30 minutes (limiting interval) Prime Performance Manager raises a TrapRateStatus minor alarm. Prime Performance Manager will continue to process traps from the node.
• If the node no longer experiences a trap storm in the next cycle (limiting interval), Prime Performance Manager will automatically clear the minor alarm.
• If the node continues to receive 2,000 or more traps (major limiting count) Prime Performance Manager raises TrapRateStatus major alarm and stop trap processing for this node.
You must log in as the root user to use this command.
ppm uninstall
Syntax
/opt/CSCOppm-gw/bin/ppm uninstall
Command Description
Uninstalls Prime Performance Manager.
You must log in as the root user to use this command.
ppm unknownage
Syntax
/opt/CSCOppm-gw/bin/ppm unknownage [number-of-days]
Command Description
Sets the maximum number of days to retain Unknown objects before deleting them from Prime Performance Manager database.
If you enter this command without the number-of-days argument, Prime Performance Manager displays the current maximum number of days. You can then change that value or leave it. The valid range is one day to an unlimited number of days. The default value is seven days. Setting this value to 0 days means that, after one hour, the system deletes Unknown.
You must log in as the root user to use this command.
A-57Cisco Prime Performance Manager 1.0 User Guide
OL-24597-01
Appendix A Command Reference General Commands
ppm updateuser
Syntax
/opt/CSCOppm-gw/bin/ppm updateuser [username]
Command Description
If you enable Prime Performance Manager User-Based Access, changes the authentication level for the specified user. Valid levels are:
• 1—Basic User
• 3—Network Operator
• 5—System Administrator
• 11 & 12 — Custom Level
If you set ppm authtype to local, you also use this command to change the user’s password. When setting the password, follow the rules and considerations in Creating Secure Passwords, page 3-6.
See Enabling and Changing Users and Passwords, page 3-11 for more information on authentication levels and the use of this command.
You must log in as the root user to use this command.
Note If you have enabled Solaris authentication, you must log in as the root user, to use this command (see Configuring User Access, page 3-1).
A-58Cisco Prime Performance Manager 1.0 User Guide
OL-24597-01

Appendix A Command Reference General Commands
ppm useraccess
Syntax
/opt/CSCOppm-gw/bin/ppm useraccess [disable | enable]
Command Description
Enables or disables Prime Performance Manager User-Based Access. User-Based Access provides multilevel password-protected access to Prime Performance Manager features. Each user can have a unique username and password. You can also assign each user to one of five levels of access, which control the list of Prime Performance Manager features accessible by that user.
Note You must enable Prime Performance Manager User-Based Access to use the associated Prime Performance Manager security commands (see Configuring User Access, page 3-1).
The ppm useraccess command goes through the following stages, checking the status of:
• ppm useraccess—Enabled or disabled.
• ppm authtype—If you have not already set Prime Performance Manager authentication type, you must do so now.
• ppm adduser—If you have already assigned users, Prime Performance Manager asks if you want to use the same user database, or create a new one. If you have not assigned users, you must do so now.
You must log in as the root user to use this command.
Related Topic
Configuring User Access, page 3-1
ppm userpass
Syntax
/opt/CSCOppm-gw/bin/ppm userpass [username]
Command Description
If you enable Prime Performance Manager User-Based Access and /opt/CSCOppm-gw/bin/ppm authtype is set to local, changes the specified user’s Prime Performance Manager security authentication password.
If Prime Performance Manager automatically disables the user’s authentication, this command re-enables the user’s authentication with a new password.
If /opt/CSCOppm-gw/bin/ppm authtype is set to Solaris or Linux, you cannot use this command; instead, you must manage passwords on the external authentication servers.
You must log in as the root user to use this command.
Related Topic
Enabling and Changing Users and Passwords, page 3-11
A-59Cisco Prime Performance Manager 1.0 User Guide
OL-24597-01
Appendix A Command Reference General Commands
ppm version
Syntax
/opt/CSCOppm-gw/bin/ppm version
Command Description
Displays version information for Prime Performance Manager servers and clients on the local host.
Related Topic
Chapter 5, “Accessing Data from the Web Interface”
ppm webport
Syntax
/opt/CSCOppm-gw/bin/ppm webport [port-number]
Command Description
Sets a new port number for the web server, where port-number is the new, numeric port number. Prime Performance Manager verifies that the new port number is not already in use.
The new port number must contain only numbers. If you enter a port number that contains nonnumeric characters, such as ppm13, Prime Performance Manager displays an error message and returns to the command prompt without changing the port number.
You must log in as the root user to use this command.
ppm who
Syntax
/opt/CSCOppm-gw/bin/ppm who
Command Description
Displays a list of all client usernames and processes connected to the server.
A-60Cisco Prime Performance Manager 1.0 User Guide
OL-24597-01
CiscoOL-24597-01
A
P P E N D I X B FAQsThis appendix contains Frequently Asked Questions (FAQs) on Cisco Prime Performance Manager:
General FAQsThese categories of frequently asked questions are general questions about the Cisco Prime Performance Manager:
• Installation Questions, page B-1
• Server Questions, page B-2
• Browser Questions, page B-4
• Polling Questions, page B-5
• MIB Questions, page B-5
• Miscellaneous Questions, page B-6
Installation QuestionsThis section addresses the following installation questions:
Q. What operating systems does Prime Performance Manager support?
A. See http://www.cisco.com/en/US/products/ps11715/prod_installation_guides_list.html for more details.
Q. What client requirements do I need to have to run Prime Performance Manager?
A. See http://www.cisco.com/en/US/products/ps11715/prod_installation_guides_list.html for more details.
Q. What system requirements do I need to have to run Prime Performance Manager?
A. See http://www.cisco.com/en/US/products/ps11715/prod_installation_guides_list.html for more details.
B-1 Prime Performance Manager 1.0 User Guide

Appendix B FAQs General FAQs
Server QuestionsThis section addresses the following server questions:
• Q.What workstation and network devices do I need to run Prime Performance Manager?, page B-2
• Q.I moved the server on which I had installed Prime Performance Manager and now I can’t start Prime Performance Manager web interface or server. Why?, page B-2
• Q.Will Prime Performance Manager server processes restart automatically after a system reboot?, page B-3
• Q.Why doesn’t my Prime Performance Manager server start after installing SSL?, page B-3
Q. What workstation and network devices do I need to run Prime Performance Manager?
A. Prime Performance Manager comprises two distinct pieces of functionality.
• Prime Performance Manager server application runs on Solaris/Linux only.
• Prime Performance Manager web interface runs on any platform that supports the list of supported browsers. Refer Supported Browsers, page 5-1 for more details.
For further hardware and software requirements, see the “Preparing to Install Prime Performance Manager” chapter of the Quick Start Guide for the Cisco Prime Performance Manager 1.0.
Q. I moved the server on which I had installed Prime Performance Manager and now I can’t start Prime Performance Manager web interface or server. Why?
A. If you change the IP address of the server on which you installed Prime Performance Manager, or if you move the server to a new network, you must reboot the server to prevent Prime Performance Manager connection problems.
To reboot the server, use this procedure:
Step 1 Log in as the root user, as described in Becoming the Root User, page 2-2.
Step 2 Enter:
cd /opt/CSCOppm-gw/bin
./ppm reboot
If you change the server’s Solaris/Linux hostname, you must reset the default hostname on Prime Performance Manager server, using this procedure:
Step 3 Log in as the root user, as described in Becoming the Root User, page 2-2.
Step 4 Enter:
cd /opt/CSCOppm-gw/bin
./ppm evilstop
Prime Performance Manager stops all Prime Performance Manager servers on the local host.
Step 5 Enter:
./ppm servername hostname
where hostname is the new default hostname. Ensure that the new name is valid and is defined in your /etc/hosts file.
B-2Cisco Prime Performance Manager 1.0 User Guide
OL-24597-01
Appendix B FAQs General FAQs
Prime Performance Manager resets the default hostname for Prime Performance Manager server and automatically restarts Prime Performance Manager server. Any Units connecting to this new host should also change their default gateway server name.
Step 6 On each Unit server perform the following steps:
Step 7 Log into the Unit servers as the root user, as described in Becoming the Root User, page 2-2.
Step 8 Enter:
cd /opt/CSCOppm-unit/bin
./ppm evilstop
Prime Performance Manager stops all Prime Performance Manager servers on the local host.
Step 9 Enter:
./ppm gatewayname hostname
where hostname is the new default gateway hostname. Ensure that the new name is valid and is defined in your /etc/hosts file.
Prime Performance Manager resets the default gateway name for Prime Performance Manager unit server and automatically restarts Prime Performance Manager unit server.
Q. Will Prime Performance Manager server processes restart automatically after a system reboot?
A. Yes. When you install Prime Performance Manager server, Prime Performance Manager modifies your system startup scripts to ensure that Prime Performance Manager server processes start up again after a system reboot. To accomplish this, Prime Performance Manager adds these lines to your system startup scripts:
/etc/init.d/ppm.gw and/or /etc/init.d/ppm.unit/etc/rc0.d/K01ppm.gw and/or /etc/rc0.d/K00ppm.unit/etc/rc1.d/K01ppm.gw and/or /etc/rc1.d/K00ppm.unit/etc/rc2.d/K01ppm.gw and/or /etc/rc2.d/K00ppm.unit/etc/rc3.d/S98ppm.gw and/or /etc/rc3.d/S99ppm.unit
These lines ensure that Prime Performance Manager shutdown and startup scripts run in the correct order for each system initiation state.
Note that for Linux only, these lines are modified as well:
/etc/rc5.d/S98ppm.gw and/or /etc/rc5.d/S99ppm.unit/etc/rc6.d/K01ppm.gw and/or /etc/rc6.d/K00ppm.unit
Q. Why doesn’t my Prime Performance Manager server start after installing SSL?
A. If you have not installed the SSL key and certificate, Prime Performance Manager server will not start. For exact details on this process, see Enabling SSL Support on Gateway in Prime Performance Manager, page 3-15.
B-3Cisco Prime Performance Manager 1.0 User Guide
OL-24597-01
Appendix B FAQs General FAQs
Browser QuestionsThis section addresses the following browser questions:
• Q.Sometimes when browsing Prime Performance Manager web interface, a popup appears with this message: Unresponsive Script. Why does this happen and how can I prevent it from reoccurring?, page B-4
• Q.Prime Performance Manager web pages appear empty (without content). Why does this happen and how can I prevent it from reoccurring?, page B-4
Q. Sometimes when browsing Prime Performance Manager web interface, a popup appears with this message: Unresponsive Script. Why does this happen and how can I prevent it from reoccurring?
A. This problem occurs when using the Firefox browser version 1.5. It is not an Prime Performance Manager bug. You can prevent the popup from occurring with this workaround:
Step 1 In the address bar of a Firefox browser window, enter about:config
Step 2 In the filter bar, enter dom.max_script_run_time.
You should now see a setting appear in the window below the filter bar. The setting's name should match what you entered previously (dom.max_script_run_time) and most likely shows a default value of 5.
Step 3 Double-click this setting. Firefox will prompt you for a new value. Enter 10.
If changing this setting still causes the Unresponsive Script popup to appear, repeat these steps but increase the number that you enter in this step.
Q. Prime Performance Manager web pages appear empty (without content). Why does this happen and how can I prevent it from reoccurring?
A. Your Internet Explorer browser settings in Prime Performance Manager client are disabling active scripting. To modify this, in Internet Explorer, change the browser settings as follows:
Step 1 Choose Tools > Internet Options.
Step 2 Select the Security tab.
Step 3 Click the Custom Level button.
Step 4 Search for Active Scripting in the Scripting section.
Step 5 Click the Enable radio button to enable Active Scripting.
Step 6 Search for Logon in the User Authentication section.
Step 7 Click the Automatic Logon with current username and password radio button.
B-4Cisco Prime Performance Manager 1.0 User Guide
OL-24597-01
Appendix B FAQs General FAQs
Polling QuestionsThis section addresses the following polling questions:
• Q.How does Prime Performance Manager poll nodes?, page B-5
• Q.How do I change the default status polling interval?, page B-5
Q. How does Prime Performance Manager poll nodes?
A. By default, Prime Performance Manager polls the nodes in the network every 15 minutes. However, you can initiate a poll for one or more nodes at any time by selecting the nodes in the Discovery tab in the Discovery dialog box and selecting Poll.
You can also change the default poll interval for one or more nodes in the SNMP Configuration dialog box. You must be logged in as a System Administrator to access this tab.
Q. How do I change the default status polling interval?
A. Prime Performance Manager polls the node for status information (for example, interface up or down) every 15 minutes. The size of this poll depends on the number and type of interfaces that are enabled on the node.
To change the default polling interval of 15 minutes, open the SNMP Editor by selecting Administrative -> SNMP from Prime Performance Manager main window. You can enter the default polling interval to any number of minutes from 5 to 1440.
Note The status information in the GUI is only as good as the most recent poll.
MIB Questions
Q. What are the names of the MIBs used by Prime Performance Manager?
A. You can find the complete list of MIBs that Prime Performance Manager configures and queries in Appendix D, “MIB Reference.”
You can obtain the latest versions of these MIBs from one of these locations:
• The Zip file mibs.zip, located at the top of Prime Performance Manager DVD Image, contains these MIBs.
• You can download these MIBs from the Cisco website:
http://www.cisco.com/public/sw-center/netmgmt/cmtk/mibs.shtml
• The MIBs are also accessible from Prime Performance Manager web interface by selecting Home, then clicking on SNMP MIBs under the Reports Documentation section.
B-5Cisco Prime Performance Manager 1.0 User Guide
OL-24597-01

Appendix B FAQs General FAQs
Miscellaneous QuestionsThis section addresses the following miscellaneous questions:
• Q.Does Prime Performance Manager require any other NMS applications?, page B-6
• Q.Can I run Prime Performance Manager on my Windows PC?, page B-6
• Q.How do I increase the swap size in Solaris?, page B-6
• Q.How do I increase the swap size in Linux?, page B-6
• Q.How can I disable DNS lookups on Prime Performance Manager server host?, page B-7
Q. Does Prime Performance Manager require any other NMS applications?
A. Prime Performance Manager is functionally a standalone product and does not require any other products. However, you can integrate Prime Performance Manager with other products to provide added value. Refer Prime Network Integration, page 2-3 for more details.
Q. Can I run Prime Performance Manager on my Windows PC?
A. Prime Performance Manager server must be run on a Solaris/Linux system.
Q. How do I increase the swap size in Solaris?
A. To create a new swap file on Solaris:
Step 1 Use mkfile to create a file suitable for a local swap area.
For example, to create a 1GB swap file, enter the following command:
/usr/sbin/mkfile 1024m /opt/swapfile
where /opt/swapfile is the name of the file to be used as swap space. Units for the size can be kilobytes (k), blocks (b), or megabytes (m). Choose carefully the disk location to create the swap file. Choose a disk partition with plenty of free disk space.
Step 2 Make the system use the file as swap by entering the following command:
/usr/sbin/swap -a /opt/swapfile
Step 3 Run swap -l to verify that the swap file has been activated.
/usr/sbin/swap -l
Step 4 Add the following line to /etc/vfstab to assure the new swapfile is maintained across system reboots:
/opt/swapfile - - swap - no -
Q. How do I increase the swap size in Linux?
A. To create a new swap file on Linux:
Step 1 Use dd to create a file suitable for a local swap area.
For example, to create a 1GB swap file, enter the following command:
/bin/dd if=/dev/zero of=/opt/swapfile bs=1M count=1024
B-6Cisco Prime Performance Manager 1.0 User Guide
OL-24597-01

Appendix B FAQs General FAQs
where /opt/swapfile is the name of the file to be used as swap space. This specifies a blocksize of 1Mb and 1024 of them for 1Gb total. Choose the disk location to create the swap file. Choose a disk partition with plenty of free disk space.
Step 2 Enter the following to make the system to start using the file as swap and activate it:
/sbin/mkswap /opt/swapfile/sbin/swapon /opt/swapfile
Step 3 Run swap -l to verify that the swap file has been activated.
/sbin/swapon -s
Step 4 Add the following line to /etc/fstab to assure the new swapfile is maintained across system reboots:
/opt/swapfile swap swap defaults 0 0
Q. How can I disable DNS lookups on Prime Performance Manager server host?
A. Long delays in Prime Performance Manager data processing can occur when looking up a node by its DNS name when does not have one defined or when there are latency issues in your network. Make the following operating system configuration changes to the system on which your Prime Performance Manager server runs to disable DNS lookups:
Step 1 Remove the “dns” parameter from the “hosts” and “ipnodes” lines in /etc/nsswitch.conf.
Step 2 Remove /etc/resolv.conf or comment the DNS server entries in /etc/resolv.conf.
B-7Cisco Prime Performance Manager 1.0 User Guide
OL-24597-01

Appendix B FAQs General FAQs
B-8Cisco Prime Performance Manager 1.0 User Guide
OL-24597-01
CiscoOL-24597-01
A
P P E N D I X C Troubleshooting Prime Performance Manager and the NetworkThis appendix provides this information for troubleshooting basic Cisco Prime Performance Manager network problems.
This appendix contains:
• Investigating Data Problems, page C-1
• Checking Prime Performance Manager Server Start Processes, page C-1
Investigating Data ProblemsIf you suspect that there are problems with the data that Prime Performance Manager is displaying, perform these tasks:
• Enter equivalent show commands on the router. Is the data the same as that visible by Prime Performance Manager?
• Send SNMP queries to the nodes. Do all queries complete?
The results of these tasks can help you distinguish between a router problem and an Prime Performance Manager problem.
Checking Prime Performance Manager Server Start ProcessesWhen you run Prime Performance start command, normal output appears:
Starting Prime Performance Manager Gateway App Server...
-- Prime Performance Manager Gateway Launch Server IS Started.-- Prime Performance Manager Gateway Database Server IS Started.-- Prime Performance Manager Gateway Naming Server IS Started.-- Prime Performance Manager Gateway MessageLog Server IS Started.-- Prime Performance Manager Gateway DataServer Server IS Started.-- Prime Performance Manager Gateway JSP Server IS Started.
Prime Performance Manager Gateway App Server IS Started.
Connect Web Browser To Gateway:http://prime-pm-server:4440
C-1 Prime Performance Manager 1.0 User Guide
Appendix C Troubleshooting Prime Performance Manager and the Network Viewing Prime Performance Manager Data on the Web
Starting Prime Performance Manager Unit App Server...==================================
-- Prime Performance Manager Unit Launch Server IS Started.-- Prime Performance Manager Unit Database Server IS Started.-- Prime Performance Manager Unit Naming Server IS Started.-- Prime Performance Manager Unit MessageLog Server IS Started.-- Prime Performance Manager Unit DataServer Server IS Started.-- Prime Performance Manager Unit JSP Server IS Started.
Prime Performance Manager Unit App Server IS Started.
Viewing Prime Performance Manager Data on the WebPrime Performance Manager provides extensive web-based troubleshooting information. From Prime Performance Manager web interface, you can access many web pages containing Prime Performance Manager data.
This includes server status, network status, installation logs, message logs, product documentation, and other important troubleshooting information about Prime Performance Manager. For full details, see Chapter 5, “Accessing Data from the Web Interface.”
C-2Cisco Prime Performance Manager 1.0 User Guide
OL-24597-01
CiscoOL-24597-01
A
P P E N D I X D MIB ReferenceThis appendix contains Management Information Base (MIB) on Cisco Prime Performance Manager:
MIBsPrime Performance Manager queries these MIBs, listed in alphabetical order:
MIB Description
ATM-MIB.my Module for ATM and AAL5-related objects for managing ATM interfaces, ATM virtual links, ATM cross-connects, AAL5 entities, and AAL5 connections.
ATM-TC-MIB.my Provides Textual Conventions and OBJECT-IDENTITY Objects to be used by ATM systems.
BGP4-MIB.my Provides access to information related to the implementation of the Border Gateway Protocol (BGP). The MIB provides:
• BGP configuration information
• Information about BGP peers and messages exchanged with them
• Information about advertised networks
BRIDGE-MIB.my Manages devices that support IEEE 802.1D.
CERENT-454-MIB.mib Defines the alarms and events for the Cisco ONS 15454. The PPM processes each ONS event by creating an PPM event with a severity that maps to the severity of the ONS event.
CERENT-ENVMON-MIB.mib Provides environmental status information.
CERENT-FC-MIB.mib Defines the managed objects for performance monitoring of supported Fibre Channel interfaces.
CERENT-GLOBAL-REGISTRY.mib Provides the global registrations for all other CERENT MIB modules.
CERENT-MSDWDM-MIB.mib Defines the managed objects for physical layer related interface configurations and objects for the protocol specific error counters for dense wavelength division multiplexing (DWDM) optical switches.
CERENT-OPTICAL-MONITOR-MIB.mib Defines objects to monitor optical characteristics and set corresponding thresholds on the optical interfaces in a network element.
D-1 Prime Performance Manager 1.0 User Guide

Appendix D MIB Reference MIBs
CERENT-TC.mib Provides the global Textual Conventions for all other CERENT MIB modules.
CISCO-AAA-SERVER-MIB.my Provides configuration and statistics reflecting the state of authentication, authorization, and accounting (AAA) server operation in the node and AAA communications with external servers.
CISCO-AAL5-MIB.my Contains performance statistics for ATM adaptation Layer 5 (AAL5) virtual channel connections (VCCs).
This MIB provides statistics not found in the aal5VccTable in RFC 1695 (for example, packets and octets received and transmitted on the VCC).
CISCO-ACCESS-ENVMON-MIB.my Describes the additional status of the Environmental Monitor on those Cisco Access devices which support one.
CISCO-ASN-GATEWAY-MIB.my Manages Cisco's Broadband Wireless Gateway (BWG).
CISCO-BITS-CLOCK-MIB.my Provides information on Building Integrated Timing Supply (BITS) clocking sources and operation modes. The Prime Performance Manager can generate notifications to indicate when clocking sources change roles or become unavailable.
CISCO-CAR-MIB.my Contains information about the Committed Access Rate (CAR) assigned to router interfaces. The CAR is used to control the rate of traffic on an interface for packet switching purposes.
The MIB provides information about how the router is to handle traffic that conforms and exceeds the CAR on the interface.
CISCO-CDMA-AHDLC-MIB.my Provides details concerning Asynchronous High-level Data Link Control (AHDLC) engine state, performance, configuration and notification.
CISCO-CDMA-PDSN-EXT-MIB.my Supports the Code Division Multiple Access (CDMA) Packet Data Serving Node (PDSN) feature. This MIB is an extension to the CISCO-CDMA-PDSN-MIB.
A CDMA2000 network supports wireless data communication through 3G CDMA radio access technology and 3G A10/A11 interface.
PDSN acts as a foreign agent that establishes, maintains, and terminates the link layer to a mobile station.
CISCO-CDMA-PDSN-MIB.my Supports the CDMA PDSN (Packet Data Serving Node) feature. A CDMA2000 network supports wireless data communication through 3G CDMA radio access technology and 3G A10/A11 interface.
PDSN acts as a foreign agent that establishes, maintains, and terminates the link layer to a mobile station.
CISCO-CEF-MIB.my Manages CISCO Express Forwarding (CEF).
CISCO-CEF-TC.my Defines Textual Conventions for Cisco Express Forwarding (CEF).
CISCO-CLASS-BASED-QOS-MIB.my Class-Based QoS Configuration and Statistics MIB. This MIB provides read access to Quality of Service (QoS) configuration and statistics information for Cisco platforms that support the Modular Quality of Service Command-line Interface (Modular QoS CLI).
MIB Description
D-2Cisco Prime Performance Manager 1.0 User Guide
OL-24597-01

DRAFT REV IEW - C ISCO CONF IDENT IAL
Appendix D MIB Reference MIBs
CISCO-CONFIG-MAN-MIB.my Provides configuration management, primarily by tracking changes and saving the running configuration. This MIB represents a model of configuration data that exists in various locations:
• running—In use by the running system
• terminal—Logical or attached hardware
• local—Saved locally in NVRAM or flash
• remote—Saved to a server on the network
CISCO-CONTENT-SERVICES-MIB.my Content Service is a capability to examine IP/TCP/UDP headers, payload and enable billing based on the content being provided.
CISCO-CSG-MIB.my Supports the Cisco Content Services Gateway (CSG) product. It includes five traps and four tables that enable querying CSG resource statistics.
CISCO-DIAMETER-BASE-PROTOCOL-MIB.my
Module for the entities implementing the Diameter Base Protocol.
CISCO-EMBEDDED-EVENT-MGR-MIB.my Describes and stores the events generated by the Cisco Embedded Event Manager.
CISCO-ENHANCED-MEMPOOL-MIB.my Monitors the memory pools of all physical entities on a managed system.
CISCO-ENTITY-ALARM-MIB.my Defines the managed objects that support the monitoring of alarms generated by physical entities contained by the system, including chassis, slots, modules, ports, power supplies, and fans.
CISCO-ENTITY-EXT-MIB.my Extension of the ENTITY-MIB specified in RFC2737.Contains Cisco-defined extensions to the entityPhysicalTable to represent information related to entities of class module(entPhysicalClass = 'module') which have a Processor.
CISCO-ENTITY-FRU-CONTROL CAPABILITY.my
Provides additional capabilities for various platforms that are needed by the CISCO-ENTITY-FRU-CONTROL-MIB.
CISCO-ENTITY-FRU-CONTROL-MIB.my Monitors and configures the operational status of Field Replaceable Units (FRUs) of the system listed in the Entity-MIB (RFC 2037) entPhysicalTable.
FRUs include assemblies such as power supplies, fans, processor modules, interface modules, and so forth.
CISCO-ENTITY-VENDORTYPE-OID-MIB.my Defines the object identifiers that are assigned to various components on Cisco products, which are used by the entPhysicalTable of the ENTITY-MIB to uniquely identify the type of each physical entry.
CISCO-ENVMON-MIB.my Provides environmental monitoring information on Cisco ITPs.
CISCO-EPC-GATEWAY-MIB.my Manages the EPC 3GPP release 8 features and configuration for PGW and SGW.
CISCO-EPC-GATEWAY-QOS-MIB.my Manages the Quality of Service parameters of PGW and SGW in LTE SAE Architecture.
MIB Description
D-3Cisco Prime Performance Manager 1.0 User Guide
OL-24597-01
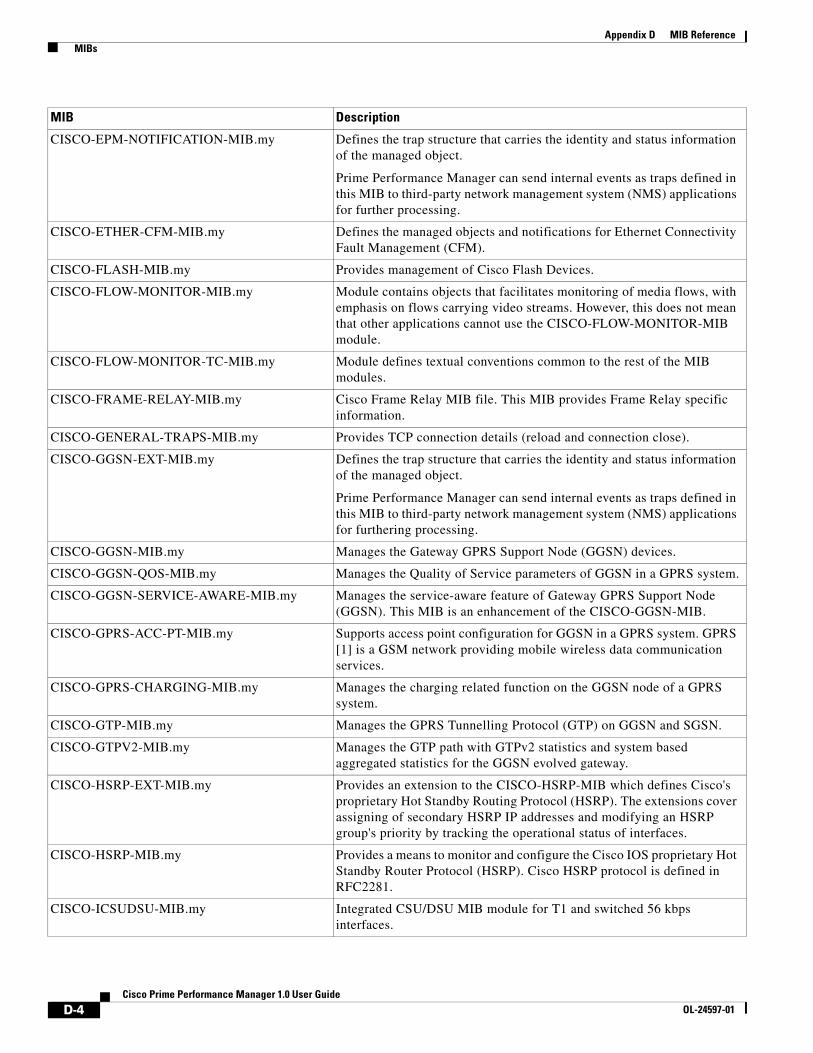
Appendix D MIB Reference MIBs
CISCO-EPM-NOTIFICATION-MIB.my Defines the trap structure that carries the identity and status information of the managed object.
Prime Performance Manager can send internal events as traps defined in this MIB to third-party network management system (NMS) applications for further processing.
CISCO-ETHER-CFM-MIB.my Defines the managed objects and notifications for Ethernet Connectivity Fault Management (CFM).
CISCO-FLASH-MIB.my Provides management of Cisco Flash Devices.
CISCO-FLOW-MONITOR-MIB.my Module contains objects that facilitates monitoring of media flows, with emphasis on flows carrying video streams. However, this does not mean that other applications cannot use the CISCO-FLOW-MONITOR-MIB module.
CISCO-FLOW-MONITOR-TC-MIB.my Module defines textual conventions common to the rest of the MIB modules.
CISCO-FRAME-RELAY-MIB.my Cisco Frame Relay MIB file. This MIB provides Frame Relay specific information.
CISCO-GENERAL-TRAPS-MIB.my Provides TCP connection details (reload and connection close).
CISCO-GGSN-EXT-MIB.my Defines the trap structure that carries the identity and status information of the managed object.
Prime Performance Manager can send internal events as traps defined in this MIB to third-party network management system (NMS) applications for furthering processing.
CISCO-GGSN-MIB.my Manages the Gateway GPRS Support Node (GGSN) devices.
CISCO-GGSN-QOS-MIB.my Manages the Quality of Service parameters of GGSN in a GPRS system.
CISCO-GGSN-SERVICE-AWARE-MIB.my Manages the service-aware feature of Gateway GPRS Support Node (GGSN). This MIB is an enhancement of the CISCO-GGSN-MIB.
CISCO-GPRS-ACC-PT-MIB.my Supports access point configuration for GGSN in a GPRS system. GPRS [1] is a GSM network providing mobile wireless data communication services.
CISCO-GPRS-CHARGING-MIB.my Manages the charging related function on the GGSN node of a GPRS system.
CISCO-GTP-MIB.my Manages the GPRS Tunnelling Protocol (GTP) on GGSN and SGSN.
CISCO-GTPV2-MIB.my Manages the GTP path with GTPv2 statistics and system based aggregated statistics for the GGSN evolved gateway.
CISCO-HSRP-EXT-MIB.my Provides an extension to the CISCO-HSRP-MIB which defines Cisco's proprietary Hot Standby Routing Protocol (HSRP). The extensions cover assigning of secondary HSRP IP addresses and modifying an HSRP group's priority by tracking the operational status of interfaces.
CISCO-HSRP-MIB.my Provides a means to monitor and configure the Cisco IOS proprietary Hot Standby Router Protocol (HSRP). Cisco HSRP protocol is defined in RFC2281.
CISCO-ICSUDSU-MIB.my Integrated CSU/DSU MIB module for T1 and switched 56 kbps interfaces.
MIB Description
D-4Cisco Prime Performance Manager 1.0 User Guide
OL-24597-01

DRAFT REV IEW - C ISCO CONF IDENT IAL
Appendix D MIB Reference MIBs
CISCO-IETF-PW-MIB.my Contains managed object definitions for Pseudo Wire operation.
CISCO-IETF-PW-TC-MIB.my Used to identify the VC (together with some other fields) in the signaling session. Zero if the VC is set-up manually.
CISCO-IETF-SCTP-EXT-MIB.my Extension to CISCO-IETF-SCTP-MIB that provides additional information to manage SCTP (RFC 2960).
CISCO-IETF-SCTP-MIB.my MIB module for managing SCTP protocol (RFC 2960).
CISCO-IF-EXTENSION-MIB.my Extension to the CISCO-IETF-SCTP-MIB used to provide additional information to manage the Stream Control Transmission Protocol (RFC 2960).
CISCO-IP-CBR-METRICS-MIB.my Module contains objects that describe the set of metrics used to measure the quality of an IP CBR traffic flow. An IP CBR traffic flow consists of a stream of IP datagrams sent from one application to another with a constant packet rate or bit rate.
CISCO-IP-LOCAL-POOL-MIB.my Defines the configuration and monitoring capabilities relating to local IP pools.
CISCO-IP-RAN-BACKHAUL-MIB.my Provides information on the optimization of IP-RAN traffic between the cell site and the aggregation node site. It handles both GSM Abis and UMTS Iub traffic.
CISCO-IPMROUTE-MIB.my Contains objects to manage IP multicast routing on the router.
CISCO-IPSLA-AUTOMEASURE-MIB.my Defines the MIB for IP SLA Automation
CISCO-IPSLA-ECHO-MIB.my Defines the templates for IP SLA operations of ICMP echo, UDP echo and TCP connect
CISCO-IPSLA-ETHERNET-MIB.my Contains objects to manage IP SLA Auto-Ethernet-CFM operations and Ethernet Jitter statistics.
CISCO-IPSLA-JITTER-MIB.my Defines templates for IP SLA operations of UDP Jitter and ICMP Jitter.
CISCO-IPSLA-TC-MIB.my Contains textual conventions used by CISCO IPSLA MIB
CISCO-ISCSI-MIB.my Module for SCSI over TCP
CISCO-ITP-ACL-MIB.my Manages access lists that control messages sent over SS7 networks using ITP.
CISCO-ITP-ACT-MIB.my Provides information specified in ITU Q752 Monitoring and Measurements for SS7 networks.
This information is used to manage messages sent over SS7 networks using ITP. This MIB has been deprecated and replaced by the CISCO-ITP-GACT-MIB.
CISCO-ITP-DSMR-MIB.my Provides information about Distributed Short Message Routing for Short Message Service Center.
This MIB will provide information used to control and measure SS7 messages signaling units in a SS7 Network. Message Signaling Units are routed based on information found in the SCCP, TCAP, MAP, and MAP-user layers.
CISCO-ITP-DSMR-SMPP-MIBmy Provides information about Distributed Short Message Routing delivery using Short Message Peer-to-Peer protocol.
MIB Description
D-5Cisco Prime Performance Manager 1.0 User Guide
OL-24597-01

Appendix D MIB Reference MIBs
CISCO-ITP-DSMR-UCP-MIB.my Provides information about Distributed Short Message Routing delivery using Universal Computer Protocol.
CISCO-ITP-GACT-MIB.my Provides information specified in ITU Q752 Monitoring and Measurements for SS7 networks.
This information is used to manage messages sent over SS7 networks using ITP. This MIB replaces the CISCO-ITP-ACT-MIB and supports multiple instances of a signaling point in the same configuration.
CISCO-ITP-GRT-MIB.my Manages information required to route messages sent over SS7 networks using ITP. This MIB replaces the CISCO-ITP-RT-MIB and supports multiple instances of a signaling point in the same configuration.
CISCO-ITP-GSCCP-MIB.my Provides information specified in ITU Q752 Monitoring and Measurements for SS7 networks.
This information is used to manage Signaling Connection Control Part (SCCP) messages sent over SS7 networks using ITP. This MIB replaces the CISCO-ITP-SCCP-MIB and supports multiple instances of a signaling point in the same configuration.
CISCO-ITP-GSP-MIB.my Manages signaling points and associated messages sent over SS7 networks using ITP. This MIB replaces the CISCO-ITP-SP-MIB and supports multiple instances of a signaling point in the same configuration.
CISCO-ITP-GSP2-MIB.my Provides information specified in ITU Q752 Monitoring and Measurements for SS7 networks. This information is used to manage messages sent over SS7 networks using ITP. This MIB replaces the CISCO-ITP-SP2-MIB and supports multiple instances of a signaling point in the same configuration.
CISCO-ITP-MLR-MIB.my Provides information about Multi-Layer Routing (MLR). This information is used to control and measure SS7 message signaling units (MSUs) in an SS7 network.
CISCO-ITP-MONITOR-MIB.my Provides information about monitoring SS7 links. This information is used to manage the state of software used to collect all packets transported and received over an SS7 link.
CISCO-ITP-MSU-RATES-MIB.my Provides information used to manage the number of MTP3 MSUs transmitted and received per processor.
Many of the higher level protocols require several MSUs per transaction. Traffic capacity planning is based on MSUs, not transactions. This MIB provides information to determine current traffic.
CISCO-ITP-RT-MIB.my Manages the route tables used to control messages sent over SS7 networks using ITP. This MIB has been deprecated and replaced by the CISCO-ITP-GRT-MIB.
CISCO-ITP-SCCP-MIB.my Manages SCCP messages sent over SS7 networks using ITP, and provides information specified in ITU Q752 Monitoring and Measurements for SS7 networks. This MIB has been deprecated and replaced by the CISCO-ITP-GSCCP-MIB.
CISCO-ITP-SP-MIB.my Manages signaling points and associated linksets and links in SS7 networks using ITP.
MIB Description
D-6Cisco Prime Performance Manager 1.0 User Guide
OL-24597-01
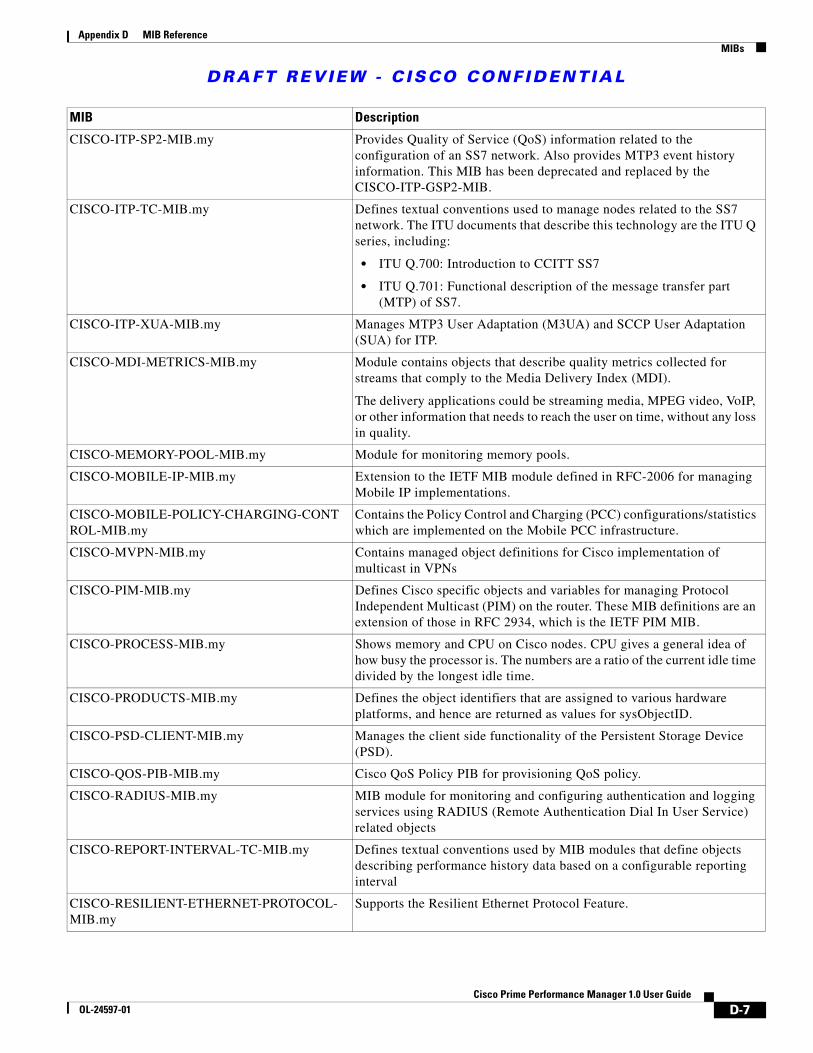
DRAFT REV IEW - C ISCO CONF IDENT IAL
Appendix D MIB Reference MIBs
CISCO-ITP-SP2-MIB.my Provides Quality of Service (QoS) information related to the configuration of an SS7 network. Also provides MTP3 event history information. This MIB has been deprecated and replaced by the CISCO-ITP-GSP2-MIB.
CISCO-ITP-TC-MIB.my Defines textual conventions used to manage nodes related to the SS7 network. The ITU documents that describe this technology are the ITU Q series, including:
• ITU Q.700: Introduction to CCITT SS7
• ITU Q.701: Functional description of the message transfer part (MTP) of SS7.
CISCO-ITP-XUA-MIB.my Manages MTP3 User Adaptation (M3UA) and SCCP User Adaptation (SUA) for ITP.
CISCO-MDI-METRICS-MIB.my Module contains objects that describe quality metrics collected for streams that comply to the Media Delivery Index (MDI).
The delivery applications could be streaming media, MPEG video, VoIP, or other information that needs to reach the user on time, without any loss in quality.
CISCO-MEMORY-POOL-MIB.my Module for monitoring memory pools.
CISCO-MOBILE-IP-MIB.my Extension to the IETF MIB module defined in RFC-2006 for managing Mobile IP implementations.
CISCO-MOBILE-POLICY-CHARGING-CONTROL-MIB.my
Contains the Policy Control and Charging (PCC) configurations/statistics which are implemented on the Mobile PCC infrastructure.
CISCO-MVPN-MIB.my Contains managed object definitions for Cisco implementation of multicast in VPNs
CISCO-PIM-MIB.my Defines Cisco specific objects and variables for managing Protocol Independent Multicast (PIM) on the router. These MIB definitions are an extension of those in RFC 2934, which is the IETF PIM MIB.
CISCO-PROCESS-MIB.my Shows memory and CPU on Cisco nodes. CPU gives a general idea of how busy the processor is. The numbers are a ratio of the current idle time divided by the longest idle time.
CISCO-PRODUCTS-MIB.my Defines the object identifiers that are assigned to various hardware platforms, and hence are returned as values for sysObjectID.
CISCO-PSD-CLIENT-MIB.my Manages the client side functionality of the Persistent Storage Device (PSD).
CISCO-QOS-PIB-MIB.my Cisco QoS Policy PIB for provisioning QoS policy.
CISCO-RADIUS-MIB.my MIB module for monitoring and configuring authentication and logging services using RADIUS (Remote Authentication Dial In User Service) related objects
CISCO-REPORT-INTERVAL-TC-MIB.my Defines textual conventions used by MIB modules that define objects describing performance history data based on a configurable reporting interval
CISCO-RESILIENT-ETHERNET-PROTOCOL- MIB.my
Supports the Resilient Ethernet Protocol Feature.
MIB Description
D-7Cisco Prime Performance Manager 1.0 User Guide
OL-24597-01

Appendix D MIB Reference MIBs
CISCO-RF-MIB.my Provides configuration control and status for the Redundancy Framework (RF) subsystem. RF provides a mechanism for logical redundancy of software functionality and is designed to support 1-to-1 redundancy on processor cards.
Redundancy is concerned with the duplication of data elements and software functions to provide an alternative in case of failure.
CISCO-RTP-METRICS-MIB.my Module contains objects that describe the quality metrics for RTP streams, similar to those described by an RTCP Receiver Report packet [RFC3550]
CISCO-RTTMON-ICMP-MIB.my Provides capability to measure metrics such as RTT (Round Trip Time), Jitter, packet loss, one-way latency by sending ICMP TIMESTAMP stream to the destination devices.
CISCO-RTTMON-IP-EXT-MIB.my Contains extensions to tables in CISCO-RTTMON-MIB to support IP-layer extensions, specifically IPv6 addresses and other information related to IPv6 and other IP information
CISCO-RTTMON-MIB.my Defines a MIB for Round Trip Time (RTT) monitoring of a list of targets, using a variety of protocols.
CISCO-RTTMON-RTP-MIB.my Provides capability to measure voice quality metrics such as RTT (Round Trip Time), Jitter, MOS (Mean Opinion Score) scores by setting up RTP stream between two routers.
In voice communications, particularly Internet telephony, MOS provides a numerical measure of the quality of human speech at the destination end of the circuit
CISCO-RTTMON-TC-MIB.my Provides textual conventions were originally defined in CISCO-RTTMON-MIB
CISCO-SLB-DFP-MIB.my Reports the congestion status of the real server. This MIB generates notifications when the congestion state is detected on the real server.
CISCO-SLB-EXT-MIB.my Supports Server Load Balancing Manager(s). This MIB extends the SLB management functionality in the CISCO-SLB-MIB. The Cisco Content Switching Module (CSM) product is the first SLB product to support this MIB.
CISCO-SLB-MIB.my Supports Server Load Balancing Manager(s), such as the Cisco IOS SLB product.
This MIB includes instrumentation for the manager-side implementation of the Dynamic Feedback Protocol (DFP). A DFP uses the DFP protocol to communicate with DFP agents in order to obtain information about Servers.
This MIB includes the objects required for implementing the load balancer management side of the Server/Application State Protocol (SASP). The load balancer is responsible for registering Members with a SASP-Agent.
A Member is an entity that is defined on the load balancer to service Internet traffic. The responsibility of the Agent is to monitor the Members, and report a recommended weight to the load balancer. The weight is then used in load balancing decisions.
MIB Description
D-8Cisco Prime Performance Manager 1.0 User Guide
OL-24597-01
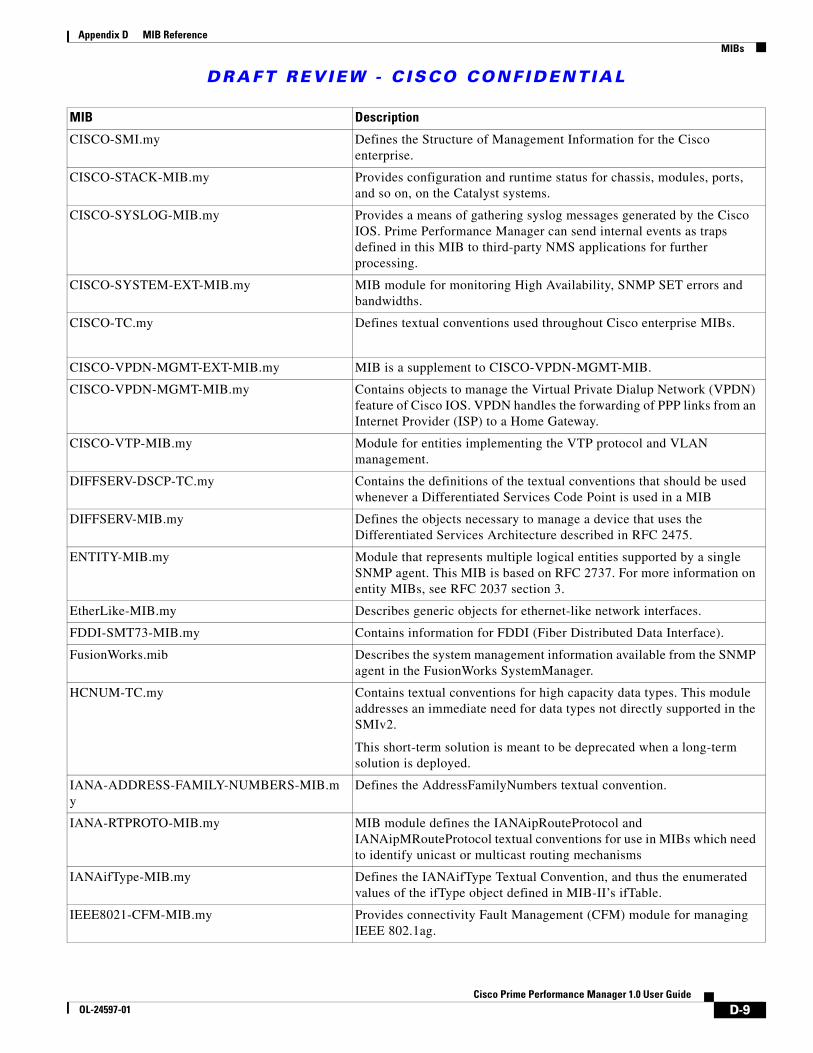
DRAFT REV IEW - C ISCO CONF IDENT IAL
Appendix D MIB Reference MIBs
CISCO-SMI.my Defines the Structure of Management Information for the Cisco enterprise.
CISCO-STACK-MIB.my Provides configuration and runtime status for chassis, modules, ports, and so on, on the Catalyst systems.
CISCO-SYSLOG-MIB.my Provides a means of gathering syslog messages generated by the Cisco IOS. Prime Performance Manager can send internal events as traps defined in this MIB to third-party NMS applications for further processing.
CISCO-SYSTEM-EXT-MIB.my MIB module for monitoring High Availability, SNMP SET errors and bandwidths.
CISCO-TC.my Defines textual conventions used throughout Cisco enterprise MIBs.
CISCO-VPDN-MGMT-EXT-MIB.my MIB is a supplement to CISCO-VPDN-MGMT-MIB.
CISCO-VPDN-MGMT-MIB.my Contains objects to manage the Virtual Private Dialup Network (VPDN) feature of Cisco IOS. VPDN handles the forwarding of PPP links from an Internet Provider (ISP) to a Home Gateway.
CISCO-VTP-MIB.my Module for entities implementing the VTP protocol and VLAN management.
DIFFSERV-DSCP-TC.my Contains the definitions of the textual conventions that should be used whenever a Differentiated Services Code Point is used in a MIB
DIFFSERV-MIB.my Defines the objects necessary to manage a device that uses the Differentiated Services Architecture described in RFC 2475.
ENTITY-MIB.my Module that represents multiple logical entities supported by a single SNMP agent. This MIB is based on RFC 2737. For more information on entity MIBs, see RFC 2037 section 3.
EtherLike-MIB.my Describes generic objects for ethernet-like network interfaces.
FDDI-SMT73-MIB.my Contains information for FDDI (Fiber Distributed Data Interface).
FusionWorks.mib Describes the system management information available from the SNMP agent in the FusionWorks SystemManager.
HCNUM-TC.my Contains textual conventions for high capacity data types. This module addresses an immediate need for data types not directly supported in the SMIv2.
This short-term solution is meant to be deprecated when a long-term solution is deployed.
IANA-ADDRESS-FAMILY-NUMBERS-MIB.my
Defines the AddressFamilyNumbers textual convention.
IANA-RTPROTO-MIB.my MIB module defines the IANAipRouteProtocol and IANAipMRouteProtocol textual conventions for use in MIBs which need to identify unicast or multicast routing mechanisms
IANAifType-MIB.my Defines the IANAifType Textual Convention, and thus the enumerated values of the ifType object defined in MIB-II’s ifTable.
IEEE8021-CFM-MIB.my Provides connectivity Fault Management (CFM) module for managing IEEE 802.1ag.
MIB Description
D-9Cisco Prime Performance Manager 1.0 User Guide
OL-24597-01

Appendix D MIB Reference MIBs
IF-MIB.my Describes generic objects for network interface sublayers. This MIB is an updated version of MIB-II's ifTable, and incorporates the extensions defined in RFC 1229.
IGMP-STD-MIB.my Status and usage for interfaces (each interface for which IGMP is enabled) and caches (for each IP multicast group).
IMA-MIB.my Module that manages ATM Forum Inverse Multiplexing for ATM (IMA) interfaces.
INET-ADDRESS-MIB.my Defines textual conventions for representing Internet addresses. An Internet address can be an IPv4 address, an IPv6 address, or a DNS domain name.
This module also defines textual conventions for Internet port numbers, autonomous system numbers, and the length of an Internet address prefix.
INTEGRATED-SERVICES-MIB.my Contains objects to manage Integrated Services Protocol
IPMROUTE-STD-MIB.my Provided information about IP multicast groups (interfaces, number of packets sent to the group, timers, etc.).
IPV6-FLOW-LABEL-MIB.my Module provides commonly used textual conventions for IPv6 Flow Labels
LLDP-MIB.my Defines module for LLDP configuration, statistics, local system data and remote systems data components.
MPLS-LDP-STD-MIB.my Provides management information for the Multiprotocol Label Switching (MPLS) Label Distribution Protocol (LDP), which is used by label switching routers (LSRs) to communicate the definitions of labels that each router is using
MPLS-LSR-MIB.my Provides configuration and performance monitoring information to manage label switched paths (LSPs) through a label switching router (LSR) remotely. The MPLS-LSR-MIB mirrors the Label Forwarding Information Base (LFIB)
MPLS-LSR-STD-MIB.my Contains managed object definitions for the Multiprotocol Label Switching (MPLS) Router. This is the standard version of the MPLS-LSR-MIB
MPLS-TC-STD-MIB.my Defines TEXTUAL-CONVENTIONs for concepts used in Multiprotocol Label Switching (MPLS) networks. This MIB has no tables.
MPLS-TE-MIB.my Defines notification messages that signal changes in the operational status of MPLS traffic engineering tunnels
MPLS-TE-STD-MIB.my Contains managed object definitions for MPLS Traffic Engineering (TE). This is the standard version of the MPLS-TE-MIB
MPLS-VPN-MIB.my Contains objects used to model an MPLS BGP Virtual Private Network (VPN), provision VPN routing/forwarding instances (VRFs) on MPLS interfaces, monitor routes and route targets for each VRF and measure the performance of MPLS/BGP VPN
NetNumber-MIB.mib Common Object Definitions for the NetNumber enterprise MIBs.
OLD-CISCO-INTERFACES-MIB.my Defines interfaces for the Cisco enterprise.
OLD-CISCO-SYS-MIB.my Provides a means of gathering basic information for an IOS node.
OLD-CISCO-SYSTEM-MIB.my Old Cisco System MIB file.
MIB Description
D-10Cisco Prime Performance Manager 1.0 User Guide
OL-24597-01

DRAFT REV IEW - C ISCO CONF IDENT IAL
Appendix D MIB Reference MIBs
OLD-CISCO-TCP-MIB.my Old Local TCP MIB file.
OLD-CISCO-TS-MIB.my Cisco Terminal Service MIB file.
OSPF-MIB.my Describes the OSPF version 2 protocol.
OSPF-TRAP-MIB.my Describes the traps for the OSPF version 2 protocol.
P-BRIDGE-MIB.my Manages Priority and Multicast Filtering, defined by IEEE 802.1D-1998.
PerfHist-TC-MIB.my Provides Textual Conventions to be used by systems supporting 15 minute-based performance history counts.
PIM-MIB.my Contains objects to manage Protocol Independent Multicast (PIM), PIM neighbors, and rendezvous point (RP) information
PPM-TREE-FIX-SMI.my MIB to support the hierarchy of IEEE MIBs
Q-BRIDGE-MIB.my Manages Virtual Bridged Local Area Networks as defined by IEEE 802.1Q-2003.
RFC1213-MIB.my Provides basic management information on the ITP (RFC 1213).
RFC1315-MIB.my Frame Relay MIB file.
RFC1406-MIB.my Contains DS1 (T1/E1) line information.
RFC2006-MIB.my Defines notification for Mobile IP entities (HA or FA) that can be sent to an NMS if there is a security violation. This notification can be used to identify the source of intrusions.
RMON-MIB.my Remote network monitoring devices, often called monitors or probes, are instruments that exist for the purpose of managing a network. This MIB defines objects for managing remote network monitoring devices.
RMON2-MIB.my Module for managing remote monitoring device implementations. This MIB module augments the original RMON MIB as specified in RFC 1757.
SNMP-FRAMEWORK-MIB.my Defines the SNMP Management Architecture.
SNMP-TARGET-MIB.my Defines the MIB objects that provide mechanisms to remotely configure the parameters used by an SNMP entity for the generation of SNMP messages.
SNMPv2-CONF.my Defines SNMPv2 conformance.
SNMPv2-MIB.my Defines SNMPv2 entities.
SNMPv2-SMI.my Defines the Structure of Management Information for SNMPv2.
SNMPv2-TC.my Defines textual conventions for SNMPv2.
TITAN-MIB.mib Module for the NetNumber TITAN.
TOKEN-RING-RMON-MIB.my Contains Token Ring monitoring information.
MIB Description
D-11Cisco Prime Performance Manager 1.0 User Guide
OL-24597-01

Appendix D MIB Reference MIBs
D-12Cisco Prime Performance Manager 1.0 User Guide
OL-24597-01

CiscoOL-24597-01
A
P P E N D I X E Configuring Prime Performance Manager to Run with Various Networking OptionsIn addition to running on standard IP-connected networks, the Cisco Prime Performance Manager has the flexibility to adapt to a variety of different networking environments, including firewall and Secure Sockets Layer (SSL). Prime Performance Manager software can run in each of these environments individually, or in any combination of networking environments.
This appendix describes communication between Prime Performance Manager Gateway and Prime Performance Manager Unit servers and between the Prime Performance Manager Gateway and web based clients. Figure E-1 includes the following:
• Two-way Remote Method Invocation (RMI) communication between Gateway and Unit server processes. The server processes can send requests to and receive responses from the each other. Each of them can send unsolicited notifications to the other.
For example, if a Unit detects that a Node's state has changed, it sends a notification to the Gateway to update its Database.
• One-way HTTP communication between a web browser and a Prime Performance Manager Gateway embedded web server, using the request/response model.
Figure E-1 Prime Performance Manager Communication
This appendix contains:
• How Does RMI Work?, page E-2
• Firewall Communication, page E-3
PPM Gateway Server
RMI name server
PPM RMIservices
PPM Unit Server
Unit ClientServiceRegistration
ServiceLookup
2
Serviceinvocation
3
E-1 Prime Performance Manager 1.0 User Guide
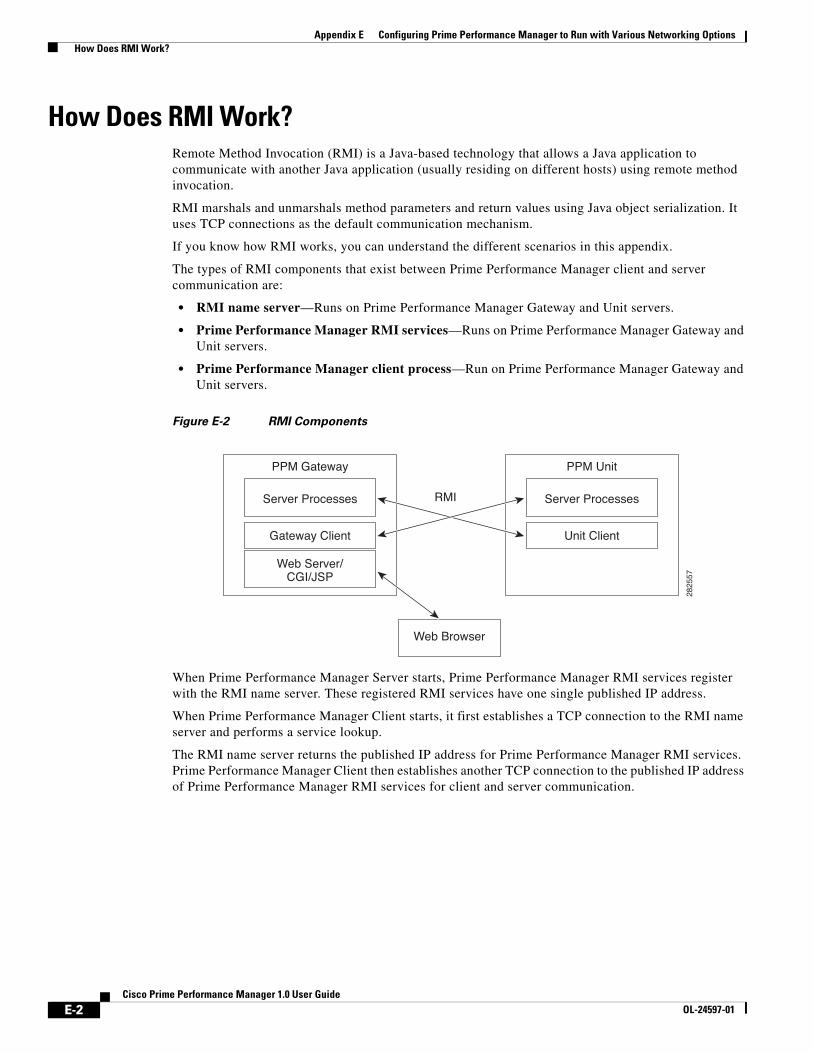
Appendix E Configuring Prime Performance Manager to Run with Various Networking Options How Does RMI Work?
How Does RMI Work?Remote Method Invocation (RMI) is a Java-based technology that allows a Java application to communicate with another Java application (usually residing on different hosts) using remote method invocation.
RMI marshals and unmarshals method parameters and return values using Java object serialization. It uses TCP connections as the default communication mechanism.
If you know how RMI works, you can understand the different scenarios in this appendix.
The types of RMI components that exist between Prime Performance Manager client and server communication are:
• RMI name server—Runs on Prime Performance Manager Gateway and Unit servers.
• Prime Performance Manager RMI services—Runs on Prime Performance Manager Gateway and Unit servers.
• Prime Performance Manager client process—Run on Prime Performance Manager Gateway and Unit servers.
Figure E-2 RMI Components
When Prime Performance Manager Server starts, Prime Performance Manager RMI services register with the RMI name server. These registered RMI services have one single published IP address.
When Prime Performance Manager Client starts, it first establishes a TCP connection to the RMI name server and performs a service lookup.
The RMI name server returns the published IP address for Prime Performance Manager RMI services. Prime Performance Manager Client then establishes another TCP connection to the published IP address of Prime Performance Manager RMI services for client and server communication.
PPM Gateway
Server Processes
Gateway Client
Web Server/CGI/JSP
PPM Unit
Server Processes
Unit Client
RMI
Web Browser
2825
57
E-2Cisco Prime Performance Manager 1.0 User Guide
OL-24597-01
Appendix E Configuring Prime Performance Manager to Run with Various Networking Options Firewall Communication
Firewall CommunicationTo enable Prime Performance Manager client/server communication through a firewall, you need to set up the firewall so that it allows Prime Performance Manager communication packets to pass through freely.
This section contains:
• Configuring Port Numbers and Parameters, page E-3
• Configuring Firewalls, page E-3
Configuring Port Numbers and Parameters
The port numbers used by Prime Performance Manager software is configured in the System.properties file:
Note Prime Performance Manager gateway and unit servers communicate using TCP sockets. All port numbers in this section are TCP ports.
• If you installed Prime Performance Manager software in the default directory, /opt, then the location of the file is /opt/CSCOppm-gw/properties/System.properties or /opt/CSCOppm-unit/properties/System.properties
• If you installed Prime Performance Manager software in a different directory, then the file resides in that directory.
Configuring Firewalls
Prime Performance Manager software uses four TCP port numbers on the server side and two TCP port numbers on the client side to communicate between Prime Performance Manager server and client(s).
Step 1 Identify the TCP port numbers that you want to use between Prime Performance Manager gateway and unit and web interface applications.
These ports include the RMI Registry Port, the Data Server Port, the Login Server Port, the Client Port, and the HTTP Web Server port. They are used for two way TCP connections between Prime Performance Manager server and client.
Step 2 Modify the System.properties file on Prime Performance Manager gateway and unit servers.
The System.properties file resides on Prime Performance Manager server under the /opt/CSCOppm-gw/properties or /opt/CSCOppm-unit/properties directory.
If you installed Prime Performance Manager software in a location other than the default (/opt), then specify the path to the file system where you installed the Prime Performance Manager software instead of the default (/opt) path.
Step 3 Using a text editor, edit this file and specify the appropriate port number where indicated subsequently:
Caution Before editing, always make a backup of the file. This ensures a valid file exists in case you make an error while editing.
E-3Cisco Prime Performance Manager 1.0 User Guide
OL-24597-01

Appendix E Configuring Prime Performance Manager to Run with Various Networking Options Firewall Communication
Step 4 Modify the node configuration files with the selected port numbers.
On Cisco nodes, you can use extended access lists to allow the chosen TCP port numbers to pass between the appropriate interface(s). Assuming a single node separates Prime Performance Manager gateway and unit servers, you can use the following extended access list:
Note The established entries are necessary, as they allow data to flow between the gateway and unit that initiated the session. Without this keyword, units will not have access to Prime Performance Manager gateway server.
Prime Performance Manager unit Interface:
• Interface FastEthernet 1/1
• ip address 192.168.1.100 255.255.255.0
• ip access-group unit-to-gateway in
Prime Performance Manager gateway Interface:
• interface FastEthernet 2/1
• ip address 192.168.2.100 255.255.255.0
• ip access-group gateway-to-unit in
Access list from unit to gateway contains:
• ip access-list extended unit-to-gateway
• 10 permit tcp any established
• 20 permit tcp 192.168.1.0 0.0.0.255 host 192.168.2.2 eq 45742
• 30 permit tcp 192.168.1.0 0.0.0.255 host 192.168.2.2 eq 45751
• 40 permit tcp 192.168.1.0 0.0.0.255 host 192.168.2.2 eq 45752
• 50 permit tcp 192.168.1.0 0.0.0.255 host 192.168.2.2 eq 4440
Access list from gateway to unit contains:
• ip access list extended gateway-to-unit
• 10 permit tcp any established
• 20 permit tcp host 192.168.2.2 192.168.1.0 0.0.0.255 eq 46173
Step 5 Restart Prime Performance Manager server to use the newly chosen TCP port numbers.
As the root user, on Prime Performance Manager server, type:
#cd /opt/CSCOppm-gw/bin#./ppm restart
The server processes restart using the newly chosen port numbers.
Both of these access lists allow established TCP connections (10 permit tcp any established, see previous).
When Prime Performance Manager client or server establishes a TCP connection to the other end, it uses a fixed destination port. However, the source port from the initiating party is random. The established keyword allows a returning TCP packet to go back to the random initiating source port.
E-4Cisco Prime Performance Manager 1.0 User Guide
OL-24597-01

OL-24597-01
G L O S S A R Y
This glossary contains Cisco Prime Performance Manager specific terms. For an online listing of other internetworking terms and acronyms, see this URL:
http://docwiki.cisco.com/wiki/Category:Internetworking_Terms_and_Acronyms_(ITA)
A
access list A list kept by routers to control access to or from the router for a number of services (for example, to prevent packets with a certain IP address from leaving a particular interface on the router).
alarm An alarm is a sequence of events, each representing a specific occurrence in the alarm lifecycle. The lifecycle of an alarm can include any number of related events that are triggered by changes in severity, updates to services, and so on. See event.
ANSI American National Standards Institute.
API Application Programming Interface. A source code interface that a computer system or program library provides to support requests for services by a computer program.
auto start Setting that enables Prime Performance Manager to start a process automatically when the Process Manager is started. See Message Log Server, Process Manager.
B
browser GUI-based hypertext client application, such as Internet Explorer or Mozilla, used to access hypertext documents and other services located on innumerable remote servers throughout the World Wide Web (WWW) and Internet.
C
Cisco IOS software Cisco Internetwork Operating System software. Cisco system software that provides common functionality, scalability, and security for many Cisco products. The Cisco IOS software allows centralized, integrated, and automated installation and management of internetworks, while ensuring support for a wide variety of protocols, media, services, and platforms.
CLI Command line interface. An interface that allows the user to interact with the Cisco IOS software operating system by entering commands and optional arguments.
client Node or software program that requests services from a server. Prime Performance Manager user interface is an example of a client. See also server.
GL-1Cisco Prime Performance Manager 1.0 User Guide
Glossary
command line
interface
See CLI.
community name See community string.
community string Text string that acts as a password and is used to authenticate messages sent between a management station and a node containing an SNMP agent. The community string is sent in every packet between the manager and the agent. Also called community name, read community.
console log Log containing unexpected error and warning messages from Prime Performance Manager server, such as those that might occur if Prime Performance Manager server cannot start.
CSV Comma-separated values. A widely-used file format for storing tabular data.
D
demand polling User-initiated poll of selected nodes. Contrast with status polling.
device See node.
device type In Prime Performance Manager, the type of a discovered device. Also called system object ID.
discovered Object that has been discovered by Prime Performance Manager. Also called known. Contrast with unknown.
Discovery Process by which Prime Performance Manager discovers objects in your network. See also recursive Discovery.
display name User-specified name for a node. Contrast with DNS name. See also node name.
domain name The style of identifier—a sequence of case-insensitive ASCII labels separated by dots (“bbn.com.”)—defined for subtrees in the Internet Domain Name System [R1034] and used in other Internet identifiers, such as host names, mailbox names, and URLs.
Domain Name
System
See DNS.
DNS Domain Name System. System used on the Internet for translating names of network nodes into addresses.
DNS name Initial name of a node, as discovered by Prime Performance Manager. Contrast with display name. See also node name.
GL-2Cisco Prime Performance Manager 1.0 User Guide
OL-24597-01
Glossary
E
Erlang (E) The international (dimensionless) unit of the average traffic intensity (occupancy) of a facility during a period of time, normally, a busy hour. The number of Erlangs is the ratio of the time during which a facility is occupied (continuously or cumulatively) to the time this facility is available for occupancy. Another definition is the ratio of the average call arrival rate into the system, to the average call duration. One Erlang is equivalent to 36 ccs (completed call seconds), which is another traffic intensity unit.
event An event is a singular occurrence in time. Events are derived from incoming traps and notifications, and from detected status changes.
Prime Performance Manager can detect events that are triggered by SNMP traps or notifications, status changes, and user actions. See alarm.
exclude Removing a network object from a view, while retaining the object in Prime Performance Manager database.
F
Field Replaceable
Units
See FRU.
FRU Assemblies such as power supplies, fans, processor modules, interface modules, and so forth.
G
graphical user
interface
See GUI.
GUI Graphical user interface. User environment that uses pictorial as well as textual representations of the input and output of applications and the hierarchical or other data structure in which information is stored. Conventions such as buttons, icons, and windows are typical, and many actions are performed using a pointing device (such as a mouse). Microsoft Windows and the Apple Macintosh are prominent examples of platforms utilizing a GUI.
H
host Computer system on a network. Similar to the term node except that host usually implies a computer system, whereas node generally applies to any network system.
host address See host number.
host number Part of an IP address that designates which node on the subnetwork is being addressed. Also called a host address.
GL-3Cisco Prime Performance Manager 1.0 User Guide
OL-24597-01
Glossary
HTML Hypertext Markup Language. Simple hypertext document formatting language that uses tags to indicate how a given part of a document should be interpreted by a viewing application, such as a web browser. See also hypertext and browser.
hypertext Electronically-stored text that allows direct access to other texts by way of encoded links. Hypertext documents can be created using HTML, and often integrate images, sound, and other media that are commonly viewed using a browser. See also HTML and browser.
Hypertext Markup
Language
See HTML.
I
ignore Exclude an object when aggregating and displaying Prime Performance Manager status information. See also unignore.
installation log Log containing messages and other information recorded during installation.
interface Connection between two systems or devices.
internal ID Unique identifier assigned by Prime Performance Manager, for its own internal use.
Internet Protocol See IP.
IP Internet Protocol. Network layer protocol in the TCP/IP stack offering a connectionless internetwork service. IP provides features for addressing, type-of-service specification, fragmentation and reassembly, and security. Documented in RFC 791.
IP address 32-bit address assigned to hosts using TCP/IP. An IP address belongs to one of five classes (A, B, C, D, or E) and is written as 4 octets separated by periods (dotted decimal format). Each address consists of a network number, an optional subnetwork number, and a host number. The network and subnetwork numbers together are used for routing, while the host number is used to address an individual host within the network or subnetwork. A subnet mask is used to extract network and subnetwork information from the IP address. CIDR provides a new way of representing IP addresses and subnet masks. See also IP.
IPC Inter Processor Communication.
ITU International Telecommunication Union.
K
known See discovered.
L
LAN Local Area Network.
GL-4Cisco Prime Performance Manager 1.0 User Guide
OL-24597-01
Glossary
local authentication Type of Prime Performance Manager security authentication that allows the creation of user accounts and passwords local to Prime Performance Manager system. When using this method, usernames, passwords, and access levels are managed using Prime Performance Manager commands.
For more information on Solaris authentication, see the “Implementing Secure User Access” section on page 2.
local IP address IP address used by Prime Performance Manager client to connect to Prime Performance Manager server.
M
Management
Information Base
See MIB.
mask Bit combination used in Prime Performance Manager to indicate the significant bits of the point code.
For ANSI and China standard networks using the default 24-bit point code format, the default mask is 255.255.255.
For ITU networks using the default 14-bit point code format, the default mask is 7.255.7.
For NTT and TTC networks using the default 16-bit point code format, the default mask is 31.15.127.
Message Log Server Multi-threaded processes that logs messages from the Process Manager and Prime Performance Manager client. See also Process Manager.
MIB Management Information Base. Database of network management information that is used and maintained by a network management protocol such as SNMP. The value of a MIB object can be changed or retrieved using SNMP commands, usually through a GUI network management system. MIB objects are organized in a tree structure that includes public (standard) and private (proprietary) branches.
N
name server Server connected to a network that resolves network names into network addresses.
NAT Network Address Translation. Internet standard that enables a LAN to use one set of IP addresses for internal traffic and a second set of addresses for external traffic.
Network Address
Translation
See NAT.
network
management
system
See NMS.
Network Time
Protocol
See NTP.
GL-5Cisco Prime Performance Manager 1.0 User Guide
OL-24597-01

Glossary
new node Node that Prime Performance Manager has newly discovered, and that has not yet been added to the current view.
NMS Network management system. System responsible for managing at least part of a network. An NMS is generally a reasonably powerful and well-equipped computer such as an engineering workstation. NMSes communicate with agents to help keep track of network statistics and resources.
node Endpoint of a network connection or a junction common to two or more lines in a network. Nodes can be processors, controllers, or workstations.
node name Name of a node. This is either the DNS name of the node, or a user-specified name. See display name, DNS name.
note User-defined descriptive string attached to an object.
NTP Network Time Protocol. Timing protocol that maintains a common time among Internet hosts in a network.
P
PDU Protocol Data Unit. OSI term for packet.
ping Packet internet groper. ICMP echo message and its reply. Often used in IP networks to test the reachability of a network device.
polling Access method in which a primary network device inquires, in an orderly fashion, whether secondaries have data to transmit. The inquiry occurs in the form of a message to each secondary that gives the secondary the right to transmit.
poll interval Time between polls.
poll response Time taken by a node to respond to Prime Performance Manager poll requests.
port In IP terminology, an upper-layer process that receives information from lower layers. Ports are numbered, and each numbered port is associated with a specific process. For example, SMTP is associated with port 25. A port number is also called a well-known address.
preferences Settings that enable a user to change the way Prime Performance Manager presents information.
primary SNMP
address
IP address used by SNMP to poll the node. (There might be other IP addresses on the node that are not the primary SNMP address.) Contrast with secondary IP address.
process Internal execution component of Prime Performance Manager. See Message Log Server, Process Manager.
Process Manager Multi-threaded process that handles the management of registered Prime Performance Manager processes.
GL-6Cisco Prime Performance Manager 1.0 User Guide
OL-24597-01

Glossary
Q
QoS Quality of service. Measure of performance for a transmission system that reflects its transmission quality and service availability.
Quality of Service See QoS.
R
RAN Radio Access Network.
RAN backhaul The end-to-end RAN connections between the BTS or Node B at the cell site and the BSC or RNC.
RAN shorthaul An interface that transports GSM or UMTS voice and data traffic between the BTS or Node-B and the RAN-O node at the cell site. At the aggregation site, RAN shorthauls exist between the RAN-O node and the BSC or RNC.
RAN-O RAN optimization. Standard-based, end-to-end, IP connectivity for GSM and UMTS RAN transport. The Cisco solution puts RAN voice and data frames into IP packets at the cell-site, and transports them seamlessly over an optimized backhaul network. At the central site, the RAN frames are extracted from IP packets, and the GSM or UMTS data streams are rebuilt.
read community See community string.
recursive Discovery Discovery of the entire network. Prime Performance Manager discovers all seed nodes and attempts to manage them; then attempts to discover and manage all ITP nodes that are adjacent to those seed nodes (unless the nodes are connected by serial links only); then attempts to discover and manage all ITP nodes that are adjacent to those nodes; and so on, until Prime Performance Manager has discovered the entire network.
route Path through an internetwork.
S
secondary IP
address
Alternate or backup IP address used by a node. Contrast with primary SNMP address.
seed file List of seed nodes. See seed node.
seed node Node used by Prime Performance Manager to discover the other objects in your network.
server Node or software program that provides services to clients. See client.
Simple Network
Management
Protocol
See SNMP.
SNMP Simple Network Management Protocol. Network management protocol used almost exclusively in TCP/IP networks. SNMP provides a means to monitor and control network devices, and to manage configurations, statistics collection, performance, and security.
GL-7Cisco Prime Performance Manager 1.0 User Guide
OL-24597-01
Glossary
SOAP Simple Object Access Protocol. A protocol for exchanging XML-based messages over computer networks. See XML.
SSL Secure Sockets Layer. A protocol for transmitting private documents via the Internet.
status Current condition, such as Active or Unknown, of a network object.
status polling Regularly scheduled polling of nodes performed by Prime Performance Manager. Contrast with demand polling.
system object ID See device type.
T
TCP Transmission Control Protocol. Connection-oriented transport layer protocol that provides reliable full-duplex data transmission. TCP is part of the TCP/IP protocol stack. See also TCP/IP.
TCP/IP Transmission Control Protocol/Internet Protocol. Common name for the suite of protocols developed by the U.S. DoD in the 1970s to support the construction of worldwide internetworks. TCP and IP are the two best-known protocols in the suite. See also IP and TCP.
TFTP Trivial File Transfer Protocol. A protocol that is used to transfer small files between hosts of a network. See also host.
thread name Task name.
time-out Event that occurs when one network device expects to hear from another network device within a specified period of time, but does not. The resulting time-out usually results in a retransmission of information or the dissolving of the session between the two devices.
tooltip Pop-ups that display information about objects and table entries.
Transmission
Control Protocol
See TCP.
Transmission
Control
Protocol/Internet
Protocol
See TCP/IP.
Trivial File Transfer
Protocol
See TFTP.
U
UDP User Datagram Protocol. Connectionless transport layer protocol in the TCP/IP protocol stack. UDP is a simple protocol that exchanges datagrams without acknowledgments or guaranteed delivery, requiring that error processing and retransmission be handled by other protocols. UDP is defined in RFC 768.
GL-8Cisco Prime Performance Manager 1.0 User Guide
OL-24597-01
Glossary
unignore Stop ignoring the selected object at the next polling cycle. See also ignore.
unknown Device type for which Prime Performance Manager is unable to determine the device type. If a node, the node failed to respond to an SNMP request. If a linkset or link, either the associated node failed to respond to an SNMP request, or Prime Performance Manager found that the linkset or link no longer exists. Contrast with discovered.
unmanaged Node status in which the node is known indirectly by Prime Performance Manager (Prime Performance Manager knows the device exists but no known SNMP stack exists on the device for Prime Performance Manager to query), or a user has set the node to this status to prevent Prime Performance Manager from polling the node.
User-Based Access Prime Performance Manager security scheme that provides multi-level password-protected access to Prime Performance Manager features. Each user can have a unique username and password. Each user can also be assigned to one of five levels of access, which control the list of Prime Performance Manager features accessible by that user.
For more information, see the “Configuring User Access” section in Chapter 3, “Configuring Security.”
User Datagram
Protocol
See UDP.
Amount of an object’s send or receive capacity that is being used, expressed as a percentage or in Erlangs.
W
World Wide Web See WWW.
WWW World Wide Web. Large network of Internet servers providing hypertext and other services to terminals running client applications such as a browser. See also browser.
X
XML Extended Markup Language. A general-purpose markup language for to facilitating the sharing of data across different information systems connected through the Internet. See SOAP.
GL-9Cisco Prime Performance Manager 1.0 User Guide
OL-24597-01

Glossary
GL-10Cisco Prime Performance Manager 1.0 User Guide
OL-24597-01
OL-24597-01
I N D E X
A
audience
document 3-xi
B
backup
Prime Performance Manager files 3-20
browser
FAQs B-4
C
changing
poller settings 4-1
client, Prime Performance Manager
access, limiting 3-19
client/server architecture, overview 1-2
command reference A-1
commands
general A-1
conventions
document 3-xii
D
data
accessing, from web 5-1
discovering networks
discovered nodes 2-5
verifying discovery 2-6
document
audience 3-xi
conventions 3-xii
organization 3-xii
F
FAQs B-1
applications, other B-6
browser B-4
MIBs B-5
moving servers B-2
polling B-5
rebooting B-3
requirements B-2
SSL, installing B-3
Windows B-6
features
GUI 1-2
integration 1-2
performance 1-2
security 1-2
server and network 1-1
web 1-2
G
General commands
ppm datadir A-14
general commands A-1
ppm A-5
ppm adduser A-6
ppm backup A-7
ppm backupdir A-9
IN-1Cisco Prime Performance Manager 1.0 User Guide
Index
ppm badloginalarm A-10
ppm badlogindisable A-10
ppm certtool A-11
ppm changes A-12
ppm checksystem A-12
ppm clitimeout A-12
ppm cmdlog A-13
ppm console A-14
ppm countnodes A-14
ppm delete A-15
ppm deluser A-16
ppm disablepass A-16
ppm disableuser A-17
ppm discover A-17
ppm diskmonitor A-17
ppm enableuser A-18
ppm eventautolog A-18
ppm eventconfig A-19
ppm eventeditor A-19
ppm eventtool A-19
ppm evilstop A-21
ppm export A-21
ppm export cw A-22
ppm help A-22
ppm inactiveuserdays A-23
ppm installlog A-24
ppm iosreport A-24
ppm ipaccess A-25
ppm jspport A-25
ppm keytool A-26
ppm listusers A-27
ppm logger A-27
ppm logtimemode A-29
ppm maxhtmlrows A-29
ppm mldebug A-29
ppm motd A-31
ppm msglog A-31
ppm msglogage A-32
ppm msglogdir A-32
IN-2Cisco Prime Performance Manager 1.0 User Guide
ppm msglogsize A-27
ppm netlog A-33
ppm netlogger A-33
ppm newlevel A-33
ppm osinfo A-34
ppm passwordage A-34
ppm patchlog A-35
ppm poll A-35
ppm print A-35
ppm props A-36
ppm purgedb A-36
ppm readme A-36
ppm reboot A-36
ppm rephelp A-37
ppm restart A-37
ppm restore A-38
ppm restoreprops A-39
ppm rootvars A-39
ppm sechelp A-39
ppm seclogppm seclog A-39
ppm servername A-41
ppm setpath A-41
ppm snmpcomm A-43
ppm snmpconf A-43
ppm snmpget A-43
ppm snmphelp A-45
ppm snmpnext A-46
ppm snmpwalk A-49
ppm ssl A-51
ppm sslstatus A-51
ppm start A-52
ppm start jsp A-52
ppm start pm A-52
ppm start web A-52
ppm statreps A-53
ppm status A-54
ppm stop A-54
ppm stop jsp A-55
ppm stop pm A-55
OL-24597-01
Index
ppm stop web A-55
ppm tac A-55
ppm traprate limit abate A-56
ppm trapratelimit count A-56
ppm trapratelimit interval A-56
ppm trapratelimit minor A-57
ppm uninstall A-57
ppm unknownage A-57
ppm updateuser A-58
ppm useraccess A-59
ppm userpass A-59
ppm version A-60
ppm webport A-60
ppm who A-60
generating
reports 7-3
getting started 2-1
H
home page
Prime Performance Manager web interface 5-10
I
interface content
Prime Performance Manager web interface 5-4
ITP networks
discovery
nodes 2-5
verifying 2-6
M
managing
reports 7-1
messages
display, changing 4-2
OL-24597-01
log file
age 4-3
dates 4-2
location 4-2
size 4-2
of the day 3-12
MIBs
common D-1
FAQs B-5
moving servers
FAQs B-2
N
navigation tree
Prime Performance Manager web interface 5-3
O
organization
document 3-xii
overview
discovery 2-4
P
poller
settings, changing 4-1
polling
FAQs B-5
PPM
commands A-1
ppm addunitconf A-5
ppm crosslaunch A-12
ppm deleteunitconf A-16
ppm exportcustnames A-21
ppm exportusers A-22
ppm importcustnames A-23
IN-3Cisco Prime Performance Manager 1.0 User Guide
Index
ppm inventoryimport A-24
ppm modifyunitconf A-31
ppm reloadmibs A-37, A-54
ppm repdir A-37
ppm showunitconf A-42
ppm syncunits A-54
Prime Performance Manager
about 3-xi
backup 3-20
client and server communication
VPN E-3
FAQs (see FAQs)
MIB reference D-1
networking options (see Prime Performance Manager, client and server communication) E-1
restoring 3-20
troubleshooting (see troubleshooting)
Prime Performance Manager web interface
archived messages 6-5
home page 5-10
interface content 5-4
logs
command 6-9
console 6-8
event automation 6-9
security 6-9
navigation tree 5-3
R
rebooting
FAQs B-3
reference
command A-1
reports
generating 7-3
managing 7-1
viewing 7-4
requirements
IN-4Cisco Prime Performance Manager 1.0 User Guide
FAQs B-2
restoring
Prime Performance Manager files 3-20
RMI
how does it work E-2
root user, becoming 2-2
S
security 3-1
client access, limiting 3-19
logs, system 3-14
message of the day 3-12
overview 3-1
passwords
changing 3-11
creating 3-6
disabling, automatically 3-7
disabling, manually 3-10
re-enabling 3-11
user-based access
disabling 3-14
implementing 3-2
user levels 3-6
(level 1) basic user 3-7
(level 3) network operator 3-7
(level 5) system administrator 3-7
users
changing 3-11
disabling, automatically 3-7
disabling, manually 3-10
listing current 3-13
re-enabling 3-11
server
setting up 4-1
server properties
viewing 6-12
starting Prime Performance Manager
server 2-1
OL-24597-01
Index
system properties
viewing 6-11
T
troubleshooting
data C-1
server processes C-1
web pages C-2
U
user-based access (see security)
users (see security)
V
viewing
reports 7-4
server properties 6-12
system properties 6-11
web configuration properties 6-12
W
web configuration properties
viewing 6-12
web pages
troubleshooting C-2
Windows
FAQs B-6
OL-24597-01
IN-5Cisco Prime Performance Manager 1.0 User Guide
Index
IN-6Cisco Prime Performance Manager 1.0 User Guide
OL-24597-01
Related Documents


