Send document comments to [email protected]. Americas Headquarters Cisco Systems, Inc. 170 West Tasman Drive San Jose, CA 95134-1706 USA http://www.cisco.com Tel: 408 526-4000 800 553-NETS (6387) Fax: 408 527-0883 Cisco Nexus 7000 Series NX-OS Fundamentals Configuration Guide, Release 4.0 January 26, 2009 Text Part Number: OL-15317-02

Welcome message from author
This document is posted to help you gain knowledge. Please leave a comment to let me know what you think about it! Share it to your friends and learn new things together.
Transcript

Send document comments to nexus7k -doc feedback@c i sco .com.
Cisco Nexus 7000 Series NX-OS Fundamentals Configuration Guide, Release 4.0 January 26, 2009
Americas HeadquartersCisco Systems, Inc.170 West Tasman DriveSan Jose, CA 95134-1706 USAhttp://www.cisco.comTel: 408 526-4000
800 553-NETS (6387)Fax: 408 527-0883
Text Part Number: OL-15317-02

Send document comments to nexus7k -doc feedback@c i sco .com.
THE SPECIFICATIONS AND INFORMATION REGARDING THE PRODUCTS IN THIS MANUAL ARE SUBJECT TO CHANGE WITHOUT NOTICE. ALL STATEMENTS, INFORMATION, AND RECOMMENDATIONS IN THIS MANUAL ARE BELIEVED TO BE ACCURATE BUT ARE PRESENTED WITHOUT WARRANTY OF ANY KIND, EXPRESS OR IMPLIED. USERS MUST TAKE FULL RESPONSIBILITY FOR THEIR APPLICATION OF ANY PRODUCTS.
THE SOFTWARE LICENSE AND LIMITED WARRANTY FOR THE ACCOMPANYING PRODUCT ARE SET FORTH IN THE INFORMATION PACKET THAT SHIPPED WITH THE PRODUCT AND ARE INCORPORATED HEREIN BY THIS REFERENCE. IF YOU ARE UNABLE TO LOCATE THE SOFTWARE LICENSE OR LIMITED WARRANTY, CONTACT YOUR CISCO REPRESENTATIVE FOR A COPY.
The Cisco implementation of TCP header compression is an adaptation of a program developed by the University of California, Berkeley (UCB) as part of UCB’s public domain version of the UNIX operating system. All rights reserved. Copyright © 1981, Regents of the University of California.
NOTWITHSTANDING ANY OTHER WARRANTY HEREIN, ALL DOCUMENT FILES AND SOFTWARE OF THESE SUPPLIERS ARE PROVIDED “AS IS” WITH ALL FAULTS. CISCO AND THE ABOVE-NAMED SUPPLIERS DISCLAIM ALL WARRANTIES, EXPRESSED OR IMPLIED, INCLUDING, WITHOUT LIMITATION, THOSE OF MERCHANTABILITY, FITNESS FOR A PARTICULAR PURPOSE AND NONINFRINGEMENT OR ARISING FROM A COURSE OF DEALING, USAGE, OR TRADE PRACTICE.
IN NO EVENT SHALL CISCO OR ITS SUPPLIERS BE LIABLE FOR ANY INDIRECT, SPECIAL, CONSEQUENTIAL, OR INCIDENTAL DAMAGES, INCLUDING, WITHOUT LIMITATION, LOST PROFITS OR LOSS OR DAMAGE TO DATA ARISING OUT OF THE USE OR INABILITY TO USE THIS MANUAL, EVEN IF CISCO OR ITS SUPPLIERS HAVE BEEN ADVISED OF THE POSSIBILITY OF SUCH DAMAGES.
CCDE, CCENT, Cisco Eos, Cisco HealthPresence, the Cisco logo, Cisco Lumin, Cisco Nexus, Cisco StadiumVision, Cisco TelePresence, Cisco WebEx, DCE, and Welcome to the Human Network are trademarks; Changing the Way We Work, Live, Play, and Learn and Cisco Store are service marks; and Access Registrar, Aironet, AsyncOS, Bringing the Meeting To You, Catalyst, CCDA, CCDP, CCIE, CCIP, CCNA, CCNP, CCSP, CCVP, Cisco, the Cisco Certified Internetwork Expert logo, Cisco IOS, Cisco Press, Cisco Systems, Cisco Systems Capital, the Cisco Systems logo, Cisco Unity, Collaboration Without Limitation, EtherFast, EtherSwitch, Event Center, Fast Step, Follow Me Browsing, FormShare, GigaDrive, HomeLink, Internet Quotient, IOS, iPhone, iQuick Study, IronPort, the IronPort logo, LightStream, Linksys, MediaTone, MeetingPlace, MeetingPlace Chime Sound, MGX, Networkers, Networking Academy, Network Registrar, PCNow, PIX, PowerPanels, ProConnect, ScriptShare, SenderBase, SMARTnet, Spectrum Expert, StackWise, The Fastest Way to Increase Your Internet Quotient, TransPath, WebEx, and the WebEx logo are registered trademarks of Cisco Systems, Inc. and/or its affiliates in the United States and certain other countries.
All other trademarks mentioned in this document or website are the property of their respective owners. The use of the word partner does not imply a partnership relationship between Cisco and any other company. (0812R)
Any Internet Protocol (IP) addresses used in this document are not intended to be actual addresses. Any examples, command display output, and figures included in the document are shown for illustrative purposes only. Any use of actual IP addresses in illustrative content is unintentional and coincidental.
Cisco Nexus 7000 Series NX-OS Fundamentals Configuration Guide, Release 4.0 © 2008-2009 Cisco Systems, Inc. All rights reserved.

Send document comments to nexus7k -doc feedback@c i sco .com.
OL-15317-02
C O N T E N T S
New and Changed Information ix
Preface xi
Audience xi
Document Organization xi
Document Conventions xii
Related Documentation xii
Obtaining Documentation and Submitting a Service Request xiii
C H A P T E R 1 Overview 1-1
Software Compatibility 1-1
Common Software Throughout the Data Center 1-1
Modular Software Design 1-3
Virtual Device Contexts 1-3
Serviceability 1-3
Switched Port Analyzer 1-3
Ethanalyzer 1-4
Call Home 1-4
Online Diagnostics 1-4
Embedded Event Manager 1-4
NetFlow 1-4
Manageability 1-4
Simple Network Management Protocol 1-5
Configuration Verification and Rollback 1-5
Role-Based Access Control 1-5
Connectivity Management Processor 1-5
Cisco NX-OS Device Configuration Methods 1-5
Traffic Routing, Forwarding, and Management 1-6
Ethernet Switching 1-6
IP Routing 1-6
IP Services 1-7
IP Multicast 1-7
Quality of Service 1-7
Network Security 1-8
iiiCisco Nexus 7000 Series NX-OS Fundamentals Configuration Guide, Release 4.0

Send document comments to nexus7k -doc feedback@c i sco .com.
Contents
Cisco TrustSec 1-8
Additional Network Security Features 1-8
Licensing 1-9
Supported Standards 1-9
C H A P T E R 2 Using the Cisco Nexus 7000 Series NX-OS Setup Utility 2-1
Information About the Cisco NX-OS Setup Utility 2-1
Prerequisites for the Setup Utility 2-3
Setting Up Your Cisco NX-OS Device 2-3
Where to Go Next 2-6
Additional References 2-7
Related Documents 2-7
C H A P T E R 3 Understanding the CLI 3-1
Information About the CLI Prompt 3-1
Command Modes 3-2
About Command Modes 3-2
EXEC Command Mode 3-3
Global Configuration Command Mode 3-3
Interface Configuration Command Mode 3-3
Subinterface Configuration Command Mode 3-4
Exiting a Configuration Command Mode 3-5
Command Mode Summary 3-6
Special Characters 3-7
Keystroke Shortcuts 3-7
Abbreviating Commands 3-9
Identifying Your Location in the Command Hierarchy 3-9
Using the no Form of a Command 3-10
Configuring CLI Variables 3-11
About CLI Variables 3-11
Configuring CLI Variables 3-11
Command Aliases 3-12
About Command Aliases 3-12
Defining Command Aliases 3-13
Command Scripts 3-14
Running a Command Script 3-14
Echoing Information to the Terminal 3-14
ivCisco Nexus 7000 Series NX-OS Fundamentals Configuration Guide, Release 4.0
OL-15317-02

Send document comments to nexus7k -doc feedback@c i sco .com.
Contents
Delaying Command Action 3-15
Context-Sensitive Help 3-16
Understanding Regular Expressions 3-17
Special Characters 3-18
Single-Character Patterns 3-18
Multiple-Character Patterns 3-19
Anchoring 3-19
Searching and Filtering show Command Output 3-20
Filtering and Searching Keywords 3-20
grep and egrep Utilities 3-21
less Utility 3-22
sed Utility 3-22
Searching and Filtering from the --More-- Prompt 3-22
BIOS Loader> Prompt 3-23
Examples Using the CLI 3-23
Defining Command Aliases 3-23
Using CLI Session Variables 3-24
Using the System-Defined Timestamp Variable 3-24
Running a Command Script 3-25
Additional References 3-26
Related Documents 3-26
C H A P T E R 4 Configuring Terminal Settings and Sessions 4-1
Information About Terminal Settings and Sessions 4-1
Terminal Session Settings 4-2
Console Port 4-2
COM1 Port 4-2
Virtual Terminals 4-2
Modem Support 4-3
Virtualization Support 4-3
Licensing Requirements for Terminal Settings and Sessions 4-3
Configuring the Terminal Settings 4-3
Configuring the Console Port 4-4
Configuring the COM1 Port 4-6
Configuring Virtual Terminals 4-8
Configuring the Inactive Session Timeout 4-8
Configuring the Session Limit 4-9
Configuring Modem Connections 4-10
vCisco Nexus 7000 Series NX-OS Fundamentals Configuration Guide, Release 4.0
OL-15317-02

Send document comments to nexus7k -doc feedback@c i sco .com.
Contents
Enabling a Modem Connection 4-11
Downloading the Default Initialization String 4-12
Configuring and Downloading a User-Specified Initialization String 4-14
Initializing a Modem for a Powered-Up Device 4-15
Clearing Terminal Sessions 4-16
Displaying Terminal and Session Information 4-16
Default Settings 4-17
Additional References 4-17
Related Documents 4-17
C H A P T E R 5 Basic Device Management 5-1
Information About Basic Device Management 5-1
mgmt0 Interface 5-2
Device Hostname 5-2
Message-of-the-Day Banner 5-2
Device Clock 5-2
Time Zone and Summer Time (Daylight Savings Time) 5-2
User Sessions 5-2
Virtualization Support 5-2
Licensing Requirements for Basic Device Management 5-3
Configuring the mgmt0 Interface 5-3
Changing the Device Hostname 5-5
Configuring the MOTD Banner 5-6
Configuring the Time Zone 5-7
Configuring Summer Time (Daylight Saving Time) 5-8
Manually Setting the Device Clock 5-9
Managing Users 5-9
Displaying Information about the Users Sessions 5-10
Sending a Message to Users 5-10
Example of Basic Device Management 5-11
Verifying Basic Device Settings 5-11
Default Settings 5-11
Additional References 5-11
Related Documents 5-11
C H A P T E R 6 Using the Device File Systems, Directories, and Files 6-1
Information About the Device File Systems, Directories, and Files 6-1
viCisco Nexus 7000 Series NX-OS Fundamentals Configuration Guide, Release 4.0
OL-15317-02

Send document comments to nexus7k -doc feedback@c i sco .com.
Contents
File Systems 6-1
Directories 6-2
Files 6-3
Virtualization Support 6-3
Licensing Requirements for Configuration Files 6-3
Using the Tab Key for Completing Filenames 6-3
Formatting External Flash Devices 6-3
Working with Directories 6-4
Identifying the Current Directory 6-4
Changing the Current Directory 6-5
Creating a Directory 6-5
Displaying Directory Contents 6-6
Deleting a Directory 6-6
Accessing Directories on the Standby Supervisor Module 6-7
Working with Files 6-7
Moving Files 6-8
Copying Files 6-9
Deleting Files 6-10
Displaying File Contents 6-10
Displaying File Checksums 6-11
Compressing and Uncompressing Files 6-11
Displaying the Last Lines in a File 6-12
Redirecting show Command Output to a File 6-12
Finding Files 6-12
Examples of Using the File System 6-13
Accessing Directories on Standby Supervisor Modules 6-13
Moving Files 6-14
Copying Files 6-14
Deleting Files 6-14
Displaying File Contents 6-15
Displaying File Checksums 6-15
Compressing and Uncompressing Files 6-15
Redirecting show Command Output 6-15
Finding Files 6-16
Default Settings 6-16
Additional References 6-17
Related Documents 6-17
viiCisco Nexus 7000 Series NX-OS Fundamentals Configuration Guide, Release 4.0
OL-15317-02
Send document comments to nexus7k -doc feedback@c i sco .com.
Contents
C H A P T E R 7 Working with Configuration Files 7-1
Information About Configuration Files 7-1
Types of Configuration Files 7-1
Virtualization Support 7-2
Licensing Requirements for Configuration Files 7-2
Managing Configuration Files 7-2
Saving the Running Configuration to the Startup Configuration 7-3
Copying a Configuration File to a Remote Server 7-3
Downloading the Running Configuration From a Remote Server 7-4
Downloading the Startup Configuration From a Remote Server 7-5
Copying Configuration Files to an External Flash Memory Device 7-6
Copying the Running Configuration From an External Flash Memory Device 7-7
Copying the Startup Configuration From an External Flash Memory Device 7-8
Copying Configuration Files to an Internal File System 7-8
Rolling Back to a Previous Configuration 7-9
Removing the Configuration for a Missing Module 7-10
Erasing Device Configurations 7-11
Verifying the Device Configuration 7-12
Examples of Working With Configuration Files 7-12
Copying Configuration Files 7-12
Backing Up Configuration Files 7-12
Rolling Back to a Previous Configuration 7-13
Additional References 7-13
Related Documents 7-13
IN D E X
viiiCisco Nexus 7000 Series NX-OS Fundamentals Configuration Guide, Release 4.0
OL-15317-02

Send document comments to nexus7k -doc feedback@c i sco .com.
New and Changed Information
This chapter provides release-specific information for each new and changed feature in the Cisco Nexus 7000 Series NX-OS Fundamentals Configuration Guide, Release 4.0. The latest version of this document is available at the following Cisco website: http://www.cisco.com/en/US/docs/switches/datacenter/sw/4_0/nx-os/security/configuration/guide/sec_nx-os_config.html
To check for additional information about Cisco NX-OS Release 4.0, see the Cisco NX-OS Release Notes available at the following Cisco website: http://www.cisco.com/en/US/docs/switches/datacenter/sw/4_0/nx-os/release/notes/401_nx-os_release_note.html
Table 1 summarizes the new and changed features for the Cisco Nexus 7000 Series NX-OS Fundamentals Configuration Guide, Release 4.0, and tells you where they are documented.
Table 1 New and Changed Features for Release 4.0
Feature DescriptionChanged in Release Where Documented
Filtering and searching utilities
Changes keywords from Linux style to Cisco NX-OS style.
4.0(3) Chapter 3, “Understanding the CLI”
grep and egrep utilities Changes keywords from Linux style to Cisco NX-OS style.
4.0(3) Chapter 3, “Understanding the CLI”
Text echoing Changed echo command syntax from Linux style keyword to Cisco NX-OS style keyword.
4.0(3) Chapter 3, “Understanding the CLI”
ixCisco Nexus 7000 Series NX-OS Fundamentals Configuration Guide, Release 4.0
OL-15317-02

Send document comments to nexus7k -doc feedback@c i sco .com.
New and Changed Information
xCisco Nexus 7000 Series NX-OS Fundamentals Configuration Guide, Release 4.0
OL-15317-02

Send document comments to nexus7k -doc feedback@c i sco .com.
Preface
This document, Cisco Nexus 7000 Series NX-OS Fundamentals Configuration Guide, Release 4.0, is intended to provide fundamental NX-OS configuration information to get your system up and running.
This preface includes the following topics:
• Audience, page xi
• Document Organization, page xi
• Document Conventions, page xii
• Related Documentation, page xii
• Obtaining Documentation and Submitting a Service Request, page xiii
AudienceThis guide is for experienced network system users.
Document OrganizationThis document is organized into the following chapters:
Chapter and Title Description
New and Changed Information Describes the new and changed information for the new Cisco NX-OS software releases.
Chapter 1, “Overview” Provides an overview of the features included in NX-OS.
Chapter 2, “Using the Cisco Nexus 7000 Series NX-OS Setup Utility”
Provides a flowchart for setting up the NX-OS.
Chapter 3, “Understanding the CLI” Describes the command line interface including command modes, special characters, and keystrokes.
Chapter 5, “Basic Device Management” Describes basic system management, including setting the clock and configuring a message of the day.
Chapter 6, “Using the Device File Systems, Directories, and Files”
Describe how to configure and manage file systems, directories, and files on an NX-OS device.
Chapter 7, “Working with Configuration Files”
Describes the configuration files and how to manage them.
xiCisco Nexus 7000 Series NX-OS Fundamentals Configuration Guide, Release 4.0
OL-15317-02

Send document comments to nexus7k -doc feedback@c i sco .com.
Preface
Document ConventionsCommand descriptions use these conventions:
Screen examples use these conventions:
This document uses the following conventions for notes and cautions:
Note Means reader take note. Notes contain helpful suggestions or references to material not covered in the manual.
Caution Means reader be careful. In this situation, you might do something that could result in equipment damage or loss of data.
Related DocumentationThe following Cisco NX-OS documents are published on Cisco.com:
Release Notes
Cisco Nexus 7000 Series NX-OS Release Notes, Release 4.0
NX-OS Configuration Guides
Cisco Nexus 7000 Series NX-OS Getting Started with Virtual Device Contexts, Release 4.0
Cisco Nexus 7000 Series NX-OS Fundamentals Configuration Guide, Release 4.0
boldface font Commands and keywords are in boldface.
italic font Arguments for which you supply values are in italics.
{ } Elements in braces are required choices.
[ ] Elements in square brackets are optional.
x | y | z Alternative, mutually exclusive elements are separated by vertical bars.
string A nonquoted set of characters. Do not use quotation marks around the string or the string will include the quotation marks.
screen font Terminal sessions and information the device displays are in screen font.
boldface screen font
Information you must enter is in boldface screen font.
italic screen font Arguments for which you supply values are in italic screen font.
< > Nonprinting characters, such as passwords, are in angle brackets.
[ ] Default responses to system prompts are in square brackets.
!, # An exclamation point (!) or a pound sign (#) at the beginning of a line of code indicates a comment line.
xiiCisco Nexus 7000 Series NX-OS Fundamentals Configuration Guide, Release 4.0
OL-15317-02
Send document comments to nexus7k -doc feedback@c i sco .com.
Preface
Cisco Nexus 7000 Series NX-OS Interfaces Configuration Guide, Release 4.0
Cisco Nexus 7000 Series NX-OS Layer 2 Switching Configuration Guide, Release 4.0
Cisco Nexus 7000 Series NX-OS Quality of Service Configuration Guide, Release 4.0
Cisco Nexus 7000 Series NX-OS Unicast Routing Configuration Guide, Release 4.0
Cisco Nexus 7000 Series NX-OS Multicast Routing Configuration Guide, Release 4.0
Cisco Nexus 7000 Series NX-OS Security Configuration Guide, Release 4.0
Cisco Nexus 7000 Series NX-OS Virtual Device Context Configuration Guide, Release 4.0
Cisco Nexus 7000 Series NX-OS Software Upgrade Guide, Release 4.0
Cisco Nexus 7000 Series NX-OS Licensing Guide, Release 4.0
Cisco Nexus 7000 Series NX-OS High Availability and Redundancy Guide, Release 4.0
Cisco Nexus 7000 Series NX-OS System Management Configuration Guide, Release 4.0
Cisco Nexus 7000 Series NX-OS XML Management Interface User Guide, Release 4.0
Cisco Nexus 7000 Series NX-OS System Messages Reference
Cisco Nexus 7000 Series NX-OS MIB Quick Reference
NX-OS Command References
Cisco Nexus 7000 Series NX-OS Command Reference Master Index, Release 4.0
Cisco Nexus 7000 Series NX-OS Fundamentals Command Reference, Release 4.0
Cisco Nexus 7000 Series NX-OS Interfaces Command Reference, Release 4.0
Cisco Nexus 7000 Series NX-OS Layer 2 Switching Command Reference, Release 4.0
Cisco Nexus 7000 Series NX-OS Quality of Service Command Reference, Release 4.0
Cisco Nexus 7000 Series NX-OS Unicast Routing Command Reference, Release 4.0
Cisco Nexus 7000 Series NX-OS Multicast Routing Command Reference, Release 4.0
Cisco Nexus 7000 Series NX-OS Security Command Reference, Release 4.0
Cisco Nexus 7000 Series NX-OS Virtual Device Context Command Reference, Release 4.0
Cisco Nexus 7000 Series NX-OS System Management Command Reference, Release 4.0
Other Software Document
Cisco Nexus 7000 Series NX-OS Troubleshooting Guide, Release 4.0
Obtaining Documentation and Submitting a Service RequestFor information on obtaining documentation, submitting a service request, and gathering additional information, see the monthly What’s New in Cisco Product Documentation, which also lists all new and revised Cisco technical documentation, at:
http://www.cisco.com/en/US/docs/general/whatsnew/whatsnew.html
xiiiCisco Nexus 7000 Series NX-OS Fundamentals Configuration Guide, Release 4.0
OL-15317-02

Send document comments to nexus7k -doc feedback@c i sco .com.
Preface
Subscribe to the What’s New in Cisco Product Documentation as a Really Simple Syndication (RSS) feed and set content to be delivered directly to your desktop using a reader application. The RSS feeds are a free service and Cisco currently supports RSS version 2.0.
xivCisco Nexus 7000 Series NX-OS Fundamentals Configuration Guide, Release 4.0
OL-15317-02
Send document comments to nexus7k -doc feedback@c i sco .com.
Cisco Nexus 7000 Series NXOL-15317-02
C H A P T E R 1
OverviewThis chapter provides an overview of the NX-OS software and includes the following sections:
• Software Compatibility, page 1-1
• Serviceability, page 1-3
• Manageability, page 1-4
• Traffic Routing, Forwarding, and Management, page 1-6
• Quality of Service, page 1-7
• Network Security, page 1-8
• Licensing, page 1-9
• Supported Standards, page 1-9
Software CompatibilityThe Cisco NX-OS software interoperates with Cisco products that run any variant of the Cisco IOS software. The Cisco NX-OS software also interoperates with any networking operating system that conforms to the networking standards listed as supported in the “Supported Standards” section on page 1-9.
This section includes the following topics:
• Common Software Throughout the Data Center, page 1-1
• Modular Software Design, page 1-3
• Virtual Device Contexts, page 1-3
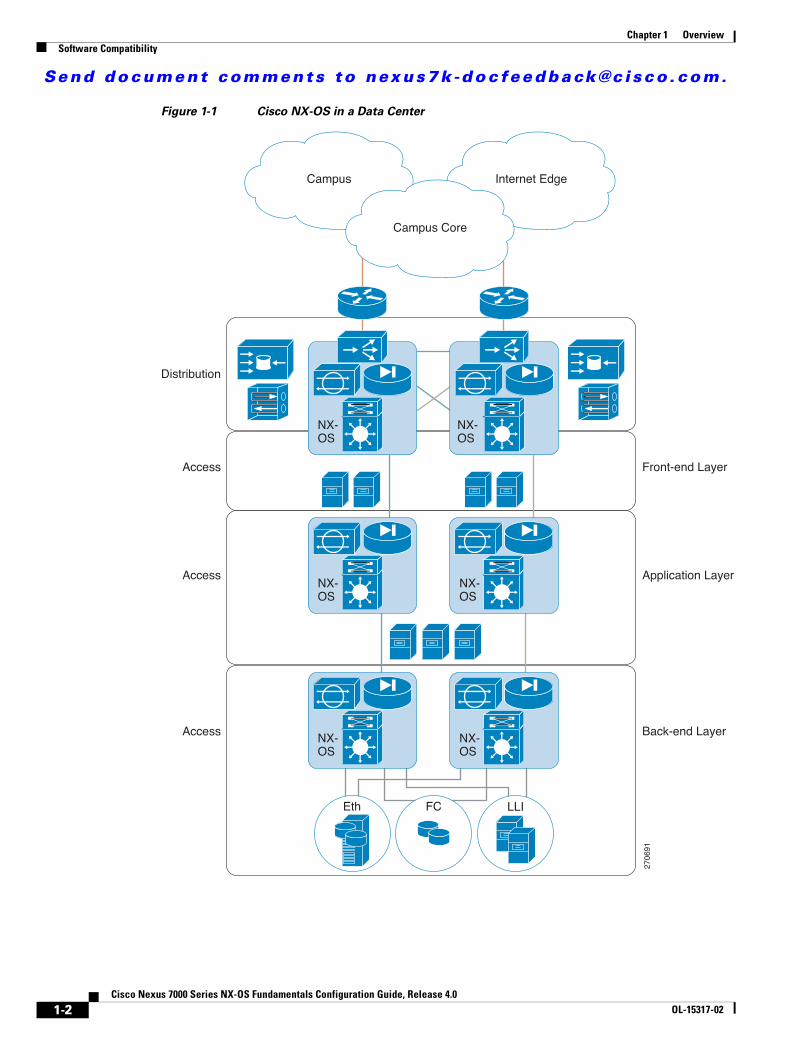
Common Software Throughout the Data CenterThe Cisco NX-OS software provides a unified operating system that is designed to run all areas of the data center network including the LAN and Layer 4 through Layer 7 network services (see Figure 1-1).
1-1-OS Fundamentals Configuration Guide, Release 4.0
Send document comments to nexus7k -doc feedback@c i sco .com.
Chapter 1 OverviewSoftware Compatibility
Figure 1-1 Cisco NX-OS in a Data Center
Campus Internet Edge
Campus Core
NX-OS
NX-OS
NX-OS
NX-OS
Eth FC LLI
Distribution
Access
Access
Access
Front-end Layer
Application Layer
Back-end Layer
2706
91
NX-OS
NX-OS
1-2Cisco Nexus 7000 Series NX-OS Fundamentals Configuration Guide, Release 4.0
OL-15317-02
Send document comments to nexus7k -doc feedback@c i sco .com.
Chapter 1 OverviewServiceability
Modular Software DesignThe Cisco NX-OS software supports distributed multithreaded processing on symmetric multiprocessors (SMPs), multi-core CPUs, and distributed data module processors. The Cisco NX-OS software offloads computationally intensive tasks, such as hardware table programming, to dedicated processors distributed across the data modules. The modular processes are created on demand, each in a separate protected memory space. Processes are started and system resources are allocated only when you enable a feature. A real-time preemptive scheduler helps to ensure the timely processing of critical functions.
Virtual Device Contexts The Cisco NX-OS software can segment system and hardware resources into virtual contexts that emulate virtual devices. Each virtual device context (VDC) has its own software processes, dedicated hardware resources (interfaces), and an independent management environment. With VDCs, you can consolidate separate networks onto a common infrastructure, which maintain the administrative boundary separation and fault isolation characteristics of physically separate networks, and provide many of the operational cost benefits of a single infrastructure. For more information, see the Cisco Nexus 7000 Series NX-OS Virtual Device Context Configuration Guide, Release 4.0.
ServiceabilityThe Cisco NX-OS software has serviceability functions that allow the device to respond to network trends and events. These features help you with network planning and improving response times.
This section includes the following topics:
• Switched Port Analyzer, page 1-3
• Ethanalyzer, page 1-4
• Call Home, page 1-4
• Online Diagnostics, page 1-4
• Embedded Event Manager, page 1-4
• NetFlow, page 1-4
Switched Port Analyzer The Switched Port Analyzer (SPAN) feature allows you to analyze all traffic between ports (called the SPAN source ports) by nonintrusively directing the SPAN session traffic to a SPAN destination port that has an external analyzer attached to it. For more information about SPAN, see the Cisco Nexus 7000 Series NX-OS System Management Configuration Guide, Release 4.0.
1-3Cisco Nexus 7000 Series NX-OS Fundamentals Configuration Guide, Release 4.0
OL-15317-02
Send document comments to nexus7k -doc feedback@c i sco .com.
Chapter 1 OverviewManageability
EthanalyzerEthanalyzer is a Cisco NX-OS protocol analyzer tool based on the Wireshark (formerly Ethereal) open source code. Ethanalyzer is a command-line version of Wireshark for capturing and decoding packets. You can use Ethanalyzer to troubleshoot your network and analyze the control-plane traffic. For more information about Ethanalyzer, see the Cisco Nexus 7000 Series NX-OS Troubleshooting Guide, Release 4.0.
Call HomeThe Call Home feature continuously monitors hardware and software components to provide e-mail-based notification of critical system events. A versatile range of message formats is available for optimal compatibility with pager services, standard e-mail, and XML-based automated parsing applications. It offers alert grouping capabilities and customizable destination profiles.You can use this feature, for example, to directly page a network support engineer, send an e-mail message to a network operations center (NOC), and employ Cisco AutoNotify services to directly generate a case with the Cisco Technical Assistance Center (TAC). For more information about Call Home, see the Cisco Nexus 7000 Series NX-OS System Management Configuration Guide, Release 4.0.
Online DiagnosticsCisco generic online diagnostics (GOLD) verify that hardware and internal data paths are operating as designed. Boot-time diagnostics, continuous monitoring, and on-demand and scheduled tests are part of the Cisco GOLD feature set. GOLD allows rapid fault isolation and continuous system monitoring. For information about configuring GOLD, see the Cisco Nexus 7000 Series NX-OS System Management Configuration Guide, Release 4.0.
Embedded Event ManagerCisco Embedded Event Manager (EEM) is a device and system management feature that helps you to customize behavior based on network events as they happen. For information about configuring EEM, see the Cisco Nexus 7000 Series NX-OS System Management Configuration Guide, Release 4.0.
NetFlowThe Cisco NX-OS NetFlow implementation supports version 5 and version 9 exports. It also supports the Flexible NetFlow configuration model and hardware-based Sampled NetFlow for enhanced scalability. For more information about NetFlow, see the Cisco Nexus 7000 Series NX-OS System Management Configuration Guide, Release 4.0.
ManageabilityThis section includes the following topics:
• Simple Network Management Protocol, page 1-5
• Configuration Verification and Rollback, page 1-5
1-4Cisco Nexus 7000 Series NX-OS Fundamentals Configuration Guide, Release 4.0
OL-15317-02

Send document comments to nexus7k -doc feedback@c i sco .com.
Chapter 1 OverviewManageability
• Role-Based Access Control, page 1-5
• Connectivity Management Processor, page 1-5
• Cisco NX-OS Device Configuration Methods, page 1-5
Simple Network Management Protocol The Cisco NX-OS software is compliant with Simple Network Management Protocol (SNMP) version 1, version 2, and version 3. A large number of MIBs is supported. For more information about SNMP, see the Cisco Nexus 7000 Series NX-OS System Management Configuration Guide, Release 4.0.
Configuration Verification and RollbackThe Cisco NX-OS software allows you to verify the consistency of a configuration and the availability of necessary hardware resources prior to committing the configuration. You can preconfigure a device and apply the verified configuration at a later time. Configurations also include checkpoints that allow you to roll back to a known good configuration as needed. For more information about rollback, see the Cisco Nexus 7000 Series NX-OS System Management Configuration Guide, Release 4.0.
Role-Based Access ControlWith role-based access control (RBAC), you can limit access to device operations by assigning roles to users. You can customize access and restrict it to the users who require it. For more information about RBAC, see the Cisco Nexus 7000 Series NX-OS Security Configuration Guide, Release 4.0.
Connectivity Management Processor The Cisco NX-OS software supports the use of a Connectivity Management Processor (CMP) for remote platform management. The CMP provides an out-of-band access channel to the NX-OS console. For more information about CMP, see the Cisco Nexus 7000 Series Connectivity Management Processor Configuration Guide.
Cisco NX-OS Device Configuration MethodsYou can configure devices using the CLI from a Secure Shell (SSH) session or a Telnet session. SSH provides a secure connection to the device. The CLI configuration guides and command references are organized by feature. For more information, see the Cisco NX-OS configuration guides and the Cisco NX-OS command references. For more information on SSH and Talent, see the Cisco Nexus 7000 Series NX-OS Security Configuration Guide, Release 4.0.
You can also configure devices using the XML management interface, which is a programmatic method based on the NETCONF protocol that complements the CLI. For more information, see the Cisco Nexus 7000 Series NX-OS XML Management Interface User Guide, Release 4.0.
1-5Cisco Nexus 7000 Series NX-OS Fundamentals Configuration Guide, Release 4.0
OL-15317-02
Send document comments to nexus7k -doc feedback@c i sco .com.
Chapter 1 OverviewTraffic Routing, Forwarding, and Management
Traffic Routing, Forwarding, and ManagementThis section includes the following topics:
• Ethernet Switching, page 1-6
• IP Routing, page 1-6
• IP Services, page 1-7
• IP Multicast, page 1-7
Ethernet SwitchingThe Cisco NX-OS software supports high-density, high-performance Ethernet systems and provides the following Ethernet switching features:
• IEEE 802.1D-2004 Rapid and Multiple Spanning Tree Protocols (802.1w and 802.1s)
• IEEE 802.1Q VLANs and trunks
• 16,000-subscriber VLANs
• IEEE 802.3ad link aggregation
• Private VLANs
• Cross-chassis private VLANs
• Unidirectional Link Detection (UDLD) in aggressive and standard modes
For more information, see the Cisco Nexus 7000 Series NX-OS Interfaces Configuration Guide, Release 4.0 and the Cisco Nexus 7000 Series NX-OS Layer 2 Switching Configuration Guide, Release 4.0.
IP RoutingThe Cisco NX-OS software supports IP version 4 (IPv4) and IP version 6 (IPv6) and the following routing protocols:
• Open Shortest Path First (OSPF) Protocol Versions 2 (IPv4) and 3 (IPv6)
• Intermediate System-to-Intermediate System (IS-IS) Protocol
• Border Gateway Protocol (BGP)
• Enhanced Interior Gateway Routing Protocol (EIGRP)
• Routing Information Protocol Version 2 (RIPv2)
The NX-OS implementations of these protocols are fully compliant with the latest standards and include 4-byte autonomous system numbers (ASNs) and incremental shortest path first (SPF). All unicast protocols support Non-Stop Forwarding Graceful Restart (NSF-GR). All protocols support all interface types, including Ethernet interfaces, VLAN interfaces, subinterfaces, port channels, tunnel interfaces, and loopback interfaces.
1-6Cisco Nexus 7000 Series NX-OS Fundamentals Configuration Guide, Release 4.0
OL-15317-02
Send document comments to nexus7k -doc feedback@c i sco .com.
Chapter 1 OverviewQuality of Service
IP ServicesThe following IP services are available in the Cisco NX-OS software:
• Virtual Routing and Forwarding (VRF)
• Dynamic Host Configuration Protocol (DHCP) Helper
• Hot-Standby Routing Protocol (HSRP)
• Gateway Load Balancing Protocol (GLBP)
• Enhanced Object Tracking
• Policy-Based Routing (PBR)
• Unicast Graceful Restart for all protocols in IPv4 Unicast Graceful Restart for OPSFv3 in IPv6
For more information, see the Cisco Nexus 7000 Series NX-OS Unicast Routing Configuration Guide, Release 4.0.
IP MulticastNX-OS Release 4.0 includes the following multicast protocols and functions:
• Protocol Independent Multicast (PIM) Version 2 (PIMv2)
• Source Specific Multicast (SSM)
• PIM sparse mode (Any-Source Multicast [ASM] for IPv4 and IPv6)
Note The Cisco NX-OS software does not support PIM dense mode.
• Bidirectional Protocol Independent Multicast (Bidir PIM)
• Anycast rendezvous point (Anycast-RP)
• Multicast NSF for IPv4 and IPv6
• RP-Discovery using bootstrap router (BSR) (Auto-RP and static)
• Internet Group Management Protocol (IGMP) Versions 1, 2, and 3 router role
• IGMPv2 host mode
• IGMP snooping
• Multicast Listener Discovery (MLD) Protocol Version 2 (for IPv6)
• Multicast Source Discovery Protocol (MSDP) (for IPv4 only)
For more information, see the Cisco Nexus 7000 Series NX-OS Multicast Routing Configuration Guide, Release 4.0.
Quality of Service The Cisco NX-OS software supports Quality of Service (QoS) functions for classification, marking, queuing, policing, and scheduling. Modular QoS CLI (MQC) supports all QoS features. You can use MQC to provide uniform configurations across various Cisco platforms. For more information, see the Cisco Nexus 7000 Series NX-OS Quality of Service Configuration Guide, Release 4.0.
1-7Cisco Nexus 7000 Series NX-OS Fundamentals Configuration Guide, Release 4.0
OL-15317-02

Send document comments to nexus7k -doc feedback@c i sco .com.
Chapter 1 OverviewNetwork Security
Network SecurityThis section includes the following topics:
• Cisco TrustSec, page 1-8
• Additional Network Security Features, page 1-8
Cisco TrustSec Cisco TrustSec security provides data confidentiality and integrity and supports standard IEEE 802.1AE link-layer cryptography with 128-bit Advanced Encryption Standard (AES) cryptography. Link-layer cryptography guarantees end-to-end data privacy while allowing the insertion of security service devices along the encrypted path. Cisco TrustSec uses security group access control lists (SGACLs), which are based on security group tags instead of IP addresses. SGACLs enable policies that are more concise and easier to manage due to their topology independence. For more information, see the Cisco Nexus 7000 Series NX-OS Security Configuration Guide, Release 4.0.
Additional Network Security FeaturesIn addition to Cisco TrustSec, Cisco NX-OS Release 4.0 includes the following security features:
• Data path intrusion detection system (IDS) for protocol conformance checks
• Control Plane Policing (CoPP)
• Message-digest algorithm 5 (MD5) routing protocol authentication
• Cisco integrated security features, including Dynamic Address Resolution Protocol (ARP) inspection (DAI), DHCP snooping, and IP Source Guard
• Authentication, authorization, and accounting (AAA)
• RADIUS and TACACS+
• SSH Protocol Version 2
• SNMPv3
• Port security
• IEEE 802.1X authentication
• Layer 2 Cisco Network Admission Control (NAC) LAN port IP
• Policies based on MAC and IPv4 addresses supported by named ACLs (port-based ACLs [PACLs], VLAN-based ACLs [VACLs], and router-based ACLs [RACLs])
• Traffic storm control (unicast, multicast, and broadcast)
• Unicast Reverse Path Forwarding (Unicast RPF)
For more information, see the Cisco Nexus 7000 Series NX-OS Security Configuration Guide, Release 4.0.
1-8Cisco Nexus 7000 Series NX-OS Fundamentals Configuration Guide, Release 4.0
OL-15317-02

Send document comments to nexus7k -doc feedback@c i sco .com.
Chapter 1 OverviewLicensing
LicensingThe Cisco NX-OS licensing feature allows you to access premium features on the device after you install the appropriate license for that feature. Any feature not included in a license package is bundled with the Cisco NX-OS software and is provided to you at no extra charge.
You must purchase and install a license for each device.
Note With the exception of the Cisco TrustSec feature, you can enable a feature without installing its license. The Cisco NX-OS software gives you a grace period during which time you can try out a feature before purchasing its license. You must install the Advanced Services license package to enable the Cisco TrustSec feature.
For detailed information about NX-OS Licensing, see the Cisco Nexus 7000 Series NX-OS Licensing Guide, Release 4.0.
For information about troubleshooting licensing issues, see the Cisco Nexus 7000 Series NX-OS Troubleshooting Guide, Release 4.0.
Supported StandardsTable 1-1 lists the IEEE compliance standards.
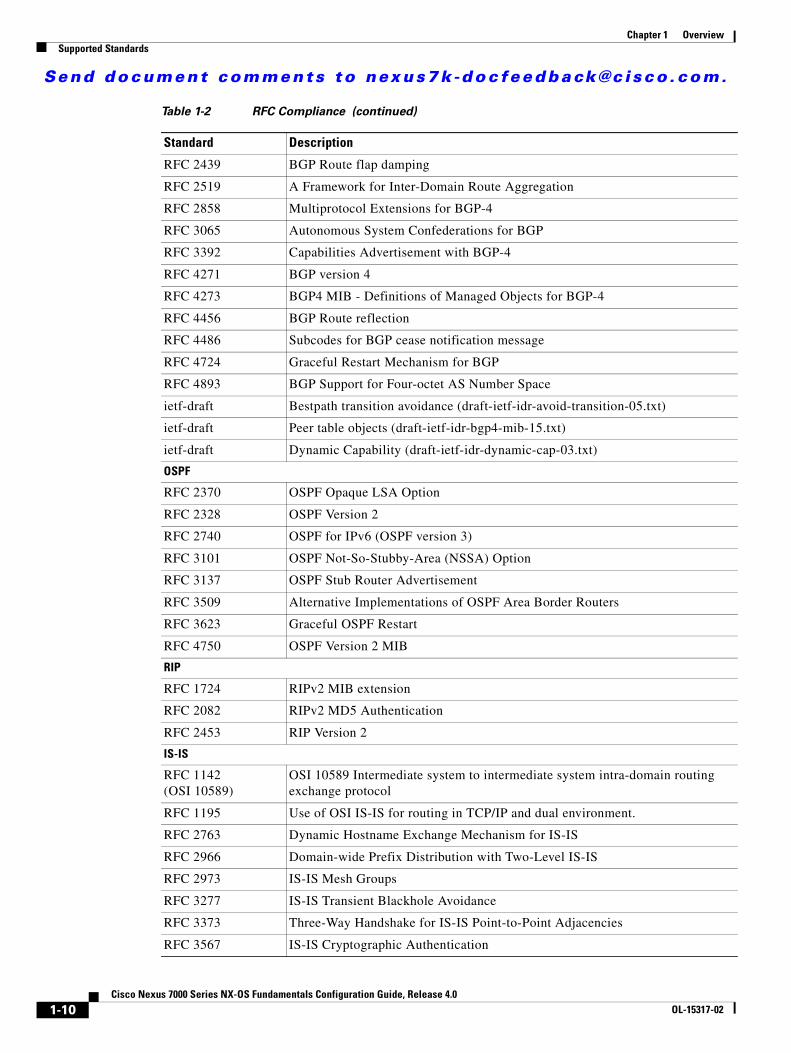
Table 1-2 lists the RFC compliance standards.
Table 1-1 IEEE Compliance
Standard Description
802.1D MAC Bridges
802.1s Multiple Spanning Tree Protocol
802.1w Rapid Spanning Tree Protocol
802.1AE MAC Security (link layer cryptography)
802.3ad Link aggregation with LACP
802.3ab 1000BaseT (10/100/1000 Ethernet over copper)
802.3ae 10 Gigabit Ethernet
802.1Q VLAN Tagging
802.1p Class of Service Tagging for Ethernet frames
802.1x Port-based network access control
Table 1-2 RFC Compliance
Standard Description
BGP
RFC 1997 BGP Communities Attribute
RFC 2385 Protection of BGP Sessions via the TCP MD5 Signature Option
1-9Cisco Nexus 7000 Series NX-OS Fundamentals Configuration Guide, Release 4.0
OL-15317-02
Send document comments to nexus7k -doc feedback@c i sco .com.
Chapter 1 OverviewSupported Standards
RFC 2439 BGP Route flap damping
RFC 2519 A Framework for Inter-Domain Route Aggregation
RFC 2858 Multiprotocol Extensions for BGP-4
RFC 3065 Autonomous System Confederations for BGP
RFC 3392 Capabilities Advertisement with BGP-4
RFC 4271 BGP version 4
RFC 4273 BGP4 MIB - Definitions of Managed Objects for BGP-4
RFC 4456 BGP Route reflection
RFC 4486 Subcodes for BGP cease notification message
RFC 4724 Graceful Restart Mechanism for BGP
RFC 4893 BGP Support for Four-octet AS Number Space
ietf-draft Bestpath transition avoidance (draft-ietf-idr-avoid-transition-05.txt)
ietf-draft Peer table objects (draft-ietf-idr-bgp4-mib-15.txt)
ietf-draft Dynamic Capability (draft-ietf-idr-dynamic-cap-03.txt)
OSPF
RFC 2370 OSPF Opaque LSA Option
RFC 2328 OSPF Version 2
RFC 2740 OSPF for IPv6 (OSPF version 3)
RFC 3101 OSPF Not-So-Stubby-Area (NSSA) Option
RFC 3137 OSPF Stub Router Advertisement
RFC 3509 Alternative Implementations of OSPF Area Border Routers
RFC 3623 Graceful OSPF Restart
RFC 4750 OSPF Version 2 MIB
RIP
RFC 1724 RIPv2 MIB extension
RFC 2082 RIPv2 MD5 Authentication
RFC 2453 RIP Version 2
IS-IS
RFC 1142 (OSI 10589)
OSI 10589 Intermediate system to intermediate system intra-domain routing exchange protocol
RFC 1195 Use of OSI IS-IS for routing in TCP/IP and dual environment.
RFC 2763 Dynamic Hostname Exchange Mechanism for IS-IS
RFC 2966 Domain-wide Prefix Distribution with Two-Level IS-IS
RFC 2973 IS-IS Mesh Groups
RFC 3277 IS-IS Transient Blackhole Avoidance
RFC 3373 Three-Way Handshake for IS-IS Point-to-Point Adjacencies
RFC 3567 IS-IS Cryptographic Authentication
Table 1-2 RFC Compliance (continued)
Standard Description
1-10Cisco Nexus 7000 Series NX-OS Fundamentals Configuration Guide, Release 4.0
OL-15317-02

Send document comments to nexus7k -doc feedback@c i sco .com.
Chapter 1 OverviewSupported Standards
RFC 3847 Restart Signaling for IS-IS
ietf-draft Internet Draft Point-to-point operation over LAN in link-state routing protocols (draft-ietf-isis-igp-p2p-over-lan-06.txt)
IP Services
RFC 768 UDP
RFC 783 TFTP
RFC 791 IP
RFC 792 ICMP
RFC 793 TCP
RFC 826 ARP
RFC 854 Telnet
RFC 959 FTP
RFC 1027 Proxy ARP
RFC 1305 NTP v3
RFC 1519 CIDR
RFC 1542 BootP relay
RFC 1591 DNS client
RFC 1812 IPv4 routers
RFC 2131 DHCP Helper
RFC 2338 VRRP
RFC 2784 Generic Routing Encapsulation (GRE)
IP-Multicast
RFC 2236 Internet Group Management Protocol, Version 2
RFC 2710 Multicast Listener Discovery (MLD) for IPv6
RFC 3376 Internet Group Management Protocol, Version 3
RFC 3446 Anycast Rendezvous Point (RP) mechanism using Protocol Independent Multicast (PIM) and Multicast Source Discovery Protocol (MSDP)
RFC 3569 An Overview of Source-Specific Multicast (SSM)
RFC 3618 Multicast Source Discovery Protocol (MSDP)
RFC 3810 Multicast Listener Discovery Version 2 (MLDv2) for IPv6
RFC 4601 ASM - Sparse Mode (PIM-SM): Protocol Specification (Revised)
RFC 4607 Source-Specific Multicast for IP
RFC 4610 Anycast-RP Using Protocol Independent Multicast (PIM)
ietf-draft Mtrace server functionality, to process mtrace-requests, draft-ietf-idmr-traceroute-ipm-07.txt
ietf-draft Bi-directional Protocol Independent Multicast (BIDIR-PIM), draft-ietf-pim-bidir-09.txt
Table 1-2 RFC Compliance (continued)
Standard Description
1-11Cisco Nexus 7000 Series NX-OS Fundamentals Configuration Guide, Release 4.0
OL-15317-02

Send document comments to nexus7k -doc feedback@c i sco .com.
Chapter 1 OverviewSupported Standards
1-12Cisco Nexus 7000 Series NX-OS Fundamentals Configuration Guide, Release 4.0
OL-15317-02

Send document comments to nexus7k -doc feedback@c i sco .com.
Cisco Nexus 7000 Series NXOL-15317-02
C H A P T E R 2
Using the Cisco Nexus 7000 Series NX-OS Setup UtilityThis chapter describes how to set up the basic Cisco NX-OS configuration after you have installed the hardware.
This chapter includes the following sections:
• Information About the Cisco NX-OS Setup Utility, page 2-1
• Prerequisites for the Setup Utility, page 2-3
• Setting Up Your Cisco NX-OS Device, page 2-3
• Where to Go Next, page 2-6
• Additional References, page 2-7
Information About the Cisco NX-OS Setup UtilityThe Cisco NX-OS setup utility is an interactive command-line interface (CLI) mode that guides you through a basic (also called a startup) configuration of the system. The setup utility allows you to configure only enough connectivity for system management.
The setup utility allows you to build an initial configuration file using the System Configuration Dialog. The setup starts automatically when a device has no configuration file in NVRAM. The dialog guides you through initial configuration.After the file is created, you can use the CLI to perform additional configuration.
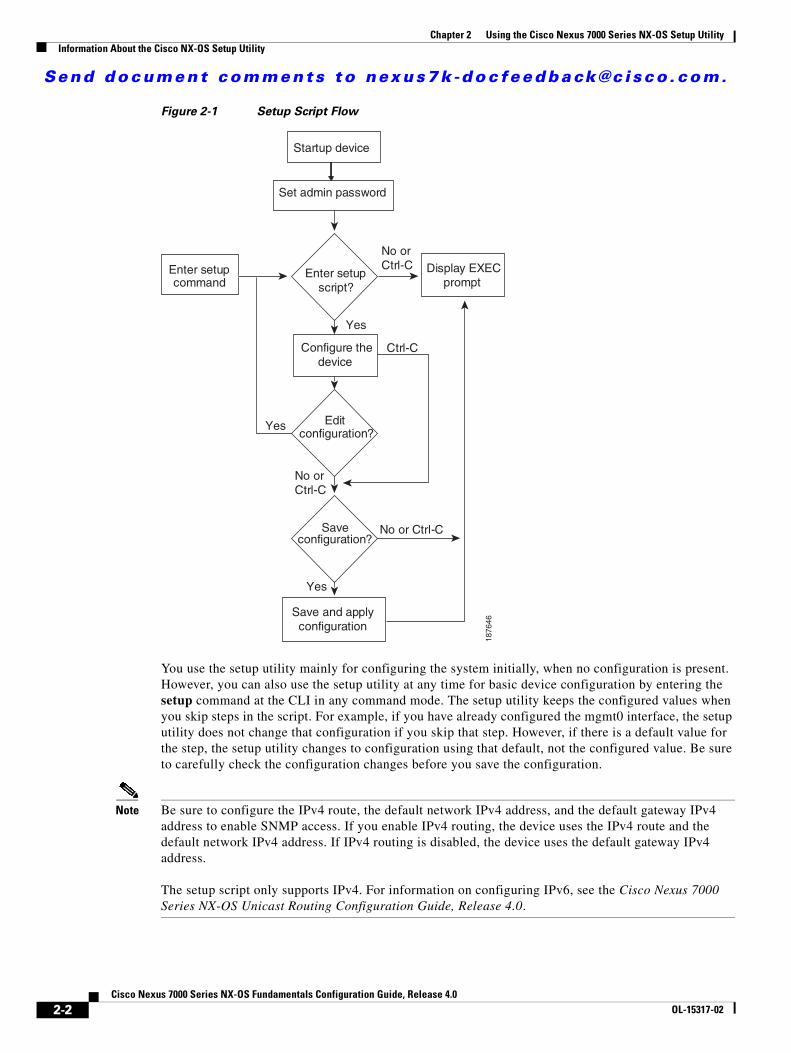
You can press Ctrl-C at any prompt to skip the remaining configuration options and proceed with what you have configured up to that point, except for the administrator password. If you want to skip answers to any questions, press Enter. If a default answer is not available (for example, an IP address), the setup utility uses what was previously configured and skips to the next question. Figure 2-1 shows how to enter and exit the setup script.
2-1-OS Fundamentals Configuration Guide, Release 4.0
Send document comments to nexus7k -doc feedback@c i sco .com.
Chapter 2 Using the Cisco Nexus 7000 Series NX-OS Setup UtilityInformation About the Cisco NX-OS Setup Utility
Figure 2-1 Setup Script Flow
You use the setup utility mainly for configuring the system initially, when no configuration is present. However, you can also use the setup utility at any time for basic device configuration by entering the setup command at the CLI in any command mode. The setup utility keeps the configured values when you skip steps in the script. For example, if you have already configured the mgmt0 interface, the setup utility does not change that configuration if you skip that step. However, if there is a default value for the step, the setup utility changes to configuration using that default, not the configured value. Be sure to carefully check the configuration changes before you save the configuration.
Note Be sure to configure the IPv4 route, the default network IPv4 address, and the default gateway IPv4 address to enable SNMP access. If you enable IPv4 routing, the device uses the IPv4 route and the default network IPv4 address. If IPv4 routing is disabled, the device uses the default gateway IPv4 address. The setup script only supports IPv4. For information on configuring IPv6, see the Cisco Nexus 7000 Series NX-OS Unicast Routing Configuration Guide, Release 4.0.
Startup device
Set admin password
Enter setupcommand
Enter setupscript?
Display EXECprompt
No orCtrl-C
Configure thedevice
Ctrl-C
Editconfiguration?
Yes
Save and apply configuration
Saveconfiguration?
Yes
No or Ctrl-C
Yes
No orCtrl-C
18
76
46
2-2Cisco Nexus 7000 Series NX-OS Fundamentals Configuration Guide, Release 4.0
OL-15317-02

Send document comments to nexus7k -doc feedback@c i sco .com.
Chapter 2 Using the Cisco Nexus 7000 Series NX-OS Setup UtilityPrerequisites for the Setup Utility
Prerequisites for the Setup UtilityThe setup utility has the following prerequisites:
• Have a password strategy for your network environment.
• Connect the console port on the supervisor module to the network. If you have dual supervisor modules, connect the console ports on both supervisor modules to the network.
• Connect the Ethernet management port on the supervisor module to the network. If you have dual supervisor modules, connect the Ethernet management ports on both supervisor modules to the network.
Setting Up Your Cisco NX-OS DeviceTo configure basic management of the Cisco NX-OS device using the setup utility, follow these steps:
Step 1 Power on the device.
Step 2 Enter the new password for the administrator.
Tip If a password is trivial (such as a short, easy-to-decipher password), your password configuration is rejected. Passwords are case-sensitive. Be sure to configure a strong password that are at least eight characters long, contain both upper- and lower-case letters, and contain numbers.
Enter the password for "admin": <password>Confirm the password for "admin": <password>
---- Basic System Configuration Dialog VDC: 1 ----
This setup utility will guide you through the basic configuration of the system. Setup configures only enough connectivity for management of the system.
Please register Cisco Nexus7000 Family devices promptly with your supplier. Failure to register may affect response times for initial service calls. Nexus7000 devices must be registered to receive entitled support services.
Press Enter at anytime to skip a dialog. Use ctrl-c at anytime to skip the remaining dialogs.
Step 3 Enter the setup mode by entering yes.
Would you like to enter the basic configuration dialog (yes/no): yes
Step 4 Create additional accounts by entering yes (no is the default).
Would you like to enter the basic configuration dialog (yes/no): yes
Note User login IDs must contain nonnumeric characters.
a. Enter the user login ID.
Enter the User login Id : user_login
2-3Cisco Nexus 7000 Series NX-OS Fundamentals Configuration Guide, Release 4.0
OL-15317-02

Send document comments to nexus7k -doc feedback@c i sco .com.
Chapter 2 Using the Cisco Nexus 7000 Series NX-OS Setup UtilitySetting Up Your Cisco NX-OS Device
b. Enter the user password.
Enter the password for "user1": user_passwordConfirm the password for "user1": user_password
c. Enter the default user role.
Enter the user role (network-operator|network-admin|vdc-operator|vdc-admin) [network-operator]: default_user_role
For information on the default user roles, see the Cisco Nexus 7000 Series NX-OS Security Configuration Guide, Release 4.0.
Step 5 Configure an SNMP community string by entering yes.
Configure read-only SNMP community string (yes/no) [n]: yes SNMP community string : snmp_community_string
For information on the SNMP, see the Cisco Nexus 7000 Series NX-OS System Management Configuration Guide, Release 4.0.
Step 6 Enter a name for the device (the default name is switch).
Enter the switch name: switch_name
Step 7 Enable the license grace period by entering yes.
Note Enabling the grace period allows users to test licensed features, except for Cisco TrustSec, which requires an Advanced Services license. The grace period is 120 days and starts when you first configure a licensed feature and stops when all features for a license are disabled. Once the grace period expires you must purchase the license to access the licensed features. For more information about licenses, see the Cisco Nexus 7000 Series NX-OS Licensing Guide, Release 4.0.
Enable license grace period? (yes/no) [n]: yes
Step 8 Configure out-of-band management by entering yes. You can then enter the mgmt0 IPv4 address and subnet mask.
Note You can only configure IPv4 address in the setup utility. For information on configuring IPv6, see the Cisco Nexus 7000 Series NX-OS Interfaces Configuration Guide, Release 4.0.
Continue with Out-of-band (mgmt0) management configuration? [yes/no]: yesMgmt0 IPv4 address: mgmt0_ip_addressMgmt0 IPv4 netmask: mgmt0_subnet_mask
Step 9 Configure the IPv4 default gateway (recommended) by entering yes. You can then enter its IP address.
Configure the default-gateway: (yes/no) [y]: yes IPv4 address of the default-gateway: default_gateway
Step 10 Configure advanced IP options such as the static routes, default network, DNS, and domain name by entering yes.
Configure Advanced IP options (yes/no)? [n]: yes
2-4Cisco Nexus 7000 Series NX-OS Fundamentals Configuration Guide, Release 4.0
OL-15317-02

Send document comments to nexus7k -doc feedback@c i sco .com.
Chapter 2 Using the Cisco Nexus 7000 Series NX-OS Setup UtilitySetting Up Your Cisco NX-OS Device
Step 11 Configure a static route (recommended) by entering yes. You can then enter its destination prefix, destination prefix mask, and next hop IP address.
Configure static route: (yes/no) [y]: yesDestination prefix: dest_prefix Destination prefix mask: dest_mask Next hop ip address: next_hop_address
Step 12 Configure the default network (recommended) by entering yes. You can then enter its IPv4 address.
Note The default network IPv4 address is the same as the destination prefix in Step 11.
Configure the default network: (yes/no) [y]: yesDefault network IP address [dest_prefix]: dest_prefix
Step 13 Configure the DNS IPv4 address by entering yes. You can then enter the address.
Configure the DNS IP address? (yes/no) [y]: yesDNS IP address: ipv4_address
Step 14 Configure the default domain name by entering yes. You can then enter the name.
Configure the default domain name? (yes/no) [y]: yesDefault domain name: name
Step 15 Enable the Telnet service by entering yes.
Enable the telnet service? (yes/no) [y]: yes
Step 16 Enable the SSH service by entering yes. You can then enter the key type and number of key bits. For more information, see the Cisco Nexus 7000 Series NX-OS Security Configuration Guide, Release 4.0.
Enable the ssh service? (yes/no) [y]: yesType of ssh key you would like to generate (dsa/rsa) : key_typeNumber of key bits <768-2048> : number_of_bits
Step 17 Configure the NTP server by entering yes. You can then enter its IP address. For more information, see the Cisco Nexus 7000 Series NX-OS System Management Configuration Guide, Release 4.0.
Configure NTP server? (yes/no) [n]: yesNTP server IP address: ntp_server_IP_address
Step 18 Specify a default interface layer (L2 or L3).
Configure default interface layer (L3/L2) [L3]: interface_layer
Step 19 Enter the default switchport interface state (shutdown or no shutdown). A shutdown interface is in an administratively down state. For more information, see the Cisco Nexus 7000 Series NX-OS Interfaces Configuration Guide, Release 4.0.
Configure default switchport interface state (shut/noshut) [shut]: default_state
Step 20 Enter the best practices profile for control plane policing (CoPP). For more information, see the Cisco Nexus 7000 Series NX-OS Security Configuration Guide, Release 4.0.
Configure best practices CoPP profile (strict/moderate/lenient/none) [strict]: policy
2-5Cisco Nexus 7000 Series NX-OS Fundamentals Configuration Guide, Release 4.0
OL-15317-02
Send document comments to nexus7k -doc feedback@c i sco .com.
Chapter 2 Using the Cisco Nexus 7000 Series NX-OS Setup UtilityWhere to Go Next
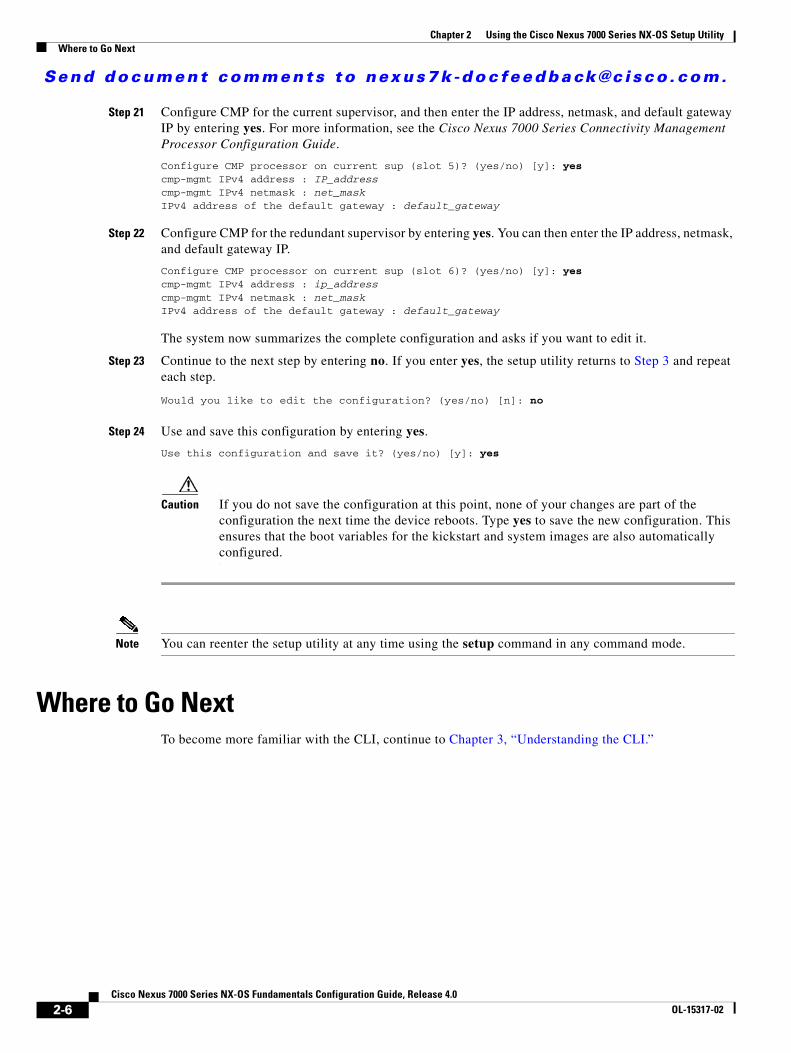
Step 21 Configure CMP for the current supervisor, and then enter the IP address, netmask, and default gateway IP by entering yes. For more information, see the Cisco Nexus 7000 Series Connectivity Management Processor Configuration Guide.
Configure CMP processor on current sup (slot 5)? (yes/no) [y]: yescmp-mgmt IPv4 address : IP_addresscmp-mgmt IPv4 netmask : net_maskIPv4 address of the default gateway : default_gateway
Step 22 Configure CMP for the redundant supervisor by entering yes. You can then enter the IP address, netmask, and default gateway IP.
Configure CMP processor on current sup (slot 6)? (yes/no) [y]: yescmp-mgmt IPv4 address : ip_addresscmp-mgmt IPv4 netmask : net_maskIPv4 address of the default gateway : default_gateway
The system now summarizes the complete configuration and asks if you want to edit it.
Step 23 Continue to the next step by entering no. If you enter yes, the setup utility returns to Step 3 and repeat each step.
Would you like to edit the configuration? (yes/no) [n]: no
Step 24 Use and save this configuration by entering yes.
Use this configuration and save it? (yes/no) [y]: yes
Caution If you do not save the configuration at this point, none of your changes are part of the configuration the next time the device reboots. Type yes to save the new configuration. This ensures that the boot variables for the kickstart and system images are also automatically configured.
Note You can reenter the setup utility at any time using the setup command in any command mode.
Where to Go NextTo become more familiar with the CLI, continue to Chapter 3, “Understanding the CLI.”
2-6Cisco Nexus 7000 Series NX-OS Fundamentals Configuration Guide, Release 4.0
OL-15317-02

Send document comments to nexus7k -doc feedback@c i sco .com.
Chapter 2 Using the Cisco Nexus 7000 Series NX-OS Setup UtilityAdditional References
Additional ReferencesFor additional information related to implementing Feature-1, see the following sections:
• Related Documents, page 2-7
Related Documents
Related Topic Document Title
Licensing Cisco Nexus 7000 Series NX-OS Licensing Guide, Release 4.0
Command reference Cisco Nexus 7000 Series NX-OS Fundamentals Command Reference, Release 4.0
CMP Cisco Nexus 7000 Series Connectivity Management Processor Configuration Guide
SSH and Telnet Cisco Nexus 7000 Series NX-OS Security Configuration Guide, Release 4.0
User roles Cisco Nexus 7000 Series NX-OS Security Configuration Guide, Release 4.0
IPv4 and IPv6 Cisco Nexus 7000 Series NX-OS Interfaces Configuration Guide, Release 4.0
SNMP and NTP Cisco Nexus 7000 Series NX-OS System Management Configuration Guide, Release 4.0
2-7Cisco Nexus 7000 Series NX-OS Fundamentals Configuration Guide, Release 4.0
OL-15317-02

Send document comments to nexus7k -doc feedback@c i sco .com.
Chapter 2 Using the Cisco Nexus 7000 Series NX-OS Setup UtilityAdditional References
2-8Cisco Nexus 7000 Series NX-OS Fundamentals Configuration Guide, Release 4.0
OL-15317-02

Send document comments to nexus7k -doc feedback@c i sco .com.
Cisco Nexus 7000 Series NXOL-15317-02
C H A P T E R 3
Understanding the CLIThis chapter describes the Cisco NX-OS software CLI.
This chapter includes the following sections:
• Information About the CLI Prompt, page 3-1
• Command Modes, page 3-2
• Special Characters, page 3-7
• Keystroke Shortcuts, page 3-7
• Abbreviating Commands, page 3-9
• Identifying Your Location in the Command Hierarchy, page 3-9
• Using the no Form of a Command, page 3-10
• Configuring CLI Variables, page 3-11
• Command Scripts, page 3-14
• Context-Sensitive Help, page 3-16
• Understanding Regular Expressions, page 3-17
• Searching and Filtering show Command Output, page 3-20
• BIOS Loader> Prompt, page 3-23
• Examples Using the CLI, page 3-23
• Additional References, page 3-26
Information About the CLI PromptOnce you have successfully accessed the device, the CLI prompt displays in the terminal window of your console port or remote workstation (see Example 3-1).
Example 3-1 Initial CLI Prompt
User Access Verificationlogin: adminPassword:<password>Cisco Nexus Operating System (NX-OS) SoftwareTAC support: http://www.cisco.com/tacCopyright (c) 2002-2008, Cisco Systems, Inc. All rights reserved.
3-1-OS Fundamentals Configuration Guide, Release 4.0
Send document comments to nexus7k -doc feedback@c i sco .com.
Chapter 3 Understanding the CLICommand Modes
The copyrights to certain works contained in this software are owned by other third parties and used and distributed under license. Certain components of this software are licensed under the GNU General Public License (GPL) version 2.0 or the GNU Lesser General Public License (LGPL) Version 2.1. A copy of each such license is available athttp://www.opensource.org/licenses/gpl-2.0.php andhttp://www.opensource.org/licenses/lgpl-2.1.phpswitch#
You can change the default device hostname (see the “Changing the Device Hostname” section on page 5-5).
From the CLI prompt, you can do the following:
• Use CLI commands for configuring features
• Access the command history
• Use command parsing functions
Command ModesThis section includes the following topics:
• About Command Modes, page 3-2
• EXEC Command Mode, page 3-3
• Global Configuration Command Mode, page 3-3
• Interface Configuration Command Mode, page 3-3
• Subinterface Configuration Command Mode, page 3-4
• Exiting a Configuration Command Mode, page 3-5
• Command Mode Summary, page 3-6
About Command ModesThe Cisco NX-OS CLI is divided into command modes, which define the actions available to the user. Command modes are “nested” and must be accessed in sequence. As you navigate from one command mode to another, an increasingly larger set of commands become available. All commands in a higher command mode are accessible from lower command modes. For example, the show commands are available from any configuration command mode. Figure 3-1 shows how command access builds from EXEC mode to global configuration mode.
3-2Cisco Nexus 7000 Series NX-OS Fundamentals Configuration Guide, Release 4.0
OL-15317-02

Send document comments to nexus7k -doc feedback@c i sco .com.
Chapter 3 Understanding the CLICommand Modes
Figure 3-1 Command Modes
EXEC Command Mode When you first log in, the Cisco NX-OS software places you in EXEC mode. The commands available in EXEC mode include the show commands that display device status and configuration information, the clear commands, and other commands that perform actions that you do not save in the device configuration.
Global Configuration Command ModeGlobal configuration mode provides access to the broadest range of commands. The term “global” indicates characteristics or features that affect the device as a whole. You can enter commands in global configuration mode to configure your device globally, or to enter more specific configuration modes to configure specific elements such as interfaces or protocols.
To access the global configuration mode, follow this step:
Interface Configuration Command ModeOne example of a specific configuration mode that you enter from global configuration mode is interface configuration mode. To configure interfaces on your device, you must specify the interface and enter interface configuration mode.
You must enable many features on a per-interface basis. Interface configuration commands modify the operation of the interfaces on the device, such as Ethernet interfaces or management interfaces (mgmt 0).
For more information about configuring interfaces, see the Cisco Nexus 7000 Series NX-OS Interfaces Configuration Guide, Release 4.0.
EXEC Command Mode
- Connect to remote devices.- Temporari ly change terminal l ine sett ings. - Perfo rm basic tests.- Save device configuration- Display dev ice information (show commands)
Global Configuration Command Mode
- Configure featu res on the device- Includes EXEC commands
switch(config)#
switch#
18
74
93
Command Purpose
Step 1 configure terminal
Example:switch# configure terminalswitch(config)#
Enters global configuration mode.
Note The CLI prompt changes to indicate that you are in global configuration mode.
3-3Cisco Nexus 7000 Series NX-OS Fundamentals Configuration Guide, Release 4.0
OL-15317-02

Send document comments to nexus7k -doc feedback@c i sco .com.
Chapter 3 Understanding the CLICommand Modes
For more information about interface commands, see the Cisco Nexus 7000 Series NX-OS Interfaces Command Reference, Release 4.0.
SUMMARY STEPS
1. configure terminal
2. interface type number
DETAILED STEPS
Subinterface Configuration Command ModeFrom global configuration mode, you can access a configuration submode for configuring VLAN interfaces called subinterfaces. In subinterface configuration mode, you can configure multiple virtual interfaces on a single physical interface. Subinterfaces appear to a protocol as distinct physical interfaces.
Subinterfaces also allow multiple encapsulations for a protocol on a single interface. For example, you can configure IEEE 802.1Q encapsulation to associate a subinterface with a VLAN.
For more information about configuring subinterfaces, see the Cisco Nexus 7000 Series NX-OS Interfaces Configuration Guide, Release 4.0.
For more information about subinterface commands, see the Cisco Nexus 7000 Series NX-OS Interfaces Command Reference, Release 4.0.
SUMMARY STEPS
1. configure terminal
2. interface type number.subint
Command Purpose
Step 1 configure terminal
Example:switch# configure terminalswitch(config)#
Enters global configuration mode.
Step 2 interface type number
Example:switch(config)# interface ethernet 2/2switch(config-if)#
Specifies the interface you that want to configure.
The CLI places you into interface configuration mode for the specified interface
Note The CLI prompt changes to indicate that you are in interface configuration mode.
3-4Cisco Nexus 7000 Series NX-OS Fundamentals Configuration Guide, Release 4.0
OL-15317-02

Send document comments to nexus7k -doc feedback@c i sco .com.
Chapter 3 Understanding the CLICommand Modes
DETAILED STEPS
Exiting a Configuration Command ModeTo exit from any configuration command mode, perform one of the following tasks:
Command Purpose
Step 1 configure terminal
Example:switch# configure terminalswitch(config)#
Enters global configuration mode.
Step 2 interface type number.subint
Example:switch(config)# interface ethernet 2/2.1switch(config-subif)#
Specifies the VLAN interface to be configured.
The CLI places you into a subinterface configuration mode for the specified VLAN interface.
Note The CLI prompt changes to indicate that you are in global configuration mode.
Command Purposeexit
Example:switch(config-if)# exitswitch(config)#
Exits from the current configuration command mode and return to the previous configuration command mode.
end
Example:switch(config)# endswitch#
Exits from the configuration command mode and returns to EXEC mode.
Ctrl-z
Example:switch(config)# ^zswitch#
Exits the current configuration command mode and returns to EXEC mode.
Caution If you use Ctrl-Z at the end of a command line in which a valid command has been typed, the CLI adds the command to the running configuration file. We recommend that you exit a configuration mode using the exit or end command.
3-5Cisco Nexus 7000 Series NX-OS Fundamentals Configuration Guide, Release 4.0
OL-15317-02

Send document comments to nexus7k -doc feedback@c i sco .com.
Chapter 3 Understanding the CLICommand Modes
Command Mode SummaryTable 3-1 summarizes information about the main command modes.
Table 3-1 Command Mode Summary
Mode Access Method Prompt Exit Method
EXEC From the login prompt, enter your username and password.
switch# To exit to the login prompt, use the exit command.
Global configuration From EXEC mode, use the configure terminal command.
switch(config)# To exit to EXEC mode, use the end or exit command or press Ctrl-Z.
Interface configuration From global configuration mode, use an interface command and specify an interface with an interface command.
switch(config-if)# To exit to global configuration mode, use the exit command.
To exit to EXEC mode, use the end command or press Ctrl-Z.
Subinterface configuration
From global configuration mode, specify a subinterface with an interface command.
switch(config-subif)# To exit to global configuration mode, use the exit command.
To exit to EXEC mode, use the end command or press Ctrl-Z.
VDC configuration From global configuration mode, use the vdc command and specify a VDC name.
switch(config-vdc)# To exit to global configuration mode, use the exit command.
To exit to EXEC mode, use the end command or press Ctrl-Z.
VRF configuration From global configuration mode, use the vrf command and specify a routing protocol.
switch(config-vrf)# To exit to global configuration mode, use the exit command.
To exit to EXEC mode, use the end command or press Ctrl-Z.
EXEC for a nondefault VDC
From EXEC mode, use the switchto vdc command and specify a VDC.
switch-vdc2# To exit to the default VDC, use the exit command or the switchback command.
EXEC for a nondefault VRF
From EXEC mode, use the routing-context vrf command and specify a VRF.
switch%red# To exit to the default VRF, use the routing-context vrf default command.
3-6Cisco Nexus 7000 Series NX-OS Fundamentals Configuration Guide, Release 4.0
OL-15317-02
Send document comments to nexus7k -doc feedback@c i sco .com.
Chapter 3 Understanding the CLISpecial Characters
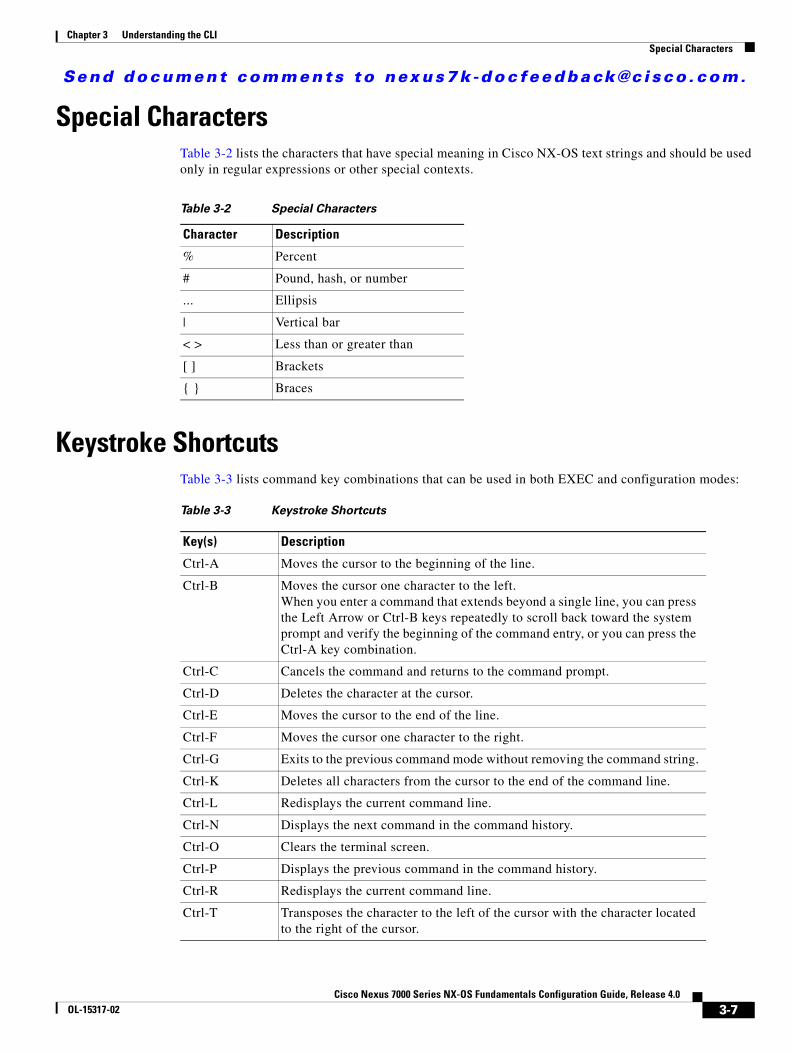
Special CharactersTable 3-2 lists the characters that have special meaning in Cisco NX-OS text strings and should be used only in regular expressions or other special contexts.
Keystroke ShortcutsTable 3-3 lists command key combinations that can be used in both EXEC and configuration modes:
Table 3-2 Special Characters
Character Description
% Percent
# Pound, hash, or number
... Ellipsis
| Vertical bar
< > Less than or greater than
[ ] Brackets
{ } Braces
Table 3-3 Keystroke Shortcuts
Key(s) Description
Ctrl-A Moves the cursor to the beginning of the line.
Ctrl-B Moves the cursor one character to the left. When you enter a command that extends beyond a single line, you can press the Left Arrow or Ctrl-B keys repeatedly to scroll back toward the system prompt and verify the beginning of the command entry, or you can press the Ctrl-A key combination.
Ctrl-C Cancels the command and returns to the command prompt.
Ctrl-D Deletes the character at the cursor.
Ctrl-E Moves the cursor to the end of the line.
Ctrl-F Moves the cursor one character to the right.
Ctrl-G Exits to the previous command mode without removing the command string.
Ctrl-K Deletes all characters from the cursor to the end of the command line.
Ctrl-L Redisplays the current command line.
Ctrl-N Displays the next command in the command history.
Ctrl-O Clears the terminal screen.
Ctrl-P Displays the previous command in the command history.
Ctrl-R Redisplays the current command line.
Ctrl-T Transposes the character to the left of the cursor with the character located to the right of the cursor.
3-7Cisco Nexus 7000 Series NX-OS Fundamentals Configuration Guide, Release 4.0
OL-15317-02

Send document comments to nexus7k -doc feedback@c i sco .com.
Chapter 3 Understanding the CLIKeystroke Shortcuts
Ctrl-U Deletes all characters from the cursor to the beginning of the command line.
Ctrl-V Removes any special meaning for the following keystroke. For example, press Ctrl-V before entering a question mark (?) in a regular expression.
Ctrl-W Deletes the word to the left of the cursor.
Ctrl-X, H Lists the history of commands you have entered.
When using this key combination, press and release the Ctrl and X keys together before pressing H.
Ctrl-Y Recalls the most recent entry in the buffer (press keys simultaneously).
Ctrl-Z Ends a configuration session, and returns you to EXEC mode.
When used at the end of a command line in which a valid command has been typed, the resulting configuration is first added to the running configuration file.
Displays the previous command in the command history.
Displays the next command in the command history.
Moves your cursor through the command history, either forward or backwards, to locate a command string.
? Displays a list of available commands.
Tab Completes the word for you after entering the first characters of the word, and then pressing the Tab key. All options that match are presented.
Use tabs to complete the following items:
• Command names
• Scheme names in the file system
• Server names in the file system
• Filenames in the file system
Exampleswitch(config)# xm<Tab> switch(config)# xml <Tab>switch(config)# xml server
Exampleswitch(config)# c<Tab>callhome class-map clock ctscdp cli control-plane
switch(config)# cl<Tab>class-map cli clock switch(config)# cla<Tab>switch(config)# class-map
Table 3-3 Keystroke Shortcuts (continued)
Key(s) Description
3-8Cisco Nexus 7000 Series NX-OS Fundamentals Configuration Guide, Release 4.0
OL-15317-02

Send document comments to nexus7k -doc feedback@c i sco .com.
Chapter 3 Understanding the CLIAbbreviating Commands
Abbreviating CommandsYou can abbreviate commands and keywords by entering the first few characters of a command. The abbreviation must include sufficient characters to make it unique from other commands or keywords. If you are having trouble entering a command, check the system prompt and enter the question mark (?) for a list of available commands. You might be in the wrong command mode or using incorrect syntax.
Table 3-4 lists examples of command abbreviations.
Identifying Your Location in the Command HierarchySome features have configuration submode hierarchy nested more than one level. In these cases, you can display information about your present working context (PWC).
SUMMARY STEPS
1. where detail
Exampleswitch# cd bootflash:<Tab>bootflash: bootflash://sup-1/ bootflash://sup-remote/bootflash:/// bootflash://sup-2/ bootflash://sup-standby/bootflash://module-5/ bootflash://sup-active/bootflash://module-6/ bootflash://sup-local/
Exampleswitch# cd bootflash://mo<Tab> bootflash://module-5/ bootflash://module-6/cvswitch# cd bootflash://module-
Table 3-3 Keystroke Shortcuts (continued)
Key(s) Description
Table 3-4 Examples of Command Abbreviations
Command Abbreviation
configure terminal conf t
copy running-config startup-config copy run start
interface ethernet 1/2 int e 1/2
show running-config sh run
3-9Cisco Nexus 7000 Series NX-OS Fundamentals Configuration Guide, Release 4.0
OL-15317-02
Send document comments to nexus7k -doc feedback@c i sco .com.
Chapter 3 Understanding the CLIUsing the no Form of a Command
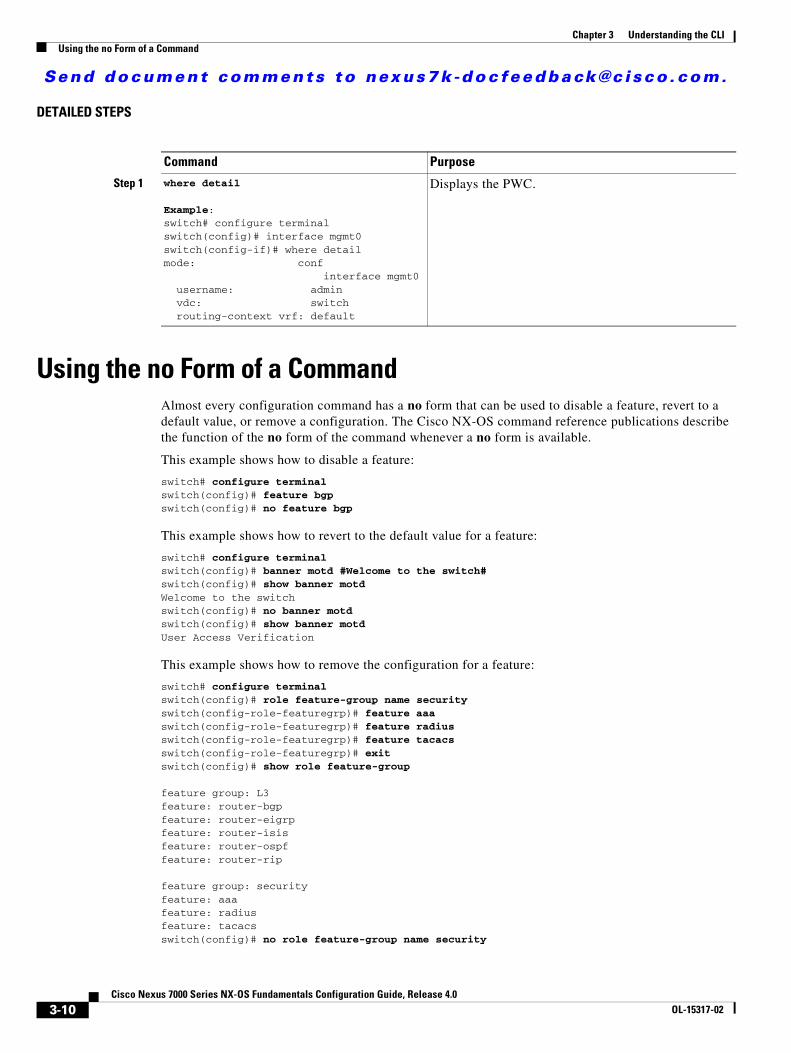
DETAILED STEPS
Using the no Form of a Command Almost every configuration command has a no form that can be used to disable a feature, revert to a default value, or remove a configuration. The Cisco NX-OS command reference publications describe the function of the no form of the command whenever a no form is available.
This example shows how to disable a feature:
switch# configure terminalswitch(config)# feature bgpswitch(config)# no feature bgp
This example shows how to revert to the default value for a feature:
switch# configure terminalswitch(config)# banner motd #Welcome to the switch#switch(config)# show banner motdWelcome to the switchswitch(config)# no banner motdswitch(config)# show banner motdUser Access Verification
This example shows how to remove the configuration for a feature:
switch# configure terminalswitch(config)# role feature-group name securityswitch(config-role-featuregrp)# feature aaaswitch(config-role-featuregrp)# feature radiusswitch(config-role-featuregrp)# feature tacacsswitch(config-role-featuregrp)# exitswitch(config)# show role feature-group
feature group: L3feature: router-bgpfeature: router-eigrpfeature: router-isisfeature: router-ospffeature: router-rip
feature group: securityfeature: aaafeature: radiusfeature: tacacsswitch(config)# no role feature-group name security
Command Purpose
Step 1 where detail
Example:switch# configure terminalswitch(config)# interface mgmt0switch(config-if)# where detailmode: conf interface mgmt0 username: admin vdc: switch routing-context vrf: default
Displays the PWC.
3-10Cisco Nexus 7000 Series NX-OS Fundamentals Configuration Guide, Release 4.0
OL-15317-02
Send document comments to nexus7k -doc feedback@c i sco .com.
Chapter 3 Understanding the CLIConfiguring CLI Variables
switch(config)# show role feature-group
feature group: L3feature: router-bgpfeature: router-eigrpfeature: router-isisfeature: router-ospffeature: router-rip
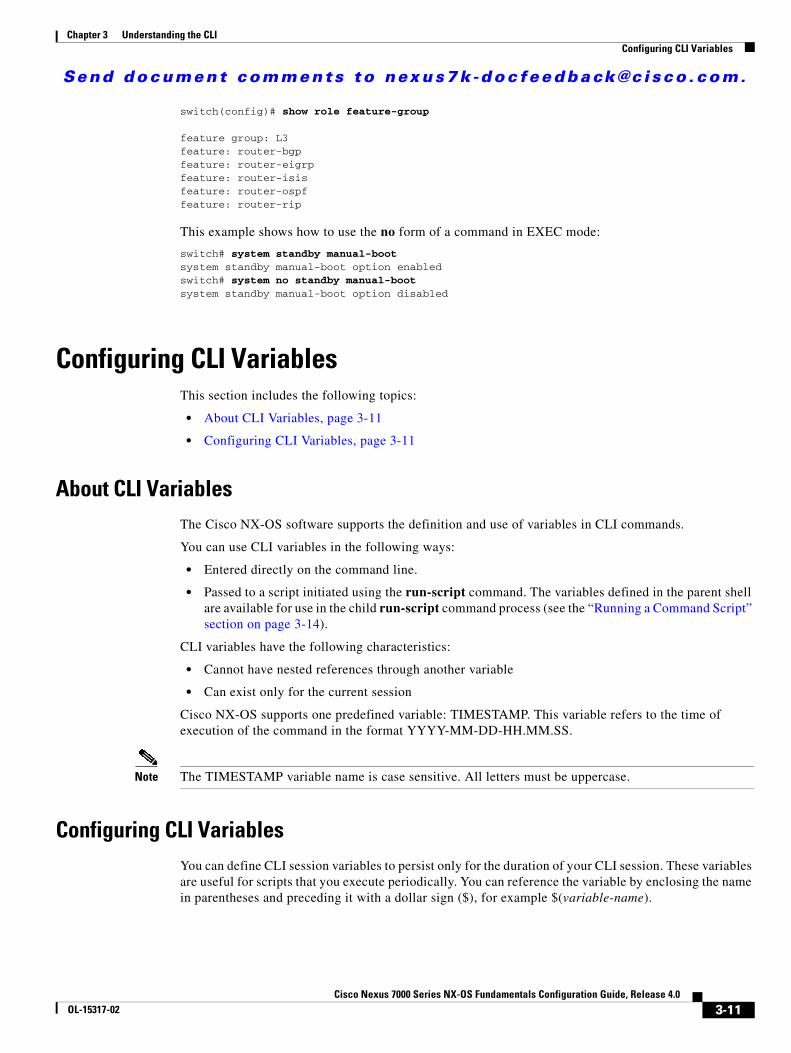
This example shows how to use the no form of a command in EXEC mode:
switch# system standby manual-bootsystem standby manual-boot option enabledswitch# system no standby manual-bootsystem standby manual-boot option disabled
Configuring CLI VariablesThis section includes the following topics:
• About CLI Variables, page 3-11
• Configuring CLI Variables, page 3-11
About CLI VariablesThe Cisco NX-OS software supports the definition and use of variables in CLI commands.
You can use CLI variables in the following ways:
• Entered directly on the command line.
• Passed to a script initiated using the run-script command. The variables defined in the parent shell are available for use in the child run-script command process (see the “Running a Command Script” section on page 3-14).
CLI variables have the following characteristics:
• Cannot have nested references through another variable
• Can exist only for the current session
Cisco NX-OS supports one predefined variable: TIMESTAMP. This variable refers to the time of execution of the command in the format YYYY-MM-DD-HH.MM.SS.
Note The TIMESTAMP variable name is case sensitive. All letters must be uppercase.
Configuring CLI VariablesYou can define CLI session variables to persist only for the duration of your CLI session. These variables are useful for scripts that you execute periodically. You can reference the variable by enclosing the name in parentheses and preceding it with a dollar sign ($), for example $(variable-name).
3-11Cisco Nexus 7000 Series NX-OS Fundamentals Configuration Guide, Release 4.0
OL-15317-02
Send document comments to nexus7k -doc feedback@c i sco .com.
Chapter 3 Understanding the CLICommand Aliases
SUMMARY STEPS
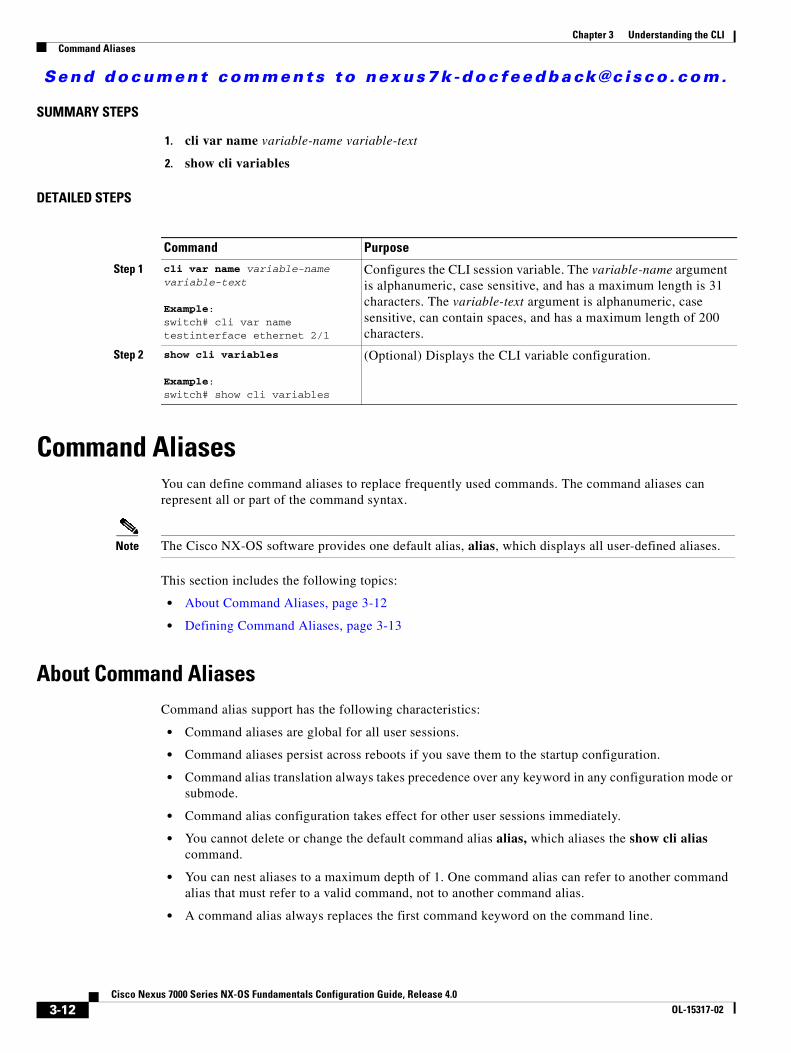
1. cli var name variable-name variable-text
2. show cli variables
DETAILED STEPS
Command AliasesYou can define command aliases to replace frequently used commands. The command aliases can represent all or part of the command syntax.
Note The Cisco NX-OS software provides one default alias, alias, which displays all user-defined aliases.
This section includes the following topics:
• About Command Aliases, page 3-12
• Defining Command Aliases, page 3-13
About Command AliasesCommand alias support has the following characteristics:
• Command aliases are global for all user sessions.
• Command aliases persist across reboots if you save them to the startup configuration.
• Command alias translation always takes precedence over any keyword in any configuration mode or submode.
• Command alias configuration takes effect for other user sessions immediately.
• You cannot delete or change the default command alias alias, which aliases the show cli alias command.
• You can nest aliases to a maximum depth of 1. One command alias can refer to another command alias that must refer to a valid command, not to another command alias.
• A command alias always replaces the first command keyword on the command line.
Command Purpose
Step 1 cli var name variable-name variable-text
Example:switch# cli var name testinterface ethernet 2/1
Configures the CLI session variable. The variable-name argument is alphanumeric, case sensitive, and has a maximum length is 31 characters. The variable-text argument is alphanumeric, case sensitive, can contain spaces, and has a maximum length of 200 characters.
Step 2 show cli variables
Example:switch# show cli variables
(Optional) Displays the CLI variable configuration.
3-12Cisco Nexus 7000 Series NX-OS Fundamentals Configuration Guide, Release 4.0
OL-15317-02

Send document comments to nexus7k -doc feedback@c i sco .com.
Chapter 3 Understanding the CLICommand Aliases
• You can define command aliases for commands in any command mode.
• If you reference a CLI variable in a command alias, the current value of the variable appears in the alias, not the variable reference.
Defining Command AliasesYou can define command aliases for commonly used commands.
SUMMARY STEPS
1. configure terminal
2. cli alias name alias-name alias-text
3. exit
4. alias
5. copy running-config startup-config
DETAILED STEPS
Command Purpose
Step 1 configure terminal
Example:switch# configure terminalswitch(config)#
Enters global configuration mode.
Step 2 cli alias name alias-name alias-text
Example:switch(config)# cli alias name ethint interface ethernet
Configures the command alias. The alias name is an alphanumeric string that is not case sensitive and must begin with an alphabetic character. The maximum length is 30 characters.
Step 3 exit
Example:switch(config)# exitswitch#
Exits global configuration mode.
Step 4 alias
Example:switch# alias
(Optional) Displays the command alias configuration.
Step 5 copy running-config startup-config
Example:switch# copy running-config startup-config
(Optional) Copies the running configuration to the startup configuration.
3-13Cisco Nexus 7000 Series NX-OS Fundamentals Configuration Guide, Release 4.0
OL-15317-02

Send document comments to nexus7k -doc feedback@c i sco .com.
Chapter 3 Understanding the CLICommand Scripts
Command ScriptsYou can create scripts of commands to perform multiple tasks.
This section includes the following topics:
• Running a Command Script, page 3-14
• Echoing Information to the Terminal, page 3-14
• Echoing Information to the Terminal, page 3-14
Running a Command ScriptYou can create a list of command in a file and execute them from the CLI. You can use CLI variables in the command script (see the “Configuring CLI Variables” section on page 3-11).
Note You cannot create the script files at the CLI prompt. You can create the script file on a a remote device and copy it the Cisco NX-OS device. This section assumes that the script file resides in the bootflash:.
SUMMARY STEPS
1. run-script filename
DETAILED STEPS
Echoing Information to the TerminalYou can echo information to the terminal, which is particularly useful from a command script. You can reference CLI variables and use formatting options in the echoed text. Table 3-5 lists the formatting options you can insert in the text.
Command Purpose
Step 1 run-script filename
Example:switch# run-script testfile
Executes the commands in the file.
Table 3-5 Formatting Options for the echo Command
Formatting Option Description
\b Back spaces.
\c Removes the new line character at the end of the text string.
\f Inserts a form feed character.
\n Inserts a new line character.
\r Returns to the beginning of the text line.
\t Inserts a horizontal tab character.
3-14Cisco Nexus 7000 Series NX-OS Fundamentals Configuration Guide, Release 4.0
OL-15317-02
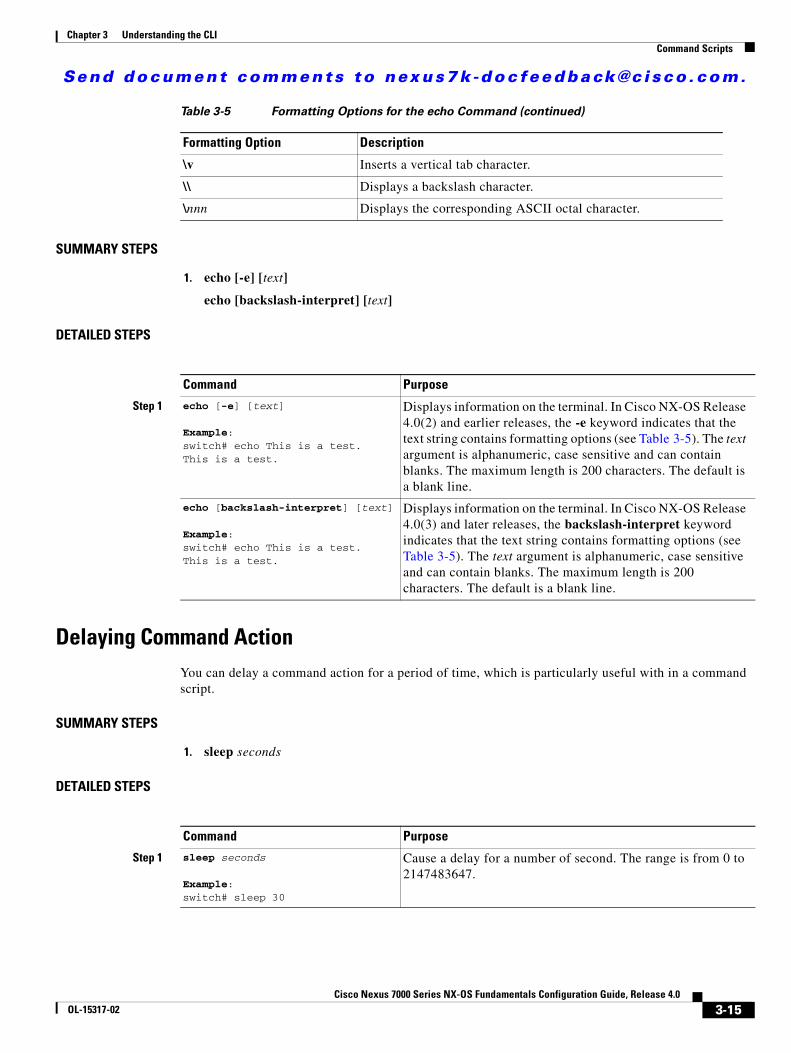
Send document comments to nexus7k -doc feedback@c i sco .com.
Chapter 3 Understanding the CLICommand Scripts
SUMMARY STEPS
1. echo [-e] [text]
echo [backslash-interpret] [text]
DETAILED STEPS
Delaying Command Action You can delay a command action for a period of time, which is particularly useful with in a command script.
SUMMARY STEPS
1. sleep seconds
DETAILED STEPS
\v Inserts a vertical tab character.
\\ Displays a backslash character.
\nnn Displays the corresponding ASCII octal character.
Table 3-5 Formatting Options for the echo Command (continued)
Formatting Option Description
Command Purpose
Step 1 echo [-e] [text]
Example:switch# echo This is a test.This is a test.
Displays information on the terminal. In Cisco NX-OS Release 4.0(2) and earlier releases, the -e keyword indicates that the text string contains formatting options (see Table 3-5). The text argument is alphanumeric, case sensitive and can contain blanks. The maximum length is 200 characters. The default is a blank line.
echo [backslash-interpret] [text]
Example:switch# echo This is a test.This is a test.
Displays information on the terminal. In Cisco NX-OS Release 4.0(3) and later releases, the backslash-interpret keyword indicates that the text string contains formatting options (see Table 3-5). The text argument is alphanumeric, case sensitive and can contain blanks. The maximum length is 200 characters. The default is a blank line.
Command Purpose
Step 1 sleep seconds
Example:switch# sleep 30
Cause a delay for a number of second. The range is from 0 to 2147483647.
3-15Cisco Nexus 7000 Series NX-OS Fundamentals Configuration Guide, Release 4.0
OL-15317-02

Send document comments to nexus7k -doc feedback@c i sco .com.
Chapter 3 Understanding the CLIContext-Sensitive Help
Context-Sensitive Help The Cisco NX-OS software provides context-sensitive help in the CLI. You can use a question mark (?) at any point in a command to list the valid input options.
CLI uses the caret (^) symbol to isolate input errors. The ^ symbol appears at the point in the command string where you have entered an incorrect command, keyword, or argument.
Table 3-6 shows how to use error isolation and context-sensitive help when setting the clock.
Table 3-6 Context-Sensitive Help Example
Command Purpose
Step 1 clock ?
Example:switch# clock ? set HH:MM:SS Current Timeswitch# clock
Displays the command syntax for the clock command in EXEC mode.
The switch output shows that the set keyword is required for using the clock command.
Step 2 clock set ?
Example:switch# clock set ? WORD HH:MM:SS Current Time
switch# clock set
Displays the command syntax for setting the time.
The help output shows that the current time is required for setting the clock and how to format the time.
Step 3 clock set HH:MM:SS
Example:switch# clock set 13:32:00<CR>% Incomplete commandswitch#
Adds the current time.
Switch indicates the command is incomplete.
Step 4 Ctrl-P or the Up Arrow
Example:switch# <Ctrl-P>switch# clock set 13:32:00
Displays the previous command that you entered.
Step 5 clock set HH:MM:SS ?
Example:switch# clock set 13:32:00 ? <1-31> Day of the monthswitch# clock set 13:32:00
Displays the additional arguments for the clock set command.
3-16Cisco Nexus 7000 Series NX-OS Fundamentals Configuration Guide, Release 4.0
OL-15317-02
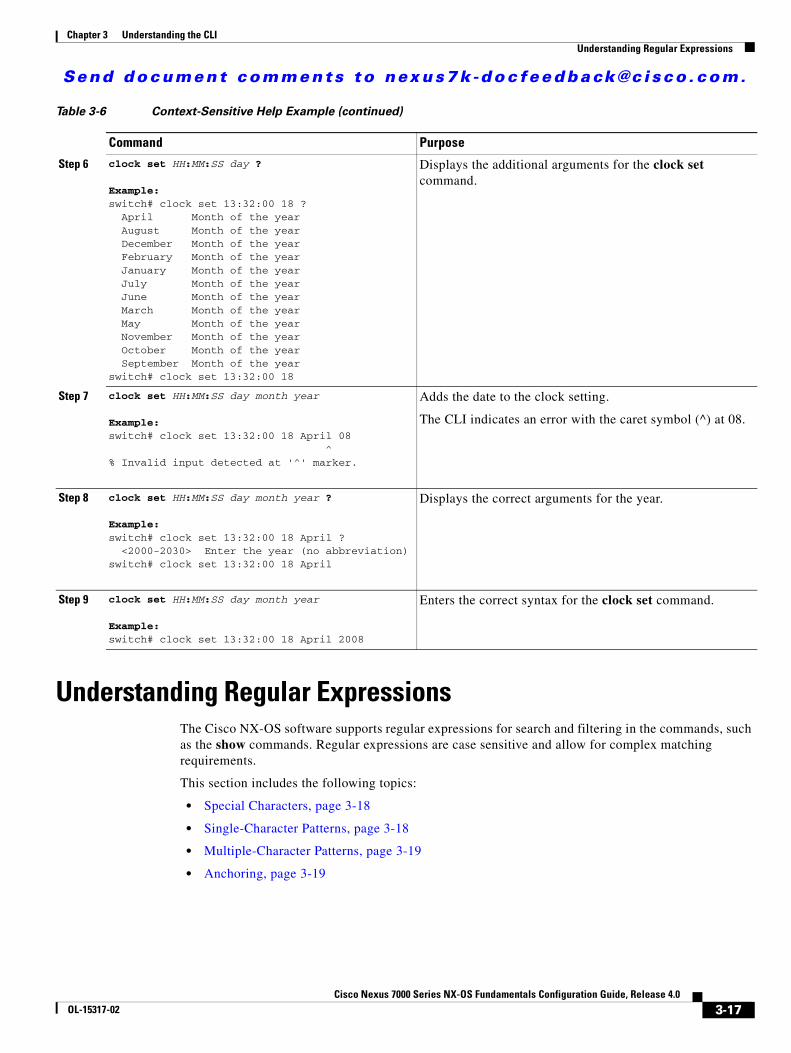
Send document comments to nexus7k -doc feedback@c i sco .com.
Chapter 3 Understanding the CLIUnderstanding Regular Expressions
Understanding Regular ExpressionsThe Cisco NX-OS software supports regular expressions for search and filtering in the commands, such as the show commands. Regular expressions are case sensitive and allow for complex matching requirements.
This section includes the following topics:
• Special Characters, page 3-18
• Single-Character Patterns, page 3-18
• Multiple-Character Patterns, page 3-19
• Anchoring, page 3-19
Step 6 clock set HH:MM:SS day ?
Example:switch# clock set 13:32:00 18 ? April Month of the year August Month of the year December Month of the year February Month of the year January Month of the year July Month of the year June Month of the year March Month of the year May Month of the year November Month of the year October Month of the year September Month of the yearswitch# clock set 13:32:00 18
Displays the additional arguments for the clock set command.
Step 7 clock set HH:MM:SS day month year
Example:switch# clock set 13:32:00 18 April 08 ^% Invalid input detected at '^' marker.
Adds the date to the clock setting.
The CLI indicates an error with the caret symbol (^) at 08.
Step 8 clock set HH:MM:SS day month year ?
Example:switch# clock set 13:32:00 18 April ? <2000-2030> Enter the year (no abbreviation)switch# clock set 13:32:00 18 April
Displays the correct arguments for the year.
Step 9 clock set HH:MM:SS day month year
Example:switch# clock set 13:32:00 18 April 2008
Enters the correct syntax for the clock set command.
Table 3-6 Context-Sensitive Help Example (continued)
Command Purpose
3-17Cisco Nexus 7000 Series NX-OS Fundamentals Configuration Guide, Release 4.0
OL-15317-02

Send document comments to nexus7k -doc feedback@c i sco .com.
Chapter 3 Understanding the CLIUnderstanding Regular Expressions
Special CharactersYou can also use other keyboard characters (such as ! or ~) as single-character patterns, but certain keyboard characters have special meanings when used in regular expressions. Table 3-7 lists the keyboard characters that have special meanings.
To use these special characters as single-character patterns, remove the special meaning by preceding each character with a backslash (\). This example contains single-character patterns that match a dollar sign ($), an underscore (_), and a plus sign (+), respectively:
\$ \_ \+
Single-Character PatternsThe simplest regular expression is a single character that matches the same single character in the command output. You can use any letter (A–Z, a–z) or digit (0–9) as a single-character pattern. You can specify a range of single-character patterns to match against command output.
To specify a range of single-character patterns, enclose the single-character patterns in square brackets ([ ]). For example, you can create a regular expression that matches a string containing one of the following letters: a, e, i, o, or u. Only one of these characters must exist in the string for pattern matching to succeed. In this case, [aeiou] matches any one of the five vowels of the lowercase alphabet, while [abcdABCD] matches any one of the first four letters of the lowercase or uppercase alphabet. You can simplify ranges by entering only the endpoints of the range separated by a dash (-). Also, you can including a caret (^) at the start of the range to match strings that do not include the range of characters.
Table 3-8 shows examples of regular expressions with ranges of characters.
Table 3-7 Special Characters with Special Meaning
Character Special Meaning
. Matches any single character, including white space.
* Matches 0 or more sequences of the pattern.
+ Matches 1 or more sequences of the pattern.
? Matches 0 or 1 occurrences of the pattern.
^ Matches the beginning of the string.
$ Matches the end of the string.
_ (underscore) Matches a comma (,), left brace ({), right brace (}), left parenthesis ( ( ), right parenthesis ( ) ), the beginning of the string, the end of the string, or a space.
Table 3-8 Example Expressions with Ranges of Characters
Example Description
[a-dA-D] Matches the characters abcdABCD.
[a-dA-D\-] Matches the characters abcdABCD and hyphen (-).
[a-dA-D\-\]] Matches the characters abcdABDC, hyphen (-), and right square bracket (]).
[^a-dqsv] Matches any letter except a-dqsv.
[^\]d] Matches anything except a right square bracket (]) or the letter d.
3-18Cisco Nexus 7000 Series NX-OS Fundamentals Configuration Guide, Release 4.0
OL-15317-02
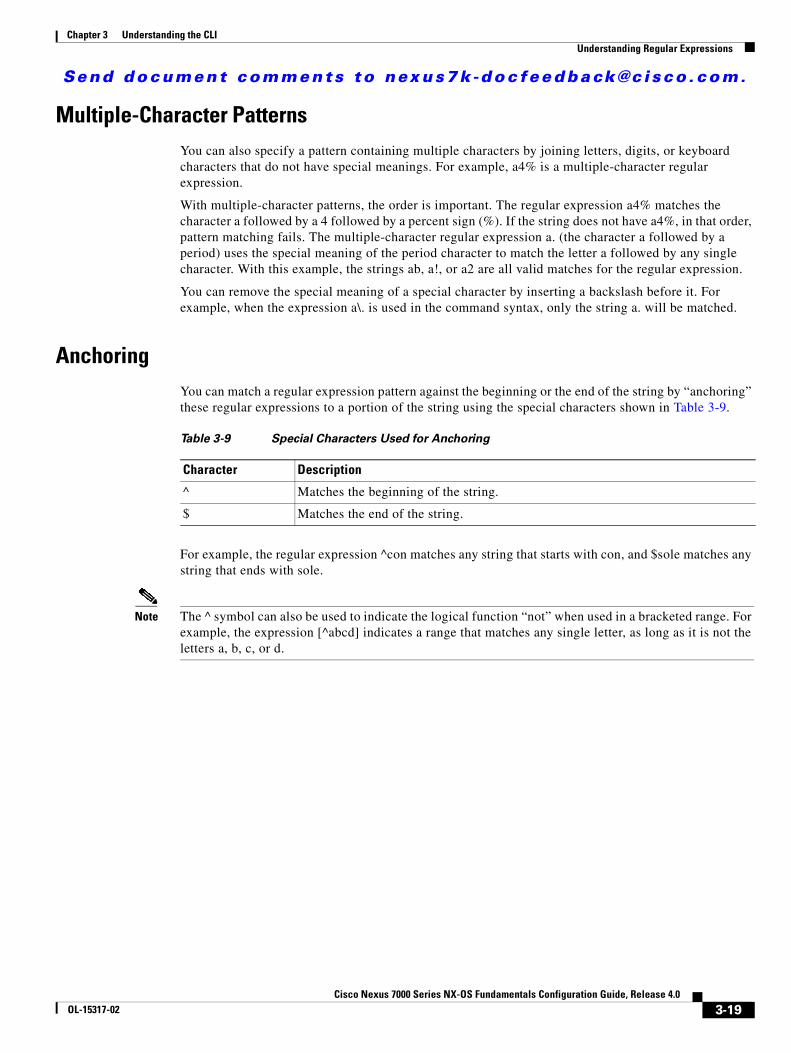
Send document comments to nexus7k -doc feedback@c i sco .com.
Chapter 3 Understanding the CLIUnderstanding Regular Expressions
Multiple-Character PatternsYou can also specify a pattern containing multiple characters by joining letters, digits, or keyboard characters that do not have special meanings. For example, a4% is a multiple-character regular expression.
With multiple-character patterns, the order is important. The regular expression a4% matches the character a followed by a 4 followed by a percent sign (%). If the string does not have a4%, in that order, pattern matching fails. The multiple-character regular expression a. (the character a followed by a period) uses the special meaning of the period character to match the letter a followed by any single character. With this example, the strings ab, a!, or a2 are all valid matches for the regular expression.
You can remove the special meaning of a special character by inserting a backslash before it. For example, when the expression a\. is used in the command syntax, only the string a. will be matched.
AnchoringYou can match a regular expression pattern against the beginning or the end of the string by “anchoring” these regular expressions to a portion of the string using the special characters shown in Table 3-9.
For example, the regular expression ^con matches any string that starts with con, and $sole matches any string that ends with sole.
Note The ^ symbol can also be used to indicate the logical function “not” when used in a bracketed range. For example, the expression [^abcd] indicates a range that matches any single letter, as long as it is not the letters a, b, c, or d.
Table 3-9 Special Characters Used for Anchoring
Character Description
^ Matches the beginning of the string.
$ Matches the end of the string.
3-19Cisco Nexus 7000 Series NX-OS Fundamentals Configuration Guide, Release 4.0
OL-15317-02

Send document comments to nexus7k -doc feedback@c i sco .com.
Chapter 3 Understanding the CLISearching and Filtering show Command Output
Searching and Filtering show Command OutputOften, the output from show commands can be lengthy and cumbersome. The Cisco NX-OS software provides the means to search and filter the output so that you can easily locate information. The searching and filtering options follow a pipe character (|) at the end of the show command. You can display the options using the using the CLI context-sensitive help facility:
switch# show running-config | ? egrep Egrep grep Grep head Stream Editor last Display last lines less Stream Editor no-more Turn-off pagination for command output sed Stream Editor wc Count words, lines, characters begin Begin with the line that matches count Count number of lines exclude Exclude lines that match include Include lines that match
Filtering and Searching KeywordsThe Cisco NX-OS CLI provides a set of keywords that you can use with the show commands to search and filter the command output (see Table 3-10).
Table 3-10 Filtering and Searching Keywords
Keyword Syntax Description Example
begin string Starts displaying at the line that contains text that matches the search string. The search string is case sensitive.
show version | begin Hardware
count Displays the number of lines in the command output.
show running-config | count
exclude string Displays all lines that do not include the search string. The search string is case sensitive.
show interface brief | exclude down
head [-n lines] In Cisco NX-OS Release 4.0(2) and earlier releases, displays the beginning of the output for the number of lines specified. The default number of lines is 10.
show logging logfile | head -n 50
head [lines lines] In Cisco NX-OS Release 4.0(3) and later releases, displays the beginning of the output for the number of lines specified. The default number of lines is 10.
show logging logfile | head lines 50
include string Displays all lines that include the search string. The search string is case sensitive.
show interface brief | include up
last [lines] Displays the end of the output for the number of lines specified. The default number of lines is 10.
show logging logfile | last lines 50
3-20Cisco Nexus 7000 Series NX-OS Fundamentals Configuration Guide, Release 4.0
OL-15317-02
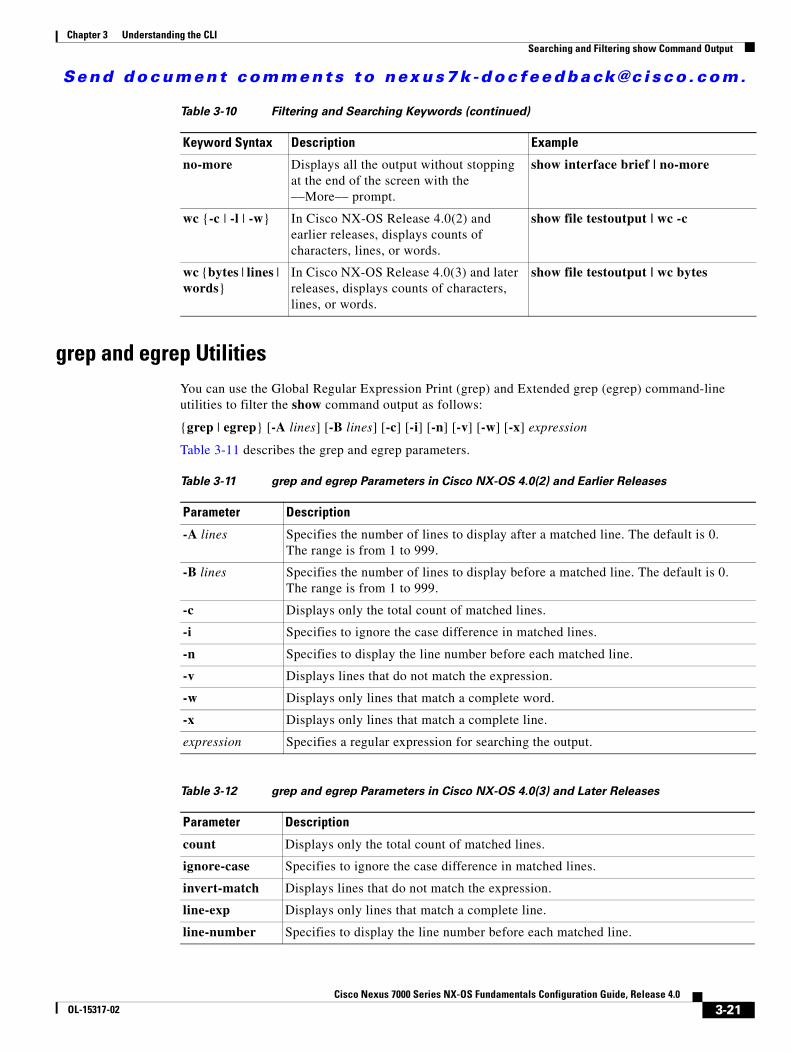
Send document comments to nexus7k -doc feedback@c i sco .com.
Chapter 3 Understanding the CLISearching and Filtering show Command Output
grep and egrep UtilitiesYou can use the Global Regular Expression Print (grep) and Extended grep (egrep) command-line utilities to filter the show command output as follows:
{grep | egrep} [-A lines] [-B lines] [-c] [-i] [-n] [-v] [-w] [-x] expression
Table 3-11 describes the grep and egrep parameters.
no-more Displays all the output without stopping at the end of the screen with the ––More–– prompt.
show interface brief | no-more
wc {-c | -l | -w} In Cisco NX-OS Release 4.0(2) and earlier releases, displays counts of characters, lines, or words.
show file testoutput | wc -c
wc {bytes | lines | words}
In Cisco NX-OS Release 4.0(3) and later releases, displays counts of characters, lines, or words.
show file testoutput | wc bytes
Table 3-10 Filtering and Searching Keywords (continued)
Keyword Syntax Description Example
Table 3-11 grep and egrep Parameters in Cisco NX-OS 4.0(2) and Earlier Releases
Parameter Description
-A lines Specifies the number of lines to display after a matched line. The default is 0. The range is from 1 to 999.
-B lines Specifies the number of lines to display before a matched line. The default is 0. The range is from 1 to 999.
-c Displays only the total count of matched lines.
-i Specifies to ignore the case difference in matched lines.
-n Specifies to display the line number before each matched line.
-v Displays lines that do not match the expression.
-w Displays only lines that match a complete word.
-x Displays only lines that match a complete line.
expression Specifies a regular expression for searching the output.
Table 3-12 grep and egrep Parameters in Cisco NX-OS 4.0(3) and Later Releases
Parameter Description
count Displays only the total count of matched lines.
ignore-case Specifies to ignore the case difference in matched lines.
invert-match Displays lines that do not match the expression.
line-exp Displays only lines that match a complete line.
line-number Specifies to display the line number before each matched line.
3-21Cisco Nexus 7000 Series NX-OS Fundamentals Configuration Guide, Release 4.0
OL-15317-02
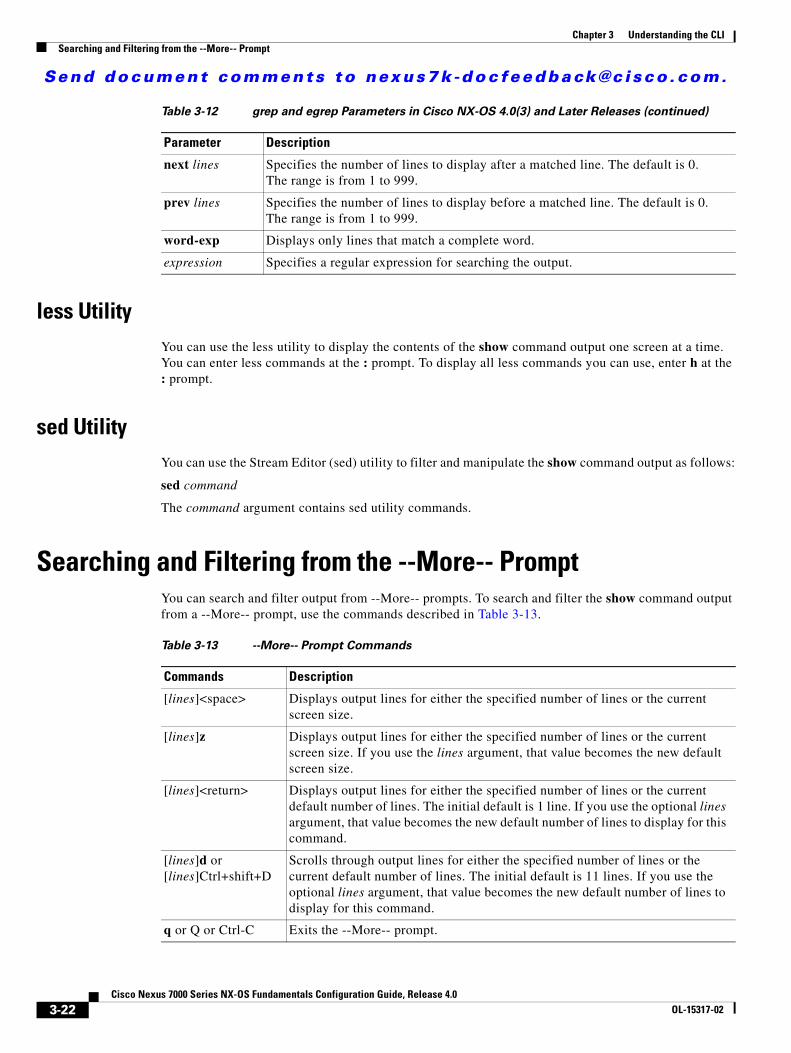
Send document comments to nexus7k -doc feedback@c i sco .com.
Chapter 3 Understanding the CLISearching and Filtering from the --More-- Prompt
less UtilityYou can use the less utility to display the contents of the show command output one screen at a time. You can enter less commands at the : prompt. To display all less commands you can use, enter h at the : prompt.
sed UtilityYou can use the Stream Editor (sed) utility to filter and manipulate the show command output as follows:
sed command
The command argument contains sed utility commands.
Searching and Filtering from the --More-- PromptYou can search and filter output from --More-- prompts. To search and filter the show command output from a --More-- prompt, use the commands described in Table 3-13.
next lines Specifies the number of lines to display after a matched line. The default is 0. The range is from 1 to 999.
prev lines Specifies the number of lines to display before a matched line. The default is 0. The range is from 1 to 999.
word-exp Displays only lines that match a complete word.
expression Specifies a regular expression for searching the output.
Table 3-12 grep and egrep Parameters in Cisco NX-OS 4.0(3) and Later Releases (continued)
Parameter Description
Table 3-13 --More-- Prompt Commands
Commands Description
[lines]<space> Displays output lines for either the specified number of lines or the current screen size.
[lines]z Displays output lines for either the specified number of lines or the current screen size. If you use the lines argument, that value becomes the new default screen size.
[lines]<return> Displays output lines for either the specified number of lines or the current default number of lines. The initial default is 1 line. If you use the optional lines argument, that value becomes the new default number of lines to display for this command.
[lines]d or [lines]Ctrl+shift+D
Scrolls through output lines for either the specified number of lines or the current default number of lines. The initial default is 11 lines. If you use the optional lines argument, that value becomes the new default number of lines to display for this command.
q or Q or Ctrl-C Exits the --More-- prompt.
3-22Cisco Nexus 7000 Series NX-OS Fundamentals Configuration Guide, Release 4.0
OL-15317-02
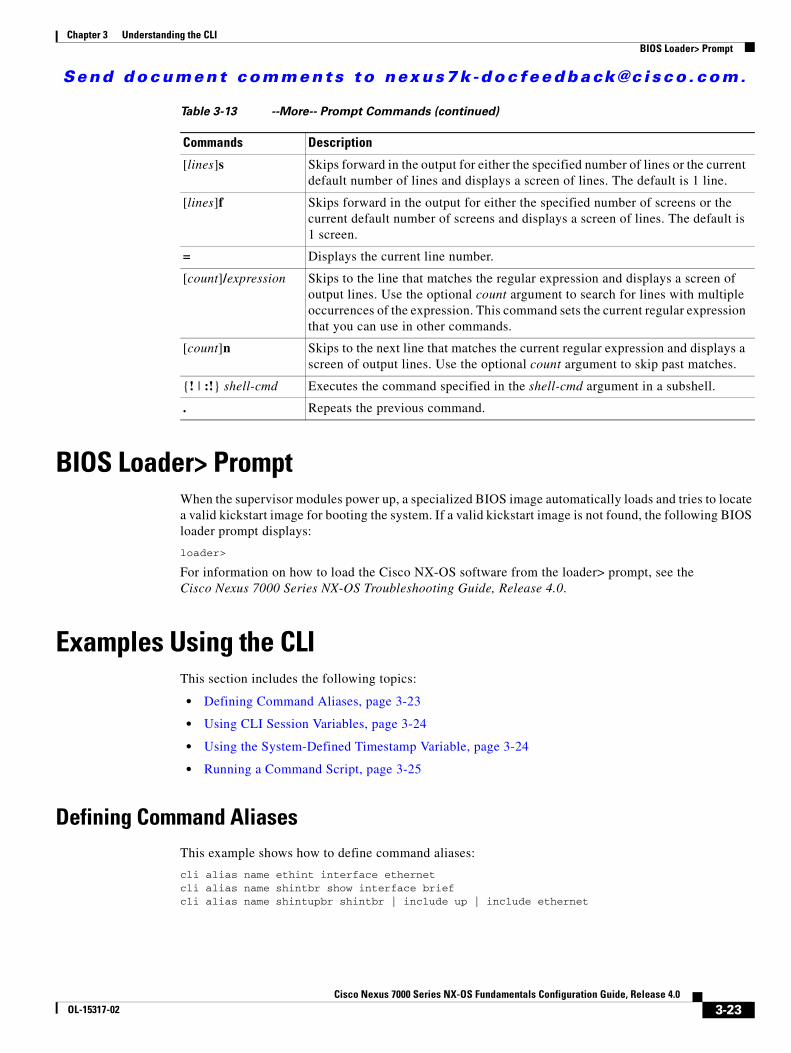
Send document comments to nexus7k -doc feedback@c i sco .com.
Chapter 3 Understanding the CLIBIOS Loader> Prompt
BIOS Loader> PromptWhen the supervisor modules power up, a specialized BIOS image automatically loads and tries to locate a valid kickstart image for booting the system. If a valid kickstart image is not found, the following BIOS loader prompt displays:
loader>
For information on how to load the Cisco NX-OS software from the loader> prompt, see the Cisco Nexus 7000 Series NX-OS Troubleshooting Guide, Release 4.0.
Examples Using the CLI This section includes the following topics:
• Defining Command Aliases, page 3-23
• Using CLI Session Variables, page 3-24
• Using the System-Defined Timestamp Variable, page 3-24
• Running a Command Script, page 3-25
Defining Command AliasesThis example shows how to define command aliases:
cli alias name ethint interface ethernetcli alias name shintbr show interface briefcli alias name shintupbr shintbr | include up | include ethernet
[lines]s Skips forward in the output for either the specified number of lines or the current default number of lines and displays a screen of lines. The default is 1 line.
[lines]f Skips forward in the output for either the specified number of screens or the current default number of screens and displays a screen of lines. The default is 1 screen.
= Displays the current line number.
[count]/expression Skips to the line that matches the regular expression and displays a screen of output lines. Use the optional count argument to search for lines with multiple occurrences of the expression. This command sets the current regular expression that you can use in other commands.
[count]n Skips to the next line that matches the current regular expression and displays a screen of output lines. Use the optional count argument to skip past matches.
{! | :!} shell-cmd Executes the command specified in the shell-cmd argument in a subshell.
. Repeats the previous command.
Table 3-13 --More-- Prompt Commands (continued)
Commands Description
3-23Cisco Nexus 7000 Series NX-OS Fundamentals Configuration Guide, Release 4.0
OL-15317-02

Send document comments to nexus7k -doc feedback@c i sco .com.
Chapter 3 Understanding the CLIExamples Using the CLI
This example shows how to use a command alias:
switch# configure terminalswitch(config)# ethint 2/3switch(config-if)#
Using CLI Session VariablesYou can reference a variable using the syntax $(variable-name).
This example shows how to reference a user-defined CLI session variable:
switch# show interface $(testinterface)Ethernet2/1 is down (Administratively down) Hardware is 10/100/1000 Ethernet, address is 0000.0000.0000 (bia 0019.076c.4dac) MTU 1500 bytes, BW 1000000 Kbit, DLY 10 usec, reliability 255/255, txload 1/255, rxload 1/255 Encapsulation ARPA auto-duplex, auto-speed Beacon is turned off Auto-Negotiation is turned on Input flow-control is off, output flow-control is off Auto-mdix is turned on Switchport monitor is off Last clearing of "show interface" counters never 5 minute input rate 0 bytes/sec, 0 packets/sec 5 minute output rate 0 bytes/sec, 0 packets/sec L3 in Switched: ucast: 0 pkts, 0 bytes - mcast: 0 pkts, 0 bytes L3 out Switched: ucast: 0 pkts, 0 bytes - mcast: 0 pkts, 0 bytes Rx 0 input packets 0 unicast packets 0 multicast packets 0 broadcast packets 0 jumbo packets 0 storm suppression packets 0 bytes Tx 0 output packets 0 multicast packets 0 broadcast packets 0 jumbo packets 0 bytes 0 input error 0 short frame 0 watchdog 0 no buffer 0 runt 0 CRC 0 ecc 0 overrun 0 underrun 0 ignored 0 bad etype drop 0 bad proto drop 0 if down drop 0 input with dribble 0 input discard 0 output error 0 collision 0 deferred 0 late collision 0 lost carrier 0 no carrier 0 babble 0 Rx pause 0 Tx pause 0 reset
Using the System-Defined Timestamp VariableThis example uses $(TIMESTAMP) when redirecting show command output to a file.
switch# show running-config > rcfg.$(TIMESTAMP)Preparing to copy....doneswitch# dir 12667 May 01 12:27:59 2008 rcfg.2008-05-01-12.27.59
3-24Cisco Nexus 7000 Series NX-OS Fundamentals Configuration Guide, Release 4.0
OL-15317-02
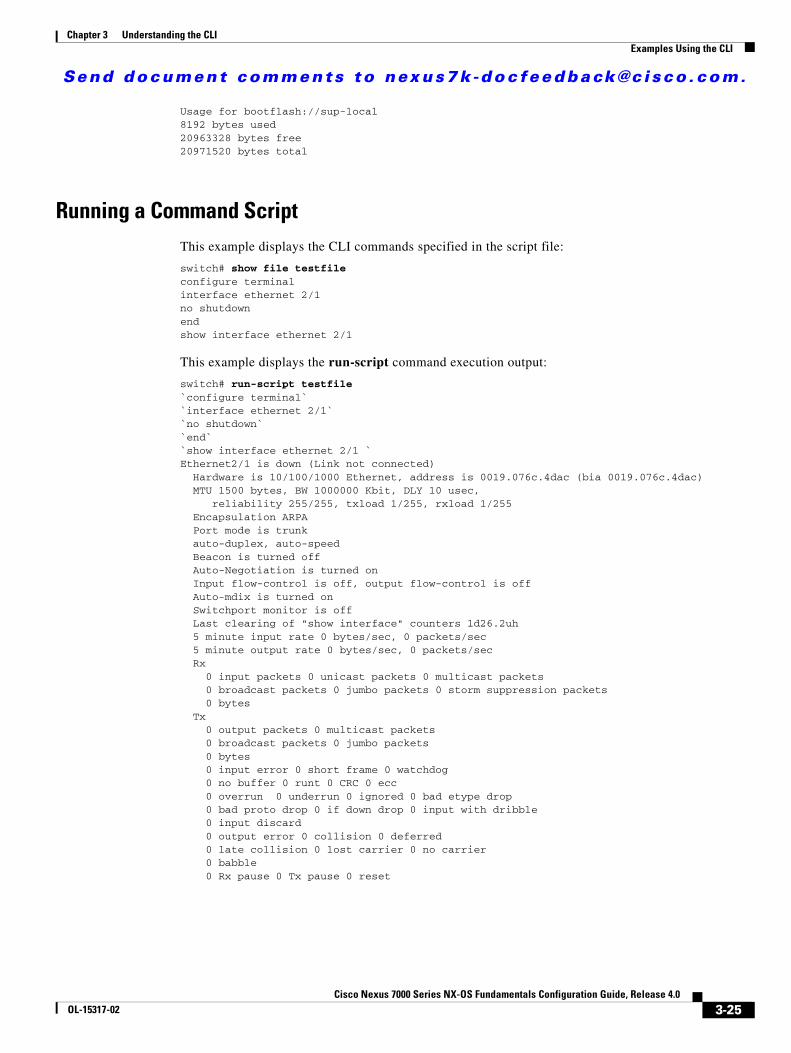
Send document comments to nexus7k -doc feedback@c i sco .com.
Chapter 3 Understanding the CLIExamples Using the CLI
Usage for bootflash://sup-local8192 bytes used20963328 bytes free20971520 bytes total
Running a Command ScriptThis example displays the CLI commands specified in the script file:
switch# show file testfileconfigure terminalinterface ethernet 2/1no shutdownendshow interface ethernet 2/1
This example displays the run-script command execution output:
switch# run-script testfile`configure terminal``interface ethernet 2/1``no shutdown``end``show interface ethernet 2/1 `Ethernet2/1 is down (Link not connected) Hardware is 10/100/1000 Ethernet, address is 0019.076c.4dac (bia 0019.076c.4dac) MTU 1500 bytes, BW 1000000 Kbit, DLY 10 usec, reliability 255/255, txload 1/255, rxload 1/255 Encapsulation ARPA Port mode is trunk auto-duplex, auto-speed Beacon is turned off Auto-Negotiation is turned on Input flow-control is off, output flow-control is off Auto-mdix is turned on Switchport monitor is off Last clearing of "show interface" counters 1d26.2uh 5 minute input rate 0 bytes/sec, 0 packets/sec 5 minute output rate 0 bytes/sec, 0 packets/sec Rx 0 input packets 0 unicast packets 0 multicast packets 0 broadcast packets 0 jumbo packets 0 storm suppression packets 0 bytes Tx 0 output packets 0 multicast packets 0 broadcast packets 0 jumbo packets 0 bytes 0 input error 0 short frame 0 watchdog 0 no buffer 0 runt 0 CRC 0 ecc 0 overrun 0 underrun 0 ignored 0 bad etype drop 0 bad proto drop 0 if down drop 0 input with dribble 0 input discard 0 output error 0 collision 0 deferred 0 late collision 0 lost carrier 0 no carrier 0 babble 0 Rx pause 0 Tx pause 0 reset
3-25Cisco Nexus 7000 Series NX-OS Fundamentals Configuration Guide, Release 4.0
OL-15317-02

Send document comments to nexus7k -doc feedback@c i sco .com.
Chapter 3 Understanding the CLIAdditional References
Additional ReferencesFor additional information related to implementing Feature-1, see the following sections:
• Related Documents, page 3-26
Related Documents
Related Topic Document Title
Licensing Cisco Nexus 7000 Series NX-OS Licensing Guide, Release 4.0
Command reference Cisco Nexus 7000 Series NX-OS Fundamentals Command Reference, Release 4.0
3-26Cisco Nexus 7000 Series NX-OS Fundamentals Configuration Guide, Release 4.0
OL-15317-02

Send document comments to nexus7k - doc fee dback@c i sco . com.
Cisco Nexus 7000 Series NXOL-15317-02
C H A P T E R 4
Configuring Terminal Settings and SessionsThis chapter describes how to manage the terminal settings and sessions on a Cisco NX-OS device.
This chapter includes the following sections:
• Information About Terminal Settings and Sessions, page 4-1
• Licensing Requirements for Terminal Settings and Sessions, page 4-3
• Configuring the Terminal Settings, page 4-3
• Configuring the Console Port, page 4-4
• Configuring the COM1 Port, page 4-6
• Configuring Virtual Terminals, page 4-8
• Configuring Modem Connections, page 4-10
• Clearing Terminal Sessions, page 4-16
• Displaying Terminal and Session Information, page 4-16
• Default Settings, page 4-17
• Additional References, page 4-17
Information About Terminal Settings and SessionsThis section includes the following topics:
• Terminal Session Settings, page 4-2
• Console Port, page 4-2
• COM1 Port, page 4-2
• Virtual Terminals, page 4-2
• Modem Support, page 4-3
• Virtualization Support, page 4-3
4-1-OS Fundamentals Configuration Guide, Release 4.0

Send document comments to nexus7k - doc fee dback@c i sco . com.
Chapter 4 Configuring Terminal Settings and SessionsInformation About Terminal Settings and Sessions
Terminal Session SettingsThe Cisco NX-OS software features allow you to manage the following characteristics of terminals:
• Terminal type—Name used by Telnet when communicating with remote hosts.
• Length—Number of lines of command output displayed before pausing
• Width—Number of characters displayed before wrapping the line
• Inactive session timeout—Number of minutes that a session remains inactive before the device terminates it.
Console PortThe console port is an asynchronous serial port that allows you to connect to the device for initial configuration through a standard RS-232 port with an RJ-45 connector. Any device connected to this port must be capable of asynchronous transmission. You can configure the following parameters for the console port:
• Data bits—Specifies the number of bits in an 8-bit byte that is used for data.
• Inactive session timeout—Specifies the number of minutes a session can be inactive before it is terminated.
• Parity—Specifies the odd or even parity for error detection.
• Speed—Specifies the transmission speed for the connection.
• Stop bits—Specifies the stop bits for an asynchronous line.
Configure your terminal emulator with 9600 baud, 8 data bits, 1 stop bit, and no parity.
COM1 PortA COM1 port is an RS-232 port with a DB-9 interface that enables you to connect to an external serial communication device such as a modem. You can configure the following parameters for the COM1 port:
• Data bits—Specifies the number of bits in an 8-bit byte that is used for data.
• Hardware flowcontrol—Enables the flow-control hardware.
• Parity—Specifies the odd or even parity for error detection.
• Speed—Specifies the transmission speed for the connection.
• Stop bits—Specifies the stop bits for an asynchronous line.
Configure your terminal emulator with 9600 baud, 8 data bits, 1 stop bit, and no parity.
Virtual TerminalsYou can use virtual terminal lines to connect to your NX-OS device. Secure Shell (SSH) and Telnet create virtual terminal sessions. You can configure an inactive session timeout and a maximum sessions limit for virtual terminals.
4-2Cisco Nexus 7000 Series NX-OS Fundamentals Configuration Guide, Release 4.0
OL-15317-02

Send document comments to nexus7k - doc fee dback@c i sco . com.
Chapter 4 Configuring Terminal Settings and SessionsLicensing Requirements for Terminal Settings and Sessions
Modem SupportYou can connect a modem to the COM1 or console ports on the supervisor module. The following modems were tested on devices running the Cisco NX-OS software:
• MultiTech MT2834BA (http://www.multitech.com/PRODUCTS/Families/MultiModemII/)
• Hayes Accura V.92 (http://www.hayesmicro.com/Products/accura-prod-v92.htm)
Note Do not connect a modem when the device is booting. Follow the procedure specified in the “Initializing a Modem for a Powered-Up Device” section on page 4-15.
The Cisco NX-OS software has the default initialization string (ATE0Q1&D2&C1S0=1\015) to detect connected modems. The default string is defined as follows:
• AT—Attention
• E0 (required)—No echo
• Q1—Result code on
• &D2—Normal data terminal ready (DTR) option
• &C1—Enable tracking the state of the data carrier
• S0=1—Pick up after one ring
• \015 (required)—Carriage return in octal
Virtualization SupportYou can configure the COM1 and consoles ports on in the default VDC. You can configure terminal sessions and virtual terminals on both the default and nondefault VDCs. For more information on VDCs, see the Cisco Nexus 7000 Series NX-OS Virtual Device Context Configuration Guide, Release 4.0.
Licensing Requirements for Terminal Settings and SessionsThe following table shows the licensing requirements for this feature:
Configuring the Terminal SettingsYou can set the following terminal type and display characteristics for your terminal session:
• Terminal type
• Screen length
• Screen width
Product License Requirement
NX-OS Terminal setting configuration requires no license. Any feature not included in a license package is bundled with the Cisco NX-OS system images and is provided at no extra charge to you. For a complete explanation of the NX-OS licensing scheme, see the Cisco NX-OS Licensing Guide.
4-3Cisco Nexus 7000 Series NX-OS Fundamentals Configuration Guide, Release 4.0
OL-15317-02
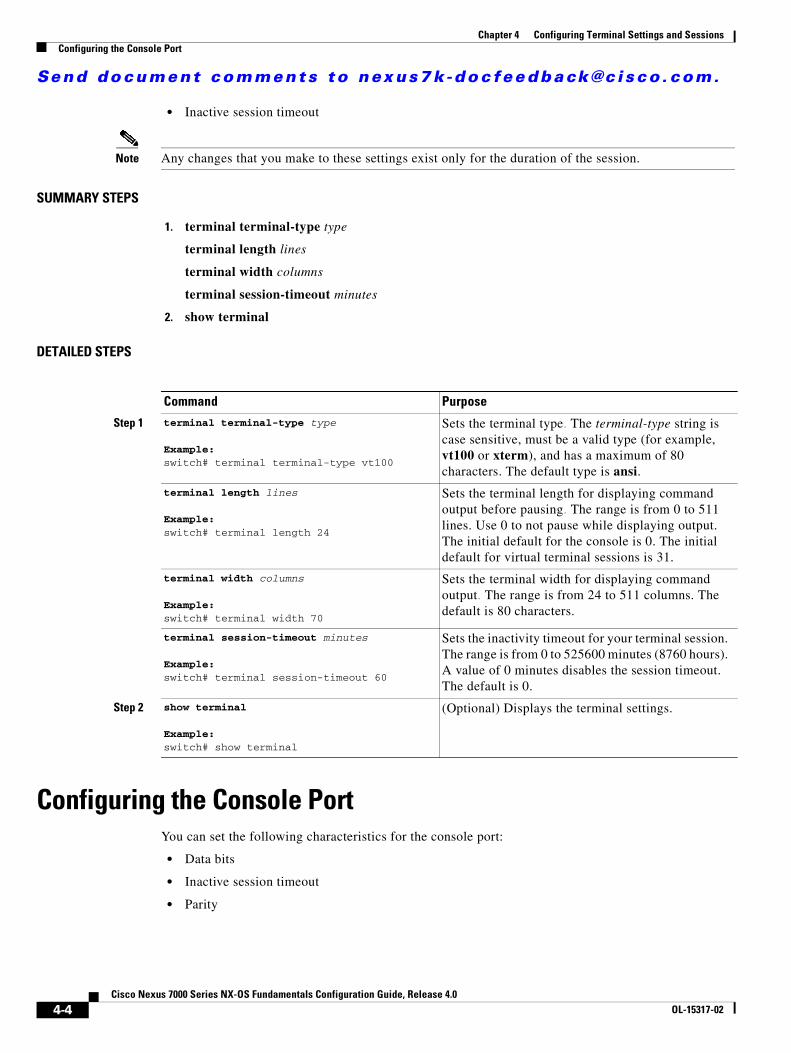
Send document comments to nexus7k - doc fee dback@c i sco . com.
Chapter 4 Configuring Terminal Settings and SessionsConfiguring the Console Port
• Inactive session timeout
Note Any changes that you make to these settings exist only for the duration of the session.
SUMMARY STEPS
1. terminal terminal-type type
terminal length lines
terminal width columns
terminal session-timeout minutes
2. show terminal
DETAILED STEPS
Configuring the Console PortYou can set the following characteristics for the console port:
• Data bits
• Inactive session timeout
• Parity
Command Purpose
Step 1 terminal terminal-type type
Example:switch# terminal terminal-type vt100
Sets the terminal type. The terminal-type string is case sensitive, must be a valid type (for example, vt100 or xterm), and has a maximum of 80 characters. The default type is ansi.
terminal length lines
Example:switch# terminal length 24
Sets the terminal length for displaying command output before pausing. The range is from 0 to 511 lines. Use 0 to not pause while displaying output. The initial default for the console is 0. The initial default for virtual terminal sessions is 31.
terminal width columns
Example:switch# terminal width 70
Sets the terminal width for displaying command output. The range is from 24 to 511 columns. The default is 80 characters.
terminal session-timeout minutes
Example:switch# terminal session-timeout 60
Sets the inactivity timeout for your terminal session. The range is from 0 to 525600 minutes (8760 hours). A value of 0 minutes disables the session timeout. The default is 0.
Step 2 show terminal
Example:switch# show terminal
(Optional) Displays the terminal settings.
4-4Cisco Nexus 7000 Series NX-OS Fundamentals Configuration Guide, Release 4.0
OL-15317-02

Send document comments to nexus7k - doc fee dback@c i sco . com.
Chapter 4 Configuring Terminal Settings and SessionsConfiguring the Console Port
• Speed
• Stop bits
BEFORE YOU BEGIN
Log in to the console port.
Ensure that you are in the default VDC.
SUMMARY STEPS
1. configure terminal
2. line console
3. databits bits
exec-timeout minutes
parity {even | none | odd}
speed {300 | 1200 | 2400 | 4800 | 9600 | 38400 | 57600 | 115200}
stopbits {1 | 2}
4. exit
5. show line console
6. copy running-config startup-config
DETAILED STEPS
Command Purpose
Step 1 configure terminal
Example:switch# configure terminalswitch(config)#
Enters global configuration mode.
Step 2 line console
Example:switch# line consoleswitch(config-console)#
Enters console configuration mode.
4-5Cisco Nexus 7000 Series NX-OS Fundamentals Configuration Guide, Release 4.0
OL-15317-02
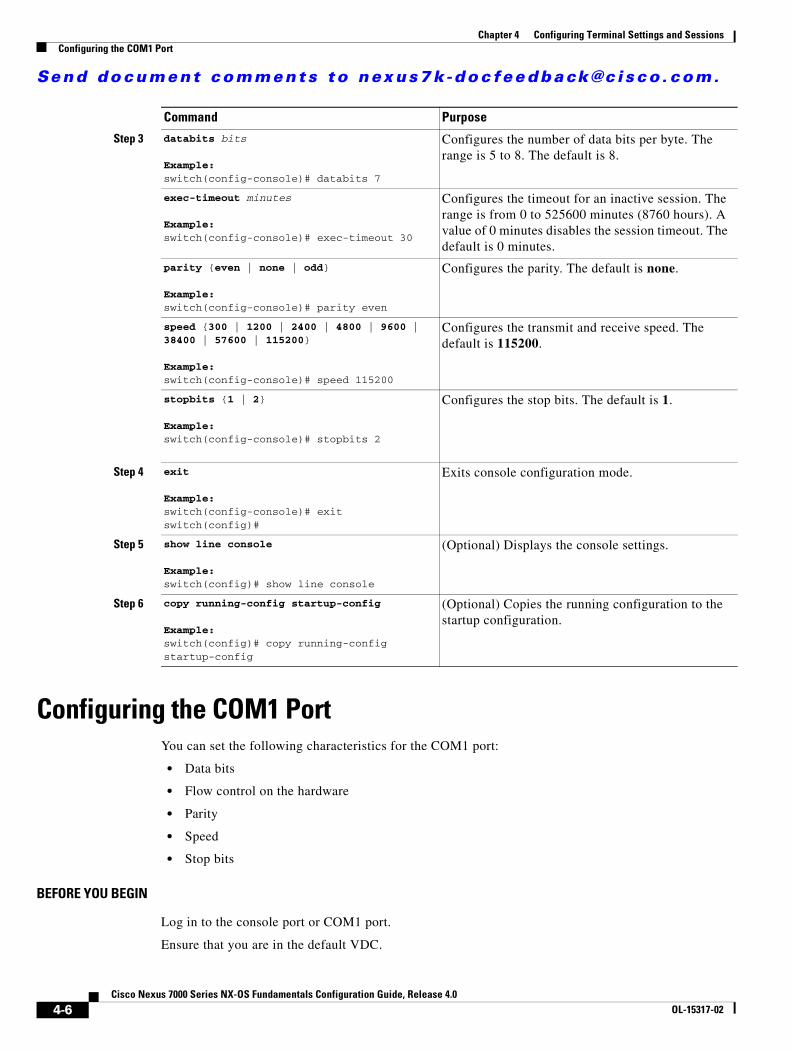
Send document comments to nexus7k - doc fee dback@c i sco . com.
Chapter 4 Configuring Terminal Settings and SessionsConfiguring the COM1 Port
Configuring the COM1 PortYou can set the following characteristics for the COM1 port:
• Data bits
• Flow control on the hardware
• Parity
• Speed
• Stop bits
BEFORE YOU BEGIN
Log in to the console port or COM1 port.
Ensure that you are in the default VDC.
Step 3 databits bits
Example:switch(config-console)# databits 7
Configures the number of data bits per byte. The range is 5 to 8. The default is 8.
exec-timeout minutes
Example:switch(config-console)# exec-timeout 30
Configures the timeout for an inactive session. The range is from 0 to 525600 minutes (8760 hours). A value of 0 minutes disables the session timeout. The default is 0 minutes.
parity {even | none | odd}
Example:switch(config-console)# parity even
Configures the parity. The default is none.
speed {300 | 1200 | 2400 | 4800 | 9600 | 38400 | 57600 | 115200}
Example:switch(config-console)# speed 115200
Configures the transmit and receive speed. The default is 115200.
stopbits {1 | 2}
Example:switch(config-console)# stopbits 2
Configures the stop bits. The default is 1.
Step 4 exit
Example:switch(config-console)# exitswitch(config)#
Exits console configuration mode.
Step 5 show line console
Example:switch(config)# show line console
(Optional) Displays the console settings.
Step 6 copy running-config startup-config
Example:switch(config)# copy running-config startup-config
(Optional) Copies the running configuration to the startup configuration.
Command Purpose
4-6Cisco Nexus 7000 Series NX-OS Fundamentals Configuration Guide, Release 4.0
OL-15317-02
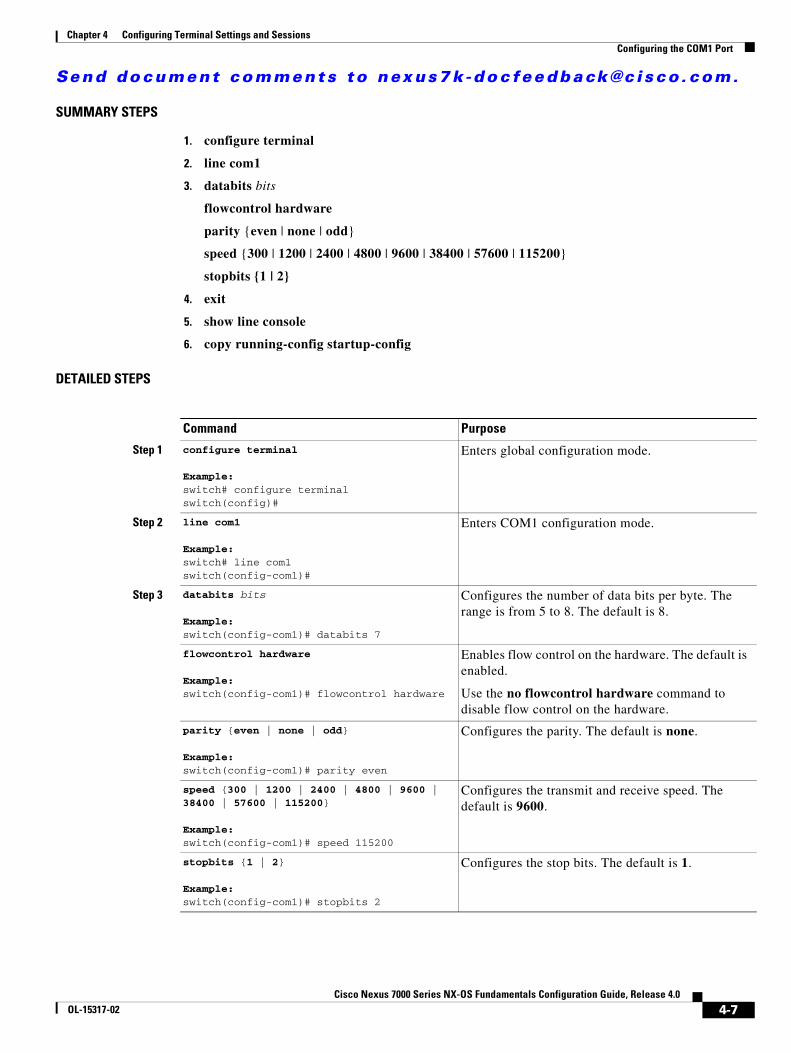
Send document comments to nexus7k - doc fee dback@c i sco . com.
Chapter 4 Configuring Terminal Settings and SessionsConfiguring the COM1 Port
SUMMARY STEPS
1. configure terminal
2. line com1
3. databits bits
flowcontrol hardware
parity {even | none | odd}
speed {300 | 1200 | 2400 | 4800 | 9600 | 38400 | 57600 | 115200}
stopbits {1 | 2}
4. exit
5. show line console
6. copy running-config startup-config
DETAILED STEPS
Command Purpose
Step 1 configure terminal
Example:switch# configure terminalswitch(config)#
Enters global configuration mode.
Step 2 line com1
Example:switch# line com1switch(config-com1)#
Enters COM1 configuration mode.
Step 3 databits bits
Example:switch(config-com1)# databits 7
Configures the number of data bits per byte. The range is from 5 to 8. The default is 8.
flowcontrol hardware
Example:switch(config-com1)# flowcontrol hardware
Enables flow control on the hardware. The default is enabled.
Use the no flowcontrol hardware command to disable flow control on the hardware.
parity {even | none | odd}
Example:switch(config-com1)# parity even
Configures the parity. The default is none.
speed {300 | 1200 | 2400 | 4800 | 9600 | 38400 | 57600 | 115200}
Example:switch(config-com1)# speed 115200
Configures the transmit and receive speed. The default is 9600.
stopbits {1 | 2}
Example:switch(config-com1)# stopbits 2
Configures the stop bits. The default is 1.
4-7Cisco Nexus 7000 Series NX-OS Fundamentals Configuration Guide, Release 4.0
OL-15317-02

Send document comments to nexus7k - doc fee dback@c i sco . com.
Chapter 4 Configuring Terminal Settings and SessionsConfiguring Virtual Terminals
Configuring Virtual Terminals This section includes the following topics:
• Configuring the Inactive Session Timeout, page 4-8
• Configuring the Session Limit, page 4-9
Configuring the Inactive Session TimeoutYou can configure a timeout for inactive virtual terminal sessions on a VDC.
SUMMARY STEPS
1. configure terminal
2. line vty
3. exec-session minutes
4. exit
5. show running-config all | begin vty
6. copy running-config startup-config
Step 4 exit
Example:switch(config-com1)# exitswitch(config)#
Exits COM1 configuration mode.
Step 5 show line console
Example:switch(config)# show line console
(Optional) Displays the console settings.
Step 6 copy running-config startup-config
Example:switch(config)# copy running-config startup-config
(Optional) Copies the running configuration to the startup configuration.
Command Purpose
4-8Cisco Nexus 7000 Series NX-OS Fundamentals Configuration Guide, Release 4.0
OL-15317-02

Send document comments to nexus7k - doc fee dback@c i sco . com.
Chapter 4 Configuring Terminal Settings and SessionsConfiguring Virtual Terminals
DETAILED STEPS
Configuring the Session LimitYou can limit the number of virtual terminal sessions on your device.
SUMMARY STEPS
1. configure terminal
2. line vty
3. session-limit sessions
4. exit
5. show running-config all | begin vty
6. copy running-config startup-config
Command Purpose
Step 1 configure terminal
Example:switch# configure terminalswitch(config)#
Enters global configuration mode.
Step 2 line vty
Example:switch# line vtyswitch(config-line)#
Enters line configuration mode.
Step 3 exec-session minutes
Example:switch(config-line)# exec-session 30
Configures the inactive session timeout for the VDC. The range is from 0 to 525600 minutes (8760 hours). A value of 0 minutes disables the timeout. The default value is 0.
Step 4 exit
Example:switch(config-line)# exitswitch(config)#
Exits line configuration mode.
Step 5 show running-config all | begin vty
Example:switch(config)# show running-config all | begin vty
(Optional) Displays the virtual terminal configuration.
Step 6 copy running-config startup-config
Example:switch(config)# copy running-config startup-config
(Optional) Copies the running configuration to the startup configuration.
4-9Cisco Nexus 7000 Series NX-OS Fundamentals Configuration Guide, Release 4.0
OL-15317-02
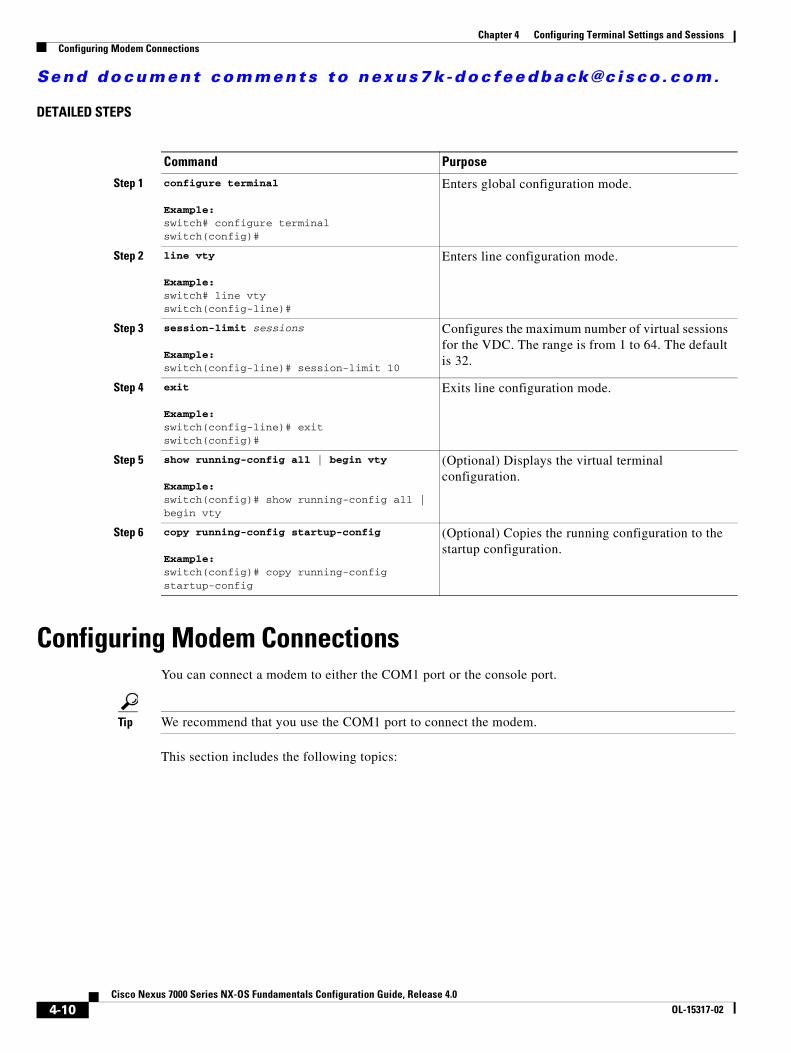
Send document comments to nexus7k - doc fee dback@c i sco . com.
Chapter 4 Configuring Terminal Settings and SessionsConfiguring Modem Connections
DETAILED STEPS
Configuring Modem ConnectionsYou can connect a modem to either the COM1 port or the console port.
Tip We recommend that you use the COM1 port to connect the modem.
This section includes the following topics:
Command Purpose
Step 1 configure terminal
Example:switch# configure terminalswitch(config)#
Enters global configuration mode.
Step 2 line vty
Example:switch# line vtyswitch(config-line)#
Enters line configuration mode.
Step 3 session-limit sessions
Example:switch(config-line)# session-limit 10
Configures the maximum number of virtual sessions for the VDC. The range is from 1 to 64. The default is 32.
Step 4 exit
Example:switch(config-line)# exitswitch(config)#
Exits line configuration mode.
Step 5 show running-config all | begin vty
Example:switch(config)# show running-config all | begin vty
(Optional) Displays the virtual terminal configuration.
Step 6 copy running-config startup-config
Example:switch(config)# copy running-config startup-config
(Optional) Copies the running configuration to the startup configuration.
4-10Cisco Nexus 7000 Series NX-OS Fundamentals Configuration Guide, Release 4.0
OL-15317-02

Send document comments to nexus7k - doc fee dback@c i sco . com.
Chapter 4 Configuring Terminal Settings and SessionsConfiguring Modem Connections
• Enabling a Modem Connection, page 4-11
• Downloading the Default Initialization String, page 4-12
• Configuring and Downloading a User-Specified Initialization String, page 4-14
• Initializing a Modem for a Powered-Up Device, page 4-15
Enabling a Modem ConnectionYou must enable the modem connection on the port before you can use the modem.
BEFORE YOU BEGIN
Log in to the console port.
SUMMARY STEPS
1. configure terminal
2. line com1
line console
3. modem in
4. exit
5. show line
6. copy running-config startup-config
DETAILED STEPS
Command Purpose
Step 1 configure terminal
Example:switch# configure terminalswitch(config)#
Enters global configuration mode.
Step 2 line com1
Example:switch# line com1switch(config-com1)#
Enters COM1 configuration mode.
line console
Example:switch# line consoleswitch(config-console)#
Enters console configuration mode.
4-11Cisco Nexus 7000 Series NX-OS Fundamentals Configuration Guide, Release 4.0
OL-15317-02

Send document comments to nexus7k - doc fee dback@c i sco . com.
Chapter 4 Configuring Terminal Settings and SessionsConfiguring Modem Connections
Downloading the Default Initialization StringThe Cisco NX-OS software provides a default initialization string that you can download for connecting with the modem. The default initialization string is ATE0Q1&D2&C1S0=1\015.
BEFORE YOU BEGIN
Log in to the console port.
SUMMARY STEPS
1. configure terminal
2. line com1
line console
3. modem init-string default
4. exit
5. show line
6. copy running-config startup-config
Step 3 modem in
Example:switch(config-com1)# modem in
Enables modem input on the COM1 port.
modem in
Example:switch(config-console)# modem in
Enables modem input on the console port.
Step 4 exit
Example:switch(config-com1)# exitswitch(config)#
Exits COM1 configuration mode.
exit
Example:switch(config-console)# exitswitch(config)#
Exits console configuration mode.
Step 5 show line
Example:switch(config)# show line
(Optional) Displays the console and COM1 settings.
Step 6 copy running-config startup-config
Example:switch(config)# copy running-config startup-config
(Optional) Copies the running configuration to the startup configuration.
Command Purpose
4-12Cisco Nexus 7000 Series NX-OS Fundamentals Configuration Guide, Release 4.0
OL-15317-02

Send document comments to nexus7k - doc fee dback@c i sco . com.
Chapter 4 Configuring Terminal Settings and SessionsConfiguring Modem Connections
DETAILED STEPS
Command Purpose
Step 1 configure terminal
Example:switch# configure terminalswitch(config)#
Enters global configuration mode.
Step 2 line com1
Example:switch# line com1switch(config-com1)#
Enters COM1 configuration mode.
line console
Example:switch# line consoleswitch(config-console)#
Enters console configuration mode.
Step 3 modem init-string default
Example:switch(config-com1)# modem init-string default
Writes the default initialization string to the modem.
modem init-string default
Example:switch(config-console)# modem init-string default
Writes the default initialization string to the modem.
Step 4 exit
Example:switch(config-com1)# exitswitch(config)#
Exits COM1 configuration mode.
exit
Example:switch(config-console)# exitswitch(config)#
Exits console configuration mode.
Step 5 show line
Example:switch(config)# show line
(Optional) Displays the console and COM1 settings.
Step 6 copy running-config startup-config
Example:switch(config)# copy running-config startup-config
(Optional) Copies the running configuration to the startup configuration.
4-13Cisco Nexus 7000 Series NX-OS Fundamentals Configuration Guide, Release 4.0
OL-15317-02
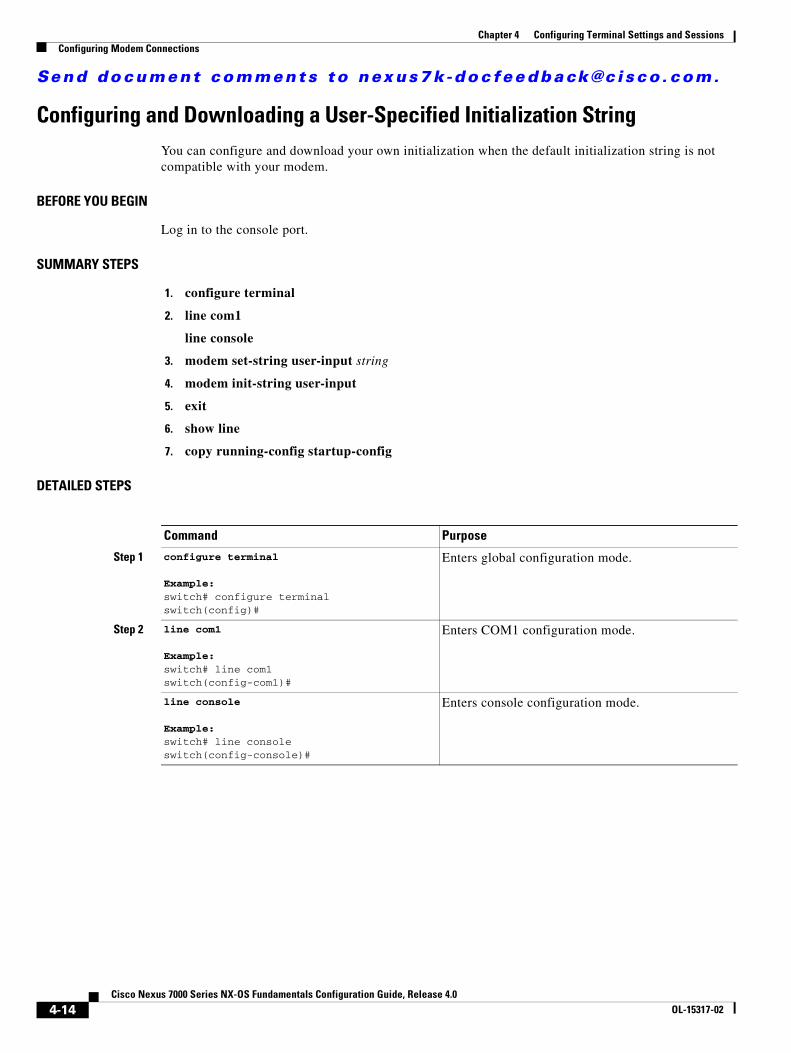
Send document comments to nexus7k - doc fee dback@c i sco . com.
Chapter 4 Configuring Terminal Settings and SessionsConfiguring Modem Connections
Configuring and Downloading a User-Specified Initialization StringYou can configure and download your own initialization when the default initialization string is not compatible with your modem.
BEFORE YOU BEGIN
Log in to the console port.
SUMMARY STEPS
1. configure terminal
2. line com1
line console
3. modem set-string user-input string
4. modem init-string user-input
5. exit
6. show line
7. copy running-config startup-config
DETAILED STEPS
Command Purpose
Step 1 configure terminal
Example:switch# configure terminalswitch(config)#
Enters global configuration mode.
Step 2 line com1
Example:switch# line com1switch(config-com1)#
Enters COM1 configuration mode.
line console
Example:switch# line consoleswitch(config-console)#
Enters console configuration mode.
4-14Cisco Nexus 7000 Series NX-OS Fundamentals Configuration Guide, Release 4.0
OL-15317-02

Send document comments to nexus7k - doc fee dback@c i sco . com.
Chapter 4 Configuring Terminal Settings and SessionsConfiguring Modem Connections
Initializing a Modem for a Powered-Up DeviceIf you connect a modem to a powered-up physical device, you must initialize the modem before you can use it.
BEFORE YOU BEGIN
After waiting until the device has completed the boot sequence and the system image is running, connect the modem to either the COM1 port or the console port on the device.
Step 3 modem set-string user-input string
Example:switch(config-com1)# modem set-string user-input ATE0Q1&D2&C1S0=3\015
Sets the user-specified initialization string for the COM1 port. The initialization string is alphanumeric and case sensitive, can contain special characters, and has a maximum of 100 characters.
Note You must first set the user-input string before initializing the string.
modem set-string user-input string
Example:switch(config-console)# modem set-string user-input ATE0Q1&D2&C1S0=3\015
Sets the user-specified initialization string for the console port. The initialization string is alphanumeric and case sensitive, can contain special characters, and has a maximum of 100 characters.
Note You must first set the user-input string before initializing the string.
Step 4 modem init-string user-input
Example:switch(config-com1)# modem init-string user-input
Writes the user-specified initialization string to the modem connected to the COM1 port.
modem init-string user-input
Example:switch(config-console)# modem init-string user-input
Writes the user-specified initialization string to the modem connected to the console port.
Step 5 exit
Example:switch(config-com1)# exitswitch(config)#
Exits COM1 configuration mode.
exit
Example:switch(config-console)# exitswitch(config)#
Exits console configuration mode.
Step 6 show line
Example:switch(config)# show line
(Optional) Displays the COM1 and console settings.
Step 7 copy running-config startup-config
Example:switch(config)# copy running-config startup-config
(Optional) Copies the running configuration to the startup configuration.
Command Purpose
4-15Cisco Nexus 7000 Series NX-OS Fundamentals Configuration Guide, Release 4.0
OL-15317-02

Send document comments to nexus7k - doc fee dback@c i sco . com.
Chapter 4 Configuring Terminal Settings and SessionsClearing Terminal Sessions
Enable the modem connection on the port (see the “Enabling a Modem Connection” section on page 4-11).
SUMMARY STEPS
1. modem connect line {com1 | console}
DETAILED STEPS
Clearing Terminal SessionsYou can clear terminal sessions on the device.
SUMMARY STEPS
1. show users
2. clear line name
DETAILED STEPS
Displaying Terminal and Session InformationTo display terminal and session information, perform one of the following tasks:
Command Purpose
Step 1 modem connect line {com1 | console}
Example:switch# modem connect line com1
Initializes the modem connected to the device.
Command Purpose
Step 1 show users (Optional) Displays the user sessions on the device.
Step 2 clear line name
Example:switch# clear line pts/0
Clears a terminal session on a specific line. The line name is case sensitive.
Command Purpose
show terminal Displays terminal settings.
show line Displays the COM1 and console ports settings.
show users Displays virtual terminal sessions.
show running-config [all] Displays the user account configuration in the running configuration. The all keyword displays the default values for the user accounts.
4-16Cisco Nexus 7000 Series NX-OS Fundamentals Configuration Guide, Release 4.0
OL-15317-02
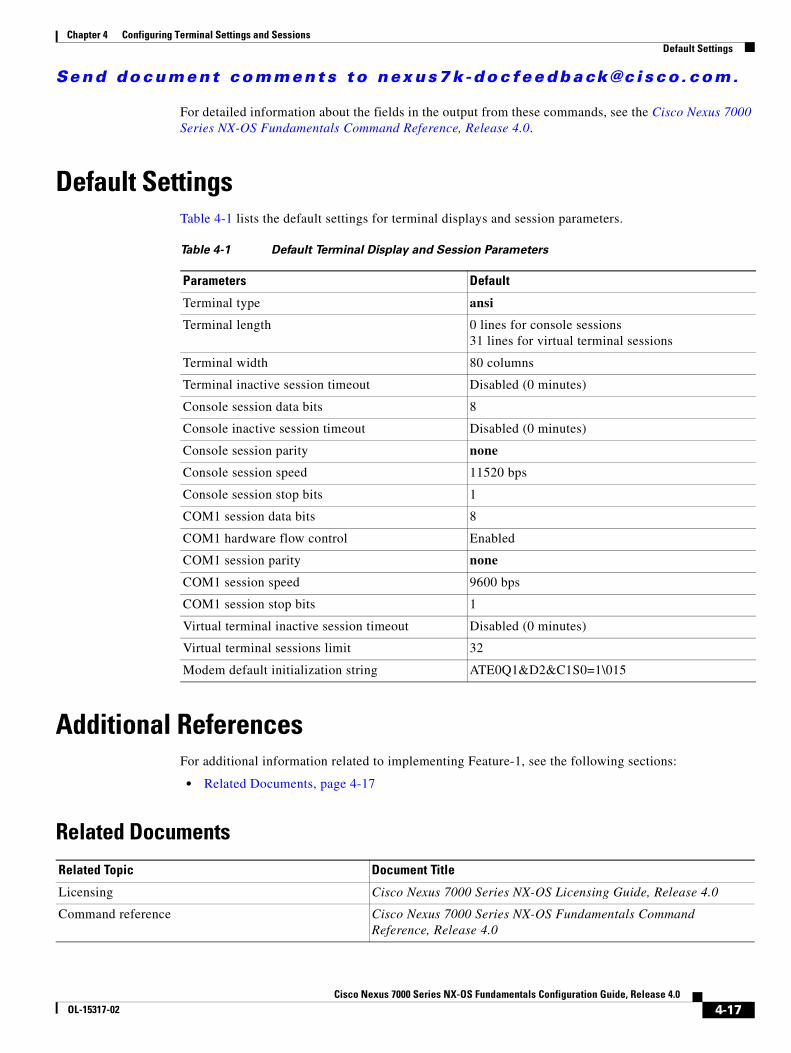
Send document comments to nexus7k - doc fee dback@c i sco . com.
Chapter 4 Configuring Terminal Settings and SessionsDefault Settings
For detailed information about the fields in the output from these commands, see the Cisco Nexus 7000 Series NX-OS Fundamentals Command Reference, Release 4.0.
Default SettingsTable 4-1 lists the default settings for terminal displays and session parameters.
Additional ReferencesFor additional information related to implementing Feature-1, see the following sections:
• Related Documents, page 4-17
Related Documents
Table 4-1 Default Terminal Display and Session Parameters
Parameters Default
Terminal type ansi
Terminal length 0 lines for console sessions 31 lines for virtual terminal sessions
Terminal width 80 columns
Terminal inactive session timeout Disabled (0 minutes)
Console session data bits 8
Console inactive session timeout Disabled (0 minutes)
Console session parity none
Console session speed 11520 bps
Console session stop bits 1
COM1 session data bits 8
COM1 hardware flow control Enabled
COM1 session parity none
COM1 session speed 9600 bps
COM1 session stop bits 1
Virtual terminal inactive session timeout Disabled (0 minutes)
Virtual terminal sessions limit 32
Modem default initialization string ATE0Q1&D2&C1S0=1\015
Related Topic Document Title
Licensing Cisco Nexus 7000 Series NX-OS Licensing Guide, Release 4.0
Command reference Cisco Nexus 7000 Series NX-OS Fundamentals Command Reference, Release 4.0
4-17Cisco Nexus 7000 Series NX-OS Fundamentals Configuration Guide, Release 4.0
OL-15317-02

Send document comments to nexus7k - doc fee dback@c i sco . com.
Chapter 4 Configuring Terminal Settings and SessionsAdditional References
4-18Cisco Nexus 7000 Series NX-OS Fundamentals Configuration Guide, Release 4.0
OL-15317-02

Send document comments to nexus7k -doc feedback@c i sco .com.
Cisco Nexus 7000 Series NXOL-15317-02
C H A P T E R 5
Basic Device ManagementThis chapter describes how to perform basic management tasks on the Cisco NX-OS device.
This chapter includes the following sections:
• Information About Basic Device Management, page 5-1
• Configuring the mgmt0 Interface, page 5-3
• Changing the Device Hostname, page 5-5
• Configuring the MOTD Banner, page 5-6
• Configuring the Time Zone, page 5-7
• Configuring Summer Time (Daylight Saving Time), page 5-8
• Manually Setting the Device Clock, page 5-9
• Managing Users, page 5-9
• Example of Basic Device Management, page 5-11
• Verifying Basic Device Settings, page 5-11
• Default Settings, page 5-11
• Additional References, page 5-11
Information About Basic Device ManagementThis section include the following topics:
• mgmt0 Interface, page 5-2
• Device Hostname, page 5-2
• Message-of-the-Day Banner, page 5-2
• Device Clock, page 5-2
• Time Zone and Summer Time (Daylight Savings Time), page 5-2
• User Sessions, page 5-2
• Virtualization Support, page 5-2
5-1-OS Fundamentals Configuration Guide, Release 4.0
Send document comments to nexus7k -doc feedback@c i sco .com.
Chapter 5 Basic Device ManagementInformation About Basic Device Management
mgmt0 InterfaceThe mgmt0 interface on Cisco NX-OS devices provides out-of-band management, which enables you to manage the device by its IPv4 or IPv6 address. The mgmt0 interface uses 10/100/1000 Ethernet.
For detailed information on configuring interfaces, see the Cisco Nexus 7000 Series NX-OS Interfaces Configuration Guide, Release 4.0 and the Cisco Nexus 7000 Series NX-OS Unicast Routing Configuration Guide, Release 4.0.
Device HostnameYou can change the device hostname displayed in the command prompt from the default (switch) to another character string. When you give the device a unique hostname, you can easily identify the device from the command-line interface (CLI) prompt.
Message-of-the-Day BannerThe message-of-the-day (MOTD) banner displays before the user login prompt on the device. This message can contain any information that you want to display for users of the device.
Device ClockIf you do not synchronize your device with a valid outside timing mechanism, such as an NTP clock source, you can manually set the clock time when your device boots. For information about NTP, see the Cisco Nexus 7000 Series NX-OS System Management Configuration Guide, Release 4.0.
Time Zone and Summer Time (Daylight Savings Time)You can configure the time zone and summer time (daylight savings time) setting for your device. These values offset the clock time from Coordinated Universal Time (UTC). UTC is International Atomic Time (TAI) with leap seconds added periodically to compensate for the Earth's slowing rotation. UTC was formerly called Greenwich Mean Time (GMT).
User SessionsYou can display the active user session on your device. You can also send messages to the user sessions. For more information about managing user sessions and accounts, see the Cisco Nexus 7000 Series NX-OS Security Configuration Guide, Release 4.0.
Virtualization SupportBasic device management is local to the virtual device context (VDC). The mgmt0 interface exists in the management virtual routing and forwarding instance (VRF) and is accessible from any VDC. You can configure a unique IP address for the mgmt0 interface in each VDC.
5-2Cisco Nexus 7000 Series NX-OS Fundamentals Configuration Guide, Release 4.0
OL-15317-02

Send document comments to nexus7k -doc feedback@c i sco .com.
Chapter 5 Basic Device ManagementLicensing Requirements for Basic Device Management
For more information on VDCs, see the Cisco Nexus 7000 Series NX-OS Virtual Device Context Configuration Guide, Release 4.0. For more information on VRFs, see the Cisco Nexus 7000 Series NX-OS Unicast Routing Configuration Guide, Release 4.0.
Licensing Requirements for Basic Device ManagementThe following table shows the licensing requirements for this feature:
Configuring the mgmt0 InterfaceYou can configure the mgmt0 interface on your Cisco NX-OS device.
BEFORE YOU BEGIN
Ensure that the management Ethernet (MGMT ETH) port on the active supervisor module is connected the network (see the hardware installation guide for your device).
For the default VDC, log in to the console port.
For non-default VDCs, log in to the default VDC and use the switchto vdc command.
SUMMARY STEPS
1. configure terminal
2. interface mgmt0
3. ip address ipv4-address[/length]
ipv6 address ipv6-address[/length]
4. no shutdown
5. exit
6. vrf context management
7. ip route ipv4-prefix[/length] ipv4-nexthop-address
ipv6 route ipv6-prefix[/length] ipv6-nexthop-address
8. exit
9. show interface mgmt0
10. copy running-config startup-config
Product License Requirement
NX-OS Basic device management requires no license. Any feature not included in a license package is bundled with the Cisco NX-OS system images and is provided at no extra charge to you. For a complete explanation of the NX-OS licensing scheme, see the Cisco NX-OS Licensing Guide.
5-3Cisco Nexus 7000 Series NX-OS Fundamentals Configuration Guide, Release 4.0
OL-15317-02

Send document comments to nexus7k -doc feedback@c i sco .com.
Chapter 5 Basic Device ManagementConfiguring the mgmt0 Interface
DETAILED STEPS
Command Purpose
Step 1 configure terminal
Example:switch# configure terminalswitch(config)#
Enters global configuration mode.
Step 2 interface mgmt0
Example:switch(config)# interface mgmt0switch(config-if)#
Specifies the mgmt0 interface and enters interface configuration mode.
Step 3 ip address ipv4-address[/length]
Example:switch(config-if)# ip address 172.20.1.1/23
Configures the IPv4 address.
ipv6 address ipv6-address[/length]
Example:switch(config-if)# ipv6 address 2001:0DB8:c18:1::3/64
Configures the IPv6 address.
Step 4 no shutdown
Example:switch(config-if)# no shutdown
Enables the interface.
Step 5 exit
Example:switch(config-if)# exitswitch(config)#
Exits interface configuration mode.
Step 6 vrf context management
Example:switch(config)# vrf context managementswitch(config-vrf)#
Specifies the management VRF and enters VRF configuration mode.
Step 7 ip route ipv4-prefix[/length] ipv4-nexthop-address
Example:switch(config-vrf)# ip route 0.0.0.0/0 172.20.20.1
Configures the IPv4 address of the next hop.
ipv6 route ipv6-prefix[/length] ipv6-nexthop-address
Example:switch(config-vrf)# ipv6 route 2001:0DB8::/16 2001:0DB8:c18:1::2
Configures the IPv6 address of the next hop.
Step 8 exit
Example:switch(config-vrf)# exitswitch(config)#
Exits interface configuration mode.
5-4Cisco Nexus 7000 Series NX-OS Fundamentals Configuration Guide, Release 4.0
OL-15317-02

Send document comments to nexus7k -doc feedback@c i sco .com.
Chapter 5 Basic Device ManagementChanging the Device Hostname
Changing the Device HostnameYou can change the device hostname displayed in the command prompt from the default (switch) to another character string.
SUMMARY STEPS
1. configure terminal
2. hostname name
switchname name
3. exit
4. copy running-config startup-config
DETAILED STEPS
Step 9 show interface mgmt0
Example:switch(config)# show interface mgmt0
(Optional) Displays the mgmt0 interface configuration and status.
Step 10 copy running-config startup-config
Example:switch(config)# copy running-config startup-config
(Optional) Copies the running configuration to the startup configuration.
Command Purpose
Command Purpose
Step 1 configure terminal
Example:switch# configure terminalswitch(config)#
Enters global configuration mode.
Step 2 hostname name
Example:switch(config)# hostname Engineering2Engineering2(config)#
Changes the device hostname. The default is switch.
switchname name
Example:switch# switchname Engineering2Engineering2(config)#
Changes the device hostname. The default is switch.
5-5Cisco Nexus 7000 Series NX-OS Fundamentals Configuration Guide, Release 4.0
OL-15317-02

Send document comments to nexus7k -doc feedback@c i sco .com.
Chapter 5 Basic Device ManagementConfiguring the MOTD Banner
Configuring the MOTD BannerYou can configure the MOTD to display before the login prompt on the terminal when a user logs in.The MOTD banner has the following characteristics:
• Maximum of 80 characters per line
• Maximum of 40 lines
SUMMARY STEPS
1. configure terminal
2. banner motd delimiting-character message delimiting-character
3. exit
4. show banner motd
5. copy running-config startup-config
DETAILED STEPS
Step 3 exit
Example:Engineering2(config)# exitEngineering2#
Exits global configuration mode.
Step 4 copy running-config startup-config
Example:Engineering2# copy running-config startup-config
(Optional) Copies the running configuration to the startup configuration.
Command Purpose
Command Purpose
Step 1 configure terminal
Example:switch# configure terminalswitch(config)#
Enters global configuration mode.
Step 2 banner motd delimiting-character message delimiting-character
Example: switch(config)# banner motd #Welcome to the Switch#switch(config)#
Configures the MOTD banner. Do not use the delimiting-character in the message text.
Note Do not use " and % as a delimiting character.
Step 3 exit
Example:switch(config)# exitswitch#
Exits global configuration mode.
5-6Cisco Nexus 7000 Series NX-OS Fundamentals Configuration Guide, Release 4.0
OL-15317-02
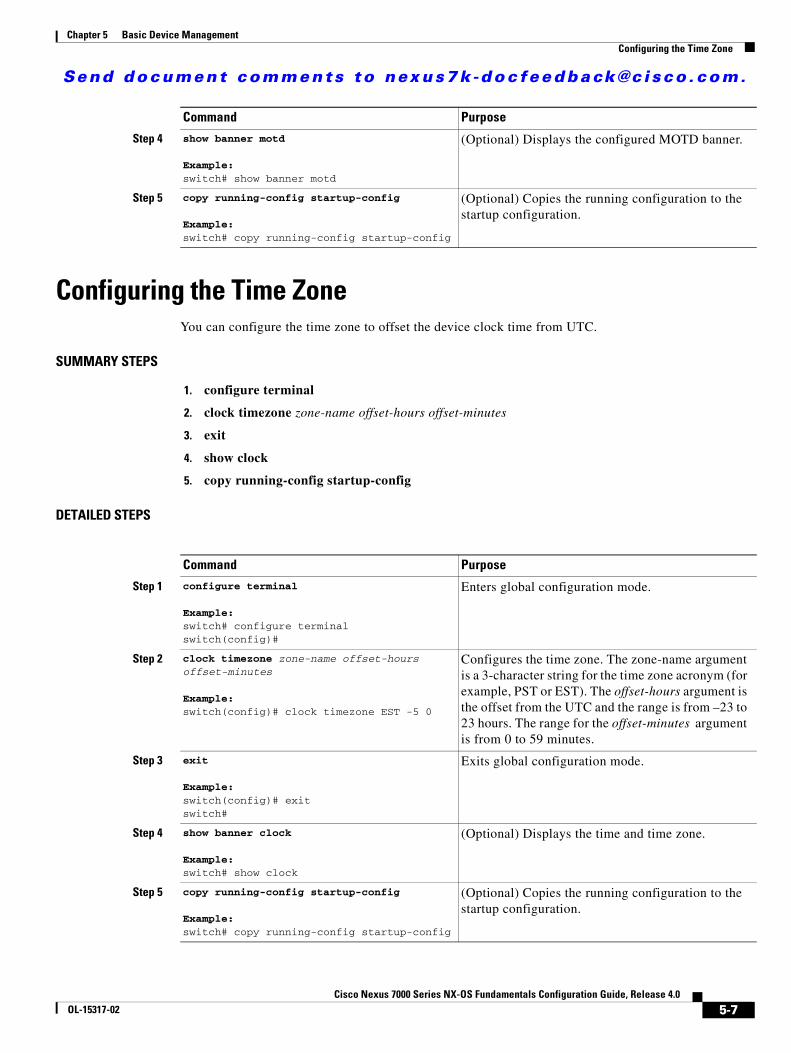
Send document comments to nexus7k -doc feedback@c i sco .com.
Chapter 5 Basic Device ManagementConfiguring the Time Zone
Configuring the Time ZoneYou can configure the time zone to offset the device clock time from UTC.
SUMMARY STEPS
1. configure terminal
2. clock timezone zone-name offset-hours offset-minutes
3. exit
4. show clock
5. copy running-config startup-config
DETAILED STEPS
Step 4 show banner motd
Example:switch# show banner motd
(Optional) Displays the configured MOTD banner.
Step 5 copy running-config startup-config
Example:switch# copy running-config startup-config
(Optional) Copies the running configuration to the startup configuration.
Command Purpose
Command Purpose
Step 1 configure terminal
Example:switch# configure terminalswitch(config)#
Enters global configuration mode.
Step 2 clock timezone zone-name offset-hours offset-minutes
Example: switch(config)# clock timezone EST -5 0
Configures the time zone. The zone-name argument is a 3-character string for the time zone acronym (for example, PST or EST). The offset-hours argument is the offset from the UTC and the range is from –23 to 23 hours. The range for the offset-minutes argument is from 0 to 59 minutes.
Step 3 exit
Example:switch(config)# exitswitch#
Exits global configuration mode.
Step 4 show banner clock
Example:switch# show clock
(Optional) Displays the time and time zone.
Step 5 copy running-config startup-config
Example:switch# copy running-config startup-config
(Optional) Copies the running configuration to the startup configuration.
5-7Cisco Nexus 7000 Series NX-OS Fundamentals Configuration Guide, Release 4.0
OL-15317-02
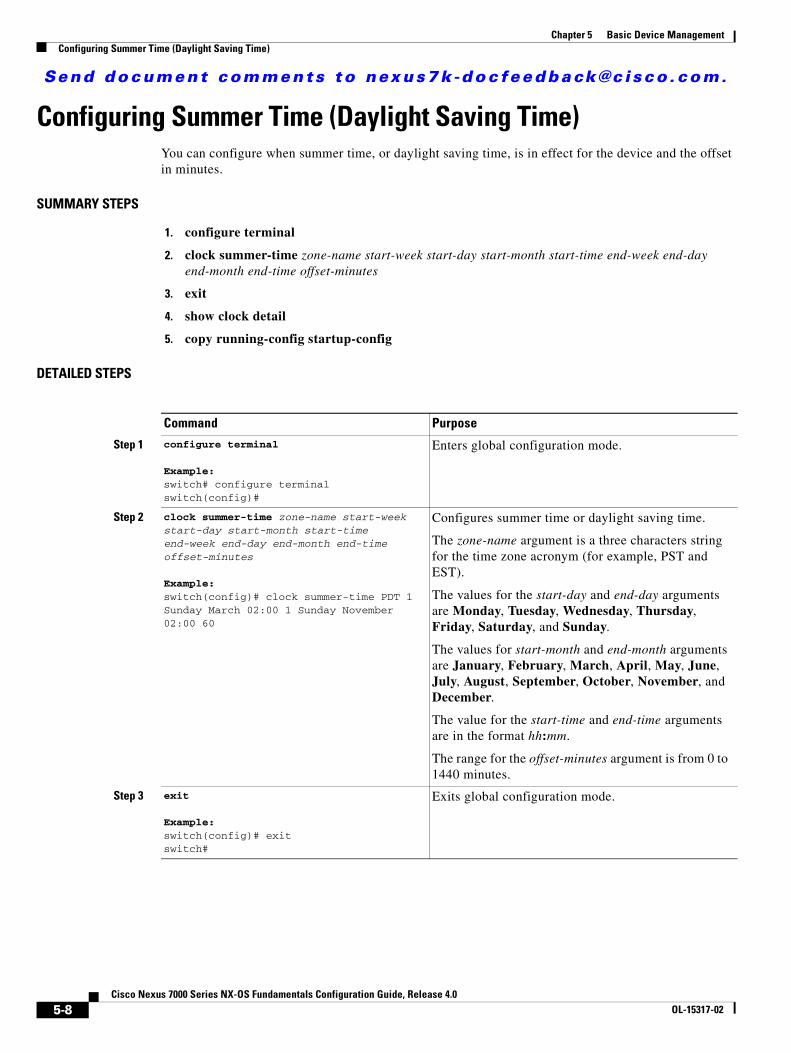
Send document comments to nexus7k -doc feedback@c i sco .com.
Chapter 5 Basic Device ManagementConfiguring Summer Time (Daylight Saving Time)
Configuring Summer Time (Daylight Saving Time)You can configure when summer time, or daylight saving time, is in effect for the device and the offset in minutes.
SUMMARY STEPS
1. configure terminal
2. clock summer-time zone-name start-week start-day start-month start-time end-week end-day end-month end-time offset-minutes
3. exit
4. show clock detail
5. copy running-config startup-config
DETAILED STEPS
Command Purpose
Step 1 configure terminal
Example:switch# configure terminalswitch(config)#
Enters global configuration mode.
Step 2 clock summer-time zone-name start-week start-day start-month start-time end-week end-day end-month end-time offset-minutes
Example: switch(config)# clock summer-time PDT 1 Sunday March 02:00 1 Sunday November 02:00 60
Configures summer time or daylight saving time.
The zone-name argument is a three characters string for the time zone acronym (for example, PST and EST).
The values for the start-day and end-day arguments are Monday, Tuesday, Wednesday, Thursday, Friday, Saturday, and Sunday.
The values for start-month and end-month arguments are January, February, March, April, May, June, July, August, September, October, November, and December.
The value for the start-time and end-time arguments are in the format hh:mm.
The range for the offset-minutes argument is from 0 to 1440 minutes.
Step 3 exit
Example:switch(config)# exitswitch#
Exits global configuration mode.
5-8Cisco Nexus 7000 Series NX-OS Fundamentals Configuration Guide, Release 4.0
OL-15317-02
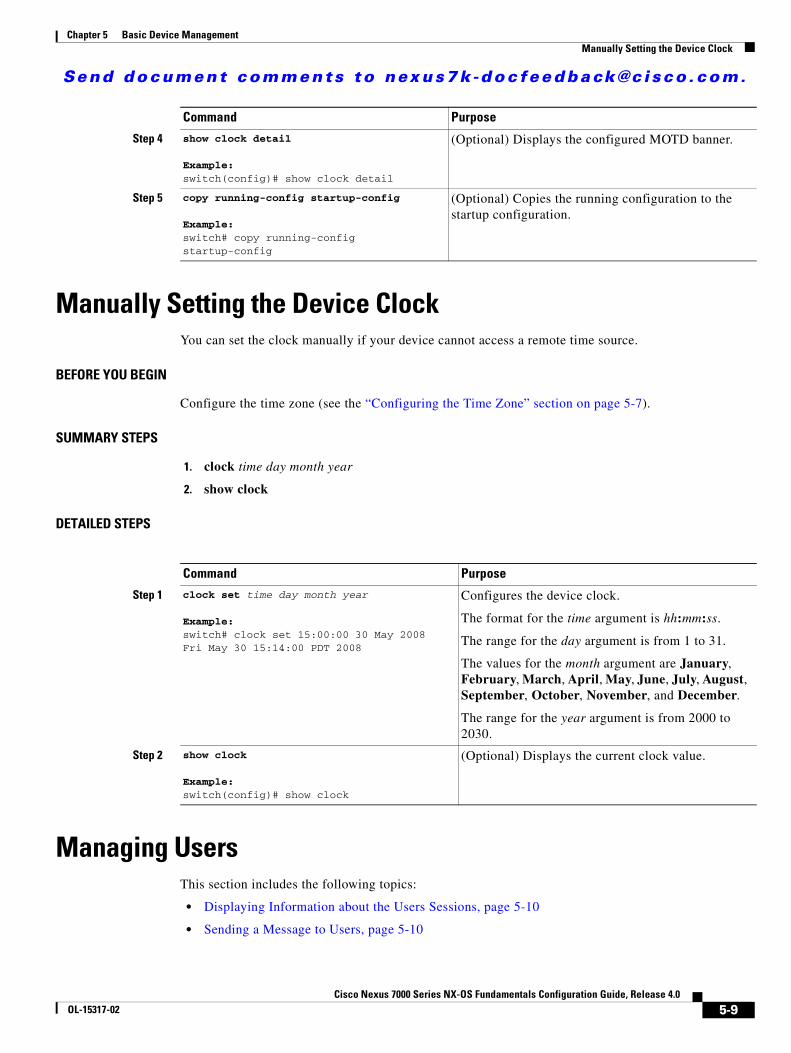
Send document comments to nexus7k -doc feedback@c i sco .com.
Chapter 5 Basic Device ManagementManually Setting the Device Clock
Manually Setting the Device ClockYou can set the clock manually if your device cannot access a remote time source.
BEFORE YOU BEGIN
Configure the time zone (see the “Configuring the Time Zone” section on page 5-7).
SUMMARY STEPS
1. clock time day month year
2. show clock
DETAILED STEPS
Managing UsersThis section includes the following topics:
• Displaying Information about the Users Sessions, page 5-10
• Sending a Message to Users, page 5-10
Step 4 show clock detail
Example:switch(config)# show clock detail
(Optional) Displays the configured MOTD banner.
Step 5 copy running-config startup-config
Example:switch# copy running-config startup-config
(Optional) Copies the running configuration to the startup configuration.
Command Purpose
Command Purpose
Step 1 clock set time day month year
Example:switch# clock set 15:00:00 30 May 2008Fri May 30 15:14:00 PDT 2008
Configures the device clock.
The format for the time argument is hh:mm:ss.
The range for the day argument is from 1 to 31.
The values for the month argument are January, February, March, April, May, June, July, August, September, October, November, and December.
The range for the year argument is from 2000 to 2030.
Step 2 show clock
Example: switch(config)# show clock
(Optional) Displays the current clock value.
5-9Cisco Nexus 7000 Series NX-OS Fundamentals Configuration Guide, Release 4.0
OL-15317-02

Send document comments to nexus7k -doc feedback@c i sco .com.
Chapter 5 Basic Device ManagementManaging Users
Displaying Information about the Users SessionsYou can display information about the user session on the device.
SUMMARY STEPS
1. show users
DETAILED STEPS
For detailed information about the fields in the output from this command, see the Cisco Nexus 7000 Series NX-OS Fundamentals Command Reference, Release 4.0.
Sending a Message to UsersYou can send a message to active users currently using the device CLI.
SUMMARY STEPS
1. show users
2. send [session line] message-text
DETAILED STEPS
Command Purpose
Step 1 show users
Example:switch# show users
Displays the user sessions.
Command Purpose
Step 1 show users
Example:switch# show users
(Optional) Displays the active user sessions.
Step 2 send [session line] message-text
Example:switch# send Reloading the device is 10 minutes!
Sends a message to all active users or to a specific user. The message can be up to 80 alphanumeric characters and is case sensitive.
5-10Cisco Nexus 7000 Series NX-OS Fundamentals Configuration Guide, Release 4.0
OL-15317-02

Send document comments to nexus7k -doc feedback@c i sco .com.
Chapter 5 Basic Device ManagementExample of Basic Device Management
Example of Basic Device ManagementThis example shows how to configure the mgmt0 interface using IPv4 addressing:
interface mgmt0 ip address 172.10.10.10/24vrf context management ip route 0.0.0.0/0 172.10.10.1
Verifying Basic Device SettingsTo verify the basic device settings, perform one of the following tasks:
Default SettingsTable 5-1 lists the default settings for basic device parameters.
Additional ReferencesFor additional information related to basic device management, see the following sections:
• Related Documents, page 5-11
Related Documents
Command Purpose
show banner motd Displays the banner MOTD.
show clock Displays clock and timezone settings.
show clock detail Displays the summer time settings.
Table 5-1 Default Basic Device Parameters
Parameters Default
MOTD banner text User Access Verification
Clock time zone UTC
Related Topic Document Title
Licensing Cisco Nexus 7000 Series NX-OS Licensing Guide, Release 4.0
Command reference Cisco Nexus 7000 Series NX-OS Fundamentals Command Reference, Release 4.0
5-11Cisco Nexus 7000 Series NX-OS Fundamentals Configuration Guide, Release 4.0
OL-15317-02

Send document comments to nexus7k -doc feedback@c i sco .com.
Chapter 5 Basic Device ManagementAdditional References
5-12Cisco Nexus 7000 Series NX-OS Fundamentals Configuration Guide, Release 4.0
OL-15317-02

Send document comments to nexus7k -doc feedback@c i sco .com.
Cisco Nexus 7000 Series NXOL-15317-02
C H A P T E R 6
Using the Device File Systems, Directories, and FilesThis chapter describes how to use the files systems on the Cisco NX-OS device.
This chapter includes the following sections:
• Information About the Device File Systems, Directories, and Files, page 6-1
• Licensing Requirements for Configuration Files, page 6-3
• Using the Tab Key for Completing Filenames, page 6-3
• Formatting External Flash Devices, page 6-3
• Working with Directories, page 6-4
• Working with Files, page 6-7
• Examples of Using the File System, page 6-13
• Default Settings, page 6-16
• Additional References, page 6-17
Information About the Device File Systems, Directories, and Files
This section includes the following topics:
• File Systems, page 6-1
• Directories, page 6-2
• Files, page 6-3
• Virtualization Support, page 6-3
File SystemsThe syntax for specifying a local file system is filesystem:[//module/]. Table 6-1 describes file systems that you can reference on your device.
6-1-OS Fundamentals Configuration Guide, Release 4.0
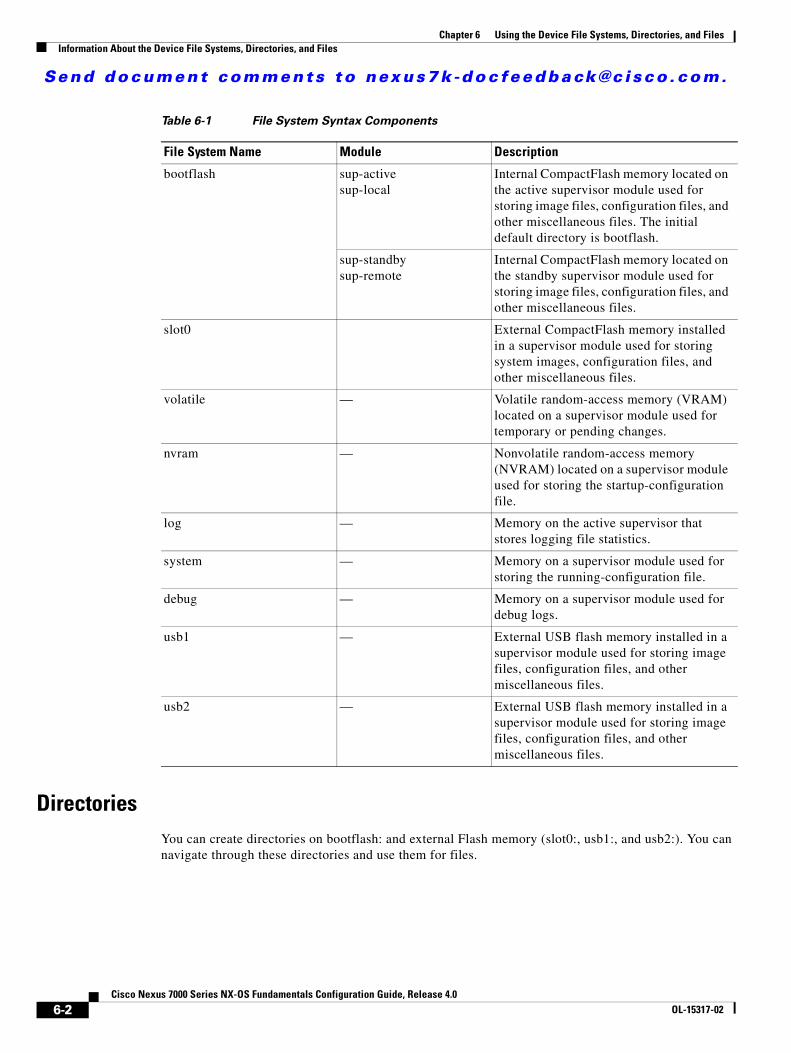
Send document comments to nexus7k -doc feedback@c i sco .com.
Chapter 6 Using the Device File Systems, Directories, and FilesInformation About the Device File Systems, Directories, and Files
DirectoriesYou can create directories on bootflash: and external Flash memory (slot0:, usb1:, and usb2:). You can navigate through these directories and use them for files.
Table 6-1 File System Syntax Components
File System Name Module Description
bootflash sup-active sup-local
Internal CompactFlash memory located on the active supervisor module used for storing image files, configuration files, and other miscellaneous files. The initial default directory is bootflash.
sup-standby sup-remote
Internal CompactFlash memory located on the standby supervisor module used for storing image files, configuration files, and other miscellaneous files.
slot0 External CompactFlash memory installed in a supervisor module used for storing system images, configuration files, and other miscellaneous files.
volatile — Volatile random-access memory (VRAM) located on a supervisor module used for temporary or pending changes.
nvram — Nonvolatile random-access memory (NVRAM) located on a supervisor module used for storing the startup-configuration file.
log — Memory on the active supervisor that stores logging file statistics.
system — Memory on a supervisor module used for storing the running-configuration file.
debug — Memory on a supervisor module used for debug logs.
usb1 — External USB flash memory installed in a supervisor module used for storing image files, configuration files, and other miscellaneous files.
usb2 — External USB flash memory installed in a supervisor module used for storing image files, configuration files, and other miscellaneous files.
6-2Cisco Nexus 7000 Series NX-OS Fundamentals Configuration Guide, Release 4.0
OL-15317-02
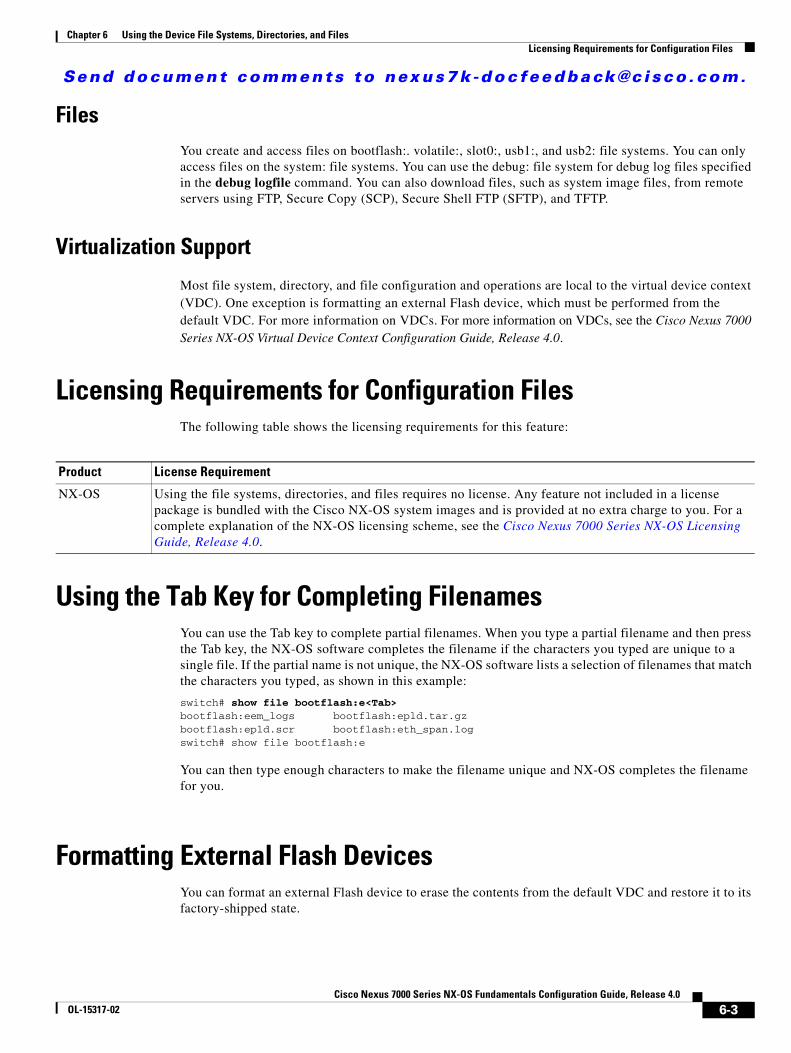
Send document comments to nexus7k -doc feedback@c i sco .com.
Chapter 6 Using the Device File Systems, Directories, and FilesLicensing Requirements for Configuration Files
FilesYou create and access files on bootflash:. volatile:, slot0:, usb1:, and usb2: file systems. You can only access files on the system: file systems. You can use the debug: file system for debug log files specified in the debug logfile command. You can also download files, such as system image files, from remote servers using FTP, Secure Copy (SCP), Secure Shell FTP (SFTP), and TFTP.
Virtualization Support
Most file system, directory, and file configuration and operations are local to the virtual device context (VDC). One exception is formatting an external Flash device, which must be performed from the default VDC. For more information on VDCs. For more information on VDCs, see the Cisco Nexus 7000 Series NX-OS Virtual Device Context Configuration Guide, Release 4.0.
Licensing Requirements for Configuration FilesThe following table shows the licensing requirements for this feature:
Using the Tab Key for Completing FilenamesYou can use the Tab key to complete partial filenames. When you type a partial filename and then press the Tab key, the NX-OS software completes the filename if the characters you typed are unique to a single file. If the partial name is not unique, the NX-OS software lists a selection of filenames that match the characters you typed, as shown in this example:
switch# show file bootflash:e<Tab>bootflash:eem_logs bootflash:epld.tar.gz bootflash:epld.scr bootflash:eth_span.log switch# show file bootflash:e
You can then type enough characters to make the filename unique and NX-OS completes the filename for you.
Formatting External Flash DevicesYou can format an external Flash device to erase the contents from the default VDC and restore it to its factory-shipped state.
Product License Requirement
NX-OS Using the file systems, directories, and files requires no license. Any feature not included in a license package is bundled with the Cisco NX-OS system images and is provided at no extra charge to you. For a complete explanation of the NX-OS licensing scheme, see the Cisco Nexus 7000 Series NX-OS Licensing Guide, Release 4.0.
6-3Cisco Nexus 7000 Series NX-OS Fundamentals Configuration Guide, Release 4.0
OL-15317-02
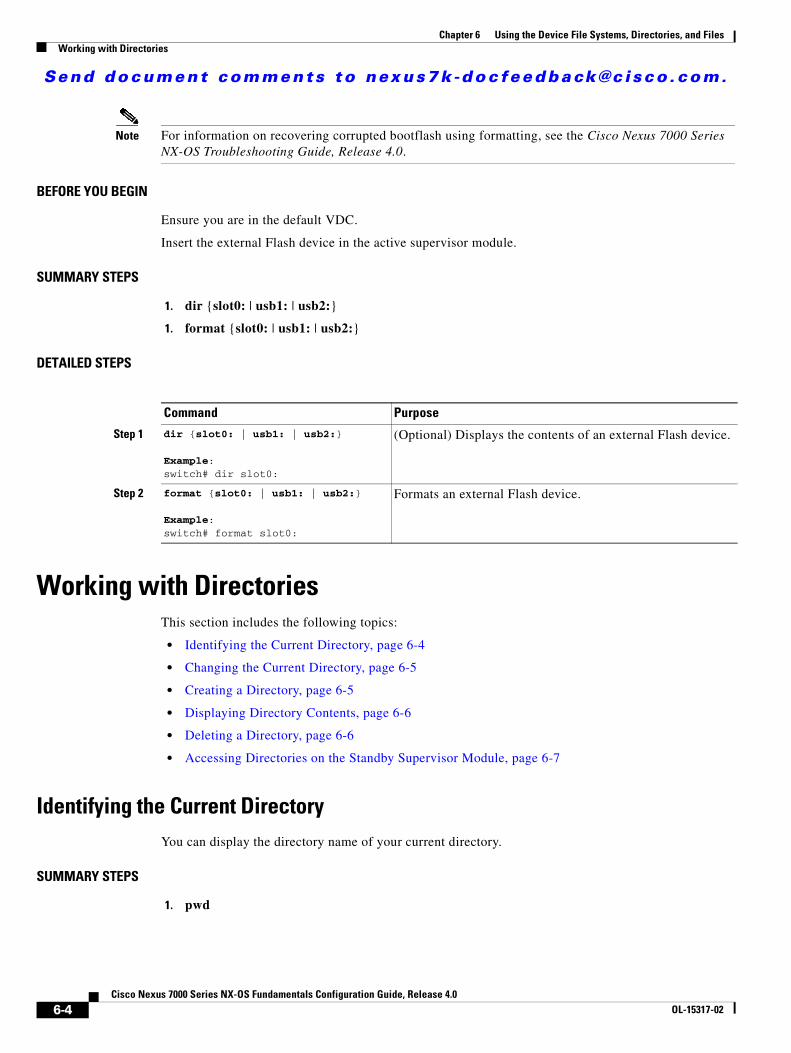
Send document comments to nexus7k -doc feedback@c i sco .com.
Chapter 6 Using the Device File Systems, Directories, and FilesWorking with Directories
Note For information on recovering corrupted bootflash using formatting, see the Cisco Nexus 7000 Series NX-OS Troubleshooting Guide, Release 4.0.
BEFORE YOU BEGIN
Ensure you are in the default VDC.
Insert the external Flash device in the active supervisor module.
SUMMARY STEPS
1. dir {slot0: | usb1: | usb2:}
1. format {slot0: | usb1: | usb2:}
DETAILED STEPS
Working with DirectoriesThis section includes the following topics:
• Identifying the Current Directory, page 6-4
• Changing the Current Directory, page 6-5
• Creating a Directory, page 6-5
• Displaying Directory Contents, page 6-6
• Deleting a Directory, page 6-6
• Accessing Directories on the Standby Supervisor Module, page 6-7
Identifying the Current Directory You can display the directory name of your current directory.
SUMMARY STEPS
1. pwd
Command Purpose
Step 1 dir {slot0: | usb1: | usb2:}
Example:switch# dir slot0:
(Optional) Displays the contents of an external Flash device.
Step 2 format {slot0: | usb1: | usb2:}
Example:switch# format slot0:
Formats an external Flash device.
6-4Cisco Nexus 7000 Series NX-OS Fundamentals Configuration Guide, Release 4.0
OL-15317-02

Send document comments to nexus7k -doc feedback@c i sco .com.
Chapter 6 Using the Device File Systems, Directories, and FilesWorking with Directories
DETAILED STEPS
Changing the Current DirectoryYou can change the current directory for file system operations. The initial default directory is bootflash:.
SUMMARY STEPS
1. pwd
2. cd {directory | filesystem:[//module/][directory]}
DETAILED STEPS
Creating a DirectoryYou can create directories in the bootflash: and Flash device file systems.
SUMMARY STEPS
1. pwd
2. cd {directory | filesystem:[//module/][directory]}
3. mkdir [filesystem:[//module/]]directory
Command Purpose
Step 1 pwd
Example:switch# pwd
Displays the name of your current default directory.
Command Purpose
Step 1 pwd
Example:switch# pwd
(Optional) Displays the name of your current default directory.
Step 2 cd {directory | filesystem:[//module/][directory]}
Example:switch# cd slot0:
Changes to a new current directory. The file system, module, and directory names are case sensitive.
6-5Cisco Nexus 7000 Series NX-OS Fundamentals Configuration Guide, Release 4.0
OL-15317-02

Send document comments to nexus7k -doc feedback@c i sco .com.
Chapter 6 Using the Device File Systems, Directories, and FilesWorking with Directories
DETAILED STEPS
Displaying Directory ContentsYou can display the contents of a directory.
SUMMARY STEPS
1. dir [filesystem:[//module/][directory]]
DETAILED STEPS
Deleting a DirectoryYou can remove directories from the file systems on your device.
BEFORE YOU BEGIN
Ensure that the directory is empty before you try to delete it (see the “Deleting Files” section on page 6-10).
SUMMARY STEPS
1. pwd
2. dir [filesystem:[//module/][directory]]
3. rmdir [filesystem:[//module/]]directory
Command Purpose
Step 1 pwd
Example:switch# pwd
(Optional) Displays the name of your current default directory.
Step 2 cd {directory | filesystem:[//module/][directory]}
Example:switch# cd slot0:
(Optional) Changes to a new current directory. The file system, module, and directory names are case sensitive.
Step 3 mkdir [filesystem:[//module/]]directory
Example:switch# mkdir test
Creates a new directory. The filesystem argument is case sensitive. The directory argument is alphanumeric, case sensitive, and has a maximum of 64 characters.
Command Purpose
Step 1 dir [directory | filesystem:[//module/][directory]]
Example:switch# dir bootflash:test
Displays the directory contents. The default is the current working directory. The file system and directory names are case sensitive.
6-6Cisco Nexus 7000 Series NX-OS Fundamentals Configuration Guide, Release 4.0
OL-15317-02

Send document comments to nexus7k -doc feedback@c i sco .com.
Chapter 6 Using the Device File Systems, Directories, and FilesWorking with Files
DETAILED STEPS
Accessing Directories on the Standby Supervisor ModuleYou can access all file systems on the standby supervisor module (remote) from a session on the active supervisor module. This feature is useful when copying files to the active supervisor modules requires similar files to exist on the standby supervisor module. To access the file systems on the standby supervisor module from a session on the active supervisor module, you specify the standby supervisor module in the path to the file using either filesystem://sup-remote/ or filesystem://sup-standby/.
Working with FilesThis section includes the following topics:
• Moving Files, page 6-8
• Copying Files, page 6-9
• Deleting Files, page 6-10
• Displaying File Contents, page 6-10
• Displaying File Checksums, page 6-11
• Compressing and Uncompressing Files, page 6-11
• Displaying the Last Lines in a File, page 6-12
• Redirecting show Command Output to a File, page 6-12
• Finding Files, page 6-12
Command Purpose
Step 1 pwd
Example:switch# pwd
(Optional) Displays the name of your current default directory.
Step 2 dir [filesystem:[//module/][directory]]
Example:switch# dir bootflash:test
(Optional) Displays the contents of the current directory. The file system, module, and directory names are case sensitive.
If the directory is not empty, you must delete all the files before you can delete the directory (see the “Deleting Files” section on page 6-10).
Step 3 rmdir [filesystem:[//module/]]directory
Example:switch# mkdir test
Deletes a directory. The file system and directory name are case sensitive.
6-7Cisco Nexus 7000 Series NX-OS Fundamentals Configuration Guide, Release 4.0
OL-15317-02

Send document comments to nexus7k -doc feedback@c i sco .com.
Chapter 6 Using the Device File Systems, Directories, and FilesWorking with Files
Moving FilesYou can move a files from one directory to another directory.
Caution If a file with the same name already exists in the destination directory, that file is overwritten by the moved file.
Tip You can use the move command to rename a file by moving the file within the same directory.
SUMMARY STEPS
1. pwd
2. dir [filesystem:[//module/][directory]]
3. move [filesystem:[//module/][directory/] | directory/]source-filename {{filesystem:[//module/][directory/] | directory/}[target-filename] | target-filename}
DETAILED STEPS
Command Purpose
Step 1 pwd
Example:switch# pwd
(Optional) Displays the name of your current default directory.
Step 2 dir [filesystem:[//module/][directory]]
Example:switch# dir bootflash
(Optional) Displays the contents of the current directory. The file system and directory name are case sensitive.
Step 3 move [filesystem:[//module/][directory/] | directory/]source-filename {{filesystem:[//module/][directory/] | directory/}[target-filename] | target-filename}
Example:switch# move test old_tests/test1
Moves a file.
The file system, module, and directory names are case sensitive.
The target-filename argument is alphanumeric, case sensitive, and has a maximum of 64 characters. If the target-filename argument is not specified, the filename defaults to the source-filename argument value.
6-8Cisco Nexus 7000 Series NX-OS Fundamentals Configuration Guide, Release 4.0
OL-15317-02

Send document comments to nexus7k -doc feedback@c i sco .com.
Chapter 6 Using the Device File Systems, Directories, and FilesWorking with Files
Copying FilesYou can make copies of files, either within the same directory or on another directory.
Note Use the dir command to ensure that enough space is available in the target file system. If enough space is not available, use the delete command to remove unneeded files.
SUMMARY STEPS
1. pwd
2. dir [filesystem:[//module/][directory]]
3. copy [filesystem:[//module/][directory/] | directory/]source-filename {{filesystem:[//module/][directory/]] | directory/}[target-filename]
DETAILED STEPS
Command Purpose
Step 1 pwd
Example:switch# pwd
(Optional) Displays the name of your current default directory.
Step 2 dir [filesystem:[//module/][directory]]
Example:switch# dir bootflash
(Optional) Displays the contents of the current directory. The file system and directory name are case sensitive.
Step 3 copy [filesystem:[//module/][directory/] | directory/]source-filename | {filesystem:[//module/][directory/]] | directory/}[target-filename]
Example:switch# move test old_tests/test1
Copies a file. The file system, module, and directory names are case sensitive. The source-filename argument is alphanumeric, case sensitive, and has a maximum of 64 characters. If the target-filename argument is not specified, the filename defaults to the source-filename argument value.
6-9Cisco Nexus 7000 Series NX-OS Fundamentals Configuration Guide, Release 4.0
OL-15317-02

Send document comments to nexus7k -doc feedback@c i sco .com.
Chapter 6 Using the Device File Systems, Directories, and FilesWorking with Files
Deleting FilesYou can delete a file or a directory and all its contents.
SUMMARY STEPS
1. dir [filesystem:[//module/][directory]]
2. delete {filesystem:[//module/][directory/] | directory/}filename
DETAILED STEPS
Displaying File ContentsYou can display the contents of a file.
SUMMARY STEPS
1. show file [filesystem:[//module/]][directory/]filename
DETAILED STEPS
Command Purpose
Step 1 dir [filesystem:[//module/][directory]]
Example:switch# dir bootflash
(Optional) Displays the contents of the current directory. The file system and directory name are case sensitive.
Step 2 delete {filesystem:[//module/][directory/] | directory/}filename
Example:switch# move test old_tests/test1
Deletes a file. The file system, module, and directory names are case sensitive. The source-filename argument is case sensitive.
Caution If you specify a directory, the delete command deletes the entire directory and all its contents.
Command Purpose
Step 1 show file [filesystem:[//module/]][directory/]filename
Example:switch# show file bootflash:test-results
Displays the file contents.
6-10Cisco Nexus 7000 Series NX-OS Fundamentals Configuration Guide, Release 4.0
OL-15317-02

Send document comments to nexus7k -doc feedback@c i sco .com.
Chapter 6 Using the Device File Systems, Directories, and FilesWorking with Files
Displaying File ChecksumsYou can display checksums to check the file integrity.
SUMMARY STEPS
1. show file [filesystem:[//module/]][directory/]filename {cksum | md5sum}
DETAILED STEPS
Compressing and Uncompressing FilesYou can compress and uncompress files on your NX-OS device using Lempel-Ziv 1977 (LZ77) coding.
SUMMARY STEPS
1. dir [filesystem:[//module/][directory]]
2. gzip [filesystem:[//module/][directory/] | directory/]filename
gunzip [filesystem:[//module/][directory/] | directory/]filename.gz
DETAILED STEPS
Command Purpose
Step 1 show file [filesystem:[//module/]][directory/]filename {cksum | md5sum}
Example:switch# show file bootflash:trunks2.cfg cksum
Displays the checksum or MD5 checksum of the file.
Command Purpose
Step 1 dir [filesystem:[//module/][directory]]
Example:switch# dir bootflash
(Optional) Displays the contents of the current directory. The file system and directory name are case sensitive.
Step 2 gzip [filesystem:[//module/][directory/] | directory/]filename
Example:switch# gzip show_tech
Compresses a file. After the file is compressed, it has a .gz prefix.
gunzip [filesystem:[//module/][directory/] | directory/]filename.gz
Example:switch# gunzip show_tech.gz
Uncompresses a file. The file to uncompress must have the .gz prefix. After the file is uncompressed, it does not have the .gz prefix.
6-11Cisco Nexus 7000 Series NX-OS Fundamentals Configuration Guide, Release 4.0
OL-15317-02
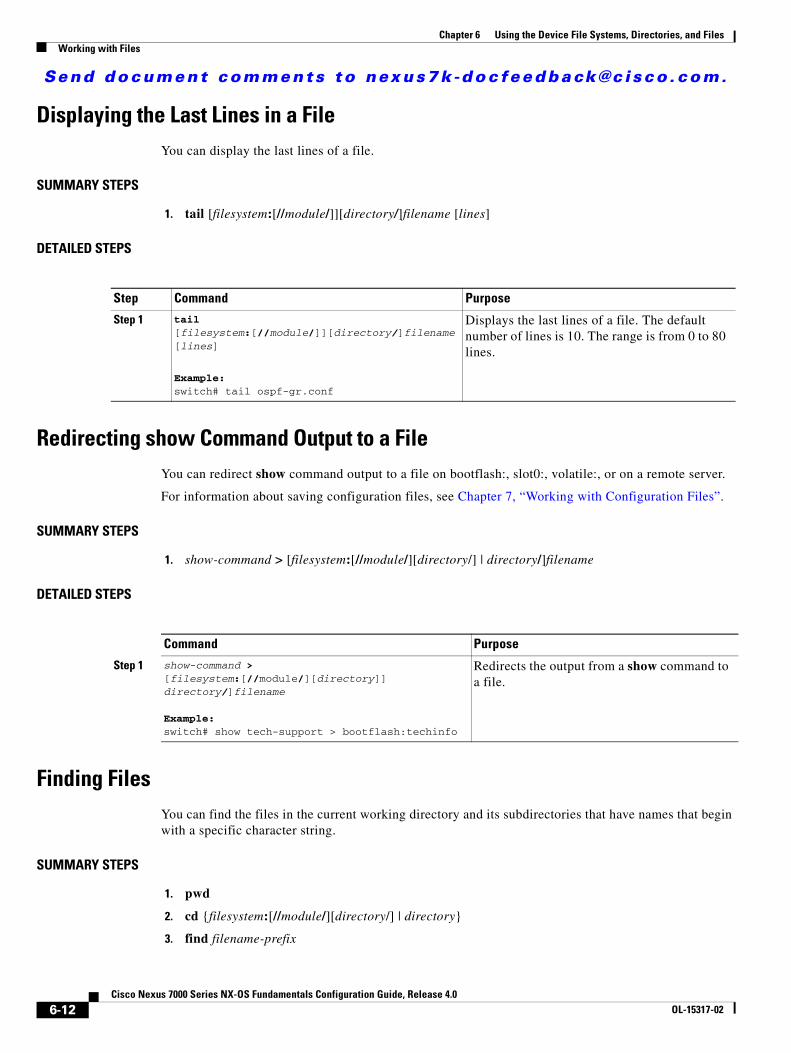
Send document comments to nexus7k -doc feedback@c i sco .com.
Chapter 6 Using the Device File Systems, Directories, and FilesWorking with Files
Displaying the Last Lines in a FileYou can display the last lines of a file.
SUMMARY STEPS
1. tail [filesystem:[//module/]][directory/]filename [lines]
DETAILED STEPS
Redirecting show Command Output to a FileYou can redirect show command output to a file on bootflash:, slot0:, volatile:, or on a remote server.
For information about saving configuration files, see Chapter 7, “Working with Configuration Files”.
SUMMARY STEPS
1. show-command > [filesystem:[//module/][directory/] | directory/]filename
DETAILED STEPS
Finding FilesYou can find the files in the current working directory and its subdirectories that have names that begin with a specific character string.
SUMMARY STEPS
1. pwd
2. cd {filesystem:[//module/][directory/] | directory}
3. find filename-prefix
Step Command Purpose
Step 1 tail [filesystem:[//module/]][directory/]filename [lines]
Example:switch# tail ospf-gr.conf
Displays the last lines of a file. The default number of lines is 10. The range is from 0 to 80 lines.
Command Purpose
Step 1 show-command > [filesystem:[//module/][directory]] directory/]filename
Example:switch# show tech-support > bootflash:techinfo
Redirects the output from a show command to a file.
6-12Cisco Nexus 7000 Series NX-OS Fundamentals Configuration Guide, Release 4.0
OL-15317-02

Send document comments to nexus7k -doc feedback@c i sco .com.
Chapter 6 Using the Device File Systems, Directories, and FilesExamples of Using the File System
DETAILED STEPS
Examples of Using the File SystemThis section includes the following topics:
• Accessing Directories on Standby Supervisor Modules, page 6-13
• Moving Files, page 6-14
• Copying Files, page 6-14
• Deleting Files, page 6-14
• Displaying File Contents, page 6-15
• Displaying File Contents, page 6-15
• Displaying File Checksums, page 6-15
• Compressing and Uncompressing Files, page 6-15
Accessing Directories on Standby Supervisor ModulesThis example shows how to list the files on the standby supervisor module:
switch# dir bootflash://sup-remote 12198912 Aug 27 16:29:18 2003 m9500-sf1ek9-kickstart-mzg.1.3.0.39a.bin 1864931 Apr 29 12:41:59 2003 dplug2 12288 Apr 18 20:23:11 2003 lost+found/ 12097024 Nov 21 16:34:18 2003 m9500-sf1ek9-kickstart-mz.1.3.1.1.bin 41574014 Nov 21 16:34:47 2003 m9500-sf1ek9-mz.1.3.1.1.binUsage for bootflash://sup-remote 67747169 bytes used 116812447 bytes free 184559616 bytes total
This example shows how to delete a file on the standby supervisor module:
switch# delete bootflash://sup-remote/aOldConfig.txt
Command Purpose
Step 1 pwd
Example:switch# pwd
(Optional) Displays the name of your current default directory.
Step 2 cd {filesystem:[//module/][directory]} directory}
Example:switch# cd bootflash:test_scripts
(Optional) Changes the default directory.
Step 3 find filename-prefix
Example:switch# find bgp_script
Finds all filenames in the default directory and in its subdirectories beginning with the filename prefix. The filename prefix is case sensitive.
6-13Cisco Nexus 7000 Series NX-OS Fundamentals Configuration Guide, Release 4.0
OL-15317-02
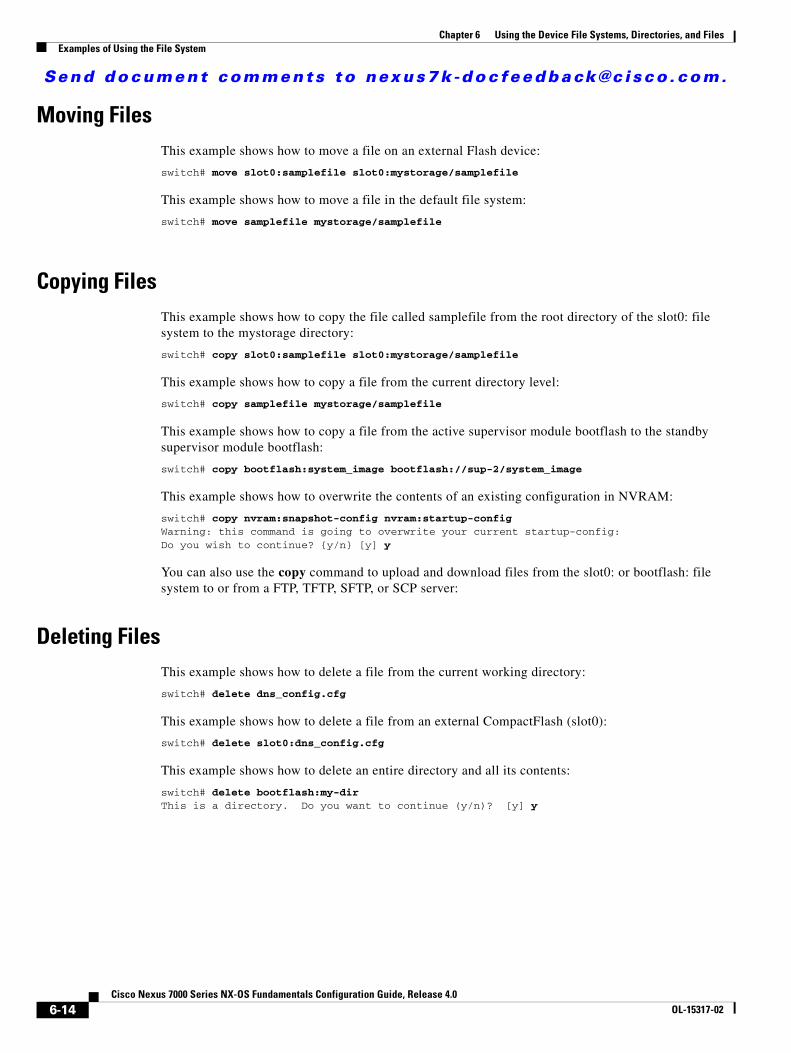
Send document comments to nexus7k -doc feedback@c i sco .com.
Chapter 6 Using the Device File Systems, Directories, and FilesExamples of Using the File System
Moving FilesThis example shows how to move a file on an external Flash device:
switch# move slot0:samplefile slot0:mystorage/samplefile
This example shows how to move a file in the default file system:
switch# move samplefile mystorage/samplefile
Copying FilesThis example shows how to copy the file called samplefile from the root directory of the slot0: file system to the mystorage directory:
switch# copy slot0:samplefile slot0:mystorage/samplefile
This example shows how to copy a file from the current directory level:
switch# copy samplefile mystorage/samplefile
This example shows how to copy a file from the active supervisor module bootflash to the standby supervisor module bootflash:
switch# copy bootflash:system_image bootflash://sup-2/system_image
This example shows how to overwrite the contents of an existing configuration in NVRAM:
switch# copy nvram:snapshot-config nvram:startup-configWarning: this command is going to overwrite your current startup-config:Do you wish to continue? {y/n} [y] y
You can also use the copy command to upload and download files from the slot0: or bootflash: file system to or from a FTP, TFTP, SFTP, or SCP server:
Deleting FilesThis example shows how to delete a file from the current working directory:
switch# delete dns_config.cfg
This example shows how to delete a file from an external CompactFlash (slot0):
switch# delete slot0:dns_config.cfg
This example shows how to delete an entire directory and all its contents:
switch# delete bootflash:my-dirThis is a directory. Do you want to continue (y/n)? [y] y
6-14Cisco Nexus 7000 Series NX-OS Fundamentals Configuration Guide, Release 4.0
OL-15317-02

Send document comments to nexus7k -doc feedback@c i sco .com.
Chapter 6 Using the Device File Systems, Directories, and FilesExamples of Using the File System
Displaying File ContentsThis example displays the contents of a file on an external Flash device:
switch# show file slot0:testconfig tInt fc1/1no shutendshow int fc1/1
This example displays the contents of a file residing in the current directory:
switch# show file myfile
Displaying File ChecksumsThis example shows how to display the checksum of a file:
switch# show file bootflash:trunks2.cfg cksum583547619
This example shows how to display the MD5 checksum of a file:
switch# show file bootflash:trunks2.cfg md5sum3b94707198aabefcf46459de10c9281c
Compressing and Uncompressing FilesThis example shows how to compress a file:
switch# dir 1525859 Jul 04 00:51:03 2003 Samplefile...switch# gzip volatile:Samplefileswitch# dir 266069 Jul 04 00:51:03 2003 Samplefile.gz...
This example shows how to uncompress a compressed file:
switch# dir 266069 Jul 04 00:51:03 2003 Samplefile.gz...switch# gunzip samplefileswitch# dir 1525859 Jul 04 00:51:03 2003 Samplefile...
Redirecting show Command OutputThis example shows how to direct the output to a file on the bootflash: file system:
switch# show interface > bootflash:switch1-intf.cfg
6-15Cisco Nexus 7000 Series NX-OS Fundamentals Configuration Guide, Release 4.0
OL-15317-02

Send document comments to nexus7k -doc feedback@c i sco .com.
Chapter 6 Using the Device File Systems, Directories, and FilesDefault Settings
This example shows how to direct the output to a file on external Flash memory:
switch# show interface > slot0:switch-intf.cfg
This example shows how to direct the output to a file on a TFTP server:
switch# show interface > tftp://10.10.1.1/home/configs/switch-intf.cfgPreparing to copy...done
This example directs the output of the show tech-support command to a file:
switch# show tech-support > SamplefileBuilding Configuration ...switch# dir 1525859 Jul 04 00:51:03 2003 SamplefileUsage for volatile:// 1527808 bytes used 19443712 bytes free 20971520 bytes total
Finding FilesThis example shows how to find a file in the current default directory:
switch# find smm_shm.cfg/usr/bin/find: ./lost+found: Permission denied./smm_shm.cfg./newer-fs/isan/etc/routing-sw/smm_shm.cfg./newer-fs/isan/etc/smm_shm.cfg
Default SettingsTable 6-2 lists the default settings for the file system parameters.
Table 6-2 Default File System Settings
Parameters Default
Default filesystem bootflash:
6-16Cisco Nexus 7000 Series NX-OS Fundamentals Configuration Guide, Release 4.0
OL-15317-02
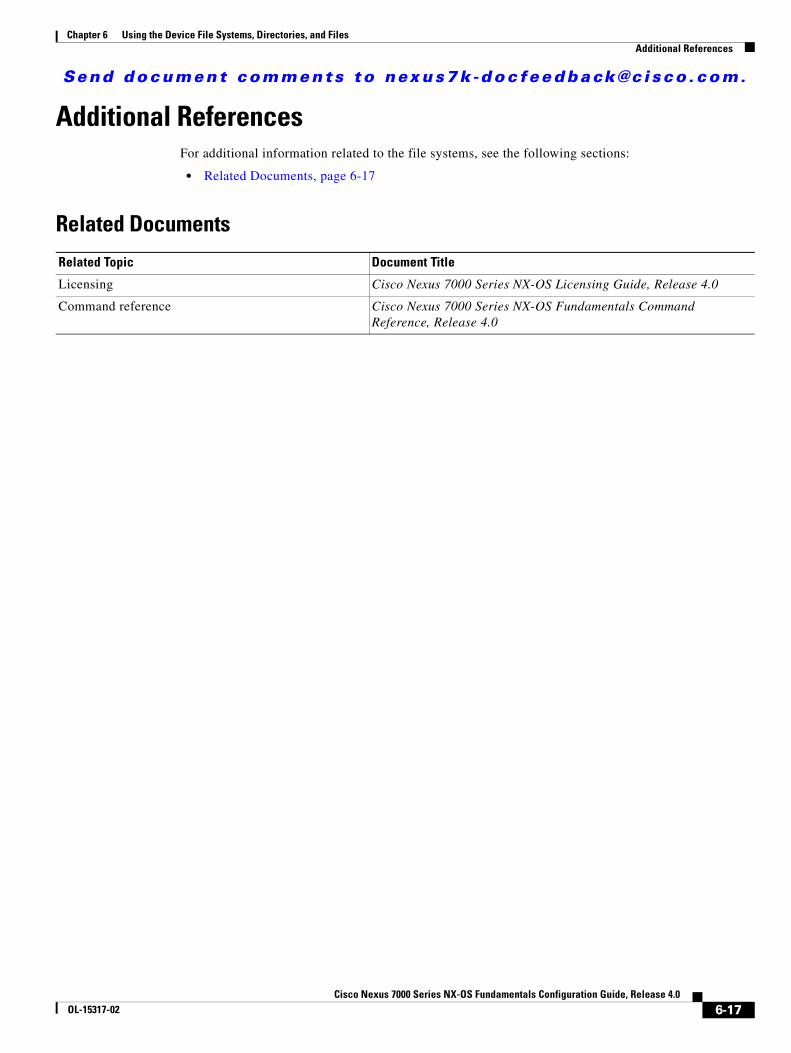
Send document comments to nexus7k -doc feedback@c i sco .com.
Chapter 6 Using the Device File Systems, Directories, and FilesAdditional References
Additional ReferencesFor additional information related to the file systems, see the following sections:
• Related Documents, page 6-17
Related Documents
Related Topic Document Title
Licensing Cisco Nexus 7000 Series NX-OS Licensing Guide, Release 4.0
Command reference Cisco Nexus 7000 Series NX-OS Fundamentals Command Reference, Release 4.0
6-17Cisco Nexus 7000 Series NX-OS Fundamentals Configuration Guide, Release 4.0
OL-15317-02

Send document comments to nexus7k -doc feedback@c i sco .com.
Chapter 6 Using the Device File Systems, Directories, and FilesAdditional References
6-18Cisco Nexus 7000 Series NX-OS Fundamentals Configuration Guide, Release 4.0
OL-15317-02

Send document comments to nexus7k -doc feedback@c i sco .com.
Cisco Nexus 7000 Series NXOL-15317-02
C H A P T E R 7
Working with Configuration FilesThis chapter describes how to work with configuration files on the Cisco NX-OS device.
This chapter includes the following sections:
• Information About Configuration Files, page 7-1
• Licensing Requirements for Configuration Files, page 7-2
• Managing Configuration Files, page 7-2
• Verifying the Device Configuration, page 7-12
• Examples of Working With Configuration Files, page 7-12
• Additional References, page 7-13
Information About Configuration FilesConfiguration files contain the Cisco NX-OS software commands used to configure the features on a Cisco NX-OS device. Commands are parsed (translated and executed) by the Cisco NX-OS software when the system is booted (from the startup-config file) or when you enter commands at the CLI in a configuration mode.
To change the startup configuration file, you can either save the running-configuration file to the startup configuration using the copy running-config startup-config command or copy a configuration file from a file server to the startup configuration (see the “Copying a Configuration File to a Remote Server” section on page 7-3).
This section includes the following topics:
• Types of Configuration Files, page 7-1
• Virtualization Support, page 7-2
Types of Configuration FilesThe Cisco NX-OS software has two types of configuration files, running configuration and startup configuration. The device uses the startup configuration (startup-config) during device startup to configure the software features. The running configuration (running-config) contains the current changes that you make to the startup-configuration file. The two configuration files can be different. You may want to change the device configuration for a short time period rather than permanently. In this case, you would change the running configuration by using commands in global configuration mode but not save the changes to the startup configuration.
7-1-OS Fundamentals Configuration Guide, Release 4.0

Send document comments to nexus7k -doc feedback@c i sco .com.
Chapter 7 Working with Configuration FilesLicensing Requirements for Configuration Files
To change the running configuration, use the configure terminal command to enter global configuration mode. As you use the Cisco NX-OS configuration modes, commands generally are executed immediately and are saved to the running configuration file either immediately after you enter them or when you exit a configuration mode. For information about configuration modes, see Chapter 3, “Understanding the CLI.”
To change the startup-configuration file, you can either save the running configuration file to the startup configuration (see the “Saving the Running Configuration to the Startup Configuration” section on page 7-3) or download a configuration file from a file server to the startup configuration (see the “Downloading the Startup Configuration From a Remote Server” section on page 7-5).
Virtualization Support
Except for removing the configuration for a missing module, the configuration file operations are local to the virtual device context (VDC). You can remove the missing module configuration only from the default VDC. For more information on VDCs, see the Cisco Nexus 7000 Series NX-OS Virtual Device Con-text Configuration Guide, Release 4.0.
Licensing Requirements for Configuration FilesThe following table shows the licensing requirements for this feature:
Managing Configuration FilesThis section describes how to manage configuration files and includes the following topics:
• Saving the Running Configuration to the Startup Configuration, page 7-3
• Copying a Configuration File to a Remote Server, page 7-3
• Downloading the Running Configuration From a Remote Server, page 7-4
• Downloading the Startup Configuration From a Remote Server, page 7-5
• Copying Configuration Files to an External Flash Memory Device, page 7-6
• Copying the Running Configuration From an External Flash Memory Device, page 7-7
• Copying the Startup Configuration From an External Flash Memory Device, page 7-8
• Copying Configuration Files to an Internal File System, page 7-8
• Rolling Back to a Previous Configuration, page 7-9
• Removing the Configuration for a Missing Module, page 7-10
• Erasing Device Configurations, page 7-11
Product License Requirement
NX-OS Configuration files require no license. Any feature not included in a license package is bundled with the Cisco NX-OS system images and is provided at no extra charge to you. For a complete explanation of the NX-OS licensing scheme, see the Cisco Nexus 7000 Series NX-OS Licensing Guide, Release 4.0.
7-2Cisco Nexus 7000 Series NX-OS Fundamentals Configuration Guide, Release 4.0
OL-15317-02
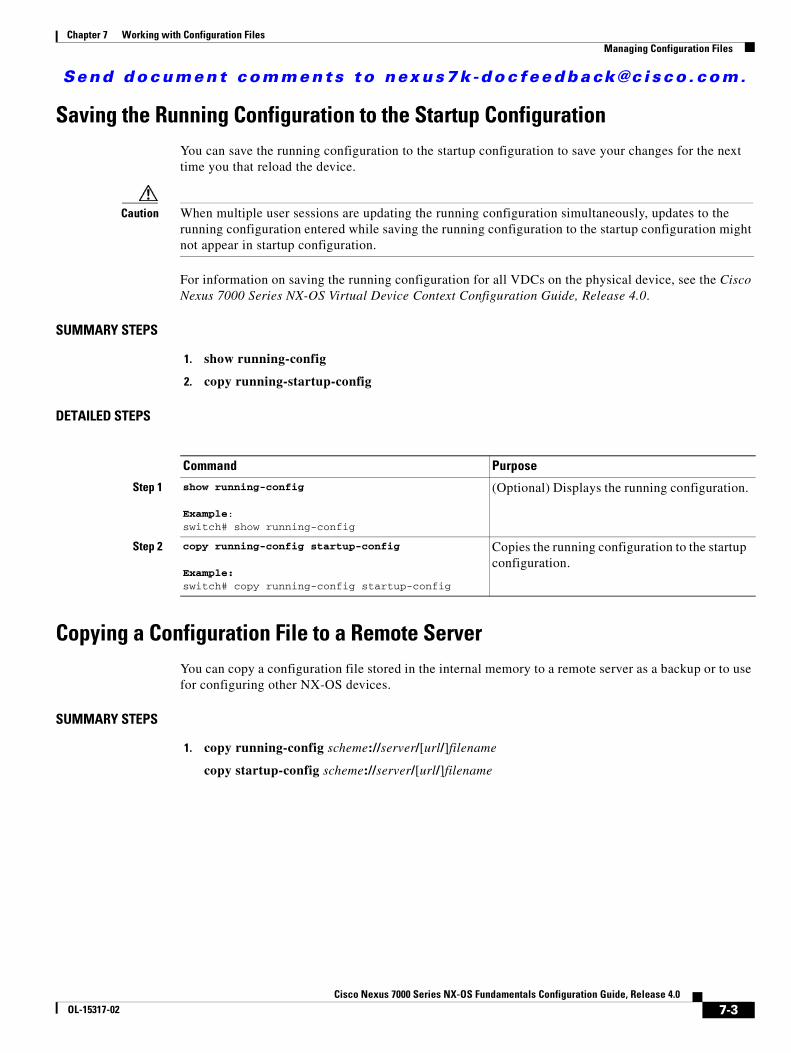
Send document comments to nexus7k -doc feedback@c i sco .com.
Chapter 7 Working with Configuration FilesManaging Configuration Files
Saving the Running Configuration to the Startup ConfigurationYou can save the running configuration to the startup configuration to save your changes for the next time you that reload the device.
Caution When multiple user sessions are updating the running configuration simultaneously, updates to the running configuration entered while saving the running configuration to the startup configuration might not appear in startup configuration.
For information on saving the running configuration for all VDCs on the physical device, see the Cisco Nexus 7000 Series NX-OS Virtual Device Context Configuration Guide, Release 4.0.
SUMMARY STEPS
1. show running-config
2. copy running-startup-config
DETAILED STEPS
Copying a Configuration File to a Remote ServerYou can copy a configuration file stored in the internal memory to a remote server as a backup or to use for configuring other NX-OS devices.
SUMMARY STEPS
1. copy running-config scheme://server/[url/]filename
copy startup-config scheme://server/[url/]filename
Command Purpose
Step 1 show running-config
Example:switch# show running-config
(Optional) Displays the running configuration.
Step 2 copy running-config startup-config
Example:switch# copy running-config startup-config
Copies the running configuration to the startup configuration.
7-3Cisco Nexus 7000 Series NX-OS Fundamentals Configuration Guide, Release 4.0
OL-15317-02

Send document comments to nexus7k -doc feedback@c i sco .com.
Chapter 7 Working with Configuration FilesManaging Configuration Files
DETAILED STEPS
Downloading the Running Configuration From a Remote ServerYou can configure your NX-OS device by using configuration files that you created on another Cisco NX-OS device and uploaded to a remote server. You then download the file from the remote server to your device using TFTP, FTP, Secure Copy (SCP), or Secure Shell FTP (SFTP) to the running configuration. For more information on copying files, see the “Copying Files” section on page 6-9.
BEFORE YOU BEGIN
Ensure that the configuration file that you want to download is in the correct directory on the remote server.
Ensure that the permissions on the file are set correctly. Permissions on the file should be set to world-read.
Ensure that your NX-OS device has a route to the remote server. The NX-OS device and the remote server must be in the same subnetwork if you do not have a router or a default gateway to route traffic between subnets.
Check connectivity to the remote server using the ping or ping6 command.
SUMMARY STEPS
1. copy scheme://server/[url/]filename running-config
2. show running-config
3. copy running-config startup-config
4. show startup-config
Command Purpose
Step 1 copy running-config scheme://server/[url/]filename
Example:switch# copy running-config tftp://10.10.1.1/sw1-run-config.bak
Copies the running-configuration file to a remote server.
For the scheme argument, you can enter tftp:, ftp:, scp:, or sftp:. The server argument is the address or name of the remote server, and the url argument is the path to the source file on the remote server.
The server, url, and filename arguments are case sensitive.
copy startup-config scheme://server/[url/]filename
Example:switch# copy startup-config tftp://10.10.1.1/sw1-start-config.bak
Copies the startup-configuration file to a remote server.
For the scheme argument, you can enter tftp:, ftp:, scp:, or sftp:. The server argument is the address or name of the remote server, and the url argument is the path to the source file on the remote server.
The server, url, and filename arguments are case sensitive.
7-4Cisco Nexus 7000 Series NX-OS Fundamentals Configuration Guide, Release 4.0
OL-15317-02

Send document comments to nexus7k -doc feedback@c i sco .com.
Chapter 7 Working with Configuration FilesManaging Configuration Files
DETAILED STEPS
Downloading the Startup Configuration From a Remote ServerYou can configure your NX-OS device by using configuration files that you created on another Cisco NX-OS device and uploaded to a remote server. You then download the file from the remote server to your device using TFTP, FTP, Secure Copy (SCP), or Secure Shell FTP (SFTP) to the startup configuration. For more information on copying files, see the “Copying Files” section on page 6-9.
BEFORE YOU BEGIN
Ensure that the configuration file you that want to download is in the correct directory on the remote server.
Ensure that the permissions on the file are set correctly. Permissions on the file should be set to world-read.
Ensure that your NX-OS device has a route to the remote server. The NX-OS device and the remote server must be in the same subnetwork if you do not have a router or a default gateway to route traffic between subnets.
Check connectivity to the remote server using the ping or ping6 command.
SUMMARY STEPS
1. copy scheme://server/[url/]filename startup-config
2. show startup-config
Command Purpose
Step 1 copy scheme://server/[url/]filename running-config
Example:switch# copy tftp://10.10.1.1/my-config running-config
Downloads the running-configuration file from a remote server.
For the scheme argument, you can enter tftp:, ftp:, scp:, or sftp:. The server argument is the address or name of the remote server, and the url argument is the path to the source file on the remote server.
The server, url, and filename arguments are case sensitive.
Step 2 show running-config
Example:switch# show running-config
(Optional) Displays the running configuration.
Step 3 copy running-config startup-config
Example:switch# copy running-config startup-config
(Optional) Copies the running configuration to the startup configuration.
Step 4 show startup-config
Example:switch# show startup-config
(Optional) Displays the startup configuration.
7-5Cisco Nexus 7000 Series NX-OS Fundamentals Configuration Guide, Release 4.0
OL-15317-02

Send document comments to nexus7k -doc feedback@c i sco .com.
Chapter 7 Working with Configuration FilesManaging Configuration Files
DETAILED STEPS
Copying Configuration Files to an External Flash Memory DeviceYou can copy configuration files to an external Flash memory device as a backup for later use.
BEFORE YOU BEGIN
Insert the external Flash memory device into the active supervisor module.
SUMMARY STEPS
1. dir {slot0: | usb1: | usb2:}[directory/]
2. copy running-config {slot0: | usb1: | usb2:}[directory/]filename
copy startup-config {slot0: | usb1: | usb2:}[directory/]filename
DETAILED STEPS
Command Purpose
Step 1 copy scheme://server/[url/]filename startup-config
Example:switch# copy tftp://10.10.1.1/my-config startup-config
Downloads the running-configuration file from a remote server.
For the scheme argument, you can enter is tftp:, ftp:, scp:, or sftp:. The server argument is the address or name of the remote server, and the url argument is the path to the source file on the remote server.
The server, url, and filename arguments are case sensitive.
Step 2 show startup-config
Example:switch# show startup-config
(Optional) Displays the running configuration.
Command Purpose
Step 1 dir {slot0: | usb1: | usb2:}[directory/] (Optional) Displays the files on the external Flash memory device.
Step 2 copy running-config {slot0: | usb1: | usb2:}[directory/]filename
Example:switch# copy running-config slot0:dsn-running-config.cfg
Copies the running configuration to an external Flash memory device. The filename argument is case sensitive.
Step 3 copy startup-config {slot0: | usb1: | usb2:}[directory/]filename
Example:switch# copy startup-config slot0:dsn-startup-config.cfg
Copies the startup configuration to an external Flash memory device. The filename argument is case sensitive.
7-6Cisco Nexus 7000 Series NX-OS Fundamentals Configuration Guide, Release 4.0
OL-15317-02
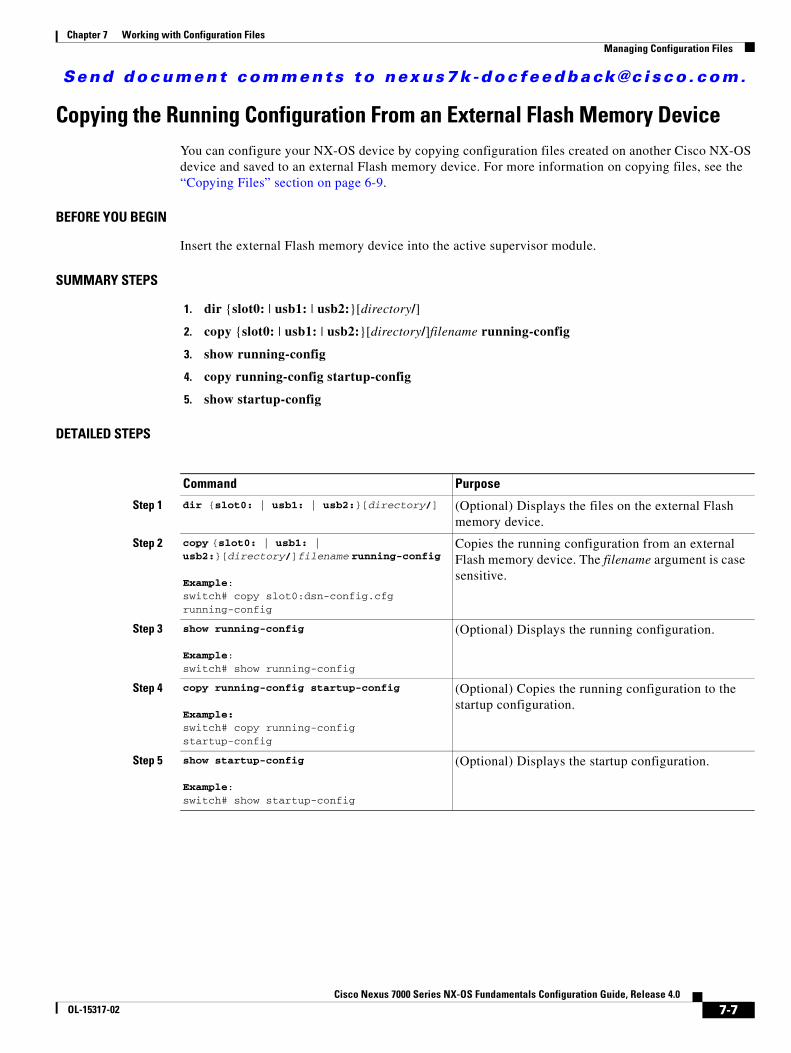
Send document comments to nexus7k -doc feedback@c i sco .com.
Chapter 7 Working with Configuration FilesManaging Configuration Files
Copying the Running Configuration From an External Flash Memory DeviceYou can configure your NX-OS device by copying configuration files created on another Cisco NX-OS device and saved to an external Flash memory device. For more information on copying files, see the “Copying Files” section on page 6-9.
BEFORE YOU BEGIN
Insert the external Flash memory device into the active supervisor module.
SUMMARY STEPS
1. dir {slot0: | usb1: | usb2:}[directory/]
2. copy {slot0: | usb1: | usb2:}[directory/]filename running-config
3. show running-config
4. copy running-config startup-config
5. show startup-config
DETAILED STEPS
Command Purpose
Step 1 dir {slot0: | usb1: | usb2:}[directory/] (Optional) Displays the files on the external Flash memory device.
Step 2 copy {slot0: | usb1: | usb2:}[directory/]filename running-config
Example:switch# copy slot0:dsn-config.cfg running-config
Copies the running configuration from an external Flash memory device. The filename argument is case sensitive.
Step 3 show running-config
Example:switch# show running-config
(Optional) Displays the running configuration.
Step 4 copy running-config startup-config
Example:switch# copy running-config startup-config
(Optional) Copies the running configuration to the startup configuration.
Step 5 show startup-config
Example:switch# show startup-config
(Optional) Displays the startup configuration.
7-7Cisco Nexus 7000 Series NX-OS Fundamentals Configuration Guide, Release 4.0
OL-15317-02
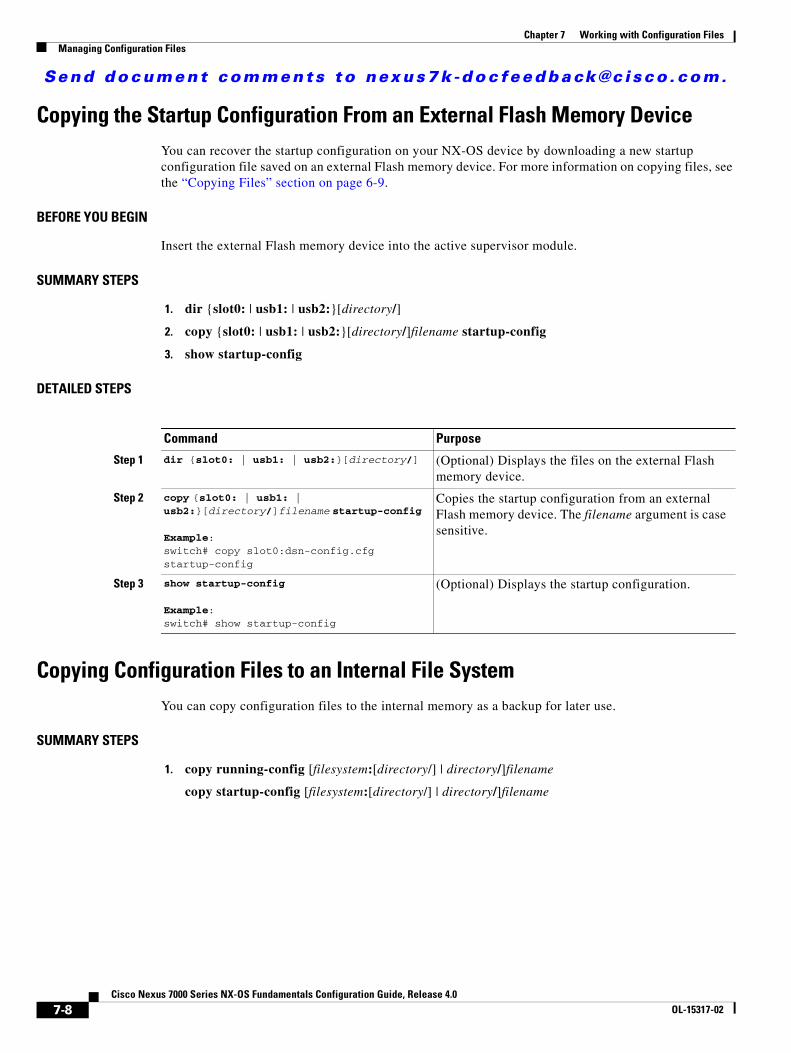
Send document comments to nexus7k -doc feedback@c i sco .com.
Chapter 7 Working with Configuration FilesManaging Configuration Files
Copying the Startup Configuration From an External Flash Memory DeviceYou can recover the startup configuration on your NX-OS device by downloading a new startup configuration file saved on an external Flash memory device. For more information on copying files, see the “Copying Files” section on page 6-9.
BEFORE YOU BEGIN
Insert the external Flash memory device into the active supervisor module.
SUMMARY STEPS
1. dir {slot0: | usb1: | usb2:}[directory/]
2. copy {slot0: | usb1: | usb2:}[directory/]filename startup-config
3. show startup-config
DETAILED STEPS
Copying Configuration Files to an Internal File SystemYou can copy configuration files to the internal memory as a backup for later use.
SUMMARY STEPS
1. copy running-config [filesystem:[directory/] | directory/]filename
copy startup-config [filesystem:[directory/] | directory/]filename
Command Purpose
Step 1 dir {slot0: | usb1: | usb2:}[directory/] (Optional) Displays the files on the external Flash memory device.
Step 2 copy {slot0: | usb1: | usb2:}[directory/]filename startup-config
Example:switch# copy slot0:dsn-config.cfg startup-config
Copies the startup configuration from an external Flash memory device. The filename argument is case sensitive.
Step 3 show startup-config
Example:switch# show startup-config
(Optional) Displays the startup configuration.
7-8Cisco Nexus 7000 Series NX-OS Fundamentals Configuration Guide, Release 4.0
OL-15317-02

Send document comments to nexus7k -doc feedback@c i sco .com.
Chapter 7 Working with Configuration FilesManaging Configuration Files
DETAILED STEPS
Rolling Back to a Previous ConfigurationProblems, such as memory corruption, can occur that make it necessary for you to recover your configuration from a backed up version.
Note Each time that you enter a copy running-config startup-config command, a binary file is created and the ASCII file is updated. A valid binary configuration file reduces the overall boot time significantly. A binary file cannot be uploaded, but its contents can be used to overwrite the existing startup configuration. The write erase command clears the binary file.
SUMMARY STEPS
1. copy [filesystem:[directory/] | directory/]backup-filename running-config
copy [filesystem:[directory/] | directory/]backup-filename startup-config
DETAILED STEPS
Command Purpose
Step 1 copy running-config [filesystem:][directory/] | directory/]filename
Example:switch# copy running-config bootflash:sw1-run-config.bak
Copies the running-configuration file to a remote server.
The filesystem, directory, and filename arguments are case sensitive.
copy startup-config [filesystem:][directory/] | directory/]filename
Example:switch# copy startup-config bootflash:sw1-start-config.bak
Copies the startup-configuration file to a remote server.
The filesystem, directory, and filename arguments are case sensitive.
Command Purpose
Step 1 copy [filesystem:][directory/] | directory/]backup-filename running-config
Example:switch# copy booflash:run-config.bak running-config
Copies a backed-up configuration to the running configuration.
The filesystem, directory, and backup-filename arguments are case sensitive.
copy [filesystem:[directory/] | directory/]backup-filename startup-config
Example:switch# copy bootflash:start-config.bak startup-config
Copies a backed-up configuration to the startup configuration.
The filesystem, directory, and backup-filename arguments are case sensitive.
7-9Cisco Nexus 7000 Series NX-OS Fundamentals Configuration Guide, Release 4.0
OL-15317-02

Send document comments to nexus7k -doc feedback@c i sco .com.
Chapter 7 Working with Configuration FilesManaging Configuration Files
Removing the Configuration for a Missing ModuleWhen you remove an I/O module from the chassis, you can also remove the configuration for that module from the running configuration. You can only remove the configuration for a missing module from the default VDC.
Note You can only remove the configuration for an empty slot in the chassis.
BEFORE YOU BEGIN
Ensure that you are in the default VDC.
Remove the I/O module from the chassis.
SUMMARY STEPS
1. show hardware
2. purge module slot running-config
3. copy running-config startup-config
DETAILED STEPS
Command Purpose
Step 1 show hardware
Example:switch# show hardware
(Optional) Displays the installed hardware for the device.
Step 2 purge module slot running-config
Example:switch# purge module 3 running-config
Removes the configuration for a missing module from the running configuration.
Step 3 copy running-config startup-config
Example:switch# copy running-config startup-config
(Optional) Copies the running configuration to the startup configuration.
7-10Cisco Nexus 7000 Series NX-OS Fundamentals Configuration Guide, Release 4.0
OL-15317-02

Send document comments to nexus7k -doc feedback@c i sco .com.
Chapter 7 Working with Configuration FilesManaging Configuration Files
Erasing Device ConfigurationsYou can erase the configuration on your device to return to the factory defaults.
You can erase the following configuration files saved in the persistent memory on the device:
• Startup
• Boot
• Debug
Note The write erase command erases the entire startup configuration, except for the following:
• Boot variable definitions
• The IPv4 configuration on the mgmt0 interface, including the following:
– Address
– Subnet mask
– Route address in the management VRF
To remove the boot variable definitions and the IPv4 configuration on the mgmt0 interface, use the write erase boot command.
SUMMARY STEPS
1. write erase [boot | debug]
DETAILED STEPS
Command Purpose
Step 1 write erase [boot | debug]
Example:
switch# write eraseWarning: This command will erase the startup-configuration.Do you wish to proceed anyway? (y/n) [n] y
Erases configurations in persistent memory. The default action erases the startup configuration.
The boot option erases the boot variable definitions and the IPv4 configuration on the mgmt0 interface.
The debug option erases the debugging configuration.
By default, the loader and debug configurations are not erased.
Note The running configuration file is not affected by this command.
7-11Cisco Nexus 7000 Series NX-OS Fundamentals Configuration Guide, Release 4.0
OL-15317-02

Send document comments to nexus7k -doc feedback@c i sco .com.
Chapter 7 Working with Configuration FilesVerifying the Device Configuration
Verifying the Device ConfigurationTo verify the device configuration, perform one of the following tasks:
Examples of Working With Configuration FilesThis section includes the following topics:
• Copying Configuration Files, page 7-12
• Backing Up Configuration Files, page 7-12
• Rolling Back to a Previous Configuration, page 7-13
Copying Configuration FilesThis example shows how to overwrite the contents of an existing configuration in NVRAM:
switch# copy nvram:snapshot-config nvram:startup-configWarning: this command is going to overwrite your current startup-config.Do you wish to continue? {y/n} [y] y
This example shows how to copy a running configuration to the bootflash: file system:
switch# copy system:running-config bootflash:my-config
Backing Up Configuration FilesThis example shows how to create a snapshot of the startup configuration in a predefined location on the device (binary file):
switch# copy startup-config nvram:snapshot-config
This example shows how to back up the startup configuration to the bootflash: file system (ASCII file):
switch# copy startup-config bootflash:my-config
This example shows how to back up the startup configuration to the TFTP server (ASCII file):
switch# copy startup-config tftp://172.16.10.100/my-config
This example shows how to back up the running configuration to the bootflash: file system (ASCII file):
switch# copy running-config bootflash:my-config
Command Purpose
show running-config Displays the running configuration.
show startup-config Displays the startup configuration.
7-12Cisco Nexus 7000 Series NX-OS Fundamentals Configuration Guide, Release 4.0
OL-15317-02
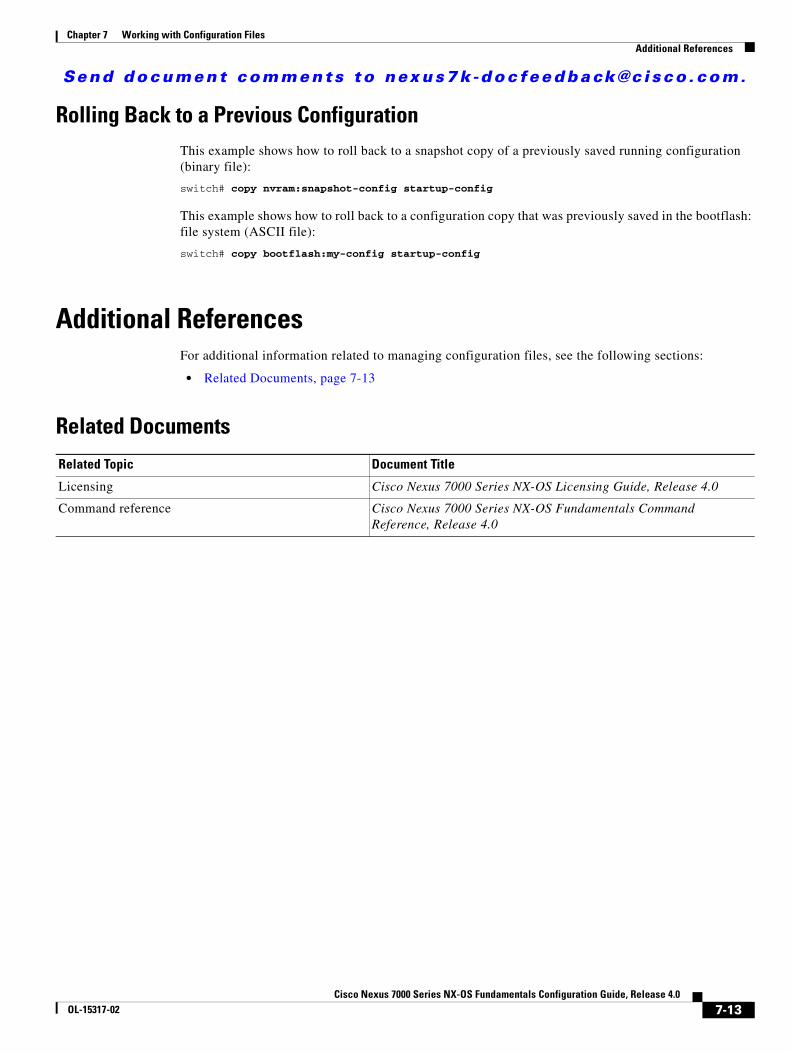
Send document comments to nexus7k -doc feedback@c i sco .com.
Chapter 7 Working with Configuration FilesAdditional References
Rolling Back to a Previous ConfigurationThis example shows how to roll back to a snapshot copy of a previously saved running configuration (binary file):
switch# copy nvram:snapshot-config startup-config
This example shows how to roll back to a configuration copy that was previously saved in the bootflash: file system (ASCII file):
switch# copy bootflash:my-config startup-config
Additional ReferencesFor additional information related to managing configuration files, see the following sections:
• Related Documents, page 7-13
Related Documents
Related Topic Document Title
Licensing Cisco Nexus 7000 Series NX-OS Licensing Guide, Release 4.0
Command reference Cisco Nexus 7000 Series NX-OS Fundamentals Command Reference, Release 4.0
7-13Cisco Nexus 7000 Series NX-OS Fundamentals Configuration Guide, Release 4.0
OL-15317-02

Send document comments to nexus7k -doc feedback@c i sco .com.
Chapter 7 Working with Configuration FilesAdditional References
7-14Cisco Nexus 7000 Series NX-OS Fundamentals Configuration Guide, Release 4.0
OL-15317-02

Send document comments to nexus7k -doc feedback@c i sco .com.
Cisco Nexus 7000 Series NXOL-15317-02
I N D E X
A
aliases. See command aliases
B
banners. See MOTD banners
BIOS
loader> prompt 3-23
C
Call Home
description 1-4
characters
special 3-7
Cisco Embedded Event Manager. See EEM
Cisco TrustSec
description 1-8
CLI
command modes 3-2
command prompt 3-1
examples 3-23
setting delay time 3-14, 3-15
CLI prompt
description 3-1
CLI variables
configuring session-only variables 3-11
examples 3-24
session-only 3-11
system-defined variables 3-24
clocks
default settings 5-11
description 5-2
displaying configuration 5-11
manually setting 5-9
CMP
description 1-5
COM1 port
settings 4-2
COM1 ports
configuring 4-6
default settings 4-17
virtualization 4-3
command aliases
defining 3-13
description 3-12
examples 3-23
command modes
description 3-2 to 3-6
EXEC 3-3
exiting 3-5
global configuration 3-3
interface configuration 3-3
subinterface configuration 3-4
summary (table) 3-6
commands
abbreviations 3-9
hierarchy 3-9
no form 3-10
command scripts
delaying actions 3-15
description 3-14
echoing information to terminal session 3-14
examples 3-25
running 3-14
IN-1-OS Fundamentals Configuration Guide, Release 4.0
Send document comments to nexus7k -doc feedback@c i sco .com.
Index
compatibility
software 1-1
configuration
displaying 7-12
erasing 7-11
removing missing module configuration 7-10
rolling back to previous 7-9
saving 7-3
configuration files
copying to internal file systems 7-6, 7-8
description 7-1
downloading 7-3, 7-4, 7-5
licensing 7-2
saving to remote servers 7-3
types 7-1
virtualization support 7-2
Connectivity Management Processor. See CMP
console ports
configuring settings 4-4
default settings 4-17
settings 4-2
virtualization 4-3
context-sensitive help
syntax checking 3-16
D
daylight savings time. See summer time
default setting
file systems 6-16
default settings
clocks 5-11
COM1 ports 4-17
console ports 4-17
modems 4-17
MOTD banners 5-11
terminals 4-17
virtual terminals 4-17
devices
IN-2Cisco Nexus 7000 Series NX-OS Fundamentals Configuration Guide
setting up 2-3 to 2-6
diagnostics. See online diagnostics
directories
copying files 6-9
creating 6-5
deleting 6-6
deleting files 6-10
description 6-2
displaying contents 6-6
displaying current directory 6-4
licensing requirements 6-3
moving files 6-8
setting current directory 6-5
virtualization support 6-3
working with 6-4 to 6-7
documentation
additional publications iv-xii
E
EEM
description 1-4
egrep utility
searching show command output 3-21
egrep utility filtering show command output 3-21
Ethanalyzer
description 1-4
Ethernet switching
description 1-6
examples
accessing directories on standby supervisor modules 6-13
backing up configuration files 7-12
compressing files 6-15
copying configuration files 7-12
copying files 6-14
deleting files 6-14
displaying file checksums 6-15
displaying file contents 6-15
, Release 4.0OL-15317-02

Send document comments to nexus7k -doc feedback@c i sco .com.
Index
finding files 6-16
moving files 6-14
redirecting show command output 6-15
rolling back to a previous configuration 7-13
uncompressing files 6-15
EXEC command mode
description 3-3
external Flash devices
formatting 6-3
F
filenames
completing with Tab key 6-3
files
compressing 6-11, 6-15
copying 6-9, 6-14
deleting 6-10, 6-14
description 6-3
displaying checksums 6-11
displaying contents 6-10
displaying files checksums 6-15
displaying files contents 6-15
displaying last lines 6-12
finding 6-12, 6-16
licensing requirements 6-3
moving 6-8, 6-14
renaming 6-8
uncompressing 6-11, 6-15
virtualization support 6-3
file systems
accessing standby supervisor modules 6-7
creating directories 6-5
default settings 6-16
deleting directories 6-6
description 6-1
displaying current directory 6-4
finding files 6-12
licensing requirements 6-3
Cisco Nexus 7000 SOL-15317-02
setting current directories 6-5
specifying 6-1
virtualization support 6-3
filtering
egrep utility 3-21
grep utility 3-21
keywords 3-20
less utility 3-22
--More-- prompt 3-22
sed utility 3-22
show command output 3-20
Flash devices
formatting 6-3
G
global configuration mode
description 3-3
summary 3-6
grep utility
searching show command output 3-21
grep utility filtering show command output 3-21
H
hostname
configuring 5-5
description 5-2
I
interface configuration mode
description 3-3
summary 3-6
IP
multicast 1-7
routing 1-6
services 1-7
IN-3eries NX-OS Fundamentals Configuration Guide, Release 4.0
Send document comments to nexus7k -doc feedback@c i sco .com.
Index
K
keystrokes
shortcuts 3-7
L
less utility
filtering show command output 3-22
searching show command output 3-22
licensing
configuration files 7-2
directories 6-3
files 6-3
file systems 6-3
support 1-9
terminal settings 4-3
load> prompt
description 3-23
loader> prompt
description 3-23
M
manageability
description 1-4
message-of-the-day banners. See MOTD banners
mgmt0 interface
configuring 5-3
mgmt0 interfaces
configuring out-of-band management access 2-4
description 5-2
missing modules
removing configuration 7-10
modems
configuring connections 4-10 to 4-16
default initialization strings 4-12
default settings 4-17
enabling connections 4-11
IN-4Cisco Nexus 7000 Series NX-OS Fundamentals Configuration Guide
initializing connection on a powered-on switch 4-15
settings 4-3
user-specified initialization strings 4-14
modes. See command modes
--More-- prompt
filtering output 3-22
searching output 3-22
MOTD banners
configuring 5-6
default settings 5-11
description 5-2
displaying 5-11
N
NetFlow
description 1-4
network security
features 1-8
O
online diagnostics
description 1-4
P
passwords
setting administrator default 2-3
privileged EXEC mode
summary 3-6
Q
QoS
description 1-7
Quality of Service. See QoS
, Release 4.0OL-15317-02
Send document comments to nexus7k -doc feedback@c i sco .com.
Index
R
RBAC
description 1-5
regular expression
special characters 3-18
regular expressions
anchoring 3-19
filtering CLI output 3-17
multiple-character patterns 3-19
single-character patterns 3-18
related documents iv-xii
role-based access control. See RBAC
running configuration
copying to internal file system 7-6, 7-8
displaying 7-12
downloading from external Flash memory device 7-7
downloading from remote server 7-4
removing missing module configuration 7-10
rolling back to previous 7-9
saving to remote servers 7-3
saving to startup configuration 7-3
S
scripts. See command scripts
searching
egrep utility 3-21
grep utility 3-21
keywords 3-20
less utility 3-22
--More-- prompt 3-22
sed utility 3-22
show command output 3-20
sed utility
filtering show command output 3-22
searching show command output 3-22
serviceability
description 1-3
Cisco Nexus 7000 SOL-15317-02
setup utility
description 2-1
prerequisites 2-3
shortcuts
keystrokes 3-7
show command output
redirecting 6-12, 6-15
show commands
filtering output 3-20
searching output 3-20
Simple Network Management Protocol. See SNMP
SNMP
description 1-5
software compatibility
description 1-1
SPAN
description 1-3
special characters
description 3-7
standards
support 1-9 to 1-12
standby supervisor modules
accessing directories 6-13
accessing file systems 6-7
startup configuration
copying to internal file system 7-6, 7-8
displaying 7-12
downloading from external Flash memory device 7-8
downloading from remote server 7-5
erasing 7-11
removing missing module configuration 7-10
rolling back to previous 7-9
saving to remote servers 7-3
subinterface configuration mode
description 3-4
summary 3-6
subinterfaces
configuring 3-4
summer time
IN-5eries NX-OS Fundamentals Configuration Guide, Release 4.0
Send document comments to nexus7k -doc feedback@c i sco .com.
Index
configuring 5-8
description 5-2
Switched Port Analyzer. See SPAN
switchname. See hostname
syntax checking. See context-sensitive help
T
terminals
default settings 4-17
terminal sessions
clearing 4-16
displaying information 4-16
settings 4-2
terminal settings
configuring 4-3
licensing 4-3
time
setting delay in CLI 3-14, 3-15
time zones
configuring 5-7
description 5-2
U
users
displaying 5-10
managing 5-9
sending messages 5-10
user sessions
description 5-2
displaying information 5-10
V
variables. See CLI variables
VDCs
description 1-3
IN-6Cisco Nexus 7000 Series NX-OS Fundamentals Configuration Guide
virtual device contexts. See VDCs
virtualization
COM1 ports 4-3
console ports 4-3
support 5-2
virtualization support
configuration files 7-2
directories 6-3
files 6-3
file systems 6-3
virtual terminals
configuring 4-8
default settings 4-17
settings 4-2
, Release 4.0OL-15317-02
Related Documents