Children of Mana: FAQ/Walkthrough by kassidynet Version: 0.90 | Last Updated: 2007-01-29 | View/Download Original File Hosted by Return to Children of Mana (DS) FAQs & Guides Would you recommend this FAQ? ------------------------------------------------------------------------------- Children of Mana Guide/Walkthrough by Kassidy (Kassidy (at) gmail (dot) com). ------------------------------------------------------------------------------- -Children of Mana --[VERSION] Version control --[THANKS] Thanks --[STORY-INTRO] Storyline (Intro sequence from the game text) --[FAQ] Frequently Asked Questions --[CONTROLS] Controls and Gameplay --[RANKING] Let's see how good you are! --[CHAR-MAIN] Characters --[CHAR-2ND] Secondary characters --[STORES] Stores at the Illusia Town Centre --[ITEMS] Available Recovery Items --[WEAPONS] Your arsenal for destruction ---[SWORDS] Swords ---[FLAILS] Flails ---[BOWS] Bow and Arrow ---[HAMMERS] Hammers --[ARMOURS] Armours --[ACCESSORIES] Accessories --[ULT] The Ultimate Weaponry --[MAGIC] The Eight Elementals --[GEMS] Gems ---[RED] Red Gems ---[BLUE] Blue Gems ---[YELLOW] Yellow Gems ---[PURPLE] Purple Gems ---[GREEN] Green Gems ---[ORANGE] Orange Gems ---[IMPURE] Impure Gems --[LEVELS] Level recommendations before starting a chapter --[WALKTHROUGH] The Walkthrough ---[FLICK] The Determination of a Young Warrior ---[TUMBLE] The Kindness of a Young Maiden ---[POP] The Curiosity of a Young Boy ---[WANDERER] The Diligence of a Wandering Niccolo ---[CHAP0] The beginning of our tale ---[CHAP1] The Mana Tower ----[BOSS1] Boss Battle : Xangar ---[CHAP2] Star Lake, Topple ----[BOSS2] Boss Battle : Galem ---[CHAP3] The Fiery Sands of Jadd ----[BOSS3] Boss Battle : Thaydol ---[CHAP4] The Ice Citadel of Lorimar ----[BOSS4] Boss Battle : Landmund ---[CHAP5] The Brightwood forest in Wendal ----[BOSS5] Boss Battle : Mana Storm ---[CHAP6] The Ruins of Illusia Isle ----[BOSS6] Boss Battle : Revenants ---[CHAP7] The Path of Life ----[BOSS7] Boss Battle : The Mana Lord ---[CHAP8] The Cosmic Rift ----[BOSS8-1] Boss Battle : Doppelgangers ----[BOSS8-2] Boss Battle : The Scion of Mana ---[END] The Beginning of a New Legend GameFAQs: Children of Mana (DS) FAQ/Walkthrough by ka... http://www.gamefaqs.com/ds/925586-children-of-mana/fa... 1 dari 69 18/11/2013 11:02

Chhildren of ManaWalkthrough
Dec 22, 2015
walkthrough
Welcome message from author
This document is posted to help you gain knowledge. Please leave a comment to let me know what you think about it! Share it to your friends and learn new things together.
Transcript

Children of Mana: FAQ/Walkthrough by kassidynetVersion: 0.90 | Last Updated: 2007-01-29 | View/Download Original File
Hosted byReturn to Children of Mana (DS) FAQs & Guides
Would you recommend this FAQ?
-------------------------------------------------------------------------------
Children of Mana Guide/Walkthrough by Kassidy (Kassidy (at) gmail (dot) com).
-------------------------------------------------------------------------------
-Children of Mana--[VERSION] Version control--[THANKS] Thanks--[STORY-INTRO] Storyline (Intro sequence from the game text)--[FAQ] Frequently Asked Questions--[CONTROLS] Controls and Gameplay--[RANKING] Let's see how good you are!--[CHAR-MAIN] Characters--[CHAR-2ND] Secondary characters--[STORES] Stores at the Illusia Town Centre--[ITEMS] Available Recovery Items--[WEAPONS] Your arsenal for destruction---[SWORDS] Swords---[FLAILS] Flails---[BOWS] Bow and Arrow---[HAMMERS] Hammers--[ARMOURS] Armours--[ACCESSORIES] Accessories--[ULT] The Ultimate Weaponry--[MAGIC] The Eight Elementals--[GEMS] Gems---[RED] Red Gems---[BLUE] Blue Gems---[YELLOW] Yellow Gems---[PURPLE] Purple Gems---[GREEN] Green Gems---[ORANGE] Orange Gems---[IMPURE] Impure Gems--[LEVELS] Level recommendations before starting a chapter--[WALKTHROUGH] The Walkthrough---[FLICK] The Determination of a Young Warrior---[TUMBLE] The Kindness of a Young Maiden---[POP] The Curiosity of a Young Boy---[WANDERER] The Diligence of a Wandering Niccolo---[CHAP0] The beginning of our tale---[CHAP1] The Mana Tower----[BOSS1] Boss Battle : Xangar---[CHAP2] Star Lake, Topple----[BOSS2] Boss Battle : Galem---[CHAP3] The Fiery Sands of Jadd----[BOSS3] Boss Battle : Thaydol---[CHAP4] The Ice Citadel of Lorimar----[BOSS4] Boss Battle : Landmund---[CHAP5] The Brightwood forest in Wendal----[BOSS5] Boss Battle : Mana Storm---[CHAP6] The Ruins of Illusia Isle----[BOSS6] Boss Battle : Revenants---[CHAP7] The Path of Life----[BOSS7] Boss Battle : The Mana Lord---[CHAP8] The Cosmic Rift----[BOSS8-1] Boss Battle : Doppelgangers----[BOSS8-2] Boss Battle : The Scion of Mana---[END] The Beginning of a New Legend
GameFAQs: Children of Mana (DS) FAQ/Walkthrough by ka... http://www.gamefaqs.com/ds/925586-children-of-mana/fa...
1 dari 69 18/11/2013 11:02
--[SUBQUESTS] Subquests--[BENEVODON] The Elemental Knowledge--[OST] The Soundtrack - Breath of Mana
-------------------------------------------------------------------------------
[VERSION] Version Control
0.90 Expanded detail for Ultimate Weapon locations.0.89 Completed weapons level requirements. Added approximate point requirementsto ranking.0.88 Added detail for the Ultimate Flail location. Added last Yellow gem! Gemscomplete! Added more info in armour and accessories. Added [LEVELS] section andseveral more Frequently Asked Questions. At recommendation of Syl, added a noteat the end of each chapter to indicate exactly what subquests becomeavailable). Weapon lists completed, though missing some names and descriptions.Armours, robes and accessories next in line to be updated.0.87 Added SEVERAL note on the importance of a better bow for the Jadd Boss.Corrected information on 3 Skull in Fury Slots. Added all multiplayer obtainedgems, and completed Impure gems section. Only missing one Yellow gem now!Started correcting typo and ortographical errors.0.86 Specified exactly who gives the Tess' Whereabouts quest. Added notes onbreaking ice in Lorimar with charged hammer. Added two more ULT weapons and twomore Impure gems.0.85 More items added, added a subquest that was missed during playthrough andthe information for the Fury Reels gem has been expanded. Completed BenevodonsKnowledge section. Added note on coloured spikes thanks to Syl. I have re-written the Weapons section almost completely to better describe and layout theeffects of each weapon and their focused attacks, as well as provide anintroduction as to what gems can do to improve these weapons. Moved the Gemssection to before the Walkthrough.0.84 Added Wanderer's unique subquest information, and relating items in thewalkthrough and gem list. Added Ranking information and started work onUltimate Weapon information.0.83 Amended a note regarding the EXP gain after an e-mail received from afellow gamer. Added note to thanks section also. Added lots of LevelReq's forWanderer's weapons.0.82 Moved note on accessing the Haunted House from Chapter 4 to end of Chapter2. Thanks to KillerRoy70 for confirming this. Added information to the Gemssection on how to upgrade the Gem Frame (for quick reference, as it is alreadyin the main walkthrough). Expanded FAQ section. Added Boss Battles to the mainmenu for easier access.0.81 Added note on requirements to advance to Chapter 3.0.80 Completed the walkthrough for the main storyline, as well as added thedetails for the ending and some other bits and bobs here and there. Upgraded toComplete Walkthrough on GameFAQs now that the main walkthrough section iscomplete, and all that remains is to flesh out details such as weaponry, theremaining subquest, gems and also character specific details.0.75 Added more LevelReqs for Flick, thanks to Sheexy.0.74 A couple of people have pointed out to me that the level requirements forweapons/armour vary from character to character, and since I have only playedthrough so far with Tumble these are the stats I have. I've rearranged thelayout to accommodate the new details as I obtain them. Any contributionswelcome. :)0.73 Corrected Flick losing his sister rather than brother. Thanks toWarWizardRichardRahl for this correction.0.72 Completed information on Tumble's unique subquest, updated gem lists.Preparing for Chapter 8 to be completed.0.71 Added more detail to the subquests after Chapter 7, amended informationabout the elemental subquests with regards to their availability at the end ofeach chapter, as some were available earlier than I had anticipated.0.70 Completed the Path of Life, may need to revisit and clear up some minordetails. Weapons section mostly up to date (again, minor details missing).Added three new subquests now available (need to complete details on these).Added Game-Revolution to list of permitted sites. Refined some details on gemsand fusion. Added some details to Soundtrack section.
GameFAQs: Children of Mana (DS) FAQ/Walkthrough by ka... http://www.gamefaqs.com/ds/925586-children-of-mana/fa...
2 dari 69 18/11/2013 11:02

0.61 Added FAQ section, since there are questions going around that have beenrepeatedly answered. Amended availability of elemental subquests note. AddedSuperCheats, GamesRadar, SuperCheats, Cheat Code Central and CheatPlanet tolist of permitted sites.0.60 Chapter 6 completed, preparing for next chapter started. Still need tocomplete details on the subquests newly available and the level requirementsfor new equipment. Also amended some minor notes to the Soundtrack.0.53 6 Elemental subquests complete, missing Wisp and Shade. Appears one canonly do up to 6 at this point in the game. Completed missing details inweapons.0.52 Added section [BENEVODONS] with information provided by the Benevodons ontheir subquests.0.51 Completed Recovery Item details (oopsy). Weapons list requires sometweaking, but is up to speed with game (missing required levels on some items).Working on Elemental Subquests next.0.5 Completed Brightwood and brought gem lists up to speed. Preparation fornext chapter pretty much ready.0.44 Orange and Green Gems list now complete. Subquests now up to date withgame progress. Next step is to move on and do Brightwood.0.43 Added details for each characters game introduction, up to meeting Tess,where all stories converge and follow the same line.0.42 Added details of the Soundtrack, added gems and fusions to list, addeddetail for weapons. Need to clarify beginning of the game more. Added moresubquests and their respective item rewards' details.0.41 Chapter 4 added, still working on post mission details. Expanded blue gemlist considerably, and brought weapons up to speed. Missing some levelrequirements, but should have that shortly. More little niggly bits here andthere improved.0.4 Improved detail on the game mechanics and controls. Clarified details inFiery Sands and added notes on the nature of quests after obtaining the Hammer.Next update to include Chapter 3.0.3 Chapter 3 added, expanded gem lists, weapons etc up to date, some blanksfilled. Added benevodos information to first quests.0.2 Chapter 2 added, expanded other lists. Submitted to GameFaqs0.1 Initial layout, chapters 0 and 1, and other lists started.
You may copy no part of this guide or the guide in its entirety without myexpress permission, and currently this information is only to be hosted at thefollowing sites:http://www.seikens.comhttp://www.gamefaqs.comhttp://www.neoseeker.comhttp://www.supercheats.comhttp://www.gamesradar.comhttp://www.cheatplanet.comhttp://www.cheatcc.comhttp://www.supercheats.comhttp://www.game-revolution.com
If you want to publish this guide, please contact me at the e-mail addressabove. Sometimes I take a couple of days to reply, but I do get there. ;)
[THANKS]
A huge thank you to Clayton Brooks for some information regarding EXP gain fromenemies and also for providing almost all Wanderer's level requirements and thedetails for Wanderer's unique subquest, unique items for Flick and Wanderer, asubquest that I had missed, information on Fury Reels (since I'd completelyskipped putting this anywhere in the guide, soppy me).
A big thank you also to Ysne58 for information on all the multiplayer uniquegems.
Shadow00X: for pointing out some information regarding elemental subquestavailability times.DavidV and Sheexy for providing some of Flick's levels for weapons.
GameFAQs: Children of Mana (DS) FAQ/Walkthrough by ka... http://www.gamefaqs.com/ds/925586-children-of-mana/fa...
3 dari 69 18/11/2013 11:02

VGMusicFreak for confirming that Tess' Subquest is a requirement to continue onto Chapter 3.Nick Matthews for picking up on a mistake in gems, and providing info for acouple of new ones I didn't have yet, including Pop's unique gem.J-V for info on multiplay gem.Syl for additional Hammer information regarding spikes.JonLeung for information provided by the benevodons on the Scion of Mana.Aldiyen for pointing out who to talk to to get the Tess' Whereabouts subquest.Efylan Krislad for additional gems and item.Volante for an additional armour.Alex McLees for additional gems and weapons for Wanderer.Mark Kempers for checking some information on Fury Slots for me.Benjamin Gemmel for the last impure gem missing.Lisa Hathaway for information on the location of Ultimate Flail.Steve Jankowski for additional armour/accessory information.Eric for another way to get past bails.Mech Gouki for providing information (nJoy japanese website) contributing tothe completion of the level requirements in weapon and armour sections.ds01253 for confirming a couple of the suspected ultimate locations.
Also, with regards to the Gem Guide, I am using the same ordering as a previousGem Guide (by eyedunno11), but the information is taken from the game as I gothrough, not copied from the other guide. However, the numbering is of greathelp so I can keep a steady order going as I move through the game.
-------------------------------------------------------------------------------
[STORY-INTRO] Storyline (Intro sequence from the game text)
'Tis a tale of long ago,when the Mana Treewas newly born.
Illusia Isle located inthe middle of a sea inthe center of the world.
Above it towered thegreat Mana Tree.I'm sure you've heardmany stories aboutthe Mana Tree andthe Sword of Mana.
The story you're aboutto hear tells of theonly time the holysword ever dared todefy Mana.
This is how it allbegan...
-------------------------------------------------------------------------------
[FAQ] Frequently Asked Questions
Q. What is this game like? How does it compare to other Seiken Densetsu games?A. It bears little similarity to previous games in that it is more of a dungeoncrawler (think Diablo) than an Action RPG. The storyline doesn't feel quite asdeep as the previous games either, but there are shimmers of the former games'style in there. Graphically it has quite the feel of Legend of Mana. The ringmenus are use quite a lot, but not as much as SoM, and magic is quite similarto Sword of Mana.
GameFAQs: Children of Mana (DS) FAQ/Walkthrough by ka... http://www.gamefaqs.com/ds/925586-children-of-mana/fa...
4 dari 69 18/11/2013 11:02
Q. Does this game have Wifi or multiplayer?A. This game does NOT have Wifi, but does have DS to DS multiplayer to docooperative play. Each player has to own the game, this is not a download playoption. Also multiplayer will allow you to access gems that normal play doesnot.
Q. Is this game difficult?A. No, the game is not all that difficult. You'll find that depending on thecharacter you'll need to adapt to a certain style of play, but overall you'llfind that if you keep up to date with levels and weapons, the game isrelatively easy.
Q. What's the music like? Do any old Seiken Densetsu tunes return?A. The music follows the style of Legend of Mana or Sword of Mana. There is afull list of composers and tracks in the soundtrack section. It sees the returnof Rising Sun, the title theme from Final Fantasy Adventure (Seiken Densetsu 1,if you wish).
Q. Can I delete save-games?A. No, you can overwrite them with new game data though.
Q. How do I change spirits?A. Talk either to Tess, or when she is unavailable talk to Nana in the SilverMermaid (girl in the green dress).
Q. Are there classes in this game like in Seiken Densetsu 3?A. No.
Q. I can't access X mission even though I've followed what the guide says.A. If part of the guide states, for example, to talk to someone to access thenext mission, and that does not trigger the event, then either e-mail me orpost a message on the GameFAQs board, stating what character you are using, andthat you have tried what it says in the walkthrough. Also if you find theanswer is talking to someone else, say, let me know of that also so I canamend the necessary notes on the matter. The more background information youprovide, the easier it will be for us to make sense of what is happening.
Q. Is the touch-screen used?A. Only for menu navigation, not in the actual gameplay itself. The menunavigation can also be done with the pad, so it is not strictly necessary touse the touch screen at all, although for things like the Gem Frame you willfind it easier to use the touchscreen.
Q. How do I extend my Gem Frame?A. The three expansions are listed in the [GEMS] section.
Q. How do I open the Haunted House?A. After Star Lake, go to Moti's house and look for the shining object near thefireplace. Pick it up and take it to Moti. Then use that object to open thedoor to the Haunted House.
Q. Where does this game fit in with the rest of Mana games with regards totimeline?A. The events of Children of Mana occur 10 years after the events of Dawn ofMana (which is yet to be released while writing this FAQ).
Q. What are the elemental sidequests for?A. Once you have finished all the sidequests and completed the game, you willbe able to access a final sidequest by touching the Mana Stone in the village.The reward for this is the Mystic Blessing gem. See the [SUBQUESTS] section formore details.
Q. How do I get past the bails of hay/floating blocks/box obstacle in certainareas that follow my movements?A. There are several ways of doing so. First off, you can bash the heck out ofit, though this will take you ages. Secondly you can put an object such as a
GameFAQs: Children of Mana (DS) FAQ/Walkthrough by ka... http://www.gamefaqs.com/ds/925586-children-of-mana/fa...
5 dari 69 18/11/2013 11:02

barrel in its path using the knock-back strike of the sword, the flail, etc.Thirdly, you can use the flail diagonally to pull yourself across just above orjust below it. It takes some practice, but the block can't follow you quicklyenough when you're pulled by the flail, so you can normally get past it thisway.Eric has also contributed the possibility of using a focused Fury Sword attackin diagonal to get past them. So give that a go if you don't have a Flail yetor aren't having any luck.
Q. How do I get past the fast-moving quick-sand in Fiery Sands?A. You can either flail yourself across by diagonally aiming and latching on toa wall, which will work pretty much every time in the subquests but won't getyou all the way in the main mission, or you can equip a Virtue of Balance gemto walk on sand and ice normally (check the [GEMS] section with regards to howto obtain said gem).
Q. Do you get penalized for dying on a level?A. You are returned to the Mana Village but you do not lose (as far as I haveseen) any Lucre, EXP or items. You do lose your progress in the level, ofcourse. While this may not be a pain in the first levels, if you die on the16th zone of a 17 zone level, you'll be kicking yourself.
Q. Do all enemies give the same EXP?A. Enemies start out by giving you a certain amount of EXP, but as you gainlevels you will find that this will reduce down to the minimum of 2EXP permonster. If you follow through this guide with the level suggestions, you'llfind that most monsters will indeed give you only 2 EXP. However, youcan increase the amount of EXP received using gems like Heart of Progress orCourage to Learn.
Q. How do I defeat the boss in Jadd?A. Use your bow. Now, you may say "but I AM using my bow and I only do 1damage", which is quite possible. If you're using the default Bow that youreceive from Moti you will indeed only do 1 damage. Make sure you equip an IronBow, and you'll find that you'll do around the 20 mark at least.
Q. Do the effects of experience gems stack?A. The effects of EXP boosting gems (such as Heart of Progress and Courage toLearn) accumulate side by side, so if you have two Heart of Progress, youdouble your EXP, as opposed to them accumulating exponentially, which wouldgive you (100 * 1.5) * 1.5 = 225%
Q. What do the Benevodon sidequests do? How do I access them?A. To access the benevodos sidequests, you must equip one of the elementalspirits and then Chat to one of their instances in the town (ie. equipSalamando then talk to the Salamando spirit in Moti's house next to thefireplace). They will give you the sidequest and details. After completing allthe sidequests, you will be able to access a final area, after you havecompleted the game, by touching the Mana Stone in the town. This mission takesplace in the Cosmic Rift. The reward at the end of this quest is MysticBlessing - Restores 6 HP and 6 MP every 3 seconds. Check the Subquest sectionfor information as to when these subquests become available throughout thegame.
Q. What are the sparkly items in my inventory?A. These are new items since you last looked at your inventory.
Q. What level do you suggest I do X mission on?A. The level recommendations are mentioned throughout the guide, however thereis a list of them as shown in the guide under [LEVELS] as the question comes upso often.
Q. If my game is a different region from the person's whom I wish to multiplaywith, will it work?A. As far as I have seen, yes.
GameFAQs: Children of Mana (DS) FAQ/Walkthrough by ka... http://www.gamefaqs.com/ds/925586-children-of-mana/fa...
6 dari 69 18/11/2013 11:02
Q. Where do I get the Ultimate Equpment?A. See the [ULT] section.
Q. Is there any point in choosing ??? as a reward for a mission?A. There is one Yellow Gem, Lore of Artificers, that is ONLY obtainable throughthis option, and appears randomly. Other than that, no.
Q. My question isn't covered here or by the walkthrough / I think there issomething wrong in your walkthrough / I have a suggestion to make for yourwalkthrough / I have some details that are missing from your guide.A. I'm very happy to receive e-mails regarding this guide, and I will endeavourto answer all e-mails received as quickly as possible. I am very grateful forany feedback, and will take suggestions on board. If you have information thatis not reflected in this guide (like a subquest I do not have listed, a weaponnot listed, etc), please e-mail me as many details as you can, and I willcredit you for providing this information when I update the guide. You can findmy e-mail address at the top of this guide.
-------------------------------------------------------------------------------
[CONTROLS] Controls and Gameplay
The button configuration and menus are well designed when it comes to doing thelevels.L - Ring Menu to select item (press Y to assign)R - Ring Menu to select weapons (press button to assign, X or A depending)A and X - Primary and secondary weapons, hold to do focused attackY - Use ItemB - Cancel in menu, hold to use magicStart - Bring up option to use Magic Rope to return to the Mana Village.Select - Activate Fury (see below)
And in town, well, it's the basic Start for menu, use A to talk, B to cancel.
As you get hit or hit others, you gain Fury meter. When the Fury meter hitsit's max, you can hit SELECT to activate it. Your attack rate is faster untilthe meter runs down again, and your focused attacks are modified to do morepower and have different effects (see the Weapons section for greater detail).You will also gain the effects of any purple gems you have equipped in your gemframe.
The bottom screen will display stats while in the town and during levels, butin the levels will also show the following info:- An overhead map of the level, pinpointing the Gleamdrop and Gleampool andlive enemies.- Information on where to find the gleamdrop and pool (ie, "in a vase")- Experience points til next level and current level.- Equipped elemental and the magic spells it provides.
Also when in the Mana Village, your next step to advance in the game will bedisplayed below.
The touch system is used only for the menu systems that involveequipping items and gems, dialogue options when talking to people, and if youreally want, choosing weapons and items during combat, but this is pointlessbecause you'd do it much faster with the ring system displayed in the mainscreen. You can even skip using the touch screen altogether by navigating themenus with the D-pad and A/B.
Levels are obtained by killing, simple as. You don't have to level up swords inthe way SoM did, just the level of your main character. Each enemy will award aminimum 2 EXP points, though there are gems to modify this to gain more.Enemies will give you more EXP the less level you have, and depending on whatlevel the enemies are (so for example the Rabites at the beginning of the game
GameFAQs: Children of Mana (DS) FAQ/Walkthrough by ka... http://www.gamefaqs.com/ds/925586-children-of-mana/fa...
7 dari 69 18/11/2013 11:02

will start off giving you 6 EXP, and dwindle down to 2 as you gain morelevels).
Your centre of operations for the game will be the Mana Village on the IllusiaIsle. You'll be given missions by Moti to progress along the game, and returnhere after the mission is complete. You can also obtain subquests to gain itemsand levels by visiting Dud Services, talking to villagers or talking toelementals. The Dud Services subquests are randomly generated, and the villagerand elemental subquests are detailed in the [SUBQUESTS] section.
When you visit a site for a mission, you'll go straight in unless you'vealready completed the main mission previously. If the latter is the case,you'll be given the option to carry out the subquest that you have picked up(you can only do one at a time), or to return to the site via a space-timerupture to redo the level and pick up items you missed, improve your level,beat your previous ranking, etc.
Missions are divided up into Zones, and to pass to the next zone you must findthe GleamDrop and take it to the GleamPool. This is explained in more detailduring your first mission. Also note that your HP is mostly restored betweenzones, so no need to waste items recovering at the end of a zone before youmove on to the next. Each 4 zones, you will have a chance to re-arrange yourequipment, save and review your Status.
Another thing to note is that the number of enemies displayed on screen will belimited as it was in previous Mana games, although this time it is not fixed atthree enemies. It will start out as such, but as you advance in the game andimprove your level things will start getting tougher. This can be used to youradvantage in some levels, as you can leave a harmless number of monsters alivewhile you scout the rest of the level killing off the monsters one at a time,then go back for the remaining swarm. A cowardly tactic, but when you're in apickle the rules of chivalry not only get thrown out of the window, but aretied to a cannon and propelled out faster than the Black Hole ride at AltonTowers.
-------------------------------------------------------------------------------
[RANKING] Let's see how good you are!
At the end of every 4 zones on a main storyline mission you will receive ascore for how well you are doing in the level, and at the end of the level intotal, after the boss, these scores will be added up and you will receive aranking according to how well you did. Depending on your ranking, you willreceive certain rewards, and the better the ranking the better the prizes. Youalso will have the option to choose a random item (marked by "???"). Generallythis will not be a good choice, HOWEVER, there is at least one item (a YellowGem) that can ONLY be received via this choice.
You ranking scores are determined by three factors:-Kills: The number of enemies you killed during the level, or the boss.-Chests: The number of treasure chests you discovered during the level. Thisincludes trap chests that you defeat, NOT ones that explode. Also, you don'tHAVE to pick up the contents of the chest.-Time: The amount of time it has taken for you to complete the set of zonesbeing ranked. This will not gain you points, but a multiplier that will takeeffect on the previously mentioned scores (the maximum is 3x).
Even if you don't get all items or kills, you'll find that getting through alevel quickly will make up for that fact.
Note on Trap Chests: Depending on the colour of the chest, and maybe thelocation of it (I'm still trying this), the chest has to be defeated with adifferent weapon, so if it doesn't go down with a hit from one weapon, switchto another.
GameFAQs: Children of Mana (DS) FAQ/Walkthrough by ka... http://www.gamefaqs.com/ds/925586-children-of-mana/fa...
8 dari 69 18/11/2013 11:02

These are some approximate point requirements for Silver and Gold ranksthroughout the game (these are estimations based on scores achieved, so are byno means exact... if you find out otherwise let me know).
1. Mana Tower - Gold:2400 Silver:8002. Star Lake - Gold:3000 Silver:10003. Fiery Sands - Gold:4500 Silver:15004. Ice Citadel - Gold:4000 Silver:15005. Brightwood - Gold:4500 Silver:15006. Ruins - Gold:4500 Silver:15007. Path of Life - Gold:6000 Silver:20008. Cosmic Rift - Gold:12000 Silver:4000
-------------------------------------------------------------------------------
[CHAR-MAIN] Characters
-Flick (J) Ferrik (U)
A fifteen-year-old boy who lost his parents and sister in the great disaster.Was saved by a knight and has since been training in the arts of swordfighting. He's a good all-round character, being quite strong in all areas.
"Versatile in offence, defence, and magic. Effective at any distance."
Hair colours: Orange, green, blue and silver.
-Tumble (J) Tamber (U)
A sixteen-year-old girl who lost her parents and little brother Toby in thegreat disaster. She is mature and seeks truth and justice. Her attack is weak,but she's fast, and is skilled in the use of magic.
"A dancer with magical talents. Though not powerful, her attacks are swift."
Dress colours: Red, white, pink and blue.
-Pop (J) Poppen (U)
A fearless nine-year-old boy who lost his mother at birth and was left anorphan during the great disaster after the death of his father. Not a greatfighter and weak when it comes to defence, he specializes in offensive magic.
"A mage specializing in attack spells. Low defence. Unskilled in close combat."
Style colours: Yellow, white, blue, red.
-Wanderer (J & U)
A travelling merchant and member of the Nikita tribe. A strong fighter,especially at close range, but weak when it comes to magic.
"Strong attack and defence. Specializes in close combat. Unskilled in magic."
Hat colours: Green, blue, emerald and brown.
Note: Whatever colour you choose, the avatar of your character when you aretalking to people and in the Status screen will show the default coloursalways. This only changes the colour of the attribute on the sprite itself.
-------------------------------------------------------------------------------
[CHAR-2ND] Secondary characters.
GameFAQs: Children of Mana (DS) FAQ/Walkthrough by ka... http://www.gamefaqs.com/ds/925586-children-of-mana/fa...
9 dari 69 18/11/2013 11:02
-Granny Hannah.She took care of Tumble after her parents died. She was attacked by a beastduring the cataclysm ten years ago, and the wounds sometimes still hurt. Shewill hang around next to Dud Services in the Silver Mermaid.
-Tess.A member of the village who conducts research using plants. She offers prayersto the Tree of Mana, giving thanks to the Mana Goddess for all she has done.She can be found sitting in front of the Mana Stone, or in the Haunted Houseafter you have unlocked it.
-Grampa Tony.An old man who you can find standing at the entrance of the village.
-MotiMoti is the mayor of the town. He lead an expedition to the island, and whenthe research was over the members of the expedition made the island their home.They asked him to become their mayor. You'll find him in his house at the topright hand corner of the village.
-SeamoonReceptionist for the Silver Mermaid, the town's mall. She can fill you in onanything you need to know about the game.
-MillionaireRuns the Golden Goods Store on the island. He lost everything during thecatastrophe ten years ago. He'll buy and sell weapons, items and accessories.
-WattsKnown as the king of the mines.
-Bomb BrothersBalbo, Belbo, Bulbo.They've come from Ishe to do research on gems on the Island of Illusia. Theyrun the Bomb Bros. R&D store at the town that sells gems and will perform gemFusion for you.
-Pete and NanaTwo villagers who walk around inside the Silver Mermaid. Later in the game Nanawill also have the function of changing your accompanying spirit.
-------------------------------------------------------------------------------
[STORES] Stores at the Illusia Town Centre
-Golden Goods
Run by Millionaire, you can buy and sell weapons, accessories and items. Alsohe will give you the option to buy a bigger knapsack, which will allow you tohold more of each item. They come at a price though.Basic Knapsack - Holds 12 of each item - 2500LLarge Knapsack - Holds 18 of each item - 10000LJumbo Knapsack - Holds 24 of each item - 30000L
Note also, items sell back for a tenth of their price, so don't expect to makea huge amount from items found on your quests.
-Bomb Bros R&D
Run by the Bomb Brothers, you can buy and sell gems here, and fuse them. Formore details on the properties of gems, their types and gem fusion, see the[GEMS] section.
Note that gems you sell will obtain a 5th of the price you'd pay to buy them,which is slightly farer than Millionaire's deal (which is why he's a
GameFAQs: Children of Mana (DS) FAQ/Walkthrough by ka... http://www.gamefaqs.com/ds/925586-children-of-mana/fa...
10 dari 69 18/11/2013 11:02

millionaire, I guess).
-Dud Services
Run by the Dudbears, they collect job requests from all over the world and postthem here to find help. You can only take one quest at a time, and have to paya service fee when you take it. When the request is completed, come back to thestore to receive the reward.The rewards will increase in value as you complete main quests in the game.Also, from what I have observed, you won't be provided with a new set of 6 jobsuntil you complete either one of the current jobs, or a main mission in thegame.
-------------------------------------------------------------------------------
[ITEMS] Available Recovery Items
-Gumdrop - 100L - Recover 30HP-Chocochomp - 200L - Recover 100HP-Magic Walnut - 150L - Recover 80MP-Pep Root - 80L - Cures all ailments but poison and ghost-Stardust Herb - 40L - Cures poison-Angel's Grail - 1000L - Recover all statuses, revive secondary party member inmultiplayer games.
There are gems that can affect the effects of these items by increasing theirrestorative properties (2x or 5x), how many members of your party inmultiplayer they affect, and also have the game automatically use them on yourcharacter when required (for example, to use a Pep Root when you are set onfire). These are all detailed in the Gems section.
-------------------------------------------------------------------------------
[WEAPONS] Your arsenal for destruction
You have 4 weapons to choose from, which you gain over the first 4 missions.Each has its own form of attack, focused attack, and focused attack duringFury, and are described in the sections below. Charging a focused attack onlytakes a second.
Weapons are acquired randomly from enemies as you go along, or fromMillionaires store, and you equip your weapon level only in towns, or afterevery 4 zones within a mission.
Each weapon has a level requirement depending on the character, and you willhave to have that level or above in order to equip it.
Note that there are also Gems that will modify the attributes of certainweapons, like allow you to do three consecutive spins with the Flail. These aredetailed in the Gems section, although I have mentioned some of the effects inthe sections below.
When fully equipped, you'll have (of which two weapons can be wielded at onetime, but switched using the R button during play):1 Sword1 Flail1 Bow1 Hammer1 Body Armour1 Accessory
Note, the appearance of the character's sprite does not change when equippedwith different armour or weapons, aside from the fact that the weapon it iswielding will change depending on what weapon you have selected (Sword, Flail,
GameFAQs: Children of Mana (DS) FAQ/Walkthrough by ka... http://www.gamefaqs.com/ds/925586-children-of-mana/fa...
11 dari 69 18/11/2013 11:02

Bow or Hammer). So any sword you equip, the spite of the sword itself willstill be the same. Another difference between this and Secret of Mana.
[SWORDS] Swords
The Sword is gained before your first mission to the Mana Tower. The basicattack for the sword is to perform up to three consecutive slashes, the lastone of which will knock enemies over. This can cause damage to enemies behindthem and in turn knock them over, etc etc. The sword will also be greatly usedto mow down small obstacles such as pots, grass and bushes, to allow you toadvance in the level, reveal the Gleamdrop and open chests. Certain gems willcause this last strike to send out a shock wave to increase its range, and alsoallow for cutting down small obstacles at a distance.
A focused attack for the sword is called a parry, and by the nature of suchwill deflect missiles and reduce the damage of physical attacks. The basicparry will only last 5 hits before failing and requiring regeneration. Certaingems will increase the number of hits the parry can take, or the damage reducedon physical attacks, or both.
A focused attack during Fury will cause the character to launch forward withthe sword glowing in front of them, causing quite considerable damage. Enemiesthat are stationary (like vortexes) will receive up to three hits. Certain gemscan increase the level of this attack, which increases the distance the chargelasts and the damage caused.
1. Short Sword - ATK 32 - Free - A small sword used for practice LevelReq - Flick:1 Tumble:1 Pop:1 Wanderer:12. Bronze Sword - ATK 38 - 150L - A common sword wrought of bronze LevelReq - Flick:4 Tumble:5 Pop:5 Wanderer:43. Iron Sword - ATK 47 - 500L - A thin, versatile sword made of iron LevelReq - Flick:8 Tumble:8 Pop:9 Wanderer:74. Broadsword - ATK 53 - 1000L - A sword with an unusually wide blade. LevelReq - Flick:11 Tumble:11 Pop:12 Wanderer:105. Long Sword - ATK 59 - 1400L - A sword with an extremely long blade. LevelReq - Flick:14 Tumble:14 Pop:15 Wanderer:136. Saber - ATK 66 - 1800L - A curved sword wielded in one hand. LevelReq - Flick:17 Tumble:18 Pop:19 Wanderer:167. Steel Sword - ATK 72 - 2000L - A simple yet sturdy sword of steel LevelReq - Flick:20 Tumble:21 Pop:22 Wanderer:198. Falchion - ATK 78 - 2300L - A sword able to split a foe in two LevelReq - Flick:23 Tumble:24 Pop:25 Wanderer:229. Bastard Sword - ATK 83 - 2500L - A balanced blade with a long handle LevelReq - Flick:25 Tumble:26 Pop:27 Wanderer:2410. Estoc - ATK 89 - 3200L - A pointed blade chiefly for thrusting. LevelReq - Flick:28 Tumble:29 Pop:30 Wanderer:2711. Flamberge - ATK 95 - 4000L - A large sword with a curved blade. LevelReq - Flick:31 Tumble:32 Pop:33 Wanderer:3012. Muramasa Blade - ATK 100 - GoldRank at Brightwood - A steel sword forged by a master. Only Flick can equip. LevelReq - Flick:28 Tumble:N/A Pop:N/A Wanderer:N/A13. Winged Sword - ATK 106 - 5000L - A light sword decorated with wings. LevelReq - Flick:36 Tumble:38 Pop:39 Wanderer:3414. Silver Blade - ATK 114 - 6000L - A sharp sword wrought of fine silver. LevelReq - Flick:40 Tumble:42 Pop:43 Wanderer:3815. Shamshir - ATK 125 - 7500L - A beautiful sword with a curved blade. LevelReq - Flick:45 Tumble:47 Pop:48 Wanderer:4316. Balmung - ATK 130 - Subquest - The favorite sword of a fallen hero. LevelReq - Flick:4017. Mythril Sword - ATK 133 - 8500L - A sword wrought of magical mythril. LevelReq - Flick:49 Tumble:51 Pop:52 Wanderer:4718. Diamond Sword - ATK 144 - 12500L - A sword made with a blade of diamond. LevelReq - Flick:54 Tumble:56 Pop:57 Wanderer:5219. Dragon Sword - ATK 153 - 25000L - A sword crafter from a dragon's scale. LevelReq - Flick:58 Tumble:60 Pop:61 Wanderer:56
GameFAQs: Children of Mana (DS) FAQ/Walkthrough by ka... http://www.gamefaqs.com/ds/925586-children-of-mana/fa...
12 dari 69 18/11/2013 11:02
20. Crystal Sword - ATK 164 - See [ULT] - A sword imbued with mystic power. LevelReq - Flick:60 Tumble:62 Pop:63 Wanderer:5821. Sigmund - ATK 170 - See [ULT] - A sword named for a tragic hero. LevelReq - Flick:6222. Excalibur - ATK 170 - See [ULT] - A fabled blade only the brave may bear. LevelReq - Tumble:6423. (COMPLETE) - ATK 170 - See [ULT] - ?Description? LevelReq - Pop:6524. Ragnarok - ATK 170 - See [ULT] - ?Description? LevelReq - Wanderer:60
[FLAILS] Flails
The Flail is gained after completing your first mission. The basic attack forthe flail consist of twirling it in a circle around you, and knocking enemiesback with it, quite useful if you get surrounded. The number of times you cantwirl it round can be increased using certain gems.
The focused attack will throw the flail out in a straight line and allow you toretrieve items that are out of reach, pull enemies toward you, pull you towardwalls or heavier enemies or obstacles, and to pull items and enemies out ofbushes that are hidden. Certain gems will allow this attack to pierce throughenemies, or steal items from them.
The focused attack during Fury causes the flail to be twirled in the same wayas a normal attack, but with greater range and a more powerful hit, the flailglowing brightly as you do so. Certain gems increase the level of this, and bydoing so increase the number of times the flail is twirled during one attack.
1. Light Flail - ATK 49 - Free - A lightweight flail with a small head LevelReq - Flick:1 Tumble:1 Pop:1 Wanderer:12. Wood Flail - ATK 60 - 1000L - A flail with a wooden head at the end. LevelReq - Flick:10 Tumble:10 Pop:11 Wanderer:93. Spiked Flail - ATK 68 - 1400L - A flail dotted with many sharp thorns. LevelReq - Flick:15 Tumble:15 Pop:16 Wanderer:144. Chain Flail - ATK 75 - 1800L - A flail of solid interlocking rings. LevelReq - Flick:18 Tumble:19 Pop:20 Wanderer:175. Steel Flail - ATK 82 - 2000L - A flail with a steel head at the end. LevelReq - Flick:21 Tumble:22 Pop:23 Wanderer:206. Ball and Chain - ATK 89 - 2300L - A flail with a metal ball at the end. LevelReq - Flick:24 Tumble:25 Pop:26 Wanderer:237. Heavy Flail - ATK 94 - 2500L - A flail sporting a heavy metal head. LevelReq - Flick:26 Tumble:27 Pop:28 Wanderer:258. Morning Star - ATK 101 - 3200L - A unique flail with a star-shaped head. LevelReq - Flick:29 Tumble: Pop:31 Wanderer:289. Bonecrusher - ATK 110 - 4000L - Amighty flail able to penetrate armor. LevelReq - Flick:32 Tumble:33 Pop:34 Wanderer:3110. Scorpion - ATK 114 - GoldRank at Brightwood - A flail with a sharp wedged head. - Only Pop can equip LevelReq - Pop:3111. Runic Flail - ATK 120 - 5000L - A flail engraved with strange glyphs. LevelReq - Flick:37 Tumble:39 Pop:40 Wanderer:3512. Silver Flail - ATK 130 - 6000L - A reliable flail made of finest silver. LevelReq - Flick:41 Tumble:43 Pop:44 Wanderer:3913. Holy Flail - ATK 142 - 7500L - A flail tempered in holy water. LevelReq - Flick: Tumble:48 Pop:49 Wanderer:4414. Meteor Flail - ATK 146 - Subquest - ?Description? LevelReq - Pop:4415. Mythril Flail - ATK 151 - 8500L - A flail made of magical mythril silver. LevelReq - Flick:50 Tumble:52 Pop:53 Wanderer:4816. Diamond Flail - ATK 163 - 12500 - A flail made of mardest diamonds. LevelReq - Flick:55 Tumble:57 Pop:58 Wanderer:5317. Dragon Flail - ATK 172 - 25000L - A flail formed from a dragon's scale. LevelReq - Flick:59 Tumble:61 Pop:62 Wanderer:5718. Crystal Flail - ATK 184 - See [ULT] - A flail imbued with mystic power.
GameFAQs: Children of Mana (DS) FAQ/Walkthrough by ka... http://www.gamefaqs.com/ds/925586-children-of-mana/fa...
13 dari 69 18/11/2013 11:02
LevelReq - Flick:61 Tumble:63 Pop:64 Wanderer:5919. Judgementica - ATK 190 - See [ULT] - A flail imbued with divine discernment LevelReq - Flick:6320. Gravity Flail - ATK 190 - See [ULT] - A quality flail of immense density. LevelReq - Tumble:6521. Altena Flail - ATK 190 - See [ULT] - A special flail made of altena alloy. LevelReq - Pop:6622. Juggernaut - ATK 190 - See [ULT] - ?Description? LevelReq - Wanderer:61
[BOWS] Bow and Arrow
The Bow is obtained after completing your second mission. Its basic attackallows you to fire two arrows a second more or less at enemies at a distance.You will be provided with a crosshair to indicate the direction you are aiming,which within a certain distance will lock on to enemies and allow you tobullseye them without having to aim much. This crosshair will also lock on totrap chests. Certain gems will allow you to fire three arrows in differentdirections at the same time (one forward, one on each diagonal adjacent toit).
The focused attack will pluck the string of the bow as if it were a harp, andsend a musical note flying out that dazes the enemies nearby momentarily to getan attack or two in. This attack leaves one very vulnerable to attack, so useit wisely. Certain gems allow for this musical note to have different effects,such as sending the enemies to sleep, thus increasing the time you have toinflict greater damage.
The focused attack during Fury sends several arrows flying outward in differentdirections with greater damage capabilities. Certain gems increase the level ofthis attack, and by doing so increase the number of arrows fired up to about 11(I tried counting them, but couldn't).
1. Short Bow - ATK 52 - Free - A small bow, light and easy to use. LevelReq - Flick:1 Tumble:1 Pop:1 Wanderer:12. Iron Bow - ATK 58 - 1800L - A thin, versatile bow made of iron. LevelReq - Flick:16 Tumble:17 Pop:18 Wanderer:153. Steel Bow - ATK 63 - 2000L - A simple yet sturdy bow of steel. LevelReq - Flick:22 Tumble:23 Pop:24 Wanderer:214. Ankh Bow - ATK 69 - 2300L - A bow shaped like a hieroglyph. LevelReq - Flick:25 Tumble:26 Pop:27 Wanderer:245. Longbow - ATK 72 - 2500L - A tall bow made for powerful arrows. LevelReq - Flick:27 Tumble:28 Pop:29 Wanderer:266. Marble Bow - ATK 78 - 3200L - A bow delicately chiseled from marble. LevelReq - Flick:30 Tumble:31 Pop:32 Wanderer:297. Great Bow - ATK 83 - 4000L - A master crafted this bow for accuracy. LevelReq - Flick:33 Tumble:34 Pop:35 Wanderer:328. Artemis' Bow - ATK 88 - GoldRank at Brightwood - A bow only skilled hunters can use. LevelReq - Tumble:299. Winged Bow - ATK 92 - 5000L - A bow hailed as a masterpiece. LevelReq - Flick:38 Tumble:40 Pop:41 Wanderer:3610. Silver Bow - ATK 100 - 6000L - A reliable bow made of finest silver. LevelReq - Flick:42 Tumble:44 Pop:45 Wanderer:4011. Ivory Bow - ATK 109 - 7500L - A beautiful bow carved from ivory. LevelReq - Flick:48 Tumble:49 Pop:50 Wanderer:4512. Elven Bow - ATK 112 - Tess Subquest - A bow once owned by an elven knight. LevelReq - Tumble:4413. Mythril Bow - ATK 116 - 8500L - A bow made of magical mythril silver. LevelReq - Flick: Tumble:53 Pop:54 Wanderer:14. Diamond Bow - ATK 126 - 12500L - A bow made of hardest diamonds. LevelReq - Flick:56 Tumble:58 Pop:59 Wanderer:5415. Dragon Bow - ATK 133 - 25000L - A bow formed from a dragon's scale. LevelReq - Flick:60 Tumble:62 Pop:63 Wanderer:5816. Crystal Bow - ATK 139 - See [ULT] - A bow imbued with mystic power.
GameFAQs: Children of Mana (DS) FAQ/Walkthrough by ka... http://www.gamefaqs.com/ds/925586-children-of-mana/fa...
14 dari 69 18/11/2013 11:02

LevelReq - Flick:62 Tumble:64 Pop:65 Wanderer:6017. Fabled Bow - ATK 147 - See [ULT] - A bow used by a legendary master. LevelReq - Flick:6318. Ares' Bow - ATK 147 - See [ULT] - ?Description? LevelReq - Tumble:6619. (COMPLETE) - ATK 147 - See [ULT] - ?Description? LevelReq - Pop:6720. Altena Bow - ATK 147 - See [ULT] - A bow made of special Altena alloy. LevelReq - Wanderer:62
[HAMMERS] Hammers
The Hammer is obtained after you complete the third mission. Its basic attackhas a greater recovery time required than other weapons, and leaves you open toattack. It is powerful, however, and will knock enemies back quite a distances,which can be useful to send them into obstacles the mow them down, or intoother enemies. The standard attack also allows you to break large obstaclessuch as pots and vines that the sword cannot, and will be greatly used toreveal the Gleampool in later levels. Certain gems allow you to reduce therecovery time and increase the distance that enemies and obstacles are launchedbackward.
The focused attack for the hammer will pound into the ground, allowing you toknock back enemies with the quake, hit pegs into the ground to reveal paths,knock spikes into the ground temporarily, and break summoning circles in laterlevels to reveal items and chests. You can also use the hammer to break thedark patches of ice in Lorimar to allow for safe passage across them, makingthis weapon one of the most useful in the game. The range of the shockwave canbe increased using certain gems.
The focused attack during Fury will send your character spinning round andround wielding the glowing hammer, turning you into a movable and powerfultornado that can inflict several hits on enemies without knocking them back.There are gems to increase the level of this attack, and by doing so willincrease the duration of the tornado attack.
1. Mallet - ATK 82 - Free - A small and versatile hammer. LevelReq - Flick:1 Tumble:1 Pop:1 Wanderer:12. Steel Hammer - ATK89 - 2300L - A strong hammer made of steel. LevelReq - Flick:22 Tumble:23 Pop:24 Wanderer:213. Smith's Hammer - ATK 94 - 2500L - A large hammer used by blacksmiths. LevelReq - Flick:28 Tumble:29 Pop:30 Wanderer:274. Magical Hammer - ATK 101 - 3200L - A mysterious hammer made by a mage. LevelReq - Flick:31 Tumble:32 Pop:33 Wanderer:305. War Hammer - ATK 108 - 4000L - This hammer looks ready for battle. LevelReq - Flick:34 Tumble:35 Pop:36 Wanderer:336. Viper Hammer - ATK 111 - GoldRank at Brightwood - A hammer adorned with sharp spikes - Only Wanderer can equip LevelReq - Wanderer:307. Great Hammer - ATK 115 - 5000L - A huge hammer, powerful and heavy. LevelReq - Flick:39 Tumble:41 Pop:42 Wanderer:378. Silver Hammer - ATK 130 - 6000L - A solid hammer made of finest silver. LevelReq - Flick:43 Tumble:45 Pop:46 Wanderer:419. Ivory Hammer - ATK 142 - 7500L - A beautiful hammer carved from ivory. LevelReq - Flick:48 Tumble:50 Pop:51 Wanderer:4610. (COMPLETE) - ATK 147 - Subquest - ?Description? LevelReq - Wanderer:4111. Mythril Hammer - ATK 151 - 8500L - A hammer of magical mythril silver. LevelReq - Flick:52 Tumble:54 Pop:55 Wanderer:12. Diamond Hammer - ATK 163 - 12500L - A hammer made of hardest diamonds. LevelReq - Flick:57 Tumble:59 Pop:60 Wanderer:5513. Dragon Hammer - ATK 172 - 25000L - A hammer made from a dragon's scale. LevelReq - Flick:61 Tumble:63 Pop:64 Wanderer:5914. Crystal Hammer - ATK 183 - See [ULT] - A hammer imbued with mystic power. LevelReq - Flick:63 Tumble:65 Pop:66 Wanderer:6115. Altena Hammer - ATK 195 - See [ULT] - A hammer made of Altena alloy.
GameFAQs: Children of Mana (DS) FAQ/Walkthrough by ka... http://www.gamefaqs.com/ds/925586-children-of-mana/fa...
15 dari 69 18/11/2013 11:02
LevelReq - Flick:6516. Runic Hammer - ATK 195 - See [ULT] - A hammer etched with illegible spells. LevelReq - Tumble:6717. (Complete) - ATK 195 - See [ULT] - ?Description? LevelReq - Pop:6718. Mjollnir - ATK 195 - See [ULT] - The cherished hammer of a great hero. LevelReq - Wanderer:63
[ARMOURS] Armours and Robes
Armour, as the term implies, increases your physical defense. There are twotypes of armour which are Robes (can be equipped by Tumble or Pop) and Armour(can be equipped by Flick or Wanderer). There are also certain ones that arecharacter unique. As with weapons, each has a level requirement.
1. Cotton Kilt - DEF 29 - Free - LevelReq - Tumble:1 Pop:12. Felt Robe - DEF 33 - 150L - A robe made of thickly layered felt. LevelReq - Tumble:3 Pop:3. Leather Armor - DEF 34 - 150L - Armor made of multilayered leather. LevelReq - Flick:3 Wanderer:34. Hemp Robe - DEF 39 - 500L - A robe constructed of flax fibers. LevelReq - Tumble:7 Pop:5. Lamellar Armor - DEF 41 - 500L - Metal armor bound by leather laces. LevelReq - Flick:7 Wanderer:76. Silk Robe - DEF 46 - 1000L - A robe sewn with magical silk thread. LevelReq - Tumble:10 Pop:7. Banded Armor - DEF 49 - 1000L - Armor reinforced by metal strips. LevelReq - Flick:10 Wanderer:108. Spark Robe - DEF 53 - 1400L - A robe made of cloth as light as wind. LevelReq - Tumble:13 Pop:9. Chain Mail - DEF 56 - 1400L - Armor of interlocking metal hoops LevelReq - Flick:13 Wanderer:1310. Leather Robe - DEF 60 - 1800L - A robe made of many leather strips. LevelReq - Tumble:16 Pop:11. Scale Mail - DEF 63 - 1800L - Armor of small layered metal plates. LevelReq - Flick:16 Wanderer:1612. Shell Robe - DEF 66 - 2000L - A sturdy robe woven with shells. LevelReq - Tumble:19 Pop:13. Steel Armor - DEF 70 - 2000L - A simple yet sturdy suit of steel. LevelReq - Flick:19 Wanderer:1914. Scale Robe - DEF 73 - 2300L - A sturdy robe woven with scales. LevelReq - Tumble:22 Pop:15. Swordman's Vest - DEF 77 - 2300L - Body armor refined by an alchemist. LevelReq - Flick:22 Wanderer:2216. Ebony Robe - DEF 80 - 2500L - A robe made with ebony tree thread. LevelReq - Tumble:25 Pop:17. Quipao - DEF 83 - Subquest - A dress high-cut for greater mobility. LevelReq - Tumble:2618. Magic Plate - DEF 84 - 2500L - Plated armour strengthened by magic. LevelReq - Flick:25 Wanderer:2519. Ash Robe - DEF 86 - 3200L - A robe made with ash tree thread. LevelReq - Tumble:28 Pop:20. Knight's Armor - DEF 91 - 3200L - Armor worn only by brave knights. LevelReq - Flick:28 Wanderer:2821. Dion Robe - DEF 93 - 4000L - A robe made with dios tree thread. LevelReq - Tumble:31 Pop:22. Half-Plate Armor - DEF 95 - Subquest - Plate mail tempered by magical fire. LevelReq - Flick:2622. Cloaking Mantle - DEF 95 - Subquest - A mantle that obscures the wearer. LevelReq - Wanderer:2623. Dark Armor - DEF 98 - 4000L - Magic armor that emits a black aura. LevelReq - Flick:31 Wanderer:3124. Magical Robe - DEF 104 - 5000L - A robe enhanced by a protective spell. LevelReq - Tumble: Pop:25. Winged Armor - DEF 110 - 5000L - Armor adorned with winged shoulders.
GameFAQs: Children of Mana (DS) FAQ/Walkthrough by ka... http://www.gamefaqs.com/ds/925586-children-of-mana/fa...
16 dari 69 18/11/2013 11:02

LevelReq - Flick:36 Wanderer:3626. Silver Robe - DEF 113 - 6000L - A robe sewn with pure silver thread. LevelReq - Tumble:40 Pop:27. Silver Armor - DEF 119 - 6000L - Effective armor made of finest silver. LevelReq - Flick:40 Wanderer:4028. Bunny Dress - DEF 120 - Subquest - A charming dress with a rabbit's tail. LevelReq - Tumble:44 Pop:29. Jet Black Robe - DEF 124 - 7500L - An evil robe made of black silk. LevelReq - Tumble:45 Pop:30. Gold Armor - DEF 131 - 7500L - Armor that gleams with a holy light. LevelReq - Flick:45 Wanderer:4531. Pure White Robe - DEF 133 - 8500L - A robe of white silk and mythril cloth. LevelReq - Tumble:49 Pop:32. Mani's Plate - DEF 135 - Subquest - Plated mail strengthened by moonlight. LevelReq - Flick:44 Wanderer:33. Mythril Armor - DEF 140 - 8500L - Armor wrought of magical mythril. LevelReq - Flick:49 Wanderer:4934. Holly Robe - DEF 144 - 12500L - A robe of unsurpassed quality. LevelReq - Tumble: Pop:35. Diamond Armor - DEF 152 - 12500L - Armor crafted from diamonds. LevelReq - Flick:54 Wanderer:5436. Dragon Robe - DEF 153 - 25000L - A robe sewn from a dragon's hide. LevelReq - Tumble:60 Pop:37. Aurora Dress - DEF 160 - ????? - A robe made of thickly layered felt. LevelReq - Tumble:5337. Dragon Armor - DEF 161 - 25000L - Armor wrought of dragon scales. LevelReq - Flick:60 Wanderer:6038. Crystal Robe - DEF 164 - See [ULT] - A robe imbued with mystic power. LevelReq - Tumble:66 Pop:39. Crystal Armor - DEF 172 - See [ULT] - Armor imbued with mystic power. LevelReq - Flick:66 Wanderer:66
[ACCESSORIES] Accessories
Accessories will increase your Intelligence (your Magical Attack power). Asthus they are rather useless, since the magic system in the game is seldomuseful. However, if you are a magic user, you will want to keep these up todate. Again, these have a level requirement, and there are some items that arecharacter specific.
1. Bead Ring - INT 32 - Free - A child's ring set with a glass bead LevelReq - Flick:1 Tumble:1 Pop:1 Wanderer:12. Jeweled Ring - INT 39 - 150L - A ring with a jewel of limited power. LevelReq - Flick: Tumble:4 Pop: Wanderer:53. Sensory Ring - INT 46 - 500L - A ring able to enhance the 5 senses. LevelReq - Flick: Tumble:8 Pop: Wanderer:94. Knight's Medallion - INT 50 - Quest - A medal given by a king for bravery. LevelReq - Flick:55. Moonstone Tiara - INT 50 - Subquest - A tiara colored by rays of moonlight. LevelReq - Tumble:46. (COMPLETE) Pop's Reward for Tess Subquest7. Mage's Gloves - INT 50 - Subquest - Gloves embroidered with magic spells. LevelReq Wanderer:58. Ring of Memory - INT 54 - 1000L - A ring containing a mage's memories. LevelReq - Flick: Tumble:11 Pop: Wanderer:129. Beholder Ring - INT 61 - 1400L - A ring set with a stone like an eye. LevelReq - Flick: Tumble:14 Pop: Wanderer:1510. Ring of Radiance - INT 68 - 1800L - A pearl ring that reflects pure light. LevelReq - Flick: Tumble:17 Pop: Wanderer:1911. Ring of Gloom - INT 75 - 2000L - A black pearl ring with shady patches. LevelReq - Flick: Tumble:20 Pop: Wanderer:2212. Giant's Ring - INT 82 - 2300L - A ring thought to hold a giant's power. LevelReq - Flick: Tumble:23 Pop: Wanderer:2513. Demon Ring - INT 89 - 2500L - A creepy ring with monster carvings. LevelReq - Flick: Tumble:25 Pop: Wanderer:27
GameFAQs: Children of Mana (DS) FAQ/Walkthrough by ka... http://www.gamefaqs.com/ds/925586-children-of-mana/fa...
17 dari 69 18/11/2013 11:02

14. Ring of the Tree - INT 96 - 3200L - A ring woven from ancient tree vines. LevelReq - Flick: Tumble:28 Pop: Wanderer:3015. Dryad's Ring - INT 103 - 4000L - A ring set with a seed from an old tree. LevelReq - Flick: Tumble:31 Pop: Wanderer:3316. Ancient Ring - INT 112 - 5000L - A ring engraved with forgotten spells. LevelReq - Flick: Tumble:36 Pop: Wanderer:3917. Hero's Medallion - INT 120 - Subquest - A medal worn by lauded heroes. LevelReq - Flick:3218. Ancient Tiara - INT 120 - Subquest - A tiara engraved with forgotten spells LevelReq - Tumble:3617. Shimmering Ring - INT 124 - 6000L - A gold ring that shines brilliantly. LevelReq - Flick:42 Tumble:40 Pop: Wanderer:4318. Soul Ring - INT 134 - 7500L - A ring that reveals its owner's soul. LevelReq - Flick:47 Tumble:45 Pop: Wanderer:4819. Mythril Ring - INT 145 - 8500L - A ring made of magical mythril silver. LevelReq - Flick:51 Tumble:49 Pop: Wanderer:5220. Elemental Ring - INT 159 - 12500L - A rind empowered by spirits' magic. LevelReq - Flick:56 Tumble: Pop: Wanderer:5721. Dragonfang Ring - INT 168 - 25000L - A ring honed from a dragon's tooth. LevelReq - Flick:60 Tumble:58 Pop: Wanderer:6122. Crystal Ring - INT 179 - Chests - A ring imbued with mystic powers. LevelReq - Flick:65 Tumble:63 Pop: Wanderer:6623. Conqueror's Medal - INT 185 -See [ULT]- A legendary medal promising victory LevelReq - Flick:6624. Princess' Tiara - ING 185 - See [ULT] - A tiara worn by one of high birth. LevelReq - Tumble:65
[ULT] The Ultimate Weaponry
Note: Section heavily under construction.
There are a series of weapons, armours and items that can be found at certainpoints during subquests to certain levels later on in the game, and are themost powerful items in their class. They can be found in small zones that have"Kill a certain enemy" for the Gleamdrop location and have a set of chests.
-SwordThis can be found sometimes in Star Lake, in one of the chests in a small Xshaped room that requires you to defeat a furry slug-like creature to obtainthe Gleamdrop. The chests are behind some large vines, and can sometimescontain this weapon. The room is the same as the 4th zone when playing throughStar Lake's main quest.-FlailThis can be found in the Fiery Sands. The area is a large quicksand pit,pulling sand toward the centre where a large beetle awaits. There are chests onthe outer edges of this area, and one of these may contain the weapon. Same as4th zone of Fiery Sands mission.-BowThis can be found in Lorimar. The area is full of pots, so time to do some"bull in a chine shop" work. There will be a walking armour in the top lefthand corner of the level. Same as 4th zone of Lorimar mission.-HammerThis can be found in Brightwood. The area is a small one with some enemies inthe centre. A bridge must be extended to reach them. One of the chests on theoutside area contains the weapon. Same as 4th zone of Brightwood.-ArmourThis can be found in the Ruins. There will be a lot of plants here to knockdown, and you should have some shells to do so with the hammer. The chest isnormally in the top left corner of the level. Same as 8th zone of Ruinsmission.-AccessoryFound in a small room with 4 red dragons and some tomatomen in the centre inthe Path of Life. Further details need confirming, but I believe this is the4th zone of the Path of Life mission.
There are also Crystal items, which are the highest non-rare items in their
GameFAQs: Children of Mana (DS) FAQ/Walkthrough by ka... http://www.gamefaqs.com/ds/925586-children-of-mana/fa...
18 dari 69 18/11/2013 11:02
categories, and can be found during the Cosmic Rift levels, or as Dud Servicesrewards for subquests that take place on this level. They are abundant aftercompleting the game and going back to do a subquest there, in particular underthe summoning circles (you can break them with a charged hammer attack). Alsonote that the crystal armours and robes are actually BETTER than the characterunique items.
-------------------------------------------------------------------------------
[MAGIC] The Eight Elementals
The system for casting is similar to Sword of Mana. Hold down the B button. Theelemental will appear. If you walk into it, it grants either the status ailmentof X Sword (ie flame, ice, etc) or other status enhancements, or if you let itbe, it will blink and then cast it's magic in the nearby space (create a smalltornado, fire flames, that sort of thing). You can press B again you'll sendthe elemental in the direction you're facing until it hits somethingto cast it's magic there.
An Elemental's level can be raised to 2 or 3 by equipping Gems. This will causestatus aids to last longer or cure more, and attack magic to have a greaterreach.
-Salamander - FireAttack - Explode: A fiery explosion blazes outward from the spirit.Support - Flamestrike: Imbues weapons with the power to set foes ablaze.-Undine - WaterAttack - Ice Crush: Ice blasts outward from the spirit on four sides.Support - Froststrike: Imbues weapons with the power to freeze foes in theirtracks.-Gnome - EarthAttack - Earth Spikes: Sharp rocks errupt from the earth beneath the spirit.Support - Stonestrike: Imbues weapons with the power to prevent foes fromattacking.-Jinn - AirAttack - Cyclone: The spirit summons a tornado that spiral outwardcounterclockwise.Support - Lighteningstrike: Imbues weapons with the power to paralyze foes.-Dryad - TreesAttack - Thorny Tendrils: Thorny vines lash out from the spirit on four sides.Support - Nature's Aura: Cures an ally's status ailments and gives temporaryimmunity.-Luna - MoonAttack - Moonbeams: Rays of light emanate diagonally from the spiritSupport - Lunar Radiance: Gradually restores an ally's HP.-Wisp - LightAttack - Holy Orb: The spirit summons an orb of light that whirls outclockwise.Support - Healing Light: Restores an ally's HP.-Shade - DarkAttack - Dark Vortex: A vortex of darkness spirals outward from the spirit.Support - Invisibility: Makes an ally invisible to enemies.
-------------------------------------------------------------------------------
[GEMS] Gems
Gems have the power to alter the escense of living things, and their power canbe harnessed by a Gem Frame that is given to you by Watts at the beginning ofthe game.
This frame can be accessed via the "Gems" option in the characters menu. Itwill show up as a grid in which stones can be placed to make their effectsactive on your character. The effects of each stone vary, and can both increase
GameFAQs: Children of Mana (DS) FAQ/Walkthrough by ka... http://www.gamefaqs.com/ds/925586-children-of-mana/fa...
19 dari 69 18/11/2013 11:02
your stats and give you additional abilities.
The Gem Frame starts off as a 2x2 grid, and can be upgraded 3 times during thegame. These are pointed out during the walkthrough, however for quick referencehere are the points where you upgrade your Frame.
-1st Upgrade (4x2)Talk to Balbo of the Bomb Brothers Store after completing Star Lake of Topple.-2nd Upgrade (cross formation, 2,4,4,2)Talk to Balbo after finishing Brightwood of Wendal.-3rd Upgrade (4x4)After completing the Path of Life, Chat to the Dudbear at Dud Services toaccess the subquest that will reward you with the Smelting Rock. Give this tothe Bomb Brothers so they can make the final expansion.
There are 7 types of Gem.
-Red Gems - The affect ATK and attack type. There are 42.-Blue Gems - These affect INT, MP, and spell levels. There are 33.-Yellow Gems - These affect MND, DEF and recovery. There are 32.-Purple Gems - These affect Fury and special attacks. There are 15.-Orange Gems - These affect items and EXP gained. There are 7.-Green Gems - These nullify status ailments & spikes. There are 12.-Impure Gems - Impure gems with unstable effects. There are 35.
Impure gems will greatly increase some stats or abilities while reducingothers. So, for example, they can give you a great boost in strength at a costof your total HP.
There are also two gem complexities as it were. The unrefined gems (forexample, those that the Bomb Brothers sell you) and refined gems (which you canget from subquests, for example, and show a much more polished look). You canfuse unrefined gems together at the Bomb Bros store to create new gems witheven greater abilities, but you can't fuse refined gems as they are in theirmost perfect state. You will see in the gem list the gems that can be obtainedby fusion, what unrefined gems are needed to make them, and also what price theBomb Bros will charge for the fusion.
Each character also has an extra gem that can only be accessed by them via asubquest (Flick a Red Gem, Pop a Blue, Wanderer a Yellow and Tumble a Purple).
Regarding recommended gems and gem combinations, it comes a lot down to thesituation you are going to enter. A few that I would recommend obtaining andlearning when to use are gems such as Sword Expertise, Heart of Progress,Virtue of Balance, Ultimate Protection (this one is particularily useful forPath of Life and Cosmic Rift, as the minor obstacles can inflict random statusailments) and Soul of the Gemma.
Blue gems are not particularily useful to me, as I have found magic to behardly an asset, so you really want to focus more on using those extra slots toadd more ATK or DEF, and maybe even boost the sword specifically a bit more.
Another thing to consider is a Green gem that protects you from the statusailments that minor obstacles can inflict (for example, poisoning inBrightwood). It will come in handy for levels that require you to searchthrough the minor obstacles for the Gleamdrop.
Also the effects of EXP boosting gems (such as Heart of Progress and Courage toLearn) accumulate side by side, so if you have two Heart of Progress, youdouble your EXP, as opposed to them accumulating exponentially, which wouldgive you (100 * 1.5) * 1.5 = 225%
I recommend reading the walkthrough section at the beginning of each level foran idea of what terrain you will be facing, and hopefully this will allow youto prepare better gem combinations for each level as required.
GameFAQs: Children of Mana (DS) FAQ/Walkthrough by ka... http://www.gamefaqs.com/ds/925586-children-of-mana/fa...
20 dari 69 18/11/2013 11:02
[RED] Red Gems01. Crystal of Strength - ATK (weapon attack power) +4 - 1x1Purchase 750L02. Unusual Life - Higher max HP the more you complete areas in multiplayer.1x1Talk to Moti after hosting a multiplayer game.03. Unusual Strength - Higher ATK the more you complete areas in multiplayer.1x1 - Talk to Moti after completing 50 multiplayer levels.04. Feral Soul - ATK +8 - 1x1Reward from the Bomb Brothers Subquest05. Steal Hook - Enables theft of items from monsters with a flick of theflail. 1x1 - Purchase 1000L06. Unstoppable Hook - Enables the flail to penetrate foes with a pull strike.1x1 - Fusion (3000L, Steal Hook + Crystal of Strength)07. Light on a Boy - Sword ATK +20, DEF and DEX +10. - 1x1Flick only subquest.08. Crystal of Life - Maximum HP +30. - 2x1Fusion (1000L, 2x Crystal of Strength)09. Sonic Wave - Cause the third sword slash to unleash a shock wave. - 2x1Purchase 3000L10. Multiple swings - Enables up to 3 consecutive swings with the flail. 2x1Purchase 3000L11. Triple Shot - Each bow attack fires arros in three directions. 2x1Purchase 8000L12. Heavy Swing - Hammer strikes knock monster even farther back. 2x1Purchase 3000L13. Double Slash - Deal double damage when striking with a sword. 2x1Fusion (8000L, Sonic Wave + Crystal of Strength)14. Double Sonic Wave - Deal double damage with sword. Third strike unleashesshock waves. 2x1 - Fusion (10000L, 2x Sonic Wave)15. Swift Rotation - Swing your flail faster. 2x1Fusion (3000L, Multiple swings + Crystal of Strength)16. Multiple Rotations - Enables up to 3 faster consecutive swings with theflail. 2x1 - Fusion (10000L, 2x Multiple Swings)17. Strong Arrows - Shots penetrate monsters. 2x1Fusion (8000L, Triple Shot + Crystal of Strength)18. Strong Triple Shot - Each bow attack fires penetrating arrows in threedirections. 2x1 - Fusion (15000L, 2x Triple Shot)19. Swift Recovery - Quickes recovery time after hammer swings. 2x1Fusion (8000L, Heavy Swing + Crystal of Strength)20. Swift Heavy Swing - Quickens hammer swing recovery time. Knock enemiesback. 2x1 - Fusion (4000L, 2x Heavy Swing)21. Sword Expertise - Sword ATK + 8. Double damage. Third strike unleashesshock waves. 2x1 - Fusion (12000L, Sonic Wave + Mighty Defense)22. Flail Expertise - Flail ATK +8. Enables up to three flail swings. 2x1Fusion (12000L, Multiple Swings + Steal Hook)23. Box Expertise - Bow ATK +8. Fire penetrating arrows in three directions.2x1 - Fusion (12000L, Triple Shot + String Resonance)24. Hammer Expertise - Hammer ATK +8. Quickens hammer recovery. Knock enemiesback. 2x1 - Fusion (12000L, Heavy Swing + Great Tremor)25. Soul of the Dragon - ATK +12. 2x1Subquest "Find the dragon mentioned in the diary"26. Mighty Defense - Raises maximum number of parries to 10. - 1x2Purchase 1000L27. String Resonance - Extends range of bow's music. 1x2Pruchase 1000L28. Great Tremor - Extends range of hammer ground strikes. 1x2Purchase 1000L29. Total Parry - Nullifies all damage when you parry with your sword. - 1x2Fusion (5000L, Mighty Defense + Crystal of Strength)30. Unstoppable Claw - Enables the flail to penetrate foes and steal items witha pull strike. 1x2 - Fusion (4000L, 2x Steal Hook)31. Lullaby - The bow's music puts enemies to sleep. 1x2Fusion (6000L, String Resonance + Crystal of Strength)32. Requiem - Extends range of bow's music and puts foes to sleep. 1x2Fusion (8000L, 2x String Resonance)
GameFAQs: Children of Mana (DS) FAQ/Walkthrough by ka... http://www.gamefaqs.com/ds/925586-children-of-mana/fa...
21 dari 69 18/11/2013 11:02
33. Meteor Shock Wave - Hammer ground strikes stun nearby monsters. 1x2Fusion (6000L, Great Tremor + Crystal of Strength)34. Sword Training - ATK +10 when striking with a sword. - 1x2Dud Services job reward35. Flail Training - ATK +10 when striking with a flail. - 1x2Dud Services job reward36. Bow Training - ATK +10 when shooting a bow. - 1x2Dud Services job reward37. Hammer Training - ATK +10 when striking with a hammer. - 1x2Dud Services job reward38. Fountain of Life - Raises maximum HP by 50. 1x2Dud Services reward.39. Flawless Parry - Raises maximum no. of parries to 10. Nullifies alldamage.- 2x2Fusion (8000L, Mighty Defense x2)40. Wide Shock Wave - Hammer ground strikes gain range and stun nearby foes.2x2 - Fusion (8000L, 2x Great Tremor)41. Might of Gemmas - ATK + 20. 2x2Fusion (8000L, Multiple Swings + Sonic Wave, other combinations of red gems)42. Soul of the Gemma - ATK +25, DEF + 10. 3x2Fusion (10000L, Multiple Seings + Mighty Defense, other combos of red gems)43. Pride of Gemmas - ATK +10, DEF +25. 3x2Fusion (10000L, Steal Hook + Mighty Defence, other red gems combos)
[BLUE] Blue Gems01. Crystal of Lore - INT (spell damage) +4 - 1x1Purchase 750L02. Unusual Power - Higher max MP the more you complete areas in multiplayer.1x1 - Talk to Moti after completing 20 multiplayer levels.03. Unusual Lore - Higher INT the more you complete areas in multiplayer. 1x1Talk to Moti after completing 30 multiplayer levels.04. Light on a Child - Flail ATK +20, INT and MND +10. 1x1Pop only subquest.05. Salamander's Favor - Salamander's spells reach level 2. - 2x1Purchase 5000L06. Undine's Favor - Undine's spells reach level 2. - 2x1Purchase 5000L07. Gnome's Favor - Gnome's spells reach level 2. - 2x1Purchase 4000L08. Jinn's Favor - Jinn's spells reach level 2. - 2x1Purchase 4000L09. Pride of the Spirits - All elemental spells reach level 2. 2x1Fusion (12000L, 2x 4000L Elemental favors)10. Crystal of Power - Raises max MP by 30 - 1x2Fusion (1000L, 2x Crystal of Lore11. Dryad's Favor - Dryad's spells reach level 2. - 2x1Purchase 5000L12. Luna's Favor - Luna's spells reach level 2. - 2x1Purchase 5000L13. Wisp's Favor - Wisp's spells reach level 2. - 2x1Purchase 4000L14. Shade's Favor - Shade's spells reach level 2. - 2x1Purchase 4000L15. Might of the Spirits - All elemental spells reach level 2. 2x1Fusion (12000L, 2x 5000L Elemental Favor)16. Bond of Salamander - Salamander's spells reach level 3. 2x2Fusion (11000L, 2x Salamander's Favor)17. Zeal of Salamander - Salamander's spells consume 40% less MP. 2x2Fusion (8000L, Salamander's Favor + Crystal of Lore)18. Bond of Undine - Undine's spells reach level 3. 2x2Fusion (11000L, 2x Undine's Favor)19. Zeal of Undine - Undine's spells consume 40% less MP. 2x2Fusion (8000L, Undine's Favor + Crystal of Lore)20. Bond of Gnome - Gnome's spells reach level 3. 2x2Fusion (11000L, 2x Gnome's Favor)21. Zeal of Gnome - Gnome's spells consume 40% less MP. 2x2
GameFAQs: Children of Mana (DS) FAQ/Walkthrough by ka... http://www.gamefaqs.com/ds/925586-children-of-mana/fa...
22 dari 69 18/11/2013 11:02
Fusion (8000L, Gnome's Favor + Crystal of Lore)22. Bond of Jinn - Jinn's spells reach level 3. 2x2Fusion (11000L, 2x Jinn's Favor)23. Zeal of Jinn - Jinn's spells consume 40% less MP. 2x2Fusion (8000L, Jinn's Favor + Crystal of Lore)24. Bond of Dryad - Dryad's spells reach level 3. 2x2Fusion (11000L, 2x Dryad's Favor)25. Zeal of Dryad - Dryad's spells consume 40% less MP. 2x2Fusion (8000L, Dryad's Favor + Crystal of Lore)26. Bond of Luna - Luna's spells reach level 3. 2x2Fusion (11000L, 2x Luna's Favor)27. Zeal of Luna - Luna's spells consume 40% less MP. 2x2Fusion (8000L, Luna's Favor + Crystal of Lore)28. Bond of Wisp - Wisp's spells reach level 3. 2x2Fusion (11000L, 2x Wisp's Favor)29. Zeal of Wisp - Wisp's spells consume 40% less MP. 2x2Fusion (8000L, Wisp's Favor + Crystal of Lore)30. Bond of Shade - Shade's spells reach level 3. 2x2Fusion (11000L, 2x Shade's Favor)31. Zeal of Shade - Shade's spells consume 40% less MP. 2x2Fusion (8000L, Shade's Favor + Crystal of Lore)32. Soul of the Spirits - All elemental spells consume 10% less MP. 2x2Fusion (4000L, a 4000L Elemental favor + a 5000L Elemental favor)33. Zeal of the Spirits - All elemental spells consume 30% less MP. 2x2Gold Rank on Path of Life level.34. Bond of the Spirits - All elemental spell reach level 3. 2x2Gold Rank on Ruins of Illusia level.
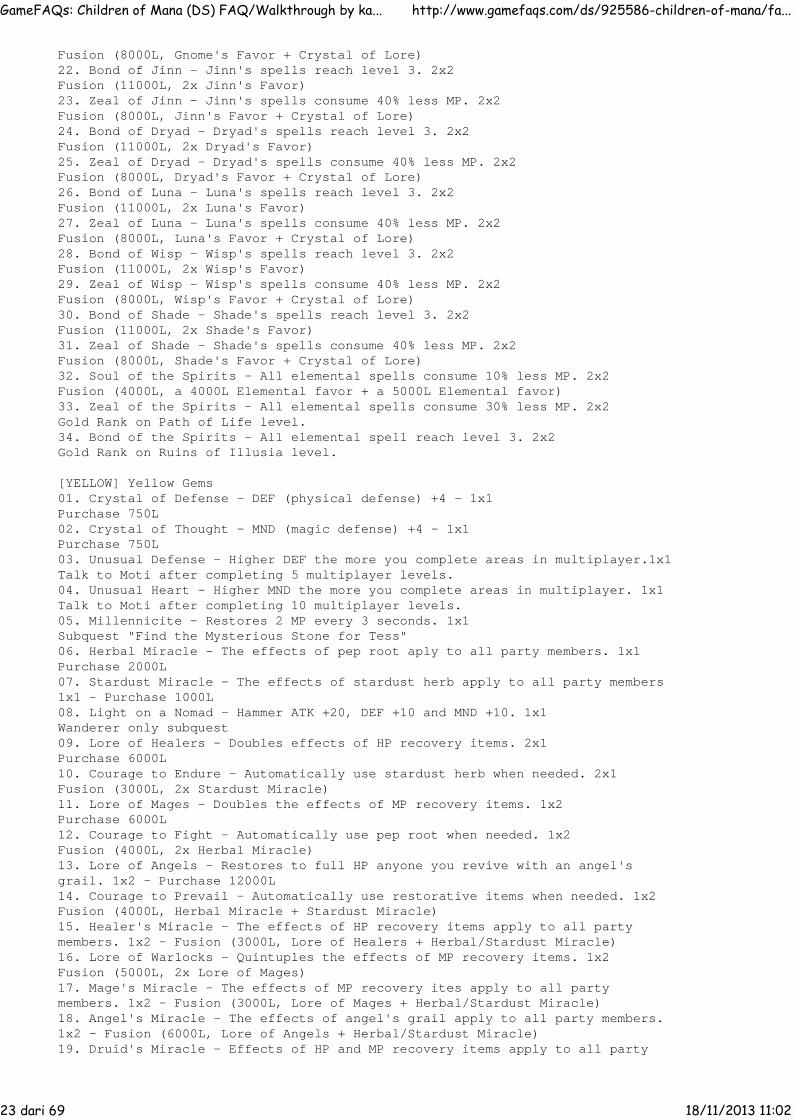
[YELLOW] Yellow Gems01. Crystal of Defense - DEF (physical defense) +4 - 1x1Purchase 750L02. Crystal of Thought - MND (magic defense) +4 - 1x1Purchase 750L03. Unusual Defense - Higher DEF the more you complete areas in multiplayer.1x1Talk to Moti after completing 5 multiplayer levels.04. Unusual Heart - Higher MND the more you complete areas in multiplayer. 1x1Talk to Moti after completing 10 multiplayer levels.05. Millennicite - Restores 2 MP every 3 seconds. 1x1Subquest "Find the Mysterious Stone for Tess"06. Herbal Miracle - The effects of pep root aply to all party members. 1x1Purchase 2000L07. Stardust Miracle - The effects of stardust herb apply to all party members1x1 - Purchase 1000L08. Light on a Nomad - Hammer ATK +20, DEF +10 and MND +10. 1x1Wanderer only subquest09. Lore of Healers - Doubles effects of HP recovery items. 2x1Purchase 6000L10. Courage to Endure - Automatically use stardust herb when needed. 2x1Fusion (3000L, 2x Stardust Miracle)11. Lore of Mages - Doubles the effects of MP recovery items. 1x2Purchase 6000L12. Courage to Fight - Automatically use pep root when needed. 1x2Fusion (4000L, 2x Herbal Miracle)13. Lore of Angels - Restores to full HP anyone you revive with an angel'sgrail. 1x2 - Purchase 12000L14. Courage to Prevail - Automatically use restorative items when needed. 1x2Fusion (4000L, Herbal Miracle + Stardust Miracle)15. Healer's Miracle - The effects of HP recovery items apply to all partymembers. 1x2 - Fusion (3000L, Lore of Healers + Herbal/Stardust Miracle)16. Lore of Warlocks - Quintuples the effects of MP recovery items. 1x2Fusion (5000L, 2x Lore of Mages)17. Mage's Miracle - The effects of MP recovery ites apply to all partymembers. 1x2 - Fusion (3000L, Lore of Mages + Herbal/Stardust Miracle)18. Angel's Miracle - The effects of angel's grail apply to all party members.1x2 - Fusion (6000L, Lore of Angels + Herbal/Stardust Miracle)19. Druid's Miracle - Effects of HP and MP recovery items apply to all party
GameFAQs: Children of Mana (DS) FAQ/Walkthrough by ka... http://www.gamefaqs.com/ds/925586-children-of-mana/fa...
23 dari 69 18/11/2013 11:02
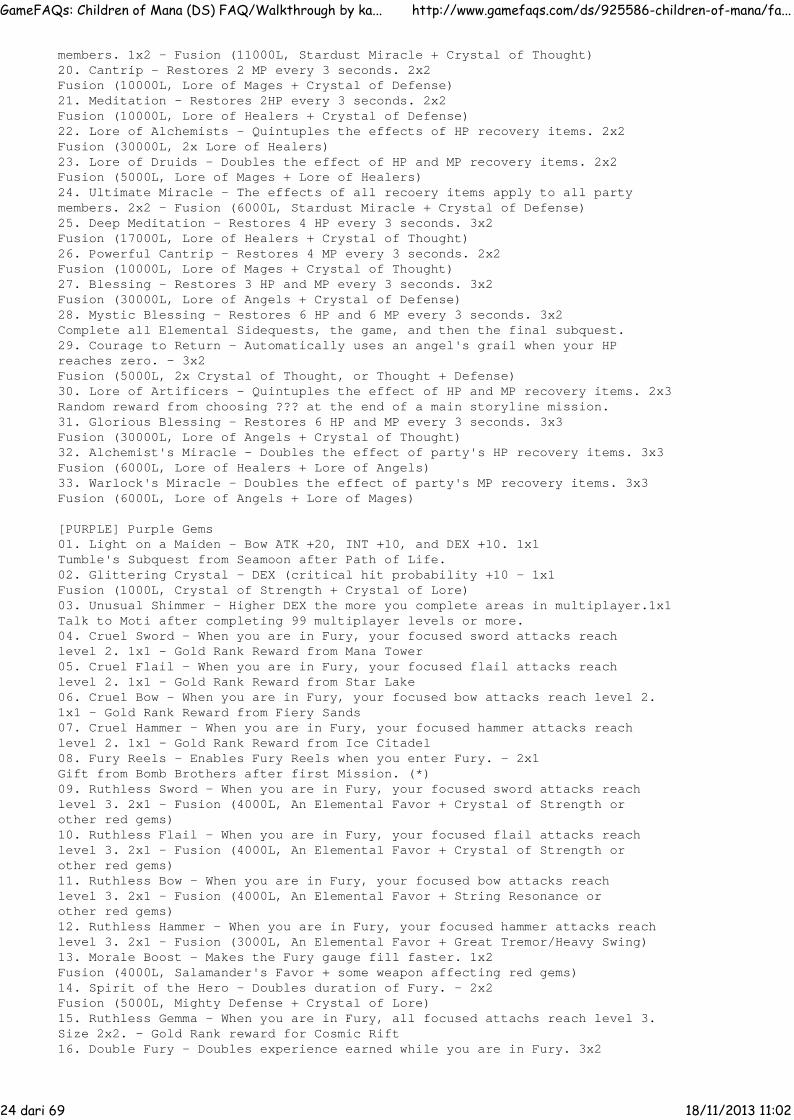
members. 1x2 - Fusion (11000L, Stardust Miracle + Crystal of Thought)20. Cantrip - Restores 2 MP every 3 seconds. 2x2Fusion (10000L, Lore of Mages + Crystal of Defense)21. Meditation - Restores 2HP every 3 seconds. 2x2Fusion (10000L, Lore of Healers + Crystal of Defense)22. Lore of Alchemists - Quintuples the effects of HP recovery items. 2x2Fusion (30000L, 2x Lore of Healers)23. Lore of Druids - Doubles the effect of HP and MP recovery items. 2x2Fusion (5000L, Lore of Mages + Lore of Healers)24. Ultimate Miracle - The effects of all recoery items apply to all partymembers. 2x2 - Fusion (6000L, Stardust Miracle + Crystal of Defense)25. Deep Meditation - Restores 4 HP every 3 seconds. 3x2Fusion (17000L, Lore of Healers + Crystal of Thought)26. Powerful Cantrip - Restores 4 MP every 3 seconds. 2x2Fusion (10000L, Lore of Mages + Crystal of Thought)27. Blessing - Restores 3 HP and MP every 3 seconds. 3x2Fusion (30000L, Lore of Angels + Crystal of Defense)28. Mystic Blessing - Restores 6 HP and 6 MP every 3 seconds. 3x2Complete all Elemental Sidequests, the game, and then the final subquest.29. Courage to Return - Automatically uses an angel's grail when your HPreaches zero. - 3x2Fusion (5000L, 2x Crystal of Thought, or Thought + Defense)30. Lore of Artificers - Quintuples the effect of HP and MP recovery items. 2x3Random reward from choosing ??? at the end of a main storyline mission.31. Glorious Blessing - Restores 6 HP and MP every 3 seconds. 3x3Fusion (30000L, Lore of Angels + Crystal of Thought)32. Alchemist's Miracle - Doubles the effect of party's HP recovery items. 3x3Fusion (6000L, Lore of Healers + Lore of Angels)33. Warlock's Miracle - Doubles the effect of party's MP recovery items. 3x3Fusion (6000L, Lore of Angels + Lore of Mages)
[PURPLE] Purple Gems01. Light on a Maiden - Bow ATK +20, INT +10, and DEX +10. 1x1Tumble's Subquest from Seamoon after Path of Life.02. Glittering Crystal - DEX (critical hit probability +10 - 1x1Fusion (1000L, Crystal of Strength + Crystal of Lore)03. Unusual Shimmer - Higher DEX the more you complete areas in multiplayer.1x1Talk to Moti after completing 99 multiplayer levels or more.04. Cruel Sword - When you are in Fury, your focused sword attacks reachlevel 2. 1x1 - Gold Rank Reward from Mana Tower05. Cruel Flail - When you are in Fury, your focused flail attacks reachlevel 2. 1x1 - Gold Rank Reward from Star Lake06. Cruel Bow - When you are in Fury, your focused bow attacks reach level 2.1x1 - Gold Rank Reward from Fiery Sands07. Cruel Hammer - When you are in Fury, your focused hammer attacks reachlevel 2. 1x1 - Gold Rank Reward from Ice Citadel08. Fury Reels - Enables Fury Reels when you enter Fury. - 2x1Gift from Bomb Brothers after first Mission. (*)09. Ruthless Sword - When you are in Fury, your focused sword attacks reachlevel 3. 2x1 - Fusion (4000L, An Elemental Favor + Crystal of Strength orother red gems)10. Ruthless Flail - When you are in Fury, your focused flail attacks reachlevel 3. 2x1 - Fusion (4000L, An Elemental Favor + Crystal of Strength orother red gems)11. Ruthless Bow - When you are in Fury, your focused bow attacks reachlevel 3. 2x1 - Fusion (4000L, An Elemental Favor + String Resonance orother red gems)12. Ruthless Hammer - When you are in Fury, your focused hammer attacks reachlevel 3. 2x1 - Fusion (3000L, An Elemental Favor + Great Tremor/Heavy Swing)13. Morale Boost - Makes the Fury gauge fill faster. 1x2Fusion (4000L, Salamander's Favor + some weapon affecting red gems)14. Spirit of the Hero - Doubles duration of Fury. - 2x2Fusion (5000L, Mighty Defense + Crystal of Lore)15. Ruthless Gemma - When you are in Fury, all focused attachs reach level 3.Size 2x2. - Gold Rank reward for Cosmic Rift16. Double Fury - Doubles experience earned while you are in Fury. 3x2
GameFAQs: Children of Mana (DS) FAQ/Walkthrough by ka... http://www.gamefaqs.com/ds/925586-children-of-mana/fa...
24 dari 69 18/11/2013 11:02

Gold Rank reward for Brightwood.
(*) A full description of the extent of the powers of this gem should beprovided at this point. The Fury Reels (Fever Slots in the Japanese version)change your Fury meter into a slot machine when you activate your Fury. Thecombination of the 3 pictures in the slots will give you a specific bonus whenyou use Fury, and are explained here:-Three Swords: Berserk - Every hit is critical during Fury-Three Armors: Aegis - Invincibility during Fury-Three Skull: Bad Luck - You lose your Fury.-Three Lucre: Jackpot - Large Lucre drops from enemies during Fury.-Three Gumdrop: Full HP - HP is restored to full.-Two of a kind: HP Up - 50% of your total HP is restored.-All different: Nothing - Fury acts as normal.
[ORANGE] Orange Gems01. Lore of Thieves - Makes fake treasure chests appear as monsters on radar.1x1 - Fusion (1000L, Crystal of Defense + Crystal of Strength)02. Drain Life - Converts 3% of damage inflicted on monsters into HP. 2x1Fusion (30000L, Lore of Healers + weapon effect Red Gem (ie String Reson.))03. Drain Will - Converts 3% of damage inflicted on monsters into MP. 1x2Fusion (15000L, Lore of Mages + weapon effect red gem (ie Sonic Wave))04. Drain Soul - Converts 3% of damage inflicted on monsters into HP and MP.2x1 - Fusion (35000L, Lore of Angels + weapon effect Red Gem (ie TripShot)05. Heart of Progress - Inreases experience gain by 50% - 2x2Fusion (10000L, Crystal of Strength + Crystal of Thought, Mighty Defense +Crystal of Defense or Crystal of Thought)06. Lore of Niccolos - Adds 10% bonus to lucre gained. 2x2Fusion (4000L, Stardust Miracle + Mighty Defense)07. Double Drop - Double the chance that monsters will drop items and lucre.2x2 - Fusion (5000L, A Miracle gem + Crystal of Strength)
[GREEN] Green Gems01. Flame's Shelter - Prevents you from catching fire. 2x1Fusion (4000L, Salamanders Favor + Stardust Miracle)02. Water's Shelter - Prevents you from being turned into a snowman. 2x1Fusion (4000L, Undine's Favor + Stardust Miracle)03. Earth's Shelter - Prevents you from being disarmed. 2x1Fusion (4000L, Gnome's Favor + Stardust Miracle)04. Wind's Shelter - Prevents you from being paralyzed. 2x1Fusion (4000L, Jinn's Favor + Stardust Miracle)05. Forest's Shelter - Prevents you from being put to sleep. 2x1Fusion (4000L, Dryad's Favor + Stardust Miracle)06. Moon's Shelter - Prevents you from being confused. 2x1Fusion (4000L, Luna's Favor + Stardust Miracle)07. Light's Shelter - Prevents you from being stunned. 2x1Fusion (4000L, Wisp's Favor + Stardust Miracle)08. Shadow's Shelter - Prevents you from being blinded. 2x1Fusion (4000L, Shade's Favor + Stardust Miracle)09. Purity's Shelter - Prevents you from being poisoned - 1x2Fusion (8000L, Crystal of Defense + Crystal of Lore)10. Virtue of Balance - Enables steady travel over sand and ice. 2x2Fusion (6000L, Any elemental Favor + Crystal of Thought)11. Virtue of Safety - Enables safe travel over spikes. 2x2Fusion (6000L, Any elemental Favor + Crystal of Defense)12. Ultimate Protection - Prevents all ailments - 3x2Fusion (12000L, Crystal of Lore + Crustal of Thought)
[IMPURE] Impure Gems(note, all are found either in chests, dropped by enemies, Dud Services reward)01. Life's Thirst - Converts 3% of damage inflicted on mosnters into HP.ATK -10.02. Mind's Thirst - Converts 3% of damage inflicted on monsters into MP.INT -10. 1x10³. Soul's Thirst - Converts 3% of damage inflicted into MP and MP. ATK -10,INT -10. 1x1
GameFAQs: Children of Mana (DS) FAQ/Walkthrough by ka... http://www.gamefaqs.com/ds/925586-children-of-mana/fa...
25 dari 69 18/11/2013 11:02

04. Meager Resistance - Automatically uses stardust herb. Increases risk ofailments. - 1x10⁵. Meager Courage - Autmaically use pep root. Increases risk of ailments. 1x10⁶. Chivalry - DEF +20, MND -20. 1x10⁷. Asceticism - MND +20, DEF -20. 1x10⁸. Good and Bad Luck - Increases Lucre gain by 20%. Items drop less often. 1x10⁹. Planted Feet - Enables steady travel over sand and ice. Increases risk ofailments. 2x110. Berserking - ATK +15, DEL -10 - 2x111. Wizardry - INT +15, MND -10. 2x112. Clouded Vivicite - Raises maximum HP by 50. DEF -10. 2x113. Clouded Magicite - Raises maximum MP by 30. MND -5. 2x114. Evil Spirits' Favor - All elemental spells reach level 2. ATK -10 2x115. Cautious Feet - Enables steady travel over spikes. Increases risk ofailments. 1x216. Meager Hope - Automatically use angel's grail, but you will catch onfire.1x217. Uneasy Meditation - Restores 3 HP every 3 seconds. DEX -5. 2x218. Budding Warlock - Doubles effect of MP recovery items. Increases risk ofailments. 2x219. Budding Alchemist - Doubles effect of HP recovery items. Increases risk ofailments. 2x220. Courage to Learn - Increases experience gain by 75%. DEF -20. 2x221. Fire & Water Flaw - Raises risk of burning & freezing. Lowers risk ofothers. 2x222. Earth & Wind Flaw - Raises risk of paralysis & disarmament. Lowers risk ofothers. 2x223. Moon & Wood Flaw - Raises risk of confusion & sleep. Lowers risk of others.2x224. Light & Dark Flaw - Raises risk of stunning & blindness. Lowers risk ofothers. 2x225. Poison Flaw - Raises risk of poison. Lowers risk of all other ailments. 2x226. Soul of Progress - Increases experience gain by 75%. Items drop lessoften. 2x227. Academia - INT and MND +12. ATK and DEF -5. 2x228. Barbarism - ATK and DEF +12. INT and MND -5. 2x229. Budding Artificer - Quintuples effect of recovery items. Increases risk ofailments. 2x230. Bond of Demons - All elemental magic reaches level 3. ATK -50. 2x231. Zeal of Demons - All elemental spells consume 30% less MP. ATK -50. 2x232. Uneasy Blessing - Restores 8 HP and 8 MP every 3 seconds. ATK and INT -10.Size 2x333. Witch's Cantrip - Restores 5mp every 3 seconds. MND -10. - 3x234. Witch's Meditation - Restores 5 HP every 3 seconds. Def -10. - 3x235. Witch's Blessing - Restores 10HP and 10MP every 2 seconds. ATK and INT -50.3x3.
-------------------------------------------------------------------------------
[LEVELS] Recommended levels before starting a chapter
Many questions float about regarding what level I recommend people should be atbefore starting a chapter. Now, throughout the guide these recommendations areprovided in the paragraphs before a new Chapter starts, but to make thingseasier, I have included here a list of my recommendations as shown throughoutthe walkthrough.
-Mana Tower: Level 1 (because you don't have any other option really)-Star Lake: Level 10-Fiery Sands: Level 19 or 20-Ice Citadel: Level 30-Brightwood: Level 40-Ruins: Level 45-50-Path of Life: 55-60-Cosmic Rift: 65-70
GameFAQs: Children of Mana (DS) FAQ/Walkthrough by ka... http://www.gamefaqs.com/ds/925586-children-of-mana/fa...
26 dari 69 18/11/2013 11:02
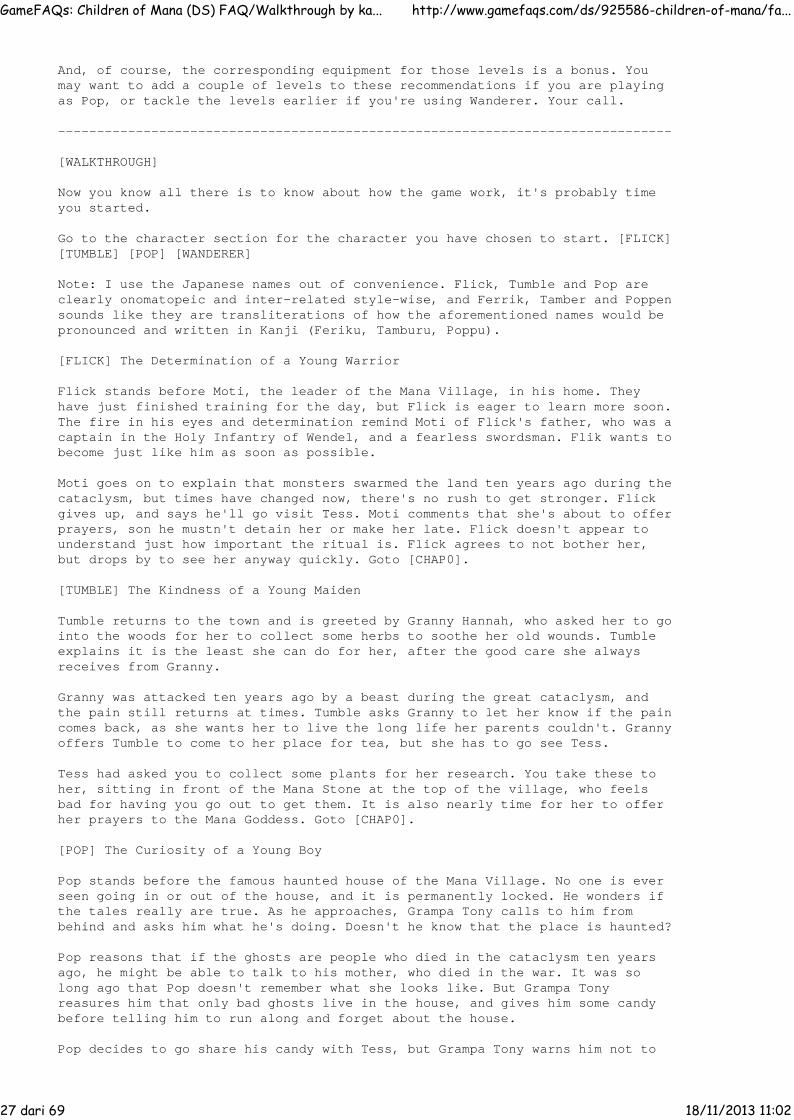
And, of course, the corresponding equipment for those levels is a bonus. Youmay want to add a couple of levels to these recommendations if you are playingas Pop, or tackle the levels earlier if you're using Wanderer. Your call.
-------------------------------------------------------------------------------
[WALKTHROUGH]
Now you know all there is to know about how the game work, it's probably timeyou started.
Go to the character section for the character you have chosen to start. [FLICK][TUMBLE] [POP] [WANDERER]
Note: I use the Japanese names out of convenience. Flick, Tumble and Pop areclearly onomatopeic and inter-related style-wise, and Ferrik, Tamber and Poppensounds like they are transliterations of how the aforementioned names would bepronounced and written in Kanji (Feriku, Tamburu, Poppu).
[FLICK] The Determination of a Young Warrior
Flick stands before Moti, the leader of the Mana Village, in his home. Theyhave just finished training for the day, but Flick is eager to learn more soon.The fire in his eyes and determination remind Moti of Flick's father, who was acaptain in the Holy Infantry of Wendel, and a fearless swordsman. Flik wants tobecome just like him as soon as possible.
Moti goes on to explain that monsters swarmed the land ten years ago during thecataclysm, but times have changed now, there's no rush to get stronger. Flickgives up, and says he'll go visit Tess. Moti comments that she's about to offerprayers, son he mustn't detain her or make her late. Flick doesn't appear tounderstand just how important the ritual is. Flick agrees to not bother her,but drops by to see her anyway quickly. Goto [CHAP0].
[TUMBLE] The Kindness of a Young Maiden
Tumble returns to the town and is greeted by Granny Hannah, who asked her to gointo the woods for her to collect some herbs to soothe her old wounds. Tumbleexplains it is the least she can do for her, after the good care she alwaysreceives from Granny.
Granny was attacked ten years ago by a beast during the great cataclysm, andthe pain still returns at times. Tumble asks Granny to let her know if the paincomes back, as she wants her to live the long life her parents couldn't. Grannyoffers Tumble to come to her place for tea, but she has to go see Tess.
Tess had asked you to collect some plants for her research. You take these toher, sitting in front of the Mana Stone at the top of the village, who feelsbad for having you go out to get them. It is also nearly time for her to offerher prayers to the Mana Goddess. Goto [CHAP0].
[POP] The Curiosity of a Young Boy
Pop stands before the famous haunted house of the Mana Village. No one is everseen going in or out of the house, and it is permanently locked. He wonders ifthe tales really are true. As he approaches, Grampa Tony calls to him frombehind and asks him what he's doing. Doesn't he know that the place is haunted?
Pop reasons that if the ghosts are people who died in the cataclysm ten yearsago, he might be able to talk to his mother, who died in the war. It was solong ago that Pop doesn't remember what she looks like. But Grampa Tonyreasures him that only bad ghosts live in the house, and gives him some candybefore telling him to run along and forget about the house.
Pop decides to go share his candy with Tess, but Grampa Tony warns him not to
GameFAQs: Children of Mana (DS) FAQ/Walkthrough by ka... http://www.gamefaqs.com/ds/925586-children-of-mana/fa...
27 dari 69 18/11/2013 11:02

keep her from her duties of offering up prayers to the Mana Goddess, as it isthanks to maidens like her that we can all live in peace. He goes running up toTess, who is sitting in front of the Mana Stone at the top of the town, andtells her how Grampa Tony gave him candy and wants her to have some, and alsoasks what she is researching in front of the Mana Stone. Goto [CHAP0].
[WANDERER] The Diligence of a Wandering Niccolo
Wanderer reports back to the Golden Goods store that everything has been takento the port storage. Millionaire commends him for his hard work, but tells himnot to take it lightly: no hard work, no eating. But Wanderer knows well thathe has to work, and he is grateful to Millionaire for taking care of him afterthey both lost everything in the cataclysm ten years ago.
Millionaire wonders if maybe it's time for Wanderer to settle down on theisland. He likes it here, it makes sense, so he'll give it some thought.Millionaire invites him round for dinner that night, but Wanderer declines, ashe has to go see Tess and give her a pretty seashell he found at the port.Millionaire reminds him that Tess will be heading out for her prayers aboutnow, so best not to bother her more than giving her the shell. And don't belate for work tomorrow!
Wanderer heads to the Mana Stone at the top of the town, where Tess is sittingdoing her research. He gives her the seashell, which she comments on being alovely gift. Wanderer then asks her about her research. Goto [CHAP0]
[CHAP0] The beginning of our tale
Lately Tess has noticed something strange happenning with the flora and faunaof the area, as if they're afraid. After explaining this, she gives some Notesto you to take to Moti which she can't take herself lest she be late forprayers at the Mana Tower.
Tumble then goes to Moti in the town hall (top right house) and gives him thenotes, which relate to some abnormal growth in plants. As you are about toleave, Watts enters the house (who incidently talks like a scot). After somefriendly chatter, Watts hands over a geode he's worried about, and is trying tofind answers about here in Illucia, where he thinks something strange may behappenning. One of his lads found it. He explains they can alter the essence ofany living thing, according to Professor Bomb.
This worries Moti, who suspects that the evil spirits, the power of Mavolia,have returned. Ten years ago they were contained when the Mana Goddess herselfsealed the gates to Mavolia.
An earthquake then strikes and Pete, a villager, runs in exclaiming somethinghas happenned to The Stone. The three rush out to the Mana Stone, a great lapidat the back of the town with an engraving of the Mana Tree and the eightelementals, which is currently glowing, and then cracks, leaving everyonebafflingly philosophical.
A girl, Nana, then rushes in crying for help. The Mana Tower has been swallowedby a white light! Nana escaped, but Tess is still inside. You offer to goand rescue her, at which point Watts tell her to take Professor Bomb's latestinvention with her: the Gem Frame (see [GEMS] for details). Moti also providesyou with the Magic Rope, that will return you to the village should you seeyourself in trouble.
As you head out of the village, onward toward your first quest, a voice callsto you urging you to stop. The eight elementals appear and offer theirservices. You can only choose one to take with you, and since you're going tobe up against fire, either take Undine or Shade.
And now, young traveller, it is time to face the music and dance. Onward to...
[CHAP1] The Mana Tower
GameFAQs: Children of Mana (DS) FAQ/Walkthrough by ka... http://www.gamefaqs.com/ds/925586-children-of-mana/fa...
28 dari 69 18/11/2013 11:02

-1st ZoneGleamdrop: Hidden by a potGleamwell: --------
As you approach the Mana Tower you see that it has changed completely. As youenter, the elemental will explain to you that the force engulfing the tower isripping it's fabric apart, and is bringing monster into the world.
You'll then receive an explination from your character that you use A to attackand can perform up to a 3 hit combo. Take out the nearby Rabites and open thechest in this first room to receive a Gumdrop. Break the small jars in the roomin case any have any items, and then move on to the next room.
Here you'll be confronted by some Chobin Hoods. Pause for another explanation.This time you're reminded that Moti taught you to deflect arrows with yoursword by holding down the A button. Give the skill a try, and combine it withyour previous knowledge to take out the archers.
The next room will prompt another tutorial, this time about the Fury bar. Wenyou strike an enemy or are hit, the bar will fill up. When full, use SELECT torelease the power. This will make your attacks faster, and holding A willunleash powerful attacks.
But that's not all. Now some Slimes will appear, and your elemental will stepup to the challenge. They'll explain that to summon them, you must hold andrelease the B button, and they will blast everyone with magic that's nearby.Alternatively you can touch them and receive their support power (see notes on[MAGIC] for more details on these powers). Personally, I don't use magic much,but I suggest practicing the skill so you have all your options open to you andare well versed in them, so press down B until you hear the sound effect forsummon complete, run up to the slimes, and release next to them, then leg itwhile they do the dirty work for you.
Moving on to the fourth room here sees our character startled at the lack ofstairs. Cue another tutorial. YOur elemental will explain that due to changesin the fabric of space, stairs are no longer here (trekkies rejoice!). Thespirit will feel the Mana Goddess' power coming from nearby, where you will seea glowing spot on the floor. This is the Gleampool, and you'll need to find theGleamdrop to amplify its power and transport you to the next level.
Fight off slimes and break pots until you find, in one pot just below theGleamwell, the Gleamdrop. Your elemental will explain this is a crystalizedform of the Mana Tree's power, and will amplify the light of the Gleamwellenough to let us proceed. Use th A button to pick it up and carry it to theGleamwell. Press A once you hear asparkly sound effect to move on to the nextfloor. But remember, while carrying the Gleamdrop you CANNOT attack and arerather susceptible to getting slaughtered, so get all your bottom prodding outof the way first.
-2nd ZoneGleamdrop: Hidden by a potGleamwell: --------
Your instruction isn't over yet. Now you learn about using your items bypressing the Y button. Since you have some Gumdrops, this will be the item inquestion, which restores 30HP if you have received any damage. Once you havemore, you can switch between them using the L button. You can see which isequipped in the top left hand corner of your screen. You'll also learn aboutselecting Multiplayer from the menu screen when you're in the town if you wantto invite a friend to play.
That done with, let's get back to business. You're now going to receive arather swift lesson in recoil. There are barrels lying about the place justbefore you enter each room and your enemies appear (which now include some nicezombies, by the by). If you hit these with your third combo hit, they'll jump
GameFAQs: Children of Mana (DS) FAQ/Walkthrough by ka... http://www.gamefaqs.com/ds/925586-children-of-mana/fa...
29 dari 69 18/11/2013 11:02
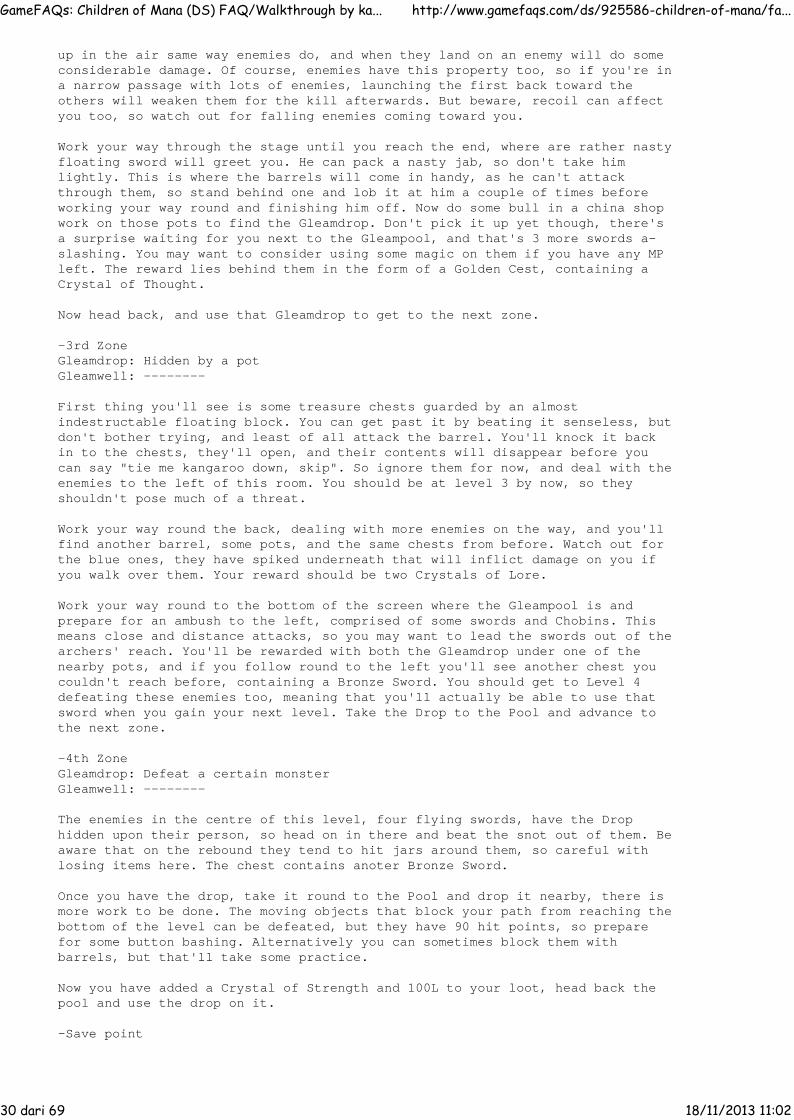
up in the air same way enemies do, and when they land on an enemy will do someconsiderable damage. Of course, enemies have this property too, so if you're ina narrow passage with lots of enemies, launching the first back toward theothers will weaken them for the kill afterwards. But beware, recoil can affectyou too, so watch out for falling enemies coming toward you.
Work your way through the stage until you reach the end, where are rather nastyfloating sword will greet you. He can pack a nasty jab, so don't take himlightly. This is where the barrels will come in handy, as he can't attackthrough them, so stand behind one and lob it at him a couple of times beforeworking your way round and finishing him off. Now do some bull in a china shopwork on those pots to find the Gleamdrop. Don't pick it up yet though, there'sa surprise waiting for you next to the Gleampool, and that's 3 more swords a-slashing. You may want to consider using some magic on them if you have any MPleft. The reward lies behind them in the form of a Golden Cest, containing aCrystal of Thought.
Now head back, and use that Gleamdrop to get to the next zone.
-3rd ZoneGleamdrop: Hidden by a potGleamwell: --------
First thing you'll see is some treasure chests guarded by an almostindestructable floating block. You can get past it by beating it senseless, butdon't bother trying, and least of all attack the barrel. You'll knock it backin to the chests, they'll open, and their contents will disappear before youcan say "tie me kangaroo down, skip". So ignore them for now, and deal with theenemies to the left of this room. You should be at level 3 by now, so theyshouldn't pose much of a threat.
Work your way round the back, dealing with more enemies on the way, and you'llfind another barrel, some pots, and the same chests from before. Watch out forthe blue ones, they have spiked underneath that will inflict damage on you ifyou walk over them. Your reward should be two Crystals of Lore.
Work your way round to the bottom of the screen where the Gleampool is andprepare for an ambush to the left, comprised of some swords and Chobins. Thismeans close and distance attacks, so you may want to lead the swords out of thearchers' reach. You'll be rewarded with both the Gleamdrop under one of thenearby pots, and if you follow round to the left you'll see another chest youcouldn't reach before, containing a Bronze Sword. You should get to Level 4defeating these enemies too, meaning that you'll actually be able to use thatsword when you gain your next level. Take the Drop to the Pool and advance tothe next zone.
-4th ZoneGleamdrop: Defeat a certain monsterGleamwell: --------
The enemies in the centre of this level, four flying swords, have the Drophidden upon their person, so head on in there and beat the snot out of them. Beaware that on the rebound they tend to hit jars around them, so careful withlosing items here. The chest contains anoter Bronze Sword.
Once you have the drop, take it round to the Pool and drop it nearby, there ismore work to be done. The moving objects that block your path from reaching thebottom of the level can be defeated, but they have 90 hit points, so preparefor some button bashing. Alternatively you can sometimes block them withbarrels, but that'll take some practice.
Now you have added a Crystal of Strength and 100L to your loot, head back thepool and use the drop on it.
-Save point
GameFAQs: Children of Mana (DS) FAQ/Walkthrough by ka... http://www.gamefaqs.com/ds/925586-children-of-mana/fa...
30 dari 69 18/11/2013 11:02

You'll now have the option to save you progress and do some equiping, 'causeit's not over yet (in spite of the really happy music). So Open the Main Menuand get yourself ready, by putting some Crystals in your frame and equiping anyarmour enemies may have dropped.
After this, continue on.
- [BOSS1] Boss Battle : Xangar -
You find Tess in a clearing, who explains she was praying when suddenlyeverything lit up and she was transported here, away from the Tower. Butreally, it IS the tower, but space has been changed.
At this point our fiery friend appears and Tess is told to run for cover,leaving us to deal with the nasty little beastie. Don't touh him, he can setyou alight!
The beast will fly at your horizontally, or attack from the top of the screen,launching small heat seeking flames that dissipate after a while, or if heforms a tornado around him he'll launch a towering flame that circles thecentre of the screen a few times, before he then flies downward off the screen.Watch out for these flames, as they set you on fire, and render you ratheruseless, running around like a lost chicken. If you're feeling confident, use aParry on these, but remember, you can only deflect 5 times at the moment.
Any attacks at this point are utterly and absolutly useless. He has a shieldprotecting him from harm. You may want to take the opportunity to break jars ifyou have space for some Gumdrops.
You do have to land some blows to him though to continue, so once you've got anidea of how he moves, land a few hits. After a while, your character willrealize the futility of this situation. Then suddenly, a sword falls from thesky and sticks itself in the ground near the beast. A light emanates from itand suddenly the protection the beast had is gone. Now the battle will startagain, but the odds are looking a bit more promising.
He now has some more attacks though, so you're back to square one. He can stayat the top of the screen and launch two shurikens at you (these inflictconfusion as well as the damage), or just fly downward in the same way he didhorizontally before (which is anounced by a distant squawk). The only wayyou'll avoid the shurikens is to go right to the bottom of the screen or todeflect them back by parrying with your sword. They move faster than you can,so you can't out-run them once they're launched.
Your best bet is going to be waiting 'til he flies by and trying to land a blowthen. Once you've weakened him a bit he'll start to fly much faster though, sowatch out. Else wait for his tornado attack and get behind him, that'll giveyou a good chance at hitting him 6 or 9 times.
Once you've defeated him you'll receive your mission tally, and receive areward depending on your ranking. This can be in the form of items, armor,accessories, etc. Once you've chosen your reward, you'll see the beast split into two essences (Fire and Wind) known as benevodons and vanish.
Tess and your character will now head over to the sword and be blinded by a newlight from the sword. Tess seems troubled, but says she's alright.
But we're not the only ones on the scene. A Man's Voice comes from a distance,intrigued at a human defeating a malevodon. A dark clad man walks on, asking ifthis sword is the Goddess' solution, and tells them they have no business withit. But the sword will not let him take it.
"So, mother goddess, you have some power here. Still, it is of no consequence.The Mana Tree is dormant and powerless to interfere. Now, no one can stand inmy way!"
GameFAQs: Children of Mana (DS) FAQ/Walkthrough by ka... http://www.gamefaqs.com/ds/925586-children-of-mana/fa...
31 dari 69 18/11/2013 11:02

He claims a new force is rising, that the lost shall return as the worldwithers, and will soon cease to exist. Then, as mysteriously as he arrived, hevanishes. An earthquake then strikes, and the two look out over a scene wherebythree cities are engulfed by sky-scraping towers of light.
The two return to Moti's house, with the Holy Sword now in your posession. Theyexplain the appearance of the sword, the strange man, and how he reveled in allthe strange happennings of late. Moti fears the horrors of ten years agorepeating themselves: the gates of Mavolia opening again!
It is decided that something has to be done. Watts heads back to Ishe to puttogehter an expedition, while Moti contacts other nations to seek aid. Ourtask, meanwhile, as chosen ones of the sword, is to investigate the towers oflight that have appeared in Lorimar, Jadd and Topple. As the ones in Toppleseem to be causing the most grief right now, this will be our first stop. Tohelp is on our way, Moti gives us the Light Flail, and explains its varioususes to us, as well as now giving us the option to train in his back gardenshould we want to.
When we're ready, he asks us to see him at the upstairs balcony of the SilverMermaid. Before that, I'd suggest taking a few subquests from the recentlyopened Dud Services, as well as the subquest you receive from chatting to Tessat the Mana Stone. You will also have available the elemental subquest forJinn. See the [SUBQUEST] section for details on how to access the elementalsubquests.
Also make sure you visit the Bomb Brothers to receive a Purple Gem and learnabout gem fusion.
Subquests available: A Maiden's Prayer (Tess), Benevodon of Wind (Jinn)
[CHAP2] Star Lake, Topple
When you're finished doing some subquests (I really can't recommend thisenough, 'cause not only will you gain levels, but gems, recovery items, armoursand weapons from enemies... you'll hardly need to shop, if at all, which atthis point is a really good thing because you're probably rather poor at themoment) and stocking up on any material if necessary, head for the upstairsbalcony of the Silver Mermaid and talk to Moti there.
To get to your next mission, Moti will give you a Spin Drum, which wasentrusted to him by the spirits to call upon the guardian spirit Flammie. Youtake this, go to the balcony, and spin it. One nice FMV sequence later, andyou'll be flying around over the Mana Village on top of Flammie. Click on theMore button at the bottom of your screen to leave Illusia Isle and head forother lands, then go for the Star Lake on the Isle of Topple. Now we've landedand taken a nice long look at the lovely waterfall, time to enter the cave.
-1st ZoneGleamdrop: Hidden in a chestGleamwell: --------
Now at this point I'm going to give you a heads up on some new things to dowithin the level relating to item finding and general navigation. First off,the bushes in Star Lake often hide items and bags of money in them. To revealthem, charge up your flail as if to draw an object near, aim at the bush andsee what happens. If there is an item, it will be brought out to you andpickedup. If there isn't, you'll be pulled toward the bush. Also be careful ofmonsters hiding in the bushes.
The second thing is the small pink plants that appear to be substituting thebarrels. You can push these around, and they will come in handy for the nexttype of plant, which is the grabbing grass. This grass will move in the wind,and when you step on it, will tangle you up for a few seconds, making yoususceptible to attacks and stopping you from doing ANYTHING about it. You justhave to keep running until it lets go. But, they are weak to being cut down
GameFAQs: Children of Mana (DS) FAQ/Walkthrough by ka... http://www.gamefaqs.com/ds/925586-children-of-mana/fa...
32 dari 69 18/11/2013 11:02

when in this state, and also trap enemies and pink plants... So, either lure anenemy in, or push a pink plant on to them, then take one hack with your sword,and you can clear a path through.
You will also see some large vines blocking your way often enough, same as thebig blue jars in the Mana Tower. These can be broken either by a falling enemy,or you'll have to wait until you get a hammer later on.
That done and dusted, on with the level. You'll get to practice all of theabove here with little enemy hinderence, so try out your new skills and getused to how this level works. You'll find the GleamDrop in the first chest youencounter to the left of where you start the level, so pick it up afterdefeating the nearby beasties and drop it further down the level as you goalong, and keep doing this, leaving it behind until you've cleared yourself apath. This'll save you going all the way back afterwards.
-2nd ZoneGleamdrop: Hidden in a chestGleamwell: --------
Now the fun begins, we see the return of the Mad Mallard. He packs a punch, sowatch out. If you followed m advice on the subquests, you should AT LEAST be atlevel 10 by now. The Drop is in a chest on the far right hand side of the zone,but make sure you drop by the left hand side. There are three chests huddledtogether across to pits of spikes. To get across, use the Flail to hook on tothe bushes in between and pull yourself along. There are also another twochests near the drop, at the bottom of the level. To get to these, push thenearest pick flower you find down and Sword Combo it into them to break them. Agem and money are in store. Another gem is located just above these on anisland. Use your Flail to open the chest and pull the gem back.
This will be your first encounter with impure gems. If you've read the GemGuide you'll already know, but just in case, these gems grant powerful boostsbut are unstable, and so will reduce other stats. Careful using them.
Once you've done some more exploring, take the drop to the pool
-3rd ZoneGleamdrop: Hidden in a chestGleamwell: --------
As if Tonpoles weren't enough nostalgia for you, now you get Snap Dragons too.An they'll gobble you up just like the old days, so proceed with caution. Onyour left there will be a golden chest behind a pit of spikes, guarded by twofake chests. Take these out with your flail to avoid any trouble from them.
At the top of this level there is a grouping of four, yes four, heavily guardedgolden chests with some nice rewards in them. To get to them, push one of thepink plants up to the grabbing grass at the top right corner of the zone andhack own the grass, then use the same plant to kill knock down the vines. Dothis twice, and prepare to kick some buttock to get at the golden booty.
You'll find other passages with the same properties. Same technique applies. Ifyou run out of pink flowers, you can always come back to the level again usingthe space-time distortion.
-4th ZoneGleamdrop: Defeat a certain monsterGleamwell: --------
This one's pretty simple, take out the enemies, and the slithery one will giveyou the drop. Make sure you check out everything in this room before moving on,you'll be up for a challenge next..
- [BOSS2] Boss Battle : Galem -
GameFAQs: Children of Mana (DS) FAQ/Walkthrough by ka... http://www.gamefaqs.com/ds/925586-children-of-mana/fa...
33 dari 69 18/11/2013 11:02
Now this one is an interesting boss battle, so get your equipment and gems upto speed with what you've found on your way. The beast is a huge bush,basically. You character will use the Holy Sword to strip away it's protectiveaura.
The boss will launch his orbiting mini-bushes, and there is no way of hurtinghim. To get around this, you have to use a charged flail to pull the bushesaway, defeat them, and once you've done them all attack the core. Careful whenhe glows, he will send out vines that rise from the ground and knock you outtemporarily.
Once the mini bushes are defeated, start pummeling the centre, but watch out,he'll regenerate the orbiters, and if you're standing right next to him youwill die almost imediatly from multiple hits.
Give him two or three rounds worth of beating and he should be yours.
The boss will again split in to two benevodons (Light and Wood) and disappear.In his place, the face of a tree will float in the air. He will introducehimself as Treant, patriarch of the trees. He explains that the power warpingthe world is not that of Mavolia, but of Mana. He doesn't know why, but it'ssurging out of control and may destroy the world. To avoid the world being tornapart, he entrusts you the task of quelling the Mana collumns spurting over theworld.
To help you, he will give you one of his branches, which will open the way toother places. You then make your way back to Moti's place and give him and Tessthe low-down. Moti will now give you a new weapon, the Short Bow. You can nowattack enemies at a distance, and charm those nearby by charging and pluckingthe bowstring.
Now go and visit the Bomb Brothers. Balbo has just been given some ore whichhe'll use to expand your gem frame. Now you have a 4x2 grid, meaning double thegem capacity you had before.
Your next course of action will be to talk to the villagers and find out somemore details about recent incidents. But first, I'd suggest doing some moresubquests to prepare yourself for the upcoming stages, they only get harder.
I'd recommend at this point that you get your level up to 19 or 20, and equipthe weapons apropriate for said level. Gem-wise, taking in to account that Idon't use magic, I've decided to invest in a "Soul of the Gemma" and add thatto my "Sword Training" gem. Other combinations you can try are things such astwo "Berserking" with as much defense as you can fit in to compensate for thedefense loss (if you don't, you're a sitting duck, and I cannot stress thisenough, you WILL die VERY quickly). Also beore questing too much, get rid ofsome of your duplicate items, and maybe even increase your knapsack to hold 12of each, so you can stuff your bag full of even more goodies to sell later. Youcan't sell things for much, but to be honest, this game really makes you saveup the pennies, so you might as well. Otherwise, you're going to find yourselfrevealing items that you can't pick up because your inventory is full, which isa waste. I was able to pull together an extra 20000L pretty much this way ontop of what I was getting from the quests themselves.
You'll also notice in Moti's place, right next to the fireplace, a shiningobject. It's a Rusty Key. Take it over to Moti and he'll reveal that it is thekey to the haunted house, which is in fact where the village stores all itsrecords, studies of the tree. He had intented to give it to you or Tess, but hemisplaced it. He tells you to keep it. Now take it to the door of the hauntedhouse, below his, and open the door. You'll go in and have a rummage throughthe books in there, finally finding what looks like a Journal. It is entitledthe Adventurer's Log I. It talks of the adventurers quest into the Star Lake atTopple, and how he heard a dragon's roar. He went to investigate and indeedfound a dragon, which enquired whether he had come to be eaten. When he said hecame to slay the dragon, it laughed and attacked. The adventurer vanquished thedragon with two slashes of his blade. Astonished you finish reading the tome,
GameFAQs: Children of Mana (DS) FAQ/Walkthrough by ka... http://www.gamefaqs.com/ds/925586-children-of-mana/fa...
34 dari 69 18/11/2013 11:02

and Tess walks in. She reads the journal too, and asks if you're planning ongoing to Topple. If you say yes you'll take this on as a subquest.
Now with this extra money, and seeing as we're going into Jadd, you may want toinvest in getting one of the Elemental Friend Gems and fusing it with a Crystalof Thought. This will give you a gem, Virtue of Balance, that will allow you towalk on quicksand as if it were normal ground, and you'll see as we go throughthat it can prove tremendously useful to access certain chests in the desert.You can of course always revist the level later with the gem if you don't wantto invest in it now and would rather hack your way through the first timeround. You'll get the low-down of what the chests have ahead, so judge if youwant the items or not.
Subquests available: A Valuable Watch (Millionaire), The Bomb Brother'sDiscovery (Bomb Bros), The Dragon in the Journal (Tess, open Haunted House)
[CHAP3] The Fiery Sands of Jadd
Go round talking to the villagers, in particular make sure you talk to Nana inthe Silver Mermaid, as she will reveal Moti's worry for his homeland of Jadd.
(IMPORTANT NOTE: If you have NOT completed Tess' quest to rid the Mana Tower ofmonsters as suggested at the end of the first chapter, this trigger will notoccur, so make sure you do this subquest.)
Next head over to Moti's and you'll find that Nana's suspicions are correct, heis troubled by word reaching him that monsters are attacking the desert land ofJadd. Which means that you now have a new mission to head out on: head to Jaddand find out why monsters are inexplicably on the rise.
Get your armour, weapons (invest in a better bow if available!) and gemsequipped and ready, Save, and call Flammie. Ah that soothing music... Just asbefore, a new location will show up on the map, the Fiery Sands of Jadd.
Your feet firmly on the ground, you'll find that the wind is making itimpossible to go any further. Good job we have that branch from Treant to useas a wind-break. The wind will stop, and the level will now start, with somerather funky racy music, I might add, that has my head bopping as I play.
Now, some quick notes on new game physics here. New land, new dangers to face.First off, bushes. The red ones are safe as a sausage to cut down, but if youhit a green one, you'll find yourself siled with paralysis, meaning yourcharacter will hesitate every now and then and won't be able to move. Also, theenemies are going to start getting really nasty. Bees are very versatile inlong and short distance combat, the rolling green armadillos can spin a rockformation toward you causing you to not be able to attack, and the walkingskeletons will resist your hits while their shields glow. Aren't you glad youlevelled up?
Another quick note. This time, barrels are substituted for small round cactiwith pink flowers, and these can be used to knock down the rather large cacti.However, unlike previous instances of these items, they will hurt you if youtouch them. But they also hurt enemies, which means that some monsters will diesimply by insisting to walk into a cactus over and over. Let one do it, 'tisvery funny indeed. So how do we move these small cacti ourselves? Have I nottaught you the wonders of the Flail? Stand where you want the cacti to be,pretty much, the pull it towards you. Sometimes it will damage you, sometimesit won't, but you stand a better chance of avoiding tooth-rot this way.
-1st ZoneGleamdrop: Defeat a certain monsterGleamwell: --------
There's nothing particularily note worthy in this zone. It will get you used tothe enemies and dangers of this level, as well as reward you with an impure gemor two along the way, so take your time to study how the enemies move, swarm,
GameFAQs: Children of Mana (DS) FAQ/Walkthrough by ka... http://www.gamefaqs.com/ds/925586-children-of-mana/fa...
35 dari 69 18/11/2013 11:02
and attack. You'll also find that rushing in to things in this level won't getyou far, as the maximum number of enemies on screen has now increased, sodiving in head first could get you into a LOT of trouble.
-2nd ZoneGleamdrop: Defeat a certain monsterGleamwell: --------
A few new enemies here, but nothing that you can't handle by now. At thetopmost left hand corner and the bottom right hand corner of the level you willfind two unpassable chasms with a skeletal rat and a chest. Defeat the rat withyour Bow and then reap the rewards, including the Gleamdrop which you will getfrom defeating the rat. You should also receive a Steel Sword and an ImpureGem.
-3rd ZoneGleamdrop: Defeat a certain monsterGleamwell: --------
Now first off, to the right of where you start you will find a chest guarded bysnakes (I hate snakes!). This should pose you any problem, so deal with them asyou normally would. Now, don't attack the snakes on the other side of thechasms, you don't want one knocking that chest open. Instead, head back towhere you started, and go up and then right. They only have Lucre in them, sonothing terribly exciting. Now the chests above, that's something different! Toget to these we need to have created a Gem called Virtue of Balance (asmentioned before). The chests contain two impure gems, a yello, and some Lucre,so nothing too special. There are also two trap chests, so watch out.
Other than that, this zone has little to offer, so make your way over to theleft and defeat the skeletal rat to get the Gleamdrop, right next to theGleampool.
-4th ZoneGleamdrop: Defeat a certain monsterGleamwell: --------
Well now, almost a mini-boss, you could say. First off, get some distance, hecan't follow you out of the sandpit, so quite calmly collect the Lucre in thechests and when you're ready hit him with a few arrows from outside the runningsand Then go in, collect the drop and get to your save point.
Now, if you happen to have collected any new items or gems that you'reinterested in, and have the level to use them, equip as per normal, Save, andget ready to move along.
-5th ZoneGleamdrop: Defeat a certain monsterGleamwell: --------
Again, the rat has the Gleamdrop, and there's nothing terribly exciting in thezone. Hack your way through, collect an impure gem in the golden chest at thetop middle, and move along to the next level. You may want to have bow equippedfor those bees, and get some practice in.
-6th ZoneGleamdrop: Defeat a certain monsterGleamwell: --------
Same as before, I'm afraid. Lots of monsters, not many goodies, and the rat hasswalloed the key.
-7th ZoneGleamdrop: Defeat a certain monsterGleamwell: --------
GameFAQs: Children of Mana (DS) FAQ/Walkthrough by ka... http://www.gamefaqs.com/ds/925586-children-of-mana/fa...
36 dari 69 18/11/2013 11:02
Same old same old, except we do have some more quick quicksand to deal with.Now, if you have the gem, it's easy. If not, you can at least get two of thechests. The chest on the left you can get by flailing yourself diagonally overthe first batch of quicksand, then flailing the chest. Only gets you a Crystalof thought though. So head round to the other, which you can reach easily, fora Saber. You CAN get across the first lot of sand with the Flail, but it'llonly get you far enough to set off the trapped chest. The other two remain outof reach. One of them contains an impure gem, the other a piece of armour (thiscan vary).
The drop is right over the far left, and again it seems the rats got to it.
-8th ZoneGleamdrop: Defeat a certain monsterGleamwell: --------
It's the same cockroach as before, except now there's no chests to keep ushappy. Same tactic as before really, and head for the exit.
Now, it's your last chance to save and equip before the boss, so make sureyou're up to scratch. If you used the gem to stabilize yourself over thequicksand, you may want to switch to something more useful now, although itcould still be useful on the boss' quicksand, but personally I don't thinkyou'll need it.
IMPORTANT: EQUIP A BETTER BOW! I can't stress how important this is, as thequestion has arisen countless times. If you use the default bow given to you byMoti you will do 1 point worth of damage per arrow, so you'll defeat him butyour thumb will hate you.
- [BOSS3] Boss Battle : Thaydol -
Well your character knew what was coming, and I'm sure you did. Yep, it'sanother big beastie with a barrier that needs some Holy Sword intervention. Anddoesn't he remin you of something from Seiken Densetsu 3?
Anyway, on to the fight, you're on uneasy ground sliding toward the boss allthe time, but don't worry about falling into the pit, that's not going tohappen.
This is probably the easiest boss you'll face in the game! While in his backposition, he'll lunge at you with his claws and knock you back. Now, if youstand right in the middle and pummel him with arrows, he doesn't do any damageto you with this side swipe, just knock you back (or at least that's whathappenned to me, if you find out otherwise let me know and I shall ammend).
When he leans forward, that's a different story altogether. Run like hellfiretoward the far right or far left. He'll either set some blue flames ablazing atdifferent parts of the quicksand, or lunge at you with both paws straight downthe middle. Either way, if you keep far to either side, you'll miss those.
Then just run back and keep hitting him with arrows. I defeated him in around 2minutes, and that's while writting this, so you can probably do it in much lessthan that.
After your ranking and prize, we see the beast split into two spirits once more(the benevodons of Moon and Shadow), and are now greeted by Gaia as the heir tothe holy sword of Mana. He is the face of the earth who has been sleeping forten years also (holy hibernation, Batman!). He explains that evil forces flowedthrough the creature turning it into a malevodon, and the sword restored it toits true form, through the rebirth as a benevodon, of which six are alreadyborn (the ones corresponding to the beasts you've defeated... all starting tomake sense now, eh?). Your sword has the power to restore the world to itsproper state.
He also states that you must stop the man you saw before at any costs, even if
GameFAQs: Children of Mana (DS) FAQ/Walkthrough by ka... http://www.gamefaqs.com/ds/925586-children-of-mana/fa...
37 dari 69 18/11/2013 11:02

he defies the will of the planet. Gaia then hands over a stone of his beingthat should break his spell, together with the branch from Treant. With that,he vanishes, leaving you to return and explain it all to Moti.
You show the stone to Moti, but he is equally puzzled about who the man is andwhat his spell is. What Moti can do is to give you another weapon, that Wattscrafted himself and sent as a gift: the Mallet! You can knock enemies back withthese hammers, and send shock waves through the ground to knock them over orhit pegs into the ground. And, quite importantly, break the big pots, cacti andvines we've been having such a hard time doing so before! Now, this does have adown side to it... Unfortunatly, this now means that in pretty much every questand zone, the Gleampool is going to be hidden by one of these large objects,which means not only do we have to find the Gleamdrop, but the pool as well,and with the recoil time the hammer has, that makes it a long task. So all Ican say is...
IT'S HAMMER TIME!
Well, not really, it's actually time to save, and do some more subquesting, aswell as checking out new stocks at the stores. You may want to revisit some ofthe levels you've already done as well if there were things you couldn't getbefore (like the chests guarded by quicksand). Also make sure that you Chatwith Balbo of Bomb Brothers to receive their subquest. You will now also haveavailable the elemental subquests for Salamando and Luna.
If you want some good levelling, I'd recommend Fiery Sands subquests thatmention eliminating all the monsters, specifically those stating "overgrowninsects". These large cockroaches award 14 EXP each (as opposed to the rathermeager 2 that most enemies are awarding), and when you've got a whole batch of20 or so of these bugs, that means almost a level in itself. Or half, at least.And if you REALLY want to get the best out of them, you may want to considerinvesting in a Heart of Progress gem. It'll only increase the gain of EXP by50%, and it takes up 2x2, but an EXP saved is an EXP earned.
Another suggestion is that you take the time at this point to revisit oldstages as their original missions, and try to better your ranking to Gold ifyou didn't manage it first time through. This will give you some rare PurpleGems to increase the level of your focused attacks during Fury, so they'reworth getting your grubby mits on.
My recommendation level wise is to get your character up to level 30, and kitthem out with the best available gear (because at level 30 you'll be able to).Gem-wise you'll probably want to stick with what you know, or if you've aquiredsome better gems switch them out, but you don't have any more space to put themat the moment, so you can't add more on. You should probably, if you have themoney, upgrade your knapsack. I went straight to Jumbo at this point, but youcan just go for the next size up, it'll do just fine.
Once you feel you're ready, we'll move on to the next chapter.
Subquests available: Big Money! (Millionaire), On the Wings of Dreams (Tess),Benevodon of Fire (Salamando).
[CHAP4] The Ice Citadel of Lorimar
Once you're ready for the next level, go talk to Tess. She'll reveal thatmonster are attacking the Ice Citadel in Lorimar. No one can get in as it'sprotected by a strange barrier. But we, of course, have the Stone of Gaia, andthis sounds just the situation he was talking about, so we'll reassure Tessthat we can handle it (seeing as she's from Lorimar and all) and save the day.
Set out from the Village, and once more a new spot will appear in the map, thistime on the northwestern isle of Lorimar. Set a course and engage (you may wantto read the next couple of paragraphs with regards to gem equipment, but it isnot essential).
GameFAQs: Children of Mana (DS) FAQ/Walkthrough by ka... http://www.gamefaqs.com/ds/925586-children-of-mana/fa...
38 dari 69 18/11/2013 11:02

You arrive before the gates of the Citadel, surrounded by a purple barrier.Without hesitation, your character will release the power of the Stone of Gaiaand the Branch of Treant, and the barrier will be broken. Time to find outwhat's going on inside.
Before we go on ahead, a quick run-down of the game mechanics for this level.You'll now be facing patches of ice (patches can be read as "huge ice-rinksized stadiums worth" in some zones), which prevent you from turning quickly,if at all, and will have you sliding all over the place. At certain parts, it'simportant to start walking on these diagonally to catch on to the edge of yourturn, but we'll get to those. Note that if you have the Virtue of Balanceequipped, this will allow you to talk on ice with no hinderance, same as we didbefore with the quicksand. Again, this will leave you without 2x2 of your gemframe, so you judge. Personally, I find that I can get along without it justfine.
Even better, there is a third way to deal with this ice! At the edge of the iceyou'll notice a series of cracks. Bring down a focused hammer attack on tothis, and watch the ice crack away!
Also you're going to be in danger of getting turned into a snowman on a regularbasis. Again, we could use gems to counteract, but hopefully by now you shouldbe used to avoiding danger like the plague, so we'll trust your acquiredskills. In any case, if you're having problems, there's always the 4th Zonesave-point to rearrange your tackle.
Terrain-wise, we now have small and large ice blocks that are destroyed withsword and hammer respectively as in previous levels. Beware of the lightersmall icicles, as they will be the ones doing the freezing into a snowman onyou and the enemies (don't you just lng for those days in the Mana Tower whereall you'd get were spikes, eh?).
-1st ZoneGleamdrop: Eliminate all monstersGleamwell: Hidden by ice
This zone is designed to get you quickly used to your new dangers. There'snothing special here, aside from large amounts of blue rabites, and a hugepatch of ice (yes, Sanka, ice!) over on the right. The Gleampool is hiddenunder the top-right-most large block of ice.
-2nd ZoneGleamdrop: Eliminate all monstersGleamwell: --------
Now we're inside the castle itself, so we're back to pots, but still hugequantities of ice on the floor. You'll also find that you can slow your advanceon the ice by pushing the crates that you find alone the way, but this willslow your progress and open you to attack. Another good thing is that you canuse your hammer on these and on the enemies to place a nice game of billiardswith them, and get them out of the way. Remember though, chances are you'll potthe cue-ball if you're not careful.
Take the route round to the left, defeating all your enemies, and move on.
-3rd ZoneGleamdrop: Defeat a certain group of monsterGleamwell: Hidden by ice
Back outside, the first thing we'll see is a chest just next to us. Careful,it's a trap! Use the bow on him to try and knock him out. Now head on down andtoward the right, getting rid of Chobins and the flying pinyata enemies alongthe way. The Chobins are the group to defeat in this zone.
Now, about half way across the stage you'll see a path leading upwards with a
GameFAQs: Children of Mana (DS) FAQ/Walkthrough by ka... http://www.gamefaqs.com/ds/925586-children-of-mana/fa...
39 dari 69 18/11/2013 11:02
really blue ice-patch. This one is much more slippery than the standard whiteice, and as soon as you get into motion, you'll lose control of your character.The way to tackle this is to run at it diagonally (up-right). Now yourcharacter will use the wall for friction and stop a few paces to the right. Doit again, and same thing, they'll stop a bit further to the right. A third timewill have you catching on the edge of the turn and walking up it. You'll berewarded with 6 chests, but beware, they are guarded by 6 rather meanwearwolves, so get ready for some pain and gain. Incidentally, this is theirfirst appearance, which coincides nicely with Secret of Mana when you visitElinee's Castle. Ah, nostalgia how I love thee...
When you're done exploring and have the Gleam drop in your hands, go to the topright corner of the stage, and the left block o ice will have the Gleampool.
-4th ZoneGleamdrop: Defeat a certain monsterGleamwell: --------
Back in the... warm? We'll find ourselves surrounded by vase. Time to do as thebull's do in a China shop. To make quick work of it, put your Flail on, andthen when you reach the crates, hammer them. If you nee to stock up on Candy,this is the place to do it.
The Gleampool is in the bottom left corner of the room in clear view, so nowyou just need to get the drop from the Walking Armour up at the top. Heshouldn't pose too much of a threat, and you can use the crates to youradvantage here. If you're at the suggested level and have the right weapons,you should find he'll go down with 3 or 4 slashes of the sword.
Time to save. You shouldn't have anything of particular interest to goequiping, so just move along.
-5th ZoneGleamdrop: Defeat a certain group of monsterGleamwell: Hidden by ice
A rather non-eventful zone this one, although we do get a glimpse of a newmonster, resembling an ant-eater of sorts. His rolling attack is quite nasty(bit like the Mad Mallard's one) so watch out. And it's exactly these guys wened to defeat to get the Gleamdrop. So, have at them, cowboy, then take thedrop over to the far right. The Gleampool is hidden, quite obviously, under thelarge ice block surrouded by spikes and more ice.
-6th ZoneGleamdrop: Eliminate all monstersGleamwell: --------
And back inside again. This level sees the return of our good ol friend ShadowZero. Not quite as friendly as he used to be in days passed, he can inflictblindness on us, which can be a bit of a pain if we're trying to navigate amongspikes. Go through the rooms one by one killing off 4 Shadow Zeros at a time,and removing the anteaters from our path down the middle. Once we've gonethrough the lot, take the drop to the visible pool at the far right, and on wego.
-7th ZoneGleamdrop: Hidden in a chestGleamwell: Hidden by ice
Now things are getting interesting... Good job we practiced with thosewearwolved before, eh? Anyway, you'll find yourself doing quite a bit ofswitching between the Bow and the Hammer for this level, as some enemies liketo keep themselves out of reach. The lower-left section has nothing special.The Gleam Pool is found in the iceblock below and just a bit to the left of thegold chest in the top centre section of the zone. Careful, that gold chest is atrap, while we're at it, as is the second silver one in from the left. The one
GameFAQs: Children of Mana (DS) FAQ/Walkthrough by ka... http://www.gamefaqs.com/ds/925586-children-of-mana/fa...
40 dari 69 18/11/2013 11:02

at the far left corner has the Drop.
The right portion of the level has nothing special at all in the bottom, andthe top has two more trapped chests (the silver ones) and a bronze chest, soyou don't really have to go here at all unless you feel like exploring andgetting a Gumdrop.
-8th ZoneGleamdrop: Eliminate all monstersGleamwell: --------
A short level, get the two chests just below you for some meager Lucre, thenhead for the upper right. Four walking armours await you with eager eyes. Youcan either brings some crates with you (which I think is a waste of time) orcharge in there (which I recommend personally). Best thing to do is knock thevases down, wait for one or two to come out, and hit them with your hammer.This will disperse them so you can pick them off one by one, and they'll be abit weaker than before. Take them down, get the drop and exit via the Gleampoolat the right of the central passage.
Save and prepare for battle...
We'll run in to a room (on ice) and find the "Man". He'll turn round ratherbewildered at the fact you made it in here. But he then remembers Treant andGaia and all becomes clear. This doesn't rock his confidence, as the next stageof his plan is already underway. But he's not letting on.
He tells us of a time when land-dwellers tried to harness the power of Mana invessels and use them as channeling orbs, but when chaos engulfed the world tenyears ago the orbs were buried underground, where they reside now. His plan(oh, so he IS letting on?) is to release all those orbs in one shot and destroythe world, and he puts it down to the will of the Mana Goddess.
He then summons Landmund forth to take you down, who happens to be a rathernasty malevodon, with again, a barrier raised. So he's behind the monsters! Butthis time the sword isn't working... The man tries to taunt you with ideas thatmaybe you're not the hero you think you are, and the sword has abandoned you.
A brilliant light fills the room suddenly, and Tess' voice commands you tofocus.. to believe! Finally the barrier gives way, much to the man's dismay, anthe time for battle begins.
- [BOSS4] Boss Battle : Landmund -
This boss is a pice of pie, again so long as you've come prepared. The threeattacks he had time to inflict were first to breath indeep diagonally andrelease three clouds of toxic gas. If you stay near him on the opposite side ofhis intake, you'll avoid the gases with ease. Take a few shots at him.
Second attack, he'll raise his fists and hit the floor, so don't be in front ofhim. This will knock you to the ground, and icicles will start to fall. Theydon't do much damage, but you're best to avoid if possible. Just above the bossto the right I found to be a good spot.
Third attack, which can catch you easily off guard, is to roll diagonally downin your direction, get to the corner of the screen, head up, then diagonallydown to the oposite corner, and back up diagonally to the centre top. Afterthis his pattern will move to the first or second attack.
I found that slashing at him full on, he didn't get a chance for anotherattack, and so should be the case for you if you've been following my level andweapon advice.
After receiving your reward, Landmund will split into the two last benevodos(Water and Earth) and disappear, leaving you alone with the man again, whostates the eight benevodos are now all born. He's impressed at your ability to
GameFAQs: Children of Mana (DS) FAQ/Walkthrough by ka... http://www.gamefaqs.com/ds/925586-children-of-mana/fa...
41 dari 69 18/11/2013 11:02
call on the sword's power so well, but smirks at your threats to bring him tothe sword. As you raise the sword to him the sword leaps from your hands andstrikes you down instead.
The man explains that the Sword of Mana was created by the Mana Goddess, andcannot be wielded by mortal hands, and answers only to him, the Mana Lord. Hethen takes posession of the sword, and prepares to move in for the kill.
At that moment, Watts enters the scene with Tess by his side. While Tess tendsto you, Watts stands his ground firm in the path of the Mana Lord, who commentson Tess' grace from the Mana Goddess. His amusement is short lived, as theearth begins to shake. The time has come, and he smiles. The channeling orbsare rising.
A terrible dark whirlpool raises skyward from the Citadel, piercing the cloudswith an evil aura. The Mana Lord then bids the children of Mana farewell, andvanishes.
Watts and Tess take you back to Moti's. Tess watches over you as you sleep,while Watts and Moti discuss these latest discoveries. Moti ponders the natureof good becoming evil if the wrong hands attain its power, with Mana being noexception. Watts doesn't seem to like all the sitting around philosophyzing,and is eager to do something about this madness. But how?
Moti explains that the only thing that can counter Mana's force is the holysword the Mana Lord now has posession of. The room falls silent in quiet andglum contemplation, until a voice comes claiming they can help.
The group turns to see the Stone of Gaia and the Branch of Treant reveal theirfaces before everyone. Treant prophesies the tempest soon hitting the verdantkingdom of Wendel, a Mana Storm that must be stopped. At the centre of thatstorm, Gaia explains you must strike with the power of all eight elementalspirits combined. At that moment, when calm sets in, they will suppress theMana surge.
Watts is all for it, but Moti reminds him of the danger of plunging in likethat. Danger? Excitement? Who else, but you could be up for the challenge. Yourise from bed, and walk over to the group, still wounded, and calim tha you'llgo and get things sorted. Tess worries still about your healing not beingcomplete, but the brave hero you are put it down to being a mere scratch...there's work to be done!
(Author's Note: it always happens, the heroic music sets in, and suddenly I getall wishy-washy and can't write without going all hell for leather with the"let's save the world" style of writting.)
The village... nay, the WORLD is counting on you, and you're not about to letthem down. We must head for the storm, and when we're at the centre, call onGaia, Treant and the spirits to bring this evil scheme to an end! Let's get outthere and show them they can't mess with the children of Mana!
Our new mission awaits, we must now head to Wendel to subdue the Mana tempest.
Or so you think! No, now we've managed to get the heroic streak out of ourheads for two seconds, and are lulled into peace once again by the tunes of theMana Village, it's time to think straight and get our priorities right.
First off, we want to get some subquests done and bring our level up to a nicehealthy 40 (which shouldn't take long 'cause you're at 30... 'cause you ARE at30, right?). Consider at this point a Heart of Progress if you haven't alreadygot one. Though remember, this takes up a considerable amount of your gemframe, so make sure you're strong enough for the task (these enemies aren'teasy pickings either). You'll find that by doing a couple of the charactersubquests, a couple of Dud services, and maybe go back and get a Gold Rank on alevel or two you'll make it to 40 in no time. You could pass off with just 35,which will give you the capability for the latest weaponry, but at this point
GameFAQs: Children of Mana (DS) FAQ/Walkthrough by ka... http://www.gamefaqs.com/ds/925586-children-of-mana/fa...
42 dari 69 18/11/2013 11:02

you may as well put in that little bit of extra effort, it'll make your life awhole lot easier.
The subquest you receive from Watts is particularily good (I think I managed awhole 3 levels). You will also have the elemental subquests for Gnome andUndine available to access now.
When you're ready, and have the right level and kitted yourself out, head forBrightwood in Wendal, down at the bottom of the map. It has a large cyclone ofdarkness hanging over it, you can't miss it.
Subquests Available: Why He Disappeared (Watts), A Stone Sleeping for an Age(Tess), Benevodons of Water (Undine), Earth (Gnome).
[CHAP5] The Brightwood forest of Wendal
A storm rages so violent you find it hard to keep your footing as you gaze overthe darkness that has engulfed Brightwood. Now speaking of footing, veryregularily in Brightwood you'll see circular pegs on the ground. These can behammered down using a focused Hammer attack, so keep that equipped most of thetime. Hitting them will make bridges appear over the water, so you can advancein the level.
Small obstacles are now in the form of mushrooms. Watch out for the green ones,they will inflict poison on you (we're talking 20HP drainage every 2 or 3seconds, it is NOT nice). Large obstacles are in the form of tree stumps, andyou can use a small purple deeleewopper the same way we used barrels before.Again, your hammer will be very useful, because the Gleampool has a hbit ofhiding itself under one of these stumps.
-1st ZoneGleamdrop: Defeat a certain groupGleamwell: Hidden by a stump
We start off straight away dealing with our friends the Mushbooms, and alreadywe see an example of the bridge-revealing peg. Get your hammer ready, there'smore where this one came from. Again, this is another starter-level to get youused to all the mechanics I've described above.
You'll find the Gleampool in the bottom-right corner of the zone, under a stumpnext to a golden chest. The Gleamdrop is in the custody of the purple walkingflowers, so take them out (there's not too many of them.
-2nd ZoneGleamdrop: Defeat a certain groupGleamwell: Hidden by a stump
You start off amidst dozens of stumps. Start playing some rather precariouspool with the enemies, including the return of Sonic, I mean, molebears. TheGleampool should be hidden under a stump at the top left hand corner of thelevel, so reveal that first off, then hack your way through the purple flowersagain.
-3rd ZoneGleamdrop: Defeat a certain groupGleamwell: Hidden by a stump
You can either head to the right or up at the start of this level. Mysuggestion is upward-bound. Make your way round toward the right, ad you'llfind 4 stumps near a bridge off to the right. The left-middle stump has theGleampool. Head over the bridge and you'll find a dark-whorl generating enemieslike no tomorrow. You can use this to gain some EXP, up to you, but I wouldn'thang around right now. The whorl CAN be defeated by brute force, but it has arather high HP and you only inflict 1HP damage with each hit, so you could bethere a while. Head on round the top of the rock formation, defeating theexploding pumpkins on the way. These guys have the Gleamdrop this time. Once
GameFAQs: Children of Mana (DS) FAQ/Walkthrough by ka... http://www.gamefaqs.com/ds/925586-children-of-mana/fa...
43 dari 69 18/11/2013 11:02
you have it, race back round to the pool. You can only go via the top, as thevortex will stop you from going the bottom route (unless you shut it downthrough sheer barbarian frustration that is).
-4th ZoneGleamdrop: Defeat a certain groupGleamwell: --------
Our friends the walking armour are back, hiding out on the island in the centreof the screen. You have three pegs at the bottom, and each will activate abridge on either side of the island. I'd suggest activating just one andheading in. The pegs, from left to right, activate the following bridges: topand bottom, left, and right.
It is recommended that you weaken them a bit first with some non-aimed arrows from the bottom, and when going in make your first hit one withthe hammer to weaken them more. In such close proximity they are not easy tocharge head-on, and you could find yourself in for a nasty surprise if you'renot careful.
Save your game and move on to the next zone.
-5th ZoneGleamdrop: Defeat a certain groupGleamwell: Hidden by a stump
Something new for us to deal with from here onward are big Xs on the ground. Ifyou step on them, vines will rush out and knock the wind out of you quickerthan you can say "Rabites eat my baby". If you walk in between them, and I meandead-centre, you're fine. Enemies are also affected by these, so for examplewhen you head down from your starting point here, you can get yourself into aheap of trouble because one enemy walks on them, gets knocked toward you,knocks you in to the next lot behind you... Nasty stuff.
After you've had your first experience with them, head over to the right. TheGleampool should be under the stump heading straight right from the bridge. TheGleamdrop is held hostage by the pumpkins again.
-6th ZoneGleamdrop: Defeat a certain groupGleamwell: Hidden by a stump
More of the same now. Defeat all the purple flowers for the drop, and the poolshould be under the stump that is to the left of a small pond on the left handside of the zone. The chests here aren't too interesting, but they do help yourscore at the end of the level.
-7th ZoneGleamdrop: Defeat a certain groupGleamwell: Hidden by a stump
Now, for a complex one. You'll find yourself switching back and forth betweenbow and hammer, or combining the two, as the bees tend to kep their distanceover water. Head over the first two bridges, then move up between the Xs toreach the peg you see at the top of the screen from the back (don't approach itfrom the bottom). Hit that down to activate a bridge over on the right handside of the screen. Now, head up again, and careful with the golden chest, it'sa trap. The silver one is OK. Go down and right and you'll find another vortezgenerating enemies. Go down via the bridge you just activated, defeat theenemies here, and hit the peg to activate the bridge above the whorl. Move uphere and defeat the blue shell creatures to get the Gleamdrop. The Gleampool isunder a stump just to the left of the vortex. You can go for extra exploring bydefeating the vortex and heading over the bridge on the right if you feel likeit. All you'll find there though is a silver chest and three trapped goldenones. You can also reach the chests on the far right island from the top islandusing the flail.
GameFAQs: Children of Mana (DS) FAQ/Walkthrough by ka... http://www.gamefaqs.com/ds/925586-children-of-mana/fa...
44 dari 69 18/11/2013 11:02

-8th ZoneGleamdrop: Defeat a certain groupGleamwell: --------
There are two ways to do this level. FIrst you can head up, through themushrooms, get the two chests and hit the peg to open a small bridge to thelower part of the level, or you can tiptoe through the Xs and go for them head-on. There will be 4 Sabertooth Tiger Heads (yes, just the heads) bouncingaround and getting themselves hurt by vines. Go down and finish off the job forthem, then take the drop to the pool for another save point.
You reach the eye of the storm, a quiet place. ALmost too quiet. A glowing orbof darkness (oxymoron?) swirls just above you. You call on Treant and Gaia, butjust as you do so, the Mana Lord appears before you. He expected you to getthis far. He taunts you with the Mana Sword, asking if it is what you werelooking for to save the world. He may have underestimated you, but he fears youhindering him not.
You protest. If this keeps up, the world will... indeed, as he interrupts you,cease to exist. Which is exactly what he wants, the destruction of the worldfroma maelstrom of Mana. Did you think he was trying to take over the world orsettle a personal grudge? He then disappears to leave you to try and calm thestorm yourself.
The vortex speeds up, gaining strength, and prepares for your attacks.
- [BOSS5] Boss Battle : Mana Storm -
This is an interesting battle with not an awful lot of science to it. The stormwill not allow you to get near its core when the vortex is thick. Even arrowscan't get in. You can use the glowing orbs by knocking them toward the stormwith the Hammer, that'll do some damage. Magic is too slow to do anythingwhatsoever (the storm will move by the time you've cast it, let alone have thespell take effect). So when you see the storm weaken it's vortex, run towardit, and hammer away at it with your sword. With your current level it should godown with about three bursts of this sort of attack.
As you strike your last blow, the core explodes in a brilliant light. You'll betaken to the ranking screen now. The gold ranking for this level will give youthe option to a weapon of each type and a purple gem. The weapons can only beequipped one by each character (ie Tumble can only equip the bow).
Returning to the scene of events, the Mana Lord reappears after the storm hasdisolved, and is rather impressed. But how do you attempt to vanquish the ManaTempest without the sword? He is interrupted by the appearance of Treant andGaia.
The conceed that, as the Mana Lord says, they are no match against Mana bythemselves. But they aren't alone. The spirits are with them. The Mana Lord isenraged by their defiance, as he watches the spirits rise through the woodtoward the tempest above and dispel it with ease (in full motion video too!).As you celebrate this victory, the Mana Lord summons his powers and strikesdown the spirits, Treant and Gaia, in a torment of lightning bolts. He thencasts you backward to the ground and approaches you with the Mana Sword tofinish you off.
Just as he raises his sword, a gem pops out of the ground and hovers in the airnear the Mana Lord. A dozen more join it and cling to the Mana Lord, who isstunned and can't move. Using up a lot of his power he casts them away. Hecan't understand everyone defying him, he is doing what the Mana Goddess wishesand filling the world with Mana. As he regrets not finishing you off atLorimar, he has an epiphany regarding the Mana Tree's maiden and her powers. Heis of course refering to Tess! He then says something about the Seed of Mana,and determined that this is the solution to his dilemma, retreats once more.
GameFAQs: Children of Mana (DS) FAQ/Walkthrough by ka... http://www.gamefaqs.com/ds/925586-children-of-mana/fa...
45 dari 69 18/11/2013 11:02
You return to the Mana Village, with the words of the Mana Lord heavy on yourmind. Right now the game will tell you to go talk to Tess, but she is nowhereto be found. At this point, before going any further, my advice is to get doingsome subquests from Dud Services and get up to level 45 before even thinking ofadvancing anymore. Also it is important that you go talk to Balbo and the BombBrothers, as they have just found a really pure ore and can make your gem frameeven bigger! The grid will now have the form of a cross, with 2, 4, 4, 2 slots.This will make for even more power boosting possibilities you weren't open tobefore. Take the time to plan out some new gem fusions if you have the money to(you should have stacks of it at the moment... think of all the possibilitiesabout 50000L has to offer), work up a good gem configuration, and prepare forsome questing.
You will now be able to access the elemental subquest for Dryad. However,seeing as Tess is nowhere to be found, you'd think we're stuck with whateverelemental we already have equipped, right? Wrong! Go talk to Nana in theMermaid, and she will be able to change spirits for you.
Also, IMPORTANT, before checking out the glowing Mana Stone, talk to GrannyHannah or Nana (Chat) to receive a subquest for the Mana Tower to try and findTess. If you touch the Mana Stone, you may not be able to do this subquest.
So my advice is to start out doing some subquests, get your level upto 45, or if you're feeling up for it, 50, while keeping your weapons up todate and gems in line, and then when you've done this move on to the nextchapter. You should have no problem doing subquests in a very short time bythis point.
Personally, my current gem combination contains Sword Expertise, SwordTraining, Soul of the Gemma, Glittering Crystal and Chivalry. Gets through themlike butter.
Subquests Available: Tess' Whereabouts (Nana, MUST BE DONE BEFORE TOUCHING MANASTONE!!!), Benevodon of Wood (Dryad)
[CHAP6] The Ruins of Illusia Isle
Now that we're ready for the real deal, it's time to find out where Tess hasdisappeared to. She's not searchign through the archives, so let's go check upat the Mana Stone.
We'll find that there is energy glowing all round the Mana Stone. If you touchit, gems will spring from the ground, surround you, and transport you to adesolate place: the Ruins (this will also appear on the main Flammie map, so ifyou cancel the mission, you can go back via this route).
As you gaze around the surrounding, you get the feeling of having been herebefore, and that Tess has to be here. So let's set out to find her.
There's no really new mechanics for this level, rather it takes everythingwe've seen up until now, puts a nice calming soundtrack over it, and throws itat us thick and fast. Gleampools are generally hidden by large brown plants.
-1st ZoneGleamdrop: Defeat a certain groupGleamwell: Hidden by a plant
Case in point. Doesn't this remind you of Snow Country from Secret of Mana, andI don't mean just because of the enemies either. Anyway, gleampool is under oneof the top plants, normally next to the bridge on the left, and the drop isheld custody by the wooly bulls. Also you can access the middle chest byhitting the peg in the top right corner of the level and activating the bridge.
-2nd ZoneGleamdrop: Eliminate all monstersGleamwell: Hidden by a plant
GameFAQs: Children of Mana (DS) FAQ/Walkthrough by ka... http://www.gamefaqs.com/ds/925586-children-of-mana/fa...
46 dari 69 18/11/2013 11:02
The pegs will activate the two bridges. Careful, there are 5 or 6 bulls at theend of each bridge waiting for you to charge in. You can knock the stone towardthem if you want. The pool will be in the top right corner, next to the goldenchest. You must go down to though to eliminate all monsters, so I suggest youdo the bottom half of the zone first, then move to the top.
-3rd ZoneGleamdrop: Defeat a certain monsterGleamwell: Hidden by a plant
The bronze chests on this left side of the main bridge are traps, so don'tbother with them. You'll need to push enemies into the grabbing plants at thebottom if you want to get the two chests there. The drop is held by the blueeye in the centre of the bridge. As for the pool, take the drop over to theleft side of the bridge, and break down the plant at the top. Also note, thegrabby plants will reduce your HP while you're stuck.
-4th ZoneGleamdrop: Eliminate all monstersGleamwell: --------
Get the chests, hack down any of the plants surrounding the skeleton in thecentre and have at him, he'll go down in a few strikes of your sword if you'refollowing my advice. Save, and continue onward young warrior.
-5th ZoneGleamdrop: Hidden by a flowerGleamwell: Hidden by a plant
The drop will be hidden pretty near the bottom right. Careful with the twofountains, as when you hit them, they will generate a field that knocks youbackwards. Make your way round the right hand side of the screen, and hit downthe two pegs at the top. These will reveal the bridge up the centre of the twofountains, which leads to the plant underwhich the pool is hidden.
-6th ZoneGleamdrop: Hidden in a chestGleamwell: Hidden by a plant
First hit the peg on the right to extend the central brige to the island withthe Gleampool and the one above that. Won't need to go there yet, so hit thepeg to the left to reveal the long bridge up that side of the zone. This willlead you to the chest with the GleamDrop. You can also then hit the peg on thisisland to head across to the right and then down to the island with theGleampool.
-7th ZoneGleamdrop: Defeat a certain groupGleamwell: Hidden by a plant
You'll find here that by going up and round to the bottom right, you'll killoff all the pink snake-tails you need to get the drop, and will end up rightnext to the Gleampool under the last plant in the bottom corner. If you'relooking to get some chests, head over the left through the grabby plants adtake the gold chests and the top and bottom-most silver ones. The rest are alltraps.
-8th ZoneGleamdrop: Defeat a certain monsterGleamwell: --------
You'll find yourself surrounded by plants to be knocked down. Best bet is toget to where one of the stones is and play a game of billiards. Make your wayto the top right for the pool. If you're interested, there's a golden chest atthe top left, but nothing too interesting in there. The pool is guarded by the
GameFAQs: Children of Mana (DS) FAQ/Walkthrough by ka... http://www.gamefaqs.com/ds/925586-children-of-mana/fa...
47 dari 69 18/11/2013 11:02

skeleton with the drop and three mer-men. Another save point, which I suggestyou take advantage of.
-9th ZoneGleamdrop: Hidden by flowersGleamwell: Hidden by a plant
This level is longer that previous ones, so we'll be heading in to doublefigures soon. Anyway, the pool shoul be under the plant next to your startingpoint, and the drop is to the right of the fountain near the top of the level.Aside from that, nothing to report other than a rather large number ofwerewolves.
-10th ZoneGleamdrop: Eliminate all monstersGleamwell: Hidden by a plant
Beat your way through everyone, take the chests although there's nothing reallyinteresting in them, find the pool under a plant around the middle left of thezone.
-11th ZoneGleamdrop: Hidden in a chestGleamwell: Hidden under a plant
First off, take down some plants in the bottom left corner, and hit the peg toactivate the bridge at the top right of the zone. Head up there, across thebridge, and hit that peg to reveal another bridge over the top left. That willlead to 4 chests with items in. There is another peg behind the flowers next tothe first bridge we revealed. Cut these down and activate this peg to revealthe final bridge at the bottom right, which will lead the chest with thegleamdrop in it. Two other gold chests surround it which are traps. The pool isunder one of the plants in the centre, surrounding the fountain.
-12th ZoneGleamdrop: Defeat a certain groupGleamwell: --------
Knock down the bushes and hammer the enemies on either side of you with arrows.You can't get on to the islands with them. You can also speed things up a bitwith some magic while you deal with the opposite set. Retrieve the drop withyour flail and head for the pool. Note, if you knock the enemy back and thedrop ends up on the other side of the island, you'll have to go up and roundthe other side to retrieve it with your flail, so judge your attack patterncarefully. Save and get ready for our next challenge.
The Mana Lord looms over Tess, demanding her she lend him her powers. Shedoesn't appear to understand what he means, until he asks her o call forth theSeed of Mana. If he uses the powers within the seen, the surge will egulf theworld beyond all control. Tess can't believe that he actually wants to destroythe world. He explais that he only wishes to fill it with Mana, and doesn'tcare what happens to the people.
Tess however refuses to call forth the seed, and demands the Mana Lord returnthe sword and stop this nonsense. As he prepares to take her life into hishands with the sword, you enter the scene and once again, we get a taste ofthat heroic melody from before. Tess hides behind you. She doesn't know wherewe are, but has that same feeling that she's been here before.
The Mana Lord then explains that this is the Sanctuary of Mana on Illusia inseveral thousand years to come. Your character doesn't understand, neither doesTess. He explains that in the current chaotic state, Mana distorts time andspace, drawing Illusia's future to the present. He then rants on about howdestruction is what is to become of everything... although some things return.
Darkness surrounds you, and everything disappears. A light appears before you,
GameFAQs: Children of Mana (DS) FAQ/Walkthrough by ka... http://www.gamefaqs.com/ds/925586-children-of-mana/fa...
48 dari 69 18/11/2013 11:02

and shadows with a familiar voice stand ahead. You stand in disbelief as theshadows explain that the surge has brought them back to you... your lostfamily, who died in the cataclysm. But before you fall completely into thetrap, Tess' voice calls you back to your senses.
The Mana Lord asks if you heard the voices, and then indicates around you. Yousee several shadows all around. He explains they are those lost that havereturned. He is the collection of them, and the bridge between this world andthe afterlife. The shadows then collect together into one form, a hideous beastof darkness covered in eyes and hands and mouths all over the place. In thewords of my wife: Eww.
- [BOSS6] Boss Battle : Revenants -
There are two ways to damage this boss. The first is to shoot it while standingnear the central pillar in an attempt to make it jump toward you and land onthe pillar, causing it some rather nasty damage. Once it has fallen on thepillar once, the gem at the top will have crumbled and you can move it aroundand hammer it into the beast. The pillar can also crumble from the beast eatingaway at it.
The other is to look for the spirit that has red eyes when it splits in toseveral entities, and hammer that with arrows when you can. The other smallrevenants won't be hurt.
Don't let the shadow that appears on the floor catch up with you when heplunges a hand into the ground, as the hand will come out of that shadow andattack you.
Once you have dealt it enough damage, it will disappear in a blinding light.Three shadows will remain once you've obtained your ranking, and will call yourname once more, leaving you an item (Tumble's is a Hairpin, Flick's a ToyHorse, Wanderer's is a Harmonica) before vanishing for the last time. As theMana Lord comments on the futility of it all, you charge and are knocked back.Before the Mana Lor can finish you off, Tess asks him what the sword means tohim. He considers itto be a tool to slay those who oppose him. Tess tries toexplain it is not just a weapon, but it is useless.
The geodes appear to defend you once more, which he disipates in disgust beforelaunching a highly charged energy bolt at the two of you. It doesn't impactthough, and instead the Seed of Mana materializes beween you. The Mana Lordtakes it for his own and makes off with it. There's no time to lose, you mustreturn to the village and plan your next move.
You explain your findings to the others, and Moti reasons that something willcause the Mana Tree to wither and Illusia to fall. Although the Mana Treelooked dead, there was still new life underground waiting for the time tosprout. The Seed must have been that.
You all stand wondering where he could have taken the seed, but no answer comesto mind. Tess reasons that the goddess isn't absent as Watts thinks, she surelyhad a plan when she sent the sword.
At that moment Treant and Gaia appear, and tell you that the Mana Lord is atthe heart of the Mana surge, where the source of Mana lies. If the Mana Seedwere taken there, it could absorb all Mana there and grow out of control. THeythen explain that the Mana Lord was born of the goddess, but never understoodher will, and only thinks of filling the world with Mana by destroyingeverything we know and replacing it with Mana. The surge is deep under theroots of the Mana Tree. Which means you now have a new mission: go to the ManaTree's roots and stop the Mana seed's release.
Before we do that though, we'll be saving, checking out new weapons and gems,and doing some more subquests. Namely do the Wisp's elemental subquestand one from Seamoon which will now appear when you Chat to her. Tess has a newone for you too, so make sure you check up on her.
GameFAQs: Children of Mana (DS) FAQ/Walkthrough by ka... http://www.gamefaqs.com/ds/925586-children-of-mana/fa...
49 dari 69 18/11/2013 11:02

As for level recommendation, 55 is good, anything between that and 60 is abonus but not essential. This will mean you can use all your latest weapons(unless of course you've acquired some rather juiy weapons through questingthat Millionaire hasn't got his hands on yet). With that, we are ready to moveforward. As for equiping an elemental, I found Wisp somwhat useful from time totime on the next chapter, so may as well put that on your list ofconsiderations. Set a course for the Path of Life which will have now appearedon Illusia Isle.
Subquests Available: A Checkered Past (Seamoon), Rainbow Garden (Tess),Benevodon of Light (Wisp).
[CHAP7] The Path of Life
Above us looms the great Mana Tree, wind russling in the leaves, dwarving us aswe stand before it, determined to find the Mana Lord below. As we are about togo in, Tess appears claiming this may be the last battle, and she is sure thatthe Mana Lord knows also. She feels so useless surrounded by others who areputting their lives on the edge all the time. But you remind her of all thetimes she's bailed you out, that you would never have made it here without her.
A glow then comes from within you. It is the object from your family at theRuins. It floats over to the base of the tree and open a portal to theunderground. The time has come to take on the Path of Life.
The mechanics here don't vary too much. The rather obnoxiously green plants canbe brought down with the hammer, the small purple plants will inflict a randomstatus ailment on you, and the green shells and floating clouds will act asbarrels did back in the good old days of the Mana Tower.
-1st ZoneGleamdrop: Defeat a certain groupGleamwell: Hidden under a plant
The group to defeat are the orange ant-eater-like creatures, and the gleampoolSHOULD be around where the path splits on the right side of the zone. Irecommend taking the right path upward to get the glden chest, then back downthe left after going over the spikes. This level also sees the return of theflying tomato men! I'd be more worried about the orange anteaters if I were youthough, they can pack a nasty rolling punch.
-2nd ZoneGleamdrop: Defeat a certain monsterGleamwell: Hidden under a plant
The drop is hidden by the red rat, and the gleampool is under the plant rightnext to it. But before that you'll encounter a very small section of path thatis FILLED with monsters to the brim, and they keep coming at you. They shouldpose too much of a problem, but you have been warned, they can catch you offyour guard, especially the hedgehogs, since they can stop you from attackingwith weapons. The chests down at the bottom of the screen don't have anythingof interest, but you may want to get them anyway if you're aiming for GoldRank.
-3rd ZoneGleamdrop: Hidden in a chestGleamwell: Hidden under a plant
This zone is REALLY nasty. You'll find little fluffy seeds flying at youslowly, almost harmless, but when they explode can inflict ridiculous amountsof damage (we're talking almost up to the 300 mark on a good night). Keep themat bay with your flail, and make your way upward. Head right first, the drop isin the far right, bottom silver chest. The one just above it is a trap, and theother two should be harmless. There is also a path on the left with morechests. To get this, hack through ONLY the bottom row of bushes, since the top
GameFAQs: Children of Mana (DS) FAQ/Walkthrough by ka... http://www.gamefaqs.com/ds/925586-children-of-mana/fa...
50 dari 69 18/11/2013 11:02

one will keep the floating block from hitting you. Otherwise you're in for along beating session. Note that this block has spikes on it too! The GleamPoolis heading straight up the middle of the zone, under the plant at the end.
-4th ZoneGleamdrop: Defeat a certain monsterGleamwell: --------
The tomatomen in the centre of the level are capable of launching those seedswe saw before, so take them out first thing with your bow. Then head over tothe right hand side of the screen where we'll see a red walking armour. He canpack one helluva punch, so take extreme caution. If possible, weaken him eitherwith magic or sonic waves before knocking the bush down, as his hits willsending you flying. He'll give you the gleamdrop for the pool just below.
Now you've seen what the level has to offer, you may want to consider re-arranging your gems to suit the situation, and save, by all means save.
-5th ZoneGleamdrop: Hidden under a plantGleamwell: Hidden under a plant
Now we have some stone heads to deal with that spurt out random status ailmentsat us. They only do so in one direction and at regular intervals, so they areeasy to avoid. You can even spin the head a new direction with the hammer ifyou want. The Gleamdrop will be under a small plant on the left hand side ofthings, around the middle of the level (there will be a small peninsula, as itwere, with plants round all sides and a shell in the middle), and you'll wantto take it to the top right peninsula with a plant in the middle and a few redrats and a pumpkin on it. The enemies appear few and far-between on this level,as it appears the stone heads take up one of the max-enemy slots.
-6th ZoneGleamdrop: Defeat a certain groupGleamwell: Hidden under a plant
My suggestion for this level is to first head round the bottom of the level, upthe left and centre, then lastly head back round the centre to the right, andup the second path from the right. The gleampool should be under the plantthere, and the leaving these monsters 'til last (in particular the anteaterswho have the drop) will mean the Gleamdrop will be right next to the pool foryou. If this pool is in a different location due to random selection, let meknow as I'll have to ammend this. I will be playing through this level againsoon, but the more I know the better I can inform. ;)
-7th ZoneGleamdrop: Hidden by a chestGleamwell: Hidden under a plant
This level is curious in that it forces you to deal with the spiked floatingblocks. Make your way down the path on the left, then up the second to find theplant with the gleampool under it. Then head over the centre bridge toward thethird path, where there will be a cluster of chests and two spiked blocksguarding them from either entrance. You can get the gleamdop one by using thefocused flail in diagonal from below on the bottom silver chest. The rest youcan try and get by flailing from the other path on the far right.
-8th ZoneGleamdrop: Defeat a certain groupGleamwell: --------
Head for the top of the zone and bash down the plants to get at the redarmours. Again, if you can weaken them befre charging in to make your lifeeasier. I was lucky in that I had Wisp equipped, so I was able to send themintoa bit of confusion which helped me with my final charge. Again, save your
GameFAQs: Children of Mana (DS) FAQ/Walkthrough by ka... http://www.gamefaqs.com/ds/925586-children-of-mana/fa...
51 dari 69 18/11/2013 11:02
progress and move onward.
-9th ZoneGleamdrop: Defeat a certain groupGleamwell: Hidden under a plant
Remember those Xs on the ground we saw in the Ruins? Well they're back heretoo, except they're a rather conspicuous light blue that blends in well withthe ground, so keep a careful eye out for these. As before, vines will pop outand unleash unholy hell on you. The middle of this level is very interestingbecause it is covered with those Xs, has two ailment heads at top and bottom,and yet you have to fight in this little arena because that is where a lot ofthe orange wolves you need to defeat will be appearing. Luckily the Gleampoolis easily concealed under the plant just below this ring of chaos.
-10th ZoneGleamdrop: Eliminate all monstersGleamwell: Hidden under a plant
Well that's all we needed, another colloseum of madness. This time there arethree heads on each side of this square, 2 Xs in the topleft and bottomrightcorners, and we have to defeat all the monsters available. To make your life abit easier, I suggest whacking the head that is facing inwards toward itscompanion so at least you don't have random status ailments giving you grief,and take the chests on the outside while you do this, so you use this asprotection from the monsters. Then unleash some heavy fighting in the centrewhile avoiding those sneaky vines. The gleampool should be toward the top rightcorner of the ring.
-11th ZoneGleamdrop: Defeat in a chestGleamwell: Hidden under a plant
There are tons of the ailment heads set up around the paths of this zone, whichare fun to try avoiding. You'll also see another two golden chests on the lefthand side of the vertical path guarded by a spiked block. You can stop it fromgetting you by maneuvering a shell in there that should appear toward the topof the path, but I'd make sure you turn the heads the other way, as they canknock you back in there and then your only way out is to fight your way outagainst the block (which is a pain, trust me). Also watch out for monstersmoving the shell out of the way. The drop is infact in one of th chests amongthe spikes on the right hand side of this same path, a bit further down.Hopefully it is at the beginning, otherwise you have a long job of flailing itback. The Gleampool is hopefully on the horizontal path about mid-top zone. Ifyou're really unlucky, it could go right up the top, which means a long haulavoiding ailments...
-12th ZoneGleamdrop: Defeat a certain groupGleamwell: --------
The red armours will start coming at you fast, so move quick. Hammer one of thefloating clouds toward them, and hopefully you'll knock them in to an ailmentplant that'll stop them in their tracks long enough for you to charge in andfinish the job off. Now if you want some extra brownie points, go down and uparound the outside of the level, take out the pinochios, and then push a cloudup the path. Knock it upward with your hammer toward the end to take out theplant there, and then flail back the contents of the chests. You'll probablyknock yourself back doing this, but you'll be alright, we're almost at a savepoint, which you should definitely use since things are going to get nastierstill.
You find the Mana Lord at the end of the Path of Life, the seed glowing beforehim. He welcomes you and says that the time has come to unleash the power ofthe seed, and all shall be bathed in a sea of the purest life that is Mana.(insert evil laughter here) He argues with you that there is no such thing as
GameFAQs: Children of Mana (DS) FAQ/Walkthrough by ka... http://www.gamefaqs.com/ds/925586-children-of-mana/fa...
52 dari 69 18/11/2013 11:02
purpose in this world, and that the imposition of humans is meaningless, thatyour importance is just an illusion. But now it is time for the show, and he'sglad you're here to witness it.
As he cracks the seed open with the Mana Sword, the Geodes appear once more andhalt the new surge of Mana that was about to be unleashed. He can't understandhow the geodes managed this... could they be crystals of living memory, thusgiving them a will of their own. Could they have come from the futuresanctuary? Ludicrous, they can't stop him, he claims. He strikes the seed onceagain, but it has become immune to the Sword of Mana.
A beautiful FMV sequence plays, with Tess standing at the foot of the ManaTree.
"The Sword of Mana is not a mere weapon. Don't you hear the voices of the gems?Life must go on, than that is where one finds true meaning."
The Mana Lord now angers, his rage bringing forth the power of thunder aroundyou to announce your imminent demise! Your time has come to face him.
- [BOSS7] Boss Battle : The Mana Lord -
How on earth did they make this battle this easy... I lost a total of 30HP! Hisattacks consist of lightning strikes, then he will move in your direction andtry to use a sonicwave on you. First off, I found that if I run in his generaldirection, I'll avoid the lightning strike, get a hit or two with your sword inbefore he uses his sonicwave, which instead makes him just throw me back in anydirection. Lather, rinse and repeat. I defeated him within 30 seconds. Notethat if you get hit by lightning once, he'll most likely manage to get anotherhit in, as it paralyzes you and allows him to aim with another easily.
He will admit that you have power, but you are a mere worm against him. Youhaven't defeated him yet!
This time his attacks become more vicious. He will launch lightning balls atyou, rush at you landing three or four hit combos, added to the previousattacks he had. But again, the same strategy as before applies, though thistime you'll take a bit more damage. But this time he actually went down in 10seconds flat, and I took 40HP damage.
The game registered a total of 38 seconds for this battle. I've since been ableto defeat him in 20.
Now the battle is over and you have received your ranking, time to see how hereacts to this defeat.
He explain the goddes has just descended into this world, and her powers spunout of control as she doesn't know herself yet. This produced an entity that isdeliriously intoxicated with its own powers, roaming the planet like aninnocent newborn... the force behind the surges is a child: the Scion of Mana.
He tells you to give the seed of Mana to the maiden, for she will know what todo with it. He then gives you back the Sword of Mana. When the columns firstsprouted, the goddess sent you the sword, she must have wanted you to stop thechaos she could not. She could do no more than that as the Tree was alreadyshackled by the columns. After giving birth to the Lord and the Scion, shestruggled to stop them. The Mana Lord knew the will of the goddess to want tostop the columns, but he continued on because that is what he is. That was thereason he was born: to fill the world with Mana. But he now sees that the gemsare a fusion of the powers of Mana and the will of the creatures to live, andwonders how far you will get fighting against the Mana that he longed to free.
With that he says "I am the Mana Lord! Dear planet, witness my end! Take mylife, my child!" and plunges himself into the flows of Mana under the Path ofLife. The earth begins to shake, and the powers of Mana grow uncontrollably.You run for it, now in posession of the Sword and Seed of Mana.
GameFAQs: Children of Mana (DS) FAQ/Walkthrough by ka... http://www.gamefaqs.com/ds/925586-children-of-mana/fa...
53 dari 69 18/11/2013 11:02

Mana begins to surge from the foot of the Mana tree and accumulates above thetree to form a portal, revealing the path to another world. The Benevodons thencircle the tree and the island, witnessing the rift above the Mana Tree.
Back in the village, Moti makes the claim that the Scion of Mana, the source ofthe chaos, must be on the otherside of the rift. It looks like there's no otheroption other than to face off against Mana itself. You're not so sure that theSword will even help, as when you show it to the others, it is covered in blackvines... has it forsaken the people? Watts cares not a tait, this is where thereal fight begins, when all hope is lost and you can't fall any farther.
Moti still has his doubts with the sword in such a state, but Tess assures himthat it is blessed with the power to set things right, so as long as ourpurpose is to set the world right it will lend us its power. Thus, our missionis to enter the rift and stop the chaos, and restore everything to normal...Good game, good game...
But before that, it is time to do some maintenance.
First off, we want to expand our Gem Frame to the max so time to activate thesubquest that will finally allow us to do just that. Chat with the Dudbear atDud Services. One of their team went to Lorimar to gather info and hasn't comeback. He asks if we can go find out what has happenned to him, as he may havehad an accident. This will give us the subquest which leads to obtaining aneven bigger gem-frame, so you REALLY want to do this!
You should also at this point complete the last elemental subquest for Shadewhich will now be available. You will also be able to access a subquest foreach individual character. If you are playing with Tumble, talk to Seamoon toaccess her subquest. For Flick, talk to Watts to access the subquest. ForWanderer, Chat to Millionaire.
So use these to get your level up above 65, recommended 70. Kit out with thelatest gear, and get your gems arranged as you feel fit. The final showdown isahead.
Suquests Available: Friendship Beyond Words (Dudbear), Benevodon of Shadow(Shade), Character Specific Subquests (see Subquests section for more info onwho to talk to).
[CHAP8] The Cosmic Rift
The final showdown is ahead. We summon Flammie with the drum and fly high abovethe Mana Tree. He drops us off on what looks like the entrance to a churchfloating in the sky, and we waste no time in moving forward.
Game mechanic-wise, we now have crystals substituting the normal obstacles,large blue orbs substituting the barrels (there are also shinier ones withorbiting smaller orbs that act more like the floating clouds we saw on the Pathof Life as they can move over pits). You'll find that purple small crystalswill inflict a random status ailment and have spikes underneath so watch out.
Also spikes are multi-coloured here. Syl tells me that if you hammer down thespikes for one colour, the holes next to them of the same colour will sproutspikes, meaning you can open paths through them.
After a certain point you will see summoning circles on the floor. These willsprout an enemy when you walk over them in some cases. You can also break themwith a charged hammer attack, sometimes producing an item.
Another new one is multi-coloured giant dice. ou can use them like barrels, butwhen they stop moving after th first hit, depending what they land on theresult will be different. A Green means a mosnter will hatch from it, a Yellowproduces an item and Purple makes it explode.
GameFAQs: Children of Mana (DS) FAQ/Walkthrough by ka... http://www.gamefaqs.com/ds/925586-children-of-mana/fa...
54 dari 69 18/11/2013 11:02
The Gold Rank requirement for this level is 12000. I know this because I got11979 on one play through and got Silver, but 12174 got me Gold.
-1st ZoneGleamdrop: Eliminate all monstersGleamwell: Hidden by a crystal
An easy introductory level, hack your way through the monsters and then revealthe Gleampool under the large crystal in the centre of the level. Don't thinkthe level is going to be this easy all the way through though.
-2nd ZoneGleamdrop: Hidden in a chestGleamwell: Hidden by a crystal
Use the blue orbs to the best possible effect to clear a path through thecrystals, or you'll be here a long time! There are two silver chests in the topright and bottom left corners. The top right one should have the GleamDrop. TheGleamPool should be under a crystal at the middle bottom of the level. Watchout for the flying swords, they're nastier than they used to be.
-3rd ZoneGleamdrop: Hidden by a crystalGleamwell: Hidden by a crystal
In my case the GleamPool was under the crystal right next to the startingpoint, so make sure you uncover that before you go any farther, as this willsave you the job of knocking down every other crystal in the level. As for theGleamdrop it is under the only batch of small crystals I came across around themiddle of the level. We also see the return of another old friend, the ChessKnight. If you want extra brownie points, make sure you head up and left fromthe Gleamdrop, as you'll find a vortex spewing out swords like no tomorrow.Take this down, and head up to receive 3 golden chests. You'll also come acrosstwo trapped bronze chests. Defeat these with an arrow.
-4th ZoneGleamdrop: Defeat a certain monsterGleamwell: --------
Now this guy is what I call a monster. Head along the level right until theend, where you'll see the Gleampool guarded by a rather nasty looking armouredman, with a monstruous head on each arm. Shame that he didn't have the time toattack me, he went down in three sowrd strikes. If you're not feelingconfident, use the blue orbs to weaken him a bit first, then charge in andfinish him off.
Take advantage of this save point to check if you've received any beefierweaponry from the monsters in the level, as well as checking that you're happywith the way your gems are arranged now you know the terrain a bit better.
-5th ZoneGleamdrop: Defeat a certain monsterGleamwell: Hidden by a crystal
The enemy to defeat here is the red dragon at the top of the level. Also watchout for sudden appearances of other red dragons when you step on the summoningcircles on the ground. For example, just next to where the visible one is. TheGleampool is over to the far top right. We will also see now that there arepurple small crystals. These will inflict a random status ailment, as well asreveal spikes. Also if you want to get the far chests, use the floating orbswith the hammer to knock down the crystals (the flying eyes work pretty welltoo), then flail back the contents.
-6th ZoneGleamdrop: Defeat a certain groupGleamwell: Hidden by a crystal
GameFAQs: Children of Mana (DS) FAQ/Walkthrough by ka... http://www.gamefaqs.com/ds/925586-children-of-mana/fa...
55 dari 69 18/11/2013 11:02

The enemies to defeat here are the red Shadow Zero's. The Gleampool is in thetop left corner. There is also a golden chest via a passage way full ofcrystals. To make quick work of this, push the blue orb to the entrance of thepassage way and hammer it down there. Otherwise you're going to be in for along ailment filled hack and slash until you get there.
-7th ZoneGleamdrop: Hidden by a crystalGleamwell: Hidden by a crystal
The Gleamdrop is under a puple crystal just to the right of where you start,above a silver chest. As for the pool, it should be under the top rightcorner's crystal, though there are another 4 or 5 along the top that it mayvary to. You'll want to get the chests on the isolated islands, as these willincrease your chance of a Gold Rank, even though they don't hold anything ofgreat interest to us. Keep the Gleamdrop with you, it's a large level and it iseasy to take far too long roaming around afterwards to get the drop to thepool.
-8th ZoneGleamdrop: Defeat a certain monsterGleamwell: --------
Again our ugly friend is back. We can use the orbs to bash his brains around abit, or just charge in there, he's a push-over. Take the drop he drops over tothe pool on the right and have another well-deserved rest.
We'll arrive at a clearing with a pit in the middle, and we'll see threeshadows appear around it. They will form into dark clones of the other gamecharacters (so if you're playing as Tumble, they'll form into Flick, Pop andWanderer). And we get to fight them! By the way, the time you spend looking atthem now counts against you, so hit A and have at them.
- [BOSS8-1] Boss Battle : Dopplegangers -
Each of the characters will adopt a different strategy. Flick will run at you,knock you down, and run away again. Wanderer will try and knock you with hishammer and Pop... well, he just ran away. I don't know Tumbles strategy, but Ican give you one for defeating this lot.
Best bet is to head for Flick first, as he seems to be the most vicious, thentake down Wanderer, and lastly Pop. Wanderer will probably knock you from yourfeet once, but if you go for him first, you'll find yourself running afterFlick once he's hit you once. Time-wise, I had these guys down in under 10seconds, but the counter on the game counts from the moment you enter the room,so you'll end up with a 1x Bonus no matter what you do.
Note, on replay I defeated them in 17 seconds clocked, and still only 1x bonus,so I get the feeling you just can't get more than that.
We'll now see an FMV with Tess praying amongst the trees, who will call out ourname. Then, as quickly as it started, we're back into the thick of it.
-10th ZoneGleamdrop: Hidden in a chestGleamwell: Hidden by a crystal
The pool will be under a crystal near the top middle of the level. As for thedrop, there are 4 possible locations, and those are the silver chests guardedby Chess Knights along the passageways in each corner of the level. The mostlikely is the bottom left, but you want to do all four anyway for the chestbonus.
-11th ZoneGleamdrop: Defeat a certain monster
GameFAQs: Children of Mana (DS) FAQ/Walkthrough by ka... http://www.gamefaqs.com/ds/925586-children-of-mana/fa...
56 dari 69 18/11/2013 11:02

Gleamwell: Hidden by a crystal
The Gleampool is hidden rather obviously under the crystal in the dead centreof the level. The drop is held by the ugly gargoyle creature on the right sideof the level. He'll go down pretty quick, though he does have a considerable HPlevel. There are also another three or four of these guys hidden in the dice-cubes in the centre of the zone, so take them out too. Rememer the golden chestalong the top of the level, guarded by two red dragons, even if it is only animpure gem.
-12th ZoneGleamdrop: Hidden in a chestGleamwell: Hidden by a crystal
This zone is long, so you've been warned. Start off going to the bottom righthand corner, then fo the left side to get the Gleamdrop. Also bring with youthe floating orb. DON'T use it going up the right hand side of the level aroundthe middle, it's a decoy. Take it up the centre all the time. At the end of thelevel is where you're going to find both orbs useful. There are some goldenchests at the end up passages of crystals, as well as the Gleampool hidden atthe end of the far left passage under the big crystal (there's another, so youmay have to check that one too). Alternatively, the flail is going to be yourbest bet.
-13th ZoneGleamdrop: Defeat a certain groupGleamwell: --------
Now we are faced with two ugly ducklings, one in the top left, another in thebottom right. To take them out, use the floating orbs to break the crystalsguarding them, then pummle them with arrows. The last one to go down will needthe drop recovering from him with the flail, so make sure you don't knock himout of your reach (although I don't think this can technically happen, youdon't want to risk it anyway).
We have arrived once more at a save point. But it's not over yet.
-14th ZoneGleamdrop: Hidden by a crystalGleamwell: Hidden by a crystal
Ooh, pretty flowers. Don't spend too long looking at them, there's work to do.Anyway, this level is a real pain. The drop is hidden under a crystal that isnot too far left of the centre. There are a bunch of dragons in the middle, andyou'd think they can't do anything, but they can teleport, so watch out! TheGleampool should be under a large crystal in the top right corner of the zone.
-15th ZoneGleamdrop: Defeat a certain groupGleamwell: Hidden by a crystal
Work your way round the outside of the spikes defeating all the purple dragons,as these hold the Gleamdrop, then when you've taken down the last one, makeyour way into the middle via the crystals on either side and take down thecrystal in the centre with the Gleampool. There is also a golden chest to theright that you may want to get, just go down the passage way from the left.Another chest is a silver one on the left hand side of the level, you can getto it by cutting down some flowers. They're harmless so don't worry about usingthe ball necessarily.
-16th ZoneGleamdrop: Hidden by a crystalGleamwell: Hidden by a crystal
The pool is obvious, it is right at the top of the level. The drop on the otherhand is a pain to get to. Now, first off you may want to do some exploring over
GameFAQs: Children of Mana (DS) FAQ/Walkthrough by ka... http://www.gamefaqs.com/ds/925586-children-of-mana/fa...
57 dari 69 18/11/2013 11:02

to the right of the level. There are two vortexes producing enemies, which iswhy you won't encounter many enemies or they'll appear slowly throughout therest of the level. Behind these are some one or two golden chests. On the farleft, there are two chests guarded by large crystals. Use the tomatomen toknock these down by hammering them across. As for the drop, follow a bitfurther up from these lasts chests and you'll find a whole field of crystals.Again, use enemies to billiard down the crystals and find the drop as quicklyas possible, then take it up to the top.
-17th ZoneGleamdrop: Defeat a certain monsterGleamwell: --------
You're going to have to walk over some spikes on the left I'm afraid, then usethe floating orb to mow down some of the flowers and make a path over to thered dragons and the walking armour holding the drop. Once you've done that,take the drop to the left again, drop it upon hitting the spikes, then flail itback across. Painful, I know, but necessary. This is the quickest method.Otherwise, you could mow down the flowers from this side of the pit, wait forthem to approach and use arrows, but this takes far too long.
Another save point, use it well.
We run out into a clearing, and from beneath the ground plants of all coloursbegin to sprout, and among them, one last plant with the face of a child thatscreams out at you. This is the scion of Mana. Another FMV will show us Tess atthe foot of the tree once more.
"Whose soul wields it decides out fate..."
We take up the Mana Sword in hand and ask it to show the weight of our soul,the future of this world. Not that we're going to use it as a weapon itself,but the dramatic gesture had to be there. Thus begins the final battle.
- [BOSS8-2] Boss Battle : The Scion of Mana -
The beastie has two types of attacks. The first is to make impenetrable bushessprout in a formation on the ground, leaving us few paths to follow, then itwill descend at the top of the level, and try to grab us with vines that comedown from above. If these get hold of us, we're paralyzed, and then releasedwith a bang. Not too damaging though.
The second attack type is to make mowable flowers sprout, then appear at acertain part of the arena surrounded by various attacking plants, and thendisappear shortly afterwards.
There is also a third attack which isn't seen quite so often, unless youinflict damage on the surrounding plants in the second attack and not inflictmuch on the Scion itself. The Scion will appear in the centre of the level andfill the rest with flowers, then sprout palm leaves from his head and causeseeds to drop from the sky. Now these hurt, but not as much as when theysprout. They form vine clusters that then emit explosions and send you flyingall over the place.
The strategy? You'll be using your radar a lot. Once the point shows, head forit. If it is at the top, prepare your bow and pummle it with arrows, or use thesword if you get directly beneath it.
When the point appears elsewhere, again run toward it, then hack away with yoursword as fast as you can before it disappears again. The pattern will generallybe 1 2 1 2, so it is easy to follow, just look out for the point on the radar.
The beastie went down in 3 minutes on my first attempt while writing this, soyou be the judge as to how difficult it is. And now sit back, and relax,watching the ending of the game.
GameFAQs: Children of Mana (DS) FAQ/Walkthrough by ka... http://www.gamefaqs.com/ds/925586-children-of-mana/fa...
58 dari 69 18/11/2013 11:02

[END] The Beginning of a New Legend
You hold the sword high above you, and the black vines break free from it,filling the room with the sword's glow. You then dig it into the ground,producing a blinding light that soars toward the heavens and crystalizes.
Back in the town Moti comments on its brilliance, while Watts points out thatthis is how miracles are born. The crystals shatter and begin to rain from thesky, as "Rising Sun" plays once again.
At the foot of the Mana Tree, Tess holds the seed which starts to glowmysteriously. The villagers and the spirits celebrate back at the town.
Then the cry of a baby...
You walk back to the foot of the Mana Tree and join Tess, and finally realizeyou're back on Illusia. As you celebrate the breaking of the shackles overIllusia, Mana's child appears from the ground, as do a set of Geodes that allbecome one with the Seed. Treant and Gaia then show up and explain that it isMana's progeny and shall be entrusted to the daughters of Mana when the Treefalls one day, the descendants of your children's children.
The progeny rises skyward and shows the image of the Mana Goddess for a secondholding her child, then vanishes. It is then that you realize the Sword of Manahas gone too, and returned to Mana where it belongs.
Days later, you find yourself abroad a boat headed away from Illusia. Moti hasdecreed that Illusia must be sealed off as a sanctuary, for its powers are toogreat to be handled. The benevodons will keep it out of reach. You look back insadness as you remember events of the past days...
Tess has to stay behind... someone has to do it, and she wants to stay with theMana Tree. Together they will always watch over you.
As you look back, the benevodos form a circle round the island, and then theisland disappears. Now it is time to head for Jadd, Moti's homeland, at leastfor now, with help of the spirits Undine and Jinn.
Watts tries to comfort you, as there is a lot to do in the new world. Flickagrees, and Tumble remembers that the Mana Goddess will always watch over them.Wanderer welcomes the dawn of a new world, while Pop says his last goodbye toTess.
And that is howIllusia Isle wassealed off as asanctuary and sentto a place farbeyond the reachof mortals.
Even now,maidens attendto the Mana Treeand watch over us allwith great affection,that we might enjoypeace and prosperity.
Roll Credits!
Congratulations, you have completed the main storyline of Children of Mana.Enjoy the music as the names of all those who spent their lives making thisgame possible fly from the pages of the book.
GameFAQs: Children of Mana (DS) FAQ/Walkthrough by ka... http://www.gamefaqs.com/ds/925586-children-of-mana/fa...
59 dari 69 18/11/2013 11:02
And that is the end ofthe tale. Did you find itentertaining?
What's that? You wantto hear more of thetree and the sword?
Hohoho...Let this be enough fornow. I will gladly tellyou another storyanother day.
Now, be a good childand go to sleep.
I will pray to thegoddess that yourdreams be sweet.
Fin
"Returning to Mana Village."
You're now given a new mission... "You may have missed something. Leave nostone unturned as you search."
Which means you can play any part of the game again, including the final stage.Also you will now have access to the Final Elemental Subquest, by walking up tothe Mana Stone and touching it (assuming that you have completed all otherelemental subquests). You will now find also that sometimes standard monsterswill appear in certain places and be black instead of their other normalcolours. These enemies give you a lot of EXP, so keep an eye out for them.
-------------------------------------------------------------------------------
[SUBQUESTS] Subquests
Subquests are mainly obtained from Dud Services. You will be provided with 6 tochose from, and these will rotate once you have completed one of them (so a new6 will appear). A small fee must be paid to obtain the information on arequest, and you may only hold one Dud Services request at a time (if youchoose to do another instead of the one you have, you will not regain yourmoney for the previous request).
There are three basic types of request:- Kill X monster (defeat that certain monster in the last area to get the drop)- Kill X monsters (defeat all monsters in the last area for drop)- Find X item (finish all area, and character will automatically find item)
There are 3 or 4 variants for each type for each level. The rewards for thesesubquests include Weapon Expertise gems, impure gems, regular armour andweapons, and crystal armour and weapons.
Aside from the Dud Servies subquests, there are a series of subquests which youobtain by either talking to the villagers or one of the 16 elemental spirits(there are eight elementals, two instances of each) at certain points in thegame, generally after the area where the subquest is held has been clearedduring the game. If you miss any subquests as you go through, don't worry, justtalk to the characters later in the game and you can catch up with them.
However, in the same way that you can't have more than one Dud Services
GameFAQs: Children of Mana (DS) FAQ/Walkthrough by ka... http://www.gamefaqs.com/ds/925586-children-of-mana/fa...
60 dari 69 18/11/2013 11:02
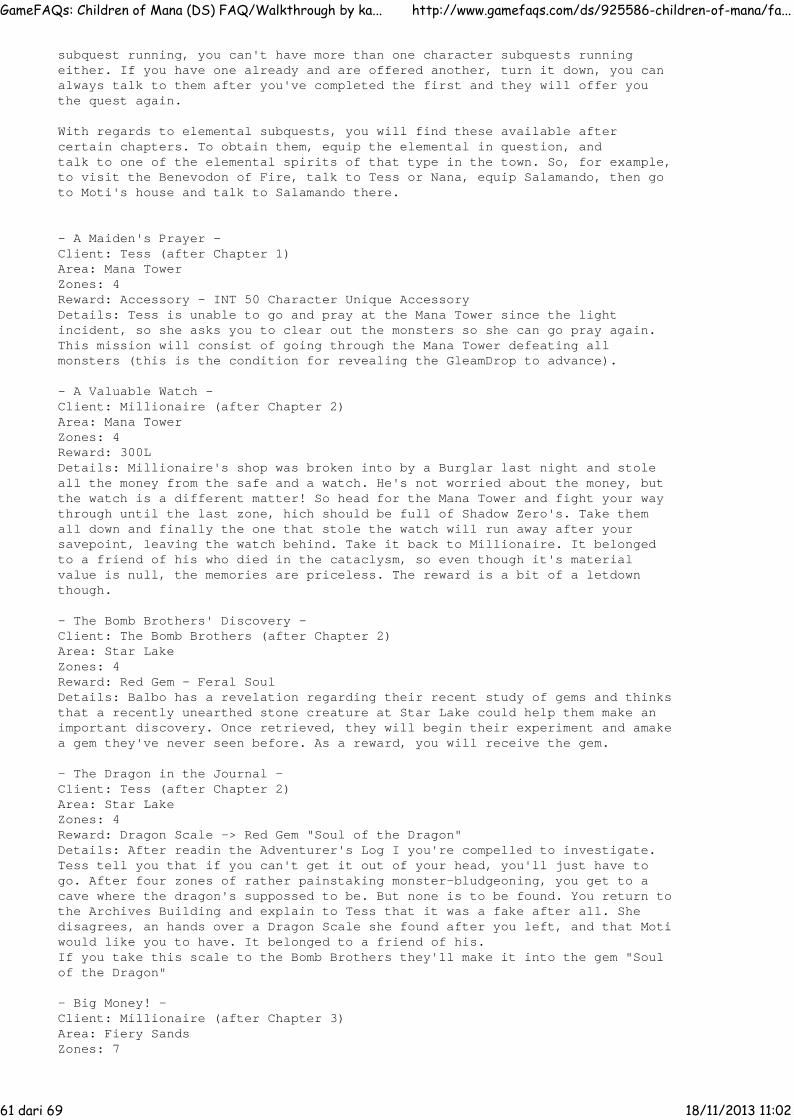
subquest running, you can't have more than one character subquests runningeither. If you have one already and are offered another, turn it down, you canalways talk to them after you've completed the first and they will offer youthe quest again.
With regards to elemental subquests, you will find these available aftercertain chapters. To obtain them, equip the elemental in question, andtalk to one of the elemental spirits of that type in the town. So, for example,to visit the Benevodon of Fire, talk to Tess or Nana, equip Salamando, then goto Moti's house and talk to Salamando there.
- A Maiden's Prayer -Client: Tess (after Chapter 1)Area: Mana TowerZones: 4Reward: Accessory - INT 50 Character Unique AccessoryDetails: Tess is unable to go and pray at the Mana Tower since the lightincident, so she asks you to clear out the monsters so she can go pray again.This mission will consist of going through the Mana Tower defeating allmonsters (this is the condition for revealing the GleamDrop to advance).
- A Valuable Watch -Client: Millionaire (after Chapter 2)Area: Mana TowerZones: 4Reward: 300LDetails: Millionaire's shop was broken into by a Burglar last night and stoleall the money from the safe and a watch. He's not worried about the money, butthe watch is a different matter! So head for the Mana Tower and fight your waythrough until the last zone, hich should be full of Shadow Zero's. Take themall down and finally the one that stole the watch will run away after yoursavepoint, leaving the watch behind. Take it back to Millionaire. It belongedto a friend of his who died in the cataclysm, so even though it's materialvalue is null, the memories are priceless. The reward is a bit of a letdownthough.
- The Bomb Brothers' Discovery -Client: The Bomb Brothers (after Chapter 2)Area: Star LakeZones: 4Reward: Red Gem - Feral SoulDetails: Balbo has a revelation regarding their recent study of gems and thinksthat a recently unearthed stone creature at Star Lake could help them make animportant discovery. Once retrieved, they will begin their experiment and amakea gem they've never seen before. As a reward, you will receive the gem.
- The Dragon in the Journal -Client: Tess (after Chapter 2)Area: Star LakeZones: 4Reward: Dragon Scale -> Red Gem "Soul of the Dragon"Details: After readin the Adventurer's Log I you're compelled to investigate.Tess tell you that if you can't get it out of your head, you'll just have togo. After four zones of rather painstaking monster-bludgeoning, you get to acave where the dragon's suppossed to be. But none is to be found. You return tothe Archives Building and explain to Tess that it was a fake after all. Shedisagrees, an hands over a Dragon Scale she found after you left, and that Motiwould like you to have. It belonged to a friend of his.If you take this scale to the Bomb Brothers they'll make it into the gem "Soulof the Dragon"
- Big Money! -Client: Millionaire (after Chapter 3)Area: Fiery SandsZones: 7
GameFAQs: Children of Mana (DS) FAQ/Walkthrough by ka... http://www.gamefaqs.com/ds/925586-children-of-mana/fa...
61 dari 69 18/11/2013 11:02
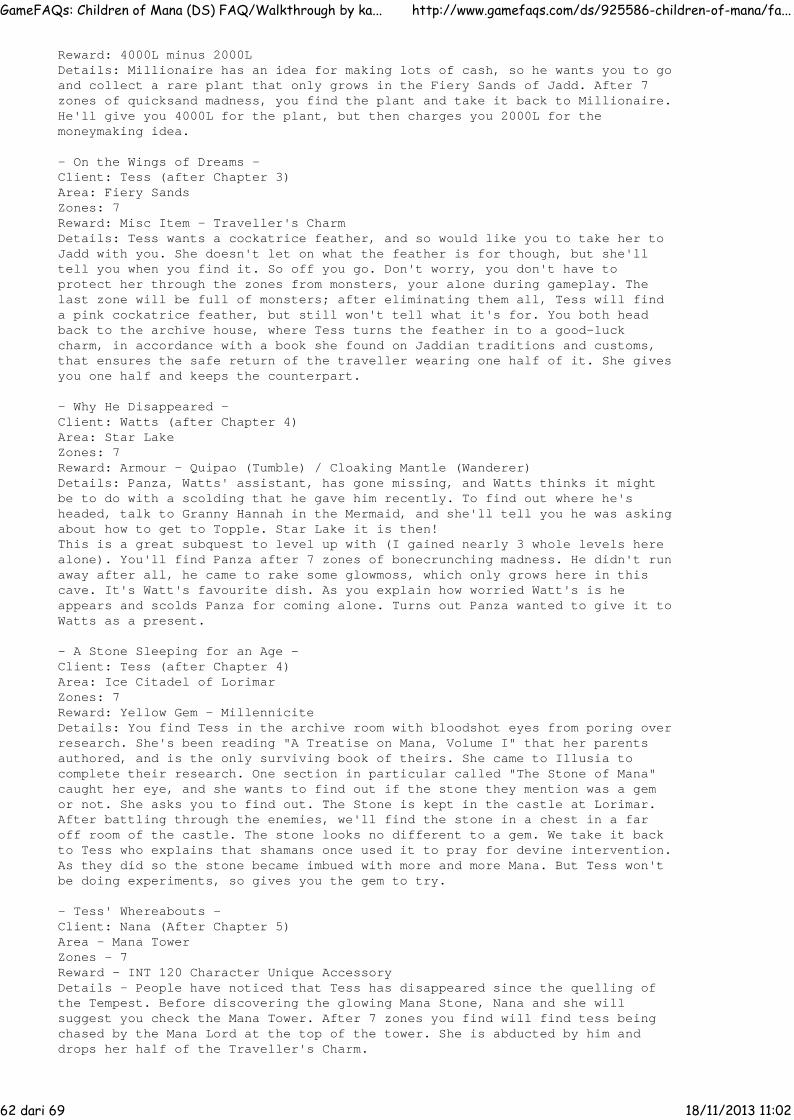
Reward: 4000L minus 2000LDetails: Millionaire has an idea for making lots of cash, so he wants you to goand collect a rare plant that only grows in the Fiery Sands of Jadd. After 7zones of quicksand madness, you find the plant and take it back to Millionaire.He'll give you 4000L for the plant, but then charges you 2000L for themoneymaking idea.
- On the Wings of Dreams -Client: Tess (after Chapter 3)Area: Fiery SandsZones: 7Reward: Misc Item - Traveller's CharmDetails: Tess wants a cockatrice feather, and so would like you to take her toJadd with you. She doesn't let on what the feather is for though, but she'lltell you when you find it. So off you go. Don't worry, you don't have toprotect her through the zones from monsters, your alone during gameplay. Thelast zone will be full of monsters; after eliminating them all, Tess will finda pink cockatrice feather, but still won't tell what it's for. You both headback to the archive house, where Tess turns the feather in to a good-luckcharm, in accordance with a book she found on Jaddian traditions and customs,that ensures the safe return of the traveller wearing one half of it. She givesyou one half and keeps the counterpart.
- Why He Disappeared -Client: Watts (after Chapter 4)Area: Star LakeZones: 7Reward: Armour - Quipao (Tumble) / Cloaking Mantle (Wanderer)Details: Panza, Watts' assistant, has gone missing, and Watts thinks it mightbe to do with a scolding that he gave him recently. To find out where he'sheaded, talk to Granny Hannah in the Mermaid, and she'll tell you he was askingabout how to get to Topple. Star Lake it is then!This is a great subquest to level up with (I gained nearly 3 whole levels herealone). You'll find Panza after 7 zones of bonecrunching madness. He didn't runaway after all, he came to rake some glowmoss, which only grows here in thiscave. It's Watt's favourite dish. As you explain how worried Watt's is heappears and scolds Panza for coming alone. Turns out Panza wanted to give it toWatts as a present.
- A Stone Sleeping for an Age -Client: Tess (after Chapter 4)Area: Ice Citadel of LorimarZones: 7Reward: Yellow Gem - MillenniciteDetails: You find Tess in the archive room with bloodshot eyes from poring overresearch. She's been reading "A Treatise on Mana, Volume I" that her parentsauthored, and is the only surviving book of theirs. She came to Illusia tocomplete their research. One section in particular called "The Stone of Mana"caught her eye, and she wants to find out if the stone they mention was a gemor not. She asks you to find out. The Stone is kept in the castle at Lorimar.After battling through the enemies, we'll find the stone in a chest in a faroff room of the castle. The stone looks no different to a gem. We take it backto Tess who explains that shamans once used it to pray for devine intervention.As they did so the stone became imbued with more and more Mana. But Tess won'tbe doing experiments, so gives you the gem to try.
- Tess' Whereabouts -Client: Nana (After Chapter 5)Area - Mana TowerZones - 7Reward - INT 120 Character Unique AccessoryDetails - People have noticed that Tess has disappeared since the quelling ofthe Tempest. Before discovering the glowing Mana Stone, Nana and she willsuggest you check the Mana Tower. After 7 zones you find will find tess beingchased by the Mana Lord at the top of the tower. She is abducted by him anddrops her half of the Traveller's Charm.
GameFAQs: Children of Mana (DS) FAQ/Walkthrough by ka... http://www.gamefaqs.com/ds/925586-children-of-mana/fa...
62 dari 69 18/11/2013 11:02

Keep this Traveller's Charm for after completing the Ruins quest. Once this iscompleted, the Charm will be given back to Tess and exchanged for an Accessory.In Flick's case this is the Hero's Medallion, Tumble's its the Ancient Tiara.
- A Checkered Past -Client: Seamoon (After Chapter 6)Area: Star Lake of ToppleZones: 9Reward: Level 44 Character Unique Armour or RobeDetails: Seamoon wants you to take a coral earring from her and cast it intothe lake deep in Topple. As for why she wants you to do this, she merely saysshe has a checkered past. After completing the zones you stand before a lakedeep in the cave and throw the earring in. A voice says "Farewell". Confusedyou head back to see Seamoon, who offers to explain her chekered past, but youdon't want to pry. You mention the voice saying farewell, which seems tostartle Seamoon slightly. After you leave, Seamoon says "Goodbye, love..."
- The Rainbow Garden -Client: Tess (After Chapter 6)Area: Fiery Sands of JaddZones: 10Reward: Weapon - Balmung (Flick)/Elven Bow (Tumble)/Meteor Flail(Pop)Details: Tess hasn't found anything useful about the current issue at hand butshe has found a new and interesting journal by the same person who wrote theone about the Dragon at Topple. The Journal explains that he was returning toJadd to tend unfinished business, and saw some multicoloured flowers that onlygrow on the far side of Jadd after a long jounrey through the desert. You offerto go and pick some for Tess, as they may still be in bloom. You head for Jadd,fight your way through the desert, but find no flowers at the end of it all.Just as you are about to give up, you see something shining on the ground. Theyare seeds! You go back and explain to Tess you didn't find anything, and shehands over another Journal she found just after you left. The travellerreturned to look for the flowers, but none remained after the cataclysm. Hemade it his quest to form an investigative team to head for Illusia andresearch the Mana Tree, and his friend from Ishe supports the idea. Afterreading it you suspect that the journal's author is Mayor Moti, so go and Chatto him. He says that the flowers sparkled with all the hues of the rainbow. Yougive him the seeds you found, and he exclaims that these must be the seeds forthose flowers, and that if these take root the desert could bear the flowersonce more, so he'll keep them and have Professor Bomb overlook their growth. Asa reward you receive a weapon from Moti for your efforts.
- Friendship Beyond Words -Client: Dudbear of Dud Services (After Chapter 7)Area: Ice Citadel of LorimarZones: 10Reward: Shiney Rock, Duddish DictionaryDetails: A dudbear has gone missing in Lorimar, at the Ice Citadel, and theyare worried that he's had an accident. Time to go find him. After 10painstaking levels in the Ice Citadel, you arrive at a room with a shovel inthe middle. It must belong to a dudbear. You decide to take the Shovel back toDud Services and report your findings. It turns out the clumsy dudbear hasalready returned by himself. The Formerly Missing Dudbear apologizes for makingyou worry and the trouble you had to go to, and mentiones he lost his shovel,which you return, much to his delight. He gives you a Shiny Rock and a DuddishDictionary. If you now take the Shiny Rock to the Bomb Brothers, they'llrecognize it as the legendary Smelting Rock, with which they can increase yourgem frame to 4x4! As if you weren't unstoppable already, now you get to be evenmore so!
-- Character Specific Subquests --
- Flick says goodbye -Client: Watts (after the Path of Life, Flick only)Area: Brightwood of WendalZones: 10
GameFAQs: Children of Mana (DS) FAQ/Walkthrough by ka... http://www.gamefaqs.com/ds/925586-children-of-mana/fa...
63 dari 69 18/11/2013 11:02

Reward: Red Gem - Light on a BoyDetails: You talk to Watts about your family, and reflect on how your sisterand father would always make fun of you , and you would go crying to yourmother. Flick feels sad anout being such a crybaby when he was little, butWatts comforst him by reminding him of what a hero he has turned in to now, andhow that is what is important. Flick feels however that he should say goodbyeto his family in Brightwood.You arrive at a clearing in Brightwood and call out to your family. The ToyHorse begins to glow and the voices of your family tell you how proud they areof you for all you are doing. The Toy Horse then gathers their wills togetherand embodies them in a new Red Gem. You thank them and leave.
- Tumble says goodbye -Client: Seamoon (after the Path of Life, Tumble only)Area: Star Lake of ToppleZones: 10Reward: Purple Gem - Light on a MaidenDetails: You ask Seamoon if she knew Tumble's mother, which she did, and theypractically grew up together. You hand her the hairpin that you obtained fromthe Shadows at the end of the Ruins Chapter and ask her to have a look at it.It was Tumble's mother's favourite hairpin, which you thought to be lost in thefire ten years ago. So it really was her shadow... Tumble says this hairpin washanded down to her on her fifth birthday, and she always wanted to become adancer, but her father didn't approve. She kept persisting and improving tryingto become like her mother. Seamoon comments that you must be tired, runningaway into the memories of the past. It's ten years since Seamoon brought Tumbleto Illusia, she knows what you're thinking, trying to please everyone aroundyou. For a second, Tumble thinks she can hear her mother calling, and shedecides to go and say goodbye over in Topple.You arrive at a clearing in Topple, and call out to your family, saying youcan't look back anymore. You ask to hear them just one more time. The hairpinemerges from your pocket, and fills the cave with light. The voice of yourfather comments on how you've grown, and you make him proud. You mother remindsyou that you must take the world down its proper path. Toby says goodbye, andtells you to take care. With that the hairpin gather together the will of yourfamily and embodies it in a new purple gem. You thank your family and leave.
- A Traveler's Memories -Client: Millionaire (after the Path of Life, Wanderer Only)Area: BrightwoodZones: 10Reward: Yellow Gem - Light on a NomadDetails: (Details missing for pre-quest conversation with Millionaire)You arrive at a clearing and call out to Sophie and Danny. At first there is noanswer, but then the Harmonica lets out a bright light. Suddenly you hearSophie's voice: "Listen closely. I cannot see you anymore. But I want you tohave this." After Sophie's voice fades, you begin to hear the voice of Danny:"I'm watchin' over you from above. Do your best to make the future a brightone!" Sophie's voice can then be heard again: "Farewell, Wanderer. My love..."After the light dissipates, a gem is left in the place of the Harmonica. Youcome to believe that it is a crystal of their hearts. After shouting yourthanks, you head back to Mana Village.
-- Benevodon Elemental Subquests --
- The Benevodon of Fire -Client: Salamando (in Moti's house after Chapter 3)Area: Fiery Sands of JaddZones: 7Reward: FlammalexDetails: Salamando suggests that you visit Xan Bie, the benevodon of fire, tolearn more about how to quell the collumns of Mana. After 6 zones, youencounter a rather large ogre in the middle of a quicksand pit, menacingly andprecariously flinging about a mace. You should be able to take him out withrelative ease. Then you'll encounter Xan Bie, hovering over the pit where youdefeated the enemy that contained him previously. You ask him about what is
GameFAQs: Children of Mana (DS) FAQ/Walkthrough by ka... http://www.gamefaqs.com/ds/925586-children-of-mana/fa...
64 dari 69 18/11/2013 11:02

happenning to the world. You have three choices as to what to ask him about.These are detailed in the [BENEVODON] section.After the explanation, he will leave you Flammalex and fly off again.
- The Benevodon of Water -Client: Undine (nearest the Mana Stone after Chapter 4)Area: Star LakeZones: 7Reward: AqualexDetails: Undine thinks that Fiegmund the Great, the benevodon of water, couldhelp you clear up some details on what's going on with the world. Again, the7th zone is guarded this time by a cyclops. Fiegmund will then appear and youwill enquire again about a subject detailed in [BENEVODON].After the explanation, you will be left with Aqualex, and return to the ManaVillage.
- The Benevodon of Earth -Client: Gnome (near town entrance after Chapter 4)Area: Ice Citadel of LorimarZones: 7Reward: TerralexDetails: Gnome suggests asking Land Umber the Unyielding for information.You'll find him at Lorimar, after another 6 painstaking zones and a cyclops.Land Umber will appear in what is so far the most stately room in the citadelto give us another tidbit of information. He will then leave behind Terralexfor you to take back to the Mana Village.
- The Benevodon of Wind -Client: Jinn (Silver Mermaid balcony after Chapter 1)Area: Ice Citadel of LorimarZones: 4Reward: VentilexDetails: Jinn recommends you talk to Dangaard the Lofty, benevodon of wind, whodwells inside the Mana Tower. This subquest is shorter than other ones, and youencounter the cyclops on the 4th zone. You reach the top of the Mana Tower andDangaard appears to you. After some chitchat, Ventilex is yours.
- The Benevodon of Wood -Client: Dryad (to the right of Moti's door after Chapter 5)Area: Brightwood of Wendel.Zones: 7Reward: ArborelexDetails: Dryad thinks Mispolm the Ageless, the benevodon of wood, could helpyou on your quest. You'll find him in Brightwood, after 6 zones of sheerfrustration (I hate Brightwood for subquests), 4 walking trees and a cyclops.Learn some more and add Arborelex to your collection.
- The Benevodon of Moon -Client: Luna (in Moti's house after Chapter 3)Area: Mana TowerZones: 7Reward: LunalexDetails: Luna suggests talking to Dolan the Celestial in the Mana Tower forsome advice on how to stop the surges. 7 zones later, and you'll know, andyou'll receive Lunalex.
- The Benevodon of Light -Client: Wisp (to the left of the Mana Stone after Chapter 6)Area: RuinsZones: 10Reward: LustrilexDetails: Wisp suggests talking to Lightgazer the Luminous at the Ruins ofIllusia. After 9 painful levels, you reach another ogre who's asking for abeating. Then you will meet Lightgazer, a big floating eye. After learning morefrom him, you will receive Lustrilex and return to the village.
GameFAQs: Children of Mana (DS) FAQ/Walkthrough by ka... http://www.gamefaqs.com/ds/925586-children-of-mana/fa...
65 dari 69 18/11/2013 11:02
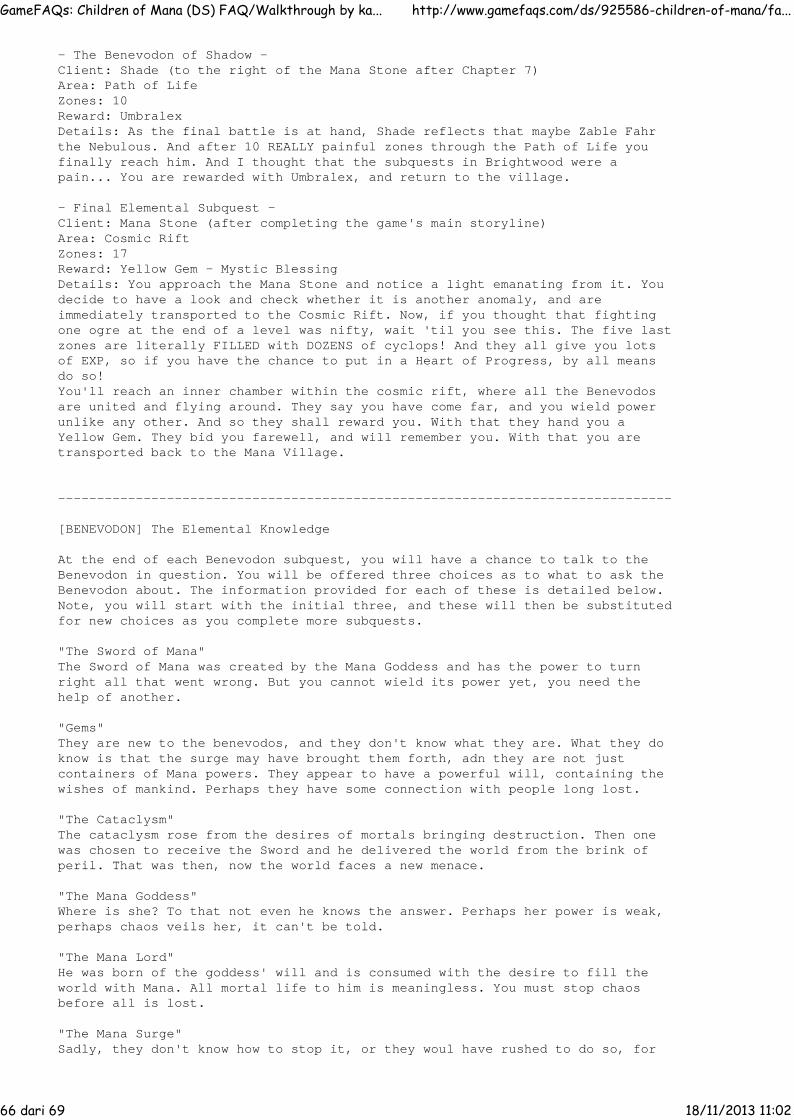
- The Benevodon of Shadow -Client: Shade (to the right of the Mana Stone after Chapter 7)Area: Path of LifeZones: 10Reward: UmbralexDetails: As the final battle is at hand, Shade reflects that maybe Zable Fahrthe Nebulous. And after 10 REALLY painful zones through the Path of Life youfinally reach him. And I thought that the subquests in Brightwood were apain... You are rewarded with Umbralex, and return to the village.
- Final Elemental Subquest -Client: Mana Stone (after completing the game's main storyline)Area: Cosmic RiftZones: 17Reward: Yellow Gem - Mystic BlessingDetails: You approach the Mana Stone and notice a light emanating from it. Youdecide to have a look and check whether it is another anomaly, and areimmediately transported to the Cosmic Rift. Now, if you thought that fightingone ogre at the end of a level was nifty, wait 'til you see this. The five lastzones are literally FILLED with DOZENS of cyclops! And they all give you lotsof EXP, so if you have the chance to put in a Heart of Progress, by all meansdo so!You'll reach an inner chamber within the cosmic rift, where all the Benevodosare united and flying around. They say you have come far, and you wield powerunlike any other. And so they shall reward you. With that they hand you aYellow Gem. They bid you farewell, and will remember you. With that you aretransported back to the Mana Village.
-------------------------------------------------------------------------------
[BENEVODON] The Elemental Knowledge
At the end of each Benevodon subquest, you will have a chance to talk to theBenevodon in question. You will be offered three choices as to what to ask theBenevodon about. The information provided for each of these is detailed below.Note, you will start with the initial three, and these will then be substitutedfor new choices as you complete more subquests.
"The Sword of Mana"The Sword of Mana was created by the Mana Goddess and has the power to turnright all that went wrong. But you cannot wield its power yet, you need thehelp of another.
"Gems"They are new to the benevodos, and they don't know what they are. What they doknow is that the surge may have brought them forth, adn they are not justcontainers of Mana powers. They appear to have a powerful will, containing thewishes of mankind. Perhaps they have some connection with people long lost.
"The Cataclysm"The cataclysm rose from the desires of mortals bringing destruction. Then onewas chosen to receive the Sword and he delivered the world from the brink ofperil. That was then, now the world faces a new menace.
"The Mana Goddess"Where is she? To that not even he knows the answer. Perhaps her power is weak,perhaps chaos veils her, it can't be told.
"The Mana Lord"He was born of the goddess' will and is consumed with the desire to fill theworld with Mana. All mortal life to him is meaningless. You must stop chaosbefore all is lost.
"The Mana Surge"Sadly, they don't know how to stop it, or they woul have rushed to do so, for
GameFAQs: Children of Mana (DS) FAQ/Walkthrough by ka... http://www.gamefaqs.com/ds/925586-children-of-mana/fa...
66 dari 69 18/11/2013 11:02
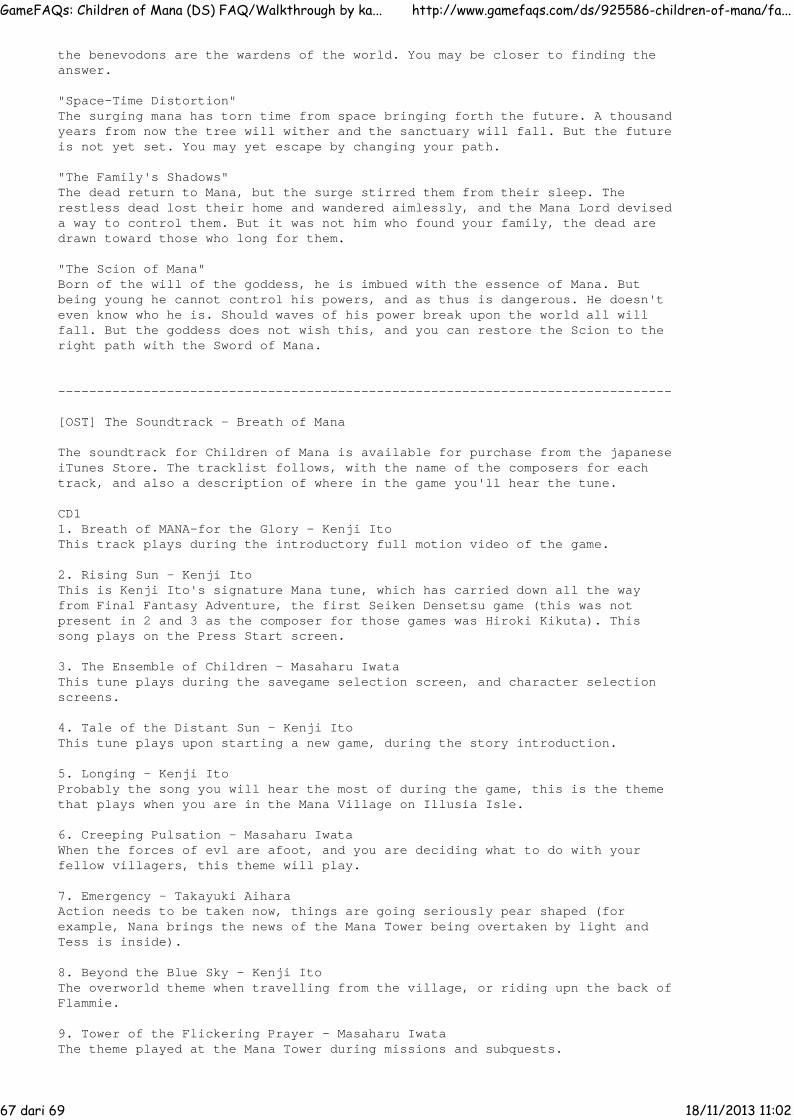
the benevodons are the wardens of the world. You may be closer to finding theanswer.
"Space-Time Distortion"The surging mana has torn time from space bringing forth the future. A thousandyears from now the tree will wither and the sanctuary will fall. But the futureis not yet set. You may yet escape by changing your path.
"The Family's Shadows"The dead return to Mana, but the surge stirred them from their sleep. Therestless dead lost their home and wandered aimlessly, and the Mana Lord deviseda way to control them. But it was not him who found your family, the dead aredrawn toward those who long for them.
"The Scion of Mana"Born of the will of the goddess, he is imbued with the essence of Mana. Butbeing young he cannot control his powers, and as thus is dangerous. He doesn'teven know who he is. Should waves of his power break upon the world all willfall. But the goddess does not wish this, and you can restore the Scion to theright path with the Sword of Mana.
-------------------------------------------------------------------------------
[OST] The Soundtrack - Breath of Mana
The soundtrack for Children of Mana is available for purchase from the japaneseiTunes Store. The tracklist follows, with the name of the composers for eachtrack, and also a description of where in the game you'll hear the tune.
CD11. Breath of MANA-for the Glory - Kenji ItoThis track plays during the introductory full motion video of the game.
2. Rising Sun - Kenji ItoThis is Kenji Ito's signature Mana tune, which has carried down all the wayfrom Final Fantasy Adventure, the first Seiken Densetsu game (this was notpresent in 2 and 3 as the composer for those games was Hiroki Kikuta). Thissong plays on the Press Start screen.
3. The Ensemble of Children - Masaharu IwataThis tune plays during the savegame selection screen, and character selectionscreens.
4. Tale of the Distant Sun - Kenji ItoThis tune plays upon starting a new game, during the story introduction.
5. Longing - Kenji ItoProbably the song you will hear the most of during the game, this is the themethat plays when you are in the Mana Village on Illusia Isle.
6. Creeping Pulsation - Masaharu IwataWhen the forces of evl are afoot, and you are deciding what to do with yourfellow villagers, this theme will play.
7. Emergency - Takayuki AiharaAction needs to be taken now, things are going seriously pear shaped (forexample, Nana brings the news of the Mana Tower being overtaken by light andTess is inside).
8. Beyond the Blue Sky - Kenji ItoThe overworld theme when travelling from the village, or riding upn the back ofFlammie.
9. Tower of the Flickering Prayer - Masaharu IwataThe theme played at the Mana Tower during missions and subquests.
GameFAQs: Children of Mana (DS) FAQ/Walkthrough by ka... http://www.gamefaqs.com/ds/925586-children-of-mana/fa...
67 dari 69 18/11/2013 11:02
10. Peaceful Underground Lake - Masaharu IwataThe theme played at the Star Lake in Topple during missions and subquests.
11. Storm of the Red Sand - Masaharu IwataThe theme played at the Fiery Sands of Jadd during missions and subquests.
12. Frozen Majesty - Masaharu IwataThe theme played at the Ice Citadel of Lorimar during missions and subquests.
13. Monster of the Forest - Takayuki AiharaThe theme played at the Brightwood forest of Wendal during missions andsubquests.
(COMPLETE)14. The Wind Sings Loudly - Takayuki Aihara15. King of Chaos - Takayuki AiharaThe Mana Lord's theme, plays when he confronts the players with new revelationsof his plan and defiances.
16. The Blocking Menace - Kenji ItoThe theme that plays when a boss appears and has its barrier raised, ready forbattle.
17. Evil Beast - Masaharu IwataThe battle theme when fighting against a Malevodon.
18. Triumphant Return - Kenji ItoThe theme that plays when you complete 4 zone of a mission and aresaving/equiping, or you complete a mission or subquest in its totality.
19. The Desire Vanishes - Kenji ItoThe theme that plays should you perish during a mission or subquest.
CD21. Together With Comrade-in-Arms - Takayuki AiharaTheme played in the menus for MultiPlayer.
2. Singing Voice of Light - Masaharu IwataThe theme that plays when a malevodon is reborn as two benevodos, or Treant andGaia appear.
3. Challenge - Kenji ItoThe theme that plays when a heroic gesture in the storyline is made, and theodds are overcome to fight forth and vanquish evil.
4. The Ruined Ground - Takayuki AiharaThe theme played during missions and subquests for the area Ruins, on IsleIllusia.
5. Fate - Takayuki AiharaThe theme played during missions and subquests for the Path of Life.
6. Rut of the Crystal - Takayuki AiharaTheme that plays during missions and subquests for the Cosmic Rift.
7. The Shaking Earth - Masaharu IwataTheme that plays when the pillars of Mana reveal themselves.
8. The Sky's Lamentation - Takayuki AiharaTheme when the forces of evil gain a step in their favour.
9. Grasslands of Eternity - Kenji Ito10. Trial - Takayuki AiharaMajor Boss Battle theme against one of the Mana Lord's non-Malevodon creatures.
11. The Thunder Emperor's Aloofness - Kenji Ito
GameFAQs: Children of Mana (DS) FAQ/Walkthrough by ka... http://www.gamefaqs.com/ds/925586-children-of-mana/fa...
68 dari 69 18/11/2013 11:02

Children of Mana: FAQ/Walkthrough by kassidynetVersion: 0.90 | Last Updated: 2007-01-29 | View/Download Original File
Hosted byReturn to Children of Mana (DS) FAQs & Guides
Boss Battle against the Mana Lord.
12. Infant of Mana - Kenji ItoFinal Battle against the Scion of Mana.
13. The Desire Not Forgotten - Kenji ItoPlays at the end of the Ruins stage when shadows of the past appear before theplayer.
14. The Beginning of a New Legend - Kenji ItoThe Ending Theme for the game, plays as the credits roll.
-------------------------------------------------------------------------------
End of File.
GameFAQs: Children of Mana (DS) FAQ/Walkthrough by ka... http://www.gamefaqs.com/ds/925586-children-of-mana/fa...
69 dari 69 18/11/2013 11:02
Related Documents