Chassis Block Diagrams -3- V1 L1 R1 V2 L2 R2 FV3 FL3 FR3 Vo Lo Ro AV1 AV2 Front AV2 AV Out IC201 IF/Video/Chroma <QXXAVB241M> TELETEXT BOARD IC801 CPU Tuner IC501 V-OUT <LA7841> Q432 H-OUT Q431 H-DRIVE Pcc Circuit Q461-Q462 PICTURE TUBE Q721 Q701 Q711 Video Output H.V T471 FBT DY C515 R518 X161 SAW Filter IC1200 AV SW. <LA7016> IC1201 AV SW. <TC4052BP> IC3501 3D SURROUND <MM1369AD> IC1920 AUDIO CONTROL <TDA8424> IC001 AUDIO OUT <LA4270> 6 7 3 52 36 48 34 24 21 12 38 39 20 19 18 27 23 28 30 R G B BLK R G B BLK 4 2 4 7 2 3 13 10 9 23 1 6 10 11 13 1 3 9 13 2 5 7 10 3 L R L R L R L R 3 Stereo AV1/AV2 TV/AV 3D Surround I 2 C Bus I 2 C Bus I 2 C Bus Mute Speakers Headphones Video out 5.5MHz Aerial IF Band SW Tu SIF-in Video int Ext. V-feedback V-drive H-drive Video-out Sync-in R-out G-out B-out From: CPU AVS Circuit Q653 Q652 IC651 Q684 Q683 5V 12V 9V 25V 140V 24V POWER SUPPLY CIRCUIT 1/5 2/15 4/11 L/R L/R L/R V-out 5.5/6.5MHz X3801 SAW Filter 6 5 1 17 24 8 7 13 14 X3802 IF IF IC3801 SECOND SIF DECODER <LA7577N> 5.742MHz Audio out 2nd Sound 1st Sound IC3401 STEREO/DUAL SOUND PROCESSOR <TDA9840/V2> 12/14 L-OUT L R R-OUT 10 3 2 1 6 Mute Q002 IC1401 PRE-AMP.<NJM4558L> IC1402 P-AMP.<LA4270> SUPER WOOFER 16 7 15 8 IC3451 NICAM DECODER MAIN SIGNAL PROCESSING CIRCUIT Following diagrams show the fundamental block diagrams for AC2 chassis and there- fore differ slightly from actual diagram of each TV set. <QXXAVB488>

Welcome message from author
This document is posted to help you gain knowledge. Please leave a comment to let me know what you think about it! Share it to your friends and learn new things together.
Transcript

Chassis Block Diagrams
-3-
V1 L1 R1
V2 L2 R2
FV
3F
L3F
R3
Vo Lo Ro
AV
1
AV
2
Fron
tA
V2
AV
Out
IC20
1IF
/Vid
eo/C
hro
ma
<QX
XA
VB
241M
>
TE
LE
TE
XT
BO
AR
D
IC80
1C
PU
Tun
er
IC50
1V-
OU
T<L
A78
41>
Q43
2H
-OU
T
Q43
1H
-DR
IVE
Pcc
Circ
uit
Q46
1-Q
462
PIC
TU
RE
TU
BE
Q72
1
Q70
1Q71
1
Vid
eo O
utp
ut
H.V
T47
1 F
BT DY
C51
5R
518
X16
1S
AW
Filt
er
IC12
00A
V S
W.
<LA
7016
>
IC12
01A
V S
W.
<TC
4052
BP
>
IC35
013D
SU
RR
OU
ND
<MM
1369
AD
>
IC19
20A
UD
IO C
ON
TR
OL
<TD
A84
24>
IC00
1A
UD
IO O
UT
<LA
4270
>
6 7 3 52 36 48 34242112383920191827232830
R G B
BLK
RG
BB
LK
42
4 7 2
3 13
109
23 1 610
11131 3
9132 5
710
3
L R
L R
L R
L R
3 S
tere
oA
V1/
AV
2T
V/A
V3D
Sur
roun
dI2 C
Bus
I2 C B
us
I2 C B
us
Mut
e
Spe
aker
s
Hea
dpho
nes
Vid
eoou
t
5.5M
Hz
Aer
ial
IF
Band SW
Tu
SIF
-in
Vid
eoin
t
Ext
.V
-fee
dbac
k
V-d
rive
H-d
rive
Vid
eo-o
ut
Syn
c-in
R-o
ut
G-o
ut
B-o
ut
From
: CP
U
AV
SC
ircui
t
Q65
3
Q65
2
IC65
1
Q68
4
Q68
3
5V 12V
9V 25V
140V
24V
PO
WE
R S
UP
PLY
CIR
CU
IT
1/5
2/15
4/11
L/R
L/R
L/R
V-o
ut
5.5/
6.5M
Hz
X38
01 S
AW
Filt
er
65 1
17 248 7 1314
X38
02
IF
IF
IC38
01S
EC
ON
D S
IF D
EC
OD
ER
<LA
7577
N>
5.742MHz
Audi
o ou
t
2nd
Sou
nd
1st S
ound
IC3401STEREO/DUAL SOUND PROCESSOR
<TDA9840/V2>
12/1
4
L-O
UT
L R
R-O
UT
10 3
21
6
Mut
eQ
002IC
1401
PR
E-A
MP.
<NJM
4558
L>
IC14
02P
-AM
P.<L
A42
70>
SU
PE
R W
OO
FE
R
16 7
15 8
IC34
51 N
ICA
M D
EC
OD
ER
MAIN SIGNAL PROCESSING CIRCUIT
Following diagrams show the fundamental block diagrams for AC2 chassis and there-fore differ slightly from actual diagram of each TV set.
<Q
XX
AV
B48
8>

-4-
1 2 3 4 5 6 7 8 9 10 11 12 13 14 15 16 17 18 19 20 21222324252627282930313233343536373839404142
H-S
YN
C
V-S
YN
C
BA
ND
A
BA
ND
B
SO
UN
D M
UT
E
ON
-TIM
ER
LE
D
TV
(L)/
AV
(H
)
AV
1(L)
/AV
2(H
)
SIF
4.5
M S
W
SIF
5.5
M S
W
SIF
6.5
M S
W
WO
OF
ER
ON
/OF
F
3D S
UR
RO
UN
D O
N/O
FF
3D S
TE
RE
O O
N/O
FF
PO
WE
R O
N(H
)/O
FF
(L)
OP
TIO
N S
W (
PO
SIT
ION
)
GN
D
OS
C8M
GN
D
R G B
BLK
3.58
M S
W
50/6
0Hz
SW
AC
K
STA
TU
S
SC
L
EE
PR
OM
CLO
CK
SD
A
EE
PR
OM
DAT
A
AF
T-S
AD
J IN
OP
TIO
N S
WC
OLO
UR
SW
RE
SE
T
PR
OT
EC
T
RC
IN
Vcc
5V
IC201If/Video/chroma
2 41IC
801
CP
U
Tuni
ng
Tune
rQ
836
Q83
7
key
switc
hes
&op
tion
sw.
H V
RC
Pre
-Am
p
SYSTEM CONTROL

IC Block Diagrams
-5-
IC201 < IF/Video/Chroma/Def. > QXXAVB488
VIF INIF AGC OUT AFT
TV IN
EXT IN
AUDIOPOWER
33
29
35
26
37
40
32
13
44
43
11
15
16
12
2725242122412819201830239101445
QX
XA
VB
241
AF A
MP
AF A
MP
4.5/
6.0
SIF
IO A
DJ
BUS
I/F
FM DET
LIM
ITTE
R
B EX
ITIN
PUT
R E
XIT
INPU
T
G E
XIT
INPU
T
V SY
NC
TRIG
SYN
CSE
P.
SYST
EMID
EQ ELIM
INAT
E
BGP
GEN
E.PH
ASE
CO
NT
KILL
ERD
ET
LOC
KD
ET
ID DET
CH
RO
MA
APC
DET
PAL
SW
SEC
AMFF SE
LFAD
J
V.R
AMP
AFC
AFC
1H D
LVC
XO
ACC
DET
F/F
2ND
AM
P
CH
RO
MA
BPF
1ST
AMP
(AC
C)
HPF
AFT
AFT
OU
TVI
DEO M
UTE
H S
TOP
H.P
HAS
E
AUD
IO M
UTE
SW
SDA
SCL
FAST
BLK
B IN
R IN BR G G
SEC
AM R
EF
SEC
AM R
EF
V.SI
ZESE
RVI
CE
SW
MUTEOUT
SELF
AD
J.
CLA
MP
50/6
0 O
UT
R
TIN
T
BRDR
IVE B
G
ABC
LAB
CL
ID C
UT
BLU
EBAC
KW
HIT
E BA
CK C
OLO
RC
ON
TRAS
T
SER
VIC
EBR
IGH
T
STAT
ION
DET
STAT
ION
SYST
EM S
ET
SYST
EM
IF A
GC
DEL
AY A
DJ
DEF
EAT
DL
TIM
E
DL
FIN
E
VIDEOVCC
CHROMAGND
DEFLECTIONGND
TRAP
SWD
.TR
AP
F.TR
AP
BLAC
K ST
REC
H O
FF
F AG
C
VID
EOD
ETVI
FAM
P
APC
DET
ADJ
DET
BLAC
KST
REC
H
VID
EOTO
NE
CH
RO
MA
TRAP
VID
EOM
UTE
CLA
MP
SHAR
PNES
S
CO
NTR
AST
DEL
AY
FEF
FILT
ER
AGC
R-Y IN
B-Y IN
H OUTPUT
SYST
EMD
ECO
DE
BRIG
HT
CH
RO
MA
DEM
OD
ULA
TOR
DR
/VE
AMP
AFC
GAI
N
RG
B M
ATR
IXC
ON
TRAS
T
32 F
HVC
O
MU
TED
ET
HV
BLK
VER
TIC
ALC
OU
NTD
OW
N
HO
RIZ
ON
TAL
CO
UN
TDO
WN
EXIT AUDIOIN
GND
VCC
VIFSIF
VCC
47
48
46
1
8
3
42
52
51
50
49
5
4 6 7 2 9 31 38
36
34
39
QX
XA
VB
488

-6-
IC501 < Vertical Output > LA7841
THERMALPROTECTION
PUMPUP
AMP
-
+G
ND
Ver
. Out
put
Out
put
Sta
ge V
cc
Non
Inv.
Inpu
t
Inve
rtin
gIn
put V
cc
Pum
p U
pO
utpu
t
LA7841
1 2 3 4 5 6 7
IC001 < Sound Output > LA4270
CH1
CH2
ThermalShutdownOverVoltage
RippleFilter
30K
300
30K
300
Vcc
-
+
+
-
Fee
dbac
k 1
Inpu
t 1
Rip
ple
filte
r
Inpu
t sid
eea
rth In
put 2
Fee
dbac
k 2
Out
put 2
Out
put s
ide
eart
h
Pow
er s
uppl
y
Out
put 1
LA4270
IC3801 <SIF Demodulator> LA7577N
LIMAMP
AGC EQ AMPB/W
N.S.C. VIDEOAMP
APCTIME CONSTSW
VCO
FMDET.
MIX VIDEO DET.
IFAMP
PREAMP
RF AGC AMP AFT
LOCKDET.
IF AGC
APCDET.
LA7577N
24 23 22 21 20 19 18 17 16 15 14 13
1 2 3 4 5 6 7 8 9 10 11 12

-7-
IC3501 < 3D Surround Processor > MM1369BD
SIMULATEDSTEREO
SIMULATEDSTEREO
VIRTUAL AUDIO
QXPANDER PROCESSOR
gm
24 23 22 21 20 19 18 17 16 15 14 13
1 2 3 4 5 6 7 8 9 10 11 12
Vcc Lin Gl1 Gl2 Gl3 Gl4 Fc Qf1 Qf2 Qf3 Qf4 Lout
Rin Gr1 Gr2 Gr3 Gr4 M/g Ref SPC Qi S/Q Rout Gnd
MM1369AD
IC1920 < Sound Controller > TDA8424
MO
DE
SE
LEC
TO
R
stereo/spatial
mono
spatial
stereo/mono
spatial
stereo/mono
stereo/spatial
POWERSUPPLY
treble L treble Rbass Rbass L
treblebassvolu
me
bala
nce
IIC BUS
D.GNDSCLSDAVcc GND
Vcap
L-IN
R-IN mono
L-OUT
R-OUT
8146 716 15
13
9
101211254
1
3
TDA8424

-8-
SC
LVO
1
VO
2
VO
3
VO
4
500
mV
RM
S14
500
mV
RM
S13
500
mV
RM
S12
500
mV
RM
S11
MA
IN
SC
AR
T
6 dB
6 dB
6 dB
6 dB
Vi4
Vi4
Vi3
+
2.2µ
F
+
2.2µ
F
109
25 kΩ
25 kΩ
25 kΩ
25 kΩ
mut
e
CD
2C
D1
10nF
±5%
10nF
±5%
5 kΩ
L/A
/MO
NO
250
mV
RM
S
500
mV
RM
S
0 to
-0.
4 dB
A/M
ON
O
+ - -
L
10 kΩ
5 kΩ
R/B
250
mV
RM
S
1715
10 kΩ
+ +-
0 to
4.5
dB
-2 d
B
40 kΩ
40 kΩ
-2 d
B
10 kΩ
10 kΩ
0 to
4.5
dB
7 8
250
mV
RM
S(f
rom
1st
SC
)
2.2µ
F
+
Vi1
2L+R
, A
250
mV
RM
S(f
rom
2nd
SC
)V
i2
R, B
+
2.2µ
F
30 kΩ
47 p
F
Vip
il5 4 2 3
2.5
mH
Q0=
70
ster
eole
vel
3.3
nF
CD
CL
CA
GC
CLP
10 µ
F
10 µ
F
100
nF
LEV
EL
AN
DS
TE
RE
O
AD
JUS
TM
EN
T
TD
A98
40
25 kΩ
25 kΩ
DIG
ITA
LP
LL
OS
CIL
LATO
R
DIG
ITA
L P
LLA
ND
D
EM
OD
ULA
TOR
DIG
ITA
L P
LLA
ND
D
EM
OD
ULA
TOR
GE
NE
RAT
ION
OF
R
EF
ER
EN
CE
VO
LTA
GE
S
DIG
ITA
LIN
TE
GR
ATO
R
DIG
ITA
LIN
TE
GR
ATO
R
PO
WE
R-O
N
RE
SE
T
I2 C-B
AS
CO
NT
RO
L
CO
NT
RO
L LO
GIC
DU
AL
bit
20 1
SC
L
SD
A
ST
ER
EO
bit
Vre
f
1618
6
Vp
GN
D1/
2 V
p
+
Cre
f
100µ
F/
15V
19
XTA
L
10 M
Hz
Inpu
t and
out
put l
evel
s ar
e no
min
al v
alue
s.T
hey
are
rela
ted
to th
e S
CA
RT
nor
m.
(AM
: m=
0.54
, FM
: ∆f=
±27
kHz)
.
Blo
ck d
iagr
am o
f the
bip
olar
TV
/VT
R-s
tere
o de
code
r.
tanδ
≤ 0.
002
+
IC3401 <Stereo/Dual Sound Processor> TDA9840/V2
-9-
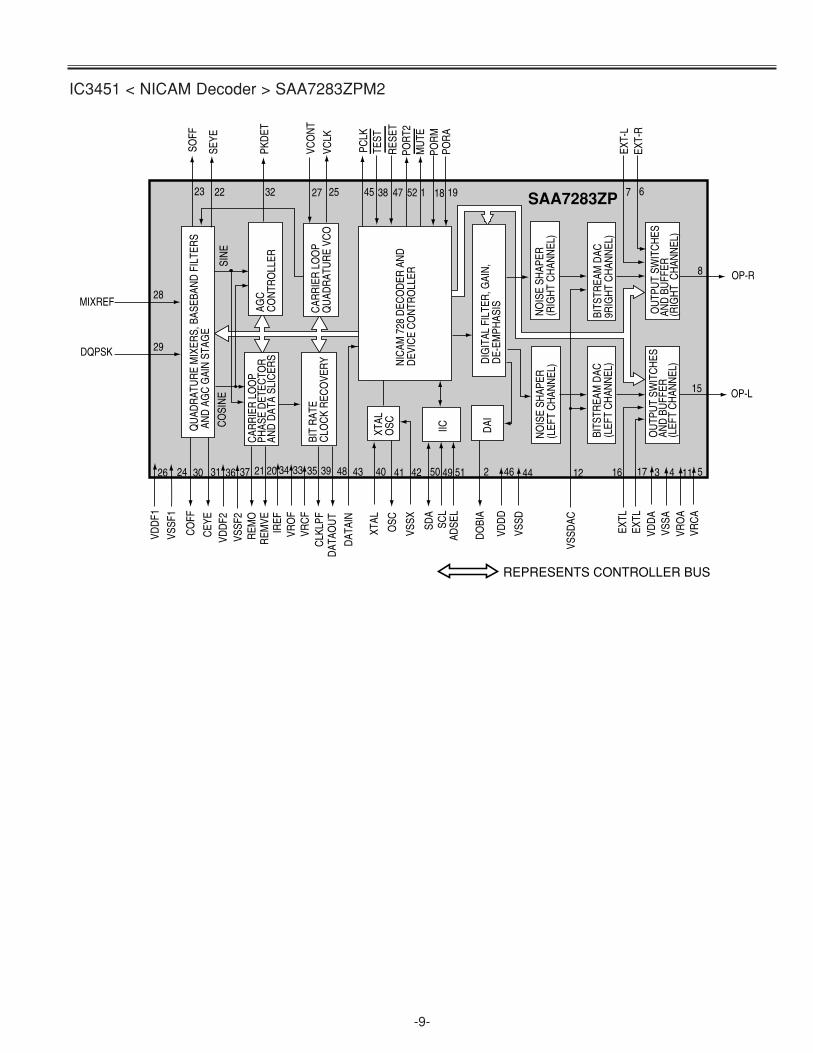
IC3451 < NICAM Decoder > SAA7283ZPM2
QU
ADR
ATU
RE
MIX
ERS,
BAS
EBAN
D F
ILTE
RS
AN
D A
GC
GAI
N S
TAG
E
CO
SIN
ESI
NE
CAR
RIE
R L
OO
PPH
ASE
DET
ECTO
RAN
D D
ATA
SLIC
ERS
CAR
RIE
R L
OO
PQ
UAD
RAT
UR
E VC
OBI
T R
ATE
CLO
CK
REC
OVE
RY
AGC
CO
NTR
OLL
ER
NIC
AM 7
28 D
ECO
DER
AN
DD
EVIC
E C
ON
TRO
LLER
XTAL
OSC IIC DAI
DIG
ITAL
FIL
TER
, GAI
N,
DE-
EMPH
ASIS
NO
ISE
SHAP
ER(L
EFT
CH
ANN
EL)
BITS
TREA
M D
AC(L
EFT
CH
ANN
EL)
OU
TPU
T SW
ITC
HES
AND
BU
FFER
(LEF
T C
HAN
NEL
)
NO
ISE
SHAP
ER(R
IGH
T C
HAN
NEL
)
BITS
TREA
M D
AC9R
IGH
T C
HAN
NEL
)
OU
TPU
T SW
ITC
HES
AND
BU
FFER
(RIG
HT
CH
ANN
EL)
26 24 30 31 36 37 21 20 34 33 35 39 48 43 40 41 42 50 49 51 2 46 44 12 16 17 3 4 11 5
15
8
6719181524738452527322223
28
29
MIXREF
DQPSK
VDD
F1
VSSF
1
CO
FF
CEY
EVD
DF2
VSSF
2R
EMO
REM
VEIR
EFVR
OF
VRC
FC
LKLP
FD
ATAO
UT
DAT
AIN
XTAL
OSC
VSSX SD
ASC
LAD
SEL
DO
BIA
VDD
D
VSSD
VSSD
AC
EXTL
EXTL
VDD
AVS
SAVR
OA
VRC
A
SOFF
SEYE
PKD
ET
VCO
NT
VCLK
PCLK
TEST
RES
ETPO
RT2
M
UTE
POR
MPO
RA
EXT-
LEX
T-R
OP-R
OP-L
REPRESENTS CONTROLLER BUS
SAA7283ZP

-10-
Service Adjustments Location
SW601POWERSWITCH
KGL602
PS601
KE
KA
A1901RC PRE-AMP.
D1901 SW1901
SW
1902
Q1902
SW1903 SW1904
C651
Q682
IC651
PROG.+ PROG.- VOL.+ VOL-
Q685Q684
Q686
IC631Q652
Q1901
C804
C656
C652 C654
C653
C685
C644 Q653
C655
F601
TP-EE
R602
L603
Q611
R621
Q612
Q613POWER
SWITCHING
KHC607
Y13 Y12
Q461
Q462
VR
462
C463
C462
C468
R435
C467
T471F.B.T
C471C469
KSC
KQ
C486
L462
C423
C465
C424
C425
C420
C441
C442
L441
L442
Y07
L461
KDY
Q432HORIZ.
OUTPUT
Q527
C527
TP-B
C464
T611CONVERTER
TRANS.
D615
Y14JW17
R645 C645
Q683
C643
C641
C540
JW14
C515
C482
C521
C517
Q431 C514
C434
T431
TP
-AC
K
TP
-ST
S
TP
-SC
L
TP
-SD
T
TP
-GN
D
JW1JW3
JW2KY
JW16
IC501VERT.DEF.
Q540
KCC297
TP-G
TP-V
VR830
Q830
Q831 C830
C835
AU
DIO
IN
PU
T JA
CK
(L)@
SW
1905 SW1906
C829
IC801 CPU
Q813
X801 JW28
IC802MEMORY
C828
Q837Q836
Q824
Q360
C351C354
C355
C361C201
C225
KP
JW13
JW12
Q251
X213
X211
C243
C241
L171C206
X361
KCD
KZ
IC202
C122
IC201IF/COLOR DEF.
KSAKSB
Q171
C251
Q190
Q183
Q261
X182
X183KCA
X131Q131 Q135
Q133X133
JW23
KNB KNA
JW21
KZZ
JW24REAR TERMINAL UNIT
KWJW22
A101TUNER TP-A
C102
JW4
JW6
L102
TP-E
C106
KKQ101
Q102Q140
Q137
JW9
C138C172
C177
Q138
X161
JW11
KJ
KLA
KL
C1198
KR
KB
KFC1197
HEADPHONEJACK
K1111
SW
1907
FU
NC
TIO
N
PR
ES
ET
TV
/AV
Selector
VID
EO
IN
PU
T JA
CK
AU
DIO
INP
UT
JA
CK
(R)
JW18
JW27
C809
MAIN BOARD
(F2EA)
NTSC UNIT
SECAM UNIT
TE
LE
TE
XT
UN
IT
SO
UN
D U
NIT
+B POWER SUPPLY CHECKFOCUS ADJ.
SCREEN VR
HORIZONTAL WIDTH ADJ.
NIC
AM
/ A2 U
NIT
This TV set has a built-in power supply protection circuit.It is provided to protect the TV set in case of a power supply circuit malfunctions. When something abnormalityoccurs during TV reception, the TV set goes to the stand-by mode.
When an abnormality occurs during TV reception, it causes pin 24 of the CPU to go continually Low(less than0.75V) for about one second. The CPU detects that this has occurred and outputs the signal from pin 15 toswitch off the power supply lines.
Releasing the protective circuit and restoring power supply
To release the protective circuit and restore power supply, turn the power to the TV set OFF and then ON againvia either the main power switch or the ON-OFF button on the remote control. This will work only if the powersupply trouble was temporary. If there is permanent trouble such as a damaged circuit, power cannot berestored and the circuit will have to be repaired.
Protection Circuit

Service Adjustments with Replacing Memory IC(IC802)
-11-
Note: The CPU (IC801) and memory IC (IC802) store the service adjustments data and controls data for each circuit.When the Memory IC(IC802) is replaced, some of the service adjustments should be readjusted to obtain thebest performance. The necessary service adjustments are carried out by using the RC handset. Please setup the TV set with following steps [1] to [3].
[1] Initializing Procedure1. Put a new memory IC.2. Turn on the TV set.3. Press and hold the [TV/AV] button on the TV set more than 2 seconds. The following picture appears on the screen.
4. Press the [FUNCTION] button on the TV set while the above On-Screen Display is still on the screen. The followingpicture appears on the screen.
This completes the initialization of memory IC.
Following shows the initialized contents of memory data by this procedure.- Plug & play : No executed- Inhibit data : Cancelled- Ch skip data : Cancelled- Set volume control value to 10/63 steps.- Set all of control values in PERSONAL mode to initial value shown in below table.
1AUTO
CLR
AV
Controls PERSONAL DYNAMIC NATURAL SOFT GAME
COLOUR 31/63 35/63 31/63 31/63 23/63BRIGHTNESS 31/63 33/63 31/63 34/63 26/63CONTRAST 55/63 63/63 55/63 26/63 55/63TINT 31/63 31/63 31/63 31/63 31/63SHARPNESS 31/63 48/63 31/63 24/63 10/63
Note: When the memory IC replaced, the CPU writes the controls initial value to the replacedmemory IC as shown in below table.

-12-
[2] Required Service AdjustmentsReadjust the following service adjustments.
Adjustments Service Mode No. & ItemHorizontal centre adjustment Item 01, H-PVertical centre adjustment Item 02, V-PVertical size adjustment Item 03, V-SOSD position adjustment Item 04, OSDRF AGC adjustment Item 05, AGCAFT adjustment Item 06, VCOSIF adjustment Item 07, SIFGrey scale adjustment Item 18-24
Further adjustment please refer to “Service adjustment-1” on page 14-15.
Following table shows the initial values which have been stored in the CPU ROM, and items for the service adjust-ments.
Notes:+ The initial value that the CPU writes down the CPU ROM data to the memory when replaced the memory IC. TV set
may not operate correctly with this initial value. It is required to set up the fine adjustment for service adjustmentsdescribed in the above.
No. Item Initial value Range Description
01 H-P 8 0~15 Horizontal centre adjustment02 V-P 4 0~7 Vertical centre adjustment03 V-S 80 0~127 Vertical size adjustment04 OSD 1 0~15 OSD position adjustment05 AGC 64 0~127 RF AGC adjustment06 VCO 128 0~255 VCO (AFT) adjustment07 SIF 0 0~3 SIF VCO adjustment08 SELF 0 0~15 SELF-adjusting 09 DLT 2 0~3 DL-time adjustment10 DLF 0 0, 1 DL-fine adjustment11 B-ST 0 0, 1 Black stretch on/off setting12 ABCL 1 0, 1 ABCL adjustment13 AB-G 0 0, 1 ABCL gain adjustment14 TRAP 3 0~3 Trap frequency adjustment15 WBK 0 0, 1 White back setting16 BBK 0 0, 1 Blue back setting17 AFCG 2 0~2 AFC gain adjustment18 RBI 0 0~255 Red bias adjustment19 GBI 0 0~255 Green bias adjustment20 BBI 0 0~255 Blue bias adjustment21 RD 64 0~127 Red drive adjustment22 BD 64 0~127 Blue drive adjustment23 DRV -- -- White balance adjustment24 -- -- -- Y-cut setting
Service mode adjustments table in CPU ROM
Grey scale adjustment

-13-
[Entering to Service Mode]1. Press and hold the [FUNCTION] button on the TV set and press the [1] button on the remote control handset.
Following setting setting items appears on the screen.
2. Select item by pressing the [OFF TIMER] or [MUTE] button on the remote control handset.3. Adjust value by pressing the [VOLUME +] or [VOLUME - ] button on the remote control handset.
To return to normal TV mode, press the [FUNCTION] button on the TV set or on the remote control handset.
[3] Special Function Setting1. Following items should be set up in the special function mode, please refer to “Special Functions” on page 15 for
actual setting up.
- Volume Lock : OFF- Tuning Lock : OFF- AV Start : OFF- Blue Back : OFF- Music Mode : OFF
2. Confirm following system setting by pressing [RECALL] button on the remote control handset.
- Colour system : AUTO- SIF system : S-1
*Note: There may be not available the above function depending on the specification of TV set.
0010010
05 AGC 63
Item No. Item
Read Status
Data value
0010010
23 DRV R 64 B 64
Item No. Item
Read Status
Data value for Red
Data value for Blue
Display for [DRV] White balance adjustment
Display for [AGC] AGC adjustment

-14-
Service Mode Adjustments
(1) Receive the monochrome circular pattern.(2) Set the brightness and contrast to normal.(3) Select [H-P] in the service mode.(4) Change value to be optimum horizontal centre position.(5) Exit from the service mode.
(1) Receive the monochrome circular pattern.(2) Set the brightness and contrast to normal.(3) Select [V-P] in the service mode.(4) Change value to be optimum vertical centre position.(5) Exit from the service mode.
(1) Receive the monochrome circular pattern.(2) Set the brightness and contrast to normal.(3) Select [V-S] in the service mode.(4) Change value to be optimum vertical size.(5) Exit from the service mode.
(1) Receive the monochrome circular pattern.(2) Set the brightness and contrast to normal.(3) Select [OSD] in the service mode.(4) Change value to be proper OSD position.(5) Exit from the service mode.
NOTE: Do not attempt this adjustment with weak signal.(1) Tune the receiver to most clearest (or strongest) VHF
station in your area. Set the brightness and contrastcontrols to maximum. Set the colour control to mini-mum.
(2) Select [AGC] in the service mode.(3) Change value until the snow noise just disappears.(4) Exit from the service mode.
(1) Input the SG signal to collector of Q101.SG signal frequency : 38.9MHzSG signal level : 70 dB
(2) connect a short clip between the base of Q101 andground.
(3) Connect oscilloscope to pin 2 of IC201.(4) Select [VCO] in the service mode.(5) Change value until the voltage to be 4.5 ± 1.0V.(6) Exit from the service mode.
(1) Tune the receiver to the clearest station with SystemB/G(5.5MHz) in your area.
(2) Connect DC voltmeter to pin 46 of IC201 and ground.(2) Select [SIF] in the service mode.(3) Change value until the voltage to be about 3.0 V.(4) Exit from the service mode.
Item 07 [SIF] SIF
Item 06 [VCO] AFT
Item 05 [AGC] AGC
Item 04 [OSD] OSD POSITION
Item 03 [V-S] VERTICAL SIZE
Item 02 [V-P] VERTICAL CENTRE
Item 01 [H-P] HORIZONTAL CENTRE
Horizontal centre
Vertical centre
Vertical size
ADJUSTMENT-1Following adjustments should be carried out when the memory IC is replaced. How to enter the service mode andadjust values, please refer to “ Entering to Service mode” on page 13.

-15-
(1) Receive the monochrome circular pattern.(2) Set the brightness and colour to normal, contrast to
maximum.(3) Enter to the service mode.(4) Set each value of [RBI], [GBI], [BBI] mode to 0. Set each
value of [RD], [BD] mode to 64.(5) Select next of [DRV] mode to be one horizontal scan-
ning line and turn the screen volume on the FBT toobtain just visible one coloured line.
(6) Press the [1], [2], [5], [6], [9] or [0] button to adjust thebrightness of each colour until a dim white line pro-duced. Please see the control button allocations in thismode.
(7) Select [DRV] mode to enter the white balance adjustingmode.
(8) Press the [3], [4], [-/--] or [RECALL] button alternate-ly to produce normal black and white picture.
(9) Exit from the service mode.(10) Check for proper grey scale tracking at all brightness
levels.NOTE: If the grey scale adjustment is made after picture
tube replacement, check the high voltage.
Items 18-24 GREY SCALE
i
Y ?
X
TXT/TV
0
7
1
4
8
5
2 3
6
9
BASS
JXMKM
PIC MODE
SWAP
F
-/--
P P
TV/
A•B
CH SCAN
TIMER
SURROUND
P
SYSTEM
(1) Connect DC meter to TP-B and the ground.(2) Set the brightness and contrast to normal.
Tune the receiver to an active channel and synchro-nized picture.
(3) The B-voltage must be 140 ± 1 volt DC.
(1) Receive the monochrome circular pattern.(2) Set the brightness and contrast to maximum.(3) Connect a high voltage probe to anode lead of the pic-
ture tube.(4) The high voltage must be 29KV ± 1KV and less than
32KV at 0 beam current.
NOTE:If the picture tube is replaced, check the high voltage.The horiz. width adjustment affects the high voltage.Therefore, re-check the high voltage.
(1) Receive the monochrome circular pattern.(2) Set the brightness and contrast to normal.(3) Adjust VR462 for optimum horizontal width.
HORIZONTAL WIDTH
HIGH VOLTAGE CHECK
B-VOLTAGE SUPPLY CHECK
ADJUSTMENT-2Following adjustments are not required to readjust when replacing the memory IC.
Red Bias -
Red Bias +
Green Bias -
Green Bias +
Blue Bias -
Blue Bias +
Press [F] button to exitfrom service mode
Red Drive -
Red Drive +
Blue Drive -
Blue Drive +

Stereo Adjustments
-16-
X3401JWW1
C3421
C3401
T3401
C3408
C3405
C3409
JWW2
C3452
X3451
C3459
JWW3
K34ZZ
C3488
Q3484Q3482
IC3451NICAM
JWW4
Q3803
Q3804
T3802
C3805
X3802
IC3801SECOND
SIF DECODER
C3498X3801
T3801
Q3802
Q3801
K34Z
IC3453
JWW6
JWW9C3478
X3461
C3494
C3462
C3813
JWW5
JWW11
(F2DV)
A2/NICAM STEREO BOARD (Adjustment Location)
IC3401STEREO/DUALSOUND PROCESSOR
TPJ3804
Pin13
Pin17
Pin 6
Pin 8
TPJ3405PILOT ALIGNMENT
SIF ALIGNMENT
FM DETECTOR ADJ.
Setting
DC 12VAGC voltage (DC5V-6V)Output probe
Input probe Sweep ATTMarker Frequency
K34Z-pin 6IC3801-pin 13K34Z-pin8(side a)IC3801-pin 1712dB38.9 MHz
1. Adjust AGC voltage to be “A”=0.05 - 0.07Vp-p.
2. By using T3802, adjust “P”to be on the top of waveform.
Adjustment Waveform
P
A
0V
(38.9 MHz)
Tools
10KΩ
0.002µ a
b1KΩ75Ω
GNDGND
Input probe Output probe
(1) Receive a stereo broadcast.(2) Connect oscilloscope to TPJ3804.(3) By using T3801 DC voltage to be 4.0V.
4.0Vp-p
0V
SIF Alignment
FM Detector Adjustment

-17-
Pilot Alignment
Setting
Oscilloscope
Input sound signal sourceTV systemDeviationMode
TPJ3405(IC3401-Pin5)
System B/G27kHzStereo
By using T3401, adjust amplitude to be maximum.
Adjustment Waveform
A
Stereo Separation Adjustment
Separation-1
Setting
Oscilloscope
Input sound signal sourceTV systemDeviationModeModulation
Audio Monitor Out-Right Jack(K12RC3) on theBack unit.
System B/G27kHzStereoRight 1kHzLeft None
(1) Press and hold the FUNCTIONkey on the TV set, and pressthe “4” key on the Remote Control Transmitter to enter toK1 service mode.
Adjustment Waveform
A
(2)Adjust “A” to be 1.4Vp-p±0.25Vusing the LEVEL UP or DOWNkey on the Remote ControlTransmitter.
ADJUST DATA
K1 -002
Separation-2
Setting
Oscilloscope
Input sound signal sourceTV systemDeviationModeModulation
Audio MonitorOut-Left Jack(K12RC3) on theBack unit.
System B/G27kHzStereoRight 400HzLeft None
(1) Press and hold the FUNCTIONkey on the TV set, and pressthe “4” key on the Remote Control Transmitter to enter toK1 service mode.
(2) Select K2 mode, by pressingthe FUNCTION key. (RC or TV)
Adjustment Waveform
B
K1 Service Mode
To exit from the service mode, press the RECALL button.
ADJUST DATA
K2 -011
K2 Service Mode
(3) Adjust “B” to be minimum using LEVEL UP or DOWN key on the Remoto Control Transmitter.

-18-
Purity and Convergence Adjustment
RED
BLUE
Adjust tabs together tosuperimpose red andblue horizontal line.
Figure- 2 BLUE AND RED LINE MOVEMENT Figure- 3 BLUE/RED AND GREEN MOVEMENT
Adjust tabs together tosuperimpose red/blueand green horizontalline.
Adjust tabs angle to superimposeblue and red vertical line.
Adjust tabs angle to superimposered/blue and green vertical line.
GREEN
BLUE / RED
CAUTION: The Convergence and Purity adjustments have been made at the factory. Readjustmentshould be made only after picture tube or deflection yoke replacement, following the steps below:
PURITY ADJUSTMENT1. Demagnetize the picture tube and receiver using an external
degaussing coil. When replacing picture tube or deflectionyoke, mount deflection yoke and purity-convergence magnetsassembly properly, see figures 1 and 4.
2. Turn Red and Blue guns off and provide only Green raster.Rotate Screen control to fully counterclockwise. Rotate Redand Blue Bias controls fully counterclockwise. Slowly rotateGreen Bias control clockwise to produce Green raster.
3. Loosen the screw holding the Deflection Yoke and remove the3 Rubber Wedges, and slide the Deflection Yoke fully forward.
4. Rotate and spread the Tabs of the two Purity Magnets to cen-tre the vertical green belt in the picture screen. The PurityMagnets are also adjusted to obtain vertical centring of theraster.
5. Slowly slide the Deflection Yoke backward until a uniformgreen screen is obtained.
6. Check the purity of the red and blue screens for uniformity,turn off other colours to check this (use bias controls).Readjust the yoke position if necessary until all screens arepure.
7. Adjust each Bias control and screen control to obtain whiteraster. Refer to Gray Scale Adjustment. If part of the picturescreen is coloured, adjust the Deflection Yoke position forwardor backward slightly.
8. Tighten the mounting screw of the Deflection Yoke. AdjustConvergence next.
CENTRE CONVERGENCE ADJUSTMENT1. Use a dot crosshatch pattern signal.2. Turn Red and Blue guns on and turn off Green gun. Adjust the
angle between the Tabs of the Four Pole Magnet 1 and 2, andsuperimpose the Red and Blue vertical lines in the centre areaof the picture screen. Refer to figure 2.
3. Keeping the mutual angle of the Tabs of the Four Pole Magnetturn them together to superimpose the Blue and Red horizon-tal lines in the centre area of the picture screen. Refer to fig-ure 2.
4. Turn Green gun on and adjust Six Pole Magnet 3 and 4 thatthe Green line superimposed on the Red/Blue lines.This is the same procedure used in steps 2 and 3.Refer to figure 3.
OUTER AREA CONVERGENCE ADJUSTMENTSlightly loosen the screw holding the Deflection Yoke. Adjust theDeflection Yoke to converge the detail in the outer area (left sideand right side) of the picture screen by orbital movement of thefront of the Yoke, then secure the Deflection Yoke in appropriateposition by putting the wedges as illustrated. Tighten screw hold-ing the Deflection Yoke.
RUBBERWEDGE
DEFLECTION YOKE
DEFLECTION YOKEMOUNTING SCREW
Figure 4. Deflection Yoke Movement
SIX-POLEMAGNET TABS FOUR-POLE
MAGNET TABS
ANGLEOF TABS
PURITYMAGNETTABS
432
1
FOCUS GAP(G3-G4)
Figure 1. Purity and Convergence Magnets
MAGNET TABS
ANGLE OF MAGNET TABS
Figure 5. Adjusting Magnet

-19-
C4LVFCabinet Parts List
1 610 299 4315 ASSY,BUTTON POWER2 610 295 2483 DEC IND3 610 299 4322 ASSY,BUTTON UNITED4 645 043 3801 BADGE,SANYO or 645 043 5058 BADGE,SANYO
5 610 299 4353 COMPL,CABINET FRONT5-a 610 299 4360 CABINET FRONT 5-b 645 019 2210 HANDLE
6 610 299 4377 DEC.SPEAKER
7 610 297 6403 CABINET BACK8 610 299 4766 LABEL RATING
9 645 050 2521 ASSY,REMOCON JXMKM 10 610 288 7631 RC-BATTERY LID
610 296 9290 INSTRUCTIONS MANUAL
Key No. Part No. Description Key No. Part No. Description
Note: Parts order must contain Service Ref. No., Part No., and descriptions.
i
Y ?
X
TXT/TV
0
7
1
4
8
5
2 3
6
9
BASS
JXMKM
PIC MODE
SWAP
F
-/--
P P
TV/
A•B
CH SCAN
TIMER
SURROUND
P
SYSTEM
10
VIDEO L-AUDIO-R
TV/AV F
P
PT
4
3 2 1
ANT 75Ω
7
8
6
5-a
5-b
9
Related Documents