http://www.instructables.com/id/Charliecube-Charlieplexed-4x4x4-RGB-LED-cube/ Food Living Outside Play Technology Workshop Charliecube -- Charlieplexed 4x4x4 RGB LED cube by HippyNerd on January 8, 2015 Table of Contents Charliecube -- Charlieplexed 4x4x4 RGB LED cube . . . . . . . . . . . . . . . . . . . . . . . . . . . . . . . . . . . . . . . . . . . . . . . . . . . . . . . . . . . . . . . . . . . . . . . . . . . . . . . . . . . . 1 Intro: Charliecube -- Charlieplexed 4x4x4 RGB LED cube . . . . . . . . . . . . . . . . . . . . . . . . . . . . . . . . . . . . . . . . . . . . . . . . . . . . . . . . . . . . . . . . . . . . . . . . . . . . 2 Step 1: Prepare your parts, and do a good job. . . . . . . . . . . . . . . . . . . . . . . . . . . . . . . . . . . . . . . . . . . . . . . . . . . . . . . . . . . . . . . . . . . . . . . . . . . . . . . . . . . . . 3 Step 2: Building an LED spire . . . . . . . . . . . . . . . . . . . . . . . . . . . . . . . . . . . . . . . . . . . . . . . . . . . . . . . . . . . . . . . . . . . . . . . . . . . . . . . . . . . . . . . . . . . . . . . . . 4 Step 3: Build the cube . . . . . . . . . . . . . . . . . . . . . . . . . . . . . . . . . . . . . . . . . . . . . . . . . . . . . . . . . . . . . . . . . . . . . . . . . . . . . . . . . . . . . . . . . . . . . . . . . . . . . . . 5 Step 4: Testing! . . . . . . . . . . . . . . . . . . . . . . . . . . . . . . . . . . . . . . . . . . . . . . . . . . . . . . . . . . . . . . . . . . . . . . . . . . . . . . . . . . . . . . . . . . . . . . . . . . . . . . . . . . . . 7 Step 5: . . . . . . . . . . . . . . . . . . . . . . . . . . . . . . . . . . . . . . . . . . . . . . . . . . . . . . . . . . . . . . . . . . . . . . . . . . . . . . . . . . . . . . . . . . . . . . . . . . . . . . . . . . . . . . . . . . 8 Step 6: . . . . . . . . . . . . . . . . . . . . . . . . . . . . . . . . . . . . . . . . . . . . . . . . . . . . . . . . . . . . . . . . . . . . . . . . . . . . . . . . . . . . . . . . . . . . . . . . . . . . . . . . . . . . . . . . . . 10 Related Instructables . . . . . . . . . . . . . . . . . . . . . . . . . . . . . . . . . . . . . . . . . . . . . . . . . . . . . . . . . . . . . . . . . . . . . . . . . . . . . . . . . . . . . . . . . . . . . . . . . . . . . . . . 10 Advertisements . . . . . . . . . . . . . . . . . . . . . . . . . . . . . . . . . . . . . . . . . . . . . . . . . . . . . . . . . . . . . . . . . . . . . . . . . . . . . . . . . . . . . . . . . . . . . . . . . . . . . . . . . . . . . . . 10 Comments . . . . . . . . . . . . . . . . . . . . . . . . . . . . . . . . . . . . . . . . . . . . . . . . . . . . . . . . . . . . . . . . . . . . . . . . . . . . . . . . . . . . . . . . . . . . . . . . . . . . . . . . . . . . . . . . 10

Welcome message from author
This document is posted to help you gain knowledge. Please leave a comment to let me know what you think about it! Share it to your friends and learn new things together.
Transcript
http://www.instructables.com/id/Charliecube-Charlieplexed-4x4x4-RGB-LED-cube/
Food Living Outside Play Technology Workshop
Charliecube -- Charlieplexed 4x4x4 RGB LED cubeby HippyNerd on January 8, 2015
Table of Contents
Charliecube -- Charlieplexed 4x4x4 RGB LED cube . . . . . . . . . . . . . . . . . . . . . . . . . . . . . . . . . . . . . . . . . . . . . . . . . . . . . . . . . . . . . . . . . . . . . . . . . . . . . . . . . . . . 1
Intro: Charliecube -- Charlieplexed 4x4x4 RGB LED cube . . . . . . . . . . . . . . . . . . . . . . . . . . . . . . . . . . . . . . . . . . . . . . . . . . . . . . . . . . . . . . . . . . . . . . . . . . . . 2
Step 1: Prepare your parts, and do a good job. . . . . . . . . . . . . . . . . . . . . . . . . . . . . . . . . . . . . . . . . . . . . . . . . . . . . . . . . . . . . . . . . . . . . . . . . . . . . . . . . . . . . 3
Step 2: Building an LED spire . . . . . . . . . . . . . . . . . . . . . . . . . . . . . . . . . . . . . . . . . . . . . . . . . . . . . . . . . . . . . . . . . . . . . . . . . . . . . . . . . . . . . . . . . . . . . . . . . 4
Step 3: Build the cube . . . . . . . . . . . . . . . . . . . . . . . . . . . . . . . . . . . . . . . . . . . . . . . . . . . . . . . . . . . . . . . . . . . . . . . . . . . . . . . . . . . . . . . . . . . . . . . . . . . . . . . 5
Step 4: Testing! . . . . . . . . . . . . . . . . . . . . . . . . . . . . . . . . . . . . . . . . . . . . . . . . . . . . . . . . . . . . . . . . . . . . . . . . . . . . . . . . . . . . . . . . . . . . . . . . . . . . . . . . . . . . 7
Step 5: . . . . . . . . . . . . . . . . . . . . . . . . . . . . . . . . . . . . . . . . . . . . . . . . . . . . . . . . . . . . . . . . . . . . . . . . . . . . . . . . . . . . . . . . . . . . . . . . . . . . . . . . . . . . . . . . . . 8
Step 6: . . . . . . . . . . . . . . . . . . . . . . . . . . . . . . . . . . . . . . . . . . . . . . . . . . . . . . . . . . . . . . . . . . . . . . . . . . . . . . . . . . . . . . . . . . . . . . . . . . . . . . . . . . . . . . . . . . 10
Related Instructables . . . . . . . . . . . . . . . . . . . . . . . . . . . . . . . . . . . . . . . . . . . . . . . . . . . . . . . . . . . . . . . . . . . . . . . . . . . . . . . . . . . . . . . . . . . . . . . . . . . . . . . . 10
Advertisements . . . . . . . . . . . . . . . . . . . . . . . . . . . . . . . . . . . . . . . . . . . . . . . . . . . . . . . . . . . . . . . . . . . . . . . . . . . . . . . . . . . . . . . . . . . . . . . . . . . . . . . . . . . . . . . 10
Comments . . . . . . . . . . . . . . . . . . . . . . . . . . . . . . . . . . . . . . . . . . . . . . . . . . . . . . . . . . . . . . . . . . . . . . . . . . . . . . . . . . . . . . . . . . . . . . . . . . . . . . . . . . . . . . . . 10
http://www.instructables.com/id/Charliecube-Charlieplexed-4x4x4-RGB-LED-cube/
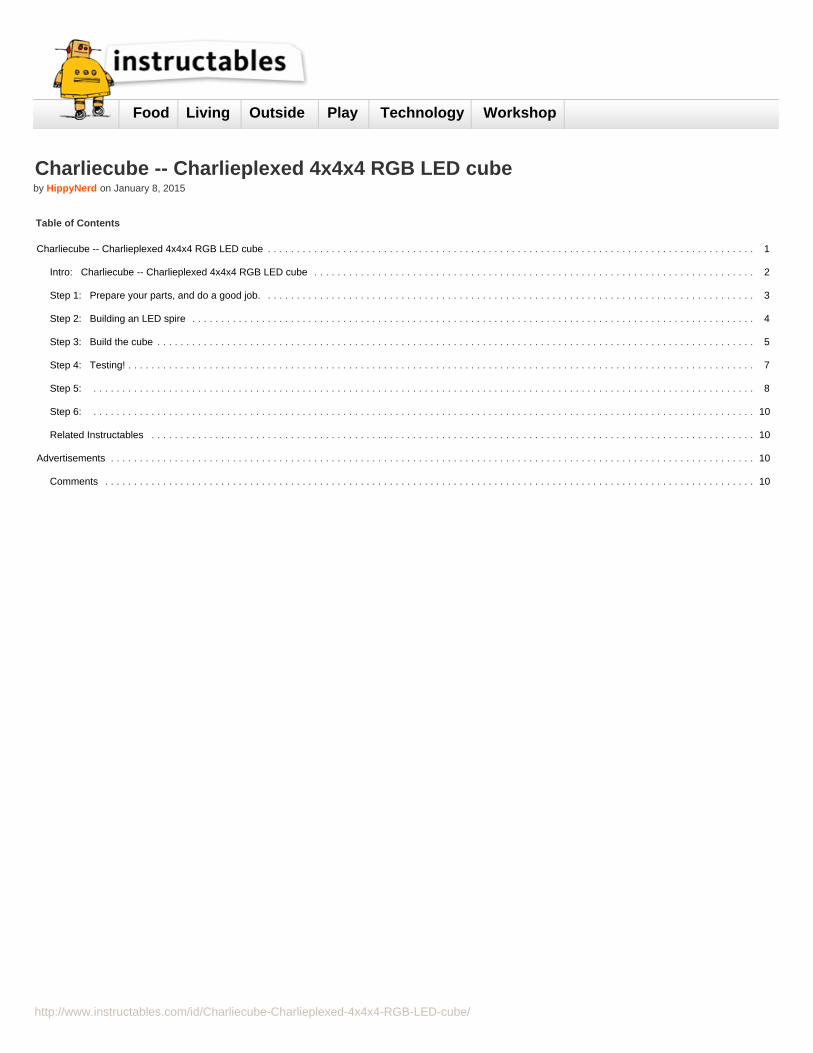
Intro: Charliecube -- Charlieplexed 4x4x4 RGB LED cubeThis is a Charlieplexed 64 RGB LED 3D Cube.
The CharlieCube has a total of 192 LEDs and is controlled by 16 arduino pins wired through 16 spires of 4 LEDs and 4 connections. The 64 connections that 16 spires of4 leads are wired in such a way that they only need 16 micro-controller (arduio) connections. The arduino (not pictured), connects directly to the LEDs without using anyresistors, shift registers, LED drivers or any other electronic components. It is simply LEDs, micro-controller, and circuitry. It is sorta like applying geometry to circuitry.
This cube design uses complex wiring instead of parts. This type of wiring LEDs is known as charlieplexing, and it is a type of multiplexing, that arranges LEDs facingeach other in groups. The result is that it requires less connections to control the LEDs. In the case of 64 RGB LEDs that is actually 192 LEDs that can be controlled with16 tri-state micro-controller input/output connections (pins).
The original website by asher glick describes how to make this cube with common cathode RGB LEDs, however I have modified the code to work with common anodeLEDs. I made an instructable called Hacking the Charliecube, and it describes how I went about making the code for this cube, also work with common anode LEDs. Ihave a website that I created with pictures and in depth details how to make the cube, Im going to try to re-create it here, and focus on just building the cube.
The parts list for this 4x4x4 RGB LED cube are simple:
64 RGB LEDS (common anode, or common cathode)Arduino Nano or variant with 328 chip (168 chip may not work)Wires (various depending on how you build your cube)Prototyping printed circuit board (pad per hole type), Optional (if you are hard core!)
Tools:Soldering iron, tweezers, wire cutters, wire strippers, drill (5mm)
Supplies:Flux, Solder, Alcohol, a small board, patience.
My website about the cube:
https://sites.google.com/site/rgbledcubes/home/cha...
Asher Glicks website about the cube (where it all started)
http://aglick.com/charliecube.html
More about Charlie Allen Charliplexing can be found here:
https://en.wikipedia.org/wiki/Charlieplexing
My other instructable about hacking the charliecube.http://www.instructables.com/id/Hacking-the-Charli...
http://www.instructables.com/id/Charliecube-Charlieplexed-4x4x4-RGB-LED-cube/
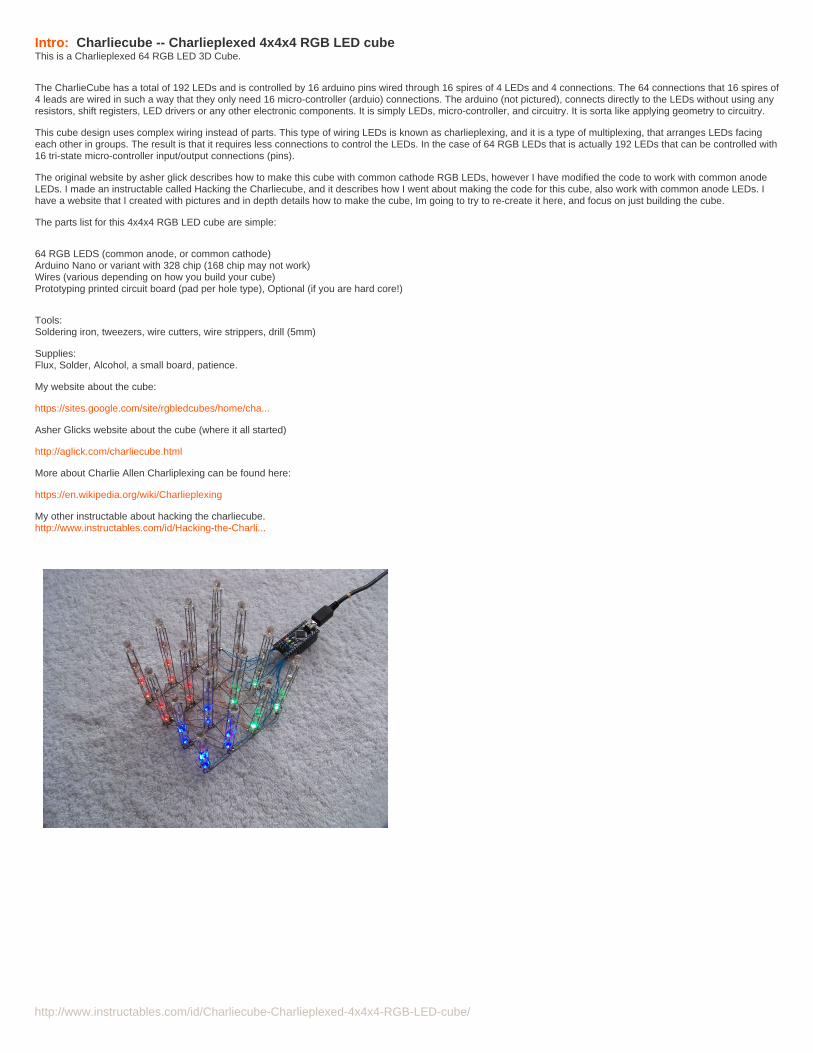
Step 1: Prepare your parts, and do a good job.The first part is always preparing your parts, I always tell people to take their time here, and do a good job, because how well this part is made effect the next step in theprocess, and that effects the next step, and so on and so forth. Little things in the first step, become much more exaggerated by the last step. Being consistent is alsovery important, the first one, and last one should look about the same. If they are not, go ahead and fix the first ones, until they all look the same.
Use the first image as a guide how to bend the LED leads. The black one is the common cathode lead, I like to mark my LED common lead with a black marker, thishelps later when setting them up to solder. Notice how the blue and red are just the same direction, but the inner 2 leads can be easily done 2 different ways, be carefulto make sure that you do them all the right way, if not, fix them now, before moving on to the next step.
Now that all your LED leads are bent, group them in 8 groups of 8, to make it a manageable group of groups. Then take a group of 8, and break that into 2 groups of 4,and set 4 of those aside.
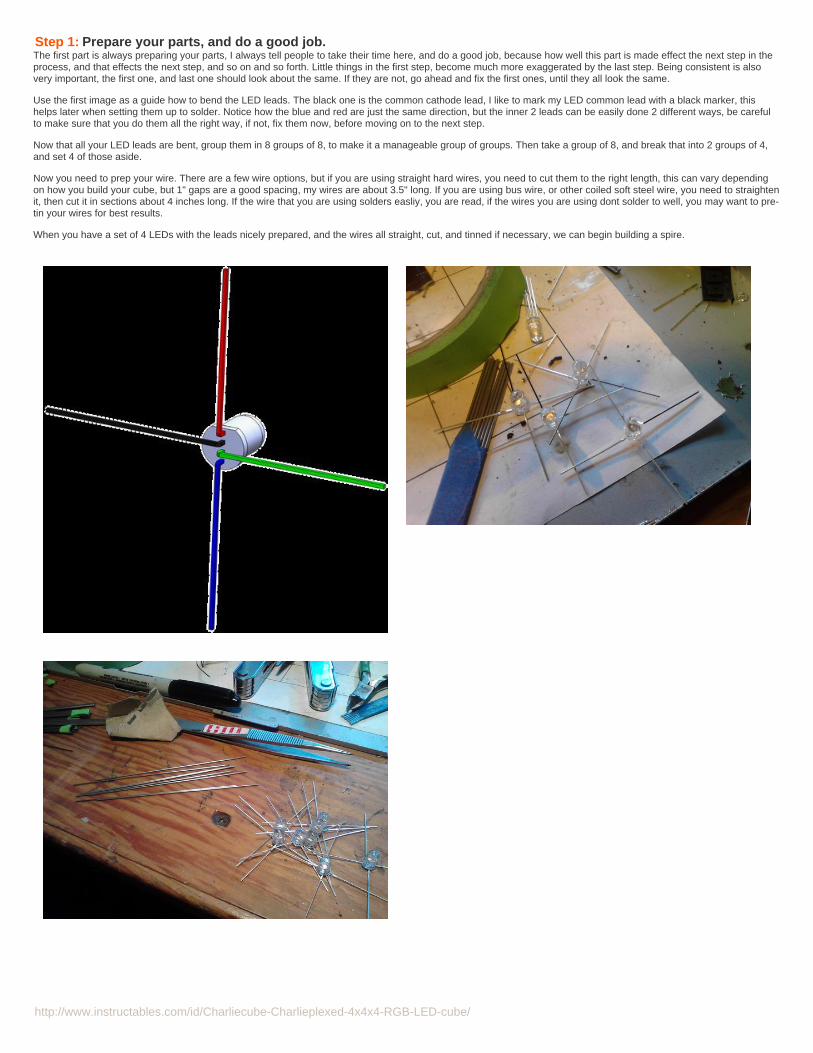
Now you need to prep your wire. There are a few wire options, but if you are using straight hard wires, you need to cut them to the right length, this can vary dependingon how you build your cube, but 1" gaps are a good spacing, my wires are about 3.5" long. If you are using bus wire, or other coiled soft steel wire, you need to straightenit, then cut it in sections about 4 inches long. If the wire that you are using solders easliy, you are read, if the wires you are using dont solder to well, you may want to pre-tin your wires for best results.
When you have a set of 4 LEDs with the leads nicely prepared, and the wires all straight, cut, and tinned if necessary, we can begin building a spire.
http://www.instructables.com/id/Charliecube-Charlieplexed-4x4x4-RGB-LED-cube/
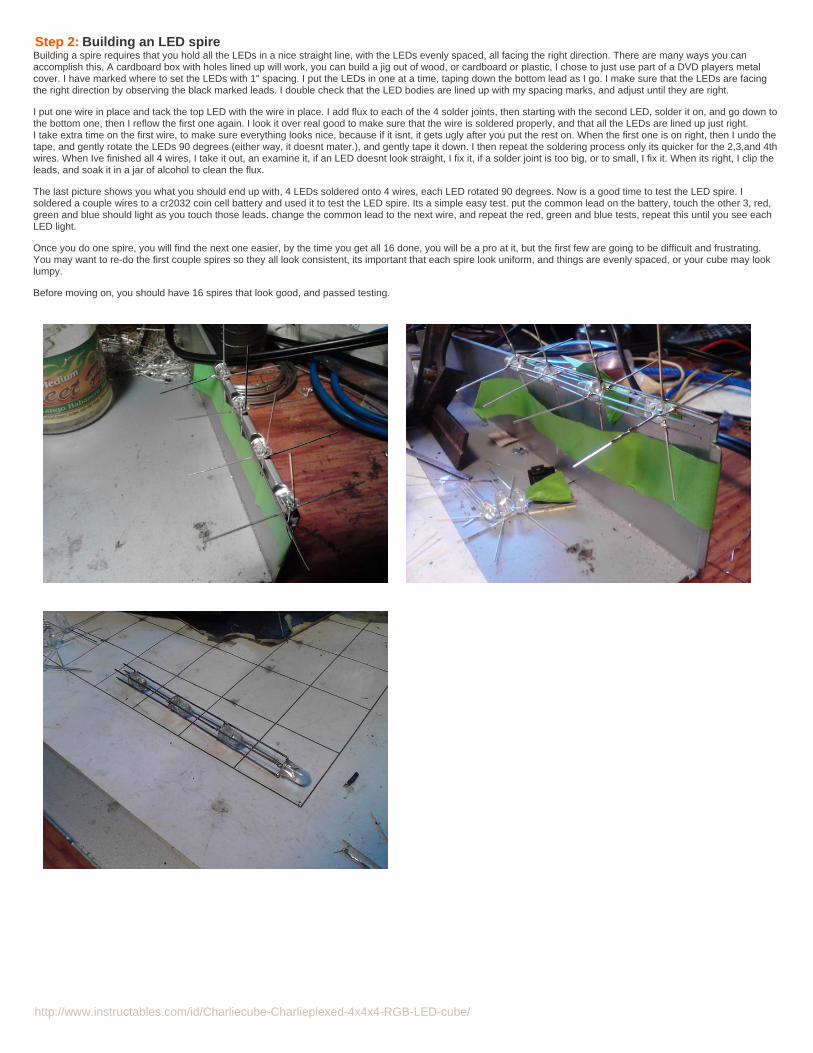
Step 2: Building an LED spireBuilding a spire requires that you hold all the LEDs in a nice straight line, with the LEDs evenly spaced, all facing the right direction. There are many ways you canaccomplish this, A cardboard box with holes lined up will work, you can build a jig out of wood, or cardboard or plastic, I chose to just use part of a DVD players metalcover. I have marked where to set the LEDs with 1" spacing. I put the LEDs in one at a time, taping down the bottom lead as I go. I make sure that the LEDs are facingthe right direction by observing the black marked leads. I double check that the LED bodies are lined up with my spacing marks, and adjust until they are right.
I put one wire in place and tack the top LED with the wire in place. I add flux to each of the 4 solder joints, then starting with the second LED, solder it on, and go down tothe bottom one, then I reflow the first one again. I look it over real good to make sure that the wire is soldered properly, and that all the LEDs are lined up just right.I take extra time on the first wire, to make sure everything looks nice, because if it isnt, it gets ugly after you put the rest on. When the first one is on right, then I undo thetape, and gently rotate the LEDs 90 degrees (either way, it doesnt mater.), and gently tape it down. I then repeat the soldering process only its quicker for the 2,3,and 4thwires. When Ive finished all 4 wires, I take it out, an examine it, if an LED doesnt look straight, I fix it, if a solder joint is too big, or to small, I fix it. When its right, I clip theleads, and soak it in a jar of alcohol to clean the flux.
The last picture shows you what you should end up with, 4 LEDs soldered onto 4 wires, each LED rotated 90 degrees. Now is a good time to test the LED spire. Isoldered a couple wires to a cr2032 coin cell battery and used it to test the LED spire. Its a simple easy test. put the common lead on the battery, touch the other 3, red,green and blue should light as you touch those leads. change the common lead to the next wire, and repeat the red, green and blue tests, repeat this until you see eachLED light.
Once you do one spire, you will find the next one easier, by the time you get all 16 done, you will be a pro at it, but the first few are going to be difficult and frustrating.You may want to re-do the first couple spires so they all look consistent, its important that each spire look uniform, and things are evenly spaced, or your cube may looklumpy.
Before moving on, you should have 16 spires that look good, and passed testing.
http://www.instructables.com/id/Charliecube-Charlieplexed-4x4x4-RGB-LED-cube/
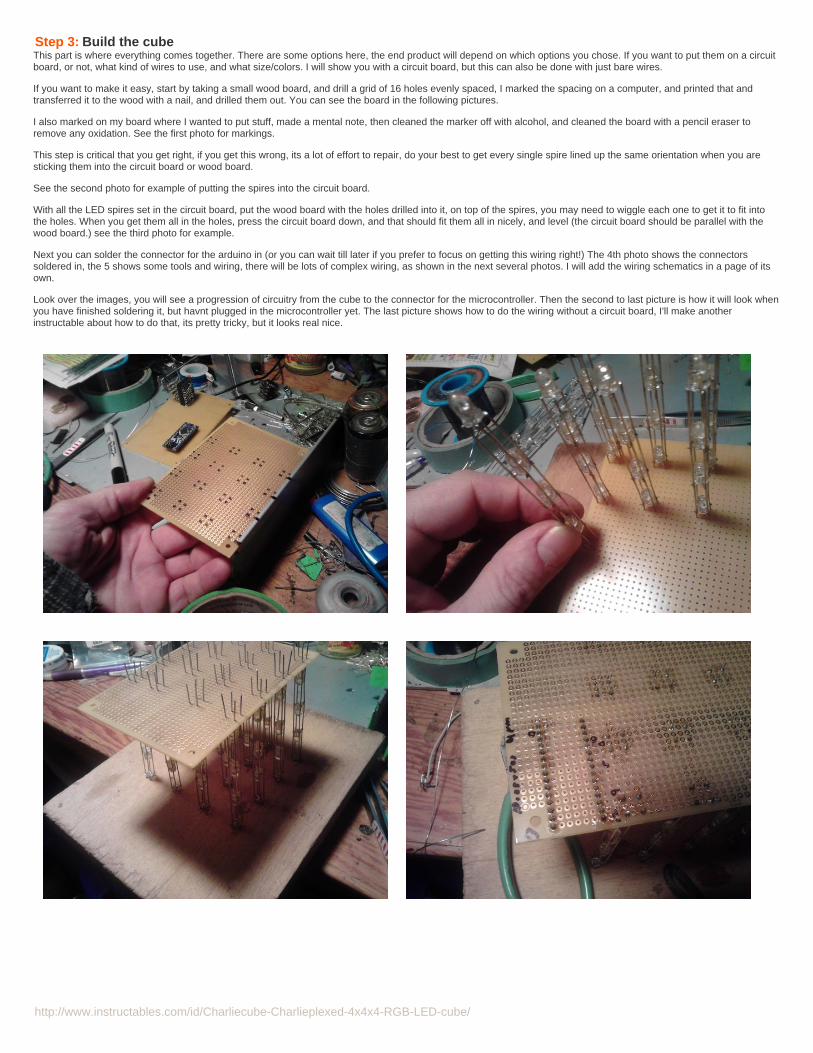
Step 3: Build the cubeThis part is where everything comes together. There are some options here, the end product will depend on which options you chose. If you want to put them on a circuitboard, or not, what kind of wires to use, and what size/colors. I will show you with a circuit board, but this can also be done with just bare wires.
If you want to make it easy, start by taking a small wood board, and drill a grid of 16 holes evenly spaced, I marked the spacing on a computer, and printed that andtransferred it to the wood with a nail, and drilled them out. You can see the board in the following pictures.
I also marked on my board where I wanted to put stuff, made a mental note, then cleaned the marker off with alcohol, and cleaned the board with a pencil eraser toremove any oxidation. See the first photo for markings.
This step is critical that you get right, if you get this wrong, its a lot of effort to repair, do your best to get every single spire lined up the same orientation when you aresticking them into the circuit board or wood board.
See the second photo for example of putting the spires into the circuit board.
With all the LED spires set in the circuit board, put the wood board with the holes drilled into it, on top of the spires, you may need to wiggle each one to get it to fit intothe holes. When you get them all in the holes, press the circuit board down, and that should fit them all in nicely, and level (the circuit board should be parallel with thewood board.) see the third photo for example.
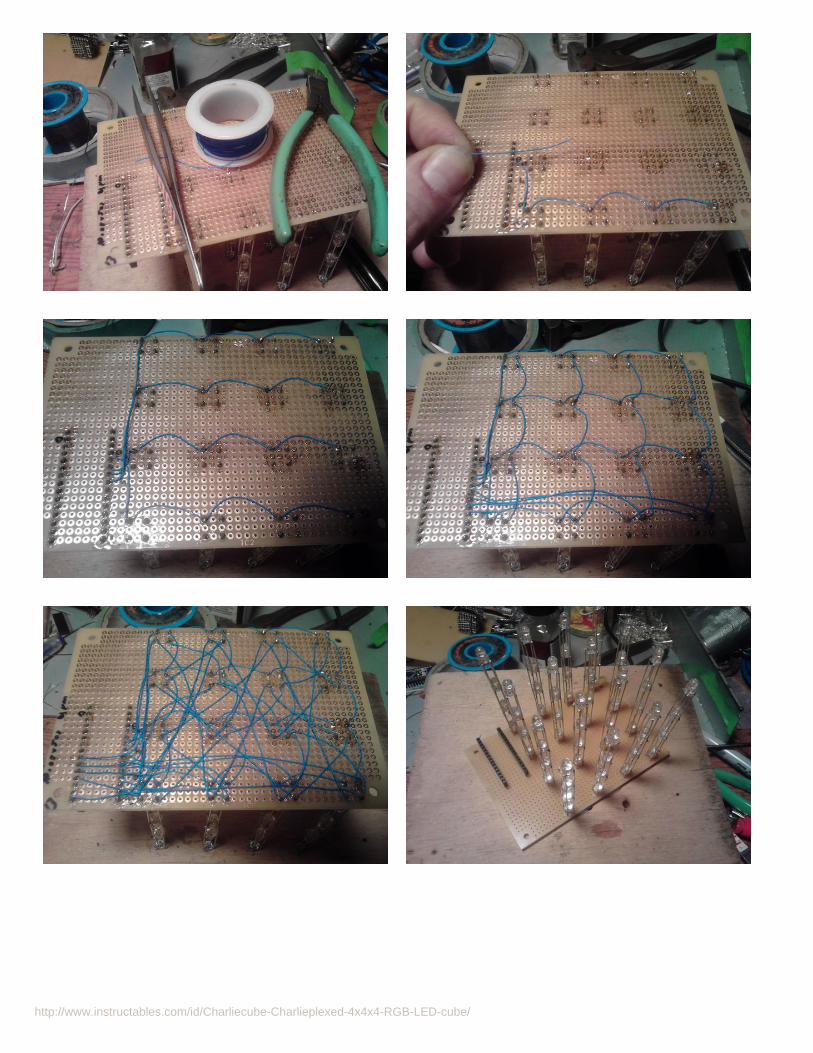
Next you can solder the connector for the arduino in (or you can wait till later if you prefer to focus on getting this wiring right!) The 4th photo shows the connectorssoldered in, the 5 shows some tools and wiring, there will be lots of complex wiring, as shown in the next several photos. I will add the wiring schematics in a page of itsown.
Look over the images, you will see a progression of circuitry from the cube to the connector for the microcontroller. Then the second to last picture is how it will look whenyou have finished soldering it, but havnt plugged in the microcontroller yet. The last picture shows how to do the wiring without a circuit board, I'll make anotherinstructable about how to do that, its pretty tricky, but it looks real nice.
http://www.instructables.com/id/Charliecube-Charlieplexed-4x4x4-RGB-LED-cube/

http://www.instructables.com/id/Charliecube-Charlieplexed-4x4x4-RGB-LED-cube/
Step 4: Testing!The last step is programming the microcontroller, and plugging it in, and testing.
You may have broken a solder joint, or not wired everything correctly. There are 4 different ways that I have miswired the cube, and Ive figured out how to compensatefor it. I wont go into the details about how to program the microcontroller, but I will describe how to test the cube. Ive written a little program to help, You can use it to seehow your cube is lighting, it should light up in a predictable sequence, but if not, you may need to change some code, or check your wiring. You pre-tested each spire, sothose should be right, and assuming you put each spire in the same direction, that should be right, but the wiring is still easy to mess up.
You can start by running the sample programs that come with the cube, asher wrote a bunch of programs that should run if you upload them, watch the shift squares, andthe fountain. You can also slow the cube down by changing the animation speed of each program. I like to comment out all but one program, and slow it down. if it startsat the right place, and does the right things, then Its mostly right. If you start with the fountain program, it should start at the bottom inside 4 LEDs, progress up 2,3,4, thelight the outside square (12 LEDs), and go down 3,2,1. Slow it down and watch. If it doesnt start in the right place, you should get my cubeplex.h file, and look forflushfuffers, I have setup 8 flush buffers, 4 for common anode, 4 for common cathode, uncomment out the one for your cube, and test it again until you get it right. Whenfountain looks right, then try shift squares, it too should work right. If it works right, then you are probably good, but if you want to be certain every single LED is workingright, then try my test program.
Here is my program to test your cube.
/******************************** Sequence THE DOT ****************************\| | | | | Hacked up by [email protected] to suit his testing needs. |
| Inspired By: Jonah Glick | | Written By: Asher Glick | \******************************************************************************/
void SeqTheDot()
{ continuePattern = true;
int animationSpeed = 200; // change this to speed up or down.
// color= green; // change this to set a specific color or comment it out to cycle.
int xpos = 0;
int ypos = 0;
int zpos = 0;
while (continuePattern) {
for (xpos; xpos < 4; xpos++)
{ for (ypos; ypos < 4; ypos++)
{ for (zpos; zpos < 4; zpos++)
{
// drawLed(color,1,1,3);
// use this one to light up a specific LED drawLed(color,xpos,ypos,zpos);
flushBuffer();
clearBuffer();
delay(animationSpeed);
} zpos=0;
} ypos=0;

http://www.instructables.com/id/Charliecube-Charlieplexed-4x4x4-RGB-LED-cube/
} xpos=0;
}
color=nextColor(color);
}
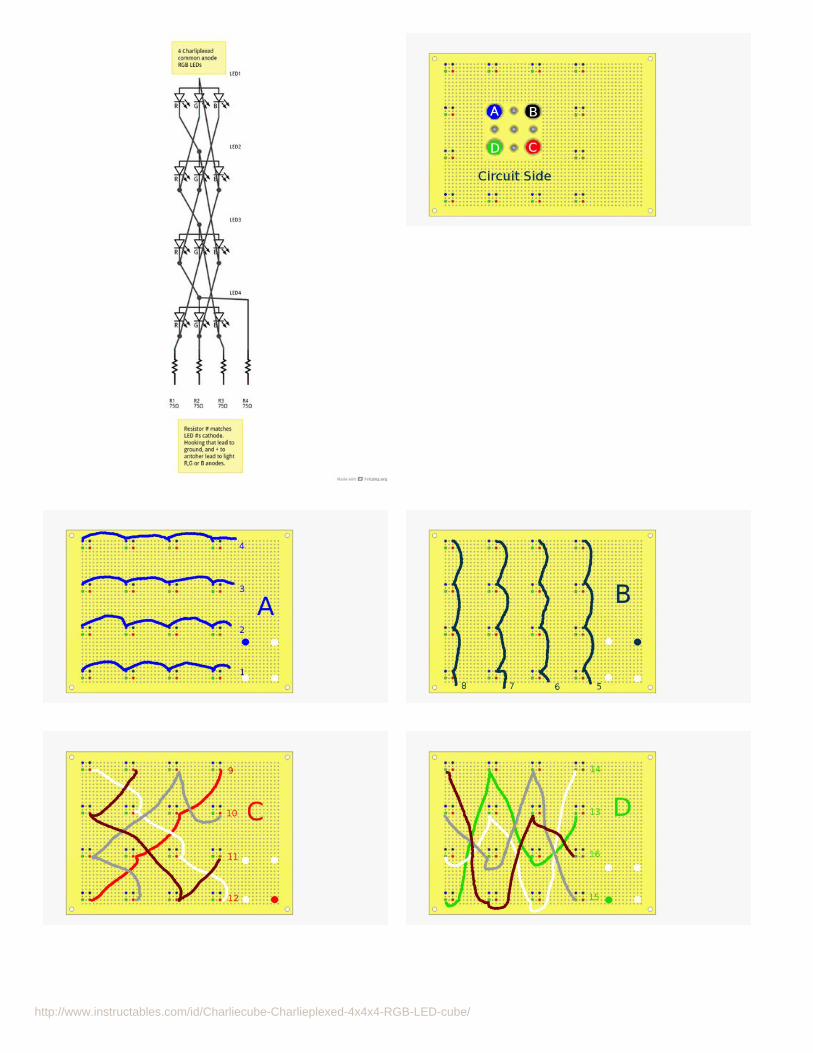
Step 5: The first image is a schematic of a spire with brief explanation.
The second drawing illustrates how each spires leads are organized and labled a,b,c,d to a match with the wiring schemes a,b,c,d.The next four drawings show the wiring for each letters group. Note, all "A"s use the same spire pin location, all the "B"s use the same spire pin location, ... You can makeit easier to get them right by doing all As at a time, then the Bs, then the Cs, then the Ds. The first 2 sets are the easy ones.
Now its important to make sure that you have your cube oriented properly before moving on to the next step, connecting the cube to the arduino.
The cube connects to the arduino via 16 tri-state microcontroller ports. It holds 14 at input, one high, another low, and that lights up a specific LED.
The last diagram shows how you wire from the arduino to the cube from the circuit side of the board.
Side note:
You can add 75 ohm resistors to each arduino pin to make this a safer design,that maximizes the lifespan of all the parts, but it will run for years without them, and theymay be under no excessive load as is.
http://www.instructables.com/id/Charliecube-Charlieplexed-4x4x4-RGB-LED-cube/

http://www.instructables.com/id/Charliecube-Charlieplexed-4x4x4-RGB-LED-cube/
Step 6:
Related Instructables
Hacking theCharlieCube byHippyNerd
LED CubeSpectrumAnalyzer bytronixstuff
4x4x4 RGB LEDCube by rojm
3D LEDCharlieplexCube fromChrismas TreeLights by rgbphil
Arduino 4x4x4LED Cube byPhogie7
3D Snake onCharlieplexed4x4x4 LED Cubeby White-Tea
Advertisements
Comments
Related Documents