CHAPTER Our First Python Forensics App 3 CHAPTER CONTENTS Introduction ............................................................................................................. 54 Naming Conventions and Other Considerations .......................................................... 55 Constants ................................................................................................... 55 Local Variable Name .................................................................................... 55 Global Variable Name .................................................................................. 55 Functions Name .......................................................................................... 55 Object Name ............................................................................................... 55 Module ....................................................................................................... 55 Class Names ............................................................................................... 56 Our First Application “One-Way File System Hashing” ................................................ 56 Background ................................................................................................ 56 One-way Hashing algorithms’ Basic Characteristics ..................................... 56 Popular Cryptographic Hash Algorithms? .................................................... 57 What are the Tradeoffs Between One-Way Hashing Algorithms? .................... 57 What are the Best-use Cases for One-Way Hashing Algorithms in Forensics? ... 57 Fundamental Requirements .......................................................................... 58 Design Considerations .................................................................................. 59 Program Structure ................................................................................... 61 Main Function ........................................................................................ 62 ParseCommandLine ................................................................................ 62 WalkPath Function .................................................................................. 63 HashFile Function ................................................................................... 63 CSVWriter (Class) .................................................................................... 63 Logger ................................................................................................... 63 Writing the Code ..................................................................................... 63 Code Walk-Through .................................................................................................. 64 Examining Main—Code Walk-Through ........................................................... 64 ParseCommandLine() ................................................................................... 66 ValiditingDirectoryWritable ........................................................................... 69 WalkPath .................................................................................................... 69 HashFile ..................................................................................................... 71 CSVWriter ................................................................................................... 74 Full Code Listing Pfish.py ............................................................................ 75 Full Code Listing _Pfish.py ........................................................................... 76 Python Forensics © 2014 Elsevier Inc. All rights reserved. 53

Welcome message from author
This document is posted to help you gain knowledge. Please leave a comment to let me know what you think about it! Share it to your friends and learn new things together.
Transcript
CHAPTER
Our First PythonForensics App 3CHAPTER CONTENTS
Introduction ............................................................................................................. 54
Naming Conventions and Other Considerations .......................................................... 55
Constants ...................................................................................................55
Local Variable Name ....................................................................................55
Global Variable Name ..................................................................................55
Functions Name ..........................................................................................55
Object Name ...............................................................................................55
Module .......................................................................................................55
Class Names ...............................................................................................56
Our First Application “One-Way File System Hashing” ................................................ 56
Background ................................................................................................56
One-way Hashing algorithms’ Basic Characteristics ..................................... 56
Popular Cryptographic Hash Algorithms? .................................................... 57
What are the Tradeoffs Between One-Way Hashing Algorithms? .................... 57
What are the Best-use Cases for One-Way Hashing Algorithms in Forensics? ... 57
Fundamental Requirements ..........................................................................58
Design Considerations ..................................................................................59
Program Structure ................................................................................... 61
Main Function ........................................................................................ 62
ParseCommandLine ................................................................................ 62
WalkPath Function .................................................................................. 63
HashFile Function ................................................................................... 63
CSVWriter (Class) .................................................................................... 63
Logger ................................................................................................... 63
Writing the Code ..................................................................................... 63
Code Walk-Through .................................................................................................. 64
Examining Main—Code Walk-Through ...........................................................64
ParseCommandLine() ...................................................................................66
ValiditingDirectoryWritable ...........................................................................69
WalkPath ....................................................................................................69
HashFile .....................................................................................................71
CSVWriter ...................................................................................................74
Full Code Listing Pfish.py ............................................................................75
Full Code Listing _Pfish.py ...........................................................................76
Python Forensics
© 2014 Elsevier Inc. All rights reserved.53
Results Presentation ................................................................................................ 83
Chapter Review ........................................................................................................ 86
Summary Questions .................................................................................................. 89
Looking Ahead ......................................................................................................... 89
Additional Resources ............................................................................................... 89
INTRODUCTIONIn 1998, I authored a paper entitled “Using SmartCards and Digital Signatures to
Preserve Electronic Evidence” (Hosmer, 1998). The purpose of the paper was to
advance the early work of Gene Kim, creator of the original Tripwire technology
(Kim, 1993) as a graduate student at Purdue. I was interested in advancing the model
of using one-way hashing technologies to protect digital evidence, and specifically I
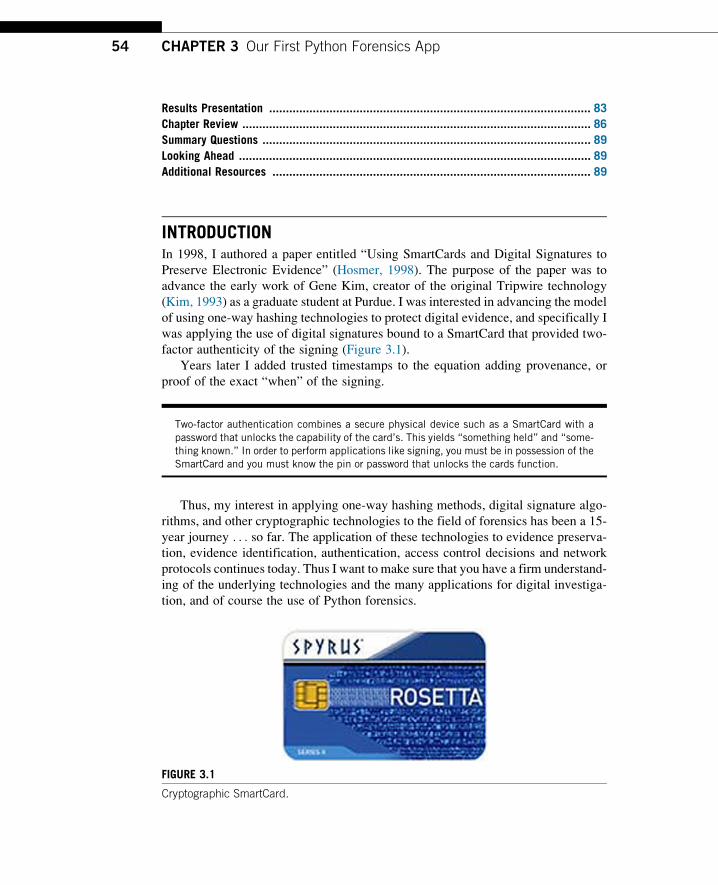
was applying the use of digital signatures bound to a SmartCard that provided two-
factor authenticity of the signing (Figure 3.1).
Years later I added trusted timestamps to the equation adding provenance, or
proof of the exact “when” of the signing.
Two-factor authentication combines a secure physical device such as a SmartCard with apassword that unlocks the capability of the card’s. This yields “something held” and “some-thing known.” In order to perform applications like signing, you must be in possession of theSmartCard and you must know the pin or password that unlocks the cards function.
Thus, my interest in applying one-way hashing methods, digital signature algo-
rithms, and other cryptographic technologies to the field of forensics has been a 15-
year journey . . . so far. The application of these technologies to evidence preserva-
tion, evidence identification, authentication, access control decisions and network
protocols continues today. Thus I want to make sure that you have a firm understand-
ing of the underlying technologies and the many applications for digital investiga-
tion, and of course the use of Python forensics.
FIGURE 3.1
Cryptographic SmartCard.
54 CHAPTER 3 Our First Python Forensics App
Before I dive right in and start writing code, as promised I want to set up some
ground rules for using the Python programming language in forensic applications.
NAMING CONVENTIONS AND OTHER CONSIDERATIONSDuring the development of Python forensics applications, I will define the rules and
naming conventions that are being used throughout the cookbook chapters in the
book. Part of this is to compensate for Python’s lack of the enforcement of strongly
typed variables and true constants. More importantly it is to define a style that will
make the programs more readable, and easier to follow, understand, and modify or
enhance.
Therefore, here are the naming conventions I will be using.
ConstantsRule: Uppercase with underscore separation
Example: HIGH_TEMPERATURE
Local variable nameRule: Lowercase with bumpy caps (underscores are optional)
Example: currentTemperature
Global variable nameRule: Prefix gl lowercase with bumpy caps (underscores are optional)
Note: Globals should be contained to a single module
Example: gl_maximumRecordedTemperature
Functions nameRule: Uppercase with bumpy caps (underscores optional) with active voice
Example: ConvertFarenheitToCentigrade(. . .)
Object nameRule: Prefix ob_ lowercase with bumpy caps
Example: ob_myTempRecorder
ModuleRule: An underscore followed by lowercase with bumpy caps
Example: _tempRecorder
55Naming Conventions and Other Considerations
Class namesRule: Prefix class_ then bumpy caps and keep brief
Example: class_TempSystem
You will see many of these naming conventions in action during this chapter.
OUR FIRST APPLICATION “ONE-WAY FILE SYSTEMHASHING”The objective for our first Python Forensic Application is as follows:
1. Build a useful application and tool for forensic investigators.
2. Develop several modules along the way that are reusable throughout the book
and for future applications.
3. Develop a solid methodology for building Python forensic applications.
4. Begin to introduce more advanced features of the language.
BackgroundBefore we can build an application that performs one-way file system hashing I need
to better define one-way hashing. Many of you reading this are probably saying, “I
already know what a one-way hashing is, let’s move on.” However, this is such an
important underpinning for computer forensics it is worthy of a good definition, pos-
sibly even a better one that you currently have.
One-way hashing algorithms’ basic characteristics1. The one-way hashing algorithm takes a stream of binary data as input; this could
be a password, a file, an image of a hard drive, an image of a solid state drive, a
network packet, 1’s and 0’s from a digital recording, or basically any continuous
digital input.
2. The algorithm produces a message digest which is a compact representation of
the binary data that was received as input.
3. It is infeasible to determine the binary input that generated the digest with only
the digest. In other words, it is not possible to reverse the process using the digest
to recover the stream of binary data that created it.
4. It is infeasible to create a new binary input that will generate a given message
digest.
5. Changing a single bit of the binary input data will generate a unique message
digest.
6. Finally, it is infeasible to find two unique arbitrary streams of binary data that
produce the same digest.
56 CHAPTER 3 Our First Python Forensics App
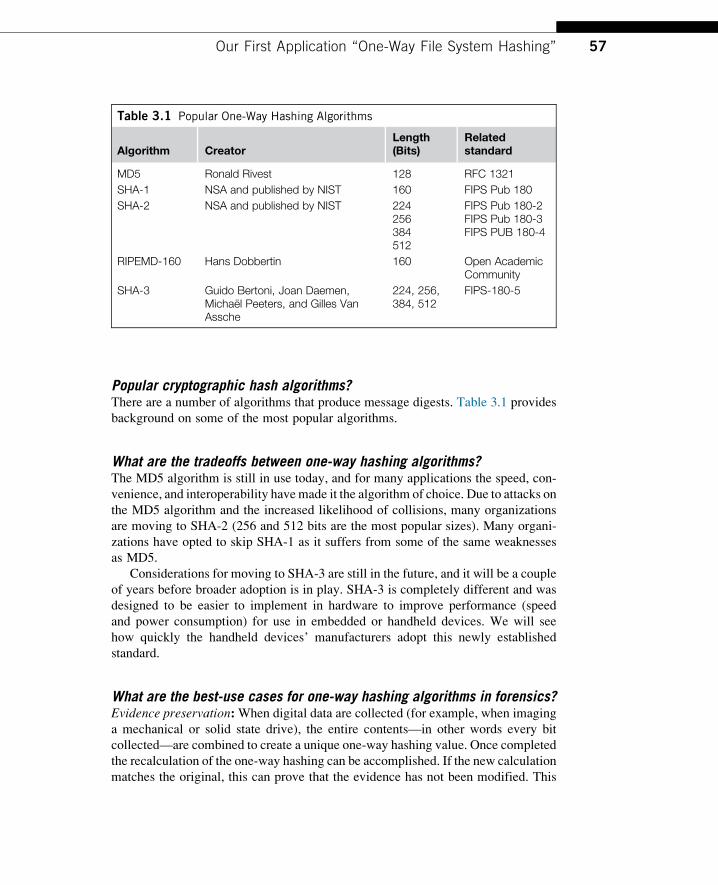
Popular cryptographic hash algorithms?There are a number of algorithms that produce message digests. Table 3.1 provides
background on some of the most popular algorithms.
What are the tradeoffs between one-way hashing algorithms?The MD5 algorithm is still in use today, and for many applications the speed, con-
venience, and interoperability havemade it the algorithm of choice. Due to attacks on
the MD5 algorithm and the increased likelihood of collisions, many organizations
are moving to SHA-2 (256 and 512 bits are the most popular sizes). Many organi-
zations have opted to skip SHA-1 as it suffers from some of the same weaknesses
as MD5.
Considerations for moving to SHA-3 are still in the future, and it will be a couple
of years before broader adoption is in play. SHA-3 is completely different and was
designed to be easier to implement in hardware to improve performance (speed
and power consumption) for use in embedded or handheld devices. We will see
how quickly the handheld devices’ manufacturers adopt this newly established
standard.
What are the best-use cases for one-way hashing algorithms in forensics?Evidence preservation:When digital data are collected (for example, when imaging
a mechanical or solid state drive), the entire contents—in other words every bit
collected—are combined to create a unique one-way hashing value. Once completed
the recalculation of the one-way hashing can be accomplished. If the new calculation
matches the original, this can prove that the evidence has not been modified. This
Table 3.1 Popular One-Way Hashing Algorithms
Algorithm CreatorLength(Bits)
Relatedstandard
MD5 Ronald Rivest 128 RFC 1321
SHA-1 NSA and published by NIST 160 FIPS Pub 180
SHA-2 NSA and published by NIST 224256384512
FIPS Pub 180-2FIPS Pub 180-3FIPS PUB 180-4
RIPEMD-160 Hans Dobbertin 160 Open AcademicCommunity
SHA-3 Guido Bertoni, Joan Daemen,Michael Peeters, and Gilles VanAssche
224, 256,384, 512
FIPS-180-5
57Our First Application “One-Way File System Hashing”
assumes of course that the original calculated hash value has been safeguarded
against tampering since there is no held secret and the algorithms are available. Any-
one could recalculate a hash, therefore the chain of custody of digital evidence,
including the generated hash, must be maintained.
Search: One-way hashing values have been traditionally utilized to perform
searches of known file objects. For example, if law enforcement has a collection
of confirmed child-pornography files, the hashes could be calculated for each file.
Then any suspect system could be scanned for the presence of this contraband by
calculating the hash values of each file and comparing the resulting hashes to the
known list of contraband hash values (those resulting from the child-pornography
collection). If matches are found, then the files on the suspect system matching
the hash values would be examined further.
Black Listing: Like the search example, it is possible to create a list of known bad
hash files. These could represent contraband as with CP example, they could match
knownmalicious code or cyber weapon files or the hashes of classified or proprietary
documents. The discovery of hashes matching any of these Black Listed items would
provide investigators with key evidence.
White Listing: By creating a list of known good or benign hashes (operating sys-
tem or application executables, vendor supplied dynamic link libraries or known
trustworthy application download files), investigators can use the lists to filter out
files that they do not have to examine, because they were previously determined
as a good file. Using this methodology you can dramatically reduce the number
of files that require examination and then focus your attention on files that are not
in the known good hash list.
Change detection: One popular defense against malicious changes to websites,
routers, firewall configuration, and even operating system installations is to hash
a “known good” installation or configuration. Then periodically you can re-scan
the installation or configuration to ensure no files have changed. In addition, you
must of course make sure no files have been added or deleted from the “known
good” set.
Fundamental requirementsNow that we have a better understanding of one-way hashing and its uses, what are
the fundamental requirements of our one-way file system hash application?
When defining requirements for any program or application I want to define them
as succinctly as possible, and with little jargon, so anyone familiar with the domain
could understand them—even if they are not software developers. Also, each
requirement should have an identifier such that could be traced from definition,
through design, development, and validation. I like to give the designers and devel-
opers room to innovate, thus I try to focus on WHAT not HOW during requirements
definition (Table 3.2).
58 CHAPTER 3 Our First Python Forensics App
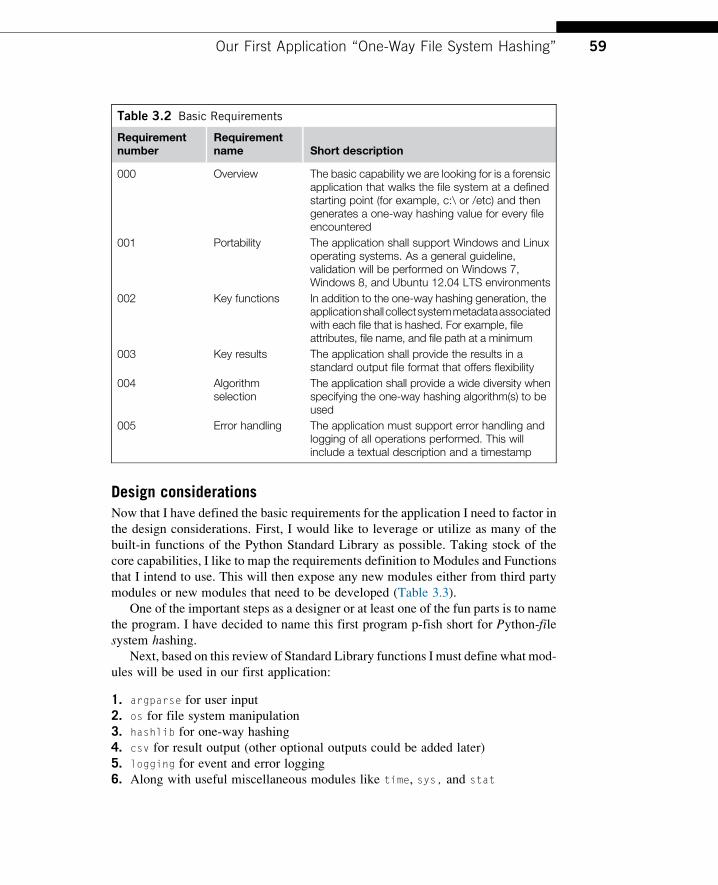
Design considerationsNow that I have defined the basic requirements for the application I need to factor in
the design considerations. First, I would like to leverage or utilize as many of the
built-in functions of the Python Standard Library as possible. Taking stock of the
core capabilities, I like to map the requirements definition to Modules and Functions
that I intend to use. This will then expose any new modules either from third party
modules or new modules that need to be developed (Table 3.3).
One of the important steps as a designer or at least one of the fun parts is to name
the program. I have decided to name this first program p-fish short for Python-filesystem hashing.
Next, based on this review of Standard Library functions I must define what mod-
ules will be used in our first application:
1. argparse for user input
2. os for file system manipulation
3. hashlib for one-way hashing
4. csv for result output (other optional outputs could be added later)
5. logging for event and error logging
6. Along with useful miscellaneous modules like time, sys, and stat
Table 3.2 Basic Requirements
Requirementnumber
Requirementname Short description
000 Overview The basic capability we are looking for is a forensicapplication that walks the file system at a definedstarting point (for example, c:\ or /etc) and thengenerates a one-way hashing value for every fileencountered
001 Portability The application shall support Windows and Linuxoperating systems. As a general guideline,validation will be performed on Windows 7,Windows 8, and Ubuntu 12.04 LTS environments
002 Key functions In addition to the one-way hashing generation, theapplicationshall collectsystemmetadataassociatedwith each file that is hashed. For example, fileattributes, file name, and file path at a minimum
003 Key results The application shall provide the results in astandard output file format that offers flexibility
004 Algorithmselection
The application shall provide a wide diversity whenspecifying the one-way hashing algorithm(s) to beused
005 Error handling The application must support error handling andlogging of all operations performed. This willinclude a textual description and a timestamp
59Our First Application “One-Way File System Hashing”

Table 3.3 Standard Library Mapping
Requirement Design considerations Library selection
User input(000, 003,004)
Each of these requirementsneeds input from the user toaccomplish the task. Forexample, 000 requires the user tospecify the starting directory path.003 requires that the user specifya suitable output format. 004requires us to allow the user tospecify the hash algorithm.Details of the exception handlingor default settings need to bedefined (if allowed)
For this first program I havedecided to use the commandline parameters to obtain inputfrom the user. Based on thisdesign decision I can leveragethe argparse Python StandardLibrary module
Walk the filesystem(000, 001)
This capability requires theprogram to traverse the directorystructure starting at a specificstarting point. Also, this mustwork on both Windows and Linuxplatforms
The OS Module from theStandard Library provides keymethods that provide the abilityto walk the file system, OS alsoprovides abstraction which willprovide cross platformcompatibility. Finally, this modulecontains cross platformcapabilities that provide accessto metadata associated with files
Meta datacollection(003)
This requires us to collect thedirectory path, filename, owner,modified/access/created times,permissions, and attributes suchas read only, hidden, system orarchive
File hashing(000)
I must provide flexibility in theHashing algorithms that the userscould select. I have decided tosupport the most popularalgorithms such as MD5 andseveral variations of SHA
The Standard Library modulehashlib provides the ability togenerate one-way hashingvalues. The library supportscommon hash algorithms suchas “md5,” “sha1,” “sha224,”“sha256,” “sha384,” “sha512.”This should provide a sufficientset of selection for the user
Result output(003)
To meet this requirement I mustbe able to structure the programoutput to support a format thatprovides flexibility
The Standard Library offersmultiple options that I couldleverage. For example, the csvmodule provides the ability tocreate comma separated valueoutput, whereas the jsonmodule (Java Object Notation)provides encoder and decodersfor JSON objects and finally theXML module could be leveragedto create XML output
Continued
60 CHAPTER 3 Our First Python Forensics App
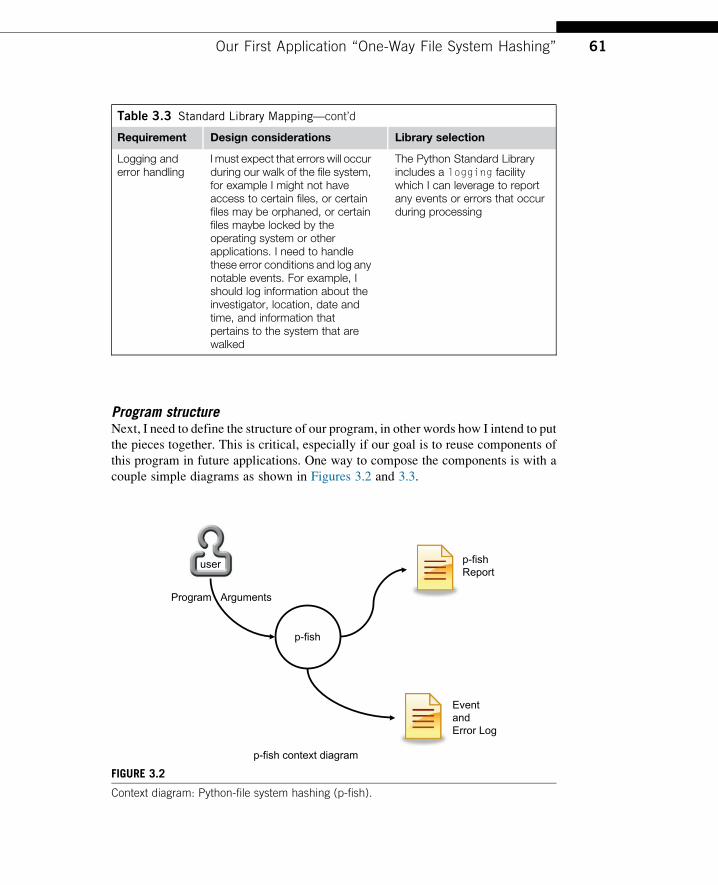
Program structureNext, I need to define the structure of our program, in other words how I intend to put
the pieces together. This is critical, especially if our goal is to reuse components of
this program in future applications. One way to compose the components is with a
couple simple diagrams as shown in Figures 3.2 and 3.3.
Table 3.3 Standard Library Mapping—cont’d
Requirement Design considerations Library selection
Logging anderror handling
I must expect that errors will occurduring our walk of the file system,for example I might not haveaccess to certain files, or certainfiles may be orphaned, or certainfiles maybe locked by theoperating system or otherapplications. I need to handlethese error conditions and log anynotable events. For example, Ishould log information about theinvestigator, location, date andtime, and information thatpertains to the system that arewalked
The Python Standard Libraryincludes a logging facilitywhich I can leverage to reportany events or errors that occurduring processing
p-fish
Program Arguments
user
Event and Error Log
p-fishReport
p-fish context diagram
FIGURE 3.2
Context diagram: Python-file system hashing (p-fish).
61Our First Application “One-Way File System Hashing”
The context diagram is very straightforward and simply depicts the major inputs
and outputs of the proposed program. A user specifies the program arguments, p-fish
takes those inputs and processes (hashes, extracts metadata, etc.) the file system pro-
duces a report and any notable events or errors to the “p-fish report” and the “p-fish
event and error log” files respectively.
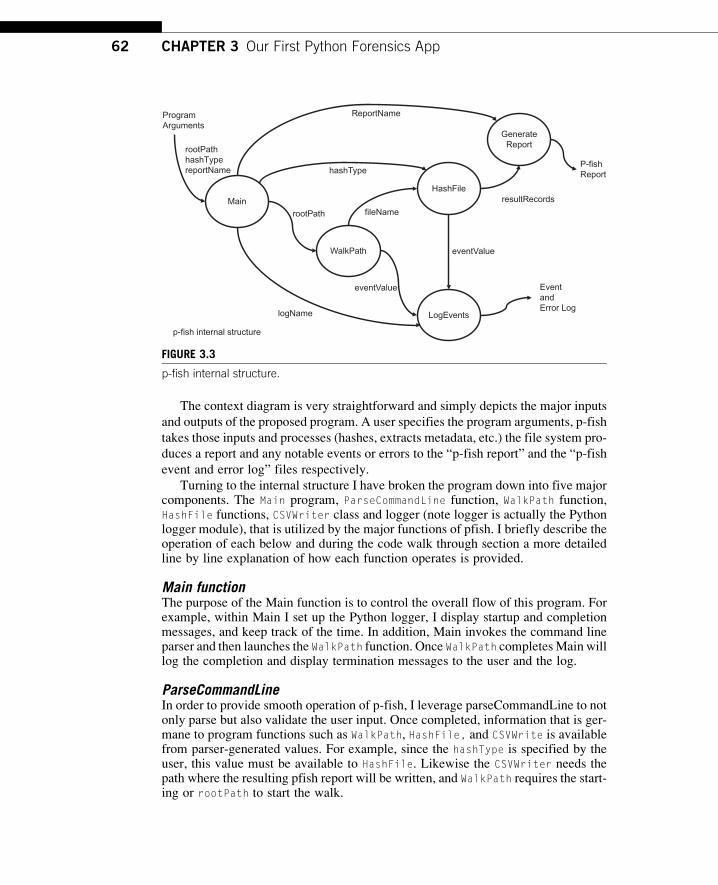
Turning to the internal structure I have broken the program down into five majorcomponents. The Main program, ParseCommandLine function, WalkPath function,HashFile functions, CSVWriter class and logger (note logger is actually the Pythonlogger module), that is utilized by the major functions of pfish. I briefly describe theoperation of each below and during the code walk through section a more detailedline by line explanation of how each function operates is provided.
Main functionThe purpose of the Main function is to control the overall flow of this program. Forexample, within Main I set up the Python logger, I display startup and completionmessages, and keep track of the time. In addition, Main invokes the command lineparser and then launches the WalkPath function. Once WalkPath completesMain willlog the completion and display termination messages to the user and the log.
ParseCommandLineIn order to provide smooth operation of p-fish, I leverage parseCommandLine to notonly parse but also validate the user input. Once completed, information that is ger-mane to program functions such as WalkPath, HashFile, and CSVWrite is availablefrom parser-generated values. For example, since the hashType is specified by theuser, this value must be available to HashFile. Likewise the CSVWriter needs thepath where the resulting pfish report will be written, and WalkPath requires the start-ing or rootPath to start the walk.
Main
Program Arguments
Event and Error Log
resultRecords
p-fish internal structure
WalkPath
HashFile
LogEvents
rootPath
GenerateReport
P-fish Report
fileName
eventValue
eventValue
logName
rootPathhashTypereportName hashType
ReportName
FIGURE 3.3
p-fish internal structure.
62 CHAPTER 3 Our First Python Forensics App
WalkPath functionThe WalkPath function must start at the root of the directory tree or path and traverseevery directory and file. For each valid file encountered it will call the HashFile
function to perform the one-way hashing operations. Once all the files have beenprocessed WalkPath will return control back to Main with the number of files suc-cessfully processed.
HashFile functionThe HashFile function will open, read, hash, and obtain metadata regarding the filein question. For each file, a row of data will be sent to the CSVWriter to be included inthe p-fish report. Once the file has been processed, HashFilewill return control backto WalkPath in order to fetch the next file.
CSVWriter (class)In order to provide an introduction to class and object usage I decided to createCSVWriter as a class instead of a simple function. You will see more of this inupcoming cookbook chapters but CSVWriter sets up nicely for a class/object dem-onstration. The csv module within the Python Standard Library requires that the“writer” be initialized. For example, I want the resulting csv file to have a headerrow made up of a static set of columns. Then subsequent calls to writer will containdata that fills in each row. Finally, once the program has processed all the files theresulting csv report must be closed. Note that as I walk through the program code youmay wonder why I did not leverage classes and objects more for this program. I cer-tainly could have, but felt for the first application I would create a more function-oriented example.
LoggerThe built-in Standard Library logger provides us with the ability to write messages to
a log file associated with p-fish. The program can write information messages, warn-
ing messages, and error messages. Since this is intended to be a forensic application,
logging operations of the program is vital. You can expand the program to log addi-
tional events in the code, they can be added to any of the _pfish functions.
Writing the codeI decided to create two files, mainly to show you how to create your own Pythonmodule and also to give you some background on how to separate capabilities.For this first simple application, I created (1) pfish.py and (2) _pfish.py. As youmay recall, all modules that are created begin with an underscore and since_pfish.py contains all the support functions for pfish I simply named it _pfish.py.If you would like to split out the modules to better separate the functions you couldcreate separate modules for the HashFile function, the WalkPath function, etc. Thisis a decision that is typically based on how tightly or loosely coupled the functionsare, or better stated, whether you wish to reuse individual functions later that need tostandalone. If that is the case, then you should separate them out.
In Figure 3.4 you can see my IDE setup for the project pfish. You notice the pro-
ject section to the far upper right that specifies the files associated with the project. I
also have both files open—you can see the two tabs far left about half way down
63Our First Application “One-Way File System Hashing”
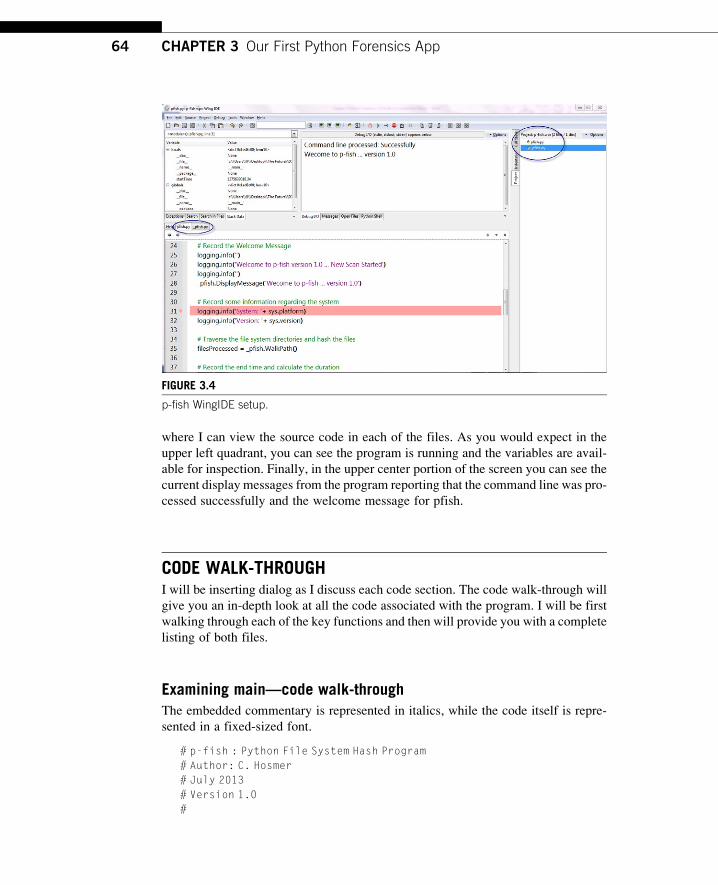
where I can view the source code in each of the files. As you would expect in the
upper left quadrant, you can see the program is running and the variables are avail-
able for inspection. Finally, in the upper center portion of the screen you can see the
current display messages from the program reporting that the command line was pro-
cessed successfully and the welcome message for pfish.
CODE WALK-THROUGHI will be inserting dialog as I discuss each code section. The code walk-through will
give you an in-depth look at all the code associated with the program. I will be first
walking through each of the key functions and then will provide you with a complete
listing of both files.
Examining main—code walk-throughThe embedded commentary is represented in italics, while the code itself is repre-
sented in a fixed-sized font.
# p-fish : Python File System Hash Program
# Author: C. Hosmer
# July 2013
# Version 1.0
#
FIGURE 3.4
p-fish WingIDE setup.
64 CHAPTER 3 Our First Python Forensics App
The main program code is quite straightforward. At the top as you would
expect, you see the import statements that make the Python Standard Library mod-
ules available for our use. What you have not seen before is the import statement
referencing our own module in this case _pfish. Since I will be calling functions
from Main that exist in our module, the module must import our own module
_pfish.
import logging # Python Library logging functionsimport time # Python Library time manipulation functions
import sys # Python Library system specific parameters
import _pfish # _pfish Support Function Module
if __name__ ¼¼'__main__':
PFISH_VERSION ¼'1.0'
# Turn on Logging
Next, you can see my initialization of the Python logging system. In this example I
have hard-wired the log to be stored in the file aptly named pFishLog.log. I set the
logging level to DEGUG and specified that I wanted the Time and Date recorded
for each log event. By setting the level to DEBUG (which is the lowest level) this
will ensure all messages sent to the logger will be visible.
logging.basicConfig(filename¼'pFishLog.log',level¼logging.
DEBUG,format¼'%(asctime)s %(message)s')
Next, I pass control to process the command line arguments by calling the _pfish.
ParseCommandLine() function. I must prefix the function with _pfish, since
the function exists in the _pfish module. If the parse is successful, the function
will return here, if not, it will post a message to the user and exit the program.
I will take a deeper look at the operation of ParseCommandLine() in the next
section.
# Process the Command Line Arguments_pfish.ParseCommandLine()
I need to record the current starting time of the application in order to calculate
elapsed time for processing. I use the Standard Library function time.time() to
acquire the time elapsed in seconds since the epoch. Note, forensically this is the
time of the system we are running on, therefore if the time is a critical element in
your investigation you should sync your system clock accordingly.
# Record the Starting TimestartTime ¼ time.time()
Next the program posts a message to the log reporting the start of the scan and
display this on the user screen only if the verbose option was selected on the com-
mand line (more about this when I examine the ParseCommandLine function).
Notice that I used a CONSTANT to hold the version number instead of just embed-
ding a magic number. Now we can just modify the CONSTANT in the future. Then
anywhere PFISH_VERSION is used it will display the proper version number. I also
logged the system platform and version in case there is a question in the future
65Code Walk-Through
about the system that was used to process these data. This would be a great place
to add information about the organization, investigator name, case number, and
other information that is relevant to the case.
# Post the Start Scan Message to the Loglogging.info('Welcome to p-fish version 1.0 . . . New Scan Started')
_pfish.DisplayMessage('Welcome to p-fish . . . version 1.0')
Note, since I created a constant PFISH_VERSION, we could use that to make the
source code easier to maintain. That would look something like:
_pfish.DisplayMessage(‘Welcome to p-fish . . . ‘þ PFISH_VERSION)
# Record some information regarding the system
logging.info('System:'+ sys.platform)
logging.info('Version:'+ sys.version)
Now the main program launches the WalkPath function within the _pfish mod-
ule that will traverse the directory structure starting at the predefined root path.
This function returns the number of files that were successfully processed by
WalkPath and HashFile. As you can see I use this value along with the ending
time to finalize the log entries. By subtracting the startTime from the endTime
I can determine the number of seconds it took to perform the file system hashing
operations. You could convert the seconds into days, hours, minutes, and seconds
of course.
# Traverse the file system directories and hash the filesfilesProcessed ¼ _pfish.WalkPath()
# Record the end time and calculate the duration
endTime ¼ time.time()
duration ¼ endTime - startTime
logging.info('Files Processed:'+ str(filesProcessed) )
logging.info('Elapsed Time:'+ str(duration) +'seconds')
logging.info('Program Terminated Normally')
_pfish.DisplayMessage("Program End)"
ParseCommandLine()In the design section I made a couple of decisions that drove the development:
1. I decided that this first application would be a command line program.
2. I decided to provide several options to the user to manipulate the behavior of the
program. This has driven the design and implementation of the command line
options.
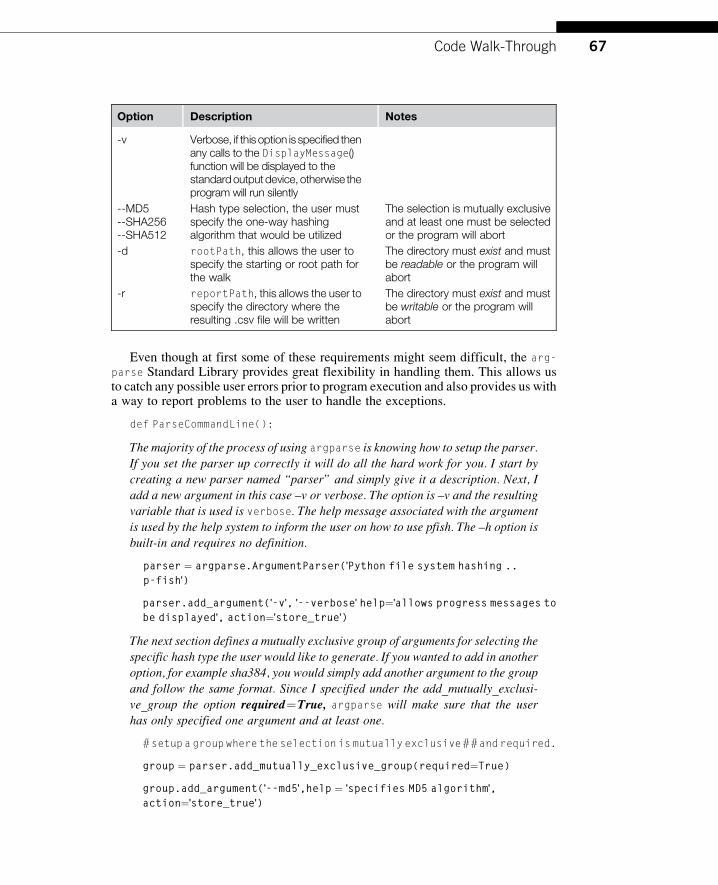
Based on this I provided the following command line options to the program.
66 CHAPTER 3 Our First Python Forensics App
Option Description Notes
-v Verbose, if this option is specified thenany calls to the DisplayMessage()function will be displayed to thestandardoutputdevice, otherwise theprogram will run silently
--MD5--SHA256--SHA512
Hash type selection, the user mustspecify the one-way hashingalgorithm that would be utilized
The selection is mutually exclusiveand at least one must be selectedor the program will abort
-d rootPath, this allows the user tospecify the starting or root path forthe walk
The directory must exist and mustbe readable or the program willabort
-r reportPath, this allows the user tospecify the directory where theresulting .csv file will be written
The directory must exist and mustbe writable or the program willabort
Even though at first some of these requirements might seem difficult, the arg-
parse Standard Library provides great flexibility in handling them. This allows usto catch any possible user errors prior to program execution and also provides us witha way to report problems to the user to handle the exceptions.
def ParseCommandLine():
The majority of the process of using argparse is knowing how to setup the parser.
If you set the parser up correctly it will do all the hard work for you. I start by
creating a new parser named “parser” and simply give it a description. Next, I
add a new argument in this case –v or verbose. The option is –v and the resulting
variable that is used is verbose. The help message associated with the argument
is used by the help system to inform the user on how to use pfish. The –h option is
built-in and requires no definition.
parser ¼ argparse.ArgumentParser('Python file system hashing ..
p-fish')
parser.add_argument('-v','--verbose'help¼'allows progress messages to
be displayed', action¼'store_true')
The next section defines a mutually exclusive group of arguments for selecting the
specific hash type the user would like to generate. If you wanted to add in another
option, for example sha384, you would simply add another argument to the group
and follow the same format. Since I specified under the add_mutually_exclusi-
ve_group the option required¼True, argparse will make sure that the user
has only specified one argument and at least one.
#setupagroupwheretheselectionismutuallyexclusive##andrequired.
group ¼ parser.add_mutually_exclusive_group(required¼True)
group.add_argument('--md5',help ¼'specifies MD5 algorithm',
action¼'store_true')
67Code Walk-Through
group.add_argument('--sha256', help ¼'specifies SHA256
algorithm', action¼'store_true')group.add_argument('--sha512', help ¼'specifies SHA512
algorithm', action¼'store_true')
Next I need to specify the starting point of our walk, and where the report should be
created. This works the same as the previous setup, except I have added the type
option. This requires argparse to validate the type I have specified. In the case of
the –d option, I want to make sure that the rootPath exists and is readable. For
the reportPath, it must exist and be writable. Since argparse does not have built-
in functions to validate a directory, I created the functions ValidateDirectory()
and ValidateDirectoryWritable(). They are almost identical and they use
Standard Library operating system functions to validate the directories as defined.
parser.add_argument('-d','--rootPath', type¼ValidateDirectory, required¼True, help¼"specify the root
path for hashing)"
parser.add_argument('-r','--reportPath', type¼ValidateDirectoryWritable, required¼True, help¼"specify the
path for reports and logs will be written)"
# create a global object to hold the validated arguments,
# # these will be available then to all the Functions
within # the _pfish.py module
global gl_args
global gl_hashType
Now the parser can be invoked. I want to store the resulting arguments (once val-
idated) in a global variable so they can be accessible by the functions within the
_pfish module. This would be a great opportunity to create a class to handle this
which would avoid the use of the global variables. This is done in Chapter 4.
gl_args ¼ parser.parse_args()
If the parser was successful (in other words argparse validated the command line
parameters), I want to determine which hashing algorithm the user selected. I do
that by examining each value associated with the hash types. If the user selected
sha256 for example, the gl_args.sha256 would be True and md5 and sha512
would be false. Therefore, by using a simple if/elif language routine I can deter-
mine which was selected.
if gl_args.md5:gl_hashType ¼'MD5'
elif gl_args.sha256:
gl_hashType ¼'SHA256'
elif gl_args.sha512:
gl_hashType ¼'SHA512'
else:
gl_hashType ¼ "Unknown"
68 CHAPTER 3 Our First Python Forensics App
logging.error('Unknown Hash Type Specified')
DisplayMessage("Command line processed: Successfully)"
return
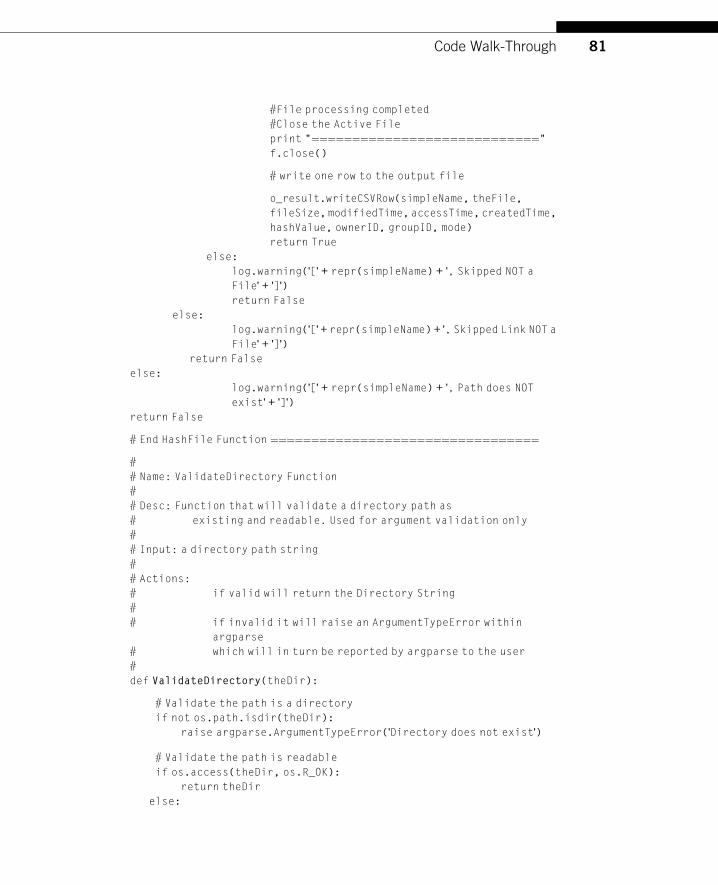
ValiditingDirectoryWritableAs mentioned above, I needed to create functions to validate the directories providedby the users for both the report and starting or root path of theWalk. I accomplish thisby leveraging the Python Standard Library module os. I leverage both the os.path.
isdir and os.access methods associated with this module.
def ValidateDirectoryWritable(theDir):
I first check to see if in fact the directory string that the user provided exists. If the
test fails then I raise an error within argparse and provide the message “Direc-
tory does not exist.” This message would be provided to the user if the test fails.
# Validate the path is a directoryif not os.path.isdir(theDir):
raise argparse.ArgumentTypeError('Directory does not
exist')
Next I validate that write privilege is authorized to the directory and once again if
the test fails I raise an exception and provide a message.
# Validate the path is writableif os.access(theDir, os.W_OK):
return theDir
else:
raiseargparse.ArgumentTypeError('Directoryis not writable')
Now that I have completed the implementation of the ParseCommandLine func-tion, let us examine a few examples of how the function rejects improper commandline arguments. In Figure 3.5, I created four improperly formed command lines:
(1) I mistyped the root directory as TEST_DIR instead of simply TESTDIR
(2) I mistyped the –sha512 parameter as –sha521
(3) I specified two hash types –sha512 and –md5
(4) Finally, I did not specify any hash type
As you can see in each case, ParseCommandLine rejected the command.In order to get the user back on track they simply have to utilize the –h or help
option as shown in Figure 3.6 to obtain the proper command line argument
instructions.
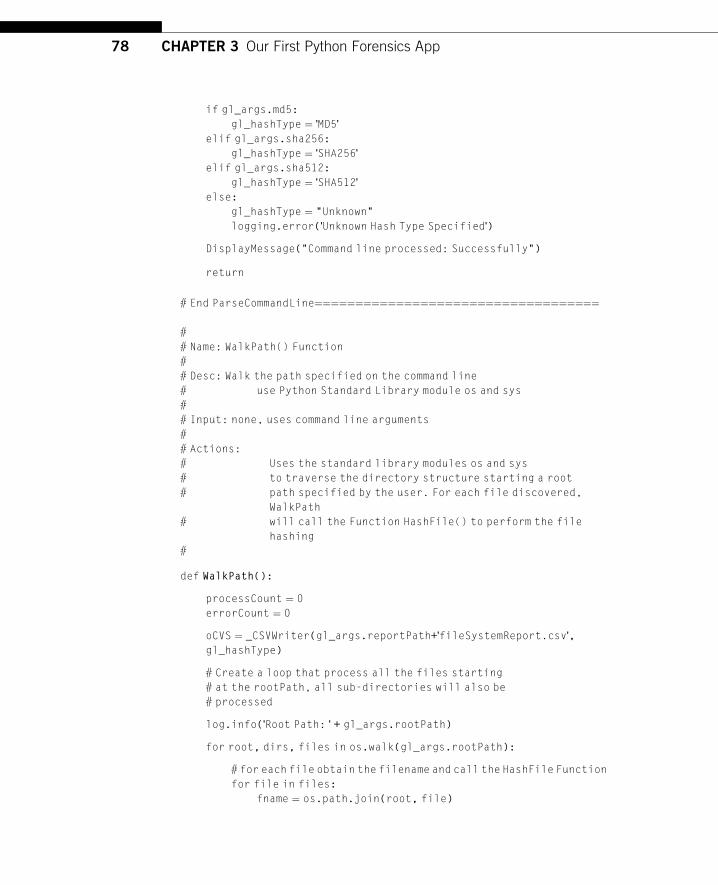
WalkPathNow let us walk through the WalkPath function that will traverse the directory struc-ture, and for each file will call the HashFile function. I think you will be pleasantlysurprised how simple this is.
69Code Walk-Through

def WalkPath():
I first initialize the variable processCount in order to count the number of suc-
cessfully processed files and I post a message to the log file to document the root
path value.
processCount ¼ 0errorCount ¼ 0
log.info('Root Path:'+ gl_args.rootPath)
FIGURE 3.6
pfish –h command.
FIGURE 3.5
Demonstration of ParseCommandLine.
70 CHAPTER 3 Our First Python Forensics App
Next I initialize the CSVWriter with the reportPath provided on the command
line by the user. I also provide the hashType selected by the user so it can be
included in the Header line of the CSV file. I will cover the CSVWriter class later
in this chapter.
oCVS ¼ _CSVWriter(gl_args.reportPath+'fileSystemReport.csv',
gl_hashType)
# Create a loop that process all the files starting
# at the rootPath, all sub-directories will also be
# processed
Next I create a loop using the os.walkmethod and the rootpath specified by the
user. This will create a list of file names that is processed in the next loop. This is
done for each directory found within the path.
for root, dirs, files in os.walk(gl_args.rootPath):
# for each file obtain the filename and call the
# HashFile Function
The next loop processes each file in the list of files and calls the function HashFile
with the file name joined with the path, along with the simple file name for use by
HashFile. The call also passes HashFile with access to the CVS writer so that
the results of the hashing operations can be written to the CVS file.
for file in files:fname ¼ os.path.join(root, file)
result ¼ HashFile(fname, file, oCVS)
# if successful then increment ProcessCount
The process and error counts are incremented accordingly
if result is True:processCount +¼ 1
# if not successful, the increment the ErrorCount
else:
errorCount +¼ 1
Once all the directories and files have been processed the CVSWriter is closed
and the function returns to the main program with the number of successfully pro-
cessed files.
oCVS.writerClose()return(processCount)
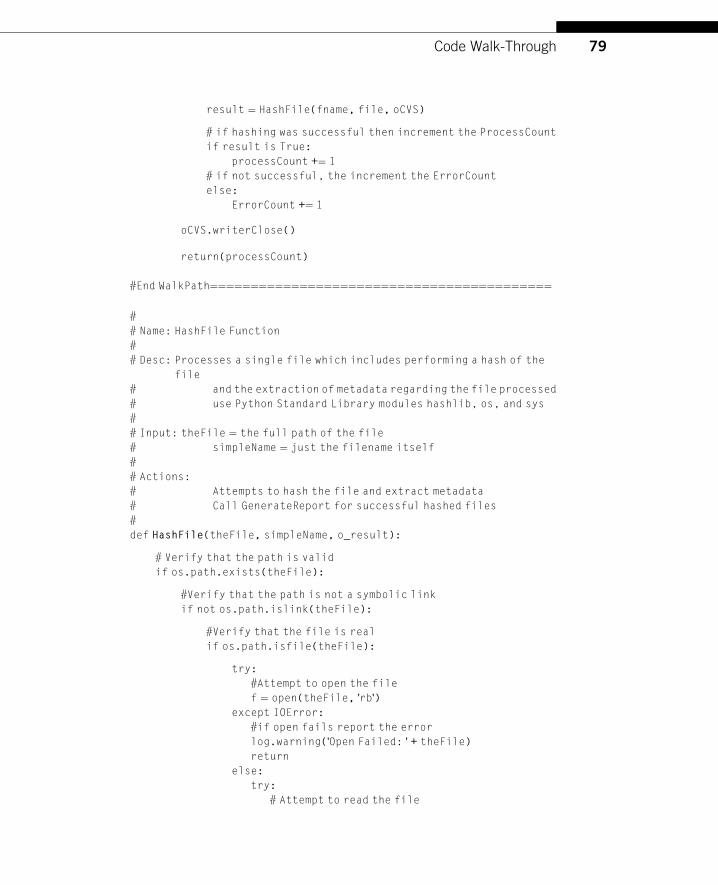
HashFileBelow is the code for the HashFile function, it is clearly the longest for this program,but also quite simple and straightforward. Let us walk through the process.
def HashFile(theFile, simpleName, o_result):
71Code Walk-Through
For each file several items require validation before we attempt to hash the file.
(1) Does the path exist
(2) Is the path a link instead of an actual file
(3) Is the file real (making sure it is not orphaned)
For each of these tests there is a corresponding log error that is posted to the log
file if failure occurs. If the file is bypassed the program will simply return to
WalkFile and process the next file.
# Verify that the path is validif os.path.exists(theFile):
#Verify that the path is not a symbolic link
if not os.path.islink(theFile):
#Verify that the file is real
if os.path.isfile(theFile):
The next part is a little tricky. Even through our best efforts to determine the existence
of the file, there may be cases where the file cannot be opened or read. This could be
caused by permission issues, the file is locked or possibly corrupted. Therefore, I uti-
lize the try methods while attempting to open and then read from the files. Note that
I’m careful to open the file as read-only the “rb” option. Once again if an error
occurs a report is generated and logged and the program moves on to the next file.
try:#Attempt to open the file
f ¼ open(theFile,'rb')
except IOError:
#if open fails report the error
log.warning('Open Failed:'+ theFile)
return
else:
try:
# Attempt to read the file
rd ¼ f.read()
except IOError:
# if read fails, then close the file and
# report error
f.close()
log.warning('Read Failed:'+ theFile)
return
else:
#success the file is open and we can
#read from it
#lets query the file stats
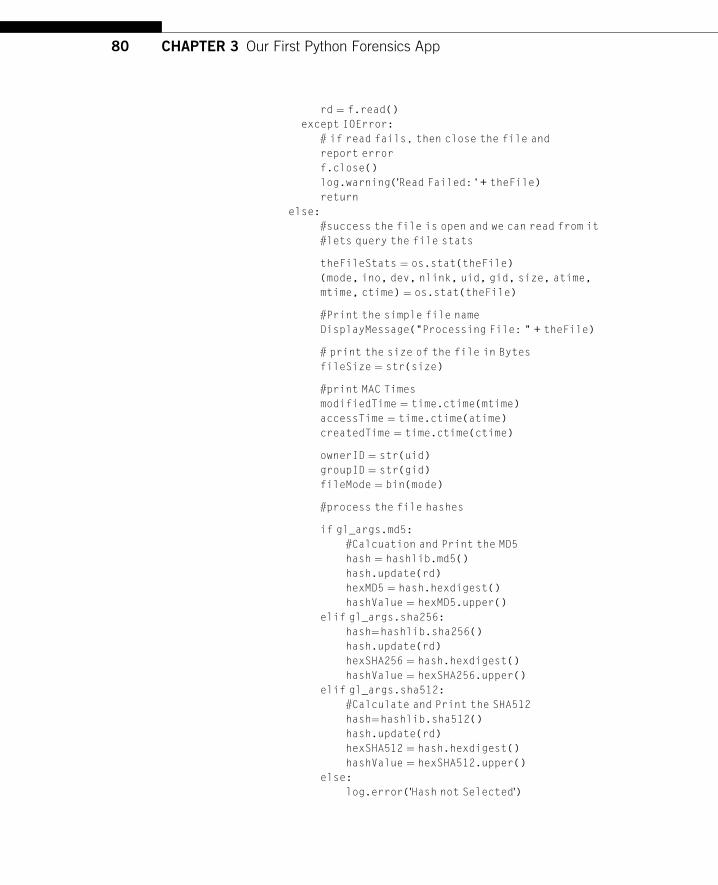
Once the file has been successfully opened and verified that reading from the file
is allowed, I extract the attributes associated with the file. These include owner,
group, size, MAC times, and mode. I will include these in the record that is posted
to the CSV file.
72 CHAPTER 3 Our First Python Forensics App
theFileStats ¼ os.stat(theFile)(mode, ino, dev, nlink, uid, gid, size,
atime, mtime, ctime) ¼ os.stat(theFile)
# Display progress to the user
DisplayMessage("Processing File: " + theFile)
# convert the file size to a string
fileSize ¼ str(size)
# convert the MAC Times to strings
modifiedTime ¼ time.ctime(mtime)
accessTime ¼ time.ctime(atime)
createdTime ¼ time.ctime(ctime)
# convert the owner, group and file mode
ownerID ¼ str(uid)
groupID ¼ str(gid)
fileMode ¼ bin(mode)
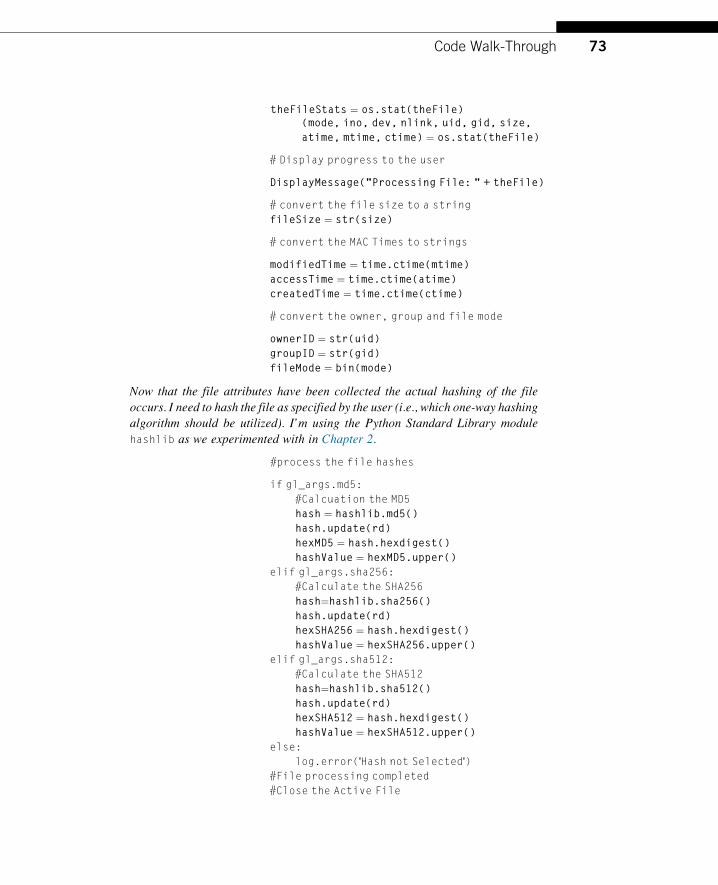
Now that the file attributes have been collected the actual hashing of the file
occurs. I need to hash the file as specified by the user (i.e., which one-way hashing
algorithm should be utilized). I’m using the Python Standard Library module
hashlib as we experimented with in Chapter 2.
#process the file hashes
if gl_args.md5:
#Calcuation the MD5
hash ¼ hashlib.md5()
hash.update(rd)
hexMD5 ¼ hash.hexdigest()
hashValue ¼ hexMD5.upper()
elif gl_args.sha256:
#Calculate the SHA256
hash¼hashlib.sha256()
hash.update(rd)
hexSHA256 ¼ hash.hexdigest()
hashValue ¼ hexSHA256.upper()
elif gl_args.sha512:
#Calculate the SHA512
hash¼hashlib.sha512()
hash.update(rd)
hexSHA512 ¼ hash.hexdigest()
hashValue ¼ hexSHA512.upper()
else:
log.error('Hash not Selected')
#File processing completed
#Close the Active File
73Code Walk-Through

Now that processing of the file is complete the file must be closed. Next I use the
CSV class to write out the record to the report file and return successfully to the
caller in this case WalkPath.
f.close()
# write one row to the output file
o_result.writeCSVRow(simpleName,
theFile, fileSize, modifiedTime,
accessTime, createdTime, hashValue,
ownerID, groupID, mode)
return True
This section posts the warning messages to the log file relating to problems
encountered processing the file.
else:log.warning('['+ repr(simpleName) +', Skipped NOT a File'+']')
return False
else:
log.warning('['+ repr(simpleName) +', Skipped Link
NOT a File'+']')
return False
else:
log.warning('['+ repr(simpleName) +', Path does NOT exist'+']')
return False
CSVWriterThe final code walk-through section I will cover in this chapter is the CSVWriter. As Imentioned earlier, I created this code as a class instead of a function to make thismore useful and to introduce you to the concept of classes in Python. The class onlyhas three methods, the constructor or init, writeCSVRow, and writerClose. Let usexamine each one.
class _CSVWriter:
The constructor or init method accomplishes three basic initializations:
(1) Opens the output csvFile
(2) Initializes the csv.writer
(3) Writes the header row with the names of each column
If any failure occurs during the initialization an exception is thrown and a log
entry is generated.
def __init__(self, fileName, hashType):try:
# create a writer object and write the header row
self.csvFile ¼ open(fileName,'wb')
74 CHAPTER 3 Our First Python Forensics App
self.writer ¼ csv.writer(self.csvFile,
delimiter¼',', quoting¼csv.QUOTE_ALL)
self.writer.writerow( ('File','Path','Size',
'Modified Time','Access Time','Created Time',
hashType,'Owner','Group','Mode') )
except:
log.error('CSV File Failure')
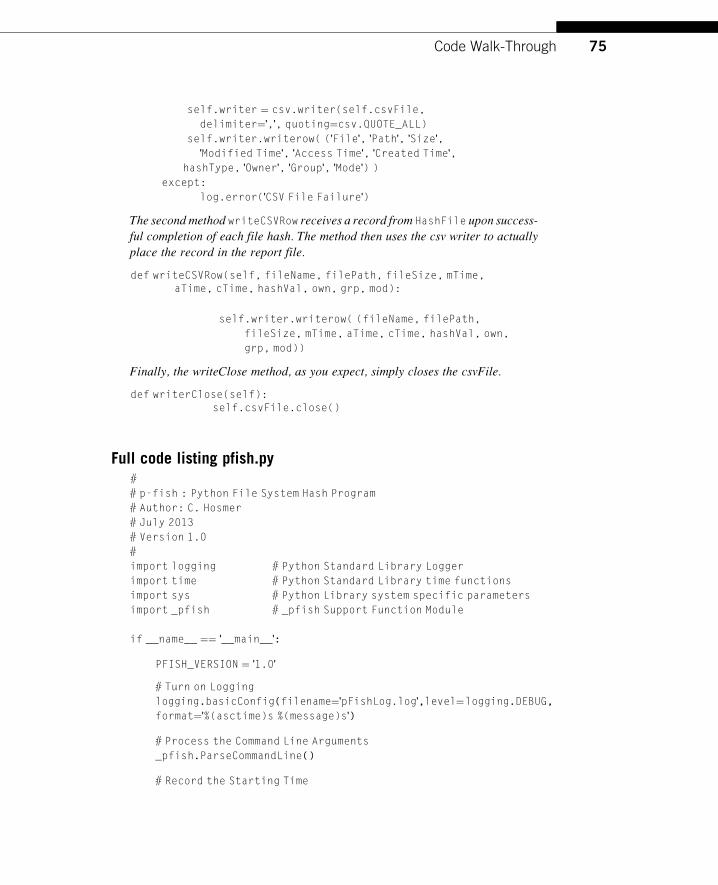
The second method writeCSVRow receives a record from HashFile upon success-
ful completion of each file hash. The method then uses the csv writer to actually
place the record in the report file.
def writeCSVRow(self, fileName, filePath, fileSize, mTime,aTime, cTime, hashVal, own, grp, mod):
self.writer.writerow( (fileName, filePath,
fileSize, mTime, aTime, cTime, hashVal, own,
grp, mod))
Finally, the writeClose method, as you expect, simply closes the csvFile.
def writerClose(self):self.csvFile.close()
Full code listing pfish.py#
# p-fish : Python File System Hash Program
# Author: C. Hosmer
# July 2013
# Version 1.0
#
import logging # Python Standard Library Logger
import time # Python Standard Library time functions
import sys # Python Library system specific parameters
import _pfish # _pfish Support Function Module
if __name__ ¼¼'__main__':
PFISH_VERSION ¼'1.0'
# Turn on Logging
logging.basicConfig(filename¼'pFishLog.log',level¼logging.DEBUG,
format¼'%(asctime)s %(message)s')
# Process the Command Line Arguments
_pfish.ParseCommandLine()
# Record the Starting Time
75Code Walk-Through
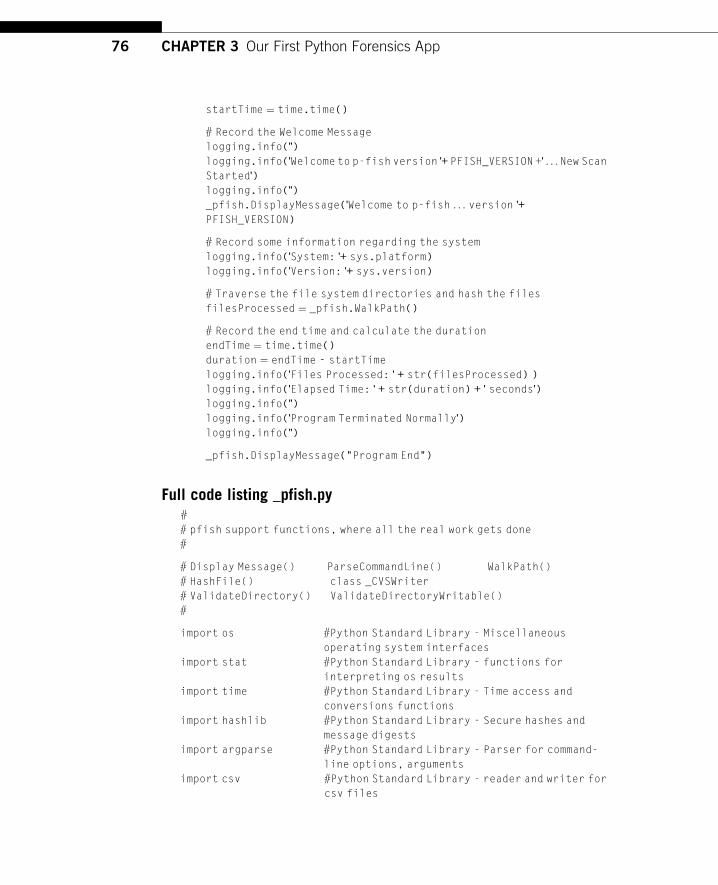
startTime ¼ time.time()
# Record the Welcome Message
logging.info('')
logging.info('Welcome to p-fish version'+ PFISH_VERSION +'. . . New Scan
Started')
logging.info('')
_pfish.DisplayMessage('Welcome to p-fish . . . version'+
PFISH_VERSION)
# Record some information regarding the system
logging.info('System:'+ sys.platform)
logging.info('Version:'+ sys.version)
# Traverse the file system directories and hash the files
filesProcessed ¼ _pfish.WalkPath()
# Record the end time and calculate the duration
endTime ¼ time.time()
duration ¼ endTime - startTime
logging.info('Files Processed:'+ str(filesProcessed) )
logging.info('Elapsed Time:'+ str(duration) +'seconds')
logging.info('')
logging.info('Program Terminated Normally')
logging.info('')
_pfish.DisplayMessage("Program End")
Full code listing _pfish.py#
# pfish support functions, where all the real work gets done
#
# Display Message() ParseCommandLine() WalkPath()
# HashFile() class _CVSWriter
# ValidateDirectory() ValidateDirectoryWritable()
#
import os #Python Standard Library - Miscellaneous
operating system interfaces
import stat #Python Standard Library - functions for
interpreting os results
import time #Python Standard Library - Time access and
conversions functions
import hashlib #Python Standard Library - Secure hashes and
message digests
import argparse #Python Standard Library - Parser for command-
line options, arguments
import csv #Python Standard Library - reader and writer for
csv files
76 CHAPTER 3 Our First Python Forensics App
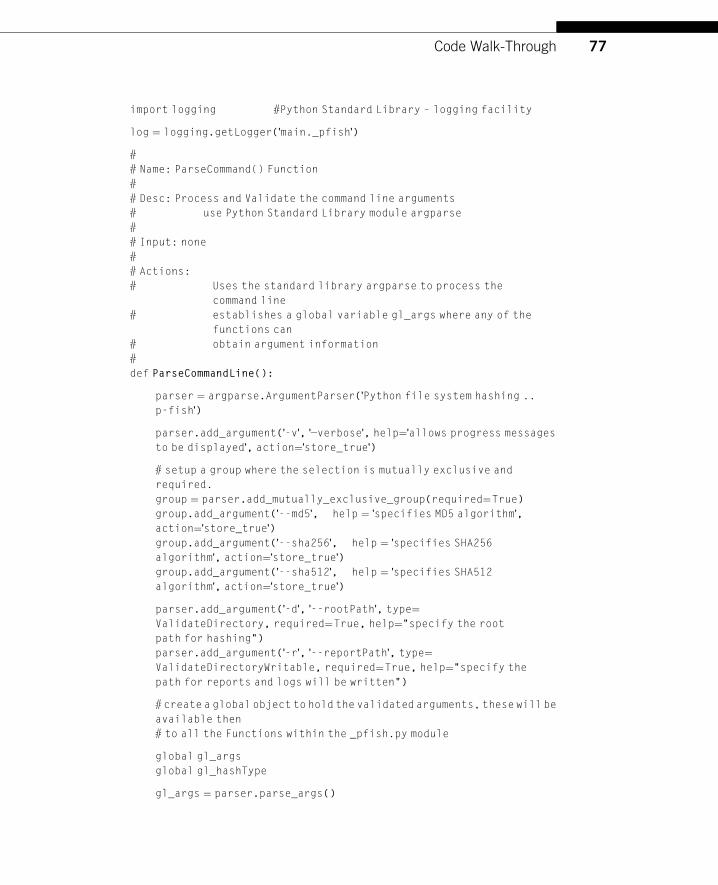
import logging #Python Standard Library – logging facility
log ¼ logging.getLogger('main._pfish')
#
# Name: ParseCommand() Function
#
# Desc: Process and Validate the command line arguments
# use Python Standard Library module argparse
#
# Input: none
#
# Actions:
# Uses the standard library argparse to process the
command line
# establishes a global variable gl_args where any of the
functions can
# obtain argument information
#
def ParseCommandLine():
parser ¼ argparse.ArgumentParser('Python file system hashing ..
p-fish')
parser.add_argument('-v','—verbose', help¼'allows progress messages
to be displayed', action¼'store_true')# setup a group where the selection is mutually exclusive and
required.
group ¼ parser.add_mutually_exclusive_group(required¼True)
group.add_argument('--md5', help ¼'specifies MD5 algorithm',
action¼'store_true')group.add_argument('--sha256', help ¼'specifies SHA256
algorithm', action¼'store_true')group.add_argument('--sha512', help ¼'specifies SHA512
algorithm', action¼'store_true')parser.add_argument('-d','--rootPath', type¼ValidateDirectory, required¼True, help¼"specify the root
path for hashing")
parser.add_argument('-r','--reportPath', type¼ValidateDirectoryWritable, required¼True, help¼"specify the
path for reports and logs will be written")
# createa globalobject to hold the validated arguments, these willbe
available then
# to all the Functions within the _pfish.py module
global gl_args
global gl_hashType
gl_args ¼ parser.parse_args()
77Code Walk-Through
if gl_args.md5:
gl_hashType ¼'MD5'
elif gl_args.sha256:
gl_hashType ¼'SHA256'
elif gl_args.sha512:
gl_hashType ¼'SHA512'
else:
gl_hashType ¼ "Unknown"
logging.error('Unknown Hash Type Specified')
DisplayMessage("Command line processed: Successfully")
return
# End ParseCommandLine¼¼¼¼¼¼¼¼¼¼¼¼¼¼¼¼¼¼¼¼¼¼¼¼¼¼¼¼¼¼¼¼¼¼¼
#
# Name: WalkPath() Function
#
# Desc: Walk the path specified on the command line
# use Python Standard Library module os and sys
#
# Input: none, uses command line arguments
#
# Actions:
# Uses the standard library modules os and sys
# to traverse the directory structure starting a root
# path specified by the user. For each file discovered,
WalkPath
# will call the Function HashFile() to perform the file
hashing
#
def WalkPath():
processCount ¼ 0
errorCount ¼ 0
oCVS ¼ _CSVWriter(gl_args.reportPath+'fileSystemReport.csv',
gl_hashType)
# Create a loop that process all the files starting
# at the rootPath, all sub-directories will also be
# processed
log.info('Root Path:'+ gl_args.rootPath)
for root, dirs, files in os.walk(gl_args.rootPath):
# for each file obtain the filename and call the HashFile Function
for file in files:
fname ¼ os.path.join(root, file)
78 CHAPTER 3 Our First Python Forensics App
result ¼ HashFile(fname, file, oCVS)
# if hashing was successful then increment the ProcessCount
if result is True:
processCount +¼ 1
# if not successful, the increment the ErrorCount
else:
ErrorCount +¼ 1
oCVS.writerClose()
return(processCount)
#End WalkPath¼¼¼¼¼¼¼¼¼¼¼¼¼¼¼¼¼¼¼¼¼¼¼¼¼¼¼¼¼¼¼¼¼¼¼¼¼¼¼¼¼¼
#
# Name: HashFile Function
#
# Desc: Processes a single file which includes performing a hash of the
file
# and the extraction of metadata regarding the file processed
# use Python Standard Library modules hashlib, os, and sys
#
# Input: theFile ¼ the full path of the file
# simpleName ¼ just the filename itself
#
# Actions:
# Attempts to hash the file and extract metadata
# Call GenerateReport for successful hashed files
#
def HashFile(theFile, simpleName, o_result):
# Verify that the path is valid
if os.path.exists(theFile):
#Verify that the path is not a symbolic link
if not os.path.islink(theFile):
#Verify that the file is real
if os.path.isfile(theFile):
try:
#Attempt to open the file
f ¼ open(theFile,'rb')
except IOError:
#if open fails report the error
log.warning('Open Failed:'+ theFile)
return
else:
try:
# Attempt to read the file
79Code Walk-Through
rd ¼ f.read()
except IOError:
# if read fails, then close the file and
report error
f.close()
log.warning('Read Failed:'+ theFile)
return
else:
#success the file is open and we can read from it
#lets query the file stats
theFileStats ¼ os.stat(theFile)
(mode, ino, dev, nlink, uid, gid, size, atime,
mtime, ctime) ¼ os.stat(theFile)
#Print the simple file name
DisplayMessage("Processing File: " + theFile)
# print the size of the file in Bytes
fileSize ¼ str(size)
#print MAC Times
modifiedTime ¼ time.ctime(mtime)
accessTime ¼ time.ctime(atime)
createdTime ¼ time.ctime(ctime)
ownerID ¼ str(uid)
groupID ¼ str(gid)
fileMode ¼ bin(mode)
#process the file hashes
if gl_args.md5:
#Calcuation and Print the MD5
hash ¼ hashlib.md5()
hash.update(rd)
hexMD5 ¼ hash.hexdigest()
hashValue ¼ hexMD5.upper()
elif gl_args.sha256:
hash¼hashlib.sha256()
hash.update(rd)
hexSHA256 ¼ hash.hexdigest()
hashValue ¼ hexSHA256.upper()
elif gl_args.sha512:
#Calculate and Print the SHA512
hash¼hashlib.sha512()
hash.update(rd)
hexSHA512 ¼ hash.hexdigest()
hashValue ¼ hexSHA512.upper()
else:
log.error('Hash not Selected')
80 CHAPTER 3 Our First Python Forensics App
#File processing completed
#Close the Active File
print "¼¼¼¼¼¼¼¼¼¼¼¼¼¼¼¼¼¼¼¼¼¼¼¼¼¼¼¼"
f.close()
# write one row to the output file
o_result.writeCSVRow(simpleName, theFile,
fileSize,modifiedTime, accessTime, createdTime,
hashValue, ownerID, groupID, mode)
return True
else:
log.warning('['+ repr(simpleName) +', Skipped NOT a
File'+']')
return False
else:
log.warning('['+ repr(simpleName) +', Skipped Link NOT a
File'+']')
return False
else:
log.warning('['+ repr(simpleName) +', Path does NOT
exist'+']')
return False
# End HashFile Function ¼¼¼¼¼¼¼¼¼¼¼¼¼¼¼¼¼¼¼¼¼¼¼¼¼¼¼¼¼¼¼¼¼#
# Name: ValidateDirectory Function
#
# Desc: Function that will validate a directory path as
# existing and readable. Used for argument validation only
#
# Input: a directory path string
#
# Actions:
# if valid will return the Directory String
#
# if invalid it will raise an ArgumentTypeError within
argparse
# which will in turn be reported by argparse to the user
#
def ValidateDirectory(theDir):
# Validate the path is a directory
if not os.path.isdir(theDir):
raise argparse.ArgumentTypeError('Directory does not exist')
# Validate the path is readable
if os.access(theDir, os.R_OK):
return theDir
else:
81Code Walk-Through
raise argparse.ArgumentTypeError('Directory is not readable')
#End ValidateDirectory ¼¼¼¼¼¼¼¼¼¼¼¼¼¼¼¼¼¼¼¼¼¼¼¼¼¼¼¼¼¼¼¼¼¼#
# Name: ValidateDirectoryWritable Function
#
# Desc: Function that will validate a directory path as
# existing and writable. Used for argument validation only
#
# Input: a directory path string
#
# Actions:
# if valid will return the Directory String
#
# if invalid it will raise an ArgumentTypeError within
argparse
# which will in turn be reported by argparse to the user
#
def ValidateDirectoryWritable(theDir):
# Validate the path is a directory
if not os.path.isdir(theDir):
raise argparse.ArgumentTypeError('Directory does not exist')
# Validate the path is writable
if os.access(theDir, os.W_OK):
return theDir
else:
raise argparse.ArgumentTypeError('Directory is not writable')
#End ValidateDirectoryWritable ¼¼¼¼¼¼¼¼¼¼¼¼¼¼¼¼¼¼¼¼¼¼¼¼¼¼¼¼
#¼¼¼¼¼¼¼¼¼¼¼¼¼¼¼¼¼¼¼¼¼¼¼¼¼¼¼¼¼¼¼¼¼¼¼¼¼¼¼¼¼¼¼¼¼¼¼¼¼¼¼#
# Name: DisplayMessage() Function
#
# Desc: Displays the message if the verbose command line option is present
#
# Input: message type string
#
# Actions:
# Uses the standard library print function to display the
message
#
def DisplayMessage(msg):
if gl_args.verbose:
print(msg)
82 CHAPTER 3 Our First Python Forensics App
return
#End DisplayMessage¼¼¼¼¼¼¼¼¼¼¼¼¼¼¼¼¼¼¼¼¼¼¼¼¼¼¼¼¼¼¼¼¼¼¼¼¼#
# Class: _CSVWriter
#
# Desc: Handles all methods related to comma separated value operations
#
# Methods constructor: Initializes the CSV File
# writeCVSRow: Writes a single row to the csv file
# writerClose: Closes the CSV File
class _CSVWriter:
def __init__(self, fileName, hashType):
try:
# create a writer object and then write the header row
self.csvFile ¼ open(fileName,'wb')
self.writer ¼ csv.writer(self.csvFile, delimiter¼',',quoting¼csv.QUOTE_ALL)
self.writer.writerow( ('File','Path','Size','Modified Time',
'Access Time','Created Time', hashType,'Owner','Group','Mode') )
except:
log.error('CSV File Failure')
def writeCSVRow(self, fileName, filePath, fileSize, mTime, aTime,
cTime, hashVal, own, grp, mod):
self.writer.writerow( (fileName, filePath, fileSize, mTime,
aTime, cTime, hashVal, own, grp, mod))
def writerClose(self):
self.csvFile.close()
RESULTS PRESENTATIONNow that the walk-through has been completed and I have gone through a deep dive
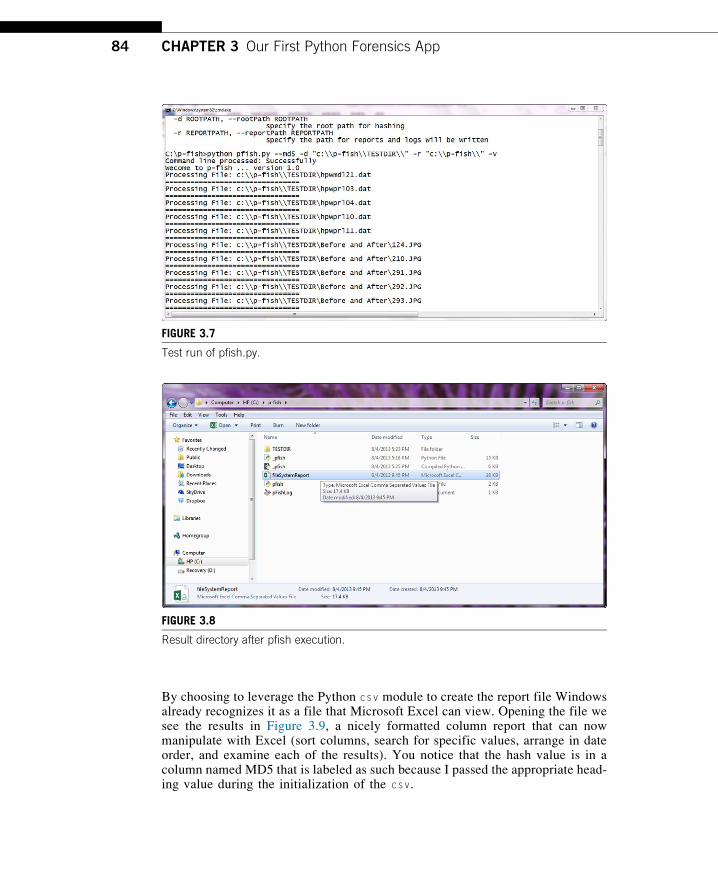
into the code, let us take a look at the results. In Figure 3.7, I executed the program
with the following options:
C:\p-fish>Python pfish.py --md5 -d “c:\\p-fish\\TESTDIR\\” -r “c:\\p-fish\\” –v
The –v or verbose option was selected and the program displayed information
regarding every file processed was selected as expected.
In Figure 3.8, I examine the c:\p-fish directory and discover that two files were
created there, which are the two resulting files for the pfish.py.
1. fileSystemReport.csv
2. pFishLog.log
83Results Presentation
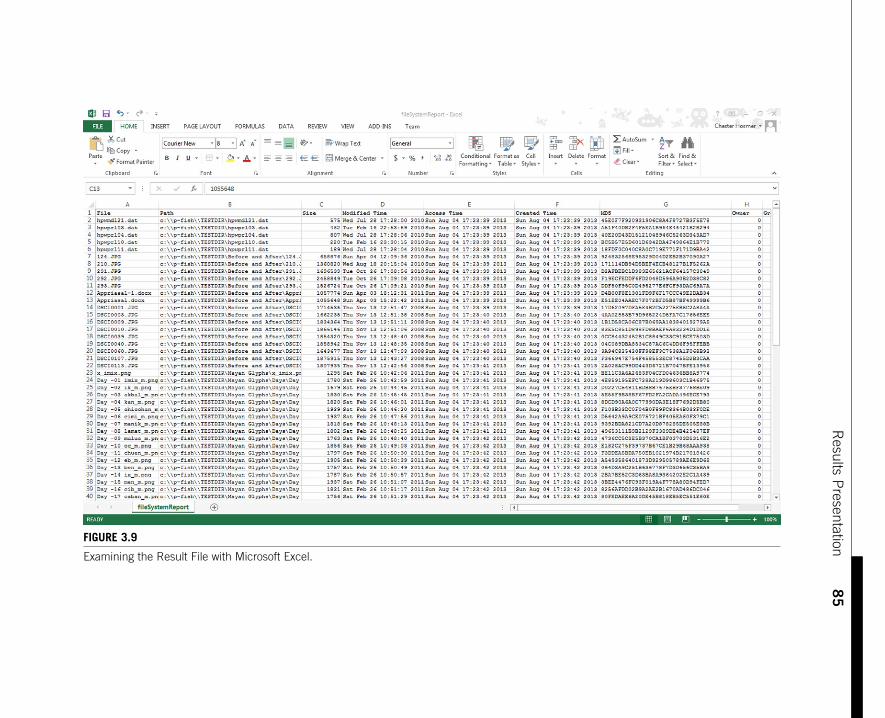
By choosing to leverage the Python csv module to create the report file Windowsalready recognizes it as a file that Microsoft Excel can view. Opening the file wesee the results in Figure 3.9, a nicely formatted column report that can nowmanipulate with Excel (sort columns, search for specific values, arrange in dateorder, and examine each of the results). You notice that the hash value is in acolumn named MD5 that is labeled as such because I passed the appropriate head-ing value during the initialization of the csv.
FIGURE 3.7
Test run of pfish.py.
FIGURE 3.8
Result directory after pfish execution.
84 CHAPTER 3 Our First Python Forensics App
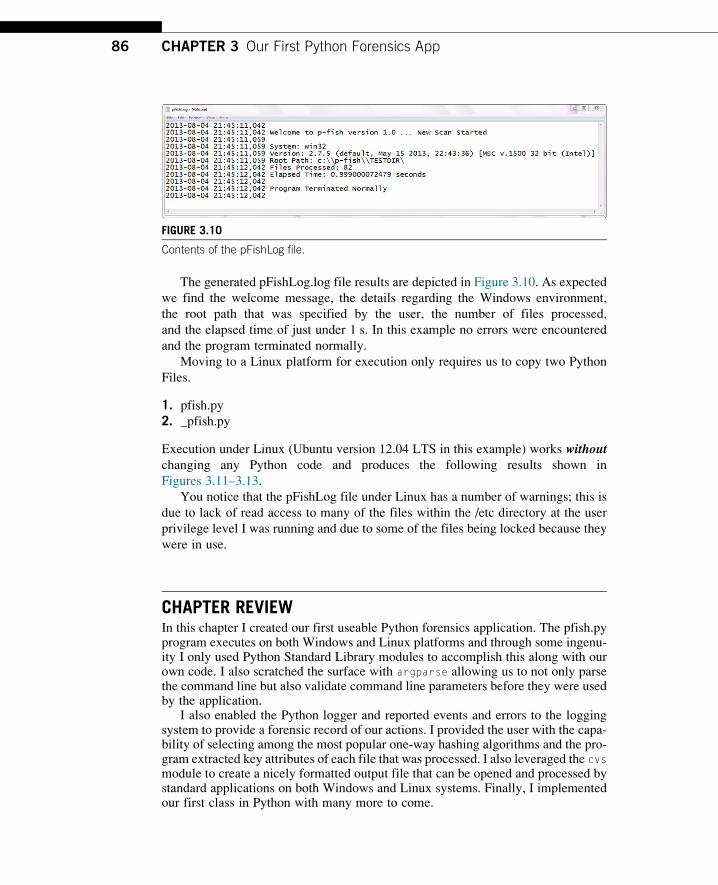
The generated pFishLog.log file results are depicted in Figure 3.10. As expected
we find the welcome message, the details regarding the Windows environment,
the root path that was specified by the user, the number of files processed,
and the elapsed time of just under 1 s. In this example no errors were encountered
and the program terminated normally.
Moving to a Linux platform for execution only requires us to copy two Python
Files.
1. pfish.py
2. _pfish.py
Execution under Linux (Ubuntu version 12.04 LTS in this example) works withoutchanging any Python code and produces the following results shown in
Figures 3.11–3.13.
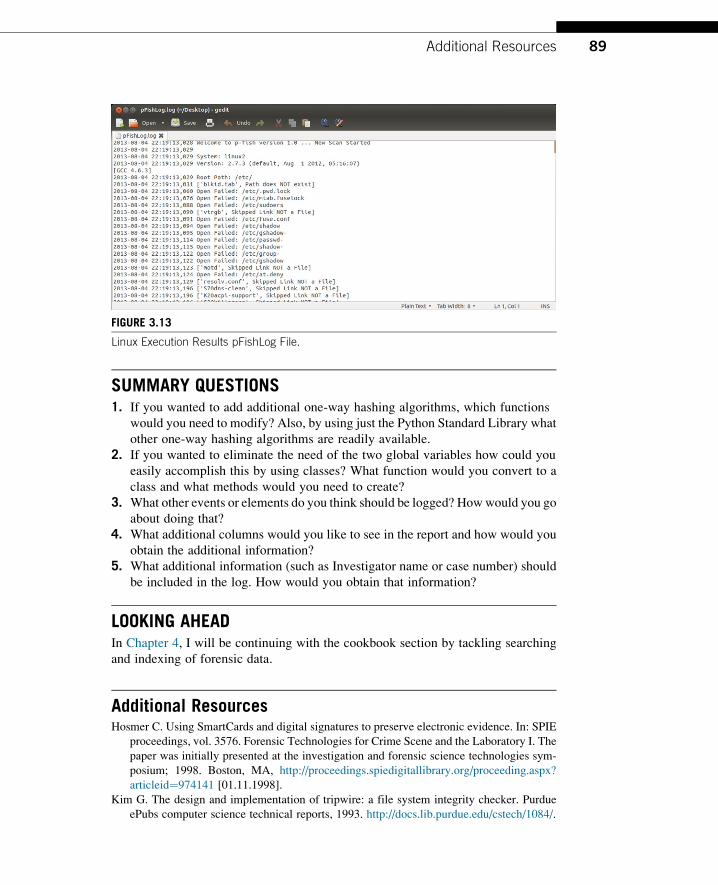
You notice that the pFishLog file under Linux has a number of warnings; this is
due to lack of read access to many of the files within the /etc directory at the user
privilege level I was running and due to some of the files being locked because they
were in use.
CHAPTER REVIEWIn this chapter I created our first useable Python forensics application. The pfish.pyprogram executes on both Windows and Linux platforms and through some ingenu-ity I only used Python Standard Library modules to accomplish this along with ourown code. I also scratched the surface with argparse allowing us to not only parsethe command line but also validate command line parameters before they were usedby the application.
I also enabled the Python logger and reported events and errors to the loggingsystem to provide a forensic record of our actions. I provided the user with the capa-bility of selecting among the most popular one-way hashing algorithms and the pro-gram extracted key attributes of each file that was processed. I also leveraged the cvs
module to create a nicely formatted output file that can be opened and processed bystandard applications on both Windows and Linux systems. Finally, I implementedour first class in Python with many more to come.
FIGURE 3.10
Contents of the pFishLog file.
86 CHAPTER 3 Our First Python Forensics App
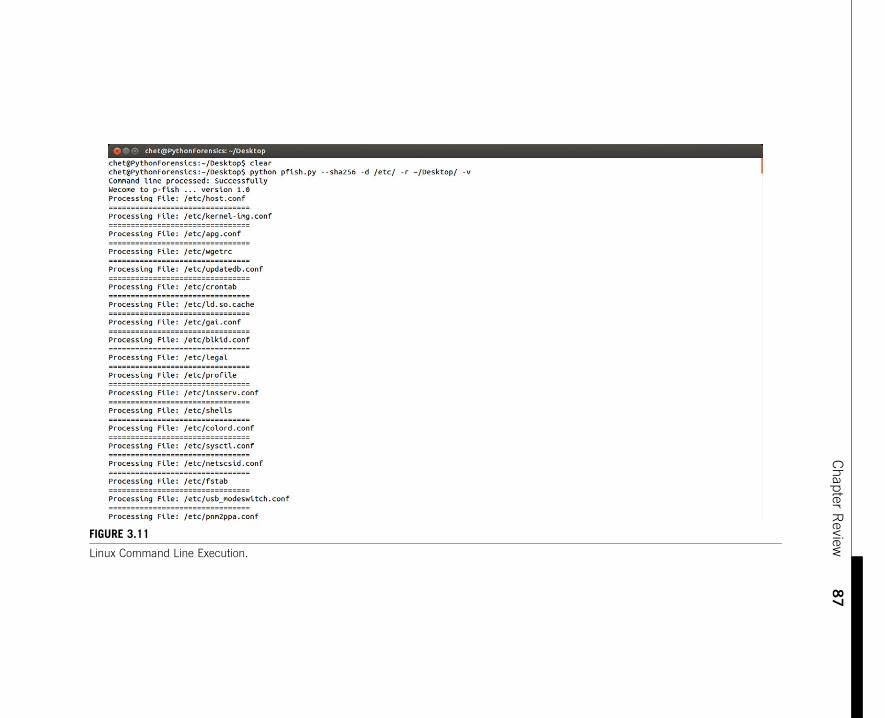
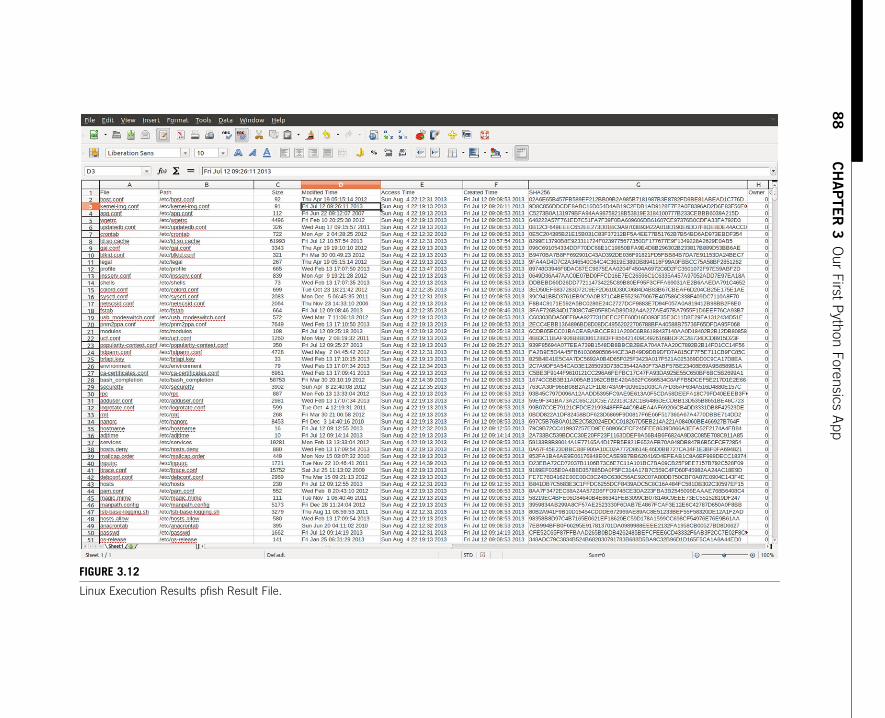
FIGURE 3.12
Linux Execution Results pfish Result File.
88
CHAPTER3
OurFirst
Pyth
onForensic
sApp
SUMMARY QUESTIONS1. If you wanted to add additional one-way hashing algorithms, which functions
would you need to modify? Also, by using just the Python Standard Library what
other one-way hashing algorithms are readily available.
2. If you wanted to eliminate the need of the two global variables how could you
easily accomplish this by using classes? What function would you convert to a
class and what methods would you need to create?
3. What other events or elements do you think should be logged? Howwould you go
about doing that?
4. What additional columns would you like to see in the report and how would you
obtain the additional information?
5. What additional information (such as Investigator name or case number) should
be included in the log. How would you obtain that information?
LOOKING AHEADIn Chapter 4, I will be continuing with the cookbook section by tackling searching
and indexing of forensic data.
Additional ResourcesHosmer C. Using SmartCards and digital signatures to preserve electronic evidence. In: SPIE
proceedings, vol. 3576. Forensic Technologies for Crime Scene and the Laboratory I. The
paper was initially presented at the investigation and forensic science technologies sym-
posium; 1998. Boston, MA, http://proceedings.spiedigitallibrary.org/proceeding.aspx?
articleid¼974141 [01.11.1998].
Kim G. The design and implementation of tripwire: a file system integrity checker. Purdue
ePubs computer science technical reports, 1993. http://docs.lib.purdue.edu/cstech/1084/.
FIGURE 3.13
Linux Execution Results pFishLog File.
89Additional Resources

This page intentionally left blank
Related Documents