57 Chapter-III METHODOLOGY In this chapter, the procedure followed towards the selection of subjects, experimental design, selection of variables, pilot study, selection test, Tester and subject reliability, reliability of the data, instrumental reliability, orientation to the subjects, training programme, training schedule, test administration, collection of blood samples, description of exercise, collection of data, statistical techniques and justification for using statistical techniques applied for analyzing the data. 3.1. Selection of Subjects The purpose of the study was to find out the effects of varma therapy and yoga therapy on selected physiological, biochemical and psychological variables of diabetic patients. To achieve the purpose of the study, 90 male diabetic patients were selected from Chennai city, India, at random and their age ranged from 40 to 55 years. The selected subjects were divided into two experimental groups and a control group with thirty subjects in (n=30) each. Experimental Group-I underwent varma therapy programme (VTG), Group-II underwent yoga therapy programme (YTG) and Group III served as control group (CG) for the training period of 12 weeks, six days per week, an hour in the morning. All the subjects were informed about the nature of the study and their consent was obtained to co-operate till the end of the experiment and testing period. Pilot study groups and experimental groups (namely VTG and YTG) were trained-up in which two modes of training were given independently with separate subjects in each group. A

Welcome message from author
This document is posted to help you gain knowledge. Please leave a comment to let me know what you think about it! Share it to your friends and learn new things together.
Transcript

57
Chapter-III
METHODOLOGY
In this chapter, the procedure followed towards the selection of subjects,
experimental design, selection of variables, pilot study, selection test, Tester and subject
reliability, reliability of the data, instrumental reliability, orientation to the subjects,
training programme, training schedule, test administration, collection of blood samples,
description of exercise, collection of data, statistical techniques and justification for using
statistical techniques applied for analyzing the data.
3.1. Selection of Subjects
The purpose of the study was to find out the effects of varma therapy and
yoga therapy on selected physiological, biochemical and psychological variables of
diabetic patients. To achieve the purpose of the study, 90 male diabetic patients were
selected from Chennai city, India, at random and their age ranged from 40 to 55 years.
The selected subjects were divided into two experimental groups and a control group
with thirty subjects in (n=30) each. Experimental Group-I underwent varma therapy
programme (VTG), Group-II underwent yoga therapy programme (YTG) and Group III
served as control group (CG) for the training period of 12 weeks, six days per week, an
hour in the morning.
All the subjects were informed about the nature of the study and their consent
was obtained to co-operate till the end of the experiment and testing period. Pilot study
groups and experimental groups (namely VTG and YTG) were trained-up in which two
modes of training were given independently with separate subjects in each group. A

58
qualified physician examined the subjects medically and declared them fit for the study.
The subjects were free to withdraw their consent in case they felt any discomfort during
the period of their participation, but there were no dropouts.
3.2. Selection of variables
Healthy life style is merely the product of physiological, psychological
parameters and lipid profiles prerequisites possessed by an individual. The investigator
had gone through the relevant literature in the area of varma therapy and yogic practice
and its various aspects in association with the guide and other experts in this area. The
variables were selected after considering the feasibility and availability of proper
techniques and instruments.
3.2.1 Dependent Variables
Based on the above facts, the following dependent variables were selected and are
presented below.
I. Physiological variables.
1. Resting Pulse rate
2. Systolic pressure
3. Diastolic pressure
II. Bio-chemical variables
1. Total Cholesterol
2. Blood glucose
III. Psychological variables.
1. Stress &
2. Self-confidence

59
3.3.2.Independent Variables
Yoga can be done for relaxation, but it improves flexibility as well. And
almost all exercises have some effect on the shape of the body. Prolonged yoga asana
practices can decreases pulse rate decreases, respiratory rate and blood pressure, it can
contribute to stabilizing the nervous system equilibrium, to normalizing gastrointestinal
functions and endocrine function, to increasing the joint range of motions, endurance
level, energy level, immunity to diseases and cardiovascular efficiency, to improving eye-
hand coordination, reaction time, dexterity skills, depth perception, sleep, etc. As for the
biochemical benefits, we can enumerate substantial decreases of glucose, sodium,
cholesterol, total white blood cell and remarkable increases of vitamin C, total serum
protein, hemoglobin etc. (Fonda’s, 1984)
Siddha medicine is the one of the oldest medical systems originated from
India. Varmam is one the main streams within siddha medicine. For example, if a patient
is suffering from pain in some part of the body, siddha medicine will externally apply
herb medicines, which after absorbed by the body, produce the cure. But based on
varmam, certain pressure points are tuned to regulate the blood flow, which gives
immediate relief to the pain. Siddha doctors in South India (notably in Kanyakumari
District of TamilNadu) use this technique of combined medication to give faster and
better relief to the patients. Ayurveda is one another oldest forms of medical systems
from India. Among ayurvedic text, there is no separate text for varmam. But in the text

60
'Astangahridayam', written by Vakpatar, the author speaks about 107 varmam points in
human body. Some other ayurvedic texts also contain sparse information about varmam
points (Aug, 2012, http://www.varmam.org/).
Considering the above facts of the following variables were selected as
independent variables.
1.Varma therapy and
2. Yoga therapy
3.3.Experimental Design
The experimental design used for this study was pre and post test random
group design involving 90 male subjects, who were divided at random into three groups
of thirty each. This study consisted of three experimental groups. Group-I underwent
varma therapy programme (VTG), Group-II underwent yoga therapy programme (YTG)
and Group III served as control group (CG). All the subjects were tested prior to and after
the training on selected variables.
Varma kalai has two sides in it as a coin has sides. One is called varma kalai
that deals with self defence and the other called the varma therapy which deals with are
some of the most important structured features of human body, ligaments, nerves, bones,
blood vessels, joints and nerve-centers etc. They meet combine and coordinate so as to
enable the body of function biologically. The nerves and bones and muscles form part of
the entire body. The bone and joints are hard structures. At many points the nerves and
nerve centres are closely in interviewed. Even a slight damage to these nerve center and
joints sometimes may nerve critically harmful. (eg. where the nerve is in contact with the

61
bone). The damage may be extensive too. They may even affect the blood vessels passing
through area causing improper blood supply to that area. This leads to pain and
unconsciousness. Varma Kalai uses pressure and precise strikes to vulnerable pressure
points on the human body to heal, maim or even kill someone depending on what part of
he body is it and how much pressure is applied based on periodic energy flows (time-
dependent) streaming through the body along meridians. (Aug, 2012,
http://www.avrdt.com/Varma-Therapy.aspx).
3.4 Pilot Study
A pilot study was conducted to assess the initial capacity of the subjects in
order to fix the load. For this, 12 diabetic patients were selected at random and divided
into two groups of six each, in which group I underwent varma therapy and group II
underwent yoga therapy under the supervision of the investigator. Based on the response
of the subjects in the pilot study, the training schedule was constructed for main study.
The basic principles of sports training namely progression of load, over load and
specificity were followed.
3.5 Criterion variables
As per the available literature, the following tests were used to collect relevant
data on the selected criterion variables and they were presented in the Table I.

62
TABLE I
TEST SELECTION.
Variables Test/Instrument Unit of
Measurement
Physiological Resting Pulse rate Radial Pulse In beats/minute
Blood Pressure Sphygmomanometer In mm.Hg.
Bio-chemical
Blood Glucose Computerized Semi Auto
Analyzer Randox In mg/dL
Total Cholesterol Computerized Semi Auto
Analyzer Randox In mg/dL
Psychological
Stress John D. and Catherine T. Macarthur
questionnaire In points
Self-confidence Agnihotri self-confidence
inventory (ASCI) In points
3.6.Reliability of the Data
The reliability of data was measured by ensuring instruments reliability, tester
competency and subject reliability.
3.7. Reliability of the Instrument
The instruments such as Sphygmomanometer, Stethoscope, Stop Watch, and
Semi auto analyzer used for biochemical variables analysis were all manufactured by
standard companies and they were maintained in good condition and calibrated daily.
Instrument reliability was also established by test-retest method. The blood samples were
analyzed in the clinical laboratory of biochemistry.

63
3.8.Tester and Subject Reliability
Three months before the commencement of the pilot study, the reliability of the data was
established by using 10 subjects at random. To ensure reliability, test and re-test method
was executed. In between the test and retest, one-day rest was given to all the subjects.
The same testing personnel by using the same equipments under identical conditions
tested all the variables selected in the present investigation twice on the same subjects.
The intra class co-efficient of correlation was used to find out the reliability of the data
and the results are given in table II
TABLE II
INTRA CLASS CO-EFFICIENT OF CORRELATION ON SELECTED
VARIABLES
Sl.No. Variables ‘R’ value
1. Resting Pulse rate 0.90*
2. Blood Pressure 0.91*
3. Total Cholesterol 0.93*
4. Blood Glucose 0.94*
5. Stress 0.91*
6. Self-Confidence 0.89*
*Significant at 0.01 level. (Table value required for significance at 0.01 level of
confidence is 0.77)
Since the obtained 'R' values were much higher than the required value, the
data were accepted as reliable in terms of instrument, tester and the subjects.

64
3.9.Orientation to the Subjects
The investigator explained the purpose of the training programme and
explained the involvement of the subjects. Before the commencement of the training
programme, the varma therapy and yoga therapy training was taught to group I and II
respectively. Two one-hour sessions was spent on each day to practice the techniques.
This helped them to perform the exercise perfectly by avoiding injuries.
3.10. Training Programme
During the training period, the experimental groups underwent their respective
training programmes six days per week for twelve weeks in addition to their regular
activities. Experimental Group I (VTG) underwent varma therapy programme and group
II (YTG) underwent yoga therapy programme only. Training volume and intensity were
increased progressively on different phases. The training schedule for the two
experimental groups were presented in table from III to VI. Every day the workout lasted
for maximum 60 minutes approximately. Group III (CG) served as the control group and
were in active rest.
The subjects underwent their training programme under strict supervision of
the investigator. Prior to every training session, subjects underwent 10 minute loosening
exercises. All the subjects involved in the training programmes were questioned about
their statures throughout the training period. None of them reported any injuries.
However, muscle soreness was reported in the early weeks, but it was subsided later.

65
VARMA THERAPY
Varma adi recognizes 108 marmas, 12 Padu marmas (death marmas) and 96
Thodu marmas (touch marmas). There are also counter marmas to heal trauma to the
marmas (Luijendijk, 2008). Prana which is acting in the body is known as varmam the
method of prana acting in the body is called nadigal. There are 10 major naadhies in the
body these 10 naadhies are called thasa nadigal. These 10 naadhies spread all over the
body and divided in to 7200 nadhiess. In some of the body these 72000 are meeting each
other. These meeting points are known as Varma stanangal important varma stanangal
are making 108 vital points in the human body. In these points the most important Uyir
Stanangal (Life Vital centres) are divided in to Padu Varmam 12 and Thodu Varmam 96.
The method of protection of these vital points is called varmakalai. Thodu Varmam
Varma locations in the body to be stimulate by a touch. not deadly, but will affect the
victim by disabling the body, organ movements and function. Padu Varmam. 12 varma
locations that are fatal. causing immediate severe effects upon the victim. Thattu
Varmam. 8 Varma locations that are used by the assans these are kept confidential until
the assan pass on the knowledge to the selected discipline. Triggering varma locations by
focusing or concentrating on the selected varma location. it will takes many years of
practice for one to become an expert nooku varmam or meitheenda kalam. These method
further divided in to Vaidhaya muraigal (expaling medical values of vital points)
Tharkappu muraigal ( explaining defence values of vital points). In the Human body there
are 108 points of Varmam ( Vital points) they are

66
From head to neck - 25 points
From neck to navel - 45 points
From navel to arm - 9 points
In arms - 14 points
In legs - 15 points
Total - 108 points

67
3.11.Training Schedule
The training was scheduled in the morning session for six days per weeks for
twelve weeks. The training schedule of VTG and YTG is presented in the table from III
to VI.
TABLE III
VARMA PRESCRIBED FOR VARMA THERAPY GROUP
DURING THE TRAINING PERIOD
Week Varma Therapy Duration Repetition Set Frequency
Days / week Rest between
sets
1-4
Ganapathi Muga Varmam
( Ganapathi Face Varma Point) 30-60 sec 1 1 6 --
Ellurukki Varmam
(Bone-Emacating Varma Point) 1 – 3min 1 1 6 --
Pakka-kaluthu nadukku Varmam
(Lateral Mid-Neck Varma Point) 1 – 3min 1 1 6 --
Kak-Kattai Varmam
(Shoulder Pole Varma Point) 30 sec 1 1 6 --
5-8
Ganapathi Muga Varmam
( Ganapathi Face Varma Point) 30-60 sec 1 2 6 5-8min
Ellurukki Varmam
(Bone-Emacating Varma Point) 1 – 3min 1 2 6 5-8min
Pakka-kaluthu nadukku Varmam
(Lateral Mid-Neck Varma Point) 1 – 3min 1 2 6 5-8min
Kak-Kattai Varmam
(Shoulder Pole Varma Point) 30 sec 1 2 6 5-8min
9-12
Ganapathi Muga Varmam
( Ganapathi Face Varma Point) 30-60 sec 1 3 6 10-12min
Ellurukki Varmam
(Bone-Emacating Varma Point) 1 – 3min 1 3 6 10-12min
Pakka-kaluthu nadukku Varmam
(Lateral Mid-Neck Varma Point) 1 – 3min 1 3 6 10-12min
Kak-Kattai Varmam
(Shoulder Pole Varma Point) 30 sec 1 3 6 10-12min

68
TABLE IV
YOGIC PRACTICES OF 1st PHASE FROM THE 1
st WEEK TO 4
th WEEK
Weeks
Dr.Swami Karmanada
from Bihar School of
Yoga
Repetition Sets Frequency
Days / week Rest
1-4
Neti 1 1 6 2min
Loosening Exercise 1 1 6 2min
Suryanamaskara 1 2 6 2min
Gomukhasana 1 2 6 2min
Bhujangasana 1 2 6 2min
Ardha Matsyendrasana 1 2 6 2min
Sarvangasana 1 2 6 2min
Halasana 1 2 6 2min
Paschimottanasana 1 2 6 2min
Matsyasana 1 2 6 2min
Nashisodhana 1 2 6 2min
Bhastrika 1 2 6 2min
Savasana II 1 2 6 2min
YogaNidra 14 min 1 6
TABLE V
YOGIC PRACTICES OF 2st PHASE FROM THE 5
th WEEKTO 8
th WEEK
Weeks
Dr.Swami Karmanada
from Bihar School of
Yoga
Repetition Sets Frequency
Days / week Rest
5-8
Neti 1 1 6 3 - 5min
Loosening Exercise 1 1 6 3 - 5min
Suryanamaskara 1 4 6 3 - 5min
Gomukhasana 1 4 6 3 - 5min
Bhujangasana 1 4 6 3 - 5min
Ardha Matsyendrasana 1 4 6 3 - 5min
Sarvangasana 1 4 6 3 - 5min
Halasana 1 4 6 3 - 5min
Paschimottanasana 1 4 6 3 - 5min
Matsyasana 1 4 6 3 - 5min
Nashisodhana 1 4 6 3 - 5min
Bhastrika 1 4 6 3 - 5min
Savasana II 1 4 6 3 - 5min
YogaNidra 14 min 1 6

69
TABLE VI
YOGIC PRACTICES OF 3rd
PHASE FROM THE 9th
WEEKTO THE 12th
WEEK
Weeks
Dr.Swami Karmanada
from Bihar School of
Yoga
Repetition Sets Frequency
Days / week
Rest
between sets
9-12
Neti 1 1 6 5 - 7min
Loosening Exercise 1 1 6 5 - 7min
Suryanamaskara 1 6 6 5 - 7min
Gomukhasana 1 6 6 5 - 7min
Bhujangasana 1 6 6 5 - 7min
Ardha Matsyendrasana 1 6 6 5 - 7min
Sarvangasana 1 6 6 5 - 7min
Halasana 1 6 6 5 - 7min
Paschimottanasana 1 6 6 5 - 7min
Matsyasana 1 6 6 5 - 7min
Nashisodhana 1 6 6 5 - 7min
Bhastrika 1 6 6 5 - 7min
Savasana II 1 6 6 5 - 7min
YogaNidra 14 min 1 6
3.12. Test administration
3.12.1.Resting pulse rate
Objective
The objective of this test was to record the number of pulse beats per minute.
Equipment
A stopwatch 1/10 of a second was used.
Procedure
The pulse rate of all the subjects was recorded in the sitting position and in the
evening between 3.30 and 4.30pm. Before taking the pulse rate the subjects were asked to

70
relax for about 30minutes. To record the pulse rate the fingertips were placed on the
radial artery at the wrist in such a manner that palpitation was clear (Clarke, 1976).
Scoring
The number of palpitation was counted for one full minute.
3.12.2. Blood pressure
Objective
To find out the systolic and diastolic blood pressure.
Equipment
Sphygmomanometer and a stethoscope.
Procedure
The rubber cuff is placed around the upper arm so it surrounds the brachial
artery. Air is pumped into the cuff so that the pressure around the arm exceeds arterial
pressure. Since the pressure applied around the aim in greater than arterial pressure, the
brachial artery is squeezed shut and the blood flow is stopped. If a stethoscope is placed
over the brachial artery (just below the cuff, no sound is heard since there is no blood
flow. However when, the air control value is slowly opened to release air, the pressure in
the cuff begins to decline and soon the pressure around the arm reaches a point that is
equal to or just slightly below arterial pressure. At this point blood being to spurt through
the artery and a sharp sound can be heard through the stethoscope. The pressure (ie)
height of mercury column at which the first tapping sound is heard, represents systolic
blood pressure. As the cuff pressure continues to decline, a series of increasingly louder

71
sounds can be heard when the pressure in the cuff is equal to or slightly below diastolic
blood pressure. The sound heard through the stethoscope is ceased. Therefore, diastolic
blood pressure represents the height of the mercury column when the sound becomes
abruptly muffled (Prentice, 1994).
3.12.3. Collection of Blood Sample
Subjects were asked to report at the laboratory after an overnight fasting and
10.0 ml of venous blood samples were collected in heparins test tubes. Thus the pre-
samples were collected in two days prior to training and after the twelve-week-training
programme on total cholesterol and blood glucose.
3.12.4. Computerized Semi- Auto Analyzer RANDOX - IMOLA
Purpose
To assess the total cholesterol and blood glucose.
Equipment
Semi- Auto Analyzer RANDOX - IMOLA
Procedure
The blood was allowed to collect 15-20min and the serum was seprated by
centrifuging 3000-4000RPM for 10minutes all chosen biochemical variables were
estimated by using serum in semi auto analyzer.
Score
Total cholesterol and Blood glucose, was measured on mg/dl level.

72
3.12.5. Administration of the Questionnaire
3.12.6.Stress Questionnaire
Purpose:
To measure the stress level.
Scale:
John D. And Catherine T. MacArthur’s Perceived Stress Scale
Procedure:
The perceived stress scale was used to measure the stress. The stress
questionnaire was administered to all the subjects. Each subject was asked to answer all
the 10 items of the tests and was instructed to express the choice most honestly. The
subjects were instructed to respond to each item according to how they generally feel in
competitive sports situations. The scholar scrutinized the completed questionnaires in
order to ensure that the subject had responded to every item and there was no question
left unanswered. All the items were evaluated in a uniform manner using the following
key. A score of one was awarded for a response indicative of stress that is, for marking
the item numbers as 0=4, 1=3, 2=2, etc. Scores obtained by each subject on each
statement was added up and that represented one’s total score on stress. The lower the
score, the lower would be the level of stress and vice versa. (The model of the perceived
stress scale questionnaire were presented in Appendix-A)

73
3.12.7.SELF-CONFIDENCE
Purpose
The purpose of this test was to measure the self-confidence of the
subjects.
Equipment
Self-confidence was measured with the Agnihotri self-confidence
inventory (ASCI) developed by REKHA AGNIHOTRI. The ASCI questionnaire
was given to all subjects to measure self-confidence. All the items were adopted
for this investigation. It consists of 56 items and it is for adults and adolescents.
The questionnaire is translated from English to Tamil so that subject can
understand.
Description
The inventory could be scored by hand. A score of one is awarded for a
response indicative of lack of self-confidence. That is for marking cross (x) to
wrong response to item numbers 2,7,23,31,40,41,43,45,53,54,55 and for making
cross (x) to right response to the rest of the items. The lower of the score the higher
would be the level of confidence and vice versa.
Scoring
Scoring was the total number of points scored by each subject as per the
questionnaire answers. (The model of the perceived stress scale questionnaire were
presented in Appendix-B)

74
3.13.DESCRIPTION OF EXERCISES
3.13.1. Neti
Cleaning the nasal passage
Step 1: Add about half a teaspoon of salt to a neti pot full of sterile lukewarm water.
Step 2: Stand with the legs apart.
Step 3: hold the neti pot in subjects’ right hand.
Step 4: Insert the nozzle of the neti pot into the right nostril.
Step 5: Keep the mouth open and breathe freely through the mouth.
Step 6: Tilt the head first slightly backwards then forwards and sideward to the left so
that the water from the pot enters the right nostril and comes out through the left by
gravity. Allow the flow till the pot is empty.
Step 7: Repeat the same on the left side.
3.13.2. Suryanamaskar (Sun Salutation)
The Sun Salutation is a 12-part warm-up exercise. It limbers up the body and
mind in preparation for the ensuing yoga session. Each of the 12 positions brings a
different vertebral movement to the spinal column and is tuned to the inhalation or

75
exhalation of the breath, thereby instilling a feeling of balance and harmony. The
positions follow on from one another, making this Salutation graceful to perform.
1. Prayer Pose: Stand up straight with one feet together and one’s arms by one’s sides.
Take a deep breath, and then exhale while bringing one’s palms together at chest level.
2. Arch Back: Inhale and stretch one’s arms up over one’s head. Arch one’s back, so
one’s hips come forwards, and stretch as far as is comfortable.
3. Bend Over: Exhale as one stretch forwards and bend down into the third Sun
Salutation position. Bring one’s hands down to the floor, and place them next to one’s
feet, with the palms downwards. One’s hips should be kept as high as possible. If
necessary, bend one’s knees so that one can touch the ground. Tuck one’s forehead in
towards one’s knees.
4. Leg Back: Inhale as one stretch one’s right leg back as far as possible and bend one’s
right knee, lowering it to the floor. Stretch one’s head and look upwards. One’s hands
should stay in the same position throughout the movement.
5. Push up Pose: Retain the breath. Bring one’s left foot back, next to one’s right foot.
Keep one’s spine straight and do not let one’s head or hips drop.
6. Lower chest to the floor: Exhale, Lower one’s knees to the floor and one’s chest
straight down between one’s hands, without rocking one’s body. Bring one’s forehead to
the floor (a beginner may need to lower the chin instead).
7. Arch One’s Chest: Inhale as one slide one’s body forwards and bring one’s hips
down to the floor. Arch one’s chest towards and tilt one’s head back. Slightly bend one’s

76
elbows into one’s body.
8. Inverted 'V': Exhale, tucking one’s toes under, and raising one’s hips to come into
the inverted "V". Do not move one’s hands or feet as one come into position.
9. Lunge Forwards: Inhale as one bring one’s right foot forwards and place it between
one’s hands, dropping one’s left knee to the floor. Raise one’s head and look up to the
ceiling.
10. Forehead to knees: Exhale as one bring one’s left foot forwards and place it next to
one’s right foot, so that the tips of one’s fingers and toes form a straight line. Raise one’s
hips and stretch them upwards, keeping one’s hands in the same position. If one cannot
straighten one’s legs fully, allow one’s knees to remain slightly bent, but keep one’s hips
up throughout. Bring one’s head down as far as possible and tuck it in as close to one’s
knees as one can manage.
11. Stretch Back: Inhale and then stand up, stretching one’s arms over one’s head as one
straighten one’s body. Stretch one’s arms back, arch one’s chest and hips, and keep one’s

77
feet together.
12. Return To Start: Exhale and straighten up, lowering one’s arms to one’s sides. Now
take a deep breath and prepare to begin another Sun Salutation sequence.
3.13.3.Gomukasana (Cow Face Pose)
Step 1: Bend the left leg underneath the right leg so that the left heel is touching the right
buttock.
Step 2: Bring the right leg over the top of the bent left leg so that the right heel touches
the left buttock adjust the right knee so that it is above the left knee. \
Step 3: place the left arm behind the back.
Step 4: The right arm over thr right shoulder. The back of the left hand shoud lie in
contact with the spine while the palm of the right hand rests against the spine while
inhaling.
Step 5: Release the right arm with inhale and bring down to exhale.
Step 6: Release the left hand
Step 7: Release the right leg
Step 8: Release the left leg.
3.13.4.BHUJANGASANA (COBRA POSE)

78
Lie flat on the stomach with the legs straight and the soles of the feet
uppermost, place the palms of the hands flat on the floor below and slightly to one side of
the shoulders, the fingers should point forwards and the arms should be bent with the
elbows facing backwards, rest the forehead on the ground, close the eyes, relax the whole
body, especially the lower back, breathe out slowly and deeply, then as you breathe in
raise the body in the way we will describe, slowly bend your head backwards so that the
chin eventually points forwards and the back of the neck is compressed, feel the stretch of
the front part of the neck, now the arms must be brought into play, slowly raise the head
and shoulders off the ground by progressively straightening the arms, keep the back and
legs as relaxed as possible, try to keep the navel in contact with the ground, if the navel is
raised too high then the bend tends to be at the knees and not the back, continue slowly to
arch the back as far as flexibility will allow, in this position the back of your head should
point towards the feet, arms may or may not be straight – it depends on the flexibility.
3.13.5.Ardha Matsyendrasana (Spinal Twist)
Position: Sit on one’s heels. Knees and feet should be together, and the chest faces
forwards.

79
Stage1: Gently shift one’s buttocks down to the floor on the left side of one’s legs. Keep
one’s back straight and centered over the buttocks.
Stage 2: Bring one’s right knee in close to one’s chest, and gently lift it over one’s left
leg; place the right foot flat on the floor by one’s left knee.
Stage 3: Keep one’s body straight and upright, turn one’s body to the right and place
one’s right hand flat on the floor. Raise one’s left arm and stretch it up above one’s head.
Stage 4: Twist one’s body to the right and look over one’s shoulder. Carry one’s left arm
around one’s right knee, clasping one’s right ankle. Hold the pose for 30 seconds. Repeat
on the other side.
3.13.6.Sarvangasana
Stage 1: Lie flat on the back on the carpet keeping the legs stretched out tightened at the
knees. Place the hands by the side of the legs, palms down. Take a few deep breaths.
Stage 2: Exhale, bend the knees and move the legs towards the stomach till the thighs
press it. Take the two breaths.

80
Stage 3: Raise the hips from the floor with an exhalation and rest the hands on them by
bending the arms at the elbows. Take two breaths.
Stage 4: Exhale, raise the trunk up perpendicularly supported by the hands until the chest
touches the chin.
Stage 5: Only the back of the head and the neck, the shoulders and the backs of the arms
up to the elbows should rest on the floor. Place the hands in the middle of the spine. Take
two breaths.
Stage 6: Exhale and stretch the legs straight with the toes pointing up.
3.13.7.HALASANA (PLOUCH POSE)
Lie flat on the floor, facing upward, the legs should be straight and together
and should remain so throughout the practice, the palms can face upwards .relax the
whole body and prepare for the practice, breath in deeply, then slowly raise the two legs
to the legs to the vertical position ;use the abdominal muscles as much as possible and the
arms; this may require a little time and practice, then fold the legs are raised over the top
of the head, the buttocks and hips should also be simultaneously raised. Gently lower the

81
feet towards the ground behind the head, but without the slightest strain, touch the toes to
the ground behind the head, the hands placed behind the hips as shown in the following
picture.
3.13.8.Paschimottanasana (posterior stretching posture)
Position: Sitting, legs together and extended.
Stage 1: Bend one’s index fingers to form a hook and hold the great toes with them and
bend the elbows. Exhale while bending forward bringing one’s head between the hands
Stage 2: Bending the elbows and the trunk further, try to touch the knees with one’s
forehead without raising the knees.
Stage 3: Inhale now, as one raise one’s head slowly bringing it between the hands.
Stage 4: Raise the trunk and the head leaving the toes and straightening the spine, with
one’s hands on the sides and back to the position.
3.13.9.Matsyasana (Fish Posture)

82
Stage1: Sit in Padmasana.
Stage 2: Lie flat on the back with the legs on the floor.
Stage 3: Exhale, arch the back by lifting the neck and the chest, take the head back and
rest the crown on the floor. Drag the head further back by holding the crossed legs with
the hands and increase the back arch.
Stage 4: Now take the hands from the legs, bend the arms, hold the elbow with the hands
and rest the forearms on the floor behind.
3.13.10.Nadi Shodhana
Purpose
The purpose of paranayama is to purify the nerves and therby to strengthen
the nervous system.
Procedure
Sit in any comfortable posture. Make one’s breathing normal. Close one’s right nostril
with one’s thumbed and fills in the breath through the left nostril. When the breath has
been filled inside close the left nostril with one’s third finger and stay in this state of
Antrik Kumbhaka for a few seconds. Then lift the thumb from the right nostril and exhale

83
slowly, keeping the left nostril closed. Repeat the process by inhaling through the left
nostril and exhaling through the right nostril.
3.13.11.Bhastrika Pranayama
Purpose
A large amount of Prana Vayu is supplied to the body.
Procedure
Sit in padmasana and make the body erect. Make the mind thought-free and
relaxed. Now close the right nostril with one’s right thumb, inhale and exhale with full
force. First do this slowly, then increase one’s speed. In the end, inhale fully, close the
left nostril with one’s third finger, and perform all the three Bandhas. Increase the
Kumbkaha according to one’s capacity. Now open the Bandhas slowly, lift the thumb
from the right nostril and exhale through it slowly. Relax for a moment. Repeat this
process by closing the left nostril.
3.13.12 Savasana II
Lie down flat on the ground and close one’s eyes. Separate one’s feet by a
distance of 3 feet. Now start relaxing the body parts from head to toe, one by one ,i.e.,
toes, soles, ankles, calf muscles, knee joints, thighs, waist , stomach , chest, fingers,

84
palms, wrist, elbows, shoulders, neck ,chin, cheeks, mouth, nose, eyes, ears, forehead,
finally top of the head. Slowly open the eyes and relax. Don’t get up immediately.
3.13.13. Yoga Nidra
1. Lie down straight on your back in Shavasana. Close one’s eyes and relax. Take a
few deep breaths in and out. Remember to take slow and relaxed breaths, and not
ujjayi breaths.
2. Start by gently taking your attention to one’s right foot. Keep one’s attention there
for a few seconds, while relaxing one’s foot. Then gently move one’s attention up
to the right knee, right thigh and hip (again for a couple of seconds). Become
aware of one’s whole right leg. Repeat this process for the left leg.
3. Similarly, take one’s attention to all parts of the body: genital area, stomach, navel
region, chest, right shoulder and right arm, followed by the left shoulder and left
arm, throat, face and the top of the head.
4. Take a deep breath in, observe the sensations in one’s body, and relax in this still
state for a few minutes.
5. Now, slowly becoming aware of one’s body and surroundings, turn to one’s right
side and keep lying down for a few more minutes.
6. Taking one’s own time, one may then slowly sit up, and whenever one feel
comfortable, slowly and gradually open one’s eyes.
3.14.Collection of Data
The data on selected dependent variables for pre-tests and post-tests were
collected two days before and after the training programme respectively. On the first day
resting pulse rate, blood pressure and stress were tested whereas self-confidence, blood
glucose and total cholesterol were tested on the second day.
3.15.Statistical Techniques

85
The data collected from the four groups before and after the experimental
period were statistically examined for significant improvement by using analysis of
covariance. The data collected from the three groups before and after the experimental
period were statistically examined for significant improvement by using Analysis of
Co-variance. (Clarke and Clarke, 1972) Whenever the 'F' ratio was found to be
significant, Scheffe’s test was used as post-hoc test to determine which of the paired
means differed significantly. In all cases the criterion for statistical significance was set at
0.05 level of confidence (P<0.05).
3.15.1 Justifications for Using ANCOVA
Analysis of covariance (ANCOVA) was used to determine how each
dependent variable is influenced by independent variables while controlling for a
covariate (Clarke and Clarke, 1972). Analysis of covariance adjusts the mean of each
dependent variable to what they would be if all groups started out equally on the
covariate. Analysis of covariance gives results preferable to those of a direct comparison
of gain scores i.e., post-test minus pre-test for the two groups, because gains are limited
in size by the difference between the test’s ceiling and the magnitude of the pre-test score
(Tuckman, 1999). In this study, pre-test scores of the selected variables have been shown
to correlate with the post test scores and thus they were considered as appropriate
covariates.
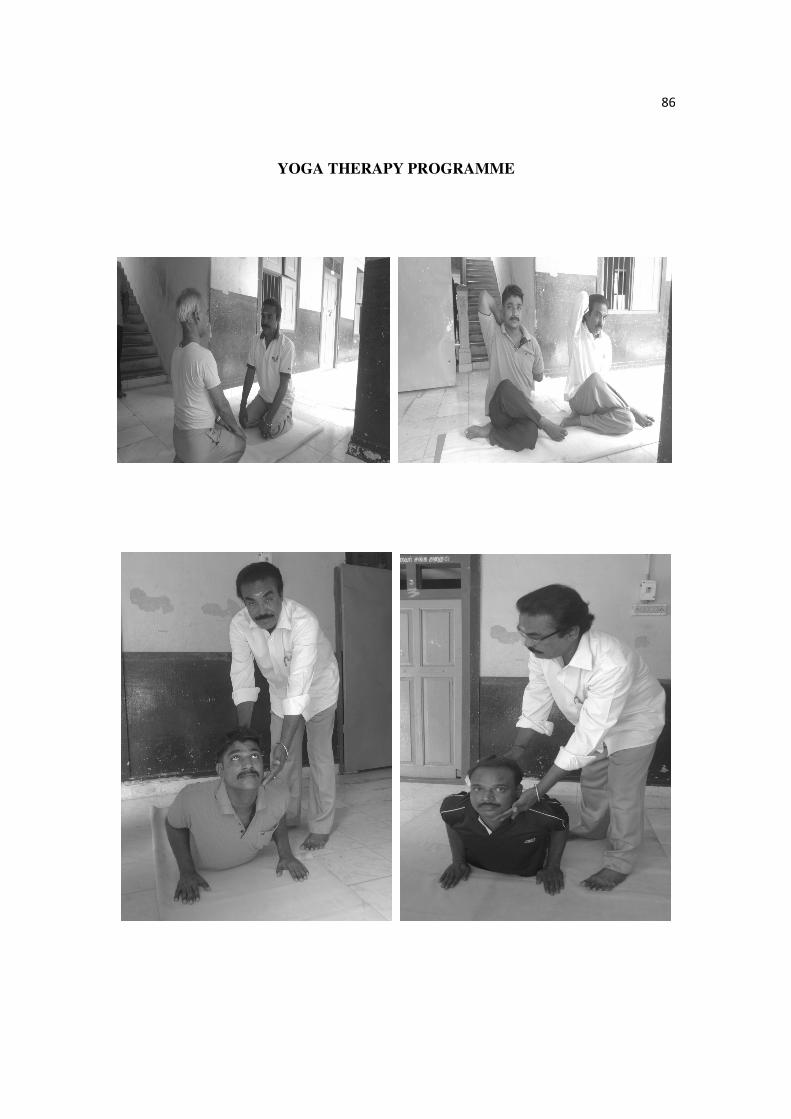
86
YOGA THERAPY PROGRAMME

87
VARMA THERAPY PROGRAMME

88
FLOW CHART SHOWING THE METHODOLOGY
Number of Subjects
N=90
Experimental Group I
n =30
Experimental Group II
n =30
Control Group
n =30
Pre test
Varma Therapy
No. of Weeks = 12
Statistical technique
ANCOVA & Scheffe’s Post
hoc Test
Bio-Chemical Variables
1. Total Cholesterol
2. Blood Glucose
Psychological Variables
1. Stress
2. Self-Confidence
Post test
Number of Subjects
N=90
Experimental Group I
n =30
Experimental Group II
n =30
Physiological Variables
1. Resting Pulse Rate
2. Systolic Blood Pressure
3. Diastolic Blood Pressure
Yoga Therapy
No. of Weeks = 12
No Specific Training
For 12 weeks
Control Group
n =30
Results, Discussions &
Conclusions
Physiological Variables
1. Resting Pulse Rate
2. Systolic Blood Pressure
3. Diastolic Blood Pressure
Bio-Chemical Variables
1. Total Cholesterol
2. Blood Glucose
Psychological Variables
1. Stress
2. Self-Confidence
Related Documents