Writer Guide Chapter 9 Working with Tables

Welcome message from author
This document is posted to help you gain knowledge. Please leave a comment to let me know what you think about it! Share it to your friends and learn new things together.
Transcript
Writer Guide
Chapter 9 Working with Tables
Copyright
This document is Copyright © 2011–2014 by the LibreOffice Documentation Team. Contributors are listed below. You may distribute it and/or modify it under the terms of either the GNU General Public License (http://www.gnu.org/licenses/gpl.html), version 3 or later, or the Creative Commons Attribution License (http://creativecommons.org/licenses/by/4.0/), version 4.0 or later.
All trademarks within this guide belong to their legitimate owners.
ContributorsJohn A Smith Jean Hollis Weber Ron Faile Jr. Barbara Duprey
FeedbackPlease direct any comments or suggestions about this document to the Documentation Team’s mailing list: [email protected]
Note: Everything you send to a mailing list, including your email address and any other personal information that is written in the message, is publicly archived and cannot be deleted.
AcknowledgmentsThis chapter is adapted and updated from Chapter 9 of the OpenOffice.org 3.3 Writer Guide. The contributors to that chapter are:
Peter Hillier-Brook John Kane Stefan A. KeelIain Roberts Gary Schnabl Janet SwisherBarbara M. Tobias Jean Hollis Weber Bob WickhamMichele Zarri Magnus Adielsson
Publication date and software versionPublished 17 June 2014. Based on LibreOffice 4.2.
Note for Mac users
Some keystrokes and menu items are different on a Mac from those used in Windows and Linux. The table below gives some common substitutions for the instructions in this chapter. For a more detailed list, see the application Help.
Windows or Linux Mac equivalent Effect
Tools > Options menu selection
LibreOffice > Preferences Access setup options
Right-click Control+click and/or right-click depending on computer setup
Opens a context menu
Ctrl (Control) ⌘ (Command) Used with other keys
F5 Shift+⌘+F5 Opens the Navigator
F11 ⌘+T Opens the Styles and Formatting window
Documentation for LibreOffice is available at http://www.libreoffice.org/get-help/documentation
Contents
Copyright..............................................................................................................................2Contributors.................................................................................................................................2
Feedback.....................................................................................................................................2
Acknowledgments........................................................................................................................2
Publication date and software version.........................................................................................2
Note for Mac users...............................................................................................................2
Introduction..........................................................................................................................5
Creating a table....................................................................................................................5Inserting a new table....................................................................................................................5
Creating nested tables.................................................................................................................6
Using AutoCorrect to create a table.............................................................................................7Create a table from formatted text...........................................................................................7Example..................................................................................................................................8
Formatting the table layout.................................................................................................8Default parameters......................................................................................................................8
Resizing and positioning the table...............................................................................................9
Resizing rows and columns.......................................................................................................10
Resizing individual cells.............................................................................................................11
Inserting rows and columns........................................................................................................11
Merging and splitting cells..........................................................................................................12
Specifying table borders............................................................................................................13
Selecting background colors and graphics.................................................................................14
Displaying or hiding table boundaries........................................................................................16
Formatting the table text...................................................................................................16Specifying text flow....................................................................................................................16
Vertical alignment......................................................................................................................17
Number formats.........................................................................................................................17
Rotating text in a table cell.........................................................................................................18
Data entry and manipulation in tables.............................................................................19Moving between cells.................................................................................................................19
Sorting data in a table................................................................................................................19
Using spreadsheet functions in a table......................................................................................20
Additional table operations...............................................................................................21Protecting cells in a table...........................................................................................................21
Adding a caption........................................................................................................................21
Cross-referencing a table...........................................................................................................23
Automatic formatting of tables...................................................................................................23
Creating a heading row in an existing table...............................................................................25
Merging and splitting tables.......................................................................................................25
Deleting a table..........................................................................................................................25
Copying a table..........................................................................................................................26
Working with Tables 3

Moving a table...........................................................................................................................26
Inserting a paragraph before or after a table..............................................................................26
Using tables as a page layout tool.............................................................................................26
The Table menu and toolbar.............................................................................................27
Working with Tables 4
Introduction
Tables are a useful way to organize and present large amounts of information, for example:
• Technical, financial, or statistical reports.
• Product catalogs showing descriptions, prices, characteristics, and photographs of products.
• Bills or invoices.
• Lists of names with address, age, profession, and other information.
Tables can often be used as an alternative to spreadsheets to organize materials. A well-designed table can help readers understand better what you are saying. While you would normally use tables for text or numbers, you could put other objects, such as pictures, in cells.
Tables can also be used as a page-layout tool to position text in areas of a document instead of using several Tab characters. For example, the descriptions under Figure 13 were created in a table with invisible borders. Another, perhaps better, example would be in headers and footers to support independent positioning of different elements, such as page number, document title etc. This use of tables is described in Chapter 4, Formatting Pages.
Creating a table
Before you insert a table into a document, it helps to have an idea of the visual result you want to obtain as well as an estimate of the number of rows and columns required. Every parameter can be changed at a later stage; however, thinking ahead can save a large amount of time as changes to fully formatted tables often require a significant effort.
Inserting a new tableTo insert a new table, position the cursor where you want the table to appear, then use any of the following methods to open the Insert Table dialog (Figure 1):
• From the Menu bar, choose Insert > Table.
• From the Menu bar, choose Table > Insert > Table.
• Press Ctrl+F12.
• On the Standard toolbar, click the left side of the split Table button
Tip
To directly insert a table with the default properties, click on the arrow button next to the Table icon on the Standard toolbar. A graphic appears where you can choose the size of the table (up to fifteen rows and up to ten columns). To create the table, click on the cell that you want to be on the last row of the last column. Holding down the mouse button over the Table icon will also display the graphic.
In the Insert Table dialog, you can specify the properties for the new table.
General settings: In the Name box, you can enter a different name from the LibreOffice-generated default for the table. This might come in handy when using the Navigator to jump quickly to a table.
In the Columns and Rows boxes, specify the number of columns and rows for the new table. You can change the size of the table later, if necessary.
Creating a table 5
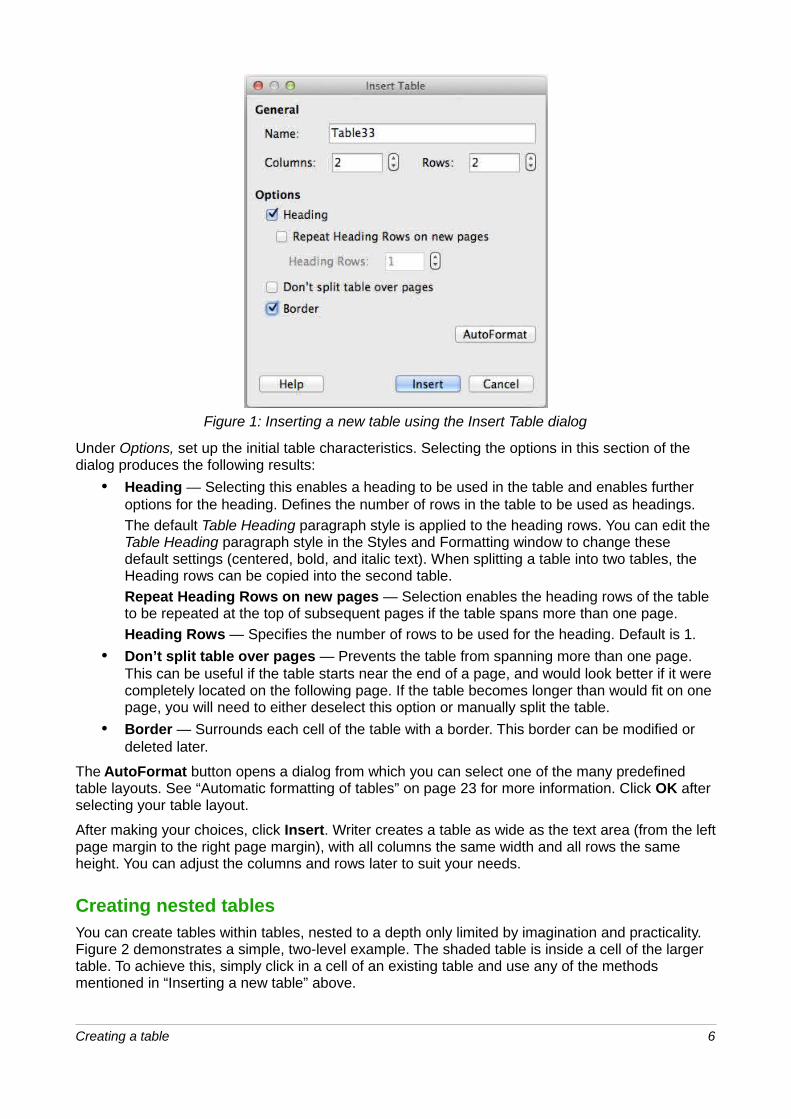
Figure 1: Inserting a new table using the Insert Table dialog
Under Options, set up the initial table characteristics. Selecting the options in this section of the dialog produces the following results:
• Heading — Selecting this enables a heading to be used in the table and enables further options for the heading. Defines the number of rows in the table to be used as headings.
The default Table Heading paragraph style is applied to the heading rows. You can edit the Table Heading paragraph style in the Styles and Formatting window to change these default settings (centered, bold, and italic text). When splitting a table into two tables, the Heading rows can be copied into the second table.
Repeat Heading Rows on new pages — Selection enables the heading rows of the table to be repeated at the top of subsequent pages if the table spans more than one page.
Heading Rows — Specifies the number of rows to be used for the heading. Default is 1.
• Don’t split table over pages — Prevents the table from spanning more than one page. This can be useful if the table starts near the end of a page, and would look better if it were completely located on the following page. If the table becomes longer than would fit on one page, you will need to either deselect this option or manually split the table.
• Border — Surrounds each cell of the table with a border. This border can be modified or deleted later.
The AutoFormat button opens a dialog from which you can select one of the many predefined table layouts. See “Automatic formatting of tables” on page 23 for more information. Click OK after selecting your table layout.
After making your choices, click Insert. Writer creates a table as wide as the text area (from the leftpage margin to the right page margin), with all columns the same width and all rows the same height. You can adjust the columns and rows later to suit your needs.
Creating nested tablesYou can create tables within tables, nested to a depth only limited by imagination and practicality.Figure 2 demonstrates a simple, two-level example. The shaded table is inside a cell of the larger table. To achieve this, simply click in a cell of an existing table and use any of the methods mentioned in “Inserting a new table” above.
Creating a table 6

Figure 2: Nested table example
Using AutoCorrect to create a tableYou can also create a table by typing a series of hyphens (-) or tabs separated by plus signs. Use the plus signs to indicate column dividers, while hyphens and tabs are used to indicate the width ofa column. When using tabs, the default tab setting determines the width; this setting can be changed in Tools > Options > LibreOffice Writer > General.
For example, this character sequence:
+-----------------+---------------+------+
creates a table like this:
NoteThis function can be disabled or enabled in Tools > AutoCorrect Options. On the Options tab, deselect or select Create table.
Create a table from formatted textYou can create a table from plain text by using the Table > Convert > Text to Table menu item. The text to be converted must contain characters to indicate column separators. Paragraph marks indicate an end of a table row.
To convert text to a table, start by editing the text to ensure the column separator character is in place where you want it. Select the text you want to convert and choose Table > Convert > Text toTable to open the dialog shown in Figure 3.
Figure 3: Dialog for the text to table conversion
Creating a table 7

The Separate text at part of the dialog has four options for the separator for the columns of text. Select Other to choose the default comma (useful if you are importing a CSV file) or type any character in the box. The other options in this dialog are the same as those in the dialog used to insert a table shown in Figure 1.
Click OK when all your choices have been made.
ExampleIn this example we will convert the following text into a table.
Row 1 Column 1; Row 1 Column 2; Row 1 Column 3
Row 2 Column 1; Row 2 Column 2; Row 2 Column 3
Choose Table > Convert > Text to Table
In this case, the separator between elements is a semicolon. By selecting the text and applying theconversion, we obtain the following result.
Row 1 Column 1 Row 1 Column 2 Row 1 Column 3
Row 2 Column 1 Row 2 Column 2 Row 2 Column 3
Note that, unlike the creation of a table by other mechanisms, the conversion from text to table preserves the paragraph style and character style applied to the original text.
You can also use the Convert menu to perform the opposite operation; that is, to transform a table into plain text. This may be useful when you want to export the table contents into a different program.
To transform a table into text, place the cursor anywhere in the table, choose Table > Convert > Table to Text in the Menu bar, pick the preferred row separator, and click OK to finish.
Formatting the table layout
Formatting a table is, generally speaking, a two-step process: formatting of the table layout (the subject of this section) and formatting of the table text (the subject of the next section).
Formatting the layout normally involves one or more of the following operations: adjusting the size of the table and its position on the page, adjusting sizes of rows and columns, adding or removing rows or columns, merging and splitting individual cells, changing borders and background.
Default parametersIf you create a table using the Insert Table dialog or the Table button on the Standard toolbar, the following defaults are set:
• The cells use the Table Contents paragraph style, which, in the default template, is identicalto the Default Style paragraph style.
• The default table occupies all the space from margin to margin (text area).
• The default table has thin black borders around each cell (grid).
Additionally, if you activate the Heading option, the cells in the heading row (or rows) use the Table Heading paragraph style. In the default template, the text is centered and set with a bold font.
Formatting the table layout 8

Resizing and positioning the tableUsing the default settings, any newly created table will occupy the entire width of the text area. This is sometimes what you want, or you may prefer a smaller table. To quickly resize a table, first move the mouse to either the left or right edge. When the cursor changes shape into a double arrow, drag the border to the new position. This operation only changes the size of the first or last column; it does not change the alignment of the table on the page.
If you need more precise control over the size and position of the table on the page, open the TableFormat dialog by choosing Table > Table Properties or by right-clicking anywhere in the table and choosing Table from the context menu. Select the Table page of the dialog.
Figure 4: The Table page of the Table Format dialog
On this page you can set the alignment of the table, choosing among the following options:
• Automatic: the default setting for a table, fills the width of the text area.
• Left: aligns the table with the left margin.
• Right: aligns the table with the right margin.
• From Left: lets you specify under Spacing exactly how far from the left margin the table is placed.
• Center: aligns the table in the middle between the left and right margins. If the table width is greater than the margin, the table will extend outside of the margins.
• Manual: lets you specify the distances from both left and right margins under Spacing.
Selecting an alignment option other than Automatic activates the Width field in the Properties section, where you can enter the desired size of the table. Select Relative to see the width as percentage of the text area.
In the Spacing section, use the Above and Below boxes to modify the separation between the textand the table. When the size of the table is less than the size of the text area, LibreOffice will insertsome values in the Left and Right boxes. You can enter values in both the Left and Right boxes ifyou select Manual alignment. You can enter values in the Left box when you select the From Left,Right or Center alignment. You can enter values in the Right box if you select Left alignment. Otherwise these values are not available. Note that the sum of the table width, and the values in the Left and Right boxes, should not be greater than the width of the text area.
Formatting the table layout 9

Resizing rows and columnsYou can adjust the height of rows and the width of columns in a table in several ways.
• Move the mouse next to the edge of the cell and when a double-headed arrow appears, click and hold the left mouse button, drag the border to the desired position, and release the mouse button.
• On the horizontal ruler, column dividers are marked by a pair of thin gray lines; the vertical ruler indicates row dividers in the same way. You can resize a row or column by holding themouse button down on the appropriate divider and dragging it to the desired location.
• Use the keyboard as described below.
Selecting Table > Autofit from the Menu bar also offers some resizing options:
• Select Column Width or Row Height to enter a dimension into the size box for each selectable column or row of the table.
• The Optimal Column Width or Optimal Row Height options make the selected columns or rows as narrow as possible while still fitting their contents. This option is only available if the table is selected and has content.
• Distribute Columns/Rows Evenly to quickly bring them back to all being the same width or height. This option is only available if the table is selected.
For greater control over the width of each column, use the Columns page of the Table Format dialog.
Figure 5: Table Format dialog: Columns page
Right-click on the table and choose Table from the context menu or choose Table > Table Properties from the Menu bar. On the Table Format dialog, select the Columns tab.
• Adapt table width: If a table already stretches to the page margins, it cannot stretch any wider and the Adapt table width option can only be used to reduce the column width. If the table is narrower, increasing the width of a column will increase the width of the whole table. This option is not available if Automatic has been selected in the Alignment area of the Table page.
If the table width already extends past the margins, with the Adapt table width option checked, attempting to change a column width will automatically decrease that column’s size so that the table will now shrink to the page margins while keeping the size of any other column intact.
• Adjust columns proportionally results in all columns changing their widths by the same percentage when one is changed. For example, if you reduce by half the size of a column, the sizes of all the other columns will be halved. This option is not available if Automatic has been selected in the Alignment area of the Table page.
Formatting the table layout 10

• Remaining space shows how much further the table can expand before hitting the limit of the margins. This value cannot be edited and will not be negative in the event that the tablewidth is already larger than the space between the left and right margins.
• Under Column width, each individual column can be adjusted. If you have more than six columns, use the arrows at the right and left to view them all. With no options selected, the column to the right of the one being adjusted will automatically adjust to keep the table width constant. Adjusting the most right hand column causes the first column to adjust.
Rather than start from the Table Format dialog, it is often more efficient to make rough adjustmentsto a new table using the mouse, and then fine tune the layout using the Columns page in conjunction with the Table page of the Table Format dialog.
It is also possible to resize a table using only the keyboard. This is sometimes easier than using the mouse.
1) Place the cursor in the cell where you want to make changes.
2) Press and hold the Alt key while using the arrow keys.
a) The left and right arrow keys adjust the column width by moving the border on the right edge of the cell, but not past the margin.
b) The up and down arrows adjust the row height (when possible) by moving the border on the lower edge of the cell.
3) Press and hold the Shift+Alt key while using the left/right arrow keys.
Adjusts the column width by moving the border on the left edge of the cell, but not past the margin.
To adjust the resizing parameters and behavior for keyboard handling, choose Tools > Options > LibreOffice Writer > Table.
Use the Row and Column values in the Move cells section to determine the amount of change produced by a single keystroke while resizing. In the Behavior of rows/columns section you can choose one of the following three strategies when resizing:
• Fixed: select this if you want the resizing to affect only the adjacent cell and not the entire table. The width of the table does not change when resizing its cells.
• Fixed, proportional: when resizing a cell with this option selected, all the other cells are also resized proportionally, but in the opposite direction so as to maintain the width of the table.
• Variable: this is the default option. Resizing a cell affects the table size. For example, whenyou widen a cell, the width of the table increases.
Resizing individual cellsPlace the cursor in the cell you wish to change.
1) Press and hold the Ctrl+Alt key while using the left/right arrow keys.
Resizes the current cell on its right edge, but not past the margin.
2) Press and hold the Ctrl+Shift+Alt key while using the left/right arrow keys.
Resizes the current cell on its left edge, but not past the margin.
Inserting rows and columnsTo insert any number of rows or columns:
1) Place the cursor in the row or column where you want to add new rows or columns and right-click.
Formatting the table layout 11

2) In the context menu, choose Row > Insert or Column > Insert. This will display a dialog where you can select the number of rows or columns to add, and whether they appear before or after the one selected.
3) Set Amount to the number of rows or columns to insert, and Position to Before or After.
4) Click OK to close the dialog.
The Table > Insert > Row and Table > Insert > Column choices from the Menu bar provide the same options.
Note
Clicking on the Insert Row icon on the Table toolbar inserts one row below the selected one. Clicking on the Insert Column icon on the Table toolbar inserts a column after (to the right of) the selected one.
Regardless of how they are inserted, new rows or columns have the same formattingas the row or column where the cursor was when the insert command was issued.
You can also quickly insert a row or a column using the keyboard:
1) Place the cursor in the row or column next to the row or column you want to insert.
2) Press Alt+Insert to activate keyboard handling.
3) Use the arrow keys as desired to add a row or column:
Left to insert a new column to the left of the cell where the cursor is located.
Right to insert a new column to the right of the cell where the cursor is.
Down to insert a new row below the cell where the cursor is.
Up to insert a new row above the cell where the cursor is.
The above keyboard technique can also be used to delete rows or columns by replacing the Alt+Insert keystroke combination in Step 2 with Alt+Delete.
Merging and splitting cellsTo merge a cell or group of cells into one cell:
1) Select the cells to merge.
2) Right-click and choose Cell > Merge in the context menu, or choose Table > Merge Cells from the Menu bar. Any content of the cells appears in the merged cell.
To merge a single cell into an adjacent cell, you can also place the cursor in the cell (origin), press Alt+Delete, release, then hold down Ctrl, and then press the left or the right arrow key. Any contents in the origin cell are lost.
To split a cell into multiple cells:
1) Position the cursor inside the cell.
2) Right-click and choose Cell > Split in the context menu, or choose Table > Split Cells from the Menu bar.
3) Select how to split the cell. A cell can be split either horizontally (create more rows) or vertically (create more columns), and you can specify the total number of cells to create.
To split a single cell, you can also place the cursor in an adjacent cell, press Alt+Ins, release, then hold down Ctrl, and then press the left or the right arrow key to split the cell tothe left/right.
It is generally a good rule to merge and split cells after completing other layout formatting. This is because some operations such as deleting a column or a row may produce a result difficult to predict when applied to a table with merged or split cells.
Formatting the table layout 12
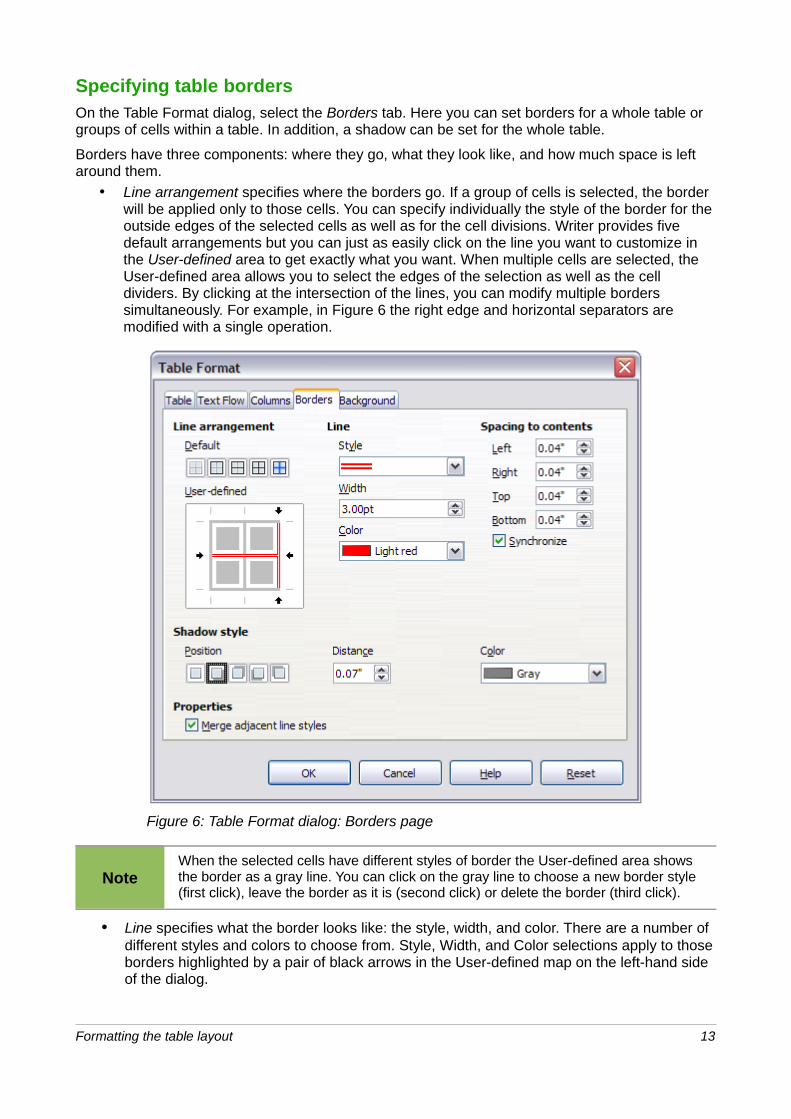
Specifying table bordersOn the Table Format dialog, select the Borders tab. Here you can set borders for a whole table or groups of cells within a table. In addition, a shadow can be set for the whole table.
Borders have three components: where they go, what they look like, and how much space is left around them.
• Line arrangement specifies where the borders go. If a group of cells is selected, the border will be applied only to those cells. You can specify individually the style of the border for the outside edges of the selected cells as well as for the cell divisions. Writer provides five default arrangements but you can just as easily click on the line you want to customize in the User-defined area to get exactly what you want. When multiple cells are selected, the User-defined area allows you to select the edges of the selection as well as the cell dividers. By clicking at the intersection of the lines, you can modify multiple borders simultaneously. For example, in Figure 6 the right edge and horizontal separators are modified with a single operation.
Figure 6: Table Format dialog: Borders page
NoteWhen the selected cells have different styles of border the User-defined area shows the border as a gray line. You can click on the gray line to choose a new border style (first click), leave the border as it is (second click) or delete the border (third click).
• Line specifies what the border looks like: the style, width, and color. There are a number of different styles and colors to choose from. Style, Width, and Color selections apply to thoseborders highlighted by a pair of black arrows in the User-defined map on the left-hand side of the dialog.
Formatting the table layout 13
• Spacing to contents specifies how much space to leave between the border and the cell contents. Spaces can be specified to the left, right, above, and below. Check Synchronize to have the same spacing for all four sides. This spacing is like a padding and it is not factored in when calculating the text measurements.
• Shadow style properties always apply to the whole table. A shadow has three components: where it is, how far from the table it is cast, and what color it is.
• If Merge adjacent line styles is checked, two cells sharing a common border will have their borders merged, rather than being side by side.
Tip
To reset everything if you are having problems with borders, right-click in the table and choose Table or choose Table > Table Properties from the Menu bar. On the Borders tab, select the Set No Borders icon under Line arrangement: Default (the box on the left).
Selecting background colors and graphicsA table background can greatly improve the readability of the data, visually highlight important parts of the table (such as the heading or a specific cell), or just make the table more appealing. You can choose between two types of background when formatting the table: solid color or graphic. The background can be applied to the whole table, to a single cell, or to a row. The background selected for a cell will be in front of the row background which in turn will hide the tablebackground.
The row background option is quite handy when you want to create alternate color rows or assign a different background to the heading of the table. The tables in this guide adopt this technique.
To set the background for a cell, row, or table:
1) Place the cursor anywhere inside the cell, row or table you want to work with. If you want toapply a background to a group of cells, select the group.
2) Right-click and choose Table from the context menu, or choose Table > Table Properties from the Menu bar.
3) In the Table Format dialog, select the Background tab (see Figure 7).
4) In the For section, chose whether to apply the settings to cell, row, or table.
• If you choose Cell, changes apply only to the selected cells, or the cell where the cursorcurrently resides. Even when selecting a group of cells, the background settings are applied to each cell individually.
• If you choose Row, changes affect the entire row where the cursor resides.
• If you choose Table, changes will set the background for the entire table, regardless of the cursor position or selected cells.
5) In the As selection box, choose whether the background is a color or a graphic.
To apply a color, select the color and click OK. Remember that you can add custom colors by choosing Tools > Options > LibreOffice > Colors.
To apply a graphic:
a) First select the graphic from your computer’s file system with the Browse button. (Writer supports a large number of graphics formats.)
Formatting the table layout 14
Figure 7: Table Format dialog: inserting a graphic background
b) You can use the Link option to link the graphic file. If it is linked, changes to the graphic (for example, if you edit it in a different software package) are reflected in yourdocument. However, you also need to keep the linked graphic file with the document file. If, for example, you email the document without the graphic file, the graphic will nolonger be visible.
c) Under Type, select the type of placement for the graphic.
• If you choose Position, you can select in the position map where the graphic willbe displayed in the selected area.
• If you choose Area, the graphic is stretched to fill the whole area.
• If you choose Tile, the graphic is tiled (repeated horizontally and vertically) to fill the area.
d) If the Preview option is checked, the graphic displays in the pane on the right.
e) To apply the graphic, click OK.
Figure 8 shows an example of a table set with a background image, and the first row background colored. As you can see, the row background covers the table background.
Figure 8: Example of table with different row and table backgrounds
Formatting the table layout 15

Displaying or hiding table boundariesA table boundary is a set of pale (usually gray) lines around the cells when viewed on-screen in LibreOffice with no borders enabled. These boundaries are not printed; their only function is to helpyou see where the table cells are.
To display the table the same way on the screen as on the printed page, with no boundary lines, right-click on the table and choose Table Boundaries from the context menu. Repeat this to have the boundaries appear again.
Note Turning boundaries off does not hide any borders that the table may have.
TipYou can also turn table boundaries on and off through Tools > Options > LibreOffice > Appearance. On that page, you can display or hide boundaries around text, pages headers and footers, figures, and other parts of a document.
Formatting the table text
Once the table layout is satisfactory, you can move on to formatting the text in the individual cells. You can apply manual formatting as with any other paragraph in the text, but it is highly recommended, for the sake of consistency and ease of maintenance, that you define your own paragraph and character styles.
Besides the paragraph and character styles, there are other aspects to consider when placing text in a table cell, such as text flow, alignment and orientation.
You can format each cell independently of other cells, or you can simultaneously format a group of cells by selecting them before applying the desired formatting.
Specifying text flowOn the Text Flow page of the Table Format dialog (Figure 9), you can:
• Insert a page or column break either before or after the table. Use the Text Flow: Break option, combined with the Page or Column and the Before or After buttons.If you insert a page break before the table (that is, start the table on a new page), you can also change the page style that will go with it by checking the With Page Style box and selecting a new page style. As with any page break, you can also reset the page numbers using the Page number box.
• Keep a table on one page by deselecting the Allow table to split across pages and columns option. If this item is deselected, the next item is not active.
• Keep each row on one page by deselecting the Allow row to break across pages and columns option.
• Use the Keep with next paragraph option to keep the table and an immediately following paragraph together if you insert a page break.
• Use the Repeat heading option, and its associated numbers box, to select the number of table heading rows that will be repeated on each page. A complicated table may need two or three heading rows to be easily read and understood.
• Use the Text orientation list to select the direction for the text in the cells. Select either Horizontal, Vertical, or Use superordinate object settings.
Formatting the table text 16
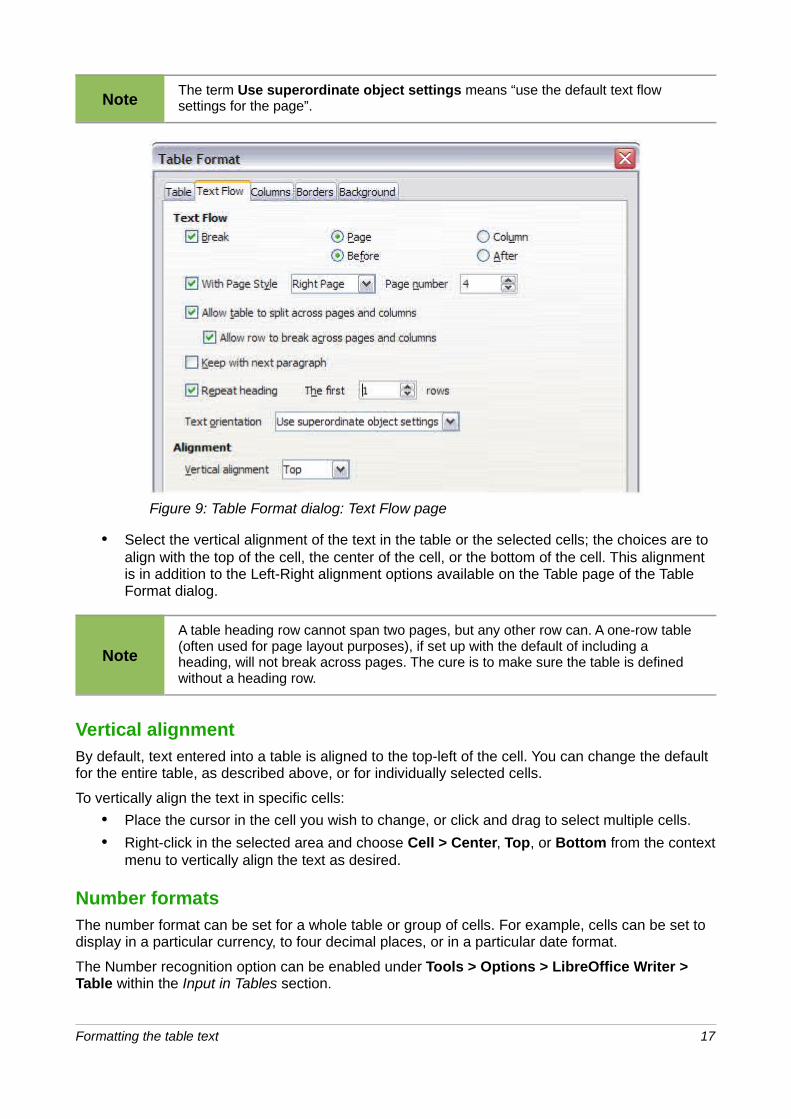
NoteThe term Use superordinate object settings means “use the default text flow settings for the page”.
Figure 9: Table Format dialog: Text Flow page
• Select the vertical alignment of the text in the table or the selected cells; the choices are to align with the top of the cell, the center of the cell, or the bottom of the cell. This alignment is in addition to the Left-Right alignment options available on the Table page of the Table Format dialog.
Note
A table heading row cannot span two pages, but any other row can. A one-row table (often used for page layout purposes), if set up with the default of including a heading, will not break across pages. The cure is to make sure the table is defined without a heading row.
Vertical alignmentBy default, text entered into a table is aligned to the top-left of the cell. You can change the default for the entire table, as described above, or for individually selected cells.
To vertically align the text in specific cells:
• Place the cursor in the cell you wish to change, or click and drag to select multiple cells.
• Right-click in the selected area and choose Cell > Center, Top, or Bottom from the contextmenu to vertically align the text as desired.
Number formatsThe number format can be set for a whole table or group of cells. For example, cells can be set to display in a particular currency, to four decimal places, or in a particular date format.
The Number recognition option can be enabled under Tools > Options > LibreOffice Writer > Table within the Input in Tables section.
Formatting the table text 17
Number recognition specifies that numbers in a text table are recognized and formatted as numbers. If Number recognition is not selected, numbers are saved in text format and are automatically left-aligned.
If Number format recognition is not selected, only input in the format that has been set for the cell is accepted. Any other input resets the format to Text.
Select the cells to format, then right-click and choose Number Format from the context menu. The Number Format dialog opens for you to set options for various categories of numerical data.
• In the Category list, select the category you want, such as currency, date, or text.
• In the Format list, choose a format for the category you just selected.
• For some categories, such as date, you may wish to change the language using the Language list, while for other numerical categories you can use the Options section of the dialog to customize the appearance.
Tip
You will notice that LibreOffice displays the formatting code for the category and format selected in Format Code section at the bottom of the dialog. For example, if you select a date format such as 31 Dec 1999 the corresponding code is D MMM YYYY. Advanced users can easily customize this formatting code as well as create new user-defined codes.
Alignment specifies that numbers are always bottom right aligned in the cell. If this field is not selected numbers are always top left aligned in the cell.
NoteDirect formatting is not influenced by the Alignment field. If you center align the cell content directly, it remains centered irrespective of whether text or numbers are involved.
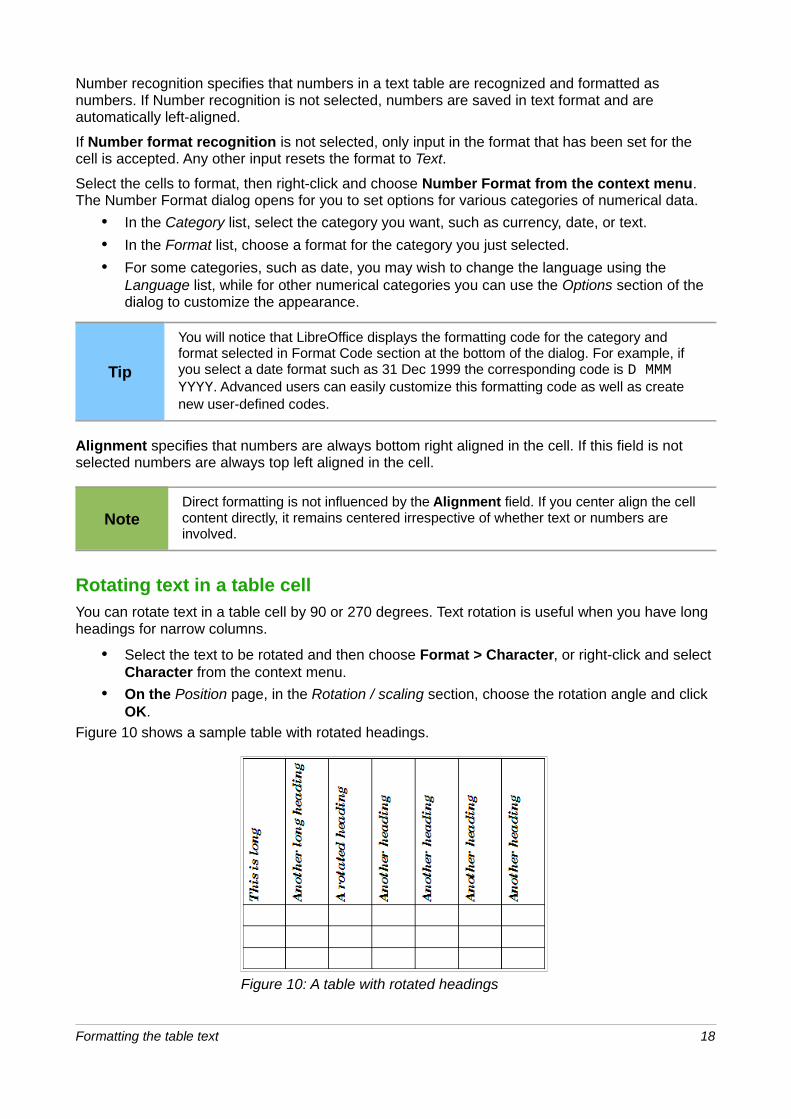
Rotating text in a table cellYou can rotate text in a table cell by 90 or 270 degrees. Text rotation is useful when you have long headings for narrow columns.
• Select the text to be rotated and then choose Format > Character, or right-click and select Character from the context menu.
• On the Position page, in the Rotation / scaling section, choose the rotation angle and click OK.
Figure 10 shows a sample table with rotated headings.
Figure 10: A table with rotated headings
Formatting the table text 18

NoteText rotation within table cells can also be achieved with the use of paragraph styles, discussed in greater detail in Chapter 7, Working with Styles.
Data entry and manipulation in tables
Moving between cellsWithin a table, you can use the mouse, the cursor keys, or the Tab key to move between cells.
The cursor keys move the cursor one text character left or right at a time. With an empty cell, pressing the cursor key will move the cursor to the adjacent cell.
The Tab key moves directly to the next cell and, if the cursor is in the last cell in the table, creates anew row. Pressing Shift+Tab moves the cursor back a cell.
TipTo enter a Tab character as part of the text of the cell, press the Ctrl and Tab keys at the same time.
To move to the beginning of the table, press Ctrl+Home. If the active cell is empty, the move is to the beginning of the table. If the cell has content, the first press goes to the beginning of the cell and the next press goes to the beginning of the table (pressing again takes you to the beginning of the document).
To move to the end of the table, press Ctrl+End. If the active cell is empty, the move is to the end of the table. If the cell has content, the first press goes to the end of the cell and the next press goes to the end of the table (pressing again takes you to the end of the document).
Sorting data in a tableJust as in a spreadsheet, Writer allows data in a table to be sorted. Up to three levels of sorting can be specified (for example, sort first by age numerically, then alphabetically by name within each age).
To sort data in a table:
1) Select the table (or part of the table) to be sorted.
2) From the Menu bar, choose Table > Sort, or select the Sort icon from the Table toolbar.
3) In the Sort dialog:
a) Decide whether you want to sort in the direction of rows or columns. The default sorting direction is by rows, which results in sorting the data in a column.
b) Select up to three keys to sort on, in the correct order.
c) For each key, select which column or row to sort on, whether the sort is Numeric or Alphanumeric and whether it is Ascending or Descending.
d) Click OK to perform the sort.
NoteYou have to select all cells that might be affected by the sorting. For example, if you select only the cells of one column, the sort affects that column only, while the others remain unchanged. In such a case, you risk mixing the data of the rows.
Data entry and manipulation in tables 19
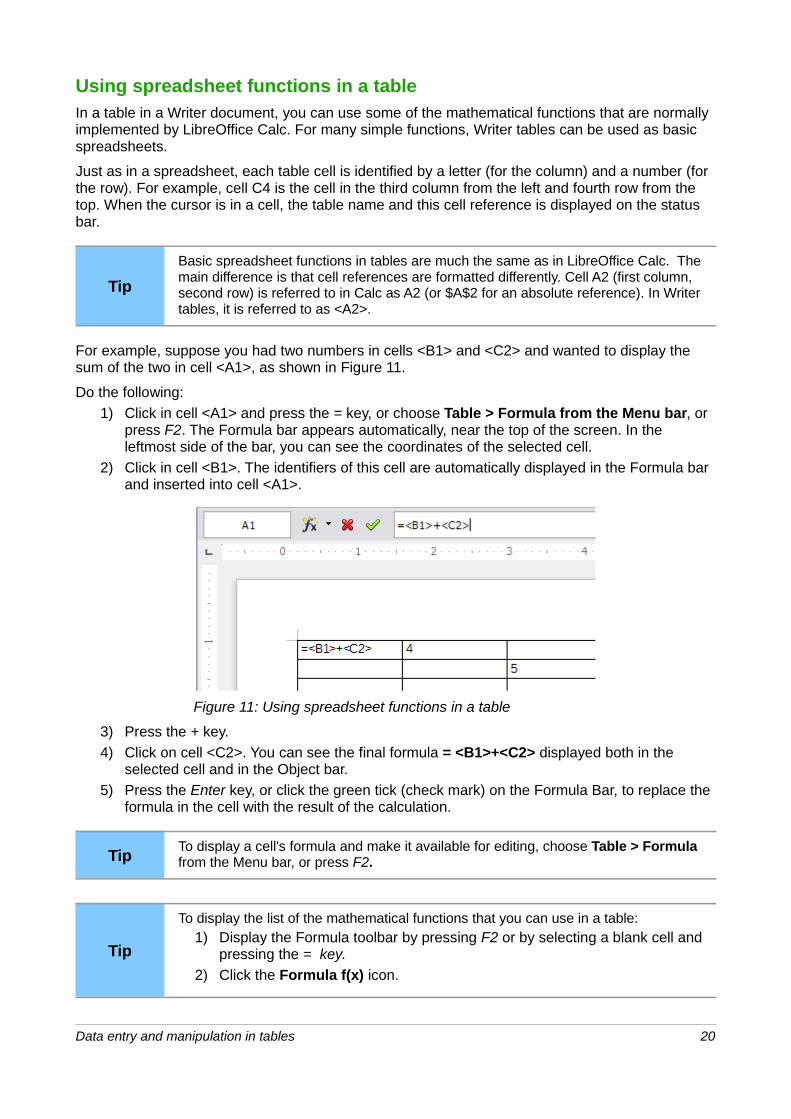
Using spreadsheet functions in a tableIn a table in a Writer document, you can use some of the mathematical functions that are normally implemented by LibreOffice Calc. For many simple functions, Writer tables can be used as basic spreadsheets.
Just as in a spreadsheet, each table cell is identified by a letter (for the column) and a number (for the row). For example, cell C4 is the cell in the third column from the left and fourth row from the top. When the cursor is in a cell, the table name and this cell reference is displayed on the status bar.
Tip
Basic spreadsheet functions in tables are much the same as in LibreOffice Calc. Themain difference is that cell references are formatted differently. Cell A2 (first column, second row) is referred to in Calc as A2 (or $A$2 for an absolute reference). In Writertables, it is referred to as <A2>.
For example, suppose you had two numbers in cells <B1> and <C2> and wanted to display the sum of the two in cell <A1>, as shown in Figure 11.
Do the following:
1) Click in cell <A1> and press the = key, or choose Table > Formula from the Menu bar, or press F2. The Formula bar appears automatically, near the top of the screen. In the leftmost side of the bar, you can see the coordinates of the selected cell.
2) Click in cell <B1>. The identifiers of this cell are automatically displayed in the Formula bar and inserted into cell <A1>.
Figure 11: Using spreadsheet functions in a table
3) Press the + key.
4) Click on cell <C2>. You can see the final formula = <B1>+<C2> displayed both in the selected cell and in the Object bar.
5) Press the Enter key, or click the green tick (check mark) on the Formula Bar, to replace the formula in the cell with the result of the calculation.
TipTo display a cell's formula and make it available for editing, choose Table > Formula from the Menu bar, or press F2.
Tip
To display the list of the mathematical functions that you can use in a table:1) Display the Formula toolbar by pressing F2 or by selecting a blank cell and
pressing the = key.
2) Click the Formula f(x) icon.
Data entry and manipulation in tables 20

In our example, this gives the result 9 in the top left cell. For summing contiguous cells, you can simply select the cells in the row, column, or the rectangle of rows and columns. Thus, for example,to add a column of numbers, do this:
1) Type an equals sign = in an empty cell.
2) Select the cells to be added together—in this case the cells from A2 to A5. The formula should be something like =<A2:A5>.
3) Press the Enter key or click the green tick (check mark) on the Formula Bar.
4) The result appears in the cell you have selected.
When using a function, you can enter the cells manually or by selecting them. Thus, to add up the four numbers that we added above (A2, A3, A4, A5), do this:
1) Type an equals sign = in an empty cell.
2) Type sum or select it from the function list f(x).
3) Select the contiguous cells to be added together. The formula should be something like =sum<A2:A5>.
4) Press the Enter key or click the green tick (check mark) on the Formula Bar.
5) The answer appears in the cell you have selected.
Caution Unlike in Calc, when inserting or deleting rows or columns of the table, formulas are not updated automatically. If you plan to use complex formulas you should consider embedding a Calc spreadsheet in your Writer document.
Additional table operations
Protecting cells in a tableYou can protect the contents of individual cells of a text table from changes.
NoteThis protection is not intended for secure protection. It is just a switch to protect the cells against accidental changes.
To turn on cell protection:
Place the cursor in a cell or select cells. Right-click to open the context menu, then choose Cell> Protect.
To tun off cell protection, do one of the following:
• Place the cursor in the cell or select the cells. First, if necessary, choose Tools > Options > LibreOffice Writer > Formatting Aids and mark Cursor in protected areas > Enable. Then right-click the cell to open the context menu and choose Cell > Unprotect.
• Select the table in the Navigator, open the context menu and select Table > Unprotect.
• Use Shift+Ctrl+T to remove protection for the entire current table or all selected tables.
Adding a captionYou can easily add a caption to any table. Writer will keep track of all your captioned tables, automatically number them, and update any links to them.
To add a caption to a table:
1) Place the cursor in the table.
Additional table operations 21
2) Right-click and choose Caption from the pop-up menu. Alternatively, the Insert > Caption menu option becomes available whenever your cursor is inside a table cell.
3) Enter the text for your caption, your category selection, the numbering style, separator, andposition (above or below the table).
4) Click OK.
Note
Once the category, numbering style, and separator are established in the Caption dialog, you can edit them in the document if you choose. However, doing so may damage the automatic numbering and reference links. If you need to establish the numbering and reference link for the caption, you can choose to leave your caption blank in the Caption dialog and add it later.
Writer supplies five category labels for captions: <None>, Drawing, Table, Illustration, and Text.
You can also create your own category labels, formatting, and separators. For example, you might want your tables to be labeled as Fantasia, formatted with roman numerals, and using a period (‘.’) as a separator, as follows:
Fantasia I. Interesting data
Fantasia II. More interesting data
Fantasia III. Yet more interesting data
To accomplish this:
1) Open the Caption dialog following the instructions above.
2) In the Category field, select the text and type the word Fantasia.
3) In the Numbering drop-down list, select the Roman (I II III) option.
4) In the Separator field, select the text and type a period (.) followed by a space.
NoteWriter will use exactly what you type into the Category and Separator fields, so be sure to include any additional spaces or punctuation you want to see in your caption.
Additional options for numbering captions by chapter are available under the Options button in the Captions dialog. Some of these settings which refer to the outline level will only have an effect if you are using outline level paragraph styles on the chapter headings within your document. See Chapter 7. Working With Styles, for information.
By adding chapter numbers to your captions, LibreOffice will restart the caption numbering for eachchapter it encounters. For example, if the last figure caption you create in chapter 1 is Figure 1.15, and the next figure caption you create is in chapter 2, the numbering will start over at Figure 2.1.
Options available to chapter numbering for captions include the following:
• Use Level to specify the outline levels that triggers a restart of the numbering as well as how many levels of outline numbering are shown before the table number. An example maybe useful. Suppose your document uses Heading 1 style for chapters and Heading 2 style for sub-headings, and that this is how you set up your outline numbering. If you want all thetables in a chapter (that is, between two Heading 1 paragraphs) to be numbered sequentially independently of the sub-heading they are under, select 1 as Level. If instead you want to restart the numbering at each sub-heading select level 2.
• Use the Separator field to establish the separator between the chapter number and figure number.
• Use Character style to set a character style for the caption. This is useful if the separator of your choice is not a symbol included in the default font type of your document or if you want the caption to have a special color, size and so on.
Additional table operations 22
• The Apply border and shadow option does not apply to table captions. LibreOffice normally wraps the objects you can add a caption to in a frame, but not for tables.
• Use Caption order to specify whether you want the category or numbering to appear first in the caption.
All of the features described above can also be set up to automatically apply to any new tables youcreate in your document.
To automatically caption all your tables:
1) Place the cursor in a table.
2) Right-click and choose Caption > AutoCaption from the pop-up menu.
3) Select LibreOffice Writer Table and select the settings you want and click OK. This dialog is covered in more detail in Chapter 2, Setting up Writer.
When AutoCaption is enabled for tables, any new tables will be captioned according to your selections in the AutoCaption dialog; however, you will need to add the specific text for each caption onto the table manually.
Cross-referencing a tableYou can insert a cross-reference to a captioned table. Clicking on the cross-reference takes the reader directly to the table.
1) Position the cursor where you want the cross reference.
2) Choose Insert > Cross-reference from the Menu bar.
3) Set the Type to Table (or whatever you chose as the category). A list of captioned tables will be shown in the Selection panel; select the one you want to reference.
4) In the Format pane, choose how the cross reference will appear.
Page creates a reference to the page number that the caption appears on.
Chapter creates a reference to the chapter number in which the caption appears. This will only produce an empty space unless you have set up your chapter headings with outline level paragraph styles.
Reference inserts the entire caption’s category, number and caption text as a reference.
Above/Below inserts “above” or “below” depending on whether the table appears above or below the cross-reference.
As Page Style creates a reference to the page number that the caption appears on, using the page style format.
Category and Number creates a cross-reference with only the caption’s category and number; for example, Table 1 for the first table.
Caption Text creates the reference using the caption text, leaving off the category and number.
Numbering inserts only the number of the caption.
5) Click Insert to add the cross-reference and click Close to exit the dialog.
Automatic formatting of tablesUsing AutoFormat, you can apply an elaborate format to your table with just a few clicks. AutoFormat is somewhat similar to paragraph styles and will enable you to obtain consistent looking tables across your document. You can also create your own table formats and save them as another AutoFormat option.
To apply an AutoFormat, place the cursor anywhere in the table and choose Table > AutoFormat. This opens the dialog shown in Figure 12.
Additional table operations 23
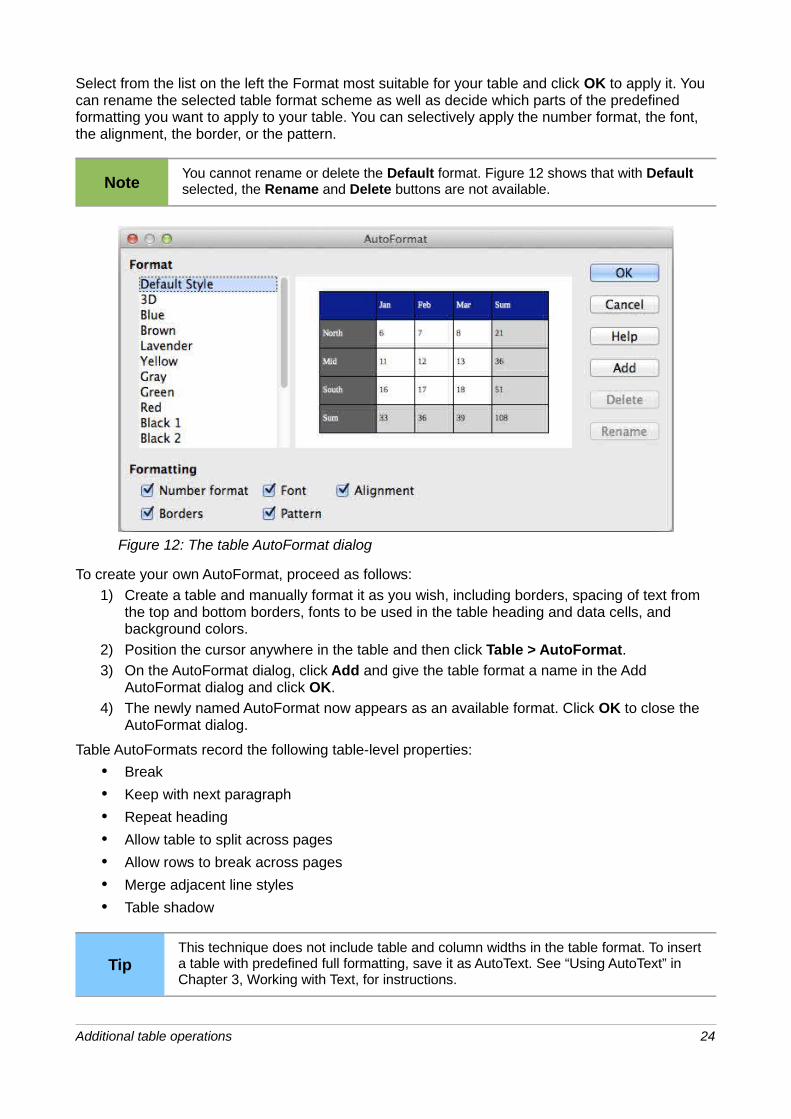
Select from the list on the left the Format most suitable for your table and click OK to apply it. You can rename the selected table format scheme as well as decide which parts of the predefined formatting you want to apply to your table. You can selectively apply the number format, the font, the alignment, the border, or the pattern.
NoteYou cannot rename or delete the Default format. Figure 12 shows that with Default selected, the Rename and Delete buttons are not available.
Figure 12: The table AutoFormat dialog
To create your own AutoFormat, proceed as follows:
1) Create a table and manually format it as you wish, including borders, spacing of text from the top and bottom borders, fonts to be used in the table heading and data cells, and background colors.
2) Position the cursor anywhere in the table and then click Table > AutoFormat.
3) On the AutoFormat dialog, click Add and give the table format a name in the Add AutoFormat dialog and click OK.
4) The newly named AutoFormat now appears as an available format. Click OK to close the AutoFormat dialog.
Table AutoFormats record the following table-level properties:
• Break
• Keep with next paragraph
• Repeat heading
• Allow table to split across pages
• Allow rows to break across pages
• Merge adjacent line styles
• Table shadow
TipThis technique does not include table and column widths in the table format. To inserta table with predefined full formatting, save it as AutoText. See “Using AutoText” in Chapter 3, Working with Text, for instructions.
Additional table operations 24

CautionAutoformats are not easily removed. You can change to a different autoformat, but it takes Undo to get back to the original table.
Creating a heading row in an existing tableTo create a heading row in an existing table that does not have one, select the first row in the table and from the Menu bar select Table > Insert > Rows. In the Insert Rows dialog that opens, ensurethe Before option is selected and click OK. Select the new first row and then from the Styles and Formatting window, double-click the Table Heading paragraph style to apply it to the heading row.As an alternative, you could apply an AutoFormat that does have a heading defined. (Here is where having some personalized table formats could come in very handy.) Place the cursor anywhere in the table and then click Table > AutoFormat. Choose a format. Click OK. Use the More button and deselect the formatting options you do not want to apply to your table.
Merging and splitting tablesOne table can be split into two tables, and two tables can be merged into a single table. Tables are split only horizontally (the rows above the split point are put into one table, and the rows below into another).
To split a table:
1) Place the cursor in a cell that will be in the top row of the second table after the split (the table splits immediately above the cursor).
2) Right-click and choose Split Table in the context menu. You can also use Table > Split Table from the Menu bar.
3) A Split Table dialog opens. You can select No heading or an alternative formatting for the heading—the top row(s) of the new table.
4) Click OK. The table is then split into two tables separated by a blank paragraph.
NoteIf cells in one table include formulas using data from the other table, those cells will contain an error message: **Expression is faulty**.
To merge two tables:
1) Delete the blank paragraph between the tables. You must use the Delete key (not the Backspace key) to do this.
2) Select any cell in one of the tables.
3) Right-click and choose Merge Tables in the pop-up menu. You can also use Table > Merge Table from the Menu bar.
TipTo see clearly where the paragraphs are and to delete them easily, choose View > Nonprinting Characters (Ctrl+F10) or click the ¶ button in the Standard toolbar.
Deleting a tableTo delete a table:
1) Click anywhere in the table.
2) Choose Table > Delete > Table from the Menu bar.
Additional table operations 25
Or:
1) Select from the end of the paragraph before the table to the start of the paragraph after the table.
2) Press the Delete key or the Backspace key.
NoteThe second method also merges the paragraph after the table with the paragraph before the table, which may not be what you want.
Copying a tableTo copy a table from one part of the document and paste it into another part:
1) Click anywhere in the table.
2) From the Menu bar choose Table > Select > Table.
3) Press Ctrl+C or click the Copy icon on the Standard toolbar.
4) Move the cursor to the target position and click on it to fix the insertion point.
5) Press Ctrl+V or click the Paste icon in the Standard toolbar.
Moving a tableTo move a table from one part of a document to another part:
1) Click anywhere in the table.
2) From the Menu bar, choose Table > Select > Table.
3) Press Ctrl+X or click the Cut icon in the Standard toolbar. (This step removes the contents of the cells but leaves the empty cells, which must be removed in step 6.)
4) Move the cursor to the target position and click on it to fix the insertion point.
5) Press Ctrl+V or click the Paste icon in the Standard toolbar. (This pastes the cells and theircontents and formatting.)
6) Return to the original table, click somewhere in it and then choose Table > Delete > Table from the Menu bar.
Inserting a paragraph before or after a tableTo insert a paragraph before a table, position the cursor before any text or other contents in the first (upper left-hand) cell and press Enter or Alt+Enter. To insert a paragraph after a table, position the cursor after any text in the last (lower right-hand) cell and press Alt+Enter.
NoteCaptions are considered as paragraphs separate from the table itself. If there is a caption below a table, for example, just position the cursor at the end of the caption and press Enter.
Using tables as a page layout toolTables may be used as a page layout tool to position text in a document instead of using tabs or spaces. For example, the Tip below is formatted as a table.
For more information and tips about using tables in page layout, see Chapter 4. Formatting Pages.
Additional table operations 26

Tip
When inserting a table used for layout, you may wish to deselect the Heading and Border options (see Inserting a new table on page 5).
To remove the borders from an existing table, right-click on the table, choose Table from the context menu, select the Borders tab (see Figure 6 on page 13), and select the icon for no borders.
The Table menu and toolbar
All of the table commands described in this chapter are conveniently located in the Menu bar underthe Table item and on the Table toolbar, shown in Figure 13.
Table 1 describes the effects of using these icons. When you create a table or select an existing table, the Table toolbar will be displayed automatically. You can manually display it at any time by clicking View > Toolbars > Table. The toolbar can float over the main Writer window (as shown inFigure 13), or it can be docked along any edge of the main window. See Chapter 1, Introducing Writer, for more about docking and floating toolbars, and how to hide and display specific tools on a toolbar.
1 Line Style 8 Top 15 Select Table
2 Line Color (of the border) 9 Center (vertical) 16 Select Column
3 Borders, add lines; SHIFT to remove
10 Bottom 17 Select Rows
4 Background Color 11 Insert Row 18 AutoFormat
5 Merge Cells 12 Insert Column 19 Table Properties
6 Split Cells 13 Delete Row 20 Sort
7 Optimize 14 Delete Column 21 Sum
Figure 13: Table toolbar
Table 1: Functions of the icons on the Table toolbar
Name Description
Line Style Opens the Border Style window where you can modify the border line style. This can be torn off and floated separately.
Line Color (of the border)
A split button. You can apply the color with a single click on the icon, or by selecting the triangle button, open the Border Color window where you can modify the border color. This can be torn off and floated separately.
Borders, add lines; SHIFT to remove
Opens the Borders window where you can select which sides of the table or of the selected cells will have a border. This can be torn off and floated separately.
Background Color
A split button. You can apply the color with a single click on the icon, or by selecting the triangle button, open the Background color window where you canselect the background color of the table or of the selected cells. This can be torn off and floated separately.
The Table menu and toolbar 27

Name Description
Merge Cells Combines the selected cells into a single cell. Refer to Merging and splitting cells on page 12 for a description of the effect of this button.
Split Cells Opens the Split Cells dialog where you can define how to split a cell. Refer toMerging and splitting cells on page 12 for a description of the effect of this button.
Optimize Opens a window with four options you can use to let Writer optimize the distribution of the columns or rows or optimize the row height or column width. This can be torn off and floated separately.
Top Press this button to align the contents of the selected cells to the top of the cell.
Center (vertical) Press this button to align the contents of the selected cells to the vertical center of the cell.
Bottom Press this button to align the contents of the selected cells to the bottom of the cell.
Insert Row Inserts a row below the selected row.
Insert Column Inserts a column after the selected column.
Delete Row Deletes the selected rows from the table.
Delete Column Deletes the selected columns from the table.
Select Table Selects the entire table.
Select Column Selects the column in which the cursor is positioned.
Select Row Selects the row in which the cursor is positioned.
AutoFormat Opens the AutoFormat dialog where you can select from several predefined formatting sets. Each set is characterized by its own fonts, shading, and border styles. You can also select AutoFormat from the Insert Table dialog.
Table Properties Opens the Table Format dialog where you can control all the properties of the table, for example name, alignment, spacing, column width, borders, and background.
Sort Opens the Sort dialog where you can specify the sort criteria for the selected cells.
Sum Activates the Sum function. Refer to “Using spreadsheet functions in a table” onpage 20 for an example of using this function.
The Table menu and toolbar 28
Related Documents