Chapter 7 – Serial- Parallel Circuits Introductory Circuit Analysis Robert L. Boylestad

Chapter 7 – Serial-Parallel Circuits Introductory Circuit Analysis Robert L. Boylestad.
Dec 17, 2015
Welcome message from author
This document is posted to help you gain knowledge. Please leave a comment to let me know what you think about it! Share it to your friends and learn new things together.
Transcript
Chapter 7 – Serial-Parallel Circuits
Introductory Circuit AnalysisRobert L. Boylestad

7.1 – Introduction
A series-parallel configuration is one that is formed by a combination of series and parallel elements.
A complex configuration is one in which none of the elements are in series or parallel.
7.2 - Series-Parallel Networks
General approach to circuit analysis: Study the problem in total and make a brief mental sketch of the
overall approach you plan to use. Examine each region of the network independently before tying them
together in series-parallel combinations. Redraw the network as often as possible with reduced branches and
undisturbed unknown quantities to maintain clarity. When you have a solution, check to see that it is reasonable by
considering the magnitudes of the energy source and the elements in the network. If it does not seem reasonable, either solve using another approach or check over your work very carefully

7.3 – Reduce and Return Approach
Reduce: Reduce the circuit to its simplest form across the
source and then determine the source current (Is).
Return: Using the resulting source current (Is) to work back to
the desired unknown.
7.4 – Block Diagram Approach
Network is broken down into combinations of elements.
Initially, there will be some concern about identifying series and parallel elements, but that will come with practice.
In reverse, the block diagram approach can be used effectively to reduce the apparent complexity of a system by identifying the major series and parallel components of the network.
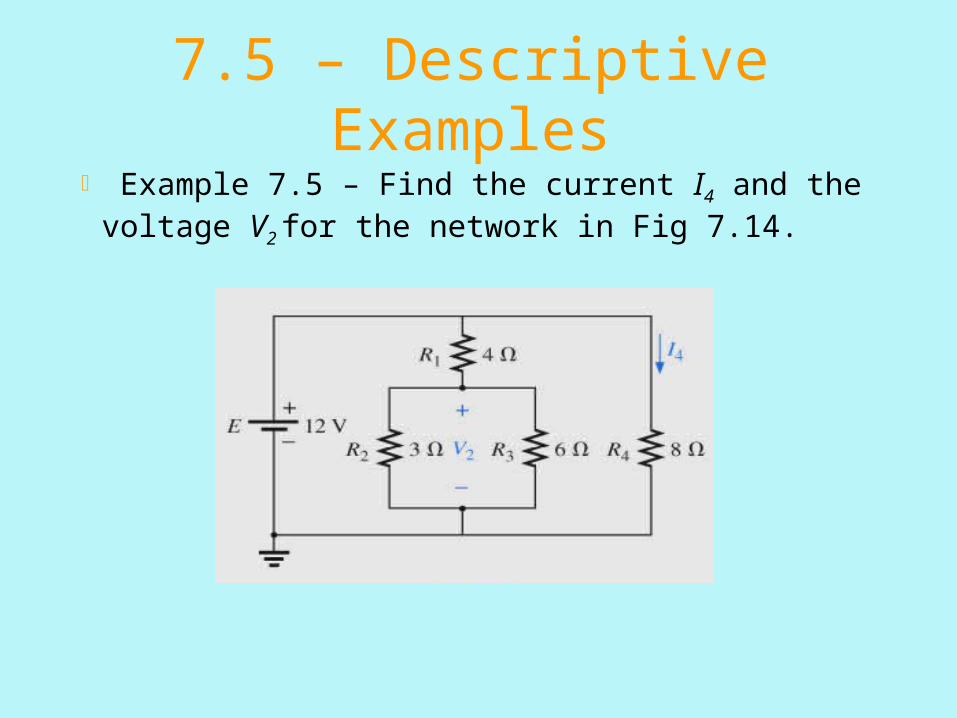
7.5 – Descriptive Examples Example 7.5 – Find the current I4 and the voltage V2 for
the network in Fig 7.14.
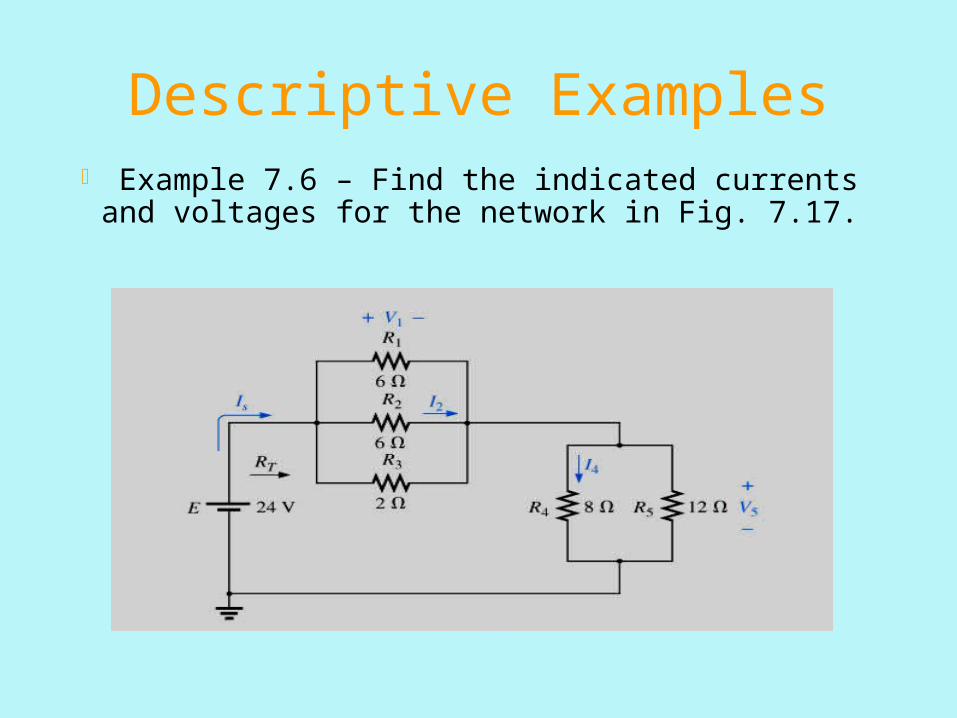
Descriptive Examples Example 7.6 – Find the indicated currents and voltages
for the network in Fig. 7.17.
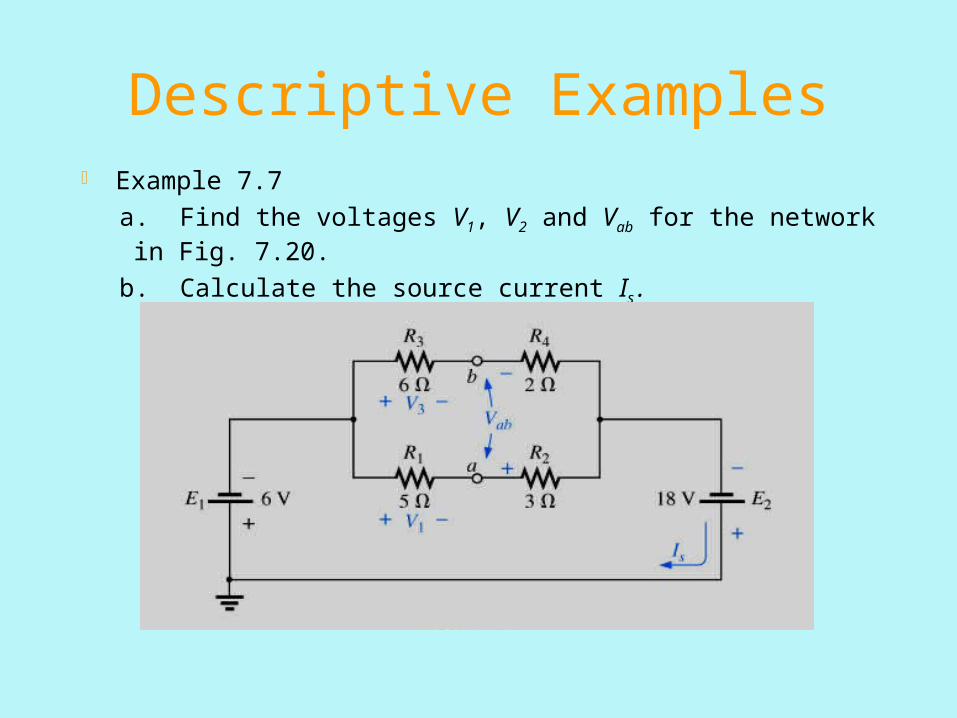
Descriptive Examples Example 7.7
a. Find the voltages V1, V2 and Vab for the network in Fig. 7.20.
b. Calculate the source current Is .
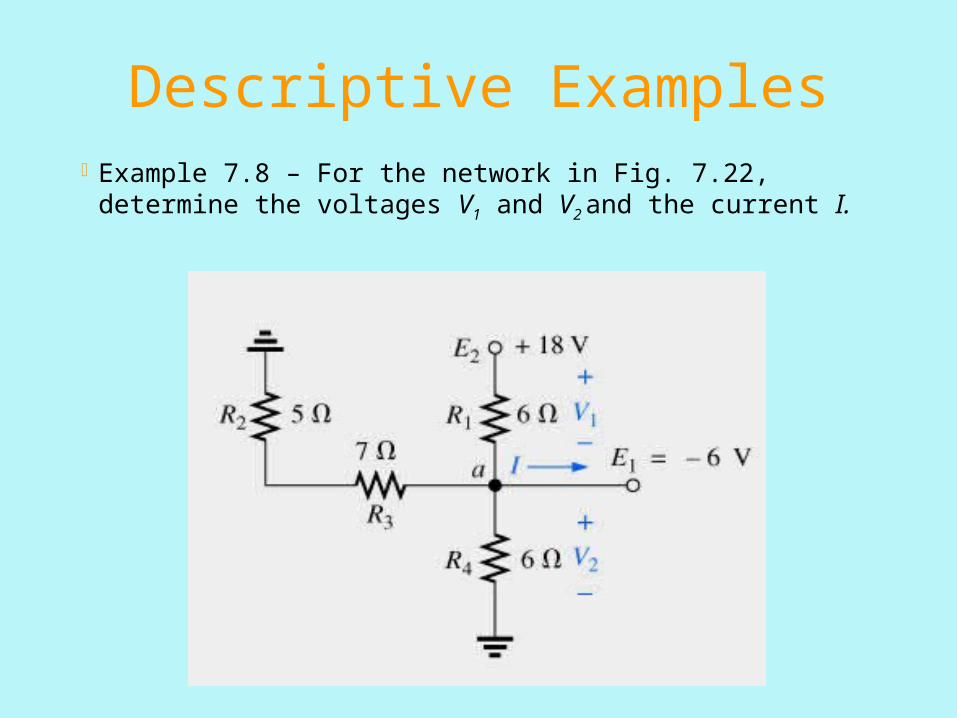
Descriptive ExamplesExample 7.8 – For the network in Fig. 7.22, determine
the voltages V1 and V2 and the current I.

Descriptive Examples Example 7.10 – Calculate the indicated currents and
voltage in Fig. 7.26.
Insert Fig. 7.22Insert Fig. 7.22
7.6 – Ladder Networks Repetitive structure that looks like a ladder
Method 1 – Calculate the total resistance and resulting source current, and then work back through the ladder until the desired current or voltage is obtained.
Method 2 – Assign a letter symbol to the last branch current, and work back through the network to the source, maintaining this assigned current or other current of interest.
7.7 – Voltage Divider Supply (Unloaded and Loaded)
Loading is the process of introducing elements that will draw current from the system. The heavier the current, the greater the loading effect.
The larger the resistance level of the applied loads compared to the resistance of the voltage divider network, the closer the resulting terminal voltage to the no-load levels.
7.8 – Potentiometer Loading
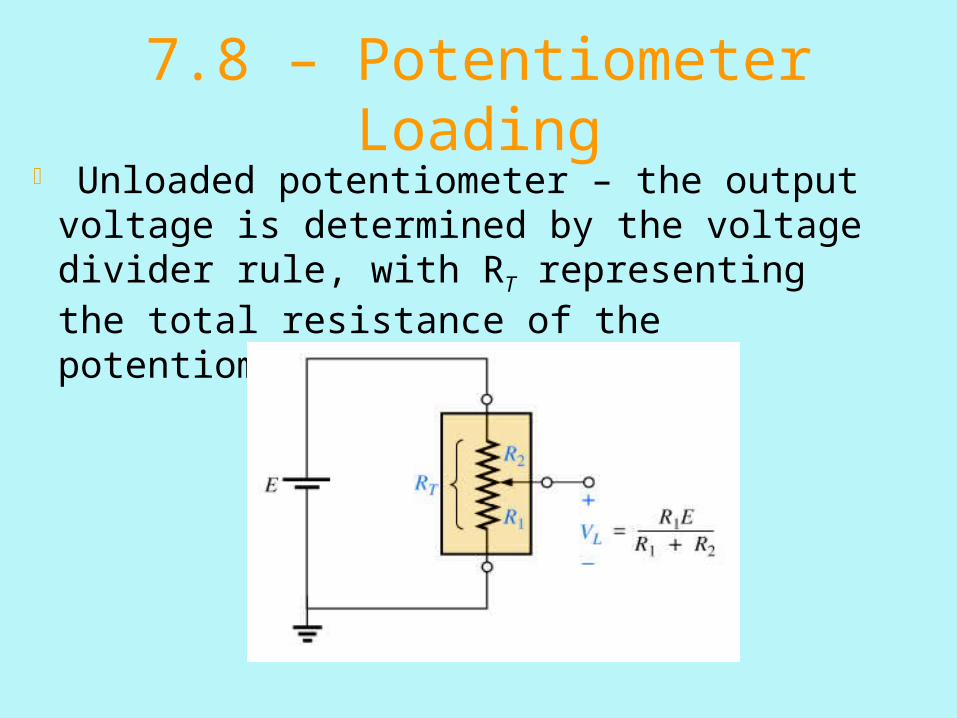
Unloaded potentiometer – the output voltage is determined by the voltage divider rule, with RT representing the total resistance of the potentiometer.
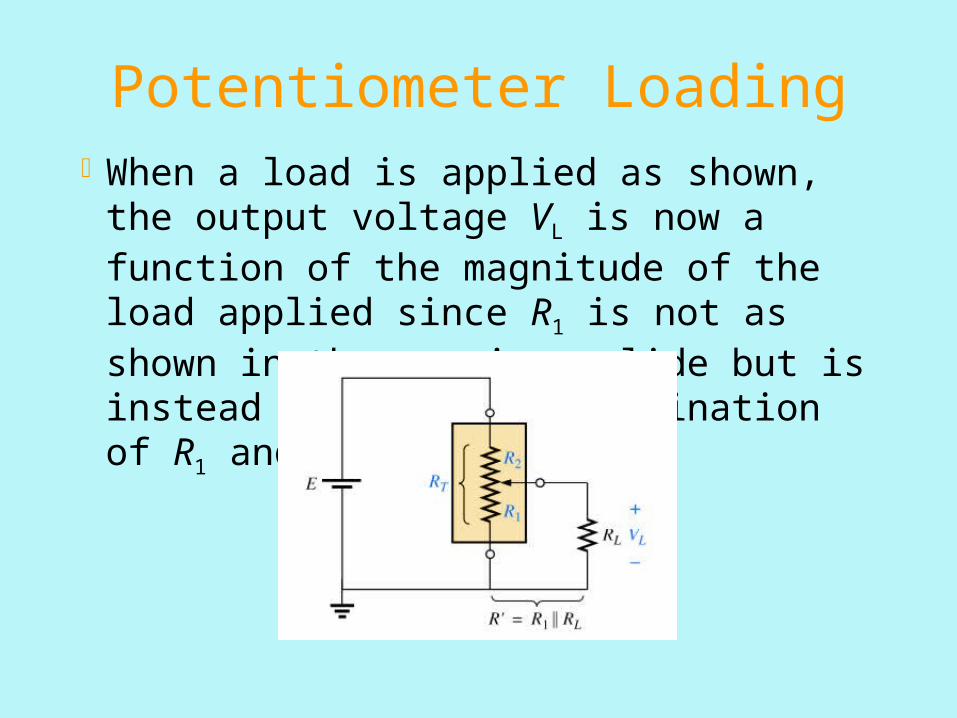
Potentiometer LoadingWhen a load is applied as shown, the output voltage VL is
now a function of the magnitude of the load applied since R1 is not as shown in the previous slide but is instead the parallel combination of R1 and RL.
7.9 – Ammeter, Voltmeter, and Ohmmeter Design
Fundamental design of an ammeter, voltmeter, and ohmmeter. d’Arsonval analog movement: An iron-core coil mounted on bearings
between a permanent magnet. The helical springs limit the tuning motion of the coil and provide a path for the current to reach the coil.
When current is passed through the movable coil, the fluxes of the coil and permanent magnet will interact to develop a torque on the coil that will cause it to rotate on its bearings.
The movement is adjusted to indicate zero deflection on a meter scale when the current through the coil is zero.
The direction of the current through the coil will determine whether the pointer will display an up-scale or below-zero indication.
Ammeter, Voltmeter, and Ohmmeter Design
The ammeter The maximum current that the d’Arsonval movement
can read is equal to the current sensitivity of the movement. Higher current can be measured if additional circuitry is introduced.
Multirange ammeters can be constructed using a rotary switch that determines the shunt resistance ( Rshunt ) to be used for the maximum current indicated on the face of the meter.
The Voltmeter
The voltmeter Additional circuitry allows the d’Arsonval movement to be
used as a voltmeter. The millivolt rating is sometimes referred to as the voltage
sensitivity (VS) The Rseries is adjusted to limit the current through the
movement when maximum voltage is applied.
The Ohmmeter The ohmmeter
Ohmmeters are designed to measure resistance in the low, mid-, or high range.
The most common is the series ohmmeter, designed to read resistance levels in the midrange.
The design is different from that of the ammeter and voltmeter because it will show a full-scale deflection for zero ohms and no deflection for infinite resistance.
The megohmmeter (“megger”) is an instrument for measuring very high resistance. Its primary function is to test the insulation found in power transmission systems, electrical machinery, transformers and so on.
7.10 – Applications Boosting a car battery
Cables should have sufficient length (16-ft) with #6 gage stranded wire and well-designed clips.
Proper sequence of events in connecting the cable to a car with a discharged battery.
Protective eye equipment is recommended. Identify which terminals are positive and which terminals are negative. Connect the red wire to the positive terminal of the discharged battery making
sure that the black lead is not touching the negative terminal or the car. Connect the red wire to the positive terminal of the fully charged battery again
making sure that the black lead is not touching the negative terminal of the battery or the car.
Connect the black terminal to the negative terminal of the fully charged battery and the black lead of the discharged battery to the block of the car and have someone maintain a constant idle speed on the car with the good battery.
Applications It is advised to let the charging action of the running
car occur for 10 to 15 minutes before starting the car with the discharged battery.
This is to protect the battery of the car with the good battery
Disconnecting the cables from a jumped car Remove the cables in the reverse order as they were
connected, making sure that the clamps don’t accidentally come in contact with the battery or the chassis of the car.
Related Documents