Chapter 4 BabySteps Computer Program INTRODUCTION: BabySteps is the computerized clinical information system, which will allow for real-time generation of NICU patient-related medical documentation. BabySteps system will include related medical documents, including: Admission Notes Daily Notes Discharge Notes Interim Notes Procedure Notes Labor and Delivery Notes Consultation Notes Transition Notes Prenatal Notes Sign Out Report Sheets Site Specific Reports Growth Charts Benefits to the BabySteps system include, but are not limited to: Increased legibility Standardization of terminology Consistency in documentation format Tracking of clinical information Efficiency of management reports Data Analysis capability Time Savings Chapter 4: BabySteps Computer Program 4-1

Welcome message from author
This document is posted to help you gain knowledge. Please leave a comment to let me know what you think about it! Share it to your friends and learn new things together.
Transcript

Chapter 4
BabySteps Computer Program
INTRODUCTION:
BabySteps is the computerized clinical information system, which will allow for real-time generation of NICU patient-related medical documentation.
BabySteps system will include related medical documents, including:
Admission Notes Daily NotesDischarge NotesInterim NotesProcedure NotesLabor and Delivery NotesConsultation NotesTransition NotesPrenatal NotesSign Out Report SheetsSite Specific ReportsGrowth Charts
Benefits to the BabySteps system include, but are not limited to:
Increased legibilityStandardization of terminologyConsistency in documentation formatTracking of clinical informationEfficiency of management reportsData Analysis capabilityTime Savings
Chapter 4: BabySteps Computer Program 4-1
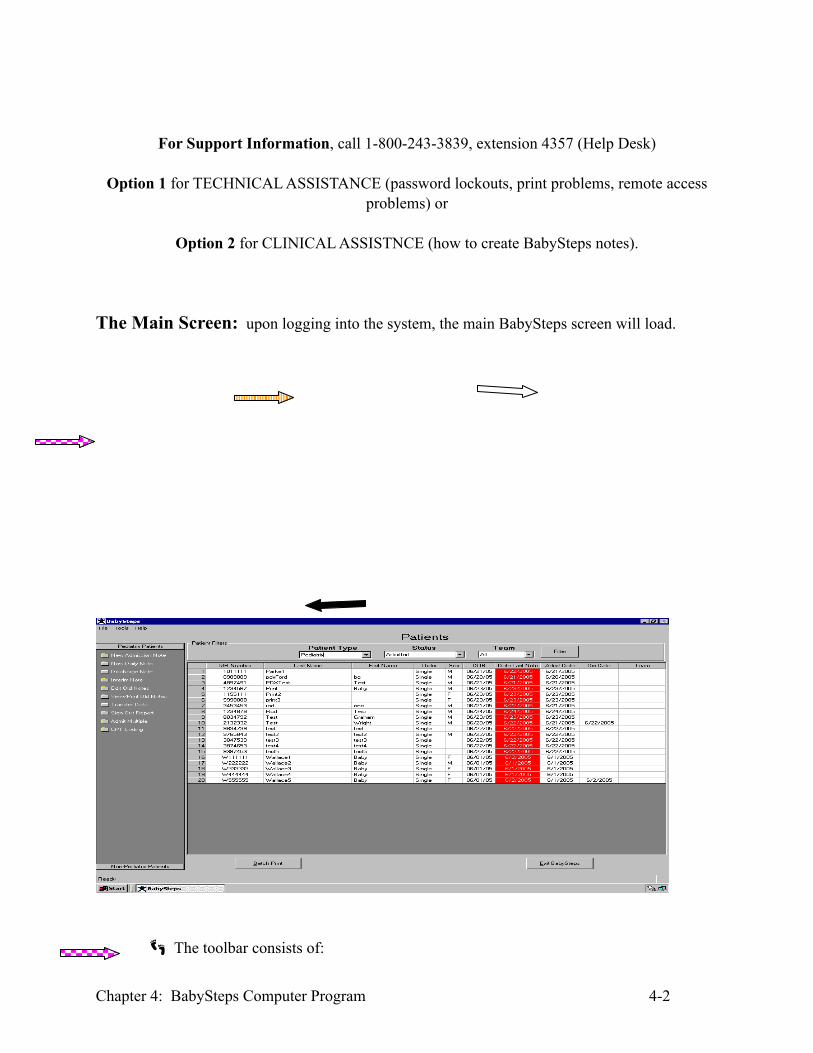
For Support Information, call 1-800-243-3839, extension 4357 (Help Desk)
Option 1 for TECHNICAL ASSISTANCE (password lockouts, print problems, remote accessproblems) or
Option 2 for CLINICAL ASSISTNCE (how to create BabySteps notes).
The Main Screen: upon logging into the system, the main BabySteps screen will load.
The toolbar consists of:
Chapter 4: BabySteps Computer Program 4-2

o File Menu Exito Tools Menu Reports Address List Calculatoro Help Menu Version HELP Dropdowns are available on the Main Screen to allow the user to see patients on the
census list based on their selection. Patient Type (Pediatrix, Non-Pediatrix, All)
o Status (Admitted, Discharged > 14 days, Discharged <= 14 days, and Transferred)
o Team filters (Set up as determined by Site) The Filter button allows a patient to be searched based on MR#, Last name, etc.
From this location, by using the Navigation folders located to the left of the screen all notes can be:
o Created (New Admission Note, New Daily Note, Discharge Note)o Edited (Edit Old Notes)o Previewed (View Print Old Notes)o Coded (CPT Coding)
The ability to batch print is also available on the Main Page
The ADDRESS LIST is located under the Tools Menu on the main toolbar
The Address Form opens to access current addresses or to add new addresses. To add a new listing:
Click the ‘New’ button at the bottom of the screenEnter the contact information in the above fieldsClick ‘Save’ once entering is completeThe listing will show beneath the fields in the gray areaTo retrieve contact information, highlight the contact and the information will appear in the fields above
Chapter 4: BabySteps Computer Program 4-3

REPORTS can be found under the Tools menu on the main toolbar.
1. Click on Reports to open the screen to open the hospital name highlighted.2. Select the report type to be generated (Admission, Census, Procedures, etc.). Upon
selecting the report type the option to put in the criteria will appear based on the report type, i.e., Procedure types, census dates (beginning date and ending date), etc.
3. Upon selecting the criteria, click Run and the report will generate based on the criteria selected.
4. The generated report can be exported into an Excel spread sheet by clicking on the button in the top right hand corner of the report
5. The generated report can be printed out directly from the above menu by clicking on Print, located in the top left hand corner.
Toolbar Menu
The above menu is where the information for each tab listed below can be found. This menu sits at the top of each screen in BabySteps.
Chapter 4: BabySteps Computer Program 4-4
Entries in this menu are found in the program as buttons also(see Navigation Buttons)
These features can be used within the program to perform the listed operations.Delete problem will be activated once a problem has been opened in the program

Navigation Buttons
Chapter 4: BabySteps Computer Program 4-5
Graphs are available to print out for patient chart with plotted information obtained from the program for weight, length and Head Circ.
The Help menu gives the Clinician access to the Help File, a shortcut list and About, which lists the program’s name and version
Calculators are available for the clinician under the

Chapter 4: BabySteps Computer Program 4-6

Navigation buttons located at the bottom of each screen are used to initiate actions within the note. (Save/Exit the note, Validate the note, Save/Print the note).
The Add Problem button, VERY IMPORTANT, is where the clinician will add problems, i.e., Cardiovascular, Respiratory, etc. Diagnoses are added within the problem
items via the drop down.Note: To Delete a Problem selected in error, click on the problem, go to Edit
on the tool bar menu and select Delete Problem.
To DELETE a Row/Diagnosis within a Problem, select the row, hit DELETE on the keyboard and Click ‘Yes’ when the message box appears.
The Previous and Next buttons are another way to navigate through the screens to enter data within the system.
This top panel contains Patient Information and remains throughout the entire note, for the clinician to refer back to for, patient name, DOB, MR#, Note Date
and Note Type.
Chapter 4: BabySteps Computer Program 4-7
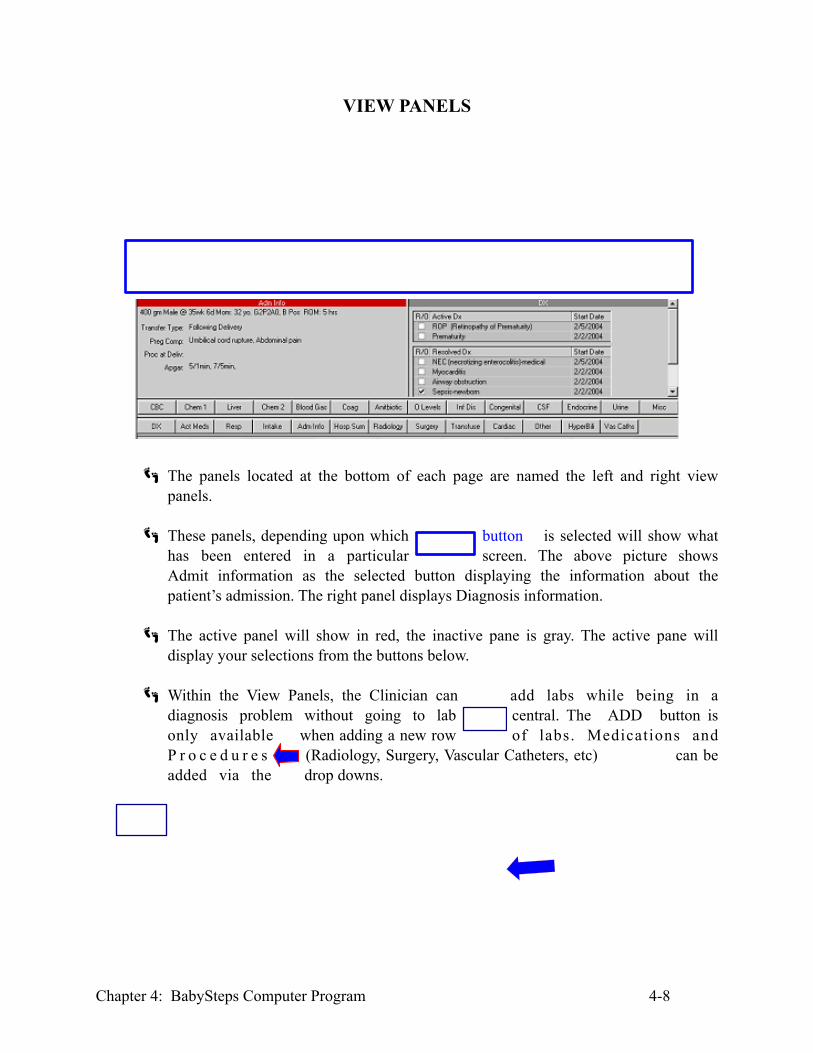
VIEW PANELS
The panels located at the bottom of each page are named the left and right view panels.
These panels, depending upon which button is selected will show what has been entered in a particular screen. The above picture shows Admit information as the selected button displaying the information about the patient’s admission. The right panel displays Diagnosis information.
The active panel will show in red, the inactive pane is gray. The active pane will display your selections from the buttons below.
Within the View Panels, the Clinician can add labs while being in a diagnosis problem without going to lab central. The ADD button is only available when adding a new row of labs. Medications and P r o c e d u r e s (Radiology, Surgery, Vascular Catheters, etc) can be added via the drop downs.
Chapter 4: BabySteps Computer Program 4-8

KEYBOARD SHORTCUTS IN BABYSTEPS
These are keys which can be used in place of the longer steps taken to fill in and remove items in the text fields or used to move about within the software The Keyboard Shortcuts can be accessed in the program by going to HELP (shown below):
Alt B = Blanks or clears field
Alt A = Pastes the Initial Admission Statement into a field
Alt D = Current Date
Alt T = Current Time
Alt N = Moves to next Problem
Alt P = Moves to Previous Problem
Ctrl X = Copies and clears text
Chapter 4: BabySteps Computer Program 4-9

Ctrl C = Copies text
Ctrl V = Pastes text
Ctrl Z= (Undo) Replaces original entry deleted from field as long as the cursor never left the field.
THESE SHORTCUTS CAN BE FOUND UNDER HELP IN THE BABYSTEPS PROGRAM, OR BY CLICKING CTRL+S ON YOUR KEYBOARD.
Admission Notes
Chapter 4: BabySteps Computer Program 4-10
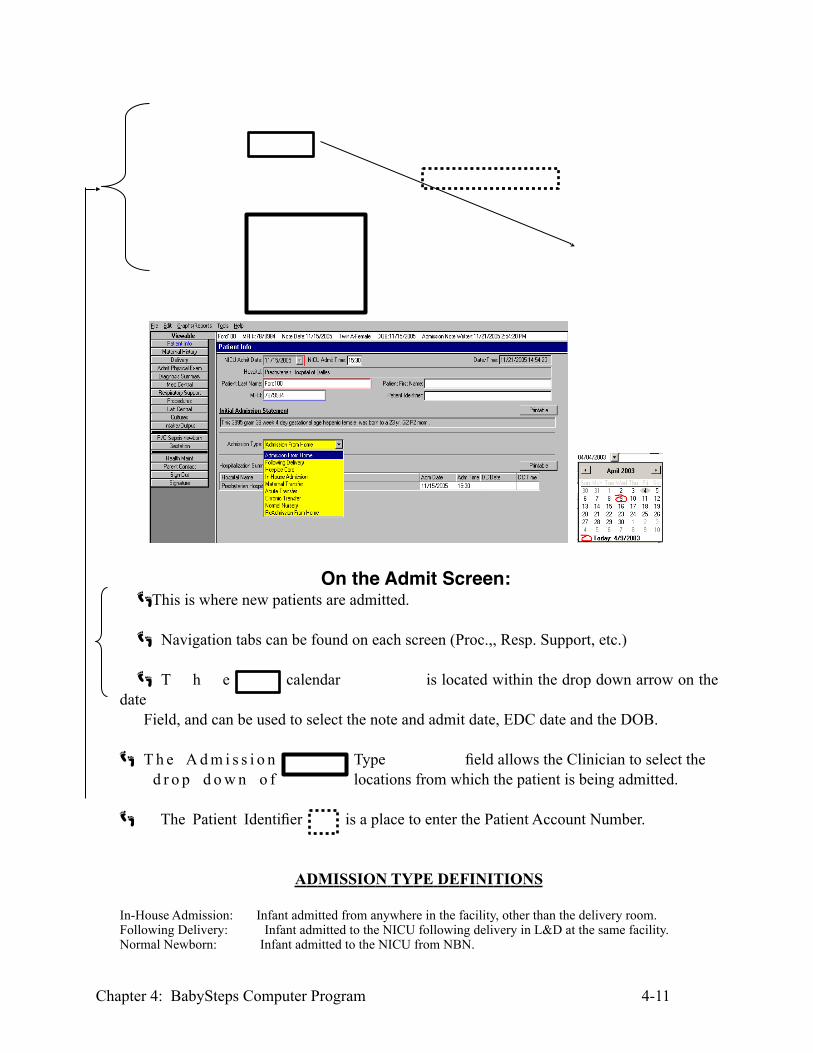
On the Admit Screen: This is where new patients are admitted.
Navigation tabs can be found on each screen (Proc.,, Resp. Support, etc.)
T h e calendar is located within the drop down arrow on the date
Field, and can be used to select the note and admit date, EDC date and the DOB.
T h e A d m i s s i o n Type field allows the Clinician to select the d r o p d o w n o f locations from which the patient is being admitted.
The Patient Identifier is a place to enter the Patient Account Number.
ADMISSION TYPE DEFINITIONS
In-House Admission: Infant admitted from anywhere in the facility, other than the delivery room.Following Delivery: Infant admitted to the NICU following delivery in L&D at the same facility.Normal Newborn: Infant admitted to the NICU from NBN.
Chapter 4: BabySteps Computer Program 4-11
Admission from Home: Infants born in the parking lot, a vehicle, or at home.Hospice: Infants admitted from a Hospice facility or area.Maternal Transfer: Mothers transferred at the request of the family, the mother or the physician.Acute Transfer: Transfer by request of a pediatrician, neonatal physician or parent for a specific reason.Chronic Transfer: Transfer for infant not needing a procedure or just to be close to mom, Re-Admission From Home: Admissions from home of infants once admitted to the NICU
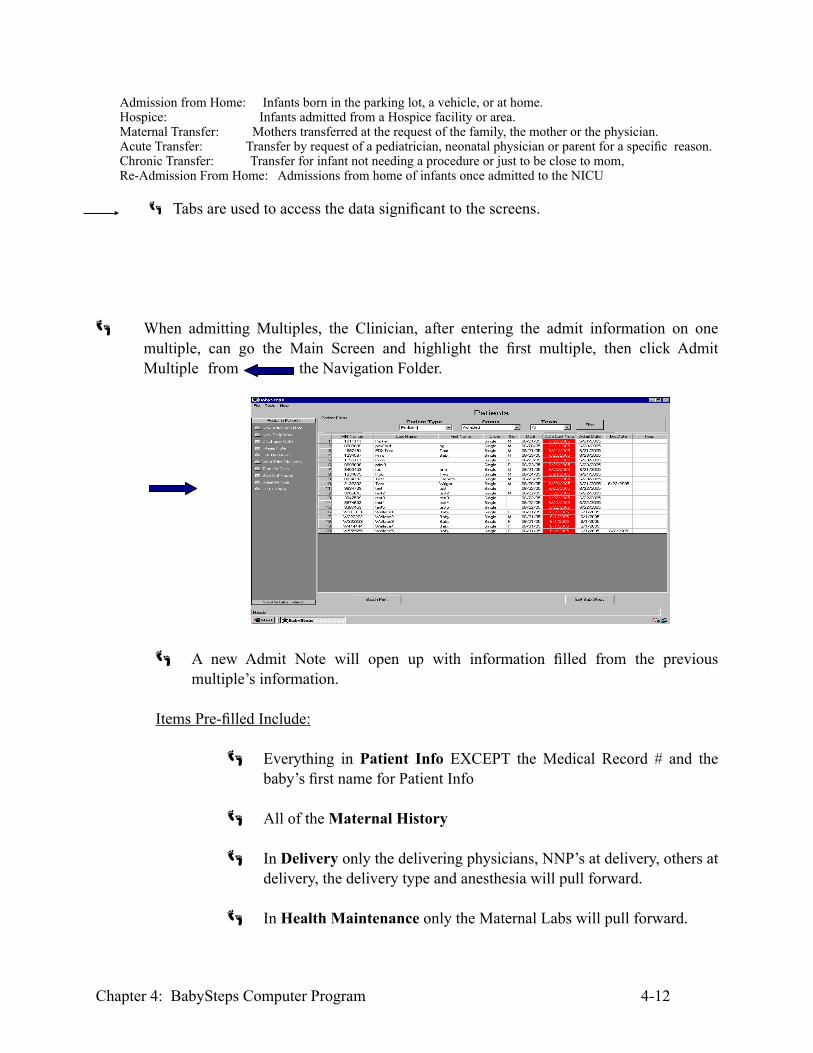
Tabs are used to access the data significant to the screens.
When admitting Multiples, the Clinician, after entering the admit information on one multiple, can go the Main Screen and highlight the first multiple, then click Admit Multiple from the Navigation Folder.
A new Admit Note will open up with information filled from the previous multiple’s information.
Items Pre-filled Include:
Everything in Patient Info EXCEPT the Medical Record # and the baby’s first name for Patient Info
All of the Maternal History
In Delivery only the delivering physicians, NNP’s at delivery, others at delivery, the delivery type and anesthesia will pull forward.
In Health Maintenance only the Maternal Labs will pull forward.
Chapter 4: BabySteps Computer Program 4-12
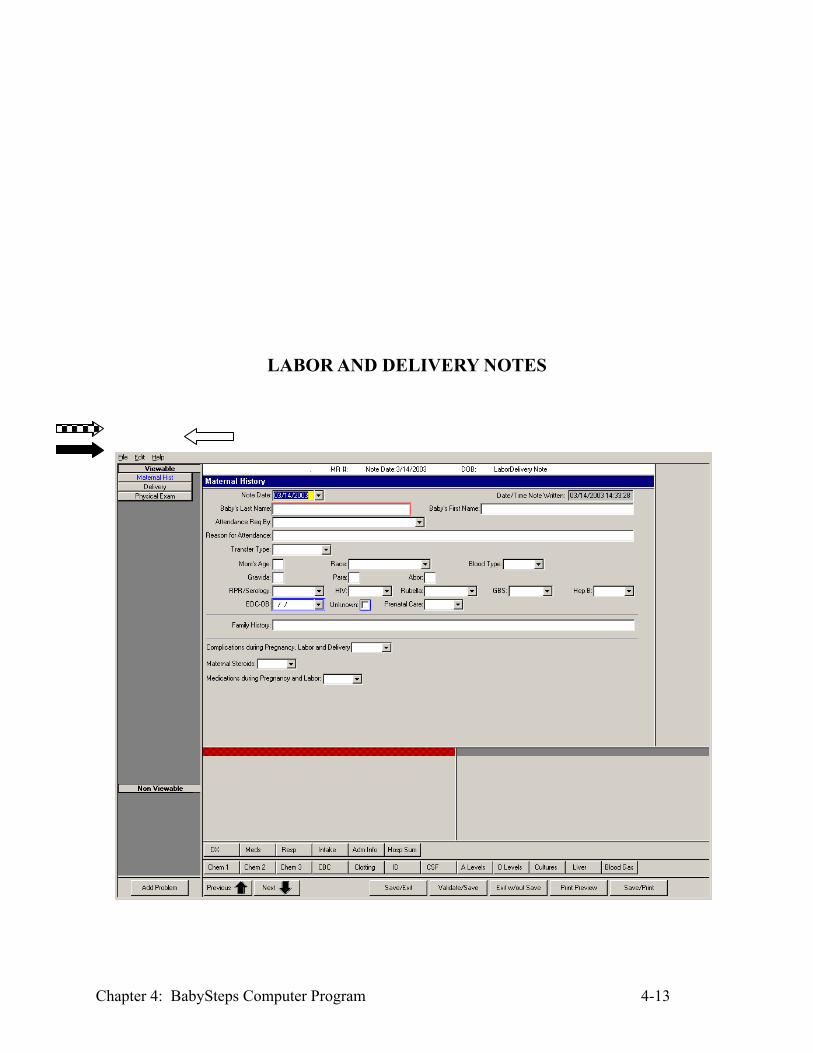
LABOR AND DELIVERY NOTES
Chapter 4: BabySteps Computer Program 4-13

The L&D Note will have 3 navigation tabs on the left panel, where information about the mother and baby will be entered.
The first page selected includes information on the mother, the baby’s name and labor information.
The next tab selected, Delivery, is where information on the delivery of the baby should be entered.
The last tab selected is where the information on gestation, baby’s gender and general exam information is found. There’s also a field for Clinician’s comments and plans. The Clinician will sign this note by filling in his/her name from the drop-down list.
DAILY NOTE SCREEN
Chapter 4: BabySteps Computer Program 4-14

Select the patient.
Click on New Daily Note.
A daily note will load for the current date.
Note: If a note was written for yesterday a message will come up stating: The note for yesterday must be written first and ask if you want to load the note for THAT DATE. At this point you have the choice of “Yes” continue or “No” which will take you back to the patient information screen and not allow the current date note to be written.
INTERIM DAILY NOTE
Chapter 4: BabySteps Computer Program 4-15

I NEED TO ADD A DIAGNOSIS OR CHANGE THE RESPIRATORY SUPPORT, HOW CAN I DO THIS IN ADDITION TO THE CURRENT DAYS NOTE?
Select the patient from the Patient Info screen and click on Interim Note.
Add new information, diagnosis, problems, etc.
Click on Save/Print.
Printed Note will only include the new information entered with a header of Interim Note.
The arrows in the above illustration indicate the problems which were added or modified.
Chapter 4: BabySteps Computer Program 4-16
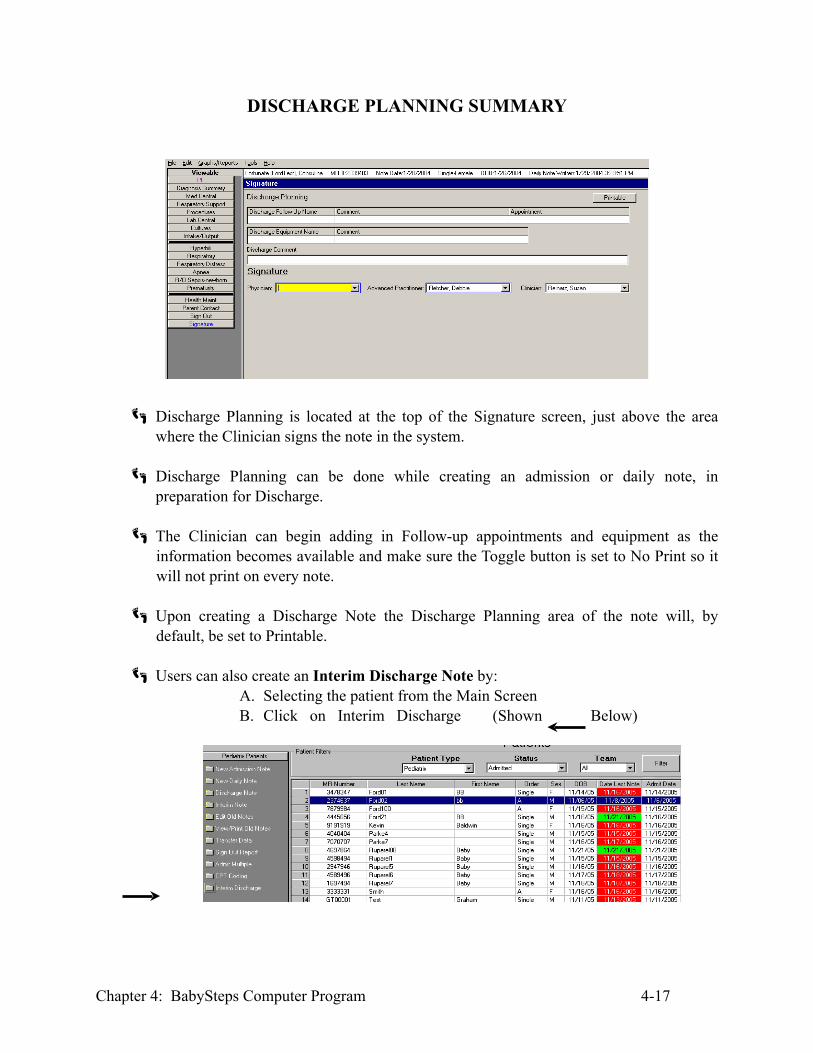
DISCHARGE PLANNING SUMMARY
Discharge Planning is located at the top of the Signature screen, just above the area where the Clinician signs the note in the system.
Discharge Planning can be done while creating an admission or daily note, in preparation for Discharge.
The Clinician can begin adding in Follow-up appointments and equipment as the information becomes available and make sure the Toggle button is set to No Print so it will not print on every note.
Upon creating a Discharge Note the Discharge Planning area of the note will, by default, be set to Printable.
Users can also create an Interim Discharge Note by: A. Selecting the patient from the Main ScreenB. Click on Interim Discharge (Shown Below)
Chapter 4: BabySteps Computer Program 4-17

DISCHARGE NOTE SCREEN
Select the patient.
Click on New Discharge Note
At this point a question will appear asking if you want to write a Discharge note for one of two specific dates.
The Discharge Note will be loaded for the selected date.
Select the Disposition (Acute Transfer, etc.) for the discharge.
The disposition will determine the note header
NOTE: Unless the patient is physically leaving the hospital your Discharge Disposition default will be Transfer, therefore, if the patient is being discharged to another area of the hospital (transfer), or if the patient is going home or to foster care select discharge.
Chapter 4: BabySteps Computer Program 4-18
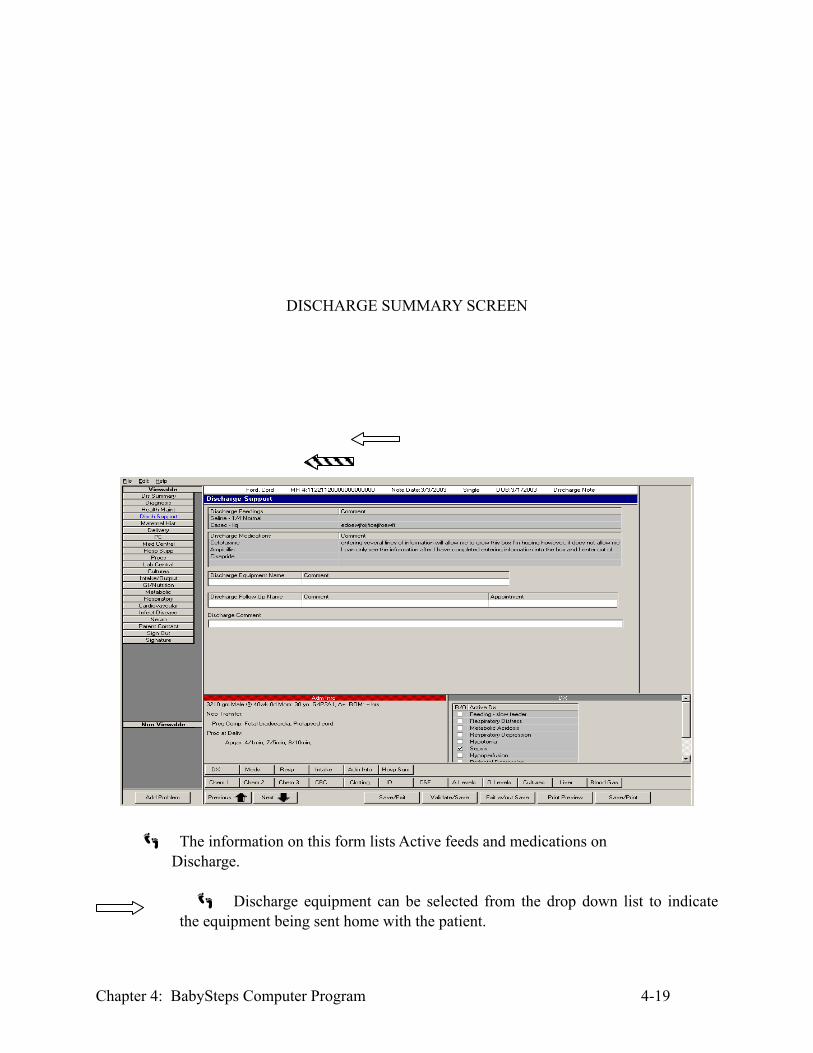
DISCHARGE SUMMARY SCREEN
The information on this form lists Active feeds and medications on Discharge.
Discharge equipment can be selected from the drop down list to indicate the equipment being sent home with the patient.
Chapter 4: BabySteps Computer Program 4-19

Choose the name of the Follow-Up Physician, Pediatrician, etc. or you may type in the name of the facility or Physician.
Selecting the Discharge Times in BabySteps
The D/C code is generated by the decision tree based on time. (99239 for > 30 minutes and 99238 for <= 30 minutes)
From the drop down menu the user would select the appropriate time spent on the discharge note in the Signature area of the note.
TRANSFERRING A PATIENT TO ANOTHER FACILITY
Upon discharging a patient as a transfer, all the information can be sent to the receiving hospital.
Chapter 4: BabySteps Computer Program 4-20

NOTE: The transferring hospital list can be update to add additional hospitals to your list, however, this should be addressed during corporate business hours, so transfers can take place over the weekend.
(This is found on the DC note on the first page next to disposition, when a transfer is selected as the disposition.)
After completing the discharge highlight the patient and select TRANSFER DATA.
An information box will appear to allow the Clinician to confirm Patient Name and receiving hospital.
The receiving site should go to STATUS and select Transferred to bring up the transferred patient list.
Highlight the transferred patient and select ‘Admit Transferred Patient’
Select the date Admit date.
READMIT or UNDISCHARGE A PATIENT
Chapter 4: BabySteps Computer Program 4-21

To ReAdmit a patient previously discharged, simply highlight the patient from the discharge <=14 days or >14 days list and click on ReAdmit. This will allow the patient to be ReAdmitted without having to re-enter important data.
If a patient was Discharged in error and has not been off Pediatrix service following the discharge, the patient can be Un-Discharged.
Chapter 4: BabySteps Computer Program 4-22

Highlight the patient from the discharge <=14 days or >14 days list and click on Un-Discharge. This will convert the existing discharge note to a Daily Note and allows the continuation of Daily Notes.
EDIT OLD NOTES SCREEN
Edit old Notes allows you to go back to previous notes, make corrections then re-bill or print as needed.
To get to Edit Old Notes
Return to the patient information screen highlight the patient and Select ‘Edit Old Notes’ from the navigation folders, found to the left of the screen.
Chapter 4: BabySteps Computer Program 4-23
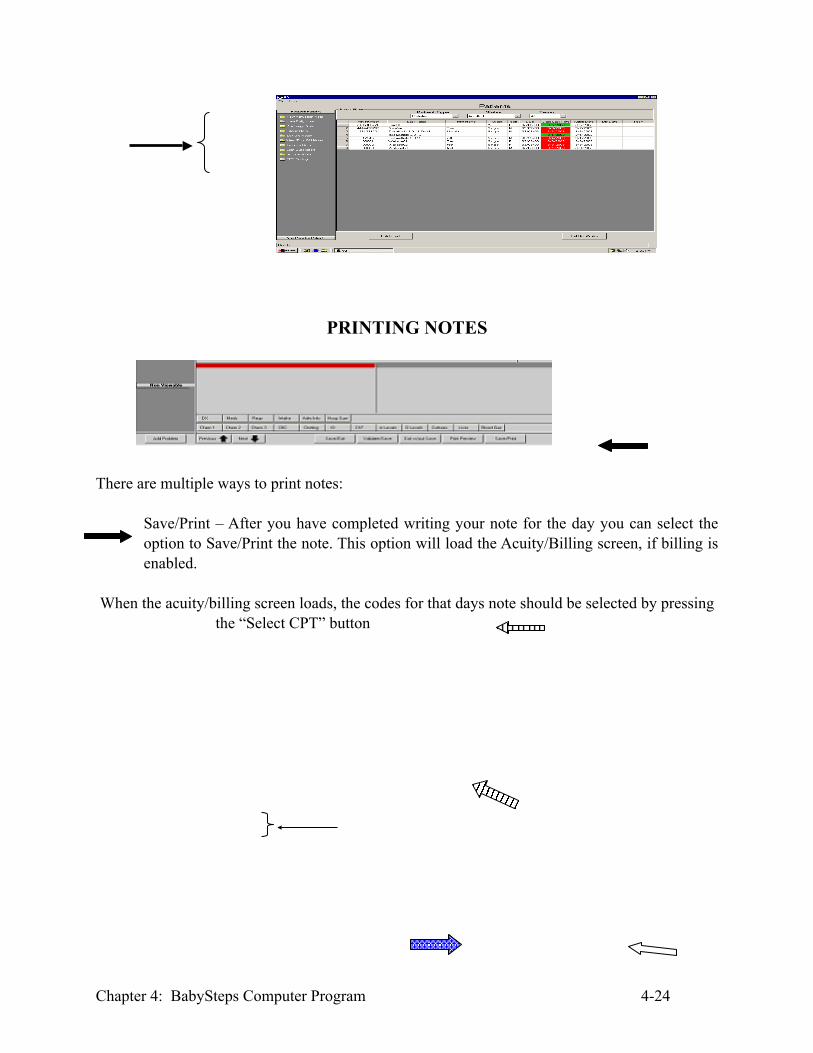
PRINTING NOTES
There are multiple ways to print notes:
Save/Print – After you have completed writing your note for the day you can select the option to Save/Print the note. This option will load the Acuity/Billing screen, if billing is enabled.
When the acuity/billing screen loads, the codes for that days note should be selected by pressing the “Select CPT” button
Chapter 4: BabySteps Computer Program 4-24

The Back to Note button allows the clinician to cancel the billing and go back to the note to make changes without exiting out of the program.
Prematurity Codes will pull based on gestational age and weight when the Prematurity Problem has been selected from the “Add Problem” list. Prematurity, age and weight will show under diagnosis on the acuity screen.The billing codes can be re-assigned if information has changed throughout the day just be sure to click Select CPT button on acuity screen upon updating a note
NOTE: All billable Procedures and Diagnoses are listed in the billing screenHere the Clinician has the option to Accept/Exit or Exit without Saving.
SIGN-OUT REPORTS
A sample sign-out report for a single patient is detailed below. Be aware that significant amounts of paper are generated when printing a sign out report for the entire NICU. Try to do this only once per day.
Chapter 4: BabySteps Computer Program 4-25

SYSTEM TIME-OUT INFORMATION
The system will time-out due to inactivity based on the following:
15 minutes of inactivity- the screen saver comes on to blank the screen. No password is required, just move the mouse.
30 minutes of inactivity- 2 minute warning shows up (this is 15 minutes after the screen saver kicks in.)
32 minutes of inactivity- session is disconnected (not reset) and is awaiting that person to login again from any workstation. Information within the note will not be lost.
Chapter 4: BabySteps Computer Program 4-26
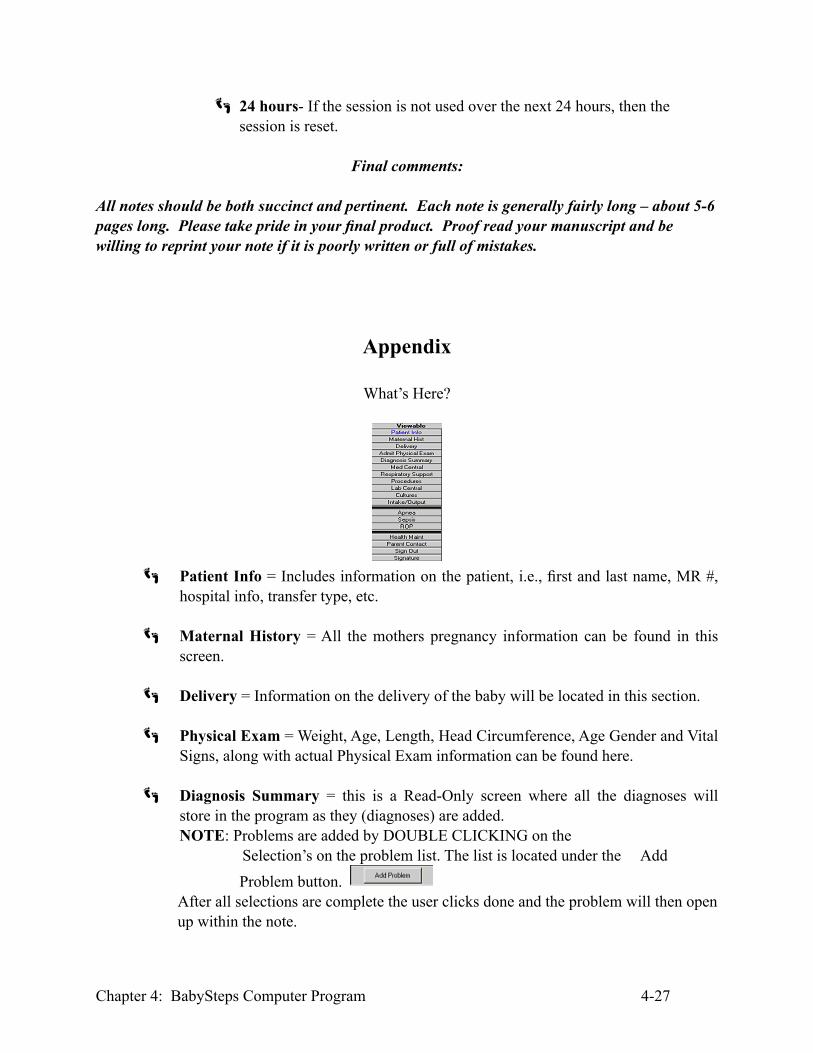
24 hours- If the session is not used over the next 24 hours, then the session is reset.
Final comments:
All notes should be both succinct and pertinent. Each note is generally fairly long – about 5-6 pages long. Please take pride in your final product. Proof read your manuscript and be willing to reprint your note if it is poorly written or full of mistakes.
Appendix
What’s Here?
Patient Info = Includes information on the patient, i.e., first and last name, MR #, hospital info, transfer type, etc.
Maternal History = All the mothers pregnancy information can be found in this screen.
Delivery = Information on the delivery of the baby will be located in this section.
Physical Exam = Weight, Age, Length, Head Circumference, Age Gender and Vital Signs, along with actual Physical Exam information can be found here.
Diagnosis Summary = this is a Read-Only screen where all the diagnoses will store in the program as they (diagnoses) are added. NOTE: Problems are added by DOUBLE CLICKING on the
Selection’s on the problem list. The list is located under the Add Problem button.
After all selections are complete the user clicks done and the problem will then open up within the note.
Chapter 4: BabySteps Computer Program 4-27

Y o u c a n also search for diagnoses here
Med Central = All medications.
Resp Support = Respiratory information will go here, i.e., support types (ventilator, nasal cannula, etc.), along with settings.
Procedures = All procedures, including Vascular Caths can be entered on this screen. Procedures Notes can be added by clicking on the button at the end of the row where the procedure was entered.
Lab Central = All lab results can be entered and found here.
Cultures = All cultures can be entered in this screen. Cultures with a status of No Growth will move to the No Growth area of the screen.
Intake/Output = Fluids will be entered in this screen along with, urine output, etc.
Health Maint = Newborn Screenings, Hearing and Retinal Screening order and results are located here. The mother’s screenings can also be found here, if they were entered in Maternal History on the Admission Note.
Parent Contact = the area where the contact information for the parent can be entered, i.e., phone number, address, including daily communications.
Chapter 4: BabySteps Computer Program 4-28
Keep in mind, when you need to add a new diagnosis within a problem, you should Resolve the original diagnosis and add a new diagnosis under the previous diagnosis.
You should never delete a diagnosis that was not entered accidentally.
Sign Out = This area is for the Clinician to enter information and print a sign out note. Used for the purpose of doing rounds and reporting off to colleagues. This note will allow the Clinician an area to print comments and history on the patient and use as opposed to writing “cheat sheets.” Patient information (names and medical record numbers) can also be changed on this screen.
Signature = the Clinicians signature can be selected from the drop-down. Discharge Planning is available here to view or input discharge equipment/follow-up name and comments for anticipated discharges.
NOTE: The signature area is also where the amount of time spent preparing and implementing discharges will be entered when creating a discharge note.
ADDITIONAL TIPS for TYPING on the DIAGNOSIS PAGE
This page can be one of the most confusing pages. It is difficult to know exactly which diagnosis to choose, when to add a comment statement, when to resolve a diagnosis, when to revive a diagnosis and how to create a concise and coherent description of the diagnosis and plan. We hope you will find the following suggestions helpful:
A. Choosing a Diagnosis (as a general rule, create a diagnosis only when it is something that is clearly an abnormal finding and that is something you will begin to treat and/or will need to treat or monitor in the future)
1. When a new clinical problem arises, attempt to match up an appropriate diagnosis using the relevant organ system to which it applies. Sometimes a descriptive adjective is needed in the “comment” box. For example, if seizures are suspected but not yet proven, write “suspected” in the comment box.
2. Any new medication that is used to treat that particular diagnosis should be put into the medication central area of the computer record along with the start date and the dose and dosing interval
3. Any procedure used to make the diagnosis or treat the clinical problem should go into the procedure area of the computer record. This includes any chest x-ray or other imaging study (including echocardiograms). Please be sure to add a start date and a brief description of the results in the procedure box. If you perform a clinical procedure with the assistance or supervision of the attending Neonatologist, please choose the procedure code containing the phrase “by PMG.” For example, “lumbar puncture by PMG”.
B. Converting a Diagnosis
Chapter 4: BabySteps Computer Program 4-29
1. On rare occasions, a diagnosis changes as more information is obtained. Thus, a suspected PDA or a sepsis possible is confirmed. If - and only if - this is the case, then it is acceptable to convert the diagnosis choice to the more appropriate description.2. A classic error example of what not to do is to convert “respiratory distress syndrome” into “bronchopulmonary dysplasia”. In this case, it is more appropriate to resolve respiratory distress syndrome and create a new diagnosis for BPD.
C. Resolving a Diagnosis
4. When a clinical problem is no longer active, resolve the diagnosis and any accompanying medications and procedures. If medications or procedures are done before the diagnosis is resolved, be sure to provide end dates that are accurate for these medications or procedures. Finally, make sure your resolution of the discussion section makes sense so that the discharge summary is accurate.
D. Reviving a Diagnosis
5. On rare occasions, a diagnosis can be revived. An example would be “hyperbilirubinemia of prematurity” accompanied by the procedure “phototherapy.” If an infant comes off of phototherapy and you think the hyperbilirubinemia problem is over, you may resolve the diagnosis only to find that it is active again two days later. In this case, go to the inactive diagnosis/medications/procedures section to bring these descriptors back to life. What you want to avoid is creating a new diagnosis for an issue which really is just a continuation of the same clinical problem.
E. Creating Brevity and Coherence with the Diagnosis Tab
6. When describing a clinical problem on the diagnosis page, carefully review your comments before printing to assure that you description of the problem makes sense (especially important if you are consulting another subspecialist who needs to know more about that particular diagnosis).
7. Be aware that there is a 400 word limit in your problem description section and in your plan section.
8. Finally, try to be brief but thorough in describing the problem and the plan. For instance, don’t just add more information each day about the issue directly on top of the previous day’s description unless it is relevant. We’ll occasionally see descriptions that say, “on 4/1 an x-ray revealed…, on 4/2 an x-ray revealed the same findings…., on 4/3 an x-ray revealed…..” Try not to produce this repetitive and - ultimately uninformative - data entry. Sometimes you can successfully consolidate a large amount of data into just a few sentences. For example, if you were describing bronchopulmonary dysplasia, you might say “60 day old former
Chapter 4: BabySteps Computer Program 4-30

25 week infant with current need for 50-100 mL/min of nasal cannula oxygen. Prior support included surfactant for RDS followed by 15 days of ventilator support and 20 days of nasal CPAP”. We don’t need to know when he was extubated and how many times he needed to go back on nasal CPAP for work of breathing or apnea.
Chapter 4: BabySteps Computer Program 4-31
Related Documents