User Guide Chapter 13 Learning Management System (LMS) Instructor Guide

chapter 13
Mar 07, 2016
guide for setting up eclassroom
Welcome message from author
This document is posted to help you gain knowledge. Please leave a comment to let me know what you think about it! Share it to your friends and learn new things together.
Transcript
User Guide
Chapter 13
Learning Management System (LMS)
Instructor Guide

SharpSchool User Manual Chapter 13: LMS (Instructor Guide)
2 | P a g e
Table of Contents
About Online Classrooms ................................................................................................................ 5
About this Guide .............................................................................................................................. 5
Who Should Use this Guide ............................................................................................................. 5
Accessing your Website ................................................................................................................... 5
Vital Information ............................................................................................................................. 6
Organizations ............................................................................................................................... 6
Direct Permissions and Actual Permissions ................................................................................. 6
Modules ....................................................................................................................................... 6
Activity Tab .................................................................................................................................. 6
Accessing My Classes ....................................................................................................................... 7
Creating Online Classes ................................................................................................................... 7
I. Homework Module ................................................................................................................ 10
1) Add Homework .................................................................................................................. 10
II. Files Module .......................................................................................................................... 11
1) Adding Items ...................................................................................................................... 11
a) How to Add a File .......................................................................................................... 11
b) How to upload multiple File Versions ........................................................................... 12
c) How to add a Folder ...................................................................................................... 12
d) How to add a Link .......................................................................................................... 13
2) Set Item Visibility ............................................................................................................... 13
3) Edit, Delete, and Move Items ............................................................................................ 14
a) Edit Items ....................................................................................................................... 14
b) Move Items ................................................................................................................... 14
c) Delete Selected Items .................................................................................................... 14
4) Release Schedule ............................................................................................................... 15
5) Activity ............................................................................................................................... 15
III. Authoring Tool ................................................................................................................... 16
1) Manage Content ................................................................................................................ 17
2) Add Sub Content ................................................................................................................ 17
3) Exporting Content and Children ........................................................................................ 18

SharpSchool User Manual Chapter 13: LMS (Instructor Guide)
3 | P a g e
4) Import Content .................................................................................................................. 18
a) Import from PowerPoint ............................................................................................... 19
b) Import SCORM ZIP Files ................................................................................................. 20
c) Import Zip Files (No SCORM Zip File) ............................................................................. 20
d) Import SCORM From LOR .............................................................................................. 20
5) Delete Content and Children ............................................................................................. 21
6) Edit Contents ..................................................................................................................... 21
a) Manage Content ............................................................................................................ 21
b) Change Positions ........................................................................................................... 21
c) Check Accessibility ......................................................................................................... 21
d) Release Schedule ........................................................................................................... 22
e) Export ............................................................................................................................ 22
f) Security ........................................................................................................................... 22
g) Activity ........................................................................................................................... 22
IV. Directory ............................................................................................................................ 23
V. Assessments .......................................................................................................................... 24
1) Add Evaluation................................................................................................................... 24
2) Edit Evaluations ................................................................................................................. 25
3) Add Questions ................................................................................................................... 25
4) Release Schedule ............................................................................................................... 26
5) Quiz Submission ................................................................................................................ 27
6) Export Quiz ........................................................................................................................ 27
7) Import Quiz ........................................................................................................................ 27
8) Chart .................................................................................................................................. 27
VI. Calendar............................................................................................................................. 28
VII. Marks ................................................................................................................................. 30
VIII. Polls ................................................................................................................................... 31
IX. Chat ................................................................................................................................... 32
1) Create a Chat Room ........................................................................................................... 32
2) Deleting a Chat Room ........................................................................................................ 32
3) How Students may use the Chat Room ............................................................................. 32
X. Forum .................................................................................................................................... 33

SharpSchool User Manual Chapter 13: LMS (Instructor Guide)
4 | P a g e
1) How to Add New Topic ...................................................................................................... 34
2) Edit Topic ........................................................................................................................... 34
3) Replying to Forum Messages ............................................................................................. 34
4) Flat/Tree View ................................................................................................................... 35
XI. Groups ............................................................................................................................... 36
1) Creating Groups ................................................................................................................. 36
2) Working with Group Workspaces...................................................................................... 37
a) Add New Item ................................................................................................................ 37
b) Move Selected ............................................................................................................... 37
c) Delete Selected .............................................................................................................. 38
3) Activity .......................................................................................................................... 38
XII. Manage .............................................................................................................................. 39
Class Management .................................................................................................................... 39
1) Edit Class ............................................................................................................................ 39
2) Automatic Course Completion .......................................................................................... 39
3) Announcements ................................................................................................................ 39
4) Roster ................................................................................................................................ 40
5) Attendance ........................................................................................................................ 40
6) Look and Feel ..................................................................................................................... 41
7) Archive Class ...................................................................................................................... 41
Data Management ..................................................................................................................... 41
1) Export Class ....................................................................................................................... 41
2) Import Class ....................................................................................................................... 41
Security and Auditing ................................................................................................................ 42
1) Activity ............................................................................................................................... 42
2) Security .............................................................................................................................. 42
Reporting ................................................................................................................................... 43
1) Reports .............................................................................................................................. 43
a) Course Content Access For a Student ........................................................................... 43
b) Class Access For All Students......................................................................................... 44
c) Student Marks vs. Time Spent on Course ...................................................................... 44
SharpSchool LMS Summary ....................................................................................................... 45

SharpSchool User Manual
About Online Classrooms
SharpSchool’s Learning Management System (L
instructors with the ability to conduct online lessons in
collaboration with conventional classroom instruction. This
system features several student specific modules
moderated discussion forums, group work areas, and lessons.
Instructors also have several tools such as
rubric builder, online chats and
About this Guide
This user guide offers instructors with a detailed explanation on using
Learning Management System (LMS), also known as
designed to help instructors create and
Each section of this guide contains
and its application in an online classroom
Who Should Use this Guide
The contents of this guide are written to be readable by user
and will primarily be used by instructors at
school and district administrators refer to Chapter 12 b
are not required to review Chapter 12.
If you have been given a training site, it is a good idea to practice the steps covered in this
guide before working on your real site. This eliminates the risk of you accidentally deleting
important content or ruining anything on your real site.
Accessing your Website
In order to use My Classes, you must first log into your website. The login page to your
school or district site will contain fields for the username and password. The location of the
login button will vary according to your website’s desi
available on the upper left corner of your website.
Chapter 13: LMS (Instructor Guide)
ssrooms
’s Learning Management System (LMS) provides
instructors with the ability to conduct online lessons in
collaboration with conventional classroom instruction. This
system features several student specific modules such as
sion forums, group work areas, and lessons.
s also have several tools such as a lesson plan builder,
and assessments.
instructors with a detailed explanation on using SharpSchoo
Learning Management System (LMS), also known as My Classes. This document has been
instructors create and maintain an online classroom presence.
Each section of this guide contains detailed information on specific modules within the
and its application in an online classroom.
Who Should Use this Guide
The contents of this guide are written to be readable by users of all technical backgrounds
instructors at educational institutions. It is recommended that
dministrators refer to Chapter 12 before reading this chapter. Teachers
are not required to review Chapter 12.
If you have been given a training site, it is a good idea to practice the steps covered in this
guide before working on your real site. This eliminates the risk of you accidentally deleting
or ruining anything on your real site.
ing your Website
, you must first log into your website. The login page to your
school or district site will contain fields for the username and password. The location of the
login button will vary according to your website’s design; however, login buttons are typically
available on the upper left corner of your website.
Chapter 13: LMS (Instructor Guide)
5 | P a g e
SharpSchool’s Online
. This document has been
within the LMS
s of all technical backgrounds
It is recommended that
chapter. Teachers
If you have been given a training site, it is a good idea to practice the steps covered in this
guide before working on your real site. This eliminates the risk of you accidentally deleting
, you must first log into your website. The login page to your
school or district site will contain fields for the username and password. The location of the
gn; however, login buttons are typically

SharpSchool User Manual
Vital Information
Upon logging into the online classrooms, you will be introduced to key terms
and concepts. It is important to understand these items and their
within the system before continuing:
Organizations
Within SharpSchool’s LMS
the responsibility of setting up organizations and assigning specific permissions is
upon administrators. As
department name and then create a classroom within it.
pertaining to classroom creation further in this manual.
Direct Permissions and Act
Throughout the system you will see a
Permissions and Actual Permissions
items. Direct Permissions
users to a particular object.
direct access to the page as well as those who inherit access from a parent object.
administrator is an example of a user who would appear in the
but not necessarily in the
over from a parent object
Modules
The Learning Management System features a variety of modules for instructor and
student use. These modules can b
instructor. Each module will be defined in detail
manual.
Activity Tab
Almost all objects in the Learning Management System feature
an Activity tab. Through this tab, an inst
subscribe to activities performed within the
beneficial tool to track
authorized personnel.
Chapter 13: LMS (Instructor Guide)
Upon logging into the online classrooms, you will be introduced to key terms
and concepts. It is important to understand these items and their application
within the system before continuing:
Within SharpSchool’s LMS, departments are referred to as an Organization
the responsibility of setting up organizations and assigning specific permissions is
As an instructor, you will be required to click on your
department name and then create a classroom within it. We will cover topics
pertaining to classroom creation further in this manual.
Permissions and Actual Permissions
Throughout the system you will see a Security tab that contains two options:
Actual Permissions. It is important to understand the definition of these
Direct Permissions allows you to add granular permissions to specific groups and
users to a particular object. The Actual Permissions tab displays all users who have
direct access to the page as well as those who inherit access from a parent object.
dministrator is an example of a user who would appear in the Actual Permissions
but not necessarily in the Direct Permissions tab since these permissions are brought
over from a parent object.
The Learning Management System features a variety of modules for instructor and
student use. These modules can be enabled and disabled as and when needed by the
Each module will be defined in detail in subsequent chapters
in the Learning Management System feature
. Through this tab, an instructor can view and
subscribe to activities performed within the module. This is a
beneficial tool to track changes made by students or other
Chapter 13: LMS (Instructor Guide)
6 | P a g e
Organization. Often
the responsibility of setting up organizations and assigning specific permissions is
an instructor, you will be required to click on your
cover topics
tab that contains two options: Direct
. It is important to understand the definition of these
specific groups and
all users who have
direct access to the page as well as those who inherit access from a parent object. An
Actual Permissions tab
since these permissions are brought
The Learning Management System features a variety of modules for instructor and
e enabled and disabled as and when needed by the
in subsequent chapters of this

SharpSchool User Manual Chapter 13: LMS (Instructor Guide)
7 | P a g e
Accessing My Classes
Advanced modules in SharpSchool are available to authorized users via the ‘Published Links’
normally found on the upper margin of your website. Upon logging into your website these
links will be populated based on the SharpSchool package purchased by the district.
Here you can click on My Classes to access the LMS.
Creating Online Classes
Upon logging into the My Classes section click the relevant department name and click on
Add Class.

SharpSchool User Manual Chapter 13: LMS (Instructor Guide)
8 | P a g e
The following page contains a form with specific details for the class:
Online Classroom Items
Classroom Name Title the name of the course
Instructor You can select the instructor for the course by clicking on the Choose User/Group
icon . Click on the users name, click Add and then Ok.
Assistants You can select course assistants from the Choose User/Group icon .
Theme &
Wording
Note: The Course Content Title dropdown will determine the naming conventions
used in the Authoring Tool module in the LMS.
Modules The LMS contains several modules for instructors to use. These modules can be
enabled and disabled by simply clicking on the checkbox next to its name.
Marking Method You can select the marking method used by the system. Note: depending on your
choice here, the Assessment module in the LMS will either display a percentage
scoring interface or strands
Course
Identification
Under the Course Identification section you can configure the grade, department,
period and section for your course. Note: the Department and Grade levels are
configured by administrators only.
Summary Create a description of the course using the content editor.

SharpSchool User Manual Chapter 13: LMS (Instructor Guide)
9 | P a g e
For details on using the content editor, refer to Appendix A: RadEditor of
SharpSchool’s manuals.
Meeting
Location
Indicate the location of the course
Meeting Times Indicate the meeting times for the course
Start Date From the available dropdown indicate the start date for the course.
Homepage If your course has a specific web site, or teacher page, then you may include the URL
here.
Other
Information
Additional information such as Required Text, Submitted Text, Objectives, Schedule,
Requirements, Grading Policy, Attendance Policy, Academic Integrity and
Miscellaneous information can also be added.
Status Once the course is over instructors are expected to Archive the
course. This option makes the course offline but still allows
administrators access to the content.
Maximum # of
Active Users
It is mandatory to include the maximum capacity of the class
Course Code Indicate the code for the course.
Associated
Standard
The LMS integrates with state and national education standards to help instructors
understand the specific expectations of any given unit. Simply select the applicable
standard from the dropdown menu.
When completed, click Save.
You can then click on the classroom name to access its modules.
We will be referring to individual modules in subsequent chapters of this manual.

SharpSchool User Manual
I. Homework Module
There are several modules available for instructors to use
Classroom. The first module is the
ability to create an agenda of homework items for students to complete.
1) Add Homework
To add a homework
window complete the form with details of the homework assignment
a) Title: the title of the homework
assignment.
b) Posted Date: the date posted
c) Due Date: the
assignment is due.
d) Content: details pertaining to the
assignment.
Note: the editor available in the
content are of the
may vary based on the settings applied
by Administrators.
Click Add to publish the homework assignment
To edit homework, simply click on the
changes. Click the Delete
Chapter 13: LMS (Instructor Guide)
Homework Module
several modules available for instructors to use in SharpSchool’s Online
. The first module is the Homework Module, whereby instructors have the
ability to create an agenda of homework items for students to complete.
ork assignment, click on Add Homework and in the following
window complete the form with details of the homework assignment:
the title of the homework
: the date posted.
: the date the homework
: details pertaining to the
the editor available in the
of the Homework module
may vary based on the settings applied
by Administrators.
publish the homework assignment.
To edit homework, simply click on the Edit button and make the appropriate
Delete button to remove a homework assignment.
Chapter 13: LMS (Instructor Guide)
10 | P a g e
in SharpSchool’s Online
, whereby instructors have the
ability to create an agenda of homework items for students to complete.
and in the following
button and make the appropriate
SharpSchool User Manual Chapter 13: LMS (Instructor Guide)
11 | P a g e
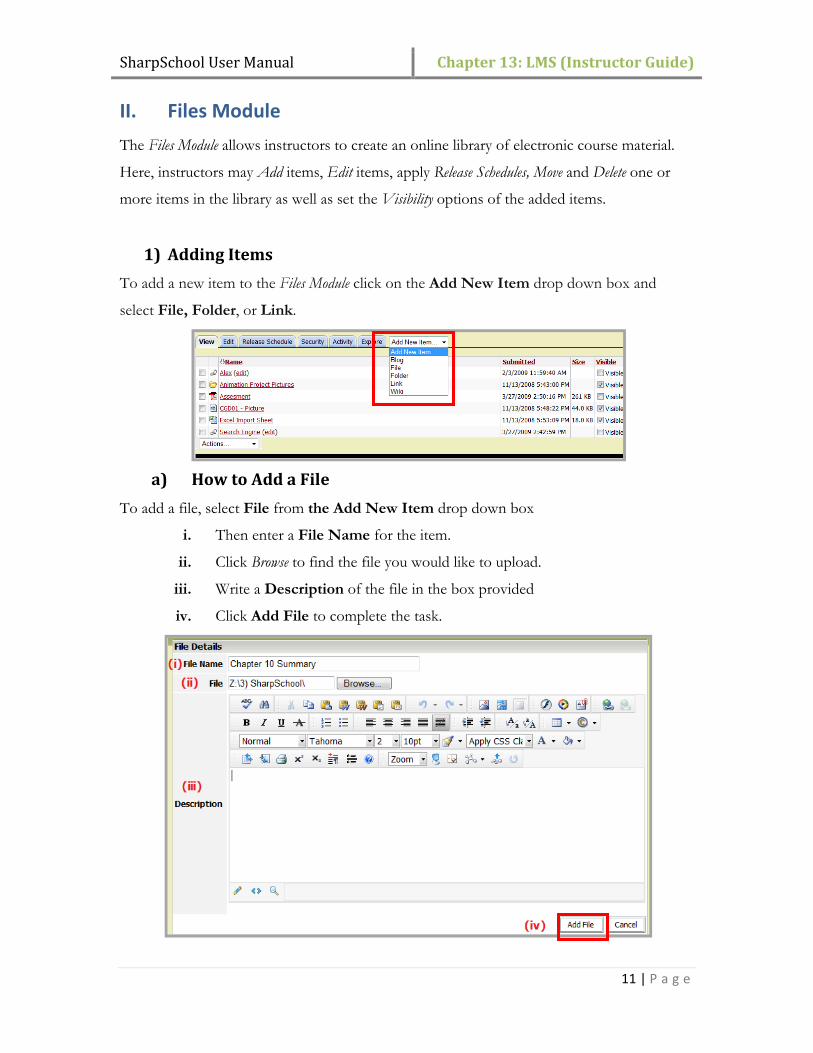
II. Files Module
The Files Module allows instructors to create an online library of electronic course material.
Here, instructors may Add items, Edit items, apply Release Schedules, Move and Delete one or
more items in the library as well as set the Visibility options of the added items.
1) Adding Items
To add a new item to the Files Module click on the Add New Item drop down box and
select File, Folder, or Link.
a) How to Add a File
To add a file, select File from the Add New Item drop down box
i. Then enter a File Name for the item.
ii. Click Browse to find the file you would like to upload.
iii. Write a Description of the file in the box provided
iv. Click Add File to complete the task.

SharpSchool User Manual Chapter 13: LMS (Instructor Guide)
12 | P a g e
b) How to upload multiple File Versions
You can add multiple versions of the same file into the Files Module. Here, you have the
ability to delete an older version of the file or simply make an older version live.
To add another version of a file, click on the file name and click on All Versions.
In the following window simply click on Add New Revision to upload a new version of the
document into the folder.
As a default, when a new version of a document is added it is made live on the site.
However, if you wished to keep an older version live on the site then simply click on the
Make Live button.
c) How to add a Folder
To add a folder, select Folder from the Add New Item drop down box. And in the
following form fill out the relevant
information, such as:
i. Folder Name
ii. Description of the folder
iii. Click Add Folder to
complete the operation.

SharpSchool User Manual Chapter 13: LMS (Instructor Guide)
13 | P a g e
d) How to add a Link
To add a link to an external website select Link from the Add New Item drop down box.
i. Enter in Link Name in the text field. This name will be published on the
main interface for the Files module.
ii. Enter the Web Address (URL)
iii. Include a Description for the link for users.
iv. Click Add Link to post the link.
2) Set Item Visibility
After adding an item to the File Module you can set its visibility. Selecting the “Visible”
option will make it available to students, while an unchecked “Visible” checkbox will
prevent the students from viewing the item.

SharpSchool User Manual Chapter 13: LMS (Instructor Guide)
14 | P a g e
3) Edit, Delete, and Move Items
After putting your items in your file system you may perform house-keeping tasks on them,
such as Edit, Delete or Move the location of the item.
a) Edit Items
To edit an item in the Files Module, click on the specific item and then click on the Edit tab.
Irrespective of whether your item is a file, folder or link the Edit tab will only allow you to
make changes to the name and description of the item.
When completed, click on the Update File or Update Folder button.
b) Move Items
Once uploaded, items can be moved from one region to another. That is, a file from one
folder can be moved into another folder if needed.
1. Check off the item(s) you want to move.
2. From the Actions drop down menu select Move Selected.
3. Click on Browse and use the window that pops up to locate the preferred location.
4. Click the Select link beside the target folder to select the destination.
5. Click Move to here to complete the operation.
c) Delete Selected Items
To delete an object, check off the file name and select Delete Selected in the Actions
dropdown. This option asks for confirmation before deleting the selected items. By clicking
, you will delete the item(s). If you decide not to delete the file, click to cancel
your decision.

SharpSchool User Manual Chapter 13: LMS (Instructor Guide)
15 | P a g e
4) Release Schedule
Several objects in the LMS support a Release Schedule feature. An instructor can control
when certain items are visible to students and when they are not.
To set the release date for an item, simply click on the Release Schedule tab in the Files Module.
Here select the date range for which you wish the resource to be made available and click
Update to save changes.
5) Activity
As mentioned in the Vital Information section of this manual, the Activity tab allows
instructors to monitor changes and activity performed within to an object in the LMS. In
addition to viewing activities, instructors can also set up an alert system that sends email
notifications when changes are made to the module. To set up this system:
1) Click on the Activity tab.
2) Select the frequency from the Send Notification drop down menu to choose how
often you would like the notifications to be.
3) Click Apply to confirm the settings.

SharpSchool User Manual
III. Authoring Tool
SharpSchool’s Learning Management System (LMS) features an
instructors to create customized
Once published, an instructor may review and edit
content as needed within the Authorin
The Authoring Tool contains 5 main sections which
are referred to as the Operations Menu
items in this menu are:
1) Manage Content: This is where instructors
can edit the content of specific sections in the
first time, simply click on Manage Content to edit the homepage.
2) Add Sub Content: This refers to the specific sub units that are contained within the
overall lesson. You may add further subsections to sub units within the lesson. We
will be returning to this tool further in the manual.
3) Export: instructors have the ability to export
4) Import: instructors have the ability to import SCORM content into SharpSchool’s
LMS Authoring Tool.
5) Delete Content and Children
subsections with the click of a button.
Reminder: the left menu is referred to as the
Chapter 13: LMS (Instructor Guide)
SharpSchool’s Learning Management System (LMS) features an Authoring Tool that allows
customized and dynamic lessons for students.
Once published, an instructor may review and edit
Authoring Tool.
contains 5 main sections which
Operations Menu. The main
This is where instructors
content of specific sections in the Authoring Tool. Upon logging in t
simply click on Manage Content to edit the homepage.
his refers to the specific sub units that are contained within the
overall lesson. You may add further subsections to sub units within the lesson. We
this tool further in the manual.
instructors have the ability to export the class content into a SCORM file.
instructors have the ability to import SCORM content into SharpSchool’s
Delete Content and Children: instructors have the ability to delete entire units and
click of a button.
s referred to as the Operations Menu.
Chapter 13: LMS (Instructor Guide)
16 | P a g e
that allows
Upon logging in the
his refers to the specific sub units that are contained within the
overall lesson. You may add further subsections to sub units within the lesson. We
the class content into a SCORM file.
instructors have the ability to import SCORM content into SharpSchool’s
rs have the ability to delete entire units and

SharpSchool User Manual
1) Manage Content
Simply click on Manage Content
log in the first time in order to populate
the homepage of the online lesson.
You may use the content editor
provided to add text, images and other
dynamic objects to the homepage of the
lesson.
When complete, click on Add
Note: there are several
available under Manage Content
We will define these tabs further
manual.
2) Add Sub Content
Sub Content refers to the units or chapters within
the lesson. You have the ability to add sub units
and subsections to those units. The tool
automatically numbers the units in chronological
order.
To add Sub Content, perform the following steps:
1. Click on Add Sub Content
2. Enter a Name for the new content.
3. To add content, you may either s
page file from your computer or add
content using the content
Once you are done designing your content
Note: to add units under a sub section, simply click on the
title and click on Manage Sub Content
and adding new content using the editor.
Chapter 13: LMS (Instructor Guide)
Manage Content when you
n the first time in order to populate
homepage of the online lesson.
You may use the content editor
provided to add text, images and other
dynamic objects to the homepage of the
dd Contents.
there are several tabs
Manage Content.
define these tabs further in the
refers to the units or chapters within
the lesson. You have the ability to add sub units
and subsections to those units. The tool
lly numbers the units in chronological
perform the following steps:
Add Sub Content.
for the new content.
To add content, you may either select a
from your computer or add
ntent editor available.
nce you are done designing your content, click on Add Content
to add units under a sub section, simply click on the specific unit
Manage Sub Content. Here, repeat the process of naming
ent using the editor.
Chapter 13: LMS (Instructor Guide)
17 | P a g e
unit
f naming
SharpSchool User Manual Chapter 13: LMS (Instructor Guide)
18 | P a g e
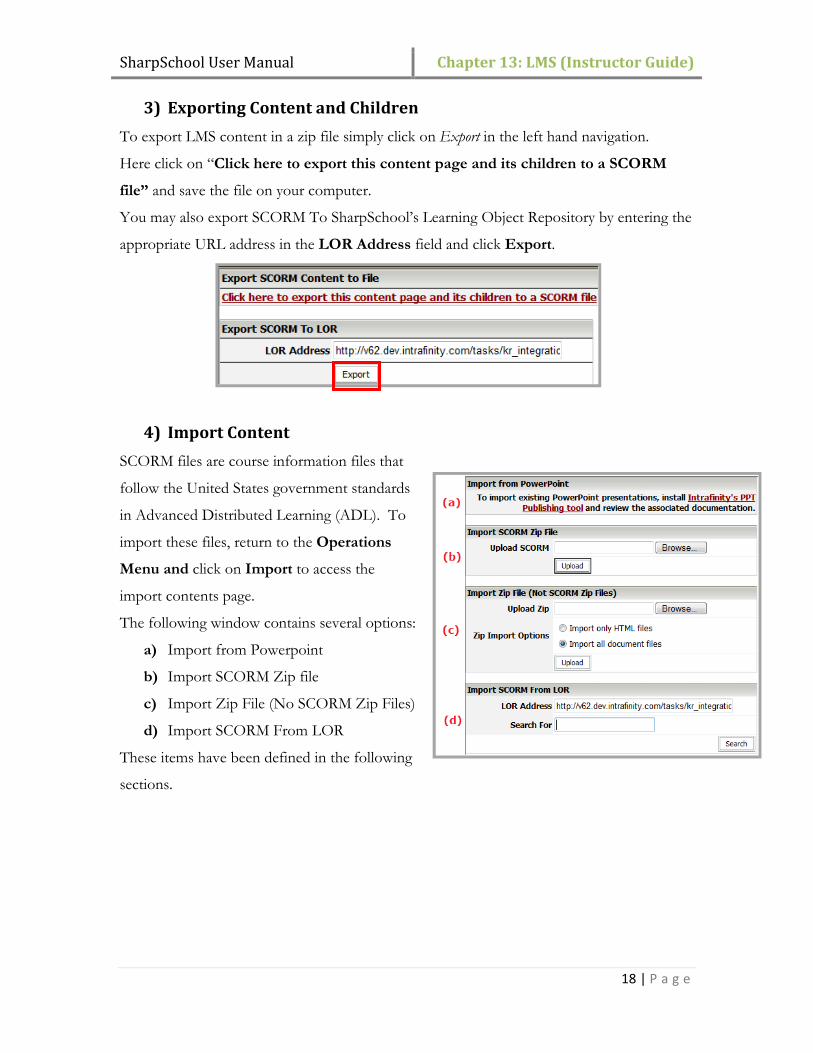
3) Exporting Content and Children
To export LMS content in a zip file simply click on Export in the left hand navigation.
Here click on “Click here to export this content page and its children to a SCORM
file” and save the file on your computer.
You may also export SCORM To SharpSchool’s Learning Object Repository by entering the
appropriate URL address in the LOR Address field and click Export.
4) Import Content
SCORM files are course information files that
follow the United States government standards
in Advanced Distributed Learning (ADL). To
import these files, return to the Operations
Menu and click on Import to access the
import contents page.
The following window contains several options:
a) Import from Powerpoint
b) Import SCORM Zip file
c) Import Zip File (No SCORM Zip Files)
d) Import SCORM From LOR
These items have been defined in the following
sections.

SharpSchool User Manual Chapter 13: LMS (Instructor Guide)
19 | P a g e
a) Import from PowerPoint
To import from PowerPoint, the file must first be converted to SCORM
1. To download the tool for the conversion, go to the import contents page and under
Import from PowerPoint and click on Intrafinity's PPT Publishing tool.
2. To convert the file, open the file in PowerPoint
3. Select the File menu and click on "Publish as LRN"
4. On the 'Publish as LRN' window, select the Output Type as SCORM
5. Click on Publish
6. Zip the published files in the directory
7. Upload the ZIP file to the LMS

SharpSchool User Manual Chapter 13: LMS (Instructor Guide)
20 | P a g e
b) Import SCORM ZIP Files
Under the Import SCORM content section, click Browse to look for the content file to
upload to your course. Once you have selected your course file, click Upload to import.
c) Import Zip Files (No SCORM Zip File)
To import Zip files, click Browse… under the Import Zip File section and select the
correct course file. Select your Zip Import Options and click Upload to import.
d) Import SCORM From LOR
Similar to exporting SCORM to LOR, enter the appropriate URL address in the LOR
Address field, enter in the search keywords in the Search for fields, and click Search to
import SCORM to LOR.

SharpSchool User Manual
5) Delete Content and Children
This option asks for confirmation before deleting the selected contents and children.
clicking , you will delete the contents and its children.
objects, click to cancel your decision.
Note: to delete a section you must first click on the section name and then click on
Delete Content and Children
6) Edit Contents
Contents of lessons may need to be modified
To facilitate this revision there are
have been defined in the following sections.
a) Manage Content
To modify the contents, click on
Editor for the current content page you are viewing.
Click Edit Contents to save the changes.
b) Change Positions
The position of the content on the page can be changed by
first clicking on the Change Positions
items click on the button t
and or click on to move the item
c) Check Accessibility
Click on the Check Accessibility
check in compliance with W3C standards.
Chapter 13: LMS (Instructor Guide)
Delete Content and Children
This option asks for confirmation before deleting the selected contents and children.
, you will delete the contents and its children. If you decide not to delete the
to cancel your decision.
delete a section you must first click on the section name and then click on
ldren
of lessons may need to be modified or removed during the course of a semester
To facilitate this revision there are editing tabs available for instructors to use. These tabs
ined in the following sections.
Manage Content
To modify the contents, click on Manage Content. This will provide access to the
for the current content page you are viewing.
e the changes.
Change Positions
The position of the content on the page can be changed by
Change Positions tab. In the list of
to move the item down the list
the item up the list.
Check Accessibility
Check Accessibility tab to run an accessibility
n compliance with W3C standards.
Chapter 13: LMS (Instructor Guide)
21 | P a g e
This option asks for confirmation before deleting the selected contents and children. By
If you decide not to delete the
delete a section you must first click on the section name and then click on
during the course of a semester.
to use. These tabs
This will provide access to the Content

SharpSchool User Manual Chapter 13: LMS (Instructor Guide)
22 | P a g e
d) Release Schedule
As discussed in previous sections, many modules in the LMS feature a Release Schedule.
However, unlike previous sections, the Release Schedule in the Authoring Tool is initiated on a
conditional basis, where by a student may be required to receive a particular minimum grade
in an assessment before being able to view a chapter. To set a Release Schedule simply select an
evaluation from the drop down and
the insert the minimum mark a
student is expected to receive. To
confirm settings, click Update.
e) Export
You have the ability to export content to a SCORM compliant file.
f) Security
Here you have the ability to add additional users into the system and grant authoring rights
for lessons on the site. It is recommended that additional users not be added to this section,
since permissions are automatically granted based on the Instructor and Assistant specified
during the classroom configuration step.
g) Activity
As mentioned in the Vital Information section, the Activity tab allows instructors to monitor
activity within an object in the LMS. In addition to viewing activities, instructors can also set
up an alert system that sends email notifications when changes are made to the module. To
set up an alert system:
• Select the Notification Type.
• Select the frequency from the Send
Notification drop down menu to
choose how frequent you would like
the notifications to be.
• Click Apply to confirm the settings.

SharpSchool User Manual Chapter 13: LMS (Instructor Guide)
23 | P a g e
IV. Directory
Students have the ability to contact classmates through the Directory module. A list of all
enrolled students is tabulated based on their status: Online, Offline or All. Click on the
corresponding radio button and click Filter.
To send an email to a user, click on the Send Message link beside the user and you will be
taken to an email message box. Here you can use the content editor available to author
messages and even attach documents. When complete, click Send.

SharpSchool User Manual Chapter 13: LMS (Instructor Guide)
24 | P a g e
V. Assessments
The Assessments Module is where instructors are able to create and maintain evaluations for
students. Items created in this tab are automatically scheduled on the classroom Calendar.
The main Assessments page contains several fields:
1. Add Evaluation: click on this button to create a new test.
2. Release Schedule: instructors can set a release schedule on assessments.
3. Edit: click on Edit to make changes to existing assessments.
4. Delete: click on Delete to remove any assessments from the system.
1) Add Evaluation
To add a new evaluation, click on Add Evaluation on the Assessments page
On the following page complete the relevant information:
1. Evaluation Name
2. The Date when the assessment is due.
3. Out of: include the total marks for the
assessment in the text field.
4. Set the Percentage of Course that the mark
is worth. Note: if the class has been setup for
strands, you will need to indicate the strand
mark breakdown that should apply for this
evaluation.
5. You can assign a Rubric to the assessment
(this is optional)
6. Select the Evaluation Type in the drop down menu
7. Write a Description of the evaluation in the text area.
8. To notify users of the new evaluation, check the Email Notification box.
9. To submit the evaluation, click on the Create Evaluation button.

SharpSchool User Manual
2) Edit Evaluations
To edit the evaluation, click on the
• Modifications can be made to the
Description, Percentage of Course
• Click on the Update Evaluation
This feature comes in handy when you decide to take a few questions off the evaluations or
change the weight or the total marks of the evaluations.
3) Add Questions
Once the evaluation is created, t
question types available for instructor
To add a question click on Add Question
the evaluation interface
From this point on, instructors may create questions based on the
down, provide Answers for the system to compare student responses against, assign
for each question and finally provide
completed, click on Add Question
Note: A script box pops up
for creating answers in the
assessments. Internet Explorer will
block this box unless authorized by the
author.
Chapter 13: LMS (Instructor Guide)
To edit the evaluation, click on the Edit link of the corresponding evaluation.
Modifications can be made to the Evaluations name, Due Date, Total Marks
ercentage of Course, and Evaluations Type.
Update Evaluation button to save the changes.
This feature comes in handy when you decide to take a few questions off the evaluations or
change the weight or the total marks of the evaluations.
Once the evaluation is created, there are several
instructors to use.
Add Question in
From this point on, instructors may create questions based on the Question Type
for the system to compare student responses against, assign
for each question and finally provide Feedback to students once the test is complete.
Question
cript box pops up
eating answers in the
assessments. Internet Explorer will
block this box unless authorized by the
Chapter 13: LMS (Instructor Guide)
25 | P a g e
Total Marks
This feature comes in handy when you decide to take a few questions off the evaluations or
Type drop
for the system to compare student responses against, assign Points
to students once the test is complete. Once

SharpSchool User Manual Chapter 13: LMS (Instructor Guide)
26 | P a g e
4) Release Schedule
Assessments can be released to students via the Release Schedule.
To set the Release Date:
1. Enter the required time information into the release fields of the respective item.
2. Specify the Release Date and Release Until date using the dropdown calendar.
3. Click Update to save these settings or click Cancel to cancel the changes.

SharpSchool User Manual Chapter 13: LMS (Instructor Guide)
27 | P a g e
5) Quiz Submission
Quiz Submission itemizes the user and date at which the quiz was completed.
6) Export Quiz
This option allows administrators to exports the quiz into an Extensible Markup Language
(XML) document for backup purposes.
7) Import Quiz
You can import SharpSchool XML quizzes.
8) Chart
This option provides instructors with
statistics on student performance.

SharpSchool User Manual Chapter 13: LMS (Instructor Guide)
28 | P a g e
VI. Calendar
The Calendar module automatically publishes assessment due dates. However, instructors
also have the ability to manually create events.
To create an event, click on and in the following page insert the relevant details for the
event.
1. Subject: The name of your event
2. Location: Where the event is taking place
3. Start Date: The date and time in which the event is starting. Use the Date Picker
button to select the day from a calendar or enter the date manually
4. End Date: The date and time in which the event ends. Use the Date Picker button
to select the day from a calendar or enter the date manually. Note: events can also be
scheduled on a recurring basis.
5. Category: Choose from a list of preset categories (not a mandatory selection).
Choosing a category for your event allows it to be filtered by that category.
6. Color: Determine the color of the text displayed on your calendar for your event.
You can choose More Colors at the bottom of the color selection pop-up to select
from a larger range of colors, or even input one by its RGB value
7. Icon: Inserts an image to be displayed beside your event name on your calendar.
This is not a mandatory element
8. Participants: Are the individuals that are selected to be part of the event. By
signing up for an event, the participants are notified by e-mail of the event, and the
event is published on that individual’s calendar within their workspace (Workspaces
are part of the Advanced SharpSchool package)
a) Members: Click on the Choose User/Group button to select members from
within the organization.
b) Non-Members: Enroll external individuals by filling in their email address,
using a comma to separate them
9. Description: Fill out the details of the event using the content editor.
When finished, click on Create Event.

SharpSchool User Manual Chapter 13: LMS (Instructor Guide)
29 | P a g e

SharpSchool User Manual Chapter 13: LMS (Instructor Guide)
30 | P a g e
VII. Marks
The LMS automatically grades students for assessments performed within the system and
allows administrators to manually insert grades. Grades can be displayed for all students for
each assessment, or for specific assessments from the Show Following Evaluations Only
section.
If an instructor wishes to manually add or change marks for a student, simply type it into the
text field provided and click on Record Marks.
To export the grades into a CSV document, simply click on Export Marks.

SharpSchool User Manual Chapter 13: LMS (Instructor Guide)
31 | P a g e
VIII. Polls
Polls allow instructors to gather student opinions on topics pertaining to the course. The poll
is automatically published on the homepage of the online classroom, and results are instantly
viewable by the student and instructor.
1) Adding Polls
To create a new poll click on the Polls tab, then click and fill out the following
information:
i. Name: enter the name of the poll.
ii. Question: insert the question being asked
iii. Response options include Allow Multiple
Answers and Allow the Results of the Vote
to be Public
iv. There five possible response choices available
for students.
v. Click Add when completed.
Polls are automatically added to the homepage of the
classroom.
2) Editing Polls
To edit a poll click on the poll name and click Edit. Now you can modify the Name of the
poll, the Question being asked, the response choices and you can add up to a total of five
possible responses. Click Update to update your poll.

SharpSchool User Manual Chapter 13: LMS (Instructor Guide)
32 | P a g e
IX. Chat
Chat rooms are used as a means of an instant communication between a group of users.
1) Create a Chat Room
i. Click on Add Chat.
ii. Enter the Name and a brief Description
of the chat room.
iii. Click on Moderate if you would like the
Chat Room to be moderated.
iv. Choose the person who you would like
have as moderator for the chat room
(Moderators can be changed at any time).
v. Select the respective radio button to
choose whether or not you want to log
the chat. (When Chat Logging is
enabled, all of the messages that are sent
through the chat by the users are saved)
vi. Click Add to create the chat room.
2) Deleting a Chat Room
To remove a Chat Room:
1. Click the checkbox next to the chat room name.
2. Choose Delete Selected in the Actions Dropdown
3. Click to confirm or to cancel.
3) How Students may use the Chat Room
Once a chat room is created, an attendee can simply click
on the name of the chat room to participate in it.
Attendees can view the list of participants in the right
column of the chat box, and also select a unique font color
for the communication

SharpSchool User Manual Chapter 13: LMS (Instructor Guide)
33 | P a g e
X. Forum
Forums are a great way for an instructor to communicate with students and for students to
communicate with each other. The LMS Forums Module features several collaboration and
security tools to enable instructors and students to gain the most benefit from the system.
On the main Forum page, there are several options available:
1. Search: users of the forum have the ability to perform key word searches across all
topics as well as view posts made by specific users.
2. Add New Topic: click on this button to create new topics in the forum
3. Edit: edit existing topics
4. Delete: delete existing topics
5. Archive: archived topics are made offline and students cannot view or participate in
them. These topics are still available to the instructor.
6. Lock: this option prevents students from contributing to topics, however they are
still able to view historical posts and comments made to it.
In a forum you are able to Add New Topic, Edit or Delete topics as well as Reply to
posts and Edit or Delete posts. However, only the person who posted the message can edit
or delete it, with the exception of the instructor.

SharpSchool User Manual Chapter 13: LMS (Instructor Guide)
34 | P a g e
1) How to Add New Topic
To add a new topic:
1. Click on Add New Topic.
2. Enter a Subject and the corresponding initial message.
3. Click Post Topic to add the new topic.
Once the topic has been added you will see it in the Forum index within the list of topics.
By selecting the Email Notification whenever someone replies box instructors can
receive an email notification whenever someone responds to the thread.
2) Edit Topic
1. Click on Edit at the far right of the topic you want to edit. You can now change the
Subject and the corresponding initial Message.
2. Click Update Topic to change the
topic.
3) Replying to Forum Messages
1. Click on the Reply link.
2. Enter the Subject and the
corresponding Message.
3. Click Browse to add an Attachment.
4. Click Post Comment to post your
reply to the previous post.

SharpSchool User Manual Chapter 13: LMS (Instructor Guide)
35 | P a g e
4) Flat/Tree View
There are two views in the Forums user interface: Flat View and Tree View. The Flat view
is for simply viewing posts in the order they were posted, with no special formatting on the
display. The Tree View arranges responses made to a post in a delineated format. This
ensures that the initial post topic is featured at the top of the page and the following
responses are tabbed to the right.
Below is an example of Tree View in the forum.

SharpSchool User Manual Chapter 13: LMS (Instructor Guide)
36 | P a g e
XI. Groups
The LMS provides students with an area to collaborate and work on projects together.
Groups are able to mimic class activities by being able to:
• Create their own private Forum topics
• Create their own Chat rooms
• Post their own Files, Folders and Links
• Establish their own Calendar where they can add Events.
1) Creating Groups
There are two ways in which an instructor can create group work areas for students. The
first is automatically done through the Group Creation Wizard and second way is through
manual creation.
The Group Creation Wizard is a quick and easy way to create multiple groups:
1. Enter the name prefix for all the groups into the Group Name Prefix.
2. Set the Number of Groups to create.
3. Click Create Groups to create your
groups.
The groups that are created will appear above the Group
Creation Wizard in the list of groups. Students may
only access the groups that you have assigned them to.
Another way to add groups is by using the
button.
1. Enter the Group Name
2. Check off the students you would like to assign to
the group.
3. Click Add Group to create the group
Unlike the Group Creation Wizard, this method allows
you to create only one group at a time.

SharpSchool User Manual Chapter 13: LMS (Instructor Guide)
37 | P a g e
2) Working with Group Workspaces
The Group Workspaces features a variety of modules for students to use. These are:
Module Purpose
Blogs The Blog allows students to create a group blog to discuss topics and ideas
Calendar Students can create a project calendar to track progress and schedule milestones
Chat This online chat session allows students to communicate with one another on a scheduled basis.
Logs from these chat sessions are saved in the system and are accessible to instructors.
File Students can upload files and folders to share with group members
Forum The discussion forum module can be used in place of the blog module. Here students also have
the ability to create and discuss topics.
Link The link section simply allows students to publish an external website link for others to see.
Wiki Students can work on a project document via the Wiki module. This tool makes it easy for
students to collaborate and incorporate their feedback into a common document.
a) Add New Item
To add a new item to the workspace pull down the Add New Item... menu. The usage and
application of these modules are defined in other sections of this manual. Simply refer to the
corresponding topics in the table of contents. For a detailed description of the Blogs module
refer to Chapter 9 of the SharpSchool documentation.
b) Move Selected
To move item(s) to a different location:
1. Select the checkbox to the left of the
item(s) to be moved.
2. Pull down the Actions... menu
3. Click on Move Selected.

SharpSchool User Manual Chapter 13: LMS (Instructor Guide)
38 | P a g e
c) Delete Selected
To delete item(s):
1. Select the checkbox to the left of the item(s) to be deleted.
2. Pull down the Actions... menu
3. Click Delete Selected.
3) Activity
As with all previous sections, the Activity tab informs instructors when changes are made
within the module.
From an instructors perspective this is a handy tool to since the columns in the interface
indicate the user and specific action performed by the user within the Group Workspaces. This
allows instructors to gauge individual student participation in the group project.
Instructors may also set up an alert system to be notified whenever changes are made to the
Group Workspaces. To set up an alert system:
• Click on the Activity tab.
• Click Subscribe.
• Select the frequency from the Send Notification drop down menu to choose how
often you would like the notifications to be.
• Click Apply to confirm the settings.

SharpSchool User Manual Chapter 13: LMS (Instructor Guide)
39 | P a g e
XII. Manage
The Manage section is where instructors can perform housekeeping tasks for the online
classroom.
Class Management
1) Edit Class
Edit class allows instructors to alter the class details such as the description, modules,
summary and other miscellaneous information
2) Automatic Course Completion
This section determines what default factors must be met before a student is granted
a completed course standing. Here you may define tasks and performance standards
to determine the minimum passing criteria for the course.
3) Announcements
Instructors can publish time sensitive announcements on the homepage of the
course. To publish a new announcement, simply insert a Title, Release Date,
Expiration Data and Body of the article and click Add Announcement. You can
then delete old announcements by clicking on the button under the Action
column.

SharpSchool User Manual Chapter 13: LMS (Instructor Guide)
40 | P a g e
4) Roster
The Roster contains the students who are enrolled in
the course. Here an instructor may manually grant
students a Completed or Dropped status within the
course. Completed is given when the student
successfully finishes the course and has met all the
requirements. Dropped is when a student leaves the
course.
- To assign a status, simply check-off the students
name and click on the or button.
- You can click on the Send Private Message
option to send an email to the student.
5) Attendance
The LMS features an Attendance tool that allows instructors to tabulate student attendance.
To add and view attendance, click on the applicable week in the dropdown calendar and
click on . Here you can mark the student as Present, Absent or Late. When completed,
click Record Attendance to save changes.

SharpSchool User Manual Chapter 13: LMS (Instructor Guide)
41 | P a g e
6) Look and Feel
The Look and Feel section defines now the modules will be published on the homepage of
the online classroom. When completed, click on Update to save changes.
7) Archive Class
The Archive Class feature makes the class offline and students will not be able to participate
in the classroom.
Classes can also be archived via the Status dropdown under Edit Class.
Data Management
1) Export Class
Instructors have the ability to export the entire course and its contents for back up purposes.
Simply click on Export Class to export the contents into an XML document.
2) Import Class
Exported SharpSchool classes can be imported back into the system via the Import Class
option. Click on Browse to select the XML document from your computer and click on
Upload.
SharpSchool User Manual Chapter 13: LMS (Instructor Guide)
42 | P a g e
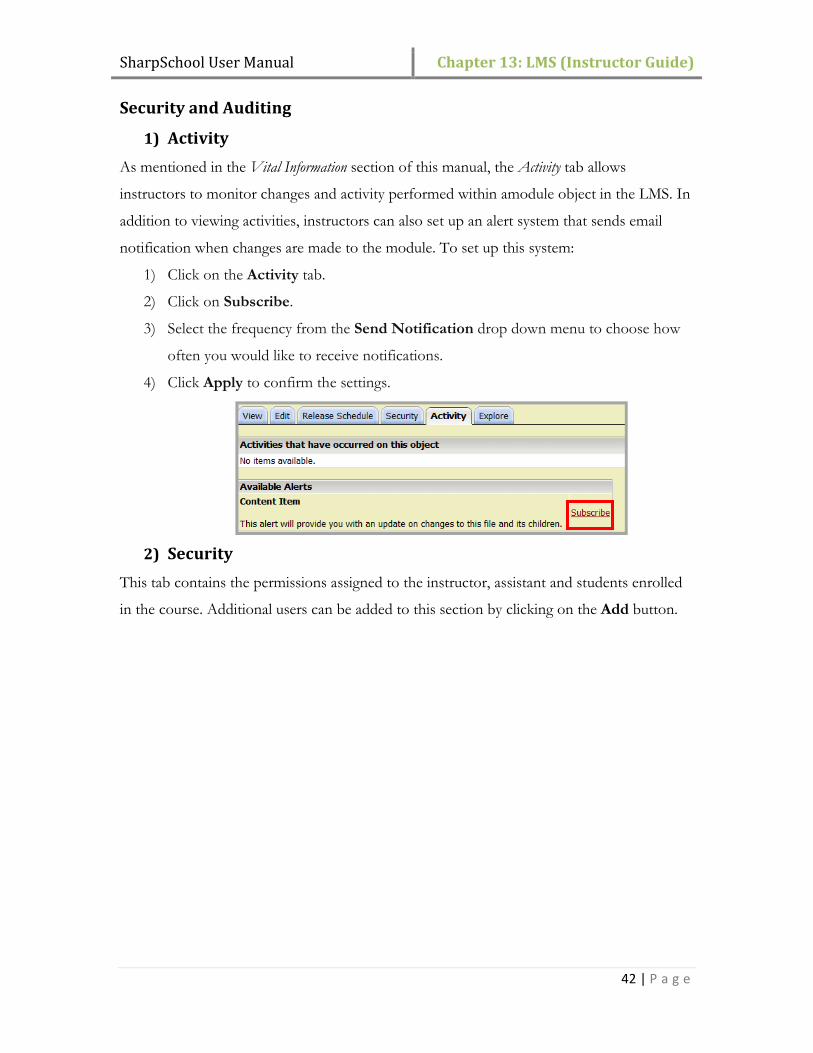
Security and Auditing
1) Activity
As mentioned in the Vital Information section of this manual, the Activity tab allows
instructors to monitor changes and activity performed within amodule object in the LMS. In
addition to viewing activities, instructors can also set up an alert system that sends email
notification when changes are made to the module. To set up this system:
1) Click on the Activity tab.
2) Click on Subscribe.
3) Select the frequency from the Send Notification drop down menu to choose how
often you would like to receive notifications.
4) Click Apply to confirm the settings.
2) Security
This tab contains the permissions assigned to the instructor, assistant and students enrolled
in the course. Additional users can be added to this section by clicking on the Add button.

SharpSchool User Manual Chapter 13: LMS (Instructor Guide)
43 | P a g e
Reporting
1) Reports
There are 3 primary reports available for the LMS: Course Content Access for a Student, Class
Access for All Students and Student Marks vs. Time Spent on Course.
a) Course Content Access For a Student
This report allows instructors to monitor specific student activity
for all modules in the LMS. To access this information click on the
students name in the dropdown menu
SharpSchool User Manual Chapter 13: LMS (Instructor Guide)
44 | P a g e
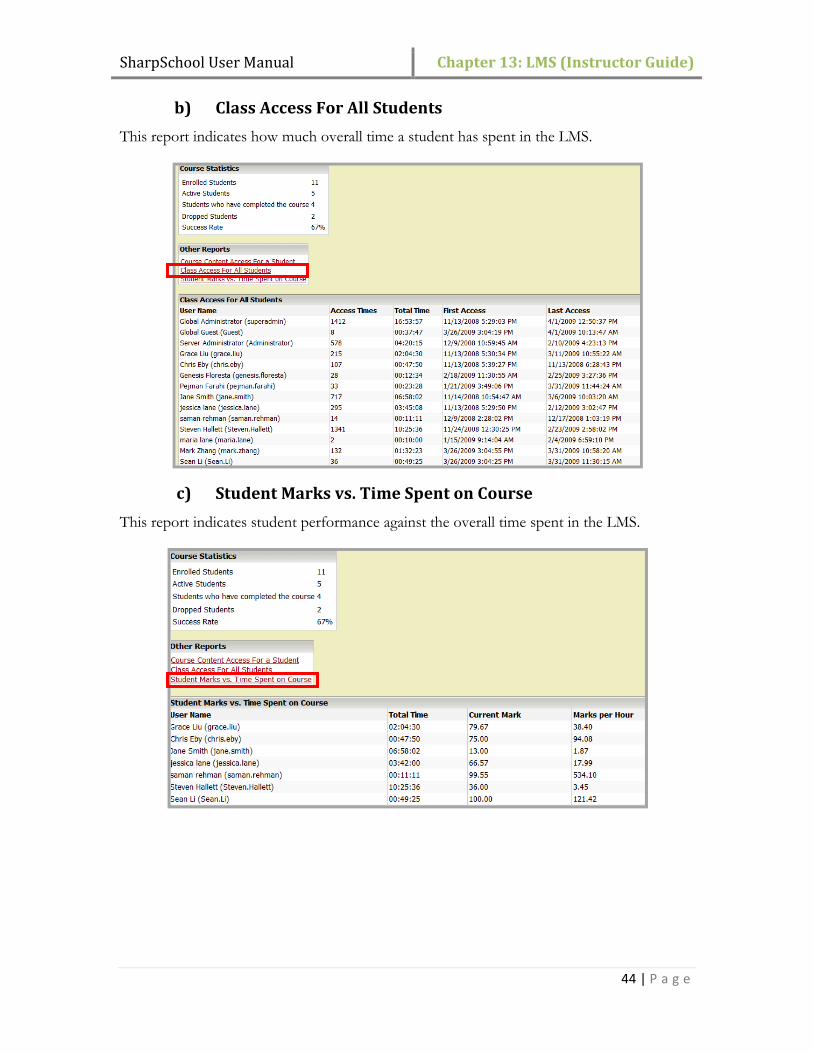
b) Class Access For All Students
This report indicates how much overall time a student has spent in the LMS.
c) Student Marks vs. Time Spent on Course
This report indicates student performance against the overall time spent in the LMS.

SharpSchool User Manual Chapter 13: LMS (Instructor Guide)
45 | P a g e
SharpSchool LMS Summary
Here are some important things about SharpSchool’s LMS:
The maximum number of students
must be defined when creating
classroom.
All modules in the LMS can be
configured by the instructor via the
Edit Class interface
Students working as a group can
only access their own Group Area.
Instructors can assign permissions to
other instructors, assistants or even
students in the LMS via the Security
tab
Activities tab allows instructors to
subscribe to changes made to that
objects.
Classes cannot be deleted, they can
only be archived.
Related Documents