12–1 CHAPTER 12: ABATEMENT Step-by-Step Summary for Abatement ............................................................ 12–5 I. Principles of Lead-Based Paint Hazard Abatement ............................ 12–7 A. Longevity of Abatement ................................................................................... 12–7 B. Prohibited Abatement Methods ....................................................................... 12–9 C. Periodic Monitoring and Reevaluation ............................................................ 12–9 1. Recordkeeping .............................................................................................. 12–9 D. Types of Abatement ........................................................................................ 12–10 E. Encapsulation ................................................................................................... 12–10 F. Relationship to Renovation, Repainting, Remodeling, Rehabilitation, Weatherization, and Other Construction Work ........................................... 12–10 Step-by-Step Summary for Building Component Replacement .......... 12–13 II. Building Component Replacement .......................................................... 12–15 A. Worksite Preparation ...................................................................................... 12–15 1. Security ....................................................................................................... 12–15 2. Waste Storage ............................................................................................. 12–15 B. General Procedures for Building Component Replacement ........................ 12–15 C. Removal and Replacement Procedures for Specific Components ............... 12–17 1. Baseboards, Casings, and Other Trim ......................................................... 12–17 2. Windows ..................................................................................................... 12–17 3. Interior and Exterior Doors ......................................................................... 12–18 4. Kitchen and Bathroom Cabinets ................................................................ 12–19 5. Railings ....................................................................................................... 12–19 6. Exterior Siding ............................................................................................ 12–19 7. Interior Walls .............................................................................................. 12–20 D. Transportation and Storage of Waste ............................................................. 12–20 Step-by-Step Summary for Enclosure Methods .......................................... 12–21 III. Enclosure Methods .......................................................................................... 12–23 A. Definition ......................................................................................................... 12–23 B. Longevity of Enclosures .................................................................................. 12–23 1. Labeling of Enclosed Surfaces ..................................................................... 12–23 2. Monitoring Enclosure Integrity .................................................................. 12–23 3. Unsound Substrates .................................................................................... 12–24

Welcome message from author
This document is posted to help you gain knowledge. Please leave a comment to let me know what you think about it! Share it to your friends and learn new things together.
Transcript

12–1
Chapter 12: Abatement
CHAPTER 12: ABATEMENT
Step-by-Step Summary for Abatement ............................................................ 12–5
I. Principles of Lead-Based Paint Hazard Abatement ............................ 12–7
A. Longevity of Abatement ................................................................................... 12–7
B. Prohibited Abatement Methods ....................................................................... 12–9
C. Periodic Monitoring and Reevaluation ............................................................ 12–9
1. Recordkeeping .............................................................................................. 12–9
D. Types of Abatement ........................................................................................ 12–10
E. Encapsulation ................................................................................................... 12–10
F. Relationship to Renovation, Repainting, Remodeling, Rehabilitation,Weatherization, and Other Construction Work ........................................... 12–10
Step-by-Step Summary for Building Component Replacement .......... 12–13
II. Building Component Replacement .......................................................... 12–15
A. Worksite Preparation ...................................................................................... 12–15
1. Security ....................................................................................................... 12–15
2. Waste Storage ............................................................................................. 12–15
B. General Procedures for Building Component Replacement ........................ 12–15
C. Removal and Replacement Procedures for Specific Components ............... 12–17
1. Baseboards, Casings, and Other Trim ......................................................... 12–17
2. Windows ..................................................................................................... 12–17
3. Interior and Exterior Doors ......................................................................... 12–18
4. Kitchen and Bathroom Cabinets ................................................................ 12–19
5. Railings ....................................................................................................... 12–19
6. Exterior Siding ............................................................................................ 12–19
7. Interior Walls .............................................................................................. 12–20
D. Transportation and Storage of Waste ............................................................. 12–20
Step-by-Step Summary for Enclosure Methods .......................................... 12–21
III. Enclosure Methods.......................................................................................... 12–23
A. Definition ......................................................................................................... 12–23
B. Longevity of Enclosures .................................................................................. 12–23
1. Labeling of Enclosed Surfaces ..................................................................... 12–23
2. Monitoring Enclosure Integrity .................................................................. 12–23
3. Unsound Substrates .................................................................................... 12–24

12–2
Chapter 12: Abatement
C. Interior Surface Enclosure Materials ............................................................. 12–26
1. Wood Paneling............................................................................................ 12–26
2. Laminated Products .................................................................................... 12–26
3. Ridged Tile and Brick Veneers ................................................................... 12–26
4. Drywall and Fiberboard............................................................................... 12–26
D. Interior Building Components Suitable for Enclosures ............................... 12–27
1. Wood Trim and Drywall ............................................................................. 12–27
2. Electrical Outlets and Vents ....................................................................... 12–28
3. Ceilings ....................................................................................................... 12–29
4. Floors ........................................................................................................... 12–29
5. Stairs ........................................................................................................... 12–30
6. Pipes ............................................................................................................ 12–30
7. Door Frames ................................................................................................ 12–30
8. Plywood Enclosures ..................................................................................... 12–30
E. Exterior Enclosure Systems ............................................................................ 12–30
1. Siding .......................................................................................................... 12–30
2. Windows ..................................................................................................... 12–31
3. Exterior Walls ............................................................................................. 12–32
F. Summary .......................................................................................................... 12–32
Step-by-Step Summary for Paint Removal Methods ................................ 12–33
IV. Paint Removal Methods ................................................................................ 12–35
A. Introduction ..................................................................................................... 12–35
B. Prohibited Methods ......................................................................................... 12–35
1. Open Flame Burning or Torching............................................................... 12–35
2. Machine Sanding or Grinding Without a HEPA Exhaust Tool ................ 12–35
3. Uncontained Hydroblasting or High-Pressure Water Wash ...................... 12–36
4. Abrasive Blasting or Sandblasting .............................................................. 12–36
C. Methods Not Recommended .......................................................................... 12–37
1. Dry Scraping ............................................................................................... 12–37
2. Chemical Paint Removers Containing Methylene Chloride..................... 12–37
D. Recommended Methods of Paint Removal .................................................... 12–37
1. Heat Guns ................................................................................................... 12–37
2. Mechanical Removal Methods ................................................................... 12–39
3. Chemical Removal Methods ...................................................................... 12–41
E. Waste Disposal................................................................................................. 12–45

12–3
Chapter 12: Abatement
Step-by-Step Summary for Soil and Exterior Dust Abatement ........... 12–47
V. Soil and Exterior Dust Abatement ........................................................... 12–49
A. Introduction ..................................................................................................... 12–49
B. Soil Abatement Methods ................................................................................. 12–49
1. Soil Removal and Replacement ................................................................. 12–50
2. Soil Cultivation .......................................................................................... 12–53
3. Soil Cleaning .............................................................................................. 12–53
4. Paving ......................................................................................................... 12–54
C. Exterior Dust Control ..................................................................................... 12–54
1. Types of Equipment ..................................................................................... 12–54
2. Evaluation of Equipment ............................................................................ 12–55
3. Removal of Heavy Accumulation .............................................................. 12–56
4. Vacuum Cleaning ....................................................................................... 12–56

12–4
Chapter 12: Abatement

12–5
Chapter 12: AbatementStep-by-Step Summary
Abatement: How To Do It1. Have a risk assessment or paint inspection performed by a certified risk assessor or a certified inspector
technician who is independent of the abatement contractor.
2. Develop a site-specific lead hazard control plan based on the hazards identified and financing available.Select the appropriate interior and/or exterior Worksite Preparation Level (from Chapter 8).
3. Have the contractor obtain any necessary building or waste permits; notify local authorities if the localjurisdiction requires it.
4. Together with the contractor (or designer or risk assessor), select specific building component replace-ment items, enclosure materials, paint removal equipment and/or chemicals, tools, and cleaning supplies.Consider waste management and historic preservation implications of the selected treatment.
5. Develop specifications (usually for large projects only).
6. Schedule other construction work so that leaded surfaces are not inadvertently disturbed and unprotectedworkers are not placed at risk. Include time for clearance examinations and laboratory dust sample analysisin the scheduling process (see Chapters 3 and␣15).
7. Select a certified abatement contractor using the lowest qualified bidder.
8. Conduct a preconstruction conference to ensure the contractor fully understands the work involved(for large projects only).
9. Notify residents of the dwelling and adjacent dwellings of the work and the date when it will begin.Implement relocation (if appropriate).
10. Correct any existing conditions that could impede the abatement work (e.g., trash removal, structuraldeficiencies).
11. Post warning signs and restrict entry to authorized personnel. Implement the worksite preparationprocedures.
12. For large projects only, consider conducting a pilot project to determine if the selected abatement methodwill actually work (pilot projects are sometimes completed before step␣4).
13. Collect preabatement soil samples, which may not have to be analyzed until postabatement soil sampleshave been collected, analyzed, and compared to clearance standards. If postabatement soil levels arebelow applicable limits, the preabatement samples need not be analyzed (see Chapter 15).
14. Execute abatement work. See the other sections of this chapter for Step-by-Step Summaries for buildingcomponent replacement, enclosure, paint removal, and soil abatement methods. Observe local or Stateregulations if applicable.
15. Store all waste in a secure area and make sure it is properly labeled with an accumulation start date(see Chapter 10).
16. Conduct daily and final cleanup (see Chapter 14). Execute waste disposal procedures.

12–6
Chapter 12: Abatement
17. Have an independent, certified inspector technician or risk assessor conduct a clearance examination afterwaiting at least 1 hour after cleanup has been completed to let dust settle (see Chapter 15).
18. If clearance is not achieved, repeat cleaning and/or complete abatement work. Repeat clearance examinationand, if clearance is achieved, obtain any required formal release or certificate of completion required by theU.S. Department of Housing and Urban Development (HUD) or local authorities.
19. Pay contractor and clearance examiner.
20. Conduct periodic monitoring and reevaluation of enclosure systems (if applicable) or lead-based paint thatwas not abated as indicated in Chapter␣6. Maintain records of all abatement, monitoring, reevaluation, andmaintenance activities, and turn them over to any new owner upon sale of the property.
Step-by-Step Summary (continued)

12–7
Chapter 12: Abatement
Chapter 12: Abatement
Section I
I. Principles of Lead-BasedPaint Hazard Abatement
A. Longevity of Abatement
Abatement is the removal of either the build-ing component or the paint itself or the near-permanent enclosure of lead-based paint haz-ards. From a public health perspective, properlyconducted abatement is the desired response tolead hazards. Abatement has two principal ad-vantages: it provides a long-term solution, andlittle (if any) monitoring or reevaluation of thetreated surface is necessary since failure is lesslikely to occur. Abatement treatments providea higher margin of safety than interim controlssince the effectiveness of the work is less depen-dent on resident action, maintenance of hous-ing stock, the conscientiousness of propertymanagers, and the attention of maintenanceworkers during repair.
As used in this chapter, abatement can meaneither correction of lead-based paint hazards(as defined in Title X) or treatment of all lead-based paint (as currently practiced in the U.S.Department of Housing and Urban Develop-ment (HUD) public and Indian housing pro-gram, where all lead-based paint is abated dur-ing rehabilitation work or when a child withan elevated blood lead level is identified).The methods explained in this chapter applyto abatement of both lead-based paint hazardsand lead-based paint.
Interim controls, abatement, or a combinationof the two are acceptable methods of addressinglead-based paint hazards. In contrast to interimcontrols, lead-based paint abatement refers toa group of measures that can be expected toeliminate or reduce exposures to lead hazardsfor at least 20 years under normal conditions.Since 20 years is the expected lifespan ofmany commonly used building components,
abatement is the closest one can get to a “per-manent” solution in housing. The abatementmethods described in this chapter should becapable of lasting 20 years under typical condi-tions. Any methods developed in the future thatalso last 20 years will be acceptable as abate-ment methods. This orientation toward perfor-mance standards should provide owners and theabatement industry with opportunities for inno-vation and flexibility, ensuring that the abate-ment method selected is the one that is mostcost-effective for a particular component.
The term “abatement” also includes a numberof other activities that are not directly related tothe work itself, but that must be included in theoverall effort for the abatement to be successful.These activities include lead hazard evaluation,planning, cleaning, clearance, and waste dis-posal and are covered elsewhere in these Guide-lines. The reader must study and understand thematerial in these other chapters prior to under-taking an abatement project. This chapter alonedoes not provide all the information necessaryto complete a successful abatement job.
The definition of abatement (as used in thisdocument) is different than the “traditional”abatement practices used in some local jurisdic-tions. Traditional abatement methods often in-volve dry scraping deteriorated paint, repaint-ing, and dry sweeping without clearance. Thesemethods are known to make leaded dust moreaccessible to young children and are thereforeoften counterproductive. Performed inad-equately, or without sufficient protection,abatement is known to increase lead exposuresto children (Amitai, 1987; Chisholm, 1985;Farfel, 1990; Rabinowitz, 1985a). When per-formed properly, abatement is known to be ef-fective (Amitai, 1991; Staes, 1994; HUD, 1991;Jacobs, 1993a; Farfel, 1994; Staes and Rinehart,1995).
Proper abatement refers to any measure de-signed to permanently eliminate lead-basedpaint hazards in accordance with standards

12–8
Chapter 12: Abatement
established by the U.S. Environmental Protec-tion Agency (EPA) Administrator pursuant toTitle IV of the Toxic Substances Control Act(TSCA). Abatement strategies include removalof lead-based paint; enclosure of lead-basedpaint; encapsulation of lead-based paint (ac-cording to the standards and procedures setforth in Chapter 13); replacement of buildingcomponents coated by lead-based paint; re-moval of lead-contaminated dust; removal oflead-based paint from painted building compo-nents (as a last resort); removal or covering oflead-contaminated soil with a durable covering(not grass or sod, which are considered interimcontrol measures); and preparation, cleanup,disposal, postabatement clearance testing,recordkeeping, and monitoring (if applicable).
More than any other abatement method, re-moval of lead-based paint involves the greatestdegree of disturbance and dust generation.Therefore, onsite removal of lead-based paintfrom a substrate should be carried out only ifabatement rather than interim control is re-quired and no other abatement method is fea-sible. For example, removal of paint from metaldoorframes may be the only feasible abatementoption, especially if the frames cannot be re-moved or enclosed and the paint cannot be sta-bilized. Paint removal may increase the levelof lead in household dust and make effectivecleaning more difficult. Even if dust clearancestandards are met, any increase in leaded dustlevels over baseline levels means some increasein exposure. Furthermore, all removal methodsleave behind some residues embedded in thesubstrate, which could continue to pose ahazard if the surface from which the paintis removed is later disturbed.
Therefore, paint removal is the most invasiveof abatement methods and should be avoidedif possible. Enclosure and building componentreplacement are the least invasive and mostpreferred of the abatement methods.
Abatement also offers the greatest challenge toplanning, since it is often performed in the con-text of other building construction work, whileinterim controls are more likely to be performedalone or as part of other maintenance work.
In fact, many forms of abatement require specialconstruction skills in addition to protectivemeasures and dust control techniques. For ex-ample, one of the most common forms of lead-based paint abatement is window replacement.Abatement contractors need to possess ad-equate carpentry skills to install (for example)new windows, as well as the demolition, dustcontainment, and cleanup skills held by abate-ment contractors. While providing some guid-ance, this chapter is not intended to impartcarpentry, painting, resurfacing, and other con-struction knowledge required for most types ofabatement. Abatement contractors should ei-ther subcontract this type of construction workor acquire the necessary construction skills be-fore the job begins. Of course, all constructionwork must be performed in accordance withlocal code requirements and all abatement workmust be done by certified firms and individuals.
Many forms of abatement can be integratedinto construction work, which provides anopportunity to install systems that will havelong-term impact. For example, wheneverbuilding components, such as doors and win-dows, are replaced, the Guidelines recommendthat they be replaced with products that aremore energy-efficient. This will help reduce en-ergy consumption and increase cost-efficiency.
EPA is establishing standard training curricu-lums and regulations for the training and certifi-cation of all individuals engaged in lead-basedpaint risk assessment, inspection, and abate-ment, and minimum performance standards forthe purpose of certifying those individuals whosupervise lead abatement projects and conductclearance examinations. EPA’s regulations willgenerally be implemented through State pro-grams. All abatement contractors and firmsmust be certified to perform this type of work,and all abatement workers must be trainedand certified. Certification of abatement con-tractors and completion of clearance examina-tions by independent, certified risk assessors orinspector technicians ensures that abatementwork is conducted properly and safely.
For exterior work, preabatement soil samplesshould be collected but not necessarily analyzed

12–9
Chapter 12: Abatement
until postabatement soil samples have been col-lected, analyzed, and compared to clearancestandards. If postabatement soil levels are be-low applicable limits, the preabatement samplesneed not be analyzed (see Chapter 15).
B. Prohibited AbatementMethods
Some techniques are prohibited because theyare known to produce extremely high levels oflead exposure and result in dwellings that aredifficult if not impossible to clean up.
The techniques shown in Table 12.1 are pro-hibited in the residential setting under HUDregulations (HUD, reserved) and severalState regulations (Massachusetts, Maryland,Minnesota, and Rhode Island).
C. Periodic Monitoring andReevaluation
Compared to interim controls, one of the chiefadvantages of abatement is that owner monitor-ing and professional independent reevaluationare either unnecessary (in the case of completelead-based paint removal) or required only in-frequently (in the case of enclosure), sinceabatement measures are much less likely to fail(see Chapter 6). This minimizes the expense,cost, and time associated with reevaluation.
Abatements can be undertaken after inspec-tions or risk assessments determine the presenceof lead-based paint or other lead hazards (see
Chapters 3 and 5 for a description of the dif-ferences between risk assessments and inspec-tions). If this initial identification phase is notcompleted before abatement, then all paintedsurfaces must be assumed to contain lead-basedpaint above the regulatory limit. This may becost-effective if it is likely that all surfaces thatmight be treated contain lead-based paint orif the housing unit is to be rehabilitated andall surfaces and components either coveredor replaced.
The cost of carefully conducted inspections orrisk assessments, however, is usually recoveredby a more focused abatement effort, especiallywhen component replacement or enclosure isconsidered. The cost savings of a more targetedabatement effort based on complete testing arenoteworthy in the case of abatement as opposedto interim controls, since the costs of abatementare initially much higher than interim controls.
1. RecordkeepingRecordkeeping is essential for all abatementmethods, including removal. The locationof enclosed or encapsulated lead-based paintshould be made known to future residents, whomay undertake remodeling or repair efforts thatcould reexpose the hazard. Depending on thejurisdiction, the location of enclosed or encap-sulated lead-based paint may need to be filedwith the appropriate municipal agency for fu-ture reference when issuing construction per-mits for renovation. The absence of lead-based
Table 12.1 Prohibited Lead-Based Paint Abatement Methods
1. Open flame burning or torching (includes propane-fueled heat grids).
2. Machine sanding or grinding without HEPA local vacuum exhaust tool.
3. Uncontained hydroblasting or high-pressure wash.
4. Abrasive blasting or sandblasting without HEPA local vacuum exhaust tool.
5. Heat guns operating above 1,100 °F.
Methods that may be prohibited in some jurisdictions and that are not recommended by HUD:
1. Methylene chloride paint removal products.
2. Dry scraping (except for limited surface areas).

12–10
Chapter 12: Abatement
paint should also be made known to futureoccupants, in order to avoid unnecessarytesting expenses.
D. Types of Abatement
This chapter covers four types of abatement:
✦ Building component replacement.
✦ Enclosure systems (this section does notinclude encapsulation, which is addressedin Chapter␣13).
✦ Onsite and offsite paint removal.
✦ Soil removal or covering.
The available information on paint abatementmethods is summarized in Table 12.2.
Experimental and innovative abatement tech-niques are currently being developed. Thereader should not conclude that a particularmethod is not permitted simply because it isnot discussed here. With the exception of theprohibited techniques listed above, new tech-niques should be developed, studied, and re-ported to HUD, the Centers for Disease Con-trol and Prevention (CDC), EPA, and otherGovernment agencies for distribution to thepublic.
E. Encapsulation
Encapsulants are coatings or rigid materials thatrely on adhesion to a lead-based painted surfaceand are not mechanically fastened to the sub-strate. Because the performance standards man-dated by Title␣X have not yet been developed,encapsulants are considered separately in Chap-ter␣13. “Enclosures” (not to be confused withencapsulants) are defined as durable, rigid con-struction materials that are mechanically fas-tened to the substrate with screws, nails, orother mechanical fastening system that can beexpected to last at least 20 years under normalconditions. These Guidelines do not considerencapsulation to be the same as enclosure. De-pending on the particular circumstances andproduct, encapsulation can be either a formof paint stabilization (an interim control) orabatement (see Chapter 13).
F. Relationship to Renovation,Repainting, Remodeling,Rehabilitation, Weatherization,and Other Construction Work
Many forms of abatement involve the samephysical work as other types of construction of-ten performed in housing. In many cases, onlythe intent of the work differs. Lead-based paintabatement is intended to produce conditionsthat prevent lead poisoning. Other constructionwork is intended to, among other things, im-prove aesthetic living conditions, bring thedwelling up to code, preserve historical evi-dence, and promote energy efficiency. For ex-ample, window replacement could be consid-ered to be a lead abatement method, renovationwork, or weatherization work all at the sametime.
While the intentions of each of these activitiesmay differ, experience shows that many of themcan be combined in order to yield savings. Inthe public housing program, for example, mostof the abatement now underway occurs in thecontext of housing modernization or rehabilita-tion work. This approach has proven to befeasible and cost-effective.
Congress recognized the wisdom of combininglead abatement with rehabilitation work. InSection 1012 of Title X, any residential con-struction job receiving more than $25,000per dwelling unit in Federal funds is requiredto have lead-based paint hazards abated. If$5,000 to $25,000 per dwelling unit in Federalfunding is received, either abatement or interimcontrols must be implemented.
Finally, lead abatement procedures cannot guar-antee that children will not be exposed to leadin the future. Enclosure systems could fail, ex-posing the hazard again. Soil coverings couldalso fail, resulting in excessive exposures. Sur-faces that were made cleanable may deteriorateor may not be kept clean, allowing leaded dustlevels to reaccumulate to hazardous levels. Nev-ertheless, abatement constitutes the most ex-tensive and protective intervention presentlyavailable. If practiced properly, abatement willgreatly reduce the risk of lead poisoning.

12
–11
Ch
apter 1
2: A
batem
ent
Table 12.2 Comparison of Lead-Based Paint Abatement Methods
Method
Removal Enclosure
Attributes HEPA Heat Gun HEPA HEPA Remove/ Caustic Offsite Plywood Gypsum Prefab Wood,Needle Vacuum Sand Replace Paste Stripping Paneling Metal Metal, Vinyl,
Gun Blast Siding
Skill Level High Moderate High Moderate High Moderate Moderate Moderate Moderate High Moderate
Esthetics Erodes Gouges Erodes Gouges/ Good Gouges Good Good Good Good Goodsurface surfaces roughens
Applicability Very low, Wide, can Very low, Low, limited Wide, de- Wide, can Low, limited Wide, walls Wide, walls Varied, Wide, wallslimited to damage limited to by surface pendent on damage to compo- and ceilings limited bymetal and some com- metal and contour skill level some com- nents compo-masonry ponents masonry ponents nents
Lead Removed Largely Largely Largely Removed Largely Largely Remains Remains Remains RemainsPresence removed removed removed removed removed
Hazardous Moderate Moderate Moderate Moderate Potentially High High, but Low Low Low LowWaste high, maintainedGeneration pending offsite
TCLP test
Weather Moderate High Moderate Moderate Minimal High None Minimal Minimal Minimal MinimalLimitations
Applicable Some Yes Some Some Yes Yes Yes No No Yes Noto FrictionSurface
Speed of Moderate Slow Slow Slow Moderate Very slow Can be Moderate Moderate Moderate ModerateMethodology slow,
requirescoordination
Training High Moderate High Moderate High Moderate Moderate High High High HighRequired
This table is continued on next page.

12–12
Chapter 12: Abatement
Table
12
.2 C
om
par
ison
of
Lead
-Bas
ed P
ain
t A
bat
emen
t M
eth
od
s (c
on
tin
ued
)
Met
ho
d
Rem
ova
lE
ncl
osu
re
Att
r ib
ute
sH
EPA
Hea
t G
unH
EP
AH
EP
AR
emo
ve/
Cau
stic
Off
site
Ply
wo
od
Gyp
sum
Pre
fab
Wo
od
,N
eed
leV
acu
um
San
dR
epla
ceP
aste
Str
ipp
ing
Pan
elin
gM
etal
Met
al,
Vin
yl,
Gu
nB
last
Sid
ing
Cap
ital
Hig
hLo
wH
igh
Mod
erat
eM
oder
ate
Low
Low
Low
Low
Hig
hM
oder
ate
Req
uir
ed
Wo
rker
Hig
hH
igh
Hig
hH
igh
Mod
erat
eH
igh
Mod
erat
eLo
wM
oder
ate
Low
Low
Pro
tect
ion
Req
uir
ed
Fin
ish
Wor
kTe
ntat
ivel
yM
oder
ate
Tent
ativ
ely
Mod
erat
eLo
wM
oder
ate
Mod
erat
eW
ide
Wid
eLi
mite
dW
ide
Req
uir
edhi
ghhi
gh
Pro
du
ctLi
mite
dM
oder
ate
Lim
ited
Lim
ited
Wid
eM
oder
ate
Lim
ited,
Mod
erat
eM
oder
ate
Long
Long
Ava
ilab
ility
strip
sho
psde
crea
sing
Du
rab
ility
Long
Long
Long
Long
Long
Long
Long
Mod
erat
eM
oder
ate
Mod
erat
eM
oder
ate
Lab
or
Hig
hH
igh
Hig
hH
igh
Hig
hH
igh
Mod
erat
eH
igh
Hig
hH
igh
Hig
hIn
ten
sity
Ove
rall
Mod
erat
eM
oder
ate
Mod
erat
eM
oder
ate
Ver
y hi
ghM
oder
ate
Hig
h-hi
ghH
igh
Hig
hH
igh
Hig
hS
afet
y
Su
rfac
eN
one
Non
eN
one
Non
eN
one
Min
imal
—M
inim
al—
Min
imal
Min
imal
Min
imal
Min
imal
Pre
par
atio
nad
jace
ntha
rdw
are
area
sre
mov
al
Co
stH
igh
Hig
hH
igh
Hig
hH
igh
Hig
hH
igh
Mod
erat
eM
oder
ate
Hig
hM
oder
ate
Sou
rce:
Ada
pted
from
Dew
berr
y an
d D
avis
, HU
D L
ead-
Bas
ed P
aint
Fed
eral
Hou
sing
Adm
inis
trat
ion
(FH
A) A
bate
men
t Dem
onst
ratio
n P
roje
ct.

12–13
Chapter 12: Abatement
Building Component Replacement:How To Do It
1. Prepare the work area by selecting a Worksite Preparation Level (see Chapter 8). Plan how the new com-ponent will be installed. Whenever possible use new energy-efficient window, door, and insulating systems.
2. Prepare the hazardous building component for removal. Turn off and disconnect any electrical circuitsinside or near the building component to be removed.
3. Lightly mist the component to be removed (unless electrical circuits are nearby).
4. Score all painted seams with a sharp knife.
5. Remove any screws, nails, or fasteners.
6. Use a flat pry instrument (crowbar) and hammer to pry the component from the substrate.
7. Remove or bend back all nails.
8. Wrap and seal bulk components in plastic and take them to a covered truck or secured waste storage areaalong pathways covered with plastic. Shovel any debris. See Chapter 10 for proper disposal methods.
9. HEPA vacuum any dust or chips in the area where the component was located.
10. Replace component (optional).
11. Conduct cleaning (see Chapter 14).
12. Conduct clearance and reclean if necessary.
Step-by-Step Summary

12–14
Chapter 12: Abatement

12–15
Chapter 12: Abatement
Section II
II. Building ComponentReplacement
Building component replacement is defined asthe removal of doors, windows, trim, and otherbuilding items that contain lead-based painthazards and their replacement with new lead-free components. Component replacement isthe most desirable abatement method becauseit offers a permanent solution to the lead-basedpaint problem. If done properly, it also mini-mizes contamination of the property and expo-sure of the workers. In addition, building com-ponent replacement can be integrated intogeneral building rehabilitation activities. Com-ponents, such as doors and windows, should bereplaced with more energy-efficient models,which will help to reduce energy consumptionand increase cost efficiency.
Component replacement may be more expen-sive, however, especially for historic preserva-tion projects, since new building componentsthat match the originals may have to be custommade. For some historic preservation projects,replacement may not be permitted (seeChapter 18).
The skills required to perform building compo-nent replacement properly are similar to thoseof the skilled carpenter. For example, it is im-portant to know how the various building com-ponents were joined so that they can be takenapart with minimal contamination and damageto adjoining surfaces.
For certain types of components, the owner maychoose to simply remove them without replace-ment. This is acceptable as long as applicablecodes are observed.
A. Worksite Preparation
The appropriate worksite preparation levelshould be selected based on the size of thebuilding component, its state of deterioration,and the ease of removal. The more deteriorated
the component and the larger the surfacearea to be disturbed, the higher the worksitepreparation level should be. Certified riskassessors or certified abatement supervisorsor trained planners and designers can deter-mine the appropriate level for a project (seeChapter 8).
1. SecuritySecurity of the premises is an important issue.If windows and doors are removed but not re-placed on the same day, it may be necessary toinstall temporary barriers over window and dooropenings to prevent vandalism and theft over-night. Therefore, every effort should be madeto remove and replace doors and windows onthe same day.
2. Waste StorageWhile architectural components may or maynot be regulated as hazardous waste (see Chap-ter 10), they still must be properly managed. Allbuilding components coated with lead-basedpaint should be stored in a secure, locked area.They should not be sold or released to anyonewho might reinstall them in another dwelling.
B. General Proceduresfor Building ComponentReplacement
✦ Using a garden sprayer or atomizer, lightlymist the component to be removed withwater to help keep the dust down duringthe removal process. Before applying thewater, be sure there are no electrical circuitsinside the component. (If electrical circuitsare present inside the component, theymust be turned off and disconnected beforeremoval. No water mist should be appliedeven if electrical circuits are turned off orde-energized.
✦ Using a utility knife or other sharp instru-ment, carefully score all affected paintedseams. This will provide space for a pry in-strument and will minimize paint chippingand dust generation during removal.

12–16
Chapter 12: Abatement
✦ Remove any screws or other fasteners.Using a flat pry instrument and a hammer,carefully pry the affected building compo-nent away from the surface to which it isattached. The pry bar should be insertedinto the seam at the nail (or other fasteningdevice) at one end of the component andpressure applied. This process should berepeated at other fastening locations untilthe end of the component is reached. Byprying in this manner, the component willbe removed intact and chip and dust gen-eration will be minimized. A pry point pador softener may be required to minimizedamage to adjoining substrates. Wider re-placement trim can sometimes be used tocover adjacent area damage.
✦ Since there is often a considerable amountof leaded dust underneath or behind thecomponent being removed, begin cleanupimmediately after the individual componenthas been removed.
✦ Carefully remove or bend back all nails(or other fastening devices) and wrap thecomponent in 6-mil plastic sheeting andseal with duct tape. Wrapping componentsin plastic may not be necessary if the dwell-ing is vacant and if the truck and the path-way to the truck are lined with plastic. Usea high-efficiency particulate air (HEPA)vacuum to remove any dust that may haveaccumulated behind the components assoon as they have been removed. Vacuum-ing may be performed by another personwhile the removal is underway. Preparingthe area for the new component (e.g., squar-ing, reducing, or enlarging openings) mayalso release accumulated dust that should beremoved. Dispose of wrapped componentsproperly.
✦ Bring new lead-free components into thework area only after all dust-generating ac-tivity is complete and the dust cleaned upby at least one HEPA vacuuming.
Figure 12.1 Use a Pry Point Pad To MinimizeDamage to Adjoining Surfaces DuringComponent Removal.
Figure 12.2 Bend Back All Nails on RemovedComponents.

12–17
Chapter 12: Abatement
C. Removal and ReplacementProcedures for SpecificComponents
1. Baseboards, Casings, andOther TrimThe term “other trim” applies to such compo-nents as window casings, interior sills (stools),aprons, door casings, baseboards (including capsand shoe moldings), chair rails, exterior fascia,soffits, shutters, and crown moldings. Compo-nents with lead-based paint should be removedas described in the previous section.
New lead-free components should be installedin a professional manner using standard carpen-try practices. In situations where trim is beingapplied to lead-based painted walls, ceilings andfloors that were enclosed, or casings for win-dows or doors where the jambs have been en-closed, the trim should be back-caulked beforeinstallation as an added precaution. “Back-caulking” refers to the application of caulk tothe perimeter of the backside of rigid buildingmaterials to seal them before installation, pre-venting leaded dust from entering the livingspace through cracks and crevices. A high-quality caulk warranted for at least 20 yearsshould be used.
2. WindowsThe term “window” applies to the sash, the stopand parting beads, and the window jambs. Af-fected components should be removed as de-scribed in Section B. Window replacement caninvolve the removal of a wooden or metal unitand the installation of a wood, vinyl, or metalunit in its place. If the jamb is not removed, itcan often be enclosed by the new window framesystem, which should be caulked and fastened.The remaining exterior portion of the jamb, ifany, can be wrapped with coil stock (aluminumor vinyl or equivalent) after back-caulking. Insituations where window units must be replacedin kind (e.g., historic preservation), the jambsshould be removed and replaced also to makesure that no friction surfaces coated with lead-based paint remain. Generally, friction surfacesshould not be painted.
Figure 12.3a Remove and Replace Trim(interior).
Figure 12.3b Remove and Replace Trim(exterior).

12–18
Chapter 12: Abatement
Depending on the building construction, it maybe possible to remove the entire window system.The new lead-free components should be in-stalled in a professional manner using standardcarpentry practices.
3. Interior and Exterior DoorsInterior and exterior doors include the door-stops and doorjambs. Affected componentsshould be removed as described above. Typicaldoor replacement usually involves the removalof a wooden unit and the installation of aprehung wooden unit in its place. In thistype of door replacement, the jamb is rarelyremoved, but is usually saved and enclosedwith the new doorjamb after back-caulking.Wooden jamb extensions or coil stock, properlyback-caulked, can be used to enclose any re-maining portion of the jamb. In situationswhere prehung door units are not permissible(e.g., code requirements, historic preservationregulations), the original jamb should also beremoved and replaced, if possible, to make surethat no friction surfaces coated with lead-basedpaint remain. If the jamb cannot be replaced,the stop should be removed and replaced withnew material after carefully stripping the oldjamb.
Primers on Metal Doors
An exception is provided for certain metaldoors and frames. If it can be determined clearlythat hazardous levels of lead on metal doors andframes reside only in the primers, and that theprimers were factory-applied and are in soundcondition, then the primers themselves neednot be abated or removed. However, finishcoats of paint that cumulatively contain leadof 1 milligram per square centimeter or greaterwill have to be treated as lead hazards. (Thealternative standard of equal to or greater than0.5 percent by weight may be used.) If labora-tory analyses of samples of the field-applied fin-ishes are negative, the metal doors and framesdo not require abatement but should be moni-tored to ensure that the lead-bearing primerdoes not become defective. If the base metal isexposed while sampling the field-applied finishpaint then the existence of a permanent bondFigure 12.5 Window Replacement.
Figure 12.4 Window Frame EnclosureSystem.

12–19
Chapter 12: Abatement
cannot be assumed and the entire sampleshould be analyzed for presence of lead. Anydamage to the primer resulting from samplecollection should be repaired immediately ina manner that restores the integrity of theprimer coat.
For the metal doors and frames under thisexception, primers should be intact and doorsshould be operating properly, free from impactor abrasion between moving parts that willdamage any surfaces. If this exception forfactory-applied primers is used, risk assessorsshould advise property owners or building man-agers of the importance of continued monitor-ing of the paint surfaces to ensure that subse-quent surface deterioration or other factorsdo not result in exposing defective lead-basedpaint surfaces (the primers). Under this excep-tion, property owners or building managersmust commit to a plan for ongoing monitoringof the condition of the painted surfaces. Thesubsequent appearance of rust indicates a fail-ure of the paint and primer, and the compo-nent must be abated.
Although unlikely, adhesion of the primercould be a problem. A simple “x” cut or cross-hatch test will show if this is a problem. If adhe-sion is poor, the paint will tend to flake awayfrom a cut. An adhesion test should also give anindication of the number of coats, color of fin-ish versus primer (which would be orange if itwas pigmented with red lead or yellow if it waspigmented with lead chromate), and thicknessof layers. Or course, other colors of lead-basedpaint may also be present. Any damage result-ing from an adhesion test should be repairedimmediately in a manner that restores the in-tegrity of the primer and finish coats to preventsubsequent deterioration.
When it can be determined that lead-basedpaint is present in a field-applied coating overan intact factory-applied primer, and paint re-moval is the abatement method of choice, onlythe finish field-applied coatings need to be re-moved. An intact primer need not be removed.
4. Kitchen and Bathroom CabinetsOld lead-based painted kitchen and bathroomcabinets can be removed and replaced. Affectedcabinets should be removed as described above.Lead-based paint on walls to which cabinets areattached should not be disturbed during cabinetremoval. Applying masking tape around thecabinet perimeter and HEPA vacuuming imme-diately after removal will help to control leadeddust.
5. RailingsRailings include the railing caps, banisters, postsand spindles (balusters), and newel posts can beremoved and replaced. Railings may or may notbe part of a stair system. Affected componentsshould be removed as described in Section B.New lead-free components should be installedin a professional manner using standard carpen-try practices.
Metal railings and other grillwork can be re-moved and taken offsite for contained abrasiveblasting or other forms of paint removal, thenreinstalled after repainting.
6. Exterior SidingExterior siding includes any materials used ona dwelling’s exterior walls. Siding of concernis generally painted wood or brick. Undermost conditions, siding will have to be abatedthrough enclosure. However, in restoration
Figure 12.6 Exterior Siding Removal and Replacement.

12–20
Chapter 12: Abatement
be placed over the plastic to protect it fromdamage during aggressive demolition, and tomake cleanup of debris easier. Prior to demoli-tion, affected areas should be sprayed lightlywith water. Workers should wear ribbed rubberboots when walking on slippery, wet plastic.If ladders must be used, the plastic should bepunctured to provide secure anchoring of thefootings to the surface underneath. Ladder foot-ings should not be placed on top of the plastic,since this will create a slip hazard. Excessivewater should not be applied, and the creationof puddles and streams that may flow throughbreaks or gaps in the containment should beprevented.
Plaster walls coated with old lead-based paintshould generally not be removed, since a greatdeal of dust will be generated. Enclosure isusually a better option.
D. Transportation and Storageof Waste
Building component replacement and demoli-tion generate a considerable amount of wastematerial. Lead-contaminated building compo-nents and demolition debris should be handledcarefully, even if they are not regulated as haz-ardous wastes (see Chapter 10). Bulk debrissuch as doors, windows, and trim should bewrapped in 6-mil plastic and sealed with tape.Smaller debris should be swept into 6-milplastic bags after spraying.
All debris should be removed from the site assoon as possible. In larger jobs where a dumpsteris being used, it may be possible to eliminate thewrapping and bagging of bulk debris as long asthe dumpster has a lockable lid and is linedwith plastic and secured with a fence and signs.Pathways to the dumpster should be lined withplastic so as not to contaminate the area.
Contaminated building components and demo-lition debris should be transported in coveredvehicles to an appropriate disposal facility. Oldbuilding components coated with lead-basedpaint must not be recycled. See Chapter 10 fora full discussion of hazardous and nonhazardouswaste disposal.
Figure 12.7a Line Walking Surfaces With Plastic.
Figure 12.7b Line Pathways With Plastic.
or historically significant projects, it may bereplaced. In such situations, the affected sidingshould be removed as described above. Caremust be taken to avoid contamination of soil,walkways, window air conditioners, and thebuilding interior.
7. Interior WallsIf abatement is performed along with gut reha-bilitation, old lead-based painted interior wallsand ceilings may be removed and replaced. Thisactivity, unlike those previously described, ismore like demolition work. In addition to thelayers of 6-mil plastic used to protect the floorsfrom contamination, sheets of plywood should

12–21
Chapter 12: Abatement
Enclosure: How To Do It1. Stamp, label, or stencil all lead-based painted surfaces that will be enclosed with a warning approximately
every 2 feet both horizontally and vertically on all components. The warning should read: “Danger:Lead-Based Paint.” Deteriorated paint should not be removed from the surface to be enclosed.
2. Select a Worksite Preparation Level (see Chapter 8).
3. Attach a durable drawing to the utility room or closet showing where lead-based paint has been enclosedin the dwelling.
4. Plan for annual monitoring of the enclosure by the owner. An independent inspector technician orrisk assessor should evaluate the integrity of the enclosure according to the reevaluation schedule inChapter 6 and after any significant damage due to plumbing or roof leaks, tornadoes, hurricanes, floods,earthquakes, etc.
5. Repair unsound substrates and structural members that will support the enclosure, if necessary.
6. Select appropriate enclosure material (drywall or fiberboard, wood paneling, laminated products, ridgedtile and brick veneers, vinyl, aluminum, or plywood).
7. Install extension rings for all electrical switches and outlets that will penetrate the enclosure.
8. If enclosing floors, remove all dirt with a HEPA vacuum to avoid small lumps in the new flooring.
9. Seal and back-caulk all seams and joints. Back-caulk means applying caulk to the underside of theenclosure.
10. When installing enclosures directly to a painted surface, use adhesive and then anchor with mechanicalfasteners (nails or screws).
11. Conduct cleanup.
12. Have a certified risk assessor or inspector technician conduct clearance testing and provide documentationand a Statement of Lead-Based Paint Compliance.
Step-by-Step Summary

12–22
Chapter 12: Abatement
12–23
Chapter 12: Abatement
Section III
I. Enclosure Methods
A. Definition
“Enclosure” is the installation of a rigid, durablebarrier that is mechanically attached to buildingcomponents, with all edges and seams sealedwith caulk or other sealant. Surfaces with lead-based paint are enclosed in order to prevent ac-cess and exposure and to provide a “dust-tight”system. Unlike encapsulation, the enclosuresystem is not dependent on the painted surfaceof the substrate for its durability. Enclosuresshould have a design life of at least 20 years.While adhesives are frequently used for initialmounting purposes and for assistance in cover-ing the lead-based painted surface with theenclosure material, it is primarily mechanicalfasteners that give enclosures their longevity.
Standard construction materials are employedto create a solid and relatively rigid end product(see Appendix 7.2 for a description of materialscommonly employed for lead-based paint enclo-sure). The primary differences between enclo-sure for lead-based paint and ordinary construc-tion includes careful sealing of all edges, joints,and seams to create a dust-tight (not necessarilyairtight) enclosure; site containment; workersafety (particularly during any needed surface orsubstrate repairs); and special cleanup. There isgenerally little or no hazardous waste disposaland little degradation of the lead-based paint aspart of the enclosure process, unless substraterepairs are necessary. The hazard and expenseof removing deteriorated paint can be avoidedwhen the enclosure material is mounted flush toa structurally sound lead-based painted substrateand all the seams are sealed. This method pro-duces little leaded dust (HUD, 1991). Theseadvantages hold down labor costs compared topaint removal and building component replace-ment, although cleanup and clearance are stillrequired. A lower level of containment can of-ten be used since less dust is generated.
For broad surfaces such as walls, ceilings, floors,and siding, enclosure is often considerably
cheaper and less hazardous than building com-ponent replacement and paint removal. How-ever, enclosure does not remove lead fromthe property; instead, it makes the dwellinglead-safe.
B. Longevity of Enclosures
There is little doubt that hurricanes, earth-quakes, tornadoes, and flooding can substan-tially compromise an enclosure’s viability. Lessdramatic but more common events can also in-crease the risk of lead exposure, such as damageto the enclosure by the occupant or water dam-age from a leaking roof, overflowing tubs, orbroken pipes. Any type of enclosure is poten-tially vulnerable to water damage. Future occu-pants can also be threatened by remodelingendeavors that break through the enclosure.
1. Labeling of Enclosed SurfacesTo prevent the breach of an enclosure, a fewsimple safety rules are relevant. The surface tobe enclosed should be labeled (behind the en-closure), horizontally and vertically, approxi-mately every 2 feet with a warning, “Danger:Lead-Based Paint.” The stamp lettering shouldbe done in permanent ink.
A durable drawing of the property floor planshould be mounted on a sturdy metal or woodbase and affixed with screws to a wall in theutility room next to the electrical panel or atany other closet location that can be easily seenby maintenance personnel. The drawing shouldbe covered with plastic for protection. Enclo-sures should be highlighted on the diagram andidentified as hazardous (see Figure 12.9 for anexample of such a diagram).
2. Monitoring Enclosure IntegrityA visual evaluation of the enclosed surfacesshould be conducted by owners or their repre-sentative at least every year or whenever wateror other damage is reported. Residents shouldalso examine the enclosure periodically. Enclo-sure integrity should be evaluated professionallyby a certified risk assessor according to theschedule in Chapter 6. A signed and datedreport of the risk assessor’s observations, which

12–24
Chapter 12: Abatement
also indicates the enclosed surface locations,should be retained by the owner, with copiesavailable to the residents.
It is a simple matter to repair an enclosureusing conventional construction techniques.The repair history of the enclosure should bemaintained in the owner’s records.
Depending on the jurisdiction, the originallead-based paint risk assessment or inspectionreport, the clearance report, and a copy of theenclosure drawing may be retained by the mu-nicipality as part of its standard records for thatproperty. The reports also may be subject todisclosure requirements during the sale of thedwelling. If a permit is obtained to do renova-tion work, if demolition of the dwelling isundertaken, or if the title and deed are trans-ferred, the history of the lead-contaminatedsurfaces hidden behind enclosures will cautionfuture workers and property buyers. Leasesshould also disclose the location of enclosedlead-contaminated surfaces.
3. Unsound SubstratesAny substrate material can be enclosed, includ-ing plaster, concrete block, brick, and concrete.All soft, moveable, or otherwise structurally un-sound structural members should be repairedprior to enclosure if they are needed to supportthe enclosure. If repair is not feasible, then thedefective area will need to be removed and en-closure will not be possible. Hazards associatedwith preparing the site for enclosure increaseas more remedial work is needed. Structural re-pairs may require lead-based paint removal orcomponent replacement, with all the accompa-nying safety protocols these practices entail. Ifthe substrate is sound but the paint deteriorat-ing, stabilization or removal of deterioratedpaint before the enclosure is installed should notbe done due to dust generation.
Figure 12.8b Caulk the Seams of a WindowFrame Enclosure System.
Figure 12.8a Label Surfaces With a StampBefore Enclosure.

12–25
Chapter 12: Abatement
Figure 12.9 Example of a Diagram Showing the Location of Lead-Based Paint Enclosures.
Bedroom Baby's Room/Nursery
Stairway
BathBedroom
C C C
Hall
C
C = CLOSET
Denotes Lead-Based Paint Enclosures Inthe Bathroom and Baby's Nursery
= WINDOWS
12–26
Chapter 12: Abatement
C. Interior Surface EnclosureMaterials
1. Wood PanelingWood paneling is an appropriate enclosurematerial, except for ceilings. It is of limiteduse, however, because it is difficult to sealseams around electrical outlets; switch boxes;and heating, ventilation, and air conditioning(HVAC) registers. There should be no gaps inthe seams, outlets, boxes, and registers, whichshould all be screwed directly to the panelingand to any framing behind the panels. Allseams should be caulked. Paneling made ofcomposite board backing materials is vulnerableto dampness, particularly in below-grade situa-tions such as basements. In some instances, theuse of these materials may violate building and/or fire codes. On the other hand, plywood pan-eling may be stronger, more impact-resistant,and more water-resistant than other enclosurematerials, such as drywall.
Paneling can be glued and mechanically fas-tened directly to the substrate, but the appear-ance is improved when the area to be coveredis first furred or framed out and the paneling isanchored to these braces. The paneling shouldnot extend past the depth of door or windowframes or other trim pieces. Baseboards can beremoved and the new cove base then glued di-rectly to the paneling. Even heavy grades ofpaneling flex and vibrate when receiving mildimpact. Over time this could compromise theseal of the seams that join the paneling withother building components. Joints and edgesmust be fully supported; furring strips shouldbe installed at the appropriate distance fromeach other, usually 12 inches apart. All seamsat these transition points should be caulkedbefore panel trim and corner moldings areinstalled as finish pieces.
2. Laminated ProductsLaminated wall sheeting products, such asMarlite™, are designed to withstand surfacemoisture and are commonly used in bathroomsand kitchens. Their surfaces have a high sheenand clean easily. However, they may become
defective when moisture gets behind theboard’s placement. This can occur from aleaking pipe or a seam opening in the bathtub/shower area. When a significant leak is de-tected, the enclosure must be reexamined.
3. Ridged Tile and Brick VeneersPlastic and ceramic tile, synthetic brick andstone veneers, and other similar products areeither glued or cemented directly to the paintedsurface. These products qualify as rigid encap-sulants rather than enclosures, since they arenot mechanically fastened to the substrate.Regardless of whether they are enclosures orencapsulants, they tend to be inappropriatefor broad application, since the cost associatedwith labor and materials is often prohibitivefor anything more than incidental use.
4. Drywall and FiberboardThe steps to install drywall and fiberboard areshown in Table 12.3 and detailed specificationsare provided by the Gypsum Association(202)␣289–5440 on the two topics listedbelow:
✦ Recommendations for covering existingwalls and ceilings with gypsum board(GA–650–86).
✦ Using gypsum board for walls and ceilings(GA–201–90).
Gypsum drywall or fiberboard is a very commonand cost-effective interior finish. It is not diffi-cult to locate skilled workers to install thisproduct. Training materials are available fromtrade groups (Gypsum Association, 1993a,1993b). When applied directly to a surface,the drywall is generally glued in place withconstruction adhesives and then mechanicallyfastened to the studs or structure behind theplaster. The screws must be long enough to gothrough the drywall, the plaster, and the wiremesh or lath and extend an inch into the studor structure. To avoid having dust escape fromthe screwhole as the drilled screw displaces plas-ter, a dab of shaving cream can be applied tothe area to be drilled.

12–27
Chapter 12: Abatement
Moisture-resistant greenboard should be in-stalled in damp areas. It is difficult to com-pletely control the long-term damaging effectsof a severe moisture problem without invasivewaterproofing and/or water diversion from theexterior of the property. Any type of enclosureis potentially vulnerable to water damage.
Quarter-inch-thick drywall tends to conform tothe contours and imperfections of the originalsubstrate or wall, compromising the appearanceof the finished product. To avoid this, use of3/8-inch-thick (minimum) drywall is recom-mended. The enclosed wall may in fact lookmuch improved over the original wall. If theoriginal wall surface is highly irregular, it maybe necessary to install furring strips 12 inchesapart and use 1/2-inch-thick drywall to improvethe appearance. If 1/4-inch-thick drywall isused, it must be applied in accordance withthe manufacturer’s specifications (GypsumAssociation, 1993a and 1993b).
D. Interior Building Compo-nents Suitable for Enclosures
All joints between drywall pieces should betaped and spackled with joint compound.
Wherever the drywall meets wood framing orany other finish material (including electricaldevices and HVAC registers), the seams shouldbe sealed with a caulk or other sealant that hasat least a 10-year warranty. Similarly, wheresealed pipes penetrate an enclosure, the open-ing around the pipe must be sealed. Drywall ispainted when installation is complete. Fasten-ing schedules are available from industry tradegroups (Gypsum Association, 1993a, 1993b).
1. Wood Trim and DrywallThe profile of the wood trim on windows anddoors must be evaluated before overlaying anadjacent wall with drywall; the wall finishshould protrude past the depth of the moldings.In homes built before 1960, this problem is lessfrequent because the trim tended to be moreornate and generally of thicker wood. Regard-less of age, the problem is more apt to occur inmultifamily public housing and institutionalsettings where the construction is basic andtrim is thin.
If the drywall overlay is too thick, it may bepossible to remove the baseboard and run thedrywall to the floor. The baseboard can then
Table 12.3 Steps To Install Drywall and Fiberboard on Interior Walls
✦ Check to make sure the depth of the trim will accommodate the thickness of the drywall (minimum of3/8 inch preferred). If it does not, this method may not be suitable.
✦ Set up the plastic containment of the work area (see Chapter 8).
✦ Remove any trim being disposed of, and install the drywall over any cavity left by the removed moldings,except large cavities over 16 inches in any direction. Repair any structural deficiencies.
✦ Repair or remove any “soft” wall areas. Removal of painted plaster generates a great deal of leaded dust.
✦ Use construction adhesive to glue the drywall directly to the surface being enclosed.
✦ Screw the drywall to the studs behind the existing wall.
a. Caulk all seams that meet molding.
✦ Use extension rings to bring out electrical devices flush with the new gypsum-based drywall and retrofitany HVAC registers.
a. Caulk all seams.
✦ Tape and finish the drywall.
✦ Prime and paint the finished area, as well as the unenclosed surfaces in the same room so that all wallsmatch the new installation. (See specifications and recommendations from the Gypsum Association.)

12–28
Chapter 12: Abatement
be reinstalled over the new drywall (unless thebaseboard itself presents a lead hazard, in whichcase it should be replaced). Obviously, caremust be taken to avoid breaking the originalbaseboard during its removal. The seam at thebottom of the drywall should be sealed withcaulk prior to the installation of the baseboardor cove base.
2. Electrical Outlets and VentsAll electrical devices, including switches andoutlets, will need extension rings in order tobring those fixtures out flush with the new dry-wall overlay. A sealant or caulk should be usedFigure 12.10a Use of Tyvek on Building
Exteriors Prior to Enclosure.
Figure 12.10b Install Underlayment and New Tile as a Suitable Lead-Based PaintEnclosure Method.

12–29
Chapter 12: Abatement
at cutouts for electrical boxes. Similarly, allgrillwork at openings for heat vents and coldair returns should be retrofitted. These areminor but necessary operations in the drywallenclosure process.
3. CeilingsCeilings are more difficult to enclose than walls.Drywall applied directly to the ceiling will fre-quently result in an uneven appearance becausethere may not be a smooth transition from oneboard edge to the next. The solution is to drawa chalk line, usually every 16 inches on center,so that metal hat channels (or metal furringchannels) or wood furring strips can be screwedinto each ceiling joist. Three- to four-inchscrews should be used to ensure that the screwpenetrates the hat channel, plaster (or othersubstrate), and the wire mesh holding the plas-ter enough to bite firmly into the joist. The hatchannel may be shimmed to get a perfectly levelfinished surface.
Next the drywall should be affixed to the hatchannel for an excellent finished product. Anextension ring will be needed for ceiling lightfixtures. Prior to lowering the ceiling slightly,the contractor should be confident that there isno interference with the top of ornate, oversizedwindow frames, pipes, vent covers, or crownmoldings. The overall height of the loweredceiling should conform with building codeclearances.
All screws for furring channels or strips mustpenetrate into the ceiling joists prior to installa-tion of the drywall. On occasion, some multi-family housing or commercial buildings con-verted to residential use may have cast-in-place,reinforced concrete ceilings. Anchoring sup-ports for the new ceiling may not be practicalin these instances. Though this constructionis generally very strong, a structural engineershould be consulted about attaching a drywallsystem to the concrete. Onsite architecturalor engineering advice is needed on a case-by-case basis to determine if this approach isappropriate.
Acoustical lay-in panels (drop-in ceilings) donot constitute lead-based paint enclosures, since
they will not adequately guard against the es-cape of leaded dust into the living space andcannot be sealed.
4. FloorsLead-based painted floors should be enclosedwith 1/2-inch or thicker plywood or otherunderlayment. The joints in underlaymentshould be flash patched. Shoe molding runningalong the baseboard should be removed beforeplywood installation and reinstalled when thefinished floor is completely in place. If the shoemolding contains lead-based paint, new shoemolding should be installed, since new moldingis inexpensive and more cost-effective than re-moving the paint from the old shoe molding.This will ensure that all floor covering runstight to the baseboard and the joints at verticalsurfaces are covered by the quarter-round mold-ing. The plywood should be covered with vinyltile or sheet goods to provide a cleanable sur-face. Covering the plywood with wall-to-wallcarpeting is generally not recommended be-cause the carpet does not provide a sealedtop cover and is harder to clean. Vinyl floorcoverings should be finished off with a metalthreshold at all doorways or at any access to anuncovered open floor to protect the exposededge.
When placing tile over old flooring, a row ofnails (preferably screws) should be run a fewinches apart in a straight line over each joistbefore putting down the plywood. Old floornails often lose much of their grip, which re-sults in squeaky floor boards. This movementcan in turn cause the edges of floor tile to liftin spite of the plywood underlayment that wasinstalled. It is most important to remember thatall the plywood sheets must be installed flushwith each other. Gaps must be filled with flashpatching cement. Also, a bead of caulk shouldbe run at the edge of every board before it is setin place. All nails must be hammered flush andall dirt HEPA vacuumed thoroughly; otherwisesmall lumps will eventually appear in the softvinyl finish goods.
If the floor to be enclosed is poured slab or cast-in-place concrete, the surface will have to bepredrilled to accept each screw that anchors the
12–30
Chapter 12: Abatement
plywood enclosure. A structural engineer shouldbe consulted for situations other than slab ongrade construction. Floor adhesive can offer anadded measure of reinforcement and sealant.Each screwhead should be just below the levelof the underlayment top surface and, along withthe seams, should be covered with a smoothcoat of flash patching cement to preventdimples in the vinyl top cover.
5. StairsDirt and loose paint should be removed priorto enclosure. Defective paint should be wetscraped and HEPA vacuumed, protective gearshould be worn by the workers, and the workarea should be contained with 6-mil plastic(or equivalent). In multifamily housing, com-mon stairways must be accessible to residentsand workers during the construction work toavoid a fire code violation.
Wooden steps with lead-based paint shouldbe completely covered with vinyl or rubbertreads and risers. These materials should havea minimum specification that would qualify forFederal Housing Administration (FHA) prod-uct approval or should be commercial grade.The vinyl should be stapled as well as gluedwith floor adhesive in order to avoid sagging.Long staples are preferred to reinforce thetread cover at this critical point and preventthe vinyl from being pulled up by the toe of ashoe. Metal bull nosing can also be used at thiswear point.
In addition, long staples or metal bull nosingshould be used at the end of the vinyl that buttsup tight to the wood riser of the next step.
Plywood can be used to cover step risers andsquared-off treads. Plywood is also useful as ad-ditional protection, supplementing the vinylcovers mentioned above. Precast concrete stepswill have to be drilled, screwed, and glued toanchor the covers in place.
6. PipesPainted pipes can be enclosed with the sametape used to make plaster casts, which providesa hard-finished end product. Loose paint anddirt should be safely removed first. The wrapped
tape should overlap itself so that it is notdependent on adhering to the painted surface.
Pipes can also be enclosed with drywall.However, this type of enclosure will insulateand limit the ability of radiator pipes carryingsteam or hot water to contribute to householdheating.
7. Door FramesPreformed metal door buck or frame coverscome in standard sizes to accommodate mostcomponents, and as such they can be usedto enclose both wood and metal door frames,either interior or exterior. All seams must becaulked. Primers on such bucks should be leadfree.
8. Plywood EnclosuresKnee walls, painted structural supports, andtrim such as baseboards, skirt boards, andstringers can be enclosed with plywood thatis cut to fit tightly. These items should besealed with adhesive and nailed. All jointsshould be caulked.
E. Exterior Enclosure Systems
1. SidingVinyl or aluminum siding may be used to en-close painted exterior surfaces. In addition,porch columns (both square and round) andporch ceilings can be enclosed with these mate-rials. Aluminum coil stock can be used on sof-fits, facia, barge board, decorative crown mold-ings (though original detailing will be lost),door and window frames, parapets, and othermoldings. All seams need to be caulked andback-caulked. Soffit coverings under roof areasoften need to be vented to prevent dry rot.However, as old paint degrades behind thiscovering, a small amount may migrate throughthe vents. Breathable cloth materials such asTyvek® or an equivalent are available in rollsfor this purpose and can be installed prior to thealuminum covering (see Figure 12.10a). Tyvek®will help prevent leaded dust from escapingthrough gaps in the new siding, although it willbe necessary to leave attic vents uncovered to

12–31
Chapter 12: Abatement
Figure 12.11 Seal All Seams for Enclosure.
FurringStrip
Wall
FurringStrip
EnclosureMaterial
Baseboard
ShoeMolding
J-Channel
Caulk Screw
Drywall
Create a dust-tight sealPaint deteriorates more quickly behindan enclosure. All edges of an enclo-sure—especially the bottom—mustbe sealed well.
Seal the bottom edge✦ Caulk the enclosure material at the
bottom.
✦ Back-caulk and nail the baseboardin place.
✦ Back-caulk, bottom-caulk, and nailthe shoe molding in place.
Seal the seams and other edges✦ Back-caulk all the seams that aren’t
taped and spackled. Use a highquality adhesive caulk.
✦ Use a “J-channel” where drywallmeets a finished surface. A J-channelis a final strip attached to the roughedge of drywall to make a finishededge. It’s called a “J-channel” becauseof its shape. Caulk the outside edgeso it seals with the finished surface.Screw the drywall in place.
permit adequate ventilation. Vent openingsshould not be covered with Tyvek® or othersimilar covering.
Since siding may not provide an airtight enclo-sure, rigid or flexible dust barriers like Tyvek®should be installed before broad surface enclo-sure. Perforated metal stock should not beused to enclose soffits, fascia, or eaves, sincethe enclosure is not dust tight.
Rotten or loose wood and any other defec-tive substrate must be repaired or replaced
to provide a sturdy foundation for the sidinginstallation and edges.
2. WindowsFor standard-sized windows, snap-in replaceablealuminum and vinyl tracks are available. Thesedevices help eliminate the painted frictionpoint (and thus the generation of leaded dust)where the moving sash abrades the painted sur-face. The track covers should be pressed into abead of caulk at each joint. Painted sashesshould be planed to remove lead-based paint

12–32
Chapter 12: Abatement
and then reinstalled (see Chapter 11,Section␣III). Friction surfaces on windowsshould not be painted.
Window troughs should be covered with fittedmetal and screwed into place. Again, the metalshould be pressed into a bead of caulk at thejoints and edges.
3. Exterior WallsBoard products made of various materials(e.g., synthetic fiberboard, wood byproductcomposites, and cementitious materials) arecommonly used in the construction industryfor exterior purposes. These heavy, sometimesbrittle coverings often have resins, fiberglass,or other durable ingredients that make themresistant to weathering and may require littlemaintenance, including painting. An addedbenefit of using these products is that theymay have thermal insulation value. The prod-ucts are best installed over flat surfaces thatare not soft, crumbling, unstable, or otherwisedefective. A defective substrate must be re-paired prior to enclosure. All joints need tobe sealed after installation.
Properly installed, natural or synthetic brickand stone veneers can be used to enclose exte-rior walls. In addition, stucco can be used as acovering material using wire mesh to physicallyanchor the cement to solid building compo-nents. A defective, weak surface needs to be
stabilized before covering. Vinyl and aluminumsiding are usually the least expensive options.
F. Summary
Enclosures are solid materials that are physicallyanchored to building components and thatcover lead-based paint. Enclosure usually in-volves common construction techniques andhas a 20-year design life. The enclosure abate-ment option is an effective, stable remedy forminimizing the danger of lead-based paint expo-sure. Because any barrier can be breached, an-nual monitoring by the owner and reevaluationby a certified risk assessor or inspector techni-cian, are necessary.
Enclosure may be less hazardous and cheaperthan paint and building component removal.There is less dust generated and little hazardouswaste disposal. Unlike encapsulation, the enclo-sure is not dependent on the adhesion of theunderlying coats of paint on the substrate sur-face for its durability, nor does it require deterio-rated paint removal or surface cleaning anddeglossing before installation.
Drywall is often a cost-effective interior finish,and aluminum or vinyl siding provides an ac-ceptable exterior barrier. Aluminum coil stockis effective for enclosing outside trim. Floorsrequire underlayment and vinyl or other sheetfinish goods. Vinyl or rubber tread and risercoverings are recommended for steps.

12–33
Chapter 12: Abatement
Paint Removal: How To Do It1. Do not use prohibited paint removal methods:
✦ Open flame burning or torching.
✦ Heat guns operating above 1,100 °F.
✦ Machine sanding or grinding without a HEPA vacuum exhaust tool.
✦ Uncontained hydroblasting or high-pressure wash.
✦ Abrasive blasting or sandblasting without a HEPA vacuum exhaust tool.
2. Avoid using the following methods:
✦ Methylene chloride chemical paint removers.
✦ Dry scraping (except for limited areas).
3. Select the appropriate Worksite Preparation Level (see Chapter 8).
4. For heat gun work, provide fire extinguishers in the work area and ensure that adequate electrical poweris available. Use for limited areas only. Train workers to avoid gouging or abrading the substrate.
5. For mechanical removal methods, use tools equipped with HEPA exhaust capability. Be sure workers keepthe shroud against the surface being treated. Vacuum blasting and needle guns should not be used on wood,plaster, drywall, or other soft substrates. Observe the manufacturer’s directions for the amount of vacuumairflow required.
6. For wet scraping, use a spray bottle or wet sponge attached to the scraper to keep the surface wet whilescraping. Apply enough water to moisten the surface completely, but not so much that large amounts runonto the floor or ground. Do not moisten areas near electrical circuits.
7. For chemical paint removers, determine if the building component can be removed and stripped offsite.Offsite stripping is generally preferred to onsite paint removal. Observe all manufacturer’s directions foruse of paint removers.
8. For offsite stripping, determine how to remove the component. Score the edges with a knife or razor blade tominimize damage to adjacent surfaces. Punch or tag the building component if similar building componentsare also being stripped offsite (e.g., doors). This will ensure that the individual component is reinstalled inthe same location. Inform the offsite paint remover that lead-based paint is present before shipping. Wrapthe component in plastic and send to the offsite stripping location. Clean all surfaces before reinstallationto remove any lead residues by HEPA vacuuming all surfaces, cleaning with other lead-specific cleaners, orphosphate detergents, and HEPA vacuuming again. Conduct cleanup and clearance.
Step-by-Step Summary

12–34
Chapter 12: Abatement
9. For onsite paint removal, first test the product on a small area to determine its effectiveness. Chemical paintremovers may not be effective or desirable on exterior, deteriorated wood surfaces, aluminum, and glass. Pro-vide neoprene, nitrile, rubber, or polyvinyl chloride (PVC) gloves (or other type of glove recommended bythe manufacturer); face shields; respirators with combination filter cartridges for leaded dust and organic va-pors (if appropriate); and chemically resistant clothing. Be sure to select the right type of organic vapor filtercartridge, gloves, and clothing for the specific chemical being used. Portable eyewash stations capable of pro-viding a 15-minute flow must be onsite. Apply the chemical and wait the required period of time. Maintainsecurity overnight to prevent passersby from coming into contact with the chemical. For caustic chemicalpaint removers, neutralize the surface before repainting using glacial acetic acid (not vinegar). Repaint andconduct cleanup and clearance.
10. Dispose of waste properly; most wastes from paint removal projects, such as paint chips and paint removersludges, will need to be managed as hazardous waste.
11. Conduct cleanup.
12. Have a certified risk assessor or inspector technician conduct a clearance examination and providedocumentation and a Statement of Lead-Based Paint Compliance.
Step-by-Step Summary (continued)

12–35
Chapter 12: Abatement
Section IV
I. Paint Removal Methods
A. Introduction
“Paint removal” means the separation of thepaint from the substrate using heat guns, chemi-cals, or certain contained abrasive measures,either onsite or offsite. As an abatement tech-nique, paint removal is usually reserved for lim-ited areas and for those surfaces where historicpreservation requirements may apply.
While paint removal can be performed safelyand effectively, it also demands the highestlevel of control and worker protection for sev-eral reasons. Paint removal usually creates thegreatest hazard for the worker, either from thehazards associated with the removal process(e.g., heat, chemicals, and sharp tools) or fromthe lead that becomes airborne or is left as aresidue on the surface after removal. Extensiveonsite paint removal should usually have anInterior Worksite Preparation Level 4 and anExterior Worksite Preparation Level 3. Lowerlevels are possible if the size of the area to betreated is small (see Chapter 8). Because of thelead residues left behind by all paint removalmethods, particularly on porous surfaces suchas wood or masonry, more extensive cleaningis usually required to meet clearance criteria.Paint removal methods also generate a signifi-cant amount of hazardous waste and may bethe most costly of all lead abatement methods(HUD, 1991).
In spite of these limitations, paint removal hasthe benefit of a low reevaluation failure rate.If some lead-based paint is left in the dwelling,its condition will need to be monitored by theowner and by a certified risk assessor based onthe Reevaluation Schedule for the specificproperty (see Chapter 6).
B. Prohibited Methods
Certain methods of lead-based paint removalare absolutely prohibited, either because ofunacceptably high worker exposures to lead
or release of lead into the environment throughproduction of dust or fumes or both.
1. Open Flame Burning or TorchingBurning, torching, fossil fuel-powered heatplates, welding, cutting torches, and heat gunsoperating at temperatures greater than 1,100 °Fare prohibited as a means of paint removal be-cause of the high temperatures generated in theprocess. So-called heat plates (those using pro-pane to heat a grid, which in turn heats thepaint) are also prohibited because of the hightemperatures generated. At these temperatures,lead fumes may be produced.
Lead fumes are formed when lead is heated intoa gas. The gas cools when it comes into contactwith the cooler surrounding air and condensesinto very small particles. These particles traveleasily, are readily inhaled and absorbed into thebody, and are difficult to clean up. Several re-searchers have found that worker exposures areextraordinarily high when doing this kind ofwork (NIOSH, 1992a; Jacobs, 1991b; Rekus,1988). The fumes may also travel throughoutthe dwelling, contaminating all surfaces withwhich they come into contact. Other hazardoussubstances may be released from the paint filmusing heat.
Using cutting torches to remove fire escapes,railings, or other metal components coated withlead-based paint is also prohibited unless thepaint is removed first. Similarly, welding ofpainted metal components (such as preprimedstructural steel) is prohibited by OccupationalSafety and Health Administration (OSHA)regulations (29 CFR 1926.354(d)).
2. Machine Sanding or GrindingWithout a HEPA Exhaust ToolMachine sanding or grinding is prohibited (re-gardless of the grit used) because of the largevolume of leaded dust generated. As a result ofthese methods, workers have been exposed toextremely high leaded dust levels, and bloodlead levels in resident children have increased(Amitai, 1991; Farfel, 1990; Jacobs, 1991b).However, machine sanding with a HEPA

12–36
Chapter 12: Abatement
exhaust tool is permitted and is discussed fur-ther below. Extensive dry hand sanding is notrecommended, but wet sanding can be doneif no electrical outlets are nearby. Limited drysanding or scraping near electrical circuitsis permitted.
3. Uncontained Hydroblasting orHigh-Pressure Water WashUncontained hydroblasting and high-pressurewater washing are prohibited. Because of thepotential for widespread environmental con-tamination, such activities should be under-taken with full containment. All water shouldbe captured, contained, and treated as poten-tially hazardous waste (contact the local waterand sewage agency for guidance on local re-quirements). Since capturing and containingall water is not feasible, this method of paintremoval is not permitted for lead-based paintabatement work in housing.
4. Abrasive Blasting or SandblastingTraditional abrasive blasting or sandblasting isprohibited in residential structures, regardless ofwhether the abrasive material is recycled or ifthe area is fully contained. These methods pro-duce widespread dust contamination; full con-tainment is nearly impossible to maintain andguarantee in a residential environment. Abra-sive blasting should only be carried out usingHEPA vacuum local exhaust equipment, whichis discussed below.
If for some reason abrasive blasting must bedone in a residential structure, the area must besealed and placed under negative pressure withat least 10 air changes per hour. If the exteriormust be blasted, the entire building must becovered with a tent and placed under negativepressure with at least 10 air changes per hour.In both cases, all exhaust air must be passedthrough a HEPA filter. Fresh air should beprovided to the containment zone at a lowerrate than the exhaust airflow to maintain thenegative pressure zone.
Figure 12.12a Open Flame Burning IsProhibited.
Figure 12.12b Open-Faced Power Sanding orGrinding Is Prohibited.

12–37
Chapter 12: Abatement
C. Methods Not Recommended
1. Dry ScrapingDry scraping is not recommended because ofthe large volume of particulate matter that isgenerated (including high levels of leaded dust).
The two situations where dry scraping is appro-priate include scraping surfaces near electricaloutlets, which cannot be wet scraped because ofthe obvious electrocution hazard, and scrapingwhen using a heat gun since this cannot be per-formed wet. For both of these cases, dry scrapingis only appropriate for limited surface areas.
2. Chemical Paint RemoversContaining Methylene ChlorideChemical paint removers containing methylenechloride are not recommended, although theyare still widely sold in paint stores. This alsoapplies to methylene chloride paint removersthat have waxes or other coatings to retardevaporation. Some local regulations may pro-hibit the use of methylene chloride. Since me-thylene chloride evaporates readily and is color-less and odorless at the permissible exposurelimit, workers may be unaware of their expo-sure. Methylene chloride can cause liver andkidney damage and carbon monoxide poisoning(as a metabolite) and is suspected to cause can-cer (ACGIH, 1992; IARC, 1990). Air-purifyingrespirators with organic vapor cartridges do notprovide adequate protection against methylenechloride. In those projects where methylenechloride must be used, air-supplied respirators(or self-contained breathing apparatuses) arerequired under OSHA regulations (29 CFR1910.134).
D. Recommended Methods
1. Heat GunsSince open flame burning is prohibited, heatremoval methods are limited to electric-powered flameless heat guns.
Before beginning work, fuses and an adequateelectrical supply should be verified. Larger fusesshould not be installed because of the possibility
Figure 12.13 Traditional Abrasive Blasting Is Prohibited(note the visible dust surrounding the worker).
Figure 12.14 Do Not Wet Painted SurfacesNear Electrical Circuits.

12–38
Chapter 12: Abatement
While there is little danger of producing dan-gerous levels of lead fumes at temperaturesbelow 1,100 °F, significant airborne particulatelead is generated by the accompanying scrapingof the paint. Also, significant amounts of poten-tially harmful organic vapors can be releasedfrom the action of the heat upon the paint,even at temperatures below 1,100 °F. For thisreason, air-purifying respirators should be outfit-ted with both a HEPA-filtered cartridge andan organic vapor cartridge. Organic vapor car-tridges may not be available for some poweredair-purifying respirators.
Depending on the size of the area and the sub-strate, paint removal by heat gun can be a slow,labor-intensive process and may result in a highfinal clearance failure rate if used extensivelyand without proper cleanup. Removing paintcompletely, particularly from crevices, requiresattention to detail. Significant leaded residuemay remain on surfaces unless cleanup is thor-ough. Heat guns do not appear to be particu-larly effective on metal or masonry substrates,which are too porous to be scraped effectively;the heat may cause small particles to fly up andhit the worker, causing burns or eye damage.Although heat guns work well on wood, theywill usually damage drywall and plaster.
Workers may tend to place the nozzle of theheat gun too close to the surface, burning outthe heating elements prematurely. One way toprevent this is to attach a small metal wire cageor extension tube to the end of the heat gun toprevent it from being placed too close. For mostheat guns, the optimal distance from the surfaceis 3 to 6 inches. The heat gun is recommendedonly for limited surface areas in well-ventilatedspaces. Other problems with heat guns includeadditional fire hazards from dry rot, insulation,and dust, especially in window troughs, roof ar-eas, and hollow porch columns. Scraping oftenleaves the substrate very rough and may singeadjacent wallpaper. Telephone wires mountedon baseboards can melt, and heat can crackglass with a cold exterior or dry glazing.
To use heat guns properly, allow the heat streamleaving the gun to merely soften the paint. Do
Figure 12.15 Heat Guns Operating Below1,100 °F Are Useful for Limited Areas.
of creating a fire hazard. A portable electricgenerator may be needed, especially if severalheat guns will be required. Care should beexercised around wallpaper, insulation, andother flammable materials. An accessible gar-den hose with a pressure-release spray nozzle,a crowbar to remove smoldering wood, and along-handled sledgehammer to open up wallsexposed to smoldering insulation should bereadily available. Under OSHA regulations(29 CFR 1926.150), a fully charged ABC-type 20-pound (minimum) fire extinguishermust be available within 100 feet of the workarea. Work should be conducted only in well-ventilated spaces, since other hazardous materi-als may be released when heating old paintedsurfaces (NIOSH, 1990).

12–39
Chapter 12: Abatement
not allow the paint film to scorch or smoke.At the very first sign of paint softening, blister-ing, or bubbling, discontinue the use of heatand immediately scrape the loose paint off thesurface.
2. Mechanical Removal Methods
HEPA Sanding
HEPA sanders are valuable for surface prepara-tion prior to repainting. Since chemical strip-ping sometimes raises the grain of the wood andsome removal methods are not effective at re-moving all visible traces of paint, some sandingprior to repainting may be needed. Sanding cancause generation of significant levels of airborneand settled lead dust; therefore, HEPA-assistedsanders are recommended whenever sandingmust be done. HEPA sanders do not work wellon detailed moldings.
HEPA sanding uses traditional electric sanders,such as disc sanders or orbital or vibrating sand-ers, equipped with specially designed shroudsor containment systems that are placed undera partial vacuum (also known as local exhaustventilation). All exhaust air is passed througha HEPA filter (often using an ordinary HEPAvacuum) to reduce the amount of airborneparticulate lead. The HEPA vacuum mustbe correctly sized to provide adequate airflowto permit the system to operate properly. Ifhoses are longer than normal, a larger HEPAvacuum may be needed to handle the increasedpressure drop.
There are two main types of HEPA sanders.The first uses a flexible shroud to surround thesanding head, with the HEPA vacuum hoseattached to the shroud. The shroud must be inconstant contact with the surface to be effec-tive. If the shroud extends beyond the surfacebeing sanded, large amounts of particulate leadwill be released into the air. In addition, thisconfiguration makes it impossible to sand to theedge of protruding surfaces, such as baseboardsor window and door casings.
The second type of HEPA sander piercesthe sandpaper with holes through whichthe vacuum draws the dust. This allows the
instrument to be used to the edge of protrudingsurfaces. However, care must be exercised tokeep the sandpaper flat on the surface. Neitherone of these methods is completely effective;respirators are always recommended. Workerfatigue can also prevent the worker from hold-ing the tool flush with the surface, making itnecessary to provide frequent breaks or rotateworkers.
Wet Scraping
Wet scraping is feasible on most surfacesand results in lower lead exposures than dryscraping. Since surfaces near electrical outletsshould never be moistened (due to the electro-cution hazard), these areas should be dryscraped.
Wet scraping can be performed by using a spraybottle or sponge attached to a paint scraper.Wet scraping is often used to remove loose and
Figure 12.16 HEPA Vacuum Power Tools.
HEPA Saw HEPA Drill
HEPA Sander

12–40
Chapter 12: Abatement
flaking paint prior to paint film stabilizationor encapsulation. If wet scraping is employedas an abatement technique, a more durablecovering than new paint is needed.
Working a few square feet at a time, the sur-face should be lightly misted with water froma garden sprayer or plant mister. Using a paintscraper, loose material should be scraped fromthe surface and deposited on the containmentplastic. Damp paint chips should be cleaned upas soon as possible so that they are not trackedthroughout the work area or crushed beneaththe feet of workers.
Scraper blades should be kept sharp to mini-mize abrasion and gouging. Additional scraperblades should be on hand and should be se-lected for the type of surface being scraped.To obtain a smooth finish, it may be necessaryto follow wet scraping with wet sanding. Avariety of scraping tools are available fromhardware and paint supply stores.
HEPA Vacuum Blasting
HEPA vacuum blasting is simply abrasiveblasting with a shroud under a vacuum that isattached to the blast head. All exhaust air ispassed through a HEPA filter, using a properlysized HEPA vacuum system. Vacuum blastingis appropriate for metal, brick, concrete, andother masonry surfaces. To date, attempts touse the process on wood, plaster, and other softmaterials have not been successful, as they usu-ally cause severe substrate damage.
Various blasting media can be used (e.g., alumi-num oxide, metal shot, walnut shells) depend-ing on the type of substrate. Blast heads, usuallya brush-type arrangement, come in various sizesand shapes. The blast head must remain in con-tinuous contact with the surface to avoid dis-persal of both the blast medium and particulatelead. The equipment can be outfitted with adevice that separates the blast media from thepaint, effectively recycling the blast material,and dramatically reducing the volume of waste.
Figure 12.17 Scraping Tools.
Figure 12.18 Vacuum Blasting.
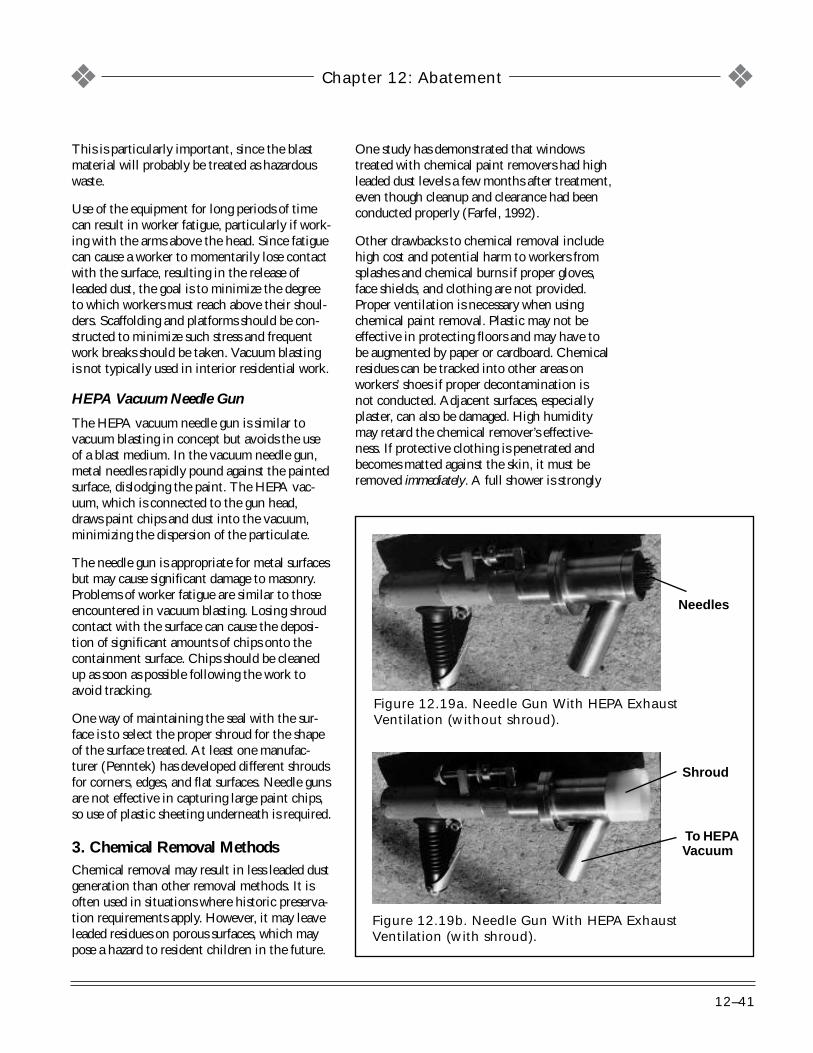
12–41
Chapter 12: Abatement
This is particularly important, since the blastmaterial will probably be treated as hazardouswaste.
Use of the equipment for long periods of timecan result in worker fatigue, particularly if work-ing with the arms above the head. Since fatiguecan cause a worker to momentarily lose contactwith the surface, resulting in the release ofleaded dust, the goal is to minimize the degreeto which workers must reach above their shoul-ders. Scaffolding and platforms should be con-structed to minimize such stress and frequentwork breaks should be taken. Vacuum blastingis not typically used in interior residential work.
HEPA Vacuum Needle Gun
The HEPA vacuum needle gun is similar tovacuum blasting in concept but avoids the useof a blast medium. In the vacuum needle gun,metal needles rapidly pound against the paintedsurface, dislodging the paint. The HEPA vac-uum, which is connected to the gun head,draws paint chips and dust into the vacuum,minimizing the dispersion of the particulate.
The needle gun is appropriate for metal surfacesbut may cause significant damage to masonry.Problems of worker fatigue are similar to thoseencountered in vacuum blasting. Losing shroudcontact with the surface can cause the deposi-tion of significant amounts of chips onto thecontainment surface. Chips should be cleanedup as soon as possible following the work toavoid tracking.
One way of maintaining the seal with the sur-face is to select the proper shroud for the shapeof the surface treated. At least one manufac-turer (Penntek) has developed different shroudsfor corners, edges, and flat surfaces. Needle gunsare not effective in capturing large paint chips,so use of plastic sheeting underneath is required.
3. Chemical Removal MethodsChemical removal may result in less leaded dustgeneration than other removal methods. It isoften used in situations where historic preserva-tion requirements apply. However, it may leaveleaded residues on porous surfaces, which maypose a hazard to resident children in the future.
One study has demonstrated that windowstreated with chemical paint removers had highleaded dust levels a few months after treatment,even though cleanup and clearance had beenconducted properly (Farfel, 1992).
Other drawbacks to chemical removal includehigh cost and potential harm to workers fromsplashes and chemical burns if proper gloves,face shields, and clothing are not provided.Proper ventilation is necessary when usingchemical paint removal. Plastic may not beeffective in protecting floors and may have tobe augmented by paper or cardboard. Chemicalresidues can be tracked into other areas onworkers’ shoes if proper decontamination isnot conducted. Adjacent surfaces, especiallyplaster, can also be damaged. High humiditymay retard the chemical remover’s effective-ness. If protective clothing is penetrated andbecomes matted against the skin, it must beremoved immediately. A full shower is strongly
Figure 12.19b. Needle Gun With HEPA ExhaustVentilation (with shroud).
To HEPAVacuum
Shroud
Figure 12.19a. Needle Gun With HEPA ExhaustVentilation (without shroud).
Needles

12–42
Chapter 12: Abatement
Offsite Paint Removal
Offsite paint removal is preferred, since most ofthe contamination and residues are generatedaway from the dwelling. The general approachis as follows.
Building components to be stripped must firstbe removed from the building. Misting withwater prior to removal will help minimize theamount of airborne lead. The painted seambetween the component and the wall shouldfirst be cut with a utility razor knife to mini-mize damage to the adjacent plaster. If there ismore than one similar component, they shouldbe labeled using a punch system in an obscurelocation (e.g., the bottom or side of a door),then wrapped in plastic and sealed with tapeto avoid the spread of contamination duringtransport. Tag systems are not recommendedsince they must be removed when the com-ponent is dipped. Markers should not be usedsince they will dissolve during stripping. Thepunch will identify exactly where the com-ponent came from, eliminating the need forchanging doors or other retrofitting problems.
Potential damage to components duringstripping includes damage to hardware (thisshould be removed before stripping), brokenglass, loss of glue joints and fillers, damage towood fibers (wood swelling), and raising ofthe wood grain. The component may evenfall apart and have to be blocked and reglued.Old glazing compounds on windows may alsobe weakened. The stripping firm should be in-structed to thoroughly wash and neutralize thecomponents after stripping.
Before materials are returned from the paintstripper, they should be wrapped in 6-milplastic and sealed with tape. This will minimizecontamination of those handling the materialssince leaded residue may remain on the surface.Materials should remain sealed in plastic untilother onsite dust-generating activities areconcluded and the dust cleaned up.
Before reinstallation, the treated componentsshould be cleaned using the standard HEPA/wetwash/HEPA cycle to remove any residues leftby the paint stripper. Components must be
Figure 12.20 Proper Protective Gear, IncludingGloves, Faceshield, Goggles, and Eyewash isRequired When Working With Chemical PaintRemovers.
Figure 12.21 Use Punches To Identify theLocation of Components Before SendingThem Offsite for Paint Removal.
recommended; the skin must be washed andthoroughly rinsed.
Chemical paint removal can be broken intotwo broad categories: offsite paint removaland onsite paint removal.

12–43
Chapter 12: Abatement
completely dry before repainting. Always checkthe pH after cleaning and before repainting.
Onsite Paint Removal
Many paint removers must be allowed to re-main on the surface anywhere from 1 hour toa day or more to accomplish effective stripping.Most paint removers are efficient within a lim-ited temperature range and may be completelyineffective in cold weather. The contractormust therefore be certain of weather conditionsprior to outdoor application. Also, rain cancause environmental contamination from thelead and the chemical remover.
Paint removers are either caustic or noncaustic.The noncaustic chemical removers are gener-ally safer to use than the caustic ones (assumingthe former do not contain methylene chloride).Material Safety Data Sheets should always beconsulted to determine potential chemicalhazards.
When using chemical strippers, security is im-portant, particularly with the caustics. Causticpaint removers can cause severe skin burn andeye damage to workers and children who maygain access to the work area. Pain receptorsin the eyes are not as sensitive to caustic sub-stances as they are to acids, so workers maysuffer damage without immediately realizing it.
The use of chemically resistant clothing; longneoprene, nitrile, rubber, or PVC gloves; andface shields is mandatory under OSHA regula-tions. OSHA also requires a portable eyewashstation whenever eye-irritating paint removersare used in housing.
An abundant source of running water in theabatement area for flushing chemicals from skinor eyes is required by OSHA regulations. Thewater should come from a nearby tap or por-table eyewash stations. If contact with the eyesoccurs, a full 15-minute rinse of the eyes is nec-essary onsite, before the individual leaves to seekmedical attention, since permanent damage tothe eyes occurs quickly. While 15 minutes mayseem excessive, a quick rinse is ineffective, andpermanent damage usually occurs on the way toseek medical attention.
Usually, noncaustic strippers are not as effec-tive at removing multiple layers of paint in asingle application, compared to the causticproducts. When using noncaustic removers,small areas should be tested before full-scaletreatment to determine their efficacy. For verti-cal surfaces, adhesion of the liquid or gel-typepaint removers should also be tested to deter-mine runoff potential (particularly a problemin warm weather). Most caustic paint removerswork best on nonporous surfaces such as steel.They generally should not be used on alumi-num or glass surfaces.
Paint removers that contain volatile substancesshould be used only in areas equipped with me-chanical ventilation and only when workersare properly equipped with gloves, face shields,protective clothing, and respirators, as needed.
Figure 12.22 Eye Wash Stations Are RequiredWhen Caustic or Chemical Paint Removers AreUsed.

12–44
Chapter 12: Abatement
After the appropriate period of time, the soft-ened paint should be removed using a scraperor putty knife and the material deposited ina watertight and corrosion-proof container(usually supplied by the manufacturer). Thewaste should be submitted for “Toxicity Char-acteristic Leading Procedure” (TCLP) tests todetermine if it qualifies as hazardous waste.Alternatively, the owner can assume that itis hazardous waste and manage it accordingly(see Chapter␣10). Chemical stripper waste isalmost always hazardous waste. The strippedsurface must be thoroughly cleaned to removelead and paint remover residues.
With wood surfaces, it is important to completethe entire neutralization and cleaning processwithout letting the surface dry. If the wood driesbefore cleanup is complete, the pores in thewood may close, locking potentially significantleaded residues inside. When repainting, someof the leaded residue may leach into the newpaint.
Alkali neutralization and residue removal areaccomplished as follows. Immediately afterpaint removal (while wood surfaces are stilldamp), the surface should be thoroughlyscrubbed with a solution of glacial acetic acid.Use of vinegar to neutralize the alkali shouldbe avoided since vinegar may be inadequateas a neutralizing agent and will also result ina significantly larger volume of liquid (andpotentially hazardous) waste.
Glacial acetic acid is hazardous and can causeskin burns and eye damage. It should be usedcarefully and only with neoprene, nitrile, rub-ber, or PVC gloves; chemically resistant cloth-ing; eye shields; a NIOSH-approved acid gascartridge; and a HEPA filter on air-purifyingrespirators.
The damp, stripped surface should be thor-oughly scrubbed with the acetic acid solution.The solution should be monitored with pH lit-mus paper and discarded if the pH exceeds 6.After use, the solution should be placed incorrosion-proof containers and treated as poten-tially hazardous waste. Sponges and other clean-ing materials should not be reused but deposited
The paint remover should be applied with aspatula, trowel, brush, or spray gun. Spray gunuse should be minimized since worker expo-sures are greater. The time the remover muststay on the surface will depend upon the num-ber of layers of paint, the type of paint, thetemperature, and the humidity, and can rangefrom a few hours to a day or more. The paintremover should not be allowed to dry out.Some manufacturers provide a polyethyleneor paper blanket that is pressed into the surfaceto retard drying; others contain a film that isformed on the surface of the paint remover asit sits to prevent drying. Caution must be usedwhen applying the paint remover overhead inorder to avoid dripping onto workers below.
Figure 12.23a Neutralize Surfaces When UsingCaustic Paint Removers.
Figure 12.23b Neutralize Surfaces With aGlacial Acetic Acid Wash When Using CausticPaint Removers.

12–45
Chapter 12: Abatement
in double 4-mil or single 6-mil trash bags thatare sealed, labeled, and put in a secure wastestorage area.
Following neutralization, the damp surfaceshould be thoroughly scrubbed with a high-phosphate detergent or other cleaner. Scrubbingshould continue until no residues are visible.The cleaning solution should be changed whenit becomes dirty. Following the detergent scrub,a clean water wash should be performed toremove residue. The pH of the water washshould be checked after use. If the pH exceeds8, further neutralization of the surface with theacetic acid solution is necessary prior to repaint-ing since an alkaline surface will cause the newpaint to fail in a matter of days or weeks.
Surfaces should be completely dry before re-painting. For wood surfaces, this may take sev-eral days to a week. If the moisture has raisedthe grain and sanding of wood surfaces is re-quired before repainting, a HEPA sandershould be used.
Since porous surfaces such as wood or masonrymay still have slight alkali residues, some typesof oil paints should not be used after causticpaint remover application. To do so may resultin saponification (a “soap-making” reaction be-tween the paint and the substrate, leading torapid paint failure). Therefore, latex paints areprobably most appropriate. Wood surfaces (es-pecially exterior ones) can deteriorate afterpaint removers have been applied, making newpaint difficult to apply. Also, the new paint maynot last long on deteriorated substrates. Someold plasters with a high pH may require specialprimers, which are no longer manufactured. Aspecial sealant may be needed on such surfaces.The specific paint remover manufacturer shouldbe contacted for further guidance on appropri-ate paints to use.
High-pressure water removal of caustic paintremovers should be avoided since control ofsolid and liquid contamination is difficult.Release of solids or liquids into the soil islikely to result in costly cleanup. Care mustbe used when applying caustic paint removersto friction surfaces, such as window jambs.Such surfaces are often weathered, makingresidue removal even more difficult. If theseresidues are embedded in a coat of new paint,the friction caused by opening and closing thewindows can lead to the release of leaded dust.
E. Waste Disposal
Wastes produced during paint removal arehighly concentrated, but low in volume. Thewaste may be exempt from some hazardouswaste regulations if less than 220 pounds is gen-erated per month (see Chapter 10). Many localjurisdictions pick up small amounts of hazardouswaste on certain days. If offsite paint removal isperformed, the waste is the responsibility of thefacility performing the removal.
Figure 12.24 Use Litmus Paper on a BareStripped Surface Before Repainting.

12–46
Chapter 12: Abatement

12–47
Chapter 12: Abatement
Soil and Exterior Dust Abatement:How To Do It
1. Determine if a soil lead hazard exists. For a hazard to exist, a total of at least 9 square feet of soil in a singleyard or area must be bare and soil concentrations must exceed either 2,000 µg/g of lead for the yard or build-ing perimeter or 400 µg/g of lead for small, high-contact play areas (pending the development of an EPA soilstandard). Bare soil above these levels should be treated by either interim controls or abatement. Soil abate-ment is most appropriate when levels of lead are extraordinarily high (greater than 5,000 µg/g) and when usepatterns indicate contact frequency and exposure will be high.
2. Collect preabatement soil samples to determine baseline levels. These samples need not be analyzed ifpostabatement soil samples are below applicable clearance levels.
3. Determine the method of soil abatement (soil removal and replacement, soil cleaning, or paving). Soilcultivation (rototilling or turning over the soil) is not recommended.
4. If paving, use a high-quality concrete or asphalt. Observe normal precautions associated with traffic loadweight and thermal expansion and contraction. Obtain any necessary permits. Keep soil cultivation to aminimum.
5. If removing and replacing soil:
a. Determine if waste soil will be placed in an onsite or offsite burial pit. Prepare vehicle operation and soilmovement plan. Test new replacement soil (should not contain more than 200 µg/g lead).
b. Contact the local United Utilities Protection Service (UUPS), Miss Dig, Miss Utility, or the AmericanPublic Works Association at (816) 472–6100, ext. 584, to determine location of underground utilities,including water, gas, electric, cable TV, and sewer, or contact each utility individually. Mark all locationsto be avoided.
c. Remove fencing if necessary to allow equipment access and define site limits with temporary fencing,signs, or yellow caution tape.
d. Tie and protect existing trees, shrubs, and bushes.
e. Have enough tools to avoid handling clean soil with contaminated tools.
f. Remove soil.
g. Clean all walkways, driveways, and street areas near abatement area.
h. Replace soil at proper grade to allow drainage. Replacement soil should be at least 2 inches aboveexisting grade to allow for settling.
i. Install new soil covering (grass or sod) and maintain it through the growing season.
j. Have enough workers and equipment available to complete the job in 1 day.
Step-by-Step Summary

12–48
Chapter 12: Abatement
6. Determine if soil waste is hazardous and manage it accordingly (see Chapter 10).
7. Conduct final cleanup and clearance.
8. Provide walk-off doormats to residents and educate them on the benefits of removing shoes at the dwellingentryway.
Step-by-Step Summary (continued)

12–49
Chapter 12: Abatement
Section V
I. Soil and Exterior DustAbatement
A. Introduction
Lead-contaminated soil and exterior dust havebeen shown to cause elevations in blood leadlevels of children in a number of studies (EPA,1993c). Exposure to lead in soil and exteriordust can occur both outside during play andinside from soil and dust carried into houseson shoes, clothing, pets, or other means.
Soil can become contaminated over a periodof years from the shedding of lead-based painton nearby buildings, windblown leaded dustfrom adjacent areas, and fallout of leaded dustfrom the atmosphere (either from a local pointsource or from leaded gasoline emissions in thepast). Uncontrolled paint removal from nearbyhouses or painted steel structures can also resultin contaminated soil (controlling soil lead lev-els should be a consideration in every exteriorlead-based paint abatement project).
Soil lead hazards are determined by measuringthe concentration of lead in the soil, examiningthe location and use of the soil, and determin-ing the degree to which the soil is “bare” (seeChapter␣5). For a yard or area to require hazardcontrol, a total of at least 9 square feet of baresoil must be present. Any size bare area in a playarea containing more than 400 µg/g of lead is ahazard. Appendix 13.3 contains details on asampling method to measure lead in soil. Whenassessing the condition of the surface cover, itis important to determine why the soil is bare.Bare soil is common in the following areas andcircumstances:
✦ Heavily used play areas.
✦ Pathways.
✦ Areas shaded by trees or buildings.
✦ Areas with damaged grass.
✦ Drought conditions.
Measuring the lead content of soil will aid inthe selection of an appropriate abatementmethod that has a reasonable likelihood of be-ing maintained. Soil abatement (as opposed tointerim controls) is generally appropriate whenlead is present in extraordinarily high concen-trations (more than 5,000 µg/g), use patternsindicate exposures are likely, or interim controlsare likely to be ineffective (e.g., planting grassin high-traffic areas). Soil interim controls werecovered in Chapter 11, Section V. This sectiondescribes soil treatments that should be effec-tive for at least 20 years.
Preabatement soil samples should be collectedbut not necessarily analyzed until postabate-ment soil samples have been collected, ana-lyzed, and compared to clearance standards. Ifpostabatement soil levels are below applicablelimits, the preabatement samples need not beanalyzed (see Chapter 15).
B. Soil Abatement Methods
Soil abatement methods include:
✦ Soil removal and replacement followedby offsite or onsite disposal.
✦ Soil cultivation (rototilling).
✦ Soil treatment and replacement.
✦ Paving with concrete or asphalt.
Soil removal is discussed in detail below; how-ever, before choosing to remove contaminatedsoil, other treatment options should be consid-ered. The advantages of using soil treatmentmethods (as opposed to soil removal) arethreefold (Elias, 1988):
✦ The costs of hauling large quantities ofcontaminated soil are eliminated or greatlyreduced.
✦ Disposal sites for soil are not neededexcept for a much smaller volume of wastesgenerated during the treatment process.
✦ The need for uncontaminated replacementsoil is greatly reduced.

12–50
Chapter 12: Abatement
1. Soil Removal and ReplacementFor most soil removal projects, removal of 6inches of topsoil is adequate. The depth of soillead contamination is usually restricted to thetop of the soil, with contamination decreasingmarkedly below the top few inches. However,in urban areas it is not uncommon for the con-tamination to extend to up to 1 or 2 feet indepth. This may be because these areas wereonce the location of buildings contaminatedwith lead-based paint. Alternatively, past prac-tices may have resulted in a gradual buildup ofthe elevation of the soil grade over time. Insuch circumstances, the removal of the top layerof soil may leave behind contaminated soil atlower depths. In mixed residential/industrialareas, or where industry once existed, the depthof the contamination may vary widely. The de-sired decision on the depth of removal shouldalso consider the depth of soil disturbance dur-ing the course of usual activities, such as gar-dening. If the top layer of soil will not be pen-etrated, then it should not be necessary toremove lead-contaminated soil at deeper levels,since there will be no exposure.
In the EPA Urban Soil Lead Abatement Project(EPA, 1993c), the depth chosen for demonstra-tion purposes was 6 inches. In residential areasin Canada, where secondary lead smelters arethe primary source of contamination, soil alsowas removed to a depth of 6 inches (Stokes,1988). Guidelines for soil removal developed bythe Ontario Ministry of the Environment(1987) recommended removal of the top 12inches. The 12-inch recommendation was basedin part on earlier experiences where consider-able recontamination was observed 7 to 8 yearsafter soil was removed to a 6-inch depth(Stokes, 1987). However, the reason for the re-contamination was thought to be due to con-tamination of the replacement soil by adjacentpolluted soil that had not been removed (Jones,1987), not by contaminated soil from deeperlevels.
For practical purposes, properly conducted soilremoval to a depth of 6 inches should suffice inurban residential areas that are restricted tograss, shrubs, or shallow gardens. However, the
depth of soil contamination should be assessedat each site, and the decision regarding depthshould be made based on the results of the soilsampling and anticipated use of the land. Formost residential areas, the depth of removal willnot exceed 6 inches. Records of the soil sam-pling and abatement that occurs should bemaintained with the permanent records of theproperty. These records will alert property own-ers who are planning excavations to depths be-low the abatement depth, such as for water orsewer line work, to use caution to avoid con-taminating the surface soil with excavated soil.The owners should be advised to sample the soilbelow the abatement depth to determine thelead concentrations so that procedures can beimplemented to segregate this deeper soil, ifcontaminated, and to use it as fill for the deeperareas of the excavation when the work is com-pleted. The maximum allowable lead concen-tration in replacement soil shall not exceed200 µg/g.
Types of Equipment
Removal and replacement of soil in residentialabatement situations may take place in bothlarge and small sites. Some urban yards are verysmall, consisting of only a few square feet; oth-ers are larger, but are sometimes surrounded bybuildings. Therefore, residential soil abatementwill often require the use of extensive manuallabor in addition to mechanical soil removal.When soil is removed by hand, it generally canbe loaded into wheelbarrows and then offloadedto other vehicles to be transported to the dis-posal site. Rather than offload the wheelbarrowsto dump trucks, it is usually more efficient todump the soil directly into rolloff containers,which are then loaded onto trucks for transportto the disposal site.
Sod and Seeded Grass Maintenance
All grass sod planted as part of the abatementoperation should be maintained until the end ofthe growing season. This maintenance shouldinclude initial frequent watering to establish therooting of the sod and germination of the grassseed, followed by watering on a regular basis tokeep the grass in a healthy state. Under some

12–51
Chapter 12: Abatement
conditions, seeding the soil may be practical,but often it is not realistic to restrict use ofthe soil area for the length of time neededto establish newly seeded grass.
Utilities
The owner or contractor should contact thelocal United Utilities Protection Service(UUPS), “Miss Dig,” or “Miss Utility” (coordi-nated information sources for all utilities) be-fore beginning work to obtain exact locations ofall underground utility lines. If a utilities infor-mation service does not exist in the community,the individual utilities should be contacted di-rectly. The American Public Works Association(APWA)—(816) 472–6100, ext. 584—can alsoprovide local phone numbers for utility lineidentification services (APWA, 1993).
Care should be taken to protect existing utili-ties during abatement to prevent any damage toexisting underground and overhead utilities andto prevent any harm to human life and property.If a contractor is used, the owner should requirethe contractor to protect the existing utilitiesand to make good any damage to these utilitiesas quickly as possible.
Existing Fences
Care should be taken while removing existingfencing for worksite access. Such fencing shouldbe salvaged and reinstalled (if it does not con-tain lead-based paint) to the satisfaction of theowner. In some cases, fencing may have to bereplaced.
Protection of Adjacent Areas
When working adjacent to excluded areas, in-cluding sidewalks, fences, trees, and patios, thesoil should be excavated at a 45° (1:1) slopeaway from the excluded areas so that contami-nation does not wash or roll into the excludedarea.
Inclement Weather
Removal and/or replacement operations shouldbe suspended at any time when satisfactorycontrol of the overall operation cannot be
maintained on account of rain, wind, or otherunsatisfactory weather or ground conditions.Determination of such conditions should bemade by the owner or project consultant. Whensuch conditions exist, the work area should becleaned up immediately and work suspended.High winds can disperse contaminated soil anddust to offsite areas and runoff from rain cancarry contamination outside the abatementarea.
Vehicle Operation
Prior to hauling contaminated soil, a vehicleoperation plan should be prepared for theequipment and hauling vehicle operators,which includes but is not limited to informationon the cleaning of vehicles, securing of tarpsand tailgates, ticketing of trucks, unloadingof material, and handling of spilled soil.
All trucks, hauling vehicles, and containersloaded with contaminated soil should be in-spected for loose material adhering to the out-side of the body, chassis, or tires before depar-ture from the worksite. Such material should becleaned up before the vehicle leaves for the dis-posal site. If the truck tires made contact withthe contaminated soil, they should be cleanedbefore the trucks leave the work area. The tiresshould be brushed off on a plastic sheet and thecontaminated soil loaded onto the truck or re-turned to the lot being excavated.
Soil should be loaded directly into dump trucksor disposal containers from the worksite. If pos-sible, there should be no “double handling” ofcontaminated material, such as shoveling thesoil into a wheelbarrow, moving it to anotherlocation, dumping it, and shoveling it againinto another container. This double handlingnot only wastes time but also increases thelikelihood of spreading the contaminationand tends to make site cleanup more difficult.
All soil removed from the worksite should beplaced in dump trucks for transport to the dis-posal site. The trucks should have secure fittingtarps and sealed tailgates to reduce leakage asmuch as possible.

12–52
Chapter 12: Abatement
Soil Replacement and Cleanup
Prior to soil replacement, all walks, driveways,lanes, and streets adjacent to the excavationarea should be cleaned of all contaminated soil.All loose soil should be scraped, washed, andswept from the above-mentioned surfaces. Noclean soil should be placed down until all con-tamination has been removed from these areas.
At the completion of the workday, all loosecontaminated soil within the limits of the workarea should be collected. The collected soilshould be transferred to a dump truck or othercontainer for subsequent disposal.
All hard surfaces, such as sidewalks, paveddriveways, and patios, should be cleaned atthe completion of each workday. This dailycleanup should consist of scraping, washing,vacuuming, and wet sweeping all soil from theabove-mentioned surfaces.
Cleanup procedures should begin early enoughso that they can be completed before the endof the workday.
Prevention of Contamination FromUnderlying Soil
Regardless of the depth of removal, the possibil-ity of contamination of the replacement soilfrom the underlying unexcavated soil exists,particularly from future activities. One way tominimize this occurrence is by laying a water-permeable fabric (geotextile) or similar lining atthe bottom of the excavated areas to provide avisual demarcation between replaced soil andoriginal soil (Weitzman, 1993). This liner canserve as a warning for persons digging in thefuture to exercise caution so that contaminatedsoil beneath the liner does not become mixedwith the replacement soil.
Contaminated Soil Load Manifest System
In order to keep track of the contaminated soilbeing hauled away from the site, a load manifestsystem should be used to keep an exact recordof the time and location of disposal. The mani-fest should consist of a two-part ticket, with oneticket given to the owner at the time of truck
Loaded trucks or containers may be left onsiteovernight provided they are secured to preventaccess or leakage. It is not advisable to leaveloaded trucks or containers onsite over theweekend. Any piece of equipment, whether adump truck or excavation equipment, shouldbe cleaned before it is removed from the site.Before decontamination, the equipment shouldbe placed on 6-mil polyethylene plastic. Decon-tamination of equipment can be achieved byfirst scraping soil from all surfaces and thenbrushing to remove all visible soil, using waterspray to prevent dispersion. The soil removedmust be contained for appropriate disposal.
Final Grade
The final grades of replaced soil should be 2inches above existing grades to allow for set-tling and to ensure that all drainage is awayfrom existing structures.
Existing Vegetation
A number of precautions are needed to protectexisting vegetation, such as bushes and trees.It is advisable to tie trees and shrubs to ensurestability.
Hand tools are needed to scrape soil fromaround roots without undermining or damag-ing them. Any large roots should be leftundisturbed.
Tool Contamination
To minimize the cross-contamination betweenexcavation and replacement worksites, separatetools should be provided for the excavationand replacement operations. A less expensivealternative is to employ an acceptable methodfor decontamination of tools, workers’ clothing,and footwear. The decontamination should in-clude physically removing as much soil as pos-sible and then washing and rinsing the con-taminated items with water.
All workers should clean their boots thoroughlybefore leaving the work area. The soil removedfrom boots should be disposed of either in atruck used for hauling contaminated soil or leftin the worksite.

12–53
Chapter 12: Abatement
departure and the other held by the hauler. Thedisposal site ticket should be presented to thesite owner or inspector technician before theend of the workday on which the material wasdeposited in the dump site. The purpose of themanifest system is to ensure that the contami-nated soil is not used as fill in other residentialareas.
If the soil is considered to be hazardous waste,the EPA manifest system must be used beforeany transportation or disposal offsite occurs (seeChapter 10). Even if the soil is not hazardouswaste, it should be manifested using an alterna-tive system such as the one described above.
Prevention of Offsite Movement ofContaminated Soil
Contaminated soil should be removed fromthe site as soon as possible to prevent wind andwater erosion. To prevent offsite migration andto avoid the possibility of tampering by chil-dren, piles of contaminated soil should not beleft onsite overnight. Wind erosion can occuron any site. Water erosion is more likely onhilly sites or during heavy precipitation. Ex-posed sites can be covered with plastic andsecured in place to prevent offsite migration ofcontaminated soil. An alternative method is towet down the site at the end of the workday toprevent wind erosion. Similar problems will beencountered when contaminated soil is stock-piled during the day prior to disposal at the endof the day. In this case, wind and water erosionshould be controlled by using a combination ofplastic sheeting and silt fencing.
Site Control
The following precautions should be taken:
✦ To prevent the spread of contaminated soil,secure working limits should be defined foreach area of excavation. Access to this areashould be restricted to authorized personnelwith entrances and exits controlled.
✦ The abatement work area should be en-closed with temporary fencing or adequatebarricades to prevent unauthorized person-nel or animals from entering the work area.
✦ Yellow caution tape should be installedacross doors leading to abatement areas.
✦ Access routes to homes should be main-tained at all times. Such routes shouldnot require passing through the area ofexcavation.
✦ The removal of a partial grass cover inpreparation for the laying of sod or grassseeding may temporarily increase the amountof bare contaminated soil. Onsite exposurecould result from children playing on theexposed soil. Abatement workers can con-trol this during the day by means of ad-equate site control. However, control is dif-ficult, if not impossible, after the end of theworkday. Lead hazard warning signs shouldbe posted to warn residents.
✦ In order to minimize inconvenience to resi-dents and neighbors and to minimize expo-sure, abatement of a particular site shouldbe completed within 1 workday.
2. Soil CultivationSince soil lead concentration often decreaseswith increasing depth, soil mixing can be con-sidered to be an abatement strategy. If the aver-age lead concentration of the soil to be abatedis below 1,500␣ µg/g, thorough mixing is an ad-equate abatement method. Pilot testing may benecessary to determine the type of mixing pro-cess needed. Rototilling may not be effective.
3. Soil CleaningThe following soil treatment methods are beinginvestigated for possible use on residential sites:
✦ Magnetic separation.
✦ Froth flotation.
✦ Washing.
Magnetic separation and froth flotation arecurrently under development and are not ad-dressed in these Guidelines. The method thathas received the most attention thus far is soilwashing. Soil washing is a waterborne processfor mechanically scrubbing soils to remove lead

12–54
Chapter 12: Abatement
and other contaminants (EPA, 1990b). The soilis removed from the yard but usually washedonsite. The process removes contaminants inone of two ways: by dissolving or suspendingthem in the wash solution (which is latertreated by conventional wastewater treatment)or by concentrating them into a smaller volumeof soil through simple particle size separationtechniques. Soils containing coarse sand andgravel are more responsive to cleaning tech-niques than soils containing a large amountof clay and silt. If the washing process involvesthe addition of surfactants or other chemicalsto separate the lead-containing particles, caremust be taken to ensure that amounts remain-ing in the remediated soil do not interfere withreuse of the soil at the site. Most soil washingin the United States has been done at Super-fund sites. Soil washing has not yet been at-tempted at residential sites. EPA is currentlyinvestigating the applicability of soil washingto residential soil abatement.
4. PavingIf contaminated soil is present in high-trafficareas, the soil can be covered by a high-qualityconcrete or asphalt. In this case, contaminatedsoil need not be removed before paving. Normalprecautions associated with thermal expansionor contraction and traffic load should be consid-ered. Hard surfaces are not appropriate in playareas where falls are possible from slides, junglegyms, etc. The Consumer Product Safety Com-mission has developed recommendations forfall surfaces in public play areas (CPSC, 1991).
C. Exterior Dust Control
Lead in exterior dust can be a source of expo-sure to children because it can be tracked insideand carried on the skin, especially the hands(Bornschein, 1986). For example, in older ur-ban areas in Cincinnati, exterior leaded dustconcentrations are on average about four timeshigher than interior leaded dust concentrations,and exterior lead surface loadings are muchhigher than for interior dust (Clark, 1993).
Just as children can be directly exposed toleaded soil, they can also be exposed to exteriorleaded dust. Exterior dust can also migrate byvarious means (children, adults, pets, or wind)to the interior of homes where there are manyopportunities for exposure to children. Exteriorleaded dust concentrations up to 50,000 µg/g(equivalent to 5 percent lead in dust) have beenmeasured in urban areas in the EPA Soil LeadAbatement Demonstration Project (EPA,1993c).
If only an individual property is involved in theexterior dust control activity, the type of equip-ment that can be used will be limited by the sizeof the area involved and the person responsiblefor the area. Owners are not required to cleanstreets, for example. Because of the mobility ofexterior dust, the length of time that the dustcleanup remains effective will be limited by thesize of the abatement area and therefore mayneed to be repeated periodically.
Exterior dust control consists of twocomponents:
✦ Controlling sources of lead-contaminateddust.
✦ Removing lead-contaminated dust frompaved areas.
Without adequate control of the sources oflead in exterior dust, recontamination of theexterior areas will occur. Studies of a schoolyardarea indicated that leaded dust concentrationsequalled preabatement levels within 1 year inWinnipeg, Ontario (Stokes, 1988). Recontami-nation of some paved areas in Cincinnati oc-curred within a few days (Clark, 1991) indicat-ing that repeated cleaning and control of thesources of the lead are necessary.
1. Types of EquipmentExterior dust cleanup consists of removing asmuch dust and dirt as possible from all pavedsurfaces on the property or properties involved.Lead-contaminated dust can be found on pavedsurfaces such as sidewalks, patios, driveways,

12–55
Chapter 12: Abatement
parking areas, etc. For multiple adjacent proper-ties that are being abated, cleanup of streets,alleys, or other common areas should be consid-ered, although this is normally a municipalresponsibility. Brick-paved areas present thebiggest challenge in removing exterior dust be-cause they contain numerous cracks. For indi-vidual properties, hosing off walkways and playareas periodically may reduce exterior leadeddust levels.
In order to meet this cleaning challenge, it isnecessary to have available the most efficienthard-surface vacuum cleaning equipment. Manycommercial contract cleaning firms located inurban areas have such equipment.
There are at least three different types ofsuitable paved-surface cleaning machines:
✦ Hand-pushed HEPA vacuum cleaners.
✦ Vacuum-assisted sweepers, which are similarto the traditional broom sweeper, with theadded feature of a slight vacuum that assistsin controlling dust and transporting mate-rial from the broom bristles to the hopper.
✦ Vacuum sweepers, which lift material frompaved surfaces—some are equipped withcurb brushes to assist in transporting thematerial from the edge of the cleaning areato the vacuum head and into the hopper.
EPA research has found that regenerative airmachines, which depend on rapidly moving airto capture particles from the source of the pave-ment, frequently remove only a small fraction ofthe dust and thus may not be suitable for leadabatement work (Pitt, 1985).
2. Evaluation of EquipmentA number of pavement cleaning machineswere tested as part of the Cincinnati SoilLead Abatement Demonstration Project(Clark, 1993). The machines tested were thevacuum-assisted sweeper, the vacuum sweeper,and the regenerative air machine. Initial testsdemonstrated that several machines operated
above the 90-percent efficiency level. A ma-chine performing at the 90-percent efficiencylevel will pick up 90-percent of the availabledirt after two passes. Equipment tested involvedboth large machines suitable for streets andparking lots and some walk-behind, vacuum-assisted broom sweepers suitable for sidewalksand other smaller areas. Several larger machinesperformed at or above the 90-percent efficiencyrate. Some of the smaller walk-behind sweepersdid not perform at an acceptable level ofefficiency.
Care must be taken when emptying the col-lected dust from the machines. The most appro-priate method to minimize dust release is todampen the contents of the hopper using anaccessible hose. If water is to be used for dustcontrol, it will be necessary to devise a meansof containing excess water. This can beachieved by placing 6-mil polyethylene plasticon the ground where the equipment is beingemptied and carefully collecting the water afterthe hopper has been emptied. It is also neces-sary to perform this operation in a secure areaso that children are not exposed.
Figure 12.25 Paving Bare Soil May Be the Best Option forHigh-Traffic Areas.
12–56
Chapter 12: Abatement
3. Removal of Heavy AccumulationThe first step in cleaning an area should be theremoval of heavy accumulations of dust anddebris. The heavily accumulated areas can becleaned either by manually removing the mate-rial with scrapers, shovels, or brooms or byvacuuming the heavily accumulated areas ifvacuuming proves to be adequate in removingthe contamination. Just as in handling lead-contaminated soil, the heavy accumulationsof exterior dust should be dampened.
4. Vacuum CleaningSmall areas, such as sidewalks and patios thatare inaccessible to larger cleaning machines,may be cleaned with an acceptable HEPA filter-equipped vacuum cleaner. Surfaces should bevacuumed continuously until no additionalvisible dust is being removed by furthervacuuming.
Related Documents