Burrows & Langford – Chapter 11 page 1 Learning Programming Using VISUAL BASIC .NET CHAPTER 11 USING VISUAL BASIC .NET TO CREATE WEB APPLICATIONS In this chapter we change our focus from building Windows Applications to building Web Applications. That is, instead of building applications that run entirely on the user’s computer, we look at applications where various parts of the application run on the user’s computer (the client) as well as on other computers (servers). Visual Basic .NET provides a powerful set of tools that support the development and testing of Web Applications using Microsoft’s ASP.NET technology. We begin by explaining and contrasting a number of different Web architecture options. We break an application into its three primary functions – presentation (GUI), processing business logic, and data management. We look at how these three functions can be located on the client and servers and evaluate the advantages and disadvantages of the various options. We then turn our attention to Visual Basic .NET and how it supports the various Web architectures. We look at creating a basic Web Application project and how to run it using the Microsoft IIS Web Server. We look at validating data (both on the client and on the server) using various Visual Basic .NET Validation controls. We next focus on processing databases in the context of Web Applications where the data are typically located on a server distinct from the client. We present the version of the DataGrid control designed to be processed on the server and look first at a simple example that displays data from a database. Next we see how the DataGrid control can support field editing with changes coming from the user at the client and the database changes being processed on the server. Lastly we look at an example that shows how XML and XSLT can be used to transform XML into different views on the server and then rendered for viewing on the client. We conclude the chapter with a project that shows how two or more web pages can communicate with each other by sharing data. We first discuss four different options for sharing data between pages and then focus on the use of the Session object that stores name/value pairs on the server. To demonstrate this concept, the project has the user fill in a typical registration form, validate it for accuracy, and then move to a second form. The second form then gets and displays the values entered by the user on the first form demonstrating that they are able to pass data between them. Objectives After studying this chapter you should be able to • Explain the various functions of a typical web application. • Explain what is meant by the term “client/server” and how the client/server architecture can be implemented in a number of different ways. • Discuss the tradeoffs associated with various client/server architecture options. • Build a Web Application using the tools available with Visual Basic .NET. • Validate user data using the Validation controls supported by Visual Basic .NET. • Use the Web Form DataGrid control to display a data set and to edit and update a database. • Use XSLT documents to transform XML into HTML on the server to then be displayed on the client. 3/15/02 Draft

Welcome message from author
This document is posted to help you gain knowledge. Please leave a comment to let me know what you think about it! Share it to your friends and learn new things together.
Transcript
Burrows & Langford – Chapter 11 page 1 Learning Programming Using VISUAL BASIC .NET
CHAPTER 11 USING VISUAL BASIC .NET TO CREATE WEB APPLICATIONS
In this chapter we change our focus from building Windows Applications to building Web Applications. That is, instead of building applications that run entirely on the user’s computer, we look at applications where various parts of the application run on the user’s computer (the client) as well as on other computers (servers). Visual Basic .NET provides a powerful set of tools that support the development and testing of Web Applications using Microsoft’s ASP.NET technology.
We begin by explaining and contrasting a number of different Web architecture options. We break an application into its three primary functions – presentation (GUI), processing business logic, and data management. We look at how these three functions can be located on the client and servers and evaluate the advantages and disadvantages of the various options.
We then turn our attention to Visual Basic .NET and how it supports the various Web architectures. We look at creating a basic Web Application project and how to run it using the Microsoft IIS Web Server. We look at validating data (both on the client and on the server) using various Visual Basic .NET Validation controls.
We next focus on processing databases in the context of Web Applications where the data are typically located on a server distinct from the client. We present the version of the DataGrid control designed to be processed on the server and look first at a simple example that displays data from a database. Next we see how the DataGrid control can support field editing with changes coming from the user at the client and the database changes being processed on the server. Lastly we look at an example that shows how XML and XSLT can be used to transform XML into different views on the server and then rendered for viewing on the client.
We conclude the chapter with a project that shows how two or more web pages can communicate with each other by sharing data. We first discuss four different options for sharing data between pages and then focus on the use of the Session object that stores name/value pairs on the server. To demonstrate this concept, the project has the user fill in a typical registration form, validate it for accuracy, and then move to a second form. The second form then gets and displays the values entered by the user on the first form demonstrating that they are able to pass data between them. Objectives
After studying this chapter you should be able to • Explain the various functions of a typical web application. • Explain what is meant by the term “client/server” and how the client/server
architecture can be implemented in a number of different ways. • Discuss the tradeoffs associated with various client/server architecture options. • Build a Web Application using the tools available with Visual Basic .NET. • Validate user data using the Validation controls supported by Visual Basic
.NET. • Use the Web Form DataGrid control to display a data set and to edit and update
a database. • Use XSLT documents to transform XML into HTML on the server to then be
displayed on the client.
3/15/02 Draft

Burrows & Langford – Chapter 11 page 2 Learning Programming Using VISUAL BASIC .NET
11.1 An Introduction to Functional Web Architectures A useful way to look at an application is to break it down into three primary
functions. These include presentation, business logic, and data management. Presentation involves how the application interacts with the user. The GUI is part of this presentation function but presentation could also include audio or video input/output on a variety of devices such as wireless devices, e.g., PDA’s and cell phones. Business logic involves rules that define how the application handles data and processes it. This can include very basic rules such as restricting part numbers to numeric characters as well as more complex rules such as determining if a customer should be given credit. Data management deals with databases and software used to manage these databases.
When an application is designed, the developer has a number of choices as to where these functions should be located. For example, the applications we have seen so far in this text have located all three functions on a single computer. This computer supported the GUI managed by the Visual Basic .NET program, it also supported the logic or business decisions that defined the program’s behavior, and, if a database was involved, it was likely managed by the MSDE service. On the other hand, if you use the Internet to buy books or other products, the browser running on your computer supports the GUI, but most of the business logic and data manage is done on the seller’s computer. We use the term “architecture” to describe how these three functions are allocated to various computers.
We now turn our attention to each of these functions and investigate the advantages and disadvantages of various architecture options. In this discussion, we will use the terms client and server. The term client means the computer (or other intelligent device) that the user is using. The term server refers to another computer that is distinct from the client and may be located anywhere in the world. There may be more than one server involved in the overall solution architecture. If there is one server involved, this is generally referred to as two-tier architecture (the client is one tier and the server is the second tier). If there are more than two servers involved, the term n-tier architecture is used. Presentation
If there are no servers involved, then the client can support the presentation function within the same program that supports the other two functions. However, with the advent of the browser, it is possible to support the presentation function distinct from the other two functions. Here we focus on the client/server solution with the assumption that the browser, running on the client computer, will be rendering HTML (or XML)1 into the content seen by the user. We will look at two options here. Option 1 – Pure HTML. In this option, any changes seen on the browser need to be sent to the browser from the web server. For example, the application might use a drop-down menu or might have font that changes color when the user places the cursor over it. If this
1 We are not limited to HTML or XML. For example, we could also use WML (Wireless Markup Language) to render content on a cell phone. HTML will be used to represent all possible markup languages.
3/15/02 Draft
Burrows & Langford – Chapter 11 page 3 Learning Programming Using VISUAL BASIC .NET
is the case, then an entire new web page would need to be sent from the server to the browser for each change seen by the user. Consider, for example, a menu on the user interface that drops down showing 5 menus items. If the user causes the menu to drop down, and then moves the cursor down the list of five items with each one changing color, this would require 5 or 6 different web pages to be sent from the server when the menu first drops down and as each item changes color.
The primary disadvantage of this option is the large amount of network traffic (called bandwidth) associated with downloading so many pages. In fact, the time it takes to download so many pages would result in a very unsatisfactory user experience. Thus, this option is unacceptable. Option 2 – Script Within the Browser. In this option, small segments of program code called script, are embedded within the HTML code sent from the server to the browser. The browser then executes this code when certain events are detected. For example, if the user clicks on a menu, then a click event could be executed that drops the menu down for the user to select a choice. With this option, a rich GUI could be supported without having to go back to the server. The term client-side script is used to describe script that is executed within the browser on the client machine. In contrast, any script executed on the server is referred to as server-side script.
The most popular scripting languages are JavaScript (also called JScript2) and VBScript (a variation of Visual Basic). Both of these languages are interpreted, not compiled into actual machine language. The main impact of this is speed – interpreted languages are not as fast as compiled languages. However, given the speed of today’s typical personal computer, this is not really a very significant factor. JavaScript is a Java-like language from a syntax perspective but it is not the same as the Java programming language. The two main browsers, Internet Explorer and Netscape Navigator, both support JavaScript.3 However, VBScript is only supported on the Internet Explorer. For this reason, most client-side script is written using JavaScript.
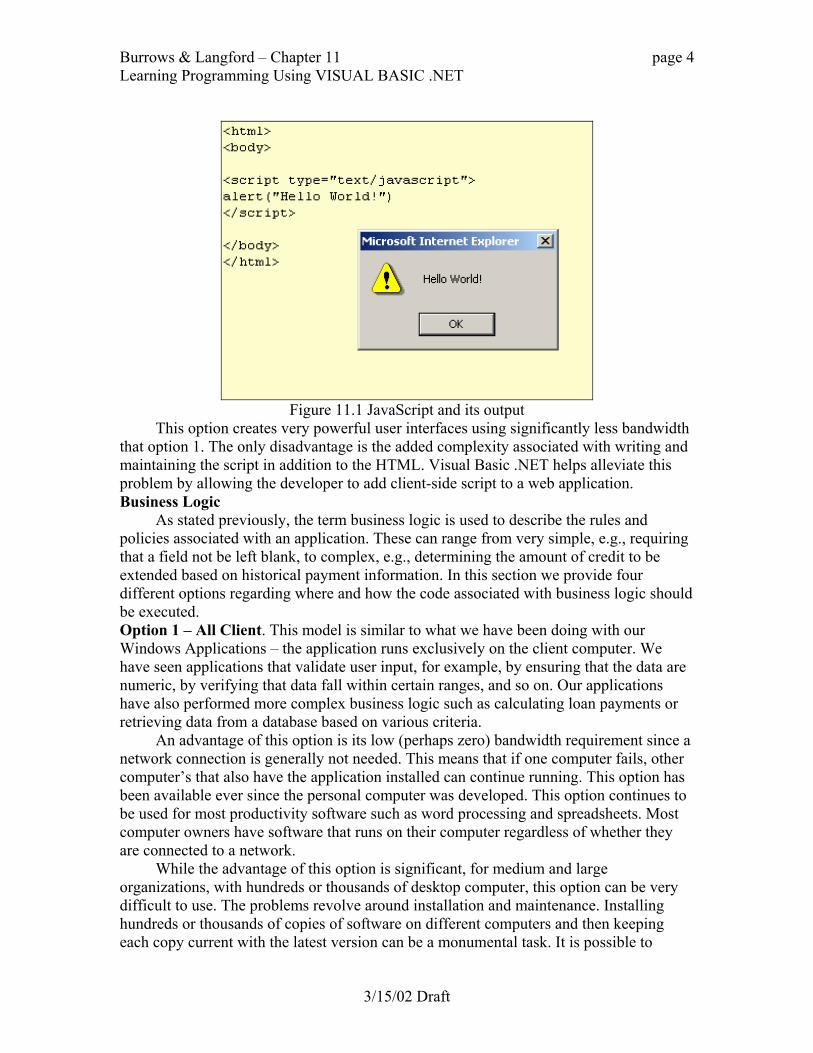
A small script written in JavaScript is shown in Figure 11.1. This script displays an alert box (similar to a MsgBox) that is also shown in the figure.
2 Both JavaScript and JScript implement a standard known as ECMAScript create by the European Computer Manufacturer’s Asscoiation. 3 Early versions of both Microsoft Internet Explorer and Netscape Navigator did not support JavaScript.
3/15/02 Draft
Burrows & Langford – Chapter 11 page 4 Learning Programming Using VISUAL BASIC .NET
Figure 11.1 JavaScript and its output
This option creates very powerful user interfaces using significantly less bandwidth that option 1. The only disadvantage is the added complexity associated with writing and maintaining the script in addition to the HTML. Visual Basic .NET helps alleviate this problem by allowing the developer to add client-side script to a web application. Business Logic
As stated previously, the term business logic is used to describe the rules and policies associated with an application. These can range from very simple, e.g., requiring that a field not be left blank, to complex, e.g., determining the amount of credit to be extended based on historical payment information. In this section we provide four different options regarding where and how the code associated with business logic should be executed. Option 1 – All Client. This model is similar to what we have been doing with our Windows Applications – the application runs exclusively on the client computer. We have seen applications that validate user input, for example, by ensuring that the data are numeric, by verifying that data fall within certain ranges, and so on. Our applications have also performed more complex business logic such as calculating loan payments or retrieving data from a database based on various criteria.
An advantage of this option is its low (perhaps zero) bandwidth requirement since a network connection is generally not needed. This means that if one computer fails, other computer’s that also have the application installed can continue running. This option has been available ever since the personal computer was developed. This option continues to be used for most productivity software such as word processing and spreadsheets. Most computer owners have software that runs on their computer regardless of whether they are connected to a network.
While the advantage of this option is significant, for medium and large organizations, with hundreds or thousands of desktop computer, this option can be very difficult to use. The problems revolve around installation and maintenance. Installing hundreds or thousands of copies of software on different computers and then keeping each copy current with the latest version can be a monumental task. It is possible to
3/15/02 Draft

Burrows & Langford – Chapter 11 page 5 Learning Programming Using VISUAL BASIC .NET
perform “network installs”, where all the software is updated via a network, but this can be a problem if, for example, a computer user has turned off the machine. Things get even more complex if users are all over the world and connected via the Internet. As a result of these difficulties, most organizations are limiting their use of this option for processing business logic. Option 2 – Embed Business Logic in a Web Page Using Client-Side Scripting. This option involves using scripts (VBScript or JavaScript) that is interpreted in the browser. It is like the second presentation option, except the script is processing business logic, not appearance. Figure 11.2 shows an example where a user tries to submit some information to a server and a message is displayed indicating that the missing information must be supplied before the submission can take place.
Figure 11.2 Alert indicating that complete and valid data required for submission The code that is executed when the user clicks on the “Submit Info” button is
shown in Figure 11.3. This code, written in JavaScript, first checks the length of the HoldersName text box to see if it equals zero. If the length is zero, the text box has been left blank and error text is added to the message variable. It then checks to see if the length of the CardNumber text box is < 16. If it is, additional error text is added to message. Finally, the CardNumber text field is tested to see if it is not a number (isNaN). If it is not a number, then additional error text is generated. Finally, if an error was found (the variable message not empty), an alert box is displayed.
3/15/02 Draft

Burrows & Langford – Chapter 11 page 6 Learning Programming Using VISUAL BASIC .NET
Figure 11.3 JavaScript used to validate user input
This option clearly overcomes the installation and maintenance issues associated with Option 1. Every time users download the page to their browser, they get a fresh version of the HTML and its embedded scripts. If a revision is made to the page on the server, then everyone who downloads the page after that gets the revised version. There is some extra network overhead associated with sending the script as well as the HTML but this is generally minimal.
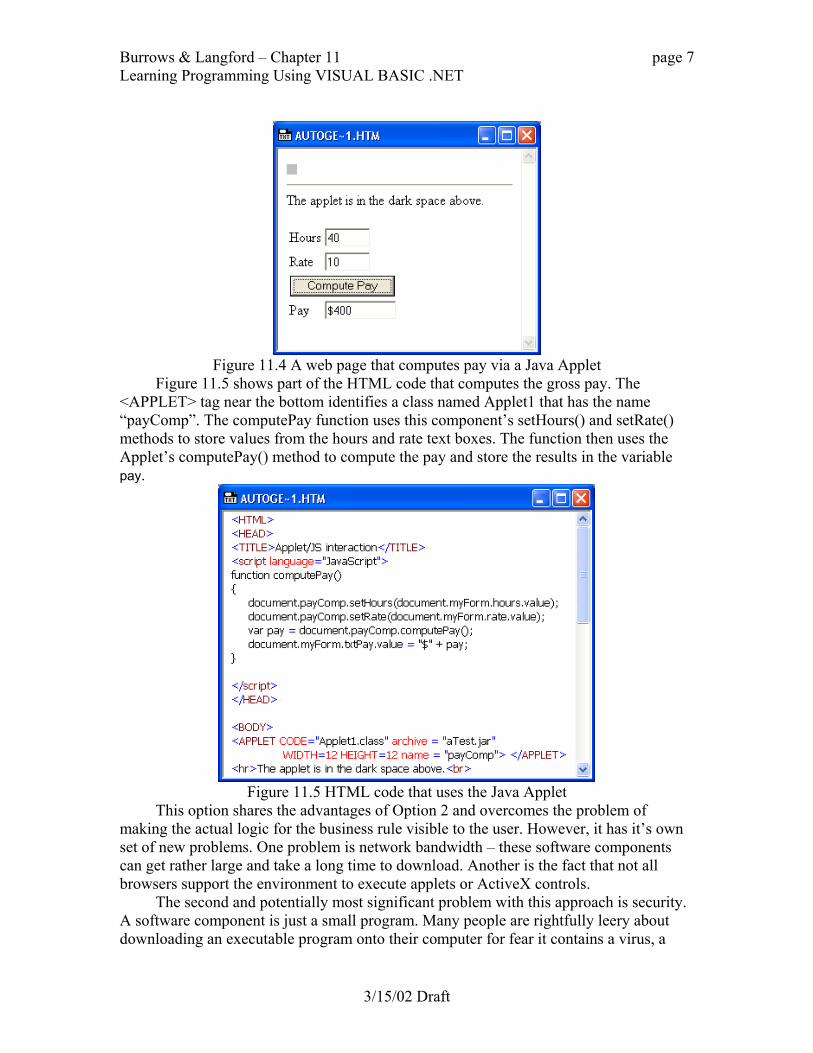
The problem with this option is the user’s ability to view the script. There is no way to prevent this with today’s technology. In the situation above, this is probably not an issue. However, there are times when the business logic is proprietary or contains sensitive information. In these cases, this option is not acceptable. Option 3 – Embed a Client-side component in the Web Page. In this option, a software component, not script, is embedded in the web page and downloaded each time the page is accessed. Software components such as Java Applets and Microsoft ActiveX components can be used in this scenario. Figure 11.4 shows a sample web page that computes gross pay (hours times rate) using a Java Applet component. The component is downloaded with the page in a form where the coded business logic is difficult or impossible for the user to examine or copy.
3/15/02 Draft
Burrows & Langford – Chapter 11 page 7 Learning Programming Using VISUAL BASIC .NET
Figure 11.4 A web page that computes pay via a Java Applet
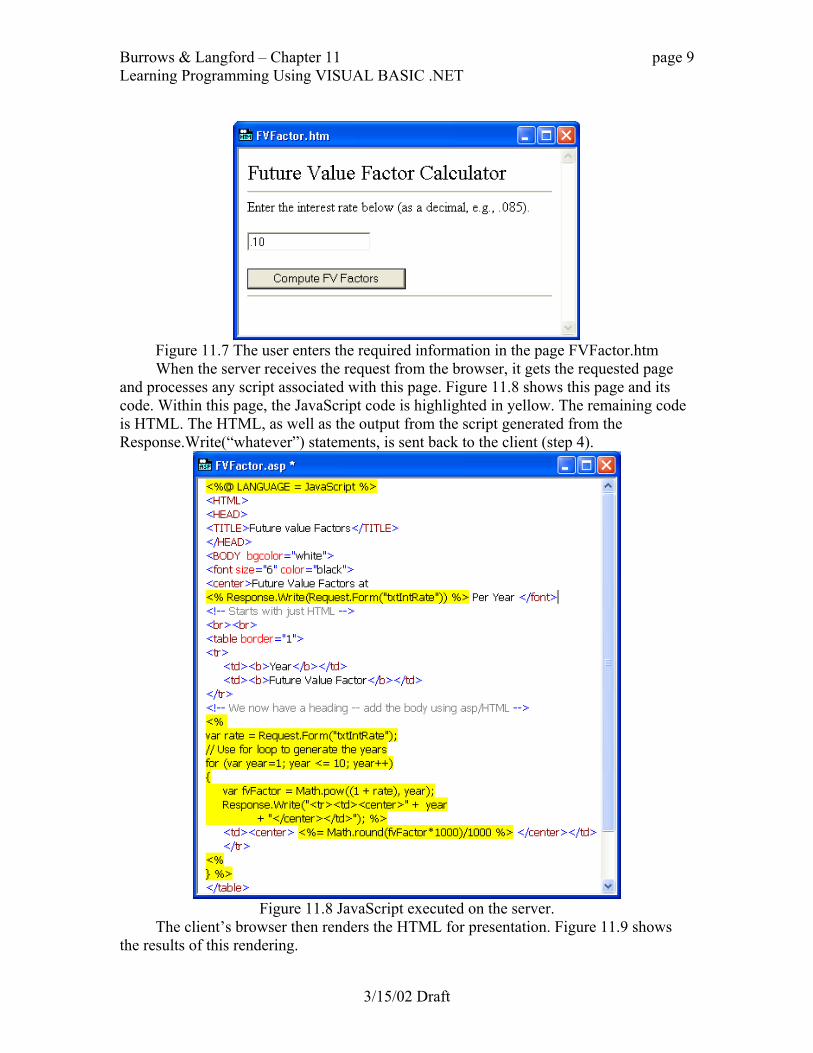
Figure 11.5 shows part of the HTML code that computes the gross pay. The <APPLET> tag near the bottom identifies a class named Applet1 that has the name “payComp”. The computePay function uses this component’s setHours() and setRate() methods to store values from the hours and rate text boxes. The function then uses the Applet’s computePay() method to compute the pay and store the results in the variable pay.
Figure 11.5 HTML code that uses the Java Applet
This option shares the advantages of Option 2 and overcomes the problem of making the actual logic for the business rule visible to the user. However, it has it’s own set of new problems. One problem is network bandwidth – these software components can get rather large and take a long time to download. Another is the fact that not all browsers support the environment to execute applets or ActiveX controls.
The second and potentially most significant problem with this approach is security. A software component is just a small program. Many people are rightfully leery about downloading an executable program onto their computer for fear it contains a virus, a
3/15/02 Draft

Burrows & Langford – Chapter 11 page 8 Learning Programming Using VISUAL BASIC .NET
Trojan horse, or something else that could damage the computer. To overcome this concern, Java restricts its Applets to run only with the browser. An Applet cannot access any resources (like file systems) that are outside the browser. While this has been fairly effective in terms of security, it has limited what Applets can do on the client computer. The term security sandbox is used to describe the situation where code is contained within a specific application that limits the code’s access to the general resources of the computer.
Instead of restricting the component to the browser, Microsoft uses the concept of a “trusted application”. In this model, the software vendor has a third party certify that they are legitimate. This third party’s certificate of authenticity is included with the component when it is downloaded. The user is given the option of accepting the component or rejecting it based on the certificate displayed. If the component is accepted by the user, it is downloaded to the client machine and has few restrictions on what it can do. Some users, however, do not like this approach because there have been reports of hackers who can “fake” the certificate of a legitimate organization. The user is then fooled into believing the component comes from a reliable source. Option 4 – Process Business Logic on the Server. In this option, the business logic is processed on the server, not on the client. Figure 11.6 shows the cycle involved in this option. In this figure, step 1 shows the user requesting a web page from a web server using an URL such as http://www.demo.com/form.html. The web server then sends the requested page to the user’s browser (step 2). The user enters information on the page and then presses the “Submit” button. This causes the information entered by the user to be sent back to the server along with the name of a page to execute on the server (step 3). The server then processes the requested page and executes any embedded script using the information provided by the user. This process creates a new page that is then sent back to the user (step 4). These fours steps are collectively referred to as a “round trip” between the client and server.
Figure 11.6 Cycle involved in server-side processing
As an example, Figure 11.7 shows a page requested by the user (the result of steps 1 and 2 in Figure 11.6). The user fills enters the information in the text box (.10) and clicks on the “Compute FV Factors” button. This causes the browser to send the value .10, as well as the name of a new page, to the server.
3/15/02 Draft
Burrows & Langford – Chapter 11 page 9 Learning Programming Using VISUAL BASIC .NET
Figure 11.7 The user enters the required information in the page FVFactor.htm When the server receives the request from the browser, it gets the requested page
and processes any script associated with this page. Figure 11.8 shows this page and its code. Within this page, the JavaScript code is highlighted in yellow. The remaining code is HTML. The HTML, as well as the output from the script generated from the Response.Write(“whatever”) statements, is sent back to the client (step 4).
Figure 11.8 JavaScript executed on the server.
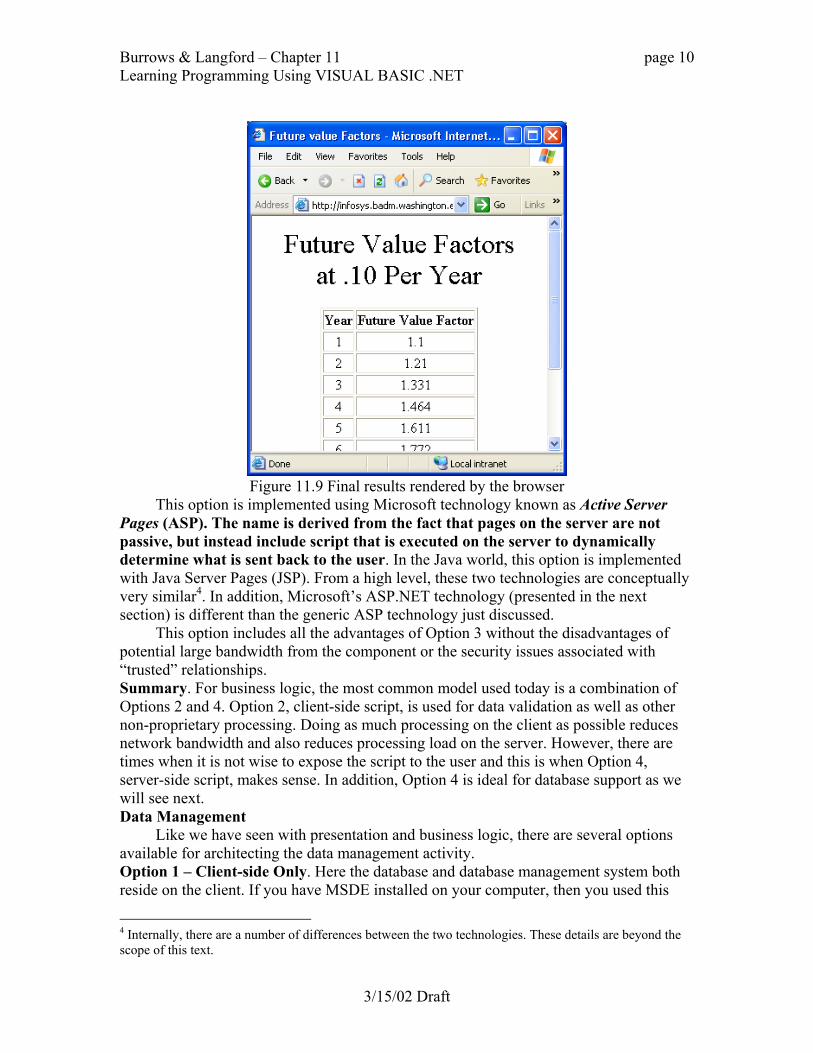
The client’s browser then renders the HTML for presentation. Figure 11.9 shows the results of this rendering.
3/15/02 Draft
Burrows & Langford – Chapter 11 page 10 Learning Programming Using VISUAL BASIC .NET
Figure 11.9 Final results rendered by the browser
This option is implemented using Microsoft technology known as Active Server Pages (ASP). The name is derived from the fact that pages on the server are not passive, but instead include script that is executed on the server to dynamically determine what is sent back to the user. In the Java world, this option is implemented with Java Server Pages (JSP). From a high level, these two technologies are conceptually very similar4. In addition, Microsoft’s ASP.NET technology (presented in the next section) is different than the generic ASP technology just discussed.
This option includes all the advantages of Option 3 without the disadvantages of potential large bandwidth from the component or the security issues associated with “trusted” relationships. Summary. For business logic, the most common model used today is a combination of Options 2 and 4. Option 2, client-side script, is used for data validation as well as other non-proprietary processing. Doing as much processing on the client as possible reduces network bandwidth and also reduces processing load on the server. However, there are times when it is not wise to expose the script to the user and this is when Option 4, server-side script, makes sense. In addition, Option 4 is ideal for database support as we will see next. Data Management
Like we have seen with presentation and business logic, there are several options available for architecting the data management activity. Option 1 – Client-side Only. Here the database and database management system both reside on the client. If you have MSDE installed on your computer, then you used this
4 Internally, there are a number of differences between the two technologies. These details are beyond the scope of this text.
3/15/02 Draft
Burrows & Langford – Chapter 11 page 11 Learning Programming Using VISUAL BASIC .NET
option with the database-related examples earlier in the text. The obvious advantage of this approach is speed. Since the database and DBMS are on the client, there are no network issues or issues with multiple people access the database concurrently. The drawbacks, and they are significant, include the same installation and maintenance issues associated with Option 1 for business logic as well as another issue; maintaining consistent data between multiple copies of the database. For example, if the database consists of product inventory information for an order entry system, then when an item is sold by one person, the adjusted inventory for that item must be updated on all the other copies of the database. If it is not updated, then the risk exists that the item could be sold a second or third time.
Due to the difficulties of database consistency, installation, and maintenance, this option is generally not feasible. Option 2 – Server-side Only. In this option, the database and DBMS both reside on a server. Note that this may or may not be the same server that hosts the web pages. The database is accessed from code that exists on the web server. The cycle is the same as shown in Figure 11.6, with the addition of database processing between steps 3 and 4.
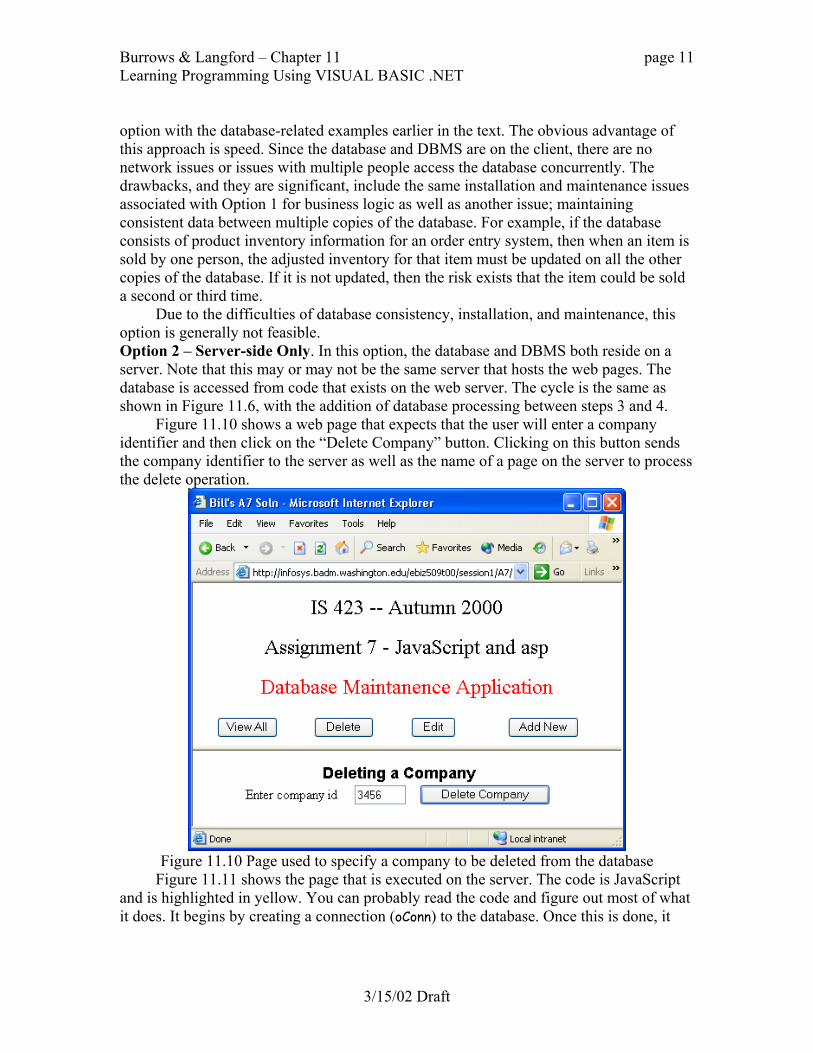
Figure 11.10 shows a web page that expects that the user will enter a company identifier and then click on the “Delete Company” button. Clicking on this button sends the company identifier to the server as well as the name of a page on the server to process the delete operation.
Figure 11.10 Page used to specify a company to be deleted from the database
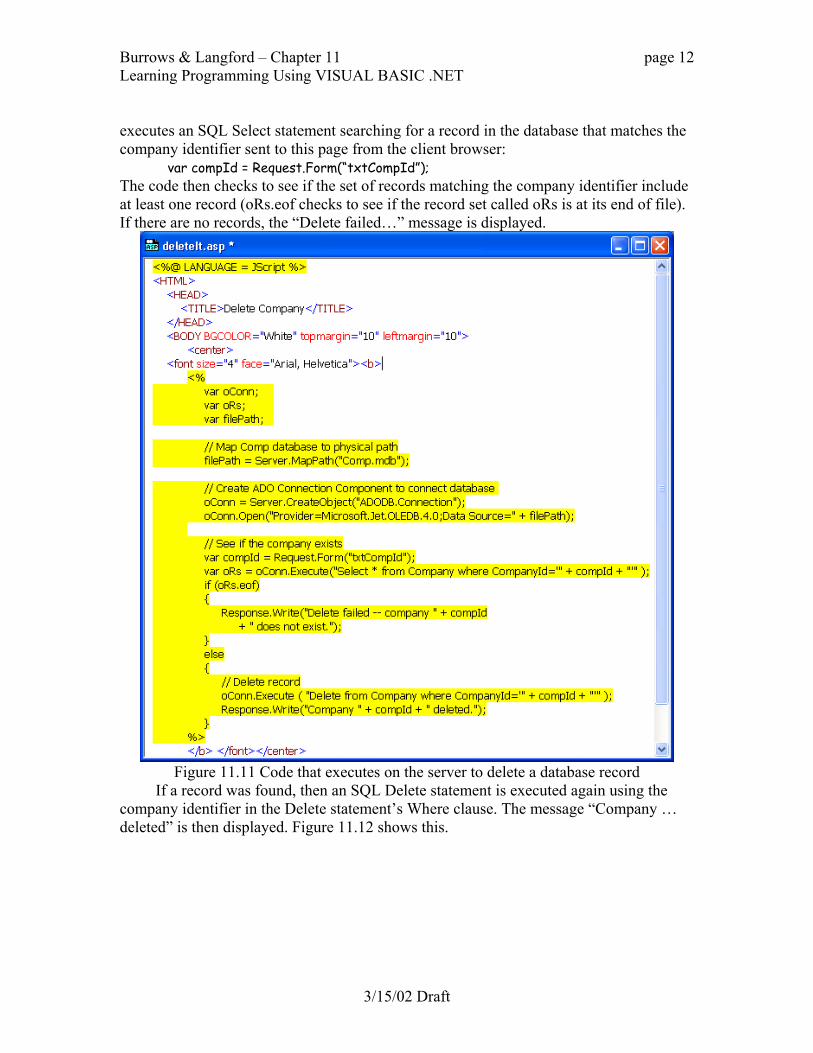
Figure 11.11 shows the page that is executed on the server. The code is JavaScript and is highlighted in yellow. You can probably read the code and figure out most of what it does. It begins by creating a connection (oConn) to the database. Once this is done, it
3/15/02 Draft
Burrows & Langford – Chapter 11 page 12 Learning Programming Using VISUAL BASIC .NET
executes an SQL Select statement searching for a record in the database that matches the company identifier sent to this page from the client browser: var compId = Request.Form(“txtCompId”); The code then checks to see if the set of records matching the company identifier include at least one record (oRs.eof checks to see if the record set called oRs is at its end of file). If there are no records, the “Delete failed…” message is displayed.
Figure 11.11 Code that executes on the server to delete a database record
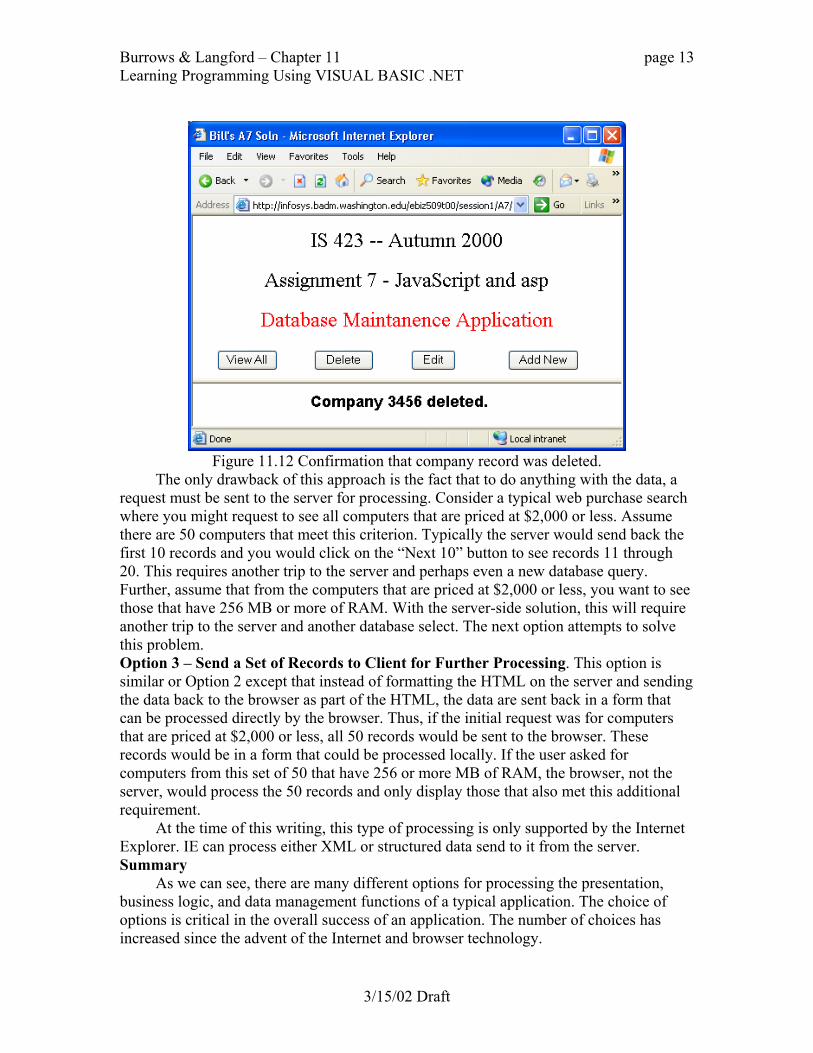
If a record was found, then an SQL Delete statement is executed again using the company identifier in the Delete statement’s Where clause. The message “Company … deleted” is then displayed. Figure 11.12 shows this.
3/15/02 Draft
Burrows & Langford – Chapter 11 page 13 Learning Programming Using VISUAL BASIC .NET
Figure 11.12 Confirmation that company record was deleted.
The only drawback of this approach is the fact that to do anything with the data, a request must be sent to the server for processing. Consider a typical web purchase search where you might request to see all computers that are priced at $2,000 or less. Assume there are 50 computers that meet this criterion. Typically the server would send back the first 10 records and you would click on the “Next 10” button to see records 11 through 20. This requires another trip to the server and perhaps even a new database query. Further, assume that from the computers that are priced at $2,000 or less, you want to see those that have 256 MB or more of RAM. With the server-side solution, this will require another trip to the server and another database select. The next option attempts to solve this problem. Option 3 – Send a Set of Records to Client for Further Processing. This option is similar or Option 2 except that instead of formatting the HTML on the server and sending the data back to the browser as part of the HTML, the data are sent back in a form that can be processed directly by the browser. Thus, if the initial request was for computers that are priced at $2,000 or less, all 50 records would be sent to the browser. These records would be in a form that could be processed locally. If the user asked for computers from this set of 50 that have 256 or more MB of RAM, the browser, not the server, would process the 50 records and only display those that also met this additional requirement.
At the time of this writing, this type of processing is only supported by the Internet Explorer. IE can process either XML or structured data send to it from the server. Summary
As we can see, there are many different options for processing the presentation, business logic, and data management functions of a typical application. The choice of options is critical in the overall success of an application. The number of choices has increased since the advent of the Internet and browser technology.
3/15/02 Draft

Burrows & Langford – Chapter 11 page 14 Learning Programming Using VISUAL BASIC .NET
In the next sections we introduce Microsoft’s ASP.NET technology and how it is
supported in Visual Basic .NET. As we cover various topics, we will make references back to this architecture discussion. Hopefully that will help solidify the understanding of these choices. Exercise 11.1. From your experience, discuss a specific business rule that would be best processed using client-side script. Exercise 11.2. From your experience, discuss a specific business rule that would be best processed using server-side script. Exercise 11.3. Assume that a company wants to allow customers to purchase products from them directly using a web browser. Provide a web architecture that could support this application. Clearly state which activities should take place on the client and which should take place on the server(s). Exercise 11.4. Discuss how using a client/server architecture helps reduce the problems associated with processing business logic solely on the client. 11.2 ASP.NET Web Applications
In this section and Section 11.3 we introduce some of the fundamental controls and concepts associated with ASP.NET and Visual Basic .NET. This coverage will not be exhaustive and instead provide a glimpse into the world of Web Applications using ASP.NET. In order to run the examples and work on the project in this chapter, you will need access to both Microsoft IIS 5.0 or newer as well as the MSDE or SQL Server. You should refer to Appendix B and C for more information on these tools including installation and configuration options. The code in this chapter uses a local version of both IIS 5.0 (localhost) and MSDE. Creating a Simple Web Application
To start, we need to understand the basic structure of a Web Application. Visual Basic .NET provides a template to create a new Web Application project using the same steps as we have already used while creating Windows Applications. We start a new project by bringing up the New Project dialog box as shown in Figure 11.13. However, unlike previous projects, we select the ASP.NET Web Application template. The location box must refer to a valid directory registered in the IIS server. When the new project is created, Visual Basic .NET automatically creates a new web directory for you. In Figure 11.13 we see the URL: http://localhost/Demo1 When you first start using Visual Basic .NET you will likely see the URL: http://localhost/WebApplication1 This second URL is referring to the default site created on the IIS server. We have changed “WebApplication1” to “Demo1” in Figure 11.13 so that the web directory has a more meaningful name.
3/15/02 Draft

Burrows & Langford – Chapter 11 page 15 Learning Programming Using VISUAL BASIC .NET
Figure 11.13 Creating a new ASP.NET Web Application
After clicking on OK, a new Web Application project will be created. The actual directory structure for this new application will be:
c:\Inetpub\wwwroot\Demo1\ The Inetpub and wwwroot folders are the standard default folders used to storing web applications associated with the IIS server.
Figure 11.14 shows the Web Form. This is similar to the Windows Form that we have been using in previous chapters. The difference is the underlying code is HTML. You can see the HTML tab at the bottom of the window.
Figure 11.14 The Web Form used to create an HTML page
3/15/02 Draft

Burrows & Langford – Chapter 11 page 16 Learning Programming Using VISUAL BASIC .NET
Just like Windows Forms, you can drag and drop components from the Toolbox.
With Web Forms, some of the tabs in the Toolbox differ from those in Windows Forms. Figure 11.15 shows a segment of the Web Forms tab. You can see many of the same controls that exist in Windows Forms (although, as we will see, the names of many of their properties will differ).
Figure 11.15 Some of the Web Forms tools
If we look at the Solution Explorer, we also see some differences. Figure 11.16 shows the Solution Explorer for our Web Application. Notice that the file extension for the Web Form is “.aspx”. This extension is very important and should not be changed. It is used by the server to indicate that the content of the files includes script that must be executed on the server.
Figure 11.16 The Solution Explorer for a Web Application Solution
We strongly recommend that you take one additional step that will make it easier to move your web project from one developer’s computer to another. This involves moving the solution file (.sln) into the web folder. Visual Basic .NET initially saves the solution file in the Documents and Settings folder on the C: drive. This works fine as long as you do your work on the same computer. However, if you move your project to another computer, you will need the solutions file as well as all the other files shown in Figure
3/15/02 Draft
Burrows & Langford – Chapter 11 page 17 Learning Programming Using VISUAL BASIC .NET
11.16. To move the solution file to the web folder, click the Solution entry at the top of the Solution Explorer window (Demo1 in this example), then select “Save Demo1.sln As…” from the File menu. Be sure you select Save As…, not just Save. In the Save dialog box that is then shown, navigate to the web application root (“c:\Inetpub\wwwroot\Demo1\” in this example), and save the solution file there. In this way, you can copy the “Demo1” folder to another computer and you will have all the files that are needed. See Appendix B for more information on moving a web application from one computer to another for development purposes.
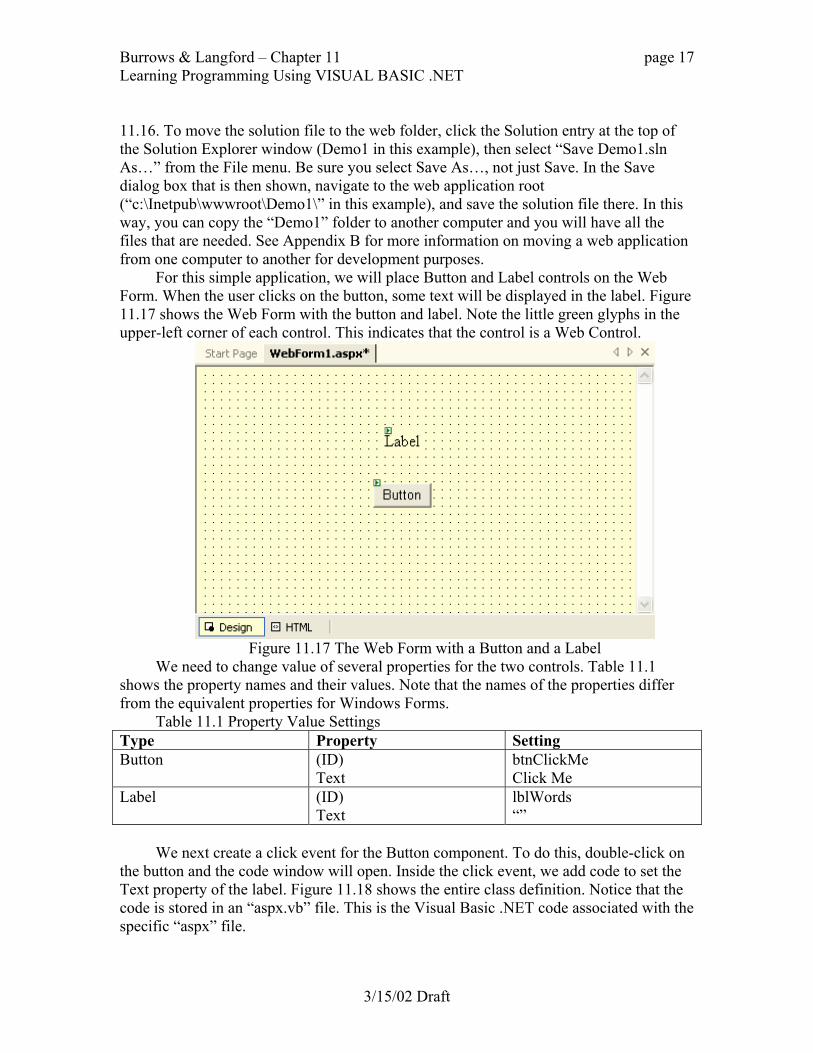
For this simple application, we will place Button and Label controls on the Web Form. When the user clicks on the button, some text will be displayed in the label. Figure 11.17 shows the Web Form with the button and label. Note the little green glyphs in the upper-left corner of each control. This indicates that the control is a Web Control.
Figure 11.17 The Web Form with a Button and a Label
We need to change value of several properties for the two controls. Table 11.1 shows the property names and their values. Note that the names of the properties differ from the equivalent properties for Windows Forms.
Table 11.1 Property Value Settings Type Property Setting Button (ID)
Text btnClickMe Click Me
Label (ID) Text
lblWords “”
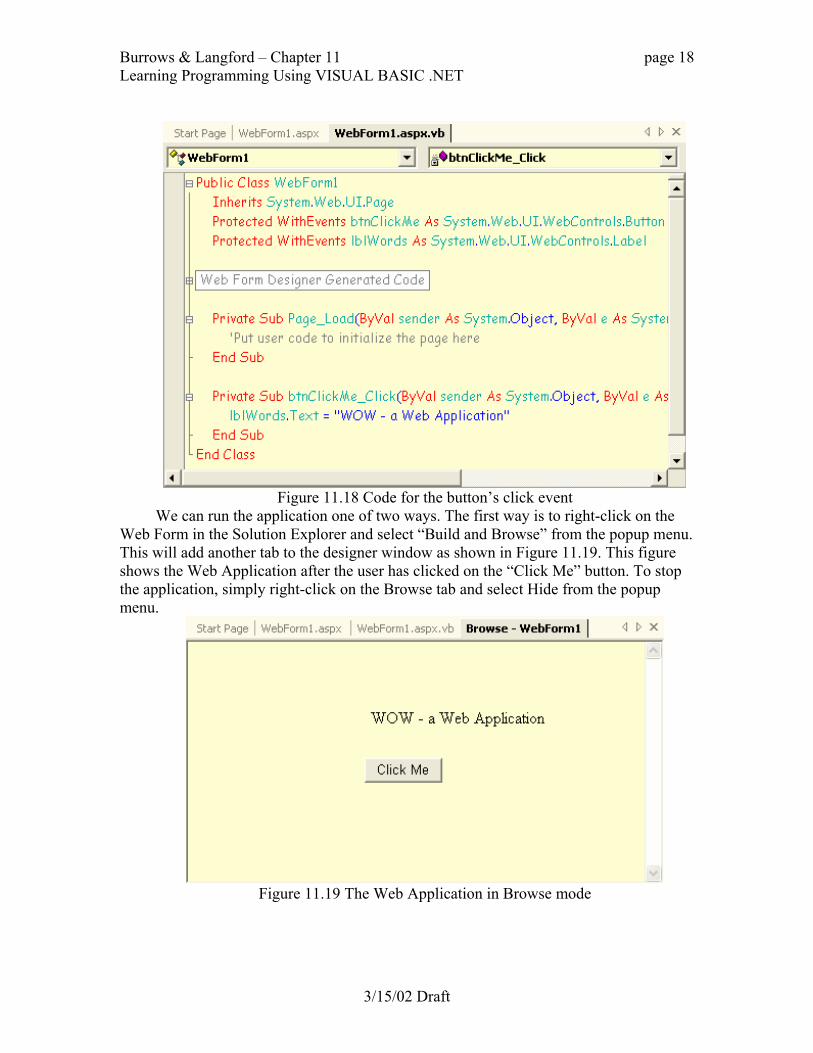
We next create a click event for the Button component. To do this, double-click on
the button and the code window will open. Inside the click event, we add code to set the Text property of the label. Figure 11.18 shows the entire class definition. Notice that the code is stored in an “aspx.vb” file. This is the Visual Basic .NET code associated with the specific “aspx” file.
3/15/02 Draft
Burrows & Langford – Chapter 11 page 18 Learning Programming Using VISUAL BASIC .NET
Figure 11.18 Code for the button’s click event
We can run the application one of two ways. The first way is to right-click on the Web Form in the Solution Explorer and select “Build and Browse” from the popup menu. This will add another tab to the designer window as shown in Figure 11.19. This figure shows the Web Application after the user has clicked on the “Click Me” button. To stop the application, simply right-click on the Browse tab and select Hide from the popup menu.
Figure 11.19 The Web Application in Browse mode
3/15/02 Draft

Burrows & Langford – Chapter 11 page 19 Learning Programming Using VISUAL BASIC .NET
The other way to run the application is to click on the Start tool in the Toolbar (or
select Start from the Debug menu). This will cause Internet Explorer to be launched and the page to be loaded.5 Figure 11.20 shows this.
Figure 11.20 Running the Web Application in a browser
When the “Click Me” button is pressed, the Web Form is sent to the server, the click event is executed, which causes the Label’s Text property to change, and then the updated page is sent back to the browser. When running within the browser, you can briefly see the status bar at the bottom of the browser window flicker as it sends the page to the server and the server sends the updated page back. Note that, unlike a Windows Application, where a click event is processed by the computer where the application is running, a Web Application’s code is executed on the server no matter where the server is located. In this case the server is running locally but it makes no difference where the server is running as long as the client browser has access to the network.
Finally, you can look at the HTML that is generated by the system by clicking on the HTML tab. Figure 11.21 shows the HTML. You probably will not have to modify the HTML but if you do modify it, the changes will appear on the Design window when you click back on the Design tab. Also, if you click on a tag in the HTML, such as click on the <form …> tag, the Properties Editor will be set to that component.
5 It may be necessary in some cases to first use the “Build and Browse” method to display the web page before displaying it using the Internet Explorer.
3/15/02 Draft

Burrows & Langford – Chapter 11 page 20 Learning Programming Using VISUAL BASIC .NET
Figure 11.21 Showing the HTML by selecting the HTML tag
Example 11.1 Simple Web Application This is a very simple example that computes gross pay based on hours worked and
an hourly rate. Figure 11.22 shows the application after the user has clicked the Compute Gross Pay button.
Figure 11.22 Example 11.1 as it runs
3/15/02 Draft

Burrows & Langford – Chapter 11 page 21 Learning Programming Using VISUAL BASIC .NET
The application at design time is shown in Figure 11.23. You can see that there are
two textboxes for user input, a label that is used to display the gross pay, and a button to initiate the calculation. In addition, there are a number of labels used to identify the text boxes and the result. These are placed on the Web Form design just as was done with the Windows Form. From this perspective, the process of creating a Web Form in Visual Basic .NET is identical to creating a Windows Form. The difference is we are using a Web Application template and taking the controls from the Web Forms Toolbox.
Figure 11.23 Example 11.1 at design time
The code for the Button control is shown in Figure 11.24. This too is just like the code that you would write for a Windows Form.
Figure 11.24 Code for Example 11.1
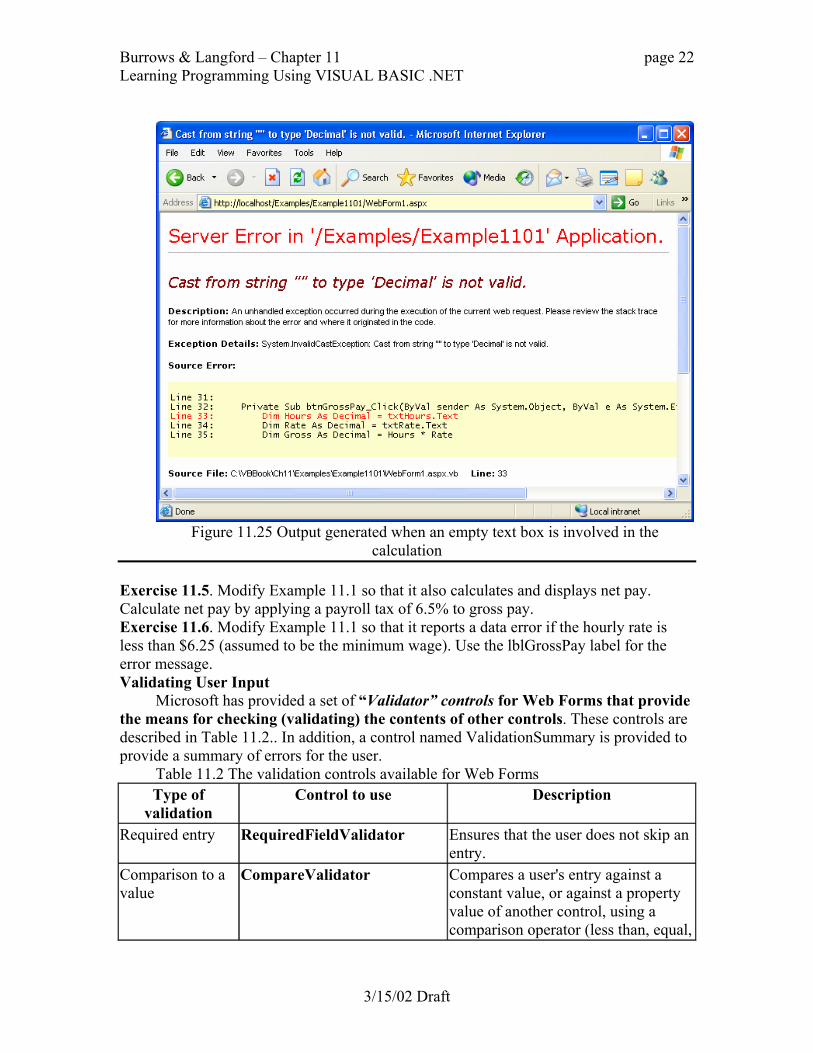
Note that the code for the button does not do any checking for valid numeric values or for empty text boxes. If the user tries to run the application with an empty text box, the output shown in Figure 11.25 is displayed. With your background, the error is fairly easy to identify. However, you would never want an application to generate an error like this for the end user who would certainly be confused. We next turn our attention to preventing such problems.
3/15/02 Draft
Burrows & Langford – Chapter 11 page 22 Learning Programming Using VISUAL BASIC .NET
Figure 11.25 Output generated when an empty text box is involved in the
calculation Exercise 11.5. Modify Example 11.1 so that it also calculates and displays net pay. Calculate net pay by applying a payroll tax of 6.5% to gross pay. Exercise 11.6. Modify Example 11.1 so that it reports a data error if the hourly rate is less than $6.25 (assumed to be the minimum wage). Use the lblGrossPay label for the error message. Validating User Input
Microsoft has provided a set of “Validator” controls for Web Forms that provide the means for checking (validating) the contents of other controls. These controls are described in Table 11.2.. In addition, a control named ValidationSummary is provided to provide a summary of errors for the user.
Table 11.2 The validation controls available for Web Forms Type of
validation Control to use Description
Required entry RequiredFieldValidator Ensures that the user does not skip an entry.
Comparison to a value
CompareValidator Compares a user's entry against a constant value, or against a property value of another control, using a comparison operator (less than, equal,
3/15/02 Draft

Burrows & Langford – Chapter 11 page 23 Learning Programming Using VISUAL BASIC .NET
greater than, and so on).
Range checking RangeValidator Checks that a user's entry is between specified lower and upper boundaries. You can check ranges within pairs of numbers, alphabetic characters, and dates.
Pattern matching RegularExpressionValidator Checks that the entry matches a pattern defined by a regular expression. This type of validation allows you to check for predictable sequences of characters, such as those in social security numbers, e-mail addresses, telephone numbers, postal codes, and so on.
User-defined CustomValidator Checks the user's entry using validation logic that you write yourself. This type of validation allows you to check for values derived at run time.
Each input control can have zero or more validators associated with it. These
validators can perform both client-side as well as server-side validation. As was discussed in Section 11.1, the ability of a web application to perform client-side validation reduces network bandwidth. With the Validator controls, client-side validation is performed by default as long as the browser hosting the application supports client-side scripting. To turn off client-side validation, a control’s EnableClientScript property should be set to False.
If client-side validation is enabled, then any validation errors detected on the client prevent the web page from being sent to the server for processing. In this way, the Web Application reduces its use of the network and server. If all validation rules are passed with a client-side check, then the page is sent to the server for processing. Regardless of whether client-side validation was enabled or disabled, the server performs the validations too. This is viewed as an extra security check to be sure that the validation rules on the client have not been compromised.
Assume we have three text boxes on a Web Form as shown in Figure 11.26. We want to enforce the following set of rules for the three text boxes.
1. All three fields are required – the user must supply data in these fields. 2. Phone number must be formatted according to U.S. phone number syntax. 3. Zip code must be formatted according to U.S. zip code syntax.
3/15/02 Draft

Burrows & Langford – Chapter 11 page 24 Learning Programming Using VISUAL BASIC .NET
Figure 11.26 A Web Form with three textboxes
To enforce these rules, we need to add appropriate Validator controls. We first add a RequiredFieldValidator and place it next to the textbox for the name. In design mode, the form should look like that in Figure 11.27. After placing the Validator on the form, we need to modify some its properties. Table 11.3 shows the properties we need to change and their new values
Figure 11.27 Adding a RequiredFieldValidator to the Web Form
Table 11.3 New Property Values for the RequiredFieldValidator Property Value Text “x” ControlToValidate txtName (the name of the text box) ErrorMessage “Name is required” Font Bold Name
True Arial
3/15/02 Draft
Burrows & Langford – Chapter 11 page 25 Learning Programming Using VISUAL BASIC .NET
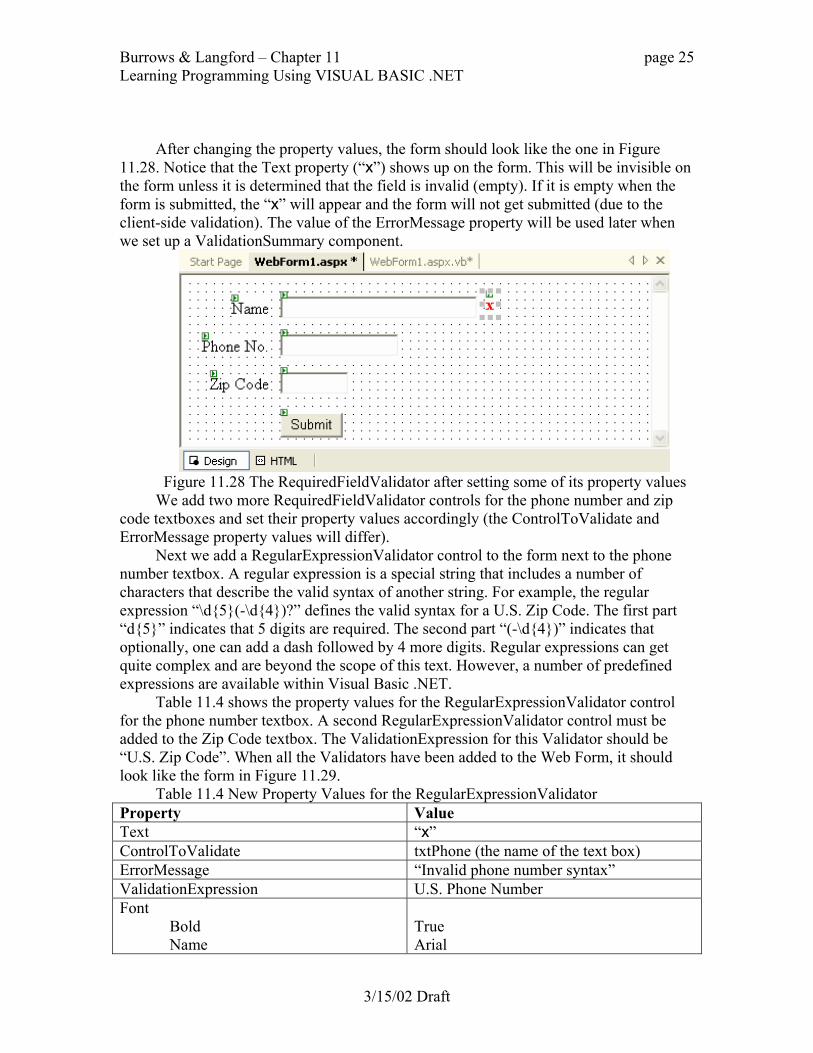
After changing the property values, the form should look like the one in Figure
11.28. Notice that the Text property (“x”) shows up on the form. This will be invisible on the form unless it is determined that the field is invalid (empty). If it is empty when the form is submitted, the “x” will appear and the form will not get submitted (due to the client-side validation). The value of the ErrorMessage property will be used later when we set up a ValidationSummary component.
Figure 11.28 The RequiredFieldValidator after setting some of its property values
We add two more RequiredFieldValidator controls for the phone number and zip code textboxes and set their property values accordingly (the ControlToValidate and ErrorMessage property values will differ).
Next we add a RegularExpressionValidator control to the form next to the phone number textbox. A regular expression is a special string that includes a number of characters that describe the valid syntax of another string. For example, the regular expression “\d{5}(-\d{4})?” defines the valid syntax for a U.S. Zip Code. The first part “d{5}” indicates that 5 digits are required. The second part “(-\d{4})” indicates that optionally, one can add a dash followed by 4 more digits. Regular expressions can get quite complex and are beyond the scope of this text. However, a number of predefined expressions are available within Visual Basic .NET.
Table 11.4 shows the property values for the RegularExpressionValidator control for the phone number textbox. A second RegularExpressionValidator control must be added to the Zip Code textbox. The ValidationExpression for this Validator should be “U.S. Zip Code”. When all the Validators have been added to the Web Form, it should look like the form in Figure 11.29.
Table 11.4 New Property Values for the RegularExpressionValidator Property Value Text “x” ControlToValidate txtPhone (the name of the text box) ErrorMessage “Invalid phone number syntax” ValidationExpression U.S. Phone Number Font Bold Name
True Arial
3/15/02 Draft

Burrows & Langford – Chapter 11 page 26 Learning Programming Using VISUAL BASIC .NET
Figure 11.29 All 5 Validator controls one the Web Form at design time
Figure 11.30 shows the Web Form as seen in the browser. The user has just clicked the Submit button and “x”s can be seen next to both the Name and Zip Code textboxes. These are a result of client-side validation finding that the required Name field is missing and the Zip Code is syntactically invalid. Remember that since a client-side validation detected an error, the form was not sent to the server for processing.
Figure 11.30 The Web Form as shown in the browser
One thing to note in Figure 11.30 is the fact that the symbol “x” may not be sufficient to help the user understand the nature of the problem. To solve this, we can add a ValidationSummary control to the form. This is shown in Figure 11.31. This control displays the value of the ErrorMessage properties for all the errors that are detected on the Web Form. There are two properties of this control that deserve mentioning: these are the DisplayMode and MessageBox properties. The value of the DisplayMode property controls how the error messages are displayed within the control. Choices include bullet
3/15/02 Draft
Burrows & Langford – Chapter 11 page 27 Learning Programming Using VISUAL BASIC .NET
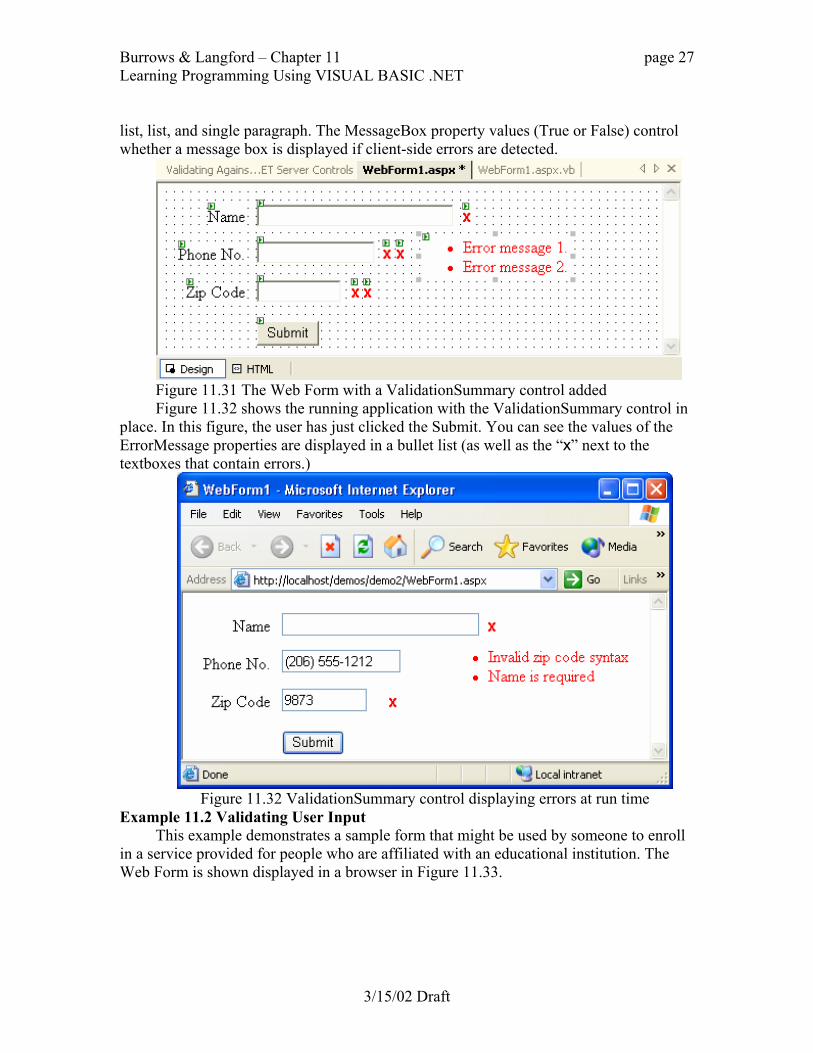
list, list, and single paragraph. The MessageBox property values (True or False) control whether a message box is displayed if client-side errors are detected.
Figure 11.31 The Web Form with a ValidationSummary control added Figure 11.32 shows the running application with the ValidationSummary control in
place. In this figure, the user has just clicked the Submit. You can see the values of the ErrorMessage properties are displayed in a bullet list (as well as the “x” next to the textboxes that contain errors.)
Figure 11.32 ValidationSummary control displaying errors at run time
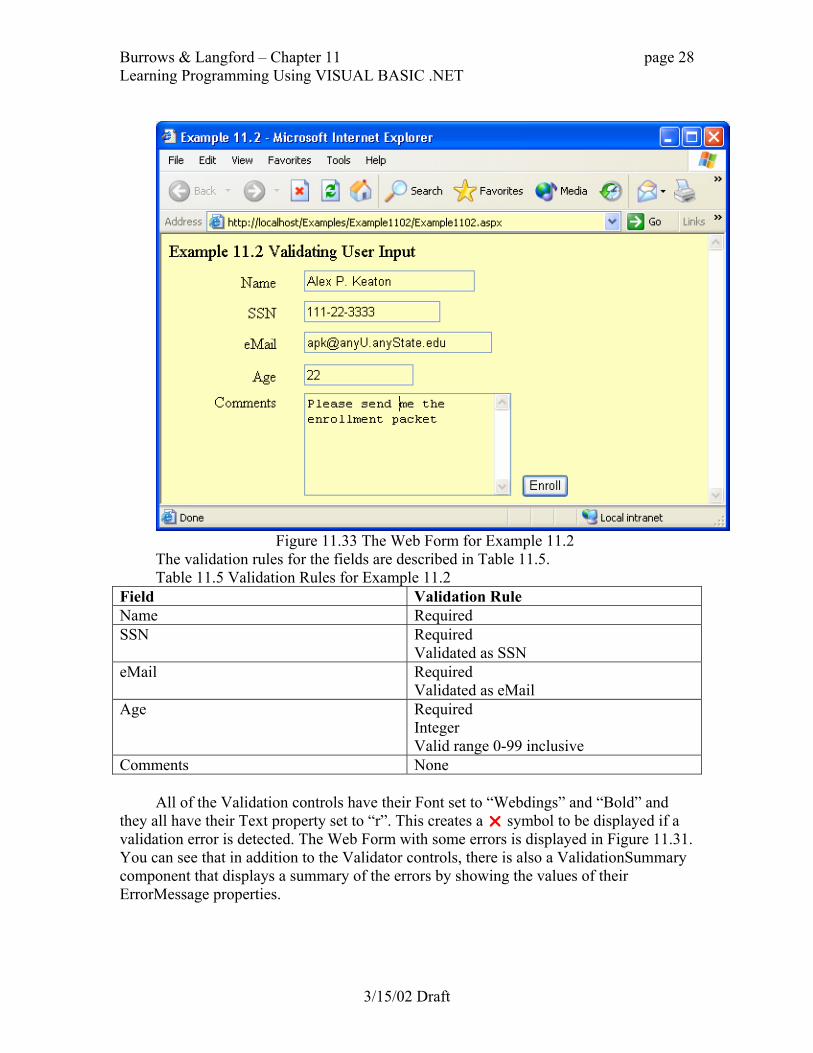
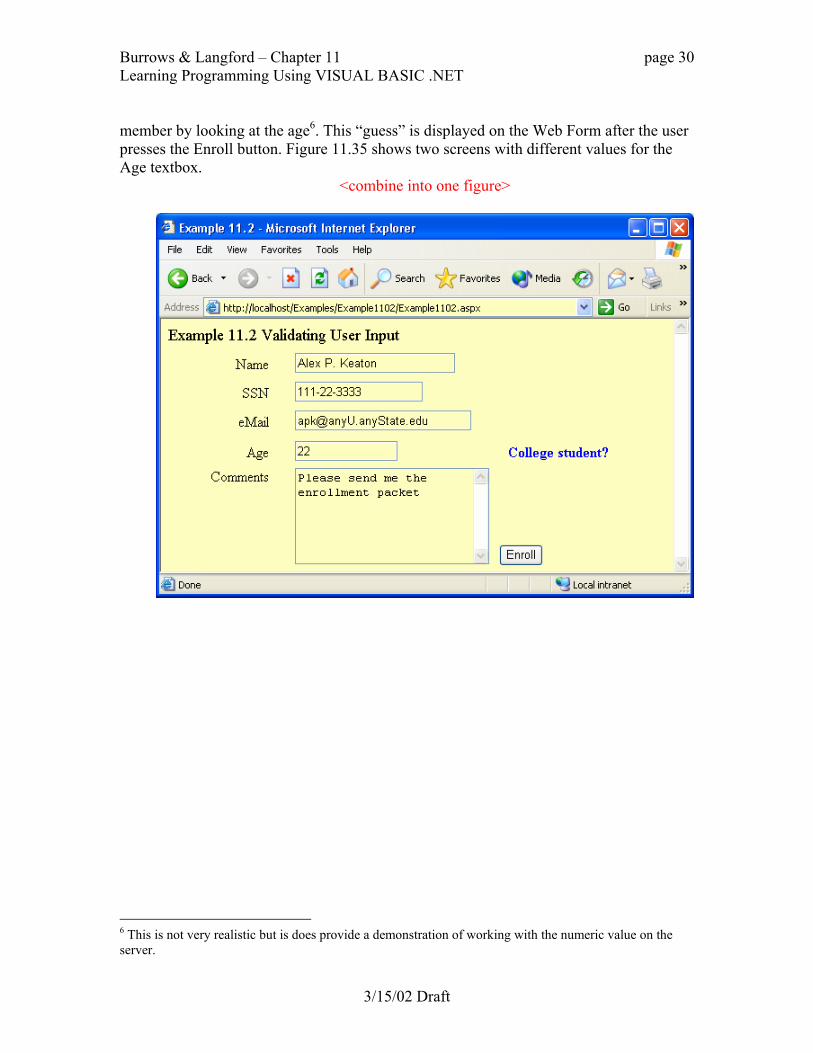
Example 11.2 Validating User Input This example demonstrates a sample form that might be used by someone to enroll
in a service provided for people who are affiliated with an educational institution. The Web Form is shown displayed in a browser in Figure 11.33.
3/15/02 Draft
Burrows & Langford – Chapter 11 page 28 Learning Programming Using VISUAL BASIC .NET
Figure 11.33 The Web Form for Example 11.2
The validation rules for the fields are described in Table 11.5. Table 11.5 Validation Rules for Example 11.2
Field Validation Rule Name Required SSN Required
Validated as SSN eMail Required
Validated as eMail Age Required
Integer Valid range 0-99 inclusive
Comments None All of the Validation controls have their Font set to “Webdings” and “Bold” and
they all have their Text property set to “r”. This creates a symbol to be displayed if a validation error is detected. The Web Form with some errors is displayed in Figure 11.31. You can see that in addition to the Validator controls, there is also a ValidationSummary component that displays a summary of the errors by showing the values of their ErrorMessage properties.
3/15/02 Draft

Burrows & Langford – Chapter 11 page 29 Learning Programming Using VISUAL BASIC .NET
Figure 11.34 Example 11.2 with some validation errors
The SSN and eMail textboxes are validated using a RegularExpressionValidator. As we saw earlier, this control has a property named ValidationExpression that includes some predefined values. These predefined values include “U.S. Social Security Number (ID Number)” and “Internet E-mail Address”. These are set for the appropriate textboxes.
The Age textbox includes two Validator controls in addition to the RequiredFieldValidator. One is a RangeValidator and the other is a CompareValidator. Table 11.x shows the property values that have been set for these properties.
Table 11.5 Property Values for the RangeValidator and CompareValidator Controls for the Age textbox Validator Property Value RangeValidator MaximumValue
MinimumValue Type
99 1 Integer
CompareValidator Operator Type
DataTypeCheck Integer
In addition to the validation process, the Enroll button should be programmed to
scan the email field and determine if it is an “.edu” type. This is a simulation of what might be done to determine the eligibility of the applicant (people affiliated with educational institutions). It also attempts to determine if the applicant is a student or staff
3/15/02 Draft
Burrows & Langford – Chapter 11 page 30 Learning Programming Using VISUAL BASIC .NET
member by looking at the age6. This “guess” is displayed on the Web Form after the user presses the Enroll button. Figure 11.35 shows two screens with different values for the Age textbox.
<combine into one figure>
6 This is not very realistic but is does provide a demonstration of working with the numeric value on the server.
3/15/02 Draft

Burrows & Langford – Chapter 11 page 31 Learning Programming Using VISUAL BASIC .NET
Figure 11.35 Web Form after being submitted to server
The code for the Enroll button is shown in Figure 11.36. You can see that we search the email textbox for the string “edu”. The type and age are then compared against parameters established by the hypothetical organization in charge of the application and the appropriate message is placed into the label on the Web Form.
3/15/02 Draft

Burrows & Langford – Chapter 11 page 32 Learning Programming Using VISUAL BASIC .NET
Figure 11.36 Code for the Enroll button for Example 11.2
It is important to understand exactly what’s happening in this example. When the user clicks on the Enroll button, client-side data validation takes place. If errors are present, they are displayed on the Web Form and the Web Form does not get sent to the server. The user is expected to correct the errors and then click on the Enroll button again. When the client-side validation finds no problems, the Web Form is sent to the server. On the server, the data validation takes place again. If errors are found at the server, the Web Form is sent back to the client with the errors displayed. If no validation errors are found, the click event is processed. The Web Form is updated with any changes (in our case, the label’s Text property is changed) and then sent back to the client. This is a cooperative effort between the client and the server and demonstrates the key architectural differences between Windows Applications (client only) and Web Applications (client/server). Also remember that the server could be anywhere in the world, even though we are testing the application with a server running on the same computer as the client browser runs. Exercise 11.7. Modify Example 11.2 so that it includes a text box to obtain the user’s zip code. Add appropriate Validation control(s) to ensure that the field is not left blank and it contains only numeric digits. Exercise 11.8. Modify Example 11.2 by adding two text boxes that store the minimum and maximum number of credits the user wants to take. Add appropriate Validation
3/15/02 Draft
Burrows & Langford – Chapter 11 page 33 Learning Programming Using VISUAL BASIC .NET
control(s) to ensure that the both values are included, that they are numeric, and that the minimum is less than or equal to the maximum. 11.3 Using Databases with Web Applications
As we discussed in Section 11.1, with web applications the location of the database can be either on the same computer as the web server or can be on a different computer that is called the database server. When the web server and database server reside on the same computer, this is referred to as two-tier architecture. If a database server is added to the solution, the architecture is called three-tier. For the discussions in this chapter we will be using a two-tier solution. Our IIS web server and the MSDE database server will be on the same computer, the local computer. If we were using a different arrangement of servers, the only difference in our solutions would be identifying the various servers using URLs in our Connection objects (for the database server).
For database access, we will be using data adapters and data sets just as we did earlier. We will also be using the DataGrid component. However, there are some differences that we need to keep in mind. First, the data adapter and data set will exist in the code running on the web server, not the client. Second, the DataGrid component we will be using on the server-side is not the same as the DataGrid we used earlier on the client. It is very similar but does not behave exactly the same, e.g.. it does not support master/detail data sets we saw back in Section 8.3.
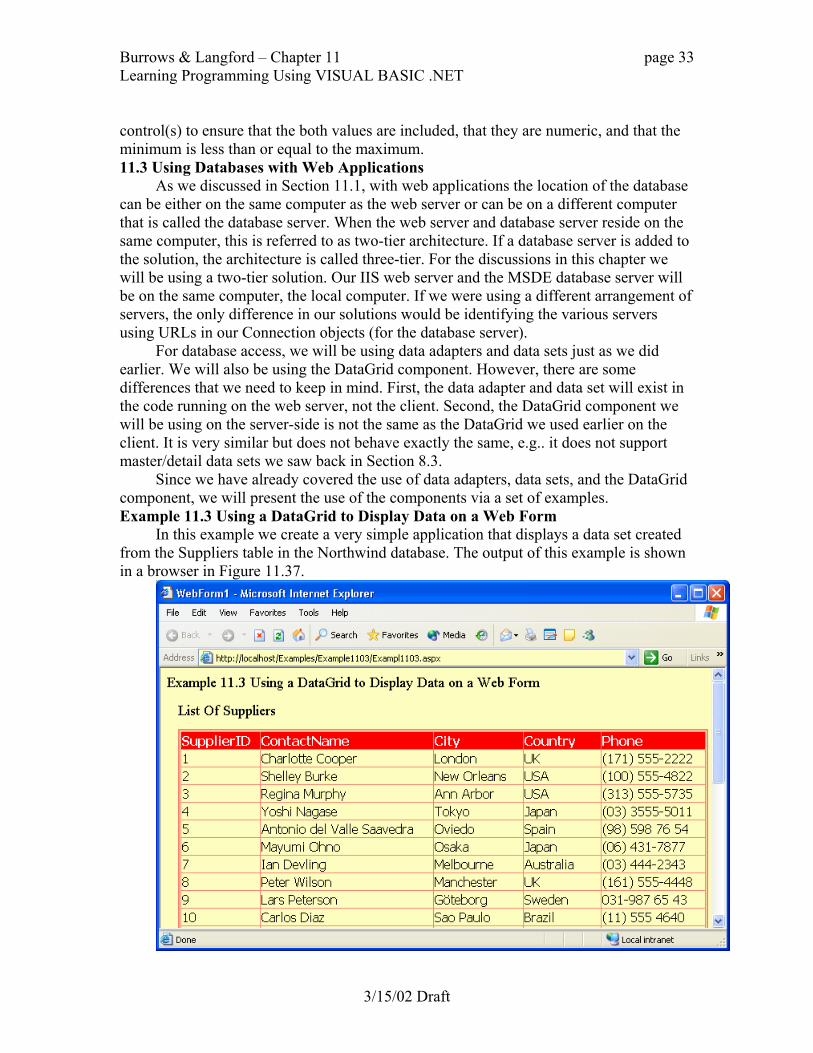
Since we have already covered the use of data adapters, data sets, and the DataGrid component, we will present the use of the components via a set of examples. Example 11.3 Using a DataGrid to Display Data on a Web Form
In this example we create a very simple application that displays a data set created from the Suppliers table in the Northwind database. The output of this example is shown in a browser in Figure 11.37.
3/15/02 Draft

Burrows & Langford – Chapter 11 page 34 Learning Programming Using VISUAL BASIC .NET
Figure 11.37 Example 11.3 shown in the browser window
After creating a new Web Application project, an OleDbDataAdapter named odaSuppliers is created. This data adapter is connected to the Northwind database. The SQL Select statement used in the data adapter is: SELECT SupplierID, ContactName, City, Country, Phone FROM Suppliers A DataSet named dsSuppliers is created next using the Suppliers table from the data adapter.
After the data adapter and data set are created, a DataGrid is added from the Web Forms tab on the Toolbox. The property settings for this DataGrid component are shown in Table 11.6.
Table 11.6 DataGrid Property settings for Example 11.3 Property Setting BorderColor Salmon BorderStyle Double BorderWidth 4 DataMember Suppliers DataSource DsSuppliers Font Tahoma HeaderStyle BackColor Font ForeColor
Red Tahoma White
To fill the DataGrid component, code is added to the WebPage’s Page_Load event
(see Figure 11.38). This event is called when the page is first loaded on the server. The two statements that are used to fill the DataGrid are: OdaSuppliers.Fill(DsSuppliers) grdSuppliers.DataBind()
Just as in Chapter 8, the Fill method fills the DataSet (DsSuppliers) with data from the database using the SQL statement defined in the OleDbDataAdapter. The second statement binds the data grid to the data set. By binding the data set to the DataGrid control, the information in the data set is displayed in the DataGrid control.
Figure 11.38 The code for Example 11.3
The term PostBack is used to describe the process of the web page being sent back to the server for processing. For example, this happened in Example 11.2 when the “Enroll” button was clicked by the user. The property IsPostBack is a Boolean property that is equal to True if the page is being posted back to the server. It is equal to
3/15/02 Draft

Burrows & Langford – Chapter 11 page 35 Learning Programming Using VISUAL BASIC .NET
False if the page is being created for the first time. The If statement in Figure 11.38 is checking to see if the page is being posted back to the server. If it is, the data grid does not have to be filled again since it is already filled. This makes the application more efficient by not doing unnecessary refills. Exercise 11.9. Modify Example 11.3 so that the suppliers are listed in the DataGrid in alphabetical order based on Country and within a country based on City. Example 11.4 Editing Data Using a DataGrid Component
The DataGrid for the Web Form includes the ability to add buttons to each record so that one can edit data within a record. This example demonstrates how to do that. Figure 11.39 shows the web page as it is first displayed in the browser.
Figure 11.39 The initial web page for Example 11.x
When the user clicks on one of the “Edit” buttons, the page is sent back to the server to be updated. When the page is sent back to the client from the server, the page looks like that shown in Figure 11.40. You can see that the Edit button has been replaced with an Update and Cancel button. In addition, the information in each field for the selected row has been placed in a TextBox control. If the user edits any one of the text boxes and then clicks on the Update button, the page is sent back to the server where the field values are used to update the both the data set and the underlying database. The page is then sent back to the client with the DataGrid updated to reflect the edited data. In addition, the two buttons in the row that was edited are replaced with a single Edit button.
3/15/02 Draft

Burrows & Langford – Chapter 11 page 36 Learning Programming Using VISUAL BASIC .NET
Figure 11.40 Example 11.4 after the user has clicked on an Edit button
After creating a new Web Application project, an OleDbDataAdapter is added to the project. It is connected to the Northwind database and defines the following SQL select statement used to extract records from the Customers table. SELECT CustomerID, ContactName, Address, City, PostalCode FROM Customers A data set is then added to the project. The data adapter is named odaCustomers and the data set is named DsCustomers.
A DataGrid is then added to the Web Form and is named grdCustomers. Auto Format is used to format the grid using the “Classic 2” option. Figure 11.41 shows the values of the “Data” properties. The DataKeyField property is set equal to the CustomerID field. This property must be set so that the appropriate row in the data set, as well as the database, can be found for the update operation.
Figure 11.41 The data properties for the DataGrid control
Finally, we need to add the special column on the left of the DataGrid that holds the various buttons. To do this, we modify the Columns collection property of the DataGrid. We first select the Columns property and click on the ellipses to open the Properties dialog box as shown in Figure 11.42. The “Columns” choice is selected in the pane on the left of the box. In the Available columns box, we click on the + expander for the “Button Column” choice. When this is expanded (see Figure 11.43), we select the “Edit, Update, Cancel” option and then click on the arrow button (>) to move the selection to the “Selected columns” box. Also the “Create columns automatically at run time” check box at the top of the form should be selected. This action sets up the first column automatically for us; all we need to do is program the behavior of the buttons. Notice that
3/15/02 Draft

Burrows & Langford – Chapter 11 page 37 Learning Programming Using VISUAL BASIC .NET
there are a Select and a Delete button that could also be added to the column if we wanted that functionality.
Figure 11.42 The Properties dialog with the Columns option selected
Figure 11.43 Moving the Edit, Update, Cancel buttons from the Available to the
Selected columns boxes We need to write code that initially fills the DataGrid with records from the data
set. The code for this located in the Page_Load event procedure as seen in Figure 11.44.
3/15/02 Draft
Burrows & Langford – Chapter 11 page 38 Learning Programming Using VISUAL BASIC .NET
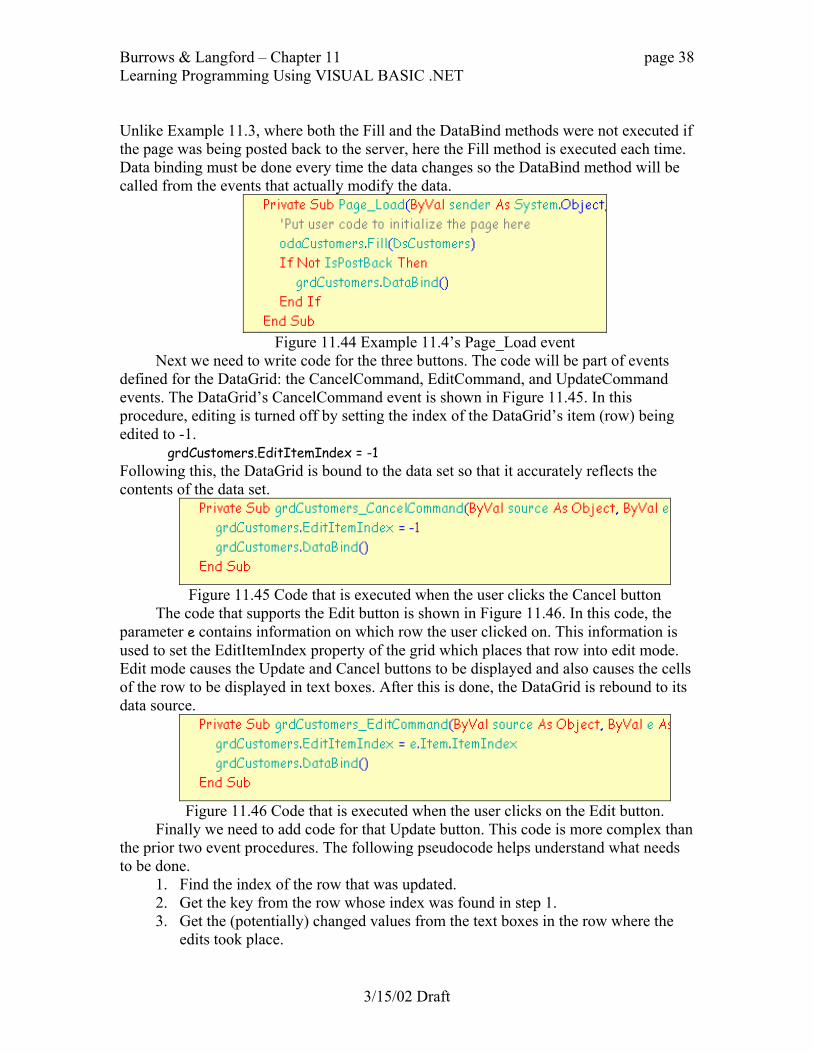
Unlike Example 11.3, where both the Fill and the DataBind methods were not executed if the page was being posted back to the server, here the Fill method is executed each time. Data binding must be done every time the data changes so the DataBind method will be called from the events that actually modify the data.
Figure 11.44 Example 11.4’s Page_Load event
Next we need to write code for the three buttons. The code will be part of events defined for the DataGrid: the CancelCommand, EditCommand, and UpdateCommand events. The DataGrid’s CancelCommand event is shown in Figure 11.45. In this procedure, editing is turned off by setting the index of the DataGrid’s item (row) being edited to -1.
grdCustomers.EditItemIndex = -1 Following this, the DataGrid is bound to the data set so that it accurately reflects the contents of the data set.
Figure 11.45 Code that is executed when the user clicks the Cancel button
The code that supports the Edit button is shown in Figure 11.46. In this code, the parameter e contains information on which row the user clicked on. This information is used to set the EditItemIndex property of the grid which places that row into edit mode. Edit mode causes the Update and Cancel buttons to be displayed and also causes the cells of the row to be displayed in text boxes. After this is done, the DataGrid is rebound to its data source.
Figure 11.46 Code that is executed when the user clicks on the Edit button.
Finally we need to add code for that Update button. This code is more complex than the prior two event procedures. The following pseudocode helps understand what needs to be done.
1. Find the index of the row that was updated. 2. Get the key from the row whose index was found in step 1. 3. Get the (potentially) changed values from the text boxes in the row where the
edits took place.
3/15/02 Draft

Burrows & Langford – Chapter 11 page 39 Learning Programming Using VISUAL BASIC .NET
4. Find the row in the data set to be updated. Since we know the value of the key
(step 3) it is used to find the row in the data set. 5. Write changes to the row in the data set. 6. Apply the same changes to row in the database. Now both the database and the
data set are updated. 7. Take the DataGrid out of edit mode and rebind it to the data source. The Visual Basic .NET code that implements the pseudocode is shown in Figure
11.47. We will take a look at each segment of code since most of it is new.
Figure 11.47 Code that is executed when the user clicks on the Update button.
To get the value of the key field, we need to determine which row was selected for editing and then get the key value associated with that row. The code to do this is:
' find the index of the row that was updated Dim RowIndex As Integer = e.Item.ItemIndex
3/15/02 Draft
Burrows & Langford – Chapter 11 page 40 Learning Programming Using VISUAL BASIC .NET
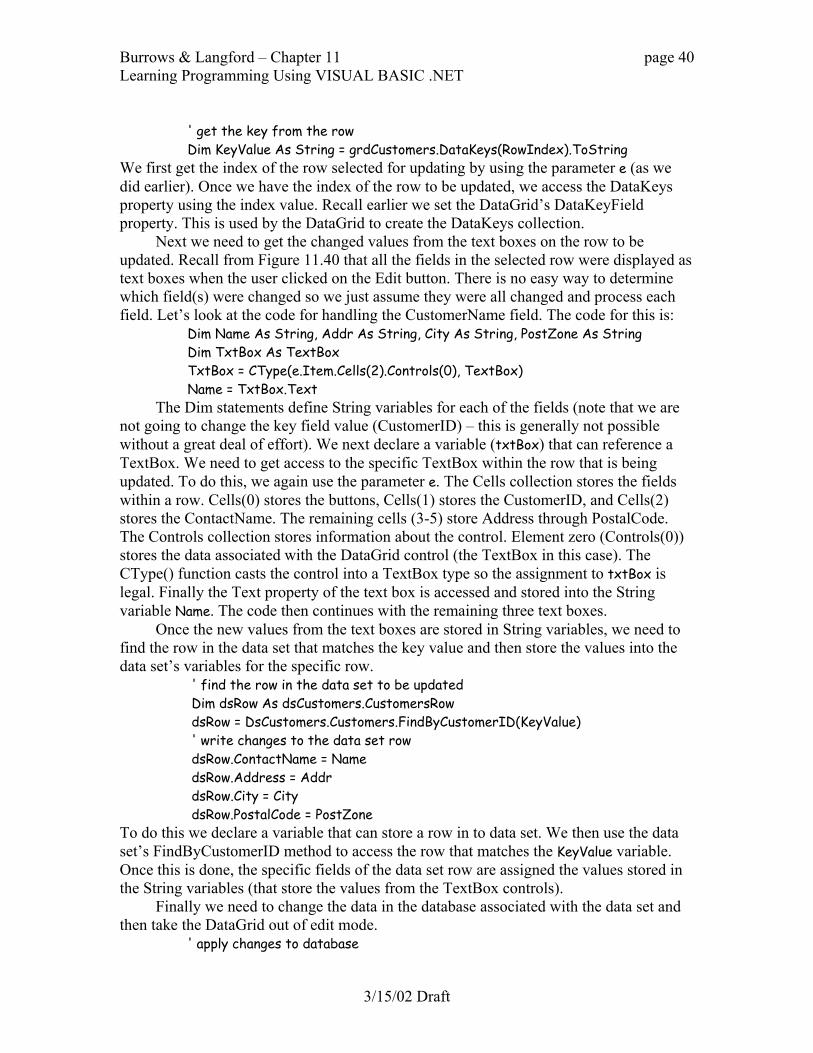
' get the key from the row Dim KeyValue As String = grdCustomers.DataKeys(RowIndex).ToString
We first get the index of the row selected for updating by using the parameter e (as we did earlier). Once we have the index of the row to be updated, we access the DataKeys property using the index value. Recall earlier we set the DataGrid’s DataKeyField property. This is used by the DataGrid to create the DataKeys collection.
Next we need to get the changed values from the text boxes on the row to be updated. Recall from Figure 11.40 that all the fields in the selected row were displayed as text boxes when the user clicked on the Edit button. There is no easy way to determine which field(s) were changed so we just assume they were all changed and process each field. Let’s look at the code for handling the CustomerName field. The code for this is:
Dim Name As String, Addr As String, City As String, PostZone As String Dim TxtBox As TextBox TxtBox = CType(e.Item.Cells(2).Controls(0), TextBox) Name = TxtBox.Text The Dim statements define String variables for each of the fields (note that we are
not going to change the key field value (CustomerID) – this is generally not possible without a great deal of effort). We next declare a variable (txtBox) that can reference a TextBox. We need to get access to the specific TextBox within the row that is being updated. To do this, we again use the parameter e. The Cells collection stores the fields within a row. Cells(0) stores the buttons, Cells(1) stores the CustomerID, and Cells(2) stores the ContactName. The remaining cells (3-5) store Address through PostalCode. The Controls collection stores information about the control. Element zero (Controls(0)) stores the data associated with the DataGrid control (the TextBox in this case). The CType() function casts the control into a TextBox type so the assignment to txtBox is legal. Finally the Text property of the text box is accessed and stored into the String variable Name. The code then continues with the remaining three text boxes.
Once the new values from the text boxes are stored in String variables, we need to find the row in the data set that matches the key value and then store the values into the data set’s variables for the specific row.
' find the row in the data set to be updated Dim dsRow As dsCustomers.CustomersRow dsRow = DsCustomers.Customers.FindByCustomerID(KeyValue) ' write changes to the data set row dsRow.ContactName = Name dsRow.Address = Addr dsRow.City = City dsRow.PostalCode = PostZone
To do this we declare a variable that can store a row in to data set. We then use the data set’s FindByCustomerID method to access the row that matches the KeyValue variable. Once this is done, the specific fields of the data set row are assigned the values stored in the String variables (that store the values from the TextBox controls).
Finally we need to change the data in the database associated with the data set and then take the DataGrid out of edit mode.
' apply changes to database
3/15/02 Draft
Burrows & Langford – Chapter 11 page 41 Learning Programming Using VISUAL BASIC .NET
odaCustomers.Update(DsCustomers) ' take data grid out of edit mode and update it grdCustomers.EditItemIndex = -1 grdCustomers.DataBind()
To update the database we use the data adapter’s Update method, passing it the now updated data set. We then take the DataGrid out of Edit mode by setting its EditItemIndex to -1. Finally we rebind the DataGrid to the data source to be sure that updated information is displayed in the DataGrid when the Web Form is sent back to the client. Exercise 11.10. Using Example 11.4 as a model, create a Web Application that provides the edit capability for the Supplier table in the Northwind database. Make the application display the SupplierID, ContactName, and HomePhone fields. The ContactName and HomePhone fields should be editable. Example 11.5 Using XML and XSL with Web Form
For this final example we are going to redo Example 9.7 where we used two XSL documents to transform an XML file with email information into a display by headers or a display of complete email messages. This solution will actually be easier because of a Web Form control called the XML control. In addition, we will be using an XML file on the server directly rather than creating an XML document from a database like we did in Example 9.7. You could do the same thing that was done in Example 9.7 if you want to start with a database instead of XML.
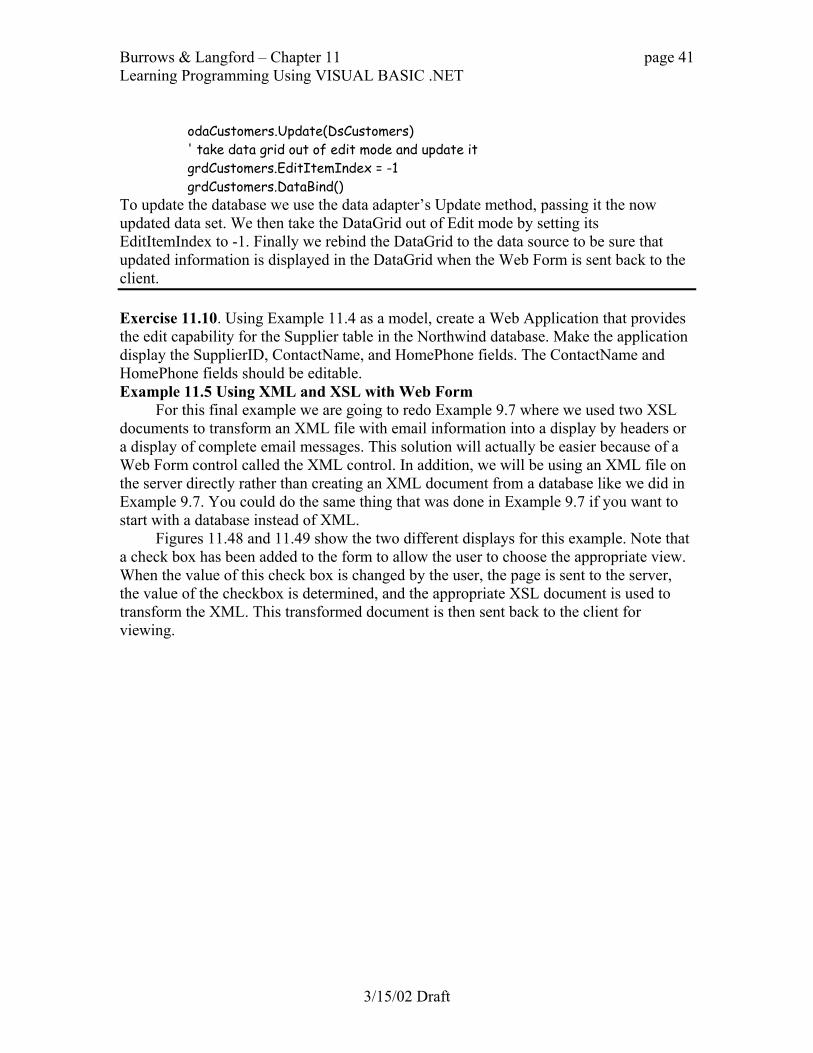
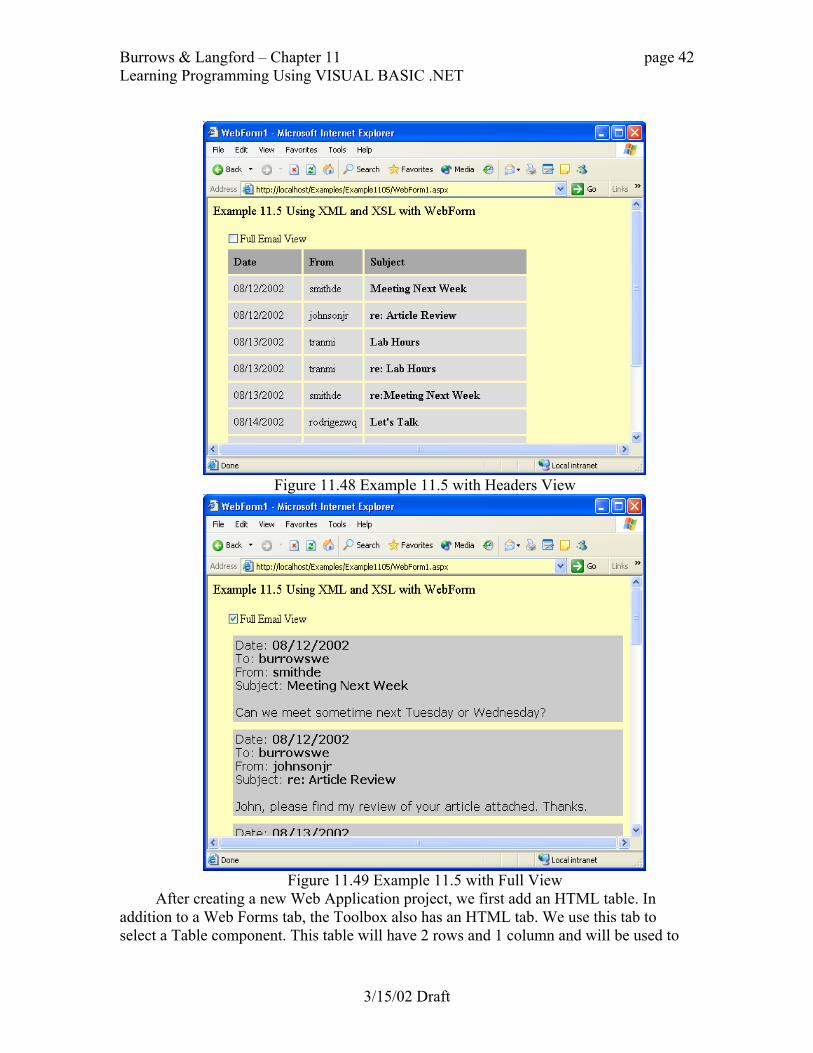
Figures 11.48 and 11.49 show the two different displays for this example. Note that a check box has been added to the form to allow the user to choose the appropriate view. When the value of this check box is changed by the user, the page is sent to the server, the value of the checkbox is determined, and the appropriate XSL document is used to transform the XML. This transformed document is then sent back to the client for viewing.
3/15/02 Draft
Burrows & Langford – Chapter 11 page 42 Learning Programming Using VISUAL BASIC .NET
Figure 11.48 Example 11.5 with Headers View
Figure 11.49 Example 11.5 with Full View
After creating a new Web Application project, we first add an HTML table. In addition to a Web Forms tab, the Toolbox also has an HTML tab. We use this tab to select a Table component. This table will have 2 rows and 1 column and will be used to
3/15/02 Draft
Burrows & Langford – Chapter 11 page 43 Learning Programming Using VISUAL BASIC .NET
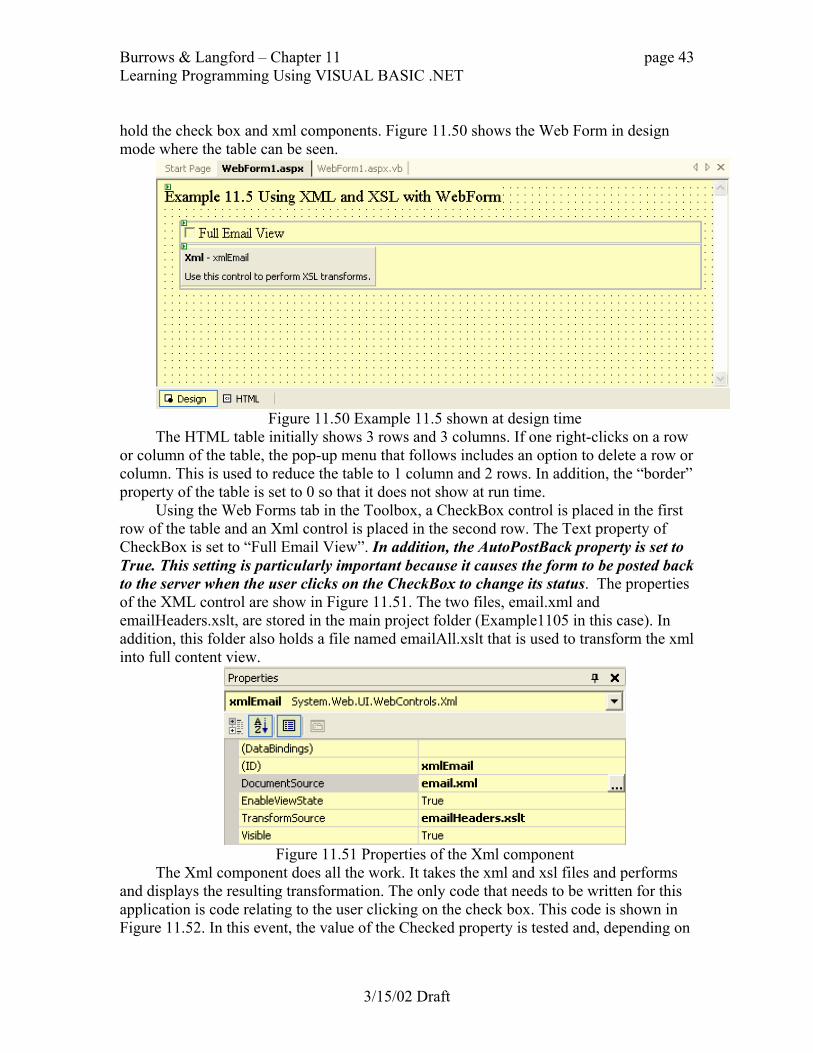
hold the check box and xml components. Figure 11.50 shows the Web Form in design mode where the table can be seen.
Figure 11.50 Example 11.5 shown at design time
The HTML table initially shows 3 rows and 3 columns. If one right-clicks on a row or column of the table, the pop-up menu that follows includes an option to delete a row or column. This is used to reduce the table to 1 column and 2 rows. In addition, the “border” property of the table is set to 0 so that it does not show at run time.
Using the Web Forms tab in the Toolbox, a CheckBox control is placed in the first row of the table and an Xml control is placed in the second row. The Text property of CheckBox is set to “Full Email View”. In addition, the AutoPostBack property is set to True. This setting is particularly important because it causes the form to be posted back to the server when the user clicks on the CheckBox to change its status. The properties of the XML control are show in Figure 11.51. The two files, email.xml and emailHeaders.xslt, are stored in the main project folder (Example1105 in this case). In addition, this folder also holds a file named emailAll.xslt that is used to transform the xml into full content view.
Figure 11.51 Properties of the Xml component
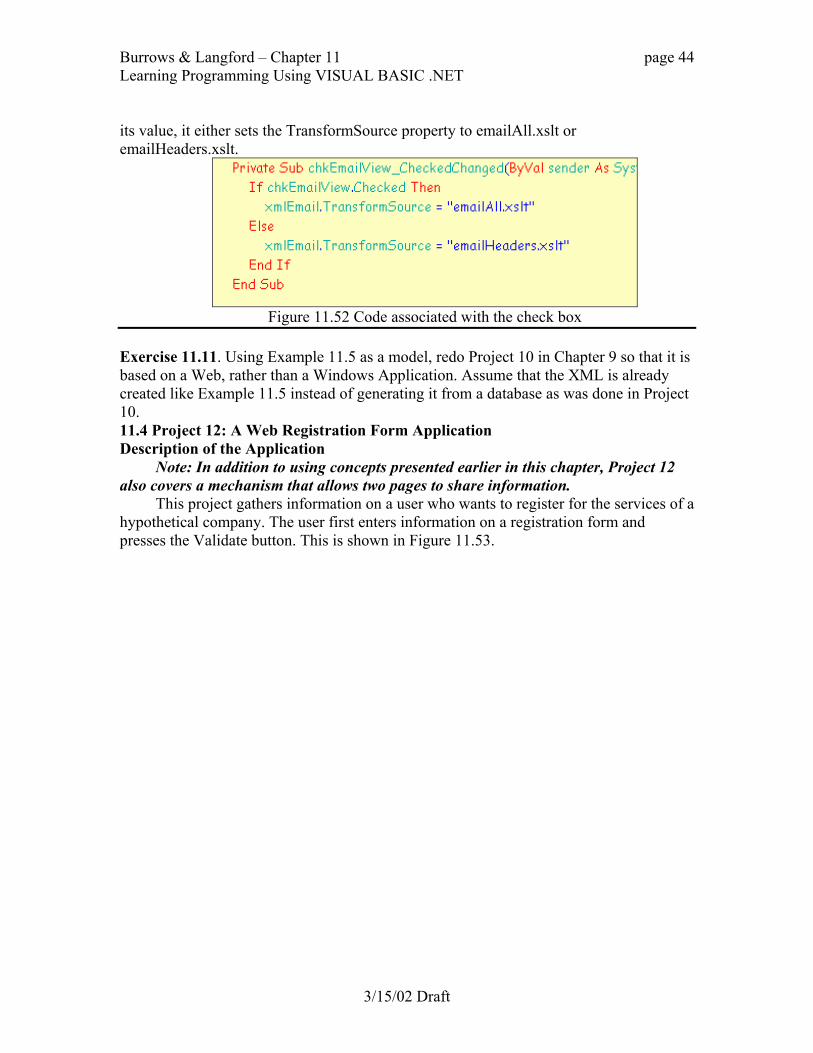
The Xml component does all the work. It takes the xml and xsl files and performs and displays the resulting transformation. The only code that needs to be written for this application is code relating to the user clicking on the check box. This code is shown in Figure 11.52. In this event, the value of the Checked property is tested and, depending on
3/15/02 Draft
Burrows & Langford – Chapter 11 page 44 Learning Programming Using VISUAL BASIC .NET
its value, it either sets the TransformSource property to emailAll.xslt or emailHeaders.xslt.
Figure 11.52 Code associated with the check box
Exercise 11.11. Using Example 11.5 as a model, redo Project 10 in Chapter 9 so that it is based on a Web, rather than a Windows Application. Assume that the XML is already created like Example 11.5 instead of generating it from a database as was done in Project 10. 11.4 Project 12: A Web Registration Form Application Description of the Application
Note: In addition to using concepts presented earlier in this chapter, Project 12 also covers a mechanism that allows two pages to share information.
This project gathers information on a user who wants to register for the services of a hypothetical company. The user first enters information on a registration form and presses the Validate button. This is shown in Figure 11.53.
3/15/02 Draft

Burrows & Langford – Chapter 11 page 45 Learning Programming Using VISUAL BASIC .NET
Figure 11.53 The initial web page for Example 12
If all the fields are valid, the Validate button is replaced with a “Next Page” button (see Figure 11.54). Clicking on this button brings up a new web page that simply shows the data entered on the first page. This can be seen in Figure 11.55. The intention of this second page is to show how one page can pass information to another page.
Figure 11.54 The “Next Page” button that is displayed after the form is validated
3/15/02 Draft

Burrows & Langford – Chapter 11 page 46 Learning Programming Using VISUAL BASIC .NET
Figure 11.55 The second web page showing the information entered by the user
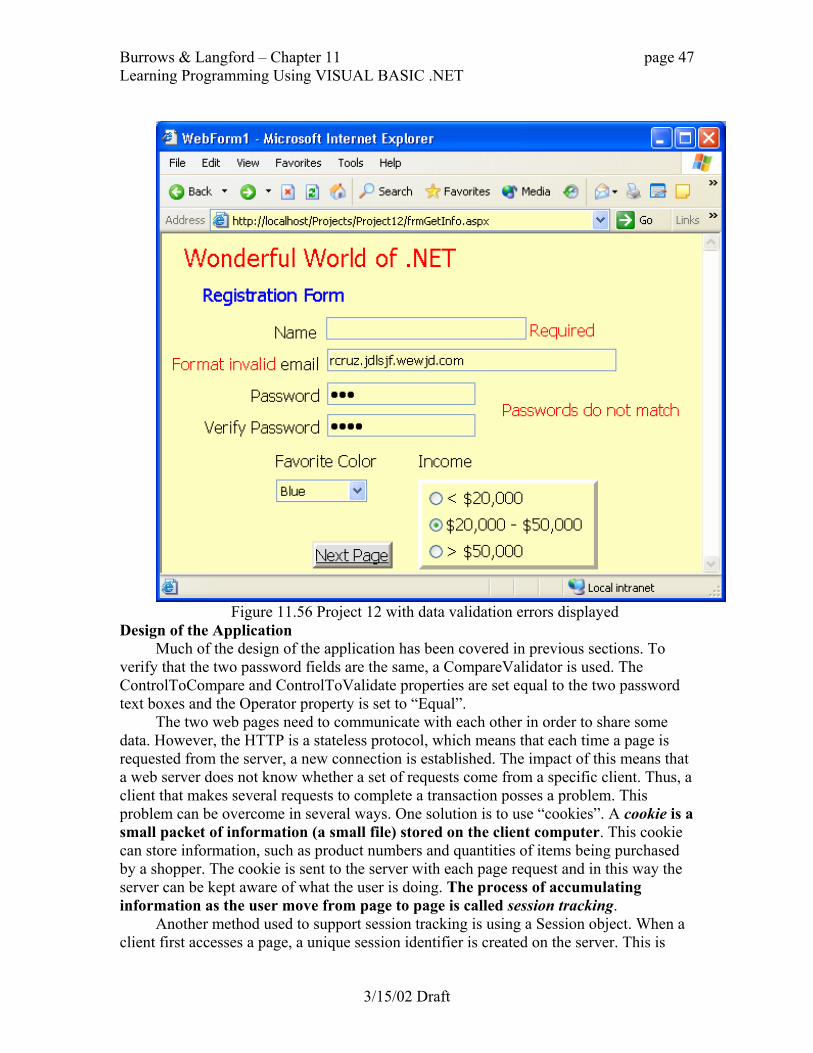
The data on the form should be validated using the following set of rules: 1. The Name, email, and two Password fields are required. 2. The email field must be formed correctly. 3. The two password fields must contain the same text.
Error messages should appear next to the field values where the problem is detected. Figure 11.56 shows the web page with several user errors present.
3/15/02 Draft
Burrows & Langford – Chapter 11 page 47 Learning Programming Using VISUAL BASIC .NET
Figure 11.56 Project 12 with data validation errors displayed
Design of the Application Much of the design of the application has been covered in previous sections. To
verify that the two password fields are the same, a CompareValidator is used. The ControlToCompare and ControlToValidate properties are set equal to the two password text boxes and the Operator property is set to “Equal”.
The two web pages need to communicate with each other in order to share some data. However, the HTTP is a stateless protocol, which means that each time a page is requested from the server, a new connection is established. The impact of this means that a web server does not know whether a set of requests come from a specific client. Thus, a client that makes several requests to complete a transaction posses a problem. This problem can be overcome in several ways. One solution is to use “cookies”. A cookie is a small packet of information (a small file) stored on the client computer. This cookie can store information, such as product numbers and quantities of items being purchased by a shopper. The cookie is sent to the server with each page request and in this way the server can be kept aware of what the user is doing. The process of accumulating information as the user move from page to page is called session tracking.
Another method used to support session tracking is using a Session object. When a client first accesses a page, a unique session identifier is created on the server. This is
3/15/02 Draft
Burrows & Langford – Chapter 11 page 48 Learning Programming Using VISUAL BASIC .NET
stored in the Session object and is sent back to the browser in the response. When the browser sends another request to the server, the Session Id is also sent so the browser can relate this new request to the prior request. The Session object can also store any number of name-value pairs. These are used by the code running on the server to store and retrieve information from request to request.
There are additional ways for pages to communicate including placing information within the URL and using Hidden fields on a web page. You may have seen a URL like the following:
http://www.google.com/search?hl=en&q=Adams+Apple&btnG=Google+Search Everything after the “?” are name-value pairs, for example, q=Adams+Apple means the query was to search for the words “Adams Apple”. HTML Hidden components are simply fields placed on the form that cannot be seen by the user. However, the code can read/write from/to these fields and thus maintain session state that way.
In this project we will be using the Session object. The main difference between using Session objects and cookies is where the information is stored. Cookies are stored on the client machine. They can stay there for a very short time (expire when the browser stops) or a very long time (forever7). Since they exist on the client, they allow a user to extend a transaction over a several-day period. In contrast, the Session object exists on the server. It persists for a much shorter period of time (the default time is 20 minutes). Some users do not like cookies being written to their computers and a Session object overcomes this concern.
For this project we use the Session object. This object has two methods that we will use; the Add and Item methods. The Add method’s syntax is Add(Name, Object) where Name is a String used to identify the item being stored and Object is the actual item being stored. For example:
Session.Add(“username”,”Joe”) would store the string “Joe” into the Session object and would be identified with the identifier “username”. To access this later, one could write: Dim Name As String = Session(“username”) Here the variable Name would be set equal to “Joe”. The Session object can store an unlimited number of name/value pairs. Each name is typically unique. For this project, we will store the registrant’s name, email, password, favorite color, and income bracket. This will be done as the data are validated. The session object will then be available to the second page and will be used to display the information from the Session object. Construction of the Application
A new Web Application project must first be created. To this is added a second Web Form (Project → Add Web Form…). The first Web Form gathers the Registration information and the second displays the user’s input. Figure 11.57 shows the first form at design time. You can see the text boxes as well as the values of the ErrorMessage properties Validator controls associated with each text box. Also note that the value of
7 Edward Rice, a Business Economics professor at the University of Washington, was fond of saying that “forever is a very long time”! It would be more accurate to say a cookie can stay on the client machine until the cookie file is erased (for whatever reason).
3/15/02 Draft
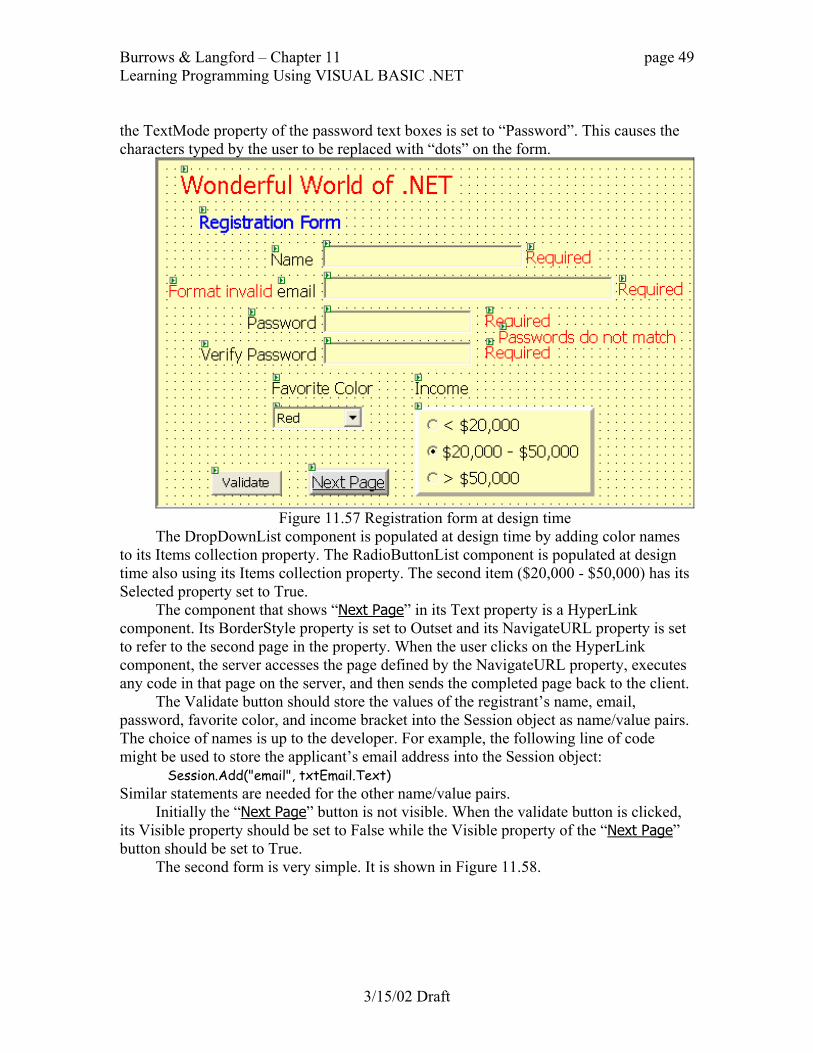
Burrows & Langford – Chapter 11 page 49 Learning Programming Using VISUAL BASIC .NET
the TextMode property of the password text boxes is set to “Password”. This causes the characters typed by the user to be replaced with “dots” on the form.
Figure 11.57 Registration form at design time
The DropDownList component is populated at design time by adding color names to its Items collection property. The RadioButtonList component is populated at design time also using its Items collection property. The second item ($20,000 - $50,000) has its Selected property set to True.
The component that shows “Next Page” in its Text property is a HyperLink component. Its BorderStyle property is set to Outset and its NavigateURL property is set to refer to the second page in the property. When the user clicks on the HyperLink component, the server accesses the page defined by the NavigateURL property, executes any code in that page on the server, and then sends the completed page back to the client.
The Validate button should store the values of the registrant’s name, email, password, favorite color, and income bracket into the Session object as name/value pairs. The choice of names is up to the developer. For example, the following line of code might be used to store the applicant’s email address into the Session object:
Session.Add("email", txtEmail.Text) Similar statements are needed for the other name/value pairs.
Initially the “Next Page” button is not visible. When the validate button is clicked, its Visible property should be set to False while the Visible property of the “Next Page” button should be set to True.
The second form is very simple. It is shown in Figure 11.58.
3/15/02 Draft

Burrows & Langford – Chapter 11 page 50 Learning Programming Using VISUAL BASIC .NET
Figure 11.58 The second Web Form shown at design time
The five Label components need to be populated with values from the Session object. A good place to do this is in the form’s Page_Load event. Here the Session object is accessed and its Item method is used to extract information store earlier by the first WebPage. For example,
lblEmail.Text = Session.Item("email") extracts the value associated with the name “email” and stores this value into the Text property of the Label named lblEmail. Chapter Summary 1. When thinking about applications on the web, it is valuable to consider the three
primary functions of any application – presentation, business logic, and data management – and then where these functions could be located to be most effective.
2. With web applications, presentation is almost always managed on the client using a browser to manage the rendering of HTML into an attractive user interface. The processing of business logic can be done on the client or on the server. Processing simple business rules such as data validation are best done with embedded script on the client. This is efficient and reduces the workload placed on both the network and the server. Complex and/or proprietary business logic should typically be done on the server. Since client-side script is viewable by the user, it should not be used for proprietary code processing. Servers are often more powerful that a typical client so they might also be better for complex processing activities. Data management is typically done on a server located on a computer other than the client. The server can reside on the same computer as the web server or a separate machine (the database server).
3. Visual Basic .NET supports Web Application projects. The Web Form is the primary component in this type of application. The developer builds her application using tools from the Web Forms and HTML tabs of the Toolbox using a drag-and-drop paradigm just like building Windows Applications.
3/15/02 Draft
Burrows & Langford – Chapter 11 page 51 Learning Programming Using VISUAL BASIC .NET
Although the Web Form looks like a typical Windows Application Form, it is
different because underlying it is HTML code that is created automatically by Visual Basic .NET.
4. Web Forms include a number of Validation controls that can be added to the project. These controls perform a number of common validation tests such as requiring the user to complete a field, limiting the user to a certain type or range of values, and so on. The validation is automatically carried out in the browser on the client via script. If a problem is found, an error message is displayed and the page does not get sent to the server. If no errors are found, the page is sent to the server for processing. The first step on the server is a repetition of the validation rules. This is done to ensure that the client-side checks have not been compromised. Following this processing, any additional processing defined by the developer is completed and the page is sent back to the client (this process is called post back).
5. The DataGrid control for the Web Form supports the display of data sets just as the DataGrid component for Windows Applications. However, the Web Form version, which executes on the server, supports different functionality. For example, it allows a new column to be added at run time that supports a number of data editing functions.
6. The XML component available for the Web Form is a component with methods that support XML processing and display as well as transformations using XSLT documents.
7. To maintain a session within ASP.NET, one can use cookies stored on the client, a Session object stored on the server, hidden fields stored in web pages, or URL encoding where name/value pairs are added to the URL as pages are posted to the server and sent back to the client. All of these methods are available within Visual Basic .NET. The Session object includes the Add and Item methods that are used to add and get name/value pairs as different pages are accessed by the user during a session.
3/15/02 Draft

Burrows & Langford – Chapter 11 page 52 Learning Programming Using VISUAL BASIC .NET
3/15/02 Draft
Key Terms active server pages data management server architecture n-tier architecture server-side script bandwidth PostBack Session object business logic presentation session tracking client round trip trusted application client-side script script two-tier architecture cookie security sandbox validator controls End-of-Chapter Problems 1. How is a web application different from a standard Windows application? 2. What is a two-tiered application? What is a three-tiered application? If the web
server and the database server are located on the same computer, how many tier application is that considered?
3. Describe the difference between client-side and server-side execution. What are the advantages and disadvantages of client-side execution? What are the advantages and disadvantages of server-side execution?
4. Explain the purpose of using an applet. What are the advantages or using an applet over client script code? What are the disadvantages? Does an applet have more robust security settings?
5. If there is client-side validation of user data, why validate it again on the server? 6. Describe the process of PostBack. Explain the function of the AutoPostBack
property of web controls. 7. What is a security sandbox? What is a trusted application? Which method is used
by a Java applet? 8. What is the purpose of the Validator controls? Name each of the 4 primary types of
Validator controls and describe the purpose of each. Can multiple Validator controls be used on a single TextBox control?
9. Can JavaScript code and VB Script code run on either Microsoft or Netscape browsers?
10. Is there a limit to the number of Session variables that may be defined? Where are Session variables stored? How long do variables defined in the Session object last? What other method is available to store user-related variables for a longer time?
Programming Problems <To be completed>
Related Documents