Chapter 1 Basic Botany, Physiology and Environmental Effects on Plant Growth Gymnosperms and Angiosperms .................................................................................................................. 1 Life Cycles ..................................................................................................................................................... 2 Principal Parts of Vascular Plants .................................................................................................................. 2 Roots ................................................................................................................................................................... 2 Types of Roots ................................................................................................................................................................. 2 Parts of a Root ................................................................................................................................................................. 3 Roots as Food .................................................................................................................................................................. 4 Stems Texture and Growth of Stems ........................................................................................................................................... 5 Diversified Stem Development ......................................................................................................................................... 5 Stem Use ......................................................................................................................................................................... 6 Leaves ................................................................................................................................................................. 7 Parts of a Leaf .................................................................................................................................................................. 7 Types of Leaves ............................................................................................................................................................... 8 Venation of Leaves ........................................................................................................................................................... 8 Leaves as a Means of Identifying Plants .......................................................................................................................... 8 Shape of the Leaf Blade .................................................................................................................................................. 9 Shape of the Blade Ends ................................................................................................................................................. 9 Leaf Margins ..................................................................................................................................................................... 9 Leaf Arrangement Along a Stem ................................................................................................................................... 10 Leaves as Food .............................................................................................................................................................. 10 Buds ................................................................................................................................................................... 10 Buds as Food ................................................................................................................................................................. 11 Flowers .............................................................................................................................................................. 11 Parts of the Flower ......................................................................................................................................................... 11 Types of Flowers ............................................................................................................................................................ 11 Flowers and Plant Classification ..................................................................................................................................... 11 How Seeds Form ............................................................................................................................................... 12 Types of Inflorescences ..................................................................................................................................... 12 Fruit .................................................................................................................................................................... 12 Parts of Fruit ................................................................................................................................................................... 12 Types of Fruit .................................................................................................................................................................. 13 Seed ................................................................................................................................................................... 13 Physiology: Plant Growth and Development .............................................................................................. 15 Photosynthesis .................................................................................................................................................. 15 Respiration ......................................................................................................................................................... 16 Transpiration ...................................................................................................................................................... 16 Environmental Factors That Affect Plant Growth ....................................................................................... 17 Light ................................................................................................................................................................... 17 Temperature ....................................................................................................................................................... 18 Review of How Temperature Affects Plant Processes: .................................................................................................. 18 Water ................................................................................................................................................................. 19 Plant Nutrition .............................................................................................................................................. 20 Macronutrient Outline ........................................................................................................................................ 21 Micronutrient Outline ......................................................................................................................................... 23 References ................................................................................................................................................... 24

Welcome message from author
This document is posted to help you gain knowledge. Please leave a comment to let me know what you think about it! Share it to your friends and learn new things together.
Transcript

Chapter 1Basic Botany, Physiology and Environmental Effects on Plant Growth
Gymnosperms and Angiosperms .................................................................................................................. 1
Life Cycles ..................................................................................................................................................... 2
Principal Parts of Vascular Plants .................................................................................................................. 2
Roots ................................................................................................................................................................... 2Types of Roots ................................................................................................................................................................. 2Parts of a Root ................................................................................................................................................................. 3Roots as Food .................................................................................................................................................................. 4
StemsTexture and Growth of Stems ........................................................................................................................................... 5Diversified Stem Development ......................................................................................................................................... 5Stem Use ......................................................................................................................................................................... 6
Leaves ................................................................................................................................................................. 7Parts of a Leaf .................................................................................................................................................................. 7Types of Leaves ............................................................................................................................................................... 8Venation of Leaves ........................................................................................................................................................... 8Leaves as a Means of Identifying Plants .......................................................................................................................... 8Shape of the Leaf Blade .................................................................................................................................................. 9Shape of the Blade Ends ................................................................................................................................................. 9Leaf Margins ..................................................................................................................................................................... 9Leaf Arrangement Along a Stem ................................................................................................................................... 10Leaves as Food .............................................................................................................................................................. 10
Buds ................................................................................................................................................................... 10Buds as Food ................................................................................................................................................................. 11
Flowers .............................................................................................................................................................. 11Parts of the Flower ......................................................................................................................................................... 11Types of Flowers ............................................................................................................................................................ 11Flowers and Plant Classification ..................................................................................................................................... 11
How Seeds Form ............................................................................................................................................... 12Types of Inflorescences ..................................................................................................................................... 12Fruit .................................................................................................................................................................... 12
Parts of Fruit ................................................................................................................................................................... 12Types of Fruit .................................................................................................................................................................. 13
Seed ................................................................................................................................................................... 13
Physiology: Plant Growth and Development .............................................................................................. 15
Photosynthesis .................................................................................................................................................. 15Respiration......................................................................................................................................................... 16Transpiration ...................................................................................................................................................... 16
Environmental Factors That Affect Plant Growth ....................................................................................... 17
Light ................................................................................................................................................................... 17Temperature....................................................................................................................................................... 18
Review of How Temperature Affects Plant Processes: .................................................................................................. 18Water ................................................................................................................................................................. 19
Plant Nutrition .............................................................................................................................................. 20
Macronutrient Outline ........................................................................................................................................ 21Micronutrient Outline ......................................................................................................................................... 23
References ................................................................................................................................................... 24

Chapter 1 Basic Botany, Physiology and Environmental Effects on Plant Growth 1
CHAPTER 1Basic Botany, Physiology,and Environmental Effects on Plant Growth
Edited and revised by Judith Schwartz, UNHCE Master Gardener and botany lecturerat Keene State College.
In order to gain a working knowledge of horticulture, it is necessary to under-stand the life cycles of plants, their various structures and how they function, andhow plants develop in reaction to the environment.
Gymnosperms and AngiospermsNearly all of the plants we use in horticulture arevascular plants. Vascular plants contain tissueswhich transport water and dissolved materials. Thevascular system may be likened to the circulatorysystem in animals, or the plumbing in your house.
A few of these plants, like ferns and horsetails, donot produce seed. They reproduce by spores. Thevast majority of vascular plants do produce trueseed; these can be further divided into two largegroups: gymnosperms and angiosperms.
Gymnosperms and angiosperms are similar inmany ways: they photosynthesize, or producesugars; they have vascular systems to transportwater, minerals and other materials; and theyreproduce by seed. But they vary in some importantways.
Gymnosperms do not have true flowers, andalthough they produce seeds, the seeds are notenclosed in fruits. Most of the gymnosperms we usein horticulture produce their seeds in cones. Ex-amples are pine, spruce, cedar and juniper. Asurprising member of this group is the ginkgo.Angiosperms produce flowers and develop fruitsthat contain seeds. This group can be further di-vided into monocotyledons (monocots) and dicoty-ledons (dicots). Monocots and dicots differ in anumber of ways:
1. Monocots produce one cotyledon, or seedleaf, when they emerge from seeds whiledicots produce two cotyledons;
2. Monocot flower parts are generally in mul-tiples of three (for example, tulips have six“petals”) while dicot flower parts are gener-ally in multiples of four or five (for example, arose has petals in multiples of five).
3. Monocot leaves are long and narrow withparallel veins (for example, corn andbermuda grass) while dicots have variouslyshaped leaves with netted veins (as found inmaples and cucumbers).
4. The internal root, leaf, and stem structuresvary significantly between monocots anddicots (see section on stems).
In this introductory chapter, we are focusing onAngiosperms, or flowering plants.

Chapter 1 Basic Botany, Physiology and Environmental Effects on Plant Growth 2
Life CyclesFlowering plants can be classified by the number ofgrowing seasons required to complete their lifecycle. Annuals pass through their entire life cyclefrom seed germination to seed production in onegrowing season, and then die. Examples includemarigold, zinnia, calendula, cucumber and tomato.Some annuals like pansy are called winter annuals,because they germinate in fall, overwinter, produceseed in spring, and then die. Plants like impatiensare perennial in their native tropical habitats, but wecan use them in colder regions as if they wereannuals.
Biennials are plants which start from seeds andproduce vegetative structures (usually only foliage)and food storage organs (roots) the first season.During the first winter, the plant is vernalized. Thatis, it is stimulated to produce reproductive struc-tures during the following growing season. In thesecond season, flowers, fruit, and seeds develop tocomplete the life cycle, and the plant dies. Carrots,beets, cabbage, celery, onions, hollyhock, foxglove,and sweet william are all biennials.
Plants which are botanically classified as biennialsmay, in some cases, complete their life cycle in onlyone growing season. This situation occurs whendrought, variations in temperature, or other climaticconditions cause the plant to physiologically passthrough the equivalent of two growing seasons, in asingle growing season. This phenomenon is referredto as bolting. Also, some specific biennials, like‘Foxy’ foxglove, act as annuals because they havebeen specifically bred to do so.
Perennial plants live for three or more years. Oncethey reach maturity, they generally produce flowersand seeds each year. Perennials are called herba-ceous if their top dies back to the ground eachwinter and new stems grow from the roots eachspring. Most of our flower garden perennials areherbaceous. Trees and shrubs are classified aswoody perennials, since their top growth persistsand develops woody tissue.
Principal Parts of Vascular PlantsThe parts of a plant can be divided into two groups;vegetative parts and sexual reproductive parts. Thevegetative parts include the stems, leaves, leaf budsand roots. Sexual reproductive parts are thoseinvolved in the production of seed: flower buds,flowers, fruits, and seeds.
Principle Parts of a Vascular Plant
RootsA thorough knowledge of plant root systems isessential in order to understand plant growth,flowering, and fruiting. The structure and growthhabits of roots have a pronounced effect on the sizeand vigor of plants, method of propagation, adapta-tion to certain soil types, and response to culturalpractices and irrigation.
Roots typically form the below-ground portion of aplant. They are characterized by the presence of aroot cap, and the absence of nodes, internodes,buds, leaves and flowers. The principal functions ofroots are to absorb nutrients and water, to anchorthe plant in the soil, to furnish physical support forthe stem, and to serve as food storage organs. Insome plants, they are used for propagation.
Types of RootsThe radicle, or seedling embryo root, develops intoone of two major types of root systems: taproot orfibrous. In taprooted plants, the radicle developsinto a central, often fleshy root which continues toelongate downward into the soil. A taproot becomesthe central and most important feature of such aroot system, with a rather limited amount of

Chapter 1 Basic Botany, Physiology and Environmental Effects on Plant Growth 3
secondary branching. Some trees, especially nuttrees like pecan, have a long taproot with very fewlateral or fibrous roots. This makes them difficult totransplant and necessitates planting only in deep,well-drained soil. Taproots are the principal edibleparts of carrot, parsnip and salsify. Most herbaceousdicots have taproots, often with many branchinglateral roots. One factor which causes shrubs anddwarf trees to remain smaller than standard trees isthe lower activity of the cambium tissue in thelateral roots.
If plants that normally develop a taproot are under-cut so that the taproot is severed early in the plant’slife, the root loses its taproot characteristic anddevelops a lateral root system. This is done com-mercially in nurseries so that trees, which naturallyhave taproots, will develop a compact, root system.This allows a higher rate of transplanting success.
A fibrous root system develops on plants whoseprimary root ceases to elongate, leading to thedevelopment of numerous secondary roots, whichbranch repeatedly and form a wide-spreading rootsystem. Most herbaceous monocots (like grasses)have fibrous root systems. Fibrous roots remainsmall in diameter because of a lack of cambialactivity.
Taproot of Carrot Fibrous Root of Grass
The quantity and distribution of plant roots influ-ence a plant’s absorption of moisture and nutrients.The depth and spread of roots depends on theinherent growth characteristics of the plant andphysical characteristics of the soil. Roots penetratemuch deeper in a loose, well-drained soil than in aheavy, poorly-drained soil. A dense, compactedlayer in the soil restricts or even stops root growth.
During early development, a seedling absorbsnutrients and moisture from just the few inches ofsoil surrounding it. Therefore, the early growth ofmost horticultural crops which are seeded in rowsbenefits from band applications of fertilizer, placeda few inches to each side and slightly below theseeds, and irrigation in the zone immediatelyaround the young plant.
As plants become established, lateral or feeder rootsystems develop laterally and usually extend far
beyond the spread of the branches. For most culti-vated crops, roots meet and overlap between therows. The greatest concentration of feeder rootsoccurs in the top 12 inches of soil, but significantnumbers of lateral roots may grow downward fromthese roots to provide an effective absorption andanchoring system several feet deep.
Parts of a RootA growing root has four major sections: the rootcap, the root tip or meristem, the zone of elonga-tion and the maturation zone. The root cap, outsidethe very tip of the root, consists of cells that aresloughed off as the root grows through the soil. Theroot cap covers and protects the meristem (root tip),which manufactures new cells. The meristem is anarea of cell division and growth. Behind it is thezone of elongation, in which cells increase in sizethrough food and water absorption. These cells, byincreasing in size, push the root through the soil. Inthe maturation zone, cells change into specifictissues such as epidermis, cortex, and vasculartissue. The epidermis, or outermost layer of cellssurrounding the root, is responsible for taking upwater and minerals. Root hairs are specializedepidermal cells which perform much of the waterand nutrient uptake. Cortex cells move water fromthe epidermis into the middle of the root, and alsoserve as a site of food storage. Vascular tissue,located in the center of the root, conducts water andnutrients upward, and synthates downward.
Root Structure

Chapter 1 Basic Botany, Physiology and Environmental Effects on Plant Growth 4
Roots as FoodSome plants such as dahlia and the sweet potatoproduce underground storage organs called tuber-ous roots. They are true roots, not stems, and haveneither nodes or internodes.Carrot, parsnip, salsify, and radish are elongatedtaproots.
StemsA stem is the main axis of a plant. Stems generallyextend upward, and often produce secondary stemscalled branches. In some plants, stems are horizon-tal at ground level, and some plants even produceunderground stems. A stem can be differentiatedfrom a root because all stems have nodes andinternodes, while roots do not. A node is the regionof stem where leaves are attached. The regionbetween two nodes is called an internode.
Parts of a Stem
The length of an internode depends on manyfactors. Decreasing fertility can decrease internodelength. Too little light can result in a long internode,creating a “spindly” plant. This situation is knownas etiolation. Growth produced early in the seasonhas the greatest internode length. Internode lengthdecreases as the growing season nears its end.Vigorously growing plants tend to have greaterinternode lengths than less vigorous plants. Intern-ode length varies with competition from surround-ing stems or developing fruit. If the energy for astem has to be divided among three or four stems,or if the energy is diverted into fruit growth, intern-ode length is shortened.
Stems help us define a plant’s habit. A tree is aperennial woody plant, generally with one mainstem called a trunk, and generally over 25 feet tall atmaturity. A shrub is a perennial woody plant withone or more main stem, generally less than 25 feettall at maturity. Vines, which may be annual orperennial, develop long, trailing stems that growalong the ground unless they are supported byanother plant or structure. Some twining vines
circle their support clockwise (hops and honey-suckle) while others circle counter-clockwise (polebeans and Dutchman’s pipe vine). Climbing vinessupport themselves with aerial roots (English ivyand poison ivy), slender tendrils which encircle thesupporting object (cucumber, gourds, grapes, andpassion-flowers), or tendrils with adhesive tips(Virginia creeper and Japanese creeper).
In addition to giving plants their characteristic form(upright, prostrate, shrubby, etc.), stems supportbuds and leaves, and serve as conduits for carryingwater, minerals, and sugars. Inside the stem is thevascular system, which transports food, water andminerals and offers skeletal support for the plant.The vascular system is composed of two types ofcomplex tissue - xylem and phloem. Xylem tissueconducts water and minerals up from the roots,while phloem conducts synthates manufactured inthe plant to wherever they are needed.
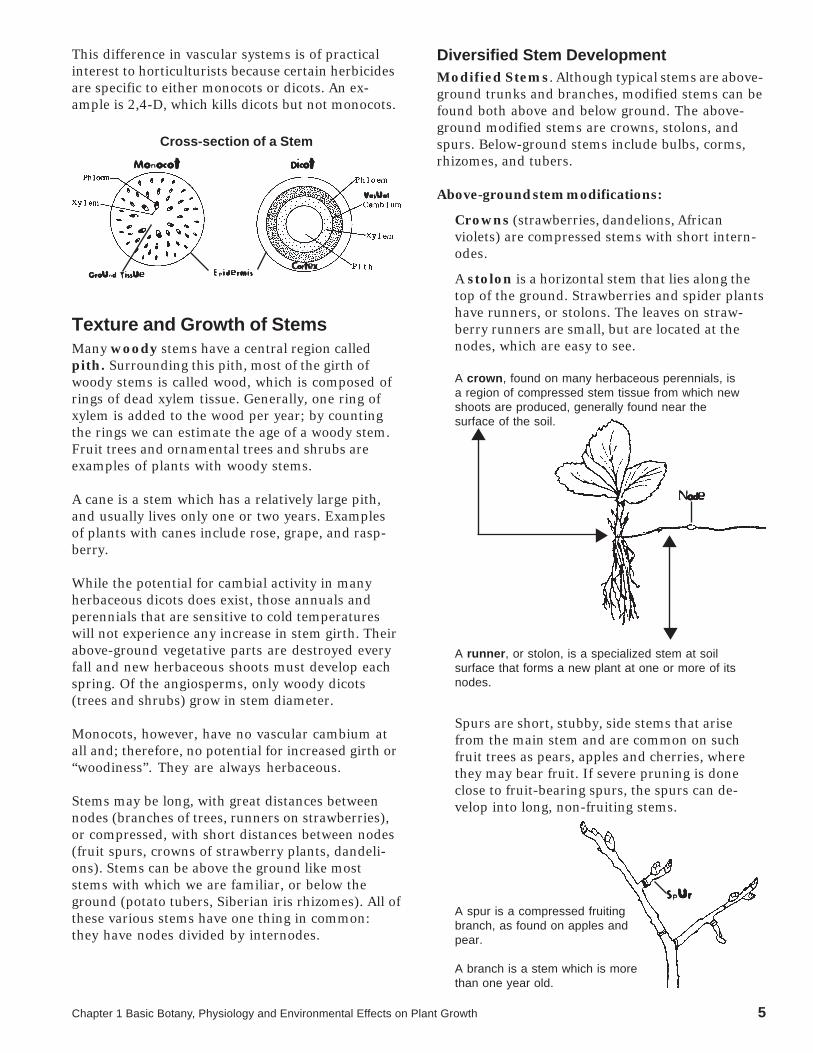
In monocots, the vascular tissues form individualbundles of paired xylem and phloem. Thesebundles are scattered throughout the simple,undifferentiated ground tissue that fills the stem.
In dicots, individual bundles are arranged in a ring,with xylem towards the inside and phloem towardsthe outside. In young dicots, the individual bundlesare still discreet. In older plants, the bundles mergeto form continuous bands of xylem and phloem.
The central core of a dicot stem is filled with simplepith tissue. The space between the epidermis andthe vascular bundles is filled with simple cortextissue.
In older dicot stems, the bands of xylem and ph-loem are separated by a thin band of cells known asthe vascular cambium. This is a lateral meristem(site of cell division and active growth), and isresponsible for the increase in stem girth in woodydicots.
Towards the inside of the vascular cambium, newxylem (or wood) cells are formed each year, contrib-uting to the formation of countable “rings” in thecross-section of a tree. Towards the outside of thevascular cambium, new phloem cells are formedeach year, but these layers are very thin and cannotbe easily distinguished as rings.
As a woody plant ages, the oldest phloem mingleswith cork and bark and may eventually be removedfrom the tree. The oldest xylem becomes the centralheartwood of the tree.
Chapter 1 Basic Botany, Physiology and Environmental Effects on Plant Growth 5
This difference in vascular systems is of practicalinterest to horticulturists because certain herbicidesare specific to either monocots or dicots. An ex-ample is 2,4-D, which kills dicots but not monocots.
Cross-section of a Stem
Texture and Growth of StemsMany woody stems have a central region calledpith. Surrounding this pith, most of the girth ofwoody stems is called wood, which is composed ofrings of dead xylem tissue. Generally, one ring ofxylem is added to the wood per year; by countingthe rings we can estimate the age of a woody stem.Fruit trees and ornamental trees and shrubs areexamples of plants with woody stems.
A cane is a stem which has a relatively large pith,and usually lives only one or two years. Examplesof plants with canes include rose, grape, and rasp-berry.
While the potential for cambial activity in manyherbaceous dicots does exist, those annuals andperennials that are sensitive to cold temperatureswill not experience any increase in stem girth. Theirabove-ground vegetative parts are destroyed everyfall and new herbaceous shoots must develop eachspring. Of the angiosperms, only woody dicots(trees and shrubs) grow in stem diameter.
Monocots, however, have no vascular cambium atall and; therefore, no potential for increased girth or“woodiness”. They are always herbaceous.
Stems may be long, with great distances betweennodes (branches of trees, runners on strawberries),or compressed, with short distances between nodes(fruit spurs, crowns of strawberry plants, dandeli-ons). Stems can be above the ground like moststems with which we are familiar, or below theground (potato tubers, Siberian iris rhizomes). All ofthese various stems have one thing in common:they have nodes divided by internodes.
Diversified Stem DevelopmentModified Stems. Although typical stems are above-ground trunks and branches, modified stems can befound both above and below ground. The above-ground modified stems are crowns, stolons, andspurs. Below-ground stems include bulbs, corms,rhizomes, and tubers.
Above-ground stem modifications:
Crowns (strawberries, dandelions, Africanviolets) are compressed stems with short intern-odes.
A stolon is a horizontal stem that lies along thetop of the ground. Strawberries and spider plantshave runners, or stolons. The leaves on straw-berry runners are small, but are located at thenodes, which are easy to see.
A crown, found on many herbaceous perennials, isa region of compressed stem tissue from which newshoots are produced, generally found near thesurface of the soil.
A runner, or stolon, is a specialized stem at soilsurface that forms a new plant at one or more of itsnodes.
Spurs are short, stubby, side stems that arisefrom the main stem and are common on suchfruit trees as pears, apples and cherries, wherethey may bear fruit. If severe pruning is doneclose to fruit-bearing spurs, the spurs can de-velop into long, non-fruiting stems.
A spur is a compressed fruitingbranch, as found on apples andpear.
A branch is a stem which is morethan one year old.
NodeNodeNodeNodeNode
SpurSpurSpurSpurSpur
Ground TissueGround TissueGround TissueGround TissueGround Tissue EpidermisEpidermisEpidermisEpidermisEpidermis
VasualVasualVasualVasualVasual
CortexCortexCortexCortexCortex
MonocotMonocotMonocotMonocotMonocot Dicot Dicot Dicot Dicot Dicot

Chapter 1 Basic Botany, Physiology and Environmental Effects on Plant Growth 6
Below-ground stems:
The tuber, like any other stem, has nodes thatproduce buds. The eyes of potato are actually thenodes on the stem. Each eye contains a cluster ofbuds.
A tuber is an enlarged portion of an undergroundstem.
Rhizomes are specialized stems which growhorizontally at or just below the soil surface.Some rhizomes are compressed and fleshy suchas those of iris; they can also be slender withelongated internodes such as quackgrass.Quackgrass, or witchgrass, is a noxious weedprincipally because of the spreading capability ofits rhizomes.
Rhizome
Stolon
Tulips, lilies, daffodils, and onions producebulbs: shortened, compressed, undergroundstems surrounded by fleshy scales (leaves) thatenvelop a central bud located at the tip of thestem. If you cut through the center of a tulip ordaffodil bulb in late fall, you can see all theflower parts in miniature within the bulb. Manybulbs require a period of low-temperatureexposure before they begin to send up newgrowth. Both the temperature and length of thistreatment are critical.
A bulb is composed of a short stem plate, closelyspaced buds and fleshy leaves. Lilies and onions arebulbs.
Corms are somewhat similar to bulbs, but do nothave fleshy scales. A corm is a solid, swollenstem whose scales have been reduced to a dry,leaf-like covering.
A corm, as in gladiolus and crocus, is compressedstem with reduced scaly leaves.
Stem UseStems can be used for plant propagation. Above-ground stems can be divided into sections withinternodes and nodes. These sections are calledstem cuttings; they produce roots to form a newplant when treated properly. Below-ground stemsare also good propagative tissues: rhizomes can bedivided into sections; small bulblets form at thebase of mature bulbs; cormels form under maturecorms; and tubers can be cut into pieces containingeyes, or nodes with buds.
LeavesLeavesLeavesLeavesLeaves
StemStemStemStemStem

Chapter 1 Basic Botany, Physiology and Environmental Effects on Plant Growth 7
loss or sun scald. The waxy cuticle also repels waterand can shed pesticides if spreader-sticker agentsare not used (many pesticide formulations containan additive that promotes the product’s penetrationof the cuticle).
On the underside of leaves, some pairs of epidermalcells surround openings to the interior of the leaf.These guard cells regulate the passage of water,oxygen, and carbon dioxide through the leafthrough the openings, called stomates. The openingand closing of stomates is determined mostly by theweather. Conditions that cause large water lossesfrom plants (high temperature, low humidity)stimulate guard cells to close. Mild weather condi-tions promote opening of stomates.
The middle layer of the leaf, the mesophyll, islocated between the upper and lower epidermis.This is the layer in which photosynthesis occurs.The mesophyll is divided into a dense upper layer,called the palisade, and a lower layer, called thespongy layer, that contains much air space. Thecells in these two layers contain chloroplasts whichare the actual site of the photosynthetic process.
Leaf Parts
Stems are used as food. The edible portions ofasparagus and kohlrabi are stem tissue. The edibleparts of broccoli are composed of stem tissue,flower buds, and small leaves. The edible part ofwhite potato is a fleshy underground tuber. Al-though the name suggests otherwise, the edible partof the cauliflower is proliferated stem tissue.
LeavesThe primary function of leaves is to photosynthe-size, or capture energy from the sun and convert itto sugars for later use. Leaves are green becausethey contain chlorophyll, the green pigment in-volved in photosynthesis. They are generally broad,to intercept a maximum amount of sunlight.
Parts of a LeafThe blade of a leaf is the expanded, thin structureon either side of the midrib or main vein. The bladeis usually the largest and most conspicuous part ofa leaf. The petiole is the stalk which supports theleaf blade. The base of the petiole is attached to thestem at a node. The small angle formed between thepetiole and the stem is called the leaf axil. A bud orcluster of buds is usually located in the axil. Thepetiole is absent in some leaves, in which case theleaf is described as sessile, and is attached directlyto the stem.
Broadleaf
The leaf blade is composed of several layers. On thetop and bottom is a layer of protective cells calledthe epidermis. Some leaves have hairs that are anextension of epidermal cells. The African violet hasso many hairs that the leaf feels velvety.
Covering the epidermis is the cuticle, which iscomposed of a waxy substance called cutin thatprotects the leaf from dehydration and preventspenetration of some diseases. Leaves grown inhigher light intensity have a thicker layer of cuticlethan leaves grown in less light. When plants aremoved from shade to sun, they should be movedgradually in order to allow more cuticle to develop,to protect the leaves from the shock of rapid water
Guard Cell Stoma Epidermis
Stomain LowerEpidermis
Cutin
Upper Epidermis
Palisade LayerMesophyll
SpongyMesophyllLayer

Chapter 1 Basic Botany, Physiology and Environmental Effects on Plant Growth 8
Types of LeavesA number of rather distinct types of leaves occur onplants. Leaves, commonly referred to as foliage, arethe most common and conspicuous and, as previ-ously stated, serve as the manufacturing centerswhere the photosynthetic activity of the plantoccurs. Scale leaves are found on rhizomes and arealso the small, leathery, protective leaves whichenclose and protect buds. Seed leaves, or cotyle-dons, are modified leaves which are found onembryonic plants in seeds, and commonly serve asstorage organs. Spines and tendrils, as found onbarberry and pea respectively, are specially modi-fied leaves which protect the plant or assist insupporting the stems. Storage leaves, found in bulbsand succulents, serve as food storage organs. Otherspecialized leaves include bracts, which are oftenbrightly colored. The showy structures on dog-woods and poinsettias are actually bracts, notpetals.
Venation of LeavesThe vascular bundles from the stem extend throughthe petiole and spread out into the blade. The termvenation refers to the patterns in which veins aredistributed in the blade. Two principal types ofvenation are parallel-veined and net-veined.
Parallel-veined leaves are those in which numerousveins run essentially parallel to each other. Themost familiar type of parallel veining found inplants of the grass family where the veins run fromthe base to the apex of the leaf. Another type ofparallel-venation is found in plants such as banana,calla, and pickerel-weed, in which the parallel veinsrun laterally from the midrib. All of these parallel-veined plants are monocots.
Net-veined leaves, also called reticulate-veined,have veins which branch from the main rib andsubdivide into finer veinlets which spread in acomplicated network. This system of veins gives theleaf more resistance to tearing than most parallel-veined leaves. Net-venation may be either pinnateor palmate. In pinnate (feather-like) venation, theveins extend laterally from the midrib to the edge,as in apple, cherry and peach. In palmate venation,like grape and maple leaves, the principal veinsextend outward like the fingers of a hand from thebase of the leaf blade. Net-veined leaves occur indicots.
Types of Venation
Parallel Veined
Pinnately Net-veined
Palmately Net Veined
Leaves as a Means of Identifying PlantsLeaves are useful in identifying species and variet-ies of horticultural plants. The shape of the leafblade and the type of margin are important asidentifying characteristics. Simple leaves have onesingle blade. Compound leaves have several sepa-rate blades, called leaflets, arising from the samepetiole.
Simple Palmate Compound
Pinnate Compound Double Pinnate Compound
A deeply lobed leaf may appear to be a compoundleaf, but if the leaflets are connected by narrowbands of blade tissue, it is classified as a simple leaf(for example, marigold, dahlia and tomato). If theleaflets have separate stalks and, particularly, ifthese stalks are jointed at the point of union with

Chapter 1 Basic Botany, Physiology and Environmental Effects on Plant Growth 9
the main leaf-stalk, the leaf is called compound (forexample, honey locust and pea shrub). Some leavesmay be doubly compound, with the leaflets dividedinto secondary leaflets.
Leaflets do not have axillary buds at the base oftheir stalks. Only leaf petioles have axillary buds. Ifaxillary buds are not present, you are probablylooking at a leaflet - not a leaf.
Shape of the Leaf BladeThe following are some common shapes which arefound in leaves and leaflets.
Linear: Narrow; several times longer thanwide; approximately the same widththroughout.
Lanceolate: Longer than wide; tapering towardthe apex and base.
Elliptical: 2 or 3 times longer than wide;tapering to an acute or rounded apexand base.
Ovate: Egg-shaped; basal portion wide;tapering toward the apex.
Cordate: Heart-shaped; tapering to an acuteapex, with the base turning in andforming a notch where the petiole isattached.
Shape of the Blade EndsThe following are common shapes of the leaf tip(apex) and leaf base (point where leaf joins topetiole).
Acuminate: Tapering to a long, narrow point.
Acute: Ending in an acute angle, with asharp, but not acuminate, point.
Obtuse: Tapering to a rounded edge.
Sagittate: Arrowhead-shaped, with twopointed lower lobes.
Truncate: Having a relatively square end.
Leaf MarginsVariations in leaf margins help in distinguishingclosely related plants.
Entire: Smooth, with no teeth or notches.
Serrate: Having small, sharp teeth pointingtoward the apex.
Dentate: Having teeth ending in an acuteangle, pointing outward.
Crenate: Having rounded teeth.
Sinuate: Having a pronounced sinuous orwavy margin.
Incised: Having sharp, deep irregular teethor incisions.
Lobed: Having incisions that extend lessthan halfway to the midrib.
Cleft: Having incisions that extend morethan halfway to the midrib.
t

Chapter 1 Basic Botany, Physiology and Environmental Effects on Plant Growth 10
Leaf Arrangement Along a StemThe various ways leaves are arranged along a stemare also used to help identify plants. A rosulatearrangement is one in which the basal leaves form arosette around the stem with extremely short nodes.Opposite leaves are positioned across the stem fromeach other, two leaves at each node. Alternate orspiral leaves are arranged in alternate steps alongthe stem with only one leaf at each node. Whorledleaves are arranged in circles along the stem, withthree or more leaves at each node.
Types of Leaf Arrangement
Rosulate (rosette) Alternate
Opposite Whorled
Leaves as FoodThe leaf blade is the principal edible part of severalhorticultural crops including chive, collard, dande-lion, endive, kale, lettuce, cabbage, parsley, spinach,and Swiss chard. The edible parts of leek andFlorence fennel are clusters of fleshy leaf bases. Theedible bulbs of onions and scallions are primarilyleaf tissue. The leaf petiole is the edible portion ofcelery and rhubarb.
BudsA bud is an undeveloped shoot from which embry-onic leaves or flower parts arise. Our temperatezone trees and shrubs typically develop a protectiveouter layer of small, leathery, bud scales on thosebuds that overwinter, while our annuals andherbaceous perennials have naked buds in whichthe outer leaves are green and somewhat succulent.
Overwintering buds of many perennial plantsrequire exposure to a certain number of days belowa critical temperature before they can resumegrowth in the spring. This dormancy period variesfor different plants. The flower buds of forsythiarequire a relatively short cold period, and resumegrowth in early spring. Many peach varietiesrequire from 700 to 1,000 hours of temperaturesbelow 45 degrees F (7 degrees C) before they resumegrowth. During this dormancy period, fully dor-mant buds can withstand very low temperatures,but after the dormancy requirement is satisfied,buds become more susceptible to weather.
Lateral buds are located on the sides of the stem.Most lateral buds arise in leaf axils, and are calledaxillary buds. In some instances, more than one budis formed. Adventitious buds are those which ariseat sites other than the stem apex or leaf axil. Adven-titious buds may develop at stem internodes; at theedge of leaf blades; from callus tissue at the cut endof stems or roots; or in a plant’s root system.

Chapter 1 Basic Botany, Physiology and Environmental Effects on Plant Growth 11
Buds as FoodEnlarged buds or parts of buds form the edibleportion of some horticultural crops. Cabbage andhead lettuce are examples of unusually large termi-nal buds. Succulent axillary buds are the edibleparts of Brussels sprouts. In the case of globeartichoke, the fleshy basal portion of the bracts ofthe flower bud are eaten along with the solid stemportion of the bud. Broccoli is the most importanthorticultural plant in which edible flower buds areconsumed (along with portions of the stem andsmall leaves).
FlowersFlowers, generally the showiest parts of plants, areimportant in sexual reproduction. Plants that arepollinated by insects, bats and other animals areoften ornamental and fragrant in order to attractpollinators. Plants that are pollinated by wind orrain are generally not as showy (for example, corn).
Parts of the FlowerAs the reproductive part of the plant, the flowercontains the male pollen grains and/or the femaleovules, plus accessory parts such as petals, sepals,and nectar glands.
The perianth is composed of the calyx and thecorolla. The calyx is divided into sepals, which aresmall, often green, leaf-like structures at the base ofthe flower. Sepals protect the flower when in bud.
The corolla is divided into petals, which are oftenhighly colored. The shape, arrangement and num-ber of flower petals is useful in identifying plants.Flowers of dicots typically have sepals and/orpetals in multiples of four or five. Monocot flowerstypically have these parts in multiples of three.
The pistil is the female part of the plant. It is in thecenter of the flower, and consists of the stigma,style, and ovary. The stigma, a sticky structurelocated at the top of the pistil, receives pollenduring pollination. The pollen then grows downthrough the tubelike style to the ovary, whichcontains the ovules, or eggs.
The stamen is the male reproductive organ. Itconsists of an anther (pollen sac) on top of a thread-like filament, which holds the anther in position sothe pollen it contains may be dispersed by wind orcarried to the stigma by insects or other pollinators.
Parts of the Flower
Types of FlowersFlowers that have a stamen, pistils, petals, andsepals are called complete flowers. If any of theseparts are missing, the flowers are designated incom-plete. For example, anemones do not have petals(the showy parts are actually sepals), and are calledincomplete flowers.
Most flowers have functional stamens and pistils,and are referred to as perfect flowers. Flowerslacking either stamens or pistils are called imper-fect. In other words, perfect flowers are both maleand female, while imperfect flowers are either maleor female. Pistillate (female) flowers possess afunctional pistil but lack stamens. Staminate (male)flowers have stamens but no pistil. Plants in whichpistillate and staminate flowers occur on the sameplant are called monoecious; examples are begoniaand corn. Plants in which pistillate and staminateflowers occur on separate plants are called dioe-cious; examples are holly and yew. Since hollies aredioecious, and both male pollen and female ovulesare required to produce the berry fruits, both a maleholly and a female holly must be planted into alandscape in order to obtain fruit. Some plants bearonly male flowers at the beginning of the growingseason, but later develop flowers of both sexes;examples are cucumbers and squash.
Flowers and Plant ClassificationPlants can be placed in a hierarchy based on howclosely they are botanically related. This relatednessis based primarily on flower structures; this ex-plains why flowers are so useful in identifyingplants. We know many plants by common names,but in order to communicate with plant profession-als around the world, we use the scientific languageof plant nomenclature. Each plant is identified by aunique botanical Latin name. The system of bino-mial nomenclature provides a double name forplants, called its genus and species. The first, orgeneric name, is followed by a descriptive, orspecific, name.

Chapter 1 Basic Botany, Physiology and Environmental Effects on Plant Growth 12
Modern plant classification, or taxonomy, is basedon a system of binomial nomenclature developed inthe 1700’s by the Swedish physician, Carl von Linne(remembered today by his Latin name, Linnaeus).Prior to Linnaeus, people had tried to classify plantsby leaf shape, plant size, flower color, etc. None ofthese systems proved workable. Linnaeus’s revolu-tionary approach based classification on the flowersand/or reproductive parts of a plant. This hasproven to be the most reliable system, since flowersare the plant part least influenced by environmentalchanges. For this reason, a knowledge of the flowerand its parts is essential to plant identification.
How Seeds FormPollination is the transfer of pollen from an antherto a stigma. This may occur by wind or rain, or bypollinators such as bats, birds and insects. Wind-pollinated flowers lack showy floral parts andnectar, since they do not need to attract a pollinator.Many flowers that are brightly colored or patternedand contain a fragrance or nectar must attractpollinating insects, birds, or bats. In the process ofsearching for food, these pollinators transfer pollenfrom anther to stigma, and from one flower toanother.
The stigma contains a chemical which excites thepollen, causing it to grow a long tube down throughthe style, to the ovules inside the ovary. Afterbreaking through the ovule, the pollen grain re-leases two sperm nuclei: one combines with thefemale egg cell to form an embryo, and the othercombines with polar nuclei in the embryo sac toform the endosperm (food storage tissue). Thisprocess is called double fertilization. If the fertili-zation process is successful, the embryo and en-dosperm and surrounding protective tissues de-velop into a seed.
Some plants are self-fertile; that is, the pollen andovules of a single plant can unite to form seedscontaining viable embryos. Most plants, even thosethat are self-fertile, can be cross pollinated; thisprocess combines genetic material from more thanone plant, and produces stronger seed and morevigorous offspring. Consequently, more plantsreproduce by cross-pollination than self-pollination.
Types of InflorescencesSome plants bear only one flower per stem; theseare called solitary flowers. Other plants produce aninflorescence, a term which refers to a cluster offlowers and how they are arranged on a floral stem.
Some examples of inflorescences are spike, raceme,corymb, umbel, and head. A spike has manystemless florets, each attached to an elongatedflower stem; an example is gladiolus. A raceme issimilar to a spike except the florets are on smallstems (pedicels) attached to the central axis; anexample is snapdragon. A corymb’s florets are onstalks, called pedicels, and are arranged at randomalong the peduncle in such a way that the floretscreate a flat, round top; an example is yarrow. Anumbel is similar except that the pedicels all arisefrom one point on the peduncle; an example is dill.A head, or composite, inflorescence is composed oftwo distinct types of stemless florets. Usually, fertiledisk florets crowd the central button and are sur-rounded by generally sterile, strap-like ray florets,often wrongly referred to as “petals”.
Some types of Inflorescences
FruitBotanically, the true fruit is the enlarged ovaryaround the newly developed seeds. But in practicalhorticulture, we often refer to fruits as the accessorytissues of the flower which develop around the truefruit.
Parts of FruitThe only parts of a fruit which are geneticallyrepresentative of both the male and female flowersare the seeds (mature ovules). The rest of the fruitarises from the maternal plant, and is thereforegenetically identical to that female parent. Thisexplains why a pumpkin can be cross-pollinated bya squash and still produce a predictable-tastingpumpkin, yet the seeds of that pumpkin will pro-duce a new plant that is a hybrid between thepumpkin and the squash.

Chapter 1 Basic Botany, Physiology and Environmental Effects on Plant Growth 13
Types of FruitJust as flowers are useful in identifying plants, fruitsare also characteristic of specific plants. Fruits canbe classified as simple fruits, aggregate fruits, ormultiple fruits. Simple fruits are those whichdevelop from a single ovary. These include cherriesand peaches (called drupes), pears and apples(called pomes), and tomatoes (called berries).Tomatoes are a botanical fruit since they developfrom the flower, as do squash, cucumbers, andeggplant. All of these fruits develop from a singleovary. Some types of simple fruit are dry, withpapery, leathery or hard tissue. Examples arepeanut (an example of a fruit type called legumes),poppy (typical of fruits called capsules), maple (asamara), and acorn (a true nut).
Aggregate fruits, such as raspberries, come from asingle flower which has many ovaries. The flowerappears as a simple flower, with one corolla, onecalyx, and one stem, but with many pistils (andtherefore many ovaries). The ovaries are fertilizedseparately and independently. Incomplete pollina-tion can produce misshapen fruit. Strawberry andblackberry are aggregate fruits born on an edible,enlarged receptacle, which is fused to the fruits andeaten as part of them. We sometimes call these“accessory” or “false” fruits, since the fleshy, juicypart is not the biological fruit, or ripened ovaryitself.
Aggregate/Accessory Fruit Multiple Fruit
Strawberry Fig
Achene-like fruits Numerous achene-likeimbedded in fleshy fruits develop fromreceptacle flowers which bloom
within fleshy covering
Multiple fruits are derived from a tight cluster ofseparate, independent flowers borne on a singlestructure. Each flower has its own calyx and corolla.Examples of multiple fruits are pineapple, fig andbeet.
Kinds of Fruit
SeedThe seed, or matured ovule, has three parts. Theembryo is a miniature plant in an arrested state ofdevelopment. Most seeds contain a built-in foodsupply called the endosperm (orchid is an excep-tion). The endosperm can be made up of proteins,carbohydrates, or fats. The third part is the hardouter covering, called a seed coat, which protectsthe seed from disease and insects and preventswater from entering the seed (this would initiate thegermination process before the proper time).
Parts of a Seed

Chapter 1 Basic Botany, Physiology and Environmental Effects on Plant Growth 14
Germination begins when the seed absorbs waterthrough the seed coat, and ends when the greenplant begins photosynthesis. Successful germinationrequires the proper environmental conditions:favorable temperatures, correct light levels, andadequate moisture and aeration. The absorbedwater activates hormones and enzymes whichconvert stored food into simpler food materials, andactivate essential growth processes. The embryobegins to grow through cell division and enlarge-ment, causing the young seedling to burst from theseed, sending its radicle downward to develop intoa root system, and its plumule upward to developinto the stem and leaves. With uptake of water fromthe soil by the young root system and photosynthe-sis by the young green tissue, germination is com-plete.
In many plants, the cotyledons (seed leaves) are thefirst structures to emerge above ground. Monocotshave one cotyledon while dicots have two cotyle-dons. The cotyledons of many plants are similar,while their true leaves can vary greatly.
Germination of a Dicot
Bean
Germination of a Monocot
Onion

Chapter 1 Basic Botany, Physiology and Environmental Effects on Plant Growth 15
Physiology: Plant Growth andDevelopmentThree major plant functions that are essential forplant growth and development are photosynthesis,respiration, and transpiration.
PhotosynthesisOne of the major differences between plants andanimals is the ability of plants to internally manu-facture their own food. For this process of photo-synthesis, a plant requires chlorophyll within itstissue, energy from light, carbon dioxide from theair, and water from the soil. If any of these ingredi-ents is lacking, photosynthesis cannot proceed.Photosynthesis literally means “to put together withlight.”
Photosynthesis
lightCARBON DIOXIDE + WATER → SUGAR + OXYGEN + WATER
chlorophyll
light
6 CO2 + 12 H
20 → C
6H
120
6 + 6 0
2 + 6 H
20
chlorophyll
Plants store the energy from light first in simplesugars, such as glucose. This food may be convertedback to water and carbon dioxide, releasing thestored energy through the process called respira-tion. This energy is required for all living processesand growth. Simple sugars can also be converted tomore complex sugars and starches (carbohydrates)which may be transported to the stems and roots foruse or storage, or they may be used as buildingblocks for other synthates, such as oils, pigments,proteins, and cell walls.
Any green plant tissue can photosynthesize. Chlo-roplasts in these cells contain the green pigment,chlorophyll, which traps the light energy. Leavesare the primary site of photosynthesis due to theirspecial structure. The internal tissue (mesophyll)contains cells with abundant chloroplasts in anarrangement that promotes easy movement of waterand air. The protective upper and lower epidermallayers of the leaf include many stomates that regu-late movement of the gases involved in photosyn-thesis into and out of the leaf.
Leaf Cross Section
Photosynthesis is dependent on the availability oflight. Generally, as sunlight increases in intensity,photosynthesis increases. This results in greaterproduction. Many garden crops, such as tomatoes,respond best to maximum sunlight. Tomato pro-duction is greatly reduced as light intensities drop.Only a few “greenhouse” tomatoes produce fruitwhen sunlight is minimal in late fall and earlyspring.
Water plays an important role in plants in severalways. First, it maintains a plant’s turgor, or thefirmness of plant tissue. Turgor pressure in a cellcan be compared to air in an inflated balloon. Waterpressure or turgor is needed by plant cells to main-tain shape and ensure cell growth. Second, water issplit into hydrogen and oxygen by the energy of thesun that is absorbed by the chlorophyll in plantleaves. This oxygen is released into the atmospherewhile the hydrogen is used in carbohydrate synthe-sis. Third, water dissolves minerals from the soiland transports them up from the roots and through-out the plant, where they serve as raw materials inthe development of new plant tissues. The soilsurrounding plants must provide adequate water tobe pulled into the plant by transpiration (evapora-tion of water from the leaves’ stomates).
Photosynthesis also requires carbon dioxide (CO2)
which enters the plant through the stomates. Car-bon and oxygen are used in the manufacture ofcarbohydrates. Carbon dioxide in the air is plentifulenough so that it does not limit plant growth out-doors. However, since carbon dioxide is consumedin making sugars and is not replenished by plants ata rapid rate, a tightly closed greenhouse in midwin-ter may not let in enough outside air to maintain anadequate carbon dioxide level. Under such condi-tions, production of roses, carnations, tomatoes, andmany other crops can be increased by addingcarbon dioxide to the growing area.

Chapter 1 Basic Botany, Physiology and Environmental Effects on Plant Growth 16
Temperature affects photosynthesis rates. Photosyn-thesis occurs at its highest rate in the temperaturerange 65 to 85 degrees F (18 to 27 degrees C) anddecreases when temperatures are above or belowthis range.
RespirationCarbohydrates made during photosynthesis are ofvalue to the plant when they are converted intoenergy, which is used for other plant processes likeplant growth. The process by which sugars andstarches are slowly oxidized to release energy iscalled respiration. It is similar to the burning ofwood or coal to produce heat (energy).
Respiration
C6H
12O
6 + 6 O
2 + 6 H
2O → 6 CO
2 + 12 H
2O + Energy
This equation is precisely the opposite of that usedto illustrate photosynthesis, although more isinvolved than just reversing the reaction. However,it is appropriate to consider photosynthesis to be abuilding process, and respiration to be a breaking-down process.
Respiration Photosynthesis
The differences and similarities between photosyn-thesis and respiration can be summarized as fol-lows:
Photosynthesis
1. Produces food.
2. Captures energy.
3. Occurs in cells containing chloroplasts.
4. Releases oxygen.
5. Uses and produces water.
6. Uses carbon dioxide.
7. Rate is dependent on light.
Respiration
1. Uses food for plant energy/growth.
2. Releases energy.
3. Occurs in all cells.
4. Uses oxygen.
5. Uses and produces water.
6. Produces carbon dioxide.
7. Rate is independent of light.
TranspirationTranspiration is the process by which a plant loseswater, primarily through leaf stomates. The amountof water lost through transpiration depends onseveral environmental factors such as temperature,humidity, and wind or air movement. Transpirationis a necessary process by which about 90% of thewater that enters plant roots is lost through thestomates. The remaining 10% of water is used inchemical reactions and in plant tissues.Transpiration is not simply water loss; it is theprocess by which water is pulled up into plants. Thewater in a plant’s xylem forms a continuous col-umn. As water evaporates through leaf stomates,more water is drawn into plant roots. The process oftranspiration provides for mineral transport fromthe soil into the plant, cooling of plant parts throughevaporation, translocating sugars and plant chemi-cals, and maintaining turgor pressure.

Chapter 1 Basic Botany, Physiology and Environmental Effects on Plant Growth 17
Environmental Factors ThatAffect Plant GrowthPlant growth and distribution are limited by theenvironment. Any one environmental factor that isless than ideal becomes a limiting factor in plantgrowth. For example, only plants adapted to limitedamounts of water can live in deserts.
Many plant problems are caused by environmentalstress, either directly or indirectly. Therefore, it isimportant to understand the environmental aspectsthat affect plant growth. These factors include light,temperature, water, humidity, and nutrition.
LightLight has three principal characteristics that affectplant growth: quantity, quality, and duration.
Light quantity refers to the intensity or concentra-tion of light. It varies with the season of the year.Maximum light occurs in the summer; minimumlight in winter. The more light a plant receives (upto a point), the better it is able to photosynthesize(capture energy). As light quantity decreases, thephotosynthetic process decreases. If light quantity istoo high, it can be decreased in a garden or green-house by using cheesecloth or lath shading abovethe plants. Low light quantities can be increased bysurrounding plants with white reflective material,or with artificial lights.
Light quality refers to the color or wavelengthreaching plant surfaces. Sunlight can be separatedinto red, orange, yellow, green, blue, indigo, andviolet light. Red and blue light have the greatesteffect on plant growth because they are the bestqualities of light for photosynthesis. In addition, redlight affects flowering. Green light is least effectiveto plants, which appear green because they reflectgreen light. Among artificial lights, a combination ofcool white and warm white fluorescent tubesprovide excellent quality light for green growth,and are excellent for starting seedlings indoors.Fluorescent “grow lights” provide a mixture of redand blue light that imitates sunlight quite closely,but they are costly and generally not of any greatervalue than regular fluorescent lights. Incandescentbulbs produce high levels of red light, but generallyproduce too much heat to be a valuable light sourcefor plants.
Light duration, or photoperiod, refers to theamount of time per day that a plant is exposed tosunlight. Some plants’ flowering process is con-trolled by photoperiod, and plants are classifiedinto three categories, depending on their exactresponse. These are short-day, long-day, and day-neutral. When the photoperiod concept was firstrecognized in the 1920’s, it was thought that thelength of light periods triggered flowering in someplants, so the various categories of responses werenamed according to the light period’s length. It waslater discovered that it is not the length of the lightperiod but the length of uninterrupted dark periodthat is critical to floral development. The categoriesof responses retain their early names, making itsomewhat confusing at first.
Short-day plants (actually long-night plants) formtheir flowers only when the day length is less than acritical length, generally about 12 hours. Short-dayplants include many spring- and fall-floweringplants such as chrysanthemum and poinsettia.Long-day plants (actually short-night plants) formflowers only when day lengths exceed 12 hours.They include many summer-flowering plants, suchas rudbeckia and California poppy, as well as manyvegetables including beet, radish, lettuce, spinach,and potato. Day-neutral plants form flowers regard-less of day length. Some plants do not really fit intoany category but may respond to combinations ofday lengths. The petunia flowers regardless of daylength, but flowers earlier and more profuselyunder long days.
This concept is important in manipulating thoseplants that respond to day length. For example,chrysanthemums are easily scheduled throughoutthe year. They produce leaves and stems underlong-day (short-night) conditions. Such conditionsoccur naturally in summer, and can be created inwinter by breaking up the long winter night withlight (greenhouse growers set timers to turn onlights for a few hours in the middle of each night,creating two “short nights”). The plants produceflowers naturally under the short-day conditions ofwinter, and they can be forced to flower in summerby artificially providing short-day conditions(greenhouse grower pull black shade cloths overchrysanthemums at the end of the work day, andremove the cloths in the morning; this creates a“long night”).

Chapter 1 Basic Botany, Physiology and Environmental Effects on Plant Growth 18
TemperatureTemperature affects plant productivity and growth.Many plant processes proceed faster in warmconditions, and slow down in cool conditions.Plants generally tolerate the coolest temperatureswhen they are dormant (well below freezing inmany cases), the warmest temperatures as youngseedlings (generally 60-80 degrees F), and tempera-tures somewhat cooler than seedling temperatureswhen they are actively growing, mature plants.
Incorrect temperatures, both high and low, canproduce undesirable effects. Under high tempera-tures and long days, cool-season crops such asspinach bolt (produce undesirable flowers) ratherthan producing the desired leaves. Temperaturesthat are too low for a warm-season crop such astomato prevent fruit set. Adverse temperatures alsocause stunted growth and poor quality; for ex-ample, lettuce grown at high temperatures becomesbitter.
Sometimes temperatures are used in connectionwith day length to manipulate the flowering ofplants. Chrysanthemums flower for the longestperiod of time if daylight temperatures remain at 59degrees F (15 degrees C). Christmas cacti formflowers in response to short days and cool tempera-tures. Daffodils flower if the bulbs are placed incold storage (35 to 40 degrees F (2 to 4 degrees C))beginning in October, to promote bulb maturation.The bulbs are transferred to a cool greenhouse inmidwinter where top growth begins, and theflowers are ready for cutting in 3 to 4 weeks.
Thermoperiod refers to daily temperature change.Plants produce maximum growth when exposed toa day temperature that is about 10 to 15 degreeshigher than the night temperature. This allows theplant to photosynthesize and respire at optimumrates in the day, and to slow the rate of respirationduring the cooler night. High temperatures increasethe respiration rate, sometimes above the rate ofphotosynthesis. In such a situation, the products ofphotosynthesis would be used more rapidly thanthey were produced, and the plant would not grow.For growth to occur, photosynthesis must exceedrespiration.
Temperatures lower than optimum for specificplants result in poor growth. Photosynthesis isslowed by low temperatures. When photosynthesisis slowed, growth is slowed, resulting in loweryields. Not all plants grow best in the same tem-perature range. For example, snapdragons growbest when nighttime temperatures are 55 degrees F(12 degrees C), while poinsettias prefer 62 degrees F(17 degrees C). Cyclamens do well under very coolconditions, while many bedding plants preferwarmer temperatures. Knowing the specific tem-perature preferences of crops allows more efficientproduction; for example, peas are far more produc-tive in the cool spring than in summer.
Winter temperatures determine how far north (andsouth) plants can grow. Perennial plants are classi-fied as either hardy or nonhardy, depending upontheir ability to withstand cold temperatures. ColdNew England winters prevent the growth of manyplants altogether. Other plants may be slightlyinjured in some winters when unseasonably lowtemperatures occur early in the fall or late spring.After a plant’s winter dormancy is met, early springthaws can cause premature bud break in someplants; this may be followed by freezing damage iftemperatures drop again. Late spring frosts oftendestroy entire peach crops in Northern New En-gland.
Review of How Temperature Affects PlantProcesses:
Photosynthesis: Increases somewhat within arange of temperatures.
Respiration: Rapidly increases as tempera-ture rises.
Transpiration: Increases with temperature.
Flowering: Is partially triggered by tem-perature in some plants.
Sugar storage: Low temperatures reduceenergy use and increase sugarstorage.
Dormancy: Is fulfilled by cold tempera-tures.
Bud DevelopmentIn Spring: May occur too early in a spring
thaw.

Chapter 1 Basic Botany, Physiology and Environmental Effects on Plant Growth 19
WaterWater is a major component of plants, composing asmuch as 95% of some plant tissues. It serves manyroles in plants. Water is responsible for maintainingthe turgor pressure (firmness) of tissue; water isinvolved in the opening and closing of stomates,thus regulating transpiration; water’s evaporationfrom plant surfaces helps regulate plant tempera-tures; water accounts for much of the cell growth inroot tips that moves roots outward into new soil;water acts as the solvent for minerals movingupward in the xylem, and for carbohydrates mov-ing through the phloem to their site of use orstorage; and water is an essential raw material forphotosynthesis.
Water is important to plants not only as liquid, butalso as vapor. Relative humidity is the percentageof water vapor in the air compared to the totalamount of water the air could hold at a giventemperature and pressure. For example, if a poundof air at 75 degrees F holds 3 grams of water asvapor, while it could hold a total of 4 grams ofwater vapor, then the relative humidity (RH) is :
RH = (3 g / 4 g) x 100% = 75% RH
Warm air can hold more water vapor than cold air.That means that if the amount of water vapor in theair remains constant, then as the temperatureincreases, the relative humidity decreases. Also, asthe temperature decreases, the relative humidityincreases until it reaches 100%, at which time the aircan hold no more. If the temperature continues todrop, water condenses and falls out of the air (innature, we call this precipitation).
Water vapor moves from a place of high relativehumidity to one of low relative humidity. Thegreater the difference in humidity, the faster watermoves. This is an important concept in transpira-tion. The spaces between plant cells (intercellularspace) can be occupied by air and water vapor.When the relative humidity in the intercellularspace near stomates approaches 100%, and thestomates open, water vapor leaves the plant (if therelative humidity outside the leaf were also 100%,the stomates would not open). As the vapor movesout, a cloud of high humidity is formed around thestomate. This cloud of humidity helps slow transpi-ration and cool the leaf. If air movement blows thehumid cloud away, transpiration increases as thestomates keep opening to balance the humidity.This is why plants exposed to windy environmentsmay experience water stress.
Dots represent Relative Humidity

Chapter 1 Basic Botany, Physiology and Environmental Effects on Plant Growth 20
Plant NutritionMany people confuse plant nutrition with plantfertilization. Plant nutrition refers to the needs anduses of the basic chemical elements in the plant.Fertilization is the term used when these materialsare supplied to the environment around the plant. Alot must happen before a chemical element suppliedin a fertilizer can be taken up and used by the plant.
Plants need 17 elements for normal growth. Carbon,hydrogen, and oxygen are found in air and water.Nitrogen, potassium, magnesium, calcium, phos-phorous, and sulfur are found in the soil. The lattersix elements are used in relatively large amounts bythe plant and are called macro-nutrients. There areeight other elements that are used in much smalleramounts; these are called micronutrients or traceelements. The micronutrients, which are found inthe soil, are iron, zinc, molybdenum, manganese,boron, copper, cobalt, and chlorine. All 17 elements,both macro-nutrients and micro-nutrients, areessential for plant growth.
Most of the nutrients that a plant needs are dis-solved in water and then absorbed by the roots.Ninety-eight percent of these plant nutrients areabsorbed from the soil solution and only about 2%are actually extracted from the soil particles by theroot. Most of the nutrient elements are absorbed ascharged ions, or pieces of molecules (which are thesmallest particle of a substance that can exist andstill retain the characteristics of the substance). Ionsmay be positively charged cations or negativelycharged anions. Positive and negative are equallypaired so that there is no overall charge. For ex-ample, nitrogen may be absorbed as nitrate (NO
3-)
which is an anion with one negative charge. Thepotassium ion (K+) is a cation with one positivecharge. Potassium nitrate (K+NO
3-) would be one
nitrate ion and one potassium ion. However, cal-cium nitrate (Ca++ NO
3 -)
2) would have two nitrate
ions and one calcium ion because the calcium cationhas two positive charges.
The balance of ions in the soil is very important.Just as ions having opposite charges attract eachother, ions having similar charges compete forchemical interactions and reactions in the environ-ment. Some ions are more active than others or cancompete better. For example, both calcium (Ca++)and magnesium (Mg++) are cations with twocharges, but magnesium is more active. If both arein competition to be absorbed, the magnesium willbe absorbed.
This explains why the results of a soil test mayindicate that, while there is sufficient calcium in thesoil, the plant may still exhibit a calcium deficiencybecause of an excess of the more active magnesium.What may be expressed as a deficiency in onemicronutrient may really be caused by an excess ofanother.
In order for the ions to be easily absorbed, theymust first be dissolved in the soil solution. Somecombinations of ions are easily dissolved, such aspotassium nitrate. When other ions combine, theymay precipitate or fall out of solution and thusbecome unavailable to the plant. Many of themicronutrients form complex combinations withphosphorous and calcium and precipitate out of thesoil solution so the nutrients cannot be easily takenup by the plant. The pH, which is a measurement ofacidity or alkalinity, greatly affects these chemicalreactions. If the soil pH is extremely high (alkaline),many of the micronutrients precipitate out of thesolution and are unavailable to the plant. When thesoil pH is extremely low (acid), some of the micro-nutrients become extremely soluble and ion levelsmay become high enough to injure the plant. Theeffect of pH varies with the ion, the types of ions inthe soil, and the type of soil. Therefore, not only isthe amount of the nutrient important, but also thesoil pH.
Adequate water and oxygen must be available inthe soil. Water is required for nutrient movementinto and throughout the roots. Oxygen is requiredbecause the mineral ions must be moved into theroot cells across their membranes. This is an activeabsorption process, utilizing energy from respira-tion. Without adequate oxygen from the soil, thereis no energy for nutrient absorption.
Anything that lowers or prevents the production ofsugars in the leaves can lower nutrient absorption.If the plant is under stress due to low light orextremes in temperature, nutrient deficiency prob-lems may develop. The stage of growth or howactively the plant is growing may also affect theamount of nutrients absorbed. Many plants go intoa rest period, or dormancy, during part of the year.During this dormancy, few nutrients are absorbed.Plants may also absorb different nutrients just asflower buds begin to develop.
Nutrients transported from the root to the cell bythe vascular system move into the cell through acell membrane. There are three different ways thishappens. First, an entire molecule or ion pair maymove through the membrane. If the cell is using

Chapter 1 Basic Botany, Physiology and Environmental Effects on Plant Growth 21
energy or active transport to absorb the ions, thenonly one of the ions in the pair is pulled into thecell. The other will follow to keep the number ofpositive and negative charges even. Most anions(negative ions) are actively absorbed.
The second way of keeping the charges inside thecell balanced and absorbing a new ion is to ex-change one charged ion for another ion with thesame charge. A hydrogen ion (H+) is often releasedso that the cell can absorb another positive ion suchas potassium (K+). Since this is a simple, passiveexchange, absorption energy may not be required.Cations may be absorbed by this passive method.
Both of the methods mentioned above may bepassive or active. However, the third method, thecarrier system, is always active absorption, requir-ing energy. Scientists have discovered that withinthe cell membrane there are specialized chemicalsthat act as carriers. The carrier, through chemicalchanges, attracts an ion from outside the cell mem-brane and releases it inside the cell. Once the ion isinside the cell, it is attached to other ions so that itdoes not move out of the cell. Complex chemicalreactions are involved in the entire process. Al-though nutrients can be absorbed passively, re-search has shown that active absorption must takeplace if the plant is to grow and be healthy. Thefactors we discussed earlier about absorption by theroot are also true for absorption by the cell. A quickreview of some of the factors that affect nutrientabsorption: type of ion, soil pH, solubility of ionpairs, water, soil oxygen, sugar supply, plant stress,and temperature.
Foliar Absorption: A Special Case. Under normalgrowing conditions, plants absorb most nutrients,except carbon, hydrogen, and oxygen, from the soil.However, some nutrients can also be absorbed bythe leaves if they are sprayed with a dilute solution.The factors that affect absorption by the cell are stillimportant because the nutrient must enter the cell tobe used by the plant. Care must be taken that theconcentration of the nutrient is not too high or theleaf will be injured. Also, the leaf is covered by athin layer of wax called the cuticle that the nutrientmust get around or through before it can enter thecell.
Macronutrient Outline
Nitrogen (N)Absorbed as NO
3-, NH
4+.
Leaches from soil, especially NO3
-
Mobile in plant.• Nitrogen excess:
Succulent growth, dark green color, weak spin-dly growth, few fruits, may cause brittle growthespecially under high temperatures.
• Nitrogen deficiency:Reduced growth, yellowing (chlorosis), reds andpurples may intensify with some plants, reducedlateral breaks. Symptoms appear first on oldergrowth.
• Action notes:In general, the best NH
4+/NH
3- ratio is 1/1.
High NH4
+ under low sugar conditions (lowlight) can cause leaf curl.Uptake inhibited by high P levels.N/K ration extremely important.Indoors, best N/K ration is 1/1 unless light isextremely high.In soils with high CHO/N ratio more N shouldbe applied.
Phosphorus (P)Absorbed as H
2PO
4-, HPO
4-
Does not leach from soil readily.Mobile in plant.
• Phosphorus excess:Shows up as micronutrient deficiency of Zn, Fe,or Co.
• Phosphorus deficiency:Reduced growth, color may intensify, browningor purpling in foliage in some plants, thin stems,reduced lateral breaks, loss of lower leaves,reduced flowering.
• Action notes:Rapidly “fixed” on soil particles when appliedunder acid conditions fixed with Fe, Mg andAl.
Under alkaline conditions fixed with Ca. Impor-tant for young plant and seedling growth. HighP interferes with micronutrient absorption and Nabsorption. Used in relatively small amountswhen compared to N and K. May leach from soilhigh in bark or peat.

Chapter 1 Basic Botany, Physiology and Environmental Effects on Plant Growth 22
Potassium (K)Absorbed as K+ Leaches from soil.Mobile in plant.
• Potassium excess:Causes N deficiency in plant and may affect theuptake of other positive ions.
• Potassium deficiency:Reduced growth, shortened internodes, marginalburn or scorch (brown leaf edges), necrotic(dead) spots in the leaf, reduction of lateralbreaks and tendency to wilt readily.
• Action notes:N/K balance is important.High N/low K favors vegetative growth; low N/high K promotes reproductive growth (flower,fruit).
Magnesium (Mg)Absorbed as Mg++
Leaches from soil.Mobile in plant.
• Magnesium excess:Interferes with Ca uptake.
• Magnesium deficiency:Reduction in growth, marginal chlorosis,interveinal chlorosis (yellow between the veins)in some species. May occur with middle or lowerleaves, reduction in seed production, cuppedleaves.
• Action notes:Mg is commonly deficient in foliage plantsbecause it is leached and not replaced. Epsomsalts at a rate of 1 teaspoon per gallon may beused 2 times a year. Mg can also be absorbed byleaves if sprayed in a weak solution. Dolomiticlimestone can be applied inoutdoor situations torectify a deficiency.
Calcium (Ca)Absorbed as Ca++, moderately leachable.Limited mobility in plant.
• Calcium excess:Interferes with Mg absorption. High Ca usuallycauses high pH which then precipitates manyof the micronutrients so that they become un-available to the plant.
• Calcium deficiency:Inhibition of bud growth, death of root tips,cupping of maturing leaves, weak growth, blos-som end rot of many fruits, pits on root veg-etables.
•Action notes:Ca is important to pH control and is rarelydeficient if the correct pH is maintained. Waterstress, too much or too little, can affect Ca rela-tionships within the plant causing deficiencyin the location where Ca was needed at the timeof stress.
Sulfur (S)Absorbed as SO
4-.
Leachable. Not mobile.• Sulfur excess:
Sulfur excess is usually in the form of air pollu-tion.
• Sulfur deficiency:S is often a carrier or impurity in fertilizers andrarely deficient. It may be also absorbed fromthe air and is a by-product of combustion. Symp-toms are a general yellowing of the affectedleaves or the entire plant.
• Action notes:Sulfur excess is difficult to control.

Chapter 1 Basic Botany, Physiology and Environmental Effects on Plant Growth 23
Micronutrient OutlineThe majority of the micronutrients are not mobile;thus, deficiency symptoms are usually found onnew growth. Their availability in the soil is highlydependent upon the pH and the presence of otherions. The proper balance between the ions present isimportant, as many micronutrients are antagonisticto each other. This is especially true of the heavymetals where an excess of one element may showup as a deficiency of another. If the pH is main-tained at the proper level and a fertilizer whichcontains micronutrients is used once a year, defi-ciency symptoms (with the exception of iron defi-ciency symptoms) are rarely found on indoorplants. Many of the micronutrients are enzymeactivators.
Iron (Fe)Absorbed as Fe++, Fe+++.
• Iron deficiency:Interveinal chlorosis primarily on young tissue,which may become white.Fe deficiency may be found under the followingconditions even if Fe is in the soil:
Soil high in Ca, poorly drained soil, soil highin Mn, high pH, high P, soil high in heavymetals (Cu, Zn), oxygen deficient soils orwhen nematodes attack the roots.
Fe should be added in the chelated form; the typeof chelate needed depends uponthe soil pH.
• Iron toxicity:Rare except on flooded soils.
Boron (B)Absorbed as BO
3-.
• Boron excess:Blackening or death of tissue between veins.
• Boron deficiency:Failure to set seed, internal breakdown, death ofapical buds.
Zinc (Zn)Absorbed as Zn++.
• Zinc excess:Appears as Fe deficiency. Interferes with Mg.
• Zinc deficiency:“Little leaf,” reduction in size of leaves, shortinternodes, distorted or puckered leaf margins,interveinal chlorosis.
Copper (Cu)Absorbed as Cu++, Cu+.
• Copper excess:Can occur at low pH. Shows up as Fe deficiency.
• Copper deficiency:New growth small, misshapen, wilted. May befound in some peat soils.
Manganese (Mn)Absorbed as Mn++.
• Manganese excess:Reduction in growth, brown spotting on leaves.Shows up as Fe deficiency. Found under acidconditions.
• Manganese deficiency:Interveinal chlorosis of leaves followed by brownspots producing a checkered red effect.
Molybdenum (Mo)Absorbed as MoO
4-.
• Molybdenum deficiency:Interveinal chlorosis on lower or midstem leaves,twisted leaves (whiptail).
Chlorine (Cl)Absorbed as Cl-.
• Chlorine deficiency:Wilted leaves which become bronze then chlo-rotic then die; club roots.
• Chlorine toxicity:Salt injury, leaf burn, may increase succulence.
Cobalt (Co)Absorbed as Co++.Needed by plants recently established.Essential for Nitrogen fixation.Little is known about its deficiency or toxicitysymptoms.

Chapter 1 Basic Botany, Physiology and Environmental Effects on Plant Growth 24
References for theMaster Gardener’s Studyof Plant Biology
I. Taxonomic references:
Baumgardt, John Philip (1982). How to IdentifyFlowering Plant Families. Portland, OR: TimberPress, Inc.
Radford, Albert E. (1986). Fundamentals ofPlant Systematics. NY: Harper & Row.
Smith, James Payne, Jr. (1977). Vascular PlantFamilies. Eureka, CA: Mad River Press.
II. Field ID (useful for native plants and SOME“escaped” exotic & horticultural varieties)
Dwelley, Marilyn J. (1973). Spring Wildflowersof New England. Camden, ME: DownEastBooks.
Dwelley (1977). Summer and Fall Wildflowers ofNew England. Camden, ME: DownEast Books.
Dwelley (1980). Trees and Shrubs of NewEngland. Camden, ME: DownEast Books.
Lellinger, David B. (1985). Ferns & Fern-Alliesof the United States & Canada. Washington, DC:Smithsonian Institution Press.
Newcomb, Lawrence (1977). Newcomb’sWildflower Guide. Boston MA: Little, Brown &Co.
Peterson, Roger Tory and Margaret McKenny(1968). Wildflowers: Northeastern/North CentralNorth America. Boston: Houghton Mifflin Co.
Symonds, George W.D. (1958). The TreeIdentification Book. NY: Wm. Morrow & Co.Symonds (1957). The Shrub Identification Book.NY: Wm. Morrow & Co.
Tiner, Ralph W., Jr. (1988). Field Guide toNontidal Wetland Identification. Annapolis,MD: Maryland Dept. of Natural Resources &Newton, MA: US Fish & Wildlife Service.Cooperative publication.
III. General Plant Biology
Imes, Rick (1990). The Practical Botanist. NY:Simon & Schuster, Inc.
Stern, Kingsley R. (1994). Introductory PlantBiology. Dubuque, IA: Wm. C. Brown, Pub.
Wilkins, Malcolm (1988). Plantwatching: HowPlants Remember, Tell Time, Form Relationshipsand More. NY: Facts on File, Inc.
Young, Paul (1982). The Botany Coloring Book.NY: Harper & Row.

Chapter 2 Soils and Fertilizers 1
CHAPTER 2Soils and Fertilizers
Reviewed by Tom Buob, UNH Cooperative Extension andJoe Homer, Natural Resource Conservation Service
Soil is formed when rock (parent material) is broken down by climate and veg-etation over a period of time. Soil is weathered rock fragments and decayingremains of plants and animals (organic matter). It contains varying amounts ofair, water, and micro-organisms. It furnishes mechanical support and nutrientsfor growing plants.
Fertilizers are materials containing plant nutrients that are added to the environ-ment around the plant. Generally, they are added to the water or soil, but somecan also be added to the air or sprayed on the leaves. Fertilizer is not plant food;plants produce their own food using water, carbon dioxide, and energy from thesun. This food (sugars and carbohydrates) is combined with the plant nutrientsto produce protein, enzymes, vitamins, and other elements essential to plantgrowth.
SoilsA desirable surface soil in good condition for plantgrowth contains approximately 50% solid materialand 50% open or pore space. The mineral compo-nent is usually made up of many different kindsand sizes of particles, ranging from those visible tothe unaided eye to particles so small that they canonly be seen with the aid of a very powerful (elec-tron) microscope. This mineral material comprisesabout 45% to 48% of the total volume. Organicmaterial makes up about 2% to 5% of the volumeand may contain both plant and animal material invarying stages of decomposition. Under ideal ornear-ideal moisture conditions for growing plants,soil or pore spaces contain about 25% air and 25%water based on the total volume of soil.
Although most New England soils developed underforest vegetation, climatic conditions from thesouthern to northern New England and from sealevel to the highest mountains vary considerablyand have resulted in rather marked effects on thesoils that have formed. The glaciers, in recentgeologic time, left loose, stony debris which ispresently being changed into soil and accounts forNew England’s soils being thin and very young.
The percentage of mineral matter and organicmatter in a cubic foot of surface soil varies from onesoil to another, and within the same soil, dependingon the kinds of crops grown, frequency of tillage,and wetness or drainage of the soil. Content oforganic matter will usually be high in soils thathave not been cultivated over long periods of time.Soils that are tilled frequently and have relativelysmall amounts of plant residues worked into thesoil are usually low in organic matter. Plowing andtilling the soil increases the amount of air in the soil,which increases the rate of organic matter decompo-sition. Further tillage leaves the soil open withoutcover. Erosion caused by wind and rain can easilymove the finer clay particles and organic mattercontent off the land. Soils with poor drainage orhigh water tables usually have higher organicmatter content than those which are well drained.As a result, decomposition of plant material isslowed and organic matter builds up in the soil.
Since either air or water fills pore spaces, theamount of air in a soil at a particular time dependson the amount of water present in the pore spaces.Immediately after a rain, there is more water andless air in the pore spaces. Conversely, in dryperiods, a soil contains more air and less water.

Chapter 2 Soils and Fertilizers 2
Increasing organic matter content usually increaseswater-holding capacity, but addition of largeamounts of decomposed organic material canreduce water capacity until the material has par-tially decomposed. Dark brown or black soilsusually have high organic matter content.
As defined above, a soil contains four principalcomponents: mineral matter, organic matter, water,and air.
Soil Horizons or LayersMost soils have three distinct principal layers orhorizons. Each layer can have two or more sub-horizons. The principal horizons (collectively calledthe soil profile) are: A, surface soil; E, the subsur-face; and B, the subsoil. Beneath the soil profile lies:C, the parent material; and R, rock, similar to thatfrom which the soil developed. Horizons usuallydiffer in color, texture, consistency, and structure. Inaddition, there are usually considerable differencesin chemical characteristics or composition.
Soil Profile
Leaf Litter
Mineral horizons at the surfaceshowing organic matterenrichment
Subsurface horizon showingdepletion of organic matter,clay, iron, and aluminumcompounds
Subsoil horizon showingenrichment of clay material,iron, aluminum, or organiccompounds.
Horizons of loosened orunconsolidated material
Hard bedrock
The surface and subsurface are usually the coarsestlayers. The surface soil contains more organicmatter than the other soil layers. Organic mattergives a gray, dark-brown, or black color to thesurface horizon, the color imparted dependinglargely upon the amount of organic matter present.Soils that are highest in organic matter usually havethe darkest surface colors. The surface layer isusually most fertile and has the greatest concentra-tion of plant roots of any horizon of the soil. Plantsobtain much of their nutrients and water from thesurface soil.
The subsoil layer is usually finer and firmer thanthe surface soil. Organic matter content of thesubsoil is usually much lower than that of thesurface layer. Subsoil colors are strong and bright;shades of red, brown, and yellow are frequentlyobserved. The subsoil supports the surface soil andmay be considered the soil reservoir, providingstorage space for water and nutrients for plants,aiding in temperature regulation of the soil, andsupplying air for the roots of plants.
The bottom horizon, or parent material, is decom-posed rock that has acquired some characteristics ofthe subsoil and retained some characteristics of therock from which it weathered. It is not hard, likerock, but may show the form or structure of theoriginal rocks or layering if it is in a water-laiddeposit. The parent material influences soil texture,natural fertility, rate of decomposition (and thusrate of soil formation), acidity, depth, and in somecases, topography (or lay of the land) on which thesoil is formed.
Physical Properties of SoilThe physical properties of a soil are those character-istics which can be seen with the eye or felt betweenthe thumb and fingers. They are the result of soilparent materials being acted upon by climaticfactors (such as rainfall and temperature), andaffected by topography (slope and direction, oraspect) and vegetation (kind and amount, such asforest or grass) over a period of time. A change inany one of these influences usually results in adifference in the type of soil formed. Importantphysical properties of a soil are color, texture,structure, drainage, depth, and surface features(stoniness, slope, and erosion).
The physical properties and chemical compositionlargely determine the suitability of a soil for itsplanned use and the management requirements to

Chapter 2 Soils and Fertilizers 3
keep it most productive. To a limited extent, thefertility of a soil determines its possible uses, and toa larger extent, its yields. However, fertility levelalone is not indicative of its productive capacity,since soil physical properties usually control thesuitability of the soil as growth medium. Fertility ismore easily changed than soil physical properties.
Soil ColorColor is an obvious and easily determined soilproperty. It is one of the most useful properties forsoil appraisal and identification because othercharacteristics can be inferred from soil color.Generally, soil color is a reflection of: 1) parentmaterial from which the soil is derived, 2) amountof organic matter, and 3) degree of oxidation and orsaturation.
Surface soil colors may vary from light brown todark brown or black. Lighter colors indicate lowamounts of organic matter whereas darker colorsindicate higher amounts. Lighter colors in thesurface horizons are frequently associated with soilshaving relatively rapid oxidation of organic matteras a result of properties that favor the decomposi-tion of organic matter. These include sandy orgravelly textures, or highly leached well drainedsoils that often have relatively high annual tempera-tures. In soils without amendments darker colorsfrequently occur in soils where the oxidation oforganic matter is slowed by properties that favorthe accumulation of organic matter, such as highwater table conditions (poor drainage) or lowannual soil temperature. Adding organic material(manure) to gardens results in dark, rich surfacesoils.
Subsoil colors generally are indications of the airand water relationships that occur in the soil. Lightbrown to yellow subsoil colors indicate a good stateof oxidation with a relatively free movement of airand water. Subsoils that are mottled with a mix ofrusty brown and gray colors indicate a fluctuatingwater table and a variable state of oxidation. Theseare subsoils that may be periodically saturated,often times for two to eight weeks in the spring, thatdry out during the summer as water tables drop.
Gray subsoil colors indicate a poor state of oxida-tion (reduced soil conditions) due to saturation forextended periods of time.
Gray colored subsoils usually indicate extendedperiods of saturation or a layer that may haverestricted drainage (i.e. hardpan). Most mottled
subsoils that have a mix of gray and rusty browncolors suggest an environment that is alternatelywet and then dry often due to seasonal fluctuationsin the water table. Yellow-to-brown colors in thesubsoil indicate that iron coatings on soil particlesare oxidized, implying good aeration. In contrast,wet soils have gray colors indicating that ironcoatings on soil particles have been chemically andbiologically reduced, implying saturation and pooraeration.
In wooded or previously wooded sites soils mayhave a gray or ashy colored layer directly below adark surface. This gray color is the result of a soilforming process, not wetness. Also, in some areasof New Hampshire gray colors are a result of thegray color of the “parent rock” from which the soilwas developed.
TextureTexture refers to the relative amounts of differentlysized soil particles, or the fineness/coarseness of themineral particles in the soil. Soil texture depends onthe relative amounts of sand, silt, and clay. In eachtexture class, there is a range in the amount of sand,silt, and clay that class contains.
The coarser mineral particles of the soil are calledsand. These particles vary in size. Most sand par-ticles can be seen without a magnifying glass. Allfeel rough when rubbed between the thumb andfingers.
Relatively fine soil particles that feel smooth andfloury are called silt. When wet, silt feels smoothbut is not slick or sticky. When dry, it is smooth,and if pressed between the thumb and finger, willretain the imprint. Silt particles are so fine that theycannot usually be seen by the unaided eye and arebest seen with a microscope.
Clays are the finest soil particles. Clay particles canbe seen only with the aid of a very powerful (elec-tron) microscope. They feel extremely smooth whendry, and become slick and sticky when wet. Claywill hold the form into which it is molded.
Loam is a textural class of soil that has moderateamounts of sand, silt, and clay. Loam containsapproximately 7% to 27% clay, 28% to 50% silt, and50% sand.
Although there are approximately 20 classes of soiltexture, most surface soils in New England fall intofive general textural classes. Each class name indi-cates the size of the mineral particles that are

Chapter 2 Soils and Fertilizers 4
dominant in the soil. Texture is determined in thefield by rubbing moist-to-wet soil between thethumb and fingers. These observations can bechecked in the laboratory by mechanical analysis orby separation into clay, silt, and various-sized sandgroups. Regardless of textural class, all soils in NewHampshire contain sand, silt, and clay, although theamount of a particular particle class may be small.
Principal Surface Soil Classes Found inNew England:
1. Loam - When rubbed between the thumb andfingers, approximately equal influence of sand,silt, and clay is felt.
2. Sandy loam - Varies from very fine loam to verycoarse. Feels quite sandy or rough, but containssome silt and a small amount of clay. Theamount of silt and clay is sufficient to hold thesoil together when moist.
3. Silt loam - Silt is the dominant particle in siltloam, which feels quite smooth or floury whenrubbed between the thumb and fingers.
4. Silty clay loam - Noticeable amounts of both siltand clay are present in silty clay loam, but silt isa dominant part of the soil. It is smooth to thetouch when dry, but when moist, it becomessomewhat slick/sticky.
5. Clay loam - Clay dominates a clay loam, which issmooth when dry and slick/sticky when wet. Siltand sand are usually present in noticeableamounts in this texture of soil, but are overshad-owed by clay.
Other textural designations of surface soils aresands, loamy sands, sandy clay loams, and clays. Ineach textural class there is a range in the amount ofsand, silt, or clay that class may contain. The com-position of each textural class does not allow foroverlap from one class to another.
Texture influences many different characteristics ofsoil. A brief comparison between sandy and claysoils will highlight these points. Coarse-textured orsandy soils allow water to enter at a faster rate andto move more freely in the soil. In addition, therelatively low water-holding capacity and the largeamount of air present in sandy soils allows them towarm up faster than fine-textured soils. Sandy soilsare also more easily tilled and more readily workedin the spring. They are well-suited for the produc-tion of special crops such as vegetable and certainfruits.
StructureSoil particles are grouped together to form struc-tural pieces called peds or aggregates. In surfacesoil, the structure will usually be granular unless itis disrupted. The soil aggregates will be roundedand vary in size from that of a very small shot tothat of a large pea. If organic matter content is lowand the soil has been under continuous cultivation,the soil structure may be quite indistinct. If the soilis fine-textured with high organic content, it mayhave a blocky surface structure.
Structure of the soil is closely related to air andwater movement within it. Good structure allowsrapid movement of air and water, while poorstructure slows down this movement. Water canenter a surface soil that has granular structure morerapidly than one that has little structure. Since plantroots move through the same channels in the soil asair and water, good structure allows extensive rootdevelopment while poor structure discourages it.Water, air, and plant roots move more freelythrough subsoils that have blocky structure thanthose with a flaky horizontal structure. Goodstructure of the surface soil is promoted by anadequate supply of organic matter, and by workingthe soil only when moisture conditions are fitting.
Soil consistency. This terminology describes thetendency of the soil to crumble or to stick togetherwhen moist. “Friable” indicates a soil that will forma ball when squeezed but will crumble whenhandled. “Plastic” would relate to a soil high in siltor clay particles that would tend to remain stucktogether. By working a heavy clay soil when it is toowet, one can destroy its natural structure or com-pact it.
Tilth. Tilth is the result of tillage practices. It is thephysical or mechanical conditioning of the soil torender it more suitable for gas exchange and mois-ture movement needed for good plant growth.
Growing plants also change the soil structure asthey send their roots into the soil for mechanicalsupport and to gather water and nutrients. Theroots of plants, as they grow, tend to enlarge theopenings in the soil. When they die and decay, theyleave channels for movement of air and water. Inaddition to the plants that we see, there are verte-brates (moles, gophers), invertebrates (slugs, earth-worms), bacteria, fungi, and very small plants(algae) growing in the soil which can be seen onlywith the aid of a microscope. All of these organismsenrich the soil by adding organic matter when theydie.

Chapter 2 Soils and Fertilizers 5
Too much or too little water in the soil is equallyundesirable. With too much water, most plants willsuffocate. Where there is too little water, plants willwilt and eventually die. The most desirable soilmoisture situation is one in which approximatelyone-half of the pore space of the surface soil isoccupied by water.
Soil porosity is defined as the number, size, andformation of the open spaces in the soil. Soil poros-ity is related to the number and size of open (air)spaces in the soil and depends on the size andarrangement of the individual soil particles present. The smaller pores permit liquids to rise againstgravity by capillary action. The larger pores arethose which allow excess water to drain from thesoil profile.
Effects of Texture on Capacity to Hold Water
NAME SHAPE DESCRIPTION WHERE COMMONLYFOUND IN SOILS
Single grain Usually individual sand Sandy or loamygrains not held together textures
Granular Porous granules held A horizons withtogether by organic some organicmatter and some clay matter
Platy Aggregates that have Compacteda thin vertical dimension layers andwith respect to lateral sometimes Edimensions horizons
Blocky Roughly equidimensional B horizonspeds usually higher in with clayclay than other structuralaggregates
Prismatic Structural aggregates In some Bthat have a much horizonsgreater vertical thanlateral dimension.
Massive No definite structure or C horizons orcompact shape; transportedusually hard. material.
DrainageSoil drainage is defined as the rate and extent ofwater movement in the soil; that is, movementacross the surface as well as downward through thesoil. Slope is a very important factor in soil drain-age. Other factors include texture, structure, andphysical condition of surface and subsoil layers. Soildrainage is indicated by soil color. Clear, brightcolors indicate well-drained soils. Mixed, drab, anddominantly gray colors indicate imperfection indrainage. Low-lying areas within the landscapereceive run-off water. Frequently, the water fromthese areas must escape by lateral movementthrough the soil or by evaporation from the surface,as poor structure and other physical influences donot allow drainage through the soil. Often soils inthe stream terraces and flood banks are poorlydrained due to groundwater moving upward inthese areas.

Chapter 2 Soils and Fertilizers 6
DepthThe effective depth of a soil for plant growth is thevertical distance into the soil from the surface to alayer that essentially stops the downward growth ofplant roots. The barrier layer may be rock, sand,gravel, heavy clay, or a partially cemented layer.Terms that are used to express effective depth ofsoil are:
Very shallow: Soil surface is less than 10 inchesfrom a layer that retards root devel-opment.
Shallow: Soil surface is 10 to 20 inches from alayer that retards root development.
Moderatelydeep: Soil surface is 20 to 36 inches from a
layer that retards root development.
Deep: Soil surface is 36 to 60 inches from alayer that retards root development.
Very deep: Soil surface is 60 inches or morefrom a layer that retards root devel-opment.
Soils that are deep, well-drained, and have desirabletexture and structure are suitable for the productionof most crops. Deep soils can hold more plantnutrients and water than can shallow soils withsimilar textures. Depth of soil and its capacity fornutrients and water frequently determine the yieldfrom a crop, particularly annual crops grownthrough the summer months.
Plants growing on shallow soils also have lessmechanical support than those growing in deepsoils. Trees growing in shallow soils are morefrequently blown over by wind than are thosegrowing in deep soils.
The physical characteristics of soil strongly influ-ence erosion. Soils that have lost part or all of theirsurface are usually harder to till and have lowerproductivity than those that have desirable thick-ness of surface soil. To compensate for surface soilloss, better fertilization, liming, and other manage-ment practices should be used. Increasing theorganic matter content of an eroded soil oftenimproves its tillage characteristics, as well as itswater and nutrient capacity.
The principal reasons for soil erosion in NewHampshire are:
• insufficient vegetative cover
• overexposure through the use of cultivated cropson soils not suited to cultivation
• improper equipment and methods used inpreparation and tillage of the soil
Soil erosion can be held to a minimum by:
• producing crops to which the soil is suited
• adequate fertilization and liming to promotevigorous growth of plants
• thorough and proper soil preparation
• proper tillage methods
• mulching
Components of SoilOrganic MatterOrganic matter in soil consists of the remains ofplants and animals. When temperature and mois-ture conditions are favorable in the soil, earth-worms, insects, bacteria, fungi, and other types ofplants and animals use the organic matter as food,by breaking it down into simpler compounds andsoil nutrients. Through this process, materials aremade available for use by growing plants.
The digested and decomposing organic materialalso helps develop good air-water relationships. Insandy soil, organic material occupies some of thespace between the sand grains, thus binding thesetogether and increasing water-holding capacity. In afinely textured or clay soil, organic material createsaggregates of the fine soil particles, allowing waterto move more rapidly around these larger particles.This grouping of the soil particles into aggregates(or peds) makes it easier to work.
Organic matter content depends primarily on thekinds of plants that have been growing in a soil, thelong-term management practices, temperature, anddrainage. Soils that have native grass cover for longperiods usually have a relatively high organicmatter content in the surface area. Those that havenative forest cover usually have relatively loworganic matter content. In either case, if the plantsare grown on a soil that is poorly drained, theorganic matter content is usually higher than wherethe same plants are grown on a well-drained soil.This is due to differences in available oxygen andother substances needed by the organisms thatattack and decompose the organic material. Soils ina cool climate have more organic matter than thosein a warm climate.
In New Hampshire, it is common to use cover cropsto protect sloping land from soil erosion during the

Chapter 2 Soils and Fertilizers 7
fall, winter, and early spring period. Because of themodest amount of organic matter contributed andits rapid decomposition, cover crops used in thegarden setting contribute very little organic matterto soil but their value to soil protection cannot beignored. Both winter rye and oats are commonlyused as cover crops. Oats will winterkill and areeasily incorporated into soil with a rototiller in thespring. Winter rye grows aggressively in the springand its springtime incorporation into soil may posea problem if excessive rye canopy develops during aprotracted period of wet weather.
Muck. One of the terms associated with organicmatter is muck. Muck in its pure form is nothingmore than an accumulation of decaying or decayedvegetable matter. It may be entirely devoid of anymineral soil. Soils containing more than 10% of thismaterial are unsatisfactory for growing most plants.It is usually too soggy when wet and it dries out toomuch when exposed to the air. However, it is anexcellent source of humus to add to other mineralsoils.
Humus. This is a term which is often misused evenby experienced gardeners. True humus is vegetableand animal matter that has been modified from theoriginal tissue through decomposition. It is theultimate end product formed by the decay andoxidation of organic matter by the soil organisms. Itis not the black material one buys in bags or bales. Itis not even the rough compost obtained from pilesof leaves, grass clippings, or manure, etc. Whilehumus will eventually be derived from this mate-rial, only the final end product of complete decom-position can be called humus. With true humusthere is no offensive smell and the organic source ofthe humus can not be determined. It is this humuswhich makes up the organic faction in the soil thatis so important to the chemical reactions in the soil.
Water and AirAll water in the soil ultimately comes from precipi-tation (rain, snow, hail, or sleet), entering the soilthrough cracks, holes, and openings between thesoil particles. As the water enters, it pushes the airout. Oxygen is taken up by roots for respiration. Ifanaerobic (lack of oxygen) conditions persist for toolong, the roots will die.
Plants use some water, some is lost by evaporation,and some moves so deep into the soil that plantroots cannot reach it. If it rains very hard or for along time, some of it is lost through run-off.When organic matter decomposes in the soil, itgives off carbon dioxide. This carbon dioxidereplaces some of the oxygen in the soil pores. As a
result, soil air contains less oxygen and more carbondioxide than the air above the soil surface. Carbondioxide is dissolved by water in the soil to form aweak acid. This solution reacts with the minerals inthe soil to form compounds that can be taken upand used as foods by the plants.
Plant NutrientsPlants need 17 elements for normal growth. Carbon,hydrogen, and oxygen (which come from air andwater) and nitrogen (which is in the soil) make up95% of plant solids. Although the atmosphere is78% nitrogen, it is unavailable for plant use. How-ever, certain bacteria which inhabit nodules on theroots of legumes are able to fix nitrogen from the airinto a form available to plants.
The other 13 essential elements are iron, calcium,phosphorus, potassium, copper, sulphur, magne-sium, manganese, zinc, boron, chlorine, cobalt andmolybdenum. These elements come from the soil.With the exception of calcium, magnesium, phos-phorus, and potassium, there is usually a largeenough quantity of each of these elements in the soilfor cultivation of crops.
Cation Exchange CapacitySoils consist of solids, liquids and gases. The solidportion (or phase) consists of the minerals (sand, siltand clay) and the organic matter. Since soils natu-rally have a strong negative charge, they attractcations (positively charged ions) such as calcium(Ca++), magnesium (Mg+) and potassium (K+).Cation exchange is the ability of a soil to trade onecation for another, either between soil particles orbetween soil particles and the soil solution. CationExchange Capacity (CEC) is a measure of the soil=sability to adsorb (attach to the surface) cations andthen release them to the soil solution or to plantroots. The CEC of a soil is related to the amount ofclay mineral and the amount of organic matter inthe soil. Since most New Hampshire soils do nothave a high percentage of clay, the organic matterfraction plays an important role in determining thisvalue. A soil with a higher CEC with hold morecations and will help protect against leaching lossesof these cations. Another soil property related toCEC is base saturation. This is a measure of thepercentage of the CEC sites which are occupied bybasic cations such as calcium, magnesium, potas-sium and sodium. Soils with high pH and or ahistory of being limed would likely have high basesaturation percentages. Soils with a low pH and orno history of liming would have a low base satura-tion. In soils like these, the CEC sites would beoccupied by acidic cations such as aluminum (Al3+)and hydrogen (H+).

Chapter 2 Soils and Fertilizers 8
Soil pHSoil pH is a measure of the amount of hydrogen insoil taken from a scale that measures the hydrogen(acid forming) ion activity of soil or growth media.The reading expresses the degree of acidity oralkalinity in terms of pH values, very much likeheat and cold are expressed in degrees Centigradeor Fahrenheit. The Centigrade temperature scale iscentered around zero degrees or the freezing pointof water, and thermometers are used to measureintensities of heat and cold above and below thispoint. The scale of measuring acidity or alkalinitycontains 14 divisions known as pH units. It iscentered around pH 7 which is neutral. Valuesbelow 7 constitute the acid range of the scale andvalues above 7 make up the alkaline range.
The measurement scale is not a linear scale but alogarithmic scale. That is, a soil with a pH of 8.5 isten times more alkaline than a soil with a pH of 7.5,and a soil with a pH of 4.5 is ten times more acidthan a soil with a pH of 5.5.
The pH condition of soil is one of a number ofenvironmental conditions which affect the quality ofplant growth. A near-neutral or slightly acidic soil isgenerally considered ideal for most plants in thenortheast. Some types of plant growth can occuranywhere in a 3.5 to 10.0 range. With some notableexceptions, a soil pH of 6.0 to 7.0 requires no specialcultural practices to improve plant growth.
The major impact that pH extremes have on plantgrowth is the availability of plant nutrients andconcentration of the plant-toxic minerals (such asaluminum) in the soil. In highly acidic soils, cal-cium, phosphorous, and magnesium become tiedup and unavailable, and manganese can be concen-trated in toxic levels. At pH values of 7 and above,phosphorus, iron, copper, zinc, boron, and manga-nese become less available.
By the application of certain materials to the soil,adjustments can be made in pH values. To reduceacidity, apply a material that contains some form oflime. Ground agricultural limestone is the mostfrequently used. The finer the grind the morerapidly it becomes effective. Different soils willrequire a different amount of lime to adjust thereaction to the proper range. The texture of the soil,organic matter content, crop, and soil type are allfactors to consider in adjusting pH. For example,soils low in organic matter require much less limethan soils high in organic matter to make the samepH change.
Wood ash is often used as a soil amendment. Itcontains potash (potassium), phosphate, boron, andother elements. Wood ash can be used to raise soilpH with twice the weight of ash applied as lime-stone for the same effect. Ash should not come intocontact with germinating seedlings or plant roots asit may cause root damage. Incorporate the ash intothe soil in the spring. Check pH yearly if you usewood ashes. Never use coal ash or large amounts ofwood ash (no more than 20 lbs. per 1000 squarefeet), as toxicity problems may occur.
If pH is too high, elemental sulfur or aluminumsulfate can be added to the soil to reduce alkalinity.Most ornamental plants require slightly to stronglyacidic soil. These species develop iron chlorosiswhen grown in soils in the alkaline range. Ironchlorosis is often confused with nitrogen deficiencysince the symptoms (a definite yellowing of theleaves) are similar. This problem can be correctedby applying chelated iron sulfate to the soil toreduce the alkalinity and add iron.
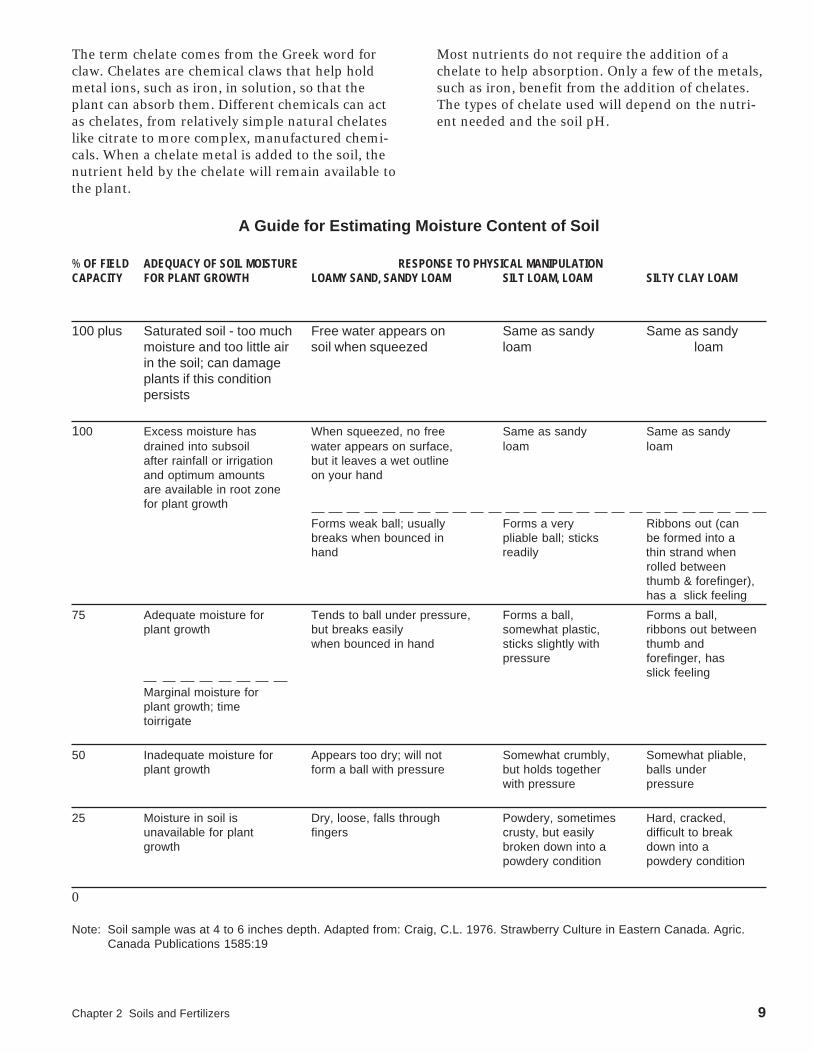
Chapter 2 Soils and Fertilizers 9
The term chelate comes from the Greek word forclaw. Chelates are chemical claws that help holdmetal ions, such as iron, in solution, so that theplant can absorb them. Different chemicals can actas chelates, from relatively simple natural chelateslike citrate to more complex, manufactured chemi-cals. When a chelate metal is added to the soil, thenutrient held by the chelate will remain available tothe plant.
Most nutrients do not require the addition of achelate to help absorption. Only a few of the metals,such as iron, benefit from the addition of chelates.The types of chelate used will depend on the nutri-ent needed and the soil pH.
A Guide for Estimating Moisture Content of Soil
% OF FIELD ADEQUACY OF SOIL MOISTURE RESPONSE TO PHYSICAL MANIPULATIONCAPACITY FOR PLANT GROWTH LOAMY SAND, SANDY LOAM SILT LOAM, LOAM SILTY CLAY LOAM
100 plus Saturated soil - too much Free water appears on Same as sandy Same as sandymoisture and too little air soil when squeezed loam loamin the soil; can damageplants if this conditionpersists
100 Excess moisture has When squeezed, no free Same as sandy Same as sandydrained into subsoil water appears on surface, loam loamafter rainfall or irrigation but it leaves a wet outlineand optimum amounts on your handare available in root zonefor plant growth
Forms weak ball; usually Forms a very Ribbons out (canbreaks when bounced in pliable ball; sticks be formed into ahand readily thin strand when
rolled betweenthumb & forefinger),has a slick feeling
75 Adequate moisture for Tends to ball under pressure, Forms a ball, Forms a ball,plant growth but breaks easily somewhat plastic, ribbons out between
when bounced in hand sticks slightly with thumb andpressure forefinger, has
slick feeling
Marginal moisture forplant growth; timetoirrigate
50 Inadequate moisture for Appears too dry; will not Somewhat crumbly, Somewhat pliable,plant growth form a ball with pressure but holds together balls under
with pressure pressure
25 Moisture in soil is Dry, loose, falls through Powdery, sometimes Hard, cracked,unavailable for plant fingers crusty, but easily difficult to breakgrowth broken down into a down into a
powdery condition powdery condition
0
Note: Soil sample was at 4 to 6 inches depth. Adapted from: Craig, C.L. 1976. Strawberry Culture in Eastern Canada. Agric.Canada Publications 1585:19
Chapter 2 Soils and Fertilizers 10
FertilizersThere are 17 elements essential to plant growth.Nitrogen, phosphorous and potassium are consid-ered fertilizer macronutrients because plants requirethem in quantity for maximum growth. Calcium,magnesium, and sulfur are secondary macronutri-ents but usually are either present in sufficientquantities or are added coincidentally with othermaterials (e.g., lime). The other 11 nutrients, calledmicronutrient, are just as important but necessaryin smaller amounts. If plants lack any of theseelements, they exhibit signs of nutrient deficiency.
Fertilizers AnalysisThe fertilizer analysis given on the package refers tothe amount of an element present in a formulationbased on percentage of weight. All fertilizers arelabeled with three numbers, giving the percentageby weight of nitrogen (N), phosphate (P
2O
5), and
potash (K2O) respectively. However, to simplify
matters, these are usually just referred to as nitro-gen, phosphorus and potassium or N, P, and K.
Some soil test labs report phosphorus results interms of P and others in terms of P
2O
5. In order to
compare results you may need to convert phospho-rus to phosphate, or vice versa. To convert P to P
2O
5
you would multiply by 2.29. (This factor is relatedto the molecular weight of the two products). Toconvert P
2O
5 to P multiply by 0.43. To convert
potassium (K) to potash (K2O) multiply K values by
1.2. To convert potash (K2O) to potassium multiply
the K2O value by 0.83. For example, if we have a 100
pound bag of 10-10-10, there are 10 pounds of N, 10pounds of P
2O
5, 10 pounds of K
20 and 70 pounds of
filler. The amount of actual phosphorus (P) in thebag is 4.3 pounds (10 pounds of phosphate x 0.43).
Filler can be important so that we can evenly spreadthe fertilizer and avoid burning plants with toomuch fertilizer. A 100-pound bag of fertilizerlabeled 0-20-10 would have 0 pounds of N, 20pounds of P
2O
5, 10 pounds of K
2O, and 70 pounds of
filler.
For many years, there has been a model label lawwhich many states have adopted for the classifica-tion of fertilizers. The law also establishes minimumlevels of nutrients allowable and provides specificlabeling requirements. To date, model label legisla-tion has not met with total acceptance, so there arestill differences from state to state as to what consti-tutes a fertilizer and the type of information on
labels. Even so, the information contained onfertilizer labels has been well standardized, and theconsumer is protected by state laws requiringmanufacturers to guarantee the claimed nutrients.
The law requires that the manufacturer guaranteesaccuracy of what is claimed on the label. In somecases, a fertilizer will contain secondary nutrients ormicronutrients not listed on the label because themanufacturer does not want to guarantee their exactamounts. The gardener/consumer is assured thatnutrients listed on the label are actually containedin the fertilizer.
On fertilizer labels, the initials W.I.N. and W.S.N.stand for Water Insoluble Nitrogen and WaterSoluble Nitrogen, respectively. The water solublenitrogen (W.S.N.) dissolves readily and is usually invery simple form, such as ammoniacal nitrogen(ammonia) or nitrate nitrogen. Nitrogen which willnot dissolve readily may exist in other forms in thefertilizer. These are usually organic forms of nitro-gen (with the exception of urea) that must be brokendown into simpler forms before it can be used.Water insoluble nitrogen (W.I.N.) is referred to as aslow-release nitrogen source and delivers nitrogenat different rates according to the amount and kindof material in its composition.
The best fertilizer to use depends on many factors,such as the nutrients needed, soil structure, soilchemistry, and method of applying the fertilizer.
Complete Versus IncompleteA fertilizer is said to be complete when it containsnitrogen, phosphorus, and potassium. The manufac-turers of commercial fertilizers are required to statethe amounts of nutrients on the container as aguaranteed analysis. Examples of commonly usedfertilizers are 10-10-10, 16-16-16, and 20-10-5. Anincomplete fertilizer will be missing one of themajor components.
The fertilizer ratio indicates the proportion ofnitrogen, phosphate, and potash contained in thefertilizer. The specific fertilizer ratio you will needdepends on the soil nutrient level. For example, a 1-1-1 ratio (10-10-10, 15-15-15, 20-20-20) is widelyused at the time of lawn establishment, but estab-lished lawns generally respond better to fertilizerratios high in nitrogen. Two of the more commoncomplete fertilizers used by homeowners for flow-ers and vegetables are 10-10-10 and 5-10-10.
Chapter 2 Soils and Fertilizers 11
Special Purpose FertilizersWhen fertilizer shopping, you will find fertilizerspackaged for certain uses or types of plants such asCamellia Food, Rhododendron and Azalea Food, orRose Food. The camellia and rhododendron/azaleafertilizers belong to an old established group, theacid plant fertilizers. Some of the compounds usedin these fertilizers are chosen because they have anacid reaction, so they are especially beneficial toacid-loving plants where soil is naturally neutral oralkaline. The other fertilizers packaged for certainplants do not have as valid a background of re-search. For example, the next time you are shop-ping, compare the fertilizer ratios of differentbrands of rose fertilizers.
A soil test should be performed before the purchaseof any expensive, special-purpose fertilizers. It isnot possible to make a blanket statement that onefertilizer is best for every area of a particular state. Itis true that different plants use different nutrients atdifferent rates. What is unknown is the reserve ofnutrients already in the soil. This changes withevery soil type and location.
Slow-Release FertilizersPlants can absorb nutrients continuously, so it isbeneficial to provide them with a balance of nutri-ents throughout their growth. Perhaps the mostefficient way to achieve this is to apply a slow-release fertilizer, which releases nutrients at a ratethat makes them available to the plants over a longperiod. Slow-release fertilizers contain one or moreessential elements. These elements are released ormade available to plants over an extended period.
Slow-release fertilizers can be categorized accordingto their release mechanism. The three major types ofnutrient release mechanisms are: (1) materials thatdissolve slowly, (2) materials containing microor-ganisms which release nitrogen, and (3) granularmaterials with membranes made of resin or sulfurto control the rate of nutrient release into the soil.
Sulfur-coated urea is a slow-release fertilizer with acovering of sulfur around each urea particle. Differ-ent thicknesses of sulfur control the rate of nitrogenrelease, which increases with temperature. Wateringdoes not affect its release rate. Sulfur-coated ureaapplied to the soil’s surface releases nitrogen moreslowly than if incorporated into the soil. Thismaterial generally costs less than other slow-releasefertilizers, and it supplies the essential element,sulfur.
When fertilizer products coated with multiplelayers of resin come into contact with water, thelayers swell and increase the pore size in the resinso that the dissolved fertilizer can move into thesoil. Release rate depends on the coating thickness,temperature, and water content of the soil. There isoften a large release of fertilizer during the first twoor three days after application. Release timing canbe from 0 to 6 months, depending on the coating.
Slow-release fertilizers need not be applied asfrequently as other fertilizers, and higher amountscan be applied without danger of burning. Plantsmay use the nitrogen in slow-release fertilizers moreefficiently than nitrogen in other forms, since it isreleased over a longer period of time and in smallerquantity. Slow-release fertilizers are generally moreexpensive than other types. The real benefit, how-ever, is the frequency of application, which is muchlower than conventional fertilizers.
Urea formaldehyde and sulfur-coated urea havebeen used as turf fertilizer, while resin-coatedfertilizers are predominantly used in containergrowing.
Caution should be used in applying slow-releasefertilizers around trees or shrubs, as they may keepthe plant in growth late in the summer. The late-season growth may not harden off completely, andexcessive winter damage may occur.
The table below compares slow-release fertilizersand conventional fertilizers.
Comparison of FertilizersSlow Release Fertilizers
Advantages Disadvantages1. Fewer applications 1. Unit cost is high2. Low burn potential 2. Availability is
limited3. Release rate varies 3. Release rate is
depending on governed by factorsfertilizer characteristics other than plant
need
Conventional FertilizersAdvantages Disadvantages
1. Fast acting 1. Greater burnpotential
2. Some are acid-forming 2. Solidifies in bagwhen wet
3. Low cost 3. Some nitrogen formsleach readily

Chapter 2 Soils and Fertilizers 12
Manures or Sewage SludgeAdvantages Disadvantages
1. Low burn potential 1. Salts may buildup
2. Relatively slow-release 2. Bulky3. Contains micronutrient 3. Odor4. Conditions the soil 4. Expensive per
pound for actualnutrient
5. Contains weed seed6. Heavy metals may
be present in sewagesludge from largecities or industrialareas
Organic FertilizersThe word organic, applied to fertilizers, simplymeans that the nutrients contained in the productare derived solely from the remains or by-productsof a once-living organism. Urea is a syntheticorganic fertilizer, an organic substance manufac-tured from inorganic materials. Cottonseed meal,blood meal, bone meal, hoof and horn meal, and allmanures are examples of organic fertilizers. Whenpackaged as fertilizers, these products will have thefertilizer ratios stated on the labels. Some organicmaterials, particularly composted manures andsludges, are sold as soil conditioners and do nothave a nutrient guarantee, although small amountsof nutrients are present. Most are high in one of thethree major nutrients and low in the other two,although you may find some fortified with nitrogen,phosphorus, or potash for a higher analysis. Manyare low in all three. In general, organic fertilizersrelease nutrients over a fairly long period; thepotential drawback is that they may not releaseenough of their principal nutrient at a time to givethe plant what it needs for best growth. Becauseorganic fertilizers depend on soil organisms tobreak them down to release nutrients, most of themare effective only when soil is moist and soil tem-perature is warm enough for the soil organisms tobe active.
Plants cannot differentiate between chemical ororganic sources of basic nutrient elements. Researchhas also indicated that sources of basic mineralplant nutrients have no impact upon plant growth,vigor, flavor, or human nutritional value.
Cottonseed meal is a by-product of cotton manufac-turing; as a fertilizer, it is somewhat acidic inreaction. Formulas vary slightly, but generallycontain 7 percent nitrogen, 3 percent phosphorus,and 2 percent potash. Cottonseed meal is readilyavailable to plants in warm soils, and there is littledanger of burn. For general garden use, apply 2 to 5pounds per 1000 square feet. Cottonseed meal isfrequently used for fertilizing acid-loving plantssuch as azaleas, camellias, and rhododendrons.
Blood meal is dried, powdered blood collected frombeef processors. It is a rich source of nitrogen — sorich, in fact, that it may do harm if used in excess.The gardener must be careful not to use more thanthe amount recommended on the label. In additionto supplying nitrogen, blood meal supplies certainof the essential trace elements, including iron.
Fish emulsion, a complete fertilizer, is a partiallydecomposed blend of finely pulverized fish. Nomatter how little is used, the odor is intense — but itdissipates within a day or two. Fish emulsion ishigh in nitrogen and is a source of several traceelements. In the late spring, when garden plantshave sprouted, an application of fish emulsionfollowed by a deep watering will boost the plant’searly growth spurt. Contrary to popular belief, toostrong a solution of fish emulsion can burn plants,particularly those in containers.
Manure is also a complete fertilizer, but low in theamounts of nutrients it can supply. Manures vary innutrient content according to the animal source,bedding material used, and what the animal hasbeen eating, but a fertilizer ratio of 1-1-1 is typical.Manures are best used as soil conditioners insteadof nutrient sources. The straw or litter in somemanures can help add organic matter to the soil,however barnyard manure usually contains largenumbers of weed seeds. Commonly availablemanures include horse, cow, pig, chicken, andsheep. The actual nutrient content varies widely: thehighest concentration of nutrients is found whenmanures are fresh. As it is aged, leached, orcomposted, nutrient content is reduced. However,the subsequent reduction in salts will reduce thechances of burning plants. Ammonia toxicity maybe another concern. Fresh manure should not beused where it will contact tender plant roots. Com-mercially dried manures are very expensive for thebenefits received. Typical rates of manure applica-tions vary from a moderate 70 pounds per 1000square feet to as much as one ton per 1000 squarefeet.

Chapter 2 Soils and Fertilizers 13
Sewer sludge is a recycled product of municipalsewage treatment plants. Two forms are commonlyavailable: activated and composted. Activatedsludge has higher concentrations of nutrients(approximately 6-3-0) than composted sludge, andis usually sold in a dry, granular form for use as ageneral purpose, long-lasting, non-burning fertil-izer. Composted sludge is used primarily as a soilamendment and has a lower nutrient content(approximately 1-2-0). There is some question aboutthe long-term effects of using sewage sludge prod-ucts in the garden, particularly around edible crops.Heavy metals, such as cadmium, are sometimespresent in the sludge, and may build up in the soil.Possible negative effects vary, not only with theorigin of the sludge, but also with the characteristicsof the soil where it is used. It may be appropriate tohave the sludge analyzed for heavy metals.
The following table shows the approximate nutrientcontent of manures and common organic fertilizersplus the suggested yearly rates of application per1000 square feet of garden area. Rates given are formaterials used singly; if combinations of two ormore materials are used or some chemical fertilizeris used, the rate should be reduced accordingly.
SuggestedType of Approx.Dry Manure Rate (lbs. peror Fertilizer Nitrogen Phosphorus Potassium 1000 Sq Ft
% % % of garden area)
Chicken manure 2.0-4.5 3.0-4.6 1.2-2.4 125
Horse manure .5-1.0 .2-.5 .3-.7 700
Dairy manure 1.2-2.75 .6-1.4 2.0-3.6 600
Sheep manure 1-1.5 .3-.5 .7-1.3 700
Green sand 0 0 4-7 50
Granite dust 0 0 3-5 50
Rock phosphate 0 33.0 0 100
Compared to synthetic fertilizer formulations,organic fertilizers contain relatively low concentra-tions of actual nutrients, but they perform otherimportant functions which the synthetic formula-tions do not. Some of these functions are: increasingorganic content of the soil; improving physicalstructure of the soil; and increasing bacterial andfungal activity, particularly the mycorrhiza fungus,which alone makes other nutrients more available toplants.
Fertilizers Combined with PesticidesThe major reason for buying a fertilizer combinedwith a pesticide is convenience. It is very convenientto combine everything you need in one application,but it is also very expensive. The problem is that thetiming for a fertilizer application often does notcoincide with the appearance of a disease or aninsect problem. In the case of a number of turfgrassdiseases, a primary cause of disease infestation ismerely a lack of proper fertilizer.
A fertilizer-insecticide combination, when appliedat the proper stage of a pest’s life-cycle, can do anadequate job of controlling the turf pest while alsogiving the grass “a shot in the arm” to help itsrecovery. However, fertilizers with pesticidesintended for use with turf or ornamentals shouldnot be used in the vegetable garden where it maycontaminate food crops. Always read the labelcarefully.
Fertilizers FormulationFertilizers come in many shapes and sizes. Differentformulations are made to facilitate types of situa-tions in which fertilizer is needed. Packaging for allformulations must show the amount of nutrientscontained, and sometimes it tells how quickly anutrient is available. Some of the formulationsavailable to the homeowner are: water-solublepowders, slow-release pellets, slow-release collarsor spikes, liquids, tablets, and granular solids.
Liquid fertilizers come in a variety of differentformulations, including complete formulas andspecial types that offer just one or two nutrients. Allare made to be diluted with water; some are concen-trated liquids themselves, others are powder orpellets. Growers of container plants often use liquidfertilizers at half the recommended dilution twice asfrequently as recommended so that the plantsreceive a more continuous supply of nutrients.

Chapter 2 Soils and Fertilizers 14
Fertilizer ApplicationComputing the amount of fertilizer needed for agiven area is rather tricky at first, but after a fewtimes, this becomes second nature. Following is anexample of a fertilizer determination for a lawn.
Since the element that is often the one usuallylacking in most soils and also required more bymost plants is nitrogen, many fertilizer recommen-dations are based on this element. For vegetablegardens, flower beds, small fruit plantings, etc. therule of thumb is 1 lb. of actual nitrogen per 1,000 sq.ft. for maintenance and 2 lbs. of nitrogen at the timeof establishment (worked into the soil).
Example. Determine the amount of ammoniumsulfate needed by a 5000 square-foot lawn if 1pound of nitrogen per 1000 square feet is required.
Lawn: 5000 square feetFertilizer: ammonium sulfate (21-0-0)Rate: 1 pound of nitrogen per 1000 square feet
1. Since we need 1 pound of nitrogen for every 1000square feet and we have 5000 square feet, weneed 5 pounds of nitrogen.
2. Ammonium sulfate is 21 percent nitrogen (roundto 20 percent).
3. 20 percent is the same as 0.20 or 1/5. This meansthat we need 5 pounds of fertilizer to get 1 poundof nitrogen.
4. Since we need 5 pounds of nitrogen, 5 x 5 = 25pounds of fertilizer.
Total fertilizer needed =
N application rate lawn size (lbs./1000 sq. ft.) x (sq. ft.) = 1 x 5000 = 25 lb.N content of fertilizer 1000 0.20 1000 fertilizerexpressed as a decimal
Nitrogen fertilizers do not burn or damage plants ifthey are applied correctly. Fertilizers are salts, muchlike our familiar table salt, except that they containvarious plant nutrients. When a fertilizer is appliedto a soil, nearby water begins to move very gradu-ally towards the area where the fertilizer has beenapplied. Salts in the fertilizer begin to diffuse ormove away from the place where they had beenapplied. This dilutes the fertilizer and distributesit through a much larger area. If tender plant rootsare close to the area where the fertilizer is placed,water will be drawn from these roots and from the
surrounding soil. The more salt or fertilizer applied,the more water will be drawn from nearby roots. Aswater is drawn from the roots, plant cells begin todehydrate and collapse, and the plant roots burn ordehydrate to a point from which they cannot re-cover. If soil moisture is limited, most of the waterdrawn towards the salt will come from plant rootsand the damage will be severe.
Two rules should be kept in mind when applying afertilizer during hot weather when soil moisture islimited: 1) do not over-apply nitrogen fertilizers;and 2) make sure adequate moisture is present afterapplying fertilizers high in salts. The following tableis a chart of commonly used garden fertilizers highin salt content or burn potential. The last column isthe practical measure of relative saltiness. A highernumber indicates greater saltiness.
Relative Saltiness
Material Nutrient level per weightof nutrient
Ammonium nitrate 33 percent Nitrogen 1.49
Ammonium sulfate 21 percent Nitrogen 1.63
Potassium nitrate 14 percent Nitrogen 2.67
Natural organic fertilizer 5 percent Nitrogen 0.41
Urea formaldehyde 38 percent Nitrogen 0.13
Urea 45 percent Nitrogen 0.81
Superphosphate 20 percent Phosphorus 0.21
Potassium chloride 60 percent Potash 0.87
Potassium sulfate 50 percent Potash 0.43
Dolomite 30 percent Calcium —
20 percent Magnesium —
Gypsum 33 percent Calcium 0.12
Epsom salts 16 percent Magnesium 1.38
Soluble salts will accumulate on top of the soil in acontainer and form a yellow-to-white crust. A ringof salt deposits may form around the pot at the soilline or around the drainage hole. Salts will alsobuild up on the outside of clay pots. Soluble saltsaccumulate when fertilizer is applied repeatedlywithout sufficient water to leach or wash the oldfertilizer’s salts through the soil. It also occurs whenwater evaporates from the soil and minerals, butsalts stay behind. As the salts in the soil becomemore concentrated, plants find it harder to take upwater. If salts build up to an extremely high level,water can be taken out of the root tips, causing themto die.

Chapter 2 Soils and Fertilizers 15
Soluble-salt problems commonly occur on plants incontainers but are rarely a problem in the garden.The best way to prevent soluble salt injury is to stopthe salts from building up. Water correctly. Whenwater is applied, allow water to drain through thebottom holes and then empty the drip plate. Waterequal to one-tenth the volume of the pot shoulddrain through each time you water. Do not allowthe pot to sit in water. If you let the drained waterbe absorbed by the soil, the salts that were washedout are taken back into the soil. Salts can be reab-sorbed through the drainage hole or directlythrough a clay pot.
Potted plants should be leached every 4 to 6months. Leach a potted plant before fertilizing toavoid washing away all newly added fertilizer.Leaching is done by pouring water on the soil andletting it drain completely. The amount of waterused for leaching should equal twice the volume ofthe pot. For example, a 6-inch pot will hold 10 cupsof water, so 20 cups of water are used in leaching.Keep the water running through the soil to wash thesalts out. If a layer of salts has formed a crust on topof the soil, you should remove the salt crust beforeyou begin to leach. Do not remove more than ¼-inchof soil. It is best not to add more soil to the top ofthe pot. If the soluble salt level is extremely high orthe pot has no drainage, repot the plant.
The level of salts that will cause injury varies withthe type of plant and how it is being grown. A plantgrown in the home may be injured by salts at aconcentration of 200 ppm. The same plant growingin a greenhouse where the light and drainage aregood will grow well until salts reach concentrations10 times that level, or 2000 ppm. Some nurseriesand plant shops leach plants to remove excess saltsbefore the plant is sold. If you are not sure that hasbeen done, leach a newly purchased plant the firsttime you water it.
Soil type dictates the frequency of fertilizer applica-tion. Sandy soils require more frequent applicationsof nitrogen and other nutrients than do clay-typesoils. Other factors affecting frequency of applica-tion include the type of crop, the level of cropproductivity required, frequency and amount ofwater applied, and type of fertilizer applied and itsrelease rate.
TimingThe type of crop influences timing and frequency ofapplication since some crops are heavier feeders ofparticular nutrients than others. Root crops requireless nitrogen fertilization than do leafy crops. Cornis a heavy feeder of nitrogen, while most trees andshrubs are generally light nitrogen-feeders. Cornmay require nitrogen fertilization every four weeks,while most trees and shrubs perform nicely withone, good, well-placed application every year ortwo. A general rule of thumb is that nitrogen is forleafy top growth; phosphorus is for root and fruitproduction; and potassium is for cold hardiness,disease resistance, and general durability.
Proper use of nutrients can control plant growthrate and character. Nitrogen is the most criticalnutrient in this regard. If tomatoes are fertilizedheavily with a nitrogen fertilizer into the summer,the plants may be all vine and no fruit. This is alsothe case with potatoes, which will show excessvining and poor tuber formation. If slow-releasefertilizers or heavy amounts of manure are used oncrops that form fruit or vegetables, leaf and vinegrowth will continue into late summer, and fruitand vegetable development will occur very late inthe season.
Remember that a nitrogen application will have itsgreatest effect for three to four weeks after applica-tion. If tomatoes are fertilized heavily on June 1,there may be no flower production until July 1,which will, in turn, delay fruit ripening until lateAugust. For this reason, it is important to plantcrops with similar fertilizer needs close together toavoid improper rates of application.
Late fertilization (after July 1) of trees and shrubscan cause new flushes of growth to occur on woodyplants that are normally adjusting themselves forthe coming winter. This may delay dormancy ofwoody plants and cause severe winter die back innew growth.
The following suggestions about groups of gardenplants are given as general guides. Gardenersshould be aware that individual species withinthese groups vary considerably. After each group ofplants, the need for the primary nutrients (nitrogen,phosphorus, and potassium) is indicated as high,medium, or low.
Chapter 2 Soils and Fertilizers 16
Vegetables High
Herbs Medium to Low
Lawns Medium to High
Fruits Medium
Annual flowers Medium
Perennial flowers Medium to Low
Deciduous shrubs Medium to Low
Evergreen shrubs Low
Deciduous shade trees Medium to Low
Evergreen shade trees Low
Application MethodsThere are different methods of applying fertilizerdepending on its formulation and the crop needs.
Broadcasting — A recommended rate of fertilizer isspread over the growing area and left to filter intothe soil or incorporated into the soil with a rototilleror spade. Broadcasting is used over large gardenareas or when time or labor is limited.
Banding — Narrow bands of fertilizer are appliedin furrows 2 to 3 inches from the garden seeds and 1to 2 inches deeper than the seeds or plants. Carelessplacement of the fertilizer band too close to theseeds will burn the roots of the seedlings. The besttechnique is to stretch a string where the seed row isto be planted. With a corner of a hoe, dig a furrow 3inches deep, 3 inches to one side, and parallel withthe string. Spread one-half the suggested rate of thefertilizer in the furrow and cover it with soil. Repeatthe banding operation on the other side of thestring, then sow seeds underneath the string.
For widely spaced plants, such as tomatoes, fertiliz-ers can be placed in bands 6 inches long for eachplant or in a circle around the plant. Place the bands4 inches from the plant base. If used in the holeitself, place the fertilizer at the bottom of the hole,work it into the soil, and place a layer of soil about 2inches deep over the fertilized soil before puttingthe plant in the hole.
Banding is one way to satisfy the needs of manyplants (especially tomatoes) for phosphorus as thefirst roots develop. When fertilizers are broadcastand worked into soil, much of the phosphorus is
locked up by the soil and is not immediately avail-able to the plant. By concentrating the phosphorusin the band, the plant is given what it needs eventhough much of the phosphorus stays locked up.
Starter solutions — Another way to satisfy the needfor phosphorus when setting out transplants oftomatoes, eggplant, peppers, or cabbage is throughthe use of a liquid fertilizer high in phosphorus, as astarter solution. Follow directions on the label.
Side-Dressing — Dry fertilizer is applied as a sidedressing after plants are up and growing. Scatterfertilizer on both sides of the row 6 to 8 inches fromthe plants. Rake it into the soil and water thor-oughly.
Foliar Feeding — Foliar feeding is used wheninsufficient fertilizer was used before planting; aquick growth response is wanted; micronutrients(such as iron or zinc) are locked into the soil; orwhen the soil is too cold for the plants to use thefertilizer applied to the soil. Foliar-applied nutrientsare absorbed and used by the plant quite rapidly.Absorption begins within minutes after applicationand, with most nutrients, it is completed within 1 to2 days. Foliar nutrition can be a supplement to soilnutrition at a critical time for the plant, but not asubstitute. At transplanting time, an application ofphosphorus spray will help in the establishment ofthe young plant in cold soils. For perennial plants,early spring growth is usually limited by cold soil,even when the air is warm. Under such conditions,soil microorganisms are not active enough toconvert nutrients into forms available for roots toabsorb; yet, if the nutrients were available, theplants could grow. A nutrient spray to the foliagewill provide the needed nutrients immediately,allowing the plants to begin growth.
Chapter 2 Soils and Fertilizers 17
Improving Soil StructureIn special cases, coarse sand, vermiculite, peat andperlite are added to heavy clays to help improve thesoil texture or structure. However, these inertmaterials can be expensive and large quantities areneeded to do any good. In some cases, they canmake the situation worse by causing clays to “setup” similar to concrete. Compost, manures, andother organic amendments are more effective andeconomical for modifying the soil structure.
Organic matter is a great soil improver for both clayand sandy soils. Good sources of organic matterinclude manures, leaf mold, sawdust, and straw.These materials are decomposed by soil organisms.Various factors such as moisture, temperature, andnitrogen availability determine the rate of decompo-sition through their effects on these organisms.Adequate water must be present, and warm tem-peratures will increase the rate at which the mi-crobes work. The proper balance of carbon andnitrogen is needed for rapid decomposition. Theaddition of nitrogen may be necessary if largeamounts of undecomposed high-carbon substancessuch as dried leaves, straw, or sawdust are used.Fresh green wastes, such as grass clippings, arehigher in nitrogen than dry material. In the processof breaking down the organic matter, nitrogen isused by the microbes and, therefore, may becomedeficient in the plants.
Peat Moss. One of the most popular sources oforganic matter which has many uses is peat moss. Itis fairly uniform, readily available, and easy to workwith. Peat moss is partially decomposed organicmatter which was formed under water (low oxygen)in bogs and swamps. There are several types of peatavailable on the market. They differ somewhatbecause of the site and depth where they wereobtained, the parent plant material and the relativestage of decomposition. The actual pH of the vari-ous peats may also vary from about pH 3.0 to pH4.5. Generally speaking, the European and Cana-dian peats are the result of sphagnum moss par-tially decomposing under bog conditions while the“domestic” peats often contain other mosses andadditional woody or herbaceous plant material suchas reed and sedge. “Native” or “Michigan” typepeat mosses have usually progressed further alongin their decomposition and are finer to the touch,with less visible plant parts remaining in them.
They may also be darker in color. All peat moss willeventually break down in the soil and producehumus, but it is lacking in the nutrients required foradequate plant growth. A sound fertilizer programis therefore a requirement when using quantities ofpeat moss.
Compost. The use of compost is one way to avoidtying up nitrogen during decomposition. Compostis usually made by the gardener from plant wastes.Correct composting can result in a valuable nutrientand humus source for any garden. The basis of theprocess is the microbial decomposition of mixedraw organic materials to humus, a dark, fluffyproduct resembling rich soil, which is then spreadand incorporated into the garden soil.
For more detailed information, refer to thecomposting chapter in this handbook.
Another source of inexpensive soil improvementthat should not be underestimated is the cover crop.Green manures, or cover crops, such as ryegrass areplanted in the garden in the fall for incorporation inthe spring. For best results, seed should be sown alittle before the first killing frost. In a fall garden,plant cover crops between the rows and in anycleared areas. Cover cropping provides additionalorganic matter, holds nutrients that might havebeen lost over the winter, and helps reduce erosionand loss of topsoil. Legume cover crops can increasethe amount of nitrogen in the soil and reducefertilizer needs. A deep-rooted cover crop allowedto grow for a season in problem soil can help breakup a hardpan and greatly improve tilth. Incorporategreen manures at least two weeks before plantingvegetables. They should not be allowed to go toseed.
The “ideal” cover crop will:
• Establish satisfactory cover for soil erosionprevention over the winter.
• Add significant amounts of organic matter to thesoil.
• Replace some of the fertilizer nitrogen require-ment.
The following crops, which include both grassesand legumes, are possibilities for cover and/orgreen manure. The choice will be governed by(a) costs; (b) seeding date; (c) period of timeallocated for growth; (d) vigor of establishment;(e) soil conditions and (f) eventual utilization.

Chapter 2 Soils and Fertilizers 18
SeedingRate
Crop (lbs/A) Comments
Winter Rye 100 First choice for gardeners for bestcover. In spring may need torototill early two-three times forcomplete kill.
Sweet Clover 12 Excellent growth in second(white) year after establishment. Needs
relatively high pH (>6.0)
Oats Seed in early spring or August forcover. Winterkills totally.
Hairy Vetch 40 Costly. Winterkills. Must seed inNH by Aug. 15 for good fall cover.
Wheat 90 Spring wheat: Early planting(spring & winter) important.
Winter wheat: No vigor advantageover rye as a cover crop.
Buckwheat 75 Sow June 1 - July 15. Sensitive todrought. Reseed by discing afterseed development. Rapidestablishment.
Alfalfa 10 Long lived perennial. Slow coverestablishment in fall with Augustseeding. Excellent N2 fixation.
Red Clover 6 Good all-purpose legume forshort term (2 yr.) Rotation. Sowby Aug. 20 for reasonable fallestablishment.
Ladino 2 Very slow to establishment.Clover Low-growing perennial. Perhaps
use for inter-row plantings. Sowby Aug. 15.
Japanese 25 Used as summer annual.Millet Rapid growth. Good organic
matter source.
Sudan or 30-50 Excellent summer annual.Sorghum May pose problems at/Sudan plow-down due to biomass.hyb.
Perennial 30 Long-term cover crop.Ryegrass Some winterkill may occur.
Field 20 Permanent, vigorous grassBromegrass cover. Reseed by discing after
seed development.
The regular addition of manures, compost, covercrops, and other organic materials can raise the soilnutrient and physical level to a point at which theneed for additional synthetic fertilizers is greatlyreduced. This highly desirable soil quality does notcome about with a single or even several additionsof organic material, but rather requires a serioussoil-building program.
Soil TestingThe purpose of a soil test is to supply the home-owner with enough information to make a wisefertilizer purchase. A soil test will provide informa-tion on buffer pH, soil pH, lime content, availablephosphorus and potassium. The results of the soiltest are mailed to the homeowner with recommen-dations as to what kind of fertilizer should beapplied for economical growth of the desired crops.Soil tests should be performed if such tests havenever been done before. A soil test need not beperformed more often than every 3 to 4 years. Thesample should be submitted in the fall, prior toplanting or tilling, so that needed lime can bechanging the pH over the winter. Fertilizers shouldbe incorporated the next spring.
The accuracy of the soil test is a reflection of thesample taken. Be sure the sample is representativeof the area to be treated. Sample the soil from 10random areas of the garden to a depth of 6 to 12inches. Avoid sampling unusual areas such as thosenear gravel roads, manure or compost spots, brushpiles, or under eaves. Place the samples in a cleanpail or container, and mix the soil thoroughly. Thentransfer a pint of mixed soil to a container and takeit to the local Extension office. Comparisons ofresults between home test kits, various state labora-tories and commercial testing services cannot reallybe made because of varying extracting and analysisprocedures.

Chapter 2 Soils and Fertilizers 19
Analysis and Use of Some Common Fertilizer Materials
Other Rate of Application nAnalysis Nutrients Speed of Effect
Name of Material N-P2O
5-K
2O Supplied Dry (lbs/cu yd)* Liquid (lbs/100 gals) Reaction on pH
Primary Fertilizers
Ammonium sulfate 20-0-0 S ½-1 lb/100 sqft. 2-3 Rapid Very Acid(NH
4)
2SO
4
Sodium Nitrate 15-0-0 ¾-1¼ lb /100 sq ft 2 oz per 2 gal Rapid BasicNaNO
3
Calcium nitrate 15-0-0 Ca ¾-1½ lb/100 sq ft 3 oz per 2 gal Rapid BasicCa(NO
3)
2.2H
2O
Potassium nitrate 13-0-44 ½-1 lb/100 sq ft 2 oz per 3 gal Rapid NeutralKNO
3
Ammonium nitrate 33-0-0 ¼-½ lb/100 sq ft 1¼ oz per 5 gal Rapid AcidNH
4NO
3
Urea 46-0-9 ¼-½ lb/100 sq ft 1-1¼ oz /5-7 gal Rapid Sl. AcidCO(NH
2)
2
Mono-ammonium 12-62-0 1 lb/100 sq ft 2 oz per 3 gal Rapid Acidphosphate NH
4H
2PO
4
Di-ammonium 21-53-0 ½-¾ lb/100 sq ft 1¼-1½ oz/per 4-5 gal Rapid Acidphosphate (NH
4)
2HPO
4
Treble superphosphate 0-40-0 Ca 1-2½ lb/100 sq ft Insoluble Medium NeutralCa(H
2PO
4)
2
Superphosphate 0-20-0 Ca+S 3-8 lbs. Insoluble Medium NeutralCa(H
2PO
4)
2+CaSO
4
Potassium chloride 0-0-60 ½-¾ lb/100 sq ft 1¼-1½ oz/4-5 gal Rapid NeutralKCl
Potassium sulfate 0-0-50 S ½-1 lb/100 sq ft Not advisable Rapid NeutralK
2SO
4
Urea formaldehyde 38-0-0 3-5 lb/100 sq ft Insoluble Slow Sl. Acid
Additives
Limestone, Dolomitic None Ca+Mg 5-20 lb Insoluble Slow Basic
Hydrated Lime None Ca 2 lb/100 sq ft Relatively insoluble Rapid BasicCa(OH)
2(Not advisable)
Gypsum None Ca+S 2-5 lb/100 sq ft Insoluble Medium Neutral(calcium sulfate) CaSO
4
Sulfur None S 1-2 lb/100 sq ft Insoluble Slow Acid
Epsom salts None Mg+S 8-12 oz/100 sq ft 1¼ Rapid Neutral(magnesium sulfate)MgSO
4.7H
2O
Aluminum sulfate None S 1 tsp. per 6" pot 20 Rapid Very AcidAl
2(SO
4)
3(Not advisable)

Chapter 2 Soils and Fertilizers 20
Other Rate of Application nAnalysis Nutrients Speed of Effect
Name of Material N-P2O
5-K
2O Supplied Dry (lbs/cu yd)* Liquid (lbs/100 gals) Reaction on pH
Complete
Complete soluble 20-20-20 Var. Not advisable as dry 1½-2½ oz/3-5 gal Rapid Various(mixtures) 20-5-30 Var.
16-32-16
Complete dry 10-10-10 Var. 2 lb/100 sq ft Relatively insoluble Various Various (mixtures) 5-10-10 Var. 2-3 lb/100 sq ft Relatively insoluble Various Various
Organic 5-10-3 Var. 2-4 lb/100 sq ft Relatively insoluble Various Various
Plastic coated pellets Variable Insoluble Slow Various
Magnesium 7-40-6 Mg Insoluble Slow Neutralammonium phosphate
Organics
Activated sludge Usually 5-4-0 3-5 lb/100 sq ft Insoluble Medium Acid
Animal tankage Usually 7-9-0 3-4 lb/100 sq ft Insoluble Medium Acid
Castor pomace 5-1-1 3-5 lb/100 sq ft Insoluble Slow -----
Cottonseed meal 7-2-2 3-4 lb/100 sq ft Insoluble Slow Acid
Dried blood 12-0-0 2-3 lb/100 sq ft Insoluble Medium Acid
Hardwood ashes 0-1-5 3-10 lb/100 sq ft Insoluble Medium Basic
Hoof and horn metal 13-0-0 2-3 lb/100 sq ft Insoluble Slow -----
Linseed meal 5-1-1 3-5 lb/100 sq ft Insoluble Slow Acid
Seaweed (kelp) Usually 2-1-15 2-3 lb/100 sq ft Insoluble Slow -----
Soy bean meal 6-0-0 3-5 lb/100 sq ft Insoluble Slow -----
Steamed bone meal Usually 3-20-0 5 lb/100 sq ft Insoluble Slow Basic
Trace
MnSO4
S 3-6 oz/100 sp. ft -----
FeSO4
S 8-12 oz/100 sp. ft -----
Chelated iron (8-12%) Fe 1-2 oz/100 sp. ft ¼
Borax B ½ oz/100 sp. ft
CuSO4
Cu+S 1-2 oz /100 sp. ft -----
FTE many
*These rates are also appropriate per 100 sq ft

CHAPTER 2Soils and FertilizerSoils .............................................................................................................................................................. 1
Soil Horizons or Layers ............................................................................................................................................... 2Physical Properties of Soil .......................................................................................................................................... 2
Color .................................................................................................................................................................................. 3Texture .............................................................................................................................................................................. 3Principal Surface Soil Classes Found in New England: ................................................................................................... 4Structure ............................................................................................................................................................................ 4Drainage ............................................................................................................................................................................ 5Depth ................................................................................................................................................................................. 6
Components of Soil ..................................................................................................................................................... 6Organic Matter .................................................................................................................................................................. 6Water and Air .................................................................................................................................................................... 7Plant Nutrients .................................................................................................................................................................. 7Cation Exchange Capacity ............................................................................................................................................... 7
Soil pH .......................................................................................................................................................... 8A Guide for Estimating Moisture Content of Soil .............................................................................................................. 9
Fertilizers .................................................................................................................................................... 10Fertilizers Analysis .................................................................................................................................................... 10Complete Versus Incomplete .................................................................................................................................... 10Special Purpose Fertilizers ....................................................................................................................................... 11Slow-Release Fertilizers ........................................................................................................................................... 11Comparison of Fertilizers .......................................................................................................................................... 11Organic Fertilizers ..................................................................................................................................................... 12
Fertilizers Combined with Pesticides ............................................................................................................................. 13Fertilizers Formulation .................................................................................................................................................... 13
Fertilizer Application ................................................................................................................................. 14Timing ....................................................................................................................................................................... 15Application Methods .................................................................................................................................................. 16
Improving Soil Structure ........................................................................................................................... 17
Soil Testing ................................................................................................................................................. 18Analysis and Use of Some Common Fertilizer Materials .......................................................................................... 19

CHAPTER 3BASICS OF ENTOMOLOGY
Basics of Classification .............................................................................................................................. 1Table 1. Classes of the Phylum Arthropoda .................................................................................................................... 2Table 2. Orders of the Class Insecta ................................................................................................................................ 2
Insect Form and Structure - Morphology .................................................................................................. 2
Head, Thorax and Abdomen ............................................................................................................................... 2Legs .................................................................................................................................................................................. 3Wings ............................................................................................................................................................................... 3Antennae .......................................................................................................................................................................... 4Mouthparts ....................................................................................................................................................................... 4
Insect Development-Metamorphosis ......................................................................................................... 4
Identifying Insects ....................................................................................................................................... 5
Insect Orders Important to the Gardener: ........................................................................................................... 6Coleoptera - Beetles, Weevils ......................................................................................................................................... 6Dermaptera - Earwigs ...................................................................................................................................................... 6Diptera - Flies, Mosquitoes, Gnats, Midges ..................................................................................................................... 6Hemiptera - Stink Bug, Plant Bug, Squash Bug, Boxelder Bug ...................................................................................... 6Homoptera - Scale Insects, Mealybugs, Whiteflies, Aphids, Cicadas, Leafhoppers. ..................................................... 7Hymenoptera - Bees, Ants, Wasps, Sawflies, Horntails .................................................................................................. 7Lepidoptera - Butterflies, Moths ....................................................................................................................................... 7Neuroptera - Lacewings, Antlions, Snakeflies, Mantispids, Dobsonfly, Dustywing, Alderfly .......................................... 7Orthoptera - Grasshopper, Cricket, ....................................................................................................................................Praying Mantid ................................................................................................................................................................. 8Thysanoptera - Thrips ...................................................................................................................................................... 8
Insect Orders of Lesser Importance to the Gardener: ........................................................................................ 8Order Examples Common “Non-Insect” Pests Found in New England: .......................................................................... 8Arachnida - Spiders, Spider Mites, Ticks ......................................................................................................................... 8Diplopoda - Millipedes ...................................................................................................................................................... 9Chilopoda - Centipedes ................................................................................................................................................... 9Crustacea - Sowbugs, Pillbugs ........................................................................................................................................ 9
Types of Insect Injury ................................................................................................................................ 10Injury by Chewing Insects .............................................................................................................................................. 10Injury by Piercing-Sucking Insects ................................................................................................................................. 10Injury by Internal Feeders .............................................................................................................................................. 10Injury by Subterranean Insects ...................................................................................................................................... 10Injury by Laying Eggs ..................................................................................................................................................... 10Use of Plants for Nest Materials .................................................................................................................................... 11Ways in Which Insects Injure Plants ............................................................................................................................. 11
Insects as Disseminators of Plant Diseases .......................................................................................... 12Disease Vector ............................................................................................................................................................... 12
Benefits and Value of Insects ................................................................................................................... 12Insects are Beneficial to the Gardener in Several Ways: .............................................................................................. 12Soil Preparation .............................................................................................................................................................. 13Plant Selection ............................................................................................................................................................... 13Cultural Practices ........................................................................................................................................................... 13Mechanical Controls ....................................................................................................................................................... 14Biological Controls ......................................................................................................................................................... 15
Pesticides ................................................................................................................................................... 16Nonsynthetic Pesticides ................................................................................................................................................. 16Synthetic Pesticides ....................................................................................................................................................... 16
Summary ..................................................................................................................................................... 17

Chapter 3 Basics of Entomology 1
CHAPTER 3Basics of Entomology
Edited and revised by Dr. Alan Eaton, University of New Hampshire Cooperative Extension
Insects and mites are among the oldest, most numerous, and most successfulcreatures on earth. It is estimated that over 100,000 different species live in NorthAmerica. In the typical backyard, there are probably 1,000 insects at any giventime. While insects which cause problems for humans are heard about mostoften, it is important to note that the vast majority are either beneficial or harm-less. Insects pollinate fruits and vegetables, provide food for birds and fish, andproduce useful products such as honey, wax, shellac, and silk. In addition, someinsects are beneficial because they feed on other insects that are considered pestsby humans.
Although the number of pest species compared to the total number of insectspecies is very small (less than 3% of all insects are classified as pests), thetroubles for humans wrought by this group reach astonishing proportions. In-sects annually destroy millions of dollars worth of crops, fruits, shade trees andornamental plants, stored products, household items, and other materials val-ued by man. They transmit diseases of humans and domestic animals. Theyattack humans and pets, causing irritation, blood loss, and in some instances,death.
This chapter is designed to present basic principles that apply to the identifica-tion of insects and mites on horticultural crops, especially those commonlyencountered in New England.
Basics of ClassificationIdentification of the thousands of species of insectswould be impossible if they were not organizedaround a standard classification system. By group-ing organisms based on the degrees of similarityamong them, we can arrive at a system of classifica-tion. At the highest level of this classificationsystem, organisms are divided into five kingdoms.Insects are placed in the Animal Kingdom. TheAnimal Kingdom has major divisions known asphyla. Several of the phyla which contain agricul-tural pests are:
• Arthropoda (insects, spiders, crayfish, milli-pedes)
• Nematoda (roundworms, trichina)
• Platyhelminthes (flatworms, flukes, tapeworms)
• Mollusca (snails, slugs, clams)
Insects belong to the phylum Arthropoda.Arthropods are a very important group of animals,as they represent more than three-fourths of theanimal species known to exist. Characteristics thatplace an animal in the phylum Arthropoda includebody segmentation and skeletons outside(exoskeleton) of their bodies.
The phylum Arthropoda is divided into classes.Table 1 describes a few of the more importantclasses and presents some characteristics that areused to distinguish between the various Arthropodclasses. Insects belong to the class Insecta. For anArthropod to be further classified in the classInsecta, it must have 3 body segments and 3 pairsof legs.

Chapter 3 Basics of Entomology 2
Classes are further divided into orders. The moreimportant orders of the class Insecta are describedin Table 2.
Table 1. Classes of the Phylum Arthropoda
Body Pairs AgriculturalClass Examples Regions of Legs Importance
Crustacea Crayfish 2 5 Sowbugs canSowbugs be minor
pests.
Arachnida Spiders, Mites, 2 4 Some mitesTicks are major
plant pests.
Symphyla Symphylan 2 12 Symphylanscan be seriouspests.
Insecta Bugs, Beetles, 3 3 Large numberButterflies are pests.
Table 2. Some Orders of the Class Insecta
Order Common Meta- Mouth- WingsName morphosis parts
Collembola Springtails none chewing none
Orthoptera Crickets gradual chewing 2 pairGrasshoppers
Isoptera Termites gradual chewing 2 pair
Thysanoptera Thrips gradual rasping- 2 pairsucking
Hemiptera True Bugs gradual piercing- 2 pairsucking
Homoptera Aphids, gradual piercing- 2 pairScales sucking
Coleoptera Beetles, complete chewing 2 pairWeevils
Lepidoptera Butterflies, complete chewing 2 pairMoths or
siphoning
Hymenoptera Bees, complete chewing 2 pairWasps,Ants
Diptera Flies complete various 1 pair
Siphonaptera Fleas complete sucking none
Dermaptera Earwigs gradual chewing 2 pair
Thysanura Silverfish gradual chewing none
Insect orders are further broken down into a classifi-cation known as family. The family is a more finitegrouping of very closely related insects. Familynames end with “idae.” Aphidae (aphids), Mus-cidae (houseflies), and Blattidae (cockroaches) areexamples of families of insects.
Families are further divided into genera and spe-cies. These are the most finite levels of our classifica-tion system. The housefly, Musca domestica, serveshere as an example of classification:
Kingdom: Animalia
Phylum: ArthropodaClass: InsectaOrder: DipteraFamily: MuscidaeGenus: MuscaSpecies: domesticaCommon name: housefly
The most commonly found insects also acquirecommon names and sometimes one species willhave several common names. For example, Heliothiszea, when found on corn, is called the corn ear-worm, but when it is found on tomatoes it is calledthe tomato fruitworm. Common names are oftenused to refer to large groups of insects, such asfamilies or orders. The term beetle refers to theentire order Coleoptera, which includes thousandsof different species. The term moth refers to thou-sands of species in the order Lepidoptera.
Insect Form and Structure -MorphologyAll adult members of the class Insecta possess thefollowing characteristics: three body regions; threepairs of legs; one pair of antennae; and zero to twopairs of wings. Legs and other appendages areoften greatly modified to suit the insect’s environ-ment; the form of its appendages is often used toclassify an insect.
Head, Thorax and AbdomenThe adult insect’s body is made up of three regions:head, thorax, and abdomen, but the division is notalways obvious between thorax and abdomen. Aninsect’s body is not supported by a bony skeleton,but by a tough body wall, or exoskeleton. Thetough covering of skin is referred to as the cuticle.

Chapter 3 Basics of Entomology 3
The cuticle contains a layer of wax which deter-mines its permeability to water and prevents desic-cation or drying. The cuticle of each segment isformed into several hardened plates called sclerites,which are separated by infolds or sutures to givethem flexibility. The cuticle of the immature stage isnot usually as hardened as that of the adult.
The thorax is made up of three segments: prothorax,mesothorax, and metathorax. Each of these seg-ments bears a pair of legs. The wings are attached tothe mesothorax and metathorax, never to the pro-thorax.
The abdomen may have 11 or 12 segments, but inmost cases they are difficult to distinguish. Someinsects have a pair of appendages at the tip of theabdomen. They may be short, as in grasshoppers,termites, and cockroaches; extremely long, as inmayflies; or curved, as in earwigs.
LegsThe most important characteristic of an insect is thepresence of three pairs of jointed legs. These arealmost always present on adult insects and aregenerally present in the other stages as well. Inaddition to walking and jumping, insects often usetheir legs for digging, grasping, feeling, swimming,carrying loads, building nests, and cleaning parts ofthe body. The legs of insects vary greatly in size andform and are used in classification.
Leg adaptations of some insects (left to right):jumping (grasshopper), running (beetle), digging(mole cricket), grasping (praying mantis), swim-ming (diving beetle).
WingsVenation (the arrangement of veins in wings) isdifferent for each species of insect; thus, it serves asa means of identification. Systems have been de-vised to designate the venation for descriptivepurposes. Wing surfaces are covered with fine hairsor scales, or they may be bare. Note that the namesof many insect orders end in “-ptera,” which comesfrom the Greek word meaning “with wings.” Thus,each of these names denotes some feature of thewings. Hemiptera means half-winged; Hy-menoptera means membrane-winged; Dipterameans two-winged; Isoptera means equal wings.

Chapter 3 Basics of Entomology 4
AntennaeThe main features of the insect’s head are the eyes,antennae, and mouthparts. The antennae are aprominent and distinctive feature of insects. Adultinsects have one pair of antennae located on thehead usually between or in front of the eyes. Anten-nae are segmented, vary greatly in form and com-plexity, and are often referred to as horns or “feel-ers.” They are primarily organs of smell, but serveother functions in some insects.
MouthpartsThe most remarkable and complicated structuralfeature of an insect is the mouth. Great variationsexist in form and function of insect mouthparts.And although insect mouthparts differ considerablyin appearance, the same basic parts are found in alltypes. Most insects are divided into two broadcategories by the type of mouthparts they possess— those with mouthparts adapted for chewing andthose with mouthparts adapted for sucking.
There are intermediate types of mouthparts: rasp-ing-sucking, as found in thrips; and chewing-lapping, as found in honey bees, wasps, and bumblebees. Sucking types are greatly varied. Piercing-sucking mouthparts are typical of the Hemiptera(bugs), Homoptera (aphids, scales, mealybugs),
blood-sucking lice, fleas, mosquitoes, and the so-called biting flies. In the siphoning types, as seen inbutterflies and moths, the mandibles are absent andthe labial and maxillary palpi are greatly reduced.Houseflies have sponging mouthparts.
Some types of insect mouthparts: A. Chewing-lapping (honey bee); B. Piercing-sucking (plantbug); C. Sponging (housefly); D. Siphoning, coiled(butterfly)
The mouthparts of immature insects tend to bemore varied than those of the adults, althoughnymphs have mouthparts similar to those of theadults. Larval forms generally have the chewingtype regardless of the kind possessed by the adults.In some adult insects, the mouthparts are vestigial(no longer used for feeding).
Insect Development— MetamorphosisIn higher animals, the most important developmenttakes place before birth (in the embryonic stage); ininsects, it occurs after birth or egg hatch. The imma-ture period of an insect is primarily one of growth,feeding, and storing up food for the pupal and adultstages which follow. Many insects feed very little ornot at all during their adult lives.

Chapter 3 Basics of Entomology 5
One of the distinctive features of insects is thephenomenon called metamorphosis. The term is acombination of two Greek words: meta, meaningchange, and morphe, meaning form. It is commonlydefined as a marked or abrupt change in form orstructure, and refers to all stages of development.Insects undergo one of four types of metamorpho-sis.
Some insects do not go through a metamorphosis,but rather gradually increase in size while maintain-ing the same characteristics. Others experience agradual metamorphosis, going through a nymphstage.
In the case of gradual metamorphosis, the stagesare: egg, nymph, and adult. In some insects, fertili-zation of the egg by sperm is not necessary forreproduction. This type of reproduction is known asparthenogenesis. Aphids are notable examples ofinsects that can reproduce by parthenogenesis.
Insects that undergo complete metamorphosis gothrough the following stages: egg, larva, pupa, andadult.
The immature insect sheds its outer skeleton (molts)at various stages of growth, since it outgrows thehard covering or cuticle more than once. Mostinsects do not grow gradually as many other ani-mals do. They grow by stages. When their skeletongets too tight, it splits open and the insect crawlsout, protected by a new and larger skeleton that hasformed underneath the old one. The stage of lifebetween each molt is called an instar. Followingeach molt, the insect increases its feeding. Thenumber of instars, or frequency of molts, variesconsiderably between species and to some extentwith food supply, temperature, and moisture.
The pupal stage is one of profound change. It is aperiod of transformation from larva to adult. Manytissues and structures, such as prolegs, are com-pletely broken down and true legs, antennae, wings,and other structures of the adult are formed.
The adult insect does not grow in the usual sense.The adult period is primarily one of reproductionand is sometimes of short duration. Their food isoften entirely different from that of the larval stage.
Identifying InsectsMost home gardeners can classify an insect by thecommon name of its order, identifying it as a beetle,wasp, or butterfly. The ability to classify an insect tothe order level gives the gardener access to muchvaluable information. This information wouldinclude the type of mouthparts the insect has (thistells us how it feeds and gives clues towards meth-ods of control), its life cycle (and proper timing forbest control), and type of habitation.
Specific Insect Orders. For your reference, theinsect orders have been divided into three sections:those containing insects important to the gardener;those containing insects of lesser importance to thegardener; and common “non-insect” pests in NewEngland. The orders containing insects of impor-tance to home gardeners will be considered indetail.

Chapter 3 Basics of Entomology 6
Insect Orders Important to theGardener:
Coleoptera - Beetles, Weevils
• Adults have hardened, horny, outer skeleton
• Adults have two pairs of wings, the outer pairhardened and the inner pair membranous
• Chewing mouthparts
• Adults usually have noticeable antennae
• Larvae with head capsule, three pairs of legs onthe thorax, no legs on the abdomen. Weevillarvae lack legs.
• Complete metamorphosis
Dermaptera - Earwigs
• Adults are moderate-sized insects
• Chewing mouthparts
• Gradual metamorphosis
• Elongate, flattened insects with strong, movableforceps on the abdomen
• Short, hardened outer wings; folded, membra-nous, “ear-shaped” inner wings
• Adults and nymphs similar in appearance
Diptera - Flies, Mosquitoes, Gnats, Midges
• Adults have only one pair of wings, are rathersoft-bodied, and are often hairy
• Adults have sponging (housefly) or piercing(mosquito) mouthparts
• Larvae may have mouth hooks or chewingmouthparts
• Most larvae are legless
• Larvae of advanced forms, housefly and rela-tives, have no head capsule, possess mouthhooks, and are called maggots; lower forms,such as mosquito larvae and relatives, have ahead capsule
• Complete metamorphosis
Hemiptera - Stink Bug, Plant Bug, SquashBug, Boxelder Bug
• Have gradual metamorphosis; stages are egg,nymph, adult
• Have two pairs of wings; second pair is membra-nous, the first pair are “half-wings” -- membra-nous with thickening on basal half
• Adults and nymphs usually resemble oneanother
• Have piercing-sucking mouthparts
• Adults and nymphs are both damaging stages

Chapter 3 Basics of Entomology 7
Homoptera - Scale Insects, Mealybugs,Whiteflies, Aphids, Cicadas, Leafhoppers.
• Generally small, soft bodied-insects; cicadas maybe large and hard-bodied
• Winged and unwinged forms
• All stages have sucking mouthparts
• Have gradual metamorphosis
• Many are carriers of plant pathogens
Hymenoptera - Bees, Ants, Wasps, Saw-flies, Horntails
• Adults have two pairs of membranous wings
• Larvae have no legs (wasps, bees, ants) or threepairs of legs on thorax and more than four pair oflegs on abdomen (some sawflies)
• Generally have chewing mouthparts
• Rather soft-bodied or slightly hard-bodied adults
• Complete metamorphosis
Lepidoptera - Butterflies, Moths
• Adults are soft-bodied, with four well-developedmembranous wings covered with small scales
• Larvae have chewing mouthparts
• Adult mouthparts are a coiled, sucking tube; feedon nectar
• Larvae are caterpillars; worm-like, variable incolor, voracious feeders
• Larvae generally have legs on the abdomen aswell as the thorax
• Complete metamorphosis
Neuroptera - Lacewings, Antlions,Snakeflies, Mantispids, Dobsonfly,Dustywing, Alderfly
• Insect predators, many are aquatic
• Two pairs of membranous wings
• Chewing mouthparts
• Complete metamorphosis

Chapter 3 Basics of Entomology 8
Orthoptera - Grasshopper, Cricket,Praying Mantid
• Adults are moderate to large, often rather hard-bodied
• Gradual metamorphosis
• Adults usually have two pairs of wings. Fore-wings are elongated, narrow, and hardened;hindwings are membranous with extensivefolded area
• Chewing mouthparts; both adults and nymphsare damaging
• Hind legs of many forms are enlarged for jump-ing
• Immature stages are called nymphs and resembleadults, but are wingless
Thysanoptera - Thrips
• Adults are small, soft-bodied insects
• Mouthparts are rasping-sucking
• Varied metamorphosis (a mixture of completeand gradual)
• Found on flowers or leaves of plants
• Wings in two pairs, slender, feather-like, withfringed hairs
Insect Orders of Lesser Importance tothe Gardener:Order Examples
Anoplura sucking lice
Collembola springtails
Diplura no common examples
Ephemeroptera Mayflies
Embioptera webspinners
Isoptera termites
Mallophaga chewing lice
Mecoptera scorpionflies
Odonata dragonflies and damselflies
Plecoptera stoneflies
Protura no common examples
Psocoptera booklice, barklice
Siphonaptera fleas
Strepsiptera no common examples
Thysanura silverfish and bristletails
Trichoptera caddisflies
Zoraptera no common examples
Common “Non-Insect” PestsFound in New England:
Arachnida - Spiders, Spider Mites, Ticks
a. Spider mites: tiny, soft-bodied animals with twobody regions, thick waists, four pairs of legs, noantennae.Common species:• Two-spotted mites and near relatives - two
spots on the back, may be clear, green, orange,or reddish; usually hard to see without amagnifying glass.
• European red mite - carmine red with whitespines.
• Clover mites - brown or gray, flat, very longfront legs.
b. Spiders: resemble mites except that most arelarger, and the two body regions are more clearlydistinct from one another (thin waist). Mostspiders are beneficial predators.

Chapter 3 Basics of Entomology 9
c. Ticks: resemble large mites and are importantagriculturally and medically in that they areparasites of animals and humans.
Diplopoda - Millipedes
These are elongated invertebrates with twovisible body regions: the head and body. Theygenerally have a round cross section, and all butthe first four or five body segments possess twopairs of legs. Millipedes are generally inoffensivecreatures that feed on fungus and decaying plantmaterial, but at times, they can be fairly destruc-tive to vegetables or plants in greenhouses.
Chilopoda - Centipedes
Centipedes strongly resemble millipedes, exceptthat they have longer antennae, a flat cross-section, and only one pair of legs on each bodysegment. They are beneficial predators of otherarthropods.
Crustacea - Sowbugs, Pillbugs
These are oval with a hard, convex, outer shellmade up of a number of plates. Sowbugs arehighly dependent on moisture. Generally, theyfeed on decaying plant material, but they willsometimes attack young plants.

Chapter 3 Basics of Entomology 10
Types of Insect Injury
Injury by Chewing InsectsInsects take their food in a variety of ways. Onemethod is by chewing off the external parts of aplant. Such insects are called chewing insects. It iseasy to see examples of this injury. Perhaps the bestway to gain an idea of the prevalence of this type ofinsect damage is to try to find leaves of plantswhich have no sign of injury from chewing insects.Cabbageworms, armyworms, grasshoppers, Colo-rado potato beetles, and fall webworms are com-mon examples of insects that cause injury by chew-ing.
Injury by Piercing-Sucking InsectsA second important way insects feed on growingplants is by piercing the epidermis (skin) andsucking sap from plant cells. In this case, onlyinternal liquid portions of the plant are swallowed,even though the insect feeds externally on the plant.These insects have a slender, sharp, pointed portionof the mouthparts which are thrust into the plantand through which sap is sucked. This results in avery different, but nonetheless severe injury. Thehole made in this way is so small that it cannot beseen with the unaided eye, but the withdrawal ofthe sap results in minute spotting of white, brown,or red on leaves, fruits, or twigs; curling leaves;deformed fruit; or general wilting, browning, anddying of the entire plant. Aphids, scale insects,squash bugs, leafhoppers, and plant bugs are well-known examples of piercing-sucking insects.
Injury by Internal FeedersMany insects feed within plant tissues during partor all of their destructive stages. They gain entranceto plants either in the egg stage, when their mothersdeposit eggs into the plant tissue, or after they hatchfrom the eggs, by eating their way into the plant. Ineither case, the hole of entry is almost alwaysminute and often invisible. A large hole in a fruit,seed, nut, twig, or trunk generally indicates wherethe insect has come out, not where it entered.
The chief groups of internal feeders are indicated bytheir common group names: borers in wood or pith;worms or weevils in fruits, nuts, or seeds; leafminers; and gall insects. Each group, except thethird, contains some of the foremost insect pests ofthe world. Nearly all of the internal feeding insectslive inside the plant during only part of their lives,and emerge usually as adults. Control measures are
most effective when aimed at emerging adults orthe immature stages prior to entrance into the plant.
Leaf miners are small enough to find comfortablequarters and an abundance of food between theupper and lower epidermis of a leaf.
Injury by Subterranean InsectsAlmost as secure from human attack as the internalfeeders are those insects that attack plants below thesurface of the soil. These include chewers, sapsuckers, root borers, and gall insects. The attacksdiffer from the above-ground forms only in theirposition with reference to the soil surface. Somesubterranean insects spend their entire life cyclebelow ground. For example, the woolly appleaphid, as both nymph and adult, sucks sap fromroots of apple trees causing the development oftumors and subsequent decay of the tree’s roots. Inother subterranean insects, there is at least one lifestage that has not taken up subterranean habit.Examples include wireworms, root maggots,pillbugs, strawberry root weevils, and grape andcorn rootworms. The larvae are root feeders, whilethe adults live above ground.
Injury by Laying EggsProbably 95% of insect injury to plants is caused byfeeding in the various ways just described. Inaddition, insects may damage plants by laying eggsin critical plant tissues. The periodical cicadadeposits eggs in one-year-old growth of fruit andforest trees, splitting the wood so severely that theentire twig often dies. As soon as the young hatch,they desert the twigs and injure the plant no further.
Gall insects sting plants and cause them to producea structure of deformed tissue. The insect then findsshelter and abundant food inside this plant growth.It is not known exactly what makes the plants formthese elaborate structures when attacked by theinsects. However, it is clear that the growth of thegall is initiated by the oviposition of the adult(laying eggs inside plant tissue), and its continueddevelopment results from secretions of the develop-ing larva. The same species of insect on differentplants causes galls that are similar, while severalspecies of insects attacking the same plant causegalls that are greatly different in appearance.Although the gall is entirely plant tissue, the insectcontrols and directs the form and shape it takes as itgrows.
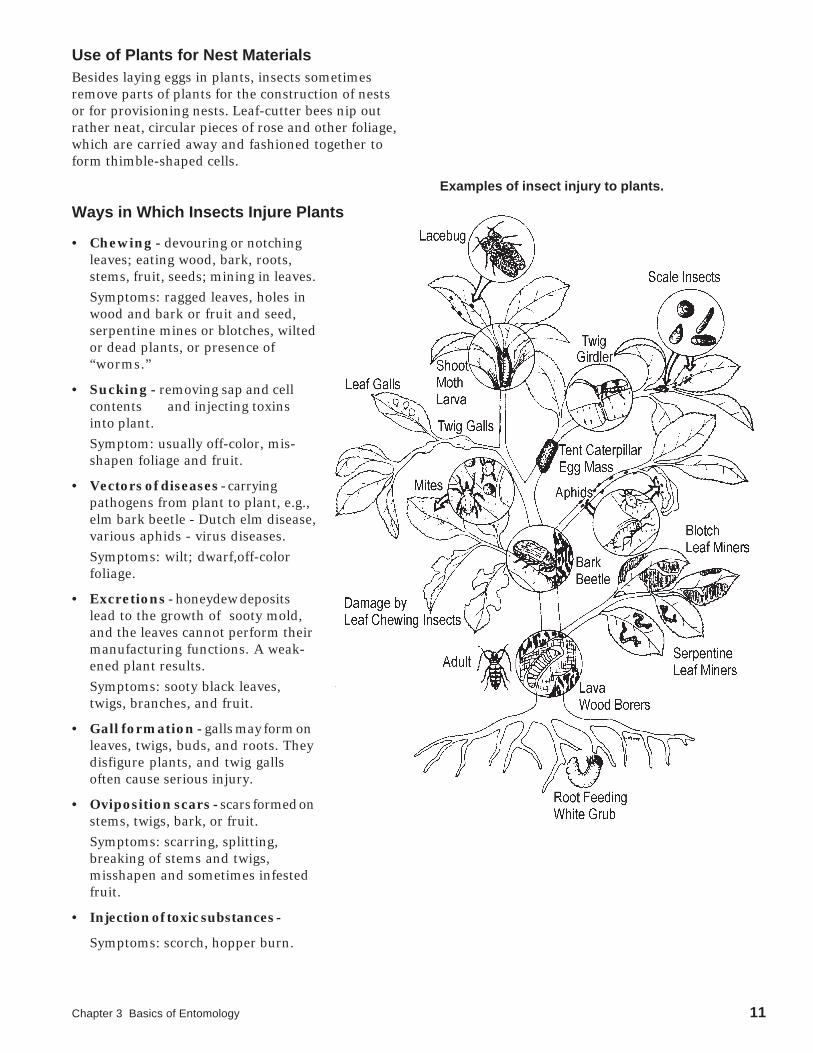
Chapter 3 Basics of Entomology 11
Use of Plants for Nest MaterialsBesides laying eggs in plants, insects sometimesremove parts of plants for the construction of nestsor for provisioning nests. Leaf-cutter bees nip outrather neat, circular pieces of rose and other foliage,which are carried away and fashioned together toform thimble-shaped cells.
Ways in Which Insects Injure Plants
• Chewing - devouring or notchingleaves; eating wood, bark, roots,stems, fruit, seeds; mining in leaves.
Symptoms: ragged leaves, holes inwood and bark or fruit and seed,serpentine mines or blotches, wiltedor dead plants, or presence of“worms.”
• Sucking - removing sap and cellcontents and injecting toxinsinto plant.
Symptom: usually off-color, mis-shapen foliage and fruit.
• Vectors of diseases - carryingpathogens from plant to plant, e.g.,elm bark beetle - Dutch elm disease,various aphids - virus diseases.
Symptoms: wilt; dwarf,off-colorfoliage.
• Excretions - honeydew depositslead to the growth of sooty mold,and the leaves cannot perform theirmanufacturing functions. A weak-ened plant results.
Symptoms: sooty black leaves,twigs, branches, and fruit.
• Gall formation - galls may form onleaves, twigs, buds, and roots. Theydisfigure plants, and twig gallsoften cause serious injury.
• Oviposition scars - scars formed onstems, twigs, bark, or fruit.
Symptoms: scarring, splitting,breaking of stems and twigs,misshapen and sometimes infestedfruit.
• Injection of toxic substances -
Symptoms: scorch, hopper burn.
Examples of insect injury to plants.

Chapter 3 Basics of Entomology 12
Insects as Disseminators ofPlant DiseasesIn 1892, it was discovered that a plant disease (fireblight of fruit trees) was spread by an insect (thehoneybee). At present, there is evidence that morethan 200 plant diseases are disseminated by insects.The majority of them, about 150, belong to thegroup known as viruses, 25 or more are due toparasitic fungi, 15 or more are bacterial diseases,and a few are caused by protozoa or mycoplasms.
Insects may spread plant diseases in the followingways:
• by feeding, laying eggs, or boring into plants,they create an entrance point for a disease that isnot actually transported by them;
• they carry and disseminate the causative agentsof the disease on or in their bodies from oneplant to a susceptible surface of another plant;
• they carry pathogens on the outside or inside oftheir bodies and inject plants hypodermically asthey feed;
• the insect may serve as an essential host for somepart of the pathogen’s life cycle, and the diseasecould not complete its life cycle without theinsect host.
Examples of insect-vectored (insect-carried) plantdiseases, their causative agents, and vectors include:
Disease Vector
Dutch Elm Disease (fungus) Small Beetle
Fireblight (bacterial) Pollinating Insects
Tomato spotted wilt (virus) Thrips
Cucumber Mosaic (virus) Aphids
X-Disease of Peach (mycoplasm) Leafhoppers
Benefits and Value of InsectsInsects must be studied carefully to distinguish thebeneficial from the harmful. People have often goneto great trouble and expense to destroy insects, onlyto learn later that the insect destroyed was not onlyharmless, but was actually saving their crops byeating destructive insects.
Insects are Beneficial to the Gardener inSeveral Ways:
• Insects aid in the production of fruits, seeds,vegetables, and flowers by pollinating the blos-soms. Most common fruits are pollinated byinsects. Melons, squash, and many other veg-etables require insects to carry their pollen beforefruit set. Many ornamental plants, both in thegreenhouse and outdoors, are pollinated byinsects (chrysanthemums, iris, orchids, andyucca).
• Insects destroy various weeds in the same waysthat they injure crop plants.
• Insects improve the physical condition of the soiland promote its fertility by burrowing through-out the surface layer. Also, the dead bodies anddroppings of insects serve as fertilizer.
• Insects perform a valuable service as scavengersby devouring the bodies of dead animals andplants and by burying carcasses and dung.
Beneficial Insects
Common species that causeno damage in the garden andhelp control other injuriousinsects.

Chapter 3 Basics of Entomology 13
Many of the benefits from insects enumeratedabove, although genuine, are insignificant com-pared with the good that insects do fighting amongthemselves. There is no doubt that the greatestsingle factor in keeping plant-feeding insects fromoverwhelming the rest of the world is that they arefed upon by other insects. Insects that eat otherinsects are considered in two groups known aspredators and parasites.
Predators are insects (or other animals) that catchand devour other creatures (called the prey), usu-ally killing and consuming them in a single meal.The prey is generally smaller and weaker than thepredator.
Parasites are forms of living organisms that live onor in the bodies of living organisms (called thehosts) from which they get their food, during atleast one stage of their existence. The hosts areusually larger and stronger than the parasites, andare not killed promptly. Some continue to live inclose association with the parasite, rather than bekilled.
Soil PreparationFor most fruits and vegetable crops, maintain aslightly acidic soil (around pH 6.5). If in doubt, havea soil analysis done through your local Extensionoffice. The appropriate pH allows vegetable plantsto have access to all the necessary soil nutrients andprovides a suitable environment for earthwormsand microorganisms. Follow recommended fertil-izer practices. Supplement chemical fertilizers withorganic material or compost to help assure that alltrace elements and major nutrients are available.Feed the soil, not just the plants; providing anappropriate environment for all soil life will resultin healthy plants which can resist pests and dis-eases.
When using manure and compost, be sure they areworked into the soil. Otherwise, millipedes, whitegrubs, and other pests may be encouraged. If theseinsects become a problem, you may be using toomuch; consider other means of adding organicmatter, such as cover-cropping or mulching.
When diseased plant material is added to compostto be used on the garden, delay using the compostuntil all material has decayed beyond recognition.Compost piles must be hot (160 degrees F.) to killdisease organisms, insect eggs, and weed seeds.
Till the soil in the fall to expose those stages of pestswhich live near the surface of the soil to naturalenemies and weather, and to destroy insects in cropresidues. If you do not till in the fall, do so earlyenough in the spring to give remaining vegetationtime to degrade before planting time.
Plant SelectionPlant crops that are suited to the soil and climate ofyour area. If you do plant vegetables or fruits thatare not normally grown in your area, do your bestto provide necessary conditions. For example,watermelons prefer a light, warm, well-drained soil;don’t try to plant in heavy clay without first addingcopious amounts of compost or other soil-lighteningmaterial, and allow the soil to warm up beforeseeding or setting plants out.
Use disease-free, insect-free, certified seed if avail-able. Select disease/insect-resistant or tolerantspecies and varieties. Resistance in plants is likely tobe interpreted as meaning immune to damage. Inreality, it distinguishes plant varieties that exhibitless insect or disease damage when compared withother varieties under similar circumstances. Somevarieties may not taste as good to the pest. Somemay possess certain physical or chemical propertieswhich repel or discourage insect feeding or egglaying. Some may be able to support insect popula-tions with no appreciable damage or alteration inquality or yield.
Select plants that are sturdy and have well-devel-oped root systems. Diseases and insects in youngseedlings may start in greenhouses or plant bedsand cause heavy losses in the garden. Buy plantsfrom a reputable grower who can assure you thatthey are disease/insect-free, or grow your own fromseed.
Avoid accepting plants from friends if there is anychance of also getting free insects or diseases!
Cultural PracticesThe most effective and most important of all prac-tices is to observe what is going on in the garden.Many serious disease or insect problems can behalted or slowed early by the gardener who knowswhat to look for and regularly visits the garden forthe purpose of trouble-shooting.

Chapter 3 Basics of Entomology 14
Rotation. Do not grow the same kind of produce inthe same place each year. Use related crops in onesite only once every three or four years. Somerelated crops are as follows: (a) chives, garlic, leeks,onions, shallots; (b) beets, Swiss chard, spinach; (c)cabbage, cauliflower, kale, Brussels sprouts, broc-coli, kohlrabi, turnips, rutabagas, Chinese cabbage;(d) peas, broad beans, snap beans; (e) carrots,parsley, celery, celeriac, parsnips; (f) potatoes,eggplant, tomatoes, peppers; (g) pumpkins, squash,watermelons, cucumbers, muskmelons; (h) endive,salsify, lettuce.
Interplantings. Avoid placing all plants of onekind together; alternate groups of different plantswithin rows or patches. If an insect lays eggs orotherwise attacks a specific species, the presence ofother species in the area can interrupt progress ofthe attack by diluting the odor of the preferredplants. This can also slow the spread of diseases andpests, giving the gardener more time to deal withthem.
Thinning. Thin young plants to a proper stand.Overcrowding causes weak growth and subsequentinsect and disease problems.
Watering. Water in the morning, so plants havetime to dry before the cool evening when fungusinfection is most likely. Drip irrigation preventsfoliage from getting wet at all when watering. Forplants susceptible to fungus infections, such astomatoes, leave extra space between plants to allowgood air flow and orient rows so that prevailingwinds will help foliage dry quickly after a rain orwatering. While this may reduce the number ofplants per square foot, yields may still be higherdue to reduced disease problems. To preventspreading diseases, stay out of the garden when theplants are wet with rain or dew.
Time Planting. Time plantings in such a way thatthe majority of the crop will avoid the peak of insectinfestations. For example, carrot rust fly problemscan be avoided by delaying planting until June 1and harvesting by late August. Keep a record of thedates insect problems occur. Also, by plantingwarm-weather crops after the soil has warmed,problems with seed and root rots will be avoided,and growth will be more vigorous.
Sanitation. Do not use tobacco products such ascigarettes or cigars when working in the garden.Tomato, pepper, and eggplant are susceptible to amosaic virus disease which is common in tobaccoand may be spread by your hands. Remove infectedleaves from diseased plants as soon as you observethem. Dispose of severely diseased plants beforethey contaminate others. Clean up crop refuse assoon as harvesting is finished. Old sacks, baskets,decaying vegetables, and other rubbish which mayharbor insects and diseases should be kept out ofthe garden.
Staking plants. Staking or planting them in wirecages prevents the fruit from touching the soil. Thisalso helps prevent fruit rots. Caging helps reducesun scald often seen in staked tomatoes, since cagedplants do not require as much pruning, leaving aheavier foliage cover. Boards or a light, open mulchsuch as straw, placed beneath melons, will preventrotting.
Avoid injury to plants. Cuts, bruises, cracks, andinsect damage are often sites for infection by dis-ease-causing organisms. In cases where fruit isdifficult to remove, such as with cucumbers andwatermelons, cut them instead of pulling them offthe plant. If you cultivate your garden, avoidcutting into the plant roots.
Mulching. Use a mulch to reduce soil splash, whichbrings soil-borne pathogens into contact with lowerleaves.
Weed control. Control weeds and grass. They oftenharbor pests and compete for nutrients and water.They provide an alternate source of food and can beresponsible for pest build-up. They provide coverfor cutworms and slugs.
Mechanical ControlsHandpicking. Inspect plants for egg clusters, beanbeetles, caterpillars, and other insects as often aspossible. Handpick as many as possible. If youdon’t like squashing the pests, knock the insects andegg clusters into a coffee can or quart jar with asmall amount of water, and then pour boiling waterover them. Kerosene is often recommended, butposes a disposal problem once you have finished;besides, water is cheaper.

Chapter 3 Basics of Entomology 15
Traps. Use appropriate insect traps to reducecertain insect populations. A simple, effectiveJapanese beetle trap can be made from two milkjugs or a single milk jug and a plastic bag. The baitused to attract the beetles is available at most farmand garden supply centers. Place traps away fromdesirable plants. Most scent-based insect traps areused for monitoring populations, not for control ofpests.
Light traps, particularly blacklight or blue lighttraps (special bulbs that emit a higher proportion ofultraviolet light that is highly attractive to nocturnalinsects), are good insect-monitoring tools, butprovide little or no protection for the garden. Whilethey usually capture a tremendous number ofinsects, a close examination of light-trap collectionsshows that they attract both beneficial and harmfulinsects that would ordinarily not be found in thatarea. Those insects attracted but not capturedremain in the area, and the destructive ones maycause damage later. Also, some wingless species aswell as those species only active during the day(diurnal, as opposed to nocturnal) are not caught inthese traps. Consequently, the use of a light trap inprotecting the home garden is generally of nobenefit and, in some instances, detrimental.
Upturned flower pots, boards, newspaper, etc. willtrap earwigs, sowbugs, and slugs; collect themevery morning, and feed them to pet frogs, toads,turtles, and fish, or destroy them with boiling water.Indoors, white flies can be caught with yellowsticky traps, made with boards painted yellow andlightly coated with oil or grease. There are alsocommercial sticky traps available through somecatalogs.
Barriers. Aluminum foil and other reflective mulchhas been shown to repel aphids. However, theenvironmental impact and energy consumptioninvolved in making aluminum foil deserves consid-eration. Spread crushed eggshells or hydrated limearound plants to discourage slugs. While heavymulch is good for weed control, it gives slugs aplace to hide.
Exclusion. Various materials can be used to physi-cally block or repel insects and keep them fromdamaging plants. Place wood ash, cardboard tubes,or orange juice cans around seedlings to keepcutworms away from plant stems. Use paper bagsover ears of corn to keep birds and insects out; donot cover until pollination is complete. Net-coveredcages over young seedlings will help prevent insect,bird, and rabbit damage. Cheesecloth screens for
cold frames and hot beds will prevent insect egg-laying; sticky barriers on the trunks of trees andwoody shrubs will prevent damage by crawlinginsects. Floating row covers of spun bonded poly-ethylene are a little more expensive, but theireffectiveness in excluding insects is proven by thenumber of commercial growers that use them,particularly on cole crops and strawberries. Remem-ber that such materials can exclude pollinatinginsects.
Biological ControlsPredators, Parasites, and Pathogens. The gardenand its surrounding environment are alive withmany beneficial organisms that are present natu-rally; however, they may not be numerous enoughto control a pest before damage is done. Actually,parasites and predators (usually other types ofinsects) are most effective when pest populationshave stabilized or are relatively low. Their influenceon increasing pest populations is usually minimalsince any increase in parasite and predator numbersdepends on an even greater increase in pest num-bers. Disease pathogens, however, seem to be mosteffective when pest populations are large.
Take advantage of the biological control alreadytaking place in your garden by encouraging naturalpredators, such as preying mantids, ladybugs,lacewings, ground beetles, and others. Purchasednatural predators are often effective for only a shortperiod, however, since they tend not to remain inthe place where they are put. Research the likes anddislikes of these helpers as to foods, habitat, etc.Provide these conditions where possible; somebeneficial insect suppliers now offer a formulationfor feeding/attracting the beneficials to keep themin the garden longer.
Learn to recognize the eggs and larvae of the benefi-cial insects, and avoid harming them. You can oftenfind preying mantid egg cases in weedy lots; justbring the twig with the cluster into the garden andset it in a place where it will not be disturbed.Spiders, toads, and dragonflies are also beneficial,and should not be a source of fright to the gardener;in most cases, they are harmless to people.
Learn to recognize parasites and their egg cases; forexample, the tomato hornworm is often seen with anumber of white cocoons, a little larger than a grainof rice, on its back. These were produced by para-sitic wasps. The hornworm will die and more waspswill emerge. You may wish to leave such parasit-ized caterpillars alone, rather than killing them.

Chapter 3 Basics of Entomology 16
Pesticides
Nonsynthetic Pesticides
Botanicals. Natural pesticidal products areavailable as an alternative to synthetic chemicalformulations. Some of the botanical pesticides aretoxic to fish and other cold-blooded creatures andshould be treated with care. Safety clothing shouldbe worn when spraying these, because some may bemore toxic than synthetics. Botanical insecticidesbreak down readily in soil and are not stored inplant or animal tissue. Often their effects are not aslong-lasting as those of synthetic pesticides.
Insecticide Use Against
Pyrethrum Aphids, leafhoppers, spidermites, cabbageworms.
Rotenone Spittlebugs, aphids, potatobeetles, chinch bugs, spidermites, carpenter ants.
Ryania Codling moths, Japanesebeetles, squash bugs, potatoaphids, onion thrips, cornearworms.
Sabadilla Grasshoppers, codlingmoths, moths, armyworms,aphids, cabbage loopers,blister beetles.
Some of these products may be very difficult tofind, expensive, and may not be registered for use inNew England.
In addition to botanical insecticides, some biologicalproducts can help in the battle against insects.Bacillus thuringiensis is an effective product com-monly used against caterpillars; B.T., as it is known,is a bacterium that gives the larvae a disease, and ismost effective on young larvae. Presently, there isresearch underway to develop strains that workagainst other types of insect larvae. Several formula-tions are available to the gardener under differenttrade names to provide effective control of severalcaterpillars without harming humans and domesticanimals. More than 400 insect species are known tobe affected by this important insect pathogen.Bacillus thuringiensis is quite slow in its action. Forexample, caterpillars that consume some of thespores will stop eating within 2 hours, but may
continue to live and move around until they die,which may be as long as 72 hours. When this occurs,the untrained gardener may assume the materialwas ineffective because of the continued pestactivity and impatiently apply a chemical pesticide.B.t. kurstaki is effective on caterpillars. B.t. israelensisis used for larvae of mosquitoes, black flies andfungus gnats. B.t. san diego is used for Coloradopotato beetle larvae. B.t. bui bui may soon be avail-able for Japanese beetle control.
Nosema locustae is a disease organism which showssome promise for controlling grasshoppers. Thereare claims that this parasite may be effective for upto five years after initial application. In some areas,this parasite is available commercially under differ-ent trade names. It is still too early to make exten-sive claims about its effectiveness in home gardens.
Enlist the aid of birds. In rural areas, chickens,guineas, and other domestic fowl can be released inunused areas of the garden to eat grubs and insects.Wild birds will also help, but they aren’t as control-lable. Provide appropriate conditions (i.e., shelter,nesting material, water) to encourage insect-eatingbirds.
Soaps. Commercial insecticidal soap (a specialformulation of fatty acids) has been proven effectiveagainst aphids, leafhoppers, mealybugs, mites, pearpsylla, thrips, and whiteflies. Homemade soapsprays also work to some extent: use three table-spoons of soap flakes (not detergent) per gallon ofwater and spray on plants until dripping. Repellentsprays, such as garlic sprays and bug sprays (madefrom a puree of bugs), have been found useful bysome gardeners, but their effectiveness is question-able. Some researchers believe that bug sprays maywork if a disease is present in the insect, which isspread through the spray to other insects. Be care-ful! Homemade soap sprays can injure some plants.
Synthetic PesticidesSynthetic pesticides, by their simplest definition, arethose pesticides made by humans in chemicallaboratories or factories. Examples of these includemalathion, diazinon, and sevin. The real surge ofdevelopment of synthetic pesticides began in WorldWar II with the discovery of DDT. For more infor-mation, refer to the Pesticides chapter.

Chapter 3 Basics of Entomology 17
SummaryInsects constitute one class of the phylum Arthro-poda, and yet they are one of the largest groups inthe animal kingdom. The insect world is made up ofindividuals that vary greatly in size, color, andshape. Although most insects are harmless or evenbeneficial to humans, the few that cause damagehave tremendous impact. Harmful species canusually be recognized with some basic knowledgeof their host, habits, life cycle, and the type ofdamage they inflict. Feeding damage varies due tothe type of mouthparts an insect possesses. Harmfulinsects can be controlled in many ways withoutresorting to the use of pesticides. Good culturalpractices and proper selection of plant varieties,coupled with mechanical and biological controls,will control insect populations. Use insecticidesjudiciously, wisely, and safely. Read and followlabel directions carefully when applying any pesti-cide.

CHAPTER 4Plant Pathology
Plant Diseases In History ............................................................................................................................ 1
Disease Defined ........................................................................................................................................... 1
Conditions Necessary for Disease............................................................................................................. 2
Symptoms, Signs, Syndromes ................................................................................................................. 2
Disease Development .................................................................................................................................. 3
Control of Diseases ..................................................................................................................................... 3
Summary ....................................................................................................................................................... 4
Chapter 4 Plant Pathology 1
CHAPTER 4Plant Pathology
Edited and revised by Dr. Cheryl Smith, University of New Hampshire Cooperative Extension
The organisms which cause plant disease can destroy crops from the time theseed is put into the ground until the crop is harvested and during storage. Somediseases are capable of totally destroying a crop, while others may cause onlycosmetic damage. However, cosmetic damage may be equivalent to total de-struction in the case of ornamental plants, certain fruits and vegetables.
While many biological organisms can cause plant diseases, the vast majority arecaused by fungi. Disease control with chemicals is tricky because it involveskilling the fungus, without killing the host, and proper timing of applications isessential.
A basic understanding of diseases and how they develop will give an apprecia-tion for the complexity of the problem and demonstrate the importance of cul-tural practices in management of plant diseases.
Plant Diseases In HistoryCertain diseases have had tremendous impacts onour society. Perhaps foremost among these is potatolate blight which caused the potato famine inIreland (1845); as a result, approximately 2 millionpeople either starved to death or emigrated to theUnited States.
Downy mildew ruined the French wine industryuntil Bordeaux mixture was accidentally discoveredas a control against the fungus.
Two forest tree diseases which caused great eco-nomic losses in America are Dutch elm disease andchestnut blight. Both were introduced accidentallyto the United States. Chestnut blight completelydestroyed the most valuable trees in the Appala-chians, while Dutch elm disease continues itsdestruction today.
These examples are prominent because they causedso much damage. However, plant diseases causevariable amounts of damage from year to year,often depending upon weather patterns.
Disease DefinedPlant disease is the rule rather than the exception.Every plant has disease problems of one sort oranother. Fortunately, plants either tolerate thesemaladies, or they are not very serious in most years.Plant pathologists consider almost any abnormalgrowth pattern by a plant to be a ‘disease’.
Plant diseases are caused by a large array of biotic(living) agents such as fungi, nematodes, bacteria,and viruses. Plant diseases are also caused by alarge array of abiotic (nonliving) factors such asnutrient deficiencies and water or temperaturestress; or sometimes by a combination of factors.Both groups of agents are capable of causing abnor-mal and harmful physiological processes in the hostplant.
One must distinguish between infectious diseases,caused by biotic agents, and noninfectious disorders(abiotic agents).

Chapter 4 Plant Pathology 2
Infectious organisms can be defined as follows:
Fungus: an organism with no chlorophyll,that reproduces by means ofstructures called spores, andusually has filamentous growth;e.g., molds, yeasts, mushrooms.
Bacterium: a single-celled, microscopic organ-ism with cell walls and no chloro-phyll; reproduces by fission.
Phytoplasma: a microscopic, bacteria-like organ-ism that lacks a cell wall, andtherefore appears filamentous.
Virus: a submicroscopic, subcellularparticle consisting of nucleic acidand protein that requires a hostcell in which to multiply. (It is notknown if a virus is a living ornonliving agent).
Viroid: a virus-like particle that lacks theouter protein coat of a virusparticle.
Nematode: a microscopic roundworm, usuallyliving in soil, which feeds on plantcells.
ParasiticSeed Plant: a higher plant with chlorophyll
that lives parasitically on otherplants, e.g., mistletoe, dodder
Fungi and bacteria cause plant diseases such as leafspot and fruit, stem, or root rot. Plant viruses,viroids, and mycoplasmas often cause growthdistortion, stunting, and abnormal coloration.Nematodes can cause stunting and root distortion.Parasitic seed plants cause a general weakening ofthe host plant.
Conditions Necessary forDiseaseIn order for disease to occur, three conditions mustbe met. First, it is necessary to have a susceptiblehost plant. Each species of plant is capable of beinginfected by only certain organisms (pathogens). Theplant must be in a stage of development susceptibleto infection by the disease agent.
The second requirement is the presence of an activepathogen in a stage of development conducive toinfecting the host plant. If there is no pathogenpresent, there can be no disease.
The third condition is an environment suitable forthe pathogen to infect the plant. Temperature andmoisture are important factors.
Symptoms, Signs, SyndromesA symptom is the physical expression of disease bythe plant. Examples of symptoms are:
blights: sudden, often widespread death oftwigs, foliage, flowers
cankers: dead places on bark and cortex ofstems; often discolored and raised orsunken
galls: abnormal, localized swellings onleaf, stem, or root tissue
rots: general decomposition and destruc-tion of tissue
necrosis: death of tissue
spots: circular or irregular lesions onabove-ground tissue
A sign is the visible presence of the pathogen, suchas a fungal fruiting body or bacterial dischargeassociated with the disease:
conks: fungal fruiting structures formed onrotting woody plants (shelf orbracket fungi)
mycelia: masses of fungal threads (hyphae)which compose the vegetative bodyof the fungus
ooze (flux): viscid mass of juices composed ofhost and parasite substances foundexuding from some diseased plants
pycnidia: minute, fungal, asexual fruitingstructures, usually globose andblack, formed on plant surfaces
rhizomorphs: string-like strands of fungal myceliasometimes found under the bark oftrees
A disease syndrome is the group of signs andsymptoms which collectively characterize a disease.Familiarity with a disease’s signs or symptoms isoften not enough to diagnose a disease; it is neces-sary to know the syndrome and case history. Seeinga spot on a leaf does not tell much, but findingpycnidia in that spot and knowing the plant speciesand recent weather conditions might be sufficientinformation to diagnose the disease. Often, labora-tory work is necessary for diagnosis.

Chapter 4 Plant Pathology 3
Disease DevelopmentIt is important to understand how plant diseasesdevelop in order to control them. By the time itbecomes obvious that a plant has a disease, it isgenerally too late to do anything about it in thatgrowing season. Plants cannot be cured in the waypeople expect their own ills to be cured. The processby which diseases develop can be broken into fourdistinct phases:
Inoculation: This is the introduction of the patho-gen to the host plant tissue. Wind, orrain, or running water can movepathogens and introduce them to ahost plant, as can birds, insects,people, or equipment. Some patho-gens move themselves short dis-tances, but most rely on othermeans. Inoculum is any part of thepathogen that comes in contact withthe host plant.
Penetration: This is the process of getting insidethe plant. It may be an active orpassive process. Some pathogensproduce enzymes to dissolve thecuticle and directly attack andpenetrate plant cells. Some patho-gens can swim through water on aplant’s surface and enter the plantthrough natural openings (such asstomata, lenticels, or hydathodes) orthrough wounds. Some pathogensare introduced into the plant byinsects, pruning tools, or drivingrain.
Infection: When the pathogen invades theplant tissue and establishes a para-sitic relationship between itself andthe host, infection has occurred.
Disease: When the host plant responds tothe presence of the pathogen, a“disease” exists. The host’s responseusually results in the development ofsymptoms of the disease, such asblight, spots or necrosis.
Control of DiseasesThe importance of understanding the diseasedevelopment process becomes obvious whenconsidering control options. By the time symptomsare expressed, the pathogen (with few exceptions) isalready inside the host plant. Therefore, controlefforts, in most cases, must occur before penetrationhas taken place. The overall principle in effectivedisease control is to keep the inoculum density ofthe pathogen at very low levels.
Success in controlling plant disease will occur whena combination of the following methods of controlare used:
Avoidance: A grower can avoid certain diseasesby choice of geographic area orchoice of planting site. Disease canalso be avoided by planting at a timethat does not favor disease develop-ment. Using disease-free plantingstock or modifying cultural practicesalso helps to avoid disease.
Exclusion: A grower can inspect stock for signsof disease and reject or treat anywhich is suspect. Plant quarantinesare designed to exclude certain pestsfrom areas that are free of that pest.Elimination of carrier insects canhelp exclude disease-causing organ-isms.
Eradication: Once a disease is established in anarea, eradication is unlikely. How-ever, significant reduction in diseaseinoculum can be attained by de-stroying diseased plants or alternatehosts, by rotating crops, or by certainsoil treatments.
Protection: Spraying or dusting plants withfungicides or bactericides canprotect them from disease. Some-times modifying cultural practices orthe environment may protect thecrop. Control of carrier insects willalso protect plants.
Resistance: Breeding and selection are used todevelop resistant crops. Resistancecan be enhanced through properculture of a crop. Resistance is notimmunity; improper culture of aresistant variety may negate theresistance.

Chapter 4 Plant Pathology 4
Therapy: There are a few diseases which canbe treated with chemicals or heat togain a degree of control.
Familiarity with crops and the diseases and insectsthat affect them is useful in planning managementprograms. Some diseases occur every season; othersoccur sporadically. Some can be managed easily byusing proper cultural and/or chemical methods;others must be tolerated. Knowing which problemfalls into which category comes with experience.Knowing the proper method to use at the propertime is a part of integrated pest management (IPM).
SummaryPlant diseases are to be expected. Fortunately, thereare few truly devastating diseases in most years.
For disease to occur, there must be a susceptiblehost, a suitable environment, and a living pathogen.When all three conditions are met, disease occurs.Severity of the disease depends on the degree towhich the conditions are met.
Disease development follows a precise course ofevents. Inoculation occurs first, usually followed bypenetration of the host . Infection occurs when thepathogen invades the host tissue. Only when thehost responds has disease occurred. By this time, itis usually too late to control the disease.
Disease management involves more than the use ofchemicals for protection. Avoidance, eradication,exclusion, resistance, and therapy all have a role indisease management. A combination of these willgive best results.

Chapter 5
Questionnaire for the Diagnosis of Plant Problems .................................................................. 2
A Systematic Approach to Diagnosing Plant Damage ............................................................... 6
Define the Problem ..................................................................................................................................... 6
Look for Patterns ........................................................................................................................................ 6
Delineate Development ............................................................................................................................... 9
Determine Causes ...................................................................................................................................... 9Distinguishing Among Living Factors: ..................................................................................................................... 9Symptoms and Signs of Pathogens ...................................................................................................................... 10
Symptoms and Signs of Insects, Mites and Other Animals ..................................................................... 12Insects .................................................................................................................................................................. 12Feeding Habits ...................................................................................................................................................... 12
Insect Life Cycles ...................................................................................................................................... 13Incomplete Life Cycle: ........................................................................................................................................... 13Complete Life Cycle .............................................................................................................................................. 13
Other Animal Damage .............................................................................................................................. 14
Distinguishing Among Nonliving Factors .................................................................................................. 14Mechanical Factors ............................................................................................................................................... 14Physical Factors .................................................................................................................................................... 14Chemical Factors .................................................................................................................................................. 15
Chemical Injury Patterns on an Individual Plant ....................................................................................... 17
Key to Symptoms of Chemical Disorders on Individual Plants .............................................. 19Symptoms Appearing First or Most Severely on New Growth .............................................................................. 19 Terminal Bud Usually Dies. Symptoms on new growth. ..................................................................................... 19 Terminal Bud Remaining Alive.Symptoms on new growth. ................................................................................ 19Symptoms Do Not Appear First on Youngest Leaves: .......................................................................................... 20 Chlorosis General, no interveinal Chlorosis. Effects usually general on whole plant. ........................................20 Vein-Clearing, Chlorosis-Necrosis at Leaf Tips and Margins, older-younger foliage Xylem-Transported ............. Photosynthetic-Inhibitors ............................................................................................................................... 20 Interveinal Chlorosis. Interveinal Chlorosis first appears on oldest leaves. ....................................................... 20 Leaf Chlorosis is Not the Dominant Symptom. Symptoms appear on older leaves at base of plant. ................ 21
References, Laboratory Analyses............................................................................................................. 22 Synthesis of Information to Determine Probable Causes of plant Damage ........................................................ 22
Summary: .................................................................................................................................................. 23
Literature Useful for Diagnosing Plant Diseases & Disorders ................................................ 24Miscellaneous ....................................................................................................................................................... 24Floriculture ............................................................................................................................................................ 24Woody Ornamentals & Trees ................................................................................................................................ 24Fruits ..................................................................................................................................................................... 24Turfgrass ............................................................................................................................................................... 24Vegetables ............................................................................................................................................................ 24Field Crops ............................................................................................................................................................ 25Disease Indices ..................................................................................................................................................... 25

Chapter 5 Diagnosing Plant Damage 1
CHAPTER 5Diagnosing Plant DamageDiagnosing Plant DamageDiagnosing Plant DamageDiagnosing Plant DamageDiagnosing Plant Damage
Edited and revised by Dr. Cheryl Smith, University of New Hampshire Cooperative Extension
Diagnosis of plant problems is often a very difficult task since there can be many differentcauses for a given symptom, not all of which are pathogenic organisms. Soil nutrition andtexture, weather conditions, lighting and many other environmental and cultural condi-tions influence the overall health of a plant. Insect damage can sometimes be confusedwith plant diseases caused by microorganisms or abiotic factors. Knowing a completehistory of the plant is essential to making an accurate diagnosis. Also, a plant specimenshould be in the early stages of disease-development when it is examined in order for anaccurate diagnosis to be made. Once it has decayed, secondary organisms invade thetissue and evidence of the primary pathogen is often obscured.
For these reasons, it is difficult to construct a foolproof key for the diagnosis of plantproblems. Even with the necessary laboratory equipment at one’s disposal, it is oftendifficult to determine the exact cause of a plant’s problem. The following pages providean aid to diagnosing some of the common problems of urban plants. This chapter wasconstructed for Master Gardeners to help solve consumers’ plant problems -- it is notmeant for diagnosis of commercial production problems or for use by laboratory diagnos-ticians. The information provided is by no means comprehensive and other resources willbe needed for many of your diagnoses. The Ortho Problem Solver is particularly useful as itcontains color pictures. Other references are listed at the end of this chapter.
This chapter should help you, as a Master Gardener, ask the right questions to determinethe cause of the problem or, at least, to narrow down the possibilities. For example, sinceboth dry weather and excess fertilizer can cause marginal leaf burn, you would want toask the grower about recent rainfall in the area and fertilizer application. Or, since wiltcan result from both dry and waterlogged soil, you would want to ask about rainfall andhow well the soil drains. In many cases, you will not be able to determine what caused theproblem, but if you can narrow down the possibilities and mention these when you sendthe sample to a diagnostic laboratory, you will save the diagnostician a lot of time.
The chapter describes a systematic approach to diagnosis.

Chapter 5 Diagnosing Plant Damage 2
The following is a list of suggested questions to ask a grower when you are attempting to diagnose a problem.
Questionnaire for the Diagnosis of Plant ProblemsCompiled by Charles H. Williams, Extension Specialist, Ornamentals
Usually when definite reasons can’t be given for the poor growth or death of plants, it is often because somefacts have been overlooked. Although these facts may seem minor, they all help. The following checklist isdesigned to assemble this information. Because these questions may direct you to areas you have overlooked,when you answer them you may be able to diagnose the problem, the cause may be due to insects, diseases,the plant’s environment or certain cultural practice.
I. General History
1. Name and address of inquirer ______________________________________________________________
_______________________________________________________________ Phone No._______________
2. Kind of plant (Botanical & Common Name) ____________________________________________________
Variety or cultivar_______________ Approximate age of plant_______________ Height_____ft.;width_____ft.
3. When was the problem first noticed this year? _________________________________________________
Has the trouble appeared in previous years? __________________________________________________
4. Has the plant recently been transplanted? When? __________ Month __________ Year __________
5. Is the plant considered winter hardy for your area? __________
6. Are other plants of the same kind nearby? __________ How near and what it their condition? ____________
______________________________________________________________________________________
7. Are there other types of plants nearby which are also affected? ____________________________________
8. Has the plant or nearby plants been sprayed or dusted for disease or insect control? ___________________
If so, when and with what? _________________________________________________________________
9. Have herbicides or any turf “weed and feed” materials been used in the vicinity? ______________________
How near and when? ____________________ ________________________________________________
What materials? _________________________________________________________________________
10. Is there any evidence of mechanical injuries from lawn mowers, automobiles, machinery, heavy pruning,
people, animals or faulty planting? __________________________________________________________
11. Was the plant planted or treated by professional tree experts or a landscape maintenance firm, etc. _______
If so, when and with what? _________________________________________________________________
12. Is the plant shaded by buildings, plants or other objects for the whole or part of the day? ________________
13. Is the plant in an exposed location for sun and wind? ____________________________________________
14. If the plant is near a building, does it primarily face north, south, east or west? ________________________

Chapter 5 Diagnosing Plant Damage 3
15. Describe the care given the plant in question for the past 2 years.
A. Fertilizer (kind and amount; foliar or soil application) __________________________________________
B. Irrigation (method and frequency) _________________________________________________________
C. Pruning _____________________________________________________________________________
D. Any other practice or treatments? _________________________________________________________
16. Comment on unusual weather conditions. (Extreme temperatures, late or early frost, heavy wind, hail and ice
storms, drought periods, excessive rainfall or flooding)
Present season: _________________________________________________________________________
Previous season: ________________________________________________________________________
17. Do cement, asphalt or other types of pavement occur near the plant? __________
What type? _______________ How near? _______________ How long has it been there? ______________
18. Are there gas, water, steam, sewer or other pipes or conduits in the ground near the plant or has anything
leaked near the plants? ___________________________________________________________________
19. Has the plant been exposed to salt used for ice control along a street or highway or along walk ways? _____
(A salty mist stirred up by auto traffic can cause foliar damage to conifers. A similar problem occurs along
seacoasts following storms.)
20. Soil in which the plant is growing.
A. How deep is the surface soil above rock, hardpan or subsurface layers of soil? _____________________
B. Is the soil primarily clay? _______________, loam? _______________ ,sand? _______________
C. What is the internal drainage of the site? Good _______________ Poor _______________
Excessive _______________(Good, poor or excessive internal drainage may be determined by the rate
at which water disappears from a test hole. A hole may be dug to a depth of 3 feet, filled with water and a
record kept of the time required for the water to disappear. Fill the hole with water 3 times and record the
time of disappearance after each filling. If water remains in the test hole one or more days, drainage is
poor and in need of improvement. If water drains away repeatedly in less than three minutes, drainage is
excessive.)
21. Has a soil analysis for pH, major elements, and total soluble salts, etc. been done lately for the area? _____
22. Have the roots around the plant been disturbed by digging or has the level of soil been raised or lowered by
filling or grading operations? _____________ If so, when and what was the change of level? ____________
______________________________________________________________________________________
23. Is there grass or other plants growing over the roots of the affected plants? __________________________
24. What mulch or winter protection practices were carried out? ______________________________________
25. Has anything been dumped or accidentally spilled in the area? ____________________________________
26. Has any unusual activity taken place in the area recently? ________________________________________

Chapter 5 Diagnosing Plant Damage 4
II. Description of Trouble
Foliage (leaves, needles)
1. Off color? (Yellow, brown spots, etc.) _____________Describe ____________________________________
______________________________________________________________________________________
2. Symptoms appear on upper leaf surface? _____________________________________________________
Lower leaf surface? ______________________________________________________________________
3. Edges of leaves brown? _______________________ Edges of leaves tattered? _______________________
4. Deformed? (galls, twisted, rolled, blisters, callus, etc.) ___________________________________________
Describe _______________________________________________________________________________
5. Leaves wilted? __________________________________________________________________________
6. Partially devoured by insects? (Holes, leaf mines, leaves chewed on peripheral or interveinal)____________
Collect or Describe_______________________________________________________________________
7. Any foreign substance noted on surface? _____________Describe ________________________________
______________________________________________________________________________________
Twigs
1. Off color? _____________ Describe _________________________________________________________
______________________________________________________________________________________
2. Deformed? (Swollen, lesions, cankers, galls, etc.) _____________Describe _________________________
______________________________________________________________________________________
3. Bark split? _____________________________________________________________________________
4. Dark or colored streaks in wood under bark? __________________________________________________
5. Channels in wood or under bark? _____________ Describe ______________________________________
______________________________________________________________________________________
6. Twig girdled by insects, old label, or price tag? _________________________________________________
Flowers
1. None developed ____________________________
2. Off color (spots on petals, etc.) _________ Describe ____________________________________________
3. Deformed? _________________________ Describe ____________________________________________
4. Chewed by insect? _______________________________________________________________________

Chapter 5 Diagnosing Plant Damage 5
Fruit (berries, pods, cones, etc.)
1. None formed ______________________________
2. Off color? __________________________ Describe ____________________________________________
3. Deformed? _________________________ Describe ____________________________________________
4. Chewed upon or hollowed out by insect? ___________ (Describe insect as caterpillar, maggot, grub, beetle,
etc.) __________________________________________________________________________________
5. Failed to mature or dropped too early? _______________________________________________________
Trunk, Branches, Roots
1. Oozing sap, flow of resin, or holes with “sawdust” noted? _____________ Describe ___________________
______________________________________________________________________________________
2. Dark streaks in wood under bark? ___________________________________________________________
3. Discolored bark? ____________________ Swollen? __________________________________ Constricted?
4. Bark split, cracked or separated from wood? __________________________________________________
5. Evidence of insects under bark? _____________ (Remove dead bark and determine extent of injury.)
(Collect insect specimen.) _________________________________________________________________
6. Any foreign substance on bark? ________ Describe ____________________________________________
7. Any unusual growth on main stem at or just under soil line?_______________________________________
8. Are some roots exposed or observed to wrap around others? _____________________________________
9. Was the container, burlap, wire basket, trunk wrap, etc. removed at time of planting? __________________
10. Upon digging, does the root system of the affected plant:
A. appear to be similar to “normal” plants of the same species? ___________________________________
B. have any lesions or growths on it? ________________________________________________________
C. show evidence of rot, discoloration, or symptoms of the outer root tissue separating from the inner
core, etc. ______________________________________________________________________________
Additional Comments, Observations, Sketches, etc.

Chapter 5 Diagnosing Plant Damage 6
A Systematic Approach toDiagnosing Plant DamageJ.L. Green, Oregon State UniversityO. Maloy, Washington State UniversityJ. Capizzi, Oregon State UniversityEd. C. Smith, University of New Hampshire
I. Define the Problem
• Plant Identification and Characteristics -Growth and Appearance of the Identified Plant- Normal? - Abnormal?
Determine if a real problem exists. It is essentialthat the plant be correctly identified (genus,species and cultivar or variety) so that the normalappearance of that plant can be established eitherby personal knowledge or utilizing plant refer-ence books. Many horticultural plants, or struc-tures on those plants such as fruit-seeds, len-ticels, etc. may appear to be abnormal to theperson who is not familiar with the specific plant.For example, the ‘Sunburst’ honey locust mightappear to be suffering from a nutrient deficiencybecause of its chlorotic yellow-green leaf color,but it was selected because of this genetic charac-teristic ... it is not abnormal for this plant. There-fore, it is not a problem.
Always compare the diseased plant with ahealthy or normal plant, since normal plant partsor seasonal changes sometimes are mistakenlyassumed to be evidence of disease. Examples arethe brown, spore-producing bodies on the lowersurface of leaves of ferns. These are normalpropagative organs of ferns. Also in this categoryare the small, brown, club like tips that developon arborvitae foliage in early spring. These arethe male flowers, not deformed shoots. Smallgalls on the roots of legumes, such as beans andpeas, are most likely nitrogen-fixing nodulesessential to normal development and are notsymptoms of root-knot nematode infection. Theleaves of some plants, such as some rhododen-dron cultivars, are covered by conspicuous fuzz-like epidermal hairs. This is sometimes thoughtto be evidence of disease, but it is a normal partof the leaf. Varieties of some plants have varie-gated foliage that may resemble certain virusdiseases. These examples illustrate the impor-tance of knowing what the normal plant lookslike before attributing some characteristics todisease.
In describing the plant “abnormality”, distin-guish between symptoms and signs: Symptomsare changes in the growth or appearance of theplant in response to living or nonliving damag-ing factors. Many damaging factors can producethe same symptoms; symptoms are not defini-tive. Signs are evidence of the damaging factor(pest or pathogen life stages, secretions; mechani-cal damage; chemical residue; records of weatherextremes or chemical applications; damagepatterns). Patterns of damage often provideexcellent diagnostic clues.
• Examine the Entire Plant and Its Community
In defining a plant problem, it is essential todetermine the real primary problem. There arefoliage symptoms that may occur due to rootdamage. The primary problem would be rootdamage, not chlorosis of the foliage, -examine theroots. In general, if the entire top of the plant orentire branches are exhibiting abnormal charac-teristics, examine the plant downward to deter-mine the location of the primary damage.
Some pathogens and insects as well as nonlivingfactors are only damaging if the plant has beenpredisposed by other primary factors. For ex-ample, borers generally only attack trees that arealready predisposed to moisture or other physi-cal stress. Premature dropping of leaves byfoliage plants (i.e. Ficus benjamina) and of needlesby conifers frequently causes alarm. Evergreenplants normally retain their leaves for 3-6 yearsand lose the oldest gradually during each grow-ing season (Figure 1). This normal leaf drop isnot noticed. However, prolonged drought orother stress factors may cause the tree as a wholeto take on a yellow color for a short period andmay accelerate leaf loss. If the factors involvedare not understood, this often causes alarm. Theleaves that drop or turn yellow are actually theoldest leaves on the tree, and their dropping is aprotective mechanism which results in reducedwater loss from the plant as a whole.

Chapter 5 Diagnosing Plant Damage 7
Figure 1.
Normal vs Abnormal Needle Drop
or Leaf Drop from Evergreens.
Nondeciduous plants normally retain their leaves or needlesfor several years, but eventually they fall. This drop isusually gradual and production of new leaves obscures lossof older leaves.
A. Normal - If drop is confined to older leaves, alarm isunnecessary because it is a normal response to acondition of stress (e.g. drought). Unfavorable growingconditions, such as drought, may accelerate leaf fall sothat it becomes apparent and of concern.
B. Abnormal - If newly produced leaves are lost, it is aproblem. Drop of current year’s leaves may result frompathogen or insect attack or from chemical deficienciesor toxicities.
II. Look for PatternsHere is where we start making the distinctionbetween living and nonliving factors that causeplant damage.
• Nonuniform Damage Pattern (living Factors) vsUniform Damage Pattern on Plant Community,Plant, Plant Part (nonliving Factors).
Living Factors: There is usually no discernablewidespread pattern of damage. Living organismsgenerally produce no uniformly repeated patternof damage on a planting (Figures 2-4). Damageproduced by living organisms, such as pathogensor pests, generally results from their using theplant as a food source. Living organisms aregenerally rather specific in their feeding habitsand do not initially produce a wide-spread,discernable damage pattern. Plants becomeabnormal: Tissues are destroyed, become de-formed, or proliferate into galls.
Living organisms are specific, i.e. damage maybe greatest on or limited to one species of plant.
Living organisms multiply and grow with time,therefore they rarely afflict 100 percent of thehost plants at one time. The damage is progres-
sive with time. Likewise, the damage, generally,is initially limited to only one part of the plantand spreads from that initial point of attack withtime.
Living organisms usually leave “signs”, i.e.excrement, cast skins, mycelium, eggs....
Nonliving Factors: Damage patterns producedby nonliving factors such as frost or applicationsof toxic chemicals (Figure 5) are generally recog-nizable and widespread: Damage will usuallyappear on all leaves of a certain age (for exampleon all the leaves forming the plant canopy at thetime a toxic spray was applied) or exposure (i.e.all leaves not shaded by overlapping leaves onthe southwest side of a plant may be damaged byhigh temperatures resulting from intense sun-light). Damage will likely appear on more thanone type or species of plant (look for similardamage patterns on weeds, neighboring plants,etc.) and over a relatively large area.
Figure 2.
Patterns on plant canopy:
A. Entire or Major Portion of Top Dying: If all or a majorportion of a tree or shrubdies, suspect a problemwith the roots. Look forDamaging Factor at theJunction of Normal andAbnormal Plant Tissue.
Gradual Decline of theentire plant or a majorportion of it is caused byliving factors such as rootrots, vascular wilts and root-feeding insects or borers.
Sudden Decline is gener-ally caused by a nonlivingfactor such as a toxicchemical in the soil ordrastic climate changessuch as freezing or drought.
B. Single Branch Dying: Ifonly scattered damageoccurs in the plant canopy,suspect that the primaryproblem is related to the foliage or aerial environment, -not the roots.
Gradual Death of Branch: If scattered branches start todecline and eventually die, suspect a living organismsuch as a canker pathogen, a shoot blight or borers.
Sudden Death of Branch: If a branch dies suddenly,and especially if affected branches are concentrated onone side of the plant, suspect a nonliving factor such asweather (wind, snow, etc.), animal damage, or chemicaldrift.
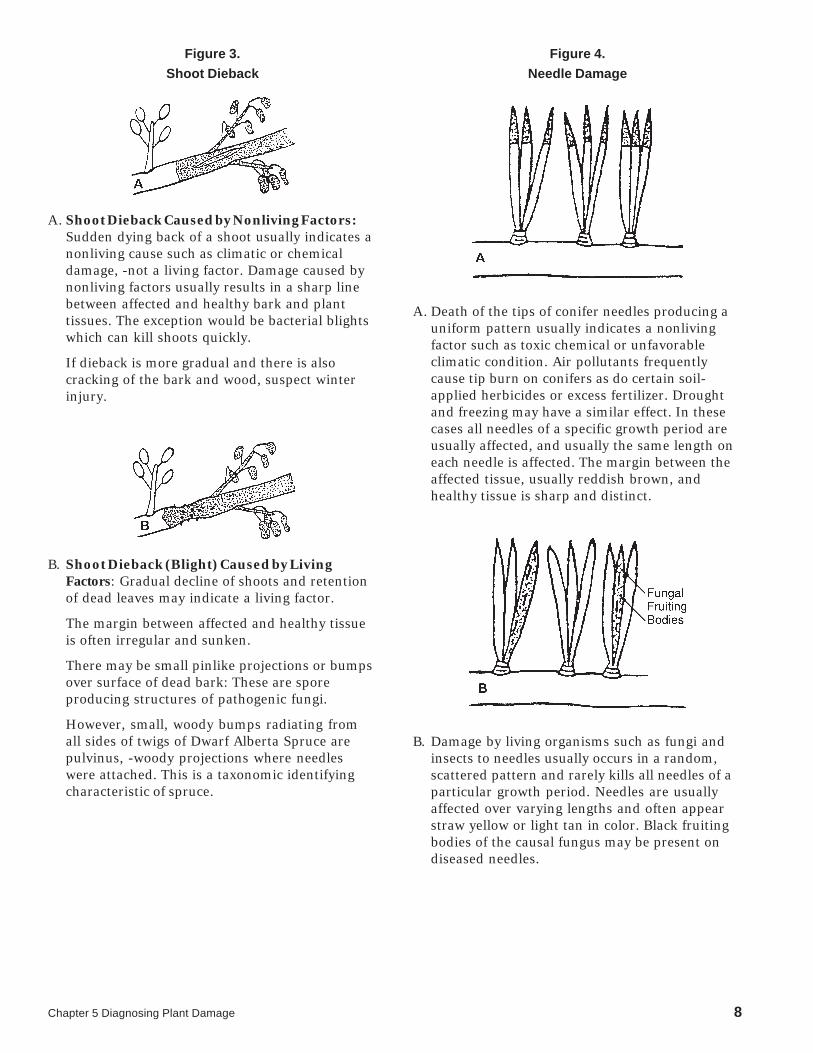
Chapter 5 Diagnosing Plant Damage 8
Figure 3.
Shoot Dieback
A. Shoot Dieback Caused by Nonliving Factors:Sudden dying back of a shoot usually indicates anonliving cause such as climatic or chemicaldamage, -not a living factor. Damage caused bynonliving factors usually results in a sharp linebetween affected and healthy bark and planttissues. The exception would be bacterial blightswhich can kill shoots quickly.
If dieback is more gradual and there is alsocracking of the bark and wood, suspect winterinjury.
B. Shoot Dieback (Blight) Caused by LivingFactors: Gradual decline of shoots and retentionof dead leaves may indicate a living factor.
The margin between affected and healthy tissueis often irregular and sunken.
There may be small pinlike projections or bumpsover surface of dead bark: These are sporeproducing structures of pathogenic fungi.
However, small, woody bumps radiating fromall sides of twigs of Dwarf Alberta Spruce arepulvinus, -woody projections where needleswere attached. This is a taxonomic identifyingcharacteristic of spruce.
Figure 4.
Needle Damage
A. Death of the tips of conifer needles producing auniform pattern usually indicates a nonlivingfactor such as toxic chemical or unfavorableclimatic condition. Air pollutants frequentlycause tip burn on conifers as do certain soil-applied herbicides or excess fertilizer. Droughtand freezing may have a similar effect. In thesecases all needles of a specific growth period areusually affected, and usually the same length oneach needle is affected. The margin between theaffected tissue, usually reddish brown, andhealthy tissue is sharp and distinct.
B. Damage by living organisms such as fungi andinsects to needles usually occurs in a random,scattered pattern and rarely kills all needles of aparticular growth period. Needles are usuallyaffected over varying lengths and often appearstraw yellow or light tan in color. Black fruitingbodies of the causal fungus may be present ondiseased needles.

Chapter 5 Diagnosing Plant Damage 9
Figure 5.
Foliar Chemical Spray Injury Pattern on Leaf
Spots are usually uniformly and evenly distrib-uted over the leaf surface and generally will be ofuniform size. Color is usually uniform across thespot.
The margin between affected and healthy tissueis usually sharp. Injury pattern does not spreadwith time or move to previously undamagedplants or plant tissue.
Figure 6.
Leaf Damage Pattern by Nonliving Factors, i.e. toxicchemical taken up through roots or from polluted air filteredthrough the leaf or from moisture stress.
Injury from chemicals taken up by plants fromsoil through roots or from air through leavesusually results in scorching (necrosis) of leafmargins and interveinal areas. If severe, necrotictissue may drop out giving a ragged appearance.Similar patterns are produced by moisture stress.If uptake of the toxic chemical is by a fullyexpanded leaf, toxicity is marginal andinterveinal. If by a nonexpanded leaf, toxicityoccurs in the veins.
III. Delineate DevelopmentAs already mentioned, another clue for distin-
guishing between living and nonliving factorscausing plant damage is to observe the develop-ment of the patterns over time.
Living organisms generally multiply with time,producing an increasing spread of the damage overa plant or planting with time.
Nonliving factors generally damage the plant ata given point in time, for example death of leaftissue caused by a phytotoxic chemical is immediateand does not spread with time (Figure 5). There areexceptions. If a nonliving damaging factor is main-tained over time, the damage will also continue tointensify over time: For example, if a toxic soil or airchemical is not removed, damage to plants withinthe contaminated area will continue to develop(Figure 6), but damage will not spread to plants inuncontaminated areas: Nonliving Factors Are NotProgressive. This again re-emphasizes the necessityof piecing together multiple clues to identify themost probable factor causing plant damage.
IV. Determine CausesPatterns of damage and distribution and patterns
of development of damage over time have beenvaluable in making the gross distinction betweendamage caused by living factors and damagecaused by non-living factors. Additional clues mustbe obtained to distinguish among factors within theliving and nonliving categories.
Distinguishing Among Living Factors:To further identify which subcategory of living
factors caused the damage requires a close examina-tion of the symptoms and signs.
Symptoms are the modified appearance of theaffected plant, for example necrotic tissues,chlorosis, cankers, galls, leaf distortion.
Signs are the presence of the actual organism orevidence directly related to it. Visual observationof the insect on the leaf, presence of fungalmycelium, spores, insect egg masses, insect frass,mite webbing, etc. Signs can be used as clues inidentifying the specific living organism thatproduced the plant damage.
A combination of clues from both symptoms andsigns are required for preliminary distinctionbetween damage caused by pathogens andinsect-mite damage.

Chapter 5 Diagnosing Plant Damage 10
Symptoms and Signs of PathogensDifferentiating between bacterial and fungal
pathogens is not always clear cut, but certainsymptoms are distinctive (Figures 7 and 8; Table 2).
Fungal Diseases (Figure 7).
Fungal leaf spots and stem rots are characterizedby various symptoms: Dry texture, concentricrings, discoloration and fruiting structures.Fungal leaf spots and stem rots are usually dry orpapery, especially in dry climates. The mostdistinguishing clue of a fungal disease is thepresence of signs: Mycelium (common underconditions of high humidity and excessivemoisture) and fruiting bodies of the fungusitself. The fruiting bodies range in size frommicroscopic to those easily detected with thenaked eye. They are found within the leaf spot orstem rot area. Each type of fungus has its owncharacteristic structures which enable plantpathologists to identify them.
Foliar Pathogens: The leaf spots caused by fungigenerally have distinct margins (Figure 7). Theyare usually circular with concentric rings result-ing from growth of the fungus from the centerpoint of initial infection outward. The conditionof the leaf tissue and associated color rangesfrom dead (necrotic tan) in the center to recentlydead (darker brown ring), to dying (darker ringwith possible light yellow, chlorotic edge indicat-ing the advancing edge of the fungal infection).The margins of fungal leaf spots (Figure 7) andstem rots (Figure 3) can be brightly discolored,such as purple (Fusarium stem rot) or yellow(Helminthosporium leaf spots), making thesesymptoms quite striking.
Root and Stem Pathogens: Root rots and vascu-lar wilts result from fungal infections and de-struction of root and stem tissues. The mostcommon visual symptom is gradual wilting ofthe above ground shoots, and symptoms ofnutrient deficiency.
Bacterial Diseases (Figure 8).
Bacteria do not actively penetrate healthy planttissue like fungi. They enter through wounds ornatural openings such as leaf stomata or twiglenticels. Once bacteria enter the plant, theyreproduce rapidly, killing the plant cells.
Bacterial galls: In some cases, toxic materialsare produced that cause plant tissues of roots,stems or leaves to grow abnormally as incrown gall.
Bacterial leaf spot disease: The bacteriausually enter through leaf stomata or hydath-odes. Symptoms include water-soaking, slimytexture, fishy or rotten odor, confined initiallybetween leaf veins resulting in discrete angu-lar spots. Many bacterial leaf spots, such asXanthomonas leaf spot on Philodendron (alsocalled red edge disease), expand until theyreach a large leaf vein. This vein frequentlyacts as a barrier and inhibits the bacteria fromspreading further. A chlorotic halo frequentlysurrounds a lesion. Lesions may enlargethrough coalescence to develop blight lesions.Some lesions exude fluid containing bacteria.Water-soaking frequently occurs in bacterialleaf spot diseases, such as Erwinia blight ofDieffenbachia. Holding the leaf to light usu-ally reveals the water-soaking. The ability ofthe bacteria (usually Erwinia species) todissolve the material holding plant cellstogether results in a complete destruction ofleaf or stem integrity. Some fungi also pro-duce this symptom, but usually not as exten-sively as bacteria. In final stages, cracks formin the tissue and disintegration follows.
Vascular wilt: In some cases, the bacteriapoison or plug the vascular water conductingtissues and cause yellowing, wilting, brown-ing and dieback of leaves, stems and roots.
Table 2.
Symptoms & Signs of Fungal
and Bacterial Leaf Spots
Abnormality Fungal Bacterial
Water-soaking non common common
Texture dryish-papery slimy-sticky
Odor usually none fishy, rotten
Pattern circular with irregular-concentric rings angular;
initiallydoes notcross veins
Disintegration uncommon common
Color changes common: red, uncommonyellow, purplehalos
Pathogen structures common uncommon
- mycelia, spores ....

Chapter 5 Diagnosing Plant Damage 11
Figure 7.
Fungal Leaf Spots
Spots usually vary in size, generally round,occasionally elongate.
Zones of different color or texture may developgiving the spot a bull’s eye effect: The deadesttissue (tan) is in the center of the spot where thefungal spore germinated. Then as the fungusmoves outward from that point of dead tissue tohealthy tissue the foliage color changes fromdead tan in the center to healthy green on theperimeter.
Spots are usually not limited by leaf veins.Figure 8.
Bacterial Leaf Spots
Bacterial leaf spots are often angular becausethey are initially limited by the leaf veins.
Color of the bacterial spots is usually uniform.Bacteria are one-celled organisms that kill as theygo. Tissue may first appear oily or water-soakedwhen fresh, but on drying becomes translucentand papery.
Viral Diseases (Figure 9).
Viruses are “submicroscopic” entities that infectindividual host plant cells. Once inside a plantcell, they are able to infect other cells. Viruses areobligate parasites: They can only replicate them-selves within a host’s cell. Because the viruscommandeers the host cell to manufactureviruses identical to itself, the plant cell is unableto function and grow normally. In the virusinfected plant, production of chlorophyll maycease (chlorosis, necrosis); cells may either growand divide rapidly or may grow very slowly andbe unable to divide (distortion, stunting). Thesymptoms of most virus diseases can be put into
four categories:
1) Lack of Chlorophyll formation in normallygreen organs.
Foliage may be mottled green and yellow,mosaic, or ringed (yellow and other pig-mented ring patterns), or be a rather uniformyellow (virus yellows).
Veins: Vein clearing is a common first symp-tom of some viral diseases. The veins have asomewhat translucent appearance. In veinbanding there is a darker green, lighter greenor yellow band of tissue along the veins.
2) Stunting or other growth inhibition: The reduc-tion in photosynthesis, because of less chloro-phyll, leads to shorter internodes, smaller leavesand blossoms and reduced yield.
3) Distortions of leaves and flowers, witches’brooms or rosettes result from nonuniformgrowth or uncontrolled growth of plant tissues.
4) Necrotic areas or lesions: Being obligate para-sites, viruses require the survival of their hostplant for their own procreation. Hence, virusesrarely cause death. Necrosis that does occur isusually confined to discrete areas of the plant;necrosis rarely occurs to such an extent that theentire plant is killed.
Figure 9.
Vein Clearing and Mosaic Leaf Patterns
Left side of leaf: vein clearing (chlorosis) withinterveinal tissue remaining green usuallyindicates a virus disease or the uptake and xylemtranslocation of a herbicide such as diuron. Thisis in contrast to the leaf veins remaining greenwith surrounding chlorotic tissues usuallyassociated with nutrient deficiencies such as irondeficiency.
Right side of leaf: Mosaic is a patchwork of greenand yellow areas over the surface of the leaf. Theleaf may also be puckered and distorted. Thesesymptoms usually indicate a virus disease,especially if the yellow areas blend graduallyinto the green areas. If margins are distinct,mottling may indicate a nutritional problem orgenetic variegation.

Chapter 5 Diagnosing Plant Damage 12
Viruses Typically Discolor, Deform or StuntPlants rather than induce necrosis or causedeath. Expressed symptoms (chlorosis, stunting,distortions) can be valuable clues for virusidentification, but can be easily confused withsymptoms induced by other problems such asnutritional disorders, spray injuries, or certainfeeding damage induced by mites or insects. Inaddition, because of their extremely small size,the virus or signs of the virus are not visible tothe unaided eye. The virus particles are detect-able within the plant through the electron micro-scope.
Viruses are transmitted from plant to plant byinsects, mites, fungi and nematodes, rubbing,abrasion or other mechanical means (includinggrafting or other forms of vegetative propagation).Viruses are occasionally transmitted in seed. Be-cause of the nature of virus transmission, virussymptoms generally spread with time from oneinfected plant tissue to other plant tissues or fromone infected plant to other plants in the community.
Nematodes:
Plant nematodes are microscopic roundwormsthat damage plant tissues as they feed on them.Many feed on or in root tissues. A few feed onfoliage or other above-ground organs.
Shoot Nematodes (Aphelenchoides spp.) —Foliar nematodes feed inside leaves betweenthe major veins causing chlorosis and necrosis.Injury is most often seen at the base of olderfoliage. When plants with a net-like pattern ofveins become infested with foliar nematodes,the tissues collapse in wedge-shaped areasand then change color.
Root Nematodes — The most commonabove-ground symptoms caused by root-infesting nematodes result from damaged rootsystems: Moisture and nutrient stress symp-toms and general stunting are common. Theroot lesion nematodes (Pratylenchus spp.) andburrowing nematodes (Radopholus similis)destroy the root cortex tissues as they feed.The root-knot nematodes (Meliodogyne spp.)inject growth-regulating substances into roottissues as they feed, stimulating the growth oflarge tender cells and causing overgrowth ofroot tissues to form visible, swollen “galls” or“knots”. Other root nematodes stunt growth,apparently by killing root meristems.
Symptoms and Signs of Insects,Mites and Other Animals
InsectsThe location of the feeding damage on the plant
caused by the insect’s feeding, and the type ofdamage (damage from chewing or from suckingmouth parts) are the most important clues in deter-mining that the plant damage was insect-causedand aide in identifying the responsible insect.
An insect’s life cycle (complete or incomplete) isimportant when attempting to detect the insect ordesign a control program.
Feeding Habits
Chewing Damage or Rasping Damage
• Entire Leaf Blade Consumed by variouscaterpillars, canker worms, and webworms.Only tougher midvein remains.
• Distinct Portions of Leaf Missing. Distinctnotches cut from leaf margin (black vineweevil adult), circular holes cut from marginof leaf (leaf cutter bees), small randomlyscattered holes in leaf (beetles, chafers, wee-vils, grass-hoppers).
• Leaf Surfaces Damaged: “Skeletonization” ofleaf surface. Slugs, beetle larvae, pearslug(pear sawfly larvae), elm leaf beetle, andthrips.
• Leaves “rolled”: Leaves that are tied togetherwith silken threads or rolled into a tube oftenharbor leafrollers or leaftiers.
• Leaf Miners Feed Between the Upper andLower Leaf Surfaces. If the leaf is held up tothe light, one can see either the insect or frass(excrement) in the damaged area (discoloredor swollen leaf tissue area), i.e. boxwood,holly, birch, elm leaf miners.
• Petiole and Leaf Stalk Borers burrow into thepetiole near the blade or near the base of theleaf. Tissues are weakened and the leaf falls inearly summer. Sectioning the petiole revealsinsect-larva of a small moth or sawfly larva,i.e. maple petiole borer.
• Twig Girdlers and Pruners, i.e. vine weeviland twig girdling beetle.
Chapter 5 Diagnosing Plant Damage 13
• Borers Feed under the bark in the cambiumtissue or in the solid wood or xylem tissue, i.e.Mountain pine beetle and smaller Europeanelm bark beetle galleries. Damage is oftenrecognized by a general decline of the plant ora specific branch. Close examination will oftenreveal the presence of holes in the bark,accumulation of frass or sawdust-like materialor pitch, i.e. raspberry crown borer, Pine pitchmoth.
• Root Feeders, larval stages of weevils, beetlesand moths cause general decline of plant,chewed areas of roots, i.e. sod webworm,Japanese beetle and root weevil.
Sucking Damage
In addition to direct mechanical damage fromfeeding, some phloem-feeding insects causedamage by injecting toxic substances whenfeeding. This can cause symptoms which rangefrom simple stippling of the leaves to extensivedisruption of the entire plant. Insect specieswhich secrete phytotoxic substances are calledtoxicogenic (toxin-producing) insects. The result-ing plant damage is called “phytotoxemia” or“toxemia”.
• Spotting or Stippling result from little diffusionof the toxin and localized destruction of thechlorophyll by the injected enzymes at thefeeding site. Aphids, leafhoppers, and lygus bugsare commonly associated with this type of injury.
• Leaf curling or Puckering - More severe tox-emias such as tissue malformations developwhen toxic saliva causes the leaf to curl andpucker around the insect. Severe aphid infesta-tions may cause this type of damage.
• Systemic Toxemia - In some cases the toxiceffects from toxicogenic insect feeding spreadthroughout the plant resulting in reduced growthand chlorosis. Psyllid yellows of potatoes andtomatoes and scale and mealy bug infestationsmay cause systemic toxemia.Examples:
• General (uniform) “stipple” or Flecking orChlorotic Pattern on leaf i.e. adelgid damageon spruce needles and bronzing by lace bugs.
• Random Stipple Pattern on leaf, i.e. leafhop-pers, mites.
• Leaf and Stem “distortion” associated with
off-color foliage = aphids (distortion oftenconfused with growth regulator injury) i.e.rose aphid, black cherry aphid, leaf curl plumaphid.
• Galls, Swellings on leaf and stem tissue maybe caused by an assortment of insects, i.e.aphids, wasps, midge, mossyrose gall wasp,popular petiole gall midge, azalea leaf gall.
• Damaged Twigs - Split: damage resemblingsplit by some sharp instrument is due to egglaying (oviposition) by sucking insects such astree hoppers and cicadas. Splitting of thebranch is often enough to kill the end of thebranch, i.e. cicada.
• Root, Stem, Branch Feeders - General Declineof Entire Plant or Section of a Plant as indi-cated by poor color, reduced growth ordieback. Scales, mealybugs, pine needle scale.
Insect Life CyclesKnowledge of life cycles assists in identifying the
damaging insect.
Incomplete Life Cycle:Insects resemble the adult upon hatching, except
they are smaller and without wings. As the insectgrows, it sheds its skin or molts leaving cast skins asa diagnostic sign.
Lygus bugs, leafhoppers, and grasshoppers areexamples of insects with incomplete life cycles.
Complete Life CycleEggs, larva (caterpillar, wormlike or grub-like
creature that may feed on various plant parts) pupa(relatively inactive, often enclosed in some form ofcocoon), adult insect completely different in appear-ance. The larval stage with chewing and raspingfeeding is most dangerous.
Examples of insects with complete life cycles arebutterflies, moths, weevils, beetles and flies.
Chapter 5 Diagnosing Plant Damage 14
Other Animal Damage
Arachnids have sucking mouth parts and have 8legs instead of six like the insects. Spider Miteshave incomplete life cycles (mite resemblingadult throughout life cycle). Damage is often acharacteristic stipple pattern on leaf which thenbecomes pale color on underside (severe infesta-tion causes leaf bronzing and death). Presence of“dirty” foliage - small fine webbing on theunderside of the foliage mixed with eggs andfrass. Eriophyid Mites - Distorted new growth,leaf margins roll, leaf veins swell and distort theleaf, (symptoms often confused with growthregulator damage).
Crustacea - Sowbugs and pill bugs feed ondecaying vegetation. Not considered to bedamaging to live plants.
Mollusca - Slugs and snails. Feeding injury tolow growing foliage resembles Skeletonizing oractual destruction of soft tissue. Signs: presenceof “silvering” and slime trails on foliage.
Miscellaneous Animals - Millipede and centi-pedes (arthropods) feed on decaying plantvegetation (many small legs, brownish or whitein color, vary in size from ½-2"). Not consideredinjurious to live plants.
Small Mammals - Chewing of bark and cam-bium tissue on small trees and shrubs in mostfrequently caused by rodents (mice, rabbits,squirrels, and possibly beavers). Signs: Noteteeth marks.
Large Mammals - Branches torn or clean cut bycattle, goats, deer and horses.
Birds - Yellow-bellied sap-sucker (even rows ofholes in the tree trunk). Missing flower petals,puncture splitting of bark.
Distinguishing Among Nonliving FactorsIf patterns of damage in the field planting and on
the individual plant are uniform and repeated, thisindicates that a nonliving factor is the probablecause of the damage. We will now examine addi-tional information and clues to discover whether thenonliving damaging factor was a mechanical,physical, or chemical factor.
Look for Changes in the affected plant’s environ-ment caused by the three categories of NonlivingFactors: 1) Mechanical Factors (Damage/Breakage) -plant damage caused by site changes - “constructiondamage”, transplanting damage, “Lawn mower
blight”, abrasion, bruising. 2) Physical Factors -environment or weather changes causing extremesof temperature, light, moisture-aeration. 3) Chemi-cal factors - chemical pesticide applications, aerialand soil pollutants, nutritional disorders.
Mechanical FactorsClose visual examination and questioning will
often determine if the stems or roots have beenbroken or girdled or if the leaves have been bruised,punctured or broken. For example, if a large Fiscuselastica is dropped while being transplanted and thestem is broken, rapid wilting of the portion of theplant above the break will occur. Examine the plantsite for signs of recent excavation, construction,paving, etc.
Physical FactorsEnvironmental Factors
Primary sources of diagnostic information aredamage patterns and weather records to pinpointthe time and location of weather extremes. Recordshelp indicate the factor that caused the plant dam-age.
Temperature Extremes:
Heat: The highest leaf temperatures will occur inthe early afternoon when the sun is located in thesouthwest quadrant of the sky. Therefore, lethalleaf temperatures produced by absorption ofsolar radiation will occur primarily on unshadedleaves on the outer surface of the plant canopy onthe southwest side. Portions of leaves shaded byother leaves or leaves on the shaded northeastside may be undamaged. The most severe dam-age occurs on the leaves most exposed andfurthest from the vascular (roots, stem, leaf vein)source of water, i.e. leaves on outer perimeter ofplant, leaf tips and interveinal areas.
Cold: Damage will occur on the least hardyplants and will be most severe on the least hardytissues of those specific plants. In fall acclimation,cold hardiness is first achieved by the terminalbuds, and then with time the lower regionsachieve hardiness; the branch crotches are oftenthe last tissues to achieve cold hardiness. And,generally, the root systems will not survive aslow a temperature as will the tops -root systemsare damaged at higher temperatures than are thetops. On the other hand, after hardiness has been

Chapter 5 Diagnosing Plant Damage 15
achieved, if warm temperatures inducedeacclimation (i.e. in the early spring), theterminals (buds) are first to become less coldhardy.
Portion of plant damaged will indicate if low tempera-ture damage occurred before plant achieved coldhardiness in the fall, or if it occurred after coldhardiness was lost in the spring: reverse patterns areproduced.
On a given structure (i.e. leaf or bud) the damagewill be death of exposed, nonhardy tissues in arecognizable (repeated) pattern. For example, frostdamage to foliage, i.e. conifer needles, in the springwill uniformly kill all needles back toward the stem.Frost cracks are longitudinal separations of the barkand wood generally on the southwest sides of thetrunk -most likely to occur because of daily, widetemperature fluctuations. Freezing death of divid-ing cells on the outer portions of leaf folds whileinside the bud will cause a distorted or lace-like leafblade because of nonuniform cell division andgrowth during leaf expansion. Cold damage to theroot system is primarily a concern with container-grown plants where the root temperature fluctuatesmore and can be expected to reach lower tempera-tures than would occur with the same plant if field-grown. Cold damage to the root system can bedetected by examining the roots: Damage generallyoccurs from the periphery of the root ball (near thecontainer edge) and evidence includes blackened orspongy roots with lack of new growth or new roothairs. Above ground symptoms generally will notbe evident until new shoot growth begins in thespring; at that time leaf expansion may be incom-plete (small leaf size) because of the restricteduptake of water and nutrients by the damaged rootsystem. With increased air temperatures, the waterloss from the shoots and leaves may exceed the rootuptake capacity and the plants may defoliate due tothis water deficit.
Plants Vary in their Cold Tolerance: The coldtolerance (hardiness) of various plants in thelandscape has been rated by the USDA (see PlantHardiness Zone Map, USDA-ARS Misc. Pub. Np.814). The “indicator plants” listed for the variouscold hardiness zones on the map are useful insurveying a group of landscape plants, observingwhich ones show cold damage and then estimat-ing how low the temperature dropped based onthe damaged/undamaged indicator plants.
Light Extremes: Plants can acclimate to variousconditions, but the primary requirement foracclimation is time. Plants respond adversely torapid changes in the environment. Rapid changefrom low to high light intensity will result indestruction of the chlorophyll pigments in theleaf (yellowed and necrosis - sunburn). Rapidchange from high to low light intensity willresult in reduced growth and leaf drop; newleaves will be larger. “Sun leaves” are smaller,thicker and lighter green in color than are “shadeleaves”. Flowering will be reduced, delayed orabsent under low light.
Oxygen and Moisture Extremes: Here we areprimarily considering the root environmentwhere oxygen and moisture are inversely related.Waterlogging (moisture saturation) of the rootenvironment results in oxygen deficiency; with-out oxygen, root metabolism and growth come toa standstill. Consequently, uptake of water andnutrients is restricted with subsequent wiltingand nutritional deficiency symptoms occurringon the above ground portions of the plant.Drought and water logging produce many of thesame symptoms on the above ground portion ofthe plant: the first symptoms will be chlorosisand abscission of older leaves. Under severe,continuing moisture stress, wilting and necrosiswill occur on the tips and interveinal regions ofrecently expanded leaves and new growth(Figure 6).
Chemical FactorsField Patterns of Plant Injury Related to ChemicalApplications
Look For Application, Drift, or Runoff Accumu-lation Patterns in the Field (Figure 10): thepattern of plant injury in a field or other group ofplants and the date of injury appearance can behelpful in relating the damage to a specificchemical application.
Damage Diminishing Uniformly From OneSide to the other (Figure 10.A, Spray Drift): Apattern in a field, yard or on a group of plantsthat starts on one side and diminishes graduallyand uniformly away from that area is typical ofwind-drifted droplets.
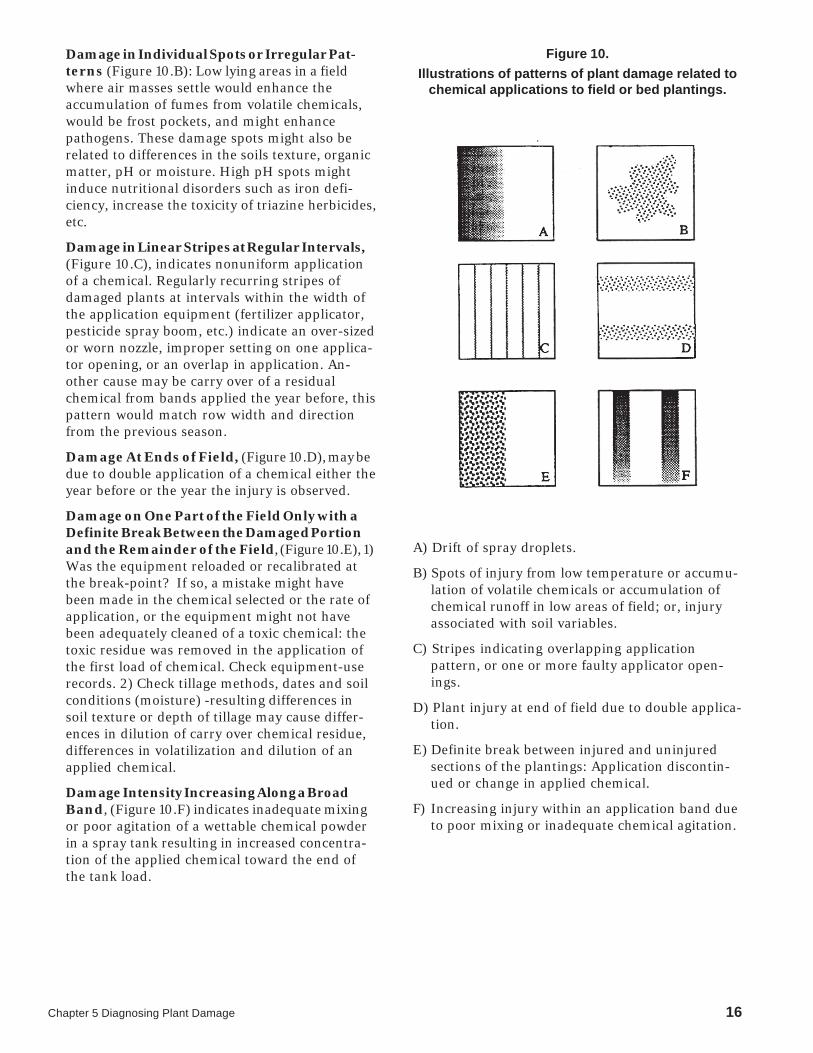
Chapter 5 Diagnosing Plant Damage 16
Damage in Individual Spots or Irregular Pat-terns (Figure 10.B): Low lying areas in a fieldwhere air masses settle would enhance theaccumulation of fumes from volatile chemicals,would be frost pockets, and might enhancepathogens. These damage spots might also berelated to differences in the soils texture, organicmatter, pH or moisture. High pH spots mightinduce nutritional disorders such as iron defi-ciency, increase the toxicity of triazine herbicides,etc.
Damage in Linear Stripes at Regular Intervals,(Figure 10.C), indicates nonuniform applicationof a chemical. Regularly recurring stripes ofdamaged plants at intervals within the width ofthe application equipment (fertilizer applicator,pesticide spray boom, etc.) indicate an over-sizedor worn nozzle, improper setting on one applica-tor opening, or an overlap in application. An-other cause may be carry over of a residualchemical from bands applied the year before, thispattern would match row width and directionfrom the previous season.
Damage At Ends of Field, (Figure 10.D), may bedue to double application of a chemical either theyear before or the year the injury is observed.
Damage on One Part of the Field Only with aDefinite Break Between the Damaged Portionand the Remainder of the Field, (Figure 10.E), 1)Was the equipment reloaded or recalibrated atthe break-point? If so, a mistake might havebeen made in the chemical selected or the rate ofapplication, or the equipment might not havebeen adequately cleaned of a toxic chemical: thetoxic residue was removed in the application ofthe first load of chemical. Check equipment-userecords. 2) Check tillage methods, dates and soilconditions (moisture) -resulting differences insoil texture or depth of tillage may cause differ-ences in dilution of carry over chemical residue,differences in volatilization and dilution of anapplied chemical.
Damage Intensity Increasing Along a BroadBand, (Figure 10.F) indicates inadequate mixingor poor agitation of a wettable chemical powderin a spray tank resulting in increased concentra-tion of the applied chemical toward the end ofthe tank load.
Figure 10.
Illustrations of patterns of plant damage related tochemical applications to field or bed plantings.
A) Drift of spray droplets.
B) Spots of injury from low temperature or accumu-lation of volatile chemicals or accumulation ofchemical runoff in low areas of field; or, injuryassociated with soil variables.
C) Stripes indicating overlapping applicationpattern, or one or more faulty applicator open-ings.
D) Plant injury at end of field due to double applica-tion.
E) Definite break between injured and uninjuredsections of the plantings: Application discontin-ued or change in applied chemical.
F) Increasing injury within an application band dueto poor mixing or inadequate chemical agitation.

Chapter 5 Diagnosing Plant Damage 17
Chemical Injury Patterns on an IndividualPlant
A general uniform pattern of damage occurringover several plant species and over a relatively largearea indicates a nonliving factor such as a chemicalphytotoxicity. Questions-answers, records, the plantsymptoms and knowledge about the mobilitywithin the plant of common chemicals (nutrientsand pesticides) should help determine whichchemical caused the damage.
Patterns of injury symptoms on an individualplant that develop because of deficiency, excess ortoxicity of a chemical differ depending primarilyupon whether the chemical causes damage directlyon Contact, or is absorbed and distributed withinthe plant through Phloem-Translocation or throughXylem-Translocation.
Symptoms from Direct Contact of Chemicals withthe Plant:
Shoot-Foliage Contact: Symptoms from shoot-contact or chemicals occur over the general plantcanopy. If the toxic chemical is applied directlyto the above ground parts of the plant (shoot-foliage contact chemical), the physical pattern ofapplication may be detected, i.e. spray dropletsize, etc. If the toxic chemical is spray-applied,the pattern of the spray droplets or areas wherespray accumulated to runoff along the leaf edgeswill show the most severe damage. If it is a toxicgas (volatile chemical acting as an aerial pollut-ant), the areas between the leaf veins and alongthe leaf margins where the concentration ofwater within the leaf is lower will be the first toshow damage. Injury from foliar applications ofinsecticides, fungicides and fertilizers is prima-rily of the direct-contact type and is typified bychlorotic-necrotic spotting, especiallyinterveinally and along leaf edges and otherareas where chemicals concentrate and are leastdiluted by inter-cellular moisture. Examples ofshoot-foliage contact chemicals are foliar-appliedfertilizer salts and herbicides such as paraquat,acifluorfen, dinoseb, and herbicidal oils. Fungi-cides and insecticides may also cause injury tosome plants.
Root Contact: Toxic contact chemicals in the rootzone, including excess fertilizer, result in poorroot development or death. Symptoms from root-contact chemicals are localized where the chemi-cal contacts the root but also result in generalsymptoms in the shoot. The shoots may showwater and nutrient stress symptoms, i.e. reducedgrowth, wilting, nutrient deficiency symptoms.
The injury symptoms on the shoot and foliagefrom root damage by direct contact with toxicchemicals or excessive salts resembles a dryinginjury -the roots are unable to obtain water. Thiswill result in a general stunting of the plant. Insevere cases, wilting can occur even though thesoil is wet. Lower Leaves generally wilt first andthis is followed by drying of the leaf margins.Many factors injuring or inhibiting root growthmay produce similar shoot symptoms: Nema-todes, soil compaction, cold weather, salinity,nutritional disorders and certain herbicides(dinitroanilines, DCPA, and diphenamid) causeroot inhibition.
Symptoms of Deficient or Toxic Trans-locatedChemicals
The effects of mobile chemicals absorbed by theplant are dependent upon whether the chemical istransported in the phloem or in the xylem. If trans-ported solely in the xylem system, the chemical willmove upward in the plant in the xylem-transpira-tion stream.
Toxic symptoms from xylem-translocated chemi-cals occur primarily in the older foliage.
Deficiency symptoms of xylem-transported(phloem-immobile) nutrient ions will occur firstin the new growth.
If the chemical is translocated in the phloem, itmay move multidirectional from the point ofabsorption, i.e. it may move from the shoot to theroot or the reverse.
Toxic symptoms from phloem-translocatedchemicals occur primarily in the new growth andmeristematic regions of the plant.
Deficiency symptoms of phloem-retranslocatednutrient ions occur first in the older foliage.
Xylem Translocated Chemicals Move PrimarilyUpward in the Plant to the Foliage
Chemicals are translocated upward in the xylem(apoplastic movement) of the plant from the pointof absorption. Symptoms occur in tissues formedafter the toxicity or deficiency occurs.
• Toxic Chemicals -xylem translocated. When toxicchemicals are translocated to fully expanded,older leaves, the toxicity symptoms generallyappear on the leaf margins and interveinal areas.When toxic chemicals are translocated to imma-ture, young leaves, the toxicity symptoms gener-ally appear associated with the veins, especiallythe midrib.

Chapter 5 Diagnosing Plant Damage 18
Photosynthetic-Inhibiting Chemicals - Injury fromtranslocated toxic chemicals is primarily to thefoliage. Plant injury generally progresses from thelower, older foliage to the top. Individual leavesshow greatest injury (chlorosis) along their tips andmargins or along the veins. Examples of xylem-translocated herbicides include the photosyntheticinhibitors such as triazine, urea and uracil herbi-cides.
Shoot-Inhibiting Chemicals - Examples of toxicchemicals absorbed by the roots and translocated inthe xylem to the shoots are the “shoot inhibitingherbicides”. The shoot inhibitors cause malformedand twisted tops with major injury at the tips andedges of the leaves; looping of the leaves may occursince the base of the leaf may continue to growwhile the leaf tips remain twisted together.Thiocarbamate herbicides cause these symptoms onboth grasses and broad leaves. Alachlor andmetolachlor herbicides cause similar injury symp-toms on grasses.
• Deficiency Nutrient Ions, xylem-translocated(phloem immobile)
Several nutrient ions are translocated upwards inthe xylem and are immobile after incorporationinto plant tissues. They cannot be withdrawn andretranslocated in the phloem to the new growthwhen deficiencies develop in the root zone.Deficiency symptoms of Phloem-Immobilenutrient ions develop on the new growth. Boronand calcium are quite phloem-immobile whichmeans that if the external supply becomes defi-cient, the symptoms of boron and calcium defi-ciency will appear in the new growth. And, withsevere deficiencies, the terminal bud dies. Iron,manganese, zinc, copper and molybdenum arealso relatively phloem-immobile and are notreadily withdrawn from the older leaves fortranslocation through the phloem to youngerleaves and organs. Deficiency symptoms aremost pronounced on the new growth.
Phloem Translocated Chemicals MoveMultidirectionally from Point of Application orSource of the Chemical to the Meristematic Re-gions.
• Toxic Chemicals - Phloem translocated
Injury from Phloem-translocated toxic chemicals- primarily to new leaves and roots because oftranslocation of the chemicals to the meristems.Whether taken up by the roots or shoots, thesecompounds are moved through the living plantcells and phloem (symplastic movement) to boththe root and shoot tips. The young tissue (shootsor roots) will be discolored or deformed andinjury may persist for several sets of new leaves.Examples of phloem-translocated toxic chemi-cals, whether absorbed by the roots or shoots,include the herbicides 2,4-D, dicamba, picloram,glyphosate, amitrole, dalapon, sethoxydim andfluazifopbutyl. These compounds move to themeristems and typically injure the youngesttissues of the plant.
• Deficient Nutrient Ions - Phloem mobile
If Phloem Mobile Nutrient Ions become deficientin the root zone, these ions may be withdrawnfrom the older plant tissues and retranslocated inthe phloem to the new growth. In such situations,deficiency symptoms will first occur on the olderleaves. Elements that may be withdrawn fromolder leaves and retranslocated in the phloem toyounger leaves and storage organs includenitrogen, phosphorus, potassium, magnesium,chlorine and, in some plant species, sulfur.Sulfur: In plant species where sulfur can bewithdrawn from the older leaves and translo-cated to the newer growth, deficiency symptomsmay initially occur on the older leaves or overthe plant in general. In plants where sulfur is notreadily re-translocated, the older leaves mayremain green and the sulfur deficiency symp-toms occur only on the new growth.

Chapter 5 Diagnosing Plant Damage 19
Key to Symptoms of ChemicalDisorders on Individual Plants
I. Symptoms Appearing First or MostSeverely on New Growth(root and shoot tips, new leaves, flowers, fruits,buds)
A. Terminal Bud Usually Dies. Symptoms onnew growth.
1. Basal part of young leaves and internal tissuesof organs may become necrotic. One of theearliest symptoms is failure of the root tips toelongate normally. Terminal shoot meristemsalso die giving rise to a witch’s broom. Youngleaves become very thick, leathery, andchlorotic; in some species young leaves maybe crinkled due to necrotic spots on leaf edgesduring development. Young leaves of termi-nal buds become light green then necrotic andthe stem finally dies back from the terminalbud. Rust colored cracks and corking occur onyoung stems, petioles, and flower stalks.“Heart rot” of beets, “stem crack” of celery ...Boron Deficiency
2. Necrosis occurs at tip and margin of leavescausing a definite hook at leaf tip. Calcium isessential for the growth of shoot and root tips(meristems). Growing point dies. Margins ofyoung leaves are scalloped and abnormallygreen and, due to inhibition of cell wallformation, the leaf tips may be “gelatinous”and stuck together inhibiting leaf unfolding.Stem structure is weak and peduncle collapseor shoot topple occurs near terminal bud.Ammonium or Magnesium Excess mayinduce a calcium deficiency in plants ...Calcium Deficiency
Differentiating between calcium and boron defi-ciency symptoms: When calcium is deficient, thereis a characteristic hooking of the youngest leaf tips.However, when boron is deficient, the breakdownoccurs at the bases of the youngest leaves. Death ofthe terminal growing points is the final result inboth cases.
3. Tissue Breakdown -necrosis and firing of thetip and margins of the leaf. The ammoniumcation itself may become phytotoxic and resultin breakdown of the plant tissue (proteolysis=breakdown of plant proteins) initially produc-ing a wet, dark-green, “steamed” appearance
at the leaf tips and margins. This destroyedtissue eventually desiccates and becomes alight tan color. Excess ammonium may alsoinduce calcium deficiency (abnormally darkgreen foliage, scalloped leaf margins, weakstem structure, death of terminal bud orgrowing point of the plant, premature shed-ding of the blossoms and buds) ... AmmoniumExcess
B. Terminal Bud Remaining Alive.Symptoms on new growth.
1. Interveinal chlorosis on young leaves.
a. Interveinal chlorosis on young leaves withlarger veins only remaining green. Necroticspots usually absent; with extreme deficien-cies, however, young leaves are almost whiteand may have necrotic margins and tips;necrotic areas may extend inward. Potassium,Zinc or Copper Excess can inhibit uptake ofiron. High pH may also induce iron deficiency... Iron Deficiency
Iron deficiency symptoms are similar to thoseof magnesium deficiency, but iron deficienciesoccur in young leaves first: Iron accumulatedin older leaves is relatively immobile in thephloem.
b. Interveinal chlorosis with smallest veinsremaining green producing a checkered orfinely netted effect. Grey or tan necrotic spotsusually develop in the chlorotic areas; thedead spots of tissue may drop out of the leafgiving a ragged appearance. Poor bloom -bothin size and color. Potassium excess can inhibituptake of manganese... Manganese Defi-ciency
c. Stunted new growth with interveinal chloro-sis: Young leaves are very small (“little leaf”),sometimes missing leaf blades altogether, andinternodes are short giving a rosette appear-ance ... Zinc Deficiency
2. Interveinal chlorosis is not the main symptom onnew growth
a. Wilting and loss of turgor of young, terminalleaves and stem tips is common. Symptomsare highly dependent upon plant species. Insome species younger leaves may showinterveinal chlorosis while tips and lobes ofolder leaves remain green followed by veinalchlorosis and rapid, extensive necrosis of leafblade ... Copper Deficiency

Chapter 5 Diagnosing Plant Damage 20
There are no known reports of H2PO
4-1 toxicity;
however, plants may take up the phosphate anionin luxury amounts. Phosphorus excess is associ-ated with impeded uptake and possible deficiency ofcopper and sometimes of zinc ... PhosphorusExcess
b. Leaves light green, veins lighter in color thanadjoining interveinal areas. Leaves over entireplant may become yellowish green, roots andstems are small in diameter and are hard andwoody. Young leaves may appear to beuniformly yellow. Some necrotic spots ...Sulfur Deficiency
In plant species where the sulfur is not with-drawn from older leaves and retranslocated to thenew growth, leaves matured prior to onset of sulfurdeficiency remain green: This retention of greencolor in older foliage distinguishes sulfur deficiencyin these species from nitrogen deficiency where thenitrogen is translocated from the older foliage intothe new leaves. With nitrogen starvation, oldleaves as well as new leaves turn yellow.
c. Shoot inhibition causing malformed andtwisted tops with major injury at the tips andedges of the leaves ... Xylem-Translocated“Shoot-Inhibiting Chemicals”
Examples of toxic xylem-transported chemi-cals include the thiocarbamate herbicides(symptoms on grasses and broad leaf plants)and alachlor and metolachlor (symptoms ongrasses)
d. Young tissues discolored or deformed andinjury may persist for several sets of newleaves ... Toxic Phloem-Translocated Chemi-cals
Examples of Toxic Phloem-Transported Chemicalsinclude the herbicides 2,4-D; dicamba; picloram;glyphosate; amitrole; dalapo; sethoxydim andfluazifopbutyl.
II. Symptoms Do Not Appear First onYoungest Leaves:Effect general on whole plant or localized onolder, lower leaves.
A. Chlorosis General, no interveinal Chlorosis.Effects usually general on whole plant.
1. Visible symptoms include yellowing anddying of older leaves. Foliage light green,growth stunted, stems slender, yellow ...Nitrogen Deficiency
Plants receiving enough nitrogen to attainlimited growth exhibit deficiency symptomsconsisting of a general chlorosis, especially inolder leaves. In severe cases, these leavesbecome completely yellow and then light tanas they die. They frequently fall off the plantin the yellow or tan stage.
2. Older leaves wilt. Entire leaf is affected bychlorosis, but edges and leaf tissues near mainveins often retain more color (chlorophyll) ...Zinc Excess
B. Vein-Clearing, Chlorosis-Necrosis at LeafTips and Margins, older-younger foliage ...Xylem-Transported Photosynthetic-Inhibitors
When toxic chemicals are xylem-translocated toolder, fully-expanded leaves, the toxicity symp-toms generally occur on the margins andinterveinal areas of the leaf. When translocated toyoung, expanding leaves, toxicity symptoms aregenerally associated with the veins, especially themidrib.
Examples of Xylem-Translocated, PhotosyntheticInhibitors include the triazine, urea and uracilherbicides.
C. Interveinal Chlorosis. Interveinal Chlorosisfirst appears on oldest leaves.
1. Older leaves chlorotic, usually necrotic in latestages. Chlorosis along leaf margins extendingbetween veins produces a “Christmas tree”pattern. Veins normal green. Leaf margins maycurl downward or upward with a puckeringeffect. Necrosis may suddenly occur between theveins. Potassium or calcium excess can inhibituptake of magnesium... Magnesium Deficiency
When the external magnesium supply is deficient,interveinal chlorosis of the older leaves is the firstsymptom because as the magnesium in the chlorophyllis remobilized, the mesophyll cells next to the vascularbundles retain chlorophyll for longer periods than dothe parenchyma cells between them. Leaves lose greencolor at tips and between veins followed by chlorosisor development of brilliant colors, starting with lowerleaves and proceeding upwards. The chlorosis/brilliantcolors (unmasking of other leaf pigments due to thelack of chlorophyll) may start at the leaf margins ortips and progress inward interveinally producing a
Chapter 5 Diagnosing Plant Damage 21
“Christmas” tree pattern. Leaves are abnormally thin,plants are brittle and branches have a tendency tocurve upward. Twigs are weak, subject to fungusinfection, leaves usually drop prematurely; plant maydie the following spring.
2. Smaller veins in older leaves may turn brown.Small necrotic spots in older leaves spread fromthe margins inwards, and finally the entire leafblade desiccates. At severe, advanced stages,young leaves also display this spotting... Manga-nese Excess
3. Chlorotic areas (pale yellow) on whole plant; leafedges curl upward ... Molybdenum Deficiency
General symptoms are similar to those of nitro-gen deficiency: Interveinal chlorosis occurs firston the older or midstem leaves, then progressesto the youngest. Sometimes, as in the “whiptail”disease, plants grown on ammonium nitrogenmay not become chlorotic, but develop severelytwisted young leaves, which eventually die.Other characteristic molybdenum deficiencysymptoms include marginal scorching androlling or cupping of leaves. With molybdenumdeficiency, nitrogen deficiency symptoms maydevelop in the presence of adequate levels ofnitrate nitrogen in the root environment and highlevels of nitrate nitrogen in the plant. Nitratenitrogen must be reduced in the plant before itcan be utilized. Molybdenum is required for thisreduction, and if molybdenum is deficient,nitrate may accumulate to a high level in theplant, and at the same time the plant may exhibitnitrogen deficiency symptoms. Molybdenumdiffers from other trace nutrients in that manyplants can develop in its absence provided thatammonium nitrogen is present. Molybdenumappears to be essential for the nitrate-reducingenzyme to function.
4. Foliar marginal necrosis is the most commonsymptom of fluoride toxicity along with chlorosisalong and between the veins in fluorine-sensitiveplants. With many plants, the marginal necrosisis preceded by the appearance of gray or light-green, water-soaked lesions which later turn tanor reddish-brown. Injury generally occurs at thetips of the leaves first, then moves inward anddownward until a large part of the leaf is affected... Fluoride Excess
D. Leaf Chlorosis is Not the DominantSymptom. Symptoms appear on olderleaves at base of plant.
1. Plant dark Green
a. At first, all leaves are dark green and growthis stunted. Purple pigment often develops inolder leaves, particularly on the underside ofthe leaf along the veins. Leaves drop early...Phosphorus Deficiency
Phosphorus deficiency is not readily identifiedby visual symptoms alone. Visual symptomsof phosphorus deficiency are not alwaysdefinite, but many phosphorus deficientplants exhibit off-color green foliage withpurple venation, especially on the undersideof leaves, and plants are stunted and remainstunted even when fertilizers supplyingpotassium and nitrogen are applied. Olderleaves assume a purple-bronze color. Smallgrowth, especially root development; spindlygrowth with tips of older leaves often dead.Phosphorus is phloem retranslocated fromolder leaves to new growth. Often enhancedby cold soil temperatures.
Aluminum appears to affect root growth inparticular: root tips blacken, no longerlengthen, and become thickened. Excessaluminum accumulation in roots reduces theircapacity for translocating phosphorus. Ame-lioration involves suppression of aluminumactivity, for example by liming soil to bringthe pH above 5.5. The toxic amount of alumi-num in a soil will depend upon other soilproperties such as pH and phosphorus con-tent and upon the plant grown. Media amend-ments such as perlite may release toxic quanti-ties of aluminum if the media pH is extremelyacid ... Aluminum Excess
b. Leaves are thick and brittle and deep green. Inacute toxicity, older leaves wilt and scorchfrom the margins inward ... Nitrate Excess
2. Necrotic spots develop on older leaves
a. Margins of older leaves become chlorotic andthen burn, or small chlorotic spots progressingto necrosis appear scattered on old leaf blades,calcium excess impedes uptake of potassiumcations... Potassium Deficiency
Potassium deficiency symptoms first appear on therecently matured leaves of the plant (not on theyoung, immature leaves at the growing point). Insome plants, the first sign of potassium deficiencyis a white specking or freckling of the leaf blades.

Chapter 5 Diagnosing Plant Damage 22
With time, the symptoms become more pronouncedon the older leaves, and they become mottled oryellowish between the veins and scorched at themargins. These progress upward until the entireleaf blade is scorched. If sodium cations are presentand taken up in place of K+1, leaf flecking (necroticspots scattered on leaf surface) and reduced growthoccur. Seed or fruit is shriveled. Potassium isphloem retranslocated from old leaves to newgrowth.
b. Tips and edges of leaves exhibit necrotic spotscoalescing into a marginal scorch. Symptomsappear from the plant’s base upwards witholder leaves being affected first. In advanced,severe toxicity, necrotic spots with a palebrown center also appear in the inner parts ofthe leaf blade... Boron Excess
c. Mottling and necrotic spots primarily onmargins and interveinally may be due toexcessive amounts of fertilizers or pesticidesapplied as foliar sprays ... Direct-Contact ofToxic Chemical with Shoot & Foliage
Examples of shoot direct-contact toxic chemicalsproducing this type of symptom include the shoot-foliage applied herbicides paraquat, acifluofen,dinoseb and the herbicidal oils.
3. Reduced growth and wilting of older leaves withdevelopment of chlorotic and necrotic spots.Roots become stunted in length and thickened, orclub-shaped, near the tips: the shoots remainnormal but may show nutrient and moisturestress. Under severe conditions, root tips may bekilled causing general stunting of the plant orwilting followed by marginal drying of the lowerleaves first... Direct-Contact Injury by ToxicChemicals or other factors in the root zone, i.e.low temperatures; nematodes; root weevils.
Examples of Root Direct-contact Toxic Chemicalsinclude excess salts or presence of toxic chemicals suchas the herbicides DPA, dinitroanilines, diphenamid.
Leaves often become bronze colored ... ChlorideDeficiency
4. Marginal scorching that may progress to generalleaf scorching. Generally no spotting ... ExcessSalt or Sodium Excess
5. Intense yellow or purple color in leaves. Molyb-denum excess or toxicity in field-grown plants israrely observed. Plants appear to tolerate rela-tively high tissue concentrations of molybdenum.Isolated reports of symptoms from excess molyb-denum include development of intense yellowcolor in tomato leaves and intense purple color incauliflower leaves... Molybdenum Excess
References, Laboratory Analyses
If you have identified the plant and have nar-rowed the probable cause down through thevarious categories (i.e. distinguished betweenliving and nonliving - then if living distinguishedbetween pathogens and animal factors - then ifpathogen, distinguished between fungal andbacterial organisms), you will probably needassistance in identifying the specific responsibleorganism or nonliving factor. But, by now youknow what specialist to contact (plant patholo-gist, entomologist, physiologist ...) and whatspecific reference book would provide furtherassistance in narrowing down the search for thespecific factor causing the observed plant dam-age. Laboratory analyses and examination maybe required to further narrow the range ofprobably causes.
V. Synthesis of Information to DetermineProbable Causes of plant Damage
The detective work to find the “signs” (residuesof the living, damaging organism or nonlivingfactor, records, etc.) is time consuming andmethodical. But, without this process of elimina-tion and synthesis, the probability of making acorrect diagnosis is low.

Chapter 5 Diagnosing Plant Damage 23
Table 3. Summary:
Systematic Approach to DiagnosingPlant Damage
I. Define the problem (determine that a “real”problem exists):
A. Plant Identification and Characteristics. Establishwhat the “normal” plant would look like at thistime of year. Describe the “abnormality”: Symp-toms & Signs.
B. Examine the Entire Plant and its Community.Determine the primary problem and part of theplant where the initial damage occurred.
II. Look for Patterns: On more than one plant?On more than one plant species?
A. Non-uniform Damage pattern (scattered damageon one or only a few plant species) is indicativeof Living Factors (pathogens, insects, etc.)
B. Uniform Damage Pattern over a large area (i.e.damage patterns on several plant species) anduniform pattern on the individual plant partsindicate Nonliving Factors (mechanical, physical,or chemical factors).
III. Delineate Time-development of Damage Pattern
A. Progressive spread of the damage on a plant,onto other plants, or over an area with timeindicates damage caused by Living Organisms.
B. Damage occurs, does not spread to other plantsor parts of the affected plant. Clear line ofdemarcation between damaged and undamagedtissues. These clues usually indicate NonlivingDamaging Factors.
IV.Determine Causes of the Plant Damage.Ask questions and gather information.
A. Distinguish Among Living Factors
1. Pathogens - Symptoms and signs.
2. Insects, mites and other Animals- Symptoms and signs.
B. Distinguish Among Nonliving Factors
1. Mechanical Factors
2. Physical Factors
a. Temperature extremes
b. Light extremes
c. Oxygen and moisture extremes
d. Weather records
3. Chemical Factors
a. Analyze damage patterns in fields andother plantings
b. Injury patterns on individual plants
c. Pesticide-pollutant phytotoxicities- damage patterns
d. Nutritional disorders - key to nutritionaldisorders
e. Spray records
C. References (check reports of damaging factorson identified plant); may need Laboratory Analy-ses to narrow range of probably causes.
V. Synthesis of Information to DetermineProbable Causes

Chapter 5 Diagnosing Plant Damage 24
Literature Useful for DiagnosingPlant Diseases & Disorders
I. Miscellaneous
The Ortho Home Gardener’s Problem Solver.1993. Smith, C. A. ed. Ortho Books, San Ramon,CA. 400 pp.
The Organic Gardener’s Handbook of NaturalInsect and Disease Control. 1992. B. A. Ellis andF. M. Bradley, eds. Rodale Press, Emmaus, PA.534 pp.
II. Floriculture
Compendium of Flowering Potted Plant Dis-eases. 1995. Daughtrey, M. L., Wick, R. L. andPeterson, J. L. APS Press, St. Paul, MN 90 pp.
Compendium of Ornamental Foliage Plant Diseases.1987. Chase, A. R. APS Press, St.Paul, MN.100 pp.
Diseases of Annuals and Perennials. Chase, A.R., Daughtrey, M. and Simone, G. W. Ball Pub-lishing Co., Batavia, IL. 202 pp.
Ball Field Guide to Diseases of Greenhouse Ornamen-tals. 1992. G. W. Ball Publishing Co., Batavia, IL.218 pp.
III.Woody Ornamentals & Trees
Compendium of Elm Diseases. 1981. Stipes, R. J.and Campana, R. J. A. R. APS Press,St. Paul, MN. 96 pp.
Compendium of Rhododendron and AzaleaDiseases. 1986. Coyier, D. L. andRoane, M. K. APS Press, St. Paul, MN. 65 pp.
Compendium of Rose Diseases. 1983. Horst, R. K.APS Press, St. Paul, MN. 50 pp.
Diagnosing Injury to Eastern Forest Trees. 19??Anonymous. Publications DistributionCenter, 112 Agricultural Administration Build-ing, University Park, PA. 16802.
Diseases of Trees and Shrubs. 1987. Sinclair, W.A., Lyon, H. W. and Johnson, W. T. CornellUniversity Press. Ithaca, NY. 575 pp.
Insects That Feed on Trees and Shrubs, 2nd ed.1991. Johnson, W. T. and Lyon, H. W. CornellUniversity Press. Ithaca, NY. 560 pp.
IV. Fruits
Compendium of Apple and Pear Diseases. 1990.Jones, A. L. and Aldwinkle,H. S. APS Press, St.Paul, MN. 100 pp.
Compendium of Blueberry and Cranberry Diseases.1995. Caruso, F. L. and Ramsdell, D. C. APSPress, St. Paul, MN. 87 pp.
Compendium of Grape Diseases. 1988. Pearson, R.C. and Goheen, A. C. APS Press, St. Paul, MN.121 pp.
Compendium of Raspberry and BlackberryDiseases and Insects. 1991. Ellis, M. A., Con-verse, R. H., Williams, R. N., and Williamson, B.APS Press, St. Paul, MN. 122 pp.
Compendium of Stone Fruit Diseases. 1996.Ogawa, J. M., Zehr, E. I., Bird, G. W., Ritchie, D.F., Uriu, K. and Uyemeoto, J. K. APS Press, St.Paul, MN. 122 pp.
Compendium of Strawberry Diseases. 1984. Maas, J.L. APS Press, St. Paul, MN. 138 pp.
V. Turfgrass
Compendium of Turfgrass Diseases, 2nd ed.1983. Smiley, R. W. , Dernoeden, P. H andClarke, B. APS Press, St. Paul, MN. 204 pp.
VI. Vegetables
Compendium of Bean Diseases. 1991. Hall, R. APSPress, St. Paul, MN. 102 pp.
Compendium of Cucurbit Diseases. 1996. Zitter, T.,Hopkins, D. L. and Thomas, C. E. APS Press, St.Paul, MN. 87 pp.
Compendium of Pea Diseases. 1984 Hagedorn, D. J.APS Press, St. Paul, MN. 57 pp.
Compendium of Onion and Garlic Diseases. 1994.Schwartz, H. F. and Mohan, S. K. APS Press, St.Paul, MN. 70 pp.
Compendium of Tomato Diseases. 1991. Jones, J.B., Jones, J. P., Stall, R. E. and Zitter, T. A. APSPress, St. Paul, MN. 100 pp.
Diseases and Pests of Vegetable Crops inCanada. 1994. Howard, R. J., Garlend, J. A., andSeaman, W. L. 554 pp.

Chapter 5 Diagnosing Plant Damage 25
VII. Field Crops
Compendium of Corn Diseases, 2nd ed. 1980.Shurtleff, M. C. APS Press, St. Paul, MN.105 pp.
Diseases of Field Crops in Canada. 1985. Martens,J. W., Seaman, W. L. and Atkinson, T. G. TheCanadian Phytopathological Society, Harrow,Ontario, Canada. 160 pp.
VIII. Disease Indices
Diseases and Pests of Ornamental Plants, 5th edition.1978. P. P. Pirone. John Wiley and Sons, Inc.,New York, NY. 566 pp.
Westcott’s Plant Disease Handbook, 5th edition.1990. Horst, K. Van Nostrand ReinholdCo., Inc., NY 953 pp.
Titles in BOLD lettering are highly recommended.cas 12/96

CHAPTER 6Pesticide Use and Safety
Terminology .................................................................................................................................................. 1
Pesticide Formulations ............................................................................................................................... 2Surfactants, Additives, or Adjuvants ................................................................................................................................. 3
The Pesticide Label ..................................................................................................................................... 4
Application Equipment ................................................................................................................................ 5Calibrating Sprayers and Spray Patterns ......................................................................................................................... 6Proper Application ............................................................................................................................................................. 7Cleaning Equipment .......................................................................................................................................................... 7Storage and Disposal ........................................................................................................................................................ 8
Using Pesticides Safely .............................................................................................................................. 8Protective Clothing ............................................................................................................................................................ 8Safety Precautions ............................................................................................................................................................ 8Symptoms of Pesticide Poisoning .................................................................................................................................... 9First Aid Procedures ......................................................................................................................................................... 9
Pesticides and the Environment ................................................................................................................ 9Direct Kill ........................................................................................................................................................................... 9Protecting Insect Pollinators ............................................................................................................................................. 9Persistence and Accumulation ......................................................................................................................................... 9Pesticides Move in the Environment ............................................................................................................................... 10Safe Use Precautions ..................................................................................................................................................... 10Compatibility .................................................................................................................................................................... 10Home Garden Versus Commercial Pesticides................................................................................................................ 10
Pesticides and Organic Gardening ...........................................................................................................11Pesticides and the Law ................................................................................................................................................... 11
Pesticide Conversion Chart .......................................................................................................................11
Chapter 6 Pesticide Use and Safety 1
CHAPTER 6Pesticide Use and Safety
Edited and revised by Dr. Stanley R. Swier, University of New Hampshire Cooperative Extension.
Pesticides may be useful when nonchemical methods fail to provide adequatecontrol of pests and when pest populations reach a level of economic injury. Thesuffix “-cide” literally means kill. The term pesticide refers to a chemical sub-stance that will kill pests. Since it is physically impossible to eradicate an entirepopulation of pests, pesticides are used as a tool to control or manage pest popu-lations to a level of tolerance. Because of government regulations, chemicalsused to attract or repel pests and to regulate plant growth or function are alsoclassed as pesticides. Also, some biologicals are also classified as pesticides.
Understanding the proper use of pesticides is imperative to their effectivenessand to your safety.
TerminologyThe wording “insecticides and pesticides” isincorrect because insecticides are pesticides.
Types and functions of pesticides include thefollowing:
Insecticides control insects
Miticides control mites
Acaricides control mites, ticks, and spiders
Nematicides control nematodes
Fungicides control fungi
Bactericides control bacteria
Herbicides control plants (herbicides killplants, not just weeds)
Rodenticides control rodents
Avicides control birds
Piscicides control fish
Molluscicides control mollusks, such as slugsand snails
Predacides control pest animals
Repellents keep pests away
Attractants lure pests
Growth stop, speed up, or otherwiseRegulators change normal plant or insect
processes
Desiccants, used to remove or kill leaves andDefoliants stems
Antitranspirants reduce water loss from plants
Antidesiccants used to protect plants fromwinter damage, drought, windburn, and transplant shock(effectiveness is being ques-tioned by recent research)

Chapter 6 Pesticide Use and Safety 2
Pesticides can be grouped according to how theywork. Many work in more than one way.
Contact poisons: Kill pests simply by touchingthem.
Stomach poisons: Kill when swallowed.
Systemics: Kill best by being taken into theblood of the animal or sap of theplant upon which the pest isfeeding.
Translocatedherbicides: Move from the point of initial
application to circulate through-out the plant. The circulation oftoxin ensures the kill of theentire plant.
Fumigants: Gasses which kill when they areinhaled or otherwise absorbedby pests.
Selectivepesticides: Kill only certain kinds of plants
or animals, for example, 2,4-Dused for lawn weed control, killsbroad leaved plants but does notharm grass.
Nonselectivepesticides: Kill most plants or animals.
The following terms describe when to applypesticides:
Pre-emergence: Use before plants emerge fromsoil.
Pre-plant: Use before crop is planted byapplying to the soil.
Post-emergence: Use after the crop or weeds havegerminated.
Terms which describe how to use pesticides:
Band: Application to a strip over oralong each crop row.
Broadcast: Uniform application to an entire,specific area by scattering.
Dip: Immersion of a plant in a pesti-cide.
Directed: Aiming the pesticide at a portionof a plant, animal or structure.
Drench: Saturating the soil with a pesti-cide.
Foliar: Application to the leaves ofplants.
In-furrow: Application to or in the furrowin which a plant is growing.
Sidedress: Application along the side of acrop row.
Spot treatment: Application of a pesticide to asmall section or area of a crop.
Pesticide FormulationsThe formulation describes the physical state of apesticide and determines how it will be applied.Pesticides are rarely applied full strength. Thechemical in the pesticide formulation that actuallykills the pest(s) is termed the active ingredient. Theadded chemical(s), those which make the producteasy and safe to formulate or apply, are termed theinert ingredients. Common pesticide formulationsfollow.
Emulsifiableconcentrates(EC or E) The active ingredient is mixed
with an oil base (often listed aspetroleum derivatives) formingan emulsion which is dilutedwith water for application. ECsare common in the home gardentrade, being easy to mix and use.They can cause a minor surfacebronzing of light-colored fruit.They should be protected fromfreezing temperatures which canbreak down the emulsifier.
Solutions (S) These formulations arepremixed, ready to use. They areoften used in household pestproducts.
Flowables(F or L) A flowable, or liquid, can be
mixed with water to form asuspension in a spray tank.
Aerosols (A) These are very low-concentratesolutions, usually applied as afine spray or mist. They aregenerally sold in aerosol cansand are a very expensive sourceof pesticide.
Dusts (D) Made by adding the activeingredients to a fine, inertpowder or talc; generally useddry.
Chapter 6 Pesticide Use and Safety 3
Granules (G) Granular formulations are madeby adding the active ingredientto coarse particles (granules) ofinert material like fired clayparticles.
Wettable powders(WP or W) Wettable powder formulations
are made by combining theactive ingredient with a finepowder. They look like dusts,but they are made to mix withwater. These formulations needcontinuous agitation to maintaina suspension and are thusdifficult for home gardeners touse. When mixing a WP, firstmix the measured quantity witha small amount of water, form-ing a slurry, (a paper cup with apopsicle stick makes a gooddisposable mixing container)then add it and the additionalwater to the spray tank. Thespray tank must be frequentlyshaken to maintain the suspen-sion.
Soluble powders(SP) Made of an active ingredient in
powder form; dissolves in water.
Baits (B) A bait formulation is made byadding the active ingredient toan edible or attractive substance.Baits are often used to controlslugs, snails, ground-dwellinginsects, and rodents.
Gardeners often attempt to compare a spray with adust. It should be noted that dusts are a type offormulation, but sprays are not a formulation; theyare one means of applying several different formu-lations such as wettable powders or emulsifiableconcentrates that are mixed with water.
Surfactants, Additives, or AdjuvantsWhen added to a pesticide, a surfactant reduces thesurface tension between two unlike materials, suchas a spray film and a solid surface. For example, byadding a surfactant to a sprayer, oil and water willmix and can be sprayed on plant surfaces. Withincreasing emphasis on safe application of pesti-cides, such factors as droplet size, spray pattern,and pesticide drift have focused more attention onsurfactants to give ideal coverage for pesticides.However, surfactants can sometimes increase the
phytotoxicity of a pesticide. Sometimes, surfactantsare already added to the formulation.
Surfactants include: activators; compatibility agents;deflocculators; detergents; dispersants; emulsifiers;foam and drift suppressants; and spreading, stick-ing, and wetting agents. These materials are addedto a spray mix to help keep the pesticide in suspen-sion; improve cohesiveness and dispersion of thespray; and increase the wetting (or coverage) of theleaves, fruits, and stems.
This section focuses on surfactants that act asspreading, sticking, and wetting agents. They aremost useful when spraying the hard-to-wet foliageof such plants as azalea, boxwood, camellia, carna-tion, conifer, euonymus, gardenia, gladiolus, holly,iris, narcissus, peony, rose, and yew. Whether aspray rolls off or sticks to a plant surface dependson the physical and chemical properties of the spraymixture and the physical properties of the surfaceitself. If the surface tension of the mixture is high, orif the plant surface is waxy, the spray droplets willroll off.
A spreader or film extender (spreader-activator) is asubstance that, when added to a pesticide mix,increases the area that a given volume of spray willcover and improves the contact between the pesti-cide and the plant surface. A spreading agent buildsspray deposits and improves weatherability. Mostwettable powder insecticides benefit from theaddition of a spreader.
A sticker or adhesive is a material that, when addedto a spray mix or dust, improves the adherence(tenacity) to a plant surface rather than increasingthe initial deposit. Commercial sticking agents areoily in consistency and increase the amount ofsuspended solids retained on plant surfaces bycoating the particles with a resin or varnish-likefilm. Most fungicides, especially wettable powders,benefit greatly from the use of stickers. Stickers maybe judged in terms of resistance to wind and water,length of adherence, and mechanical or chemicalaction.
A wetting agent is a material that, when added to apesticide, lowers the interfacial tension between aliquid and a solid; in this case, a plant surface.Effectiveness is measured by the increase in spreadof a liquid over a solid surface and the ability of thespray film to make complete contact with it. When awetting agent reduces surface tension, spreadingnaturally occurs.

Chapter 6 Pesticide Use and Safety 4
The pesticide label should state whether a surfac-tant is needed or should be added to a spray mix forcertain applications and should indicate restrictionsin the selection of compatible surfactants. In manycases, surfactants have been designed specificallyfor use with fungicides, insecticides, or herbicides.
All commercial spreading, sticking, and wettingagents should be mixed strictly according to labeldirections. Adding more surfactant than recom-mended may cause excessive runoff, resulting in apoor spray deposit and reduced pest control. Ingeneral, if the spray mix contains one or morepesticides produced or formulated by the samecompany, use a surfactant sold or recommended bythat company. Surfactants are sold separately frompesticides and are not subject to EPA registration.
Although choosing an effective surfactant to accom-pany a specific pesticide is no simple task, the labelwill state whether a surfactant is needed and thebrand that should be used.
The Pesticide LabelAll the printed information including the label onthe product, brochures, and flyers from the com-pany or its agent about a pesticide product is calledlabeling. The label printed on or attached to acontainer of pesticide will tell how to use the prod-uct correctly and what special safety measures needto be taken. Specific parts of the label include thefollowing:
Brand name: Each company uses brand names toidentify its products. The brand name shows upplainly on the front panel of the label.
Type of formulation: The same pesticide may beavailable in more than one formulation.
Ingredient statement: Each pesticide label must listthe names and amounts of the active ingredientsand the amount of inert ingredients in the product.
Common name and chemical name: Pesticideshave complex chemical names derived from theirchemical composition. Some have also been given ashorter name, or common name, to make themeasier to identify. Pesticides may be sold underseveral brand names, but you may find the samecommon name or chemical name on all of them.
Net contents: The net contents tells how much is inthe container. This can be expressed in gallons,pints, pounds, quarts, or other units of measure.
Name and address of manufacturer: The lawrequires the maker or distributor of a product toprint the name and address of the company on thelabel.
Registration number: A registration number mustbe on every pesticide label. It shows that the prod-uct has been approved by the E.P.A. for the useslisted on the label.
Establishment number: The establishment numbertells which factory made the chemical.
Precautionary statements: A section with a titlesimilar to “Hazards to Humans and DomesticAnimals” will tell the ways in which the productmay be poisonous to man and animals. It will alsodescribe any special steps necessary to avoid poi-soning, such as the kind of protective equipmentneeded. If the product is highly toxic, this sectionwill inform physicians of the proper treatment forpoisoning.
Environmental hazards: The label tells how toavoid damage to the environment. Some examplesare: “This product is highly toxic to bees exposed todirect treatment or residues on crops.” “Do notcontaminate water when cleaning equipment orwhen disposing of wastes,” and “Do not applywhere runoff is likely to occur.”
Physical and Chemical Hazards: lists specific fire,explosion, or chemical hazards that the productmay have.
Signal words and symbols: Some pesticides may behazardous to people. You can tell how toxic aproduct is by reading the Signal Word and Symbolon the label.
Signal Approx. HumanWords Toxicity Lethal Dosage Symbol
Danger Highly toxic A taste to a Skull andPoison teaspoonful Crossbones
Warning Moderately A teaspoonful to nonetoxic a tablespoonful
Caution Low toxicity; An ounce to more nonerelatively than a pintnontoxic

Chapter 6 Pesticide Use and Safety 5
Highly toxic pesticides are generally not sold in thelawn and garden trade. All products must bear thestatement “Keep Out of Reach of Children.” In somepesticide literature, the term LD50 is used to give anindication of toxicity. LD50 stands for lethal dosagenecessary to kill 50% of a test population of animals.The LD50 values are measured from 0 up. Thenumbers after the 50 represent the milligrams(mgs.) of the substance per kilogram (kg.) of bodyweight necessary to kill 50% of the test population.The lower the LD50 value the more poisonous apesticide is, for example an LD50 of 5 is morepoisonous than an LD50 of 20 because only 5 mgs.per kg. of body weight are necessary to kill 50% ofthe test population.
Statement of practical treatment: If swallowing orinhaling the product or getting it in the eyes or onthe skin would be harmful, the label containsemergency first aid measures and states types ofexposure requiring medical attention. The pesticidelabel is the most important information you cantake to the physician when someone has beenpoisoned. Without the label, it is difficult for thephysician to help.
Directions for use: These instructions will explainseveral important items -
• The pests the product will control
• The crops, animals, or other item the product canbe used on safely
• How the product should be applied
• How much to use
• Where and when the material should be applied
• Application to harvest periods
When used on fruits or vegetables, there may be aperiod of time that must pass from the time ofapplication until it is safe to pick and use the crop.Known as the application to harvest period andexpressed as “days to harvest,” this is the timerequired for the residue to drop to safe levels. It isoften listed as a number in parentheses followingthe crop name. It is a mistake to assume that aresidue can be washed off.
Misuse statement: This section will remind youthat it is a violation of Federal law to use a productin a manner inconsistent with its labeling.
Storage and disposal directions: Every pesticideshould be stored and disposed of correctly. Thissection will tell you how to store and dispose of theproduct.
Application EquipmentUsing the same sprayer equipment for weed controland then for insect control is neither safe nor desir-able. No matter how well a tank is rinsed after useof a herbicide, a residue will be left in the tank andin the gaskets, hoses and parts. If the same tank isthen used with an insecticide to spray a plant, it ispossible to kill the plant with the herbicide left inthe tank. The wisest policy is to maintain twosprayers, one for herbicides and another for insecti-cides and fungicides. Have them clearly labeledaccording to use. Always wash after each use.
Pesticide application equipment comes in allshapes, sizes, types, and prices. Select equipmentaccording to common sense.
Proportioner or Hose-End Sprayer: These inexpen-sive small sprayers are designed to be attached to agarden hose. A small amount of pesticide is mixedwith water, usually no more than a pint, and placedin the receptacle attached to the hose. A tube con-nects this concentrate to the opening of the hose.When the water is turned on, the suction created bythe water passing over the top of the tube pulls thepesticide concentrate up and into the stream of hosewater. The stream can reach into medium-high treesif water pressure is high. Problems are encounteredfrom poor spray distribution and clogging ofnozzles. The metering out of the concentrate intothe stream of hose water is very inaccurate, since itis determined by the water pressure. Proportionersput out an excessively high volume of spray formost needs, using excessive pesticide. These spray-ers are popular due to low cost, but the low pur-chase price is quickly negated by the cost of exces-sive pesticides used. All hose-end proportionersshould be equipped with an anti-siphon device toprevent back-siphoning of toxic chemicals into thewater system.
Trombone Sprayer: The trombone sprayer is amedium-sized, hand-held piece of equipment. Aspray mixture in the correct dilution is prepared ina container such as a bucket. The intake tube of thesprayer is inserted into the mixture in the bucket.Pump pressure is created by operating the sprayerin a trombone-like motion. The pesticide is pulledup the hose and out the end of the sprayer. Auniform concentration of the spray can be main-tained, since the pesticide is mixed with a knownquantity of water. When using a wettable powder,agitate the spray mixture frequently to keep it insuspension. Trombone sprayers are excellent forspraying trees and shrubs, are easy to wash andkeep clean, but require some effort to operate.

Chapter 6 Pesticide Use and Safety 6
Compressed Air Sprayer (backpack or tanksprayer): Spray is mixed in a small tank (generally 1to 5 gallons) and the tank is carried over the shoul-ders. A hand-operated pump supplies pressureduring application. A uniform concentration spraycan be maintained since the pesticide is mixed witha known quantity of water. Frequent agitation of thespray mixture is necessary when using a wettablepowder formulation. Applicator has excellentcontrol over coverage, making this sprayer a goodchoice for treating dwarf fruit trees, vegetables, andornamentals. Spray will not reach into tall trees. Aswater weighs approximately 8.23 lbs per gallon,small tanks are easier to use than large tanks.
Small Power Sprayers: These have the advantage ofbeing motor-driven, so the operator does not haveto stop to pump up the tank. They are lightweight,since the spray in the tank is concentrated anddiluted with air as it is sprayed. Power sprayersprovide uniform pressure, but are generally tooexpensive for home garden use.
Hand Duster: The duster may consist of a squeezetube or shaker, a plunger that slides through a tube,or a fan powered by a hand crank. Uniform cover-age of foliage is difficult to achieve with manydusters. Dusts are more subject to drift than liquidformulations due to their light weight and poorsticking qualities.
Calibrating Sprayers and Spray PatternsThe usual approach consumers use when applying apesticide over a given area is to mix a tablespoon ortwo of a certain pesticide and apply it to a problemarea. This is acceptable if the label gives recom-mended rates in teaspoons or tablespoons pergallon. But some pesticides, specifically herbicidesand insecticides for lawns, do not give rates intablespoons or teaspoons per gallon. Instead, theygive rates of application in teaspoons or tablespoonsper 100 or 500 square feet. Unfortunately, theconsumer all too often solves this problem byguessing how much to use. This can be dangerous;too concentrated may be too toxic; too little will notcontrol the problem. It is irresponsible of the con-sumer to apply chemicals at improper rates. It isdangerous to him/herself, neighbors, and theenvironment.
A better approach is to calibrate the sprayer. Thecalibration of a home sprayer is relatively easy.Once it has been done, it has been done for the lifeof the sprayer, provided the nozzle remains un-changed, clean, and adequate pressure is used. Itmust be kept in mind that the rate at which theliquid is applied varies with the pressure and size ofthe opening in the nozzle. High pressure and a largeopening in the nozzle permit more liquid to beapplied over a given area than low pressure and/orsmaller nozzle. For calibrating a sprayer, the proce-dure is as follows:
1) Fully pressurize the sprayer and determinedelivery time. This is done by spraying waterthrough the sprayer into a pint jar. Mark thisdelivery time on the sprayer for future use.
2) Calculate the area to be treated. Measure the areathat is to be sprayed. Multiply length timeswidth to determine the area of a rectangle. Thearea of a triangle is calculated by multiplying thebase times the height and dividing by 2. Mostareas can be calculated by combining rectanglesand triangles or subtracting triangles fromrectangles.
3) If the area is large, divide it into sections equal tothe size of the delivery area.
4) Spray an area with water, at normal workingspeed, for 30 seconds. Measure the area sprayed.This tells how much area can be sprayed in 30seconds and therefore the amount that is appliedover that area (see item 1). For example, assum-ing that it has been established: 30 seconds ofspraying delivers ½ cup and 30 seconds ofspraying will cover 100 square feet; then 1000
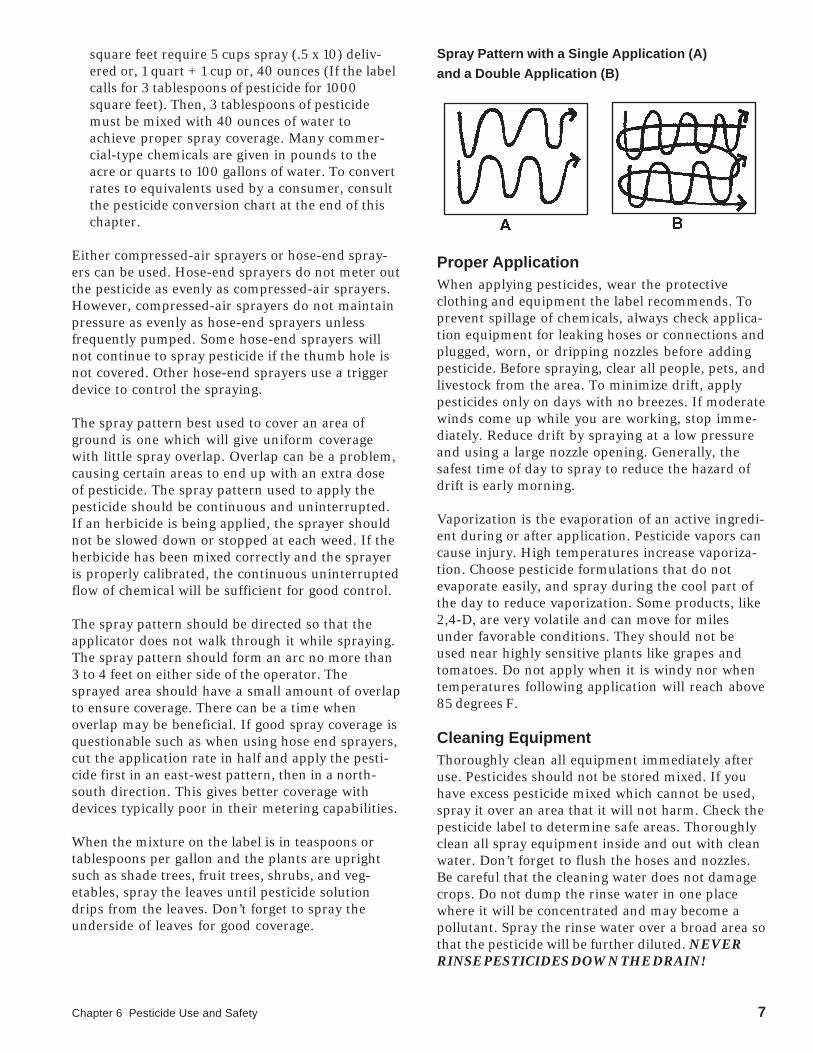
Chapter 6 Pesticide Use and Safety 7
square feet require 5 cups spray (.5 x 10) deliv-ered or, 1 quart + 1 cup or, 40 ounces (If the labelcalls for 3 tablespoons of pesticide for 1000square feet). Then, 3 tablespoons of pesticidemust be mixed with 40 ounces of water toachieve proper spray coverage. Many commer-cial-type chemicals are given in pounds to theacre or quarts to 100 gallons of water. To convertrates to equivalents used by a consumer, consultthe pesticide conversion chart at the end of thischapter.
Either compressed-air sprayers or hose-end spray-ers can be used. Hose-end sprayers do not meter outthe pesticide as evenly as compressed-air sprayers.However, compressed-air sprayers do not maintainpressure as evenly as hose-end sprayers unlessfrequently pumped. Some hose-end sprayers willnot continue to spray pesticide if the thumb hole isnot covered. Other hose-end sprayers use a triggerdevice to control the spraying.
The spray pattern best used to cover an area ofground is one which will give uniform coveragewith little spray overlap. Overlap can be a problem,causing certain areas to end up with an extra doseof pesticide. The spray pattern used to apply thepesticide should be continuous and uninterrupted.If an herbicide is being applied, the sprayer shouldnot be slowed down or stopped at each weed. If theherbicide has been mixed correctly and the sprayeris properly calibrated, the continuous uninterruptedflow of chemical will be sufficient for good control.
The spray pattern should be directed so that theapplicator does not walk through it while spraying.The spray pattern should form an arc no more than3 to 4 feet on either side of the operator. Thesprayed area should have a small amount of overlapto ensure coverage. There can be a time whenoverlap may be beneficial. If good spray coverage isquestionable such as when using hose end sprayers,cut the application rate in half and apply the pesti-cide first in an east-west pattern, then in a north-south direction. This gives better coverage withdevices typically poor in their metering capabilities.
When the mixture on the label is in teaspoons ortablespoons per gallon and the plants are uprightsuch as shade trees, fruit trees, shrubs, and veg-etables, spray the leaves until pesticide solutiondrips from the leaves. Don’t forget to spray theunderside of leaves for good coverage.
Spray Pattern with a Single Application (A)
and a Double Application (B)
Proper ApplicationWhen applying pesticides, wear the protectiveclothing and equipment the label recommends. Toprevent spillage of chemicals, always check applica-tion equipment for leaking hoses or connections andplugged, worn, or dripping nozzles before addingpesticide. Before spraying, clear all people, pets, andlivestock from the area. To minimize drift, applypesticides only on days with no breezes. If moderatewinds come up while you are working, stop imme-diately. Reduce drift by spraying at a low pressureand using a large nozzle opening. Generally, thesafest time of day to spray to reduce the hazard ofdrift is early morning.
Vaporization is the evaporation of an active ingredi-ent during or after application. Pesticide vapors cancause injury. High temperatures increase vaporiza-tion. Choose pesticide formulations that do notevaporate easily, and spray during the cool part ofthe day to reduce vaporization. Some products, like2,4-D, are very volatile and can move for milesunder favorable conditions. They should not beused near highly sensitive plants like grapes andtomatoes. Do not apply when it is windy nor whentemperatures following application will reach above85 degrees F.
Cleaning EquipmentThoroughly clean all equipment immediately afteruse. Pesticides should not be stored mixed. If youhave excess pesticide mixed which cannot be used,spray it over an area that it will not harm. Check thepesticide label to determine safe areas. Thoroughlyclean all spray equipment inside and out with cleanwater. Don’t forget to flush the hoses and nozzles.Be careful that the cleaning water does not damagecrops. Do not dump the rinse water in one placewhere it will be concentrated and may become apollutant. Spray the rinse water over a broad area sothat the pesticide will be further diluted. NEVERRINSE PESTICIDES DOWN THE DRAIN!

Chapter 6 Pesticide Use and Safety 8
To clean 2,4-D type herbicides from hand sprayequipment such as a 3-gallon garden sprayer, usehousehold ammonia. Thoroughly rinse the equip-ment with fresh water after spraying. Fill the sprayequipment with an ammonia solution, using ½ cupof ammonia to 3 gallons of water. Let the equipmentsoak for 18 to 24 hours. Always spray part of thismixture through the pump, hose, and nozzles at thebeginning and end of the soaking period. NOTE:2,4-D cannot be completely removed from a sprayeronce used in it. DO NOT USE THIS SPRAYER TOAPPLY OTHER PESTICIDES TO DESIRABLEPLANTS.
Storage and DisposalGardeners should store all pesticides in their origi-nal containers, in a locked cabinet. NO EXCEP-TIONS IF YOU ARE CONCERNED ABOUTCHILDREN’S LIVES! They should be protectedfrom temperature extremes, some can be damagedupon freezing, others can be altered by heat. Do notstore pesticides in the home! Empty containers mustbe triple rinsed before being placed in refuse cansdestined for a sanitary landfill. Wrap containers innewspaper and secure before disposal. Some stateshave special chemical dumps for pesticides; how-ever, N.H. does not have such dump sites. Thebottle should be rinsed out first, pouring the rinsewater into the spray tank. Rinse three times, allow-ing 30 seconds to drain between each rinse. Neveruse empty pesticide containers for other uses, neverallow children to play with empty containers. Ifpossible, break the containers before disposal. Donot burn paper containers.
Using Pesticides Safely
Protective ClothingIf special protective clothing is required, the labelwill tell you the kind of protection to use. Pesticidessold in the home garden trade generally do notrequire special protective clothing. Many profes-sionally used and highly toxic chemicals do. Any-time you handle pesticides, you should wear a long-sleeved shirt and long-legged trousers (or a cover-all-type garment) and shoes. Additional protectionis available by wearing unlined neoprene or rubbergloves, a wide-brimmed plastic hard hat that coversthe back of the neck, and goggles or face shield toprotect the eyes. Rubber gloves and goggles are
particularly important when mixing or pouringpesticides. Toxic commercial pesticides may alsorequire neoprene boots, chemical cartridge respira-tors, face masks, neoprene suit, or even gas masks.These more toxic chemicals should not be used in ahome garden setting. After using any pesticide,wash your hands and arms thoroughly with soapand water. Never eat, drink, or smoke beforewashing your hands. If you have been doing a lot ofspraying or dusting, remove your clothes, take ashower, and put on clean clothes. Clothing shouldbe laundered separately from the family wash. Thewasher should be run empty with detergent aftercleaning pesticide-contaminated clothing. If you getsprayed, change and shower immediately. Use firstaid procedures if necessary.
Safety PrecautionsMost pesticides can cause severe illness, or evendeath, if misused. But every registered pesticide canbe used safely. Many accidental pesticide deaths arecaused by eating or drinking the product, particu-larly by young children. Some applicators die or areinjured when they breathe a pesticide vapor or get apesticide on their skin. Pesticides can poison you intwo ways. Acute poisoning, or toxicity measured byan LD50 number, can kill or injure you after oneexposure. Chronic toxins, on the other hand, willnot produce an effect until there have been a suffi-cient number of exposures. However, the number ofexposures necessary to produce an effect varies withthe kind of pesticide and the health and size of theperson exposed. LD50 is not a measure for chronictoxicity. If an applicator uses organophosphate(diazinon, malathion) or carbamate (carbaryl,furadan) insecticides with any regularity, it wouldbe wise to ask a physician about a test to check thecholinesterase level of the blood. These pesticidesdestroy this enzyme, which is necessary to carrynerve impulses to the brain. Although chronictoxicity is not poisonous immediately, over the longrun it can be serious. Always use safety precautionsand treat all pesticides with respect. To preventaccidents with pesticides, use and store pesticidesaway from children, keep pesticides in their originalcontainers, and take care to always follow labeldirections.

Chapter 6 Pesticide Use and Safety 9
Symptoms of Pesticide PoisoningAwareness of the early symptoms and signs ofpesticide poisoning is important. Unfortunately, allpesticide poisoning symptoms are not the same.Each chemical family (organophosphates, carbam-ates, chlorinated hydrocarbons, etc.) attacks thehuman body in a different way. Fumigants andsolvents can make a person appear to be drunk. Thesymptoms are poor coordination, slurring of words,confusion, and sleepiness. Common pesticides likeorganophosphates and carbamates injure thenervous system. The symptoms develop in stages,usually occurring in this order:
Mild Poisoning or Early Symptoms of Acute Poison-ing: Fatigue, headache, dizziness, blurred vision,excessive sweating and salivation, nausea andvomiting, stomach cramps or diarrhea.
Moderate Poisoning or Early Symptoms of AcutePoisoning: Unable to walk, weakness, chest discom-fort, muscle twitches, constriction of pupil of theeye, earlier symptoms become more severe.
Severe or Acute Poisoning: Unconsciousness, severeconstriction of pupil of the eye, muscle twitches,convulsions, secretions from mouth and nose,breathing difficulty, death if not treated. Illness mayoccur a few hours after exposure. If symptoms startmore than 12 hours after exposure to a pesticide,you probably have some other illness. Check withyour physician to be sure.
First Aid ProceduresRead the “Statement of Practical Treatment” oneach label. The directions listed can save lives. If apesticide gets on the skin, remove the substance asquickly as possible. Remove all contaminatedclothing. Prompt washing may prevent sicknesseven when the spill is very large. Detergents workbetter than soap in removing pesticides. Don’tforget the hair and fingernails. If a pesticide isinhaled, get to fresh air right away. Loosen all tight-fitting clothing. If needed, give artificial respirationimmediately -- do not stop until victim is breathingwell or medical help arrives. Get the victim to aphysician. Do not administer anything to a poisonvictim unless you are trained in first aid, otherwiseyou may compound the injury.
In case of poisoning, call a physician and give thefollowing information: describe the victim by name,age, and sex, and identify yourself and your rela-tionship to the victim. Have the package or poisonin your hand and identify what the victim took andhow much was taken. Keep calm -- you haveenough time to act -- but don’t delay unnecessarily.Poisoning information is available by contactingyour local poison control center.
Pesticides and the Environment
Direct KillFine mists of herbicides can drift to nearby crops orlandscape plants and kill them. Bees and otherpollinators can be killed if a crop is treated with apesticide when they are in the field. The naturalenemies of pest insects can also be killed by pesti-cides. Life in streams or ponds can be wiped out byaccidental spraying of ditches and waterways,runoff from sprayed fields, and careless containerdisposal. If more than one pesticide will control thepest, choose the one that is the least hazardous tothe environment and most useful for the situation.To protect beneficial insects, avoid excessive use ofinsecticides -- spray only when crop and pestpopulations require.
Protecting Insect PollinatorsGardeners should give special consideration toprotecting insect pollinators, such as the honey bee,from insecticide poisoning. Insecticides highly toxicto bees have restricted application times when beingapplied to crops frequented by honey bees. Bees arenot active in late evening and early morning. Do notapply insecticides when temperatures are unusuallylow because residues will remain toxic much longer.
Persistence and AccumulationAlthough most pesticides break down quickly,remaining in the environment only a short timebefore being changed into harmless products, somepesticides break down slowly and stay in theenvironment for a long time. These are calledpersistent pesticides. Some persistent pesticides canbuild up in the bodies of animals, including man.These pesticides are called accumulative. Mostpersistent pesticides have very limited usage orhave been removed from the market. For example,chlordane is a persistent pesticide and its use waslimited to termite and fire ant control but it is nowoff the market.

Chapter 6 Pesticide Use and Safety 10
Pesticides Move in the EnvironmentPesticides become problems when they move offtarget. This may mean drifting off the target if in theform of dust or mist, moving with soil particles byerosion, leaching through the soil, being carried outas residues on crops or livestock, or evaporatingand moving with air currents.
Safe Use PrecautionsFollowing safety precautions and using commonsense can prevent harm from pesticides. Here arethe minimum safety steps you should take.
• Before buying a pesticide, identify the pest to becontrolled. Then find out which pesticide willcontrol it. If there is a choice of several, choosethe least hazardous product.
• Before purchase, read the label of the pesticideyou intend to buy to ensure that the host plant(and pest) are listed on the pesticide label andthat the pesticide is not phytotoxic to the plantbeing protected. Also check safety conditions foruse, such as special equipment, protective cloth-ing, restrictions on use, and environmentalprecautions needed.
• Before applying the pesticide, read the labelagain be sure of proper application and safetymeasures, including protective clothing andequipment needed, the specific warning andprecautions, with what it can be mixed, mixinginstructions, application to harvest period forfruit and vegetables, crops to which it can orcannot be applied, and other special instructions.
CompatibilityCompatibility occurs when two or more pesticidescan be mixed together without reducing theireffectiveness or harming the target. For instance,carbaryl (Sevin) is often combined with a miticidesuch as Kelthane in order to kill both insects andmites at one time. Synergism is the action of twomaterials of the same type which used togetherproduce a greater effect than the sum of the materi-als when used alone. One of the materials whenused alone may not affect the pest, but greatlyincreases the total effect of the two when usedtogether. Example: Chemical A kills 60%, ChemicalB kills 20%, Chemical A and B together kill 98% ofthe pests. Synergism may increase control or require
less chemical. It may also be more harmful to anontarget organism. A synergistic effect can also beundesirable, causing death or damage to the organ-ism that is being protected. It should be stressedthat no chemicals should be mixed together unlessthe label specifically says they are compatible.
Resistance concerns over insects developing immu-nity can often be reduced by switching to a differenttype (chemical group) of pesticides.
Home Garden VersusCommercial PesticidesSome pesticides are packaged specifically for homegarden use. These products are packaged in smallquantities, i.e., pints, quarts, ounces, or pounds.They are seldom highly toxic pesticides and areusually in low concentrations. The label rate isgiven in spoonfuls per gallon or pounds per 1000square feet.
Because of the small label size, home garden prod-ucts may not list all of the plants and/or pests forwhich the product may be registered for use. Forexample, one manufacturer sells Diazinon 25% ECas Fruit and Vegetable Insect Control and DiazinonInsect Spray. Both are basically the same product,but plants and pests listed vary greatly. This situa-tion causes some confusion in pesticide applicationand stimulates the purchase of excessive amounts ofpesticides.
Products packaged for the commercial grower mayappear to be less expensive, but consumers shouldnot be tempted to use them. They are generallymore toxic than those for home use and requirespecial protective clothing and equipment forapplication. These products are more concentratedand in larger containers than the consumer couldexpect to use or safely store, and are much moredifficult to calibrate and mix correctly, since ratesare usually based on a per-acre system.
A few products extremely toxic to humans or theenvironment are classified by the E.P.A. asRESTRICTED USE PESTICIDES. The label willstate “restricted use pesticides for retail sale to andapplication only by certified applicators, or personunder their direct supervision.” A license from theState Department of Agriculture is required by lawfor purchase and use of restricted use pesticides.Restricted pesticides cannot be sold to homegardeners.

Chapter 6 Pesticide Use and Safety 11
Pesticides and OrganicGardeningAlthough it is questionable whether we could raiseall crops without the use of pesticides, it is certainlytrue that we can reduce the amount of pesticides weuse by careful and efficient use. There are somesteps to consider before automatically turning to apesticide. First, determine if control measures arereally needed. Is the problem severe enough towarrant treatment? If the cost of treatment is lessthan the predicted loss, the economic threshold hasbeen reached, and treatment is necessary. Consideralternative control measures. Some examples arecultivating instead of using an herbicide, andremoving and destroying diseased plant partsrather than using a pesticide.
The next step is integrated control. This is probablythe best answer to pest control. In this situation, thewise use of pesticides is combined with alternativemethods, such as conservation practices, to encour-age natural enemies of the pest. For example, asimple integrated control program could be used ona garden. Some pests can be picked off by hand. Abiological, Bacillus thuringiensis, can be used forcaterpillars. Chemicals can be used to spot treat theworse areas showing some damage.
Pesticides and the LawThe registration and use of pesticides are governedby the E.P.A. and the NH Department of Agricul-ture. Under the amended Federal Insecticide,Fungicide, and Rodenticide Act (Federal Environ-mental Control Act of 1972) it is illegal to use apesticide on a crop unless the crop is listed on thelabel. You may not exceed the given rate of applica-tion on the label. Fines and other penalties changeand vary according to laws broken.
Under the law you are liable for misuse of pesti-cides on your property. Recent court rulings extendyour liability to include misuse by commercialapplicators you hire. Serious misuse by gardenersusually results from drift, leaching of a pesticideonto non-target plants, or the direct treatment of theplant by a wrong pesticide. If you sell your crop,you must have a pesticide license. For more detailscall the N. H. Pesticide Control Division at 271-3550.
Pesticide Conversion ChartThe measurements given below are approximateand should be used as a general guideline if thedirections for mixing small quantities are not givenon the pesticide label.
Liquid Measure:
Amount per 100 gallons Amount per gallon
¼ pint ............................................¼ teaspoon
1 pint ............................................. 1 teaspoon
1 quart ......................................... 2 teaspoons
1 gallon ................................. 2½ tablespoons
2 gallons ................................... 5 tablespoons
4 gallons ..............................................1/3 pint
11 gallons ..............................................7/8 pint
Dry Weight:
Amount per 100 gallons Amount per gallon
½ pound ......................................... 1/12 ounce
1 pound ...........................................1/6 ounce
2 pounds ......................................... 1/3 ounce
3 pounds ......................................... 1/2 ounce
4 pounds ......................................... 2/3 ounce
6 pounds ......................................... 4/5 ounce
16 pounds ...................................... 2 3/5 ounce
20 pounds ...................................... 3 1/5 ounce

CHAPTER 7
Plant Propagation
Sexual Propagation ..................................................................................................................................... 1Seed ............................................................................................................................................................................ 1Germination ................................................................................................................................................................ 2Methods of Breaking Dormancy .................................................................................................................................. 2Starting Seeds ............................................................................................................................................................ 3Seed Requirements .................................................................................................................................................... 6
Transplanting and Handling ....................................................................................................................... 7Propagation of Ferns by Spores ................................................................................................................................. 8
Asexual Propagation ................................................................................................................................... 9Cuttings ....................................................................................................................................................................... 9
Stem Cuttings.................................................................................................................................................................... 9Leaf Cuttings ................................................................................................................................................................... 10Root Cuttings .................................................................................................................................................................. 10Layering .......................................................................................................................................................................... 11
Division ..................................................................................................................................................................... 12Grafting ..................................................................................................................................................................... 12Budding ..................................................................................................................................................................... 14Plant Tissue Culture for the Home ............................................................................................................................ 14
Medium Preparation ........................................................................................................................................................ 14

Chapter 7 Plant Propagation 1
CHAPTER 7Plant Propagation
Edited and revised by David C. Sorensen, University of New Hampshire Cooperative Extension
Plant propagation is the process of multiplying the numbers of a species, per-petuating a species, or maintaining the youthfulness of a plant. There are twotypes of propagation, sexual and asexual. Sexual reproduction is the union of thepollen and egg, drawing from the genes of two parents to create a new, thirdindividual. Sexual propagation involves the floral parts of a plant. Asexualpropagation involves taking a part of one parent plant and causing it to regener-ate itself into a new plant. Genetically it is identical to its one parent. Asexualpropagation involves the vegetative parts of a plant: stems, roots, or leaves.
The advantages of sexual propagation are that it may be cheaper and quickerthan other methods; it may be the only way to obtain new varieties and hybridvigor; in certain species, it is the only viable method for propagation; and it is away to avoid transmission of certain diseases. Asexual propagation has advan-tages, too. It may be easier and faster in some species; it may be the only way toperpetuate some cultivars; and it bypasses the juvenile characteristics of certainspecies.
Although some seeds will keep for several years ifstored properly, it is advisable to purchase onlyenough seed for the current year’s use. Good seedwill not contain seed of any other crop, weeds,seeds, or other debris. Printing on the seed packetusually indicates essential information about thevariety, the year for which the seeds were packaged,and germination percentage you may typicallyexpect, and notes of any chemical seed treatment. Ifseeds are obtained well in advance of the actualsowing date or are stored surplus seeds, keep themin a cool, dry place. Laminated foil packets helpensure dry storage. Paper packets are best kept intightly closed containers and maintained around 40degrees F. in a low humidity.
Some gardeners save seed from their own gardens;however, such seed is the result of random pollina-tion by insects or other natural agents, and may notproduce plants typical of the parents. This is espe-cially true of the many hybrid varieties. (See Veg-etables chapter for information on saving vegetableseed.) Most seed companies take great care inhandling seeds properly. Generally, do not expectmore than 65% to 80% of the seeds to germinate.From those germinating, expect about 60% to 75%to produce satisfactory, vigorous, sturdy seedlings.
Sexual PropagationSexual propagation involves the union of the pollen(male) with the egg (female) to produce a seed. Theseed is made up of three parts: the outer seed coat,which protects the seed; the endosperm, which is afood reserve; and the embryo, which is the youngplant itself. When a seed is mature and put in afavorable environment, it will germinate, or beginactive growth. In the following section, seed germi-nation and transplanting of seeds will be discussed.
SeedTo obtain quality plants, start with good qualityseed from a reliable dealer. Select varieties toprovide the size, color, and habit of growth desired.Choose varieties adapted to your area which willreach maturity before an early frost. Many newvegetable and flower varieties are hybrids, whichcost a little more than open pollinated types. How-ever, hybrid plants usually have more vigor, moreuniformity, and better production than nonhybridsand sometimes have specific disease resistance orother unique cultural characteristics.

Chapter 7 Plant Propagation 2
GerminationThere are four environmental factors which affectgermination: water, oxygen, light, and heat.
WaterThe first step in the germination process is theimbibition or absorption of water. Even thoughseeds have great absorbing power due to thenature of the seed coat, the amount of availablewater in the germination medium affects theuptake of water. An adequate, continuous supplyof water is important to ensure germination.Once the germination process has begun, a dryperiod will cause the death of the embryo.
LightLight is known to stimulate or to inhibit germi-nation of some seed. The light reaction involvedhere is a complex process. Some crops whichhave a requirement for light to assist seed germi-nation are ageratum, begonia, browallia, impa-tiens, lettuce, and petunia. Conversely, calen-dula, centaurea, annual phlox, verbena, andvinca will germinate best in the dark. Otherplants are not specific at all. Seed catalogs andseed packets often list germination or culturaltips for individual varieties. When sowing light-requiring seed, do as nature does, and leavethem on the soil surface. If they are covered atall, cover them lightly with fine peat moss or finevermiculite. These two materials, if not appliedtoo heavily, will permit some light to reach theseed and will not limit germination. Whenstarting seed in the home, supplemental light canbe provided by fluorescent fixtures suspended 6to 12 inches above the seeds for 16 hours a day.
OxygenIn all viable seed, respiration takes place. Therespiration in dormant seed is low, but someoxygen is required. The respiration rate increasesduring germination, therefore, the medium inwhich the seeds are placed should be loose andwell-aerated. If the oxygen supply during germi-nation is limited or reduced, germination can beseverely retarded or inhibited.
HeatA favorable temperature is another importantrequirement of germination. It not only affectsthe germination percentage but also the rate ofgermination. Some seeds will germinate over awide range of temperatures, whereas othersrequire a narrow range. Many seeds have mini-mum, maximum, and optimum temperatures atwhich they germinate. For example, tomato seed
has a minimum germination temperature of 50degrees F. and a maximum temperature of 95degrees, but an optimum germination tempera-ture of about 80 degrees. Where germinationtemperatures are listed, they are usually theoptimum temperatures unless otherwise speci-fied. Generally, 65 to 75 degrees F. is best formost plants. This often means the germinationflats may have to be placed in special chambersor on radiators, heating cables, or heating mats tomaintain optimum temperature. The importanceof maintaining proper medium temperature toachieve maximum germination percentagescannot be over-emphasized.
Germination will begin when certain internalrequirements have been met. A seed must have amature embryo, contain a large enough endospermto sustain the embryo during germination, andcontain sufficient hormones or auxins to initiate theprocess.
Methods of Breaking DormancyOne of the functions of dormancy is to prevent aseed from germinating before it is surrounded by afavorable environment. In some trees and shrubs,seed dormancy is difficult to break, even when theenvironment is ideal. Various treatments are per-formed on the seed to break dormancy and begingermination.
Seed ScarificationSeed scarification involves breaking, scratching,or softening the seed coat so that water can enterand begin the germination process. There areseveral methods of scarifying seeds. In acidscarification, seeds are put in a glass containerand covered with concentrated sulfuric acid. Theseeds are gently stirred and allowed to soak from10 minutes to several hours, depending on thehardness of the seed coat. When the seed coat hasbecome thin, the seeds can be removed, washed,and planted. Another scarification method ismechanical. Seeds are filed with a metal file,rubbed with sandpaper, or cracked with ahammer to weaken the seed coat. Hot waterscarification involves putting the seed into hotwater (170 to 212 degrees F). The seeds areallowed to soak in the water, as it cools, for 12 to24 hours and then planted. A fourth method isone of warm, moist scarification. In this case,seeds are stored in nonsterile, warm, dampcontainers where the seed coat will be brokendown by decay over several months.

Chapter 7 Plant Propagation 3
Seed StratificationSeeds of some fall-ripening trees and shrubs ofthe temperate zone will not germinate unlesschilled underground as they over winter. This socalled “after ripening” may be accomplishedartificially by a practice called stratification. Thefollowing procedure is usually successful. Putsand or vermiculite in a clay pot to about 1 inchfrom the top. Place the seeds on top of the me-dium and cover with ½ inch of sand or vermicu-lite. Wet the medium thoroughly and allowexcess water to drain through the hole in the pot.Place the pot containing the moist medium andseeds in a plastic bag and seal. Place the bag in arefrigerator. Periodically check to see that themedium is moist, but not wet. Additional waterwill probably not be necessary. After 10 to 12weeks, remove the bag from the refrigerator.Take the pot out and set it in a warm place in thehouse. Water often enough to keep the mediummoist. Soon the seedlings should emerge. Whenthe young plants are about 3 inches tall, trans-plant them into pots to grow until time forsetting outside.
Another procedure that is usually successful usessphagnum moss or peat moss. Wet the mossthoroughly, then squeeze out the excess waterwith your hands. Mix seed with the sphagnum orpeat and place in a plastic bag. Seal the bag andput it in a refrigerator. Check periodically. Ifthere is condensation on the inside of the bag, theprocess will probably be successful. After 10 to12 weeks remove the bag from the refrigerator.Plant the seeds in pots to germinate and grow.Handle seeds carefully. Often the small roots andshoots are emerging at the end of the stratifica-tion period. Care must be taken not to breakthese off. Temperatures in the range of 35 to 45degrees F (2 to 70C) are effective. Most refrigera-tors operate in this range. Seeds of most fruit andnut trees can be successfully germinated by theseprocedures. Seeds of peaches should be removedfrom the hard pit. Care must be taken whencracking the pits. Any injury to the seed itself canbe an entry path for disease organisms.
Starting SeedsMedia A wide range of materials can be used to start
seeds, from plain vermiculite or mixtures ofsoilless media to the various amended soil mixes.With experience, you will learn to determinewhat works best under your conditions. How-ever, keep in mind what the good qualities of agerminating medium are. It should be rather fineand uniform, yet well-aerated and loose. Itshould be free of insects, disease organisms, andweed seeds. It should also be of low fertility ortotal soluble salts and capable of holding andmoving moisture by capillary action. One mix-ture which supplies these factors is a combina-tion of 1/3 sterilized soil, 1/3 sand or vermiculiteor perlite, and 1/3 peat moss.
The importance of using a sterile medium andcontainer cannot be over-emphasized. The homegardener can treat a small quantity of soil mix-ture in an oven. Place the slightly moist soil in aheat-resistant container in an oven set at about250 degrees F. Use a candy or meat thermometerto ensure that the mix reaches a temperature of180 degrees F. for at least 1/2 hour. Avoid over-heating as this can be extremely damaging to thesoil. Be aware that the heat will release veryunpleasant odors in the process of sterilization.This treatment should prevent damping-off andother plant diseases, as well as eliminate poten-tial plant pests. Growing containers and imple-ments should be washed to remove any debris,then rinsed in a solution of 1 part chlorine bleachto 9 parts water.
An artificial, soilless mix also provides thedesired qualities of a good germination medium.The basic ingredients of such a mix are sphag-num peat moss and vermiculite, both of whichare generally free of diseases, weed seeds, andinsects. The ingredients are also readily available,easy to handle, lightweight, and produce uni-form plant growth. “Peat-lite” mixes or similarproducts are commercially available or can bemade at home using this recipe: 4 quarts ofshredded sphagnum peat moss, 4 quarts of finevermiculite, 1 tablespoon of superphosphate, and2 tablespoons of ground limestone. Mix thor-oughly. These mixes have little fertility, soseedlings must be watered with a diluted fertil-izer solution soon after they emerge. Do not usegarden soil by itself to start seedlings; it is notsterile, is too heavy, and will not drain well.

Chapter 7 Plant Propagation 4
ContainersFlats and trays can be purchased or you canmake your own from scrap lumber. A convenientsize to handle would be about 12 to 18 incheslong and 12 inches wide with a depth of about 2inches. Leave cracks of about 1/8-inch betweenthe boards in the bottom or drill a series of holesto ensure good drainage.
You can also make your own containers forstarting seeds by recycling such things as cottagecheese containers, the bottoms of milk cartons orbleach containers, and pie pans, as long as gooddrainage is provided. At least one company hasdeveloped a form for recycling newspaper intopots, and another has developed a method forthe consumer to make and use compressedblocks of soil mix instead of pots.
Clay or plastic pots can be used and numeroustypes of pots and strips made of compressed peatare also on the market. Plant bands and plasticcell packs are also available. Each cell or mini-potholds a single plant which reduces the risk ofroot injury when transplanting. Peat pellets, peator fiber-based blocks, and expanded foam cubescan also be used for seeding.
SeedingThe proper time for sowing seeds for transplantsdepends upon when plants may safely be movedout-of-doors in your area. This period may rangefrom 4 to 12 weeks prior to transplanting, de-pending upon the speed of germination, the rateof growth, and the cultural conditions provided.A common mistake is to sow the seeds too earlyand then attempt to hold the seedlings backunder poor light or improper temperatureranges. This usually results in tall, weak, spindlyplants which do not perform well in the garden.
After selecting a container, fill it to within 3/4inch of the top with moistened growing medium.For very small seeds, at least the top ¼-inchshould be a fine, screened mix or a layer ofvermiculite. Firm the medium at the corners andedges with your fingers or a block of wood toprovide a uniform, flat surface.
For medium and large seeds, make furrows 1 to 2inches apart and 1/8 to ¼-inch deep across thesurface of the container using a narrow board orpot label. By sowing in rows, good light and airmovement results, and if damping-off fungusdoes appear, there is less chance of it spreading.
Seedlings in rows are easier to label and handleat transplanting time than those which have beensown in a broadcast manner. Sow the seedsthinly and uniformly in the rows by gentlytapping the packet of seed as it is moved alongthe row. Lightly cover the seed with dry ver-miculite or sifted medium if they require dark-ness for germination. A suitable planting depth isusually about twice the diameter of the seed.
Do not plant seeds too deeply. Extremely fineseed such as petunia, begonia, and snapdragonare not covered, but lightly pressed into themedium or watered in with a fine mist. If theseseeds are broadcast, strive for a uniform stand bysowing half the seeds in one direction, thensowing the other way with the remaining seed ina crossing pattern.
Large seeds are frequently sown into some sortof a small container or cell pack which eliminatesthe need for early transplanting. Usually 2 or 3seeds are sown per unit and later thinned toallow the strongest seedling to grow.
Seed TapeMost garden stores and seed catalogs offerindoor and outdoor seed tapes. Seed tape hasprecisely spaced seeds enclosed in an organic,water-soluble material. When planted, the tapedissolves and the seeds germinate normally. Seedtapes are especially convenient for tiny, hard-to-handle seeds. However, tapes are much moreexpensive per seed. Seed tapes allow uniformemergence, eliminate overcrowding, and permitsowing in perfectly straight rows. The tapes canbe cut at any point for multiple-row plantings,and thinning is rarely necessary.
PregerminationAnother method of starting seeds ispregermination. This method involves sproutingthe seeds before they are planted in pots or in thegarden. This reduces the time to germination, asthe temperature and moisture are easy to control.A high percentage of germination is achievedsince environmental factors are optimum. Layseeds between the folds of a cotton cloth or on alayer of vermiculite in a shallow pan. Keep moist,in a warm place. When roots begin to show,place the seeds in containers or plant themdirectly in the garden. While transplantingseedlings, be careful not to break off tender roots.Continued attention to watering is critical.

Chapter 7 Plant Propagation 5
When planting seeds in a container that will beset out in the garden later, place 1 seed in a 2- to3-inch container. Plant the seeds at only ½ therecommended depth. Gently press a little soilover the sprouted seed and then add about ¼inch of milled sphagnum or sand to the soilsurface. These materials will keep the surfaceuniformly moist and are easy for the shoot topush through. Keep in a warm place and care forthem as for any other newly transplanted seed-lings.
A convenient way to plant small, delicate,pregerminated seeds is to suspend them in a gel.You can make a gel by blending cornstarch withboiling water to a consistency that is thickenough so the seeds will stay suspended. Be sureto cool thoroughly before use. Place the gel withseedlings in a plastic bag with a hole in it.Squeeze the gel through the hole along apremarked garden row. Spacing of seeds isdetermined by the number of seeds in the gel. Ifthe spacing is too dense, add more gel; if toowide, add more seeds. The gel will keep thegerminating seeds moist until they establishthemselves in the garden soil.
WateringAfter the seed has been sown, moisten the plant-ing mix thoroughly. Use a fine mist or place thecontainers in a pan or tray which contains about1 inch of warm water. Avoid splashing or exces-sive flooding which might displace small seeds.When the planting mix is saturated, set thecontainer aside to drain. The soil should be moistbut not wet.
Ideally, seed flats should remain sufficientlymoist during the germination period withouthaving to add water. One way to maintainmoisture is to slip the whole flat or pot into aclear plastic bag after the initial watering. Theplastic should be at least 1 inch from the soil.Keep the container out of direct sunlight, other-wise the temperature may rise to the point wherethe seeds will be harmed. Many home gardenerscover their flats with panes of glass instead ofusing a plastic sleeve. Be sure to remove theplastic bag or glass cover as soon as the firstseedlings appear. Surface watering can then bepracticed if care and good judgement are used.
Lack of uniformity, overwatering, or drying outare problems related to manual watering. Excel-lent germination and moisture uniformity can beobtained with a low-pressure misting system.Four seconds of mist every 6 minutes or 10seconds every 15 minutes during the daytime inspring seems to be satisfactory. Bottom heat is anasset with a mist system. Subirrigation or water-ing from below may work well, keeping the flatsmoist. However, as the flats or pots must sit inwater constantly, the soil may absorb too muchwater, and the seeds may rot due to lack ofoxygen.
Temperature and LightSeveral factors for good germination have al-ready been mentioned. The last item, and by nomeans the least important, is temperature. Sincemost seeds will germinate best at an optimumtemperature that is usually higher than mosthome night temperatures, special warm areasmust often be provided. The use of thermostati-cally controlled heating cables is an excellentmethod of providing constant heat.
After germination and seedling establishment,move the flats to a light, airy, cooler location, at a55 to 60 degree F. night temperature and a 65 to70 degree F. day reading. This will prevent soft,leggy growth and minimize disease troubles.Some crops, of course, may germinate or growbest at a different constant temperature and mustbe handled separately from the bulk of theplants.
Seedlings must receive bright light after germina-tion. Place them in a window facing south, ifpossible. If a large, bright window is not avail-able, place the seedlings under a fluorescentlight. Use two 40-watt, cool-white fluorescenttubes or special plant growth lamps. Position theplants 6 inches from the tubes and keep the lightson about 16 hours each day. As the seedlingsgrow, the lights should be raised.
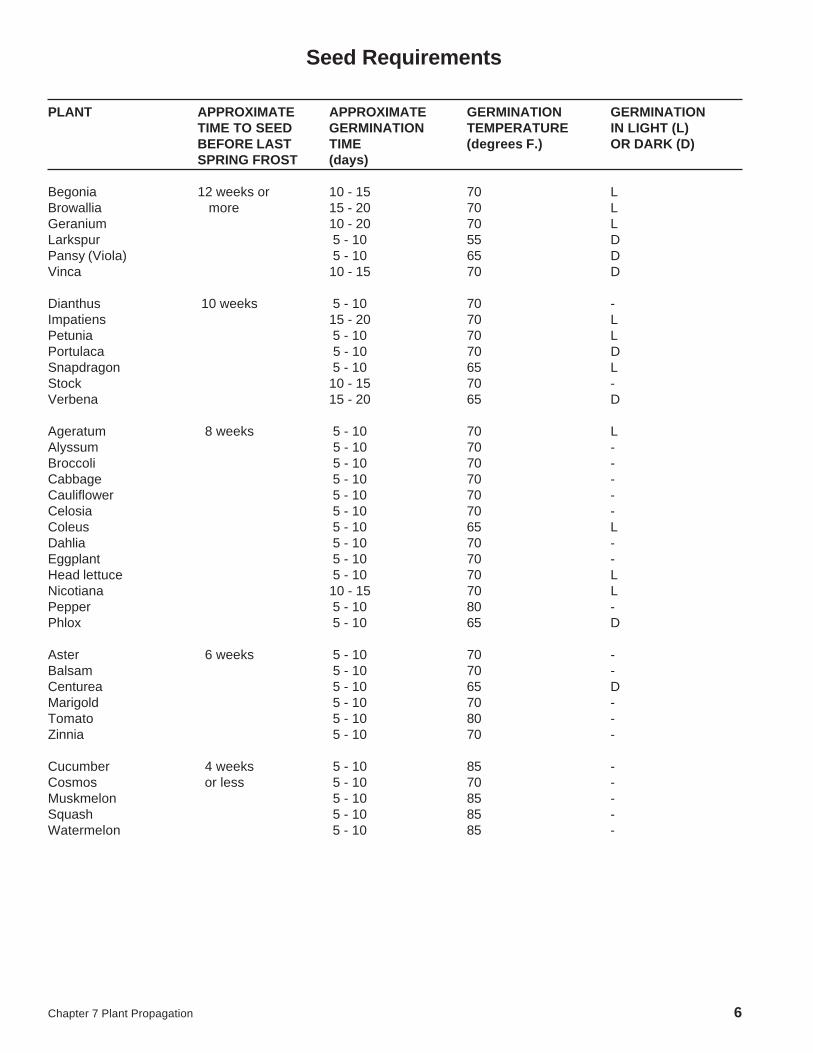
Chapter 7 Plant Propagation 6
Seed Requirements
PLANT APPROXIMATE APPROXIMATE GERMINATION GERMINATIONTIME TO SEED GERMINATION TEMPERATURE IN LIGHT (L)BEFORE LAST TIME (degrees F.) OR DARK (D)SPRING FROST (days)
Begonia 12 weeks or 10 - 15 70 LBrowallia more 15 - 20 70 LGeranium 10 - 20 70 LLarkspur 5 - 10 55 DPansy (Viola) 5 - 10 65 DVinca 10 - 15 70 D
Dianthus 10 weeks 5 - 10 70 -Impatiens 15 - 20 70 LPetunia 5 - 10 70 LPortulaca 5 - 10 70 DSnapdragon 5 - 10 65 LStock 10 - 15 70 -Verbena 15 - 20 65 D
Ageratum 8 weeks 5 - 10 70 LAlyssum 5 - 10 70 -Broccoli 5 - 10 70 -Cabbage 5 - 10 70 -Cauliflower 5 - 10 70 -Celosia 5 - 10 70 -Coleus 5 - 10 65 LDahlia 5 - 10 70 -Eggplant 5 - 10 70 -Head lettuce 5 - 10 70 LNicotiana 10 - 15 70 LPepper 5 - 10 80 -Phlox 5 - 10 65 D
Aster 6 weeks 5 - 10 70 -Balsam 5 - 10 70 -Centurea 5 - 10 65 DMarigold 5 - 10 70 -Tomato 5 - 10 80 -Zinnia 5 - 10 70 -
Cucumber 4 weeks 5 - 10 85 -Cosmos or less 5 - 10 70 -Muskmelon 5 - 10 85 -Squash 5 - 10 85 -Watermelon 5 - 10 85 -
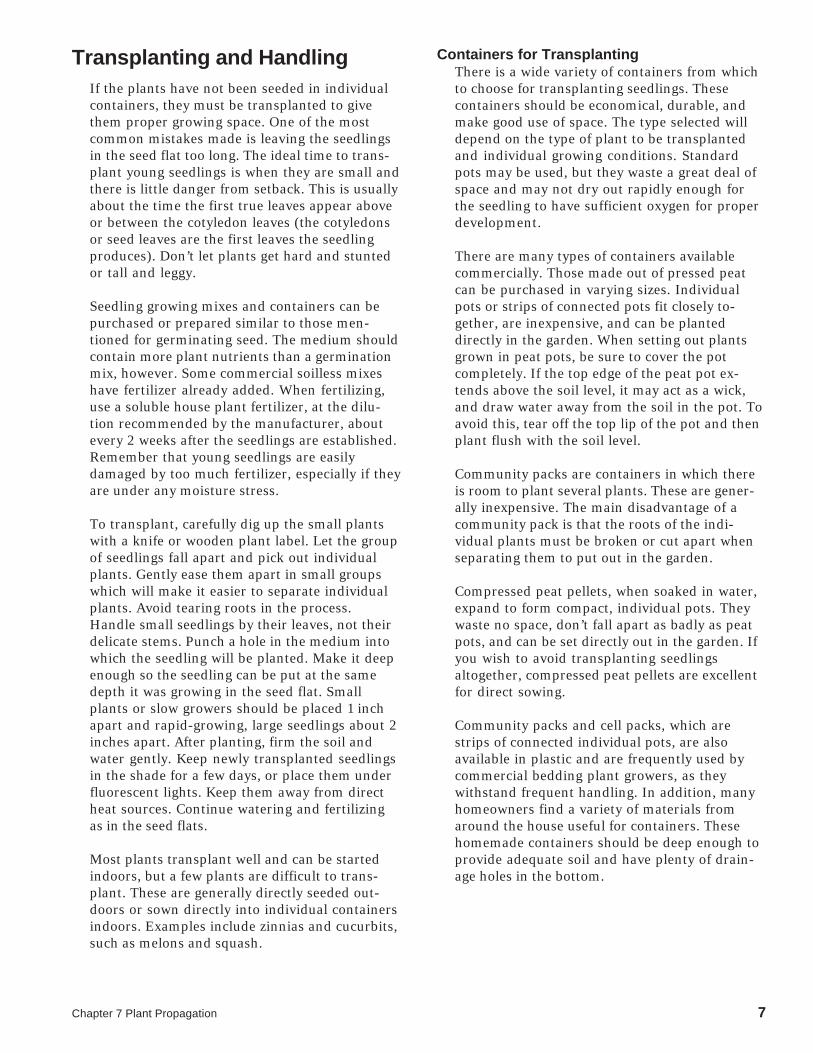
Chapter 7 Plant Propagation 7
Transplanting and HandlingIf the plants have not been seeded in individualcontainers, they must be transplanted to givethem proper growing space. One of the mostcommon mistakes made is leaving the seedlingsin the seed flat too long. The ideal time to trans-plant young seedlings is when they are small andthere is little danger from setback. This is usuallyabout the time the first true leaves appear aboveor between the cotyledon leaves (the cotyledonsor seed leaves are the first leaves the seedlingproduces). Don’t let plants get hard and stuntedor tall and leggy.
Seedling growing mixes and containers can bepurchased or prepared similar to those men-tioned for germinating seed. The medium shouldcontain more plant nutrients than a germinationmix, however. Some commercial soilless mixeshave fertilizer already added. When fertilizing,use a soluble house plant fertilizer, at the dilu-tion recommended by the manufacturer, aboutevery 2 weeks after the seedlings are established.Remember that young seedlings are easilydamaged by too much fertilizer, especially if theyare under any moisture stress.
To transplant, carefully dig up the small plantswith a knife or wooden plant label. Let the groupof seedlings fall apart and pick out individualplants. Gently ease them apart in small groupswhich will make it easier to separate individualplants. Avoid tearing roots in the process.Handle small seedlings by their leaves, not theirdelicate stems. Punch a hole in the medium intowhich the seedling will be planted. Make it deepenough so the seedling can be put at the samedepth it was growing in the seed flat. Smallplants or slow growers should be placed 1 inchapart and rapid-growing, large seedlings about 2inches apart. After planting, firm the soil andwater gently. Keep newly transplanted seedlingsin the shade for a few days, or place them underfluorescent lights. Keep them away from directheat sources. Continue watering and fertilizingas in the seed flats.
Most plants transplant well and can be startedindoors, but a few plants are difficult to trans-plant. These are generally directly seeded out-doors or sown directly into individual containersindoors. Examples include zinnias and cucurbits,such as melons and squash.
Containers for TransplantingThere is a wide variety of containers from whichto choose for transplanting seedlings. Thesecontainers should be economical, durable, andmake good use of space. The type selected willdepend on the type of plant to be transplantedand individual growing conditions. Standardpots may be used, but they waste a great deal ofspace and may not dry out rapidly enough forthe seedling to have sufficient oxygen for properdevelopment.
There are many types of containers availablecommercially. Those made out of pressed peatcan be purchased in varying sizes. Individualpots or strips of connected pots fit closely to-gether, are inexpensive, and can be planteddirectly in the garden. When setting out plantsgrown in peat pots, be sure to cover the potcompletely. If the top edge of the peat pot ex-tends above the soil level, it may act as a wick,and draw water away from the soil in the pot. Toavoid this, tear off the top lip of the pot and thenplant flush with the soil level.
Community packs are containers in which thereis room to plant several plants. These are gener-ally inexpensive. The main disadvantage of acommunity pack is that the roots of the indi-vidual plants must be broken or cut apart whenseparating them to put out in the garden.
Compressed peat pellets, when soaked in water,expand to form compact, individual pots. Theywaste no space, don’t fall apart as badly as peatpots, and can be set directly out in the garden. Ifyou wish to avoid transplanting seedlingsaltogether, compressed peat pellets are excellentfor direct sowing.
Community packs and cell packs, which arestrips of connected individual pots, are alsoavailable in plastic and are frequently used bycommercial bedding plant growers, as theywithstand frequent handling. In addition, manyhomeowners find a variety of materials fromaround the house useful for containers. Thesehomemade containers should be deep enough toprovide adequate soil and have plenty of drain-age holes in the bottom.

Chapter 7 Plant Propagation 8
Hardening PlantsHardening is the process of altering the quality ofplant growth to withstand the change in environ-mental conditions which occurs when plants aretransferred from a greenhouse or home to thegarden. A severe check in growth may occur ifplants produced in the home are planted out-doors without a transition period. Hardening ismost critical with early crops, when adverseclimatic conditions can be expected.
Hardening can be accomplished by graduallylowering temperatures and relative humidityand reducing water. This procedure results in anaccumulation of carbohydrates and a thickeningof cell walls. A change from a soft, succulent typeof growth to a firmer, harder type is desired.
This process should be started at least 2 weeksbefore planting in the garden. If possible, plantsshould be moved to a 45 to 50 degree F. tempera-ture indoors or outdoors in a shady location. Acold frame is excellent for this purpose. Whenput outdoors, plants should be shaded, thengradually moved into sunlight. Each day, gradu-ally increase the length of exposure. Don’t puttender seedlings outdoors on windy days orwhen temperatures are below 45 degrees F.Reduce the frequency of watering to slowgrowth, but don’t allow plants to wilt. Even cold-hardy plants will be hurt if exposed to freezingtemperatures before they are hardened. Afterproper hardening, however, they can be plantedoutdoors and light frosts will not damage them.
The hardening process is intended to slow plantgrowth. If carried to the extreme of actuallystopping plant growth, significant damage can bedone to certain crops. For example, cauliflowerwill make thumb size heads and fail to developfurther if hardened too severely. Cucumbers andmelons will stop growth if hardened.
Propagation of Ferns by SporesThough ferns are more easily propagated by othermethods, some gardeners like the challenge ofraising ferns from spores. One tested method forsmall quantities follows:
Put a solid, sterilized brick (bake at 250 degrees F.for 30 minutes) in a pan and add water to cover thebrick. When the brick is wet throughout, squeeze athin layer of moist soil and peat (1:1) onto the top ofthe brick. Pack a second layer (about an inch) on topof that. Sprinkle spores on top. Cover with plastic(not touching the spores) and put in a warm place inindirect light. It may take up to a month or more forthe spores to germinate. Keep moist at all times. Aprothallus (one generation of the fern) will developfirst from each spore, forming a light green mat.Mist lightly once a week to maintain high surfacemoisture; the sperm must be able to swim to thearchegonia (female parts). After about three weeks,fertilization should have occurred. Pull the matapart with tweezers in ¼-inch squares and spacethem ½-inch apart in a flat containing a 2-inch layerof sand, ¼-inch of charcoal, and about 2 inches ofsoil/peat mix. Cover with plastic and keep moist.When fern fronds appear and become crowded,transplant to small pots. Gradually reduce thehumidity until they can survive in the open. Lightexposure may be increased at this time.
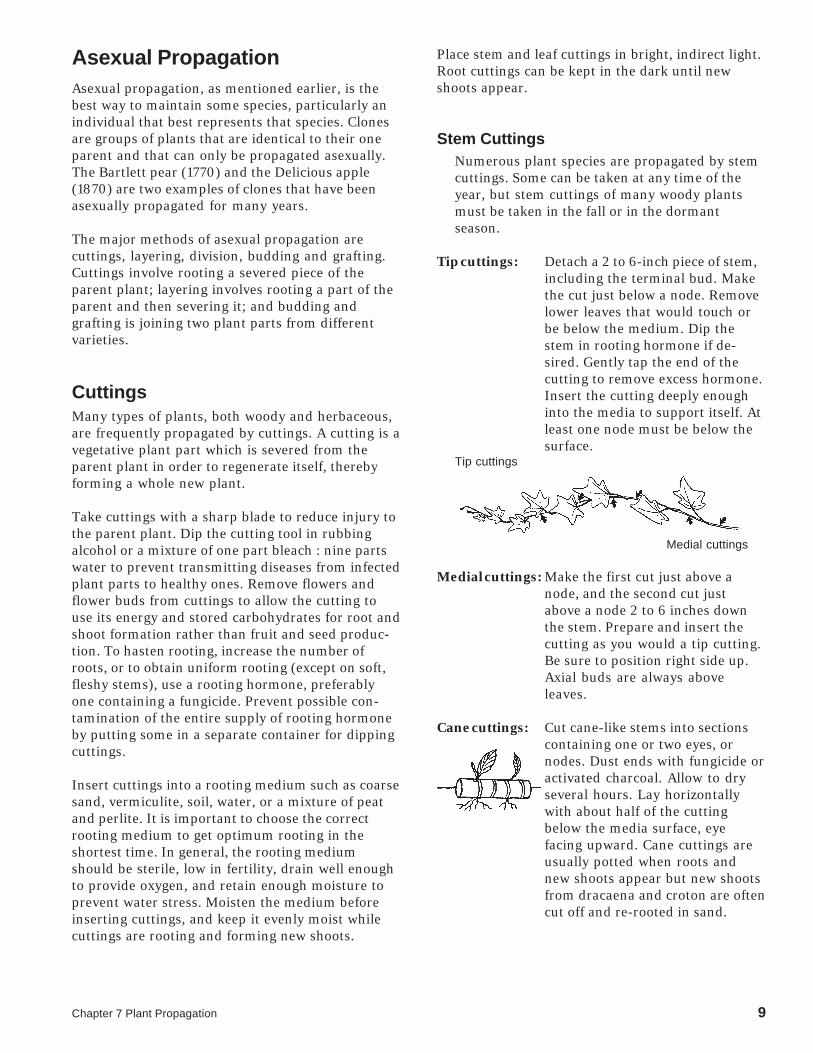
Chapter 7 Plant Propagation 9
Asexual PropagationAsexual propagation, as mentioned earlier, is thebest way to maintain some species, particularly anindividual that best represents that species. Clonesare groups of plants that are identical to their oneparent and that can only be propagated asexually.The Bartlett pear (1770) and the Delicious apple(1870) are two examples of clones that have beenasexually propagated for many years.
The major methods of asexual propagation arecuttings, layering, division, budding and grafting.Cuttings involve rooting a severed piece of theparent plant; layering involves rooting a part of theparent and then severing it; and budding andgrafting is joining two plant parts from differentvarieties.
CuttingsMany types of plants, both woody and herbaceous,are frequently propagated by cuttings. A cutting is avegetative plant part which is severed from theparent plant in order to regenerate itself, therebyforming a whole new plant.
Take cuttings with a sharp blade to reduce injury tothe parent plant. Dip the cutting tool in rubbingalcohol or a mixture of one part bleach : nine partswater to prevent transmitting diseases from infectedplant parts to healthy ones. Remove flowers andflower buds from cuttings to allow the cutting touse its energy and stored carbohydrates for root andshoot formation rather than fruit and seed produc-tion. To hasten rooting, increase the number ofroots, or to obtain uniform rooting (except on soft,fleshy stems), use a rooting hormone, preferablyone containing a fungicide. Prevent possible con-tamination of the entire supply of rooting hormoneby putting some in a separate container for dippingcuttings.
Insert cuttings into a rooting medium such as coarsesand, vermiculite, soil, water, or a mixture of peatand perlite. It is important to choose the correctrooting medium to get optimum rooting in theshortest time. In general, the rooting mediumshould be sterile, low in fertility, drain well enoughto provide oxygen, and retain enough moisture toprevent water stress. Moisten the medium beforeinserting cuttings, and keep it evenly moist whilecuttings are rooting and forming new shoots.
Place stem and leaf cuttings in bright, indirect light.Root cuttings can be kept in the dark until newshoots appear.
Stem CuttingsNumerous plant species are propagated by stemcuttings. Some can be taken at any time of theyear, but stem cuttings of many woody plantsmust be taken in the fall or in the dormantseason.
Tip cuttings: Detach a 2 to 6-inch piece of stem,including the terminal bud. Makethe cut just below a node. Removelower leaves that would touch orbe below the medium. Dip thestem in rooting hormone if de-sired. Gently tap the end of thecutting to remove excess hormone.Insert the cutting deeply enoughinto the media to support itself. Atleast one node must be below thesurface.
Tip cuttings
Medial cuttings
Medial cuttings: Make the first cut just above anode, and the second cut justabove a node 2 to 6 inches downthe stem. Prepare and insert thecutting as you would a tip cutting.Be sure to position right side up.Axial buds are always aboveleaves.
Cane cuttings: Cut cane-like stems into sectionscontaining one or two eyes, ornodes. Dust ends with fungicide oractivated charcoal. Allow to dryseveral hours. Lay horizontallywith about half of the cuttingbelow the media surface, eyefacing upward. Cane cuttings areusually potted when roots andnew shoots appear but new shootsfrom dracaena and croton are oftencut off and re-rooted in sand.

Chapter 7 Plant Propagation 10
Single Eye: The eye refers to the node. This isused for plants with alternateleaves when space or stock mate-rial are limited. Cut the stem about½-inch above and ½-inch below anode. Place cutting horizontally orvertically in the medium.
Double Eye: This is used for plants with oppo-site leaves when space or stockmaterial is limited. Cut the stemabout 12-inches above and 12-inches below the same node. Insertthe cutting vertically in the me-dium with the node just touchingthe surface.
Heel cutting: This method uses stock materialwith woody stems efficiently.Make a shield-shaped cut abouthalfway through the wood arounda leaf and axial bud. Insert theshield horizontally into the me-dium.
Leaf CuttingsLeaf cuttings are used almost exclusively for afew indoor plants. Leaves of most plants willeither produce a few roots but no plant, or justdecay.
Whole leafwith petiole: Detach the leaf and up to 1½
inches of petiole. Insert the lowerend of the petiole into the medium.One or more new plants will format the base of the petiole. The leafmay be severed from the newplants when they have their ownroots, and the petiole reused.
Whole leafwithout petiole: This is used for plants with sessile
leaves. Insert the cutting verticallyinto the medium. A new plant willform from the axillary bud. Theleaf may be removed when thenew plant has its own roots.
Split vein: Detach a leaf from the stock plant.Slit its veins on the lower leafsurface. Lay the cutting, lower sidedown, on the medium. New plantswill form at each cut. If the leaftends to curl up, hold it in place bycovering the margins with therooting medium.
Leaf sections: This method is frequently usedwith snake plant and fibrousrooted begonias. Cut begonialeaves into wedges with at leastone vein. Lay leaves flat on themedium. A new plant will arise atthe vein. Cut snake plant leavesinto 2-inch sections. Consistentlymake the lower cut slanted and theupper cut straight so you can tellwhich is the top. Insert the cuttingvertically. Roots will form fairlysoon, and eventually a new plantwill appear at the base of thecutting. These and other succulentcuttings will rot if kept too moist.
Root CuttingsRoot cuttings are usually taken from 2 to 3 yearold plants during their dormant season whenthey have a large carbohydrate supply. Rootcuttings of some species produce new shoots,which then form their own root systems, whileroot cuttings of other plants develop root sys-tems before producing new shoots.
Plants withlarge roots: Make a straight top cut. Make a
slanted cut 2 to 6 inches below thefirst cut. Store about 3 weeks inmoist sawdust, peat moss, or sandat 40 degrees F. Remove fromstorage. Insert the cutting verti-cally with the top approximatelylevel with the surface of therooting medium. This method isoften used outdoors.

Chapter 7 Plant Propagation 11
Plants withsmall roots: Take 1 to 2 inch sections of roots.
Insert the cuttings horizontallyabout 12 inch below the mediumsurface. This method is usuallyused indoors or in a hotbed.
LayeringStems still attached to their parent plants may formroots where they touch a rooting medium. Severedfrom the parent plant, the rooted stem becomes anew plant. This method of vegetative propagation,called layering, promotes a high success rate be-cause it prevents the water stress and carbohydrateshortage that plague cuttings.
Some plants layer themselves naturally, but some-times plant propagators assist the process. Layeringis enhanced by wounding one side of the stem or bybending it very sharply. The rooting mediumshould always provide aeration and a constantsupply of moisture.
Tip layering: Dig a hole 3 to 4 inches deep.Insert the shoot tip and cover itwith soil. The tip grows down-
ward first, then bendssharply and grows upward.Roots form at the bend, andthe recurved tip becomes anew plant. Remove the tiplayer and plant it in the earlyspring or late fall. Examples:
purple and black raspberries,trailing blackberries.
Simplelayering: Bend the stem to the ground.
Cover part of it with soil, leavingthe last 6 to 12 inches exposed.
Bend the tip into a verticalposition and stake in place.The sharp bend will ofteninduce rooting, but wound-ing the lower side of thebranch or loosening thebark by twisting the stem
may help. Examples: rhododen-dron, honeysuckle.
Compoundlayering: This method works for plants with
flexible stems. Bend the stem to therooting mediumas for simplelayering, butalternately cover
and expose stem sections. Woundthe lower side of the stem sectionsto be covered. Examples: heart-leafphilodendron, pothos.
Mound (stool)layering: Cut the plant back to 1 inch above
the ground in the dormant season.Mound soil over the emergingshoots in the spring to enhancetheir rooting. Examples: gooseber-ries, apple rootstocks.
Air layering: Air layering is usedto propagate some indoor plantswith thick stems, or to rejuvenatethem when they become leggy. Slitthe stem just below a node. Pry theslit open with a toothpick. Sur-round the wound with wetunmilled sphagnum moss. Wrapplastic or foil around the sphag-num moss and tie in place. Whenroots pervade the moss, cut theplant off below the root ball.Examples: dumbcane, rubber tree.
The following propagation methods can all be

Chapter 7 Plant Propagation 12
considered types of layering, as the new plants formbefore they are detached from their parent plants.
Stolons andrunners: A stolon is a horizontal, often
fleshy stem that can root, thenproduce new shoots where ittouches the medium. A runner is aslender stem that originates in a
leaf axil and growsalong the ground ordownward from ahanging basket,producing a new plantat its tip. Plants thatproduce stolons or
runners are propagated by sever-ing the new plants from theirparent stems. Plantlets at the tipsof runners may be rooted whilestill attached to the parent, ordetached and placed in a rootingmedium. Examples: strawberry,spider plant.
Offsets: Plants with a rosetted stem oftenreproduce by forming new shootsat their base or in leaf axils. Severthe new shoots from the parentplant after they have developedtheir own root system. Unrootedoffsets of some species may beremoved and placed in a rootingmedium. Some of these must becut off, while others may be simplylifted off of the parent stem.Examples: date palm, haworthia,bromeliads, many cacti.
Separation: Separation is a term applied to aform of propagation by whichplants that produce bulbs or cormsmultiply.
Bulbs: New bulbs form beside the origi-nally planted bulb. Separate thesebulb clumps every 3 to 5 years forlargest blooms and to increasebulb population. Dig up the clumpafter the leaves have withered.Gently pull the bulbs apart andreplant them immediately so theirroots can begin to develop. Small,new bulbs may not flower for 2 or3 years, but large ones shouldbloom the first year. Examples:tulip, narcissus.
Corms: A large new corm forms on top ofthe old corm, and tiny cormelsform around the large corm. After
the leaves wither, dig up thecorms and allow them to dryin indirect light for 2 or 3weeks. Remove the cormels,then gently separate the newcorm from the old corm. Dustall new corms with a fungicideand store in a cool place untilplanting time. Examples:crocus, gladiolus.
DivisionPlants with more than one rooted crown may bedivided and the crowns planted separately. If thestems are not joined, gently pull the plants apart. Ifthe crowns are united by horizontal stems, cut thestems and roots with a sharp knife to minimizeinjury. Divisions of some outdoor plants should bedusted with a fungicide before they are replanted.Examples: snake plant, iris, prayer plant, day lilies.
GraftingGrafting and budding are methods of asexual plantpropagation that join plant parts so they will growas one plant. These techniques are used to propa-gate cultivars that will not root well as cuttings orwhose own root systems are inadequate. One ormore new cultivars can be added to existing fruitand nut trees by grafting or budding.
The portion of the cultivar that is to be propagatedis called the scion. It consists of a piece of shoot withdormant buds that will produce the stem andbranches. The rootstock, or stock, provides the newplant’s root system and sometimes the lower part ofthe stem. The cambium is a layer of cells locatedbetween the wood and bark of a stem from whichnew bark and wood cells originate. (See Fruitchapter for discussion of apple rootstock).
Four conditions must be met for grafting to besuccessful: the scion and rootstock must be compat-ible; each must be at the proper physiological stage;
SeparationCorms

Chapter 7 Plant Propagation 13
the cambial layers of the scion and stock must meet;and the graft union must be kept moist until thewound has healed.
Cleft grafting: Cleft grafting is often used tochange the cultivar or top growthof a shoot or a young tree (usuallya seedling). It is especially success-ful if done in the early spring.Collect scion wood 3/8 to 5/8 inchin diameter. Cut the limb or smalltree trunk to be reworked, perpen-dicular to its length. Make a 2-inchvertical cut through the center ofthe previous cut. Be careful not totear the bark. Keep this cutwedged apart. Cut the lower endof each scion piece into a wedge.Prepare two scion pieces 3 to 4inches long. Insert the scions at theouter edges of the cut in the stock.Tilt the top of the scion slightlyoutward and the bottom slightlyinward to be sure the cambiallayers of the scion and stock touch.Remove the wedge propping theslit open and cover all cut surfaceswith grafting wax.
Bark grafting: Unlike most grafting methods,bark grafting can be used on largelimbs, although these are ofteninfected before the wound cancompletely heal. Collect scionwood 3/8 to 1/2 inch in diameterwhen the plant is dormant, andstore the wood wrapped in moistpaper in a plastic bag in the refrig-erator. Saw off the limb or trunk ofthe rootstock at a right angle toitself. In the spring, when the barkis easy to separate from the wood,make a 12-inch diagonal cut onone side of the scion, and a 1½-inch diagonal cut on the other side.Leave two buds above the longercut. Cut through the bark of thestock, a little wider than the scion.Remove the top third of the barkfrom this cut. Insert the scion withthe longer cut against the wood.Nail the graft in place with flat-headed wire nails. Cover allwounds with grafting wax.
Whip or tonguegrafting: This method is often used for
material 1/4 to ½ inch in diameter.The scion and rootstock are usu-ally of the same diameter, but thescion may be narrower than thestock. This strong graft healsquickly and provides excellentcambial contact. Make one 2½-inchlong sloping cut at the top of therootstock and a matching cut onthe bottom of the scion. On the cutsurface, slice downward into thestock and up into the scion so thepieces will interlock. Fit the piecestogether, then tie and wax theunion.
Care of the Graft: Very little success in grafting willbe obtained unless proper care is maintained for thefollowing year or two. If a binding material such asstrong cord or nursery tape is used on the graft, thismust be cut shortly after growth starts to preventgirdling. Rubber budding strips have some advan-tages over other materials. They expand withgrowth and usually do not need to be cut, as theydeteriorate and break after a short time. It is also anexcellent idea to inspect the grafts after 2 or 3 weeksto see if the wax has cracked, and if necessary,rewax the exposed areas. After this, the union willprobably be strong enough and no more waxingwill be necessary.
Limbs of the old variety which are not selected forgrafting should be cut back at the time of grafting.The total leaf surface of the old variety should begradually reduced as the new one increases until atthe end of 1 or 2 years, the new variety has com-pletely taken over. Completely removing all thelimbs of the old variety at the time of graftingincreases the shock to the tree and causes excessivesuckering. Also, the scions may grow too fast,making them susceptible to wind damage.

Chapter 7 Plant Propagation 14
BuddingBudding, or bud grafting, is the union of one budand a small piece of bark from the scion with arootstock. It is especially useful when scion materialis limited. It is also faster and forms a strongerunion than grafting.
Patch budding: Plants with thick bark should bepatch budded. This is done whilethe plants are actively growing, sotheir bark slips easily. Remove arectangular piece of bark from therootstock. Cover this wound witha bud and matching piece of barkfrom the scion. If the rootstock’sbark is thicker than that of thescion, pare it down to meet thethinner bark so that when theunion is wrapped the patch will beheld firmly in place.
Chip budding: This budding method can be usedwhen the bark is not slipping. Slicedownward into the rootstock at a
45 degree angle through 1/4of the wood. Make a secondcut upward from the first cut,about one inch. Remove abud and attending chip ofbark and wood from thescion shaped so that it fits therootstock wound. Fit the budchip to the stock and wrap
the union.
T-budding: This is the most commonly usedbudding technique. When the barkis slipping, make a vertical cut(same axis as the root stock)through the bark of the rootstock,
avoiding any buds on thestock. Make a horizontal cutat the top of the vertical cut(in a T shape) and loosen thebark by twisting the knife atthe intersection. Remove ashield-shaped piece of thescion, including a bud, bark,and a thin section of wood.
Push the shield under the loosenedstock bark. Wrap the union,leaving the bud exposed.
Care of BudsPlace the bud in the stock in August. Force thebud to develop the following spring by cuttingthe stock off 3 to 4 inches above the bud. The newshoot may be tied to the resulting stub to preventdamage from the wind. After the shoot has madea strong union with the stock, cut the stub offclose to the budded area.
Plant Tissue Culture for the HomeAlthough technical procedures for aseptic culture ofplant cells, tissues, and organs are as diverse as theplant material on which they are practiced, a simpli-fied general procedure can be followed in the home.All that is needed are a few basic supplies whichcan easily be obtained. The procedures outlined inthis section can be used in the home to propagatevarious species of plants, both easy (African violets,coleus, chrysanthemums) and difficult (orchids,ferns, weeping figs) to propagate.
Medium PreparationFor 2 pints of tissue culture medium, mix the follow-
ing ingredients in a 1-quart home canning jar:
1/8 cup sugar
1 teaspoon all-purpose, soluble fertilizermixture. Check the label to make sure it hasall of the major and minor elements, especiallyammonium nitrate. If the latter is lacking, add1/3 tsp. of a 35-0-0 soluble fertilizer.
1 tablet (100 mg) of inositol (myo-inositol)which can be obtained at most health foodstores
1/4 of a pulverized vitamin tablet which has 1to 2 mg of thiamine
4 Tablespoons coconut milk (cytokinin source)drained from a fresh coconut. The remaindercan be frozen and used later.
3 to 4 grains (1/400 teaspoon!) of acommercial rooting compound which has 0.1active ingredient IBA
• Fill the jar with distilled or deionized water. Ifpurified water is not available, water that hasbeen boiled for several minutes can besubstituted.
• Shake the mixture and make sure all materialshave dissolved.

Chapter 7 Plant Propagation 15
• Baby food jars with lids, or other heat-resistant glass receptacles with lids can beused as individual culture jars. They shouldbe half filled with cotton or paper to supportthe plant material. The medium should bepoured into each culture bottle to the pointwhere the support material is just above thesolution.
When all bottles contain the medium and have thelids loosely screwed on, they are ready to be steril-ized. This can be done by placing them in a pressurecooker and sterilizing them under pressure for 30minutes or placing them in an oven at 320 degreesF. for 4 hours. After removing them from thesterilizer, place them in a clean area and allow themedium to cool. If the bottles will not be used forseveral days, wrap groups of culture bottles in foilbefore sterilizing and then sterilize the wholepackage. Then the bottles can be removed andcooled without removing the foil cover. Sterilizedwater, tweezers, and razor blades, which will beneeded later, can be prepared in the same manner.
Plant Disinfestation and CultureOnce the growing medium is sterilized and cooled,plant material can be prepared for culture. Becauseplants usually harbor bacterial and fungal spores,they must be cleaned (disinfested) before placementon the sterile medium. Otherwise, bacteria andfungi may grow faster than the plants and dominatethe culture.
Various plant parts can be cultured, but small,actively growing portions usually result in the mostvigorous plantlets. For example, ferns are mostreadily propagated by using only ½ inch of the tipof a rhizome. For other species, ½ to 1 inch of theshoot tip is sufficient. Remove leaves attached to thetip and discard. Place the plant part into a solutionof 1 part commercial bleach to 9 parts water for 8 to10 minutes. Submerge all plant tissue in the bleach
solution. After this time period, rinse off excessbleach by dropping the plant part into sterile water.Remember, once the plant material has been in thebleach, it has been disinfested and should only betouched with sterile tweezers.
After the plant material has been rinsed, removeany bleach-damaged tissue with a sterile razorblade. Then remove the cap of a culture bottlecontaining sterile medium, place the plant part ontothe support material in the bottle making sure thatit is not completely submerged in the medium, andrecap quickly.
Transferring should be done as quickly as possiblein a clean environment. Therefore, scrub hands andcounter tops with soap and water just before begin-ning to disinfest plant material. Rubbing alcohol ora dilute bleach solution can be used to wipe downthe working surface.
After all plants have been cultured, place them in awarm, well-lit (no direct sunlight) environment toencourage growth. If contamination of the mediumhas occurred, it should be obvious within 3 to 4days. Remove and wash contaminated culturebottles as quickly as possible to prevent the spreadto uncontaminated cultures.
When plantlets have grown to sufficient size,transplant them into soil. Handle as gently aspossible because the plants are leaving a warm,humid environment for a cool, dry one. Aftertransplanting, water the plants thoroughly andplace them in a clear plastic bag for several days.Gradually remove the bag to acclimate the plants totheir new environment; start with one hour per dayand gradually increase time out of the bag over atwo-week period until the plants are strong enoughto dispense with the bag altogether.

CHAPTER 8PruningReasons for Pruning.................................................................................................................................... 1
Training the Plant .................................................................................................................................................... 1Maintaining Plant Health ......................................................................................................................................... 2Improving the Quality of Flowers, Fruit, Foliage, or Stems ..................................................................................... 2Restricting Growth .................................................................................................................................................. 2
Pruning Tools ............................................................................................................................................... 3Care of Tools ........................................................................................................................................................... 3
Pruning Techniques ..................................................................................................................................... 4Twigs and Small Branches ...................................................................................................................................... 4Thick, Heavy Branches ........................................................................................................................................... 4Root Pruning ........................................................................................................................................................... 5
Pruning Shrubs ............................................................................................................................................ 5Deciduous Shrubs ................................................................................................................................................... 5Evergreen Shrubs ................................................................................................................................................... 6
Pruning Hedges ........................................................................................................................................... 6
Pruning Roses.............................................................................................................................................. 7
Pruning Shade Trees ................................................................................................................................... 8
Pruning Vines and Ground Covers ............................................................................................................ 8
Training and Pruning Apple Trees ............................................................................................................. 8Nonbearing Apple Trees ......................................................................................................................................... 8The Planting Year .................................................................................................................................................... 8The Year After Planting ........................................................................................................................................... 9Year Three and Beyond .......................................................................................................................................... 9Bearing Apple Trees ............................................................................................................................................. 10
Pruning Other Fruit Trees ..........................................................................................................................11Special Training System ....................................................................................................................................... 12
Training and Pruning Small Fruit ............................................................................................................. 13Grapes. ................................................................................................................................................................. 13Blueberries. ........................................................................................................................................................... 14Brambles ............................................................................................................................................................... 14
Summary ..................................................................................................................................................... 15

Chapter 8 Pruning 1
CHAPTER 8Pruning
Edited and revised by William Lord and David Seavey, University of New Hampshire CooperativeExtension.
To prune or not to prune? This is a question that faces gardeners and landscapeenthusiasts often. Most feel they should, but are not sure when, why or how.Pruning is accepted practice for the orchard, fairly frequently carried out in therose garden, but rather haphazard elsewhere. Most often it is only performedwhen a shrub or tree begins to encroach on its neighbor, a path, or a building.
Pruning is often looked upon as the answer to make a barren tree fruitful. Car-ried out correctly, it will -- eventually. However, years of neglect cannot berectified in one season. The unknowing pruner who cuts because he or shethinks that it should be done but does not know how often ends up with noflowers or fruit at all, due to excessive pruning or carrying out the operation atthe wrong time of the year.
This chapter explains the reasons for pruning, the proper techniques and tools touse, and when various types of plants should be pruned.
Reasons for PruningThe reasons for pruning can be grouped under thefour following categories:
• training the plant
• maintaining plant health
• improving the quality of flowers, fruit, foliage, orstems
• restricting growth.
Training the Plant
The first pruning of young trees and shrubsconsists of removing broken, crossing, and pest-infested branches.
With trees, the rule of pruning away 1/3 of thetop growth at transplanting to compensate forroot loss is not necessary for properly grownnursery plants. Excessive pruning at transplant-ing, according to research, reduces growthhormones necessary for root development anddelays plant establishment.
As a rule, the central leader of a tree should notbe pruned unless a leader is not wanted, as is thecase with some naturally low-branched trees orwhere multiple-stemmed plants are desired.
Trees with a central leader such as linden, sweetgum, or pin oak may need little or no pruningexcept to eliminate multiple leaders or branchescompeting with the central leader; these shouldbe shortened. Some pruning may be necessary tomaintain desired shape and shorten extra-vigorous shoots.
The height of the lowest branch can be from afew inches above the ground (for screening orwindbreaks) to 12 feet or more above the ground(as needed near a street or patio). Lower limbsare usually removed over a period of years,beginning in the nursery and continuing forseveral years after transplanting, until the de-sired height of trimming is reached.
For greatest strength, branches selected forpermanent scaffolds must have wide angle ofattachment with the trunk. Branch angles of lessthan 30 degrees from the main trunk result in avery high percentage of breakage while thosebetween 60 and 70 degrees have a very smallbreakage rate.

Chapter 8 Pruning 2
Vertical branch spacing and radial branch distri-bution are important. If this has not been done inthe nursery it can at least be started the followingspring after transplanting.
Major scaffold branches of shade trees should bespaced at least 8 inches and preferably 20 inchesvertically. Closely spaced scaffolds may restrictgrowth of the central leader. Scaffolds will belong, weak, and with few lateral branches.
Scaffold branches of trees should have propervertical and radial spacing on the trunk.
Radial branch distribution should allow 5 to 7scaffolds to fill the circle of space around a trunk.Radial spacing prevents one limb from overshad-owing another, which, in turn, reduces competi-tion for light and nutrients. Remove or pruneshoots that are too low, too close, or too vigorousin relation to the leader and scaffold branches.
When deciduous shrubs are planted bare-root,some pruning may be necessary. Light pruningof roots may be needed if any are broken, dam-aged, or dead.
Shrubs transplanted with a ball of soil or from acontainer require little, if any, pruning. Occasion-ally, branches may have been damaged in transit,and these should be removed at the time ofplanting.
Most evergreen trees and shrubs are sold in acontainer or B&B (balled and burlapped) and, aswith deciduous shrubs, require little pruning ofbranches.
Maintaining Plant HealthIn pruning to maintain plant health, first con-sider sanitation, which includes the eliminationof dead, dying, or diseased wood. Any dyingbranch or stub can be the entry point or build-up
chamber for insects or pathogens that couldspread to other parts of the tree. When removingdiseased wood such as a fungal canker or fireblight, it is important that the cut be made inhealthy wood, beyond the point of infection, witha sterile blade.
The development of a sound framework throughproper thinning will help prevent disease andloss of vigor while maintaining good form.
Evergreen shrubs will benefit from thinning cuts.It will allow penetration of light and air through-out the shrub, increase the total leaf surface, andcreate an environment less attractive to mites andinsects.
Improving the Quality of Flowers, Fruit,Foliage, or Stems
The more flowers and fruit a plant produces, thesmaller they become, as can be seen on anunpruned rose bush or fruit tree. Pruning re-duces the amount of wood and so diverts energyinto the production of larger, though possiblyfewer, flowers and/or fruit. Most floweringshrubs will bloom either on 1-year old growth oron new growth. Properly timed pruning willincrease the production of wood that will bearflowers.
Some deciduous shrubs have colored barkswhich are especially delightful in winter. Thebest color is produced on young stems; thegreatest stem length and most intense colorresults from hard pruning.
Restricting GrowthOver time, trees and shrubs will often grow tosizes that exceed the space allowed for them.Where space is limited, regular pruning becomesnecessary to keep plants in bounds. Regularpruning is necessary on formal hedges to main-tain a uniform growth rate. To reduce labor,select plants according to size at maturity andavoid planting too close.

Chapter 8 Pruning 3
Pruning ToolsPruning shears are good for branches up to ½-inchin diameter.. There are two styles of hand shears:scissor action and anvil cut. In the anvil style, asharpened blade cuts against a broad, flat plate. Inthe scissor style, a thin, sharp blade slides closelypast a thicker (but also sharp) blade. The scissorstyle usually costs more, but makes cleaner, closercuts. The anvil type is faster and recommended forthinning evergreens.
Pruning Shears
Lopping Shears
Lopping shears have long handles and are operatedwith both hands. They are recommended primarilyfor removing stems in deciduous shrubs. Even thecheapest can cut ½-inch diameter material. Thebetter ones can slice through branches of 2 inches ormore, depending on plant species.
Pole pruners have a cutter with a hook above and acutting blade beneath. The cutter is on a pole and isoperated by pulling downward on a rope. Thepoles can either be in sections that fit together ortelescoping and can be made of several materials.Wooden poles are heavy. Aluminum poles are lightbut can conduct electricity if they touch an over-head wire. Fiberglass or some type of plastic com-pound is probably the best choice. Poles can befitted with saws, but are often cumbersome.
Use of pole pruners can be dangerous, as materialcut overhead can fall on the operator (unless ithangs up in other branches); exercise caution andwear head and eye protection.
Combination pole saw pruner
Hedge shears have long, flat blades and relativelyshort handles, one for each hand. Power hedgeshears are also available. All hedge shears have anegative impact on plant health and appearancewhen in an informal planting.
Hedge shears
There are many makes and models of pruning saws.Fineness of cutting edge is measured in points (teethper inch). An 8-point saw, such as an apple saw, ismost desirable for delicate, close work. Averagesaws are about 6 points, while 4½-point saws are forfairly heavy limbs.
A fixed-blade saw with a leather scabbard is saferand easier to use. Folding saws either require ascrewdriver (for a slotted-head holding screw) orwill have a protruding wing nut, which can scar thetrunk when a limb is cut. If the saw suddenly foldswhile in use, the operator’s fingers can be injured.
Blades can be either straight or curved. Many prefera curved blade that cuts on the draw stroke. Adouble-edged saw has fine teeth on one side, coarseon the other; these can be difficult to use in denselybranched plants.
Bow saws are good only where no obstruction existsfor a foot or more above the area to be cut.
Pruning saw Bow saw
Chain saws come in a variety of sizes, both gas andelectric. However, in general, chainsaws are notappropriate for pruning live plant material. Theyare better suited to tree removal and cutting fire-wood.
Care of ToolsClean and oil tools regularly. Wipe an oily cloth onblades and other surfaces after each use. Keepcutting edges sharp. Several passes with a good oil-stone will usually suffice. Wooden handles shouldbe painted, varnished, or regularly treated withlinseed oil. Use tools properly. Don’t twist or strainpruners or loppers. Keep the branch to be cut asdeeply in the jaws and near the pivot as possible.Don’t cut wire with pruning tools.

Chapter 8 Pruning 4
Pruning Techniques
Twigs and Small BranchesWhen pruning twigs and small branches, always cutback to a vigorous bud or an intersecting branch.When cutting back to a bud, choose a bud that ispointing in the direction you wish the new growthto take. Be sure not to leave a stub over the bud orcut too close to the bud.
Proper pruning angle
When cutting back to an intersecting (lateral)branch, choose a branch that forms an angle of nomore than 45 degrees with the branch to be re-moved. Also, the branch that you cut back to shouldhave a diameter at least half that of the branch to beremoved.
Make slanting cuts when removing limbs that growupward; this prevents water from collecting in thecut and expedites healing.
Thick, Heavy BranchesLarge branches should be removed flush with thecollar at the base of the branch, not flush with thetrunk.
Hardwoods
Conifers
The collar is an area of tissue that contains a chemi-cally protective zone. In the natural decay of a deadbranch, when the decay advancing downwardmeets the internal protected zone, an area of verystrong wood meets an area of very weak wood. Thebranch then falls away at this point, leaving a smallzone of decayed wood within the collar. The decayis stopped in the collar. This is the natural sheddingprocess when all goes according to nature’s plan.When the collar is removed, the protective zone isremoved, causing a serious trunk wound. Wood-decay fungi can then easily infect the trunk. Even ifthe pruned branch is living, removal of the collar atthe base still causes injury to the tree.
For over half a century, the recommendations forpruning have been to flush-cut and paint. Theserecommendations have no basis in scientific fact.The flush-cut increases the tree injury, which thepaint hides. The paint is primarily cosmetic, apsychological treatment for the person doing thepruning, to show that he or she has done somethingto “help” the tree. In fact, paints or wound dressingsmay trap moisture and increase disease problems.
When cutting branches over 1½ inches in diameter,use a 3-part cut. This is accomplished by firstsawing the bottom of the branch, 6 to 12 inches out

Chapter 8 Pruning 5
from the trunk and about 1/3 of the way throughthe branch. Next, make a second cut from the top,about 3 inches further out from the undercut, untilthe branch falls away. The resulting stub can thenbe cut back to the collar of the branch withoutdanger of tearing the bark from the trunk. If there isdanger of the branch damaging other limbs belowor objects on the ground, it must be properly ropedand supported, then carefully lowered to theground after the second cut.
Root PruningA tree growing in the woods or landscape forseveral years may develop long roots, running 15 to25 feet or more away from the plant. These, alongwith many-branched side roots, physically supportthe tree. The area in a 3-foot radius of the trunk ofthe tree contains very few of the small feeding rootsessential to gathering nourishment for the tree.
These roots are usually located quite some distancefrom the trunk, branching off the long main roots.As a consequence, if the tree were to be dug andmoved, a major part of the necessary feeding rootswould be cut off in the balling operation; the treemight easily die when transplanted. This is thereason nurserymen root-prune nursery plants, toforce them to grow a large number of small feedingroots near the base of the plant which are moved inthe balling operation and ensure growth aftertransplanting.
To make it possible to safely dig small trees orshrubs in the woods, such trees should be root-pruned a year or so before they are moved. In thespring, sever half the roots by forcing a sharp spadeinto the soil around the plant alternately leaving ashovel width of untouched soil between cuts. Thecircle of cuts should be slightly smaller than the sizeof the ball that will eventually be dug. In the fall,sever the other half of the roots, thus cutting all theroots that are at a depth of a foot or less. The treecan then be moved the following spring.
Recent research indicates that most of the new rootsgrow from the cut end. Therefore, a root ball 4 to 6inches larger than the root-pruned area must be dugto get the newly developed roots.
Root pruning is also used to force a vigorouslygrowing fruit tree, wisteria vine, or dogwood intobloom. Using a spade to cut the roots early in thespring, as explained above, is all that is sometimesnecessary to force a tree, shrub, or vine into bloomthe following year.
Pruning Shrubs
Deciduous ShrubsThe pruning recommended for most deciduousshrubs consists of thinning out, gradual renewal,and rejuvenation pruning.
In thinning out, the first cuts are made close to theground with a saw or loppers to remove the oldest,largest stems. This is followed by removal of vigor-ous branches where they join weaker side shoots.This allows light into the shrub center and promotesa “fountain” shape. Considerable growth can be cutout without changing the plant’s natural appear-ance or habit of growth. Plants can be maintained ata given height and width for years by thinning out.This method of pruning is best done with pruningshears, loppers, or a saw (not hedge shears). Theultimate goal is to develop a shrub containing 7 to12 stems, all of different ages. Each year, one or twostems are eliminated and replaced by others.
In gradual renewal pruning, a few of the oldest andtallest branches are removed at or slightly aboveground level on an annual basis. Some thinningmay be necessary to shorten long branches ormaintain a symmetrical shape.

Chapter 8 Pruning 6
To rejuvenate an old, overgrown shrub, 1/3 of theoldest, tallest branches can be removed at or slightlyabove ground level before new growth starts.
When the shrub to be pruned is grown for itsflowers, the pruning must be timed to minimizedisruption of the blooming. Spring flowering shrubsbloom on last season’s growth and should bepruned soon after they bloom. This allows forvigorous growth during the summer, to provideflower buds for the following year.
Some examples of shrubs that bloom on lastseason’s growth:
Cercis chinensis Chinese Redbud
Chaenomeles japonica Japanese Quince
Deutzia species Spring-flowering deutzias
Forsythia species Forsythias
Kerria japonica Kerria
Lonicera species Honeysuckle
Magnolia stellata Star Magnolia
Pieris species Japanese Pieris
Rhododendron species Azaleas
Rosa species Rambling rose species
Spiraea species Early white spirea species
Syringa species Lilac species
Viburnum species Viburnum
Weigela florida Old-fashioned weigela
Some shrubs that bloom after June usually do sofrom buds which are formed the same spring. Suchshrubs should be pruned in late winter to promotevigorous growth in the spring.
Some examples of shrubs that bloom on currentseason’s growth:
Abelia x grandiflora Butterfly bush
Buddleia davidii or globosa Japanese beauty bush
Clethra alnifolia Summersweet
Hibiscus syriacus Shrub althea
Hydrangea arborescens Hills of Snow
Hydrangea paniculata PeeGee Hydrangea
Hypericum species Saint Johnswort
Rosa species Bush Rose
Spirea bumalda Anthony WatererSpirea
Symphoricarpos Coralberry
Evergreen ShrubsFor most evergreen shrubs, thinning is the mostdesirable procedure. First, establish the desiredperimeter on the top and sides of the plant. Shootsthat have grown past this point are removed wherethey join another branch inside the interior of theshrub. Shoots that extend to the perimeter areallowed to remain. Approximately one out of everythree or four shoots is removed .
X X X X X X X X
Thinning X X X X X XPattern X X X X X
X X X
Most of the pruning should be done as soon as theground thaws in the spring. Pruning during late falland winter often results in sun scald. Touch-uppruning, on a small scale, can be done throughoutthe summer months.
Pruning HedgesHedges consist of plants set in a row so as to mergeinto a solid, linear mass. They have served garden-ers for centuries as screens, fences, walls, andedgings.
A well-shaped hedge is no accident. It must betrained from the beginning. The establishment of adeciduous hedge begins with the selection ofnursery stock. Choose young trees or shrubs 1 to 2feet high, preferably multiple-stemmed. Whenplanting, cut the plants back to 6 or 8 inches. Thiswill induce low branching. Late in the first seasonor before bud-break in the next, prune off half of thenew growth. In the following year, again trim offhalf the new growth to encourage branching.
In the third year, start shaping. Hedges are oftenshaped with flat tops and vertical sides. This un-natural shaping is seldom successful. The bestshape, as far as the plant is concerned, is a naturalform -- rounded or slightly pointed top with sidesslanting to a wide base. After plants have beenpruned initially to induce low branching, the lowbranching will be maintained by trimming the topnarrower than the bottom, so that sunlight canreach all of the leaves on the plant.
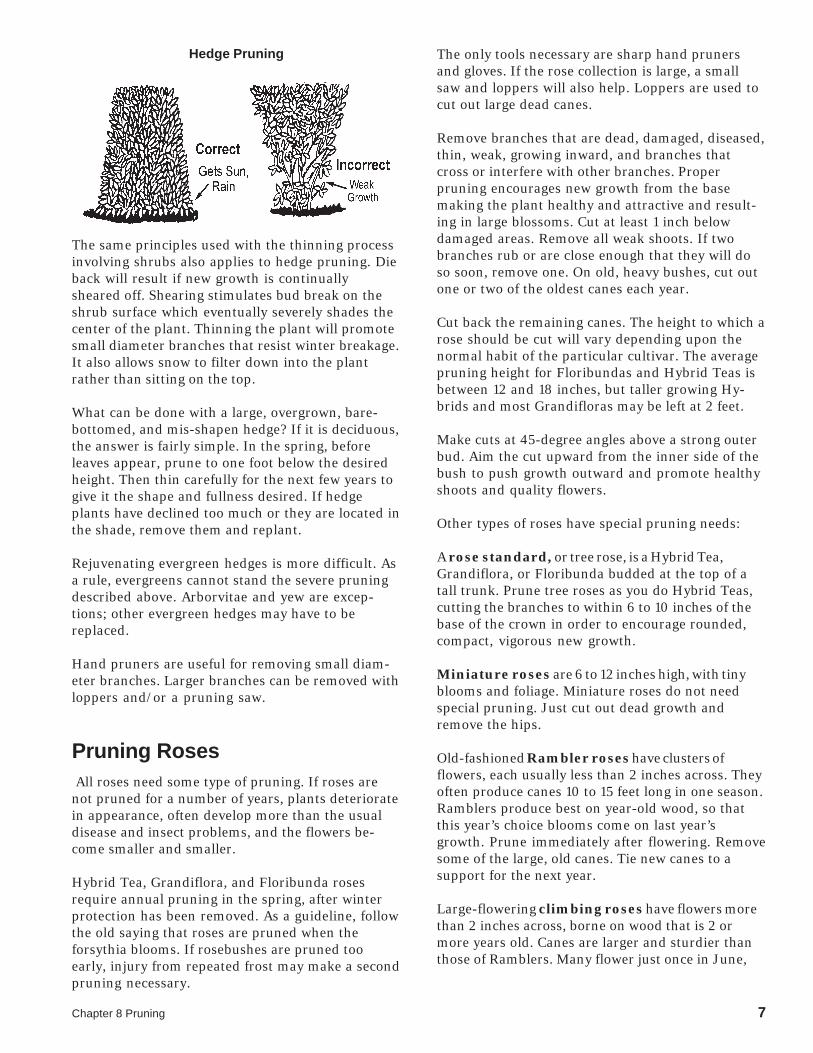
Chapter 8 Pruning 7
Hedge Pruning
The same principles used with the thinning processinvolving shrubs also applies to hedge pruning. Dieback will result if new growth is continuallysheared off. Shearing stimulates bud break on theshrub surface which eventually severely shades thecenter of the plant. Thinning the plant will promotesmall diameter branches that resist winter breakage.It also allows snow to filter down into the plantrather than sitting on the top.
What can be done with a large, overgrown, bare-bottomed, and mis-shapen hedge? If it is deciduous,the answer is fairly simple. In the spring, beforeleaves appear, prune to one foot below the desiredheight. Then thin carefully for the next few years togive it the shape and fullness desired. If hedgeplants have declined too much or they are located inthe shade, remove them and replant.
Rejuvenating evergreen hedges is more difficult. Asa rule, evergreens cannot stand the severe pruningdescribed above. Arborvitae and yew are excep-tions; other evergreen hedges may have to bereplaced.
Hand pruners are useful for removing small diam-eter branches. Larger branches can be removed withloppers and/or a pruning saw.
Pruning Roses All roses need some type of pruning. If roses arenot pruned for a number of years, plants deterioratein appearance, often develop more than the usualdisease and insect problems, and the flowers be-come smaller and smaller.
Hybrid Tea, Grandiflora, and Floribunda rosesrequire annual pruning in the spring, after winterprotection has been removed. As a guideline, followthe old saying that roses are pruned when theforsythia blooms. If rosebushes are pruned tooearly, injury from repeated frost may make a secondpruning necessary.
The only tools necessary are sharp hand prunersand gloves. If the rose collection is large, a smallsaw and loppers will also help. Loppers are used tocut out large dead canes.
Remove branches that are dead, damaged, diseased,thin, weak, growing inward, and branches thatcross or interfere with other branches. Properpruning encourages new growth from the basemaking the plant healthy and attractive and result-ing in large blossoms. Cut at least 1 inch belowdamaged areas. Remove all weak shoots. If twobranches rub or are close enough that they will doso soon, remove one. On old, heavy bushes, cut outone or two of the oldest canes each year.
Cut back the remaining canes. The height to which arose should be cut will vary depending upon thenormal habit of the particular cultivar. The averagepruning height for Floribundas and Hybrid Teas isbetween 12 and 18 inches, but taller growing Hy-brids and most Grandifloras may be left at 2 feet.
Make cuts at 45-degree angles above a strong outerbud. Aim the cut upward from the inner side of thebush to push growth outward and promote healthyshoots and quality flowers.
Other types of roses have special pruning needs:
A rose standard, or tree rose, is a Hybrid Tea,Grandiflora, or Floribunda budded at the top of atall trunk. Prune tree roses as you do Hybrid Teas,cutting the branches to within 6 to 10 inches of thebase of the crown in order to encourage rounded,compact, vigorous new growth.
Miniature roses are 6 to 12 inches high, with tinyblooms and foliage. Miniature roses do not needspecial pruning. Just cut out dead growth andremove the hips.
Old-fashioned Rambler roses have clusters offlowers, each usually less than 2 inches across. Theyoften produce canes 10 to 15 feet long in one season.Ramblers produce best on year-old wood, so thatthis year’s choice blooms come on last year’sgrowth. Prune immediately after flowering. Removesome of the large, old canes. Tie new canes to asupport for the next year.
Large-flowering climbing roses have flowers morethan 2 inches across, borne on wood that is 2 ormore years old. Canes are larger and sturdier thanthose of Ramblers. Many flower just once in June,

Chapter 8 Pruning 8
but some, called ever-blooming climbers, flowermore or less continuously. This group should bepruned in autumn, any time before cold weathersets in. First cut out dead and diseased canes. Afterthis, remove 1 or 2 of the oldest canes each season tomake room for new canes. The laterals, or sideshoots, are shortened 3 to 6 inches after flowering. Ifthe plant is strong, keep 5 to 8 main canes, whichshould be tied to the trellis, fence, wall, or othersupport. If it is not strong, leave fewer canes.
Pruning Shade TreesYoung shade trees may require pruning to developa good framework. If the tree is recently planted,wait until the following spring to prune; this willbenefit root development. Multiple leaders andcrowded branches should be removed before budbreak. Avoid mid-summer, late fall, or early winterpruning. A few tree species will bleed when prunedbut this is not harmful.
Storm damage can be remedied at any time of theyear. Dead branches are removed at the collar;painting wounds is not recommended.
Pruning Vines andGround CoversThe pruning of ornamental vines is similar to thepruning of ornamental shrubs. Flowering vines arepruned according to flower production; those thatflower on new wood are pruned before new growthbegins, those that flower on last season’s growth arepruned immediately after flowering.
Vines that are grown for foliage are pruned tocontrol growth and direction. Timing is less criticalthan for flowering vines.
Ground cover plants require very little pruning.Dead or damaged stems should be removed when-ever observed. Some trailing ground covers, such asEnglish ivy, may need pruning to prevent encroach-ment on lawn areas or other plants.
Training and PruningApple Trees
Nonbearing Apple TreesProper training and pruning are essential for devel-opment of structurally strong, productive appletrees that will bear high quality fruits continuouslyand annually. Since pruning reduces potential fruitproduction, the ideal management system is onethat requires a minimal amount of pruning toachieve the goals of exceptional fruit quality andsturdy tree structure. The use of dwarf trees ishighly recommended. Not only will dwarf treesbear fruit at a much younger age than full-sizedtrees on seedling rootstock, these trees will alsorequire much less pruning effort.
The Planting YearOrdering quality nursery stock will reduce the timeand effort needed for tree training. Heavilybranched (or feathered) one-year old nursery treeswill naturally fruit more heavily earlier in the life ofthe orchard. These trees will rarely need pruning atplanting except to eliminate oversized branches -branches with a diameter exceeding ½ to 1/3 thediameter of the trunk or leader. Whenever a branchdoes need to be pruned, whether on these newlyplanted trees or later when these trees mature, it isimportant that the entire branch is cut out. Ifinstead, you prune offending branches by simplycutting off a portion of the end, you will not solvethe structural problem the branch is causing.Rather, the branch will regrow in a vigorous andupright manner, creating unwanted shading ofother wood, delaying fruiting.
Branches are most productive at an angle some 60to 75o from the vertical leader or trunk - not quite,but nearly flat. The branches on well featherednursery trees will naturally develop wide, strongcrotches. The few that are too upright growing caneasily be tied down or spread to a wider angle.
The use of a tree training stake is the key first stepto properly training young apple and pear trees.Dwarf trees frequently require some sort of supportin part because they bear fruit so young in life.Staked trees are easy to train - simply tie the leaderor trunk to the stake. Lateral limbs that needspreading can be pulled down into position with

Chapter 8 Pruning 9
soft twine or string tied to the stake. And stakedtrees will bear fruit earlier and be more productivethan trees that are not staked. Electrical conduitpipe (3/4 to 1 inch in diameter) and pressuretreated wood (2 inches in diameter) are ideal treestakes. Use stakes 8 to 10 feet long, setting them upto 3 feet into the soil to insure good anchorage.
While well branched trees are the ideal, you oftenwill have to settle for trees that have only a few orperhaps no branches. Again, newly planted treesshould be tied to a tree training stake. If the fewbranches they do have are uniformly distributedaround the tree, then no pruning is required. If thetree is one-sided, or becomes one-sided after anoversized branch or two is removed, then perhapsthe best course of action is to remove them all andstart over. This will often be the case when a treecomes with only one or two branches. For trees thathave been pruned back to a single trunk or leader(whip), cut the leader off at a height of 36 inchesabove the ground to encourage the development ofwide-angled branches.
The Year After PlantingBeginning in the second year, pruning in the latewinter or very early spring should be an annualmanagement practice. If the trees grew exception-ally well the previous summer, or came from thenursery with many laterals, some thinning oflaterals may be necessary. More that 5 to 7 lateralsat this stage may cause crowding. Crowding meansshade, and shaded wood will produce few flowerbuds and fruit.
How do you select branches to remove? First,remove any branches that are oversized just as wedid at planting. Oversized branches will createinternal shade problems, limiting fruit productionin the future. Once again, any branch over ½ thediameter of the trunk where it joins the trunk is acandidate for removal. Be sure to follow the com-plete removal rule. Completely remove the offend-ing branch - removing a portion of it will not solvethe problems it will soon create. You should alsoremove any excessively low branches. Branches lessthan 20 to 22 inches above the ground will bedifficult to mow under and will likely produceinferior quality fruit as they sag under crop loads.
Some limb spreading may be necessary in thissecond spring. Limbs can be positioned at thedesired angle by simply tying them down using the
tree stake as an anchor. Check the leader to be sureit is properly tied to the stake. Once again, notipping of branches is recommended. There is noeasier way to delay and reduce fruiting than bytipping or heading back branches. Remember, deerare tip pruners and trees that deer prune bear few ifany fruits!
Year Three and BeyondThe basic pruning rules we have practiced in thefirst two years of the tree’s life do not change as thetree ages although the size of some of our pruningcuts might. We continue to train the leader to thestake and eliminate any oversized branches thatdevelop. Some branches that didn’t seem toovigorous in years 1 and 2 may become problems,growing at a much faster rate than other parts of thetree. These excessively large branches will need tobe removed, again by cutting them out completely.And some shade problems may develop as growingbranches crowd each other. Again, completelyeliminate a branch or two to eliminate shadingrather than cutting back all branches.
Additional limb spreading may be needed forcertain upright-growing branches, especially withcultivars like Delicious and Macoun which have anatural upright growth tendency.
Balance is the key. Branches should be relativelyuniform in size and evenly distributed around thetrunk. The top of the tree should be narrow com-pared to the lower portion, as shading of the lowerbranches will reduce fruit production. The trunk orleader should be straight, again to reduce shadingon the lower branches. And branches should bepositioned at an appropriate angle to intercept themost sunlight possible. The key tools for achievingthese goals are a tree training stake, whole limbpruning, and limb spreading.

Chapter 8 Pruning 10
Bearing Apple TreesWhen pruning is underway, older, bearing treesshould be pruned first. Young, nonbearing appletrees and stone fruits should not be pruned untilafter March 1 to minimize chances of winter injury.
The balance between vegetative and fruiting growthis influenced by the crop load, fertilization, andpruning. Fruiting may be poor because vigor is toohigh or too low. Excessive vigor can be the result ofinadequate fertilization, no pruning, excessivecropping, or shading of fruiting wood. Good fruit-ing wood requires moderate vigor and exposure togood light levels.
Light is the source of energy that produces the crop.Bearing wood that is shaded is low in vigor andproduces small, poorly colored fruits. Good lightexposure is necessary for the development of flowerbuds as well as optimum size, color, and sugarcontent of the fruit. Studies have shown that atypical tree canopy is composed of different layersor zones in respect to light exposure. As shownbelow, an outside zone of leaves and fruit receives ahigh proportion of direct light and light levelsabove those required for good growth and fruiting;a second zone receives adequate light exposure; anda third, inner zone receives inadequate light expo-sure and is unproductive.
The relative proportion of these zones in a tree isinfluenced by tree size and shape. As tree sizeincreases, the percentage of the tree that is shadedand unproductive (third zone) increases. Trees thathave wide tops and narrow bottoms also have ahigh percentage of shaded areas in the tree canopy.Trees should be cone-shaped, or larger at thebottom than the top, to maximize adequate lightexposure.
Good light exposure in the tree canopy can also bemaintained by a good pruning program. Ideally,pruning should remove unproductive wood anddevelop a uniform distribution of vigor and lightexposure throughout the tree. Proper pruning canalso help to maintain desired tree size and shape.
Pruning should be done on a regular basis andconsist of moderate cuts made throughout the treeto distribute vigor and provide good light penetra-tion. Heading cuts should only be used wherebranching is desired or in areas where vigor is low.Drooping or low-hanging branches should beremoved or pruned to a lateral that is positionedabove horizontal. Remove crossing, dead, or dam-aged limbs. Watersprouts should be removed unlessone is needed for the development of new bearingsurface. Watersprouts can be easily removed byhand as they develop in the summer.
Without regular annual pruning, trees often becomeoverly thick, and irregular bearing may occur.Spray penetration is reduced, and problems such asscale may develop in the dense areas of the tree.With this type of tree, make many thinning cutsthroughout the tree with emphasis on the upper,outer portions of the tree. This will open up areasinto the tree canopy as well as re-establish good treeshape.
Avoid bench cuts to outward-growing limbs unlessnecessary. Such cuts result in weak limbs and anumbrella shape that creates a sucker problem.Remove no more than 2 large limbs per year. Iflarge amounts of pruning are required, it should bespread over a 2 to 3 year period. In addition, suchpruning should be preceded and followed for 1 to 2years by a reduction or elimination of nitrogenapplication, depending on soil type, variety, andgrower experience.
The excess vigor that can result from severe pruningcan decrease fruit quality. The effect is much thesame as from excessive nitrogen application, andmay include excessively large, poorly colored, softapples which will not store well. Vegetative growthcompetes with fruit for calcium; thus, under condi-tions of excessive vigor, calcium related disorderssuch as bitterpit may develop.
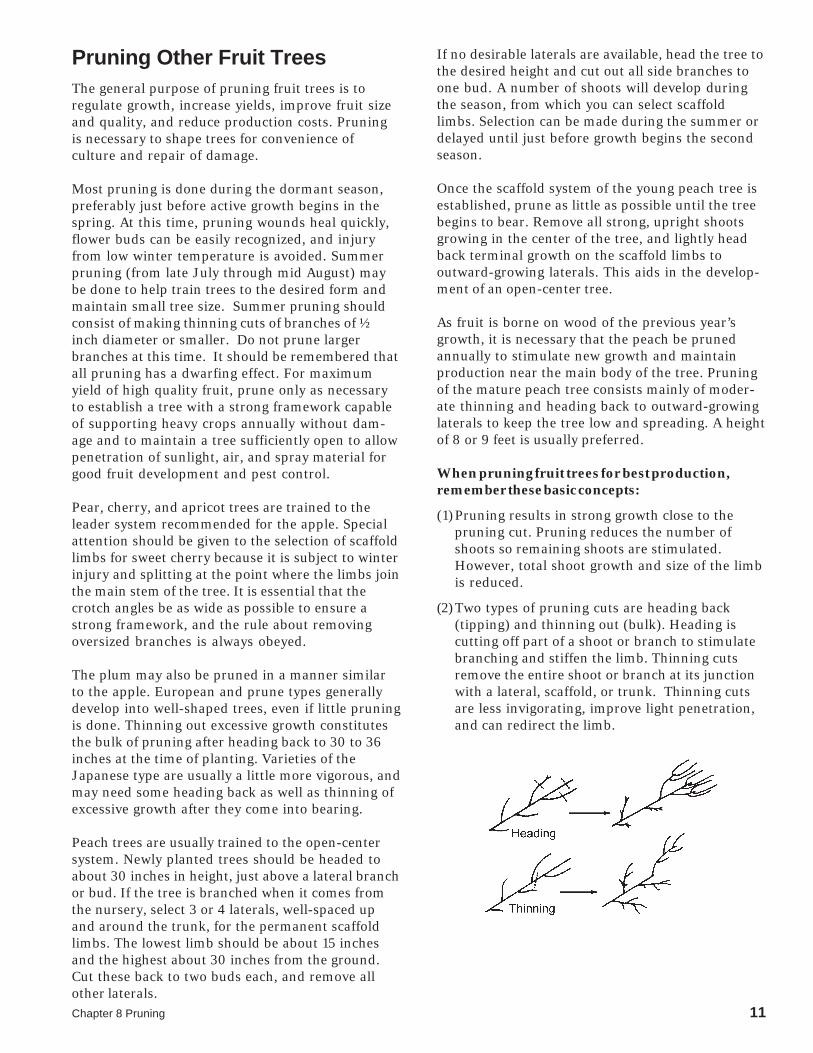
Chapter 8 Pruning 11
Pruning Other Fruit TreesThe general purpose of pruning fruit trees is toregulate growth, increase yields, improve fruit sizeand quality, and reduce production costs. Pruningis necessary to shape trees for convenience ofculture and repair of damage.
Most pruning is done during the dormant season,preferably just before active growth begins in thespring. At this time, pruning wounds heal quickly,flower buds can be easily recognized, and injuryfrom low winter temperature is avoided. Summerpruning (from late July through mid August) maybe done to help train trees to the desired form andmaintain small tree size. Summer pruning shouldconsist of making thinning cuts of branches of ½inch diameter or smaller. Do not prune largerbranches at this time. It should be remembered thatall pruning has a dwarfing effect. For maximumyield of high quality fruit, prune only as necessaryto establish a tree with a strong framework capableof supporting heavy crops annually without dam-age and to maintain a tree sufficiently open to allowpenetration of sunlight, air, and spray material forgood fruit development and pest control.
Pear, cherry, and apricot trees are trained to theleader system recommended for the apple. Specialattention should be given to the selection of scaffoldlimbs for sweet cherry because it is subject to winterinjury and splitting at the point where the limbs jointhe main stem of the tree. It is essential that thecrotch angles be as wide as possible to ensure astrong framework, and the rule about removingoversized branches is always obeyed.
The plum may also be pruned in a manner similarto the apple. European and prune types generallydevelop into well-shaped trees, even if little pruningis done. Thinning out excessive growth constitutesthe bulk of pruning after heading back to 30 to 36inches at the time of planting. Varieties of theJapanese type are usually a little more vigorous, andmay need some heading back as well as thinning ofexcessive growth after they come into bearing.
Peach trees are usually trained to the open-centersystem. Newly planted trees should be headed toabout 30 inches in height, just above a lateral branchor bud. If the tree is branched when it comes fromthe nursery, select 3 or 4 laterals, well-spaced upand around the trunk, for the permanent scaffoldlimbs. The lowest limb should be about 15 inchesand the highest about 30 inches from the ground.Cut these back to two buds each, and remove allother laterals.
If no desirable laterals are available, head the tree tothe desired height and cut out all side branches toone bud. A number of shoots will develop duringthe season, from which you can select scaffoldlimbs. Selection can be made during the summer ordelayed until just before growth begins the secondseason.
Once the scaffold system of the young peach tree isestablished, prune as little as possible until the treebegins to bear. Remove all strong, upright shootsgrowing in the center of the tree, and lightly headback terminal growth on the scaffold limbs tooutward-growing laterals. This aids in the develop-ment of an open-center tree.
As fruit is borne on wood of the previous year’sgrowth, it is necessary that the peach be prunedannually to stimulate new growth and maintainproduction near the main body of the tree. Pruningof the mature peach tree consists mainly of moder-ate thinning and heading back to outward-growinglaterals to keep the tree low and spreading. A heightof 8 or 9 feet is usually preferred.
When pruning fruit trees for best production,remember these basic concepts:
(1)Pruning results in strong growth close to thepruning cut. Pruning reduces the number ofshoots so remaining shoots are stimulated.However, total shoot growth and size of the limbis reduced.
(2)Two types of pruning cuts are heading back(tipping) and thinning out (bulk). Heading iscutting off part of a shoot or branch to stimulatebranching and stiffen the limb. Thinning cutsremove the entire shoot or branch at its junctionwith a lateral, scaffold, or trunk. Thinning cutsare less invigorating, improve light penetration,and can redirect the limb.

Chapter 8 Pruning 12
(3)Limb position affects vigor and fruitfulness.Vertical or upright branches, typical in the topsof trees, produce the longest shoots near the endof the limb and tend to be excessively vigorousand not very fruitful. Fruit are often of poorquality and subject to limb rub. Limbs growingslightly above horizontal are more apt to developa uniform distribution of vigor and fruitfulness.Light distribution tends to be even, and becausefruit hang along the branch, they are less proneto limb rub. Limbs growing below horizontaltend to develop suckers along the upper surface.Excess sucker growth will result in shading.Hangers, or limbs developing on the undersideof branches or scaffolds, are heavily shaded andlow in vigor. Fruit developing on such wood is ofpoor size and color.
(4)Pruning alters the balance between the tree topand root system. Thus, a pruning programshould be developed along with a good fertiliza-tion program. Severe pruning and/or excessfertilization can increase excessively the vigor ofthe tree and decrease fruiting.
Special Training SystemThe foregoing suggestions for pruning fruit treesare concerned with training for maximum produc-tion of high quality fruit. In addition, many homegardeners prune for decorative purposes.
Numerous training systems, based on the art ofespalier, which originated in France and Italy about400 years ago, have been devised. Some are quiteelaborate, requiring considerable time and patienceas well as detailed knowledge of the plant’s growthcharacteristics. The easiest espalier system is thehorizontal cordon. Apples, pears, and plums adaptwell to this system. The trees are usually supportedby a wall, fence, or wire trellis. Training to the four-tier cordon or four-wire trellis is relatively easy.
An espalier system can serve to separate yard areasand to provide an effective way of producing alarge volume of high quality fruit in a limited area.Trees trained in this fashion should be grafted ondwarfing rootstock. Otherwise, they tend to growtoo large and are difficult to hold within bounds.
First Winter
Second Winter
A simple, four-wire trellis may be constructed bysetting 8-foot posts 2 feet in the ground, spacingthem 12 feet apart, and running wires through theposts at heights of 18, 36, 54, and 72 inches. Planttwo unbranched whips of the desired variety 6 feetapart between each two posts.
Before growth begins in the spring, cut off the whipjust above the first bud, below the point where thewhip crosses the lowest wire. Usually three or moreshoots will develop near the point of the cut. Retainthe uppermost shoot and develop it as the centralleader. The other two can be developed into mainscaffold branches to be trained along the lower wire,one on each side of the central stem. Remove allother growth. The two shoots selected for scaffoldlimbs should be loosely tied to the wire as soon asthey are 10 to 12 inches long. Twine, plasticchainlink ties, or other suitable material may beused. Tie the shoots so that they are nearly horizon-tal. This reduces vegetative vigor and inducesflower bud formation. If the end of the shoot is tiedbelow the horizontal, however, new growth at theend will stop, and vigorous shoots will developalong the upper side. At the end of the first season,the lateral branches on the lower wire should beestablished and the central leader should havegrown above the second wire.

Chapter 8 Pruning 13
During the dormant pruning at the end of the firstwinter, cut the central leader off at a bud just belowthe second wire. Repeat the process of the previousspring by developing two scaffold branches to tie tothe second wire and allow the central leader togrow above the third wire.
This process is repeated during the next two sea-sons, at which time a total of eight scaffolds, four oneach side of the tree, should be firmly established.The leaders should be bent to form one of thescaffolds, rather than being cut off at the top wire.
By the end of the fourth season, the trees should bein heavy production. All pruning is then doneduring the spring and summer months. After newgrowth in the spring is about 2 inches long, cut itoff, and also removing about ¼ of the previousseason’s growth. Terminals of the scaffold are leftuntouched.
About the first of August, or as soon as new growthreaches 10 to 12 inches in length, cut it back to twoor three buds. Repeat about a month later, if neces-sary. This encourages fruit bud formation andprevents vigorous growth from getting out ofbounds.
Training and Pruning Small Fruit
Grapes.For grapes to be most productive, they must betrained to a definite system and pruned ratherseverely. There are several training systems used.The two most common are the vertical trellis andthe overhead arbor. Both of these are satisfactory inthe home planting if kept well-pruned.
Of the many variations of the vertical trellis, thesingle-trunk, four-arm, Kniffin system is the mostpopular. Posts are set 15 to 20 feet apart and extend5 feet above the ground. Two wires are stretchedbetween the posts, the lower being about 2½ feetabove the ground and the upper, at the top of theposts. The vine is set between the posts and trainedto a single trunk with four semipermanent arms,each cut back to 6 to 10 inches in length. One arm istrained in each direction on each wire.
During annual winter pruning, one cane is savedfrom those that grew from near the base of each armthe previous summer. This cane is cut back to aboutten buds. The fruit in the coming season is borne onshoots developing from those buds. Select anothercane from each arm, preferably one that grew nearthe trunk, and cut it back to a short stub having twobuds. This is a renewal spur. It should grow vigor-ously in the spring and will be the likely source ofthe new fruiting cane selected the following winter.All other growth on the vine should be removed.This leaves four fruiting canes, one on each arm,with eight to ten buds each, and four renewal spurs,one on each arm, cut back to two buds each.
The same training and pruning techniques may beeffectively used in training grapes to the arborsystem. The only difference is that the wires sup-porting the arms are placed overhead and parallelwith each other instead of in a horizontal position.Overhead wires are usually placed 6 to 7 feet abovethe ground.
If an arm dies, or for any reason needs to be re-placed, choose the largest cane that has grown fromthe trunk near the base of the dead arm and train itto the trellis wire. To renew the trunk, train a strongshoot from the base of the old trunk to the trellis asthough it were the cane of a new vine. Establish thearms in the same manner as for a new vine, and cutoff the old trunk.

Chapter 8 Pruning 14
Pruning may be done anytime after the vinesbecome dormant. In areas where there is danger ofwinter injury, pruning may be delayed until earlyspring. Vines pruned very late may bleed exces-sively, but there is no evidence that this is perma-nently injurious.
Blueberries.Until the end of the third growing season, pruningconsists mainly of removing low spreading canesand dead and broken branches. As the bushes comeinto bearing, regular annual pruning will be neces-sary. This should done between January and March.Select six to eight of the most vigorous, upright-growing canes for fruiting wood and remove allothers.
After about 5 or 6 years, a cane begins to lose vigorand fruit production is reduced. At the dormantpruning, remove the older canes of declining vigorand replace with strong, vigorous new shoots thatgrew from the base of the bush the previous season.Keep the number of fruiting canes to six or eight,and remove the rest. Head back excessive terminalgrowth to a convenient berry-picking height.
Pruning blueberries, before and after
BramblesMost brambles benefit from some form of support.They may be grown on a trellis, trained along afence, or tied to stakes.
A simple trellis, the T-trellis, is used in many homegardens. Two wires are set about 4 feet aboveground and spaced 2 feet apart by a lateral crossarm attached to posts set 15 to 20 feet apart in therow. Fruiting canes are tied to these wires in thespring.
If individual plant stakes are used for support, theyare driven into the ground about 1 foot from eachplant and allowed to extend 4 or 5 feet above theground. Canes are tied to the stake at a point aboutmidway between the ground and the tips of thecanes, and again near the ends of the canes.
Canes of bramble fruits are biennial in nature; thecrowns are perennial. New shoots grow from budsat the crown each year. Late in the summer, the newcanes develop fruit buds. Early in the secondseason, fruit-bearing shoots grow from these buds.After fruiting, the old canes die.
These fruiting canes may be removed any time afterharvest. They should be cut off close to the base ofthe plant, removed from the planting, and de-stroyed. Some growers, as a sanitation practice, dothis immediately after harvest. Most, however, waituntil the dormant pruning.
The dormant pruning is usually delayed untildanger of severe cold is past and accomplishedbefore the buds begin to swell. It consists of theremoval of all dead, weak, and severely damagedcanes, and the selection and pruning of the fruitingcanes for the coming season. Where possible,fruiting canes ½-inch or more in diameter areselected. Only three to four canes should be left perfoot of row.
Black raspberries should be topped in the summerwhen the young shoots are about 24 inches high;purple raspberries, when about 30 inches high.Summer-topping consists of removing the top 3 to 4inches of the new shoots by snapping them off withthe fingers or cutting them with shears or a knife.Where trained to supports, let them grow 6 to 8inches taller before topping.
At the dormant pruning, thin each plant until onlyfour or five of the best canes remain. Cut the lateralbranches of the black raspberry to 9 to 12 incheslong; those of the purple raspberry to 12 to 15 incheslong.
Pruning black rasberries, Before and after
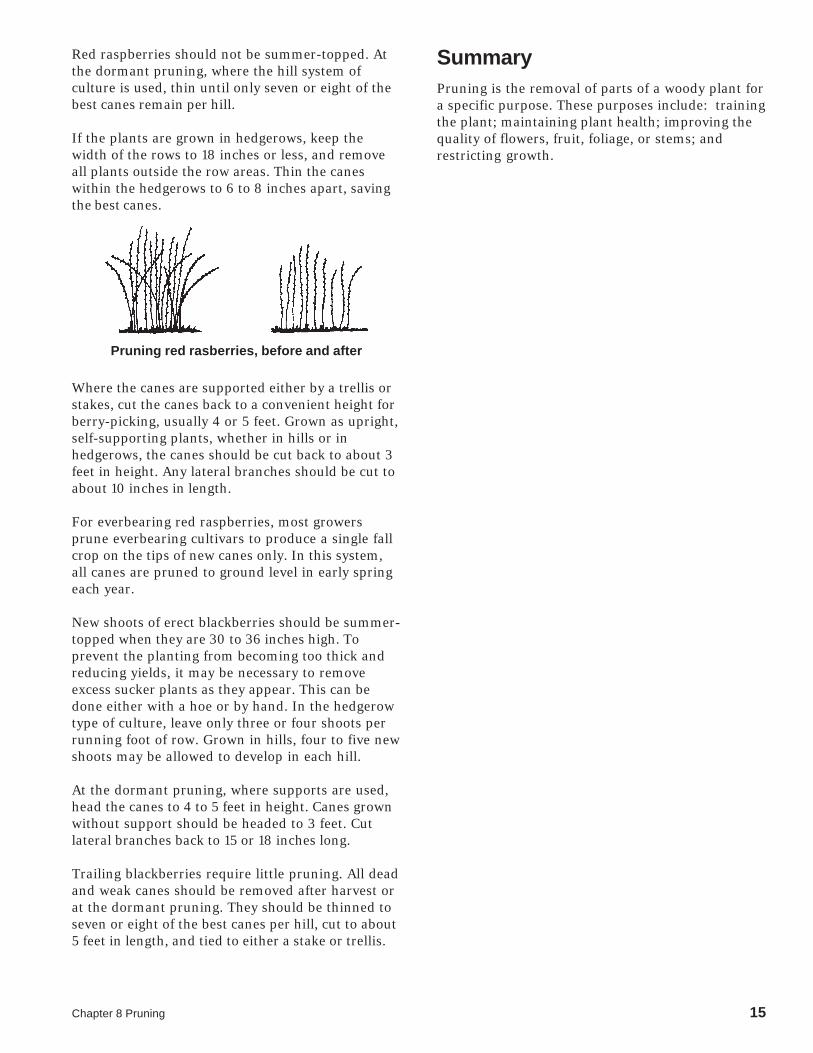
Chapter 8 Pruning 15
Red raspberries should not be summer-topped. Atthe dormant pruning, where the hill system ofculture is used, thin until only seven or eight of thebest canes remain per hill.
If the plants are grown in hedgerows, keep thewidth of the rows to 18 inches or less, and removeall plants outside the row areas. Thin the caneswithin the hedgerows to 6 to 8 inches apart, savingthe best canes.
Pruning red rasberries, before and after
Where the canes are supported either by a trellis orstakes, cut the canes back to a convenient height forberry-picking, usually 4 or 5 feet. Grown as upright,self-supporting plants, whether in hills or inhedgerows, the canes should be cut back to about 3feet in height. Any lateral branches should be cut toabout 10 inches in length.
For everbearing red raspberries, most growersprune everbearing cultivars to produce a single fallcrop on the tips of new canes only. In this system,all canes are pruned to ground level in early springeach year.
New shoots of erect blackberries should be summer-topped when they are 30 to 36 inches high. Toprevent the planting from becoming too thick andreducing yields, it may be necessary to removeexcess sucker plants as they appear. This can bedone either with a hoe or by hand. In the hedgerowtype of culture, leave only three or four shoots perrunning foot of row. Grown in hills, four to five newshoots may be allowed to develop in each hill.
At the dormant pruning, where supports are used,head the canes to 4 to 5 feet in height. Canes grownwithout support should be headed to 3 feet. Cutlateral branches back to 15 or 18 inches long.
Trailing blackberries require little pruning. All deadand weak canes should be removed after harvest orat the dormant pruning. They should be thinned toseven or eight of the best canes per hill, cut to about5 feet in length, and tied to either a stake or trellis.
SummaryPruning is the removal of parts of a woody plant fora specific purpose. These purposes include: trainingthe plant; maintaining plant health; improving thequality of flowers, fruit, foliage, or stems; andrestricting growth.


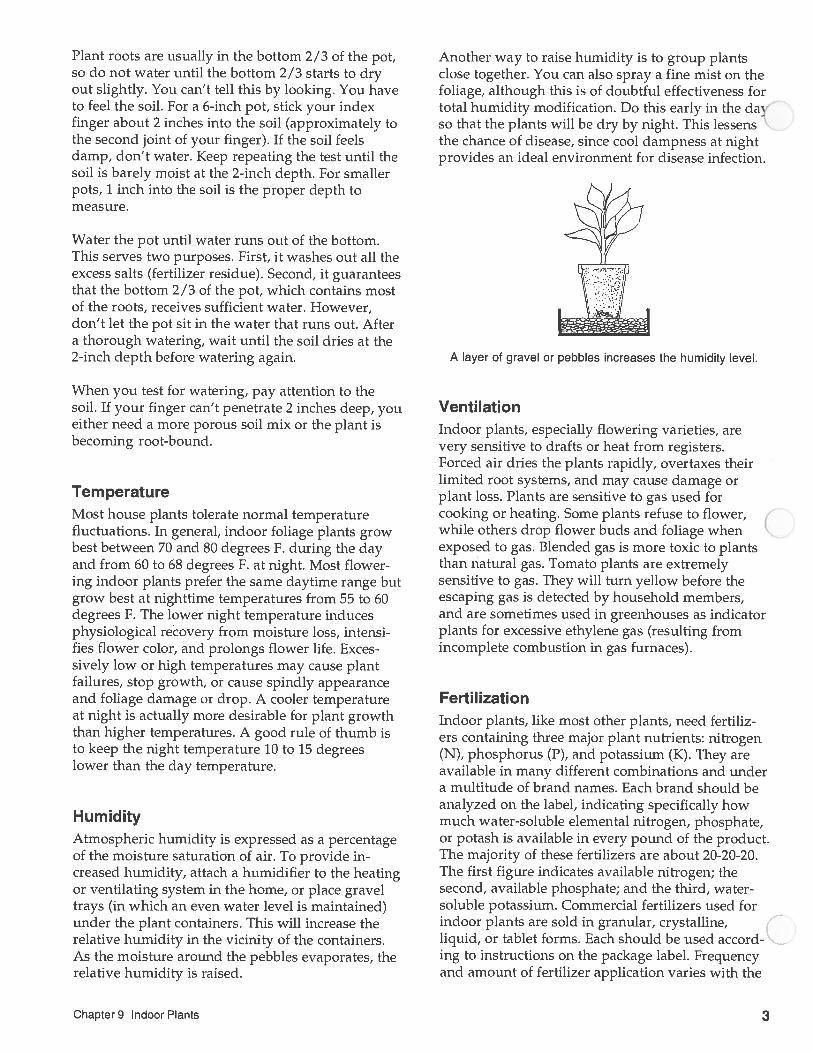


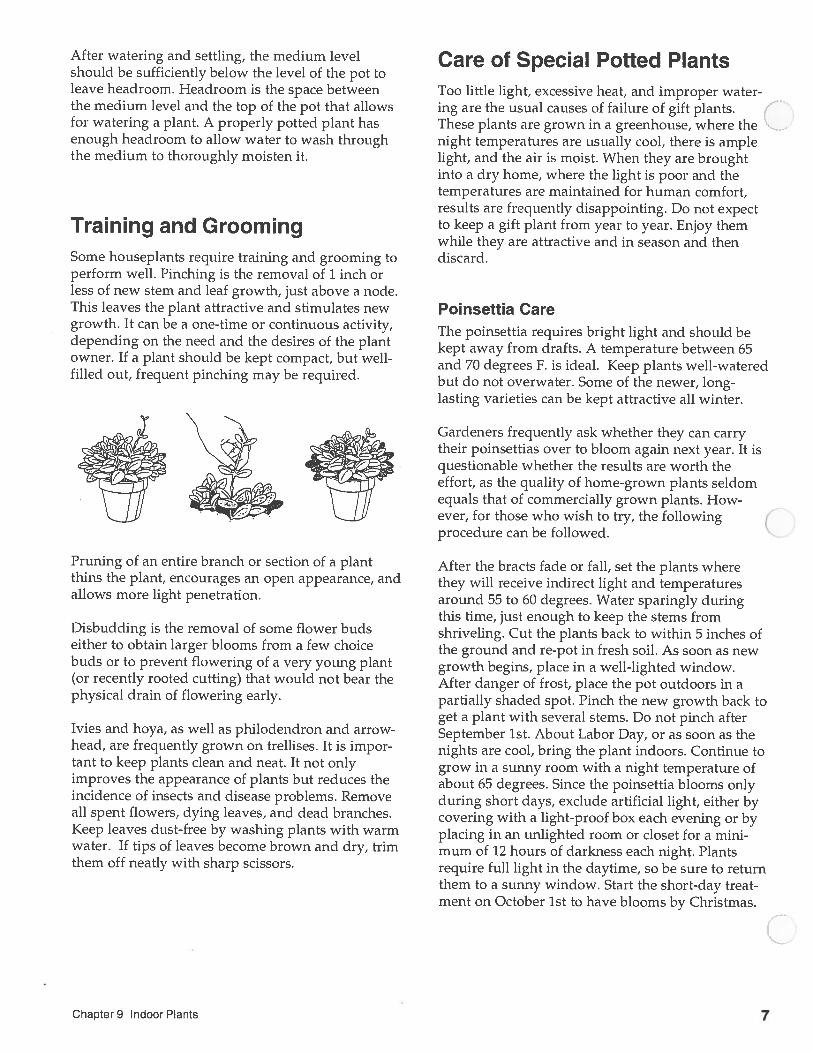


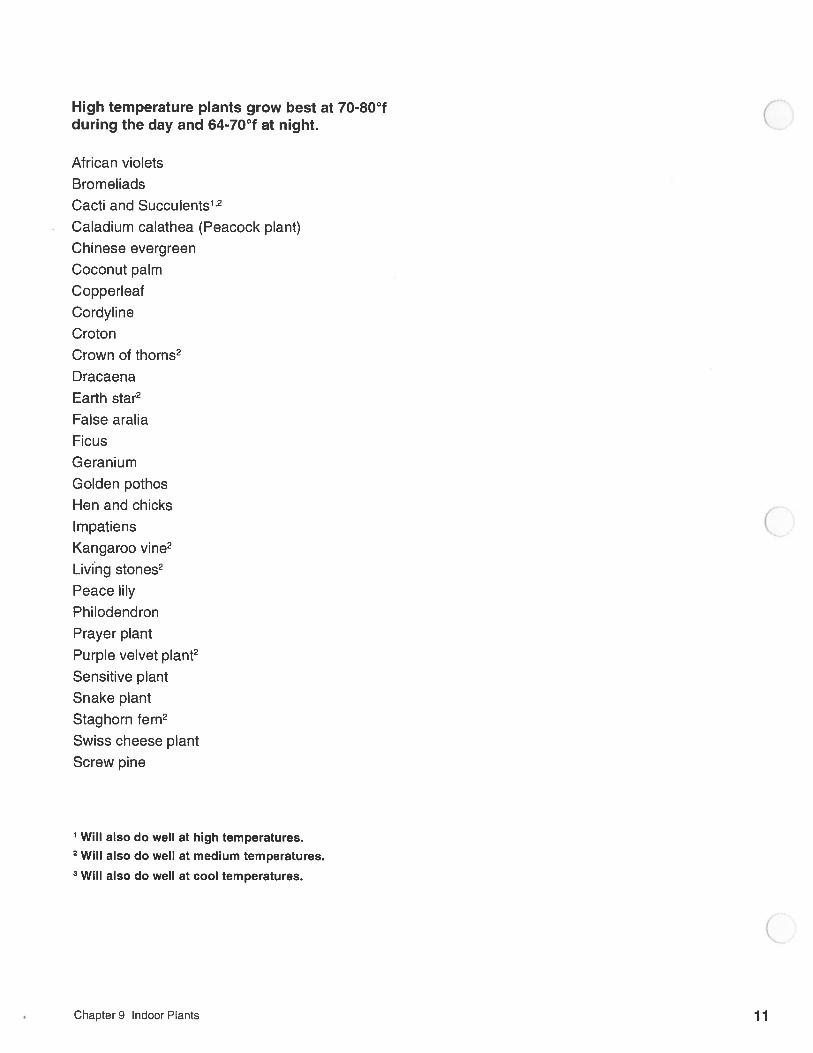
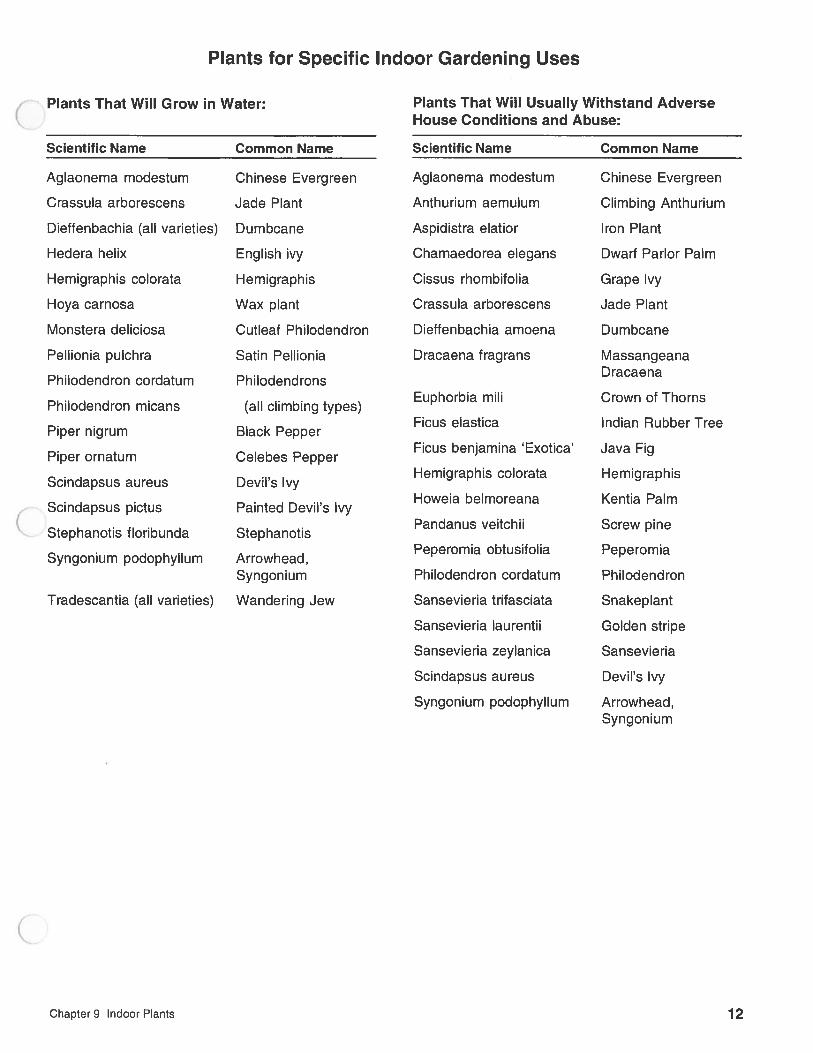

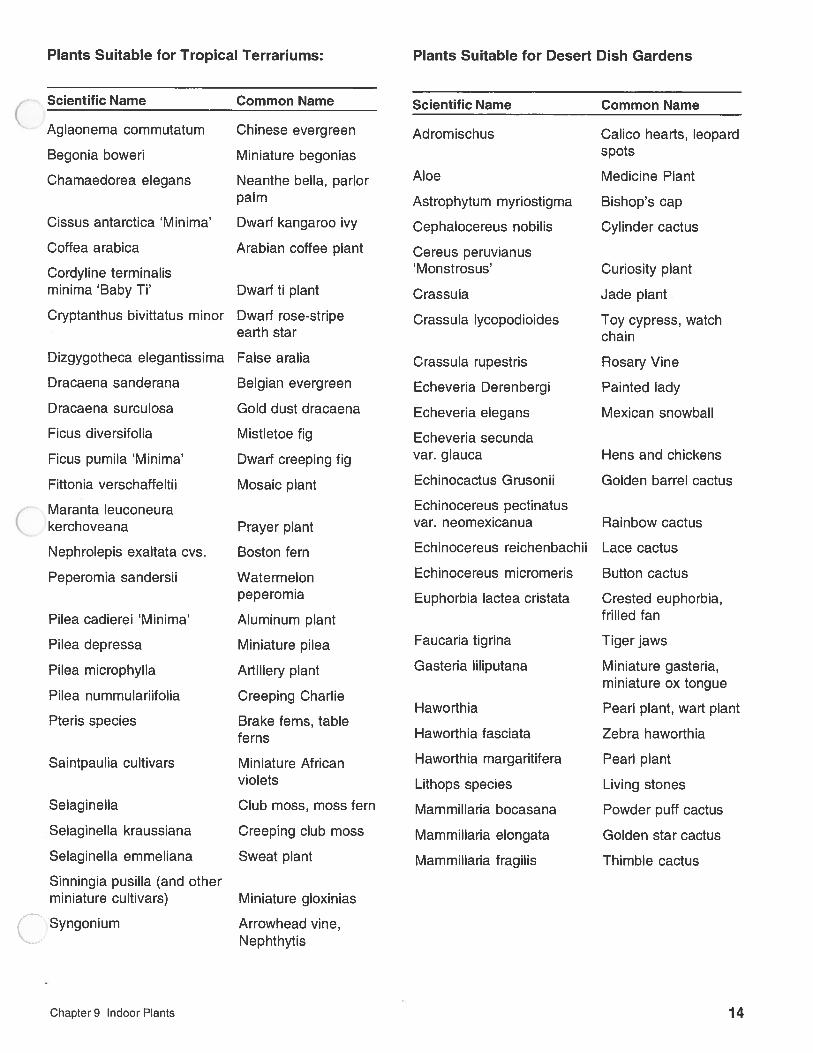


Chapter 10 Planting Vegetables 1
CHAPTER 10The Vegetable Garden
Edited and revised by by Dr. Otho Wells, University of New Hampshire Cooperative Extension
When planning your garden, it is important to ask a few basic questions:
Who will be doing the work? Will the garden be a group project with familymembers or friends who will work willingly through the season to a fall harvest,or will you be handling the hoe alone, in between camping and swimming?Remember, a small weed-free garden will produce more than a large weedymess.
What do you and your family like to eat? Although the pictures in the gardencatalog look delicious, there is no value in taking up gardening space with veg-etables that no one eats. Make a list of your family’s favorite vegetables, rankedin order of preference. This will make a useful guide in deciding how much toplant of each. Successive plantings of certain crops, such as beans, will give alonger harvest period and increase your yield. List recommended varieties andplanting dates.
How do you plan to use the produce from your garden? If you plan to can,freeze, dry, or store part of the produce, this will be a factor not only in planningthe size of the garden but also in selecting the varieties grown. Some varietieshave much better keeping quality than others. Care should be used in choosingthe seeds, making sure the varieties you select are adapted to your area andintended use.
How much space is available? That is, how much area can be converted intousable garden space, not simply how much empty ground is available.
Some Planning Hints
• Plan the garden on paper first. Draw a mapshowing arrangement and spacing of crops. Ifyou wish to keep the garden growing all season,you may need a spring, summer, and fall gardenplan.
• Plan the garden and order seeds by January orFebruary. Some plants may be started indoors asearly as late-February.
• In your plan, place tall and trellised crops on thenorth side of the garden so they won’t shade theshorter vegetables.
• Group plants by length of growing period. Plantspring crops together so that later crops can beplanted in these areas when the early cropsmature. Consider length of harvest as well astime to maturity. Place perennial crops to theside of the garden where they will not be dis-turbed by annual tillage.
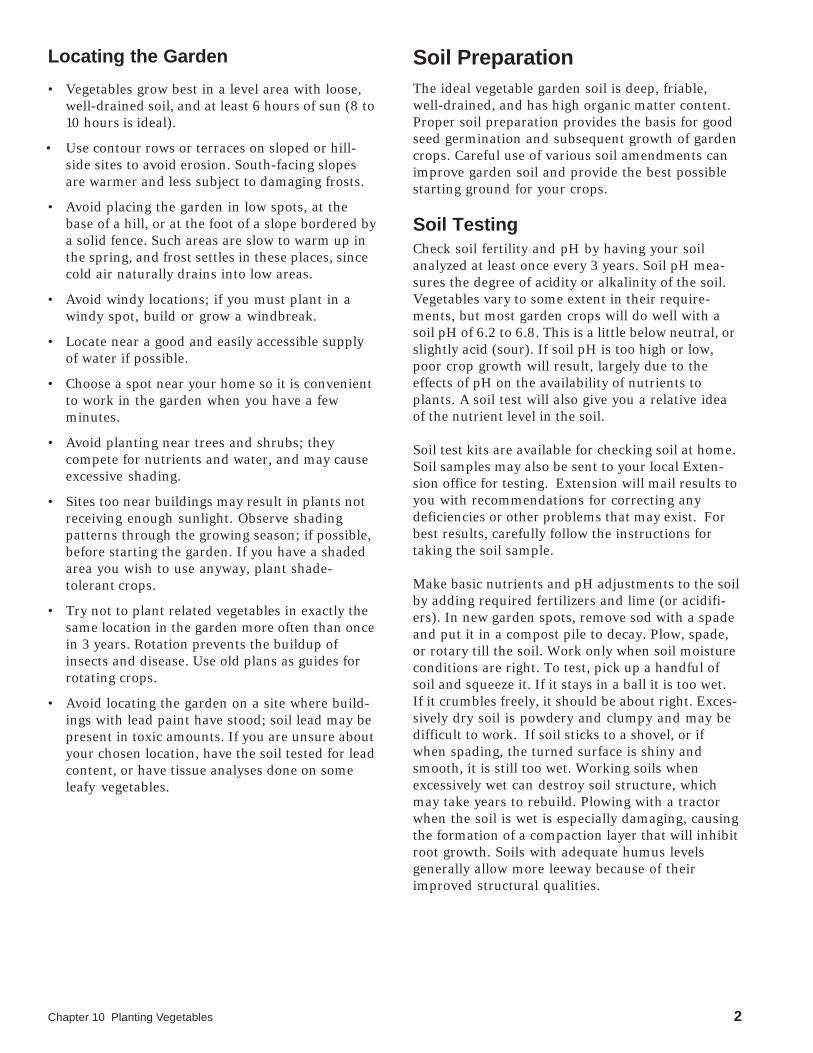
Chapter 10 Planting Vegetables 2
Locating the Garden
• Vegetables grow best in a level area with loose,well-drained soil, and at least 6 hours of sun (8 to10 hours is ideal).
• Use contour rows or terraces on sloped or hill-side sites to avoid erosion. South-facing slopesare warmer and less subject to damaging frosts.
• Avoid placing the garden in low spots, at thebase of a hill, or at the foot of a slope bordered bya solid fence. Such areas are slow to warm up inthe spring, and frost settles in these places, sincecold air naturally drains into low areas.
• Avoid windy locations; if you must plant in awindy spot, build or grow a windbreak.
• Locate near a good and easily accessible supplyof water if possible.
• Choose a spot near your home so it is convenientto work in the garden when you have a fewminutes.
• Avoid planting near trees and shrubs; theycompete for nutrients and water, and may causeexcessive shading.
• Sites too near buildings may result in plants notreceiving enough sunlight. Observe shadingpatterns through the growing season; if possible,before starting the garden. If you have a shadedarea you wish to use anyway, plant shade-tolerant crops.
• Try not to plant related vegetables in exactly thesame location in the garden more often than oncein 3 years. Rotation prevents the buildup ofinsects and disease. Use old plans as guides forrotating crops.
• Avoid locating the garden on a site where build-ings with lead paint have stood; soil lead may bepresent in toxic amounts. If you are unsure aboutyour chosen location, have the soil tested for leadcontent, or have tissue analyses done on someleafy vegetables.
Soil PreparationThe ideal vegetable garden soil is deep, friable,well-drained, and has high organic matter content.Proper soil preparation provides the basis for goodseed germination and subsequent growth of gardencrops. Careful use of various soil amendments canimprove garden soil and provide the best possiblestarting ground for your crops.
Soil TestingCheck soil fertility and pH by having your soilanalyzed at least once every 3 years. Soil pH mea-sures the degree of acidity or alkalinity of the soil.Vegetables vary to some extent in their require-ments, but most garden crops will do well with asoil pH of 6.2 to 6.8. This is a little below neutral, orslightly acid (sour). If soil pH is too high or low,poor crop growth will result, largely due to theeffects of pH on the availability of nutrients toplants. A soil test will also give you a relative ideaof the nutrient level in the soil.
Soil test kits are available for checking soil at home.Soil samples may also be sent to your local Exten-sion office for testing. Extension will mail results toyou with recommendations for correcting anydeficiencies or other problems that may exist. Forbest results, carefully follow the instructions fortaking the soil sample.
Make basic nutrients and pH adjustments to the soilby adding required fertilizers and lime (or acidifi-ers). In new garden spots, remove sod with a spadeand put it in a compost pile to decay. Plow, spade,or rotary till the soil. Work only when soil moistureconditions are right. To test, pick up a handful ofsoil and squeeze it. If it stays in a ball it is too wet.If it crumbles freely, it should be about right. Exces-sively dry soil is powdery and clumpy and may bedifficult to work. If soil sticks to a shovel, or ifwhen spading, the turned surface is shiny andsmooth, it is still too wet. Working soils whenexcessively wet can destroy soil structure, whichmay take years to rebuild. Plowing with a tractorwhen the soil is wet is especially damaging, causingthe formation of a compaction layer that will inhibitroot growth. Soils with adequate humus levelsgenerally allow more leeway because of theirimproved structural qualities.

Chapter 10 Planting Vegetables 3
Just prior to planting, break up large clods of soiland rake the bed level. Small-seeded vegetablesgerminate best in smooth, fine-surfaced soil. Do notpulverize the seedbed soil. This destroys the struc-ture and promotes crusting and erosion problems.
EquipmentThe type of equipment used to prepare your gardenwill depend on the size of the garden, your physicalability, time, and budget. Options include hand-digging with a spade or shovel, tilling with a powerrotary tiller, using a small garden tractor, or a full-sized farm tractor.
Tilling the SoilIt was once assumed that gardens should be turnedyearly with a moldboard plow, mostly for weed andpest control. While garden plowing is still a com-mon practice, turning the soil completely over hasbeen found to be detrimental in some cases, causingsoil compaction, upsetting balances of microorgan-isms, and often causing layers of coarse organicmaterial to be buried below the influence of insectsand microbes which would otherwise cause break-down of the material. Chisel plowing, which doesnot have this disruptive effect, is one alternative,but it is limited to sandy or loamy soils and manyfarmers who work gardens do not have chiselplows. In addition, gardeners in other-than-ruralareas have trouble finding a farmer who will cometo plow and disk the garden for a reasonable price(or at all). Roto-tilling most home gardens is suffi-cient, as long as plant debris accumulation is not outof hand. Rotary tilling mixes the upper layers of soilrather than completely turning the soil over, and theeffects produced are generally desirable. Onepossible harmful effect of roto-tilling is the forma-tion of a compaction layer just beyond the reach ofthe tines. This also occurs when a moldboard plowis used to the same depth every year, but at asomewhat deeper level. Use of deep-rooted covercrops or double-digging can do much to prevent oralleviate this problem when it exists. Small gardenscan be designed using raised beds which may beworked entirely by hand if the area is small enough.
Gardeners often wonder whether to plow/till in thespring or fall. Working the soil in fall has severaladvantages over the traditional spring plowing. Itallows earlier spring planting, since the basic soilpreparation is already done when spring arrives.Turning under large amounts of organic matter islikely to result in better decomposition when donein the fall, since autumn temperatures are higherthan those of early spring, and there is more time
for the process to take place. Insects, disease organ-isms, and perennial weeds may be reduced bykilling or inactivating them through burial orexposure to harsh winter weather. The physicalcondition of heavy clay soils may be improved bythe alternate freezing and thawing, which breaks uptightly aggregated particles. Also, snow is trappedbetween the hills of roughly-plowed soil, so moremoisture is retained than on flat, bare ground.Incorporation of limestone or rock fertilizers in thefall gives them time to become integrated with thesoil and influence spring plant growth.
Fall plowing alone is not recommended for hillsideor steep garden plots, since soil is left exposed allwinter, subject to erosion when spring rains come. Ifa winter cover crop is grown to improve soil andprevent erosion, the ground will have to be tilled inthe fall to prepare the soil for seed, and again inspring to turn under the green manure. Springplowing is better for sandy soils and those whereshallow tilling is practiced. Generally, most gardensmust be disked or rotary-tilled in the spring tosmooth the soil for planting.
Soil AmendmentsAny addition to the soil which improves its physicalor chemical condition is considered a soil amend-ment. Many types of amendments are available tothe home gardener.
Amendments to Change pH and Nutrient Levels:
Lime and sulfur are common amendments usedto change soil pH. The correct soil pH is essentialfor optimum plant growth. Dolomitic limestoneadds calcium and magnesium as it increases pH.Sulfur itself may acidify alkaline soil. Theamount to add depends on the current anddesired pH, one good reason to have garden soilchecked periodically.
Wood ashes are often used as a soil amendment.They contain potash (potassium), phosphate,boron, and other elements. Wood ashes can beused to raise soil pH with twice as much ashapplied as limestone for the same effect. Ashesshould not come into contact with germinatingseedlings or plant roots as they may cause rootburn. Spread in a thin layer over the winter, andincorporate into the soil; check pH yearly if youuse wood ashes. Never use coal ashes or largeamounts of wood ash (no more than 20 lbs. per1000 square feet), as toxicity problems mayoccur.

Chapter 10 Planting Vegetables 4
Other amendments are added specifically toimprove soil nutrient levels. Greensand is asource of potassium. Greensand is relatively lowin potassium which is readily dissolved. Othernutritional amendments that can be purchasedfor garden use include cottonseed meal and kelpmeal as well as an array of synthetic fertilizers.The organic amendments are particularly usefulwhere a trace element deficiency exists, whilesynthetic fertilizers are generally more available,less expensive, and have quicker results.
Amendments to Improve Soil Qualities:In special cases, coarse sand, peat, vermiculite, andperlite are sometimes added to heavy clays to helpimprove soil texture (the ratio of sand:silt:clay) orstructure. However, these inert materials can beexpensive and large quantities are needed to do anygood. Compost, manures, and other amendmentsusually serve the purpose more economically andjust as well.
Organic matter is a great soil improver for both clayand sandy soils. Good sources of organic matterinclude manures, leafmold, sawdust, straw, andothers. These materials are decomposed in the soilby soil organisms. Various factors, such as moisture,temperature, and nitrogen availability determinethe rate of decomposition through their effects onthese organisms. Adequate water must be present,and warm temperatures will increase the rate atwhich the microbes work. The proper balance ofcarbon and nitrogen in the material is needed toensure adequate nutrient availability both to grow-ing plants and decomposing organisms. Addingnitrogen may be necessary if large amounts ofundecomposed leaves, straw, sawdust, or otherhigh-carbon substances are used. Nitrogen is usedby the decayers to make proteins for their ownbodies, and if it is not present in sufficient amounts,the microbes have no qualms about stealing theplants’ share.
The use of compost is one way to get around thedecomposition problem. Compost is usually madeby the gardener from plant and/or animal wastes.Correct composting is an art which can result in avaluable nutrient and humus source for any garden.The basis of the process is the microbial decomposi-tion of mixed raw organic materials to a dark, fluffyproduct resembling rich soil, which is then spreadand worked into the garden soil.
Animal manures are commonly used as a gardensoil amendment. The value of manure in terms ofthe nutrients it contains varies. Fresh horse, sheep,
rabbit, and poultry manures are quite high innitrogen and may even burn plants if applieddirectly to a growing garden. They are best appliedin the fall and tilled under. Manure usually hasfewer total nutrients than synthetic fertilizers interms of N, P, & K, but is a valuable soil-builder.Unfortunately, manures may be a source of weedseeds; if this is a problem, composting in a hot pilemay help. In urban areas, manure may be hard tocome by, but country dwellers usually find itplentiful.
Another source of inexpensive soil improvementthat should not be underestimated is the cover crop.Green manures, or cover crops, such as annual rye,ryegrass, and oats are planted in the garden in thefall for incorporation in the spring. For best results,seed should be sown a month before the first killingfrost. In a fall garden, plant cover crops between therows and in any cleared areas. Cover croppingprovides additional organic matter, holds nutrientsthat might have been lost over the winter, and helpsreduce erosion and loss of topsoil. Legume covercrops can increase the amount of nitrogen in the soiland reduce fertilizer needs. A deep-rooted covercrop allowed to grow for a season in problem soilcan help break up hardpan and greatly improvetilth. Incorporate green manures at least 2 weeksbefore planting vegetables; they should not beallowed to go to seed before incorporation.
The regular addition of manure, compost, covercrops, and other organic materials can raise the soilnutrient and physical level to a point at which theaddition of synthetic fertilizers is no longer needed,or is at least greatly reduced. This comes about notonly through the intrinsic fertilizing value of theamendment, but also through the increased actionof microorganisms on soil and humus particles;humic acid (and other acids) helps to release previ-ously locked-up nutrients naturally present in thesoil, and the extra surface area provided by humusserves as a reserve, holding nutrient elements untilthey are needed by plants. This highly desirable soilquality does not come about with a single or evenseveral additions of organic material, but ratherrequires a serious, long-term, soil-building pro-gram. Information is widely available in books andmagazine articles on this subject.
Remember, your soil is alive and constantly chang-ing. By keeping it fertile and rich, many gardeningproblems may be diminished. Soil is the base forplant growth, and much attention should be paid togetting and keeping it in the best condition.

Chapter 10 Planting Vegetables 5
Selecting Gardening EquipmentGarden catalogs and stores are full of gardeningtools, many highly specialized; some are veryuseful, others are nice but not necessary, and someare gimmicks. The gardening equipment you needdepends on the size of your garden, your age andstrength, and whether you want to get the job donein a hurry or prefer to take your time. The minimumequipment needed by most gardeners includes ashovel or spade, a hoe, a rake, and a trowel. A wideselection of styles is available in each of these tools,and the choice is really one of personal preferenceand price range. You can get the best value for theprice range you choose by knowing each tool’s usesand particular qualities to look for when compari-son shopping.
Hand Tools for CultivatingA garden shovel with a pointed blade is lighter andsmaller than most other shovels and is well suitedfor use in the garden. Shovels are earth movers withdish-shaped blades mounted to the handle at anangle. A spade has a flat blade and is designed forcutting rather than lifting or moving soil. Spades areexcellent for shaping straight-sided trenches and foredging beds. For general purpose digging, liftingand moving, a long-handled shovel is ideal. Bothshovels and spades come with long or short handlesin standard or D-shaped styles. Choice of handlestyle will depend on personal preference; longhandles offer greater leverage and are less tiring touse in many cases. Short handles are often thickerand stronger than long ones.
A spading fork is another useful digging tool. It isideal for breaking and turning heavy soils and forloosening subsoil layers when double digging abed. Turning coarse compost, spreading mulches,and digging root crops are other jobs suitable for aspading fork.
A hoe is essential in any garden for preparing theseed bed, removing weeds, and breaking up en-crusted soil. Several different hoe styles are avail-able. The pointed hoe with a heart-shaped blade islightweight and useful for opening seed furrowsand cultivating between plants. The hula, or actionhoe, is a type of scuffle hoe which is very light-weight and maneuverable. Pushing and pulling itjust under the soil surface eliminates newly emerg-ing weeds and breaks up any crust on the soilsurface. This type of hoe is most easily used on soilwhich is not compacted, since the blade is relativelythin and lacks the clod-breaking capabilities of aheavier hoe; it is also less effective in cases whereweeds have gotten a good start. Other types ofscuffle hoes are somewhat more sturdy, and areused with a pushing motion rather than pushingand pulling. Probably the most commonly used hoeis the square-bladed hoe, which lends itself well tomany garden tasks.
A sturdy rake is useful in clearing the garden ofrocks and debris. It is also helpful in spreadingmulches and smoothing seedbeds. The size of therake right for you depends on your size andstrength and the uses you intend to put it to. As thenumber of tines increases, the rake weight alsoincreases; avoid choosing a rake so heavy it will tireyou after a short period of use. The length of therake handle is important too; the tip of the handleshould come up to your ear when standing upright.A handle that is too short will make your workharder, causing excess bending and back strain.
Especially in the spring, a trowel will be in constantuse for those many digging jobs that need not bedone with full-sized tools. The trowel is perfect fortransplanting seedlings and bulbs or diggingshallow-rooted weeds. Small hand cultivators, oftensold in sets with trowels, are good for weeding insmall areas and between closely spaced plants.Another useful small digging tool is appropriatelynamed a digger (a.k.a. weeder, cultivator, asparagusknife). This tool is available from most hardware ordiscount stores for a few dollars. It is indispensablefor digging up weeds with long taproots, such asdandelions or Queen Anne’s lace, or for prying out

Chapter 10 Planting Vegetables 6
quackgrass rhizomes. It consists of a long (10 to 14inch) solid metal rod with a two-pronged blade atone end and a handle at the other. This tool ispractically indestructible and well worth the smallinvestment of its price.
Some other tools that may have a place in thegarden tool shed include the pickaxe, mattock, andwheel cultivator. Pickaxes are used to break upextremely hard-packed or stony soil. Mattocks arefor the same purpose, but are equipped with acutting blade for areas where larger roots need to beremoved. A mattock may also be used to chop updebris for composting. A wheel cultivator has anumber of attachments for soil preparation andweed control and may prove a good investment forthose with larger gardens.
Power Tools for CultivatingThe power rotary tiller is probably the power toolmost commonly purchased by gardeners. Whetheror not a gardener needs a rototiller depends on thesize of the garden, the gardener’s capabilities, andthe intended uses of the tiller. Tiller selection maybe based on the nature of the work to be done, thequality of the machine, and ease of repair, as well aspersonal preference. The tiller’s engine powersrotating blades, or tines, which can make gardensoil loose and fluffy, ready for planting. It can alsochop up plant debris and mix it into the soil. Incor-porating organic matter and manures into thegarden is easily accomplished with a tiller, reducingthe tendency to procrastinate this necessary chore.The ability of the tiller to do these jobs effectively isa function of its weight, strength, design, type oftines, and type of soil. A heavy, powerful tiller ismost effective on stony clay soils, while in a smallgarden or one with light soil, a smaller tiller is moreappropriate. Very lightweight tillers, known as soilblenders, are designed mainly for raised-bed gar-dening; however, they are not widely available andgenerally must be mail-ordered.
Roto-tillers are available with front-mounted orrear-mounted times. Rear-tined tillers are generallybetter able to self-propel on all but the rockiest soils.They travel straight and can produce a footprint-free seedbed. Rear-tined tillers often have a numberof attachments available for a variety of uses, such
as hilling potatoes, making raised beds, even plow-ing snow! The price of a rear-tined rototiller isconsiderably higher, in most cases, than that of thefront-tined type; consideration should be given tothe payback time necessary for such a large invest-ment.
If gardening is simply a hobby, or if the garden issmall, a front-tined tiller may be suitable. Front-tined tillers are usually light in weight, but mayrequire considerable strength to guide themthrough the soil. Operating this type of tiller iscomparable to handling a large floor polisher suchas those used in schools and hospitals; mainly,leverage is required for control. New gardeners aresometimes scared away from these tillers because ofthe initial experience of having a tiller run awaywith them. The front-tined tiller may not make asstraight a pass as the heavier rear-tined type, but itis much easier to turn. Due to this increased maneu-verability, the front-tined tiller is easy to use insmall gardens and in corner areas.
The purchase of a tiller is a major investment asgarden tools go. Features to look for include heavycast-iron, steel plate and tubing, heavy bearings,strong welds used in construction, and easilyoperable controls. Ask to look at the operator’smanual and try to determine how simply a tune-up

Chapter 10 Planting Vegetables 7
can be performed; you may save yourself a greatdeal of trouble and money if you can replace plugsand points yourself, particularly if you have notruck on which to load the tiller. Also consider thelocations of service centers and parts dealers.
Careful attention to your needs, abilities, and pricerange is important. Talk to people who have thetypes of tillers you are interested in. If possible,borrow or rent various types of machines and sendfor information before buying.
If you are considering the purchase of a usedrototiller, plan to do so well ahead of time so youwill not be rushed into a purchase. If you do notknow much about such equipment, it might behelpful to have a mechanically-minded friend lookover the machines you are considering. Above all,test each tiller for ease of starting and operation. Anengine that smokes or runs roughly may require alot of work. Tines should operate smoothly andfreely. Check the welds in the handles to see thatthey are strong; re-welding may mean that thehandles have broken at some time, a commonproblem in older tillers. Look at the dipstick if thereis one; low oil or very sludgy oil may mean that thetiller has been maintained poorly. The oil and otherfluids may also be checked by opening the drainplugs. Look for excessive dirt around the engine orin the air filter. This may also mean bad mainte-nance habits. Ask the owner for an operator’smanual and ask where the machine has been ser-viced in the past. A good tiller is a long-term invest-ment, so plan carefully before you buy.
Other Power ToolsThere are few other power tools needed in thevegetable garden. Cordless tools come with variouscultivating attachments. Most are rechargeable andcan make garden chores more pleasurable; thesetools are especially useful to those with physicaldisabilities which limit strength.
A garden shredder is nice to have for a large gardenwith a lot of plant wastes. There are hand-operatedshredders which are slow but useful if wastesbecome available in small quantities and are not toocoarse. Gasoline shredders are quite expensive, andmay be disappointing to the gardener who wants tochip branches and other large materials. They arebest used for shredding leaves, small branches, andother plant wastes (though sunflower stalks wouldprobably be too much for one). A chipper, on theother hand, will chip large branches and othercoarse material, but the cost of $1000 or more makesthe chipper uneconomical for the home gardener.
Carts/WheelbarrowsA wheelbarrow or cart is very handy to have in andaround the garden area. It should be easy to handlewhen full, with good maneuverability. Durableconstruction is well worth paying for to ensure along, useful life. Be sure to choose the size appropri-ate for your physical abilities and garden needs. Awheelbarrow generally requires more strength andcontrol than do most garden carts, but many of thesmall carts generally available are made of rela-tively flimsy metal and, though inexpensive, are notparticularly long-lasting or suitable for heavy itemssuch as rocks. Again, consider your needs. If youplan to haul only light straw, leaves, sawdust, andsuch materials, then one of the small carts may besuitable. For heavier jobs, you may need a wheel-barrow; or investigate some of the newer gardencarts, especially those with bicycle-size tires, whichmake easy work of hauling. They are made of heavyplywood and metal, but are well-balanced and easyto maneuver. These carts do, however, involve asizeable investment (up to several hundred dollars)and a large storage space. Therefore, only seriousgardeners or those with other uses for such a cartfind these carts economical. One alternative is tobuild your own from one of several plans availablefrom gardening magazines or private companies.
Watering EquipmentWatering is one garden job that most gardenersmust do at least occasionally. An adequate watersupply may make a big difference in garden yields.Purchase of watering equipment depends uponavailable facilities, water supply, climate, andgarden practices. If there is no outdoor spigot nearthe garden, the expense of having one installed maybe greater than the benefits gained except in verydrought-prone areas or in the case of a gardenerwho is fully dependent on the season’s produce.Where rainfall is adequate except for a few periodsin the summer, it is wise to keep watering equip-ment simple; a rain barrel or a garden hose with afan-type sprinkler will suffice. A water breaker forsmall seedlings is a nice extra. But, in areas wherethere are extended periods of hot weather withoutprecipitation, the local water supply is likely to beshort. Overhead sprinklers are wasteful of water, soin this case, a drip irrigation system may be inorder. Drip irrigation puts water right at the rootsand doesn’t wet plant leaves, helping to preventdisease. Timers are available that allow automaticwatering with drip and some other systems.

Chapter 10 Planting Vegetables 8
However, this type of system is relatively expensiveand may be considered a nuisance by some garden-ers because of maintenance and placement require-ments. Determine whether cultural practices such asmulching, close plant spacing, shading, or wide bedplanting will meet most of your extra water needs.Then purchase watering gadgets accordingly.
Soil Testing EquipmentSoil test kits can be purchased in various sizes andlevels of sophistication. These are handy but notalways necessary; soil testing does not have to bedone more frequently than once a year for mostgardening purposes. If inexpensive garden soil testsare offered through Extension, it is often preferableto have them do the tests, as results are likely to bemore accurate. Some gardeners like to monitor thesoil quality frequently, though, making a soil test kita worthwhile purchase. An electronic pH tester ison the market for those who like gadgets.
Seeding and Planting ToolsDepending on the size of your garden and yourphysical abilities, you may want to consider a rowseeder. Seeders with wheels make easy work ofsowing long rows of corn or beans or other veg-etables. Seeders are available which make a furrow,drop the seeds properly spaced, and close up thefurrow behind the seed, all in one pass. They do notperform quite as well on small-seeded crops, and itis not really worth the effort of setting up a seederfor small areas. A hand-held seeder is probably abetter choice for this type of work. Broadcast seed-ers are available for sowing seeds such as rye orwheat for a cover crop, but are generally not neces-sary for the average home gardener, since broad-casting is easily done by hand once the propertechnique is learned.
Environmental MonitoringEquipmentSerious gardeners often invest in various types ofequipment that allow them to monitor the microcli-mate around the garden or indoors. A rain gauge isan inexpensive device that helps the gardenerdetermine if enough rain has fallen for gardenplants. A maximum-minimum thermometer is acostly, but often useful, device to measure nightlylows and daytime highs within an area; these areespecially valuable in a greenhouse. Soil thermom-eters measure soil temperature and the internaltemperature of a compost pile. Light and wateringmeters can be purchased for indoor plant monitor-ing.
Trellises/CagesTrellises and cages for vining plants save space andkeep fruits off the ground, reducing the amount ofstooping required for harvest and damage to plants.Look for heavy-duty materials and sturdy designthat will stand up to rain, wind, and drying. Wireshould be of a heavy gauge and wood should betreated with non-phytotoxic (i.e., not toxic to plants)materials. Metal parts should be rustproof or atleast rust-resistant. If you build your own, you willprobably save a considerable amount of money andget better quality for the price.
Composting EquipmentIf you wish to make compost regularly, it will behelpful to have compost bins in some form. You canconstruct two bins out of planks or concrete blocks.Make the bins about 4 feet high, 4 feet wide, and aslong as desired, and open at one end for easy access.Leave spaces between blocks or planks for aeration.Plant refuse may be accumulated in one bin whilethe composting process is taking place in the other.A third bin may be desirable for near-finished orfinished compost storage.
A simple, portable compost bin can be made withthree or four sturdy, used pallets, which are simplystood on their ends in a square or open square andlashed or otherwise held together. This type of bincan be disassembled for easy turning and emptyingand then reassembled around the new pile. Achicken wire cage supported by three or fourwooden stakes will also work satisfactorily, but issomewhat less sturdy.
There are also ready-made and kit compostersavailable, including slat-sided cylinders into whichrefuse is added from above and compost removedat ground level. Rotating barrels for easy turningare also available; gardeners who have physicaldisabilities may find either of these types easier todeal with than the standard compost bin.
Whichever type of compost maker you use, it’s agood idea to make use of the nutrients which willleach out from under the pile. This is easily done bylocating the composter in the garden (which alsoreduces hauling time) or under a large fruit tree. Or,make some provision to catch the run-off from thepile and use it as liquid fertilizer.

Chapter 10 Planting Vegetables 9
Harvesting EquipmentHarvesting equipment varies depending on the sizeand type of garden, whether or not food is to bestored, and the way in which it is to be processed.Baskets are useful to most gardeners. They may bepurchased at garden or farm supply stores orsometimes may be scrounged from local grocerystores or fruit stands. Berry baskets for small fruits,baskets with handles for carrying vegetables, andpeck or bushel baskets for storage are all useful.Fruit pickers are nice and easy to use for tall fruittrees. A sharp knife for cutting vegetables off plantsis handy and helps prevent plant damage.
Food processing equipment includes canners,blanchers, dehydrators, and sealers for frozen foodpackages. There is even a home vacuum-packeravailable. A food mill is inexpensive and veryuseful for making sauces and juices; a blender orfood processor is also useful to the gardener withextra food. More specialized tools include corncutters which remove kernels from the cob, beanFrenchers and shellers, cherry pitters, strawberrycappers, apple corers and peelers, jelly strainers andthermometers, and many more. For canning, a largekettle or pot is indispensable for preparing foodprior to canning. A jar lifter will prevent burnedfingers; a funnel for transferring food to jars reducesmessiness. As always, choices depend on individualneeds.
Purchase and MaintenanceWhen purchasing tools, buy for quality rather thanquantity. Your tools will be in frequent use through-out the garden season. Cheap tools tend to break ordull easily and may end up making a job unneces-sarily difficult and frustrating. Quality tools will lastand tend to increase in value with time if well-kept.Tools should be lightweight for easy handling, butheavy enough to do the job properly. Metal partsshould be of steel, which will stay sharp, keep itsshape, and outlast softer metals. Consumers’ maga-zines and gardening publications frequently havearticles explaining what to look for in tools andlisting alternatives to local hardware stores, whichoften carry a single line of tools. Several excellentbooks featuring garden tools have been publishedand may be available at the library.
Keeping a tool clean and sharp will increase itsusefulness and lengthen its life. Learn the tech-niques of sharpening each tool and practice themfrequently. Professional gardeners often carrysharpening stones or files while working andsharpen after every hour or so of use. Clean your
tools after each use. One effective method is to keepa five gallon bucket filled with sand and used motoroil in the tool shed. At the end of the gardening day,remove clinging dirt from tools by plunging theminto the oily sand several times. This will keep thetools cleaned and oiled, and will help preventrusting.
The last and perhaps most important step in toolcare is to put tools in their proper places. Tools leftin the garden will rust and break and can be a safetyhazard. Some gardeners paint handles with a brightcolor to make their tools easy to spot. And, if eachtool has its own place in the storage area, it issimple to determine if tools are missing beforeclosing up.
Before winter sets in, sharpen tools, then coat metalparts lightly with oil and rub wooden handles withlinseed oil. Drain power tools of gasoline and obtainfilters, mufflers, and tune-up parts so that a fall orlate-winter tuning can get the machine ready forearly spring jobs. Have maintenance done, ifneeded, in the winter, when demand is lowest andyou can afford to let the repairer take his or hertime.
In fall, any trellises or cages that have been outdoorsshould be cleaned and stored inside if possible.Traps and other pest control devices should also bestored if the pest season is over. Cold frames andother season extenders should be protected fromdamage by ice and snow or high winds, and oncetheir job is done, should be repaired if necessaryand put away if possible. Tools with wheels likecultivators, seeders, and carts should be oiled andstored. Thoughtfully selected and cared for, yourtools will give many years of service. This extra helpin the garden will pay for itself in time.

Chapter 10 Planting Vegetables 10
Seed for the GardenChoosing and purchasing vegetable seeds is one ofthe most enjoyable gardening pastimes. Thumbingthrough colorful catalogs and dreaming of theseason’s harvest is one way to make winter seem alittle warmer. Seed purchased from a dependableseed company will provide a good start towardrealizing that vision of bounty. Keep notes about theseeds you purchase - their germination qualities,vigor of plants, tendencies toward insects anddisease, etc. From this information you can deter-mine whether one seed company is not meetingyour needs, or whether the varieties you havechosen are unsuitable for your area or gardeningstyle. For example, if powdery mildew is a bigproblem on squash family plants in your area, thenext year you may want to look for mildew-resis-tant varieties.
Saving SeedSaving your own vegetable seed is another pleasur-able activity. It offers a sense of self-sufficiency andsaves money. You can maintain a variety that is notavailable commercially, which helps to perpetuate abroad genetic base of plant materials. Breeders oftensearch for old-time varieties when attempting toimprove commercial plants, since the heirloomvegetables (as they are sometimes called) often haveinbred disease- and pest-resistance or cold-hardi-ness. Participation in a seed-saver’s exchange can bea rewarding experience. Extra seeds that you havemay be traded for unusual types that are not avail-able through other sources.
There are certain considerations that should be keptin mind when saving seed, however. Hybrid variet-ies are not likely to be the same as the parent plants;therefore, only open-pollinated varieties should beused for home seed production. Some seed dealershave responded to the increasing interest in seed-saving by clearly marking open-pollinated varietiesin their catalogs. Another consideration in savingseed is the possibility of carrying seed-borne dis-eases into the next year’s crop. Many commerciallygrown seeds are grown in dry areas unsuitable tofungal, viral, and bacterial diseases which may bepresent in your region. Take care to control diseaseswhich can be carried in seed. Another weather-related factor is the speed of drying of seeds, whichcan be adversely affected by frequent rains and/orhumidity.
And finally, if you’ve ever saved squash seedduring a season in which you had more than onetype of squash planted, you have probably seen theweird results that may be obtained from cross-pollination! Saving seeds from cross-pollinatedcrops is not generally recommended for the novicebecause of problems with selection, requirementsfor hand pollination and isolation, biennial habits,and genetic variability.
Some common self-pollinated annual plants fromwhich seed may be saved include lettuce, beans andpeas, herbs, and tomatoes.
Saving beans and peas:Allow seed pods to turn brown on the plant.Harvest pods, dry for 1 to 2 weeks, shell, andthen store in a cool (below 50° F.), dry environ-ment in a paper bag.
Saving lettuce seed:Cut off seed stalks when fluffy in appearance,just before all the seeds are completely dried.Seeds will fall off the stalk and be lost if allowedto mature on the plant. Dry the harvested seedstalk further, shake seeds off, and then store in acool, dry environment in an envelope or smallglass jar.
Saving herb seeds:Herbs vary in the way their seeds are produced.In general, allow herb seeds to stay on the plantsuntil they are almost completely dry. Some seedheads, such as dill, will shatter and drop theirseeds as soon as they are dry. Watch the early-ripening seeds; if they tend to fall off, harvest theother seed heads before they get to that point,leaving several inches of stem attached. Hangseveral stems upside down, covered with a paperbag to catch falling seed, in a warm, dry placeuntil the drying is complete. Remove seeds fromthe seed heads and store in envelopes or smallglass jars. Some herb seeds, dill, celery, anise,cumin, coriander, and others are used for flavor-ing and are ready to use once dry.
Saving tomato seeds:Pick fruit from desirable plants when ripe. Cutfruit and squeeze out pulp into a container. Adda little water, then let ferment 2 to 4 days at roomtemperature, stirring occasionally. When seedssettle out, pour off pulp and spread seeds thinlyto dry thoroughly. Store in an envelope or glassjar in a cool, dry place.

Chapter 10 Planting Vegetables 11
For all kinds of saved seeds, be sure to mark thestorage containers clearly with permanent (prefer-ably waterproof) ink, indicating the variety anddate saved. Seeds will remain viable for some timeif properly stored. To test for germination, sproutseeds between moist paper towels; if germination islow, either discard the seed or plant enough extra togive the desired number of plants.
Viability of Vegetable Seeds(Average number of years seeds may be saved)
Vegetable Years
Asparagus 3
Bean 3
Beet 4
Broccoli 5
Brussels sprouts 5
Cabbage 5
Carrot 3
Cauliflower 5
Celery 5
Chinese cabbage 5
Collard 5
Corn 5
Cress, water 5
Cucumber 5
Eggplant 5
Endive 5
Kale 5
Kohlrabi 5
Vegetable Years
Leek 1
Lettuce 5
Muskmelon 5
Mustard 4
Onion 1
Parsley 2
Parsnip 1
Pea 3
Pepper 4
Pumpkin 5
Radish 5
Rutabaga 5
Spinach 5
Squash 5
Sweet corn 2
Tomato 4
Turnip 5
Watermelon 5

Chapter 10 Planting Vegetables 12
Depth for Planting Vegetable Seeds
The depth to cover seeds when you plant themdepends on a number of factors such as the size ofthe seed, the type of soil you have, and the season ofthe year.
As a general rule, vegetable and flower seedsshould be covered about 4 to 5 times their lateraldiameter or width (not their length). There areexceptions, however; read the packet directions.Some seeds require light for germination andshould not be covered at all. These instructionsapply to seeds planted both inside and out.
Starting Seed IndoorsTo start seeds indoors, it is important to haveenough light. More homegrown seedlings areprobably lost to this one factor than to any other.Vegetable seedlings grown under low-light condi-tions are likely to be leggy and weak, and many willfall over under their own weight after they are 3 to 4inches tall. If you do not have a sunny room or backporch with a southern exposure, you will probablyneed supplemental lights. A simple fluorescent shoplight with one warm-white and one cool-white bulb(or with grow lights) will suffice.
It is probably easiest to use a soilless or peat-lite mixto start seedlings, since garden soil contains diseaseorganisms which can be highly destructive to smallplants. Soil can be sterilized in the oven by baking itat 200° F. until the internal soil temperature is 180°F. It should be held at that temperature for 30minutes. This is a smelly process, but it works.Garden soil that is high in clay should be condi-tioned with compost or perlite to prevent excessmoisture and/or shrinkage. You can mix your ownpeat-like mix if you prefer, 50% vermiculite orperlite and 50% fine sphagnum peat is excellent forstarting seeds. Fertilizer at half the normal strengthmay be added to the mixture. Mix well before using.
Many types of containers can be used to start seeds.Flats or other large containers may be used; plant inrows and grow seedlings until they have one or twosets of true leaves, then transplant into other con-tainers for growing to the size to transplant out-doors. Seedlings may also be started in pots, oldcans, cut-off milk cartons, margarine tubs, eggcartons, or other throwaways. The pop-out trays
found at garden centers are easy to use and re-usable. Peat pots are nice, especially for large seeds.Sow one or two large seeds directly in each peat pot.
Thin to one seedling per pot. Peat pots may beplanted directly in the garden; do not allow theedges of the pot to stick out above the soil, sincethey will act as a wick and moisture will evaporatefrom this exposed surface.
Regardless of the type of container chosen, fill it 3/4full with seed-starting mixture and sow the seeds.Cover to the specified depth and water the mix. Ifyour home is dry, it may help to cover the contain-ers with plastic wrap to maintain a steadier mois-ture level. Seeds and seedlings are extremely sensi-tive to drying out. They should not be kept soakingwet, however, since this condition is conducive todamping-off, a fungus disease deadly to seedlings.Damping-off can be prevented or diminished bysprinkling milled sphagnum moss, which contains anatural fungicide, on top of the soil.
Another option is to use peat pellets or cubes, whichare pre-formed and require no additional soil mix.The pellets or cubes are soaked until thoroughlywet, then seeds are planted in the holes provided.The whole pellet or cube may then be plantedwithout disturbing the roots. The only disadvantageto this method is the expense.
Starting Seed OutdoorsMany seeds may be sown directly in the garden. Ifgarden soil is quite sandy, or is mellow with a highcontent of organic matter, seeds may be planteddeeper. Young seedlings can emerge quite easilyfrom a sandy or organic soil. If garden soil is heavywith a high silt and/or clay content, however, theseeds should be covered only 2 to 3 times theirdiameter. In such soils, it may be helpful to apply aband of sand, fine compost, or vermiculite 4 incheswide and ¼ inch thick along the row after seeds areplanted. This will help retain soil moisture andreduce crusting, making it easier for seedlings topush through the soil surface.
Soil temperature has an effect on the speed of seedgermination. In the spring, soil is often cold andseeds of some plants will rot before they have achance to sprout. The following chart gives opti-mum soil temperatures.

Chapter 10 Planting Vegetables 13
Plant Production Data Chart
Days to Optimum Number ofEmergence Germination Weeks
Crop From Soil to GrowSeeding Temperature Transplants
Range
Beans 5 - 10 65° - 85° 1
Beets 7 - 10 50° - 85° 1
Broccoli 3 - 10 50° - 85° 5 - 7
Cabbage 4 - 10 50° - 85° 5 - 7
Carrots 12 - 18 50° - 85° 1
Cauliflower 4 - 10 50° - 85° 5 - 7
Celery 9 - 21 50° - 65° 10 - 12
Chard, Swiss 7 - 10 65° - 85° 1
Corn, Sweet 5 - 8 65° - 85° 1
Cucumber 6 - 10 65° - 85° 4(peat pots)
Eggplant 6 - 10 65° - 85° 6 - 9
Lettuce 6 - 8 50° - 65° 3 - 5
Melons 6 - 8 65° - 85° 3 - 4(peat pots)
Onion 7 - 10 65° - 85° 8
Parsley 15 - 21 50° - 85° 8
Peas 6 - 10 50° - 65° 1
Pepper 9 - 14 65° - 85° 6 - 8
Radish 3 - 6 50° - 65° 1
Spinach 7 - 12 50° - 65° 1
Squash 4 - 6 65° - 85° 3 - 4(peat pots)
Tomato 6 - 12 65° - 85° 5 - 7
Turnip 4 - 8 50° - 65° 1
1 transplants not recommended
When planting the fall garden in midsummer, thesoil will be warm and dry. Therefore, cover theseeds 6 to 8 times their diameter. They may need tobe watered regularly with a sprinkler or a sprin-kling can to promote germination. Moisture can alsobe retained with a shallow mulch or by covering therow with a board until the seeds are up. Pre-sprout-ing is a useful technique for planting in cold soils, aswell. However, seed must be handled very carefullyonce sprouted to prevent damaging new root tissue.
Row PlantingA string stretched between stakes will provide aguide for nice straight rows, if desired. Use a hoehandle, a special furrow hoe, or a grub hoe to makea furrow of the appropriate depth for the seed beingplanted. Sow seed thinly; it may help to mix verysmall seed with coarse sand to distribute the seedsmore evenly. Draw soil over the seed, removingstones and large clods. Firming soil over seedsimproves uptake of soil moisture, hastening germi-nation. Water the seeds in to improve soil/seedcontact. When plants have grown to 4 to 6 inchestall, thin according to seed packet instructions toprovide adequate room for growth.
Broadcast PlantingMany crops may be sown in wide rows or bedsinstead of in long, single rows. Crops such asspinach, beans, peas, beets, lettuce, and carrots areespecially suited to this type of culture. Sow seedevenly over the area, then rake it in. Firm soil overthe seeds. Thin young plants to allow room forgrowth.
Hill PlantingLarger vegetables such as melons, squash, corn, andcucumbers may be planted in hills. Soil is moundedto a foot or so in diameter, at the recommendedspacing. Plant 4 to 6 seeds per hill, firming the soilwell. Thin the seedlings to 3 to 5 plants per hill.

Chapter 10 Planting Vegetables 14
Transplants for the GardenMost gardeners use transplants in the garden atsome time or another to give long season plants achance to grow to maturity under their preferredweather conditions, or just to lengthen the harvestseason.
Due to the amount of time, attention and need forcontrolled growing conditions, many gardenersprefer to purchase plants for their gardens. How-ever, for a larger choice in varieties and the controlof plant production from seed to harvest, otherschoose to start their own.
Annual PlantsTransplants of annual vegetables and flowersshould be stocky, healthy, free from disease, andhave good roots. They should not be too small ortoo mature. Be sure plants have been hardened-offso that they will easily adapt to environmentalchange, but they should not be so hardened thatthey are woody and yellow. Successful transplant-ing is achieved by interrupting plant growth as littleas possible. This is one of the advantages of usingpeat pots or peat pellets, which do not have to beremoved when transplanting.
Have garden soil prepared before transplanting. Alladditives which require time to break down, such asmanures, limestone, rock fertilizers, and greenmanures, should be incorporated several weeksbefore planting. Quick-acting lime and fertilizersand well-decayed compost may be added justbefore planting.
Transplant on a shady day, in late afternoon, or inearly evening to prevent wilting. It helps to waterthe plants several hours before transplanting; whenusing bare-root plants, soak the roots thoroughly anhour or two before setting them out in the garden.They should not be allowed to dry out completelyat any time. Handle plants carefully. Avoid disturb-ing the roots or bruising the stems.
Dig a hole large enough to hold the roots of theplants. Set the plants slightly deeper than previ-ously planted and at recommended intervals. Presssoil firmly around the roots of transplants. Pourabout a cup of starter solution in the hole aroundthe plant. Use a solution of about half the strengthrecommended for that type of plant during thenormal growing season. Fish emulsion or dilutedmanure tea may also be used.
For a few days after transplanting, protect theplants from wind and sun by placing newspaper orcardboard on their south sides, or by covering withjugs, baskets, or flower pots. Water the plants onceor twice during the next week if there is insufficientrain.
Perennial PlantsWhen buying small fruit plants and perennialcrowns such as asparagus, order early or buy fromreliable local outlets. Discount department storesoften allow plants to dry up, so watch for this,especially if you are buying sale plants. Selectvarieties that will do well in your growing condi-tions. For perennial plants, it will pay to do someresearch to find out what the major disease andinsect pests are and buy resistant varieties. Dor-mant, bareroot plants and 1- or 2-year-old crownsare preferred. Look for roots that are full, slightlymoist, and have color. Roots that are dry brown orsoggy black are indicative of poor storage and willprobably not give good results. Check crowns forsigns of viable buds. Inspect plants for signs ofinsects or disease. If you receive plants by mailwhich are not satisfactory, do not hesitate to sendthem back.
Once you have the plants, keep the roots moist (butnot soaking wet) by misting occasionally, and donot allow them to freeze or be exposed to hightemperatures. If it is necessary to keep the crownsfor more than a few days, place in cold storage (notfreezing) or else heel in a trench of moist soil in ashaded location. Pack soil firmly against roots toeliminate any air pockets.
Transplant crowns according to directions, diggingholes large enough to give the roots plenty of roomto spread. Remove any roots which are discoloredor dried out. Perennial plants appreciate a dose ofcompost mixed into the bottom of the hole.
Once transplanted, shade the plants if necessary andwater when needed. Extra care at the beginning oftheir growth will result in productive, healthyplants.

Chapter 10 Planting Vegetables 15
Transplant Production Data(Ease of transplanting)
Easily Survive Require Care Not SuccessfullyTransplanting in the Operation Transplanted by
Usual Methods
Broccoli Beets Beans
Cabbage Carrots (young) Peas
Cauliflower Celery
Eggplant Chard
Lettuce Melon
Chinese cabbage Squash
Onion Corn
Tomatoes
Pepper
Irrigating the Home GardenAdequate soil moisture is essential for good cropgrowth. A healthy plant is composed of 75% to 90%water, which is used for the plant’s vital functions,including photosynthesis, support (rigidity), andtransportation of nutrients and sugars to variousparts of the plant. During the first 2 weeks ofgrowth, plants are becoming established and musthave water to build their root systems.
While growing, vegetable crops need about an inchof water per week in the form of rainwater, irriga-tion water, or both, from May to September. Keep arain gauge near the garden or check with the localweather bureau for rainfall amounts, then supple-ment rainfall with irrigation water if needed. Thereare ways, however, to reduce the amount of wateryou have to add.
During dry periods, one thorough watering eachweek of 1 to 2 inches of moisture (65 to 130 gallonsper 100 square feet) is usually enough for most soils.Soil should be wetted to a depth of 5 to 6 incheseach time you water and not watered again until thetop few inches begin to dry out. Average gardensoil will store about 2 to 4 inches of water per foot ofdepth.
Reducing Water DemandsAll of this water, however, may not be available toplants, particularly if the soil is a heavy clay. Clayparticles hold soil moisture tightly. If, for example,there are 4½ inches of water per foot of this type ofsoil, there may be as little as 1½ inches available forplants. A relatively high level of humus in the soil,brought about by the addition and breakdown oforganic matter, can improve this proportion to someextent. By causing clay particles to form aggregatesor large clumps of groups of particles, humus alsoadds air spaces to tight clays, allowing moisture todrain to lower levels as a reserve, instead of pud-dling and running off the top of the soil.
The moisture-holding capacity of sandy soils is alsoimproved by the addition of organic matter.Though most soil water in sandy soil is available, itdrains so quickly that plants are unable to reachwater after even a few days following a rain. Hu-mus in sandy soil gives the water something to clingto until it is needed by plants. Addition of organicmatter is the first step in improving moistureconditions in the garden.
Mulching is a cultural practice which can signifi-cantly decrease the amount of water that must beadded to the soil. A 6 to 8 inch organic mulch canreduce water needs by as much as ½ by smotheringweeds (which take up and transpire moisture) andby reducing evaporation of moisture directly fromthe soil. Organic mulches themselves hold somewater and increase the humidity level around theplant. Black plastic mulch also conserves moisture.
Shading and the use of windbreaks are other mois-ture-conserving techniques. Plants that wilt in verysunny areas can benefit from partial shade duringthe afternoon in summer. Small plants, in particular,should be protected. Air moving across a plantcarries away the moisture on the leaf surfaces,causing the plant to need more water. In verywindy areas, the roots often cannot keep up withleaf demands, and plants wilt. Temporary or per-manent windbreaks can help tremendously.
During those times when cultural practices simplyaren’t enough, when rainfall is sparse and the sun ishot, watering can benefit the garden with higheryields, or may save the garden altogether in severedrought years.
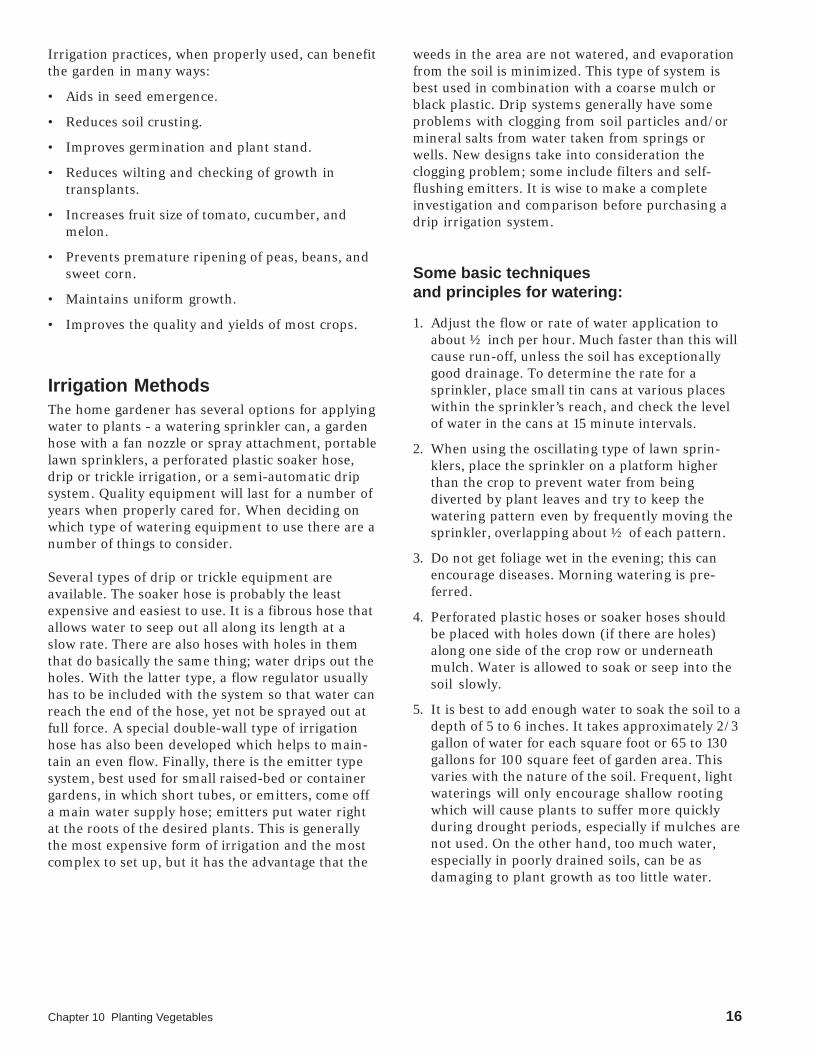
Chapter 10 Planting Vegetables 16
Irrigation practices, when properly used, can benefitthe garden in many ways:
• Aids in seed emergence.
• Reduces soil crusting.
• Improves germination and plant stand.
• Reduces wilting and checking of growth intransplants.
• Increases fruit size of tomato, cucumber, andmelon.
• Prevents premature ripening of peas, beans, andsweet corn.
• Maintains uniform growth.
• Improves the quality and yields of most crops.
Irrigation MethodsThe home gardener has several options for applyingwater to plants - a watering sprinkler can, a gardenhose with a fan nozzle or spray attachment, portablelawn sprinklers, a perforated plastic soaker hose,drip or trickle irrigation, or a semi-automatic dripsystem. Quality equipment will last for a number ofyears when properly cared for. When deciding onwhich type of watering equipment to use there are anumber of things to consider.
Several types of drip or trickle equipment areavailable. The soaker hose is probably the leastexpensive and easiest to use. It is a fibrous hose thatallows water to seep out all along its length at aslow rate. There are also hoses with holes in themthat do basically the same thing; water drips out theholes. With the latter type, a flow regulator usuallyhas to be included with the system so that water canreach the end of the hose, yet not be sprayed out atfull force. A special double-wall type of irrigationhose has also been developed which helps to main-tain an even flow. Finally, there is the emitter typesystem, best used for small raised-bed or containergardens, in which short tubes, or emitters, come offa main water supply hose; emitters put water rightat the roots of the desired plants. This is generallythe most expensive form of irrigation and the mostcomplex to set up, but it has the advantage that the
weeds in the area are not watered, and evaporationfrom the soil is minimized. This type of system isbest used in combination with a coarse mulch orblack plastic. Drip systems generally have someproblems with clogging from soil particles and/ormineral salts from water taken from springs orwells. New designs take into consideration theclogging problem; some include filters and self-flushing emitters. It is wise to make a completeinvestigation and comparison before purchasing adrip irrigation system.
Some basic techniquesand principles for watering:
1. Adjust the flow or rate of water application toabout ½ inch per hour. Much faster than this willcause run-off, unless the soil has exceptionallygood drainage. To determine the rate for asprinkler, place small tin cans at various placeswithin the sprinkler’s reach, and check the levelof water in the cans at 15 minute intervals.
2. When using the oscillating type of lawn sprin-klers, place the sprinkler on a platform higherthan the crop to prevent water from beingdiverted by plant leaves and try to keep thewatering pattern even by frequently moving thesprinkler, overlapping about ½ of each pattern.
3. Do not get foliage wet in the evening; this canencourage diseases. Morning watering is pre-ferred.
4. Perforated plastic hoses or soaker hoses shouldbe placed with holes down (if there are holes)along one side of the crop row or underneathmulch. Water is allowed to soak or seep into thesoil slowly.
5. It is best to add enough water to soak the soil to adepth of 5 to 6 inches. It takes approximately 2/3gallon of water for each square foot or 65 to 130gallons for 100 square feet of garden area. Thisvaries with the nature of the soil. Frequent, lightwaterings will only encourage shallow rootingwhich will cause plants to suffer more quicklyduring drought periods, especially if mulches arenot used. On the other hand, too much water,especially in poorly drained soils, can be asdamaging to plant growth as too little water.
Chapter 10 Planting Vegetables 17
6. By knowing the critical watering periods forselected vegetables, you can reduce the amountof supplemental water you add. This can beimportant where water supplies are limited. Ingeneral, water is most needed during the firstfew weeks of development, immediately aftertransplant, and during development of ediblestorage organs.
Specifically, the critical watering periods forselected vegetables are:Asparagus Spear production, fern
development
Broccoli Head development
Cabbage Head development
Cauliflower Head development
Beans Pod filling
Carrot Seed emergence, rootdevelopment
Corn Silking, tasseling, eardevelopment
Cucumber Flowering, fruit development
Eggplant Flowering, fruiting
Lettuce Head development; moistureshould be constant
Melons Flowering, fruit development
Peas Pod filling
Tomato Flowering, fruiting
7. In areas prone to repeated drought, look fordrought-resistant varieties when buying seed orplants.
Fertilizing the GardenThe amount of fertilizer to apply to a garden de-pends on the natural fertility of the soil, the amountof organic matter present, the type of fertilizer used,and the crop being grown. The best way to deter-mine fertilizer needs is to have the soil tested. Soiltesting is available through your local Extensionagent, and with soil test kits which can be pur-chased from garden shops and catalogs. Vegetablesfall into three main categories according to theirfertilizer requirements: heavy feeders, mediumfeeders, and light feeders. It may be advantageousto group crops in the garden according to theirfertilizer requirements to make application easier.For a complete discussion of fertilizers, refer to theSoils chapter.
Weed Control in the GardenThe old saying, “One year’s weed - seven years’seed,” contains more truth than myth, as mostgardeners soon learn. Weeds (some native and someintroduced) are remarkably adapted to conditionsin the area where they grow, usually much more sothan the imported cultured vegetables we prize sohighly for food. Many weeds which would other-wise not be growing in a lawn or natural areaappear to spring up as if by magic when the soil iscultivated. Weed seeds may remain viable for those7 (or more) years when conditions are not right fortheir growth. Then, brought to the surface by tilling,and uninhibited by sod, shade, or other factors, theygerminate and become the pests that take water,nutrients, sunlight, and space from vegetable plants.
Beneficial WeedsMany plants considered weeds in the garden havepositive attributes. Some, such as morning glory,and even thistles, have flowers that rival thoseintentionally planted in flower beds. In fact, seeds ofsome weeds are sold by seed companies as flower-ing plants.
Other native plants are edible, providing nutritiousvariety to the regular diet: dandelions, purslane,chickweed, cress, mustards, and lamb’s quarters alloffer greens; blackberries produce sweet fruits;Jerusalem artichokes, or sunchokes, are nothing butthe tubers of the native sunflower. Before attempt-ing to eat wild plants, be sure that you have prop-erly identified them. A course from a person knowl-edgeable about wild edibles is probably the bestway to learn; books often do not make fine distinc-tions between edible and non-edible wild plants.

Chapter 10 Planting Vegetables 18
Weeds are often a habitat for various insects, someof which are beneficial to the garden. They provideshelter, pollen, and nectar for such insects as beesand predators of garden pests, such as prayingmantis.
Wild plants also have other virtues. Parts of someplants are used in natural dyes and other home-made products. Weeds can be a good source ofnitrogenous materials for the compost pile if pulledbefore flowering. Many have long roots which bringelements from the subsoil into their above-groundtissues; when the weeds are pulled or tilled andallowed to decay in the garden, these elements aremade available to other plants. Finally, the presenceof some native plants can indicate certain soilproblems, e.g., deficiencies, pH changes, soil com-paction, etc. A small number of books are availablewith detailed information on this subject.
Control MethodsDespite all this goodness, most gardeners won’ttolerate weeds in their vegetable plots. Perhaps it isan overreaction to the first garden he or she allowedto go completely to weeds or perhaps it’s the unrulyappearance of weeds. This may be a sensible ap-proach. If one doesn’t have time to ruthlesslydestroy morning glory vines after enjoying the firstfew flowers and before they go to seed, the gardenwill soon become one glorious display of morningglories and little else.
Cultivation:There are several ways to rid the garden of mostproblem plants. Since mature weeds extract largequantities of moisture and nutrients from thesoil, it is more beneficial (and easier) to removeweeds when they are young and tender. Hand-pulling and digging are okay for small gardensand raised beds. Those with larger spaces usuallyprefer at least a hoe. There are manual-poweredrotary cultivators that do a good job on longrows and pathways as long as the soil is not toowet or dry and the weeds are small. In largegardens, a rotary tiller of appropriate size makesthe work easy and fast, but it is not the mostpleasant chore to get behind a smoky, noisyengine on a hot summer day. Manual and pow-ered rotary cultivators are usually unable to turnunder weeds very close to vegetable plantswithout damaging the vegetables. Hand-pullingor hoeing with a light touch are best for remov-ing weeds near vegetable plants. Deep cultiva-tion with any instrument is likely to damageroots or stems of crop plants.
Turning under weeds, especially before theyflower, provides organic matter to the soil.Hand-pulled weeds, except for rhizomatousgrasses, may be laid on top of the soil to dry outand will eventually have the same effect. How-ever, if rain is predicted in the area within a dayor two, it’s best to collect the weeds and addthem to the compost pile; rain will wash soilaround the roots and some weeds will survive. Ifweeds have started to go to seed, leaving them inthe garden is not a good idea. Composting maynot destroy weed seeds if the pile doesn’t heat upenough after the weeds are added. Grasses thatspread by rhizomes or stolons for example,quackgrass also present a problem if not com-pletely dried up. In these cases, despite theirpotential value as organic material, it’s better tolet the trash collectors take the weeds, or burnthem and spread the ashes in the garden (if localordinances permit). Reducing weed growtharound the garden by mowing or other meanswill also help prevent the spread of weeds andseeds to the garden area.
Cultivation is best done when the soil is some-what moist, but not wet. Working wet soil willchange the structure, especially of heavy soils.When it is too dry, weeds are difficult to pull andhoeing is also hard. A day or two after a rain orirrigation is probably the best time to cultivate. Ifyou have a choice, remember that the work willbe much more pleasant in the cool temperaturesof early morning or evening. On hot summerafternoons, you are likely to fatigue more easily,get a sunburn, or suffer from sun poisoning,sunstroke, or worse. Wear protective clothing ifyou must work when it’s sunny, and stop fre-quently for rest and refreshment. Controllingweeds when they are small will greatly reducelabor.
Mulching:Mulching can be an alternative to weeding if youhave a reliable source of mulching materials.Thick layers of organic mulch will not allow mostannual weeds to poke through, and those that doare usually easily pulled. Weeds with runners areoften not so easily controlled, and black plasticmay be a better choice where these prevail. Forpaths, newspaper, old carpeting, or other suchmaterials, covered with sawdust, will provideexcellent weed suppression.

Chapter 10 Planting Vegetables 19
Close Spacing:Once vegetable plants are established, if theyhave been planted close enough to each other,they will shade the soil and prevent the growthof many weed seedlings. This is the effectachieved by a well-planned raised bed, in whichplants are spaced so that the foliage of adjacentplants touches and forms a closed canopy at amature growth stage.
Other Practices:Some gardeners are experimenting with varioustypes of no-till gardening to reduce weed prob-lems and prevent erosion and moisture loss. Thestandard farm no-till practice of sowing a fallcover crop and then killing it with a herbicide,and planting vegetables in the dead sod, after arecommended waiting period, is one method.However, there are no herbicides recommendedfor use in established home vegetable gardens tokill emerged weeds at the present time. Use ofweed-killers normally recommended for lawnsor other areas is not advised, and until a safeherbicide is available for growing weeds, thistype of no-till practice is unsafe for growingvegetables in the home garden. One alternative isthe use of a living sod, mowed regularly, whichhas many of the benefits of no-till and does notnecessitate the use of herbicides. This practiceworks best with raised beds, so that only thepaths need to be mowed.
The use of cover crops over several seasons oryears in a particularly weedy section can alsoreduce weed problems. However, this methodrequires leaving that part uncultivated, reducinggardening space. Cover crops must also bemown or harvested regularly, which can be time-consuming and/or difficult without appropriatetools. Investigate crop rotations thoroughlybefore using them to control weeds. All of theabove techniques are still in the experimentalstage for home gardeners. Try them in smallsections of the garden to determine their effec-tiveness.

Chapter 10 Planting Vegetables 20
Vegetable Planting Chart and Recommended Planting Dates
Planting GuideThe Vegetable Planting Guide can be used to determine the approximate proper amount of crop to plant forthe desired yield, the amount of seed or transplants required for that amount of crop, and proper spacingbetween plants in a row.
In intensive, raised-bed gardens, use the in-row figures between all plants; i.e., use equidistant spacing be-tween plants. Sow seeds to a depth 3 to 5 times the diameter of the seed. For mid-summer plantings, sow up totwice this depth.
Planting Chart for the Home Garden
Crop Suggested Seeds or Planting Distance (Inches) Depth of Average Plantingfeet of row plants (P) Between Rows BetweenPlants Planting Date inor amount per 100 ft or Hills (H) (Inches) New Hampshire4
per person5 of row
Asparagus 15-20 60-70 (P) 36-48 18 6-8 April 20-May 15
BeansPole 10 ½ lb. 36 24 (H) 1 May 15-June 15Snap 20-301 3/4 lb. 24 2-4 1 May 15-July 1
Beets 10-151 1oz. 12-18 2-3 ½ April 25-July 1
Broccoli and 5 plants 1/8oz. or 67(P) 24-36 24-30 1/4 May 10- July 1Brussel Sprouts
CabbageEarly 5 plants 1/8oz. or 67-100 (P) 24-36 12-18 1/4 May 10Late 10 plants 24-36 18-24 1/4 July 1
Carrots 50-751 ½oz. 12-18 2-3 ½ May 1-July 1
Cauliflower 5 1/8oz. or 67 (P) 24-36 24-30 1/4 May 10-July 1
Swiss Chard 5 1oz. 18-24 6-8 ½ May 1-July 1
Sweet CornEarly 20 1/4lb. 24-36 6 1 May 1-July1Midseason 20 8Late 20 9
Cucumbers 10-15 1/2oz. 48-72 48 (H) 3/4 May 25-June 15
Eggplant 2 plants 1 pkt. or 67 (P) 24-36 18 1/4 May 25-June 15
LettuceHead 5-101 1/4oz. or 75-100(P) 12-18 15-18 1/4 May 1-July 1Leaf 51 1/4oz. 12-18 6 1/4 May 1-Aug. 1
MelonsMuskmelons 10-25 1/2oz. or 60-100(P) 72-96 48 (H) 3/4 June 1-June 15Watermelons 10-15 1oz. or 50-60 (P) 96-144 60 (H) 3/4 June 1-June 15
Onions 10-20 1lb. (sets) 12-18 1-3 ½ April 20-May 15
Parsnips 5-10 1/2oz. 18-24 2-4 ½ May 1-May 15

Chapter 10 Planting Vegetables 21
Crop Suggested Seeds or Planting Distance (Inches) Depth of Average Plantingfeet of row plants (P) Between Rows BetweenPlants Planting Date inor amount per 100 ft or Hills (H) (Inches) New Hampshire4
per person5 of row
PeasEarly & Late 50-1501 1lb. 18-36 1-2 1 April 15-July 15
Peppers 2 plants 1 pkt. or 67 (P) 18-24 18 1/4 May 25-June 20
Pumpkins2 1 hill 1oz. 36 48 (H) 1 May 25-June 10
Radishes 51 1oz. 112-18 1 ½ April 15-Aug. 15
Rhubarb 5-10 40-50 (P) 48 24-30 2-3 April 20-May 15
Rutabagas 10-20 1/4oz. 18-24 6-8 ½ June 1-July 1
Spinach 251 1oz. 12-18 3-4 ½ April 10-May 10
Squash2
Summer 1 hill 1oz. 36 48 (H) 1 May 25-July 1Winter 20-30 1oz. 72-96 72 (H) 1 May 25-June 10
Tomatoes 15 plants3 1 pkt. or 25-67(P) 24-48 18-36 1/4 May 25-June 10
1 Make two or more plantings or plant early, midseason, and late varieties at same time. Suggested amount is foreach planting.
2 Planting distance is for bush types. If large vine types are planted, allow more space.3 If only early varieties are planted, allow 15 plants per person. If main crop varieties are grown, plant 8-10 plants
per person.4 The exact date may vary with the season, soil type and local planting conditions.5 Assuming you freeze, store and can vegetables at home, these are the vegetable needs per person.

Chapter 10 Planting Vegetables 22
Intensive Gardening MethodsThe purpose of an intensively grown garden is toharvest the most produce possible from a givenspace. More traditional gardens consist of long,single rows of vegetables spaced widely apart.Much of the garden area is taken by the spacebetween the rows. An intensive garden reduceswasted space to a minimum. The practice of inten-sive gardening is not just for those with limitedgarden space; rather, an intensive garden concen-trates work efforts to create an ideal plant environ-ment, giving better yields with less labor.
Though its benefits are many, the intensive gardenmay not be for everyone. Some people enjoy thesight of long, straight rows in their gardens. Othersprefer machine cultivation to hand weeding; thoughthere is often less weeding to do in intensiveplantings because of fewer pathways and closelyspaced plants, the weeding that must be done isusually done by hand or with hand tools. Still othergardeners like to get their gardens planted in a veryshort period of time and have harvests come in allat once. The intensive ideal is to have somethinggrowing in every part of the garden at all timesduring the growing season.
A good intensive garden requires early, thoroughplanning to make the best use of time and space inthe garden. Interrelationships of plants must beconsidered before planting, including nutrientneeds, shade tolerance, above- and below-groundgrowth patterns, and preferred growing season.Using the techniques described below, anyone candevelop a high-yielding intensive garden.
The Raised BedThe raised bed or growing bed is the basic unit of anintensive garden. A system of beds allows thegardener to concentrate soil preparation in smallareas, resulting in effective use of soil amendmentsand creating an ideal environment for vegetablegrowth.
Beds are generally 3 to 4 feet wide and as long asdesired. The gardener works from either side of thebed, reducing the incidence of compaction causedby walking on the soil.
Soil preparation is the key to successful intensivegardening. To grow so close together, plants musthave adequate nutrients and water. Providing extrasynthetic fertilizers and irrigation will help, butthere is no substitute for deep, fertile soil high inorganic matter. Humus-rich soil will hold extranutrients, and existing elements that are “lockedup” in the soil are released by the actions of earth-worms, microorganisms and acids present in a life-filled soil, making them available for plant use.
If your soil is not deep, double-dig the beds for bestresults. Remove the top 12 inches of soil from thebed. Insert a spade or spading fork into the next 10to 12 inches of soil and wiggle the handle back andforth to break up compacted layers. Do this every 6to 8 inches in the bed. Mix the top soil with a gener-ous amount of compost or manure, and return themixture to the bed. It should be somewhat fluffyand may be raised slightly. To create a true raisedbed, take topsoil from the neighboring pathwaysand mix it in as well.
This is a lot of work! Try it in one or two beds forsome of your most valuable plants; if you like theresults you can proceed to other beds as you havetime. One nice thing about raised bed gardening isthat it breaks work into units. Instead of gazingdesperately at a garden full of weeds, thinkingyou’ll never have time to clean it up, you can look ateach bed and say, “I can do that in half an hourtoday!” Other chores are accomplished with thesame ease.
By their nature, raised beds are a form of wide-bedgardening, a technique by which seeds and trans-plants are planted in wide bands of several rows orbroadcast in a wide strip. In general, the goal is tospace plants at equal distances from each other onall sides, such that leaves will touch at maturity.This saves space, and the close plantings reducemoisture loss from surrounding soil.

Chapter 10 Planting Vegetables 23
Vertical GardeningThe use of trellises, nets, strings, cages, or poles tosupport growing plants constitutes vertical garden-ing. This technique is especially suited, but notlimited, to gardeners with a small garden space.Vining and sprawling plants, such as cucumbers,tomatoes, melons, and pole beans are obviouscandidates for this type of gardening. Some plantsentwine themselves onto the support, while othersmay need to be tied. Remember that a verticalplanting will cast a shadow, so beware of shadingsun-loving crops, or take advantage of the shade byplanting shade-tolerant crops near the vertical ones.Plants grown vertically take up much less space onthe ground, and though the yield per plant may be(but is not always) less, the yield per square foot ofgarden space is much greater. Because verticallygrowing plants are more exposed, they dry outfaster and may need to be watered more frequentlythan if they were allowed to spread over theground. This fast drying is also an advantage tothose plants susceptible to fungus diseases. Ahigher rate of fertilization may be needed, and soilshould be deep and well-drained to allow roots toextend vertically rather than compete with others ata shallow level.
InterplantingGrowing two or more types of vegetables in thesame place at the same time is known as interplant-ing. Proper planning is essential to obtain highproduction and increased quality of the cropsplanted. This technique has been practiced forthousands of years, but is just now gaining wide-spread support in this country. To successfully planan interplanted garden the following factors mustbe taken into account for each plant: length of theplant’s growth period, its growth pattern (tall, short,below or above ground), possible negative effectson other plants (such as the allelopathic effects ofsunflowers and Jerusalem artichokes on nearbyplants), preferred season, and light, nutrient andmoisture requirements. Interplanting can be accom-plished by alternating rows within a bed (plant arow of peppers next to a row of onions), by mixingplants within a row, or by distributing variousspecies throughout the bed. For the beginner,alternating rows may be the easiest to manage atfirst.
Long-season (slow to mature) and short-season(quick to mature) plants like carrots and radishes,respectively, can be planted at the same time. Theradishes are harvested before they begin to crowdthe carrots. An example of combining growthpatterns is planting smaller plants close to largerplants, radishes at the base of beans or broccoli.Shade tolerant species like lettuce, spinach, andcelery may be planted in the shadow of taller crops.Heavy feeders, such as cabbage family crops,should be interplanted with less gluttonous plants.
Interplanting can help keep insect and diseaseproblems under control. Pests are usually fairlycrop-specific; that is, they prefer vegetables of onetype or family. Mixing families of plants helps tobreak up large expanses of the pest-preferred crop,helping to contain early pest damage within a smallarea, thus giving the gardener a little more time todeal with the problem. One disadvantage is thatwhen it does come time to spray for pests, it’s hardto be sure that all plants are protected.
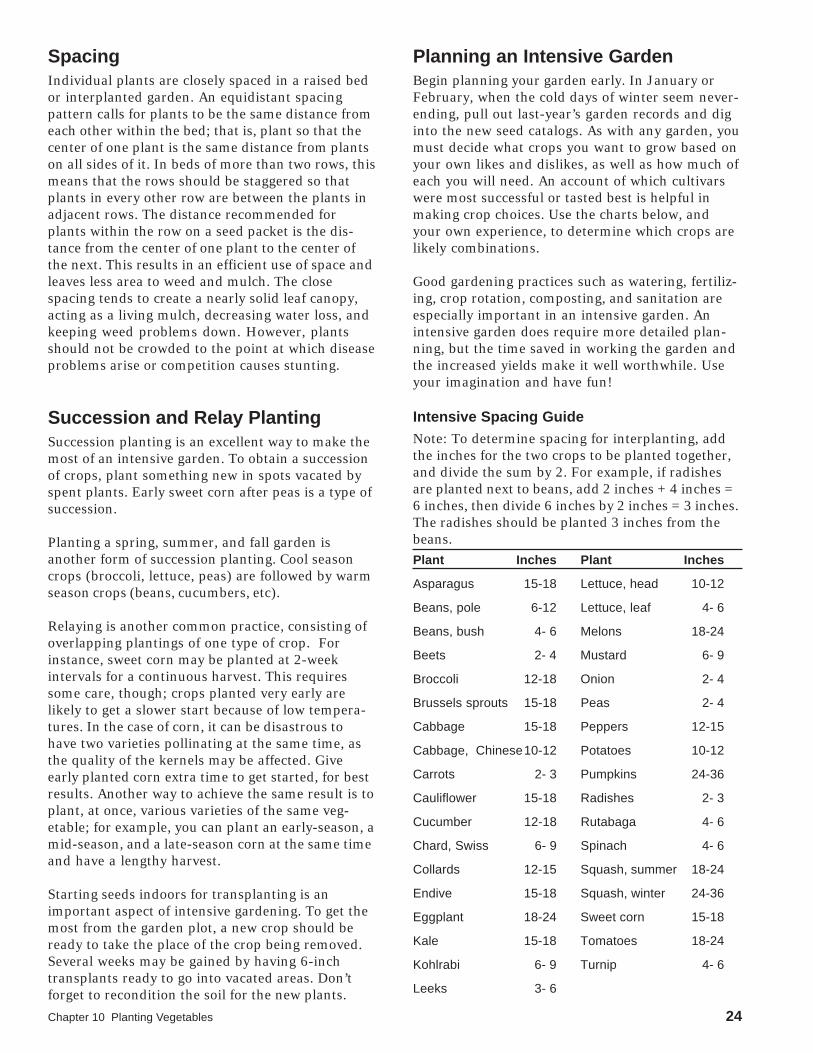
Chapter 10 Planting Vegetables 24
SpacingIndividual plants are closely spaced in a raised bedor interplanted garden. An equidistant spacingpattern calls for plants to be the same distance fromeach other within the bed; that is, plant so that thecenter of one plant is the same distance from plantson all sides of it. In beds of more than two rows, thismeans that the rows should be staggered so thatplants in every other row are between the plants inadjacent rows. The distance recommended forplants within the row on a seed packet is the dis-tance from the center of one plant to the center ofthe next. This results in an efficient use of space andleaves less area to weed and mulch. The closespacing tends to create a nearly solid leaf canopy,acting as a living mulch, decreasing water loss, andkeeping weed problems down. However, plantsshould not be crowded to the point at which diseaseproblems arise or competition causes stunting.
Succession and Relay PlantingSuccession planting is an excellent way to make themost of an intensive garden. To obtain a successionof crops, plant something new in spots vacated byspent plants. Early sweet corn after peas is a type ofsuccession.
Planting a spring, summer, and fall garden isanother form of succession planting. Cool seasoncrops (broccoli, lettuce, peas) are followed by warmseason crops (beans, cucumbers, etc).
Relaying is another common practice, consisting ofoverlapping plantings of one type of crop. Forinstance, sweet corn may be planted at 2-weekintervals for a continuous harvest. This requiressome care, though; crops planted very early arelikely to get a slower start because of low tempera-tures. In the case of corn, it can be disastrous tohave two varieties pollinating at the same time, asthe quality of the kernels may be affected. Giveearly planted corn extra time to get started, for bestresults. Another way to achieve the same result is toplant, at once, various varieties of the same veg-etable; for example, you can plant an early-season, amid-season, and a late-season corn at the same timeand have a lengthy harvest.
Starting seeds indoors for transplanting is animportant aspect of intensive gardening. To get themost from the garden plot, a new crop should beready to take the place of the crop being removed.Several weeks may be gained by having 6-inchtransplants ready to go into vacated areas. Don’tforget to recondition the soil for the new plants.
Planning an Intensive GardenBegin planning your garden early. In January orFebruary, when the cold days of winter seem never-ending, pull out last-year’s garden records and diginto the new seed catalogs. As with any garden, youmust decide what crops you want to grow based onyour own likes and dislikes, as well as how much ofeach you will need. An account of which cultivarswere most successful or tasted best is helpful inmaking crop choices. Use the charts below, andyour own experience, to determine which crops arelikely combinations.
Good gardening practices such as watering, fertiliz-ing, crop rotation, composting, and sanitation areespecially important in an intensive garden. Anintensive garden does require more detailed plan-ning, but the time saved in working the garden andthe increased yields make it well worthwhile. Useyour imagination and have fun!
Intensive Spacing Guide
Note: To determine spacing for interplanting, addthe inches for the two crops to be planted together,and divide the sum by 2. For example, if radishesare planted next to beans, add 2 inches + 4 inches =6 inches, then divide 6 inches by 2 inches = 3 inches.The radishes should be planted 3 inches from thebeans.
Plant Inches Plant Inches
Asparagus 15-18 Lettuce, head 10-12
Beans, pole 6-12 Lettuce, leaf 4- 6
Beans, bush 4- 6 Melons 18-24
Beets 2- 4 Mustard 6- 9
Broccoli 12-18 Onion 2- 4
Brussels sprouts 15-18 Peas 2- 4
Cabbage 15-18 Peppers 12-15
Cabbage, Chinese10-12 Potatoes 10-12
Carrots 2- 3 Pumpkins 24-36
Cauliflower 15-18 Radishes 2- 3
Cucumber 12-18 Rutabaga 4- 6
Chard, Swiss 6- 9 Spinach 4- 6
Collards 12-15 Squash, summer 18-24
Endive 15-18 Squash, winter 24-36
Eggplant 18-24 Sweet corn 15-18
Kale 15-18 Tomatoes 18-24
Kohlrabi 6- 9 Turnip 4- 6
Leeks 3- 6
Chapter 10 Planting Vegetables 25
Plants Grouped According to Nutrient Needs
Heavy Feeders Light Feeders Soil Builders
Asparagus Carrot Alfalfa
Beet Garlic Beans, broad
Broccoli Leek Beans, snap
Brussels sprouts Mustard greens Clover
Cabbage Onion Peas
Cantaloupe Parsnip
Pepper Celery
Collard Rutabaga
Shallot Cucumber
Eggplant Turnip
Endive
Kale
Kohlrabi
Lettuce
Parsley
Pumpkin
Rhubarb
Spinach
Squash, summer
Squash, winter
Strawberry
Sunflower
Tomato
Watermelon
Economic Value of CropsIt is difficult to evaluate the economic value of cropsgrown in the vegetable garden due to the differentlengths of time they require for maturity andharvest, the availability of varieties and vegetablestypes not generally found in the marketplace, andthe lack of comparison values for vegetables that arenot acceptable by commercial standards (crackedtomatoes, crooked cucumbers, etc.), but which areperfectly usable by the gardener. Nevertheless,several studies have attempted to determine whichcrops bring the most value per square foot ofgarden space, partly to aid small-space gardeners inmaking decisions about what to plant. Of course, ifno one in the family likes beets, there is no point ingrowing them just because they are economicallyvaluable, but this list may help you determine
which vegetables to plant and which to buy. Peren-nial crops are not on the list below because each ofthe studies was on a one-season basis. Asparagus,rhubarb, horseradish, and other perennial crops doalso have considerable economic worth. Fruit treesand shrubs are also valuable producers, especiallyconsidering the long-term.
Top 15 Vegetables in Economic Value1:Tomatoes Beets
Green bunching onions Cucumbers
Carrots Peppers
Leaf lettuce Broccoli
Swiss Chard Head Lettuce
Summer squash Turnips(greens&roots)
Edible pod peas Beans (pole, bush)
Onion storage bulbs
1 Values based on pounds produced per squarefoot, retail value per pound at harvest time, andlength of time in the garden.
Low-Value Crops:
(not recommended for small spaces)
Corn
Squash
Melons
Pumpkins
Miniature varieties or trellising may increase valueper square foot.
Container GardeningIf you don’t have space for a vegetable garden, or ifyour present site is too small, consider raising fresh,nutritious, homegrown vegetables in containers. Awindow sill, patio, balcony, or doorstep can providesufficient space for a productive container garden.Problems with soil-borne diseases, nematodes, orpoor soil can also be overcome by switching tocontainer gardening.

Chapter 10 Planting Vegetables 26
Growing vegetables that take up little space, such ascarrots, radishes and lettuce, or crops that bearfruits over a period of time, such as tomatoes andpeppers, for best use of space and containers. Dwarfor miniature varieties often mature and bear fruitearly, but most do not produce as well overall asstandard varieties. With increasing interest incontainer gardening, plant breeders and seedcompanies are working on vegetables specificallybred for container culture. These varieties are notnecessarily miniatures or dwarf and may produceas well as standard types if properly cared for.
The amount of sunlight that your container gardenspot receives may determine which crops can begrown. Generally, root crops and leaf crops cantolerate partial shade, but vegetables grown fortheir fruits generally need at least 8 hours of full,direct sunlight each day, and perform much betterwith 10 to 12 hours. Available light can be increasedsomewhat by providing reflective materials aroundthe plants, e.g., aluminum foil, white-paintedsurfaces, marble chips.
Container gardening lends itself to attractiveplantscaping. A dull patio area can be brightenedby the addition of baskets of cascading tomatoes ora colorful herb mix. Planter boxes with trellises canbe used to create a cool shady place on an apart-ment balcony. Container gardening presents oppor-tunities for many innovative ideas.
ContainersThere are many possible containers for garden-ing. Clay, wood, plastic, metal are some of thesuitable materials. Containers for vegetableplants must (1) be big enough to support plantswhen they are fully grown, (2) hold soil withoutspilling, (3) have adequate drainage, and (4)never have held products that would be toxic toplants or people. Consider using barrels, cut-offmilk and bleach jugs, window boxes, basketslined with plastic (with drainage holes punchedin it), even pieces of drainage pipe or cementblock. If you are building a planting box out ofwood, you will find redwood and cedar to be themost rot-resistant, but bear in mind that cedartrees are much more plentiful than redwoods.Wood for use around plants should never betreated with creosote or pentachlorophenol(Penta) wood preservatives. These may be toxicto plants and harmful to people as well.
Some gardeners have built vertical planters outof wood lattice lined with black plastic and thenfilled with a lightweight medium; or out of
welded wire, shaped into cylinders, lined withsphagnum moss, and filled with soil mix.
Depending on the size of your vertical planter, 2-inch diameter perforated plastic pipes may beneeded inside to aid watering.
Whatever type of container you use, be sure thatthere are holes in the bottom for drainage so thatplant roots do not stand in water. Most plantsneed containers at least 6 to 8 inches deep foradequate rooting.
As long as the container meets the basic require-ments described above it can be used. Theimaginative use of discarded items or construc-tion of attractive patio planters is a very enjoy-able aspect of container gardening. For ease ofcare, dollies or platforms with wheels or casterscan be used to move the containers from place toplace. This is especially useful for apartment orbalcony gardening so that plants can be movedto get maximum use of available space andsunlight, and to avoid destruction from particu-larly nasty weather.
MediaA fairly lightweight potting mix is needed forcontainer vegetable gardening. Soil straight fromthe garden usually cannot be used in a containerbecause it may be too heavy, unless your gardenhas sandy loam or sandy soil. Clay soil consistsof extremely small (microscopic) particles. In acontainer, the bad qualities of clay are exagger-ated. It holds too much moisture when wet,resulting in too little air for the roots, and it pullsaway from the sides of the pot when dry. Con-tainer medium must be porous in order tosupport plants, because roots require both airand water. Packaged potting soil available atlocal garden centers is relatively lightweight andmay make a good container medium. Soillessmixes such as peat-lite mix are generally too lightfor container vegetable gardening, not offeringenough support to plant roots. If the container is

Chapter 10 Planting Vegetables 27
also lightweight, a strong wind can blow plantsover, resulting in major damage. Also, soillessmixes are sterile and contain few nutrients, soeven though major fertilizers are added, no traceelements are available for good plant growth.Add soil or compost if you wish to use a sterilemix. For a large container garden, the expense ofprepackaged or soilless mixes may be quite high.Try mixing your own with one part peat moss,one part garden loam, and one part clean, coarse(builder’s) sand, and a slow-release fertilizer (14-14-14) according to container size. Lime may alsobe needed to bring the pH to around 6.5. In anycase, a soil test is helpful in determining nutrientand pH needs, just as in a large garden.
PlantingPlant container crops at the same time you wouldif you were planting a regular garden. Fill a cleancontainer to within ½ inch of the top with theslightly damp soil mixture. Peat moss in the mixwill absorb water and mix much more readily ifsoaked with warm water before putting the mixin the container. Sow the seeds or set transplantsaccording to instructions on the seed package.Put a label with the name, variety, and date ofplanting on or in each container. After planting,gently soak the soil with water, being careful notto wash out or displace seeds. Thin seedlings toobtain proper spacing when the plants have twoor three leaves. If cages, stakes, or other supportsare needed, provide them when the plants arevery small to avoid root damage later.
WateringPay particular attention to watering containerplants. Because the volume of soil is relativelysmall, containers can dry out very quickly,especially on a concrete patio in full sun. Daily oreven twice daily watering may be necessary.Apply water until it runs out the drainage holes.On an upstairs balcony, this may mean neighborproblems, so make provisions for drainage ofwater. Large trays filled with coarse marble chipswork nicely. However, the soil should never besoggy or have water standing on top of it. Whenthe weather is cool, container plants may besubject to root rots if maintained too wet. Claypots and other porous containers allow addi-tional evaporation from the sides of the pots andwatering must be done more often. Small potsalso tend to dry out more quickly than largerones. If the soil appears to be getting excessivelydry (plants wilting every day is one sign), groupthe containers together so that the foliage createsa canopy to help shade the soil and keep it cool.
On a hot patio, you might consider puttingcontainers on pallets or other structures that willallow air movement beneath the pots and pre-vent direct contact with the cement. Checkcontainers at least once a day, and twice on hot,dry, or windy days. Feel the soil to determinewhether or not it is damp. Mulching and wind-breaks can help reduce water requirements forcontainers. If you are away a lot, consider anautomatic drip emitter irrigation system.
FertilizingIf you use a soil mix with fertilizer added, thenyour plants will have enough nutrients for 8 to 10weeks. If plants are grown longer than this, add awater-soluble fertilizer at the recommended rate.Repeat every 2 to 3 weeks. An occasional dose offish emulsion or compost will add trace elementsto the soil. Do not add more than the recom-mended rate of any fertilizer, since this maycause fertilizer burn and kill the plants. Con-tainer plants do not have the buffer of largevolumes of soil and humus to protect them fromover-fertilizing or over-liming. Just because alittle is good for the plants does not guaranteethat a lot will be better.
General careVegetables grown in containers can be attackedby the various types of insects and diseases thatare common to any vegetable garden. Plantsshould be periodically inspected for the presenceof foliage-feeding and fruit-feeding insects aswell as the occurrence of diseases. Protect plantsfrom very high heat caused by light reflectionfrom pavement. Move them to a cool spot orshade them during the hottest part of the day.Plants should be moved to a sheltered locationduring severe rain, hail, or wind storms, and forprotection from early fall frosts.
Indoor container gardening with vegetablesIf you want fresh, home-grown vegetables overthe winter, or if you don’t have an outdoor spacein which you can place containers, it is worthtrying some indoor container gardening. Ofcourse you cannot have a full garden in thehouse, but a bright, sunny window can be thesite for growing fresh food all year. Some small-fruited tomatoes and peppers, several types oflettuce, radishes, and many herbs are among theplants you can include in the indoor garden.
Follow directions given above for preparing potsand for watering, fertilizing, etc. However, notethat plants will dry out less quickly indoors and

Chapter 10 Planting Vegetables 28
will also grow more slowly, needing less fertil-izer. To make watering easy it is wise to set thepots in large trays with an inch or two of decora-tive stones in them. Not only will this preventyour having to move the plants in order to waterthem, which may discourage you from wateringwhen you should, but it will also provide humid-ity, which is a major requirement, especiallyduring winter when the house is warm and dry.
As mentioned before, a sunny window, prefer-ably south-facing, is almost a must for indoorvegetable growing. Fruiting vegetables such astomatoes and peppers will also need supplemen-tal light, such as a combination warm-white/cool-white fluorescent fixture, during wintermonths. Insufficient light will result in tall,spindly plants and failure to flower and set fruit.
Herbs are a first choice for many indoor garden-ers. Many are less demanding than vegetableplants, and cooks find it pleasant to be able tosnip off a few sprigs of fresh parsley or chopsome chives from the windowsill herb garden.Chives grow like small onions with leaves about6 inches tall. These plants prefer cool conditionswith good light, but will grow quite well on awindowsill in the kitchen. One or two pots ofchives will provide leaves for seasoning saladsand soups. Plant seeds in a 6-inch pot. The plantsshould be about 1 inch apart over the entiresurface area. It will require about 12 weeks fromthe time seeds are planted until leaves can be cut.For variety, try garlic or Chinese chives, whichgrow in a similar fashion, but have a mild garlicflavor.
Parsley seeds can be planted directly into 6-inchpots, or young, healthy plants can be trans-planted from the garden. One vigorous plant perpot is enough. Standard parsley develops attrac-tive, green, curly leaves about 6 or 8 inches tall.Italian, or flat-leaved, parsley has a slightlystronger flavor and is a favorite for pasta dishes.Leaves can be clipped about 10 to 12 weeks afterplanting the seeds.
Cilantro, or the leaves of the young corianderplant, can be grown in the windowsill garden.Cilantro is used in Oriental and Mexican dishes,but it is not available in most grocery stores andmust be used fresh. Grow cilantro as you wouldparsley. Thyme and other herbs will also growwell indoors if given the right conditions.
The small-fruited varieties of tomatoes such asTiny Tim, Small Fry, and the paste tomato,Roma, may be raised quite satisfactorily in thehome. They will challenge your gardening
ability, and supply fruits which can be eatenwhole, cooked, or served with salad. The TinyTim tomato grows to a height of about 12 to 15inches. Small Fry, which is about 3 feet tall, andRoma will need more space and should belocated on an enclosed porch or in a sun room.Several varieties have been developed for hang-ing baskets; they may be worth experimentingwith.
Some of the small-fruited peppers may be grownas indoor plants. Like tomatoes, they requirewarm, bright conditions in order to grow wellindoors. Fruits will be ready to harvest frompeppers and tomatoes about ten weeks afterplanting. Whiteflies and aphids may present aproblem on indoor tomato and pepper plants.Keep a close watch for these pests so they do notget a good start in your planting. Yellow stickytraps, either purchased or homemade, are effec-tive in trapping whiteflies. Insecticidal soap orother pesticide approved for vegetable plants canbe used to control aphids. Fortunately, you willbe less likely to experience problems with suchoutdoor pests as tomato hornworms and earlyblight than you would if plants were outside.
For a quick-growing crop, try radishes. Thesemust be grown very rapidly if they are to becrisp and succulent. Scatter radish seeds on moistsoil in a 6-inch pot. Cover with ¼-inch of soil andplace a piece of glass or plastic wrap over the potto conserve moisture until the seeds germinate.Carrots are slower, but can be grown in the sameway; use the small-rooted varieties, such as LittleFinger, for best results indoors.
Experiment with various types of lettuce. Leaflettuce and the miniature Tom Thumbbutterhead are some to try. Space them accordingto package directions. Keep lettuce moist and ina very sunny spot.
If light is limited, an old standby for fresh tasteand high food value is sprouted seeds. Almostany seeds can be sprouted: corn, barley, alfalfa,lentils, soybeans, rye, peas, radish, mung beans,sunflowers, etc. Use only special seeds forsprouting available from health food or grocerystores to avoid the possibility of getting seedstreated with pesticides. Use any wide-mouthedcontainer such as a Mason or mayonnaise jar.Soak seeds overnight, drain, and place in thecontainer. Cover with a double cheesecloth layerheld with rubber bands, or a sprouting lid. Setthe container in a consistently warm spot andrinse and drain seeds two or three times daily. In3 to 5 days, sprouts will be 1 to 3 inches long andready for harvesting.

Chapter 10 Planting Vegetables 29
Information for Growing Vegetables in Containers
Minimum Distance (“) Days fromLight Container Plants in Seed to
Vegetable1 Requirements2 Size Containers Harvest Comments
Beans, bush FS 2 gal. 2-3 45-60 Several plantings, week intervals
Beets FS/PS ½ gal. 2-3 50-60 Thin plants when 6-8" tall
Carrots FS/PS 1 qt. 2-3 65-80 Several plantings, 2-week intervals
Cabbage FS/PS 3 gal. 12-18 65-120 Requires fertile soil
Chard, Swiss FS/PS ½ gal. 4-6 30-40 Harvest leaves
Cucumbers FS 3 gal. 14-18 70-80 Require hot weather, vining typesneed support
Eggplant FS 3 gal. 1 plant per 75-100 Requires fertile soil container
Kale FS/PS 2 gal. 10-15 55-65 Harvest leaves
Lettuce, leaf PS ½ gal. 4-6 30-35 Harvest leaves
Mustard greens PS ½ gal. 4-5 35-40 Several plantings 2-week intervals
Onions, green FS/PS ½ gal. 2-3 70-100 Requires lots of moisture
Peppers, Bell FS 2 gal. 1 plant per 110-120 Require hot weather container
Squash, summer FS 3 gal. 1 plant per 50-60 Plant only bush type container
Tomatoes FS 3 gal. 1 plant per 55-100 Stake and prune or cage container
Tomatoes, cherry FS 1 gal. 1 plant per 55-100 Helps to stake & prune container
Turnips FS/PS 3 gal. 2-3 30-60 Harvest roots & leaves
1 Consult seed catalogs for varieties adapted to container culture
2 FS = Full Sun FS/PS = Full sun; tolerates partial shade PS = Partial shade

Chapter 10 Planting Vegetables 30
Vegetable Gardening in the FallPlanting for a Fall HarvestBy planning and planting a fall vegetable garden itis possible to have fresh vegetables up to and evenpast the first frosts. At the time when retail veg-etable prices are on the rise, you can be reapinglarge and varied harvests from your still-productivegarden site.
Many varieties of vegetables can be planted inmidsummer to late summer for fall harvests. Suc-cession plantings of warm season crops, such ascorn and beans, can be harvested until the firstkilling frost. Cool season crops, such as kale, tur-nips, mustard, broccoli, cabbage, etc., grow wellduring the cool fall days and withstand light frosts.Timely planting is the key to a successful fall gar-den. Refer to the planting chart for latest plantingdates.
When planting fall crops, prepare the soil by restor-ing nutrients removed by spring and summer crops.A light layer of compost or aged manure, or a smallapplication of complete chemical fertilizer willboost soil nutrients in preparation for another crop.
Dry soil may make working the soil difficult andinhibit seed germination during the midsummerperiod. Plant fall vegetables when the soil is moistafter a rain, or water the area thoroughly the daybefore planting. Seeds may be planted in a shallowtrench to conserve moisture. Cover the seeds abouttwice as deeply as you do in the spring. An old-timetrick for germinating seeds in midsummer is toplant the seeds, water them in well, and then place aboard over the row until the sprouts just reach thesoil surface; at that time remove the board. Plasticwill also work, but must be completely anchored sothe soil does not dry out underneath or the plasticblow away. An organic mulch on top will help keepsoil cool. Mulching between rows can also help keepsoil cool and decrease soil drying. In severe hotweather a light, open type of mulch, such as loosestraw or pine boughs, may be placed over theseeded row. This must be removed as soon asseedlings are up so that they receive full sun.Starting transplants in a shaded cold frame or in acool indoor area is another possibility.
Once young plants are established, a heavier mulchmay be used to hold moisture and control weeds.Irrigate when necessary so the young plants havesufficient moisture. Fall plantings often have fewinsect problems, as they avoid the peak insect
activity period of midsummer. However, someinsects, such as cabbageworm and corn earworm,may be even worse late in the year than in summer;vigilance is still required! Avoid some pests anddiseases by planting crops of different families thanwere originally in that section of the garden.
Some of the best quality vegetables are producedduring the warm days and cool nights of the fallseason. These environmental conditions add sugarto sweet corn and crispness to carrots. Parsnips andrutabagas are examples of crops that are very muchimproved by a touch of frost.
Protection of vegetable plants during cold periodsmay extend your season even further. Though in thehot days of summer the last thing you want to thinkabout is planting more crops to take care of, lookahead to the fall garden, which offers its ownsatisfaction through prolonged harvest of freshvegetables, savings in food costs, and the knowl-edge that you’re making full use of your gardeningspace and season.
Care of Fall CropsThe beginning of fall garden care comes when theweather and the radio station announce the firstarrival of frost. Your main concern then should beto harvest all ripe, tender crops. Tomatoes, summersquash, melons, eggplant, cucumbers and peppersare some of the crops that cannot withstand frostand should be picked immediately. Store the veg-etables in a place where they can be held untilneeded for eating or processing. If the frost warningis mild, predicting no lower than a 30° F., try cover-ing tender plants in your garden that still hold anabundance of immature fruit. Baskets, burlap,boxes, row covers, blankets, or buckets help protectthem from the frost. Warm days after the frost willstill mature some of the fruit as long as the plantshave this nightly frost protection. Much will dependon the garden’s microclimate. If your spot is lowand unsheltered, it is likely to be a frost pocket.Gardens sheltered from winds and on the upperside of a slope are less susceptible to early frostdamage.
When using a cold frame to extend the harvestseason, be sure to close the top on frosty nights toprotect the plants from the cold. When the suncomes out the next morning and the air warms,open the cold frame again; leave it closed if daytimetemperatures are low. Spun bonded row coverswork well for season extension.

Chapter 10 Planting Vegetables 31
Cool-season crops such as cabbage, cauliflower,broccoli, spinach, and Brussels sprouts can with-stand some cold. In fact, their flavor may be en-hanced after a frost. They cannot stay in the gardenall winter, but do not need to be picked immedi-ately when frost comes. Kale, spinach, evergreenbunching onions, lettuce, parsley, parsnips, carrots,and salsify are some crops that may survive allwinter in the garden. Mulch these overwinteringvegetables with 8 inches of mulch to prevent heav-ing of the soil. Most of these vegetables can be dugor picked in early spring.
Now is the time to prepare perennial vegetables forwinter, too. Most will benefit from a topdressing ofmanure or compost and a layer of mulch, whichreduces damage from freezing and thawing. Deadleaf stalks of perennial vegetables such as asparagusand rhubarb should be cut to the ground after theirtops are killed by frost, though some people preferto leave asparagus stalks until late winter to holdsnow over the bed. Don’t forget strawberry beds.Remove weeds that you let grow when you weretoo busy last summer. You can transplant some ofthe runner plants if you carefully dig a good-sizedball of soil with the roots. Mulch the bed well with alight material. Old raspberry canes can be cut backat this time or late in the winter.
When tender crops have been harvested and over-wintering crops cared for, pull up all stakes andtrellises in the garden except those stakes that areclearly marking the sites of overwintering plants.Clean stakes and trellises of remnants of plantmaterials and soil. Hose them down and allow todry. Tie stakes in bundles and stack them so thatthey won’t get lost over the winter. If possible, rollup wire trellises and tie them securely. Store theseitems inside your attic, barn, or shed in an areawhere they are out of the way, and where rodentsand other animals cannot get to them to use aswinter nests.
Preparing Soil for WinterPull up all dead and unproductive plants and placethis residue on top of the soil to be tilled under, orin the compost heap. Remove any diseased orinsect-infested plant material from the garden thatmay shelter overwintering stages of disease andinsect pests. If this plant material is left in thegarden, you are leaving an inoculum of diseasesand insects which will begin to reproduce the nextspring and add to your pest problems.
The best thing to do is to remove infested plantmaterial from the garden or burn it. Burning willkill any diseases or insects that may be in plantwastes. Spread the ashes on the garden to get thebenefit of mineral nutrients. Check laws in yourarea before burning anything; you may need apermit. If you live near a wooded area, burning maybe too risky. In this case, haul the diseased materialaway.
Clean-up also gives you the chance to add compostto the garden. Compost contains highly nutritious,decomposed plant material and beneficial organ-isms, and is an excellent soil-builder. By spreadingcompost and other wastes on the soil and plowingthem in, you are adding nutrients to the soil for nextyear’s crop. The beneficial insects and microorgan-isms in the compost will help integrate the compostwith the soil, and the added humus will improvesoil structure.
Don’t overlook other excellent sources of organicmaterial available during the fall. Leaves are abun-dant, and neighbors will usually be glad to givetheir leaves away. Put some on the garden now andstore some for next year’s mulch. Leaves will mat ifput on in too thick a layer, and will not decomposequickly. You can help leaves break down moreeasily by running a lawn mower back and forthover the pile. Put the shredded leaves directly ontothe garden or compost them. Sawdust and woodchips are easy to obtain from sawmills and manyfarms and stables want to get rid of manure pilesbefore winter sets in.
If you wait until spring to add organic material tothe garden, it may not have time to decompose andadd its valuable nutrients to the soil by the time youare ready to plant, and you may have to delayplanting to a later date. Hot (very fresh) manure canalso burn young seedlings. By adding these materi-als in the fall, you give them plenty of time todecompose and blend into the soil before plantingtime. If you don’t have enough organic material forthe entire garden, try to cover those areas that youwant especially rich for next summer’s crop.
If the weather stays dry enough before the groundfreezes, you can plow or rototill in the fall. Turningunder vegetation in the fall allows earlier plantingin the spring and is especially good for heavy soils,since they are exposed to the freezing and thawing

Chapter 10 Planting Vegetables 32
that takes place during the winter. This helps toimprove soil structure. If you have a rainy fall, or ifthe garden is steep and subject to erosion, you maydecide you’d rather plant a cover crop for wintergarden protection. A cover crop decreases erosionof the soil during the winter, adds organic materialwhen it is incorporated in the spring, improves soiltilth and porosity, and adds valuable nutrients.Winter cover crops can be planted as early asAugust 1 but should not be planted any later thanmid-September. They should make some growthbefore hard frost kills them. Where you have fallcrops growing, you can sow cover crop seed be-tween rows a month or less before expected harvest.This way the cover crop gets a good start, but willnot interfere with vegetable plant growth.
Prepare the soil for cover crop seed by tilling underplant wastes from the summer. Ask at the seed storewhat the best type of cover crop for your area is andat what rate (pounds per 100 square feet) to plant it.Broadcast the seed, preferably before a rain, andrake it evenly into the soil. Spring planting may be
delayed somewhat by the practice of cover crop-ping, since time must be allowed for the greenmanure to break down. If you have crops that needto be planted very early, you may prefer to leave asection of the garden bare or with a stubble mulch.
When time or weather conditions prohibit eithertilling or cover cropping, you may wish to let yourgarden lie under a mulch of compost, plant wastes,or leaves all winter to be plowed or tilled under inthe spring. However, if you want to plant early thenext spring, a mulch of heavy materials such aswhole leaves may keep the soil cold long enough todelay planting. In this case, chop them fine enoughthat they will break down over the winter. Theaddition of fertilizer high in nitrogen will also helpbreak down organic matter more quickly.
Some cover crops suitable for winter use are in thetable on the next page. Mixtures of legumes andnon-legumes are effective as well.

Chapter 10 Planting Vegetables 33
Cover Crops
Legume/ Amount to When toNon-Legume sow per 100 When to Turn
Type sq. ft. (Oz.) Sow Under Effects Notes
Alfalfa L ½ Spring Fall Fixes 150-250 Loam, fairly fertilelbs. N/ac./yr.; soil; needs warmdeep roots break temps. For
Late Summer Spring up hard soil, germination. Lime iftrace elements to pH is low. Hardy.surface In mtns sow by
Aug. 10. Drought -tolerant. Innoculate
Barley N 4 Fall Spring Adds organic Prefers medium-matter; improves rich, loam soil.soil aggregation. Lime if pH is low.
Spring Fall Not as hardy as rye.Tolerates drought.
Buckwheat N 2-1/2 Spring Summer Mellows soil; Must leave part ofrich in potassium garden in cover
crop during season.Summer Fall Grows quickly. Not
hardy.
Crimson Clover L 1/3 Spring Fall Fixes 100-150 Not reliably hardy.lbs. N/ac/yr. Sow before mid-
Sept in PiedmontFall Spring and mountains.
Not drought-tolerant. Lime if pHis low. White cloversomewhat hardier.
Fava beans L Plant 8" apart Early spring Early summer Some types fix Will grow on many700-100 lbs. soil types. MediumN/acre in as drought tolerance.little as 6 wks. Likes cool growing
weather. Good forLate summer Fall Use small-seeded mountain areas. If
rather than large- planted in earlySeed table types. spring can grow
late vegetables.Innoculate withsame bacteria asfor hairy vetch.
Oats N 4 Spring Summer Adds organic Needs adequatematter; improves manganese. Not
Fall Spring soil aggregation hardy; tolerateslow pH.
Rye, winter N 3-1/2 Fall Spring Adds organic Very hardy. Canmatter; improves plant till earlysoil aggregation. October
Vetch, hairy L 2-1/2 Early fall Spring Fixes 80-100 lbs. Innoculate; slow toN/acre/yr. establish. Fairly
hardy. Till underbefore it seeds; canbecome a weed.
Wheat, winter N 4 Fall Spring Add organic Same as barley.matter; improvessoil aggregation.

Chapter 10 Planting Vegetables 34
Care of Garden EquipmentClean-up of tools and equipment is another impor-tant practice related to the garden which should notbe ignored in the fall. Proper clean-up of tools nowwill leave them in top shape and ready to use whenspring comes. Clean, oil, and repair all hand tools.Repaint handles or identification marks that havefaded over the summer. Sharpen all blades andremove any rust. Power tools should be cleaned ofall plant material and dirt. Replace worn sparkplugs, oil all necessary parts, and sharpen blades.Store all tools in their proper place indoors, neveroutdoors where they will rust over the winter.
Unless you are lucky enough to live in a warm areawhere a cold frame will protect vegetables allwinter, you will need to clean up the frame when allvegetables have been harvested. Remove all remain-ing plant material and spread it on the cold framesoil. Spade the plant refuse and any other organicmaterial into the soil in the cold frame as thor-oughly as possible. Do not leave the top on the coldframe over the winter, as the cold air or the weightof snow may crack or break the glass. Remove thetop, wash it thoroughly, and store it on its side in aprotected indoor area where it will not get broken.
Successful gardening doesn’t stop when frostcomes, but continues throughout the fall and earlywinter months. When following good garden carepractices during this time, your garden will beready for the growth of healthy vegetables nextspring.
Season ExtendersTo get the most out of a garden, you can extend thegrowing season by sheltering plants from coldweather both in early spring and during the fall.Very ambitious gardeners harvest greens and othercool-weather crops all winter by providing the rightconditions. There are many ways to lengthen thegrowing season, and your choice depends on theamount of time and money you want to invest.
Cold Frames and Hot BedsCold frames, sun boxes, and hot beds are relativelyinexpensive, simple structures providing a favor-able environment for growing cool-weather crops inthe very early spring, the fall, and even into thewinter months. Some are elaborate and require alarge investment, but are reasonable for those whoare serious about having fresh vegetables during thewinter.
Cold frames and sun boxes have no outside energyrequirements, relying on the sun for their source ofheat. Hot beds are heated by soil heating cables,steam-carrying pipes, or fresh strawy manureburied beneath the rooting zones of the plants. Heatis collected by these frames when the sun’s rayspenetrate the sash, made of clear plastic, glass, orfiberglass. The ideal location for a cold frame is asouthern or southeastern exposure with a slightslope to ensure good drainage and maximum solarabsorption. A sheltered spot with a wall or hedge tothe north will provide protection against winterwinds. Sinking the frame into the ground somewhatwill also provide protection, using the earth forinsulation. To simplify use of the frame, consider awalkway to the front, adequate space behind theframe to remove the sash, and perhaps weights tomake raising and lowering of glass sashes easier.Some gardeners make their cold frames lightweightenough to be moved from one section of the gardento another. Another possibility is the Dutch light,which is a large but portable greenhouse-likestructure which is moved around the garden.
New designs in cold frames include passive solarenergy storage. For example, barrels painted blackand filled with water absorb heat during the dayand release it at night. The solar pod, shown on nextpage, is one design which provides for this type ofheat storage. Other new cold frames are built with avery high back and a steep glass slope and insulatedvery well; these may also include movable insula-tion that is folded up during the day and down atnight or during extremely cold weather.

Chapter 10 Planting Vegetables 35
In early spring, a cold frame is useful for hardening-off seedlings which were started indoors or in agreenhouse. This hardening-off period is important,as seedlings can suffer serious setbacks if they aremoved directly from the warmth and protection ofthe house to the garden. The cold frame provides atransition period for gradual adjustment to theoutdoor weather. It is also possible to start cool-weather crops in the cold frame and either trans-plant them to the garden or grow them to maturityin the frame.
Spring and summer uses of the cold frame centeraround plant propagation. Young seedlings ofhardy and half-hardy annuals can be started in aframe many weeks before they can be started in theopen. The soil in a portion of the bed can be re-placed with sand or peat moss or other mediumsuitable for rooting cuttings.
Fall is also a good time for sowing some cool-weather crops in frames. If provided with adequatemoisture and fertilization, most cool-season cropswill continue to grow through early winter in theprotected environment of the cold frame. Depend-ing on the harshness of the winter and whether ornot additional heating is used, your frame maycontinue to provide fresh greens, herbs, and rootcrops throughout the cold winter months.
Growing frames can be built from a variety ofmaterials; wood and cement block are the mostcommon. If you use wood, choose wood that willresist decay, such as a good grade of cypress orcedar, or use pressure-treated wood. Never usecreosote-treated wood or wood treated with pen-tachlorophenol, since these substances are harmfulto growing plants. Wood frames are not difficult tobuild. Kits may also be purchased and easily as-sembled; some kits even contain automatic ventila-tion equipment.
There is no standard-sized cold frame. The dimen-sions of the frame will depend on amount of avail-able space, desired crops, size of available windowsash, and permanency of the structure. Do not makethe structure too wide for weeding and harvesting;4 to 5 feet is about as wide as is convenient to reachacross. The sash of the frame should be sloped tothe south to allow maximum exposure to the sun’srays.
Insulation may be necessary when a sudden coldsnap is expected. A simple method is to throwburlap sacks filled with leaves over the sash on theframe at night to protect against freezing. Or, balesof straw or hay may be stacked against the frame.
Ventilation is most critical in the late winter, earlyspring, and early fall on clear, sunny days whentemperatures rise above 45 degrees. The sash shouldbe raised partially to prevent the buildup of extremetemperatures inside the frame. Lower or replace thesash each day early enough to conserve some heatfor the evening.
In summer, extreme heat and intensive sunlight candamage plants. This can be avoided by shadingwith lath or old bamboo window blinds. Wateringshould be done early so that plants dry before dark,to help reduce disease problems.
You may convert your cold frame to a hotbed. For amanure-heated bed: dig out to 2 feet deep (deeperto add gravel for increased drainage); add an 18-inch layer of strawy horse manure; cover with 6inches of good soil. For an electric heated bed: digout area 8 inches deep; lay down thermostaticallycontrolled electric cable in 6 to 8-inch long loops,evenly spacing cable, but never crossing; cover with2 inches of sand or soil; lay out hardware cloth toprotect cable; cover with 4 to 6 inches of good soil.
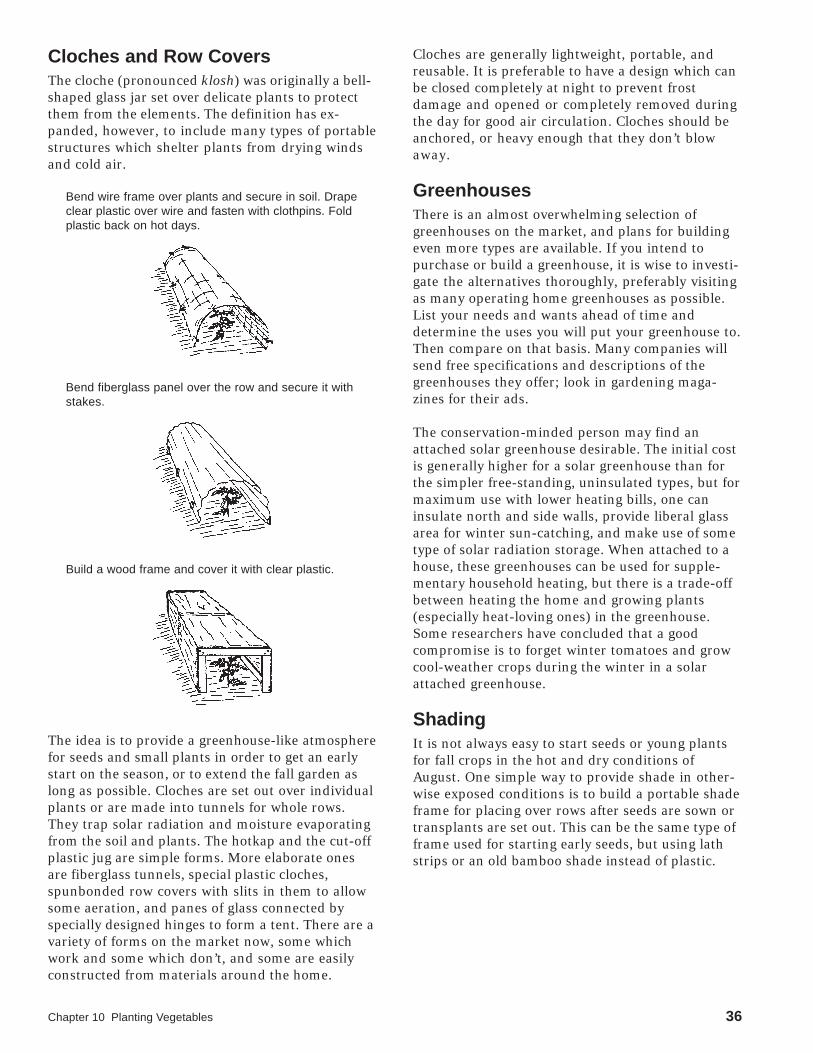
Chapter 10 Planting Vegetables 36
Cloches and Row CoversThe cloche (pronounced klosh) was originally a bell-shaped glass jar set over delicate plants to protectthem from the elements. The definition has ex-panded, however, to include many types of portablestructures which shelter plants from drying windsand cold air.
Bend wire frame over plants and secure in soil. Drapeclear plastic over wire and fasten with clothpins. Foldplastic back on hot days.
Bend fiberglass panel over the row and secure it withstakes.
Build a wood frame and cover it with clear plastic.
The idea is to provide a greenhouse-like atmospherefor seeds and small plants in order to get an earlystart on the season, or to extend the fall garden aslong as possible. Cloches are set out over individualplants or are made into tunnels for whole rows.They trap solar radiation and moisture evaporatingfrom the soil and plants. The hotkap and the cut-offplastic jug are simple forms. More elaborate onesare fiberglass tunnels, special plastic cloches,spunbonded row covers with slits in them to allowsome aeration, and panes of glass connected byspecially designed hinges to form a tent. There are avariety of forms on the market now, some whichwork and some which don’t, and some are easilyconstructed from materials around the home.
Cloches are generally lightweight, portable, andreusable. It is preferable to have a design which canbe closed completely at night to prevent frostdamage and opened or completely removed duringthe day for good air circulation. Cloches should beanchored, or heavy enough that they don’t blowaway.
GreenhousesThere is an almost overwhelming selection ofgreenhouses on the market, and plans for buildingeven more types are available. If you intend topurchase or build a greenhouse, it is wise to investi-gate the alternatives thoroughly, preferably visitingas many operating home greenhouses as possible.List your needs and wants ahead of time anddetermine the uses you will put your greenhouse to.Then compare on that basis. Many companies willsend free specifications and descriptions of thegreenhouses they offer; look in gardening maga-zines for their ads.
The conservation-minded person may find anattached solar greenhouse desirable. The initial costis generally higher for a solar greenhouse than forthe simpler free-standing, uninsulated types, but formaximum use with lower heating bills, one caninsulate north and side walls, provide liberal glassarea for winter sun-catching, and make use of sometype of solar radiation storage. When attached to ahouse, these greenhouses can be used for supple-mentary household heating, but there is a trade-offbetween heating the home and growing plants(especially heat-loving ones) in the greenhouse.Some researchers have concluded that a goodcompromise is to forget winter tomatoes and growcool-weather crops during the winter in a solarattached greenhouse.
ShadingIt is not always easy to start seeds or young plantsfor fall crops in the hot and dry conditions ofAugust. One simple way to provide shade in other-wise exposed conditions is to build a portable shadeframe for placing over rows after seeds are sown ortransplants are set out. This can be the same type offrame used for starting early seeds, but using lathstrips or an old bamboo shade instead of plastic.

CHAPTER 11Fruit in the HomeTree Fruits ..................................................................................................................................................... 1
Planning the Tree Fruit ................................................................................................................................................ 1Size of Planting ................................................................................................................................................................. 1Tree Spacing ..................................................................................................................................................................... 1Site Selection .................................................................................................................................................................... 2Variety Selection ............................................................................................................................................................... 2
Apple Rootstocks ........................................................................................................................................................ 3Size control (Dwarfing) ...................................................................................................................................................... 4Precocity ........................................................................................................................................................................... 4Stability .............................................................................................................................................................................. 4
Buying Trees ............................................................................................................................................................... 4Setting the Orchard ..................................................................................................................................................... 4
Time of Planting ................................................................................................................................................................ 4Handling Nursery Stock .................................................................................................................................................... 5Planting the Trees ............................................................................................................................................................. 5
Orchard Management ................................................................................................................................................ 5Cultural Practices .............................................................................................................................................................. 5Fertilization ........................................................................................................................................................................ 5Pruning .............................................................................................................................................................................. 6Thinning ............................................................................................................................................................................ 6Rodent Control .................................................................................................................................................................. 7Tree Fruit Spraying ........................................................................................................................................................... 7Sanitation .......................................................................................................................................................................... 8
Small Fruits .................................................................................................................................................. 9Planning the Small Fruit Garden ................................................................................................................................. 9General: Establishing the Planting ............................................................................................................................ 10General: Maintaining the Planting ............................................................................................................................. 10Strawberries .............................................................................................................................................................. 11
Variety Selection ............................................................................................................................................................. 11Establishing the Planting ................................................................................................................................................ 11 Site and Soil ................................................................................................................................................................ 11
Planting ........................................................................................................................................................................ 12Maintaining the Planting ................................................................................................................................................. 12
Soil Management ......................................................................................................................................................... 12Fertilization .................................................................................................................................................................. 12Training ........................................................................................................................................................................ 12Blossom Removal ........................................................................................................................................................ 12Renovation ................................................................................................................................................................... 12Pest Control ................................................................................................................................................................. 13
Culture of Everbearing and Day Neutral Varieties .......................................................................................................... 13Strawberry Growing in Pyramids and Barrels ................................................................................................................. 13Harvesting ....................................................................................................................................................................... 14
Grapes ...................................................................................................................................................................... 14Variety Selection ............................................................................................................................................................. 14
American Bunch Grapes ............................................................................................................................................. 14Seedless Table Grapes ............................................................................................................................................... 14Wine Grapes (French Hybrids) .................................................................................................................................... 14
Establishing the Planting ................................................................................................................................................ 14Site and Soil ................................................................................................................................................................ 14Planting ........................................................................................................................................................................ 14
Maintaining the Planting ................................................................................................................................................. 15Soil Management ......................................................................................................................................................... 15Fertilization .................................................................................................................................................................. 15Training and Pruning ................................................................................................................................................... 15
Harvesting ....................................................................................................................................................................... 15

Brambles ................................................................................................................................................................... 15Variety Selection ............................................................................................................................................................. 15
Blackberries ................................................................................................................................................................. 15Raspberries ................................................................................................................................................................. 16
Establishing the Planting ................................................................................................................................................ 16Site and Soil ................................................................................................................................................................ 16Planting ........................................................................................................................................................................ 16
Maintaining the Planting ................................................................................................................................................. 16Soil Management ......................................................................................................................................................... 16Fertilization .................................................................................................................................................................. 17Training and Pruning ................................................................................................................................................... 17
Harvesting ....................................................................................................................................................................... 17Blueberries ................................................................................................................................................................ 17
Variety Selection ............................................................................................................................................................. 17Establishing the Planting ................................................................................................................................................ 18
Site and Soil ................................................................................................................................................................ 18Planting ........................................................................................................................................................................ 18
Maintaining the Planting ................................................................................................................................................. 18Soil Management ......................................................................................................................................................... 18Fertilization .................................................................................................................................................................. 18Pruning ........................................................................................................................................................................ 18Pest Control ................................................................................................................................................................. 18
Harvesting ....................................................................................................................................................................... 18

Chapter 11 Fruit in the Home Garden 1
CHAPTER 11Fruit in the Home Garden
Edited and revised by William Lord, University of New Hampshire Cooperative Extension
Success with a fruit planting depends upon how well it is planned and how wellthe plans are carried out. Unfortunately, it is not possible for trees to be plantedand good quality fruit harvested with little or no effort. Relatively less care isrequired in the culture of sour cherries and pears than any of the other treefruits, but even these cannot be expected to produce good quality fruit year afteryear if left unattended. Proper attention must be given to insect and diseasecontrol, pruning, fertilization, soil management, and other necessary practices.
The small fruits offer advantages over fruit trees for home culture. They requirea minimum of space for the amount of fruit produced, and bear 1 or 2 years afterplanting. Also, pest control is typically easier than with most tree fruits. Successwith a small fruit planting will depend upon the attention given to all phases ofproduction: variety selection, soil management, fertilization, pruning, and pestcontrol. Plant only what you can care for properly. It is better to have a small,well-attended planting than a large, neglected one.
Tree Fruits
Planning the Tree FruitIt is desirable to locate the fruit planting as close toyour home as possible. Full sunlight all day long isrequired for good fruit production. Where space islimited, fruit trees may be set in almost any locationsuitable for ornamental plants. Consider the maturesize of the tree when designing the planting. Dwarffruit trees lend themselves to ornamental plantingsas well as orchards. They come into bearing earlierthan standard-sized trees, occupy less space, andcan be more easily pruned and sprayed with equip-ment normally available to the average gardener.Most nurseries now carry dwarf and semi-dwarfapple trees of several varieties. Dwarf pear, peach,and cherry trees are not recommended in northernareas as they lack hardiness; however, they may beworth trying in extreme southern New Hampshire.
Size of PlantingSpace, site, size of family, available time, andpollination requirements determine size of theplanting. Choose fruits based on family prefer-ence, adaptability, and available space. Neverattempt to plant more than you can care forproperly. The information in the table on pagetwo should help you determine the size of yourplanting.
Tree SpacingHow far apart should the trees be set? This is animportant factor, and to a large extent, it influ-ences selection of site and varieties. The table onthe next page shows the minimum desirabledistances between fruit trees in home orchards.They can be set farther apart if space allows, but,for best results, should not be set closer than theminimums indicated. To maintain a bearingsurface low enough for necessary pest control,trees should not be crowded.

Chapter 11 Fruit in the Home Garden 2
Space Requirement, Yield, Bearing Age,and Life Expectancy of Tree Fruits
Minimum Approximate Years toDistance Yield FirstBetween Per Significant Life
Fruit Plants Plant Production Expectancy(feet) (bushels) (years) (years)
Apple - standard 30 8 7 to 10 35 to 45
Apple - semi-dwarf 15 4 4 to 6 35 to 45
Apple - dwarf 8 1 2 to 3 35 to 45
Pear - standard 20 3 5 to 8 35 to 45
1Pear - dwarf 12 1 3 to 4 15 to 20
Peach (and nectarine) 15 4 3 to 4 15 to 20
Plum 18 2 4 to 5 15 to 20
Cherry - sour 20 60 qt. 4 to 5 15 to 20
2Cherry - sweet 25 40 qt. 4 to 5 15 to 20
3Apricot 20 1 - 2 4 to 6 15 to 20
1Rootstock only hardy to -5 to -10 0F. Extreme southern N.H. only.2Hardy to -100 F, bloom very early so frost-free site important.3Similar climatic limits as sweet cherry but, blooms so early that frost is a problem in most locations.
Site SelectionThe importance of selecting the best site possiblefor fruit planting cannot be overemphasized.Good air drainage is essential. Cold air, likewater, flows downhill. For this reason, fruit budson plants set in a low spot are more likely to bekilled than those on a slope. Frost pockets; low,wet spots; and locations exposed to strongprevailing winds must be avoided. South-facingslopes encourage early bud development and cansometimes result in frost damage. Select late-maturing varieties for this location.
Deep, well-drained soil of good fertility shouldbe selected. A fertile, sandy loam or sandy clayloam is suitable for most tree fruits. Adequatedrainage is the most important soil characteristic.No fruit trees will grow well or survive long insoils that are excessively wet! Poor soils mayeasily be improved by proper fertilization andcultural practices. Improving soil with poorinternal drainage is difficult and expensive.Fertile soil is desirable; deep, well-drained soil isvital.
Variety SelectionGive special attention to the selection of varieties.They must be adapted to your soil and climaticconditions. Northern-most parts of New Englandare at the northern edge of fruit tree adaptation.Select hardy species like apple. If possible,without sacrificing too much yield or quality,select varieties with the fewest insect and diseaseproblems.
Several varieties of the same kind of fruit matur-ing at different times may be planted to prolongthe season. The value of certain varieties forspecial uses such as freezing, canning, andpreserving should be considered. Some varietiesmay be purchased in season from commercialgrowers more economically than you can growthem yourself.
Cross-pollination is necessary for satisfactoryfruit set in many tree fruits. Varieties that arecross-fruitful and that have overlapping bloomdates should be selected. To be certain of ad-equate cross-pollination, plant at least threevarieties of apples.

Chapter 11 Fruit in the Home Garden 3
The following table lists some varieties of treefruits suitable for planting. The varieties are listedin the order of ripening.
Some Suggested Varietiesfor the Home Fruit Garden
(listed in order of ripening)
Apricots are recommended for trial planting only.The buds of currently available varieties respond tothe first warm days of early spring and are usuallykilled by frost or low temperature common to mostareas. Unless protection can be provided, a crop canbe expected no more frequently than once every 4 or5 years.
Winter Minimum Temperature*Hardiest Cultivars
Crop Degrees F
Apple -40
Apricot -20
Blackberrythorny -25thornless 0
Blueberryhighbush -20hybrids -35
GrapeAmerican -30vinifera -5French Hybrid -20
Peach, Nectrine -15
Pear -30
Plum -25
Raspberryred -30purple -15black -10
Sour Cherry -30
Strawberry (unmulched) 5
Sweet Cherry -10
Production Limits*
Apple RootstocksApples, like other tree fruits, will not produce treeswith the same characteristics from seed. If you planta seed from a McIntosh apple, the fruit would likelybe small, unattractive, and of poor quality. There-fore, apple trees are propagated vegetatively byeither budding or grafting scion wood of the de-sired cultivar on a rootstock. The rootstock andscion variety maintain their respective geneticidentity but are joined at the graft union and func-tion as a unit .
APPLES• Dutchess• Ginger Gold• Paulared• McIntosh• Gala• Cortland• Macoun• Golden Delicious• Red Delicious• Northern Spy
APPLES (scab immune)• Redfree• Prima• Liberty• Freedom• Jonafree
2NECTARINES• Mericrest• Hardired
2CHERRIES (sour)• Montmorency• North Star
PEARS• Harrow Delight• Clapp's Favorite• Moonglow• Bartlett• Seckel• Flemish Beauty• Harvest Queen
2PEACHES• Redhaven• Reliance• Madison
CHERRIES (SWEET)• Sam• Hedelfingen• Van• Kristin•PLUMS (Japanese)• Methley• 1Shiro• Ozark Premier
PLUMS (Hybrid)• Underwood• Pipestone• Superior• Toka
PLUMS (European)• Earliblue• Blue Bell• Italian Prune• Stanley
APRICOT• 2Goldcot• Perfection
At least two of the recommended pear and plumvarieties should be planted. Japanese and Europeanplums are not effective as pollinizers for each otherso two varieties of the same type should be planted.
1Shiro is not a good pollinizer. Plant three varietiesif it is one of your planting choices.
2Self-fruitful - no cross pollination needed.
All of the sour cherry and peach varieties listed aresufficiently self-fruitful to set satisfactory crops withtheir own pollen.

Chapter 11 Fruit in the Home Garden 4
Traditionally, apple trees have been propagated bygrafting wood from desired varieties onto appleseedlings. More recently, increasing use is beingmade of vegetatively propagated or clonalrootstocks which offer distinct advantages overseedlings. The three major considerations in root-stock selection are:
Size control (Dwarfing)Probably the most widely accepted reason for theuse of clonal rootstocks is tree size control. Byproper selection of rootstock, we can determinemature tree size. For example, the same varietyof apple will produce a 16- to 18-foot tree on theroot stock cultivar, Malling Merton (MM)111,down to a dwarf tree of 7 to 8 feet on a Malling(M)9 rootstock. Intermediate sizes can be at-tained by other rootstocks such as M26 and M7.Unfortunately, many apple trees offered toconsumers are labeled as dwarf trees, but thebuyer has no idea which rootstock has been usedand how dwarf the tree will be.
PrecocityThe earliness at which a tree produces fruit isalso directly affected by the rootstock. Trees onseedling rootstocks usually do not begin fruitinguntil they are 7 to 10 years old. Trees on M9rootstock will often produce crops in 2 to 3 years.Other rootstocks are intermediate in this regard.Usually, the more dwarfing the rootstock, theearlier the tree will bear fruit.
StabilityA major consideration in selecting applerootstocks is the degree of anchorage provided.For example, trees on M9 rootstock are verysmall but because of brittle roots, must be pro-vided some type of support. This can consist of apost, a trellis, or other means of holding the treeupright. The semi-dwarfing M7 rootstock mayrequire support for the first few years but is oftengrown without support.
Buying TreesObtain the best nursery stock available. Buy onlyfrom reputable nurseries who guarantee theirplants to be true to name, of high quality, andpacked and shipped correctly. Beware of bargains.High prices do not necessarily mean high quality,but good nursery stock is not inexpensive.
One-year-old trees are usually preferred. A commonmistake made by many gardeners is to select over-sized or ready-to-bear nursery trees. Experience hasshown that younger trees bear almost as soon, areeasier to keep alive, and develop into more healthy,vigorous trees than do the oversized stock. Theolder trees cost nurserymen more to grow and aresold for higher prices, but are usually worth lessthan younger trees. Fruit trees grow well fromdormant, bare root stock if planted early beforegrowth begins.
For peaches a 4-foot tree, ½-inch in diameter, isconsidered the ideal size for planting. Vigorous, 4-to 7-foot, 1-year-old whips about 3/4-inch in diam-eter are preferred for apples. Pears, plums, cherries,and apples may be planted as 1- or 2-year-old trees.Either will be satisfactory as long as the trees haveattained sufficient size and have good root systems.
When purchasing apple trees on dwarfing root-stock, be sure to specify the rootstock desired.EM-9 is very dwarfing, has a rather weak rootsystem, and must have mechanical support. Treeson EM-7 attain a size about 2/3 that of the samevariety on seedling rootstock. EM-7 is a goodchoice for poorer soils. M-26 is recommended forgeneral use in N.H. It will produce a tree that iseasy to manage (10 ft.) and bears fruit early in life,generally beginning in the third year from planting.It should be staked. A 2 in. x 2 in. x 8 or 10 ft.pressure treated stake is ideal. Set the stake 2 ½ feetin the ground at planting. The young tree should beloosely tied to the stake with soft twine or plasticelectrical tape.
Setting the OrchardTime of Planting
Fruit trees should be planted in early spring (lateApril to mid-May). Fall planting is not recom-mended in New Hampshire. The importantthing to remember is that trees should be dor-mant and the soil should have proper moisturecontent.
Chapter 11 Fruit in the Home Garden 5
Handling Nursery StockRoots of nursery stock should never be allowedto freeze or dry out. When your order arrives,unpack the bundles immediately and inspect thetrees. The roots and packing material should bemoist. Check to see if the bark is withered.Withered bark indicates the trees have beenallowed to dry out in storage or in transit.
If trees cannot be planted immediately, they maybe held dormant in the original packing inrefrigerated storage for a week or two. If refriger-ated storage is not available, trees should betaken out of the bundle and heeled-in carefully ina trench of moist soil in a shaded location.
Planting the TreesPreparation of the soil where fruit trees are to beplanted should be as thorough as preparation ofthe soil for a vegetable garden or ornamentalplanting. If the places selected for trees are in alawn, it is best to remove the turf and spade thesoil deeply over an area of several square feetwhere each tree is to stand.
Dig the hole a little deeper and wider thannecessary to accommodate the roots, leaving thesoil loose in the bottom of the hole.
Prune the roots of young trees only wherenecessary to remove broken and damaged onesor to head back some that are excessively long.Should a tree be so badly scarred or damagedthat there is doubt of its survival, it is wise todiscard it.
Set the tree at approximately the same depth itgrew in the nursery. Never set it so deep that theunion of the scion and rootstock is below groundlevel when the hole is filled. Ideally, this graftunion will be 2 - 3 inches above the soil line.
Then begin filling the hole with pulverizedtopsoil, shaking the tree gently to filter the soilamong the roots. The soil can be fortified with acouple of quarts of wet peat moss if desired.Don't mix fertilizer with the soil in the plantinghole. Tamp the soil firmly and thoroughly. Theaddition of water when the hole is about 3/4 fullwill aid in settling the soil around the roots andincrease chances for the tree's survival. After thewater has completely soaked in, finish filling thehole, leaving the soil loose on top. Do not leave awater catching basin or depression around thetree. Ice freeze damage in snow-less winters canoccur.
Orchard ManagementCultural Practices
Excellent weed control around young fruit treesshould be practiced until they begin to bear fruit.Weeds must be eliminated so they will notcompete for available moisture and fertilizer.Cultivation must be shallow to avoid injury toroots near the surface. The cultivated area shouldextend a little beyond the spread of the branches.
The use of mulch around tree fruits is not recom-mended as it provides ideal cover for mice whichcan girdle trees.
When trees are planted in rows, the area betweenthe rows may be allowed to grow in sod or usedfor interplanting with low-growing vegetables orstrawberries. Under sod culture, frequent, closemowing during the growing season is desirable.
Fruit trees, especially those on dwarfing root-stock, are becoming prominent in landscapedesigns. Under lawn culture, fruit trees can begiven more attention than is usually convenientunder other systems of culture. Equipment andmaterials for watering, pruning, spraying, andother cultural practices are essentially the sameas those required for ornamental plantings. It isgood practice to cultivate lightly for the first yearor two, or until the tree has become firmlyestablished. Lawn grass, if kept closely clipped,may be allowed to grow around the base of thetree in the third year, but will reduce growth andyield.
Chemicals for weed control should be used withextreme caution in the home garden. Careless usecan result in severe injury to fruit trees andnearby ornamental plantings. See your countyExtension educator for latest recommendations.
FertilizationAs a rule, no fertilizer is recommended or neededat planting time. After the young tree becomesestablished and growth begins, apply ½ to 3/4 lb.of a 10-10-10 fertilizer in a circle around the tree,about 16 inches from the trunk.
Because there are many soil types and varyinglevels of natural fertility, it is difficult to makeone fertilizer recommendation which will applyequally well in all areas. Over-fertilization witheither organic or inorganic materials should beavoided. Excessive vegetative growth will result,usually accompanied by delayed fruiting andpossible winter injury. Contact your local Exten-sion educator for information about a soil testthat may identify specific needs in your planting.

Chapter 11 Fruit in the Home Garden 6
Fertilizer may be applied in early spring about 1or 2 weeks before active growth begins. Whentrees are grown in a lawn area, delay fertilizingthe lawn until after trees are dormant to avoidlate summer growth.
The usual method of application is to scatterfertilizer evenly under the tree, starting about 2feet from the trunk and extending to just beyondthe tips of the branches.
Terminal growth and general vigor of the indi-vidual tree should be observed closely. Wheregrowth the past year was short, increase theamount of fertilizer slightly. If growth wasexcessive, reduce the amount or withhold itentirely. Remember that pear and some applevarieties are highly susceptible to fire blight andexcessive growth will make this disease moreprevalent.
Mature, bearing trees of peach, nectarine, andsweet cherry should produce an average of 10 to15 inches of new growth annually. From vigor-ous, young, non-bearing trees, about twice thatamount can be expected.
In general, 8 to 10 inches of terminal growth isconsidered adequate for mature, bearing apple,pear, quince, plum, and sour cherry trees. Abouttwice that amount is sufficient for young, non-bearing trees.
PruningThe general purpose of pruning fruit trees is toregulate growth, increase yields, improve fruitsize and quality, and reduce production costs.Pruning is necessary to shape the trees forconvenience of culture and for repair of damage.The methods for pruning fruit trees are designedto produce a strong framework and maximumyield of high quality fruit. However, the keypurpose of pruning is to maximize exposure tothe fruiting portion of the tree to sunlight.
Most pruning is done during the dormant sea-son, preferably just before active growth beginsin the spring. At this time, pruning wounds healfaster, flower buds can be easily recognized, andinjury from low winter temperature is avoided.Summer pruning may be done to help trainyoung trees to the desired shape, remove watersprouts and other undesirable growth, andmaintain smaller tree size. It should be remem-bered, however, that all pruning has a dwarfingeffect. For maximum yield of high quality fruit,prune only as necessary to establish a tree with astrong framework capable of supporting heavy
crops annually without damage and to maintaina tree sufficiently open to allow penetration ofsunlight, air, and spray material for good fruitdevelopment and pest control. Pruning fromSeptember 1st through January 30th is notrecommended.
(Peach, Nectarine) (Other Tree Fruits)
Although pruning procedures vary according tothe type, age, and variety, all newly planted fruittrees should be pruned in the spring beforegrowth starts. This is necessary to stimulatelateral bud development from which to selectgood scaffold limbs. For a discussion of theproper pruning techniques to use on differentfruit trees, see the Pruning chapter.
ThinningQuite frequently, peach and apple trees set morefruit than they can mature to a desirable size. Bythinning, or removing excess fruit, this difficultycan be overcome. Thinning not only allows for anincrease in size of the remaining fruit on the tree,but also improves fruit color and quality, reduceslimb breakage, and promotes general tree vigor.Thinning helps maintain regular annual bearingin certain apple varieties, such as Golden Deli-cious and Yellow Transparent, which otherwisehave a tendency to bear heavy crops every otheryear.
Experimental results indicate that the soonerpeach trees are thinned after bloom, the earlierthe ripening and the larger the fruits at harvest. Itis doubtful that final size of the fruits of anyvariety will be greatly increased by thinning if itis delayed much after the pits begin to harden.

Chapter 11 Fruit in the Home Garden 7
It is generally recommended that peaches bespaced at least 6 to 8 inches apart on a branch.When thinning by hand, grasp the stem orbranch firmly between your thumb and forefin-ger and pull the fruit off with a quick motion ofthe second and third fingers. Remove fruits thatare small, shaded, or damaged by insects ordisease, leaving the large, clean fruits exposed tosunlight.
Many growers use the pole method of thinningpeaches. A 4- or 5-foot section of bamboo orother light wood is used. A piece of 3/4-inchgarden or spray hose about 15 inches long isforced tightly onto the end of the pole, leavingsome 8 to 10" of the hose extending beyond theend of the pole. A snug fit is necessary so thehose will remain in place while being used. Manymodifications of this tool are used. One of themost common is a 30-inch section of plastic pipe,1 inch in diameter.
Remove peaches by striking the limbs about 18inches from their tips with the flexible part of thehose, using sharp, firm blows. This dislodges anyloosely attached fruits. With a little practice, youshould be able to remove individual fruits by thismethod.
Apples should be thinned as soon as possibleafter the fruit has set. If full benefits are to beobtained, thinning should be completed within20 to 25 days after full bloom. In hand-thinningapples, use the same general technique used inhand-thinning peaches. A distance of 6 to 10inches between fruits is recommended. Withvarieties of Delicious apples, where greater sizeof individual fruits is important, the greaterspacing is preferred. The center apple of a clusteris usually the largest and the best apple to leave.
Thinning plums is usually limited to the large-fruited Japanese varieties. The primary concernhere is to facilitate insect and disease control.Plums are usually thinned by hand to about 4inches apart.
Rodent ControlMice (voles) may cause serious damage to thefruit planting. They chew off the bark nearground level or below and often completelygirdle a tree, causing it to die. Most of thisdamage takes place during winter. Mice may becontrolled by trapping. This can be successfulwhere only a few trees are involved.
Rabbits are responsible for the loss of thousandsof young fruit trees each year. Perhaps the mostsatisfactory method of preventing rabbit andvole damage is the use of a mechanical guard.Galvanized screen or "hardware cloth" with a ¼-inch mesh is frequently used. A roll 36 incheswide may be cut lengthwise, forming two 18-inchstrips. By cutting these strips into pieces 14inches long, guards 14 by 18 inches are obtained.Roll or bend the strip around the trunk of thetree so that the long side is up and down thetrunk and the edges overlap. Twist a small wireloosely about the center to prevent the strip fromunrolling. Push the lower edges well into theground. This metal guard will last indefinitelyand can be left in place all year.
Perforated plastic guards are also available. Likethe metal guards, these can be left in place year-round. These are not as desirable as the hard-ware cloth guards since they become brittle andbreak. In addition, they shield the trunk fromsunlight and air movement increasing the poten-tial for insect and disease damage.
Other methods of rabbit control have beensuccessful. Ordinary whitewash has given goodresults in some instances. A repellent washrecommended by the USDA, containing equalparts of fish oil, concentrated lime sulfur, andwater, is used by some commercial growers.Also, rabbit repellents under various tradenames are available. All these materials may beapplied with a paint brush, from the ground upinto the scaffold limbs.
Tree Fruit SprayingFor significant insect or disease problems, it maybe necessary to follow a spray program. Informa-tion on the use of chemicals for such a program isavailable from the Extension office.
To be successful with your spray program, sprayat the proper time and do it thoroughly. Leaveno portion of the tree unsprayed. To make the jobeasier and to ensure adequate coverage, thin outexcessive growth and remove all dead and weakwood. Cut old trees back to 20 feet or less, ifpossible. Train younger trees so they reach aheight of no more than 18 feet.
Semi-dwarf and dwarf trees should be consid-ered when making your planting. Their smallsize makes the task of spraying easier.

Chapter 11 Fruit in the Home Garden 8
SanitationAdopt good orchard sanitation practices. Thedestruction of harboring places for insects anddiseases plays a large part in the control pro-gram. Conditions which encourage mice shouldalso be eliminated.
These are some practices to include in an orchardsanitation program:
• Collect and remove debris.
• Remove and destroy all dropped fruit.
• Rake and remove apple and cherry leaves.
• Scrape loose bark from trunks, crotches, andmain limbs of apple trees.
• Prune out and destroy all dead or diseasedlimbs, branches, and twigs.
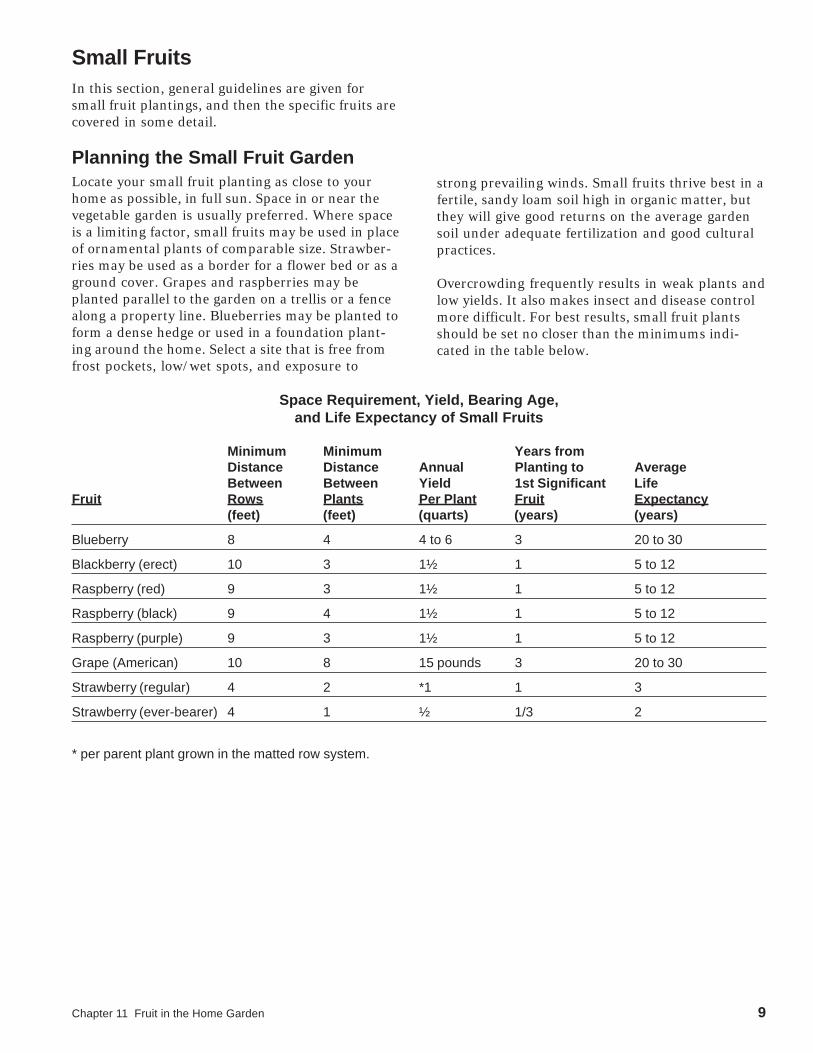
Chapter 11 Fruit in the Home Garden 9
Small FruitsIn this section, general guidelines are given forsmall fruit plantings, and then the specific fruits arecovered in some detail.
Planning the Small Fruit GardenLocate your small fruit planting as close to yourhome as possible, in full sun. Space in or near thevegetable garden is usually preferred. Where spaceis a limiting factor, small fruits may be used in placeof ornamental plants of comparable size. Strawber-ries may be used as a border for a flower bed or as aground cover. Grapes and raspberries may beplanted parallel to the garden on a trellis or a fencealong a property line. Blueberries may be planted toform a dense hedge or used in a foundation plant-ing around the home. Select a site that is free fromfrost pockets, low/wet spots, and exposure to
Space Requirement, Yield, Bearing Age,and Life Expectancy of Small Fruits
Minimum Minimum Years fromDistance Distance Annual Planting to AverageBetween Between Yield 1st Significant Life
Fruit Rows Plants Per Plant Fruit Expectancy(feet) (feet) (quarts) (years) (years)
Blueberry 8 4 4 to 6 3 20 to 30
Blackberry (erect) 10 3 1½ 1 5 to 12
Raspberry (red) 9 3 1½ 1 5 to 12
Raspberry (black) 9 4 1½ 1 5 to 12
Raspberry (purple) 9 3 1½ 1 5 to 12
Grape (American) 10 8 15 pounds 3 20 to 30
Strawberry (regular) 4 2 *1 1 3
Strawberry (ever-bearer) 4 1 ½ 1/3 2
* per parent plant grown in the matted row system.
strong prevailing winds. Small fruits thrive best in afertile, sandy loam soil high in organic matter, butthey will give good returns on the average gardensoil under adequate fertilization and good culturalpractices.
Overcrowding frequently results in weak plants andlow yields. It also makes insect and disease controlmore difficult. For best results, small fruit plantsshould be set no closer than the minimums indi-cated in the table below.

Chapter 11 Fruit in the Home Garden 10
Special attention should be given to the selection ofvarieties. They must be adapted to your soil andclimatic conditions. If possible, without sacrificingtoo much yield or quality, select varieties with theleast insect and disease problems. The followingtable lists some varieties of suggested small fruits.They are listed in the order of ripening, and includeonly those adapted for growing under NorthernNew England conditions.
Suggested Varietiesfor Home Small Fruit Planting
(listed in order of ripening)
When your order arrives, unpack the bundles andinspect the plants. The roots should be moist andhave a bright, fresh appearance. Shriveled rootsindicate that the plants have been allowed to freezeor dry-out in storage or transit. Such plants seldomsurvive.
If the plants cannot be set immediately, they shouldbe kept either in cold storage or heeled-in. Wrapthem in a garbage bag, or other material that willprevent their drying out, and store them at a tem-perature just above freezing. Strawberry plants, insmall quantities, may be held in the refrigerator fora few days. If refrigerated storage is not available,remove the plants from the bundle and heel them incarefully in a trench of moist soil in a shaded loca-tion. Pack the soil firmly around the roots to elimi-nate all air pockets and to prevent the roots fromdrying out.
Blueberries are often available as container grownplants. These cost more but generally perform betterthan bare root stock.
General: Establishing the PlantingThere is probably nothing that causes more disap-pointment and failure in small fruit plantings thanthe lack of careful preparation and attention todetail at the time the plantings are established.Prepare the soil properly, set the plants carefully,and generally create conditions favorable for newgrowth. Detailed suggestions for the establishmentof each of the small fruits follows. These suggestionsshould be followed closely for best results.
General: Maintaining the PlantingOnce the planting has been established, futuresuccess will depend upon the care that it is given. Ifthe planting is to be productive and long-lived, itmust be properly fertilized. Competition fromweeds or other plants must be avoided. Insects anddiseases must be controlled, and the plants must beproperly pruned. Study the maintenance sugges-tions for each of the small fruit crops, and plan tocare for the planting properly. To do otherwise willprobably result in disappointment and wastedeffort.
BLUEBERRIES• Patriot• *St. Cloud• Northland• Blueray• Bluecrop• Bluejay• *Northblue• *Friendship• Jersey
BLACKBERRIES• Illini
RASPBERRIES (Red)• Latham• Boyne• Killarney• Autumn Britain• Redwing• Heritage
RASPBERRIES (Black)• Jewel
RASPBERRIES (Purple)• Success• Royalty
STRAWBERRIES(Everbearing)• Superfection
(Gem, Brilliant)• Ozark Beauty
STRAWBERRIES(Day-neutral)• Tribute
STRAWBERRIES(Regular)• Earliglow• Annapolis• Northeaster• Mohawk• Cavendish• Allstar• Red Chief• Primetime• Sparkle
* Highbush x lowbush crosses especially suited tocolder areas of New Hampshire.
Obtain the best nursery stock available. Buy onlyfrom reputable nurseries who guarantee their plantsto be true to name, of high quality, and packed andshipped correctly. Beware of bargains. High pricesdo not necessarily mean high quality, but well-grown plants are not expensive.
Place your order early, as soon as you decide whatyou want. Specify variety, size, and grade of plantsdesired, and time of shipment preferred. It is best tohave the plants arrive at the time you are ready toset them out.

Chapter 11 Fruit in the Home Garden 11
StrawberriesStrawberries are the most widely cultivated smallfruit in America. They are the favorite of many forpies, jams, jellies, preserves, and for eating fresh.Because strawberries are adaptable to a greaterrange of soil and climatic conditions than any otherfruit, they are well-suited to the home garden andmay be grown successfully in every section ofnorthern New England.
Variety SelectionStrawberry varieties vary greatly in their adaptabil-ity to soil and climatic conditions. The varietiessuggested for planting in New England are ofproven merit and have been selected on the basis ofplant vigor, resistance to soil borne diseases, pro-ductivity, and quality of the fruit. Virus-free plantsof each variety are available.
Earliglow is noted for its superior dessert qualityand disease resistance. The medium-large berriesare very attractive with a glossy, deep-red color.It is one of the best for eating fresh, as a frozenproduct, and in jams and jellies. The plants arevery vigorous but not highly productive in allnorthern areas.
Annapolis has excellent fruit quality, red steleresistance, and is winter hardy.
Northeaster is a new, very disease resistantvariety from USDA. Fruits are flavorful. Espe-cially suited to New England.
Mohawk is another new, flavorful, diseaseresistant variety from USDA.
Cavendish is a disease resistant variety fromCanada. It produces large, flavorful fruit thatsometimes color irregularly.
Allstar, berries are large and attractive with mildflavor. The plants are vigorous and runnerfreely. Resistant to red stele and Verticillium.
Red Chief is an extremely productive, high-quality dessert berry. It is medium to large insize, of uniform deep- red color, with a firm,glossy surface. Red Chief is very resistant to redstele.
Primetime is another new variety from USDA.Fruits are large, firm and flavorful.
Sparkle, is an excellent flavored fruit, but issomewhat soft. Fruit size tends to decrease asseason progresses. Plants are vigorous, copiousrunner producers with some resistance to redstele.
Everbearing strawberries are not as good as theregular varieties, either in quality or yield. Becauseof consistently low yields, they are not recom-mended for planting in northern New England.Ozark Beauty is an everbearing variety that showsconsiderable promise. The plant is vigorous andproduces good quality fruit. The berries are red,wedge-shaped, firm, and only slightly acid. It is agood variety for eating fresh and for freezing.
An interesting development in strawberry breedingis the production of varieties that are day-lengthneutral. This means that they do not respond today-length the way that conventional varieties do,and can continue to produce over a long period oftime. Although these varieties are listed witheverbearers in catalogues, they are heavier produc-ers and can be used satisfactorily in the homegarden. Tribute is a vigorous variety with glossy,deep-green leaves; fruit is medium-sized in springand summer, large in fall. Production and size dropin the heat of summer but pick up in fall. Best forfresh eating. Tristar also produces high quality fruit,but is not as productive as Tribute.
Establishing the Planting
Site and SoilStrawberries bloom very early in the spring, andthe blossoms are easily killed by frost. In areaswhere late frosts are a hazard, try to select a sitefor your planting that is slightly higher thansurrounding areas. Although strawberries growbest in a fertile, sandy loam soil with a pH of 5.7to 6.5, they may be successfully grown in anygood garden soil that is well-drained and well-supplied with organic matter. Soil for strawber-ries should be thoroughly prepared for planting.It should be loose and free of lumps.
Do not set strawberries in land that has recentlybeen in sod. A clean-cultivated crop planted onthe site for a year or two will leave the soil betterprepared for strawberries and will assist incontrolling weeds and white grubs which are sotroublesome in strawberry plantings.

Chapter 11 Fruit in the Home Garden 12
PlantingVirus-free 1-year-old plants should be set outearly in the spring, about 3 or 4 weeks before theaverage date of the last frost. Spacing of theplants will depend on the training system used,but they should not be crowded. They should beplaced no less than 12 inches apart in rows.Spacing plants 18 inches apart in rows 4 feetapart is more desirable if space is not limited. Seteach plant so that the base of the bud is at the soillevel. Spread the roots out and firm the soilcarefully about them to prevent air pocketswhich allow them to dry out. Water well whenplanting is finished.
Maintaining the Planting
Soil ManagementWeeds are enemy #1 in the strawberry planting!Cultivation for weed control in strawberriesshould begin soon after planting and continue atapproximately 2-week intervals throughout thefirst growing season. Cultivation must be shal-low to prevent root injury. Hoe as often asnecessary to remove grass and weeds growingbetween the plants.
Home garden strawberry plantings should bemulched in late fall. Any organic material free ofweed seeds makes good mulch. Straw and pineneedles are most frequently used. Mulch shouldbe applied 2 to 4 inches deep over and aroundthe plants after the first freezing weather in thefall. The last weekend in November is traditionalin southern N.H. while mid-November is betterin northern areas. This protects them fromheaving and freezing injury during the winter. Inmid-April (late April in northern areas), abouthalf the mulch should be raked off the plants intothe area between the rows. Mulch left around theplants will help keep the berries clean, conservemoisture, and check weed growth.
FertilizationHeavy fertilization seldom proves beneficial tostrawberries on good soils well-supplied withorganic matter. Where a soil analysis indicatesthe need, about 1 lb. per 100 feet of row of acomplete fertilizer, such as 10-10-10, should becultivated into the soil before planting. Thefertilizer used in the fall application should bethe same analysis at the same rate and should bebroadcast over the row in late August or earlySeptember.
The limited root systems will not benefit fromfertilizer placed in the row middles. Applyfertilizer when plants are dry and brush thematerial off the plants to avoid foliage injury.
Do not apply spring fertilizer to strawberriesgrowing in heavy land because there is danger ofexcess vegetative growth which results in re-duced yield, increased rot, later ripening, andpoor quality fruit. In light, sandy soils, wherenitrogen leaches out rapidly, a spring applicationis usually beneficial. Apply a quickly solublenitrogen fertilizer, such as nitrate of soda, at therate of ½ to 3/4 lb. per 100 feet of row before newgrowth begins.
TrainingThere are three basic training systems used instrawberry production. Many modifications ofthese systems are found. Under the matted-rowsystem, used by most home gardeners, runnerplants are allowed to set freely in all directions.The original plants should be set 18 to 24 inchesapart in the row. Keeping the width of the plantbed narrow (usually 15 to 18" and no wider than24") results in a good grade of fruit which is easyto pick.
In the hill system, plants are spaced 12 inchesapart in the row. All runners are removed assoon as they appear, and the plants are encour-aged to multiply in large crowns. This system isdesired by many because the planting is easier tocultivate and harvest and produces larger andbetter berries than other systems. Many plantsare required, however, and the initial cost of theplanting is high. Black plastic mulch is particu-larly effective with this training system.
Plants in the spaced-row system are set 18 inchesapart in the row. The runner plants are set inplace by hand until the desired stand is obtained.They are usually spaced 6 to 12 inches apart. Alllate-formed runners are removed as they appear.
Blossom RemovalDuring the first planting season, all flower stemson the plants should be removed as soon as theyappear. This strengthens the plants and allowsearly and vigorous runner production. The early-formed runner plants bear the best fruit thefollowing year.
RenovationIf your strawberry planting is in a vigorouscondition, it may be retained for another fruiting.

Chapter 11 Fruit in the Home Garden 13
Soon after harvest, remove the mulch and clipthe tops of the plants to within 1 inch of thecrowns with a scythe or mower. If insects andfoliage diseases are prevalent, move the leavesand mulch material out of the planting, and burnthem. Apply a quickly soluble nitrogen fertilizer,such as nitrate of soda, at the rate of ½ to 3/4 lb.per 100 feet of row to encourage vigorous topgrowth. Any good garden fertilizer supplying anequivalent amount of nitrogen may be used ifdesired. Rototill or spade row middles, narrow-ing the plant row to 8 to 12". During the tillingprocess, mulch sides of crowns lightly (½") withloose soil. Water the planting thoroughly.
Some plant thinning may be needed, particularlyin the matted-row system. Thin plants to 6 to 8inches apart after new foliage appears. Keep theplanting clean-cultivated throughout the sum-mer, irrigating when necessary during the dryseason to keep the plants growing vigorously.Fertilize again in the fall as recommended for thefirst year, and renew the mulch after freezingweather begins.
Pest ControlBirds are one of the biggest pests in the straw-berry planting. It may be necessary to cover theplants with plastic netting to keep the crop frombeing eaten before the berries are ripe enough toharvest. Aluminum pie tins, suspended by astring or wire above the plants in such mannerthat they twist and turn in the breeze, have beensuccessful in keeping birds away.
Culture of Everbearing and Day NeutralVarietiesThe everbearing varieties of strawberries are lessvigorous and generally less productive than theregular varieties. Irrigation is necessary for thembecause the late summer and early fall crop ripensduring a period when soil moisture is usually quitelow. Soil preparation and fertilizer requirementsbefore planting are the same as for regular varieties.Best yields are obtained from the everbearingvarieties if they are set in early spring in the hillsystem about 1 foot apart, cultivated for the first 10days to 2 weeks, and then mulched to a depth of 2to 4 inches with pine needles or straw.
As the mulch decays, the development of a nitrogendeficiency could occur. It can be quickly overcomewith the application of 10 lbs. of 10-10-10 to each100 sq. ft. of mulched area.
Remove all runners as soon as they appear, toencourage the plants to multiply in large crowns.Blossom clusters should be removed until the plantshave become firmly established. Berries will beginto ripen about a month after bloom and plants willcontinue to bear fruit until frost, if weed growth iskept down and adequate moisture is supplied.Allow the plants to bear fruit for the spring and fallcrops the second year, then replant.
Strawberry Growing in Pyramids andBarrelsIn a garden where space is extremely limited orwhere the gardener wishes to use the strawberryplanting as a novelty or decorative feature, thestrawberry pyramid or the strawberry barrel can beuseful and interesting. Pyramids may be square orround. Each step of the pyramid should have a flatsurface not less than 6 to 8 inches in width. Theframes for a square pyramid can be constructed outof 6-inch wide boards of a durable wood such asredwood.
A suggested soil mixture for the pyramid is twoparts good garden soil, one part peat, and one partsand. In preparing a strawberry barrel, 1-inchdiameter holes are made in the sides of the barrel atapproximately 8-inch spacings. As the barrel isfilled with successive layers of soil, strawberryplants are carefully inserted through the holes sothat the roots are held firmly in contact with thesoil.
List of materials necessary for a 72 inch wide, 5 levelsquare sided pyramid where each ascending level is 12inches less in width.
4 boards 6 feet long and 6 inches wide4 boards 5 feet long and 6 inches wide4 boards 4 feet long and 6 inches wide4 boards 3 feet long and 6 inches wide10 feet of 2” x 2” for corners1 pound of 6 penny galvanized nails

Chapter 11 Fruit in the Home Garden 14
Though the strawberry barrel may be a successfulnovelty, yields of fruit will be smaller than those inpyramid culture, and much more attention toplanting, watering, and winter protection arerequired.
Damage to the strawberry plants growing undernormal cultural conditions can be expected if theyare not protected from extreme cold during thewinter. Because plants growing in a pyramid orbarrel are elevated above normal ground level andtherefore are highly exposed, additional winterdamage can be expected to roots, crowns, and fruitbuds. Consequently, care must be taken to provideadequate winter protection. Pyramids can bemulched with 6 to 8 inches of straw after the soil isfrozen. Even with careful mulching, some plantinjury can be expected during severe winters.
HarvestingIn the home garden, strawberries should beallowed to get an overall red color and becomefully ripe before harvesting. It is at this stagethat the sugar content is highest and the flavor isbest. It is necessary to harvest every day duringthe peak of the season.
Harvest the berries carefully by the stems toprevent bruising. Pick all that are ripe, since theywill not keep until the next harvest. Ripe straw-berries may be held for a day or two in a refrig-erator.
GrapesGrapes are only marginally hardy in northern NewEngland and are often severely winter damaged.Grapes should only be planted in protected sites.They are not recommended for commercial produc-tion. Carefulselection ofcultivated variet-ies compatiblewith local soiland climaticconditions hasled to successfulproduction inhome gardensand commercialvineyards inmany sections of the region.
Variety Selection
American Bunch Grapes(These are the hardiest grapes, and the only typerecommended for northern areas. )
Beta - Very hardy blue-black grape; it has smallberries in small bunches. Beta is early ripening,and vigorous.
Valiant - Red, seeded, very hardy.
Edelweiss - Green, seeded, sweet, very produc-tive.
Swenson Red - Very productive red grape,seeded, good flavor.
Seedless Table Grapes(Hardy to -200 F)
Reliance - Hardy, seedless red table grape thatripens in mid-September. It has some diseaseresistance.
Canadice -Hardy seedless red table grape. It isearly ripening and has good flavor.
Wine Grapes (French Hybrids)(Hardy in southern N.H. only)
Foch- Small berries and bunches, Burgundy typewine.
Aurore - White, makes a fruity wine.
Establishing the PlantingSite and Soil
Grapes should be planted where they have fullsun all day. They are deep-rooted plants, fre-quently penetrating to a depth of 6 to 8 feetunder good soil conditions. They grow best onfertile sandy-loam soils high in organic matter.Deep sands or heavy clays may be used, how-ever, if provisions are made for adequate fertili-zation, moisture, and soil drainage. Grapes aretolerant to a wide range of soil acidity, but prefera pH of 5.0 to 5.8.
PlantingGrape vines are usually set in early spring, about3 or 4 weeks before the average date of the lastfrost. Vigorous, 1-year-old plants are preferred.Allow at least 8 feet between plants. Trim theroots to about 6 inches in length in order toencourage formation of feeder roots near thetrunk. Where the vines are to be set, dig the holes

Chapter 11 Fruit in the Home Garden 15
large enough so that the roots may be spreadwithout crowding. Plants are set at about thesame depth they grew in the nursery. Prunenewly set plants to a single cane, and head itback to two buds.
Maintaining the PlantingSoil Management
Grapes are generally grown using shallowcultivation. A system of grass sod row middlesand a shallow cultivated strip 2 feet wide underplants works well.
Although grapes are deep-rooted plants, they donot thrive in competition with weeds and grass.Cultivation to facilitate weed control should bedone. It should be shallow and only as necessaryto eliminate undesired vegetation.
FertilizationGrapes require a large amount of nitrogen.Except in sandy soils, this element may be theonly one needed in the fertilization program. Inthe home garden, ¼ cup or about 3 ounces of 10-10-10 per vine should be applied after growthbegins in the spring. Spread the fertilizer in acircle around the plant and 10 to 12 inches fromthe trunk. Repeat the application about 6 weekslater. Just before growth begins in the spring ofthe second year, apply 4 oz. in a 4 foot circlearound each vine and about 1 foot from thetrunk. Increase the amount to 8 oz. per yearbeginning in the third year.
Fertilizer applications to mature, bearing vinesshould be based on the growth and vigor of theplant. If the average cane growth is only 3 feet orless, additional nitrogen may be needed. Whereproper pruning is practiced and competitionfrom weeds and grass is kept to a minimum,however, it is doubtful that you will need to gobeyond the amount recommended for a 3-year-old vine.
Training and PruningMuch attention is given to the training andpruning of grapes. To be most productive, theymust be trained to a definite system and prunedrather severely. There are several training sys-tems used. The two most common are the verti-cal trellis and the overhead arbor. Both of theseare satisfactory in the home planting if kept well-pruned. For detailed discussion see the Pruningchapter.
HarvestingFor best quality, bunch grapes should be fully ripewhen harvested. They will not improve in sugarcontent or flavor after being removed from the vine.Most varieties should be used immediately becausethey do not keep well after ripening. Cut the clus-ters off with a knife or shears to avoid bruising thefruit and damaging the vine.
BramblesBramble fruits include the red, black, and purpleraspberries and theerect and trailingblackberries. Only redraspberries are hardyenough to be depend-able producers, how-ever. Purple and blackraspberries and erectblackberries maysurvive in protectedsites. Trailing blackberries are not recommended.Both raspberries and blackberries will usually yield
a moderate crop offruit the secondyear after plantingand a full crop thethird season. Withgood manage-ment, it is possiblefor gardeners toextend the pro-
ductive life of well-located plantings beyond the 6-to 8-year average.
Variety SelectionOf the many varieties of raspberries available, fewhave proven hardy enough with short ripeningseasons to be satisfactory for growing under NewEngland conditions. Only top-quality 1-year-oldplants of the best varieties should be planted.Obtain virus-free plants when possible.
BlackberriesOnly one erect-type blackberry variety is sug-gested for planting in northern New England. Itis productive, vigorous, and relatively winter-hardy.
Illini has good hardiness and large berries ofgood quality. Illini plants are very thorny!
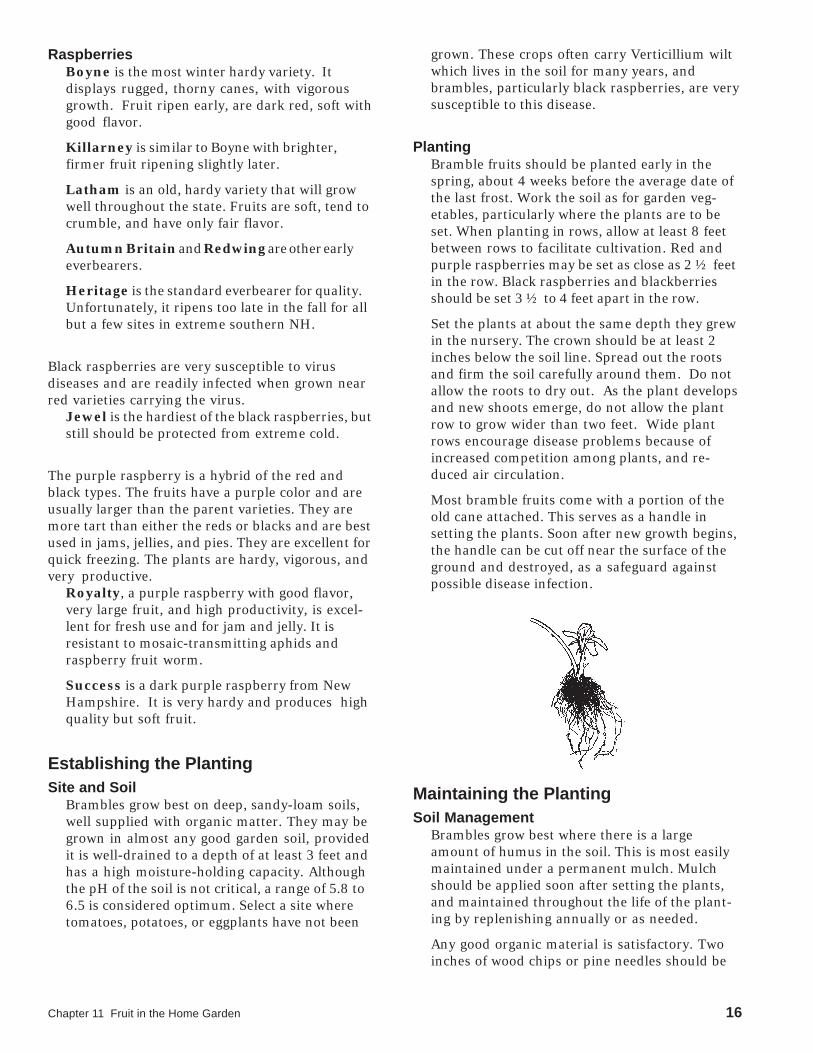
Chapter 11 Fruit in the Home Garden 16
RaspberriesBoyne is the most winter hardy variety. Itdisplays rugged, thorny canes, with vigorousgrowth. Fruit ripen early, are dark red, soft withgood flavor.
Killarney is similar to Boyne with brighter,firmer fruit ripening slightly later.
Latham is an old, hardy variety that will growwell throughout the state. Fruits are soft, tend tocrumble, and have only fair flavor.
Autumn Britain and Redwing are other earlyeverbearers.
Heritage is the standard everbearer for quality.Unfortunately, it ripens too late in the fall for allbut a few sites in extreme southern NH.
Black raspberries are very susceptible to virusdiseases and are readily infected when grown nearred varieties carrying the virus.
Jewel is the hardiest of the black raspberries, butstill should be protected from extreme cold.
The purple raspberry is a hybrid of the red andblack types. The fruits have a purple color and areusually larger than the parent varieties. They aremore tart than either the reds or blacks and are bestused in jams, jellies, and pies. They are excellent forquick freezing. The plants are hardy, vigorous, andvery productive.
Royalty, a purple raspberry with good flavor,very large fruit, and high productivity, is excel-lent for fresh use and for jam and jelly. It isresistant to mosaic-transmitting aphids andraspberry fruit worm.
Success is a dark purple raspberry from NewHampshire. It is very hardy and produces highquality but soft fruit.
Establishing the PlantingSite and Soil
Brambles grow best on deep, sandy-loam soils,well supplied with organic matter. They may begrown in almost any good garden soil, providedit is well-drained to a depth of at least 3 feet andhas a high moisture-holding capacity. Althoughthe pH of the soil is not critical, a range of 5.8 to6.5 is considered optimum. Select a site wheretomatoes, potatoes, or eggplants have not been
grown. These crops often carry Verticillium wiltwhich lives in the soil for many years, andbrambles, particularly black raspberries, are verysusceptible to this disease.
PlantingBramble fruits should be planted early in thespring, about 4 weeks before the average date ofthe last frost. Work the soil as for garden veg-etables, particularly where the plants are to beset. When planting in rows, allow at least 8 feetbetween rows to facilitate cultivation. Red andpurple raspberries may be set as close as 2 ½ feetin the row. Black raspberries and blackberriesshould be set 3 ½ to 4 feet apart in the row.
Set the plants at about the same depth they grewin the nursery. The crown should be at least 2inches below the soil line. Spread out the rootsand firm the soil carefully around them. Do notallow the roots to dry out. As the plant developsand new shoots emerge, do not allow the plantrow to grow wider than two feet. Wide plantrows encourage disease problems because ofincreased competition among plants, and re-duced air circulation.
Most bramble fruits come with a portion of theold cane attached. This serves as a handle insetting the plants. Soon after new growth begins,the handle can be cut off near the surface of theground and destroyed, as a safeguard againstpossible disease infection.
Maintaining the PlantingSoil Management
Brambles grow best where there is a largeamount of humus in the soil. This is most easilymaintained under a permanent mulch. Mulchshould be applied soon after setting the plants,and maintained throughout the life of the plant-ing by replenishing annually or as needed.
Any good organic material is satisfactory. Twoinches of wood chips or pine needles should be

Chapter 11 Fruit in the Home Garden 17
sufficient. Where straw, sawdust, or other mate-rial low in nitrogen is used, it may be necessaryto add sufficient nitrogenous fertilizer to preventa temporary deficiency as the mulch begins todecay. Usually about ½ lb. of nitrate of soda or 1lb. of 10-10-10 for each 100 sq. ft. of mulched areawill be enough. In addition; mulch may delayfruiting until later in the season and couldincrease risk of early winter injury by delayingplant hardening in the fall.
FertilizationOn fertile soils, or where a good mulch is main-tained, it is usually unnecessary to make anapplication of fertilizer in the bramble planting.If growth is poor, the addition of 4 to 6 lbs. ofnitrate of soda to each 100 feet of row whengrowth begins in the spring will be beneficial. Onlight, sandy soils, where phosphorus and potas-sium may be low, an equal amount of 10-10-10 orsimilar fertilizer should be used instead. Do notover-fertilize, however, because it may result intoo much vegetative growth with a loss of yieldand quality of fruit or in injury to the roots of theplant and burning foliage.
Training and PruningRefer to the Pruning chapter.
HarvestingRaspberries and blackberries are highly perishable.They should be harvested as soon as ripe, handledvery carefully, and either placed in cold storage orused without delay. It may be necessary to harvestdaily to prevent loss of fruit and the spread ofmolds and other diseases in the planting.
BlueberriesMany home gardeners have been successful withhighbush blueberryplantings in northernNew England. Theymay be grown in anyarea where nativeblueberries, azaleas,mountain laurel, orrhododendrons do well.They are very exactingin soil and moisturerequirements, but require little protection frominsect and disease pests.
Variety SelectionTo provide adequate cross-pollination and toincrease chances for a good crop of fruit, two ormore varieties of blueberries should be planted.The following varieties suggested for planting ingardens in New England ripen over a 4- to 6-weekperiod, beginning in mid-July and continuingthrough August. All are vigorous and productiveunder good growing conditions and produceberries of large size and good quality.
Patriot is a very hardy plant developed inMaine. It produces large excellent quality fruit.Patriot ripens early.
Blueray, very hardy and productive, is recom-mended for planting throughout northern NewEngland. The fruit is large, medium-light-blue,flavorful, and resistant to cracking.
Bluejay is a hardy, mid-season cultivar fromMichigan. Fruits are attractive and flavorful.
Bluecrop, although lacking in vigor, is veryhardy and drought-resistant. The fruits arelarge, light-blue, firm, and resistant to crack-ing. Their dessert quality is good. Bluecropwill not tolerate poorly drained soils.
Northland is a hardy vigorous variety whichproduces high yields of small, good qualityberries.
Jersey is a good quality late summer variety.Fruit are only medium sized and production ismoderate.
In Coos county and other colder areas of the state,very hardy highbush x lowbush crosses arerecommended. These include the varieties St.Cloud, Friendship, North Country, and NorthBlue.

Chapter 11 Fruit in the Home Garden 18
Establishing the PlantingSite and Soil
Blueberries should be planted where they havefull sunlight most of the day, and far enoughfrom the roots of trees to avoid competition formoisture and nutrients. They are shallow-rootedplants and must be heavily mulched. Supple-mental irrigation will be necessary in dry peri-ods. Adequate drainage must be provided,however, because they cannot tolerate wet feet.
They grow best in porous, moist, sandy soilshigh in organic matter with a pH range of 4.5 to5.2. Have the soil tested and if it is not acidenough for blueberries, work sulfur into the areawhere the plants are to be set. This should bedone 6 months to a year before planting. Toacidify sandy soils, sulfur is recommended at therate of 3/4 lb. per 100 sq. ft. for each full pointthe soil tests above pH 4.5. On heavier soils use1½ to 2 lb. Once proper acidity is established, itcan be maintained through the annual use of anacid fertilizer, such as ammonium sulfate .
PlantingVigorous 2-year-old plants about 15 inches highare the minimum size recommended for plant-ing. Two or three year old container grown stockis preferable to bare root stock. Set in earlyspring, about 3 or 4 weeks before the averagedate of the last frost. Blueberries are usuallyplanted every 4-6 feet in rows 6-8 feet apart.
Give the roots plenty of room. Where the plantsare to be set, dig the holes wider and deeper thannecessary to accommodate the root systems. Ifnot previously done, incorporate plenty oforganic matter--well-rotted sawdust, peat moss,or leaf mold--into the soil in and around the hole.If peat moss is used, be sure to soak it well beforeuse. Trim off diseased and damaged portions ofthe top and roots, and set the plants just a littledeeper than they grew in the nursery. Spread theroots out, and carefully firm the soil mixture overthem. Water thoroughly after planting.
Maintaining the PlantingSoil Management
Mulching is the preferred soil managementpractice in the blueberry planting. The entire areaaround and between the plants should bemulched. Nearly any organic material is satisfac-tory: leaves, straw, wood chips, bark, peat moss,or sawdust. It should be applied loosely to adepth of 5 or 6 inches. Many growers use acombination mulch, a layer of leaves on the
bottom with 2 or 3 inches of sawdust on top.Renewed annually, this heavy mulch retainsmoisture, keeps the soil cool in summer, andadds needed organic matter, and providesprotection from low winter temperatures.
FertilizationNo fertilizer should be applied at planting time,and usually none is needed during the firstgrowing season. On weak soils, however, theapplication of 2 oz. of ammonium sulfate aroundeach plant about the first of June is beneficial.
Ammonium sulfate, at the rate of 2 oz. per plant,should be spread in a circle around each plantabout 12 to 16 inches from its base just before thebuds begin to swell the second spring. Increasethe amount each succeeding spring by 1 oz. untileach mature bush is receiving a total of 8 oz.annually. Where sawdust is used as a mulch, itmay be necessary to apply additional nitrogen toprevent a deficiency as the sawdust decays.Increase fertilizer rates up to 50% as necessary tomaintain good plant vigor.
PruningRefer to Pruning chapter.
Pest ControlBirds are by far the greatest pest in the blueberryplanting. Covering the bushes with wire cages orplastic netting is perhaps the best method ofcontrol. Aluminum pie tins have been usedsuccessfully. They are suspended by a string orwire above the bushes in such a manner that theytwist and turn in the breeze and keep the birdsaway.
HarvestingSome varieties of blueberry will bear the secondyear after planting. Full production is reached inabout 6 years with a yield of 4 to 6 qt. per plant,depending on vigor and the amount of pruning.
Blueberries hang on the bushes well and are not asperishable as blackberries or raspberries. Picking isusually necessary only once every 3 to 7 days.Blueberries will keep for several weeks in coldstorage.
For optimum flavor, do not harvest as soon as theyturn blue. Rather, wait until the ring around thepoint of stem attachment turns blue - then theblueberry is ripe and at maximum flavor.

ChaChaChaChaChapter 12 Lapter 12 Lapter 12 Lapter 12 Lapter 12 LawnswnswnswnswnsBenefits of Turfgrass ................................................................................................................................... 1
Starting a New Lawn ................................................................................................................................... 2Overseeding Home Lawns .......................................................................................................................................... 2
Turfgrasses for Home Lawns ..................................................................................................................... 3Tips on buying seed: ......................................................................................................................................................... 3Kentucky Bluegrass .......................................................................................................................................................... 4Perennial Ryegrass ........................................................................................................................................................... 4Red Fescue ....................................................................................................................................................................... 4
Installation and Maintenance of Sod ......................................................................................................... 5Preparing the Soil ............................................................................................................................................................. 5Measuring and Ordering Turf ............................................................................................................................................ 5Laying Your Quality Turf .................................................................................................................................................... 5
Sod Maintenance ........................................................................................................................................................ 5Watering Schedule ............................................................................................................................................................ 5Mowing .............................................................................................................................................................................. 5Traffic Caution ................................................................................................................................................................... 5Fertilization ........................................................................................................................................................................ 6
Successful Home Lawn Establishment- A Checklist ............................................................................... 6
Fertilization of Home Lawns ....................................................................................................................... 7Fertility Options for Home Lawns ...................................................................................................................................... 7New Hampshire Lawn Fertilization ................................................................................................................................... 7Fertility Needs During the Year ......................................................................................................................................... 7Nutrient Functions ............................................................................................................................................................. 8Characteristics of Nitrogen Fertilizers ............................................................................................................................... 8
Maintaining Home Lawns ........................................................................................................................... 9A Home Lawn Maintenance Calendar .............................................................................................................................. 9Mowing .............................................................................................................................................................................. 9Watering .......................................................................................................................................................................... 10Fertilization ...................................................................................................................................................................... 10Liming .............................................................................................................................................................................. 10Thatch ............................................................................................................................................................................. 10
Pests of Home Lawns.................................................................................................................................11Lawn Insects ............................................................................................................................................................. 11
Common Turfgrass Diseases of Home Lawns: ...................................................................................... 12
Turfgrass Diseases: Cultural Management Recommendations .......................................................... 13
Weeds in Home Lawns .............................................................................................................................. 14Control Methods: ............................................................................................................................................................. 14
Other Common Home Lawn Problems .................................................................................................... 14Moss and Mushrooms in Home Lawns ..................................................................................................................... 14
Moss ................................................................................................................................................................................ 14Mushrooms ..................................................................................................................................................................... 14
Moles in Home Lawns ............................................................................................................................................... 15
Management Practices To Reduce Ground Water Contamination In Home Lawns ........................... 15

Chapter 12 Lawns 1
CHAPTER 12LawnsEdited and revised by by Dr. John Roberts, University of New Hampshire Cooperative Extension
Producing quality lawns in New Hampshire is a relatively easy task if you fol-low some basic cultural practices. The climate is conducive for grass production,particularly for cool-season grass species. With proper cultural practices, a goodlawn can be established and maintained.
• Turfgrasses help purify water entering under-ground aquifers by its root mass and soil mi-crobes acting as a filter to capture and break-down many types of pollutants.
• A Gallup survey reported 62% of all U.S.homeowners felt investment in lawns and land-scaping was as good or better than other homeimprovements. The investment recovery rate is100 to 200% for landscape improvement, com-pared to a deck or patio that will recover 40 to70%. Proper and well maintained landscapingadds 15% to a home’s value according to buyers.
• Grass areas quickly affect people’s moods bycreating feelings of serenity, privacy, thoughtful-ness or happiness and its yearly cycles of growthand color change lift human spirits and linkurban inhabitants with their countryside heri-tage.
• A turf area just 50 feet by 50 feet absorbs carbondioxide, ozone, hydrogen fluoride andperosyacetyle nitrate and releases enough oxy-gen to meet the needs of a family of four. Thegrass and trees along the U.S. interstate highwaysystem release enough oxygen to support 22million people.
Benefits of TurfgrassWhat has a lawn done for you lately?• Front lawns of just eight average houses have the
cooling effect of about 70 tons of air conditioning,while the average home-size central air unit hasonly a 3 to 4 ton capacity.
• Turfgrasses trap much of an estimated 12 milliontons of dust and dirt released annually into theU.S. atmosphere.
• Playing fields covered with dense turf haveproven safer, as demonstrated by a simple eggdrop test. When a dozen raw eggs were droppedfrom a height of 11 feet onto a two-inch thickpiece of dense turf, none broke; two thirds ofthem broke on thin turf from that height; andfrom just 18 inches up, all broke on an all-weather track!
• Healthy, dense lawns absorb rainfall six timesmore effectively than a wheat field and fourtimes better than a hay field. Sodded lawns canabsorb 10 to 12 times more water than seededlawns, even after two years of growth, thuspreventing run-off and erosion.
• Recovery rates among hospitalized patients areoften quicker when their rooms view a land-scaped area than patients with non-landscapedviews. Where vegetation grows, child mortality,suicide and energy consumption are less than inplaces where there are no plants.
• With up to 90% of the weight of a grass plant inits roots, it makes a very efficient erosion preven-tion device, also removing soil particles fromsilty water.
Chapter 12 Lawns 2
Starting a New LawnThe following steps are critical for successful lawnestablishment:
Site InvestigationThe ground should gently slope (1 to 15%) awayfrom the house to prevent water from enteringthe basement.
Soil ModificationIf the native soil is undesirable (i.e. extremelyrocky, droughty, compacted or poorly drained),modification is necessary for turfgrasses to growvigorously. Drainlines or underground irrigationlines can be installed at this time. In poor soils,adding 4 to 6 inches of loam also will be benefi-cial.
Soil testAn inexpensive soil test helps measure the soil’spH and fertilizer needs. Obtaining soil test kitsand sampling instructions can be obtained fromyour local UNH Cooperative Extension CountyOffice.
Apply lime (if necessary)Lime is very immobile in the soil and should berototilled into the upper 4 to 6 inches of soilbefore seeding.
RototillRototill, disc, or otherwise loosen (and incorpo-rate lime) in the upper 6 inches of soil.
RakeRake and remove any large stones, sticks orother debris visible on the soil surface.
Firm soil surfaceRolling or watering helps settle the loosened soil.
Apply fertilizerPreferably, a starter-type fertilizer should beapplied to deliver 1 pound of actual nitrogen per1000 square feet and raked into the upper inch.
SeedSelect a seed mixture containing improvedvarieties well suited for your lawn. Seed shouldbe uniformly broadcast over the area using adrop or rotary spreader. This can easily beobtained by seeding in opposite directions andsetting the spreader to deliver at 1/2 of desiredrate.
RakeUsing very light pressure, rake the seed into theupper 1/4 inch of soil. While some seeds willremain visible on the surface, (birds don’t eatenough seed to ruin a seeding), it’s more effectivethan burying the seed too deeply!
Roll (optional)Rolling helps pinch the seeds and soil particlestogether to prevent drying out.
Crabgrass control (spring seedings)Unless prevented, crabgrass often predominatesa spring lawn seeding. Weed killers or herbicidesare available on the market that stop crabgrassseeds from germinating. Read the herbicide labelcarefully before purchasing a herbicide sincesome products can only be used on mature turf(not new seedings).
Mulch (optional)A weed-free straw uniformly applied over thenew seeding conserves moisture and reduceserosion on sloping ground. Apply approximately1 bale per 1000 square feet.
WaterKeep the soil surface moist to prevent the seedsfrom drying out. This often requires light (5 to 10minute), frequent (twice daily) watering for 2 to 3weeks after seeding.
Overseeding Home LawnsRenovation, or overseeding, involves revitalizing anold lawn without removing all the sod. Many old,thin, and weed- infested HOME LAWNS are com-pletely restored using this approach. Renovation ismost successful when over 50% of the existing lawnis composed of desirable turfgrass species.
Thatch removalPower rake the area to be overseeded as often asnecessary to remove all thatch and unwantedvegetation. Thoroughness is important. Seedinginto thatch results in poor germination.
Clipping removalUsing a mower, collect and remove the displacedthatch. For small areas, a bamboo rake workswell.
ReseedUniformly scatter seeds over the soil surfaceusing a drop or rotary spreader. Hand sprinklingseeds also works well on small, irregular patchesthat need overseeding.

Chapter 12 Lawns 3
RakeLightly drag or rake the seed into the upper 1/4inch of soil.
RollRoll the area to ensure firm contact of the seedwith the soil.
Mulch (optional)Sprinkle weed-free straw over the seeded area.
WaterAs with new lawns, the seed should be keptmoist at all times during the germination andearly seeding stages.
MowContinue mowing the lawn at approximately 2inches.
Turfgrasses for Home Lawns
Tips on buying seed:
The grass will likely be greener on your side of thefence if you:
1. Select a lawn seed mixture which performs wellwhere it’s sown (i.e. high maintenance, sunnylocation versus densely shaded, low maintenancelocation).
2. Select lawn seed mixtures that contain varieties(not generic ‘no name’ mixtures) tolerant to NewHampshire’s diverse climate and soil conditions.
Note: While several good lawn mixtures contain-ing improved varieties exist on the market,availability can be limited (especially when you’rebuying small quantities).
Use Species/Mix Lbs./(% by wt.) 1000 sq. ft.
Sun:Moderate to 50% Kentucky bluegrasshigh maintenance (or more)
25% perennial ryegrass 3-425% fine fescue (not more)
Sun:Low maintenance 50% fine fescueand/or droughty site 20% perennial ryegrass 4-5
20% Kentucky bluegrass10% Dutch white clover
or80% Tall Fescue20% Kentucky bluegrass 7-9
Shade:(less than 4 hours 70% fine fescue full sun) 20% perennial ryegrass 4-5
10% Kentucky bluegrass(shade tolerant variety)

Chapter 12 Lawns 4
Cultural Requirements of
Kentucky Bluegrass
(Poa pratensis)General:
Provides high quality lawn. Spreading growthhabit. Slow to germinate in cool weather. Thepredominate grass found in sod.
Soil:Prefers moist, well-drained, fertile soils with apH of 6.0 to 7.0. Has poor tolerance in stronglyacidic soils (below 5.0).
Fertilizing:Requires 0.5 pounds of nitrogen per 1,000 squarefeet per growing month.
Mowing:Will tolerate various mowing heights with 2inches preferred in most home lawns.
Light:Does best in open, sunny areas; has poor denseshade tolerance. Prefers at least 4 hours of fullsun per day.
Watering:Can tolerate drought periods by becoming semi-dormant. Prefers 1 inch of water per week duringthe summer.
Varieties (partial listing):Blacksburg, Trenton, Majestic, Victa, Baron,Gnome, Adelphi
Cultural Requirements ofPerennial Ryegrass
(Lolium perenne)General:
Fast germinating, wear resistant, bunch typegrowth habit. Effective in over-seeding and inlawn mixtures. Prone to winter injury.
Soil:Similar to Kentucky bluegrass except can toleratea more acidic soil pH.
Fertilizing:Requires 0.5 pounds of nitrogen per 1,000 squarefeet per growing month.
Mowing:Can withstand various mowing heights with 2inches generally recommended. Sharp mowerblades required.
Light:Prefers sunny, open areas but has good partialshade tolerance.
Watering:Requires supplemental irrigation to insuresurvival during extended drought periods.
Varieties (partial listing):Yorktown III, Prelude II, Pinnacle, SR 4200,Palmer II, Affinity
Cultural Requirements of Red Fescue
(Festuca rubra)General:
Low cultural requirements; used primarily inlow-maintenance and shaded areas.
Soil:Well-adapted to dry, sandy, infertile soils havinga pH of 5.5 to 6.5. Has poor tolerance to poorly-drained or saline (high salt content) soils.
Fertilizing:Grows well under low fertilization levels of 0.2 to0.5 pounds of nitrogen per 1,000 square feet pergrowing month.
Mowing:Under most home lawn conditions, red fescueshould be cut 2 inches high.
Light:Has excellent shade tolerance but won’t domi-nate a Kentucky bluegrass or perennial ryegrassstand in open, sunny areas.
Watering:Requires minimum irrigation. Turf qualitydeclines if irrigated excessively.
Varieties (partial listing):Reliant, Warwick, Longfellow, SR 3000, Aurora,Jamestown II

Chapter 12 Lawns 5
Installation and Maintenance ofSodSodding your lawn allows you to enjoy instantbeauty and maturity without the usual time-con-suming hassles of seeding. For best results however,sod needs to be properly installed and maintained.
Advantages of Sod Include:• Installation of sod is possible anytime the ground
isn’t frozen.
• More dependable results on hillsides and steepslopes where erosion is a problem.
• Reduced encroachment of weed species, espe-cially crabgrass, when compared to springseedings.
• Better establishment on high-traffic areas.
Preparing the Soil1. Rototill or spade the soil to a depth of 4 inches.
2. Remove sticks, stones, roots and other debris.
3. Take soil test samples and ask CooperativeExtension to provide recommendations.
4. In accordance with soil test, mix lime into theupper 4 inches of soil. Incorporate a completefertilizer into the upper inch of soil.
5. Smooth the soil by raking with a steel rake.
6. Firm the soil by lightly rolling. Fill in any lowspots and grade down high points. A smooth, flatsurface prevents later scalping by the mower.
NOTE: Avoid shady areas. Sod requires 4 to 5hours of direct sunlight per day to thrive.
Measuring and Ordering Turf• Using a tape measure, measure the area (length,
width, any unusual features), and put thesemeasurements on a sketch.
• Ideally, take delivery on the day you plan to startlaying your sod. Install all the sod delivered thatday. However, any sod not installed should beunrolled in a shady area and lightly watered toprevent heating.
Laying Your Quality Turf1. Start at a straight line such as a driveway or
walk.
2. Lay out the sod as you would a rug or tiles.
3. Make sure all joints are butted tightly together—without overlapping or spaces between strips ofsod.
4. Stagger the joints in each new row like rows ofbricks.
5. Use a large sharp knife for shaping sod aroundtrees, at flower beds, or along borders.
6. Completely soak the sod with at least 1 inch ofwater. Start watering 20 minutes after first stripis laid.
7. Roll the sod to smooth out small bumps and airpockets. This will assure good contact with thesoil.
Sod MaintenanceWatering Schedule• To gauge watering, simply place an empty can
about 6 feet away from the sprinkler.
• When there is one inch of water in the can, it istime to move the sprinkler to the next area. Sodrequires roughly one inch of water per week.
• Reflected sun along buildings dries sod quickly,so be sure to water these areas more often.
Mowing• Your new living carpet generally needs mowing
6-7 days after installation.
• The basic mowing rule is never remove morethan 1/3 of the leaf blade during a single mow-ing.
• Mow when grass height reaches 2 ½ - 3 inches.
• Set your mower at a cutting height of 2 inches.
• For best appearance, be sure to keep your mowerblades sharp.
Traffic Caution• Use your newly sodded lawn sparingly until
good root establishment has taken place (2-3weeks).
• Avoid concentrated play activities or similarrough usage for four weeks.
• There are no restrictions on visually enjoyingyour beautiful new lawn!

Chapter 12 Lawns 6
Fertilization• To maintain its high quality, sod should be
fertilized at least 2 times during the year. Springand fall applications are popular for many lawns.An additional summer fertilization will helpinsure a season long beauty!
• For more specific information on fertilization andlawn maintenance, see the appropriate sectionsin this chapter.
Successful Home LawnEstablishment- A ChecklistI seeded a new lawn and it didn’t work. Why?There are a number of reasons why initial seedingsfail.
Did you prepare the soil properly? The finalsurface should be loose and non-compacted toinsure a good seed to soil contact. Also,turfgrasses don’t perform well in poorly-drainedor compacted soils.
Did you have the soil tested? An inexpensivesoil test will measure the soil’s pH and fertilizerneeds. Most New Hampshire soils are acidic, andoften require lime. Seedlings fail to root deeplywhen the pH value drops below 5.0. With time,these grasses also become more susceptible todrought and other problems.
Did you fertilize before seeding? Withoutfertilization, young seedlings will soon lose theirvigor and turn a pale yellow-green color. The netresult will often be a lawn predominated byweeds. A starter-type (i.e. 10-20-10) formulationapplied prior to seeding provides the nutrientsneeded for the first 6 to 8 weeks. Another fertili-zation will likely be necessary for best results.
Did you seed too early or too late in the year?In the cold soils of early spring or late fall it cantake up to 3 weeks before some turfgrass seedsemerge. While such seedings can be successful,weed competition and erosion pose seriousthreats. Ideally, the optimum time to seed isbetween mid-August and early September(August 15 to September 10). During this period,crabgrass competition is minimal and the warmsoil temperatures hasten the germination andestablishment of the grass (up to 3 times faster).Seedings throughout the growing season willalso succeed with proper care.
Did you choose the right seed mixture? Insunny locations, the grasses most often used areKentucky bluegrass, perennial ryegrass, and(more recently) the tall fescues. While Kentuckybluegrass performs well in sunny sites, it haspoor shade tolerance. Grasses that have excellentshade tolerance are the ‘fine-leaf fescues’ whichinclude creeping red, chewings and hard fes-cues. In shady locations, seed mixtures should becomprised of at least 70% of these narrow-bladed grasses. Fine-leaf fescues are also recog-nized for having good drought tolerance and arecapable of surviving in low maintenance areas.
Chapter 12 Lawns 7
Did you apply the seed uniformly over thesurface and rake it lightly (1/4 inch) into thesoil? A normal seed rate would be 3 to 4 poundsper 1000 square feet. If seed isn’t raked in, butjust left on the surface, it often dries out orwashes away. Light rolling after the seed is putdown also helps insure good seed to soil contactessential for best results.
Did you irrigate frequently? Seeds need to bekept moist for germination to occur. This oftenrequires light (5 minute), frequent (twice a day inhot weather) watering for at least two weeksfollowing seeding.
Did you apply mulch? Mulch, usually straw,helps protect the seeds from drying out andreduces erosion on steep slopes. Warning:Mulches should be weed free! Straw fromhayfields often contain tons of weed seeds thatwill ruin your seeding. To avoid smothering yournew grass, apply only 1 bale of straw per 1000square feet. Roughly 3 weeks after germination,straw can be raked off if desired.
Did you have weeds enter after the seeding?Weeds are often more aggressive and faster togerminate than turfgrass seeds. This is a seriousproblem especially in the spring when manylawns are seeded. Crabgrass, in particular, willgerminate in cool soils of early spring andcontinue to out compete young turf seedlingsthroughout the summer. Herbicides are on themarket that are effective in preventing andcontrolling both crabgrass and broadleaf weeds.
Did you see any signs of disease or insects?Both of these pest problems can injure and thinout young turfgrasses. If so, products can bepurchased to prevent further damage.
Fertilization of Home LawnsFertilization is one of the most important practicesin lawn care. A properly fertilized lawn is moredense, darker green and has fewer weeds than onewhich is under (or never) fertilized! Few of ournative soils contain enough of the most importantnutrients needed by turfgrasses, nitrogen, phospho-rous and potassium. As a result, lawns need supple-mental fertilization to maintain vigorous andhealthy growth.
An inexpensive soil test will determine the soils pHand overall fertility status. Contact your local UNHCooperative Extension County office for samplinginstructions and other information regarding lawnfertilization.
Fertility Options for Home LawnsWhat to buy? When to apply? Fortunately, thereare several products on the market (both organicand inorganic) effective in producing desirableresults. The calendar and comments below aresuggested to serve only as a guideline.
New Hampshire Lawn Fertilization
Maintenance Level Timing Comments
None Never Crabgrass galore!
Lower (1 x/yr) Fall Efficient &economical
Moderate (2 x/yr) Spring Good over-all& Fall choice
Higher (3 x/yr) Spring, Season long beautySummer&Fall
Fertility Needs During the YearFall
Fall is a recovery time for turfgrasses. The warmdays and cool nights are ideal for lawns toproduce new growth, both roots and leaves.Early fall is often considered the most efficienttime of the year to fertilize a lawn. Fertilizershaving nearly equal amounts of nitrogen, phos-phorus and potassium are encouraged duringthis season.
SpringSpring also represents a time for turfgrasses toinitiate new growth. While ‘Mother Nature’alone helps stimulate spring green-up, mostturfgrasses benefit from a fertilization. Starter-type fertilizers which generally contain more

Chapter 12 Lawns 8
phosphorus than nitrogen are commonly used ina spring feeding. Additional phosphorus helpsinitiate root development and early turf estab-lishment of young seedlings.
SummerMost turfgrasses turn brown and go dormantduring the hot periods of summer withoutadditional water. If a lawn is fertilized this timeof year, lighter application rates of productscontaining mostly slow release nitrogen sources(including organics) are suggested to avoidburning of the lawn.
Nutrient FunctionsNitrogen
Turfgrasses require nitrogen in larger quantitiesthan other essential nutrients. It is involved withnearly all the plant growth and development
Characteristics of Nitrogen FertilizersFAST RELEASE NITROGEN FERTILIZERS
Fertilizer Name Nitrogen Low Temperature Residual N Leaching(%) Response Activity (weeks) Potential
Ammonium nitrate 33 rapid 4-6 high
Ammonium sulfate 21 rapid 4-6 high
Urea 46 rapid 4-6 high
SLOW-RELEASE NITROGEN FERTILIZERS
Fertilizer Name Nitrogen Low Temperature Residual N Leaching(%) Response Activity (weeks) Potential
Synthetic Organic
Sulfur-coated urea 22-38 mod. rapid 10-15 low
Once 24-35 mod. rapid 15-36 low
ScottsPoly-S products 16-40 medium 12-24 low
IBDU 31 mod. rapid 10-16 mod.-low
Nitroform 38 slow 10-30 very low
Fluf 18 medium 6-10 low
Nutralene 40 medium 10-16 low
Methylene urea 39 medium 7-9 low
Natural organic fertilizers
Ringer 6 medium 10-12 low(blood, bone, seed meals)
Sustane 5 medium 10-12 low(turkey waste)
Milorganite 6 slow 10-12 low(activated sludge)
Where trade names are used for identification, no product endorsement is implied nor is discrimination intended against similar materials.
processes. Increased top growth, darker greencolor and denser turf are generally associatedwith moderate (2 applications per year) nitrogenlevels.
PhosphorusThe primary function of phosphorus is in thedevelopment of a strong root system and earlyseedling establishment.
The majority of rooting of turfgrasses occurs inthe spring and fall of the year.
PotassiumAmong its various roles, potassium helps in cellwall development and regulates water move-ment within the plant. Turfgrasses with adequatepotassium levels have improved drought andwear tolerance. A nitrogen to potassium ratio of4:3 is desirable to maintain during the year.

Chapter 12 Lawns 9
Maintaining Home LawnsThe following maintenance calendar and tips will be helpful for growing a healthy, attractive lawn inNew Hampshire.
A Home Lawn Maintenance Calendar
more than 40% of the leaf at one time. Thisprevents ‘scalping’ of the lower leaf blades,resulting in a loss of their dark green color andresistance to traffic and pest pressure.
Mowing Equipment:The most common type of mower for homelawns is a rotary type (not reel or flail). Thisincludes mulching-type mowers which chopgrass leaves more finely, increasing the rate ofleaf decomposition. For best results, mowerblades should be periodically sharpened to avoidragged cuts of the leaf tip.
Clipping recycling:Frequent (weekly) mowing helps to keep thequantity of clippings small enough to filter downand not smother the turf. When mowing, leavingthe clippings on the surface (not bagging) isencouraged. Clippings help return importantnutrients to the lawn and conserve valuable soilmoisture.
MowingMowing is particularly important in maintaining adense and attractive home lawn. With propermowing, turfgrasses help crowd out weeds, reducedisease invasion and improve a turfgrass’s droughtand wear tolerance.
Height:Most home lawns should be mowed at 2 inches.Maintaining home lawns at lower mowingheights is possible, yet more difficult. At lowermowing heights, home lawns are more likely tobecome infested with weeds, insects and dis-eases. In mid-summer, increasing the mowingheight between 2 ½ and 3 inches helps preventdrought damage.
Frequency:As a rule of thumb, lawns maintained at 2 inches,should be mowed every 5 to 7 days during thegrowing season. Mowing shouldn’t remove
Jan Feb Mar April May June July Aug Sept Oct Nov Dec
Mowing
Fertilizing
Liming
Crabgrass Control
Irrigation
Seeding
Overseeding
Sodding
Thatch Removal
Insect Control
Braodleaf WeedsBroadleaf

Chapter 12 Lawns 10
WateringDuring the summer:
Lawns will often go semi-dormant and turnbrown during the hot periods of summer withoutbeing irrigated. Death of the lawn may resultfrom severe drought. Most lawn grasses duringthe summer require 1 inch of water each week toremain green and healthy. Placing an emptycoffee can 5 to 10 feet away from a sprinkler is aneasy and helpful way to monitor the amount ofwater applied.
Time of watering: The most efficient time to water home lawns isearly in the morning! While evening wateringsare convenient for most homeowners, theyencourage more disease activity. Mid-daywaterings are also possible (they will not harmthe turfgrass) but the water lost to evaporation ishigher.
FertilizationFertilization is one of the most important practicesin lawn care. A properly fertilized lawn is moredense, darker green and has fewer weeds thanlawns under (or never) fertilized. Few of our nativesoils contain enough of the most important nutri-ents needed by turfgrasses; nitrogen, phosphorous,and potassium. As a result, lawns need supplemen-tal fertilization to maintain vigorous and healthygrowth.
What to buy? When to apply? Depending on themaintenance level desired, most lawns should befertilized between one and three times per year.Fertilizers containing slow release nitrogen sources(including natural and synthetic organic) helpreduce the threat of nitrate leaching and provide alonger response.For more information on home lawn fertilization,see the section on fertilization in this chapter.
LimingTo determine if lime is necessary, have the soil pHchecked at a local laboratory. Since lime is slow toreact (up to 6 months) and quite immobile in thesoil, late fall applications are ideal. However,agricultural limestone can be safely appliedthroughout the year due to its low burning poten-tial.
For newly seeded lawns, limestone should beapplied prior to seeding and thoroughly mixed intothe upper 4 to 6 inches. The desired pH for lawngrasses is between 5.5 and 7.0. Lawns containingpredominantly Kentucky bluegrasses should have aminimum soil pH value of 6.0.
ThatchThatch (also known as organic matter) is the layer ofpartially decomposed stems, roots and some leavesof grasses which accumulates at the soil surface.Thatch buildup is a naturally occurring process asolder plant parts die and new tissues are generated.Bacteria in the soil feed on thatch and help break itdown. Moderate (½ inch) thatch layers are consid-ered desirable in home lawns.
However, excessive thatch buildup (greater than 1inch) is unwanted. Thick layers harbor insects anddiseases, promote shallow rooting of turfgrasses(lawns will dry out faster in hot weather), and causean overall decline in turf vigor.
Thatch controlPowered rakes (also called dethatching or verti-cal thinning machines) are effective in removingthatch (1/4 inch at a time). These can be rentedfrom garden equipment outlets. Early spring orfall mechanical thinnings are preferred as recov-ery of the lawn during these periods will berapid (1 to 2 weeks). Fertilizing immediatelyfollowing a dethatching also hastens the recoverytime.

Chapter 12 Lawns 11
• Remove both ends of a can press it into theground. Fill the can with water. Stir up thegrass with your hand. The bugs should floatto the top.
White Grubs:White grubs are the larval or grub stage ofseveral species of beetles and chafers. The twomost common in New Hampshire are the Japa-nese beetle and the June bug. These beetle larvaeare C-shaped, and can be found feeding amongthe roots of grass. They are typically cream-colored with a brown head and with a dark areaat the posterior end where the body contentsshow through the skin. White grubs feed ongrass roots and most complete their developmentin one year (June beetles require two or threeyears).
Japanese beetle eggs are laid in July and August.June beetle eggs are laid in June and July. Theyoung begin feeding on the grass roots withinone or two weeks. Feeding goes on until fallwhen the grubs burrow deep into the ground tooverwinter. In the spring, the grubs burrowupwards to the grass root level. They resumefeeding until June when they transform to thepupal stage.
Adults begin emerging from the ground aboutthe first week of June for the June beetle and thefirst week of July for the Japanese beetle. Evi-dence of an infestation of white grubs appears asgrass begins to turn brown due to root damage.Usually the turf can be rolled back like a rug toreveal the white grubs.
Pests of Home Lawns
Lawn InsectsThere are naturally many different types of insectspresent in a lawn. Most of these are not harmful tothe grass. Control for insects is not necessary unlessthe pest population builds up enough to causevisible damage to the lawn.
The most common above-ground insect pests inNew Hampshire are chinch bugs; these feed ongrass leaves and stems. Below ground, the mostcommon pest is the white grub larvae; these feed onplant stems and roots.
Hairy Chinch Bug:Chinch bugs are probably the most destructivepest of home lawns. The adults are small (1/16"long), black, with white wings and red legs. Thesmall nymphs are without wings and appearcompletely red. These insects damage grass bypiercing the plant with their needle-like mouthparts and sucking plant juices. Rainy weatherhinders chinch bug development so damage isless likely to occur during wet periods. Chinchbugs prefer to feed on bluegrass and fescues.
Chinch bugs prefer sunny areas and lawns withthatch. The overwinter adults emerge fromsheltered areas and seek grass plants. Egg-layingoccurs when temperatures reach 70 0F, generallyin May. The eggs hatch into young nymphswhich do the greatest amount of damage.
Damage to turf is first observed in June. Thisbegins as yellowish areas which soon becomedead patches. During warm weather, turf can bedamaged quickly as the bug population multi-plies. New adults will appear in July. A secondgeneration occurs in August and more turfdamage can be expected. In the fall, large num-bers of adults are seen around building founda-tions.
Chinch bug damage appears quickly in hotweather and is often confused with droughtdamage. If chinch bugs are suspected, there areseveral methods of detection:
• Get down on your hands and knees andsearch the crown of the grass next to a dam-aged area. Chinch bugs are most active andvisible during the heat of the day.

Chapter 12 Lawns 12
Bird, mole, or skunk damage is a sign of grubspresent. Chemical control depends on propertiming of the application. Usually chemicalcontrol isn’t necessary until there are 10 grubsper square foot. Most chemicals should beapplied when the grubs are near the surface(spring or late summer). The grubs are smallestin late summer and control will be better at thistime.
For specific insect control recommendations andmore information on other lawn insect pests, referto Insect Fact Sheet #7, “Insect Pests of HomeLawns”, by Dr. Stanley R. Swier.
Common Turfgrass Diseases ofHome Lawns:
Red Thread & Pink PatchInfected lawns often have a pink or reddish cast.Irregular patches of dead and dying leaves arealso common. Upon close inspection, tiny redthreads of the fungus may be observed growingfrom the leaf tips. Red thread and pink patch aremost common on perennial ryegrasses and finefescues, but they may be seen on any species ofturfgrass. Infections are most obvious during thespring and fall during cool (65-75 0F), moistweather. Cultural management techniquesinclude maintaining soil pH at 6.5-7.0, collectionof clippings during mowing, avoiding late daywatering, and aeration to improve turf growth.
Leaf Spots and Melting OutThe initial symptoms first appear on the leaves assmall purple or red colored oval spots. Thecenters of the spots eventually turn tan, formingdark-bordered ‘eye spots’. Under moist condi-tions, leaf spots may coalesce and blight theentire leaf. The fungus may eventually invadethe crown and roots causing the ‘melting out’phase of the disease which is visible as largepatches of dead and dying turfgrass. The leafspot phase is most common during the springand fall and the ‘melting out’ phase is moreprevalent during the warm months of summer.Succulent growth, promoted by high nitrogenfertilization and high moisture conditions favorthe development of the disease. Several culturalmanagement practices can help reduce bothphases of the disease; 1) avoid excessive fertiliza-
tion with water soluble nitrogen sources, particu-larly in the spring, 2) raise the mower height to2.5-3" and remove no more than 1/3 of the leafblade at any mowing, 3) do not mow wet grass,4) water infrequently and deeply and never mowin the late afternoon or early evening, 5) reseeddamaged areas with turfgrass cultivars resistantto leaf spots. Blends of turfgrass species arepreferable to monocultures.
Rhizoctonia Brown PatchCircular patches of yellow, brown and sunkengrass up to several feet in diameter may developon home lawns. Individual grass blades oftendevelop irregular purplish-brown lesions. Undermoist conditions. a gray, web like fungal growthmay be visible on the infected leaves, particularlyat the margins of the patch. Brown patch is mostcommon during the hot humid weather ofsummer. Several successive nights of warmtemperatures with high humidity often triggeroutbreaks of the disease. Cultural managementtechniques include; 1) avoiding nitrogen fertilizerapplications just prior to and during hot humidweather, 2) water early in the day ( to a depth of6"). Kentucky bluegrass and fine fescue lawnsare less susceptible to brown patch.
Snow Molds (pink and gray)Injury caused by snow mold fungi usuallybecomes evident as the snow melts in the spring.Roughly circular patches of dead, matted grass,3-12" or greater may appear white to gray oreven pink. Gray snow mold rarely damages thecrowns or roots, thus lawns infected with thegray snow mold fungus usually recover quickly.Pink snow mold infections often kill the crownand roots thus infected areas often requirereseeding. Snow mold fungi are most activeunder moist conditions at temperatures justabove freezing. Ideal conditions for the develop-ment of snow molds occurs when snow coveroccurs early over unfrozen ground and remainsthroughout the winter. Thick layers of fallenleaves also provide moist conditions favorablefor snow mold development. To prevent snowmold, it is important to continue to mow thegrass until growth ceases in the fall. Slow releasenitrogen fertilizers should be applied at least sixweeks before dormancy. In the spring, dead andmatted grass should be raked from the affectedareas to allow for new growth.

Chapter 12 Lawns 13
Turfgrass Diseases: Cultural Management RecommendationsCheryl A. Smith, Extension Specialist, Plant Health
Disease Turfgrass Season of Cultural Management(pathogens) Hosts Occurrence Methods
Dollar Spot All species late spring-September avoid drought stress, water(Sclerotinia homeocarpa) early (5-10am), avoid
compaction, balanced N-P-K,reduce thatch
Leaf Spot, Melting-Out All species, spring-October raise mowing height, avoid(Bipolaris, Dreschlera) Kentucky bluegrasses*, excess soluble N, reduce
,fine fescues thatch, water early
Red Thread Most species spring-October maintain balanced N-P-K,(Corticium fuciforme) perennial ryegrasses, avoid low pH, light applications
fine fescues of N (0.5-1.0#/1000 ft2),remove clippings, avoid low pH
Powdery Mildew Kentucky bluegrasses early summer-October reduce shade, avoid excess(Erysiphe graminis) fine fescues (most prevalent in Sept.) N, improve air circulation
Brown Patch All species July-September avoid excess N(Rhizoctonia solani) tall fescues, (especially during active
perennial ryegrasses growth), mow only when dry,water early (5-10am)
Pythium Blight All species June-mid-September avoid night watering, avoid(Pythium spp.) perennial ryegrasses excess N, mow only when dry,
(fungicides usually required)
Pythium Root Rot All species March-November as above, increase organic(Pythium spp) annual bluegrasses (periods of slow plant growth) matter, improve drainage
Anthracnose Bluegrasses, fescues, July-September avoid drought stress, avoid(Colletotrichum graminicola) bentgrasses compaction, balanced N-P-K
annual bluegrass
Summer Patch Fine fescue, July-September avoid compaction, avoid(Magnaporthe poae) Kentucky bluegrass, drought stress, raise mowing
annual bluegrass height, lower pH in top 1" soil6.5, avoid overwatering
Fusarium Blight All species June-September as for summer patch(Fusarium culmorum)
Snow Molds All species November-April continue mowing until growthGray (Typhula spp) (during extended periods ceases in the autumn, maintainPink (Microdochium nivale) of cool, wet weather, pH < 7.0, avoid late N
32-55 F) applications
* Most susceptible species indicated by bold type.

Chapter 12 Lawns 14
Weeds in Home LawnsControl Methods:Cultural Control:
Effective weed control involves the use of recom-mended cultural practices and the use of herbi-cides when necessary. Producing a dense,healthy stand of turfgrass is the best way tominimize annual grass weeds and other broad-leaf weeds. The proper mowing height andfrequency, fertilization and irrigation are part ofthe weed control program and should be prac-ticed throughout the growing season. There aretwo basic groups of weeds: broadleaf weeds andweedy grasses. Broadleaf weeds consist of thefamiliar dandelion, chickweed, ground ivy,oxallis, plantain, and anything which is notclassed as a grass. Examples of weedy grassesare quackgrass and crabgrass.
Chemical Control:Timing is important for herbicide application.The best time for annual grass weed control islate April or early May in New England. The bestapproach is application of a preemergencecrabgrass or annual grass control herbicide abouttwo weeks before annual grass seeds germinate.If you apply these herbicides after annual grassesappear above-ground, the application may not beeffective. Preemergence herbicides controlgerminating weeds and provide effective controlof crabgrass and other annual grass weeds forseveral weeks or months, depending upondosage and products. The effectiveness of thesematerials is based upon their ability to provideexcellent weed control with no turf injury.
There are good selective herbicides available forbroadleaf weed control. In general, broadleafweeds respond best to weed killers when theyare most actively growing and/or in the seedlingstage. This is usually in late spring or early fall.When equally effective, fall applications arepreferable because fewer ornamental and gardenplants are in an active state of growth.
Herbicides for Broadleaf Weed Control in Turf
Trade Name Common Name RecommendedFl. Oz./1000 sq. ft.
TRIMEC CLASSIC 2,4-D+ 1.2 to 1.5MCPP + dicamba
SUPER TRIMEC 2,4-D 0.75 to 1.12,4-DP + dicamba
TURFLON D 2,4-D + triclopyr 1.1 to 1.5
WEEDONE DPC 2,4-D+ 1.0 to 1.52,4-DP
CONFRONT Triclopyr +clopyralid 0.37 to 0.74
Other Common Home LawnProblems
Moss and Mushrooms in HomeLawns
MossMany home lawns in New Hampshire contain mossand/or algae. Moss is often found in shady condi-tions which have acidic, infertile, poorly-drainedsoils. They won’t directly damage the turfgrass, butthey do compete for space and can dominate sec-tions of a lawn with time.
Mosses are small green plants which have a mass offine stems and shallow roots. They can be a veryattractive ground cover in those areas to which theyare well adapted. However, if control is desired, thefollowing practices are suggested.
Generally, moss cannot invade a vigorous, healthylawn. Unless the basic fault(s) that allowed moss toenter in the first place is corrected, the control willbe incomplete or only temporary.
For successful control of moss, maintain good soilfertility and pH values which favors dense, vigor-ous turf growth. Have the soil tested to determinelime and fertilizer needs. Liming alone is notrecommended as a short-term control measure.
MushroomsMushrooms, also called toadstools and puffballs, liveon organic matter in the soil. The mushroom is theabove-ground fruiting or reproductive structure ofa fungus. After wet weather, mushrooms willsprout (overnight) in the lawn. Most mushroomsdon’t damage the lawn, but are objectionablebecause they are unsightly.
There is no practical or permanent way to eliminatemushrooms. However:1) The easiest (yet temporary) solution is to simply
mow them off.
2) Annual dethatching to reduce the organic matterbuildup also helps.
3) If possible, remove any buried roots, stumps andlumber that mushrooms might live on.
Chapter 12 Lawns 15
Moles in Home LawnsLook, there’s another one! Homeowners often seelarge mounds of soil and ridge-like tunnels in theirlawns shortly following snowmelt in early spring.This is the result of mole activity. Due to the un-sightly mounds moles create, they are often consid-ered unwanted pests in home lawns.
Runways are dug to search for food, provide protec-tion from predators and create space for resting andbreeding. The annoying mole hills are externalevidence of the moles’ underground tunnelingactivities. Unfortunately, for most homeowners,moles remain active throughout the year.
Moles are primarily carnivores. Their diets consistmainly of earthworms, grubs, beetles and insectlarvae they find in the soil. A mole’s appetite seemsto be insatiable. They consume enough food toequal 60-80% of their body weight (averaging only 3to 4 ounces) daily. The estimated yearly intake offood for a single mole is about 40 pounds!
In the long haul, moles are here to stay. Thoroughcontrol is difficult to obtain due to a mole’s elusivelife style and its ability to form an extensive net-work of underground tunnels of numerous nestingsites. Some farmers have trapped 100 moles annu-ally, only to be faced with the original amount ofinfestation the following season!
As a result, when large populations of moles exist ina lawn, only short term and partial reductionsshould be expected. Often times, the easiest methodfor homeowners is to “wait and see”. Mole activitywill often subside later in the spring once theground dries out.
For additional information on home lawn insects,diseases and other pests such as moss, mushroomsand moles, contact your local county Extensionoffice.
Management Practices ToReduce Ground WaterContamination In Home Lawns• Reduce the need of pesticides by following
recommended cultural practices such as propermowing and watering which maintain a dense,vigorous lawn.
• Select pesticides and fertilizers that are resistantto leaching. For example, when possible selectfertilizers that have ‘slow release’ or less watersoluble sources of nitrogen.
• Use minimum dosage of pesticides to achieveadequate pest control. Read and follow theinstructions on the label.
• Calibrate fertilizer and pesticide equipment inorder to assure the desired application rate isbeing applied.
• If needed, when establishing new lawns, select atopsoil such that its depth, soil texture andpercent organic matter are effective in absorbingfertilizers and pesticides. For example, 6 inchesof a silt loam textured soil would be preferred to3 inches of a sandy loam soil.
• Maintain soil conditions such as adequate drain-age and aeration which favor microorganismactivity since they are important for decompos-ing pesticides in the soil.
• Select turfgrass species well adapted to localenvironmental conditions and varieties whichhave a low pesticide and fertilizer demand.
• Use rinsate from washed pesticide containersand application equipment on the lawn asdiluted pesticide.
• To avoid runoff and leaching, do not applypesticides just prior to heavy rainfall. To avoidpesticide “drift” off the target area do not sprayon windy days.
• When applicable, apply fertilizers and pesticidesduring periods of active turf growth for im-proved uptake by the plant.

Chapter 13 Woody Landscape Plants 1
CCCCCHAPTERHAPTERHAPTERHAPTERHAPTER 13 13 13 13 13WWWWWoody Landscaoody Landscaoody Landscaoody Landscaoody Landscape Plantspe Plantspe Plantspe Plantspe Plants
Vines in the Landscape ............................................................................................................................... 1Selection .......................................................................................................................................................................... 1Culture .............................................................................................................................................................................. 2
Ground Covers in the Landscape .............................................................................................................. 2Selection .......................................................................................................................................................................... 2Culture .............................................................................................................................................................................. 2
Selecting Trees and Shrubs ........................................................................................................................ 3
Purchasing Trees and Shrubs .................................................................................................................... 5
Planting Trees and Shrubs ......................................................................................................................... 7Transplanting Native Trees .............................................................................................................................................. 8
Care of Trees and Shrubs ........................................................................................................................... 9Pruning and Supporting Newly Installed Plants ............................................................................................................... 9Fertilizing Trees and Shrubs .......................................................................................................................................... 10Mulching Plants .............................................................................................................................................................. 11Hay or straw ................................................................................................................................................................... 11Pine needles .................................................................................................................................................................. 12Grass clippings ............................................................................................................................................................... 12Leaves ............................................................................................................................................................................ 12Peat moss ...................................................................................................................................................................... 12Compost ......................................................................................................................................................................... 12Gravel, stone, and sand ................................................................................................................................................. 12Watering Plants .............................................................................................................................................................. 12Know the condition of the soil. ....................................................................................................................................... 13Learn the cultural requirements of plants being grown. ................................................................................................ 13Mulch plantings to reduce the frequency of watering during dry spells. ....................................................................... 13Winterizing Trees and Shrubs........................................................................................................................................ 14Avoid Damage. ............................................................................................................................................................... 15Select Hardy Plants. ...................................................................................................................................................... 15Select Appropriate Site. ................................................................................................................................................. 15Avoid Poorly Drained Soil. ............................................................................................................................................. 15Follow Recommended Cultural Practices. ..................................................................................................................... 15Protecting Against Damage. .......................................................................................................................................... 15Winter Injury. .................................................................................................................................................................. 16Storm-Damaged Trees. .................................................................................................................................................. 16Special Fruit Tree Treatment. ......................................................................................................................................... 17
Protecting and Repairing Trees During Construction ....................................................................................... 17Protecting Trees During Construction. ........................................................................................................................... 17Mower Wounds Can Kill Trees ...................................................................................................................................... 18

Chapter 13 Woody Landscape Plants 2
CHAPTER 13Woody Landscape PlantsEdited and revised by David Seavey, U.N.H. Cooperative Extension
Woody ornamental plants are key components in a well-designed, useful envi-ronment. This large group of plants can be divided into three general categories:trees, shrubs, and vines.
Trees are woody plants that produce one main trunk and a more or less distinctand elevated head (height of 15 feet or more).
Shrubs are woody plants that usually produce multiple shoots or stems with aheight of 15 feet or less.
Vines are climbing or crawling woody plants without self-supporting uprightstems.
Ground covers are low-growing plants that create an attractive carpet effect.
This chapter will include considerations in selecting plants based on: function,soils characteristics, and climatic factors. Planting, fertilizing, mulching, andother cultural practices are discussed.
Vines in the LandscapeMost vines are woody or semiwoody climbing ortrailing plants. Like shrubs, trees, and groundcovers, vines can be important to the interest of anygarden landscape. Each species and variety of vinepossesses distinctive characteristics which make itwell-adapted to certain locations in the landscapeplan.
SelectionIn selecting vines, as in selecting trees and shrubs,carefully review the needs of the area, and thenselect the most suitable plants. Vines can be usefulin a variety of sites. Some vines are valued for theshade they provide when trained over an arbor.Others add interest to a planting when trainedagainst the wall of a building or when used to framea doorway. Some vines can be used to relieve themonotony of a large expanse of wall, being trainedin a definite pattern or allowed to completely covera wall with leafy green, while others dramaticallychange a plain fence. Vines can be useful to form acascade of bloom on rough, steep banks whileholding the soil in place.
Vines also offer diverse visual qualities and arevalued for the rich texture of their foliage, theirdecorative habit of growth, the fragrance of theirblooms, or the beauty of their flowers. Some arevalued for the graceful tracery of their simple stemsor for the beauty of their leaf pattern. Vines offer arich source of material with which to create interest-ing, exciting, and beautiful plantings.
Vines are generally divided into three generalgroups based on their method of climbing:
(1)Some, like Boston ivy, climb by attaching small,root-like appendages to the wall as a means ofsupport. Sometimes these are modified tendrilswith small, circular discs at the tips; others, likeEnglish ivy, have small rootlets along the stem tofirmly attach the vine to either brick or wood.
(2)Vines such as clematis and grape climb bywinding tendrils (or leaflike appendages whichact as tendrils) around the object on which theyare growing.
(3)The third group, including bittersweet andwisteria, climb by twining. It is interesting tonote that all vines do not twine in the same

Chapter 13 Woody Landscape Plants 3
direction. There is not a haphazard method oftwining. The plants of each species invariablytwine in one direction. As example, bittersweettwines by climbing from left to right. Hall’shoneysuckle twines by climbing from right toleft.
By knowing in advance how each vine climbs, theproper means of support can be provided for thoseselected.
CultureMost vines will quickly revert to a tangled mass offoliage over the ground if they are not given theproper means of support and a reasonable amountof care and maintenance. The best type of supportfor vines gives the required structural strength andstability, and at the same time, is neat in appear-ance.
Like most other plants, vines require some mainte-nance. Pruning is necessary to remove old wood.This may require several cuts to each stem so theycan be untangled. It is often necessary to pruneoccasionally to keep the plant within bounds and toguide future growth. As with other plants, vines arepruned to produce better bloom. Insect and diseasecontrol is important. Watch for signs of pests,identify the cause of the problem and use appropri-ate control measures. Your local Extension officecan help you with this process.
The area to be covered should be studied carefullyto determine what type of vine should be used. Rateof growth is a critical consideration, since there arevines that exhibit rampant growth and can soonbecome a nuisance.
Ground Covers in the LandscapeIn a broad sense, ground covers include any mate-rial that covers the ground surface so that it cannotbe seen from above and so that rain does not strikedirectly upon it. With this definition, grass, varioustypes of paving, shrubs, and even trees could becalled ground covers. However, here we are refer-ring to ground covers as low (up to 18 inches), mat-forming or trailing plants, other than grasses orother plants that tolerate walking or mowing. Mostground covers are not intended to be walked uponand will be severely damaged by pedestrian traffic.When ground covers are chosen carefully andplaced correctly, they greatly enhance the beauty ofthe landscape composition. In addition to theiraesthetic value, they fulfill a number of other
important functions:
• Controlling erosion on slopes
• Obstructing traffic without impeding view
• Conserving soil moisture and, during periods ofextreme heat, lowering temperatures in the soil
• Reducing lawn maintenance
• Filling narrow, odd-shaped areas where mowingand edging might be difficult
• Providing vegetative growth where grass isdifficult to maintain
• Producing interesting patterns with variation inheight, texture, and color
• Trees and shrubs are visually tied together inbeds when interplanted with ground covers.
In practice, the ground covers most frequently usedare plants that are easily propagated, vigorous, andhardy.
SelectionSelection of a ground cover will depend uponseveral factors. Is the area flat or sloping? Is it insun, or partially or deeply shaded? Soil conditionsmust be studied. Some ground covers prefer a moistsoil, rich in organic matter while others will adaptto dry, sandy situations. Give consideration to color,texture, height, and habit as well, since someground covers tend to grow rampantly. One prob-lem that limits the use of ground covers is the costof installation since large numbers of small, indi-vidual plants are required. In addition, a well-prepared planting bed is essential to the establish-ment of ground covers and can be costly and time-consuming. Hardiness is also a factor, especially ifthe ground is bare during winter months.
CultureSignificant maintenance is necessary for the first 1 to3 years or until the ground cover becomes estab-lished. Cultivation is necessary to control weeds;fertilization to encourage fast, vigorous growth toachieve good cover; irrigation in times of dryness;and disease and pest control. When these mainte-nance considerations are ignored, the progresstoward achieving a good ground cover planting isdisappointing.
Wherever paving, lawn, or cultivated beds are notdesirable, ground covers can be successfully used.Newly cut banks, and any slopes greater than 12%are best treated with ground cover plantings.Around buildings, ground covers are superior topaving or structural controls for reducing heat,glare, noise, and dust.

Chapter 13 Woody Landscape Plants 4
Selecting Trees and ShrubsBecause there are so many woody plants availablefor use in landscaping, we must be careful to selectplants that are appropriate for our needs. Selectionshould be based on several different factors.
The intended purpose should influence selection ofplants with appropriate shape, size, and otherphysical characteristics. Trees are used for shade,ornamental, screening, windbreak, and sound-reducing purposes. Shrubs are used for screens,barriers, windbreaks, ornamentals, ground coversand wildlife shelters. Both trees and shrubs can beselected to provide edible fruit or nuts.
Providing shade usually requires tall, sturdy, long-living species. Density of foliage, which determinesthe amount of shading, is important. A tree such asa Norway maple will produce a very dense shadethat prevents plants or turfgrass from growingunder it, while a honey locust will produce a lightpartial shade which is not a hindrance to otherplants growing below it. Deciduous trees should beused to shade the south windows of a home in thesummer, thus allowing the sun to penetrate in thewinter. Screens usually require plants that producea dense foliage. Windbreaks must be able to surviverigorous climate conditions. Evergreen plants areusually chosen for screening. Barrier plantingsusually require sturdy plants with dense growth,and possibly thorns or spines.
Size of mature shade trees in relation to the height of a two story house.
Dogwood Ginkgo White Spruce Catalpa Black Birch Sugar Maple
Red Maple Paper Birch Yellowwood Red Mulberry White Oak
Willow Oak Horsechestnut Chestnut Oak Sweetgum
American Birch American Linden Black Oak Shellback Hickory
Tuliptree Scarlet Oak Red Cedar Mimosa Hackberry Redwood

Chapter 13 Woody Landscape Plants 5
Ornamental attributes are quite varied. Both trees and shrubs can be selected for flowers or colorful fruit,interesting foliage, fall color, interesting bark, winter colors of foliage or branches, or interesting shapes of theplants themselves.
Consider the size of mature trees and shrubs and where they are to be used. Trees that grow tall, such as thewhite oak, sugar maple and white ash, are suitable for larger buildings. They tend to dominate or hide one-story buildings. For attractive and proper balance with one-story buildings, trees that do not grow over about35 feet are recommended. Shrubs that outgrow their spaces can hide windows, block walkways, or crowd outother plants. Shrubs can sometimes be kept small by pruning, but this requires continuing maintenance.Careful consideration of mature sizes will reduce the need for pruning.
Shape is especially important in selecting trees for ornamental and shade purposes. Tall trees with long,spreading or weeping branches give abundant shade. Small trees and trees of other shapes, including thepyramidal evergreens, the clump birch and the low growing hawthorn, crab apple, and dogwood are usefulfor ornamental purposes but do not give abundant shade.
Branches Pendulant Branches AscendingWillow White Oak
Trunk Single, Trunk Dividing,Branches Horizontal Branches Spreading
White Pine Elm
Environmental conditions should influence the selection of plants. Size of the planting area is important, as aresite characteristics such as sunny or shaded, wet or dry, exposed to winter winds or pollution. Plants selectedshould be tolerant of existing conditions, and be hardy in the appropriate climate zone.
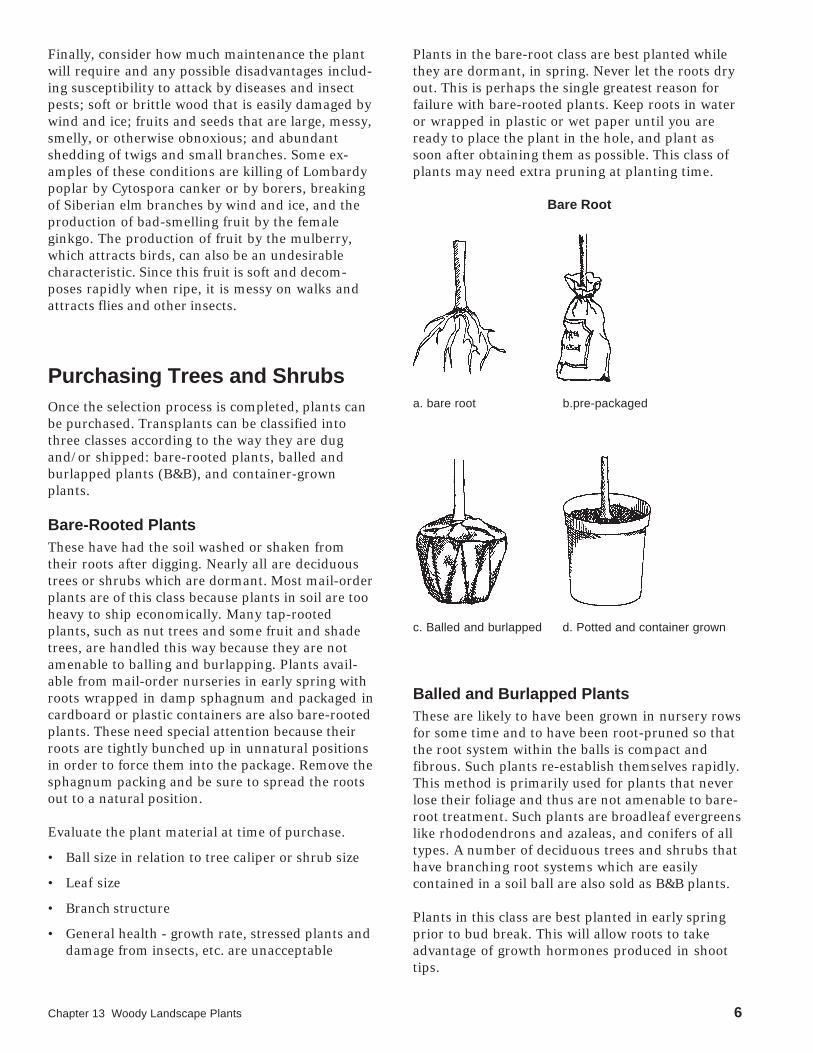
Chapter 13 Woody Landscape Plants 6
Finally, consider how much maintenance the plantwill require and any possible disadvantages includ-ing susceptibility to attack by diseases and insectpests; soft or brittle wood that is easily damaged bywind and ice; fruits and seeds that are large, messy,smelly, or otherwise obnoxious; and abundantshedding of twigs and small branches. Some ex-amples of these conditions are killing of Lombardypoplar by Cytospora canker or by borers, breakingof Siberian elm branches by wind and ice, and theproduction of bad-smelling fruit by the femaleginkgo. The production of fruit by the mulberry,which attracts birds, can also be an undesirablecharacteristic. Since this fruit is soft and decom-poses rapidly when ripe, it is messy on walks andattracts flies and other insects.
Purchasing Trees and ShrubsOnce the selection process is completed, plants canbe purchased. Transplants can be classified intothree classes according to the way they are dugand/or shipped: bare-rooted plants, balled andburlapped plants (B&B), and container-grownplants.
Bare-Rooted PlantsThese have had the soil washed or shaken fromtheir roots after digging. Nearly all are deciduoustrees or shrubs which are dormant. Most mail-orderplants are of this class because plants in soil are tooheavy to ship economically. Many tap-rootedplants, such as nut trees and some fruit and shadetrees, are handled this way because they are notamenable to balling and burlapping. Plants avail-able from mail-order nurseries in early spring withroots wrapped in damp sphagnum and packaged incardboard or plastic containers are also bare-rootedplants. These need special attention because theirroots are tightly bunched up in unnatural positionsin order to force them into the package. Remove thesphagnum packing and be sure to spread the rootsout to a natural position.
Evaluate the plant material at time of purchase.
• Ball size in relation to tree caliper or shrub size
• Leaf size
• Branch structure
• General health - growth rate, stressed plants anddamage from insects, etc. are unacceptable
Plants in the bare-root class are best planted whilethey are dormant, in spring. Never let the roots dryout. This is perhaps the single greatest reason forfailure with bare-rooted plants. Keep roots in wateror wrapped in plastic or wet paper until you areready to place the plant in the hole, and plant assoon after obtaining them as possible. This class ofplants may need extra pruning at planting time.
Bare Root
a. bare root b.pre-packaged
c. Balled and burlapped d. Potted and container grown
Balled and Burlapped PlantsThese are likely to have been grown in nursery rowsfor some time and to have been root-pruned so thatthe root system within the balls is compact andfibrous. Such plants re-establish themselves rapidly.This method is primarily used for plants that neverlose their foliage and thus are not amenable to bare-root treatment. Such plants are broadleaf evergreenslike rhododendrons and azaleas, and conifers of alltypes. A number of deciduous trees and shrubs thathave branching root systems which are easilycontained in a soil ball are also sold as B&B plants.
Plants in this class are best planted in early springprior to bud break. This will allow roots to takeadvantage of growth hormones produced in shoottips.

Chapter 13 Woody Landscape Plants 7
When selecting a balled and burlapped plant, besure the ball is sound and hasn’t been broken.Avoid those plants that feel loose in the soil balls. Besure the soil ball does not dry out. These plants willusually need little if any pruning at planting.
Container-Grown PlantsThese are usually grown in the container in whichthey are sold and are increasing in popularity in thenursery trade. Because of their appearance, garden-ers are often misled into thinking that all they haveto do is put these plants into the ground and forgetabout them, but they need the same careful plantingand maintenance as other plants -- proper wateringis critical. Container-grown plants can be plantedany time during the growing season but prior toOctober 1st. Roots must grow out one-half inchbefore water absorption occurs through root tips.
Container-grown plants can easily become pot-bound. Their roots are contained in a limited spaceand coiled around one another in the container, andmay fill it tightly. Some of the larger roots may havebecome coiled back around the trunk and begun aprocess called girdling.
The solution to this problem is to split the lower halfof the root system and spread the roots horizontally.This practice will prune the roots, thus encouragingnew laterals, prevent girdling roots and raise thelower roots closer to the soil surface. An alternativeis to cut vertical slits around the root ball, in 4 to 5evenly spaced places. If any roots are girdling thebase of the stem, sever them.
When selecting plants, look for a good naturalshape, free from thin spots or broken limbs. Makesure the root ball is solid and the bark is intact.Avoid container-grown plants where you can seeroots circling on the surface or coming out of thedrainage holes. Plants chosen should be free of anyinsects or diseases. Generally, the smaller sizes of a
plant will cost less, and may establish faster. Don’tbuy plants so small they are in danger of beingwalked on or mowed over.
Proportion of Roots to Top
Good Poor Poor
Loose root ball is Root ball of acceptable B&B plantunacceptable. stays firm when rocked gently.
Shrub Symmetry
Good Poor
Broken twigs Broken branches, gougedare acceptable. trunks are unacceptable.

Chapter 13 Woody Landscape Plants 8
Evergreen Silhouettes
Good Poor Poor
Vigorous, Poor coniferbushy conifer
Planting Trees and ShrubsThe proper installation of plants in the landscapeinvolves much more than just digging holes andsetting plants in them. The planter is responsible, asfar as possible, for developing a satisfactory micro-climate for optimum growth and development ofthe plant. A healthy and vigorous plant is requiredif the landscape is to achieve the desired effect.Healthy plants will need less maintenance in theyears following establishment.
The planting hole is important since this is theenvironment of the plant root system. Dig a widehole, twice as wide as the root ball if possible, andonly as deep as the root ball. For very large speci-mens, such as trees of 4-inch caliper or more (theterm caliper is derived from the use of a caliper tomeasure the trunk diameter) and large shrubs witha soil ball of 3 feet or more, the hole should be madeup to 24 inches wider.
A traditional recommendation for preparing aplanting hole for trees and shrubs has been toincorporate organic matter into the backfill soil.Recent research has cast doubt on the value of thispractice. In fact, it appears that energy could bebetter spent digging a slightly wider hole thanworking organic matter into the soil.
Apparently, the addition of organic matter into thebackfill soil creates an interface between theamended soil and the undisturbed soil around theplanting hole that is detrimental to root growth andwater movement between the two soils. In testsconducted at the University of Georgia, examinationof the root systems of plants in holes with amendedsoil revealed that the majority of the roots wereconfined to the original planting hole.
A better approach is to select a plant appropriate tothe soil type or to replace or amend a poor soil witha better loam.
The finished planting depth after settling of the soilshould be such that the plant is exactly the samedepth after replanting as when growing in thenursery. Probably more plants are lost because theywere planted too deep than for any other reason. Setthe plant on firm native soil in the bottom of thehole. When planting a poorly drained site, set theplant so that 1 to 2 inches of the root ball are abovethe soil level.
Proper Planting Depth
correct
incorrect
Balled and burlapped material must be handledcarefully. On most species if the soil ball is broken,many of the roots will be severed from the trunkand the plant will die. Always pick the plant up bythe soil ball or container, never by the trunk or stem.Set the B&B plant into the hole, remove all ropes,and fold the burlap down into the bottom of thehole. Cut away and discard the burlap if possible,especially if it is actually plastic. Remove all plasticor metal containers before placing a containerizedplant in the hole. Small containers with tapered

Chapter 13 Woody Landscape Plants 9
sides can be removed by turning the plant upsidedown and giving the top edge of the container asharp rap. Catch the soil ball with your hands as itslips from the container. Do not break the soil ballapart. The larger-sized containers (five gallons ormore) should be cut away with special cutters. If thetrees’ balls are in wire baskets, they also should becut away. If plants have become overgrown in thecontainer and the root mass is growing in a tight,compact circle around the soil ball, cut out the outerroots with a sharp knife in two or four placesaround the soil ball. Make the cut from the top tothe bottom of the soil ball.
Bare-root plants should have the packing materialand all damaged or dead roots removed. If possible,before planting, the roots should be soaked in waterfor at least an hour but not longer than 12 hours. Donot allow roots to be exposed to sunlight or dry outbefore planting. It is best to keep bare roots coveredwith moist burlap or some reasonable substituteuntil planting time. When planting into droughtprone soils consider soaking the roots in an aqua geljust prior to planting.
After the B&B or container-grown plant has beenplaced in the hole, fill in around the plant with thebackfill until the hole is 2/3 full. With bare-rootplants, the soil should be worked gently in andaround the roots while the plant is being supported.The most satisfactory way of removing air pocketsis to fill the hole with water and firm the soil aroundthe plant ball or roots. However, be sure not to useexcessive force, since soil compaction should beavoided.
Before finishing the filling process, make certain theplant is straight and at the proper depth, thencomplete the filling process with the backfill. If thespecimen is an individual, construct a ring of earth2 to 3 inches high at the edge of the outside diam-eter of the hole to form a water basin. Plants in bedsprobably will not require a water basin. Water the
plant thoroughly as soon as the water basin isconstructed. Fill in the basin prior to winter toreduce the possibility of freezing/thawing andheaving. Organic mulches such as pine needles,bark, and wood chips provide the best environmentfor future root development, and are applied inNovember. Pull the mulch back about 6" around thebase of the plant.
Soil depression retains water
Note that a complete fertilizer is not added to thebackfill. Newly developing roots can be damagedby too much fertilizer. Limestone or super phos-phate can be incorporated into the soil if a soil testindicates a need. Large areas should already havean established fertility level based on recommenda-tions from soil test results before the planting ofindividual plants takes place. A fertility programmay be delayed until the spring of the followingyear to provide needed nitrogen and potassium or aslow-release fertilizer, such as 18-6-12, can beapplied 4 weeks after planting at a rate of 2 oz. per 4sq. ft. area.
Transplanting Native TreesMany homeowners who transplant native plantsfrom the woods are often disappointed because theplants die. Nursery trees are root pruned a year ormore before transplanting is to occur, which resultsin a compact root system. This allows more of theroots to be dug up when transplanting.
For success in transplanting native plants, it isimportant to understand the environment in whichthey are growing naturally. Duplicating this envi-ronment on the new planting site is the key to theplant’s survival. Some environmental factors toconsider include light, soil moisture, and soilacidity. Most of our native soils are slightly acid, soyou may have to adjust the soil pH in the newlocation. This can be determined by having the soil

Chapter 13 Woody Landscape Plants 10
tested at your local Extension Office well in advanceof anticipated transplanting. Soil moisture can varywithin the distance of a few feet. Plants growingnaturally on a slope probably require good drain-age, while those growing in bogs require wetconditions. Similarly, if the soil is sandy, the plantwill transplant best into sandy soil. A plant growingon the edge of the woods generally requires morelight than one in a thick forest. These environmentalconditions must be similar at the new location.
The following planting conditions will increase thechance of survival:
• Smaller plants transplant more successfully thanmature specimens. A six-inch tall plant may bemoved when dormant and bare rooted.
• Root prune by cutting around the circumferenceof the root area in the Spring; one year prior tothe planting date. A sharp nursery spade shouldbe used for best results. On the planting date, re-cut the ball, dig a trench on the outside of thecircumference, under-cut the ball, and finallyremove the plant.
• Dig a hole no deeper and 12 inches wider thanthe root system. Refill with a mixture of enoughexisting and native soil of the plant to accommo-date the root ball or bare-root system. Avoidplanting too deep.
• Firm the soil and water thoroughly.
• Mulch with approximately 2 inches of decayedsawdust, leaf mold, or other available materialsin November.
• Fertilize only with superphosphate.
Adequate soil moisture is critical for several monthsafter transplanting. Water only when necessary.Over watering will result in sure death. To deter-mine if the soil is dry, stick your finger 1 to 2 inchesbelow soil surface. When necessary, water slowly inorder to soak the ground thoroughly.
Care of Trees and Shrubs
Pruning and SupportingNewly Installed PlantsAn initial pruning may be needed immediately afterplanting bare-rooted plants to remove competingmultiple leaders. Do not over-prune or develop-ment will be inhibited. Container-grown and B&Bplants require only the removal of all broken anddamaged branches. Be sure not to ruin the naturalgrowth habit of shrubs, and do not remove thecentral leader of shade trees.
Prune One Year After Planting
1. sucker
2. broken branch
3. heading back side branch
4. water sprout
5. interfering branch
6. double leader
head back to a side branch.... or bud
correct incorrectleave no stubs
Corrective pruning to improve branch structure isusually practiced the following spring after plant-ing. With all newly planted woody plants, it is moresuccessful to avoid heavy pruning at planting if youcan ensure that the plants will be well-wateredduring their first year or two in the ground. Pruningreduces the leaf area; this reduces transpiration butalso reduces the leaf area which produces photosyn-thates for root growth. Since the plant will notresume a normal growth rate until the root systemis re-established, one is better off to avoid wilting bywatering than by canopy pruning. This also avoidsa proliferation of suckers in the inner canopy.

Chapter 13 Woody Landscape Plants 11
Most shrubs do not need to be supported afterplanting unless bare-root stock has been plantedthat is quite large, or very tall B&B specimens havebeen used. If so, use the same techniques for shrubsthat will be described for trees.
Staking and guying are rarely required. If a tree isplanted in a very windy location or on a slope,support may be needed until new anchoring rootsdevelop. Drive two stakes into the ground onopposite sides of the tree, being sure to sink themfirmly into native soil. Use a wire, cushioned withrubber hose, to secure the tree to the stakes. Stakethe tree at the level of its lowest branches.
All support should be removed within one yearafter planting. The tree should have become estab-lished in this period of time, and it has been re-ported that tree trunks are weakened and growth isactually reduced if the supports are left in place forlonger periods of time.
Plants in your landscape will require periodicmaintenance to produce the best effects. Thisincludes winterizing, mulching, watering, pruning,and fertilization when necessary.
Fertilizing Trees and ShrubsOrnamental trees and shrubs planted in fertile, well-drained soil should not require annual fertilization.Trees and shrubs that are growing well don’trequire extra nutrients. If you have ornamentals thatare not growing well, fertilization may be one of thepractices recommended to correct the problem.
Plants which are growing poorly will exhibit any orall of these symptoms:
• light green or yellow leaves
• leaves with dead spots
• leaves smaller than normal
• fewer leaves and/or flowers than normal
• short annual twig growth
• dying back of branches at the tips
• wilting of foliage
Symptoms of poor growth may also be caused byinadequate soil aeration or moisture; by adverseclimatic conditions; by improper pH; by disease orby other conditions. You should attempt to deter-mine the specific cause in each particular situationand apply corrective measures. Do not assume that
an application of fertilizer will quickly remedy anyproblem which is encountered.
The cause of poor growth may or may not beevident. Ornamentals transplanted or disturbed byconstruction within the past 5 or 10 years may be inshock, their root systems having been disturbed.Pruning to balance the top growth with root growthat the time of the injury will help, followed byadequate irrigation.
Good soil drainage to a depth of at least 2 feet isneeded for ornamental trees and shrubs in thelandscape planting. Plants on poorly drained soilmay exhibit one or more nutrient deficiency symp-toms. If the site is low, install drainage tile to re-move excess water before the plants are set out. Thetile must have an outlet at a lower level so the watercan move out freely. If the use of tile is impractical,or a suitable outlet for the water cannot be ar-ranged, the grade may be elevated by using fill toprovide better runoff and drainage conditions.
Most trees and shrubs tolerate a wide range of soilacidity. A range of pH 6.0 to 7.0 is suitable for mostlandscape plants. Plants such as pine, spruce, or firdo best in a pH range of 5.0-6.0 while broad leafevergreens such as andromeda, rhododendron, orblueberry prefer 4.5-5.5.
Soil pH can be lowered quite easily for these acid-loving plants. You should first have the soil testedto determine the pH level. If the pH is too high, itcan be lowered by using sulfur, iron sulfate, oraluminum sulfate. Sulfur is preferred for loweringpH.
Apply sulfur at the rate of 1 ½ lb. per 100 sq. ft. toreduce a loam soil 1.0 pH value and make it moreacid. Use half as much on sandy soil and 1½ timesas much on clay soils. After several months, test thesoil again to determine the effectiveness of treat-ment.
Small trees and shrubs that are in need of nutrientsshould have ½ to 1 cup of 10-10-10 fertilizer spreadevenly under their branches in early spring. Fertili-zation in summer may cause serious injury thefollowing winter, by stimulating late growth thatwill not harden off before frost.
For large trees research indicates that completefertilizers usually are not essential. To determinehow much nitrogen is needed, measure the diam-eter of the tree at breast height. For each inch ofdiameter, apply 2-3 lbs. of a 10 percent nitrogenfertilizer such as 10-10-10 or 10-3-6. Application

Chapter 13 Woody Landscape Plants 12
should be made in the spring, or in late fall aftertwo hard frosts and before the ground freezes. If thetree is large, it is best to split the fertilizer applica-tion; one in spring and the remainder in fall. Spreadthe fertilizer evenly under the branches. Solublenitrates will move into the soil quite readily.
If turfgrass is present, it is important to place thetree fertilizer beneath the grass roots to avoidburning. A crowbar is effective by punching holes 2½ feet apart, 10 inches deep, all around the treeextending past the tips of branches. Approximatelyone cupfull of fertilizer is placed in each holefollowed by watering.
Depending on the reason a large tree is doingpoorly, fertilization might be called for each year.However, a feeding program must be coupled withproper cultural practices. For example, neglectingnecessary insect or disease control and failure toremove dead wood from a large shade tree willnegate the positive effects of fertilization.
Shrubs are fertilized in the spring at bud break or inlate fall during the hardening off process. A fertil-izer such as 10-10-10 or 10-3-6 slow release is surfaceapplied at a rate of 1-2 lbs. per 100 sq. ft. dependingon the size of the shrubs in the bed.
A moderate rate of growth and good green color isall that is desired of woody plants. Excessive vigor,which is evident by lush green leaves and longshoot growth, is undesirable. Such plants are moresusceptible to injury by cold in winter, are morelikely to be broken during wind and sleet storms,and usually will have a shorter life than thosemaking moderate growth.
Mulching PlantsFor year-round benefits of mulching, apply a 2-4inch mulch of aged sawdust, fresh shredded bark orwood chips, or peat moss around shrubs, roses, andrecently planted trees. This mulch will conservemoisture and help suppress the growth of weedsand grass.
Sawdust or shredded bark from the inside of a largepile may go through anaerobic decomposition andbecome very acid, with a pH of about 3.0 and apungent odor. Such material is toxic to plants.In some cases, mice may tunnel in the mulch andcause damage by chewing the bark from the stemsof shrubs. This is more likely to happen when coarsematerials like straw or hay are used. The bestcontrol is to keep the mulch back about 6 inchesfrom the stems, use wire mesh mouse guards, or
trap the mice. A circle of crushed stone or coarse,sharp cinders about 6 inches wide around the stemsmay also be helpful.
Woody roots that anchor trees penetrate deep intothe soil, but herbaceous roots that take up waterand nutrients are shallow and wide-spreading.These roots function best when they do not have tocompete with lawn roots. For this reason, it isdesirable to mulch under trees, as far out as thebranches extend if possible. A 2 to 3 inch layer oforganic mulch prevents weeds, conserves water,and stabilizes soil temperatures. Both organic andinorganic mulches can be useful in the home land-scape. Some of the more readily available onesinclude:
SawdustA 2-3 inch layer of sawdust provides good weedcontrol. If fresh sawdust is applied aroundgrowing plants, add ½ pound of actual nitrogenper 10 cubic feet of sawdust to prevent nutrientdeficiency; fresh sawdust contains a great deal ofcarbon and very little nitrogen, and its break-down requires that microorganisms take nitro-gen from the soil. There is often a problem withcrusting of fresh sawdust, with resulting imper-meability to rainfall. Sawdust is best used forgarden paths and around permanent plantings. Itis readily available from sawmills. One problemassociated with mounding sawdust close to thestems of plants is its’ impermeability and watertends to run off away from the plant.
BarkA 2- to 3-inch layer of one of several types ofbark provides good weed control. Bark is slow todecompose and will stay in place. Shredded barkdecomposes more quickly than the stone types.Wood chips are often available free or for a smallcharge from professional tree pruning services,or may be purchased in large bags at retail stores.Bark makes a very attractive mulch, and isespecially recommended for mulching aroundtrees and shrubs.
Hay or straw
Although not typically used around trees andshrubs, a 3- to 4-inch layer of hay provides goodannual weed control. Some people use a 1-foot,compacted layer of straw, pulling back the layerfor planting. This provides excellent weedcontrol. These materials decompose quickly andmust be replenished to keep weeds down. Theystay in place and will improve the soil as theydecay. Avoid hay which is full of weed seed and
Chapter 13 Woody Landscape Plants 13
brambles. Fresh legume hay, such as alfalfa,supplies nitrogen as it quickly breaks down. Hayand straw are readily available in rural areas, butcity dwellers may not be able to obtain hay.Straw, on the other hand, may be purchased atmost garden centers, often commanding a highprice. Both are recommended for vegetable andfruit plantings but not for ornamental plantings.Hay or straw will make a good habitat formeadow voles.
Pine needles
Pine needles make an excellent mulch for acid-loving plants, but can be too acidic for manyplants if incorporated into the topsoil. Pineneedles are readily available and are best usedaround shrubs and trees, particularly acid-lovingtypes.
Grass clippings
A 2-inch layer of grass clippings provides goodweed control. Build up the layer gradually, usingdry grass, to prevent formation of a solid mat.Clippings will decompose rapidly and providean extra dose of nitrogen to growing plants, aswell as making fine humus. Avoid crabgrass andgrass full of seed heads. Also, do not use clip-pings from lawns which have been treated thatseason with herbicide or a fertilizer/herbicidecombination (“weed and feed” types). They arean excellent source of nitrogen to help increasemicrobial activity in the compost pile, especiallyfor those gardeners without access to manures.Be on the lookout for slugs.
Leaves
A 2- to 3-inch layer of leaves, after compaction,provides good weed control. Leaves will decom-pose fairly quickly, but are easily blown unlesspartially decomposed. Leaves are usually easy toobtain, attractive as a mulch, and will improvethe soil once decomposed. They are highlyrecommended as a mulch.
Peat moss
A 2- to 3-inch layer of peat moss will give fair togood weed control. This material is slightly acid,and thus suitable for use with acid-loving plants.However, peat tends to form a crust if used inlayers thick enough to hold weeds down, or itmay be blown away. Peat is also a relativelyexpensive mulching material which breaks downrapidly. It is suitable for incorporation into thesoil.
Compost
A 2- to 3-inch layer of compost is a fair weedcontrol. Most compost, however, provides a goodsite for weed seeds to grow but is an excellentsoil amendment. A layer of compost may be usedon over-wintering beds of perennials, such asasparagus or berries, to provide nutrients andhelp protect crowns.
Gravel, stone, and sand
A 1-inch layer of rock will provide fair weedcontrol. They make a good mulch for permanentplantings, as around foundation plants and inalpine gardens. None of these mulches areeffective in controlling erosion; soil will washright out from under rocks, and sand will beswept away. Availability varies with area.
Watering PlantsWatering plants correctly is vital for developing andmaintaining a landscape planting. Lack of water cancause a plant to wilt and ultimately dry up and die.Excessive water can cause root rot, in which case theplant wilts because it is oxygen-starved, and conse-quently, is unable to take up moisture. As a rule,plants are capable of withstanding moderatedrought more easily than too much moisture. Forthis reason, it is important to water thoroughly, yetallow the soil to become fairly dry betweenwaterings.
Wilting is a condition brought about in plants whenroots are unable to supply sufficient moisture to thestems and leaves. Wilting for short periods of timewill not harm plants; over a prolonged period,however, it will cause permanent damage. Some-times a plant will wilt on a hot day because mois-ture is evaporating from the leaves faster than theroots can supply it. If there is ample soil moisture,the plant will absorb water in the evening to firm upthe stems and leaves.
In late summer or early fall, it is not uncommon toexperience a sustained period of wilting, particu-larly of broad-leaved evergreens such as rhododen-drons. Latest research establishes this condition asthe cause of much leaf damage typically attributedto winter desiccation. When the leaves hang downand no rain is predicted, it is advisable to provideprolonged, deep watering to keep the leaves turgid.To wet the soil at least 6 inches deep requires 1 to 2inches of surface water.

Chapter 13 Woody Landscape Plants 14
Container-grown landscape plants may be suscep-tible to drought stress once they are transplanted tothe landscape. Drought stress occurs because thewell-drained organic mix in which the plants aregrown in the nursery is prone to rapid loss ofmoisture due to plant transpiration (loss of waterfrom plant leaves) and evaporation from the soilsurface. Even though moisture is available in thesoil surrounding the organic mix, it does not moveinto the transplanted root ball rapidly enough toprevent moisture stress from developing. Researchhas shown that the available moisture in the con-tainer mix can be depleted in about 2 days in theabsence of irrigation. For this reason, these plantsare watered at least every other day while in thenursery. This routine should be followed aftertransplanting until the root system penetrates thesurrounding soil back fill (approximately 3 to 4weeks) where moisture is available for absorptionby the plant.
Care must be taken not to allow the transplantedroot ball to dry out because the organic mix is verydifficult to rewet once it becomes dry. Water can beapplied to a drought-stressed plant where the rootball has become very dry and not successfullyrelieve the moisture stress because the mediumdoes not readily absorb the applied water. In thiscase, water should be applied 2 or 3 times each dayuntil the root ball has been rewet.
To maximize the effectiveness of watering practices:
Know the condition of the soil.
It is important to observe how quickly soil driesout after a rain or watering. For example, a clay-type soil will be watered less frequently than asandy one. Clay soil drains slowly, sandy soilquickly. The addition of organic matter to the soilwill increase drainage in clay soil and moistureretention in sandy soil.
Learn the cultural requirements of plantsbeing grown.
Different plants have different water needs;azaleas require more moisture than lilacs. Theuse of good reference books will provide thegardener with this information. It is particularlyimportant to provide a relatively high soilmoisture supply for evergreen plants during thefall before the ground freezes. The leaves of suchplants continue to lose water during the winter,especially when the temperature is above 40° F. Ifthe soil is dry, the plants may become desiccated,
turn brown, and die. Therefore, water shrubsseveral times during the late fall if the soilmoisture supply is low.
Mulch plantings to reduce the frequency ofwatering during dry spells.
Mulches help keep soils cool and reduce water lossthrough evaporation.
As with any job, to water properly, the gardenermust have the right tools; hose, water breakers,sprinklers, sprinkling can, and utility pails.
When acquiring a hose, make sure it will reach allplants in the garden so the end can be placed at thebase of any plant. When watering individual plantswith a hose, attach a water breaker to the end. Itwill concentrate a soft flow of water in a small area,but will not wash away soil. Don’t use a trigger-type nozzle; it will wash soil away from the roots.
water breaker trigger-type nozzle
There are many types of good sprinklers on themarket. One type is a spike sprinkler on a riser thatcan be adjusted from 2 feet to 4 feet. This sprinklesabove shrubs and small trees, providing excellentwater distribution. However, much water is lost toevaporation. Sprinklers should not be used onwindy days, because water will be blown awayfrom the desired location. Sprinklers may alsoencourage foliar diseases such as Anthracnose onmaple and Powdery Mildew on Azaleas.
spike sprinkler on riser sprinkling can
Sprinkling cans and utility pails are adequate whenwatering only one or two small shrubs or trees, butare generally inadequate for watering in the land-scape.
Trickle or drip irrigation is increasing in popularity.Systems are easy to set up by do-it-yourselfers.
Chapter 13 Woody Landscape Plants 15
They are also rather inexpensive when comparedwith other methods of irrigation. Less water isrequired because it is placed in the root zone. Thereis also a savings in electricity.
If the soil is dry when preparing a hole for a newplant, dig the hole and fill it with water the daybefore the plant goes into the ground. This allowsthe soil time to absorb water and does not create amuddy condition during the planting. Once a treeor shrub has been planted a thorough soaking afterplanting eliminates air pockets around roots.
It is important when planting (particularly con-tainer-grown material) to avoid covering the top ofthe root ball with more than ½ to 1 inch of nativesoil. Otherwise water can be diverted sidewaysthrough the native soil and not soak down into theroot ball where it is needed.
When there is an extended period without rainduring the summer, new plants should be deeplywatered once a week. By allowing the soil surface todry out somewhat between waterings, major rootdevelopment will be at greater depths where soilmoisture is highest. Plants watered frequently butlightly will have roots close to the surface, makingthem more vulnerable to wilting. They will notbecome well-established and will have littledrought tolerance. This happens with automaticoverhead sprinkler systems that are designed to goon for a short period of time each night and onlymoisten the surface. This practice also encouragesfoliar diseases in midsummer.
During cool seasons, less watering is necessarybecause evaporation from the leaves and soil isslow. Normally, abundant rainfall during springand autumn diminishes the need for watering.During any dry autumn before the ground freezes,all garden plants should have a thorough wateringto help prevent root damage from cold wintertemperatures. Root damage from unusually coldtemperatures shows up in the spring and earlysummer in the form of leaf drop because there arenot enough roots to support the foliage.
With well-established groups of woody plants,watering should be done every 10 days duringprolonged dry spells. Since root systems of estab-lished plants are rather widespread and deep, it isvital that enough moisture be put down to reachthem. A general rule of thumb is that 1 inch of waterpenetrates 6 inches of soil. If a sprinkler is set up towater a group of plants, a coffee can should beplaced in range of the sprinkler. When 1 inch of
water accumulates in the can, 1 inch of water hasbeen distributed in the soil.
The best time to water is in the morning when airtemperatures are lower than at midday, thus reduc-ing evaporation. Evening watering is less desirablebecause wet foliage at night promotes fungaldisease development.
Winterizing Trees and ShrubsIt is often necessary to give a little extra attention toplants in the fall to help them over-winter and startspring in peak condition. Understanding certainprinciples and cultural practices will significantlyreduce winter damage of ornamentals.
Causes of winter damage. Types of winter damage canbe divided into three categories: desiccation, freez-ing, and breakage.
Desiccation, or drying out, is a significant causeof damage, particularly on evergreens. Thisoccurs when water is leaving the plant fasterthan it is being taken. There are several environ-mental factors that can influence desiccation. Theneedles and leaves of evergreens transpire somemoisture even during the winter months. Duringseverely cold weather, the ground may freezethereby cutting off the supply of water. If the fallhas been particularly dry, there may be insuffi-cient ground moisture to supply the roots withadequate water. Water loss is greatest duringperiods of strong winds and during periods ofsunny, mild weather. The heat of the sun cancause stomates on the lower sides of the leaves toopen, increasing transpiration. Small, shallow-rooted plants are often injured when alternatefreezing and thawing of the soil heaves the plantsfrom firm contact with the soil and exposes theroots to wind desiccation. Injury due to desicca-tion is commonly seen as discolored, burnedevergreen needles or leaves. It is most severe onthe side facing the wind. It can be particularlyserious if plants are near a white house where thesun’s rays bounce off the siding, causing extradamage.
Freezing injury can take several forms. Newgrowth stimulated in early fall by late summerfertilization may not have had time to harden offsufficiently to survive sudden drops to belowfreezing temperatures. Ice crystals rupture cellwalls. This damage will show up as dead branchtips and branches. A sharp temperature changebetween day and night may freeze the waterwithin the trunk of a tree, causing it to explode orsplit open in a symptom called frost cracking. If

Chapter 13 Woody Landscape Plants 16
not severe, these cracks seem to close whenwarm weather arrives, but the wood fiberswithin may not grow back together. Bark ofyoung trees sometimes cracks open on thesouthwest side of the trunk if the warm wintersun warms the tissue and a sudden, severe dropin temperature occurs at sunset. This problem iscommonly called sunscald. Both frost crack andsunscald are less common in healthy, fullyhardened trees with vigorous, far reaching rootsystems.
The sun can also prematurely stimulate theopening of flowers or leaf buds in the springwhich might be killed by freezing night tempera-tures. Bud injury due to the cold temperatures ofwinter also occurs in the dormant state on moretender trees and shrubs. Flowering shrubs, likeForsythia, may lose their flower buds, althoughtheir leaf buds usually come through. Root injurymay occur in containers and planters, or balledand burlapped (B&B) stock which has been leftexposed during the winter. Lethal root tempera-tures can start at 23° F on some species.
Breakage of branches is usually related to snowand ice. Two causes of damage by snow and iceare weight and careless snow removal. Highwinds compound the damage done when ice ison the plant. Damage may take the form ofmisshapen plants or may actually result inbroken branches and split trunks.
Avoid Damage.
Much of the disappointment and frustration ofwinter-damaged plants can be avoided byplanning ahead.
Select Hardy Plants.
Grow plant materials that are native or areknown to be winter hardy in your area.
Select Appropriate Site.
When planting broadleaf evergreens that areknown to be easily injured, such as some variet-ies of rhododendron, azalea, daphne, and holly,select a location on the north, northeast, oreastern side of a building or other barrier wherethey will be protected from prevailing winds andintense winter sun. These exposures will alsodelay spring growth, thus preventing injury tonew growth of flowers from late spring frost.Another situation to avoid is planting hemlocksand other needle evergreens on dry soils, in fullsun, and on windy sites.
Avoid Poorly Drained Soil.
Avoid low spots that create frost pockets andsites that are likely to experience rapid fluctua-tions in temperature. Since heavy snow and icecan cause much damage to branches and trunks,it is important that plants be placed away fromhouse eaves and other snow or ice collectingareas, where snow or ice is likely to fall or slideonto the plants.
Follow Recommended Cultural Practices.
Following recommended cultural practices hasbeen shown to be highly effective in reducingwinter injury to ornamentals. Plants that arediseased or deficient in nutrients are moresusceptible to winter injury than strong, healthyplants.
Avoid late summer or early fall fertilizationwhile plants are still active, as this stimulates latefall growth which is easily killed by the cold.
Pruning by thinning is effective in reducingdamage by ice and snow. Small diameterbranches are encouraged which are less prone tobreakage. Particularly important is the removalof any weak, narrow-angled, V-shaped crotches.Avoid late-summer pruning which stimulatesnew, tender growth and reduces the supply ofnutrients available to the plant through thewinter. Do not prune needle evergreens in latefall or sun scald will result.
Proper watering can be a critical factor in winter-izing. If autumn rains have been insufficient, giveplants a deep soaking that will supply water tothe entire root system before the ground freezes.This practice is especially important for ever-greens. Mulching is an important control forerosion and loss of water. A 2-inch layer ofmulch material such as tan bark, fir bark, pineneedles, wood chips, or sawdust will reducewater loss and help maintain uniform soil mois-ture around roots. Mulching also reduces alter-nate freezing and thawing of the soil whichheaves some shallow-rooted plants and can causesignificant winter damage.
Protecting Against Damage.
The best protection against winter damage is toput the right plant in the right place. Specialprecautions can be taken to protect plants duringthe winter. Antidesiccant compounds are sold inmany garden centers and supply catalogs. Applyin the fall and again during a January thaw whentemperatures are above 50o F.

Chapter 13 Woody Landscape Plants 17
Small evergreens can best be protected by usingwind breaks made out of burlap, canvas, orsimilar materials. Wind breaks help reduce theforce of the wind and also shade the plants.Windbreaks can be created by attaching materi-als to a frame around a plant. A complete wrap-ping of straw or burlap is sometimes used. Blackplastic should be avoided as a material forwrapping plants. During the day it builds upheat inside, increases the extreme fluctuationbetween day and night temperatures, and mayspeed up growth of buds in the spring, makingthem more susceptible to a late frost. Certainlythese various boxes, shields, and wrappings addnothing to the aesthetics of your winter land-scape. If ornamentals require annual protectionmeasures to this extent, it would be wise to movethem to a more protected location or replacethem with hardier specimens.
Collecting snow should be removed with abroom. Always sweep upward with the broom tolift snow off. When the branches are frozen andbrittle, avoid disturbing them. Wait until awarmer day.
Winter Injury.
After a particularly severe winter, many plantsmay show substantial injury. Damage symptomsare discolored, burned evergreen needles orleaves, dead branch tips and branches, heavedroot systems, and broken branches. At winter’send, remove only those branches that are brokenor so brown that they are obviously dead. Do notremove branches when scraping the outer barkreveals a green layer underneath. The extent ofwinter damage can best be determined after newgrowth starts in the spring. Wait until midsum-mer before pruning because even dead-lookingplants may still be alive.
If discoloration on narrow-leaved evergreenneedles is not too severe, they may regain theirgreen color or new foliage may be produced onthe undamaged stem. Broad-leaved evergreensshowing leaf damage will usually produce newleaves if branches and vegetative leaf buds havenot been too severely injured. Damaged leavesmay drop or be removed. Prune to remove badlydamaged or broken branches, to shape plant, andto stimulate new growth.
Replant small plants with root systems partiallyheaved out of the ground as soon as the soilthaws. Unless the root system is small enough tobe pushed easily with the fingers into the softsoil, dig the plant, retaining as much as possibleof the root system within a soil ball, and replantit.
Special care should be given to plants injured bywinter’s cold. The dry months of July, andAugust can be particularly damaging as theplants are weak and often unable to survive thestress of drought. Be sure to water adequately.
Storm-Damaged Trees.
Treatment of storm-damaged trees requires wisedecisions and prompt action if the maximum inrepair work is to be achieved. Repairs come intwo stages: First Aid for immediate attention;and Follow-Up Work to be distributed over aperiod of several months to several years.
Decision factors:• Is the tree damaged beyond practical repair? If
over 30 to 50 percent of the main branches ortrunk are severely split, broken, or mutilated,extensive repair efforts are questionable.
• Desirability of species. Some less desirablespecies are: black locust, Siberian (Chinese)elm, box elder, mulberry, true poplars, silver-leaf maple, arborvitae.
• Location. If too close to power lines, buildingor other structures, the tree may need to beremoved.
• Soundness. Extremely old, low-vigor treesmight not have recovery ability.
• Special values. Rarity of species or variety,sentimental and/or historical value.
• Purpose of the tree. Does it serve a truelandscape purpose or value?

Chapter 13 Woody Landscape Plants 18
Workmanship factors:• Remove only the branches necessary for
immediate repairs. Too much removal ofwood in one season can help create suchproblems as sunscald, weak branching habits,and soft sucker growth.
• Major tree work, such as wiring and bracingshould be done by a professional arborist.
• Observe safety precautions relative to fallingbranches, use ladders, and avoid contact withpower lines.
• Promptly remove all debris such as brokenbranches and prunings to help eliminatebreeding grounds for insects and diseases.
Follow-up considerations:• Gradually prune and reshape trees for balance
and general appearance over a period of 3 to 5years.
• Control devitalizing conditions such as suckersprouts, insects, and disease damage.
• Replacement trees, if necessary, should becarefully selected for durability, generaladaptation, and mature size.
Special Fruit Tree Treatment.
Broken limbs should be cut back to a strong sidebranch. When cutting terminal growth to a sidebranch, make the cut so it continues the line ofdirection of the side branch so the wound willheal quickly. If damage to fruit trees has de-stroyed over 50% of the bearing surface, it maybe wise to remove the entire tree. Damage thatexposes large areas of wood has traditionallybeen treated with commercial wound dressing,but current research indicates that this oftenslows recovery.
Protecting and Repairing TreesDuring ConstructionThe location of a house on a lot should be carefullyplanned to utilize existing trees and avoid unneces-sary and destructive grading. Trees of desirablespecies located where they may serve a usefulpurpose in the landscape should be protectedduring the construction process. Consult a personwith training and experience in landscaping to helpselect those trees which should be saved and thosewhich should be removed.
Plan protective measures before construction starts.If construction damage occurs, start corrective
practices as soon as damage is observed. The longeran injury is neglected, the greater will be the ulti-mate damage to the tree.
Trees may respond quite differently to varioustypes of injury. Under some circumstances, deathmay occur soon after the tree has received appar-ently minor damage. In other cases, trees may growquite satisfactorily after being subjected to severeinjury. In most situations, an effort should be madeto save well-located trees of young or middle age.
Protecting Trees During Construction.
Trees which are not needed in the landscapeplanting should be eliminated before construc-tion starts. This will provide more space for thesoil from the basement, building supplies, andthe movement of equipment involved in buildingthe house.
Protect trees which are to be saved for futurelandscape use by placing tall, conspicuous stakesat the ends of the branches on the sides wheretrucks or bulldozers will be operating. As addedprotection, attach heavy fencing to the stakes.
General Corrective Practices.Damage to trees during construction operationsusually involves impairment of the water andnutrient supply system. This is true when eitherthe roots or top of the tree is damaged. Therefore,three corrective procedures should be applied: 1)prune back and thin out the branches to reducewater requirement; 2) irrigate as needed tomaintain an adequate moisture supply in the soil,and 3) apply fertilizer to help stimulate renewedgrowth if the top of the tree is damaged.
Prune back the top in proportion to the severityof the root damage. In cases of serious injury, cutback and thin out the branches quite drastically.
Bruised and Peeled Bark.Damage to tree trunks caused by careless opera-tion of trucks or other equipment should beassessed. If the damaged area is less than 25% ofthe circumference of the trunk, the woundshould gradually heal over and permanent injurymay be minimal. If the damage involves morethan 50% of the circumference, the tree may beseriously reduced in vigor. It may lose branchesand be quite unsightly. The corrective proce-dures of top pruning, irrigation, and fertilizationshould be practiced until the tree recovers or it isevident that the tree will not recover satisfacto-rily and should be removed.

Chapter 13 Woody Landscape Plants 19
Broken Branches.Remove tree branches which have been brokenfrom any cause. Damage near the end of a branchcan be eliminated by cutting back to a stronglateral. Cut the entire branch off close to thetrunk at the “collar” when the broken area is nearthe base. See the Pruning chapter for moredetails.
Root Damage by Trenches.Digging of trenches for water or gas lines, or forfoundations for buildings, walks, or drives maydamage the root system of nearby trees. If suchinjury cannot be avoided, the top of the tree canbe pruned back and thinned out to reducedemand for water from the remaining roots.
Roots Covered By Pavement.Roots which are covered by pavement may bedeprived of air and moisture which are essentialfor growth. If the covered area involves only aportion along one side of the tree, satisfactorygrowth should continue. If the entire area aroundthe tree is paved, the surface should be porous toallow water and air to penetrate. If brick orflagstone is used, joints should not be mortared.When pavement is nonporous, an openingshould be left around the trunk of the tree. Thisopening should be at least 6 feet in diameter forsmall trees. The opening should be larger aroundmature trees. Roots of trees extend as much asthree times beyond the spread of the branches.
Fertilization of Damaged Trees.When the root system of a tree has been dam-aged during construction, a moderate applicationof fertilizer may be beneficial. Use 2 pounds of 5-10-5 formula per tree for each inch of trunkdiameter measured 3 feet above the ground.Follow method of application described insection ‘Fertilizing Trees and Shrubs’.
Grading Around Trees.A majority of the feeder roots of trees are locatedwithin a foot of the surface and typically extendseveral feet beyond the end of the branches. Thetopmost roots of trees are usually covered withabout 4 inches of soil. Topsoil should not bedisturbed around landscape trees during theconstruction operation unless absolutely neces-sary to change the grade.
The removal of soil around ornamental trees maydamage or destroy vital feeder roots. If damageis not too severe, a layer of fertile loam may be
applied over the exposed roots. The tree shouldrecover and continue active growth.
In some situations, the grade level around thehouse may need to be changed and involve theaddition of soil around trees. If the ground levelis raised 6 inches or more, the air supply to theroots will be reduced and the tree may decline invigor or die. Beech, most maples, poplar,hickory, walnut, and most evergreen trees areparticularly susceptible to injury of this type.
Grade changes so severe as to require tree wellsare to be avoided.
Mower Wounds Can Kill TreesInjury and infection started by lawnmower woundscan often be the most serious threat to tree health ongolf courses, parks, and home lawns.
Extensive research has been conducted on theimportance of wounds in tree health care. Thisresearch has led to significant adjustments inpruning, cabling, bracing, injection, and cavitytreatment.
Lawnmowers cause the most severe injury duringperiods when tree bark is most likely to slip, inearly spring during leaf emergence, and in early fallduring leaf drop. If the bark slips, a large wound isproduced from even minor injuries.
Most tree injuries occur when mower operatorsattempt to trim close to tree trunks with a powermower. This can be prevented by removal of turfaround trees and replacement with mulch or byhand trimming. Care must also be used to avoidharming trees with filament-line weed-trimmingmachines. They can do a great deal of damage to thebark, particularly on young trees.
The site of injury is usually the root buttress, since itflares out from the trunk and gets in the path of themower. However, injury is also common anywherefrom the roots to several feet above the ground.Although large wounds are most serious, repeatedsmall wounds can also add up to trouble.
Wounds from lawnmowers are serious enough bythemselves, but the wounded tree must also protectitself from pathogens that invade the wound. Thesemicroorganisms can often attack the injured barkand invade adjacent healthy tissue, greatly enlarg-ing the affected area. Trees can be completelygirdled from microbial attack following lawnmowerwounds.

Decay fungi also become active on the woundsurface, and structural deterioration of the woodytissues beneath the wound will often occur. Manywounded trees which are not girdled may eventu-ally break off at the stem or root collar due tointernal decay.

Chapter 14 Herbaceous Landscape Plants 1
CHAPTER 14Herbaceous Landscape Plants
Planning the Flower Border ........................................................................................................................ 2
Annuals ......................................................................................................................................................... 4Culture and Maintenance of Annuals ................................................................................................................................ 4Controlling Insects and Diseases ..................................................................................................................................... 7
Biennials ....................................................................................................................................................... 8
Perennials ..................................................................................................................................................... 8Culture and Maintenance of Perennials ........................................................................................................................... 9Controlling Insects and Diseases ................................................................................................................................... 11Asexual propagation of perennials ................................................................................................................................. 11
Bulbs ........................................................................................................................................................... 12Culture and Maintenance of Bulbs .................................................................................................................................. 12
Annuals for Special Uses .......................................................................................................................... 14Annuals for Special Environments .........................................................................................................................16Annuals Tolerant of Cool Weather .................................................................................................................................. 16Tender Annuals ............................................................................................................................................................... 16Heat-resistant Annuals .................................................................................................................................................... 16Annuals for Partial Shade ............................................................................................................................................... 16Annuals That Tolerate Heat, Drought and Sandy Soils .................................................................................................. 16
Annuals by Color and Height .................................................................................................................... 17
Perennials for Special Use ........................................................................................................................ 18Perennials for Borders of Ponds And Streams ...................................................................................................... 18Perennials for Background Planting ............................................................................................................................... 18Perennials for Edging ...................................................................................................................................................... 18Perennials for Ground Cover, Banks, and Terraces ....................................................................................................... 18Perennials for Bold or Sub-tropical Effects ..................................................................................................................... 18Perennials for Naturalizing .............................................................................................................................................. 18Perennials for Old-fashioned Gardens ........................................................................................................................... 19Fragrant Perennials ........................................................................................................................................................ 19Perennials Having Especially Long Blooming Seasons ................................................................................................. 19Perennials Suitable for Cut Flowers ............................................................................................................................... 19
Perennials for Special Environments ...................................................................................................... 20Perennials for Shade ...................................................................................................................................................... 20Perennials for Semi-shade ............................................................................................................................................. 20Perennials for Wet Soils .................................................................................................................................................. 20Perennials Which May Be Grown in Water ..................................................................................................................... 20Perennials for Poor Soil .................................................................................................................................................. 20Perennials Requiring Well-drained Soil .......................................................................................................................... 20Perennials for Dry, Sandy Soil ........................................................................................................................................ 20
Bloom Calendar ......................................................................................................................................... 20Perennials for Early Spring ............................................................................................................................................. 20Perennials for Spring....................................................................................................................................................... 21Perennials for Early Summer .......................................................................................................................................... 22Perennials for Mid Summer ............................................................................................................................................ 22Perennials for Late Summer and Early Fall .................................................................................................................... 23

Chapter 14 Herbaceous Landscape Plants 2
CHAPTER 14Herbaceous Landscape PlantsEdited and revised by Dr. Charles Williams, University of New Hampshire Cooperative Extension
Flower gardening is a rewarding pastime for millions of home gardeners. Flow-ers from herbaceous plants and bulbs provide a range of color to supplement thepredominant green of lawns and other landscape plantings. The variety of foli-age, shapes and sizes available add accent and contrast that can make a land-scape lively and interesting. They can add depth, dimension, form, texture andfragrance to the visual environment. Flowers can also be useful outside thegarden providing some culinary herbs for the table and cut flowers for fresh andpreserved arrangements, etc.
Flower gardening has evolved to meet the trends and fashions of contemporarysociety. As with most aspects of horticulture, there is no singular or absolute bestway to utilize flowers in public or private landscapes. The text of this manualessentially reviews some of the basic principles and practices involved with theselection, production, maintenance and utilization of herbaceous floweringplants.
Many of today’s aspiring flower gardeners live in apartments or condominiumswhere space is limited. Others have a family life style that may preclude orcurtail the establishment or maintenance time required for elaborate and exten-sive flower beds. While it is still desirable to plan for a sequence of bloom andgroup plants with a consideration for height and color, compromises may haveto be made. If the site precludes a traditional flower border perhaps a flower“island” with taller plants in the center is in order. Flowers can be incorporatedinto foundation plantings, vegetable gardens, or almost any site on the property;however, small beds in the middle of lawn open space may be disruptive andadd to maintenance time.
Certain home gardeners may also be interested in developing some sort of aspecialty garden that reflects their interests or hobby. Others may opt forplantings that are in tune to environmental needs or ecological site require-ments. Thus, there are an infinite number of combinations of: native plant or“naturalistic” gardens, butterfly or hummingbird gardens, all blue or whitegardens, all rose or iris gardens, Alpine gardens, rock gardens, container gar-dens, seaside gardens, shady gardens, etc.
This manual chapter and the period of class instruction for Master Gardenersand other interested participants cannot begin to cover all of the details andramifications of the broad topic of flowering herbaceous plants. Individual back-grounds, experience, and education will vary. If one is interested in particularaspects of flower gardening, a wide range of books and magazines are availableon the market.
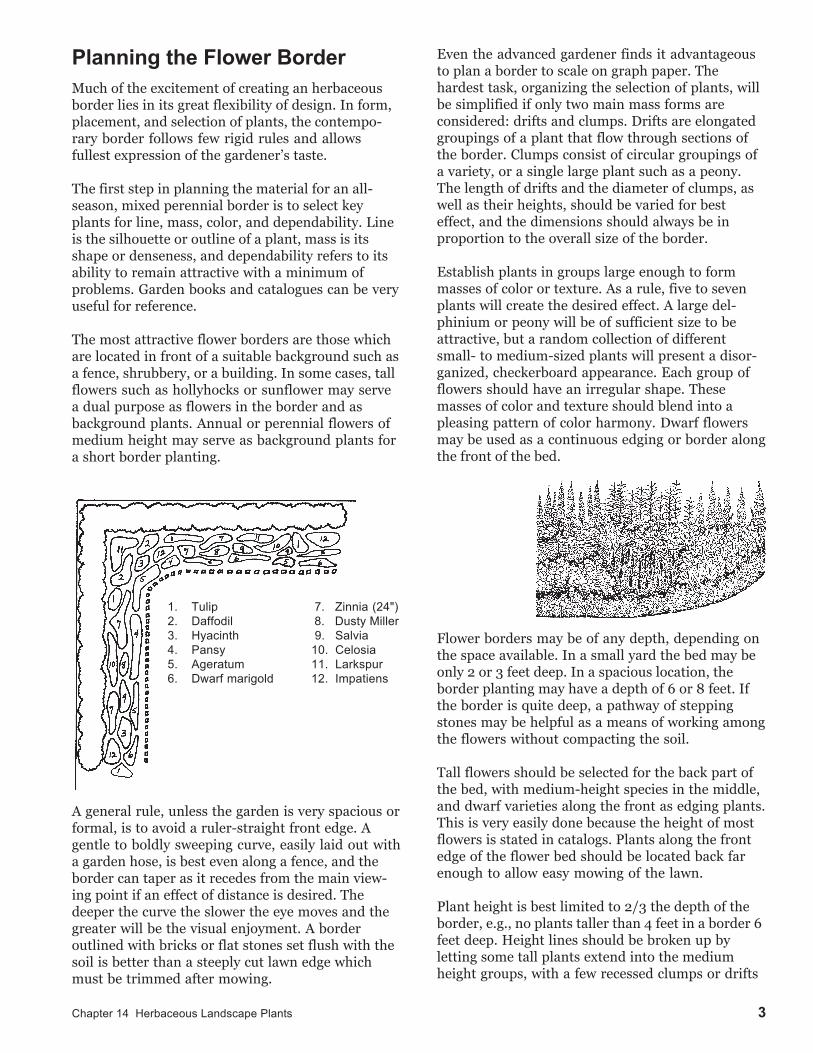
Chapter 14 Herbaceous Landscape Plants 3
Planning the Flower BorderMuch of the excitement of creating an herbaceousborder lies in its great flexibility of design. In form,placement, and selection of plants, the contempo-rary border follows few rigid rules and allowsfullest expression of the gardener’s taste.
The first step in planning the material for an all-season, mixed perennial border is to select keyplants for line, mass, color, and dependability. Lineis the silhouette or outline of a plant, mass is itsshape or denseness, and dependability refers to itsability to remain attractive with a minimum ofproblems. Garden books and catalogues can be veryuseful for reference.
The most attractive flower borders are those whichare located in front of a suitable background such asa fence, shrubbery, or a building. In some cases, tallflowers such as hollyhocks or sunflower may servea dual purpose as flowers in the border and asbackground plants. Annual or perennial flowers ofmedium height may serve as background plants fora short border planting.
1. Tulip 7. Zinnia (24")2. Daffodil 8. Dusty Miller3. Hyacinth 9. Salvia4. Pansy 10. Celosia5. Ageratum 11. Larkspur6. Dwarf marigold 12. Impatiens
A general rule, unless the garden is very spacious orformal, is to avoid a ruler-straight front edge. Agentle to boldly sweeping curve, easily laid out witha garden hose, is best even along a fence, and theborder can taper as it recedes from the main view-ing point if an effect of distance is desired. Thedeeper the curve the slower the eye moves and thegreater will be the visual enjoyment. A borderoutlined with bricks or flat stones set flush with thesoil is better than a steeply cut lawn edge whichmust be trimmed after mowing.
Even the advanced gardener finds it advantageousto plan a border to scale on graph paper. Thehardest task, organizing the selection of plants, willbe simplified if only two main mass forms areconsidered: drifts and clumps. Drifts are elongatedgroupings of a plant that flow through sections ofthe border. Clumps consist of circular groupings ofa variety, or a single large plant such as a peony.The length of drifts and the diameter of clumps, aswell as their heights, should be varied for besteffect, and the dimensions should always be inproportion to the overall size of the border.
Establish plants in groups large enough to formmasses of color or texture. As a rule, five to sevenplants will create the desired effect. A large del-phinium or peony will be of sufficient size to beattractive, but a random collection of differentsmall- to medium-sized plants will present a disor-ganized, checkerboard appearance. Each group offlowers should have an irregular shape. Thesemasses of color and texture should blend into apleasing pattern of color harmony. Dwarf flowersmay be used as a continuous edging or border alongthe front of the bed.
Flower borders may be of any depth, depending onthe space available. In a small yard the bed may beonly 2 or 3 feet deep. In a spacious location, theborder planting may have a depth of 6 or 8 feet. Ifthe border is quite deep, a pathway of steppingstones may be helpful as a means of working amongthe flowers without compacting the soil.
Tall flowers should be selected for the back part ofthe bed, with medium-height species in the middle,and dwarf varieties along the front as edging plants.This is very easily done because the height of mostflowers is stated in catalogs. Plants along the frontedge of the flower bed should be located back farenough to allow easy mowing of the lawn.
Plant height is best limited to 2/3 the depth of theborder, e.g., no plants taller than 4 feet in a border 6feet deep. Height lines should be broken up byletting some tall plants extend into the mediumheight groups, with a few recessed clumps or drifts

Chapter 14 Herbaceous Landscape Plants 4
leading the eye back into the border. This gives amore natural effect than a step profile. Try to varyheights, but in general, keep taller plants in the backand shorter ones toward the front.
The distance between plants in a flower borderdepends on the form of the individual plants andthe effect which is desired in the landscape. Allowadequate space between plants. Many gardenerscrowd their plants too much.
As a rule, the tall, spired-type flowers such ashollyhock, gladiolus, and tall snapdragons whichare trained to a very few stems, should be plantedin small clumps, to preserve their vertical effect.Bushy plants may be massed together or plantedfurther apart, depending on the effect desired.Creeping, ground cover-type plants should bespaced just far enough apart to form a continuousmat or edging.
The enormous color range in perennials, plus theireasy relocation if disharmony occurs, give thegardener great latitude in choosing and combiningcolors. A border in tones of the same color can beeffective, or several closely related colors may beused, or the border may be made wildly exuberantwith a variety of hues in one or more seasons. Huesare modifications of color such as orangish-red. Theobjective is a balanced composition in every season,with no section being at any time too heavilyweighted with one color, and the bloom so distrib-uted that it always makes a pleasing patternthrough the bed.
Many gardening books give excellent lists of com-patible colors; these plus a garden notebook andcamera are invaluable for planning and revisingcolor schemes. For real floral artistry, it is as impor-tant to consider intensity, which is the vividness of acolor, as hue. For example, light tones placed neardark ones, or contrasting palest tones with the mostintense, can give new interest and life to the border.Also consider location and color. Near patios, whiteis especially good because it shows up well in theevening or dusk hours when patios are often in use.Some colors are suitable only as dramatic accents:deep, pure red clashes with almost anything (unlesssoftened by dark green foliage), yet properly used itconfers strength and depth. White flowers and grayfoliage are indispensable as separators of conflictingcolors.
Red, orange, and yellow are warm colors. Blue,green, and violet are cool colors. The use of warmcolors in the flower border of a small yard will givethe illusion of little space. Conversely, the use ofcool colors gives the impression of openness andspace. In general, the smaller the area, the fewerwarm colors should be used. A border planted withwarm colors in front and cool colors in the backcauses the front to appear closer, and the back toappear further away. This tricks the eye intobelieving the garden is deeper than it really is.
A gardener who becomes adept at producingconstant color harmony in the border becomes moreaware of the roles played by plant forms andfoliage. Good foliage is obviously vital in plantswith short blooming periods. Consider how muchof the plant foliage will be usable and whether it is apositive or negative attribute. Some plants practi-cally disappear when their blooming season is over(i.e., oriental poppy and bleeding heart), but othersstay presentable even when not in flower. Plantswith distinctive forms, color, and foliage -- airy anddelicate, or strong and solid -- are wonderfullyuseful for creating interest. Ornamental grasses, andeven handsome-foliaged vegetables like broccoliand asparagus can be used for effect.
The most logical way to choose plants is first bylocation, second by period of bloom, then by heightand width, and finally, by color. Location takes intoaccount environmental factors, such as the amountof sun or shade and water required. This informa-tion is easy to find in books on flowers and incatalogs.
The only restrictions on any given plant will beenvironmental; a lack of ability to tolerate winter orsummer temperature extremes; special soil, mois-ture or light needs; and any limits the gardenermust place on time available for maintenance.
Even in a small border, single plants of differentvarieties should not be used. This gives a jumbledlook. Do not set in precise rows, but in groups, asplants might grow in nature. Allow enough spacefor each group to grow comfortably. Decide whichflowers you like best, and let these be the basis ofyour planting. Place them in several spots, if youlike, down the length of the border, but don’toverdo any one plant.

Chapter 14 Herbaceous Landscape Plants 5
Divide a flower border into bold plant groupingsaccording to height. Background: large groups of tallplants. Foreground: shallower, wide groupings ofsmall plants.
Selection of garden groups as to seaon of floweringand whether annual, biennial, or perennial.
The longer the border has flowers in bloom, themore you will enjoy it. Consider the months wheneach plant will be at its best. Do not confine yourselfto material that blooms all at one time. Aim for asteady succession of color.
A last bit of advice: don’t be afraid to be bold, evenif it results in some mistakes. Flowers are easy tomove, change, or take out altogether. There is noneed to be conservative or confined. Flowers are fastgrowers and can be transplanted quite easily to helpcreate the desired effect.
AnnualsAnnual flowers live only one growing season,during which they grow, flower, and produce seed,thereby completing their life cycle. Annuals must beset out or seeded every year since they don’t persist.Some varieties will self-sow, or naturally reseedthemselves. This may be undesirable in most flow-ers because the parents of this seed are unknownand hybrid characteristics will be lost. Plants willscatter everywhere instead of their designated spot.Examples are alyssum, petunia, and impatiens.Some perennials, plants that live from year to year,are classed with annuals because they are notwinter-hardy and must be set out every year;begonias and geraniums are examples. Annualshave many positive features. They are versatile,sturdy, and relatively cheap. Plant breeders haveproduced many new and improved varieties.Annuals are easy to grow, produce instant color,and most important, they bloom for most of thegrowing season.
There are a few disadvantages to annuals. Theymust be set out as plants or sowed from seed everyyear, which involves some effort and expense. Withsome species, old flower heads should be removedon a weekly basis to ensure continuous bloom. Ifthey are not removed, the plants will produce seed,complete their life cycle, and die. Some annualsdeteriorate by late summer and need to be cut backfor regrowth or replaced.
Annuals offer the gardener a chance to experimentwith color, height, texture, and form. If a mistake ismade, it’s only for one growing season. Annuals areuseful for filling in spaces until permanent plantsare installed, to extend perennial beds and fill inholes where an earlier perennial is gone or the nextone has yet to bloom; to cover areas where springbulbs have bloomed and died back; and to fillplanters, window boxes, and hanging baskets.
Culture and Maintenance of Annuals Site Selection
Consider aspects of the site that affect plantgrowth such as light, soil characteristics, andtopography. Various annuals perform well infull sun, light shade, or heavy shade. The slope ofthe site will affect temperature and drainage. Soiltexture, drainage, fertility, and pH influenceplant performance.

Chapter 14 Herbaceous Landscape Plants 6
Site PreparationPreparation is best done in the fall. Properpreparation of soil will enhance success ingrowing annuals. First, have the soil tested andadjust the pH if needed. Check and adjust drain-age. To do this, dig a hole about 10 inches deepand fill with water. The next day, fill with wateragain and see how long it remains (should notexceed 8 hours). If drainage is poor, plan to plantin raised beds, or take the time to improve thedrainage of the soil by adding organic matter.The next step is to dig the bed. Add 4 to 6 inchesorganic matter to heavy clay to improve soiltexture. Rototill or dig to a depth of 12 inchesand leave “rough” in fall. Finally, in spring, addfertilizer, spade again, and rake the surfacesmooth.
Seed SelectionIf you can not find the variety of plants you needor you want to grow your own, try seeds. To geta good start toward raising vigorous plants, buygood seed packaged for the current year. Seedsaved from previous years may have lost itsvigor. It tends to germinate slowly and errati-cally and produce poor seedlings. Keep seed dryand cool until planted. If seed must be stored,place in an air-tight container, and refrigerate orplace in a cool dry place. When buying seed,look for new cultivars listed as hybrids. Plantsfrom hybrid seed are more uniform in size andmore vigorous than plants of open-pollinatedcultivars. They usually produce more flowerswith better substance and may offer betterdisease resistance or insect tolerance.
Starting Plants IndoorsThe best media for starting seeds is loose, well-drained, fine-textured, low in nutrients, and freeof disease-causing fungi, bacteria, and unwantedseeds. Many soil-less commercial products meetthese requirements. Fill clean containers withpotting medium. Level the medium. It should bedamp but not soggy. Make a shallow furrow.Sow large seed directly in the bottom of thefurrow. Very small seed should be sown on thesurface, without first making a furrow. Someseed should not be covered. Seed may be sown inflats following seed package directions or di-rectly in individual peat pots or pellets, twoseeds to the pot. After seed is sown, cover allfurrows with a thin layer of mix or vermiculite,then water with a fine mist. You may want toplace a sheet of glass or plastic over seededcontainers, to keep them moist. Set them in an
area away from sunlight where the temperatureis between 60 and 75 degrees F. Bottom heat ishelpful.
Make shallow depressions in the medium to facilitateuniform seeding.
Sow the seeds thinly and evenly, then label each variety. Bysowing in rows, the spread of some diseases is curtailed.
As soon as seeds have germinated, removeplastic sheeting and place seedlings in good light.If natural light is poor, fluorescent tubes can beused. Place seedlings 6 to 10 inches below thetubes. After the plastic is removed from thecontainer, the new plants need watering andfertilizing, since most planting material containslittle or no nutrients. Use a half-strength fertilizersolution after plants have been watered. Whenseedlings develop two true leaves, thin plants inindividual pots or packs to one seedling per cell.Transplant those in flats to packs or other flats,spacing a few inches apart, or to individual pots.
Do not start seeds too early indoors. Earlygerminations and growth times will vary withspecies. Generally, start most plants 4 to 8 weeksprior to the expected frost free outdoor plantingtime in your area.
Planting TimesDo not be in a rush to start seeds outdoors or toset out started plants. As a general rule, delaysowing seed of warm-weather annuals outdoorsor setting out started plants until after the lastfrost date. Most such seeds will not germinatewell in soils below 60 degrees F. If soil is too coldwhen seed is sown, seeds will remain dormantuntil soil warms, and may rot instead of germi-nating.

Chapter 14 Herbaceous Landscape Plants 7
Sowing Seed OutdoorsAnnuals seeded in the garden frequently fail togerminate properly because the surface of thesoil cakes and prevents entry of water. To avoidthis, sow seed in vermiculite-filled furrows.Make furrows in soil about one half inch deep. Ifsoil is dry, water the furrow, then fill it with finevermiculite and sprinkle with water. Then makeanother shallow furrow in the vermiculite andsow the seed in this furrow. Sow at the raterecommended on the package. Cover the seedwith a layer of vermiculite, and using a nozzleadjusted for a fine mist, water the seeded areathoroughly. Keep the seed bed well-watered orcover with a sheet of clear plastic to preventexcess evaporation of water. Remove plasticpromptly after germination starts.
Setting Out TransplantsBy setting started plants in the garden you canhave a display of flowers several weeks earlierthan if you sow seeds of the plants. This isespecially useful for annuals which germinateslowly or need several months to bloom. You canbuy plants of these or other annuals or you canstart your own. Buy only healthy plants, free ofpests and diseases. Before setting out transplants,harden them off by exposing them to outsideconditions during the day which will providemore light and cooler temperatures than theyreceived inside. After the last frost date, annualplants may be set out. Dig a hole for each plantlarge enough to accept its root system comfort-ably. Lift out each plant from its flat or pack witha block of medium surrounding its roots. Put theblock in a planting hole and backfill it so theplant is set at its original level. Planting in holespunched into a black plastic mulch with a bulbplanter promotes early growth and reduces theneed for future weeding and irrigation.
When setting out plants in peat pots, either tearoff the peat pot, or at least remove the upperedges of the pot so that all of the peat pot iscovered when soil is firmed around the trans-plant. If a lip of the peat pot is exposed above thesoil level, it may produce a wick effect, pullingwater away from the plant and into the air.
After setting the plants, water them with a startersolution of high phosphate fertilizer which iswater-soluble. Follow package directions. Pro-vide protection against excessive sun, wind, orcold while the plants are getting settled in theirnew locations. Inverted pots, plastic or fabrictunnels, or cloches can be used.
ThinningWhen most outdoor-grown annuals develop thefirst pair of true leaves, they should be thinned tothe recommended spacing. This spacing allowsplants enough light, water, nutrients, and spacefor them to develop fully above and below theground. If they have been seeded in vermiculite-filled furrows, excess seedlings can be trans-planted to another spot without injury. Thin theremaining plants to the recommended 8 to 12inch spacing. An exception to the rule for thin-ning is sweet alyssum. This annual is particularlysusceptible to damping-off. To insure a goodstand of plants, sow the seed in hills and do notbother to thin the seedlings; the clump of seed-lings will develop into a colorful mound.
WateringDo not rely on summer rainfall to keep flowerbeds watered. Plan to irrigate them from thebeginning. When watering, moisten the entirebed thoroughly, but do not water so heavily thatthe soil becomes soggy. After watering, allow thesoil to dry moderately before watering again. Asoaker hose is excellent for watering beds. Waterfrom the soaker hose seeps directly into the soilwithout waste and without splashing leaves andflowers. The slow-moving water does not disturbthe soil or reduce its capacity to absorb water.Water wands and drip systems are also good.Sprinklers are not as effective as soaker hoses.Water from sprinklers wets the flowers andfoliage, making them susceptible to diseases.Structure of the soil may be destroyed by impactof water drops falling on its surface; the soil maypuddle or crust, preventing free entry of waterand air. The least effective method for wateringis with a hand-held nozzle. Watering with anozzle has all the objections of watering with asprinkler. In addition, gardeners seldom arepatient enough to do a thorough job of wateringwith a nozzle; not enough water is applied, andthe water that is applied is usually poorly distrib-uted over the bed. If you water with a sprinkleror hand-held nozzle, water in early morning sothe foliage can dry quickly; this will preventmany foliar diseases from developing.

Chapter 14 Herbaceous Landscape Plants 8
MulchingMulches help keep the soil surface from dryingor crusting and aid in preventing growth ofweeds. Organic mulches can add humus to thesoil. Sheet plastics or fabric weed barriers used inthe flower garden may be covered with a thinlayer of bark or other organic mulches for abetter appearance until the plants are largeenough to cover it.
Weeding (cultivating)After plants are set out or thinned, cultivate onlyto break crusts on the surface of the soil. Whenthe plants begin to grow, stop cultivating andpull weeds by hand. As annual plants grow,feeder roots spread between the plants; cultiva-tion is likely to injure these roots. In addition,cultivation stirs the soil and uncovers weed seedsthat then germinate.
Deadheading (removing old flowers)To maintain vigorous growth of some plants andassure neatness, remove spent flowers and seedpods. Flowers that respond particularly well tothis practice include some ageratum, calendula,cosmos, marigold, pansy, scabiosa, and zinnia.
StakingTall-growing annuals like larkspur, or tall variet-ies of marigold or cosmos, may need support toprotect them from strong winds and rain. Tallplants are supported by stakes of wood, bamboo,or reed large enough to hold the plants uprightbut not large enough to be conspicuous. Stakesshould be about 6 inches shorter than the matureplant so their presence will not interfere with thebeauty of the bloom. Begin staking when plantsare about 1/3 their mature size. Place stakesclose to the plant, but take care not to damage theroot system. Secure the stems of the plants tostakes in several places with paper-covered wireor other materials that will not cut into the stem.Plants with delicate stems (like cosmos) can besupported by a framework of stakes and stringsin criss-crossing patterns. Tall annuals planted infull sun, where they can develop into strongmature plants, often do not require staking.
FertilizingWhen preparing beds for annuals, organic orchemical fertilizer should be added according torecommendations given by soil sample analysis,or derived from observation of plants that have
grown on the site. Lime may also be needed ifthe soil test results indicate a pH below 6.5. Usedolomitic limestone that contains both calciumand magnesium rather than hydrated lime.Ideally, lime should be added in the fall andworked into the soil so it will have time tochange the pH. Fertilizer should be added in thespring so it will not leach out before plants canbenefit from it.
Once annuals have germinated and begin togrow, additional fertilizers may be needed. Thisis especially true if certain raw organic mulchesare added to a new garden area, because micro-organisms decomposing the mulch take upavailable nitrogen. Thus a fertilizer high innitrogen should be used in these situations. Besure to work the fertilizer in around the plants insuch a way as to avoid direct contact between thestems and the fertilizer. Apply fertilizers to dampsoil and water afterward. Liquid fertilization isalso an option.
Controlling Insects and DiseasesInsects and Related Pests
Do not apply an insecticide unless it is necessaryto prevent damage to flowers or shrubs. Mostinsect pests in the garden will not cause appre-ciable damage if their predators and parasites areavailable and protected. However, if there is apest that usually causes serious damage unlessan insecticide is used, apply the insecticide assoon as the infestation appears and begins toincrease.
Watch for such pests as spider mites, aphids,Japanese beetles and other beetles, lacebugs, andthrips; these are some of the insects most likely toneed prompt treatment with insecticides. Do nottreat for soil insects unless you find numbers ofcutworms, white grubs, or wireworms whenpreparing the soil for planting.
When using a pesticide, be certain that both thepest and the flower are indicated on the label.Read and follow all directions for use, includingprecautions, shown on the label.
DiseasesSince annuals only grow in the garden for oneseason, diseases are not as serious a problem asthey are for perennials. However, some wilt androot rot diseases may persist in the soil. Selectvarieties of plants that are resistant to disease,follow recommended practices for planting andmaintaining annuals, and you will avoid mostdisease problems. However, there are times
Chapter 14 Herbaceous Landscape Plants 9
when weather conditions are highly favorable fordiseases. If this happens, determine what diseaseis affecting the plants, then use a cultural control,rogue out the affected plant or, where necessary,apply an appropriate pesticide according to labeldirections.
Damping-off causes seeds to rot and seedlings tocollapse and die. The disease is carried in soiland may be present on planting containers andtools. Soil moisture and temperature necessaryfor germination of seeds are also ideal for devel-opment of damping-off. Once the disease ap-pears in a seed flat, it may travel quickly throughthe flat and kill all seedlings planted there. Thiscan be prevented. Before planting, treat the seedwith a fungicide, pasteurize the soil, and usesterile containers. Treat the seed by tearing offthe corner of the seed packet, and through thehole in the packet, insert about as much fungi-cide dust as you can pick up on the tip of thesmall blade of a penknife. Close the hole byfolding over the corner of the packet, then shakethe seed thoroughly to coat it with the fungicidedust.
For best results, use a soilless mix. If you mustuse a soil-based mix, pasteurize it in an oven. Filla metal tray with moist, but not wet, soil. Hold itat 180 degrees F for 30 minutes. Do not overheat.This will produce an unpleasant smell.
To avoid introducing the damping-off organismson containers, use fiber seed flats or peat pots.These containers are sterile, inexpensive, andeasily obtained from garden shops. Fiber flats arelight and strong. Peat pots can be set out in thegarden along with the plants they contain; rootsof the plants grow through the walls of the pots.Plants grown in peat pots suffer little or nosetback when they are transplanted to the gar-den. Larkspur and poppy, which ordinarily donot tolerate transplanting, can be grown in peatpots satisfactorily. If wooden boxes or clayflower pots are used for soil containers, cleanthem well. Soak clay pots in water and scrubthem to remove all the white fertilizer crust fromthe outside. Sterilize clay pots by swabbing themwith a solution of 1 part chlorine bleach to 9parts water. Allow containers to dry thoroughlybefore filling them with soil. If, despite precau-tions, damping-off appears in seedlings, discardthe containers and soil and start again.
BiennialsBiennials are plants that complete their life cycle in2 years. During the first growing season theyproduce leaves, usually a rosette; then in the secondgrowing season, preceded by a cold period, theyproduce blooms and die. For the flower gardener,biennials present the obvious disadvantage ofproducing only foliage the first year and no blooms.For this reason, new varieties have been developedthat produce early bloom. “Foxy” is a variety offoxglove that will bloom the first year. Biennialseeds can be sown in midsummer to produce plantsthat develop in the fall, forcing the plant to bloomthe next year. Many gardeners maintain biennialsin clumps, and encourage the plants to self-sow. Atany given time, a clump contains both first andsecond year plants. This practice produces flowerseach year, and promotes a “perennial clump ofbiennial plants”.
PerennialsPerennials are plants that live year after year. Treesand shrubs are perennial. Most garden flowers areherbaceous perennials. This means the tops of theplants -- the leaves, stems, and flowers die back tothe ground each fall with the first frost or freeze.The roots persist through the winter and everyspring, new plant tops arise. Any plant that livesthrough the winter is said to be hardy. Select plantssuited to your particular hardiness zone, howevermicro climates and snow cover can alter survival.
There are advantages to perennials, the most obvi-ous being that they do not have to be set out, likeannuals, every year. Some perennials, such asdelphiniums, have to be replaced every few years.Another advantage is that with careful planning, aperennial flower bed will change colors through theseason, as one type of plant finishes and anothervariety begins to bloom. Also, since many perenni-als have a limited blooming period of about 2 to 3weeks, deadheading, or removal of old blooms, isnot as frequently necessary to keep them blooming.However, they do require pruning and maintenanceto keep them attractive. Their relatively short bloomperiod is a disadvantage, but by combining themwith annuals, a continuous colorful show can beprovided. Many require transplanting every 3 to 5years.
Chapter 14 Herbaceous Landscape Plants 10
Culture and Maintenance of PerennialsSite Location
You need to consider many of the same aspectsof site selection for perennials as you do forannuals; sunlight (full sun to heavy shade), slopeof the site (affects temperature and drainage),soil type, and the role the plants selected willplay in the garden. This is especially importantwith perennials, as they usually are left in the sitefor several years. In general, it is best to plantclumps of perennials rather than one plant. Largeplantings may be made if space allows. An ideallocation would provide a background such as awall or hedge against which perennials willstand out while in bloom. In island beds, peren-nials can provide their own background if tallones are planted in the center and low onestoward the edges.
Soil PreparationPreparing the soil is extremely important toperennials. Many annuals can grow and flowerin poorly prepared soil, but few perennialssurvive more than one year if the soil is notproperly prepared.
For new beds, begin preparing soil in the fallbefore planting time. Have the soil tested first.Results will indicate how much lime or acidifierneeds to be added during preparation and howmuch fertilizer needs to be added in the spring.Materials to adjust pH need time to work. Beforepreparing new beds, check the soil to see that it iswell-drained, yet has some water-holding capac-ity. Test for drainage as described in the sectionon annuals. If drainage is inadequate, dig fur-rows along the sides of the bed and add soil fromthe furrows to the bed. This raises the level of thebed above the general level of the soil. Excesswater can then seep from the bed into the fur-rows. Raised beds may wash during heavy rains.This can be prevented by surrounding the bedswith wooden or masonry walls. Since raised bedsdry out more quickly than flat beds, water bedsfrequently during the summer. After forming thebeds, spade the soil to a depth of 8 or 10 inches.Turn soil over completely, incorporating 2 to 4inches of organic material and add lime if re-quired. Remove debris and leave rough duringthe winter.
In the spring, just before planting, spade again.At this spading, add recommended levels offertilizers. Be sure to work any phosphorousdeeply into the soil, where plant roots can get it.Rake the soil surface smooth. After raking, thesoil is ready for seeding or planting.
Selecting PlantsIt is best to select plants with a purpose in mind,such as edging plants, accents for evergreens,masses of color, rock garden specimens, etc. Withspecific purposes in mind, you can chooseperennials by considering their characteristicsand deciding which plants best meet yourrequirements.
For a good display from a limited number ofplants in a limited space, select named varieties.Observe the flowering times of perennials inyour neighborhood. That way you will be able tochoose plants that will flower together and plantsthat will be showy when little else is in bloom.The flowering time may vary as much as 6 weeksfrom year to year, but plants of the same kindand their cultivars usually flower at the sametime. To obtain details on particular plants orgroups of plants, consult plant societies, specialtybooks, nurseries which specialize in herbaceousperennials, and local botanical gardens.
Plants of many perennials can be bought at alocal greenhouse or nursery. If these plants are inbloom when they are offered for sale or havepicture tags, you can select the colors you want.Buy perennial plants that are compact and darkgreen. Plants held in warm shopping areas toolong are seldom vigorous and generally havethin, pale, yellow stems and leaves. Avoidbuying these plants. Buy named varieties ofplants for known characteristics of diseaseresistance, heat and cold resistance, growthhabits and colors.
Many perennials do not grow true to type ifgrown from seed saved from old plants. If youplant seed you have saved, many off-types ofcolor, flower form, and plant habit are produced.Purchased seed, whether hybrid or strains,usually give uniform results. You can sowperennial seeds directly in the beds where theplants are to bloom, or you can start early plantsindoors or in a cold frame and set them out inbeds after the weather warms. Some perennialswill bloom the first year from seed, however,most species take two years to flower.
Planting TimesIn northern New England, it is best to plant mostperennials in spring. This allows the plants todevelop excellent root systems. Exceptions arepeony and bearded iris, which should be plantedfrom mid-August to mid-September. Container-grown perennials can be planted from springthrough early fall, if watered well. The later inthe season perennials are planted, the more likelythey are to require a top mulch to survive theirfirst winter.

Chapter 14 Herbaceous Landscape Plants 11
Planting Seed OutdoorsPerennials seeded in the garden frequently fail togerminate properly because the surface of thesoil cakes and prevents entry of water. To avoidthis, sow the seed in vermiculite-filled furrows.For planting directions, see the previous sectionon annuals.
Setting Out PlantsWhether you buy plants from a nursery, mail-order source, or start your own indoors, set themout the same way. When the time comes to setplants out in the garden, remove them from thepots, packs, or flats. Lift out each plant with themedium surrounding its roots and set the soilblock in a planting hole. If the plants are bareroot, spread out the root mass and set the plantin a prepared planting hole. When setting outplants in peat pots, remove the top edge of thepot to prevent it from drying out and limiting theroot development of the plant. Thoroughlymoisten the pot and its contents to help the rootsdevelop properly. Drench the soil around theplanting hole with a liquid fertilizer (16-12-10 or20-20-20 mixed 1 tablespoon per gallon of water)to stimulate root growth. Set the moistened potin the planting hole and press the soil up aroundthe plant. Allow plenty of space between plants,because perennials need room to develop.Perennials usually show up best when planted inclumps or groups of plants of the same variety.
WateringSince herbaceous perennials grow back from theroots every year, it is important to encouragehealthy, deep roots. Proper watering promotesgood root development. Make sure when water-ing that all the roots are reached. Follow direc-tions on watering in the section on annuals.Avoid over watering and insure adequate drain-age, especially in the late winter and earlyspring.
MulchingAny type of mulch gives an orderly look to thegarden and cuts down on weeding. Mulches arevery useful for maintaining uniform moistureconditions in the garden. Soil temperatures aremodified by mulches to various degrees. Organicmulches keep the soil cooler in early spring. Mostorganic mulches should be applied after plantsare well-established and when there is reason-ably good soil moisture. Bark, pine needles, andshredded leaves are common organic mulchesused in perennial beds. Organic mulches decom-
pose over time, adding nutrients and organicmatter to the soil. For uniform appearance,replenish the 1 to 2 inch layer every 1 to 2 years.
Perennials should be top mulched during thewinter months to protect them from the heavingthat results from repeated freezing and thawingof the soil. However, you must be careful withwinter mulching, as it can do more harm thangood. Be careful not to pile mulch heavily overthe crowns, as this would encourage rotting.Boughs of evergreens give ample protection butallow air circulation. Apply mulch around theplants only after the soil temperature has de-creased after several killing frosts. If wintermulch is applied too early, mice may move inand eat the plants. Severe damage to the plantcan result from new growth not being acclimatedand frozen back. Remove winter mulch as soonas growth starts in the spring. If you don’t, newgrowth will develop abnormally with long,gangly stems and insufficient chlorophyll.
Weeding
Follow weeding directions in the section onannuals. A few pre-emergent herbicides are nowregistered for use in perennial flowers. For mostgardens, mulch plus hand weeding or cultivationprovide excellent weed management.
FertilizingOn most native soils, regular fertilization isnecessary. However, do not fertilize perennialsheavily. A light fertilization program gives acontinuous supply of nutrients to producehealthy plants. Use 5-10-5 fertilizer or similarcomplete fertilizer. Place fertilizer in small ringsaround each plant in March or April. Repeat in 6weeks. This should be enough to carry plantsthrough the summer. Apply another treatment offertilizer to late-blooming plants in late summer.Always water the bed after applying fertilizer.This will wash the fertilizer off the foliage andprevent burn. It will also make fertilizer availableto the plants immediately. The use of loweranalysis slower release organic type fertilizers isalso an alternative.
DeadheadingAfter perennials have bloomed, spent flowersmay be removed. This will keep the beds lookingneat and will prevent plants from wasting energysetting seed. Some perennials like Delphiniumscan be forced to reblossom if cut back severelyafter the first bloom.
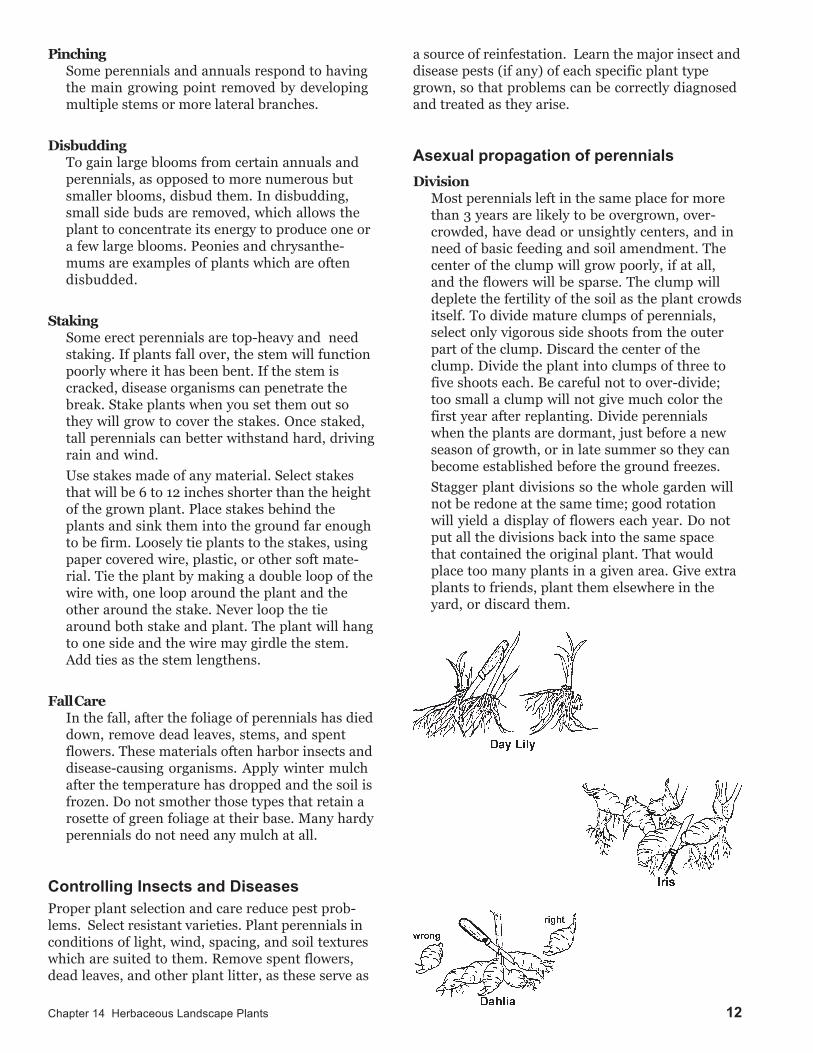
Chapter 14 Herbaceous Landscape Plants 12
PinchingSome perennials and annuals respond to havingthe main growing point removed by developingmultiple stems or more lateral branches.
DisbuddingTo gain large blooms from certain annuals andperennials, as opposed to more numerous butsmaller blooms, disbud them. In disbudding,small side buds are removed, which allows theplant to concentrate its energy to produce one ora few large blooms. Peonies and chrysanthe-mums are examples of plants which are oftendisbudded.
StakingSome erect perennials are top-heavy and needstaking. If plants fall over, the stem will functionpoorly where it has been bent. If the stem iscracked, disease organisms can penetrate thebreak. Stake plants when you set them out sothey will grow to cover the stakes. Once staked,tall perennials can better withstand hard, drivingrain and wind.
Use stakes made of any material. Select stakesthat will be 6 to 12 inches shorter than the heightof the grown plant. Place stakes behind theplants and sink them into the ground far enoughto be firm. Loosely tie plants to the stakes, usingpaper covered wire, plastic, or other soft mate-rial. Tie the plant by making a double loop of thewire with, one loop around the plant and theother around the stake. Never loop the tiearound both stake and plant. The plant will hangto one side and the wire may girdle the stem.Add ties as the stem lengthens.
Fall CareIn the fall, after the foliage of perennials has dieddown, remove dead leaves, stems, and spentflowers. These materials often harbor insects anddisease-causing organisms. Apply winter mulchafter the temperature has dropped and the soil isfrozen. Do not smother those types that retain arosette of green foliage at their base. Many hardyperennials do not need any mulch at all.
Controlling Insects and DiseasesProper plant selection and care reduce pest prob-lems. Select resistant varieties. Plant perennials inconditions of light, wind, spacing, and soil textureswhich are suited to them. Remove spent flowers,dead leaves, and other plant litter, as these serve as
a source of reinfestation. Learn the major insect anddisease pests (if any) of each specific plant typegrown, so that problems can be correctly diagnosedand treated as they arise.
Asexual propagation of perennialsDivision
Most perennials left in the same place for morethan 3 years are likely to be overgrown, over-crowded, have dead or unsightly centers, and inneed of basic feeding and soil amendment. Thecenter of the clump will grow poorly, if at all,and the flowers will be sparse. The clump willdeplete the fertility of the soil as the plant crowdsitself. To divide mature clumps of perennials,select only vigorous side shoots from the outerpart of the clump. Discard the center of theclump. Divide the plant into clumps of three tofive shoots each. Be careful not to over-divide;too small a clump will not give much color thefirst year after replanting. Divide perennialswhen the plants are dormant, just before a newseason of growth, or in late summer so they canbecome established before the ground freezes.
Stagger plant divisions so the whole garden willnot be redone at the same time; good rotationwill yield a display of flowers each year. Do notput all the divisions back into the same spacethat contained the original plant. That wouldplace too many plants in a given area. Give extraplants to friends, plant them elsewhere in theyard, or discard them.

Chapter 14 Herbaceous Landscape Plants 13
CuttingsMany plants can be propagated from either tip orroot cuttings. Generally, tip cuttings are easier topropagate than root cuttings.
To propagate most perennials, take tip cuttingsfrom the flush of growth in June. Make tipcuttings 3 to 6 inches long. Treat the base of thecutting with a root stimulant. Leave all foliage onthe cutting except the part that will be below thesoil line. Insert one cutting per peat pot. Placepeat pots of tip cuttings in a lightly shaded place.Cover with a sheet of clear plastic. Check regu-larly to make sure the cuttings do not dry out.
When cuttings do not pull easily out of the soil,they have begun to root. Make holes in theplastic sheet to increase the exposure of thecuttings to the air. This will harden the cuttings.Every few days make new holes, or enlarge theholes.
Make root cuttings of phlox, babys-breath, andoriental poppy. Dig the plants in late summerafter they have bloomed. Select pencil-sizedroots; cut them into 4-inch sections. Put eachpiece in a peat pot. Prepare a tray of peat pots asfor seeds, except the soil mix should be 2 partssand, 1 part soil, and 1 part peat moss. Waterthoroughly.
BulbsThis is a term loosely used to include corms, tubers,tuberous roots, and rhizomes as well as true bulbs.This section of the chapter will refer to all of theabove as bulbs. However, a true bulb is a completeor nearly complete miniature of a plant encased infleshy modified leaves called scales which containreserves of food. Corms are the base of a stem thatbecomes swollen and solid with nutrients. It has nofleshy scales. The tuber, which is an undergroundstem that stores food, differs from the true bulb orcorm in that it has no covering of dry leaves and nobasal plant from which the roots grow. Usuallyshort, fat and rounded, it has a knobby surface withgrowth buds, or eyes, from which the shoots of thenew plant emerge. Tuberous roots are the only onesfrom this group that are real roots; their food supplyis kept in root tissue, not in stem or leaf tissue as inother bulbs. Rhizomes, which are sometimes calledrootstocks, are thickened stems that grow horizon-tally, weaving their way along or below the surfaceof the soil and at intervals sending stems aboveground.
Bulbs are broadly grouped into spring-flowering(April-May) and summer-flowering (June-Septem-ber). Spring bulbs provide early color before mostannuals and perennials. One of the most popularspring bulbs is tulip. These are sold by type andvariety. Tulips come in all colors except blue. Someof the most common types are:
Single early: Flower at same time asdaffodils
Darwin/Darwin hybrid: Tall, blocky flowers
Lily flowered: Petals recurve - bell-shape
Parrot: Twisted, ruffled petals
Double: 2 or more rows ofpetals
Narcissus and daffodils are classed by length ofcorolla (“trumpet”) in relation to perianth segments.They come in the colors of white, yellow, and peach.Many naturalize well. Hyacinths produce a largesingle spike of many small, fragrant flowers, andcome in a complete color range. Crocus and otherminor bulbs are usually grown for early bloom.They are usually short, but are the earliest-flower-ing bulbs in northern New England and are wellsuited for “naturalizing”.
Selecting quality spring bulbs is very important,because the flower bud has already developedbefore the bulb is sold. Size is also important; lookfor plump, firm bulbs. Select on a basis of color, andsize for intended purposes; for example, small onesfor naturalizing and large ones to stand out asspecimen plants.
The summer-flowering bulbs include tuberousbegonia, caladium, dahlia, gladiolus, and lily.
Culture and Maintenance of BulbsStorage
Plant bulbs as soon after obtaining them aspossible. In the mean time, keep them in a cool,dry place (60 to 65 degrees F). Temperatureshigher than 70 degrees F will damage the flowerinside spring-flowering bulbs. Rhizomes, tubers,and tuberous roots are more easily desiccatedthan bulbs and corms, and should be stored inpeat, perlite, or vermiculite, if held for more thanseveral days.

Chapter 14 Herbaceous Landscape Plants 14
Site SelectionIn selecting a site for planting, consider light,temperature, soil texture, and function. Mostbulbs need full sun to light shade. Select a plant-ing site that will provide at least 5 to 6 hours ofdirect sunlight a day. Bulbs left in the groundyear after year should have 8 to 10 hours of dailysunlight for good flowering. Bulbs planted in asouthern exposure near a building or wall willbloom earlier than bulbs planted in a northernexposure. Adequate drainage is an importantconsideration. Most bulbs and bulb-like plantswill not tolerate poor drainage, and rot easily ifplanted in wet areas. Function must also be keptin mind. If bulbs are being used to naturalize anarea, toss the bulbs then plant them where theyfall to create a scattered effect.
Site PreparationGood drainage is the most important singlefactor for successful bulb growing. Bulb bedsshould be dug when the soil is fairly dry. Wetsoil packs tightly and retards plant growth.Prepare the soil 8 to 12 inches deep. Add lime-stone and organic matter if needed and incorpo-rate a complete fertilizer. Use 1 pound of 5-10-10fertilizer or similar analysis for a 5 by 10 footarea. Throughly mix the lime, fertilizer andorganic matter with the soil. For individualplanting holes, loosen the soil below the depththe bulb is to be planted. Add fertilizer and coverwith a layer of soil (bulbs should not contactfertilizers directly). Set bulb upright in plantinghole and cover.
Time of PlantingHardy, spring-flowering bulbs are planted inearly fall. Hardy, fall-flowering bulbs, such ascolchicum, are planted in August or September.Tender, summer-flowering bulbs are planted inthe spring after danger of frost. Lilies are bestplanted in late fall.
Depth of PlantingAs a general rule of thumb, bulbs should beplanted 2½ to 3 times the diameter of the bulb indepth. An alternative rule is to plant large bulbs(tulips, daffodils, hyacinths) 8 to 10 inches deep,and small bulbs (scilla, crocus, grape hyacinth) 5inches deep. It is important not to plant bulbstoo shallowly, as this will encourage frost heav-ing. If desired, after planting mulch with a 2 to 3inch layer of organic material such as bark chipswhen the ground has frozen.
Watering Normal rainfall usually provides enough mois-ture for bulbs. But during dry weather, waterplants at weekly intervals, soaking the groundthoroughly. Be especially careful not to neglectbulbs after blooming.
FertilizingAfter plants bloom, again fertilize them lightlywith something like a 5-10-10 fertilizer. Avoidhigh-nitrogen fertilizer. To avoid possible burn-ing, keep fertilizers off of the leaves. In additionto 5-10-10 fertilizer, you can use bonemeal as anextra source of phosphorus.
Staking
A few tall, heavy-flowered bulbs may requirestaking. Stake plants when they are emerging,but be careful not to damage the bulb with thestake. Avoid the need for staking by selectinglower-growing bulbs, planting them where theyare shielded from the wind.

Chapter 14 Herbaceous Landscape Plants 15
DeadheadingWhen flowers fade, cut them off to prevent seedformation. Seeds take stored food from the bulbs.
MovingIf leaving bulbs in place for bloom next year, donot cut the leaves after flowering until they startto wither. Green leaves produce food for plantgrowth next year. After leaves turn yellow, cutand destroy the stems and foliage of the plants.Dead foliage left on the ground may carrydisease to new growth the next year. If movingbulbs from one place to another, or if a plantinghas become crowded and ceased blooming, moveonly after the foliage has faded. Bulbs dug andmoved before foliage fades are useless.
Digging and StoringMany summer-flowering bulbs should be dugand stored, as they are tender. This is done whenthe leaves on the plants turn yellow. Use aspading fork to lift the bulbs from the ground.Wash off any soil that clings to most bulbs.Spread the washed bulbs in a shaded place todry. When dry, store them away from sunlight ina cool, dry place. Avoid temperatures below 50or above 70 degrees F. Be sure that air circulatesaround stored bulbs. Never store bulbs morethan two or three layers deep, as they generateheat and cause decay. Leave the soil onachimenes, begonia, canna, caladium, dahlia, andismene bulbs. Store these bulbs in clumps on aslightly moistened layer of peat moss or sawdustin a cool place. Rinse, clean, and separate themjust before planting the following year.
Annuals for Special Uses
Annuals for Bedding(Masses and Drifts)
Wax begoniaBrowallia, Amathyst flowerCelosia, CockscombDusty millerColeusSeed dahliaDianthus, China pinksHeliotropeImpatiensLobeliaMarigoldNicotiana, Flowering tobaccoPetuniaAnnual phloxSalviaScabiosa, Pincushion flower
Annuals for EdgingAgeratumSweet alyssumWax begoniaDianthus, China pinksDaisy, DahlbergLobeliaFrench marigoldMyosotis, Forget-me-notNierembergia, Cup flowerPetuniaAnnual phloxPortulaca, Moss roseVerbenaAnnual vinca
Annuals for Ground CoversCreeping Zinnia, SanvitaliaMyosotis, Forget-me-notNasturtiumPortulaca, Moss roseSweet AlyssumVerbenaAnnual vinca
Annuals for FoliageAmaranthusBasilCastor BeanColeusDusty MillerKochia

Chapter 14 Herbaceous Landscape Plants 16
Annuals for FragranceSweet alyssumDianthus, China pinksHeliotropeNasturtiumNicotiana, Flowering tobaccoStockPetuniaAnnual phloxSweet pea
Annuals for Fences and TrellisesCanary CreeperCobaea, Cup-and-saucer vineGourdsMorning GloryScarlet Runner BeanSweet peaThunbergia
Annuals for Low BordersDwarf CelosiaDwarf Bedding DahliasFrench MarigoldScotch marigoldPetuniaDwarf zinnia
Annuals for Screen PlantsCleomeKochia (evergreen)Tall MarigoldTithonia, Mexican sunflowerTall ZinniaCastor bean
Annuals for Window Boxes, Hanging Baskets,Urns, or Tubs
Sweet alyssumWax begoniaColeusLobeliaNierembergia, Cup flowerCascade PetuniaThunbergiaImpatiensGerman IvyFuchsiaIvy geranium
Annuals for the SeasideSweet AlyssumDusty MillerStaticePetunia
Annuals for the Rock GardenAgeratumSweet AlyssumWax BegoniaDwarf Celosia, CockscombColeusGazaniaLobeliaFrench MarigoldNasturtiumPansyPetuniaAnnual PhloxPortulacaVerbenaDwarf Zinnia
Annuals for Cut FlowersChina AstersBells of Ireland (also dried)CarnationCelosia (also dried)Bachelor ButtonsPink CosmosCynoglossumSeed DahliaGaillardia, Blanket FlowerGerberaGomphrena, Globe Amaranth (also dried)Gypsophila, Annual baby’s breathLarkspurLove-in-a-Mist (also dried)MarigoldNasturtiumPetuniaRudbeckia, Black-eyed SusanBlue Salvia (also dried)Scabiosa, Pincushion FlowerSnapdragonAnnual Statice (also dried)Tithonia, Mexican SunflowerZinnia

Chapter 14 Herbaceous Landscape Plants 17
Annuals for Special EnvironmentsAnnuals Tolerant of Cool Weather
Plant after danger of heavy frost is over in thespring, except sweet peas, which should be plantedjust as soon as the soil is workable. Some varietiescan also be sown, with risk, late in fall, just beforethe ground freezes, so seed will not germinate untilspring.
Sweet AlyssumChina AsterBells of IrelandCalendula, Pot Marigold (can sow in fall)Annual CandytuftAnnual ChrysanthemumClarkiaCleome, Spider Flower (can sow in fall)Bachelors Buttons, Cornflower (can sow in fall)CosmosCynoglossum (can sow in fall)Dianthus, China pinksDidiscus, Lace FlowerDimorphotheca, African DaisyAnnual Gaillardia, Blanket FlowerLarkspurLobeliaNigella, (Love-in-a-Mist)PansyAnnual PhloxPoppy, Shirley & CaliforniaSalpiglossis (painted tongue)Blue SalviaScabiosa, Pincushion FlowerSnapdragonStockSweet Pea
Tender AnnualsPlant when all danger of frost is over in the spring.
AgeratumGarden BalsamWax BegoniaCelosia, CockscombColeusGlobe AmaranthGourdsImpatiensMarigoldMorning GloryNasturtiumNicotiana, Flowering tobaccoPetuniaRed SalviaVerbenaAnnual VincaZinnia
Heat-resistant AnnualsCelosiaCleome, Spider FlowerCosmosFour O’ClockGaillardia, Blanket-flowerGeraniumGlobe AmaranthHelichrysum, StrawflowerLarkspurMarigoldMorning GloryNicotiana, Flowering tobaccoNierembergia, Cup FlowerPetuniaAnnual PhloxPortulaca, Moss RoseRed SalviaScabiosa, Pincushion FlowerSunflowerVerbenaZinniaOrnamental Pepper
Annuals for Partial ShadeAlyssumAsterBalsamBegoniaBrowalliaCalendulaColeusCornflowerImpatiensLobeliaMyosotisNasturtiumNicotianaPansyPetuniaSnapdragonToreniaWallflower
Annuals That Tolerate Heat, Droughtand Sandy Soils
CleomeGaillardia, Blanket FlowerMarigoldPetuniaAnnual PhloxPortulaca, Moss RoseRed SalviaSunflowerVerbenaZinnia
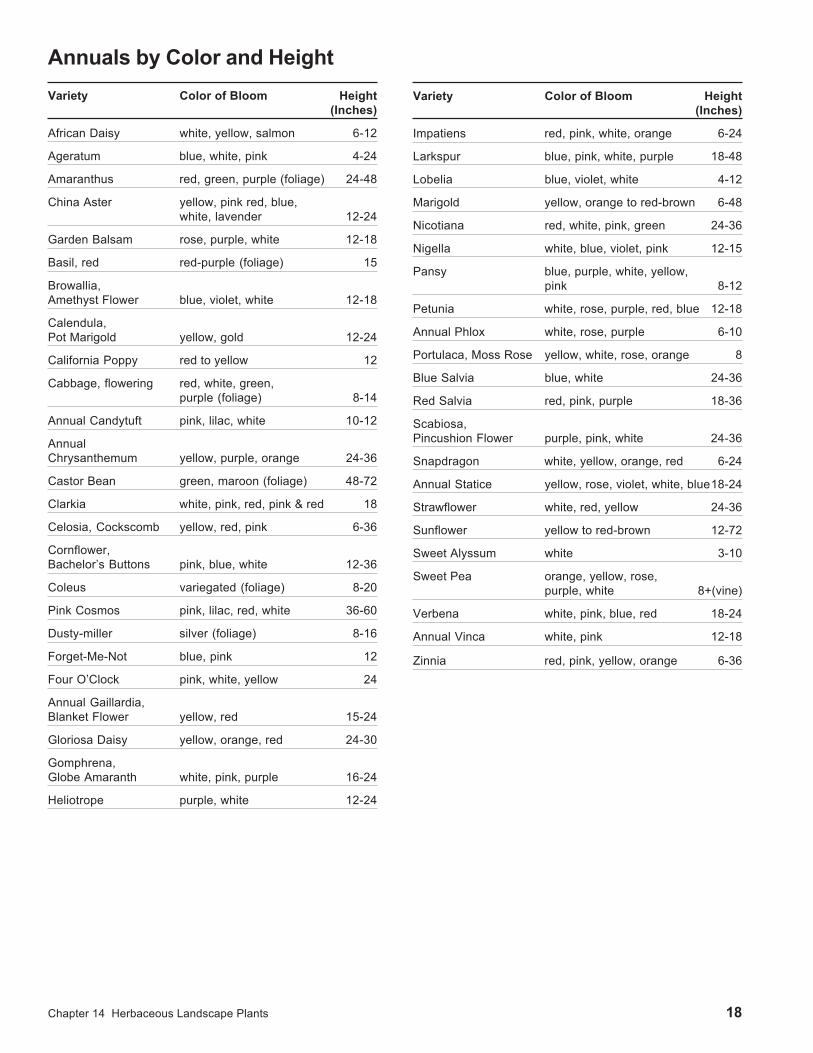
Chapter 14 Herbaceous Landscape Plants 18
Annuals by Color and HeightVariety Color of Bloom Height
(Inches)
African Daisy white, yellow, salmon 6-12
Ageratum blue, white, pink 4-24
Amaranthus red, green, purple (foliage) 24-48
China Aster yellow, pink red, blue,white, lavender 12-24
Garden Balsam rose, purple, white 12-18
Basil, red red-purple (foliage) 15
Browallia,Amethyst Flower blue, violet, white 12-18
Calendula,Pot Marigold yellow, gold 12-24
California Poppy red to yellow 12
Cabbage, flowering red, white, green,purple (foliage) 8-14
Annual Candytuft pink, lilac, white 10-12
AnnualChrysanthemum yellow, purple, orange 24-36
Castor Bean green, maroon (foliage) 48-72
Clarkia white, pink, red, pink & red 18
Celosia, Cockscomb yellow, red, pink 6-36
Cornflower,Bachelor’s Buttons pink, blue, white 12-36
Coleus variegated (foliage) 8-20
Pink Cosmos pink, lilac, red, white 36-60
Dusty-miller silver (foliage) 8-16
Forget-Me-Not blue, pink 12
Four O’Clock pink, white, yellow 24
Annual Gaillardia,Blanket Flower yellow, red 15-24
Gloriosa Daisy yellow, orange, red 24-30
Gomphrena,Globe Amaranth white, pink, purple 16-24
Heliotrope purple, white 12-24
Variety Color of Bloom Height(Inches)
Impatiens red, pink, white, orange 6-24
Larkspur blue, pink, white, purple 18-48
Lobelia blue, violet, white 4-12
Marigold yellow, orange to red-brown 6-48
Nicotiana red, white, pink, green 24-36
Nigella white, blue, violet, pink 12-15
Pansy blue, purple, white, yellow,pink 8-12
Petunia white, rose, purple, red, blue 12-18
Annual Phlox white, rose, purple 6-10
Portulaca, Moss Rose yellow, white, rose, orange 8
Blue Salvia blue, white 24-36
Red Salvia red, pink, purple 18-36
Scabiosa,Pincushion Flower purple, pink, white 24-36
Snapdragon white, yellow, orange, red 6-24
Annual Statice yellow, rose, violet, white, blue18-24
Strawflower white, red, yellow 24-36
Sunflower yellow to red-brown 12-72
Sweet Alyssum white 3-10
Sweet Pea orange, yellow, rose,purple, white 8+(vine)
Verbena white, pink, blue, red 18-24
Annual Vinca white, pink 12-18
Zinnia red, pink, yellow, orange 6-36

Chapter 14 Herbaceous Landscape Plants 19
Perennials for Special UsePerennials for Borders of Ponds And Streams(Well-drained soil)
Sunny Locations:Cimicifuga racemosa (Cohosh Bugbane)*
Grasses (Ornamental Grasses)Iris, in varietyMyosotis scorpioides semperflorens (Dwarf Per-petual Forget-me-not)Tradescantia virginiana (Spiderwort)*
Trollius europaeus (Globeflower)
Semi-shady Locations:Anemone hupenhensis or A. x hybrida (JapaneseAnemone)Eupatorium purpureum (Joe-Pye-weed)
*also do well in semi-shade
Perennials for Background PlantingAlthaea rosea (Hollyhock) (actually biennial)Aster novae-angliae (New England Aster)Campanula persicifolia (Peach-leaved Bellflower)Cimicifuga racemosa (Cohosh Bugbane)Delphinium hybrids (Delphinium)Helenium autumnale (Sneezeweed)Rudbeckia laciniata (Goldenglow) ‘hortensia’Valeriana officinalis (Common Valerian)Yucca filamentosa (Common Yucca)
Perennials for EdgingAchillea tomentosa (Woolly Yarrow)Ajuga reptans (Carpet Bugle)Armaria species (Thrift)Arabis caucasica (Wallcress)Aubrietia deltoidea (Purple Rockcress)Aurinia saxatilis ‘Compacta’ (Dwarf Goldentuft)Bellis perennis (English Daisy)Campanula carpatica (Carpanthian Bellflower)Cerastium tomentosum (Snow-in-summer)Dianthus deltoides (Maiden Pink)Dianthus plumarius (Grass Pink)Iberis sempervirens (Edging Candytuft)Papaver nudicaule (Iceland Poppy)Phlox subulata (Moss Phlox)Primula hybrids (Primrose)Sedum stoloniferum (Running Stonecrop)Veronica latifolia (Rock Speedwell)Viola, in variety (Violet)
Perennials for Ground Cover, Banks, and TerracesSunny Locations:Cerastium tomentosum (Snow-in-summer)Ceratostigma plumbaginoides (Larpente Plumbago)Iberis sempervirens (Edging candytuft)Nepeta mussini (Mussini Mint)Phlox subulata (Moss Phlox)Sedum spurium (Running Stonecrop)Thymus praecox subspecies artieus (Mother-of-thyme)Veronica latifolia (Rock Speedwell)Vinca minor (Periwinkle)
Shady Locations:Ajuga reptans (Bugle)Asperula odoratum (Sweet Woodruff)Convallaria majalis (Lily-of-the-valley)Hedera helix (English Ivy)Pachysandra terminalis (Japanese Pachysandra)
Perennials for Bold or Sub-tropical EffectsAruncus dioicus (Spirea)Acanthus mollis (Artist’s Acanthus)Dipsacus fullonum (Teasel)Echinops ritro and exaltatus (Globe Thistles)Elymus arenarius (Sea Lyme grass)Heracleum laciniatum (Cow-parsnip)Kniphofia uvaria (Torchlily, Red-hot-poker plant)Yucca filamentosa (Yucca)
Perennials for NaturalizingAsclepias tuberosa (Butterfly weed)Aster (various)(Aster)Cimicifuga racemosa (Cohosh Bugbane)Convallaria majalis (Lily-of-the-valley)Hepatica (Roundlobe Hepatica)Lobelia cardinalis (Cardinal Flower)Mertensia virginica (Virginia Bluebells)Monarda didyma (Bee Balm)Physostegia virginiana (False Dragonhead, Obedience)Polemonium reptans (Creeping Polemonium)Sanguinaria canadensis (Bloodroot)Smilacina racemosa (Solomon’s zig-zag, Falsespikenard)Solidago canadensis (Canada Goldenrod)Trillium grandiflorum (Trillium)

Chapter 14 Herbaceous Landscape Plants 20
Perennials for Old-fashioned GardensAconitum, in variety (Monkshood)Althaea rosea (Hollyhock) (biennial)Asters, old varietiesCampanula, in variety (Bellflower)Delphinium x Belladonna (Delphinium)Dianthus barbatus (Sweet William)Dianthus plumarius (Grass or Garden Pink)Dicentra spectabilis (Bleeding-heart)Dictamnus alba (Dittany or Gas Plant)Digitalis, in variety (Foxglove)Hemerocallis lilio asphodelus (Lemon Lily)Hesperis matronalis (Sweet Rocket)Lilium candidum (Madonna Lily)Lunaria (Honesty)(Biennial)Mertensia (Mertensia or Blue Bells)Myosotis, in variety (Forget-me-not)Paeonia officinalis types (Peony)Viola odorata (Sweet Violet)
Fragrant PerennialsArtemisia abrotanum (Southernwood)Convallaria majalis (Lily-of-the-Valley)Dianthus plumarius (Grass Pink)Dictamnus albus (Dittany or Gas Plant)Galium odoratum (Sweet woodruff)Hesperis matronalis (Sweet Rocket)Hosta plantaginea grandiflora (Funkia or Big Plan-tain Lily)Monarda didyma (Bee Balm)Paeonia, in variety (Peony)Phlox paniculata (Phlox)Rosa species (Heritage Roses)Valeriana officinalis (Common Valerian)Viola cornuta (Tufted Pansy, Horned violet)Viola odorata (Sweet Violet)Thymus, in variety (Thyme)Lavandula augustifolia (True Lavender)
Perennials Having Especially Long BloomingSeasons
Anchusa azurea (Bugloss)Campanula carpatica (Tussock Bellflower)Delphinium, if cut backHeuchera sanguinea (Coral Bells)Lathyrus latifolius (Perennial Pea)Lysimachia (Gooseneck Loosestrife)Viola tricolor (Johnny-Jump-Up)
Perennials Suitable for Cut FlowersAchillea millefolium (Yarrow)Anemone japonica (Japanese Anemone)Aster (various)(Aster)Chrysanthemum coccineum (Painted Lady)Delphinium hybrids (Delphinium)Dianthus barbatus (Sweet William)Dicentra (Bleeding Heart)Gaillardia x grandifolia (Blanket Flower)Gypsophila paniculata ‘Flore Pleno’ (Babysbreath)Heuchera sanguinea (Coral Bells)Iris (various)(Iris)Lysimachia (Gooseneck Loosestrife)Mertensia virginica (Blue Bells)Paeonia (various)(Peony)Rudbeckia (various)(Cone Flower)Salvia azurea grandiflora (Azure Sage)

Chapter 14 Herbaceous Landscape Plants 21
Perennials for SpecialEnvironmentsPerennials for Shade
Ajuga (Bugle)Anemone japonica (Japanese Anemone)Asperula (Woodruff)Convallaria majalis (Lily-of-the-Valley)Dicentra spectabilis (Bleeding-Heart)Heuchera sanguinea (Coral Bells)Hosta, in variety (Plantain Lily)Mertensia virginica (Virginia Bluebells)Phlox divaricata Primula, in variety (Primrose)Trillium grandiflorum (Trillium)Trollius europeaus (Globeflower)
Perennials for Semi-shadeAnchusa azurea (Bugloss)Aquilegia hybrids (Columbine)Campanula rotundifolia (Harebell)Chelone lyonii (Pink Turtlehead)Cimicifuga racemosa (Cohosh Bugbane)Digitalis purpurea (Foxglove)Doronicum cordatum (Leopard’s bane)Monarda didyma (Bee-balm)Physostegia Virginiana (False Dragonhead, Obedience)PolemoniumPulmonaria saccharata (Bethlehem Sage)Pyrethrum (Chrysanthemum coccineum, Pink Daisy)
Perennials for Wet SoilsBoltonia asteroides (White Boltonia)Caltha palustris (Marsh Marigold)Eupatorium purpureum (Joe-Pye-weed)Hibiscus Moscheutos (Swamp Rose-Mallow)Iris Pseudacorus (Yellowflag)Lobelia cardinalis (Cardinal Flower)Lysimachia clethroides (Clethra Loosestrife, Gooseneck Loosestrife)Miscanthus sinensis (Eulalia, Ornamental Grass)Monarda didyma (Bee-balm)Myosotis scorpioides (True Forget-me-not)Onoclea sensibilis (Sensitive Fern)Osmunda cinnamomea (Cinnamon Fern)Osmunda regalis (Royal Fern)
Perennials Which May Be Grown in WaterCaltha palustris (Marsh Marigold)Iris Pseudacorus (Yellowflag)Osmunda regalis (Royal Fern)
Perennials for Poor SoilAchillea millefolium (Milfoil or Yarrow)Aurinia saxatilis (Goldentuft)Cerastium tomentosum (Snow-in-summer)Gypsophila paniculata (Baby’s breath)HeliantIberis sempervirens (Edging Candytuft)Linaria vulgaris (Toadflax)Phlox subulata (Moss Phlox)Sedum stoloniferum (Running Sedum)Sempervivum (Roof Houseleek)Verbascum Thapsus (Mullen)Veronica rupestris (Creeping Speedwell)
Perennials Requiring Well-drained SoilArabis alpina (Alpine Rockcress)Asclepias tuberosa (Butterflyweed)Aubrietia deltoidea (Purple Rockcress)Coreopsis grandiflora (Tickseed)Dianthus barbatus (Sweet William)Digitalis purpurea (Common Foxglove)Echinops Ritro (Steel Globe Thistle)Eryngium maritmum (Sea-holly)Iris hybrids (Bearded Iris)Liatris pycnostachya (Cattail Gayfeather)Papaver nudicaule (Iceland Poppy)
Perennials for Dry, Sandy SoilAchillea Ptarmica (Sneezewort)Anthemis tinctoria (Golden marguerite)Asclepias tuberosa (Butterflyweed)Aster novae-angliae (New England Aster)Coreopsis grandiflora (Tickseed)Dianthus plumarius (Grass Pink)Echinops Ritro (Steel Globe Thistle)Limonium latifolium (Statice)Papaver nudicaule (Iceland Poppy)Rudbeckla laciniata (Goldenglow)Yucca filamentosa (Common Yucca)
Bloom CalendarPerennials for Early Spring
Scientific Name Common Name Height Color (inches)
Iberis sempervirens Edging Candytuft 12 White
Sanguinaria canadensis Bloodroot 8 White
Galanthus nivalis Common Snowdrop 6 White
Scilla siberica Siberian Squill 6 Blue
Chionodoxa Luciliae Glory-of-the-snow 4 Blue
Claytonia virginica Spring beauty 4 Blue
Crocus vernus Dutch Crocus 4 Various
Eranthis hyemalis Winter Aconite 3 Yellow

Chapter 14 Herbaceous Landscape Plants 22
Bloom Calendar cont.
Perennials for Spring
Scientific Name Common Name Height Color (inches)
Aquilegia canadensis AmericanColumbine 18 Red-
Yellow
Bergenia cardifolia Heartleaf Saxifrage 12 Pink
Pulmonariaangustifolia Cowslip Lungwort 12 Blue
Arabis alpina Alpine Rock-cress 12 White
Tulipa (early) Tulip 12 Various
Narcissus (various) Narcissus 12 Yellow
Leucojum vernum Spring Snowflake 12 White
Dicentra Cucullaria Dutchman’s Breeches 10 White
Primula hybrids Cowslip 9 Various
Anemone Pulsatilla Pasqueflower 9 Purple
Viola cornuta Horned Violet 8 Various
Viola odorata Sweet Violet 8 Violet
Muscari botryoides Common GrapeHyacinth 8 Blue
Hyacinthus orientalis Hyacinth 8 Various
Hepatica americana Roundleaf Hepatica 6 Blue
Aubrietia deltoidea Common Aubrietia 6 Purple
Trollius europaeus Globe Flower 24 Yellow
Dicentra spectabilis Bleedingheart 36 Pink
Iris germanica Iris 18-36 Various
Thalictrumaquilegifolium Columbine Meadowrue 36 Purple
Hemerocallis Lemon Daylily 36 Yellow
Paeonia officinalis Common Peony 30 Various
Aquilegia chrysantha Golden Columbine 24 Yellow
Doronicum cordatum CaucasianLeopardbane 24 Yellow
Scientific Name Common Name Height Color (inches)
Euphorbiaepithymoides Cushion Spurge 24 Yellow
Chrysanthemumcoccineum Painted Lady 24 Various
Trollius europaeus Common Globeflower 24 Yellow
Aurinia saxatilis Goldentuft 18 Yellow
Tulipa Gesnerana Darwin Tulip 18 Various
Gaillardia aristata Common Peren.Gaillardia 15 Red-
Orange
Brunneramacrophylla Siberian Bugloss 12 Blue
Convallaria majalis Lily-of-the-valley 12 White
Nepeta Mussinii Mussini Mint 12 Blue
Phlox divaricata Blue Phlox 12 Laven-der
Galium odoratum Sweet Woodruff 8 Yellow
Ajuga reptans Carpet Bugle 6 Purple
Phlox subulata Moss Phlox 6 Pink
Primula Primrose 6 Various
Polemonium reptans Creeping Polemonium 6 Blue
Ranunculus repens Creeping Buttercup 6 Yellow
Silene quadrifida Alpine Catchfly 6 White
Cerastium tomentosum Snow-in-summer 6 White
Veronica prostrata Rock Speedwell 4 Blue
Pulmonaria officinalis Pulmonuria 6-12 Purple
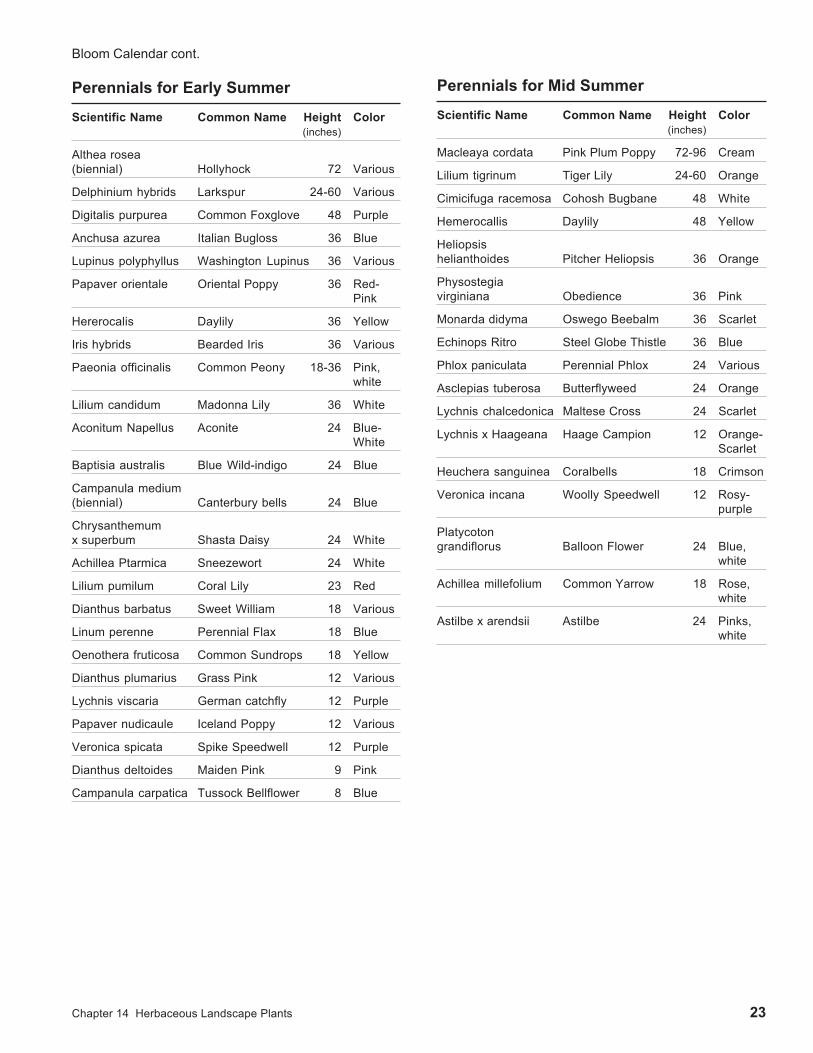
Chapter 14 Herbaceous Landscape Plants 23
Bloom Calendar cont.
Perennials for Early Summer
Scientific Name Common Name Height Color (inches)
Althea rosea(biennial) Hollyhock 72 Various
Delphinium hybrids Larkspur 24-60 Various
Digitalis purpurea Common Foxglove 48 Purple
Anchusa azurea Italian Bugloss 36 Blue
Lupinus polyphyllus Washington Lupinus 36 Various
Papaver orientale Oriental Poppy 36 Red-Pink
Hererocalis Daylily 36 Yellow
Iris hybrids Bearded Iris 36 Various
Paeonia officinalis Common Peony 18-36 Pink,white
Lilium candidum Madonna Lily 36 White
Aconitum Napellus Aconite 24 Blue-White
Baptisia australis Blue Wild-indigo 24 Blue
Campanula medium(biennial) Canterbury bells 24 Blue
Chrysanthemumx superbum Shasta Daisy 24 White
Achillea Ptarmica Sneezewort 24 White
Lilium pumilum Coral Lily 23 Red
Dianthus barbatus Sweet William 18 Various
Linum perenne Perennial Flax 18 Blue
Oenothera fruticosa Common Sundrops 18 Yellow
Dianthus plumarius Grass Pink 12 Various
Lychnis viscaria German catchfly 12 Purple
Papaver nudicaule Iceland Poppy 12 Various
Veronica spicata Spike Speedwell 12 Purple
Dianthus deltoides Maiden Pink 9 Pink
Campanula carpatica Tussock Bellflower 8 Blue
Perennials for Mid Summer
Scientific Name Common Name Height Color (inches)
Macleaya cordata Pink Plum Poppy 72-96 Cream
Lilium tigrinum Tiger Lily 24-60 Orange
Cimicifuga racemosa Cohosh Bugbane 48 White
Hemerocallis Daylily 48 Yellow
Heliopsishelianthoides Pitcher Heliopsis 36 Orange
Physostegiavirginiana Obedience 36 Pink
Monarda didyma Oswego Beebalm 36 Scarlet
Echinops Ritro Steel Globe Thistle 36 Blue
Phlox paniculata Perennial Phlox 24 Various
Asclepias tuberosa Butterflyweed 24 Orange
Lychnis chalcedonica Maltese Cross 24 Scarlet
Lychnis x Haageana Haage Campion 12 Orange-Scarlet
Heuchera sanguinea Coralbells 18 Crimson
Veronica incana Woolly Speedwell 12 Rosy-purple
Platycotongrandiflorus Balloon Flower 24 Blue,
white
Achillea millefolium Common Yarrow 18 Rose,white
Astilbe x arendsii Astilbe 24 Pinks,white

Bloom Calendar cont.
Perennials for Late Summer and Early Fall
Scientific Name Common Name Height Color (inches)
Eupatoriumpurpureum Joe-Pye-weed 72 Purple
Lilium Henryi Henry Lily 60-72 Orange
Artemisia vulgaris White Mugwort 48 White
Liatris pycnostachya Cattail Gayfeather 48 Purple
Lilium speciosum Speciosum Lily 24-48 Pink
Solidago canadensis Canada Goldenrod 36 Yellow
Rudbeckia fulgida Showy Coneflower 36 Golden
Lilium superbum American Turk’sCap Lily 24-36 Orange-
Red
Veronica longifoliasubsessilis Clump Speedwell 24-36 Blue-
Purple
Liatris spicata Spike Gayfeather 24 Purple
Limonium latifolium Bigleaf Sea-lavender 20 Lavender
Colchicum autumnale Common AutumnCrocus 3-4 Purple
Aconitumcarmichaelii Violet Monkshood 48-60 Blue
Aster novibelgii New York Aster 36-60 Blue
Aster novae-angliae New EnglandAster 36-48 Various
Helenium autumnale CommonSneezeweed 36-48 Yellow
Echinacea purpurea Purple Coneflower 36 Purple-Rose
Anemone x hybrida Japanese Anemone 24-36 Various
Chelone Lyonii Pink Turtlehead 24-36 Pink
Aconitum Fischeri Azure Monkshood 24-36 Blue
Sedum spectabile Showy Stonecrop 18 Crimson
Anemone hupehensis JapaneseAnemone 12 Rose

CHAPTER 14Herbaceous Landscape Plants
Planning the Flower Border ........................................................................................................................ 2
Annuals ......................................................................................................................................................... 4Culture and Maintenance of Annuals ............................................................................................................................... 4Controlling Insects and Diseases ..................................................................................................................................... 7
Biennials ....................................................................................................................................................... 8
Perennials ..................................................................................................................................................... 8Culture and Maintenance of Perennials ........................................................................................................................... 9Controlling Insects and Diseases ................................................................................................................................... 11Asexual propagation of perennials ................................................................................................................................. 11
Bulbs ........................................................................................................................................................... 12Culture and Maintenance of Bulbs ................................................................................................................................. 12
Annuals for Special Uses .......................................................................................................................... 14Annuals for Special Environments ......................................................................................................................... 16Annuals Tolerant of Cool Weather .................................................................................................................................. 16Tender Annuals ............................................................................................................................................................... 16Heat-resistant Annuals ................................................................................................................................................... 16Annuals for Partial Shade ............................................................................................................................................... 16Annuals That Tolerate Heat, Drought and Sandy Soils .................................................................................................. 16
Annuals by Color and Height .................................................................................................................... 17
Perennials for Special Use........................................................................................................................ 18Perennials for Borders of Ponds And Streams ...................................................................................................... 18Perennials for Background Planting ............................................................................................................................... 18Perennials for Edging ..................................................................................................................................................... 18Perennials for Ground Cover, Banks, and Terraces ....................................................................................................... 18Perennials for Bold or Sub-tropical Effects ..................................................................................................................... 18Perennials for Naturalizing .............................................................................................................................................. 18Perennials for Old-fashioned Gardens ........................................................................................................................... 19Fragrant Perennials ........................................................................................................................................................ 19Perennials Having Especially Long Blooming Seasons ................................................................................................. 19Perennials Suitable for Cut Flowers ............................................................................................................................... 19
Perennials for Special Environments ...................................................................................................... 20Perennials for Shade ...................................................................................................................................................... 20Perennials for Semi-shade ............................................................................................................................................. 20Perennials for Wet Soils ................................................................................................................................................. 20Perennials Which May Be Grown in Water .................................................................................................................... 20Perennials for Poor Soil .................................................................................................................................................. 20Perennials Requiring Well-drained Soil .......................................................................................................................... 20Perennials for Dry, Sandy Soil ........................................................................................................................................ 20
Bloom Calendar ......................................................................................................................................... 20Perennials for Early Spring ............................................................................................................................................. 20Perennials for Spring ...................................................................................................................................................... 21Perennials for Early Summer .......................................................................................................................................... 22Perennials for Mid Summer ............................................................................................................................................ 22Perennials for Late Summer and Early Fall .................................................................................................................... 23

Chapter 15 Landscape Design 1
CCCCCHAPTERHAPTERHAPTERHAPTERHAPTER 15 15 15 15 15
Program Development and Analysis of Site and Family Needs.............................................................. 1
Factors Influencing Landscape Design ..................................................................................................... 1The Lot and Its Characteristics ........................................................................................................................................ 1Neighborhood Sights and Sounds ................................................................................................................................... 2Climate ............................................................................................................................................................................. 2Family Activities ................................................................................................................................................................ 2Cost-Effective Maintenance ............................................................................................................................................. 3
Definition of Areas and Design Considerations ....................................................................................... 3Private or Outdoor Living Area ......................................................................................................................................... 3Service and Work Area .................................................................................................................................................... 4Public Area ....................................................................................................................................................................... 5
Elements of Design ...................................................................................................................................... 5Scale ................................................................................................................................................................................ 5Balance ............................................................................................................................................................................ 6Unity ................................................................................................................................................................................. 6Rhythm ............................................................................................................................................................................. 6Simplicity .......................................................................................................................................................................... 6Accent .............................................................................................................................................................................. 6Repetition ......................................................................................................................................................................... 7Harmony ........................................................................................................................................................................... 7Space Dividers, Accents, and Transitions ........................................................................................................................ 7Dominance and Contrast ................................................................................................................................................. 7
Drawing a Landscape Plan ......................................................................................................................... 8Step 1 - Preparing Baseline Map. .................................................................................................................................... 8Step 2 - Deciding the Ground Area. ................................................................................................................................. 8Step 3 - Placing Use Areas on the Map. .......................................................................................................................... 9Step 4 - Develop the Landscape Plan. ............................................................................................................................ 9Step 5 - General and Specific Planting Plan. ................................................................................................................. 10
Selecting Plant Materials........................................................................................................................... 12
Cultural Characteristics ..................................................................................................................................... 12Ornamental Characteristics ............................................................................................................................... 12
Deciduous Shade and Flowering Trees ................................................................................................... 13
How to Choose Trees ........................................................................................................................................ 13Environmental Considerations........................................................................................................................... 14Availability and Adaptability ............................................................................................................................... 14Flowering Trees ................................................................................................................................................. 14Rare and Unusual Trees .................................................................................................................................... 15Problem Trees ................................................................................................................................................... 15Selected Shade and Flowering Trees ............................................................................................................... 16
Conifers....................................................................................................................................................... 25
Dwarf and Slow-Growing Conifers .................................................................................................................... 25Landscape Use .................................................................................................................................................. 25Culture ............................................................................................................................................................... 25
Deciduous Shrubs ..................................................................................................................................... 30
Selected Deciduous Shrubs .............................................................................................................................. 30

Chapter 15 Landscape Design 2
Broad-Leaved Evergreens ........................................................................................................................ 35
Selected Broad-leaved Evergreens ................................................................................................................... 36
Ornamental Vines....................................................................................................................................... 41
Types ................................................................................................................................................................. 41Culture ............................................................................................................................................................... 42Selected Vines ................................................................................................................................................... 42
Groundcovers ............................................................................................................................................ 45
Culture ............................................................................................................................................................... 46Selected Groundcovers ..................................................................................................................................... 46
List of Plants for Specific Purposes ........................................................................................................ 49Trees Resistant to Gypsy Moth ...................................................................................................................................... 49Plants to Attract Wildlife ................................................................................................................................................. 50Plants Tolerant of Dry, Poor Soil .................................................................................................................................... 50Plants Tolerant of Shade ................................................................................................................................................ 51Plants Tolerant of Salt .................................................................................................................................................... 51Plants with Colorful Autumn Foliage .............................................................................................................................. 51Plants with Attractive Fruit .............................................................................................................................................. 52
New Hampshire Plant Hardiness Zone Map ........................................................................................... 53

Chapter 15 Landscape Design 3
CHAPTER 15Landscape DesignEdited and revised by Ralph Winslow, University of New Hampshire Cooperative Extension
Landscape design can be defined as the art of organizing and enriching outdoorspace through the arrangement of plants, structures, and land form in agreeableand useful relationship with the natural environment and the desired use.
Designing a landscape is an art and a science. Landscaping means creating aplan to make the best use of the space available in the most attractive way. Itmeans shaping the land to make the most of the site’s natural features and ad-vantages. It means building such necessary structures as fences, walls, and pa-tios. Finally, it means selecting and growing the plants that best fit the design.
The smaller the house, grounds, and budget, the greater the need for correct andcomplete planning, because every square foot of space and every dollar mustproduce maximum results. Plan for the best use of the site and minimum up-keep as well as pleasant appearance.
Program Development andAnalysis of Site and FamilyNeedsThe first step in landscape design is to develop aspecific program based upon:
• The people who will use it, their cultural needs,individual desires, and economic abilities
• The climate
• The site, its immediate surroundings, topo-graphic and ecological conditions, and all objects,natural and man-made now existing on the siteor planned for the future
• The available materials and methods of fabrica-tion
The next step in landscape design is to conduct asite inventory and to develop a site analysis.Analyze the site in terms of what features to keep,what features to accentuate and what features toremove. Next, bring to mind what cultural, physi-cal and emotional needs to address. Specificallyanalyze how the existing landscape fits in with theseneeds and what manipulations will be needed todevelop the ultimate landscape.
Factors Influencing LandscapeDesign
The Lot and Its CharacteristicsIn laying out a design, consider preserving the site’sbest natural resources, such as mature trees, brooks,ponds, rock outcroppings, good soil, turf, andinteresting variations in the terrain. These naturalelements affect the ease of construction and land-scape possibilities. A careful survey of the areashould be made to determine whether site condi-tions will be a deterrent or can be incorporated intoa design plan. Examples of problems are thin,overcrowded trees which should be removed. Theremight be micro environmental problems on a sitethat requires special consideration, such as lowplaces with poor air drainage or a spot with poorsoil and water drainage.
Changes in elevation can add interest and variety tothe home landscape. The character of the land, itshills, slope, and trees should help determine thebasic landscape pattern. A hilly wooded lot lendsitself to an informal or natural design, with largeareas left in their natural state. In such a setting, itmay be particularly appropriate to retain largetrees.

Chapter 15 Landscape Design 4
Because natural slope variations are usually anasset, excess grading of terraces or retaining wallsshould be avoided. If these features are necessary tofacilitate construction or control water drainage,they should be designed to enhance the naturalterrain.
Neighborhood Sights and SoundsIt is important to keep in mind throughout thedesign process the elements of the surroundingenvironment. These elements include both visualand audio stimuli. A basic rule to remember is:keep good elements as visual and audio “assets”and screen out the undesirable elements. Don’t letyour design get too complex though--often a shrubor two will provide all the screening that is neces-sary.
ClimateClimate includes light, all forms of precipitation,wind, and temperature. All these affect the way ahouse should be placed on a lot, how the land isused and what is planted. In planning the grounds,don’t fight the climate; capitalize on its advantages.For example, orienting the long axis of the house toface between due south and S 17oW will maximizesolar gain and enhance winter warming and sum-mer cooling. In warm regions, enlarge the outdoorliving area if possible. In cold regions, plant so thatthe winter scene is enjoyed from the inside.
Evergreens and hedges are picturesque whencovered with snow. Since people respond differ-ently to sun and shade, it is important to study theamount and location of each on the lot. Sun andshade patterns change with the seasons and varyeach minute of the day. The sun is highest andshadows are shortest in the summer.
Northern exposures receive the least light, andtherefore are the coolest. The east and west receivemore light; western exposures are warmer thaneastern because they receive afternoon light. Thesouthern orientation receives the most light andtends to be the warmest.
Plan future shade from tree plantings with greatcare in order to keep sunny areas for garden, sum-mer shade for house and terrace. Deciduous trees(those that shed their leaves) shade the house insummer and admit the sun in winter. Place trees offthe corners (rather than the sides) of the housewhere they will accent the house but not blockviews and air circulation from windows. Rememberthat over-planting trees tends to shut out sun andair.
Family ActivitiesUse of the land is an important factor in landscapedesign. Analyze the activities of the family. Forexample, small children need open lawn for play-ing, gardeners need space for growing vegetablesand flowers. Make allowances for future changes.Consider outdoor living, recreation, gardening, andhousehold servicing.

Chapter 15 Landscape Design 5
Cost-Effective MaintenanceDecide on maintenance standards. For the personwho enjoys spending many hours about the yard,landscape design may be elaborate. However, ingeneral, the simpler the site, the less there is tomaintain. A low-maintenance plan is the goal ofmost homeowners. This may be achieved, to a largeextent, in the planning stage, by careful attention tothe nature of the site. Existing trees, elevations, andthe use to be made of the area should be primeconsiderations. Low maintenance may be achievedby adopting one or more of the following possibili-ties:
• Minimize lawn area. Consider using dwarfturfgrass varieties.
• Use ground covers and low maintenance peren-nials with natural pine, straw, barkchips, or othermulches.
• Use paving in heavily traveled areas.
• Provide mowing strips of brick or concrete toedge shrub and flower beds.
• Use fences, walls or informal hedges instead ofclipped formal hedges for screening.
• Use raised flower beds and planters for easyaccess and lower maintenance.
• Install an underground irrigation system in areasof low rainfall.
• Keep flower beds small. Use flowering trees andshrubs for color.
• Be selective in the choice of plant materials. Someplants require much less care than others.
• Use native plant materials, as appropriate.
• Keep the design simple.
• Use mulches for weed control when possible.
• Group high water use plants in one area of thelandscape to conserve time and water whenirrigating.
• Use dwarf, compact and insect and diseaseresistant varieties.
Definition of Areas and DesignConsiderationsAreas of the landscape are defined in terms ofdesired use: the public area, the private area, andthe service and work area. The public area is thesection that passersby view. The living or privatearea is for the family and may contain a patio, deckor porch for outdoor sitting, entertaining or dining.The service and work area should provide a placefor special interests such as a garden shed or toolstorage area. Well defined and adequate separationbetween these use areas is usually desirable toavoid conflicts, especially in terms of pedestrianand vehicular circulation.
When defining the areas of the landscape, think interms of a series of “outside rooms”, each with afloor, walls and a ceiling. This will help you todefine the areas as well as help you to establishwhat plant material to use and where to place it.
Private or Outdoor Living AreaThe private living area or outdoor living room hasbecome an important part of the American home.No yard is too small to have a private sitting areawhere family and guests can gather. Where pos-sible, there should be easy access from the house tothe outdoor area. The ideal arrangement is to havethe living room open onto a porch or terrace, and/or have the kitchen near the outdoor dining area.The outdoor living room can be simple. An open,grassy area enclosed by a wall or shrubs enables thehomeowner and guests to sit outdoors in private. Amore elaborate outdoor living room can be devel-oped by introducing a series of gardens or gardenstructures such as paving material, benches andplanters.
The outdoor private area can serve the followingfunctions:
Outdoor entertainingFamily relaxationRecreationOutdoor eatingAesthetic enjoyment
Chapter 15 Landscape Design 6
The following are guidelines to consider whenplanning major private areas:
Privacy: The area should be enclosed frompublic view or nearby neighbors. Properlygrouped shrub borders and trees will do this. Fora small area, use a fence to save space. Theprivate area should be screened from work areas,such as clothes lines, wood piles, garden sheds,and other less pleasant views.
Livable touch: Furniture should be attractive,designed for outdoor use, and appropriate forthe size of the landscaping. Garden accessoriesshould be kept to a minimum and be simple andunobtrusive.
Year-round interest: If the area is visible fromthe house or if the area is frequented in thewinter, the outdoor living area should beplanned so the selection of plant material isvaried and so there is interest throughout theyear. For winter interest, select shrubs and treeswith interesting form and texture, colorful bark,evergreen foliage, or colorful fruit. The rest of theyear use flowers, shrubs, and trees to createinterest. Landscape embellishments such aspools, statuary, stone steps, paving, walls, bird-feeding stands, and other architectural featureswill add interest to the garden. Architecturaldetails do not change with the seasons, and theygive interest and meaning to the garden through-out the year.
Climate control: Control of weather in theoutdoor living area helps to extend the period ofusefulness. Shade trees screen the area from thehot sun. Windbreaks cut down some of the windin the fall. An awning or lattice roof can protectagainst inclement weather. A garden pool orfountain can convey the effect of coolness duringthe hot summer season.
The terrace or sitting area: The center of activityfor a living area is often a space arranged withgarden or patio furniture. It may be a porch,deck, or terrace next to the house, or the specialsection of the living area. This latter area mightbe under the shade of a large tree or in a shadycorner. The sitting center may be either paved orin turf. Flagstone, brick, concrete blocks, orconcrete with redwood dividers are materialscommonly used for surfacing the outdoor ter-race. The size of the paved terrace depends uponits expected use and the type and amount offurniture desired. An area 10 feet by 10 feet willhold four chairs and is about the minimum size
for accommodating four people comfortably.Increase the size if space is desired for a picnictable. This area may also include a grill or out-door cooking area.
The play area: To accommodate the specialinterests of small children, a play area can be apart of the outdoor living area. For very youngchildren, a small area enclosed by a fence nearthe kitchen or living area may be desirable. Aswing, sand box, or other equipment can beplaced here. In yards with a good deal of openlawn space, there is room for croquet, badmin-ton, or a portable wading pool. A large tree in theback yard may be ideal for a tree house. A paveddriveway or parking area makes an ideal area forbadminton, basketball, or shuffleboard for olderchildren, as well as tricycling or roller skating foryounger ones. Since ages of children in a familyare always changing, it is necessary to makedesign adjustments to meet changing recre-ational needs.
Enclosed Front Yard as a Private Area: The areain front of the majority of homes has traditionallybeen left more or less open so the passing publiccan view the home. Plantings, such as hedges ora screen planting of trees and shrubs along thestreet in order to make the public area private,have been used to provide privacy for the frontarea. Privacy in the front yard may be desirablewhen a picture window faces the street or whenthe front yard is used for outdoor sitting. Wherespace is limited, a tall attractive fence mayprovide privacy and be used as an attractivebackground for shrubs and smaller plants.
Service and Work AreaWhen designating the service area, consider prox-imity to out-buildings, such as a garage. Spaceoften needs to be provided for permanent clotheslines, garbage cans, trash burners, air-conditionerunits, tool storage, wood storage, vegetable garden,compost, cutting garden, cold frame, small green-house, or kennel. Service facilities should not bevisible from the outdoor living area or from thestreet. However, an exception might be an attractivegreenhouse or tool storage building designed andconstructed so that it blends well into the overallsetting, with an interesting composition of plantmaterial around it. Wood or wire fences, brick ormasonry walls, or plant material alone or in combi-nation are the materials most commonly used tohide or screen service areas.

Chapter 15 Landscape Design 7
Public AreaThis is the area, generally in the front facing thestreet, that the public sees. The landscape in thisarea should create the illusion of spaciousness. Keepthe lawn open, keep shrubs to the side and infoundation plantings. When selecting shrubs toframe the front door, consider their texture, color,size, and shape so they will enhance the total effectof welcoming guests. Tall trees in the backyard andmedium-sized ones on the sides and in front willhelp accomplish this effect. The house is to be thefocal point of the view.
Driveways should be pleasing in appearance,useful, and safe. The landscaping of many homes isspoiled by poorly designed and maintained drive-ways. Some driveways tend to cut up the yardunnecessarily. Parking areas and turnabouts shouldbe provided when practical. If possible, the drive-way should be hard-surfaced because it is neaterand requires less maintenance than unpaved drive-ways. Do not plant tall shrubbery at a drivewayentrance or allow vegetation to grow so tall that itobstructs the view of the abutting road in eitherdirection.
In planning the home grounds, give careful consid-eration to foot traffic patterns so there will be easyaccess from one area to another. This traffic may beserved by walkways, terraces, or open stretches oflawn. In areas of heavy use, paved surfacing mate-rial is best.
Design of the walk system to the primarily-useddoor will often depend on the location of the doorand guest parking as well as the topography of theland. If guest parking is at the edge of the street, astraight walk is probably best if the grade is suit-able. When the guest parking area is planned for theproperty, the walk might more logically lead fromthe guest parking area to the front door. Foot trafficcan use the driveway.
Sometimes the topography of the land will make itdesirable to have the entrance walk start at the edgeof the property and curve to the front door to takeadvantage of a gradual grade. However, avoidcurved walks that have no apparent reason forcurving.
For a residence, make the primary walk at least 4feet wide. Build walks so they are safe. Avoid usingmaterials that are rough or raised, since it is pos-sible to trip over or catch one’s heel on such materi-als. Design steps so they will be safe, especially inwet or icy weather. Make the treads wider and therisers shorter than the treads and risers used in-doors. Install handrails where needed.
Elements of DesignThere are no hard and fast rules for landscapingsince each design is a unique creation. However, thefollowing list of design elements are good basicguides and should be incorporated as part of thefinal plan. Landscaping, as in other art forms, isbased on certain elements of design, which arediscussed here.
ScaleScale refers to the proportion between two sets ofdimensions. Knowing the eventual or mature size ofa plant is critical when locating it near a building.Plants that grow too large will overwhelm and maypotentially be destructive to a building. Smallplantings around a large building can be similarlyinappropriate. It is essential, therefore, to know thefinal size of a particular plant before using it in alandscape. Both the mature height and spread of aplant should be considered.
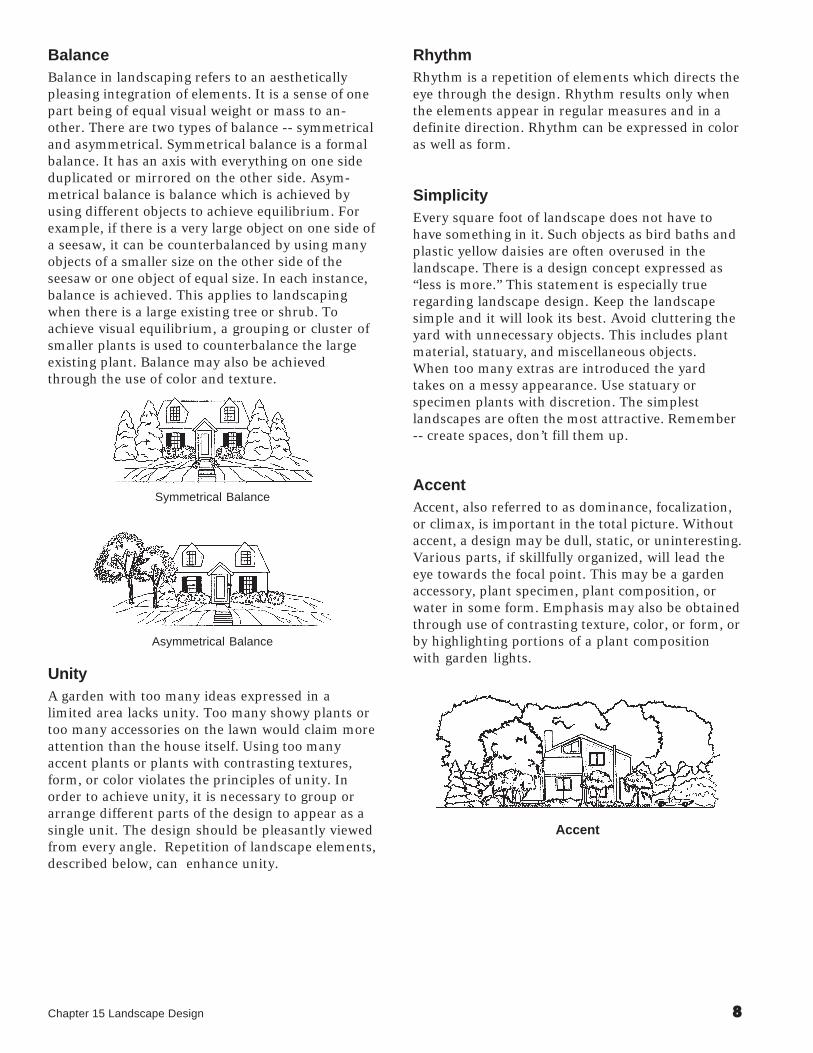
Chapter 15 Landscape Design 8
BalanceBalance in landscaping refers to an aestheticallypleasing integration of elements. It is a sense of onepart being of equal visual weight or mass to an-other. There are two types of balance -- symmetricaland asymmetrical. Symmetrical balance is a formalbalance. It has an axis with everything on one sideduplicated or mirrored on the other side. Asym-metrical balance is balance which is achieved byusing different objects to achieve equilibrium. Forexample, if there is a very large object on one side ofa seesaw, it can be counterbalanced by using manyobjects of a smaller size on the other side of theseesaw or one object of equal size. In each instance,balance is achieved. This applies to landscapingwhen there is a large existing tree or shrub. Toachieve visual equilibrium, a grouping or cluster ofsmaller plants is used to counterbalance the largeexisting plant. Balance may also be achievedthrough the use of color and texture.
Symmetrical Balance
Asymmetrical Balance
UnityA garden with too many ideas expressed in alimited area lacks unity. Too many showy plants ortoo many accessories on the lawn would claim moreattention than the house itself. Using too manyaccent plants or plants with contrasting textures,form, or color violates the principles of unity. Inorder to achieve unity, it is necessary to group orarrange different parts of the design to appear as asingle unit. The design should be pleasantly viewedfrom every angle. Repetition of landscape elements,described below, can enhance unity.
RhythmRhythm is a repetition of elements which directs theeye through the design. Rhythm results only whenthe elements appear in regular measures and in adefinite direction. Rhythm can be expressed in coloras well as form.
SimplicityEvery square foot of landscape does not have tohave something in it. Such objects as bird baths andplastic yellow daisies are often overused in thelandscape. There is a design concept expressed as“less is more.” This statement is especially trueregarding landscape design. Keep the landscapesimple and it will look its best. Avoid cluttering theyard with unnecessary objects. This includes plantmaterial, statuary, and miscellaneous objects.When too many extras are introduced the yardtakes on a messy appearance. Use statuary orspecimen plants with discretion. The simplestlandscapes are often the most attractive. Remember-- create spaces, don’t fill them up.
AccentAccent, also referred to as dominance, focalization,or climax, is important in the total picture. Withoutaccent, a design may be dull, static, or uninteresting.Various parts, if skillfully organized, will lead theeye towards the focal point. This may be a gardenaccessory, plant specimen, plant composition, orwater in some form. Emphasis may also be obtainedthrough use of contrasting texture, color, or form, orby highlighting portions of a plant compositionwith garden lights.
Accent
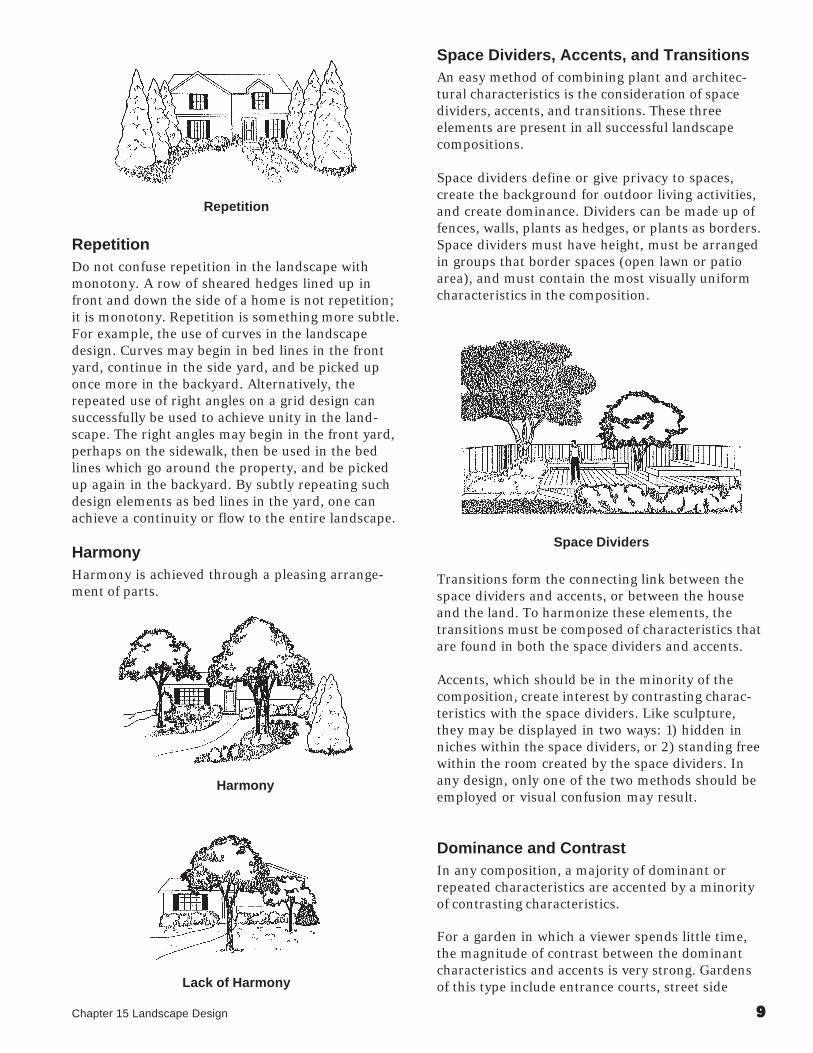
Chapter 15 Landscape Design 9
Repetition
RepetitionDo not confuse repetition in the landscape withmonotony. A row of sheared hedges lined up infront and down the side of a home is not repetition;it is monotony. Repetition is something more subtle.For example, the use of curves in the landscapedesign. Curves may begin in bed lines in the frontyard, continue in the side yard, and be picked uponce more in the backyard. Alternatively, therepeated use of right angles on a grid design cansuccessfully be used to achieve unity in the land-scape. The right angles may begin in the front yard,perhaps on the sidewalk, then be used in the bedlines which go around the property, and be pickedup again in the backyard. By subtly repeating suchdesign elements as bed lines in the yard, one canachieve a continuity or flow to the entire landscape.
HarmonyHarmony is achieved through a pleasing arrange-ment of parts.
Harmony
Lack of Harmony
Space Dividers, Accents, and TransitionsAn easy method of combining plant and architec-tural characteristics is the consideration of spacedividers, accents, and transitions. These threeelements are present in all successful landscapecompositions.
Space dividers define or give privacy to spaces,create the background for outdoor living activities,and create dominance. Dividers can be made up offences, walls, plants as hedges, or plants as borders.Space dividers must have height, must be arrangedin groups that border spaces (open lawn or patioarea), and must contain the most visually uniformcharacteristics in the composition.
Space Dividers
Transitions form the connecting link between thespace dividers and accents, or between the houseand the land. To harmonize these elements, thetransitions must be composed of characteristics thatare found in both the space dividers and accents.
Accents, which should be in the minority of thecomposition, create interest by contrasting charac-teristics with the space dividers. Like sculpture,they may be displayed in two ways: 1) hidden inniches within the space dividers, or 2) standing freewithin the room created by the space dividers. Inany design, only one of the two methods should beemployed or visual confusion may result.
Dominance and ContrastIn any composition, a majority of dominant orrepeated characteristics are accented by a minorityof contrasting characteristics.
For a garden in which a viewer spends little time,the magnitude of contrast between the dominantcharacteristics and accents is very strong. Gardensof this type include entrance courts, street side

Chapter 15 Landscape Design 10
foundation plantings, entrances to public buildings,or plantings seen from the highway. The magnitudeof contrast refers to the degree of change betweenvisual characteristics such as plant type, height,form, color, and texture. Generally, the ratio ofdominant characteristics to contrasting featuresshould be about 8:2 or 9:1. Also, the accents must beconcentrated in one area. Gardens of this type takeon a bold, architectural effect, as in many of thecontemporary California gardens. The effect can begrasped and understood at a glance.
The contrast between the space dividers and theaccents is created by:
• Tree types: evergreen and deciduous.
• Form: the evergreens are pyramidal as contrastedwith the rounded viburnum.
• Height: the evergreens grow to at least 40 feet ascontrasted with viburnums, growing to about 15feet.
Drawing a Landscape PlanThe following section provides the informationnecessary to draw a landscape plan that embodiesthe elements of good design. These steps are forthose who want the fun and satisfaction of prepar-ing their own landscape plan. They are:
1. Preparing the map.
2. Deciding how the ground area is to be used.
3. Placing use areas on the map.
4. Developing the landscape plan.
5. Preparing a planting plan.
Completing these steps will enable you to develop afinal plan that can be implemented over severalyears as time and money permit.
Step 1 - Preparing Baseline Map.
Prepare a scale map of the home grounds andtake the site inventory. Use graph paper and letone square equal so many feet, or draw to scaleusing a ruler or an engineer’s scale.
SuggestedScale Small Lot Large Lot
Engineering 1 inch equals 10 feet 1 inch equals 20 feetArchitectural 1 inch equals 8 feet 1 inch equals 16 feet
The map should include the following:
• Property lines
• Undesirable features of home grounds or adjoin-ing property
• North arrow
• Views - point arrows in direction of each goodview
• House, garage, other buildings
• Doors, windows, porches, and location of rooms
• Existing trees, rock outcroppings
• Walks and driveways, if already constructed
• Contour of the land (use an arrow to showdirection of surface water flow)
• Scale used
• Location of septic tank or sewer lines
• Location of utility lines
Step 2 - Deciding the Ground Area.
Items listed below are most often included in thefinal development. Make a list that suits yourindividual needs.
• front lawn area or public area
• laundry area
• vegetable garden
• cooking and eating area

Chapter 15 Landscape Design 11
• garden pools
• walks
• flower beds
• outdoor living or private area
• children’s play area
• small fruit
• driveway
• guest parking
• turnabouts
• garage
• other items particular to your land area
Step 3 - Placing Use Areas on the Map.
Place the use areas on the map. Fit them togetherwith two considerations, traffic flow and use.How will people move from one area to anotheror from the house to an outside area be func-tional in relation to the house? Will it make useof existing features such as views or changes inthe terrain? Try different combinations in rela-tion to rooms of the house, surrounding areas,and potential views.
Step 4 - Develop the Landscape Plan.
Design driveways, parking areas, and walks.
Indicate where landscape elements are neededfor (1) separating areas, (2) screening undesirableviews, and (3) providing shade, windbreaks,beauty.
Do not attempt at this point to name the treesand shrubs, but think in terms of plant massesthat will serve a purpose and help tie the variousareas together into a unified plan consideringdesign elements previously discussed.
In preparing the plan, use landscape symbols toindicate trees and shrub masses.
Landscape Symbols

Chapter 15 Landscape Design 12
Draw symbols to scale to represent the actualamount of space that will be involved. Forexample, a white pine tree at maturity will havea spread of approximately 20 feet. Make the scalediameter of the symbol in this case 20 feet.
Indicate on the map where paving, plants, andstructures will be. In developing the plan, seethat the proposed scheme is practical and thatthe following questions are addressed:
a. Is the driveway design pleasing, useful, andsafe?
Have the following been provided for: safeentrance? turnabout? guest parking?
Will guests use the front door?
Is the coal bin or oil tank handy to the driveway but screened from public view?
Will the proposed drive be too steep?
b. Are the walks convenient? Are they of asuitable width and constructed with appro-
priate paving material?
c. Will the view be attractive from the livingroom?
the picture window?
the porch?
the dining room?
d. Has an outdoor living area been provided,and is it adequately screened from neighbors?
the service area?
the buildings?
e. Is the clothesline close to the laundry?
f. Do all the parts fit together into a unifiedplan?
g. Have a good setting, background, andprivacy been provided?
h. Are the house and major plants set back incase the highway department/local govern-ment widens the street?
i. Will the proposed location of the septic tankand drainage fields interfere with plantingneeded shade trees?
Step 5 - General and Specific Planting Plan.
First, for each tree or shrub mass on the plan,make a set of specifications. These specificationsshould include:
Height - low, medium, tall
Form - spreading, upright, arching, globe
Purpose - shade, background, hedge, screen,accent, mass
Seasonal Interest - fruit, flowers, foliage
Type - evergreen, broadleaf evergreen, de-ciduous
Maintenance - subject to insects or plantdiseases
Cultural Needs - shade, sunlight, moisturerequirements

Chapter 15 Landscape Design 13
Then, select a plant or group of plants to meet thespecifications. Consult garden books and nurserycatalogs. Visit a local ornamental or botanicalgarden or nursery. Become familiar with plantmaterial and discuss your plant with nurserystaff.
Designate specific plantings on the map devel-oped in Step 4.
4.
Planting PlanPlanting Key
1. Yew 11. White pine
2. Holly 12. Spirea
3. Daphne 13. Perennial border
4. Barberry 14. Weigelia
5. Azaleas 15. Flowering Quince
6. Hemlock 16. Potentilla
7. English Ivy 17. Flowering Crabapple
8. Pin Oak 18. Lilac
9. Hydrangea 19. Existing Maple
10. Viburnum

Chapter 15 Landscape Design 14
Selecting Plant MaterialsWell-chosen plantings are usually essential toachieving a desired landscape effect. There arehundreds of varieties of trees, shrubs, vines,groundcovers, perennials and annuals from whichto choose. Remember, plants are not merely orna-mental accessories. They have mass, define spacein, and, consequently, contribute to the overall thegarden design. When selecting plants, considerboth their cultural needs and aesthetic value.
Cultural Characteristics
Hardiness: This is the plant’s ability to withstandwinter and summer climatic changes, which willdetermine its longevity or permanence. In NewHampshire we are usually more concerned witha plant’s ability to survive our long, cold winters,than with its ability to survive summer heat.Plant hardiness zone ratings are based on anarea’s mean minimum winter temperature. Ahardiness zone map for New Hampshire hasbeen included at the end of this chapter.
Soil, moisture and drainage: These are impor-tant parts of a plant’s environment. Some plantsrespond unfavorably when a change occurs inthis environment; some plants can tolerateextremely dry or wet conditions while otherscannot.
Degree of sun or shade: This depends on wherethe plant is to be located in the garden. Someplants require shade, while others require fullsun for best growth.
Maintenance: When selecting plant materials,consider the level of maintenance that may berequired. Choose trees and shrubs that aregenerally low maintenance and tend to be dis-ease and insect resistant. Usually a fast growingplant has a short life span and will consequentlyneed replacing after a few years.
Pollution and salt resistance. Depending on thegrowing environment, tolerance of pollution,either atmospheric or soil or of salt, especially forstreet, may be an important consideration.
Ornamental Characteristics
Plant Size: The size which a plant attains atmaturity must be considered when selections aremade for the landscape plan. A common mistakeis selecting plants which soon become too largefor their location. The drastic pruning whichthen becomes necessary adds to the cost ofmaintenance and may reduce the grace andbeauty of the specimen. Overgrown plantswhich are left unpruned will alter the balanceand accent of the design, and may partially hidethe house which they are supposed to comple-ment. The use of newer, more compact cultivarsmay prevent this problem, as well as contribut-ing to lower maintenance.
The landscape picture is constantly changingbecause the plants which give it form and sub-stance are continually growing. This fact pre-sents a challenge to the landscape designer whichis not found in most other artistic media.
Plant Form: Trees and shrubs used in landscap-ing develop many distinct forms. Some commonforms include:• prostrate or spreading• round or oval• vase• pyramidal• columnar
The form of mature shrubs and trees is usuallymore open and spreading than that of youngplants. For example, the head of a young oaktree may be pyramidal in shape; during middleage the head is an irregular oval; and during oldage a large, massive oak may have a spreadingvase form.
Ground covers, such as turf, low-spreadingshrubs, creeping plants, and prostrate vines areimportant materials in landscaping. The princi-pal use of turf is for the lawn area. Other groundcover plants are commonly used on banks whichare too rough or steep to mow or under treeswhere grass grows poorly.
Shrubs are woody plants which grow to a heightof 12 to 15 feet. They may have one or severalstems with foliage extending nearly to theground. The following examples represent someof the more common forms of shrubs:• Low spreading: junipers• Round or Upright: many types of deciduous
shrubs• Vase: Vanhoutte spirea• Pyramidal: arborvitae• Columnar: junipers
Chapter 15 Landscape Design 15
Trees are woody plants which typically growmore than 15 feet tall and commonly have onlyone main stem or trunk, although there are manymulti-stem types. The crown or leafy portion ofthe tree develops a typical form such as;Round or Oval: most common trees such asmaple, oak and pine• Vase: elm• Pendulous or Weeping: willow, cherry• Pyramidal: spruce, fir and hemlock• Columnar: Lombardy poplar
Trees are long-lived and relatively inexpensive,given their initial cost and maintenance whencompared with lawns or flower beds. In the pastmany builders have committed costly errors bydestroying trees when establishing new residen-tial subdivisions. Most real estate developersnow appreciate the value of trees and attempt tosave them when land is graded prior to construc-tion. Regardless of our affection for trees, wemust recognize they do not live forever. De-crepit, hazardous, or improperly located treesshould usually be removed and replaced withnew, more suitable species.
Plant Texture: The texture of plant materials isdependent on the size, branch structure anddisposition of the foliage. Plants with largeleaves which are widely spaced have coarsetexture. A plant with small, closely spacedleaves has fine texture. Extremes in texturewhich prevent harmony in the compositionshould be avoided. On the other hand, somevariation in texture is needed to give variety.Texture can be influenced on a seasonal basis,depending on whether the plant is deciduous orevergreen.
Plant Color: Although green is the basic color ofmost plant materials in the landscape picture.Visual variety may be enhanced by using plantswith lighter or darker foliage. Also, fall foliagecolor may be introduced by the selection offlowering shrubs which may also producecolorful fruit. Care should be exercised in theuse of particularly showy plants such as hydran-gea and blue spruce. Such plants may so domi-nate the landscape as to destroy the balance andunity of the composition. Select colors whichrelate to the house exterior and other landscapeelements, depending on their location andrelationship.
Other Characteristics: Other ornamental charac-teristics to consider when selecting plant materi-als include winter habit, bark, fragrance, persis-tent fruit, and multi-seasonal appeal.
Deciduous Shade and FloweringTreesTrees are the basic element for any landscape plan.They set the stage for the entire home groundsdesign. The type used and their location determineto a great extent what other plantings are appropri-ate.
Trees are the most permanent plants we grow.Many will live and enhance the landscape for 100 ormore years if they are given a chance. Because ofthe permanency of trees and their importance in thelandscape, care must be taken to select the bestspecies for each situation. The wrong tree or oneplanted in the wrong spot can actually detract fromthe overall landscape. Five to ten years of precioustree growing time may be lost before the mistake isrealized.
How to Choose TreesNo species or variety of tree is sufficiently superiorto be called “best” without some qualifications.However, there are many excellent varieties.Choosing a variety with the characteristics that willprovide the greatest satisfaction in a given situationrequires careful consideration.
Most people make the mistake of selecting a par-ticular tree and then trying to fit it into their land-scape. A better approach is to decide where a tree isneeded and what that tree should do in the land-scape. After the desired type of tree has beendetermined, then it is appropriate to select a speciesto fulfill those requirements.
Avoid trees that are susceptible to storm damage,ones that are hosts to destructive insect and diseasepests, and those that produce an over-abundance ofobjectionable seeds or fruits. The choice will gener-ally depend on existing conditions at the plantingsite. These include room for top and root growth,soil type, subsurface drainage, and the kind ofplants you will be able to grow under the tree.
A tree is a long-term investment. Therefore, startwith a high quality plant. Trees at least 5 to 8 feettall, either balled and burlapped or containergrown, are usually the best buy. Difficult-to-transplant species may be more easily established ifyou start with smaller sizes. A reputable dealer canhelp select the tree and will guarantee it to be aliveand healthy.

Chapter 15 Landscape Design 16
Most of the tree species described in the followingsection are commonly available in retail nurseriesand garden centers. Some species have been in-cluded on the list because they are commonlyavailable even though they may not be recom-mended for general landscape planting. A localnursery will probably not stock all of the speciesincluded in this list, but will generally be able toobtain a specimen for you if given enough time. Ifyou don’t have a green thumb, a nursery profes-sional will probably plant the tree for a smalladditional cost.
Improved varieties are available for most of thespecies included in the list. The term cultivar wascoined by L.H. Bailey to designate a cultivatedvariety. In most cases a cultivar is asexually propa-gated from the original selected parent material.Most of the selected cultivars are superior to thestandard varieties grown from seed and are wellworth the added cost needed to produce andpurchase them.
Trees are often divided into three groups accordingto their size. Large trees generally reach a matureheight of greater than 60 feet. Trees with a matureheight between 30 and 60 feet make up the medium-sized group. Small trees usually grow to a heightless than 30 feet. The need for small trees may oftenbe satisfied by flowering trees.
Environmental ConsiderationsWhether a tree lives up to its potential for healthand beauty is largely dependent upon its environ-ment: soil, water, light, and surrounding buildingsand vegetation. Purchase trees on the basis of theirexpected behavior under the prevailing growingconditions unless these conditions can be changedsignificantly.
Few trees tolerate wet or very heavy soils. Verysandy or gravelly soils can cause problems for treesas well; they tend to remain too dry. Nearly alltrees, however, respond favorably to deep andfertile topsoil with good internal drainage. Whenthe soil is inhospitable, try to identify species thatwill tolerate that problem or add good soil in raisedbeds to help ensure that trees will thrive and flowerwell.
Flowering and fruiting as well as growth rate anddensity are greatly influenced by the duration andintensity of sunlight. Most flowering trees areadapted to full sunlight and perform better awayfrom buildings or trees which cast dense shade
during most of the day. Those preferring shadeflower best where there is partial shade all day,especially in the afternoon.
Availability and AdaptabilityOur range of choices among trees is largely deter-mined by their general adaptability to the area. Theclimatic range over which a tree will thrive isusually reflected in the species or varieties offeredin local retail nurseries and garden centers.
Flowering TreesIn the home landscape, flowering trees are second-ary in importance to shade trees. The basic ele-ments of framing, background, and shading areprovided by shade trees, while flowering treesprovide showy and unusual features with theirfloral beauty and seasonal interest. In addition,many flowering trees have colorful or interestingfruits which may be edible or attractive to birds.
Flowering trees must fit into the landscape. Onlyafter deciding where they can be used most effec-tively should you try to select the variety to be used.If a certain type of flowering tree is desired, makethe necessary changes to fit it into the landscaperather than simply placing it in the first open space.
Use relatively few flowering trees in the landscape.A small, residential property usually needs onlytwo or three trees. Rows, large masses, and formaldesigns can be used more readily on estates orcommercial properties.
When selecting among the many species and variet-ies of flowering trees available, consider:• Size, form, and overall appearance of the tree.• Intensity, duration, and color of the flowers and
season of bloom.• Cultural requirements, including pruning,
fertilizing, and protection from insects anddiseases.
Give consideration to those trees with other strikingfeatures. Some trees which do not have spectacularflowers compensate by providing brightly coloredor persistent fruits, pods, fall leaf color, bark, oruniquely colored summer foliage.
Whether a tree is considered a flowering tree isoften a matter of opinion. All trees produce flowers,but whether we value them for the blossoms de-pends on how colorful, spectacular, or unusual they

Chapter 15 Landscape Design 17
are. Few large trees are noted for their flowers.While their flowers may be noticeable, large treesusually are valued more for other reasons.
Fruiting characteristics and site selection should beconsidered together. Soft-fruited trees and thosewhich attract birds create periods of inconveniencewhen they drop fruit and create litter problems onpaved surfaces such as patios, walks, driveways, orgame-courts. Some native flowering trees arebeautiful, hardy and adaptable to landscape condi-tions. They should be used wherever possible.
Rare and Unusual TreesThere are many tree species that can be successfullygrown in northern New England, but are rarelyseen in our landscapes. Although not ordinarilyrecommended or readily available, these trees maybe useful to carry out a specific landscape theme, tosubstitute for an exotic type which is not locallyadapted, or may be prized for unusual form, flow-ers, fruits, bark, or foliage. Trees listed in thispublication are reasonably reliable and most arehardy throughout the region.
Unusual forms of common tree species such ascorkscrew willow, columnar or cutleaf maples, andtrees with unusual foliage color are not included.Brooklyn Botanic Gardens Handbook No. 63, 1200Trees and Shrubs - Where to Buy Them, is an excellentsource of information on where to obtain plants thatare not commonly available in nurseries and gardencenters. It may be ordered from the BrooklynBotanic Gardens, Brooklyn, New York 11225.
Problem TreesWhen selecting a tree to plant in the yard, it is niceto know exactly what you are getting. Many peopleplant a sapling, enjoy it for a few years, and thendiscover some serious disadvantages when the treereaches an effective height. The following list oftrees have certain disadvantages which you shouldbe aware of before you plant them in your yard.Most are inappropriate for street tree use.
Box Elder (Acer negundo).This tree has weak wood, is short-lived, is sus-ceptible to box elder bugs, and most types havepoor forms.
Silver Maple (Acer saccharinum ).One of the worst trees available because of itsbrittle wood and tendency to become hollow andhazardous. Its shallow surface roots can ruinsidewalks and driveways and prevent turfgrassgrowth underneath. Also susceptible to insects.Outlawed in some localities.
Tree of Heaven (Ailanthus altissima ). A weed tree that sprouts up everywhere and hasa disagreeable odor. It is outlawed in somecities.
Catalpa (Catalpa sp.).Catalpas have messy flowers and seed pods.
Flowering Dogwood (Cornus florida ).Because of the increasingly common occurrenceof dogwood anthracnose, use of this tree shouldbe tempered. Substitute Cornus kousa or usedisease resistant varieties as they become avail-able.
Ginko (Ginkgo biloba).Do not plant the female Ginkgo as its fruits havea very offensive odor. Use male selections only.
Black Walnut (Juglans nigra ).The tree roots produce a toxin that is harmful tocertain other plants, including tomatoes. Avoidplanting it near vegetable gardens.
Mulberry (Morus species).Mulberries have messy fruit.
Sycamore (Platanus occidentalis ).Leaves and seeds from this tree are messy; it hasbrittle wood and surface roots. Anthracnose, alate spring blight which occurs most years, willattack it.
Poplars (Populus species ).These trees have brittle wood and surface rootsystems, but their main problem is their suscepti-bility to canker diseases which disfigure andusually kill them. Some also have messy flowersor send up suckers from their roots.
Black Cherry (Prunus serotina).Has objectionable fruit, is susceptible to insects,and is susceptible to black knot fungus.
Black Locust (Robinia pseudoacacia).This tree is good for fence posts and firewood,but not for landscaping. It has brittle wood, issusceptible to cankers, and over time developsinto a copse of suckers.
Chapter 15 Landscape Design 18
Problem Trees continued
Willows (Salix species).These trees have very brittle wood and aresusceptible to canker diseases. Their roots willclog sewer and drain pipes. Some are attractiveon large lots, especially near water and in wetareas.
European Mountain Ash (Sorbus aucuparia ).Not for hot locations, insect and disease prob-lems can often weaken it and cause prematuredeath.
American Elm (Ulmus americana ).Use only Dutch elm disease resistant varieties, asavailable.
Siberian Elm (Ulmus pumila).Its brittle wood will result in severe damage inice storms, and its seeds and suckering habitmake it a pest. Also very short-lived. Note thatthe Chinese elm (Ulmus parviflora) is often con-fused with the Siberian elm, but is far superior.
In the following list of recommended trees, it is asimpractical to list all the superior species and varieties asit is impossible for every nursery to stock all of them.Every retailer will have some desirable varieties not listedhere. On the other hand, not all dealers will have all thoselisted. Several trees may not be readily available in thenursery trade or may have limited uses in the landscape.
Selected Shade and Flowering Trees
AMUR MAPLE, Acer ginnalaThe Amur maple is a small, round-headed,extremely hardy tree. Its red fall color is asbrilliant as any of the maples. The winged seedsoften hang on the tree after the leaves havefallen, adding interest to the tree in winter. It isone of the best of the small trees, requiringpractically no attention and able to grow in awide range of soil types. (15 to 18 ft. height;spread may equal height)
PAPERBARK MAPLE, Acer griseumThis round-headed, rather open maple growsmoderately fast while young. The bright, coppercolored bark peels off in paper-like strips creat-ing intense winter interest. The compoundleaves resemble box elder and change to a russet-red in the fall. Paperbark maple is best used as alawn or specimen tree where it is visible inwinter. It tolerates a wide range of soils and
exposures; it may need extra water during hotsummers. Best used in southern New Hampshireonly. (20-30 ft. height; spread: 1/2 to equalheight)
JAPANESE MAPLE, Acer palmatumThis large shrub or small tree is planted for itsinteresting foliage. There are many varietiesavailable, but the ones with red leaves and thosewith finely cut foliage are the most popular.Japanese maple can be grown in coastal northernNew England. A rich, well-drained soil high inorganic matter is needed for best growth. Japa-nese maple will not grow on poorly drained ordry soils. Although some varieties grow 25 feettall, most of the varieties commonly grown asornamentals will not get over 10 feet tall. Most ofthe varieties are very slow growing. (6 to 25 footheight; 6 to 25 foot spread)
NORWAY MAPLE, Acer platanoidesAlthough the Norway maple is a native ofEurope, it has been widely planted over theeastern United States. Most of the varieties ofmaple with unusual shape or foliage color havebeen derived from this species. They includesuch popular varieties as: ‘Schwedler,‘ withpurple leaves in early spring that change to darkgreen color; ‘Crimson King,‘ with purple leavesthat retain their color all summer; ‘Columnare,‘one of several varieties with a narrow, columnarhabit of growth; ‘Globosum’, a low-growing,round-headed tree that can be crown underutility wires; and ‘Summershade,’ a rapidlygrowing, heat-resistant variety with an uprightgrowth habit. Many other varieties of Norwaymaple have been selected and named. Because aname does not appear in the above list does notmean that it is not as good as the ones listed. Askyour nursery manager for advice on varieties notlisted.
The dense shade and shallow root system make italmost impossible to grow anything under aNorway maple. Its yellow flowers in earlyspring are interesting, but not especially orna-mental. It certainly has merit for planting inareas where you don’t care whether or not youcan grow anything in its shade. Norway maple’stend to aggressively out compete our nativeforest trees. To avoid future problems, useNorway maples with discretion (40 to 50 ft.height; spread may equal height)

Chapter 15 Landscape Design 19
RED MAPLE, Acer rubrumOne of the first signs of spring is the flowers ofthe red maple. The profusion of tiny, red flowerswith the background of smooth, gray bark is abeautiful sight. Red maple is also one of the firsttrees to change color in the fall. Some treesdevelop a red fall color, but many of them donot. Several improved varieties of red maplehave been developed that produce outstandingfall color such as ‘Red Sunset,’ ‘October Glory,’and ‘Autumn Flame.’ There are also varietiesavailable with a narrow crown. Red maple iseasy to transplant, grows rapidly and toleratesmoist soils. (40 to 60 ft. height; spread may equalheight)
SUGAR MAPLE, Acer saccharumThe fire-red to yellow fall color of the sugarmaple is one of the most beautiful sights innorthern New England. The sap of this tree canbe boiled down to produce maple syrup andsugar. Mature sugar maples show a wide varia-tion in form but tend to have a broad, roundedhead. Susceptibility to gas and smoke damagemakes sugar maple less suitable for city condi-tions than Norway and red maples. Improvedvarieties of sugar maple include a dwarf, globe-shaped form; a very narrow, columnar form; anda cut-leaved form. (60 to 75 ft. height; spreadmay be 2/3 of height)
SILVER MAPLE, Acer saccharinumSilver maple is a fast-growing, but relativelyshort-lived tree. Its brittle wood is too subject tostorm damage for it to be recommended forgeneral landscape use. The tree is also notoriousfor plugging sewer lines and lifting sidewalks. Itshould only be used where falling branches willnot be a hazard and where the roots cannotinterfere with sewers or sidewalks. The silveryundersides of the leaves are exposed when thewind blows; giving it some additional ornamen-tal value. (50 to 70 ft. height; spread may be 2/3of height)
HORSE CHESTNUT, Aesculus hippocastanumThe horse chestnut is a magnificent tree in thespring when its foot-long panicles of showyflowers cover the tree, resembling candles on aChristmas tree. It is definitely not a tree for thesmall yard. Its coarse texture and large sizemake it look out of place except in a very largearea. The horse chestnut has earned a badreputation in many areas. Its branches arerelatively weak and subject to storm damage.
The large nuts are produced profusely. Theyhave no economic or ornamental value and are anuisance wherever they fall, in addition to beingpoisonous.
The ‘Baumannii’ horse chestnut, a double-flowered variety, should be planted in preferenceto the standard varieties because it does notproduce seed. There is also a red-flowered formavailable that is more showy than the standardtypes. (50 to 75 ft. height; 40 to 70 ft. spread)
SERVICEBERRY, Amelanchier arboreaUpright in youth, and oval to spreading withage, this native plant has a slow to moderategrowth rate, depending upon the site. Its matureheight may exceed 40 feet in the best locations.Masses of small, white flowers in noddingclusters appear in early spring, followed bymaroon-purple, edible berries which are quicklyeaten by birds. The fall foliage is yellow, golden,or red. Used as a specimen or lawn tree, inborder masses or in naturalistic groups, it preferswell-drained sites. It is occasionally damaged byan assortment of leaf eating insects. Many newcultivars exist. ‘Princess Diana’ and ‘PrinceCharles’, both 25' tall are excellent.
PAPER BIRCH, Betula papyriferaThis native tree is a popular landscape specimenin northern New England, either as a single trunkor as a clump. The bark becomes chalky whitewith age, and peels in paper-like layers. It doesbest in well-drained, acid, cool soil. Paper birch’sgraceful catkins in spring, yellow foliage in falland white bark all year give it multi seasoninterest. (50 to 70 ft. height; 25 to 50 spread)
RIVER BIRCH, Betula nigraThe most interesting characteristic of the nativeriver birch is its salmon-colored bark that peelsoff in paper-thin layers. The tree is noted for itsability to grow in wet soils, but it will grow indrier situations as well. The river birch has beengreatly ignored in favor of the showier whitebirches, but it is a fine ornamental and should beplanted more. It is far more resistant to insectsthan the white birches. ‘Heritage’ is a highlyrecommended cultivar. (40 to 70 ft. height; 40 to60 ft. spread)

Chapter 15 Landscape Design 20
Selected Shade and Flowering Trees continued
EUROPEAN WHITE BIRCH, Betula pendulaThe European white birch is a very graceful, butrelatively short-lived tree, grown for its strikingwhite bark. The tree is extremely susceptible tothe bronze birch borer, an insect that can destroya large specimen tree in a single season. Birchborer can be a serious problem, particularly ontrees weakened by leaf miner damage. Fortu-nately, northern New England provides anexcellent habitat, and both problems are rarelyserious. (40 to 50 ft. height; spread may be 2/3 ofheight)
EUROPEAN HORNBEAM, Carpinus betulusHornbeam is a slow growing, pyramidal treewhile young; rounded at maturity. Light graybark covers its smoothly ridged or flattenedtrunk. Delicate, elm-like leaves and a densebranching habit characterize the tree. The seedsare borne in hanging clusters of leaf-like struc-tures. Several improved cultivars of hornbeamhave been developed, of which Columnaris, anarrow, pyramidal tree with dense branches, isthe most popular, being useful as a screen andplant. Hornbeam is difficult to transplant, so itshould be moved while small. It is a relativelypest free tree. (40-60 ft. height; 30-40 ft. spread)
CHINESE CHESTNUT, Castanea mollissimaChinese chestnut is resistant to the destructivechestnut blight disease which has almost entirelydestroyed the native American chestnut. Severalgovernment agencies have promoted plantingthis tree for both ornamental use and nut produc-tion. The flowers are produced in long, showycatkins in early summer; nuts, which are excel-lent for eating, are produced in large, pricklyburs that are a nuisance in the lawn where theyhave fallen. Therefore, it should only be plantedin areas where the burs will not be a problem.Tolerates hot, dry areas well. (40-60 ft. height;4060 ft. spread)
KATSURA TREE, Cercidiphylum iaponicumThis is a large, rounded-to-spreading tree oftenwith more than one trunk. The leaves, about thesame size and shape as redbud leaves but with aserrate or toothed rather than smooth leaf mar-gin, develop scarlet to yellow fall color. Katsuratrees are essentially pest free. Though somewhatdifficult to transplant, they make outstandingshade trees and should be more widely planted.(40-60 ft. height; variable 20-60 ft. spread)
EASTERN REDBUD, Cercis canadensisAn understory tree native to areas south of NewHampshire, it is noted for early, abundant rosypink flowers and graceful, upright habit. Thelarge, heart-shaped leaves emerge as reddishpurple and gradually change to a lustrous darkgreen. The foliage turns a mediocre yellow in thefall and usually drops quickly. Clusters ofdark-brown pods may persist through fall andwinter. The tree is used as a specimen, planted inmasses, or naturalized at the edge of woods. It isgenerally hardy in central and southern NewHampshire and tolerant of a wide range of soils.Be sure to buy plants propagated from northernseed sources and avoid the frequently less hardycultivars, which are available in white andtrue-pink. (10-20 ft. height; 15-20 ft. spread)
AMERICAN YELLOWWOOD, Cladrastiskentukea (lutea)Named for the color of its heartwood, the yellow-wood is a medium-sized tree with very showy,long panicles of fragrant, white pea-like flowersin late spring. Its bright green summer foliageand often good yellow-gold fall color make it adesirable shade and specimen tree. Its thin, graybark is similar to beech, and its lack of major pestproblems makes it an excellent tree for relativelysmall landscapes. Prefers moist soil and full sunto partial shade. (30-50 ft. height; 40-55 ft. spread)
KOUSA DOGWOOD, Cornus kousaA dogwood fairly tolerant of full sun and dry,compacted soil, his tree has a rounded shapewith horizontal branching, reaching about 20 feetat maturity. The Kousa dogwood flowers after itleafs out and has large, pin-wheel like, whitebracts with pointed tips. In the fall, the foliageturns a variable reddish purple to scarlet. Thefruit is 1/2' in diameter, reddish-pink,raspberry-like, and attractive to birds. This treemakes a beautiful small specimen in the limitedparts of southern New Hampshire where it isreasonably hardy.
CORNELIAN CHERRY, Cornus masRounded with dense, ascending branches, thisshrub-like but vigorous tree eventually reaches20 feet in height. Clusters of small, yellow flow-ers appear before the lustrous foliage, whichturns red in fall. The fruit is medium to large,maroon-red, cherry-like, edible, and attractive tobirds. White- and yellow-fruited selections areavailable. Use as a specimen or in groups orborders. It prefers excellent soil, is hardy, andrelatively pest-free.
Chapter 15 Landscape Design 21
TURKISH FILBERT (HAZELNUT),Corylus colurnaTurkish filbert is a well shaped ornamental treewith a regular, pyramidal habit of growth. Therough, corky bark and heavy crop of catkins,produced in April, make this a worthwhileornamental tree. It is especially adapted forplanting in hot, dry areas. No major insect ordisease problems. (40-50 ft. height; 15-40 ft.spread)
HAWTHORN, Crataegus spp.There are many species and varieties of haw-thorn. They are valued for their profuse flowers,fruits, and picturesque growth habit. They aredense and thorny plants, with white flowers andred fruits, though exceptions to these characteris-tics exist. Many are native to North America.They grow well in all but the wettest and poorestsoils and are used as specimens, naturalized atthe edge of woods, or in large formal plantings.The fruit is highly attractive to birds. Hawthornis subject to borers, cedar-hawthorn rust, fireblight, and leaf-eating insects. It is somewhatdifficult to transplant. Annual maintenance isbeneficial. Winter King hawthorn (C. Viridis‘Winter King’) and the Washington hawthorn (C.phaenopurum) are two of the most outstandinghawthorns for landscape use.
RUSSIAN OLIVE, Elaeagnus angustifoliaThe unique silver or grey foliage of Russian-oliveis its most striking feature. The flowers areinconspicuous but very fragrant. The brown,shredded bark of its crooked trunk may be verypicturesque. Russian-olive will grow in manytypes of soil, but it is especially adapted to hot,dry areas. Several diseases, including verticil-lium, can be devastating. It will grow in placeswhere few other trees will survive, and its salttolerance make it a good seaside tree. (12 to 15 ft.height; spread may equal height)
EUROPEAN BEECH, Fagus sylvaticaThe European beech is a better adapted land-scape specimen than the native American beech.The dark green, glossy foliage and smooth, lightgray bark make it a very handsome tree. Manyunusual cultivars have been selected from thisspecies. They include cultivars with unusualform, variable leaf shape, or unusual coloredfoliage. Beech is difficult to establish. (50-60 ft.height; 35-45 ft. spread)
WHITE ASH, Fraxinus americanaWhite ash does not grow as fast as green ash, butit will eventually become a larger tree. It devel-ops a purple fall color that is rather unique.White ash has the same borer problems as greenash. The new seedless varieties of white ash suchas ‘Rose Hill’ or ‘Autumn Purple’ should beplanted in preference to the standard varieties.(50 to 80 ft. height; spread may equal height)
GREEN ASH, Fraxinus pennsylvanicaGreen ash is a vigorous tree while young. Itdevelops a broad crown at maturity. The leavesturn a bright-yellow in fall but do not remain onthe tree long enough to be effective. It is droughtresistant and will grow on a wide variety of soiltypes. A borer insect can be a serious pest ofgreen ash while it is becoming established.Seedlings of green ash can be a problem in flowerbeds and untended areas; it is advisable to plantthe new seedless varieties such as ‘Marshall’sSeedless’ instead of the standard ones. (50 to 60ft. height; spread may be 1/2 of height)
GINKGO, Ginkgo bilobaGeological evidence indicates that the ginkgo hasbeen growing on the earth for 150 million years.Although it is one of the most primitive treesknown, it is one of the best adapted to cityconditions. The ginkgo has no known insect ordisease pests and, hence, never needs spraying.The interesting fan-shaped leaves of the ginkgoturn a clear yellow in fall. Only graftednonfruiting (male) varieties should be planted;the round, plum-like fruits of the female treeshave an obnoxious odor. Ginkgo will eventuallybecome a large tree, but it is slow growing andwill take at least 50 years to develop. (50 to 80 ft.height; 30 to 40 ft. spread)
HONEY LOCUST,Gleditsia triacanthos var. inermisNative honey locust trees are best known fortheir long, stiff, branched thorns that are aconstant hazard. They also produce long, flatseed pods that may be a nuisance. The improvedthornless (var. Inermis) and usually podlessvarieties of honey locust, such as ‘Sunburst’,’Shademaster’, ‘Skyline’, and ‘Majestic’ are someof the best for landscape use. Their lacy foliagegives a loose, open shade that is ideal for patiosand shade-loving plants. In the fall, the smallleaflets filter into the grass as they fall andrequire little raking. (30 to 70 ft. height; spreadmay equal height)
Chapter 15 Landscape Design 22
Selected Shade and Flowering Trees continued
GOLDENRAINTREE, Koelreuteria paniculataThe large, conspicuous, yellow flower clusters ofthe goldenraintree are produced in late Junewhen few other trees are in bloom. The flowersare followed by showy, bladder-like fruit thathangs like clusters of small Chinese lanterns untillate in the fall. It will grow in a wide variety ofsoils and has no serious insect or disease pests.However, it is a relatively short-lived tree, and isrelatively hardy only in southern New Hamp-shire. (30 to 40 ft. height; spread may equalheight).
GOLDENCHAIN TREE, Labumum x watereriGoldenchain tree is a striking sight in mid-springwhen it is covered with foot-long, pendulousclusters of bright yellow flowers. It is a vase-shaped tree that grows fairly rapidly. Thegoldenchain tree grows best during cool, moistsummers. (12-15 ft. height; 9-12 ft. spread)
SWEET GUM, Liquidambar styracifluaThe glossy, green, star-shaped leaves of the sweetgum are one of its most ornamental features,especially when they take on fall colors of yel-low, orange, red, and purple. Where it is givenroom to develop, few trees will approach it insymmetrical beauty. The interesting ball-shapedfruit hangs on the tree long after the leaves havefallen; they are a nuisance in the lawn when theyfinally fall. An additional ornamental feature isthe winged or corky bark projections that de-velop along the branches. Unfortunately, thinacid soils and low temperatures limit the use ofSweet Gum in northern New England. (30 to50 ft. height; 20 to 30 ft. spread)
TULIPTREE, Liriodendron tulipiferaThe native tuliptree needs a deep, fertile, moistsoil to develop properly. It is often difficult totransplant, but once established it will growrapidly and develop into a large tree. It is toolarge for the average-sized yard and should beplanted only where it has ample growing space.Pale-yellow, tulip-shaped flowers are producedin May. After the fruit breaks open in the fall torelease its seed, a tulip-shaped portion of thefruit remains on the tree to add interest duringthe winter. The tuliptree has few serious insector disease problems. Tuliptree is not hardy inthe mountainous areas of northern New England.(70 to 90 ft. height; 35 to 50 ft. spread)
AMUR MAACKIA, Maackia amurenisMaackia is moderately fast growing, developinga rounded head at maturity. Its major interest isthe small, white, late summer flowers that arearranged in branched clusters 4 to 6 inches long,although its bronze-colored bark can add winterlandscape interest. It is widely adapted and canbe easily grown. No major pest problems havebeen reported. (20-30 ft. height; 20-30 ft. spread)
LOEBNER MAGNOLIA, Magnolia x loebneriThis tree is a 30 foot rounded tree that producesspectacular white or pink flowers in early spring.‘Leonard Messel’ (pink-tinged flowers) and‘Merrill’ are both outstanding. They prefer rich,moist, well-drained soil, full sun, and protectionfrom winter wind. They are not hardy in north-ern New England.
STAR MAGNOLIA, Magnolia stellataOne of the hardiest magnolias, the star magnoliaforms a dense, mounded, large shrub or smalltree reaching 20 feet. The large, white, star-likeflowers appear in early April before the foliageemerges, even on young plants. This trouble-freemagnolia has effective, dark green foliage thatturns to a nondescript leathery brown in the fall.Winter exposes an attractive smooth gray bark.Best used as a specimen or in small groups.
CRABAPPLE, Malus spp.Crabapples are among the most popular flower-ing trees. Not only are they splendid in bloombut also versatile in tree form and growth habit.Some are also prized for their attractive orpersistent fruits, which attract birds. There aremore than 200 named varieties of crabapple.
The choice to use crabapples in the landscapeshould be accompanied by a willingness toattend to their maintenance if their full value asornamentals is to be realized. Pruning is neces-sary to maintain the proper growth habit. Applescab, cedar apple rust, and fire blight can beserious diseases of crab apples which requiresome control; try to use disease-resistant culti-vars. Powdery mildew can be a fall diseaseproblem, and cankers may develop whereequipment makes wounds in the trunk. Chewingand scale insects, borers, and even mice (inweedy or brushy areas) will sometimes attack thetree. To avoid the need to control diseases,choose from the many superior resistant cultivarsavailable.

Chapter 15 Landscape Design 23
The following cultivars have been selected asamong the best, based on their disease resistanceand ornamental characteristics.
‘Adams’ has single pink flowers and 5/8" redpersistent fruit. It is very disease resistant, has adense round habit and reaches 24' height.
‘Dolgo’ has pink buds that turn into whiteflowers. Its 1 1/4" red-purple fruit is good forjelly. It reaches 40' in height.
‘Donald Wyman’ has single pink buds turning towhite flowers. Its bright red 3/8" fruit persistinto winter. It is disease resistant and reaches 20in height and 25' in spread.
‘Mary Potter’, with pink buds, single whiteflowers, and ½” red fruit, reaches 10-15' in heightand 15-20' in width. It is disease resistant.
‘Red Jewel’ reaches 15' in height and 12' in width.It produces an abundance of white flowers andsmall red fruit.
‘Sentinel’ has pale pink flowers and small fruit.Its somewhat upright, columnar habit make ituseful in narrow spaces.
‘Sugar Tyme’ has pink buds, white flowers andpersistant ½’ red fruit. It reaches 18' in heightand is disease resistant.
Malus floribunda — The pink buds change tofragrant, white flowers which produce small,yellow and red fruit. This variety has a roundedgrowth habit and reaches 30 feet in height. It ismoderately disease susceptible.
‘Jackii’ — Single, white, very fragrant flowers arefollowed by tiny, persistent, bright-red fruit onthis upright variety which reaches a compact 20feet.
‘Katherine’ — The double, light-pink flowersfade to white and produce medium-sized,dull-red fruit. This variety has a loose, opengrowth habit that reaches 20 feet and exhibitsgood disease resistance.
‘Liset’ — This variety has the deepest-red flowersof all the crabs and begins flowering at an earlyage. It has medium sized, bright-red fruit. Thenew foliage is purple, but changes to greenduring the growing season. A rounded, denselybranched growth habit is characteristic. The treegrows to 15 feet and is slightlydisease-susceptible.
‘Pink Spires’ — Light-pink flowers give way tomedium, purplish red fruit on this variety. Themedium to upright growth habit reaches 20 feet.It is moderately susceptible to scab.
‘Red Jade’ — Clusters of small, single, whiteflowers are most prolific in alternate years. Themedium, bright-red fruit persists into winter andattracts birds. This variety has a characteristic,weeping growth habit that reaches 15 feet. Thetree is moderately disease-susceptible.
Malus sargentii — Clusters of small, fragrant,white flowers produce the little, dark-red, persis-tent fruits on this variety, one of the smallestcrabs. Its low, mounded, dense growth habitreaches only 8 feet. It is slightly susceptible todisease. A dwarf Sargent type that is outstand-ing for the shrub border is ‘Tina’, which reachesonly 5' in height.
Malus sieboldii var. zumi ‘Calocarpa’ — The pinkbuds open into fragrant, white flowers (best inalternate years) on this variety. The small, redfruit attracts birds well into the winter. This treehas a dense, pyramidal growth habit and reaches25 feet. ‘Spring Snow’ is a 25' tall, rounded treethat produces a spectacular show of whiteflowers. Because it is sterile, it is appropriate forplaces where fruits are undesirable.
BLACK GUM, Nyssa sylvaticaThe scarlet to orange fall color of the native blackgum is one of the most brilliant of any treespecies. It is a dense, pyramidal tree with lus-trous, dark green, leathery leaves. It is a difficulttree to transplant and like most hard-to-trans-plant trees, smaller sizes have a better chance ofsurviving after they are moved. At the presenttime, black gum is difficult to find in manynurseries, but it should become more commonlyavailable as more people get to know its merits.It is a slow-growing, pest-free tree. (30 to 50 ft.height; 20 to 35 ft. spread)
AMUR CORKTREE, Phellodendron amurenseCorktree is a slow growing, spreading tree. Itsmassive branches and deeply furrowed, cork-likebark make the tree interesting in winter. Incon-spicuous, small, white flowers are produced inearly summer. They are followed by clusters ofberries that change from glossy green to black.The foliage, which is somewhat coarse, dropssoon after turning yellow in the fall. Corktree isbest used as a specimen or lawn tree. It is easilytransplanted and tolerates a wide range of soilsand exposures. It has no serious insect or diseaseproblems. (30-45 ft. height; 30-45 ft. spread)

Chapter 15 Landscape Design 24
Selected Shade and Flowering Trees continued
AMERICAN PLANETREE/SYCAMORE,Platanus occidentalisThe most striking feature of the sycamore is theflaking bark that peels off to reveal a lightercolored bark underneath. Sycamore is consid-ered a dirty tree; it is continuously dropping barkthat needs to be picked up. A twig blight thattemporarily disfigures the foliage attacks sy-camore almost every spring. It will seldom killthe tree, but it certainly reduces its value as anornamental. Sycamore is a fast-growing tree thatwill reach an immense size. It is too large for theaverage home grounds and should not be used asa street tree due to roots that heave sidewalksand a tall crown that interferes with overheadpower lines. It needs a deep, rich soil to developproperly. (75 to 100 ft. height; spread may exceedheight). If a sycamore-type tree is desired,London Planetree (P. x acerifolia) is a better choicethan the native American species. It is resistantto the twig blight and does not reach as large asize.
FLOWERING CHERRY, Prunus spp.Among the many flowering cherries, only a feware good landscape specimens. They serve asspecimens, accents, borders, or in groups. Mostare slow growing. They respond well to good soilor soil improvement and tend to decline in vigoron poor or heavy soils. Cherries will not toleratewet soils. The fruits of most flowering cherriesare hardly considered ornamental but are veryattractive to birds. Attention must be given topruning, fertilization, and borer control.
Double-Flowered Mazzard Cherry — This dense,pyramidal tree grows to 40 feet and is hardy. Thedouble, white flowers last for 7-10 days, and themedium-sized, edible fruit is attractive to birds.
Higan Cherry — A dense, rounded tree, thisvariety reaches 30 feet in height. The light-pinkflowers may be single or double and producesmall, black, inconspicuous fruits. A pendulous,weeping variety is the most popular.
‘Kwanzan’ Cherry — The hardiest and mostreliable form of Oriental Cherry, this variety hasdouble, pink flowers and an upright growthhabit that stays under 30 feet.
Sargent Cherry (P. sargentii) — One of the largestand hardiest of the cherries, this medium-sizedshade tree reaches 40 feet and features showy,deep pink blooms followed by lustrous green
foliage. The round headed crown sports bronzeto reddish fall foliage, and the trunk has a pol-ished, chestnut brown bark. A narrow, columnarvariety, ‘Columnaris,’ is also available. SargentCherry is one of the better Prunus species forNew Hampshire where the choice of cherries isoften limited.
FLOWERING PLUM, Prunus spp.The most popular plums are those which havereddish-purple foliage. Trees are rounded toupright, densely branching, with double orsingle flowers. The varieties with brightly col-ored foliage include ‘Newport’ and ‘Thunder-cloud.’ ‘Atropurpurea’ and ‘Nigra’ (Black My-robalan Plum) have darker foliage colors. Fruit,when present, is edible but not ornamental. Theplums require regular maintenance—pruning,fertilization, and occasional spraying—to main-tain vigor. Sunscald is often destructive tounshaded or unprotected trunks, and manyinsects can cause problems. Dark leaved plumsshould be used sparingly in the landscape.
CALLERY PEAR, Pyrus calleryanaThis species grows to 30 feet and is native toChina. It is fast growing and pyramidal whenyoung, but with age, becomes upright orrounded. Before the foliage appears, the branchesare laden with fragrant, white flowers. Theglossy foliage becomes orange to scarlet to deepcrimson in fall. It is an excellent lawn, specimen,or street tree. Avoid using it in narrow areas, ifpossible. It is tolerant of all but wet or very poorsoils and is somewhat resistant to fire blight. Thesmaller sizes are best for transplanting. Goodcultivars to consider for different forms include‘Aristocrat,’ ‘Whitehouse,’ ‘Capitol,’ ‘Chanti-cleer,’ and ‘Redspire.’ Avoid planting the cultivar‘Bradford’ due to graft incompatibility andsevere splitting.
WHITE OAK, Quercus albaA mature white oak is one of the most majestictrees. They are rounded in outline with thick,sturdy, horizontal branches. The native whiteoak is slower-growing and more difficult totransplant than most other oaks. However, it isnot as susceptible to insects and diseases, and itgrows on a wider range of soil types. It is adifficult species to transplant and is best movedonly in the spring. (100 ft. height; 50 to 80 ft.spread)

Chapter 15 Landscape Design 25
RED OAK, Quercus rubraRed Oak is one of the fastest-growing oaks. Itdevelops into a large, broad, round-topped treewith a deep-red fall color. It withstands cityconditions, has a clean habit of growth, andmakes one of the best street and shade trees. (65to 75 ft. height; 40 to 50 ft. spread)
PIN OAK, Quercus palustrisThe branching habit of the native pin oak is trulyunique. The upper branches are ascending, themiddle ones horizontal, and the lower onesdrooping. This makes the pin oak a generallypoor choice as a shade or street tree. One excep-tion is the cultivar ‘Sovereign’ cultivar; whoselower branches do not droop. However, ‘Sover-eign’ is no longer recommended due to graftincompatibility. As the drooping lower branchesare removed to allow for traffic beneath the tree,the horizontal branches begin to droop; somebranches always seem to be interfering withtraffic. Pin oak should be planted where it hasroom to assume its natural shape. It will growpoorly in soil with a high pH - the leaves willturn yellow due in part to iron chlorosis, andextensive soil treatment will be necessary toreturn the tree to a healthy condition. (60 to 70 ft.height; 25 to 40 ft. spread)
JAPANESE PAGODATREE, Sophora japonicaThis tree gets its common name from the fact thatit was planted around Buddhist temples in theOrient. It is also known as the scholar tree orsimply as Sophora. Its large clusters of pea-likeflowers are relatively showy and appear in mid-summer after most other trees have alreadyflowered a forming a creamy carpet under thetree as they fall. A good tree for city conditionsand poor soils, it could be considered messysince its petals, fruits, leaves, and pods drop atdifferent times. (50 to 75 ft. height; spread mayequal height)
KOREAN MOUNTAIN ASH, Sorbus alnifoliaGenerally superior to its commonly plantedEuropean cousin, this medium-sized, pyramidalto broad-oval shade tree offers white flowers andglossy green, beech-like foliage which turnsyellow, orange and golden brown in the fall. Thepersistent brilliant red fruits offer food for birdsand add to the fall foliage display. A better parkthan street tree, this plant is definitely one of thebest mountainash.
EUROPEAN MOUNTAINASH,Sorbus aucupariaUpright when young and spreading at maturity,this vigorous, rapidly growing tree reaches 45feet on the best sites. Flat clusters of fragrant,white flowers appear in late spring and clustersof small, orange-red berries, attractive to birds, inthe fall. The loose, compound foliage turnsreddish in fall. The tree is best used as a speci-men. It is subject to sunscald, borers, and fireblight. Varieties available include cutleaf, weep-ing, upright, and yellow-fruited types.Mountainash, being best adapted to coolerclimates, performs well in northern New En-gland.
JAPANESE STEWARTIA(Stewartia pseudocamellia).Not well known or widely available, this small tomedium-sized upright oval tree is possibly oneof the best small trees for the garden. Surpris-ingly hardy, the showy white flowers are ac-cented by orange anthers and occur over a threeweek period in July. The dark green leaves mayturn yellow to dark reddish purple in the fall.The bark is first rate for winter effect, developinga mottled, peeling character.
JAPANESE TREE LILAC, Syringa reticulataThe Japanese tree lilac is a tough, adaptable,small tree with rounded to spreading growthhabit. It is noted for its large, showy, creamywhite clusters of flowers which appear in mid-June, about four to six weeks after common lilachas bloomed. The dark green foliage which mayturn a translucent yellow in the fall is not over-whelming, but is generally superior to mostlilacs. The shiny, reddish brown, cherry-likebark develops on the trunk and larger branches,adding interest in winter. It tolerates a widerange of growing conditions. (20-30 ft. height; 15-25 ft. spread)
BALD CYPRESS, Taxodium distichumThis fast-growing, pyramidal tree becomesrounded with age. The light-green, fernlikeleaves turn a rust color before they are shed inthe fall. This tree has relatively few insect ordisease problems and will grow on a widevariety of soil types and moisture conditions. Itis especially suited to wet or swampy conditionsand is hardy to south New Hampshire only. (50to 70 ft. height; 20 to 30 ft. spread)

Chapter 15 Landscape Design 26
Selected Shade and Flowering Trees continued
LINDEN, Tilia spp.The lindens are some of the best shade trees.Their small flowers which are produced in earlysummer, are not especially ornamental, but arehighly fragrant. The small, round seed is bon onan interesting leafy bract that hangs on the treewell into the winter. Of the seven species oflinden grown in this country, the littleleaf linden(Tilia cordata) is the most commonly availableand best-suited for home situations. The leavesremain green on the tree long after other treeshave shed. Lindens have few insect or diseasepests.
Two improved cultivars of littleleaf linden are‘Greenspire,’ a straight-trunked tree that rapidlygrows into a narrow, oval form, and ‘Chancellor,’with a narrow, compact, upright form. (60 to 70ft. height; spread may be 1/2 to 2/3 of height)
SILVER LINDEN, Tilia tomentosaThis is a beautiful specimen tree that toleratesheat and drought better than other lindens. Theupper leaf surface is dark green, but the under-sides are densely covered with hairs, which givethem a silver color. When the leaves are blownin the wind, the silver under surfaces can beseen, giving a beautiful effect. This tree shouldnot be planted in areas where there is a largeamount of dust or soot present as it will collecton the hairy leaves and make them unsightly.Flowers of this species have been reported to bepoisonous to bees. (50-70 ft. height; 25-40 ft.spread)
LACEBARK ELM, Ulmus parvifloraA superior landscape elm, not to be confusedwith the inferior Siberian elm (U. pumila). Small,dark green leaves that may turn yellow in fall.Profuse clusters of small samaras (winged dryfruit) present in the fall. Magnificent mottled,somewhat exfoliating bark in light gray, green,orange, and brown. Very environmentallydurable plant with high resistance to Dutch elmdisease and elm leaf beetle. (40-60 ft. height; 40 ft.spread)
JAPANESE ZELKOVA, Zelkova serrataZelkova is a fast-growing, vase-shaped tospreading tree. Its leaves resemble those of theelm; it is a close relative, but unlike the elms, ithas smooth, gray bark. Young Zelkova trees areoften crooked and need corrective pruning todevelop into a desirable tree. Zelkova is suscep-tible to several pests that attack elm trees, but itis relatively resistant to Dutch Elm Disease. (50 to80 ft. height; 50 to 80 ft. spread)

Chapter 15 Landscape Design 27
ConifersConifers, or cone bearing plants, generally havenarrow-leaved or needle-type evergreen foliage.Noted for the attractiveness of their evergreenfoliage, conifers are available in a variety of sizes,shapes, and colors. The deciduous conifers are anunusual group of trees. Their foliage is needle-like,similar to narrow leaved evergreens, but it is shedin the fall of the year. Two examples include thelarches and dawn redwood.
Conifers range in size from prostrate plants, grow-ing only a few inches tall, to large trees. Shapesinclude flat ground covers; horizontal spreaders;upright, pyramidal forms; and even weeping andcontorted forms. Foliage color ranges from a goldand cream variegation to all shades of green,gray-green, and blue-green.
The most common causes of damage or death ofneedled evergreens are poorly drained soil, plantingtoo deeply, and winter drying. Most are easilykilled by water standing around their roots; there-fore, they should be planted in well-drained soil. Araised bed may be the solution for planting onexcessively wet sites.
Winter drying can be a problem with nearly allevergreens. The foliage may be damaged when coldor frozen soils make it difficult for roots to replacemoisture as fast as it is lost by the foliage. If thesummer or fall has been dry, thoroughly soak thearea around the plants in October, so the plants gointo the winter with an adequate moisture supply.Less winter-hardy evergreens should be planted inareas protected from winter sun and wind to pre-vent damage and ensure their survival.
Evergreens are sold either balled-and-burlapped orin containers. The burlap may be left on the ball forplanting unless it is treated or plastic, in which caseit should be slit in several places. Loosen the burlapfrom around the trunk and tuck it under the sides ofthe ball. Be careful to remove any string or wirewrapped around the plant. Remove metal or plasticcontainers before planting.
Fertilizing at planting time with a liquid, fertilizercan help with plant establishment. Establishedplants that have good color and are making satisfac-tory growth usually don't need additional fertilizer.However, if fertilizer is required, low rates arerecommended.
Dwarf and Slow-Growing ConifersContemporary, residential landscapes frequentlyrequire the use of low maintenance plants whichmust fit within the scale of small suburban environ-ments. Dwarf conifers can be effectively used insuch small scale landscapes to add diversity ofform, texture, and coloration. Since the dwarfconifers are evergreen, these features are manifestedthroughout the year and tend to dominate thewinter scene.
Landscape UseThe wide diversity of plant growth habits enablesone to use dwarf conifers effectively in foundationplantings, in shrub borders, or as patio plants. Theparticularly interesting shapes and growth charac-teristics of many dwarf conifers serve as ideal accentor focal points, and caution should be exercised notto overuse species with exceptionally strong fea-tures. In rock gardens or in landscapes with analpine theme, dwarf conifers are unexcelled. Tex-tures vary from coarse to very fine, and colors rangefrom yellowish-green through all shades of green,all the way to pale-blue.
CultureAs a general rule, the dwarf and slow-growingconifers are adaptable to a wide range of soil condi-tions. Most are fairly drought tolerant, extremelycold hardy, and relatively insensitive to soil fertility.However, optimal growth is obtained when plantsare grown in well-drained, moist soils of mediumfertility. Since most plants are purchasedcontainer-grown, the root ball should be gentlyloosened around the outside during planting, withspecial care being taken to avoid planting the rootsystem below the original level. Established plantswould be fertilized in the spring with a generalpurpose tree and shrub fertilizer (such as a 10-6-4analysis or equivalent) at 1 to 2 pounds per 100square feet. Pruning is not generally required tomaintain the size or form of the plant. Dwarf coni-fers are notably insect and disease free, althoughspider mites might present problems on thedense-foliaged types if left uncontrolled. Mulchingprevents weed infestations, eliminates the necessityfor mowing close to the plant (thereby reducing thepotential for mechanical damage), and serves tohighlight the plant's exceptional features.
Chapter 15 Landscape Design 28
One good example of a dwarf conifer is Picea abies‘Nidiformis,’ the birdnest spruce. This plant mayattain a height of 4 feet and a width of 5 to 6 feet. Itis globose in shape, often somewhat depressed inthe top, reminding one of a bird's nest. The foliage isa good, dark-green color of medium to fine texture.Birdnest spruce is best used in foundation or borderplantings, or in a container.
FIR, Abies speciesThe flat needles of firs leave a round but flat scarwhen they fall from the twig. The cones of firsare borne in an erect position, while those ofmost other conifers hang downward. Concolorfir, described below, is the most common onegrown as a landscape plant.
BALSAM FIR, Abies balsameaThe native balsam fir is a popular Christmas treebecause of its fragrant needles. It is not a goodplant for the refined landscape, and its useshould be limited to native plantings.
CONCOLOR/WHITE FIR, Abies concolorThe concolor fir is similar to blue spruce infoliage color and general form, but has a softerlook and is less stiff. Because of its greater insectand disease resistance, it may be preferable toblue spruce. White fir tolerates city conditions,and is fairly resistant to heat and drought. (30 to50 ft. height; 15 to 30 ft. spread)
VEITCH FIR, Abies veitchiiThe needles of this stiffly pyramidal evergreenare a dark green above and a whitish colorbelow. This is one of the hardiest of the firs. It isa relatively slow-growing tree with horizontalbranches. Veitch fir prefers moist, acid soils.(5075 ft. height; 25-35 ft. spread)
FALSE CYPRESS, Chamaecyparus spp.Chamaecyparis, or false cypress, is a variableevergreen. Both tree and shrub forms are avail-able in a wide variety of foliage colors. Thefoliage is similar to that of Thuja, but has whitelines on the undersides. Falsecypress is adaptedto a cool, moist climate and tends to be scorchedand discolored by drought and drying winterwinds. Falsecypress comprise a group of slowgrowing, dense, pyramidal evergreens with awide variety of foliage colors and textures. Manycultivars of Hinoki Falsecypress (C. obtusa) areavailable. ‘Erecta” forms a slender column,
“Filicoides” has twisting frond-like foliage and“Gracilis” is a slender tree with weepingbranchlets. The varieties of Sawara falsecypress(C. pisifera) offer great diversity in foliage andtree form. (40-75 ft. height; 10-20 ft. spread)
JUNIPER, Juniperus spp.Junipers have sharp, pointed, needle andscale-like foliage. Their fruit is a fleshy, blueberry. The sexes are separate, and only femaleplants produce berries. Junipers are adaptable,and hence commonly grown evergreens. Theywithstand dry, poor soils better than otherevergreens. Junipers need full sun for bestdevelopment. None of the junipers will grow onwet, poorly drained soil or heavy shade.
There are hundreds of varieties of juniper fromwhich to choose; they come in all sizes andshapes. The color varies from yellow-green togreen, blue-green, gray-green, or silver. Becauseso many varieties of juniper have been grown,many of the names have become confused. Forlandscape purposes we can divide them intothree major groups: prostrate, spreading, andupright.
The prostrate (creeping) junipers are low grow-ing plants used primarily as ground covers. Theyseldom grow over 18 inches high and will spreadover a large area. The foliage of many prostratejunipers changes color in winter. Some examplesinclude: J. horizontalis, J. procumbens
Spreading junipers can be divided into twogroups. The first group has a horizontal growthhabit which gives the plant a flat-topped appear-ance. Branches on the second group have anarching pattern of growth that makes a morevase-shaped plant. Most spreading junipersretain the same foliage color year round. Ex-amples include: J. chinensis and J. sabina.
Most upright junipers are actually tree typeswhich are grown as shrubs. Unless they areheavily sheared, they will quickly outgrow theirintended use. To develop their natural beauty,they need to be planted where they have plentyof room to grow. The foliage color of mostupright junipers does not change with the sea-sons. Examples include: J. scopulorum and J.virginiana.

Chapter 15 Landscape Design 29
One newer cultivar for New Hampshire gardensis listed below:
Blue Star Juniper (Juniperus squamata ‘BlueStar’).A brilliant blue green, this tough little shrub iswell adapted for sunny, well-drained areas.Maturing at a height of about 2½ feet by about 4feet in width, ‘Blue Star’ is a compact juniper thatis ideal for foundation planting.
EUROPEAN LARCH, Larix deciduaThe spring needles of the European Larch arefresh apple-green and soft. They turn deepergreen in summer and spectacular golden yellowin fall before deciduating. A large tree (75 feettall, 30 feet wide), it prefers sunny locations, inmoist to wet acid soil. Larix kaempferi, the Japa-nese Larch, has more graceful, pendulousbranches, and is a better landscape specimen.Both are related to Larix laricina, our nativetamarack.
DAWN REDWOOD,Metasequoia glyptostroboidesDawn redwood was believed to be extinct until1941 when a Chinese botanist discovered itgrowing in a remote valley of central China.Three years later a botanical expedition obtainedseeds from these and distributed them to botani-cal gardens and arboreta throughout the world.It is a fast-growing, pyramidal tree with a ten-dency to grow late in the season which results insome twig dieback. The loose, feathery, needle-like foliage drops quickly in the fall. Deep, well-drained, moist soils are preferred. Avoid plant-ing in frost pockets. No serious pests are known.(70-100 ft. height; 25 ft. spread)
SPRUCE, Picea speciesThe needle-like foliage of the spruces has fourangles when seen in cross section; the needles arenot flat as with most conifers that produce theirneedles singly. Spruces can be recognized by thepersistent leaf bases that remain on the twigsafter the needles have fallen.
Spruces are native to cool climates and areexcellent landscape plants for northern NewEngland. They should be planted only inwell-drained soils. Young trees with densefoliage and a symmetrical growth habit are themost attractive. The four spruces described in thefollowing section are the ones most commonlyavailable in the nursery trade.
NORWAY SPRUCE, Picea abiesBecause Norway spruce is one of the fastestgrowing of all the spruces, it is perhapsoverplanted. As the tree grows older, the sidebranches become horizontal with a slight upturnat the tip. Secondary branches hang downwardfrom the main branches, giving the tree a grace-ful appearance. The large cones (4 to 6 incheslong), largest of any of the spruces, are an addedattraction. (40 to 60 ft. height; 25 to 30 ft. spread)
BLACK HILLS SPRUCE,Picea glauca ‘Densata’Black Hills spruce, a slow-growing, compactvariety of the native white spruce, is one of thehardiest of the spruces. Its dense, green tobluish-green foliage is its most ornamentalcharacteristic. Its mature size of 20-25 feet makesit useful in the small landscape.
DWARF ALBERTA SPRUCE,Picea glauca ‘Conica’The dwarf Alberta spruce is slow growing, cone-shaped tree which seldom needs pruning. Thebright-green, dense foliage makes it attractive.Although capable of growing larger, Its maxi-mum size seldom exceeds 12 feet. Alberta spruceis often used a novelty specimen plant and alsoas a container plant.
SERBIAN SPRUCE, Picea omorikaA great choice for a limited space, this denselynarrow evergreen is noted for its distinctivefishhook branching and refined habit. Althoughfairly adaptable as to site, this spruce does beston deep, well drained—yet moist—soils withwinter protection from strong winds. (50-60 ft.height; 20-25 ft. spread)
COLORADO BLUE SPRUCE,Picea pungens var. glaucaThe Colorado blue spruce is a very strong accentplant due to its stiff growth habit and unusualcolor, it stands out wherever it is planted. Placingthis tree in a landscape is difficult because it is sodominant. It is best used as a single specimen foraccent. A blue spruce grows slower than greentypes and usually commands a higher price. (90to 135 ft. height; 20 to 30 ft. spread)
Chapter 15 Landscape Design 30
PINE, Pinus speciesThe pines can be easily distinguished from otherevergreens because their leaves are produced inbundles of two, three, or five needles. Pines areused for screens, windbreaks and mass plantings,or are planted as specimen trees. They need fullsunlight to develop properly.
Many species of pine can be grown in northernNew England. The five species described in thefollowing section are the ones most commonlygrown as ornamentals. Four of these speciesgrow to be large trees; mugo pine is a shrub.
BRISTLECONE PINE, Pinus aristataOne of the oldest living plants in the world,living specimen bristlecone pines growing inArizona and Nevada are over 4,000 years old. itis becoming popular in landscape plantingsprimarily because of its dense, short needles andits picturesque growth habit. Probably neverdestined to be a mainstream commodity, thissurprisingly hardy and tough plant can make apicturesque, bonsai-like focal point for a privatepatio or meditative garden. It is very slowgrowing and endures a hot, dry exposure, butdoes not tolerate shade. (8-20 ft. height; spread:irregular)
LACEBARK PINE, Pinus bungeanaLacebark pine is a relatively slow growing treeand often develops with more than one trunk.The needles are about 3 inches long and aregrouped three to a bundle. Needles are retainedon the tree several years longer than on mostpines, making the tree especially dense. The barkpeels off the trunk and branches in irregularpatches, producing a beautiful mottled effect.(30-50 ft. height; 20-35 ft. spread)
SWISS STONE PINE, Pinus cembraThis is a slow-growing pine with a dense, pyra-midal habit of growth. It is very similar to whitepine in foliage color and texture. It will grow ona wide variety of soils and exposures. (30-40 ft.height, 15-25 ft. spread)
JAPANESE RED PINE, Pinus densifloraA picturesque tree with a distinct, flat-toppedgrowth habit, often used for bonsai. The conesare produced in dense clusters. Orange-red barkis interesting throughout the year. A dwarf, flat-topped cultivar, Tanyosho pine, is commonlygrown as a shrub. It will grow to about 6 feet inheight. (40-60 ft. height; 40-60 ft. spread)
WHITE PINE, Pinus strobusThe delicate, soft, light bluish-green foliage of thenative white pine makes it an attractive ever-green tree. It is one of the few commonly grownfive-needled pine. Easily transplanted and fastgrowing, it will become a large tree and needsadequate room to develop properly.
On favorable sites, white pine sometimes growstoo fast to retain its dense foliage. This can beavoided by pruning the tree to increase itsdensity. However, in pruning white pine, notethat needles are not produced evenly along thestem but are clustered near the tip. When the tipis cut back, some needles must be left on theremaining portion or the twig will die back tolast year's growth. White pine is sensitive to airpollution and road salt and is not a good choicefor planting in city conditions. (50 to 80 ft.height; 20 to 40 ft. spread)
AUSTRIAN PINE, Pinus nigraThe long, stiff needles of Austrian pine areproduced in bundles of two. They are a deep,dark-green color, which makes the plant excel-lent for use as a background for small trees withcolorful flowers or ornamental fruit. Austrianpine develops into a large tree and needs ad-equate room for growth. It is relatively resistantto air pollutants and will grow on a wide rangeof soil types. (50 to 60 ft. height; 20 to 40 ft.spread)
JAPANESE BLACK PINE, Pinus thunbergianaJapanese black pine produces its stiff, dark green,3 to 5 inch long needles in bundles of two. Itslarge, grayish-white terminal buds help distin-guish it from most other pines. Popularity ofJapanese black pine has increased during the pastfew years, primarily because of its informalgrowth habit. This irregular growth habit makesit a good accent or specimen plant for use ininformal landscapes, but it is not well-suited formass plantings. Salt tolerant; spreading, compactforms are valued in the shrub border. (20 to 80 ft.height; spread 20 to 40 ft.)
SCOTCH PINE, Pinus sylvestrisScotch pines, commonly grown for Christmastrees, can be recognized by their short, twistedneedles that are produced in bundles of two.Young scotch pines have a symmetrical, pyrami-dal shape but develop an open growth habit asthey mature. Mature specimens develop areddish-orange, flaking bark on upper branches.(30 to 60 ft. height; 30 to 40 ft. spread)

Chapter 15 Landscape Design 31
MUGO PINE, Pinus mugoSometimes called Swiss mountain pine, mugopine is an excellent, small, evergreen shrub witha dense, rounded growth habit. Plants of mugopine show a wide variation in shape and vigor.The compact types such as the variety P. mugomugo are the most desirable. Because of itsvariability, it is more desirable when grown as asingle plant rather than in masses. Pruning maybe necessary to maintain a desirable growthhabit. (15 to 20 ft. height; 30 to 40 ft. spread)
UMBRELLA PINE, Sciadopitys verticillataAlthough not a true pine, the Umbrella pine is avery slow growing (perhaps one-half foot peryear), dense evergreen with large, lustrous,flattened needles arranged in whorls around thestems. It is best used as a specimen because of itsunique beauty and dense pyramidal shape.Avoid hot, dry locations and maintain a constantmulch under the plant. Little other maintenanceis required. Best for southern New Hampshirelandscapes. (20-30 ft. height; 15-20 ft. spread)
HEMLOCK, Tsuga speciesHemlock can be recognized by its short, flatneedles with narrow, white stripes on the under-side. Its small cones are only about 1/2 inch long.
CANADA HEMLOCK, Tsuga canadensisHemlock is one of the most graceful and beauti-ful of the native needled evergreen trees, but itneeds moist, well-drained soil to develop prop-erly. It prefers partial shade and should beprotected from the wind. It is easy to transplantbut requires a good soil. Hemlock will withstandclose shearing and is one of the better needledevergreens for growing as a hedge. (40 to 70 ft.height; 25 to 35 ft. spread)
CAROLINA HEMLOCK, Tsuga carolinianaLess well known than our native Canadianhemlock, this somewhat less graceful tree is moretolerant of city conditions. More compact,deeper green, and slower growing than ournative species, this evergreen is offered as analternative to, but not as a substitute for, ourCanadian hemlock.
YEW, Taxus sp.Yews' fleshy, red fruit; ability to grow in shade;and lack of serious insect or disease pests alsocontribute to their popularity.
The sexes are separate in yews. Male flowers areproduced on one plant and the female flowers onanother. Only female plants produce the attrac-tive berries, but both sexes need to be present toensure fruit production. One male plant isgenerally sufficient to pollinate six to eightfemale plants. The seed within the female fruit ispoisonous, as are most other parts of the plant.
Yews prefer a shaded or partially shaded plant-ing site with a moist–not wet— well-drained soil.Direct sunlight and strong winds may injure thefoliage in winter as will the summer heat.
Among the yews grown as ornamentals, theJapanese yew (Taxus cuspidata) and the interme-diate yew (Taxus x media), are the most commonforms. Taxus canadensis, the Canada yew, is thehardiest. Although not as dark green as theothers, it should be considered in northern NewEngland as well as Taxus cuspidata ‘Nana’, a slowgrowing form that is greatly resistant to winterburn.
The many varieties of yew can be divided intothree major groups: upright, globe-shaped, andspreading. Upright yews are usually less thanhalf as wide as they are tall. Globe-shaped orrounded ones have about the same width andheight. Spreading yews are two to three times aswide as they are tall. (English - 35 to 60 ft. height;15 to 25 ft. spread. Japanese - 10 to 40 ft. height;equal spread)
One variety, described below, is especially welladapted for residential landscapes throughoutNew Hampshire.
Taunton Yew, Taxus x media ‘Tauntonii’A smaller, more compact Taxus that grows to aheight of about 3½ feet and a width of 6-8 feet, itis extremely resistant to winter burn and re-sponds well to regular clipping.

Chapter 15 Landscape Design 32
EASTERN ARBORVITAE, Thuja occidentalisAlso called American arborvitae or white cedar,is native throughout the northern half of easternNorth America, especially in moist areas. Thisplant has long been established in Americangardens, and according to some, is overused bybuilding contractors. Arborvitae propagatesreadily from cuttings, is relatively easy to pro-duce in a short time, and is relatively inexpen-sive, thus it is a favorite of building contractors.
At maturity, arborvitae are usually dense, pyra-midal, 40 to 50 foot trees, but cultivars rangefrom dwarf to rounded or globe shapes, withfoliage colors of yellow, blue, and various shadesof green. Arborvitae are small, evergreen treesand shrubs with needle-like juvenile leaves andscale-like mature foliage and branchlets flattenedin one plane. Branches are erect and spreadingwith thin, scaly bark. Its seed is produced insmall cones. It is an easily propagated,fast-growing plant. (40 to 60 ft. height; 10 to 15ft. spread)
Deciduous ShrubsDeciduous shrubs, those that lose their leaves in fall,give seasonal color and texture changes to thelandscape. The flowers, foliage, fruit, and barkprovide color and landscape interest. A properlyselected group of shrubs will give interest to thelandscape throughout the year.
Deciduous shrubs usually tolerate difficult growingconditions better than most other ornamentals.Many grow rapidly and may require some annualpruning. Cutting older, heavier shoots back toground level is one accepted practice for multi-stemmed shrubs, especially if the plant is over-grown. One third to one fourth of the stems shouldbe removed each year. Many deciduous shrubs havefew serious insect or disease problems. Aphids ormites are occasional problems, but they are rela-tively easy to control.
Many deciduous shrubs are sold bare root whilesome must be balled and burlapped orcontainer-grown to be successfully transplanted.Bare root plants are planted in the spring beforegrowth starts. Balled and burlapped and containershrubs may be planted almost anytime if properlycared for.
The species and varieties described in the followingsection are hardy and most commonly grown. Theexpected maximum height and width of each shrubare listed after the common name.
Selected Deciduous Shrubs
JAPANESE BARBERRY, Berberis thunbergiiBarberry is a rugged plant that adapts to manysituations. It has been widely used as a hedge orbarrier plant because of its thorny twigs. It is aneasy plant to prune and can be clipped into tighthedges. The small, yellow flowers are not espe-cially showy but the bright-red berries areattractive in the fall. Barberry leaves normallyhave a good, red fall color. The varietyatropurpurea has red foliage throughout thegrowing season. “Crimson Pygmy,” a dwarfred-leaved cultivar, is also available. (3 to 6 footheight; 4 to 7 foot spread)
Chapter 15 Landscape Design 33
BEAUTYBUSH, Kolkwitzia amabilisA tall, vigorous, upright shrub with an archingbranching habit, the plant is covered with pinkflowers in May or June. The brown, bristly seedsof beautybush are also interesting. This shrub iseasy to grow and requires little attention if it isgiven enough room to develop. (6 to 15 footheight; 4 to 8 foot spread)
RED CHOKEBERRY, Aronia arbutifoliaA dependable shrub on almost any soil, it pro-duces small white to reddish flowers in late May.Chokeberry is planted primarily for thebright-red berries that are produced in latesummer. There is also a Black chokeberry, Aroniamelanocarpa. (6 to 10 foot height; 3 to 5 footspread)
DWARF FLOWERING ALMOND,Prunus glandulosaFlowering almond is a small, delicate shrub. Itsbranches are covered with small flowers in earlyMay. The flowers may be pink or white, single ordouble. This shrub makes a nice accent plant in afoundation planting. (4 to 5 foot height; 3 to 4foot spread)
PURPLELEAF SAND CHERRY,Prunus x cistenaThis small shrub is valued for its purple-coloredfoliage which persists throughout the growingseason. It produces small, pinkish flowers in Mayand small, colorful cherries in fall. (7 to 10 footheight; 5 to 8 foot spread)
SPREADING COTONEASTER,Cotoneaster divaricatusAn interesting plant, spreading cotoneaster hasan upright growth habit and arching, spreadingbranches. Red berries cover the branches duringearly fall adding considerable interest to thelandscape. Cotoneaster is susceptible to fireblight disease and is occasionally attacked byspider mites. (5 to 6 foot height; 6 to 8 footspread)
SLENDER DEUTZIA, Deutzia gracilisDeutzias are a group of shrubs grown for theshowy, white or pinkish flowers produced inMay. Slender deutzia is desirable because of itssmall size and slender, graceful, arching, growthhabit. This plant is useful in a large shrubborder, but is limited in use due to its rattyappearance when not in flower. (2 to 6 footheight; 3 to 4 foot spread)
REDOSIER DOGWOOD,Cornus sericea (stolonifera)Redosier is a shrub-type dogwood adaptable tomost soils but does best in moist situations. Itspreads by underground stems and increases indiameter as new stems arise from the ground. Itdoes not have interesting flowers or fruit but isgrown primarily for its colorful stems. Bothred-stemmed and yellow-stemmed varieties areavailable. A dwarf cultivar, ‘Kelseyi,’ seldomgrows over 2 feet high and is useful as a groundcover in large areas. This is an excellent wetlandplant. (7 to 9 foot height; 10 to 12 foot spread)
WINGED EUONYMUS, Euonymus alatusWinged euonymus, a large shrub, can be used asa hedge because its neat, uniform appearancerequires little or no pruning. Twigs of this shrubhave corky ridges and are especially interestingin winter after catching a soft snow. This planthas excellent, scarlet color in the fall. The com-pact variety, E. alatus ‘Compactus,’ grows to only4 feet tall and is more commonly planted thanthe standard variety, but is not hardy in themountainous parts of northern New England.Euonymus must be transplanted with eartharound its roots. Once established, they requirelittle care. (15 to 20 foot height; 15 to 20 footspread)
BORDER FORSYTHIA, Forsythia x intermediaThe profuse, yellow flowers of forsythia areconsidered by many people to be the first suresign of spring. They are easily grown on almostany soil but prefer full sun. There are manycultivars of forsythia available, including somedwarf forms. Cultivars of Border forsythia, suchas ‘Beatrix Farrand’, ‘Karl Sax’ and ‘Lynwood’perform well in coastal areas. Further north,their flower buds survive winter infrequently,and hybrids like ‘Vermont Sun’, ‘Meadowlark’and ‘Northern Sun’ should be planted. (8 to 10foot height; 10 to 12 foot spread)
EUROPEAN FLY HONEYSUCKLE,Lonicera xylosteumThis is one of the few honeysuckles refinedenough to be used in the landscape. Thegray-green foliage forms a mound 8-10 feet talland 8-10 feet wide. It produces white flowers inspring and red fruit in midsummer. Two culti-vars, ‘Claveyi’ and ‘Emerald Mound’, are morecompact, have bluish foliage, and are excellenthedge plants.

Chapter 15 Landscape Design 34
AMUR HONEYSUCKLE, Lonicera maackiiAmur honeysuckle is the largest and fastestgrowing of all the shrub honeysuckles. Fragrant,white flowers are produced in late May.Bright-red berries remain on the plant fromSeptember to November. Amur honeysuckleholds its leaves late in the fall, and it is notunusual for the plant to have green leaves andred berries at Thanksgiving time. Amur honey-suckle makes a fast growing screen, but it needsplenty of room to develop. (8 to 15 foot height; 8to 12 foot spread)
HYDRANGEA, Hydrangea arborescens‘Annabelle’This hydrangea is a small shrub that produceslarge, white flower clusters almost 6 inches indiameter. It is usually killed back to the groundin winter. Hydrangea does not require anyspecial soil but prefers a light shade location. (3to 5 foot height; 3 to 6 foot spread)
COMMON LILAC, Syringa vulgaris.Lilac is one of the best known and most com-monly planted of all the flowering shrubs. It isgrown primarily for its late spring flowers. Ofthe hundreds of varieties of lilacs that have beennamed, the so-called French hybrids are amongthe most popular. They are dense, upright shrubsthat can be grown almost anywhere. Lilac flow-ers range in color from white to pink to lilac tobluish to purple. Both single- anddouble-flowered forms are commonly available.The flowers of most varieties are very fragrant.
Proper pruning is necessary to keep the plantsattractive and to promote heavy flower produc-tion. After the plant becomes established, aboutone third of the old stems should be removedeach year. Older lilac stems may be attacked byborers, and powdery mildew is a commonsummer disease. Proper pruning helps to mini-mize this problem. (8 to 12 foot height; 6 to 15foot spread) Another good lilac is Syringa patula‘Miss Kim’. It reaches 3-4 feet in height andproduces blue flowers a bit later than most lilacs.
LATE LILAC, Syringa villosaThis very hardy lilac produces lilac to whiteflowers a bit later than most lilacs. It reaches 10feet in height and width, and is a good additionto the shrub border.
SWEET MOCKORANGE, PhiladelphuscoronariusMockorange is a vigorous, upright shrub grownprimarily for its white flowers which are borne inlate spring. There are many varieties ofmockorange from which to choose. Some variet-ies produce very fragrant flowers while othersare not fragrant. Both single- anddouble-flowered varieties are available, andflower size varies from ½ inch to almost 2½inches in diameter. Some varieties never get over4 feet in height while others may grow to 12 feet.
Mockorange has no serious insect or diseaseproblems. Removal of a few older stems from thebase each year will keep the plants vigorous andflowering. They have little ornamental valueother than their flowers, and easily out growtheir space if not pruned regularly. (4 to 12 footheight; 4 to 12 foot spread)
PRIVET, Ligustrum spp.Privets are automatically considered hedgeplants because they have been so widely grownfor this purpose. Unsheared specimens producepyramidal clusters of small, white flowersfollowed by similar clusters of black berries.Fruit remains on the plant most of the winter andprovides considerable food for birds.
Privets are vigorous plants that will adapt tomost types of soil, under most conditions. Thereare several varieties of privet available. Theyrange from 4 to 12 feet in height. Some of themore popular varieties include:
‘Amur’ - one of the hardiest varieties.
‘Regel’ - a low cultivar with almost horizontalbranches.
‘Golden Vicary’ - with bright-yellow foliagethroughout the growing season.
ROSEGOLD PUSSY WILLOW, Salix gracilistyla
GOAT WILLOW, Salix caprea
BLACK PUSSY WILLOW, Salix melanostachys

Chapter 15 Landscape Design 35
PURPLEOSIER WILLOW, Salix purpureaPussy willow is grown for its interesting andattractive catkins (flowers). The sexes in willoware separate with the male having large, gray,fluffy catkins with bright-yellow stamens. Thefemale flower is not as attractive. The catkins onpussy willow appear in very early spring. It is aneasily transplanted, vigorous shrub. However, ithas many problems and needs to be kept vigor-ously growing to look attractive. Pussy willowhas been overplanted in many areas. Purpleosier willow is the hardiest of those listed.(Rosegold Pussy Willow 6 to 10 foot height, 6 to10 foot spread; Goat Willow 15 to 25 foot height,12 to 15 foot spread; Black Pussy Willow 6 to 10foot height, 6 to 10 foot spread; PurpleosierWillow 8 to 10 foot height, 6 to 8 foot spread)
FLOWERING QUINCE,Chaenomeles speciosaQuince shrubs usually have deep-red flowers.However, new varieties with white, pink, andvarious shades of red flower colors are nowavailable. Lustrous, green foliage appears soonafter the flowers have opened. The large,yellow-green, apple-like fruits are not particu-larly attractive but can be used to make jellies.The Japanese quince (C. japonica), a smaller plantonly 3 feet high, is similar to flowering quince. (6to 10 foot height; 6 to 12 foot spread)
ROSE-OF-SHARON, Hibiscus syriacusA large shrub, Rose-of-Sharon flowers in August,a time when few other shrubs are in bloom.Flowers may be single or double and range incolor from white to pink to red to violet, with allthe variations in between. Unless the olderportions of the plant are pruned out regularly,the flowers will become smaller. If handledproperly, the plant is bushy enough to be used asa hedge or screen. It is hardy in coastal northernNew England. (6 to 12 foot height; 6 to 10 footspread)
SMOKEBUSH, Cotinus coggygriaThe plumose, fruiting panicles of smokebush areattractive for several weeks in summer. Thefoliage is blue-green throughout the growingseason. This shrub is often used as an accentpoint in the landscape because of the showypanicles. The yellow to orange autumn color isalso attractive. Smokebush will grow in any soiland any location in the garden. Insects anddisease are of little concern. The cultivar‘Purpureus’ has purple leaves and fruitingpanicles that are much showier than the species.(15 foot height).
SPIRAEA, Spiraea spp.Spiraeas are as easy to grow as any group offlowering shrubs. They adapt to a wide range ofsoil types. A good deal of sunshine is requiredfor flowering, but they will grow in moderateshade. Most spiraeas have white flowers, butthere are a few with pink or red flowers. Theyrange in height from 1 1/2 to 7 feet. Vanhouttespiraea is the most well known, and still popularbecause of its heavy set of white flowers andgraceful, arching growth habit. Bridalwreathspiraea is attractive with its double, white flow-ers; lustrous, green foliage; and orange fall color.‘Anthony Waterer’ is the most popular smallspiraea, around 2 feet high. The red flowers ofthis species are borne in large 5 to 6 inch clusters.Many new, white-flowered, dwarf cultivars arebeing used as foundation plants. Spiraeas arerelatively free of insect or disease pests. Occa-sionally a heavy spring infestation of aphids willoccur. (1½ to 12 foot height; 1½ to 12 foot spread)
STAGHORN SUMAC, Rhus typhinaSumacs are easily grown shrubs and do particu-larly well in a dry soil. The staghorn sumac caneventually become a rather large shrub, perhaps35 feet high; however, as a multiple-stemmedplant, it seldom reaches that height. There areplants with male flowers only, female flowersonly, or plants with both male and female flow-ers. Female flowers develop into bright-red fruitspikelets in fall and are quite interesting. Thebrilliant, red fall color of sumac foliage is out-standing. Staghorn Sumac has fuzzy twigs fromwhich it derived its common name. The plant canbe used as a mass planting, but in modernlandscapes it is often used as a specimen becauseof its interesting growth habit. Attractive, cutleafcultivars are available. Sumacs have no seriousinsect or disease problems. Though related topoison ivy, it is not a poisonous plant. (15 to 25foot height; 15 to 30 foot spread)
BUCKTHORN, Rhamnus frangulaBuckthorn was developed and is used almostsolely as a hedge. A columnar cultivar willspread only about 4 feet wide and maintains itsshape with little or no pruning. The foliage is adense, dark, lustrous green. It is densely twiggyand stiff, but is useful where a columnar tallhedge is needed. (10 to 12 foot height; 8 to 12 footspread)
Chapter 15 Landscape Design 36
VIBURNUM, Viburnum spp.As a group of shrubs, viburnums have much tooffer. They have beautiful spring flowers;attractive summer foliage; excellent fall color;and attractive, bright-colored fruits in fall andwinter. The fruits may be red, yellow, blue, orblack and in a given species may change colorseveral times as they mature. In some species theflowers are quite fragrant, adding materially totheir value as ornamental plants. Viburnums areusually sold balled and burlapped or in contain-ers. (2 to 30 foot height; 2 to 30 foot spread).
HOBBLEBUSH (Viburnum alnifolium).Despite being a native plant best used for natu-ralizing, hobblebush does have several ornamen-tal qualities of merit. The large, white, flattopped flower clusters are a one of the showiestof any native woody plant. The clean greenfoliage emerges becoming an effective deep redto maroon in the fall. This leggy, and somewhatopen, plant appears to be hobbling around on itsknees and elbows and is best used when facedwith greenery or a stone wall. Hobblebush doesbest in light shade on the edge of moist, decidu-ous woods.
KOREANSPICE VIBURNUM , V. carlesiiA small shrub growing to 6 feet, the flower budsare pink, opening to white flowers that are quitefragrant. The cultivar ‘Compactum’ is a preferredselection that matures at about 3 ½ feet and isattractive year round. Like the species, the early,semi-snowball type white flower clusters arepink in bud and are very pleasantly fragrant.The attractive green foliage turns a more consis-tent red to maroon bronze in the fall than thespecies and then drops to reveal a clean winterhabit.
WITHEROD VIBURNUM (Viburnumcassinoides).Another native viburnum, this plant fits in wellwith our natural New Hampshire landscape.The creamy white flower clusters produce afruiting display that passes through a sequentialripening process, changing in color from green tonearly white and then to pink, rose, blue, andfinally becoming black, Often all stages arepresent together on the same fruiting cluster. Asunusual as this trait is, the fruits are quicklyenjoyed by birds. Foliage is a shiny rich greenfollowed by a brilliant and dependable red. Likemost viburnums, its clean winter habit is an assetin the winter landscape.
ARROWWOOD VIBURNUM, V. dentatumA large shrub, 6 to 16 feet, arrowwood will growin sun or shade and is adaptable to any soil.Arrowwood is a rapid grower and may havegood, glossy, yellow to red fall color.
WAYFARINGTREE VIBURNUM, V. lantanaAnother large shrub, 10 to 15 foot, this viburnumis especially good for dry soil situations. The fallcolor is a good red; the fruit changes from red toblack and provides a source of food for birds.
BLACKHAW VIBURNUM, V. prunifoliumA large shrub, 12 to 15 feet in height, can grow 20to 30 feet high. During May this shrub is coveredwith white flowers in flat clusters, later followedby blue-black berries that are among the largestfruits in the viburnums. Blackhaw has an excel-lent, shining, red fall color.
DOUBLEFILE VIBURNUM,V. plicatum tomentosumA medium-sized shrub, up to 9 feet high. DuringMay this plant has creamy-white flowers bornein flat clusters followed by bright-red berries infall. The fall color is a consistent reddish purple.The plant’s most interesting features are itshorizontal branching and wide-spreadinggrowth habit. This interesting form gives theplant added interest in the landscape.
Other important landscape viburnums includethe Burkwood viburnum (V. x burkwoodii andcultivars) and American cranberrybush vibur-num (V. triloba).
WEIGELA, Weigela floridaMost of the weigelas available in the nurserytrade are hybrids developed to produce superiorflowers. The funnel-shaped flowers are borne inclusters of three to five. They range in color fromwhite to deep red. The stems are usually coveredwith flowers for a short period of time in thespring. Weigela is easy to grow and has noserious insect or disease problems. (6 to 9 footheight; 9 to 12 foot spread)

Chapter 15 Landscape Design 37
WINTERBERRY, llex verticillataWinterberry is grown primarily for its bright-redberries that appear while the leaves are stillgreen and remain on the plant long after theleaves have fallen. The inconspicuous flowersare borne on separate plants; some plants haveall male flowers and others have all femaleflowers. Only female plants produce the berries,but both sexes need to be present to ensure fruitproduction. One male plant is enough to polli-nate six to eight females. Winterberry will growin any good garden soil. Many cultivars, includ-ing ‘Red Sprite’ with superior winter fruit areavailable. (6 to 10 foot height; 6 to 10 foot spread)
Broad-Leaved EvergreensAmong the most highly prized landscape plants arebroad-leaved evergreens. They are the true aristo-crats of our gardens. However, many of themrequire special attention if they are to develop intoattractive, long-lived plants.Wide fluctuations in temperature, prolonged dryperiods, drying winds, and bright sunshine are notideal conditions for most broad-leaved evergreens.Good soil preparation and a carefully selectedlocation will help ensure the success of these plants.However, the year-round beauty and special effectthat they give to the landscape make them wellworth the extra care needed to grow them.
The broad-leaved evergreens are valued chiefly fortheir evergreen foliage, but many of them possessother desirable ornamental traits. They are gener-ally clean plants, dropping few leaves at any onetime. They offer a range of foliage colors and tex-tures for landscape interest.
Broad-leaved evergreens prefer a rich, well-drained,slightly acid soil. Increasing organic matter contentand improving drainage can modify an existingpoor soil to one in which they will grow success-fully.
Locate those broad-leaved evergreens subject towinter injury in areas where they receive protectionfrom the wind and afternoon sun, especially inwinter. North and east sides of buildings are ideal.Wind and sun protection provided by fences orlarge plants will also help prevent injury. Protectionfrom the hot summer sun of southern and westernexposures, may be needed.
Broad-leaved evergreens are best fertilized in thespring. Summer or fall fertilization may induce lateseason growth that is highly susceptible to winterinjury. Winter scorch of foliage can also develop ifplants dry out during the winter. To prevent this,water plants in late summer and fall if rainfall hasbeen deficient.
Plant size is also important for the winter hardinessof some species. A small, young plant may be easilykilled while the same species may be quite hardywhen larger-sized plants are used. Poor culture,attacks by insects or disease, or any other factor thatweakens a plant makes it more subject to winterinjury.

Chapter 15 Landscape Design 38
Selected Broad-leaved EvergreensThe plants described in the following section aregenerally hardy in all parts of the state. Whenbroad-leaved evergreens are planted and locatedproperly, they can add year-round interest to thelandscape and provide a pleasant contrast toneedle-leaved evergreens in both winter and sum-mer.
AZALEA AND RHODODENDRON,Rhododendron spp.The plants commonly called azaleas and thosecalled rhododendron belong to the botanicalgenus, Rhododendron. It is the largest group ofwoody ornamental plants. Over 4,000 species,varieties, and hybrids have been recognized.Most azaleas are deciduous, and most rhododen-drons are evergreen. Both require acid, moist,organic soils, cool temperatures, high humidity,and protection from harsh winter winds. Theyare valued for their very colorful flowers in thespring and summer, and the evergreen types areadditionally valued for the foliage color they addto the winter landscape. New cultivars of azaleasand rhododendron are added to nursery listsevery year. Check with a local nursery for thosebest adapted to your location.
Selection and Culture of Azaleas and Rhodo-dendrons
Although all azaleas and rhododendrons belongto the genus Rhododendron by plant taxonomists,the name azalea” is commonly used for NorthAmerican deciduous species and many ever-green hybrid types. Generally “Rhododendron”is used for those species that have large, ever-green, leathery leaves and flowers distinctlyclustered in terminal groups. When a sharpdivision cannot be made, it is always correct tocall any of them rhododendrons. Whatevername is used, the culture required for all theseplants is very similar. The same cultural prac-tices as described below may also be applied toblueberries, pieris, heather, holly, and otherericaceous plants that prefer acid, organic soils.
LocationMost azaleas and rhododendrons are at their bestin fairly mild, humid climates. Selecting a goodsite is very important, as is selecting good qualityplants. A site sloping to the north or east isusually best, because it is protected from dryingsouth and west winds. Thus, plants are lesssubjected to rapid temperature changes in latefall or early spring.
Always plant azaleas and rhododendrons wherethey get protection from strong winds. Buildingsand slopes provide good barriers. Evergreenshrubs or trees such as pine, juniper, or spruceplanted to the south or west of rhododendronsprotect them and make good backgrounds forshowing off the flowers. Plants not given protec-tion from the wind often develop leaf scorch orsplitting of the bark on the stems. Avoid siting atthe corners of buildings where wind tends to bestronger and on southwest building faces wherelate winter sun and heat can promote foliardamage.
LightFiltered sunlight is ideal for many rhododen-drons, but morning sunlight with shade after 1p.m. may be satisfactory and desirable. Plantsmay survive continuous shade if trees havebranches pruned high. Protection from after-noon sun may also be given by fences, shrub-bery, or screens. Some deciduous azaleas are lesssensitive to sun, and should be used if the loca-tion receives full afternoon sun. Many small-leaved types may not only thrive, but prefer fullsun. However, in full sun delicate flower colorswill bleach quickly even though the plants maygrow well,
DrainageBecause the delicate roots of azaleas and rhodo-dendrons are easily destroyed, excellent drainageis important. To test drainage, dig a hole sixinches deep in the bed and fill it with water. Ifthe water has not drained from the hole in fourhours, install drainage tile to carry away excesswater, or build raised beds.
Starting the BedPlanting azaleas and rhododendrons in groupsrather than individually permits more efficientuse of prepared soil. Don’t place the bed close toshallow rooted trees such as maple, ash, or elm.Feeder roots rapidly move into improved soiland compete for water and plant food. For bestresults, dig out the bed to loosen the soil. Plantsshould be spaced 3 to 4 feet apart, and at least 18inches from the edge of the bed.
Soil ConsiderationsProper placement alone is not enough. Azaleasand rhododendrons must have soil that is pre-pared carefully and thoroughly. Roots of azaleasand rhododendrons are very delicate and unableto penetrate heavy or rocky soils.
Azaleas and rhododendrons required an acidsoil. Most of them thrive best at a soil pH be-tween 4.5 and 6.0. Many northern New England
Chapter 15 Landscape Design 39
soils have a native acid reaction. However,alluvial or river bottom soils may have a morealkaline reaction and need to be made more acidto grow azaleas and rhododendrons well. Soilspreviously limed heavily for a lawn or gardenmay need the pH lowered. Mortar or similarbuilding materials mixed into the soil close tofoundations may increase pH. When the pH isunknown, it can be determined by conducting asoil test.
If the pH is too high, the soil may be made moreacid by incorporating agricultural sulfur, alumi-num sulfate, or iron sulfate into the soil at anappropriate rate. Although a soil test is the bestway to determine the amount required, in gen-eral, about two to three pounds of agriculturalsulfur per 100 square feet will lower the pH oneunit, depending on soil texture and organicmatter content. This rate should be multipliedby 6.9 for aluminum sulfate and by 9.0 for ironsulfate. Raising soil pH by the addition of limingagents, such as ground limestone, is rarelynecessary for rhododendron and azaleas.
The best soil in which to grow azaleas is goodquality, loamy topsoil which contains plenty oforganic matter. In areas with heavy clay orexcess sand, good quality topsoil can be added orused to replace the poorer soil only if the entiresoil area is treated that way. Amendmentsshould not be added just in individual plantingholes because water movement will be impeded.If topsoil is added to the planting bed, be sure tocheck the pH and make any adjustments thatmay be necessary.
MulchMost azaleas and rhododendrons are shallowrooted and need a mulch to conserve moisturearound the roots, to minimize winter injury, andto prevent injury from cultivation. Coarsematerials such as partly decomposed oak leavesor pine needles are ideal. Oak shavings, hard-wood chips, and aged sawdust or peat mossmixed with coarser materials may also be usedsatisfactorily. A two to three inch depth ofmulch is satisfactory. Avoid piling up mulch tooclose to the base of the plant stem. As the oldmulch decomposes, add new mulch. Given theabundance of materials, late fall can be a goodtime to apply additional mulch.
FertilizationAfter planting, an application of liquid fertilizerformulated for acid-loving plants may aid inestablishment Follow the directions on thepackage. In subsequent years, a granular fertil-izer for acid-loving plants may be broadcast
evenly around plants, as required. Use only thoseproducts specially formulated for rhododen-drons and azaleas and follow directions. Rhodo-dendrons and azaleas grow well naturally atrelatively low nutrient levels and little additionalfertilizer is required. Ideally, fertilizing shouldbe done in April or May; don’t apply fertilizeafter July 1. Late summer fertilization may forceout tender fall growth or delay hardening off ofnew growth and may result in increased winterdamage.
Maintaining The PlantingRhododendrons and azaleas require little careonce they are properly established. Mulch willkeep down weeds and conserve moisture. Culti-vation should be done carefully, it at all, becausethe shallow, fine roots are easily damaged.
WateringAlthough rhododendrons have been killed byover watering, more often that not newerplantings often suffer from a lack of water. Theshallow fibrous root system of rhododendronsand azaleas makes them susceptible to drought.As a general rule, one inch of water, either fromrainfall or artificial irrigation, should be avail-able per week during the growing season.
PruningUsually there is little need to prune azaleas andrhododendrons. If growth becomes excessive,reduce the size can be kept in check with light,periodic pruning after bloom. Amazingly, manytypes will break bud readily from old wood andrespond well to heavy pruning, if necessary.
Azaleas sometimes branch poorly and form aloose, open shrub. The plants’ form can beimproved by pinching out the soft, new shoots ofvigorous growing plants. Do not pinch after Julybecause flower buds will not have time to de-velop for the following year.
Winter ProtectionIn New Hampshire, winter damage to evergreenrhododendrons and azaleas is a common prob-lem. To avoid winter damage, proper siting isimportant. As a general rule, avoid site exposedto winter wind and sun. Most damage shows upas split bark, dried leaves, or dead or damagedflower buds. If hardy types are selected andproper locations are chosen, little or no winterprotection is needed. If existing varieties showwinter damage, provide some protection. It isnormal for leaves to curl and droop on cold days.
Discarded Christmas trees may be used toprotect plants. Branches can be anchored in theground to shield the rhododendron from wind

Chapter 15 Landscape Design 40
and sun. Screens may be built of burlap or othermaterials to provide shade and windbreak.Temporary fences made of lath or snow fencingare effective in providing necessary windbreakand light shade.
Protection must remain loose and airy through-out the winter. Small plants should not becovered with large mounds of leaves. Masses ofleaves may begin to decay and smother the plantbeneath them. Leaves may be pulled up aroundthe stems in late fall but should not cover theentire plant.
Also, several types of aerosol, anti-transpirantsmay be applied to evergreen foliage to protect itfrom winter time water loss. As a rule, thesematerials should be applied when the tempera-ture is no lower than 40oF. Often these materialsare not effective throughout an entire winter, andmay need to be reapplied during a January thaw.The practice of using anti-transpirants can beexpensive and time consuming. However, fornewly planted rhododendrons, anti-transpirantscan be very effective in minimizing winter injury.
ProblemsSunscald, scorchLarge-leaved evergreen rhododendrons aresometimes subject to sunscald during winter.This is most likely to happen if the plant did notreceive ample moisture before freezing in fall.The exposed portions of the leaf (usually thecentral portion when the leaf was curled) maybecome brown. This browning may also appearon the edges of some leaves. To prevent scorch,plants should be well watered in the fall ifrainfall has been sparse, protected from dryingwinds, mulched well, and given some shade.Iron ChlorosisIf leaves turn yellow in the sections between theveins, but the veins remain green, iron deficiencymay be the cause. If the entire leaf turns yellowwith some browning, other problems are sug-gested, for example, calcium deficiency. Chloro-sis may also result from soil that is not acidenough, poor drainage, nematodes, or otherconditions that cause root or stem injury. Ironchlorosis can usually be temporarily controlledby spraying the foliage with an iron (ferrous)sulfate solution, chelated iron, or a liquid fertil-izer formulated for acid-loving plants. Condi-tions leading to chlorosis, such as poor drainageor alkaline soil, must also be corrected. In acidsoils, iron chlorosis rarely occurs.
Insects and DiseasesThere are several insects and diseases thatcommonly bother azaleas and rhododendrons.The most common insect problems are rootweevils, azalea bark scale and rhododendronborer. The most common diseases arePhytophthora root and crown rot, Ovulinia petalblight and fungal leaf spots.
Stem Bark SplittingThis problem results from rapid temperaturechanges and freezing. The bark above groundsplits and may peel off. The stems do not usuallyheal, and the branch dies above the injury. Deathmay not occur for one or two years. Winterprotection may help, but generally the bestremedy is to plant reliably hardy varieties orprune out affected branches of injured plants.When checking a reference for hardiness of aparticular rhododendron or azalea, keep in mindthat northern New England has cold winters,which stress plants and may predispose them toother problems.
Evergreen Rhododendron VarietiesThere are many beautiful rhododendrons.However, many are not reliably cold hardy inNew Hampshire. Generally more varieties maybe grown in the milder climate of the coast. Thefollowing selected varieties are some of the mostreliable.
Of the many hybrids available, those derivedfrom Rhododendron catawbiense, called Catawbahybrids, have the greatest hardiness. Newvarieties may be superior to those listed, butestablishing their true adaptability takes manyyears. The collector may be willing to take riskswith tender plants, but the beginner shouldalways select varieties well adapted to the localgrowing environment.
‘Album Elegans’- Soft lilac fading to white, lateflowering, a R. maximum hybrid.
‘America’ - Dark red with a ball-shaped flowercluster. Broad, bushy plant.
‘Atrosanguineum’- Red with purple markings.Hardy.
‘Boule de Neige’- White, early. Slow growing,but develops into a compact, large plant.
‘Boursault’ - Compact grower, buds purple,turning rosy-lilac.
Catawbiense Album - White flowers in roundtrusses. Narrow leaves, tall, vigorous.
‘English Roseum’- Lilac pink, large foliage,

Chapter 15 Landscape Design 41
vigorous upright growth.
‘Everestianum’ - Purplish-pink with greenmarkings. Hardy.
‘Ignatius Sargent’ - Purplish red with brownmarkings.
‘Lord Roberts’ - Medium height, red flowers withblack blotch.
‘Mrs. Chas S. Sargent’ - Deep rose spotted withyellow. Cold hardy.
‘Nova Zembla’- Red flowers similar to ‘America.’Cold and heat tolerant.
‘P.J.M.’- Early flowering, purple, dark foliage.This is a reliable rhododendron for central andnorthern New Hampshire. Many of the newerintroductions have been selected for improvedflower color.
‘Purple Splendor’- Very deep violet purple withdarker blotch.
‘Ramapo’- Small, violet blue flowers. Low,spreading plant. Tolerates sun and shade.
‘Roseum Elegans’ - Lavender-pink with greenmarkings. Endures temperature extremes. Goodfor the beginner.
Deciduous Rhododendron VarietiesDeciduous azaleas and rhododendrons are fairlycold hardy and provide a mass of color in springas well as often providing effective fall foliage,ranging from shades of yellow to oranges andreds. Different species vary widely in hardiness,however. Normally, those found in nurserieswill be the ones best suited to the area. Chooseonly vigorous plants of good varieties. Beginnersshould choose some of the old standards andlater try some of the newer introductions.
Flame Azalea (R. calendulaceum) - The showiestof the deciduous American azaleas, retainingtheir flowers for nearly two weeks. Available inyellows, apricot, salmon, pinks, oranges, andreds. Excellent for mass planting and to createnaturalistic plantings. For central and southernNew Hampshire only.
Exbury (Knap Hill) Hybrids - A very populargroup due to their showiness and hardiness.Available in pastel shades ranging from cream,through pink to yellow and orange.
Mollis Hybrids (R. x kosteranum) - slightly moretender and smaller than Exbury, but muchvarietal variation. Colors mainly in yellow,apricot, orange, red.
Cornell Pink Rhododendron (Rhododendronmucronulatum ‘Cornell Pink’). One of the firstrhododendrons to bloom, its true pink flowersheld on naked stems are a welcome harbinger ofspring. This medium-sized, compact shrub isnearly rounded in outline and has soft greensummer foliage which changes to shades ofyellow and bronzy crimson in the fall. Winterhabit is clean and neat.
Northern Lights Hybrid Azaleas (Rhododendron‘Northern Lights’) - Hardy to nearly -40o F, thisgroup of deciduous rhododendrons blooms earlyin a variety of colors. Flowering in white, yellow,orange, rosy pink, or lilac, these plants aremedium-sized and compact. Reported to not beespecially resistant to powdery mildew, attentionto site selection and cultural conditions-good aircirculation, low humidity, and proper sanita-tion—is important. However, this group ofespecially hardy shrubs might be a good choicewhere the selection of rhododendrons is limited.
Royal Azalea (R. schlippenbachii) - An azaleahardy in coastal areas with large, fragrant, rose-pink flowers. Foliage has good autumn coloralthough may sometimes be burned by latesummer heat.
BOXWOOD, Buxus spp.Boxwood has been a popular, broad-leavedevergreen for many years, and very old speci-mens can be found. Boxwoods make excellentspecimen plants or hedges. They can be easilypruned to any desired shape. Of the availableboxwood types, the Korean or littleleaf box ismost hardy and easily grown. The leaves tend tolose color in winter; in shade, winter discoloringis less severe. Because boxwood foliage isdesicated every winter, its use is limited to moist,protected coastal regions. (3 to 4 foot height; 3 to4 foot spread)
DROOPING LEUCOTHOE,Leucothoe fontanesianaA slow-growing plant with spreading, archingbranches and lustrous, dark-green leaves, itproduces fragrant, bell-shaped flowers in earlyspring. It needs shade for best growth and ismost suitable beneath large evergreens. It isrelated to pieris and requires the same growingconditions. Best used in southern New Hamp-shire (3 to 6 foot height; 3 to 6 foot spread)

Chapter 15 Landscape Design 42
WINTERCREEPER EUONYMUS,Euonymus fortuneiMost varieties of wintercreeper euonymus arevines or groundcovers. Sarcoxie's euonymus,developed at Sarcoxie, Missouri, is an erect formthat makes an excellent, broad-leaved, evergreenshrub. It grows in full sun but will retain itsgreen winter color better when grown in shade.Many cultivars exist with different leaf colorsand variegation patterns. Euonymus scale, awhite-covered scale insect, may attack the stemand leaves of euonymus. It is not hardy inmountainous areas of northern New England.Winter damage is common. (4 inches to 4 footheight; indefinite spread)
JAPANESE HOLLY, Ilex crenataMost Japanese hollies produce small, spinelessleaves and black fruit. They are popular, small,compact, evergreen shrubs further south, but arelimited to coastal areas of northern New En-gland.
INKBERRY, Ilex glabraThe inkberry, a black-fruited holly native toeastern North America, is not as showy anornamental as the other hollies, but it is one ofthe most hardy of the group and makes a goodhedge or screen. Leaf size, shape, and glossinessvary considerably. The selection ‘Compacta’should be used in the landscape. Occasionalpruning will keep the plant from developing aloose, open type of growth. (6 to 8 foot height; 8to 10 foot spread)
AMERICAN HOLLY, Ilex opacaThe spiny, evergreen leaves and bright-redberries of American holly are familiar to mostpeople. It is native and is slow-growing, eventu-ally developing into a small tree.
The sexes of holly are on separate plants. Someplants produce only male flowers and othersproduce only female flowers. Only the femaleplants produce berries, but both sexes must bepresent to ensure fruiting. One male plant isenough to pollinate the flowers of six to eightfemale plants. Acid soils high in organic matterand with good drainage are essential forgrowing hollies. Limited to use in southernNew Hampshire only. (40 to 50 foot height;18 to 40 foot spread)
JAPANESE PIERIS, Pieris japonicaFormerly called andromeda, pieris is an attrac-tive, broad-leaved evergreen. The new foliage isbronze in color in spring, soon turning a lustrousmedium-green. The flowers, borne in April, arecreamy-white and hang in long, drooping clus-ters. The plant needs protection from winter sunand wind to prevent leaf scorch and flower buddamage. A light, well-drained, acid soil high inorganic matter will produce the best plants. It ishardy in coastal areas, but suffers foliage desicca-tion in winter in many parts of northern NewEngland. (9 to 12 foot height; 6 to 8 foot spread)
OREGON GRAPEHOLLY,Mahonia aquifoliumOregon grapeholly is a fairly coarse, stiff shrubthat reaches 3-6 feet. In April, the plant is cov-ered with bright-yellow flowers. In the summer,the bluish-black, grape-like fruits develop. Thefoliage is dark, lustrous, and holly-like. In winter,the leaves turn a bronze-purple color. This shrubis usually semi-evergreen and much of thefoliage dies in the winter. Protection from wintersun and wind will help it remain more attractive.It is useful in coastal areas of northern NewEngland, but suffers winter leaf desiccation. (3 to9 foot height; 3 to 5 foot spread)
PYRACANTHA/FIRETHORN,Pyracantha coccineaPyracantha is an evergreen to semi-evergreenshrub. It produces showy, small, white flowers inthe spring, but the clusters of bright-orangeberries produced in the fall, hanging on the plantuntil mid-winter, are its main attraction. Pyra-cantha can be grown as an individual specimenplant, hedge, or barrier. It can be trained flatagainst a wall or on a trellis to look like a vine orespalier. It normally grows 6 to 7 feet tall and canspread to almost twice as wide, so ample spacemust be given for the plant to develop fully.Dwarf varieties are available for smaller areas, asare varieties with brighter-red fruit. Pyracanthais one of the few plants that seems to do best onpoor soil. Good soil and high fertility producerampant growth susceptible to disease (fireblight) and low in berry production. The planthas several insect problems to watch for, includ-ing lacebug and spider mite. It is best grown incoastal areas, and often suffers leaf desiccation.(2 to 10 foot height; 2 to 10 foot spread)
Chapter 15 Landscape Design 43
MOUNTAIN LAUREL, Kalmia latifoliaThis beautiful shrub, with buds and flowers inmany pink, rose, and red colors, is one of theprettiest shrubs available for both sun and shadelocations. A moist, well-drained, acid soil isnecessary. It suffers winter desiccation in all butcoastal areas. (3 to 15 foot height; 3 to 15 footspread)
NORTHERN BAYBERRY,Myrica pennsylvanicaBayberry is grown for its aromatic,semi-evergreen leaves and its waxy, gray berries.Because of their fragrance, the berries are fre-quently used in making candles. The sexes ofbayberry are usually separate so both male andfemale plants need to be planted together toensure production of the ornamental berries.Bayberry grows vigorously on good soil but willgenerally fruit more heavily when grown onpoor soil. It is a fine ornamental, for its foliage aswell as its fruit. It is very salt tolerant. (5 to 12foot height; 5 to 10 foot spread)
Ornamental VinesVines serve many useful landscaping purposes.Where space is limited, vines may be used asdividers or barriers. They can screen unsightlyviews or provide privacy for the patio or porch.The monotony of a long fence or blank wall may bebroken with vines. They can soften harsh structurallines and blend the structure with other plantings.On steep banks and in other areas where grass isdifficult to establish and maintain, vines may beused as ground covers. They can be established ontrellises against buildings to provide shade, therebyimproving energy efficiency for cooling.
Selection of a suitable vine depends on its intendeduse, location, soil adaptability, and type of support.Dense, coarse foliage is desirable if a screen isneeded. A fine-textured, slow-growing vine shouldbe selected to add pattern and interest to a stone orbrick wall. A decorative vine should possessdesirable flowers, fruit, or foliage for seasonalinterest.
TypesVines can be classified according to their method ofclimbing: by tendrils, twining, or clinging. Thekind of support required is determined by thegrowth habit of the vine selected.
Tendrils are slim, flexible, leafless stem appendagesthat wrap themselves about anything they contact.The grape is probably the best known vine whichclimbs by means of tendrils. Twining vines, such asbittersweet and clematis, wind their stems aroundany available support. Clinging vines climb bymeans of either tendrils with disk-like adhesive tipsthat attach themselves to any surface, such asBoston Ivy, or by means of small aerial rootletsalong the stems that attach themselves into crevicesof a rough-textured surface, such as Wintercreepereuonymus or climbing hydrangea.
Vine SupportsVine SupportsVine SupportsVine SupportsVine SupportsTwining and tendril-type vines climb best on wires,trellises, and arbors. They can be grown on solidvertical surfaces only if proper supports are pro-vided. Although clinging vines can be used onbrick or masonry walls, they can erode cementbetween bricks and weaken the wall. They shouldnever be used on walls of frame buildings as theirmethod of climbing, can cause damage. These vinescling so closely to the wall that moisture is likely tocollect under them and cause the wood to rot.

Chapter 15 Landscape Design 44
Grow clinging vines on trellises far enough from thesiding of wood structures to allow free air circula-tion behind the vines. The trellis should be movableto permit painting the siding without damaging thevine. Clinging vines are particularly valuable onconcrete exposures such as along highways orcommercial buildings.
Vine supports should be constructed with sturdy,durable materials. Wire, tubing, or wood may beused to make suitable support. Copper or alumi-num wire or tubing is preferred over other metals,because these materials will not rust. Use pressure-treated wood or treat wood with a preservative thatis not toxic to plants to make it last longer.
CulturePlant bare-rooted vines in the spring before newgrowth starts. Plants growing in containers may beplanted to early summer. Young vines should betrained to provide the desired growth pattern. Newstems may need to be fastened into position bytying with a soft cloth. Some vines grow rampantand appear overgrown unless severely pruned atfrequent intervals. Only when a naturalistic effect isdesired, and there is adequate space, should vinesbe allowed to grow freely. Vines may developsparse foliage low on the trellis and develop a massof foliage at the top. To prevent this, pinch back theterminal growth of the stems as they develop.Pinching forces lower branching and more uniformdistribution of foliage on the trellis. Vines growingpoorly should be fertilized in early spring or latefall according to soil test recommendations.
Selected Vines
BITTERSWEET, Celastrus spp.Two types of bittersweet commonly grown forornamental use in the garden are: Americanbittersweet, C. scandens, a native plant, andOriental bittersweet, C. orbiculata. The Americanbittersweet is a vigorous vine that grows 10 to 20feet tall and climbs by means of twining stems. Itwill thrive in almost any soil or exposure excepta wet, boggy situation. Bittersweet is planted forits attractive fruit, a favorite for dried arrange-ments. Reddish-yellow fruit capsules split openin early autumn to expose red-orange berries.The fruits are grouped in terminal clusters whichmake them conspicuous both before and after theleaves fall.
Bittersweet produces male and female flowers onseparate plants. Male and female plants must begrown to ensure fruit set. Male plants are morevigorous growers and usually must be prunedharder than female plants to prevent the berryproducing plants from being crowded out. Onemale plant should be used for each five femaleplants. Bittersweet is not easily transplanted dueto the spreading root system; therefore, small,young plants should be used. Plants growrapidly once established and can become aserious pest if not pruned back to keep themunder control. The vines should not be permit-ted to climb trees or shrubs, as they have theability to choke them out. Bittersweet occasion-ally may be infested with euonymus scale, buthas few other insect or disease pests.
BOSTON IVY, Parthenocissus tricuspidataBoston ivy is one of the best vines for coveringstructures or supports quickly. It is a fast-growing, close-clinging vine which climbs bymeans of adhesive disks that have the potentialto damage masonry walls and buildings. Thevine is tolerant of many soil types and grows infull sunlight or in shade. Boston ivy grows to aheight of 50 to 60 feet. Its bright-green leavesstand out and overlap on long stalks. Leavesturn rich tones of scarlet, orange, or purple in thefall. The new growth in spring is reddish-bronze.
The flowers are inconspicuous but attract a largenumber of bees. Fruit is fairly showy in the fallafter the leaves are gone. The bluish-blackberries are attached to the vine in grape-likeclusters and persist after the leaves have fallen.The vine is well-adapted to city conditions.When given free rein, the vine will cover win-dows, doors, or anything in its path; it needsannual pruning. Easily transplanted; start with2-year plants.
CLEMATIS, Clematis spp.Clematis are among the most decorative andspectacular of all the flowering vines. A widerange of color and flower shape may be found inthe many varieties and species offered for sale.The large-flowered clematis hybrids are the mostwidely used. These hybrids are deciduous vinesthat climb by twining stems, which act as ten-drils. They attain a height of 8 to 10 feet. Flower-ing time varies according to variety but may befrom late spring until frost. The Sweet AutumnClematis, Clematis dioscoreifolia robusta (C.paniculata), is a more vigorous species thatgrows to 20 or 30 feet. It is an easy vine to growand is popular for the masses of fragrant, whiteflowers produced in late August and September.

Chapter 15 Landscape Design 45
Clematis prefer a light, loamy, well-drained soilwith a pH between 6.5 and 7. Lime should beadded if soil pH is below pH 6.5. They requireconstant soil moisture. Clematis grow well infull sun or partial shade. Preferably, the foliageshould be exposed to full sun and the soil keptcool and shaded by low ground-cover plants ormulch. Vines grow well on the east side of awall, but not on the north. Protection fromstrong winds is also desirable. Proper pruningtime depends upon variety. Those which bloomon previous year’s wood should be prunedimmediately after flowering. Many types grownin northern New England bloom on growthmade during the current year and should bepruned in early spring before new growthappears.
When planting, the crown of the plant should beset at ground level and mulched. Support, suchas a bamboo stake, must be provided immedi-ately to prevent breakage of the brittle stems. Alight lattice trellis is one of the best supports forclematis. The landscape uses of clematis aremany. They are excellent accent vines whentrained on arbors, light wires, or delicate trellisesbut are also effective when allowed to trail overrocks, stone walls, or fences.
ENGLISH IVY, Hedera helixEnglish ivy is a handsome evergreen vine,climbing by attaching itself to rough surfaces byvery short aerial rootlets. It may attain a heightof 20 to 50 feet further south, but in northernNew England it generally winter kills on branchtips, a process which prevents it from reachingmaximum size. The rich, leathery, dark, shinyleaves hold their color all winter if protectedfrom winter sun and wind. North or east facingwalls are the most satisfactory locations. Englishivy prefers a shady location with a fairly moistsoil, well-supplied with organic matter.
Flowers are only produced on old vines that havereached a mature condition. They are greenishand small, followed by ½ inch, blue-black fruit inlarge clusters that persist for several months.The landscape uses of English ivy are many, bothindoors and outdoors. As a ground cover in theshade or under trees and shrubs, it is an excellentbroad-leafed evergreen. On vertical, flat sur-faces, interesting patterns are formed during itsfirst few years of growth. It is not suitable forcovering walls with a southern exposure becauseof the intense summer heat and winter sun.‘Baltica’ and ‘Bulgaria’ English Ivy are a hardiervarieties recommended for use in New Hamp-shire.
HONEYSUCKLE, Lonicera spp.A few climbing honeysuckles are suitable forlandscape use in northern New England. Mostfrequently found are the Hall’s Japanese Honey-suckle, L. japonica ‘Halliana,’ Goldflame Honey-suckle, L. heckrottii, and Trumpet Honeysuckle,L. sempervirens. Hall’s Japanese honeysuckle is asemi-evergreen vine with wiry stems. It climbs20 to 30 feet by twining, or forms a ground coverby rooting at the joints. It is a rampant vine thateasily grows out of bounds and becomes a pestunless carefully controlled. Flowers open whiteand turn pale yellow. They are produced fromJune to September. Black berries produced in thefall are of little ornamental value. It should notbe placed where it can climb on other plants ortrees. It needs annual pruning to keep it inbounds. Goldflame Honey suckle is the best ofthe climbing honeysuckles. Pink buds open toyellow, and then age to pink, from early tomidsummer. It climbs 10 to 20 feet.
The Trumpet Honeysuckle is a loose-growingvine with twining stems and semi-evergreen,bluish-green leaves. Scarlet trumpet-shapedflowers are produced from May to August at theends of the branches. Red fruits attract the birdsin early fall. It will grow 15 to 20 feet high.
The climbing honeysuckles are among the easiestplants to grow in the garden. They will thriveeither in sun or shade. Although they performbest in good, well-drained garden soil, they willtolerate poor soils. However, they do not toler-ate wet, boggy conditions. Honeysuckles standsevere pruning and can be cut back to 6 to 8inches if they have grown out of bounds or needrejuvenation. Although a few insects and dis-eases may attack honeysuckles, they usually arenot serious problems.
CHINA FLEECE VINE/SILVER-LACE VINE,Polygonum aubertiiThis vine, sometimes called a silver-lace vine,produces clusters of small, white to greenish-white flowers in August and September, whichturn pinkish at maturity and remain effective fora long time. The dense foliage is bright-green.The vine is a rank grower and can be used for aquick screen. Once established, it may grow asmuch as 20 feet in a single season. It will requiresevere pruning each spring to keep it withinbounds, and can become a nuisance. It is adapt-able to many soil types and is suitable for cityconditions. It needs a sunny location.

Chapter 15 Landscape Design 46
TRUMPET CREEPER/TRUMPET VINE,Campsis radicansCommon trumpet creeper is a deciduous, robustvine that climbs by both aerial rootlets andtwining stems. Growing to a height of 25 to 30feet, this vine is useful for rustic effects on fenceposts, walls, poles, or rock work. Brilliant orangeand scarlet, 2 to 3 ½ inches long, the trumpet-shaped flowers are very showy from Julythrough September. The dark-green leavespresent a bold, tropical appearance. Long, cigar-like fruits on bright-tan stems may be considereddecorative during the winter months. Commontrumpet-creeper grows well in partial shade.However, a full-sun exposure is required formaximum flower production. It will tolerateboth wet and dry soils.
Additional support is sometimes required forthis vigorous vine. Tying the heavy branches toa sturdy support and thinning the vine in earlyspring will prevent strong winds from tearing itdown. Pinch back the tips during the growingseason to eliminate excessive top growth andpromote bushiness. Common trumpet-creepertransplants readily. It is a prolific seed producerand may become a pest if not kept under control.A hybrid variety, ‘Madame Galen,’ has larger,more showy flowers than the common type.Color is salmon-red rather than orange-scarlet.
VIRGINIA CREEPER/WOODBINE,Parthenocissus quinquefoliaVirginia creeper is a native, deciduous vinewhich climbs by tendrils with adhesive disks thatadhere to brick, stone, or tree trunks. It grows 30to 50 feet tall and has a loose, open growthpattern. The leaves of Virginia creeper are five-parted and stand out on slender, drooping sidebranches. They open purplish in the spring,remain a dull, deep green throughout the sum-mer, and turn brilliant scarlet or crimson beforedropping in the fall. It is one of the first of allwoody plants to display fall color. Inconspicu-ous, greenish flowers develop into clusters ofbluish black, pea-sized berries in September andOctober. The berries either fall before winter orare eaten by birds after the leaves drop.
Virginia creeper will grow in a variety of soilsand is considered to be a very drought-resistantplant. Thriving either in a sun or shade expo-sure, Virginia creeper is valued for producing apleasing pattern on large blank walls, for cover-ing rustic structures, and for covering ground orbank in rocky areas.
WINTERCREEPER EUONYMUS, Euonymus fortuneiWintercreeper euonymus is a handsome, ever-green vine growing to 15 to 20 feet. This shrubbyvine climbs by means of aerial rootlets. It at-taches to any upright support or roots on the soilsurface to form a near mat. The species seldomflowers or produces fruit. However, severalvarieties available are valued for their pinkcapsuled fruits which split open to expose orangeseeds. The rich, dark-green, leathery leaves ofsome types turn a bronzy-green in the fall.
Wintercreepers grow slowly in the shade butprefer protection from the winter sun to preventdesiccation. The plant is tolerant to many soilconditions but prefers soil that is moist and wellsupplied with organic matter. Wintercreepers areuseful for training against walls, as groundcovers, and for climbing over low walls and ontree trunks. The vine may be allowed to com-pletely cover a wall or may be thinned out togive a tailored tracery. Varieties of varying leafform and fruiting ability are available. Growthhabits and cultural requirements of these areessentially the same. Euonymus scale is theirmost serious pest. This plant often winterburnsand dies back from winter damage.
JAPANESE WISTERIA, Wisteria floribundaThe wisterias are vigorous, twining vines thatgrow to 25 or 30 feet. These vines are mostvalued for their long, pendant clusters ofviolet-blue flowers. Varieties are available whichproduce flowers of varying colors (from white topink to deep reddish and bluish-violet).Bean-like, velvety pods remain after the leavesfall, but are not particularly ornamental. Allwisterias will bloom, but some vines take as longas 7 to 15 years to produce their first flowers.Excessive nitrogen fertilizer may stimulate leafand stem growth at the expense of flower pro-duction. The following practices may help induceflowering: (1) an application of superphosphatein early spring, (2) severe pruning of the newgrowth in late spring or early summer, and (3)root pruning by cutting some of the roots with aspade a few feet from the trunk in late fall.Grafted plants or plants that have flowered in thenursery are recommended to ensure earlierbloom.
Wisterias are excellent vines for training onstoutly constructed arbors and pergolas but are

Chapter 15 Landscape Design 47
hardy only in the milder areas of northern NewEngland. They are best when trained horizontallyon a wire or structure 10 to 20 feet above theground. The vines are excellent for use onopen-structured roofs over patios and terraces.
Japanese wisteria is a rapid-growing vine. Itclimbs by stems twining from right to left. Atwisted, heavy main stem or trunk several inchesin diameter is often developed. The shiny,bright-green leaves turn yellow in autumn. Thefragrant, pea-like flowers are arranged in clusters8 to 36 inches long. The flowers open graduallyfrom base to tip of the cluster when the leavesappear. The flower clusters are longer but moreopen than those of the Chinese wisteria, which isnot hardy in the north.
CLIMBING HYDRANGEA,Hydrangea anomla subsp. petiolarisAn excellent landscape vine with very showy,flat-topped flower clusters in summer; glossy,dark-green leaves; and exfoliating winter bark, itis slow to establish but once well-rooted growsrapidly with clinging roots that will attach tostructures and supports. It may grow 60 to 80feet, so use a sturdy support. It is generallyhardy in central and southern New Hampshire.
DUTCHMAN'S PIPE, Aristolochia duriorThis vigorous vine graces many New Englandporches with its 4-10 inch dark green,heart-shaped leaves and unusual yellowishflowers. It grows 10-20 feet in a single seasonand tolerates any moist, well-drained soil in asunny or partly shaded location.
GroundcoversGroundcovers are low-growing plants that spreadquickly to form a dense cover. They add beauty tothe landscape and at the same time help prevent soilerosion. Many types of plants, including shrubs,vines, and perennials, can be used as excellentgroundcovers.
Grass is the best known groundcover, but grass isnot suited to all locations. Other groundcover plantsshould be used where grass is difficult to grow ormaintain. Unlike grass, most groundcovers cannotbe walked on. They can be used effectively toreduce maintenance work and to put the finishingtouch on any landscaping project.
LocationGround covers can be found to fit many condi-tions, but they are used most frequently for thefollowing locations:
Steep banks or slopes
Shady areas under trees and next to buildings
Underplanting in shrub borders and beds
Where tree roots grow close to the surfaceand prevent grass from growing.
Very wet or very dry locations
When planted under trees, ground covers reducethe possibility of mower damage to the base ofthe tree. Some ground covers may be used toprotect the roots of shallow-rooted trees. Theyshade the soil and keep it from drying outrapidly. Some ground covers don't require asmuch moisture and nutrients as grass. Therefore,they are in less competition with trees andshrubs.
SelectionSelection of a suitable plant for ground coverdepends on the area where it will be grown.Some ground cover plants prefer partial shade;others thrive in deep shade or full sun; and a fewgrow well in either sun or shade. The selectedground cover plants listed here grow well in awide variety of soil types. Some, however, prefermoist soil, while others need dry or well drainedsoil. Select types best suited to the conditionsexisting where the ground cover is needed. Fromthese selected types, choose one that ornamen-tally blends best with surrounding plantings.
Chapter 15 Landscape Design 48
CultureA well-prepared planting bed is necessary to de-velop a dense, healthy ground cover planting. Thesoil should be worked to a depth of 6 to 8 inches.Take care to eliminate perennial weeds and grassthat might compete with the ground cover duringestablishment. Organic materials such as peat moss,leaf mold, compost, or well rotted manure lightenclay soils and improve the water-holding capacityof sandy soils. Eight to ten bushels of organicmaterials per 100 square feet incorporated to adepth of 6 to 8 inches may be necessary in very pooror heavy soils. If you need to add a soil amendment,add it to the entire planting bed, not just to indi-vidual planting holes.
A soil test provides the best guidance for fertilizerusage. Mix the fertilizer into the soil to a depth of 6to 8 inches. Most ground cover plants can beplanted from spring to midsummer, but spring ispreferred. The arrangement and spacing of plants inthe planting bed depends on the growth characteris-tics of the plant.
Space plants so they will develop a uniformlycovered area in a relatively short period of time.Plant in staggered rows, not straight lines, in bothdirections to get faster coverage.
Plants that spread rapidly may be spaced muchwider than slowly spreading types. Spacing alsodepends on funds available and how quickly acomplete cover is wanted. Spacings from 6 inches to2 feet are most frequently used. If plants are spaced4 inches apart, 100 plants will cover about 11 squarefeet.
Watering, weeding, mulching, and feeding will bethe main requirements of the new ground coverplanting. Water during dry periods. An occasionalthorough soil soaking is better than frequent lightwatering. Occasional hand weeding with a mini-mum disturbance of the soil may be necessary. A 1to 2 inch mulch layer of leaf mold, compost, orsimilar organic material will conserve soil moistureand reduce weed growth.
Selected Groundcovers
AJUGA/CARPET BUGLEWEED, AjugareptansAjuga is a good ground cover, forming a densecarpet of foliage over the soil. Thissemi-evergreen plant grows rapidly by produc-ing mats of foliage in rosettes. Runners developfrom the mother plants, take root and producenew plants. The foliage grows about 4 incheshigh with upright clusters of blue flowers reach-ing 6 to 8 inches. The plant flowers in early Mayto mid-June. Ajuga will flourish in almost anysoil with good drainage. It grows best in sun orlight to medium shade.
The foliage is deep-green in color and partlyevergreen, turning brown after severe freezingweather. Bronze and variegated varieties are alsoavailable. The extensive root system prevents soilerosion. If established plants are set 12 to 15inches apart in the spring, they will cover the soilin one growing season. Do not set the plants toodeep. The crown should never be covered. In thespring or early fall, rooted “runner plants” can bedug from established plantings and replantedelsewhere.
CREEPING JUNIPER, Juniperus horizontalisAlthough not the only juniper species commonlyused as a groundcover, creeping juniper is anexcellent, woody, evergreen plant cover thatgrows 1 to 2 feet tall depending on the variety. Itis a vigorous grower capable of covering a largearea. The leaves are needle-shaped and green orblue-green in color. The foliage frequently turnsa purple or slate color in the winter.
Creeping juniper withstands hot, dry situations,prefers full sun and excellent drainage, andgrows well on slopes and banks. The plants maybe improved by clipping the ends of mainbranches for two or three seasons after plantingto induce a dense branching system. Plantsshould be spaced 2 to 4 feet apart. Some commonvarieties are listed below:
Andorra juniper (J. h . ‘Plumosa’) is a flat-toppedvariety with a compact habit of growth, reachinga height of approximately 18 inches. The foliageis a light grey-green, becoming a purplish-plumcolor in the winter.
‘Bar Harbor’ is a low, vigorous-growing plantusually no more than 8 inches tall. The foliage isgrey-green in summer, turning a slate color inwinter.

Chapter 15 Landscape Design 49
‘Wiltoni’ (Blue Rug) grows flat on the ground.The foliage is an outstanding blue color which isretained all winter.
MOSS PINK, Phlox subulataCreeping phlox is commonly used as a rockgarden plant but forms an effective ground coveron poor, bare soils where there is little competi-tion. It forms a dense mat of moss-like foliage,which is covered in spring with masses of flow-ers in either pink, purple, or white. In rockyareas, it will persist in the existing soil and drapeitself over the stones. It is a plant for full sun andrelatively dry soils. As plants age, they may tendto develop occasional dead spots. Periodicdivision to fill such spots may be necessary. Incoastal areas the plants are evergreen, but wherewinters are cold and plants are exposed, brown-ing may occur.
CROWN VETCH, Coronilla variaCrown vetch is a perennial legume sometimesused to cover dry, steep, rocky slopes. The plantgrows 1 to 2 feet tall and bears small pink flowersfrom July to September. The plant spreads byunderground stems, and one plant can cover anarea up to 6 feet in diameter. It tolerates shadebut thrives in full sun. The foliage dies to theground by December. Crown vetch is mostvalued for its ability to prevent soil erosion. It isoften used for this purpose on highway slopes.The plant is suited for covering large areas and istoo vigorous and invasive for small sections ofthe landscape.
The plant is propagated either from crowns or byseed. Crowns planted 2 feet apart will providecoverage in about 2 years. One crown per squarefoot is recommended for quick cover. It can beseeded further south with good results, but innorthern New England crowns produce quickereffect.
ENGLISH IVY, Hedera helixEnglish ivy is an evergreen, creeping vine form-ing a dense mat of dark-green foliage 6 to 8inches tall. The plant grows best in shade orsemi-shaded locations. It is most useful on northand east facing banks, under trees where grasswill not grow, or under planted between shrubs.If exposed to full sun or sweeping winds, thefoliage “burns” in the winter. Although it can beplanted 1 foot apart for cover in 1 year, it is moreeconomical to transplant growing plants frompots or flats in the spring at a spacing of 18 to 24inches. Vines may grow about 3 feet the firstseason.
When used next to buildings or walls, Englishivy will climb, clinging by means of aerial root-lets. This may be an asset or fault dependingupon the situation and personal preference. Itsaerial roots have the ability to damage mortarbetween benches. ‘Baltica’ and ‘Bulgaria’ Englishivy are hardy selections recommended for coastaland northern New England.
HALL'S JAPANESE HONEYSUCKLE,Lonicera japonica ‘Halliana’Hall's honeysuckle is a branched, dense,semi-evergreen, woody vine which covers theground and roots at the nodes. It is best used onlarge banks or other difficult situations wherelarge areas must be covered. The plant is toovigorous and rangy for small areas. It shouldnever be planted near trees or shrubs as it willclimb them and eventually choke them out. Thedark-green leaves appear early in the spring,turn bronze in the fall, and usually hang on mostof the winter.
The fragrant flowers are white, turning a paleyellow with age. The plant flowers continuouslyin midsummer. The plant grows slowly untilwell established, then very robustly, attaining aheight of 18 to 24 inches. It does well in sun orpartial shade. The plant is tolerant of all soilconditions, including very dry soils.
HOSTA/PLANTAIN LILY, Hosta spp.For partially shaded areas, hostas make effectiveground covers. They appear most often in peren-nial borders as accent plants or edgings, but theirlarge leaves provide a lush covering for the soil.Hosta species vary in size and foliage color.Some have deep-green, yellow-green, blue-green,or grey-green foliage while others are edged orvariegated with white or cream. Hostas may alsoproduce lily-shaped flowers in white or lavender.Flower stems may be 6 to 24 inches tall, andplants range from dwarf (3 to 4 inches) to tall (2feet) forms.
As a ground cover, hostas are best where the soilremains slightly moist. Excessively dry soil maycause the foliage to burn around the margins orpartially die back. In full sun, leaf color is paleand leaf die-back may be more severe, especiallyduring dry periods. In winter the foliage ofhostas dies back leaving the ground exposed.However, new foliage develops quickly in springand lasts well into the fall.
Chapter 15 Landscape Design 50
PACHYSANDRA/JAPANESE SPURGE,Pachysandra terminalisPachysandra is a popular ground cover suitablefor shady landscape situations. This evergreenplant spreads by underground stems and attainsa height of 1 foot. The foliage is tinged purple inspring, becoming bright-green in summer andyellow-green in winter. Clusters of tiny,off-white blossoms appear above the leaves inMay, but they have little ornamental value.
The plant is adapted to full or partial shade.When planted in full sun, growth is poor. It isone of the few plants that will grow underevergreens and in dense shade. The evergreenleaves commonly “burn” and turn brown inexposed places during the winter. Establishedplants are usually planted 1 foot apart in thespring. Clipping the tips of vigorous growingshoots in the spring will induce the plant tobecome more dense. The plants should not be cutall the way to the ground. The plant prefers amoist, highly organic, well-drained soil for bestestablishment. A planting of this ground cover isusually a uniform height throughout.
COMMON PERIWINKLE/MYRTLE/VINCA,Vinca minorPeriwinkle or myrtle is an excellent, evergreenground cover with dark-green foliage andpurple, blue, or white flowers, depending on thevariety. It blooms in April-May. The plant growsabout 6 inches tall, spreading in all directions bysending out long trailing and rooting shootswhich make new plants. It prefers shade. Thefoliage color is richer in mid shade, but moreflowers are produced in light shade.
This ground cover is most commonly used forunder planting trees and shrubs, on shadedslopes, or on the north side of buildings. Rootedcuttings or established plants are normallyspaced from 12 to 18 inches apart. At a 6-inchspacing, a complete cover will be produced in 1year. Plant in the spring in areas with severewinters. Spring flowering bulbs interplantedwith periwinkle will lend color and interest tothe ground cover planting. Daffodils are particu-larly well-suited since they bloom with peri-winkle and do not require frequent division.
PURPLELEAF WINTERCREEPER,Euonymus fortunei coloratusPurpleleaf Wintercreeper is an excellent ever-green plant for covering relatively large areas,banks, slopes, and shaded areas under trees. Theplant sends out prostrate stems which root wherethey contact moist soil. It will cling to verticalwalls and surfaces it contacts and has the poten-tial to do some damage. When established, thisground cover forms a loose, somewhat irregularnetwork of stems to a height of 8 to 12 inches. Itsdeep-rooting habit makes it a good soil binder.
The medium-green evergreen foliage turnspurplish-red in early fall, retaining this colorthroughout the winter. The plant does notproduce flowers or fruit. Established plants areusually planted in the spring at a distance of 18to 24 inches apart. One plant per square yard willmake a cover in two or three growing seasons.Some pruning of upright shoots helps to keep theground cover lower and more compact. Theplant grows well in full sun or shade. It issuitable for most of northern New England, butwinter kills in the far north or on sites exposed towinter wind and sun. In addition to thepurpleleaf variety, there are numerous cultivarsof wintercreeper that make excellentgroundcovers.
YUCCA, Yucca filamentosaYucca is a rugged plant able to take almost anysituation. The plant is normally around 2 feethigh with all the leaves arising from a centralpoint at ground level in a rosette fashion. Theleaves are long, pointed and rigid. In summer theplant produces a flower stalk about 4 feet highwith a large head of pendulous, creamy-whiteflowers. Yucca is used as an accent plant and isfrequently used in modern ground plantings.The plant is suited best to hot dry situations.
RUSSIAN ARBORVITAE,Microbiota decussataThis 12" tall evergreen groundcover resembleseastern white cedar in texture. With time, it canspread to a diameter of 12 to 15 feet. It performsbest in full sun to partial shade, and moistwell-drained soil. It is green in summer andpurplish in winter.

Chapter 15 Landscape Design 51
SEDUM/STONECROP, Sedum spp.Over 300 species and 500 cultivars of sedumsexist, ranging from tiny mats only a few incheshigh to plants 2 feet high. They are used as massground covers, in rock gardens, on slopes,between stepping stones, and even in containers.Most of the sedums are spreading or creepingplants that will root from broken branches orfallen leaves. Related to the cacti, their thick,waxy, generally evergreen leaves mean that theydo not require large amounts of water. Mostsedums are very drought tolerant, and will rot ifkept too moist or if air circulation is poor. Theyare best used in full sun, where they produceflowers ranging from tiny yellow-green stars tolarge masses of small, pink to wine-coloredflowers. Foliage color will also vary, from vari-ous shades of green to blues and bronzes.
ORNAMENTAL GRASSES, numerous genera,species, and cultivarsThe group of ground covers increasing mostrapidly in popularity at present is the ornamentalgrasses. With heights ranging from under 1 foot(blue fescue) to over 5 feet (zebra grass), theornamental grasses will generally have a memberthat can fit any landscape situation. Often usedstrictly as ground covers and for erosion controlon slopes, ornamental grasses also make out-standing specimen plants when used as indi-vidual plants in the landscape. In addition to awide range of heights and spread, there is tre-mendous variation in leaf size and color. Leafcolors range from pale greens to bright powerblues and blood reds, with many types of bothvertical and horizontal stripe patterns.
Most of the ornamental grasses require full sunand will produce a wide variety of flowers,ranging from small, bottlebrush arrangements tolarge, showy plumes. Flower colors range frompale yellows and pinks to deep maroons. Manyof the flower spikes persist well into the wintergiving added landscape interest, though the leafclumps will generally die to the ground andregrow each spring.
Additional ground covers to consider includebearberry, hypericum, candytuft, goutweed,santolina, ferns, many plants often classified asperennials (such as daylilies), and various woodyshrubs (Japanese holly, cotoneasters, etc.)
List of Plants forSpecific Purposes
Trees Resistant to Gypsy Moth
Species rarely fed upon:
ash Fraxinus species
red cedar Juniperus virginiana
honey locust Gleditsia triacanthos
sycamore Platanus occidentalis
tulip tree Liriodendron tuplifera
white cedar Thuja occidentalis
black walnut Juglans nigra
black locust Robinia pseudoacacia
Species fed upon when other foliage is gone:
hickory Carya species
black gum Nyssa sylvatica
hornbeam Carpinus caroliniana
red maple Acer rubrum
Norway maple Acer platanoides
sassafras Sassafras albidum
beech Fagus grandifolia
Thorned and prickly plants useful as barriers:
barberry Berberis species
hawthorn Crataegus species
flowering quince Chaenomeles species
roses Rosa species
red cedar Juniperus virginiana
holly Liex species
mahonia Mahonia species

Chapter 15 Landscape Design 52
Plants to Attract WildlifeBirds and other animals seek food, shelter, water,and safeareas for reproduction. The plants listed help meet theserequirements.
Trees:
beech Fagus species
oak Quercus species
pine Pinus species
red cedar Juniperus virginiana
ash Fraxinus species
birch Betula species
cherry Prunus species
dogwood Cornus species
blackgum Nyssa sylvatica
hickory Carya species
holly Ilex species
magnolia Magnolia species
maple Acer species
persimmon Diospyros virginiana
tulip tree Liriodendron tulipifera
service berry Amelanchier species
sassafras Sassafras albidum
crabapple Malus species
Shrubs:
sumac Rhus species
spice bush Lindera benzoin
viburnum Viburnum species
yew Taxus species
elderberry Sambucus species
rhododendron Rhododendron species
hawthorn Crataegus species
Russian olive Elaeagnus angustifolius
Oregon grape holly Mahonia species
pyracantha Pyracantha species
Vines and other plants:
blackberry
raspberry
teaberry
partridge berry
honeysuckle
Virginia creeper
bittersweet
pokeberry
blueberry
Plants Tolerant of Dry, Poor SoilGet the plants listed here off to a good start by preparingthe soil they are to be planted in and by watering untilthey are established.
Trees:
graybirch Betula populifolia
hackberry Celtis occidentalis
junipers Juniperus species
golden rain tree Koelreutaria paniculata
osage orange Maclura pomifera
Virginia pine Pinus virginiana
red pine Pinus resinosa
chestnut oak Quercus prinus
locust Robinia pseudoacacia
sassafras Sassafras albidum
Shrubs:
amur maple Acer ginnala
Japanese barberry Berberis thunbergii
quince Chaenomeles species
smoketree Cotinus coggygria
broom Cytisus species
Russian olive Elaeagnus angustifolia
witch hazel Hamamelis virginiana
St. Johnswort Hypericum species
privet Ligustrum species
buckthorn Rhamnus species
sumac Rhus species
Groundcovers:
yarrow Achillea species
sweet William Dianthus species
daylilies Hemerocallis species
cinquefoil Potentilla species
creeping phlox Phlox subulata
St. Johnswort Hypericum species

Chapter 15 Landscape Design 53
Plants Tolerant of Shade
The degree of shade tolerance varies from plant to plant.
Most will do well with some sun, especially those thatflower.
Trees:
red bud Cercis canadensis
arborvitae Thuja occidentalis
hemlock Tsuga species
Shrubs:
abelia Abelia species
alders Alnus species
chokeberry Aronia species
aucuba Aucuba japonica
barberry Berberis species
Hinoki cypress Chamaecyparis species
hollies Ilex species
mountain laurel Kalmia latifolia
leocothoe Leucothoe fontanesiana
mahonia Mahonia species
heavenly bamboo Nandina domestica
pieris Pieris species
rhododendron Rhododendron species
yew Taxus species
viburnum Viburnum species
Ground covers:
spurge Pachysandra terminalis
periwinkle Vinca minor
bugle weed Ajuga species
lily-of-the-valley Convallaria majalis
ferns several
daylilies Hemerocallis species
plantain lily Hosta species
Virginia bluebells Mertensia virgnica
primrose Primula species
violets Viola species
Plants Tolerant of Salt
autumn olive Elaeagnus angustifolia
honey locust Gleditsia triacanthos
mulberry Morus species
black locust Robinia pseudoacacia
buffalo berry Shepherdia argentea
tamarix Tamarix gallica
white oak Quercus alba
red oak Quercus borealis
English oak Quercus robur
white willow Salix alba
Plants with Colorful Autumn Foliage
Shrubs:
Botanical Name Common Name Color
Range Height
Acer ginnala Amur Maple Scarlet 8 feet
Cornus alba‘sibirica’ Siberian Dogwood Red 9 feet
Euonymus alatus Winged Euonymus Scarlet 7 feet
Nandina domestica Nandina Scarlet 6 feet
Rhus aromatica Fragrant Sumac Yellow-scarlet 4 feet
Rhus copallina Shining Sumac Scarlet 25 feet
Rhus glabra Smooth Sumac Bright red 25 feet
Rhus typhina Staghorn Sumac Red 30 feet
Rosa rugosa Rugosa Rose Red-yellow 6 feet
Vaccinium species Blueberries Scarlet 3-25 feet
Viburnum species Arrowwood Red toburgandy 6-20 feet
Trees:
Botanical Name Common Name Color
Range Height
Acer saccharum Sugar Maple Red-yellow Tall
Acer rubrum Red orSwamp Maple Red Tall
Amelanchier laeois Chionanthusvirginicus Fringetree Yellow Medium
Cornus mas Cornelian Cherry Red Small
Cornus kousa Japanese Dogwood Bronze to red Small
Crataegus Washingtonphaenopyrum Hawthorn Scarlet
/orange Medium
Ginkgo biloba Ginkgo Yellow Tall
Liquidambarstyraciflua Sweet Gum Scarlet Tall
Oxydendrum Sourwoodarboreum or Sorrel Tree Scarlet Medium
Pyrus calleryana‘Bradford’ Bradford Pear Dark red Medium
Quercus rubra Red Oak Red Tall
Quercus coccinea Scarlet Oak Scarlet Tall
Sassafras albidum Sassafras Orange/scarlet Medium

Chapter 15 Landscape Design 54
Plants with Attractive Fruit
Shrubs:
Botanical Name Common Name Fruit Color Season Height
Aronia arbutifolia Red Chokeberry Red Fall 8 feet
Berberis thunbergii Japanese Barberry Red Fall-Winter 5 feet
Callicarpa japonica Japanese Beautyberry Purple Fall 6 feet
Cotoneaster species Cotoneaster Red Fall 1-15 feet
Elaeagnus multiflora Cherry Elaeagnus Red Mid Spring 9 feet
Euonymus alatus Winged Euonymus Scarlet Fall 7 feet
Ilex verticillata Winterberry Red Fall-Winter 7 feet
Ligustrum lucidum Evergreen privet Blue-black Fall-Winter 10 feet
Lonicera species Bush Honeysuckle Red Spring-Fall 8-15 feet
Mahonia aquifolium Oregon Holly Grape Bluish-black Spring 6 feet
Nandina domestica Nandina Red & white Fall-Winter 6 feet
Pyracantha Pyracanthacoccinea lalandei or Firethorn Orange Fall-Winter 6-20 feet
Rhus glabra Smooth Sumac Scarlet Fall-Winter 15-20 feet
Rhus typhina Staghorn Sumac Crimson Fall-Winter 15 feet
Rosa species Rose Red Fall 6 feet
Symphoricarpos albus Snowberry White Fall 3 feet
Viburnum dilatatum Linden Viburnum Red Fall 10 feet
Viburnum opulus European Cranberry bush Red Fall-Winter 10 feetViburnum
Trees
Botanical Name Common Name Fruit Color Season Height
Acer ginnala Amur Maple Red Summer 20 feet
Crataegus species Hawthorn Red Fall 15-30 feet
Ilex opaca American Holly Red Fall-Winter 45 feet(marginal)
Juniperus virginiana Red Cedar Bluish Fall-Winter 75 feet
Liquidambar styraciflua Sweet Gum Brown Fall 100 feet
Malus species Crab Apple Red to yellow Fall 20-40 feet
Melia azedarach Chinaberry Yellow Fall-Winter 40 feet
Oxydendrum arboreum Sourwoodor Sorrel Tree Grayish Fall-Winter 75 feet
Sorbus species Mountain Ash Red Fall 30 feet
Evergreens with cones Brown Fall-Winter 75-100 feet
Vines
Botanical Name Common Name Fruit Color Season Height
Ampelopsis brevipedunculata Porcelain Ampelopsis Lilac-blue Fall 25 feet
Celastrus scandens American Bittersweet Yellow-red Fall-Winter 30 feet
Euonymus fortunei Wintercreeper Orange Fall 30 feet

Chapter 15 Landscape Design 55
New Hampshire Plant Hardiness Zone MapAverage Winter Minimum Temperatures
U.S. Dept. ofAgriculture Arnold Arboretum
Zone Degrees (F) Zone Degrees (F)
3A -35 to -40 3 -20 to -35
3B -30 to -35 4 -10 to -20
4A -25 to -30 5 -5 to -10
4B -20 to -25 6 -5 to -5
5A -15 to -20
5B -10 to -15
6A -5 to -10
6B -0 to -5
Adapted from the latest U.S.D.A. hardiness rangemap by Charles H. Williams, UNH ExtensionSpecialist-Ornamentals. 1991


CCCCCHAPTERHAPTERHAPTERHAPTERHAPTER 17 17 17 17 17Composting PrComposting PrComposting PrComposting PrComposting ProcessesocessesocessesocessesocessesIntroduction to Composting ....................................................................................................................... 1
What is “Organic”? ...................................................................................................................................... 1
Decomposition: a Problem and a Solution ............................................................................................... 2
Landfilling and Burning of Leaf & Yard Waste ......................................................................................... 2
Composting: Nature’s Recycling System ................................................................................................ 2Compost Flora and Fauna .......................................................................................................................................... 2
Bacteria: Powerhouse of the Compost Pile ...................................................................................................................... 2Nonmicrobial Composters ................................................................................................................................................. 3Unwanted Guests: Pests of the Compost Pile ................................................................................................................. 4
Basic Compost Farming.............................................................................................................................................. 4Materials: “Greens” and “Browns” ..................................................................................................................................... 5Surface Area ..................................................................................................................................................................... 5Moisture and Aeration ....................................................................................................................................................... 6Volume .............................................................................................................................................................................. 7Time and Temperature ...................................................................................................................................................... 7
Compost Benefits and Uses ....................................................................................................................... 7Beneficial Properties of Compost ................................................................................................................................ 7
Soil Structure .................................................................................................................................................................... 7Nutrient Content ................................................................................................................................................................ 8Nutrient Storage and Availability ....................................................................................................................................... 8Beneficial Soil Life ............................................................................................................................................................ 8
Compost Uses ............................................................................................................................................................ 9Mulching ............................................................................................................................................................................ 9Soil Amendment .............................................................................................................................................................. 10Potting an d Seedling Mixes ........................................................................................................................................... 10
Managing Organic Materials at Home ......................................................................................................11Source Reduction ..................................................................................................................................................... 11
Determine Needs ............................................................................................................................................................ 11Identify Alternatives ........................................................................................................................................................ 11Grasscycling.................................................................................................................................................................... 11Mulching .......................................................................................................................................................................... 12Selective Fertilization and Watering ............................................................................................................................... 12Turn In Crop Wastes ....................................................................................................................................................... 12Alternatives to Lawns ...................................................................................................................................................... 12Natural Landscapes ........................................................................................................................................................ 12Selection ......................................................................................................................................................................... 13
Reusing Organic Materials: Home Composting ........................................................................................................ 13Composting Yard Debris ................................................................................................................................................. 13Building a Hot Compost Pile ........................................................................................................................................... 16Composting Sod and Weeds .......................................................................................................................................... 16Composting Food Scraps ............................................................................................................................................... 17Worm Composting .......................................................................................................................................................... 18

Chapter 17 Composting Processes 1
CHAPTER 17Composting Processes
Taken from the 1993 King County, WA Master Recycler Composter Training ManualEdited and revised by Nancy E. Adams, University of New Hampshire Cooperative Extension
In this chapter we will examine the potential for recycling organic debristhrough natural processes of decomposition. This includes the biological pro-cesses that transform organic materials into compost, the uses for compost, andthe benefits of compost for soils and plant growth. We will focus on compostingof yard debris and food scraps.
Introduction to CompostingYard debris and food “wastes” are valuable re-sources. They are also the most economical andpractical materials suited for composting, becausethey are large, easily separated parts of our wastestream. We will look at home composting options aswell as centralized composting operations.
Terms introduced in this chapter include:• Organic wastes
• Carbon:Nitrogen ratio
• Vermicompost
• Holding unit
• Turning unit
• Mulch
• Fertilizer
• Soil amendment
• Compost
• Humus
• Bacteria
• Soil structure
• Soil aggregates
• Micronutrients
• Macronutrients
• Grasscycling
What is “Organic”?Anything that is alive or was once alive is “or-ganic.” All plants and animals, and anything madefrom plants or animals, is organic. Any wastesgenerated by plants and animals, or remaining afterwe use products made from a plant or an animal,are also organic. Organic products are an importantpart of our economy and of our lives. Some of thecommon organic materials that we use and disposeof daily are listed in Figure 1.
As Figure 1 illustrates, organic materials account formuch of what we consume and throw away everyday. Paper products alone make up over one thirdof our waste. Yard debris comprises an estimated 17percent of our garbage, and food wastes another 7percent. Due to the sheer volume of organic wastesproduced, the way that we choose to handle thesematerials is one of the most important waste man-agement decisions that we face today.
Figure 1.
Common Organic Materials
Food — Fruits, vegetables, grains, eggs, dairyproducts, meat, and fish.
Clothing and Furnishings — Cotton, wool, burlap,leather, feathers, and down.
Building Materials — Lumber, plywood, and otherwood-based materials.
Paper Products — Paper, newsprint, cardboard, andtissues
By-products — Food processing wastes, sawdust,blood, bones, and fur.
Animal Wastes — Manure, sewage, and hair.
Yard Debris — Grass clippings, leaves, prunings,fallen branches, and trees.
Chapter 17 Composting Processes 2
Decomposition: a Problemand a SolutionOrganic materials have many different qualities anduses, but all organic materials have a common traitwhich sets them apart from other waste materials:organic wastes naturally break down into a rich,soil-like material called compost. Decomposition isinevitable. When organic wastes are separated fromtrash and allowed to decompose with an adequateair supply, they can be turned into a valuable soilamendment which helps plants grow better, pro-tects soil from erosion, and conserves other re-sources.
In some situations, particularly landfills, decompo-sition can create serious problems. When buried,organic materials decompose in the absence of air,or anaerobically, and produce methane gas. Thiscan create a problem if the methane gas migratesinto nearby buildings, creating a danger of explo-sion. As rain or groundwater percolates through alandfill, weak acids are produced by decayingorganic matter. As these acids wash through thelandfill they react with other trash, creating apotentially toxic leachate which can contaminategroundwater, lakes, and streams.
Landfilling and Burningof Leaf & Yard Waste
NH RSA 266:3 VI
Beginning July 1, 1993, NH RSA 266:3 VI takeseffect. It states that “no leaf or yard waste shallbe disposed in a solid waste landfill or incinera-tor including any waste to energy facility. Thisparagraph shall not apply to municipalitiesorganized under RSA 53-A, RSA 53-B, or 1986,139, if application of the paragraph would causethe municipality to violate or incur penaltiesunder legal obligations existing on the effectivedate of the paragraph. Any generator or trans-porter who violates this paragraph shall besubject to the penalties and enforcement provi-sions of RSA 149-M:12.”
266.4 Effective Date. This act shall take effectJanuary 1, 1993.
(Approved May 18, 1992)
(Effective Date January 1, 1993).
Composting: Nature’sRecycling SystemThe natural processes of decomposition are thebasis for recycling systems for many types oforganic materials. Some of the organic wastecomposting systems currently being promoted assolutions to our solid waste problems include:
• Backyard composting of yard debris and foodscraps.
• Mulching organic wastes to protect soil fromerosion and help establish new plantings ondisturbed lands.
• Centralized composting of yard debris, such aslocal curbside collection.
• Mixed waste composting of soiled paper, foodwastes, and other organic materials.
• Co-composting of sewage sludge with sawdustor shredded yard debris.
Each of these composting systems has advantagesand disadvantages. Which system is preferred for agiven situation depends on the convenience andavailability of transportation and markets, and thevolume and type of organic waste to be handled,whether the waste generators involved are large orsmall, concentrated or dispersed. Yet all of thesesystems operate on the same biological principleswhich are described in the following sections.
Compost Flora and FaunaBacteria: Powerhouse of the Compost PileThe most numerous organisms in a compost pile arebacteria. Too small to be seen individually, theeffects of bacterial activity are easy to detect. Bacte-ria generate the heat associated with composting,and perform the primary breakdown of organicmaterials, setting the stage for larger decomposersto continue the job.
Bacteria don’t have to be added to compost.They are present virtuallyeverywhere, and enter thecompost pile with every singlebit of added organic matter.Initially, their numbers may bemodest, but given the properconditions (proper moisture, air,a favorable balance of carbonand nitrogen, and lots of surface area to work on)bacteria can reproduce at a remarkable rate.
Bacteria
Chapter 17 Composting Processes 3
Bacteria are unicellular micro-organisms whichreproduce by division: simply growing a wallthrough the middle of their cells and dividing intotwo. Then they do it again and two cells becomefour, then four cells become eight, and so on. Thismight not be as impressive if it didn’t happen sofast. One gram of the common bacteria Escherichiacoli would become a pound in three hours, and amass the size of the earth in one and a half days ifsufficient food and proper conditions were avail-able.
Many types of bacteria are at work in the compostpile. Each type thrives on special conditions anddifferent types of organic materials. Even at tem-peratures below freezing some bacteria can be atwork on organic matter. These psychrophilic bacte-ria (a grouping of bacterial species that includes allthose working in the lowest temperature range) dotheir best work at about 55 0F, but they are able tocarry on right down to 0 0 F. As these bacteria eataway at organic wastes, they give off a smallamount of heat. If conditions are right for them togrow and reproduce rapidly, this heat will besufficient to set the stage for the next group ofbacteria, the “mesophilic,” or middle-temperature-range, bacteria.
Like us, mesophilic bacteria thrive at temperaturesfrom 70 to 90 0F, and just survive from 40 to 700F, orfrom 90 to 110oF. In many compost piles, theseefficient mid-range bacteria do most of the work.However, given optimal conditions, they mayproduce enough heat to kick in the real hot shots,the “thermophilic,” or heat-loving, bacteria.
Thermophilic bacteria work fast, in a temperaturerange of 104 to 200 0F. Unless the compost pile isturned at strategic times or new materials are addedto the pile, the bacteria will work for only four toseven days until their activity peaks and the pilecools down below their optimum range. But whatactivity in those four to seven days! In that shorttime, they turn green, gold, and tan organic materialinto a uniform deep brown. If the pile is turned tolet more air in, the thermophilic bacteria will feastfor another four to seven days. (Large compost pileswith a volume of several yards or more can retainenough heat to keep thermophilic bacteria alive forseveral weeks or longer).
In all of this work, the bacteria are not alone —though at first they are the most active decompos-ers. Other microbes, fungi, and a host of inverte-brates take part in the composting process. Some areactive in the heating cycle, but most organisms
prefer the cooler temperatures of slow compostpiles or proliferate only when hot piles start tostabilize at lower temperatures.
Nonmicrobial CompostersA compost pile is a real zoo. Besides the many typesof bacteria, a multitude of larger organisms, manyof them feeding on the spent bacteria and their by-products, add diversity to the compost pile. Thefollowing is just a sampling of some of the morecommon organisms in this diverse group. (Much ofthis information about nonmicrobial composters isquoted from Dr. Daniel L. Dindal’s slide show, TheDecomposer Food Web).
Actinomycetes are a type of primary decom-poser common in the early stages of the decom-position of the pile. Actino-mycetes produce greyish cob-webby growths throughoutcompost that give the pile apleasing, earthy smell similar toa rotting log. They are fre-quently seen in drier parts of compost piles andsurvive a wide range of temperatures and condi-tions.
Fungi also perform primary decomposition inthe compost pile. Fungi send out thin mycelialfiber-like roots, far from their spore-formingreproductive structures. Themost common of the reproduc-tive structures are mushroomsthat sometimes pop up on acool pile. Though they aremajor decomposers in thecompost pile, fungal decomposition is not asefficient as bacterial decay. The growth of fungi,even more than bacteria, is greatly restricted bycold temperatures. Since they have no chloro-phyll, fungi must obtain their food from plantsand animals. Parasitic fungi exist on living plantsor animals. Most fungi are saprophytic, living ondecayed vegetable and animal remains.
Nematodes, or roundworms, are the mostabundant invertebrates in thesoil. Typically less than 1millimeter in length, they preyon bacteria, protozoa, fungalspores, and each other. Thoughthere are pest forms of nema-todes, most of those found in soil and compostare beneficial.

Chapter 17 Composting Processes 4
Fermentation mites, also called mold mites, aretransparent-bodied creaturesthat feed primarily on yeasts infermenting masses or organicdebris. Literally thousands ofthese mites can develop into aseething mass over a ferment-ing surface. Their presence in a compost pile is agood sign.
Springtails, along with nematodes and mites,share the numerical dominanceamong soil invertebrates. Theyfeed principally on fungi,although they also eat nema-todes and small bits of organicdetritus. They are a major population controllingfactor on fungi.
Wolf spiders are truly “wolves” of the soil andcompost microcommunities. They don’t buildwebs, but merely run freely hunting their prey.Depending on the size of the spider, their preycan include all sizes of arthropods, invertebrateanimals with jointed legs and segmented bodies.
Centipedes are found frequently in soil andcompost microcommunities.They prey on almost any typeof soil invertebrate near theirsize or slightly larger.
Sow bugs feed on rotting woody materials andhighly durable leaf tissues, suchas the veins comprised ofwoody xylem tubes. Sow bugsthat roll up like an armadilloare known as pill bugs or rolypolys.
Ground beetles have many representativeslurking through litter and soilspaces. Most of them feed onother organisms, but some feedon seeds and other vegetablematter.
Redworms play an important part in breakingdown organic materials and informing finished compost. Asworms process organic materi-als, they coat their wastes witha mucus film that binds smallparticles together into stable aggregates andhelps to prevent nutrients from leaching out withrainwater. These stable aggregates give soil aloose and well-draining structure.
Unwanted Guests: Pestsof the Compost PileGiven a comfortable or nourishing environment,pest species will be attracted to the action in thecomposting pile. Common pests in compost systemsinclude house and fruit flies, rodents, raccoons, anddomestic animals such as cats and dogs. Rats areprobably the least-wanted guests of all. In a hospi-table environment with plenty of food, their num-bers increase quickly and they may become trans-mitters of disease. Although pests may take resi-dence in any compost pile, they are especiallyattracted to the same high-quality foods that hu-mans and our pets like to eat. So it is important tokeep kitchen scraps, including vegetable and fruitscraps, meat, fish, dairy products, grains, and petfood out of yard debris compost piles. Safe methodsfor composting many food wastes will be discussedin this chapter.
Basic Compost FarmingPut a pile of leaves, an old cotton rag, or a freshlycut board out in the environment, and decomposi-tion is bound to occur. How long the process takesdepends on a number of factors: the makeup of thematerials, the amount of surface area exposed, theavailability of moisture and air, and the presence ofinsulating materials around the decomposingobject.
It is useful to think of composting as growingmicroorganisms. Just as a farmer keeps in mind thebasics of fertility, cultivation, irrigation, and theseason when growing a crop; a good composterfocuses on the materials being composted, theirpreparation, and their moisture content to ensure ahealthy compost crop. Fortunately, as composterswe can do much more to control the conditions in acompost pile than a farmer can do to control theweather.
Understanding how to create the ideal compostingconditions described here will allow you to makecompost quickly and help you to diagnose andsolve other peoples’ composting problems. Butremember that provided sufficient time, perfectlygood compost can be made without the prepara-tions described here.
Chapter 17 Composting Processes 5
Figure 2.
Carbon: Nitrogen Ratio Effects on Composting
Materials: “Greens” and “Browns”All living organisms need relatively large amountsof the element carbon (C) and smaller amounts ofnitrogen (N). The balance of these elements in amaterial is called the carbon-to-nitrogen ratio (C:N).This ratio is an important factor determining howeasily bacteria are able to decompose an organicmaterial. The microorganisms in compost usecarbon for energy and nitrogen for protein synthe-sis, just as we use carbohydrates for energy andprotein to build and repair our bodies. The optimalproportion of these two elements used by thebacteria averages about 30 parts carbon to 1 partnitrogen. Given a steady diet at this 30:1 ratio,bacteria can decompose organic material veryquickly (see Figure 2).
It helps to think of materials high in nitrogen as“greens,” and woody, carbon-rich materials as“browns.” There is often a visual correlation be-tween high nitrogen content in green plant material,and high carbon content in brown materials. Figure3 lists the C:N ratios for several common organicwastes.
As the chart illustrates, most materials available forcomposting don’t have the ideal carbon to nitrogenratio. One way to speed-up composting is to com-bine nitrogen-rich “green” materials (such as grassclippings) with carbonaceous “brown” materials(such as autumn leaves) to create a mix having a30:1 carbon-to-nitrogen ratio. This works best on aweight, rather than volume, basis. For instance, amixture of one-half brown tree leaves (40:1 ratio)could be used with one-half fresh, green grassclippings (20:1 ratio) to make a pile with the ideal30:1 ratio.
The C:N ratios listed in Figure 3 are only guidelines.For instance, brown grass clippings from anunwatered lawn will have far less nitrogen contentthan green clippings from an abundantly fertilizedlawn. Similarly, the leaves from different types oftrees vary in the C:N balance. There are also someconfusing exceptions to green-nitrogen, brown-carbon correlations. For instance, evergreen leavesare low in nitrogen, and brown-colored animalmanures are often high in nitrogen.
The best way to become familiar with C:N balanc-ing is to try to be specific about it for a while, thenrelax into an intuitive assessment of what a pileneeds. Think like a chef varying the ingredients fora recipe. Be curious, write down the type andquantity of materials used, and take note of thetemperature your pile reaches and the quality of thefinished compost. After a while, the process be-comes as intuitive as cooking.
Figure 3.
Average Carbon:Nitrogen Ratios
Food scraps 15:1
Grass clippings 19:1 Greens
Rotted manure 25:1
30:1 Ideal
Corn stalks 60:1
Leaves 40 – 80:1
Straw 80:1
Paper 170:1 Browns
Sawdust, wood chips 500:1
Surface AreaA melting block of ice provides a good analogy forhow surface area affects the speed of decomposi-tion. A large block of ice melts slowly, but when it isbroken into smaller pieces the surface area in-creases, and the ice melts more quickly.
Similarly, when large, coarse, or woody organicmaterials are chopped or shredded into smallerpieces, the composting process speeds up (see Figure4). With more surface area exposed, bacteria havegreater access to easily available food, so they canreproduce and grow quicker, producing more heat.

Chapter 17 Composting Processes 6
While breaking organic materials into smaller piecesspeeds up the decomposition process, it isn’t essen-tial in order to compost them. In some instances,such as when using organic wastes as mulches, slowdecomposition is advantageous. The less surfacearea that is available on a mulch, the slower itdecomposes and the longer it will continue tocontrol weeds, slow evaporation, and stop soilcompaction and erosion.
Figure 4.
Particle Size Effects on Composting
Moisture and AerationAll compost organisms need a certain amount ofwater and air to survive. The amounts of air andwater in a compost pile form a delicate balance thatmust be maintained for rapid decomposition to takeplace. Too much air circulating in the pile can makethe pile too dry for bacteria to function. At less than40 percent moisture, the bacteria are slowed by thelack of water. At greater than 80 percent moisture,there is not enough air for “aerobic” decompositionto continue. Anaerobic bacteria, which thrive in theabsence of oxygen, can take over the pile. Anaerobicdecomposition is slow and can produce unhealthyby-products, including an odor similar to rotteneggs.
Optimal moisture levels for composting occur whenmaterials are about as moist as a wrung-out sponge.It should be obviously moist to the touch, but yieldno liquid when squeezed. This level of moistureprovides organisms with a thin film of water onmaterials, while still allowing air into their sur-roundings.
If a compost pile is too wet, it should be turned(pulled apart and restacked) to allow air back intothe pile and loosen up the materials for betterdrainage. Mixing materials of different sizes andtextures also helps to provide a well-drained andwell-aerated compost pile. Figure 5 shows the effectof turning.
If an undecomposed pile of yard debris becomesdry it needs to be pulled apart and watered as it isrestacked. Watering an intact pile from above is noteffective as dry organic materials often shed water.Dry materials must be gradually wetted and mixeduntil they glisten with moisture. Prolonged expo-sure to winter rains can effectively soak a drycompost pile. It is best to cover a pile once materialsare uniformly moist to retain moisture and toprevent the pile from becoming anaerobic.
Compost should be about as moistas a wrung-out sponge. It should beobviously moist to touch, but yield noliquid when squeezed.
Figure 5.
Turning Frequency Effects onComposting Temperature
Figure 6.
Troubleshooting Compost Piles
Symptom The heap is wet and smells like rotteneggs.
Problem Not enough air; pile too wet.
Solution Turn it; add coarse, dry wastes such asstraw or corn stalks.
Symptom The center is dry and contains tough,woody wastes.
Problem Not enough water in pile.Too woody.
Solution Turn and moisten; add fresh greenwastes; chop or shred.
Symptom The heap is damp and warm right in themiddle, but nowhere else.
Problem Pile is too small, or too dry.
Solution Collect more material and mix into a newpile; moisten.
Symptom The heap is damp and sweet-smelling, butwill not heat up.
Problem Lack of nitrogen in pile.Compost is done!
Solution Mix in fresh grass clippings or nitrogenfertilizer.
Chapter 17 Composting Processes 7
Figure 7.
Pile Volume Effects on Composting
VolumeFor fast, efficient composting, a compost pile mustbe large enough to hold heat and moisture, andsmall enough to admit air to the center. As a rule ofthumb, compost piles need to be a minimum size of3 ft. by 3 ft. by 3 ft. (1 cubic yard).
A smaller pile will dry out easily, and cannot retainthe heat required for quick composting. However,by insulating the sides of smaller piles, highertemperatures and moisture can be maintained.
The upper size limits for a compost pile are about 5ft. by 5 ft. by any length. Larger piles must beturned frequently or have “ventilation stacks”placed throughout the pile to allow air into theinterior to prevent anaerobic conditions fromforming. Figure 7 shows the effect pile volume canhave on decomposition.
Time and TemperatureThe hotter the pile, the faster the composting pro-cess. As we’ve seen, temperature is dependent onhow we manage our microorganism farm. A homecompost pile built with proper consideration ofcarbon to nitrogen ratios, surface area, volume,moisture, and aeration, can produce stabilizedcompost in as little as three weeks. A commercialcomposting operation, which thoroughly shredsmaterials and turns or aerates piles, may require sixto 12 weeks to produce finished compost. Thesmaller particle sizes and increased pile volumes oflarger systems reduce aeration in the interior ofpiles, slowing down the process.
With less attention to the details of materials usedand the environment provided for them, a cooler,slower pile can be built. Low-maintenance methodsof composting will still create an excellent compost,but may take six months to two years to yieldfinished compost.
Compost Benefits and UsesWhether a compost pile is quick and hot or slowand cool, when the decomposer organisms havecompleted their work, the contents of the pile havebeen transformed into an entirely new material.Most of the wastes that made up the pile are nolonger recognizable in the finished compost — withthe exception of some persistent, woody parts. Whatremains is dark, loose, crumbly material that re-sembles rich soil. The volume of the finished com-post has been reduced because of biochemicalbreakdown and water respiration to about 30 to 50percent of what went into the pile. The compost isnow ready to use for growing new plants, and beginthe cycle over again.
Beneficial Properties of CompostCompost will improve the quality of almost anysoil. The main benefit is to improve the “structure”of the soil. The structure of a soil determines itsability to drain well, store adequate moisture, andmeet the many needs of healthy plants. Althoughcompost provides important nutrients, it is not asubstitute for fertilizers. More important than thenutrients supplied by compost is its ability to makeexisting nutrients more easily available to plants.
Soil StructureThe value of compost as a soil amendment is sug-gested by its appearance. Even a casual observationof soil amended with compost shows that it is madeup of many round, irregular “aggregates.” Aggre-gates are groups of particles loosely bound togetherby the secretions of worms and compost bacteria. Ifthese aggregates are rubbed between a finger andthumb, they break down into smaller aggregates. Inbetween and within the aggregates themselves aremany small air channels like the empty spaces leftin a jar of marbles.

Chapter 17 Composting Processes 8
A well-structured soil with lots of small aggregatesstays loose and easy to cultivate. The channels thataggregates create through the soil allow plant rootsand moisture to penetrate easily. The smaller poreswithin the aggregates loosely hold moisture until aplant needs it. The larger pore spaces between theaggregates allow excess water to drain out and airto circulate and warm the soil.
By encouraging the formation of aggregates, com-post improves the structure of every type of soil:silt, sand, or clay. In loose sandy soils, composthelps to bind unconsolidated particles together toretain water and nutrients that would normallywash right through. Added to a clay or silt soil,compost breaks up the small tightly bound particlesand forms larger aggregations, which allow water todrain and air to penetrate.
Figure 8.
pH Levels of Soil
Material pH
Recycled yard debris compost 5.5 – 7.5
Sphagnum peat moss 3.5
Douglas fir bark 3.6 – 3.8
Nutrient ContentDark, loose compost looks like it should be rich innutrients. Indeed, compost contains a variety of thebasic nutrients that plants require for healthygrowth. Of special importance are the micronutri-ents present in compost, such as iron, manganese,copper, and zinc. They are only needed in smalldoses, like vitamins in our diet, but without themplants have difficulty extracting nutrients fromother foods. Micronutrients are often absent fromcommercial fertilizers, so compost is an essentialdietary supplement in any soil.
Compost also contains small amounts of the macro-nutrients that plants need in larger doses. Macronu-trients include nitrogen, phosphorous, potassium,calcium, and magnesium. These nutrients areusually applied in measured amounts throughcommercial fertilizers and lime. The three numberslisted on fertilizer bags (e.g., 10-10-10) refer to thepercentage of the three primary macronutrients —nitrogen, phosphorous, and potassium (N-P-K) —available in the fertilizer.
Although compost generally contains smallamounts of the these macronutrients, they aretypically present in forms that are not readilyavailable to plants. When applied in four to six inchlayers, compost may provide significant amounts ofthese nutrients. However, due to the variability andslow release of major nutrients, compost is consid-ered a supplement to fertilization with more reliablenutrient sources.
Nutrient Storage and AvailabilityTo understand how compost is able to store nutri-ents and make them available when needed byplants requires a closer look. When viewing com-post through a microscope that enlarges things1,000 times, individual compost particles resemblethe aggregates that are observed with the unaidedeye. Like the aggregates, individual particles ofcompost contain many porous channels. Just as thechannels in the aggregates provide space to storewater, these spaces in the compost particles providespaces to store nutrients.
The sides of the channels provide vast surfacesinside the particles where individual ions of miner-als and fertilizers can cling. These ions are given upto plant roots as the plants require them. Thus,compost is able to store nutrients that might other-wise wash through a sandy soil or be locked up inthe tight spaces of a clay soil.
The ions clinging to the surfaces of our compostparticles tend to be those that give soil a “neutral”pH. A measure of soil acidity or alkalinity is its pH.The acidity or alkalinity of a soil affects the avail-ability of nutrients to plants. Most important plantnutrients are relatively easily available to plants at apH range of 5.5 to 7.5. At pH levels above this range(alkaline) or below this range (acid), essentialnutrients become chemically bound in the soil andare unavailable to plants. Recycled yard debriscompost typically has a pH range of 5.5 to 7.5.When mixed into soil, this compost will help keepthe pH at optimum levels for nutrient availability.The pH levels of some common soil amendmentsare compared in Figure 8.
Beneficial Soil LifeTaking a step back from the microscopic view,another beneficial characteristic of compost isevident. The presence of redworms, centipedes, sowbugs, and others shows that compost is a healthy,living material.

Chapter 17 Composting Processes 9
The presence of decomposer organisms means thatthere is still some organic material being slowlybroken down which is releasing nutrients. They arealso indicators of a balanced soil ecology, whichincludes organisms that keep diseases and pests incheck. Many experiments have shown that the richsoil life in compost helps to control diseases andpests that might otherwise overrun a more sterilesoil lacking natural checks against their spread.
Compost UsesCompost is a much needed resource. It is not onlyuseful to the home gardener, but is essential to therestoration of landscapes where topsoil has beenremoved or destroyed during construction ormining operations. Compost is increasingly beingapplied to agricultural and forest lands depleted oftheir organic matter. The most common use ofcompost today is probably in topsoil mixes used inthe landscape industry.
Compost is typically applied in three ways:1. To mulch or “top dress” planted areas2. To amend soil prior to planting3. To amend potting mixes
MulchingGardeners and landscapers use mulches and topdressings over the surface of the soil to suppressweeds, keep plant roots cool and moist, conservewater, maintain a loose and porous surface, andprevent soil from eroding or compacting. Compostserves all of these purposes and also gives plantingsan attractive, natural appearance. Compost can beused to mulch around flower and vegetable plants,shrubs, trees, and ground covers.
To prepare any area for mulching, first clear awayany visible grass or weeds that might grow upthrough the mulch. Make sure to remove the rootsof any weedy plants which spread vegetatively,such as quack grass, ivy, and buttercup. Differenttypes of plants benefit from varying applicationrates and grades of mulch. Recommended uses ofcompost as mulch and top dressings are shown inFigure 9.
Figure 9.
Using Compost as MulchOn flower and vegetable beds:
Screen or pick through compost to removelarge, woody materials. They are less attrac-tive, and will compete for nitrogen if mixed intothe soil.
Apply ½ to 1 inch of compost over the entirebed, or place in rings around each plantextending as far as the outermost leaves.Always keep mulches a few inches away fromthe base of the plant to prevent damage bypests and disease.
On lawns:
Use screened commercial compost, or sifthomemade compost through a ½ inch or finermesh. Mix with an equal amount of sand orsandy soil.
Spread compost / sand mix in 1/4 to ½ inchlayers after thatching or coring, and beforereseeding.
On trees and shrubs:
Remove sod from around trees and shrubs asfar as branches spread. If this is impractical,remove sod in a circle a minimum of 4 feet indiameter around plants.
Use coarse compost or material left aftersifting. Remove only the largest branches androcks.
For erosion control:
Spread coarse compost, or materials left aftersifting, in 2 to 4 inch deep layers over entireplanting area or in rings extending to the dripline.
Mulch exposed slopes or erosion prone areaswith 2 to 4 inches of coarse compost.

Chapter 17 Composting Processes 10
Soil AmendmentCompost can be used to enrich garden soils beforeplanting annuals, ground covers, shrubs, and trees.Many commercial topsoil mixes contain compostedyard debris or sewage sludge as a major compo-nent, along with sand, sandy soil removed fromconstruction sites, peat moss, and ground bark.
Amend soils by mixing compost or topsoil mixesthoroughly with existing soil. If a rich compost ortopsoil mix is laid on top of the existing soil withoutmixing, the zone where they meet can become abarrier to penetration by roots and water. In thiscondition, plantings often develop shallow rootsand eventually blow over or suffer from lack ofwater and nutrients. Recommended applications fordifferent situations are shown in Figure 10.
Figure 10.
Using Compost as Soil Amendment
In flower and vegetable beds andground covers:
Dig or till base soil to a minimum 8 to 10 inchdepth.
Mix 3 to 4 inches of compost through theentire depth. For poor soils, mix an additional3 inches of compost into the top 3 inches ofamended soil. In established gardens, mix 2to 4 inches of compost into top 6 to 10 inchesof soil each year before planting.
Planting lawns:
Till base soil to 6 inch depth.
Mix 4 inches of fine textured compost into theloosened base soil.
Planting trees and shrubs:
Dig or till base soil to a minimum 8 to 10 inchdepth throughout planting area, or an area 2to 5 times the width of the root ball of indi-vidual specimens.
Mix 3 to 4 inches of compost through theentire depth. For poor soils, mix an additional3 inches of compost into the amended topsoil.Do not use compost at the bottom of individualplanting holes or to fill the holes. Mulch thesurface with wood chips or coarse compost.
Potting and Seedling Mixes Sifted compost can be used to make a rich, loosepotting soil for patio planters, house plants, or forstarting seedlings in flats. Compost can be used toenrich purchased potting mixes or to make yourown mixes. Plants growing in containers are entirely reliant onthe water and nutrients that are provided in thepotting mix. Compost is excellent for containergrowing mixes because it stores moisture effectivelyand provides a variety of nutrients not typicallysupplied in commercial fertilizers or soil-freepotting mixes. However, because of the limits of thecontainer, it is essential to amend compost-basedpotting mixes with a “complete” fertilizer to pro-vide an adequate supply of macronutrients (N-P-K).Simple “recipes” for making your own compostmixes are shown in Figure 11.
Figure 11.
Using compost in potting mixes
For starting and growing seedlings in flats orsmall containers:
Sift compost through a ½ inch or finer mesh.
Mix 2 parts sifted compost, 1 part coarse sandand 1 part Sphagnum peat moss. Add ½ cupof lime for each bushel (8 gallons) of mix. Useliquid fertilizers when true leaves emerge.
For growing transplants and plants in largercontainers:
Sift compost through 1 inch mesh or removelarger particles by hand.
Mix 2 parts compost; 1 part ground bark,Perlite or pumice; 1 part coarse sand and 1part loamy soil or peat moss. Add ½ cup oflime and ½ cup of 10-10-10 fertilizer for eachbushel (8 gallons) of mix. (An organic fertilizeralternative can be made from ½ cup blood orcottonseed meal, 1 cup of rock phosphate,and ½ cup of kelp meal.)

Chapter 17 Composting Processes 11
Managing Organic Materials atHomeWith an understanding of the value of finishedcompost and the biological processes that transformorganic materials, it is easy to see why peoplewould want to compost organic materials at home.Home composting not only provides a free soilamendment, but also reduces the cost of garbagecollection and landfilling. Composting at home is awinning proposition.
Many of the common organic materials identifiedearlier are materials we generate at home and arecandidates for home composting. These includeyard debris, kitchen scraps, sawdust, soiled paperand cardboard, hair, pet wastes, and natural fiberfabrics. However, just because a waste could becomposted at home does not mean that it should be.Some of these organic materials, including manyyard clippings, are better managed by not produc-ing them in the first place. Others, such as meat andother animal or fatty food wastes, invite so manyproblems that we are better off putting them intothe trash.
Part of your role as a Master Gardener may be tohelp people decide which approaches are mostappropriate for their unique situation. The decisiondepends on what materials are available, how muchtime and effort a person is willing to spend, thespace available, costs, aesthetic considerations, andwhat options are available. To guide these decisionsyou must be familiar with the entire range of homecomposting methods and the types of materials andmaintenance styles best suited to each of thesesystems.
The first step in selecting a management strategy fororganic materials generated at home is to under-stand what options are available. When we applysolid waste management priorities to organicmaterials, we create the following hierarchy ofoptions:
1. Reduction — Landscaping strategies and prac-tices that reduce the amount of yard debris.
2. Reuse — Composting of materials for reuse on-site.
3. Recycling — Collection of organic materials forprocessing and marketing by centralizedcomposting facilities.
The following sections examine the specific practicesinvolved in each of these options.
Source ReductionSource reduction principles should be applied topurchases of organic products as they are to anyother. But how can we be selective about the wastesthat come out of our yards and gardens? Whenautumn comes we cannot decide that the leaveswon’t fall. And we can’t very well selectively cut thegrass, can we?
In fact, we can choose to reduce organic materialsgenerated at home. The choices are fewer than themultitude of choices we can make at the supermar-ket, but the process is the same and the results canbe just as impressive.
Determine Needs
There are three main questions that we can askourselves about how we generate yard debris todetermine if we “need” to be producing so muchwaste.1. How do you use your yard? These uses affect the
amount of space devoted to high-maintenance/high-waste-producing components, such as lawnand annual flower beds, as opposed to low-maintenance plantings or paved areas.
2. Is the level of maintenance you provide essential forplant health and the reasonable appearance of theyard? Yard debris can be reduced by less prun-ing, mowing, watering, and fertilization withoutsacrificing appearance and health.
3. Are there materials that can be put to use at home thatare currently being disposed?
Identify AlternativesA number of steps can be taken to reduce theamount of organic wastes generated in our land-scapes. The alternatives range from simple changesin maintenance procedures to complete re-landscap-ing of yards to create self-sustaining compostingsystems. Several source reduction options aredescribed here, starting with the simplest andmoving to more involved strategies.
Grasscycling
Grass clippings are the largest single componentof landscape waste in most yards. Yet it is actu-ally healthier for the lawn to leave the clippingson the lawn than to remove them. Letting theclippings remain on the ground returns nutrientsto the lawn, adds organic matter to rejuvenatethe soil, conserves moisture, and saves time and

Chapter 17 Composting Processes 12
money on bagging. Grasscycling does not con-tribute to build-up of “thatch,” which is anaccumulation of dead roots and stems.
It helps to have a lawn mower that is designed to“mulch” grass clippings back into the turf.Mulching mowers, now widely available, recir-culate the clippings through the blades, choppingthem into tiny pieces and blowing them downinto the grass. Reel-type mowers are also effec-tive at cutting the clippings small enough so thatthey are not conspicuous when left on the lawn.Other mowers may be adapted by modifying theoutlet spout to direct clippings down rather thanout.
During periods of fast growth and wet weather,grasscycling may require more frequent cuttings,to avoid heavy deposits of clippings. But withoutbagging the clippings, each mowing can take halfthe time.
Mulching
Many common yard clippings make excellentmulches or soft “paving” for paths and playareas. Grass clippings, leaves, and pine needlesare all suitable for mulching landscapes. Woodchips from pruning and removing trees are anatural looking substitute for “Beauty Bark.”This material can often be obtained for free bycalling a tree service.
Yard debris mulches can be applied followingthe same methods described for using compostas mulch (see Figure 9). Mulch annual flower andvegetable gardens with nonwoody materials thatbreak down quickly and can be tilled underwithout competing with plants for nitrogen. Ifwoody materials, such as sawdust or wood chips,are used in an annual garden they must bepulled aside before tilling, or they must bebalanced by adding a high-nitrogen fertilizersuch as blood meal when tilling them in.
Trees and shrubs can be mulched with one-halfto one inch layers of grass clippings, or with twoto four inch layers of wood chips, twigs or pineneedles. Avoid making thick layers of fine greenmaterials, as they can mat down, becominganaerobic and acting as impenetrable barriers toair and water.
Selective Fertilization and WateringSelective use of fertilizers and water, applied at thecorrect time in proper amounts, actually makeslawns healthier and more tolerant of stress, and
produces less waste. Lawns should be fertilized inspring and early autumn to encourage strong rootdevelopment. For more information on lawn fertili-zation, see the chapter on lawns in this handbook.
Turn In Crop Wastes
At harvest time, chop or till crop wastes fromannual vegetable and flower gardens into thesoil. Spring crops will decompose quickly if cutwhen they are still succulent, or you can addnitrogen fertilizer to speed decomposition. Fallcrop wastes can be turned in or left cut roughlyon the surface to protect soil from erosion andcompaction, then tilled in with fertilizers a fewweeks before spring planting.
Alternatives to Lawns
Reducing the size of one’s lawn can produce lessdebris and conserve fertilizer, water, labor, andother resources. Many low-maintenance groundcovers can be used to replace grass in low-trafficareas. In many cases, ground covers will behealthier and more attractive than lawns grownin less than optimum conditions, and theycertainly require less work to stay attractive.Many low, spreading shrubs also provide inter-esting alternatives to lawns.
Areas used heavily as paths or play areas can bereplaced by wood chips. To create a low-mainte-nance, long-lasting path or play area, remove thesod and lay down two or three overlappinglayers of corrugated cardboard to suppress weedgrowth. Cover the cardboard with four to sixinches of chip; it will compact as it is walked on.
Natural LandscapesMany people are replacing high-maintenancelawns and shrubs with more natural-lookingwooded areas (with native and other understoryplantings and shade-loving ground covers) orwildflower meadows. An initial thick layer ofwood chip or other yard debris will help createthe woodland look and reduce watering, weed-ing, and other maintenance. These woodlandsalso provide areas to reduce grass clippings,leaves, needles, and other trimmings by usingthem as mulches. Meadow areas (probably awayfrom the street or borders with neighbors) can beseeded with wildflowers and pasture grasseswith attractive seed heads. These meadows areattractive when left unwatered and unmowed, oronly mowed once each summer after flowering.

Chapter 17 Composting Processes 13
SelectionSometimes major changes in the layout of a gardenor maintenance plan are not possible. In these cases,it is important to carefully select landscapingpractices to reduce waste. Here are some generalcriteria to use in selecting yard debris managementoptions.
1. Reduce or reuse as many materials as possible athome (or on-site at public facilities). On-sitereuse or composting is the most efficient land-scape waste management option.
2. Use organic materials diverted from other siteswhenever possible to meet landscape needs.Consider trading unwanted plants or plantdivisions with neighbors and friends. Always tryto reuse wastes, such as wood chips and animalmanures, before purchasing new materials thatwould provide the same service.
3. Buy compost and mulch products made fromrecycled yard debris whenever possible forpotting mixes, soil amendments, and othergarden needs.
Reusing Organic Materials:Home CompostingComposting at home is an easy way to reuse yarddebris. Home composting methods range from “nowork” techniques that require maintenance once ortwice a year, to active turning methods that aremaintained weekly. Composting systems can becategorized by the type of materials they process:yard debris, food wastes, or pet wastes. In additionto considering the materials to be composted, thecomposting method chosen depends on how muchspace is available, the time and effort that thecomposter is willing to spend, and how quickly thecompost is desired. The following sections reviewcommon home composting systems and discusstheir advantages and drawbacks. Figure 12 lists thebrochures available from New Hampshire to helppeople choose and use a home composting system.
Composting Yard DebrisYard debris can be composted in simple holdingunits where it will sit undisturbed for slow decom-position, or in turning bins, which produce finishedcompost in as little as a month. Not all yard debrisis appropriate for home composting. Figure 13 liststhe types of debris considered appropriate for homecomposting and materials to avoid.
Holding Units are simply bins used to keep decom-posing materials in an organized way while theybreak down. Using a holding unit is the easiest wayto compost. It requires no turning or other labor,except for placing the debris into the bin as it isgenerated.
Non-woody materials, such as grass clippings, cropwastes, garden weeds, and leaves, work best inthese systems. Decomposition can take from sixmonths to two years. The process can be reduced tojust a few months by chopping or shredding wastes,mixing green and brown materials, and maintainingproper moisture.
Since materials are added continuously, theydecompose in stages. Generally, the more finishedcompost is located inside and at the bottom of thepile, while partially decomposed materials are nearthe top. Once or twice a year, remove the finishedcompost and return the undecomposed materials tothe holding bin.
Some examples of holding units include circles ofsnow fencing or stiff hardware cloth (not poultrywire), old wooden pallets lashed together, andstacked cinder blocks. There are also a variety ofcommercially available bins made from wood,molded plastic, or metal.
Figure 12.
NH Composting BrochuresUNH Cooperative Extension offers a number ofbrochures and workbooks about composting.Titles include:
Backyard Composting (a flyer prepared withthe NH Governor’s Recycling Program espe-cially for backyard composters. Cost: Free)
Composting: Wastes to Resources (designedfor adult volunteers, leaders, camp counse-lors, and teachers who want to set upcomposting projects with youth. Cost: $8.00)
Composting to Reduce the Waste Stream (aguide to small scale food and yard wastecomposting. Cost $7.00)
Municipal Leaf & Yard Waste Composting (aplanning guide for New Hampshire communi-ties. Cost: Free. Contact: Governor’s Recy-cling Program; 271-1098)

Chapter 17 Composting Processes 14
Turning Units are typically a series of bins used forbuilding and turning hot, fast compost piles or forslowly accumulating debris in cool piles that areturned occasionally for aeration. Barrels or drumsare also used as turning units, mounted eithervertically or horizontally for easy turning. Turningunits allow wastes to be conveniently mixed foraeration on a regular basis. This speeds compostingby providing bacteria with the air they need tobreak down materials. Given the proper mix andpreparation of materials, turning piles will alsogenerate the heat required to kill weed seeds, insectpests, and plant diseases.
Turning units can be expensive to buy or build, andhot composting requires substantial effort (seeFigure 15). However, the effort and expense isrewarded with high-quality compost produced inshort periods of time.
Hot composting must be done in batches usingenough material to fill a 3 ft. by 3 ft. by 3 ft. bin, orabout two-thirds of a barrel composter. Materialsshould be chopped, moistened, layered, and mixedas described in Figure 16. Hot piles should bemonitored and turned after temperatures peak andbegin to fall. Compost prepared in this way can beready for use in three to four weeks.
Composting in rotating barrel units requires thesame attention to balancing of carbon and nitrogen,chopping, and moisture control. If the materials areproperly prepared and the barrel is rotated everytwo to four days, compost can be ready to use intwo to three weeks.
Figure 13. Composting Materials
Yard Debris Acceptable forHome Composting
Grass clippings: Our most common organicwaste at home.
Yard Trimmings: Old plants, wilted flowers,small prunings from shrubs and trees.
Leaves: Deciduous leaves are ideal forcomposting. Evergreen leaves are slow todecompose and may need to be shredded beforecomposting.
Weeds: Weeds make fine compost, if seedheads, rhizomes, and other vegetative reproduc-ing parts are kept out.
Plant-derived food scraps: Vegetable and fruitwaste can be composted with yard debris in aproperly prepared hot compost pile or worm bin.
Wood chip: Wood chip is a product resultingfrom tree trimming. Tree services will gladly leavesome from work in your neighborhood.
Sawdust: Sawdust from unpainted, untreatedwood without glues (i.e., no plywood) can becomposted in worm bins or in yard debris piles insmall amounts.
Cardboard and paper: Soiled cardboard andpaper are not acceptable for recycling, but theycan be torn up and composted with yard debris,or used under wood chip paths to suppressweeds.
Organic Materials ThatShould Not Be Composted At Home
Everything that was once alive will compost, butnot everything belongs in your compost pile.Some materials that create problems and shouldbe kept out of home compost systems include:
Plants infected with a disease or a severeinsect attack: Insect eggs and disease sporescan be preserved or the insects themselvescould survive in most home compost piles(examples are apple scab, aphids, and tentcaterpillars). These materials should becomposted in large commercial systems whichuniformly reach high, pasteurizing temperatures.
Ivy, succulents, and certain perniciousweeds: Plants which spread by rhizomes; suchas Morning glory, Buttercups, Quack grass, andComfrey may not be killed even in a well built hotpile in a home compost system. They can chokeout other plants when compost is used in thegarden. These plants should be composted inlarge commercial systems which uniformly reachhigh, pasteurizing temperatures.
Cat and dog manures: Even though you findthese in your yard, they are not yard wastes. Petwastes can contain pathogens harmful to people.These wastes should be buried in ornamentalareas of the garden, or flushed down the toilet.
Waxy leaves: The waxy leaves of plants such asRhododendron, English Laurel, and Pine needlesbreak down very slowly. Try composting smallamounts of these mixed with other materials, orshred them for use as mulch. Large amounts ofthese leaves should be composted in largecommercial systems which uniformly reach hightemperatures and involve mechanical shreddingprocesses.

Chapter 17 Composting Processes 15
Figure 14.
Compost Holding UnitsMoveable holding units constructed from:
Wire
Snow fencing
Wood-and-wire
Stationary holding units constructed from:
Cinder blocks
Mortared bricks
Wood
Figure 15.
Compost Turning Units
Wood slat three-bin turning system
Cinder block and wood turning unit.
Rotating barrel composting unit
Wooden stair-step
turning unit

Chapter 17 Composting Processes 16
Figure 16.
Building a Hot Compost PileHot compost piles are the only effective way tocompost food and yard wastes together withoutpest problems. They can also kill plant diseasesand weed seeds and will produce compost in ashort period of time. Unfortunately, many homecompost piles, even when built carefully, do notattain the high temperatures needed to killdiseases and pests uniformly throughout the pile.Diseased or insect-infested plant materials arebest composted in large commercial operationswhere high temperatures are uniformly producedthroughout the compost pile.
To Build a Hot Compost Pile:
1. Gather enough green and brown materialsto make at least a 3 ft. by 3 ft. by 3 ft. pile (1cubic yard) and to approximate a 30:1 carbonto nitrogen balance.
2. Shred or chop coarse and woody materialsto increase their surface area. Semi-woodyyard wastes like corn stalks can be cut up witha pair of pruners, or chopped with a macheteor square point spade on a block of wood.Even some pounding with the back of ahatchet will create entry ways for decomposerorganisms. A wide range of shredders andchippers are available for yard debris, or arotary lawn mower can be used to shredleaves on a hard surface such as a driveway.
3. Start building the pile with a 4 to 6 inchbase of the coarser, brown wastes (smallbranches, corn stalks, straw) to help aircirculate from below. Moisten each layer.
4. Add a 4 to 6 inch layer of nitrogen materi-als. If the greens are not very fresh, sprinkle asmall amount of blood meal or cottonseedmeal, high nitrogen fertilizer such as ammo-nium sulfate, vegetative food scraps, orpoultry manure over this layer. Food wastesmay make up a part of this layer. High-nitrogen materials such as fresh grass clip-pings or vegetative food wastes should beused in thinner layers. Moisten and mix thegreen and brown layers together, so bacteriacan feed on both layers simultaneously.
5. Continue alternating and mixing layers ofgreen and brown materials, adding waterand extra nitrogen-rich materials as needed,until the bin is full.
6. Close the lid or cover the pile, and wait.
7. Monitor the temperature of the interior ofthe pile on a regular basis. It should peakbetween 120 to 160oF in 4 to 7 days.
8. When the temperature begins to decrease,turn the pile. Take materials from the outeredges and top of the pile and place them atthe base and middle of the new pile; thosefrom the middle should be on the outsideedges and top of the new pile.
9. Continue monitoring the temperature in thepile.
10. About one week later, turn the pile againafter the temperature of the pile peaks.After another week the compost should befinished.
Turning a compost pile
Composting Sod and Weeds
Weeds that spread through roots or rhizomes andsod stripped from a lawn require special, coveredcompost piles. The roots of these plants — includingQuack Grass, Buttercup, and Morning Glory — willsprout and spread through compost piles unlesslight is completely excluded. Small volumes of theseweeds can be composted in any system that effec-tively excludes light and prevents their spread intosoil. A covered garbage can or extra thick blackplastic bag can be used as a “weed holding pile.”

Chapter 17 Composting Processes 17
To compost large quantities of stripped sod, simplypile the fresh cut sod, (roots up/grass down), in asquare or rectangle up to three feet high. Make sureeach layer is thoroughly wet, and cover the entirepile (including the sides) with black plastic or atarp. Sod piles may take one to three years tocompletely decompose. Decomposition of sod pilescan be shortened to as little as six months by sprin-kling each layer with a high-nitrogen fertilizer, suchas cottonseed meal or ammonium sulfate.
Do not put flowers and seed heads of any weedsinto sod piles or any other home compost system.Weed seeds can only be killed by the high uniformtemperatures of a large compost pile.
Composting Food Scraps
Although non-fatty food scraps can be compostedwith yard debris in properly maintained hot piles, itis difficult for most people to maintain the condi-tions required for successful hot piles. Improperlycomposted food wastes can attract pests, createunpleasant odors, and make the compost unhealthyto handle. As Master Gardeners, encourage peopleto practice two other methods for safely compostingfood scraps:
1. To incorporate them into the soil where they willdecompose and fertilize established or futureplantings,
2. To compost them in worm bins which producerich “castings” and use the castings as a mulch orsoil amendment.
Figure 17 lists the types of food scraps appropriatefor home composting and those that are inappropri-ate.
Soil Incorporation. This is the simplest methodfor composting kitchen scraps. Dig a hole onefoot deep. Chop and mix the food wastes into thesoil, then cover with at least eight inches ofadditional soil. Depending on soil temperature,the supply of microorganisms in the soil, and thecarbon content of the wastes, decomposition willoccur in one month to one year.
Food waste burial can be done randomly infallow areas of the garden, or in an organizedsystem. One such system is to bury scraps inholes dug around the drip line of trees or shrubs.
An English system, known as “pit and trench”composting (Figure 18) maintains a three-seasonrotation of soil incorporation and crop growth.
The garden includes three rows: a trench inwhich to bury food wastes, a row for growingcrops, and a third row to use as a path. In thenext season, the fertile soil of the former composttrench is used to grow crops, the former crop rowis left fallow and used as a path, and the com-pacted path is loosened and dug as a new trenchto bury food wastes. After a third season ofrotation, the cycle starts over again. This form ofcomposting keeps the garden perpetually fertilewith little organizational effort.
Figure 17.
Compostable Food Wastes
Can Be Used Cannot Be Used
Apples Butter
Apple peels Bones
Cabbage Cheese
Carrots Chicken
Celery Fish scraps
Coffee grounds, filters Lard
Egg shells Mayonnaise
Grapefruit Meat scraps
Lettuce Milk
Onion peel Peanut butter
Orange peel Sour cream
Pears Vegetable oil
Pineapple Yogurt
Potatoes
Pumpkin shells
Squash
Tea leaves and bags
Tomatoes
Turnip leaves
Figure 18.
Pit and Trench Composting

Chapter 17 Composting Processes 18
Worm Composting
Worm composting systems use “redworms” (notearthworms) to compost food scraps. Redworms canbe purchased, found in leaf or manure piles, ortaken from another worm bin. Worm bins areusually wood boxes with tightly fitting lids thatprovide redworms with a dark and moist environ-ment, while excluding rodents and other pests. (SeeFigure 19) Surface area is more important than depthin sizing a worm system; generally, one square footof surface is required for every pound of food wasteto be composted per week. Drainage must be pro-vided by drilling small holes in the bottom of thebin.
The worms live in moist “bedding” made fromshredded newsprint, corrugated cardboard, saw-dust, fall leaves, or other high-cellulose materials.Scraps are buried in this bedding, and the wormsturn the food wastes and bedding into a high-quality soil amendment suitable for use on houseplants, vegetable seedlings, and flowers. With abasic understanding of worms, thesevermicomposting systems are simple to maintain.
Two or three times a year, when most of the con-tents of the bin have become dark “worm castings,”the compost may be harvested. The finished com-post will be greatly reduced in volume from that ofthe original materials, and should only fill one halfor less of the bin. The compost may be harvested bymoving it all to one side of the bin and adding freshbedding to the empty side. Then you begin buryingfood waste in the new bedding. The worms willfinish decomposing the old bedding and thenmigrate to the fresh bedding and food scraps,allowing the finished compost to be harvested.
Worm bins are fun and interesting. Mary Appelhof’sbook Worms Eat My Garbage is the best single sourceof information about these “living” garbage dispos-als.
Figure 19.
Worm Composting Bin
Figure 20.
Composting CriteriaMaterials
Types of organic materials to be composted.
CostAmount of money required to buy or build aparticular system.
LaborAmount of time and energy needed to main-tain the compost system.
AestheticsTypes of materials and construction that areattractive and fit into a particular backyard.Also, how neatly the system organizes thecompost.
EfficiencyAmount of time and space required to makecompost, and the desired quality and quantityof the finished product.
Pest ControlHow well pests are excluded.

Chapter 18 Who are the Master Gardeners? 1
CHAPTER 18Who are the Master Gardeners?Edited and revised by Holly Young, UNH Cooperative Extension and Judith Lonergan, formerlywith UNH Cooperative Extension
The purpose of this section is to explain why the Master Gardener Program wascreated, what Master Gardeners do, and how they are a part of CooperativeExtension . This section also explains many of the tasks Master Gardeners per-form, and suggests ways you can improve your telephone, writing, and publicpresentation skills.
The Cooperative ExtensionSystemIn all states where the program exists, MasterGardeners are trained and supervised by Coopera-tive Extension (CE). In fact, Cooperative Extensioncreated the Master Gardener Program. When youwork as a Master Gardener, you are acting as arepresentative of CE. In New Hampshire, MasterGardeners are covered by the University of NewHampshire’s general comprehensive liability policy.Transportation is excluded from this policy. Formore information, contact your county educator.
So, what is Cooperative Extension?
Genesis of the CooperativeExtension SystemThe CE grew out of the U.S. Congress’ concern forthe education of the average citizen. Prior to theCivil War, very few college courses addressed theproblems of citizens who made their livelihoodfrom agriculture. In 1862, however, Congresspassed the Morrill Act, which provided for a uni-versity in every state which would educate citizensin agricultural and mechanical fields. These collegesare known today as “Land-Grant Universities.”
Congress soon realized that to be effective, theeducational function of land-grant universities mustbe supplemented with a research capability. Conse-quently, it passed the Hatch Act in 1887. This actprovided for the establishment of facilities wherecolleges could conduct research into agricultural,mechanical, and related problems faced by ruralcitizenry.
Finally, in order to spread the benefits of the land-grant universities into even the most rural andremote parts of each state, Congress passed theSmith Lever Act of 1914. This act provided for theestablishment of the Cooperative Extension Service.As a result of the Smith Lever Act, there are nowExtension offices in every county which serve to“extend” to the public the information which hasbeen developed on the campuses and researchstations of the land-grant universities. In fact,Extension agents are considered members of theuniversity faculties, since their role is primarilyeducational.
Organization of CooperativeExtensionAs a Master Gardener, the vast majority of yourcontacts with the CE will be through your localExtension Educator and office. This is because localeducators determine, within a set of state guide-lines, how to teach and administer the MasterGardener Program in their individual Extensionunit. Each Extension office in New Hampshireconducts programs in Agriculture (includinghorticulture), Forestry and Wildlife, Family, Com-munity and Youth (the 4-H program). MasterGardeners generally fall within the Agricultureeducator’s sphere of responsibility, but many haveused their horticultural skills to conduct programsin cooperation with other areas.

Chapter 18 Who are the Master Gardeners? 2
In addition to administrative and program develop-ment assistance, the land-grant universities providetechnical support to the local Extension office. Thisis essential, since no Extension Educator can knowthe answers to every question posed by the public.Consequently, universities employ experts, calledExtension Specialists, in specific areas such ashorticulture, soils, turf, tree diseases, insect prob-lems, etc. Local Extension offices and their MasterGardeners often contact these Specialists for an-swers to difficult questions.
Volunteers in ExtensionVolunteer workers are one of the most importantand unique aspects of Cooperative Extension. Thisis in keeping with Extension’s philosophy thatactive citizen participation in planning and imple-mentation ensures program success. As a MasterGardener, you will join this family of volunteers.
Each Extension office has an Advisory Councilmade up of local citizens and civic leaders whoprovide feedback and direction. Many ExtensionEducators ask Master Gardeners to serve on theseboards. Other educators ask Master Gardeners toact as program coordinators who perform much ofthe administration of local Master Gardener activi-ties.
Creation of the Master GardenerProgramThe Master Gardener Program was created byExtension to meet an enormous increase in requestsfrom home gardeners for horticultural information.This increase derives primarily from the urban andtransient nature of modern American life.
Fifty years ago, an Extension educator dealt withthe questions of a few hundred farm families. Inmany regions, however, land that once constituted asingle farm now encompasses several subdivisions,increasing the number of families an Extensionoffice must serve by the hundreds. In addition,many of these new families are recent arrivals, andare unfamiliar with the grasses, shrubs, trees,diseases, etc, which comprise the micro environ-ment of their new urban or suburban home. Theyoften call their local Extension office for advice onwhat to plant and how to care for it.
Consequently, the Master Gardener Program wascreated in 1972 in the state of Washington. Sincethen it has spread to 48 states. Master Gardenershave become a vital part of Extension’s ability toprovide consumers with up-to-date, reliable knowl-edge so they can enjoy and protect the value ofhorticulture around their homes. Master Gardeninghas also become a fun and useful volunteer activitywhich has given its participants a sense of commu-nity spirit, accomplishment, and intellectual stimu-lation.
Your Responsibilities as aMaster GardenerWhen you enter the Master Gardener Program, youenter into a contract. In essence, you agree that inreturn for the training you receive, you will volun-teer an equal number of hours back to Extension.Failure to complete this obligation means that youare not entitled to participate in Master Gardeneractivities. Upon completion of your training, youhave one year to complete the agreed-upon volun-teer service commitment, or “payback” time.
After you complete your payback time, you maychoose to continue with the Master GardenerProgram. Numerous people have worked as MasterGardeners for years and contributed substantialamounts of time to Extension--sometimes hundredsof hours! To be considered an “active” MasterGardener, however, you must agree to volunteer aminimum number of hours annually. This require-ment varies from unit to unit, so ask your ExtensionEducator what pertains in your local program. Ifyou choose not to continue in the program, you maynot, thereafter, represent yourself as a MasterGardener.
Your Extension Educator determines what may becounted as work time and what may be counted ascontributed time. The distinction between the twotypes of time allows local units some autonomywhile ensuring one standard for any comparison ofthe total amount of time Master Gardeners put inaround the state.
As an example, imagine that a Master Gardeneragrees to talk to a local garden club about growingherbs. The Master Gardener spends one hourresearching and preparing his or her speech. TheMaster Gardener decides to bake the herbs intocookies for the audience’s appreciation; this takesone hour. The Master Gardener spends a half hourcommuting to and from the talk location, and one

Chapter 18 Who are the Master Gardeners? 3
hour giving the talk. This is a total of three and halfhours of work as a Master Gardener. It is possiblethat the Extension educator may decide that bakingthe cookies was a nice gesture, but can’t be countedas work time. In that case, this Master Gardenercould count two and half hours work time and onehour contributed time.
Volunteer work is usually done within the geo-graphical area served by the Extension unit officeconducting the training. Master Gardeners canmake special arrangements with their Extensioneducators, however, to participate in activitiesoutside of their unit. Some Master Gardeners areretired and have a great degree of flexibility aswhen they can volunteer. Other Master Gardenerswho are still working can make arrangements withtheir educators to volunteer in the evening or onweekends. Some volunteers perform tasks that canbe done after-hours, such as research, writing,telephone-calling, and record-keeping.
Time SheetsTime sheets are used to keep track of the hours oftime you volunteer as a Master Gardener. (Timesheets are available from your county educator.)Turn these in on a regular basis, as determined byyour local county educator. Most educators willappoint a Master Gardener to keep track of theseand tally your hours. Don’t be lax in reporting yourtime; you deserve recognition for your efforts!
Time sheets are an important part of the MasterGardener Program. Not only do they allow Exten-sion to reward volunteers for their hard work, butthey are also valuable for program evaluation. Thetime sheets provide a record of the many waysMaster Gardeners serve the public. Local and stategovernments, which fund Extension, are veryinterested in how effectively Extension uses taxrevenues. Consequently, detailed time sheetsbenefit both the Master Gardener Program and itsclients.
Use of the title “Master Gardener”The title Master Gardener should be used only byindividuals trained in a Cooperative Extensionprogram. The title is valid only when used by anactive Master Gardener who is participating in a
program approved by an Extension educator. Whenan individual ceases to be active in the MasterGardener program, their designation as a MasterGardener ceases.
Master Gardeners should not display credentials orgive the appearance of being a Master Gardener at aplace of business unless that place has been desig-nated as a site for Extension education. The title“Master Gardener” should not be used in a mannerwhich implies Cooperative Extension endorsementof any product or place of business.
The title Master Gardener should be used only whendoing unpaid volunteer work for Extension. Whenexperienced Master Gardeners speak before groupson horticultural subjects, they may accept unsolic-ited reimbursements (such as reimbursements forexpenses) or gifts. It is inappropriate, however, toseek speaking engagements for pay while partici-pating in an authorized Extension activity andusing the title Master Gardener.
Pesticide RecommendationsUNH Cooperative Extension promotes an Inte-grated Pest Management approach to yard andgarden problems. Master Gardeners know that theuse of chemicals in the garden is usually a lastresort. An experienced Master Gardener maysuggest a non-chemical treatment if the culturalproblem is one which is not specifically covered byExtension recommendations. N.H. Master Garden-ers may not recommend chemical controls withoutapproval from their county educator.
Even with approval from local Extension Educators,Master Gardeners must be very careful aboutchemical recommendations because the registrationand use of pesticides are governed by the UnitedStates Environmental Protection Agency and thestate Department of Agriculture. Under theamended Federal Insecticide, Fungicide, and Ro-denticide Act (Federal Environmental Control Actof 1972), it is illegal to use a pesticide on a cropunless the crop is listed on the label. The given rateof application on the label may not be exceeded.Fines and other penalties vary according to the lawsbroken.

Chapter 18 Who are the Master Gardeners? 4
Master Gardener PositionsOver the years the program has existed, the activi-ties of Master Gardeners around the country havebroadened considerably. When the program began,Master Gardeners mostly answered telephonerequests for gardening information. They alsostaffed plant clinics and information booths. Inmany areas of the country, these tasks are still vitalto Extension. In recent years, however, creativeMaster Gardeners and Extension educators haverecognized that the talents which citizens bring tothe Master Gardener program can be utilized in avariety of horticultural activities.
Some examples of activities N.H. Master Gardenershave participated in are listed below. Note that notall of these activities involve the examination ordiscussion of plants. All do, however, help Exten-sion provide horticultural information to the public.If you think of an activity which uses your specialtalents, discuss this with your educator. He or shemight agree it would be a good way for you tocontribute to the Master Gardener Program and toExtension.
• Created and maintained demonstration gardens.
• Gardened with the elderly and handicapped.
• Worked at county fairs and plant clinics.
• Conducted a garden project for low incomeyouth with Expanded Food Nutrition EducationProgram.
• Acted as liaison for Extension office in a residen-tial area by answering gardening questions andtaking soil samples.
• Wrote gardening articles for local newspapers.
• Conducted school gardening programs.
• Gave talks to groups interested in horticulture.
• Presented 4-H demonstrations.
• Instructed other Master Gardeners.
• Appeared as guests on televised gardeningprograms.
• Participated in on-site lawn and garden clinics.
• Worked in trial gardens at research station.
• Conducted garden tours.
• Planned and implemented public relationsprojects.
• Worked on special events projects.
• Planned and completed community beautifica-tion projects.
• Compiled plant lists for specific areas.
• Photographed Master Gardener activities.
• Developed educational fact sheets.
• Worked in the university soil testing lab.
• Created and maintained historic garden restora-tions.
• Maintained office reference library.
• Designed brochures.
• Solicited seed and plant donations for variousprojects.
• Designed and maintained community and schoollandscapes.
• Assisted with vegetable gardening project atcounty farm.
• Contributed to the preparation of the MasterGardener Handbook.
• Produced slide programs.
• Volunteered as 4-H leaders.
• Served on Extension Advisory Council.
• Served as a judge at county fairs.
CommunicatingAs a Master Gardener, you will work with all sortsof people. These people will come to you withquestions and problems about horticulture. To fullyunderstand the client’s problem and suggest asolution, you must be able to communicate effec-tively. This can be a challenge, since the object ofdiscussion, the client’s garden or plant, is often notpresent, and you must deduce the problem from averbal description of the trouble.
Effective communication is not just a matter ofspeaking clearly and listening closely. As you listento a client’s description of his or her ailing indoorplant, you are trying to understand a situation thatyou have not experienced. It is very easy to leaveout details when we describe something that isfamiliar. The client may not know that the color ofthe leaf edges or the proximity of heating ducts tothe plant are important clues to the plant’s problem.You can improve communication by asking ques-tions.

Chapter 18 Who are the Master Gardeners? 5
By thinking of all the possible symptoms andconditions that might match up with the describedailing plant, you can pose questions that shouldyield enough information to find the solution. It is agood idea to summarize your findings and presentthem to the client. Don’t be afraid to say somethinglike, “I am going to describe, in my own words, thecondition of your plant as I understand it. Stop meif I have it wrong.” After all, we are not talkingbooks -- we’re all merely human and what we meanand what we say are not always the same. Beinghuman, we have ways of interpreting meaning fromvoice changes, gestures, facial expressions, andgeneral body language, as well as words. Theimportant point is to express our own understand-ing so the client can compare it with his or herknowledge of the situation.
There is a stumbling block to communication otherthan incomplete information from the client -- theMaster Gardener’s horticultural expertise. This canbe a problem in at least two ways. The MasterGardener can know so much about a topic that he orshe does not bother to listen to everything the clienthas to say. Or, the problem may be identified andpossible solutions discovered, but the MasterGardener cannot describe necessary procedures interms the client understands. Germination, propa-gation, and fertilization are all very nice terms, butthey are quite useless if they draw blank looks.There is nothing wrong with basic, down-to-earthterms like grow, dig, and water -- go ahead and usethem.
Although some people dispute this statement, noone knows everything. As a Master Gardener youknow a great deal about horticulture, but rememberthat one of the most important things you know ishow to find answers. In your work at plant clinicsor at the Extension office phone, you will haveaccess to excellent resource material. If your client’sproblem is too complex to readily solve with yourknowledge and the aid of the resource material,take the person’s name, address, and phone numberand then find the time to answer the questionthoroughly or see that it is answered by the Exten-sion educator or a specialist.
Using the TelephoneWhen working with clients by telephone, communi-cation can be even more difficult because there areno visual clues to meaning. Listen carefully and askmany questions. Be sure to familiarize yourself withthe office procedure for telephone use. Your Exten-sion educator or someone on the staff should be ableto provide you with such information as what to saywhen answering the phone and how to log calls.
Every time you make or receive a telephone call as aMaster Gardener, you are representing CooperativeExtension. The impression you create can be alasting one and may determine whether or not theperson you are speaking with will continue to turnto Extension for assistance.
When the telephone rings, answer promptly -- quickservice helps build a reputation of efficiency.Identify yourself -- it helps personalize the call andgets the conversation off to a good start. Be friendlyby being a good listener so the caller will not haveto repeat what is said. Be considerate by not carry-ing on two conversations at once. Callers should notbe made to feel they are competing with people inthe office for your attention.
Sound as good as you are. Show that you are wideawake and ready to help the person on the line. Usesimple, straightforward language. Avoid technicalterms and slang. Speak directly into the telephone,pronouncing words clearly. Talk at a moderate rateand volume, but vary the tone of your voice.
When you must leave the line to obtain informationfor the caller, it’s courteous to ask, “Will you wait?Or shall I call you back?” If the person chooses tostay on the line, use the hold button (if your tele-phone has one) or lay the receiver down gently.Should it take longer than you expected to gathermaterial, return to the line every 30 seconds or so toassure the caller you’re working on the request.When you have the information, thank the caller forwaiting. Transfer a call only when necessary, but ifyou must, explain why you’re connecting the callerwith someone else. Be sure the caller wants to betransferred. If he/she does not, offer to have some-one call back.

Chapter 18 Who are the Master Gardeners? 6
When answering for someone else, be tactful.Comments such as “He hasn’t come in yet” or“She’s just stepped out for coffee” can give thewrong impression. It’s better to say “Mr. Jones isaway from his desk right now. May I ask him to callyou?” When you take a message, be sure to writedown the name, time, date, and telephone number.Don’t hesitate to ask the individual to spell his/hername or repeat the number.
You will occasionally speak with a caller who maybe having a bad day and takes it out on you. Re-main calm and don’t take the comments personally.As long as you are trying, in a courteous manner, tohelp a caller, you are doing your job. Retain yoursense of humor and give the caller your sincereattention.
Because people are calling you for information, youneed to know how to utilize Extension publicationson horticulture. Printed material is recognized as ameans of saving the time of county staff membersand specialists. However, publications should notbe treated as free products. Find out what theoffice’s policy is on publications and how conserva-tive you need to be in their distribution. Orderingand distribution of Extension publications is nowcomputerized and supplies can be obtained quickly.
Writing TipsMaster Gardeners have plenty of opportunity to usewriting skills. Some Master Gardeners help producepublications for local gardening needs, othersprepare scripts for slide sets, and some write news-letters and columns for the local newspaper.
Organization and simplicity will help you achieve awell-written product. A great deal of time andcrumpled paper can be saved by starting with aclearly defined purpose and outline. An easy way tounderstand the purpose of your writing is to createthe title. A good title tells, in a few words, what thesubject of the work is. “All about Grapes” indicatesa great deal of material is going to be covered:history, varieties, culture, and uses of the fruit. Ifyou are only writing about the culture or the prun-ing, say so. Do not mislead the audience. Once thetitle is written, you know how you should limit thetopic and what should be covered. The roughestoutline is better than none, and its bare-bonesstructure makes it easy to see the logic of the workyou are about to create. It is much easier to repairholes in the logic at the outline stage than later,
when hard-won paragraphs or even pages mayhave to be removed. It’s a lot like pruning -- easierdone when there are no leaves on the tree. Make anoutline after the topic has been captured in a title.
After the title and outline are complete, the writingcan proceed. Address each topic on the outline, andsoon the job will be finished. Remember the idea ofa topic sentence for each paragraph. Explain eachtopic on the outline and back up what you say withinformation from professionals. If you really getstuck, examine the idea you are trying to express.Perhaps there is nothing more to say about it thanthe sentence that is already there. Perhaps it isirrelevant or misplaced in the outline. If all else fails,put the work aside and go find a garden to play in.A change of scenery and a little time away from thewords can do wonders for clearing the head. Whenyou come back to the work, the problem may beperfectly clear and the solution obvious.
Simplicity is essential to clear writing. Even thoughvague phrases invade business letters, news writ-ing, television, and radio, there is no need to pro-mote the trend. For instance, “We would like foryou to stop by our office” can be replaced with“Please come into our office.” The same message isconveyed with greater clarity using half as manywords. If you find yourself struggling over a choiceof words, try telling someone what you want to say.As you say it, listen to yourself, because you areprobably using the words you need to write thesame explanation. Avoid slang, jargon, and floweryor obscure vocabulary. You won’t go wrong withthe simplest English words used correctly. The goalof good writing is to communicate, not to confuse.
An interesting sentence carries a strong verb andfew adjectives. If you must shorten a piece ofwriting, you can sacrifice adjectives and gainsimplicity along with space. Articles (a, an, the) areoften unnecessary. Some languages do not havearticles at all; we can probably do without some ofours.
Perhaps the most common misunderstanding aboutwriting is that it is easy. While it is true some peopleare more adept at writing than others, those whowrite well usually admit it takes work. Just as goodgardeners must get their hands dirty, good writersspend hours rewriting and use dictionaries andgrammar books constantly. They are not looking upwords you’ve never heard of either. They check theactual meaning of “cultivate” or whether or notthere is a hyphen in “damping-off.” Make sure thereis a good dictionary in the office and use it.

Chapter 18 Who are the Master Gardeners? 7
Sometimes new publications need to be produced orexisting ones adapted for local conditions. If theeducator you are working with decides you candevelop new materials for distribution, check officefiles for old publications and/or write the appropri-ate specialist. Some already available materials mayonly need slight modification. Remember thatproper letterheads and policy statements are neces-sary on all materials sent out via franking privi-leges. After the publication is complete, send a copyto the appropriate specialist so that they can beshared with other units.
When producing new materials from old, be certainnot to infringe upon a copyright. Most Extensionmaterials are not copyrighted and may be used forExtension purposes. If you want to use copyrightedmaterial or even parts of that material (this includesart work) written permission must be obtained fromthe publisher and often from the author or artist aswell.
Public PresentationsBecause Cooperative Extension provides informa-tion and educates the community, you will haveplenty of opportunity to appear before the public inyour capacity as a Master Gardener, if you so desire.Not only do Master Gardeners meet the public atplant clinics but many Master Gardeners become soknowledgeable about a specific horticultural inter-est that they are invited to give talks to clubs andgroups. This is a wonderful way to help Extension,as educators are often in demand for such talks.Educators and Master Gardeners are also calledupon to provide workshops, demonstrations, andtours.
Most public presentations have four components:title, introduction, body, and summary. The titleshould be short, descriptive, and interest-catching,but most of all, it should tell what the subject is. Theintroduction tells the audience who you are andelaborates on the goal/content of the talk. This partof the presentation is often the key to success orfailure as it sets the tone for the remainder of theprogram and should hook the interest of the audi-ence.
The body of the presentation contains the substanceand should satisfy the curiosity that brought theaudience to the presentation. Use research-sup-ported information and cite references wheneverpossible. The summary states the major points of
the presentation in a logical sequence withoutdetails. This part should be short and clear. Follow-ing a presentation, be prepared to answer questions.Repeat questions for the audience when they aredifficult to hear or understand, then answer them.
Public presentations take preparation to be success-ful. Don’t be fooled by a casual delivery. Manypeople who appear to be relaxed and able to effort-lessly speak before groups have actually spentmany hours achieving this effect by preparing andpracticing. To plan a presentation consider:
• Who the audience is
• Their general knowledge of the subject
• How technical the subject is
• Timeliness
• Appropriateness
• Purpose
• Materials
• Length of presentation.
After collecting materials, studying, and reviewingnotes, Rehearse. Observe these points carefullyduring rehearsal:
• Are charts, graphs, and posters easy to see andread?
• Can the audience hear the speaker from any-where in the room?
• Are the materials used in the demonstrationarranged so they are accessible and easy to reachwithout fumbling and delay?
• Does the speaker make unnecessary apologies?Avoid saying “This is the first time I’ve donethis” or “I’m not used to speaking beforegroups.” Do the best job you can. The audiencedoesn’t expect you to be perfect, and you areprobably much better than you think.
• If you are giving a demonstration with anotherperson, are the delivery and action coordinatedor does one team member do so much the other’sparticipation seems unnecessary?

Chapter 18 Who are the Master Gardeners? 8
If you are preparing an exhibit for public presenta-tion here are some basic concepts to keep in mindwhen planning and setting it up:
• Choose one idea which can be explained in asimple, catchy statement. Use few printed words.
• Have a single center of interest to which the eyeis drawn.
• Develop the story completely using as few itemsas possible. Clutter is not good for an exhibit.
• Create a design which is orderly, interesting, andartistic.
• Attract attention with movement, color, light,sound, or a clever title and attractive design, butnot with all of these.
• Make sure that charts, posters, and other visualsare attractive, neat, clean, and easily read.
• Judge exhibit by asking if it attracts attention,arouses interest, conveys a message, is well-constructed for a neat and orderly appearance.
• Select people to tend exhibits who are well-informed, can meet the public easily, and create afavorable impression.
Advertising public presentations is very important.Too often, well-prepared programs fail to reach alarge audience for lack of adequate advertising.Word of mouth is not sufficient. Public events canbe announced in newsletters, newspaper featurearticles or regular columns, paid advertisements,radio or television public service announcements,and on posters displayed in appropriate locations.Sometimes it is helpful to find a local sponsor, suchas a shopping center, a bank, or the chamber ofcommerce, to assist in financing and advertising anevent. Be certain all arrangements with sponsors areclearly defined and responsibilities are agreed uponahead of time. These arrangements must be ap-proved by your county educator. When advertisingoutdoor events, such as garden tours or communitygarden walk-throughs, where no indoor facilitiesare available, include an alternative time and datein case of bad weather.
Preregistration can serve as an indicator of expectedattendance. Some educators report good responsefor workshops that require pre-payment of minimalfees to cover costs of materials. Participants appearto be more motivated and interested after making afinancial commitment.
Slides may be available for use in public presenta-tions through your Extension office.
If no slide sets are available for your use and thereis adequate time for the project, you may want toproduce a slide set. (Check with your county educa-tor prior to beginning the project .) Begin with thesame principles basic to good writing and speaking:clarify the subject and identify the audience.
It is best to plan the show and write the scriptbefore taking pictures. Illustrations and photo-graphs should relate directly to the script. Decidewhat should be illustrated and prepare a list ofobjects and scenes to be photographed. Plan toshoot more pictures than you need and be ready toshoot retakes. Professional photographers often fillthe wastebasket with rejects before finding themasterpiece we see published. Avoid complicatedslides that show too much.
When presenting a slide program avoid phrasessuch as “This is a slide of ...” “Here we see. . .”“Now we’re looking at. . .” “Next we have. . .” “Thispicture you’re watching. . . .” Instead, talk aboutwhat is in the picture. Do not leave a scene on thescreen too long, but never for less than 5 seconds.Slides shown longer than 1 minute tend to warp.Each time the topic changes in the script, the newsubject should be identified immediately. Do not letthe audience sit and wonder why they are suddenlylooking at a wheelbarrow when just a second agoyou were discussing beans. Do not lead up to thepoint, begin with the point and then explain it. Donot ask the viewer to recall a prior slide. If you wantthe audience to see the same slide twice, at differenttimes in the program, provide two slides.
Be sure to view the slides before the talk so that youcan be familiar with the equipment and to check forupside-down and reversed slides. Familiarizeyourself with the script before the presentation.Reading the script to the audience yields a monoto-nous delivery that can be very dull. Answer somequestions as they arise but avoid straying far fromthe topic.
Videotapes are now available for many topics, aswell.

Chapter 18 Who are the Master Gardeners? 9
Radio and TelevisionExtension educators have been presenting educa-tional radio and television programs for manyyears. If you have an interest or experience in thisarea, you might want to volunteer to do a programor to work on the production of a program. Beforeproducing a radio or television program, rememberthat while you will reach a large audience with onepresentation, you will also increase demand forinformation from the Extension office as new peoplebecome aware of its existence. Always check withyour county educator before committing to a massmedia presentation.
First, let’s look at radio program production. Beforeapproaching a radio station with your ideas, con-sider the identity of the audience you want to reach.What is their age, sex, marital status? Are theyrenters or homeowners? What time of day are theylikely to listen to the radio for information? Radiostations know who their listeners are and what theylike. Find the best station for your information bymatching your audience with the radio station theyare most likely to hear.
Maximum impact can be obtained by a differentprogram each day in the same time slot. People canthen habitually tune in to find out what gardeningtips you are offering. Plan a message approximately30 seconds to 2 minutes in length. Longer messagescause listeners to lose interest.
After identifying the audience and preparing theprogram, make arrangements to meet with theprogram director at the station you have chosen.Take one or two sample programs with you. Somestations prefer to use their own personnel to prere-cord messages from a script you have prepared.Others choose to have you record the message usingtheir facilities. Beware of the live call-in or talk showformat. These can lead to drawn out and uninterest-ing rambling sessions and can put the person withthe answers on the spot if the question is unclear orcontroversial. Plan to record 1 or 2 weeks’ worth ofprograms at each visit to the studio.
Whatever the format, the message should be clearand concise.
• Use common English and simple sentencestructure.
• Keep stories or examples to a minimum, usingthem only to emphasize or clarify a point.
• Short (30 seconds to 3 minutes) time slots shouldaddress only one topic.
• Radio presentations are usually one-way conver-sations and are most effective when delivered ina somewhat conversational manner. Ad-libbingfrom a carefully prepared set of notes comesacross better than reading from a script.
• Speak clearly, emphasizing important points.Avoid talking fast. Practice!
• Even in a short message, main points and espe-cially control recommendations need to berepeated or else summarized at the end.
• Provide a means for obtaining additional infor-mation. This may increase the office work load,but it also increases the audience you are reach-ing. However, it is not a good idea to offerspecific publications on the radio. The demandmay exceed the supply and the station is oftenpicked up in other counties or states.
Television broadcasts need to be well-prepared inadvance, as do radio programs. However, theadded visual dimension of the medium must betaken into consideration. Be certain the material youpresent is best for television, i.e., it can be madevisually informative or entertaining. Demonstra-tions are good for television. Interviews can be doneon radio. Television is good when visual examplesare useful: healthy versus diseased plants, charac-teristic markings on insects, variety of color or petalshape in flowers. Find out ahead of time if thestation can and will use your slides, films, or videotapes.
Before you get to the studio:
• Outline the material in a script. It does not haveto be a word-for-word account, but should be inlogical order and contain all the points you wantto make.
• Approach script writing as a story telling experi-ence. Tell an interesting and informative story.
• As always, use simple English words correctly.Avoid slang and jargon.
• Scripts should be like public presentations madein person, with a title, introduction, body, andsummary.
• Use only the visuals that help tell the story andeliminate the others.

Chapter 18 Who are the Master Gardeners? 10
• Use 35 mm slides for visuals, not snapshots.
• Evaluate art work and visual props. You shouldbe able to determine the main topic from 6 feet.Use photographs at least 8 by 10 inches in sizewhen possible.
• Avoid detail in graphs and charts. Keep itsimple.
• Mark on the script where slides/graphics shouldappear; be ready to make changes for the direc-tor.
• Leave sufficient time to have slides and othergraphics processed.
• Prepare parts of the demonstration ahead of timeif necessary.
• Obtain necessary approval and clearances for useof films and slides.
• Remember that color contrast may not be clearon black and white television sets. Use light anddark shades for good contrast.
• Rehearse in front of a mirror: check timing,eliminate any bad habits (head bobbing, frown-ing, fidgeting).
• Watch out for bad verbal habits (using too manyah’s, um’s, or ok’s) and eliminate them.
A relaxed appearance is best, so wear appropriatebut comfortable clothing. A brand-new outfit is notthe best idea; you may find yourself uncomfortableand begin to adjust your clothing or look unhappy.Avoid white, plaids, bright colors, shiny fabrics,and bold patterns. Noisy or shiny jewelry candistract viewers from the material you are present-ing. A fresh hairstyle or cut can look unnatural. Askthe television station personnel for additional tipson dress and makeup. Don’t feel embarrassed aboutthis admitted concern for your appearance. Televi-sion is a visual medium and the way you look is animportant part of a successful production.
When you get to the studio, go over the script withthe director. Decide on cues and positions and makea final check to be certain your slides and graphicsare in order. A quick run-through will reveal anyupside-down or backward images.
During the filming, speak in a natural tone. Relax.Imagine you are talking to a person just a few feetaway. Maintain eye contact with the camera, unlessadvised otherwise. If you make an error, correct itnaturally and without fuss. Just as in live presenta-tions, don’t apologize. Tell the viewers of other
ways to obtain information on your subject. Most ofall, enjoy the experience.
The Master Gardener asManagerMaster Gardener volunteers make it possible forExtension educators to reach more people withhorticulture programs than would be possiblewithout them. This expansion of program servicesmakes the educator more efficient, but increasesresponsibility. That is why it is important thatMaster Gardeners manage their own program.While the Extension educator continues to head theprogram, a Master Gardener volunteer can act ascoordinator of the activities performed by volun-teers. In some units there are several coordinators,each one responsible for a different geographic areaor a different program need.
After the Master Gardener program becomesestablished in an area, volunteer coordinators canhelp strengthen the program by participating in theprogram’s planning and goal-setting. By meetingand working with the Extension educator respon-sible for the program, you can help determine theneeds of the community for horticultural informa-tion and the Master Gardener projects that wouldmeet those needs. It is important at goal-settingtime to determine how the program’s success willbe measured. Master Gardeners need to keeprecords of their work; the volunteer coordinator isin a good position to explain the importance of thisto the other volunteers and to see that accuraterecords are kept.
If you have management skills or think you couldbecome a good manager, express your interest soyou can be considered for the position of coordina-tor. Some mental signals that might mean you aremanager material: are you the one with the sugges-tions on how to schedule the plant clinics, staff thejobs that need doing, match workers, outline thetasks to be completed in order to accomplish thejob?
The Master Gardener program needs a volunteercoordinator from the beginning. At the first trainingsession, you may find yourself selected to help withthe lecturer’s audio-visual equipment or to helpcorral the students after a break. Coordinators beginwith small jobs like this and take on more compli-cated tasks as the program progresses. VeteranMaster Gardeners are often involved in decision-making concerning new projects, advanced training,and screening of new Master Gardeners.

Chapter 18 Who are the Master Gardeners? 11
Work EvaluationYou, the Master Gardener, and your local Extensioneducator should plan to evaluate your performanceof volunteer tasks and in return, the adequacy ofsupport from the Extension Office. The purpose ofthis is to ensure your satisfaction with volunteerwork and to determine whether the tasks youperform are worthwhile for you, the community,and Extension.
As a volunteer you should expect the followingfrom Extension employees for whom you work:
• Concise explanation of jobs and opportunities forvolunteer service.
• Staff guidance and support in accomplishment oftasks.
• Maintenance of records of task accomplishments.
• Recognition of outstanding accomplishments.
• Integration of Master Gardener volunteers as fullpartners in the accomplishment of Extension’smission to the citizens of the community.
• Continuous Master Gardener training opportuni-ties.
• Periodic evaluation of Master Gardener perfor-mance.
Extension, in turn, expects the following from you:
• Assistance in developing meaningful jobs andopportunities for Master Gardeners.
• Timely notice of needs and support from theExtension Staff for required tasks.
• Reporting of tasks accomplished, number ofhours involved, and task evaluation at specifiedreporting time.
• Acting as an equal partner in the Extension teamin a manner that reflects credit upon you and theCooperative Extension.
• Recruitment of additional individuals for futureMaster Gardener training.
• Participation in periodic conferences with anExtension educator to evaluate task(s) performedand Extension’s support of Master Gardenertasks.
The Master Gardener PaycheckAs you know, volunteers are not paid with money,but we hope that the gratitude of your fellow paidworkers in the Extension office and the district andstate staff will help you feel that your work isappreciated. Certainly the number of citizens whocome to you with plant problems will indicate thatyou and your knowledge are needed.
As you do your job, you will probably begin tonotice some of the pay that volunteers traditionallyenjoy. You are, after all, a Master Gardener, andyour horticultural and communication skills qualifyyou to do some interesting work. Your sense ofaccomplishment and pride in a job well done areassets that only you can collect.

CHAPTER 18Who are the Master Gardeners?
The Cooperative Extension System........................................................................................................... 1
Genesis of the Cooperative Extension System ........................................................................................ 1
Organization of Cooperative Extension .................................................................................................... 1Volunteers in Extension............................................................................................................................................... 2
Creation of the Master Gardener Program ................................................................................................ 2
Your Responsibilities as a Master Gardener ............................................................................................ 2Time Sheets ...................................................................................................................................................................... 3Use of the title “Master Gardener” .................................................................................................................................... 3Pesticide Recommendations ............................................................................................................................................ 3
Master Gardener Positions ......................................................................................................................... 4
Communicating ............................................................................................................................................ 4
Using the Telephone .................................................................................................................................... 5
Writing Tips .................................................................................................................................................. 6
Public Presentations ................................................................................................................................... 7
Radio and Television ................................................................................................................................... 9
The Master Gardener as Manager ............................................................................................................ 10
Work Evaluation ..........................................................................................................................................11
The Master Gardener Paycheck ................................................................................................................11
Related Documents