4 Just Enough SAS: A Quick-Start Guide to SAS for Engineers 1.3 Starting a SAS Session 1.3.1 SAS for Windows When you start SAS for Windows, five windows open: three visible and two minimized. Program Editor: The window where you write and submit SAS code. Log: The session Log, Notes, and Messages are written here when you submit code. Explorer: This is like the Windows Explorer, but is used to explore various SAS objects. Results: This window contains results, such as charts and tables, generated by your code. Output: This window contains text-only output from various SAS procedures. Display 1-2: The SAS for Windows Programming Interface 1.3.2 SAS for UNIX When you start SAS for UNIX, the same five windows open, as well as a toolbox, which changes depending on which of the other windows is active. In Display 1-3, the Results and Output windows have been closed. You can reopen any closed window by selecting it from the View menu in any open window. Use the Toolbox to change the Explorer window to a split-screen as indicated in Display 1-3.

Welcome message from author
This document is posted to help you gain knowledge. Please leave a comment to let me know what you think about it! Share it to your friends and learn new things together.
Transcript
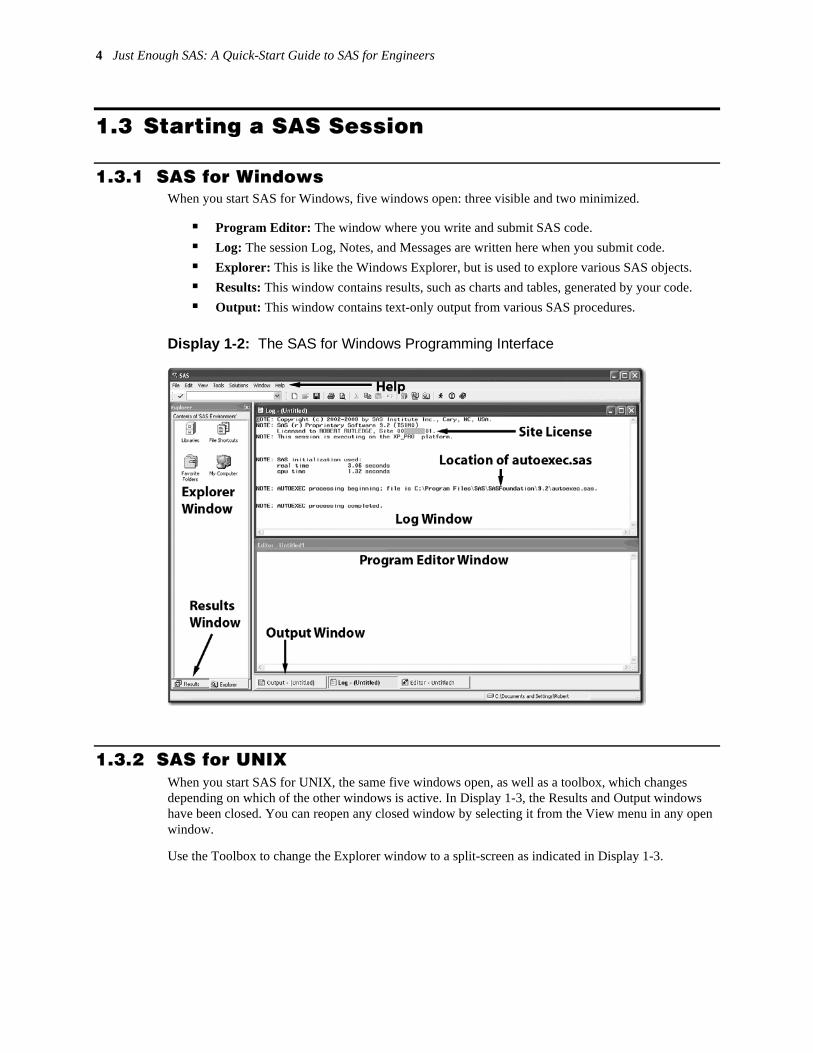
4 Just Enough SAS: A Quick-Start Guide to SAS for Engineers
1.3 Starting a SAS Session
1.3.1 SAS for Windows When you start SAS for Windows, five windows open: three visible and two minimized.
Program Editor: The window where you write and submit SAS code.
Log: The session Log, Notes, and Messages are written here when you submit code.
Explorer: This is like the Windows Explorer, but is used to explore various SAS objects.
Results: This window contains results, such as charts and tables, generated by your code.
Output: This window contains text-only output from various SAS procedures.
Display 1-2: The SAS for Windows Programming Interface
1.3.2 SAS for UNIX When you start SAS for UNIX, the same five windows open, as well as a toolbox, which changes depending on which of the other windows is active. In Display 1-3, the Results and Output windows have been closed. You can reopen any closed window by selecting it from the View menu in any open window.
Use the Toolbox to change the Explorer window to a split-screen as indicated in Display 1-3.

Chapter 1: Getting Started 5
Display 1-3: The SAS for UNIX Programming Interface
In the Program Editor window, select Tools Options Preferences Editing, and make sure that Automatically store selection is unchecked, and Cursor is set to Insert rather than Overtype.
Display 1-4: The Preferences Window
1.3.3 Site License and Path to autoexec.sas When you start a SAS session, a note is written to the Log window with your site license, as shown in Displays 1-2 and 1-3. Make a note of this number as you will need it when you call SAS Technical Support.
When SAS starts up, it first tries to run the code in a file called autoexec.sas if it can find such a file. You might or might not also see a note indicating that the autoexec.sas code file was run. If you don’t see the AUTOEXEC note, that’s OK; you will create your own autoexec.sas file later. If you do see the AUTOEXEC note, write down the path to the autoexec.sas file so you can edit this file, as shown in Section 1.5.

6 Just Enough SAS: A Quick-Start Guide to SAS for Engineers
1.4 Writing, Submitting, and Saving SAS Code
1.4.1 Macro Functions and Variables Macro programming is discussed in Chapter 11, but a few simple ideas are introduced here as they will greatly simplify the process of running the examples in this book.
%PUT is a macro function which writes a text string to the Log window. For example:%PUT Some text; writes “Some text” to the Log window.
%LET is a macro function which assigns a value to a macro variable. For example: %LET myName = Bob; assigns the value “Bob” to the macro variable &myName.
%INCLUDE is a Base SAS function, not a macro function; it runs a file containing SAS code. For example: %INCLUDE “c:\mySASfolder\test.sas” runs the code in test.sas.
Macro function names have a prefix of “%” and macro variable names have a prefix of “&”.
1.4.2 Writing and Submitting Code All of the code used in this book is included in the ~\JES\sample_code folder, which you downloaded following the instructions in Section 1.2. The code used in each section is identified with a highlighted statement like this: The code for this section is in ~\JES\sample_code\ch_1\hello_world.sas. For this section, however, there is so little code to enter that it will be just as easy to type it in yourself. It is customary to introduce a new programming language or environment with a program that simply writes “Hello World!” to some appropriate output location. To create a “Hello World” program in SAS, type these lines in the Program Editor window, replacing “(your name)” with your own name.
%LET myName = (your name); %PUT Hello World! My name is &myName;
There are several different ways to run this program:
Run Submit (i.e., select Submit from the Run menu).
Click the Running Man icon at the top of the screen (Windows only).
Press the F3 key.
When you run the program, the code and then the results are written to the Log window, as shown here.
If you are running SAS for Windows, the code in the Program Editor window is unchanged. If you are running SAS for UNIX, however, you will notice that the code has vanished from the Program Editor window. You can bring back the lost code in either of two ways:
Run Recall Last Submit (i.e., select Recall Last Submit from the Run menu).
Press the F4 key.
%LET myName = (your name); %PUT Hello World! My name is &myName; Hello World! My name is (your name)

Chapter 1: Getting Started 7
UNIX users can avoid having to recall the missing code by using the mouse to highlight the code you want to run, and then submitting the code in either of two ways:
� Run�Submit.
� Press the F3 key.
The result is the same except that the code does not disappear from the Program Editor window.
1.4.3 Saving Code The process for saving SAS code is just the usual process for saving a file in any text editor. And, you can in fact use any text editor to edit your SAS code, although the Program Editor is usually more convenient. To save the “Hello World” code that you wrote in the previous section, select File�Save As in the Program Editor window, navigate to the ~\JES\sas_code folder, and save the file as hello_world.sas. It is conventional, but not necessary, to use a .sas extension for a SAS program. (The rules for constructing valid SAS names are given in Section 1.6.2.) Note that the name of the new file, “hello_world.sas”, now appears at the top of the Program Editor window. To save an updated version of your code with the same name, just select File�Save.
To open SAS code that you have saved, select File � Open Program (or File�Open in UNIX) in the Program Editor, navigate to the folder where you saved the code, and open the file.
Windows users: You can have several Program Editor windows open at the same time. When you open a SAS program, it appears in a new window of its own.
UNIX users: You have only one Program Editor window to work with. When you open a SAS program, it is appended at the bottom of the window, below any code that was already there. This is almost always not what you want to happen, so before you open a program, you should clear out the Program Editor window by selecting Edit�Clear All.
1.4.4 Using the %INCLUDE Function to Run SAS Code You can use the %INCLUDE function to run code without bringing it into the Program Editor.
1. In the Program Editor window, select Edit�Clear All to get rid of whatever code is there.
2. Type in the statement shown below, replacing ~\JES\ with the path to your JES folder.
3. Submit the code using any of the methods described in the previous section.
4. Check the Log window to verify that the code you saved in hello_world.sas was run correctly.
%INCLUDE "~\JES\sas_code\hello_world.sas";
You can avoid having to type in your JES path repeatedly by storing the value in a macro variable.
%LET JES = ~\JES\; %INCLUDE "&JES.sas_code\hello_world.sas";
� Type in the code above, replacing ~\JES\ with the path to your JES folder.
� The first line creates a macro variable, &JES, which contains the path to your JES folder.
� The second line replaces &JES with whatever you typed in between = and ; in the first line, and then runs the %INCLUDE statement.
� Note that the macro variable &JES is resolved only within double quotes. This code does not work if single quotes are used.
� The period after &JES is a delimiter indicating the end of the variable name. Without the period, SAS would look for a variable named &JESsas_code.
The value of &JES will be lost when you close your SAS session, but you can make sure that it is always available by including it in your autoexec.sas file, as shown in Section 1.5.

8 Just Enough SAS: A Quick-Start Guide to SAS for Engineers
1.5 Using autoexec.sas Each time SAS starts up, it looks for a file named autoexec.sas and, if it finds one, runs the code in that file before doing anything else. On a Windows system, the location where SAS looks for autoexec.sas is the same folder where the SAS executable is located; for example:
C:\Program Files\SAS\SASFoundation\9.2\autoexec.sas
On a UNIX system, the typical location where SAS looks for autoexec.sas is in your home directory; for example:
/home/your_name/autoexec.sas
Depending on how SAS was installed, you might or might not already have an autoexec.sas file. If you do, you would have seen the path to your autoexec.sas file in the Log window when you started your SAS session (see Display 1-2 or 1-3 in Section 1.3). If you already have an autoexec.sas file, open it up with the Program Editor and add the following lines at the bottom, replacing ~\JES\ with the actual path to your JES folder.
%LET JES = ~\JES\ ; %PUT JES=&JES; %INCLUDE "&JES.sas_code\hello_world.sas";
The %LET function creates a macro variable, JES, which contains the path to your ~\JES\ folder.
The %PUT function prints the value of &JES to the Log window.
The %INCLUDE function runs your hello_world.sas code, but only if you actually saved it (see Section 1.4), and got the path right.
If you don’t already have an autoexec.sas file, create one in the Windows or UNIX location indicated above, enter the above lines, and save the file. Run the code to verify that you got the path right. If you did not, the third line won’t run and will generate an error message in the Log window.
Then, shut down your SAS session by selecting FileExit from the Program Editor window, and open a new SAS session. If all goes well, you should see something like this in the Log window when the new session opens.
If you don’t see the AUTOEXEC processing lines in the Log window, check to see that the name, autoexec.sas, and location of the file that you saved is correct. If the path is not correct, fix it and try again. If the path is correct, but hello_world.sas doesn’t run, make sure you’ve saved it to the right place. The path to your JES folder, &JES, is needed for most examples in this book to tell SAS where to find code and data files and where to send results, so please ensure that this path is correct before continuing.
NOTE: AUTOEXEC processing beginning; file is C:\Program Files\SAS\SASFoundation\9.2\autoexec.sas. JES=c:\JES\ Hello World! My name is (your name) NOTE: AUTOEXEC processing completed.

Chapter 1: Getting Started 9
1.6 Just Enough Syntax
You will of course be learning SAS syntax throughout the book. The point of this section is to bootstrap the process by giving you “just enough” syntax to get started. The code for this section is in ~\JES\sample_code\ch_1\just_enuf_syntax.sas.
1.6.1 SAS Statements The code below, and the results in the Log window, illustrate a few basic rules of SAS syntax. Note that the Program Editor automatically color codes your SAS code, making it easier to understand. For example, macro function names, such as %LET, are in blue, and comments are in green. Other uses of color coding will become clear as you look at the other code samples.
/* This is a comment */ * And this is another comment; %LET First=SAS; %LET Second = Program; %LET both = &first &SECOND; %PUT The results are: &First, &Second, --- &Both.ming;
Anything between /* and the next */ is treated as a comment and is not executed.
Anything from * to the next ; is treated as a comment and is not executed.
You can have multiple statements on a single line. Each statement ends with a semicolon.
A single statement can span multiple lines.
A period is used as a delimiter to tell SAS where a macro variable name ends.
When you run the code, the lines you submitted, and the resulting output, are written to the Log window.
1.6.2 SAS Names The names of SAS data sets and variables:
Are case insensitive. For example, %LET, %let, and %LeT are considered equivalent. In this book, however, SAS keywords appear in uppercase letters.
Contain at most 32 characters. The characters must be letters, numbers, or the underscore character.
Must begin with a letter or the underscore character.
/* This is a comment */ * And this is another comment; %LET First=SAS; %LET Second = Program; %LET both = &first &SECOND; %PUT The results are: &First, &Second, --- &Both.ming; The results are: SAS, Program, --- SAS Programming
10 Just Enough SAS: A Quick-Start Guide to SAS for Engineers
1.7 SAS Programming
The key elements you will use to construct your SAS programs are DATA steps, procedures, macros, and the Output Delivery System. These are all discussed in detail in the following chapters, but some simple examples are included here to give you an idea of where you’re going. The code for this section is in ~\JES\sample_code\ch_1\sas_programming.sas.
1.7.1 DATA Steps (Chapter 2) DATA step programming is used to create, merge, and transform SAS data sets. The code below uses the SAS function RANPOI to create the data set, New, containing 2500 random values from a Poisson distribution with mean 100.
DATA New; DO i = 1 TO 2500; X=RANPOI(0, 100); OUTPUT New; END; RUN;
1.7.2 Procedures (Various Chapters) SAS has hundreds of built-in procedures that you can invoke to automatically process your data and produce results such as tables, graphs, parameter estimates, etc. A partial list of these procedures is given in Section 1.8. The next example uses the UNIVARIATE procedure to fit a normal distribution to the random numbers in the New data set generated in the DATA step, and performs the Anderson-Darling test for goodness-of-fit. The tabular results are sent to the Output window, and a graph is sent to the Graph window.
GOPTIONS RESET=ALL GUNIT=PCT HTEXT=3 FTEXT=SWISSB; PROC UNIVARIATE DATA=New; VAR X; HISTOGRAM X / Normal(MU=EST SIGMA=EST); INSET N MEAN STD NORMAL(AD ADPVAL) / HEIGHT=2.5 FORMAT=5.2 POSITION=NE; RUN; QUIT;
1.7.3 Macro Programs (Chapter 11) The SAS macro language allows you to wrap up useful chunks of code that can be customized with parameters and used throughout your projects. A macro definition begins with %MACRO followed by the name of the macro to be defined, and ends with a %MEND statement. After the macro has been defined, it is invoked by entering the macro name, preceded by a percent sign. The macro below runs the same code as in the previous example for the data set specified in the macro call, which in this case is the same data set, New.
%MACRO simpleMacro(dataSetName); TITLE "Distribution of 100 Random Poisson Variables"; PROC UNIVARIATE DATA=&dataSetName; VAR X; HISTOGRAM X / Normal(MU=EST SIGMA=EST); INSET N MEAN STD NORMAL(AD ADPVAL) / HEIGHT=2.5 FORMAT=5.2 POSITION=NE; RUN; QUIT; %MEND simpleMacro; %simpleMacro(New)
Chapter 1: Getting Started 11
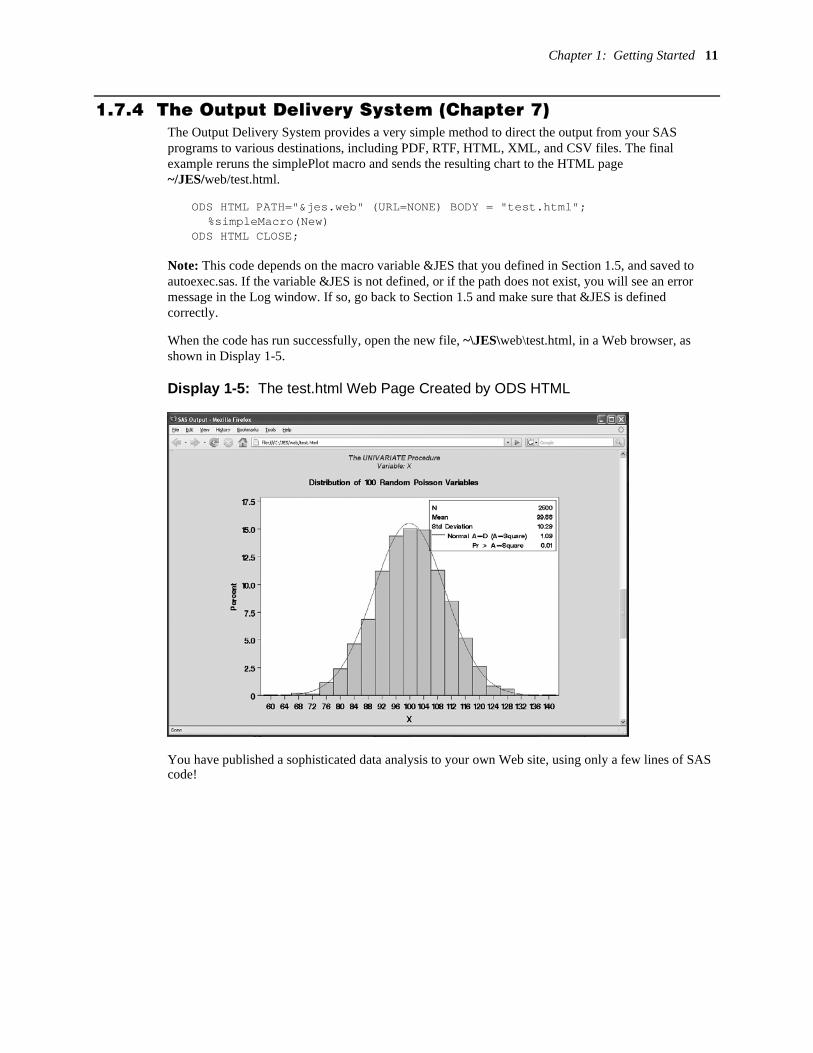
1.7.4 The Output Delivery System (Chapter 7) The Output Delivery System provides a very simple method to direct the output from your SAS programs to various destinations, including PDF, RTF, HTML, XML, and CSV files. The final example reruns the simplePlot macro and sends the resulting chart to the HTML page ~/JES/web/test.html.
ODS HTML PATH="&jes.web" (URL=NONE) BODY = "test.html"; %simpleMacro(New) ODS HTML CLOSE;
Note: This code depends on the macro variable &JES that you defined in Section 1.5, and saved to autoexec.sas. If the variable &JES is not defined, or if the path does not exist, you will see an error message in the Log window. If so, go back to Section 1.5 and make sure that &JES is defined correctly.
When the code has run successfully, open the new file, ~\JES\web\test.html, in a Web browser, as shown in Display 1-5.
Display 1-5: The test.html Web Page Created by ODS HTML
You have published a sophisticated data analysis to your own Web site, using only a few lines of SAS code!

12 Just Enough SAS: A Quick-Start Guide to SAS for Engineers
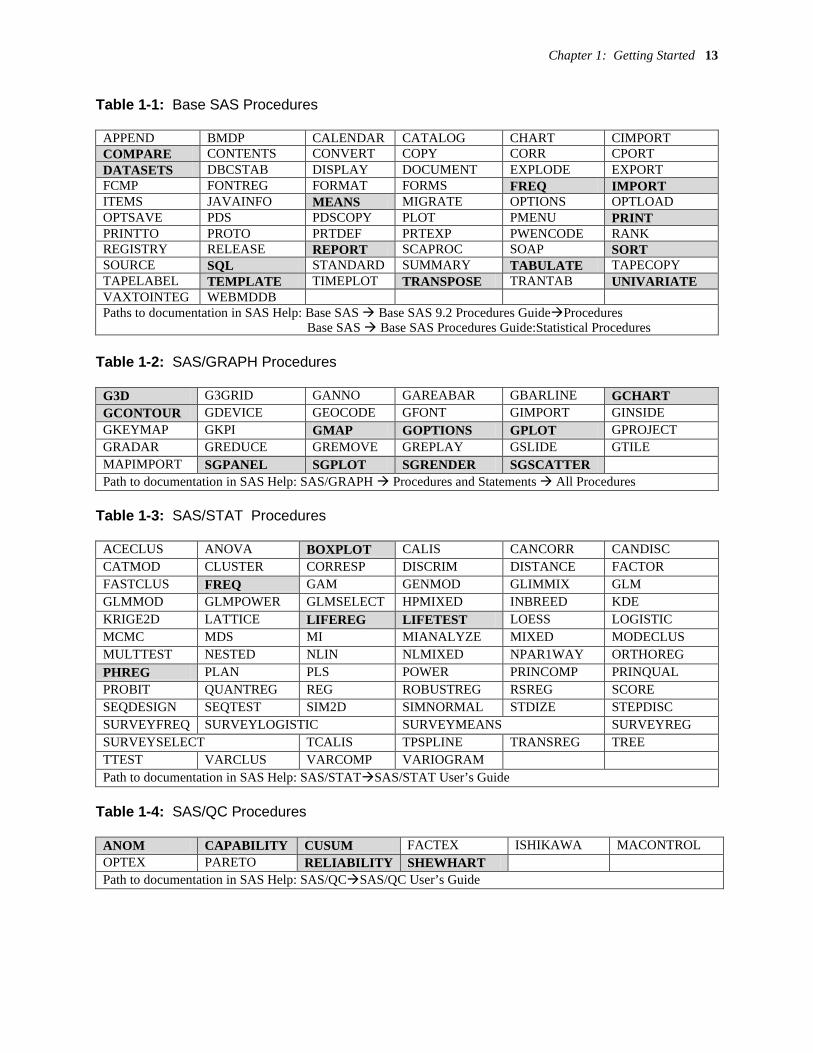
1.8 SAS Procedures
Tables 1-1 to 1-4 list all of the procedures in four SAS products: Base SAS, SAS/GRAPH, SAS/STAT, and SAS/QC. The list is complete for SAS 9.2, but procedures are added with each new release of SAS, so you should check the SAS online documentation for new procedures.
Some of the procedure names are easy to decipher (e.g., TTEST) while others are decidedly cryptic; e.g., MI, and others such as PRINCOMP will be recognized only by those with specialized subject knowledge, which would be principal components analysis in this case. In any case, the best way to know what a procedure actually does is to consult the documentation. You can open the SAS Help and Documentation in the Program Editor by using the Help pull-down menu (see Display 1-2) and selecting SAS Help and Documentation. A separate window opens that has a left pane with four tabs (Contents, Index, Search, and Favorites) and a right pane that displays the selected topic. The Contents tab has an expandable tree, and the SAS product documentation contains a wealth of information about the procedures, their specific syntax, and details about the various algorithms. The Search tab has a field where you can enter keywords, click List Topics, and the documentation will be searched for the entered text. If there are specific sections that you refer to often, you can add them to the list on the Favorites tab. To quickly find documentation on any of the procedures in Tables 1-1 to1-4, or to look for newly added procedures, select
SAS Products SAS Procedures SAS Procedures by Product
Or, follow the path for each product shown at the bottom of each table. You will be able to use only the SAS procedures in the products that are included in your SAS license. You can see which products you have by running PROC SETINIT. (You might note that PROC SETINIT is nowhere to be found in the tables on the facing page, and in fact I can’t find it anywhere in the online documentation, but it works.)
PROC SETINIT NOALIAS; RUN;
When you run this line, the products included in your SAS license and the expiration dates are written to the Log window.
Every SAS license includes Base SAS. This book assumes that you also have at least SAS/GRAPH and SAS/STAT. If you will be working with quality and/or reliability data, I would highly recommend that you also have SAS/QC. Some of the examples require SAS/QC, and these will be noted in the text.
If you need to access a relational database, you will also need an appropriate SAS product such as
SAS/ACCESS Interface to ORACLE
SAS/ACCESS Interface to DB2
SAS/ACCESS Interface to ODBC
The procedures discussed in this book are highlighted in Tables 1-1 through 1-4.
Product expiration dates: ---Base Product 14DEC2008 ---SAS/STAT 14DEC2008 ---SAS/GRAPH 14DEC2008 ---SAS/QC 14DEC2008 ---SAS/INSIGHT 14DEC2008 ---SAS/ACCESS Interface to ORACLE 14DEC2008
Chapter 1: Getting Started 13
Table 1-1: Base SAS Procedures
APPEND BMDP CALENDAR CATALOG CHART CIMPORT COMPARE CONTENTS CONVERT COPY CORR CPORT DATASETS DBCSTAB DISPLAY DOCUMENT EXPLODE EXPORT FCMP FONTREG FORMAT FORMS FREQ IMPORT ITEMS JAVAINFO MEANS MIGRATE OPTIONS OPTLOAD OPTSAVE PDS PDSCOPY PLOT PMENU PRINT PRINTTO PROTO PRTDEF PRTEXP PWENCODE RANK REGISTRY RELEASE REPORT SCAPROC SOAP SORT SOURCE SQL STANDARD SUMMARY TABULATE TAPECOPY TAPELABEL TEMPLATE TIMEPLOT TRANSPOSE TRANTAB UNIVARIATE VAXTOINTEG WEBMDDB Paths to documentation in SAS Help: Base SAS Base SAS 9.2 Procedures GuideProcedures
Base SAS Base SAS Procedures Guide:Statistical Procedures Table 1-2: SAS/GRAPH Procedures
G3D G3GRID GANNO GAREABAR GBARLINE GCHART GCONTOUR GDEVICE GEOCODE GFONT GIMPORT GINSIDE GKEYMAP GKPI GMAP GOPTIONS GPLOT GPROJECT GRADAR GREDUCE GREMOVE GREPLAY GSLIDE GTILE MAPIMPORT SGPANEL SGPLOT SGRENDER SGSCATTER Path to documentation in SAS Help: SAS/GRAPH Procedures and Statements All Procedures
Table 1-3: SAS/STAT Procedures
ACECLUS ANOVA BOXPLOT CALIS CANCORR CANDISC CATMOD CLUSTER CORRESP DISCRIM DISTANCE FACTOR FASTCLUS FREQ GAM GENMOD GLIMMIX GLM GLMMOD GLMPOWER GLMSELECT HPMIXED INBREED KDE KRIGE2D LATTICE LIFEREG LIFETEST LOESS LOGISTIC MCMC MDS MI MIANALYZE MIXED MODECLUS MULTTEST NESTED NLIN NLMIXED NPAR1WAY ORTHOREG PHREG PLAN PLS POWER PRINCOMP PRINQUAL PROBIT QUANTREG REG ROBUSTREG RSREG SCORE SEQDESIGN SEQTEST SIM2D SIMNORMAL STDIZE STEPDISC SURVEYFREQ SURVEYLOGISTIC SURVEYMEANS SURVEYREG SURVEYSELECT TCALIS TPSPLINE TRANSREG TREE TTEST VARCLUS VARCOMP VARIOGRAM Path to documentation in SAS Help: SAS/STATSAS/STAT User’s Guide
Table 1-4: SAS/QC Procedures
ANOM CAPABILITY CUSUM FACTEX ISHIKAWA MACONTROL OPTEX PARETO RELIABILITY SHEWHART Path to documentation in SAS Help: SAS/QCSAS/QC User’s Guide

14 Just Enough SAS: A Quick-Start Guide to SAS for Engineers
1.9 Debugging Basics
When you begin to write SAS programs, you will surely make some mistakes. Just as beginning skiers are first taught how to fall without getting hurt, it’s a good idea to begin your SAS programming with a few intentional mistakes, so that you learn how to recognize and recover from them. If you are just starting out, you will not yet understand the syntax of the sample code used here. Just run the code to understand the basics of the error detection and correction process. The sample code for this section is in ~\JES\sample_code\ch_1\bugs.sas.
1.9.1 Detecting Problems The first step in recovering from a mistake is to notice that you made one. SAS helps out with this by writing WARNING and ERROR messages to the Log window. An ERROR message points to something which is definitely wrong, while a WARNING message points to something irregular, but which might or might not be a bug. When you run a new program, you should review the SAS log for ERROR or WARNING messages. Errors must be fixed, and warnings should at least be understood. The code below contains a bug: you are trying to reference a data set, Old, which does not exist.
DATA New; SET Old; RUN;
When you run the code, an error message is written to the Log window.
The next example includes the same bug, but when you run this one, you might not notice the error message in the Log window because only the last few lines will be visible. The only way to be sure your program ran without any ERROR messages is to scroll to the very top of the Log window, and then use EditFind to search for the word “ERROR”. Be sure to clear the Log window (EditClear All) before you run your code. Otherwise, you will just rediscover errors you already fixed but which are still in the Log window from a previous run.
%MACRO sas_bugs; %DO n = 1 %TO 1000; %PUT n=&n; %IF &n=666 %THEN %DO; DATA new; SET old; RUN; %END; %END; %MEND sas_bugs; %sas_bugs
1.9.2 Correcting Problems Most errors will be simple mistakes in the code that, hopefully, you will figure out by reading your code and the ERROR message carefully. However, there are a few common bugs which effectively hang the SAS interface, and which you should learn to escape from. These usually happen when SAS is expecting to see something in your code that never comes; for example:
a semicolon at the end to complete a SAS statement
a RUN; statement to complete a DATA step or procedure
an ending quote symbol to balance a beginning quote symbol
a %MEND statement to complete a %MACRO definition
DATA New; SET Old; RUN; ERROR: File WORK.OLD.DATA does not exist. NOTE: The SAS System stopped processing this step because of errors. WARNING: The data set WORK.NEW may be incomplete. When this step was stopped there were 0 observations and 0 variables. WARNING: Data set WORK.NEW was not replaced because this step was stopped.
Chapter 1: Getting Started 15
While SAS waits for the other shoe to drop, it misinterprets everything else you enter—which can be a very frustrating experience. The code below is a typical example. When you run this code, SAS waits for the quote to be completed.
DATA a; X= "some text with unbalanced quotes'; OUTPUT a; RUN;
In this example, it is obvious what went wrong: The double quotes at the beginning of the line are not closed by the single quote at the end, so SAS thinks the quoted text is continuing. You can tell from the color coding that SAS thinks that OUTPUT a; is part of the quoted text. But if this occurred in the middle of a 1,000-line program, it could be very hard to find. Fortunately, you can escape from this and other similar situations by running the following line of code:
*'; *"; RUN; %MEND;
Depending on how deep a hole you have dug for yourself, you might need to run this line several times. You’ll know you’re done when you see an error message that says “No matching %MACRO statement for this %MEND statement.” The line works on unbalanced quotes because anything between an asterisk and the next semicolon is treated as a comment by SAS, unless there is an open quote, in which case it is just part of the quote. For example, *”; will close a double quote if one is open, but will not start a new quote.
1.9.3 Escaping from a Runaway Program In some cases, your code will go off into never-never land, and you will lose control of the interface. You have no chance of fixing this with a line of code because in this situation you can’t enter code, or do anything else. The code below causes this problem by trying to execute the nonsensical statement X=1/X.
DATA a; DO x=1 TO 100; x = 1/x; END; RUN;
To escape from this one, you will have to interrupt the program as follows:
Windows: Select Break (Exclamation inside circle) from the top of the SAS window, and then select Cancel Submitted Statements.
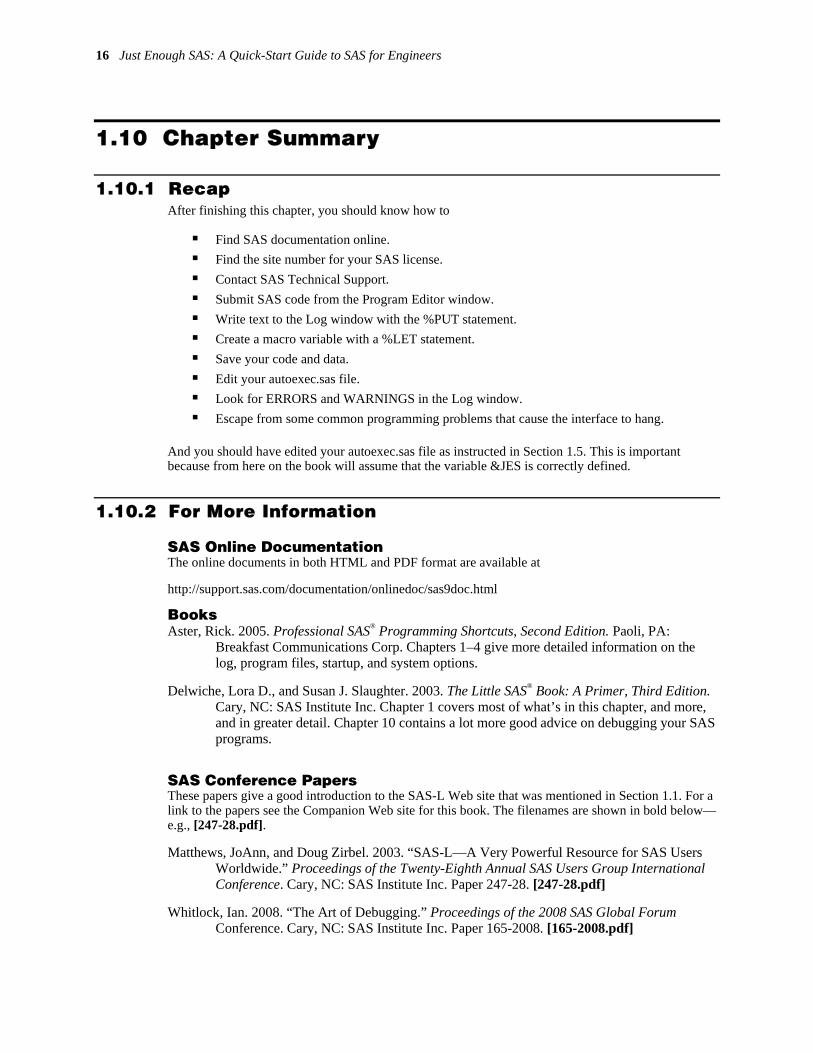
UNIX: Open the Session Management window. This is located in different places for different versions of UNIX, so you might have to hunt around a bit. Best to find it now before you get into real trouble. When you get there, select Interrupt and then Cancel Submitted Statements.
Display 1-6: The SAS for UNIX Session Management Window
16 Just Enough SAS: A Quick-Start Guide to SAS for Engineers
1.10 Chapter Summary
1.10.1 Recap After finishing this chapter, you should know how to
Find SAS documentation online.
Find the site number for your SAS license.
Contact SAS Technical Support.
Submit SAS code from the Program Editor window.
Write text to the Log window with the %PUT statement.
Create a macro variable with a %LET statement.
Save your code and data.
Edit your autoexec.sas file.
Look for ERRORS and WARNINGS in the Log window.
Escape from some common programming problems that cause the interface to hang.
And you should have edited your autoexec.sas file as instructed in Section 1.5. This is important because from here on the book will assume that the variable &JES is correctly defined.
1.10.2 For More Information SAS Online Documentation The online documents in both HTML and PDF format are available at
http://support.sas.com/documentation/onlinedoc/sas9doc.html
Books Aster, Rick. 2005. Professional SAS® Programming Shortcuts, Second Edition. Paoli, PA:
Breakfast Communications Corp. Chapters 1–4 give more detailed information on the log, program files, startup, and system options.
Delwiche, Lora D., and Susan J. Slaughter. 2003. The Little SAS® Book: A Primer, Third Edition. Cary, NC: SAS Institute Inc. Chapter 1 covers most of what’s in this chapter, and more, and in greater detail. Chapter 10 contains a lot more good advice on debugging your SAS programs.
SAS Conference Papers These papers give a good introduction to the SAS-L Web site that was mentioned in Section 1.1. For a link to the papers see the Companion Web site for this book. The filenames are shown in bold below—e.g., [247-28.pdf].
Matthews, JoAnn, and Doug Zirbel. 2003. “SAS-L—A Very Powerful Resource for SAS Users Worldwide.” Proceedings of the Twenty-Eighth Annual SAS Users Group International Conference. Cary, NC: SAS Institute Inc. Paper 247-28. [247-28.pdf]
Whitlock, Ian. 2008. “The Art of Debugging.” Proceedings of the 2008 SAS Global Forum Conference. Cary, NC: SAS Institute Inc. Paper 165-2008. [165-2008.pdf]

Chapter 1: Getting Started 17
1.10.3 Exercises 1. Write a SAS program to write your name and address to the SAS Log window.
2. Save your program in a file called myname.sas in the ~\JES\sas_code directory.
3. Arrange for SAS to write “Welcome Back (your name)!” to the Log window automatically each time you start SAS.
4. Open your favorite browser and bookmark both the PDF and HTML versions of the SAS online documentation.
5. Go to the SAS-L Web site to better understand the kinds of help you might find there:
http://listserv.uga.edu/archives/sas-l.html
6. View the documentation on the APPEND procedure in both HTML and PDF formats. Hint: Use the tables in Section 1.8 to help you find out where to look.
7. Get prepared to use SAS Technical Support:
� What is your site license number? ______________________________________________
� What version of SAS are you running? ______________________________________
� What is the phone number for SAS Technical Support? ___________________

18
Related Documents